

Page 1
LSQT1048(ENG).book 1 ページ 2006年2月6日 月曜日 午後2時13分
Cover
Operating Instructions
DVD Video Camera
Model No.VDR-D150EB
VDR-D100EB
Before use, please read these instructions
completely.
VDR-D150 VDR-D100
Card slot ¥ –
–: not available
LSQT1048 B
Page 2
LSQT1048(ENG).book 2 ページ 2006年2月6日 月曜日 午後2時13分
Left/Right
Dear Customer,
We would like to take this opportunity to thank
you for purchasing this Panasonic Movie
Camera. Please read these Operating
Instructions carefully and keep them handy for
future reference. Please note that the actual
controls and components, menu items, etc. of
your Movie Camera may look somewhat
different from those shown in the illustrations in
these Operating Instructions.
∫ Warning
Do not remove the cover (or back); there
are no user serviceable parts inside.
Refer servicing to qualified service
personnel.
Use only the recommended accessories.
≥ Keep the Memory Card out of reach of
children to prevent swallowing.
CLASS 1
LASER PRODUCT
IEC 60825-1:2001
CAUTION
This product contains a laser diode of higher
class than 1. To ensure continued safety, do
not remove any covers or attempt to gain
access to the inside of the product. Refer all
servicing to qualified personnel.
Information on Disposal for Users of
Waste Electrical & Electronic Equipment
(private households)
This symbol on the products
and/or accompanying
documents means that used
electrical and electronic
products should not be mixed
with general household
waste.
For proper treatment,
recovery and recycling, please take these
products to designated collection points,
where they will be accepted on a free of
charge basis. Alternatively, in some
countries you may be able to return your
products to your local retailer upon the
purchase of an equivalent new product.
Disposing of this product correctly will help
to save valuable resources and prevent any
potential negative effects on human health
and the environment which could otherwise
arise from inappropriate waste handling.
Please contact your local authority for further
details of your nearest designated collection
point.
Penalties may be applicable for incorrect
disposal of this waste, in accordance with
national legislation.
For business users in the European
Union
If you wish to discard electrical and
electronic equipment, please contact your
dealer or supplier for further information.
LSQT1048
Information on Disposal in other
Countries outside the European Union
This symbol is only valid in the European
Union.
If you wish to discard this product, please
contact your local authorities or dealer and
ask for the correct method of disposal.
2
Page 3

LSQT1048(ENG).book 3 ページ 2006年2月6日 月曜日 午後2時13分
Information for Your Safety
As this equipment gets hot during use,
operate it in well ventilated place; do not
install this equipment in a confined space
such as a bookcase or similar unit.
To reduce the risk of fire, electric shock or
product damage, do not expose this
equipment to rain, moisture, dripping or
splashing and ensure that no objects filled
with liquids, such as vases, shall be placed on
the equipment.
Movie Camera
≥ The rating plate is on the underside of the
Movie Camera.
AC Adaptor
≥ The rating plate is on the underside of the
AC Adaptor.
Caution for AC mains lead
For your safety, please read the following text
carefully.
This appliance is supplied with a moulded
three-pin mains plug for your safety and
convenience. A 5-ampere fuse is fitted in this
plug.
Should the fuse need to be replaced, please
ensure that the replacement fuse has a rating
of 5-amperes and it is approved by ASTA or
BSI to BS1362.
Check for the ASTA mark Ï or the BSI mark
Ì on the body of the fuse.
If the plug contains a removable fuse cover
you must ensure that it is refitted when the
fuse is replaced. If you lose the fuse cover,
the plug must not be used until a replacement
cover is obtained. A replacement fuse cover
can be purchased from your local Panasonic
Dealer.
IF THE FITTED MOULDED PLUG IS
UNSUITABLE FOR THE SOCKET OUTLET
IN YOUR HOME THEN THE FUSE SHOULD
BE REMOVED AND THE PLUG CUT OFF
AND DISPOSED OF SAFELY.
THERE IS A DANGER OF SEVERE
ELECTRICAL SHOCK IF THE CUT OFF
PLUG IS INSERTED INTO ANY 13-AMPERE
SOCKET.
If a new plug is to be fitted, please observe
the wiring code as shown below.
If in any doubt, please consult a qualified
electrician.
∫ IMPORTANT
The wires in this mains lead are coloured in
accordance with the following code:
Blue: Neutral
Brown: Live
As the colours of the wires in the mains lead
of this appliance may not correspond with the
coloured markings identifying the terminals in
your plug, proceed as follows:
The wire which is coloured BLUE must be
connected to the terminal in the plug which is
marked with the letter N or coloured BLACK.
The wire which is coloured BROWN must be
connected to the terminal in the plug which is
marked with the letter L or coloured RED.
Under no circumstances should either of
these wires be connected to the earth
terminal of the three-pin plug, marked with the
letter E or the Earth Symbol Ó.
∫ Before Use
Remove the Connector Cover.
∫ How to replace the Fuse
The location of the fuse differ according to the
type of AC mains plug (figures A and B).
Confirm the AC mains plug fitted and follow
the instructions below.
Illustrations may differ from actual AC mains
plug.
1) Open the fuse cover with a screwdriver.
Figure A Figure B
Fuse cover
2) Replace the fuse and close or attach the
fuse cover.
Figure A Figure B
Fuse
(5 ampere)
Fuse
(5 ampere)
3
LSQT1048
Page 4
LSQT1048(ENG).book 4 ページ 2006年2月6日 月曜日 午後2時13分
∫ Indemnity concerning recording content
The manufacturer shall in no event be liable for the loss of recordings due to malfunction or defect
of this unit, its accessories or recordable media.
∫ Carefully observe copyright laws
Recording of pre-recorded tapes or discs or other published or broadcast material for
purposes other than your own private use may infringe copyright laws. Even for the
purpose of private use, recording of certain material may be restricted.
≥ SD Logo is a trademark.
≥ The Movie Camera uses copyright-protected technologies and is protected by the patented
technologies and intellectual properties of Japan and the U.S. To use these copyright-protected
technologies, authorization of the Macrovision Company is required. It is prohibited to
disassemble or modify the Movie Camera.
≥ Manufactured under license from Dolby Laboratories.
“Dolby” and the double-D symbol are trademarks of Dolby Laboratories.
≥ Other names of systems and products mentioned in these instructions are usually the registered
trademarks or trademarks of the manufacturers who developed the system or product concerned.
These operating instructions are designed for use with models VDR-D150 and VDR-D100. Pictures
may be slightly different from the original.
≥ The illustrations used in these operating instructions show model VDR-D150, however, parts of
the explanation refer to different models.
≥ Depending on the model, some functions are not available.
≥ Features may vary, so please read carefully.
LSQT1048
4
Page 5

LSQT1048(ENG).book 5 ページ 2006年2月6日 月曜日 午後2時13分
Contents
Before using
Features ................................................ 7
Accessories.......................................... 9
Parts identification and handling ..... 10
Using the LCD monitor ............................13
Using the viewfinder ................................13
Discs and cards.................................. 14
Discs that can be used on this unit.......... 14
Cards that you can use with this unit
(VDR-D150 only) .....................................17
Disc and card handling ............................18
Setup
Power supply...................................... 19
Charging the battery................................19
Connecting to the AC outlet..................... 22
Turning the unit on/off .............................. 23
Inserting/removing a disc.................. 24
Inserting/removing an SD card
(VDR-D150 only)................................. 26
Selecting a mode................................ 27
How to use the joystick ..................... 28
Switching the language..................... 32
Using the menu screen...................... 33
Setting date and time......................... 35
Adjusting LCD monitor/viewfinder... 37
Recording
Before recording.................................38
Recording motion pictures................39
Changing the recording mode of the
motion picture ......................................... 41
Recording still pictures
(VDR-D150 only) .................................42
Various recording functions..............44
Zoom in/out function ............................... 44
Recording yourself.................................. 46
Soft skin mode ........................................ 47
Fade in/fade out function ........................ 48
Backlight compensation function ............ 50
Self-timer recording (VDR-D150 only) .... 51
Wind noise reduction function................. 52
Cinema mode.......................................... 53
Night view function.................................. 54
Image stabilizer function ......................... 55
Manual recording functions ..............56
Scene mode............................................ 56
Manual focus adjustment ........................ 58
White balance ......................................... 59
Manual shutter speed/aperture
adjustment .............................................. 61
Playback
Motion picture playback ....................62
Still picture playback
(VDR-D150 only) .................................65
Playing back still pictures as a
slide show ............................................... 66
5
LSQT1048
Page 6
LSQT1048(ENG).book 6 ページ 2006年2月6日 月曜日 午後2時13分
Editing
Editing scenes ....................................67
Deleting scenes....................................... 67
Dividing a scene...................................... 69
Combining scenes................................... 70
Using playlists ....................................71
What is a playlist? ................................... 71
Creating a new playlist............................ 72
Playing back a playlist............................. 73
Editing a playlist ......................................74
Editing still pictures
(VDR-D150 only) .................................80
Deleting still pictures ............................... 80
Locking still pictures ................................ 82
DPOF setting........................................... 83
Disc and card management
Formatting discs and cards...............84
Formatting discs......................................84
Formatting an SD card
(VDR-D150 only) ..................................... 85
Finalizing a disc..................................86
Finalizing a disc....................................... 86
Un-finalizing a DVD-RW.......................... 87
Protecting a disc ................................88
Displaying disc information .............. 89
With other products
With a TV............................................. 90
Playback on TV .......................................90
With a DVD recorder/player .............. 91
Playback on DVD recorder/player ...........91
Copying recordings onto a
DVD recorder’s hard disk ........................92
With a VCR.......................................... 93
Dubbing images onto other
video devices...........................................93
With a printer (PictBridge)
(VDR-D150 only)................................. 94
Others
Menus ................................................. 97
Menu list ..................................................97
Setup menu .............................................99
Indications........................................ 100
Indications .............................................100
Messages ..............................................102
Functions that cannot be used
simultaneously...................................... 104
Frequently asked questions ........... 105
Troubleshooting............................... 106
Cautions for use ...............................110
Explanation of terms ........................114
Specifications....................................116
Number of recordable pictures on an
SD card (VDR-D150 only) .....................118
Index ..................................................119
LSQT1048
6
Page 7

LSQT1048(ENG).book 7 ページ 2006年2月6日 月曜日 午後2時13分
Before using
Features
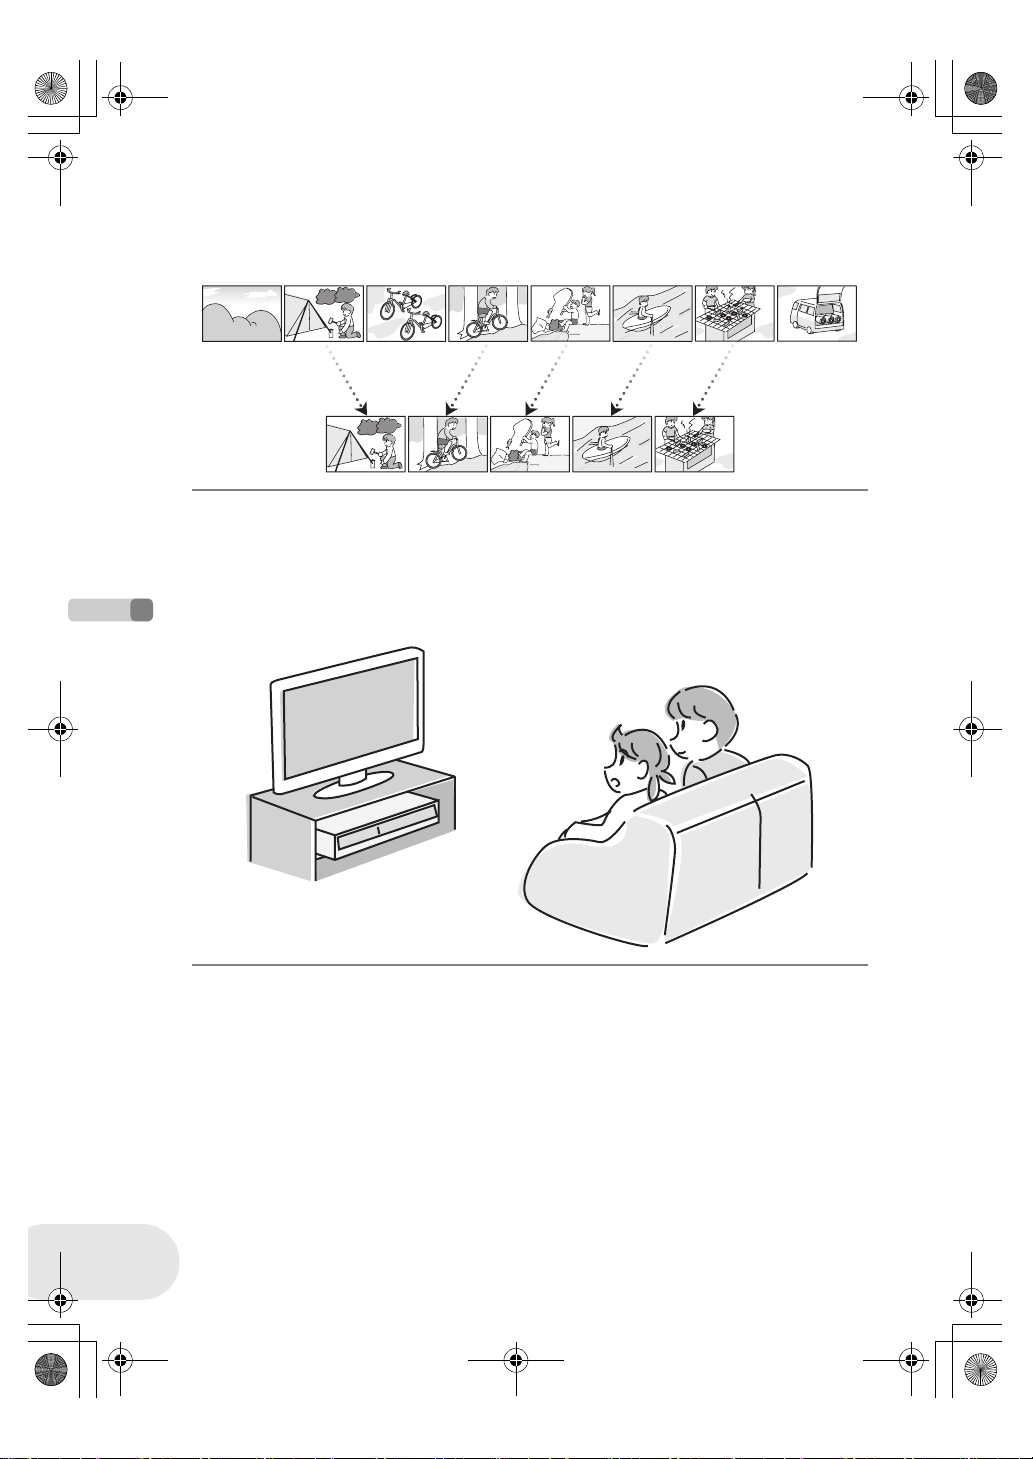
∫ Easy recording! (l 39)
No need to search for the recording start position.
The new recording will not overwrite any previously recorded scene.
∫ Easy playback! (l 62)
Recorded scenes are displayed as thumbnails.
You can easily search for the scenes you want to watch.
Features
Before using
7
LSQT1048
Page 8
LSQT1048(ENG).book 8 ページ 2006年2月6日 月曜日 午後2時13分
Features
∫ Editing scenes! (l 67, 71)
You can create an original video (playlist) by collecting your favourite scenes together and then
easily dub this video to a VCR or a DVD recorder hard disk.
∫ Using with DVD player/recorder! (l 91)
Just insert the disc into a DVD player/recorder compatible with 8 cm discs to play back the scenes
recorded with this unit on it.
If you have a DVD recorder with hard disk, you can dub scenes recorded on DVD-RAM or DVD-RW
(VR format) with this unit to the hard disk.
Before using
LSQT1048
8
Page 9

LSQT1048(ENG).book 9 ページ 2006年2月6日 月曜日 午後2時13分
Accessories
∫ Sales and Support Information
Customer Care Centre
≥ For customers within the UK: 08705 357357
≥ For customers within the Republic of lreland: 01 289 8333
≥ Visit our website for product information
≥ E-mail: customer.care@panasonic.co.uk
Technical Support for AV Software
≥ For UK, ROI: 08701 505610
Direct Sales at Panasonic UK
≥ Order accessory and consumable items for your product with ease and confidence by phoning
our Customer Care Centre Monday–Thursday 9.00 a.m.–5.30 p.m., Friday 9.30 a.m.– 5.30 p.m.
(Excluding public holidays)
≥ Or go on line through our Internet Accessory ordering application at www.panasonic.co.uk.
≥ Most major credit and debit cards accepted.
≥ All enquiries transactions and distribution facilities are provided directly by Panasonic UK Ltd.
≥ It couldn’t be simpler!
≥ Also available through our Internet is direct shopping for a wide range of finished products, take a
browse on our website for further details.
Interested in purchasing an extended guarantee?
Please call 0870 240 6284 or visit our website www.panasonic.co.uk/guarantee
.
Accessories
Check the accessories before using this unit.
Battery pack
CGA-DU12
AC adaptor
VSK0651B
(DE-974GB)
DC cable
K2GJ2DC00011
AV/S cable
K2KZ9CB00001
Disc cleaning cloth
VFC3778-2
AC cable
K2CT3CA00004
(RJA0053-3X)
Optional accessories
AC adaptor (VW-AD11EB) MC protector (VW-LMC30E)
Battery pack (lithium/CGA-DU12/1150 mAh) Tripod (VW-CT45E)
Battery pack (lithium/CGA-DU14/1360 mAh) 8 cm DVD-RAM disc (single sided/LM-AF30E)
Battery pack (lithium/CGA-DU21/2040 mAh) 8 cm DVD-RAM disc (double sided/LM-AF60E)
Wide conversion lens (VW-LW3007E) 8 cm DVD-RW disc (single sided/LM-RW30E)
Tele conversion lens (VW-LT3014E) 8 cm DVD-RW disc (double sided/LM-RW60E)
ND filter (VW-LND30E) 8 cm DVD-R disc (single sided/LM-RF30E)
USB cable (K1HA05CD0010) Shoulder strap (VFC3506-1A)
DVD Movie Album SE4 (VW-DTD10E)
≥ Some optional accessories may not be available in some countries.
Before using
9
LSQT1048
Page 10

2
3
4
7
5
6
LSQT1048(ENG).book 10 ページ 2006年2月6日 月曜日 午後2時13分
Parts identification and handling
Parts identification and handling
1Lens
2 Microphone (built-in, stereo)
3 White balance sensor (l 60)
4 Terminal cover
5 Audio-video output terminal [A/V] (l 90, 93)
6 USB terminal [ ] (l 94)
≥ When you are operating this unit with a computer, we
recommend an operating environment less than
approximately 30 °C and an operating time of
approximately 30 minutes.
7 Viewfinder (l 13, 37)
Due to limitations in LCD production
technology, there may be some tiny bright or
dark spots on the viewfinder screen.
However, this is not a malfunction and does
not affect the recorded picture.
8 LCD monitor open button [PUSH OPEN] (l 13)
9 DC input terminal [DC/C.C. IN] (l 22)
10 Recording start/stop button (l 39)
11 Power switch [OFF/ON] (l 23)
12 Status indicator (l 23)
13 Mode dial (l 27)
Before using
14 Joystick (l 28)
≥ Move up, down, left or right to select items.
≥ Press the centre to enter the selection.
15 Delete button [ ] (l 67, 78, 80)
16 Menu button [MENU] (l 33)
17 Battery holder (l 20)
18 Eyepiece corrector knob (l 37)
19 Zoom lever [W/T] (l 44)
Volume lever [sVOLUMEr] (l 63)
20 Photo shot button [PHOTO SHOT]
(VDR-D150 only) (l 42)
21 Card access lamp (VDR-D150 only) (l 26)
22 Card slot cover (VDR-D150 only) (l 26)
23 Card slot (VDR-D150 only) (l 26)
24 Tripod receptacle (l 12)
25 Battery release lever [BATTERY RELEASE] (l 20)
10
1
2
3
4
65
11
7
8
9
18 19 20
21
22 2523 24
1
1
1
1
1
1
10
LSQT1048
Page 11
8
9
LSQT1048(ENG).book 11 ページ 2006年2月6日 月曜日 午後2時13分
Parts identification and handling
26 Reset button [RESET] (l 109)
27 LCD monitor (l 13)
Due to limitations in LCD production
technology, there may be some tiny bright or
dark spots on the LCD monitor screen.
However, this is not a malfunction and does
not affect the recorded picture.
26
27
28 Mode select switch [AUTO/MANUAL/FOCUS]
(l 56)
29 Speaker
30 Disc eject lever [DISC EJECT] (l 24)
31 Disc access lamp [ACCESS/PC] (l 24)
32 Disc compartment (l 24)
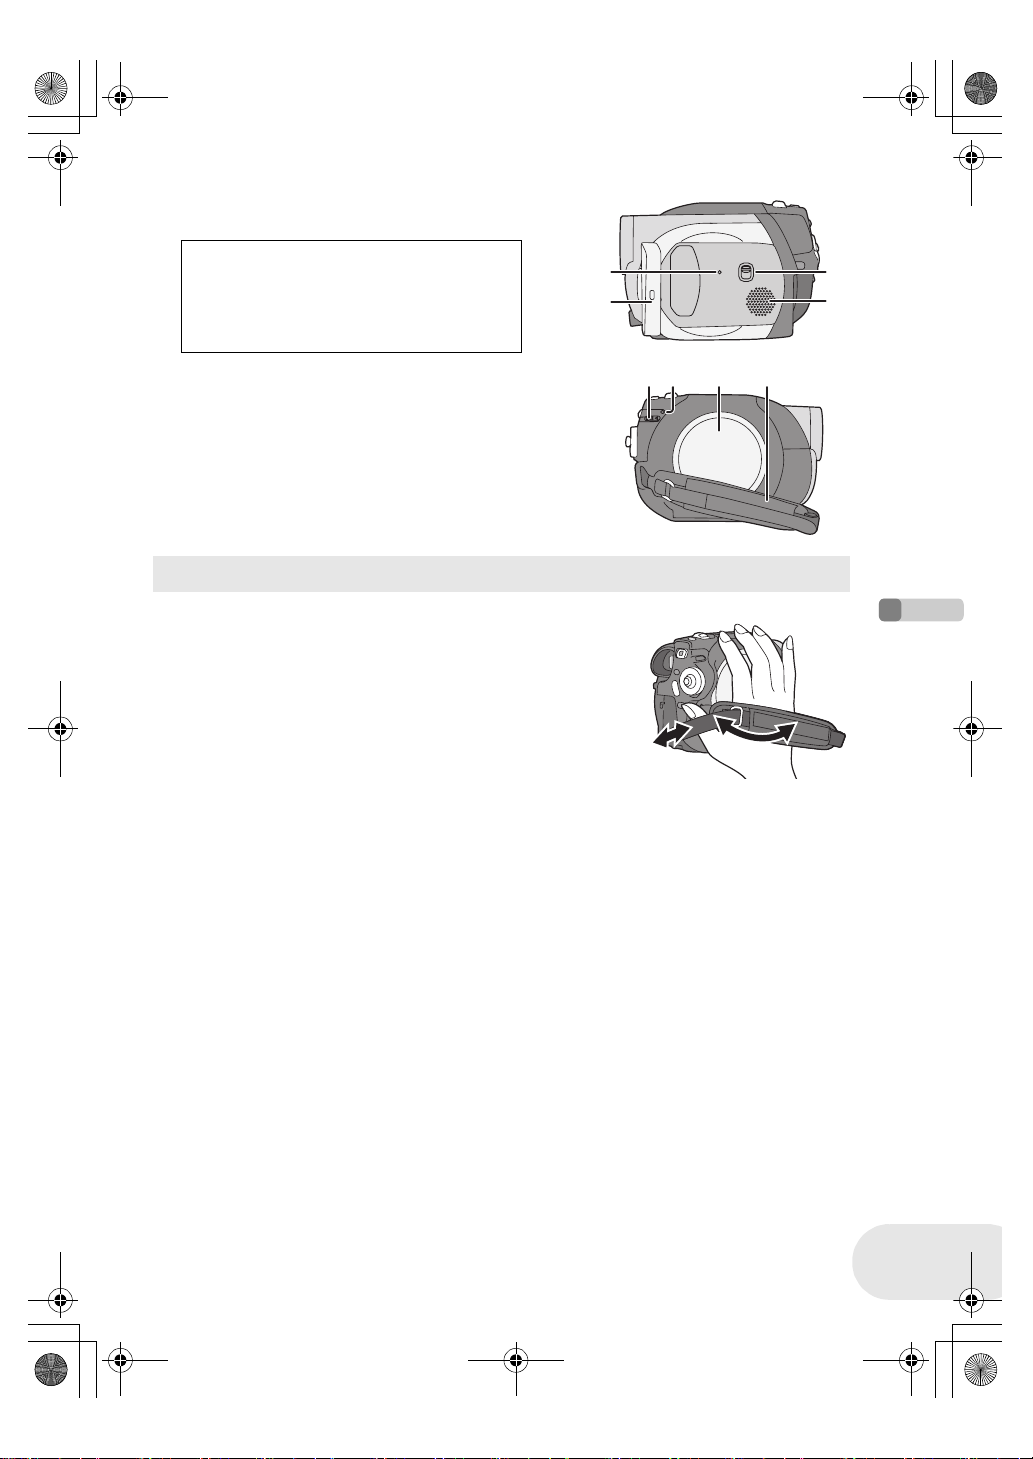
33 Grip belt (l below)
Using grip belt
Adjust the belt length so it fits your hand.
Adjust the belt length and the pad position.
1 Flip the belt.
2 Adjust the length.
3 Fix the belt.
2
2
30 31 32 33
1
2
3
Before using
11
LSQT1048
Page 12

LSQT1048(ENG).book 12 ページ 2006年2月6日 月曜日 午後2時13分
Parts identification and handling
Fitting the lens cap
Fit the lens cap to protect the surface of the lens.
The lens cap and lens cap cord comes preattached to the grip belt.
≥ When not using the lens cap, pull the lens
cap cord in the direction of the arrow. A
≥ When you are not recording, be sure to
cover the lens with the lens cap for
protection. B
≥ When you remove the lens cap, press the knobs firmly.
≥ If the lens cap cord has come off
Pass the end of the lens cap cord through the attached eye
on the lens cap. Then pass the lens cap through the loop
made by itself and pull tight.
Before using
Tripod receptacle
This is a hole for attaching the unit to the optional tripod.
(Please carefully read the operating instructions for how to attach
the tripod to the unit.)
≥ When the tripod is used, the card slot cover cannot be opened.
Insert an SD card before attaching this unit to the tripod. (l 26)
A
B
12
LSQT1048
Page 13

LSQT1048(ENG).book 13 ページ 2006年2月6日 月曜日 午後2時13分
Parts identification and handling
Using the LCD monitor
You can record the image while viewing it on the LCD monitor.
1 Press the PUSH OPEN button. The LCD
monitor opens slightly.
Pull the LCD monitor out in the direction of
the arrow.
≥ The viewfinder is now deactivated.
≥ It can open up to 90o.
2 Adjust the angle of the LCD monitor according to your preference.
≥ It can rotate up to 180o A towards the lens or 90o B towards the viewfinder.
BA
PUSH
OPEN
≥ The brightness and colour level of the LCD monitor
can be adjusted from the menu. (l 37)
≥ If it is forcibly opened or rotated, the unit may be
damaged or fail.
Using the viewfinder
Pull out the viewfinder.
(l 37, Adjusting viewfinder)
≥ When the LCD monitor is rotated by 180o towards
the lens (when recording yourself), the LCD monitor
and the viewfinder will be simultaneously activated.
Before using
13
LSQT1048
Page 14
LSQT1048(ENG).book 14 ページ 2006年2月6日 月曜日 午後2時13分
Discs and cards
Discs and cards
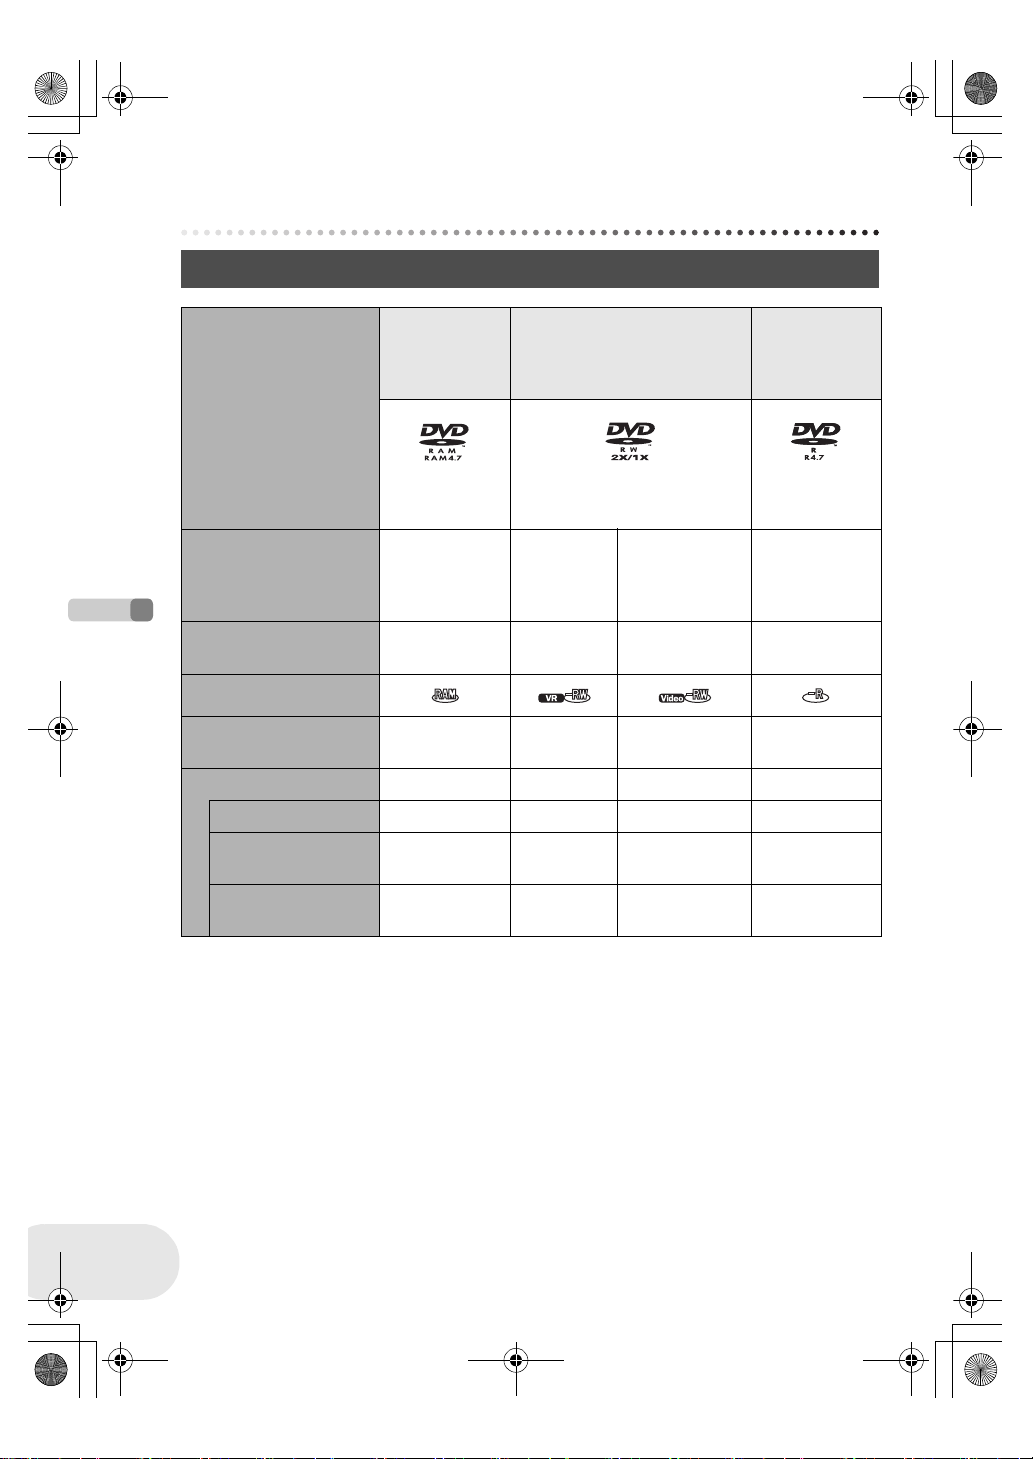
Discs that can be used on this unit
DIsc type DVD-RAM
8 cm
Single sided/
DVD-RW
8 cm
Single sided/double sided
double sided
(DVD-RAM
Ver. 2.1)
Recording format DVD Video
Recording
format
(VR format)
Characteristic Rewritable disc Rewritable
[DVD-RW Ver. 1.1/
2X-SPEED (2X/1X)]
DVD Video
Recording
format
(VR format)
disc
DVD-Video
format
(Video format)
One time
recording disc
Display on the screen
Indication in these
Before using
instructions
(RAM) (-RW‹VR›) (-RW‹V›) (-R)
Functions
≥ Editing on this unit ¥¥ ––
≥ Playback on other
products
*2
≥ Recording after
finalizing
*1 By formatting the disc, it can be used repeatedly. (l 84)
*2 DVD players and DVD recorders that support 8 cm discs.
*3 Playback is possible on compatible products.
*4 Playback is possible on compatible products. (May have to be finalized on this unit.)
*5 Must be finalized on this unit. (l 86)
*6 Un-finalize the disc. (l 87)
*3
¥
– ¥
*4
¥
DVD-R
8 cm
Single sided/
double sided
(DVD-R for
General Ver. 2.0)
DVD-Video
format
(Video format)
One time
*1
recording disc
*5
¥
*6
¥
*5
¥
–
¥: available –: not available
14
LSQT1048
Page 15

LSQT1048(ENG).book 15 ページ 2006年2月6日 月曜日 午後2時13分
Discs and cards
≥ Still pictures cannot be recorded on a disc with this unit.
≥ When using double sided disc, you cannot record or play continuously from one side of the disc
to the other. You will need to eject the disc and turn it over.
≥ Discs inserted in a holder, cartridge, or caddy case cannot be used. Always remove bare discs
from these containers prior to use.
≥ It is recommended that you use Panasonic discs. Usually discs compatible with the DVD
standard can be used for recording and playback with no problems. However, some commercially
available discs do not meet the DVD standard for quality and performance. If you use one of
these discs, you may not be able to record or playback normally. (The message “FOR BEST
PERFORMANCE PANASONIC DISC IS RECOMMENDED.” appears.) Refer to the following
support site for information about discs that have been confirmed as compatible by Panasonic.
http://panasonic.co.jp/pavc/global/cs/e_cam (This website is in English only.)
≥ Discs recorded on this unit may not be playable on other products.
≥ Recording on DVD-R in DVD Video Recording format is not supported.
≥ When using DVD-RW or DVD-R, do not perform the following, as doing so may make the disc
unusable.
– Record on a disc with other products after recording on it with this unit.
– Record on a disc with this unit after recording on it with other products.
– Insert an un-finalized disc in any other products.
∫ About format types
What is the DVD Video Recording format
(VR format)?
This is a format for recording on DVD discs
which allows you to record and erase
repeatedly and create playlists. You can
record on DVD-RAM and DVD-RW in DVD
Video Recording format with this unit.
What is the DVD-Video format (Video
format)?
By finalizing the disc, it can be played back
on most DVD players.
You can record on DVD-RW and DVD-R in
DVD-Video format with this unit.
Before using
∫ Examples of discs that cannot be used on this unit
≥ DVD-RAM (2.6 GB) Ver. 1.0 ≥ DVD-ROM ≥ MO
≥ DVD-R (3.9 GB) Ver. 1.0 ≥ DVD-Video ≥ MD
≥ DVD-R (4.7 GB) for Authoring Ver. 2.0 ≥ CD-R ≥ iD
≥iRW ≥ CD-RW ≥ Floppy disk
≥iR ≥ CD ≥ CD-ROM
≥ DVD-R DL ≥ LD
≥ Discs other than those with diameter of 8 cm
≥ Dual/double layer discs
15
LSQT1048
Page 16

LSQT1048(ENG).book 16 ページ 2006年2月6日 月曜日 午後2時13分
Discs and cards
When using brand-new DVD-RW
When using DVD-RW, select whether to record in DVD Video Recording format (VR format) or
DVD-Video format (Video format) and then format the disc. (l 15, About format types)
1 When a brand-new DVD-RW is inserted in this unit,
the screen on the right appears. Select [YES], then
press the joystick.
2 Select format type, then press the joystick.
VIDEO: DVD-Video format
VR: DVD Video Recording format
3 When the confirm screen appears, select [YES], then press the
joystick.
≥ To change the format type, format the disc again.
(l 84)
If the disc is formatted, then all the data recorded on
the disc will be erased.
Before using
16
LSQT1048
Page 17
LSQT1048(ENG).book 17 ページ 2006年2月6日 月曜日 午後2時13分
Discs and cards
Cards that you can use with this unit (VDR-D150 only)
Card type SD Memory Card
Capacity 8 MB, 16 MB, 32 MB, 64 MB, 128 MB, 256 MB, 512 MB, 1 GB,
Indication in these
instructions
≥ Motion pictures cannot be recorded on an SD card with this unit.
≥ Please confirm the latest information on the following website. (This website is in English only.)
http://panasonic.co.jp/pavc/global/cs/e_cam
≥ For the purposes of these operating instructions, SD Memory Card and miniSD™ Card are
referred to as the “SD card”.
≥ This unit supports SD cards formatted in FAT12 system and FAT16 system based on SD Memory
Card Specifications.
≥ Use this unit to format SD cards. If an SD card is formatted on other products (such as a
computer), the time spent for recording may become longer and you may not be able to use the
SD card. (l 85)
≥ We recommend that you use a Panasonic brand SD card.
≥ Be sure to insert miniSD™ Cards in the dedicated card adaptor before use. Inserting a card in
this unit without the adaptor may damage the unit or the card.
≥ Do not insert an empty card adaptor in this unit. Do not leave the adaptor in this unit while
inserting or removing miniSD™ Cards. This may cause the unit to malfunction.
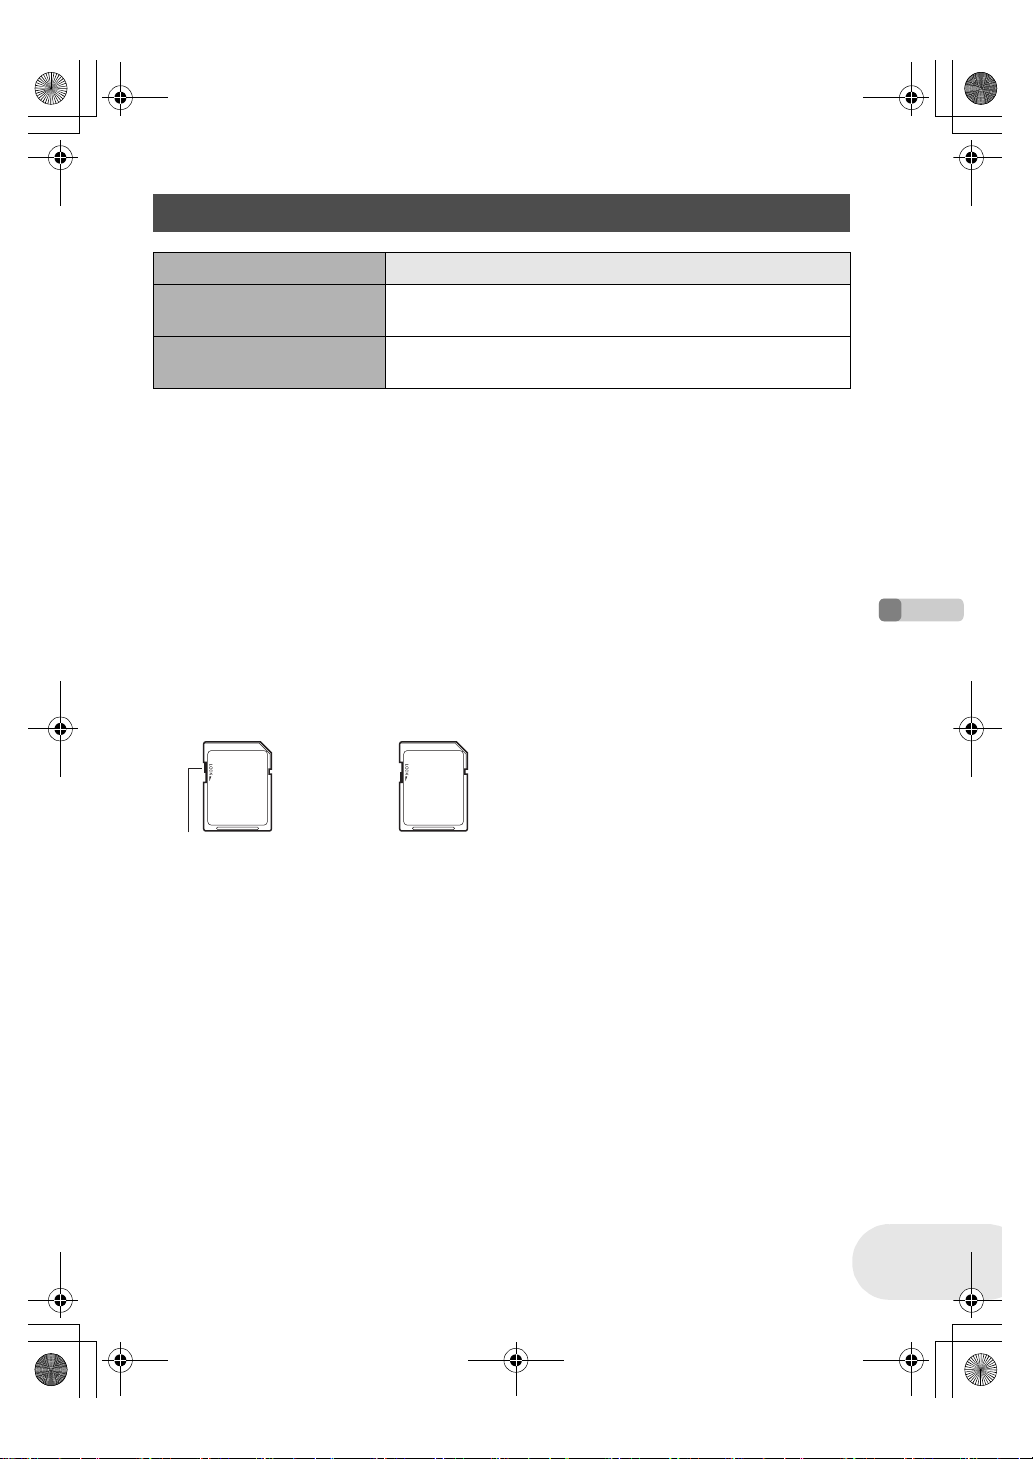
≥ When the write-protect switch on SD Memory Card is locked, no recording, deletion or editing will
be possible on the card.
2 GB (Maximum)
(SD)
Before using
Write-protect switch Locked status
≥ Keep the memory card out of reach of children to prevent swallowing.
≥ A MultiMediaCard cannot be used on this unit.
17
LSQT1048
Page 18
LSQT1048(ENG).book 18 ページ 2006年2月6日 月曜日 午後2時13分
Discs and cards
Disc and card handling
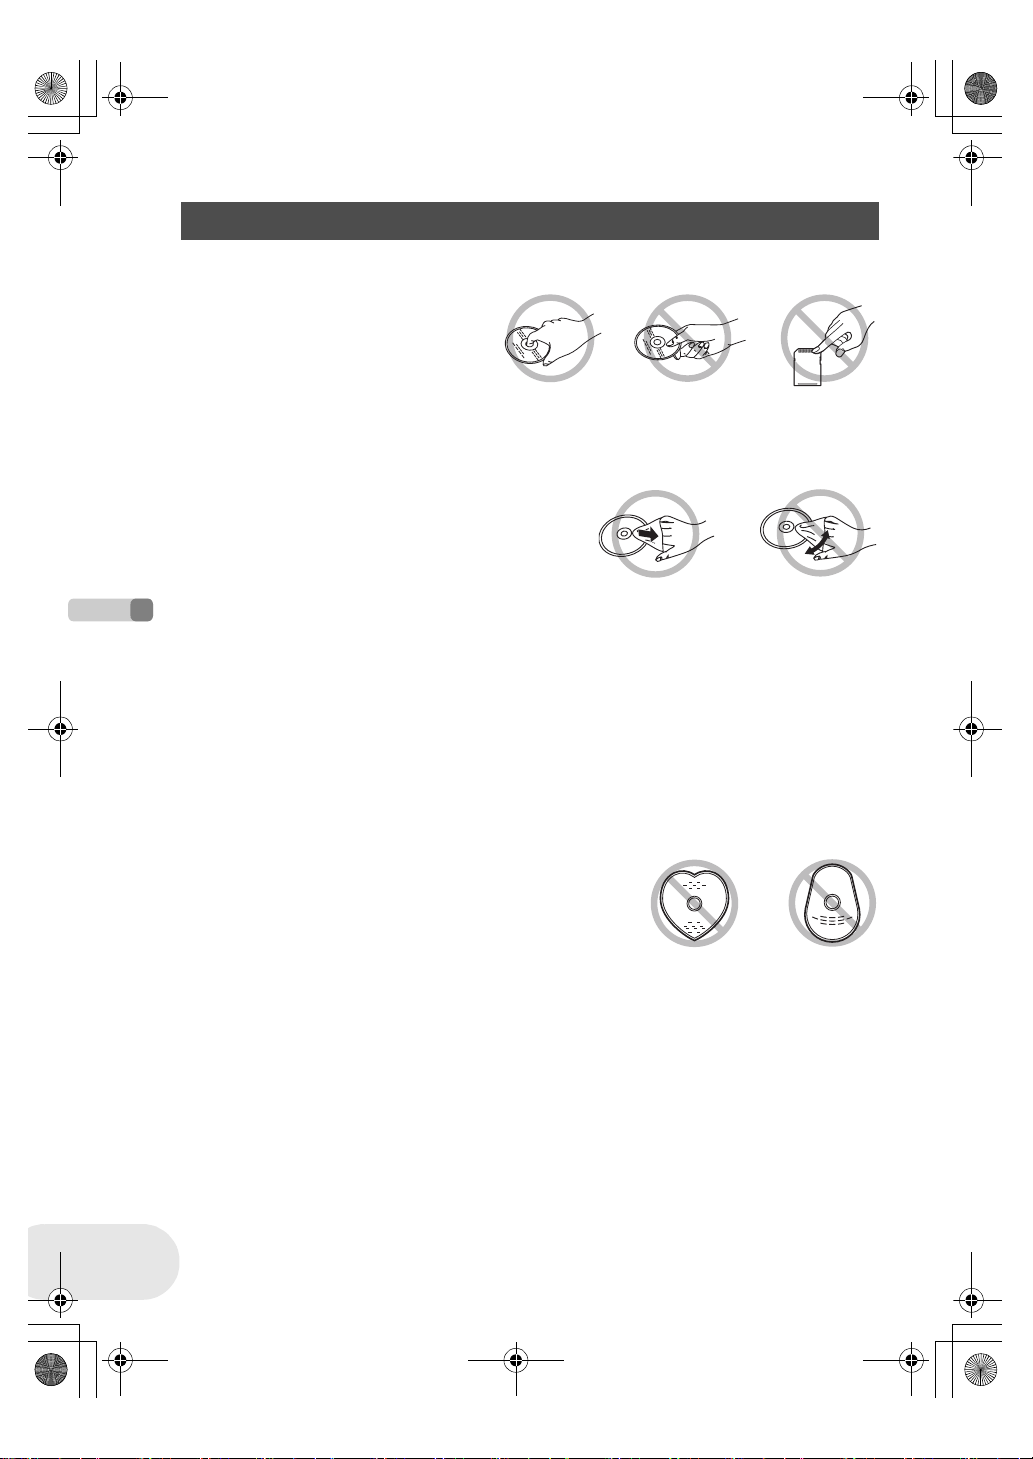
∫ How to hold a disc or card
Do not touch the recorded surface or the terminal surface.
∫ If there is dirt on the disc
Clean it with the supplied disc cleaning cloth. Wipe the disc from the centre to the outer edge to
remove the dirt. Do not use force when wiping the disc as it may scratch it. Also, do not use
solvents (thinner, water, antistatic agent, detergent etc.).
∫ Handling precautions
≥ Be careful about scratches and dirt.
≥ Do not attach labels or stickers to discs.
(This may cause disc warping and un-balanced rotation, rendering it unusable.)
≥ Write on the label side of the disc only with a soft, oil-based felt pen. Do not use ballpoint pens or
other hard writing implements.
≥ Do not use record cleaning sprays, benzine, thinner, static electricity prevention liquids or any
other solvent.
Before using
≥ Do not use scratch-proof protectors or covers.
≥ Do not expose the terminals of the card to water, garbage or dust.
≥ Do not drop, stack, or impact discs. Do not place objects on them.
≥ Do not use the following discs:
– Discs with exposed adhesive from removed stickers or labels.
– Discs that are badly warped or cracked.
– Irregularly shaped discs, such as heart shapes.
18
LSQT1048
≥ Do not place in the following areas:
– In direct sunlight.
– In very dusty or humid areas.
– Near a heater.
– Locations susceptible to significant difference in temperature (condensation can occur).
– Where static electricity or electromagnetic waves occur.
≥ To protect discs and cards, return them to their cases when you are not using them.
Page 19
LSQT1048(ENG).book 19 ページ 2006年2月6日 月曜日 午後2時13分
Setup
Power supply
Charging the battery
When this unit is purchased, the battery is not charged. Charge the battery before using this unit.
Power supply
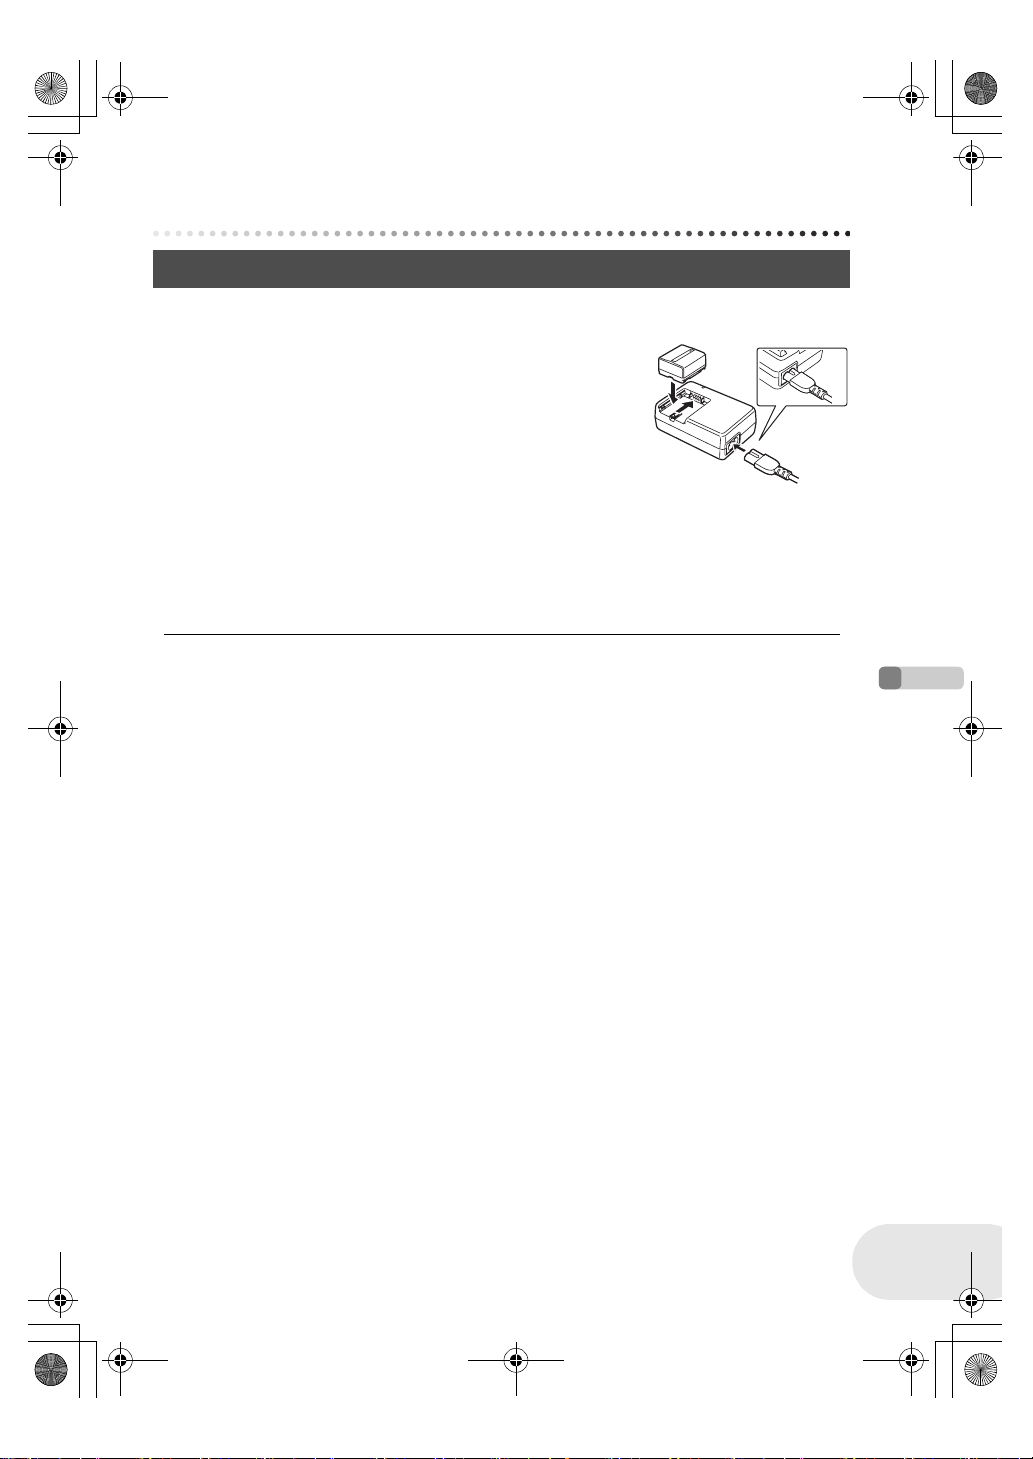
1 Connect the AC cable to the AC adaptor and the
A
AC outlet.
2 Put the battery on the battery mount by aligning
the mark, and then securely plug it in.
≥ The output plug of the AC cable is not completely connected to the
AC adaptor socket. As shown in A, there is a gap.
∫ Charging lamp
Lights up: Charging
Goes off: Charging completed
Flashing: The battery is over discharged (discharged excessively). In a while, the lamp will light up
≥ Battery charging time (l 21)
≥ We recommend using Panasonic batteries.
≥ If you use other batteries, we cannot guarantee the
and normal charging will start.
When the battery temperature is excessively high or low, the CHARGE lamp flashes and
the charging time will be longer than normal.
≥ If the DC cable is connected to the AC adaptor, then
the battery will not charge. Remove the DC cable
from the AC adaptor.
quality of this product.
Setup
19
LSQT1048
Page 20

LSQT1048(ENG).book 20 ページ 2006年2月6日 月曜日 午後2時13分
Power supply
Fitting the battery
Push the battery against the battery holder and slide
it until it clicks.
Removing the battery
While sliding the BATTERY RELEASE lever, slide the
battery to remove it.
≥ Hold the battery with your hand so it does not fall.
≥ Be sure to turn off the power on this unit and check
that the status indicator and the access lamp are
both off before removing the battery.
Setup
20
LSQT1048
Page 21

LSQT1048(ENG).book 21 ページ 2006年2月6日 月曜日 午後2時13分
Power supply
Charging time and recordable time
The times shown in the tables below are for when the temperature is 25 oC and the humidity is
60%. If the temperature is higher or lower than 25 oC, the charging time will become longer.
∫ Charging time
Battery model number Voltage/capacity Charging time
Supplied battery/
CGA-DU12 (optional)
CGA-DU14 (optional) 7.2 V/1360 mAh 2 h 45 min
CGA-DU21 (optional) 7.2 V/2040 mAh 3 h 55 min
≥ “2 h 25 min” indicates 2 hours 25 minutes.
≥ The charging time shown in the table are approximations.
∫ Recordable time
≥ The times indicate the recordable time when the viewfinder is used. The times in parentheses
indicate the recordable time when the LCD monitor is used.
≥ The intermittent recordable time refers to recordable time when the recording and stopping
operations are repeated. In reality, it may be shorter than this.
Battery model
number
Supplied
battery/
CGA-DU12
(optional)
CGA-DU14
(optional)
CGA-DU21
(optional)
≥ “1 h 50 min” indicates 1 hour 50 minutes.
≥ The recordable time shown in the table are approximations.
Voltage/
capacity
7.2 V/
1150 mAh
7.2 V/
1360 mAh
7.2 V/
2040 mAh
7.2 V/1150 mAh 2 h 25 min
(When using a DVD-RAM disc)
Recording
mode
XP
SP
LP
XP
SP
LP
XP
SP
LP
Maximum
continuously
recordable time
1h50min
(1 h 40 min)
2h5min
(1 h 50 min)
2h15min
(2 h)
2h20min
(2 h 5 min)
2h35min
(2 h 20 min)
2h50min
(2 h 35 min)
3h30min
(3 h 10 min)
3h55min
(3 h 30 min)
4h20min
(3 h 50 min)
Intermittent
recordable time
55 min
(50 min)
1h
(55 min)
1h5min
(1 h)
1h10min
(1 h)
1h15min
(1 h 10 min)
1h25min
(1 h 15 min)
1h45min
(1 h 35 min)
1h55min
(1 h 45 min)
2h10min
(1 h 55 min)
Setup
21
LSQT1048
Page 22

LSQT1048(ENG).book 22 ページ 2006年2月6日 月曜日 午後2時13分
Power supply
≥ Along with the reduction of the battery capacity, the
display will change:
####.
If the battery discharges, then ( ) will
flash.
≥ The recordable time will become shorter when you
use both the viewfinder and the LCD monitor
simultaneously while rotating the LCD monitor
frontward to record yourself, etc.
≥ The batteries heat up after use or charging. This
≥ Be aware that the operating time of the battery will
Connecting to the AC outlet
1 Connect the AC cable to the AC adaptor and
the AC outlet.
2 Connect the DC cable to the AC adaptor.
3 Connect the DC cable to this unit.
≥ Do not use the AC cable for other equipment since the AC
cable is exclusively designed for this unit. Do not use the AC
cable from other equipment for this unit.
≥ While the DC cable is connected to the AC adaptor,
Setup
the battery will not charge.
unit will also heat up while being used. This is not a
malfunction.
become shorter in low temperatures. We
recommend charging a spare battery for use when
recording.
22
LSQT1048
Page 23

B
LSQT1048(ENG).book 23 ページ 2006年2月6日 月曜日 午後2時13分
Power supply
Turning the unit on/off
≥ When recording, remove the lens cap before turning the unit on.
If the unit is turned on with the lens cap fitted, the automatic white balance adjustment may not
function properly.
How to turn on the power
While pressing the button A, set the
OFF/ON switch to ON.
The status indicator B lights red.
A
≥ The date and time display flashes. Set this. (l 35)
How to turn off the power
While pressing the button A, set the OFF/ON switch to
OFF.
The status indicator B goes off.
When the power is turned on for the first time after changing the disc or battery, the unit carries
out a recognition procedure to check that there are no problems with the disc.
This takes approximately 25 seconds with DVD-RAM.
If you want to start using the unit as soon as you turn on the power, do the following.
1) Turn on the power.
2) After “READING DISC...” disappears from the screen, turn off the power.
You can start recording approximately 8 seconds after you turn on the power again.
≥ Depending on the condition of the disc, it may take longer than this.
≥ If the date and time are not set, this function does not work.
B
A
Setup
23
LSQT1048
Page 24
LSQT1048(ENG).book 24 ページ 2006年2月6日 月曜日 午後2時13分
Inserting/removing a disc
Inserting/removing a disc
When inserting or removing the disc, fit the charged battery pack or connect the AC adaptor to the
unit. The cover of the disc compartment will not open unless the unit is powered.
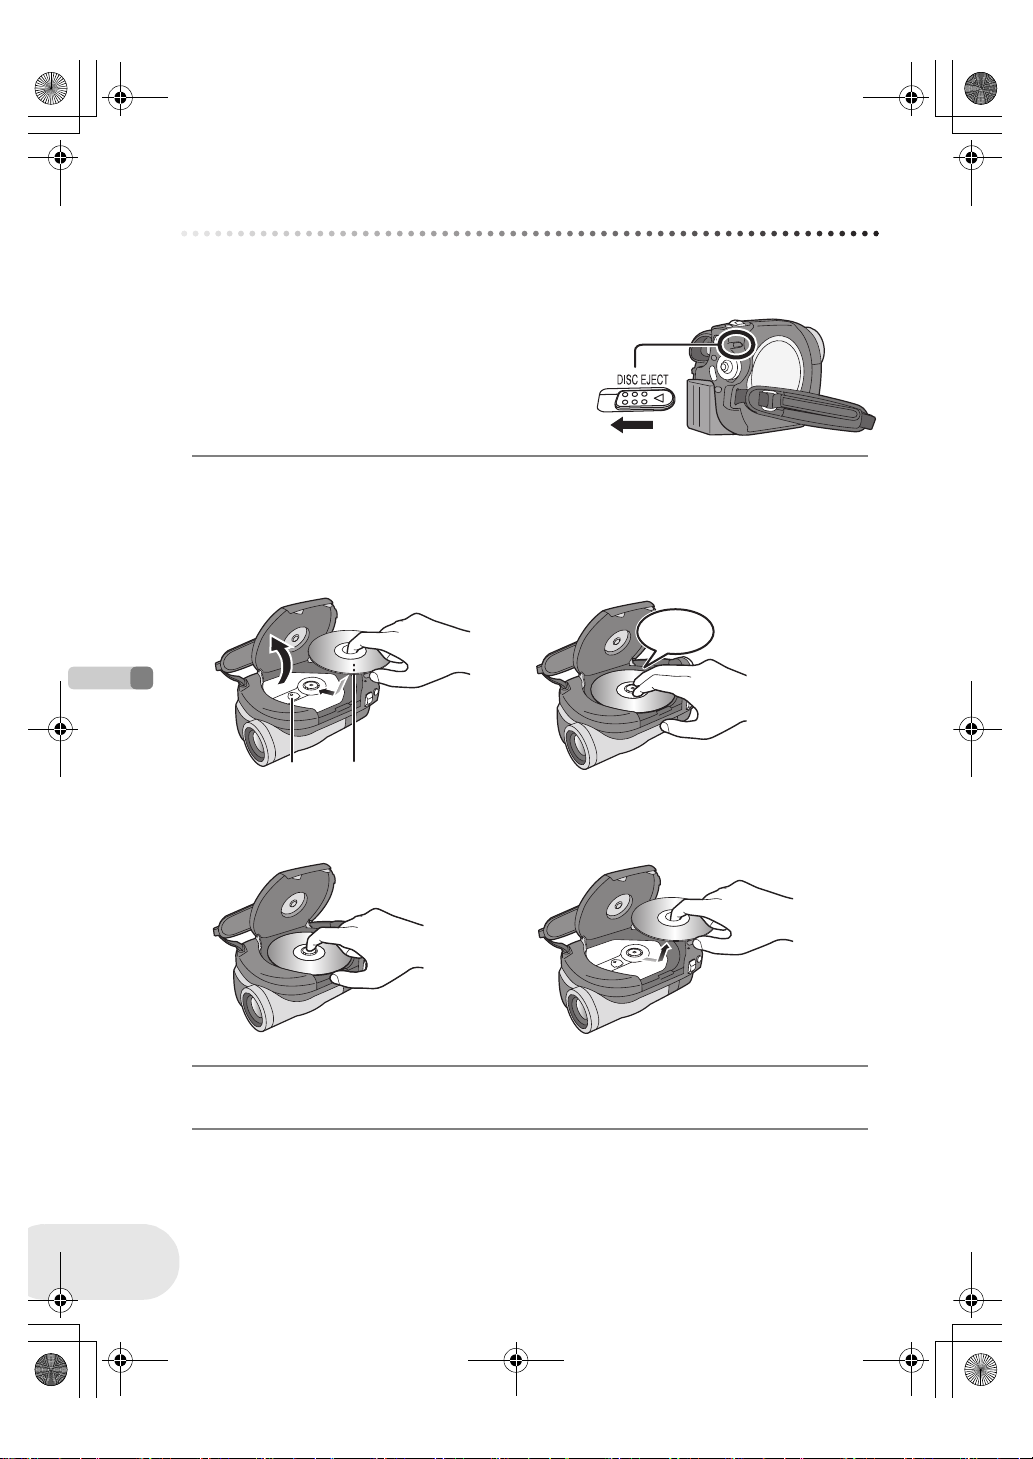
1 Slide the DISC EJECT lever once and
release it.
A few moments after the ACCESS/PC lamp blinks,
the cover of the disc compartment will open slightly.
2 Open the cover of the disc compartment by hand and insert/remove
the disc.
∫ Inserting disc
Fit the disc onto the spindle in the centre.
A Recording/playback side
B Pickup lens
Click!
Setup
24
LSQT1048
AB
∫ Removing disc
While pressing down on the spindle, grasp the edge of the disc and gently lift it out.
3 Push the section marked “PUSH CLOSE” on the cover of the disc
compartment to close the cover.
Page 25
LSQT1048(ENG).book 25 ページ 2006年2月6日 月曜日 午後2時13分
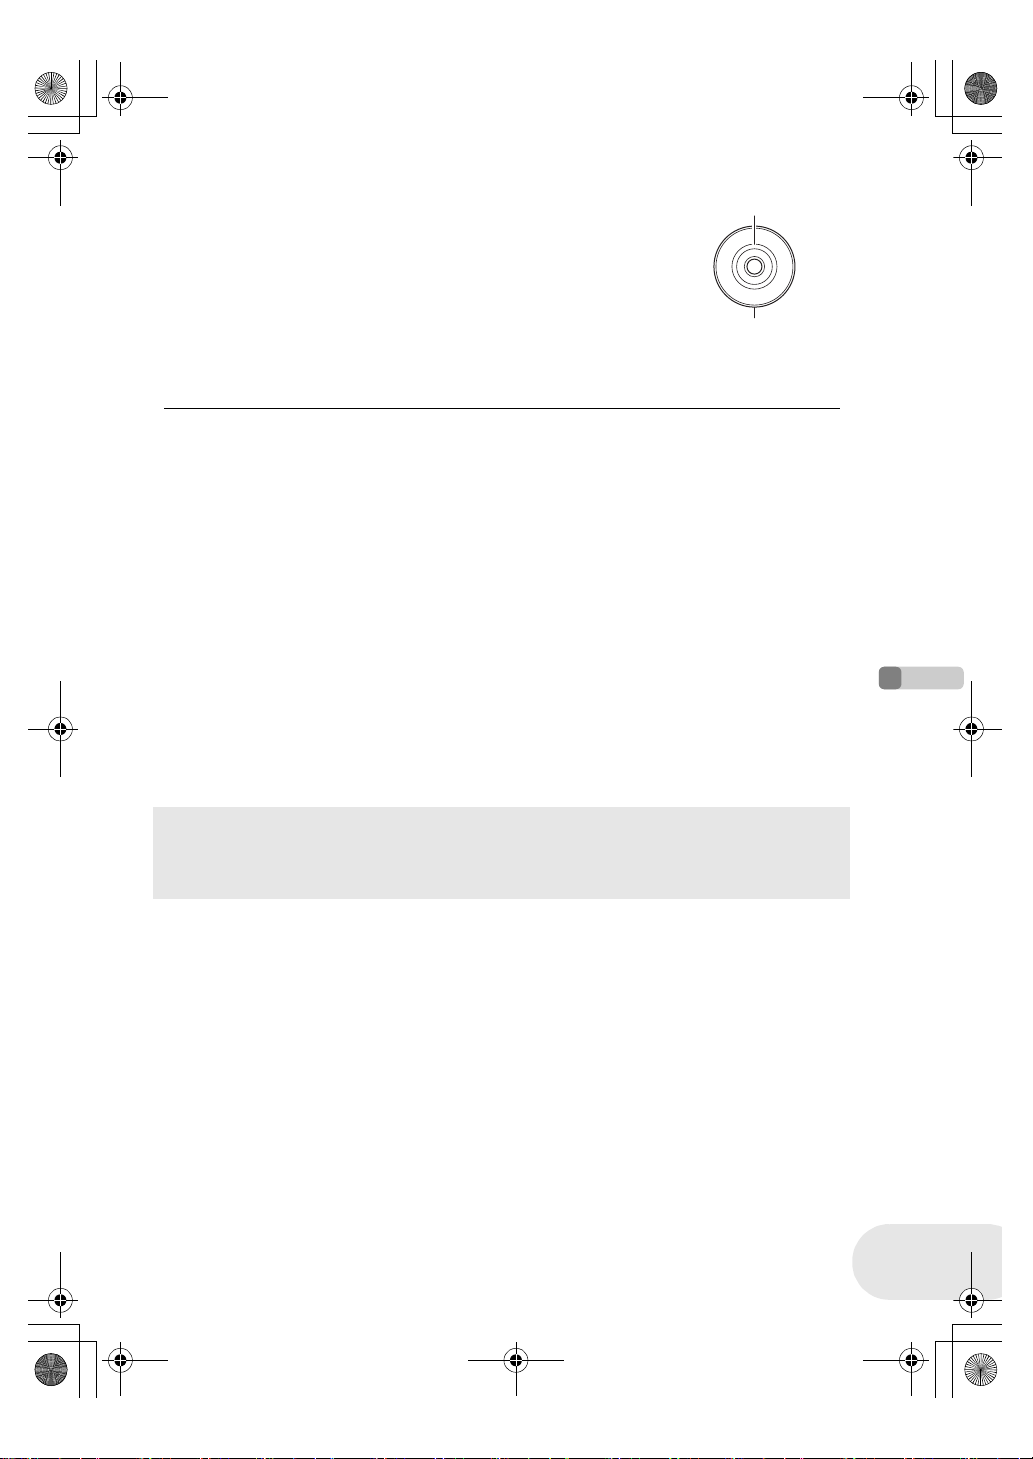
∫ Identifying recording/playback sides of disc
Single sided disc:
The recording/playback side is opposite to the labelled side.
Double sided disc:
The “SIDE A” recording/playback side is opposite to the “SIDE A”
marked side. The “SIDE B” recording/playback side is the “SIDE A”
marked side.
Inserting/removing a disc
“SIDE A” mark
M
/
S
A
I
D
R
-
E
D
A
V
D
The opposite side is the
“SIDE A” recording/ playback
side.
≥ Do not use excessive force when opening the cover.
≥ Do not touch the pickup lens or the recording/
playback side of the disc.
This may impair recording and playback.
≥ Insert the disc securely to prevent damage.
≥ When you open the cover, the ACCESS/PC lamp
flashes red. Do not leave the cover open.
≥ If the cover is open, the power will not turn off even
if the OFF/ON switch is set to OFF.
≥ If the disc is not correctly inserted, the cover will not
close. Never try to forcibly close the cover. This
could cause damage. Reinsert the disc properly.
≥ If a single sided disc is inserted into the unit with the
printed label facing the inside, an error message will
appear. Remove the disc and reinsert it with its
≥ Do not remove the battery pack or disconnect the
AC adaptor while removing the disc or until power is
completely turned off. If you do, the cover will not
open. If this happens, reattach the battery pack or
reconnect the AC adaptor, slide the DISC EJECT
lever once, and then release it. A repair disc
message may be displayed when the power is
turned back on. (l 103, About recovery)
≥ Do not insert anything other than the 8 cm DVD-
RAM, DVD-RW or DVD-R disc into the disc
compartment. Doing so could cause malfunctions.
≥ Do not touch the pickup lens or other parts inside
the disc compartment. Be sure not to touch the area
around the pickup lens for it becomes extremely
hot.
recording/playback side facing the inside.
≥ Do not allow the recording/playback side to become
dirty or scratched.
After inserting a disc/After recording finishes
While the ACCESS/PC lamp is lit, the disc is rotating and disc information is being recorded. If
the power supply is interrupted at this time, the disc may become unusable. Do not disconnect
the AC adaptor or remove the battery. Also, do not strongly shake or cause impact to the unit.
Setup
25
LSQT1048
Page 26

A
LSQT1048(ENG).book 26 ページ 2006年2月6日 月曜日 午後2時13分
Inserting/removing an SD card (VDR-D150 only)
Inserting/removing an SD card
(VDR-D150 only)
Before inserting/removing an SD card, be sure to turn off the power.
If the SD card is inserted or removed with the power turned on, this unit may malfunction or the data
recorded on the SD card may be lost.
1 Open the card slot cover.
2 Insert/remove the SD card into/from the card slot.
≥ When inserting an SD card, face the label side A upwards and press
it straight in with one stroke as far as it goes.
≥ When removing the SD card, press the centre of the SD card and then
pull it straight out.
3 Securely close the card slot cover.
Setup
26
LSQT1048
∫ Concerning the SD card
≥ Electrical noise, static electricity or failure of this unit or the SD card may damage or erase the
data stored on the SD card. We recommend saving important data on a computer.
∫ Card access lamp
≥ When this unit accesses the SD card (reading, recording, playback, erasing, etc.), the access
lamp lights up.
≥ If the following operations are performed when the access lamp is lit, then the SD card or the
recorded data may be damaged or this unit may malfunction.
– Inserting or removing the SD card
– Operating the OFF/ON switch or the mode dial
Page 27
LSQT1048(ENG).book 27 ページ 2006年2月6日 月曜日 午後2時13分
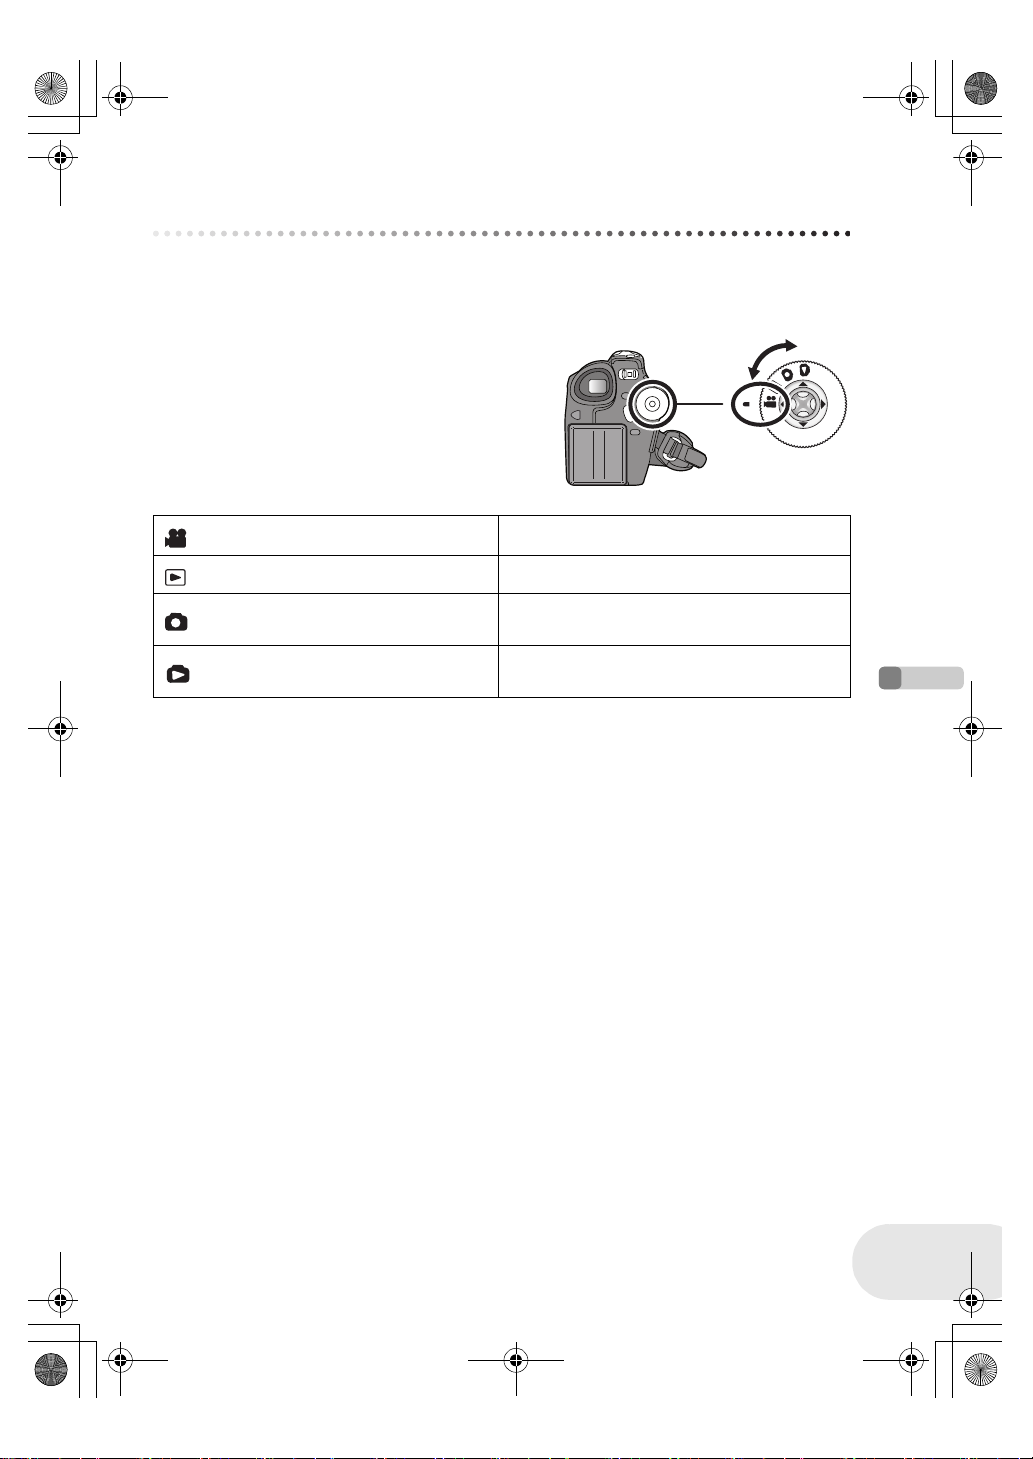
Selecting a mode
The mode dial is used to switch between recording and playback modes.
Rotate the mode dial slowly but surely.
≥ Do not forcefully turn the dial.
Rotate the mode dial, and set the desired
mode pictograph to the position shown in
the illustration.
Disc recording mode (l 39) Use this to record motion pictures on a disc.
Disc playback mode (l 62) Use this to play back motion pictures on a disc.
Selecting a mode
Card recording mode (l 42)
(VDR-D150 only)
Card playback mode (l 65)
(VDR-D150 only)
Use this to record still pictures on an SD card.
Use this to play back still pictures on an SD
card.
Setup
27
LSQT1048
Page 28
LSQT1048(ENG).book 28 ページ 2006年2月6日 月曜日 午後2時13分
How to use the joystick
How to use the joystick
This unit has a joystick for selecting functions, performing operations, etc. so it is easy to operate
this unit with one hand.
Basic operations
Operations on the menu screen and selection of files on the thumbnail view screen, etc.
Move the joystick up, down, left, or right to select an item or file, and then
press the joystick to set it.
1
3 4
2
≥ Menu screen operations (l 33)
5
Joystick and screen display
Press the centre of the joystick, and icons will be displayed on the screen. Each press switches the
display as follows depending on the mode.
(In the disc playback mode or the card playback mode, the icons will be automatically displayed on
the screen.)
1 Select by moving up.
2 Select by moving down.
3 Select by moving left.
4 Select by moving right.
5 Press the joystick to select the item.
Setup
28
LSQT1048
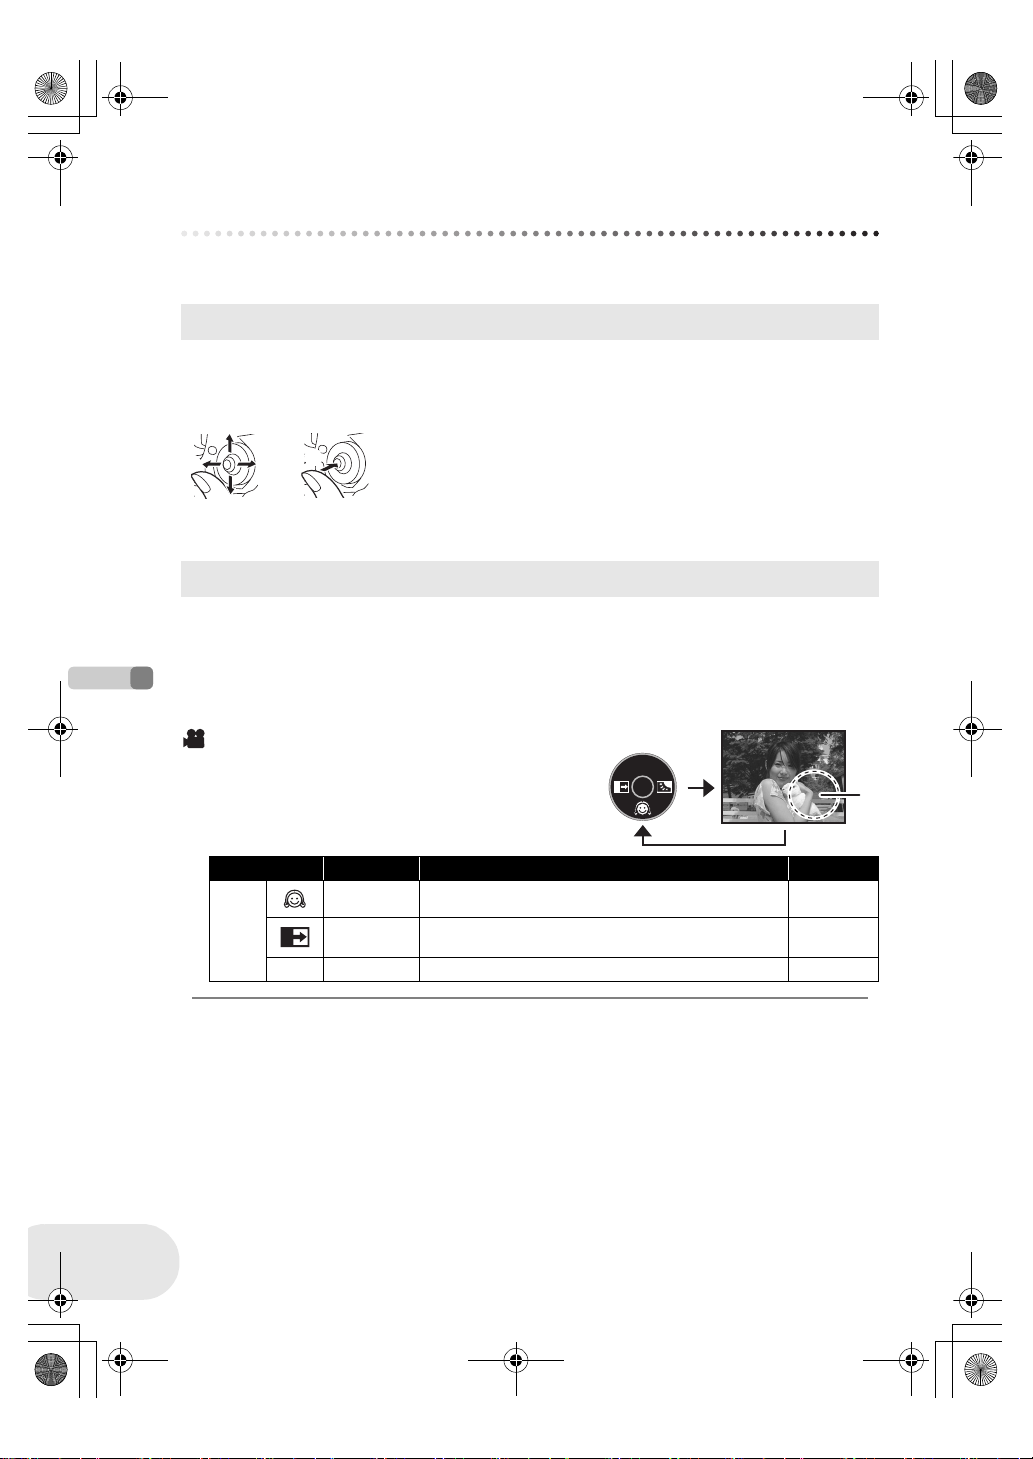
Disc recording mode
(AUTO/MANUAL/FOCUS switch is set to AUTO)
A: The operation icon is off.
Icon Direction Function Page
4 Soft skin mode 47
—
ª 1 Backlight compensation 50
2 Fade 48
A
Page 29

LSQT1048(ENG).book 29 ページ 2006年2月6日 月曜日 午後2時13分
Disc recording mode
(AUTO/MANUAL/FOCUS switch is set
to MANUAL)
A: The operation icon is off.
Icon Direction Function Page
4 Soft skin mode 47
(1/2)
ª 1 Backlight compensation 50
(2/2)
s
r
2 Fade 48
Manual white balance set
3
4
21
(Only when manual white balance adjustment
mode is selected)
White balance 59
Shutter speed 61
Iris or gain value 61
White balance mode selection, manual
adjustments
How to use the joystick
A
60
58, 59, 61
Disc playback mode
A: The operation icon is off.
Icon Direction Function Page
1/;3Playback/pause 62
∫4Stop playback and show thumbnails 62
:
—
2; Reverse slow/frame playback (during pause) 63
9
;1 Forward slow/frame playback (during pause) 63
2
1
Rewind, skip (during playback) 62
Fast forward, skip (during playback) 62
A
Setup
29
LSQT1048
Page 30

LSQT1048(ENG).book 30 ページ 2006年2月6日 月曜日 午後2時13分
How to use the joystick
Card recording mode (VDR-D150 only)
(AUTO/MANUAL/FOCUS switch is set to AUTO)
A: The operation icon is off.
Icon Direction Function Page
4 Soft skin mode 47
—
Ø 2 Self timer 51
ª 1 Backlight compensation 50
Card recording mode
(VDR-D150 only)
(AUTO/MANUAL/FOCUS switch is set
to MANUAL)
A: The operation icon is off.
Icon Direction Function Page
4 Soft skin mode 47
(1/2)
Setup
(2/2)
Ø 2 Self timer 51
ª 1 Backlight compensation 50
3
4
s
r
21
Manual white balance set
(Only when manual white balance adjustment
mode is selected)
White balance 59
Shutter speed 61
Iris or gain value 61
White balance mode selection, manual
adjustments
A
A
60
58, 59, 61
30
LSQT1048
Page 31

LSQT1048(ENG).book 31 ページ 2006年2月6日 月曜日 午後2時13分
Card playback mode (VDR-D150 only)
(When [PICTURE] is selected)
A: The operation icon is off.
Icon Direction Function Page
∫4Stop playback and show thumbnails 65
—
E2Playback previous picture 65
D1Playback next picture 65
Card playback mode (VDR-D150 only)
(When [SLIDE SHOW] is selected)
A: The operation icon is off.
Icon Direction Function Page
1/;3Slide show start/pause 66
∫4Stop playback and show thumbnails 65
—
E2Playback previous picture (during pause) 65
D1Playback next picture (during pause) 65
How to use the joystick
A
A
Setup
31
LSQT1048
Page 32

LSQT1048(ENG).book 32 ページ 2006年2月6日 月曜日 午後2時13分
Switching the language
Switching the language
You can switch the language on the screen display or the menu screen.
1 Press the MENU button, then select [ LANGUAGE]
and press the joystick.
2 Select [English] and press the joystick.
Setup
32
LSQT1048
Page 33

LSQT1048(ENG).book 33 ページ 2006年2月6日 月曜日 午後2時13分
Using the menu screen
Refer to “Menu list” (l 97) for information about the menus.
1 While stopped, press the MENU button.
The menu displayed differs depending on the position of the mode
dial.
≥ Do not switch the mode dial when the menu is displayed.
Using the menu screen
MENU
2 Move the joystick up or down in order to
select the desired top menu A.
3 Move the joystick right or press
the joystick.
The submenu B is displayed.
4 Move the joystick up or down in order to
select the submenu item.
C Current settings on menus
A
B
Setup
C
33
LSQT1048
Page 34

LSQT1048(ENG).book 34 ページ 2006年2月6日 月曜日 午後2時13分
Using the menu screen
5 Move the joystick right or press
the joystick.
6 Move the joystick up or down in order to
select the desired item.
7 Press the joystick to enter the selection.
To get back to the previous screen
Move the joystick left.
Setup
34
LSQT1048
To exit the menu screen
Press the MENU button.
≥ The menu screen does not appear during recording
or playing. You cannot start other operations while
the menu screen appears.
MENU
Page 35

LSQT1048(ENG).book 35 ページ 2006年2月6日 月曜日 午後2時13分
Setting date and time
Setting date and time
If the screen shows the incorrect date/time, then adjust it.
¬Rotate the mode dial to select or .
1 Press the MENU button, then select [ BASIC] #
[ CLOCK SET] # [YES] and press the joystick.
2 Move the joystick left or right to select the item to be
set. Then, move the joystick up or down to set the
desired value.
≥ The year will change as follows:
2000, 2001, ..., 2099, 2000, ...
≥ The 24-hour system is used to display the time.
3 Press the joystick to enter the selection.
≥ After pressing the MENU button to finish the setting, check the date and time display.
≥ The clock function starts at [00] seconds.
Setup
35
LSQT1048
Page 36

LSQT1048(ENG).book 36 ページ 2006年2月6日 月曜日 午後2時13分
Setting date and time
∫ Changing the display style
Press the MENU button, then select [ SETUP] #
[DATEFORMAT] # desired display style and press the joystick.
Display style Y/M/D M/D/Y D/M/Y
Screen display
15:30
2006.12.15
∫ Changing the date and time display style
Press the MENU button, then select [ SETUP] # [DATE/TIME]
# desired display style and press the joystick.
[DATE] [D/T] [OFF]
15:30
15.12.2006
15.12.2006
≥ The recording time is not displayed in disc playback mode.
15:30
12.15.2006
15:30
15.12.2006
≥ The date and time function are driven by a built-in
lithium battery.
≥ Make sure to check the time before recording.
≥ If [0] or [- -] is indicated when this unit is turned
on, then the built-in lithium battery runs down. After
charging the battery using the steps below, set the
clock.
Connect the AC adaptor to this unit or place the
Setup
battery on this unit, and the built-in lithium battery
will be recharged. Leave this unit as is for approx.
24 hours, and the battery will save the date and time
for approx. 6 months. (Even if the OFF/ON switch is
set to OFF, the battery is still being recharged.)
WARNING
THE LITHIUM BATTERY IN THIS
EQUIPMENT MUST ONLY BE REPLACED
BY QUALIFIED PERSONNEL. WHEN
NECESSARY, CONTACT YOUR LOCAL
PANASONIC SUPPLIER.
36
LSQT1048
Page 37

LSQT1048(ENG).book 37 ページ 2006年2月6日 月曜日 午後2時13分
Adjusting LCD monitor/viewfinder
Adjusting LCD monitor/viewfinder
Adjust the brightness and colour level.
1 Press the MENU button, then select [ SETUP] #
[ LCD SET] or [ EVF SET] # [YES] and press the
joystick.
2 Move the joystick up or down to select the item to be
adjusted. Then, move the joystick left or right to
make the adjustment.
The bar display moves.
[LCDSET]
: Brightness of the LCD monitor
: Colour level of the LCD monitor
[ EVF SET]
EVF
: Brightness of the viewfinder
EVF
EVF
≥ In order to adjust the brightness of the viewfinder,
close the LCD monitor, and the viewfinder will be
activated.
≥ When the LCD monitor is rotated by 180° towards
the lens, the brightness of the LCD monitor cannot
be adjusted.
≥ These settings will not affect the images actually
recorded.
Adjusting the field of view
Adjust the focus by sliding the eyepiece corrector
knob.
≥ You can adjust the brightness of the viewfinder from the menu.
(l above)
15:30
15:30
15:30
15.12.2006
15.12.2006
15.12.2006
15:30
15.12.2006
Setup
37
LSQT1048
Page 38

LSQT1048(ENG).book 38 ページ 2006年2月6日 月曜日 午後2時13分
Recording
Before recording
Before recording
Basic camera positioning
1
4
2
3
5
1 Hold the camera with both hands.
2 Run your hand through the grip belt.
3 Do not cover the microphones or sensors with your hands.
4 Keep your arms near your body.
Recording
5 Slightly open your legs.
≥ When you are outdoors, record pictures with the sunlight behind you. If the subject is backlit, it
will become dark in the recording.
38
LSQT1048
Page 39

LSQT1048(ENG).book 39 ページ 2006年2月6日 月曜日 午後2時13分
Recording motion pictures
Recording motion pictures
Record motion pictures onto a disc.
(RAM) (-RW‹VR›) (-RW‹V›) (-R)
1 Remove the lens cap, then turn the unit on.
If the unit is turned on with the lens cap fitted, the automatic white balance adjustment may not
function properly.
2 Rotate the mode dial to select .
3 Press the recording start/stop
button to start recording.
To end the recording
Press the recording start/stop button again to
pause recording.
≥ [¥] and [;] are red during recording. Do not
move this unit until [;] is green.
≥ The images recorded between pressing the recording start/stop button to start recording and
pressing it again to pause recording become one scene.
≥ When about 5 minutes has passed without any operation, this unit automatically turns off to
prevent the battery from running down. When you use this unit, turn it on again.
This setting can also be set to [OFF]. (l 99, POWER SAVE)
Recording
39
LSQT1048
Page 40

R 0h02m
0h00m10s
LSQT1048(ENG).book 40 ページ 2006年2月6日 月曜日 午後2時13分
Recording motion pictures
≥ The maximum number of scenes on a disc
(per side): 999 (Even if there is remaining capacity
for recording (on a disc), you may not be able to
record 999 scenes.)
≥ While “WRITING THE INFORMATION ON THE
DISC.” is displayed, do not disconnect the AC cable
or remove the battery as doing so may make the
disc unusable.
≥ Sound is recorded in Dolby Digital from the internal
stereo microphone on the front of the unit. Take
care not to block this microphone.
≥ Each time the unit enters the recording pause
mode, the counter display will be reset to
“0h00m00s”.
Screen indications in the disc recording mode
A Remaining time left for recording
(When the remaining time is less than 1 minute, [R 0h00m]
flashes red.)
B Recording mode
C Recording time elapsed
≥ While motion picture recording is in progress, do not
disconnect the battery or AC adaptor. If you do, a
repair disc message may be displayed when the
power is turned back on. (l 103, About recovery)
A
B
C
R 0h02m
R 0h02m
Immediately after recording finishes the ACCESS/PC lamp lights. While it lights, the disc is
rotating and disc information is being recorded. If you run while holding the unit or swing it, the
recorded images may be distorted so do not strongly shake or cause impact to it.
SP
0h00m10s
0h00m10s
Recording
40
LSQT1048
Page 41

LSQT1048(ENG).book 41 ページ 2006年2月6日 月曜日 午後2時13分
Recording motion pictures
Changing the recording mode of the motion picture
Press the MENU button, then select [ BASIC] #
[RECMODE] # desired item and press the joystick.
Recording modes and recordable time available for the motion picture
This unit records in VBR. VBR is an abbreviation for Variable Bit Rate. VBR recording automatically
varies the bit rate (amount of data in a fixed time) depending on the subject being recorded. This
means if a subject with sharp movements is recorded, the recording time is reduced.
Recording mode
XP
(High quality) Approx. 18 min
SP
(Normal) Approx. 37 min
LP
(Long play) Approx. 75 min
≥ Mosaic-pattern noise may appear on a playback
image in the following cases.
– When there is a complicated pattern in the
background
– When the unit is moved too much or too fast
– When a subject with sharp movements has been
recorded
(Particularly if [ REC MODE] was set to [ ]
during recording.)
Recordable time
(on single side)
Image quality prioritized
Recording time prioritized
LP
Recording
41
LSQT1048
Page 42

LSQT1048(ENG).book 42 ページ 2006年2月6日 月曜日 午後2時13分
Recording still pictures (VDR-D150 only)
Recording still pictures (VDR-D150 only)
Record the still picture on an SD card.
1 Remove the lens cap, then turn the unit on.
If the unit is turned on with the lens cap fitted, the automatic white balance adjustment may not
function properly.
2 Rotate the mode dial to select .
3 Press the PHOTO SHOT button.
The unit automatically focuses on the subject at the centre of screen
(when auto focus is selected).
≥ The size of pictures: 640k480 pixels
≥ For information about the number of recordable still
pictures on an SD card (l 118)
≥ The sound cannot be recorded.
≥ If the write protection switch on the SD card is set to
LOCK, it cannot be used for recording.
≥ If set [PICT. QUALITY] # [ ], mosaic-pattern
Recording
noise may appear on a playback image depending
on the picture content.
≥ While the card access lamp is lit, do not perform the
following, as doing so may damage the SD card or
the data on the card.
– Turn the unit off.
– Insert or remove the SD card.
– Operate the mode dial.
≥ Another product may degrade or not play back still
pictures recorded on this unit.
(SD)
42
LSQT1048
∫ To record still pictures clearly
When zooming in on the subject with a magnification of 4k or higher, it is difficult to reduce the
slight shaking from holding this unit by hand. We recommend decreasing the zoom magnification
and approaching the subject when recording.
You can record stable pictures without shaking by using a tripod.
Page 43

R 3
LSQT1048(ENG).book 43 ページ 2006年2月6日 月曜日 午後2時13分
Recording still pictures (VDR-D150 only)
Screen indications in card recording mode
A Remaining number of still pictures
(Flashes in red when [R 0] appears.)
B Size of still pictures
C Quality of still pictures
A
B
C
Progressive function
You can record still pictures with higher picture quality and frames.
(You cannot switch the progressive function off/on.)
≥ The progressive function may be disabled depending on the other
functions used. (l 104)
Picture quality for still picture recording
Press the MENU button, then select [ BASIC] #
[ PICT. QUALITY] # desired item and press the
joystick.
: Still pictures with a high picture quality are recorded.
: Priority is given to the number of still pictures recorded. Still pictures
are recorded in normal picture quality.
R 3
R 3
Recording with a shutter operation effect
You can add a shutter operation simulating sound.
Press the MENU button, then select [ ADVANCED] #
[ SHTR EFFECT] # [ON] and press the joystick.
≥ This function’s default setting is [ON].
Recording
43
LSQT1048
Page 44

LSQT1048(ENG).book 44 ページ 2006年2月6日 月曜日 午後2時13分
Various recording functions
Various recording functions
Zoom in/out function
You can zoom in up to 30k optically.
¬Rotate the mode dial to select or .
Move the zoom lever.
T side: To bring distant people or objects appear closer
for recording (zoom in)
W side: To make sights appear more distant for
recording (zoom out)
≥ When zooming in while holding this unit by hand,
we recommend using the image stabilizer function.
(l 55)
≥ When distant subjects are brought closer, they are
focused at about 1.3 m or more.
Recording
(RAM) (-RW‹VR›) (-RW‹V›) (-R) (SD)
≥ When the zoom magnification is 1k, this unit can
focus on a subject approx. 2 cm away from the lens.
(Macro function)
≥ The zoom speed varies depending on the range
over which the zoom lever is moved.
≥ When the zoom speed is high, the subject may not
be focused easily.
44
LSQT1048
Page 45

LSQT1048(ENG).book 45 ページ 2006年2月6日 月曜日 午後2時13分
Various recording functions
Digital zoom function
If the zoom magnification exceeds 30k, then the digital zoom function will be activated. The
maximum magnification provided by the digital zoom can be switched.
¬Rotate the mode dial to select .
(RAM) (-RW‹VR›) (-RW‹V›) (-R)
Press the MENU button, then select [ ADVANCED] #
[D.ZOOM] # desired item and press the joystick.
[OFF]: Optical zoom only (Up to 30k)
[50k]: Up to 50k
[1000k]: Up to 1000k
≥ The larger the digital zoom magnification, the more
the image quality is degraded.
≥ This function cannot be used in card recording
mode.
To use the zoom microphone function
Interlocked with the zooming operation, the microphone will collect sounds clearly far away with the
tele-shot or those in the vicinity with the wide-angle shot.
¬Rotate the mode dial to select .
(RAM) (-RW‹VR›) (-RW‹V›) (-R)
Press the MENU button, then select [ ADVANCED] #
[ ZOOM MIC] # [ON] and press the joystick.
Recording
45
LSQT1048
Page 46

LSQT1048(ENG).book 46 ページ 2006年2月6日 月曜日 午後2時13分
Various recording functions
Recording yourself
(RAM) (-RW‹VR›) (-RW‹V›) (-R) (SD)
You can record yourself while viewing the LCD monitor. You can record persons in front of the unit
while showing them the image. The image is horizontally flipped as if you see a mirror image.
(However the image recorded is the same as a normal recording.)
¬Rotate the mode dial to select or .
Rotate the LCD monitor towards the lens side.
≥ When the LCD monitor is opened, the viewfinder automatically turns
off. However if the LCD monitor is then rotated towards the lens side,
the viewfinder is activated.
≥ When the LCD monitor is rotated towards the lens side, the icon will
not be displayed even if you press the joystick.
≥ Only some indications will appear on the screen. When [°] appears,
return the direction of the LCD monitor to normal position and check the warning/alarm indication.
(l 102)
Recording
46
LSQT1048
Page 47

LSQT1048(ENG).book 47 ページ 2006年2月6日 月曜日 午後2時13分
Various recording functions
Soft skin mode
This makes skin colours appear softer for a more attractive appearance.
This is more effective if you record the bust image of a person.
¬Rotate the mode dial to select or .
1 Press the joystick to display the icon shown in the
illustration.
2 Move the joystick down to select [ ].
To cancel the soft skin mode
Select [ ] again.
(RAM) (-RW‹VR›) (-RW‹V›) (-R) (SD)
≥ If the background or anything else in the scene has
colours similar to the skin colour, they will also be
smoothed.
≥ If the brightness is insufficient, the effect may not be
clear.
Recording
47
LSQT1048
Page 48

LSQT1048(ENG).book 48 ページ 2006年2月6日 月曜日 午後2時13分
Various recording functions
Fade in/fade out function
Fade in: The image and audio gradually appear.
Fade out: The image and audio gradually disappear.
¬Rotate the mode dial to select .
To fade in
1 While recording is paused, press the joystick to
display the icon shown in the illustration.
2 Move the joystick left to select [ ].
3 Press the recording start/stop button.
Start recording. (Fade in)
When you start recording, the image/audio
disappears completely and the image/audio
gradually appears.
(RAM) (-RW‹VR›) (-RW‹V›) (-R)
Recording
48
LSQT1048
To fade out
1 During recording, press the joystick to display the
icon shown in the illustration.
Page 49

LSQT1048(ENG).book 49 ページ 2006年2月6日 月曜日 午後2時13分
Various recording functions
2 Move the joystick left to select [ ].
3 Press the recording start/stop button.
Pause recording. (Fade out)
The image/audio gradually disappears. After the
image/audio completely disappears, recording stops.
To cancel fading
Select [ ] again.
To select the colour for fade in/out
The colour which appears in fading pictures can be selected.
Press the MENU button, then select [ ADVANCED] # [ FADE COLOUR] # [WHITE] or
[BLACK] and press the joystick.
≥ By operating the OFF/ON switch, the fade in/fade
out function is cancelled.
≥ While the fade in/fade out function is selected, it
takes several seconds to display the image when
you start recording. It also takes several seconds to
pause recording.
≥ The thumbnails of scenes recorded using fade in
become black (or white).
Recording
49
LSQT1048
Page 50

LSQT1048(ENG).book 50 ページ 2006年2月6日 月曜日 午後2時13分
Various recording functions
Backlight compensation function
This is for protecting a backlit subject from being darkened.
Use this function when the light is emanating from behind the subject and the subject appears dark.
¬Rotate the mode dial to select or .
1 Press the joystick to display the icon shown in the
illustration.
2 Move the joystick right to select [ª].
The image on the screen will become brighter.
To return to normal recording
Select [ª] again.
≥ By operating the OFF/ON switch or mode dial, the
backlight compensation function is cancelled.
(RAM) (-RW‹VR›) (-RW‹V›) (-R) (SD)
Recording
50
LSQT1048
Page 51

LSQT1048(ENG).book 51 ページ 2006年2月6日 月曜日 午後2時13分
Various recording functions
Self-timer recording (VDR-D150 only)
This is for recording shots of yourself as well.
You can record still pictures on an SD card using the timer.
¬Rotate the mode dial to select .
1 Press the joystick to display the icon shown in the
illustration.
2 Move the joystick left to select [Ø].
Each leftward press changes the modes:
] # [Ø2] # setting cancelled
[Ø
10
Ø10: Records after 10 seconds
: Records after 2 seconds
Ø
2
3 Press the PHOTO SHOT button.
After the [Ø10] or [Ø2] display flashes for the time which has been set, a still picture will be
recorded.
≥ After recording, the self-timer is cancelled.
(SD)
To stop the timer midway through
Press the MENU button. (The self-timer setting is cancelled.)
≥ By operating the OFF/ON switch, the self-timer
standby mode is cancelled.
≥ Depending on the time taken to bring the subject
into focus, the recording may take longer than set to
start.
≥ Setting the self-timer to [Ø2] is a good way to
prevent image shake when the PHOTO SHOT
button is pressed while using a tripod etc.
Recording
51
LSQT1048
Page 52

LSQT1048(ENG).book 52 ページ 2006年2月6日 月曜日 午後2時13分
Various recording functions
Wind noise reduction function
This is for reducing the wind noise coming into the microphone when
recording.
(RAM) (-RW‹VR›) (-RW‹V›) (-R)
¬Rotate the mode dial to select .
Press the MENU button, then select [ BASIC] #
[ WIND CUT] # [ON] and press the joystick.
To cancel the wind noise reduction function
Press the MENU button, then select [ BASIC] # [ WIND CUT] # [OFF] and press the
joystick.
≥ This function’s default setting is [ON]. ≥ Depending on the wind strength, the wind noise is
reduced. (If this function is activated in strong
winds, the stereo effect may be reduced. When the
wind weakens, the stereo effect will be restored.)
Recording
52
LSQT1048
Page 53

LSQT1048(ENG).book 53 ページ 2006年2月6日 月曜日 午後2時13分
Various recording functions
Cinema mode
This allows you to record images compatible with wide-screen TVs.
Images are recorded with a black belt appearing along the top and bottom of the screen so that
they look like theatre movies.
¬Rotate the mode dial to select .
Press the MENU button, then select [ BASIC] #
[CINEMA] # [ON] and press the joystick.
To cancel the cinema mode
Press the MENU button, then select [ BASIC] # [ CINEMA] # [OFF] and press the joystick.
(RAM) (-RW‹VR›) (-RW‹V›) (-R)
≥ Images played back vary depending on the TV
connected. Please refer to the operating
instructions for your TV.
≥ When images are played back on a TV screen, the
date display may be erased in some cases.
≥ Depending on the TV, the picture quality may
deteriorate.
≥ When a cinema picture is imported onto a personal
computer, the imported picture may not be
displayed correctly, depending on the software
used.
Recording
53
LSQT1048
Page 54

LSQT1048(ENG).book 54 ページ 2006年2月6日 月曜日 午後2時13分
Various recording functions
Night view function
This allows recording in dark locations.
This function allows you to record colour subjects in dark locations to stand out against the
background.
Attach this unit to a tripod, and you can record images free from vibration.
≥ Recorded scene is seen as if frames were missed.
¬Rotate the mode dial to select .
Press the MENU button, then select [ ADVANCED] #
[NIGHTVIEW] # [ON] and press the joystick.
After exiting the menu screen, the unit is in manual focus mode. Move the
joystick left or right to bring the subject into focus manually. (l 58)
≥ If the manual focus indication is not displayed, press the joystick twice
and then focus the subject.
To cancel the Night view function
Press the MENU button, then select [ ADVANCED] # [ NIGHT VIEW] # [OFF] and press
the joystick.
(RAM) (-RW‹VR›) (-RW‹V›) (-R)
≥ The Night view function makes the signal charging
time of CCD up to approximately 25k longer than
usual, so that dark scenes invisible to the naked eye
can be recorded brightly. For this reason, bright dots
that are usually invisible may be seen, but this is not
a malfunction.
Recording
≥ By operating the OFF/ON switch or mode dial, the
Night view function is cancelled.
≥ If set in a bright place, the screen may become
whitish for a while.
54
LSQT1048
Page 55

LSQT1048(ENG).book 55 ページ 2006年2月6日 月曜日 午後2時13分
Various recording functions
Image stabilizer function
This is for reducing image shakes during recording.
Reduces the image shaking due to hand movement when recording.
¬Rotate the mode dial to select .
Press the MENU button, then select [ ADVANCED] #
[SIS] # [ON] and press the joystick.
To cancel the image stabilizer function
Press the MENU button, then select [ ADVANCED] # [ SIS] # [OFF] and press the joystick.
(RAM) (-RW‹VR›) (-RW‹V›) (-R)
≥ When a tripod is used, we recommend that you turn
the image stabilizer off.
≥ In the following cases, the image stabilizer function
may not work effectively.
– When the digital zoom is used
– When the unit is shaken greatly
– When you record a moving subject while tracking
it
Recording
55
LSQT1048
Page 56

LSQT1048(ENG).book 56 ページ 2006年2月6日 月曜日 午後2時13分
Manual recording functions
Manual recording functions
When the AUTO/MANUAL/FOCUS switch is set to AUTO, the unit adjusts automatically the
following settings.
≥ White balance
≥ Shutter speed
≥ Iris/gain value
≥ Focus
Above settings may not be adjusted automatically depending on light sources or
scenes. If so, adjust the settings manually.
Scene mode
This is for recording in various situations.
When you record images in different situations, this mode automatically sets optimum shutter
speeds and apertures.
Rotate the mode dial to select or .
¬
1 Set the AUTO/MANUAL/FOCUS
switch to MANUAL.
(RAM) (-RW‹VR›) (-RW‹V›) (-R) (SD)
Recording
56
LSQT1048
2 Press the MENU button, then select [ BASIC] #
[ SCENE MODE] # desired item and press the
joystick.
Display Mode Recording conditions
5 Sports To record sports scenes or scenes where there are quick motions
Portrait To make people stand out against the background
Low light To make the scene brighter in dark conditions
Spotlight To make the subject under a spotlight look more attractive
Surf & snow To record images in bright places such as ski slopes and beaches
Page 57

LSQT1048(ENG).book 57 ページ 2006年2月6日 月曜日 午後2時13分
Manual recording functions
To cancel the scene mode function
Press the MENU button, then select [ BASIC] # [ SCENE MODE] # [OFF] and press the
joystick.
≥ You can also cancel the scene mode function by setting the AUTO/MANUAL/FOCUS switch to
AUTO.
Sports mode
≥ For slow-motion playback or playback pause
of recorded pictures, this mode helps
diminish camera shake.
≥ During normal playback, the image
movement may not look smooth.
≥ Avoid recording under fluorescent light,
mercury light or sodium light because the
colour and brightness of the playback image
may change.
≥ If you record a subject illuminated with strong
light or a highly reflective subject, vertical
lines of light may appear.
≥ If the brightness is insufficient, the sports
mode does not function. The [5] display
flashes.
≥ If this mode is used indoors, the screen may
flicker.
Portrait mode
≥ If this mode is used indoors, the screen may
flicker. If so, change the scene mode setting
to [OFF].
Low light mode
≥ Extremely dark scenes may not be able to be
recorded finely.
Spotlight mode
≥ If the recording subject is extremely bright,
the recorded image may become whitish and
the periphery of the recorded image
extremely dark.
Surf & snow mode
≥ If the subject is extremely bright, the
recorded image may become whitish.
Recording
57
LSQT1048
Page 58

LSQT1048(ENG).book 58 ページ 2006年2月6日 月曜日 午後2時13分
Manual recording functions
Manual focus adjustment
(RAM) (-RW‹VR›) (-RW‹V›) (-R) (SD)
If auto focusing is difficult due to the conditions, then manual focusing is available.
¬Rotate the mode dial to select or .
1 Set the AUTO/MANUAL/FOCUS
switch to MANUAL.
2 Move the switch down and set it to
FOCUS position.
The manual focus indication [1MF] is displayed.
3 Move the joystick left or right to bring the subject
into focus.
≥ When focused with a wide angle, the subject may not be in focus when
zoomed in. First, zoom in on the subject, and then focus on it.
To restore to the automatic adjustment
Press the AUTO/MANUAL/FOCUS switch down again to the FOCUS position.
≥ You can also restore the auto focusing by setting the AUTO/MANUAL/FOCUS switch to AUTO.
Recording
MNL
MNL
58
LSQT1048
Page 59

LSQT1048(ENG).book 59 ページ 2006年2月6日 月曜日 午後2時13分
Manual recording functions
White balance
This is for recording in natural colours.
The automatic white balance function may not reproduce natural colours depending on the scenes
or lighting conditions. If so, you can adjust the white balance manually.
(RAM) (-RW‹VR›) (-RW‹V›) (-R) (SD)
¬Rotate the mode dial to select or .
1 Set the AUTO/MANUAL/FOCUS switch to MANUAL.
The icon shown in the illustration is displayed automatically.
2 Move the joystick down to select the white balance
display (such as ).
AWB
3 Move the joystick left or right to select the white
balance mode.
Display Mode Recording conditions
AWB
Auto white balance adjustment —
Indoor mode (for recording
under incandescent lamps)
Outdoor mode Outdoors under a clear sky
Incandescent lights, halogen lamps
MNL
MNL
MNL
Recording
≥ Mercury-vapor lamps, sodium lamps, some
Manual adjustment mode
fluorescent lights
≥ Lights used for wedding receptions at
hotels, stage spotlights in theatres
≥ Sunrise, sunset, etc.
To restore to the automatic adjustment
Set the white balance mode to [ ].
≥ You can also restore the automatic adjustment by setting the AUTO/MANUAL/FOCUS switch to
AUTO.
AWB
59
LSQT1048
Page 60

LSQT1048(ENG).book 60 ページ 2006年2月6日 月曜日 午後2時13分
Manual recording functions
To set the white balance manually
Select [ ] mode, fill the screen with a white subject
and then move the joystick up to select [ ].
When the [ ] display changes from flashing to on, setting is complete.
≥ When the [ ] display continues flashing green, the white balance
cannot be set because the place is dark etc. In this case, use the
automatic white balance.
∫ About the white balance sensor A
The white balance sensor detects the type of light source during
recording.
Do not cover the white balance sensor during recording, or it may
not function properly.
≥ When the [ ] display flashes white, the manual
white balance previously adjusted is stored.
Whenever recording conditions change, re-set the
white balance for correct adjustment.
≥ When the unit is turned on with the lens cap fitted,
the automatic white balance adjustment may not
function properly. Please turn the unit on after
removing the lens cap.
≥ When setting both the white balance and the iris/
gain, set the white balance first.
MNL
A
Recording
60
LSQT1048
Page 61

60
OPEN
OdB
60
OPEN
OdB
LSQT1048(ENG).book 61 ページ 2006年2月6日 月曜日 午後2時13分
Manual shutter speed/aperture adjustment
(RAM) (-RW‹VR›) (-RW‹V›) (-R) (SD)
Shutter Speed: Adjust it when recording fast-moving subjects.
Aperture: Adjust it when the screen is too bright or too dark.
Manual recording functions
¬Rotate the mode dial to select or .
1 Set the AUTO/MANUAL/FOCUS switch to MANUAL.
The icon shown in the illustration is displayed automatically.
2 Move the joystick down several times and select
the shutter speed indication (such as 1/100) or iris/
gain indication (such as F2.4, 0dB).
3 Move the joystick left or right to make the
adjustment.
A Shutter speed:
1/50 to 1/8000
1/50 to 1/500
≥ The shutter speed closer to 1/8000 (1/500) is faster.
B Iris/Gain value:
CLOSE # (F16 to F2.0) # OPEN # 0dB # 18dB
≥ Value closer to [CLOSE] darken the image.
≥ Value closer to [18dB] brighten the image.
≥ Values with [dB] are gain values.
To restore to automatic adjustment
Set the AUTO/MANUAL/FOCUS switch to AUTO.
≥ When setting both the shutter speed and the iris/
gain value, set the shutter speed and then set the
iris/gain value.
≥ When recording in an extremely bright place, the
screen may change colour or flicker. If so adjust the
shutter speed manually to [1/50] or [1/100].
A
B
1/60
1/100
OPEN
OPEN
OdB
1/60
1/100
OPEN
OPEN
OdB
MNL
MNL
MNL
Recording
∫ Manual shutter speed adjustment
≥ Avoid recording under fluorescent light, mercury
light or sodium light because the colour and
brightness of the playback image may change.
≥ If you increase the shutter speed manually, the
sensitivity lowers and accordingly the gain value
increases automatically, which may increase the
noises on the screen.
≥ You may see vertical lines of light in the playback
image of a brightly shining subject or highly
reflective subject, but this is not a malfunction.
≥ During normal playback, image movement may not
look smooth.
∫ Manual iris/gain adjustment
≥ If the gain value is increased, the noise on the
screen increases.
≥ Depending on the zoom magnification, there are iris
values that are not displayed.
61
LSQT1048
Page 62

B
LSQT1048(ENG).book 62 ページ 2006年2月6日 月曜日 午後2時13分
Playback
Motion picture playback
Motion picture playback
1 Rotate the mode dial to select .
The motion pictures recorded on the disc are displayed
as thumbnails.
(RAM) (-RW‹VR›) (-RW‹V›) (-R)
2 Select the scene to be played back.
A Scene number
B Scroll bar display
The selected scene will be encircled by a red frame.
≥ When 9 or more scenes have been recorded, the next (or previous) page
is displayed by moving the joystick.
≥ If you move and hold the joystick up or down, you can advance 8 scenes
at a time. The screen will not change at this time, but the scene numbers
and scroll bar display will change so release the joystick when you have
arrived at the page with the scene you want to display.
3 Press the joystick.
The selected scene is played back on the full screen.
The operation icon is automatically displayed on the screen.
4 Move the joystick to operate.
1/;: Playback/Pause
: (Move): Skip playback (backward)
Playback
: (Move and hold): Review playback
9 (Move): Skip playback (forward)
9 (Move and hold): Cue playback
∫: Stops the playback and shows the thumbnails.
≥ No sound will be heard except during normal
playback.
≥ If pause play is continued for 5 minutes, the screen
returns to the thumbnails.
≥ When the amount of time recorded on the scene is
short, playback may not be possible.
≥ The thumbnails of motion pictures that cannot be
played back are displayed in shades of blue and
white.
A
62
LSQT1048
Page 63

LSQT1048(ENG).book 63 ページ 2006年2月6日 月曜日 午後2時13分
Motion picture playback
To display the recording date during playback
Press the MENU button, then select [ SETUP] # [DATE] # [ON] and press the
joystick.
≥ During playback, the recording time is not displayed
on the screen.
Slow-motion playback
1 Move the joystick up during playback to pause the
playback.
2 Move and hold the joystick right.
(Slow-motion pictures will be played back in reverse
when you move and hold the joystick left.)
≥ Normal playback is restored when you move the joystick up.
Frame-by-frame playback
The motion picture is advanced one frame at a time.
1 Move the joystick up during playback to pause the
playback.
2 Move the joystick right.
(The frames will be advanced one at a time in the
reverse direction when you move the joystick left.)
≥ Normal playback is restored when you move the joystick up.
To adjust the volume
Adjust the speaker volume during playback.
Move the volume lever to change the volume
level.
Tow ards “ r”: increases the volume
Tow ards “ s”: decreases the volume
≥ The further the [ ] indicator moves to the right (towards the “i” end), the higher the volume level
becomes.
≥ When the adjustment is completed, the volume setting display will disappear.
Playback
63
LSQT1048
Page 64

LSQT1048(ENG).book 64 ページ 2006年2月6日 月曜日 午後2時13分
Motion picture playback
Playing back motion pictures by date
Recorded scenes are grouped by date on this unit.
Scenes recorded on the same day can be played back in succession.
1 Press the MENU button, then select
[PLAYSETUP] # [PLAYMODE] # [BY DATE]
and press the joystick.
≥ When [PLAY MODE] is set to [VIEW ALL], all recorded motion
pictures will be played back in succession. ([ ALL] is displayed.)
2 Select the date for playback, then press the joystick.
The scenes recorded on the same day are displayed as thumbnails.
3 Select the scene to be played back.
≥ Even if scenes are recorded on the same day, they are grouped separately in the following cases.
– When the number of scenes exceeds 99 (RAM) (-RW‹VR›) (-RW‹V›) (-R)
– When the disc is removed (-RW‹V›) (-R)
– When the disc is repaired (-RW‹V›) (-R)
– When the mode dial is switched (-R)
– When the power is turned off (-R)
Playback
64
LSQT1048
Resuming the previous playback
Press the MENU button, then select [ PLAY SETUP]
# [ RESUME PLAY] # [ON] and press the joystick.
If playback of a motion picture is stopped, [R] appears on the thumbnail
view of the stopped scene.
≥ If playback is stopped at any point during a motion picture while
[RESUME PLAY] is set to [OFF], the next time the motion picture is
played back, it will be from the beginning.
≥ The resume position memorized is cleared if the
unit is turned off, but the menu setting is not
cleared.
Page 65

LSQT1048(ENG).book 65 ページ 2006年2月6日 月曜日 午後2時13分
Still picture playback (VDR-D150 only)
Still picture playback (VDR-D150 only)
1 Rotate the mode dial to select .
The still pictures recorded on the SD card are displayed
as thumbnails.
(SD)
2 Select the file to be played back.
A File number
B Scroll bar display
The selected file will be encircled by a red frame.
≥ When 9 or more files have been recorded, the next (or previous) page is
displayed by moving the joystick.
≥ If you move and hold the joystick up or down, you can advance 8 files at
a time. The screen will not change at this time, but the file numbers and
scroll bar display will change so release the joystick when you have
arrived at the page with the file you want to display.
A
3 Press the joystick.
The selected file is played back on the full screen.
The operation icon is automatically displayed on the screen.
4 Move the joystick to operate.
1/;: Slide show (playback of the still pictures on the SD card in numerical order) start/pause.
E: Plays back the previous picture.
D: Plays back the next picture.
∫: Stops the playback and shows the thumbnails.
B
Playback
65
LSQT1048
Page 66

LSQT1048(ENG).book 66 ページ 2006年2月6日 月曜日 午後2時13分
Still picture playback (VDR-D150 only)
Playing back still pictures as a slide show
Press the MENU button, then select [ PLAY SETUP]
# [PLAYMODE] # [SLIDE SHOW] and press the
joystick.
∫ About still picture compatibility
≥ This unit is compliant with the unified standard DCF (Design rule for Camera File system)
established by JEITA (Japan Electronics and Information Technology Industries Association).
≥ The file format supported by this unit is JPEG. (Not all JPEG formatted files will be played back.)
≥ If an out-of-specs file is played back, the folder/file number may not be displayed.
≥ This unit may degrade or not play back data recorded or created on another product and another
product may degrade or not play back data recorded on this unit.
≥ Do not operate the mode dial during the slide show.
≥ When the access lamp is lit, do not insert or remove
an SD card.
≥ It takes time to display the file depending on the
number of pixels of the file.
≥ If you attempt to play back file recorded in a
different format or file data is defective, the whole
display becomes grayish and an error message
may appear.
Playback
≥ When playing back a file recorded on other
products, the date and time display is different from
when it was recorded.
≥ When playing back a file recorded on other
products, its size and that of this unit may appear
differently. (l 101)
66
LSQT1048
Page 67

LSQT1048(ENG).book 67 ページ 2006年2月6日 月曜日 午後2時13分
Editing
Editing scenes
Editing scenes
Deleting scenes
This is for deleting scenes recorded on discs.
(RAM) (-RW‹VR›)
The deleted scenes cannot be restored.
≥ Scenes on DVD-RW (Video format) and DVD-R cannot be deleted.
Deleting scenes one at a time
¬Rotate the mode dial to select .
1 Press the button during playback.
2 When the confirmation message appears, select [YES], then press the
joystick.
Editing
67
LSQT1048
Page 68

LSQT1048(ENG).book 68 ページ 2006年2月6日 月曜日 午後2時13分
Editing scenes
Deleting multiple scenes from the thumbnail display
¬Rotate the mode dial to select .
1 Press the MENU button, then select [ DELETE] #
[ SELECT] or [ ALL] and press the joystick.
≥ When [ALL] is selected, the following scenes will be deleted. Proceed to
step 4.
– When [PLAY MODE] is set to [VIEW ALL]: All the scenes on the disc
– When [PLAY MODE] is set to [BY DATE]: All the scenes selected by date
2 (Only when [SELECT] is selected in step 1)
Select the scene to be deleted, then press the
joystick.
The selected scene is encircled by a yellow frame.
≥ When the joystick is pressed again, the selected scene will be cancelled.
≥ Up to 8 scenes displayed on a page can be set in succession.
3 (Only when [SELECT] is selected in step 1)
Press the button.
4 When the confirmation message appears, select [YES], then press the
joystick.
Editing
68
LSQT1048
(Only when [SELECT] is selected in step 1)
To continue deleting other scenes
Repeat steps 2-4.
To complete editing
Press the MENU button.
≥ To delete an unwanted part of a scene, divide the
scene first, and then delete the unnecessary part.
(l 69)
≥ In case of [ALL], the deletion may take time if there
are many scenes on the disc.
≥ Do not turn off this unit while deleting.
≥ When you delete scenes, use a battery with
sufficient battery power or use the AC adaptor.
≥ It may not be possible to delete scenes that have
been divided. Combine the divided scenes, and
then delete them.
Page 69

LSQT1048(ENG).book 69 ページ 2006年2月6日 月曜日 午後2時13分
Editing scenes
Dividing a scene
This is for dividing a scene into two.
To delete unnecessary portion of scene, first divide the scene, and then delete the unnecessary
portion.
¬Rotate the mode dial to select .
1 Press the MENU button, then select
[ EDIT SCENE] # [ DIVIDE] and press the
joystick.
2 Select the scene to be divided, then press the
joystick.
The selected scene is played back.
3 When you reach the area where you want to divide
the scene, move the joystick down to set the
dividing point.
≥ Using slow-motion playback or frame-by-frame playback makes it easy
to search for the point where you want to divide the scene. (l 63)
(RAM) (-RW‹VR›)
4 When the confirmation message appears, select [YES], then press the
joystick.
To continue dividing other scenes
Repeat steps 2-4.
To complete editing
Press the MENU button.
Editing
69
LSQT1048
Page 70

LSQT1048(ENG).book 70 ページ 2006年2月6日 月曜日 午後2時13分
Editing scenes
Combining scenes
This function is only for combining two consecutive scenes into one.
(RAM) (-RW‹VR›)
¬Rotate the mode dial to select .
1 Press the MENU button, then select
[ EDIT SCENE] # [ COMBINE] and press the
joystick.
2 Select the scene to be combined, then press the
joystick.
≥ The selected scene and the next scene are combined.
≥ If you wish to combine scenes that are not next to each other or scenes
with different recording dates, first create a playlist and then combine the
scenes on the playlist. (l 72, 77)
3 When the confirmation message appears, select [YES], then press the
joystick.
Editing
70
LSQT1048
To continue combining other scenes
Repeat steps 2-3.
To complete editing
Press the MENU button.
Page 71

LSQT1048(ENG).book 71 ページ 2006年2月6日 月曜日 午後2時13分
Using playlists
Using playlists
What is a playlist?
You can create a playlist by gathering your favourites from the recorded scenes.
Since the playlist is not created by copying data, you will consume little of the disc capacity by
making a playlist.
≥ If you create or delete playlists, the original scenes will not be modified. Editing scenes on a
playlist will not affect the original scenes.
Recorded scenes
Playlist
≥ The maximum number of items on a disc (per side)
– Playlists: 99
– Playlist scenes: 999
≥ If original scenes are deleted, the portion of playlists
created with these scenes is also deleted.
Editing
71
LSQT1048
Page 72

LSQT1048(ENG).book 72 ページ 2006年2月6日 月曜日 午後2時13分
Using playlists
Creating a new playlist
¬Rotate the mode dial to select .
1 Press the MENU button, then select
[PLAYSETUP] # [PLAYMODE] # [PLAYLIST]
and press the joystick.
2 Select [CREATE], then press the joystick.
3 Select the scene to be added to the playlist, then
press the joystick.
The selected scene is encircled by a yellow frame.
≥ When the joystick is pressed again, the selected scene will be cancelled.
≥ Up to 8 scenes can be set in succession.
≥ The scenes are registered in the playlist in the order that they were
selected. After creating a playlist, the order of the scenes in it can be
changed by [MOVE] function. (l 75)
(RAM) (-RW‹VR›)
Editing
72
LSQT1048
4 Press the MENU button.
5 When the confirmation message appears, select [YES], then press the
joystick.
The thumbnail view screen of the created playlist is displayed.
To add another scene to the same playlist
Select [ADD]. (l 74)
To playback a playlist
Select the scene to start playback, then press the joystick.
Page 73

LSQT1048(ENG).book 73 ページ 2006年2月6日 月曜日 午後2時13分
Playing back a playlist
¬Rotate the mode dial to select .
1 Press the MENU button, then select
[PLAYSETUP] # [PLAYMODE] # [PLAYLIST]
and press the joystick.
2 Select the playlist to be played back, then press the
joystick.
Scenes in the selected playlist are displayed as thumbnails.
3 Select the scene to start playback, then press the
joystick.
Using playlists
(RAM) (-RW‹VR›)
To select a different playlist
When the first scene is selected in the playlist thumbnail view screen, move the joystick left. The
screen returns to the PLAYLIST VIEW (step 2).
To return to showing the original scenes
Press the MENU button, then select [ PLAY SETUP] # [PLAYMODE] # [VIEW ALL] or
[BY DATE] and press the joystick.
Editing
73
LSQT1048
Page 74

LSQT1048(ENG).book 74 ページ 2006年2月6日 月曜日 午後2時13分
Using playlists
Editing a playlist
Editing scenes on a playlist will not affect the original scenes.
Adding scenes to playlist
¬Select playlist playback mode. (l 73, steps 1 and 2)
1 Press the MENU button, then select [ EDIT] and
press the joystick.
2 Select the playlist to be edited, then press the
joystick.
3 Select [ ADD], then press the joystick.
(RAM) (-RW‹VR›)
Editing
74
LSQT1048
4 Select the scene to be added, then press the
joystick.
The selected scene is encircled by a yellow frame.
≥ When the joystick is pressed again, the selected scene will be cancelled.
≥ Up to 8 scenes can be set in succession.
≥ The scenes are added to the playlist in the order that they were selected.
The order of the scenes in the playlist can be changed by [MOVE]
function. (l 75)
5 Press the MENU button.
6 When the confirmation message appears, select [YES], then press the
joystick.
The thumbnail view screen of the playlist that scenes were added to is displayed.
To continue adding scenes to the playlist
Repeat steps 1-6.
Page 75

LSQT1048(ENG).book 75 ページ 2006年2月6日 月曜日 午後2時13分
Moving scenes
The scenes in a playlist can be moved.
¬Select playlist playback mode. (l 73, steps 1 and 2)
1 Press the MENU button, then select [ EDIT] and
press the joystick.
2 Select the playlist to be edited, then press the
joystick.
3 Select [ MOVE], then press the joystick.
Using playlists
4 Select the scene to be moved, then press the
joystick.
The selected scene is encircled by a yellow frame, and the position to
insert is shown by a red bar.
5 Select the position to insert the scene, then press
the joystick.
To continue moving other scenes in the playlist
Repeat steps 4-5.
To complete editing
Press the MENU button.
Editing
75
LSQT1048
Page 76

LSQT1048(ENG).book 76 ページ 2006年2月6日 月曜日 午後2時13分
Using playlists
Dividing a scene
You can divide a scene into two parts.
≥ Dividing scenes on a playlist will not affect the original scenes.
¬Select playlist playback mode. (l 73, steps 1 and 2)
1 Press the MENU button, then select [ EDIT] and
press the joystick.
2 Select the playlist to be edited, then press the
joystick.
3 Select [ DIVIDE], then press the joystick.
Editing
76
LSQT1048
4 Select the scene to be divided, then press the
joystick.
The selected scene is played back.
5 When you reach the area where you want to divide
the scene, move the joystick down to set the
dividing point.
≥ Using slow-motion playback or frame-by-frame playback makes it easy
to search for the point where you want to divide the scene. (l 63)
6 When the confirmation message appears, select [YES], then press the
joystick.
To continue dividing other scenes
Repeat steps 4-6.
To complete editing
Press the MENU button.
Page 77

LSQT1048(ENG).book 77 ページ 2006年2月6日 月曜日 午後2時13分
Combining scenes
Two scenes can be combined into one.
≥ Combining scenes on a playlist will not affect the original scenes.
¬Select playlist playback mode. (l 73, steps 1 and 2)
1 Press the MENU button, then select [ EDIT] and
press the joystick.
2 Select the playlist to be edited, then press the
joystick.
3 Select [ COMBINE], then press the joystick.
Using playlists
4 Select the scene to be combined, then press the
joystick.
≥ The selected scene and the next scene are combined.
5 When the confirmation message appears, select [YES], then press the
joystick.
To continue combining other scenes
Repeat steps 4-5.
To complete editing
Press the MENU button.
Editing
77
LSQT1048
Page 78

LSQT1048(ENG).book 78 ページ 2006年2月6日 月曜日 午後2時13分
Using playlists
Deleting scenes
≥ Deleting scenes on a playlist will not affect the original scenes.
Deleting scenes one at a time:
¬Select playlist playback mode. (l 73, steps 1 and 2)
1 Press the button during playback.
2 When the confirmation message appears, select [YES], then press the
joystick.
Deleting multiple scenes from the thumbnail display:
¬Select playlist playback mode. (l 73, steps 1 and 2)
1 Press the MENU button, then select [ EDIT] and
press the joystick.
Editing
78
LSQT1048
2 Select the playlist to be edited, then press the
joystick.
Page 79

LSQT1048(ENG).book 79 ページ 2006年2月6日 月曜日 午後2時13分
Using playlists
3 Select [ DELETE] # [ SELECT] or [ ALL] and
press the joystick.
≥ When [ALL] is selected, the selected playlist will be erased. Proceed to
step 6.
4 (Only when [SELECT] is selected in step 3)
Select the scene to be deleted, then press the
joystick.
The selected scene is encircled by a yellow frame.
≥ When the joystick is pressed again, the selected scene will be cancelled.
≥ Up to 8 scenes displayed on a page can be set in succession.
5 (Only when [SELECT] is selected in step 3)
Press the button.
6 When the confirmation message appears, select [YES], then press the
joystick.
(Only when [SELECT] is selected in step 3)
To continue deleting other scenes
Repeat steps 4-6.
To complete editing
Press the MENU button.
≥ Deleting scenes on a playlist will not increase the
remaining capacity for recording.
≥ The playlist itself is deleted if you delete all the
scenes in it.
≥ When a playlist is deleted, the number of each
subsequent playlist decreases by one.
≥ It may not be possible to delete scenes that have
been divided. Combine the divided scenes, and
then delete them.
Editing
79
LSQT1048
Page 80

LSQT1048(ENG).book 80 ページ 2006年2月6日 月曜日 午後2時13分
Editing still pictures (VDR-D150 only)
Editing still pictures (VDR-D150 only)
Deleting still pictures
This is for deleting still picture files recorded on SD cards.
The deleted files cannot be restored.
Deleting files one at a time
¬Rotate the mode dial to select .
1 Press the button during playback.
2 When the confirmation message appears, select [YES], then press the
joystick.
(SD)
Editing
80
LSQT1048
Page 81

LSQT1048(ENG).book 81 ページ 2006年2月6日 月曜日 午後2時13分
Editing still pictures (VDR-D150 only)
Deleting multiple files from the thumbnail display
¬Rotate the mode dial to select .
1 Press the MENU button, then select [ DELETE] #
[ SELECT] or [ ALL] and press the joystick.
≥ When [ALL] is selected, all files on the SD card except the locked files
will be erased. Proceed to step 4.
2 (Only when [SELECT] is selected in step 1)
Select the file to be deleted, then press the joystick.
The selected file is encircled by a yellow frame.
≥ When the joystick is pressed again, the selected file will be cancelled.
≥ Up to 8 files displayed on a page can be set in succession.
3 (Only when [SELECT] is selected in step 1)
Press the button.
4 When the confirmation message appears, select [YES], then press the
joystick.
(Only when [SELECT] is selected in step 1)
To continue deleting other files
Repeat steps 2-4.
To complete editing
Press the MENU button.
∫ Deleting still picture files recorded on an SD card by other products
A still picture file (other than JPEG) that cannot be played back on this unit may be erased.
≥ In case of [ALL], the deletion may take time if there
are many files on the SD card.
≥ Do not turn off this unit while deleting.
≥ When you delete files, use a battery with sufficient
battery power or use the AC adaptor.
≥ Do not remove the SD card while deleting.
≥ If files conforming to DCF standard are deleted, all
the data related to the files will be deleted.
Editing
81
LSQT1048
Page 82

LSQT1048(ENG).book 82 ページ 2006年2月6日 月曜日 午後2時13分
Editing still pictures (VDR-D150 only)
Locking still pictures
This is for preventing still picture files from being deleted by mistake.
Still picture files recorded on an SD card can be locked so that they may not be deleted by mistake.
(However even if you lock some files on an SD card, formatting the card will delete all the files.)
¬Rotate the mode dial to select .
1 Press the MENU button, then select
[PLAYSETUP] # [LOCK] # [YES] and press
the joystick.
2 Select the file to be protected, then press the
joystick.
[ ] display appears and the selected file is locked.
≥ Press the joystick again to release the lock setting.
≥ To lock other files, repeat step 2.
To complete the settings
Press the MENU button.
(SD)
Editing
82
LSQT1048
Page 83

LSQT1048(ENG).book 83 ページ 2006年2月6日 月曜日 午後2時13分
Editing still pictures (VDR-D150 only)
DPOF setting
This is for writing the printing data on an SD card.
You can write the data of still pictures to be printed and number of copies (DPOF data) onto the SD
card.
¬Rotate the mode dial to select .
1 Press the MENU button, then select
[PLAYSETUP] # [ DPOF SET] # [SET] and
press the joystick.
2 Select the file to be set, then press the joystick.
The number of prints set to be in DPOF is displayed.
3 Move the joystick up or down to select the number of prints, then
press the joystick.
≥ You can select from 0 to 999. (The selected number of pictures can be printed with the printer
supporting DPOF.)
≥ To cancel the setting, set the number of prints to [0].
≥ To set other files, repeat steps 2–3.
(SD)
To complete the settings
Press the MENU button.
To cancel all DPOF settings
Press the MENU button, then select [ PLAY SETUP] # [ DPOF SET] # [CANCEL ALL] and
press the joystick.
≥ When the confirmation message appears, select [YES], then press the joystick.
∫ What is DPOF?
DPOF stands for Digital Print Order Format. This enables picture printing information to be written
onto an SD card so that it can be used on a system supporting DPOF.
≥ The DPOF setting can be established for up to 999
files.
≥ DPOF setting made on other devices may not be
recognized by this unit. Please perform the DPOF
settings on this unit.
≥ You cannot add the recording date to pictures to be
printed with the DPOF settings.
Editing
83
LSQT1048
Page 84

LSQT1048(ENG).book 84 ページ 2006年2月6日 月曜日 午後2時13分
Disc and card management
Formatting discs and cards
Formatting discs and cards
Formatting discs
This is for initializing discs.
(RAM) (-RW‹VR›) (-RW‹V›)
Please be aware that if a disc is formatted, then all the data recorded on the disc will be erased.
¬Rotate the mode dial to select .
1 Press the MENU button, then select [ SETUP] #
[FORMATDISC] # [YES] and press the joystick.
≥ When formatting a DVD-RAM, skip to step 3.
2 (When formatting a DVD-RW only)
Select format type (l 15), then press the joystick.
Disc and card management
84
LSQT1048
3 When the confirmation message appears, select [YES], then press the
joystick.
≥ When formatting is complete, press the MENU button to exit the message screen.
≥ During formatting, do not turn this unit off.
≥ When you format the disc, use a battery with
sufficient battery power or the AC adaptor.
≥ In the case of a double sided disc, format each side.
≥ It may not be possible to format a disc with many
scratches or dirt. Such discs cannot be used.
≥ Use this unit to format discs. This unit may not
recognize some discs that have been formatted
using a computer or a device other than this unit.
Page 85

LSQT1048(ENG).book 85 ページ 2006年2月6日 月曜日 午後2時13分
Formatting discs and cards
Formatting an SD card (VDR-D150 only)
This is for initializing cards.
Please be aware that if an SD card is formatted, then all the data recorded on the card will be
erased. Store important data on a computer, etc.
¬Rotate the mode dial to select .
1 Press the MENU button, then select [ SETUP] #
[ FORMAT CARD] # [YES] and press the joystick.
2 When the confirmation message appears, select [YES], then press the
joystick.
≥ When formatting is complete, press the MENU button to exit the message screen.
(SD)
≥ During formatting, do not turn this unit off.
≥ When you format the SD card, use a battery with
sufficient battery power or the AC adaptor.
≥ Use this unit to format SD cards. If an SD card is
formatted on other products (such as a computer),
the time spent for recording may become longer
and you may not be able to use the SD card.
≥ Depending on the type of SD card being used, it
may take time to format.
≥ Do not remove the SD card while formatting.
Disc and card management
85
LSQT1048
Page 86

LSQT1048(ENG).book 86 ページ 2006年2月6日 月曜日 午後2時13分
Finalizing a disc
Finalizing a disc
Finalizing a disc
This is for enabling discs to be played on other devices.
(-RW‹VR›) (-RW‹V›) (-R)
To play back a DVD-RW (Video format) or a DVD-R on other devices e.g. a DVD player, finalize the
disc.
∫ Finalizing video format discs
Be sure to finalize the disc on this unit, before using it on other devices.
DVD-RW (Video format): After finalizing, the disc becomes play-only. You can record on the
DVD-R: After finalizing, the disc becomes play-only and you can no longer
∫ Finalizing VR format discs
DVD-RAM: It is not necessary to finalize DVD-RAM.
DVD-RW (VR format): Finalizing a DVD-RW (VR format) increases its compatibility with other
¬Connect this unit to the AC adaptor. (Finalization cannot be executed using a battery.)
¬Rotate the mode dial to select .
1 Press the MENU button, then select [ SETUP] #
[ FINALIZE] # [YES] and press the joystick.
disc after un-finalizing (l 87) or formatting (l 84).
record.
products. DVD-RW (VR format) after finalization can be recorded and
edited in the same way as DVD-RW (VR format) before finalization.
Disc and card management
86
LSQT1048
2 When the confirmation message appears, select [YES], then press the
joystick.
≥ When finalizing is complete, press the MENU button to exit the message screen.
≥ Do not finalize a disc recorded on this unit using any
other device.
≥ In the case of a double sided disc, finalize each
side.
≥ The top menu created when finalizing does not
appear on this unit. Play back the disc on a DVD
player. Titles are displayed by recording date on the
top menu. However, when [PLAY MODE] is set to
[BY DATE] to view scenes by recording date, some
scenes recorded on the same date may be
separated. (l 64) These scenes will be displayed
as separate titles on the top menu.
≥ Depending on the condition of the disc, the time it
takes for finalizing will differ. It may take up to
15 minutes.
≥ If this unit becomes hot or is shaken strongly or
impacted while finalizing, the finalization will fail and
the disc may become unplayable on other devices.
≥ If the power supply stops while finalizing, the
finalization will fail and the disc may become
unplayable on other devices even if disc repair is
carried out.
Page 87

LSQT1048(ENG).book 87 ページ 2006年2月6日 月曜日 午後2時13分
Finalizing a disc
Un-finalizing a DVD-RW
This is for un-finalizing a DVD-RW (Video format) so that it can be used for
recording.
(-RW‹V›)
¬Rotate the mode dial to select .
1 Press the MENU button, then select [ SETUP] #
[ UN-FINALIZE] # [YES] and press the joystick.
2 When the confirmation message appears, select [YES], then press the
joystick.
≥ When un-finalizing is complete, press the MENU button to exit the message screen.
≥ When you un-finalize the disc, use a battery with
sufficient battery power or the AC adaptor.
≥ DVD-RW (VR format) cannot be un-finalized. DVD-
RW (VR format) after finalization can be recorded
and edited in the same way as DVD-RW (VR
format) before finalization.
≥ DVD-R cannot be un-finalized.
Disc and card management
87
LSQT1048
Page 88

LSQT1048(ENG).book 88 ページ 2006年2月6日 月曜日 午後2時13分
Protecting a disc
Protecting a disc
This is for preventing recorded contents from being deleted or edited by mistake.
Further recording and editing is not possible on protected discs until the protection is released.
(RAM) (-RW‹VR›)
¬Rotate the mode dial to select .
1 Press the MENU button, then select [ SETUP] #
[ DISC PROTECT] and press the joystick.
2 When the confirmation message appears, select [YES], then press the
joystick.
To release disc protection
1) Press the MENU button, then select [ SETUP] # [ DISC PROTECT] and press the
joystick.
2) When the confirmation message appears, select [YES], then press the joystick.
≥ If the disc has been protected on another device, it
may not be possible to release the protection on this
unit. In this case, release the protection on the
device that you used to protect it.
Disc and card management
88
LSQT1048
Page 89

LSQT1048(ENG).book 89 ページ 2006年2月6日 月曜日 午後2時13分
Displaying disc information
Displaying disc information
Information such as the number of recorded scenes, the remaining space and whether or not the
disc is finalized or protected is displayed.
¬Rotate the mode dial to select .
(RAM) (-RW‹VR›) (-RW‹V›) (-R)
Press the MENU button, then select [ SETUP] #
[INFORMATION] # [YES] and press the joystick.
To exit the information screen
Press the MENU button.
Disc and card management
89
LSQT1048
Page 90

LSQT1048(ENG).book 90 ページ 2006年2月6日 月曜日 午後2時13分
With other products
With a TV
With a TV
Playback on TV
Images recorded by this unit can be played back on a TV.
≥ Use the AC adaptor to free you from worrying about the battery running down.
(RAM) (-RW‹VR›) (-RW‹V›) (-R) (SD)
1 Connect this unit and a TV.
A AV/S cable (supplied)
≥ Insert the plugs as far as they will go.
≥ If your TV is not equipped with AV Input
Sockets, the 21-pin Adaptor B (purchase
separately) is necessary. Consult your dealer.
S VIDEO IN
*
VIDEO IN
* If the TV has an S Video terminal, also connect the
S Video plug to it. This allows you to enjoy more
beautiful pictures.
B
AUDIO IN
2 Turn on this unit, then rotate the mode dial to select or .
3 Change the input channel on the TV.
≥ The channel set will differ depending on the terminal to which the unit is connected.
4 Start playback on this unit.
The image and audio are output on the TV.
∫ If the image or audio from this unit is not output on the TV
≥ Check that the plugs are inserted as far as they go.
≥ Check the connected terminal.
≥ Check the TV’s input setting (input switch). (For more information, please read the
operating instructions for the TV.)
A
With other products
90
LSQT1048
Page 91

LSQT1048(ENG).book 91 ページ 2006年2月6日 月曜日 午後2時13分
With a DVD recorder/player
With a DVD recorder/player
Playback on DVD recorder/player
≥ When playing back a disc on another DVD recorder/player, place the device so that the disc lies
flat.
Playing back a DVD-RAM or a DVD-RW (VR format)
(RAM) (-RW‹VR›)
Insert the disc in the DVD recorder/player, then play
it back.
≥ Playback is only possible on devices that support
8 cm DVD-RAM or DVD-RW (VR format). See the
operating instructions for DVD recorder/player.
≥ DVD-RW (VR format) may have to be finalized. In
this case, finalize the disc on this unit. (l 86)
≥ You cannot record images that allow “One time only
recording” on a 8cm disc.
Playing back a DVD-RW (Video format) or a DVD-R
1 Finalize the disc on this unit. (l 86)
2 Insert the disc in the DVD recorder/player, then
play it back.
≥ Do not insert a disc that has not been finalized into
a DVD recorde/player: the disc may be unusable.
Also, a message asking you to format the disc may
appear on the DVD recorder. Do not format the disc.
≥ Playback is possible on devices that support 8 cm
DVD-Video, but playback on all DVD players is not
guaranteed.
(-RW‹V›) (-R)
With other products
91
LSQT1048
Page 92

LSQT1048(ENG).book 92 ページ 2006年2月6日 月曜日 午後2時13分
With a DVD recorder/player
Copying recordings onto a DVD recorder’s hard disk
(RAM) (-RW‹VR›) (-RW‹V›) (-R)
If you have a DVD recorder with hard disk, images recorded by this unit can be stored on the hard
disk.
If you want to dub a disc that the DVD recorder is not compatible with, connect this unit and the
DVD recorder with the AV/S cable and then dub the disc.
1 [Only when you dub a DVD-RW (Video format) or a DVD-R]
Finalize the disc on the unit. (l 86)
2 Insert the disc in the DVD recorder, then dub the
contents onto the hard disk.
≥ For details on how to dub the images onto the hard disk, refer to the
operating instructions of the DVD recorder.
(l 93)
≥ DVD-RW (VR format) may have to be finalized. In
this case, finalize the disc on this unit. (l 86)
≥ You cannot record images that allow “One time only
recording” on a 8cm disc.
With other products
≥ If your DVD recorder has an SD card slot, you can
write the still picture files recorded on an SD card
with this unit to a disc or the hard disk.
92
LSQT1048
Page 93

LSQT1048(ENG).book 93 ページ 2006年2月6日 月曜日 午後2時13分
With a VCR
Dubbing images onto other video devices
With a VCR
You can dub images played back on this unit onto other video devices.
You can create a playlist by gathering the scenes you want to dub, then dub the scenes in this
playlist only to other devices. (l 72)
≥ Use the AC adaptor to free you from worrying about the battery running down.
(RAM) (-RW‹VR›) (-RW‹V›) (-R)
1 Connect this unit and a video
device.
A AV/S cable (supplied)
≥ Insert the plugs as far as they will go.
≥ If your recorder is not equipped with AV
Input Sockets, the 21-pin Adaptor B
(purchase separately) is necessary.
Consult your dealer.
* If the video device has an S Video terminal,
also connect the S Video plug into it. This
allows you to enjoy more beautiful pictures.
B
S VIDEO IN
VIDEO IN
AUDIO IN
*
A
2 Turn on this unit, then rotate the mode dial to select .
3 Change the input channel on the video device and TV.
≥ The channel set will differ depending on the terminal to which the unit is connected.
4 Start playback on this unit.
Then start recording on the connected device.
≥ See the operating instructions of the video device for details.
To stop dubbing
Stop recording on the connected device.
Then stop playback on this unit.
With other products
93
LSQT1048
Page 94

LSQT1048(ENG).book 94 ページ 2006年2月6日 月曜日 午後2時13分
With a printer (PictBridge) (VDR-D150 only)
With a printer (PictBridge) (VDR-D150 only)
To print pictures by directly connecting this unit to the printer, use a printer compatible with
PictBridge. (Read the operating instructions for the printer.)
≥ Use the AC adaptor to free you from worrying about the battery running down.
¬Insert an SD card with recorded images in the unit, turn on the unit and then
rotate the mode dial to select .
1 Press the MENU button, then select [ SETUP] #
[ USB FUNCTION] # [PictBridge] and press the
joystick.
≥ Press the MENU button to exit the menu screen.
2 Connect this unit and a printer.
A USB cable (not supplied)
≥ Insert the plugs as far as they will go.
[ ] indication appears.
≥ If the [ ] indication does not appear or
continues to flash, disconnect and then reconnect
the USB cable or check the printer, SD card and
settings on this unit.
A
3 Select a file to be printed, then press the joystick.
The number of pictures set is displayed.
(SD)
With other products
94
LSQT1048
Page 95

LSQT1048(ENG).book 95 ページ 2006年2月6日 月曜日 午後2時13分
With a printer (PictBridge) (VDR-D150 only)
4 Move the joystick up or down to select the desired number of prints,
then press the joystick.
≥ You can set up to 9 prints.
≥ To cancel the setting, set the number of prints to [0].
≥ Up to 8 files displayed on a page can be set in succession by repeating steps 3 and 4.
5 Press the MENU button to display the PictBridge
menus.
6 Select the date print setting on [ DATE PRINT].
≥ If the printer is not capable of date printing, this setting is unavailable.
7 Select the paper size setting on [ PAPER SIZE].
STANDARD: Size specific to the printer
4t5 INCH: L size
5t7 INCH: 2L size
4t6 INCH: Postcard size
A4: A4 size
≥ You cannot set paper sizes not supported on the printer.
With other products
95
LSQT1048
Page 96

LSQT1048(ENG).book 96 ページ 2006年2月6日 月曜日 午後2時13分
With a printer (PictBridge) (VDR-D150 only)
8 Select the layout setting on [ PAGE LAYOUT].
STANDARD: Layout specific to the printer
: No frame print
: Frame print
≥ You cannot set page layouts not supported on the printer.
9 Select [ PRINT] # [YES] and press the joystick.
The pictures are printed.
≥ Exit PictBridge by disconnecting the USB cable after the pictures have
been printed.
When you stop printing halfway
Move the joystick down.
A confirmation message appears. If [YES] is selected, the number of prints set is cancelled and the
screen returns to step 3. If [NO] is selected, all the settings are kept and the screen returns to
step 3.
≥ Avoid the following operations during printing.
These operations disable proper printing.
– Disconnecting the USB cable
– Removing the SD card
– Switching the mode dial
– Turning off the power
≥ Check the settings for the paper size, quality of
print, etc. on the printer.
With other products
≥ You cannot print pictures that cannot be played on
this unit.
≥ When the unit is connected directly to the printer,
the DPOF settings cannot be used.
≥ Connect the printer directly to this unit. Do not use a
USB hub.
96
LSQT1048
Page 97

LSQT1048(ENG).book 97 ページ 2006年2月6日 月曜日 午後2時13分
Others
Menus
Menu list
Menus
Motion picture recording
menus
∫ [ BASIC]
[ SCENE MODE] (l 56)
[WINDCUT] (l 52)
[RECMODE] (l 41)
[ CINEMA] (l 53)
[ CLOCK SET] (l 35)
∫ [ ADVANCED]
[ D.ZOOM] (l 45)
[SIS] (l 55)
[ NIGHT VIEW] (l 54)
[ FADE COLOUR] (l 49)
[ ZOOM MIC] (l 45)
∫ [SETUP]
[DISPLAY] (l 99)
[DATE/TIME] (l 36)
[ DATE FORMAT] (l 36)
[ POWER SAVE] (l 99)
[BEEPSOUND] (l 99)
[ LCD SET] (l 37)
[EVFSET] (l 37)
EVF
[ INITIAL SET] (l 99)
DEMO
[DEMOMODE] (l 99)
Still picture recording menus
(VDR-D150 only)
≥ For [ SETUP] items, refer to the motion
picture recording menus.
∫ [ BASIC]
[ SCENE MODE] (l 56)
[ PICT. QUALITY] (l 43)
[ CLOCK SET] (l 35)
∫ [ ADVANCED]
[ SHTR EFFECT] (l 43)
∫ [LANGUAGE] (l 32)
∫ [ LANGUAGE] (l 32)
Others
97
LSQT1048
Page 98

LSQT1048(ENG).book 98 ページ 2006年2月6日 月曜日 午後2時13分
Menus
Motion picture playback menus
∫ [ DELETE]
(Only when [PLAY MODE] is set to [VIEW ALL]
or [BY DATE])
[ SELECT] (l 68)
[ ALL] (l 68)
∫ [PLAYSETUP]
[ PLAY MODE] (l 64, 72, 73)
[RESUMEPLAY] (l 64)
∫ [ EDIT SCENE]
(Only when [PLAY MODE] is set to [VIEW ALL]
or [BY DATE])
[ DIVIDE] (l 69)
[ COMBINE] (l 70)
∫ [EDIT]
(Only when [PLAY MODE] is set to
[PLAYLIST])
[ ADD] (l 74)
[ MOVE] (l 75)
[ DIVIDE] (l 76)
[ COMBINE] (l 77)
[ DELETE] (l 78)
Still picture playback menus
(VDR-D150 only)
∫ [ DELETE]
[ SELECT] (l 81)
[ ALL] (l 81)
∫ [PLAYSETUP]
[ PLAY MODE] (l 66)
[ LOCK] (l 82)
[ DPOF SET] (l 83)
∫ [SETUP]
[DISPLAY] (l 99)
[DATE/TIME] (l 36)
[ DATE FORMAT] (l 36)
[ FORMAT CARD] (l 85)
[ POWER SAVE] (l 99)
[BEEPSOUND] (l 99)
[ LCD SET] (l 37)
[EVFSET] (l 37)
EVF
[ USB FUNCTION] (l 94)
∫ [ LANGUAGE] (l 32)
Others
98
LSQT1048
∫ [SETUP]
[ FORMAT DISC] (l 84)
[ FINALIZE] (l 86)
[ UN-FINALIZE] (l 87)
[DISCPROTECT] (l 88)
[INFORMATION] (l 89)
[DISPLAY] (l 99)
[DATE] (l 63)
[ DATE FORMAT] (l 36)
[ POWER SAVE] (l 99)
[ BEEP SOUND] (l 99)
[LCDSET] (l 37)
[EVFSET] (l 37)
EVF
∫ [ LANGUAGE] (l 32)
Page 99

LSQT1048(ENG).book 99 ページ 2006年2月6日 月曜日 午後2時13分
Setup menu
Menus
∫ [DISPLAY]
≥ OFF ≥ ON
The screen indications are selected as shown
in the illustration below.
OFF
ON
15:30
15.12.2006
SP
R 0h00m
15:30
15.12.2006
;
;
0h00m00s
∫ [ POWER SAVE]
≥ OFF ≥ 5 MINUTES
[OFF]:
The power saving function is not activated.
[5 MINUTES]:
When about 5 minutes passed without any
operation, this unit automatically turns off to
prevent the battery from running down. When
you use this unit, turn it on again.
≥ In the following cases, the unit may not turn
off even when you set this to [5 MINUTES].
– When using the AC adaptor
– When connecting the unit to a computer or
printer via the USB cable
∫ [ BEEP SOUND]
≥ OFF ≥ ON
This allows operations such as starting and
ending recording to be signaled by a beep.
When [OFF] is set, no beep is heard when an
operation such as recording is started or
ended.
1 Beep
When you start recording
When you turn on the power
When this unit is recognized by the computer or
the printer, etc.
2 Beeps
When you pause recording
When you turn off the power
2 Beeps for 4 times
When an error occurs e.g. recording not
starting. Check the sentence displayed on the
screen. (l 102)
∫ [ INITIAL SET]
≥ YES ≥ NO
When there is a menu that cannot be selected
depending on a combination of functions, set to
[YES] for changing the menu settings back to
the initial shipping condition.
(Language setting cannot be back to the initial
shipping condition.)
DEMO
∫ [ DEMO MODE]
≥ OFF ≥ ON
This item is used to start the unit
demonstration.
(Only when using the AC adaptor and the mode
dial is at the or position)
If you set this to [ON] without inserting a disc or
an SD card, this unit is automatically set to the
demonstration mode for introducing its
functions. If any button is pressed or operated,
the demonstration mode is cancelled. If no
operations take place for approx. 10 minutes,
the demonstration mode automatically starts.
To terminate the demonstration mode, insert a
disc or an SD card, or set this to [OFF]. For
normal use, set this function to [OFF].
∫ [ USB FUNCTION]
≥ PictBridge ≥ PC CONNECT
[PictBridge]:
When you connect the unit to a printer via the
USB cable.
[PC CONNECT]:
When you connect the unit to a computer via
the USB cable.
Others
99
LSQT1048
Page 100

LSQT1048(ENG).book 100 ページ 2006年2月6日 月曜日 午後2時13分
Indications
Indications
Indications
∫ Recording indications
Motion picture recording Still picture recording (VDR-D150 only)
SP
R 0h00m
;
0h00m00s
50×
R 100
30×
;
AWB
1/100
OPEN
3dB
15:30
15.12.2006
Remaining battery power
R 0h00m Remaining time for recording
0h00m00s Elapsed recording time
15:30
15.12.2006
Date/Time indication
¥/; (Red) Recording
; (Green) Recording pause
Digital zoom
AUTO
MNL
Auto mode
Manual mode
MF Manual focus
2t Zoom magnification indication
ª Back light mode
Image stabilizer
1/100 Shutter speed
OPEN, F2.0 F number
0dB Gain value
Soft skin mode
Fade (White)
Others
ZOOM
Fade (Black)
Night view function
Zoom microphone
Wind noise reduction
, ,
XP SP LP
Motion picture recording
mode
AWB
1/100
OPEN
6dB
15:30
15.12.2006
5 Sports mode
AWB
, Ø
Ø
10
2
(White)
(Green)
(Red)
, Still picture quality
R 100
Portrait mode
Low light mode
Spotlight mode
Surf & snow mode
Auto white balance
Indoor mode (recording under
incandescent lamp)
Outdoor mode
Manual adjustment mode
Disc type
DVD-RAM
DVD-RW (VR format)
DVD-RW (Video format)
DVD-RW (unformatted)
DVD-R
Progressive photoshot mode
Self-Timer recording
Number of recording pixels for
still pictures
640k480
Card can be recorded to
Recognizing the card
Recording/accessing the card
Remaining number of still
pictures
100
LSQT1048
 Loading...