

Page 1

DIRECTV Digital
Satellite Receiver
Operating Instructions
TZ-DBS01
®
For product assistance, please call: 1-888-726-2377 or
send e-mail to: consumerproducts@panasonic.com
TQB2AA0366 10301
PRINTED IN MEXICO
Page 2

Table of Contents
Important Safety Instructions........................... 2
Important Information....................................... 4
Information on the DIRECTV Digital
Satellite Receiver............................................ 6
Reception Capability of DIRECTV Digital Satellite
Receiver .............................................................................. 6
Panasonic DIRECTV Digital Satellite
Receiver Model TZ-DBS01................................................... 6
Congratulations.................................................. 7
Customer Record........... ...................................... .................7
Care and Cleaning ................................................................7
Specifications........................................................................7
Important Notes.................................................. 8
Digital Satellite Receiver Location........................................8
Connecting Cables...............................................................8
AC Power Supply Cord.........................................................8
Satellite Dish Antenna Connection.......................................8
Antenna/Cable Connection...................................................9
TZ-DBS01 Front Panel...................................... 10
TZ-DBS01 Rear Panel....................................... 11
Features of the Digital Satellite
Receiver......................................................... 12
DIRECTV Channel Banner ................................................12
Viewing modes ...................................................................14
Tuning modes...................... ........................... ....................15
Getting Started.................................................. 17
Step 1. Connect AC Power Cord..................... .................17
Step 1a. DIRECTV Satellite Dish Connection......... ...........17
Step 1b. Antenna / Cable Connection................................17
Step 1c. Digital Satellite Connection to TV or Monitor........18
Step 1d. Connection to Satellite Dish, Cable box and
Terrestrial Antenna............................................................. 19
Step 1e. Digital Satellite Receiver Connection to VCR ......20
Step 2. Turning Digital Satellite Receiver ON...................21
Step 3. Roller Guide Menu™............................................21
Step 3a. ACTION/Navigation Button..................................21
Remote Control Guide ..................................... 22
Remote Control Functional Key Chart................................23
Battery Installations and Precautions.................................24
Special Remote Buttons............................... ......................25
Programming the Remote Control......................................26
Remote Control Component Codes ...................... .............27
Special Features of the Digital
Satellite Receiver.................. ....... ...... ....... ...... 29
Impulse pay per view................................ ..........................29
Software Upgrade Messages.............................................32
T
ABLE OF CONTENTS
Roller Guide Menu™.........................................33
Navigation/ACTION button.................................................33
Roller Guide Menu Feature Chart....................34
SETUP.....................................................................37
Satellite Setup....................................................................37
Monitor...............................................................................40
System Test...................... ............. ....................................41
Access Card.......................................................................42
TV Output...................... ............. ......................... ...............43
ADVANCED PROGRAM GUIDE™ ........................ 44
Picture In Guide ........................... ........................... ...........45
Searching the Guide by Categories ...................................46
Direct Channel Entry..........................................................47
Banner Description Icons...................................................47
Grid ....................................................................................48
LOCK ......................................................................49
Password ...........................................................................49
Unlock................................................................................50
Movies Limits .....................................................................51
TV Limits.. ...................................... ......................... ...........52
Channel Locks ............................. ......................................53
Spending..................... ........................... ............................54
ACCOUNT.......................................... ..... ...... ...... ....55
Future Purchases...............................................................55
Past Purchases..................................................................56
Messages.............. ........................... ........................... .......56
OPTIONS ..................................... ...... ..... ...... ...... ....57
Audio............................... ...................................... .............57
Clock.. ...................................... ......................... .................58
Favorites ............................................ ................................59
About................................... .......................... .....................60
Upgrades............................... ............................ .................61
Features.................... ............... ........................... ...............61
TIMER .......................................... ...... ..... ...... ...... ....62
Timer error Messages. .......................................................63
Glossary and Acronyms...................................64
Troubleshooting Table .....................................66
Service Information...........................................67
Read these instructions completely before
operating.
Specifications are subject to change without notice
or obligation.
Copyright 2001 by Matsushita Electric Corporation of America.
All rights reserved. Unauthorized copying and distribution is a
violation of law.
1
Page 3

IMPORTANT SAFETY INSTRUCTIONS
IMPORTANT SAFETY INSTRUCTIONS
WARNING
RISK OF ELECTRIC SHOCK
DO NOT OPEN
WARNING: To reduce the risk of electric shock do not remove cover or back. No
user-serviceable parts inside. Refer servicing to qualified service personnel.
The lightning flash with arrow
head within a triangle is intended
to tell the user that parts inside
the product are a risk of electric
shock to persons.
Note To CATV System Installer: This reminder is provided to call the CATV system installer’s attention to article 820-40 of
the National Electric Code that provides guidelines for proper grounding and, in particular, specifies that the cable ground shall be
connected to the grounding system of the building, as close to the point of cable entry as practical.
Note To Satellite Dish Installer:
This reminder is provided to call your attention to Article 810 and in particular article 810-15 of the National Electrical Code which
covers proper installation and grounding of television receiving equipment as well as to article 820-40 of the National Electrical Code
which specifies that the satellite dish cable ground shall connected to the grounding system of the building as close to the point of
cable entry as practical.
Important Safety Instructions For The Digital Satellite Receiver:
1. Read and apply the operating instructions provided with Digital Satellite Receiver.
2. Read all of the instructions given here and retain them for later use.
3. Unplug this Digital Satellite Receiver from the wall outlet before cleaning. Do not use liquid or aerosol cleaners. Use a damp
cloth for cleaning.
4. Do not use attachments not recommended by the Digital Satellite Receiver manufacturer as they may cause hazards.
5. Do not use this Digital Satellite Receiver near water. For example: Avoid placing it near a bathtub, washbowl, kitchen sink, or
laundry tub, in a wet basement, or near a swimming pool, etc.
6. Do not place this Digital Satellite Receiver on an unstable cart, stand, or table. The Digital Satellite Receiver may fall, causing
serious injury to a child or adult and serious damage to the appliance. Use only with a cart or stand recommended by the
manufacturer, or sold with the Digital Satellite Receiver. Wall or shelf mounting should follow the manufacturer’s instructions,
and should use a mounting kit approved by the manufacturer.
6a. An appliance and cart combination should be moved with car e. Quick stops, excessive force, and uneven
surfaces may cause the appliance and cart combination to overturn.
7. Slots and openings in the cabinet and the back or bottom are provided for ventilation, and to insure reliable
operation of the Digital Satellite Receiver and to protect it from overheating. These openings must not be
blocked or covered. The openings should never be blocked by placing the Digital Satellite Receiver on a bed,
sofa, rug or other similar surface. This Digital Satellite Receiver should never be placed near or over a radiator or heat register.
This Digital Satellite Receiver should not be placed in a built-in installation such as a bookcase unless proper ventilation is
provided.
8. Operate only from the type of power source indicated on the marking label. If you are not sure of the type of pow er supplied to
your home consult your Video dealer or local power company. For Digital Receivers designed to operate from battery power,
refer to the operating instructions.
9. This Digital Satellite Receiver is equipped with a polarized alternating-current line plug (a plug having one blade wider than the
other). This plug will fit into the power outlet only one way. This is a safety feature. If you are unable to insert the plug fully into
the outlet, try reversing the plug. If the plug should still fail to fit, contact your electrician to replace your obsolete outlet. Do not
defeat the safe purpose of the polarized plug,
10. Do not allow anything to rest on the power cord. Do not locate this Digital Satellite Receiver where the cord will be abused by
persons walking on it.
11. Follow all warnings and instructions marked on the Digital Satellite Receiver.
2
The exclamation point within a triangle is
intended to tell the user that important
operating and servicing instructions are
in the papers with the appliance.
Page 4

IMPORTANT SAFETY INSTRUCTIONS
12. Do not overload wall outlets and extension cords as this can result in fire or electric shock.
13. Never push objects of any kind in to this Digital Satellite Receiver through cabinet slots as they may touch dangerous voltage
points or short out parts that could result in a fire or electric shock. Never spill liquid of any kind on the Digital Satellite Receiver .
14. If an outside antenna is connected to the decoder equipment, be sure the antenna system is grounded so as to provide some
protection against voltage surges and built up static charges. In the U.S. Section 810 of the National Electrical Code, ANSI/
NFPA 70 provides information with respect to proper grounding of the mast and supporting structure, grounding of the lead-in
wire to an antenna discharge unit, size of grounding conductors, location of antenna-discharge unit, connection to grounding
electrodes, and requirements for the grounding electrode. See Figure.
15. For added protection for this Digital Satellite Receiver during a lightning storm, or when it is left unattended and unused for long
periods of time, unplug it from the wall outlet and disconnect the antenna. This will prevent damage to the decoder due to
lightning and power-line surges.
16. An outside antenna system should not be located in the vicinity of overhead power lines or other electric light or power circuits,
or where it can fall into such power lines or circuits. When installing an outside antenna system extreme care should betaken to
keep from touching such power lines or circuits as contact with them might be fatal.
17. Unplug this Digital Satellite Receiver from the wall outlet, and refer servicing to qualified service personnel under the following
conditions:
a. When the power cord or plug is damaged or frayed.
b. If liquid has been spilled into the Digital Satellite Receiver.
c. If the Digital Television Decoder has been exposed to rain or water.
d. If the Digital Satellite Receiver does not operate normally by following the operating instructions. A djust only those
controls that are covered by the operating instructions as improper adjustment of other controls may result in damage
and will often require extensive work by a qualified technician to restore the Digital Satellite Receiver to normal operation.
e. If the Digital Satellite Receiver has been dropped or the cabinet has been damaged.
f. When the Digital Satellite Receiver exhibits a distinct change in performance - this indicates a need for service.
18. Do not attempt to service this Digital Television Decoder yourself as opening or removing covers may expose you to dangerous
voltage or other hazards. Refer all servicing to qualified service personnel.
19. When replacement parts are required, be sure the service technician has used replacement parts specified by the manufacturer
that have the same characteristics as the original part. Unauthorized substitutions may result in fire, electric shock , or other
hazards.
20. Upon completion of any service or repairs to this Digital Satellite Receiver, ask the service technician to perform routine safety
checks to determine that the decoder is in safe operating condition.
21. WARNING: TO PREVENT FIRE OR SHOCK HAZARD, DO NOT EXPOSE THIS APPLIANCE TO RAIN OR MOISTURE.
22. CAUTION: TO PREVENT ELECTRIC SHOCK DO NOT USE THI S (PO LARIZED) P LUG W ITH A RE CEPTACLE OR OTHER
OUTLET UNLESS THE BLADES CAN BE FULLY INSERTED TO PREVENT BLADE EXPOSURE.
Note: DIRECTV® service can only be received within the USA and is not available in Canada
3
Page 5

I
MPORTANT INFORMATION
Important Info rm ati o n
FCC INFORMATION
Your Digital Satellite Receiver is registered with the Federal Communications Commission and is in compliance with CFR47, Parts 15 and 68, FCC Rules and Regulations.
Radio Interference
This equipment has been tested and found to comply with the limit for a Class B Digital Device in accordance
with the specifications in Part 15 of FCC Rules. The rules are designed to provide reasonable protection against
radio and television interference in a residential installation. This equipment generates, uses and can radiate
radio frequency energy and, if not installed and used in accordance with the instructions, may cause harmful
interference to radio communications. However, there is no guarantee that interference will not occur in a particular installation.
If this equipment does cause interference to radio or televisions reception (which you can determine by turning
the equipment off and on), try to correct the interference by one or more of the following measures.
• Reposition or relocate the receiving antenna for the radio or television that is “receiving” the interference.
• Change the position of the Digital Satellite Receiver with respect to the radio or television equipment that is
receiving interference.
• Move the Digital Satellite Receiver away from equipment receiving interference.
• Plug the Digital Satellite Receiver into a different wall outlet so the Digital Satellite Receiver and equipment
receiving the interference are on different branch circuits.
If these measures do not eliminate interference, please consult your dealer or an experienced radio/television technician for assistance..
FCC CAUTION:
Pursuant to 47CFR, Part 15 .21 of the FCC rules, any change s or mo difica tions to this Digi tal Satellite Rec eiver
not expressly approved by Matsushita Electric Corporation of Am erica could cause har mful interference and
would void the user’s authority to operate this device.
A FCC compliant modem cable with modular plug is pro vided with this equipm e nt. Th is equ ipm ent is de signe d
to be connected to the telephone network or premises wiring using a compatible modular jack that is Part 68
compliant. See Installation Inst ructions for details.
FCC Declaration of Conformity
PANASONIC HOME AND COMMERCIAL PRODUCTS
COMPANY
Responsible party:
Matsushita Electric Corporation of America
One Panasonic Way
Secaucus, NJ 07094
U.S.A.
Telephone Num ber: 1-88 8-7 26-2 377
(8 a.m.-10 p.m., Mon-Fri, EST)
(10 a.m.-10 p.m., Sat-Sun, EST) OR
E-MAIL: CONSUMER PRODUCTS@PANASONIC.COM
This device complies with Part 15 of the FCC rules. Operation is
subject to the following two conditions: (1) this device may not
cause harmful interference, and (2) this device must accept any
interference received, including interference that may cause
undesired operation.
4
Page 6

I
MPORTANT INFORMATION
Notification to the Local Telephone Company
On the back of this equipment is a label indicating among other information, the FCC Registration number
and Ringer Equivalence Number (REN) for the equipment. You must, upon request, provide this information to your telephone company. The REN is useful to determine the number of devices you may connect
to your telephone line and still have all these devices ring when your telephone number is called. In most
(but not all) areas, the sum of the RENs of all devices connected to one line should not exceed 5. To be
certain of the number of devices you may connect to your line as determined by the REN, you should contact your local telephone company.
Notes: This equipment may not be used on coin service provided by the telephone company.
Party lines are subject to state tariffs, and therefore, you may not be able to use your own telephone equipment if you are on a party line. Check with your local telephone company.
Notice must be given to the telephone company upon permanent disconnection of your Digital Satellite
Receiver from your line.
Rights of the Telephone Company
Should your equipment cause trouble on your line which may harm the telephone network, the telephone
company shall, where practicable, notify you that temporary discontinuance of service may be required.
Where prior notice is not practicable and the circumstances warrant such action, the telephone company
may temporarily discontinue service immediately. In case of such temporary discontinuance, the telephone
company must: (1) promptly notify you of such temporary discontinuance (2) afford you the opportunity to
correct the situation and (3) inform you of your right to bring a complaint to the Commission pursuant to
procedures set forth in Subpart E of Part 68, FCC Rules and Regulations. The telephone company may
make changes in its communication facilities, equipment, operations of procedures where such action is
required in the operation of its business and not inconsistent with FCC Rules and Regulations. Of these
changes are expected to affect the use or performance of your telephone equipment, the telephone company must give you adequate notice, in writing, to allow you to maintain uninterrupted service.
5
Page 7

I
NFORMATION ON THE
DIRECTV D
IGITAL SATELLITE RECEIVER
Information on the DIRECTV Digital Satellite Receiver
Reception capability of DIRECTV Digital Satellite Receiver
The Panasonic Digi tal Satellite Recei ver is capable of rec eiving DIRECTV
satellite signals and co nver ting the m to standard def initi on signal . You may connect a
terrestrial or cable antenna to the VHF/UHF ANT input of the Digital Satellite Receiver.
DIRECTV
SATELLITE
DIRECTV
SATELLITE
ANALOG
TERRESTRIAL
ANTENNA
®*
digital
TERRESTRIAL
ANTENNA
TV OR MONITOR
Oval dish
SATELLITE
DISH ANTENNA
CABLE SIGNAL
DIGITAL SATELLITE
RECEIVER
Terrestrial off-air signals or unscrambled cable-service signals can be passed through
the Digital Satellite Receiver when the antenna is connected to the VHF/UHF IN input
and the Digital Satelli te Receiver is Off or whe n the user pr esses the TV/S AT button
on the remote. The desired channels are tuned by the television.
Panasonic DIRECTV Digital Satellite Receive r Model TZ-DBS01
Panasonic Digital Satellite Receiver with a built-in DIRECTV Receiver, can receive
and process DIRECTV standard definition video from satellite broadcasts if you
®
subscribe to DIRECTV
chips which allow cur rent televisions (with A/V inpu ts) to display dig itally broadcast
programs. This Digital Sate llite Receiver also has a RF OUT j ack, which enab les the
unit to be hooked up to a televis ion without A/V inpu ts. The Digital Satell ite Receive r,
which receives digital signals, has the ability to convert the digital broadcast into
National Television System Committee (NTSC)** signals that a conventional television
can display.
*
DIRECTV and the Cyclone Design logo and Advanced Program Guide are trademarks of DIRECTV, Inc.,
a unit of Hughes Electronics Corp., and are used with permission.
**NTSC is the current television system used in the U.S. It uses analog (non-digital) signals.
programming. Model TZ-DBS01 uses specially developed
6
Page 8

Congratulations
Y our Panason ic Digital Satellite Receiver fea tures state-of-the-art technology for high -quality
picture and sound with complete audio/video output jacks for your home theater system.
This Digital Satellite Receiver is capable of receiving D IRECTV
signals. DTV signals are displa yed in interlaced format, providing a clear, crisp picture. Your
new Digital Satellite Receiver is designed to give you many years of enjoyment.
Customer Record
The model and serial num ber of this product are located on the bac k of the Digital
Satellite Receiver. You should note the model and serial number in the space
provided and retain as a permanent record of your purchase. This will aid in
identification in the even t of theft or loss.
www.prodreg.com\panasonic.
Care and Cleaning
Turn Digital Satellite Receiver Off
r For Digital Satellite Receiver, avoid excessive moisture and wipe dry.
r Avoid bumping or scraping the Digital Satellite Receiver.
Remote Control
r For Remote Control, use a soft cloth dampened with water or a m ild detergent
r Do not use benzene, thinner or other petroleum based products.
Specifications
Product reg istration is avail able on-line at:
Model
Number
TZ - DBS01
Serial
Number
solution. Avoid excessive moisture and wipe dry.
C
ONGRATULATIONS
®
standard definition sate llite
Power Source 120V AC, 60Hz
Channel Capability – NTSC and CABLE
Satellite Signal Range
NTSC Video Output jack
NTSC Audio Output jacks 0-2.0V rms 4.7k Ohm
VHF / UHF ANT IN jack 75 Ohm, F Connector
VHF / UHF (Passthrough) , SAT OUT jack 75 Ohm, F Connector
Modem Jack RJ11C, 4 Conductor
Specifications are subject to change without notice or obligation.
*The digital tuning system allows channel numbers up to 9999 to be displayed. The total chan-
nel capability, however, remains as stated.
Note: The Digital Satellite Receiver will only passthrough your off-air antenna or cable
signals. You must tune off-air or cable channels with your television or cable box.
VHF/UHF - 2-69*(Passthrough)
CATV - 1-125* (Passthrough)
950 - 1450 Mhz (L-Band)
1V
, 75 Ohm, Phono Jack Type
p-p
7
Page 9

I
MPORTANT NOTES
Important Notes
Digital Satellite Receiver Location
This unit can be used as part of an entertainment center. Consult your dealer for
available options.
r Avoid exce ssive sunlight or bright lights.
r Keep away from excessive heat or moisture. Inadequate ventilation may cause internal
component failure.
r Fluorescent lighting may reduce Remote Control transmitting range.
Connecting Cables
Shielded audio/video c ables (provided) should be used for all connectio ns between
components. For best results:
r Use 75 Ohm coaxial shielded cables.
r Check type of output and input connectors on your components.
r Determine required cable lengths.
AC Power Supply Cord
CAUTION: TO PREVENT ELECTRIC SHOCK, MA TCH WIDE BLADE
OF PLUG TO WIDE SLOT OF AC OUTLET AND FULL Y INSER T. DO
NOT USE A PLUG WITH A RECEPTACLE OR OTHER OUTLET
UNLESS THE BLADE CAN BE FULLY INSERTED TO PREVENT
BLADE EXPOSURE.
Polarized Plug
PROTECT POWER CORDS FROM BEING WALKED ON, ROLLED OVER, CRIMPED, BENT
OR PINCHED, PARTICULARLY AT PLUGS, CONVENIENCE RECEPTACLES, AND THE
POINT WHERE THEY EXIT FROM THE APPARATUS.
Satellite Dish Antenna Connection
Connect the cable co ming from th e DIRECTV satell ite dish to the Satellit e In jack o n
the Digital Satellite Receiver.
Note: With this receiver and the proper satellite dish antenna, you may be able to subscribe
to local channels from DIRECTV in certain markets. Additional equipment may be
required in s ome a r eas. Ch e ck wi t h yo ur re ta il er or visi t DI RE CT V.com for inf or m ati on
on availability of local channels from DIRECTV in your area.
8
Page 10

Antenna/Cable Connection
A terrestrial antenna o r cable antenna may be connected to the VHF/UHF IN j ack of
the Digital Satellite Receiver. This input works as a passthrough. The VHF/UHF
channels can be passed throug h either by toggling TV/ SAT button on remote control
or by turning the Digital Sa tellite Receiv er off. The RF output (VHF (S AT) UHF OUT)
of the Digital Satellite Receiver must be connected to the television.
Antenna Connection
For proper reception of VHF/UHF channels, a directional antenna is required. For best
reception, an outdoor antenna is recommended.
Procedure
r Connect the antenna cable from your antenna to the VHF/UHF IN jack of the Digital
Satellite Receiver.
Cable Connection
Before connecting your cable to the Digital Satellite Receiver, contact your local cable
provider and ask the following question:
• Do you need a separate cable box to receive cable channels in your area?
Incoming Cable from
Home Antenna
75 Ohm ANT IN input on back
of Digital Satellite Receiver
I
MPORTANT NOTES
Procedure
r Connect the cable wire provided by your local cable provider.
Incoming Cable from
Cable Provider
75 Ohm ANT IN input
on back of Digital Satellite
Receiver
9
Page 11

F
RONT AND REAR VIEW OF THE DIGITAL SATELLITE RECEIVER
Front and Rear View of the Digital Satellite Receiver
Front Panel
Menu button
Power indicator LED
Navigation buttons
Info bu ttto n
Smart Card
(behind door)
POWER
Po w e r b u tto n
MENU
GUIDE
INFO
ACTION
Navigation buttons
Panasonic
DIGITAL SATELLITE RECEIVER
Remote Control sensor
Actio n b u tto nGuide button
POWER Turns the Digital Satellite Receiver On.
MENU Press to enter and exit Roller Guide Menu system.
GUIDE Press to access the Advanced Program Guide™.
INFO Press to display the Channel banner or to search within the
Guide.
ACTION Press to enter selection from the Guide or from the Menu.
NAVIGATION
BUTTONS Press the navigatio n arrows to move t he highlight up, d own, left
or right.
SMART CARD Also known as Access Card, identifies you to your program
providers. The DIRECTV Sy ste m r equ ires a v ali d car d. (S li de th e
door to the right to access the smart card.)
10
Notes:
r DIRECTV programming sold separately.
r Programming subject to change. You must be physically located in the U.S. to receive
DIRECTV service. DIRECTV services not available outside the U.S. DIRECTV
programming is sold separately and independently of DIRECTV System hardware. A valid
programming subscripti on is re quired t o operat e DIRECT V System h ardware. Ac tivate your
DIRECTV programming today at 1-800 DIRECTV (1-800-347-3288).
Page 12

Rear Panel
F
RONT AND REAR VIEW OF THE DIGITAL SATELLITE RECEIVER
SATELLITE IN jack
SATELLITE
IN
NTSC OUTPUT
R-AUDIO-L VIDEO
NTSC OUTPUT
VHF/UHF
IN
VHF (SAT) /UHF
OUT
VHF (SAT) /UHF
OUT Jack
TEL LINE
Tel Line
UHF/VHF IN Jack
AC IN
AC POWER INPUT
SATELLITE IN Use to connect DIRECTV satellite d ish antenn a to the Dig ital
Satellite Receiver.
VHF/UHF IN Use to connect an off-air antenna or cable TV signal to the
Digital Satellite Receiver. This input serves as a passthrough
for off-air antenna or cable signal when the user presses the
TV/SAT button or when the Digital Satellite Receiver is
powered off.
VHF (SAT) / UHF Use to connect the Digital Satellite Receiver to your TV.
OUT
NTSC OUTPUT Use to connect the Digital Satellite Receiver to a TV or
Monitor. By using the audio/video jacks, you will get better
picture and sound quality.
TEL LINE Use to connect a pho ne line to the Digital Sa tellite Receiver
to enable receipt of certain DIRECTV
®
services.
11
Page 13

F
EATURES OF THE DIGITAL SATELLITE RECEIVER
Features of the Digital Satellite Receiver
DIRECTV Channel Banner
The Channel Banner is ava ilable with DIRECTV® programming to show you which
channel and pro gr am you ar e cu rren tly v i ewing or h ave s el ec ted. The fo ll owin g fig ur e
shows the DIRECTV channel banner. The DIRECTV channel banner description area
can be expanded, if the user presses the INFO key.
Any Given Sunday
Any Given Sunday
105
3:00 PM - 5:37 PM Mon 10/30/00 3:23 PM
3:00 PM - 5:37 PM Mon 10/30/00 3:23 PM
Movie. Drama. (1999) Al Pacino, Cameron Diaz, Dennis
Movie. Drama. (1999) Al Pacino, Cameron Diaz, Dennis
Quaid. Oliver Stone scores with this tale of egos colliding on
Quaid. Oliver Stone scores with this tale of egos colliding on
& off the pro football field. All Day Ticket. AC, AL.
& off the pro football field. All Day Ticket. AC, AL.
DTV
DTV
ALL CH
ALL CH
CC
CC
The DIRECTV Channel Banner
In addition to viewing the program description, the user can add or remove the
channel from the favorite chan nel list. This is accom plished by navig ating left or right
and pressing the ACTION key.
Channel Banner: Favorite Channel List
The favorite channel list is a customized list that allows you to create your own unique
channel list. The favorit e chan nel lis t is act ive when yo u selec t the “FAV CH” mode in
the guide screen. By default, the “ALL CH” mode is selected. Also, by default, both the
“ALL” mode and “FAV” modes default to all the channels selected in their lists.
When the description of the channel banner is expanded, the user now has the
opportunity to add or remove a channel from the favorite list. By default,
Delete from FAV button is highlighted when the Channel Banner is expanded. Once a
channel is removed from the favorite li st, the user is require d to numerically e nter in
the channel number to vi ew that cha nnel, a t which ti me the user can ad d the chan nel
back into the favorite channel list.
The following figure depicts the Channel Banner, when the Description area is
highlighted.
Rating R
Rating R
12
ALL CH
Delete from FAV
Channel Banner
Page 14
F
EATURES OF THE DIGITAL SATELLITE RECEIVER
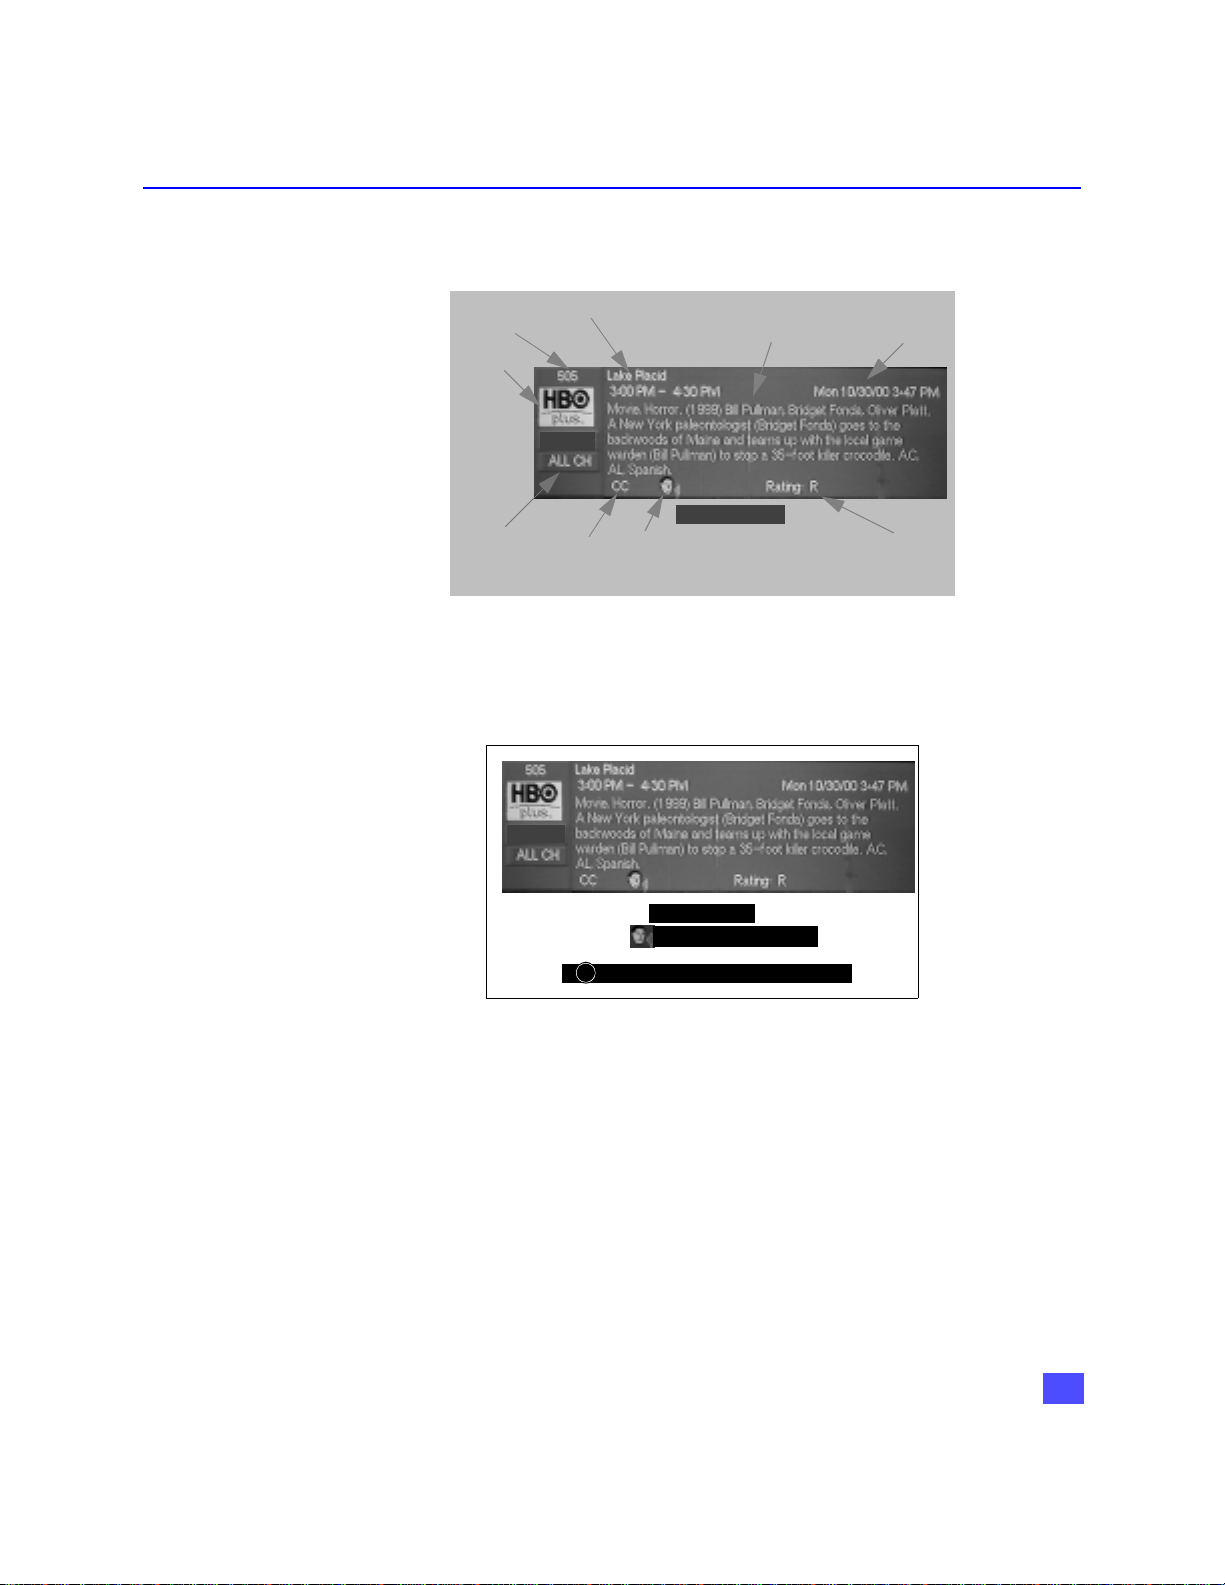
Channel Banner: Components
The Channel Banner is used to show you which channel and program you are
currently viewing or sele cting. The figure below indicate s the various components of
the Channel Banner.
Channel
Number
Channel
Name
Title and duration
Description
System Clock
Channel Surf
Mode
(FAV or ALL CH)
Closed
Caption
Icon
Delete From FAV
Alternate
Audio Icon
Rating Level
Channel Banner Components
The following figure display s some of the information tha t can possibly be displayed ,
simultaneously.
Delete from FAV
Audio Track (1of 2) English
i
Press INFO if you want to purchase this event.
Channel Banner with OSD Messages
13
Page 15

F
EATURES OF THE DIGITAL SATELLITE RECEIVER
Icons: Channel Banner
The Channel Banner contains sev eral icons tha t are displaye d only when the featur e
is available and is supported by the Digital Satellite Receiver. The following figure and
table depicts the location and appearance of these icons.
Icon Name Icons Description Icon Appearance
Viewing Modes
Messages
Lock
Alternate Audio
Closed Captioning
Indicates that there is an unread
message.
Indicates that the channel is locked
due to either limits on spending or
by content advisory.
Indicates that the current program
has multiple audio tracks.
Indicates that the program has
Closed Captioning.
CC
This section descr ibes the user inter face that is direc tly controlled by remote or front
panel. The following operational modes are supported by this interface:
• Tuning Mode
• Recall Display Mode
• Exiting T uni ng Mo de
Normal Viewing Mode
Normal Viewing Mode is defined as only the video being displayed and possibly
closed captioning data. When Digital Satellite Receiver is first powered on, it will be in
the Normal Viewing mode.
Note: The first time the
exceeding the MPAA or TV rating limits and channels not authorized by DIRECTV are
shown.
Digital Satellite Receiver
is powered On, all channels except those
Once the user has created a favorite channel list , the Digital Satellite Receiv er will
channel surf on ly to channels t hat are part of the fav orite channel lis t. The user may
tune to a channel that is not a member of the favorite channel li st by entering in a
channel number, explained in the Dir ect Tuning Method section. The user m ust add
this channel using the menu system .
14
Page 16

Tuning Mode
F
EATURES OF THE DIGITAL SATELLITE RECEIVER
Power On Requirements
When the Digital Satellite Receiver is powered on, the receiver wil l tune to the last
tuned channel. If this chann el no long er exists, the receiver wi ll tune to c hannel 100 .
Prior to initial setup of the rece iver, the receiver may automatically go to Setup menu
or tune to channel 100.
The Tuning Mode happens when the user attempts to change the channel. The Digital
Satellite Receiver will support 3 ways to change the channel, as outlined below:
Method Result
• Direct Tuning (0-9 and PROG keys) Tunes directly to a channel using
either single or compound numbers.
• Channel UP/Down Tuning (pqkeys) Tunes to the next/previous available
channel.
• Rapid Tune (R-TUNE) Switches between the last two
channels, accessed. This is
accomplished using the R-TUNE key
on the remote.
Direct Tuning Method
The Digital Satellite Receiver supports the tuning of either single or compound
channel numbers. The single channel numbers range from (0 to 9999) and compound
channel numbers (major-minor) can range from (0-0 to 999-99)*. The compound
channel number uses the “PROG” button to enter the minor number field. Following is
an example of Direct tuning screen.
345-78
MSNBC
FAV CH
Star Battle
9:00 PM - 10:00 PM
“The battle of the universe begin when the evil…”
CC
Direct Tuning example
9:15 PM
Sun 3/21/01
RATING: T V- PG
*For example, 120-1 is an example o f a compoun d number. 120 is the major number
and 1 is the minor number.
15
Page 17

F
EATURES OF THE DIGITAL SATELLITE RECEIVER
Tuning Mode (Cont.)
Example of Non-compound (Single) Channel Number Input
For example, to tune channel 345, you enter the channel number by using the number
keys (0-9) on th e remote control. Then pr ess the ACTION button which causes the
tuning event to occur.
Example of Compound Channel Number Input
A compound num bers (ma jor-mi nor) can range from ( 0-0 to 999- 99). For ex ample , to
enter channel number 345-78, you do the following.
• Press the numeric buttons 3, 4 and 5 on the remote control.
• Press PROG button to enter the minor number field.
• Press number 7 and 8 buttons on the remote control.
• Pres s A CTION button to complete the tuning event.
Note: If you do not enter a number after 3 seconds, the number 0 is assumed for the minor
number.
Unavailable Channel Selection
The “Channel Not Available” screen is displayed when you select an unavailable
channel. The following is a list of some possible situations where an unavailable
channel selection may occu r.
r Tuning to a channel that is not transmitting any programs.
r Tuning to a channel that is blocked either by spending or content advisory limits.
r The signal strength of the RF signal is insufficient to obtain consistent error free data.
Following is a example of Channel Not Available screen.
Random Hearts
119
DTV
ALL CH
4:30 PM - 5:4 5 PM
Movie, Drama, Harrison Ford, Kristin Scott Thom
Rating Limit Exceeded.
Press ACTION to Override.
Wed 05/03/00 6:00 PM
Rating: R
Channel Not Available Screen
The following is an example of insufficient credit.
For ordering information, please call
i
customer service, ext. 732.
16
Page 18

Getting Started
Step 1. Connect AC Power Cord
Plug the AC power cord into a gro unded outle t. Do not turn on a ny devices until yo u
have finished making all necessary connections.
Step 1a. DIRECTV Satellite dish Connection
Connect the DIRECTV Satellite dish downlead to the Satellite In jack on the rear panel
of the Digital Satellite Receiver.
SATELLITE
DISH
G
ETTING STARTED
Note: With this receiver and the proper satellite dish antenna, you may be able to subscribe
to local channels from DIRECTV in certain markets. Additional equipment may be
required in s ome a r eas. Ch e ck wi t h yo ur re ta il er or visi t DI RE CT V.com for inf or m ati on
on availability of local channels from DIRECTV in your area.
Step 1b. Antenna/Cable Connection
Connect the antenna or cable wire to the VHF/UHF IN jack on the rear panel of th e
Digital Satellite Receiver. The signal from the terrestrial antenna or cable will be
passed through when the user presses the TV/SAT button on the remote co ntrol or
when the digital satellite receiver is off. The RF output of the Digital Satellite Receiver
must be connected to the television.
SATELLITE
SATELLITE
IN
NTSC OUTPU T
R-AUDIO-L VIDEO
IN
NTSC OUTPU T
R-AUDIO-L VIDEO
VHF/UHF
IN
TEL LINE
VHF (S AT) /UHF
OUT
CABLE OR OFF-AIR ANTENNA
VHF/UHF
IN
TEL LINE
VHF (S AT) /UHF
OUT
AC IN
AC IN
17
Page 19

G
ETTING STARTED
Step 1c. Digital Satellite Receiver connection to TV or Monitor
Follow this diagram when connecting the Digital Satellite Receiver to a Television or
Monitor.
SATELLITE
IN
INPUT
AUDIO
RL
VIDEO
NTSC OUTPUT
R-AUDIO-L VIDEO
ANT IN
TV
Incoming signal from
cable or antenna
VHF/UHF
IN
VHF (SAT) /UHF
OUT
NOTE: A/V CABLES AND MODEM
CABLE INCLUDED.
Digita l S a t e llite R eceiver
TEL LINE
AC IN
DIGITAL SATELLITE RECEIVER CONNECTION TO TV OR MONITOR
Procedure
• Connect the VHF (SAT) /UHF OUT to the ANT IN of the television or connect video cable
from the video output jack on the Dig ital Satellite Receiver to the vide o input jack on the TV.
• Connect audio cables from the left and right NTSC audio output jacks on the Digital
Satellite Receiver to the left and right audio input jacks on the TV.
18
To receive off-air programming (no cable box)
• Turn off the Digital Satellite Receiver or press TV/SAT button to toggle.
• Tune TV to desired channel.
To receive off-air programming (with cable box)
• Turn off the Digital Satellite Receiver or press TV/SAT button to toggle.
• Tune TV to cable box output channel (either CH3 or Ch4).
• Tune the cable channels using the cable box.
Note: Modem should also be connected to a telephone jack using the cable supplied RJ11C
cable if impulse pay per view services are desired.
Page 20

G
ETTING STARTED
Step 1d. Digital Satellite Receiver, Satellite dish, Cable box and terrestrial antenna
Follow this diagram if you have Satellite service, cable box and terrestrial antenna.
Cable or terrestrial ante nna signal i s passed through wh en you press TV/SAT button
to toggle or when the Digital Satellite Receiver is turned off.
CABLE BOX
NOTE: A/V CABLES AND MODEM
CABLE INCLUDED.
A/B SWITCH
AC IN
ANT IN
TV
VIDEOR-AUDIO-L
Dig ita l Satellite R eceiver
SATELLITE
IN
NTSC OUTPUT
R-AUDIO-L VIDEO
ANT IN ANT OUT
UHF/VHF
IN
VHF (SAT) /UHF
OUT
TEL LINE
DIGITAL SATELLITE RECEIVER, SATELLITE DISH,
CABLE BOX AND TERRESTRIAL ANTENNA
Procedure
• Connect the antenna cable to one of the inputs (A or B) of the A/B switch.
• If using a cable box, connect the cable wire from the wall jack to the cable box ANT
(antenna) IN jack using a standard RF cable with coaxial connector and connect the cable
box ANT (antenna) OUT jack to the other input (A or B) of the A/B switch.
• If not using a c ab le b ox , c onnect the cable wire from th e wall jack to the sec ond inp ut of the
A/B switch using an RF cable (not shown).
• Connect the OUT signal of the A/B switch to the ANT IN jack of the Digital Satellite
Receiver.
• Connect the VHF (SAT) /UHF OUT jack to the Conventional TV or Monitor by using a RF
cable.
• Connect the NTSC OUTPUTS of the Digital Satellite Receiver to the A/V inputs of the
television or monitor.
Note: If viewing video using RF Input, select either CH 3 or CH 4 in TV Output section in the
Setup menu. Tune your television to the same channel (either CH 3 or CH 4).
19
Page 21

G
ETTING STARTED
Step 1e. Digital Satellite Receiver Connection to VCR
Follow this diagram when connecting the Digital Satellite Receiver to a standard VCR.
R-AUDIO-L VIDEO
SATELLITE
IN
TV
R-AUDIO-L VIDEO
NTSC OUTPUT
R-AUDIO-L VIDEO
ANT IN
VCR
ANT OUT
VIDEO OUT
VIDEO IN
VHF (SAT) /UHF
ANT IN
Incoming Signal from antenna or cable
DIGITAL SATELLITE RECEIVER
VHF/UHF
IN
TEL LINE
OUT
NOTE: A/V CABLES AND MODEM
CABLE INCLUDED.
AC IN
20
VCR SETUP
Procedure
• Connect video c able from the vi deo outp ut jack on the Di git al Sat ellite Receiv er to the v ideo
input jack on the VCR.
• Connect audio cables from the left and right audio output jacks on the Digital Satellite
Receiver to the left and right audio input jacks on the VCR.
• Connect video cable from video output jack on the VCR to video input jack on TV.
• Connect the audio out cables from the audio output jacks on the VCR to the audio input
jacks on the TV.
To record off-air programming
• Turn off satellite receiver or press TV/SAT button to toggle. Tune the VCR to desired
channel and push record button on the VCR to start recording
Note: This Digital Satellite Receiver incorporates an anticopy process technology that
is protected by U.S. patents and other inte llec tual property rights me asure s. Th e
anticopy process is licensed for non-commercial, home use only. Reverse
engineering or disassembly is prohibited.
Page 22

Step 2. Turning Digital Satellite Receiver On
Procedure
• Press the Remote Control SAT mode button .
• Press the POWER button.
Note: Monitor/TV should also be turned on.
Step 3. Roller Guide Menu™
Press the MENU button to display the Roller Guide Menu*. P ress the or arrow
on the ACTION button to rotate the Roller Gui de . P re ss th e arrow on the ACTION
button to exit the Roller Guide Menu.
Panasonic
ROLLER GUIDE MENU SELECTIONS
G
ETTING STARTED
T
A
S
Note: To exit the Roller Guide Menu, press the arrow on the ACTION button, press the
MENU button or press the EXIT button on the remote control.
Step 3a. ACTION / Navigation Button
Press ACTION to select th e Roller Guide Menu item. Press the or arrows to
highlight sub menus . P ress th e arrow to select features. Press th e or arrows
to scroll through optio ns within a fea ture. Press the arrow to return to main menu
items.
Remote ACTION / Navigation Button
CH
CH
pq
for more features
Press ACTION to enter.
21
Page 23

R
EMOTE CONTROL
Remote Control
POWER
Press to turn ON and OFF.
ACTION
Press to access sub menus or
display Main Menus.
Press to activate wink enabled
transactions (available in the
future).
MENU
Press to access Roller Guide
Menu.
INFO
Press to display time, channel
banner, and other options.
“0” ~ “9”
Press numeric keypad to select
any channel.
EXIT
Press to exit SAT Guide or DVD
menu.
GUIDE
Press to select STB Guide or DVD
menu.
TV/SAT TV/VCR
Press to select VIDEO inputs in TV
mode.
Press to switch between TV and SAT
in SAT mode or to switch between
TV and VCR in VCR mode.
SAT VCR DVD TV
Press to select remote operation
mode.
PROG (Program) / MUTE
Press to enter the 2-digit minor
number in a compound channel
number.
Press to mute TV audio.
R-TUNE/JUMP
Press to switch to previously
viewed channel or program.
Press to skip (jump) the Guide 24
hours ahead.
22
EUR511515
CH / PAGE
Press to select Page up/down,
next/previous channel or
Slow+ / Slow-
Page 24

R
POWER
V
C
R
D
V
D
T
V
S
A
T
O
O
ACTION
EMOTE CONTROL FUNCTIONAL KEY CHART
Remote Control Functional Key Chart
Key Component Function
ALL COMPONENTS Turn components On and Off
CH
CH
MENU
INFO
EXIT
ALL COMPONENTS
Component mode selection for
Remote Control
TV SAT VCR DVD
CH
Channel up/down
Up navigation
Down navigation
CH
TV
SAT
DVD
AUDI
TRACK
/ VO L
AUDI
TRACK
/ VO L
Left and right navigation
Exit Roller Guide Menu
Select and adjust features
Select audio tracks
Roller Guide Menu
Main menu selections
Select
Activates wink enabled transactions (available in the future)
SAT
DVD TV
TV VCR DVD
SAT
Roller Guide Menu
Menu
On screen display
SAT Pr ogram Info
SAT Exit Menus
GUIDE
R-TUNE/JUMP
PROG/MUTE
REC
SAT Guide
TV SAT
SAT
DVD
SAT
TV VCR DVD
Previous channel
Skips the GUIDE 24 hours ahead
Title
Press to enter the 2- digit minor
number in a compou nd number.
Mute TV audio
VCR Record
23
Page 25

R
p
q
EMOTE CONTROL FUNCTIONAL KEY CHART
Remote Control Functional Key Chart
Key Component Function
REW
PLAY
u
FF
STOP
TV / SAT
TV / VCR
PAUSE
CH / PAGE
DVD
VCR
VCR DVD
DVD
VCR
VCR DVD Stop
TV
SAT
VCR
DVD
VCR
SAT
VCR
DVD
Skip / Search Rewind
Rewind
Play
Skip/Search Fast Forward
Fast Forward
Selects Video inputs
Switch between TV and SAT
Switch between TV and VCR
Still / Pause
Pause
Page up/down
Channel up / down
Slow +/-
24
1 2 3
4 5 6
7
TV SAT VCR DVD
CD
98
Selects channel number
Selects code
Selects tra ck
0
Battery Installation
Incorrect installation c an cause battery leakage and co rrosion that will damage the
Remote Control.
Use two AA batteries:
Remove the battery co ver by pushing in near the arrow an d sliding the cover
back.
Install batteries matching (+) and (-) polarity signs.
Replace the battery cover.
Precautions
• Replace batteries in pairs.
• Do not mix battery types (zinc carbon with alkaline).
• Do not recharge, short-circuit, heat, burn, or disassemble batteries.
Page 26

Special Remote Buttons
MENU
MENU button
The MENU button is us ed to enter and exit the Rol ler G ui de Me nu s y ste m. Eac h tim e
the MENU butto n is pres sed, the R oller Gui de will appear on an d disapp ear from th e
viewing screen.
INFO
INFO button
The INFO button lets you view Satellite program display and other on-screen displays
when you are in TV, VCR or DVD operating modes.
GUIDE
GUIDE button
The GUIDE button lets you bring up the Satellite guide.
TV/VCR
TV/SAT
TV/SAT / TV/VCR button
The TV/SAT button lets you switch between TV and satellite programming.
The TV/VCR button lets you switch between TV and VCR programming.
While in TV mode, this button lets you select TV video inputs.
S
PECIAL REMOTE BUTTONS
R-TUNE/JUMP button
In TV or SAT mode, the R-TUNE/JUMP button quickly switches between two
channels or programs.
If you press this button while viewing the Program Guide, the Guide will skip 24 hours
ahead. Each time y ou press this button, the Guid e will jump 1 day ahead. You can
jump (skip ahead) th e Guide three times . At the fourth try, the Guide will display th e
original screen.
In DVD mode it will let you select titles.
PROG/MUTE
PROG/MUTE button
In TV, VCR or DVD mode, the PROG/MUTE button mutes the audio.
In SAT mode, press the PROG/MUTE button to enter the 2 digit mi nor number in a
compound number.
CH / PAGE
CH/PAGE button
q
In SAT mode, press PA GE p or PAG E q button to scroll up or down through the
Program Guide quickly.
In TV or VCR mode, press to change channels.
R-TUNE/JUMP
p
25
Page 27

P
ROGRAMMING THE REMOTE CONTROL
Programming the Remote Control
The Universal Remote Co ntrol can be progra mmed to operate ma ny manufacturers’
components using the component function buttons for TV, VCR, DVD. Follow the
procedures for programming your Remote Control with and without codes for the
component. Determine t he manufacturer of the c omponent and look in t he table for
the code.
Programming With Code
• Confirm that the external component is plugged in and is turned on.
• Turn the component off.
• Press the ACTION and POWER button, tog ethe r, for at least 5 seconds and
then let go of the buttons.
• Press appropriate component button (TV , VCR, DVD) on the Remote Control.
• Enter the 3-digit componen t code using the Remote Contr ol numeric keypad
(0 ~ 9 buttons). If a proper c ode wa s e ntered , the mode button will blink twi c e
and go out.
• Press the Remote Control POWER button to test the component. If the
procedure was successful, the component will turn on.
Unsuccessful Code
Programming Without Code
This procedure searches all codes and is called the “sequence method”.
• Confirm that the external component is plugged in and is turned on.
• Turn the component off.
• Press the ACTION and POWER button, together, for at least 5 seconds, and
then let go of the buttons.
• Press appropriate component button on the Remote Control.
• Press the button to move forward to the next code. P ress the button to
move backward.
• Press the Remote Control POWER button to test the component. If the
procedure was successful, the component will turn on.
Note: Repeat the preceding two steps until the component code is found. It may take many attempts
before the correct code is found.
• After the code is found, press the AC TION button to store the code.
If the component does not operate with the Remote Control,
repeat the procedure using another code. (Some brands have
multiple codes.)
If an incorrect code is entered, or if the procedure takes longer
than 30 seconds, the programming will fail.
26
Page 28

C
OMPONENT CODES
Component Codes
The Universal Remote Control is capable of operating many component brands after entering a code.
Some components may not ope rate beca use memory is limited. The Universal Remote Control does not
control all features in all models.
Codes for TV
Brand Code
Akai 104
Centurion 104
Daewoo 104, 106
Emerson 104, 108, 109, 110, 120
Fisher 111
GE/Panasonic/
Quasar
GE/RCA 112
Hitachi 113
JVC 114
Magnavox 104, 115, 116
Marantz 117
101
Brand Code
Denon 100
Ferguson 101
JVC 108, 109
Mitsubishi 105
Nordmende 101
Panasonic 100
Philips 103
Pioneer 102
Brand Code
Panasonic 100, 101, 102
Pioneer 101, 107, 118
Proscan 104, 112, 119
Quasar 101, 103
Radioshack 104, 112, 117, 120
RCA 104, 112, 119, 121, 122
Samsung 104, 123
Sears/Toshiba 104, 107, 111, 112, 115
Sharp 120, 124
Sony 125
Zenith/Inteq 126, 127
Codes for DVD
Brand Code
RCA 101
Saba 101
Samsung 110
Sharp 108
Sony 104
Thomson 101
Toshiba 103
Yamaha 100
Zenith 107
Write the code numbers for your components in the space provided below. This will serve as a reference
when you need to reprogram your remote control.
Television VCRDVD
27
Page 29

C
OMPONENT CODES
Codes for VCR
Brand Code
Admiral 135
Aiwa 132
Akai 129, 114, 115, 116
Audio Dynamic 111 , 139
Bell & Howell 105, 113
Broksonic 120, 126
Canon 123, 125
CCE 143
Citizen 106
Craig 105, 106, 129
Curtis Mathes 124, 127, 145
Daewoo 101, 124, 143
DBX 110, 111, 139
Dimensia 145
Emerson 103, 118, 119, 120, 125, 126, 141, 143
Fisher 105, 107, 108, 109, 113
Funai 120, 126, 127, 134
GE 124, 133, 145
Go Video 137, 149, 150, 151
Goldstar 106
Gradiente 134
Hitachi 100, 123, 127, 145
Instant Replay 123, 124
Jensen 139
JVC 110, 111, 134, 139
Kenwood 106, 110, 111, 139
LXI 100, 105, 106, 107, 108, 109, 127
Magnavox 123, 124, 131
Marantz 110, 111, 139
Marta 106
Memorex 109, 124
MGA 138, 140, 141, 147, 148
Minolta 100,145
Mitsubishi 138, 140, 141, 147, 148
Multitech 104, 127, 147
NEC 110, 111, 134, 139
Olympic 123, 124
Optimus 106, 121, 128, 135
Brand Code
Orion 120, 126
Panasonic 121, 122, 123, 124
Penney 100, 105, 110, 111, 124, 139, 145
Pentax 100, 111, 145
Philco 120, 123, 124, 126, 127, 131
Philips 123, 124, 131, 173
Pioneer 123
Proscan
Quasar 121, 122, 123, 124
Radio Shack 105, 109, 124, 127, 133, 136, 140
RCA 100, 102, 123,124, 131, 133, 145, 146
Realistic 105, 109, 124, 127, 136, 140
Samsung 102, 104, 133, 137
Sansui 120, 126, 139, 152
Sanyo 105, 109, 113
Scott
Sears 100, 105, 106, 107, 108
Sharp 135, 136
Shintom 117
Signature 2000 127, 135
Singer 117
Sony 128, 129, 130
SV2000 127
Sylvania 123, 124, 127, 131
Symphonic 127
Tashiro 106
Tatung 11 0, 111, 139
Teac 110, 111, 127, 139
Technics 121, 122,123, 124
Teknica 112, 124, 127
To shiba 146
Vector
Research
Yamaha 105, 110, 111, 139
Wards 106, 109, 135, 136, 144
Zenith 106, 144
100, 101, 102, 123,124, 131, 133, 145,
146
102, 104, 109, 120, 126, 138, 140,
147, 148
111
28
Page 30

S
PECIAL FEATURES OF DIGITAL SATELLITE RECEIVER
Special Features of Digital Satellite Receiver
Impulse Pay Per View (IPPV)
You mus t connect your phone line to the Digital Satelli te Receiver to receive pay per
view (PPV) service offered by DIRECTV. Connec ting the phone line permits you to
use the IPPV feature, which allows event purchases without calling a CSR (Customer
Service Representative). If you decide against connecting to your phone line, you
must call the CSR to purchase events, such as pay per view movies*. DIRECTV refers
to such CSR assisted purchases as OPPV (Order ahead pay per view).
When OPPV or subscript ion auth or izati on c ha nges (e.g. , customer cancels the mov i e
purchases), the Digital Satellite Receiver will reflect that change immediately. The
Digital Satellite Receiver will display a message, identifying the reason for the
authorization status change.
The Digital Satellite Recei ver has the ability to allow you to purchase a PPV event
offered by DIRECTV. When the Digital Satellite Receiver is tuned to an IPPV channel,
(video may or may not be displayed, depending upon whether the PPV eve nt has
started) the following message is displayed on the screen.
Purchase available - Press ACTION for purchase information.
IPPV message with video in the background
*An additional fee applies to all pay per view phone-in orders.
29
Page 31

S
PECIAL FEATURES OF DIGITAL SATELLITE RECEIVER
If you press the ACTION key, the PPV window will be displayed. Once a PPV event
starts, video and audio coul d be displayed for 5 minutes into the P PV event. After 5
minutes have elapsed, video and audio are removed from the screen. You can
purchase the current PPV event up to 30 minutes after an event ha s started. If the
PPV event passes the 30 minutes from the event starting time, a message will be
displayed and video will be blocked as shown below and you will not be able to
purchase the program.
This showing is no longer available.
Check Program Guide for other show times.
30
Impulse pay per view: Icons
The Channel Banner will contain several icons that are displayed only when the
feature is available and is supported by the Digital Satellite Receiver.
The following figure depicts the PPV window. If you decide to buy the event or buy and
record the event, a nother confirmation win dow is displayed, r equiring you to c onfirm
the purchase before completing the transaction.
Swift, Smart and Deadly
345
Sun 3/21/01 9:15 PM
“Test the limits of shark smarts with two New Zealand
Buy
researchers as they hand feed sharks...” Thriller,
Record
Times...
Cancel
Drama, Sports (1999)
John Smith, Jane Doe, Joe Miller - The Sharks...
PG-13 Movie
Buy: $3.99
1Hr 23 Min 9:00 PM 3/22/01
PPV Window
Page 32

S
PECIAL FEATURES OF DIGITAL SATELLITE RECEIVER
You will be given a choice of whether you wi sh to Pu rchase ( OK) or Cancel th is PPV
event, as shown below.
Swift, Smart and Deadly
345
Sun 3/21/01 9:15 PM
“Test the limits of shark smarts with two New Zealand
Buy
researchers as they hand feed sharks...” Thriller,
Times
Drama, Sports (1999)
John Smith, Jane Doe, Joe Miller - The Sharks...
Exit
CC PG-13
MSNBC
Buy: $3.99
1 Hr 23 Min 9:00 PM 03/22/01
Do you want to purchase this event?
Cancel
OK
PPV Confirmation Window (Buy Event)
Swift, Smart and Deadly
345
Sun 3/21/01 9:15 PM
“Test the limits of shark smarts with two New Zealand
Buy
researchers as they hand feed sharks...” Thriller,
Record
Times
Exit
Drama, Sports (1999)
John Smith, Jane Doe, Joe Miller - The Sharks...
CC PG-13
MSNBC
Buy: $2.99 Record: $4:00
1Hr 23 Min 9:00 PM 3/22/01
Do you want to purchase this event?
Be sure that
Your VCR is set to record.
Cancel
OK
PPV Confirmation Window (Buy and Record Event)
You can also select other time to view this event, as shown below. After you have
selected a different time, the PPV confirmation screen is displayed.
345
Buy
Record
Times
Cancel
Swift, Smart and Deadly 9:15 PM
Sun 3/21/01
Ch. 345 9:00 PM 11/28/01
Ch. 345 9:00 PM 11/29/01
Ch. 345 11:00 PM 11/29/01
Ch. 345 9:00 PM 11/30/01
Ch. 345 11:00 PM 11/30/01
Ch. 345 9:00 PM 12/01/01
Press ACTION for purchase information
PPV Other Times Window
31
Page 33

S
PECIAL FEATURES OF DIGITAL SATELLITE RECEIVER
Software Upgrade Messages
The Digital Satellite Receiver has the ability to receive download replacement
software. This will allow th e Digital Satellite Receiver software to be upgraded. The
Digital Satellite Receiver will prompt you when an update is required. You have the
ability to reject or cancel the update at this time. However, this notification will
repeatedly occur until you have upgraded the software.
The Digital Satellite Recei v er wil l fir st dis play and upd ate mes s age when the uni t is in
the tuning mode. This OSD will al low you to begin or cancel the software download,
as shown below.
Software upgrade is required.
Do you wish to begin upgrade?
Software Upgrade Message
Start
Cancel
If the user elects to download software when prompted, an approximate time
remaining for download will be displayed, as shown below.
Time remain for software download...
5:20
Time Remain for Software Download
If you elect to cancel the downl oad, the user will be prompted again to perfor m this
download every time th e user turns ON the Digital Satellite Recei ver. Thi s software
download message will occur, until the Digital Satellite Receiver unit has been
updated.
32
Page 34

Roller Guide Menu™
Press the MENU button on the Remote Control to display the Roller Guide Menu™*.
Press the p or q arrow to rotate the Roller Guide. Press the ACTION button to enter
a category submenu screen, where the options for that category can be changed.
Press the t arrow to exit the Roller Guide Menu.
The Roller Guide scr een is the e ntr y poi nt for al l m enu oper at ion s o n the sy st em. Th e
first time that the Digital Satellite Receiver is powered ON, the SET UP category is the
default state. The main menu provides access to the following categories:
• Guide
•Lock
• Account
• Options
•Setup
• Timer
Panasonic
R
OLLER GUIDE MENU
ROLLER GUIDE MENU SELECTIONS
™
Note: To exit the Roller Guide Menu, press the arrow on the ACTION button or press t h e
MENU button.
ACTION / Navigation Button
Press the ACTION button to select main menu items. Press the or arrows to
highlight sub menus. Press the arrow to select features. Press the or arrows
to scroll through options within a feature. Press the arrow to return to main menu
items.
Remote ACTION / Navigation Button
*Roller Guide Menu is a trademark of Panasonic Consumer Electronics Company. U.S. patent pending.
pq
for more features
Press ACTION to enter.
33
Page 35

R
OLLER GUIDE FEATURE CHART
Roller Guide Feature Chart
Roller Guide Feature Chart
M
ENU
Satellite Setup
MONITOR
System Test
Access Card
TV Output
D
ESCRIPTION
SET UP
r Dish Type - Lets you choose Oval or
Round dish.
r Sat. Ports - Selects up to 4 nominal
satellite configuration or lets you perform
auto-detection. The user can select:
• Dish Type : Oval or Round
• Satellite A and B
• Satellite A, B, and C
• Auto Configuration
r Dish Position - Digital Satellite Receiver
displays the proper co-ordinates for the
particular zip code.
r Signal Meter - Shows the strength of the
selected satellite signal.
r TYPE
• 4:3 (default setting) for conventional
TV screen.
• 16:9 for wide screen.
r System Test - Invokes system test
available for Satellite Input.
r Access card - Remapping of information.
(Use only when instructed by DIRECTV.)
r TV Setup - Lets you set the RF output of
the Digital Satell ite Receiv er to Ch 3 or 4 so
that you can connect the output to the ANT
IN jack of your television.
34
GUIDE
Guide provides Channels and Program
information to the user.
Note: The Guide i s active in the S AT mod e
only.
Page 36

R
OLLER GUIDE FEATURE CHART
Roller Guide Feature Chart (Cont.)
M
ENU
TIMER 1
TIMER 2
TIMER 3
TIMER 4
TIMER 5
TIMER 6
TIMER 6
TIMER 7
TIMER 8
r MODE - Select one of the following:
• OFF (default setting) to disable timer.
• ON to turn on Digital Satellite Receiver only .
(Must turn TV on to view the event).
• Repeat (weekly or once)
r DAY - Select the day of the week to
activate timer.
• START - Select time for timer to start.
• STOP - Select time for timer to stop.
r CHANNEL - Select the channel for STB to
tune to at appropriate time.
Note: Whenever the antenna or cable mode
is changed, Timers will revert back to
default settings.
D
ESCRIPTION
TIMER
LOCK
Unlock
Movie Limits
TV Limits
Ch Locks
Spending
Password
r Unlock - Lets you un loc k or lo ck t he Di gita l
Satellite Receiver.
r Movie Limits- Lets you block out movies
based on MPAA ratings.
r TV Limits- Lets you block out TV programs
based on TV Parental Guide ratings.
r Ch Locks - Lets you lock satellite channels
from being displayed. Need to enter
password to view these channels.
r This feature allo ws the user to control the
amount per event. If the amount is be low
the event cost, you won’t be able to view
the event.
r Password - A password, the user must
provide in order to perform a function.
35
Page 37

R
OLLER GUIDE FEATURE CHART
Roller Guide Feature Chart (Cont.)
M
ENU
Future Purchases
Past purchases
Messages
D
ESCRIPTION
ACCOUNT
r Future purchases - Displays PPV events
purchased, but not aired. Also lets you to
cancel a PPV event.
r Past purchases - Lets you review PPV
purchased events. Displays CAM slot
numbers when Past purchase data is
highlighted.
r Messages - Displays message sent to the
Digital Satellite Receiver from DIRECTV
over the Satellite Link.
OPTIONS
Audio
Clock
Favorites
About
Upgrades
Features
r Audio - Selects the Format and Language
preferences.
r Clock - Lets you configure the system clock
for DIRECTV. (Clock is set automatically
when DIRECTV Service is activated.)
r Favori tes - Le t s y ou add or d ele te c ha nne ls
from the favorite list.
r About - Displays various information about
the Digital Satellite Receiver including the
model number, serial number, and the
current software version.
r Upgrades - Displays Software upgrade
information.
r Features - Displays the feature list of the
Digital Satellite Receiver.
36
Page 38

Roller Guide Menu Operations
Setup
To help you with the initi al set up of the Digital Satellite Rec eiver, the Setup menu is
displayed automatic ally when the Digital Satellite Receiver is turned on for the first
time. A setup wizard will help guide you through the procedure of setting up the proper
satellite configurations, dish type, monitor and TV output setup. The Setup options will
assist you to conf igure the DIRECTV signals so that the unit c an receive the desired
video signals. Following are requirements that are needed to receive DIRECTV
programming.
Option
Sat. Setup Yes
Monitor Yes
System Test Yes
Access Card Yes
TV Output Yes
Setup : Satellite Setup – Dish Type
This menu lets you select the t yp e of s ate llite dish that you have i ns talled. If you h av e
round dish, select Round and if you have oval shaped dish, select Oval.
q
Sat Setup
Sat Ports
R
OLLER GUIDE MENU OPERATIONS
Setup Options
Required for DIRECTV
Dish Type
u
u
Oval
Sat A and B
®
Dish Pos
Sig Meter
Warning: Satellite dish must be
installed and positioned
properly for auto configuration
to function correctly.
Pressu to for Dish Type, q for port config.
Sat A, B and C
Auto Configuration
Satellite Setup – Dish Type
Procedure
r Press u button to highlight Dish Type.
r Press u button to change Dish Type.
r Press pq to select either Round or Oval (Round is the default setting).
r Press ACTION button to save the selection.
r Press t button once to return to Sat. Setup menu.
37
Page 39

R
OLLER GUIDE MENU OPERATIONS
Setup : Satellite Setup – Sat. Ports
After you have selected the Dish type, you can choose the satellite port configuration.
If Round dish is selecte d, then only the Satellite A configu ration is available. If you
selected Oval shaped dish, you can choose from the three configurations: Auto
configuration, Sat. A and B, and Sat. A, B and C. If you select Auto configuration
operation, the navigation buttons are disabled until the Digital Satellite Receiver
completes the auto configuration.
Sat Setup
q
Sat Ports
Dish Pos
Sig Meter
Pressu to setup satellite ports.
Dish Type
u
u
Sat A and B
Sat A, B and C
Auto Configuration
Satellite Setup – Sat. Ports Screen
Note: Please also refer to the installation manual for the satellite dish antenna for
proper mounting procedure.
Procedure
r
Press uand qbutton to setup satellit e ports configuration.
r
Press
pq
buttons to navigate a mong the choices - Sat. A and B, Sat. A , B and C, and Au to
Configuration.
r
Select Sat A & B and Auto Confi gur at ion, if you have Oval shaped di sh.
r
Press ACTION button to save the selection.
r
Press t button to return to Sat. Setup menu.
Oval
38
Page 40

R
OLLER GUIDE MENU OPERATIONS
Setup : Satellite Setup – Dish position
This screen allows you to position your Satellite antenna by having the Digital Satellite
Receiver provide approximate values for elevation, azimuth and tilt (marked in degrees),
after the you have entered your 5-digit zip code.
Sat Setup
q
Sat Ports
Dish Pos
Sig Meter
Pressu to change the zip code.
Zip code for position 92154
Elevation
Azimuth
Tilt
Enter zip code, press A CTION
51 degrees
166 degrees
101 degrees
Dish position screen
Procedure
r
In Sat Setup m enu, press
pq
buttons to highlight Dish Position. Dish Position sub menu is
displayed.
r
Press u button to enter your Zip code. Use the numeric keys on the Remote Control to input
your zip code numbers. Press
r
Press ACTION button to enter the new zip code. Elevation, Azim uth and Tilt are automatically
u
button to move to the next position.
displayed after you pr ess the ACTION button.
r
This information should be used to properly align and position the satellite antenna. These
values are approximations. Proper alignment should also be verified by using the signal strength
meter.
Setup : Satellite Setup – Signal Meter
Since the Digital Satellite Receiver is capable of receiving satellite programming from
multiple DIRECTV satellites, the user has the ability to choose one of 3 supported
satellites to receive signal strength and is primarily used during the system set-up
procedure. The Digital Satellite Receiver signal meter uses a horizontal digital signal
strength percent bar meter. The user will have the ability to select which transponder (1 to
32) they wish to measure the signal strength. The following is the signal meter screen
.
Sat Setup
q
Sat Ports
Dish Pos
Sig Meter
Pressu to change satellite.
Satellite
Transponder
Signal strength 91%
A
u
1 of 32
Signal Meter Screen
Procedure
r
In the Sat. Setup menu, press q button to highlight Signa l Met er. Sub- menu is displ ay ed.
r
Press u to highlight Satellite.
r
Press u to change Satellite
r
Press pq buttons to select Satellite A, B or C.
r
Press ACTION to enter the selection.
r
Press q button to highlight Transponder.
r
Press ubutton then pq buttons to choose one of 32 transponders. S elect the transponder
that gives you a signal stren gt h of 85% .
r
Press ttwo times to return to SETUP menu.
39
Page 41

R
OLLER GUIDE MENU OPERATIONS
Setup : Monitor
The monitor menu a llows you to match your mon itor/receiver type. You can choose
between two monitor types: 16:9 or 4:3 aspect ratio.
u
Sat Setup
Monitor
u
4:3 Aspect
System Test
Access Card
TV Output
Press u to set monitor aspect ratio.
Panasonic
Standard TV
Setup : Monitor Screen
The following table shows the ic on and messages displayed for each of the monitor
types.
Type Picture Icon Message
4:3 “Standard TV”
16:9 “DTV Wide Screen”
Panasonic
Panasonic
40
Procedure
r In SETUP menu, press q button to select Monitor.
r Press u button to highlight Monitor.
r Press u button to change monitor aspect ratio.
r Press pq buttons to select 4:3 or 16:9.
r Press ACTION button to save the selection.
Page 42

R
OLLER GUIDE MENU OPERATIONS
Setup : System Test
The System Tes t menu allows you to invok e a system test which perfo rm a check of
the following subsystems.
Component Requirement Display Information
Tuning Test
This attempts to tune to an
known frequency.
Signal Test This tests the signal strength. Status: PASSED or FAILED
Phone T est
Access Test
This checks the modem
operational status.
This checks the Access Card
function.
Card ID Card is installed in TZ-DBS01 Serial # xxxx-xxxx-xxxx
Status: PASSED or FAILED
Status: PASSED or FAILED
Status: PASSED or FAILED
Note: System test is only available for Satellite input.
The following screens show the system test screen and the system test in progress.
u
Sat Setup
Monitor
System Test
Access Card
TV Output
Press u to start system test.
System Test Screen
Procedure
r In SETUP menu, press p or q button to highlight System Test.
r Press u button to highlight Start.
r Press ACTION button to start the System Test.
r Press t button to return to Setup Menu.
Start
Tuning
Signal
Phone
Access
Card ID
Status:
Status:
Status:
Status:
u
Sat Setup
Monitor
System T est
Access Card
TV Output
Press ACTION to start the system test.
Start
Tuning
Signal
Phone
Access
Card ID
Status:
Status:
Status:
Status:
PASSED
PASSED
PASSED
CHECKING
322452186
System Test Screen (System Test in progress)
41
Page 43

R
OLLER GUIDE MENU OPERATIONS
Setup : Access Card
The Setup screen allows you to setup a new access card. You can transfer existing
access card infor mation to the new ac cess card. This procedure is ca lled “chainin g”.
When you press th e ACTIO N button while the A ccess Card is high lighte d, a s eries o f
Conditional Access driven menus will be displayed. This will direct you on what
procedures to perform.
u
Sat Setup
Monitor
System Test
Access Card
TV Output
Press ACTION to set up a new access card.
New Card Configuration:
Please insert the old Card
and press the ACTION key.
This will start the Card
duplication procedure.
Access Screen (Entry Point)
Procedure
r In SETUP menu, press p or q buttons to highlight Access Card. Follow the directions
displayed on-screen.
r Press ACTION button to setup a new access card.
r Press t button to return to Rollerguide menu.
Note: This procedure can only be used in the case where a new card is provided by
DIRECTV and is different from the card that comes with the unit.
42
Page 44

R
OLLER GUIDE MENU OPERATIONS
TV Output
This menu lets you set the RF output of the Digital Satellite Receiver to either CH 3 or
CH 4. Y ou can connect the Digital Satellite Receiver to your television, even if your TV
does not have video inputs.
u
Sat Setup
Monitor
System Test
Access Card
TV Output
Press u to change TV output settings.
Channel
Warning: Tel ev isi on mus t be
set to the selected channel!
u
4
TV Output Screen
Procedure
r In SETUP menu, press p or q buttons to highlight TV Output.
r Press u to change the TV output settings.
r Press p or q to select CH 3 or 4.
r Press ACTION button to save the selection.
Note: Prior to adjusting this feature, make sure that your TV is set either CH 3 or 4.
TV output channe l t hat you select in the SETUP menu s ho uld be the same a s
the television.
43
Page 45

R
OLLER GUIDE MENU OPERATIONS
Guide
The Advanced Program Guide™ (APG) is a key feature of the Digital Satellite
Receiver. The Guide enables you to b ro ws e th ro ugh a la rg e n umb er of pr og rams an d
provides useful information upon user request, as shown below.
If the user tries to access the Guide while it is acquiring data from the satellite signal, a
message will be di spl ayed showing the graphical countdown clo ck of when the Guide
will be ready for display.
Guide: Full Screen
44
80%
Acquiring data...
6
Guide : Acquisition Delay window
100% Acquisition Window
100%
Please Wait...
Tuning to a Program
You can select a program by highlighting the program in the Guide and pressing
ACTION button on the remote control or by directly entering the desired channel
number using the remote control number keys and pressing the ACTION button.
Page 46

R
OLLER GUIDE MENU OPERATIONS
Guide : Channel List
The guide will display channel(s) that are ei ther in the “ALL CH” or “FAV CH” mode.
The Digital Satellite Receiver default mode is “ALL CH”. The user can switch the
mode through a button in the channel banner area of the guide.
Guide : “ALL CH” mode
“All CH” mode - APG will contain all guide ‘permitted channels’.
Guide : “FAV CH” mode
“FAV CH” - APG will contain all guide defined ‘permitted channels’ except the
channels the user chose to remove. While navigating the guide in the “FAV CH” mode,
entering a number for a hidden channel ( channels that were removed by the user are
referred to as hidden channel) the next highest non-hidden channel is selected.
Procedure
r Press GUIDE button on the remote control to display the APG.
r Press INFO button on the remote control.
r Press q button to highlight ALL CH or FAV CH.
r Press ACTION button to toggle back and forth.
Picture in Guide
When in Guide, the Pictur e in Guid e featur e will display a video panel of the cu rrently
tuned channel on the top left corner of the screen. When Guide screen is active,
pressing the GUIDE key wil l cause the guide layout to toggle be tween the Standard
and Picture in Guide screen. Press the INFO key to disp lay the Category screen. If
you press the INFO or GUIDE but ton while in Category Search mode , the Category
Search will termi nate and the previous Gu ide screen (Standard or Picture in Guide)
will be displayed. Press EXIT button to exit the Guide screen.
505
Lake Placid
HBPW
3:00 PM - 4:30 PM
Movie, Horror. (19999) Bill Pullman, Bridget Fonda,
Oliver Platt. A New Yorker paleontologist goes to the
backwoods of Maine and teams up with the local game
warden (Bill Pullman ) to s top a 3 6- foot killer crocodile.
AC, AL. Spanish.
Mon 10/30/00 3:47 PM
45
Page 47

R
OLLER GUIDE MENU OPERATIONS
Searching the Guide by Categories
The APG is capable of displaying information according to the catego ries that you
have selected. For example, if you select M ovies category, then only those ch annels
broadcasting movies are displayed in the guide. You can also select sub-categories of
the category you selected.
Guide: Search Screen Guide: Search Screen - Sub categories
Procedure
r Press GUIDE button to display the Guide screen.
r Press INFO button to display the Search Screen.
r Press q button to highlight Search.
r Press u button to display categories.
r Press p or q button to highlight the desired category.
r Press ACTION button to start the search. If there are programs available in the category
you selected, they will be listed in the guide.
t
Movies
Action/Adventure
Animation
Biography
Comedy
Current Affairs
Press ACTION to search - Press INFO for Grid.
46
Following is an example of Guide showing Movie channels only.
Page 48

R
OLLER GUIDE MENU OPERATIONS
Guide : Direct Channel Entry
The APG has the ability to search for a channel based on the channel number. When
the user presses a numeric key to enter in channel numbers, a channel entry area
appears in the top left corner of the guide channel banner, as shown below.
101
Guide: Direct Channel Entry
Guide : Banner Description Icons
The Guide Banner will contain se veral ic ons that are displaye d only when the feat ure
is available and i s suppo rted b y the Digital S atellite Recei ver. The following table an d
figure shows the appearance of these icons.
Icon Name Icons Description Icon Appearance
Messages Indicates unread messages.
Lock
Alternate Audio
Closed Captioning
Indicates that the channel is locked
due to either limits on spending or
by content advisory.
Indicates that the program has
multiple audio tracks.
Indicates that the program has
Closed Captioning.
CC
47
Page 49

R
OLLER GUIDE MENU OPERATIONS
Guide (Cont.)
The following figure shows the Banner components.
Mode selection
Channel Number
Banner Icons
Guide Banner Components
Content Advisory Rating
System Clock
Guide : Banner Components
Guide : Grid
The guide grid shows information on 5 channels within 1.5 hour time span. The
channel name can be highlighted b y navigating to t he left of the grid. Fo llowing is an
example of the Channel Grid Components.
Channel Number
and Name
(5 channel span)
Time columns
(1.5 hours span)
Future continuation
indicator
48
Past continuation
indicator
Guide : Grid Components
Page 50

Lock
R
OLLER GUIDE MENU OPERATIONS
This Digital Satellit e Receiver i ncorporat es V-Chip technology to bl ock the viewi ng of
movies and television programs according to the rating category. There are 2 Content
Advisory catego ries: MPAA (Motion Picture Associatio n of Ameri ca) and TV Pa rental
Guidelines Ratings and are used as guidelines for blocking the programs.
Lock : Password
Before you can access the LOCK menu settings, you n eed to enter a 4 digit secret
code.
Procedure
r In the Roller Guide menu, press the pq buttons to highlight the LOCK icon.
r Press ACTION button to display the LOCK menu.
r Press u button.
r Use the numeric keypad to enter a four-digit secret code.
(Use a code that is easy to
remember and record it in a safe place).
Once you correctly ente rs the co de, y ou wil l ha ve acces s to the us er pr ofile a s s how n
below.
Password
Enter
_ _ _ _
Unlock
Movie Limits
TV Limits
Ch Locks
Spending
Password
Change Password
Enter
Confirm
Movie and TV Limits,
Channel Locks and
Spending Limit are active
only when IRD is locked.
- - - -
- - - -
Pressu to enter password.
Lock : Password Screen
Pressu to set or change passw or d and lock the IRD .
Lock : Change Password Screen
Once you gain access to the us er profile, the user can have acces s to the following
areas.
Settings Description
Unlock
Movie Limits
TV Limits
Ch Locks
Spending
Password
Lets you unlock and lock the Digital Satellite Receiver
so that you can view the locked channels.
This allows the user to set the movie ratings limit,
according to MPAA.
This allows the user to set TV ratings limit.
This allows the user to lock all satellite and non-
satellite channels from being displayed or unlock all
channels.
This allows the user to set the spending limit.
The user can change the current password.
49
Page 51

R
OLLER GUIDE MENU OPERATIONS
Lock: Unlock
This menu lets you unlock the Digital Satellite Receiver so that you can view the
locked channels after entering the password.
Unlock
Movie Limits
TV Limits
Ch Locks
Spending
Password
Press ACTION to unlock the IRD.
The IRD is cur r ently locke d
Press ACTION to
permanently unlock the IRD and
remove password challenges.
Unlock
Movie Limits
TV Limits
Ch Locks
Spending
Password
The IRD is now unlocked.
The IRD is currently unlocked
Press ACTION to
lock the IRD and enable
passw or d c ha ll en ges.
Unlock Screen
Procedure
r In the Roller Guide menu, press the pq buttons to highlight the LOCK icon.
r Press ACTION button to display the LOCK menu.
r Press ACTION button to unlock the Digital Satellite Receiver. The screen on the right will
be displayed.
50
Page 52

R
OLLER GUIDE MENU OPERATIONS
Lock : Movie Limits
The MPAA uses the standard movie ratings. The TV Parental Guidelines provides
rating schemes of its own: age-based ratings, content-based ratings or combination of
the two.
The following table and figure shows the MPAA ratings system.
MPAA Rating Description
NR Not Rated by MPAA
G General Audience
PG
PG-13
R
NC-17 No one 17 and under admitted
X No one 17 and under admitted
Parental Guidance Suggested. Some material may not
be suitable for children.
Parent Strongly Cautioned. Some material may be
inappropriate for children under 13.
Restricted. Under 17 requires accompanying parent or
guardian.
Unlock
NR
Viewable
Movie Limits
TV Limits
Ch lock
PG
PG-13
Spending
Password
Press u to change Movie Limits.
NC - 17
G
R
X
Viewable
Viewable
Viewable
Blocked
Blocked
Blocked
Lock : Movie Limits Screen
Procedure
r In the Roller Guide Menu, press pq buttons to highlight LOCK icon.
r Press ACTION button to display the LOCK menu.
r Press pq buttons to highlight Movie Limits.
r Press u button to display the sub-menu.
Note: You will need to enter your password to change any ratings.
r Press pq buttons to move between different ratings.
51
Page 53

R
OLLER GUIDE MENU OPERATIONS
Lock : TV Limits
The TV Parental Guidelines has 7 levels of age-based ratings that the user can select.
These 7 levels are split into 2 age-based groups: Youth Age-based Ratings and
Guidance Age-based Ratings.
Some of these age-based ratings can also have content-based ratings, denoted as
D (Dialog), L (Language), S (Sex) and V (Violence). Any non-rated program that does
not provide Content A dvisory infor mation will be viewable. Fol lowing table sh ows the
Age-based Ratings Selection.
Age-based Group
NR (Not Rated) NA
Youth
Guidance
Age-based
Ratings
TV - Y
TV - Y7
TV - G
TV - PG
TV - 14
TV - MA
Possible Content Selections
• Viewable
• Blocked
• Viewable
• Blocked
• (Fantasy) FV
• Viewable
• Blocked
• Viewable
• Blocked
• D,L,S,V (all selected)
• Any combination of D, L, S, V
• D, L S, V (all selected)
• Any combination of D, L, S, V
• L, S, V (all selected)
• Any combination of L, S, V
52
Procedure
r In the Roller Guide Menu, press pq buttons to highlight LOCK icon.
r Press ACTION button to display the LOCK menu.
Unlock
Movie Limits
TV Limits
Ch lock
Spending
Password
Press u to set TV Limits. This does not affect Movie Limits.
Press u to change TV Limits.
NR
TV - Y
TV - Y7
TV - G
TV - PG
TV - 14
TV - MA
Viewable
Viewable
FV
Viewable
D L S V
D L S V
L S V
Lock :TV Limits Screen
r Press pq buttons to highlight TV Limits.
r Press u button to display the sub-menu.
Note: You will need to enter your password to change any ratings.
r Press pq buttons to move between different ratings.
r Press ACTION button to activate or deactivate the rating level.
Page 54

R
OLLER GUIDE MENU OPERATIONS
Lock : Ch Locks
The user can lock satell ite chan nels from being di spla yed. To access these channels
when channel surfing, the user is required to enter the 4 digit secret password.
Once the user has highlighted Sat Ch Lock or Non-Sat Lock Grid, the user will be able
to easily “Unlock A ll” or “Lock All ” available chan nels. The channel numbers that ar e
underlined indicate that there are more than one minor channel number. You can also
individually cycle between the following selection by pressing the ACTION button:
• Channel Available — Green color
• Channel locked — Red color
• Channel Not Available — Black Color
Unlock
Movie Limits
TV Limits
Ch locks
Spending
Password
Press ACTION to change -INFO to view minors.
355 CNBC
Channel Available
Channel 300’s Lock All Unlock All
00 01 02 03 04 05 06 07 08 09
11 12 13 14 15 16 17 18 19
21 22 23 24 25 26 27 28 29
3132 33 34 35
30
40 41 42 43 44 45 46 47 48 49
50 51 52 53 54 56 57 58 59
60 61 62 63 64 65 66 67 68 69
70 71 72 73
80 81 82 83 85 86 87 88 89
90 91 93 94 95 96 97 98 99
55
Lock : Ch Lock Screen
Procedure
r In the LOCK menu, press p or q button to highlight CH Locks.
r Press u button.
r Press p or q to Set Group, press ACTION to display channels and press INFO to enter
Grid.
r Press pq or tu buttons to navigate and ACTION to change.
Once the user has created a channel lock list, the Digital Satellite Receiver will
channel surf (when pressing p or q key) to the locked channels, however the user is
then required to enter in the 4-digit password to view the video.
The channel lock list will have its channel number color coded as defined in the
following table.
Color Description
Red Channel locked
Green Channel available
Black Channel not available
53
Page 55

R
OLLER GUIDE MENU OPERATIONS
Lock : Spending
The feature allows the user to control the amount per event. If the amount is below the
event cost, you won’t be able to view the event.
Procedure
r In LOCK menu, press p or q button to highlight Spending.
r Press u button to highlight Amount per event.
r Press u button to highlight amount field . Use nu mber ke ys on the remote co ntrol to ch ange
the numbers.
r Press ACTION to save the new spending limit.
Unlock
Movie Limits
TV Limits
Ch locks
Spending
Password
Press u to change Spending Limit.
Amount per Event
Lock : Spending Screen
$ 10.00
54
Page 56

ACCOUNT
R
OLLER GUIDE MENU OPERATIONS
The Account category conveys information to the user. This information was either the
result of the action by the user or sent from DIRECTV to the Digital Satellite Receiver.
This category contains 2 areas:
Purchase
Messages
Purchases of programs (Future / Past)
Electronic messages sent to the user through the satellite link.
Account : Future and Past Purchase
The Purchase screen al lows yo u to review up co ming and past PPV even t purchas es.
Purchases event screen contains information regarding the Event title, Channel
Number, Date, S tart time and Cost.
Account : Future
The Future Purchase screen di splays PPV events purch ased, but not yet aired. The
Future purchases appear in chronological order, beginning with the soonest event and
ending with the most distant future event. This screen also allows you to cancel a PPV
purchase. A “CANCEL EVENT” message will appear in the list box. To cancel an
event, highlight the event in the list box and press ACTION button.
Future
Past
Msgs
Press ACTION to cancel the PPV event .
Swift, Smart and Deadly
Ch: 320.24 Date: 11/30
Time: 9:00 PM Cost: $3.50
CANCEL EVENT
Johnny Carson Show #20
Ch: 130 Date: 10/05
Time: 9:00 PM Cost: $3.50
Johnny Carson Show #22
Ch: 130 Date: 11/05
Time: 9:00 PM Cost: $3.50
Account : Future Purchase Screen (User Cancelling a PPV event)
55
Page 57

R
OLLER GUIDE MENU OPERATIONS
Account : Past
This screen allows you to review PP V purchased events. The PPV events that the
subscriber purchased but cancels or does not watch will not be displayed. Following is
an example of Past purchase screen.
Future
Past
Msgs
Press ACTION to cancel the PPV event .
Account : Past Purchase Screen
Swift, Smart and Deadly
Ch: 320.24 Date: 11/30
Time: 9:00 PM Cost: $3.50
CANCEL EVENT
Johnny Carson Show #20
Ch: 130 Date: 10/05
Time: 9:00 PM Cost: $3.50
Johnny Carson Show #22
Ch: 130 Date: 11/05
Time: 9:00 PM Cost: $3.50
Account : Msgs (Unread and Read)
The message screen di splays messages sent to the Digital Sat ellite Receiver from
DIRECTV. Unread messages are listed before the Read Message.
You ca n de let e th e Re ad messages. To delete the Read Message, highlight the Rea d
Message and press the ACTION button.
56
Future
Past
Msgs.
Pressu to view messages .
/
(Read Message)
Message from service provider.
DIRECTV is offering a special
.
all day ticket
.
(Unread Message)
Message from service provider
DIRECTV is offering a special
.
all day ticket
Account : Message Screen
Page 58

Options
R
OLLER GUIDE MENU OPERATIONS
The Options menu gives you the ability to configure the Digital Satellite Receiver. These
options can affect the overall behavior of the Digital Satellite Receiver. Options menu has
the following sub-options:
•Audio
•Clock
• Favorites
• About
• Upgrades
• Features
Options : Audio
The Audio option allows you to select the Language preferences.
Following are the Language preferences:
• English (default language) • Spanish • French • German
• Italian • Japanese • Korean • Chinese
Audio
Clock
Favorites
About
Upgrades
Features
Language
Press u to change audio preferences.
English
u
Options : Audio Screen
Procedure
r Press MENU button to display Rollerguide.
r Press pq buttons to highlight OPTION Icon. Press ACTION button to display the OPTION
menu. Audio is highlighted.
r Press u button to change audio preferences.
r Press u button to change Audio Language preferences.
r Press p or q buttons to select the preferred language.
Note: The Audio Language preference is used in cases where a program has multiple audio tracks. As
r Press ACTION button to save the language setting.
r Press t button once to return to Options menu.
an example, if a program is encoded with two audio tracks (English/Spanish) and you have
selected Spanish as the Audio Language preference, then the Spanish audio track is
automatically selected for that particular program.
57
Page 59

R
OLLER GUIDE MENU OPERATIONS
Options : Clock
The clock option allows you to configure the system clock. When connected to
®
DIRECTV
service, you can set the DST (daylight savings time), Time Zone and reset
the time to what is current in the smart card.
Procedure
r Select OPTIONS from the Rollerguide.
r Press ACTION button to display the OPTIONS menu.
r Press pq buttons to highlight Clock. Clock sub-menu i s displayed.
r Press u button to change the clock settings.
r Press u button to highlight DST.
r Press pq buttons to select Observed or Not Observed.
r Press ACTION button.
r Press q button to highlight Time Zone. Press u button to change and pq buttons to
navigate the Time Zone settings.
r Press ACTION button .
r Press q button to highlight Reset Time.
r Press ACTION button to reset time.
r Press t button three times to exit Rollerguide.
Audio
Clock
Favorites
About
Upgrades
Features
Press u to change system clock settings.
Wednesday 10/18 1:43 PM
DST
Time Zone
Press Reset Time to default to
Access Card settings.
Reset Time
DIRECTV Screen
Observed
Pacific
58
Page 60

R
OLLER GUIDE MENU OPERATIONS
Options : Favorites
The Favorites Option allo ws you to c reate a favorite channel l ist when you to ggle the
FAV mode in the Advanced Program Guide™ or to remove all channels from the
favorite list (Delete All), as shown below.
Audio
Clock
Favorites
About
Upgrades
Features
Press u to change favorite channel settings.
Add Channels to
Channel List
Chan 000’s Del All Add All
Audio
Clock
Favorites
About
Upgrades
Features
pq
-Set Group. ACTION - Display. INFO - Enter Grid.
Add Channels to
Channel List
Chan 000’s Del All Add All
00 01 02 03 04 05 06 07 08 09
10 11 12 13 14 15 16 17 18 19
20 21 22 23 24 25 26 27 28 29
30 31 32 33 34 35 36 37 38 39
40 41 42 43 44 45 46 47 48 49
50 51 52 53 54 55 56 57 58 59
60 61 62 63 64 65 66 67 68 69
70 71 72 73 74 75 76 77 78 79
8
0 81 82 83 84 85 86 87 88 89
90 91 92 93 94 95 96 97 98 99
Options : Favorites Screens
Procedure
r In Options Menu, press p or q button to highlight Favorites.
r Press u to change Favorite channel settings.
r Press pq buttons to set Group.
r Press ACTION button to display all channels in that group. Highlighted numbers are the
channels available in that group.
r Press INFO to enter grid.
r Use pq or tu buttons to navigate.
r Press ACTION button to change.
r Press u button to highlight Delete All or Add All.
r Press ACTION to enter your choice.
r Press t button repeatedly to exit Favorite sub-menu.
59
Page 61

R
OLLER GUIDE MENU OPERATIONS
Options : About
The About screen displays assorted information about the manufacturer, including the
following:
• Produc t Description
• Version
• Serial # number of the Digital Satellite Receiver
• Model #
Audio
Clock
Favorites
About
Upgrades
Features
About Panasonic DTV Digital Receiver.
Panasonic
APG Digital Satellite Receiver
Version: Version 3.8
Serial # MR1
Model # TZ-DBS01
DIRECTV
Options: About Screen
Procedure
r Press MENU button to display the Rollerguide.
r Press pq buttons to highlight the OPTIONS Icon.
r Press ACTION button to display the OPTIONS screen.
r Press pq buttons to highlight About. Information about the unit is displayed.
r Press t button twice to exit the Rollerguide menu.
Note: Your digital satelli te rec eiv er i s ab le to rece ive upgrades or modification s to s om e of its
features and functions. These modifications will occur automatically, usually at times
when the receiver would likely be turned off. If your receiver is on when an upgrade or
modification is sent, you may experience a disruption in reception for a minute or two.
Your reception should return to normal after the modification is complete. Do not
unplug your receiver while an upgrade is in progress. Please consult the Upgrade
Menu to find a schedule of upgrades or modifications planned by DIRECTV.
60
Page 62

R
OLLER GUIDE MENU OPERATIONS
Options : Upgrades
This screen shows the past and present version of the software and any future
upgrades.
Audio
Clock
Favorites
About
Upgrades
Features
Software upgrades information.
TZ-DBS01
Upgrade List
Software Revisions:
Original 3.8
Current 3.8
Future Upgrades:
None pending.
Options: Upgrades Screen
Procedure
r In th e O pt ion s m en u, pres s p or q bu tton to hig hl igh t Upg rad es. The software info rma tio n
is displayed.
Options: Features
This screen shows the special features of the Digital Satellite Screen.
Audio
Clock
Favorites
About
Upgrades
Features
TZ-DBS01 IRD
Advanced Features List
DIRECTV Multi-Set
Advanced Program Guide
Receiver Feature List
Options: Features Screen
Procedure
r In Options menu, press p or q button to highlight Features. Information regarding the
Digital Satellite Receiver is sho wn.
61
Page 63

R
OLLER GUIDE MENU OPERATIONS
TIMER
This Digital Satellite Receiver contains eight timers that are capable of tuning the Digital
Satellite Receiver on and off at selected times, on selected channels and on selected
days. The timer options provide you an automatic way of controlling the Dig ital Satellite
Receiver when it is active. The options are the following:
• OFF (default state)
•ON
Off state
The Off state disables the timer and clears the timer data fields.
On state
The On state enables the timer to perform several actions once a timer is active. The
Digital Satellite Receiver is turned ON and it is tuned to the specified channel. Once the
event has ended the Digital Satellite Receiver is turned OFF.
By leaving a timer in a ON mode, the Digital Satellite Receiver will tune to that channel
every week at that specified time and day. To turn off the timer, toggle the ON mode to
OFF.
Timer 1
Timer 2
Timer 3
Timer 4
Timer 5
Timer 6
Timer 7
Timer 8
Press u to change Timer 1 settings.
Mode
Start
Stop
Repeat
Channel
Off
u
----- --:-- --
--- --:-- --
Once
u
0-0
Channel Not Available
Procedure
r Press MENU button to display the Rollerguide menu.
r Press pq buttons to highlight TIMER icon.
r Press ACTION button to display the TIMER menu.
r Press pq buttons to select the desired Timer.
r Press u button to change TIMER settings.
r Press u button to enter the mode field.
r Use pq buttons to select the Mode OFF or ON.
r Press ACTION button to save your selection.
r Press q button to select Start (current day and time are shown).
r Use u and pq to select day, press u and pq to sele ct hour and press u and pq to
select minutes.
r Press t to highlight Start and press q to select Stop and repeat procedure to set day,
hours and minutes.
r Press q button to highlight Channel. Use numeric keys on the remote control to enter
channel number. Press ACTION to enter your channel selection.
r Press q button to highlight Repeat.
r Press u button to highlight weekly or once.
r Use pq buttons to select the choices.
r Press t button 3 times to exit the menu.
62
Page 64

TIMER (Cont.)
R
OLLER GUIDE MENU OPERATIONS
Note: All Data fields must be entered prior to setting the view mode. Timers cannot overlap
between the timers. The first entered timer will override the other timers.
TIMER Activation
The TIMER is active when the Digital Satellite
Receiver is OFF or ON. The Digital Satellite
Receiver will switch to the selected channel at the
selected time set in the TIMER.
Timer Error Messages
The Digital Satellite Receiver will scan the timer data fields and notify you of any
problems before letting you set the viewing mode.
Timer Error Messages
Error Condition Error Message
The system time was not set NOTICE: Clock must be set
One or more start time elements was not
entered
One or more stop time elements was not
entered
The channel number was not entered NOTICE: Ch number must be entered.
The day conflicts with the other timer NOTICE: Day conflicts with Timer 2 (or 1)
The start time conflicts with the other timer NOTICE: Start conflicts with Timer 2 (or 1)
The stop time conflicts with the other timer NOTICE: Stop conflicts with Timer 2 (or 1)
The stop time conflicts with start time NOTICE: Stop conflicts with start time
NOTICE: Start time must be entered.
NOTICE: Stop time must be entered.
63
Page 65

G
LOSSARY AND ACRONYMS
Glossary and Acronyms
APG
ATSC
CAM
CSR
DIRECTV
DST
DTV
IPPV
Advanced Program Guide™ the DIRECTV electronic program guide.
Advanced Television Systems Committee. Standardization body that developed the
Digital Television Terrestrial formats.
Conditional access module, usually referred to as the
electronic subassembly providing conditional access control of the subscriber
terminal.
Customer Service Representat ive
DIRECTV is a registered trademark of DIRECTV, Inc., a unit of Hughes Electronics
Corporation.
Daylight Saving Time
Digital Television
Impulse pay per view. A method for ordering service on “impulse” where payments are
required for each program or special event independently.
access card
. A removable,
LNB
MPAA
NTSC
ODU
OPPV
64
Low Noise Block down conv er ter. Portion of O DU tha t rec ei ve s the s atel li te sign al an d
converts the signal into L-band frequency of 950-1450 MHz.
Motion Picture Association of America. Guild governing rating assignments to movies.
National Television Systems Committee. Standardization body that developed the
Analog Television Terrestrial formats.
Outdoor Satellite Dish Unit. The System that provides signal reception and down
conversion.
Order Ahead pay per view. Movie purchases placed by calling a customer service
representative rather than using the on-screen displays. Necessary to purchase
movies when the subscriber does not connect the phone to the Digital Satellite
Receiver.
Page 66

OSD
On-screen display
G
LOSSARY AND ACRONYMS
Password
SD
Smart Card
Subscriber
A stored word a user must provide in order to perform a function.
Standard Definition
Credit card sized microcomputer capable of securely storing service authorization and
system preferences such as pay per view lock. Also known as the CAM.
Customer of the DIRECTV Service
This product incorporates copyright protection technology that is protected by U.S.
patents and other intellectual property rights. Use of this copyright protection
technology must be authorized by Macrovisio n, and is intended for ho me and other
limited pay-per-view uses only unless otherwise authorized by Macrovision. Reverse
engineering or disassembly is prohibited.
U.S. Patent Nos. 6,020,880; 5,987,635; 5,926,573; 5,917,481; 5,874,995;
5,819,035; 5,802,241; 5,737,019; 5,699,125; 5,650,825;
5,623,311; 5,619,337; 5,583,574; 5,534,944; 5,532,748; 5,510,842;
5,502,493; 5,485,215; 5,477,397; 5,387,939; 5,367,334; 5,325,125;
5,311,297; 5,294,974; 5,293,229; 5,260,788; 5,168,358; 5,130,796;
5,126,841; 5,1 13,255; 4,984,081; RE36,507; RE36,015; other U.S. and foreign
patents pending.
65
Page 67

T
ROUBLESHOOTING
Troubleshooting
Before requesting service for this unit, check the table below for a poss ible cause of the probl em you are
experiencing. Some si mple checks or a minor adjustment on your part may eli minate the problem and
restore proper operation.
If you are in doubt about some of the check points, or if the remedies indicated in the table do not solve the
problem, consult your dealer or call 1-888-726-2377 for assistance.
Symptom Remedy
No power
No reception
No picture
No sound Check that equipment is connected properly.
The remote control is not responding
The remote control is operational, but
the Digital Satellite Receiver is not
responding
The remote control is operational, but
other component(s) are not responding
The ACTION button is not responding •Make sure the remote control is in SAT or TV mode.
No key operation (by the unit and/or
the remote control) is effective.
No key operation is effective. OSD
reads: “Searching for Satellite Signal.
VCR is not responding
Timer does not work
Check that the AC power cord is securely plugged into the AC IN jack.
Check that the AC power plug is securely plugged into the power outlet.
•Check that equipment is connected properly.
•Make sure that the Satellite Dish unit is properly mounted and inst alled.
•Check that antenna is properly installed and oriented.
•Check that the antenna or cable wire is connected properly.
•Check that equipment is connected properly.
•Check if the channel is available.
•Check that the batteries are installed with the correct polarities (+ and -).
•The batteries are depleted: Replace them with new ones.
•Point the remote control unit at the remote control sensor and operate.
•Operate the remote control unit at a distance of not more than 23 feet (7
meters) from the remote control sensor.
•Remove any obstacles between the remote control unit and remote
control sensor.
•Check that the AC power plug is securely plugged into the power outlet.
•Make sure the Digital Satellite Receiver is on.
•Make sure the remote control is in SAT mode.
•Check that the AC power plug is securely plugged into the power outlet.
•Make sure the component(s) are on.
•Reprogram the remote control to make sure it is programmed properly
to operate the component(s).
•Make sure the remote control is in the proper component mode (i.e. TV,
VCR, DVD, etc.).
Set the POWER button to OFF and then back to ON. Alternatively, turn
off the power, disconnect the power plug and then reconnect it. (The
Digital Satellite Receiver may not be operating properly due to lightning,
static electricity or some other external factor).
ODU (Satellite Dish) is momentarily disconnected from the Digital
Satellite Receiver. Alternatively, turn off the power, disconnect the power
plug and then reconnect it. (The Digital Satellite Receiver or the satellite
dish antenna may not be operating properly due to lightning, static
electricity or some other external factor).
•Check that the AC power plug is securely plugged into the power outlet.
•Check that equipment is connected properly.
•Make sure remote control is in VCR mode.
•Make sure the clock is set.
•Check to see whether the timers have overlapping times programmed.
•Check if the timer did not reset to default settings.
66
Page 68

Service Information
S
ERVICE INFORMATION
Product Service
Do not attempt to remove the cover or repair
the unit yourself. Refer servicing to qualified
personnel only.
Product Information
For product service, product information or
assistance with product operation, consult your
dealer or call 1-888-726-2377 (
8AM-10PM
Please have your Digital Satellite Receiver
Identification Number (ID#) available when you
call. The ID# is displayed on your TV screen
when the Digital Sate llite Receiver is tun ed to
any unavailable channel.
) (Sat & Sun/ 10AM-10PM) EST.
Monday-Friday/
For service assistance with hardware, please call:
1-888-726-2377
For assistance with software related problems or
If you ship the product
Carefully pack and send it prepaid,
adequately insured and preferably in the
original carton. Attach a postage-affixed
letter, detailing the complaint, to the outside of
the carton. DO NOT send the p roduct to the
Executive or Regiona l Sa le s office s. They are
NOT equipped to make repairs.
access card, please call DIRECTV:
1-800-DIRECTV
67
Page 69

N
OTES
68
Panasonic Home and Commercial Products Company,
Division of Matsushi ta
Electric Corporation of America
One Panasonic Way
Secaucus, New Jersey 07094
 Loading...