

Page 1
Model No.
Model No.
U/V Tuner Board with MATE I/F
Operating Instructions
TY-42TM6MA
TY-42TM6M
Before connecting, operating or adjusting this product, please read these
instructions completely. Please keep this manual for future reference.
Syntoniseur UHF/VHF avec interface complémentaire
Manuel d’utilisation
Avant de connecter, d’utiliser ou de paramétrer cet appareil, lire attentivement ces
instructions. Conserver ce manuel pour consultation ultérieure.
Tarjeta de sintonizador U/V con MATE I/F
Manual de instrucciones
Antes de conectar, utilizar o ajustar este producto, lea completamente este manual
de instrucciones; y guárdelo para consultarlo en el futuro en caso de ser necesario.
English
English
Français
Español
TQZH573-1
Page 2
Table of Contents
Features ......................................................................... 2
FCC STATEMENT .......................................................... 2
Safety Precautions ........................................................ 3
Handling Cautions ........................................................ 3
Accessories ................................................................... 3
Remote Control Batteries............................................ 3
Connection .................................................................... 4
Installation. .................................................................. 4
Antenna Connection ................................................... 4
Connection of external equipment .............................. 5
The remote control........................................................ 6
Watching TV programs ................................................. 7
ASPECT mode ............................................................... 8
Features
Changing the initial settings ........................................ 9
PICTURE menu .......................................................... 9
AUDIO menu ............................................................... 9
CHANNELS menu .................................................... 10
TIMER menu ............................................................. 10
LOCK menu .............................................................. 10
SET UP menu ........................................................... 11
Replicating the settings - CLONE BOX ..................... 13
Selecting the master TV settings .............................. 13
Uploading the master TV’s settings into
the Clone Box (LEARN) .................................. 13
Downloading the settings into another TV (TEACH)..
Switching between the normal TV mode
and the HOTEL mode ..................................... 14
Resetting all the settings to Factory Preset .............. 14
Troubleshooting Guide............................................... 15
Specifications .............................................................. 15
14
Can receive terrestrial analog broadcasting
You can install the U/V Tuner Board with MATE I/F TY-42TM6MA in the slot of the display and receive
English
terrestrial analog broadcasting.
Can connect various kinds of video equipment
The option board can be installed in the PWD, PHD and LHD Series plasma displays and liquid crystal displays.
∗ As for the applicable models, refer to the manual of the display.
FCC STATEMENT
FCC STATEMENT
This device is verified to comply with part 15 of the FCC Rules for use with cable television service.
FCC CAUTION:
Pursuant to 47CFR, Part 15.21 of the FCC rules, any changes or modifications to this monitor not expressly
approved by Panasonic Corporation of North America could cause harmful interference and would void the
user’s authority to operate this device.
Model No. TY-42TM6MA
2
Responsible Party: Panasonic Corporation of North America
One Panasonic Way, Secaucus, NJ 07094
Contact Source: Panasonic Consumer Electronics Company
1-888-843-9788
email: consumerproducts@panasonic.com
Page 3

Safety Precautions (Be sure to observe)
WARNING
• Never attempt to disassemble or modify this product.
To avoid fire, shock, or failure.
• If you sense smoke, an odd odor, or unusual noises while in operation, immediately unplug the display.
Switch off the display and unplug the power cord plug from the supply outlet.
To avoid fire or shock, do not leave the power of the display turned on.
• To avoid shock or other problems, do not leave the power cord plug plugged into the supply outlet.
• Please contact our designated service department for installation or change of this Product.
To Service personnel:
Before removing or installing the Terminal Board, be sure to turn power of the display off and unplug the
power cord plug from the supply outlet.
Handling Cautions
• Do not touch connector contacts with hands directly.
To avoid electrostatic damage to internal parts, before handling this product touch a large metallic object such as a steel
cabinet to discharge yourself.
• Be sure to use the supplied cable or specified parts for interconnection.
To avoid malfunction or failure, do not use parts other than those recommended.
Accessories
Please check and identify the supplied accessories.
• Remote control
N2QAFB000003
• F-type antenna adapter • Screw ( × 4)
For 5C ( × 1) For 4C ( × 1)
Remote Control Batteries
1. Open the cover.
2. Insert batteries. Note the correct
polarity (+ and -).
• Remote control
batteries
(AA Battery × 2)
Precautions
Mishandling of batteries can cause electrolyte leakage which can damage
items the fluid contacts and may cause a fire.
• Do not mix old and new batteries.
• Do not use different types at the same time. (ex. zinc carbon and alkaline)
• Do not heat or expose to flame.
• Do not take apart or short circuit.
• Do not attempt to recharge, short-circuit, disassmble, heat or burn used
alkaline or manganese batteries.
• Replace the batteries if the remote control does not work properly.
• Ferrite core
( × 1)
English
• Terminal function label (1 sheet)
MATE
(Affix this label to the applicable slot of the rear panel
of the display.)
• Terminal Board
Replacement
Instructions
AA size
For your reference
Use alkaline batteries for longer life.
3
Page 4
Connection
Installation
Precautions
• Before installation
T
urn the power switch off and disconnect the plug of the display. Disconnect all the plugs connected to the display.
• Before removing, turn the power off with the tuner board’s remote control and then turn the main power off.
• When installing or removing the terminal board, exercise care to avoid injury.
There may be some sharp-pointed solder joints on the rear side of the board that could cause unexpected injury.
• When installing the board, fully insert the Board into the slot horizontally until it is firmly plugged into the
connector.
N
ote that incomplete insertion may damage the internal components.
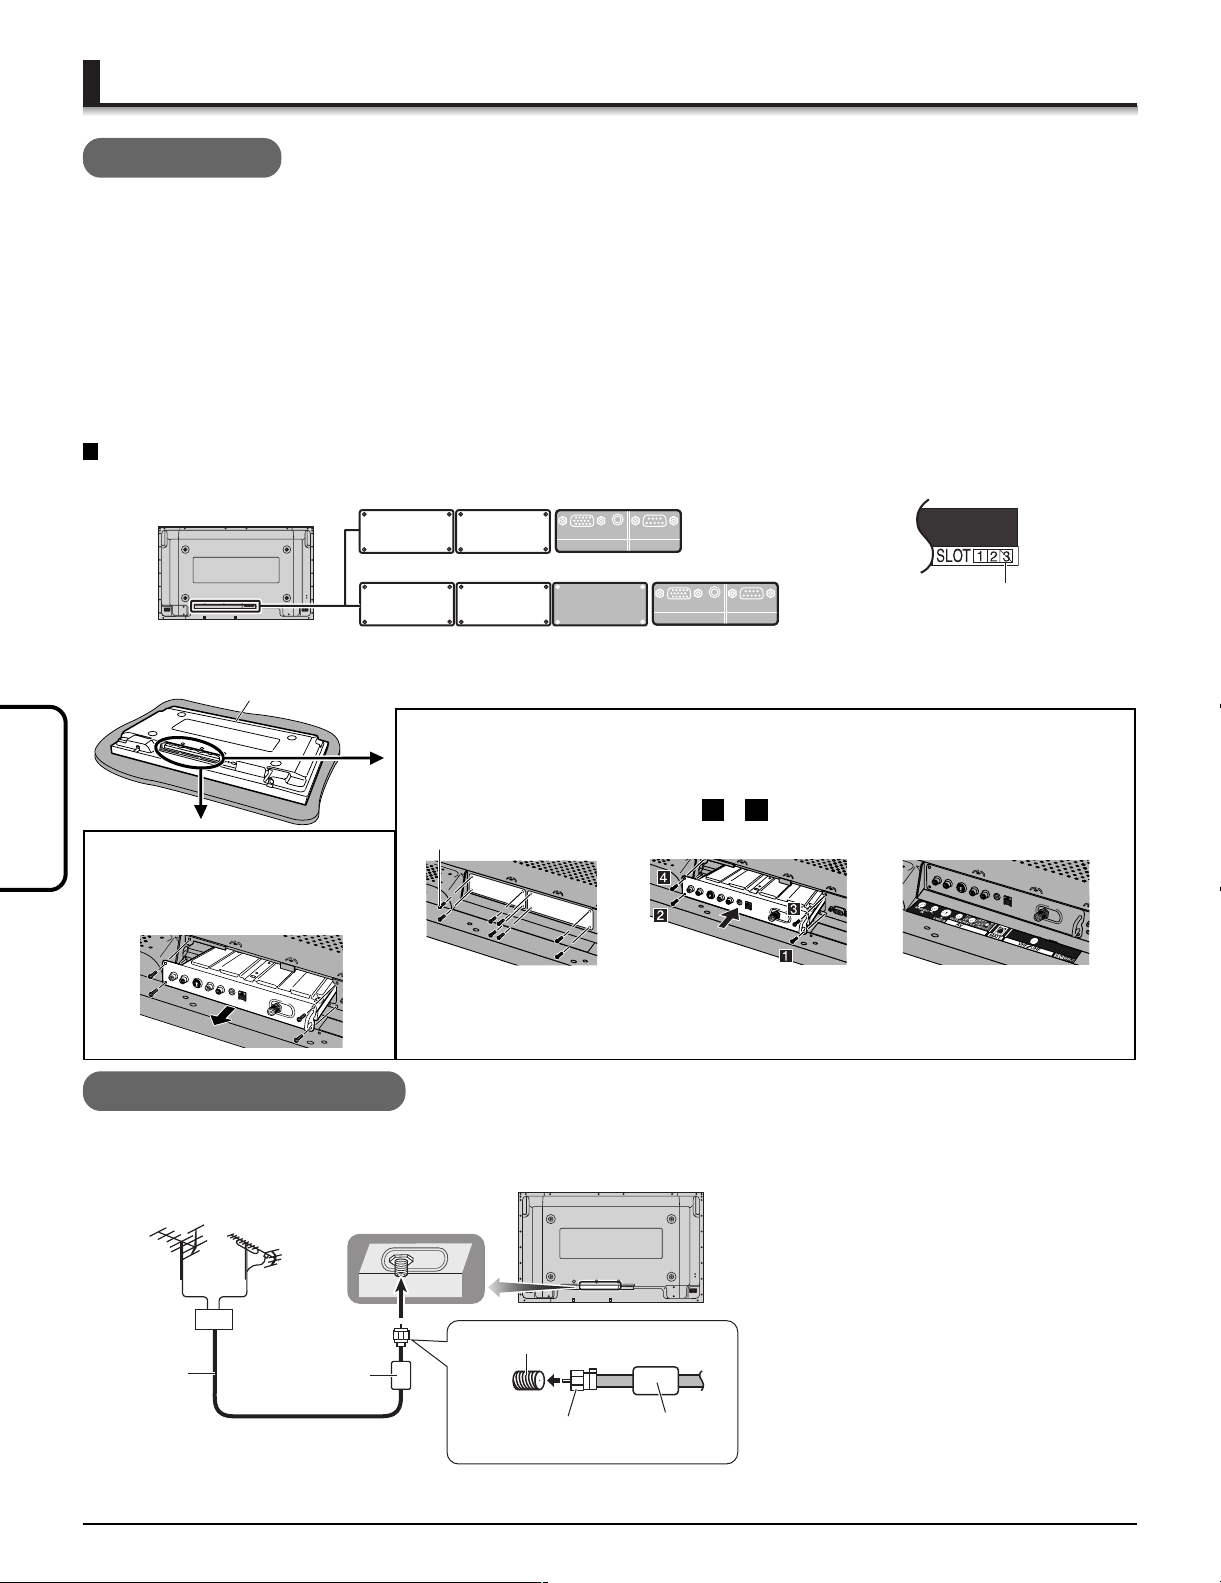
Compatible slot Nos. are SLOT1 and SLOT2.
• Terminal function label
2 slots model
SLOT1
3 slots model
SLOT1
SLOT2
AUDIO
SERIALPC IN
SLOT3SLOT2
AUDIO
SERIALPC IN
SLOT3 is not
compatible.
Foam mat or thick soft cloth
To remove
English
Remove the slot cover. Grip the
To install
1.Remove the
slot cover.
Securing screw
2.Insert the terminal board
until it is firmly plugged
into the connector.
Tighten screws in the
order 1 - 4 .
3.Affix the terminal
function label
(included).
handle of the terminal board, and
slowly pull out in the direction of
the arrow.
• Make sure that the Board does not ride on the two lower claws.
• Be sure to fasten all screws tightly.
•
Have the customer keep the removed Terminal Board for future servicing needs.
Antenna Connection
For proper reception of VHF/UHF channels, an external antenna is required. For best reception, an outdoor antenna is
recommended. The antenna mode must be set to “TV” (see page 11, SET UP menu-MODE).
Note
VHF Antenna UHF Antenna
Mixer
75 Ω
Coaxial
Ferrite core
(included)
Cable
75 Ω VHF/UHF
F-type antenna
adapter (included)
Ferrite core
(included)
•
To obtain optimum quality picture and sound,
an Antenna, the correct cable (75 Ω coaxial)
and the correct terminating plug are required.
• If a communal Antenna system is used, you
may require the correct connection cable
and plug between the wall Antenna socket
and your television receiver.
• Your local television service center or dealer
may be able to assist you in obtaining the
correct Antenna system for your particular
area and the accessories required.
• Any matters regarding Antenna installation,
upgrading of existing systems or
accessories required, and the costs
incurred, are your responsibility.
4
Page 5
MATE
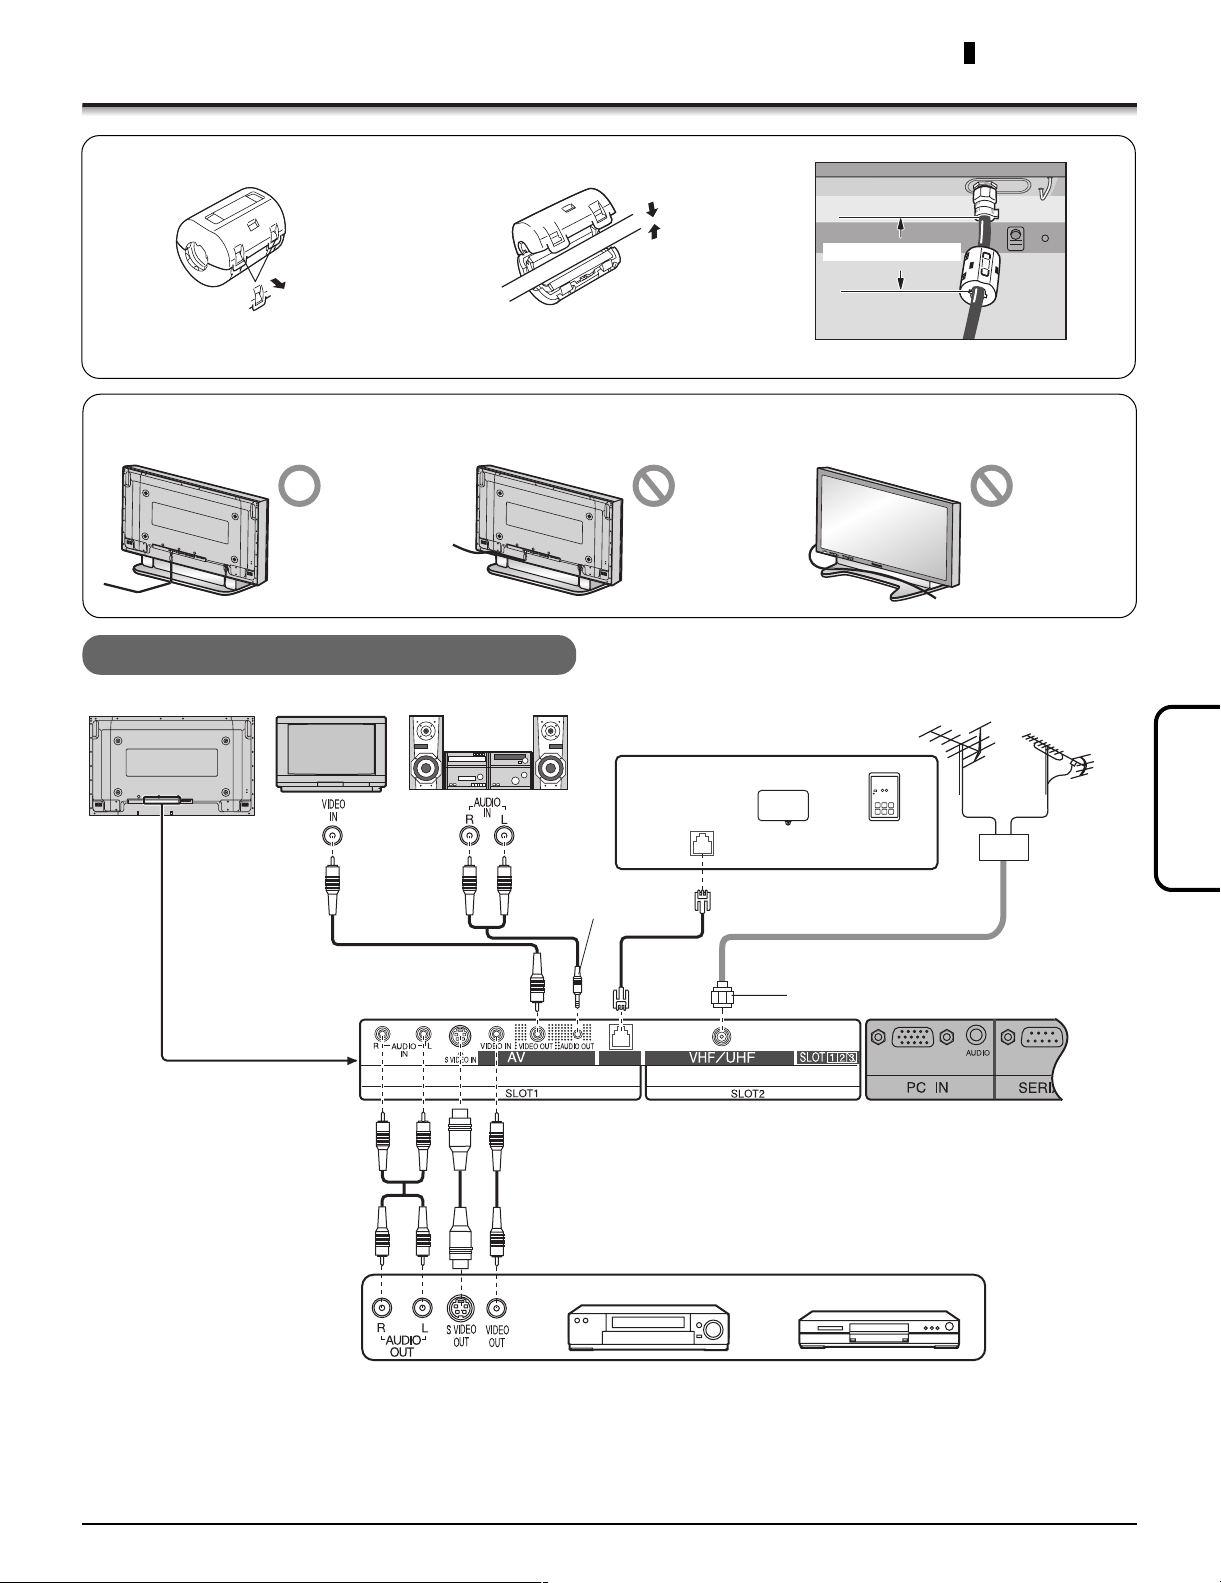
Attaching the ferrite core
1
Connection
2
Pull back the tabs
(in two places) to
open.
Note
If the ferrite core is not attached, noise may occur in the video or audio.
Handling the antenna cable
To avoid noise in the video, hold the antenna cable correctly.
Back Back Front
Route away from
the display.
Put the cable
and close.
Do not route close
to the display.
Connection of external equipment
Display
Monitor
Amplifier to speaker system
Digital
interface port
Less than 10 cm (4”)
Do not pass
around the front
of the display.
VHF Antenna UHF Antenna
Mate Box Clone Box
Mini-plug (M3) stereo
F-type antenna adapter (included)
Note
• Peripheral equipment and optional cables/adapters sold separately unless otherwise indicated.
• S-video signal input (S VIDEO IN) is prior to composite signal input (VIDEO IN).
• A light gun game console using CRT TV’s electron-gun scanning system is not compatible with a display.
• VIDEO OUT is available only when “VIDEO1” is selected as the input source for INPUT 1 (see page 6).
VCR DVD player
Mixer
English
5
Page 6
POWER
MUTE
RECALL
ASPECT
SAP
R-TUNE
TV/VIDEO INPUT
ACTION
CH
CH
VOL VOL
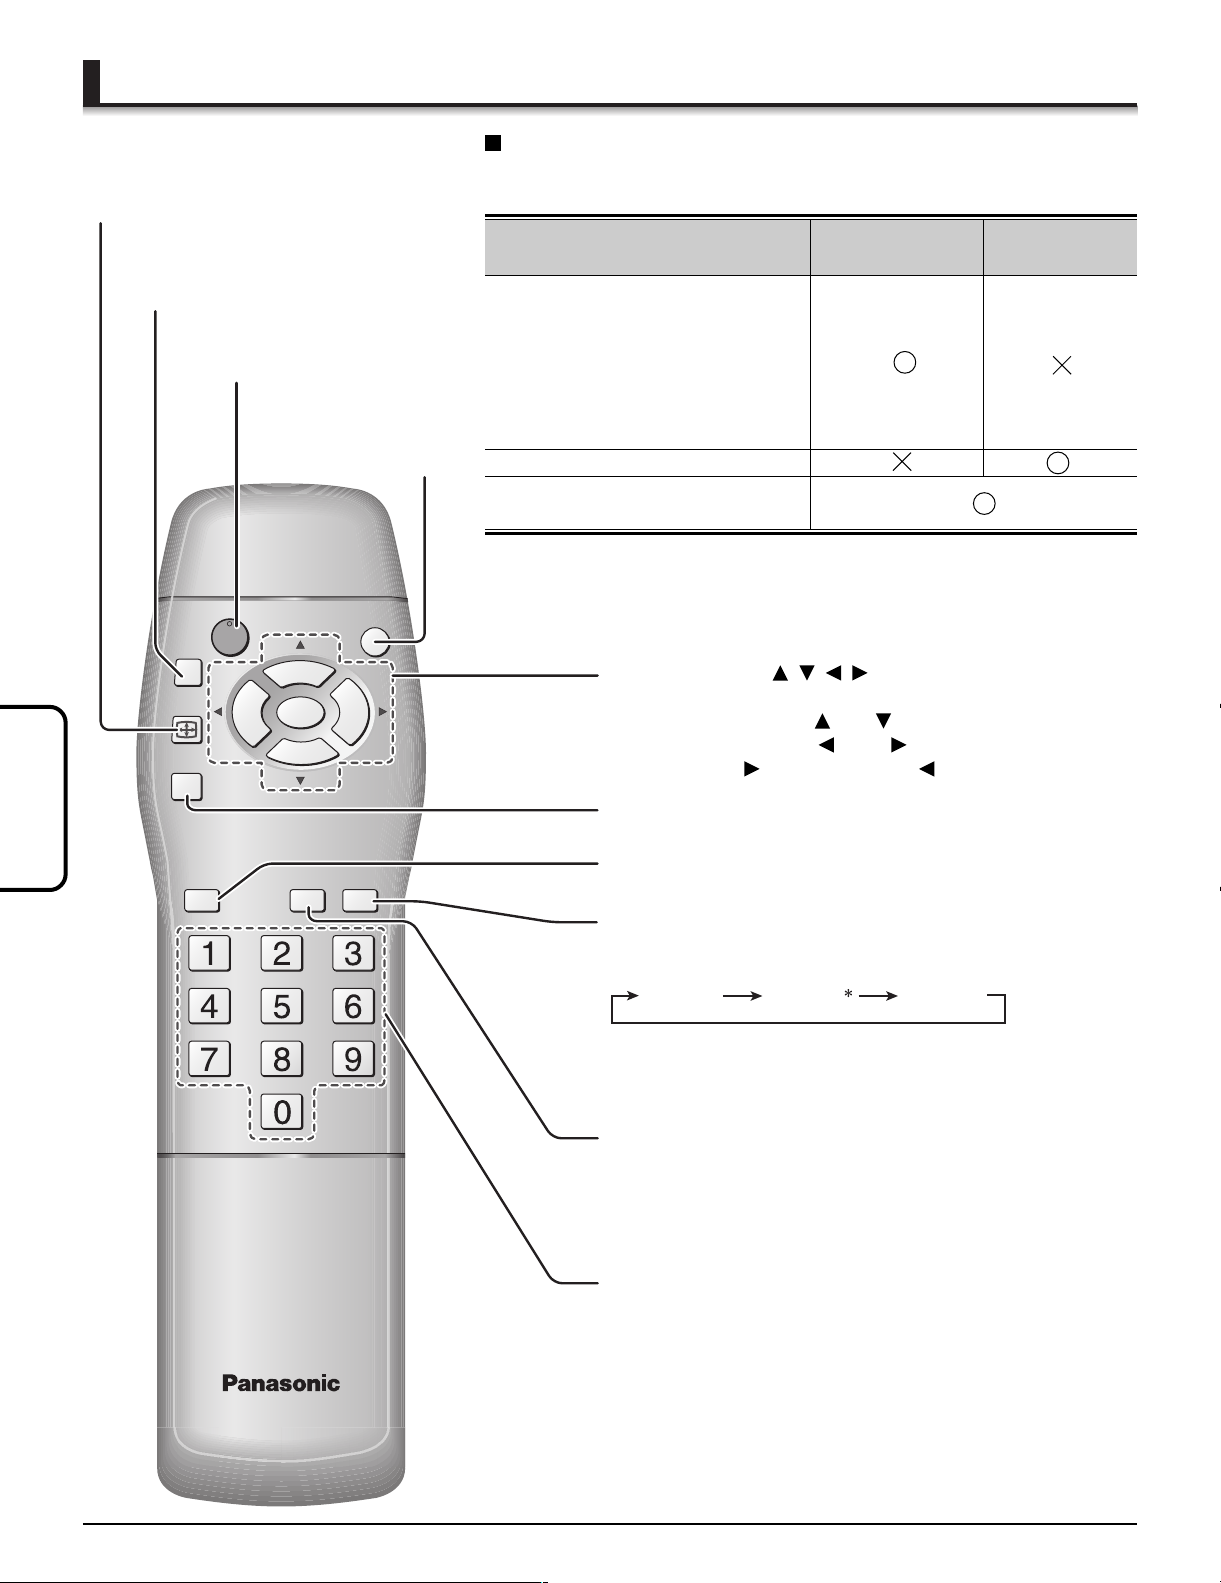
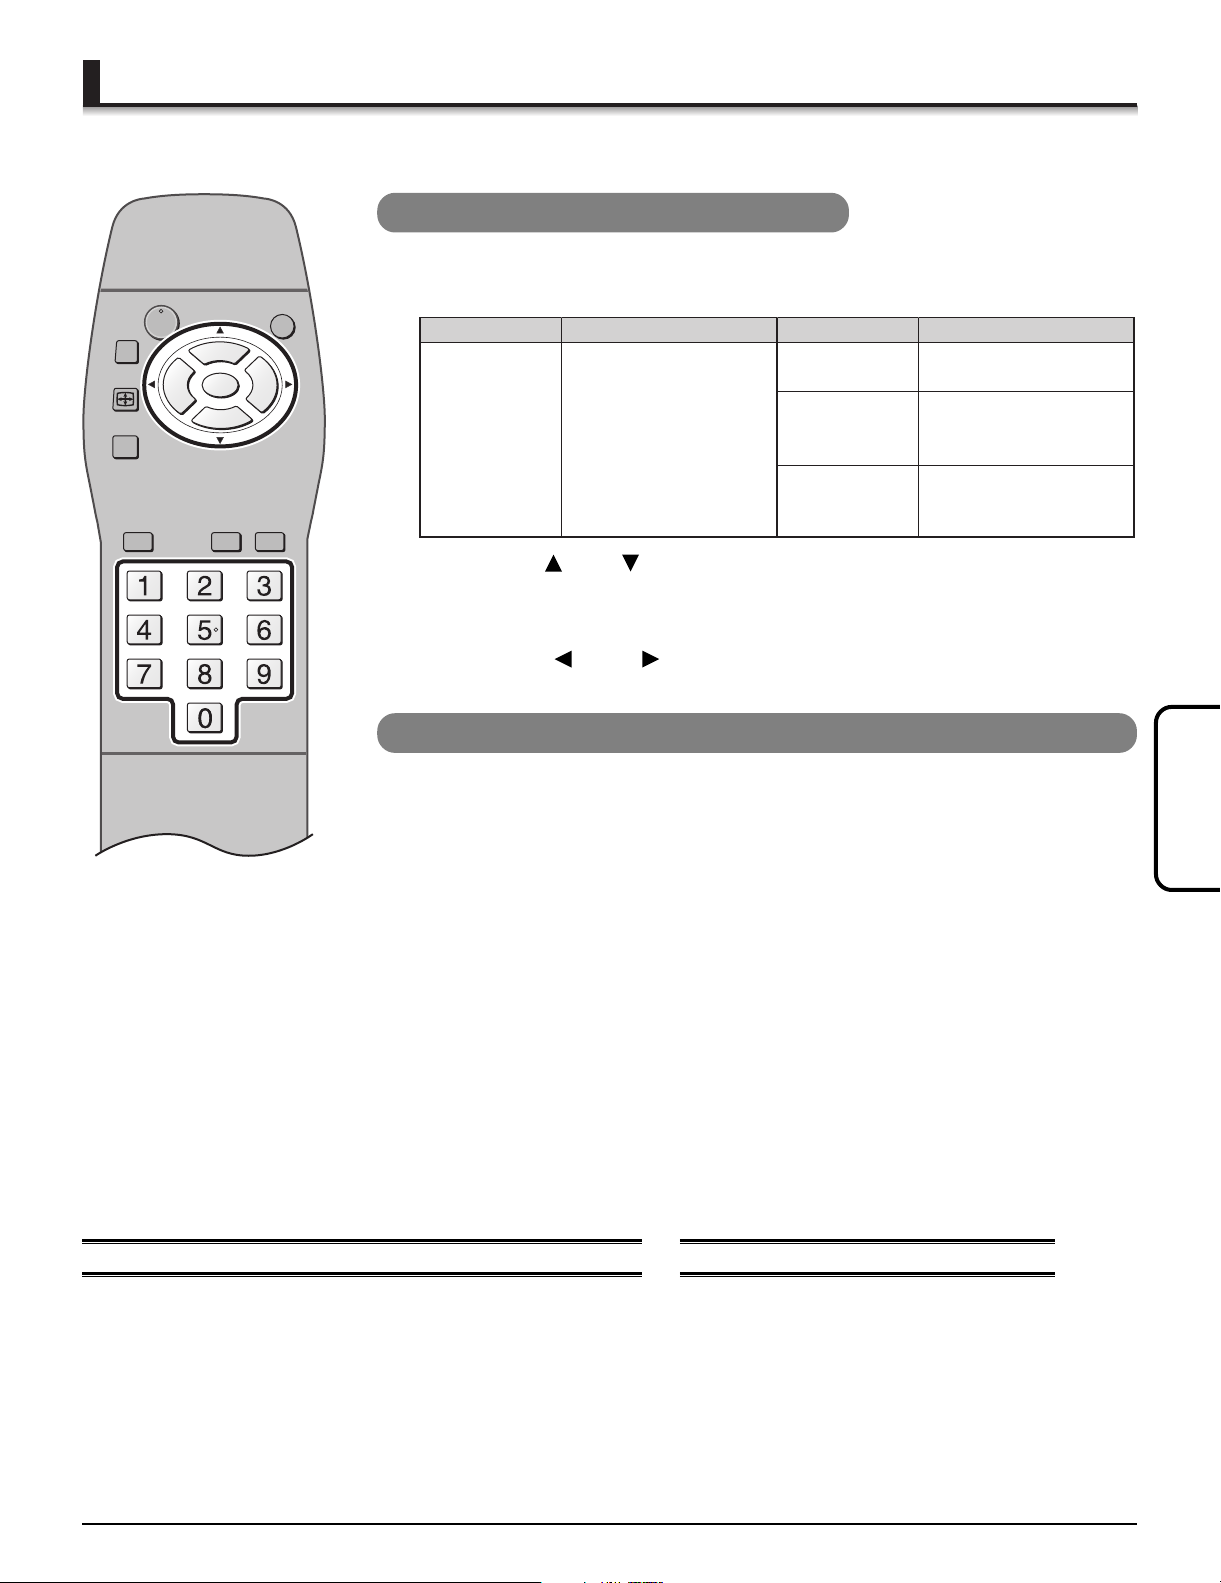
The remote control
ASPECT button
Change aspect (see page 8).
RECALL button
Display the channel, the audio mode,
the remaining time of SLEEP timer, etc.
POWER button
Turn the display ON or OFF.
English
MUTE button
Mute the sound or
cancel the mute.
Control reference of Tuner board and Display
Note
For the common features, be sure to use the remote control of Tuner board.
The remote control
of Tuner board
The remote
control of Display
• Watching TV programs
• Tuning TV channels
• Adjusting the volume
• Muting the sound
• Selecting the aspect mode
• Displaying the current setting etc.
•
Selecting the input mode of Tuner board
•
Displaying the current setting etc. of Display
•
Selecting the input mode of Display
• Turning the display On/Off
• You cannot select the source of INPUT 1 (TV or VIDEO1) with the
display’s remote control.
• Use the remote control of the display when adjusting “PICTURE
POSITION/SIZE” and “SURROUND” on the display. Refer more details
of the display’s controls to the display’s operating instructions.
Cursor buttons ( , , , ),
ACTION button
Channel buttons (CH , CH )
Volume buttons (VOL , VOL )
Increase (VOL ) or reduce (VOL ) volume.
SAP button
Select the audio mode (see page 7).
R-TUNE button
Return to previously viewed channel or video mode.
INPUT button
Select the input mode.
Each time you press the button:
PC inputINPUT 1 INPUT 3
6
• SLOT 1 and 2 (Tuner board) correspond to INPUT 1, SLOT
3 to INPUT 3 and PC IN to PC input.
∗ 3 slots model only. You can select INPUT 3 only when a
terminal board is set to SLOT 3.
TV/VIDEO button
Select the source of INPUT 1 from TV or VIDEO1.
• This does not work for INPUT 3 or PC input.
• To give a label or to skip VIDEO1 input (see page 10,
CHANNELS menu-INPUT LABEL)
Numbered buttons
Page 7
Watching TV programs
POWER
ASPECT
R-TUNE
RECALL
ACTION
CH
CH
VOL VOL
INPUTTV/VIDEO
MUTE
SAP
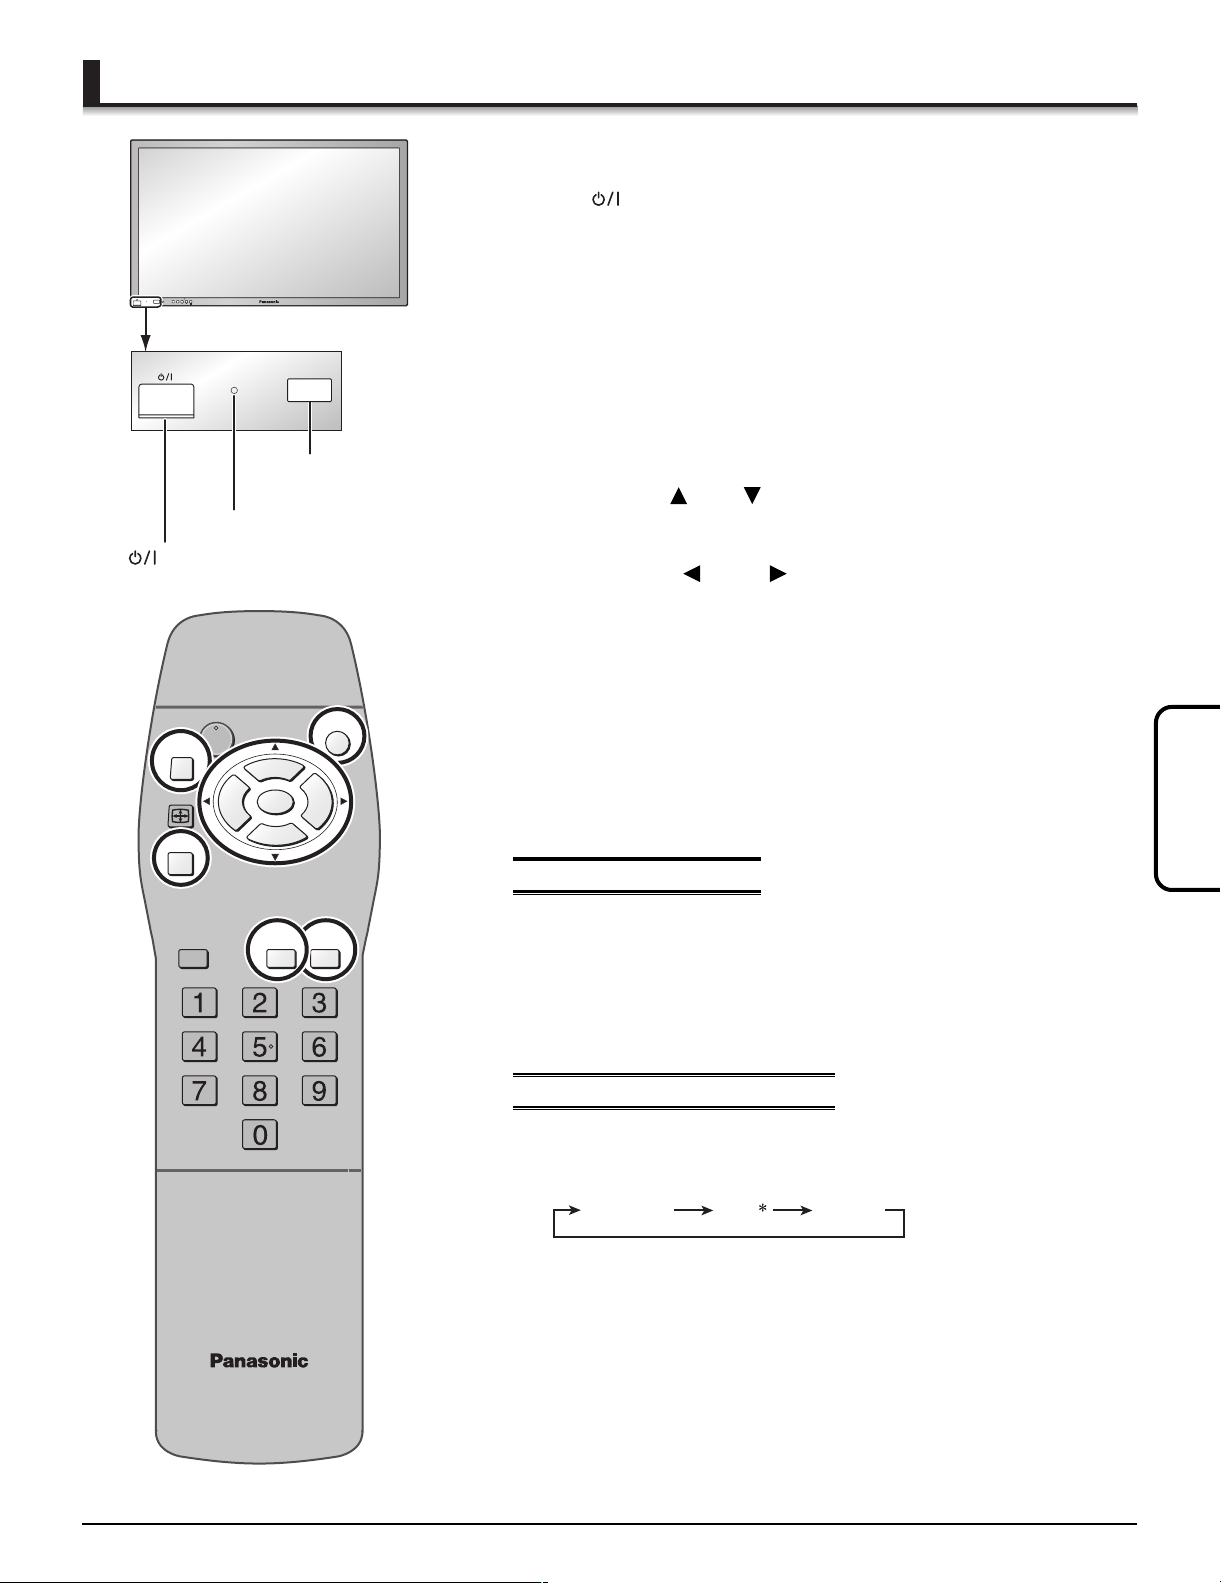
Preparation
1. Connect the power cord of the display to the wall socket.
2. Press button on the display to turn on the main power.
• The power indicator lights (Green: Power ON, Red: Standby, No
light: Power OFF).
• You can use the remote control when the indicator lights Green or
VOL
ENTER
INPUTMENU
+
R - STANDBY
G POWER ON
R - STANDBY
G POWER ON
Red.
3. Select the menu language in SET UP menu (see page 11).
1 Press [INPUT] to select INPUT 1 (tuner board).
button
Remote control
signal sensor
Power indicator
2 Press [TV/VIDEO] to select the TV mode.
3 Press [CH , CH ] or the numbered buttons to select
the channel.
4 Press [VOL , VOL ] to adjust the volume.
Note
• Lower the volume when howling occurs.
•“AUTO POWER OFF” feature of the display does not work when you
select INPUT1(tuner board).
For your reference
Press [RECALL] to display the channel, the audio mode, the remaining
time of SLEEP timer, etc.
English
To mute the sound
Press [MUTE].
• “MUTE” appears on the display.
• Press [MUTE] again to cancel mute.
To select the audio mode
Press [SAP].
Each time you press the button:
MONOSTEREO SAP
∗
SAP: Secondary Audio Program
Note
• The setting is available when displayed in red, and not available
when displayed in white.
• To change the external audio input mode, select the setting on the
connected equipment.
7
Page 8
ASPECT mode
JUST
4
3 9
16
FULL
4
3
16
9
4 : 3
3
4
ZOOM
4
3
16
9
R-TUNE
RECALL
SAP
INPUTTV/VIDEO
ACTION
CH
CH
VOL VOL
MUTE
POWER
ASPECT
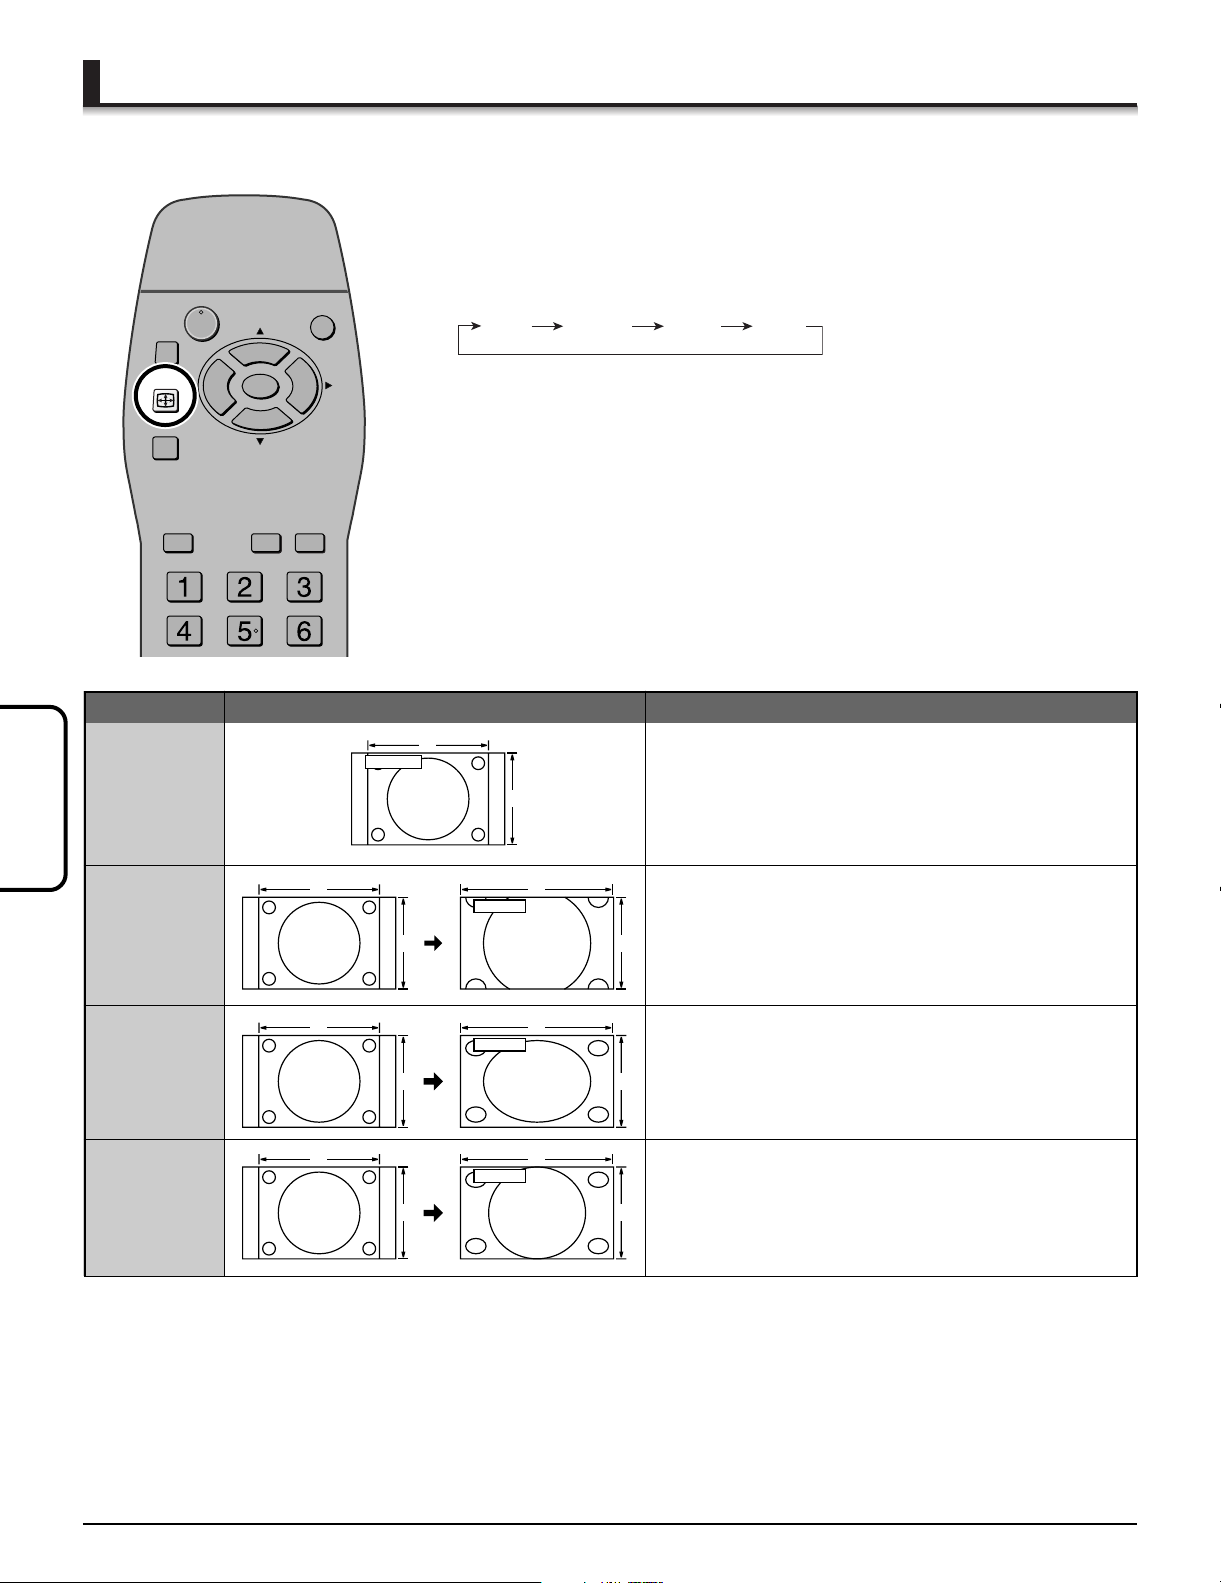
You can change the aspect ratio so the picture expands to the optimum size to fill the screen.
Press [ASPECT] to select the aspect mode.
The modes you can select depend on viewing materials.
Each time you press the button:
JUSTFULLZOOM4 : 3
Mode
4 : 3
Picture Explanation
Displays a 4:3 image in the original ratio with gray
bands on both sides.
English
ZOOM
FULL
JUST
Note
You can adjust the picture position and size only with the display’s remote control.
Expands an image to fill the screen in the original
ratio.
Laterally stretches a 4:3 image to fill the screen.
The video is enlarged in the horizontal direction to fill
the screen. The original aspect ratio is maintained
near the center, while the video is stretched out more
as it approaches either side of the screen. The result
is an image with less incongruity.
8
Page 9
Changing the initial settings
POWER
MUTE
ASPECT
SAP
R-TUNE
RECALL
ACTION
CH
CH
VOL VOL
INPUTTV/VIDEO
You can change the settings to suit your preferences and to suit the unit to the environment in which it is being used. Then
you can clone the setting and switch to the “HOTEL” mode so the guest users can access the particular settings only (see
page 14).
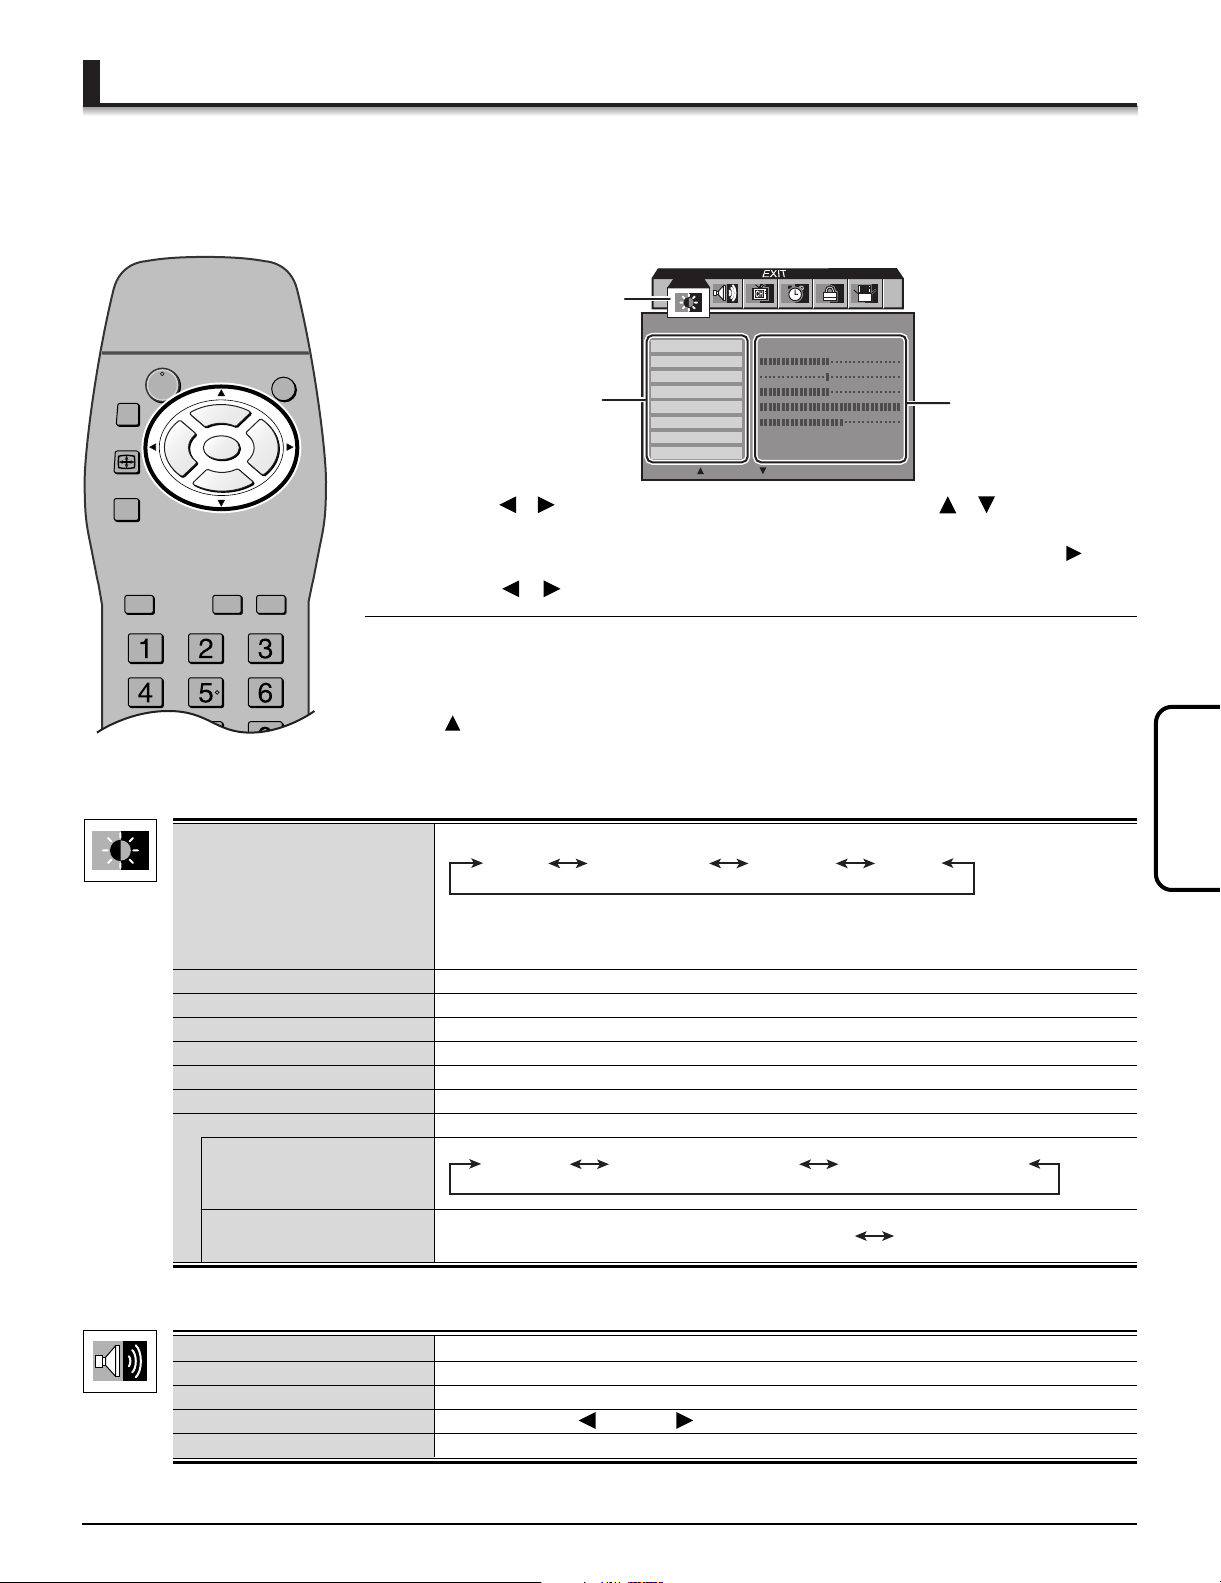
1 Press [ACTION] to display the menu screen.
Menu icon
PICTURE
PIC MODE
COLOR
TINT
Submenu
BRIGHTNESS
PICTURE
SHARPNESS
NORMAL
OTHER ADJ.
:
EXIT
:
SUB MENU
2 Press [ , ] to select the menu icon, and press [ , ] to select the
submenu.
To select the submenus not displayed, select “OTHER ADJ.” and press [ ].
3 Press [ , ] to change the settings or enter the option menu.
To return to the previous screen
Press [ACTION].
VIVID
Option menu
SET
PICTURE menu
AUDIO menu
PIC MODE
COLOR
TINT
BRIGHTNESS
PICTURE
SHARPNESS
NORMAL
OTHER ADJ.
COLOR TEMP
(Color temperature)
3D Y/C FILTER
MODE (see page 7)
BASS
TREBLE
BALANCE
NORMAL
To exit the menu screen
Press [ ] while highlighting a menu icon.
Note
This feature does not work for the sub picture of the display’s “MULTI PIP” function.
Select the picture mode.
STANDARD CINEMAVIVID AUTO
Note
Select “CINEMA” when the side bars (the gray bands on the both sides of 4:3
picture) flash (alternate gray/white).
Adjust the color intensity.
Adjust natural flesh tones.
Adjust the brightness in dark areas of picture.
Adjust white balance of picture.
Adjust clarity of outline detail.
Reset all the picture adjustments to factory preset.
NORMAL WARM (Increases red) COOL (Increases blue)
ON
(Minimize noise and cross color in the picture)
OFF
STEREO / SAP / MONO
Adjust the bass response.
Adjust the treble response.
Adjust the left ( )/ right ( )speaker volume balance.
Reset BASS, TREBLE and BALANCE adjustments to factory preset.
English
9
Page 10
Changing the initial settings
CHANNELS
A&E
AMC
BET
BRAVO
CNBC
CNN/SI
COMEDY
COURT
PRESS ACTION TO RETURN
PRESET CAPTION
ABC
CBS
FOX
NBC
PBS
CNN
ESPN
HBO
PRESS FOR MORE CHANNELS
CHANNELS
ENTER CHANNEL 10
ENTER CAPTION
PRESS ACTION TO RETURN
MANUAL CAPTION
TO MOVE CURSOR
TO SELECT CHARACTER
See page 9 for operation.
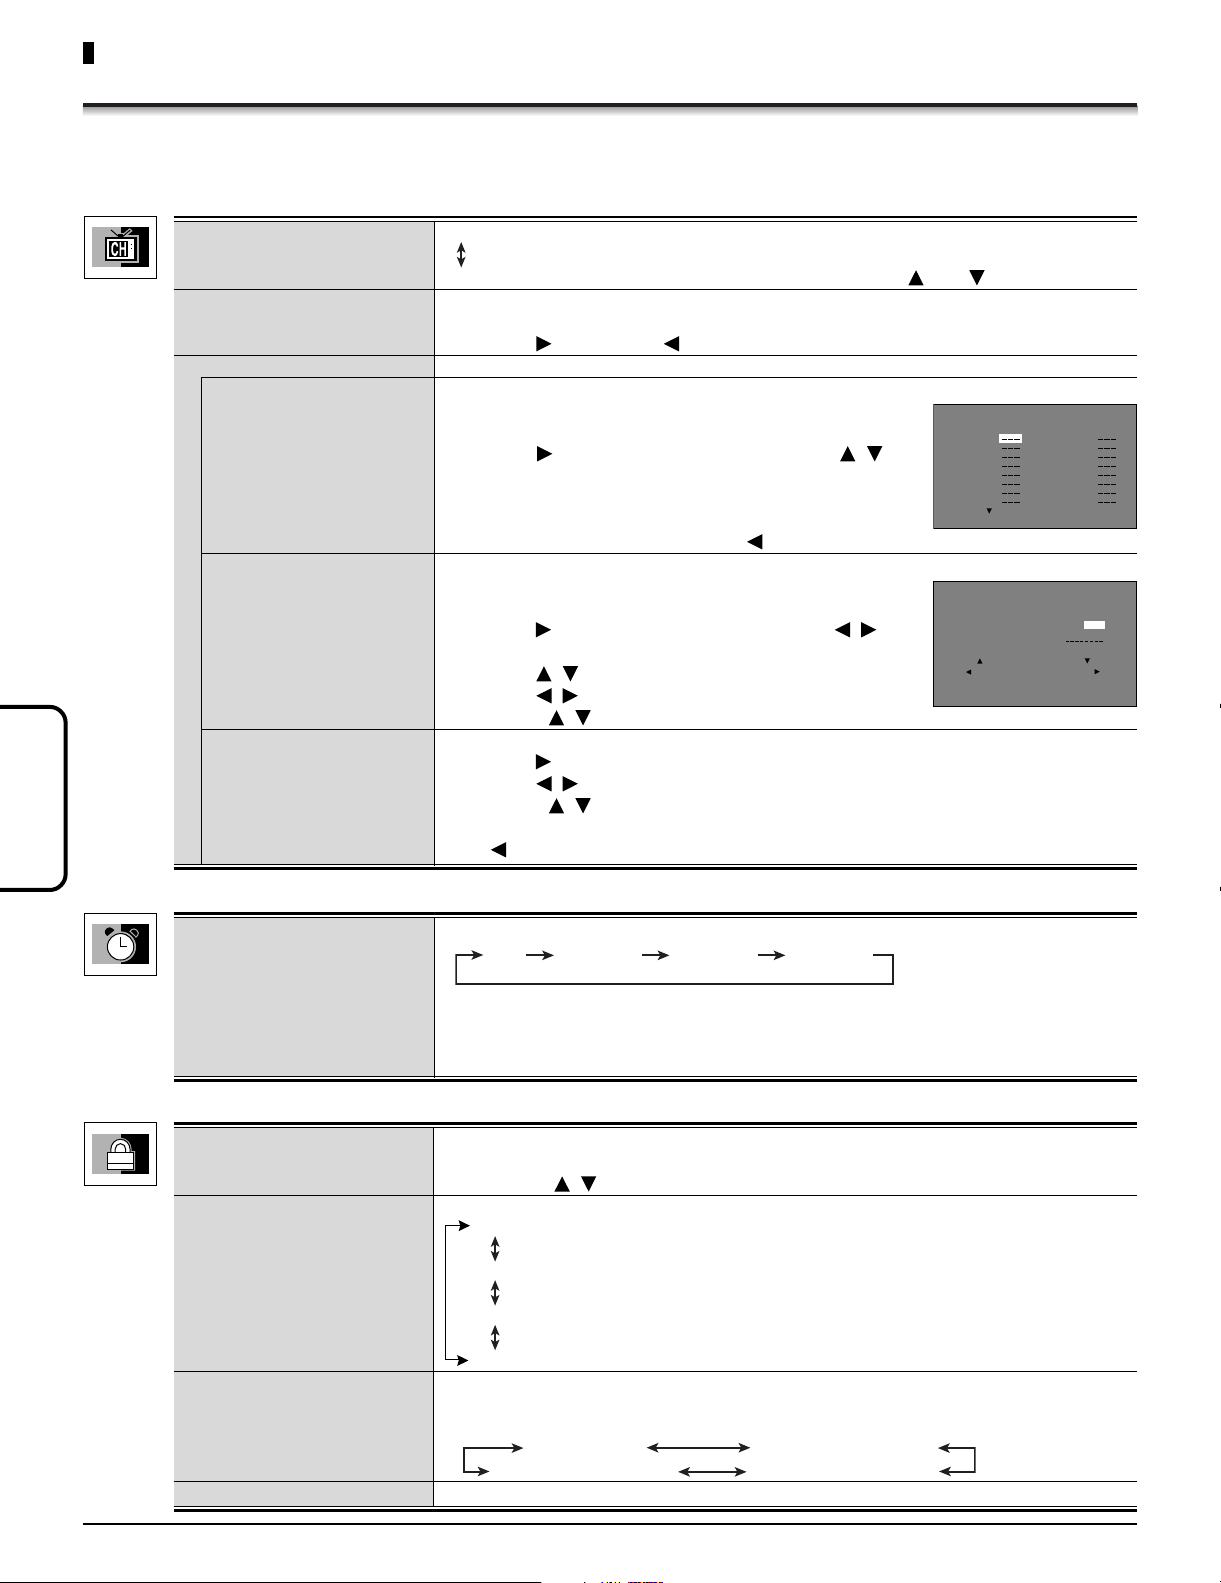
CHANNELS menu
English
CH. SCAN
FAVORITES
OTHER ADJ.
PRESET CAPTION
MANUAL CAPTION
INPUT LABEL
FAV : Enter up to 16 favorite channels.
ALL : Scan all channels you can select using [ CH , CH ].
Add or delete the 16 favorite channels.
1. Press the numbered buttons to select the channel.
2. Press [ ] to add or [ ] to delete the channel.
Give preset captions to the channels.
• You have to delete the previously set MANUAL
CAPTION to replace it by PRESET CAPTION.
1. Press [ ] to enter the menu and press [ , ] to
select the caption.
2. Press the numbered buttons to select the channel
corresponding to the caption.
• To delete the channel, press [ ] .
Set channel captions manually (up to 8 charactors).
• You have to delete the previously set PRESET
CAPTION to replace it by MANUAL CAPTION.
1. Press [ ] to enter the menu and press [ , ] or
the numbered buttons to enter the channel.
2. Press [ , ] to select “ENTER CAPTION”.
3. Press [ , ] to select the character.
• Press [ , ] to move the cursor.
Give the label (up to 8 characters) to VIDEO1 input.
1. Press [ ] to enter the menu.
2. Press [ , ] to select the character.
• Press [ , ] to move the cursor.
• To skip VIDEO1 input, move the cursor to the left-most position and press
[ ] to select “SKIP”.
TIMER menu
LOCK menu
10
SLEEP Set the sleep time.
NO 30 (min.) 60 (min.) 90 (min.)
Note
• When you set the sleep time on the display or another installed terminal board
too, the display turns off at the earliest sleep time.
•
The sleep time information may not be displayed when you select another input mode.
CREATE CODE FIRST/
ENTER CODE
Enter the secret code to display LOCK menu. (Do not forget the code.)
Press the numbered buttons to enter the secret code (4 digit).
• Press [ , ] to reenter the code.
LOCK SET
Limit viewing.
OFF
GAME : Lock CH3, CH4 and Video input.
CHANNEL : Lock up to 4 channels.
ALL : Lock all channels and video inputs.
V-CHIP SET
(see page 12)
The V-CHIP uses the two rating systems, MPAA (MOTION PICTURE) and TV
PARENTAL GUIDELINES, which block out programs following the rating
information in the XDS data packets from broadcasting stations.
U.S. MOVIES
CANADIAN FRENCH
CODE
Change the secret code.
U.S. TV PROGRAMS
CANADIAN ENGLISH
Page 11
See page 9 for operation.
ENGLISH
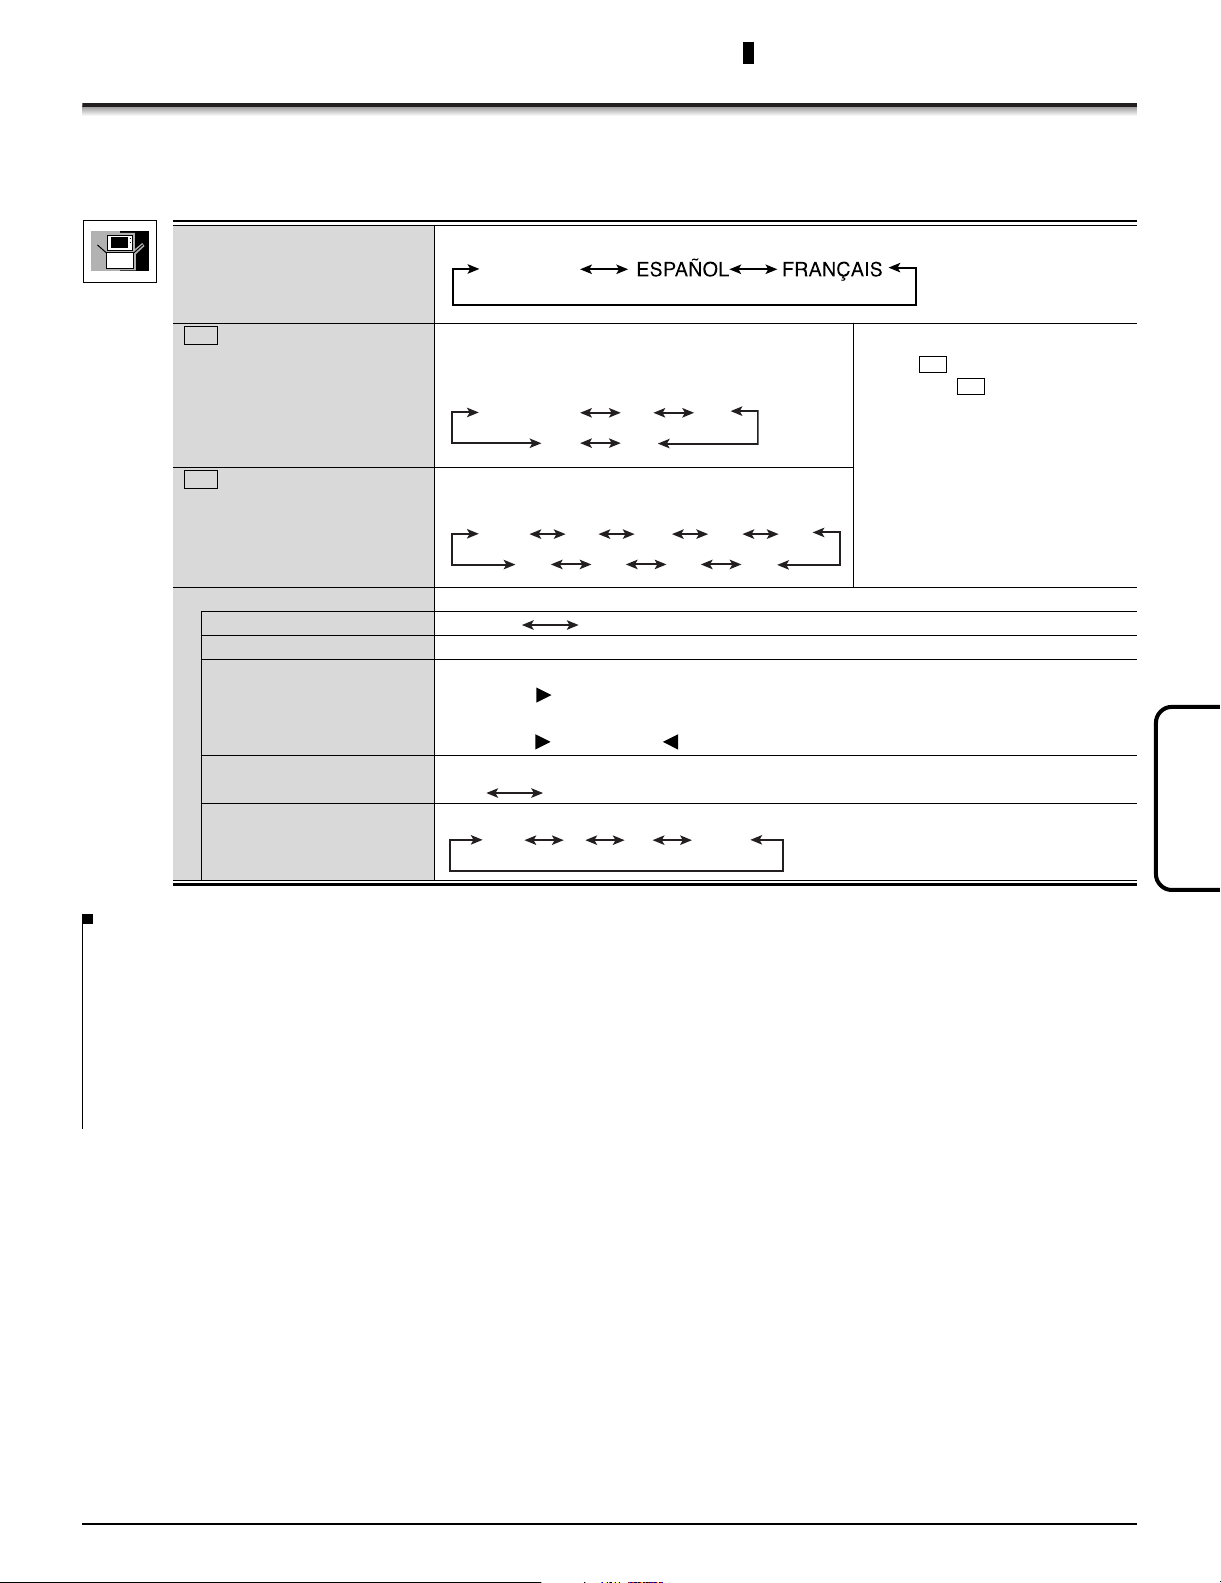
SET UP menu
Changing the initial settings
IDIOMA / LANGUE
cc ON MUTE
cc MODE
OTHER ADJ.
MODE
AUTO PROGRAM
MANUAL PROGRAM
CHAN BANNER
ENERGY MGMT
(Energy management)
Select the menu language.
Display closed captions when muting the
sound. (Refer to “CLOSED CAPTIONS
CHART” below.)
NO (OFF) C1 C2
C4
C3
Display closed captions constantly. (Refer to
“CLOSED CAPTIONS CHART” below.)
OFF C1 C2 T1
T2
Note
• Set “ cc MODE” to “OFF” to
activate “ cc ON MUTE”.
• Some programs do not include
closed captions.
• Closed captions are not
displayed when ASPECT
mode is “ZOOM” (see page 8).
C4T3T4 C3
CABLE TV
Set the channels automatically.
Set the channels manually.
1. Press [ ] to enter the menu and press the numbered buttons to select the
channel.
2. Press
[ ]
to add or
[ ]
to delete the channel.
Display the CHANNEL BANNER.
ON OFF
Select how long the unit remains On when it is not being used.
12NO ....15
English
CLOSED CAPTIONS CHART
CAPTION OFF Recommended mode when Closed Caption is not being used.
CAPTION C1 For video related information that can be displayed (up to 4 lines of script strategically placed on the television screen so that it does not
CAPTION C2 Another mode used for video related information.
TEXT T1 Blanks out a large portion of the picture on the television screen, and displays program guide or any other information currently being
TEXT T2 Another mode which displays information and blanks out a large portion of the picture on the television screen.
CAPTION C3 Another mode used for video related information.
CAPTION C4 Another mode used for video related information.
TEXT T3 Another mode which displays information and blanks out a large portion of the picture on the television screen.
TEXT T4 Another mode which displays information and blanks out a large portion of the picture on the television screen.
obstruct relevant parts of the picture).
transmitted.
11
Page 12
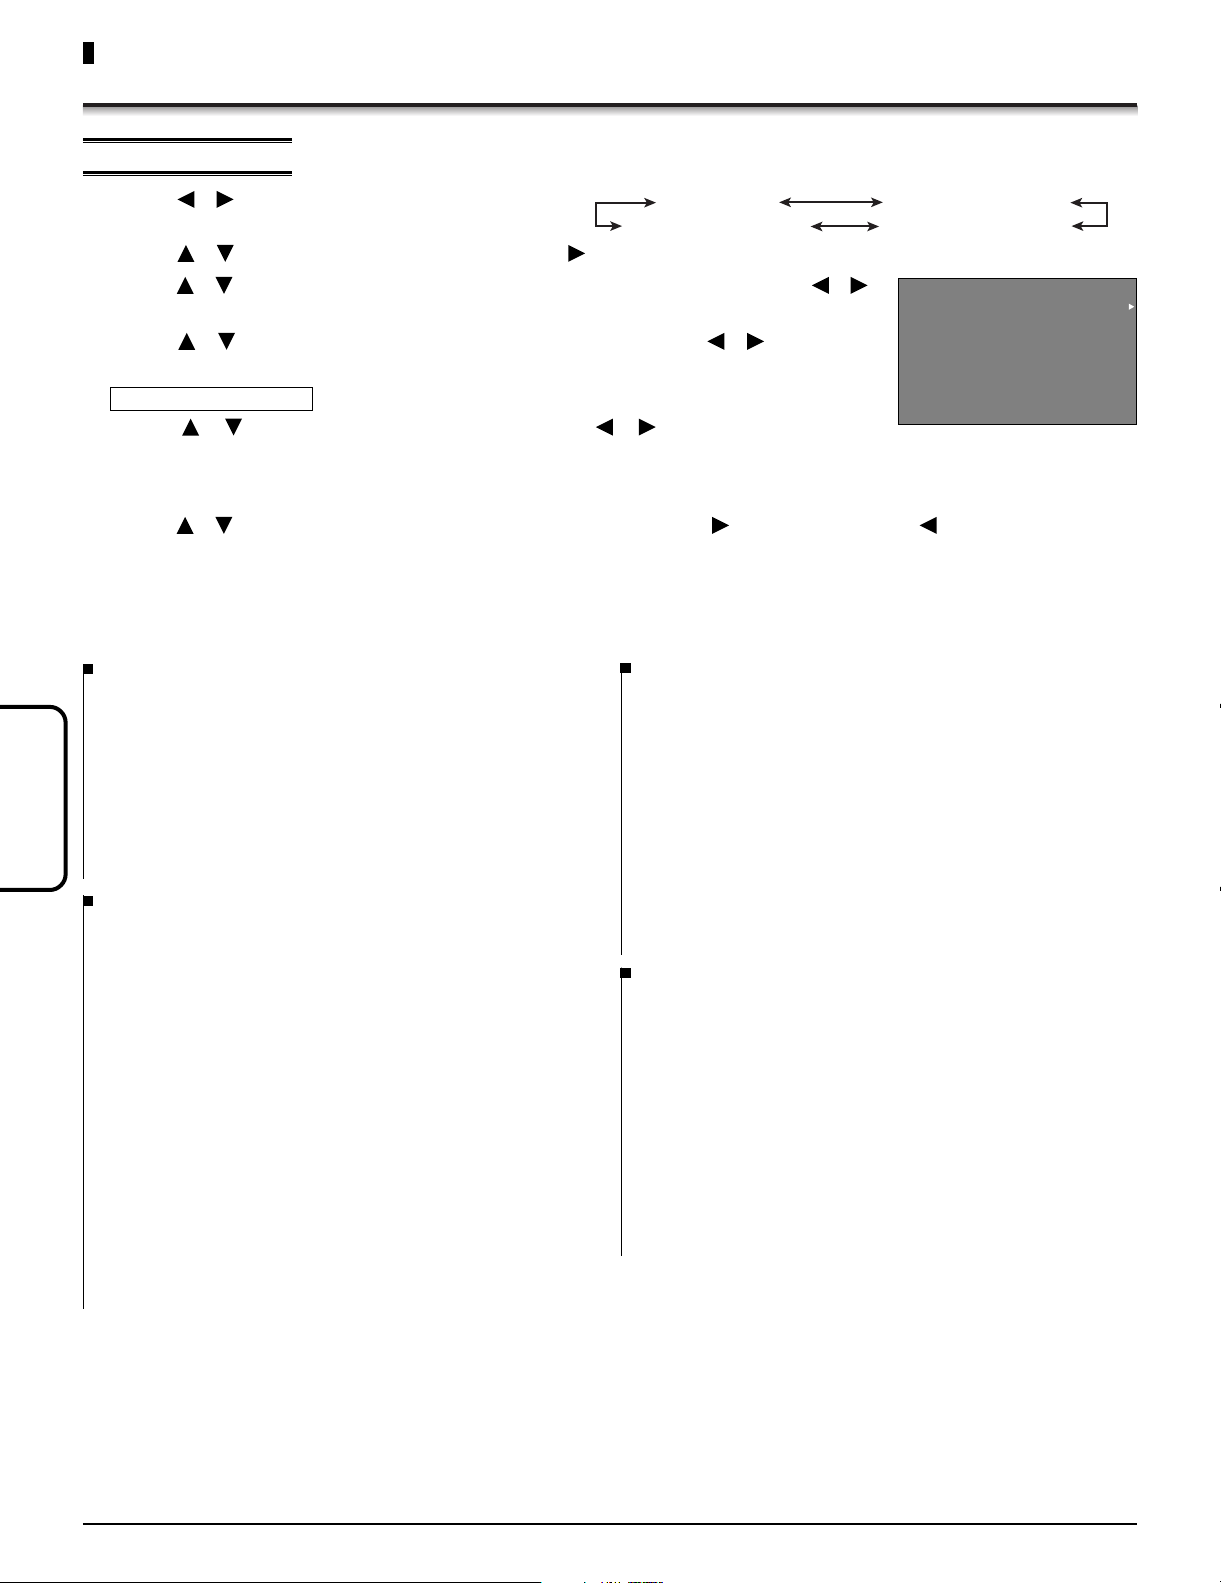
Changing the initial settings
VIEW NR PROGRAMS?
PRESS ACTION TO RETURN
U. S MOVIES
LOCK
OFF
YES
G
PG
PG-13
R
NC-17
X
To set V-CHIP SET
1. Press [ , ] to select the option menu.
U.S. MOVIES
CANADIAN FRENCH
U.S. TV PROGRAMS
CANADIAN ENGLISH
2. Press [ , ] to select “SETTING” and press [ ].
3. Press [
, ] to highlight the option menu selected in step1, and press [ , ]
to select “ON” or “OFF”.
4. Press [
, ] to select “VIEW NR PROGRAMS?” and press [ , ] to select “
YES” or “NO”.
5. U.S. TV PROGRAMS only
Press [ , ] to select “SETTING” and press [ , ] to select “BASIC” or
“DETAILED”.
BASIC : General ratings such as TV-Y, TV-PG, etc only.
DETAILED : General ratings and content such as V, L, etc.
6. Press [ , ] to select the rating level (see below) and press [ ] to lock (RED) or [ ] to unlock (GREEN).
Repeat Step 6 for each rating.
Note • This function does not work with some movies.
• When the program exceeds the rating level, a blocking message appears. Enter the 4-digit secret code to view the
program. The secret code will be valid again when the display is turned off.
U.S. MOVIES RATINGS CHART
NR CONTAINS NO RATING (NOT RATED) AND NA (NOT
APPLICABLE) PROGRAMS.
G GENERAL AUDIENCES. All ages admitted.
PG PARENTAL GUIDANCE SUGGESTED. Material not be suitable
for children.
PG-13 PARENTS STRONGLY CAUTIONED. Material inappropriate for
children under 13.
R RESTRICTED. Under 17 requires accompanying parent or adult
English
guardian.
NC-17 NO ONE 17 AND UNDER ADMITTED.
X ADULTS ONLY.
U.S. TV PROGRAMS RATINGS CHART
NR Not Rated. SEE CUSTOMER CAUTION below.
TV-Y All children. The themes and elements in this program are
specifically designed for a very young audience, including children
from ages 2-6.
TV-Y7 Directed to older children. Themes and elements in this program
may include mild physical or comedic violence, or may frighten
children under the age of 7.
TV-G General audience. It contains little or no violence, no strong
language, and little or no sexual dialogue or situations.
TV-PG Parental guidance suggested. The program may contain infrequent
coarse language, limited violence, some suggestive sexual
dialogue and situations.
TV-14 Parents strongly cautioned. This program may contain
sophisticated themes, sexual content, strong language and more
intense violence.
TV-MA Mature audiences only. This program may contain mature themes,
profane language, graphic violence, and explicit sexual content.
FV FANTASY/CARTOON VIOLENCE
V VIOLENCE
S SEX
L OFFENSIVE LANGUAGE
D DIALOGUE WITH SEXUAL CONTENT
CANADIAN ENGLISH RATINGS CHART
E Exempt - Exempt programming includes: news, sports,
documentaries and other information programming, talk shows,
music videos, and variety programming.
C Programming intended for children under age 8. No offensive
language, nudity or sexual content.
C8+ Programming generally considered acceptable for children 8 years
and over. No profanity, nudity or sexual content.
G General programming, suitable for all audiences.
PG Parental Guidance suggested. Some material may not be suitable
for children.
14+ Programming contains themes or content which may not be
suitable for viewers under the age of 14. Parents are strongly
cautioned to exercise discretion in permitting viewing by pre-teens
and early teens.
18+ ADULTS ONLY
CANADIAN FRENCH RATINGS CHART
E Exempt - Exempt programming.
G General - Programming intended for audience of all ages.
Contains no violence, or the violence content is minimal or is
depicted appropriately.
8 ANS+ 8+ General - Not recommended for young children. Programming
intended for a broad audience but contains light or occasional
violence. Adult supervision recommended.
13ANS+ Programming may not be suitable for children under the age of
13 - Contains either a few violent scenes or one or more
sufficiently violent scenes to affect them. Adult supervision
strongly suggested.
16ANS+ Programming may not be suitable for children under the age of
16 - Contains frequent scenes of violence or intense violence.
18ANS+ 18 ans +Programming restricted to adults. Contains constant
violence or scenes of extreme violence.
Customer Caution
The V-Chip system that is used in this set is capable of blocking “NR” programs (non rated, not applicable and none) per FCC Rules
Section15.120(e)(2). If the option of blocking “NR” programs is chosen “unexpected and possibly confusing results may occur, and you
may not receive emergency bulletins or any of the following types of programming:”
• Emergency Bulletins (Such as EAS messages, weather warnings and others)
• Locally originated programming • News • Political • Public Service Announcements • Religious • Sports • Weather
12
Page 13
Replicating the settings - CLONE BOX
POWER
ASPECT
R-TUNE
RECALL
ACTION
CH
CH
VOL VOL
INPUTTV/VIDEO
MUTE
SAP
The Clone Box (separately purchased) replicates the settings of the master TV into other TVs.
Selecting the master TV settings
1 Select the settings of the master TV (see pages 9-12).
You can replicate the following settings.
Menu Submenu Menu Submenu
PICTURE PIC MODE AUDIO BASS
COLOR TREBLE
TINT CHANNELS PRESET CAPTION
BRIGHTNESS MANUAL CAPTION
PICTURE INPUT LABEL
SHARPNESS SET UP AUTO PROGRAM
COLOR TEMP MANUAL PROGRAM
ENERGY MGMT
2 Press [ CH , CH ] or the numbered buttons to select the initial
channel you would like to display at power ON (ex. self-advertising
channel).
3 Press [ VOL , VOL ] to select the volume level which will be the
maximum volume in the HOTEL mode (see page 14).
Uploading the master TV’s settings into the Clone Box (LEARN)
Be sure to set the TV to the normal TV mode before uploading. If not in the normal TV
mode, change the mode referring to “Switching between the normal TV mode and the
HOTEL mode” (see page 14).
Preparation
• Connect the master TV display to the AC outlet.
• Connect the Clone Box to the MATE terminal on the tuner board.
1 Turn the master TV display on.
2 Turn the Clone Box on.
The red and green LEDs on the Clone Box flash.
3 Hold down [ALT] button and press [LEARN] button on the Clone Box.
• The red LED flashes during uploading.
• The green LED lights for approx. 2 seconds when uploading is completed.
• After uploading, the master will be automatically switched into the HOTEL mode.
4 Turn the main power of the display and the Clone Box off.
To check the settings uploaded into the Clone Box To check the Clone Box’s battery
1. Insert a slender tool about 3/4 inch (ex. a paper clip) into
[AMS] hole on the Clone Box to switch the TV to the normal
TV mode.
The green LED lights for approx. 2 seconds.
2. Press [TEST] button on the Clone Box.
• The red and green LED flash alternately during checking.
• The green LED lights for approx. 2 seconds when the settings
replicated in the Clone Box correspond to the master TV settings.
If the red LED does not light, upload the settings again.
English
1. Turn the Clone Box on.
2. Hold down [ALT] button and press [TEST]
button on the Clone Box.
• The red and green LEDs flash alternately during
checking.
• The green LED lights for approx. 2 seconds when
the battery has enough remaining power. If the
LEDs do not light, replace the battery to new one
(use a 9-volt battery).
13
Page 14

Replicating the settings - CLONE BOX
Downloading the settings into another TV (TEACH)
Be sure to set the TV to the normal TV mode before downloading. If not in the normal TV mode, change the mode referring
to “Switching between the normal TV mode and the HOTEL mode” (see below).
Preparation
• Connect the receiving TV display to the AC outlet.
• Connect the Clone Box to the MATE terminal on the tuner board.
1 Turn the receiving TV display on.
2 Turn the Clone Box on.
The red and green LEDs on the Clone Box flash.
3 Press [TEACH] button on the Clone Box.
• The green LED flashes during downloading.
• The green LED lights for approx. 2 seconds when downloading is completed.
• After downloading, the receiving TV will be automatically switched into the HOTEL mode.
4 Turn the main power of the display and the Clone Box off.
Repeat the steps above to download to other TVs.
Switching between the normal TV mode and the HOTEL mode
When you used the Clone Box
Insert a slender tool about 3/4 inch (ex. a paper clip) into [AMS] hole on the Clone Box.
The green LED lights for approx. 2 seconds.
When you switch the mode with the remote control
Press [SAP], [ASPECT], and then press and hold [MUTE] for approx. 3 seconds.
Press the next button within a second.
English
To enter or exit the HOTEL mode menu
Press [ACTION] to enter and press again to exit.
HOTEL mode menu
SET UP menu
• SLEEP (see page 10)
• cc MODE (see page 11)
• MODE (see page 9)
• VIDEO (see page 11, MODE)
• V-CHIP SET
Does not appear in the initial setting. To display, press
[SAP], [ASPECT] and then press and hold [RECALL]
for approx. 3 seconds.
Resetting all the settings to Factory Preset
Preparation
• Connect the TV display to the AC outlet.
• Connect the Clone Box to the MATE terminal on the tuner board.
1. Turn the display on.
2. Turn the Clone Box on.
The red and green LEDs on the Clone Box flash.
3. Insert a slender tool about 3/4 inch (ex. a paper clip) into [AMS] hole on the Clone Box.
The green LED lights for approx. 2 seconds.
4. Press [SAP], [ASPECT] and press and hold [TV/VIDEO] for approx. 3 seconds.
All settings will return to the default values.
5. Turn the main power of the display and the Clone Box off.
LOCK menu
To display, press [ ] while highlighting “V-CHIP SET” in
SET UP menu (see left).
• CREATE CODE FIRST / ENTER CODE (see page 10)
• V-CHIP SET (see pages 10, 12)
• CODE (see page 10)
• HOW LONG? : 12HOURS (Fixed)
The settings selected in HOTEL mode returns to the
initial settings after 12 hours.
14
Page 15

Troubleshooting Guide
Before reguesting service, make the following checks.
Symptoms
VIDEO AUDIO
Solutions
Snowy Video
Multiple Image
Interference
Normal Video
No Video with Snow
No Video / No PIP
No Color
Noisy Audio
Noisy Audio
Noisy Audio
No Audio
Noisy Audio
No Audio
Normal Audio
Adjust Antenna Location and Connection.
Adjust Antenna Location and Connection.
Check Antenna Lead-in Wire.
Move television away from Electrical Appliances, Lights,
Vehicles and Medical Equipment.
Increase Volume.
Check Mute.
Change Channel.
Set TV or Cable Mode Properly.
Check Antenna Cables.
Check Power Cord is Plugged into Active Outlet.
Adjust Brightness and Audio Controls.
Change Channel.
Check Cable Connections.
Check Second Video Source Operation.
Adjust Color Settings.
Change Channel.
Normal Video
Black Box on Screen
Normal Video
Intermittent Remote Control Operation
Specifications
Model No.
Channel Capability-181
Connection Terminals
Model No.
Mass (weight)
Operating range
Wrong Audio
Normal Audio
Normal Audio
U/V Tuner Board with MATE I/F
TY-42TM6MA
VHF-12 : UHF-56 : Cable-125
AV INPUT VIDEO (RCA PIN JACK TYPE) 1.0 Vp-p (75 Ω)
S VIDEO (Mini DIN 4-pin) Y : 1.0 Vp-p (75 Ω), C : 0.286 Vp-p (75 Ω)
AUDIO L-R (RCA PIN JACK TYPE) 0.5 Vrms
AV OUTPUT VIDEO (RCA PIN JACK TYPE) 1.0 Vp-p (75 Ω)
Check Audio is set to stereo or Mono, not to SAP.
Change CC (Closed Captioning).
Replace Remote Control Batteries.
∗ Cannot output UHF/VHF signals.
AUDIO L-R (M3 JACK TYPE) 0.5 Vrms
Digital interface port (MATE) RJ-11C
Remote control
N2QAFB000003
approx. 160 g (5.6 oz)(including batteries)
approx. 7 m (23 feet) directly in front of the unit
English
15
Page 16

Table des matières
Caractéristiques .......................................................... 16
Consignes de sécurité ................................................ 17
Précautions à prendre ................................................ 17
Accessoires ................................................................. 17
Mise en place des piles de la télécommande ........... 17
Raccordements ........................................................... 18
Installation ................................................................. 18
Connexion à une antenne ......................................... 18
Connexion d’équipement externe ............................. 19
Télécommande ............................................................ 20
Réception d’émissions de télévision ........................ 21
Mode ASPECT ............................................................. 22
Modification des paramètres initiaux ........................ 23
Menu IMAGE ............................................................ 23
Menu AUDIO ............................................................. 23
Menu CANAUX ......................................................... 24
Menu MINUTERIE .................................................... 24
Menu BLOCAGE....................................................... 24
Menu RÉGLAGE....................................................... 25
Duplication des paramètres – Unité de clonage ...... 27
Sélection des paramètres du téléviseur “maître” ...... 27
Téléchargement des paramètres du téléviseur
“maître” sur l’unité de clonage (LEARN) .......... 27
Téléchargement des paramètres
sur un autre téléviseur (TEACH) ....................... 28
Commutation entre les modes TV normal
et HÔTEL ........................................................ 28
Rétablissement des paramètres par défaut .............. 28
Guide de dépannage ................................................... 29
Spécifications .............................................................. 29
Français
Caractéristiques
Réception du signal de télédiffusion analogique terrestre
Il est possible d’installer le syntoniseur UHF/VHF avec interface complémentaire TY-42TM6MA dans la
fente de l’écran et ainsi capter le signal de télédiffusion analogique terrestre.
Possibilité de connexion de divers appareils vidéo
La carte optionnelle peut être installée sur les écrans à plasma de la série PWD, PHD et LHD, ainsi que sur
les écrans à cristaux liquides.
∗ Quant aux modèles concernés, se référer au manuel d’utilisation de l’affichage.
16
Page 17

Consignes de sécurité (À bien observer)
AVERTISSEMENT
• Ne tentez pas de démonter ni de modifier cet appareil.
Cela afin d'éviter les risques d'incendie, de secousse électrique ou d'anomalie.
•
Si vous sentez une odeur de fumée ou une odeur anormale, si des bruits inhabituels se produisent pendant le fonctionnement, débranchez
immédiatement l’écran.
Mettez l’écran hors tension et débranchez-le de la prise secteur.
Pour éviter tout risque d’incendie ou d’électrocution, ne laissez pas l’écran sous tension.
• Pour éviter tout risque d’électrocution, ne laissez pas la fiche du cordon d’alimentation branchée sur la prise secteur.
• Pour l’installation ou la modification de cet appareil, veuillez prendre contact avec notre service d’entretien
désigné.
A l'attention du personnel d'entretien:
Avant de déposer ou d’installer la carte de connexion, assurez-vous que l’écran est hors tension et débranchez
la fiche du cordon d’alimentation de la prise secteur.
Précautions à prendre
• Ne touchez pas les contacts du connecteur directement avec les mains.
Pour éviter que les organes internes ne soient endommagés par une décharge d’électricité statique, touchez un objet
métallique de grande taille, par exemple une armoire métallique, pour vous décharger de l’électricité accumulée avant
de manipuler l’appareil.
• Pour effectuer l’interconnexion, n’utilisez que le câble et les pièces fournis.
Pour éviter une anomalie de fonctionnement ou une panne, n’utilisez aucune pièce autre que celles prescrites.
Accessoires
Vérifier la présence des accessoires ci-dessous.
• Télécommande
N2QAFB000003
•
Adaptateur d’antenne de
type F
Pour 5C ( × 1)
Pour 4C ( × 1)
Mise en place des piles de la télécommande
1. Ouvrir le couvercle du logement des piles.
2. Mettre les piles en place. Prendre
soin de respecter la polarité (+ et -).
• Piles pour
télécommande
(2 piles AA)
• Vis ( × 4)
• Noyau de ferrite
( × 1)
Précautions à prendre
Un traitement inapproprié des piles peut entraîner une fuite de l’électrolyte
susceptible d’endommager les objets avec lesquels elle entrerait en contact
et de provoquer un incendie.
• Ne pas utiliser ensemble des piles neuves et usées.
• Ne pas utiliser ensemble des piles de types différents (ex. zinc carbone et
alcaline).
• Ne pas exposer les piles à la chaleur ou à une flamme.
• Ne pas démonter ou court-circuiter les piles.
• Ne pas tenter de charger, court-circuiter, démonter, chauffer ou brûler des
piles alcalines ou au manganèse usées.
• Remplacer les piles si la télécommande ne fonctionne pas adéquatement.
• Étiquette des bornes et prises (1 feuille)
MATE
(Apposez cette étiquette sur le panneau arrière de l’écran.)
• Notice de
remplacement du
syntoniseur
Français
Grandeur AA
Renseignement utile
Pour une autonomie prolongée, utiliser des piles alcalines.
17
Page 18

Raccordements
Installation
Précautions à prendre
• Avant l’installation
Couper le contact sur l’écran et en débrancher le cordon d’alimentation. Débrancher toutes les fiches raccordées à l’écran.
• Avant de retirer le syntoniseur, couper le contact sur l’écran au moyen de sa télécommande avant de couper
l’alimentation secteur.
•
Lors de l’installation ou du retrait du syntoniseur, procéder avec le plus grand soin afin de prévenir les blessures.
Il pourrait y avoir des points de soudure tranchants sur l’arrière du syntoniseur pouvant blesser les mains ou les doigts.
• Lors de la mise en place du syntoniseur, l’introduire à fond à l’horizontale dans la fente jusqu’à ce qu’il soit
fermement relié au connecteur.
Il est noter que si le syntoniseur n’est pas inséré jusqu’au fond, des composantes internes pourraient être endommagées.
Fentes compatibles: SLOT 1 et SLOT 2
• Étiquette d’identification des bornes
Modèle à 2 fentes
SLOT1
Modèle à 3 fentes
SLOT2
SLOT1
AUDIO
SERIALPC IN
SLOT3SLOT2
AUDIO
SERIALPC IN
La fente 3 (SLOT3) n’est
pas compatible.
Coussinet en mousse ou tissu épais
Retrait
Installation
1.Retirer le
couvercle
de la fente.
Vis de fixation
2. Introduire le syntoniseur
dans la fente jusqu’à ce
qu’il soit fermement relié
au connecteur.
Serrer les vis dans
l’ordre 1 à 4 .
3.Apposer l’étiquette
d’identification des
bornes et prises
(fournie).
Retirer le couvercle de la fente. Agripper
la poignée du syntoniseur, puis le tirer
doucement dans le sens de la flèche.
• S’assurer que le syntoniseur ne bascule pas sur les deux griffes inférieures.
• Serrer toutes les vis à fond.
Demander au client de conserver le syntoniseur pour permettre
•
Français
récupération des composantes ou son reconditionnement.
Connexion à une antenne
Afin d’assurer une bonne réception des canaux VHF et UHF, il est nécessaire de recourir à une antenne externe. Pour
une réception de qualité optimale, il est recommandé d’utiliser une antenne extérieure. Le sélecteur de mode (antenne)
doit être réglé sur ‘‘TV’’ (voir à la page 25, menu RÉGLAGE – MODE).
Antenne VHF Antenne UHF
Mélangeur
75 Ω VHF/UHF
Câble
coaxial
75 Ω
Noyau de ferrite
(fourni)
Adaptateur d’antenne
de type F (fourni)
Noyau de
ferrite (fourni)
Nota
•
Pour une image et un son de qualité optimale, une
antenne, un câble approprié (coaxial 75 Ω) et une
fiche de raccordement adéquate sont nécessaires.
• Si une antenne communautaire est utilisée, il sera
peut-être nécessaire d’utiliser un câble et une
fiche de raccordement entre la prise murale de
l’antenne et le récepteur de télévision.
• Un revendeur ou un centre de service Panasonic
sera en mesure de vous conseiller quant à la
connexion à l’antenne et aux accessoires requis.
• L’utilisateur est responsable de tous les aspects
reliés à l’installation de l’antenne, à la mise à
niveau des systèmes ou des accessoires ainsi
que de tous les coûts qui y sont associés.
la
18
Page 19

MATE
Fixation du noyau de ferrite
1
Raccordements
2
Tirer les languettes
vers l’arrière (en
deux endroits) pour
Nota
Si le noyau de ferrite n’est pas fixé, le signal audio ou vidéo pourrait être entaché de bruit.
Manipulation du câble d’antenne
Afin de prévenir que du bruit n’affecte le signal vidéo, faire cheminer et fixer adéquatement le câble d’antenne.
ouvrir.
Arrière Arrière Avant
Faire cheminer le
câble loin de
l’écran.
Passer le fil
dans le noyau,
puis refermer.
Ne pas faire
passer le câble
près de l’écran.
Moins de 10 cm (4 po)
Ne pas faire
passer le câble
devant l’écran.
Connexion d’équipement externe
Écran Moniteur
Amplificateur à système
d’enceintes
Port d’interface
numérique
Unité
complémentaire
Antenne VHF Antenne UHF
Unité de
clonage
Mélangeur
Mini fiche (M3) stéréo
Adaptateur d’antenne de type F (fourni)
Magnétoscope
Nota
• Sauf indication contraire, tout l’équipement externe et les câbles/adaptateurs en option sont vendus séparément.
• Le signal d’entrée S-Vidéo (S VIDEO IN) a préséance sur le signal d’entrée composite (VIDEO IN).
• Une console de jeu vidéo avec fusil optique utilisant le système de balayage du canon à électrons d’un téléviseur à
écran cathodique n’est pas compatible avec un écran.
•
VIDEO OUT n’est disponible que lorsque ‘‘VIDEO1’’ est sélectionné comme source d’entrée pour la prise INPUT 1 (voir la page 20).
Lecteur DVD
Français
19
Page 20

POWER
MUTE
RECALL
ASPECT
SAP
R-TUNE
TV/VIDEO INPUT
ACTION
CH
CH
VOL VOL
Télécommande
Touche ASPECT
Pour changer le format (rapport largeur/
longueur) de l’image (voir page 22).
Touche RECALL
Affichage du canal, du mode audio, du temps
restant sur la minuterie SOMMEIL, etc.
Touche POWER (Interrupteur)
Pour établir/couper le contact sur
l’écran.
Touche MUTE
Pour mettre le son en sourdine
ou désactiver la fonction.
Tableau de référence des commandes du syntoniseur et de l’écran
Nota
Pour les fonctions communes, s’assurer d’utiliser la télécommande du syntoniseur.
Télécommande
de l’écran
•
Visionnement d’émissions télédiffusées
•
Syntonisation de canaux télédiffusées
Télécommande du
syntoniseur
• Réglage du volume
• Mise en sourdine
• Sélection du format d’image
• Affichage des réglages actuels
•
Sélection du mode d’entrée du syntoniseur
•
Affichage des réglages actuels de l’écran
•
Sélection du mode d’entrée de l’écran
• Mise en/hors contact de l’écran
• La source de INPUT1 (TV ou VIDÉO1) ne peut être sélectionnée au
moyen de la télécommande de l’écran.
• Utiliser la télécommande de l’écran pour modifier les réglages de ‘‘Taille/
Pos. Image’’et ‘‘Surround’’ de l’écran. Pour plus de détails sur les
commandes de l’écran, se reporter au manuel d’instructions de celui-ci.
Touches de déplacement du curseur ( , , , )
Touche ACTION
Touches de syntonisation (CH , CH )
Touches de réglage du volume (VOL , VOL )
Pour monter (VOL ) ou baisser (VOL ) le volume.
Touche SAP
Pour la sélection du mode audio (voir page 21).
Touche R-TUNE
Pour retourner au canal ou au mode vidéo précédemment visualisé.
Touche INPUT
Pour la sélection du mode d’entrée.
Sur chaque pression de la touche:
INPUT 1 INPUT 3
Entrée PC
Français
20
• Les fentes SLOT1 et 2 (syntoniseur) correspondent à
INPUT1, SLOT3 à INPUT3 et PC IN à l’entrée PC.
∗
Modèle à 2 fentes seulement. La borne INPUT3 ne peut être
sélectionnée que lorsqu’un syntoniseur est dans la fente 3 (SLOT3)
Sélecteur télé/vidéo (TV/VIDEO)
Sélection de la source INPUT1 de la TV ou VIDÉO1.
• Cela ne peut s’appliquer à INPUT3 ni à l’entrée PC.
• Pour étiqueter ou sauter le signal d’entrée VIDÉO1 (voir
page 24, menu CANAUX – IDENT. PRISES).
Touches numériques
.
Page 21

Réception d’émissions de télévision
POWER
ASPECT
R-TUNE
RECALL
ACTION
CH
CH
VOL VOL
INPUTTV/VIDEO
MUTE
SAP
Préparatifs
1. Brancher le cordon d’alimentation de l’écran dans une prise de courant.
2. Appuyer sur la touche de l’écran pour le mettre en marche.
• Le voyant d’alimentation s’allume (vert: en contact; rouge: en attente;
éteint: hors contact).
• Il est possible d’utiliser la télécommande lorsque le voyant est rouge
VOL
ENTER
INPUTMENU
+
R - STANDBY
G POWER ON
R - STANDBY
G POWER ON
Voyant d’alimentation
Capteur du signal
de la télécommande
ou vert.
3. Sélectionner la langue d’affichage des menus dans le menu RÉGLAGE
(voir page 25).
1
Appuyer sur [INPUT] pour sélectionner INPUT1 (syntoniseur).
2 Appuyer sur [TV/VIDEO] pour sélectionner le mode TV.
3 Appuyer sur [CH , CH ] ou sur les touches numériques
pour sélectionner un canal.
Interrupteur
4 Appuyer sur [VOL , VOL ] pour régler le volume.
Nota
• Baisser le volume dans l’éventualité où un hululement serait produit.
• La fonction de mise hors contact automatique de l’écran ne peut
fonctionner lorsque INPUT1 est sélectionné (syntoniseur).
Renseignement utile
Appuyer sur [RECALL] pour afficher le canal, le mode audio, le temps
restant sur la minuterie SOMMEIL, etc.
Mise en sourdine
Appuyer sur [MUTE].
• L’indication ‘‘COUPURE SON’’ s’affiche.
• Appuyer de nouveau sur [MUTE] pour annuler.
Français
Sélection du mode audio
Appuyer sur [SAP].
Sur chaque pression de la touche:
MONOSTÉRÉO SAP
∗
SAP: Deuxième voie son
Nota
• Le paramètre est disponible lorsque son indication est affichée en
rouge et n’est pas disponible lorsqu’elle est affichée en blanc.
• Pour commuter le mode d’entrée du signal audio externe, faire la
sélection sur l’équipement externe.
21
Page 22

Mode ASPECT (format de l’image)
4 : 3
3
4
ZOOM
4
3
16
9
R-TUNE
RECALL
SAP
INPUTTV/VIDEO
ACTION
CH
CH
VOL VOL
MUTE
POWER
ASPECT
Il est possible de modifier le rapport largeur/longueur de l’image de manière que celle-ci puisse remplir l’écran.
Appuyer sur [ASPECT] pour sélectionner le format d’image.
Les modes disponibles dépendent du matériel à visualiser.
Sur chaque pression de la touche :
Mode
4 : 3
ZOOM
Image Signification
Affiche une image 4:3 à son format d’origine, avec
bandes grises sur les côtés.
L’image, à son format d’origine, est agrandie de
manière à remplir tout l’écran.
4
Français
TOUT ÉCRAN
4
CADRAGE
Nota
Le réglage du format et de la position de l’image ne peut se faire qu’au moyen de la télécommande de I’écran.
3
3 9
TOUT ÉCRAN
CADRAGE
16
16
Étire horizontalement l’image 4:3 de manière à remplir
9
l’écran.
L’image vidéo est agrandie horizontalement de manière
à remplir l’écran. Le format d’origine est maintenu près
du centre tandis que l’étirement de l’image se fait
progressivement plus grand vers chaque côté de
l’écran. Il est résulte une image moins incongrue.
22
Page 23

Modification des paramètres initiaux
POWER
MUTE
ASPECT
SAP
R-TUNE
RECALL
ACTION
CH
CH
VOL VOL
INPUTTV/VIDEO
Il est possible de modifier les paramètres selon ses préférences et les conditions ambiantes. Il est également possible de
télécharger les paramètres au moyen de l’unité de clonage, puis de mettre l’appareil dans le mode ‘‘HÔTEL’’ de manière
que les invités ne puissent avoir accès qu’à certains paramètres (voir page 28).
1 Appuyer sur [ACTION] pour afficher l’écran du menu.
Icône du menu
IMAGE
MODE
COULEUR
NUANCES
Sous-menu
BRILLANCE
IMAGE
NETTETÉ
NORM.
AUTRES RÉG
:
QUITTER
:
2 Appuyer sur [ , ] pour sélectionner l’icône du menu, puis sur
[
, ] pour sélectionner le sous-menu.
Pour sélectionner les sous-menus non affichés, sélectionner ‘‘AUTRES RÉG’’, puis
appuyer sur [ ].
3 Appuyer sur [ , ] pour modifier les paramètres ou entrer dans le
menu des options.
ÉCLATANT
Menu des options
VAL IDE R
SOUS-MENU
Menu IMAGE
Menu AUDIO
Retour à l’écran précédent
Appuyer sur [ACTION].
Pour quitter l’écran menu
Appuyer sur [ ] tout en mettant une icône de menu en surbrillance.
Nota
Cette fonction ne peut être utilisée pour l’image incrustée de la fonction de ‘‘l’image
dans l’image’’ de l’écran.
MODE
COULEUR
NUANCES
BRILLANCE
IMAGE
NETTETÉ
NORM.
AUTRES RÉG
TEMP. COUL.
(température de la couleur)
FILTRE 3D Y/C
Sélection du mode de l’image.
STANDARD CINÉMAÉCLATANT AUTO
Nota
Sélectionner ‘‘CINÉMA’’ lorsque les bandes latérales (bandes grises sur les
deux côtés de l’image 4:3) clignotent (gris/blanc en alternance).
Réglage de l’intensité de la couleur.
Réglage des nuances.
Réglage de la brillance des parties sombres de l’image.
Réglage de l’équilibre des blancs de l’image.
Réglage de la netteté des contours.
Rétablissement des paramètres par défaut.
NORM
ROUGE (accentuation du rouge)
BLEU (accentuation du bleu)
EF (réduit le bruit et la diaphotie dans l’image) HF
Français
MODE (voir page 21)
GRAVES
AIGUS
ÉQUILIBRE
NORM
STÉRÉO / SAP / MONO
Réglage de la réponse en basse fréquence.
Réglage de la réponse en haute fréquence.
Réglage de l’équilibre du volume des haut-parleurs gauche ( )/ droit ( ).
Rétablissement des paramètres par défaut pour GRAVES, AIGUS et ÉQUILIBRE.
23
Page 24

Modification des paramètres initiaux
CANAUX
A&E
AMC
BET
BRAVO
CNBC
CNN/SI
COMEDY
COURT
APPUYER ACTION POUR RETOURNER
SIGLE PRRGL
ABC
CBS
FOX
NBC
PBS
CNN
ESPN
HBO
APPUYER PR CONTINUER
CANAUX
ENTRER CANAL 10
ENTRER SIGLE
APPUYER ACTION POUR RETOURNER
SIGLE MANUEL
PR DPLACER CRSEUR
PR SLECT. CANAL
Se reporter à la page 23 pour des instructions détaillées.
Menu CANAUX
BAL. CA
FAVORIS
AUTRES RÉG
SIGLE PRÉRÉGLÉ
SIGLE MANUEL
IDENT. PRISES
FAV : Maximum de 16 canaux.
TOUS
: Balayer tous les canaux pouvant être sélectionnés [ CH , CH ].
Ajout ou suppression d’un des 16 canaux favoris.
1. Au moyen des touches numériques, sélectionner un canal.
2. Appuyer sur [ ] pour ajouter un canal ou sur [ ] pour en supprimer un.
Assignation d’un sigle préréglé aux canaux.
•
Il est nécessaire de supprimer le SIGLE MANUEL précédemment
entré pour le remplacer par un SIGLE PRÉRÉGLÉ.
1. Appuyer sur [ ] pour accéder au menu, puis
appuyer sur [ , ] pour sélectionner le sigle.
2. Au moyen des touches numériques, sélectionner le
canal correspondant au sigle.
• Pour supprimer le canal, appuyer sur [ ].
Assignation manuelle de sigles (maximum de 8 caractères).
•
Il est nécessaire de supprimer le SIGLE PRÉRÉGLÉ
précédemment entré pour le remplacer par un SIGLE MANUEL.
1. Appuyer sur [ ] pour accéder au menu, puis
appuyer sur [ , ] pour sélectionner le sigle.
2.
Appuyer sur
[ , ]
pour sélectionner ‘‘ENTRER SIGLE’’.
3. Appuyer sur [ , ] pour sélectionner le caractère.
• Appuyer sur [ , ] pour déplacer le curseur.
Assignation d’une étiquette (maximum de 8 caractères) à l’entrée VIDÉO1.
1. Appuyer sur [ ] pour accéder au menu.
2. Appuyer sur [ , ] pour sélectionner le caractère.
• Appuyer sur [ , ] pour déplacer le curseur.
• Pour sauter l’entrée VIDÉO1, déplacer le curseur vers la position la plus à
gauche, puis appuyer sur [ ] pour sélectionner ‘‘OMETTRE ’’.
Menu MINUTERIE
Français
Menu BLOCAGE
24
SOMMEIL Réglage de la minuterie.
NON
30 (min) 60 (min) 90 (min)
Nota
• Lorsque la minuterie est réglée également sur l’écran ou un autre syntoniseur,
l’affichage s’éteint à l’heure la plus rapprochée réglée.
•
Il se peut que le réglage de la minuterie ne soit pas affichée lorsque le mode d’entrée est commuté.
CRÉER CODE D’ABORD/
ENTRER CODE
Entrer le code secret pour accéder au menu BLOCAGE. (Ne pas oublier le code.)
Au moyen des touches numériques, entrer le code secret (4 chiffres).
• Appuyer sur [ , ] pour entrer le code de nouveau.
VERROUILLER
Restriction de l’accès à des canaux ou à une console de jeux.
HF
JEU : Bloque les entrées CH3, CH4 et Vidéo.
CANAL : Blocage de jusqu’à 4 canaux.
TOUS : Bloque tous les canaux et tous les signaux d’entrée.
PUCE RÉGL.
(voir page 26)
La puce anti-violence utilise deux systèmes de classification – MPAA (films) et COTE TÉLÉ –
lesquels bloquent la réception des émissions en fonction des renseignements sur la
classification contenus dans les paquets de données XDS diffusés par les stations de télévision.
FILMS USA
CANADA-QUÉBEC
CODE
Changement du code secret.
ÉMIS.TÉLÉ USA
CANADA
Page 25

Se reporter à la page 23 pour des instructions détaillées.
12
NON
....15
Menu RÉGLAGE
Modification des paramètres initiaux
IDIOMA / LANGUE
cc EF MUET
cc MODE
AUTRES RÉG
MODE
PROG AUTO
PROG MANUELLE
BANNIÈRE CA
ÉCONO ÉNERGIE
Sélection de la langue d’affichage des menus.
ENGLISH
Affichage des sous-titres lors de la mise en
sourdine du son. (Se reporter au ‘‘Tableau
des sous-titres’’ ci-dessous.)
NON (HF) C1 C2
C4
C3
Affichage permanent des sous-titres. (Se reporter
au ‘‘Tableau des sous-titres’’ ci-dessous.)
HF C1 C2 T1
T2
Nota
• Régler “ cc MODE” sur
‘‘NON’’ pour activer “ cc EF
MUET”.
• Certaines émissions ne
comportent pas de sous-titres.
• Les sous-titres ne sont pas
affichés lorsque le mode
ASPECT est réglé sur
‘‘ZOOM’’ (voir page 22).
C4T3T4 C3
CÂBLE TÉLÉ
Programmation automatique des canaux.
Programmation manuelle des canaux.
1. Appuyer sur [ ] pour accéder au menu et sélectionner le canal au moyen
des touches numériques.
2. Appuyer sur
[ ]
pour ajouter un canal ou sur
[ ]
pour en supprimer un.
Affichage de la BANNIÈRE CA.
EF HF
Sélection du délai d’inactivité pour la mise hors marche automatique.
Tableau des sous-titres
HF (HORS FONCTION)
C1 Pour l’affichage d’informations relatives à l’image (maximum de 4 lignes placées convenablement sur l’écran de manière à ne pas
C2 Autre mode pour les informations relatives à l’image.
T1 Masquage d’une grande partie de l’image et affichage du programme des émissions ou d’autres informations pertinentes.
T2 Autre mode donnant lieu à l’affichage d’informations et au masquage d’une grande partie de l’image sur l’écran du téléviseur.
C3 Autre mode pour les informations relatives à l’image.
C4 Autre mode pour les informations relatives à l’image.
T3 Autre mode donnant lieu à l’affichage d’informations et au masquage d’une grande partie de l’image sur l’écran du téléviseur.
T4 Autre mode donnant lieu à l’affichage d’informations et au masquage d’une grande partie de l’image sur l’écran du téléviseur.
Mode conseillé lorsque l’affichage des sous-titres n’est pas utilisé.
masquer les parties essentielles de l’image).
Français
25
Page 26

Modification des paramètres initiaux
Paramétrage de la puce antiviolence (PUCE RÉGL.)
1. Appuyer sur [ , ] pour accéder au menu des
options.
FILMS USA
CANADA-QUÉBEC
ÉMIS.TÉLÉ USA
CANADA
2. Appuyer sur [ , ] pour sélectionner ‘‘RÉGLAGE’’ et appuyer sur [ ].
3. Appuyer sur [
à l’étape 1, puis appuyer sur [ , ] pour sélectionner ‘‘EF’’ ou ‘‘HF’’.
4. Appuyer sur [
sur [ , ] pour sélectionner ‘‘OUI’’ ou ‘‘NON’’.
5. ÉMISSIONS TÉLÉ USA seulement
Appuyer sur [ , ] pour sélectionner ‘‘RÉGLAGE’’, puis appuyer sur [ , ]
, ] pour mettre en surbrillance le menu des options sélectionné
, ] pour sélectionner ‘‘REGARDER SANS VISA’’, puis appuyer
FILMS USA
REGARDER SANS VISA
G
PG
PG-13
R
NC-17
APPUYER ACTION POUR RETOURNER
X
pour sélectionner ‘‘DE BASE’’ ou ‘‘DÉTAILLÉ’’.
DE BASE : Classifications générales telles que TV-V, TV-PG, etc. seulement.
DÉTAILLÉ : Classifications générales et qualification du contenu telles que V, L, etc.
6. Appuyer sur [ , ] pour sélectionenr le niveau de classification (voir ci-dessous), puis appuyer sur [ ]
pour verrouiller (ROUGE) ou sur [ ] pour déverrouiller (VERT).
Recommencer l’étape 6 pour chaque classification.
Nota • Cette fonction pourrait ne pas pouvoir être utilisée avec certains films.
• Lorsque la classification de l’émission est supérieure au niveau défini, un message de blocage s’affiche. Entrer le code
secret à 4 chiffres pour recevoir l’émission. Le code secret demeure valide même après la mise hors marche de l’écran.
Tableau de classement FILMS USA
NR NE CONTIENT PAS DE CLASSEMENT (NON CLASSÉ) ET
PROGRAMMES NA (NON APPLICABLES). Films qui n’ont pas
été classés ou dont le classement n’est pas applicable.
G PUBLIC GÉNÉRAL. Autorisé à tous les âges.
PG CONTRÔLE PARENTAL CONSEILLÉ. Programmes ne
conviennent pas aux enfants.
PG-13 MISE EN GARDE IMPORTANTE DES PARENTS. Scènes ne
conviennent pas aux enfants de moins de 13 ans.
R CONTRÔLÉ. Les enfants de moins de 17 ans doivent être
accompagnés par un parent ou un gardien adulte.
NC-17 INTERDIT AUX MOINS DE 17 ANS.
X POUR ADULTE UNIQUEMENT.
Tableau de classement ÉMIS.TÉLÉ USA
NR
Non classé. Reportez-vous aux précautions pour l’utilisateur ci-dessous.
TV-Y
Tous les enfants. Le thème et le contenu de ce programme sont spécialement
conçus pour un public jeune, y compris les enfants de 2 à 6 ans.
TV-Y7 Destiné aux enfants âgés. Le thème et le contenu de ce
programme peuvent contenir des éléments de violence légère ou
comique, ou peuvent effrayer les enfants de moins de 7 ans.
TV-G Public général. Programme contenant peut ou pas du tout de
Français
Précautions pour l’utilisateur
La puce antiviolence utilisée dans cet appareil est capable de bloquer les programmes sans “visa” (non classés, auquel aucun classement
ne s’applique et avec aucun classement) tels que définis par la section 15.120(e)(2) du Règlement FCC. Si l’option de blocage des
programmes sans “visa” est choisie, “des résultats inattendus et éventuellement confus peuvent être obtenus, il se peut même que
vous ne puissiez pas recevoir les bulletins d’urgence ni les types de programmes suivants:”
• Bulletins d’urgence (tels que des messages EAS, des avertissements météorologiques, etc.)
• Programme d’origine locale • Informations • Programmes politiques • Annonces des services publiques
• Programmes religieux • Programmes sportifs • Programmes météorologiques
violence, pas de mots grossiers et peu ou aucun dialogue ou
situation d’ordre sexuel.
TV-PG Contrôle parental conseillé. Ce programme peut contenir de façon
rare des mots grossiers, des scènes de violence limitée, certains
dialogues et situations sexuels suggestives.
TV-14 Mise en garde importante des parents. Ce programme peut
contenir des thèmes sophistiqués, des scènes sexuelles, un
langage grossier et des scènes d’intense violence.
TV-MA Public adulte uniquement. Ce programme peut contenir des
thèmes pour adulte, un langage blasphématoire, de la violence et
des scènes sexuelles explicites.
FV VIOLENCE FANTASTIQUE/DESSIN ANIMÉ
V VIOLENCE
S SEX
L LANGUAGE AGRESSIF
D DIALOGUE À CONTENU SEXUEL
Tableau de classement CANADA
E
Exempt - Les programmes exemptés comprennent: informations,
programmes sportifs, documentaires, autres programmes
d’information, causeries, vidéo musicales et programmes de variété.
C Programmes pour les enfants de moins de 8 ans. Pas de langage
offensif, de nudité, ni de contenu sexuel.
C8+
Programme généralement considéré acceptable pour les enfants de
plus de 8 ans. Pas de blasphème, de nudité ni de contenu sexuel.
G Programmes généraux, pour tout public.
PG Contrôle parental conseillé. Certains programmes ne conviennent
pas aux enfants.
14+ Programmes contenant des thèmes ou un contenu qui peut ne
pas convenir aux enfants de moins de 14 ans. Les parents sont
fortement mis en garde d’interdire leur accès aux jeunes
adolescents et aux enfants plus jeunes.
18+ POUR ADULTE UNIQUEMENT.
Tableau de classement CANADA-QUÉBEC
E Exempt - Les programmes exemptés.
G Général - Programmes pour tout public et tous les âges. Ne
8 ANS+ 8+ Général - N’est pas recommandé pour les jeunes enfants.
13ANS+ Programmes qui peuvent ne pas convenir aux enfants de moins
16ANS+ Programme pouvant ne pas convenir aux enfants de moins de
18ANS+ 18 ans +Programme réservé aux adultes. Contient des scènes
contient pas de violence ou le contenu violent est faible ou
représenté approximativement.
Programme destiné à un public jeune mais contenant
occasionnellement des scènes de violence légère. Supervision
par un adulte recommandée.
de 13 ans - Contient quelquesscènes de violence ou une ou
plusieurs scènes violentes pouvant l’affecter. Supervision par
un adulte fortement conseillée.
16 ans - Contient des scènes fréquentes de violence ou de
violence intense.
constantes de violence ou des scènes d’extrême violence.
BLOCAGE
OUI
HF
26
Page 27

Duplication des paramètres – Unité de clonage
POWER
ASPECT
R-TUNE
RECALL
ACTION
CH
CH
VOL VOL
INPUTTV/VIDEO
MUTE
SAP
L’unité de clonage (vendue séparément) copie les paramètres du téléviseur ‘‘maître’’ pour fins de téléchargement sur
d’autres téléviseurs.
Sélection des paramètres du téléviseur ‘‘maître’’
1 Sélectionner les paramètres du téléviseur ‘‘maître’’ (voir pages 23-26).
Il est possible de copier les paramètres suivants.
Menu Sous-menu Menu Sous-menu
IMAGE MODE AUDIO GRAVES
COULEUR AIGUS
NUANCES CANAUX
BRILLANCE SIGLE MANUEL
IMAGE IDENT. PRISES
NETTETÉ
TEMP. COUL. PROG MANUELLE
ÉCONO ÉNERGIE
RÉGLAGE
2 Appuyer sur [ CH , CH ] ou sur les touches numériques pour
sélectionner le canal initial à syntoniser au moment de la mise en
marche (ex. canal donnant les horaires de télévision).
3 Appuyer sur [ VOL , VOL ] pour régler le niveau maximum de
volume dans le mode HÔTEL (voir page 28).
SIGLE PRÉRÉGLÉ
PROG AUTO
Téléchargement des paramètres du téléviseur “ maître ” sur l’unité de clonage (LEARN)
S’assurer que le téléviseur est réglé dans le mode TV normal avant d’effectuer le
téléchargement. Autrement, commuter le mode conformément aux instructions de la
section ‘‘Commutation entre les modes TV normal et HÔTEL’’ (voir page 28).
Préparatifs
•
Brancher le cordon d’alimentation de l’écran du téléviseur ‘‘maître’’ dans une prise de courant.
• Raccorder l’unité de clonage à la borne MATE du syntoniseur.
1 Mettre l’écran du téléviseur “maître” en marche.
2 Mettre l’unité de clonage en marche.
Les voyants rouge et vert de l’unité de clonage clignotent.
3
Enfoncer la touche [ALT] et appuyer sur la touche [LEARN] de l’unité de clonage.
• Le voyant rouge clignote pendant le téléchargement.
•
Le voyant vert s’allume pendant environ 2 secondes pour confirmer la fin du téléchargement.
•
Après la fin du téléchargement, le téléviseur passe automatiquement dans le mode HÔTEL.
4 Couper le contact sur l’écran et sur l’unité de clonage.
Vérification des paramètres téléchargés sur l’unité de clonage
1. Introduire un objet mince d’environ 3/4 po (un trombone,
par exemple) dans le trou [AMS] de l’unité de clonage pour
mettre le téléviseur dans le mode TV normal.
Le voyant vert s’allume pendant environ 2 secondes.
2. Appuyer sur le bouton [TEST] de l’unité de clonage.
• Les voyants vert et rouge clignotent en alternance pendant
• Le voyant vert demeure allumé pendant environ 2 secondes
la vérification.
lorsque les paramètres téléchargés sur l’unité de clonage
correspondent aux paramètres du téléviseur. Si le voyant
ne s’allume pas, recommencer le téléchargement.
Français
Vérification de l’état de la batterie de l’unité de clonage
1. Mettre l’unité de clonage en marche.
2. Enfoncer la touche [ALT] et appuyer sur la
touche [TEST] de l’unité de clonage.
• Les voyants vert et rouge clignotent en alternance
pendant la vérification.
• Le voyant vert demeure allumé pendant environ
2 secondes si la capacité de la batterie est
suffisante. Si les voyants ne s’allument pas,
remplacer la batterie (utiliser une batterie de 9
volts).
27
Page 28

Duplication des paramètres – Unité de clonage
Téléchargement des paramètres sur un autre téléviseur (TEACH)
S’assurer que le téléviseur est réglé dans le mode TV normal avant d’effectuer le téléchargement. Autrement, commuter le
mode conformément aux instructions de la section ‘‘Commutation entre les modes TV normal et HÔTEL’’ (voir ci-dessous).
Préparatifs
• Brancher le cordon d’alimentation de l’écran à paramétrer dans une prise de courant.
• Raccorder l’unité de clonage à la borne MATE du syntoniseur.
1 Mettre l’écran du téléviseur à paramétrer en marche.
2 Mettre l’unité de clonage en marche.
Les voyants rouge et vert de l’unité de clonage clignotent.
3 Appuyer sur la touche [TEACH] de l’unité de clonage.
• Le voyant rouge clignote pendant le téléchargement.
• Le voyant vert s’allume pendant environ 2 secondes pour confirmer la fin du téléchargement.
• Après la fin du téléchargement, le téléviseur principal passe automatiquement dans le mode HÔTEL.
4 Couper le contact sur l’écran et sur l’unité de clonage.
Recommencer les étapes ci-dessus pour effectuer un téléchargement sur un autre téléviseur.
Commutation entre les modes TV normal et HÔTEL
Si une unité de clonage est utilisée
Introduire un objet mince d’environ 3/4 po (un trombone, par exemple) dans le trou [AMS] de l’unité de clonage.
Le voyant vert s’allume pendant environ 2 secondes.
Lorsque la commutation de mode se fait au moyen de la télécommande
Appuyer sur [SAP] et [ASPECT], puis maintenir la touche [MUTE] enfoncée pendant environ 3 secondes.
Appuyer sur la touche suivante dans un délai de moins de une seconde.
Pour accéder ou quitter le menu du mode HÔTEL
Appuyer sur [ACTION] pour accéder au menu; appuyer de nouveau sur la touche pour le quitter.
Menu du mode HÔTEL
Menu RÉGLAGE
• SOMMEIL (page 24)
• cc MODE (page 25)
• MODE (page 23)
Français
• VIDÉO (page 25, MODE)
• PUCE RÉGL.
Ne s’affiche pas dans le paramétrage initial. Pour l’afficher,
appuyer sur [SAP] et [ASPECT], puis maintenir la touche
[RECALL] enfoncée pendant environ 3 secondes.
Menu BLOCAGE
P
our afficher ce menu, appuyer sur [ ] après avoir mis
‘‘PUCE RÉGL.’’ en surbrillance dans le menu RÉGLAGE
(voir ci-contre).
• CRÉER CODE D’ABORD / ENTRER CODE (page 24)
• PUCE RÉGL. (page 24, 26)
• CODE (page 24)
• NBRE D’HEURES? : 12 HEURES (Fixe)
Les paramètres sélectionnés dans le mode HÔTEL sont remplacés
par les paramètres par défaut après une période de 12 heures.
Rétablissement des paramètres par défaut
Préparatifs
• Brancher l’écran dans une prise de courant.
• Raccorder l’unité de clonage à la borne MATE sur le syntoniseur.
1. Mettre l’écran en marche.
2. Mettre l’unité de clonage en marche.
Les voyants vert et rouge de l’unité de clonage clignotent.
3. Introduire un objet mince d’environ 3/4 po (un trombone, par exemple) dans le trou [AMS] de l’unité de clonage.
Le voyant vert s’allume pendant environ 2 secondes.
4. Appuyer sur [SAP] et [ASPECT], puis maintenir la touche [TV/VIDEO] enfoncée pendant environ 3 secondes.
Tous les paramètres par défaut sont rétablis.
5. Couper le contact sur l’écran et l’unité de clonage.
28
Page 29

Guide de dépannage
Avant d’appeler un réparateur, effectuer les vérifications suivantes.
VIDÉO
Image vidéo
neigeuse
Multiples
images
Interférence
Vidéo normale
Pas d’image
mais de la neige
Pas d’image /
Pas d’image
dans l’image
Pas de couleur
Symptômes
AUDIO
Son parasité
Son parasité
Son parasité
Pas de son
Son parasité
Pas de son
Son normal
Solutions
Ajustez l’emplacement et la connexion de l’antenne.
Ajustez l’emplacement et la connexion de l’antenne.
Vérifiez le câble d’entrée de l’antenne.
Éloignez le téléviseur des appareils électriques, des
éclairages, des véhicules et équipements médicaux.
Augmentez le volume.
Vérifiez la fonction de sourdine.
Changez le canal.
Réglez le mode de téléviseur ou de câblodistribution
correctement.
Vérifiez les câbles d’antenne.
Vérifiez si le cordon d’alimentation est branché dans
une prise secteur active.
Ajustez la luminosité et les réglages sonores.
Changez le canal.
Vérifiez la connexion des câbles.
Vérifiez le fonctionnement de la deuxième source vidéo.
Ajustez les réglages des couleurs.
Changez le canal.
Vidéo normale
Cadre noir sur
l’écran
Vidéo normale
Commande intermittente par télécommande
Spécifications
Modèle
Bloc d’accord – 181
Prises
Modèle
Poids
Plage de fonctionnement
Son incorrect
Son normal
Son normal
Syntoniseur UHF/VHF avec interface complémentaire
TY-42TM6MA
VHF-12; UHF-56; Câble-113
Entrée AV VIDÉO (Prise RCA)
S VIDÉO (Mini DIN à 4 broches)
AUDIO L-R (Prise RCA)
Sortie AV VIDÉO (Prise RCA)
Vérifiez si le réglage audio est sur stéréo ou mono,
pas sur SAP.
Changez le réglage sur CC (sous-titres).
Remplacez les piles de la télécommande.
∗ Sortie de signaux UHF/VHF impossible.
AUDIO L-R (Prise de type M3) 0,5 Vrms
Port d’interface numérique (MATE)
N2QAFB000003
environ 160 g (5,6 oz) (avec piles)
Environ 7 m (23 pi) directement devant l’unité
RJ-11C
Télécommande
1,0 V c.-à-c., 75 ohms
Y :1,0 V c.-à-c., 75 ohms, C : 0,286 V c.-à-c., 75 ohms
0,5 V eff
.
1,0 V c.-à-c., 75 ohms
Français
29
Page 30

Índice
Características ............................................................ 30
Precauciones para su seguridad ............................... 31
Cuidados para el manejo............................................ 31
Accesorios ................................................................... 31
Pilas del control remoto ............................................ 31
Conexión ...................................................................... 32
Instalación ................................................................. 32
Conexión de la antena .............................................. 32
Conexión de un equipo externo ................................ 33
El control remoto ........................................................ 34
Para ver programas de TV.......................................... 35
Modo ASPECT ............................................................. 36
Características
Cambio de los ajustes iniciales ................................. 37
Menú IMAGEN .......................................................... 37
Menú AUDIO ............................................................. 37
Menú CANALES ....................................................... 38
Menú CRONOMETRO.............................................. 38
Menú BLOQUEO ...................................................... 38
Menú AJUSTE .......................................................... 39
Repetición de los ajustes - CAJA DE CLONACIÓN ... 41
Selección de los ajustes del TV maestro .................. 41
Descarga de los ajustes del TV maestro en la
caja de clonación (APRENDER) ..................... 41
Descarga de los ajustes a otro TV (ENSEÑAR) ........
Cambio entre el modo de TV
normal y el modo HOTEL ............................... 42
Reposición de todos los ajustes a los ajustes de fábrica ...
Guía para la solución de problemas ......................... 43
Especificaciones ......................................................... 43
42
42
Español
Puede recibir emisiones analógicas terrestres
Puede instalar la tarjeta de sintonizador U/V con MATE I/F TY-42TM6MA en la ranura de la pantalla y
recibir emisiones analógicas terrestres.
Puede conectar varios tipos de equipos de vídeo
La tarjeta opcional se puede instalar en las pantallas LCD y en las pantallas de plasma de la serie PWD, PHD y LHD .
∗ En cuanto a los modelos aplicables, consulte el manual del visor.
30
Page 31

Precauciones para su seguridad (Sígalas siempre)
ADVERTENCIA
• No intente nunca desmontar o modificar este producto.
Para evitar un incendio, descarga eléctrica o fallo.
• Si nota humo, un mal olor o ruidos extraños durante el funcionamiento, desenchufe inmediatamente la pantalla.
Apague la pantalla y desenchúfela de la toma de corriente.
Para evitar un incendio o una descarga eléctrica, no deje conectada la alimentación de la pantalla.
• Para evitar descargas eléctricas u otros problemas, no deje enchufada la clavija del cable de alimentación en la
toma de corriente.
• Póngase en contacto con nuestro departamento de servicio designado para instalar o cambiar este producto.
Al personal de servicio:
Antes de retirar o instalar la tarjeta de terminales, asegúrese de desconectar la alimentación de la pantalla
y desenchufar la clavija del cable de alimentación de la toma de corriente.
Cuidados para el manejo
• No toque directamente con las manos los contactos de los conectores.
Para evitar que la electricidad estática estropee las partes internas, antes de manejar este producto, toque un objeto
metálico grande como, por ejemplo, un armario de acero para descargarse usted mismo de la electricidad estática.
• Asegúrese de utilizar los cables suministrados y las partes especificadas para hacer la interconexión.
Para evitar fallos del funcionamiento y otros problemas, no utilice otras partes diferentes de las recomendadas.
Accesorios
Verifique e identifique los accesorios suministrados.
• Control remoto
N2QAFB000003
•
Adaptador de antena tipo F
para 5C ( × 1) para 4C ( × 1)
Pilas del control remoto
1. Abra la tapa.
2. Inserte pilas. Fíjese en las polaridades
(+ y -).
• Pilas del control
remoto
(2 × tamaño AA)
• Tornillo ( × 4)
Precauciones
Maltratar las pilas puede causar fugas de electrólito, el cual puede dañar
los artículos que toca y causar un incendio.
• No mezcle pilas nuevas y viejas.
• No utilice tipos diferentes al mismo tiempo. (Ej.: carbón de zinc y alcalinas)
• No las caliente ni acerque a las llamas.
• No las desmonte ni cortocircuite.
• No intente cargar, cortocircuitar, desarmar, calentar o quemar las pilas
alcalinas o de manganeso viejas.
• Reemplace las pilas si el control remoto no funciona bien.
• Etiqueta de funciones de terminales (1 hoja)
(
Fije esta etiqueta en el panel trasero de la pantalla.
• Núcleo de ferrita
( × 1)
MATE
)
• Instrucciones de
reemplazo de la
tarjeta de
terminales
Español
Tamaño AA
Para su referencia
Use pilas alcalinas de larga duración.
31
Page 32

Conexión
Instalación
Precauciones
• Antes de instalar
Desconecte la alimentación y desenchufe la pantalla. Desconecte todas las clavijas conectadas a la pantalla.
• Antes de quitar, dé vuelta a la energía apagado con el control del romote del sintonizador board’s y
entonces dé vuelta a la alimentación principal apagado.
• Cuando ponga o quite la tarjeta de terminales, tenga cuidado para no herirse.
En el lado trasero de la tarjeta puede haber uniones de soldadura puntiaguda que podrían causar heridas inesperadas.
•
Cuando instale la tarjeta, insértela horizontalmente a fondo en la ranura hasta que quede bien enchufada en el conector.
Tenga en cuenta que la inserción incompleta puede dañar los componentes internos.
Las ranuras compatibles son: SLOT1 y SLOT2.
Estera de espuma o paño blando
Para quitar
Quite la tapa de la ranura. Sujete
el asa de la tarjeta de terminales
y sáquela lentamente en el
sentido de la flecha.
Modelo de 2 ranuras
SLOT1
Modelo de 3 ranuras
SLOT2
SLOT1
Para instalar
1. Quite la tapa
de la ranura.
Tornillo de fijación
• Asegúrese de que la tarjeta no se monte en los dos ganchos inferiores.
• Asegúrese de apretar bien todos los tornillos.
•
Pida al cliente que guarde la tarjeta de terminales retirada por si resulta necesarias
para reparaciones futuras.
AUDIO
SERIALPC IN
SLOT3SLOT2
AUDIO
SERIALPC IN
2. Inserte la tarjeta de
terminales hasta que
quede firmemente
enchufada en el conector.
Apriete los tornillos en el
orden 1 - 4 .
• Etiqueta de funciones de terminales
SLOT3 no es
compatible.
3.Fije la etiqueta de
funciones de
terminales
(incluida).
Conexión de la antena
Para recibir correctamente los canales de VHF/UHF se necesita una antena externa. Para obtener la mejor recepción se
recomienda una antena exterior. El modo de antena deberá ponerse en “TV” (vea la página 39, MODO en el menú AJUSTE).
Nota
Antena VHF Antena UHF
•
Para obtener una imagen y sonido de calidad
óptima se necesita una antena, cable 75 Ω
coaxial) y clavija de terminación correctos.
• Si usa una antena comunal puede que
Español
Mezclador
Cable
coaxial
de 75
ohmios
Núcleo de ferrita
(incluida)
75 ohmios, VHF/UHF
Adaptador de antena
tipo F (incluida)
Núcleo de ferrita
(incluida)
necesite el cable y la clavija de conexión
correctos entre el zócalo de la pared y su
receptor de televisión.
• Su centro de servicio de televisión o
concesionario puede ayudarle a obtener el
sistema de antena correcto para su zona
particular y los accesorios necesarios.
• Cualquier problema con la instalación de
la antena, mejora de los sistemas
existentes o accesorios adquiridos, y los
gastos incurridos, son su responsabilidad.
32
Page 33

MATE
Colocación del núcleo de ferrita
1
Conexión
2
Tire de las lengüetas
(dos lugares) para
abrir.
Nota
Si no se pone el núcleo de ferrita pueden producirse ruidos en el vídeo o audio.
Manejo del cable de antena
Para evitar ruido en el vídeo, sujete bien el cable de la antena.
Detrás Detrás Delante
Alejándolo de la
pantalla.
Ponga el cable
y cierre.
No lo ponga cerca
de la pantalla.
Conexión de un equipo externo
Pantalla Monitor
De amplificador a
sistema de altavoces
Puerto de
interfaz digital
Caja de
acoplamiento
Miniclavija (M3)
estéreo
Menos de 10 cm (4”)
No lo pase por
delante de la
pantalla.
Antena VHF Antena UHF
Caja de
clonación
Mezclador
Adaptador de antena tipo F (incluida)
Videograbadora
Nota
• El equipo periférico y los cables/adaptadores opcionales se venden separadamente a menos que se indique lo contrario.
• La entrada de señal de vídeo S (S VIDEO IN) es anterior a la entrada de señal compuesta (VIDEO IN).
• Una consola de juegos de pistola de luz que usa un sistema de exploración de cañón electrónico de TV de CRT no es
compatible con una pantalla.
• VIDEO OUT sólo está disponible cuando se selecciona “VIDEO1” como fuente de entrada para INPUT 1 (vea la página 34).
Reproductor DVD
33
Español
Page 34

POWER
MUTE
RECALL
ASPECT
SAP
R-TUNE
TV/VIDEO INPUT
ACTION
CH
CH
VOL VOL
El control remoto
Botón ASPECT
Cambia el aspecto(vea la página 36).
Botón RECALL
Visualiza el canal, modo de audio, tiempo
restante del temporizador APAGADO, etc.
Botón POWER
Enciende o apaga la pantalla.
Botón MUTE
Silencia el sonido o
cancela el silenciamiento.
Referencia de controles de la tarjeta de sintonizador y pantalla
Nota
Para las funciones comunes, asegúrese de usar el control remoto de la tarjeta de sintonizador.
Control remoto de la
tarjeta de sintonizador
Control remoto
de la pantalla
• Para ver programas de TV
• Sintonización de canales de TV
• Ajuste del volumen
• Silenciamiento del sonido
• Selección de modo de aspecto
• Visualización de ajuste actual, etc.
•
Selección del modo de entrada de la tarjeta de sintonizador
•
Visualización de ajuste actual, etc. de la pantalla
•
Selección del modo de entrada de la pantalla
• Encendido/Apagado de pantalla
• No puede seleccionar la fuente de INPUT 1 (TV o VIDEO1) con el control
remoto de la pantalla.
• Use el control remoto de la pantalla cuando ajuste “Pos./Tamaño Imagen”
y “Sonido ambiental” en la pantalla. Para conocer más detalles de los
controles de la pantalla, lea el manual de instrucciones de la misma.
Botones de cursor ( , , , )
Botón ACTION
Botones de canales (CH , CH )
Botones de volumen (VOL , VOL )
Aumentan (VOL ) o reducen (VOL ) el volumen.
Botón SAP
Selecciona el modo de audio (vea la página 35).
Botón R-TUNE
Para volver al canal o modo de vídeo anterior.
Botón INPUT
Selecciona el modo de entrada.
Cada vez que presiona el botón:
PC inputINPUT 1 INPUT 3
Español
34
• SLOT 1 y 2 (tarjeta de sintonizador) corresponde a la entrada
INPUT 1, SLOT3 a INPUT 3 y PC IN a PC.
∗
Modelo de 3 ranuras”. Puede seleccionar INPUT 3 sólo cuando
se ha configurado una tarjeta de terminales para SLOT 3.
Botón TV/VIDEO
Seleccione la fuente de INPUT 1 desde TV o VIDEO1.
• Esto no sirve para la entrada INPUT 3 o PC.
•
Para poner una etiqueta o saltar la entrada VIDEO1 (vea la página
38, PONGA TÍTULO en el menú CANALES)
Botones numerados
Page 35

Para ver programas de TV
POWER
ASPECT
R-TUNE
RECALL
ACTION
CH
CH
VOL VOL
INPUTTV/VIDEO
MUTE
SAP
Preparación
1. Conecte el cable de alimentación de la pantalla a la toma de corriente.
2. Presione el botón en la pantalla para conectar la alimentación
principal.
• El indicador de alimentación se enciende (Verde: alimentación
conectada, Rojo: en espera, Apagado: alimentación desconectada).
VOL
ENTER
INPUTMENU
+
R - STANDBY
G POWER ON
R - STANDBY
G POWER ON
• Puede utilizar el control remoto cuando el indicador se enciende en
Verde o Rojo.
3. Seleccione el idioma de menú en el menú AJUSTE (vea la página 39).
1 Presione [INPUT] para seleccionar INPUT 1 (tarjeta de
sintonizador).
Botón
Sensor de señales
del control remoto
Interruptor de la alimentación
2 Presione [TV/VIDEO] para seleccionar el modo de TV.
3 Presione [CH , CH ] o los botones numerados para
seleccionar el canal.
4 Presione [VOL , VOL ] para ajustar el volumen.
Nota
• Baje el volumen cuando se produzca aullido.
• La función “AUTO APAGADO” de la pantalla no se activa cuando usted
selecciona INPUT1 (tarjeta de sintonizador).
Para su referencia
Presione [RECALL] para visualizar el canal, modo de audio, tiempo
restante del temporizador APAGADO, etc.
Para silenciar el sonido
Presione [MUTE].
• “MUDO” aparece en la pantalla.
• Presione de nuevo [MUTE] para cancelar el silenciamiento.
Para seleccionar el modo de audio
Presione [SAP].
Cada vez que usted presiona el botón:
MONOESTÉREO SPA
∗
SPA: Programa de Audio Secundario
Español
Nota
• El ajuste está disponible cuando se visualiza en rojo, no cuando
lo hace en blanco.
• Para cambiar al modo de entrada de audio externo, seleccione el
ajuste en el equipo conectado.
35
Page 36

Modo ASPECT
4 : 3
3
4
R-TUNE
RECALL
SAP
INPUTTV/VIDEO
ACTION
CH
CH
VOL VOL
MUTE
POWER
ASPECT
Puede cambiar la relación de aspecto para que la imagen se expanda hasta llenar la pantalla.
Presione [ASPECT] para seleccionar el modo de aspecto.
Los modos que puede seleccionar dependen del material que va a ver.
Cada vez que presione el botón:
Modo
4 : 3
ACERC
4 : 3
ACERC
JUSTOCOMP
Imagen Explicación
Visualiza una imagen 4:3 con la relación original y
bandas grises en ambos lados.
4
3
ACERC
16
Expande una imagen para llenar la pantalla con la
9
relación original.
COMP
4
3
COMP
16
Alarga lateralmente una imagen 4:3 para llenar la
9
pantalla.
4
Español
JUSTO
Nota
Puede ajustar la posición y el tamaño de la imagen con el control remoto de la pantalla.
36
3 9
JUSTO
16
La imagen se expande en sentido horizontal para llenar
la pantalla. La relación de aspecto original se mantiene
cerca del centro, mientras la imagen se alarga más
hacia el exterior según se aproxima a cada lado de la
pantalla. La imagen tiene así menos incongruencia.
Page 37

Cambio de los ajustes iniciales
POWER
MUTE
ASPECT
SAP
R-TUNE
RECALL
ACTION
CH
CH
VOL VOL
INPUTTV/VIDEO
Puede cambiar los ajustes según sus preferencias para adaptarlos al aparato y al ambiente de utilización. Luego podrá
clonar los ajustes y cambiar al modo “HOTEL” para que los clientes puedan tener acceso a ajustes particulares solamente
(vea la página 42).
1 Presione [ACTION] para visualizar la pantalla de menú.
Icono de menú
IMAGEN
MODO
COLOR
TINTE
Submenú
BRILLO
CONTRASTE
NITIDEZ
NORMAL
OTROS AJ
:
SALIR
:
SUBMENU
2 Presione [ , ] para seleccionar el icono de menú, y presione [ ,
] para seleccionar el submenú.
Para seleccionar submenús que no estén visualizados, seleccione “OTROS AJ.” y
presione [ ].
3 Presione [ , ] para cambiar los ajustes o introducir el menú de
opciones.
Para volver a la pantalla anterior
Presione [ACTION].
VIVIDO
Menú de opciones
SI
Menú IMAGEN
Menú AUDIO
MODO
COLOR
TINTE
BRILLO
CONTRASTE
NITIDEZ
NORMAL
OTROS AJ.
TEMP COLOR
(Temperatura)
3D Y/C FILTRO
Para salir de la pantalla de menú
Presione [ ] mientras resalta un icono de menú.
Nota
Esta función no se activa para la imagen secundaria de las visualizaciones de la función
“MULTI PIP’’.
Seleccione el modo de imagen.
ESTANDAR CINEMAVIVIDO AUTO
Nota
Seleccione “CINEMA” cuando parpadeen (en gris/blanco) las barras laterales
(las bandas grises a ambos lados de la imagen 4:3).
Ajusta la intensidad del color.
Ajusta los tonos naturales de la piel.
Ajusta el brillo de las partes oscuras de la imagen.
Ajusta el equilibrio del blanco de la imagen.
Ajusta la claridad de los contornos.
Repone los ajustes de imagen a los de fábrica.
NORMAL ROJO (Aumenta el rojo) AZUL (Aumenta el azul)
SI
(Minimiza el ruido y la diafotía cromática en la imagen)
NO
Español
MODO (vea la página 35)
BAJOS
ALTOS
BALANCE
NORMAL
ESTÉREO / SPA / MONO
Ajusta la respuesta de los graves.
Ajusta la respuesta de los agudos.
Ajusta el equilibrio del volumen de los altavoces derecho ( )/izquierdo ( ).
Repone los ajustes de BAJOS, ALTOS y BALANCE a los de fábrica.
37
Page 38

Cambio de los ajustes iniciales
CANALES
A&E
AMC
BET
BRAVO
CNBC
CNN/SI
COMEDY
COURT
PRESIONE ACTION PARA REGRESAR
PREFIJADO
ABC
CBS
FOX
NBC
PBS
CNN
ESPN
HBO
PRESIONE
PARA MAS CNLS
CANALES
ELIJA CANAL 10
PONGA IDENTIDAD
PRESIONE ACTION PARA REGRESAR
MANUAL
PARA MOVER CURSOR
PARA ESCOGER CANAL
Vea la página 37 para conocer la operación.
Menú CANALES
BUSQUEDA
FAVORITOS
OTROS AJ.
PREFIJADO
MANUAL
PONGA TÍTULO
FAV : Introduzca hasta 16 de sus canales favoritos.
TODO
: Explore todos los canales que pueda seleccionar con [ CH , CH ].
Agregue o borre los 16 canales favoritos.
1. Presione los botones numerados para seleccionar el canal.
2. Presione [ ] para agregar o [ ] para borrar el canal.
Ponga títulos preajustados a los canales
• Tiene que borrar el MANUAL puesto anteriormente
para reemplazarlo por PREFIJADO.
1. Presione [ ] para entrar en el menú y presione [ ,
] para seleccionar el título.
2. Presione los botones numerados para seleccionar
el canal correspondiente al título.
• Para borrar el canal, presione [ ] .
Ponga manualmente títulos a los canales (hasta 8 caracteres).
• Tiene que borrar el PREFIJADO puesto anteriormente
para reemplazarlo por MANUAL.
1. Presione [ ] para entrar en el menú y presione [ ,
] o los botones numerados para introducir el canal.
2.
Presione [ , ] para seleccionar “PONGA IDENTIDAD”.
3. Presione [ , ] para seleccionar el carácter.
• Presione [ , ] para mover el cursor.
Ponga la etiqueta (hasta 8 caracteres) en la entrada VIDEO1.
1. Presione [ ] para entrar en el menú.
2. Presione [ , ] para seleccionar el carácter.
• Presione [ , ] para mover el cursor.
• Para saltar la entrada VIDEO1, mueva el cursor a la posición del extremo
izquierdo y presione [ ] para seleccionar “BRINCAR”.
Menú CRONOMETRO
Menú BLOQUEO
Español
38
APAGADO Ponga la hora de apagado.
Nota
• Cuando ponga la hora de apagado en la pantalla o en otra tarjeta de terminales
instalada, la pantalla se apagará al llegar la primera hora de apagado.
• La información de la hora de apagado puede que no se visualice cuando se
seleccione otro modo de entrada.
CREAR CLAVE/
INGRESAR
Introduzca el código secreto para visualizar el menú BLOQUEO. (No se olvide del código.)
Presione los botones numerados para introducir el código secreto (4 dígitos).
• Presione [ , ] para volver a introducir el código.
BLOQUEO
Límite de visión.
NO
JUEGO : Bloquea CH3, CH4 y la entrada de vídeo.
CANAL : Bloquea hasta 4 canales.
TODO : Bloquea todos los canales y entradas de vídeo.
V-CHIP
(vea la página 40)
V-CHIP usa los dos sistemas de calificación, MPAA (PELICULAS) y GUIA
PATERNAL DE TV, que bloquean programas según la información de los
paquetes de datos XDS de las emisoras.
PELICULAS DE EEUU
FRANCES DE CANADA
CLAVE
Cambia el código secreto.
NO 30 (min.) 60 (min.) 90 (min.)
PROGRAMAS DE EEUU
INGLES DE CANADA
Page 39

Vea la página 37 para conocer la operación.
Menú AJUSTE
Cambio de los ajustes iniciales
IDIOMA / LANGUE
cc EN MUDO
MODO cc
OTROS AJ.
MODO
PROGRAMA AUTO
PROGRAMA MANUAL
CANAL INFO.
ENERGÍAMONITOR
(Energía gerencia)
Selecciona el idioma de menús.
ENGLISH
Visualiza títulos ocultos cuando se silencia
el sonido. (Consulte la “LISTA DE TÍTULOS
OCULTOS”.)
NO C1 C2
C4
C3
Visualiza constantemente títulos ocultos.
(Consulte la “LISTA DE TÍTULOS OCULTOS”.)
NO C1 C2 T1
T2
Nota
• Ponga “MODO cc ” en “NO”
para activar “ cc EN MUDO”.
• Algunos programas no
incluyen títulos ocultos.
• Los títulos ocultos no se
visualizan cuando el modo
ASPECT es “ACERC” (vea la
página 36).
C4T3T4 C3
CABLE TV
Ajuste los canales automáticamente.
Ajuste los canales manualmente.
1. Presione [ ] para entrar en el menú y presione los botones numerados para
seleccionar el canal.
2. Presione
[ ]
para añadir o
[ ]
para borrar el canal.
Visualiza CANAL INFO.
SI NO
Seleccione cuánto tiempo va a estar encendido el aparato cuando no se utilice.
12NO ....15
LISTA DE TÍTULOS OCULTOS
TÍTULOS NO TÍTULOS C1 -
TÍTULOS C2 TEXTO T1 -
TEXTO T2 TÍTULOS C3 TÍTULOS C4 TEXTO T3 TEXTO T4 -
Modo recomendado para cuando no se utilizan los títulos ocultos.
Para información relacionada con vídeo que puede ser visualizada (hasta 4 líneas de texto colocadas estratégicamente en la pantalla
del televisor para que no tapen las partes importantes de la imagen).
Otro modo utilizado para la información relacionada con vídeo.
Tapa una parte grande de la imagen de la pantalla de televisión y visualiza una guía de programas o cualquier otra información que
esté siendo transmitida.
Otro modo que visualiza información y tapa una parte grande de la imagen de la pantalla de televisión.
Otro modo utilizado para la información relacionada con vídeo.
Otro modo utilizado para la información relacionada con vídeo.
Otro modo que visualiza información y tapa una parte grande de la imagen de la pantalla de televisión.
Otro modo que visualiza información y tapa una parte grande de la imagen de la pantalla de televisión.
Español
39
Page 40

Cambio de los ajustes iniciales
NO CLASIFICADOS
PRESIONE ACTION PARA REGRESAR
PELICULAS DE EEUU
BLOQUEO
NO
SI
G
PG
PG-13
R
NC-17
X
Para ajustar V-CHIP
1. Presione [ , ] para seleccionar el menú de
opciones.
PELICULAS DE EEUU
FRANCES DE CANADA
PROGRAMAS DE EEUU
INGLES DE CANADA
2. Presione [ , ] para seleccionar “AJUSTE” y presione [ ].
3. Presione [
, ] para resaltar el menú de opciones seleccionado en el paso 1, y
presione [ , ] para seleccionar “SI” o “NO”.
4. Presione [
, ] para seleccionar “NO CLASIFICADOS” y presione [ , ] para
seleccionar “ SI” o “NO”.
5. PROGRAMAS DE TV DE LOS EEUU SOLAMENTE
Presione [ , ] para seleccionar “AJUSTE” y presione [ , ] para seleccionar
“BÁSICA ” o “DETALLADA”.
BÁSICA : Calificaciones generales como TV-Y, TV-PG, etc. solamente.
DETALLADA
: Calificaciones generales y contenido como V, L, etc.
6. Presione [ , ] para seleccionar el nivel de calificación (vea abajo) y presione [ ] para bloquear (ROJO)
o [ ] para desbloquear (VERDE).
Repita el paso 6 para cada calificación.
Nota • Esta función no se activa con algunas películas.
• Cuando un programa exceda el nivel de calificación aparecerá un mensaje de bloqueo. Introduzca el código
secreto de 4 dígitos para ver el programa. El código secreto volverá a tener validez cuando se apague la pantalla.
GRÁFICA DE CALIFICACIONES DE PELÍCULAS PARA LOS EEUU
NR CONTIENE PROGRAMAS SIN RESTRICCIONES Y
PROGRAMAS NA (NO APLICABLES). Las películas no tienen
restricciones o las restricciones no son aplicables.
G PÚBLICO EN GENERAL. Se admiten a todos los públicos.
PG SE SUGIERE LA SUPERVISIÓN DE LOS PADRES. Material no
adecuado para niños.
SE RECOMIENDA ENCARECIDAMENTE LA SUPERVISIÓN DE LOS
PG-13
PADRES. Material no apropiado para niños menores de 13 años.
R RESTRINGIDAS. Los jóvenes menores de 17 años y los niños
necesitan estar acompañados de sus padres o una persona adulta
que los supervise.
NC-17 NO SE ADMITE AL PÚBLICO MENOR DE 17 AÑOS.
X ADULTOS SOLAMENTE.
GRÁFICA DE CALIFICACIONES DE PROGRAMAS DE TV PARA LOS EEUU
NR Sin restricción. Consulte Precauciones del cliente abajo.
TV-Y Para todos los niños. Los temas y elementos de este programa
han sido diseñados específicamente para el público joven,
incluyendo niños de 2 a 6 años.
TV-Y7 Para niños mayores. Los temas y elementos de este programa
pueden incluir violencia física moderada, o pueden asustar a los
niños menores de 7 años.
TV-G
Para el público en general. Contiene un poco de violencia o ninguna y no
se emplean palabras malsonantes, y en los diálogos y en las situaciones
no se toca el tema del sexo o éste se menciona sólo un poco.
TV-PG Se sugiere la supervisión de los padres. El programa puede tener
conversaciones groseras infrecuentes, violencia limitada y
diálogos y situaciones con sexo provocativo.
TV-14 Se recomienda encarecidamente la supervisión de los padres.
Este programa puede contener temas sofisticados, contenido
sexual, lenguaje fuerte y violencia intensa.
TV-MA Para un público adulto solamente. Este programa puede contener
temas para adultos, lenguaje profano, violencia vívida y un
contenido sexual explícito.
FV
VIOLENCIA EN PROGRAMAS DE FANTASÍA/DIBUJOS ANIMADOS
V VIOLENCIA
S SEXO
Español
L LENGUAJE OFENSIVO
D DIÁLOGO CON CONTENIDO SEXUAL
GRÁFICA DE CALIFICACIONES PARA INGLÉS DE CANADÁ
E Exenta - La programación exenta incluye: noticias, deportes,
documentales y otros programas de información, entrevistas,
vídeos musicales y programas de variedades.
C Programación para niños menores de 8 años. Sin lenguaje
ofensivo, desnudos ni contenido sexual.
C8+
Programación considerada generalmente aceptable para niños de
8 años y menos. Sin blasfemias, desnudos ni contenido sexual.
G Programación general para todos los públicos.
PG Se sugiere la supervisión de los padres. Algún material puede no
ser apropiado para los niños.
14+ La programación contiene temas que pueden no ser apropiados
para el público menor de 14 años. A los padres se les avisa que
no deben dejar ver estos programas a los niños ni a los jóvenes
menores de 14 años.
18+ ADULTOS SOLAMENTE
GRÁFICA DE CALIFICACIONES PARA FRANCÉS DE CANADÁ
E Exenta - La programación exenta.
G General - Programación para público de todas las edades. No
8 ANS+ 8+ General - No se recomienda para los niños pequeños. La
13ANS+ La programación tal vez no sea adecuada para niños menores
16ANS+ La programación puede que no sea apropiada para menores
18ANS+ Programación limitada a los adultos. Contiene escenas de
contiene violencia, o el contenido de la misma es mínimo o se
muestra apropiadamente.
programación es para un público diverso, pero contiene violencia
de vez en cuando. Se recomienda la supervisión de adultos.
de 13 años. Contiene pocas escenas de violencia o una o más
escenas suficientemente violentas como para afectarlos. Se
recomienda encarecidamente la supervisión de personas
adultas.
de 16 años. Contiene frecuentes escenas de violencia o de
mucha violencia.
violencia constante o de mucha violencia.
Precauciones del cliente
El sistema V-Chip que se utiliza en este aparato es capaz de bloquear los programas “NR” (no clasificados, no aplicables y ninguno)
de acuerdo con las normas de la FCC indicadas en la Sección 15.120(e)(2). Si se elige la opción de bloqueo de programas “NR”,
“podrán producirse resultados inesperados y posiblemente confusos, y usted tal vez no pueda recibir anuncios de emergencia o
ninguno de los tipos de programación siguientes”.
• Anuncios de emergencia (mensajes EAS, avisos del tiempo y otros)
• Programas locales • Noticias • Política • Anuncios de servicios públicos • Religión • Deportes • Tiempo
40
Page 41

Repetición de los ajustes - CAJA DE CLONACIÓN
POWER
ASPECT
R-TUNE
RECALL
ACTION
CH
CH
VOL VOL
INPUTTV/VIDEO
MUTE
SAP
La caja de clonación (adquirida por separado) repite los ajustes del TV maestro en otros TVs.
Selección de los ajustes del TV maestro
1 Seleccione los ajustes del TV maestro (vea las páginas 37-40).
Usted puede replegar los ajustes siguientes.
Menú Submenú Menú Submenú
IMAGEN MODO AUDIO BAJOS
COLOR ALTOS
TINTE CANALES
BRILLO MANUAL
CONTRASTE PONGA TÍTULO
NITIDEZ
TEMP COLOR
ENERGÍAMONITOR
AJUSTE
PROGRAMA AUTO
2 Presione [ CH , CH ] o los botones numerados para seleccionar el
canal inicial que quiera ver al conectar la alimentación (ej.: canal con
su propia publicidad).
3 Presione [ VOL , VOL ] para seleccionar el nivel del sonido que
será el mínimo en el modo HOTEL (vea la página 42).
PREFIJADO
PROGRAMA MANUAL
Descarga de los ajustes del TV maestro en la caja de clonación (APRENDER)
Asegúrese de poner el TV en el modo de TV normal antes de descargar. Si no está en
el modo de TV normal, cambie el modo consultando “Cambio entre el modo de TV
normal y el modo HOTEL” (vea la página 42).
Preparación
• Conecte el TV maestro a una toma de CA.
• Conecte la caja de clonación al terminal MATE de la tarjeta de sintonizador.
1 Encienda la pantalla del TV maestro.
Para comprobar los ajustes cargados en la caja de clonación
1. Inserte una herramienta delgada de unos 19 mm (un clip
de papel, por ejemplo) en el agujero [AMS] de la caja de
clonación para poner el TV en el modo de TV normal.
El LED verde se enciende durante unos 2 segundos.
2. Presione el botón [TEST] de la caja de clonación.
• El LED rojo y el verde parpadean alternativamente durante
la comprobación.
• El LED verde se enciende durante unos 2 segundos cuando
los ajustes repetidos en la caja de clonación corresponde al
ajuste del TV maestro. Si no se enciende el LED rojo, cargue
de nuevo los ajustes.
2 Encienda la caja de clonación.
Los LEDs rojo y verde de la caja de clonación parpadearán.
3 Mantenga presionado el botón [ALT] y presione el botón [LEARN] de
la caja de clonación.
• El LED rojo parpadea durante la carga.
• El LED verse se enciende durante unos 2 segundos cuando termina la carga.
• Tras la carga, el TV maestro se pondrá automáticamente en el modo HOTEL.
4
Desconecte la alimentación principal de la pantalla y de la caja de clonación.
Para comprobar la pila de la caja de clonación
1. Encienda la caja de clonación.
2. Mantenga presionado el botón [ALT] y presione
el botón [TEST] de la caja de clonación.
• El LED rojo y el verde parpadean alternativamente
durante la comprobación.
• El LED verde se enciende durante unos 2
segundos cuando la pila tiene suficiente carga.
Si no se enciende este LED, reemplace la pila
por otra nueva (use una de 9 voltios).
Español
41
Page 42

Repetición de los ajustes - CAJA DE CLONACIÓN
Descarga de los ajustes a otro TV (ENSEÑAR)
Asegúrese de poner el TV en el modo de TV normal antes de descargar. Si no está en el modo de TV normal, cambie el
modo consultando “Cambio entre el modo de TV normal y el modo HOTEL” (vea más abajo).
Preparación
• Conecte el TV receptor a una toma de CA.
• Conecte la caja de clonación al terminal MATE de la tarjeta de sintonizador.
1 Encienda el TV receptor.
2 Encienda la caja de clonación.
Los LEDs rojo y verde de la caja de clonación parpadean.
3 Presione el botón [TEACH] en la caja de clonación.
• El LED verde parpadea durante la descarga.
• El LED verse se enciende durante unos 2 segundos cuando termina la descarga.
• Tras la descarga, el TV receptor se pondrá automáticamente en el modo HOTEL.
4 Desconecte la alimentación de la pantalla y de la caja de clonación.
Repita los pasos de arriba para descargar a otros TVs.
Cambio entre el modo de TV normal y el modo HOTEL
Cuando utilice la caja de clonación
Inserte una herramienta delgada de unos 19 mm (un clip de papel, por ejemplo) en el agujero [AMS] de la caja de clonación.
El LED verde se enciende durante unos 2 segundos.
Cuando cambie el modo con el control remoto
Presione [SAP], [ASPECT], y luego mantenga presionado [MUTE] durante unos 3 segundos.
Presione el siguiente botón antes de que pase un segundo.
Para entrar o salida en el menú del modo HOTEL
Presione [ACTION] para entrar y vuelva a presionarlo para salir.
Menú del modo HOTEL
Menú AJUSTE
• APAGADO (vea la página 38)
• MODO cc (vea la página 39)
• MODO (vea la página 37)
• VIDEO (vea la página 39, MODO)
• V-CHIP
No aparece en el ajuste inicial. Para visualizarlo,
presione [SAP], [ASPECT] y luego mantenga
presionado [RECALL] durante unos 3 segundos.
Menú BLOQUEO
Para visualizarlo, presione [ ] mientras resalta “V-CHIP”
en el menú AJUSTE (vea a la izquierda).
• CREAR CLAVE / INGRESAR (vea la página 38)
• V-CHIP (vea la página 38, 40)
• CLAVE (vea la página 38)
• TIEMPO? : 12HORAS (Fija)
Los ajustes seleccionados en el modo HOTEL pasan a
ser los ajustes iniciales tras 12 horas.
Reposición de todos los ajustes a los ajustes de fábrica
Preparación
• Conecte la pantalla de TV a una toma de CA.
• Conecte la caja de clonación al terminal MATE de la tarjeta de sintonizador.
Español
1. Encienda la pantalla.
2. Encienda la caja de clonación.
Los LEDs rojo y verde de la caja de clonación parpadean.
3.
Inserte una herramienta delgada de unos 19 mm (un clip de papel, por ejemplo) en el agujero [AMS] de la caja de clonación.
El LED verde se enciende durante unos 2 segundos.
4. Presione [SAP], [ASPECT] y mantenga presionado [TV/VIDEO] durante unos 3 segundos.
Todos los ajustes volverán a ser los valores predeterminados.
5. Desconecte la alimentación principal de la pantalla y de la caja de clonación.
42
Page 43

Guía para la solución de problemas
Antes de solicitar el servicio de reparaciones, haga las comprobaciones siguientes.
Síntomas
VÍDEO AUDIO
Soluciones
Vídeo con efecto
de nieve
Imagen múltiple
Interferencia
Vídeo normal
No hay vídeo pero
sí efecto de nieve
No hay vídeo
ni PIP
No hay color
Vídeo normal
Audio con ruido
Audio con ruido
Audio con ruido
No hay audio
Audio con ruido
No hay audio
Audio normal
Audio equivocado
Ajuste la ubicación y la conexión de la antena.
Ajuste la ubicación y la conexión de la antena.
Verifique el cable de baja de la antena.
Separe el televisor de otros aparatos eléctricos,
luces, vehículos y equipos médicos.
Suba el volumen.
Verifique el silen.ciamiento.
Cambie el canal.
Fije correctamente el modo del televisor o de la televisión
por cable.
Verifique los cables de las antenas.
Verifique si el cable de la alimentación está enchufado en
un tomacorriente activo.
Ajuste los controles de brillo y audio.
Cambie el canal.
Verifique las conexiones de los cables.
Verifique el funcionamiento de la segunda fuente de vídeo.
Ajuste las fijaciones de los colores.
Cambie el canal.
Verifique que el audio está en estéreo o mono, no
en SAP.
Recuadro negro
en la pantalla
Vídeo normal
Operación intermitente del control remoto
Especificaciones
Número de modelo
Capacidad de recepción de canales: 181
Terminales de conexión
Número de modelo
Massa (Peso)
Alcance de funcionamiento
TY-42TM6MA
12 de VHF, 56 de UHF y 125 de televisión por cable
AV INPUT VÍDEO (Tipo de clavija RCA) 1,0 Vp-p (75 Ω)
AV OUTPUT VÍDEO (Tipo de clavija RCA) 1,0 Vp-p (75 Ω)
Puerto de interfaz digital (MATE)
N2QAFB000003
160 g aproximadamente (5,6 onzas) (incluyendo pilas)
7 m aproximadamente (23 pies) directamente enfrente del aparato
Audio normal
Audio normal
Tarjeta de sintonizador U/V con MATE I/F
S VÍDEO (Mini DIN de 4 contactos) Y : 1,0 Vp-p (75 Ω), C : 0,286 Vp-p (75 Ω)
AUDIO L-R (Tipo de clavija RCA) 0,5 Vrms
Cambie CC (títulos ocultos).
Reemplace las pilas del control remoto.
∗ No puede hacer salir señales de UHF/VHF.
AUDIO L-R (TIPO TOMA M3) 0,5 Vrms
RJ-11C
Control remoto
Español
43
Page 44

Customer’s Record
The model number and serial number of this product can be found on its back cover. You should note this
serial number in the space provided below and retain this book, plus your purchase receipt, as a permanent
record of your purchase to aid in identification in the event of theft or loss, and for Warranty Service purposes.
Model Number Serial Number
Note au client
Le numéro de modèle et le numéro de série de cet appareil figurent sur le panneau arrière. Notez le numéro
de série à l’emplacement ci-dessous réservé à cet effet; conservez ce manuel et la facture d’achat, ce qui
aidera à l’identification du produit en cas de perte ou de vol.
Numéro de modèle Numéro de série
Anotación del cliente
El modelo y el número de serie de este producto se encuentran en su panel posterior. Deberá anotarlos en
el espacio provisto a continuación y guardar este manual, más el recibo de su compra, como prueba
permanente de su adquisición, para que le sirva de ayuda al identificarlo en el caso de que le sea sustraído
o lo pierda, y también para disponer de los servicios que le ofrece la garantía.
Número de modelo Número de serie
Matsushita Electric Industrial Co., Ltd.
Web Site : http://www.panasonic.co.jp/global/
2005 Matsushita Electric Industrial Co., Ltd. All Rights Reserved.
Tous droits réservés.
Printed in Japan
Imprimé au Japon
Impreso en Japón
M0405T4065
 Loading...