

Panasonic TX-L39E6EK, TX-L42E6EK, TX-L42E6EW, TX-L32E6E, TX-L50E6E Operating Instructions
...Page 1

e
TX-L32E6E
TX-L39E6E(K)(W)
TX-L42E6E(K)(W)
TX-L50E6E
HELP
English
Page 2

Watching
my Home Screen
•Information 10
•How to use 10
•Settings 11
Basic
•Basic connection 13
•Selecting channel 15
•Information banner 16
•Option Menu 18
•Subtitle 19
•Off Timer 19
•Last view 20
External equipment
•External connection 20
•Watching external input 22
•Operating with TV’s remote control 23
•HDMI features 24
•Terminal information 26
•Valid input signals 27
For best picture
•Viewing Mode 27
•Ambient Sensor 28
•Auto power standby function 28
•Aspect 29
•Auto aspect 30
•Advanced Settings 31
•Copy Adjustment 34
For best audio
•Sound mode 34
TV Guide
•Using TV Guide 35
- 2 -
Page 3

Teletext
•Viewing Teletext 37
•Teletext mode 39
Tuning and editing channels
•Setting menu 40
•Favourites Edit 40
•Channel List 42
•Auto Setup 43
•Manual Tuning 44
•Update Channel List 45
•New Channel Message 45
•Signal Condition 45
Internet service
Internet content
•Information 47
•Selecting internet content 47
•Note 48
Network connections
•Internet connection 48
•Note 49
Network settings
•Network Connection 50
•Custom - Wireless 51
•Custom - Wired 53
•Network Status 55
•VIERA remote Settings 55
•Network Link Settings 55
•Software Update 55
•New Software Message 55
Home network
DLNA
- 3 -
Page 4

•Information 56
•Using DLNA 58
Network connections
•DLNA connection 59
•Note 61
Network settings
•Network Connection 61
•Custom - Wireless 63
•Custom - Wired 65
•Custom - Wireless Access Point 66
•Network Status 67
•VIERA remote Settings 67
•Network Link Settings 68
•Software Update 69
•New Software Message 69
Photos
•Selecting file 69
•Viewing photo 70
•Using slideshow 71
Videos
•Selecting file 72
•Watching video 72
•Video Setup 73
•Audio output settings 74
Music
•Selecting file 75
•Playing music 76
•Music Setup 76
DIGA Recorder
•Controlling DIGA Recorder 76
Technical information
•Photo format 77
- 4 -
Page 5

•Video format 78
•Music format 80
Media Player
Using Media Player
•Information 81
•Selecting device / mode 82
Photo mode
•Selecting file 83
•Viewing photo 84
•Sorting photos 84
•Using slideshow 85
Video mode
•Selecting file 88
•Watching video 88
•Video Setup 89
•Audio output settings 90
Music mode
•Selecting file 91
•Playing music 92
•Music Setup 92
Technical information
•Device handling caution 93
•USB devices 93
•Photo format 93
•Video format 94
•Music format 96
Functions
APPS list
•Information 98
•How to use 98
•Settings 99
- 5 -
Page 6

VIERA Link “HDAVI Control™”
•Summary of VIERA Link 99
•Preparations 103
•Easy playback 103
•Power on Link 104
•Power off Link 104
•Standby Power Save 104
•Intelligent Auto Standby 104
•VIERA Link Control 105
•Speaker Selection 106
•Note 107
Child Lock
•Using Child Lock 107
•PIN number 108
•Parental Rating 108
Data Service Application
•Using Data Service Application 108
•Cookie 109
•Note 109
Common Interface
•Caution 110
•Using Common Interface 110
Shipping Condition
•Shipping Condition 111
Updating the TV Software
•Preparations 111
•Auto update 111
•Manual update 112
Setting characters
•Using numeric buttons 112
Keyboard / Gamepad
•Keyboard 113
•Gamepad 114
- 6 -
Page 7

Settings
Setting menu
•How to use 115
Picture
•Viewing Mode 116
•Basic settings 117
•Ambient Sensor 117
•Noise reduction settings 117
•Advanced Settings 118
•Option Settings 118
•Screen Settings 119
•Copy Adjustment 120
•Reset to Defaults 120
Sound
•Mode 120
•Basic settings 120
•Volume settings 121
•Voice Guidance Settings 122
•Audio output settings 122
•Reset to Defaults 124
Network
•Network Connection 124
•Network Status 125
•VIERA remote Settings 125
•Network Link Settings 125
•Other settings 125
Timer
•Off Timer 125
•Time Zone 125
•Auto Standby 126
•No signal Power off 126
Setup
•Eco Navigation 126
- 7 -
Page 8

•USB Device Setup 126
•Child Lock 126
•Tuning Menu 126
•Language 128
•Display Settings 129
•Common Interface 130
•VIERA Link Settings 130
•Data Service Application 131
•System Menu 132
•Other Settings 132
Support
FAQs
•Picture 134
•Digital TV 135
•Analogue TV 136
•Sound 136
•HDMI 137
•Network 138
•Other 139
Maintenance
•Care and Cleaning 140
Information
•Using Help menu 141
Optional accessories
•Communication Camera 141
•Wall-hanging bracket 141
Licence
•Licence 142
- 8 -
Page 9
OK Letters enclosed in a box indicate remote control buttons.
Menu Letters in cyan indicate on-screen display items.
References in this eHELP
●
The images shown in this eHELP are for illustrative purposes only.
- 9 -
Page 10
Watching
my Home Screen
Information
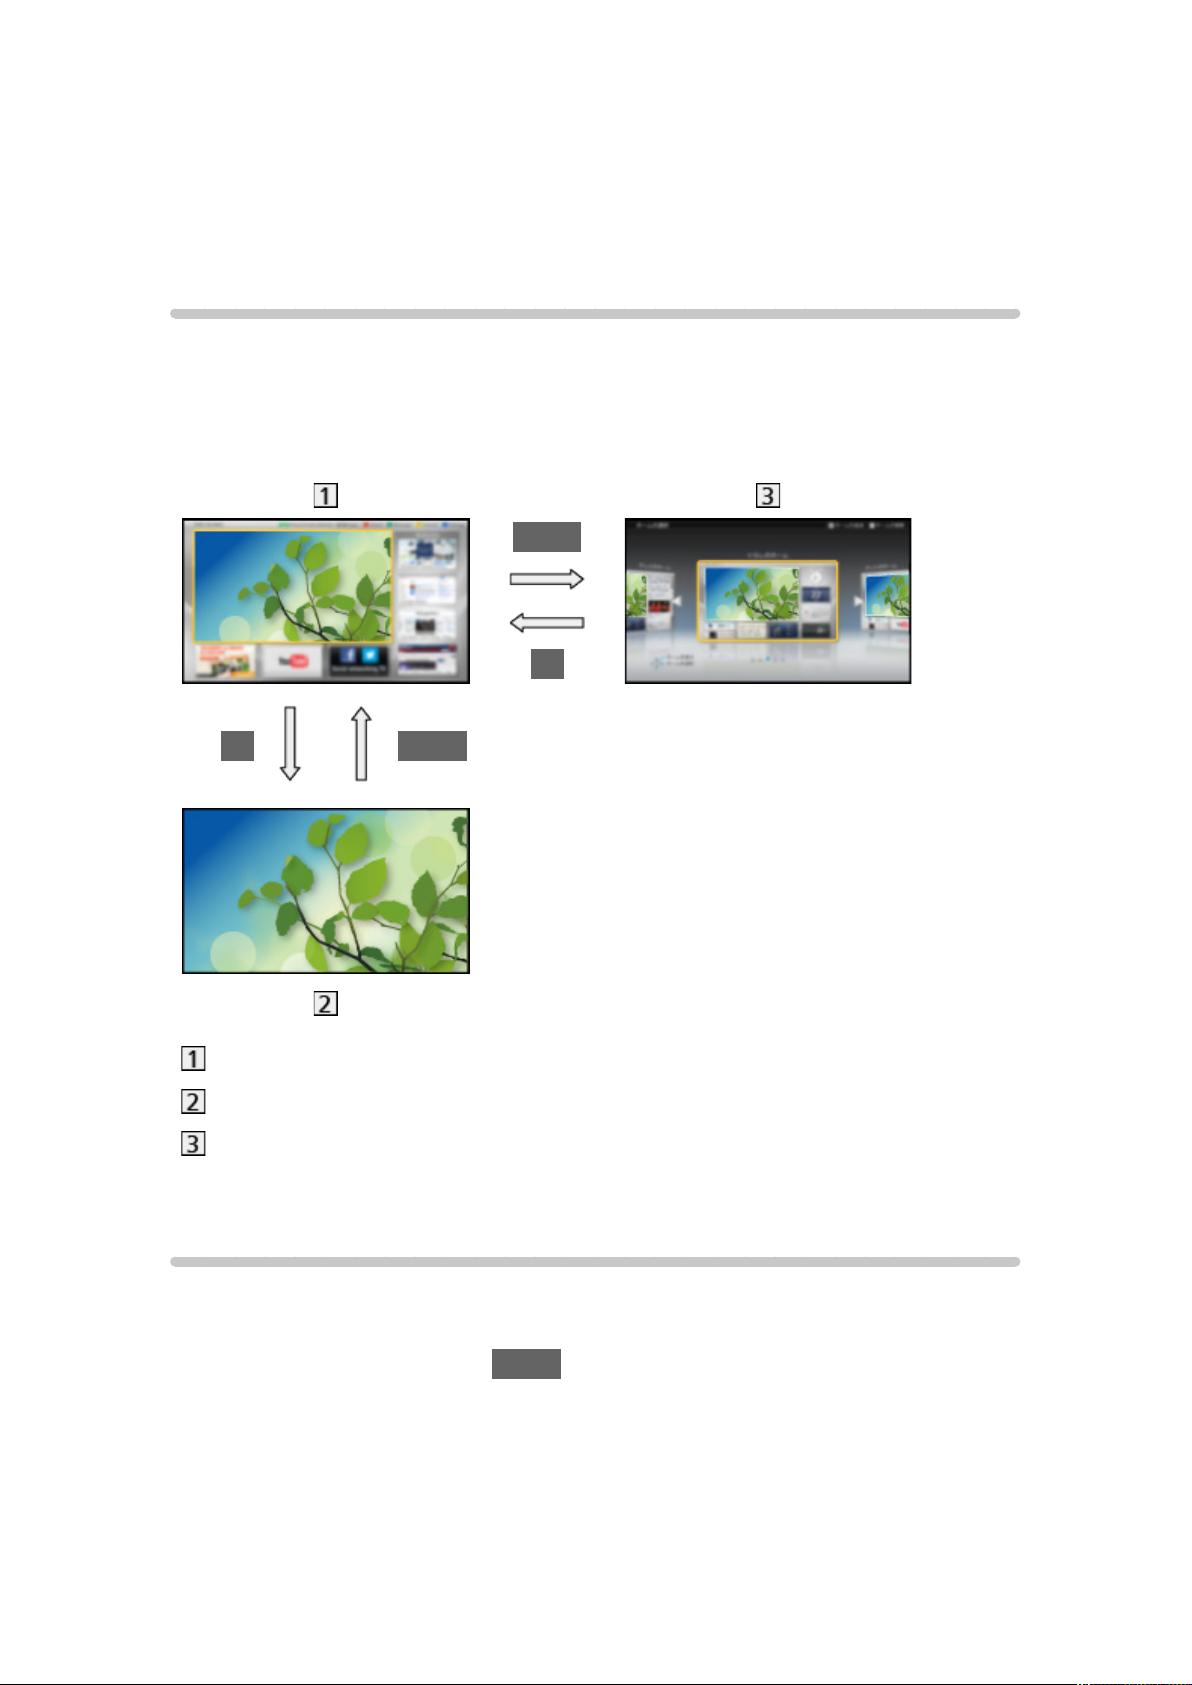
“my Home Screen” is a gateway to the TV, applications, and more.
It provides easy access to special features such as the Media Player, videos,
games, communication tools, etc. as shown below (example).
HOME
OK
OK HOME
Home Screen
Selected content screen (TV, application, etc.)
Home Screen Selection
– Your preferred Home Screen can be selected or added.
How to use
Home Screen provides access to special features such as the Media Player, TV,
internet content, data services, communication tools, etc.
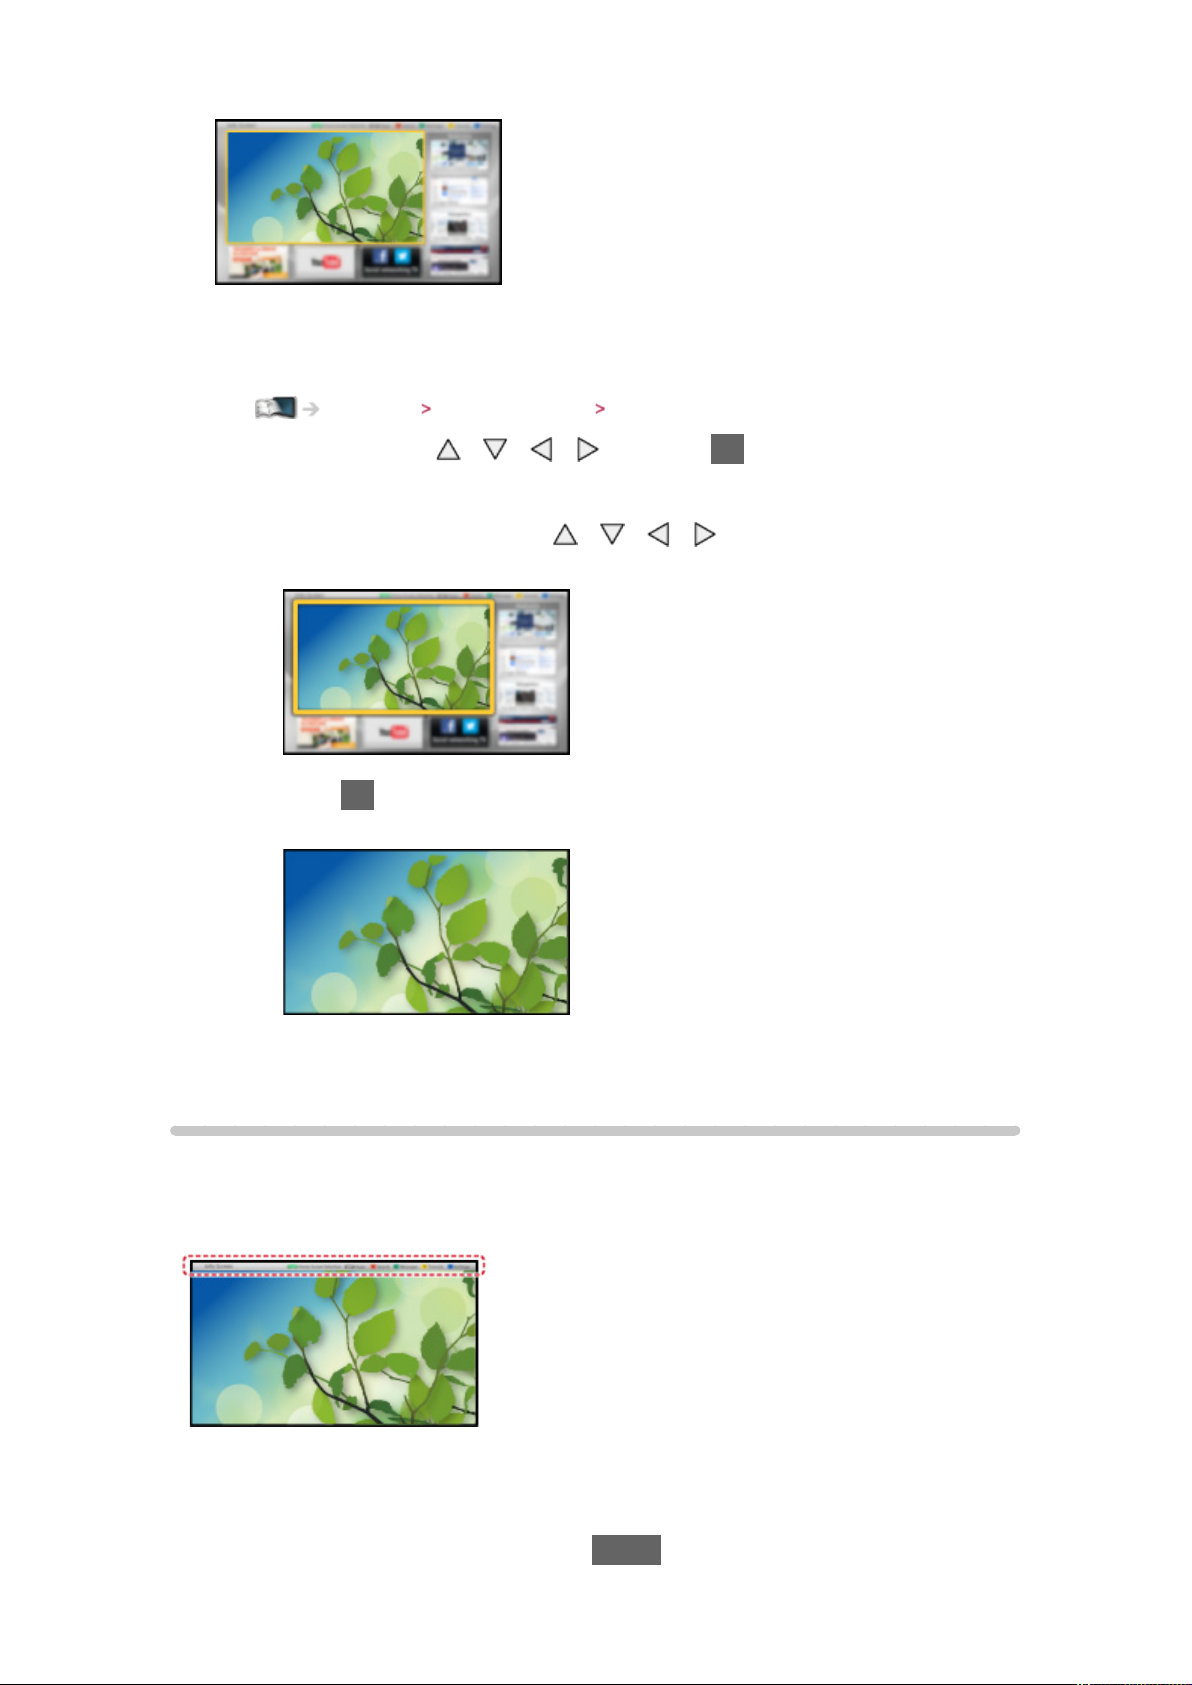
1. Display Home Screen with HOME
(Example)
- 10 -
Page 11
●
The last viewed Home Screen is displayed when the TV is turned on.
●
Press again to select or add your preferred Home Screen layout.
Watching my Home Screen Settings
2. Select a feature with / / / and press OK to access
●
To watch full-screen TV
1) Select the TV viewer with
/ / /
(Example)
2) Press OK to watch
(Example)
●
Also refer to Tutorial from the tool guide.
Settings
Select the setup menu from the tool guide on the top of the screen, or use
coloured button to display the setup menu.
(Example)
■ Home Screen Selection
1. Display Home Screen Selection with HOME
- 11 -
Page 12
(Example)
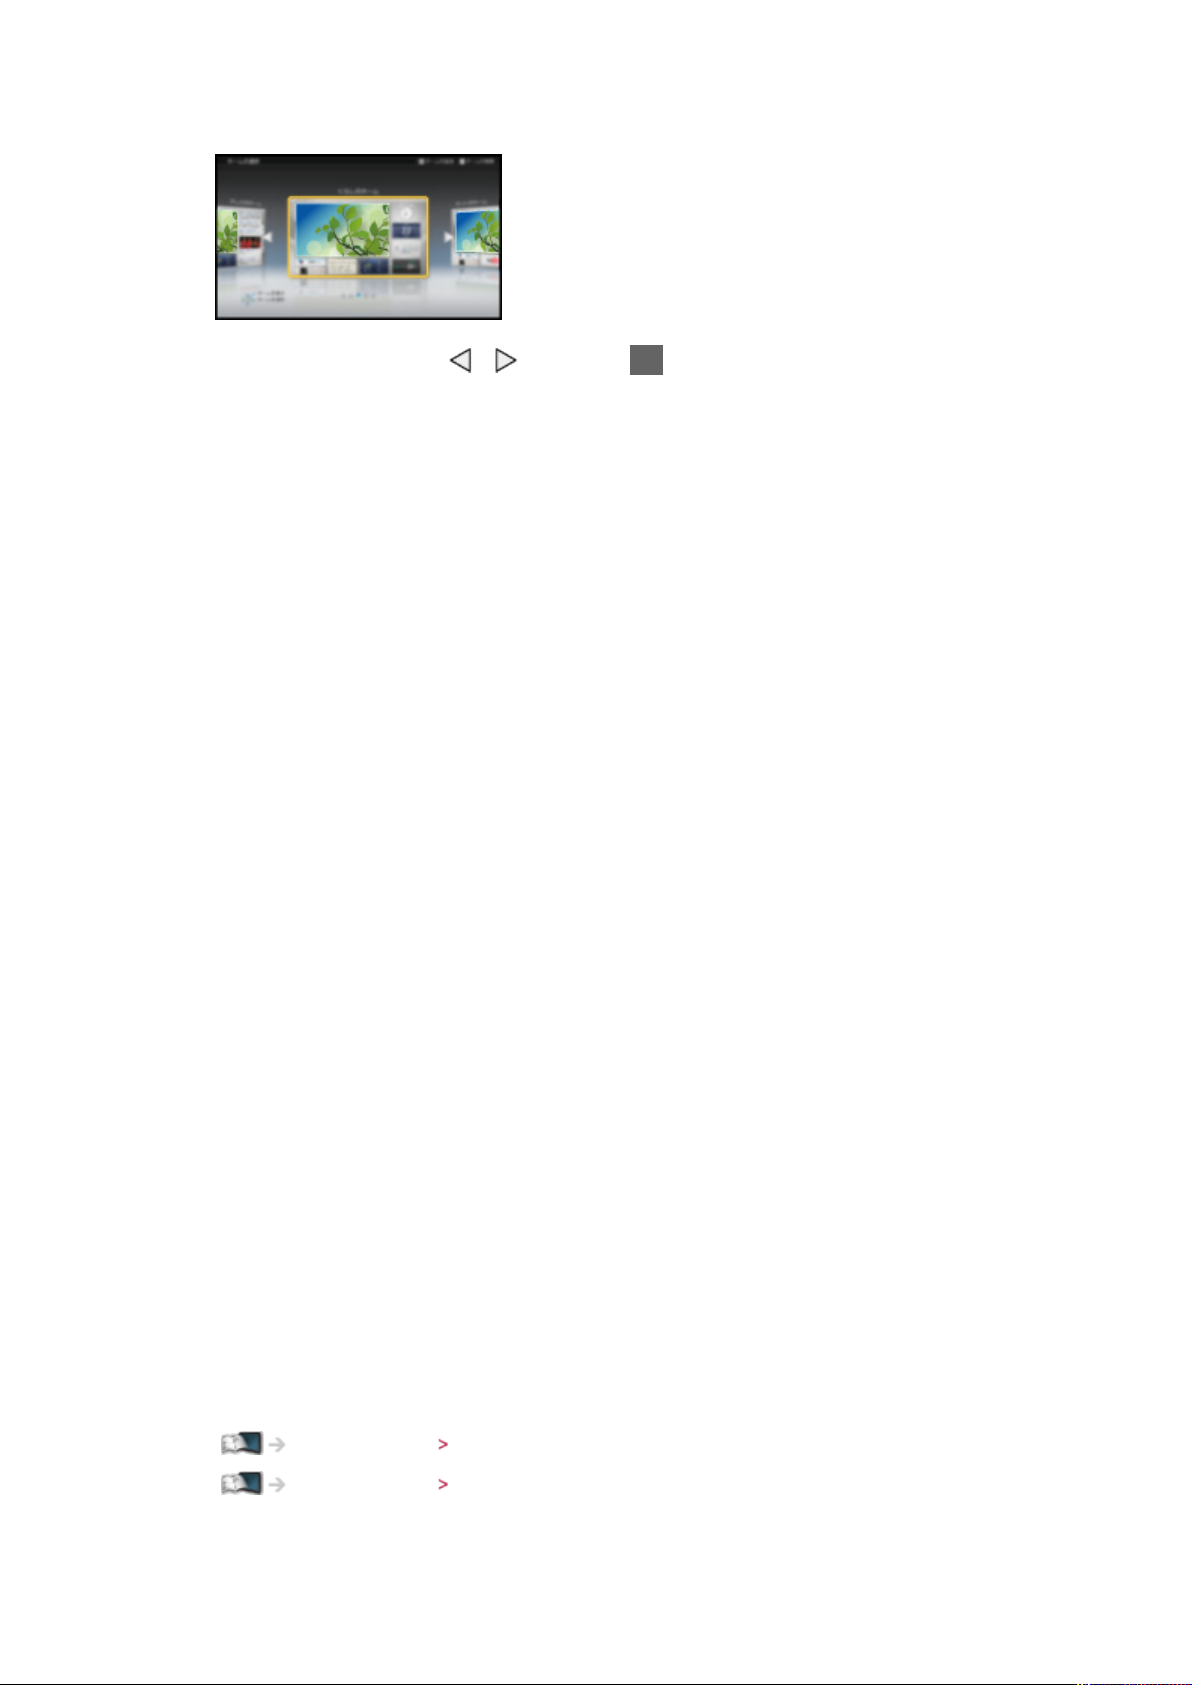
2. Select the screen with
Full Screen TV:
Displays full-screen TV
TV Home Screen:
To make your TV experience more convenient and comfortable.
Lifestyle Screen:
Displays the TV with useful information and services for everyday life.
Info Screen:
Enjoy internet content while watching TV.
Add New Screen:
You can add a new screen to personalise.
/ and press OK to set
■ Settings
You can customise any Home Screen. (For example, changing the wallpaper,
renaming freely, editing applications, setting the screen launched when the TV
is turned on, etc.)
1. Select Settings from the tool guide
2. Follow the on-screen instructions
■ Search
You can search the content from various features.
1. Select Search from the tool guide
2. Follow the on-screen instructions
= Note =
●
To use this function fully, you need a broadband network environment.
Ensure the network connections and network settings are completed.
Internet service Network connections
Internet service Network settings
●
Be sure to update the software when a software update notice is displayed
on the TV screen. If the software is not updated, you will not be able to use
- 12 -
Page 13
my Home Screen. You can update the software later manually.
Internet service Network settings Software Update
Basic
Basic connection
Please ensure that the unit is disconnected from the mains socket before
attaching or disconnecting any cables.
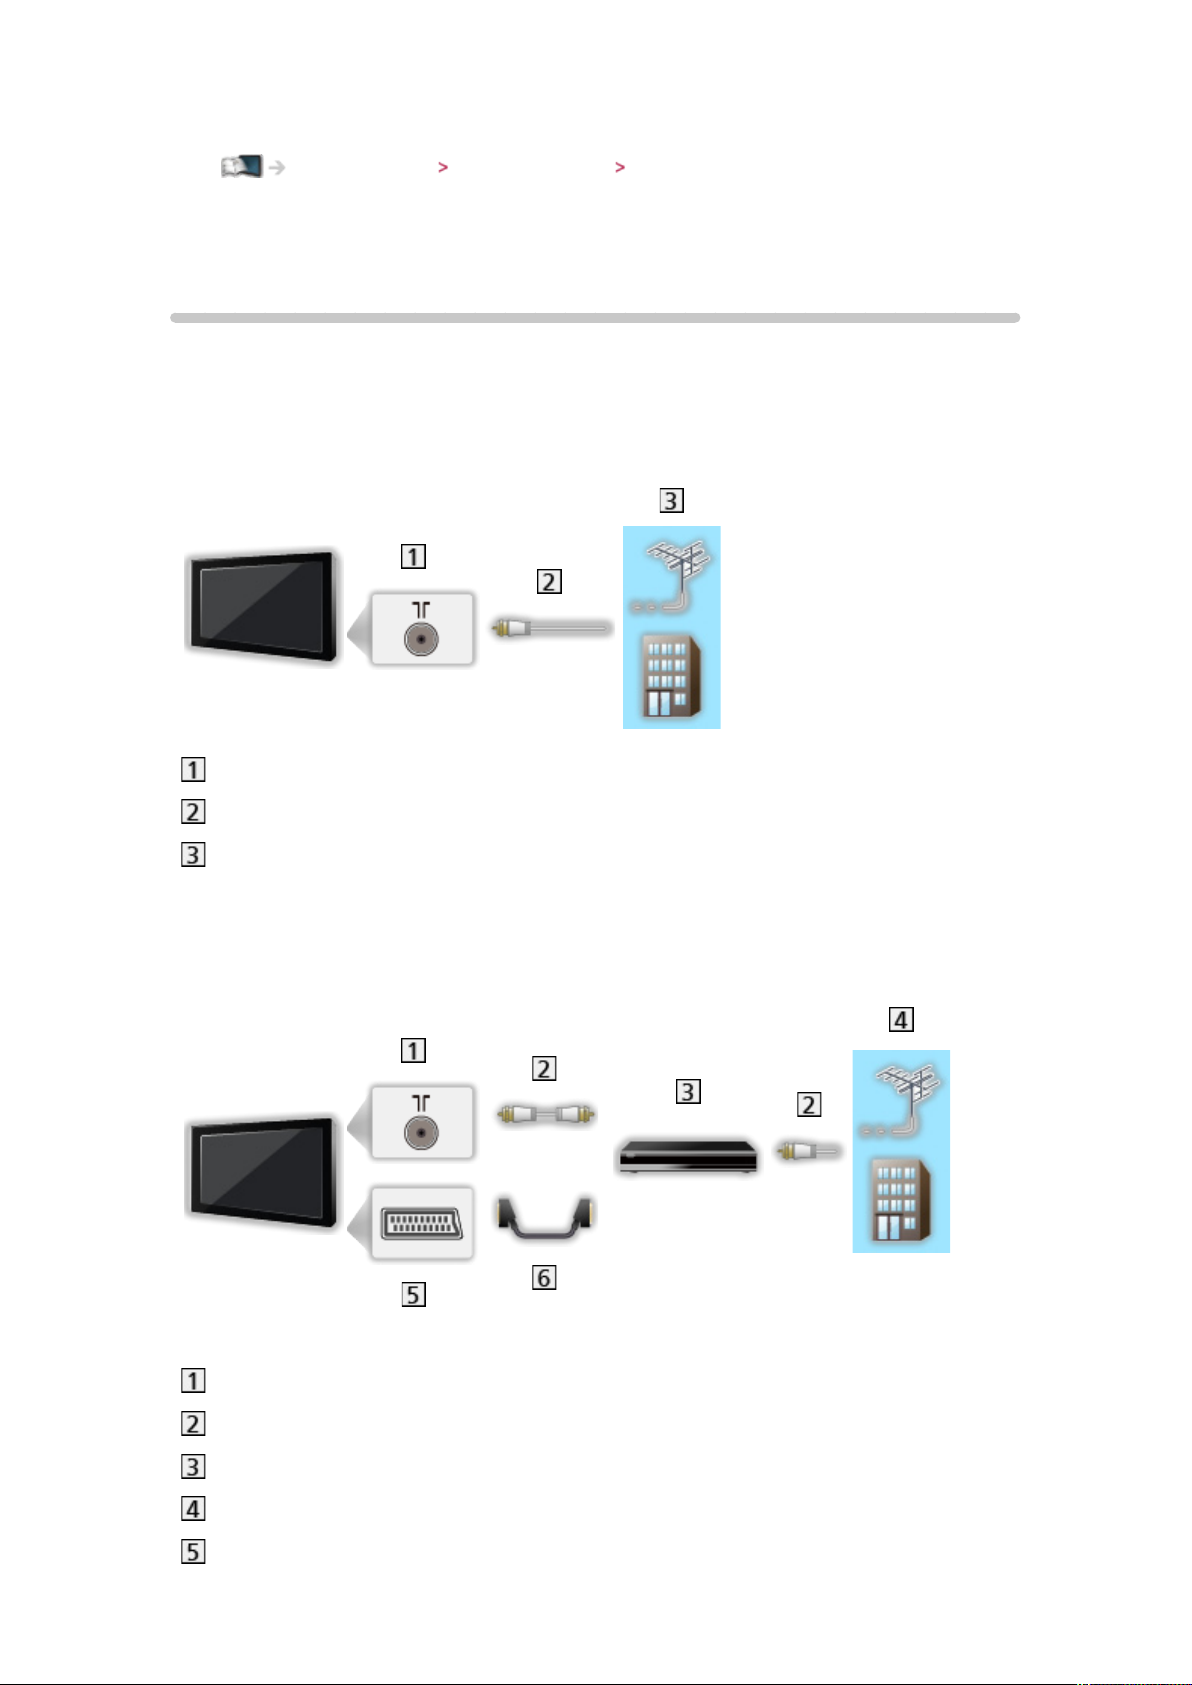
■ Aerial
Terrestrial / cable terminal
RF cable
Terrestrial aerial or cable
●
For DVB-C, DVB-T, Analogue
■ DVD Recorder / VCR
Terrestrial / cable terminal
RF cable
DVD Recorder / VCR
Terrestrial aerial or cable
AV1 (SCART) terminal
- 13 -
Page 14
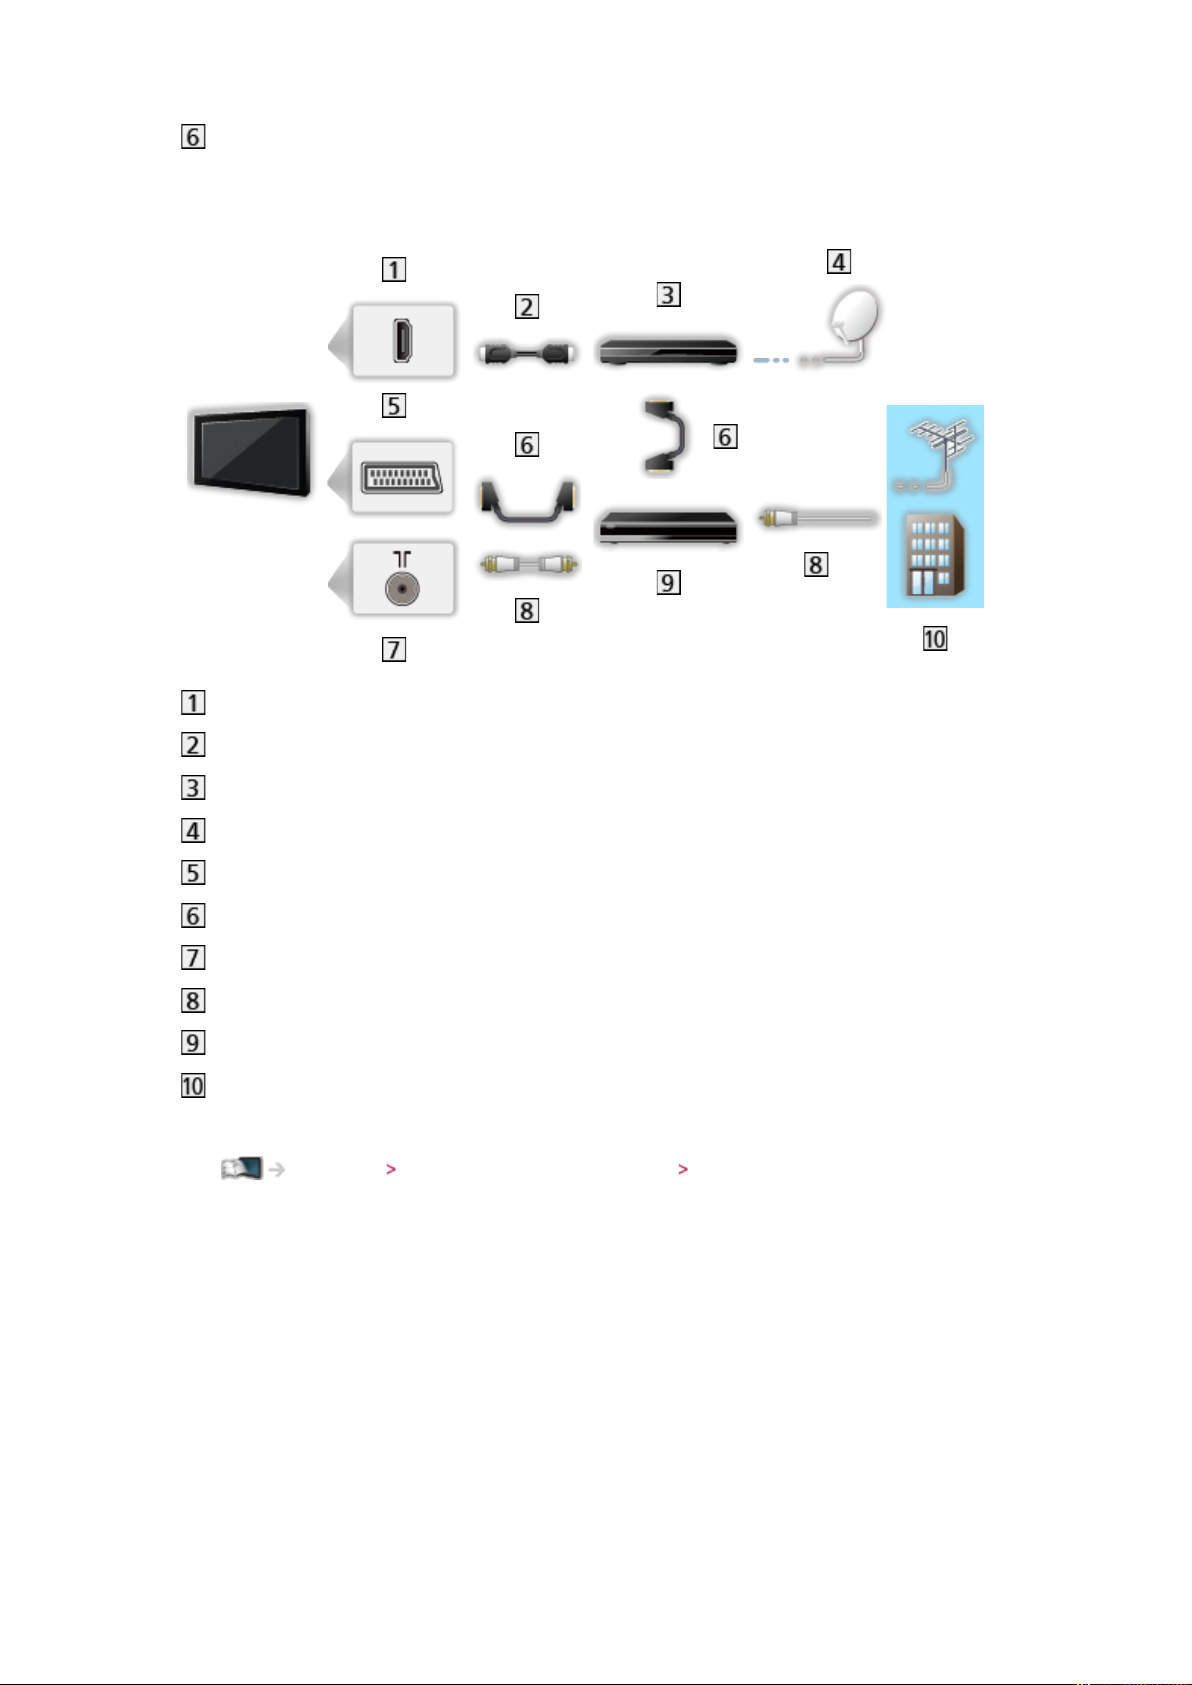
SCART cable
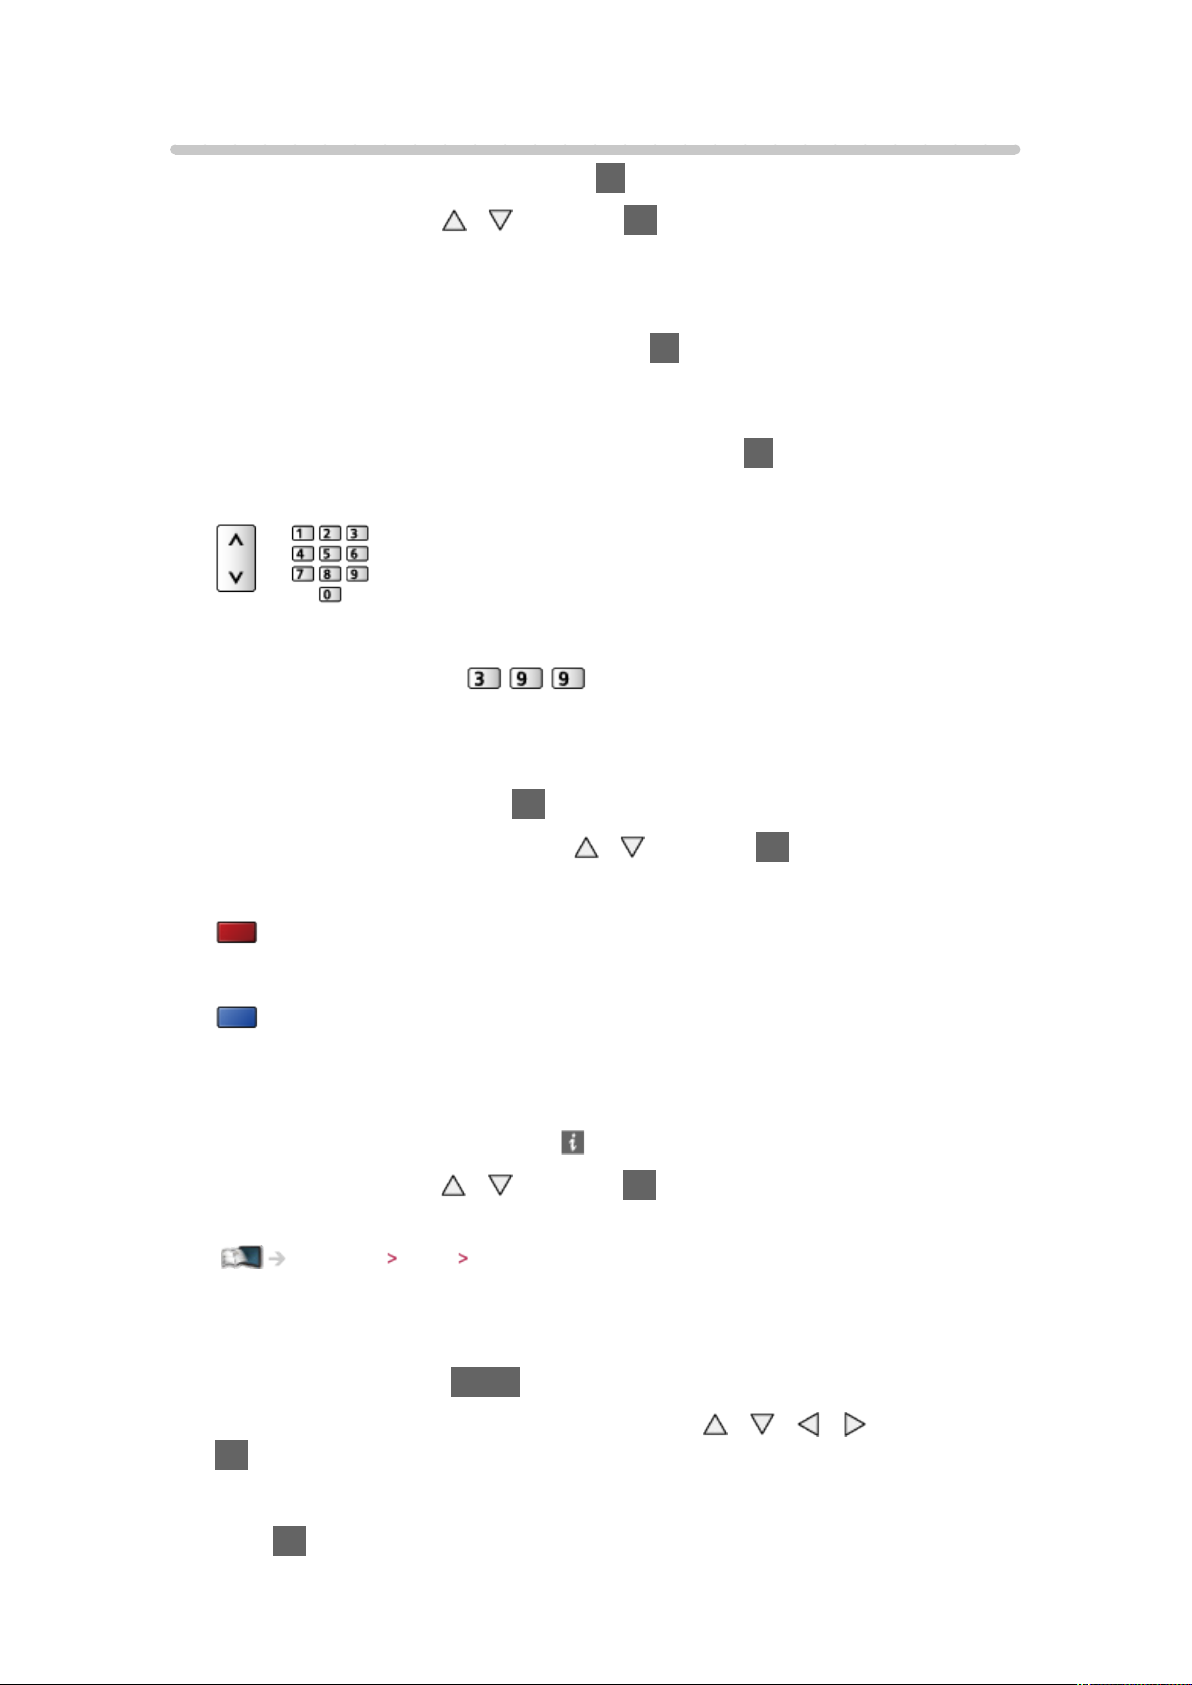
■ DVD Recorder / VCR and Set top box
HDMI terminal
HDMI cable
Set top box
Satellite dish
AV1 (SCART) terminal
SCART cable
Terrestrial / cable terminal
RF cable
DVD Recorder / VCR
Terrestrial aerial or cable
●
For VIERA Link connections
Functions VIERA Link “HDAVI Control™” Summary of VIERA Link
= Note =
●
External equipment and cables shown are not supplied with this TV.
●
Please also read the manual of the equipment being connected.
●
Keep the TV away from electronic equipment (video equipment, etc.) or
equipment with an infrared sensor, otherwise distortion of image / sound
may occur or operation of other equipment may be affected.
●
When using a SCART or HDMI cable, it is recommended to use fully wired
one.
●
Check the terminal type and cable plugs are correct when connecting.
- 14 -
Page 15
Selecting channel
1. Display the TV Selection screen with TV
2. Select the mode with
DVB-C / DVB-T / Analogue
●
The selectable modes vary depending on the channels stored.
●
You can also select the mode pressing TV repeatedly on the remote
control or INPUT/OK/HOLD for MENU button on the control panel of
the TV.
●
If the TV Selection menu is not displayed, press TV to switch the mode.
3. Select a channel with Channel Up / Down or numeric buttons
●
Press the numeric buttons to select a channel position with 2 or moredigit (e.g. 399, press ).
/ and press OK to set
■ To select a channel from the channel list
1. Display the channel list with OK
2. Select a channel from the list with
●
To sort channel names in alphabetical order
(red)
●
To change the category
(blue)
/ and press OK to watch
■ To select a channel using information banner
1. Display information banner with if it is not displayed
2. Select a channel with
displayed
Watching Basic Information banner
/ and press OK to watch while the banner is
■ To select a channel using TV Guide
1. Display TV Guide with GUIDE
2. Select the current programme or channel with
OK to access
– The current programme is displayed on the top left of the screen.
3. Press OK to exit TV Guide
- 15 -
/ / / and press
Page 16
Watching TV Guide Using TV Guide
●
The postcode entry or update may be required depending on the country
you select. Follow the on-screen instructions.
■ To watch pay-TV
●
For information of the encrypted channels
Functions Common Interface Using Common Interface
●
Consult the operator / broadcaster or CI module manufacturer for more
information and conditions of the services.
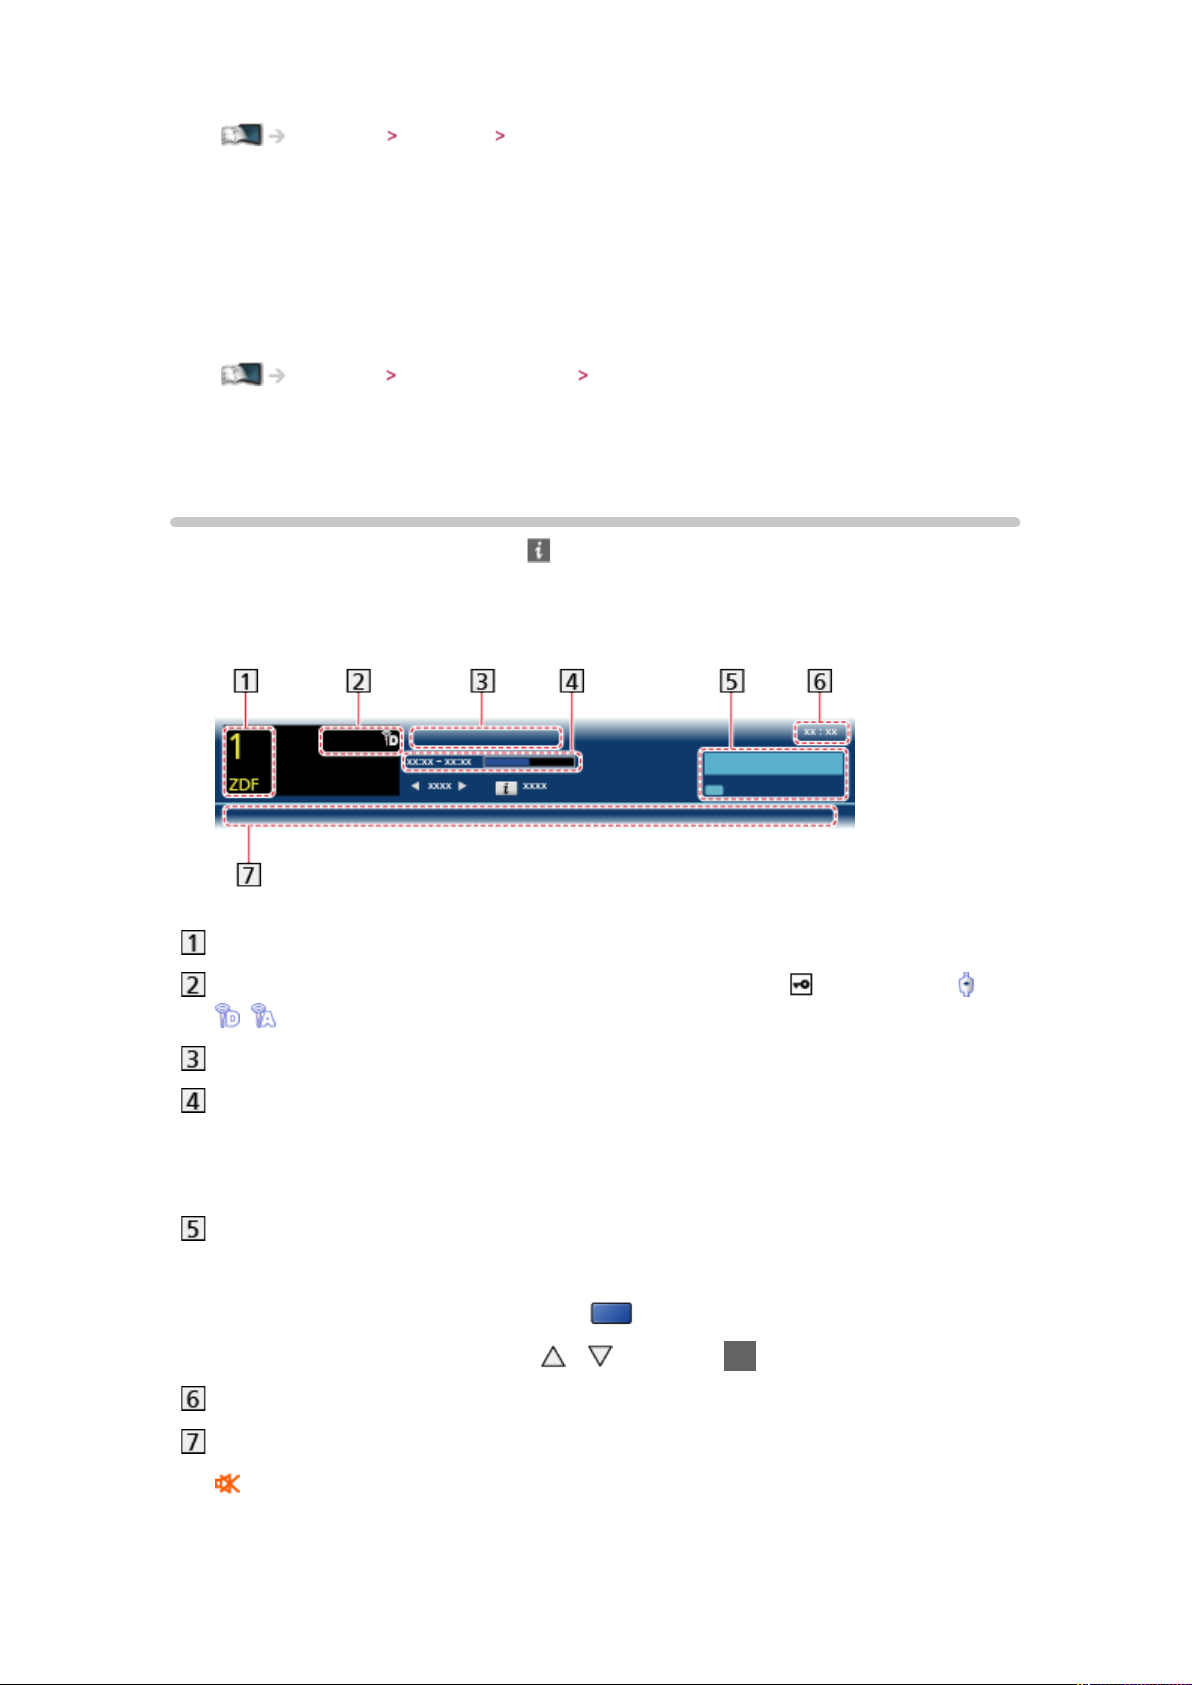
Information banner
Display information banner with .
●
Also appears when changing a channel.
(Example)
Channel position and name
Channel type (Radio, HDTV, etc.) / encrypted channel ( ) / TV mode ( ,
, )
Programme
Programme start / finish time (except Analogue)
Channel position, etc. (Analogue)
Progress time indicator of the selected programme (except Analogue)
Category
●
To change the category (DVB)
1) Display the category list with
2) Select the category with
/ and press OK to change
(blue)
Current time
Features available / message meanings
:
Sound mute is on
- 16 -
Page 17

Bad signal:
Poor quality TV signal
Dolby D+, Dolby D, HE-AAC:
Dolby Digital Plus, Dolby Digital or HE-AAC audio track
:
Subtitle service available
:
Teletext service available
:
Multiple audio available
:
Multiple video available
:
Multiple audio and video available
Stereo, Mono:
Audio mode
:
Data service (Hybrid Broadcast Broadband TV application) available
Functions Data Service Application Using Data Service Application
1 – 90:
Off Timer remaining time
Watching Basic Off Timer
●
To confirm another tuned channel
/
●
To watch the channel listed in the banner
OK
●
Information on the next programme (DVB)
●
To hide the banner
EXIT
●
Extra information (DVB)
– Press again to hide the banner.
- 17 -
Page 18
●
To adjust banner timeout, set Banner Display Timeout.
Settings Setup Display Settings
Option Menu
Confirm or change the current status.
1. Display Option Menu with OPTION
2. Select one of the following items with
/ and press OK to access
Voice Guidance Settings / Multi Video / Multi Audio / Dual Audio / Sub
Channel / Subtitle Language / Teletext Character Set / Teletext Language /
MPX / Volume Correction
●
The function items vary depending on the country you select.
3. Set with
/ / / and press OK to store
Voice Guidance Settings
Guidance settings for visually impaired users
Settings Sound Voice Guidance Settings
Multi Video
Selects from a group of multiple videos (if available).
●
This setting is not memorised and it will return to the default setting once
you exit the current programme.
●
For DVB mode
Multi Audio
Selects between alternative languages for sound tracks (if available).
●
This setting is not memorised and it will return to the default setting once
you exit the current programme.
●
For DVB mode
Dual Audio
Selects stereo / monaural (if available).
●
For DVB mode
Sub Channel
Selects the multifeed programme - sub channel (if available).
●
For DVB mode
- 18 -
Page 19
Subtitle Language
Selects the language for subtitles (if available).
●
For DVB mode
Teletext Character Set
Sets the teletext language font.
Settings Setup Display Settings
Teletext Language
Selects between alternative languages for teletext (if available).
●
For DVB mode
MPX
Selects multiplex sound mode (if available).
Settings Sound Audio output settings
●
For Analogue mode
Volume Correction
Adjusts the volume of each individual channel or input mode.
Subtitle
Display / hide subtitles (if available) with STTL.
●
To select the preferred language for DVB subtitles (if available), set
Preferred Subtitles.
Settings Setup Language
= Note =
●
If you press STTL in Analogue mode, the TV switches to teletext service and
calls up a favourite page. Press EXIT to return to TV mode.
Off Timer
Turn the TV Standby mode automatically after a fixed period with OFF TIMER.
●
Press repeatedly until desired time appears.
0 / 15 / 30 / 45 / 60 / 75 / 90 (minutes)
●
To cancel, set to 0 or turn the TV off.
●
The remaining time displays on the information banner.
Watching Basic Information banner
●
When the remaining time is less than 3 minutes, the remaining time will
- 19 -
Page 20
flash on the screen.
●
You can also set the time from Off Timer in the Timer Menu.
Settings Timer Off Timer
Last view
Switch to a previously viewed channel or input mode easily with LAST VIEW.
●
Press again to return to the current view.
= Note =
●
Watching less than 10 seconds is not reflected in the previously viewed
channel or input mode.
External equipment
External connection
These diagrams show our recommendations for connection of your TV to
various pieces of equipment. For other connections, consult the instructions for
each piece of equipment.
●
For basic connection
Watching Basic Basic connection
●
Check the terminal type and cable plugs are correct when connecting.
■ HDMI equipment
HDMI terminal
Fully wired HDMI compliant cable
Recorder / Player / Set top box / Camcorder / Amplifier with speaker system
= Note =
●
For VIERA Link connections
Functions VIERA Link “HDAVI Control™” Summary of VIERA Link
●
Use HDMI2 for connecting an amplifier. This connection is applicable when
using an amplifier that has ARC (Audio Return Channel) function.
- 20 -
Page 21
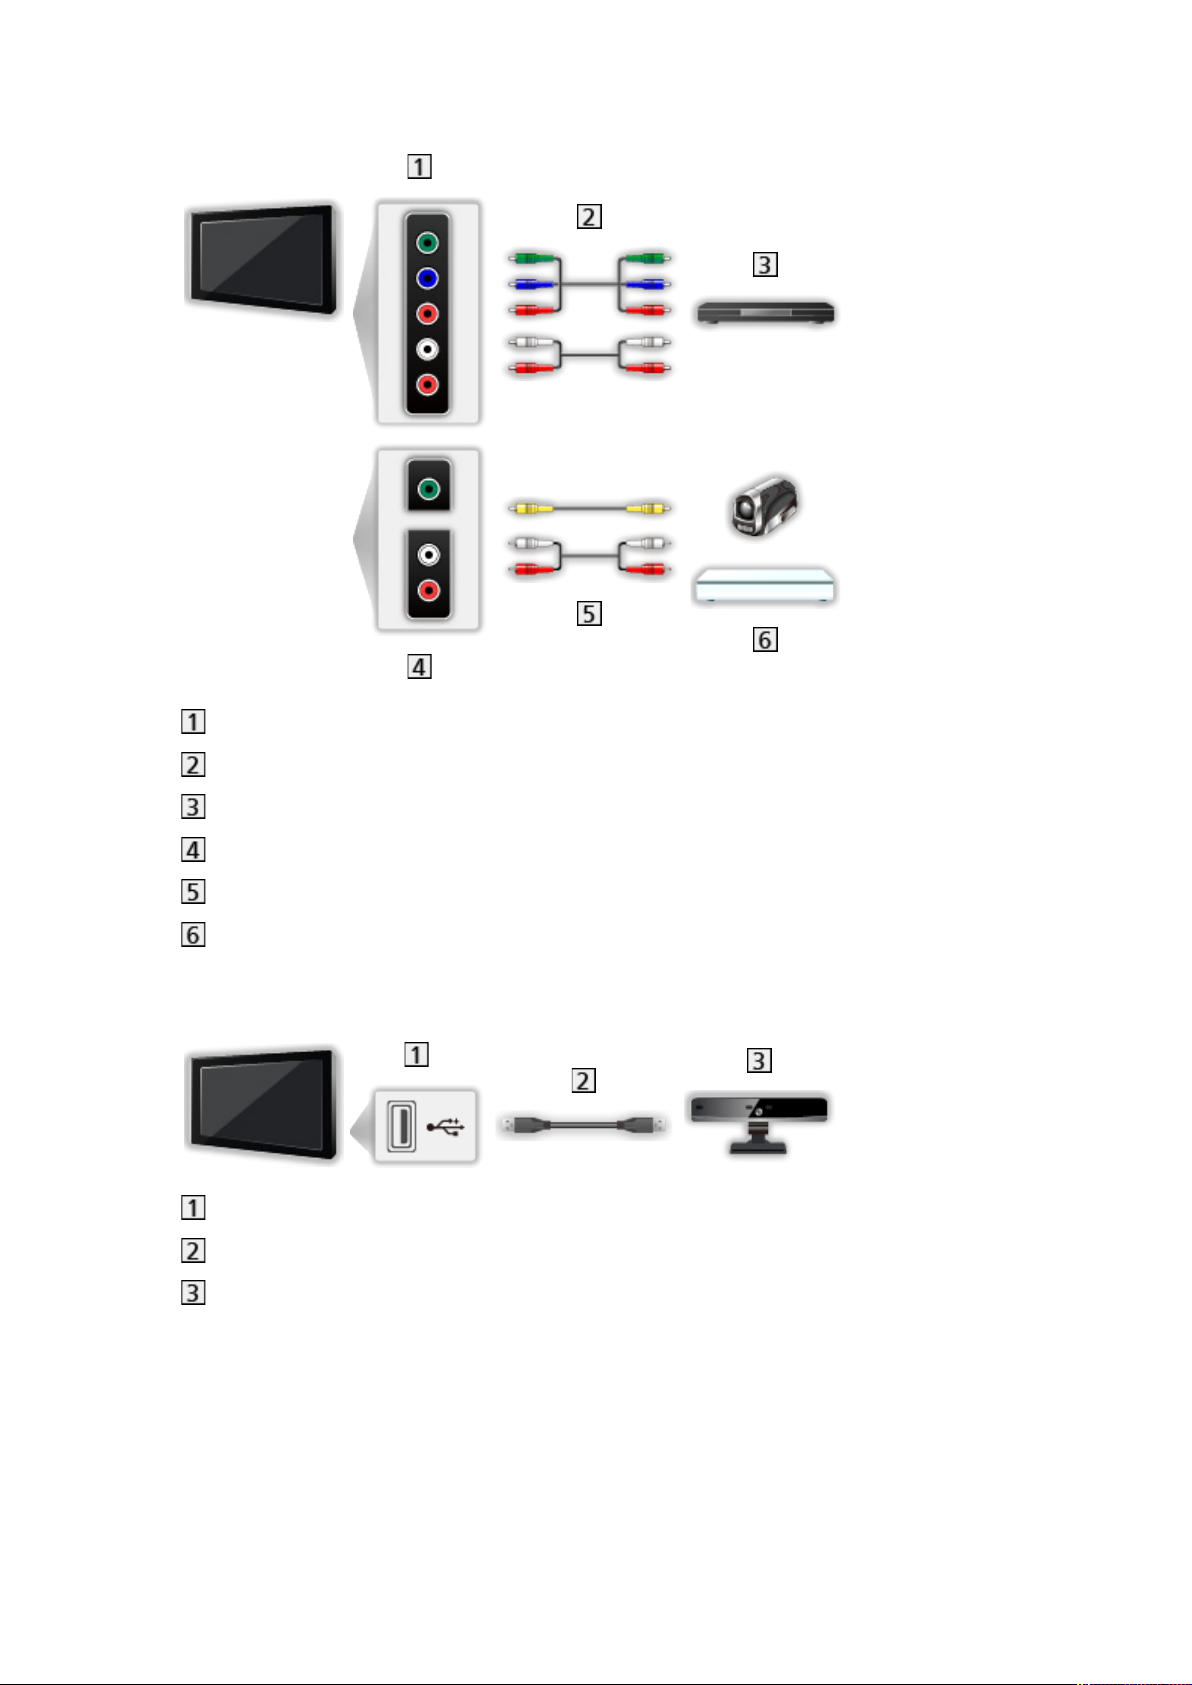
■ AV devices
AV2 (COMPONENT) terminals
Component cables
DVD player
AV2 (VIDEO) terminals
Composite cables
Camcorder / Game equipment
■ USB devices
USB port
USB cable
Communication Camera
= Note =
●
It is recommended to connect the devices to the TV’s USB ports directly.
●
You cannot use two or more of the same kind of USB devices
simultaneously except USB Flash Memory.
●
Use USB 1 port for connecting the Communication Camera.
●
Some USB devices or USB HUB may not be used with this TV.
- 21 -
Page 22
●
You cannot connect any devices by using USB card reader.
●
Additional information for the devices may be on the following website.
(English only)
http://panasonic.net/viera/support
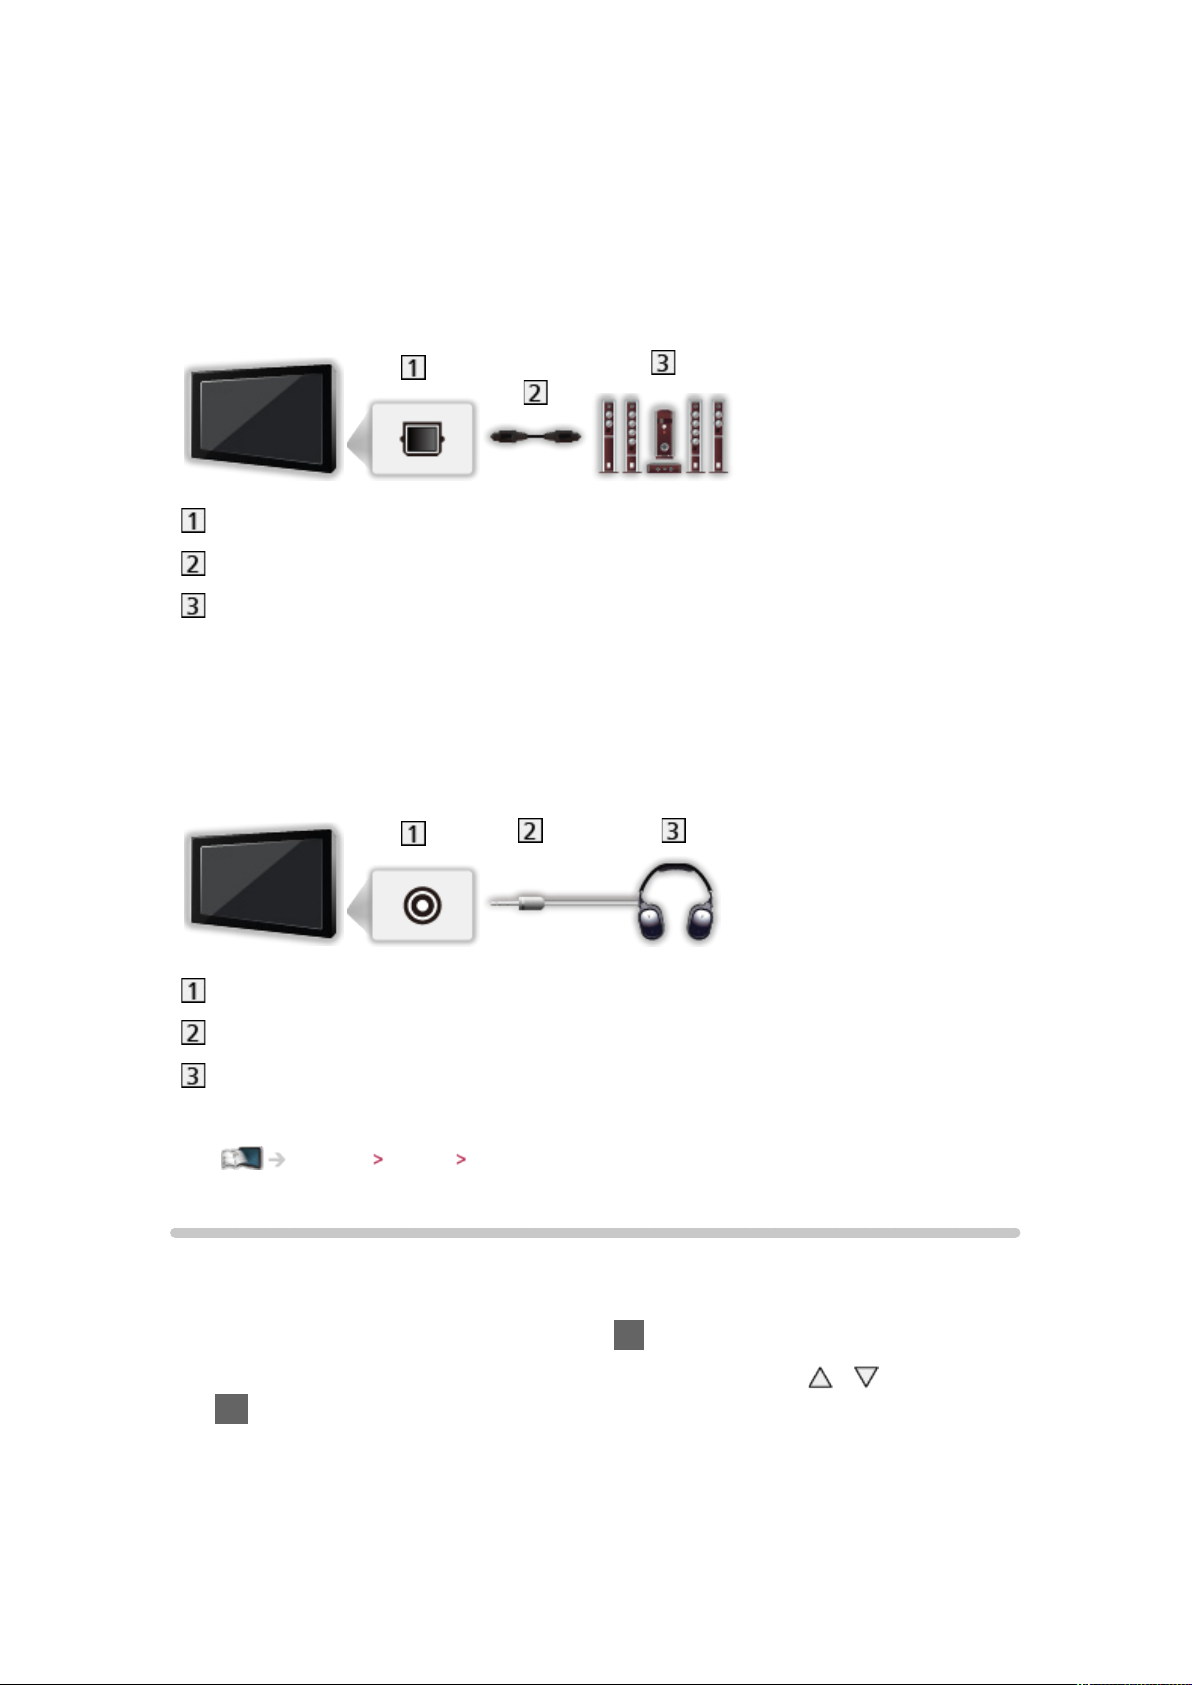
■ To listen with speakers
DIGITAL AUDIO
Optical digital audio cable
Amplifier with speaker system
●
To enjoy the sound from the external equipment in multi-channel sound
(e.g. Dolby Digital 5.1ch), connect the equipment to the amplifier. For the
connections, read the manuals of the equipment and amplifier.
■ Headphones
Headphone jack
M3 stereo mini plug
Headphones
●
To adjust volume, set Headphone Volume.
Settings Sound Volume settings
Watching external input
Connect the external equipment (VCRs, DVD equipment, etc.) and you can
watch through the input.
1. Display the input selection menu with AV
2. Select the input mode connected to the equipment with
OK to watch (The selected mode is displayed on the top left of the screen)
●
TV receives input signals automatically connecting with SCART when
playback starts.
– Input signals are automatically identified by the SCART (pin 8) terminal.
- 22 -
/ and press
Page 23

– This function is also available for HDMI connections.
– When input mode is not switched automatically, perform as above or
check the setup of the equipment.
●
You can also select the input pressing AV on the remote control or
INPUT/OK/HOLD for MENU button on the control panel of the TV. Press
repeatedly until the desired input is selected.
●
To switch between COMPONENT and VIDEO in AV2, select with
●
You can label or skip each input mode. Skipped inputs will not be displayed
/ .
when AV is pressed. (Input Labels)
Settings Setup Display Settings
●
The remote control is capable of operating the contents or external
equipment.
Watching External equipment Operating with TV’s remote control
●
To return to TV mode
TV
= Note =
●
If the external equipment has an aspect adjustment function, set it to 16:9.
●
For details, read the manual of the equipment or ask your local dealer.
Operating with TV’s remote control
You can operate the contents in Media Player / media server, recording
functions or the connected equipment with the below buttons of this TV’s
remote control.
:
Playback videocassette / DVD / video content
:
Stop the operations
:
Rewind, view the picture rapidly in reverse (VCR)
Skip to the previous track, title or chapter (DVD / video content)
:
Rewind, view the picture rapidly in reverse (VCR)
Search backward (DVD / video content)
:
Fast-forward, view the picture rapidly forward (VCR)
- 23 -
Page 24

Skip to the next track, title or chapter (DVD / video content)
:
Fast-forward, view the picture rapidly forward (VCR)
Search forward (DVD / video content)
:
Pause / Resume
Press and hold to play at slow speed (DVD)
:
Start recording (DVD Recorder / VCR)
■ How to change the code
Each Panasonic product has its own remote control code. Change the code
according to the product for operation.
1. Press and hold Standby On / Off switch during the following operations
2. Enter the appropriate code as follows with numeric buttons
●
Codes for each product and features
70: DVD Recorder, DVD Player, Blu-ray Disc Player
71: Player theatre, Blu-ray Disc theatre
72: VCR
73 (default):
Using in Media Player, DLNA features, product using in VIERA Link
3. Press
to change
= Note =
●
Confirm if the remote control works correctly after changing the code.
●
The codes may be reset to defaults if batteries are replaced.
●
Some operations may not be available depending on the equipment.
HDMI features
HDMI (high-definition multimedia interface) is the world’s first complete digital
consumer AV interface complying with a non-compression standard.
HDMI allows you to enjoy high-definition digital images and high-quality sound
- 24 -
Page 25

by connecting the TV and the equipment.
HDMI-compatible equipment
with an HDMI or DVI output terminal, such as a
DVD player, a set top box or game equipment, can be connected to the HDMI
terminal using an HDMI compliant (fully wired) cable.
Watching External equipment External connection
: The HDMI logo is displayed on HDMI-compliant equipment.
■ Applicable HDMI features
●
Input audio signal:
2ch Linear PCM (sampling frequencies - 48 kHz, 44.1 kHz, 32 kHz)
●
Input video signal:
Matches the output setting of the digital equipment.
Watching External equipment Valid input signals
●
VIERA Link (HDAVI Control 5)
Functions VIERA Link “HDAVI Control™” Summary of VIERA Link
●
Content Type
●
Deep Colour
●
Audio Return Channel
– Audio Return Channel (ARC) is a function to send digital sound signals
via an HDMI cable.
– For HDMI2 terminal
■ DVI connection
If the external equipment has only a DVI output, connect to the HDMI terminal
via a DVI to HDMI adaptor cable. When using the DVI to HDMI adaptor cable,
connect the audio cable to the audio input terminal (use AV2 audio terminals).
●
Enquire HDMI adaptor cable at your local digital equipment retailer shop.
= Note =
●
Audio settings can be made on HDMI1 / 2 / 3 Input in the Sound Menu.
Settings Sound Audio output settings
●
If the connected equipment has an aspect adjustment function, set the
aspect ratio to “16:9”.
●
These HDMI connectors are “type A”.
●
These HDMI connectors are compatible with HDCP (High-Bandwidth Digital
Content Protection) copyright protection.
●
Equipment having no digital output terminal may be connected to the
- 25 -
Page 26
input terminal of component or video to receive analogue signals.
●
This TV incorporates HDMI™ technology.
Terminal information
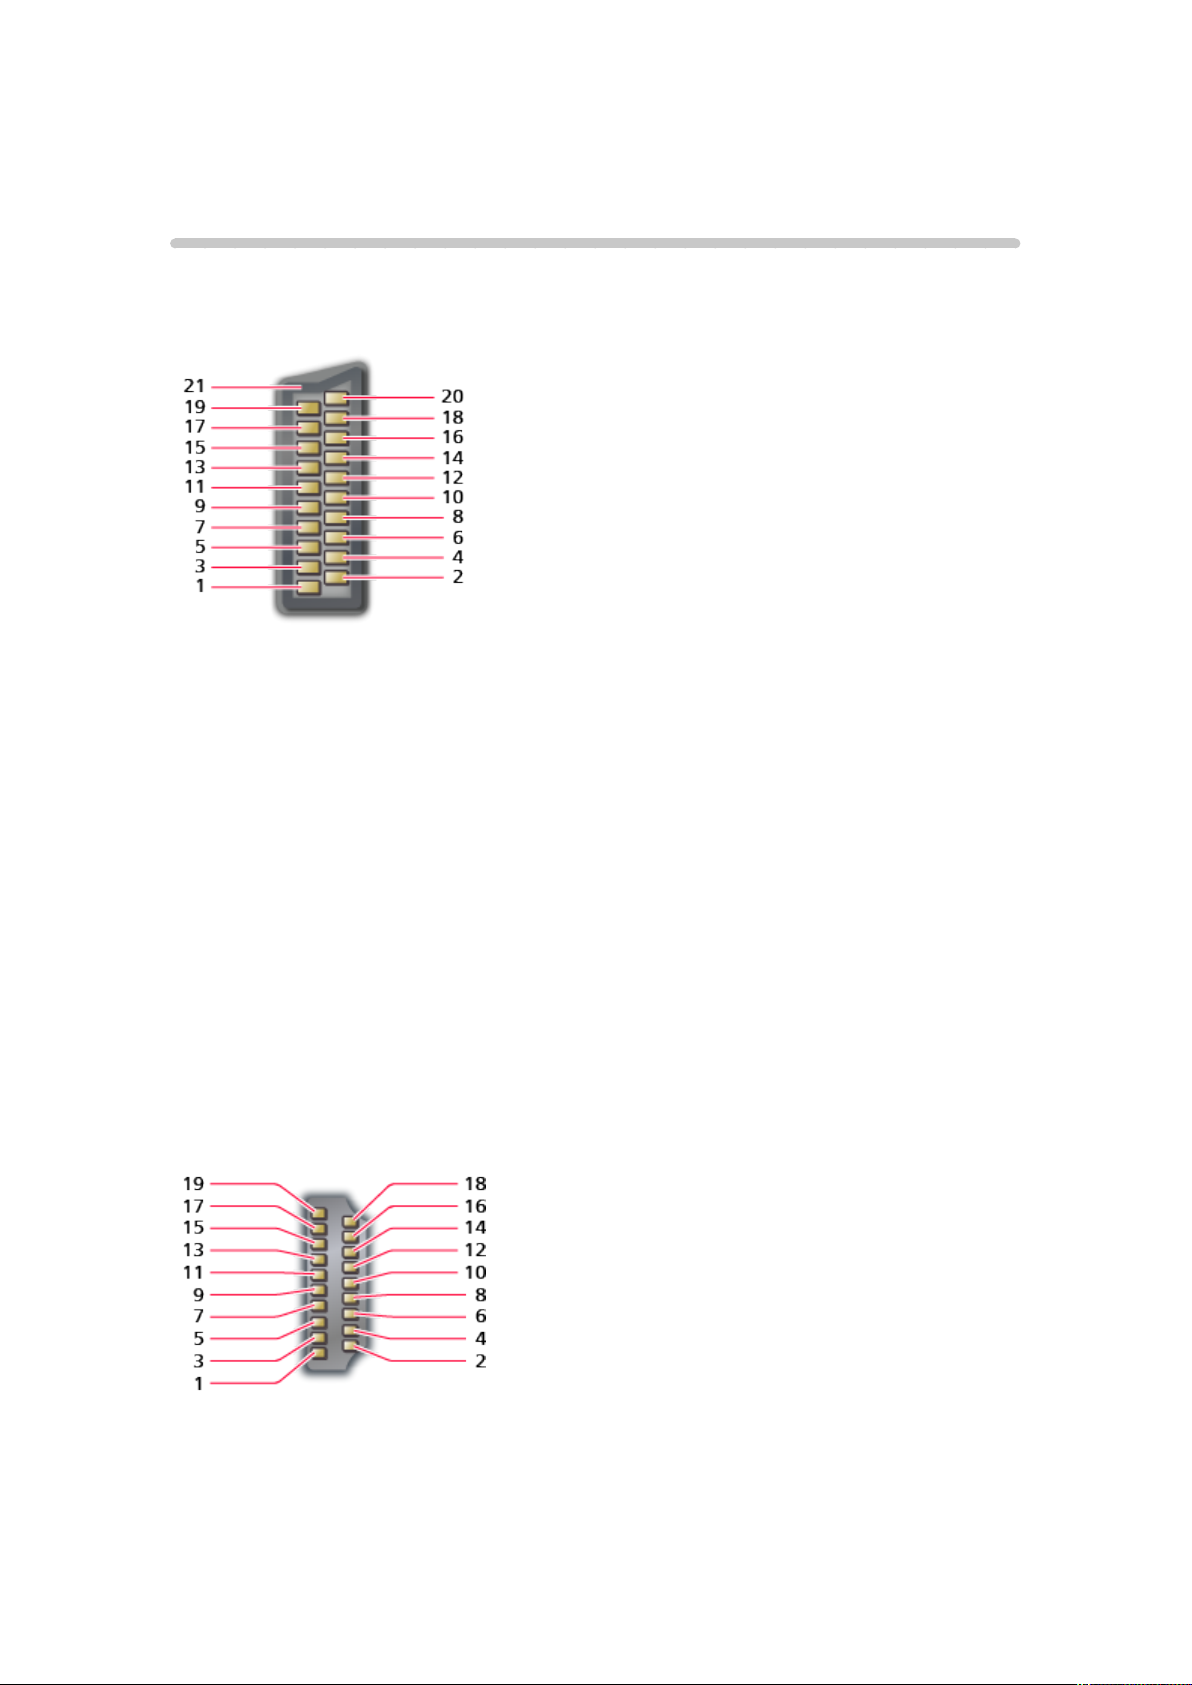
■ AV1 SCART terminal (RGB, VIDEO)
1 : Audio out (R)
2 : Audio in (R)
3 : Audio out (L)
4 : Audio earth
5 : Blue earth
6 : Audio in (L)
7 : Blue in
8 : Status CVBS
9 : Green earth
10: -11: Green in
■ HDMI terminal
12: -13: Red earth
14: Earth
15: Red in
16: Status RGB
17: CVBS earth
18: RGB status earth
19: CVBS out (video)
20: CVBS in (video)
21: Socket Earth
- 26 -
Page 27
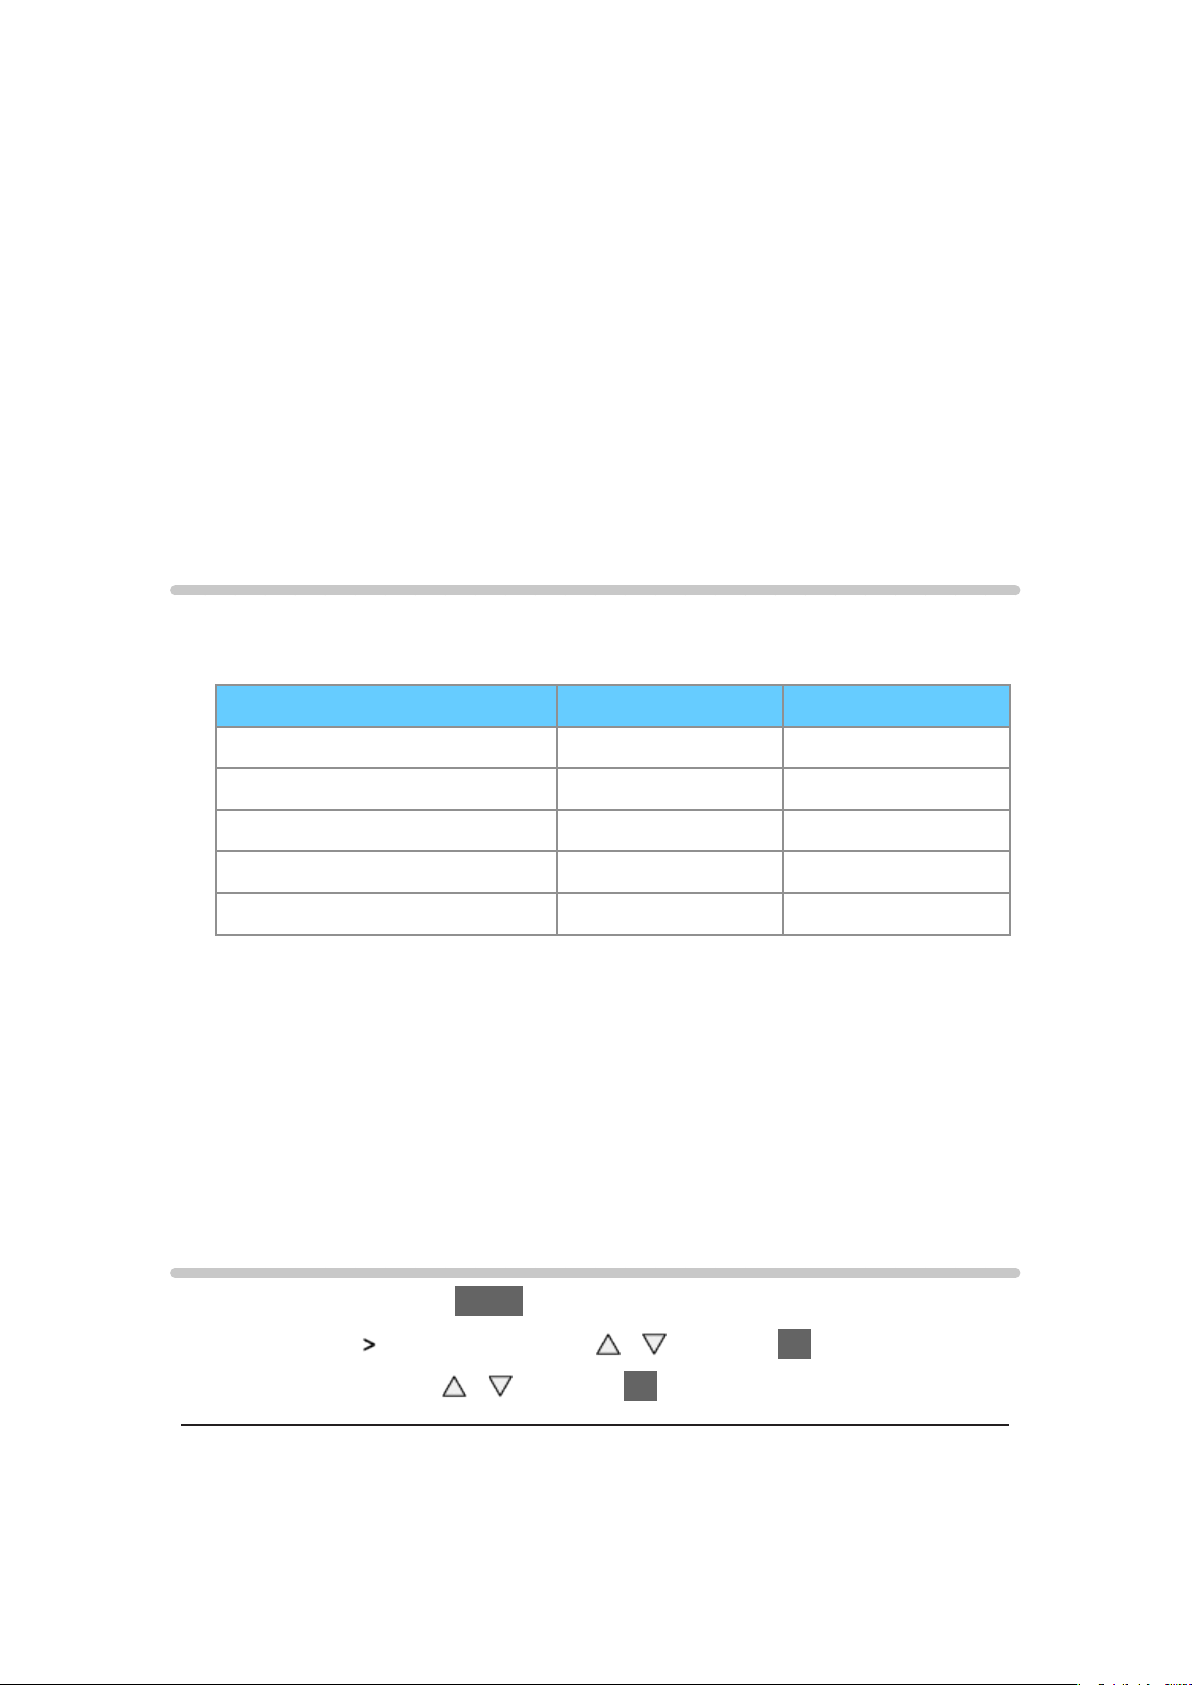
1 : TMDS Data2+
11: TMDS Clock Shield
2 : TMDS Data2 Shield
3 : TMDS Data2−
4 : TMDS Data1+
5 : TMDS Data1 Shield
6 : TMDS Data1−
7 : TMDS Data0+
8 : TMDS Data0 Shield
9 : TMDS Data0−
10: TMDS Clock+
12: TMDS Clock−
13: CEC
14: Utility
15: SCL
16: SDA
17: DDC/CEC Ground
18: +5V Power
19: Hot Plug Detect
Valid input signals
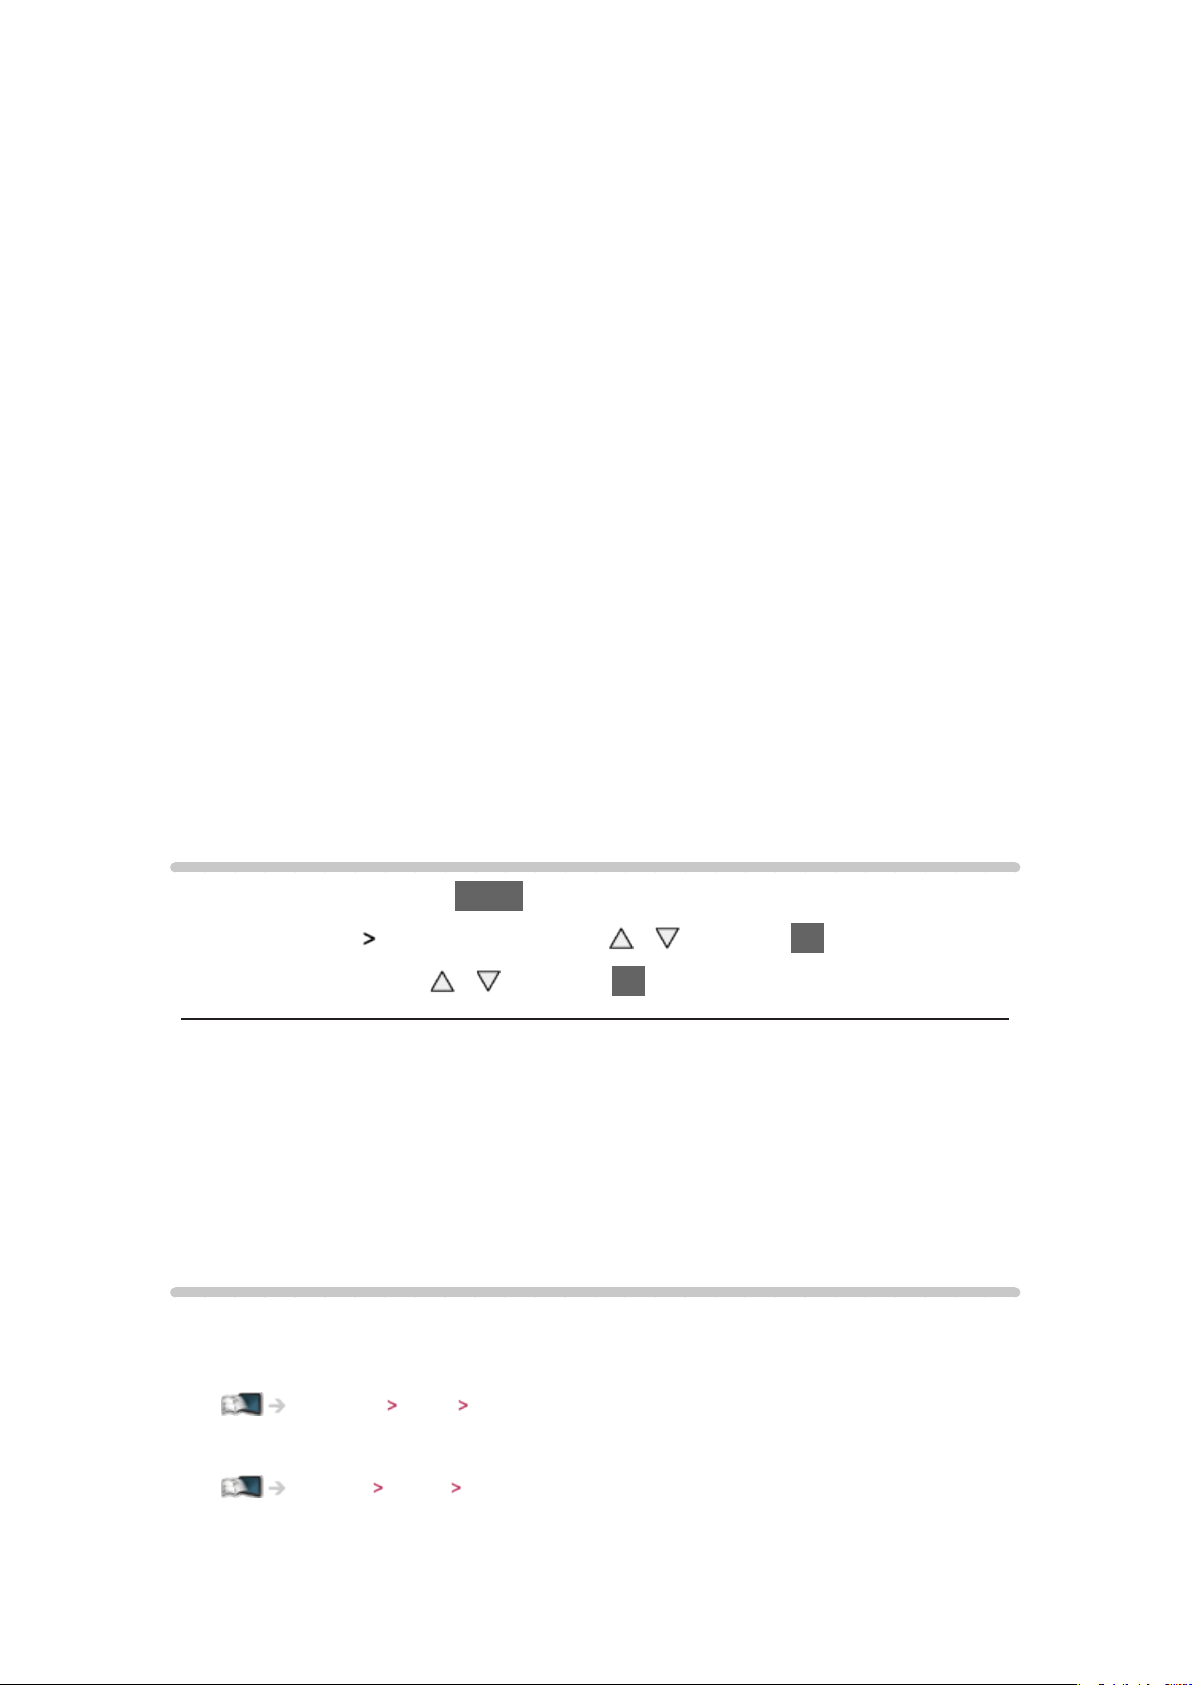
■ COMPONENT (Y, Pb, Pr), HDMI
Signal name COMPONENT HDMI
525 (480) / 60i, 60p ○ ○
625 (576) / 50i, 50p ○ ○
750 (720) / 60p, 50p ○ ○
1,125 (1,080) / 60i, 50i ○ ○
1,125 (1,080) / 60p, 50p, 24p ○
○: Applicable input signal
= Note =
●
Signals other than above may not be displayed properly.
●
The above signals are reformatted for optimal viewing on your display.
For best picture
Viewing Mode
1. Display the menu with MENU
2. Select Picture
Viewing Mode with / and press OK to access
3. Select the mode with
Viewing Mode
(Dynamic / Normal / Cinema / True Cinema / Custom)
Selects your favourite picture mode for each input.
/ and press OK to set
- 27 -
Page 28
Dynamic:
Improves contrast and sharpness for viewing in a bright room.
Normal:
Normal use for viewing in a normal lighting condition.
Cinema:
Improves the performance of contrast, black and colour reproduction
for watching movies in a darkened room.
True Cinema:
Reproduces the original image quality precisely without any revision.
Custom:
Adjusts each menu item manually to suit your favourite picture quality.
In each Viewing Mode, Backlight, Contrast, Brightness, Colour, Tint, Sharpness,
Colour Temperature, Vivid Colour, Adaptive Backlight Control, Ambient Sensor,
Noise Reduction and MPEG Noise Reduction can be adjusted and stored.
When in True Cinema or Custom mode, Advanced Settings can be adjusted
additionally. The settings in True Cinema or Custom mode can be stored for
each input.
Ambient Sensor
1. Display the menu with MENU
2. Select Picture
3. Select On / Off with
Ambient Sensor with / and press OK to access
/ and press OK to set
Ambient Sensor
(On / Off)
●
Automatic Brightness Control function
Adjusts picture settings automatically depending on ambient lighting
conditions.
Auto power standby function
The TV will automatically go into Standby mode in the following conditions:
●
Off Timer is active.
Watching Basic Off Timer
●
No operation is performed for 4 hours while Auto Standby is set to On.
Settings Timer Auto Standby
●
No signal is received and no operation is performed for 10 minutes while
No signal Power off is set to On.
- 28 -
Page 29
Settings Timer No signal Power off
Aspect
Change the aspect ratio (image size) with ASPECT.
●
Enjoy viewing the image at its optimum size and aspect. Programmes
usually contain an “Aspect Control Signal” (Widescreen signal, etc.), and
the TV will choose the aspect ratio automatically according to the “Aspect
Control Signal”.
Watching For best picture Auto aspect
■ To change the aspect ratio manually
1. Display Aspect Selection list with ASPECT
2. Select the mode with
●
You can also change the mode pressing ASPECT.
/ and press OK to set
(Press repeatedly until you reach the desired mode.)
●
Programmes usually contain an “Aspect Control Signal” (Widescreen signal,
etc.), and the TV will select the aspect ratio automatically according to the
“Aspect Control Signal”.
Watching For best picture Auto aspect
Auto:
Watching For best picture Auto aspect
16:9:
Directly displays the image at 16:9 without distortion (anamorphic).
14:9:
Displays the image at the standard 14:9 without distortion.
Just:
Displays a 4:3 image full-screen. Stretching is only noticeable at the left and
right edges.
4:3:
Displays the image at the standard 4:3 without distortion.
Zoom:
Displays a 16:9 letterbox or 4:3 image without distortion.
4:3 Full:
Displays a 4:3 image enlarged horizontally to fit the screen.
●
For HD (High definition) signals
Sidecut Just:
- 29 -
Page 30

Displays a 16:9 letterbox (anamorphic) image full-screen. Stretching is only
noticeable at the left and right edges.
●
For HD (High definition) signals
Sidecut Zoom:
Displays a 16:9 letterbox (anamorphic) image full-screen without distortion.
●
For HD (High definition) signals
= Note =
●
Display the image (TV, external input, etc.) full-screen to use this function
completely.
●
Aspect mode can be memorised separately for SD (Standard definition) and
HD (High definition) signals.
●
Aspect cannot be changed in teletext service.
Auto aspect
The optimum size and aspect can be selected automatically, and you can enjoy
finer images.
Watching For best picture Aspect
■ Aspect Control Signal
Terrestrial / cable terminal (WSS only)
●
Valid input signal format:
DVB-C
DVB-T
PAL B, G, H, I, D, K
SECAM B, G, L, L’, D, K
Invalid input signal format:
PAL 525/60 6.5 MHz
PAL 525/60 6.0 MHz
PAL 525/60 5.5 MHz
M.NTSC 6.5 MHz
M.NTSC 6.0 MHz
M.NTSC 5.5 MHz
AV1 (SCART) / AV2 (VIDEO) terminals
●
Valid input signal format:
- 30 -
Page 31

PAL
SECAM
PAL 525/60
M.NTSC
NTSC
: Control signal through SCART (pin 8) / HDMI terminal only
AV2 (COMPONENT) terminals (WSS only)
●
Valid input signal format:
625 (576) / 50i, 50p
Invalid input signal format:
525 (480) / 60i, 60p
750 (720) / 60p, 50p
1,125 (1,080) / 60i, 50i
HDMI terminal
●
Valid input signal format:
525 (480) / 60i, 60p
625 (576) / 50i, 50p
750 (720) / 60p, 50p
1,125 (1,080) / 60i, 50i
1,125 (1,080) / 60p, 50p, 24p
●
HDMI terminal does not receive WSS signal.
= Note =
●
If the screen size looks unusual when a widescreen-recorded programme is
played back on a VCR, adjust the tracking of the VCR. Read the manual of
the VCR.
Advanced Settings
You can adjust and set up the detailed picture settings for each input and
Viewing Mode. Set input mode and viewing mode to adjust and set up first.
●
To use this function completely, set Viewing Mode to True Cinema or
Custom.
Watching For best picture Viewing Mode
1. Select the input mode with AV or TV
- 31 -
Page 32

2. Display the menu with MENU
3. Select Picture
4. Select the mode with
Viewing Mode with / and press OK to access
/ and press OK to set
■ Adjust the detailed picture settings
1. Display the menu with MENU
2. Select Picture
Expander / Clear White Effect / White Balance / Colour Management /
Gamma with / and press OK to access
3. Set with
Advanced Settings Adaptive Gamma Control / Black
/ / / and press OK to store
■ Adaptive Gamma Control
Adaptive Gamma Control
Adjusts the gamma curve to make the image brighter.
●
Not valid when Adaptive Backlight Control is set to Off
■ Black Expander
Black Expander
Gradually adjusts the shades of black.
■ Clear White Effect
Clear White Effect
Makes the white area clearer.
■ White Balance
R-Gain / G-Gain / B-Gain
Adjusts the white balance of bright red / green / blue areas.
R-Cutoff / G-Cutoff / B-Cutoff
Adjusts the white balance of dark red / green / blue areas.
More Detailed Adjustment
- 32 -
Page 33
Adjusts more detailed White Balance items.
Input Signal Level:
Adjusts the input signal level.
R-Gain / G-Gain / B-Gain:
Adjusts the detailed white balance of bright red / green / blue areas.
Reset to Defaults:
Press OK to reset to the default detailed White Balance.
Reset to Defaults
Press OK to reset to the default White Balance.
■ Colour Management
R-Hue / R-Saturation / R-Luminance
Adjusts the picture hue / saturation / luminance of red areas.
G-Hue / G-Saturation / G-Luminance
Adjusts the picture hue / saturation / luminance of green areas.
B-Hue / B-Saturation / B-Luminance
Adjusts the picture hue / saturation / luminance of blue areas.
Reset to Defaults
Press OK to reset to the default Colour Management.
■ Gamma
Gamma
(2.6 / 2.4 / 2.2 / 2.0 / 1.8)
Switches the gamma curve.
●
Please note the numerical values are reference for the adjustment.
More Detailed Adjustment
Adjusts more detailed Gamma items.
Input Signal Level:
Adjusts the input signal level.
- 33 -
Page 34
Gain:
Adjusts the gain of gamma for selected signal level.
Reset to Defaults:
Press OK to reset to the default detailed Gamma.
Reset to Defaults
Press OK to reset to the default Gamma.
■ Reset to Defaults
Reset to Defaults
Press OK to reset Advanced Settings to the default settings.
= Note =
●
Colour Management is available when Viewing Mode in the Picture Menu is
set to True Cinema or Custom.
Copy Adjustment
Copies the picture settings of True Cinema or Custom to those of another input
or another Viewing Mode.
1. Display the menu with MENU
2. Select Picture
Destination Input with / and press OK to access
3. Select the destination to copy to with
4. Select Copy Start with
5. When the confirmation screen is displayed, select Yes with
OK to set
= Note =
●
Option Settings and Screen Settings will not be copied.
Copy Adjustment Destination Viewing Mode /
/ and press OK to set
/ and press OK to copy
/ and press
For best audio
Sound mode
1. Display the menu with MENU
2. Select Sound
3. Select the mode with
Mode with / and press OK to access
/ and press OK to set
- 34 -
Page 35

Mode
(Standard / Music / Speech / User)
Selects your favourite sound mode for each input.
Standard:
Provides the comfortable sounds with original quality.
Music:
Improves sound quality for watching music videos, etc.
Speech:
Improves sound quality for watching news, drama, etc.
User:
Adjusts the sounds manually using the equaliser to suit your favourite
sound quality.
●
For the User mode, Equaliser will be available in the Sound Menu instead of
Bass and Treble. Select Equaliser and adjust the frequency.
Settings Sound Basic settings
●
This function is not effective for the sound from headphones.
TV Guide
Using TV Guide
TV Guide - Electronic Programme Guide (EPG) provides an on-screen listing of
the programmes currently broadcast and the forthcoming broadcasts over the
next seven days (depending on the broadcasters).
1. Display the TV Selection screen with TV
2. Select the mode with
DVB-C / DVB-T / Analogue
3. Press GUIDE to view TV Guide
●
Press again to change the layout (Landscape / Portrait).
– View Landscape to see several channels.
– View Portrait to see one channel by time.
/ and press OK to set
●
Depending on the country you select, you can select the TV Guide type.
(Default Guide)
Settings Setup Display Settings
– If you set Default Guide to Channel List, the channel list will appear
when pressing GUIDE.
(Example)
- 35 -
Page 36
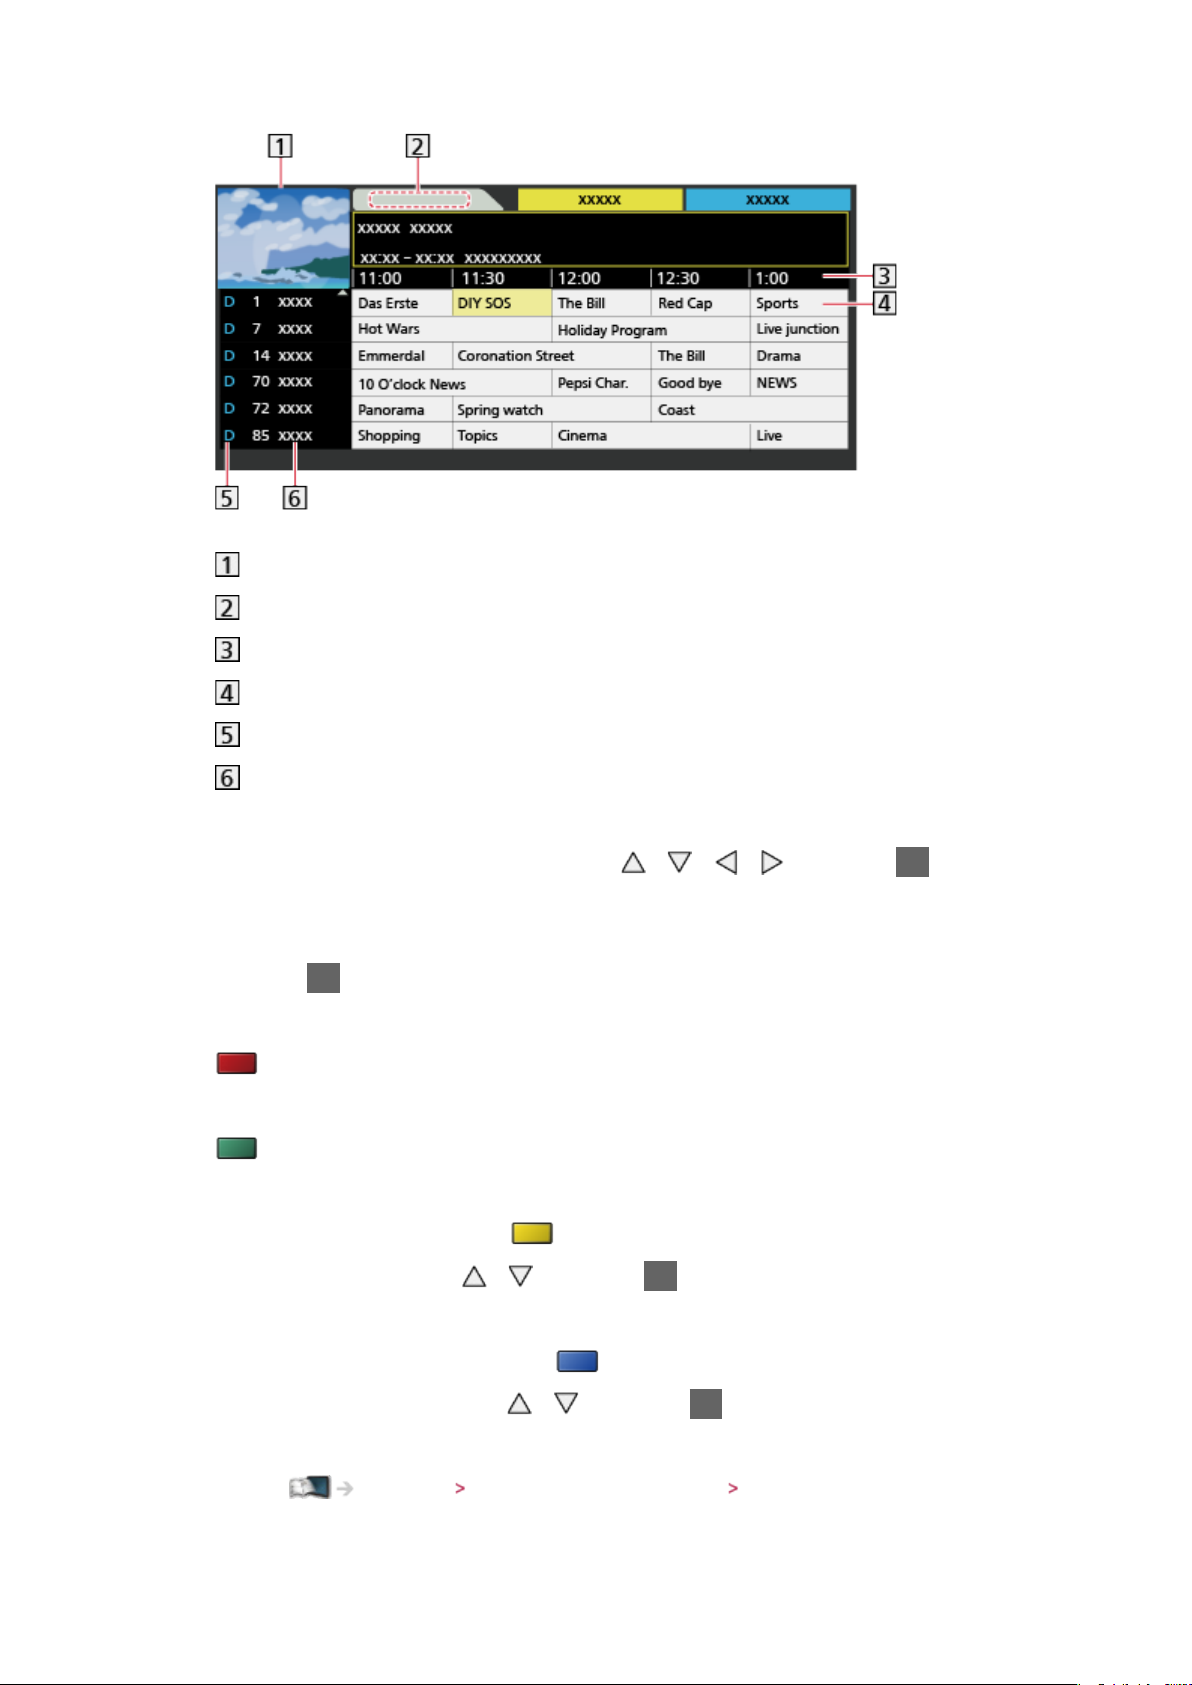
TV screen
TV Guide date
TV Guide time
Programme
D (DVB-T) / A (Analogue)
Channel position and name
●
To watch the programme
1) Select the current programme with
/ / / and press OK to
access
– The current programme is displayed on the top left of the screen.
2) Press OK to exit TV Guide
●
To the previous day (DVB)
(red)
●
To the next day (DVB)
(green)
●
To view a channel list of the selected type
1) Display the type list with
2) Select the type with
●
To view a channel list of the selected category
/ and press OK to view
1) Display the category list with
2) Select the category with
(yellow)
(blue)
/ and press OK to view
– To list favourite channels, set Favourites Edit.
Watching Tuning and editing channels Favourites Edit
●
To view more details of the programme (DVB)
- 36 -
Page 37
1) Select the programme with / / /
2) Press to view
– Press again to return to TV Guide.
●
To exit TV Guide
EXIT
= Note =
●
When this TV is turned on for the first time, or the TV is switched off for
more than a week, it may take some time before TV Guide is completely
shown.
●
This function varies depending on the country you select.
●
The postcode entry or update may be required to use the GUIDE Plus+
system depending on the country you select.
●
DVB-T and Analogue channels are displayed on the same TV Guide screen.
D and A may be displayed to distinguish DVB-T and Analogue channels.
There will be no programme listings for Analogue channels.
Teletext
Viewing Teletext
1. Switch to teletext with TEXT
●
Displays the index page (content varies depending on the broadcasters).
●
Current / sub page numbers are displayed on the top left of the screen.
●
Time / date is displayed on the top right of the screen.
●
Colour bar is displayed on the bottom of the screen.
2. Select the page with numeric buttons,
(Coloured buttons)
●
To adjust contrast
1) Press MENU three times to display Contrast
/ or
2) Adjust with
●
To exit teletext
EXIT
■ Reveal hidden data
1. Press MENU
/ and press OK to set
- 37 -
Page 38
2. Reveal with (red)
●
Press again to rehide.
■ To view a favourite page stored
Press STTL to view a favourite page.
●
Call up the page stored on (blue) (List mode).
●
Factory setting is “P103”.
■ FULL / TOP / BOTTOM
1. Press MENU
2. Press
(green) to change the layout
■ Watch TV and teletext in two windows at once
1. Press MENU twice
2. Set Picture and text to On / Off with
●
Operations can be made only in teletext screen.
/
■ Store frequently viewed pages in the colour bar (List mode)
1. Press (Coloured buttons) while the page is displayed
2. Press and hold OK
●
The stored page number changes to white.
●
To change stored pages
1) Press
2) Enter a new page number with numeric buttons
(Coloured buttons) to change
3) Press and hold OK
■ View sub page
The number of sub pages is displayed on the top of the screen. Press / to
view sub page. (Only when teletext has more than one page.)
●
The number of sub pages varies depending on the broadcasters (up to 79
pages).
●
Searching may take time while you are watching TV.
●
To view a specific sub page
- 38 -
Page 39

1) Press MENU
2) Press
3) Enter the 4-digit number (e.g. P6, press
(blue)
)
Teletext mode
Teletext services are the text information provided by the broadcasters.
●
The features may vary depending on the broadcasters.
1. Display the menu with MENU
2. Select Setup
access
3. Select TOP (FLOF) / List with
Settings Setup Display Settings
Display Settings Teletext with / and press OK to
/ and press OK to set
■ FLOF (FASTEXT) mode
In FLOF mode, four differently coloured subjects are situated on the bottom of
the screen.
To access more information about one of these subjects, press the appropriate
coloured button.
This facility enables fast access to information on the subjects shown.
■ TOP mode (in case of TOP text broadcasting)
TOP is a particular improvement of the standard teletext service that results in
an easier search and effective guide.
●
Fast overview of the teletext information available
●
Easy to use step-by-step selection of the topical subject
●
Page status information on the bottom of the screen
●
Available page up / down
(red) / (green)
●
To select among subject blocks
(blue)
●
To select next subject within the subject block
(yellow)
(After the last subject, it moves to the next subject block.)
■ List mode
In List mode, four differently coloured page numbers are situated on the
- 39 -
Page 40
bottom of the screen. Each of these numbers can be changed and stored in the
TV’s memory.
Watching Teletext Viewing Teletext
Tuning and editing channels
Setting menu
You can retune channels, create your favourite channel lists, skip unwanted
channels, etc.
1. Display the TV Selection screen with TV
2. Select the mode with
DVB-C / DVB-T / Analogue
3. Display the menu with MENU
4. Select Setup
DVB-C Tuning Menu / DVB-T Tuning Menu / Analogue Tuning Menu
●
The menu name varies depending on the TV mode.
5. Select one of the functions with
Favourites Edit / Channel List / Auto Setup / Manual Tuning / Update
Channel List / New Channel Message / Signal Condition
●
The function items vary depending on the country you select.
Tuning Menu with / and press OK to access
Settings Setup Tuning Menu
/ and press OK to set
/ and press OK to access
Favourites Edit
■ List favourite DVB channels
Create your favourite channel lists from various broadcasters (up to 4:
Favourites 1 to 4).
The DVB Favourites lists are available from Category in the information banner
and the TV Guide screen.
Watching Basic Information banner
Watching TV Guide Using TV Guide
1. Select Favourites Edit with / and press OK to access
2. Select a channel to list from all DVB channels with
●
appears when the channel is encrypted.
●
To display other Favourites
(green)
- 40 -
/
Page 41
●
To sort channel names in alphabetical order
(red)
●
To change the category
(blue)
3. Press OK to add it to Favourite List
●
To add all channels to the list
1) Press
2) Press
●
To add consecutive channels to the list at once
1) Press
2) Make the channel block with
(yellow)
(green) to add all
(yellow)
/ and press OK to add
4. Press BACK/RETURN and OK to store
■ Edit DVB Favourites list
You can edit the favourites list while the cursor is on the channel in the
favourites list.
●
To move the channel
1) Select the channel with
2) Press (green)
3) Select the new position with
/
/ or numeric buttons
4) Press
●
To delete the channel
1) Select the channel with
(green) to store
/
2) Press OK to delete
– Press
●
To name the Favourites
1) Press
(yellow) to delete all channels
(red)
2) Enter characters (maximum 10 characters) with
numeric buttons, and press OK to set
3) Press BACK/RETURN to store
- 41 -
/ / / or
Page 42
Channel List
■ Skip unwanted DVB / Analogue channels
You can hide (skip) unwanted channels. The hidden channels cannot be
displayed except in this function.
1. Select Channel List with
2. Select a channel with
/ and press OK to access
/
3. Press OK to set Reveal / Hide (skip)
: Reveal
: Hide (skip)
●
To reveal all channels (DVB / Analogue)
(yellow)
●
To sort channel names in alphabetical order (DVB)
(red)
●
To change the category (DVB)
(blue)
■ Edit DVB / Analogue Channels
●
To swap / move the channel position (if available)
1) Press
2) Set the new position with
(green) to edit
/ or numeric buttons, and press
(green) to store
●
To retune each channel (Manual Tuning)
(red)
– For Analogue mode
Watching Tuning and editing channels Manual Tuning
– Only for the revealed channels
●
To rename the channel name (Analogue)
1) Press
(blue) to edit
2) Enter characters (maximum 5 characters) with
numeric buttons, and press OK to set
/ / / or
- 42 -
Page 43
3) Press BACK/RETURN to store
= Note =
●
If a VCR is connected only with the RF cable in Analogue mode, edit VCR.
Auto Setup
Automatically retunes the channels received in the area.
●
This function is available if channel tuning is already performed.
●
Only the selected mode is retuned. All the previous tuning settings are
erased.
●
If Child Lock PIN number has been set, the PIN number is required.
Functions Child Lock PIN number
●
If tuning has not been done completely, set Manual Tuning.
Watching Tuning and editing channels Manual Tuning
■ DVB-C, DVB-T, Analogue channels
1. Select Auto Setup with / and press OK to access
2. Set DVB-C Auto Setup Settings with
/ / / and press OK to store
(DVB-C)
●
Scan Mode
Full:
Scans the whole frequency range.
Quick:
Scans the suitable frequency in your country.
●
Normally set Frequency, Symbol Rate and Network ID to Auto. If Auto
is not displayed or if necessary, enter each value specified by your cable
provider with numeric buttons.
●
After settings, select Start scan with / and press OK to search.
3. The confirmation screen is displayed and press OK to start Auto Setup
(Settings are made automatically)
●
When the operation is completed, the channel at the lowest position will
be displayed.
- 43 -
Page 44

■ Auto Setup using the buttons on the TV
1. Press and hold INPUT/OK/HOLD for MENU button for 3 seconds to display
the menu
2. Set Auto Setup with following control panel buttons
●
Move the cursor / select from a range of options / select the menu item
(up and down only)
●
Access the menu / store settings after adjustments have been made or
options have been set with INPUT/OK/HOLD for MENU button.
Manual Tuning
●
Normally use Auto Setup or Update Channel List to retune DVB channels.
●
If tuning has not been done completely or for adjusting the direction of the
aerial, use this function. (DVB)
●
All DVB channels found will be added to Channel List.
■ DVB-C
1. Enter the frequency with numeric buttons
●
Normally set Symbol Rate and Service ID to Auto.
2. Select Start scan with
/ and press OK to search
■ DVB-T
1. Select a channel with / and adjust frequency with / for each
channel
●
Set where the level of Signal Quality becomes the maximum.
2. Press OK to search
■ Analogue
Set Analogue channel manually after Auto Setup.
●
Set Sound System and Colour System, and then perform this function.
Normally set Colour System to Auto.
– SC1: PAL B, G, H / SECAM B, G
– SC2: PAL I
- 44 -
Page 45
– SC3: PAL D, K / SECAM D, K
– F: SECAM L, L’
1. Select the channel position with numeric buttons
2. Select the channel with Channel Up / Down button
3. Search with /
4. Select Store with / and press OK to set
●
Use Fine Tuning to make small adjustments to the tuning of an individual
programme (affected by weather conditions, etc.).
●
If a VCR is connected only with the RF cable, select channel position 0.
Update Channel List
By updating the DVB channel list, you can add new channels, delete removed
channels or change channel names and positions automatically.
●
The channel list is updated while keeping your settings in Favourites Edit,
Channel List, Child Lock, etc.
●
Depending on the signal condition, the update may not work properly.
New Channel Message
Selects whether to give a notification message when a new DVB channel is
found or not.
●
When a notification message appears, you can perform Update Channel
List pressing OK.
Signal Condition
Selects a channel and checks the signal condition.
A good Signal Strength is not an indication of suitable signal for DVB reception.
●
Use the Signal Quality indicator as follows.
– Green bar: Good
– Yellow bar: Poor
– Red bar: Bad (Check the terrestrial aerial or cable)
●
Vertical lines show the maximum signal value of the selected channel.
●
To change the channel
- 45 -
Page 46

●
For DVB mode
- 46 -
Page 47
Internet service
Internet content
Information
You can access some specific websites supported by Panasonic, and enjoy
internet contents such as videos, games, communication tools, etc. from APPS
list.
(Example)
●
To enable this function, you need a broadband network environment.
Ensure the network connections and network settings are completed.
Internet service Network connections
Internet service Network settings
Selecting internet content
1. Display APPS list with APPS
●
For details of APPS list
Functions APPS list
●
Depending on the usage conditions, it may take a while to read all the
data.
2. Select the desired item with
(Example)
/ / / and press OK to access
●
To return to APPS list
APPS
●
To exit APPS list
EXIT
●
You can connect a keyboard and a gamepad for character input and
playing games in the applications. You can also use the keyboard or
- 47 -
Page 48

gamepad for TV operation as well as for APPS list.
Functions Keyboard / Gamepad
●
Video communication (for example Skype™) requires an exclusive
Communication Camera TY-CC20W. For details, read the manual of the
Communication Camera.
Support Optional accessories Communication Camera
Note
●
If you cannot access the internet contents, check the network connections
and settings.
Internet service Network connections
Internet service Network settings
●
APPS list is subject to change without notice.
●
Not all the features of the websites are available.
●
Be sure to update the software when a software update notice is displayed
on the TV screen. If the software is not updated, you will not be able to use
APPS list. You can update the software later manually.
Internet service Network settings Software Update
●
The services through APPS list are operated by their respective service
providers and such service may be discontinued either temporarily or
permanently without notice. Therefore, Panasonic will make no warranty
for the contents or the continuity of the services.
●
Some contents may be inappropriate for some viewers.
●
Some contents may only be available for specific countries and may be
presented in specific languages.
●
Depending on the connection environment, the internet connection may be
slow or may not be successful.
●
During the operation, audio signal is output from DIGITAL AUDIO and
HDMI2 (ARC function) terminals. But no video signals are output. To use
HDMI2 with ARC function, connect an amplifier that has ARC function and
set to use theatre speakers.
Functions VIERA Link “HDAVI Control™”
Network connections
Internet connection
To use internet service, you need a broadband network environment.
●
If you do not have any broadband network services, please consult your
retailer for assistance.
●
Dial-up internet connections cannot be used.
- 48 -
Page 49
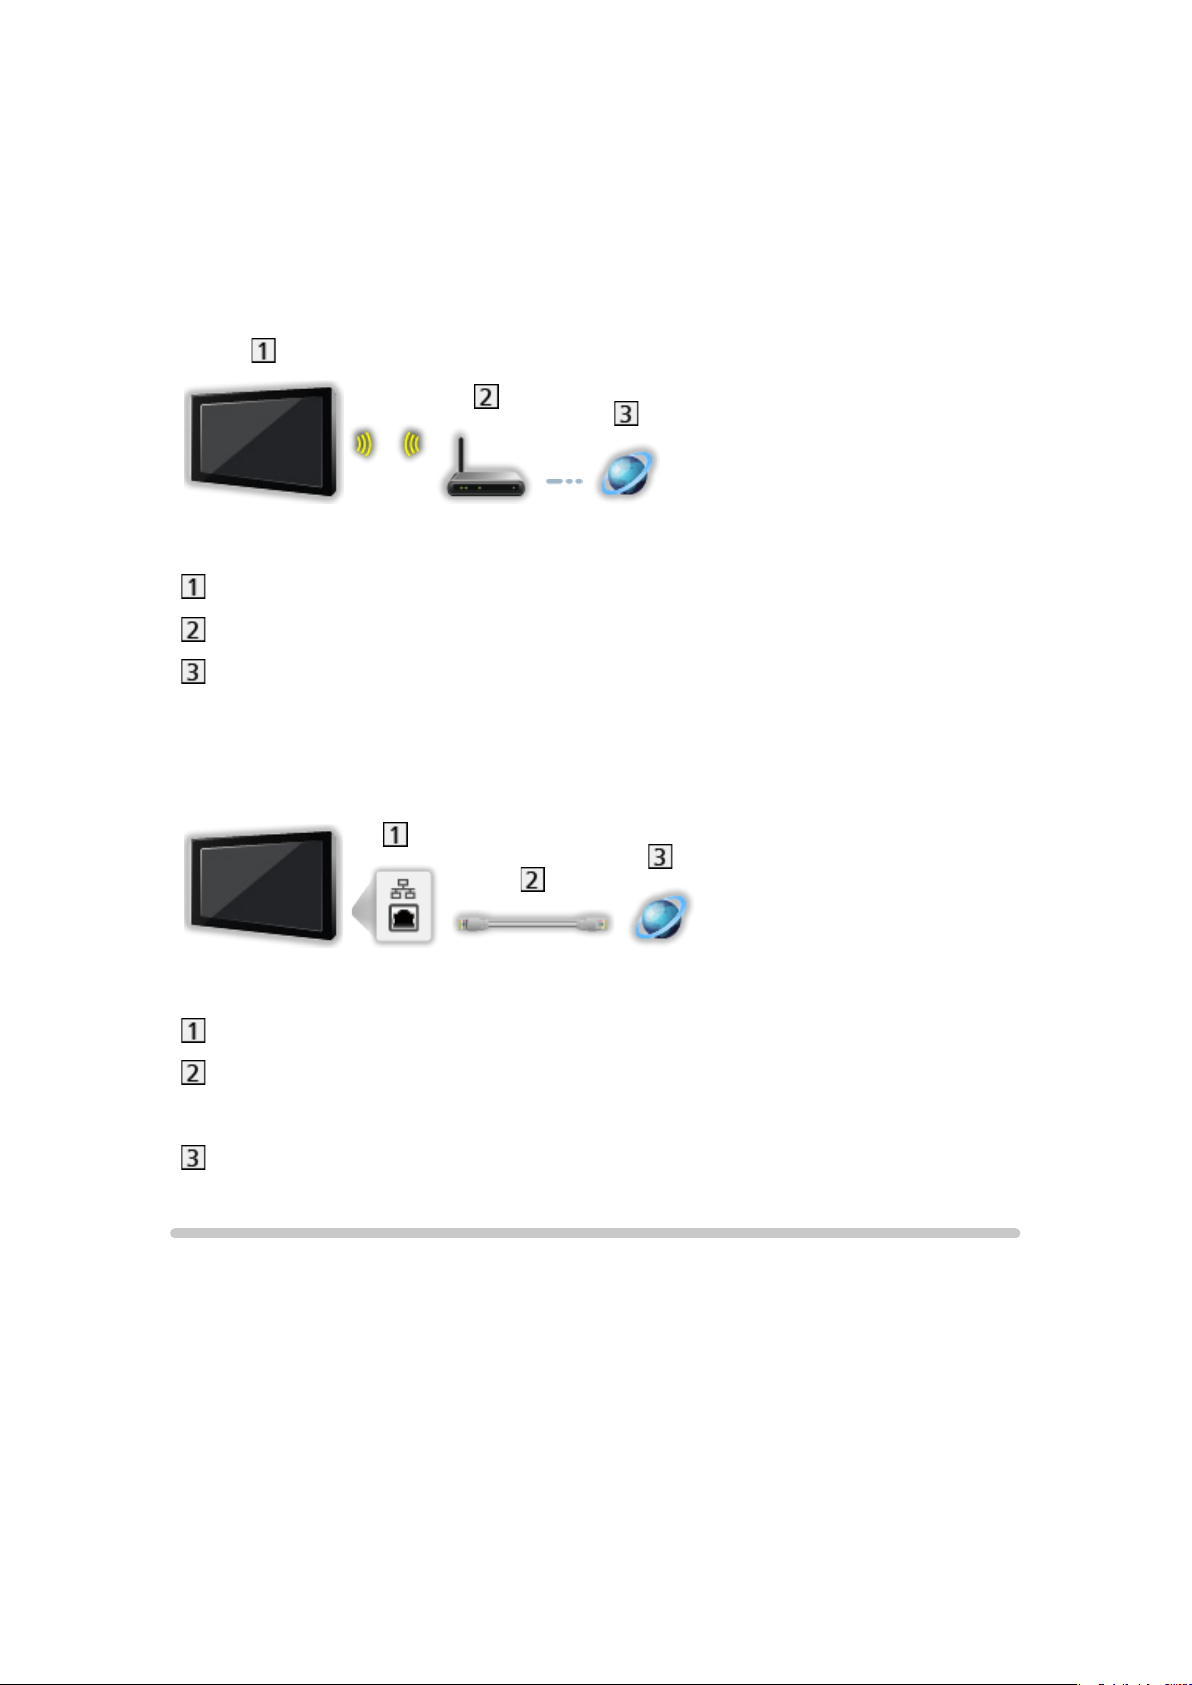
●
Required speed (effective): at least 1.5 Mbps for SD (Standard Definition)
and 6 Mbps for HD (High Definition) picture quality, respectively. If the
transfer speed is not enough, contents may not be played back properly.
■ Wireless connection
Built-in wireless LAN (Rear of the TV)
Access point
Internet environment
■ Wired connection
ETHERNET terminal
LAN cable (Shielded)
●
Use the Shielded Twist Pair (STP) LAN cable.
Internet environment
Note
●
Ensure to use a LAN straight cable.
●
Set up and connect equipment required for the network environment. You
cannot make such settings on this TV. Read the manual of the equipment.
●
If your modem has no broadband router functions, use a broadband router.
●
If your modem has broadband router functions but there are no vacant
ports, use a hub.
●
Ensure that the broadband routers and hubs are compatible with 10BASE-T
/ 100BASE-TX.
- 49 -
Page 50

●
If you use the equipment compatible only with 100BASE-TX, category 5 or
later LAN cables are required.
●
Contact your Internet Service Provider (ISP) or telecommunications
company for further assistance regarding the network equipment.
●
Confirm the terms and conditions of the contracts with your Internet
Service Provider (ISP) or telecommunications company. Depending on the
contracts, additional fees may be charged or multiple connections to the
internet may be impossible.
●
Turn the TV off, and then on again when changing or making the network
connection again.
Network settings
Network Connection
Ensure the connections are completed before starting network setup.
Internet service Network connections
■ Quick setup - Wireless
1. Display the menu with MENU
2. Select Network
●
Confirm the encryption key, settings and position of your access point
before starting setup. For details, read the manual of the access point.
3. Select Quick setup with
●
When the LAN cable is connected, wired setup will be done
automatically.
4. Select your desired access point with
●
Available Wireless Networks are displayed automatically.
: Encrypted access point
●
For WPS(Push button)
1) Select Easy setup with Push button with
access
2) Press the WPS button on the access point until the light flashes
Network Connection with / and press OK to access
/ and press OK to access
/ and press OK to access
/ and press OK to
3) Connect the TV with the access point with OK
– WPS: Wi-Fi Protected Setup™
– If the connection has failed, check the settings and positions of your
access point. And then, follow the on-screen instructions.
●
It is recommended to select the encrypted access point.
5. Enter the encryption key of the access point with
- 50 -
/ / / and press
Page 51
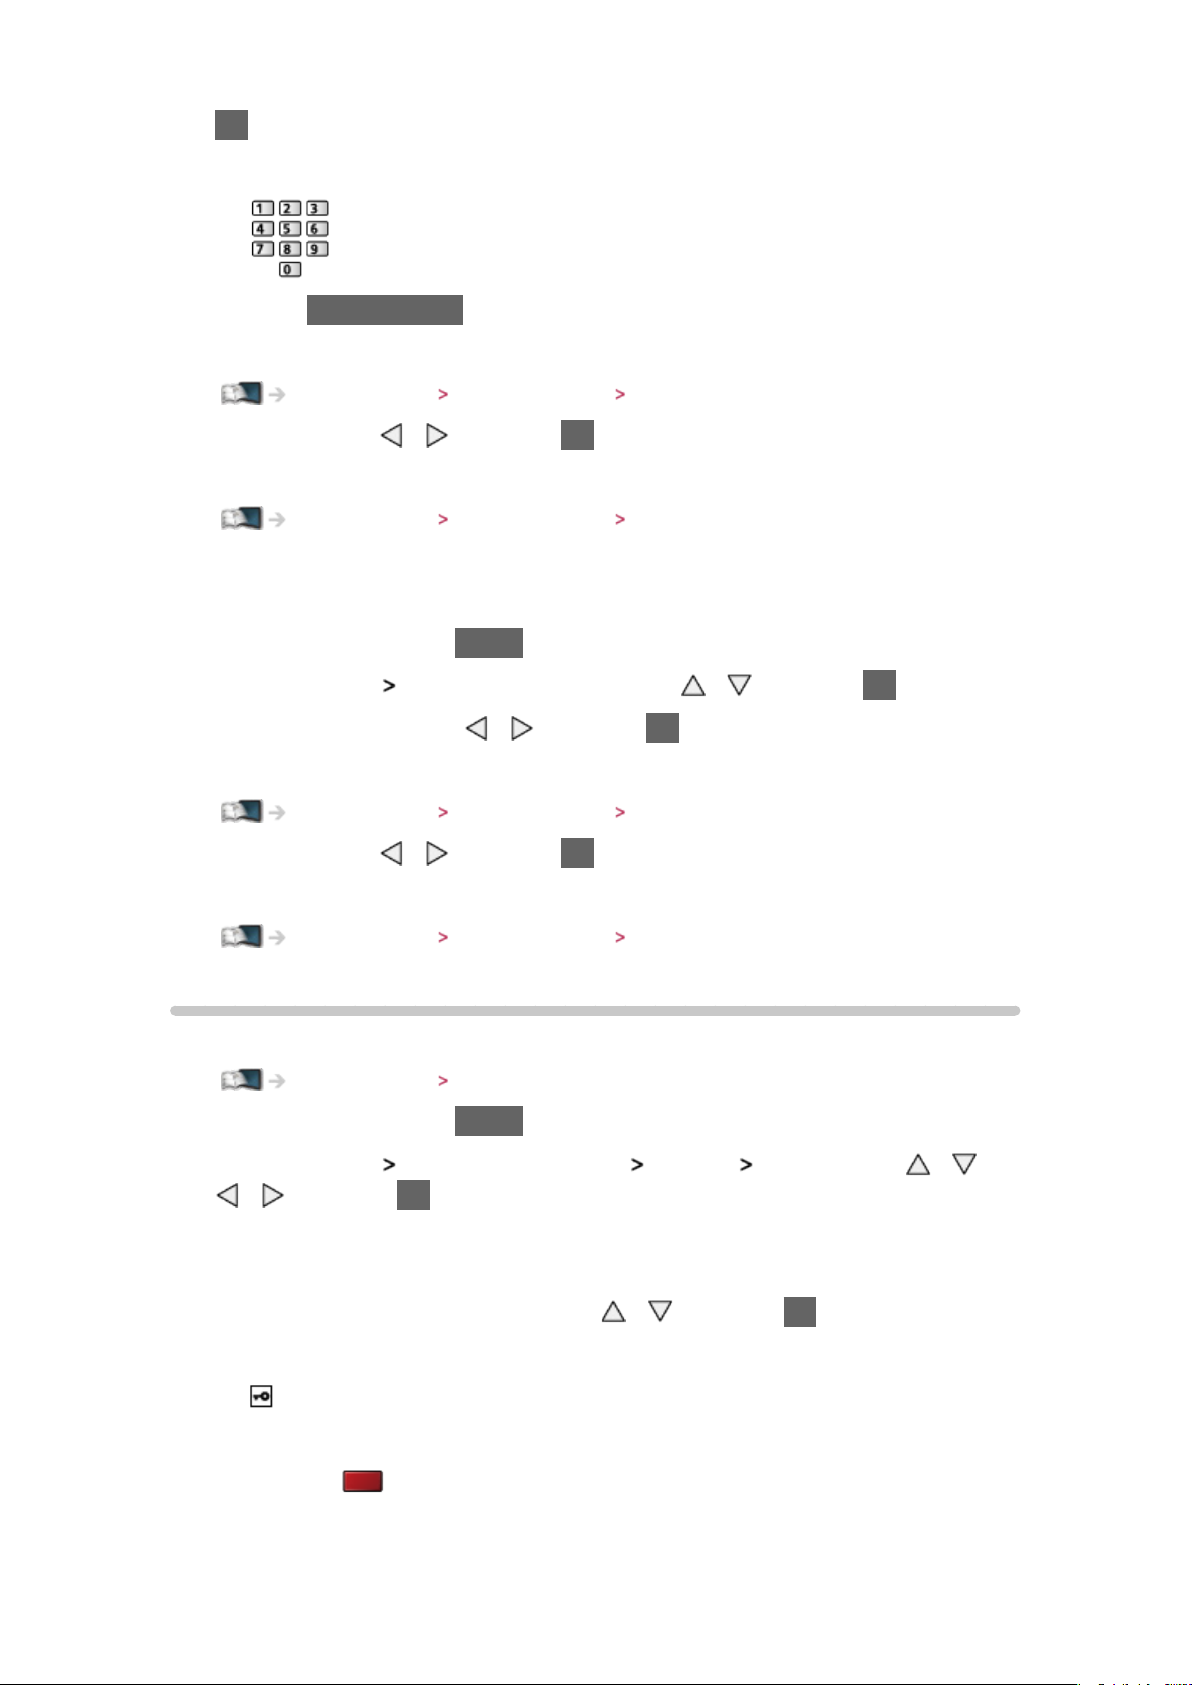
OK to set
●
You can set characters using numeric buttons.
●
Press BACK/RETURN to store
6. Automatically setup is done and the Network Status screen is displayed
Internet service Network settings Network Status
7. Select Exit with / and press OK to set
●
To set manually
Internet service Network settings Custom - Wireless
■ Quick setup - Wired
1. Display the menu with MENU
2. Select Network
3. Select Quick setup with
Network Connection with / and press OK to access
/ and press OK to access
4. Automatically setup is done and the Network Status screen is displayed
Internet service Network settings Network Status
5. Select Exit with
●
To set manually
Internet service Network settings Custom - Wired
/ and press OK to set
Custom - Wireless
Ensure the connections are completed before starting network setup.
Internet service Network connections
1. Display the menu with MENU
2. Select Network
/ and press OK to access
●
Confirm the encryption key, settings and position of your access point
before starting setup. For details, read the manual of the access point.
Network Connection Custom Wireless with / /
3. Select your desired access point with
●
Available Wireless Networks are displayed automatically.
: Encrypted access point
●
For WPS(Push button)
1) Press
(red)
2) Press the WPS button on the access point until the light flashes
- 51 -
/ and press OK to access
Page 52
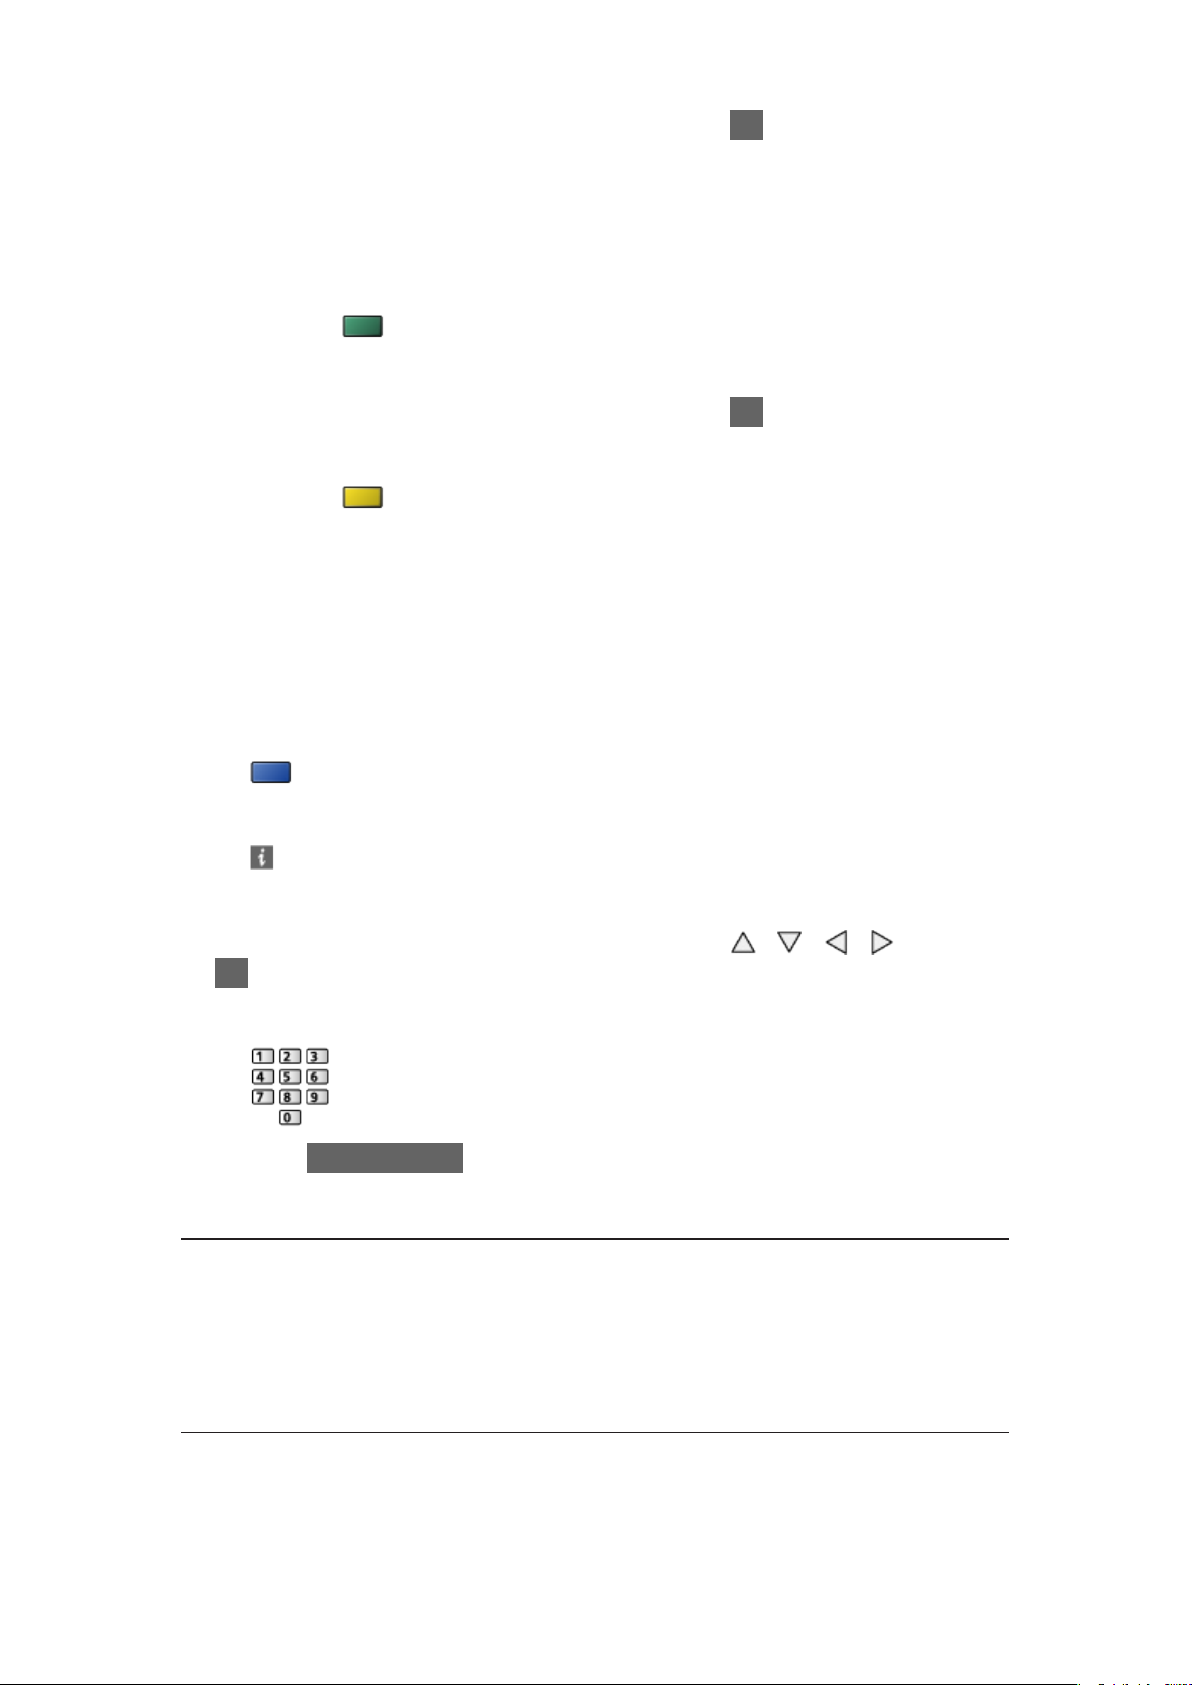
3) Connect the TV with the access point with OK
– WPS: Wi-Fi Protected Setup™
– If the connection has failed, check the settings and positions of your
access point. And then, follow the on-screen instructions.
●
For WPS(PIN)
1) Press
(green)
2) Enter the PIN code to the access point
3) Connect the TV with the access point with OK
●
For Manual
1) Press
(yellow)
2) You can set up SSID, security type, encryption type, and encryption
key manually
3) Follow the on-screen instructions and set manually
– When you use 11n (5 GHz) for the wireless system between the built-
in wireless LAN and access point, select AES for the encryption type.
●
To search access points again
(blue)
●
To display / hide information of the highlighted access point
●
It is recommended to select the encrypted access point.
4. Enter the encryption key of the access point with
/ / / and press
OK to set
●
You can set characters using numeric buttons.
●
Press BACK/RETURN to store
5. The VIERA Name/IP/DNS Settings screen is displayed
VIERA Name
●
You can set your favourite name for this TV.
●
This name will be used as the name of this TV on the screen of the other
network equipment.
Acquire IP Address / Acquire DNS Address
●
Auto is recommended.
●
Available settings are displayed automatically.
- 52 -
Page 53
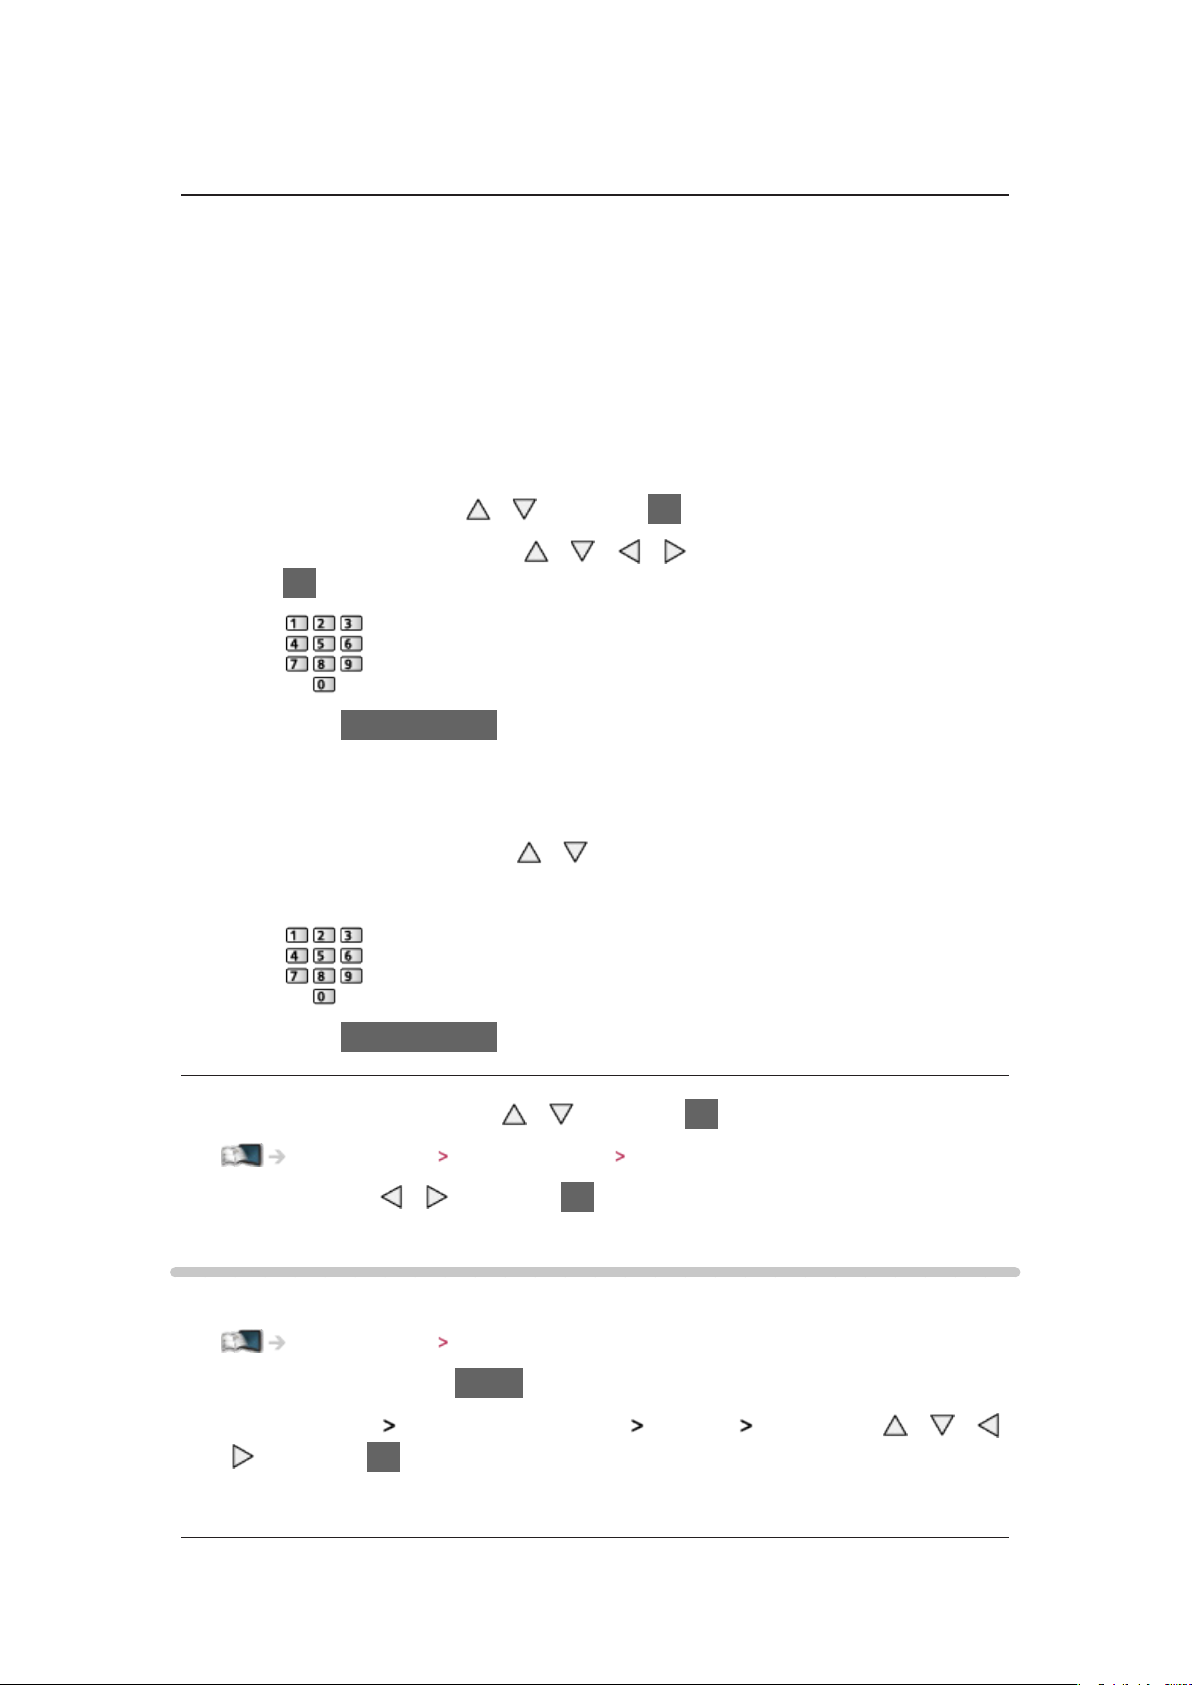
●
To set manually, select and set IP Address / Subnet Mask / Default Gateway
/ DNS Address.
Proxy Settings
●
It is not required for normal household use.
●
Some internet services may not be available depending on the proxy
settings.
Proxy:
This is the address of the relay server connected between the browser
and the target server and sends data to the browser.
1) Select Proxy with
2) Enter the address with
/ and press OK to access
/ / / or numeric buttons, and press
OK to set
3) Press BACK/RETURN to store
Proxy Port:
This number is also specified by the provider with the Proxy address.
1) Select Proxy Port with
/
2) Enter the number with numeric buttons
3) Press BACK/RETURN to store
6. Select Network Status with
Internet service Network settings Network Status
/ and press OK to access
7. Select Exit with / and press OK to set
Custom - Wired
Ensure the connections are completed before starting network setup.
Internet service Network connections
1. Display the menu with MENU
2. Select Network
/ and press OK to access
3. The VIERA Name/IP/DNS Settings screen is displayed
Network Connection Custom Wired with / /
- 53 -
Page 54
VIERA Name
●
You can set your favourite name for this TV.
●
This name will be used as the name of this TV on the screen of the other
network equipment.
Acquire IP Address / Acquire DNS Address
●
Auto is recommended.
●
Available settings are displayed automatically.
●
To set manually, select and set IP Address / Subnet Mask / Default Gateway
/ DNS Address.
Proxy Settings
●
It is not required for normal household use.
●
Some internet services may not be available depending on the proxy
settings.
Proxy:
This is the address of the relay server connected between the browser
and the target server and sends data to the browser.
1) Select Proxy with
2) Enter the address with
/ and press OK to access
/ / / or numeric buttons, and press
OK to set
3) Press BACK/RETURN to store
Proxy Port:
This number is also specified by the provider with the Proxy address.
1) Select Proxy Port with
/
2) Enter the number with numeric buttons
3) Press BACK/RETURN to store
4. Select Network Status with
Internet service Network settings Network Status
/ and press OK to access
5. Select Exit with / and press OK to set
- 54 -
Page 55
Network Status
Displays and checks the network status (MAC Address, current network
settings, etc.).
1. Display the menu with MENU
2. Select Network
3. Automatically testing is done and the Network Status screen is displayed
Try Again:
Performs automatic testing of the network connection for the TV and
displays the current status again.
Status Details:
Displays the detailed network status (SSID, security type, encryption
type, etc.).
●
For more information of the network connection, select Help.
Network Status with / and press OK to access
VIERA remote Settings
Sets to control the TV with any VIERA remote connected to your network.
Home network Network settings VIERA remote Settings
Network Link Settings
Sets to control the TV with devices connected to the network.
Home network Network settings Network Link Settings
Software Update
Accesses the specific website to update the TV’s software if any updates are
available.
1. Display the menu with MENU
2. Select Network
3. Follow the on-screen instructions
Software Update with / and press OK to access
New Software Message
Selects whether to give a notification message when new software is found via
network or not.
1. Display the menu with MENU
2. Select Network
access
3. Select On / Off with
New Software Message with / and press OK to
/ and press OK to set
- 55 -
Page 56
Home network
DLNA
Information
This TV is a DLNA Certified™ product.
DLNA
Certified digital electronics easier and more convenient to use on a home
network. To learn more, visit www.dlna.org.
®
(Digital Living Network Alliance) is a standard that makes DLNA
●
To enable this function, connect this TV to your home network.
Home network Network connections
Home network Network settings
■ Playback of sharing contents stored in the media server
Store photos, videos or music contents into the DLNA Certified media server
(for example, PC with Windows 7 / Windows 8 installed, DIGA Recorder, etc.)
connected to your home network. And then you can enjoy these contents on
this TV.
(Example)
●
For watching and operating contents on this TV
Home network DLNA Using DLNA
●
For supported file formats
Home network Technical information
To use a PC as a media server
●
Prepare the PC with Windows 7 / Windows 8 or ensure the server software is
installed on the PC. “Windows 7 / Windows 8” and “Twonky 7 (installed on the
PC with Windows XP or Mac)” are the server software that has been tested for
compatibility with this TV (as of January, 2012). Any other server software has
not been tested with this TV, therefore compatibility and performance cannot
be assured.
●
Windows 7 / Windows 8
The setup for homegroup settings of Windows 7 / Windows 8 is required.
- 56 -
Page 57

For details, refer to the help functions of Windows 7 / Windows 8.
●
Twonky
“Twonky” is the product of PacketVideo Corporation.
To obtain the Installation Guides for installing and setting “Twonky”, visit
the website of TwonkyMedia.
Additional fees may be charged to obtain server software.
= Note =
●
For more information about the server software, please consult each
software company.
●
When server software for the media server is installed on the PC, the data
on the PC may be at risk of being accessed by other people. Please take care
of the settings and connections under the network circumstances in office,
hotel or even at home when not using a router.
To use a DLNA compatible DIGA Recorder as a media server
●
By connecting a DLNA compatible DIGA Recorder to your home network, you
can control it as one of the media servers.
●
Please read the manual of your DIGA Recorder to check if the recorder is
compatible with DLNA.
■ Playback of sharing contents on this TV with the DMC (Digital
Media Controller) network equipment
You can enjoy contents stored in the media server by controlling with the DMC
network equipment (smartphone, PC with Windows 7 / Windows 8 installed,
etc.) connected to your home network.
●
To use this function with your smartphone or Windows 7 / Windows 8, set
VIERA remote of this TV to On.
Home network Network settings VIERA remote Settings
And you need to install the application for controlling VIERA on your
smartphone. For information of the application (English only):
http://panasonic.net/viera/support
For the operations, refer to the support information of the application.
●
“Windows 7 / Windows 8” are the OS that have been tested for
compatibility of this TV (as of January, 2012). For the operations, refer to
the help functions of Windows 7 / Windows 8.
- 57 -
Page 58

■ Sharing the TV programme or contents of this TV with another
piece of network equipment
You can enjoy the contents of this TV on the other DLNA Certified VIERA ,
your smartphone
the current digital TV programme on the other DLNA Certified VIERA
For example, watching the continuation of the current programme on another
VIERA, etc.
: Available contents:
●
Contents that can be played back in Media Player of this TV and
another piece of network equipment
: DLNA Certified VIERA manufactured before the year 2009 may not be
available. The compatibility with future products is not guaranteed.
●
To use this function with another DLNA Certified VIERA, set Network
Link Settings of this TV.
: To use this function with your smartphone, you need to install the
application for controlling VIERA in your smartphone. For the information
of the application (English only):
, etc. connected to your home network. You can also watch
.
Home network Network settings Network Link Settings
http://panasonic.jp/support/global/cs/tv/
For the operations, refer to the support information of the application.
●
Sharing the current programme may not be available when selecting radio
channels, encrypted (copy-protected) programmes or when the broadcast
prohibits the output of video and audio.
= Note =
●
To use this function, turn this TV on.
●
This function is available only with 1 piece of other equipment.
●
This function may not be available in the following conditions of this TV:
– When in internet service
– When accessing the media server
– When the data service is active
Using DLNA
To use DLNA® features, ensure the preparations of the media server, network
connections and network settings are completed.
Home network DLNA Information
Home network Network connections
Home network Network settings
1. Display APPS list with APPS
- 58 -
Page 59
2. Select Media Server with / / / and press OK to access
3. Select one of the media servers with
●
For the operations to access another TV, select the name of another TV
/ and press OK to access
from the displayed media server list.
●
To display / hide information of the highlighted media server
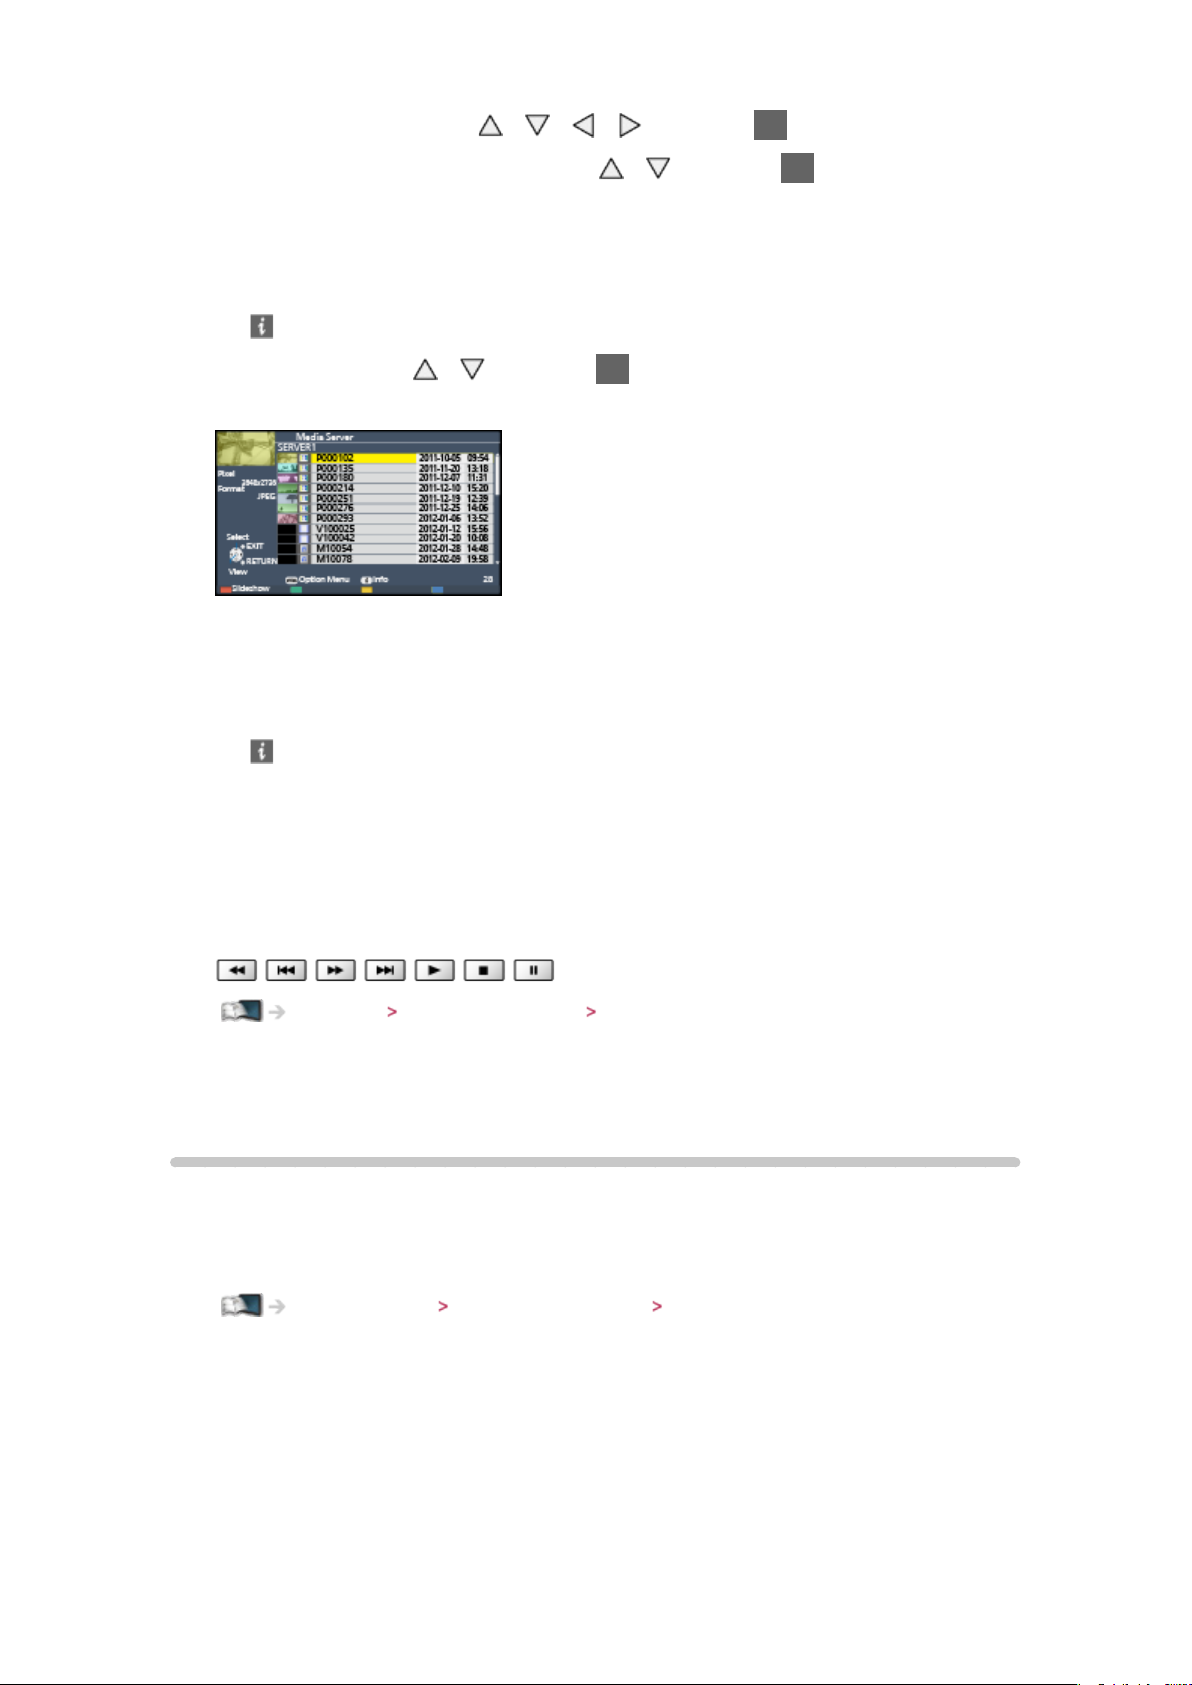
4. Select the file with / and press OK to access
(Example)
●
Depending on the condition of media server, you may need to select the
folder before selecting the file.
●
To display / hide information of the highlighted file
= Note =
●
Non-playable files are also listed but cannot be selected.
●
You can use the following buttons during playback. Confirm the remote
control code is “73”.
Watching External equipment Operating with TV’s remote control
Network connections
DLNA connection
To use DLNA features, you need a home network environment and you can
operate the features without a broadband network environment.
●
To use internet service, you need a broadband network environment.
Internet service Network connections Internet connection
- 59 -
Page 60
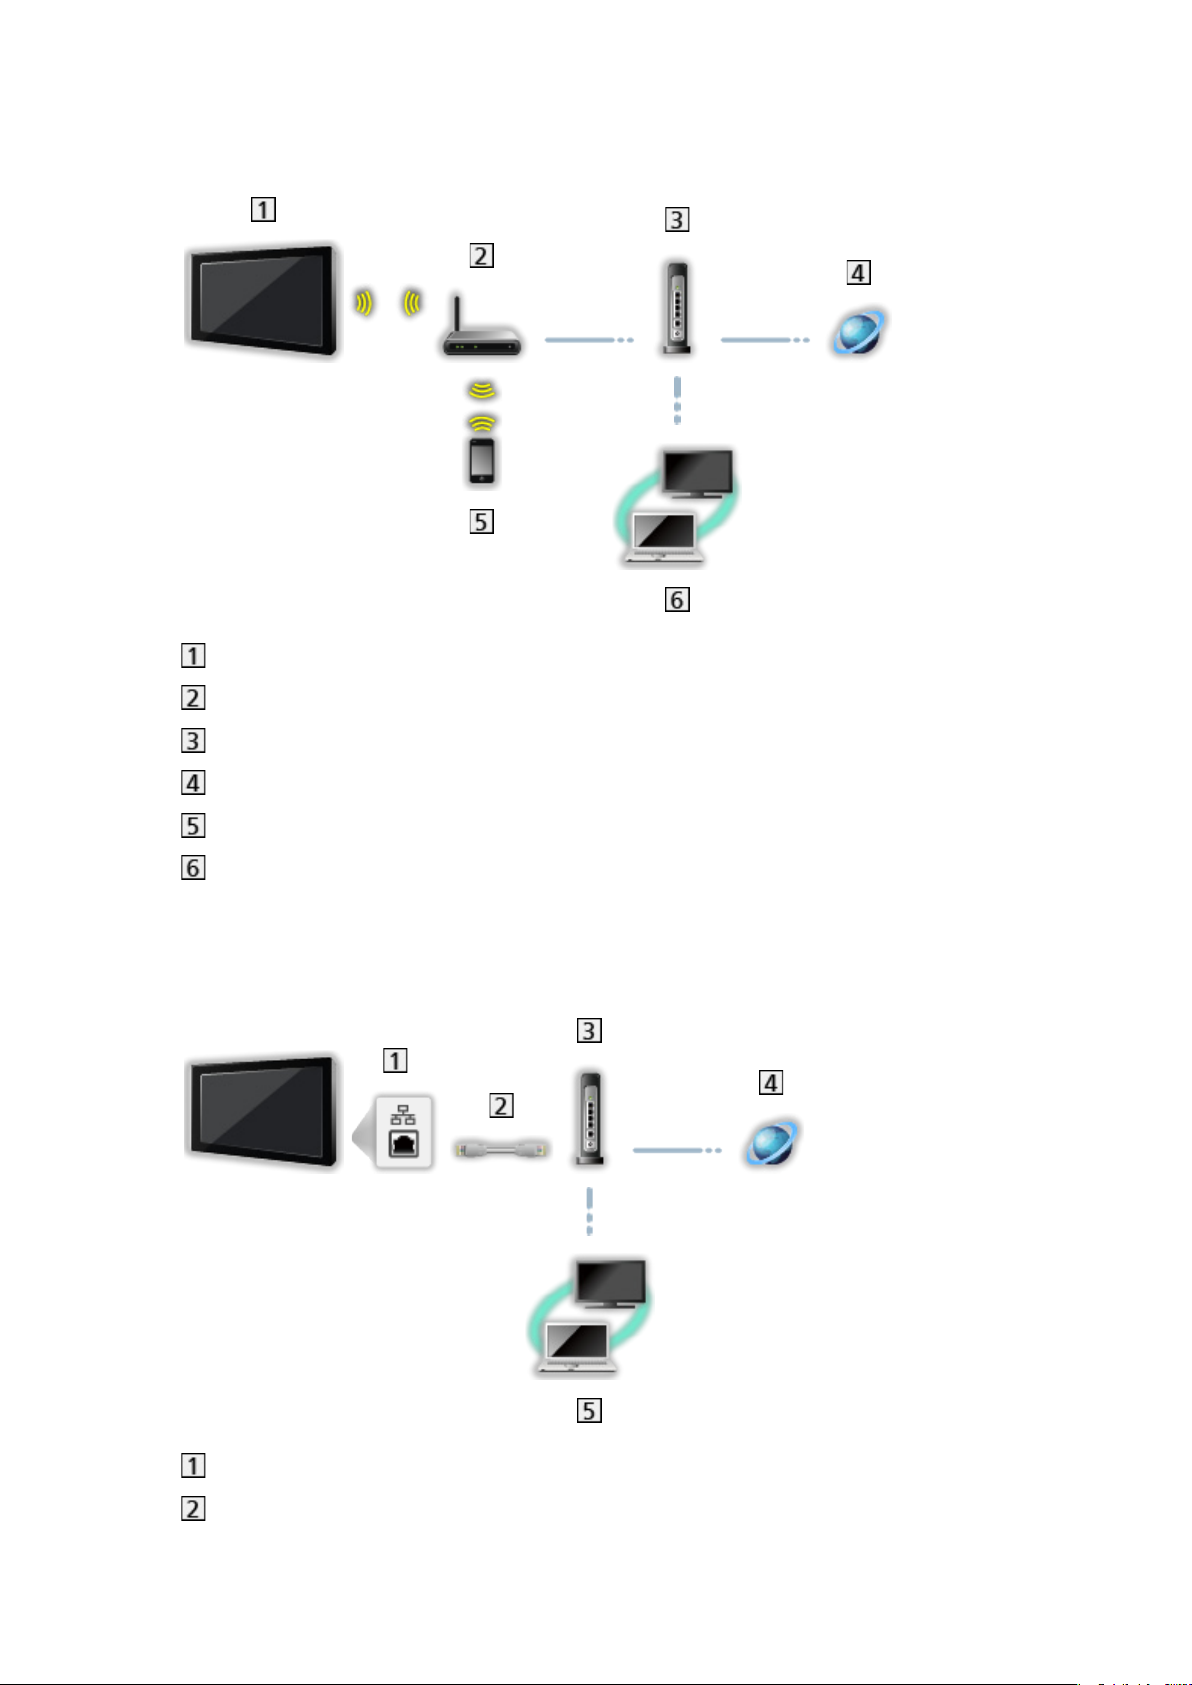
■ Wireless connection (For DLNA and internet service)
Built-in wireless LAN (Rear of the TV)
Access point
Hub or Router
Internet environment
Smartphone
DLNA Certified media server
■ Wired connection (For DLNA and internet service)
ETHERNET terminal
LAN cable (Shielded)
●
Use the Shielded Twist Pair (STP) LAN cable.
- 60 -
Page 61
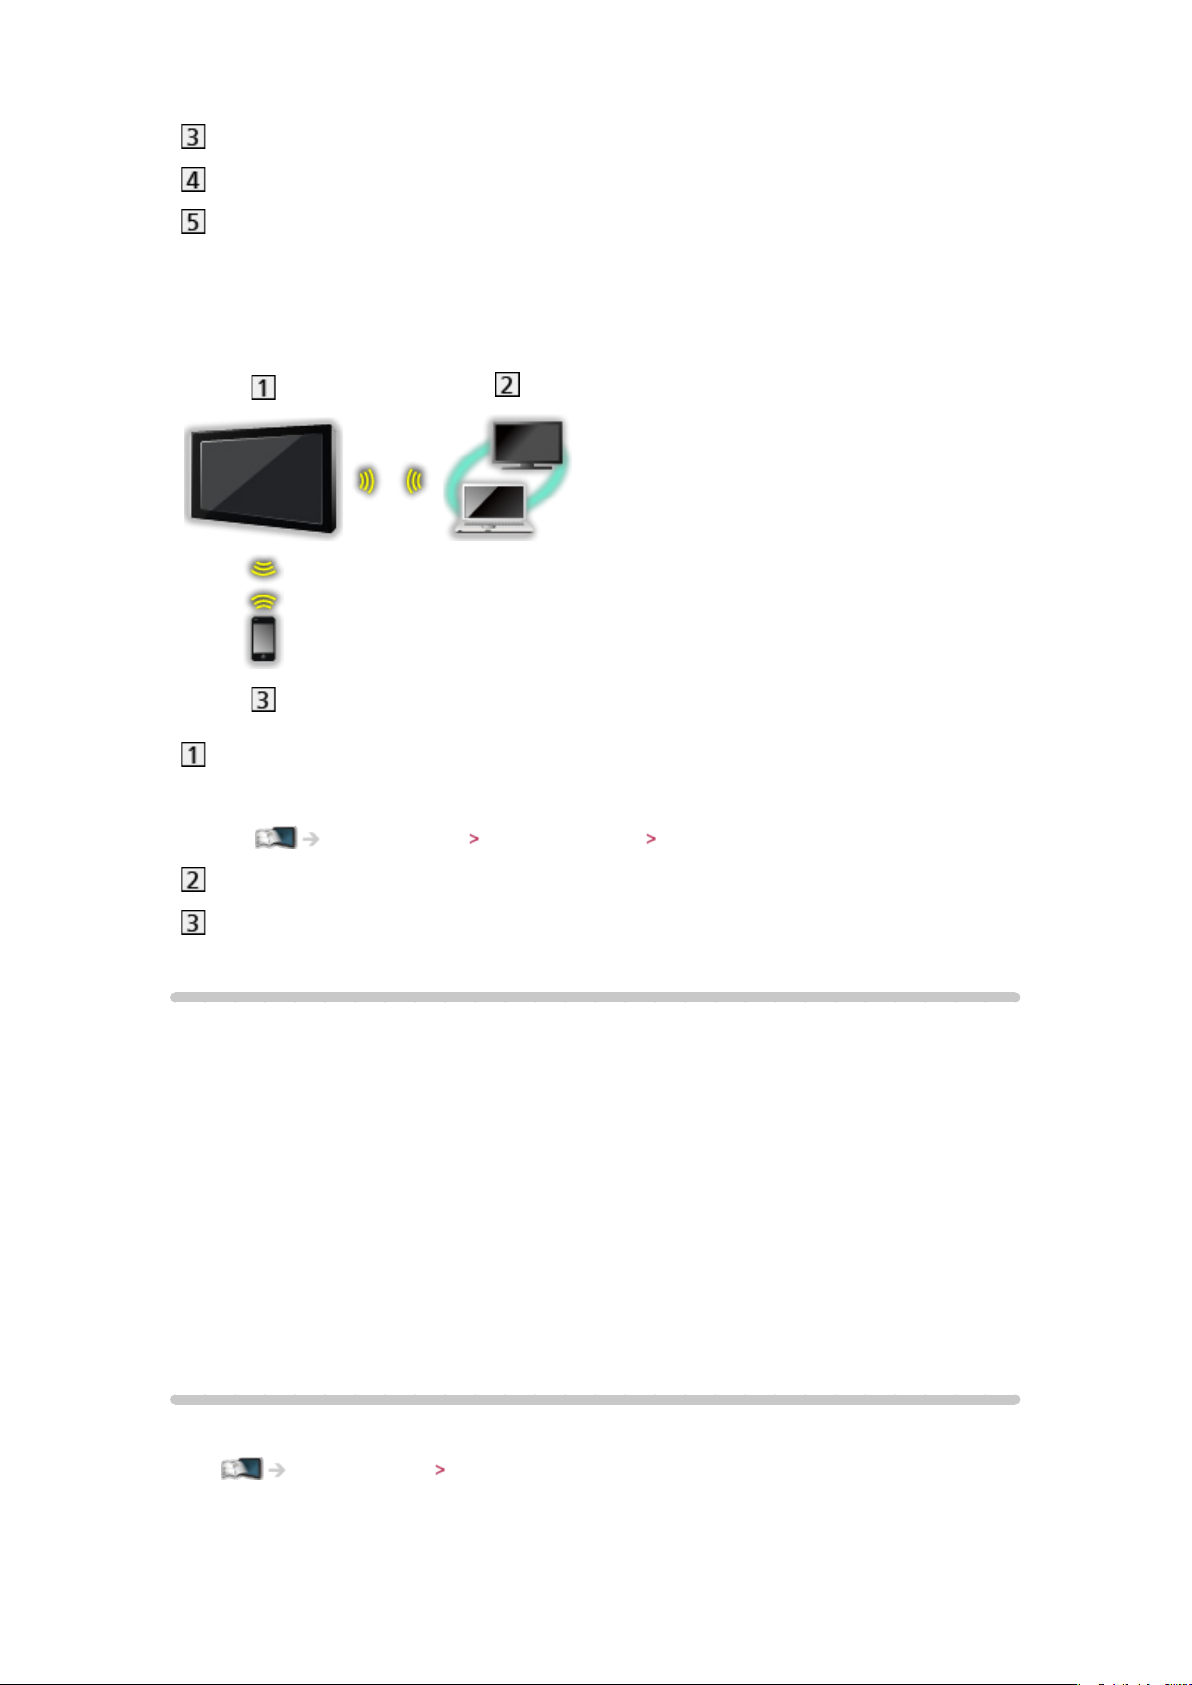
Hub or Router
Internet environment
DLNA Certified media server
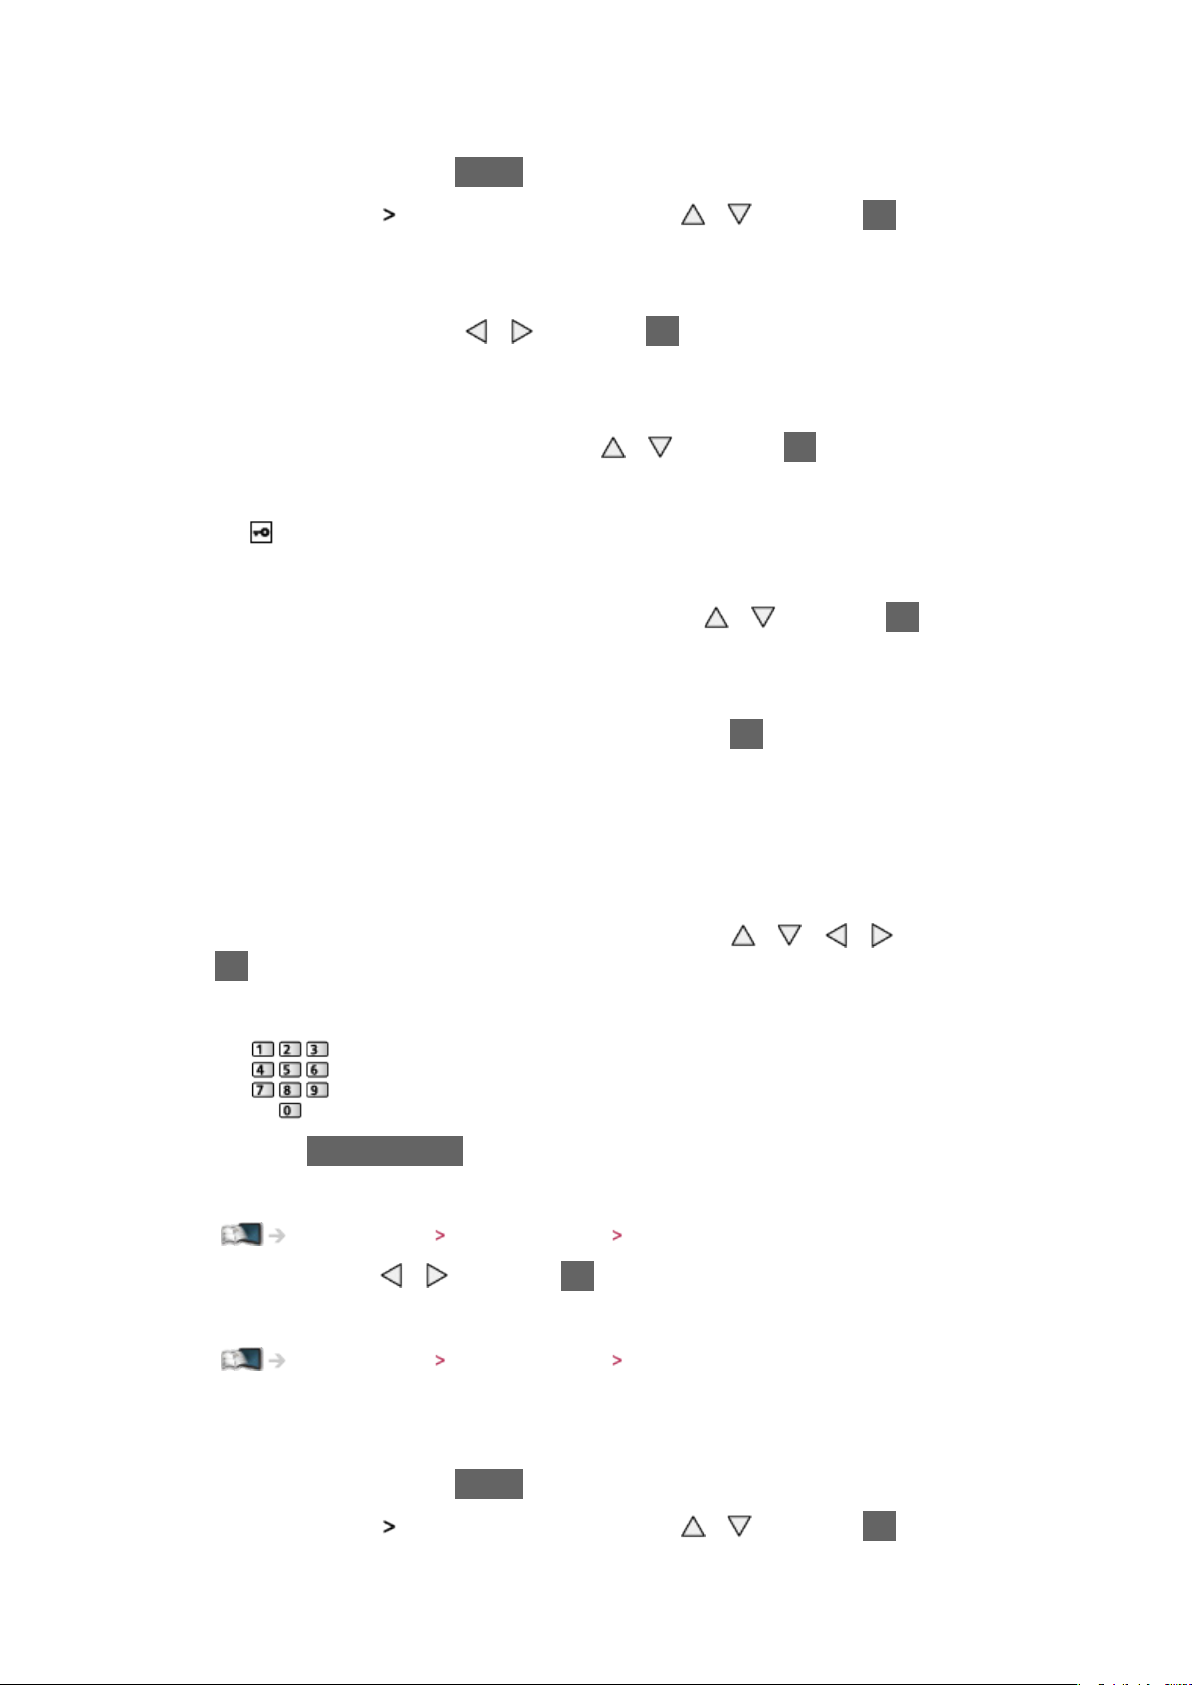
■ Wireless connection (For DLNA)
TV
●
To use the TV as a wireless access point
Home network Network settings Custom - Wireless Access Point
DLNA Certified media server
Smartphone
Note
●
Ensure to use a LAN straight cable.
●
Set up and connect equipment required for the network environment. You
cannot make such settings on this TV. Read the manual of the equipment.
●
If you use the equipment compatible only with 100BASE-TX, category 5 or
later LAN cables are required.
●
Turn the TV off, and then on again when changing or making the network
connection again.
Network settings
Network Connection
Ensure the connections are completed before starting network setup.
Home network Network connections
- 61 -
Page 62
■ Quick setup - Wireless
1. Display the menu with MENU
2. Select Network
●
Confirm the encryption key, settings and position of your access point
Network Connection with / and press OK to access
before starting setup. For details, read the manual of the access point.
3. Select Quick setup with
●
When the LAN cable is connected, wired setup will be done
/ and press OK to access
automatically.
4. Select your desired access point with
●
Available Wireless Networks are displayed automatically.
: Encrypted access point
●
For WPS(Push button)
1) Select Easy setup with Push button with
access
2) Press the WPS button on the access point until the light flashes
3) Connect the TV with the access point with OK
– WPS: Wi-Fi Protected Setup™
/ and press OK to access
/ and press OK to
– If the connection has failed, check the settings and positions of your
access point. And then, follow the on-screen instructions.
●
It is recommended to select the encrypted access point.
5. Enter the encryption key of the access point with
/ / / and press
OK to set
●
You can set characters using numeric buttons.
●
Press BACK/RETURN to store
6. Automatically setup is done and the Network Status screen is displayed
Home network Network settings Network Status
7. Select Exit with / and press OK to set
●
To set manually
Home network Network settings Custom - Wireless
■ Quick setup - Wired
1. Display the menu with MENU
2. Select Network
Network Connection with / and press OK to access
- 62 -
Page 63
3. Select Quick setup with / and press OK to access
4. Automatically setup is done and the Network Status screen is displayed
Home network Network settings Network Status
5. Select Exit with / and press OK to set
●
To set manually
Home network Network settings Custom - Wired
Custom - Wireless
Ensure the connections are completed before starting network setup.
Home network Network connections
1. Display the menu with MENU
2. Select Network
Network Connection Custom Wireless with / /
/ and press OK to access
●
Confirm the encryption key, settings and position of your access point
before starting setup. For details, read the manual of the access point.
3. Select your desired access point with
●
Available Wireless Networks are displayed automatically.
: Encrypted access point
●
For WPS(Push button)
1) Press
(red)
2) Press the WPS button on the access point until the light flashes
3) Connect the TV with the access point with OK
– WPS: Wi-Fi Protected Setup™
– If the connection has failed, check the settings and positions of your
access point. And then, follow the on-screen instructions.
●
For WPS(PIN)
/ and press OK to access
1) Press
(green)
2) Enter the PIN code to the access point
3) Connect the TV with the access point with OK
●
For Manual
1) Press
(yellow)
2) You can set up SSID, security type, encryption type, and encryption
key manually
3) Follow the on-screen instructions and set manually
– When you use 11n (5 GHz) for the wireless system between the built-
in wireless LAN and access point, select AES for the encryption type.
- 63 -
Page 64
●
To search access points again
(blue)
●
To display / hide information of the highlighted access point
●
It is recommended to select the encrypted access point.
4. Enter the encryption key of the access point with
/ / / and press
OK to set
●
You can set characters using numeric buttons.
●
Press BACK/RETURN to store
5. The VIERA Name/IP/DNS Settings screen is displayed
VIERA Name
●
You can set your favourite name for this TV.
●
This name will be used as the name of this TV on the screen of the other
network equipment.
Acquire IP Address / Acquire DNS Address
●
Auto is recommended.
●
Available settings are displayed automatically.
●
To set manually, select and set IP Address / Subnet Mask / Default Gateway
/ DNS Address.
Proxy Settings
●
It is not required for normal household use.
●
Some internet services may not be available depending on the proxy
settings.
Proxy:
This is the address of the relay server connected between the browser
and the target server and sends data to the browser.
1) Select Proxy with
2) Enter the address with
/ and press OK to access
/ / / or numeric buttons, and press
OK to set
- 64 -
Page 65
3) Press BACK/RETURN to store
Proxy Port:
This number is also specified by the provider with the Proxy address.
1) Select Proxy Port with
/
2) Enter the number with numeric buttons
3) Press BACK/RETURN to store
6. Select Network Status with
Home network Network settings Network Status
/ and press OK to access
7. Select Exit with / and press OK to set
Custom - Wired
Ensure the connections are completed before starting network setup.
Home network Network connections
1. Display the menu with MENU
2. Select Network
/ and press OK to access
Network Connection Custom Wired with / /
3. The VIERA Name/IP/DNS Settings screen is displayed
VIERA Name
●
You can set your favourite name for this TV.
●
This name will be used as the name of this TV on the screen of the other
network equipment.
Acquire IP Address / Acquire DNS Address
●
Auto is recommended.
●
Available settings are displayed automatically.
●
To set manually, select and set IP Address / Subnet Mask / Default Gateway
/ DNS Address.
Proxy Settings
●
It is not required for normal household use.
●
Some internet services may not be available depending on the proxy
settings.
- 65 -
Page 66
Proxy:
This is the address of the relay server connected between the browser
and the target server and sends data to the browser.
1) Select Proxy with
2) Enter the address with
/ and press OK to access
/ / / or numeric buttons, and press
OK to set
3) Press BACK/RETURN to store
Proxy Port:
This number is also specified by the provider with the Proxy address.
1) Select Proxy Port with
/
2) Enter the number with numeric buttons
3) Press BACK/RETURN to store
4. Select Network Status with
Home network Network settings Network Status
/ and press OK to access
5. Select Exit with / and press OK to set
Custom - Wireless Access Point
You can use the TV as a wireless access point and connect the network
equipment without an access point.
●
Confirm the PIN code, network settings of the equipment before starting
setup. For details, read the manual of the equipment.
1. Display the menu with MENU
2. Select Network
with
/ / / and press OK to access
3. Select Connect to device in WPS with
●
To set manually, select Change settings. (see below)
4. Select and set WPS(Push button) / WPS(PIN) with
access
Network Connection Custom Wireless Access Point
/ and press OK to access
/ and press OK to
WPS(Push button):
Set the equipment to WPS (Push button) mode. For details, read the
manual of the equipment.
- 66 -
Page 67

WPS(PIN):
Enter the PIN code of the equipment.
●
If the connection has failed, check the settings and positions of the
equipment. And then, follow the on-screen instructions.
■ Change settings
You can set up Network name(SSID), Encryption key, Wireless type and
Channel setting method manually.
Follow the on-screen instructions and set manually.
●
Set Reset settings to reset the items of Change settings.
= Note =
●
You cannot connect the internet service while the TV is set to Wireless
Access Point.
●
You can connect up to 7 devices. But the transfer rate will vary according to
communication environment or the numbers of connected equipment.
●
To confirm the current network settings
Home network Network settings Network Status
●
Ensure the equipment to connect supports WPS for this setup.
●
WPS: Wi-Fi Protected Setup™
Network Status
Displays and checks the network status (MAC Address, current network
settings, etc.).
1. Display the menu with MENU
2. Select Network
3. Automatically testing is done and the Network Status screen is displayed
Try Again:
Performs automatic testing of the network connection for the TV and
displays the current status again.
Status Details:
Network Status with / and press OK to access
Displays the detailed network status (SSID, security type, encryption
type, etc.).
●
For more information of the network connection, select Help.
VIERA remote Settings
Sets to control the TV with any VIERA remote connected to your network.
1. Display the menu with MENU
- 67 -
Page 68
2. Select Network VIERA remote Settings with / and press OK to
access
3. Select one of the following items with
/ and press OK to access
VIERA remote
(On / Off)
Enables to control the TV from the network equipment (smartphone, etc.).
●
You need to install the application for controlling VIERA on your
smartphone. For information of the application (English only):
http://panasonic.net/viera/support
For the operations, refer to the support information of the application.
Device to upload contents
Selects device to upload contents from the network equipment (smartphone,
etc.).
= Note =
●
Depending on the area, this function may not be available. For details,
consult your local Panasonic dealer.
Network Link Settings
Sets to control the TV with devices connected to the network.
1. Display the menu with MENU
2. Select Network
3. Select one of the following items with
DLNA Server / Registration Type / Remote Device List
4. Set with
/ / / and press OK to store
DLNA Server
(On / Off)
Enables to share the TV programme or contents of this TV with the network
equipment (DLNA Certified VIERA, etc.).
Network Link Settings with / and press OK to access
/ and press OK to access
●
To use this function with another VIERA, select the name of this TV from
the DLNA server list of another VIERA, and then select the content to share.
Also read the manual of another VIERA.
Registration Type
- 68 -
Page 69
(Auto / Manual)
Selects the type to restrict the access to this TV for each piece of equipment on
the home network.
Auto:
All available equipment on the home network is accessible. (maximum
16 pieces of equipment)
Manual:
Sets the restrictions for each piece of equipment in the Remote Device
List.
Remote Device List
Lists the equipment accessible to this TV on the home network.
= Note =
●
Depending on the area, this function may not be available. For details,
consult your local Panasonic dealer.
Software Update
Accesses the specific website to update the TV’s software if any updates are
available.
1. Display the menu with MENU
2. Select Network
3. Follow the on-screen instructions
Software Update with / and press OK to access
New Software Message
Selects whether to give a notification message when new software is found via
network or not.
1. Display the menu with MENU
2. Select Network
access
3. Select On / Off with
New Software Message with / and press OK to
/ and press OK to set
Photos
Selecting file
Ensure the preparations of the media server, network connections and
network settings are completed.
Home network DLNA Information
- 69 -
Page 70
Home network Network connections
Home network Network settings
1. Display APPS list with APPS
2. Select Media Server with
3. Select one of the media servers with
●
For the operations to access another TV, select the name of another TV
/ / / and press OK to access
/ and press OK to access
from the displayed media server list.
●
To display / hide information of the highlighted media server
4. Select the file with / and press OK to access
●
Depending on the condition of media server, you may need to select the
folder before selecting the file.
●
To display / hide information of the highlighted file
= Note =
●
Non-playable files are also listed but cannot be selected.
●
You can use the following buttons during playback. Confirm the remote
control code is “73”.
Watching External equipment Operating with TV’s remote control
Viewing photo
■ Playback
Photos are displayed one at a time.
●
To operate Single view
: To the previous photo
: To the next photo
: Stop (return to list)
OK : Slideshow
●
To display / hide the operation guide
●
To rotate 90°
(blue)
●
To return to list
- 70 -
Page 71
BACK/RETURN
Using slideshow
Slideshow ends when all photos within the list are viewed.
1. Select the file from the thumbnail of photos for the first view with
/
2. Start Slideshow with (red) and OK
●
To display / hide the operation guide
●
To pause (return to Single view)
OK
●
To return to list
BACK/RETURN
■ Slideshow Settings
Set up the settings for photo file operations on this TV.
1. Display the option menu with OPTION
2. Select Slideshow Settings with
/ and press OK to access
/ /
3. Select one of the following items with
Auto Makeup / Interval / Repeat / Back Ground Music
4. Set with
Auto Makeup
(On / Off)
Automatically detects the face in the photo and improves luminance and
contrast.
Interval
(Long / Normal / Short)
Selects slideshow interval.
Repeat
(On / Off)
/ / / and press OK to store
/ and press OK to access
Slideshow repeat
Back Ground Music
- 71 -
Page 72
(Off / Type1 / Type2 / Type3 / Type4 / Type5)
Selects the background music during Photo mode.
Videos
Selecting file
Ensure the preparations of the media server, network connections and
network settings are completed.
Home network DLNA Information
Home network Network connections
Home network Network settings
1. Display APPS list with APPS
2. Select Media Server with
3. Select one of the media servers with
●
For the operations to access another TV, select the name of another TV
/ / / and press OK to access
/ and press OK to access
from the displayed media server list.
●
To display / hide information of the highlighted media server
4. Select the file with / and press OK to access
●
Depending on the condition of media server, you may need to select the
folder before selecting the file.
●
To display / hide information of the highlighted file
= Note =
●
Non-playable files are also listed but cannot be selected.
●
You can use the following buttons during playback. Confirm the remote
control code is “73”.
Watching External equipment Operating with TV’s remote control
Watching video
■ Playback
If you have stopped the last playback halfway, the confirmation screen is
displayed to select whether to start from where you stopped last time or from
the beginning.
●
To operate playback
- 72 -
Page 73
: Manual skip
– Press to skip forward approx. 30 seconds.
: Rewind
: Fast forward
: Stop
OK : Pause (displays the time seek bar) / Playback
●
To display / hide the operation guide and information banner
●
To the previous content
(red)
●
To the next content
(green)
●
To change aspect
1) Display Aspect Selection list with ASPECT
2) Select the mode with
/ and press OK to set
Aspect1:
Displays the content enlarged without distortion.
Aspect2:
Displays the content full-screen.
Original:
Displays the content original size.
– You can also change the mode pressing ASPECT. (Press repeatedly until
you reach the desired mode.)
– Aspect cannot be changed depending on the content.
●
To return to list
BACK/RETURN
Video Setup
Set up the settings for video file operations on this TV.
1. Display the option menu with OPTION
2. Select Video Setup with
3. Select one of the following items with
/ and press OK to access
/ and press OK to access
Video Preview / Multi Audio / Dual Audio / Dual Mono Audio / Subtitle /
Subtitle Text / Subtitle Language / Repeat
●
Menu items and selectable options vary depending on the content.
- 73 -
Page 74
4. Set with / / / and press OK to store
Video Preview
(On / Off)
Sets to start the preview of the title or scene in the thumbnail view.
●
Images may not be displayed for an instant in the thumbnail view. Set the
preview Off to solve this.
Multi Audio, Dual Audio, Dual Mono Audio
Selects for selectable sound tracks (if available).
●
It may take several seconds to change the sound.
●
This function is available during playback.
Subtitle
Display / hide subtitles (if available).
●
This function is available during playback.
Subtitle Text
Selects the font type to display subtitles correctly (if available).
●
This function is available during playback.
Subtitle Language
Selects the language for subtitles (if available).
●
This function is available during playback.
Repeat
(On / Off)
Playback repeat within the selected file
Audio output settings
You can enjoy the multi-channel sound via an amplifier connected to DIGITAL
AUDIO or HDMI2 (ARC function) terminal.
●
To confirm or change the current sound status
Home network Videos Video Setup
1. Display the menu with MENU
2. Select Sound
3. Select Auto / PCM with
SPDIF Selection with / and press OK to access
/ and press OK to set
- 74 -
Page 75
SPDIF Selection
(Auto / PCM)
Selects the initial setting for digital audio output signal from DIGITAL AUDIO
and HDMI2 (ARC function) terminals.
●
SPDIF is a standard audio transfer file format.
Auto:
Dolby Digital Plus, Dolby Digital and HE-AAC multi-channel are output as
Dolby Digital Bitstream. MPEG is output as PCM. DTS is output as DTS.
PCM:
Digital output signal is fixed to PCM.
●
ARC (Audio Return Channel) is a function of digital audio output using
HDMI cable.
Music
Selecting file
Ensure the preparations of the media server, network connections and
network settings are completed.
Home network DLNA Information
Home network Network connections
Home network Network settings
1. Display APPS list with APPS
2. Select Media Server with
3. Select one of the media servers with
●
For the operations to access another TV, select the name of another TV
/ / / and press OK to access
/ and press OK to access
from the displayed media server list.
●
To display / hide information of the highlighted media server
4. Select the file with / and press OK to access
●
Depending on the condition of media server, you may need to select the
folder before selecting the file.
●
To display / hide information of the highlighted file
= Note =
●
Non-playable files are also listed but cannot be selected.
●
You can use the following buttons during playback. Confirm the remote
- 75 -
Page 76
control code is “73”.
Watching External equipment Operating with TV’s remote control
Playing music
■ Playback
●
To operate playback
: Rewind
: Fast forward
: Stop
OK : Pause / Playback
●
To display / hide the operation guide
●
To the previous track
(red)
●
To the next track
(green)
●
To return to list
BACK/RETURN
Music Setup
Set up the settings for music file operations on this TV.
1. Display the option menu with OPTION
2. Select Music Setup
3. Select Folder / One / Off with
Folder:
Playback repeat within the selected folder
One:
Playback repeat of the selected one file
Repeat with OK
/ and press OK to set
DIGA Recorder
Controlling DIGA Recorder
Ensure the preparations of the media server, network connections and
network settings are completed.
Home network DLNA Information
- 76 -
Page 77
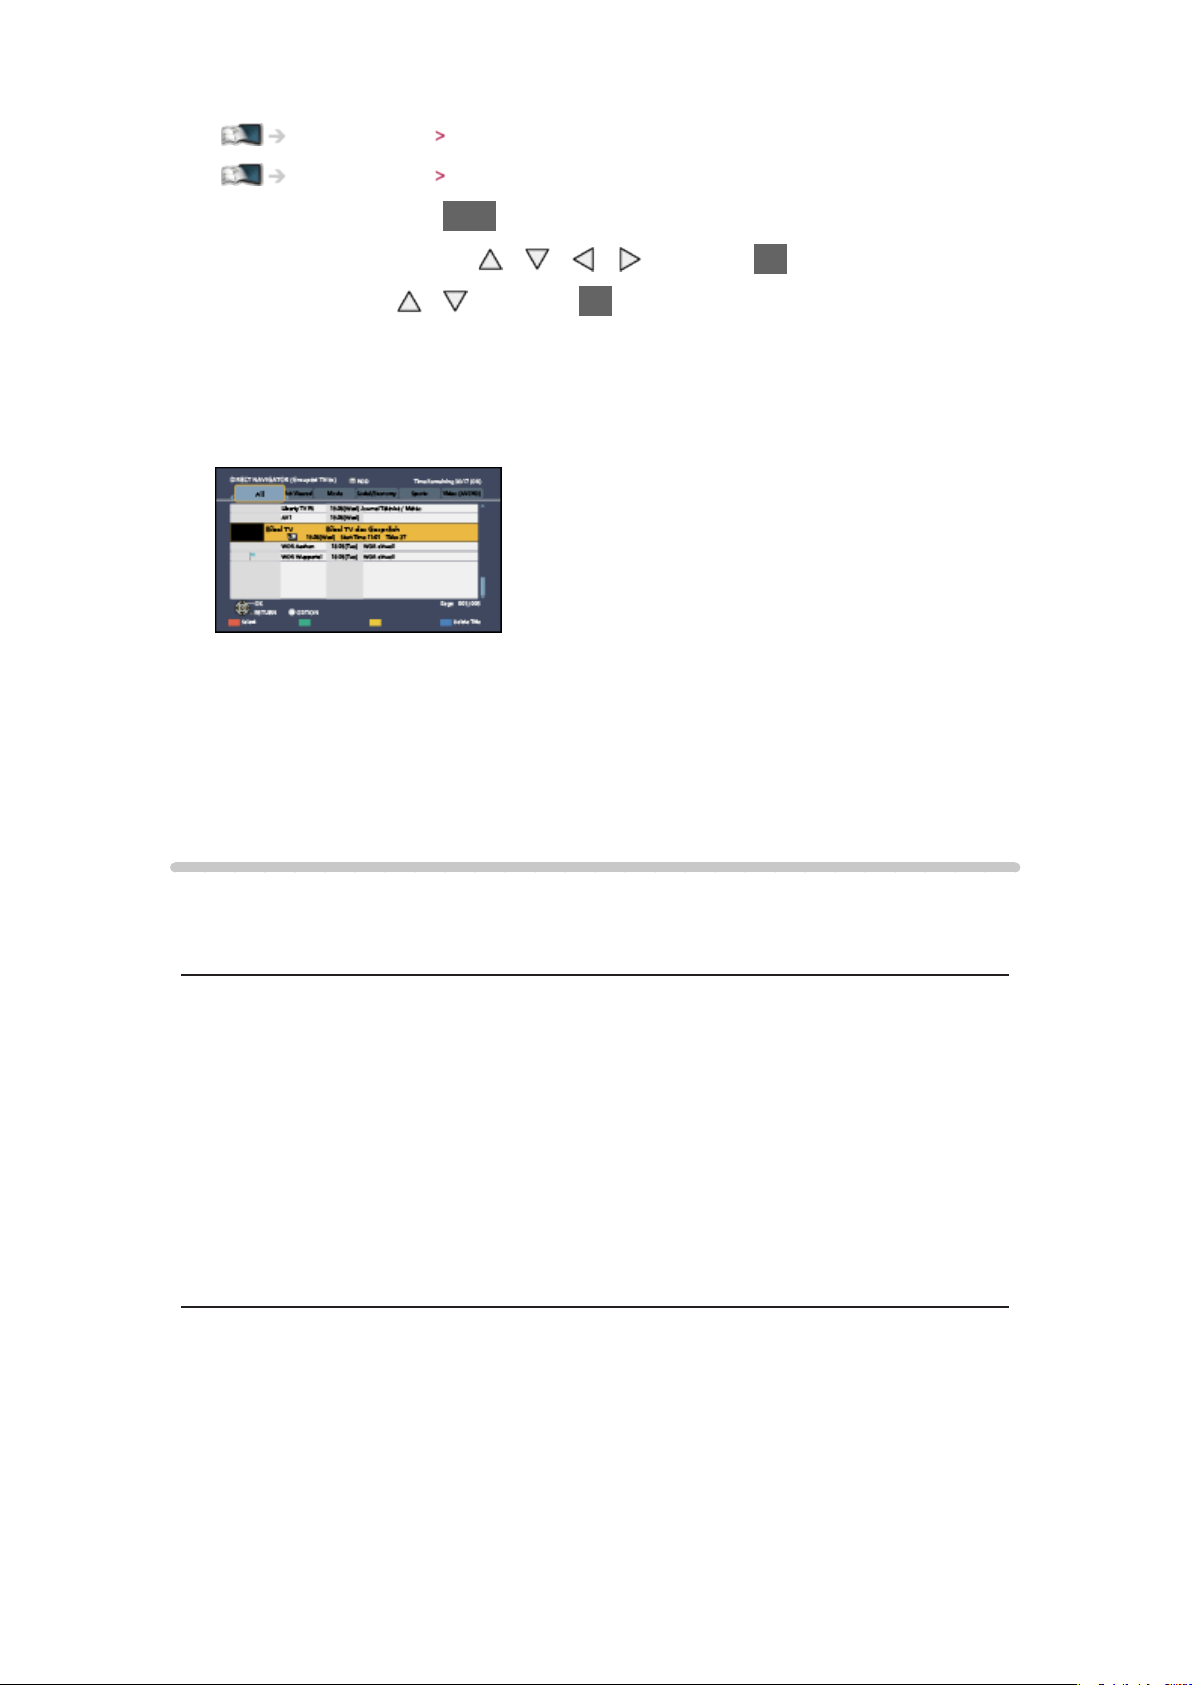
Home network Network connections
Home network Network settings
1. Display APPS list with APPS
2. Select Media Server with
3. Select DIGA with
/ and press OK to access
/ / / and press OK to access
4. The screen of the DIGA Recorder will be displayed. You can control the
functions of the DIGA Recorder with this TV’s remote control according to
the operation guide.
(Example)
●
Before operating, register this TV on the DIGA Recorder.
●
For details, read the manual of the DIGA Recorder.
Technical information
Photo format
■ Supported Photo formats
JPEG (.jpg, .jpeg)
●
Image resolution (pixel):
8 × 8 to 30,719 × 17,279
Sub-sampling:
4:4:4, 4:2:2, 4:2:0
●
DCF and EXIF standards
●
Progressive JPEG is not supported.
= Note =
●
Some files may not be played back even if they fulfil these conditions.
●
Do not use two-byte characters or other special codes for file names.
●
Connected devices may become unusable with this TV if the file or folder
names are changed.
- 77 -
Page 78

Video format
■ Supported Video formats
AVI (.avi)
●
Video codec:
H.264 BP/MP/HP, MPEG1, MPEG2, MPEG4 SP/ASP, VC-1, Windows
Media Video Ver. 9
Audio codec:
AAC, ADPCM, Dolby Digital, Dolby Digital Plus, DTS core, HE-AAC, LPCM,
MPEG Audio, MP3, WMA, WMA Pro
●
Some subtitles or chapter functions may not be available.
MKV (.mkv)
●
Video codec:
H.264 BP/MP/HP, MPEG1, MPEG2, MPEG4 SP/ASP
Audio codec:
AAC, Dolby Digital, Dolby Digital Plus, DTS core, HE-AAC, MPEG Audio,
MP3
●
Some subtitles or chapter functions may not be available.
ASF (.asf, .wmv)
●
Video codec:
MPEG4 SP/ASP, VC-1, Windows Media Video Ver. 9
Audio codec:
AAC, Dolby Digital, Dolby Digital Plus, HE-AAC, LPCM, MP3, WMA,
WMA Pro
●
Copy-protected files cannot be played back.
MP4 (.f4v, .m4v, .mp4)
●
Video codec:
H.264 BP/MP/HP, MPEG1, MPEG2, MPEG4 SP/ASP
Audio codec:
AAC, Dolby Digital, Dolby Digital Plus, HE-AAC, MPEG Audio, MP3
●
This TV supports this container recorded with Panasonic products. For
details, read the manual of the products.
- 78 -
Page 79

FLV (.flv)
●
Video codec:
H.264 BP/MP/HP
Audio codec:
AAC, MP3
3GPP (.3gp, .3g2)
●
Video codec:
H.264 BP/MP/HP, MPEG4 SP/ASP
Audio codec:
AAC, HE-AAC
PS (.mod, .mpg, .mpeg, .vob, .vro)
●
Video codec:
MPEG1, MPEG2
Audio codec:
Dolby Digital, LPCM, MPEG Audio
TS (.mts, .m2ts, .tp, .trp, .ts, .tts)
●
Video codec:
H.264 BP/MP/HP, MPEG1, MPEG2
Audio codec:
AAC, Dolby Digital, Dolby Digital Plus, HE-AAC, MPEG Audio
■ Supported Subtitles formats
MicroDVD, SubRip, TMPlayer (.srt, .sub, .txt)
●
●
The video file and subtitles text file are inside the same folder, and the file
names are the same except for the file extensions.
●
If there are more than one subtitles text files inside the same folder, they
are displayed in the following order of priority: “.srt”, “.sub”, “.txt”.
= Note =
●
Some files may not be played back even if they fulfil these conditions.
●
Do not use two-byte characters or other special codes for file names.
- 79 -
Page 80

●
Connected devices may become unusable with this TV if the file or folder
names are changed.
●
Supported Video formats are different in Media Player and media server.
Media Player Technical information Video format
Music format
■ Supported Music formats
MP3 (.mp3)
●
AAC (.m4a)
●
●
Copy-protected files cannot be played back.
WMA (.wma)
●
●
Copy-protected files cannot be played back.
LPCM (.wav)
●
FLAC (.flac)
●
= Note =
●
Some files may not be played back even if they fulfil these conditions.
●
Do not use two-byte characters or other special codes for file names.
●
Connected devices may become unusable with this TV if the file or folder
names are changed.
- 80 -
Page 81
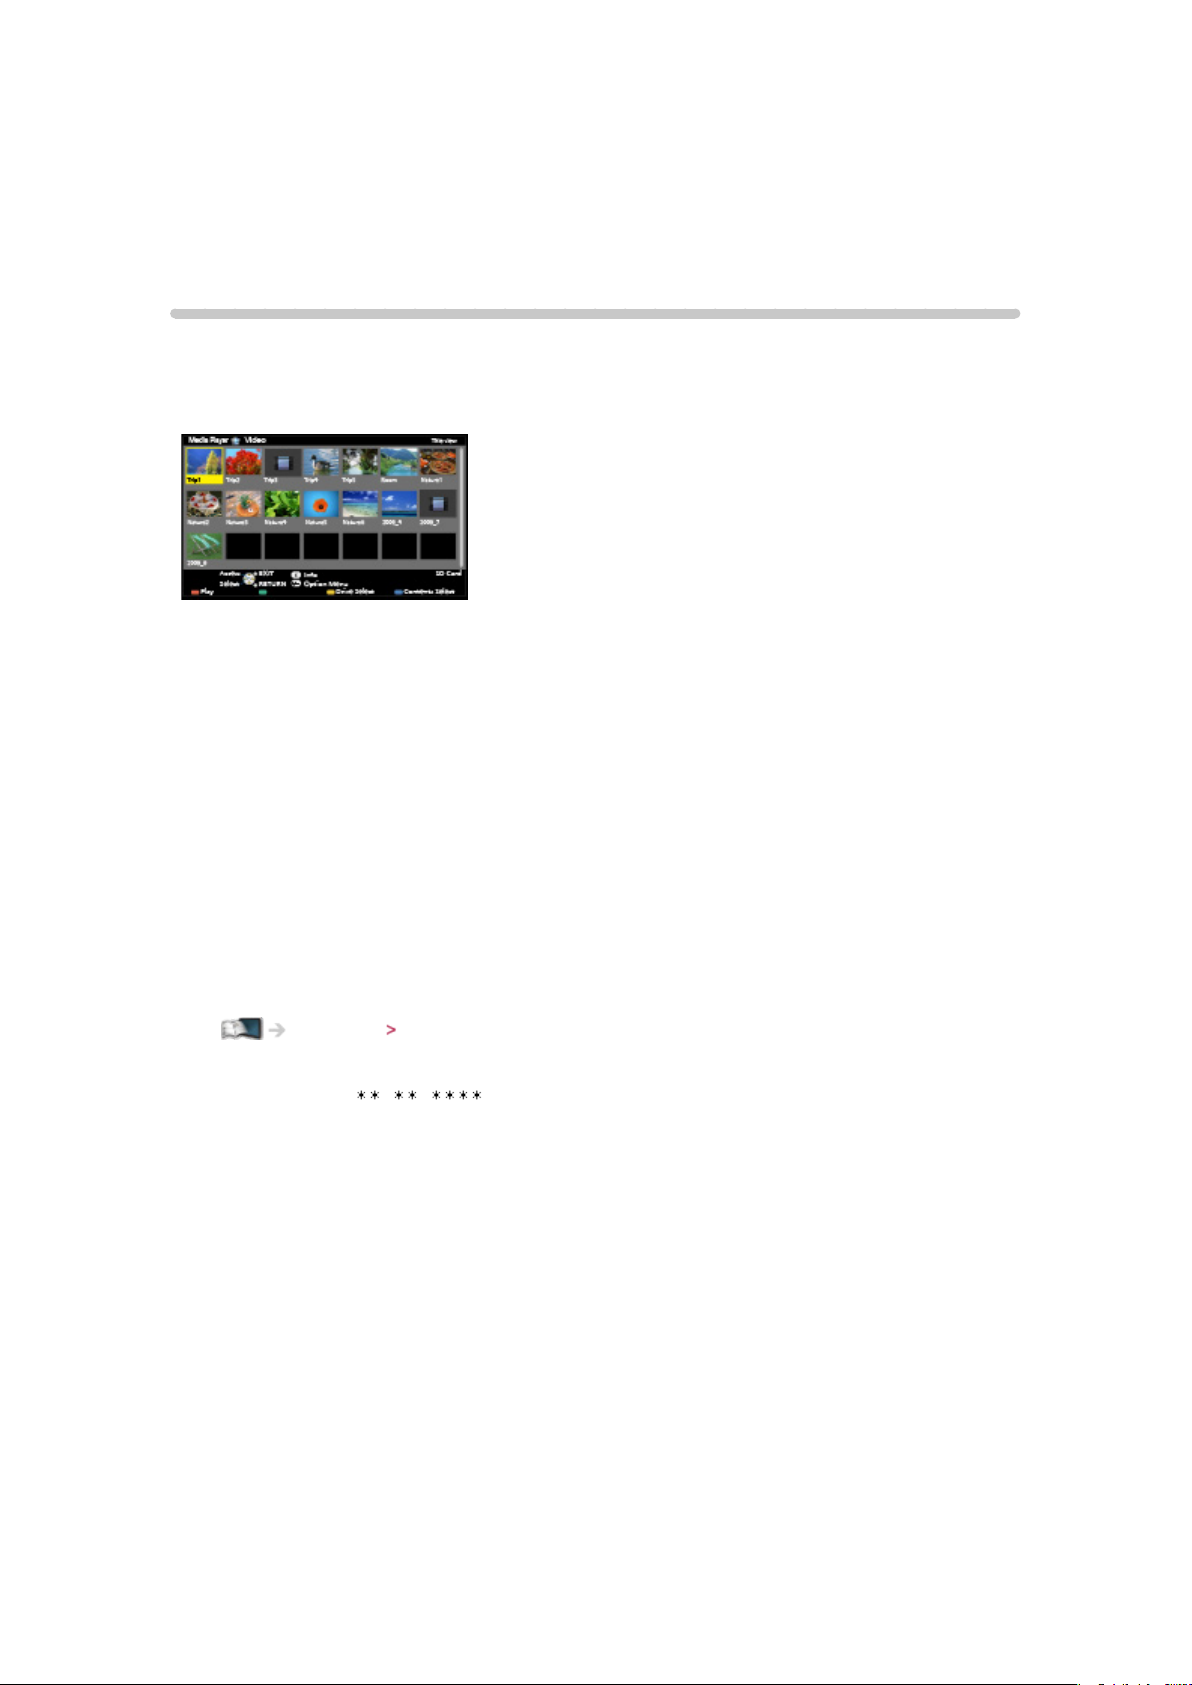
Media Player
Using Media Player
Information
Media Player allows you to enjoy photo, video or music recorded on a USB
Flash Memory.
(Example)
Photo mode:
Still pictures recorded with digital cameras will be displayed.
Video mode:
Moving pictures recorded with digital video cameras will be played back.
Music mode:
Digital music data will be played back.
●
During operation, audio signals are output from DIGITAL AUDIO and
HDMI2 (ARC function) terminals, however, no video signals are output. To
use HDMI2 with ARC function, connect an amplifier that has ARC function
and set to use theatre speakers.
Functions VIERA Link “HDAVI Control™”
●
Date shows the date on which the recording was made with the recording
equipment. “ / / ” appears on a file on which recording date has
not been recorded.
●
Pictures may not appear correctly on this TV depending on the recording
equipment used.
●
Displaying may take some time when there are many files and folders.
●
Partially degraded files may be displayed with reduced resolution.
●
Picture setting may not work depending on the conditions.
●
Folder and file names may be different from those on the digital camera or
digital video camera used.
■ To insert or remove the USB Flash Memory
Insert or remove straight and completely.
- 81 -
Page 82
●
To remove the USB Flash Memory safely from the TV, perform Safely
remove USB in USB Device Setup.
Settings Setup USB Device Setup
●
Connect the USB Flash Memory to the USB 1 or 2 port.
= Note =
●
Check the terminal type and devices are correct when connecting.
●
For the information of the devices
Media Player Technical information
●
For supported file formats
Media Player Technical information
Selecting device / mode
1. Insert the USB Flash Memory to the TV
Media Player Using Media Player Information
2. Display APPS list with APPS
3. Select Media Player with
4. Select the device with
●
If two or more devices are not connected, this step will be skipped.
/ / / and press OK to access
/ and press OK to access
5. Select Photo / Video / Music with
Photo
Media Player Photo mode
Video
Media Player Video mode
Music
Media Player Music mode
6. The thumbnail view will be displayed
(Example)
/ and press OK to access
- 82 -
Page 83
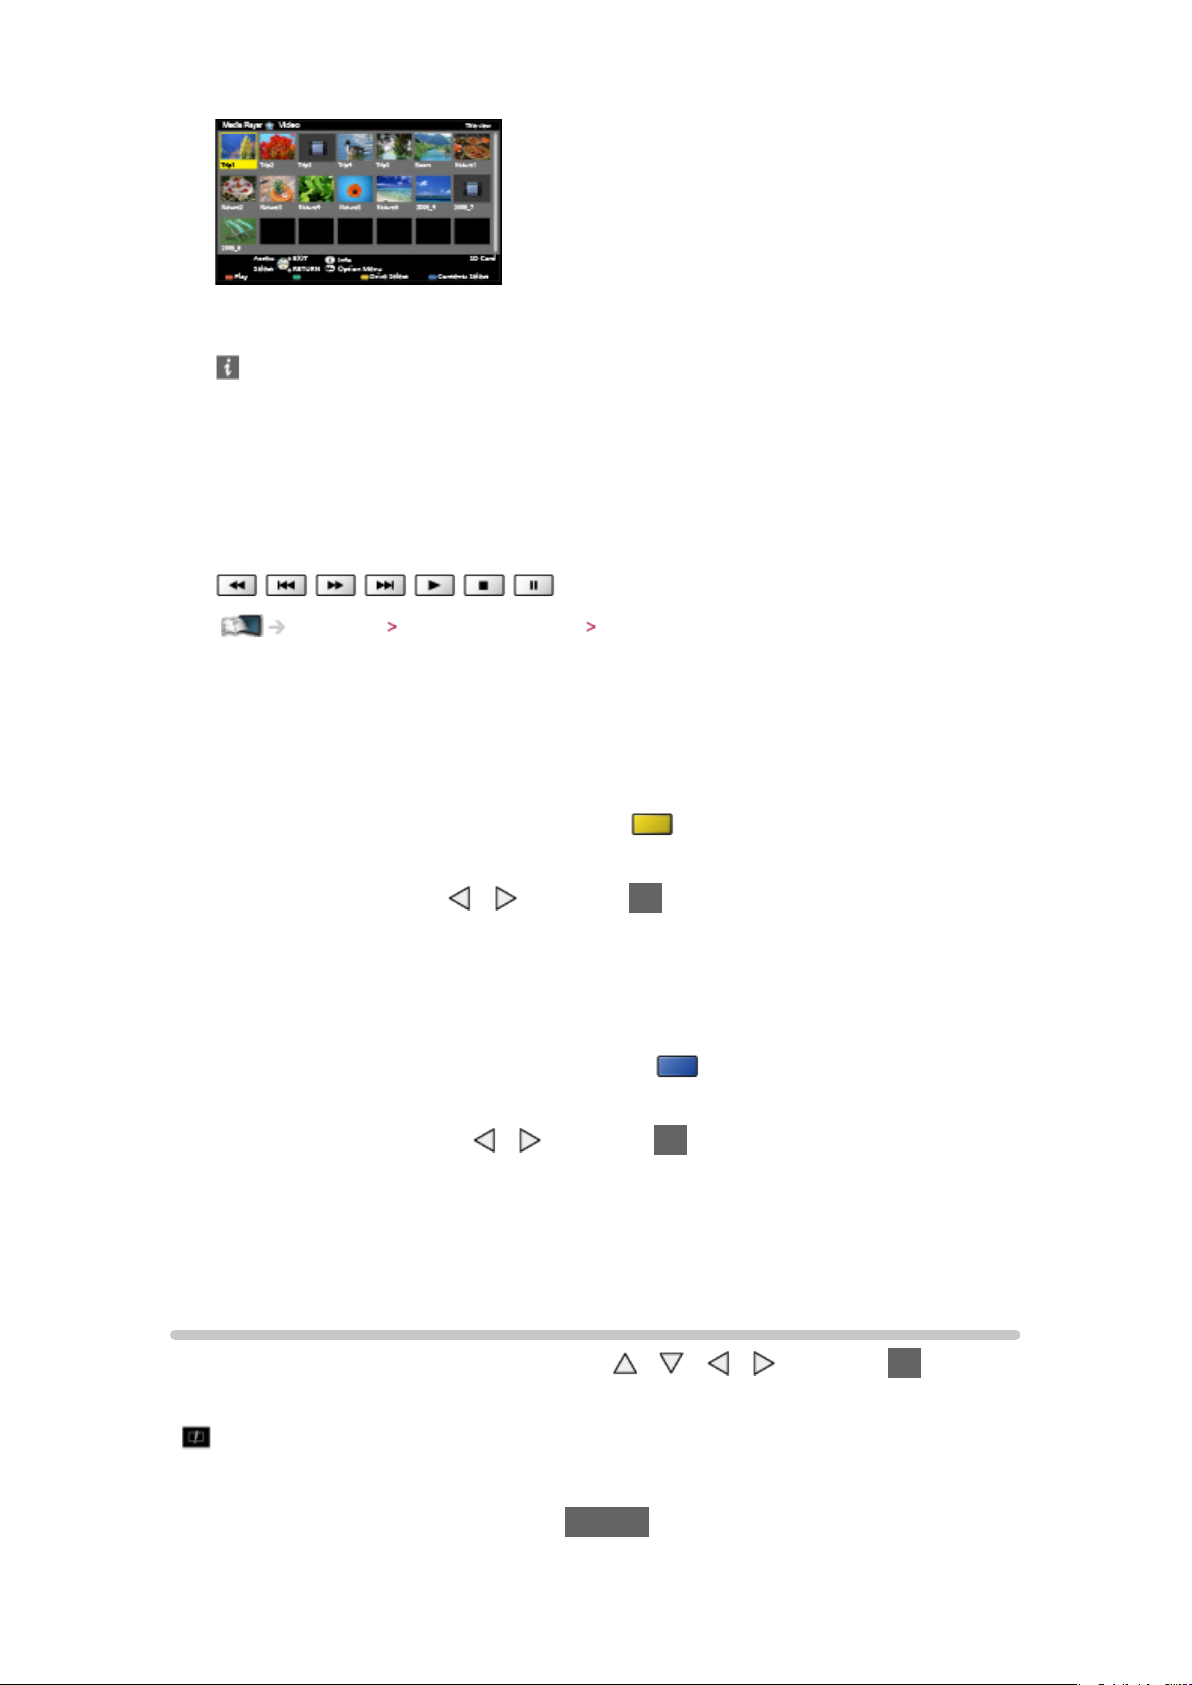
●
To display / hide information of the highlighted content
= Note =
●
Select the appropriate device and content for playing back each file.
●
You can use the following buttons during playback. Confirm the remote
control code is “73”.
Watching External equipment Operating with TV’s remote control
■ To change the device
You can change the current device to another device directly in the same mode
when two or more available devices are connected.
1. Display the device selection screen with
displayed
2. Select the device with
/ and press OK to access
(yellow) while the thumbnail is
■ To change the mode
You can switch to another mode of Media Player from the thumbnail view.
1. Display the contents selection screen with
displayed
2. Select the contents with
●
The mode can be switched in the current device.
/ and press OK to access
(blue) while the thumbnail is
Photo mode
Selecting file
Select the file in the thumbnail view with / / / and press OK to start
playback.
: Error display
●
To change the size of photos in the thumbnail view
1) Display the option menu with OPTION
- 83 -
Page 84
2) Select Change Size with / and press OK to change
●
For supported file formats
Media Player Technical information Photo format
■ Thumbnail view
●
To display / hide information of the highlighted content
●
To display Slideshow Settings
(red)
Media Player Photo mode Using slideshow
●
To Sort
(green)
●
To change the device
(yellow)
●
To change the contents
(blue)
Viewing photo
■ Playback
●
To operate Single view
: To the previous photo
: To the next photo
: Stop (return to thumbnail)
OK : Slideshow
●
To display / hide the operation guide
●
To rotate 90°
(blue)
●
To return to thumbnail
BACK/RETURN
Sorting photos
■ To sort by folder, recorded date or recorded month
1. Display the view selection in the thumbnail view with (green)
- 84 -
Page 85
2. Select Folder view / Sort by Date / Sort by Month with / and press OK
to set
Folder view:
Displays the thumbnail grouped by folder.
●
Files which are not in a folder will be collected to the folder named
“/”.
Sort by Date / Sort by Month:
Displays the thumbnail grouped by the same date or month.
●
The group of the photos without recorded dates is shown as
Unknown.
●
To return to the thumbnail of all photos
1) Display the view selection in the thumbnail view with
2) Select All photos with
/ and press OK to set
(green)
Using slideshow
Slideshow ends when all photos within the current thumbnail are viewed.
1. Select the file from the thumbnail of photos for the first view with
/
2. Start Slideshow with (red) and OK
●
To display / hide the operation guide
●
To pause (return to Single view)
OK
●
To return to thumbnail
BACK/RETURN
●
You can change the back ground music by setting Back Ground Music in
Slideshow Settings (see below).
/ /
■ Slideshow Settings
Set up the settings for Photo mode.
1. Display the option menu with OPTION
2. Select Slideshow Settings with OK
3. Select one of the following items with
Frame / Colour Effect / Auto Makeup / Screen Mode / Burst Playback /
Interval / Repeat / Back Ground Music
4. Set with
/ / / and press OK to store
- 85 -
/ and press OK to access
Page 86

Frame
(Off / Multi / Collage / Drift (+ calendar) / Drift / Gallery (+ calendar) / Gallery
/ Cinema)
Selects the frame type of the slideshow.
Multi:
9 photos are displayed orderly at once.
Collage:
Each photo is displayed at a random position and random scale.
Drift (+ calendar) / Drift:
Photos are displayed with flow images.
●
You can select whether to display the calendar or not. The month of
calendar is changed with
/ .
Gallery (+ calendar) / Gallery:
Various sizes of photos in the frames are displayed.
●
You can select whether to display the calendar or not. The month of
calendar is changed with / .
Cinema:
Photos are displayed as old films (sepia tone).
Colour Effect
(Off / Sepia / Gray scale)
Selects the colour effect of photos in Single view and Slideshow.
●
Not valid when Frame is set to Drift, Gallery or Cinema
Auto Makeup
(On / Off)
Automatically detects the face in the photo and improves luminance and
contrast.
Screen Mode
(Normal / Zoom)
Selects enlarged or normal viewing in Single view and Slideshow.
●
Not valid when Frame is set to Collage, Drift, Gallery or Cinema
●
Depending on the photo size, the photo may not be fully enlarged to fill
the screen (e.g. portrait style picture).
- 86 -
Page 87

Burst Playback
(On / Off)
Selects whether to display burst photos in a fast-paced slideshow mode or not.
●
Not valid when Frame is set to Drift, Gallery or Cinema
Interval
(Long / Normal / Short)
Selects slideshow interval.
●
Not valid when Frame is set to Drift, Gallery or Cinema
Repeat
(On / Off)
Slideshow repeat
Back Ground Music
(Off / Type1 / Type2 / Type3 / Type4 / Type5 / User / Auto)
Selects the background music during Photo mode.
Type1 - 5:
Music files installed on this TV at the factory settings will be played back.
Auto:
Music files stored in the root folder of the current device will be played
back randomly.
●
If there is no available music data, no sound will be played back.
User:
Music files in the device registered by yourself will be played back.
●
If no music files have been registered or the device which had registered
music files is removed, no sound will be played back.
To register music
●
1) Select the music file with
●
Depending on the condition of the device, select folders until you
/ and press OK to access
reach the desired music file.
2) Select File / Folder with
File:
The selected music file will be registered.
Folder:
All the music files in the folder which contains the selected music file
/ and press OK to set
- 87 -
Page 88
will be registered.
= Note =
●
Picture quality may be degraded depending on the slideshow settings.
●
Picture setting may not work depending on the slideshow settings.
Video mode
Selecting file
1. Select the title in the thumbnail view with
: Error display
: The file does not support thumbnail view.
●
The preview will start when the title / scene is highlighted in the
thumbnail view if it supports a preview. To turn off the preview, set
Video Preview to Off.
Media Player Video mode Video Setup
2. Start playback with (red)
●
If you have stopped the last playback halfway, the confirmation screen is
displayed to select whether to start from where you stopped last time or
from the beginning.
●
For supported file formats
Media Player Technical information Video format
■ Thumbnail view
/ / /
●
To display / hide information of the highlighted content
●
To start playback
(red)
●
To change the device
(yellow)
●
To change the contents
(blue)
Watching video
■ Playback
●
To operate playback
- 88 -
Page 89
: Rewind
: Fast forward
: Stop
OK : Pause (displays the time seek bar) / Playback
●
To jump to the specified time point
1) Display the time seek bar with OK
2) While the time seek bar is displayed
Press
/ :
Search approx. 10 seconds
Press and hold
/ :
Search rapidly
3) Jump to the specified time point with OK
●
To display / hide the operation guide and information banner
●
To the previous title / scene
(red)
●
To the next title / scene
(green)
●
To change aspect
1) Display Aspect Selection list with ASPECT
2) Select the mode with
/ and press OK to set
Aspect1:
Displays the content enlarged without distortion.
Aspect2:
Displays the content full-screen.
Original:
Displays the content original size.
– You can also change the mode pressing ASPECT. (Press repeatedly until
you reach the desired mode.)
– Aspect cannot be changed depending on the content.
●
To return to thumbnail
BACK/RETURN
Video Setup
Set up the settings for Video mode.
- 89 -
Page 90

1. Display the option menu with OPTION
2. Select Video Setup with OK
3. Select one of the following items with
/ and press OK to access
Video Preview / Multi Audio / Dual Mono Audio / Subtitle / Subtitle Text /
Repeat
●
Menu items and selectable options vary depending on the content.
4. Set with
/ / / and press OK to store
Video Preview
(On / Off)
Sets to start the preview of the title or scene in the thumbnail view.
●
Images may not be displayed for an instant in the thumbnail view. Set the
preview Off to solve this.
●
This function is available in the thumbnail view.
Multi Audio, Dual Mono Audio
Selects for selectable sound tracks (if available).
●
It may take several seconds to change the sound.
●
This function is available during playback.
Subtitle
Display / hide subtitles (if available).
●
This function is available during playback.
Subtitle Text
Selects the font type to display subtitles correctly (if available).
●
This function is available during playback.
Repeat
(On / Off)
Playback repeat within the title or selected file (depending on the content)
Audio output settings
You can enjoy the multi-channel sound via an amplifier connected to DIGITAL
AUDIO or HDMI2 (ARC function) terminal.
●
To confirm or change the current sound status
Media Player Video mode Video Setup
- 90 -
Page 91
1. Display the menu with MENU
2. Select Sound
3. Select Auto / PCM with
SPDIF Selection with / and press OK to access
/ and press OK to set
SPDIF Selection
(Auto / PCM)
Selects the initial setting for digital audio output signal from DIGITAL AUDIO
and HDMI2 (ARC function) terminals.
●
SPDIF is a standard audio transfer file format.
Auto:
Dolby Digital Plus, Dolby Digital and HE-AAC multi-channel are output as
Dolby Digital Bitstream. MPEG is output as PCM. DTS is output as DTS.
PCM:
Digital output signal is fixed to PCM.
●
ARC (Audio Return Channel) is a function of digital audio output using
HDMI cable.
Music mode
Selecting file
1. Select the folder in the thumbnail view with / / /
2. Start playback with
●
For supported file formats
Media Player Technical information Music format
■ Thumbnail view
●
To display / hide information of the highlighted content
●
To start playback
(red)
●
To change the device
(yellow)
(red)
●
To change the contents
(blue)
- 91 -
Page 92
Playing music
■ Playback of the selected file in the folder
1. Select the folder with / / / and press OK to access
2. Select the file with
3. Start playback with (red)
/ / /
■ Playback
●
To operate playback
: Rewind
: Fast forward
: Stop
OK : Pause / Playback
●
To display / hide the operation guide
●
To the previous track
(red)
●
To the next track
(green)
●
To return to thumbnail
BACK/RETURN
Music Setup
Set up the setting for Music mode.
●
This function is available in the thumbnail view.
1. Display the option menu with OPTION
2. Select Music Setup
3. Select Folder / One with
Folder:
Playback repeat within the selected folder
One:
Playback repeat of the selected one file
Repeat with OK
/ and press OK to set
- 92 -
Page 93

Technical information
Device handling caution
●
Data modified with a PC may not be displayed.
●
Do not remove the device while the TV is accessing data. Otherwise this can
damage the device or TV.
●
Do not touch the pins on the device.
●
Do not subject the device to a high pressure or impact.
●
Insert the device in the correct direction. Otherwise this can damage the
device or TV.
●
Electrical interference, static electricity, or erroneous operation may
damage the data or device.
●
Back up the recorded data at regular intervals to prevent data
deterioration, data damage or erratic operation of the TV. Panasonic is not
liable for any deterioration or damage of recorded data.
USB devices
●
It is recommended to connect the USB Flash Memory to the TV’s USB ports
directly.
●
Some USB devices or USB HUB may not be used with this TV.
●
You cannot connect any devices using a USB card reader.
●
Additional information for the devices may be found on the following
website. (English only)
http://panasonic.net/viera/support
■ USB Flash Memory
(for playing back in Media Player)
USB Flash Memory format:
FAT16, FAT32 or exFAT
●
USB HDDs formatted on a PC are not guaranteed to work in Media Player.
Photo format
■ Supported Photo formats
JPEG (.jpg, .jpeg)
●
Image resolution (pixel):
- 93 -
Page 94

8 × 8 to 30,719 × 17,279
Sub-sampling:
4:4:4, 4:2:2, 4:2:0
●
DCF and EXIF standards
●
Progressive JPEG is not supported.
= Note =
●
Some files may not be played back even if they fulfil these conditions.
●
Do not use two-byte characters or other special codes for file names.
●
Connected devices may become unusable with this TV if the file or folder
names are changed.
Video format
■ Supported Video formats
AVI (.avi)
●
Video codec:
H.264 BP/MP/HP, MPEG1, MPEG2, MPEG4 SP/ASP, VC-1, Windows
Media Video Ver. 9
Audio codec:
AAC, ADPCM, Dolby Digital, Dolby Digital Plus, DTS core, HE-AAC, LPCM,
MPEG Audio, MP3, WMA, WMA Pro
●
Some subtitles or chapter functions may not be available.
MKV (.mkv)
●
Video codec:
H.264 BP/MP/HP, MPEG1, MPEG2, MPEG4 SP/ASP
Audio codec:
AAC, Dolby Digital, Dolby Digital Plus, DTS core, HE-AAC, MPEG Audio,
MP3
●
Some subtitles or chapter functions may not be available.
ASF (.asf, .wmv)
●
Video codec:
MPEG4 SP/ASP, VC-1, Windows Media Video Ver. 9
- 94 -
Page 95

Audio codec:
AAC, Dolby Digital, Dolby Digital Plus, HE-AAC, LPCM, MP3, WMA,
WMA Pro
●
Copy-protected files cannot be played back.
MP4 (.f4v, .m4v, .mp4)
●
Video codec:
H.264 BP/MP/HP, MPEG1, MPEG2, MPEG4 SP/ASP
Audio codec:
AAC, Dolby Digital, Dolby Digital Plus, HE-AAC, MPEG Audio, MP3
●
This TV supports this container recorded with Panasonic products. For
details, read the manual of the products.
FLV (.flv)
●
Video codec:
H.264 BP/MP/HP
Audio codec:
AAC, MP3
3GPP (.3gp, .3g2)
●
Video codec:
H.264 BP/MP/HP, MPEG4 SP/ASP
Audio codec:
AAC, HE-AAC
PS (.mod, .mpg, .mpeg, .vob, .vro)
●
Video codec:
H.264 BP/MP/HP, MPEG1, MPEG2, VC-1
Audio codec:
AAC, Dolby Digital, Dolby Digital Plus, HE-AAC, LPCM, MPEG Audio, MP3
TS (.mts, .m2ts, .tp, .trp, .ts, .tts)
●
Video codec:
H.264 BP/MP/HP, MPEG1, MPEG2, VC-1
Audio codec:
AAC, Dolby Digital, Dolby Digital Plus, DTS core, HE-AAC, MPEG Audio,
- 95 -
Page 96

MP3
■ Supported Subtitles formats
MicroDVD, SubRip, TMPlayer (.srt, .sub, .txt)
●
●
The video file and subtitles text file are inside the same folder, and the file
names are the same except for the file extensions.
●
If there are more than one subtitles text files inside the same folder, they
are displayed in the following order of priority: “.srt”, “.sub”, “.txt”.
= Note =
●
Some files may not be played back even if they fulfil these conditions.
●
Do not use two-byte characters or other special codes for file names.
●
Connected devices may become unusable with this TV if the file or folder
names are changed.
●
Supported Video formats are different in Media Player and media server.
Home network Technical information Video format
Music format
■ Supported Music formats
MP3 (.mp3)
●
AAC (.m4a)
●
●
Copy-protected files cannot be played back.
WMA / WMA Pro (.wma)
●
●
Copy-protected files cannot be played back.
LPCM (.wav)
●
FLAC (.flac)
●
= Note =
●
Some files may not be played back even if they fulfil these conditions.
- 96 -
Page 97

●
Do not use two-byte characters or other special codes for file names.
●
Connected devices may become unusable with this TV if the file or folder
names are changed.
- 97 -
Page 98
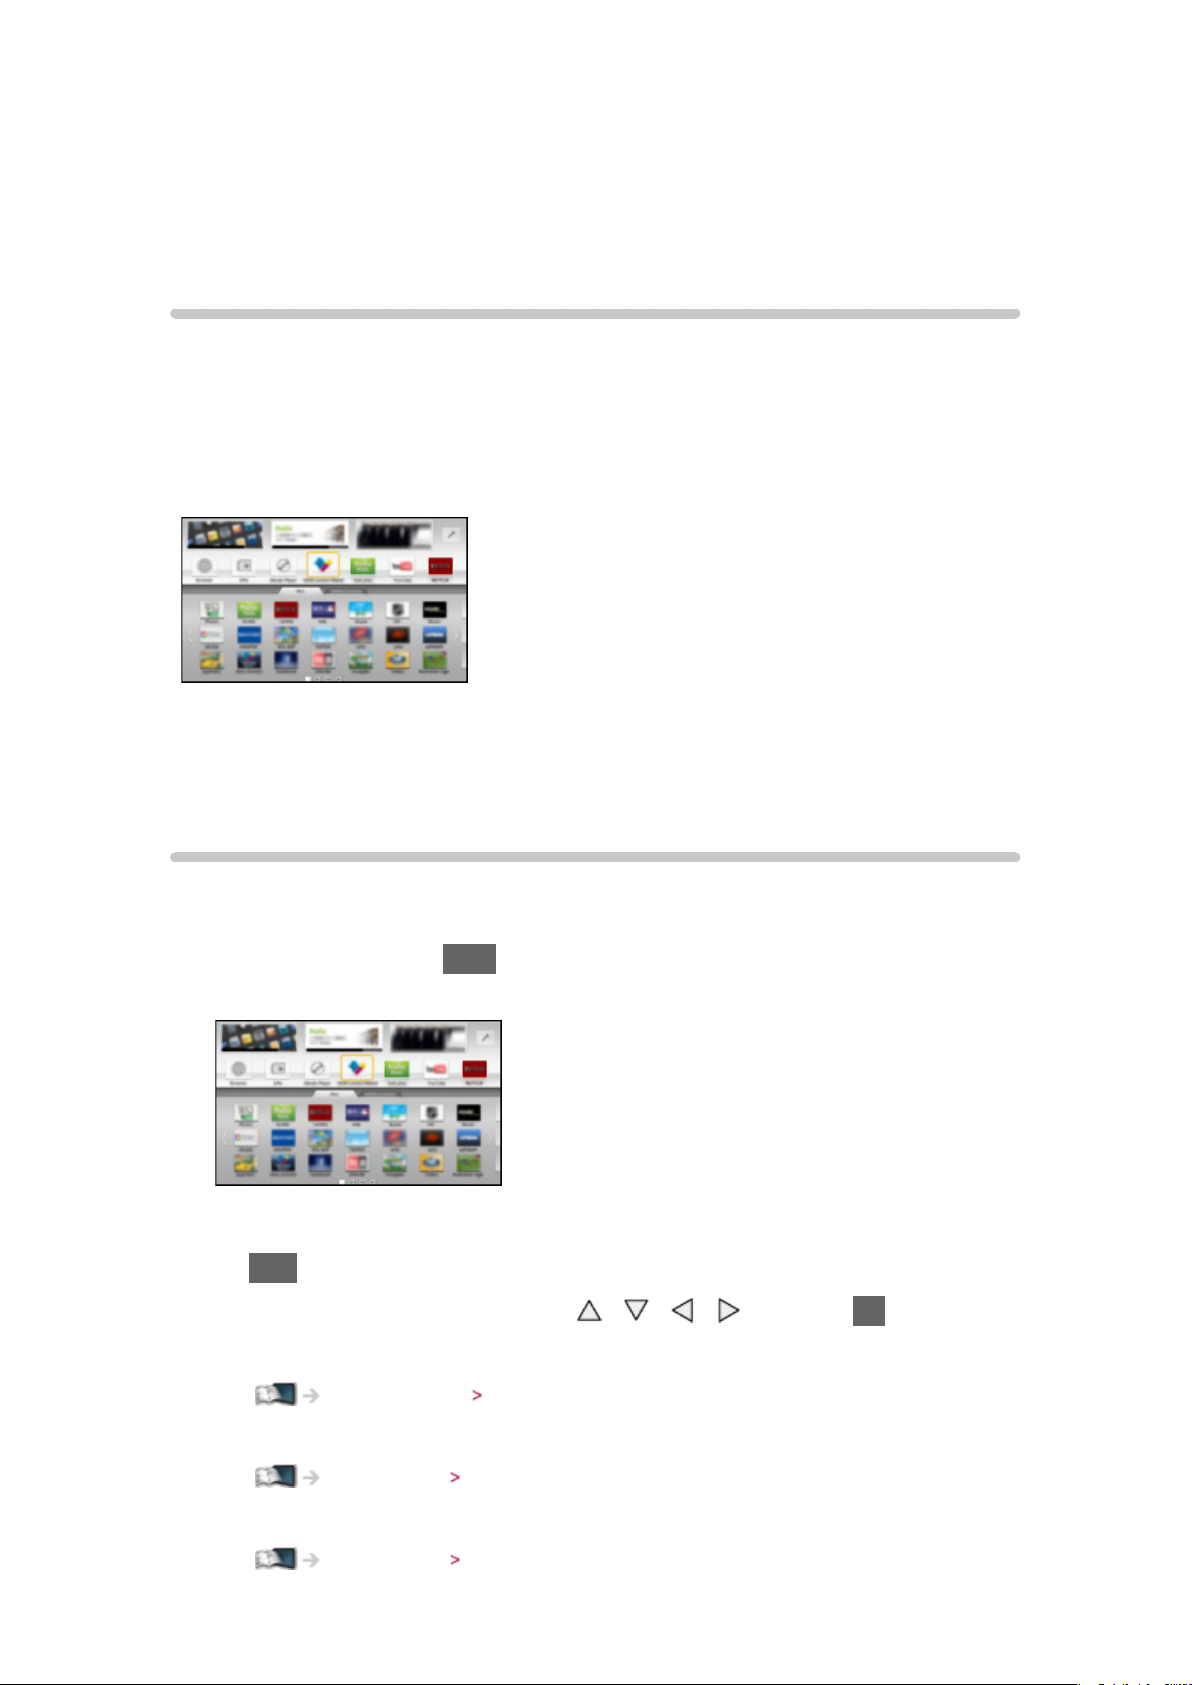
Functions
APPS list
Information
Various applications (internet contents, network contents, Media Player, etc.)
can be accessed easily from APPS list.
■ APPS list
(Example)
= Note =
●
APPS list is subject to change without notice.
How to use
You can access special features such as internet contents, network contents,
Media Player, etc. from APPS list.
1. Display APPS list with APPS
(Example)
●
To exit APPS list
EXIT
2. Select an icon of the features with
/ / / and press OK to access
Internet contents
Internet service Internet content
Photo
Media Player Photo mode
Video
Media Player Video mode
- 98 -
Page 99
Music
Media Player Music mode
Media Server
Home network DLNA Using DLNA
VIERA Link
Functions VIERA Link “HDAVI Control™”
Settings
You can set up APPS list manually. (For example, screen settings, account
information, restriction, etc.)
1. Display APPS list with APPS
2. Select the setup menu on APPS list with
/ / / and press OK to
access
3. Follow the on-screen instructions
= Note =
●
Setup menu items may be change without notice
VIERA Link “HDAVI Control™”
Summary of VIERA Link
Enjoy additional HDMI Inter-Operability with Panasonic products which have
“HDAVI Control™” function.
VIERA Link (HDAVI Control) connects the TV and the equipment with VIERA
Link function, and enables easy control, playback, energy saving, creating
home theatre, etc., without complicated settings. Connections to the
equipment (DIGA Recorder, HD Video Camera, Player theatre, Amplifier, etc.)
with HDMI and SCART cables allow you to interface them automatically. These
features are limited to models incorporating “HDAVI Control” and “VIERA
Link”.
●
This TV supports “HDAVI Control 5” function.
●
Some functions are not available depending on the equipment’s version
of HDAVI Control. Confirm the connected equipment’s version of HDAVI
Control.
●
VIERA Link features may be available even with other manufacturers’
equipment supporting HDMI CEC.
●
VIERA Link “HDAVI Control” is a unique function that we have developed
and added based on the control functions provided by HDMI which is an
industry standard known as HDMI CEC (Consumer Electronics Control). As
- 99 -
Page 100
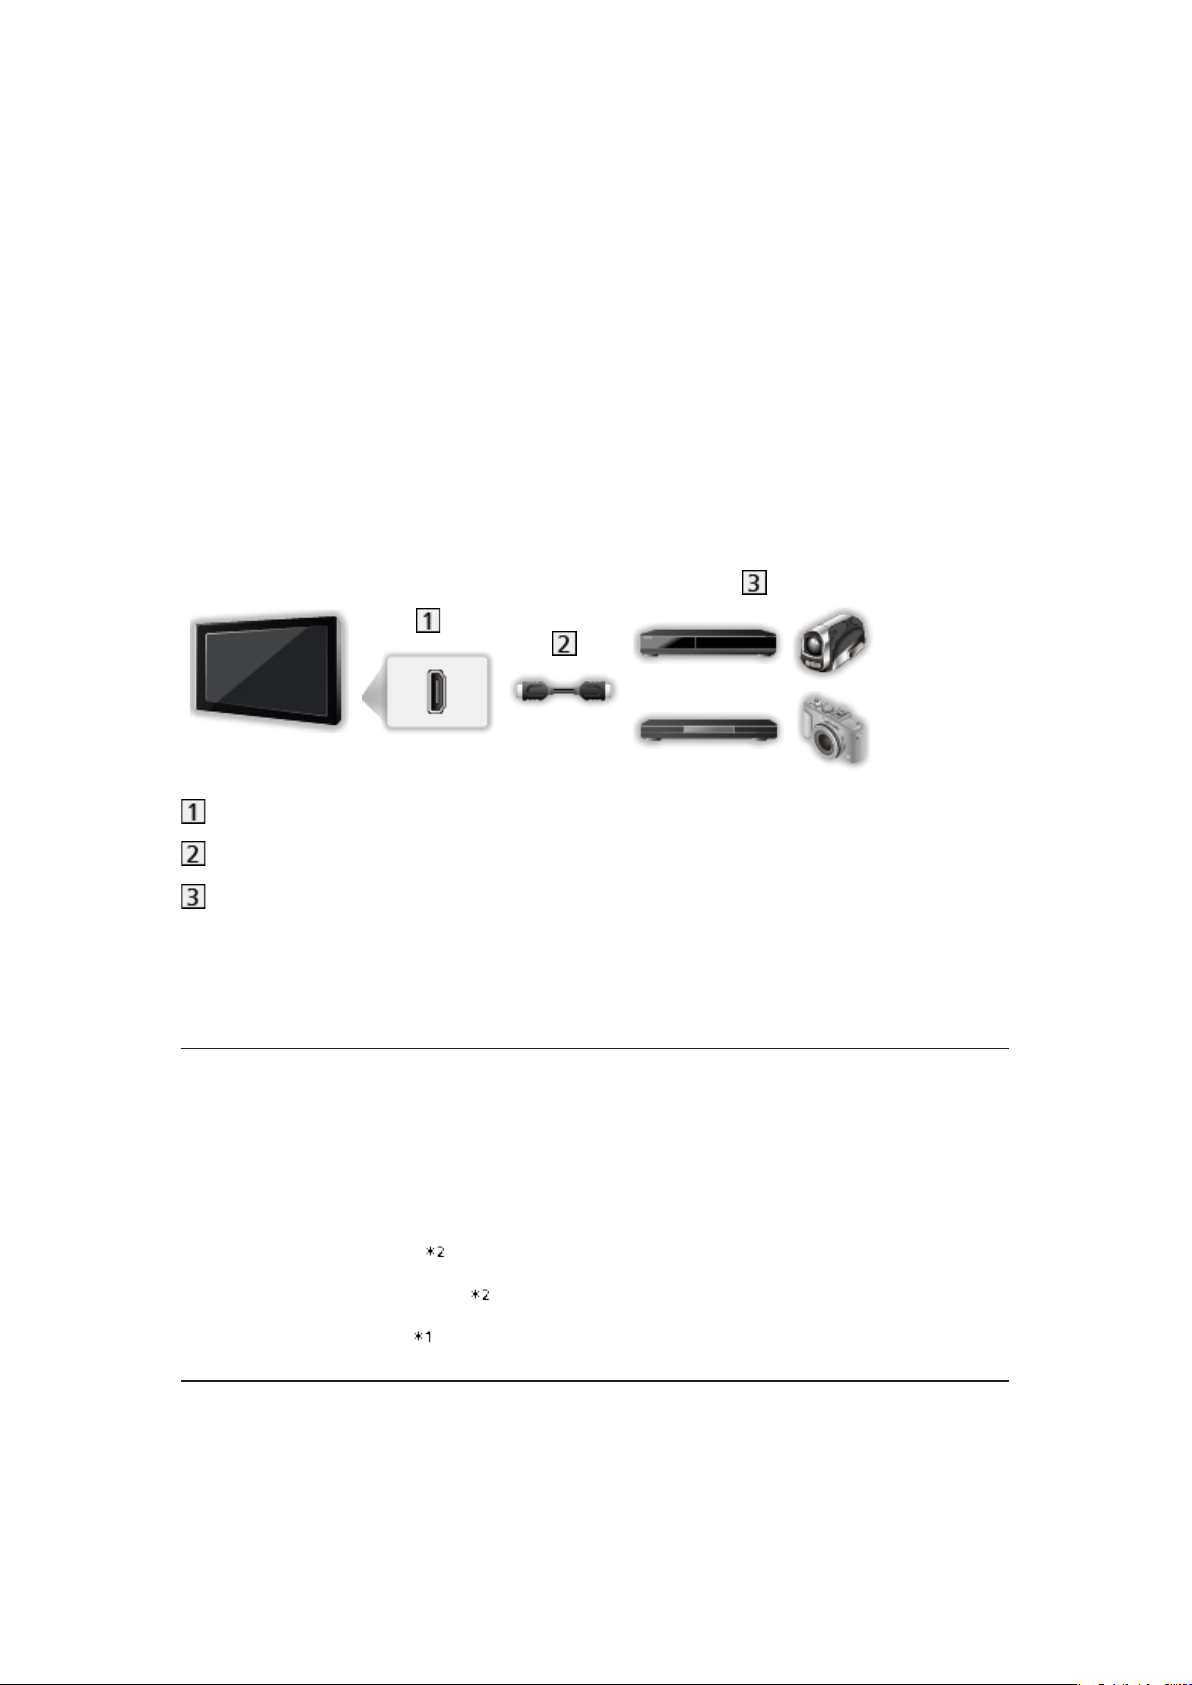
such, its operation with other manufacturers’ product that supports HDMI
CEC cannot be guaranteed.
●
Please refer to individual manuals for other manufacturers’ product
supporting VIERA Link function.
●
About applicable Panasonic product, consult your local Panasonic dealer.
■ VIERA Link (HDMI connection)
●
Use a fully wired HDMI compliant cable.
●
Connect the equipment supporting VIERA Link to the TV’s HDMI terminal
via an HDMI cable.
About HDMI cable for connecting Panasonic HD Video Camera or LUMIX
Camera, read the manual of the equipment.
HDMI terminal
HDMI cable
Equipment with VIERA Link function (DIGA Recorder / DVD Player / Blu-ray
Disc Player / HD Video Camera / LUMIX Camera)
■ Available features (HDMI connection)
DIGA Recorder / DVD Player / Blu-ray Disc Player
●
Easy playback
●
Power on link
●
Power off link
●
Standby Power Save
●
Intelligent Auto Standby
●
VIERA Link Control
HD Video Camera / LUMIX Camera
●
Easy playback
●
Power on link
●
Power off link
- 100 -
 Loading...