

Panasonic TX-77EZW1004, TX-65EZC954, TX-65EZW1004, TX-55EZW954, TX-55EZC954 Operating Instructions
...Page 1

TX-65EZC1004 TX-77EZC1004
TX-55EZC954 TX-65EZC954
TX-65EZW1004 TX-77EZW1004
TX-55EZW954 TX-65EZW954
English
e
HELP
Page 2

Read first
Before use
•Licence 13
Features
•4K resolution 16
•Home Screen 17
•Info Frame 18
•Touch Pad Controller 19
•TV Anywhere 20
•DVB-via-IP 21
•Dual Tuner 22
•Easy Mirroring 23
Home Screen
Home Screen
•Information 24
•How to use 26
•Pin to HOME 27
•Option menu 28
Live TV
•How to use 29
•Option menu 30
Apps
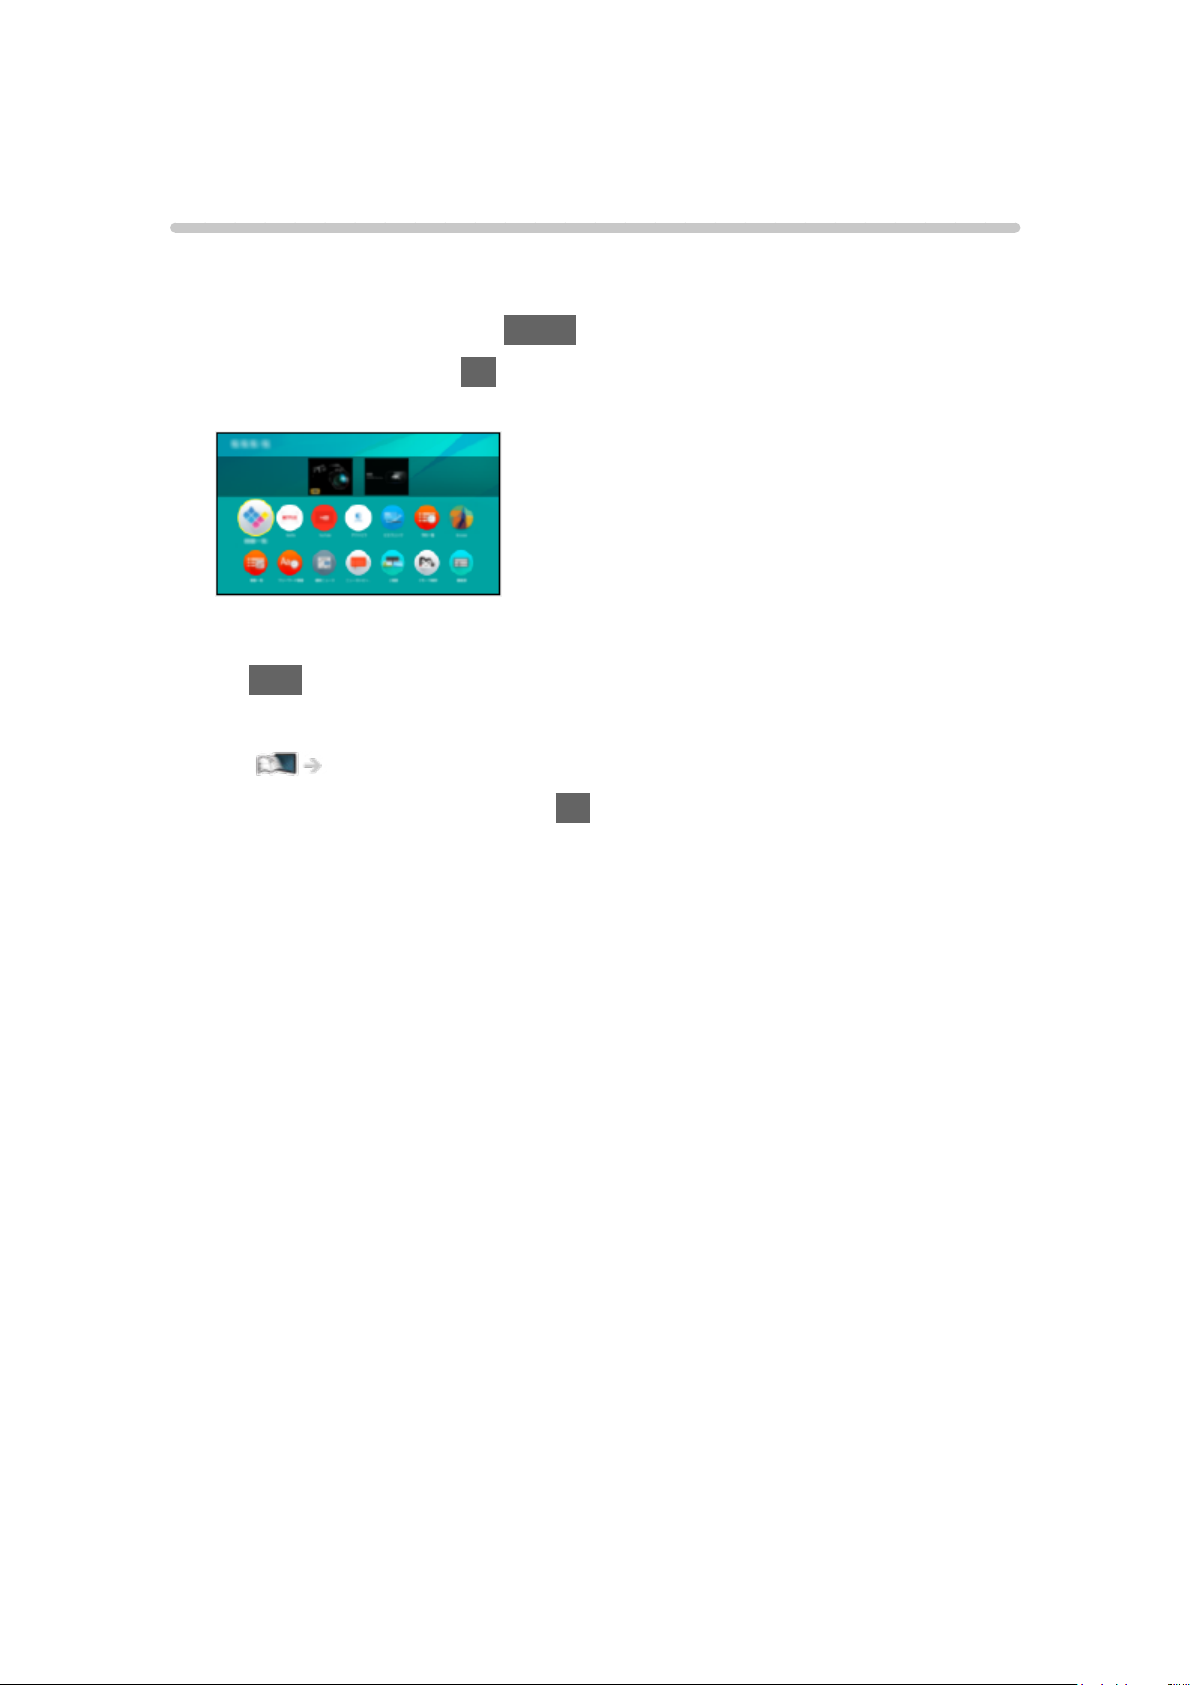
•How to use 31
•My App 32
•Option menu 33
Devices
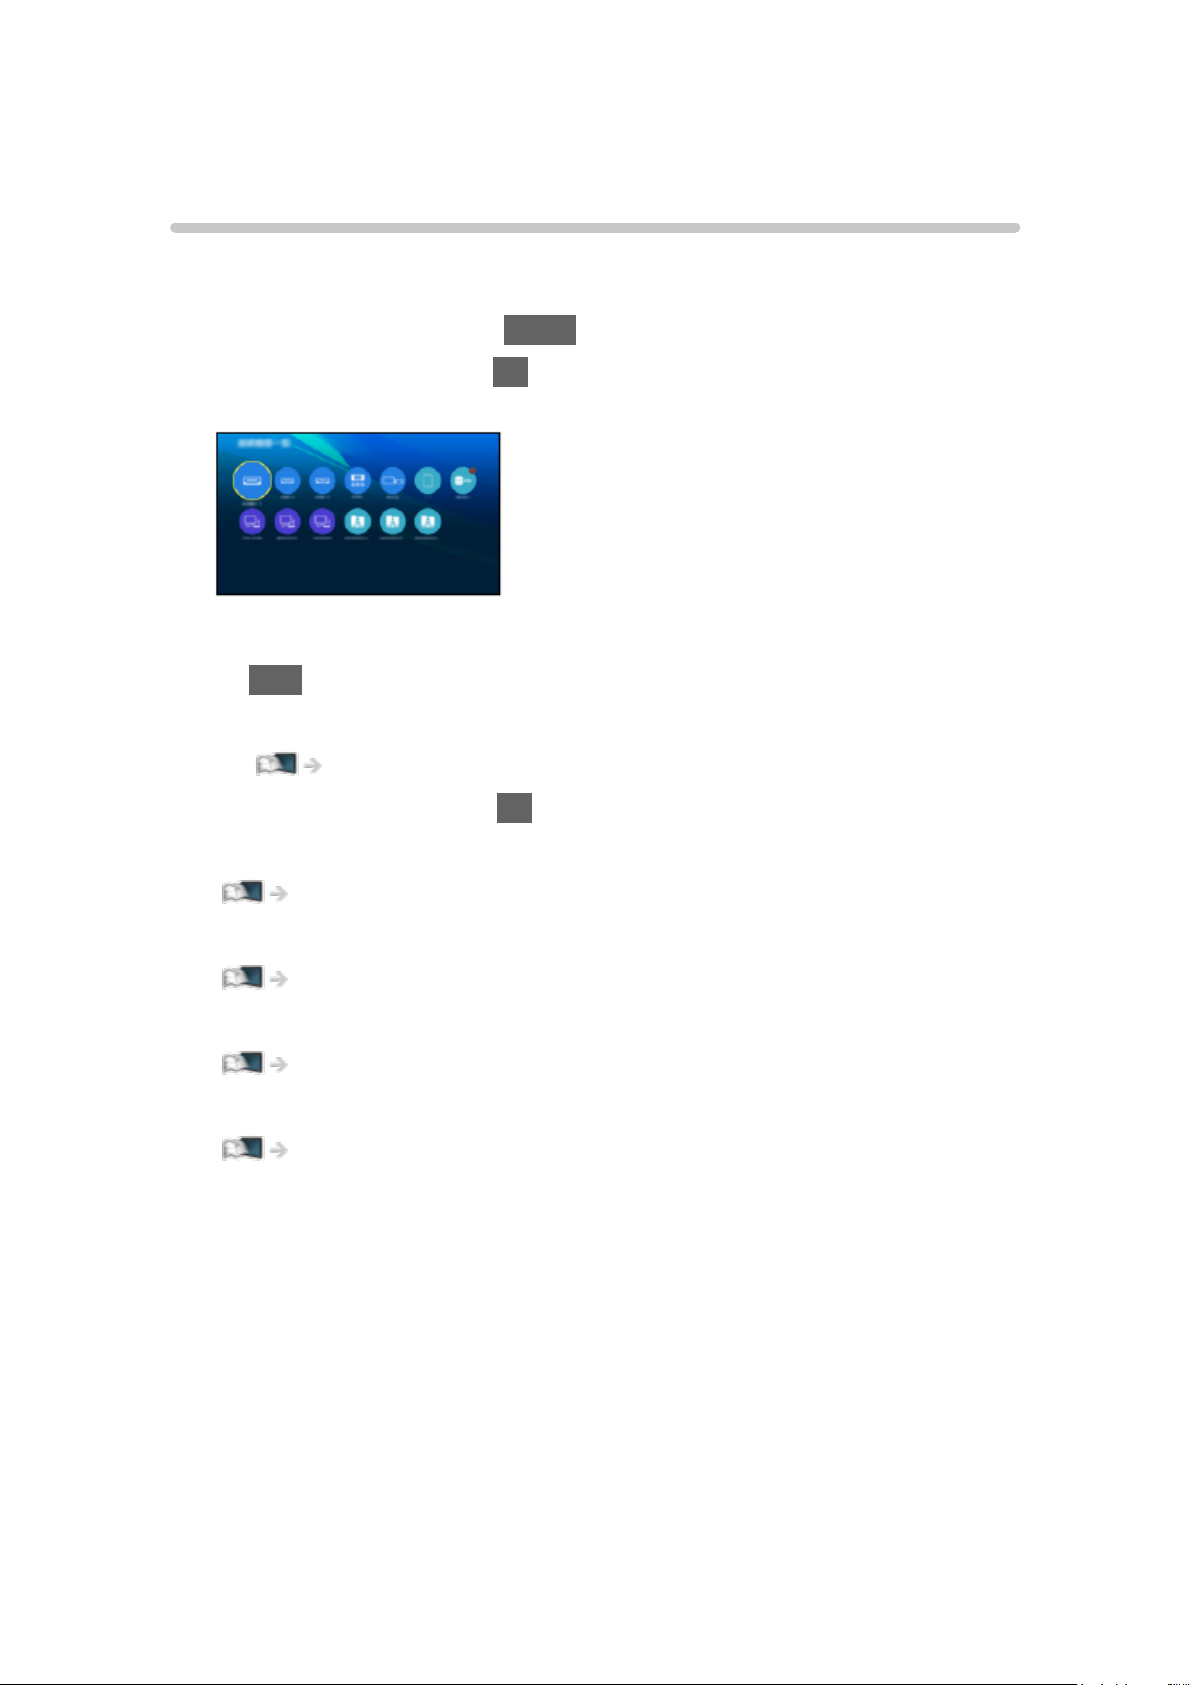
•How to use 34
•Option menu 35
Watching
Basic
•Satellite connection 36
- 2 -
Page 3

•Basic connection 38
•Selecting channel 40
•Information banner 42
•AV Options 45
•Subtitle 48
•Last view 49
•Off Timer 50
•Energy saving functions 51
•Adjusting time 53
•Language 54
4K resolution
•4K compatible equipment 55
•HDMI Auto Setting 56
•Valid 4K format 57
External equipment
•External connection 58
•Watching external input 61
•Operating with TV’s remote control 63
•HDMI features 65
•HDMI HDR Setting 67
•Valid input signals 68
For best picture
•Viewing Mode 69
•Ambient Sensor 71
•Aspect 72
•Aspect Control Signal 73
•Basic settings 75
•Noise reduction settings 78
•Advanced Settings 79
•Option Settings 84
•Screen Settings 88
•Lock Settings 90
•Copy Adjustment 91
- 3 -
Page 4

For best audio
•Sound mode 92
•Basic settings 93
•Volume settings 95
•Voice Guidance Settings 97
•Audio Description 99
•Advanced settings 100
TV Guide
•Using TV Guide 103
•Timer Programming 106
Teletext
•Viewing Teletext 108
•Teletext mode 110
•Teletext Character Set 111
Tuning and editing channels
•Setting menu 112
•Channel List Editor 113
•Favourites Editor 116
•Auto Setup 118
•Manual Tuning 122
•Update Channel List 125
•Signal Condition 126
•Other settings 127
•Selectable satellites 128
Recording
USB HDD setup
•Preparations 129
•Setting for USB HDD 131
Recording current programme
•One Touch Recording 133
•REW LIVE TV 134
- 4 -
Page 5

Timer Programming
•Setting Timer Programming 136
•Editing Timer Programming 138
•Remote recording 139
•Note 140
Technical information
•USB HDD 141
Media Player
Using Media Player
•Information 142
•Selecting device / mode 145
•Network device 147
•Sharing file 148
Easy List View
•Selecting file 149
•Filtering files 151
Mix Folder View
•Selecting file 152
•Filtering files 154
•Sorting files 155
Playback
•Playback 156
•Slideshow Settings 158
•Video Setup 160
•Audio output settings 161
Recorded TV mode
•Selecting content 162
•Watching recorded TV 163
•Grouping content 165
•Deleting content 166
•Chapter List 167
•Audio output settings 168
- 5 -
Page 6

Connected device
•Device handling caution 169
•SD Card 170
•USB devices 171
Supported format
•Photo format 172
•Video format 173
•Music format 176
Network
Internet content
•Information 177
•Selecting internet content 178
•Note 179
DLNA
•In-House streaming 180
•Using DLNA 182
Network connections
•Internet connection 183
•DLNA connection 184
•Note 186
Network settings
•Network Connection 187
•Custom - Wireless 189
•Custom - Wired 192
•Custom - Wireless Access Point 194
•Network Status 195
•my Home Cloud Settings 196
•VIERA Name 197
•TV Remote App Settings 198
•Network Link Settings 200
•DVB-via-IP Server Settings 202
•TV Anywhere Settings 203
- 6 -
Page 7

•File Sharing Settings 204
•Mirroring Settings 205
•Control4 Settings 206
•Software Update 207
•New Software Message 208
Photos
•Selecting file 209
•Viewing photo 210
•Using Slideshow 211
Videos
•Selecting file 212
•Watching video 213
•Video Setup 215
•Audio output settings 217
Music
•Selecting file 218
•Playing music 219
•Music Setup 220
Supported format
•Photo format 221
•Video format 222
•Music format 225
Functions
Info Frame
•Information 226
•How to use 227
•Settings 228
Voice Control
•Information 229
•How to use 230
•Settings 231
•Note 232
- 7 -
Page 8

Touch Pad Controller
•Information 233
•Pairing 234
•Identifying controls 235
•Settings 237
TV Anywhere
•How to use 238
•TV Anywhere Settings 239
Mirroring
•How to use 240
•Mirroring Settings 241
DVB-via-IP
•DVB-via-IP server connection 242
•DVB-via-IP Server Settings 244
•DVB-via-IP client connection 245
•DVB-via-IP Server Selection 247
•Note 248
Multi Window
•Information 249
•Multi Window 250
•Note 252
VIERA Link “HDAVI Control™”
•Summary of VIERA Link 253
•Preparations 258
•Easy playback 259
•Power on Link 260
•Power off Link 261
•Standby Power Save 262
•Intelligent Auto Standby 263
•VIERA Link Control 264
•Speaker Selection 266
•Note 267
- 8 -
Page 9

Child Lock
•Using Child Lock 268
•PIN number 269
•Parental Rating 270
Data Service Application
•Using Data Service Application 271
•Privacy Setting 272
•Note 273
Common Interface
•Caution 274
•Using Common Interface 275
Shipping Condition
•Shipping Condition 276
Updating the TV Software
•Information 277
•Auto update 278
•Manual update 279
Setting characters
•Using Numeric buttons 280
Bluetooth devices
•Bluetooth Setup 281
Keyboard
•Keyboard 282
Settings
Setting menu
•How to use 283
Picture
•Viewing Mode 285
•Basic settings 286
•Ambient Sensor 288
•Noise reduction settings 289
- 9 -
Page 10

•Advanced Settings 290
•Option Settings 291
•Screen Settings 293
•Lock Settings 294
•Copy Adjustment 295
•Reset to Defaults 296
Sound
•Mode 297
•Basic settings 298
•Volume settings 299
•Voice Guidance Settings 300
•Audio Description 301
•Advanced settings 302
•Reset to Defaults 303
Network
•Network Connection 304
•Network Status 305
•my Home Cloud Settings 306
•VIERA Name 307
•TV Remote App Settings 308
•Network Link Settings 309
•DVB-via-IP Server Settings 310
•TV Anywhere Settings 3 11
•File Sharing Settings 312
•Mirroring Settings 313
•Control4 Settings 314
•Other settings 315
Timer
•Off Timer 316
•Timer Programming 317
•Time Zone 318
•Auto Standby 319
•No signal Power off 320
- 10 -
Page 11

Setup
•Eco Navigation 321
•Voice Control Settings 322
•USB Device Setup 323
•Recording Setup 324
•VIERA Touch Pad Controller 325
•Bluetooth Setup 326
•Child Lock 327
•Tuning Menu 328
•Language 330
•Display Settings 331
•HDMI Auto Setting 333
•HDMI HDR Setting 334
•Common Interface 335
•VIERA Link Settings 336
•Data Service Application 337
•System Menu 338
•Other Settings 339
Support
Help menu
•Using Help menu 340
FAQs
•Picture 341
•Digital TV 343
•Analogue TV 345
•Sound 346
•HDMI 347
•Network 348
•Other 350
•Detailed information 352
Maintenance
•Care and Cleaning 353
- 11 -
Page 12
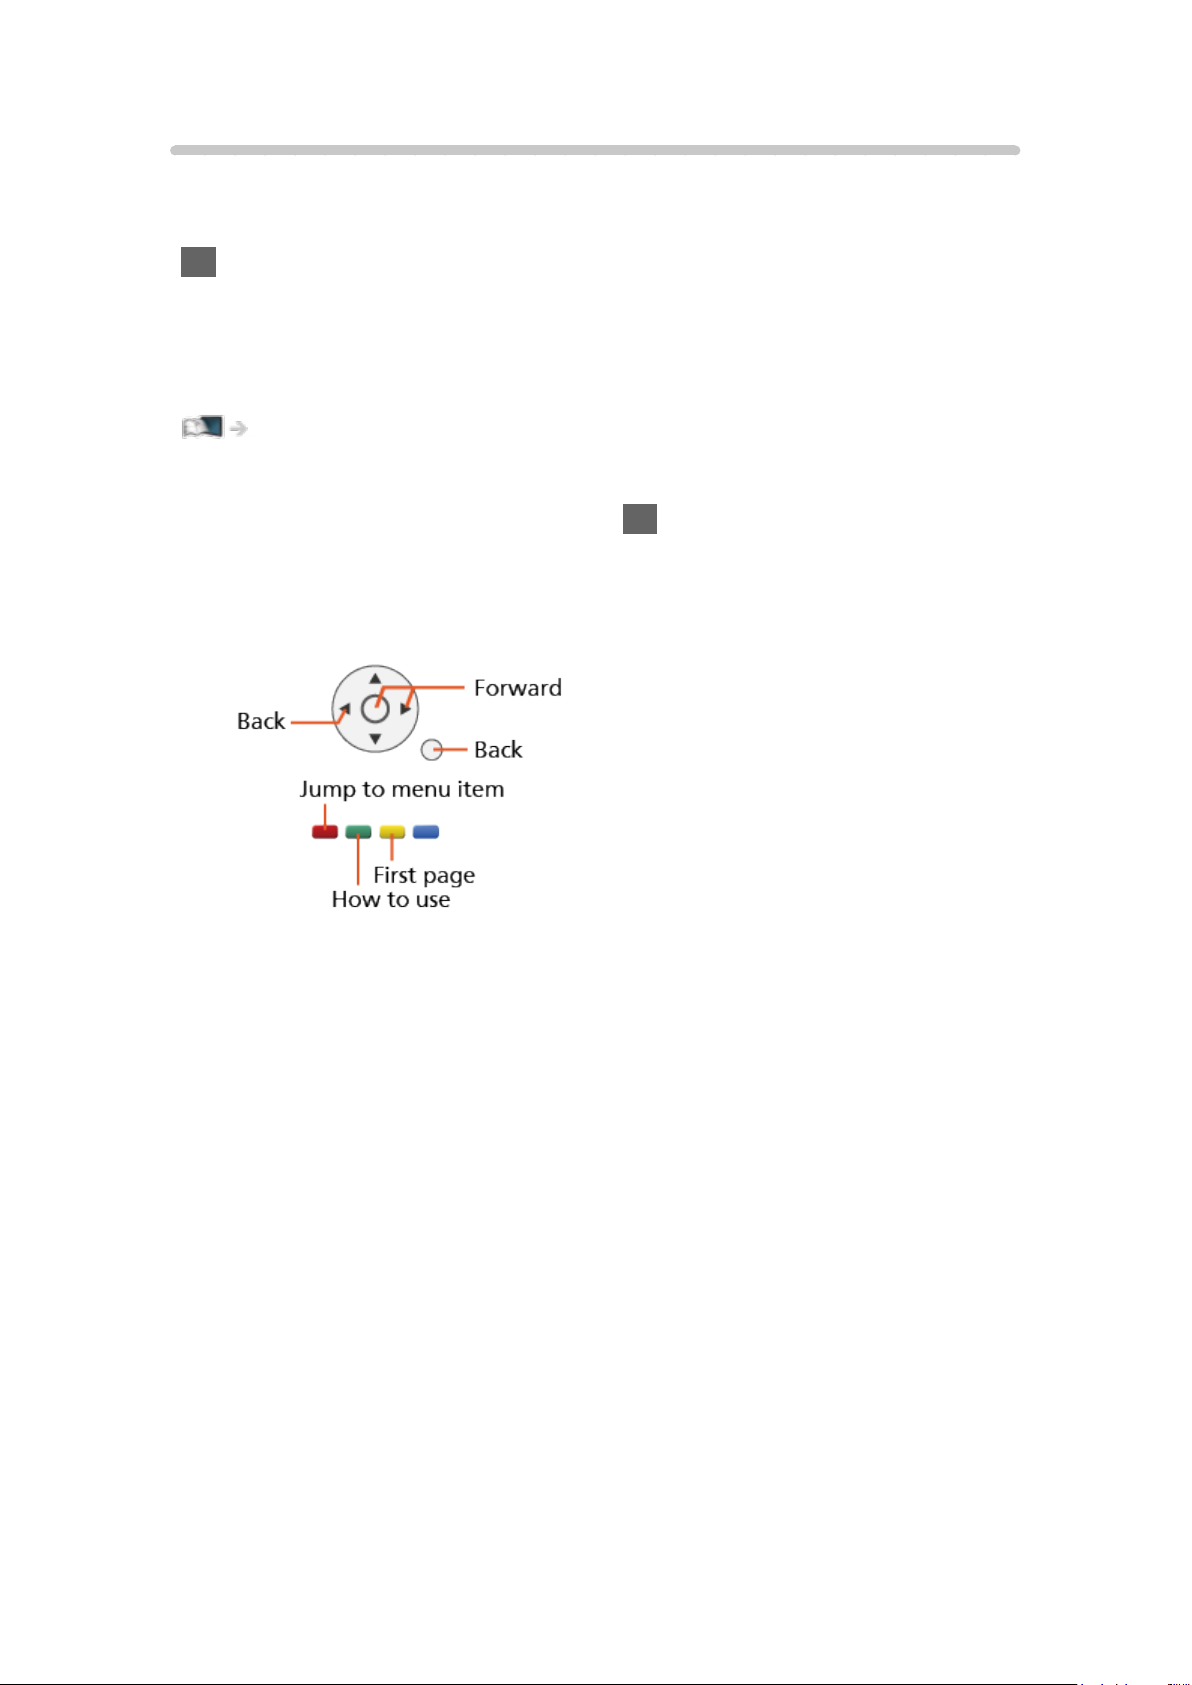
How to use
■ Meaning of signs
OK :
Letters enclosed in brackets indicate remote control buttons.
Menu :
Letters in cyan indicate on-screen display items.
:
References in this eHELP
You can jump to the page by pressing OK while the cursor is on the
references.
■ Operation guide
= Note =
●
Design and specifications are subject to change without notice.
●
The images shown in this eHELP are for illustrative purposes only.
●
This eHELP covers all models, however, some features may not be
available on certain models.
●
Refer to the paper manual and the actual menu in the TV etc. to confirm
your model’s features.
- 12 -
Page 13

Read first
Before use
Licence
Even if no special notation has been made of company or product
trademarks, these trademarks have been fully respected.
DVB and the DVB logos are trademarks of the DVB Project.
DiSEqC™ is a trademark of EUTELSAT.
THX and the THX logo are trademarks of THX Ltd., registered in the United
States and other countries.
®
The Bluetooth
Bluetooth SIG, Inc. and any use of such marks by Panasonic Corporation
is under license. Other trademarks and trade names are those of their
respective owners.
word mark and logos are registered trademarks owned by
SDXC Logo is a trademark of SD-3C, LLC.
“AVCHD” and “AVCHD Progressive” are trademarks of Panasonic Corporation
and Sony Corporation.
®
DLNA
marks, or certification marks of the Digital Living Network Alliance.
The terms HDMI and HDMI High-Definition Multimedia Interface, and the
HDMI Logo are trademarks or registered trademarks of HDMI Licensing
Administrator, Inc. in the United States and other countries.
x.v.Colour™ is a trademark.
HDAVI Control™ is a trademark of Panasonic Corporation.
, the DLNA Logo and DLNA CERTIFIED™ are trademarks, service
- 13 -
Page 14

Manufactured under license from Dolby Laboratories.
Dolby, Dolby Audio, and the double-D symbol are trademarks of Dolby
Laboratories.
Speech Powered by Dragon
2002-2017 Nuance Communications, Inc. All rights reserved.
“PlayReady” is a trademark registered by Microsoft. Please be aware of the
following.
(a) This product contains technology subject to certain intellectual property
rights of Microsoft. Use or distribution of this technology outside of this
product is prohibited without the appropriate license(s) from Microsoft.
(b) Content owners use Microsoft PlayReady™ content access technology to
protect their intellectual property, including copyrighted content. This device
uses PlayReady technology to access PlayReady-protected content and/or
WMDRM-protected content. If the device fails to properly enforce restrictions
on content usage, content owners may require Microsoft to revoke the
device’s ability to consume PlayReady-protected content. Revocation should
not affect unprotected content or content protected by other content access
technologies.
Content owners may require you to upgrade PlayReady to access their
content.
If you decline an upgrade, you will not be able to access content that requires
the upgrade.
Firefox
®
OS is a registered trademark of the Mozilla Foundation.
This product incorporates the following software:
(1) the software developed independently by or for Panasonic Corporation,
(2) the software owned by third party and licensed to Panasonic Corporation,
(3) Firefox OS is powered by Mozilla,
(4) the software licensed under the GNU GENERAL PUBLIC LICENSE
Version 2.0 (GPL V2.0),
(5) the software licensed under the GNU LESSER GENERAL PUBLIC
LICENSE Version 2.1 (LGPL V2.1), and/or,
(6) open source software other than the software licensed under the GPL
V2.0 and/or LGPL V2.1.
- 14 -
Page 15

About the software categorized as (3), please refer to the “About Firefox OS”
menu on this product.
The software categorized as (4) - (6) are distributed in the hope that it will be
useful, but WITHOUT ANY WARRANTY, without even the implied warranty of
MERCHANTABILITY or FITNESS FOR A PARTICULAR PURPOSE. Please
refer to the detailed terms and conditions thereof shown in the “Software
Licence” menu on this product.
At least three (3) years from delivery of this product, Panasonic will give to
any third party who contacts us at the contact information provided below,
for a charge no more than our cost of physically performing source code
distribution, a complete machine-readable copy of the corresponding source
code covered under GPL V2.0, LGPL V2.1 or the other licenses with the
obligation to do so, as well as the respective copyright notice thereof.
Contact Information: [email protected]
The source code and the copyright notice are also available for free in our
website below.
http://www.unipf.jp/dl/EUIDTV17/
- 15 -
Page 16

Features
4K resolution
You can watch content in 4K format that has twice the horizontal and vertical
resolution of the 1080p signal.
Watching > 4K resolution > 4K compatible equipment
- 16 -
Page 17

Home Screen
“Home Screen” is a gateway to the TV programmes, applications and
connected devices.
It provides you an easy way to access all the features.
Home Screen > Home Screen > Information
- 17 -
Page 18

Info Frame
Info Frame is a convenient feature to provide you relevant information of the
programme being watched, recommendations, etc. It is displayed on the edge
of screen when you need it.
Functions > Info Frame > Information
- 18 -
Page 19

Touch Pad Controller
The Touch Pad Controller is designed for convenient and intuitive operation of
applications and internet content.
Functions > Touch Pad Controller > Information
- 19 -
Page 20

TV Anywhere
You can watch TV and set timer event with the network equipment
(smartphone, etc.) from outside the home network.
●
Due to network conditions or certain broadcaster restrictions, this function
may not be available.
Functions > TV Anywhere > How to use
- 20 -
Page 21

DVB-via-IP
This TV can be configured as a DVB-via-IP server to provide broadcast
streaming to another TV supporting DVB-via-IP client function or SAT>IP
compatible devices.
Functions > DVB-via-IP > DVB-via-IP server connection
This TV has DVB-via-IP client function and can connect to DVB-via-IP server
or SAT>IP compatible servers to receive broadcast streaming.
Functions > DVB-via-IP > DVB-via-IP client connection
- 21 -
Page 22

Dual Tuner
You can watch or record 2 programmes simultaneously, watch a programme
while recording another programme, etc.
Functions > Multi Window > Multi Window
- 22 -
Page 23

Easy Mirroring
You can watch and display images of other devices (smartphone, etc.) on the
TV screen using a mirroring function. You can also start the mirroring function
from the other devices without operating the TV.
Functions > Mirroring > How to use
- 23 -
Page 24
Home Screen
Home Screen
Information
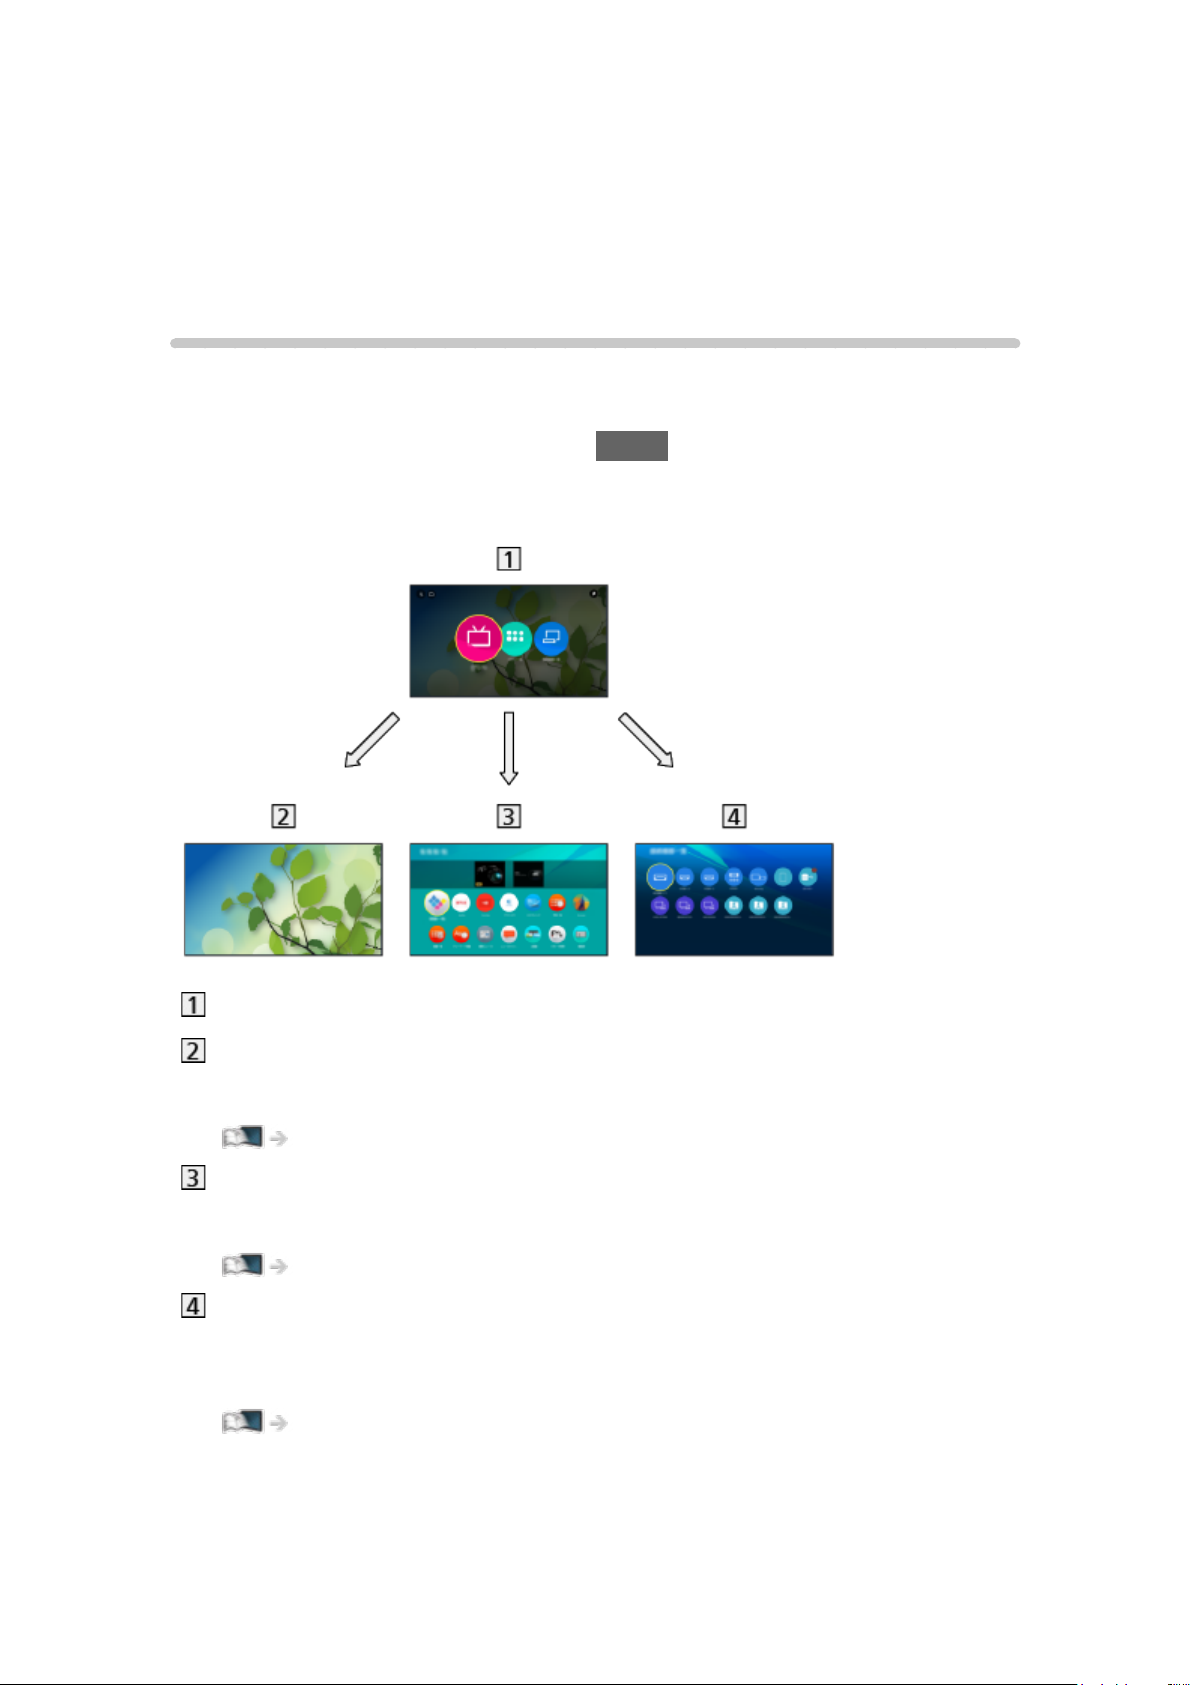
“Home Screen” is a gateway to the TV programmes, applications and
connected devices.
Home Screen is displayed by pressing HOME and it provides you an easy
way to access all the features as shown below (example).
Home Screen
Live TV
– Gateway to TV programmes
Home Screen > Live TV
Apps
– Gateway to various applications (internet content, etc.)
Home Screen > Apps
Devices
– Gateway to connected devices (HDMI equipment, USB device, network
device, etc.)
Home Screen > Devices
- 24 -
Page 25

= Note =
●
Be sure to update the software when a software update notice is displayed
on the TV screen. If the software is not updated, you may not be able to
use Home Screen. You can update the software later manually.
Network > Network settings > Software Update
- 25 -
Page 26
How to use
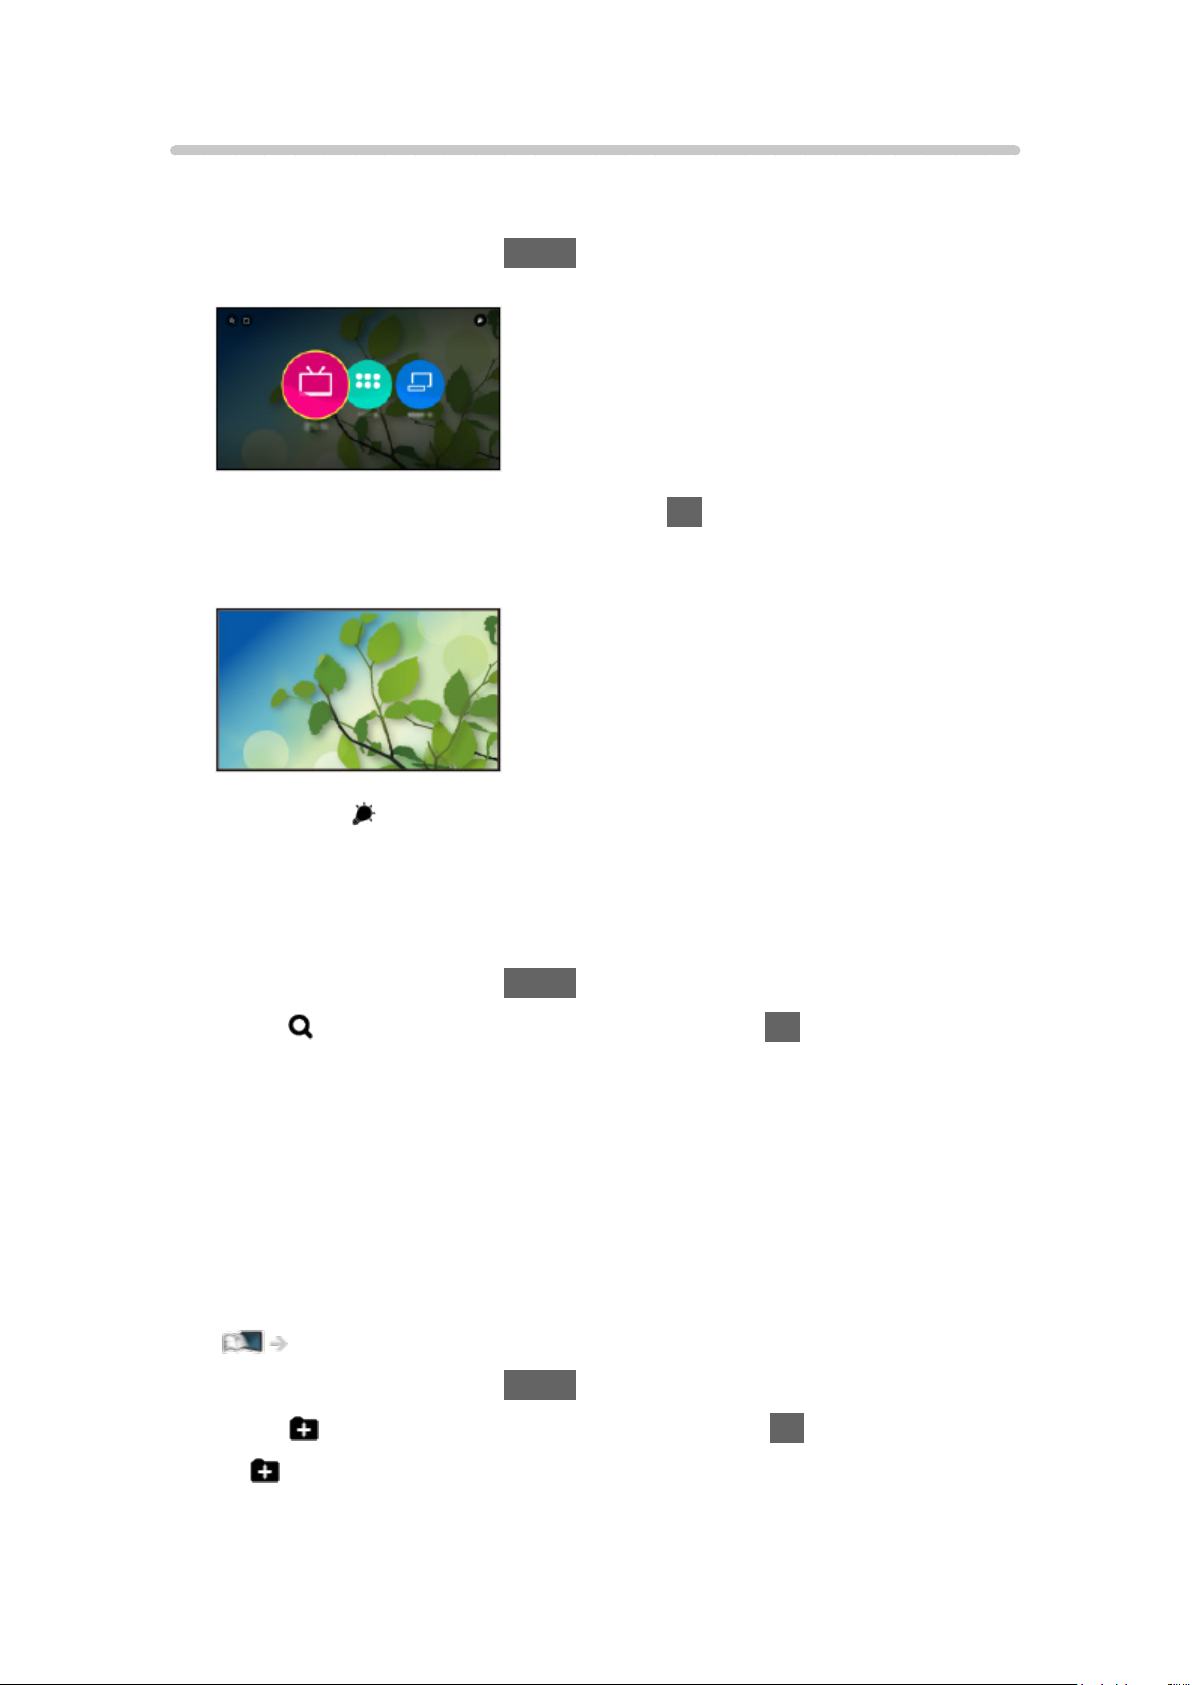
From Home Screen, you can access all the features such as TV programmes,
applications and connected devices.
1. Display Home Screen with HOME.
(Example)
2. Select Live TV / Apps / Devices and press OK to access.
●
To watch full-screen TV, select Live TV.
(Example)
●
Also refer to on the top right of Home Screen for the operations.
■ Search
You can search for content from various sources.
1. Display Home Screen with HOME.
2. Select
3. Follow the on-screen instructions.
on the top left of Home Screen and press OK to access.
■ My Folder
You can create a folder to store your favourite shortcut icons (TV programme
/ application / device) on Home Screen. Up to 9 shortcuts can be registered in
a folder.
●
To add a shortcut icon
Home Screen > Home Screen > Pin to HOME
1. Display Home Screen with HOME.
2. Select
●
3. Follow the on-screen instructions.
on the top left of Home Screen and press OK to access.
is not displayed while no shortcut icon is added on Home Screen.
- 26 -
Page 27

Pin to HOME
You can add a shortcut for a frequently used feature on Home Screen.
1. Display Home Screen with HOME.
2. Select Live TV / Apps / Devices and press OK to access.
3. Select a feature (TV programme / application / device).
4. Display the option menu with OPTION.
5. Select Pin to HOME and press OK to set.
●
To remove a shortcut from Home Screen, set Unpin from HOME.
Home Screen > Home Screen > Option menu
- 27 -
Page 28

Option menu
You can customise Home Screen.
1. Display the option menu with OPTION.
2. Select one of the following items and press OK to access.
Unpin from HOME / Move / Edit folder
3. Set the item and press OK to store.
Unpin from HOME
Removes a shortcut from Home Screen.
Move
Arranges the position of the icons.
Edit folder
Edits the folder for the favourite shortcut icons (TV programme / application /
device) and the folder name.
●
Select the folder name on the top right of the screen and press OK to edit
the name.
- 28 -
Page 29
Live TV
How to use
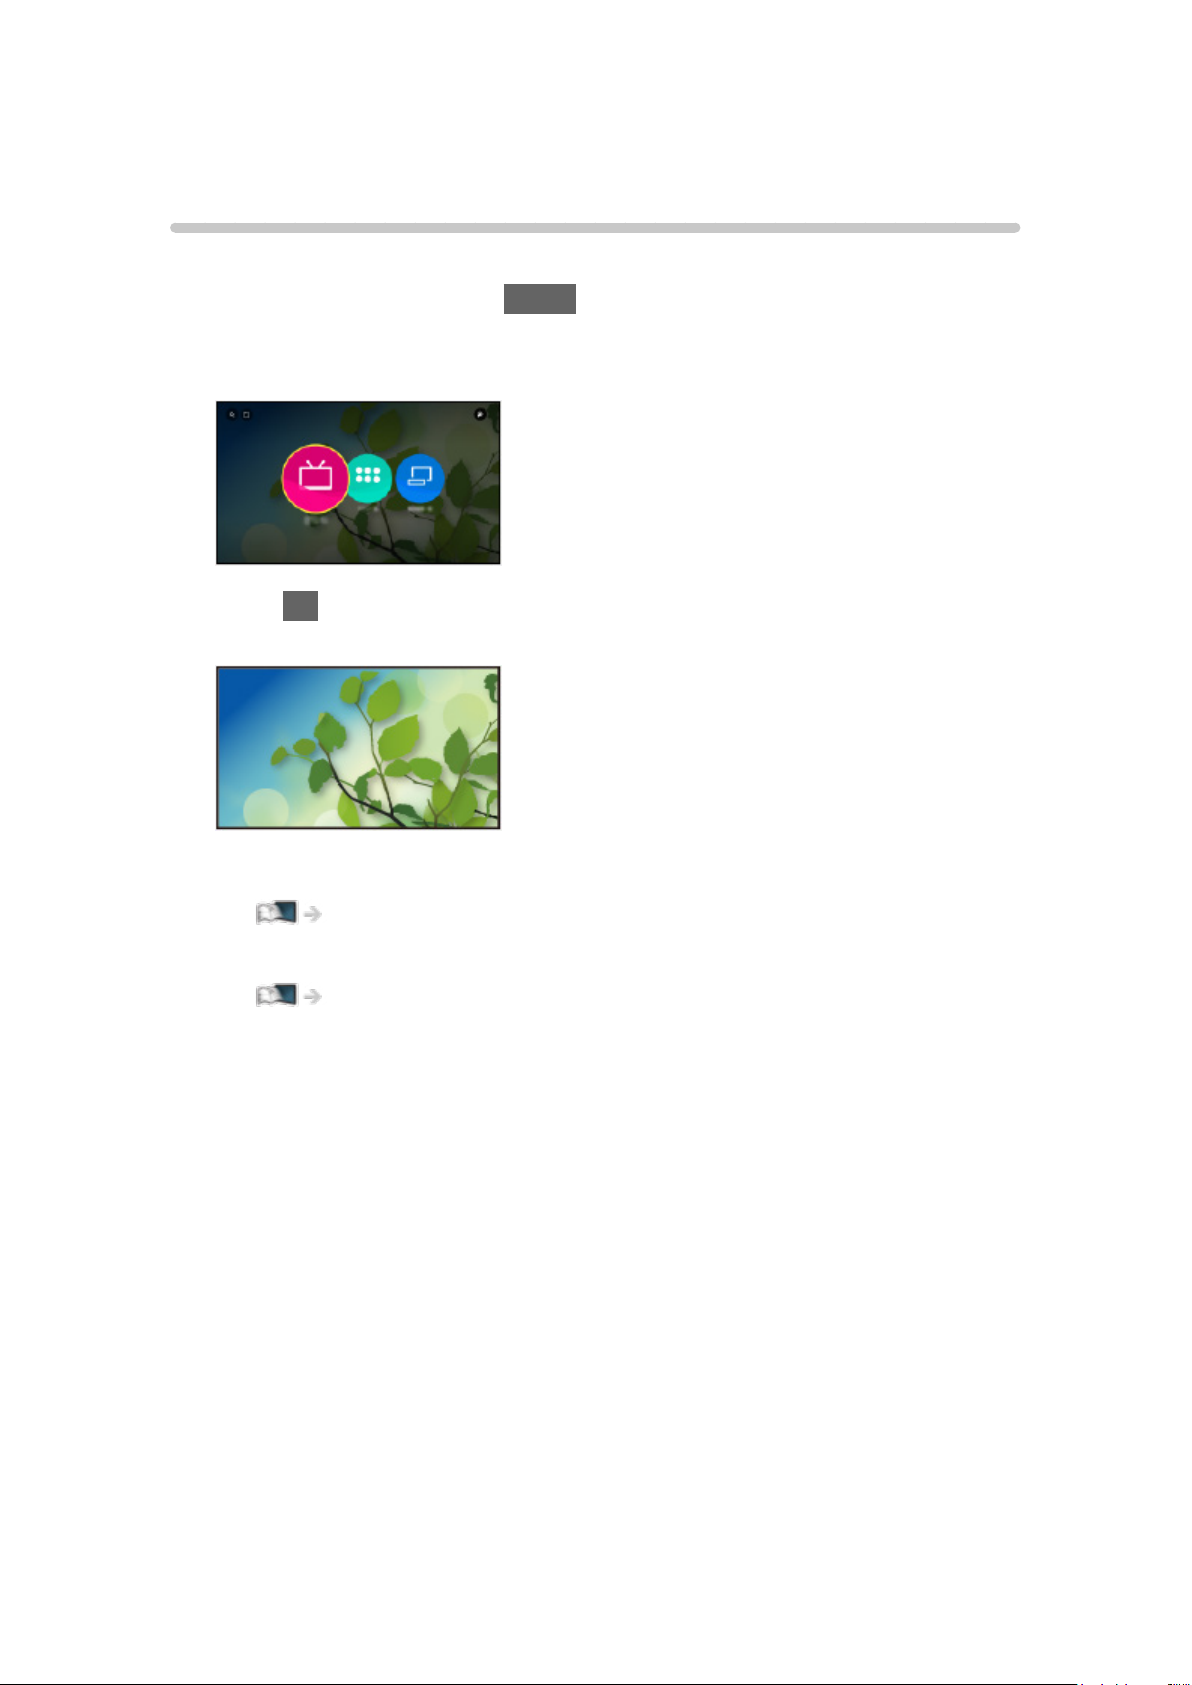
Live TV is a gateway to the TV programmes.
1. Display Home Screen with HOME.
2. Select Live TV.
(Example)
3. Press OK to access.
(Example)
●
For details of watching TV
Watching > Basic
●
To add a shortcut icon
Home Screen > Home Screen > Pin to HOME
- 29 -
Page 30
Option menu
1. Display the option menu with OPTION.
2. Select one of the following items and press OK to access.
Pin to HOME / Accessibility / AV Options
3. Set the item and press OK to store.
Pin to HOME
Adds a shortcut for a frequently used feature on Home Screen.
Home Screen > Home Screen > Pin to HOME
Accessibility
Guidance settings for visually impaired users
Watching > For best audio > Voice Guidance Settings
AV Options
Easy optional setting for viewing, sound, etc.
Watching > Basic > AV Options
●
Menu items and selectable options vary depending on the TV mode.
- 30 -
Page 31
Apps
How to use
Various applications (internet content, etc.) can be accessed easily from
Apps.
1. Display Home Screen with HOME.
2. Select Apps and press OK to access.
(Example)
●
To exit Apps
EXIT
●
To add a shortcut icon
Home Screen > Home Screen > Pin to HOME
3. Select an application and press OK to access.
4. Follow the on-screen instructions.
= Note =
●
A broadband network environment is required to fully use this function.
●
Design and specifications are subject to change without notice.
- 31 -
Page 32

My App
You can assign your favourite application to MY APP of the TV’s remote
control. After setting, you can easily start the application only by pressing
MY APP.
●
Only one application can be assigned to MY APP.
■ To assign an application for the first time
1. Press MY APP to display My App.
2. Select the application to assign and press OK to set.
●
is displayed on the assigned application.
■ To change the application to assign
1. Display Home Screen with HOME.
2. Select Apps and press OK to access.
3. Select My App and press OK to access.
4. Select the application to assign and press OK to set.
- 32 -
Page 33
Option menu
1. Display the option menu with OPTION.
2. Select one of the following items and press OK to access.
Pin to HOME / Move / Lock / Unlock / Uninstall / Show Info.
3. Set the item and press OK to store.
Pin to HOME
Adds a shortcut for a frequently used feature on Home Screen.
Home Screen > Home Screen > Pin to HOME
Move
Arranges the position of the applications.
Lock, Unlock
Locks / unlocks a specific application to restrict access (if available).
●
Child Lock PIN number is required to access to locked application.
Functions > Child Lock > PIN number
Uninstall
Deletes an application from Apps (if available).
Show Info.
Displays the information about the selected application.
- 33 -
Page 34
Devices
How to use
Connected devices (HDMI equipment, USB device, network device, etc.) can
be accessed easily from Devices.
1. Display Home Screen with HOME.
2. Select Devices and press OK to access.
(Example)
●
To exit Devices
EXIT
●
To add a shortcut icon
Home Screen > Home Screen > Pin to HOME
3. Select a device and press OK to access.
●
For external equipment
Watching > External equipment
●
For SD Card, USB device, network device for Media Player
Media Player > Using Media Player
●
For network equipment for DLNA
Network > DLNA
●
For mirroring function
Functions > Mirroring
= Note =
●
Design and specifications are subject to change without notice.
- 34 -
Page 35
Option menu
1. Display the option menu with OPTION.
2. Select one of the following items and press OK to access.
Pin to HOME / Accessibility / Switch to Component / Switch to Video /
Show Info.
3. Set the item and press OK to store.
Pin to HOME
Adds a shortcut for a frequently used feature on Home Screen.
Home Screen > Home Screen > Pin to HOME
Accessibility
Guidance settings for visually impaired users
Watching > For best audio > Voice Guidance Settings
Switch to Component / Switch to Video
You can select COMPONENT and VIDEO in AV.
Show Info.
Displays the information about the selected device.
- 35 -
Page 36
Watching
Basic
Satellite connection
Please ensure that the unit is disconnected from the mains socket before
attaching or disconnecting any cables.
●
External equipment and cables shown are not supplied with this TV.
●
Depending on the model, it may be necessary to remove the terminal
cover / cable cover before connecting or disconnecting cables.
●
For DVB-S
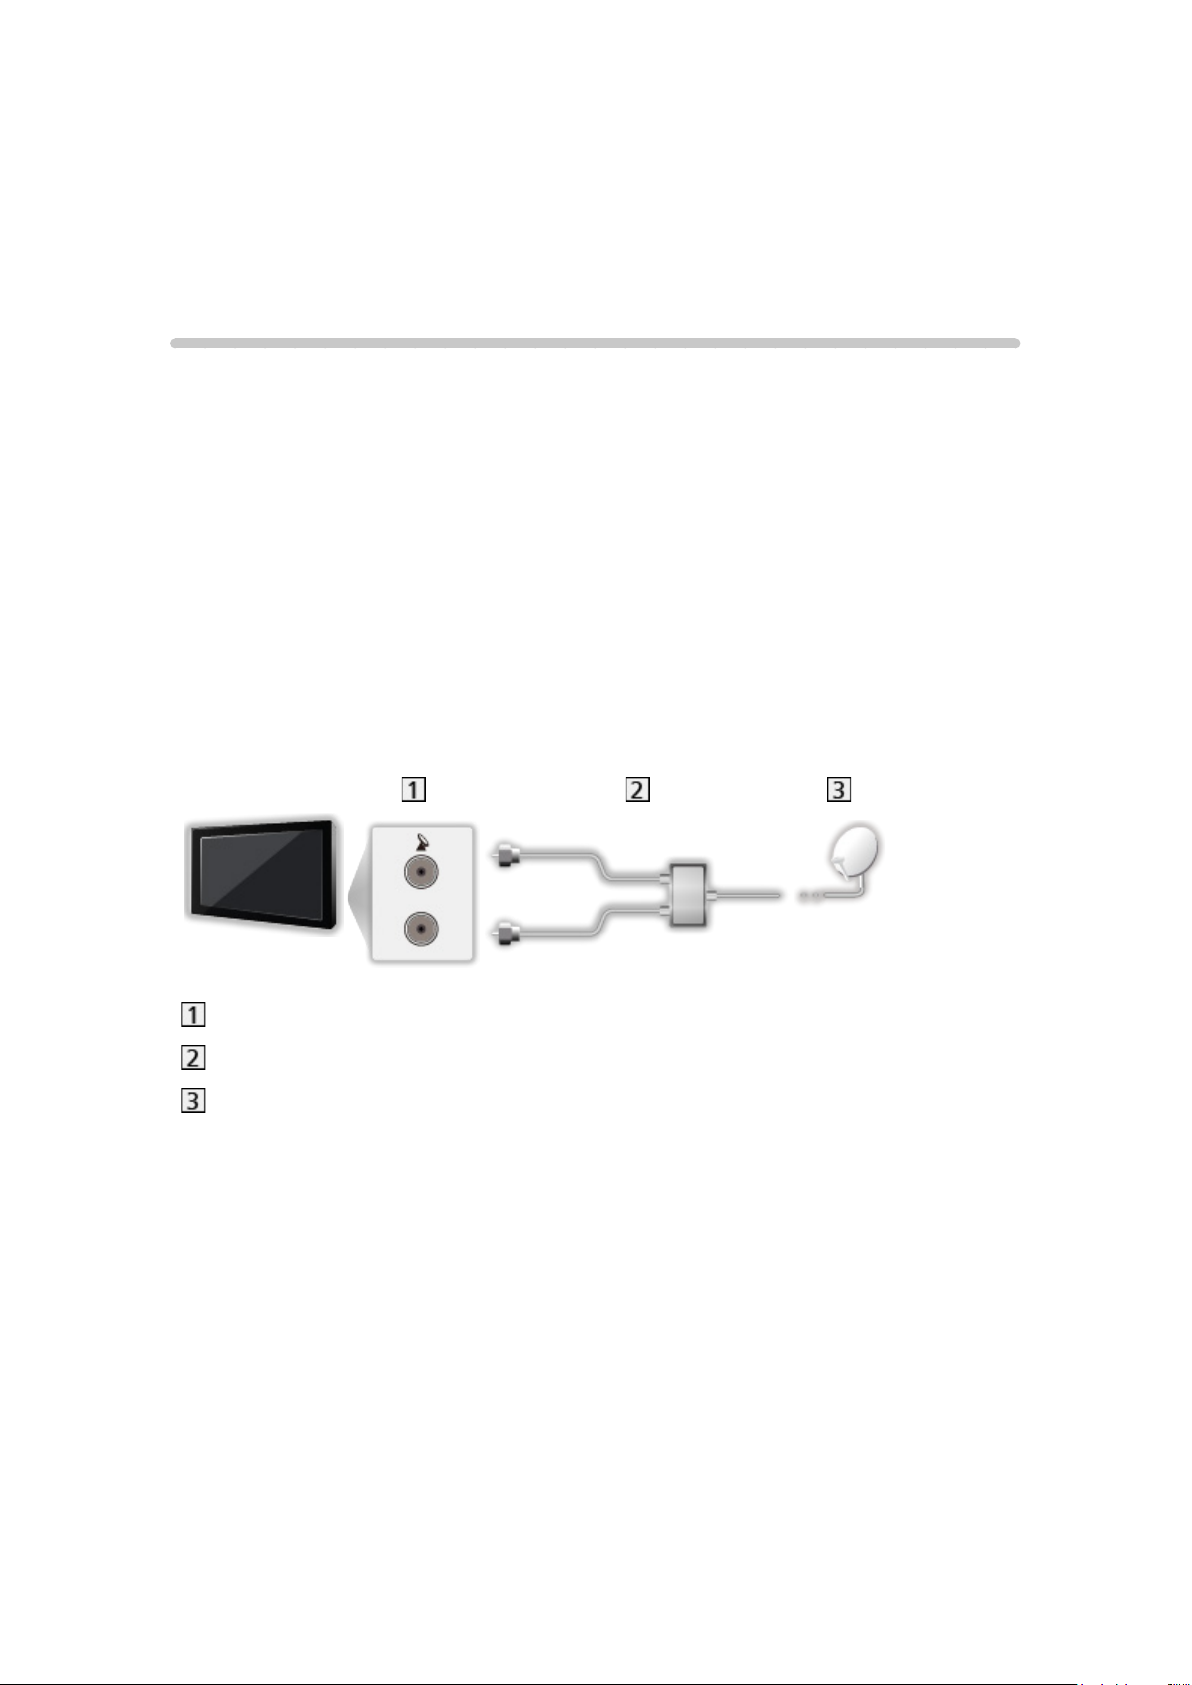
■ Dual Tuner (DiSEqC)
Connecting both satellite terminals IN 1 and IN 2 to a satellite dish
with a Multiswitch allows you to watch or record 2 DVB-S programmes
simultaneously.
Satellite IN 1 / IN 2 terminals
Satellite cables with Multiswitch
Satellite dish
- 36 -
Page 37
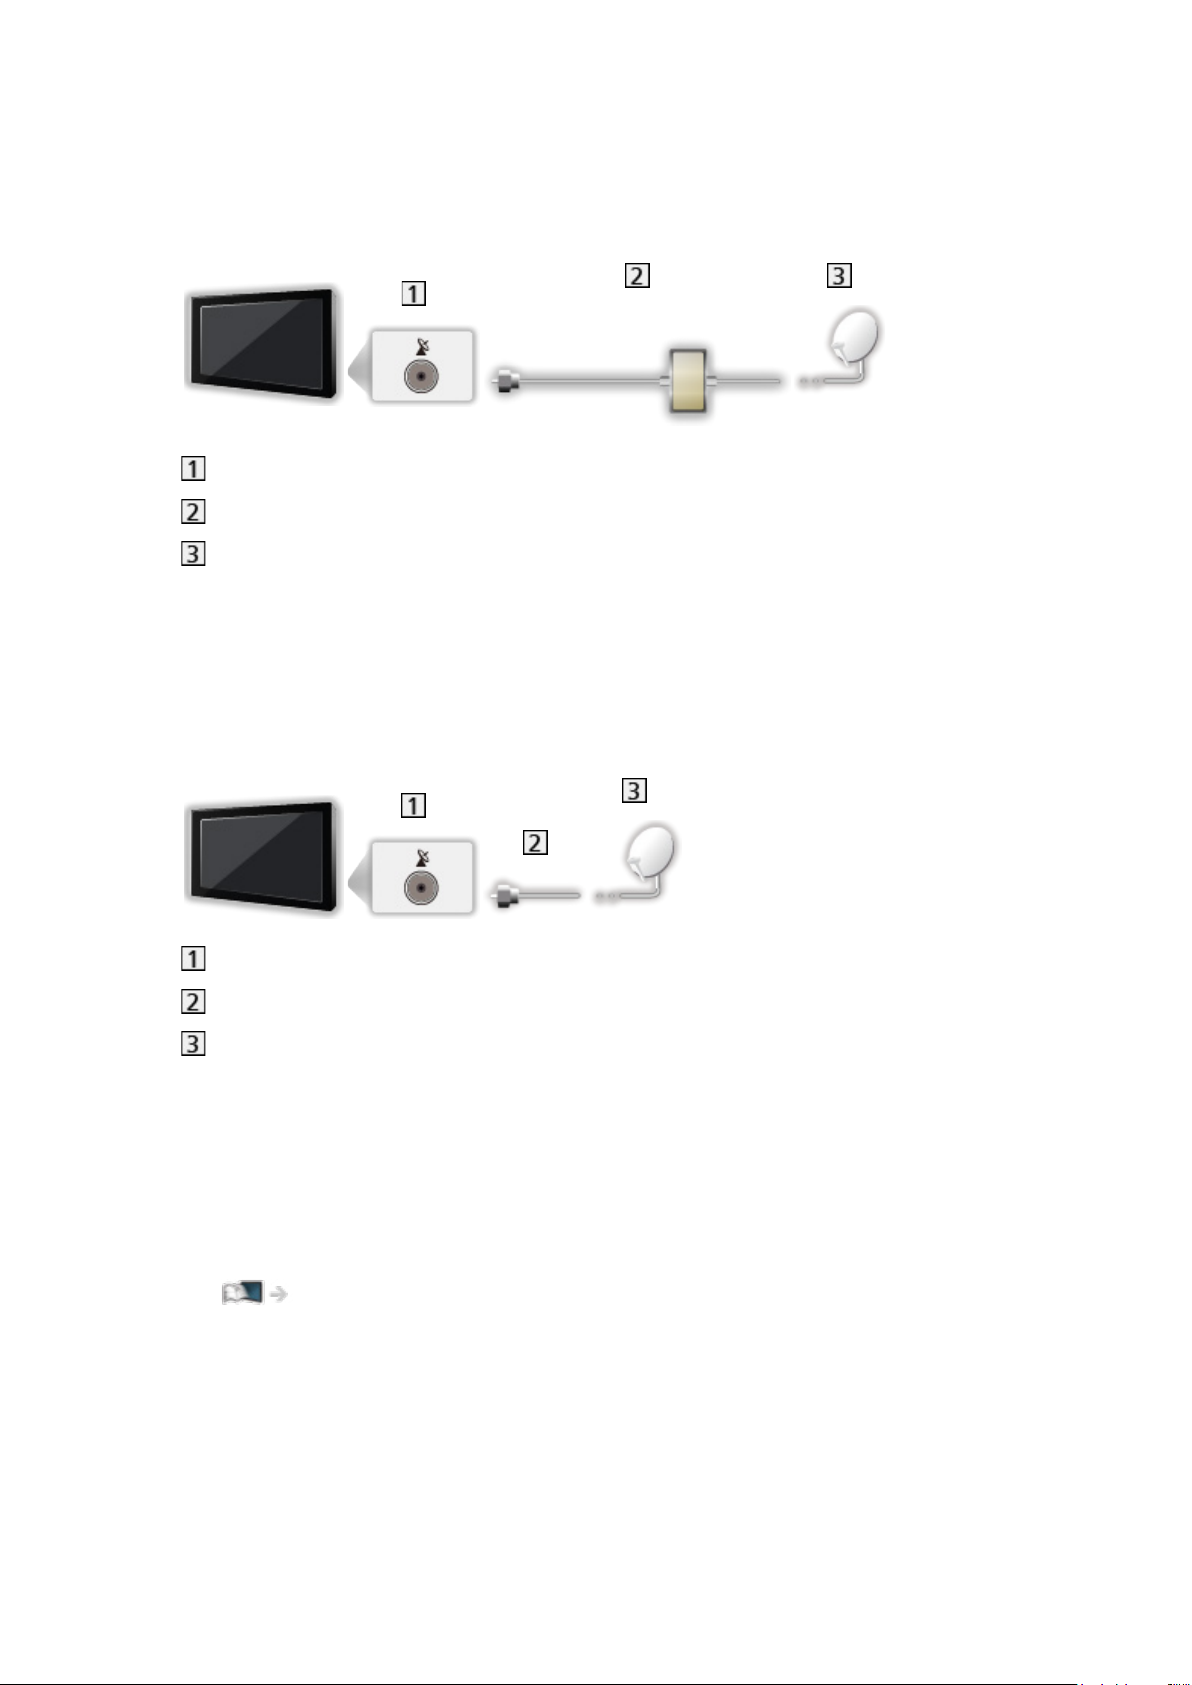
■ Dual Tuner (Single Cable System)
Connecting the satellite terminal IN 1 to a satellite dish with a Single Cable
router allows you to watch or record 2 DVB-S programmes simultaneously, as
long as both programmes are on the same transponder.
Satellite IN 1 terminal
Satellite cable with Single Cable router
Satellite dish
■ Single Tuner
Connect the satellite IN 1 terminal to the satellite dish.
●
Watching or recording 2 DVB-S programmes simultaneously, etc. is not
supported in single tuner mode.
Satellite IN 1 terminal
Satellite cable
Satellite dish
= Note =
●
To ensure your satellite dish is correctly installed, please consult your local
dealer. Also consult the received satellite broadcasting companies for
details.
●
Selectable satellites and dish alignment to tune DVB-S channels
Watching > Tuning and editing channels > Selectable satellites
●
Keep the TV away from electronic equipment (video equipment, etc.) or
equipment with an infrared sensor, otherwise distortion of image / sound
may occur or operation of other equipment may be affected.
●
Check the terminal type and cable plugs are correct for connection.
●
Dual tuner function (watching or recording 2 programmes simultaneously,
watching a programme while recording another programme, etc.) is not
available while using DVB-via-IP server function.
- 37 -
Page 38
Basic connection
Please ensure that the unit is disconnected from the mains socket before
attaching or disconnecting any cables.
●
External equipment and cables shown are not supplied with this TV.
●
Depending on the model, it may be necessary to remove the terminal
cover / cable cover before connecting or disconnecting cables.
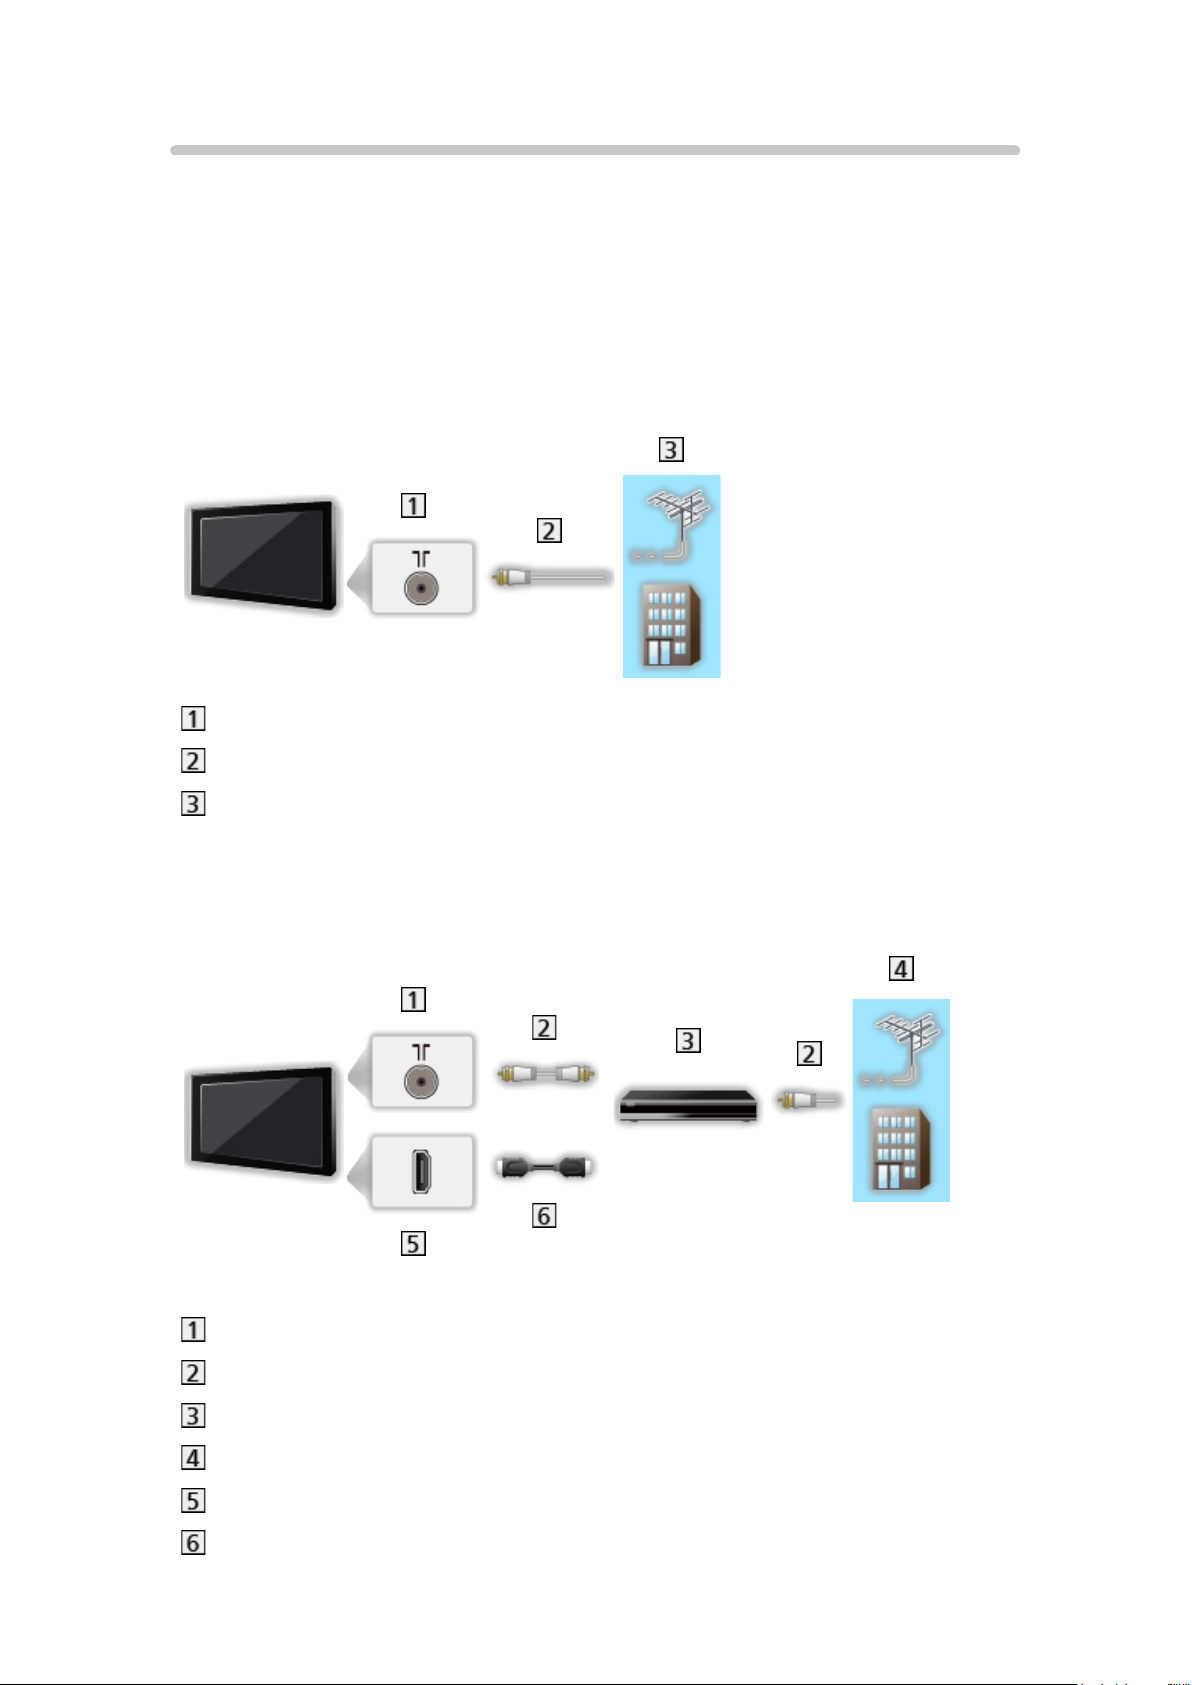
■ Aerial
Terrestrial / cable terminal
RF cable
Terrestrial aerial / Cable
●
For DVB-C, DVB-T, Analogue
■ DVD Recorder / Blu-ray Recorder, etc.
Terrestrial / cable terminal
RF cable
DVD Recorder / Blu-ray Recorder, etc.
Terrestrial aerial / Cable
HDMI terminal
HDMI cable
- 38 -
Page 39
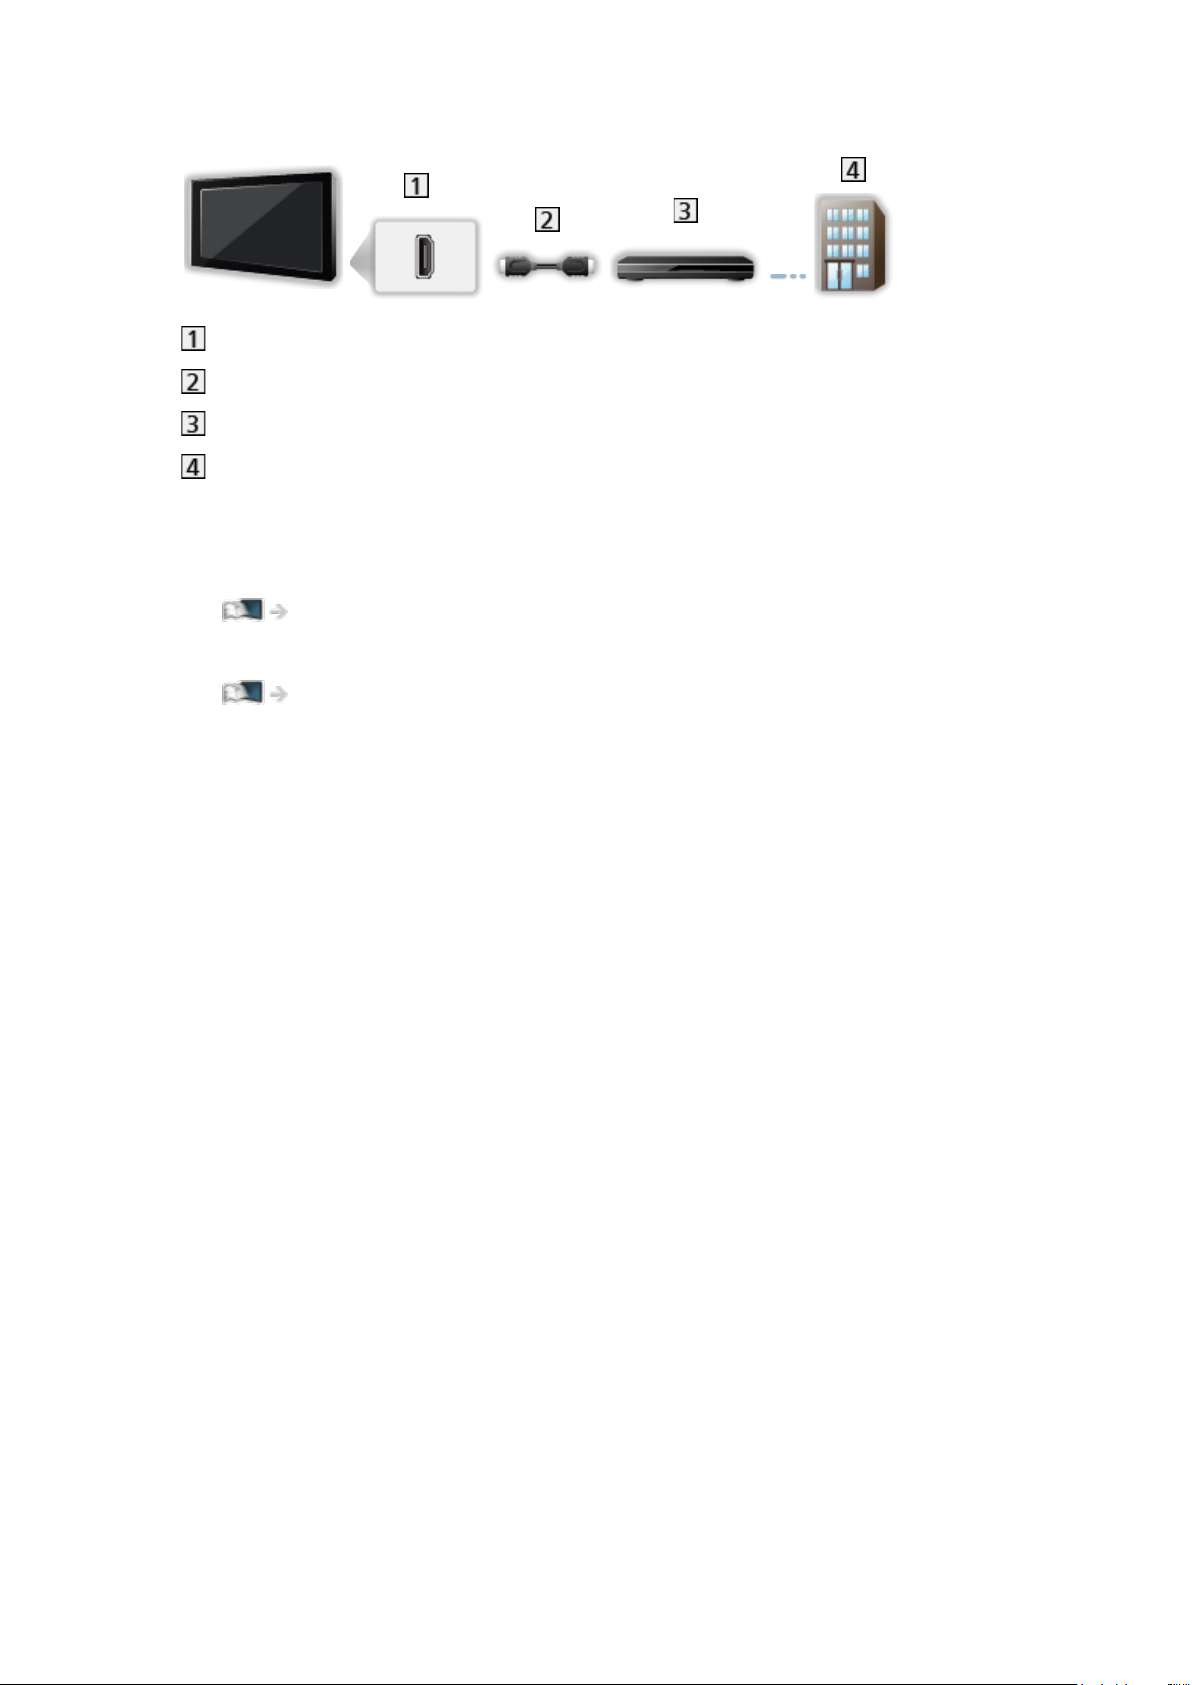
■ Set top box
HDMI terminal
HDMI cable
Set top box
Cable
= Note =
●
For details of DVB-via-IP connections
Functions > DVB-via-IP
●
For details of VIERA Link connections
Functions > VIERA Link “HDAVI Control™” > Summary of VIERA Link
●
Please also read the manual of the equipment being connected.
●
Keep the TV away from electronic equipment (video equipment, etc.) or
equipment with an infrared sensor, otherwise distortion of image / sound
may occur or operation of other equipment may be affected.
●
Use a fully wired HDMI compliant cable.
●
Check the terminal type and cable plugs are correct for connection.
- 39 -
Page 40
Selecting channel
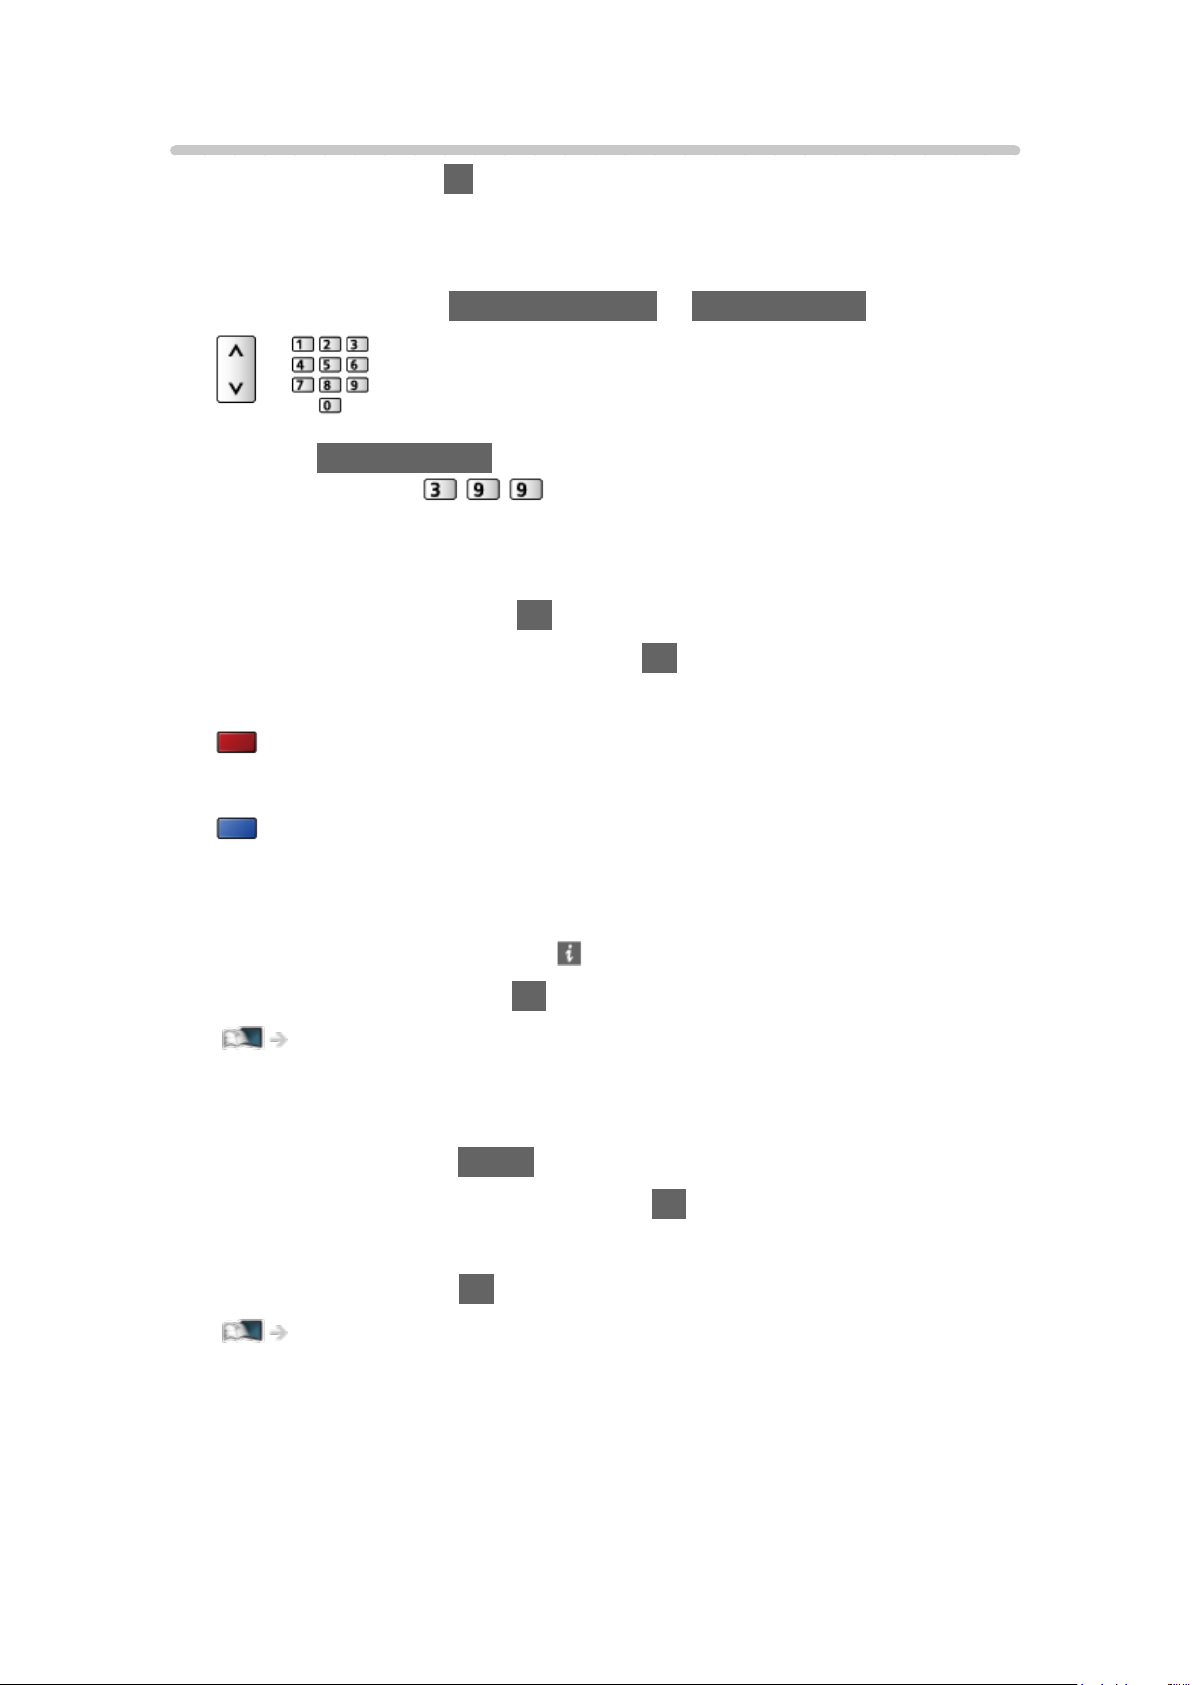
1. Select the mode with TV.
DVB-S / DVB-C / DVB-T / DVB-via-IP / Analogue
●
Selectable modes vary depending on the channels stored.
2. Select a channel with Channel Up / Down or Numeric buttons.
●
Press Numeric buttons to select a channel position with 2 or more-digit
(e.g. 399, press
).
■ To select a channel from the channel list
1. Display the channel list with OK.
2. Select a channel from the list and press OK to watch.
●
To sort channel names in alphabetical order
(red)
●
To change the category
(blue)
■ To select a channel using information banner
1. Display information banner with if it is not displayed.
2. Select a channel and press OK to watch while the banner is displayed.
Watching > Basic > Information banner
■ To select a channel using TV Guide
1. Display TV Guide with GUIDE.
2. Select the current programme and press OK to access.
– The current programme is displayed on the top left of the screen.
3. Select View and press OK to watch.
Watching > TV Guide > Using TV Guide
●
Not valid in Analogue
- 40 -
Page 41

■ To watch pay-TV
●
For details of the encrypted channels
Functions > Common Interface > Using Common Interface
●
Consult the operator / broadcaster or CI module manufacturer for more
information and conditions of the services.
- 41 -
Page 42
Information banner
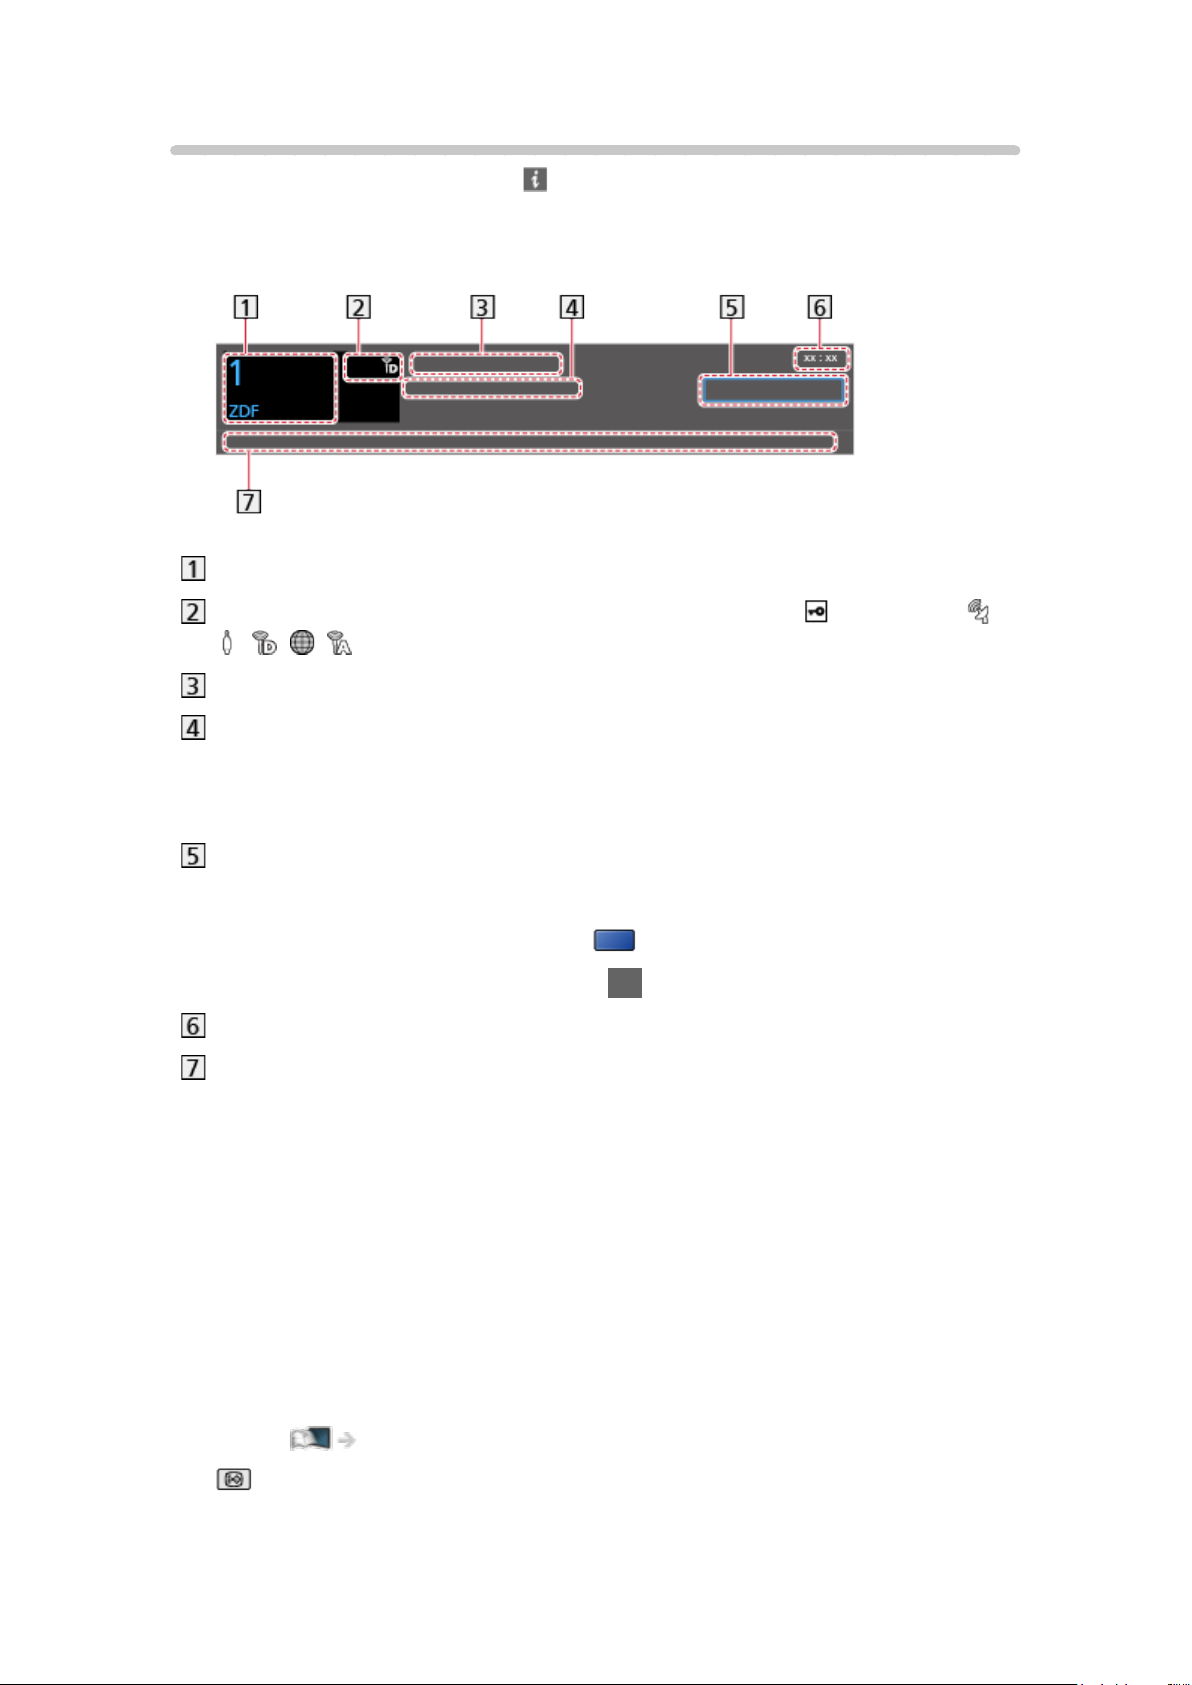
Display information banner with .
●
Also appears when changing a channel.
(Example)
Channel position and name
Channel type (Radio, HDTV, etc.) / Encrypted channel ( ) / TV mode ( ,
, , , )
Programme
Start time / End time (except Analogue)
Channel position, etc. (Analogue)
Progress time indicator of the selected programme (except Analogue)
Category
●
To change the category (DVB)
1) Display the category list with
(blue).
2) Select the category and press OK to change.
Current time
Features available / message meanings
Bad signal:
Poor quality TV signal
DD+, DD, HE-AAC:
Dolby Audio (Dolby Digital Plus, Dolby Digital) or HE-AAC audio track
AD:
Audio Description service available
●
This function can aid visually-impaired viewers by providing an
additional audio track to describe events on screen.
Watching > For best audio > Audio Description
:
Subtitle service available
- 42 -
Page 43
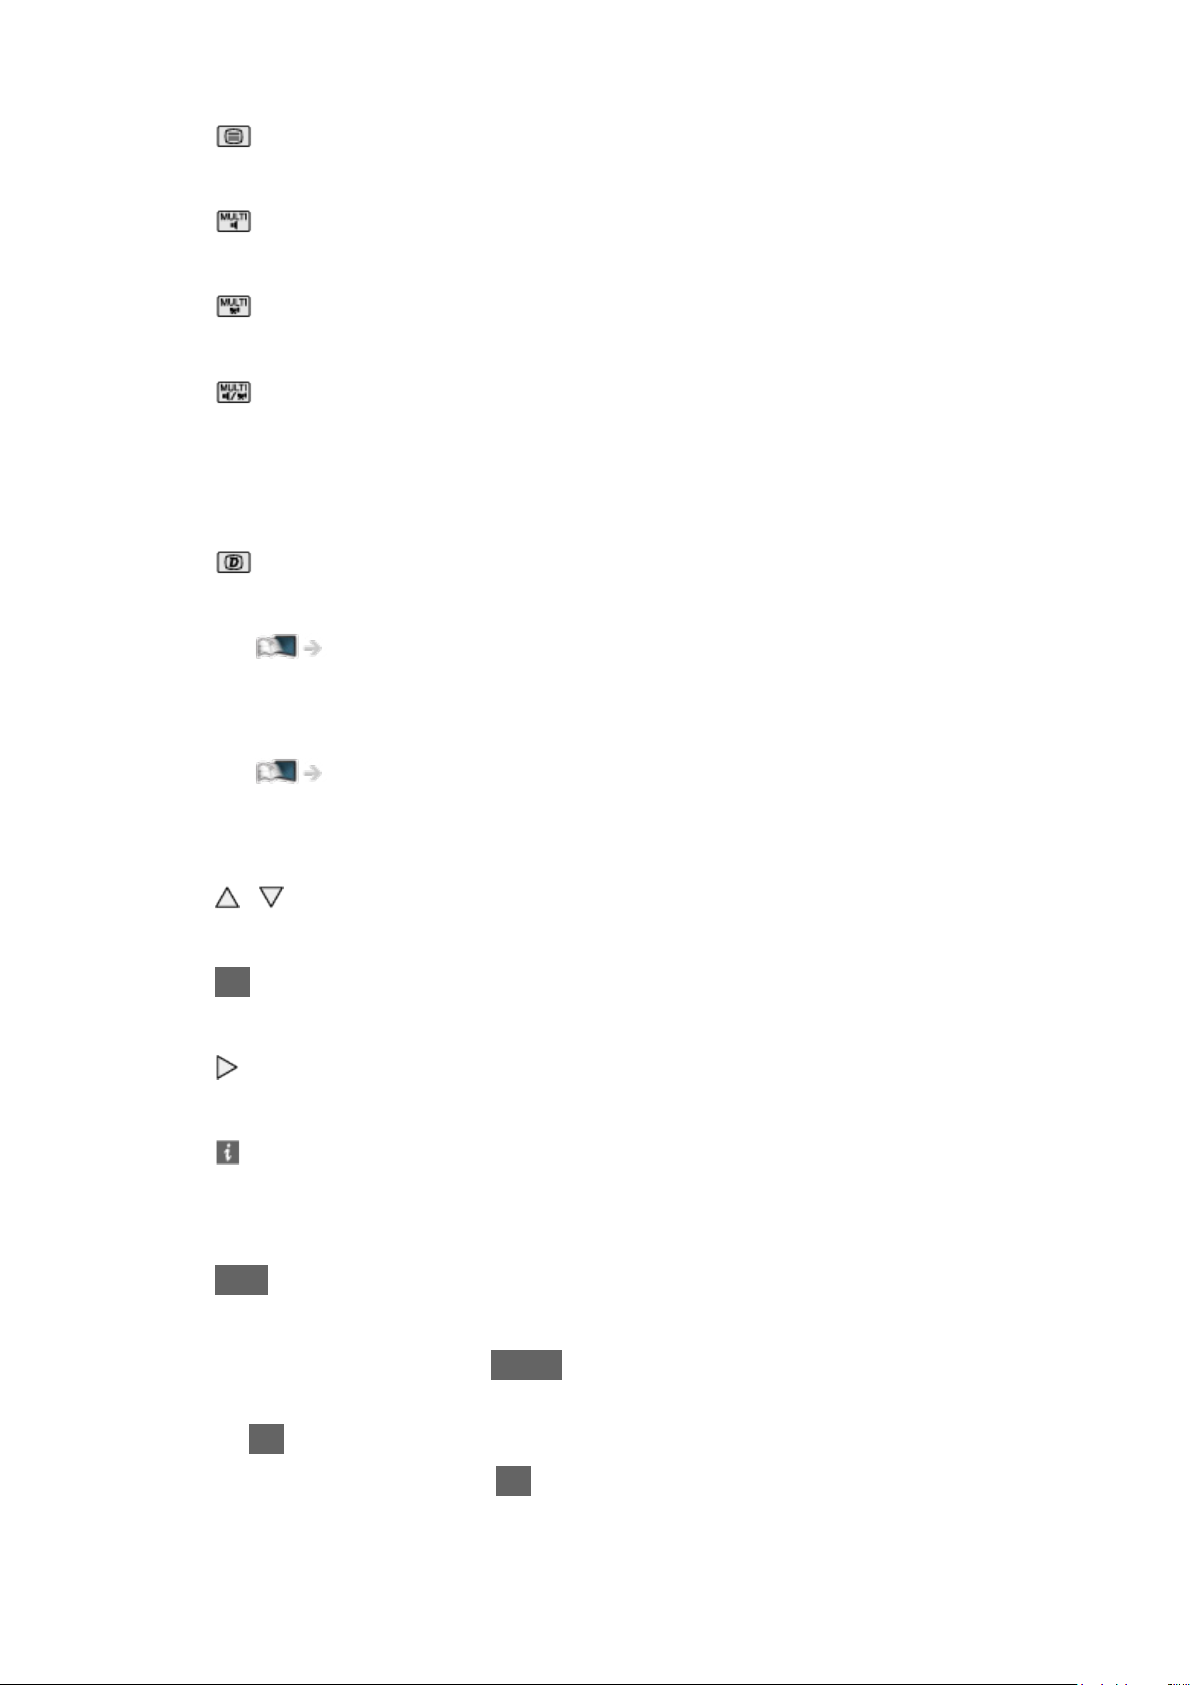
:
Teletext service available
:
Multiple audio available
:
Multiple video available
:
Multiple audio and video available
Stereo, Mono:
Audio mode
:
Data service (Hybrid Broadcast Broadband TV application) available
Functions > Data Service Application > Using Data Service Application
1 – 90:
Off Timer remaining time
Watching > Basic > Off Timer
●
To confirm another tuned channel
/
●
To watch the channel listed in the banner
OK
●
Information on the next programme (DVB)
●
Extra information (DVB)
– Press again to hide the banner.
●
To hide the banner
EXIT
●
To adjust banner timeout, set Banner Display Timeout.
1) Display the menu with MENU.
2) Select Setup > Display Settings > Banner Display Timeout and press
OK to access.
3) Set the item and press OK to store.
- 43 -
Page 44

●
To display the introduction banner for the internet service
1) Display the menu with MENU.
2) Select Setup > Display Settings > Smart Banner and press OK to
access.
3) Select On / Off and press OK to set.
- 44 -
Page 45

AV Options
Confirm or change the current status.
●
Display the full-screen TV to use this function.
1. Display the option menu with OPTION.
2. Select AV Options and press OK to access.
3. Select one of the following items and press OK to access.
Audio Type / Multi Video / Multi Audio / Dual Audio / Sub Channel / Subtitle
Language / Teletext Character Set / Teletext Language / MPX / Volume
Correction / CAM Selection
●
The function items vary depending on the TV mode and country you
select.
4. Set the item and press OK to store.
Audio Type
Set to Audio Description if the programme has Audio Description service,
then you will hear an additional audio track to describe events on screen (if
available).
●
For DVB
●
To adjust the volume for Audio Description
Watching > For best audio > Audio Description
●
Not valid in multi window mode
Multi Video
Selects from a group of multiple videos (if available).
●
This setting is not memorised and it returns to the default setting once you
exit the current programme.
●
For DVB
Multi Audio
Selects between alternative language or Audio Description for sound tracks (if
available).
●
This setting is not memorised and it returns to the default setting once you
exit the current programme.
●
For DVB
- 45 -
Page 46
Dual Audio
Selects stereo / monaural (if available).
●
For DVB
Sub Channel
Selects the multifeed programme - sub channel (if available).
●
For DVB
Subtitle Language
Selects between alternative subtitle languages or types (if available).
●
This setting is not memorised and it returns to the default setting once you
exit the current programme.
●
For DVB
●
Not valid on the sub screen in multi window mode
Teletext Character Set
Sets the teletext language font.
Watching > Teletext > Teletext Character Set
Teletext Language
Selects between alternative teletext languages (if available).
●
This setting is not memorised and it returns to the default setting once you
exit the current programme.
●
For DVB
MPX
Selects multiplex sound mode (if available).
Watching > For best audio > Advanced settings
●
For Analogue
Volume Correction
Adjusts the volume of each individual channel or input mode.
- 46 -
Page 47

CAM Selection
Selects CI module (if available).
●
Not valid while recording is in progress
●
For DVB
- 47 -
Page 48

Subtitle
Display / hide subtitles (if available) with STTL.
●
To select the preferred language for DVB subtitles (if available), set
Preferred Subtitles.
Watching > Basic > Language
●
To select the preferred subtitle type
1) Display the menu with MENU.
2) Select Setup > Display Settings > Preferred Subtitle Type and press
OK to access.
3) Select Standard / Hard of Hearing and press OK to set.
– Hard of Hearing provides aids in understanding and enjoyment with
DVB subtitles (depending on the broadcaster).
●
Preferred Subtitles 1 / 2 in Language are given priority.
Watching > Basic > Language
= Note =
●
If you press STTL in Analogue, the TV switches to teletext service and
calls up a favourite page. Press EXIT to return to TV mode.
●
Not valid on the sub screen in multi window mode
- 48 -
Page 49

Last view
Switch to a previously viewed channel or input mode easily with last view
button.
(LAST VIEW)
●
Press again to return to the current view.
= Note =
●
Switching channel may not be available depending on the condition.
●
Watching less than 10 seconds is not reflected in the previously viewed
channel or input mode.
- 49 -
Page 50

Off Timer
Switch to TV Standby mode automatically after a fixed period.
1. Display the menu with MENU.
2. Select Timer > Off Timer and press OK to access.
3. Select the time in 15-minute increments and press OK to set.
90 / 75 / 60 / 45 / 30 / 15 / Off (minutes)
●
To cancel, set to Off or turn the TV off.
●
The remaining time is displayed on the bottom right of the screen.
●
The remaining time will flash on the screen when less than 3 minutes.
- 50 -
Page 51

Energy saving functions
The TV can be eco-friendly using energy-saving functions.
The TV goes into Standby mode in the following conditions:
●
Eco Navigation is set to Set to Eco.
●
Off Timer is active.
Watching > Basic > Off Timer
●
No operation is performed for 4 hours while Auto Standby is set to On.
●
No signal is received and no operation is performed for 10 minutes while
No signal Power off is set to On.
= Note =
●
This function does not affect the recording.
■ Auto Standby
1. Display the menu with MENU.
2. Select Timer > Auto Standby and press OK to access.
3. Select On / Off and press OK to set.
Auto Standby
(On / Off)
Automatically turns the TV to Standby mode for energy saving when no
operation is performed for 4 hours.
●
Automatic input switching with the connected equipment affects this
function and time-count resets.
●
A notification message will appear 3 minutes before going into Standby
mode.
●
Changing the default configuration may result in higher energy
consumption of the product.
- 51 -
Page 52

■ No signal Power off
1. Display the menu with MENU.
2. Select Timer > No signal Power off and press OK to access.
3. Select On / Off and press OK to set.
No signal Power off
(On / Off)
Automatically turns the TV to Standby mode to prevent unnecessary power
consumption when no signal is received and no operation is performed for 10
minutes.
●
A notification message will appear 3 minutes before going into Standby
mode.
■ Eco Navigation
Automatically sets the TV to the most suitable energy-saving mode.
The concerned items and their current settings are displayed. Select Set to
Eco to set them to the energy-saving settings at once.
1. Display the menu with MENU.
2. Select Setup > Eco Navigation and press OK to access.
3. Select Set to Eco and press OK to set.
●
Auto Standby and No signal Power off are active when Eco Navigation is
set to Set to Eco.
■ Radio Mode
Sets the timer for turning off the screen automatically when a radio channel is
selected.
1. Display the menu with MENU.
2. Select Setup > Display Settings > Radio Mode and press OK to access.
3. Select the time and press OK to set.
20 / 15 / 10 / 5 / Off (seconds)
●
Sound is active even if the screen is turned off. This function is effective in
reducing power consumption when listening to a radio channel.
●
Press any buttons except Standby On / Off switch, Volume Up / Down and
MUTE to turn the screen on.
●
Not valid in Analogue
- 52 -
Page 53

Adjusting time
Adjusts the time data.
1. Display the menu with MENU.
2. Select Timer > Time Zone and press OK to access.
3. Set the item and press OK to store.
●
The time data are corrected based on GMT.
●
The availability of this function depends on the country and TV mode you
select.
- 53 -
Page 54
Language
1. Display the menu with MENU.
2. Select Setup > Language and press OK to access.
3. Select one of the following items and press OK to access.
OSD Language / Preferred Audio 1 / 2 / Preferred Subtitles 1 / 2 /
Preferred Teletext
4. Set the item and press OK to store.
OSD Language
Changes language for on-screen displays.
Preferred Audio 1 / 2
Selects the first and second preferred language for DVB multi audio
(depending on the broadcaster).
Preferred Subtitles 1 / 2
Selects the first and second preferred language for DVB subtitles (depending
on the broadcaster).
●
To display subtitles
Watching > Basic > Subtitle
Preferred Teletext
Selects the preferred language for DVB teletext service (depending on the
broadcaster).
- 54 -
Page 55
4K resolution
4K compatible equipment
You can watch content in 4K format that has twice the horizontal and vertical
resolution of the 1080p signal.
●
For details of valid 4K format
Watching > 4K resolution > Valid 4K format
●
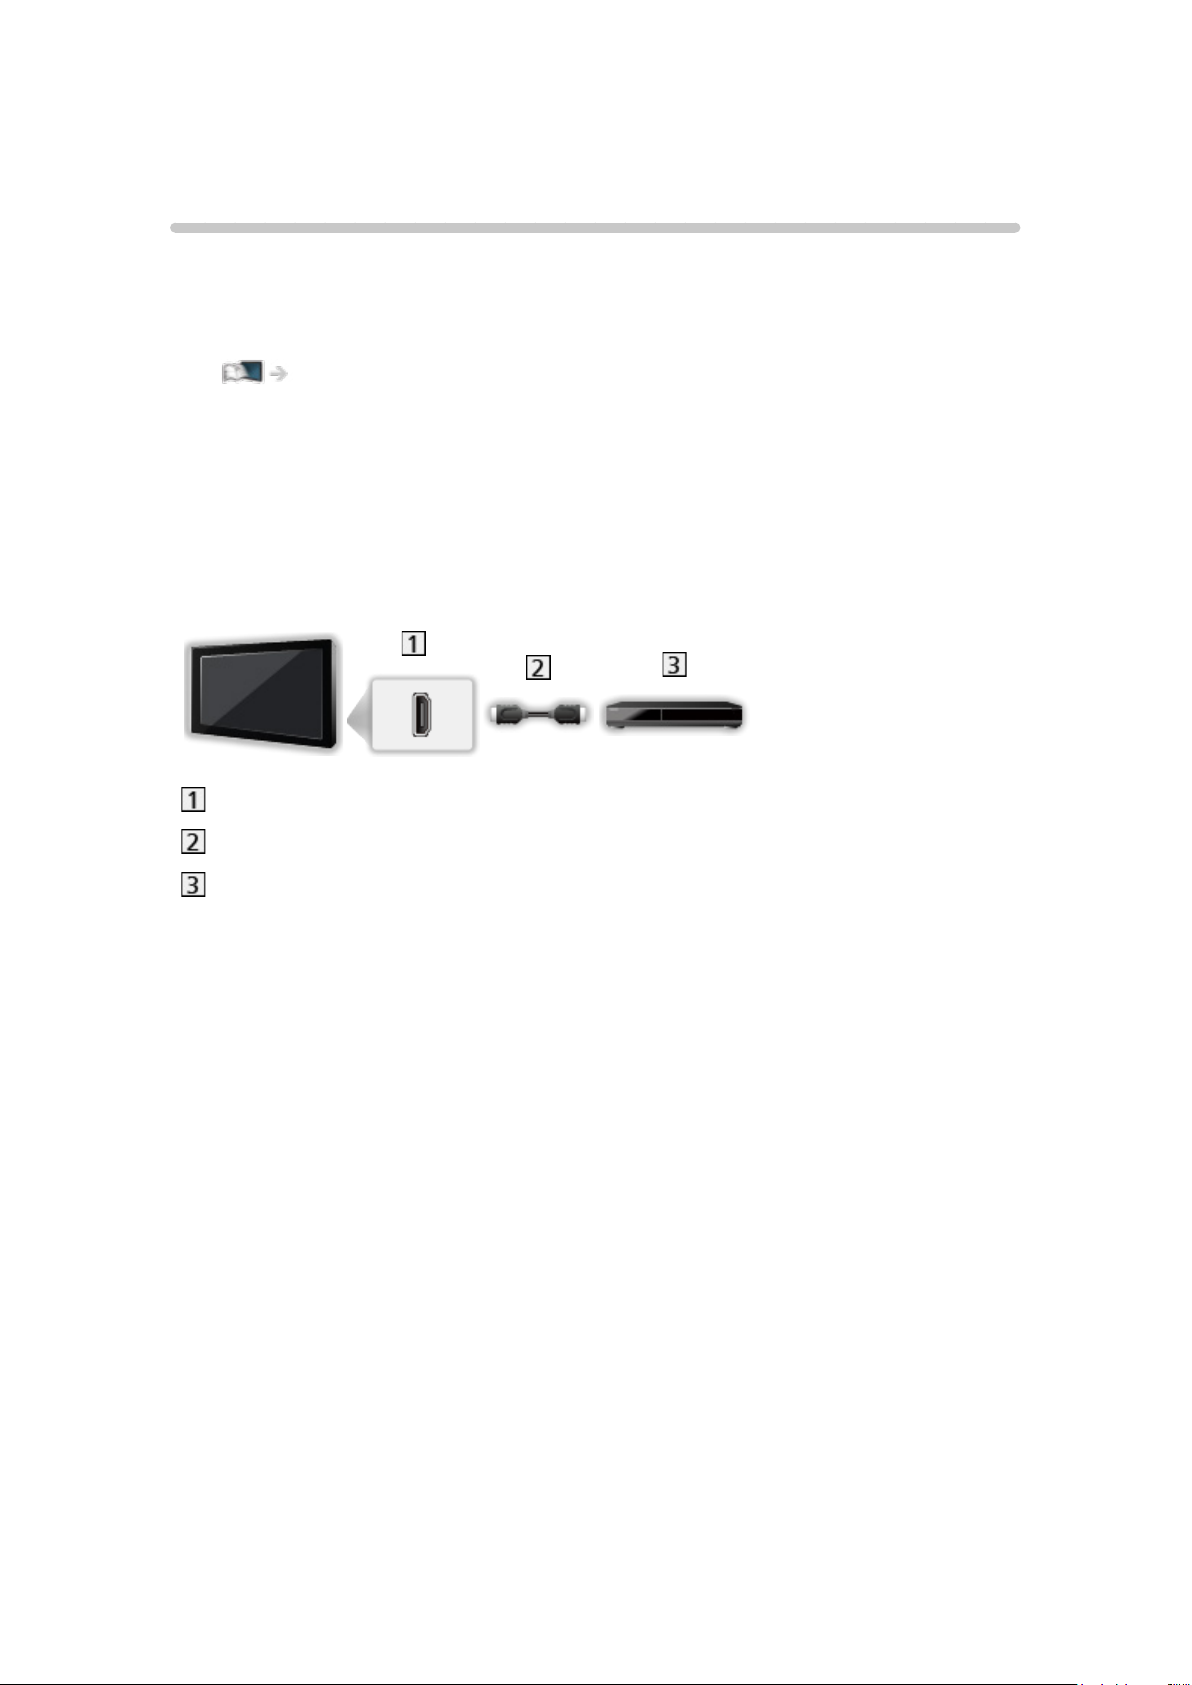
Connect the 4K compatible equipment to HDMI terminal using a 4K
compatible cable and you can watch content in 4K format.
●
Depending on the model, it may be necessary to remove the terminal
cover / cable cover before connecting or disconnecting cables.
■ 4K compatible equipment
HDMI terminal
HDMI cable
4K compatible equipment
●
Check the terminal type and cable plugs are correct for connection.
●
Use a fully wired HDMI compliant cable.
- 55 -
Page 56

HDMI Auto Setting
1. Display the menu with MENU.
2. Select Setup > HDMI Auto Setting and press OK to access.
3. Set the item and press OK to store.
HDMI Auto Setting
(Mode1 / Mode2)
Reproduces the image more precisely with the expanded colour gamut when
connecting the 4K compatible equipment. Select the mode depending on the
equipment.
Mode1:
For better compatibility. Set to Mode1 when the image or sound in
HDMI input is not played properly.
Mode2:
For the 4K compatible equipment that has the function to output the
image precisely with the expanded colour gamut
●
The setting can be stored for each HDMI input.
●
For HDMI1/2
●
Valid format (4K)
– Mode1: 4:4:4 / 4:2:2 (30p, 25p, 24p), 4:2:0 (60p, 50p)
– Mode2: 4:4:4 / 4:2:2 (30p, 25p, 24p), 4:4:4 / 4:2:2 / 4:2:0 (60p, 50p)
- 56 -
Page 57

Valid 4K format
■ Valid 4K format (HDMI)
4K UHD
●
3 840 × 2 160 (60p, 50p, 30p, 25p, 24p)
– Aspect is fixed to 16:9.
DCI 4K
●
4 096 × 2 160 (60p, 50p, 30p, 25p, 24p)
– Actual resolution is 3 840 × 2 160p.
– Aspect is fixed to V Full.
= Note =
●
Connect to HDMI1 or HDMI2 for the following formats.
– 60p, 50p / 4:4:4, 4:2:2
●
The above signals are reformatted for optimal viewing on your display.
●
For details of aspect
Watching > For best picture > Aspect
- 57 -
Page 58
External equipment
External connection
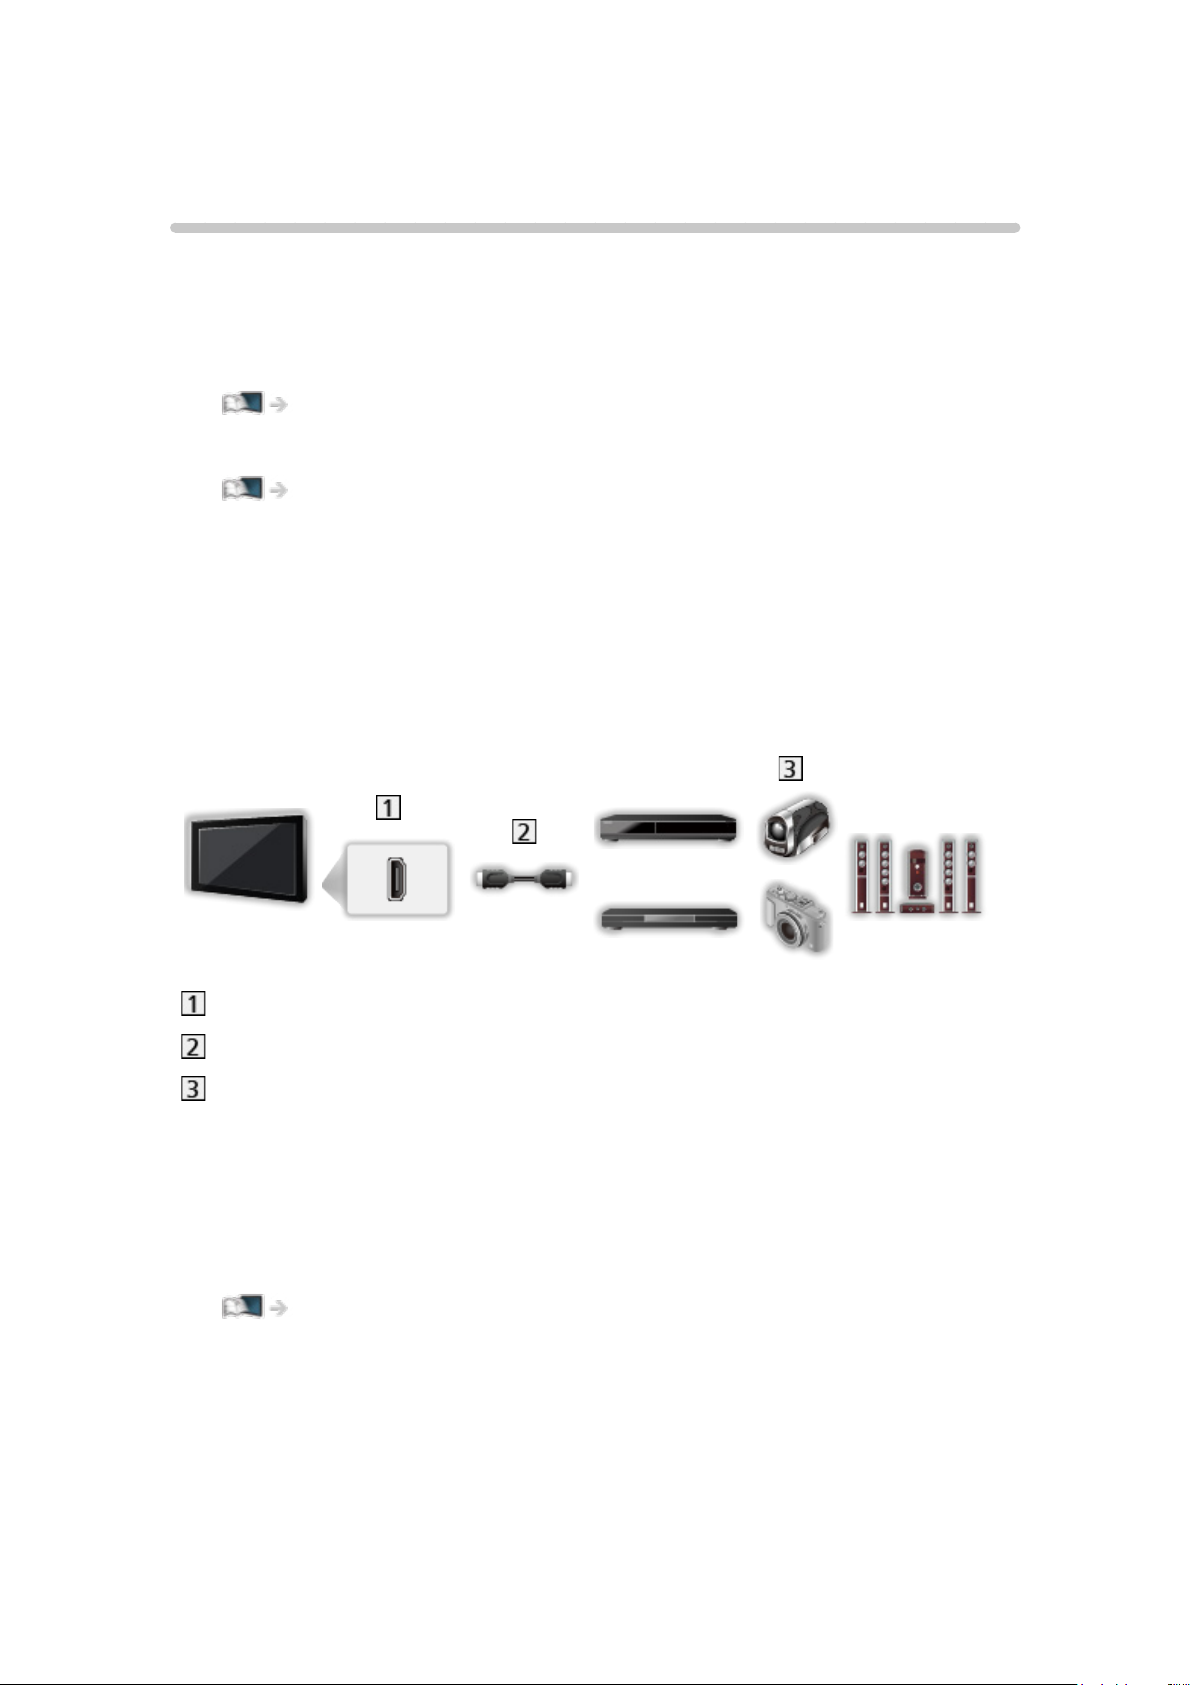
These diagrams show our recommendations for connection of your TV to
various pieces of equipment. For other connections, consult the instructions
for each piece of equipment.
●
For details of basic connection
Watching > Basic > Basic connection
●
To use the specific devices supporting Bluetooth wireless technology
Functions > Bluetooth devices
●
Check the terminal type and cable plugs are correct for connection.
●
External equipment and cables shown are not supplied with this TV.
●
Depending on the model, it may be necessary to remove the terminal
cover / cable cover before connecting or disconnecting cables.
■ HDMI equipment
HDMI terminal
HDMI cable
Recorder / Player / Set top box / Camcorder / Amplifier with speaker
system
= Note =
●
Use a fully wired HDMI compliant cable.
●
For details of VIERA Link connections
Functions > VIERA Link “HDAVI Control™” > Summary of VIERA Link
●
Use HDMI2 to connect the TV to an amplifier which has ARC (Audio
Return Channel) function.
- 58 -
Page 59
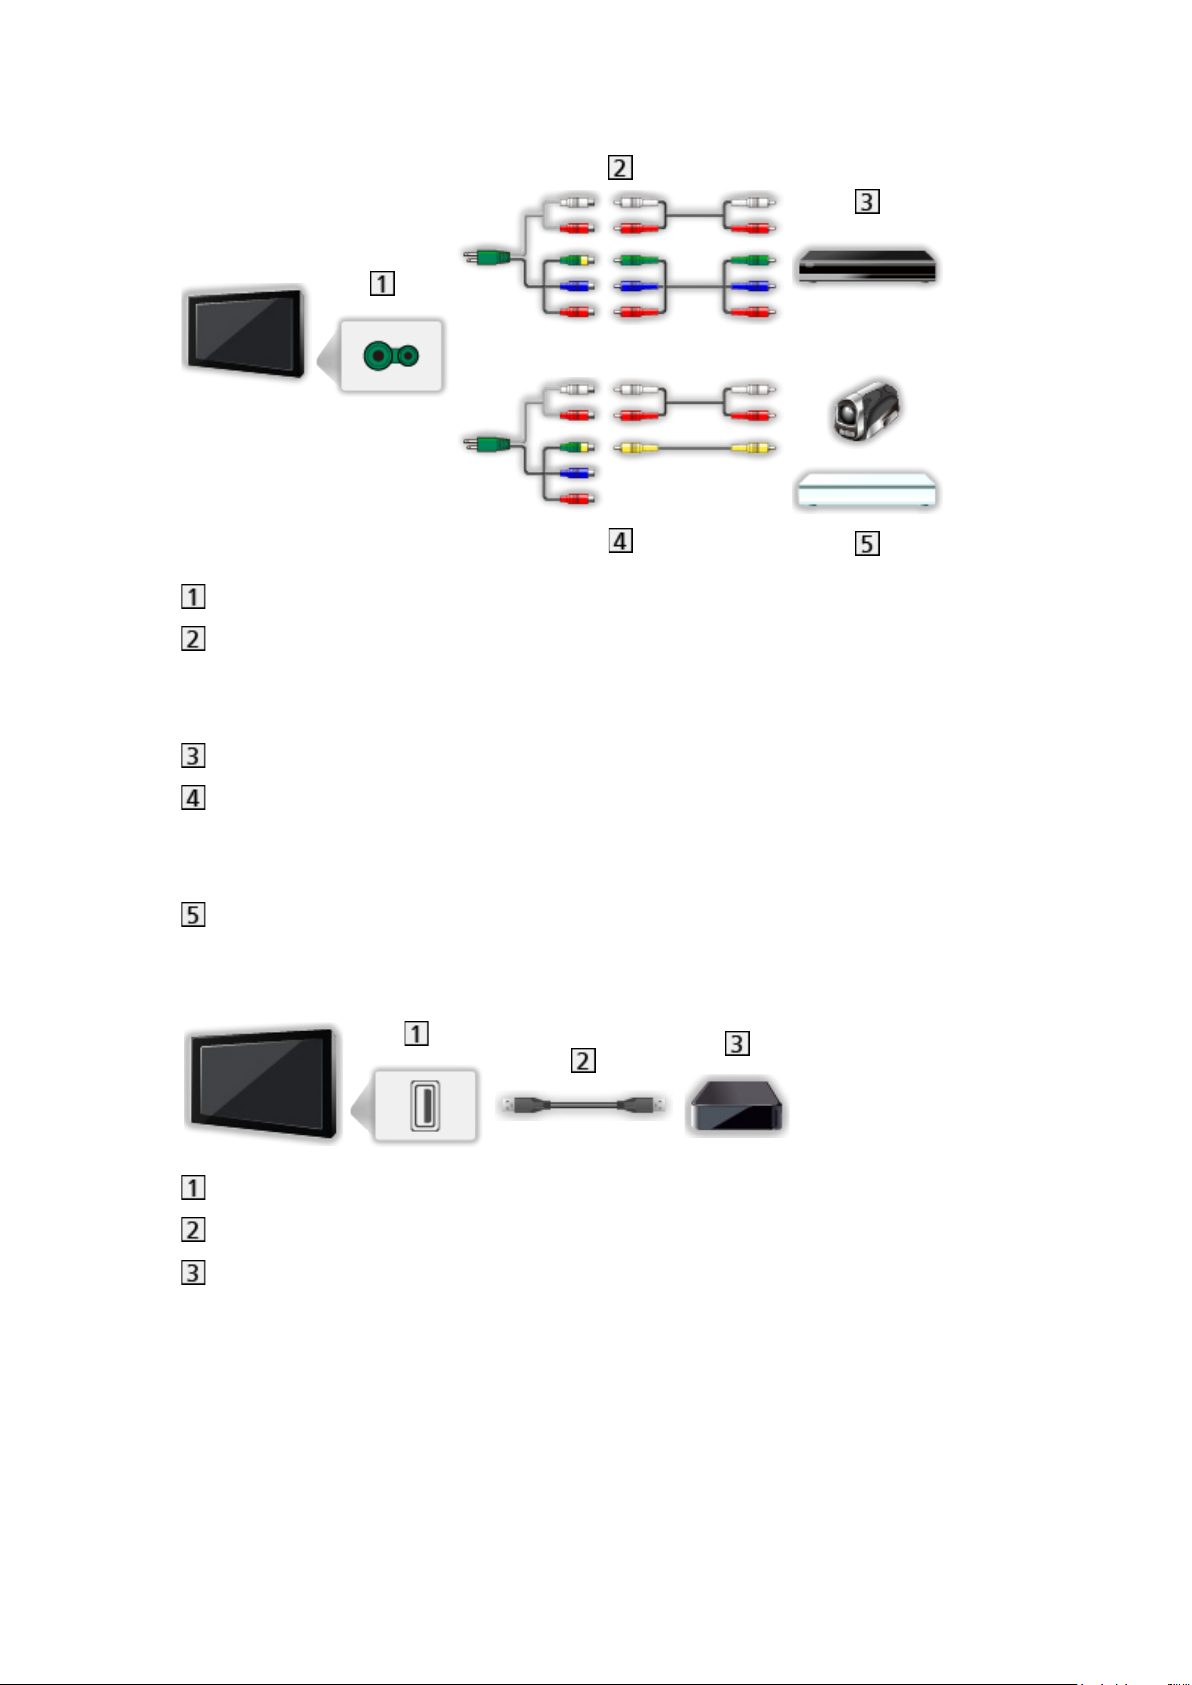
■ AV devices
AV (COMPONENT) terminals
Component cables
– AV (COMPONENT / VIDEO) adaptor (supplied) is necessary when
connecting to the TV.
DVD Player, etc.
Composite cables
– AV (COMPONENT / VIDEO) adaptor (supplied) is necessary when
connecting to the TV.
Camcorder / Game equipment
■ USB devices
USB port
USB cable
USB HDD, etc.
= Note =
●
It is recommended to connect the device to the TV’s USB port directly.
●
You cannot use two or more of the same kind of USB devices
simultaneously except USB Flash Memory or USB HDD.
●
Use USB 1 port for connecting the USB HDD.
●
Some USB devices or USB HUB may not be used with this TV.
●
You cannot connect any devices by using USB card reader.
- 59 -
Page 60
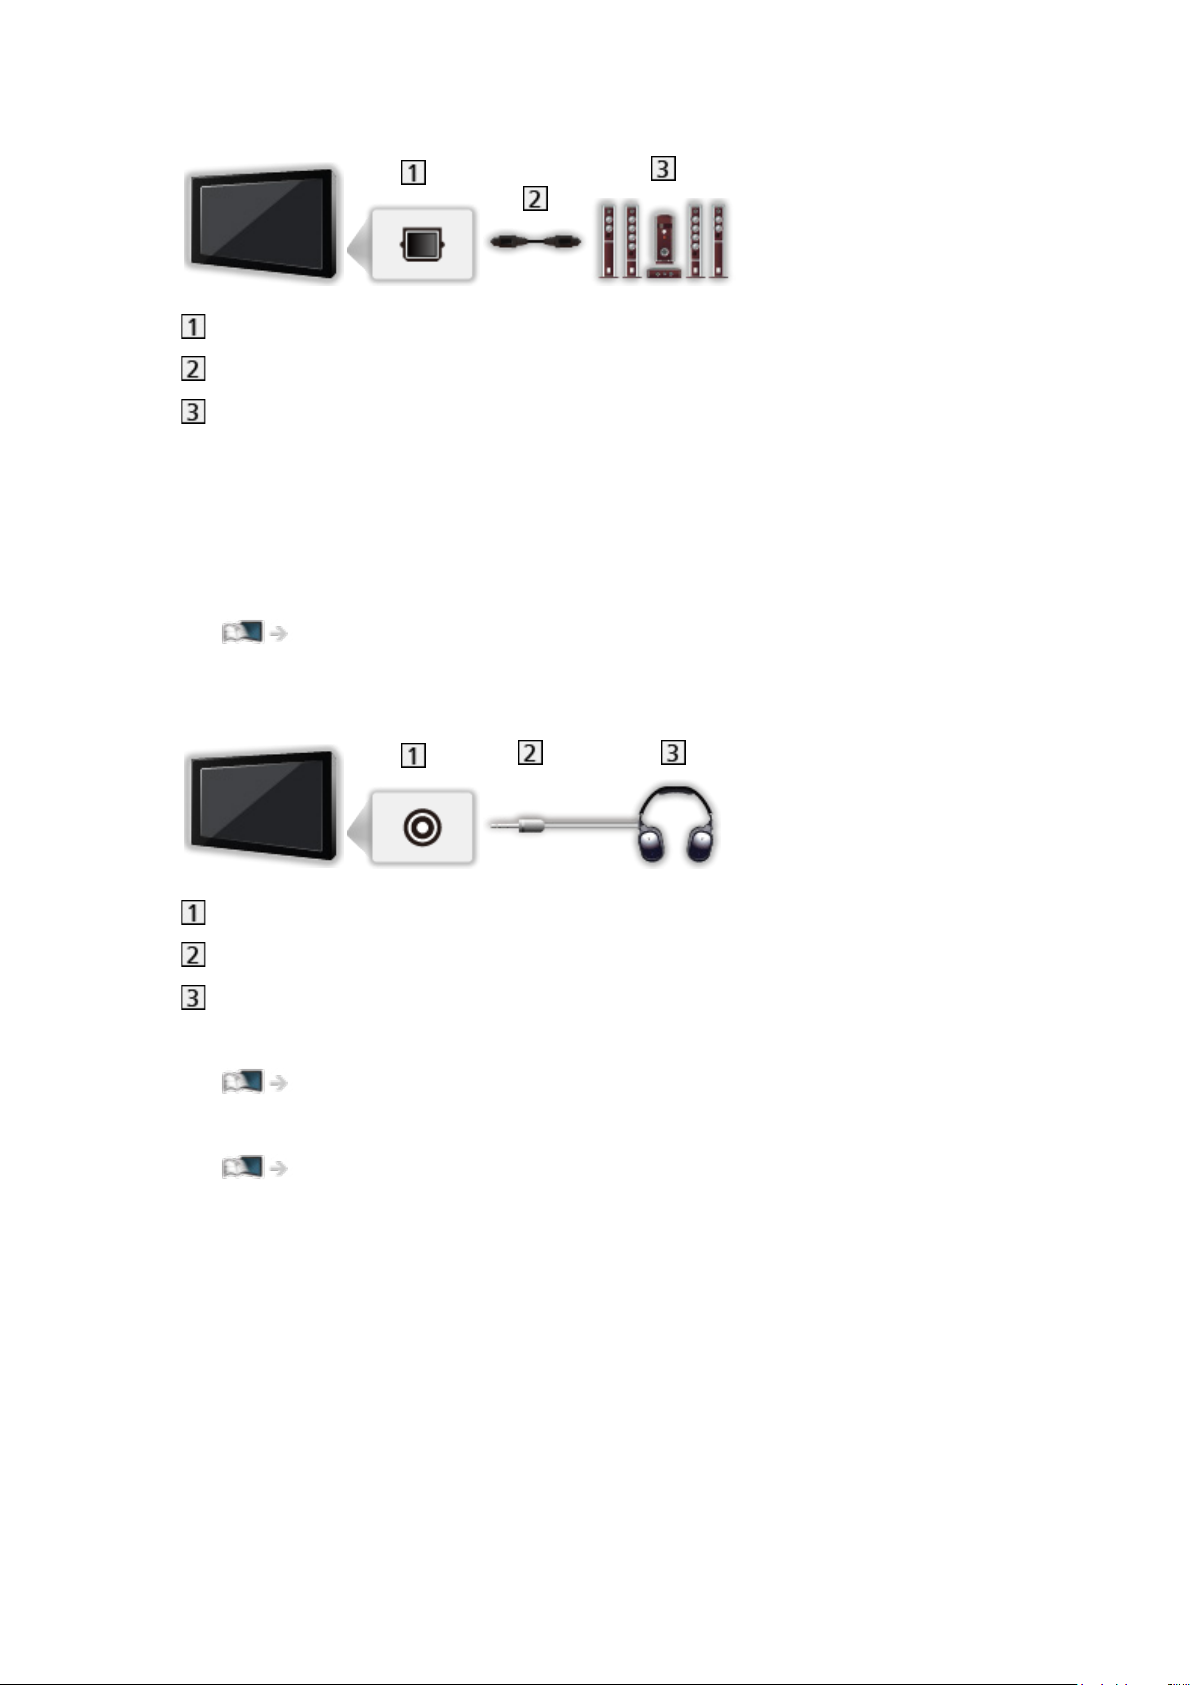
■ Listening with external speakers
DIGITAL AUDIO
Optical digital audio cable
Amplifier with speaker system
●
To enjoy multi-channel sound from external equipment (e.g. Dolby
Audio (Dolby Digital) 5.1ch), connect the equipment to the amplifier. For
information about the connections, read the manuals of the equipment and
amplifier.
●
To select the sound output to adjust volume, set TV Speaker Setting.
Watching > For best audio > Volume settings
■ Headphones
Headphone jack
M3 stereo mini plug
Headphones
●
To adjust volume, set Headphone Volume.
Watching > For best audio > Volume settings
●
To select the sound output to adjust volume, set TV Speaker Setting.
Watching > For best audio > Volume settings
- 60 -
Page 61

Watching external input
Connect the external equipment (VCR, DVD, etc.) and you can watch through
the input.
1. Display the input selection menu with AV.
2. Select the input mode connected to the equipment and press OK to watch.
(The selected mode is displayed on the top left of the screen.)
●
You can also select the input pressing AV. Press repeatedly until the
desired input is selected.
●
You can select COMPONENT and VIDEO in AV.
●
You can label or skip each input mode. Skipped inputs will not be
displayed when AV is pressed. (Input Labels)
●
The remote control is capable of operating the content or external
equipment.
Watching > External equipment > Operating with TV’s remote control
●
To return to TV mode
TV
= Note =
●
If the external equipment has an aspect adjustment function, set it to 16:9.
●
For details, read the manual of the equipment or ask your local dealer.
■ Input Labels
Accessing the input labels list allows you to change the input name or skip
the input if unconnected, improving identification and selection in the Input
Selection banner.
Watching > Basic > Information banner
1. Display the menu with MENU.
2. Select Setup > Display Settings > Input Labels and press OK to access.
3. Set the item and press OK to set.
●
To name each input mode freely, select User input and set characters
(maximum 10 characters).
●
To skip the input mode, select Skip.
- 61 -
Page 62

■ Playing Time Display
Set to On to display a time period of continuous use in Game Mode on the top
right of the screen every 30 minutes.
1. Display the menu with MENU.
2. Select Setup > Display Settings > Playing Time Display and press OK to
access.
3. Select On / Off and press OK to set.
●
This function is available when Game Mode is set to On.
- 62 -
Page 63
Operating with TV’s remote control
You can operate the content in Media Player / media server, recording
functions or the connected equipment with the following buttons of this TV’s
remote control.
:
Playback (VCR / DVD / video content)
:
Stop the operations
:
Rewind, view the picture rapidly in reverse (VCR)
Skip to the previous track, title or chapter (DVD / video content)
:
Rewind, view the picture rapidly in reverse (VCR)
Search backward (DVD / video content)
:
Fast-forward, view the picture rapidly forward (VCR)
Skip to the next track, title or chapter (DVD / video content)
:
Fast-forward, view the picture rapidly forward (VCR)
Search forward (DVD / video content)
:
Pause / Resume
Press and hold to play at slow speed (DVD)
:
One Touch Recording
Recording > Recording current programme > One Touch Recording
- 63 -
Page 64

■ How to change the code
Each Panasonic product has its own remote control code. Change the code
according to the product for operation.
1. Press and hold Standby On / Off switch during the following operations.
2. Enter the appropriate code as follows with Numeric buttons.
●
Codes for each product and features
70: DVD Recorder, DVD Player, Blu-ray Disc Player
71: Player theatre, Blu-ray Disc theatre
72: VCR
73 (default):
Using in USB HDD recording, Media Player, DLNA features or VIERA
Link
3. Press
to change.
= Note =
●
Confirm if the remote control works correctly after changing the code.
●
The codes may be reset to defaults if batteries are replaced.
●
Some operations may not be available depending on the equipment.
- 64 -
Page 65

HDMI features
HDMI (high-definition multimedia interface) is the world’s first complete digital
consumer AV interface complying with a non-compression standard.
HDMI allows you to enjoy high-definition digital images and high-quality
sound by connecting the TV to external equipment.
HDMI-compatible equipment
with an HDMI or DVI output terminal, such as a
DVD player, a set top box or game equipment, can be connected to the HDMI
terminal using a fully wired HDMI compliant cable.
Watching > External equipment > External connection
: The HDMI logo is displayed on HDMI-compliant equipment.
■ Applicable HDMI features
●
Input audio signal:
2ch LPCM, Dolby Audio (Dolby Digital, Dolby Digital Plus)
– Audio settings can be made on HDMI Audio Format in the Sound
Menu.
Watching > For best audio > Advanced settings
●
Input video signal:
Matches the output setting of the digital equipment.
Watching > External equipment > Valid input signals
●
VIERA Link (HDAVI Control 5)
Functions > VIERA Link “HDAVI Control™” > Summary of VIERA Link
●
Content Type
●
Deep Colour
●
Audio Return Channel
– Audio Return Channel (ARC) is a function to send digital sound signals
via an HDMI cable.
– For HDMI2
●
x.v.Colour™
●
4K
Watching > 4K resolution > Valid 4K format
- 65 -
Page 66

■ DVI connection
If the external equipment has only a DVI output, connect to the HDMI terminal
via a DVI to HDMI adaptor cable. When using the DVI to HDMI adaptor cable,
connect the audio cable to the audio input terminal (use COMPONENT /
VIDEO audio terminals).
●
AV (COMPONENT / VIDEO) adaptor (supplied) is necessary when
connecting to the COMPONENT / VIDEO audio terminals.
●
Enquire HDMI adaptor cable at your local digital equipment retailer shop.
= Note =
●
Audio settings can be made on HDMI Audio Format / HDMI Input in the
Sound Menu.
Watching > For best audio > Advanced settings
●
If the connected equipment has an aspect adjustment function, set the
aspect ratio to “16:9”.
●
These HDMI connectors are “type A”.
●
These HDMI connectors are compatible with HDCP (High-Bandwidth
Digital Content Protection) copyright protection.
●
Equipment having no digital output terminal may be connected to the input
terminal of component or video to receive analogue signals.
●
This TV incorporates HDMI™ technology.
- 66 -
Page 67

HDMI HDR Setting
1. Display the menu with MENU.
2. Select Setup > HDMI HDR Setting and press OK to access.
3. Set the item and press OK to store.
HDMI HDR Setting
(On / Off)
Set to On when the HDR device is connected to the TV.
●
Please turn Off this function if the image looks unnatural. This may occur
in some cases such as compatibility with the connected device, source
images or with use of multi-window function.
●
Image may disappear for a few seconds when the setting is changed.
●
For HDMI
- 67 -
Page 68
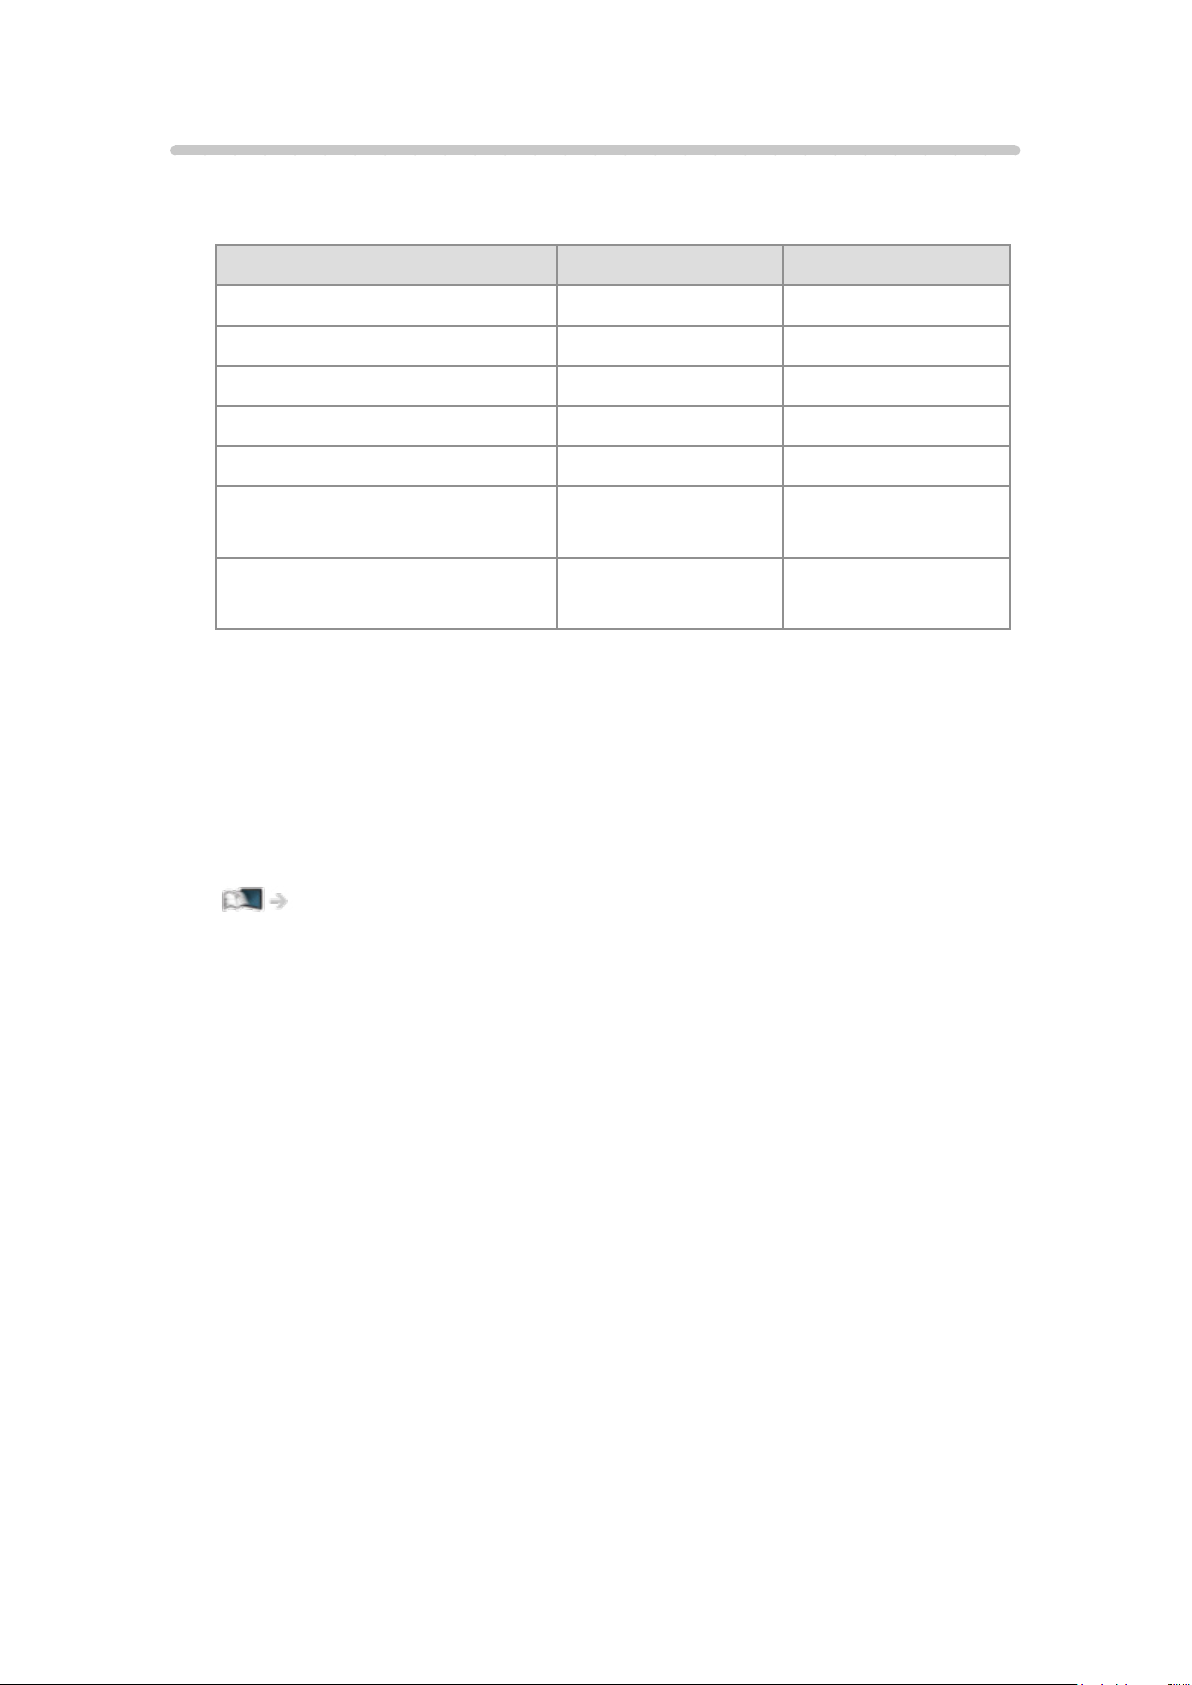
Valid input signals
■ COMPONENT, HDMI
Signal name COMPONENT HDMI
525 (480) / 60i, 60p ○ ○
625 (576) / 50i, 50p ○ ○
750 (720) / 60p, 50p ○ ○
1 125 (1 080) / 60i, 50i ○ ○
1 125 (1 080) / 60p, 50p, 24p ○
3 840 × 2 160 / 60p, 50p,
30p, 25p, 24p
4 096 × 2 160 / 60p, 50p,
30p, 25p, 24p
○:Applicableinputsignal
= Note =
●
Signals other than above may not be displayed properly.
●
The above signals are reformatted for optimal viewing on your display.
●
For details of valid 4K format
Watching > 4K resolution > Valid 4K format
○
○
- 68 -
Page 69

For best picture
Viewing Mode
Some features are not available on all models. Available menu items are displayed on your TV screen.
1. Display the menu with MENU.
2. Select Picture > Viewing Mode and press OK to access.
3. Select the mode and press OK to set.
Viewing Mode
(Dynamic / Normal / Professional Photo / Cinema / THX Cinema / THX Bright
Room / True Cinema / Custom / Professional1 / Professional2)
Selects your favourite picture mode for each input.
Dynamic:
Improves contrast and sharpness for viewing in a bright room.
Normal:
Normal use for viewing in a normal lighting condition.
Professional Photo:
Reproduces the original image for photo.
●
For photo content
Cinema:
Improves the performance of contrast, black and colour reproduction
for watching movies in a darkened room.
THX Cinema
Reproduces the original image quality precisely in a darkened room.
THX Bright Room
Reproduces the original image quality precisely in a bright room.
True Cinema:
Reproduces the original image quality precisely without any revision.
Custom:
:
:
Adjusts each menu item manually to suit your favourite picture quality.
Professional1 / 2:
Allows you to set and lock the professional picture settings.
Watching > For best picture > Advanced Settings
●
If a certified professional dealer sets these modes, Professional1
and Professional2 may be displayed as isf Day and isf Night.
- 69 -
Page 70

●
The following items can be adjusted and stored for each mode.
Luminance Level / Contrast / Brightness / Colour / Tint / Sharpness /
Colour Temperature / Vivid Colour / Colour Remaster / Rec.2020 Colour
Remaster / Reversal Film Effect / Ambient Sensor / Noise Reduction /
MPEG Remaster / Resolution Remaster / Dynamic Range Remaster /
Intelligent Frame Creation / Clear Motion
●
This function can be memorised respectively for input or TV mode.
: THX modes are used to mirror the picture settings used by professional
filmmakers, faithfully reproducing the image quality of THX Certified
movies. THX Certified movies have the THX logo on the disc. THX modes
are not available for photo content.
- 70 -
Page 71

Ambient Sensor
1. Display the menu with MENU.
2. Select Picture > Ambient Sensor and press OK to access.
3. Select On / Off and press OK to set.
Ambient Sensor
(On / Off)
●
Automatic Brightness Control function
Adjusts picture settings automatically depending on ambient lighting
condition.
- 71 -
Page 72

Aspect
Change the aspect ratio (image size) with ASPECT.
■ To change the aspect ratio manually
1. Display Aspect Selection with ASPECT.
2. Select the mode and press OK to set.
●
You can also change the mode pressing ASPECT.
(Press repeatedly until you reach the desired mode.)
Auto:
The best ratio is selected automatically according to the “Aspect Control
Signal”.
Watching > For best picture > Aspect Control Signal
16:9:
Directly displays the image at 16:9 without distortion (anamorphic).
4:3:
Displays the image at the standard 4:3 without distortion.
Zoom:
Displays a 16:9 letterbox or 4:3 image without distortion.
4:3 Full:
Displays a 4:3 image enlarged horizontally to fit the screen.
V Full:
Displays the image enlarged vertically to fit the screen without distortion.
●
For DCI 4K format
= Note =
●
Display the image (TV, external input, etc.) full-screen to use this function
completely.
●
Aspect mode can be memorised separately for SD (Standard definition)
and HD (High definition) signals.
●
Aspect cannot be changed in teletext service.
●
Aspect is fixed to 16:9 in the following conditions:
– Game Mode is set to On.
– 1080p Pure Direct is set to On.
– 4K Pure Direct is set to On.
– 1080p Pixel by 4pixels is set to On.
– 4K content except DCI 4K
- 72 -
Page 73

Aspect Control Signal
Programmes usually contain an “Aspect Control Signal”. (Widescreen signal,
Control signal through HDMI terminal)
In Auto mode, aspect mode will appear in the top left of the screen if a
Widescreen signal (WSS) or a Control signal through HDMI terminal is found.
The aspect switches to the appropriate ratio.
Watching > For best picture > Aspect
■ Available conditions
Satellite terminal (WSS only)
●
Valid input signal format:
DVB-S
Terrestrial / cable terminal (WSS only)
●
Valid input signal format:
DVB-C
DVB-T / DVB-T2
PAL B, G, H, I, D, K
SECAM B, G, L, L’, D, K
Invalid input signal format:
PAL 525/60 6.5 MHz
PAL 525/60 6.0 MHz
PAL 525/60 5.5 MHz
M.NTSC 6.5 MHz
M.NTSC 6.0 MHz
M.NTSC 5.5 MHz
AV (VIDEO) terminals
●
Valid input signal format:
PAL
SECAM
PAL 525/60
M.NTSC
NTSC
: Control signal through HDMI terminal only
- 73 -
Page 74

AV (COMPONENT) terminals (WSS only)
●
Valid input signal format:
625 (576) / 50i, 50p
Invalid input signal format:
525 (480) / 60i, 60p
750 (720) / 60p, 50p
1 125 (1 080) / 60i, 50i
HDMI terminal
●
Valid input signal format:
525 (480) / 60i, 60p
625 (576) / 50i, 50p
750 (720) / 60p, 50p
1 125 (1 080) / 60i, 50i
1 125 (1 080) / 60p, 50p, 24p
3 840 × 2 160 / 60p, 50p, 30p, 25p, 24p
4 096 × 2 160 / 60p, 50p, 30p, 25p, 24p
●
HDMI terminal does not receive WSS signal.
= Note =
●
If the screen size looks unusual when a widescreen-recorded programme
is played back on a VCR, adjust the tracking of the VCR. Read the manual
of the VCR.
●
For details of valid 4K format
Watching > 4K resolution > Valid 4K format
- 74 -
Page 75

Basic settings
1. Display the menu with MENU.
2. Select Picture and press OK to access.
3. Select one of the following items and press OK to access.
Luminance Level / Contrast / Brightness / Colour / Tint / Sharpness /
Colour Temperature / Vivid Colour / Colour Remaster / Rec.2020 Colour
Remaster / Reversal Film Effect / Resolution Remaster / Dynamic Range
Remaster / Intelligent Frame Creation / Clear Motion
4. Set the item and press OK to store.
Luminance Level, Contrast, Brightness, Colour, Tint, Sharpness
Adjusts the levels of these options according to your personal preference.
●
Sharpness is not available when 1080p Pixel by 4pixels is set to On.
Colour Temperature
Sets the overall colour tone of the picture (bluer - redder).
Vivid Colour
(On / Off)
Automatically adjusts colours to vivid ones.
Colour Remaster
(Max / Min / Off)
Displays the vivid images with the expanded colour gamut.
●
Not valid in the following conditions:
– Photo content
– Viewing Mode is THX mode.
Rec.2020 Colour Remaster
(Max / Min / Off)
Displays the vivid images with the suitable colour gamut.
●
This function is available only for Rec. 2020 and displayed instead of
Colour Remaster.
- 75 -
Page 76

Reversal Film Effect
(Max / Min / Off)
Provides the picture effect such as the reversal film for photo content.
●
For photo content
●
Not valid when Viewing Mode is THX mode
Resolution Remaster
(Auto / Max / Mid / Min / Off)
Enhances picture resolution to make the image sharper.
●
Not valid when 1080p Pixel by 4pixels is set to On
Dynamic Range Remaster
(On / Off)
Enhances bright areas of the image closer to the original luminance making
improved picture impact.
●
Not valid in the following conditions:
– Multi window
– Contrast Control is set to Off.
Intelligent Frame Creation
(Custom / Max / Mid / Min / Off)
Automatically compensates the picture frame rate and removes juddering
movements to make the images smooth.
●
Depending on the content, images may be noisy. To prevent the noise,
change the setting.
●
Select Custom to set Intelligent Frame Creation manually.
Blur Reduction:
Adjusts the smoothness of camera content to minimise blur.
Film Smooth:
Adjusts the smoothness of film content.
Reset to Defaults:
Resets items for Intelligent Frame Creation.
●
Not valid in the following conditions:
– Game Mode is set to On.
– 1080p Pixel by 4pixels is set to On.
– 1080p Pure Direct is set to On.
- 76 -
Page 77

– 4K Pure Direct is set to On.
– Photo content
Clear Motion
(On / Off)
Makes the blurring image clearer such as when Game Mode is set, etc.
●
Not valid for photo content
- 77 -
Page 78

Noise reduction settings
1. Display the menu with MENU.
2. Select Picture > Noise Reduction / MPEG Remaster and press OK to
access.
3. Set the item and press OK to store.
Noise Reduction
(Auto / Max / Mid / Min / Off)
Reduces unwanted picture noise.
MPEG Remaster
(Auto / Max / Mid / Min / Off)
Reduces flicker noise in contoured parts of a picture and block noise.
- 78 -
Page 79

Advanced Settings
Some features are not available on all models. Available menu items are displayed on your TV screen.
You can adjust and set up the detailed picture settings when Viewing Mode is
set to Professional Photo, Cinema, True Cinema, Custom or Professional1 /
2. The settings in True Cinema, Custom or Professional1 / 2 can be stored for
each input.
Watching > For best picture > Viewing Mode
1. Select the input mode with AV or TV.
2. Display the menu with MENU.
3. Select Picture > Viewing Mode and press OK to access.
4. Select the mode and press OK to set.
Professional Photo / Cinema / True Cinema / Custom / Professional1 /
Professional2
■ Adjust the detailed picture settings
1. Display the menu with MENU.
2. Select Picture > Advanced Settings and press OK to access.
3. Select one of the following items and press OK to access.
Contrast Control / HDR Brightness Enhancer / Colour Gamut / White
Balance / Colour Management / Gamma / Reset to Defaults
4. Set the item and press OK to store.
■ Contrast Control
Contrast Control
(Custom / Auto / Off)
Automatically adjusts the detailed contrast settings. Select Custom to set
Contrast Control Setting manually.
Contrast Control Setting
Adaptive Gamma Control:
Adjusts the gamma curve to make the image brighter.
Black Expander:
Gradually adjusts the shades of black.
Clear White Effect:
Makes the white area clearer.
Reset to Defaults:
Resets items for Contrast Control Setting.
- 79 -
Page 80

■ HDR Brightness Enhancer
HDR Brightness Enhancer
(On / Off)
Enhances the luminance when watching HDR video in a bright environment.
■ Colour Gamut
Colour Gamut
(Native / Rec. 709 / SMPTE-C / EBU / Rec. 2020 / DCI-P3 / Auto / sRGB /
Adobe)
Reproduces image colour precisely according to the colour gamut standards.
Native:
Displays deep colours by expanding the colour gamut to its maximum.
Rec. 709:
Standard for HD (High definition)
SMPTE-C:
Standard for NTSC
EBU:
Standard for PAL
Rec. 2020:
Provides the suitable colour gamut for Rec. 2020.
DCI-P3:
Provides the suitable colour gamut for DCI 4K.
Auto:
Automatically adjusts the colour gamut according to the input signal.
(For photo content)
sRGB:
Standard for sRGB (For photo content)
Adobe:
Standard for AdobeRGB (For photo content)
●
Set Colour Remaster, Rec.2020 Colour Remaster and Reversal Film
Effect to Off to use this function.
●
Auto / sRGB / Adobe are available for the photo content.
- 80 -
Page 81

■ White Balance
R-Gain / G-Gain / B-Gain
Adjusts the white balance of bright red / green / blue areas.
R-Cutoff / G-Cutoff / B-Cutoff
Adjusts the white balance of dark red / green / blue areas.
More Detailed Adjustment
Adjusts more detailed items for White Balance.
Input Signal Level:
Adjusts the input signal level.
R-Gain / G-Gain / B-Gain:
Adjusts the detailed white balance of bright red / green / blue areas.
Reset to Defaults:
Resets items for More Detailed Adjustment.
Reset to Defaults
Resets White Balance to the default settings.
- 81 -
Page 82

■ Colour Management
R-Hue / R-Saturation / R-Luminance
Adjusts the picture hue / saturation / luminance of red areas.
G-Hue / G-Saturation / G-Luminance
Adjusts the picture hue / saturation / luminance of green areas.
B-Hue / B-Saturation / B-Luminance
Adjusts the picture hue / saturation / luminance of blue areas.
More Detailed Adjustment
Adjusts more detailed items for Colour Management.
C-Hue / M-Hue / Y-Hue:
Adjusts the picture hue of cyan / magenta / yellow areas.
C-Saturation / M-Saturation / Y-Saturation:
Adjusts the saturation of cyan / magenta / yellow areas.
C-Luminance / M-Luminance / Y-Luminance:
Adjusts the luminance of cyan / magenta / yellow areas.
Reset to Defaults:
Resets items for More Detailed Adjustment.
Reset to Defaults
Resets Colour Management to the default settings.
- 82 -
Page 83

■ Gamma
Gamma
Switches the gamma curve.
●
Please note the numerical values are reference for the adjustment.
More Detailed Adjustment
Adjusts more detailed items for Gamma.
Input Signal Level:
Adjusts the input signal level.
Gain:
Adjusts the gain of gamma for selected signal level.
Reset to Defaults:
Resets items for More Detailed Adjustment.
Reset to Defaults
Resets Gamma to the default settings.
■ Reset to Defaults
Reset to Defaults
Resets Advanced Settings to the default settings.
- 83 -
Page 84

Option Settings
Some features are not available on all models. Available menu items are displayed on your TV screen.
1. Display the menu with MENU.
2. Select Picture > Option Settings and press OK to access.
3. Select one of the following items and press OK to access.
Game Mode / Film Cadence Mode / 1080p Pure Direct / 4K Pure Direct /
1080p Pixel by 4pixels / HDMI Content Type / HDMI EOTF Type / EOTF
Type / HDMI Colorimetry Type / HDMI RGB Range / HDMI YCbCr Range /
AV Colour System / 3D-COMB
4. Set the item and press OK to store.
Game Mode
(On / Off)
Provides suitable images for fast response signals when playing games.
●
Not valid in the following conditions:
– TV mode
– 1080p Pixel by 4pixels is set to On.
– 1080p Pure Direct is set to On.
– 4K Pure Direct is set to On.
●
To display a continuous record of time spent using Game Mode, set
Playing Time Display.
Film Cadence Mode
(Auto / On / Off)
Improves vertical resolution for movie images.
●
This function is available for interlaced signals (except in the mode of multi
window, Network services or when Game Mode is set to On).
1080p Pure Direct
(On / Off)
Reproduces the original image quality in detail for 1080p (HDMI) input signal.
●
Not valid in the following conditions:
– Multi window
– 1080p Pixel by 4pixels is set to On.
- 84 -
Page 85

4K Pure Direct
(On / Off)
Reproduces the original image quality in detail for 4K (HDMI) input signal.
●
Not valid in the following conditions:
– Multi window
1080p Pixel by 4pixels
(On / Off)
Displays like pixel by pixel to make the image sharper for 1080p signal.
●
For HDMI
●
Not all image may be displayed as pixel by pixel precisely.
●
Not valid in the following conditions:
– Multi window
HDMI Content Type
(Graphics / Photos / Auto / Off)
Adjusts the picture settings of each HDMI input according to the selected
content type.
Auto:
Automatically adjusts the picture settings according to the received
HDMI content if the connected equipment supports HDMI Content
Type.
●
To set the availability of each content type for Auto mode, select Auto
Detail Setting.
●
For HDMI
●
Not valid when Viewing Mode is set to Professional Photo
HDMI EOTF Type
(Auto / Traditional gamma / HLG / PQ)
Selects the EOTF type for each HDMI input. Set to Auto for general use.
●
For HDMI
- 85 -
Page 86

EOTF Type
(Auto / Traditional gamma / HLG / PQ)
Selects the EOTF type of broadcast or video content.
It works correctly only when the signal corresponds the each EOTF type. Set
to Auto for general use.
●
Automatically switches to Auto for broadcast each time another input /
channel is selected.
●
For DVB, video content
HDMI Colorimetry Type
(Auto / Rec. 601 / Rec. 709 / Rec. 2020)
Selects the colourimetry type for each HDMI input.
●
For HDMI
HDMI RGB Range
(Auto / Full / Normal)
Adjusts the black level of the image for each HDMI input.
●
When the black level is not suitable, select Full.
●
For HDMI
HDMI YCbCr Range
(Full / Normal)
Adjusts the black level of the image in the YCbCr signal for each HDMI input.
●
For HDMI
AV Colour System
(Auto / PAL / SECAM / M.NTSC / NTSC)
Selects optional colour system based on video signals.
●
For AV (VIDEO)
- 86 -
Page 87

3D-COMB
(On / Off)
Makes still or slow moving pictures more vivid.
●
Occasionally, while viewing still or slow moving pictures, colour patterning
may be seen. Set to On to display sharper and more accurate colours.
●
For PAL / NTSC signal reception in TV mode or from composite
connection
- 87 -
Page 88

Screen Settings
1. Display the menu with MENU.
2. Select Picture > Screen Settings and press OK to access.
3. Select one of the following items and press OK to access.
16:9 Overscan / Zoom Adjustments / Screen Display / Pixel Orbiter / Panel
Maintenance / Panel Maintenance Message
4. Set the item and press OK to store.
16:9 Overscan
(On / Off)
Selects the screen area displaying the image for 16:9 aspect.
On:
Enlarges the image to hide the edge of the image.
Off:
Displays the image in the original size.
●
Set to On if noise occurs on the edge of the screen.
●
This function can be memorised for SD (Standard definition) and HD (High
definition) signals respectively.
●
Not valid in the following conditions:
– 4K content
– Photo content
– Game Mode is set to On.
– 1080p Pixel by 4pixels is set to On.
– 1080p Pure Direct is set to On.
– 4K Pure Direct is set to On.
– Multi window
Zoom Adjustments
Adjusts the vertical position and size when aspect is set to Zoom.
●
Not valid in the following conditions:
– 4K content
– Multi window
- 88 -
Page 89

Screen Display
(On / Off)
Turns the screen off when you select Off.
●
This function is effective in reducing power consumption when listening to
the sound without watching the TV screen.
●
Press any buttons (except Standby On / Off switch) to turn the screen on.
Pixel Orbiter
(On / Off)
Sets the pixel shifting of the image to prevent panel “image retention”.
Panel Maintenance
Turns the screen off and perform the maintenance to prevent the panel
“image retention”.
●
It takes approx. 80 minutes to finish the maintenance.
●
LED turns to orange during adjustment of the panel.
●
To cancel the maintenance, turn the TV on while the maintenance is in
progress.
●
A white horizontal line appears on the screen for a while to adjust the
panel. This is not a malfunction.
●
Completion message will be displayed when turning the TV on after panel
maintenance.
Panel Maintenance Message
(On / Off)
Enables to display the regular panel maintenance notification.
On:
The message automatically displays for maintenance when the TV is
turned off with Standby On / Off switch of the TV’s remote control after
watching for a certain period of time.
Off:
The message does not display. Select Panel Maintenance and perform the
panel maintenance manually. (see above)
- 89 -
Page 90

Lock Settings
Locks the settings of Professional1 / 2 for each input.
●
Select Professional1 / Professional2 in Viewing Mode in advance.
Watching > For best picture > Viewing Mode
1. Display the menu with MENU.
2. Select Picture > Lock Settings and press OK to access.
3. Enter the PIN number (4 digits) with Numeric buttons.
●
Enter the PIN number twice at first setting.
●
Make a note of the PIN number in case you forget it.
4. Select Adjustment Lock and press OK to access.
5. Select On and press OK to set.
●
The following items can be locked.
Luminance Level / Contrast / Brightness / Colour / Tint / Sharpness /
Colour Temperature / Vivid Colour / Resolution Remaster / Dynamic
Range Remaster / Advanced Settings / Reset to Defaults
■ To change the PIN number
1. Select Change PIN and press OK to access.
2. Enter a new PIN number twice with Numeric buttons.
- 90 -
Page 91

Copy Adjustment
Copies the picture settings of True Cinema, Custom, Professional1 or
Professional2 to those of the other input mode or Viewing Mode.
1. Display the menu with MENU.
2. Select Picture > Copy Adjustment > Destination Viewing Mode /
Destination Input and press OK to access.
3. Select the destination to copy to and press OK to set.
4. Select Copy Start and press OK to copy.
5. When a confirmation screen is displayed, select Yes and press OK to set.
= Note =
●
Option Settings and Screen Settings are not copied.
●
You cannot copy to the locked mode.
- 91 -
Page 92

For best audio
Sound mode
1. Display the menu with MENU.
2. Select Sound > Mode and press OK to access.
3. Select the mode and press OK to set.
Mode
(Standard / Music / Ambience / User)
Selects your favourite sound mode for each input.
Standard:
Provides the suitable sound quality for all types of scenes.
Music:
Improves sound quality for watching music videos, etc.
Ambience:
Improves spatial effects and provides clear sounds.
User:
Adjusts the sounds manually using the equaliser to suit your favourite
sound quality.
●
The following items can be adjusted and stored for each mode.
Bass / Treble / Surround / Bass Boost
●
For the User mode, Equaliser is available in the Sound Menu instead of
Bass and Treble. Select Equaliser and adjust the frequency.
Watching > For best audio > Basic settings
●
This function is effective only for the sound from TV speakers.
- 92 -
Page 93

Basic settings
1. Display the menu with MENU.
2. Select Sound and press OK to access.
3. Select one of the following items and press OK to access.
Bass / Treble / Equaliser / Balance / Surround / Bass Boost
4. Set the item and press OK to store.
Bass
Adjusts level to enhance or minimise lower, deeper sound output.
Treble
Adjusts level to enhance or minimise sharper, higher sound output.
Equaliser
Adjusts the frequency level to suit your favourite sound quality.
●
This function is available when Mode is set to User.
●
Select the frequency and adjust the frequency level.
●
To enhance the bass sound, raise the level of the lower frequency. To
enhance the treble sound, raise the level of the higher frequency.
●
To reset the levels of each frequency to the default settings, select Reset
to Defaults and press OK.
●
This function is effective only for the sound from TV speakers.
Balance
Adjusts volume level of right and left speakers.
Surround
(Virtual Surround+ / Virtual Surround / Off)
Selects surround sound settings.
Virtual Surround+:
Provides a more progressive enhancer and reverberation to simulate
improved spatial effects.
Virtual Surround:
Provides a dynamic enhancer of width and depth to simulate improved
spatial effects.
●
This function is effective only for the sound from TV speakers.
- 93 -
Page 94

Bass Boost
(On / Off)
Enhances the effect of bass sounds.
●
This function is effective only for the sound from TV speakers.
- 94 -
Page 95
Volume settings
1. Display the menu with MENU.
2. Select Sound and press OK to access.
3. Select one of the following items and press OK to access.
Speaker Selection / TV Speaker Setting / Headphone Volume / Auto Gain
Control / Volume Correction / Clear Sound Adjustment
4. Set the item and press OK to store.
Speaker Selection
(TV / Home Cinema)
Enables controlling the theatre speaker with this TV’s remote control by
pointing at the TV’s signal receiver.
TV:
TV speakers are active.
Home Cinema:
The sound is delivered from theatre speakers. Player theatre, Bluray Disc theatre or Amplifier will be automatically turned on if it is in
Standby mode.
●
The sound of TV speakers is mute. When the equipment is turned
off, TV speakers will be activated.
●
You can use Volume Up / Down and MUTE.
●
This function is available when the theatre speakers supporting VIERA
Link function is connected to this TV.
TV Speaker Setting
(TV Speaker / Headphone / Off)
Selects the sound output to adjust volume.
●
Sound from TV speaker turns off when Headphone or Off is selected.
Headphone Volume
Adjusts the volume of headphones.
- 95 -
Page 96

Auto Gain Control
(On / Off)
Automatically regulates large sound level differences between channels and
inputs.
Volume Correction
Adjusts the volume of each individual channel or input mode.
Clear Sound Adjustment
(On / Off)
If the sound from TV speakers is unclear due to installation environment, On
is recommended.
●
This function is effective only for the sound from TV speakers.
- 96 -
Page 97

Voice Guidance Settings
1. Display the menu with MENU.
2. Select Sound > Voice Guidance Settings and press OK to access.
3. Select one of the following items and press OK to access.
Voice Guidance / Speed / Volume / Language / User Level / Web Browser
4. Set the item and press OK to store.
Voice Guidance
(On / Off)
Set to On to enable voice guidance of the basic features (on-screen
messages, etc.) for visually impaired users.
●
Not valid in multi window mode
Speed
(Fast / Normal / Slow)
Selects the readout speed for the voice guidance.
Volume
(Max / Mid / Min)
Selects the volume for the voice guidance.
Language
Changes language for the voice guidance.
●
All languages may not be available. When the selected language is not
supported, Language is set to English automatically.
User Level
(Beginner / Expert)
Selects the level of verbosity for the voice guidance.
Web Browser
(On / Off)
Set to On to enable voice guidance of the network content in web browser
function.
- 97 -
Page 98

= Note =
●
Voice guidance function may not correspond exactly.
- 98 -
Page 99

Audio Description
1. Display the menu with MENU.
2. Select Sound > Audio Description and press OK to access.
3. Select one of the following items and press OK to access.
Preferred Audio Type / Volume / Speakers / Headphones
4. Set the item and press OK to store.
●
For DVB
Preferred Audio Type
(Audio Description / Standard)
Narration settings for visually impaired users
Set to Audio Description to activate the narration sound track when available
on the broadcast.
●
The availability of audio description sound track is indicated by AD in the
information banner.
●
Not valid in multi window mode
Volume
Adjusts the volume for Audio Description.
Speakers
(Mix / Standard)
Set to Mix to activate the description sound track from TV speakers.
Headphones
(Mix / Standard)
Set to Mix to activate the description sound track from headphones.
- 99 -
Page 100

Advanced settings
1. Display the menu with MENU.
2. Select Sound and press OK to access.
3. Select one of the following items and press OK to access.
MPX / Audio Preference / SPDIF Selection / HDMI Audio Format / PCM
Optical Level / SPDIF Delay / HDMI Input
4. Set the item and press OK to store.
MPX
Selects multiplex sound mode (if available).
Stereo:
Use this normally.
Mono:
When stereo signal cannot be received
M1 / M2:
Available while mono signal is transmitted
●
For Analogue
Audio Preference
(Auto / Multichannel / Stereo / MPEG)
●
Selectable options vary depending on the country you select.
Selects the initial setting for audio tracks.
Auto:
Automatically selects the audio tracks if a programme has two or more
tracks. The priority is given in the following order - Dolby Audio (Dolby
Digital Plus), HE-AAC, Dolby Audio (Dolby Digital), MPEG.
Multichannel:
The priority is given to multi-channel audio track.
Stereo:
The priority is given to stereo (2ch) audio track.
MPEG:
The priority is given to MPEG.
●
Dolby Audio (Dolby Digital, Dolby Digital Plus) is the method of coding
digital signals developed by Dolby Laboratories. Apart from stereo (2ch)
audio, these signals can be multi-channel audio.
- 100 -
 Loading...