

Panasonic TX-24G310E, TX-32G310E, TX-32G320E, TX-43G320E User Manual
Operating Instructions
LED TV
Model No.
TX-24G310E
TX-32G310E
TX-32G320E
TX-43G320E
English
Nederlands
Русский
(image: TX-32G310E)
Thank you for purchasing this Panasonic product.
Please read these instructions carefully before operating this product and retain them
for future reference.
Please carefully read the “Safety Precautions” of this manual before use.
The images shown in this manual are for illustrative purposes only.
Please refer to Pan European Guarantee Card if you need to contact your local
Panasonic dealer for assistance.

Table of Contents
Licence
Licence .............................................................. 2
Important Notice ............................................... 3
Safety Precautions ........................................... 4
Accessories ......................................................7
Installing the TV ................................................ 8
Installing the wall-hanging bracket ...............10
Connections .................................................... 11
Identifying Controls ........................................13
First time Auto Setup .....................................15
Watching TV ....................................................16
How to Use Menu Functions .........................17
Menu Overview ............................................... 18
Changing Picture and Sound settings .........19
Retuning from Setup Menu ............................21
Channel Options ............................................. 22
Channels List .................................................. 23
Child Lock ....................................................... 24
Watching External Inputs ..............................25
Viewing Teletext .............................................. 26
Using TV Guide ............................................... 27
Using Media Player.........................................28
Setup menu ..................................................... 29
Software ..........................................................31
FAQs ................................................................32
Maintenance .................................................... 33
Specifications ................................................. 33
Even if no special notation has been made of company
or product trademarks, these trademarks have been fully
respected.
DVB and the DVB logos are trademarks of the DVB
Project.
DiSEqC™ is a trademark of EUTELSAT.
The terms HDMI and HDMI High-Definition Multimedia
Interface, and the HDMI Logo are trademarks or
registered trademarks of HDMI Licensing LLC in the
United States and other countries.
Dolby, Dolby Audio, and the double-D symbol are
trademarks of Dolby Laboratories. Manufactured
under license from Dolby Laboratories. Confidential
unpublished works. Copyright © 1992-2015 Dolby
Laboratories. All rights reserved.
For DTS patents, see http://patents.dts.com.
Manufactured under license from DTS Licensing
Limited. DTS, the Symbol, DTS and the Symbol
together, Digital Surround, and the DTS 2.0+Digital Out
logo, are registered trademarks and/or trademarks of
DTS, Inc. in the United States and/or other countries.
© DTS, Inc. All Rights Reserved.
The illustration for TX-32G310E is used in this
manual unless otherwise mentioned.
Illustrations shown may be different depending on
the model.
English
2

Important Notice
Notice for DVB / Data broadcasting
This TV is designed to meet the standards (as of
August, 2018) of DVB-T / T2 (MPEG2, MPEG4AVC(H.264)) digital terrestrial services, DVB-C
(MPEG2, MPEG4-AVC(H.264)) digital cable services
and DVB-S (MPEG2, MPEG4-AVC(H.264)) digital
satellite services.
Consult your local dealer for availability of DVB-T / T2
or DVB-S services in your area.
Consult your cable service provider for availability of
DVB-C services with this TV.
●
This TV may not work correctly with the signal which
does not meet the standards of DVB-T / T2, DVB-C
or DVB-S.
●
Not all the features are available depending on the
country, area, broadcaster, service provider and
satellite environment.
●
Not all CI modules work properly with this TV. Consult
your service provider about the available CI module.
●
This TV may not work correctly with CI module that is
not approved by the service provider.
●
Additional fees may be charged depending on the
service provider.
●
Compatibility with future services is not guaranteed
Panasonic does not guarantee operation and
performance of peripheral devices made by other
manufacturers; and we disclaim any liability or damage
arising from operation and/or performance from usage of
such other maker’s peripheral devices.
Handling of customer information
Customer’s personal information may be stored on
this TV by broadcasting organization. Before repairing,
transferring or discarding this TV, erase all the
information stored on this TV according to the following
procedure.
[Reinstall TV] in [General settings]
(p. 30)
This product is licensed under the AVC patent portfolio
license for the personal and non-commercial use of a
consumer to (i) encode video in compliance with the
AVC Standard (“AVC Video”) and/or (ii) decode AVC
Video that was encoded by a consumer engaged in
a personal and non-commercial activity and/or was
obtained from a video provider licensed to provide AVC
Video. No license is granted or shall be implied for any
other use.
Additional information may be obtained from MPEG LA,
LLC.
http://www.mpegla.com.
See
English
3

This mark indicates the product operates on AC voltage.
This mark indicates a Class II or double insulated
electrical appliance wherein the product does not require
a safety connection to electrical earth (ground).
Transport only in upright position.
Safety Precautions
To help avoid risk of electrical shock, fire, damage or
injury, please follow the warnings and cautions below:
■ Mains plug and lead
Warning
If you detect anything unusual,
immediately remove the mains
plug.
●
This TV is designed to operate on AC 220-240 V, 50
/ 60 Hz.
●
Insert the mains plug fully into the mains socket.
●
To turn Off the apparatus completely, you must pull
the mains plug out of the mains socket.
Consequently, the mains plug should be easily
accessible at all times.
●
Disconnect the mains plug when cleaning the TV.
●
Do not touch the mains plug with wet hands.
●
Do not damage the mains lead.
Do not place a heavy
•
object on the lead.
Do not place the lead near
•
a high temperature object.
Do not pull on the lead.
•
Hold onto the mains plug
body when disconnecting
the plug.
Do not move the TV with the lead plugged into a
•
mains socket.
Do not twist the lead, bend it excessively or stretch
•
it.
Do not use a damaged mains plug or mains
•
socket.
Ensure the TV does not crush the mains lead.
•
●
Do not use any mains lead other than that provided
with this TV.
English
4
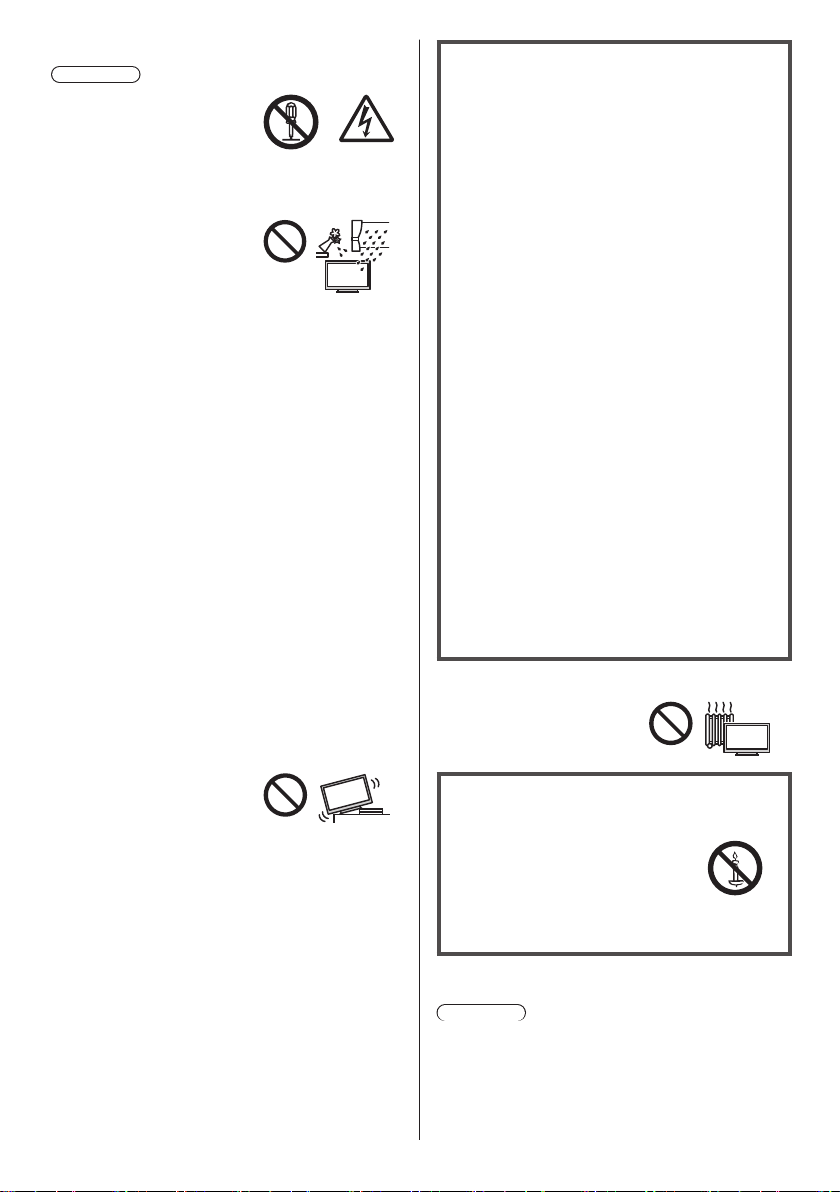
■ Take care
Warning
●
Do not remove covers
and never modify the TV
yourself as live parts are
accessible and risk of
electric shock when they are
removed. There are no user
serviceable parts inside.
●
Do not expose the TV to rain
or excessive moisture. This
TV must not be exposed to
dripping or splashing water
and objects filled with liquid,
such as vases, must not be
placed on top of or above
the TV.
●
Do not insert foreign objects into the TV through the
air vents.
●
If the TV is used in an area where insects may easily
enter the TV.
It is possible for insects to enter the TV, such as small
flies, spiders, ants, etc. which may cause damage to
the TV or become trapped in an area visible on the
TV, e.g. within the screen.
●
If the TV is used in an environment where there is
dust or smoke.
It is possible for dust/smoke particles to enter the TV
through the air vents during normal operation which
can become trapped inside the unit. This may cause
overheating, malfunction, deterioration in picture
quality, etc.
●
Do not use an unapproved pedestal / mounting
equipment. Be sure to ask your local Panasonic
dealer to perform the setup or installation of approved
wall-hanging brackets.
●
Do not apply any strong force or impact to the display
panel.
●
Ensure that children do not climb on the TV.
●
Do not place the TV on
sloping or unstable surfaces,
and ensure that the TV does
not hang over the edge of
the base.
Warning
A television set may fall, causing serious personal
injury or death. Many injuries, particularly to children,
can be avoided by taking simple precautions such as:
ALWAYS use cabinets or stands or mounting
•
methods recommended by the manufacturer of the
television set.
ALWAYS use furniture that can safely support the
•
television set.
ALWAYS ensure the television set is not
•
overhanging the edge of the supporting furniture.
ALWAYS educate children about the dangers of
•
climbing on furniture to reach the television set or
its controls.
ALWAYS route cords and cables connected to your
•
television so they cannot be tripped over, pulled or
grabbed.
NEVER place a television set in an unstable
•
location.
NEVER place the television set on tall furniture
•
(for example, cupboards or bookcases) without
anchoring both the furniture and the television set t
a suitable support.
NEVER place the television set on cloth or other
•
materials that may be located between the
television set and supporting furniture.
NEVER place items that might tempt children to
•
climb, such as toys and remote controls, on the top
of the television or furniture on which the television
is placed.
If the existing television set is going to be retained
and relocated, the same considerations as above
should be applied.
●
This TV is designed for table-top use.
●
Do not expose the TV to
direct sunlight and other
sources of heat.
To prevent the
spread of fire, keep
candles or other
open flames away
from this product at
all times.
■ Suffocation / Choking Hazard
Warning
●
The packaging of this product may cause suffocation,
and some of the parts are small and may present a
choking hazard to young children. Keep these parts
out of reach of young children.
English
5

■ Pedestal
Warning
●
Do not disassemble or modify the pedestal.
Caution
●
Do not use any pedestal other than the one provided
with this TV.
●
Do not use the pedestal if it becomes warped or
physically damaged. If this occurs, contact your
nearest Panasonic dealer immediately.
●
During setup, make sure that all screws are securely
tightened.
●
Ensure that the TV does not suffer any impact during
installation of the pedestal.
●
Ensure that children do not climb onto the pedestal.
●
Install or remove the TV from the pedestal with at
least two people.
●
Install or remove the TV according to the specified
procedure.
■ Radio waves
Warning
●
Do not use the TV in any medical institutions or
locations with medical equipment. Radio waves may
interfere with the medical equipment and may cause
accidents due to malfunction.
●
Do not use the TV near any automatic control
equipment such as automatic doors or fire alarms.
Radio waves may interfere with the automatic
control equipment and may cause accidents due to
malfunction.
●
Keep at least 15 cm away from the TV if you have a
cardiac pacemaker. Radio waves may interfere with
the operation of the pacemaker.
●
Do not disassemble or alter the TV in any way.
■ Ventilation
Caution
Allow sufficient space (at least 10 cm) around the TV in
order to help prevent excessive heat, which could lead
to early failure of some electronic components.
a
a: 10 cm
a
a
b
b: 10 cm
■ Moving the TV
Caution
Before moving the TV, disconnect all cables.
●
At least two people are required to move the TV.
■ When not in use for a long time
Caution
This TV will still consume some power even in the Off
mode, as long as the mains plug is still connected to a
live mains socket.
●
Remove the mains plug from the wall socket when
the TV is not in use for a prolonged period of time.
■ Excessive volume
Caution
Allow sufficient space (at least 10 cm) around the TV in
order to help prevent excessive heat, which could lead
to early failure of some electronic components.
●
Do not expose your ears to
excessive volume from the
headphones. Irreversible
damage can be caused.
●
If you hear a drumming noise in your ears, turn
down the volume or temporarily stop using the
headphones.
●
Ventilation should not be
impeded by covering the
ventilation openings with
items such as newspapers,
tablecloths and curtains.
●
Whether you are using a pedestal or not, always
ensure the vents at the bottom of the TV are not
blocked and there is sufficient space to enable
adequate ventilation.
English
6
■ Battery for the Remote Control
Caution
●
Incorrect installation may cause battery leakage,
corrosion and explosion.
●
Replace only with the same or equivalent type.
●
Do not mix old and new batteries.
●
Do not mix different battery types (such as alkaline
and manganese batteries).
●
Do not use rechargeable batteries (Ni-Cd, etc.).
●
Do not burn or break up batteries.
●
Do not expose batteries to excessive heat such as
sunshine, fire or the like.
●
Make sure you dispose of batteries correctly.
●
Remove the battery from the unit when not using for
a prolonged period of time to prevent battery leakage,
corrosion and explosion.
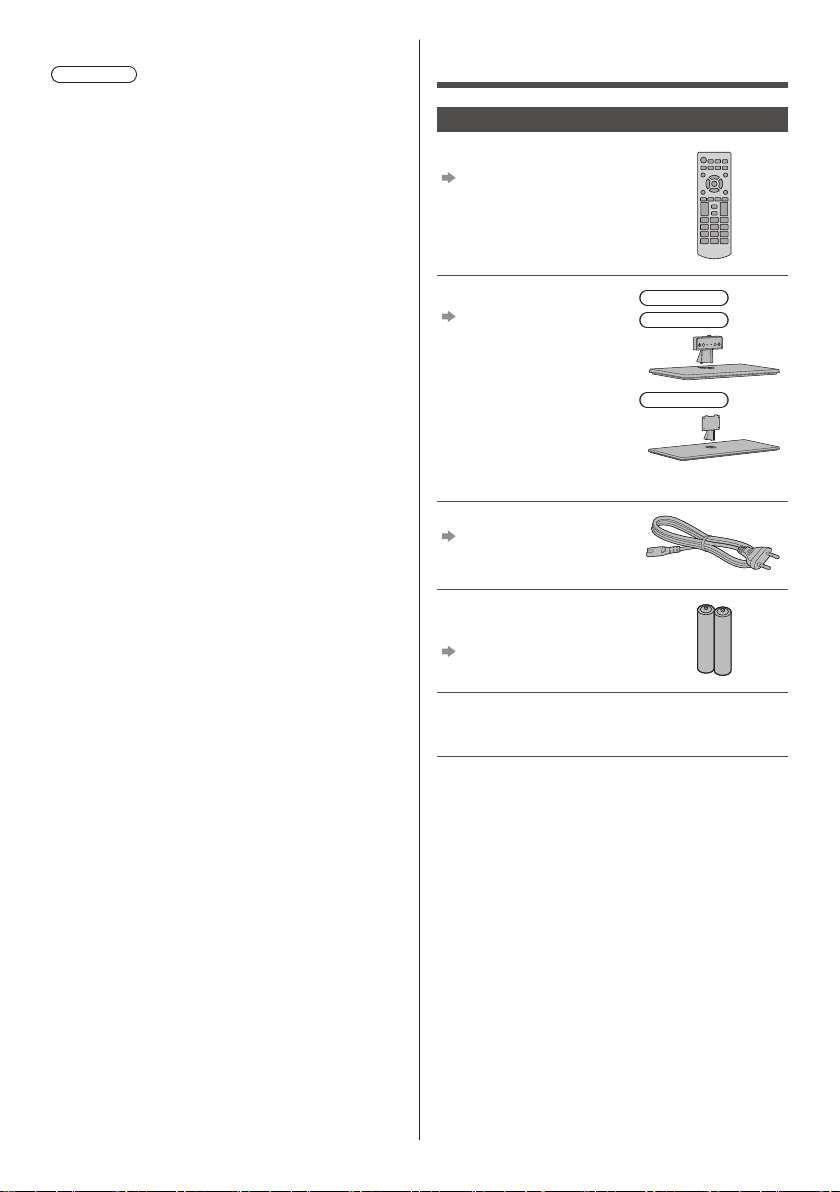
Accessories
Standard accessories
Remote Control
(p. 13)
●
N2QAYB000816
Pedestal
(p. 8)
24-inch model
32-inch model
■ LED TV Declaration of Conformity (DoC)
“Hereby, Panasonic Marketing Europe GmbH declares
that this TV is in compliance with the essential
requirements and other relevant provisions of the
Directive 2014/53/EU.”
If you want to get a copy of the original DoC of this TV,
please visit the following website:
http://www.ptc.panasonic.eu/doc
Authorized Representative:
Panasonic Testing Centre
Panasonic Marketing Europe GmbH
Winsbergring 15, D-22525 Hamburg, Germany
43-inch model
Mains lead
(p. 11)
●
TZSH3042
Batteries (2)
●
R6
(p. 14)
Operating Instructions
Pan European Guarantee Card
●
Accessories may not be placed all together. Take care
not to throw them away unintentionally.
English
7
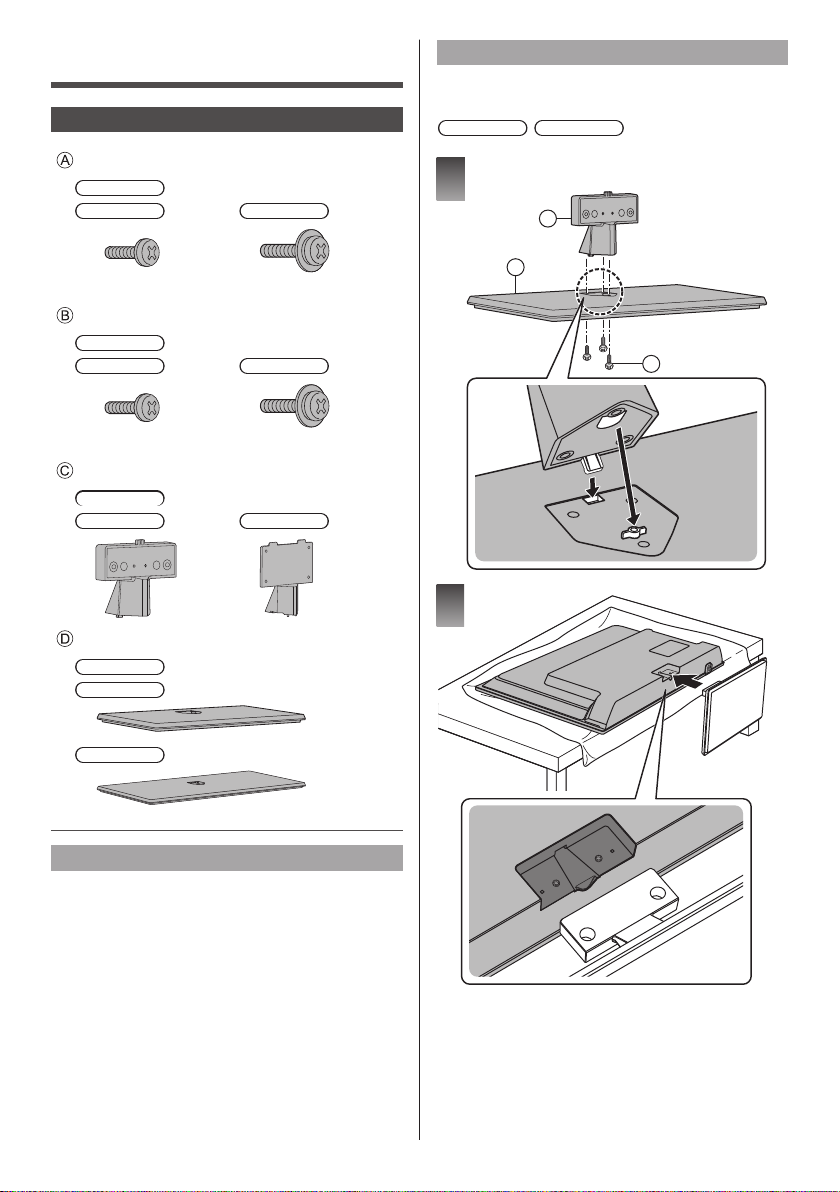
Installing the TV
Assembling / Removing the pedestal
Assembling the pedestal
●
Do not assemble the pedestal by any method other
than those specified below.
24-inch model 32-inch model
Assembly screw
24-inch model
32-inch model
TP4 x 12 (3)
Assembly screw
24-inch model
32-inch model
TP4 x 12 (2)
Bracket
24-inch model
32-inch model
Base
24-inch model
32-inch model
43-inch model
M4 x 12 (3)
43-inch model
M4 x 12 (4)
43-inch model
1
C
D
A
2
43-inch model
Preparations
Take out the pedestal and the TV from the packing case
and put the TV onto a work table with the screen panel
down on the clean and soft cloth (blanket, etc.)
●
Use a flat and firm table bigger than the TV.
●
Do not hold the screen panel part.
●
Make sure not to scratch or break the TV.
English
8
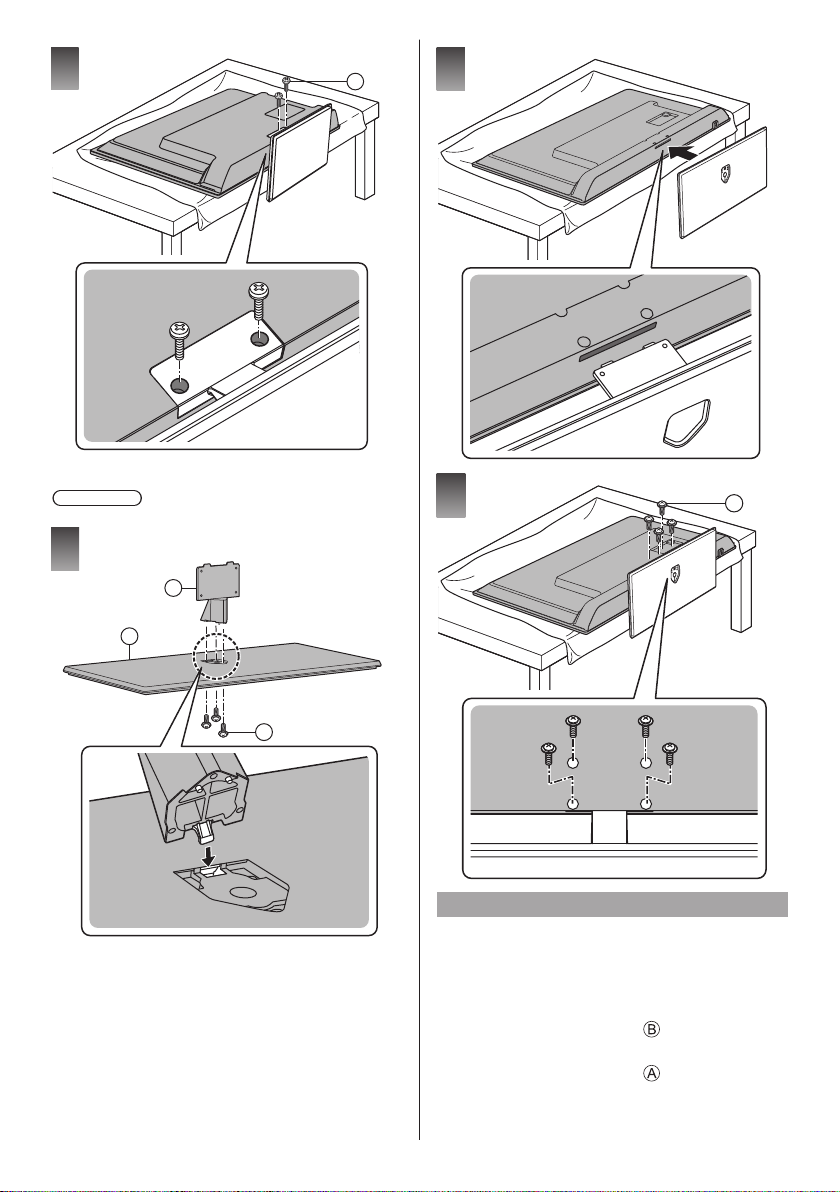
3
B
2
43-inch model
1
3
C
D
A
B
Removing the pedestal
Be sure to remove the pedestal in the following
procedures when you use the wall-hanging bracket or
repack the TV.
1. Put the TV onto a work table with the screen panel
down on the clean and soft cloth.
2. Remove the assembly screws
3. Pull out the pedestal from the TV.
4. Remove the assembly screws from the bracket.
from the TV.
English
9
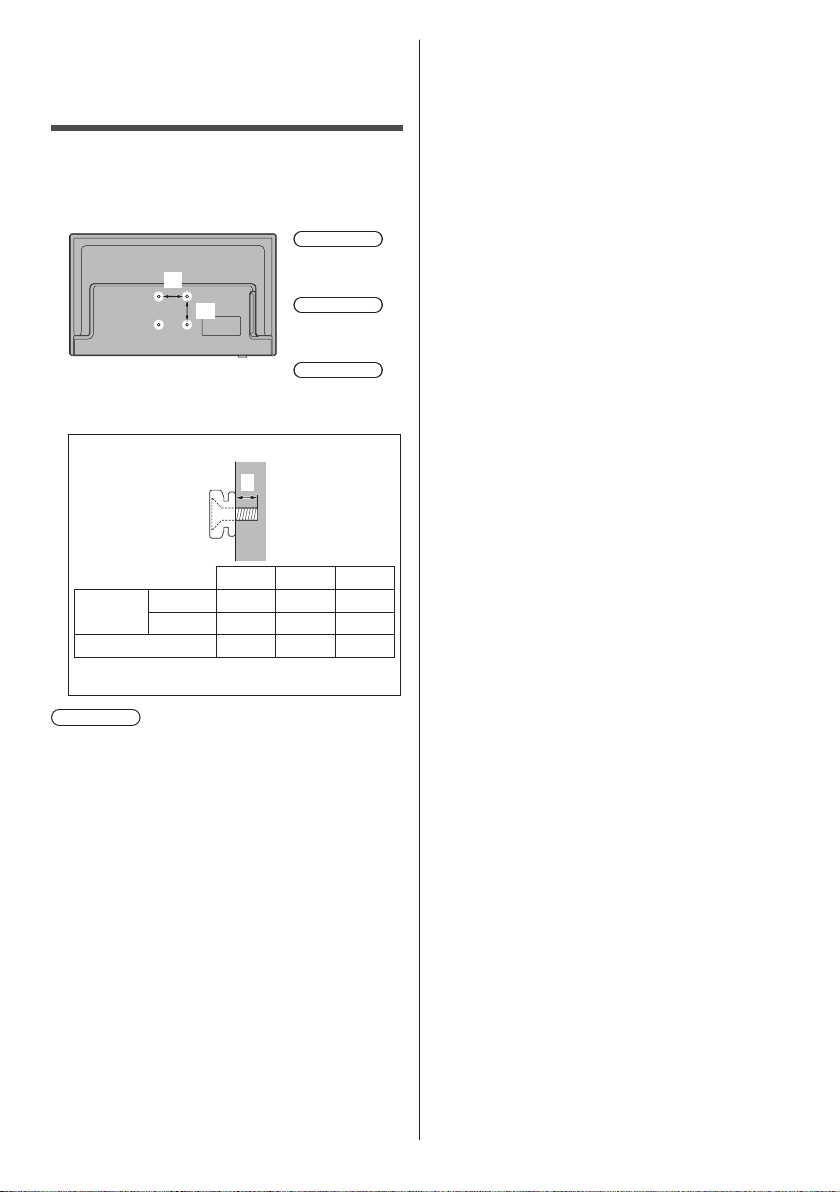
Installing the wallhanging bracket
Please contact your local Panasonic dealer to purchase
the recommended wall-hanging bracket.
●
Holes for wall-hanging bracket installation
Rear of the TV
a
b
(View from the side)
24-inch 32-inch 43-inch
Depth of
screw (L)
Diameter M4 M6 M6
Screw for fixing the TV onto the wall-hanging
bracket (not supplied with the TV)
Warning
●
Using other wall-hanging brackets, or installing a wallhanging bracket by yourself have the risk of personal
injury and product damage. In order to maintain the
unit’s performance and safety, be absolutely sure to
ask your dealer or a licensed contractor to secure
the wall-hanging brackets. Any damage caused by
installing without a qualified installer will void your
warranty.
●
Carefully read the instructions accompanying optional
accessories, and be absolutely sure to take steps to
prevent the TV from falling off.
●
Handle the TV carefully during installation since
subjecting it to impact or other forces may cause
product damage.
●
Take care when fixing wall brackets to the wall.
Always ensure that there are no electrical cables or
pipes in the wall before hanging bracket.
●
To prevent fall and injury, remove the TV from its fixed
wall position when it is no longer in use.
●
Please be advised for wall hanging functionality using
VESA certified bracket (Vertical HDMI cannot be
accessed).
min. (mm)
max. (mm)
10 10 17
24-inch model
a: 100 mm
b: 200 mm
32-inch model
a: 100 mm
b: 100 mm
43-inch model
a: 200 mm
b: 200 mm
L
8 8 14
10
English
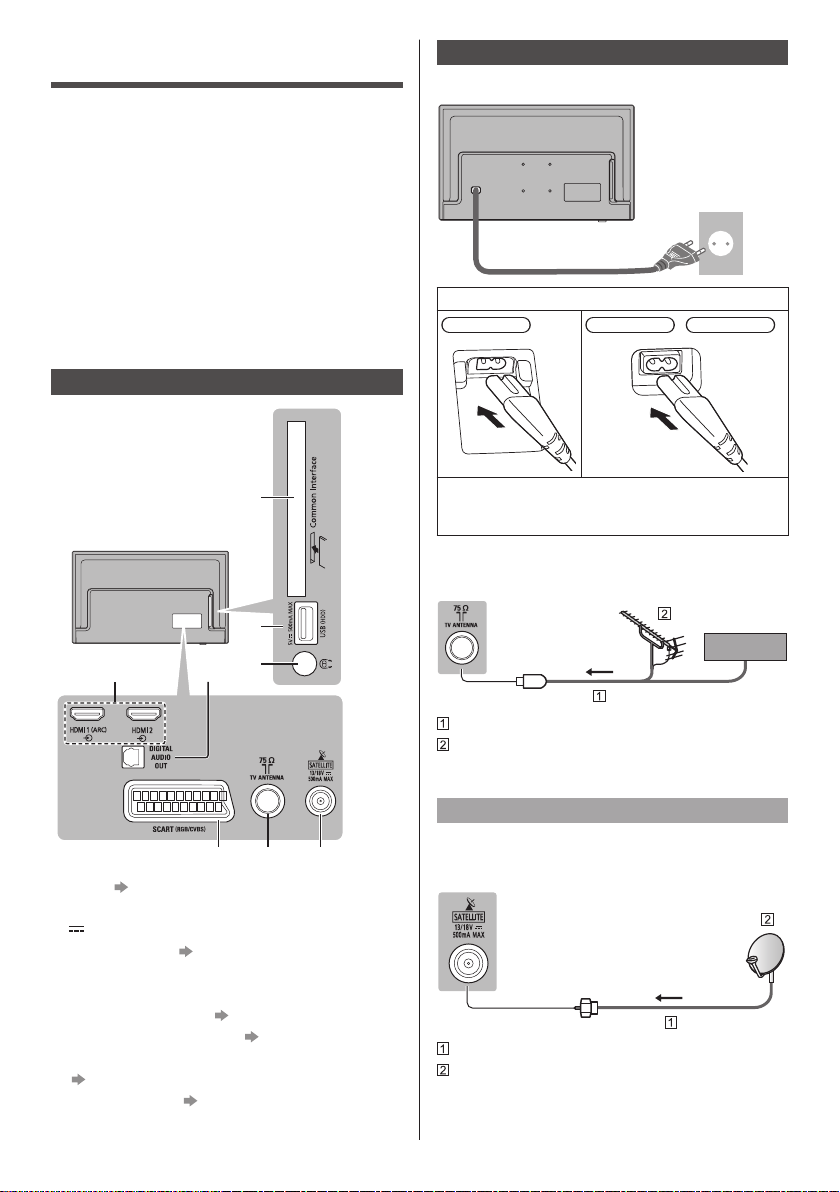
Connections
●
External equipment and cables shown are not
supplied with this TV.
●
Please ensure that the unit is disconnected from the
mains socket before attaching or disconnecting any
cables.
●
Check the terminal type and cable plugs are correct
for connection.
●
Use a fully wired HDMI compliant cable.
●
Keep the TV away from electronic equipment (video
equipment, etc.) or equipment with an infrared sensor,
otherwise distortion of image / sound may occur or
operation of other equipment may be affected.
●
Please also read the manual of the equipment being
connected.
Terminals
1
2
3
54
Basic connections
■ Mains lead
AC 220-240 V
50 / 60 HZ
Mains lead
(supplied)
Insert the mains plug firmly into place.
24-inch model 32-inch model 43-inch model
●
When disconnecting the mains lead, be absolutely
sure to disconnect the mains plug from the mains
socket first.
■ Aerial
TV
Cable
6 7 8
1 CI slot (p. 13)
2 USB port
This symbol indicates DC operation
3 Headphone jack (p. 12)
4 HDMI1 - 2
5 DIGITAL AUDIO OUT
6 SACRT (RGB / CVBS) (p. 12)
7 Terrestrial / cable terminal
●
To watch content in 4K format, use HDMI terminal.
(p. 16)
8 Satellite terminal
(p. 11)
(p. 11)
RF cable
Terrestrial aerial
●
For DVB-C, DVB-T, Analogue
Satellite dish
■ DVB-S
TV
Satellite cable
Satellite dish
●
To ensure your satellite dish is correctly installed,
please consult your local dealer. Also consult the
received satellite broadcasting companies for details.
English
11
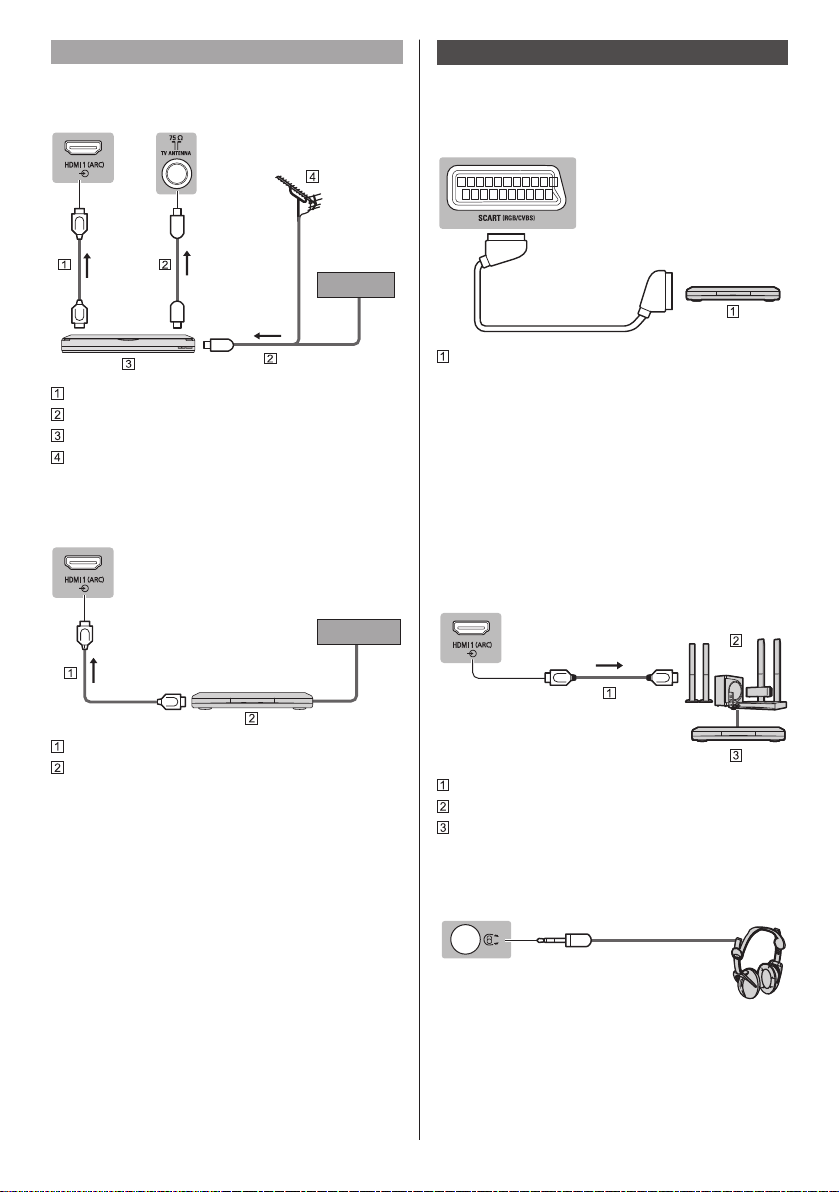
AV devices
Other connections
■ DVD Recorder, etc.
TV
HDMI cable
RF cable
DVD Recorder, etc.
Terrestrial aerial
■ Set top box
TV
Cable
Cable
■ DVD Player
(RGB/CVBS)
TV
DVD Player
■ Amplifier (listening with external speakers)
●
Use HDMI 1 to connect the TV to an amplifier which
has ARC (Audio Return Channel) function.
If connecting to an amplifier without ARC function,
use DIGITAL AUDIO.
●
To enjoy multi-channel sound from external
equipment (e.g. Dolby Digital 5.1ch), connect the
equipment to the amplifier. For information about the
connections, read the manuals of the equipment and
amplifier.
TV
12
HDMI cable
Set top box
HDMI cable
Amplifier with speaker system
External equipment (DVD Player, etc.)
■ Headphones
TV
(3.5 mm stereo mini plug)
English

■ Common Interface
●
Unplug the power cord before inserting or removing
the CI module.
●
If a smart card and a CI module come as a set, first
insert the CI module, then insert the smart card into
the CI module.
●
Insert or remove the CI module completely in the
correct direction as shown.
●
Normally encrypted channels will appear. (Viewable
channels and their features depend on the CI
module.)
●
There might be some CI modules in the market with
older or newer firmware versions that do not work
fully interoperable with this CI+ v1.3 TV. In this case,
please contact your content provider.
●
Be sure to remove the CI module card, etc. before
repairing, transferring or discarding.
TV
CI module
Identifying Controls
Remote Control
MEDIA
PLAYER
GUIDE
ASPECT
STILL
1
●
When LED lights on, switches TV on or standby.
2 MEDIA PLAYER
●
Display files from USB.
3 MENU
●
Press to access Channels, Sources, Utilities, and
Settings.
4 Teletext button
●
Press to open or close Text / Teletext.
5 Information
●
Displays channel and programme information.
6 OK
●
Confirms selections and choices.
●
Press after selecting channel positions to quickly
change channel.
7 OPTION
●
Press to open or close the Options menu.
8 Coloured buttons
(red-green-yellow-blue)
●
Used for the selection, navigation and operation of
various functions.
English
13
9 Volume Up / Down
●
Press to adjust the volume level.
10
Numeric buttons
●
Changes channel and teletext pages.
●
Sets characters.
●
When in Standby mode, switches TV on.
11
STILL
●
Freeze screen.
12
Input mode selection
●
TV - switches to DVB-C / DVB-T / Analogue.
●
AV - opens or closes the Sources menu - the list of
connected devices.
13
TV Guide
●
Displays Electronic Programme Guide.
14
Subtitles
●
Displays subtitles.
15
Exit
●
Returns to the normal viewing screen.
16
Cursor buttons
●
Makes selections and adjustments.
17
Return
●
Returns to the previous menu / page.
18
Channel Up / Down
●
Switches to the next or previous channel.
19
Aspect ratio
●
Changes picture format.
20
Sound Mute On / Off
●
Press to mute the sound or to restore it.
21
Last view
●
Switches to previously viewed channel.
■ Installing / Removing batteries
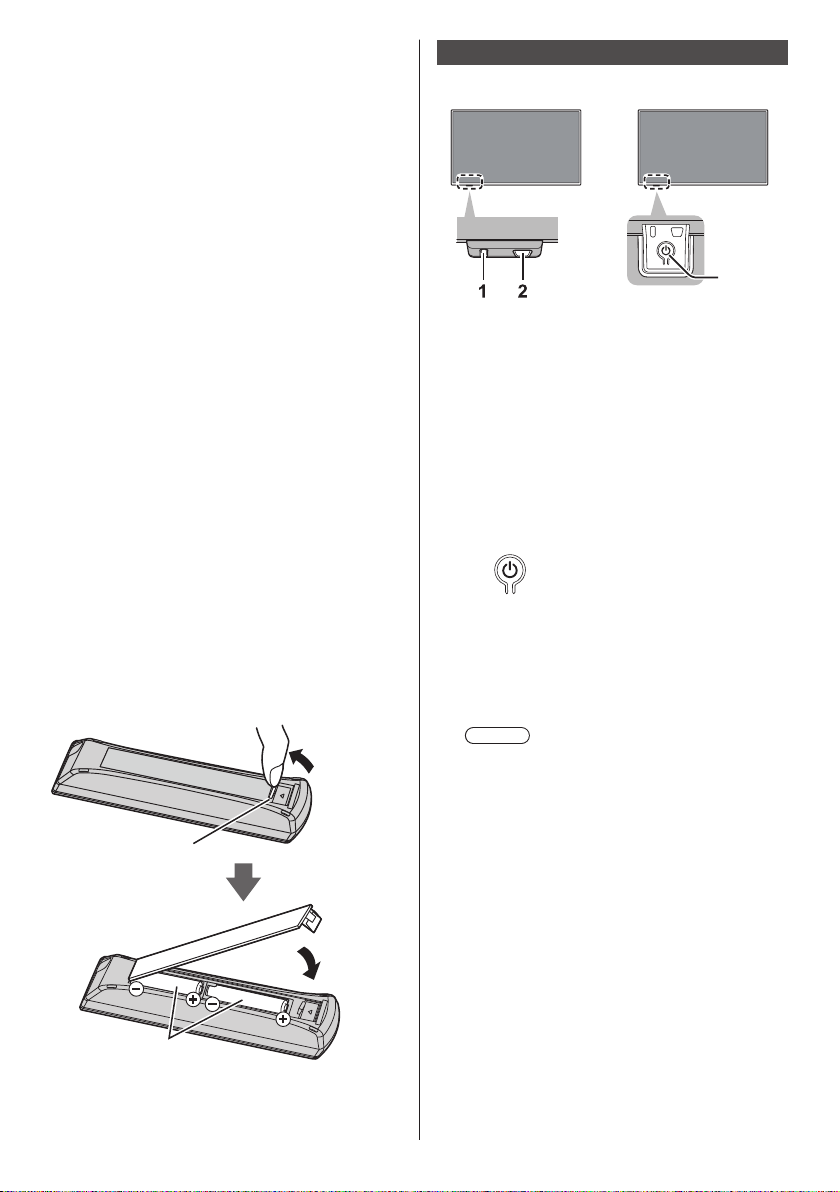
Pull open
Indicator / Control panel
Front
Bottom
1 Power LED
Red:
Standby
Green:
On
●
The LED blinks when the TV receives a command
from the remote control.
Both LEDs off:
Power off
●
Press the power key at the bottom of the TV to
turn on.
2 Remote control signal receiver
●
Do not place any objects between the TV remote
control signal receiver and remote control.
3 Power key
●
Use to switch the mains power on / off. Both LEDs
off. To turn on the TV, press the button again.
Note
●
To turn Off the apparatus completely, you must
pull the mains plug out of the mains socket.
3
14
Hook
Close
Note the correct
polarity (+ or -)
English
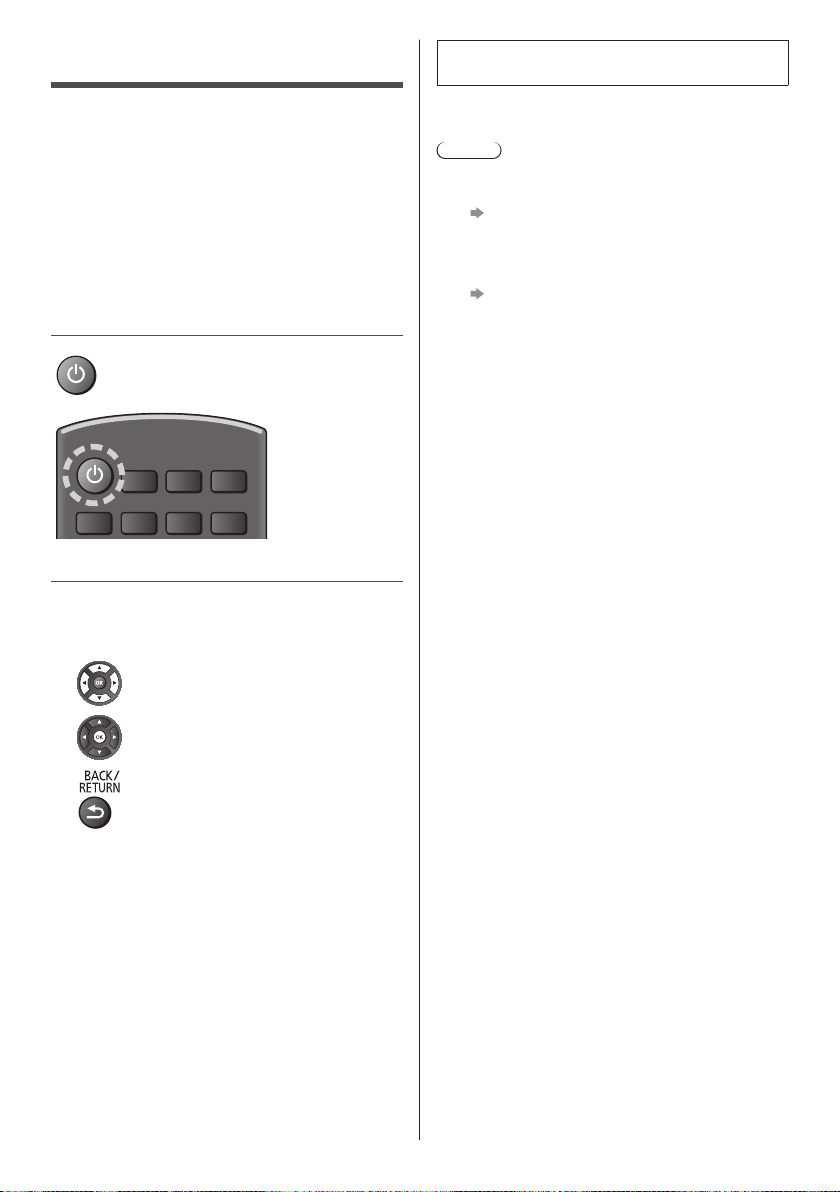
First time Auto Setup
Auto Setup is now complete and the TV is ready
for viewing.
When the TV is turned on for the first time, it will
automatically search for available TV channels and give
options to set up the TV.
●
These steps are not necessary if the setup has been
completed by your local dealer.
●
Please complete connections (p. 11 - 13) and settings
(if necessary) of the connected equipment before
starting Auto Setup. For information about the settings
for the connected equipment, read the manual of the
equipment.
1 Plug the TV into a live mains socket and
turn the power on
●
Takes a few seconds to be displayed.
2 Select the following items
Set up each item by following the on-screen instructions.
■ How to use the remote control
Move the cursor
If tuning has failed check the RF cable and then follow
the on-screen instructions.
Note
●
To retune all channels
[Re-install channels] in [Search for channels]
(p. 21)
●
To update the available TV signal mode later
[Automatic channel update] in [Satellite
installation] / [Antenna/cable installation]
(p. 21)
●
To initialise all settings
[Factory settings] in [General settings]
Access the item / store the setting
Return to the previous item (if available)
Select the language
Select your country
●
Depending on the country you select, select your
Region and/or store the PIN code number (“0000”
cannot be stored).
English
15
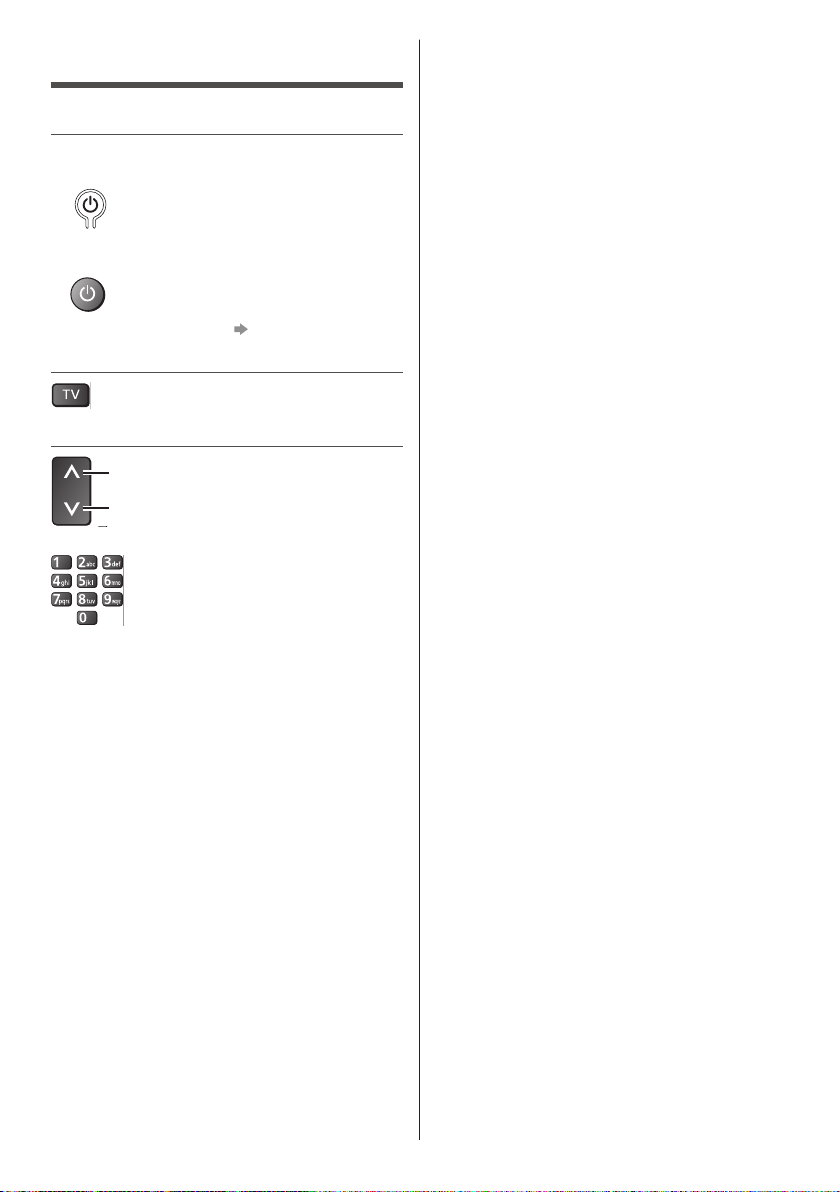
Watching TV
1 Turn power on
TV can be turned on based on the power status.
●
Red LED: Use remote control to turn on the TV.
(TV)
●
Both LEDs off: Use the power key at the bottom of the
TV to turn on.
(Remote Control)
●
For LED status, refer to (p. 14)
2 Select the source
3 Select a channel
up
down
or
●
To select a channel position with digit numbers, e.g.
399
16
English

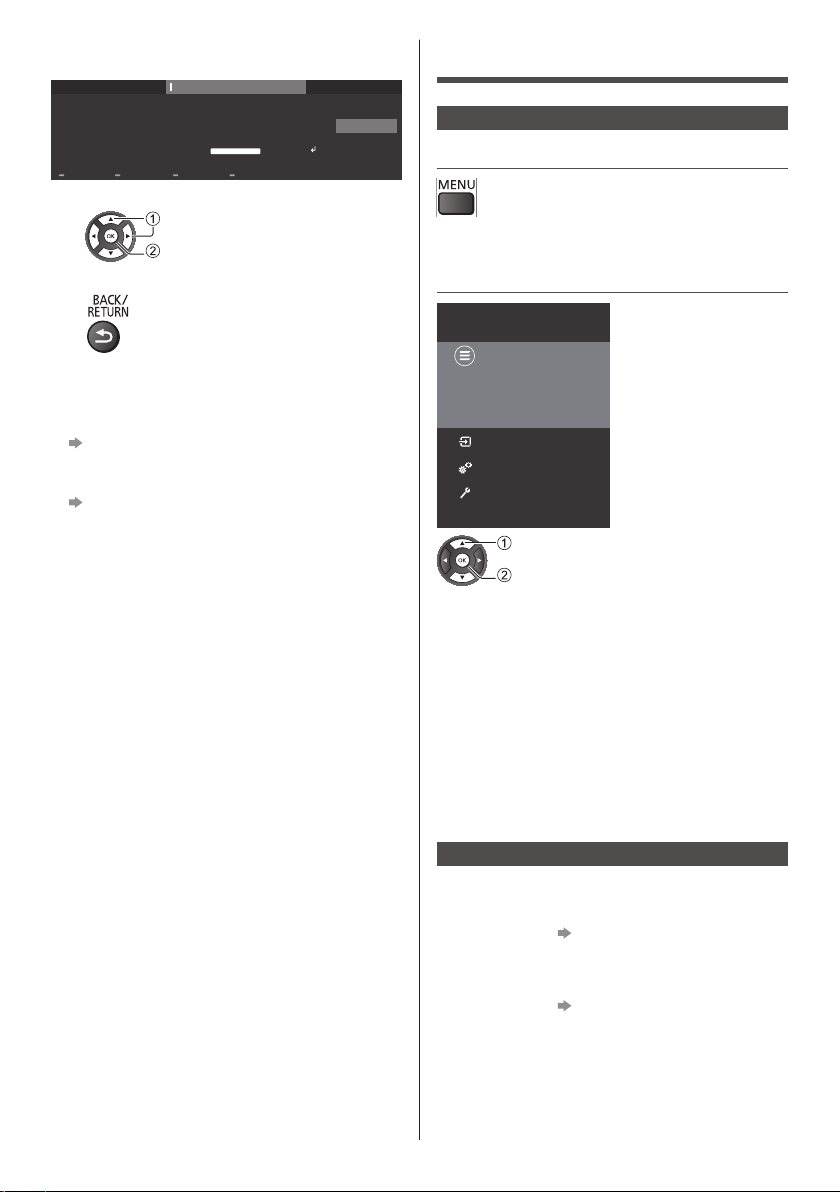
How to Use Menu Functions
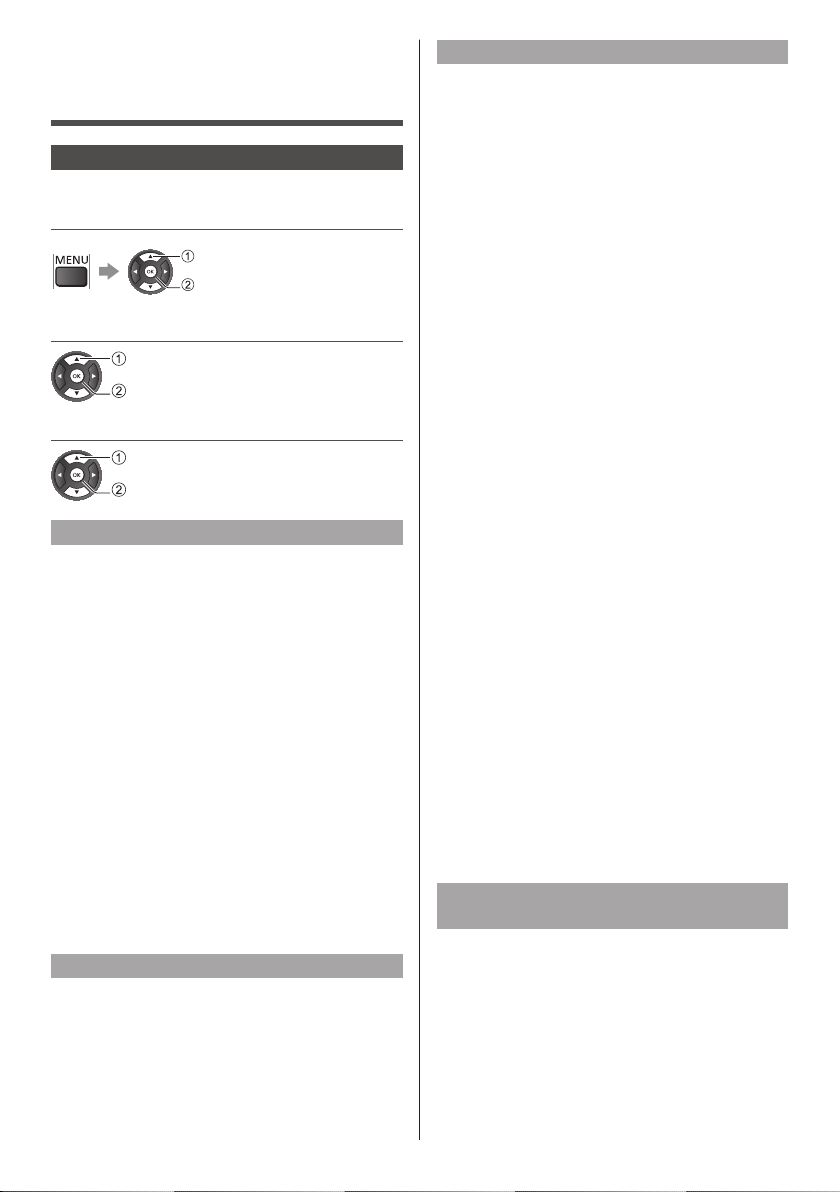
1 Display the menu
●
Displays the functions that can be set (varies
according to the input signal).
2 Select the menu
Panasonic TV
Channels
Game Of Thones
11:30 - 13:30
Summers span decades. Winters
can last a lifetime. And the struggle
for the Iron Throne has begun...
Sources
Utilities
Settings
●
To return to the previous screen
●
To change menu pages
up
down
■ Choose from among alternatives
Setup
Custom
Dynamic
Picture
Natural
Normal
Viewing Mode
Cinema
Game
select
store
■ Adjust using the slide bar
select
access
3 Select the item
Example: [Picture Menu]
Setup
Picture
Sound
Eco settings
General settings
Region and Language
Universal access
Child lock
Antenna/Cable installation
Satellite installation
Update software
Operation guide
select
access
●
To exit the menu screen
Setup
Sharpness
Picture
Sharpness
10
5
0
change
store
■ Go to the next screen
Child Lock
access
Moved
5
English
17
■ Enter characters by free input menu
You can enter names or numbers freely for some items.
abc ABC 123+/;www Backspace
1 Set characters one by one
2 Store
●
You can set characters by using numeric buttons.
User input
1 2 3 4 5 6 7 8 9 0 [
q w e r t y u i o p ]
a s d f g h j k l ; :
z x c v b n m , . ‘ ?
\ ! @ _ /
select
set
Enter
Cancel
■ To reset the settings
●
Picture or sound settings only
[Factory settings] in [General settings]
(Settings Menu)
●
To initialise all settings
[Reinstall TV] in [General settings] (Settings
Menu)
Menu Overview
Home menu
1 Display the menu
●
Displays the functions that can be set (varies
according to the input signal).
2 Select the item
Panasonic TV
Channels
Game Of Thones
11:30 - 13:30
Summers span decades. Winters
can last a lifetime. And the struggle
for the Iron Throne has begun...
Sources
Utilities
Settings
select
access
■ Channels
Contents all channels.
●
Press OK to open channel list.
■ Sources
Contents available sources.
■ Utilities
Contents available TV functions for user.
■ Settings
Contents available settings for user.
18
English
Utilities menu
■ TV guide
Open TV guide.
For details, refer to page 27 “Using TV Guide”.
■ Browse USB
Open files from USB.
For details, refer to
Player”.
page 28 “Using Media
■ Channels
Open channel list.
Changing Picture and Sound settings
Picture
1 Display the menu and select
[Settings]
select
access
2 Select [Picture]
select
access
3 Select the item to adjust
select
access
Viewing Mode
You can select your favourite mode for each input.
■ [Custom]:
Adjusts each picture menu item manually to suit your
favourite picture quality.
■ [Dynamic]:
Improves contrast and sharpness for viewing in a
bright room.
■ [Natural]:
Improves natural picture quality.
■ [Normal]:
General use for viewing in a normal lighting condition.
■ [Cinema]:
Improves the performance of contrast, black and
colour reproduction for watching movies in a
darkened room.
■ [Game]:
Improves picture quality for playing games, etc.
Other picture settings
■ [Colour] / [Contrast] / [Sharpness] /
[Brightness]:
Adjusts the levels of these options according to your
personal preference.
Advanced picture settings
Selects advanced video settings.
■ [Computer]:
Sets to Computer to have the ideal picture settings for
using your TV as a computer monitor.
■ [Colour]
[Colour enhancement]:
Sets the level of the colour intensity and the details
in bright colours.
[Colour temperature]:
Sets the overall colour tone of the picture (bluer redder).
[Custom colour temperature]:
Sets the overall colour tone manually.
■ [Contrast]:
[Contrast modes]:
Sets the TV automatically reduce the contrast,
for best power consumption or for best picture
experience.
[Dynamic contrast]:
Enhances the details in the dark, middle and light
areas of the picture automatically.
[Video contrast]:
Adjusts the detailed white balance of bright red /
green / blue areas.
[Gamma]:
Switches the gamma curve.
●
Please note the numerical values are reference
for the adjustment.
■ [Sharpness]:
[Super Resolution]:
Sets to have a superior sharpness in line edges
and details.
■ [Picture Clean]:
[Noise reduction]:
Reduces unwanted picture noise.
[MPEG artefact reduction]:
Reduces flicker noise in contoured parts of a
picture and block noise.
Adjust picture format and screen
edges
Selects [Format and edges] in [Picture].
■ [Picture format]:
Selects the preset picture format to fills the screen.
■ [Screen edges]:
Sets to slightly enlarge the picture to hide distorted
edges.
■ [Picture shift]:
●
Picture shift setting will be saved when set to
Computer.
English
19

●
To reset the current [Viewing Mode] to the default
settings
[Factory settings] in [General settings]
(Settings Menu)
Sound
1 Display the menu and select
[Settings]
select
access
2 Select [Sound]
select
access
3 Select the item to adjust
select
access
Sound Mode
You can select your favourite mode for each input.
■ [User]:
Adjusts the sounds manually to suit your favourite
sound quality.
■ [Standard]:
Provides the suitable sound quality for all types of
scenes.
■ [Cinema]:
Improves sound quality for watching movies.
■ [Music]:
Improves sound quality for watching music videos,
etc.
■ [Game]:
Improves sound quality for playing games, etc.
■ [Speech]:
Improves sound quality for watching news, drama,
etc.
■ [Surround mode]:
Selects surround sound settings.
■ [Headphones volume]:
Adjusts the volume of headphones.
■ [TV placement]:
Selects the TV position.
■ Advanced sound settings
Selects advanced sound settings.
[Auto volume levelling]:
Automatically regulates large sound level
differences between channels and inputs.
[Delta volume]:
Adjust the delta value for TV speaker volume.
Delta volume is available when the input source
is set to HDMI or Analogue sources and the Audio
out is set to TV speakers or HDMI sound system.
[Audio out]:
Selects the sound output to adjust volume.
[Clear Sound]:
If the sound from TV speakers is unclear due to
installation environment, On is recommended.
●
This function is effective only for the sound from
TV speakers.
[Digital out format]:
Selects the initial setting for audio tracks.
●
Selectable options vary depending on the
country you select.
[Digital out levelling]:
Adjusts the loudness level from device which is
connected to digital audio output (SPDIF) or HDMI.
[Digital out delay]:
Adjusts the delay time of the sound output from
DIGITAL AUDIO and HDMI 1 (ARC function)
terminals if the sound does not synchronise the
image.
[Digital out offset]:
If you cannot set a delay on the Home Theatre
System, you can set the TV to sync the sound.
You can set an offset that compensates for the
time necessary for the Home Theatre System to
process the sound of the TV picture.
You can set the value in steps of 5ms. Maximum
setting is 60ms.
●
Only available when Digital out delay set to On
Other sound settings
■ [Bass]:
Adjusts level to enhance or minimise lower, deeper
sound output.
■ [Treble]:
Adjusts level to enhance or minimise sharper, higher
sound output.
English
20
●
To reset the current [Sound Mode] to the default
settings
[Factory settings] in [General settings]
(Settings Menu)

Retuning from Setup Menu
Automatically retunes the channels received in the area.
●
This function is available if channel tuning is already
performed.
●
Only the selected mode is retuned. All the previous
tuning settings are erased.
●
Child Lock PIN number is required to retune locked
channels.
1 Display the menu and select
[Settings]
select
access
Channel Update Messages
When new channels are found or if channels are
updated or removed, a message is shown at TV start up.
To avoid this message to appear after every channel
update, you can switch it off.
Satellite (if available)
●
You can install up to 4 satellites on this TV. Select the
number of satellites you wish to install at te start of
the installation. This will speed up the installation.
●
You can use a Unicable system to connect the
antenna dish to the TV. Select Unicable for 1 or for 2
satellites at the start of the installation.
Re-install Channels
1 Select [Satellite installation] > [Search for satellite].
2 Select [Re-install channels].
3 Select [Settings] or select [Start] to update channels.
2 Select [Satellite installation] /
[Antenna/cable installation]
select
access
3 Select the item and press OK to
access
select
access
Start the Installation
■ Update Channels
1 Select [Update channels].
select
access
You can always start a channel update manually, new
channels will be added, and unavailable channels will
be removed.
Automatically Search for Channels
1 Select [Automatic channel update].
●
If you receive digital channels, you can set the TV to
automatically update the list with new channels.
●
New channels are stored in the All channels list and
New channels list. Empty channels are removed.
●
If new channels are found or if channels are updated
or removed, a message is shown at TV start up.
The TV must be in standby to automatically update
channels.
■ Settings Menu
●
Connection type
Select the number of satellites you want to install.
The TV sets the appropriate connection type
automatically.
■ LNB settings
In some countries, you can adjust the expert settings
for homing transponder and each LNB. Only use or
change these settings when a normal installation fails.
If you have non-standard satellite equipment, you can
use these settings to overrule the standard settings.
Some providers might give you some transponder or
LNB valeus which you can enter here.
Manual Installation
Manually install satellite channels if needed.
1 Select [Satellite installation] > [Manual Installation].
■ LNB
Select the LNB for which you want to add new
channels.
■ Polarisation
Select the polarisation you need.
■ Symbol rate mode
Select [Manual] to enter symbol rate.
■ Frequency
Enter the frequency for the transponder.
■ Search
Search for transponder.
English
21
DVB-C, DVB-T, Analogue
Re-install Channels
1 Select [Antenna/cable installation] > [Search for
channels].
2 Select [Re-install channels].
3 Select the country and press OK.
4 Select [Antenna (DVB-T)] or [Cable (DVB-C)], and
select one item you need to re-install.
5 Select [Digital and analogue channels], [Only digital
channels], or [Only analogue channels].
6 Select [Start] and press OK to update channels. This
can take a few minutes..
Reception test
The digital frequency is shown for the channel. If the
reception is poor, check and reposition your antenna.
Check the signal quality, select [Search].
If you use DVB-C to receive channels, the option
[Symbol rate mode] is available. For Symbol rate mode,
select [Automatic], unless your cable provider gave
you a specific symbol rate value. To enter the specific
symbol rate value, select [Symbol rate], and type in the
value.
Manual Installation
Manually install analogue TV channel if needed.
1 Select [Antenna/cable installation] > [Analogue:
Manual Installation].
■ System
Set up the TV system and select the country.
■ Search Channel
Enter a frequency to find a channel. The found
channel is shown and if the reception is poor, press
[Search] again. Select [Done] and press OK to store
the channel.
■ Fine tune
Select [Fine tune] to fine tune a channel.
■ Store
You can store the channel on the current channel
number or as a new channel number.
Select [Store] and press OK. The new channel
number is shown briefly.
Channel Options
While watching a programme, you can set some options.
1 Select the mode
2 Open options
select
access
■ Subtitles
To switch [Subtitles on] or [Subtitles off]. Alternatively
you can select [Automatic].
If language information is part of the digital broadcast
and the broadcasted programme is not in your language
(the language set on TV), the TV can show subtitles
automatically in one of your preferred subtitle languages.
One of these subtitle languages must also be part of the
broadcast.
You can select your preferred subtitle languages in
[Subtitle language].
■ Subtitles Language
Set the subtitles language. If none of the preferred
subtitle languages are available, you can select another
subtitle language if available.
■ Audio Language
Set the audio language. If none of the preferred audio
languages are available, you can select another audio
language if available.
■ Dual I-II
If an audio signal contains two audio languages but one
language or both has no language indication, this option
is available.
■ Common Interface
If prepaid premium content is available from a CAM, you
can set the provider settings with this option.
■ Mono / Stereo
To switch the sound of an analogue channel to Mono or
Stereo.
■ Status
To view the technical information on the channel.
■ Clock
To display time on the corner of the TV screen.
22
English
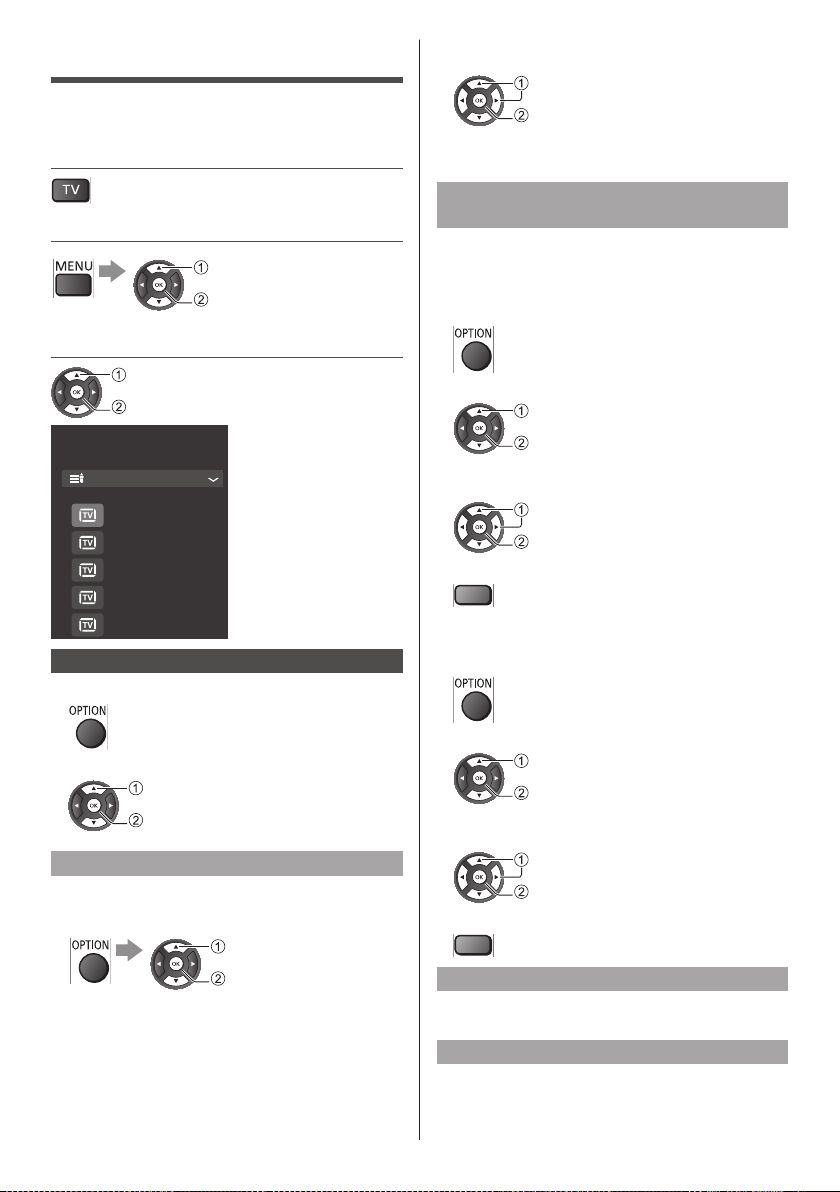
Channels List
You can create your favourite channel lists, skip
unwanted channels, etc.
1 Select the mode
2 Select [Channels]
select
access
3 Open [Channel list]
select
access
Antenna
All antenna channels
1 BBC ONE
2 BBC TWO
7 BBC THREE
30 CBBC channel
40 BBC NEWS 24
Channel List Option
1 Display option menu.
4 Use navigation keys to select a character, then press
OK
select
set
5 Select [Done] when complete the editing
●
Follow the on-screen instructions
Create or Edit Favourites Channel
List
■ Create Favourites Channel List
Create your favourite channel lists from various
broadcasters (up to 4: [Favourite]1 to 4).
1 Display option menu
2 Select [Create favourites list]
select
access
3 Select a channel and press OK to add in a favourites
list.
select
set
4 Store when complete the editing.
(green)
■ Edit Favourites Channel List
1 Display option menu
2 Select one of options
select
access
Rename Channel
1 Select a channel to edit
2 Display option menu and select [Rename channel]
select
access
3 In the typing field, press OK to open on-screen
keyboard
2 Select [Edit favourites]
select
access
3 Select a channel and press OK to add in or remove
from a favourites channel list.
select
set
4 Store when complete the editing
(green)
Select Channel Range
Select a range of channels in a favourites channel list.
Press OK when completed.
Select Channel List
Select one channel list you want to watch and press OK.
English
23
Lock / Unlock channel
To prevent children from watching a channel, you can
lock a channel. To watch a locked channel, you must
enter the 4 digit Child Lock PIN code first. You cannot
lock programmes from connected devices.
The locked channel will have
logo.
next to the channel
Search channel
Search for a channel to find it in a long list of channels.
1 Display option menu
Child Lock
You can lock specific channels to restrict access to
them.
When the locked channel is selected, a message
appears. Enter the PIN number to watch.
1 Display the menu and select
[Settings]
select
access
2 Select [Search channel]
select
access
3 In the typing field, press OK to open on-screen
keyboard
4 Use navigation keys to select a character
select
set
5 Select [Done] when complete the editing.
2 Select [Child lock]
select
access
1 Enter the PIN number (4 digits)
●
Enter the PIN number twice at first setting.
●
Make a note of the PIN number in case you forget
it.
2 Select the channel to be locked
select
lock / unlock
: Appears when the channel / input is locked
Parental rating
To watch the DVB programme that has rating
information on the selected age, enter the PIN number
(depending on the broadcaster).
1 Select [Parental Rating]
select
access
2 Select an age for the restriction of programmes
select
access
●
The availability of this function depends on the
country you select
24
English

Change code
■ Change code
You can change the PIN number.
1 Select [Change code]
select
access
2 Enter a new PIN number (4 digits) twice with Numeric
buttons.
Watching External Inputs
Connect the external equipment (VCR, DVD, etc.) and
you can watch through the input.
●
For details, refer to page 11 “Connections”.
1 Display the input selection menu
Sources
Satellite TV
Antenna TV
USB
HDMI1
HDMI2
Scart
2 Select the input mode connected to
the equipment
select
watch
●
You can also select the input pressing the AV button.
Press repeatedly until the desired input is selected.
English
25

Viewing Teletext
Teletext services are the text information provided by the
broadcaster.
The features may vary depending on the broadcaster.
Viewing Teletext
1 Switch to Teletext
●
Displays the index page (content varies depending on
the broadcaster).
2 Select the page
or
Coloured buttons
(Corresponds to the colour
bar)
■ To select function
Freeze page
Dual screen
Options
T.O.P. overview
Enlarge
Reveal
Cycle subpage
Language
1 Display the option menu
2 Select [Search by genre]
■ To return to TV
English
26
select
set
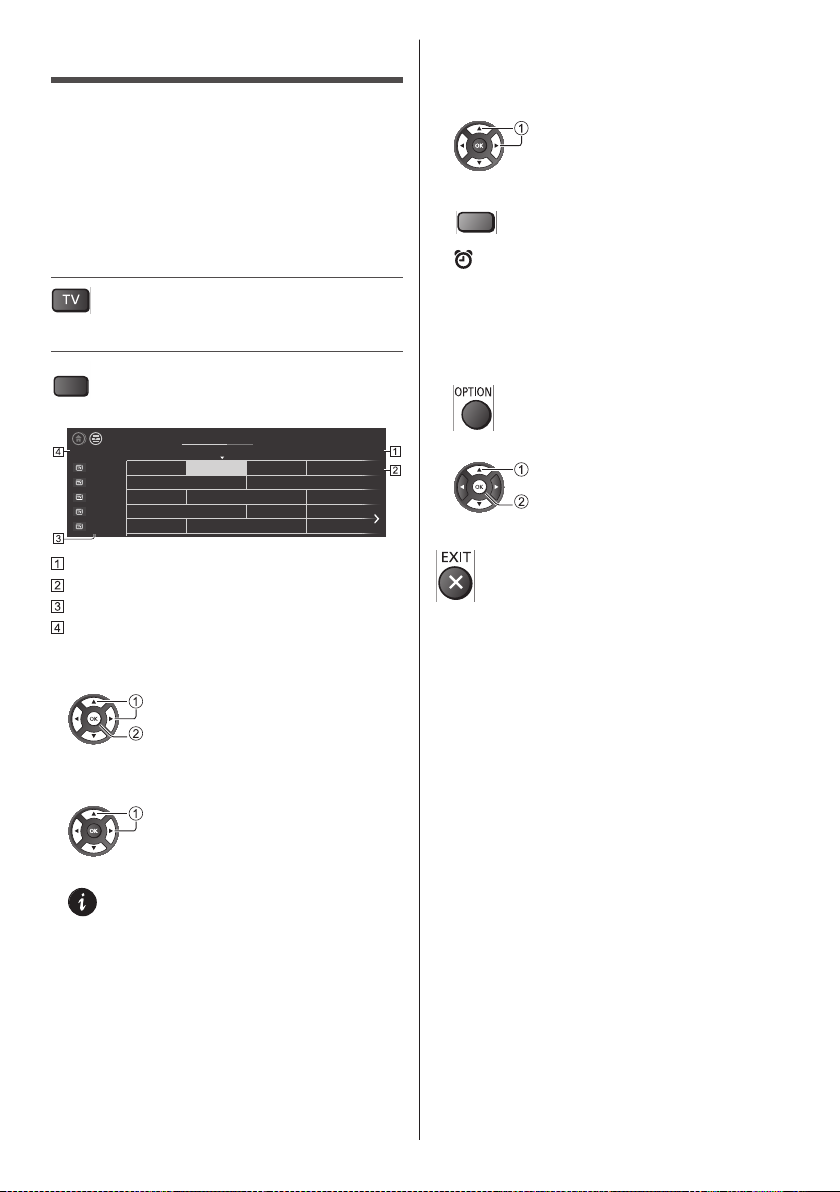
Using TV Guide
GUIDE
1 BBC ONE
TV Guide - Electronic Programme Guide (EPG) provides
an on-screen listing of the programmes currently
broadcast and the forthcoming broadcasts over the next
seven days (depending on the broadcaster).
●
When this TV is turned on for the first time, or the
TV is switched off for more than a week, it may take
some time before TV Guide is completely shown.
●
Not valid in Analogue
1 Select TV
2 Display TV Guide
Example:
TV guide
Wed 18 Oct. 2017 19:30
1
BBC ONE
2
BBC THREE
3
E4
4
BBC FOUR
5
BBC 2W
Time
Programme
Channel position and name
Date
■ To watch the programme
1 Select the current programme
20:00 - 20:30 DIY SOS : We open in the Battersbys
20:00 20:30 21:00 21:30
Das Erste DIY SOS The Bill Red Cap
Hot Wars Holiday Program
Emmerdal. Coronation Street The Bill
10 O’ clock News BBC Pepsi Char. Good bye
Panorama Spring watch Coast
20:21
select
watch
■ To set reminder
With reminder, a message will alert you at the start of
the programme.
1 Select the forthcoming programme
select
2 Set the reminder
(green)
: Appears with a reminder is set.
■ To search by genre
If the information is available (depending on the
broadcaster), you can search the scheduled
programmes by genre, like news, movies, sports, etc.
1 Display the option menu
2 Select [Search by genre]
select
set
■ To return to TV
■ To view programme details
1 Select the current programme
2 Display the programme details
select
English
27
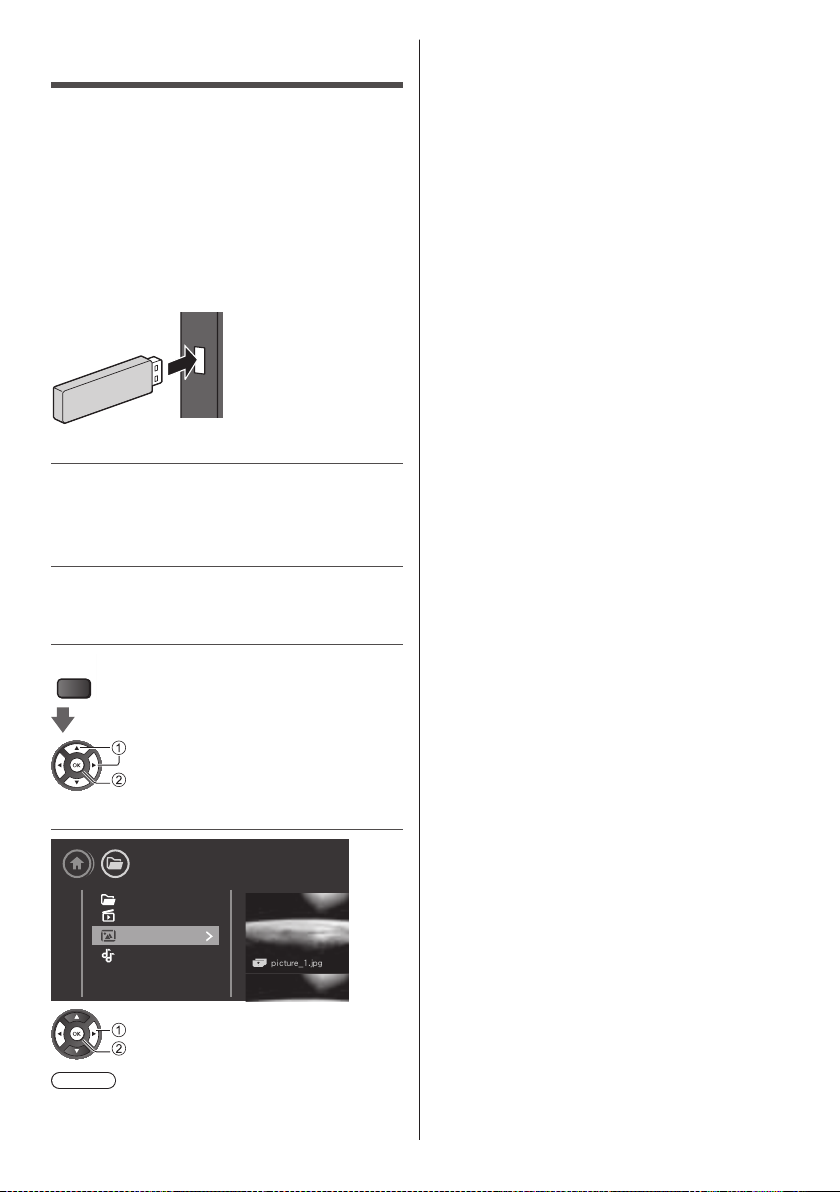
Using Media Player
MEDIA
picture_1.jpg
Media Player allows you to enjoy photo, video or music
stored on the USB Flash Memory / USB HDD.
Easy List View:
Still pictures / moving pictures stored with digital
cameras are displayed.
Mix Folder View:
All files grouped by folder are displayed.
■ To insert or remove the USB Flash Memory
Ensure alignment is straight and complete when
inserting or removing.
●
Connect the USB Flash Memory to the USB port.
●
Check the terminal type and devices are correct for
connection.
1 Insert the USB Flash Memory to the
TV
●
To play back content in the USB HDD device, ensure
the connection and settings are completed.
2 Display multimedia
■ Supported USB file System
●
USB (FAT / FAT 32 / NTFS): only connect USB
devices that consume 500 mA of power or less.
■ Playback formats
●
Image Codec: JPEG, GIF, PNG, BMP
●
Audio Codec: MP3, WAV, WMA (v2 up to v9.2),
AC3, AAC, HE-AAC, DTS 2.0
●
Video Codec: AVI, MKV, H.264/MPEG-4 AVC,
MPEG1, MPEG2, MPEG4, WMV9/VC1
●
Subtitle: SRT, SMI, SSA, SUB, ASS, TXT
PLAYER
3 Select the content
USB device
Note
●
Select the appropriate device and content for playing
back each file.
English
28
select
access
Media
Folders
Videos
Photos
Music
select
access

Setup menu
1 Display the menu and select
[Settings]
select
access
Panasonic TV
Channels
Sources
Utilities
Settings
Select to view the list of settings,
offered in this TV.
2 Select the item and press OK to
access
select
access
Setup
Picture
Sound
Eco settings
General settings
Region and Language
Universal access
Child lock
Antenna/Cable installation
Satellite installation
Update software
●
To return to the previous screen
Eco settings
■ [Energy saving]
Set energy saving level.
Select [Minimum], [Medium], or [Maximum] to have
different degrees for energy saving, or select [Off] to
switch off energy saving mode.
■ [Screen off]
Set screen off to save energy consumption.
Select [Screen off], the TV screen is switched off, to
switch the TV screen back on, press any key on the
remote control.
●
When TV is in screen off mode, the LED lights
green and blinks every 2 seconds.
■ [Switch off timer]
Set TV switch off timer.
Press to adjust the value. The value 0 (Off)
deactivates the automatic switch off.
select
access
Select Switch off timer, the TV switches off
automatically to save energy.
●
TV switches off if receiving a TV signal but you
don’t press a key on the remote control during a 4
hour period by default.
●
TV switches off if not receiving a TV signal nor a
remote control command for 10 minutes.
●
If you use the TV as a monitor or use a digital
receiver to watch TV (a Set-Top Box - STB) and
you do not use the remote control of the TV, you
should deactivate this automatic switch off, to set
the value to 0.
General settings
Connection Related Settings
■ HDMI-CEC Connection
Connect HDMI CEC-compatible devices to your TV,
you can operate them with the TV remote control. HDMI
CEC must be switched on on the TV and the connected
device.
●
Switch on CEC
●
Operate HDMI CEC-compatible devices with TV
remote control
Note
●
CEC might not work with devices from other
brands.
●
The HDMI CEC functionality has different
names on different brands. Not all brands are
fully compatible with CEC. Example HDMI CEC
branding names are property of their respective
owners.
English
29
■ [CAM Operator Profile]
To switch on operator profile for CI+/CAM for easy
channel installation and updates.
■ [CAM Profile Name]
When CAM operator profile is set to enable, select to
display the profile name of the connected CAM card.
Reset TV Settings and Reinstall TV
■ [Factory settings]
Reset all settings value to original TV settings.
■ [Reinstall TV]
Redo full TV installation and set TV status back to the
first time you switch on.
Region and Language settings
Language
■ [Menu language]
Change the language of the TV menu and messages
■ [Primary audio language] / [Secondary
audio language]
Set audio preference language.
Digital TV channels can broadcast audio with several
spoken languages for a programme. You can set a
preferred primary and secondary audio language. If
audio in one of these languages is available, the TV
will switch to this audio.
■ [Primary subtitle language] / [Secondary
subtitle language]
Set subtitle preference language.
Digital channels can offer several subtitle languages
for a programme. You can set a preferred primary
and secondary subtitle language. If subtitles in one of
these languages are available, the TV will show the
subtitles you selected.
■ [Primary text] / [Secondary text]
Set teletex preference language.
Some digital TV broadcasters have several Text
languages available.
■ Correct clock manually
Set the time manually if none of the automatic
settings display the time correctly.
■ [Sleep timer]
Set the TV to switch to Standby automatically after
a preset time. If the timer set to 0, the sleep timer is
switched off.
Universal Access Settings
This function can aid visually-impaired viewers by
providing an additional audio track to describe events
on screen.
1 Select [Universal Access] > [Universal Access]
select
access
2 Select [On] to activate
select
set
■ [Hearing impaired]
Some digital TV programmes broadcast special audio
and subtitles adapted for the hard of hearing or deaf
people.
■ [Audio description]
Set [On] to activate special audio commentary
describing what is happening on screen.
[Mixed volume]:
Mix the volume of the normal audio with the audio
commentary. Adjust the volume value.
[Audio effects]:
Set to [On] for extra audio effects in the
commentary audio.
[Speech]
Set [Descriptive] or [Subtitles] for speech
preference.
Timer
■ Correct clock automatically
The time information comes from the broadcasted
UTC - Coordinated Universal Time information.
[Auto clock mode]:
The standard setting for the TV clock is
[Automatic]. If the clock is not correct, you can set
the TV clock to [Country dependent].
[Daylight saving]:
Select the appropriate setting from [Daylight
saving] when the clock mode is set to [Country
dependent].
English
30
 Loading...