

Page 1
Operating Instructions
TX--32DTX40
Colour Television with
Integrated Digital Terrestrial Decoder
(U.K. Standard)
TQB8E4062
Page 2
WELCOME
Dear Panasonic Customer,
Wehope that you have many years of enjoyment from your new TV.TheQuick Start Guide section at the beginning of this instruction
bookwillallow you tousetheTV asquicklyaspossible.Werecommend thatyouthenread the completeinstructionbook,and keep itto
refer to as you explore the range of advanced features that this TV offers.
ThisTVhas alowpowerconsumptionmakingitverycosteffectivetorun.Also, whenin Standbymodethepowerconsumptionis
merely 1,2W.This instruction book is produced using recycled paper.
Analogue and Digital television --- what are they?
Analoguetransmissionisthesystem thathas beenused formanyyearsforbroadcastingtelevisionprogrammes.Withcontinuous
improvements intechnologyitis nowpossibletotransmit programmesinadigital format,allowingclearerpictures,morestations
and other services to be displayed on screen. Digital television is provided in three different ways; it can be sent along a cable
connection directtoyourhouse,broadcastfromasatellite,or broadcast using traditional land based (terrestrial) transmitters. The
first two options require youtohavean extra ‘set topbox’ decoder and in the case of satellite, a receiving dish mounted outdoors.
Whileallowingyoutoreceive traditional analoguetransmissionsin the usual way,this television can alsoreceive terrestrialdigital
services using an integrated (Digital Video Broadcasting) decoder.Thisallowsyou to enjoy the new era of digital terrestrial
television, including interactive services, without the need for a ‘set top box’ or satellite dish --- an adequate roof or loft mounted
antenna is all you need.
CONTENTS
Page Page
Warnings and Precautions 3........................
Accessories 4.....................................
Inserting the Remote Control Batteries 4............
Front Panel Controls 4.............................
Remote Control 5.................................
Quick Start Guide 6................................
Using the On Screen Displays 10...................
Aspect Controls 11................................
Multi window 13...................................
Picture Menu 14...................................
Sound Menu 15...................................
Setup Menu 16....................................
Manual tuning --- Front Panel Controls 23............
DVB System Setup 24.............................
Common Interface Module Menu 25.................
Favourites Setup Menu 26..........................
Information Banner 26.............................
System Update Menu 27...........................
System Update Notification 27......................
DVB Timer Programming Menu 28..................
TV Guide 30......................................
Q-- Link 31........................................
VCR / DVD Recorder Installation 32.................
Telete xt Op eration 33..............................
Analogue Tuning Menu -- overview 17...............
Analogue Tuning Menu -- Programme edit 18.........
DVB Auto setup 20................................
Analogue Auto setup 20............................
Analogue Tuning Menu -- Manual Tuning 21..........
Shipping condition 21.............................
Analogue Tuning Menu -- Owner I.D. 22..............
22
Audio / Video (AV) Connections 36..................
Front connections 36................................
SocketInformation 36................................
Rear connections 37.................................
Troubleshooting 38................................
Foryourguidance 40..............................
Specifications 40..................................
Page 3
WARNINGS AND PRECAUTIONS
D This TV set is designed to operate on 220-- 240V, 50Hz A.C.
D
Batteries,packaging andoldequipmentshould
not be disposed of as domestic waste, but in
accordance with the applicable regulations.
D Toprevent damage which might resultinelectric shockorfire,
donot exposethis TVsettorainorexcessivemoisture.ThisTV
must not be exposed to dripping or splashing water and
objectsfilledwithliquid,suchasvases,mustnotbeplacedon
top of or above the TV.
D WARNING : HIGH VOLTAGE !!!
Donotremovetherearcoveraslivepartsareaccessiblewhen
it is removed. There are no user serviceable parts inside.
D TV Games / Home Computers
Extended use of TV games or home computers with any
television setcancausea permanent‘shadow’onthescreen.
This type of irreversible picture tube damage, can be limited
by observing the following points:
D Reduce the brightness and contrast levels to a minimum
viewing level.
D Donotoperatethetelevisionsetfor acontinuousperiodof
time while usingTV games or home computers.
D This type of picture tube damage, is not an oper ating
defect, and as such is not covered by the Panasonic
warranty.
FOR YOUR SAFETY PLEASE READ THE FOLLOWING TEXT CAREFULLY
This appliance is supplied with a fitted three pin mains plug for your safety and convenience. A 5 amp fuse is fitted in this plug. If the
fuse is replaced then the replacement fuse must be 5 amp rated and should be approved by ASTA or BSI to BS1362.
D Ensurethatthemainsplugis easilyaccessibleatalltimes.The
On/Off switch on this model does not fully disconnect the TV
from the mains supply.Remove the mains plug from the wall
socket when the TV set is not used for a prolonged period of
time.
Note:
D If the set is not switched off when the TV station stops
transmitting,it will automaticallygo to standby mode after
30minutes.Thisfunctionwillnot operate whentheTVisin
AV mode.
D Cabinet and picture tube care
Removethemainsplug fromthewallsocket.Thecabinet and
picture tube can be cleaned with a soft cloth moistened with
mild detergent and water. Do not use solutions containing
benzol or petroleum. TV sets can produce static electricity,
care must be taken whenever touching the TV screen.
D Adequate ventilationisessentialtopreventfailureofelectrical
components,werecommendthatagapofat least5cmisleft
allaroundthistelevision receiver even whenitisplacedinside
a cabinet or between shelves. Ventilation should not be
impededbycovering theventilationopenings withitemssuch
as newspapers, table---cloths and curtains
D Avoid exposingtheTVset todirect sunlightand othersources
ofheat.To preventfire neverplaceanytypeofcandleornaked
flame on top or near the TV set.
ASA
Check for the ASTA mark
If thefittedplughasa removable fusecoveryoumustensure thatitisrefitted whenthefuseis
replaced. If you lose the fuse cover the plug must notbe used until a replacement coveris
obtained.Replacementfuseco ver scan be purchasedthro ughyour localPanasonicdealer.
Theplug fitted tothisapplianceincorporatesa mains filter circuit. If thisisrem oved or
replaced with a non-- filtered plug this television will no longer meet the European
standardsforElectromagneticCompatibility (EMC).Ifthefitted plug is unsuitable for
the socket outlet in your home an appropriate adapter should be used.
Nonetheless,if thefittedplug is replaced,the fuseshouldbetaken outandthe cut-- off
plug disposed of safely.Thereisdangerofsevereelectricalshockif the cut off plug is
inserted into any 13 amp socket.
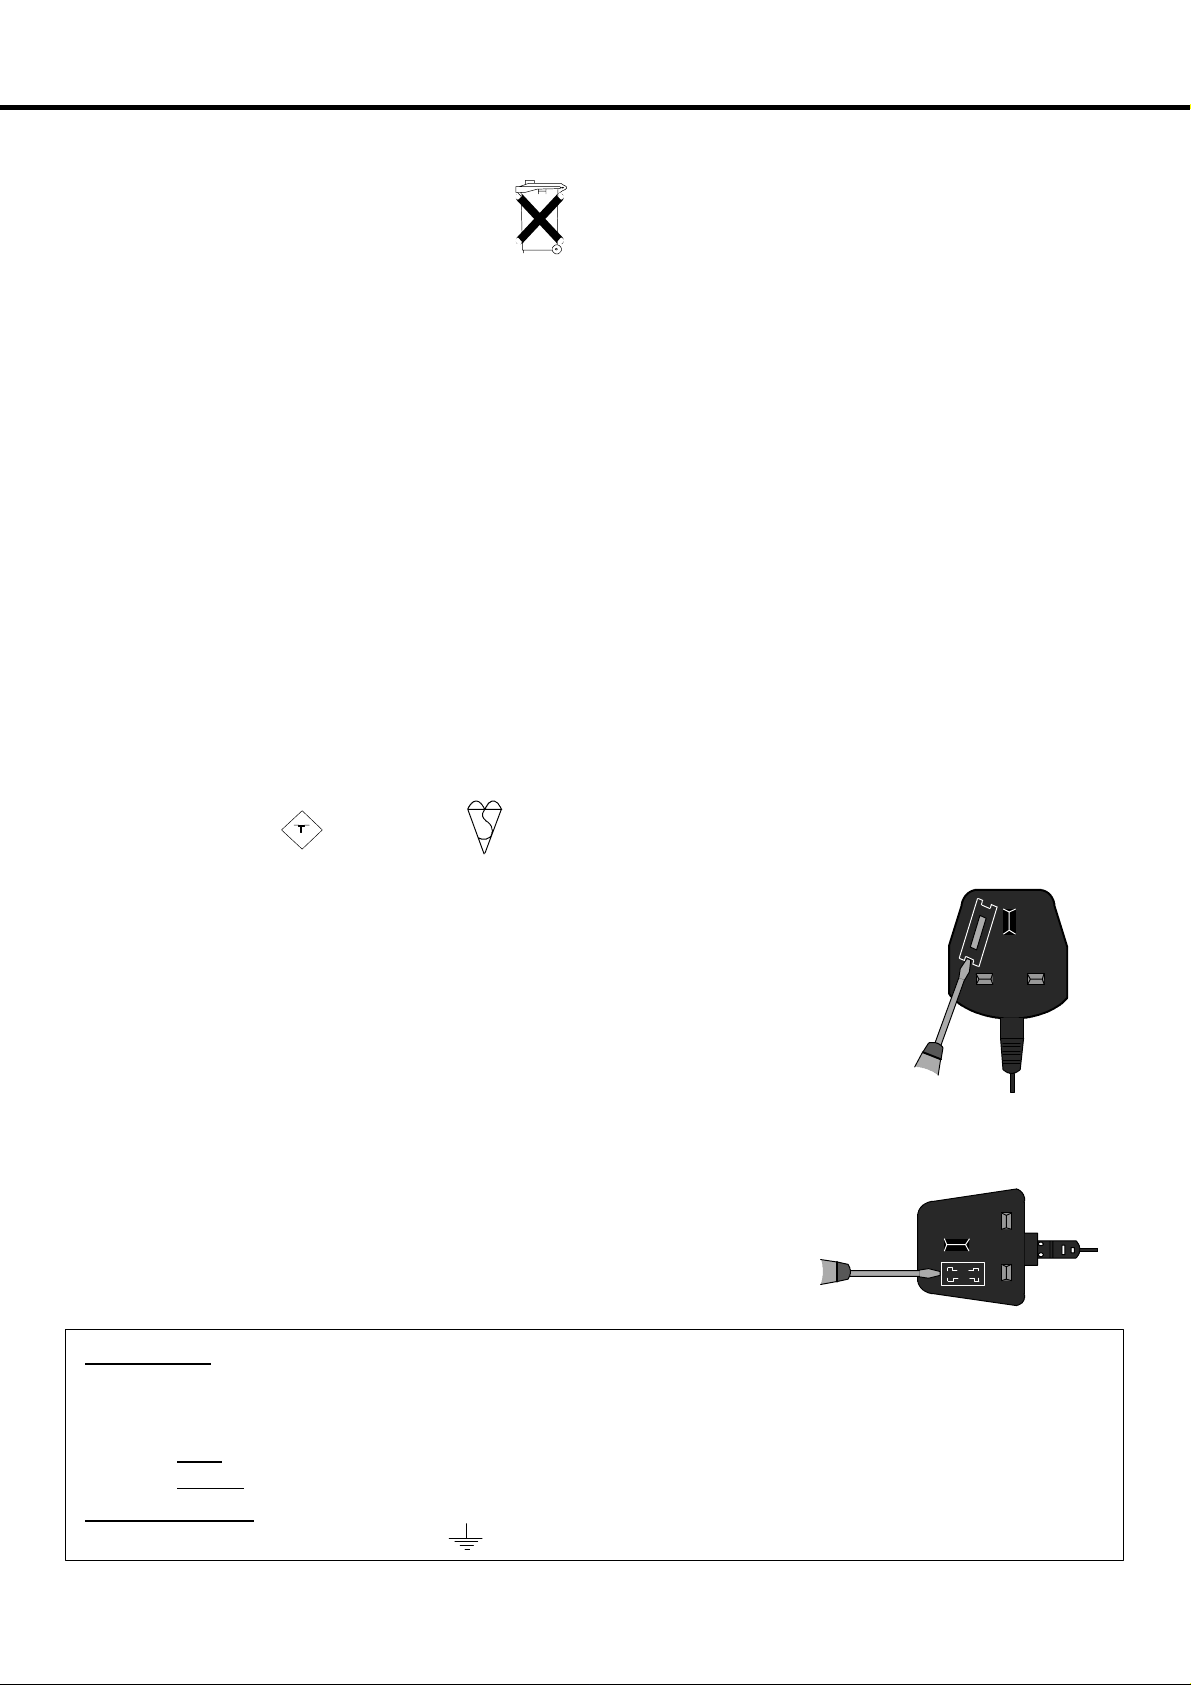
If a new plug is to be fitted please observe the wiring code as shown below.
If in any doubt please consult a qualified electrician.
Howtoreplacethefuse(forplugtypeshowninexample1):
Lift out the removable fuse compartment with a screwdriver and replace the fuse, then refit
securely into the mains plug (see example 1).
Howtoreplacethefuse(forplugtypeshowninexample2):
Lift open thefuse compartment,inthemainsplug,withascrewdriver, and replace thefuse,
then press the fuse cover down securely (see example 2).
IMPORTANT
Asthecoloursofthewiresinthemainslead ofthisappliance maynotcorrespondtothe markingsidentifyingtheterminals inyourplug,
proceed as follows :--
1. The BLUE
2. The BROWN
IMPORTANT NOTE
marked with the letter ‘E’ or the earth symbol.
:-- The wires in the mains lead of this appliance are coloured in accordance with the following code :--
wire must be connected to the terminal marked ‘N’ or coloured black.
wire must be connected to the terminal marked ‘L’ or coloured red.
: Under no circumstances should either of these wires be connected to the Earth terminal of the three pin plug,
or the BSI mark on the body of the fuse.
Example 1
Example 2
BLUE : NEUTRAL BROWN : LIVE
3
Page 4
ACCESSORIES
Check that you have the accessories and items shown
Operating Instruction book
TQB8E4062
Remote Control Transmitter
EUR7636010
Batteries for the Remote Control
T ransmitter. (2 x R6 (UM3) size)
VS--- 32PXM
(Video cabinet)
TV Guarantee
CRT Guarantee
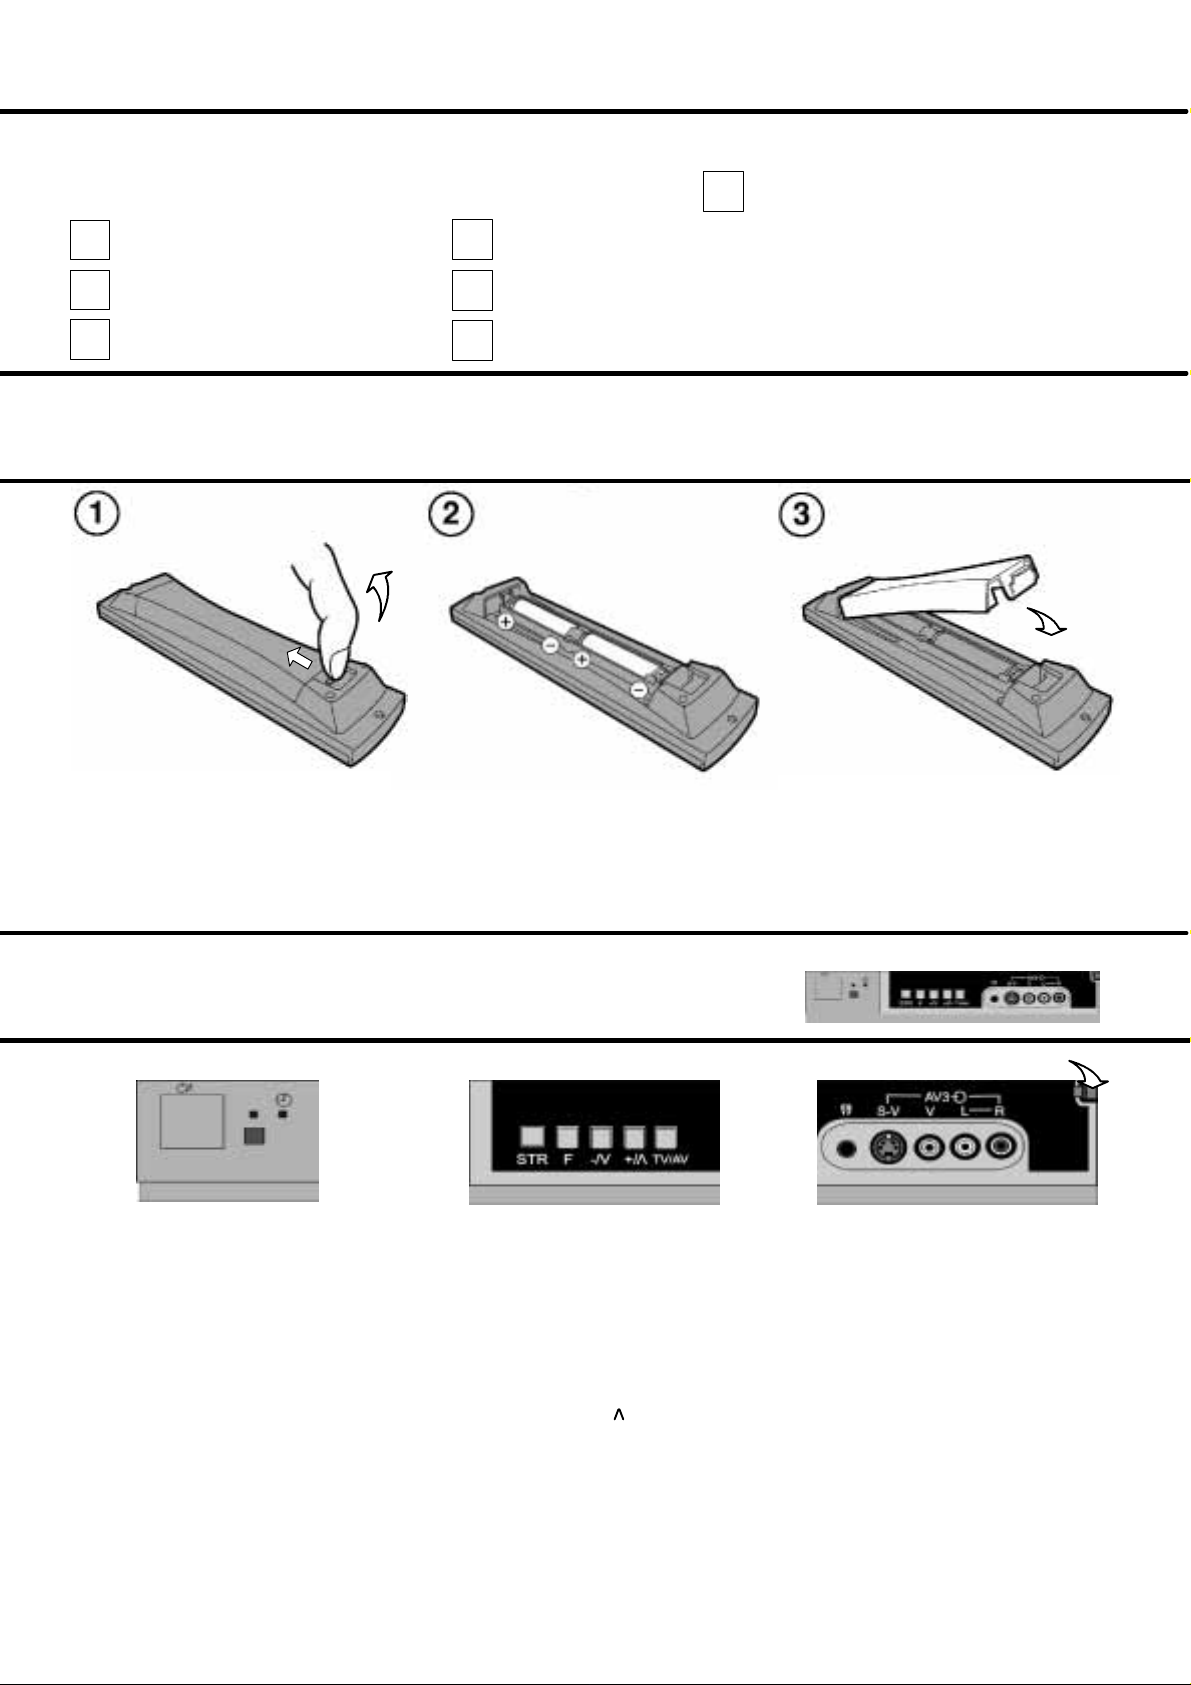
INSERTING THE REMOTE CONTROL BATTERIES
n
Whilst squeezing the recessed catch, lift the
battery cover away from the remote control
Notes:
D Make sure that the batteries are fitted the correct way round.
D Do not mix old batteries with new batteries. Remove old, exhausted batteries immediately.
D Do not mix different battery types, i.e. Alkaline and Manganese. Do not use rechargeable (Ni-- Cad) batteries.
Insert batteries ---note correct
polarity (+ and --- )
Replace the battery cover
FRONT PANEL CONTROLS
Press here and open flap to expose TV controls, front AV3 and headphone terminals
MAINS Power On/Offswitch.
Indicator LED’s
Red indicates Standby mode.
Orange indicates DVB system
active for recording or DVB
tuner lock on.
STR (Normalisation store)
Used to store tuning and other function settings.
F (Function select)
Displays the On Screen Display functions, press
repeatedly to select from the available functions ---
Volume, Contrast, Brightness, Colour, Sharpness,
Tint (in NTSC mode), Bass, Treble, Balance, Tuning
mode (only when viewing analogue transmissions)
and Geomagnetic Correction.
--- /V +/
Increases or decreases the programme
position by one. When a function is
displayed, press to increase or decrease
the selected function.
TV/AVselect
(see page 9).
Headphone socket
(see page 36).
S --- V HS socket
(see page 36).
RCA Audio/Videosockets
(see page 36).
44
Page 5
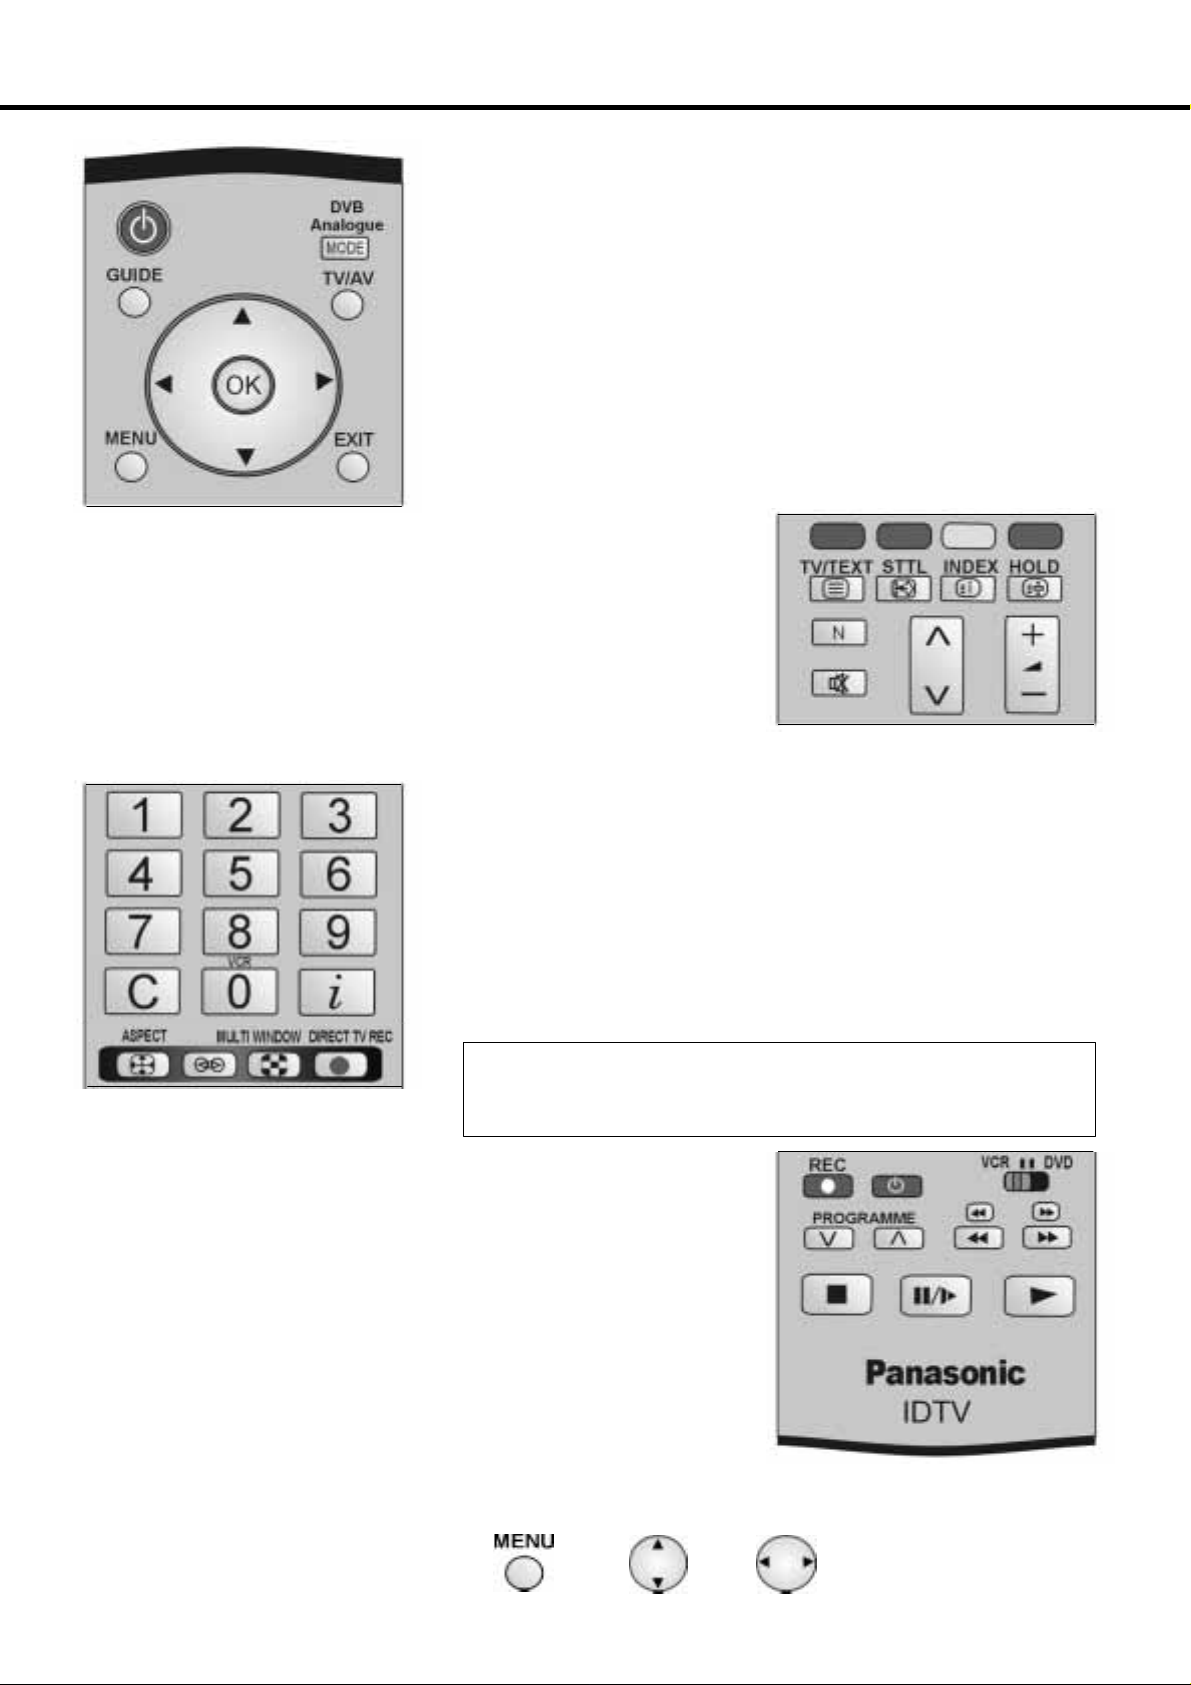
REMOTE CONTROL
(StandbyOn / Off)
(Cursor buttons)
Multi function buttons --- red, green, yellow and blue. Used for the selection, navigationand
operation of various functions.
TV / Text button(see page33).
STTL --- Displays subtitles (if available).
Index --- Selects the nearest teletext index page (see page 33).
Ho ld --- Freezes the currentteletext page(see page33) Stills the picture,press again
to return to watchingthecurrent programme
N(Normalise)button will recallstored settings.
Channel number up and down, teletext page selection (see page 10).
Volume increase/decrease(seepage10).
Mute --- Soun d mute On /Off.
(Status
)
Standby On/Off switch
Switches TV On or Off standby. Switches DVB system on or off standby if tuner lock is not set.
Mode --- Switch between viewing DVB and Analogue modes.
Guide ---DisplaystheDVBTVGuide(seepage30).
TV/AV - -- Switch between viewing TV or AV input (see page 9).
Cursor buttons to makeselectionsand adjustments.
OK button to confirm selectionsand choices. Pressafter selecting
programme positions 1---99 (0---9 in Analogue mode) to avoid delay.
Me nu --- Press to access the Picture, Sound and Setup menus (see page 10).
Exit the menu system.
Numeric Keys used for:- -- Programme / channel change ; T eletext page
selection (see page 33); When in Standby mode, switches TV on.
Direct channel access During analogue TV viewing or when in the Tuning
menu, press and then enter channel number using the numeric buttons.
i --- Shows status information for the current Programme position (see page 26).
Aspect control button (see page 11).
Dolby Virtual on/off.
MULTI WINDOW button (see page 13)
Direct TV Record button(seepage 31).
(Multi function buttons)
(Channel) (Volume)(Mute)
The Remote Control is capable of operating some functions of selected Panasonic
(Dolby Virtual)
Record --- Press this buttonto startrecording.
Standby --- Press to switch the VCR, DVD or DVD Recorder to standby mode. Press
again to switch back on.
VCR / DVD switch --- Use this switch to select whether controls
operate DVD equipment or your VCR.
Programme Up / Down --- Press to increase or decrease the programme position by one.
Skip/FastForward/Cue
VCR: Pressto fastforward the tape.InPlaymode, presstoviewthe picturerapidly forward(Cue).
DVD: Press once to skip to the next track. In play mode press and hold to view the picture rapidly
forward.
Skip / Rewind / Review
VCR: Pressto rewindthe tape.InPlaymode, press to viewthepicturerapidly in reverse (Review).
DVD: Press once to skip to the previous track. In play mode press and hold to view the picture
rapidly in reverse.
Stop --- Press to stop thetape or DVD.
Pause / Still --- Press in playbackmode, the picture will pause. Pressagain to restartplay.
Play --- Pres s t o playback the ta pe or DVD.
Throughout thisbook, buttons relevant to the operations described will be as shown in the followingexample:---
Open the Main menu (1)
Move to Setup menu (2)
Access Setup menu (3)
VCRs and DVD (Digital Versatile Disc) equipment. Some VCR and DVD equipment have
different functions, so to ensure compatibility please refer to the equipment’s instruction
book or consult your dealer for details.
(1) (2) (3)
(Standby)
(Skip)
(Stop) (Pause / Still) (Play)
5
Page 6
QUICK START GUIDE
Connection and setting up options
Note:-- Please ensure that the unit is not connected to the mains before any leads are attached or removed.
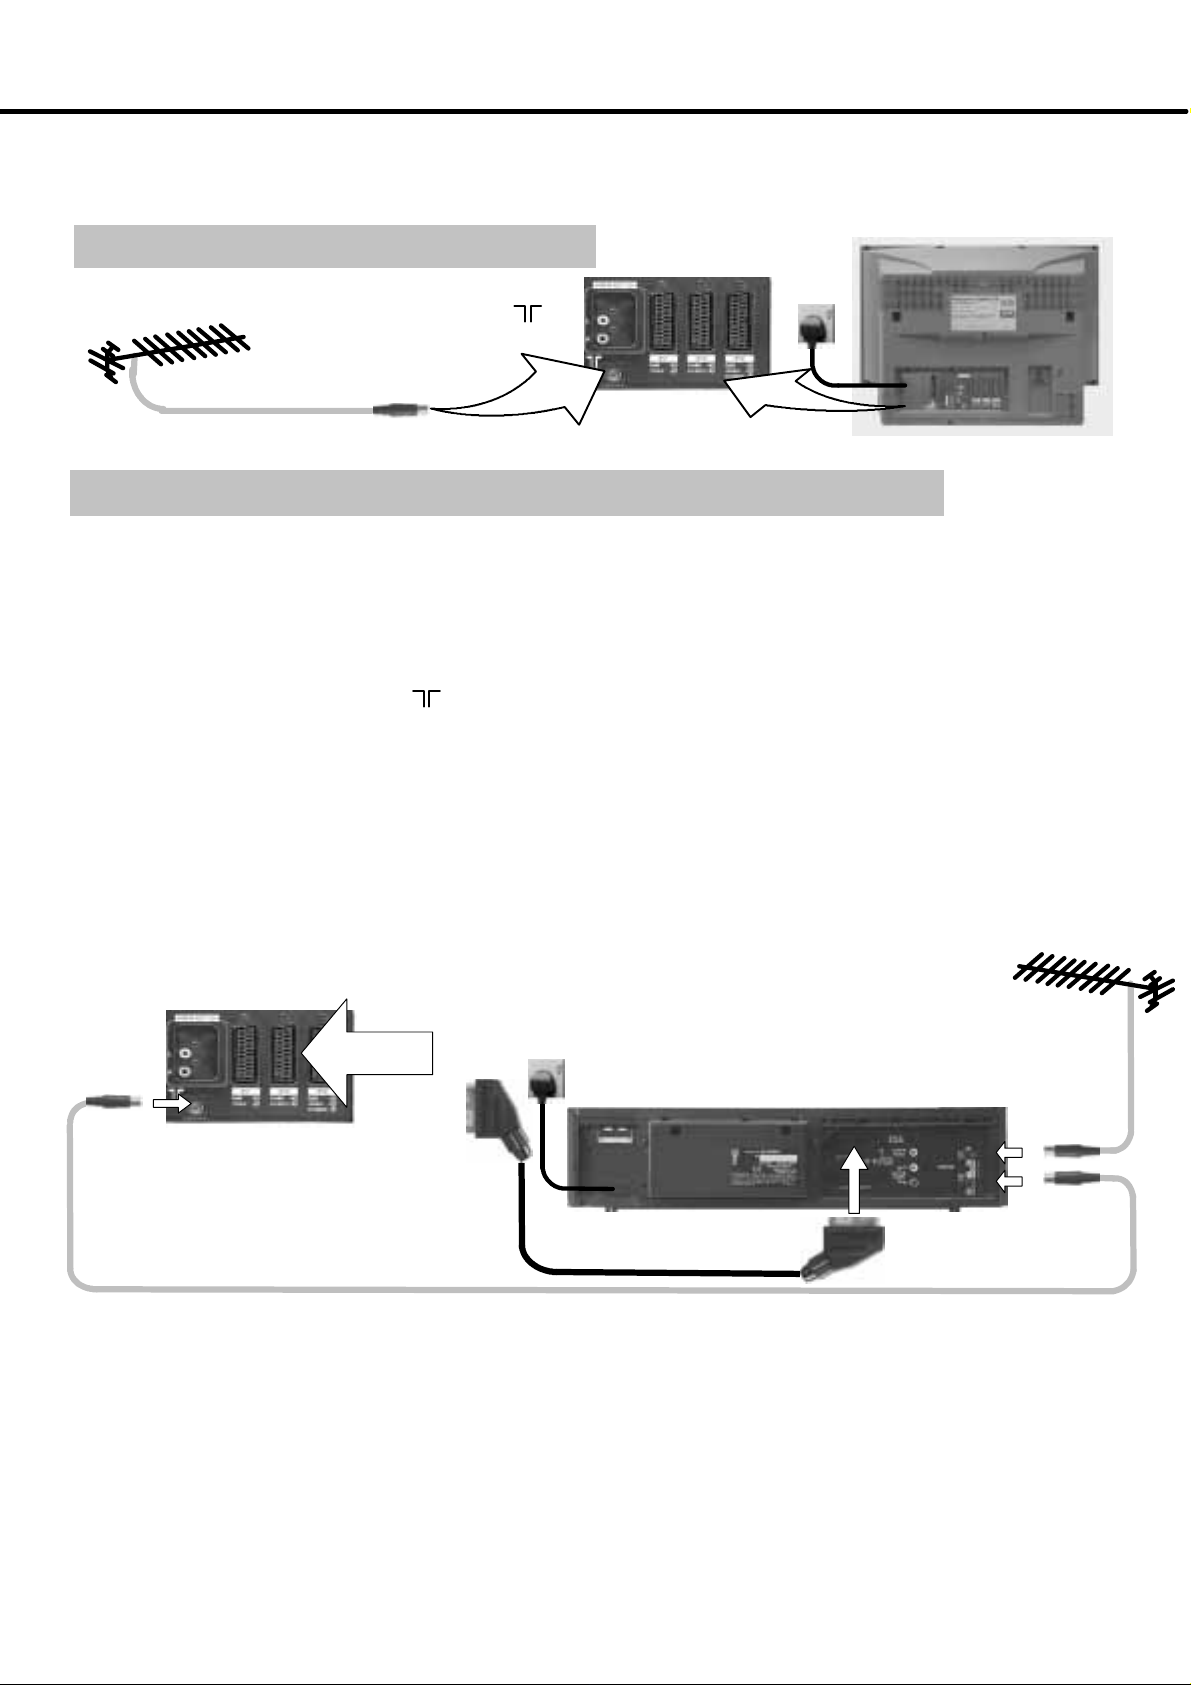
Connection of T V using an RF cable only
RF Connection
D Connect the RF cable into the TV Aerial socket ( ).
Aerial
Input
socket
TV
Mains
Socket
Connection of TV and VCR or DVD Recorder using Scart and RF cables
Scart Connections
D The VCR / DVD Recorder can also be connected to the TV using a Scart cable, if you are using a Scart equipped VCR
/DVDRecorder.
D Use the TV’s AV2 Scart socket for any VCR. Always use a “fully wired” Scart cable.
D Use the TV’s AV1 or AV4 Scart socket for any DVD Recorder. Always use a “fully wired” Scart cable.
RF Connection
D Connectthe RF cableto the“AerialIn”socketoftheVCR/DVD Recorderand anRFc a blefromtheVCR/DVD Recorder
AerialOutsockettotheTVAerialsocket( ).
Notes :
Ifusinga
oftheTV. IfyourVCRorDVDRecorderisnota
Further information on Q-- Link can be found on page 31.
“Q-- Link”
VCR /DVDRecorder, then theAV1Scartof the VCR /DVDRecordermustbeconnectedto theAV2socket
“Q-- Link”
device,pleaseconsulttheoperatinginstructionbookforthatproduct.
TV
Mains
VCR
DVDR
AV2 Scart socket
Aerial
Input
socket
Notes:
D A Satellite Receiver can be connected to any available Scart socket. If all socketsare in use, please refer to your VCR or DVD
Recorder operating instruction manual for further connection options.
D Additionalequipment and cables are not supplied.
D Furtherdetails of audio/ video connections can be found on pages 36 and 37.
D Further information for VCR or DVD Recorder installation with this TV can be found on page 32.
Socket
VCR / DVD Recorder
Aerial
Input
socket
Aerial
Output
socket
66
Page 7
QUICK START GUIDE
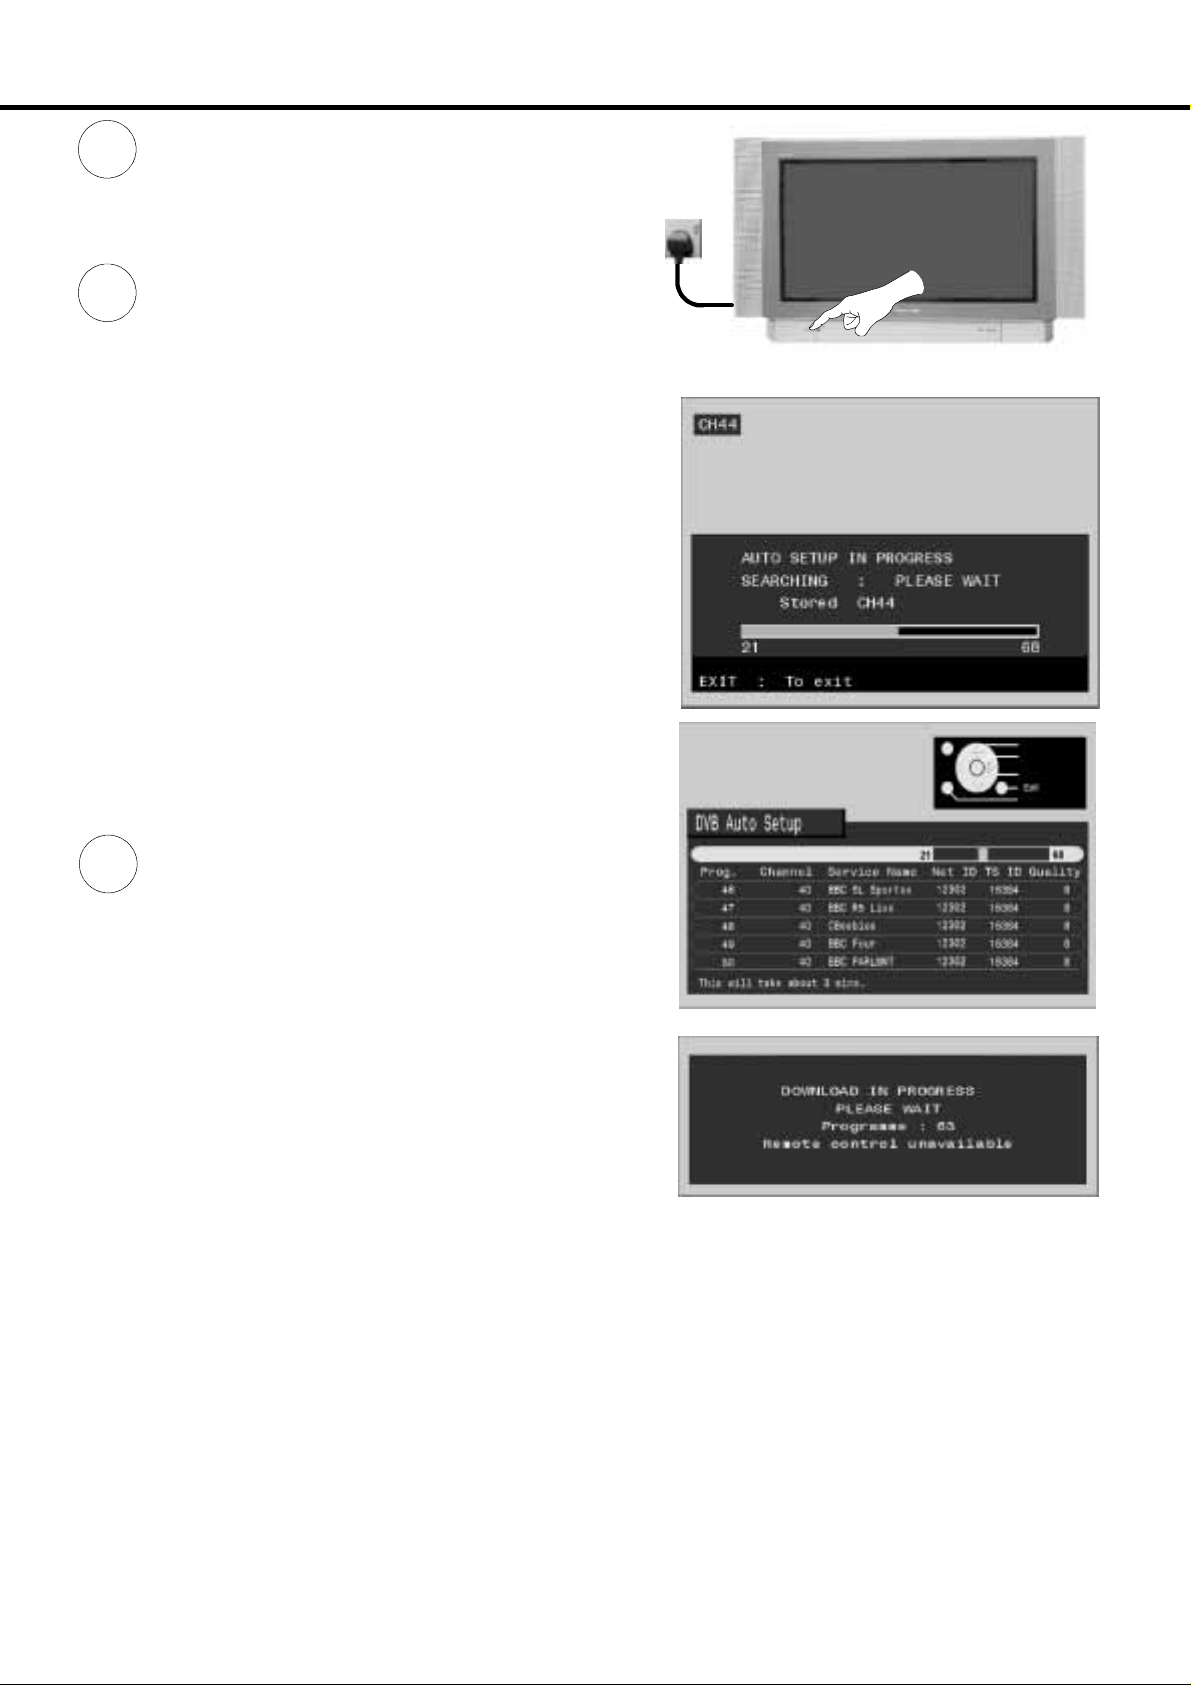
Ensure that the VCR or DVD Recorder is in
1
Standby mode.
Plug the TV into mains socket and switch ON.
Programmes will appear immediately if your dealer
2
has programmed the TV for you.
If the TV has not been programmed for you then
Auto setup will begin.
First, the TV will search for analogue stations:
When the search for analogue stations is complete, the
TV will continue to search for DVB stations.
TV stations will be located, sorted into order and stored
ready for use.
Stations are sorted into the following order:
Mains
Socket
D DVB Stations: Are sorted by their logical channel number
D Analogue Stations: Are sorted into channel order.
The sorted programme order depends upon the TV signal, the
broadcasting system, and reception conditions.
3
TV to VCR or DVD Recorder Download
If a “Q-- Link”, “
has been connected to a Scart socket before starting Step 1,
programme information will be downloaded to that device.
Onlytheanalogueprogrammepositionswillbedownloadedto
the recording device, in the correct order .See page 31.
Not all VCRs / DVD Recorders support this download of
programme information, some may require to be started
manually.
Refer to the recording device’s operating instruction book.
If a recording device other than those described above has
been connected, then there will be no download operation, the
TV is now ready for use.
Notes :
If the recording device has not accepted downloaddata from the TV, you may need to select the Download optionfromthedevice’s
menu system.
Refer to the recording device’s operating instruction book.
NEXTVIEWLINK”
or compatible recording device
If Q-- Link is not operating correctly, check the following :
D The Scart cable is connected to the TV’s Scart socket.
D The Scart cable is connected to the recording device’s compatible (Q-- Link,
D The Scart cable is a “fully wired” type.
For further information on Q-- Link and connecting equipment, see pages 31, 36 and 37.
NEXTVIEWLINK
or similar technology) Scart socket.
7
Page 8

QUICK START GUIDE
Owner ID
4
As an added feature, this TV has the option of adding a
security code (Owner ID) and personal details into its memory,
so that in the unfortunate event of theft it will help the Police to
trace the owner.
Using the numeric buttons, 0 to 9 on your
remote control (1), enter required 4 digit
Owner ID PIN NUMBER.
(1)
EnterNAME, HOUSE NUMBER and POSTCODE.
If a 4 digit PIN NUMBER was entered above, you will be taken
automatically to the NAME line.
If not, using the left or right cursor buttons (2) move to the NAME line.
Change character using the up or down cursor buttons (3).
Select the character position using the left or right cursor buttons (2).
(2) (3) (4)
Repeat above until NAME, HOUSE NUMBER and POSTCODE are
entered.
Press the OK button (4) to store the details.
Press the OK button (4) again, when you are asked “Are you sure ?”.
For further information on Owner I.D., see page 22.
A space is provided on page 22 to write down the PIN
NUMBER for future reference.
5
(5)
To view a list of the stations that have been found, press the
GUIDE button (5) on the remote control (see page 30).
Use the cursor buttons (6) to move the cursor bar up and down
the list. Use the programme change button (7) to step through
the guide page by page.
To view the selected programme press the OK button (8).
(7)
(8)
(9)(6)
(10)
Categories
To make stations easier to find, specific stations can be listed by
category; press the left or right cursor button (9) to choose a category.
The chosen category name is shown on screen.
For example, if you select ‘Free TV’, only ‘free --- to --- air’ stations w ill be
listed --- you can view any of these now.
If you select ‘Pay TV’, only subscription stations will be listed -- - you
will need to contact the service provider to find out how to subscribe to
these stations.
A separate guide is available when viewing analogue mode. In this
guide, use the cursor buttons (6 & 9) to move the cursor bar around
the list, use the programme change button (7) to step through the
guidepagebypage.PresstheOK button (8) to view the selected
programme.
Both guides can be cleared from the screen using the EXIT button
(10).
88
Page 9
QUICK START GUIDE
6
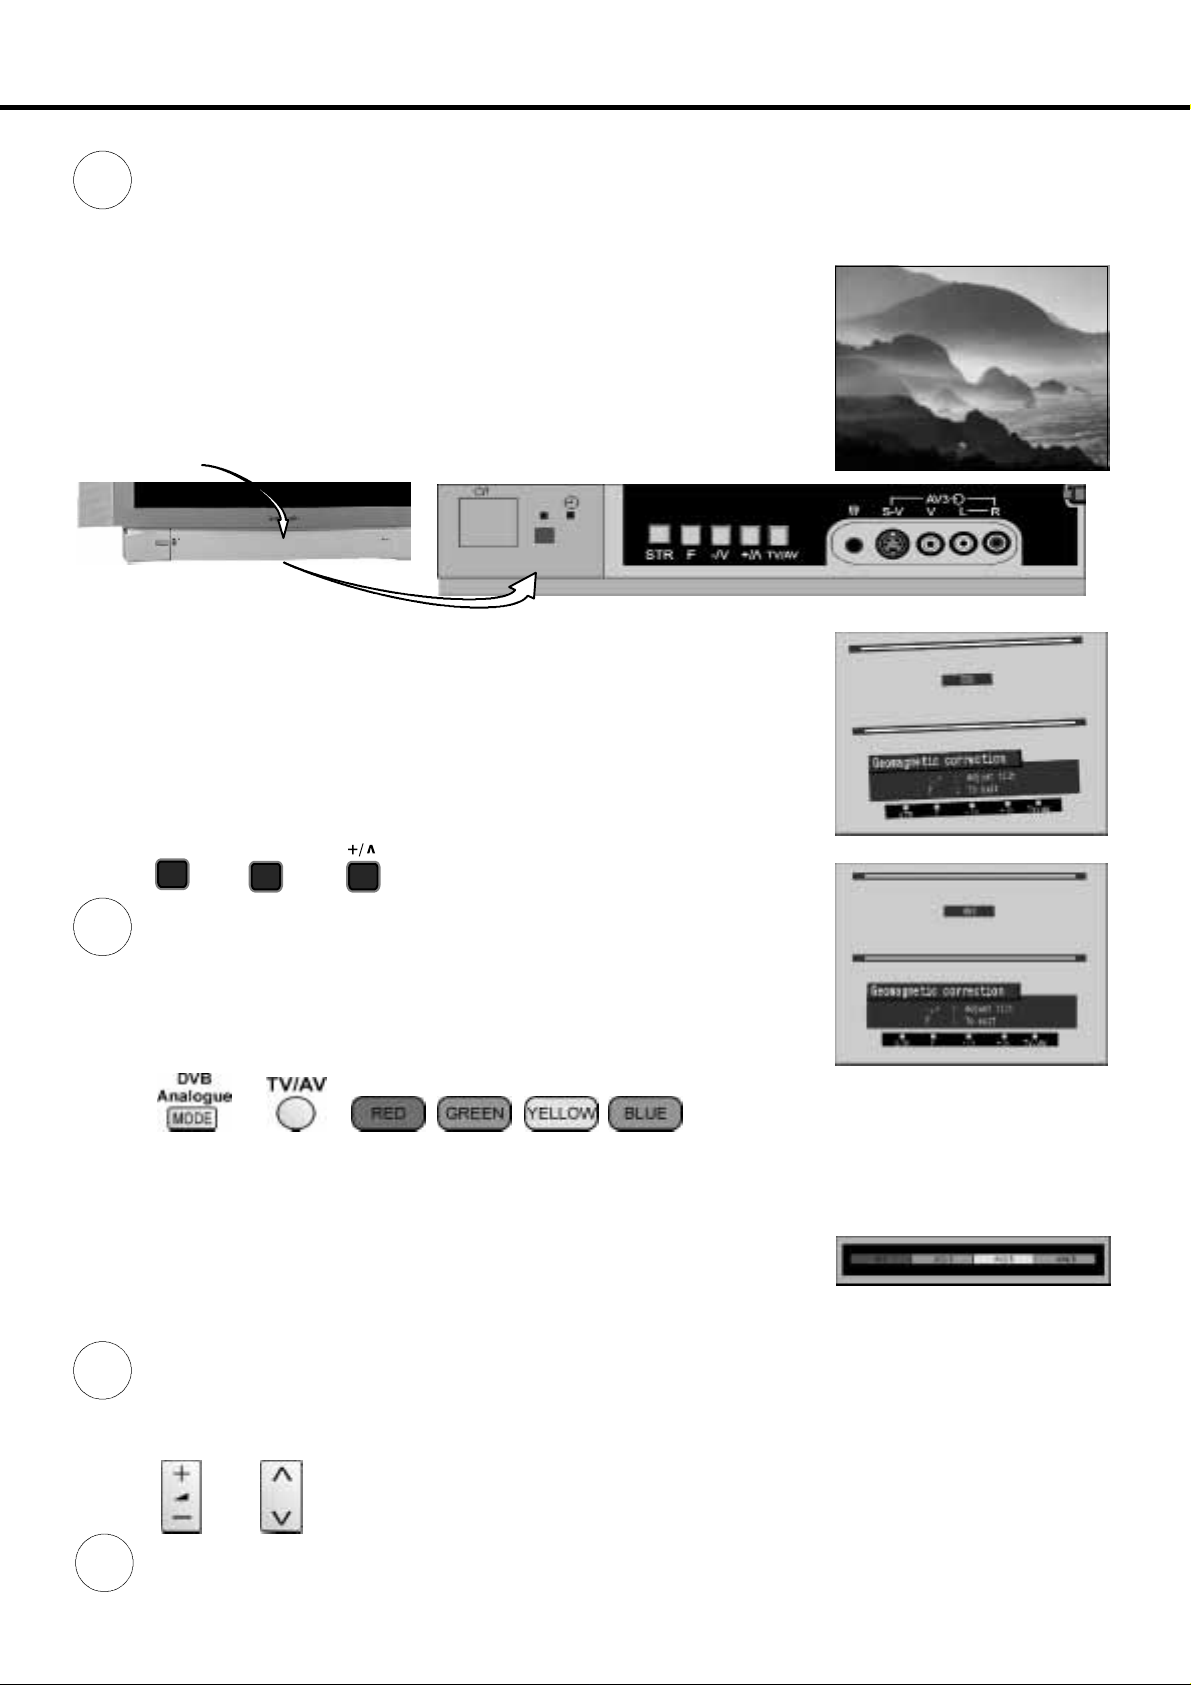
Slight tilting of the picture may be noticeable or colouredpatchesmay sometimes appear at the cornersof the
screen (colour purity). The Geomagnetic Correction feature can be used to eliminate them, if necessary:
First, ensure the Auto setup and Q- --Link download procedures are complete.
The screen should not be showing any On---Screen Display menus.
Open the flap on the television’s front panel.
Press and release here to open flap
Press the F button (1) repeatedly until the Geomagnetic Correction feature is displayed .
Press the + or --- buttons (2) or (3) repeatedly until the picture appears to be level.
Press the F button (1) again to return to normal viewing.
Close the flap to prevent damage.
(1) (2) (3)
F
7
To switch between analogue and DVB modes, press the Mode button (4).
To switch to AV mode, press the TV/AV button (5).
The AV Select menu will allow you to choose which AV source to view. AV select menu
Press the Red (6), Green (7), Yellow (8) or blue (9) multi function button (whilst the
options remain on screen) to choose which AV source to view.Should the options
disappear, press any multi function button (6), (7), (8) or (9) to restore them.
Press the TV/AV button (5) to exit from AV mode.
-- /v
(5) (6) (7) (8)(4) (9)
8
AdjustthevolumeusingtheVolume button (10).
Change programme positions using the Channel button (11).
(11)(10)
9
You are now ready to begin viewing programmes.
9
Page 10
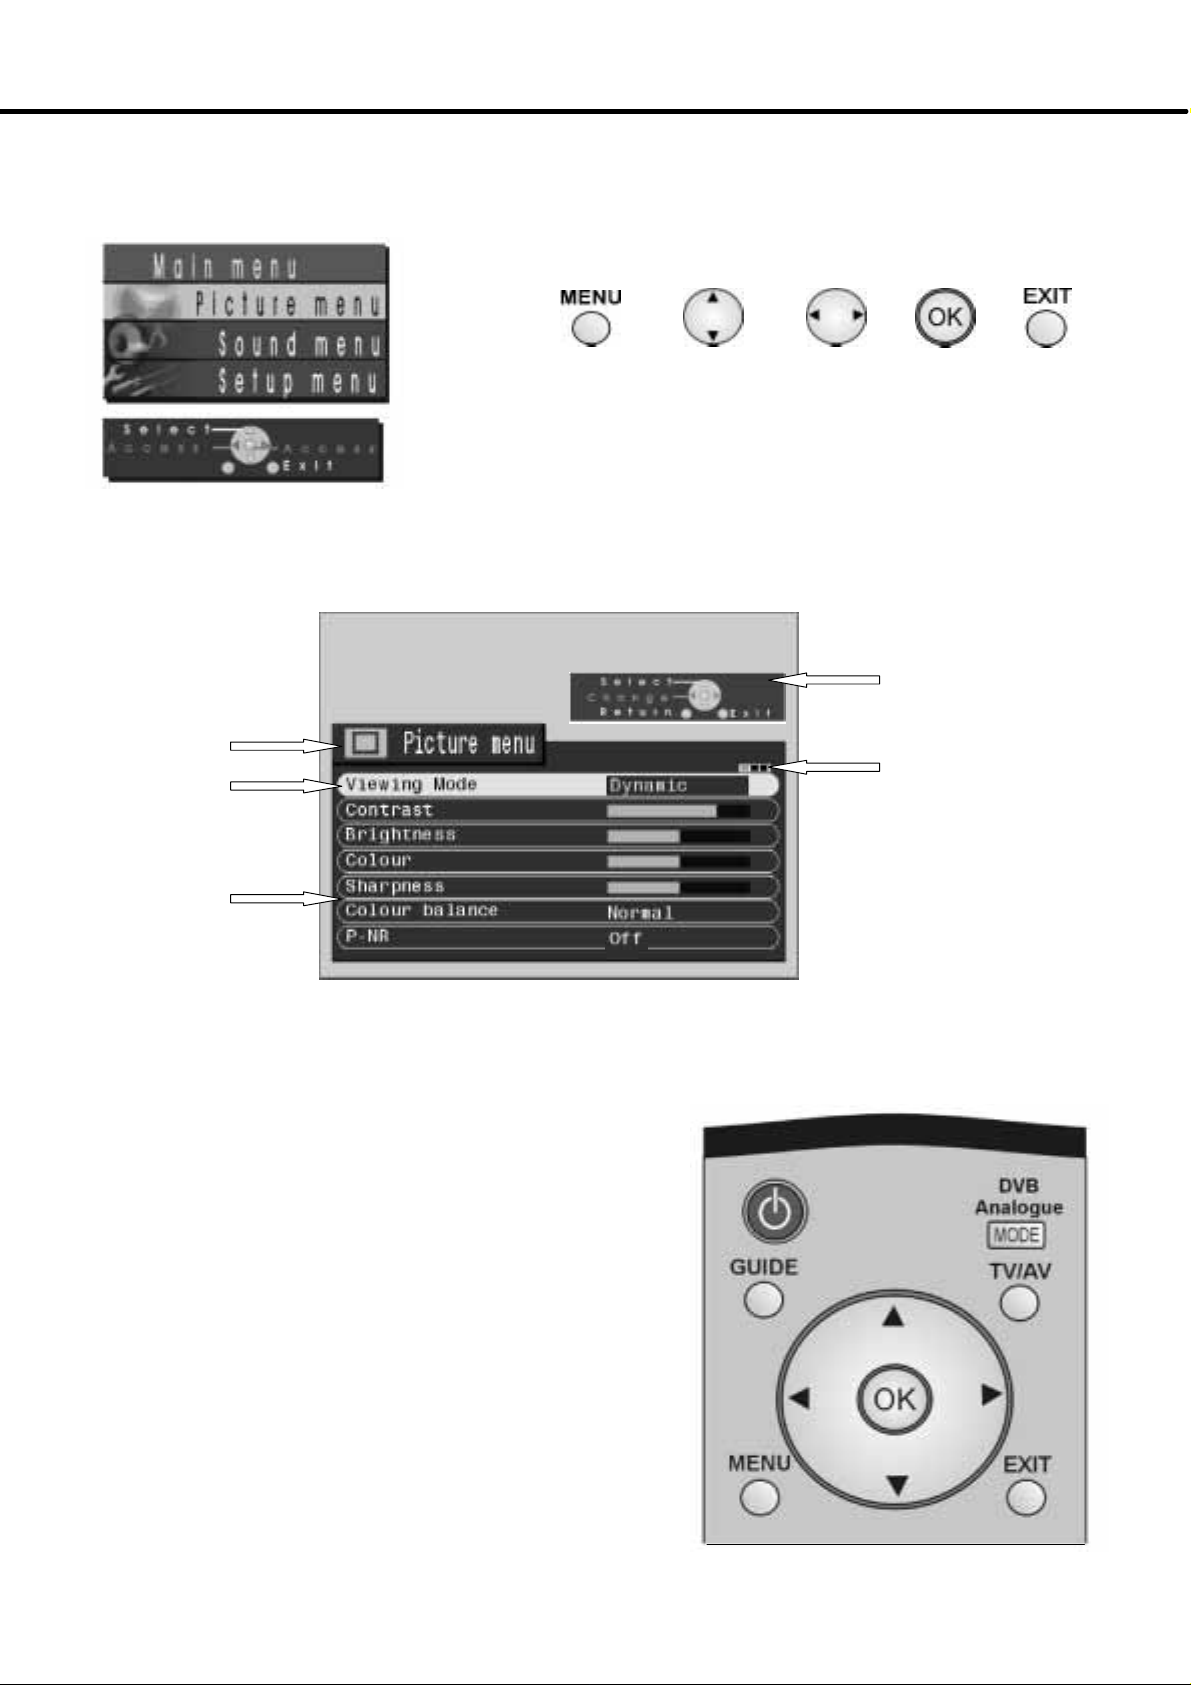
USING THE ON SCREEN DISPLAYS
This TV has a comprehensive system of On Screen Display (OSD) menus to access
adjustments and options
Press the Menu button (1) to access the Main menu
(1)
The up and down CURSOR buttons (2) are used to move the cursor up and down the
PICTURE, SOUND and SET UP menus.
The left and right CURSOR (3) or OK (4) buttons are used to access the menus.
Menu Title
Selection bar
(2) (3) (4)
(5)
ON SCREEN HELP
’Instructions’ box
The Help box is not
showninthemenu
pictures in this
instruction book due to
space limitations.
Indicator for options
Sub-- menus
Some selections, for example, Contrast, Brightness, Colour and Sharpness
will allow you to increase or decrease their level.
Some selections, for example, Off timer, allow a change of setting to be made.
Some selections, for example Tuning menu, will lead to a further menu.
The up and down CURSOR buttons (4) are used to move the cursor up
and down the menus.
The left and right CURSORbuttons (5) are used to accessmenus,adjust
levels or to select from a range of options.
The OK button (4) is used to store settings after adjustments have been
made or options have been set, in the DVB Setup menu for example.
The EXIT button (5) is used to exit the menu system and return to the
normal viewing screen.
1010
Page 11
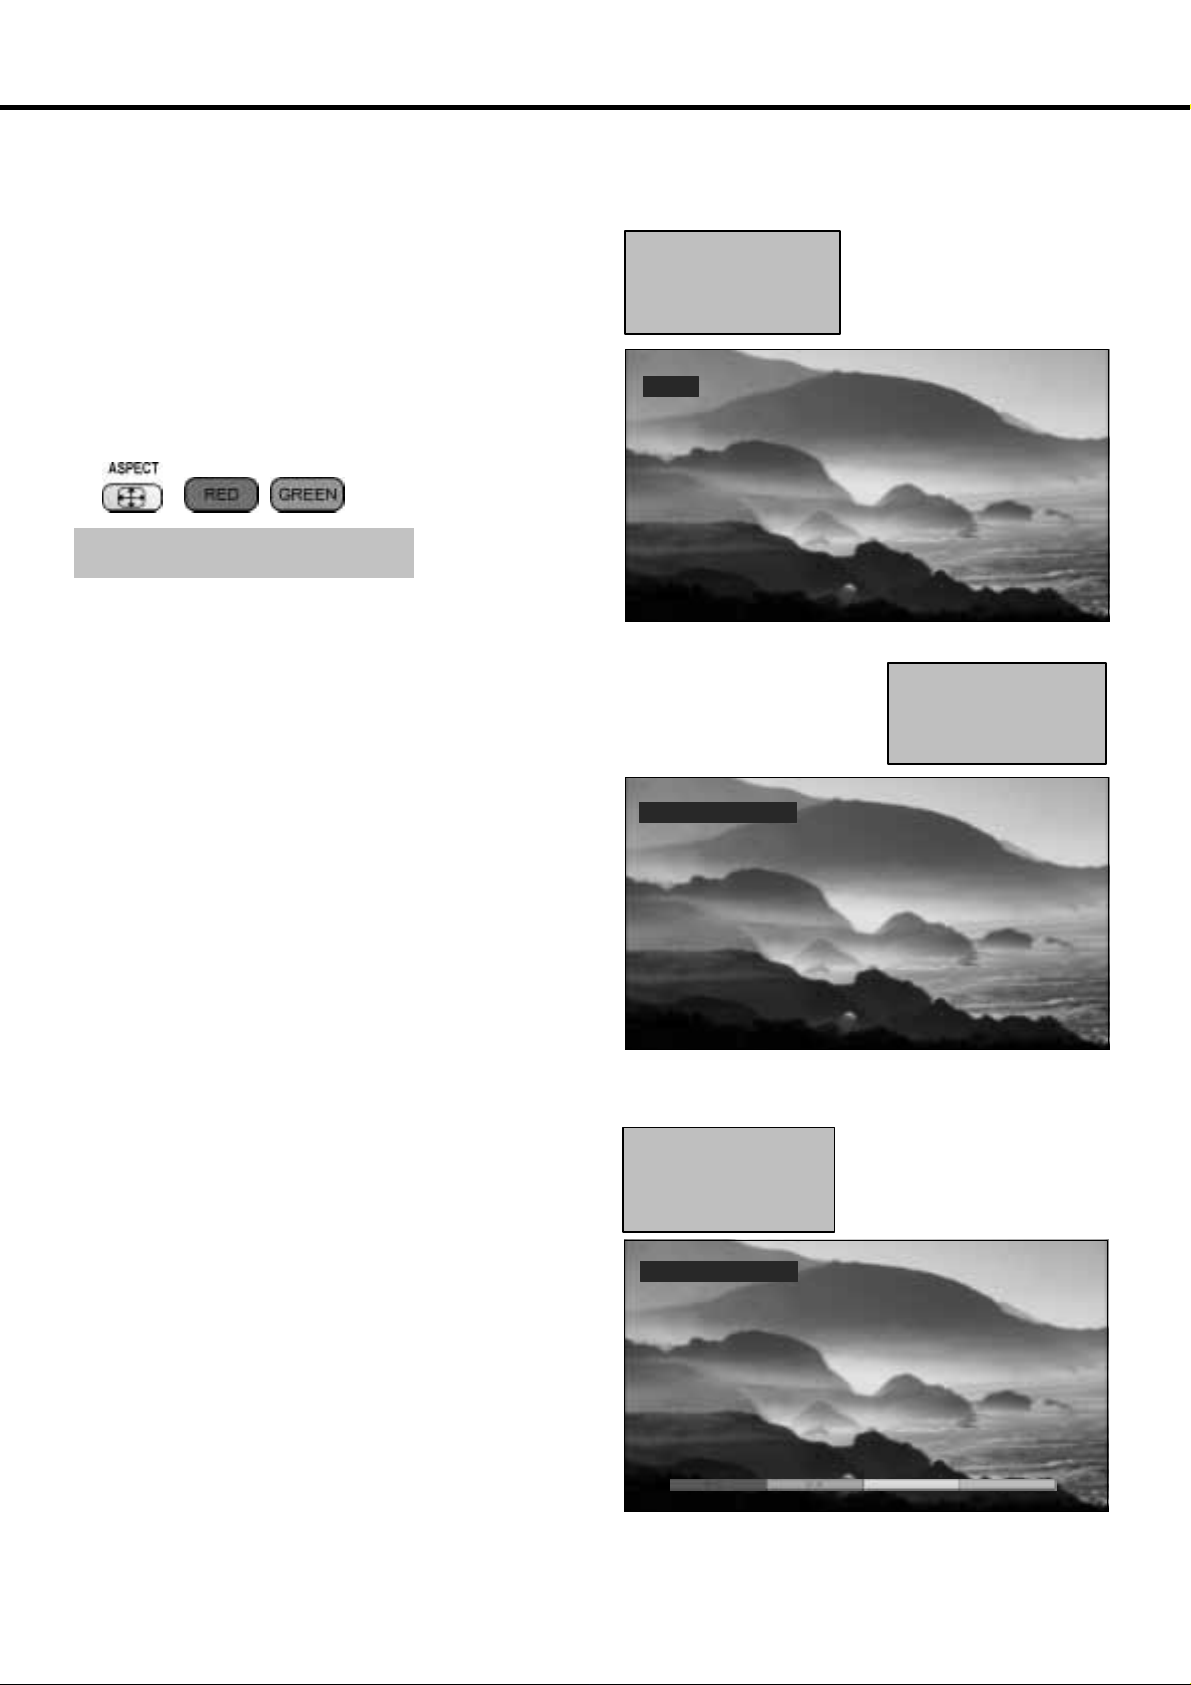
ASPECT CONTROLS
The widescreen TV will allow you to enjoy viewing the picture at its optimum size and aspect,
including widescreen ‘cinema format’ pictures.
’WIDE’ appearsinthetop
Press the ASPECT button (1) repeatedly to move through the
seven aspect options: Panasonic Auto, 16:9, 14:9, 4:3, Zoom1,
Zoom2 and Zoom3.
OR
PresstheASPECTbutton(1) thenusetheRed(2)orGreen(3)
buttons to move in either direction through the seven aspect
options.
(1)
(2)
(3)
Panasonic Auto
PanasonicAuto determinesthebest aspectratiotousetofillyour
screen. It does this using a four step process to determine if the
picture being viewed is a widescreen picture.
IfPanasonicAutodetectsawidescreensignalit switches intothe
appropriate 16:9 or 14:9 widescreen mode. If Panasonic Auto
does not detect a widescreen signal then this advanced TV set
enhances the picture for optimum viewing pleasure.
left of the screen,
PanasonicAutoswitches
to the appropriate 16:9 or
14:9 widescreen ratio.
WIDE
’PanasonicAuto’ appears
in the top left of the screen,
The best ratio is chosen
and the picture expanded
to fill the screen.
The text shown on the screen indicates how Panasonic Auto
determined which ratio to use:
’WIDE’ appears in the top left of the screen if a widescreen
identification signal (WSS) is found or a signal found through a
Scartsocket.Panasonic Autoswitchestotheappropriate16:9or
14:9 widescreen ratio. This function will also work in any
aspect mode.
’Panasonic Auto’ appears in the top left of the screen if black
stripes above and below the picture are detected. Panasonic
Auto chooses the best ratio and expands the picture to fill the
screen.Thisprocesscan takeseveralminutes,depending onthe
darkness of the picture.
Notes:
D If, in Panasonic Auto mode, you experience
problems with the screen display size when
playing back widescreen format recordings from
your VCR then it is possible that the tracking
control of your VCR requires adjustment (your
VCR instruction book will contain adjustment
details).
D The widescreen aspectratiosofdifferent films and
programmes can vary. If these are wider than a
standard 16:9 aspect picture then a black band
may bevisibleatthetopand bottom of thescreen.
Panasonic Auto
Press the ASPECT button,
then use the RED or
GREEN buttons to move
in either direction through
the seven aspect options.
Panasonic Auto
11
Page 12

ASPECT CONTROLS
16:9 will display a true
16:9 (anamorphic)picture
withnoaspectdistortions.
16:9
4:3 will display a 4:3
picture at its standard 4:3
size with no aspect
distortions.
14:9 will display a 14:9
letterbox or 4:3 picture with
no aspect distortions.
14:9
4:3
Zoom2 will display 16:9
anamorphic letterbox
pictures as a full screen
display with no aspect
distortions.
Zoom2
Zoom1 will display 16:9
letterbox or 4:3 pictures
withnoaspectdistortions.
Zoom1
Zoom3 will display 21:9 letterbox
pictures as a full screen display
withnoaspectdistortions16:9will
displaythepictureatitsmaximum
sizebutwithslightstretching.
1212
Zoom3
Page 13
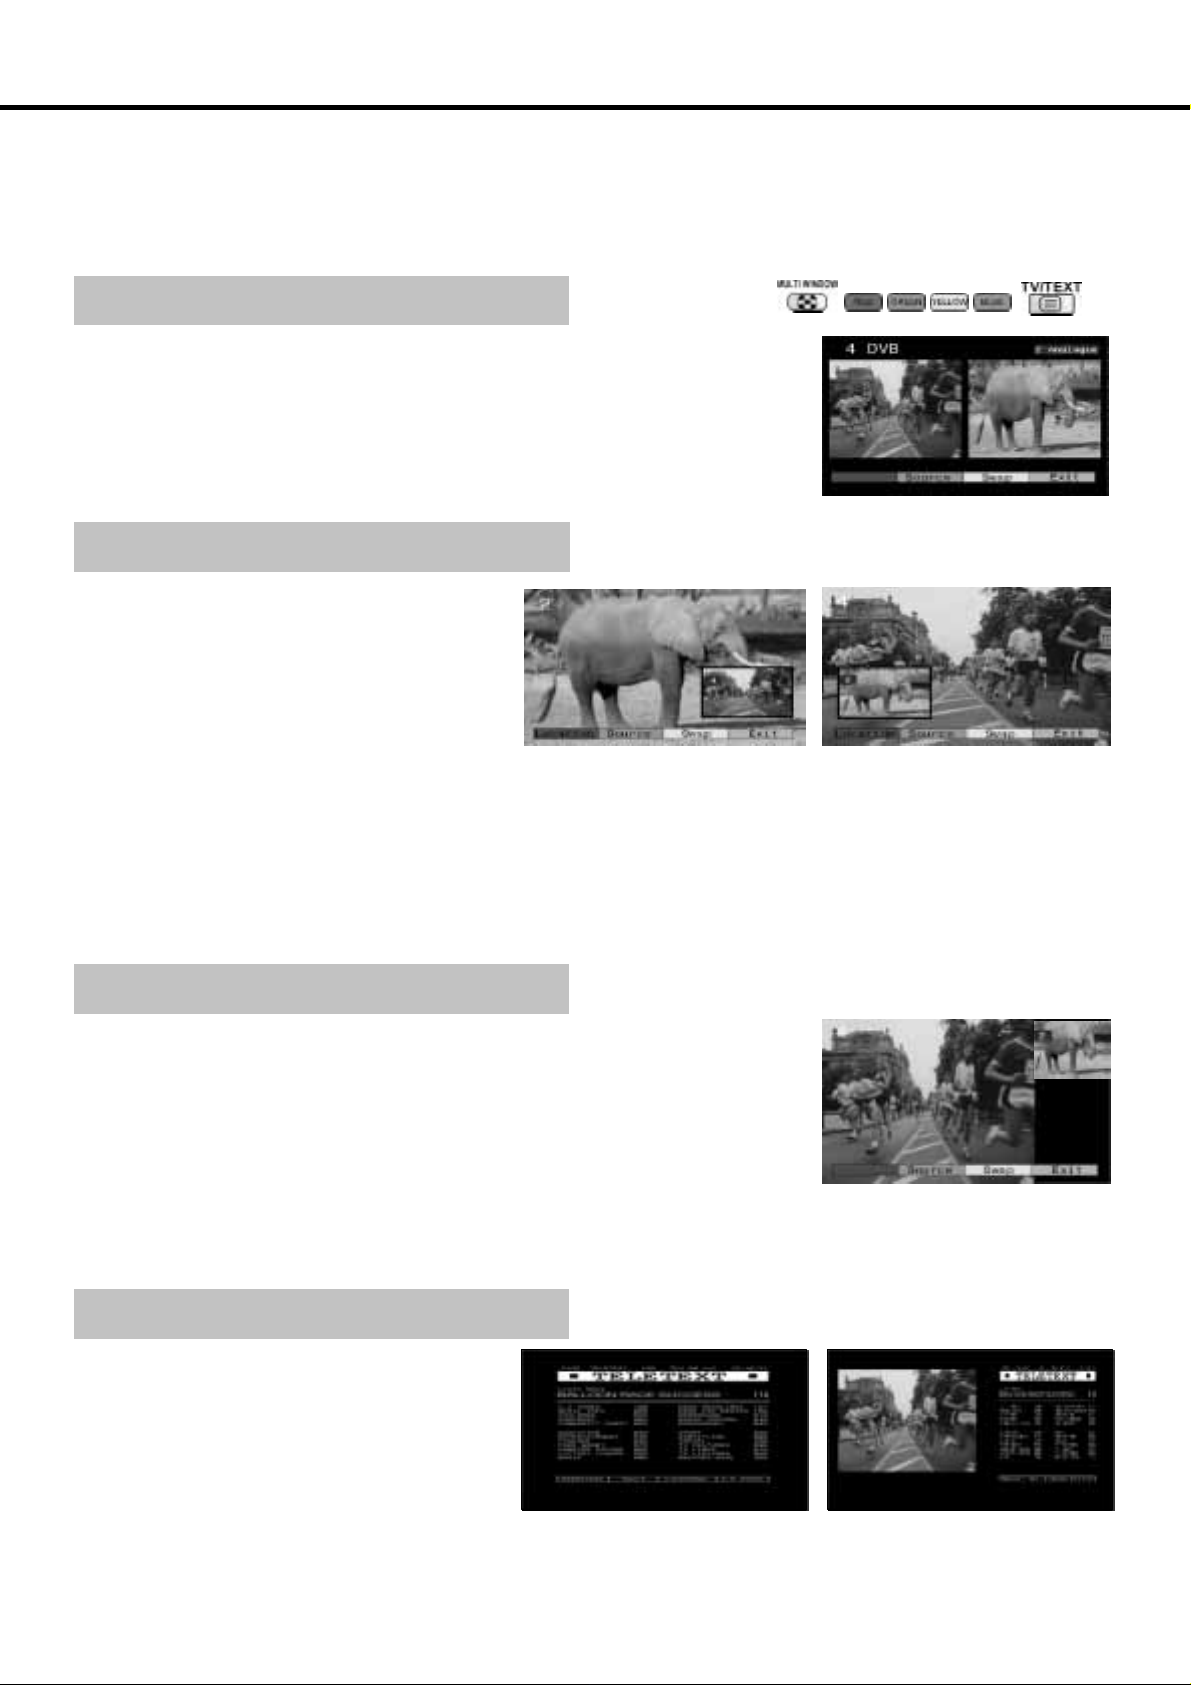
MULTI WINDOW
PresstheMULTIWINDOW button(1),repeatedly, whilsttheon screenselectorkeys areonscreen, tomove
between the picture and picture feature,pictureinpicturefeature orpicture out of picture (4:3aspect
mode only) and normal viewing.
The on screen selector keys (corresponding to the four coloured buttons on the remote control (2))that
appear for the features clear after a few seconds. If you want to select an operation when the keys are not
shown, press the MULTI WINDOW button (1) once more and the keys will reappear.
Picture and picture
Allowstwopicturesto beviewedatthesametime.Pressthegreenbutton(2)toselectthe
contentsof therightwindow,switchingbetween displayinga DVBTVchanne l,Analogue
TV channel and all AV sources in turn.
Press the yellow button (2) to swap the contents of the two windows.
Whist the on screen selector keys are shown, use the remote control to select a TV
channel to appear in the right window. When the on screen selector keys are not
displayed, use the remote control to select a TV channel to appear in the left window.
Press the blue button (2) to return to normal viewing.
Picture in picture
Allows two pictures to be viewed at the same time.
Presstheredbutton(2)tochangethelocationofthe
smaller window.
Press the green button (2) to select the contents of
thesmallerwindow,switchingbetweendisplayinga
DVB TV channel, Analogue TV channel and all AV
sources in turn.
Press the yellow button (2) to swap the contents of
the two windows.
Whist the on screen selector keys are shown, use
the remote control to select a TV channel to appear
in the smaller window.When the on screen selector
keys are not displayed, use the remote control to
select a TV channel to appear in the main window.
Press the blue button (2) to return to normal
viewing.
Picturein picture mode
(1) (2) (3)
Picture and picture mode
Thetwoprogrammeshavebeen
swapped, the programme in the
smaller window has become the
main window programme. Also, the
location of the smaller window has
been changed.
Picture out of picture (4:3 aspect mode only)
This featureallows two programmesto be viewedatthe sametime,aspicture in picture
does. The difference is how the two programmes are displayed: in picture in picture the
smaller window appears within the main image; in picture out of picture the smaller
window appears to the right of the main image.
Press the green button (2) to selectthecontents of the smaller window,switchingbetween
displaying a DVB TV channel, Analogue TV channel and all AV sources in turn.
Press the yellow button (2) to swap the contentsof the two windows.
Whist the on screen selector keys are shown, use the remote control toselecta TV channel
to appear in the smaller window. When the on screen selector keys are not displayed, use
the remote control to select a TV channel to appear in the main window.
Press the blue button (2)toreturntonormalviewing.
Picture and text (analogue only)
Press the TEXT button (3), followed by the MUL TI
WINDOW button (1) to move between viewing
teletext and the picture and text feature. Picture
and text lets you see the current programme and a
page of teletextside by side.
Whilst using this feature, the remote control affects
theteletextpage;ifyou wish tomakechanges tothe
programme viewed press the TEXT button (3) to
return to watching the programme on its own then
make the desired changes.
TELETEXT mode
Picture out of picture mode
Picture and text mode
13
Page 14
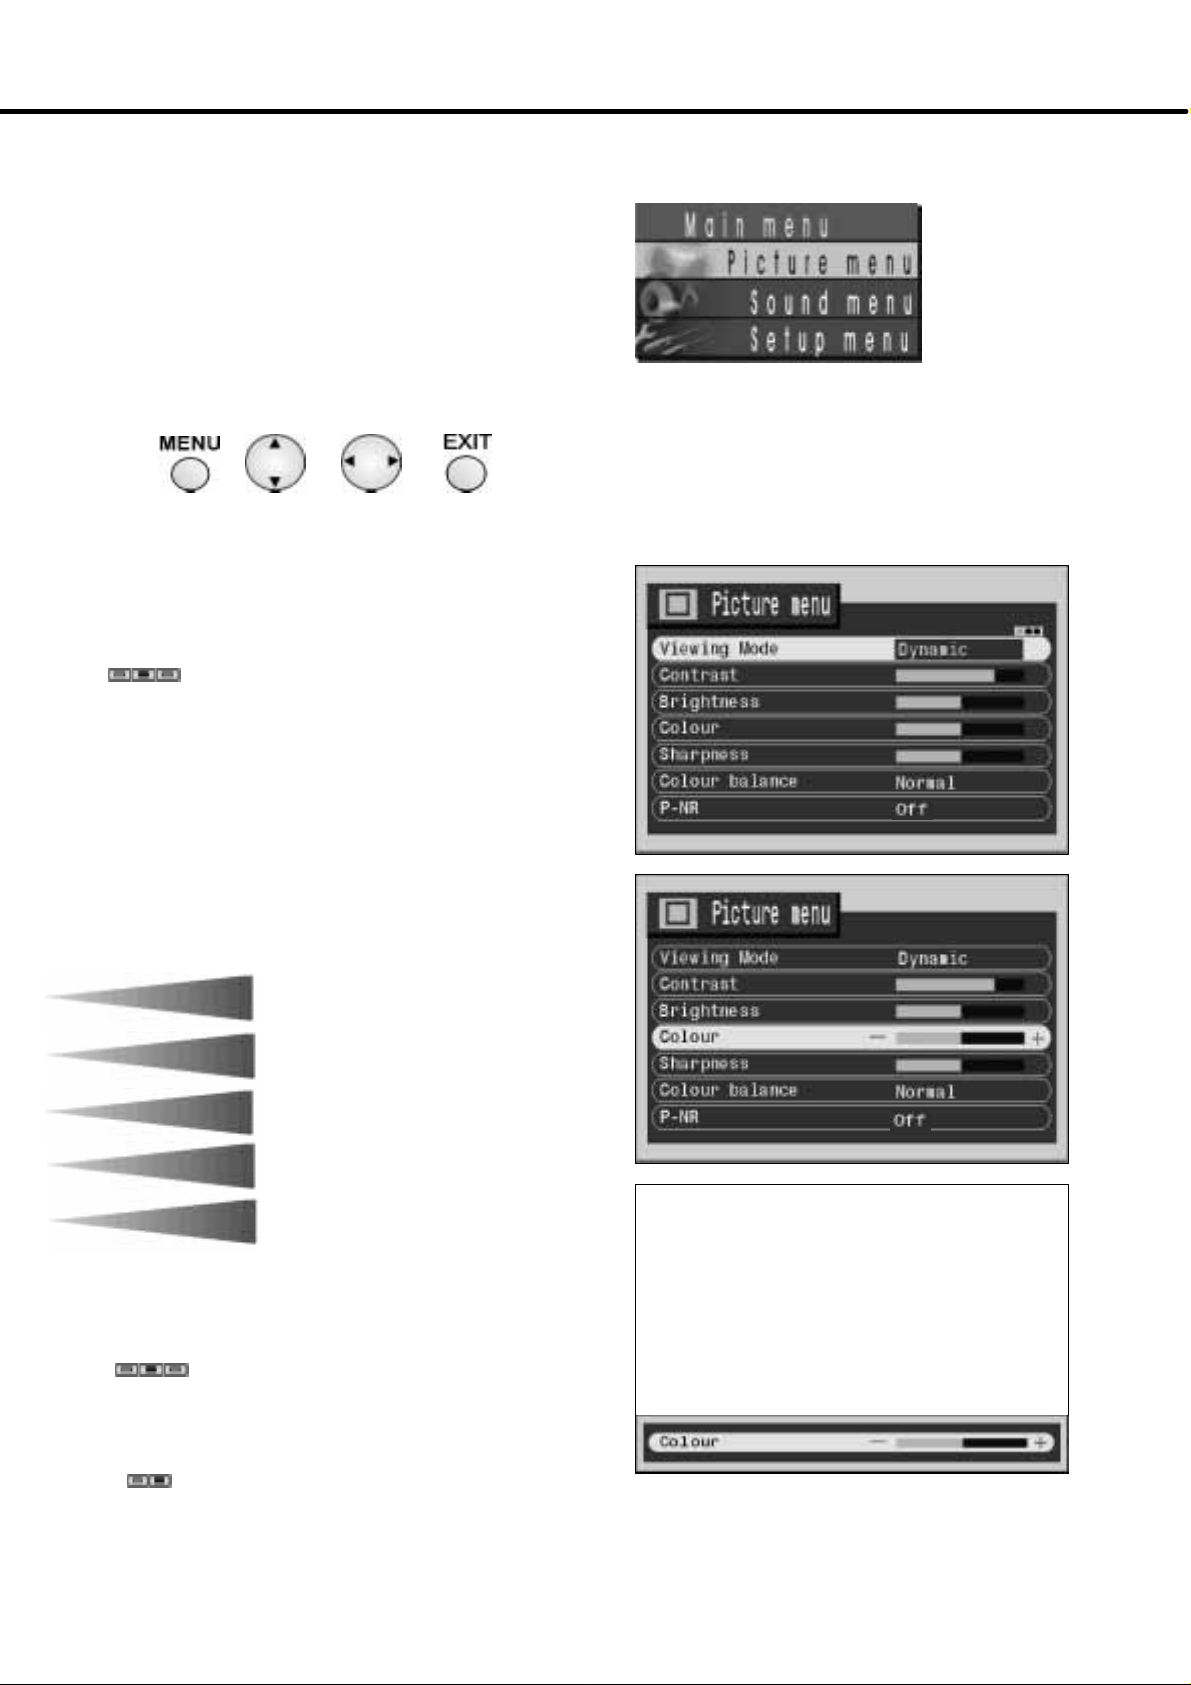
PICTURE MENU
Using the Menu button (1),opentheMain Menu.
Access the Picture menu.
Move to your choice (2).
Increase or decrease levels or set options (3).
Press the EXIT button (4) to exit the Picture menu.
(Depending upon your signal source, some options may
not be available).
(1) (2) (3) (4)
Viewing mode
Contrast
Brightness
Colour
Sharpness
Tint
The Viewing mode menu allows you to
select three different screen settings --Dynamic, Normal and Cinema.
In eachViewing mode setting, Contrast,
Brightness, Tint (in NTSC only), Colour,
Sharpness and Colour balance can be
adjusted to suit your particular viewing
requirement (for example, you may
require different settings for viewing
sport, films, news etc.)
Changes will be stored automatically.
By analysing and processing the
incoming picture, all three modes
feature automatic enhancement.
The Contrast, Brightness, Colour and
Sharpnesslevelscan beadjustedtosuit
your own preferences.
The Tint adjustment will only appear as
a menuitemifyouhaveanNTSCsignal
source connected to the TV and will
allow adjustment of the hue.
Colour balance
P-- NR
1414
TheColourbalancesettingallows y ou
to set the overall colour tone of the
picture.
P-- NR will automatically reduce
unwanted picture noise.
Page 15
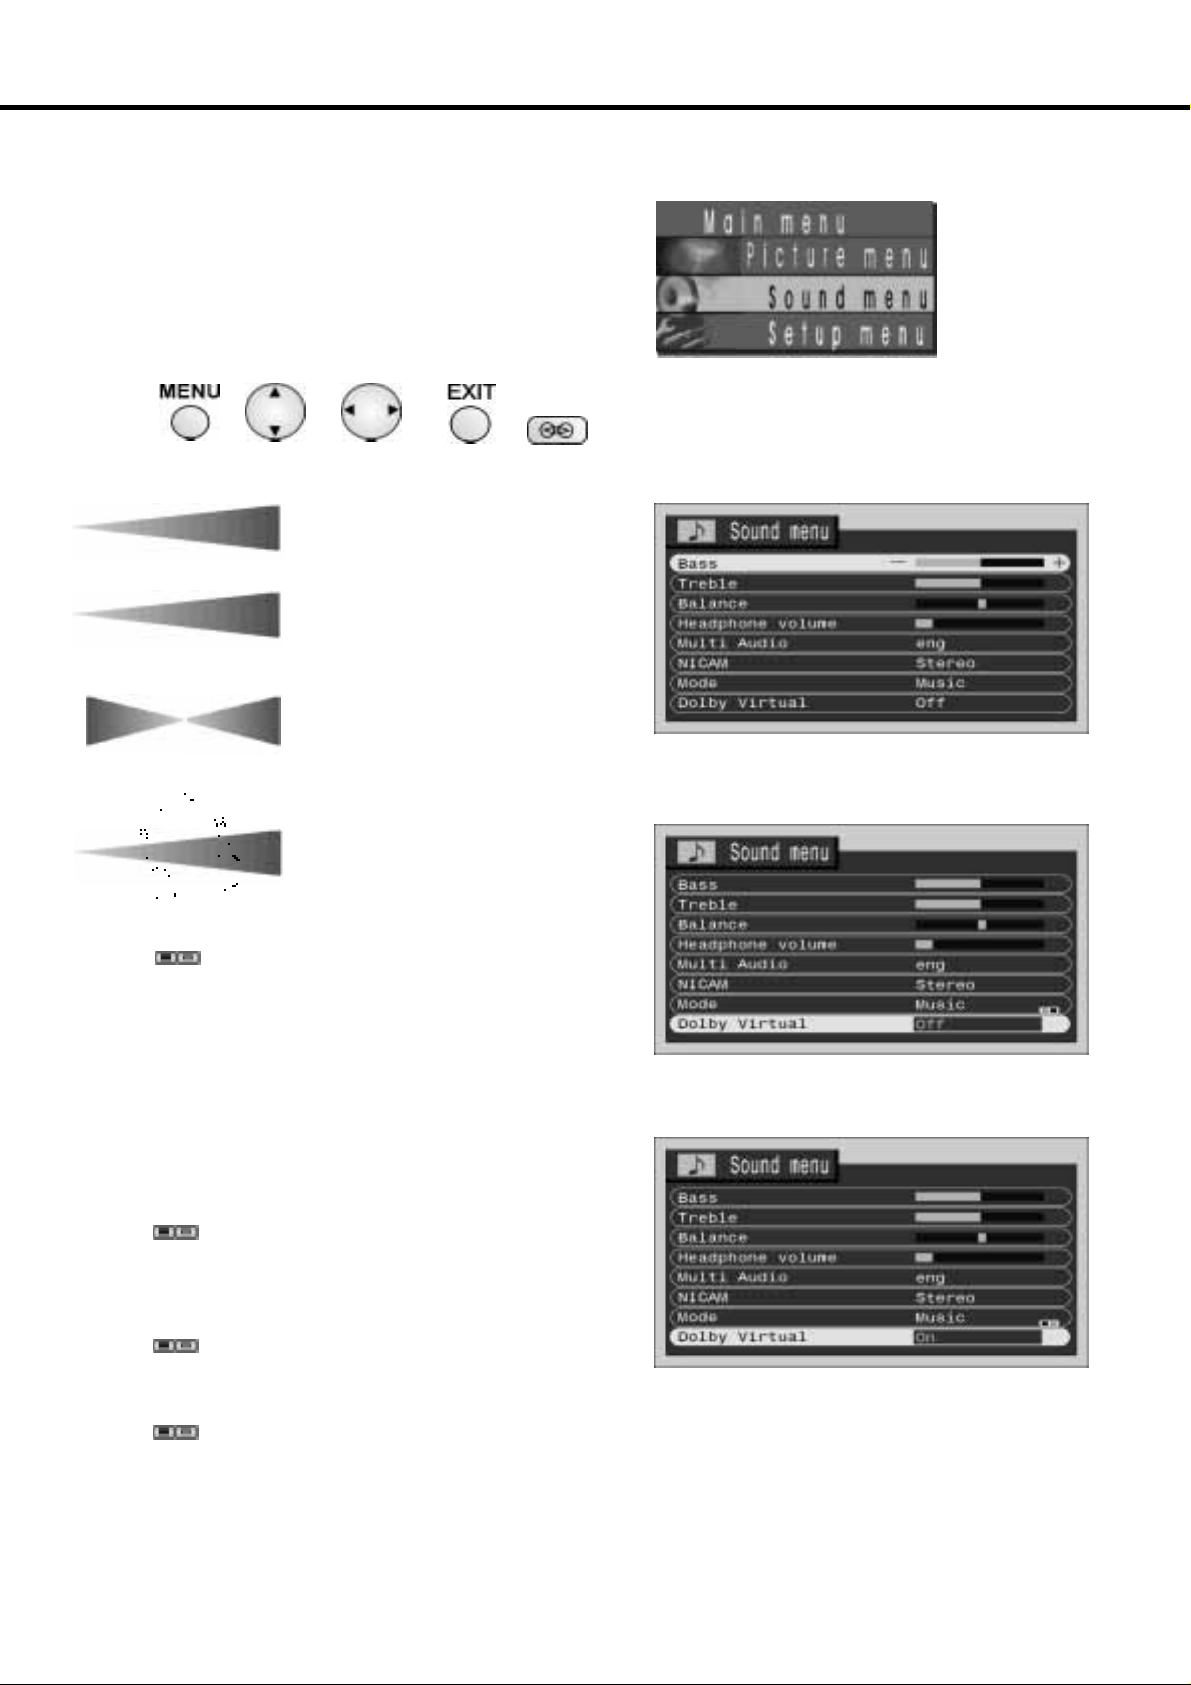
SOUND MENU
Using the Menu button (1),opentheMain Menu.
Access the Sound menu.
Move to your choice (2).
Increase or decrease levels or set options (3).
Press the EXIT button (4) to exit the Sound menu.
(1) (2) (3)
Bass
Treble
Balance
Headphone
volume
NICAM
(4)
Bass adjustment will emphasise the
lower , deeper frequencies and can be
increased or decreased.
T reble adjustment will emphasise the
sharper, higher frequencies and can be
increased or decreased.
Balance affects the levels of sound
between the left and right speakers.
Adjustment can be made so that the
level from the speakers will suit your
listening position.
The headphone volume can be
adjusted independently of the TV
speakers so that everyone can enjoy
listening at their own comfort level.
(Not available with DVB programmes).
Select On to provide stereo sound
reproduction. Select Off for FM Mono
sound output.
If Nicam Mono is being transmitted
select either FM Mono (Off), Nicam
Mono I (M1) or Nicam Mono II (M2).
The options depend upon the signal
being transmitted.
If reception deteriorates it is advisable
to switch to FM Mono (Off).
(5)
Multi audio
...
Mode
Dolby virtual
Multi audio, which will only appear
when a DVB programme is selected,
allows you to select an alternative
sound track. The number of options
available depends on each broadcast.
The sound can be improved during
Music or Speech mode by selecting the
appropriate function.
Dolby Virtual uses two speakers to
simulate the surround effect produced
by a multichannel system. Dolby Virtual
feature works with Dolby encoded
signal only. Dolby Virtual can also be
controlle d using the Dolby Virtual
button (5) on your remote control.
15
Page 16
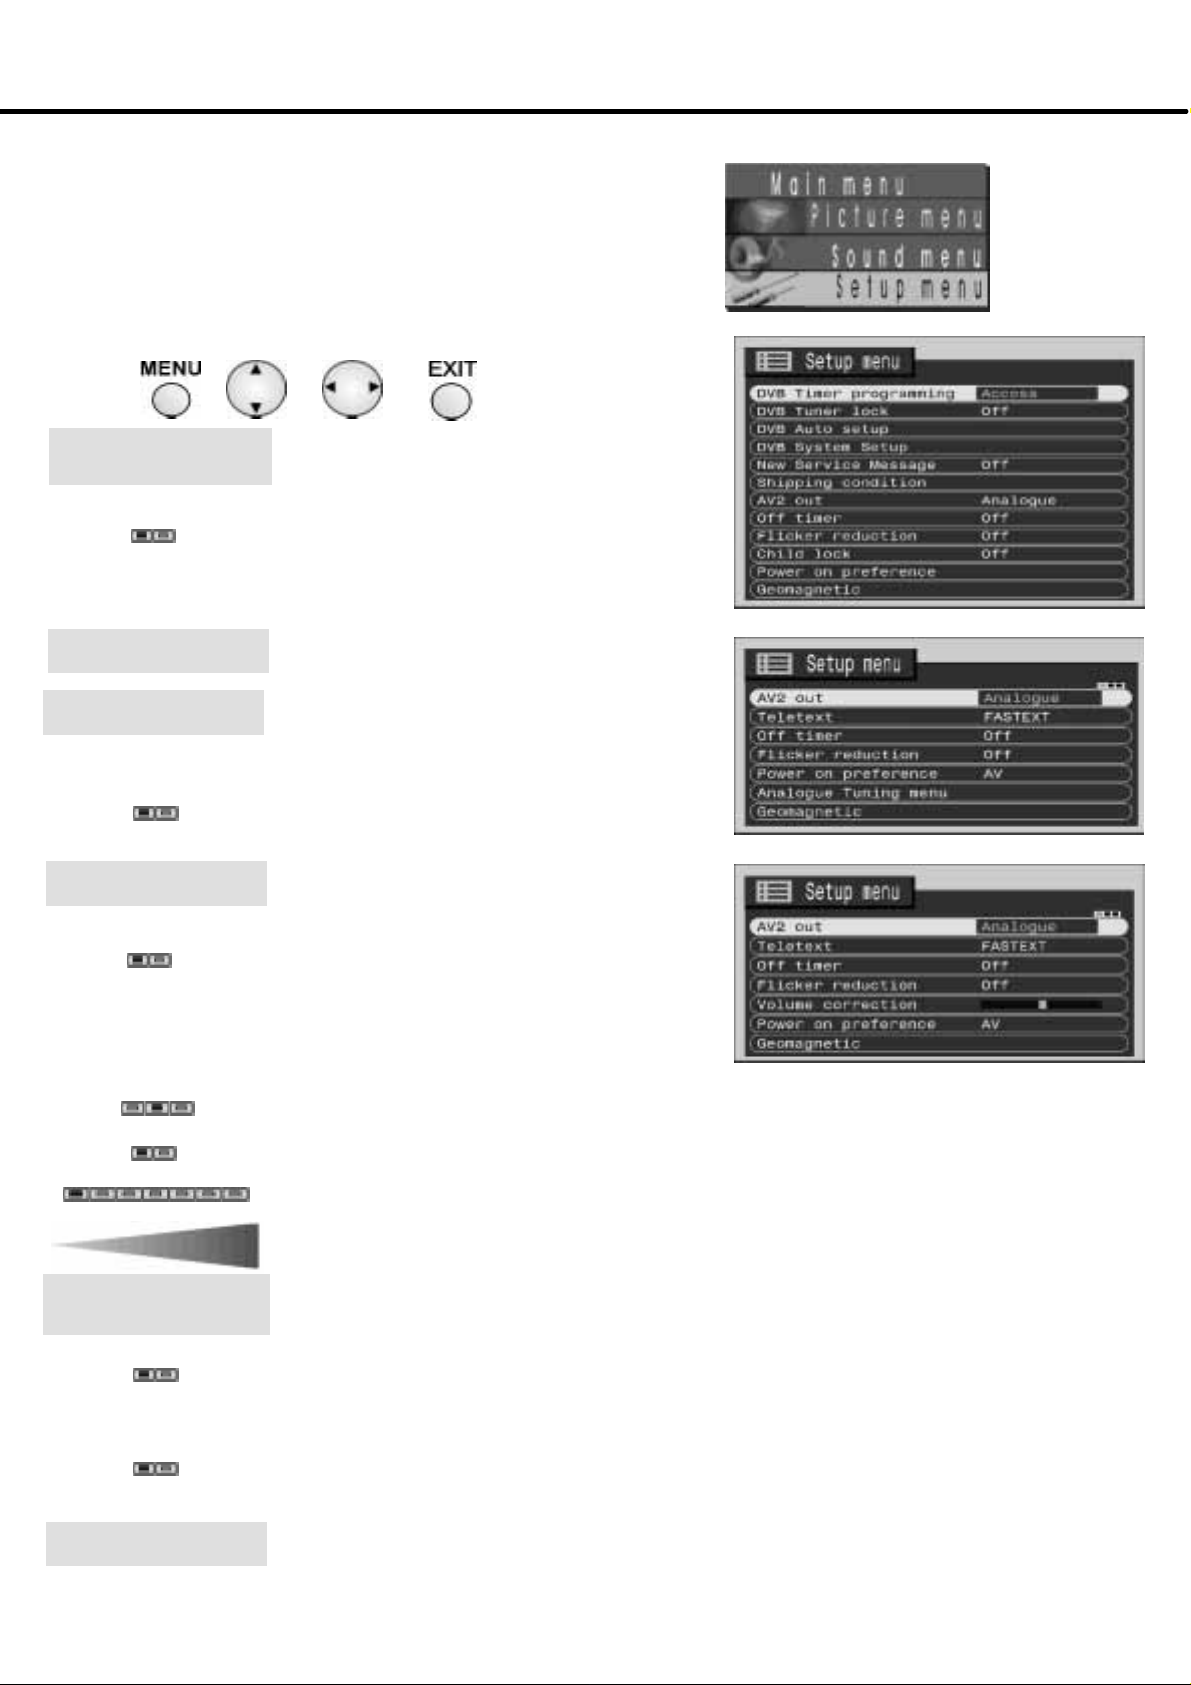
SETUP MENU
The Setup menu provides access to various advanced features and also to the Tuning menu
Using the Menu button (1),opentheMain Menu.
Access the Setup menu.
Move to your choice (2).
Increase or decrease levels, set options or access further
menus (3).
Press the EXIT button (4) to exit the Setup menu.
(1) (2) (3)
(4)
SetupmenuinDVBMode
DVB
Timer Programming
DVBtunerlock
DVB Auto Setup
DVB System Setup
New Service
Message
Shipping condition
Child Lock
TheDVB Timer programmingmenuallowsyoutoenter
programme times at which the DVB tuner must switch
on, ready for recording .See page 28.
DVB tuner lock prevents you from accidentally
changing programme position while recording a DVB
broadcast.IftheTV isswitchedintostandbymodewhile
DVB tunerlockison, the DVB tuner willremainactiveto
ensure recording can still take place.
SetupmenuinAnalogueMode
DVB Auto Setup allows you to clear all current digital
tuning data, and scan for new services. See page 20.
DVB System Setup provides access to various
specialised DVB options. See page 24.
ThisTVcontinuallyscansforupdatedDVB servicesand
notifies you of any changes. Set to ON to receive
notification.SettoOFF ifyou donotwishtobe informed
of any updates.
SetupmenuinAVMode
Allows you to clear all tuning information and reset all
control levels back to factory settings. See page 21.
Y ou may wish to lock a DVB programme channel to
prevent access to it. Set to ON to lock the current
programme position. Set to OFF to unlock.
When a programme position is locked, Direct Channel
Access using the ’C’ and numeric keys on the remote
control is not available.
AV2 out
Teletext
Off timer
Volume correction
Analogue
Tuning Menu
Flicker reduction
Power on
Preference
Geomagnetic
1616
AV2outoffers youachoiceofsignalstosendto theAV2SCART socket. Youcan choosefromthesignalscurrently
tuned on the Analogue or DVB tuners, or Monitor --- the picture displayed on screen.
The Teletext option allows you to choose between FASTEXT or LIST mode. See page 33.
Off timerwillswitchthe TV off withinapresettime which youcanchoosefrom between0to90minutesin 15minute
intervals.
Volumecorrection(inAVmodeonly)allowsyouto adjust thevolumelevelofeachAV input tocompensateforany
differences in audio levels from external equipment.
The Tuningmenu provides an entry to many other analogue features including Programme edit and Auto setup.
Seepage17.
Letsyoucontrolanypicturemovement.SettoON tocorrectminorpicturemovement.Set toOFFtohave no flicker
reduction at all.
Controlswhat you see when you switch the TV set on. Set to TV to view picture from your TV tuner.
Set to AV to view input from any live equipment attached to a scart socket on your TV (eg. set top box, digital
converter box etc.)
Note: ---
The external equipment must be switched on and transmitting a signal for automatic switching to occur
If you notice a slight tilt to the picture or if there are coloured patches at the corners of the screen, use this feature
toeliminatethem.SeeStep6,page9(QuickStartGuide).
Page 17
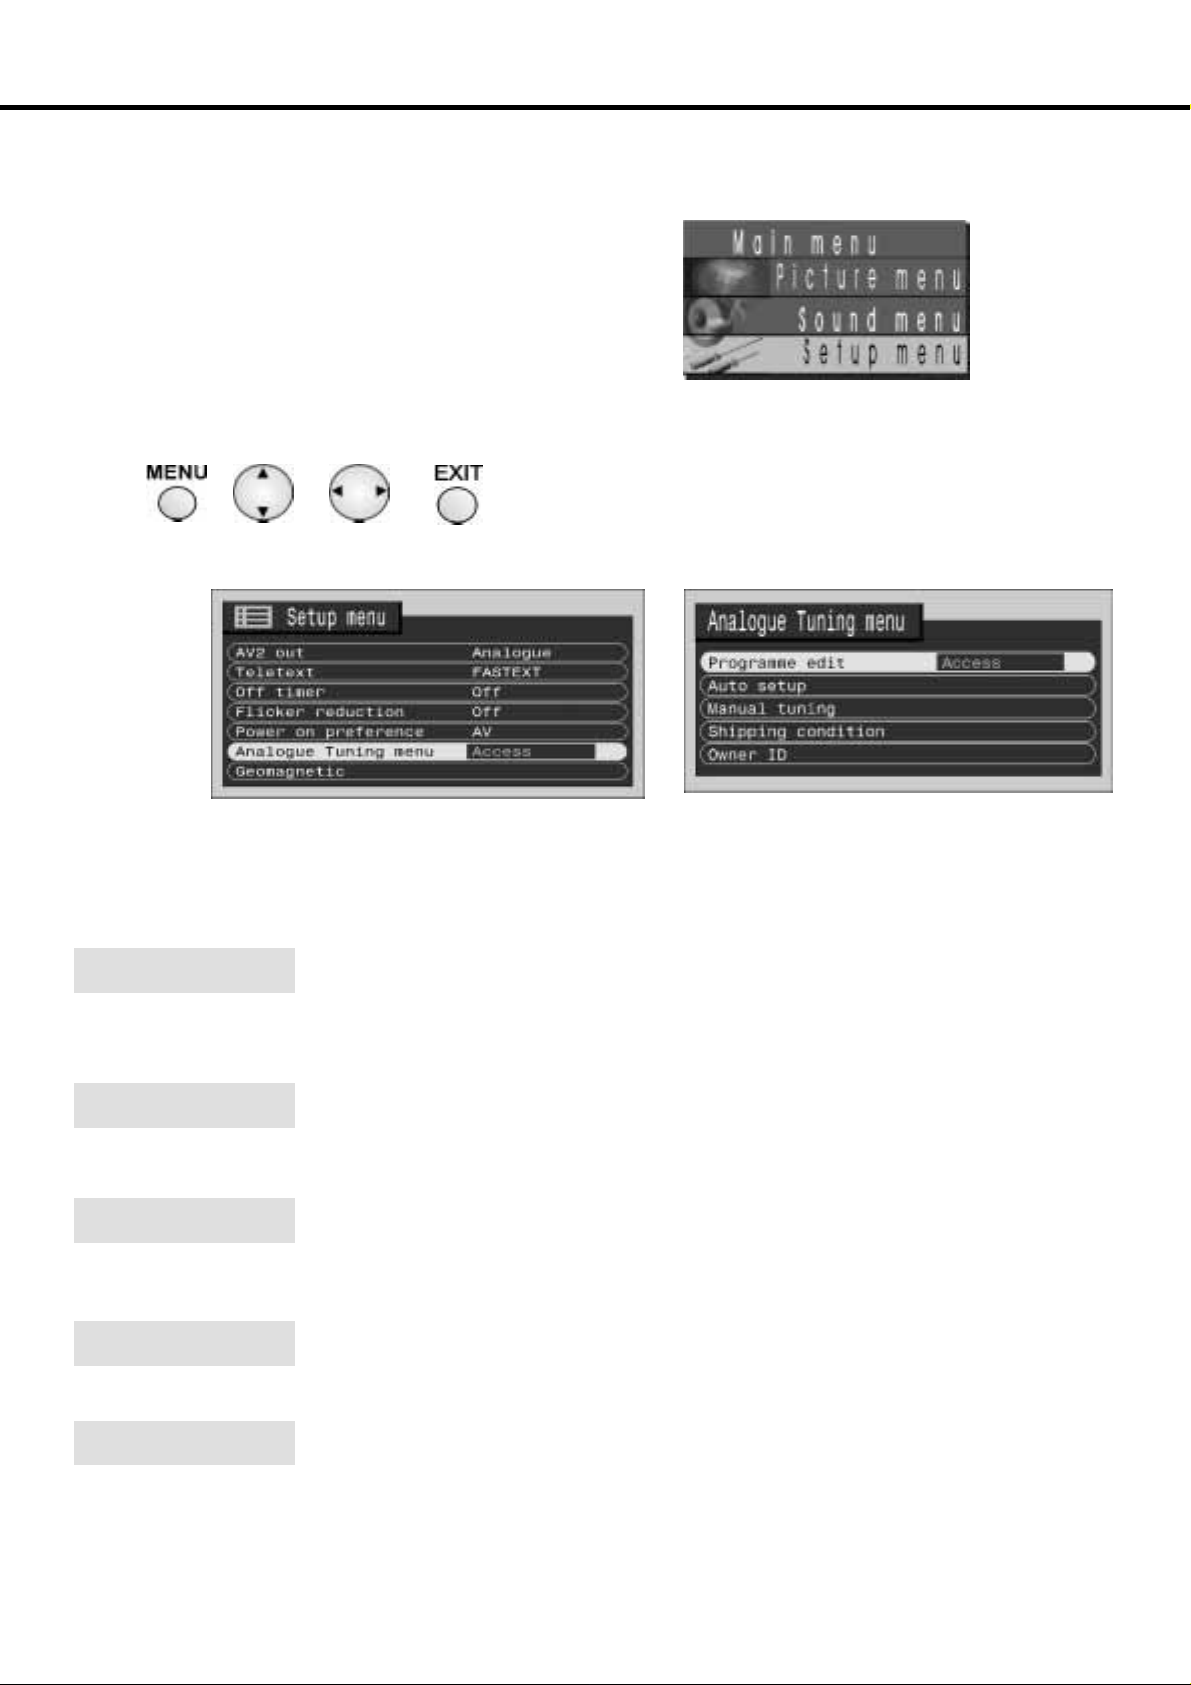
ANALOGUE TUNING MENU -- overview
In Analogue mode
Using the Menu button (1),opentheMain Menu.
Access the Setup menu.
Move to Tuning menu (2).
Access Tuning menu (3).
Move to your choice (2).
Access further menus (3).
Press the EXIT button to exit (4).
(1) (2) (3)
Programme edit
(4)
Accessing the Programme edit menu will allow stations to be moved, added,
deleted, named or locked.
Seepage18.
Auto setup
Manual tuning
Shipping Condition
Owner ID
Auto setup allows you to clear all current analoguetuningdata, and scan for
newservices.Seepage20.
Allows individual programme positions to be tuned manually. See page 21.
Allows you to clear all tuning information and reset all control levels back to
factory settings. See page 21.
Allows you to enter a security code and address information. See page 22.
17
Page 18
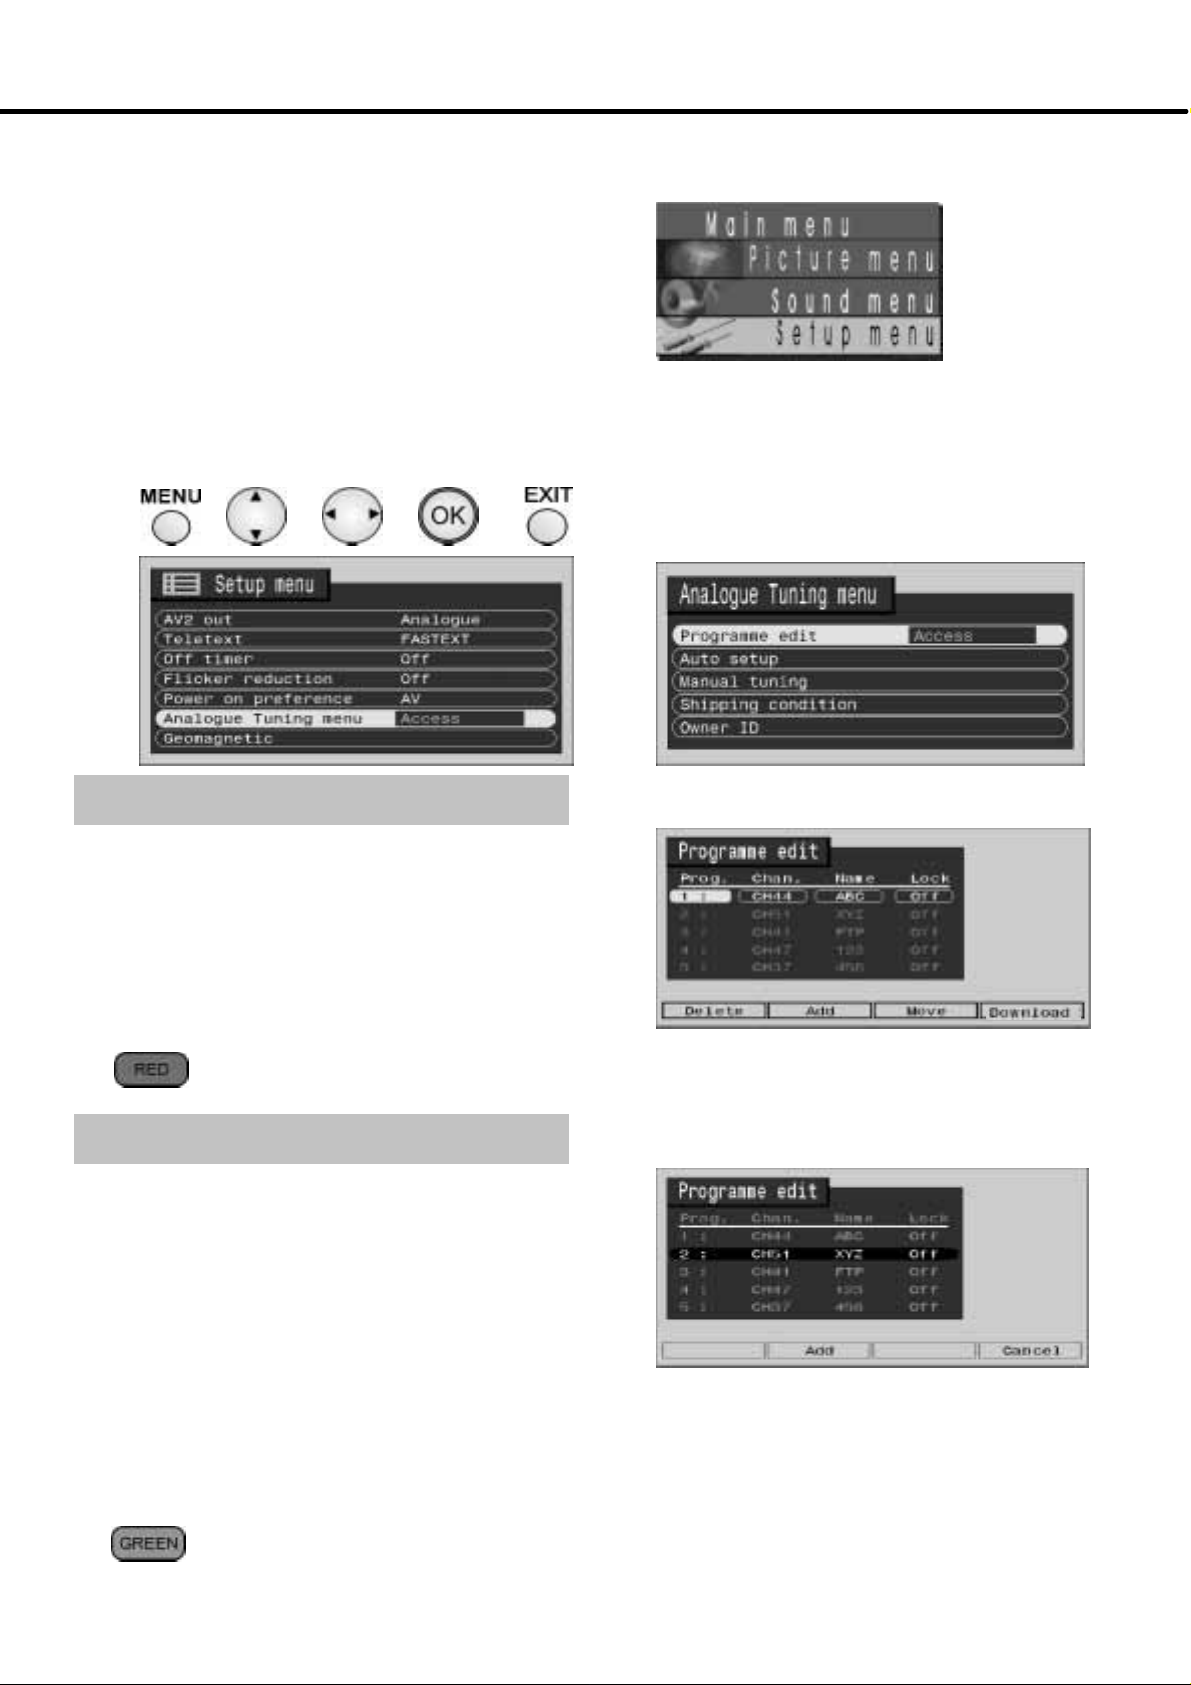
ANALOGUE TUNING MENU -- PROGRAMME EDIT
The Programme edit menu allows you to edit the analogue programme position settings
Using the Menu button (1),opentheMain Menu.
Access the Setup menu.
Move to Tuning menu (2).
Access Tuning menu (3).
Move to Programme edit menu (2).
Access Programme edit menu (3).
Make required changes (see sections below).
Press OK button (4) to store changes.
If you have finished in the Programme edit menu, press the EXIT
button (5) to return to normal viewing.
(1) (2) (3) (4) (5)
To delete an unwanted programme position
Ensure that the cursor is in the Prog. Column.
Choose the programme position (2).
Press the Red button (7) on remote control.
Press the Red button (7) again to confirm.
If you have finished in the Programme edit menu, press the EXIT
button (5) to return to normal viewing.
(7)
To add a programme position
Choose the programme position where the new programme is to
be inserted (2).
Press the Green button (8).
Press the Green button (8) again to confirm.
The blank programme can then be tuned (see page 21), named
(see page 19) or locked (see page 19).
Press the OK button (4) to store the programme position.
Press the Setup button (1) to return to the Programme edit menu.
If you have finished in the Programme edit menu, press the EXIT
button (5) to return to normal viewing.
(8)
1818
Page 19
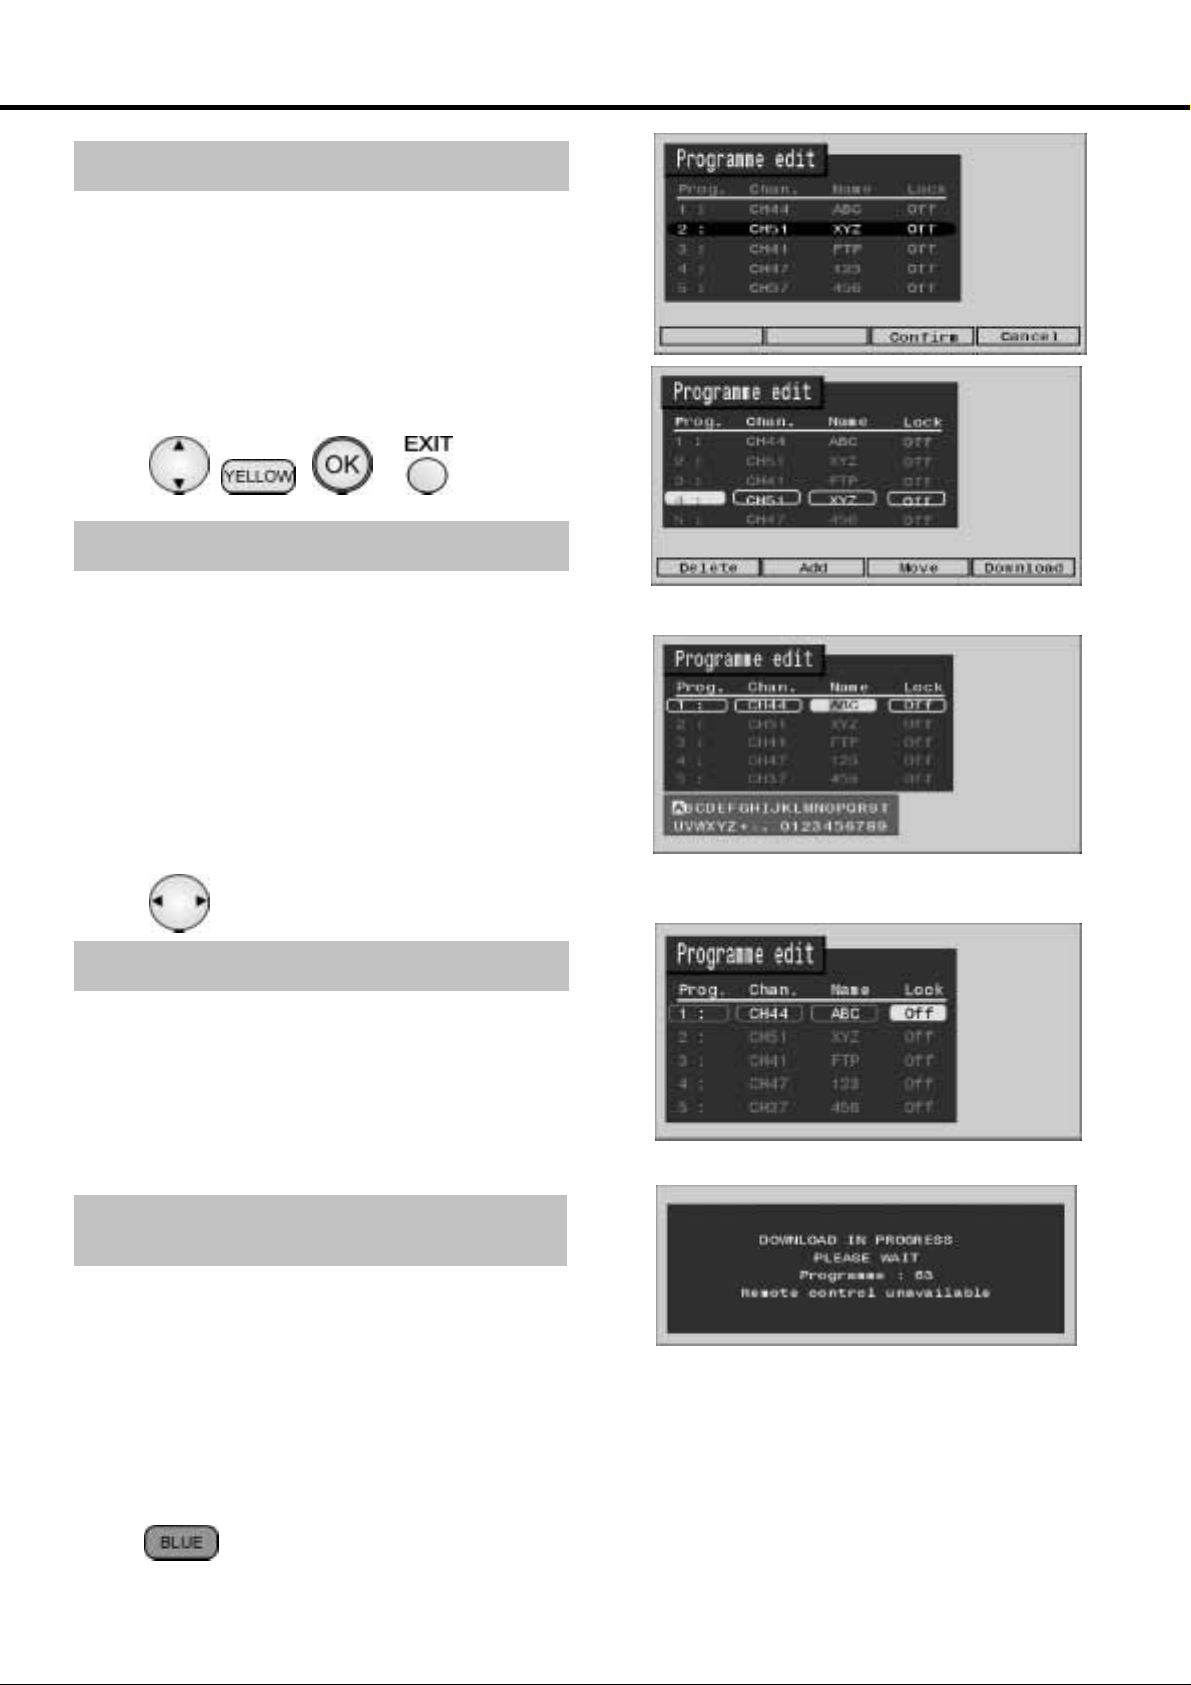
ANALOGUE TUNING MENU -- PROGRAMME EDIT
To move a programme to another position
Choose the programme position to be moved (1).
Press the Yellowbutton (2) on remote control.
Choose the new position (1).
Press the Yellowbutton (2) again to confirm.
Press the OK button (3) to store your changes.
If you have finished in the Programme edit menu, press the EXIT
button (4) to return to normal viewing.
(1) (2) (3) (4)
To rename a programme position
Choose the programme position (1).
Move to the Name column (5).
Choose the new character(1).
Move to the next character position (5).
Continue until renaming is done.
Press OK to store (3).
If you have finished in the Programme edit menu, press the EXIT
button (4) to return to normal viewing.
(5)
To lock a programme position to prevent
access
Choose the programme position (1).
Move to the Lock column (5).
Select either On or Off (1).
Press the OK button (3) to store.
If you have finished in the Programme edit menu, press the EXIT
button (4) to return to normal viewing.
To copy programme information to a
compatible recording device
Ensure that the cursor is in the Prog. Column.
Press the Blue button (6) on the remote control.
Programme data will now be sent to the recording device(s). This might take a while, depending on the number of stations stored.
If the message “Feature not available” appears on the screen, the televisionis unable to send programme information to the
recording device(s). See the device’s handbook for further information.
If you have finished in the Programme edit menu, press the EXIT button (5) to return to normal viewing.
(6)
19
Page 20
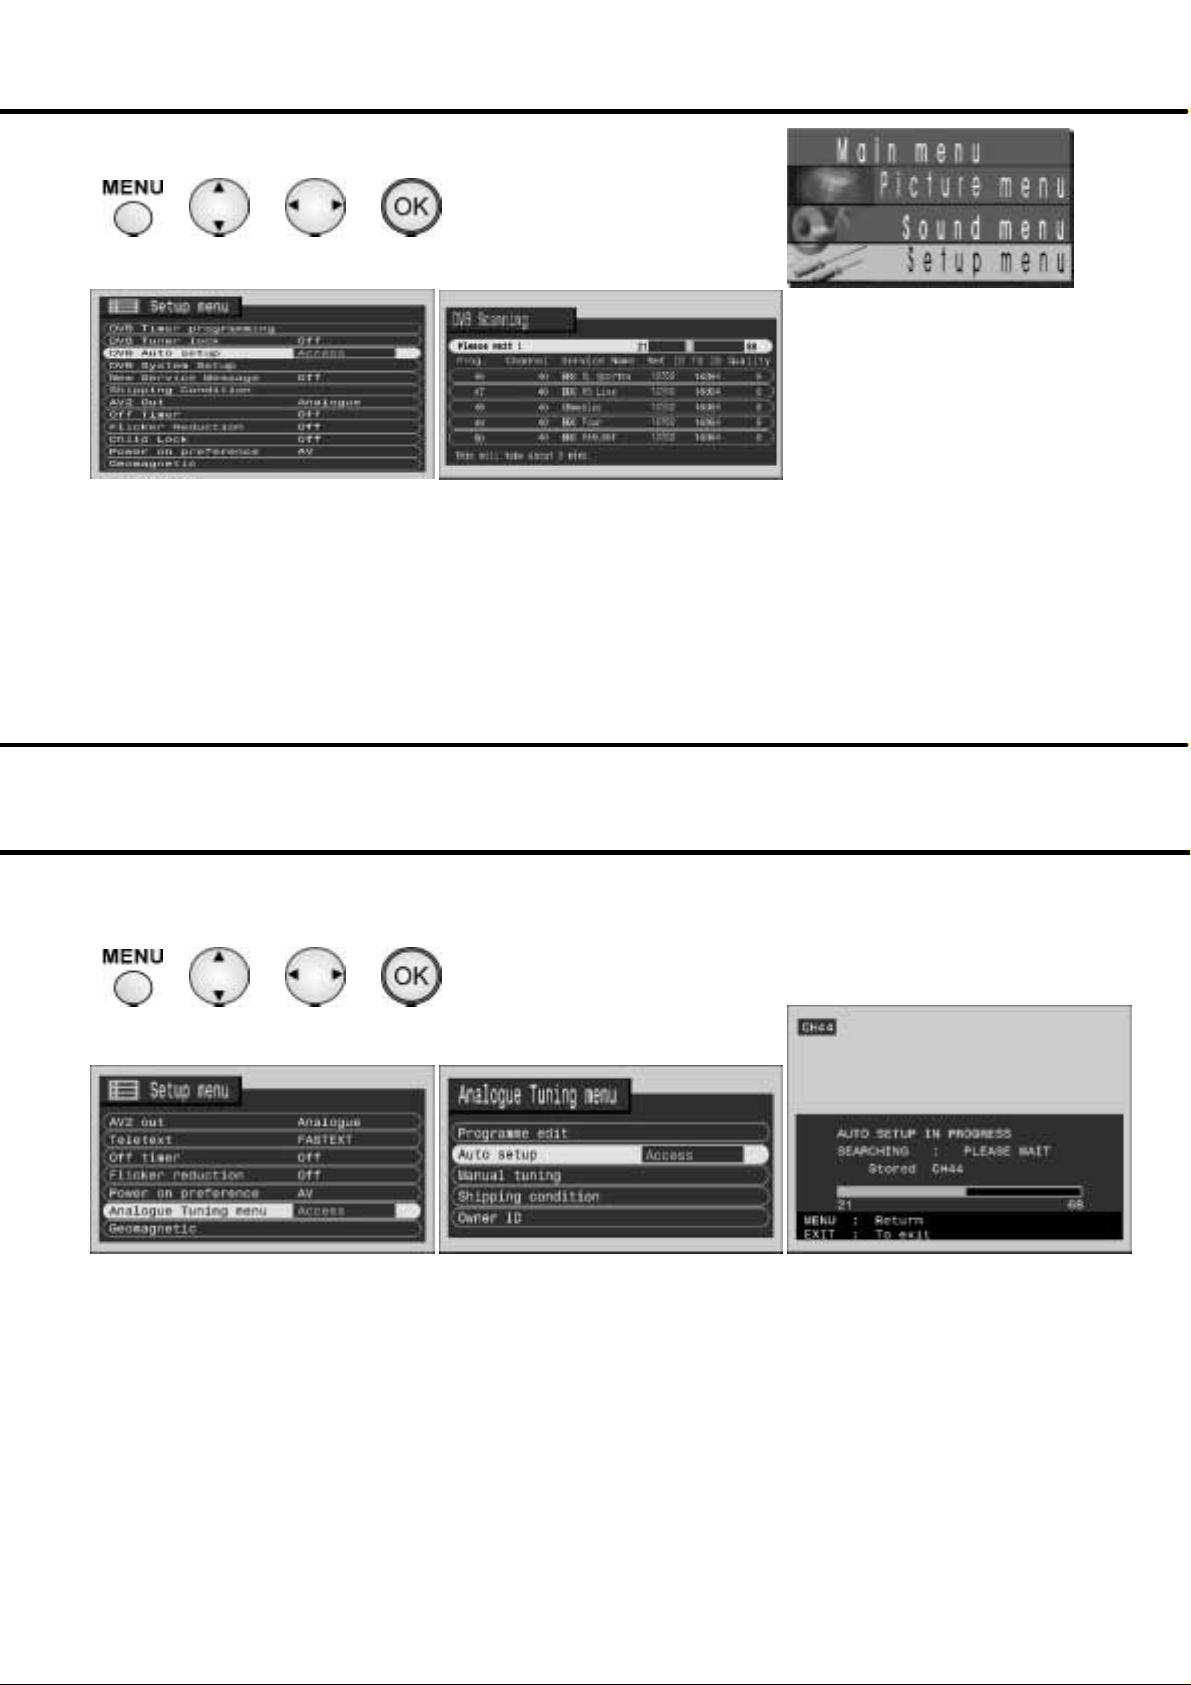
DVB AUTO SETUP
(1) (2) (3) (4)
DVB MODE
Using the Menu button (1),opentheMain Menu.
Access the Setup menu.
Move to DVB Auto Setup (2).
Access DVB Auto Setup (3).
Press OK to start DVB Auto Setup (4).
The TV will search for, locate and sort into order your local stations. If a compatible recording device is
connected via the AV sockets, programme data will be sent to the device via Q-- Link (see page 31).
Once this operation is completed, the TV will display programme position 1.
ANALOGUE AUTO SETUP
(1) (2) (3) (4)
ANALOGUE MODE
Using the Menu button (1),opentheMain Menu.
Access the Setup menu.
Move to Tuning menu (2).
Access Tuning menu (3).
Move to Auto setup (2).
Access Auto setup (3).
Press OK to start Auto setup (4).
The TV will search for, locate and sort into order your local stations. If a compatible recording device is
connected via the AV sockets, programme data will be sent to the device via Q-- Link (see page 31).
Once this operation is completed, the TV will display programme position 1.
2020
Page 21
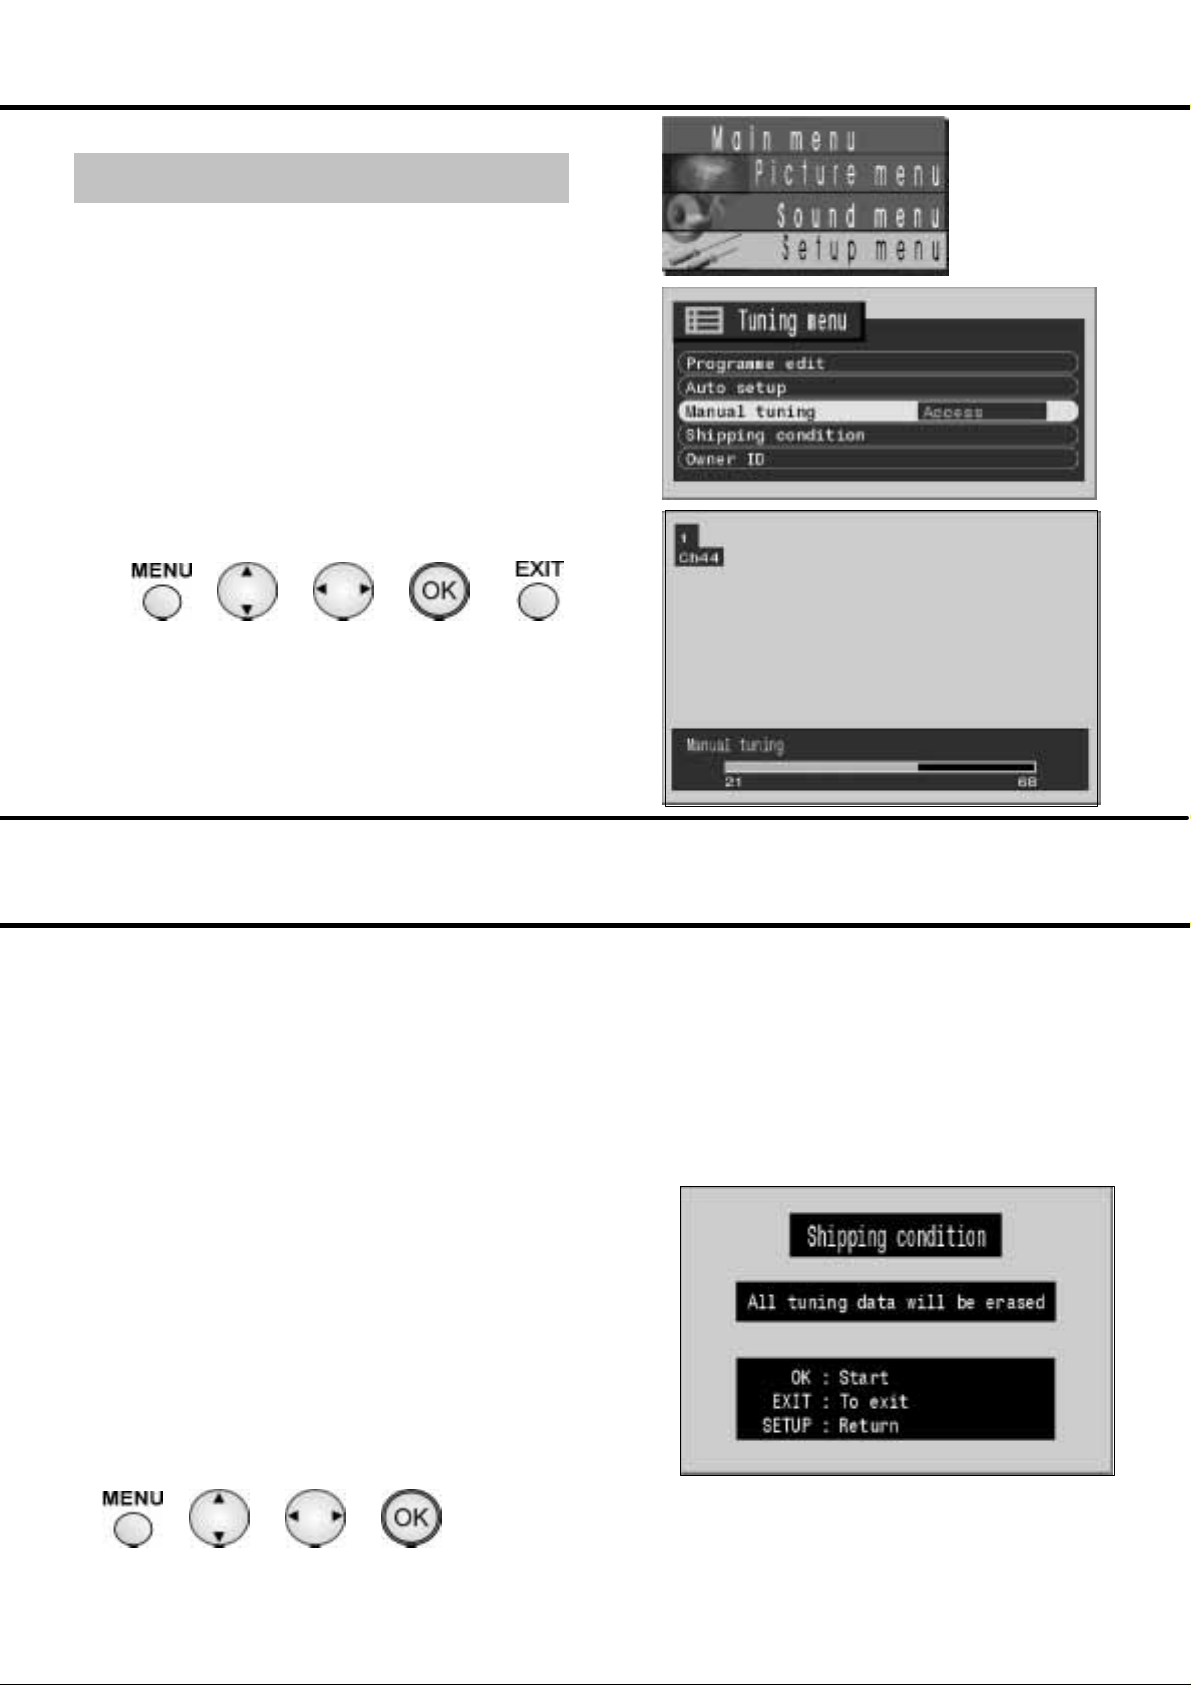
ANALOGUE TUNING MENU -- MANUAL TUNING
To add an analogue pro gramme position
Using the Menu button (1),opentheMain Menu.
Access the Setup menu.
Move to Analogue Tuning menu (2).
Access Analogue Tuning menu (3).
Move to Manual tuning (2).
Access Manual tuning (3).
Press the left or right cursor buttons repeatedly until the required
station is found (3).
Press OK to store the programme position (4).
Press Setup to return to the Tuning menu (1).
If you have finished in the Tuning menu, press the EXIT button to
exit (5).
(1) (2) (3) (4) (5)
SHIPPING CONDITION
Shipping condition allows you to reset the TV to its original condition, i.e. no channels tuned in.
This is useful, for example, if you move to a different area when you will probably want the TV to tune itself to your new local stations.
This function is available in both analogue and DVB modes.
TheShippingconditionmenu willresetall data,clearingall analogueandDVB tuninginformationandresettingallcontrollevels backto
factory settings.
Y o umay need to adjust your VCR or programme position ‘0’ VCR after operating the Shipping condition menu -- refer to page 32.
Using the Menu button (1),opentheMain Menu.
Access the Setup menu.
In analogue mode,movetoAnalogue Tuning menu (2).
In analogue mode, access Analogue Tuning menu (3).
Move to Shipping condition (2).
Access Shipping condition (3).
Press OK to start (4).
Press OK again, to confirm, each time that you are asked,
“Are you sure?” (4).
Switch TV off and wait for a few seconds.
Switch TV on again.
Auto setup will begin, followed by DVB Scanning. Analogue and DVB
stations will be located, sorted and stored ready for use. See page 20.
(1) (2) (3) (4)
21
Page 22
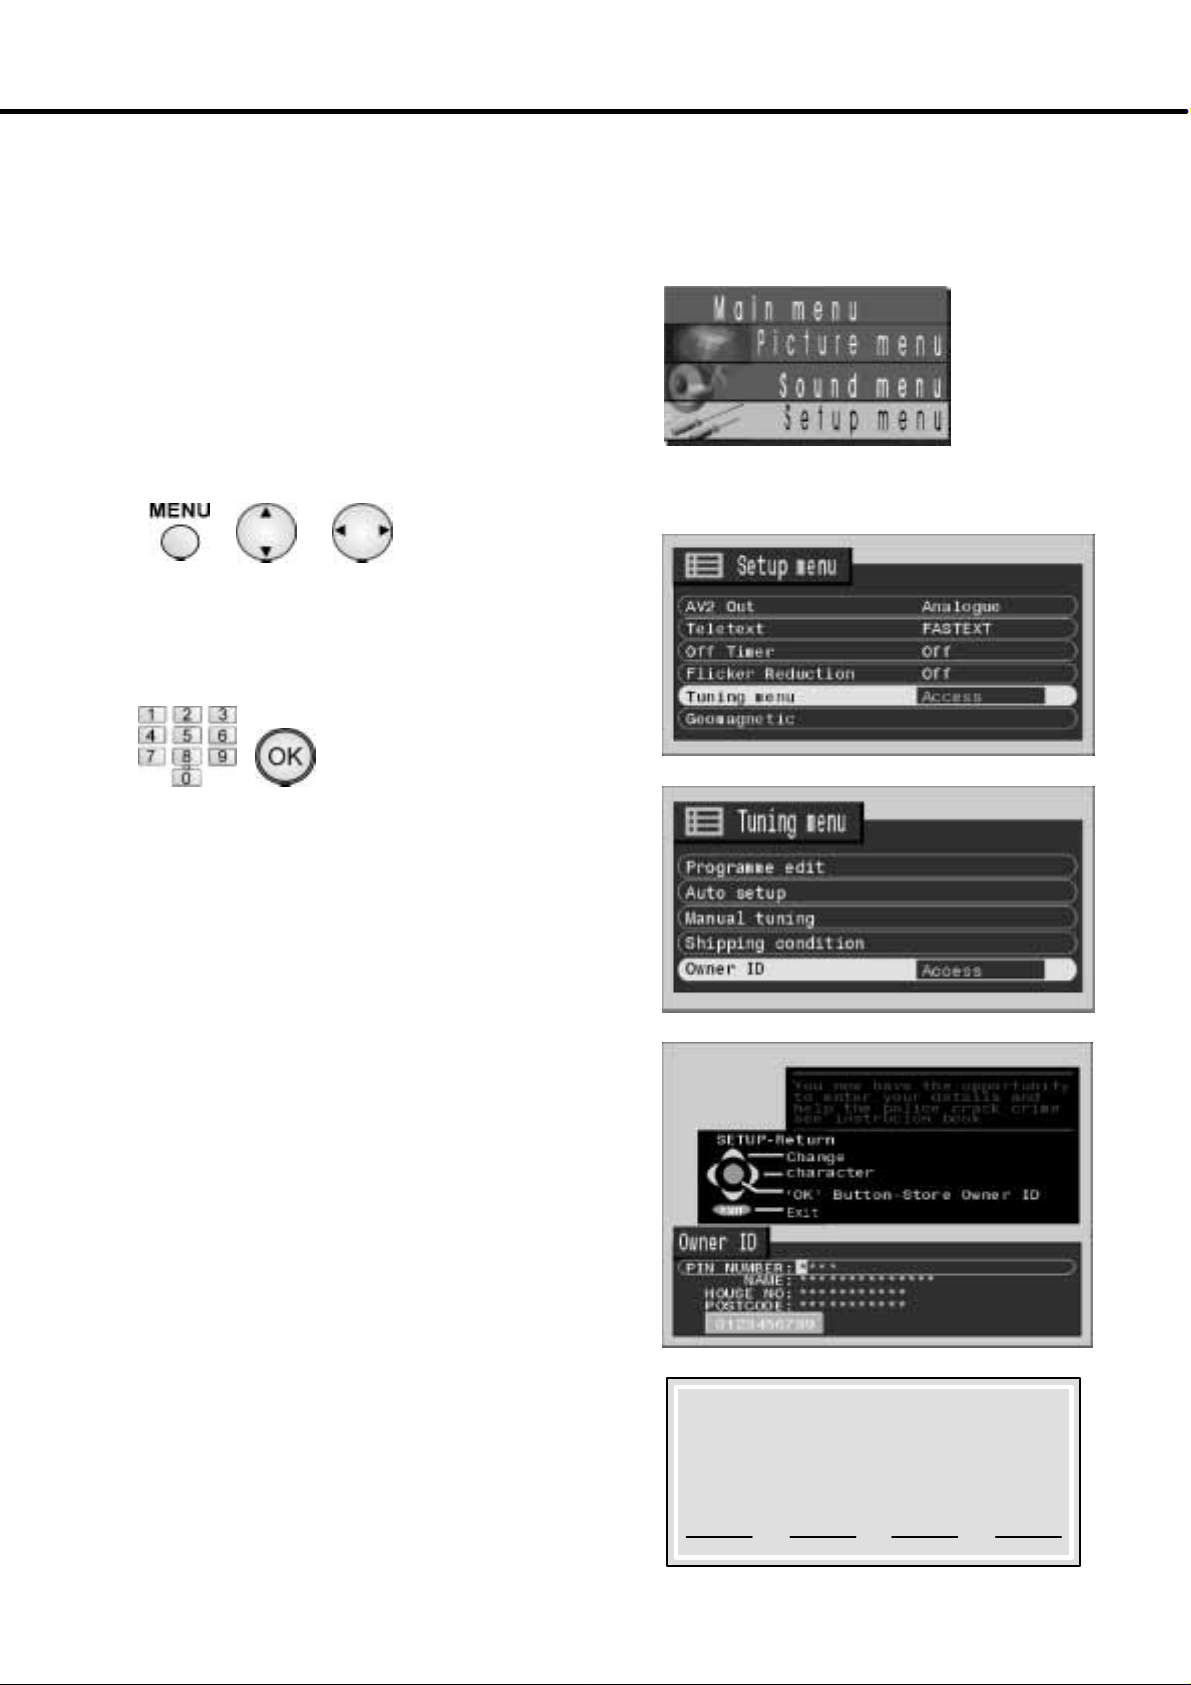
ANALOGUE TUNING MENU -- OWNER I.D.
Owner I.D. allows you to enter a security code and address information so that in the unfortunate
event of theft it will help the Police to determine the owner.
If the Owner I.D. information was not entered after Auto setup or it is necessary to alter some of the I.D.
information it can be re-- accessed via the Tuning menu.
ANALOGUE MODE
Using the Menu button (1),opentheMain Menu.
Access the Setup menu.
Move to Analogue Tuning menu (2).
Access Analogue Tuning menu (3).
Move to Owner I.D. (2).
Access Owner I.D. (3).
(1) (2) (3)
If the Owner I.D. has previously been set, enter the PIN NUMBER,
using 0 to 9 on the remote control (4), followed by OK (5).Thiswill
take you to the NAME option.
(4) (5)
If no Owner I.D. has previously been set, enter the required 4 digit
Owner I.D.PIN NUMBER, using 0 to 9 on the remote control (4).
If a 4 digitPIN NUMBERwas entered above, you will be taken
automatically to the NAME line.
If not, move to the NAME line (3).
Change character (2).
Select character position (3).
Repeat above until NAME, HOUSE NUMBER and POSTCODE
are entered.
Press OK to store the details (5).
Press OK again, to confirm, when asked, “Are you sure ?” (5).
Return --
For future reference,
write your PIN Number here :
2222
Page 23
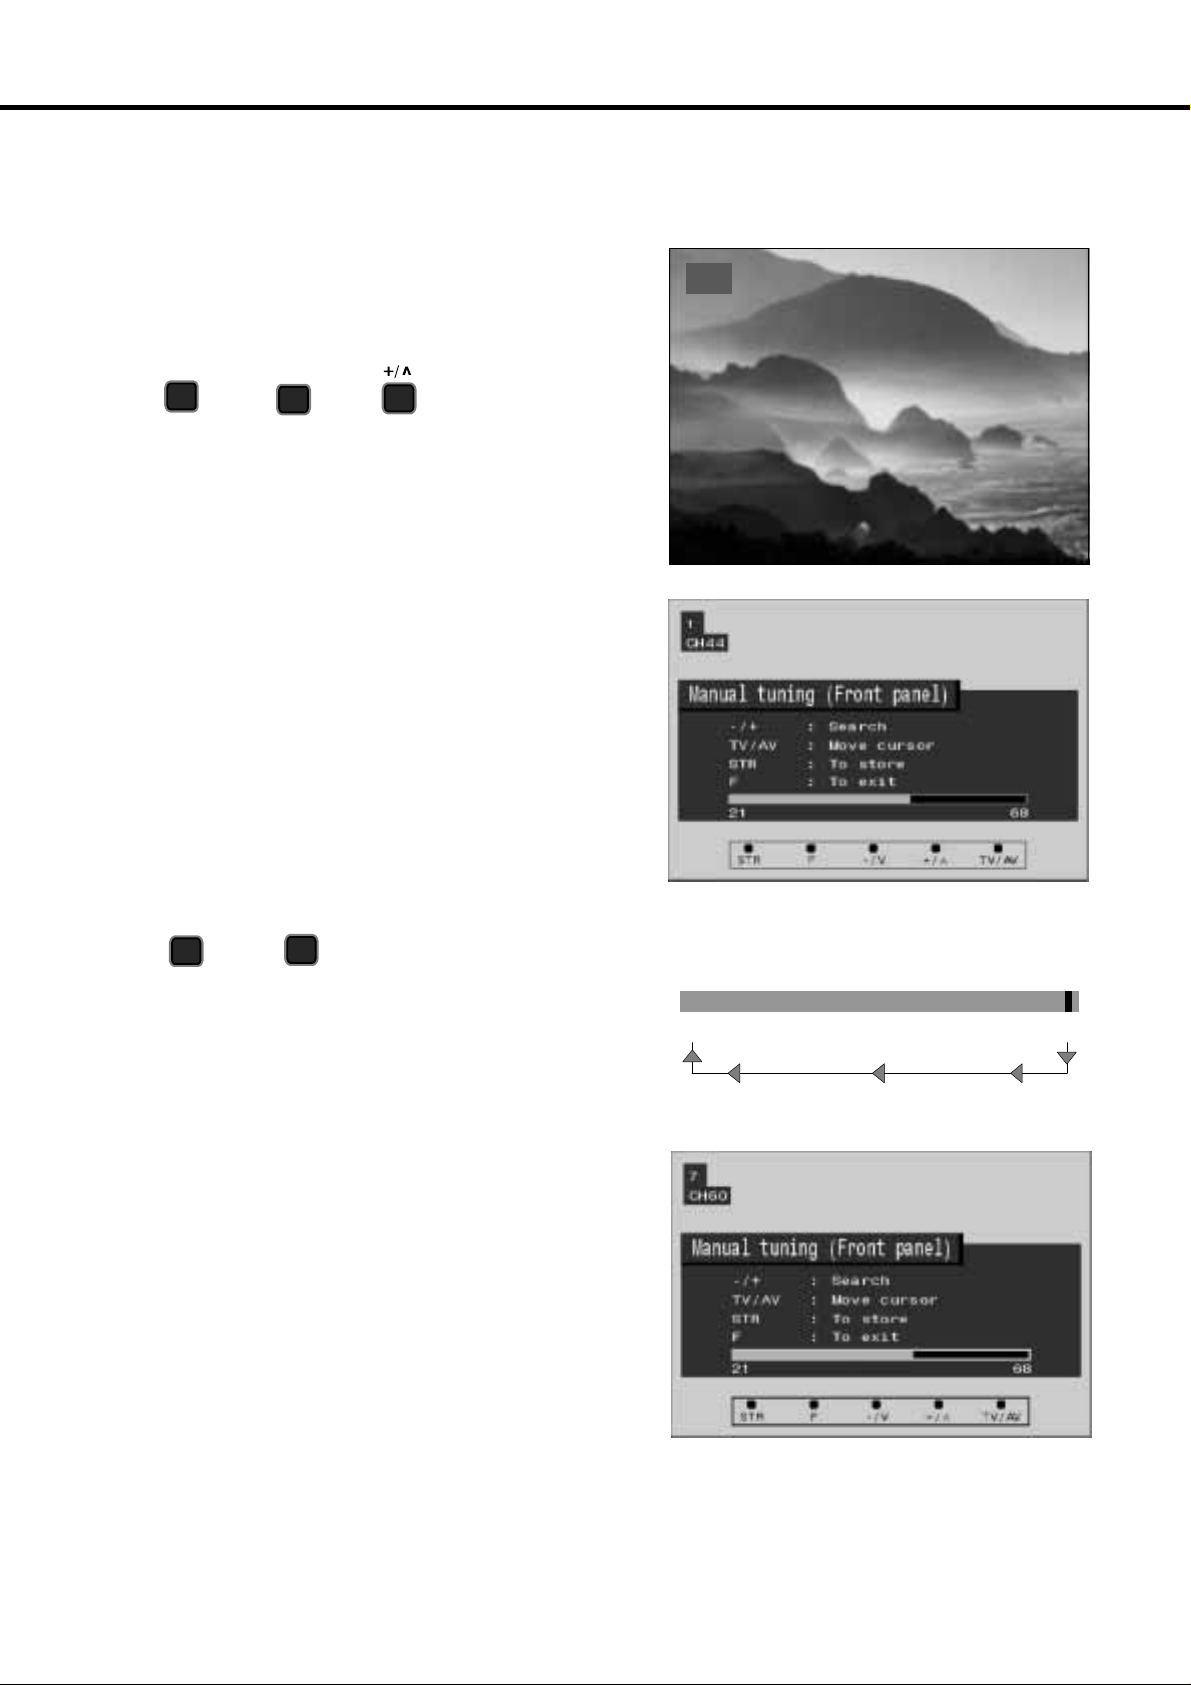
MANUAL TUNING --- FRONT PANEL CONTROLS
Manual tuning of the analogue programme positions is available from the front panel controls
The Front panel controlsare located under the flap on the front
of the TV.
(1) (2) (3)
1
F
Select an existing analogue programme position.
Press the F button (1) repeatedly until “Tuning mode” is
reached.
Press the -- or + button (2) or (3) to access Manual tuning
(Front panel).
Press --- or +(2)or (3), to begin searching for stations.
The television will begin to search for stations. When a station is
found the search will pause; if it is not the correct station, you
can press the --- or + buttons (2) or (3) to continue searching.
-- /v
(4) (5)
TV/AV
STR
Important note :
On passing channel 68, tuning will restart at channel 21.
When the desired station is found, press the TV/AV button (4) to
move to the programme position indicator.
Press --- o r + , (2) or (3) to select the programme position in
which the station is to be stored.
Press STR to store the programme position (5).
The programme position and channel number indicators will
flash to indicate the station is being stored.
To tune further stations press the TV/AV button (4) and repeat
the tuning process.
To exit Manual Tuning, press the F button (1).
21 68
23
Page 24
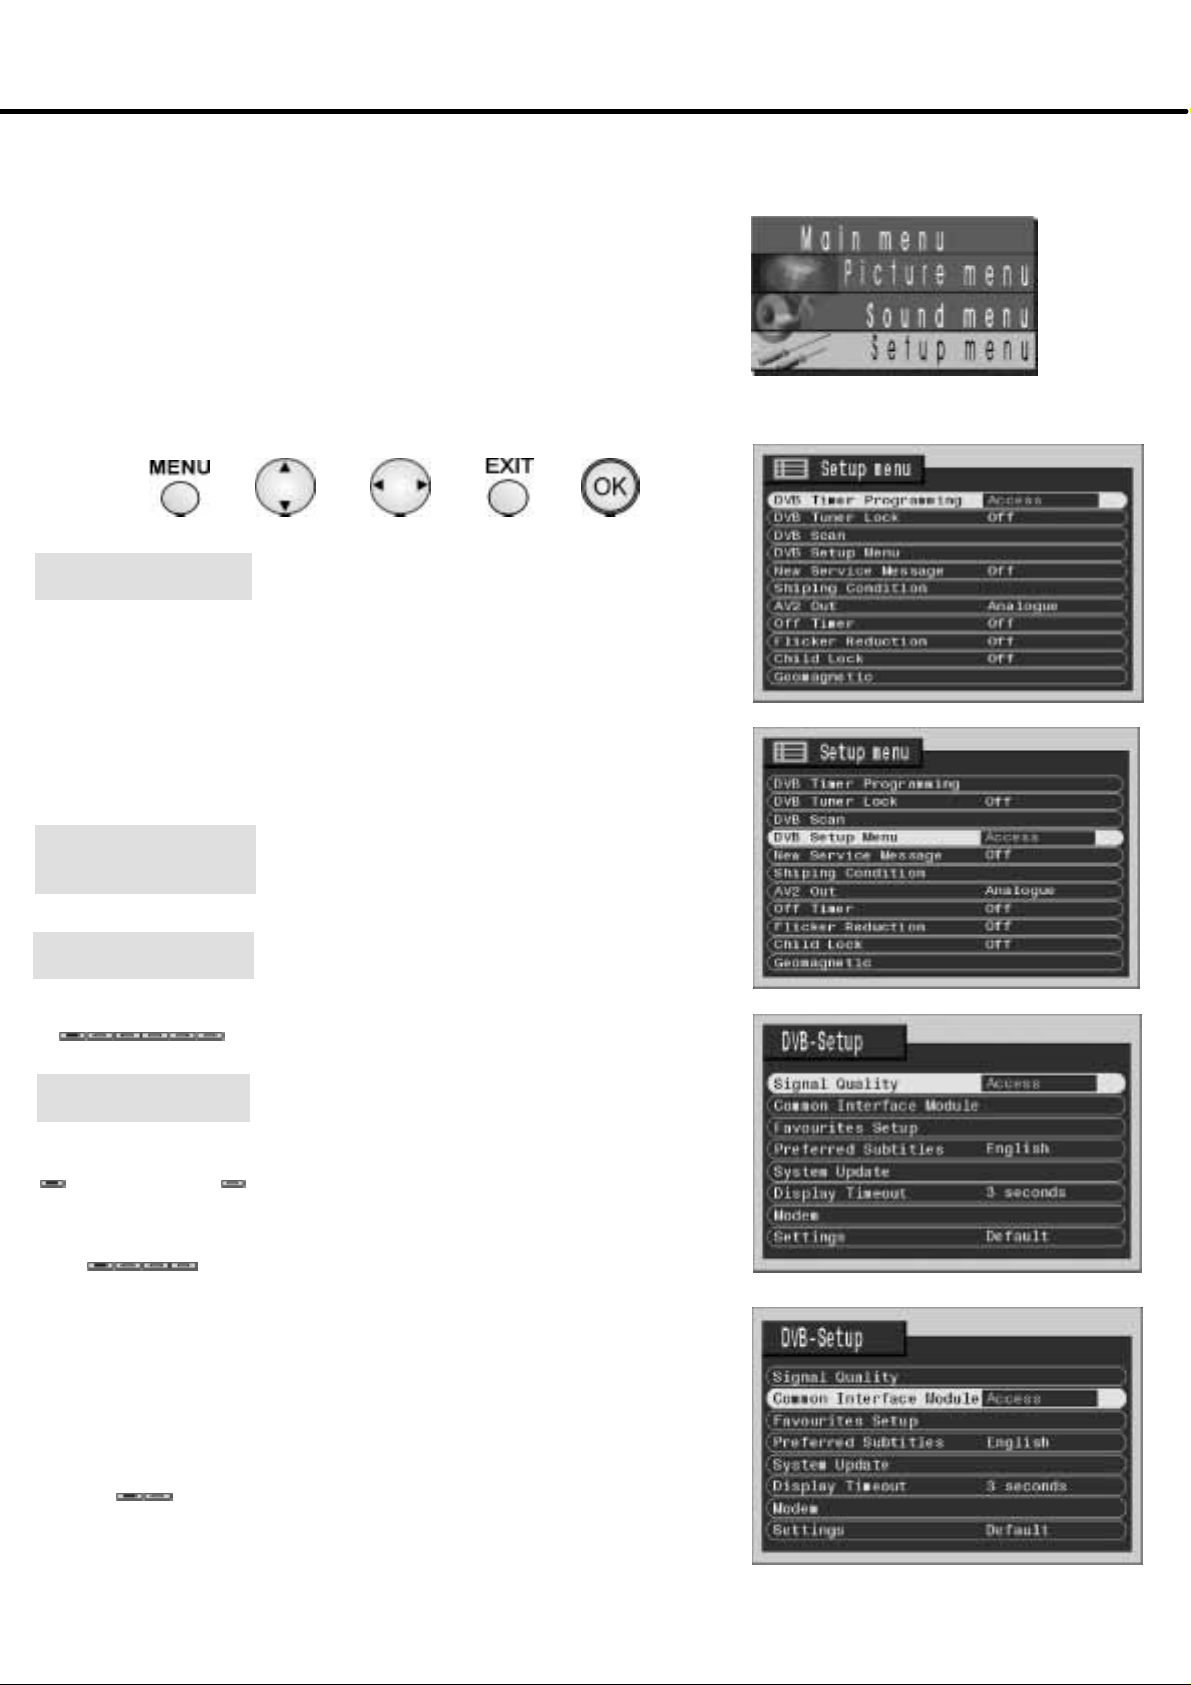
DVB SYSTEM SETUP
The DVB setup menu provides access to DVB specific options.
Note: If DVB transmissions cannot be received clearly, the DVB setup menu may not be available.
Using the Menu button (1),opentheMain Menu.
Access the Setup menu.
Move to DVB Setup Menu (2).
Access DVB Setup Menu (3).
Move to your choice (2).
Set options or access further menus (3).
Press the OK button (5) to store your settings.
Press the EXIT button (4) to return to normal viewing.
(1) (2) (3) (4)
(5)
Signal Quality
Common Interface
Module
Favourites Setup
Preferred Subtitles
System Update
The signal quality function displays an indication of signal
quality for each DVB programme position.
The DVB system requires a good quality signal to provide
the best picture. When viewing analogue pictures,
interference such as signal reflection from nearby buildings
ormountainscauses‘ghosting’,but stillprovidesaviewable
picture. For the DVB system, interference such as this can
disrupt the flow of data causing the picture to appear to be
made up of large blocks, or to freeze intermittently. If the
picture disappears completely, this could mean that signal
quality is very poor.If this happens often, you may need to
improve your aerial system to provide a better signal.
The Common Interface Module menu provides access to
functions contained on a Common Interface Module
inserted into the CI slot, located at the rear of the TV. See
page 25.
Allowsyoutoselectyourfavouriteprogramme positionsand
display them as a list in the TV Guide. See page 26.
This option allows you to select the language in which
subtitles should appear (if available) when the SUBTITLES
button is pressed.
This menu allows you to download new softwar e to the
television. See page 27.
Display Timeout
0 (no display) ~ 10
Screensaver Active
Settings
2424
This option allows you to set how long the information
banner stays on screen. Select from 0 (no display) to 10
seconds in 1 second increments.
A screensaver can be enabled in DVB mode to help protect
this TV from screen damage. This option allows you to set
the time delay before a screensaver appears. Choose from
Off(noscreensaver)1minute,2minute or5minutedelays.
Two different screensavers are launched:---
1. When no signal is being received for example, the
Panasonic logo is displayed.
2. When receiving DVB radio services for example, the
brightness and contrast of the screen will be reduced.
To cancel either screensaver, press any button.
Changes made within the DVB---Setup menu will cause
settingstochange from“Default”to“Userdefined”.Toreturn
to the default settings for this TV, select “Default” using the
left or right cursor key (3),thenpressOK (5) to store your
setting.
Page 25
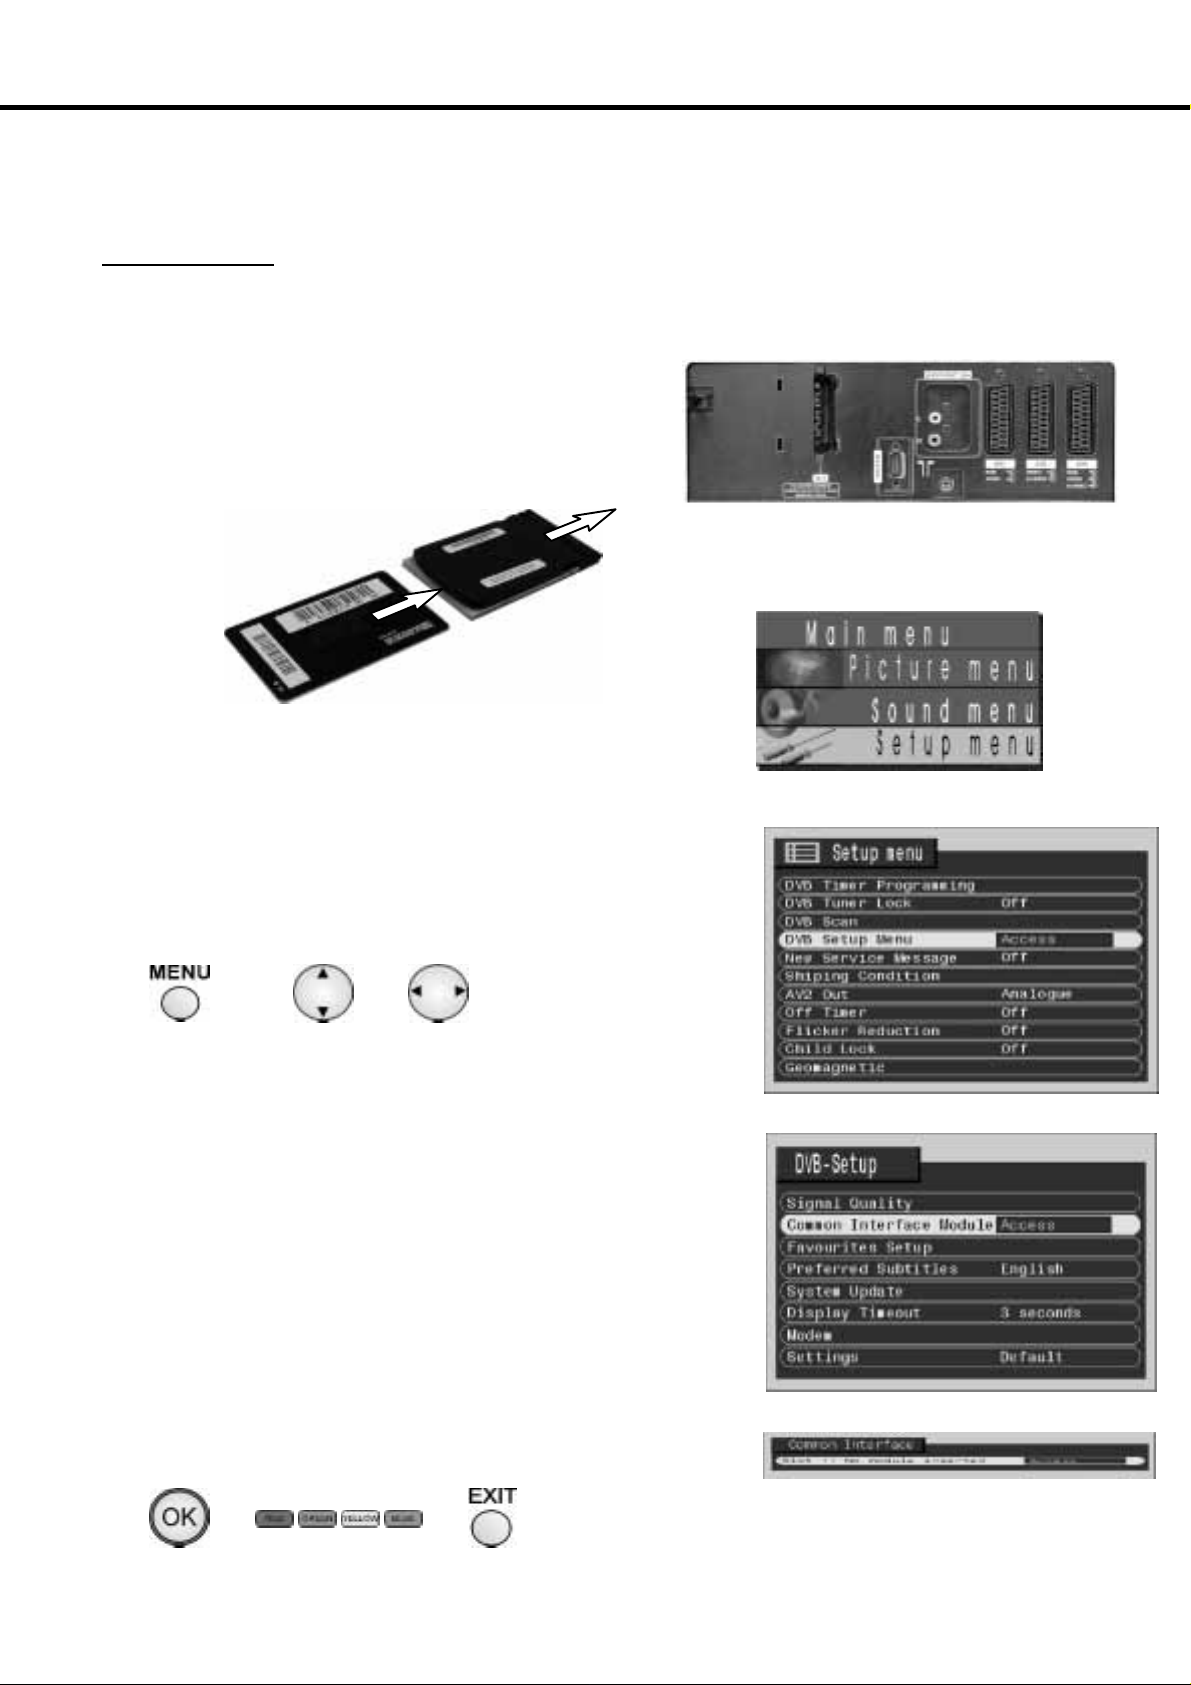
COMMON INTERFACE MODULE MENU
The Common Interface Module menu provides access to software contained on
Common Interface (CI) Modules. These can be inserted in the “CI” slot located at the rear of the TV.
IMPORTANT NOTES:
Switch off the TV using the front panel switch before inserting or removing a module.
If you are installing a TV software update, please follow the dedicated instructions supplied with the module.
InserttheCImoduleasdescribedbelow:
Some Common Interface Modules may be a two piece design
consisting of a card reader together with the viewing card. When using
this design of card, first insert the card reader firmly into the CI slot on
the TV (flap side to the left).
Secondly, insert the viewing card into the reader.
TV
Insert flap
Viewingcard
Card reader
side to the
left !
Switch on the TV.
Using the Menu button (1),opentheMain Menu.
Access the Setup menu.
Move to DVB setup (2).
Access DVB setup menu (3).
Move to Common Interface Module (2).
Access Common Interface Module (3).
Access the module (3).
(1) (2) (3)
If no module is inserted the message “No Module Inserted!” will be displayed.
(If you have inserted a module, check that it is fully inserted.)
The features that now appear on screen are dependent on the contents of the
selected Common Interface Module.
Refer to the instructions supplied with the card or contact the vendor.
In all cases, it is possible to navigate the pages using buttons on the remote
control, but becausethecommandsavailable must apply to all manufacturers
of DVB equipment, some on---screen commands may not correspond exactly
to the remote control buttons.
For example:
For the on---screen command ‘select’or‘go’, use the OK button (4).
If you see the
If you see a line of key words displayed in red, green, yellow and blue, use
the coloured multifunction buttons to operate the functions (5).
The EXIT button should always allow you to exit the CI software
A"BY
symbols, use the cursor keys (2) or (3).
(4) (5) (6)
(6).
25
Page 26
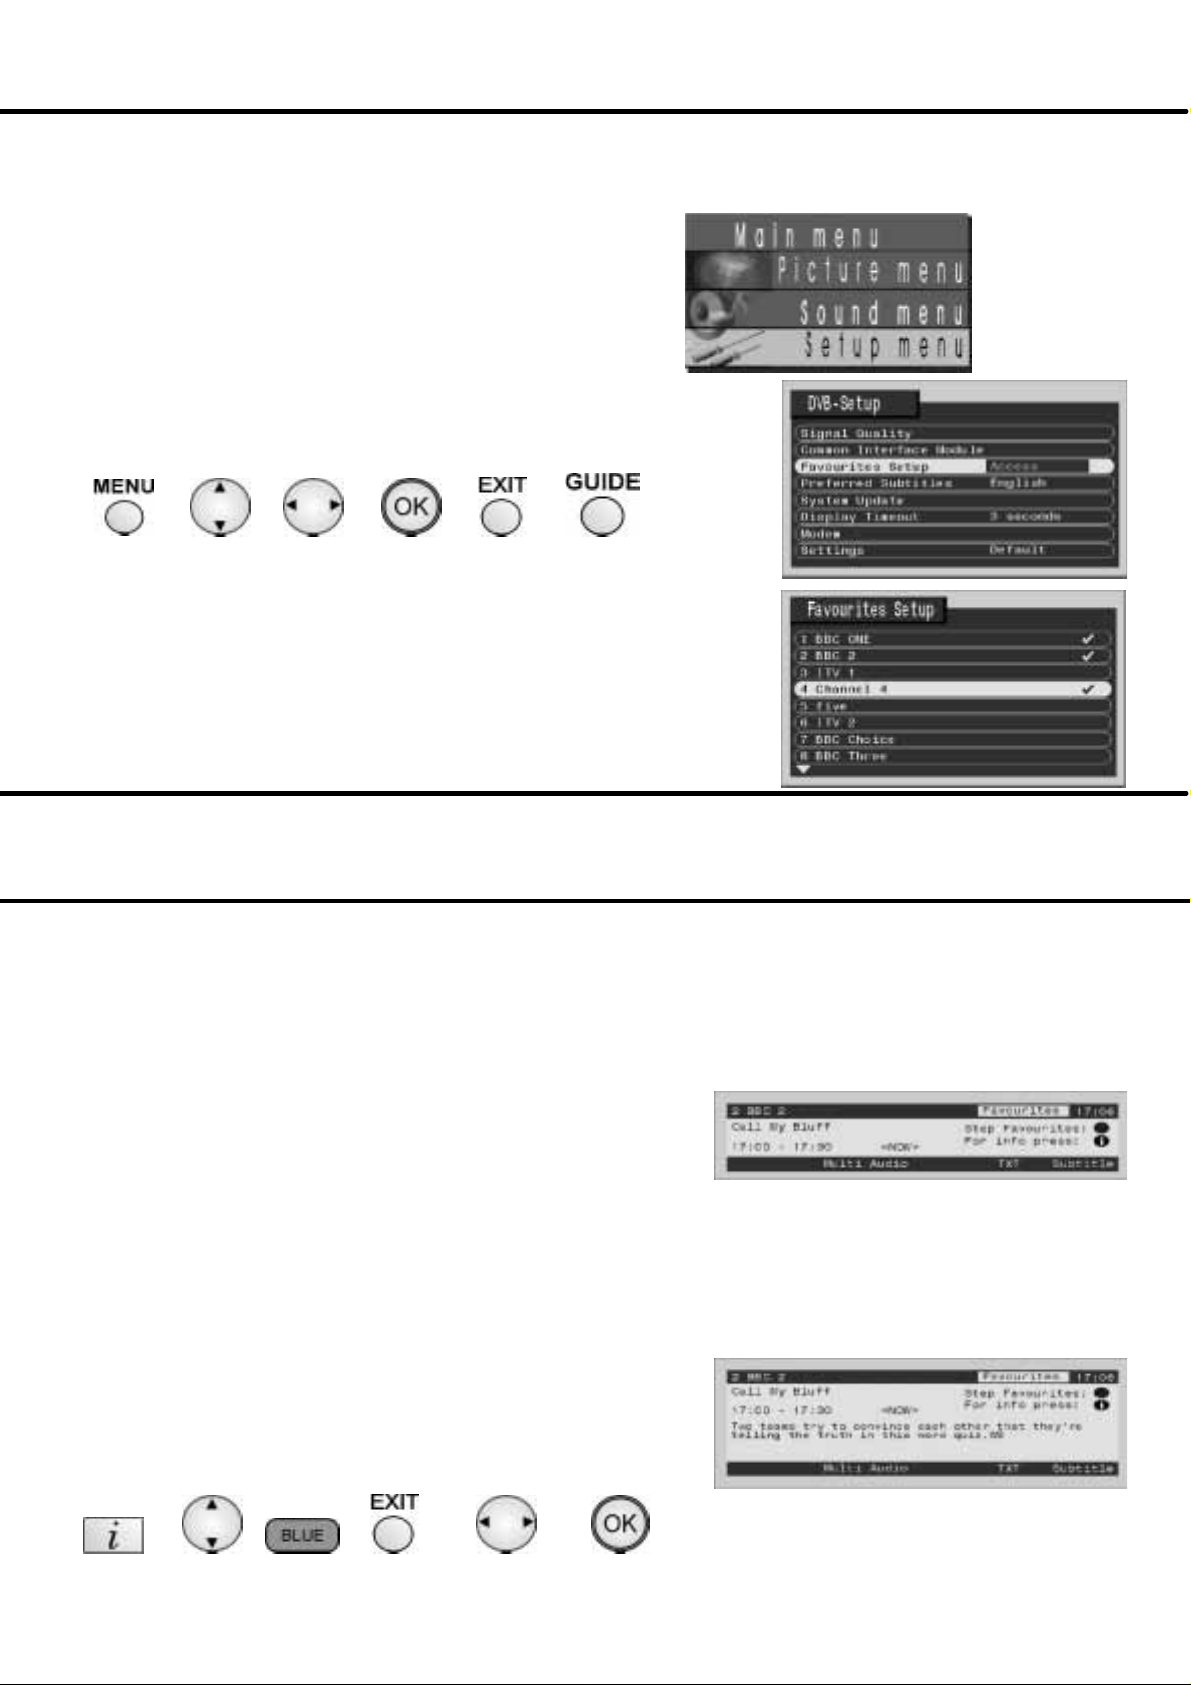
FAVOURITES SETUP MENU
The Favourites setup menu allows you to select your favourite programme positions and display
them as a list in the TV Guide, to allow quick and easy access to the programs you watch most
often.
Using the Menu button (1),opentheMain Menu.
Access the Setup menu.
Move to DVB System Setup (2).
Access DVB System Setup menu (3).
Move to Favourites Setup menu (2).
Access Favourites Setup menu (3).
Move to the programme position which you wish to set as a favourite (2).
Press the OK button to set your favourite (4).
(1) (2) (3) (4) (5)
A tick appears next to the selected program position.
You may move to and select as many programme positions as you wish.
To clear a previously selected favourite, select it with the cursor bar (2)
and press the OK button (4).
Press the Menu buttontoreturntotheDVB System S etup menu (1).
Press the EXIT button to exit (5).
(6)
A list of favourites can be accessed by pressing the Guide button (6).
Seepage30.
INFORMATION BANNER
The Information banner provides access to information on current and upcoming programmes and
easy switching between all channels or just those in your Favourites list.
Press the Information button (1)
An information banner will appear with details of the current programme being
broadcast. These details may include the channel number and programme
position, the title and duration of the current or next programme, details of
transmitted support services (for example text, multi audio, subtitles) and the
current time.
Y ou can set how long the information banner stays on screen. See page 24.
Use the cursor up and down buttons to scroll through the programme list (2).
If you have set favourite channels and want to scroll through only those channels,
press the Blue button (3).
To step through your favourite channels press the Blue button repeatedly (3).
Further information on the individual programmes shown can be displayed by
pressing the Information button (1).
To return to the normal Information banner view press the information button
once more (1), alternatively,press the Exit button (4) to return to normal viewing
mode.
For information on the upcoming (next) programme on any individual channel,
press the Left or Right cursor button (5).
To select any programme listed in the Information banner press the OK button (6).
(1) (2) (3) (4) (5) (6)
2626
Page 27
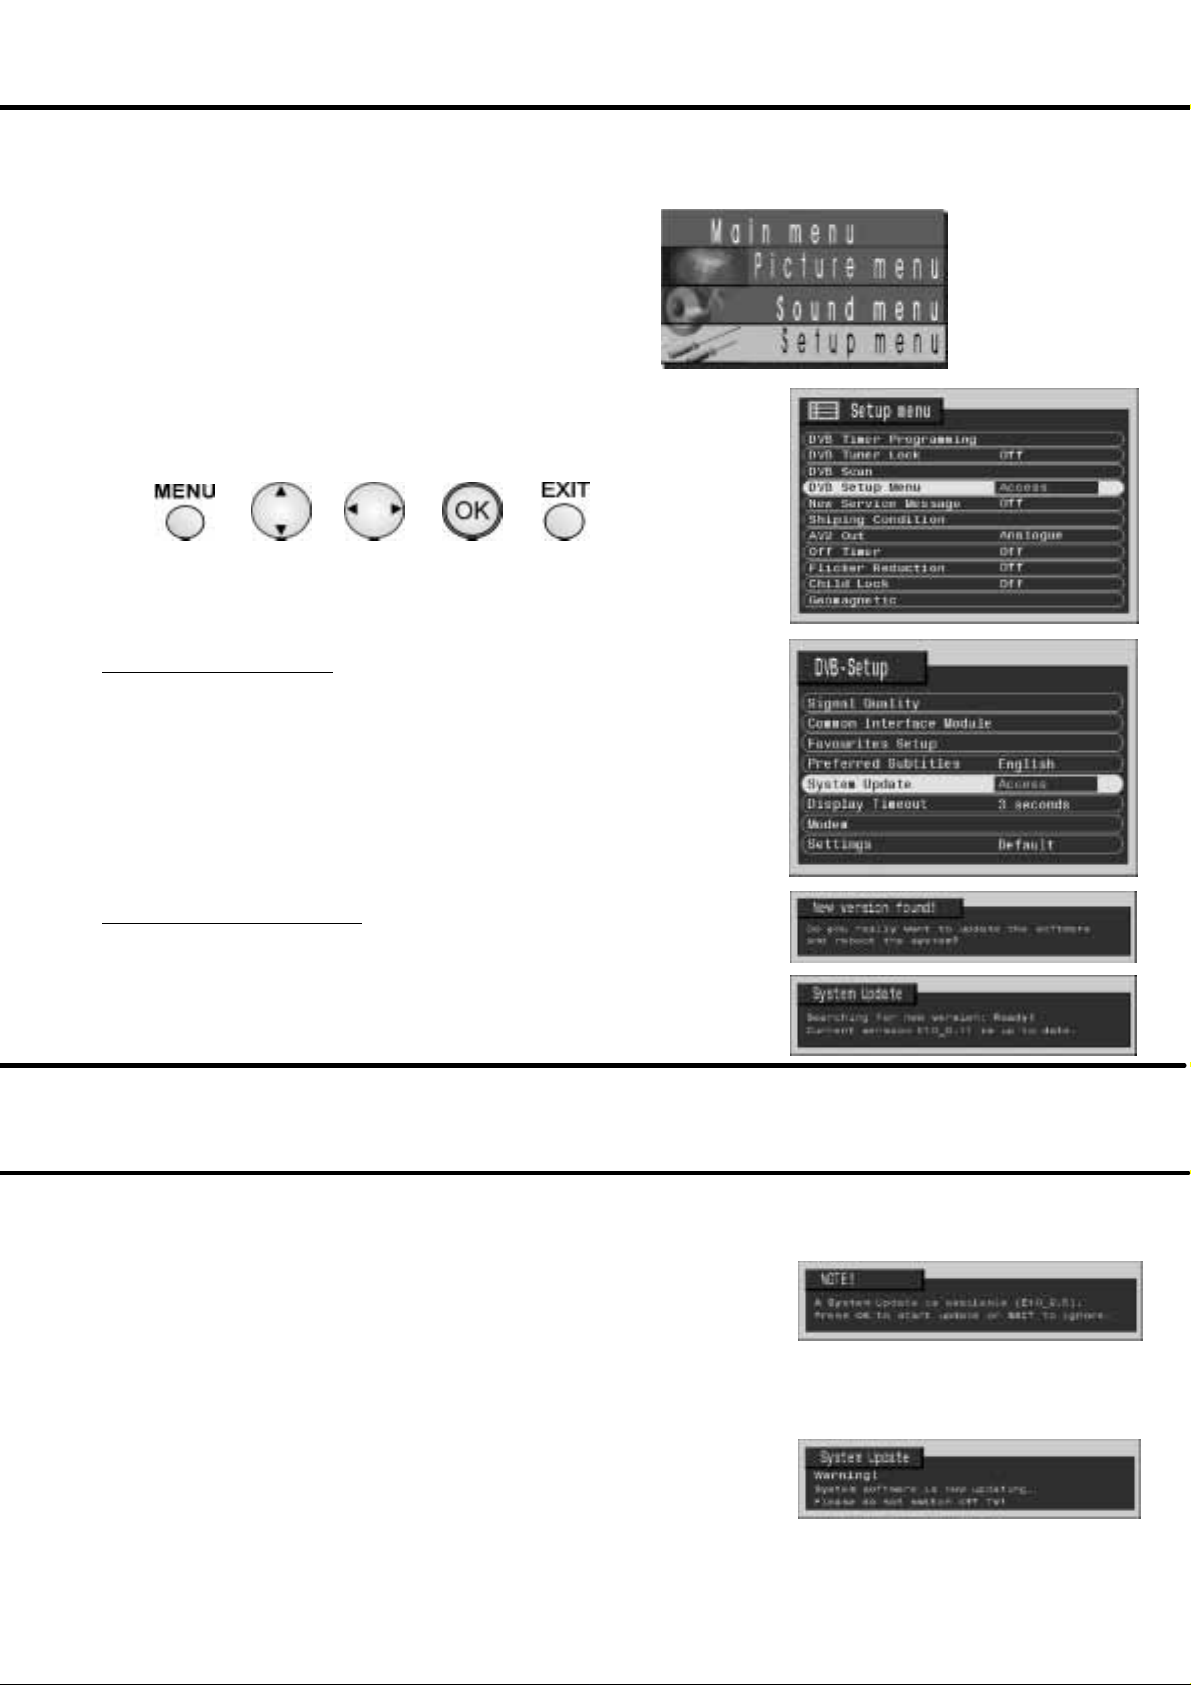
SYSTEM UPDATE MENU
The System Update menu allows the DVB system to check that it has the latest software.
If newer software is available, it can be downloaded.
Using the Menu button (1),opentheMain Menu.
Access the Setup menu.
Move to DVB System Setup Menu (2).
Access DVB System Setup Menu (3).
Move to System Update (2).
Access System Update (3).
The System Update Menu will appear.
(1) (2) (3) (4) (5)
The DVB system will now begin to search for new software --- this will
take a few seconds.
If a newer version is available
Important Note!
You must not switch off the TV while downloading is in progress, as
errors could occur.
Downloading will take a few minutes to complete, so check first that
there are no imminent programmes that you wish to watch.
Press the OK button (4) to initiate download.
If a newer version is not available
A message will appear telling you that the current software is
up --- to--- date.
Press the EXIT button (5) to return to normal viewing.
:
:
SYSTEM UPDATE NOTIFICATION
Occasionally, a newer version of software may become available. An automatic update message
may be shown when you switch on your TV.
This message will only appear if your TV is set to one of the following
channels:--BBC ONE, BBC TWO, BBC THREE, BBC NEWS 24, CBeebies or BBCi.
Press the OK button (4) to initiate download.
Press the EXIT button (5) to ignore this message.
Important Note!
You must not switch off the TV while downloading is in progress, as
errors could occur.
Downloading will take a few minutes to complete, so check first that
there are no imminent programmes that you wish to watch.
27
Page 28
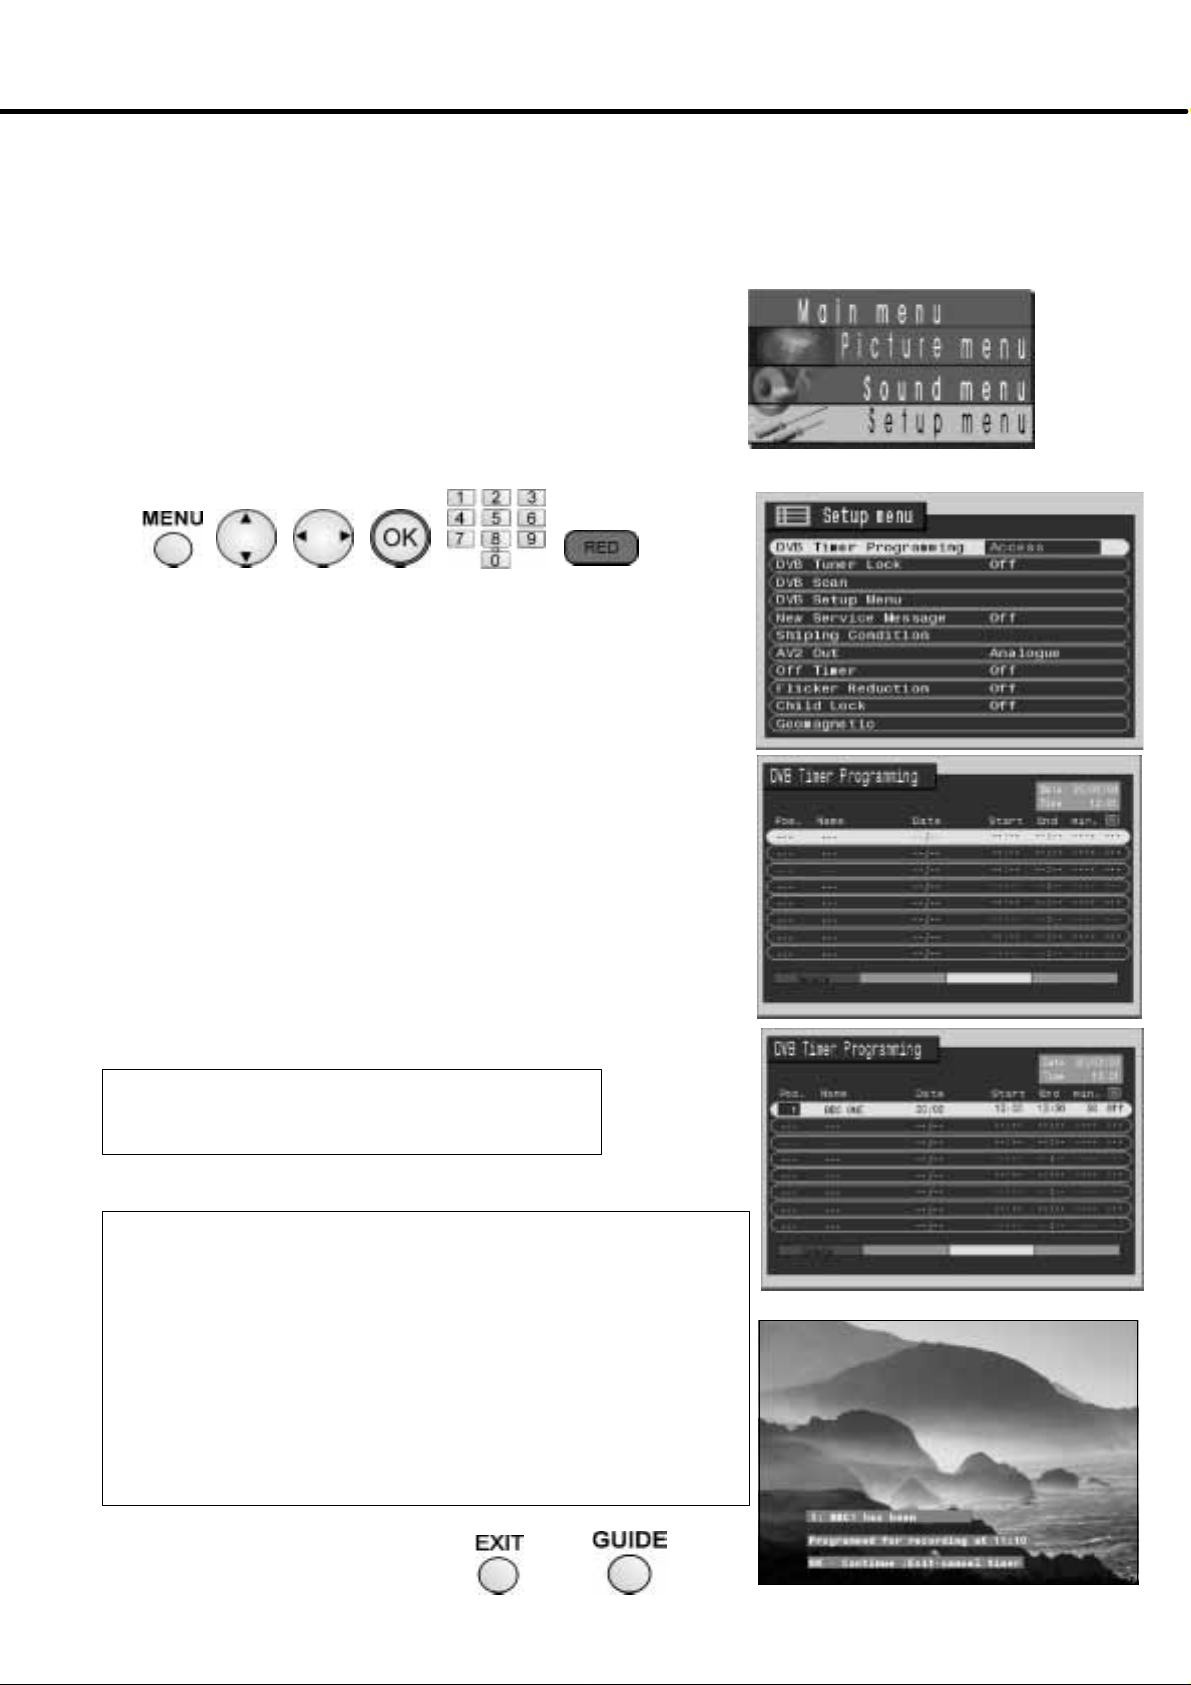
DVB TIMER PROGRAMMING MENU
For an external recording dev ice to record DV B progra m m es, the integrated DVB sy stem m ust be active to provid e the signal.
TheTim erprogrammingmenuallowsyoutochooseprogr am me sthatyouwishtorecord.Atthecorrecttime,theDVBsystem will
switchonand tunetothe correctstation(even iftheTV isinstandb y mode).Iftherecording dev ice iscompatiblewithQ ---Linkor
similar technologies (see page 31) and connected to the TV’s AV2 socket, y ou do not need to program the devi ce --- the DV B
system will control the recording process.
ThedevicemustbeconnectedtotheTV’sAV2socketusingaSCARTcabletorecordDVBprogrammes.
Using the Menu button (1),opentheMain Menu.
Access the Setup menu.
MovetoDVB Time r prog r a mmi ng (2) .
Access DVB Timer prog r a mmin g (3 ) .
Press the OK button to begin programming (4).
Select the Prog ram m e position to be recorded (2).
Move to th e Date field (3).
Set the Da te on which recording is to take place (2).
(1) (2) (3) (4)
The current Date and Time are shown at the top of the menu.
Seepage29forfurtherDateoptions.
(5)
(6)
Move to th e Start time f ield (3).
Set the Starttime (2).
Move to th e End time field (3).
Set the End time (2).
The duration of the recording is shown in the M in. column.
The channel position, start and end times can also be input using the
numeric keys on th e remote contr ol (5).
Move to the Subtitles field (3).
If you wish to record sub titles (if available) select Auto (2).
Press the OK b utton (4) to store.
Notes:
To delete a timer programme, select the recording with the cursor bar and
pressthe Red multi function b utton (6).
To edit a previously entered timer programme, select it with the cursor b ar
(2) and press the OK bu tton (4).
Timer programmes can also be entered from the TV Guide --- see page 30.
Note:
Two minutesbeforetherecordingisduetostart,areminder
will appear on screen:
Press the OK b utton (4) to remove the reminder from the screen.
Ifyouwishtocanceltherecording,presstheEXIT bu tton (7).
Notes:
Thirty secondsbeforetherecording isdue tostarttheDVBsystemwilltuneto
the correct station. I f you were already watching another DVB station you will
see the station change on screen.If you were watchingan analoguechannel,
you willnotsee thechange.
You can continue to watch analogue stations while a timer recording is in
progress.
If you attempt to switch to an other DVB programme position w hile a timer
recordingisinprogressthemessage“DVBprog. islockedforrecording”willbe
displayed.Pressthe OK button(4)to continue recording,orEXITto unlockthe
programmeposition(7).Beware thatifyoupressEXIT,timer programmingfor
this DVB position w ill b e immediately deleted .
Toimmediatelycancelarecordingthatisalreadyinprogress,pressGUIDE (8)
then EXIT (7).
(7)
(8)
2828
Page 29
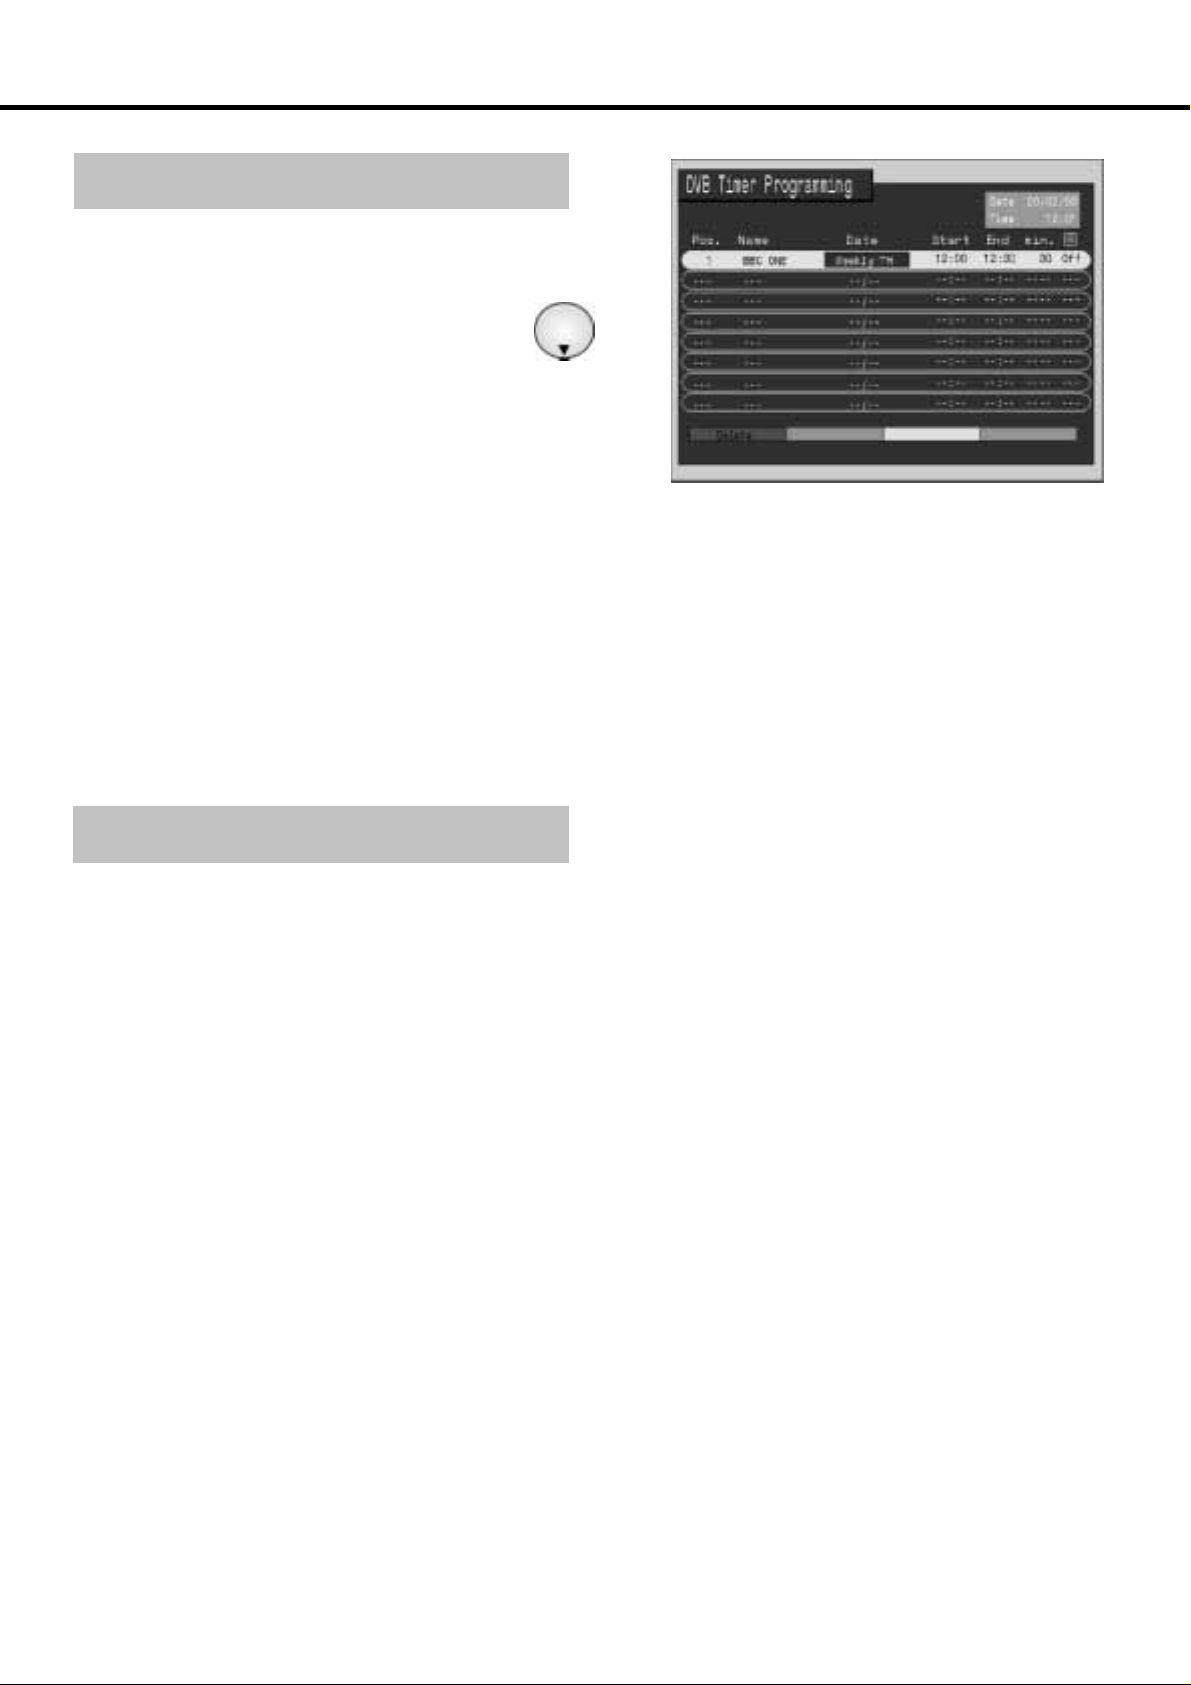
DVB TIMER PROGRAMMING MENU
Daily and Weekly T imer Programmes
While in the Date field of the DVB Timer
Programming menu, you can select various
options to determine how often a recording
should be made. Press the down cursor button
repeatedly to access the following options:
Dai ly Su --- Sa
The recording device will record at the same
time every day.
Dai ly Mo --- S a
The recording device will record at the same
time each day from Monday to Saturday.
Dai ly Mo --- Fr
The recording device will record at the same time each day from Monday to Friday.
WeeklySa,Fr,Th,We,Tu,Mo,or Su
Therecordingdevicewillrecordatthesametimeonthesamedayeachweek.
Note:
If new timerprogrammedata overlapsanypartof an existingtimerprogramme, themessage“Timer Incorrect”willbe displayedand
thenew datawillbecleared.Ifoverlappingdataisenteredusing theTimerfunctionon theTVGuidemenu(see page30), themessage
“Timer overlap with other timer!” will appear.
Encrypted Programmes
In the future, some DVB programmes may be “encrypted”. This means that the DVB programme cannot be viewed or recorded
unlessyouhave the correct Common Interfacemodule to decode the programme.
When you attemptto view or set Timer recording of an encrypted programmeandyou have no CI moduleinserted,a message
will appear on screen.
29
Page 30
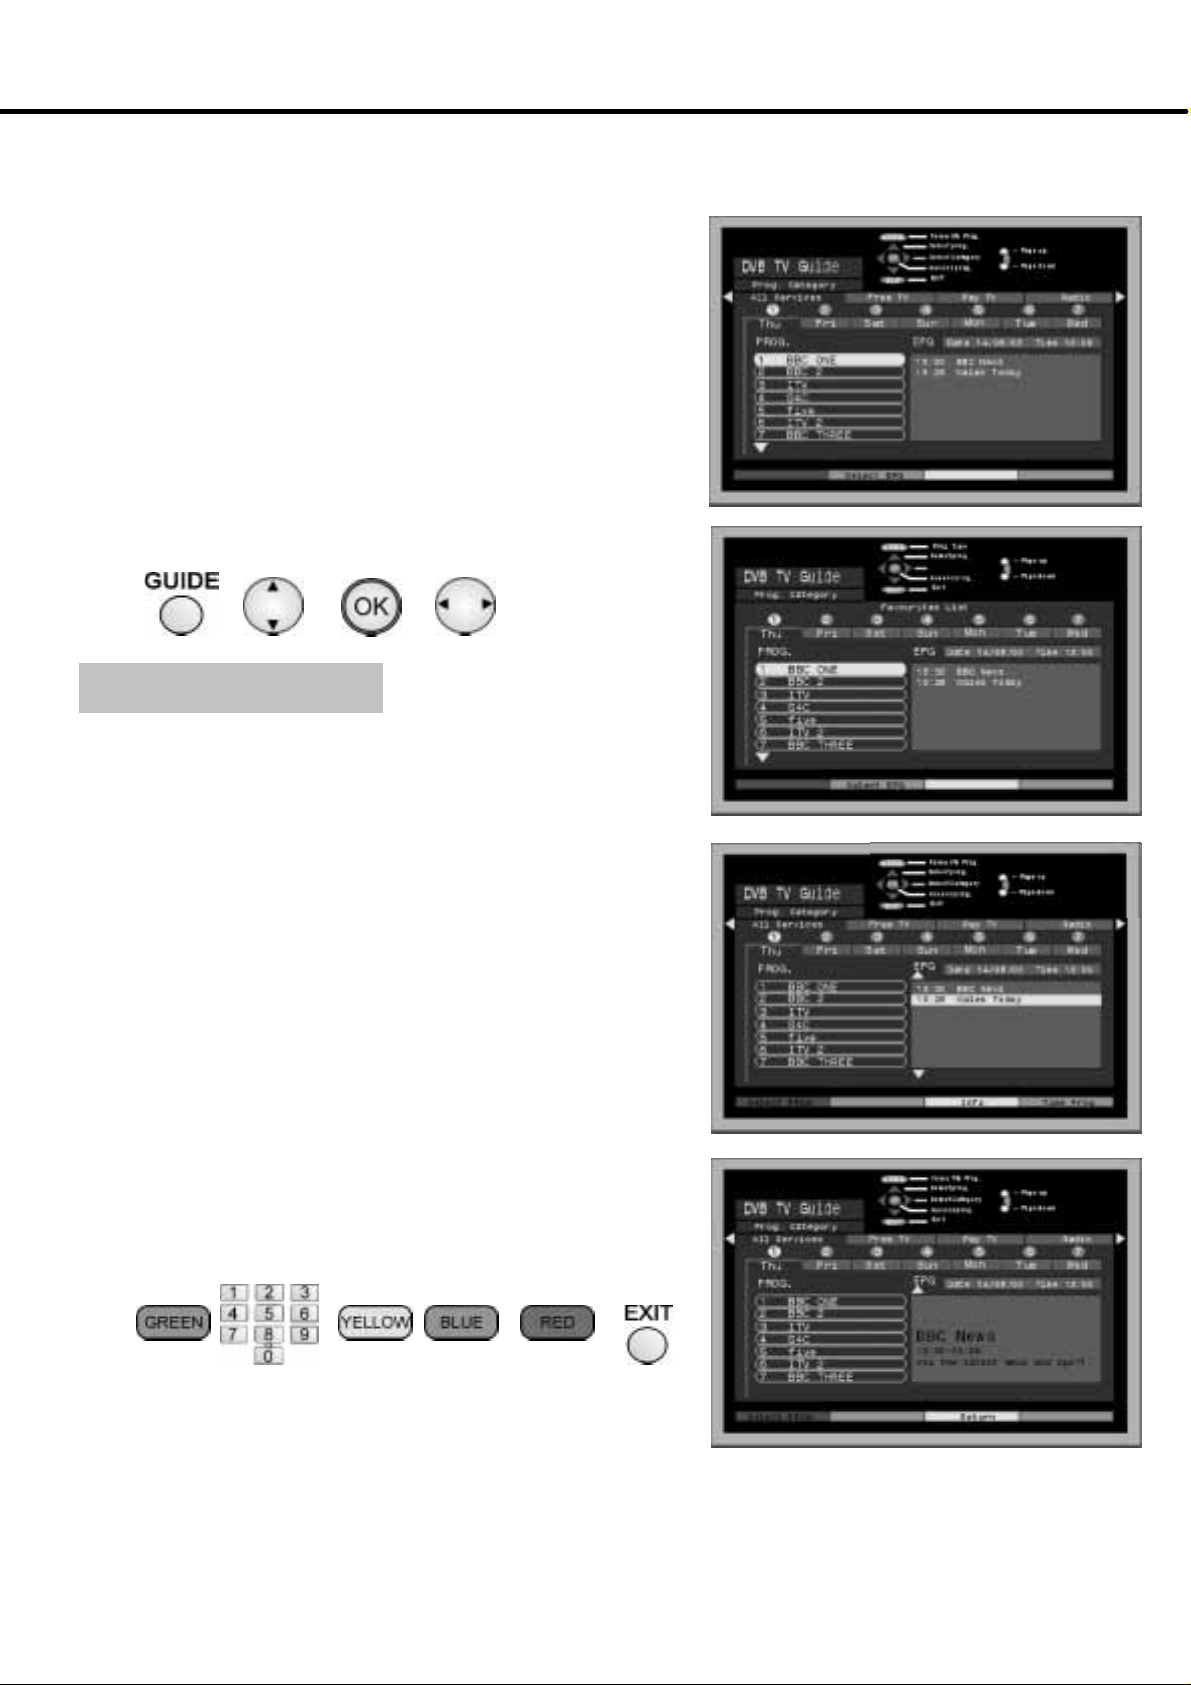
TV GUIDE
The DVB TV Guide displays the current programmes being transmitted, and forthcoming
programmes on each DVB channel, up to seven days ahead.
Press the Guide button (1). Three separate guides can be accessed by
pressing the Guide button repeatedly (1). Choose from ‘Category’,
‘Favourites list’ and ‘T ype’.
The Favourites list can be customised using the DVB setup menu (see
page 26).
After a few moments the DVB TV Guide will be displayed. If you wish to
view one of the listed DVB stations, select it with the up or down cursor
buttons (2) and press the OK button (3).
From the ‘Category’ and ‘Type’ guides, you can also view a list of DVB
channels by category, for example ‘Free TV’ or ‘Radio’ services, ‘News’ or
‘entertainment’ by pressing the left or right cursor buttons (4).The
categories displayed will change, depending on which of the guides you
have selected.
(1) (2)
(3)
(4)
Info and Time Prog.
Y ou can view further information about the selected programme:
Select a DVB channel using the up or down cursor buttons (2).
Press the Green multi function button (5) to move the highlighted cursor
bar to the EPG (Electronic Programme Guide).
The EPG lists current and forthcoming programmes up to seven days
in advance (depending on the broadcaster). The days of the week are
represented by numbers, displayed above them. Use the numeric keys on
your remote control (6) to move the EPG listing through the next seven
days.
Press the Green multi function button (5) to move the highlighted cursor
bar back to the EPG (ElectronicProgramme Guide).
Select the programme for which you require further information using the
up or down cursor buttons (2).
Press the Yellowmulti function button (7) to display the information.
Press the Yellowbutton (7) again to return to the list of programmes.
When you select a programme from the EPG list which has yet to start,
press the Blue multi function button (8) to send details of the selected
programmetothetimerprogramme menu, ready for automatic recording at
the correct time.
Press the Red multi function button (9) to move the highlighted cursor bar
back to the list of DVB channels.
(5) (6) (7) (8) (9) (10)
Press the EXIT button to exit the guide (10).
3030
Page 31

Q-- LINK
Q-- Link allows the television to communicate with a compatible VCR or DVD Recorder.
ForQ-- Linkcommunicationtowork,the TV mustbeconnectedtoarecordingdevicewith the “Q-- Link”, “NEXTV I EWL I N K ”, “DATA
LOGIC”, “Easy Link”, “Megalogic” or“SMARTLIN K ” logousinga“fullyw ired” Scart cablebetweentheAV2 socketofthetelevision
and the appropria te socket on your VCR or DV D Recorder.
For connection to the appropriate Scart socket on the recording device, refer to the device’s operating instruction book.
Whenusinga“NEXTVIEWLINK”devicethemainfeaturespossiblearethefollowing:
Preset Download
This allows the programme order from the TV to be downloaded to the recording device, helping to ensure that correct recordings are
made; there are several ways to perform this operation :
1. During installationas explained in the ’Quick Start Guide’ beginning on page 6.
2. When Auto setup is started from within the Tuning menu, see page 20.
3. Preset download started from the recording device, refer to the device’s operating instruction book.
Because a recording device cannot tune to DVB stations, only the analogue programme positions are downloaded to the device.
Important Note:
Notallrecording devicessupportthistypeof datacommunicationsystem.Somemay supportcertainfeatures,butnot others.Refertothe
recording device’s operating instruction book.
If Q-- Link is inoperative, first confirm that your Scart cable is a “fully wired” type. Ask your dealer for further details.
What You See Is What You Record (DIRECT TV RECORDING)
Thiswillallowtheimmediaterecordingof the programmecurrentlyshown onthetelevision,bytherecording
device attached to the AV2 Scart socket.
Press the DIRECT TV REC button on the remote control.
If the recording device is in Standby mode with usable recording media inserted, it will automatically switch
on when you press the DIRECT TV REC button.
If a “Q-- Link” device is connected, a message will appear on the TV screen showing what is being recorded, or if it is not possible to
record.Some“Q-- Link” compatible devices will only display the message when on the VCR programme position(0) or in AV mode. Refer
to the device’s operating instruction book.
Recording in progress
The recording device is recording the programme signal
fromitsowntuner.IfyouwishyoucanswitchofftheTV
and leave the device recording in the normal way.
No recording -- Check tape or disc
The tape or disc may have been “write protected”, missing
or may be damaged. The device may already be recording.
Refer to the device’s operating instruction book.
Recording DVB stations
If you press the DIRECT TV REC button while watching a DVB station, the recording device will automatically switch to its AV input to
record the DVB signal from the TV (via the SCART cable), and the DVB programme position will be locked. If you attempt to select
another DVB programme position while recording, you will see the message “DVB programme is locked”. Press the OK button to clear
the message, or the EXIT button to unlock the programme. Beware that if you press EXIT, the DVB programme will be unlocked --switching to an other DVB programme will spoil your intended recording.
Additionally, whenusing a “Q-- Link” device themain features possible are the following:
ThefollowingfeaturesareonlyavailablefromthedeviceconnectedtotheAV2scartsocket.
TV / Recording device Auto Power On
If you insert pre---recorded media into the recording device and press the Play button whilst the TV is in ’Standby’ mode, the TV will
automatically switch on and select the correct AV input so that you can view the content.
Recording device Auto Power Standby
When the TV is switched into ’Standby’ mode, therecordingdevicewill also switchinto’Standby’ mode if thereisnomediainserted,or
if there ismedia inserted and thedevice isin’Rewind’ or’Stop’mode.If a VCR is rewinding a tape, itwillnotswitchinto’Standby’mode
until rewinding has finished.
Recording device Image View On
If the TV is in Standby mode and the recording device sends a menu to be displayed on the TV screen (e.g. Main menu), the TV will
automatically switch On and the menu will be displayed.
Some other devices may support this feature. Refer to the device’s operating instructionbook.
This TV will also communicate with other recording device’s that bear the following logos :
D “DATA LOGIC” (a trademark of Metz Corporation). D “Easy Link” (a trademark of Philips Corporation).
D “Megalogic” (a trademark of Grundig Corporation). D “SMARTLINK” (a trademark of Sony Corporation).
Important Note:
These recording devices may support some or all of the above functions. Refer to the device’s operating instruction book.
Notallrecording devicessupportthistypeof datacommunicationsystem.Somemay supportcertainfeatures,butnot others.Refertothe
device’s operating instruction book. Some features are only available from the device connected to the AV2 scart socket.
If Q-- Link is inoperative, first confirm that your Scart cable is a “fully wired” type. Ask your dealer for further details.
31
Page 32
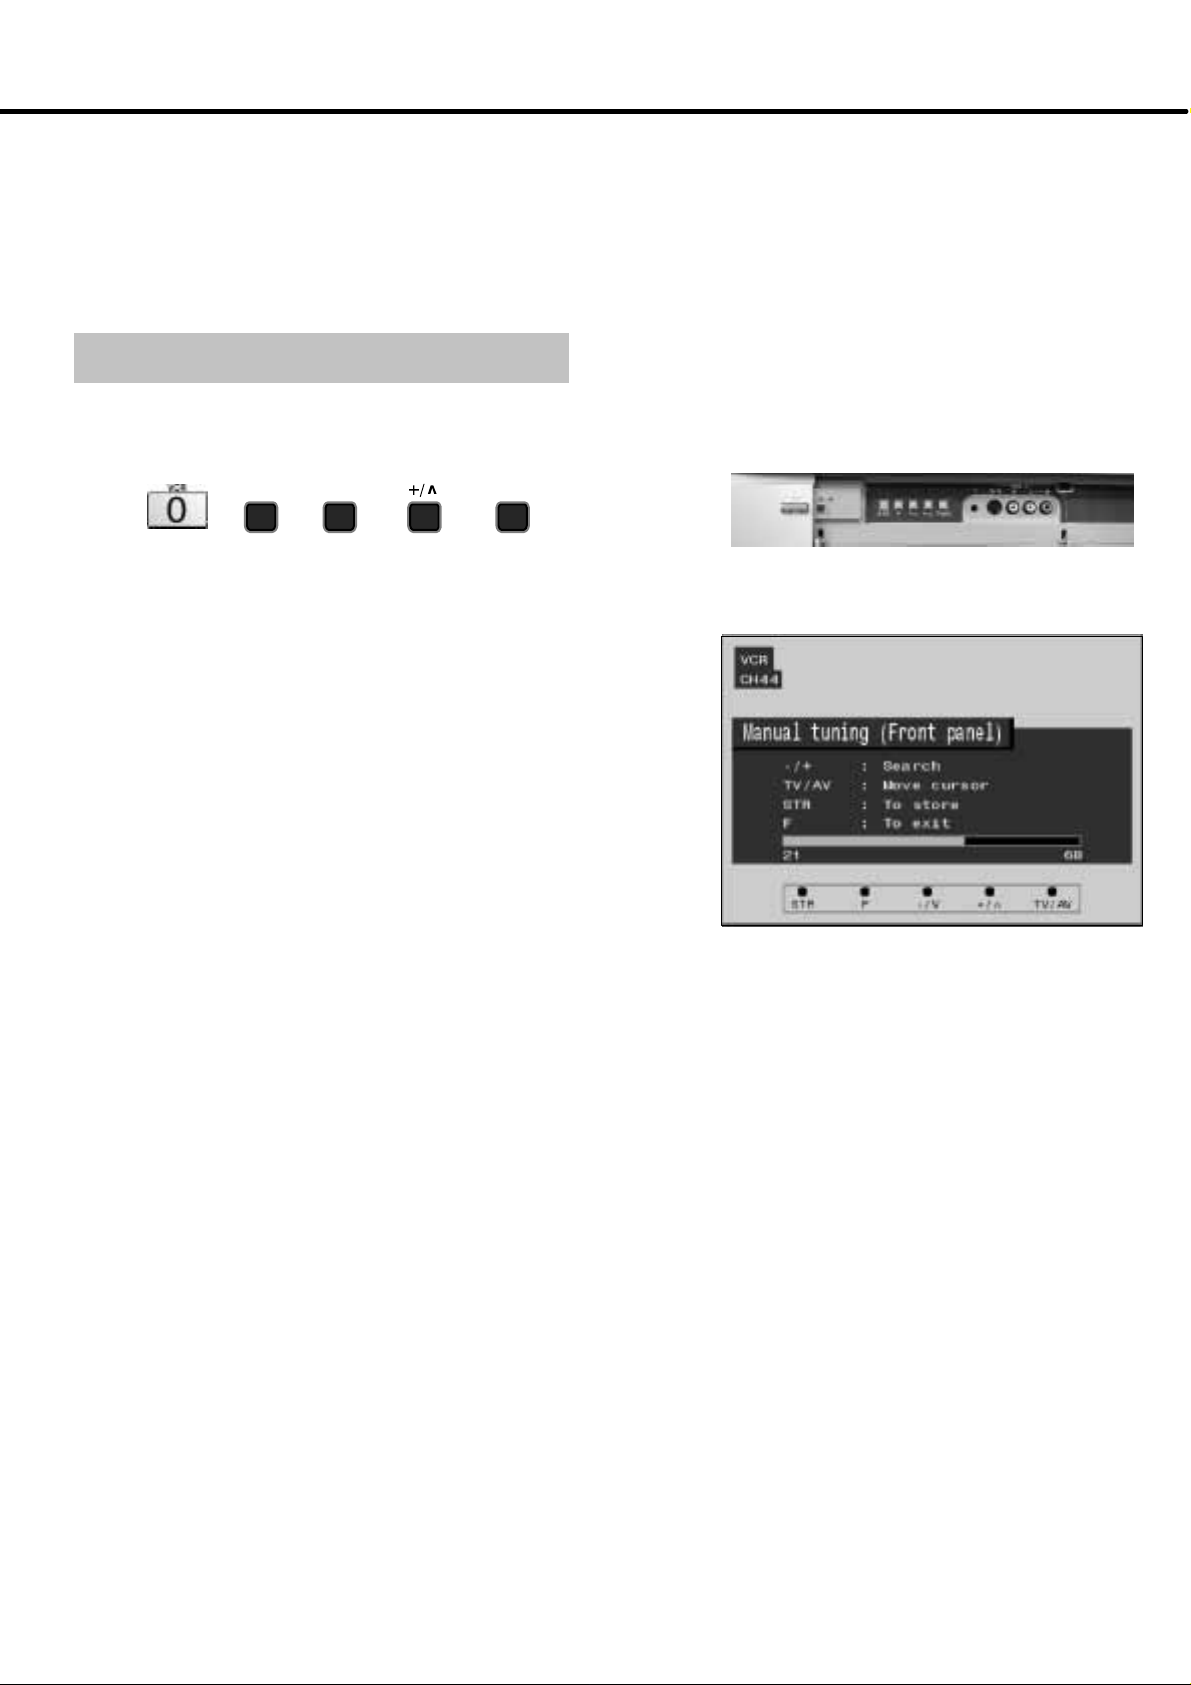
VCR / DVD RECORDER INSTALLATION
Y our new TV is supplied with programme position ‘0’ set to receive an RF signal from your VCR or DVD Recorder , although a Scart
connectionis preferable if the device is so equipped.
However,ifforsomereas onyourVCRorDVD RecorderistunedtoadifferentRFchannelthenyouwillnotre ceive any picture orsound
from your device on programme position ‘0’ of the TV. It will be necessary to either adjust the RF channel of your device (some device’s
allow adjustment of their RF channel via their remote controlunit)ortoadjustthe tuningof theTV’s programmeposition‘0’or both until
it receives the RF output channel of your VCR or DVD Recorder.
It is intended that this advice is used in conjunction with the instruction books for your additional equipment.
Use the AV2 Scart terminal for an S-- Video, Q-- Link,
To tune your TV to the recording device
Switch on the device, insert and play a pre-- recorded tape or disc
with known content.
(1) (2) (3) (4) (5)
NEXTVIEWLINK
or compatible VCR or DVD Recorder.
F STR
On the TV, selectprogramme position “0 --- VCR ” ( 1) .
Open the Front panel flap.
Press the F button (2) repeatedly until “Tuning mode” is reached.
Press the -- or + button (3) or (4) to access Tuning mode.
Press -- or +(3)or (4) to begin searching for the device’s playback.
When the playback is found, press the STR button (5) to store the
programme position.
The programme position and channel number indicators will flash to
indicate the station is being stored.
To exit Manual Tuning, press the F button (2).
Note:
If picture patterning occurs on programme position ‘0’ it may be
necessary to adjust the RF output channel of the recording device, refer
to the device’s instruction book.
-- /v
3232
Page 33
TELETEXT OPERATION
D Teletext features may vary depending on the Broadcasting Companies and is only available if the channel selected is transmitting
teletext.
D Pressing the Menu button whilst in teletext operation will display special function options at the bottom of the screen
D When in teletext mode, the volume may still be altered to the desired listening level.
D For information on the Picture and Text function (PAT) see page 13
What is LIST mode ?
InLISTmode,four differentlycolouredpagenumbersaresituatedatthe bottomofthe screen.Eachof thesenumberscanbealteredand
stored in the TV’s memory.
What is FASTEXT?
In FASTEXT mode, four differently coloured subjects are situated at the bottom of the display.To accessmoreinformationaboutoneof
these subjects, press the appropriately coloured button. This facility enables fast access to information on the subjects shown.
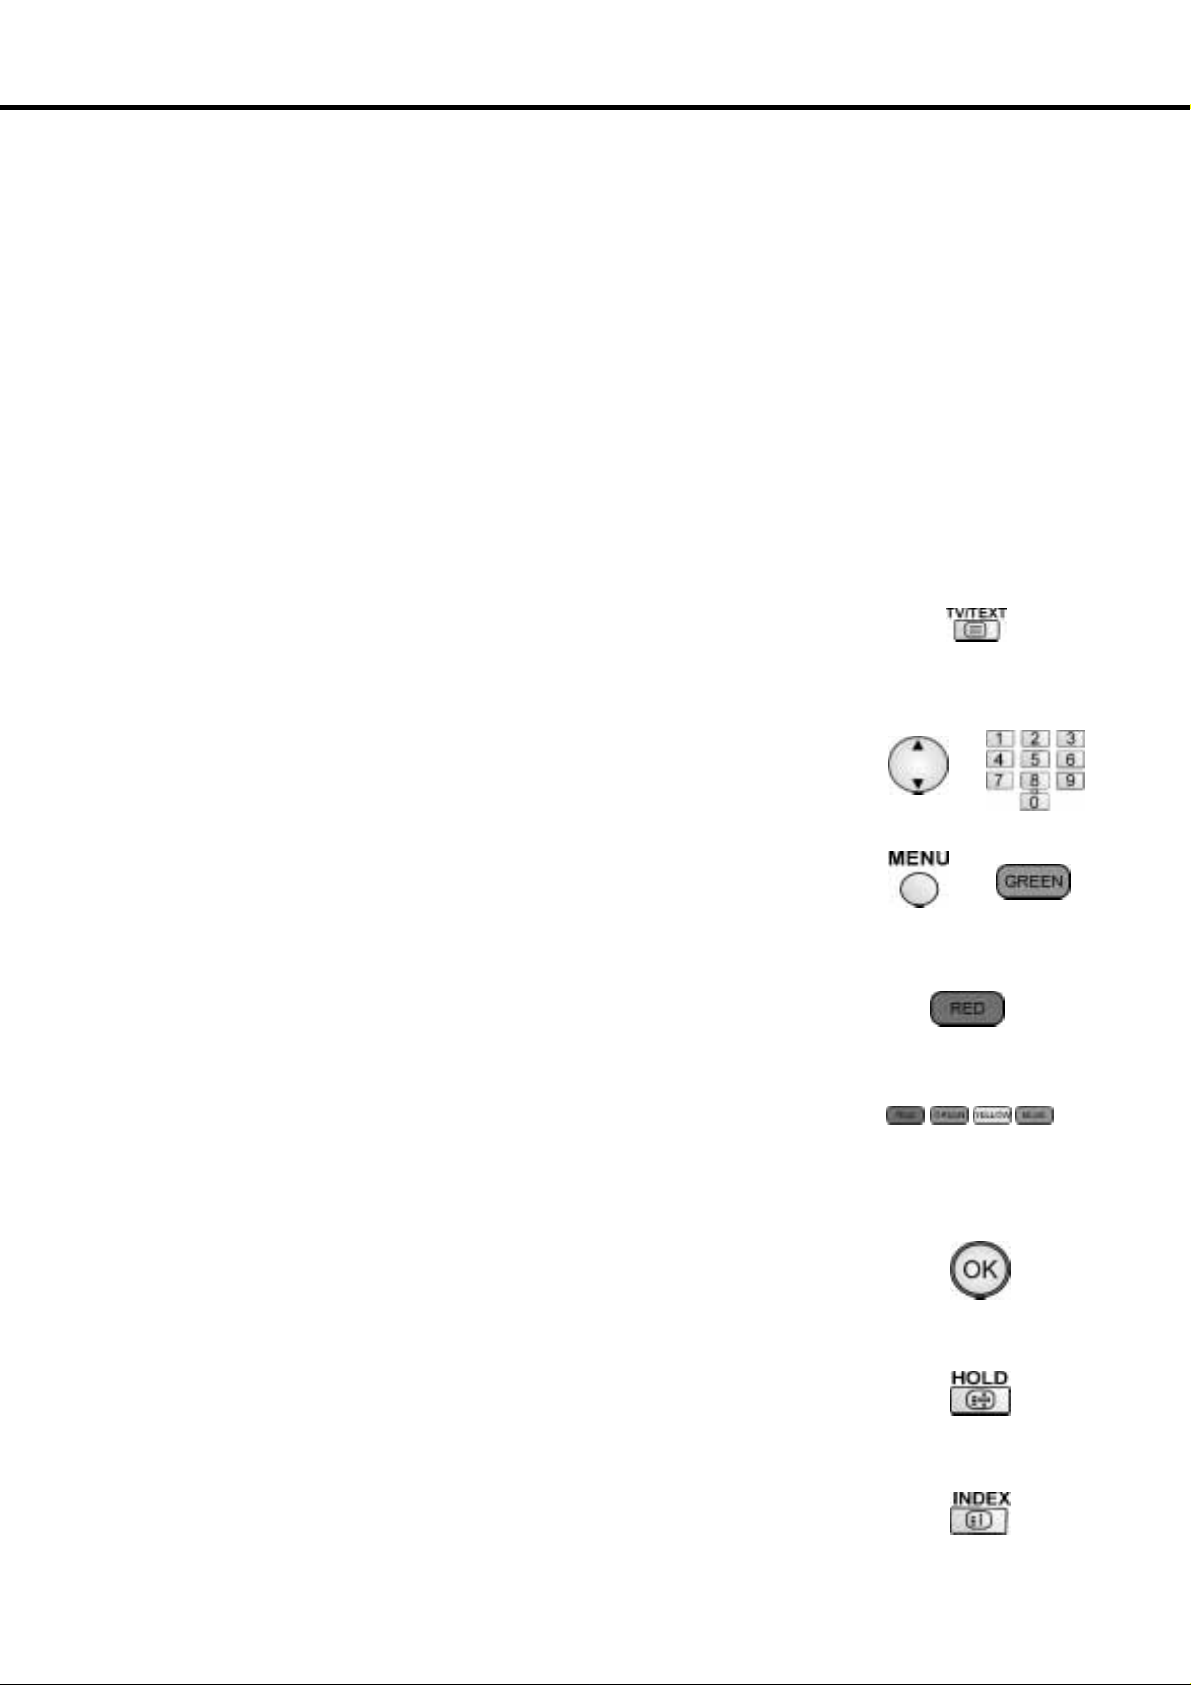
TV/ Teletextmode
Press the TV/TEXT button (1).
The screen will display the teletext page.
Press TV/TEXT button (1) again when you wish to return to TV mode.
Page Selection
Pages can be selected in two ways :
a. Press the Up / Down buttons (2) to increase or decrease the page number by one.
b. By entering the page number, using 0 - 9 on the remote control (3).
Full/Top/Bottom
Press the MENU button (4) to display special functions, followed by the Green button (5)
to expand the TOP half.
Press the Green button (5) again to expand the BOTTOM half.
Press the Green button (5) again to return to normal (FULL) size.
Reveal
Press the MENU button (4) to display special functions, followed by the Red button (6) to
reveal hidden words e.g. quiz page answers. Press the Red button (6) again to hide.
Red / Green / Yellow / Blue buttons (7)
In FASTEXT mode these correspond to the differently coloured subjects. In LIST mode they
correspondto the differently colouredpage numbers.
(2)
(4)
(1)
(3)
(5)
(6)
(7)
List Store
In LIST mode the four page numbers can be altered (only for analogue stations stored on
programme positions 1 - 25).
To do this, press one of the four coloured buttons (7) and enter the new page number.
Press and hold OK (8), the page numbers will change to white indicating that the page is
stored.
Hold
Press HOLD (9) to hold the teletext page when viewing multi-- page information. Press again to
return to automatic page update.
Index
When in FASTEXT operation:
Press INDEX (10) to return to the main index page.
Depending on the way information is transmitted, this may have to be pressed more than once toreturn
to the main index page.
(8)
(9)
(10)
33
Page 34
TELETEXT OPERATION
It is not possible to change the programme position when in News flash, Update or Sub Coded Page Access operation.
Update Display (Display Cancel)
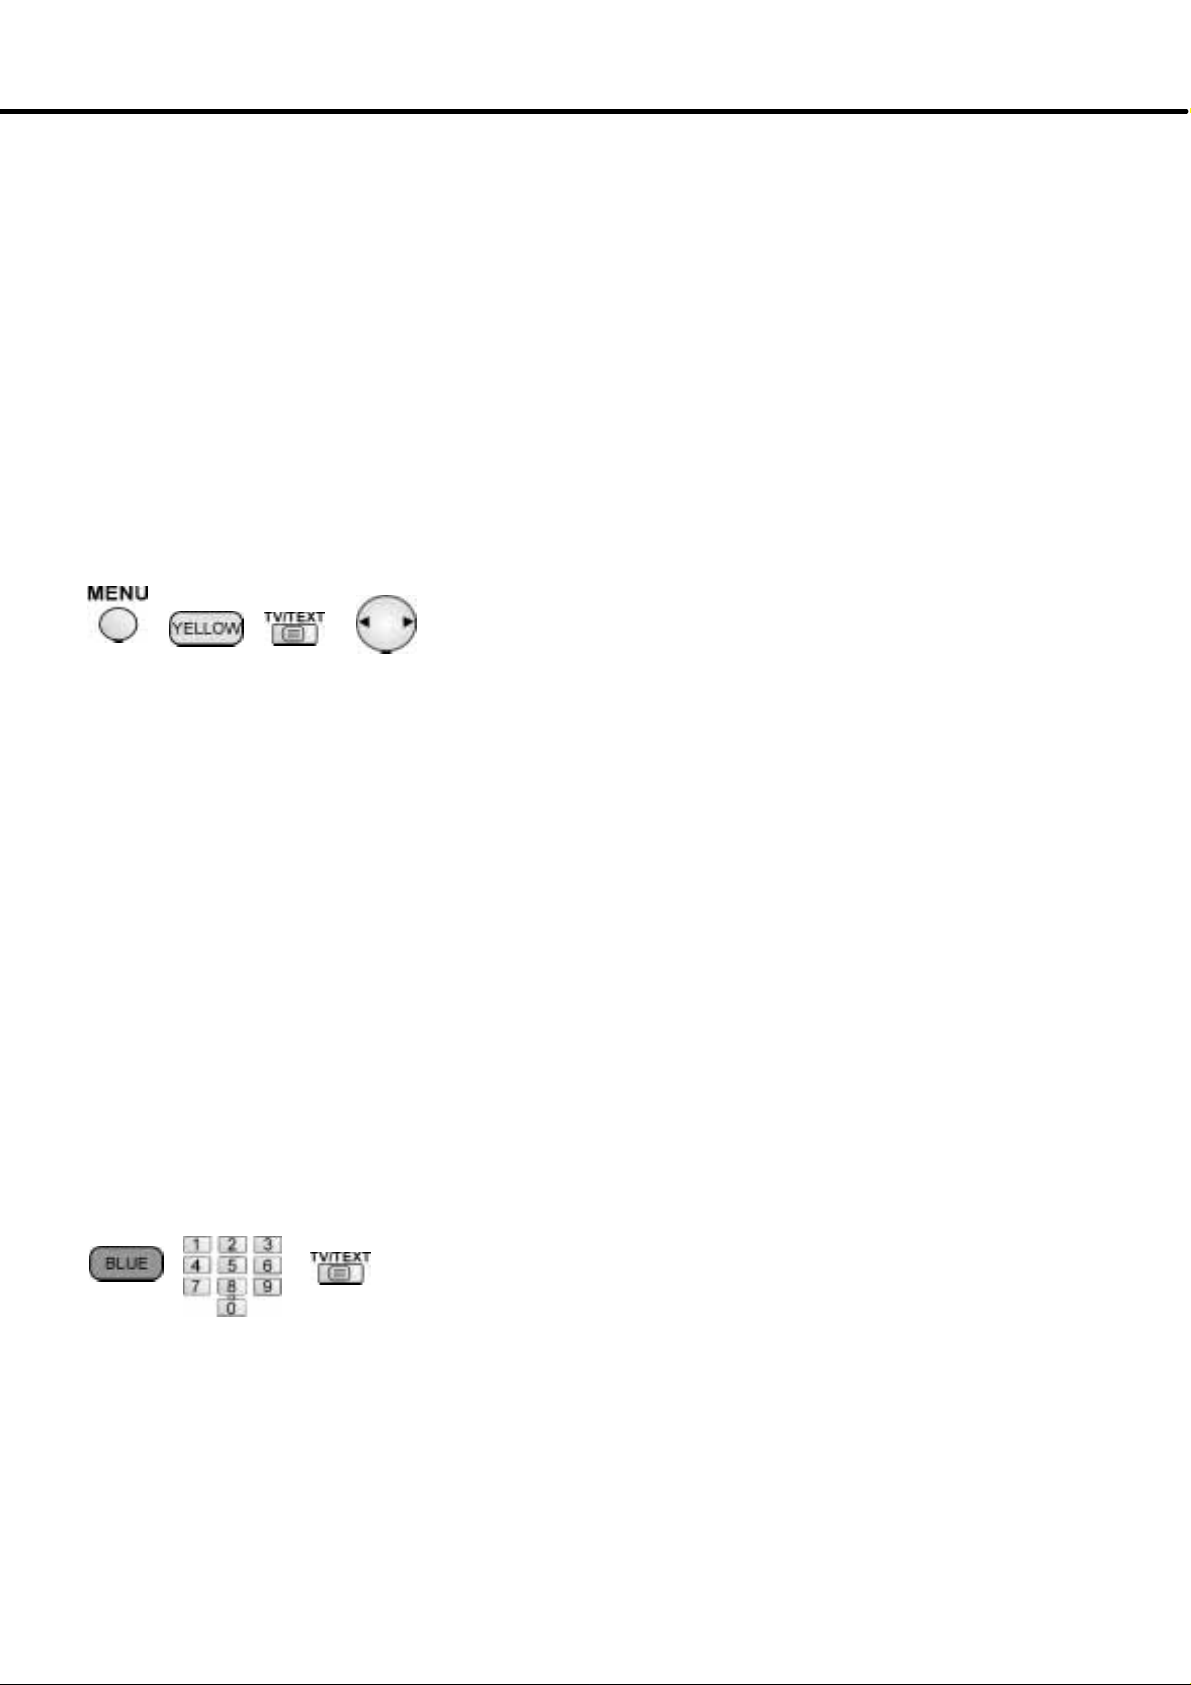
Press the Menu button (1) to display special functions, followed by the Yellow button (2) to view the TV picture whilst
searching for a teletext page.
When found, the screen will display the page number at the top left.
Press the Yellow button (2)toviewthepage.
Press TV/TEXT (3) to return to normal TV operation.
News Flash
When a news flash page has been selected, press Menu (1), Yellow (2), to view the TV picture. When an update is received,
thepagenumberwillbedisplayedonscreen.
Press the Yellowbutton (2) to display the News Flash.
Press TV/TEXT (3) to return to normal TV operation.
Update
Press Menu (1), Yellow(2) to see the update of information on certain pages.
When an update is received, the page number will be displayed at the top left of the screen.
Press the Yellowbutton (2) to view the page.
Press TV/TEXT (3) to return to normal TV operation.
(1) (2)
(3) (4)
Sub Coded Page Access
When Teletext information exceeds one page, it may take some time for the automatic changing of the sub pages to reach the
sub page you require. As each sub page is found its number is displayed at the top of the page so that you may select it; as
more sub pages are picked up, the display at the top of the page changes, so that you are always offered the most recently
transmitted selection of sub pages.
However, the page number, if it exceeds 79, will not be displayed. Youcan still view those pages using the left and right cursor
buttons (4).
In picture and text mode, use the left and right cursor buttons (4) to select a sub page from the range displayed at the top of
the Teletext window.
In Teletext operation, use the following procedure to access sub pages:
If the sub page you want to look at is not yet available, press the Menu button (1) (to display special functions) followed by the
Y ello w button (2) to view the TV picture whilst waiting for more sub pages to be found. The sub pages found will be displayed
across the top of the screen.
When the sub page you are waiting for is available press the Yellow button (2) to return to viewing the Teletext pages, then use
the left and right cursor buttons (4) to select the sub page of your choice.
Notes:
D If you do not want the four coloured special function keys to be displayed on the TV picture while waiting for a sub page to
be found, press the Menu button (1) to clear the keys from the screen. Press the Menu key (1) once more to redisplay the
keys.
D If you have cleared the special function keys from the screen and then used the left and right cursor buttons to select a sub
page, whilst still viewing the TV picture, you must press the Menu button (1) then the Yellow (2) button to display the
Teletext page again.
D If the top of the page indicates that sub pages are being transmitted but the page displayed never changes, then the ’sub
page number’ is there to show the page contentshave been updated, there are no sub pages.
(5) (6)
(7)
Alternatively, if you know which sub page you require, press the Menu button (1), to display special functions followed by the
Blue button (5); T**** will be displayed at thetopleft of the screen..
Enter desired sub page number using the numeric keys (6) on the remote controlbeforetheT****disappears.
For example, to select page 6 enter 0, 0, 0 and 6.
Press the Yellowbutton (2) to view the TV picture whilst waiting for more sub pages to be found.
Whenthepageisavailable,presstheYellow button (2) to view the page.
To clear the page, perform one of the following:
Select a new page number.
Press the TEXT button (7) to return to normal TV operation.
3434
Page 35
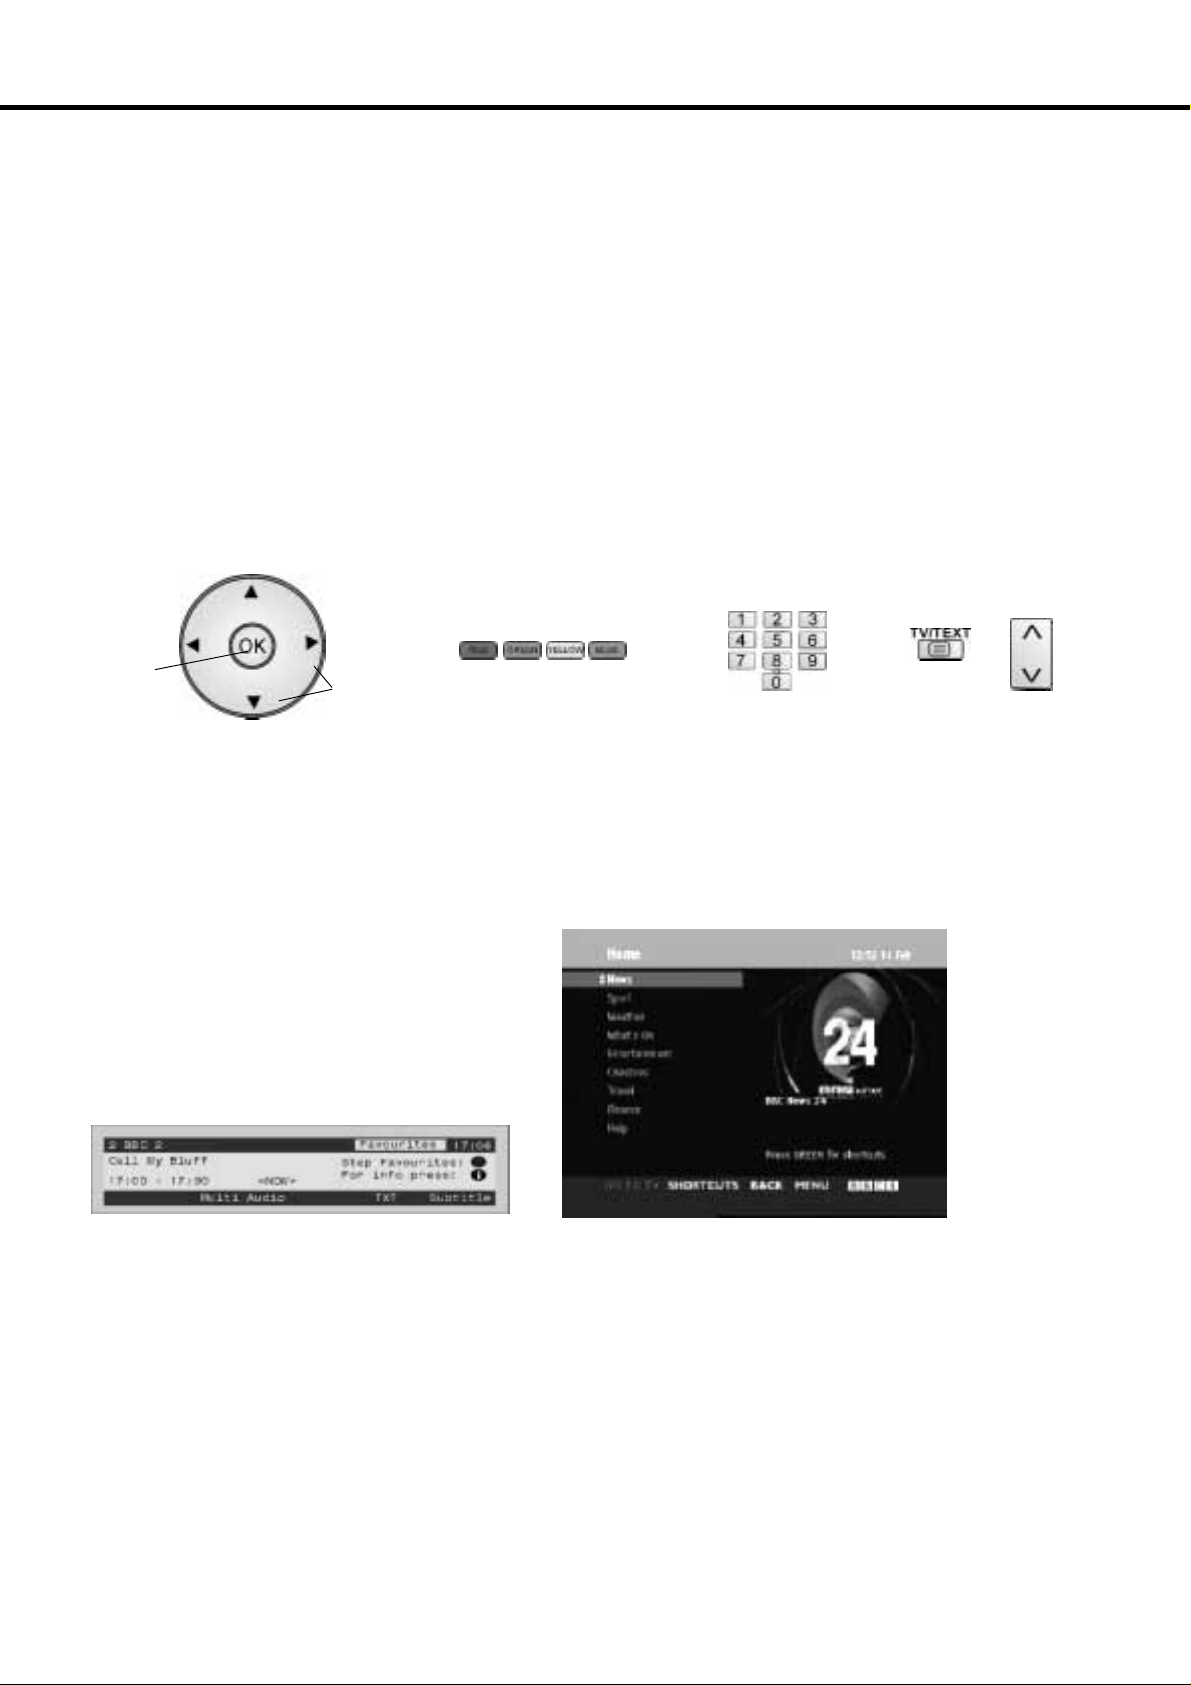
TELETEXT OPERATION
DVB teletext services
DVB teletext services differ greatly from analogue teletext. When you switch to a DVB teletext service, the images you see can
contain graphics and text, laid out and controlledin a manner decided by the broadcaster. In all cases, it is possible to navigate
the pages using buttons on the remote control, but because the commands available must apply to all manufacturers of DVB
equipment, some on---screen commands may not correspond exactly to the remote control buttons. For example:
D For the on---screen command ‘select’or‘go’, use the OK button (1).
D If you see the
D If you see a line of key words displayed in red, green, yellow and blue, use the colouredmultifunctionbuttons(3) to operate
the functions.
D For numbered options, use the numeric keypad (4).
D The TV/TEXT button (5) should allow you to exit the teletext system. Alternatively,press the CHANNEL UP / DOWN buttons
(6) to select another channel.
(1) (2) (3) (4) (5) (6)
A"BY
symbols, use the appropriate CURSOR keys (2).
‘Select’
‘Go’
‘OK’
Assoonasyouswitch toaDVBchannelwithlinkstoa teletextservice,softwareisdownloaded inthebackground toenable theteletext
function. This means that when switching to a DVB channel, you should wait for approximately 5 seconds before pressing the
TV/TEXT button (5) --- this will allow the software to download. If you press the TV/TEXT button (5) before download is complete,
there will be a short delay before the text screen is displayed.
‘Cursor keys’
‘Up/Down/
Left/Right’
Coloured Keywords Numbered options
Return to TV mode
While navigating DVB teletext, you will find there is a short delay when moving between pages while the page downloads.
There is often a prompt shown somewhere on the page (for example “Loading”) to let you know that this is happening.
35
Page 36
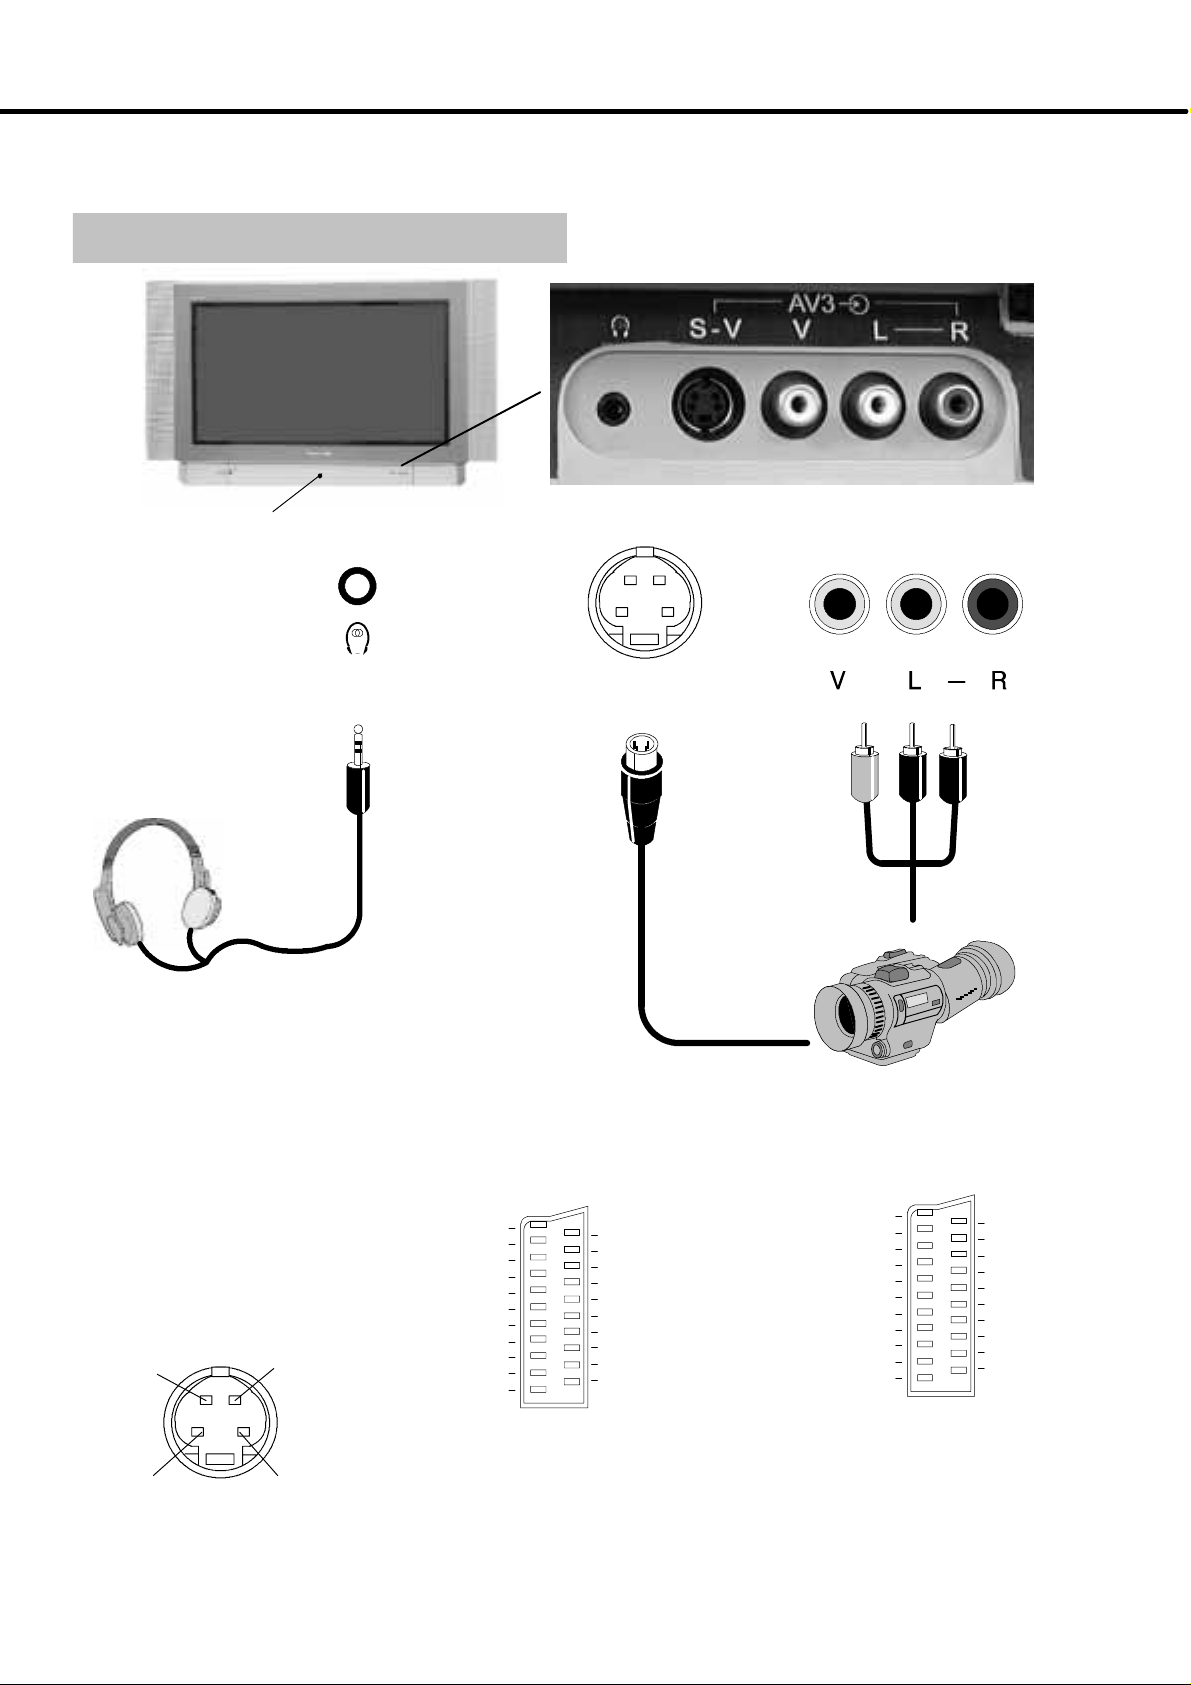
AUDIO/VIDEOCONNECTIONS
Front AV34PinS---Video, RCAAudio /Video and Headphones Sockets
Front Connections
Press and release
to open
S --- V
Outputfrom
Headphone
socket
3.5mm Stereo Plug
STEREO HEADPHONES
with 3.5mm Plug
Note :
Additional equipment and cables shown are not supplied with this TV set.
H Socket information
S --- Vid eo 4 p in socke t
Chrominance in
Chrominance earth
Luminance in
Luminance earth
AV1 / AV4 Scart socket
(S---Video AV4 only)
Socket Earth
CVBS out (video)
CVBS earth
Red in,S.C. in*
Red earth
Greenin
Green earth
Blue in
Blue earth
Audio out (L)
Audio out (R)
Video input to
S --- V
S --- V ideo socket
21
19
17
15
13
11
9
7
5
3
1
20
18
16
14
12
10
8
6
4
2
Suitable inputs for AV1 / AV4 include
RGB (Red/Green/Blue).
S. C. --- In* : on Pin 15 ’S.C.-- -In’ only applies
to AV4.
AV4 : Pins 15 and 20 are dependent
on AV4 S---VHS / VIDEO switching.
CVBSin (video)
RGB status earth
Status RGB
Earth
--- ---
--- --Status CVBS
Audio in (L)
Audio earth
Audio in (R)
Video input to
V socket
RCA
Video
Cable
AV2 Scart socket (S-- Video, Q-- Link)
Socket Earth
CVBS out (video)
CVBS earth
S.C. -- In
Earth
--- ---
Earth
--- ---
Earth
Audio out (L)
Audio out (R)
AV2 -- Pins 15 and 20 are dependent on
AV2 S-- VHS / VIDEO switching.
CAMCORDER
21
19
17
15
13
11
9
7
5
3
1
Audio input to
L/R
sockets
2xRCA
Audio
Cables
CVBS in (video)
20
18
Earth
16
--- ---
14
Earth
12
--- --Q --- Li nk da t a
10
8
Status CVBS
6
Audio in (L)
4
Audio earth
Audio in (R)
2
3636
Page 37
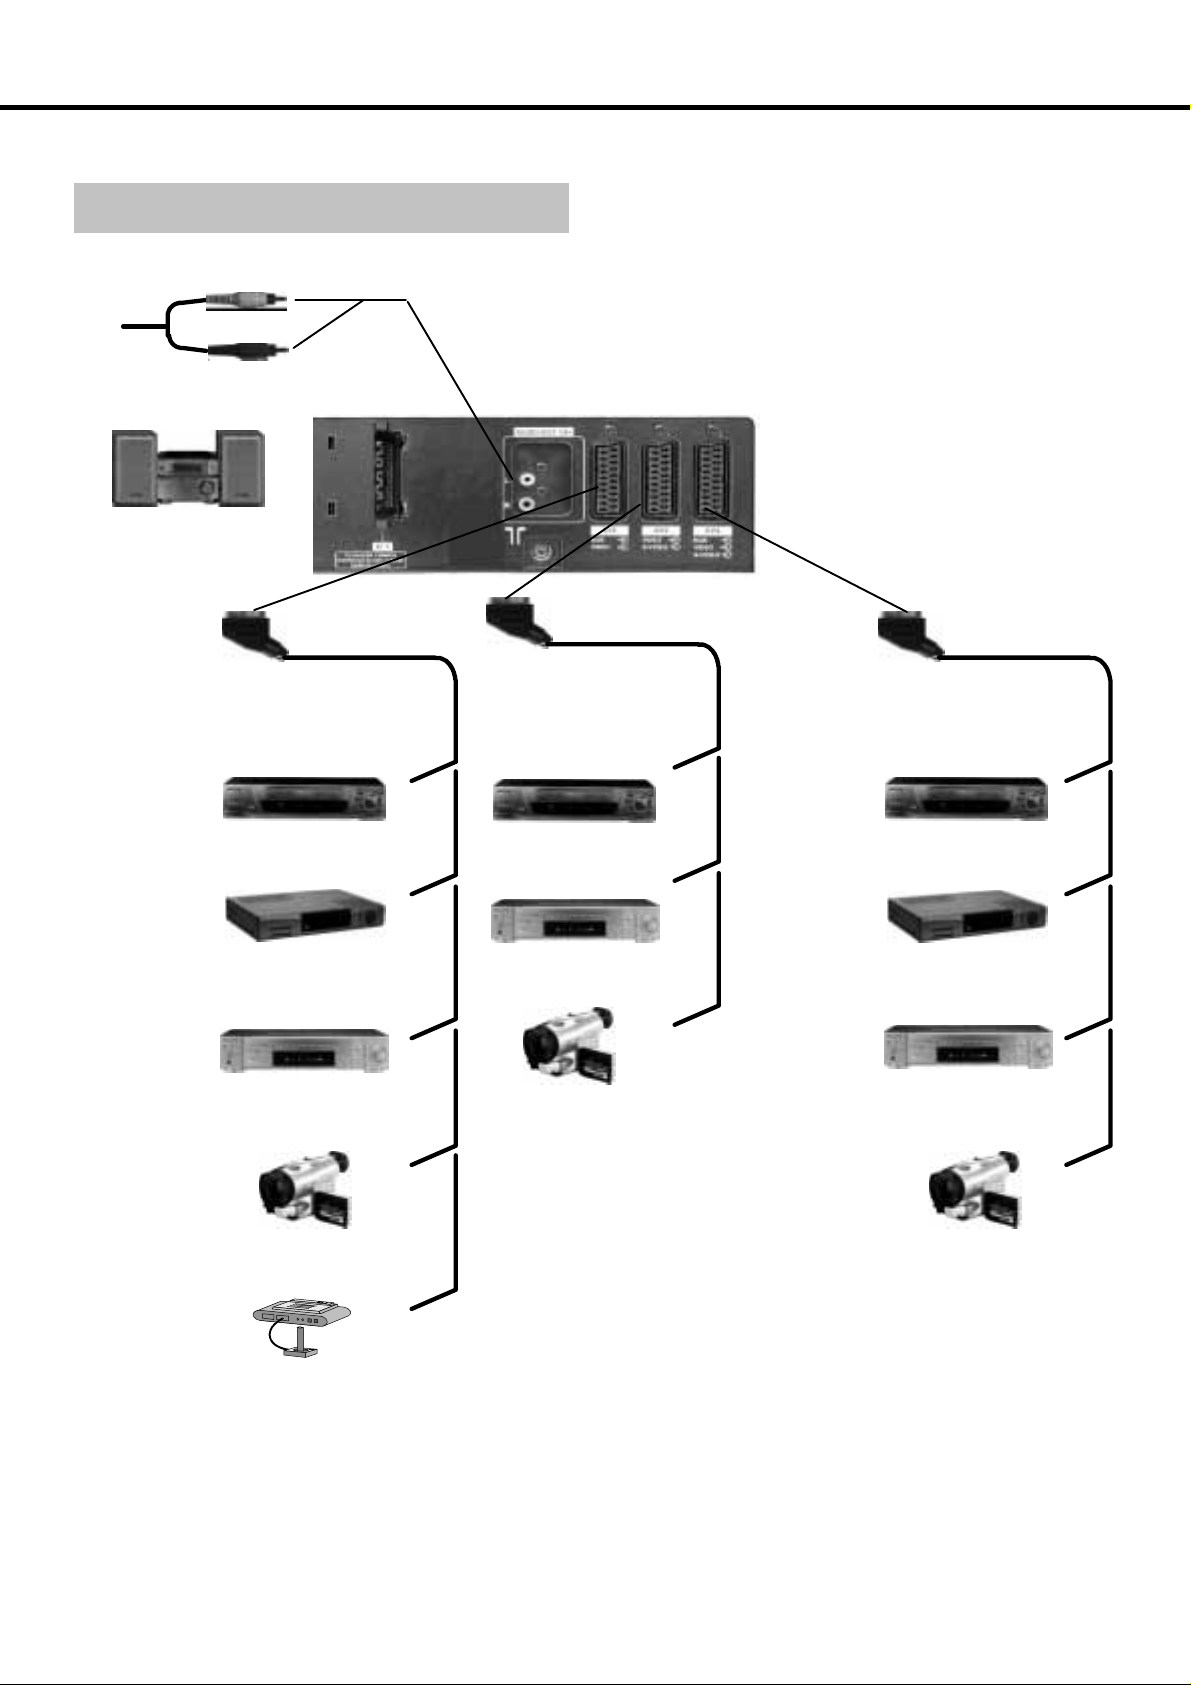
A
A
AUDIO / VIDEO CONNECTIONS
Rear AV1/AV2(S)/AV4(S) 21 Pin Scart, Modem and RCA Audio Out Terminals
Rear connections
Additional equipment can be connected at the rear of the TV via three 21 pin Scart sockets, AV1 / AV2(S) / AV4(S).
2xRC
Outputfrom
L --- R A UDI O OUT
Sockets
HI---FI SYSTEM
udio Cables
Input/Output from
AV1 Scart Socket
Scart cable Scart cable
S --- VID EO VC R
VCR
SET TOP BOX
DVD PLAYER
DVD RECORDER
CAMCORDER
Q --- LIN K C OMPATIB LE VCR
Q---LINK COMPATIBLE DVD RECORDER
DVD PLAYER
S --- VID EO CA M CO RD ER
Input/Outputfrom AV2 Scart Socket
Q --- L ink data
VCR
Input/Output from
AV4 Scart Socket
Scart cable
VCR
S --- VID EO VC R
SET TOP BOX
DVD PLAYER
DVD RECORDER
S --- VID EO CA M CO RD ER
GAMES CONSOLE /
COMPUTER (RGB)
Notes:
D Additional equipment and cables shown are not supplied with this TV set.
D Do not connect a computer with TTL output (5V) to this set.
D The AV2 21 pin socket can also be used as an output to Audio/Video equipment; see page 16 for details.
D For Scart socket wiring information see page 36.
37
Page 38
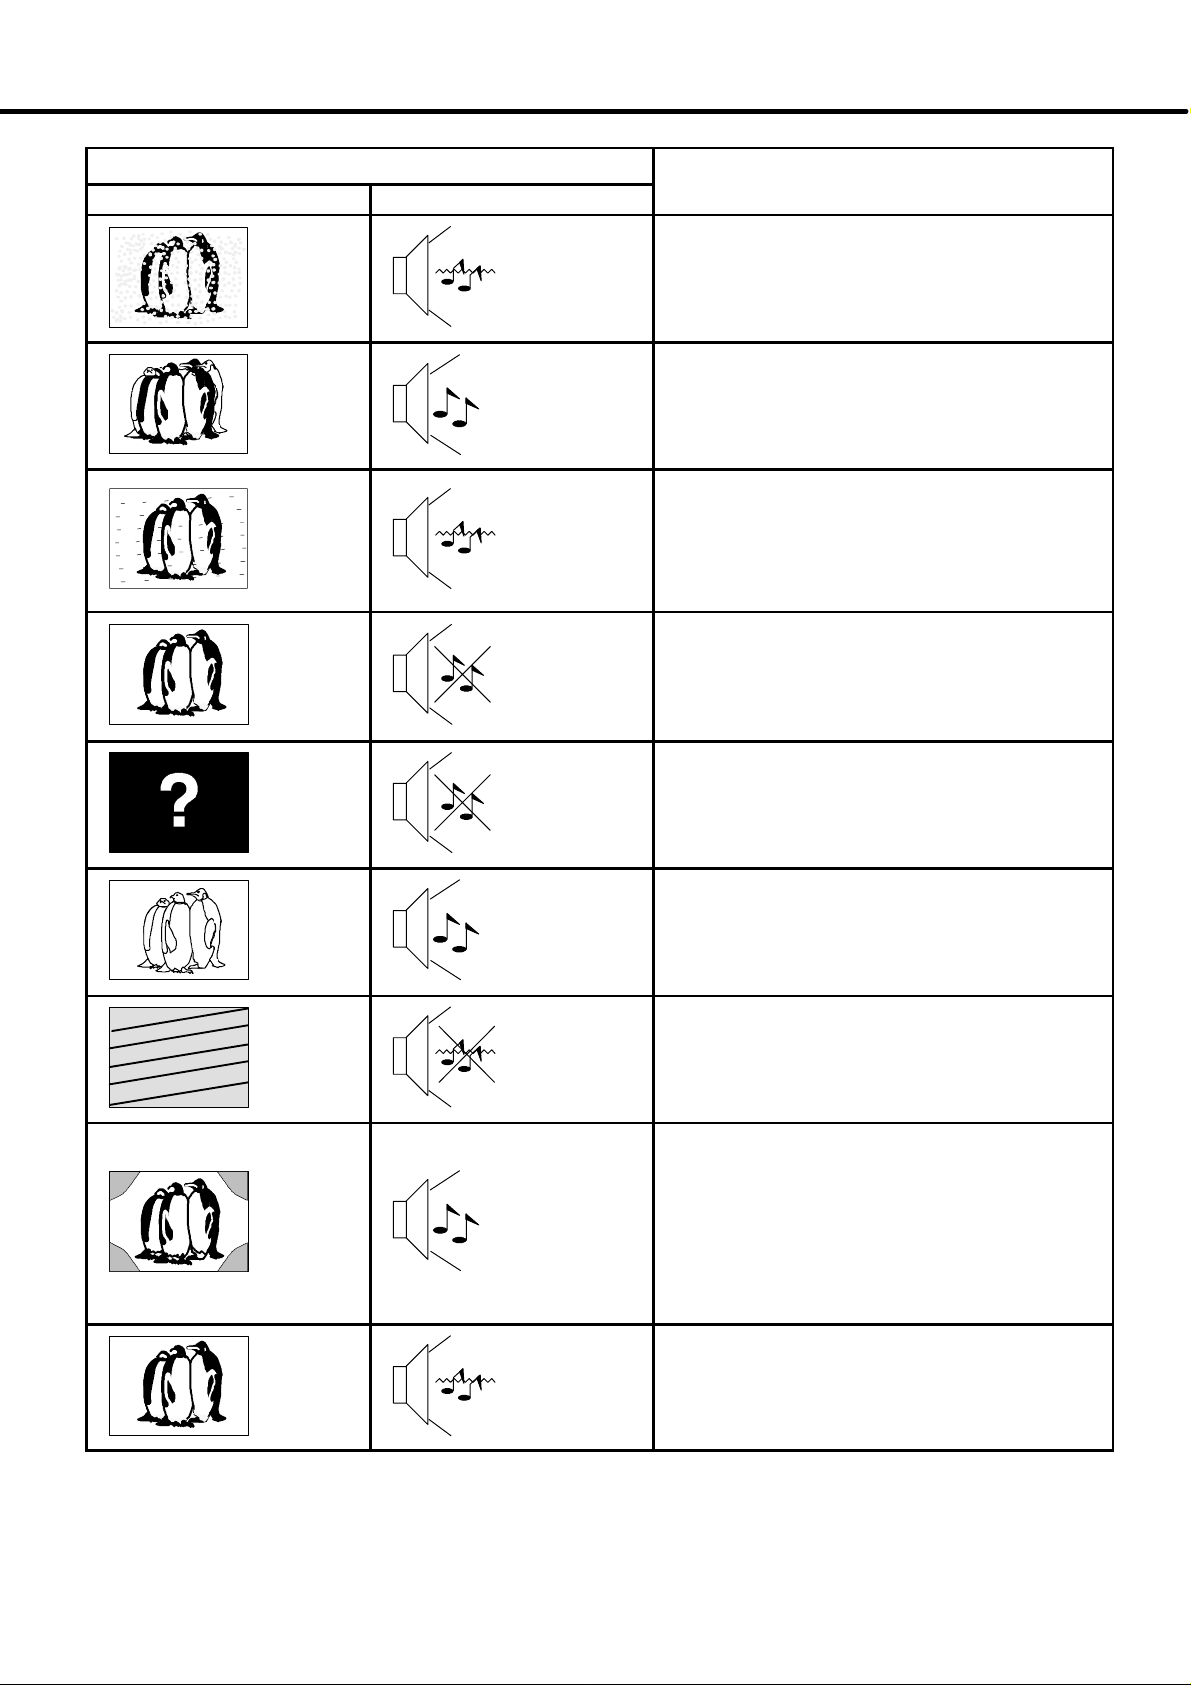
Check
s
GENERAL TROUBLESHOOTING
Symptoms
Picture Sound
Snowy
Picture
Multiple
Images
Interference
Normal
Picture
No Picture No Sound
Noisy
Sound
Normal
Sound
Noisy
Sound
No Sound
Aerial location, direction or connection.
Aerial location, direction or connection.
Electrical appliances.
Cars / Motorcycles.
Fluorescent lights.
Switch on P-- -NR in Picture menu to reduce picture
noise.
Volume level.
Sound mute switched on.
TV set to AV mode.
Not plugged into A.C. outlet.
Not switched on.
Picture / Sound controlsset at minimum levels.
Check if in standby mode.
No Colour
Poor or
Distorted
Picture
Coloured
Patches
Normal
Picture
Normal
Sound
Weak or
No Sound
Normal
Sound
Weak or
distorted
sound
Colour controls set at minimum levels.
Retune Channel(s).
Magnetic Interference from unshielded
equipment.
Receiver moved while switched ON, switch
TV off for 30 minutes.
If picture is also tilted, use Geomagnetic
Correction feature (see Quick Start Guide,
page 9).
Sound reception may have
deteriorated.
Switch NICAM setting (Sound menu in
Analogue only) to Off until reception
improves.
3838
Page 39
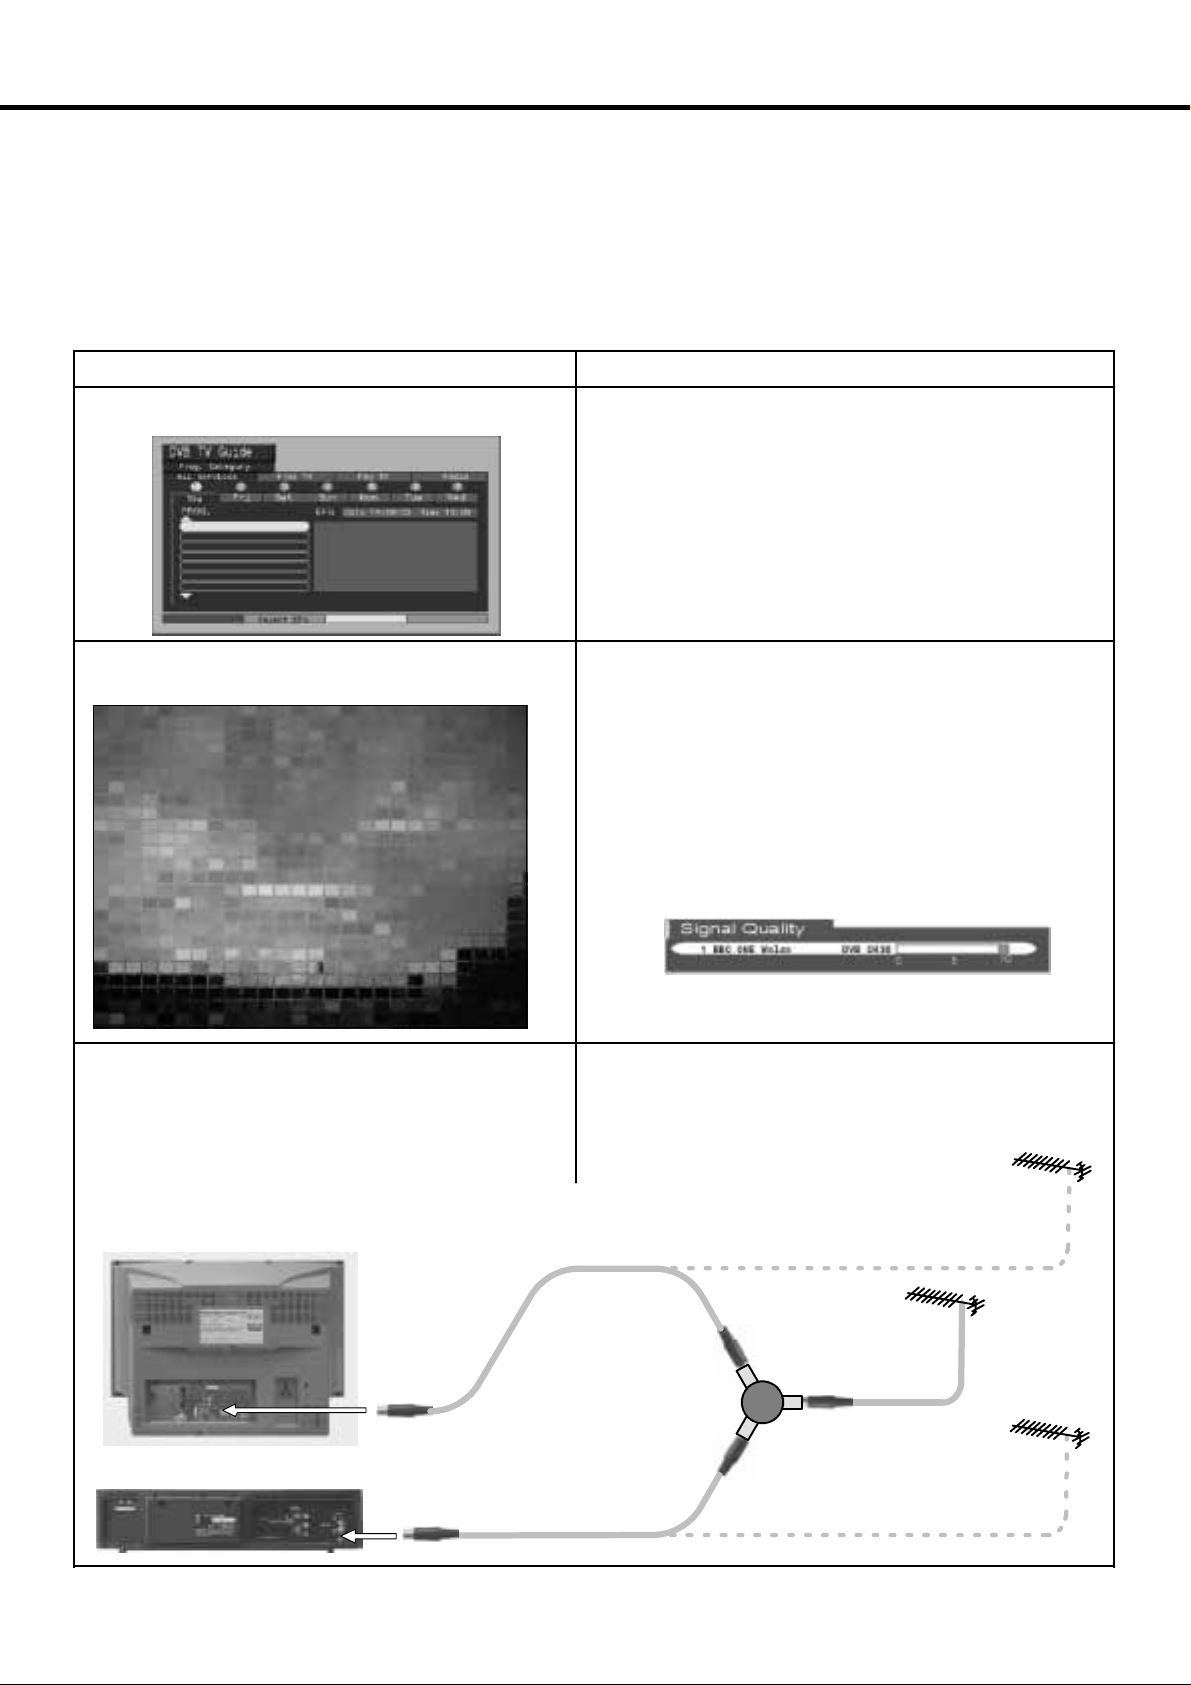
DVB TROUBLESHOOTING
Some problems will only occur when viewing DVB channels. Due to the different techniques involved in digital reception, DVB signal
quality can be poor even if you appear to have a strong signal when viewing analogue programmes.
The DVBsystemrequiresagood quality signal toprovidethebestpicture. When viewing analoguepictures,interference such as signal
reflectionfrom nearby buildings or mountains causes ‘ghosting’, but stillprovidesa viewable picture. For the DVB system, interference
such as this can disrupt the flow of data causing the picture to appear to be made up of large blocks, or to freeze intermittently. If the
picture disappears completely, this could mean that signal quality is very poor. If this happens often, you may need to improve your
aerial system to provide a better signal. This TV co ntains a complex microprocessor which enables you to view enhanced digital
services. Occasionally this device may need to be reset. This can be done by pressing the standby button on your remote control.
Symptom Checks
No DVB channels listed in the TV Guide after Auto Setup.
Check that DVB transmissions are available from the transmitter
you are currently using. If not, try directing the aerial at another
local transmitter .
Check analogue transmissions. If picture quality is poor, you will
need to improve or change your aerial system to receive DVB
channels. Consult a local installer.
Blocky interference.
Picture freezes intermittently.
I have a good aerial system, but still cannot receive
DVB stations.
TV
Blocky interference indicates that the signal quality is poor.
You should consider improving your aerial system.
To check the quality of your signal use the Signal Quality
feature(seepage24).
Good quality signal - -- indication is green.
Poorquality signal --- indication is red.
If you have tried the previous solutionsand are still unable to
receive DVB channels, you may need to provide dedicated
aerial feeds to the TV and other equipment.
This can be implemented using an aerial
splitter or separate aerials.
Separate
Aerial
VCR / DVD RECORDER
Aerial
Input
socket
Aerial
Input
socket
Aerial
Output
Aerial
Output
AERIAL
SPLITTER
Aerial
Input
Separate
Aerial
39
Page 40
/
DVB
D
igital
UHF
l
i
FORYOURGUIDANCE
H Service
Before requesting service, please refer to the troubleshooting
guide on pages 38 and 39 todetermine the symptoms. To obtain
service please contact your local Panasonic dealer quoting the
model number and serial number (both are located at the rearof
the TV).
H TV Games / Home Computers
ExtendeduseofTVgamesorhome computerswithanytelevision
set can cause a permanent ‘shadow’ on the screen. This type of
irreversiblepicturetubedamage, can be limited by observing the
following points:
D Reduce the brightness and contrast levels to a minimum
viewing level.
D Donotoperatethetelevisionsetfor acontinuousperiodof
time while usingTV games or home computers.
D This type of picture tube damage, is not an oper ating
defect, and as such is not covered by the Panasonic
warranty.
SPECIFICATIONS
H Last Position Memory
Certain functions have a last position memory, i.e. the setting at
thetimeofswitch-- off willbe thesettingusedwhenthereceiveris
switched on again.
H Sleep Feature (analogue Mode)
If the set is not switched off when the TV station stops
transmitting, it will automatically go to standby mode after 30
minutes. This function will not operate when the TV is in DVB or
AV modes.
H Screensaver (DVB Mode)
A screensaver can be enabled in DVB mode to help protect this
TV from screen damage.
1. When no signal is being received for example, the Panasonic
logo is displayed.
2. When receiving DVB radio services for example, the
brightnessand contrast of the screen will be reduced.
To cancel either screensaver, press any button. See page 24.
TX--32DTX40
Power Source 220 -- 240V 50Hz A.C.
Power Consumption 111W
1,2W (TV only)
Standby Consumption
Picture T ube
Visible Diagonal
Audio Output
MusicPower
H
Dimensions
Weight (kg) 60
Receiving
Systems
Band name
Aerial -- Rear UHF
Headphones -- Front 3.5mm, 8Ω impedance.
AV -- Rear
W
D
PAL I UHF E21-- 68.
PAL 525/60 Playback of NTSC tape from some PAL Video recorders (VCR).
M.NTSC Playback from M.NTSC Videorecorders (VCR).
NTSC (AV input only) Playback from NTSC Videorecorders (VCR).
AV2 --- 21 pin socket --- Audio / Video in/out, S--- Video in, Q --- Link.
AV4 --- 21 pin socket --- A udio / Video in / out, S --- Vi deo in, RGB in.
11,3W (TV + DVB system set to record
Timer programmes).
76cm
FrontLeft/Right20Wx2(MPO),
8Ω impedance.
566mm
902mm
549mm
terrestrialservices via
AV1 --- 21 pin socket --- A udio / Video in / out, R GB in.
2 x RCA Audio Monitor Out.
aeria
nput.
AV -- Front AV3 -- S---Video in, RCA Audio / Video in.
Specifications are subject to change without notice. Weight and dimensions shown are approximate.
Dolby Virtual and the are trademarks of Dolby Laboratories.
Manufactured under license from Dolby Laboratories
4040
Page 41

UNITED KINGDOM / IRELAND
PANASONIC TECHNICS
GUARANTEE
CONDITIONSOF GUARANTEE
This guarantee is in addition to anddoes not inany way affectany statutory or otherrightsofconsumer purchasers. If within theapplicable guarantee period (asshownin 8 below) theappliance
provestobe defectiveby reasonof faultydesign, workmanship ormaterials, we undertakesubjecttothe followingconditionstohave thedefectiveappliance(oranypart orparts thereof)rep aired
or atourdiscretion replaced free ofcharge.
1.The applianceshall havebeenpurchased andusedsolelywithin theEU/EEAcountries and usedsolelyfordomesticandnormal purposesand inaccordance withstandard operating instructions
and thetechnicaland/or SafetyStandardsrequiredin thecountry wherethe applianceis tobe used.
2. Forappliancesused inthe U.K.,Channel Islands,Isle ofMan and Republicof Ireland theapplianceshould be returned togetherwith thisguaranteeand proofof purchasepromptly onbeing
founddefective, at thepurchasersriskand expense,totheauthoriseddealerfrom whomtheappliance was purchasedor to the nearestauthorisedServiceDealer.Allenquiriesmust bethroughsuch
dealers.
3. The guarantee shall not apply to damage caused through fire, accident, misuse, wear an d tear, neglect, incorrect adjustment or repair, to damage caused through installation, adaption,
modifications,or use inan impropermanner orinconsistentwith thetechnicaland/or safetystandardsrequiredin the countrywhere thisappliance isused, orto damageoccurring duringtransit
to orfrom the purchaser.
4. If atany time during the guarantee period any partorpar ts of the appliance arereplacedwith a part or partsnot suppliedorapproved by usor of anobjective quality safe and suitable for the
appliance, or the appliance has been dismantled or repaired by a person not authorised by us, the purchaser shall not be entitled to any rights and/or remediesunder thisguarantee.
5.Thepurchaserssoleand exclusive remedy under thisguaranteeagainstusis forthe repair(oratour discretionthereplacement)of theapplianceorany partorpartsand no otherremedy,including,
but notlimitedto, incidentalor consequentialdamage orloss ofwhatsoever nature shallbeavailableto thepurchaser.
6. This guaranteeshall notapply to stylus,bulbs, batteries,dust covers,dust bags,belts,brushes,cabinet partsor anyother parts ofa limitednaturallife.
7. Our decisiono n all matters relating tocom plaints shallbe final. Any appliance or defectivepart whichhasbeen replaced shall become our property.
8. Theguarantee period applicableto thisappliance shall be12 months.
PanEuropean Guarantee;Conditionsapplicable inany countryother than thecountry of originalpurchase.
A.When thepurchaserfindsthe applianceto be defective,he shouldpromptly contacttheproper salescompany ordistributorinthe EU/EEAcountryor Turkeywhere thisguaranteeis claimed,
asindicatedin the”productservicesguide” orthe nearestauthoriseddealertogether withthe guaranteeand proofofdate ofpurchase. Thepurchaser willthen be informed whether
i The salescompany ornational distributorwill handlethe repairserviceor
ii The salescompany ornational distributorwill arrangefor trans-- shipment ofthe applianceto the EU/EEAcountry orTurkey wherethe appliancewasoriginally marketed, or
iii thepurchaser mayhimself send theappliance tothe sales companyor nationaldistributorin theEU/EEAcountry or Turkey wherethe appliance wasoriginally marketed
B.If theapplianceisa product/model whichis normallysuppliedby thesalescompany ornationaldistributorin the country whereitis usedby thepurchaser, thentheappliance together with the
guaranteeand proof ofdate of purchase,should be returned atthe purchaser’srisk andexpense tosuchsalescompany or distributor,whichwillhandle therepairservice.In somecountries, the
affiliated sales company or national distributor will designate dealers or certain service centres to execute therepairsinvolved.
C. Ifthe appliance isaproduct/model whichisnot normally supplied in thecountry where used,or if the appliances internal or external productcharacteristics are different from those of the
equivalentmodel inthe country where used, thesalescompany ornationaldistributormay beableto havethe guaranteerepair serviceexecuted byobtainingspare partsfrom thecountrywhere
theappliancewas originally marketed,or it maybe necessaryto havethe guaranteerepair service executed bythe salescompany or nationaldistributorin the countrywhere theappliance was
originallymarketed.In either casethe purchasermust furnish this guaranteeandproof of dateof purchase.Any necessary transportation,both oftheappliance andany spareparts,willbe atthe
purchasersrisk andexpense, andthere maybe a consequentdelay inthe repairservice.
D.When theconsumer sendsthe applianceforrepair tothe salescompany ornational distributorin thecountry ofuse of theappliance,the servicewillbe provided onthe samelocalterms and
conditions(including theperiodof guaranteecoverage)asprevailforthesamemodelapplianceinthecountryofuse,andnotthecountryofinitial sale inthe EU/EEAor Turkey.Wherethe consumer
sendsthe appliancefor repairto the salescompany or national distributorin theEU/EEAor Turkey wheretheappliancewas originally marketed therepair servicewill beprovided on thelocal
terms and conditions prevailing in the countryof initial sale inthe EU/EEA or Turkey.
E.Someproductmodelsrequireadjustment or adaptationforproperperformanceand safeusein safetyorothertechnicalstandardsimposedor recommendedby applicableregulations.For certain
product modelsthe cost of such adjustment or adaptation may be substantialand it may be difficult tosatisfy local voltagerequirementsand safety or other technical standards. It isstrongly
recommendedthat thepurchaser investigatethese localtechnicaland safety factorsbefore usingthe appliance inanother EU/EEAcountry orTurkey.
F.Theguaranteeshall not cover the costof anyadjustmentsoradaptationstomeetlocalvoltage requirementsand safetyor othertechnicalstandards.The salescompanyornational distributormay
bein apositionto makethenecessary adjustments oradaptatio nstocertain productmodelsatthe costof thepurchaser.However, for technicalreasonsit isnot possibletoadjustor adaptall product
models tocomply with local voltage requirementsand safety or other technical standards.Moreover whereadaptations oradjustmentsare carried outthe performanceofthe appliancemay be
affected.
G.If inthe opinionofthe salescompany ornationaldistributor in thecountry where the appliance is usedthepurchaser has the necessaryadjustmentsor adaptationsto localvoltagerequirements
and technical or safety standards properly made, any subsequentguarantee repair service will beprovided as aboveindicated, provided thepurchaser disclosesthe nature ofthe adjustmentor
adaptationif relevantto therepair.(It isrecommended thatthe purchasershould notsend adaptedor adjusted equipmentfor repairto thesales companyor thenationaldistributor in thecountry
where the appliancewasoriginally marketed if the repair relatesin any way totheadaptation or adjustment)
H.Thisguaranteeshall onlybe validin territoriessubjectto thelaws ofthe EuropeanUnion and theEEA, aswell asTurkey.
Pleasekeep theguarantee with yourreceipt.
Caution: Please ensurethattheform iscompletedatthetimeof purchaseand presentittoyourdealerwithreceiptattached forunder guaranteeservice,otherwiseyourguaranteemay beaffected.
Model:
TX---32DTX40
Serial No.: Date of Purchase
Customer’s Name and Address:
Dealers Stamp
41
Page 42

Sales and Support
Information
Customer Care
S For UK customers: 08705 357357.
S For Republic of Ireland customers: 01 289 8333.
S Visit our website for product information
www. p anasonic.co.uk.
S Order accessory and consumable items for your
product with ease and confidence by telephoning our
Customer Care Centre Mon-- -Friday 9:00am---5:30pm
(Excluding public holidays).
S Or go on line through our Internet Accessory ordering
application at www.panasonic.co.uk.
S Most major credit and debit cards accepted.
S All enquiries, transactions and distribution facilities are
provided directly by Panasonic UK Ltd.
S It couldn’t be simpler!
S Also available through our internet is direct shopping for
a wide range of finished products, take a browse on our
Centre
UK
website for further details.
4242
Trade Mark of the DVB Digital Video Broadcasting Project (1991 to 1996)
TX---32DTX40 Declaration of Conformity No 2934, 24th October 2003
Panasonic (U.K.) Ltd
Willoughby Road, Bracknell,
Berks RG12 8FP.
E Matsushita Electric (U.K.) Ltd.
 Loading...