

Page 1

Panasonic
Operating Instruction
Colour Television
TX-29F155A
Please read the operating instructions completely before operating this set.
TQB4G2758
Page 2
Dear Panasonic customer
Welcome to the Panasonic family of customers. We hc^ that you will have many years of enjoyment from your
new colour television.
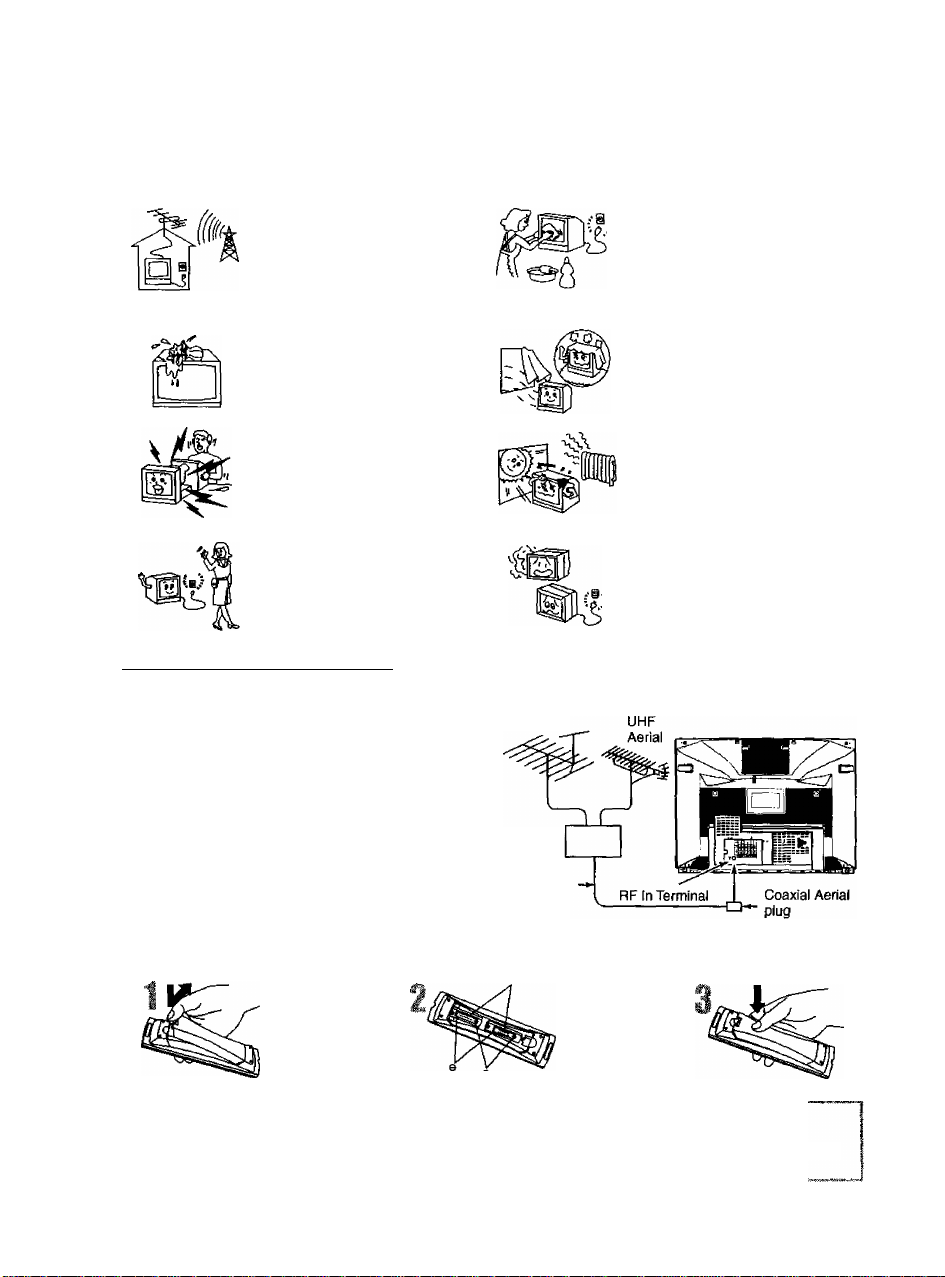
(safety Instructions}
The TV set can be operated on AC
SINGLE 230-240V, 50Hz.
The apparatus shall not be
exposed to dripping or splashing
and that no objects filled with
liquids, such as vases, shall be
placed on the apparatus.
Do not remove the rear cover, as
live parts are accessible when it is
removed.
The cabinet and picture tube can
be kept in good condition by simply
wiping with a clean, soft cloth
moistened with mild detergent and
water. Do not use solutions
containing benzol, petroleum or a
chemical cloth. For safety, remove
the plug from the wall outlet.
Adequate ventilation is essential to
prevent failure of electrical
components.
Avoid exposing the TV set to direct
sunlight and other source of heat.
Remove the plug from the wall
outlet (Power point) when the TV
set is not used for a prolonged
period of time.
(Before Operating This Set ^
■ Connect the Aerial Cable to the RF In Terminal
To obtain the best quality picture and sound, an external
antenna, the correct cables (75 Ohm coaxial) and the
correct terminating plug will be required.
If a communal antenna system is used, you may require
the correct connection cable and plugs between the wall
antenna socket and your television receiver.
Your local Television Service Dealer may be able to
assist you in obtaining the correct antenna system for
your particular area and accessories required.
Any matters about antenna installation, upgrading of
existing systems or accessories required, and the cost
incurred, are the responsibility of the customer.
■ Battery Installation
Open the cover.
A Cautions
Do not use rechargeable (Ni-Cd) batteries.
They are different in shape and performance and may fail to ensure correct operation.
The incorrect use of batteries can cause electrolyte leakage which will corrode the Remote
Control or cause the batteries to burst.
Insert the two batteries.
VHF Aerial
Mixer
75fi
Coaxial
Cable
Two “R6 (AA)" size
Do not use this set if abnormal
c^eration occurs.
EX: smoke, odd sounds or smells,
turn the power switch off and
disconnect the AC power if you
notice any unusual operation.
Close the cover.
Page 3
Before Operating This Set)
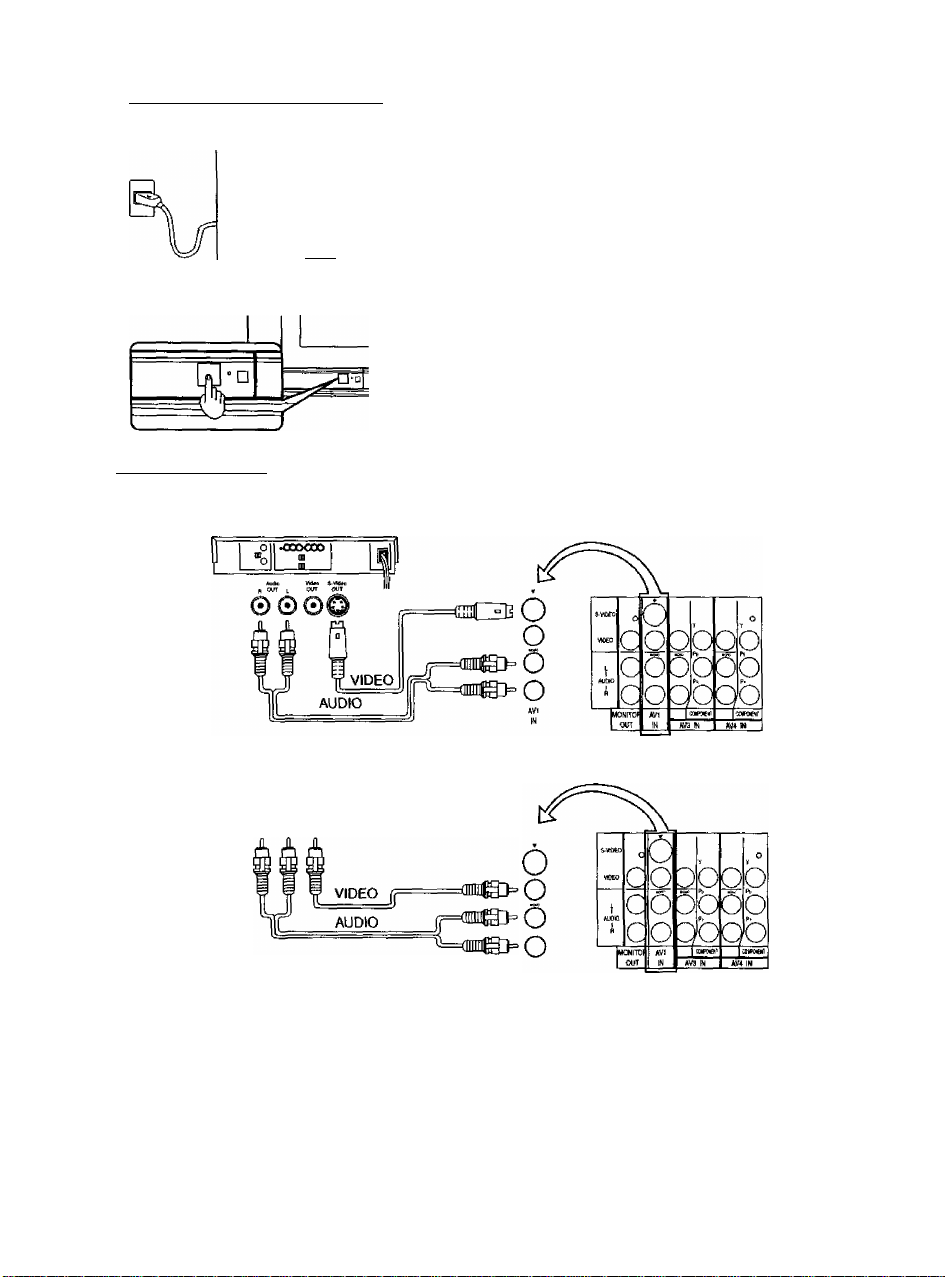
■ Connecting the Plug to the Wall Outlet
Note:
• Mains plug types vary between countries. The mains plug shown at left
L-i n[ may therefore not be the type fitted to your set.
How to Turn the Power On
Press the Power switch on Television to turn the set on. (See page 6)
( Connections ^
■ How to connect the “AV1,2,3 or 4” Input Terminals
(Super-VHSVCR)
(VMS VCR)
0©0
Notes:
1. When an S-Video cable is connected to the S-Video terminal, the Video input will be automatically switched
off for the AV mode.
2. When a Monaural VCR is used, connect the Monaural Audio cable to the Audio “L” (left) terminal.
3. Select the desired AV input position by pressing the “TV/AV” button (refer to page 6).
4. The AV3 and AV4 audio input terminals serves as the audio input terminal for both the video input and for the
DVD input.
5. input 2 is located on the front of the unit.
6. When using “MONITOR OUT function with source connected to “AV2 IN”, please use “VIDEO” input
(NOT “S-VIDEO” input).
Page 4
( Before Operating This Set)
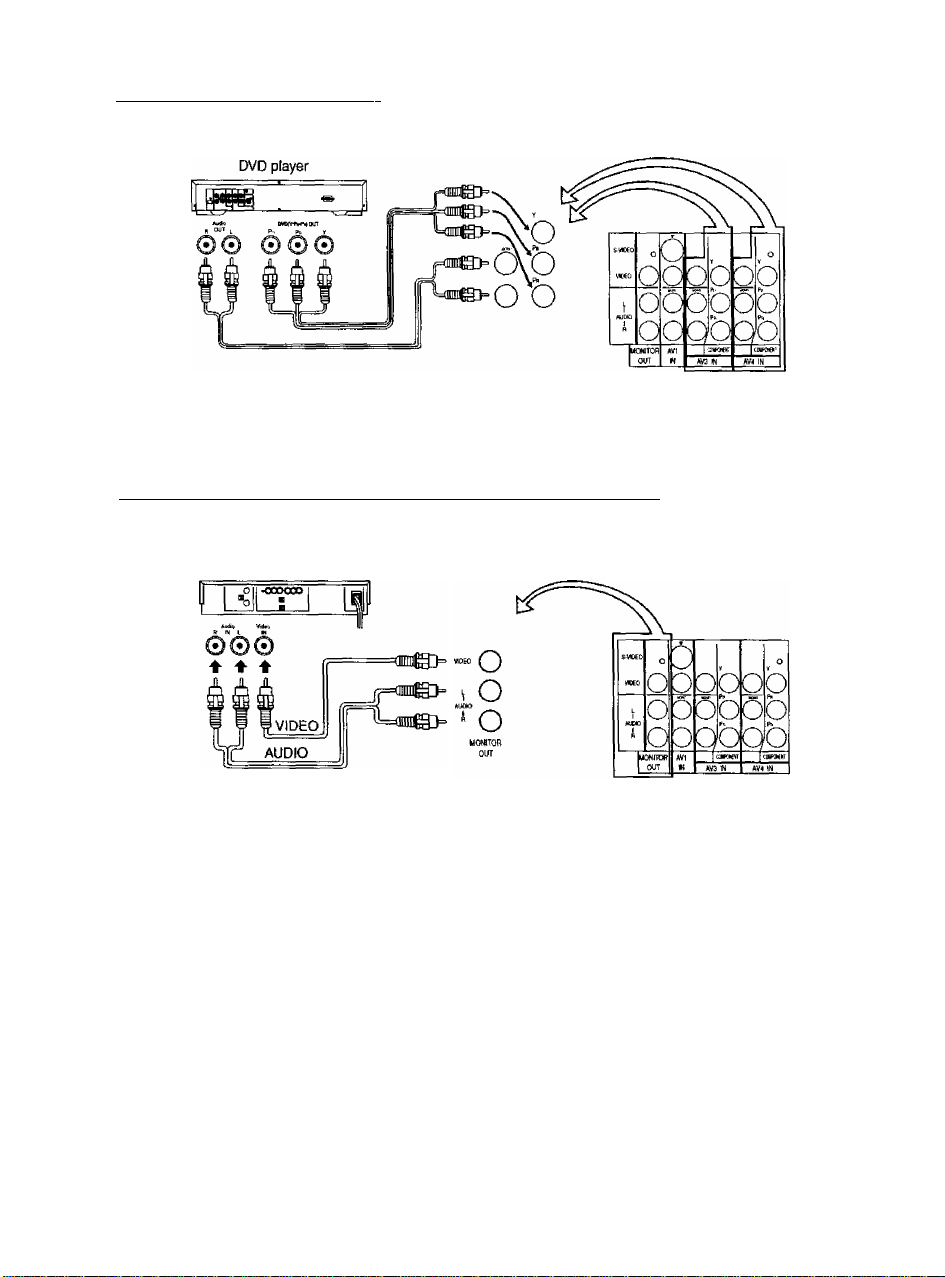
■ How to connect the DVD Input Terminals
Notes:
1. The AV4 audio signal is common for both AV4 and DVD input signal terminals.
2. The DVD signal input terminal takes priority over the AV4 video signal input terminal.
3. Similar connection are available at the component v^deo input 3 terminal.
U How to connect the AV Monitor Output Terminals to other Equipment______________
The “Monitor Out” terminal output the same signals as main picture on the TV screen and sound from the
speaker at that time, e.g.TV programmes or signals from AV1, AV2, AV3 or AV4 input.
Recording Equipment (VHS VCR)
Notes:
1. Never connect the same video recorder with both the VIDEO IN and MONITOR OUT terminals on this TV set,
as this could cause incorrect operation.
2. The MONITOR OUT emits the main picture normal video and audio signals.
3. The DVD signal (Y*Pb*Pr) Is not output at the MONITOR OUT terminals.
4. When using “MONITOR OUT function with source connected to “AV2 IN”, please use “VIDEO" input
(NOT“S-VIDEO" input).
Page 5
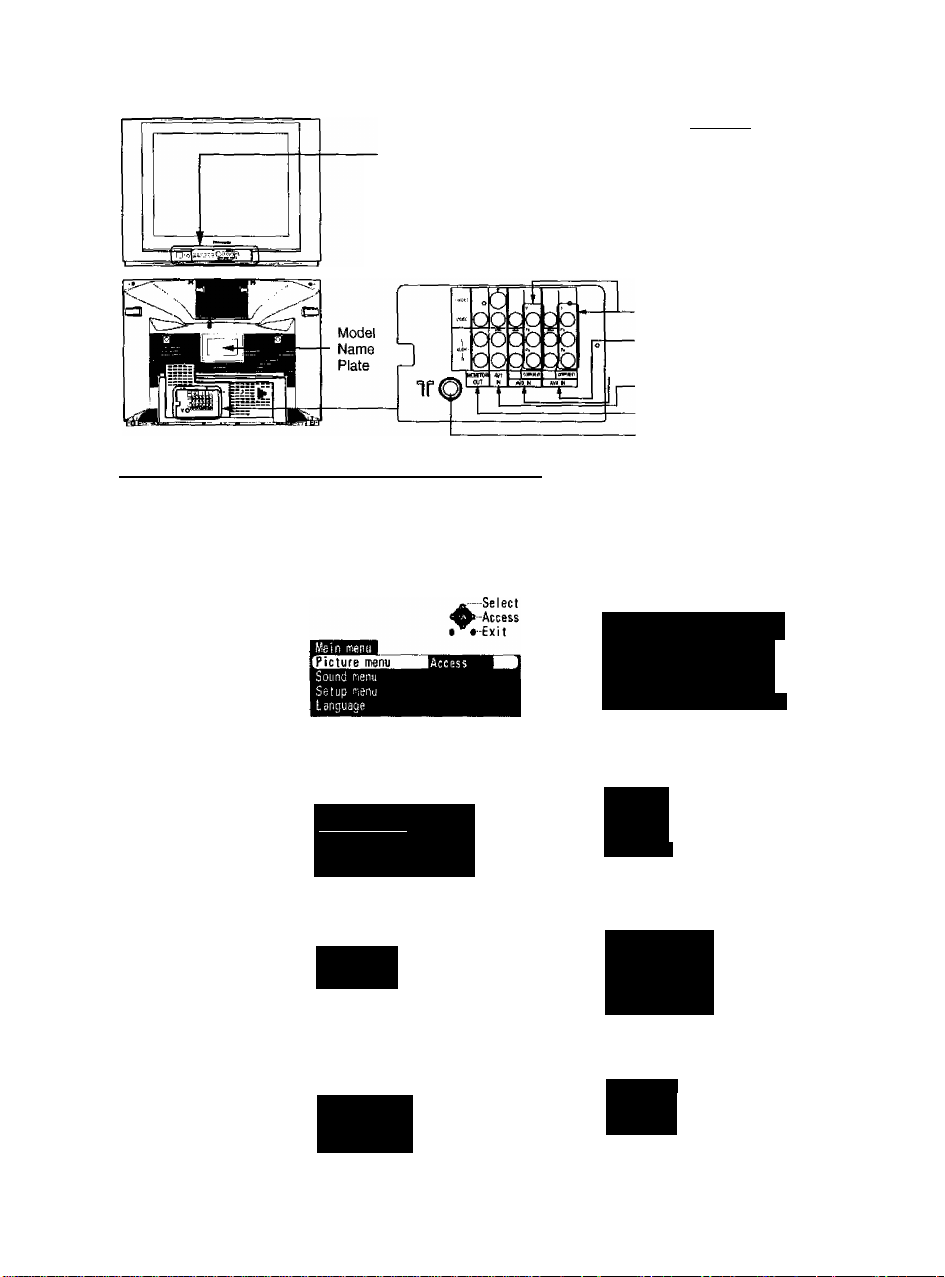
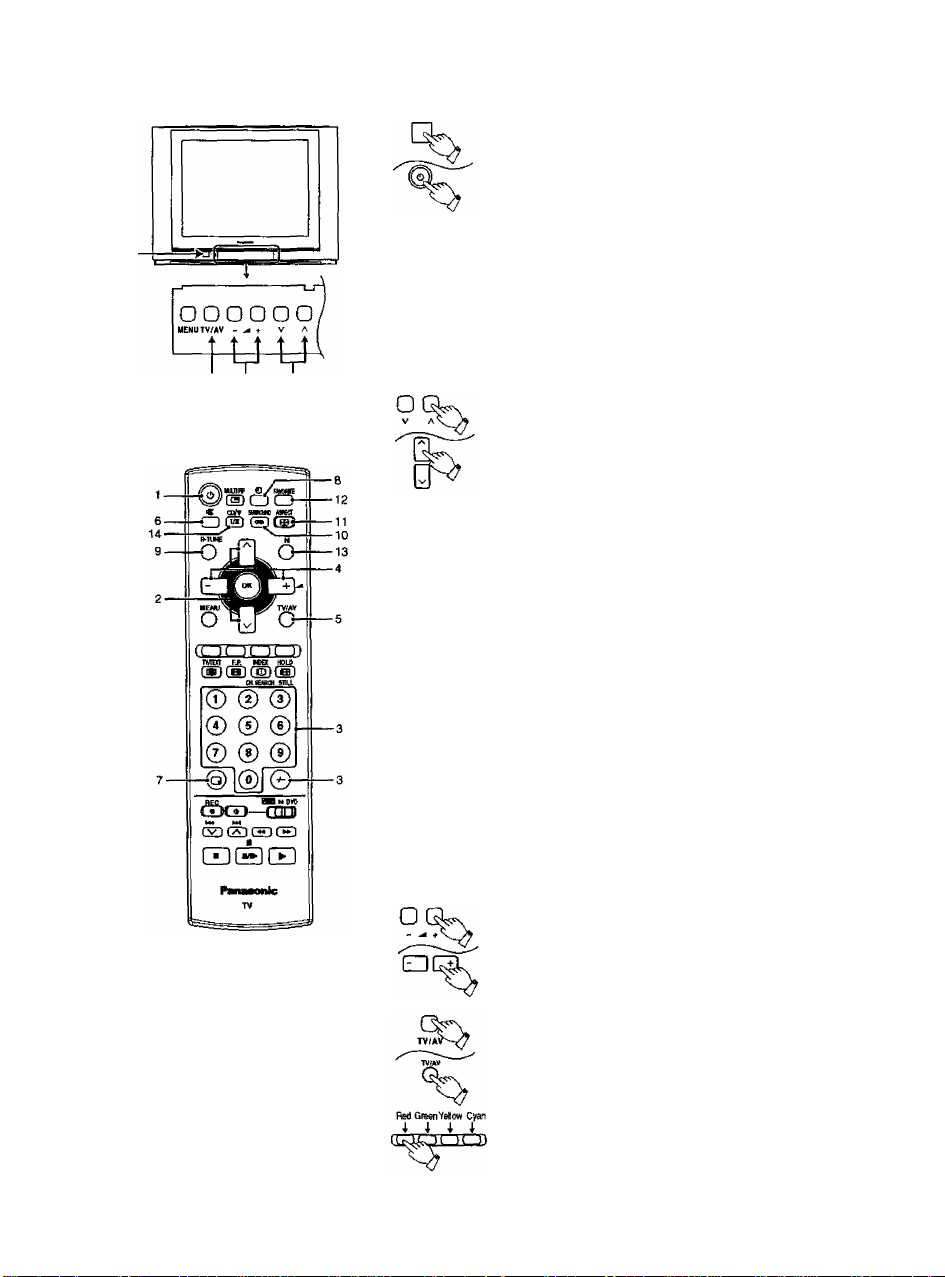
(Location of Control (TV)^
0 o o o o o O o o oio)
IKMUrV/AV - -4 + V A
□
1 i i i i i S-VIQEO VIDEO AUDIO fi
lAiawo ft~
Power Menu tv/AV Volume Channel AV2 In
Switch button button Up and Up and
Down Down
buttons buttons
-----
AV3 Input Terminals
DVD (Y«Pb*Pb) Input
AV4 Input Terminals
AV I Input Terminals
Monitor Output Terminals
Aerial Terminal {RF in Terminal)
Headphones
terminal
(Flow Chart of Main Menu (Remote Control)^
When the “MENU” (EXIT) button is pressed at the Main Menu screen, the screen display will return to the normal
viewing condition.
When the “MENU” (EXIT) button Is pressed at each MENU screen (Picture, Sound, Setup menu, Language), the
screen display will return to the Main Menu screen.
Menu
Picture menu
Sound menu
' When NTSC signal is received.
Main nteni}
Pictijfe nenu
^SnSlSQHnB Ac c e s s
Setup rnenu
Language
On Screen Indication
^-Select
»-Access
VExit
Contrasi ~
Brightness —
Colour —'
Sharoness
I'iTSC-Ti'K
Cril'jjr reinperatu’e Standard
V'oi nine
Eqya'iter
Balnnr.e
AVL
Sur■ound
Dynarri c
OlTI
ni”)
Setup menu
Language
'Main menu
Pi ct ur e n'lcnu
Sound menu
Main №!iu
Picture rrenu
Sourid Tienu
Setup menu
^—Select
»-Access
VExit
^ -Select
»-Access
VExit
Cff t;rrer
itake up TiTer
flicker rjidiic-ion
Ch colour set
3'ue Back
VCR GAk'E
fl l>nlTf)U
TE'ta V ET
Malaysia
••1
Page 6
(General Operation^
5 4 2
(TV set)
How to switch the power ON or OFF
The TV set must first be switched on at the wall outlet
and at the Power Switch (refer to page 3).
Press this button to turn the TV set ON, from STANDBY
mode.
Press it again to turn the TV set OFF, STANDBY mode.
Power - indicator
STANDBY - Red
POWER ON - Green
Note: It is also possible to turn the TV set on
STANDBY by pressing the “Direct Programme
Number Selection” buttons (0~9) and the
“Programme Number Up” or “Down” button,
either on the set or on the Remote Control.
Programme Number Selection
Press the Programme Number Up “A" or Down “v”
button to select the next higher or lower Programme
Number.
©
©
%
Direct Programme Number Selection
(Ch select = Position)
You can select the numbers directly by pressing “0~9”
buttons and the two digit numbers by pressing “Two
Digif and “Programme Number” buttons.
Programme Number 8
Programme Number 12
Direct Programme Number Selection
(Ch select = Direct)
You can select the number directly by pressing the
corresponding Programme Number button.
Programme Number 8
Programme Number 36
Programme Number 124
Note: When the Skip setting for Programme Number
100 through 125 is on, the channel selection
time will be shortened, and thus you cannot
input three digits at a time.
Volume Adjustment
Press the Volume Up “+” or Down button to increase
or decrease the sound volume level.
TV/AV Mode Selection
Press the “TV/AV” button to select TV, AVI, AV2, AV3,
AV4, input signal modes sequentially.
..........
.........
..........
........
......
®
© ,©,®
®
®,®
®,®,®
Remote control:
Press the TV/AV button to display AV1-AV4 at the
bottom of the screen. Each coloured button
corresponds with each input. For example, pressing the
Red button selects AVI.
Page 7

( General Operation)
« Mute Button
8 Д
9
10
It
Press this button to mute the sound completely. The “MUTE” symbol will appear. {Colour will
change to red.)
Press the button once again to restore the previous sound level and cancel the mute.
Recall Button
Press the "Recall” button to display the current system status. Press again to cancel.
Off Timer Button
The TV set may be preset to switch to stand-by after a fixed period.
By pressing “OFF-Timet” button, you can select the preset time; either “15”, “30", “45", “60”,
“75” or “90” minutes,
Rapid Tune Button
Press the button to access previously viewed channel.
Present channel
being viewed
EI15-»E13O
^
---
H0<
->0 45
- - - - - - -
->EI60->H
09O<
75
Last viewed channel
Ш
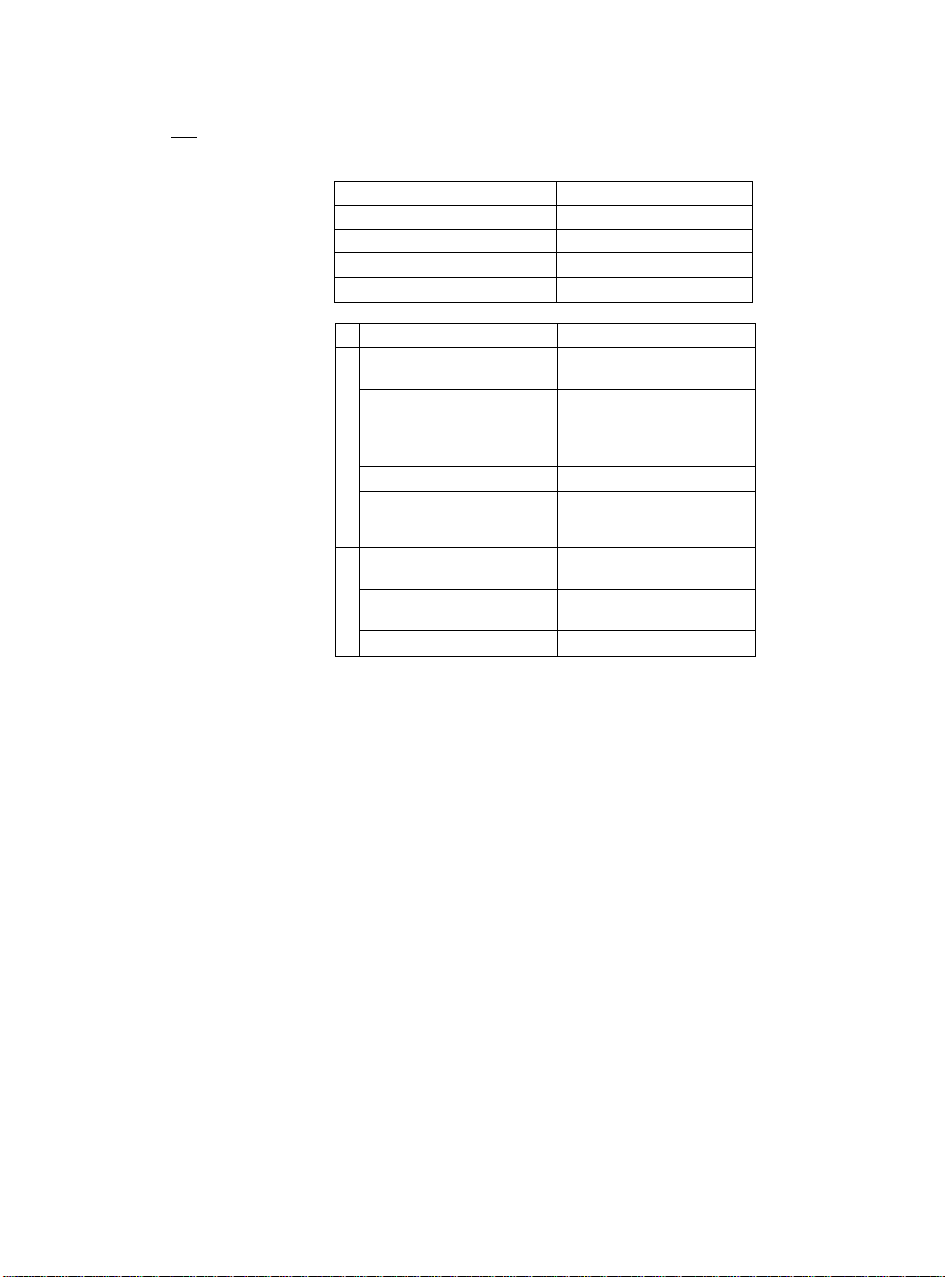
Surround Sound Operation
On-screen display during surround mode
Type of Broadcast
TV/AV mode
Press ^ to move through the Aspect options:
Notes:
• Simpiy press ^ to display mode information on the center left of the screen.
• 16:9 picture has been used to illustrate all of the Aspect modes described In this section.
Mode Picture
4:3
f
3
1
16:9
r
9
i
On-screen Display
Surround On -Ч—
1
Surround Oft
4:3-«
-------
4:3 will display a 4:3 picture at its standard 4:3 size
without any stretching.
16:9 will display the picture at its maximum size but
with slight stretching. Black stripes will be visible
down the top and bottom of the picture.
-----------
■16:9
Explanation
« ^
13
How to use Favorite CH mode
Refer to page 15.
Normal (N) Button
By pressing the Normal “N" button on the Remote Control while Picture or Sound Control
Function is displayed, the selected function will be changed to the Normal Mode.
Normalization wilt not occur if the function is not displayed when the “N” button is pressed.
The Normal mode is the factory preset condition. Returning to this original condition is called
“Normalization”.
Page 8
(^General Operation)
14
tjofv
Stereo/BNingual Sound Selection Button
Sound output modes can be selected by pressing the “Sound Selection” button.
STEREO, BILINGUAL (if transmitted) and MONO modes can be selected using this button.
Audio Signal
STEREO
MAIN!
SUBII
MONO V
Type of broadcast
Regular broadcast
(Standard Audio)
Regular
s
<
o
NICAM DUAL MONO
C
<9
£
BILINGUAL or DUAL MONO
d>
s
9
+
NICAM MONO I
(MAIN 1)
NICAM STEREO
(MAIN I/SUBII)
Regular broadcast
(Standard Audio)
; MAIN I/SUB 11
STEREO
Mode Indicator
CD
I
11
Mode Indicator
No Indicators V
V
0><^ V
1 11
No Indicator <r^ V
I^II
CD^ V
Notes:
1. The “A2 (German)” stereo/billngual TV sound transmission system is used in the following
countries; Australia, Malaysia, Thailand, Indonesia, etc. The “NICAM” stereo TV sound
transmission system is used in the following countries: New Zealand, Singapore, Hong
Kong, Thailand, China and Malaysia.
2. if the stereo signal is poor or the receiving conditions are not optimum or if STEREO;
MONO automatic switching occurs, it is recommended you switch from STEREO to
MONO. When the broadcasting mode changes to “STEREO", or “MONO” after you have
selected “MONO” mode, change over “STEREO' mode wilt be made automatically.
3. Even when the contents of the receiving signal undergo changes, selection mode is kept
intact.
4. When the receiving conditions deteriorate, listening will be easier if the mode is set to the
“MONO’ position, using the stereo/bilingual sound selection button.
5. “DUAL", also known as “DUAL MONO’ or as “BILINGUAL” is not currently transmitted in
some countries.
Page 9
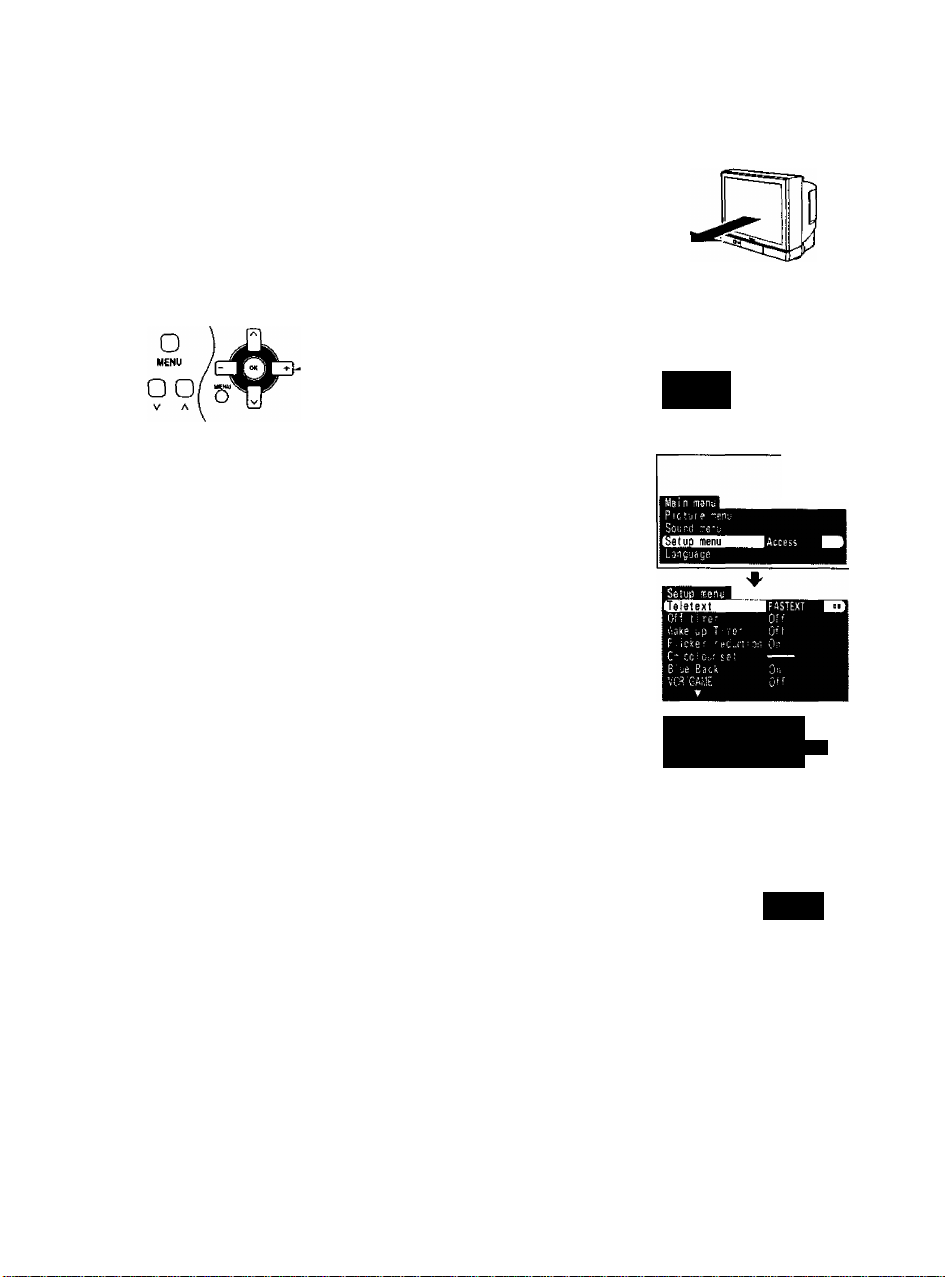
(Geomagnetic Correction )
Slight tilting of the picture may be noticeable or coloured patches may sometimes appear at the corners of the
screen (colour purity). The Geomagnetic Correction feature can be used to eliminate them, if necessary.
1 The Power should be off when determining the installation location and
direction.
At this time, please verify what direction the TV screen is to face (direction
indicated by the arrow).
Geomagnetic corrections can be made from the remote control or the TV set.
Press the “Main Power Switch”.
-w
Press the “MENU” button.
Select the “Setup menu” by pressing the Channel
Up “A” or Down "V” button.
__ ___
Ot?№Lpl LMt;? niVIIU n
□
U/ EZl CIÏ] Up “+" or Down button.
□ 0^ac3
/TV/AV
Ü
Select the “Setup menu” mode by pressing Volume
Press the Channel Up “A” or Down “v" button to
select Geomagnetic.
Press the Volume Up “+” or Down button to
adjust the geomagnetic level, so that the colour
patches in the four corners of the screen do not
appear.
Press the “MENU" button 3 times.
Press the TV/AV button to exit the Geomagnetic
correction mode.
OR
j^-Seleci
vv-Access
SoLi'-ii
—Select
• --Exit
Setup MH;;
Favc? \ :<■ CH
Te>:t se'ec! [■■■gi'sr
Ct!-!:! 0“'
Adjust lilt
Exit.
Normal Viewing
-Access
Helpful Hint
1. If Geomagnetic changes still cause colour patches on the screen even after the TV is installed, turn the power
off and turn on again after about 30 minutes.
2. Adjustment for geomagnetism should be performed every time the location of the TV is changed.
3. In some cases, colour patches will not be completely eliminated even after adjustment, particularly in ferro
concrete buildings and other structures susceptible to geomagnetism. In these cases adjust by changing the
installation location.
9
Page 10
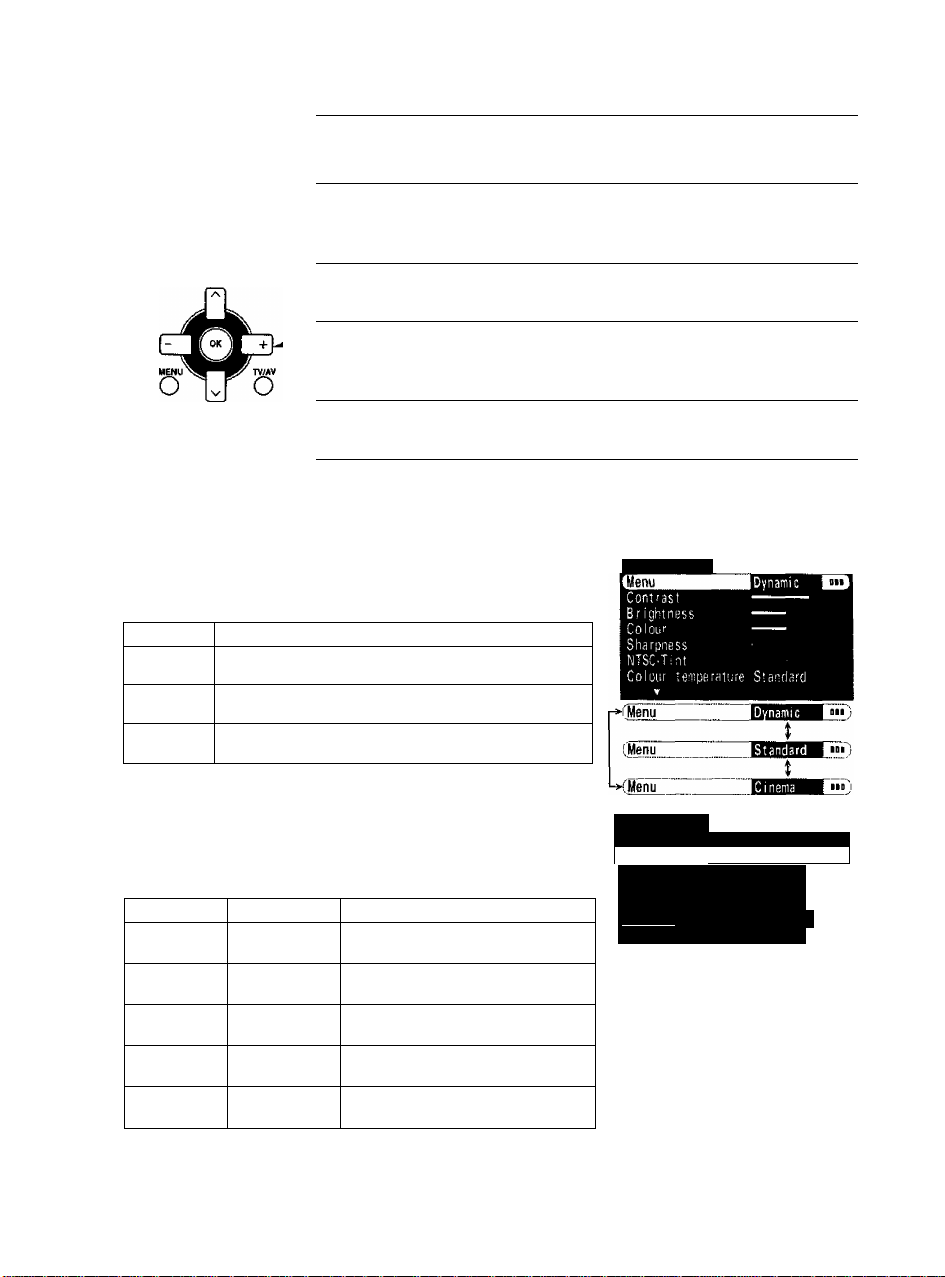
^Picture menu }
Press the “MENU” button to select Main Menu.
Move to choose Picture menu by using Channel Up
“A” or Down “V" button.
Access Picture menu mode by using the Volume Up
or Down button.
Move to choose menu option by Channel Up “A” or
Down “V” button.
□ o o □ □ oy
MEHUTV/AV - J + V A I
OR
1
2
f ^ I MENU
^/o
menu! ^
99(’0
3
O^O^ai3
4
99/0
5
□ O^aQ
IV/tAV
□
/Q
MENU You can change the level of each Function (Colour, NTSC-Tint,
Brightness, Contrast, Sharpness) for each Picture menu.
Picture menu mode will be memorized for each TV, AV1, AV2,
AV3 and AV4 mode.
On-screen Function
Dynamic
Standard
Cinema
For viewing in brighter environments. This menu selects a
higher than normal levels of Brightness and Contrast.
For viewing in normal (evening lighting) environments. This
menu selects the normal levels of Brightness and Contrast.
Ideal for movies.
Can be selected for VIDEO/COMPONENT.
Adjust chosen option or access menu chosen by
using Volume Up “+” or Down button.
Press the “MENU” button twice.
Press “TV/AV” button at any time to go back to
watching TV.
OR
Piciurs menu
Contrast, Brightness, Colour, Sharpness, NTSC-Tint
Increase or decrease the levels of Contrast, Brightness, Colour and
Sharpness cations according to your personal preference.
Witti an NTSC-Tint signal source connected to the TV, the picture hue
can be adjusted to suit your taste.
Item
Contrast □a
Brightness
Colour
Sharpness
NTSC-Tint
EHect
Less More
QC3
Darker Brighter
□a
Less More
Less More
ac3
Reddish Greenish
Function
Adjust for contrast.
Adjust for easier viewing of dark
pictures such as night scenes and hair.
Adjust slightly to a lighter colour.
Displays a sharp image.
Adjust for proper skin colour.
10
P icture menu
■ jyiiiau..... ......
[Contrast
Bright.ness ---Colour ----
Sharpiiess
N^SC-Tiot
'C6Ii r■ ■■ te ni DOr si or e S t'
Note: When the TV is receiving
NTSC signals, NTSC-Tint is
displayed and level adjustment
would be possible.
............
Jlviiamii:
......
....
____ 1
Page 11

( Picture menu )
Colour temperature Allow you to set the overall colour tone of the
picture.
Press or QT) to switch between modes.
Cool- •Standard" Warm
c
P-NR
{Picture Noise
Reduction)
Scan mode Lets you choose the screen refresh method:
Automatically reduces unwanted picture noise.
Press or 03 to switch between modes.
■ Weak
Off •
c
Auto-
Press (33 or C3 to switch between modes.
Auto-
loom
[!
Mode
Auto
100Hz
Progressive
Note:
We recommend that you set Scan mode to Progressive when viewing a PAL 60 or
NTSC transmission. When viewing a PAL transmission (other than PAL 60) with Scan
mode set to Progressive, the screen will flicker, this is not a fauft.
The TV software will select the best mode for the signal being
viewed.
a
> Strong
■ Progressive
!]
100Hz will give a steady picture for most signal transmission.
Recommended when receiving NTSC signals.
P i ct ure me nu 1
M e n j D y nam i c
Co nt ras t
Br ig htn es s
Co lo ur
Sharpr^ess
NTSC'-Tifit
|ilii!l rtii I »TlnffiTninTil C. 0 0
P
icture menu
Picture mertti
P- MR
Function
------------
-------
-------
------------
■'i>- Helpful Hint ( ® Normalization)
By pressing the Normal “N" button on the Remote Control while the Picture menu is displayed, the selected menu
wilt be changed to the Normal mode.
Normalization will not occur if the menu is not displayed when the “N" button is pressed.
The Normal mode is the factory preset condition. Returning to this original condition is called “Normalization”.
11
Page 12

(Sound menu}
□ O □ □ Ü □/
MENUTVÍAV - J + V A ,
OR
1
O } MENU
^/o
«EHUf
2
Press the “MENU" button to select Main Menu.
Move to choose Sound menu by using Channel Up
“A” or Down V” button.
99(’EI
3
Access Sound menu mode by using the Volume Up
“+” or Downbutton.
4
Move to choose menu option by Channel Up “a” or
Down “V" button.
99/0
5
;tv/av
0
MENU You can change the level of each Function (Equalizer) for each
Sound menu.
Sound menu mode will be memorized for each TV, AV1, AV2,
AV3 and AV4 mode.
On-Screen
Music
News
Cinema
Volume, Equalizer, Balance, AVL, Surround
Item
Menu
Volume
Equalizer
Balance
AVL
Surround
Recreates the acoustics feel on a live concert. Adds
excitement to music videos, soundtracks and provide
powerful sound presence.
Enable spoken voices I0 be heard more clearly. Perfect for
news, documentaries and talk shows.
Recreates the cinematic sound effect from yourTV.This
setting provides clear and crisp dialogue.
Effect Indicator
Music News -«n
'
-------
> Cinema <
□ 13
less More
Access
□ □
Left Sp. Ric^t Sp.
□ □
On «Off
□ □
On «Off
-----
Function
'
ÍVolUÍTlG
Adjust chosen option or access menu chosen by
using Volume Up “+” or Down button.
Press the “MENU” button twice.
Press “TV/AV” button at any time to go back to
watching TV.
Menu
Equalizer
-
AVL
Surround
OR
: Sound flffitlU
[Menu
Volume
Equalizer
Ba lance
AVL
Surround On
■CMenu ! Music
(Menu i Mews
^■Cinenna
On
Í
Í
Helpful Hint (Normalization)
By pressing the Normal “N” button on the Remote Control while the Sound menu is displayed, the selected menu
will be changed to the Normal mode.
Normalization will not occur If the menu is not displayed when the “N” button is pressed.
The Normal mode Is the factory preset condition. Returning to this original condition is called "Normalization”.
12
Page 13

(sound menu}
■ Equalizer mode
■j Press the “MENU” button and Channel Up “a”
or Down “v" button until Sound menu is
selected.
2 Press the Volume Up “+” or Down button
setting to Sound menu mode.
3 Press the Channel Up “A" or Down “V" button
until Equalizer is selected.
4 Press the Volume Up “+” or Down button to
access Equalizer menu.
5 You can change the level of each frequency
level by pressing the Volume Up “+” or Down
button.
8 Press o' at any time to go back to watching
TV.
Note:
120Hz and 500Hz ; for bass adjustment (low frequency).
5KHz and fOKHz: for treble adjustment (high frequency).
13
Page 14

(setup menu )
Press the “MENU" button to select Main Menu mode.
Move to choose Setup menu by using Channel Up “a”
or Down “V" button.
Access Setup menu mode by using the Volume Up “+”
or Down button.
Move to choose menu option by Channel Up “a” or
Down “v” button.
□ О □ Ü □
KEHUTV/AV - J + V Л / 2
OR
1
2
( \ Ímbju
^/o
menu!
99/0
3
4
99/B
5
6
Teletext
Off timer
Wake up Timer
Flicker reduction
Ch colour set
Blue Back
VCR/GAME
Favorite CH
Text select Select character set, so that all characters needed are available for text on teletext pages,
Allow you to choose 2 modes (see page 26).
Switches the TV oft within a preset time which you can choose from between 0 to 90
minutes in 15 minutes intervals.
Switches the TV on within a preset time which you can choose from 0:10 to 12:00 hours
in 10 minutes intervals.
The Flicker reduction will stop the flicker of the picture and vice versa when it is on.
Colour density varying between broadcast channels can be adjusted to three levels of
each reception channel.
You can choose Blue Back display On or Off when there is no signal.
Reproduction of irregular signals, such as certain TV games and rental video tapes, may
be improved.
Favorite CH allows you to store up to 9 programmes in preferred channel positions, (see
page 15)
(eg: cyrillic, characters, etc)
Mode languages: English / CIS! E.Europe / Persian.
□ Uv
menu!
Adjust chosen option or access menu chosen by
using Volume Up “+" or Down button.
Press the “MENU" button twice.
Press “TV/AV” button at any time to go back to
watching TV.
______
^ 15 30 ^ 46-«______________
1
-----
1
OR
П ele text
14
Page 15

( Setup menu )
Child lock To Child lock any channel, press the Volume Up “+” or Down button.
Geomagnetic If you notice a slight tilt to the picture or if there are coloured patches at the corners of the
1. When channel is “Lock”, sound is muted and screen becomes black screen colour.
2. If any of the channels is Child Locked, Tuning menu selection on the front panel will
not function and if the Volume Up “+” or Down button on the front panel is pressed.
Child lock icon will blinking.
3. Main power On in Child Locked channel will display Child lock icon on screen to
remind user that the Child lock is On and is in Child Locked channel.
4. Each channel has its own memory for channels to be Child Locked.
screen, use this feature to eliminate them {see page 9),
Favorite CH mode
After Auto Search, this feature allows you to store up to 9 programmes in preferred channel positions without
researching again.
How to use Favorite CH mode
1. Press “MENU" button once, setting to “Main Menu".
2. Press the Channei Up “a” or Down “s/* button setting to Setup menu.
3. Press the Volume Up “+” or Down button setting to Setup menu mode.
4. Press the Channel Op “a” or Down “v” button to select Favorite CH,
5. Press the Volume Up “+” or Down button to select “Favorite CH" indication.
6. Key in the preferred channel number using direct Programme Number (0-9) or Channel Up “A" or Down “v”
button. Press the Volume Up “+” or Down button to select the 9 channels that you preferred.
7. After completed the preferred channel setting, press ttie TV/AV button to return the set to the normal viewing
condition.
8. To view Favorite CH, press favorite button on the remote control.
To Cancel Setting
1. Press the “MENU” button once and Channel Up “a” or Down V” button until Setup menu is selected.
2. Press the Volume Up “+” or Down button on the Remote Control, setting to Setup menu mode.
3. Press the Channel Up “A” or Down “v” button until Favorite CH is selected.
4. Press the Volume Up “+” or Down button to select the stored Programme Number that need to be
cancelled and press “Normal" button.
5. Press “TV/AV” button to exit to normal viewing.
15
Page 16

(Tuning menu)
□ □□□□□/
MENUTV/AV - ^ + V A J
OR
( ) yWEHU
U/q
\ Move to choose Setup menu by using Channel Up “a”
Q Q iQ or Down“V”button.
V ^ [ Q
3 \ Access Setup menu mode by using Volume Up “+” or
Press the “MENU” button setting to Main Menu mode.
/□ C3 Down button.
4 \ Move to choose Tuning menu option by Channel Up
^ p-, J Q “A” or Down V" button.
V'^(g
5 r~\
OOtaa -
__
___
Access Tuning menu by using Volume Up"+” or Down
' button.
\ Move to cnoose r
n O / Q Down "V” button.
Move to choose menu option by Channel Up “A” or
V .(g
) Adjust chosen option or access chosen menu by
U / EZ] C3 using the Volume Up “+” or Down button.
I 1 / TV«V
u/q
Press the “MENU" button three times.
OR
Press TV/AV” button at any time to go back to
watching TV.
16
Page 17

(^Tuning menu)
Ch select
(Channel Selection)
Sys select
(System Selection)
Auto tuning Allows you to automatically retune the TV. Useful if you move house and wish to
Manual tuning
Sound system You can change the Sound system used for a programme channel.
Select the most easily viewed channel selection method (see page 18).
«1
Select the system.
j-» Chii\a —>HK/UK —^ Asia/M.East
■ Japan —> CATV
System Select by Region
System Select Region
China China
HK/UK
Asia/M.East
NZ/INDONES New Zealand, Indonesia, etc.
Australia Australia
E.Europe
Sped Ver
America
CATV USA CATV
Japan Japan
retune your TV to the local stations. (See page 20)
Allows individual programme positions to be turned, manually. (See page 21)
Choose the required Sound system:
Hong Kong, United Kingdom
Malaysia, Singapore, Thailand, Asia countries, Kuwait, Saudi Arabia,
United Arab Emirates. Middle East countries, etc.
CIS, Poland, etc.
South Africa
U.S.A., Chile, Mexico, Panama, Peru, Philippines, Taiwan, Venezuela, etc.
America —> Sped Ver
1
---
^ 4,5MHz ^^ 5.5MHi < 1
'
----
> 6.5MHz *€—3. 6.0MHz
NZ/IH PONES —^ Austratj
E.Europe
Colour system Lets you select the correct transmission standard for the transmission signal being
Fine tuning
Skip It is possible to sidp Programme Number on which no TV stations are tuned
received.
Use to make small adjustments to the tuning of an individual station (useful for
example when weather conditions are affecting reception quality of a programme).
appearing on the screen. The function is only effective when selecting Programme
Numbers by pressing the Programme Number Up or Down button either on the TV
set or the Remote Control.
17
Page 18

(Tuning menu)
Channel Selection
Select the most easily viewed channel selection method.
Programme
Number
1
2
3
4
5
6
7
8
9
10
é-
Example
Programme
Number Display Channel
1
2
3
4
5
6
7
8
9
10
•
•
20
•
Channel
Display
2
4
6
8
10
12
14
16
18
20
Channel
2
- -
4
- -
6
- -
8
-
10
9
20
«
9
9
Received
Channel
2
4
6
8
10
12
14
16
18
20
Received
2
4
6
8
10
«
«
•
20
•
9
When the Channel Selection is on Position, and Auto
Tune is performed, the unit memories the channels
tuned in order from Programme No. 1.
Press the button 0 to view channel 2.
Press the button 0 to view channel 4,
Press the button © to view channel 6.
During Position mode various reception channels can
be viewed.
Direct Select
When the Channel Selection is on Direct, and Auto Tune
is performed, the unit memorise the Programme
Number which is the same as the channel tuned.
This method allows you to select the desired channel by
pressing the Programme Number directly on the
Remote Control to select the channel. The channel
display numbers for the broadcast stations in each
region are listed on page 19.
18
Page 19

(tuning menu)
■ Channel Allocation
CATV {USA CATV) channel numbers as recommended by the joint EIA/NCTA Engineering committee and
published as EIA INTERIM STANDARD N0.6-CABLE TELEVISION CHANNEL IDENTIFICATION PLAN-MAY
1983.
The receiving channels are as follows:
19
Page 20

(Tuning menu)
Auto tuning (Via Remote controi)
Before Auto tuning, set the “Sys select” and “Ch select” mode.
1 Press
©®on
^ suKuo ma
Q ®
B-TUW N
o fl o
2 Move to choose Setup menu option by using Q or Q.
3 Access Setup menu mode by using p | or r~T|.
4 Move to choose Tuning menu option by using Q or Q,
5 Access Tuning menu by using p~) or (~T1.
AUTO SETUP IN PROGRESS
SEARCNING :P[.£ASE WAIT
Auto tuning (Via front panel)
It is also possible to use the control panel buttons on the front of the TV to tune individual programme positions.
6 Move to choose Auto tuning by Q or Q.
7 Access Auto tuning by using or Q+].
Once this operation is compieted, the TV will display the programme now
stored on programme position 1.
8 Press Q at any time to go back to watching TV.
OR
Press the
1
Press
Press
2
PressOor O to access Setup menu.
3
Press
4
Press
5
Press
6
Pressoor O to start search.
7
8 Press O button 3 times to exit the Tuning menu.
Press O at any time to go back to watching TV.
button three times.
o
o
(front panel) setting to Main Menu mode.
UEHU
□
or O to select Setup menu in Main Menu.
V
A
o
or O to select Tuning menu.
V
o
or O to access Tuning menu mode.
□
or O to select Auto tuning.
A
VENU
OR
-E
Helpful Hint
1. If a clear picture with correct colours cannot be obtained when a Broadcast or AV signal is received, refer to
the “Colour System Selection” operation on page 17.
2. After the Auto tuning is finished, press the Programme Number “Up” txjtton to confirm the tuning condition for
each Programme Number, If some Programme Numbers are unused, it is possible to skip such Programme
Numbers. Please refer to the Programme Skip function on page 17.
20
Page 21

^Tuning menu^
Manual tuning (Via Remote control)
Before Manual tuning, set the “Sys select” and “Ch select” mode.
1 Press
O'
2 Move to choose Setup menu option by using or Q.
3 Access Setup menu mode by using p~| or |~~v|.
4
Move to choose Tuning menu by using Q or Q.
5 Access Tuning menu by or .
6 Move to choose Manual tuning by Q or Q.
.^—Program mg'
4v-Search
fleturn
Mrr.dl ilining
|J1
Not applicable for front panel
■ Manual tuning (via front panel)
It is also possible to use the control panel buttons on the front of the TV to tune individual programme positions.
7 Access Manual tuning by using p~| or .
8 Select the programme position to be tuned by using Q or Q.
Press repeatedly until required station is found by using or
4 A TV/AV
III Press Q at any time to go back to watching TV.
Press the
^ Press O (front panel) setting to Main Menu mode.
■«enij
button three times.
o
OR
2 Press O or O to select Setup menu in Main Menu.
3 Press O or O to access Setup menu.
8 Press O or O to select Tuning menu.
5 Press O or O to access Tuning menu mode.
6 Press O or O to select Manual tuning.
^ Press O or O to start search. Repeat above procedure to tune
additional programme positions.
8 Press O button 3 times to exit the Tuning menu.
MENU
Press O at any time to go back to watching TV.
OR
Helpful Hint
1, If a clear picture with correct colours cannot be obtained when a Broadcast or AV signal is received, refer to
the “Colour System Selection” operation on page 17.
2. After the Manual tuning is finished, press the Programme Number “Up” button to confirm the tuning condition
for each Programme Number, if some Programme Numbers are unused, it is possible to skip such
Programme Numbers. Please refer to the Programme Skip function on page 17.
21
Page 22

(^Language menu^
O O O □ □ □/
MENUTV/AV - ^ + V A I
OR
f \ /MENU
U/q
\ Move to choose Language menu by using Channel
y Q up “A” or Down "V” button,
Press the "MENU" button to select Main Menu.
V Wg
^ 1 Access Language menu n
U LJ / Q CZI Up “+” or Down button.
\ Move lo cnoose ian>
„ ^ J Q or Down V” button.
Access Language menu mode by using the Volume
Move to choose language option by Channel Up “A”
yy(g
/TV/AV
□
Press the “MENU” button twice.
Press “TV/AV" button at any time to go back to
watching TV.
OR
22
Page 23

(Multi pip)
©
« ^ «muti ««Cl
iCTrJCTC-iì
WTEff FP. BCa NOLO
© © ©
© © ©
© © ©
© © 0
Mun»» 0 womt
® O Q
CD ® (3IE1
CKSEUCN 5TU
Press the “MULTI PIP” button to move between watching the current program,
the picture in picture feature, picture and picture feature.
The on screen selector keys (corresponding to the four coloured buttons on
the Remote Control) will disappear after a few seconds, if you want to select
an operation when the keys are not shown, press the “MULTI PtP” button once
more, the keys will reappear.
Picture in picture (PIP)
Press this button to view the two pictures at the same time (the
sub picture contained in the main one)
"Locate I TV|AV I Chafwa I ^ I
Red Gmr\ cyan
coooni}
Press the YELLOW button:
A B
The Main picture and Sub
picture will be exchanged each
time you press the button.
moff
Press the MULTI PIP button again to exit.
23
é-
Page 24

(Muffi pip)
■ Picture and picture (PAP)
MULTI W
Press this button and then the corresponding coloured button to select the picture and picture (PAP).
Press the YELLOW button.
The left and right picture will be exchanged each time
you press the button.
Press the MULTI PIP button to exit.
Picture and Picture mode
Channel Search
é-
Press this button to exit.
Still
Pres this button to freeze the picture and press again to resume watching the current program.
24
Page 25

(Advanced Remote Control Transmitter Operation^
■ Remote control setting for VCR’s and DVD’s
Remote Control Operation is possible for the Panasonic VCR’s and DVD’s
© ® 0
0 0®
0 0®
(S SSCZ)
Helpful Hint
1. The respective VCR/DVD code is cancelled when battery has been exchanged.
Please set it again.
2. Depending on the model, operation of VCR’s or DVD’s of the manufacturers listed above may not be possible.
3. In some cases, new products may not be operative.
4. It will not operate with other than the above manufacturers.
VCR / DVD
The Remote Control is capable of operating some functions of selected Panasonic VCRs and DVD (Digital
Versatile Disc) equipment. Some VCR and DVD equipment have different functions. So to ensure compatibility,
please refer to the equipment’s instruction book or consult your dealer for details.
5- cnci
9
----
|-£g3 jgJC^CE
3—
equipment.
After completion of setting, execute the various operations after pressing the
VCR/DVD selection switch.
Switch to select VCR or DVD.
While pressing the VCR/DVD Power button, press the
manufacturer code {enter the two digit code), and press the
0
VCR/DVD Stop button.
0
VCR
0
Manufacturer
Panasonic/National
Note: After setting, execute operation confirmation, if there is
no operation, set a different code.
1
Play button
2
Rew (Rewind) / Review button
Stop button
3
4
Power button
5
VCR REC (Record) button
6
Pause / Still button
7
FF (Fast Forward) / Cue button
B
VCR and DVD Select button
9
Programme Number Left and Right buttons for VCR
Programme Skip button for DVD
Code
10,11,12,13
Function (VCR/DVD)
DVD PLAYER
Panasonic 70,71
----
1
0
0
®
an
®
0
0
0
ra
Manufacturer Code
25
Page 26

(Teletext OperatiorT)
0 WBHH
®
« ^ MHU« >»tn
O ® ®
(fjcrrm)
tWEa f.R IWQ BOLD
{»)CD(MDCS)
oa
CtLSEMCM STU
© © ©
□ © © ©
Q© ® (1)
©
HOLD
STU
Red Green Yetlow Cyan
1 11 1
coacjoj
IWEX
CH.SEARCH
• Teletext features may vary depending on the Broadcasting Companies and is
only available if the channel selected is transmitting Teletext.
• When in teletext mode, the volume may still be altered to the desired listening
level.
What is List mode?
In List mode, four different coloured page numbers are situated at the bottom of
the screen. Each of these numbers can be altered and stored in the TV's memory.
What is FASTEXT?
In FASTEXT mode, four differently coloured subjects are situated at the bottom of
the display. To access more information about one of these subjects, press the
appropriately coloured button. This facility enables fast access to information of
the subjects shown.
What are the advantages?
• Page selection at the touch of a Colour-coded button.
• Easy to use step-by-step selection of the topics subject.
• Reduction of waiting time.
• Page status line at bottom of screen so you always know which button will take
you to the desired information.
Note:
Characters will be illegible unless you select the Text Language which matches the
text being received.
Select the correct Text Language (refer to page 14).
• White in Text mode, press menu key on remote once will display the text menu
list in four colours which are Red, Green, Yellow and Cyan,The rotation of the
displayed is as below:
First press: REVEAL (red) and F/T/B (green). Display Cancel (yellow) and
Second press; Contrast.
Third press: Normal Text.
• The Volume, Contrast and Fine Tuning control is same as normal TV mode.
This menu adjustment also valid by used panel menu & Volume Up or Down key
while in text mode.
TV/Teletext mode
By pressing the “TV/TEXT” button, to change the TV/Teletext mode as follows:
TIME TEXT (cyan).
( TV )
•(text)
111
Page Selection
Page can be selected in two ways:
a) Press Q or Q to increase or decrease the page number by one.
b) By entering the page number, using 0 ~ 9 on the Remote Control.
Hold
Press to hold the current page.
Press again to cancel the hold.
Colour-coded Buttons
In FASTEXT mode these correspond to the differently coloured subjects,
in List mode they correspond to the differently coloured page numbers.
Index
INDEX
Press to return to the main index page.
CH. SEARCH
26
Page 27

(Teletext Operation^
MENU
O
o i
o i
© © ©(¡¡T)
Cyan
© © ©
1
a® © ©fi^
TV/TStr
©
Green
1
CD
FuM/Top/Bottom
Press to display special functions, followed by Green button.
Press the Green button again to expand the Top/Bottom half.
Press again to return to normal (FULL) size.
Reveal
Press Q to display special functions, followed by the Red button to reveal
hidden words e.g. quiz page answer.
Press again to hide.
Display Cancel
Press Q* to display special functions, followed by Yellow button to view the
norm^ TV programme. When the desired Sub-page is received, the page number
will stop blinking.
TWTEJCr
Press to exit to the normal TV mode.
Notes:
• This features is to cancel the Text display and to exit the display cancel
function.
• During in text mode, Position Up or Down button can change the text page
number.
Favourite Page (F.P.)
Stores a Favourite Page in memory for instant recall. To store such a page, the TV
must be in List mode.
Press the Cyan button, select the page number, then press and hold (^.
The page number is now stored.
Press to recall this page.
Sub Coded Page Access
The TEXT Menu will be displayed in TEXT mode. When teletext information exceeds more than one page, it may
take some time for the automatic changing of the sub pages to reach the sub page you require. It is possible to
enter your required sub page and continue watching the normal programme until the correct sub page is found.
Select the required page number using buttons 0-9.
If the top of the page indicates that sub pages are being transmitted yet the page does not change, then the
number at the top of the page is there to indicate that the broadcaster has updated the page’s contents, there are
no sub pages.
Cyan
1
O
© 0 © «!■
.'^ © © ©4
© © ©
©
Press q“ followed by Cyan button to request Time Text Page.
T*"* will be displayed at the top right of TV screen and enter desired Sub Page
number before T**“ dis^pears.
a
To select page number 6, enter 0,0, 0 and 6.
Press Display Cancel (Yellow button) to view a normal TV programme and
TVffEir
indication display on the top left of the screen.
During searching the sub page, the page number will be blinking at the top left
of the screen. When the page is available, press the Yellow button (Display
cancel) again to view the sub page.
27
4
Page 28

4^
(^Troubleshooting }
Before you call for service, determine the symptoms and make a few simple checks as shown below.
28
Page 29

(Specifications )
Power Source : AC SINGLE 230-240V, 50Hz
Power Consumption : 164 W
Receiving System ; 21 SYSTEMS
1. PAL B,G,H
2.
PAL 1
3.
PAL D,K
4
•SFCAM p G
5.
SECAM d!k
6, SECAM K1
7.
NTSC M (NTSC 3.58 / 4.5MHz)
8.
NTSC 4.43 / 5.5MHz
9. NTSC 4.43/6.0MHz
10. NTSC 4.43/6.5MHz
11. NTSC 3.58/5.5MHz
12.
NTSC 3.58 / 6.0MHz
13. NTSC 3.58 / 6.5MHz
14. SECAM 1
PAL 60Hz/5.5MHz
15.
16. PAL 60Hz/6.0MHz
17. PAL 60Hz/6.5MHz
18.
SECAM 60HZ / 5.5 MHz
19. SECAM 60HZ/6.0 MHz
20. SECAM 60HZ/6.5 MHz
21.
NTSC 50HZ/4.5 MHz
Receiving Channels:
VHF BAND
2-12
0-12
1 -9
1-12
1-12
2-13
Tuning System : Frequency synthesizer
Picture Tube : Overall Picture tube measured diagonally: 73 cm
Audio Output: 10W+10W = 20W
Aerial Impedance : 75 ii Unbalanced coaxial.
Video/audio terminal:
Remote CcMitrol Transmitter: N2QAJS000108
Battery : R6 (AA) x 2
Dimension (W x D x H); 786 x 512 x 578 mm
Weight (Net): 43 kg
PAL/SECAM B,K1
PAL B (AUST.)
PAL B (N.Z.)
PAL/SECAM D
NTSC M (JAPAN)
NTSC M (U.S.A.)
SYSTEMS
Reception of broadcast transmissions and playback from
Video Cassette Tape Recorders.
Playback from Special VCR's.
Playback from Special Disc Player and Special VCR's.
UHF BAND
21-69
28-69
13-57 PAL D,K
13-62
14-69
Auto search tuning
POS (Position): 100 position
DIRECT: 125 position
Viewable Picture tube measured diagonally: 68 cm
CRT Deflection; 104°
AVI, 2, 3,4
DVD
Monitor Out
PAL G,H,l / SECAM G,K,K1
PAL B (AUST.)
NTSC M (JAPAN)
NTSC M (U.S.A.)
FUNCTION
CATV
SI - S20
1-125
C13-C49
S21 - S41
Z1 -Z37 (CHINA)
5A,9A (AUST.)
S-Video In
Y
Pb
pR
Video In
Audio In Approx. 0,5 V, 47 kfl
Video Out
Audio Out Approx. 0.5 V, 1 kil
0.7 Vp-p, 75 il
0.7 Vp-p, 75 il
1 Vp-p, 75 il
(OSCAR)
(U.S.A. CATV)
(JAPAN)
(HYPER)
Y:1 Vp-p, 75 Q
C;0.3Vp-p, 75 il
1.0 Vp-p, 75 il
1 Vp-p, 75 il
Note:
Design and Specifications are subject to change without notice. Weight and Dimensions shown are approximate.
29
Page 30

Customer’s Record
The model number and serial number of this product can be found on its cabinet. You should note this
serial number in the space provided below and retain this book plus your purchase receipt as a
permanent record of your purchase to aid in identification in the event of theft or loss and for Warranty
Service purposes.
Model Number
Serial Number
30
Page 31

31
Page 32

Matsushita Electric Industrial Co., Ltd
Central P.O. Box 288, Osaka 530-8692, Japan
 Loading...