

Panasonic TX-29AS1FB User Manual

Panasonic¡Panasonic¡Panasonic¡Panasonic¡Panasonic¡Pa
nasonic¡Panasonic¡Panasonic¡Panasonic¡Panasonic¡Pana
sonic¡Panasonic¡Panasonic¡Panasonic¡Panasonic¡Panaso
nic¡Panasonic¡Panasonic¡Panasonic¡Panasonic¡Panasoni
c¡Panasonic¡Panasonic¡Panasonic¡Panasonic¡Panasonic¡
Panasonic¡Panasonic¡Panasonic¡Panasonic¡Panasonic¡Pa
nasonic¡Panasonic¡Panasonic¡Panasonic¡Panasonic¡Pana
sonic¡Panasonic¡Panasonic¡Panasonic¡Panasonic¡Panaso
nic¡Panasonic¡Panasonic¡Panasonic¡Panasonic¡Panasoni
¡Panasonic¡Panasonic¡Panasonic¡Panasonic¡Panasonic¡
c
Panasonic¡Panasonic¡Panasonic¡Panasonic¡Panasonic¡Pa
nasonic¡Panasonic¡Panasonic¡Panasonic¡Panasonic¡Pana
sonic¡Panasonic¡Panasonic¡Panasonic¡Panasonic¡Panaso
nic¡Panasonic¡Panasonic¡Panasonic¡Panasonic¡Panasoni
c¡Panasonic¡Panasonic¡Panasonic¡Panasonic¡Panasonic¡
Panasonic¡Panasonic¡Panasonic¡Panasonic¡Panasonic¡Pa
nasonic¡Panasonic¡Panasonic¡Panasonic¡Panasonic¡Pana
sonic¡Panasonic¡Panasonic¡Panasonic¡Panasonic¡Panaso
¡Panasonic¡Panasonic¡Panasonic¡Panasonic¡Panasoni
nic
c¡Panasonic¡Panasonic¡Panasonic¡Panasonic¡Panasonic¡
Panasonic¡Panasonic¡Panasonic¡Panasonic¡Panasonic¡Pa
nasonic¡Panasonic¡Panasonic¡Panasonic¡Panasonic¡Pana
sonic¡Panasonic¡Panasonic¡Panasonic¡Panasonic¡Panaso
nic¡Panasonic¡Panasonic¡Panasonic¡Panasonic¡Panasoni
c¡Panasonic¡Panasonic¡Panasonic¡Panasonic¡Panasonic¡
Panasonic¡Panasonic¡Panasonic¡Panasonic¡Panasonic¡Pa
nasonic¡Panasonic¡Panasonic¡Panasonic¡Panasonic¡Pana
sonic
nic¡Panasonic¡Panasonic¡Panasonic¡Panasonic¡Panasoni
c¡Panasonic¡Panasonic¡Panasonic¡Panasonic¡Panasonic¡
Panasonic¡Panasonic¡Panasonic¡Panasonic¡Panasonic¡Pa
nasonic¡Panasonic¡Panasonic¡Panasonic¡Panasonic¡Pana
sonic¡Panasonic¡Panasonic¡Panasonic¡Panasonic¡Panaso
nic¡Panasonic¡Panasonic¡Panasonic¡Panasonic¡Panasoni
T X --- 2 9 A S 1 F / B
c¡Panasonic¡Panasonic¡Panasonic¡Panasonic¡Panasonic¡
Panasonic¡Panasonic¡Panasonic¡Panasonic¡Panasonic¡Pa
nasonic
sonic¡Panasonic¡Panasonic¡Panasonic¡Panasonic¡Panaso
nic¡Panasonic¡Panasonic¡Panasonic¡Panasonic¡Panasoni
c¡Panasonic¡Panasonic¡Panasonic¡Panasonic¡Panasonic¡
Panasonic¡Panasonic¡Panasonic¡Panasonic¡Panasonic¡Pa
nasonic¡Panasonic¡Panasonic¡Panasonic¡Panasonic¡Pana
sonic¡Panasonic¡Panasonic¡Panasonic¡Panasonic¡Panaso
nic¡Panasonic¡Panasonic¡Panasonic¡Panasonic¡Panasoni
c¡Panasonic¡Panasonic¡Panasonic¡Panasonic¡Panasonic¡
Panasonic
nasonic¡Panasonic¡Panasonic¡Panasonic¡Panasonic¡Pana
sonic¡Panasonic¡Panasonic¡Panasonic¡Panasonic¡Panaso
nic¡Panasonic¡Panasonic¡Panasonic¡Panasonic¡Panasoni
c¡Panasonic¡Panasonic¡Panasonic¡Panasonic¡Panasonic¡
Panasonic¡Panasonic¡Panasonic¡Panasonic¡Panasonic¡Pa
nasonic¡Panasonic¡Panasonic¡Panasonic¡Panasonic¡Pana
sonic¡Panasonic¡Panasonic¡Panasonic¡Panasonic¡Panaso
nic¡Panasonic¡Panasonic¡Panasonic¡Panasonic¡Panasoni
This is an unapproved issue --- for your information only
c¡
Panasonic¡Panasonic¡Panasonic¡Panasonic¡Panasonic¡Pa
¡Panasonic¡Panasonic¡Panasonic¡Panasonic¡Panaso
¡Panasonic¡Panasonic¡Panasonic¡Panasonic¡Pana
Colour television
¡Panasonic¡Panasonic¡Panasonic¡Panasonic¡Pa
Operating Instructions
English
TQB8E3287eng
Panasonic¡Panasonic¡Panasonic¡Panasonic¡Panasonic¡

WELCOME
Dear Panasonic Customer,
Welcome to the Panasonic family of customers. We hope that you have many years of enjoyment from your
new colour television. This is a very advanced television; however, the Quick Start Guide will tell you how to
have the TV operating quickly. You can then read the instructions completely and retain them for future
reference.
CONTENTS
Warnings and Precautions 2.......................
Accessories 3....................................
Quick Start Guide 4...............................
Basic Controls 6..................................
Using the On Screen Displays 7....................
Picture Menu 8...................................
Sound Menu 9....................................
Setup Menu 10...................................
Tuning Menu 11..................................
Tuning Menu -- Programme edit 12.................
Tuning Menu -- Auto Setup 16......................
Tuning Menu -- Manual tuning 17...................
OSD Language 18................................
Q-- Link 19.......................................
AV Select and Setup 20...........................
VCR/DVD Operation 21...........................
Te l et e xt O pe r at io n 2 2.............................
Audio / Video (AV) Connections 24.................
Via the front AV3 Audio / Video (RCA)
and Headphone Sockets 24........................
SCART and S-- Video Terminal Information 24..........
ViatherearAV1/AV221Pin(SCART)
and RCA Audio Out terminals 25.....................
Troubleshooting 26...............................
Foryourguidance 26.............................
Specifications 27.................................
WARNINGS AND PRECAUTIONS
D This TV set is designed to operate on A.C. 220 -- 240V, 50Hz.
D To prevent damage whichmight resultin electric shockor fire,
do not expose this TV set to rain or excessive moisture.
D WARNING : HIGH VOLTAGE !!!
Donotremovetherearcoveraslivepartsareaccessiblewhen
it is removed. There are no user serviceable parts inside.
D Avoid exposing t heTV set todirect sunlightand othersources
of heat.
D The On/Off switch on this model does not fully disconnect the
TV from the mains supply. Remove the mains plug from the
wall socketwhen the TVset is notused for a prolongedperiod
of time.
2
D CABINET AND PICTURE TUBE CARE
Remove the mains plugfrom the wall socket. The cabinetand
picture tube can be cleaned with a soft cloth moistened with
mild detergent and water. Do not use solutions containing
benzol or petroleum. TV sets can produce static electricity,
care must be taken whenever touching the TV screen.
D Adequate ventilationis essential to prevent failure ofelectrical
components, we recommend that a gap of at leas t5cm is left
all around this television receiver even whenit is placedinside
a cabinet or between shelves.
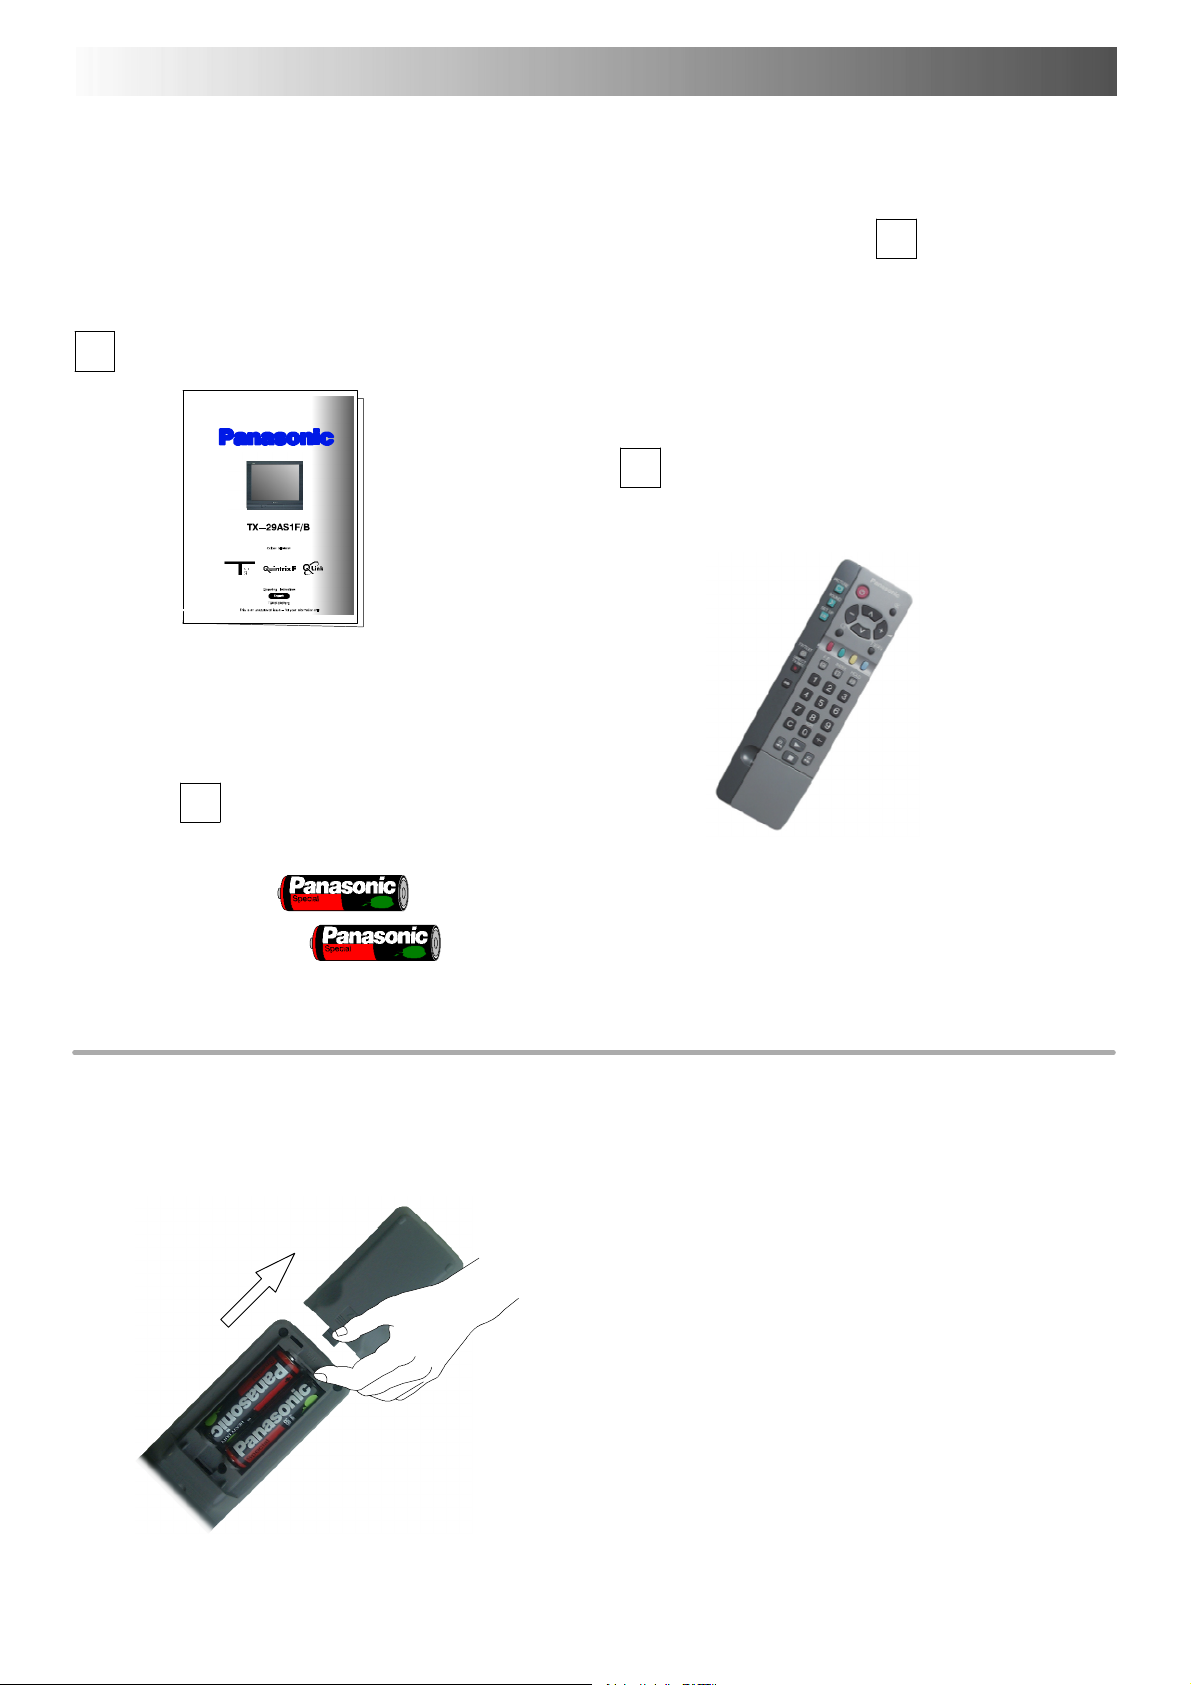
ACCESSORIES
Check that you have the accessories and items shown
Operating Instruction book
Batteries for the Remote Control
T ransmitter.
(2 x R6 (UM3) size)
n
Remote Control Transmitter
EUR511200
Remote control batteries
D Make sure that thebatteries arefitted
the correct way round.
D Do not mix old batteries with new
batteries. Remove old, exhausted
batteries immediately.
D Do notmix differentbattery types,i.e.
Alkaline and Manganese or use
rechargeable (Ni---Cad) batteries.
3
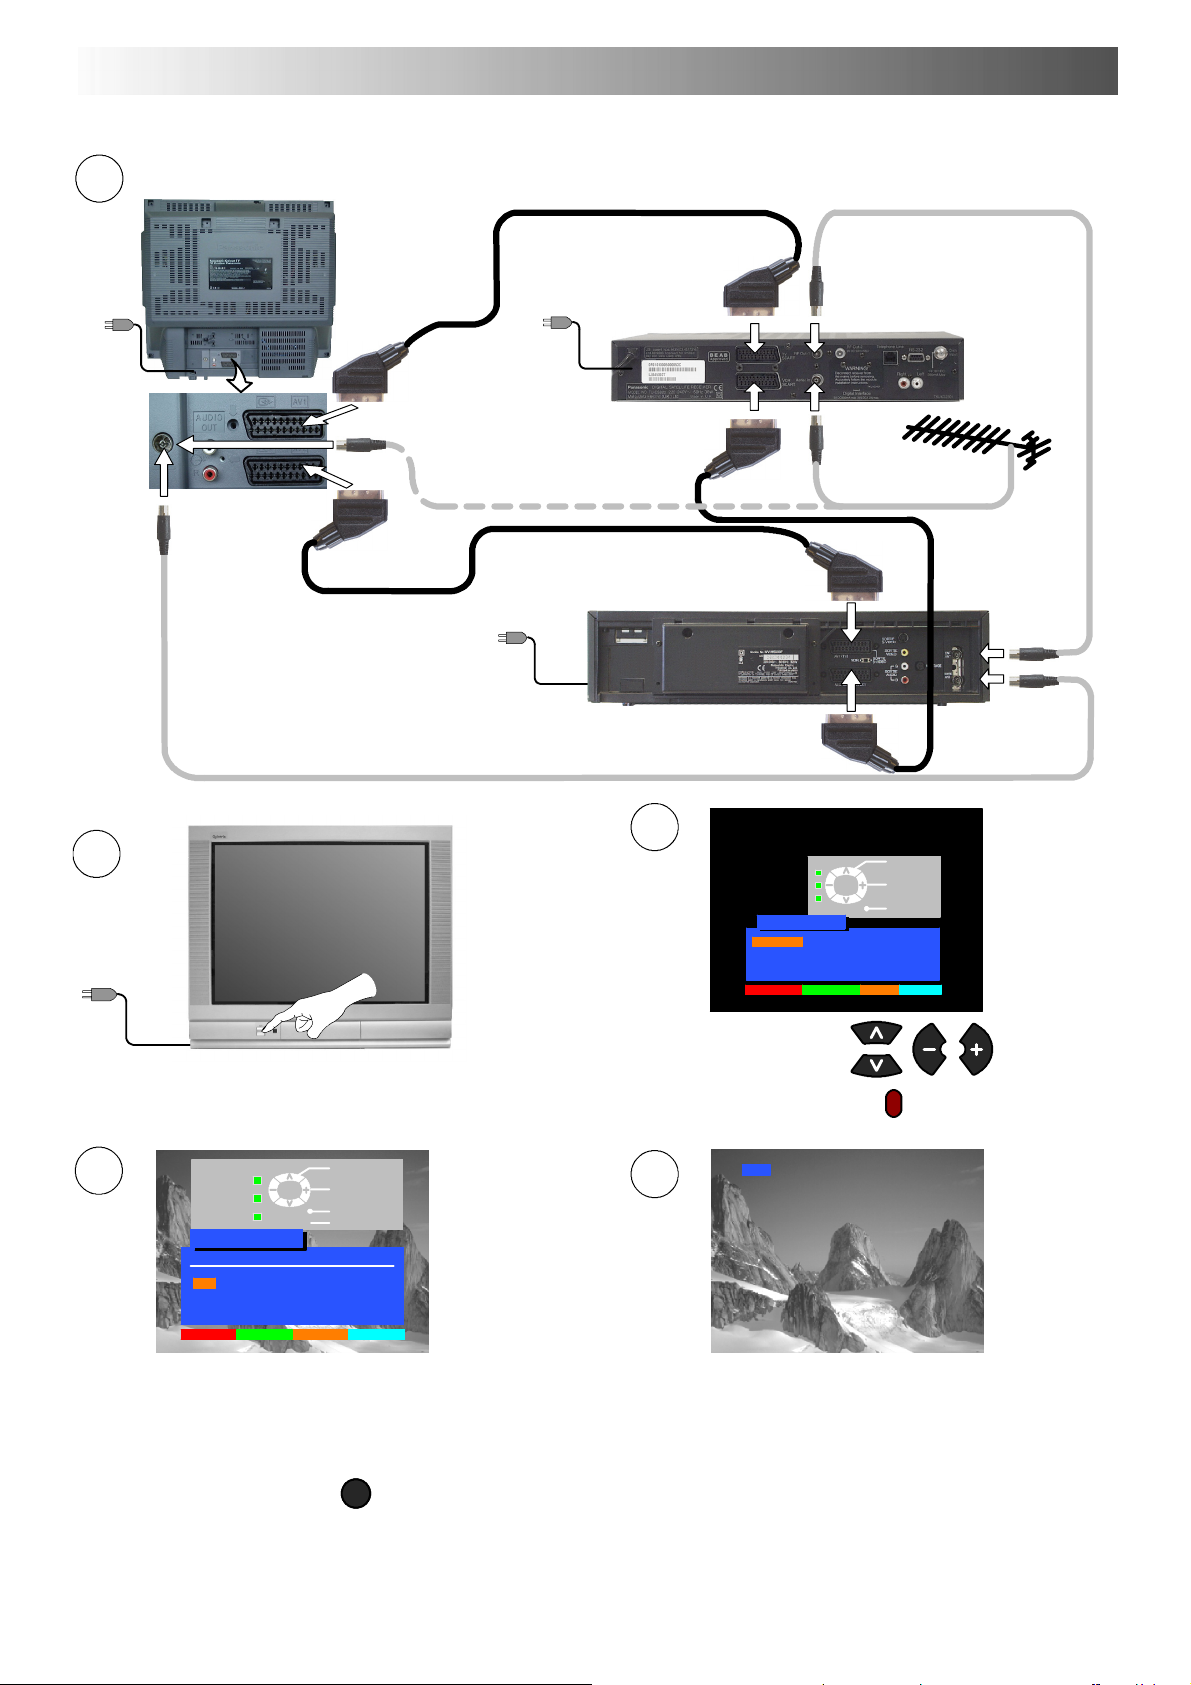
QUICK START GUIDE
Plug in aerial and connect ancillary equipment.
1
AV1
AV2
SATELLITE RECEIVER
OR
VCR
AV1
AV2
3
2
OSD language
English Magyar Hrvatski
Čeština Russkij Bulgarian
Română SlovenskySlovensko
Polski Nemački
Start ATP Manual tune
TV/AV
Select
Select
Exit
Select your country.
First, ensure that the VCR is in Standby mode.
Plug in TV and switch on.
STR
Change
programme
Select
option
Exit
Store
4
Return --
Programme edit
Prog. Chan. Name Lock Sys
1: CH41 XYZ Off SC2
2: -- Off SC2
3: -- Off SC2
4: -- Off SC2
5: -- Off SC2
Delete Add Move TV > VCR
TV/AV
Auto setup will begin, your stations will be located and stored.
Use the Programme Edit menu to delete unwanted stations
(see page 12).
Press the TV/AV button to exit.
TV/AV
If you are installing a new Q--- Link compatible VCR, you can now
switch it ON. Downloaded tuning data will match the television’s.
If you are installing a new
need to initiate download manually.
See the VCR handbook for details.
Press the red button.
5
CH41
NEXTVIEWLINK compatible VCR, you will
D If the VCR has not accepted download data from the TV, you may need to select the Download option from the VCR’s menu.
D If Q - --Link is not operating correctly, check it is connected to the television’s AV2 socket, the SCART lead is a “full function” type, and
the VCR is compatible with Q ---Link,
NEXTVIEWLINK or similar technologies. Ask your dealer for further details.
D For further information on Q ---Link and connecting equipment, see pages 19, 24 and 25.
4
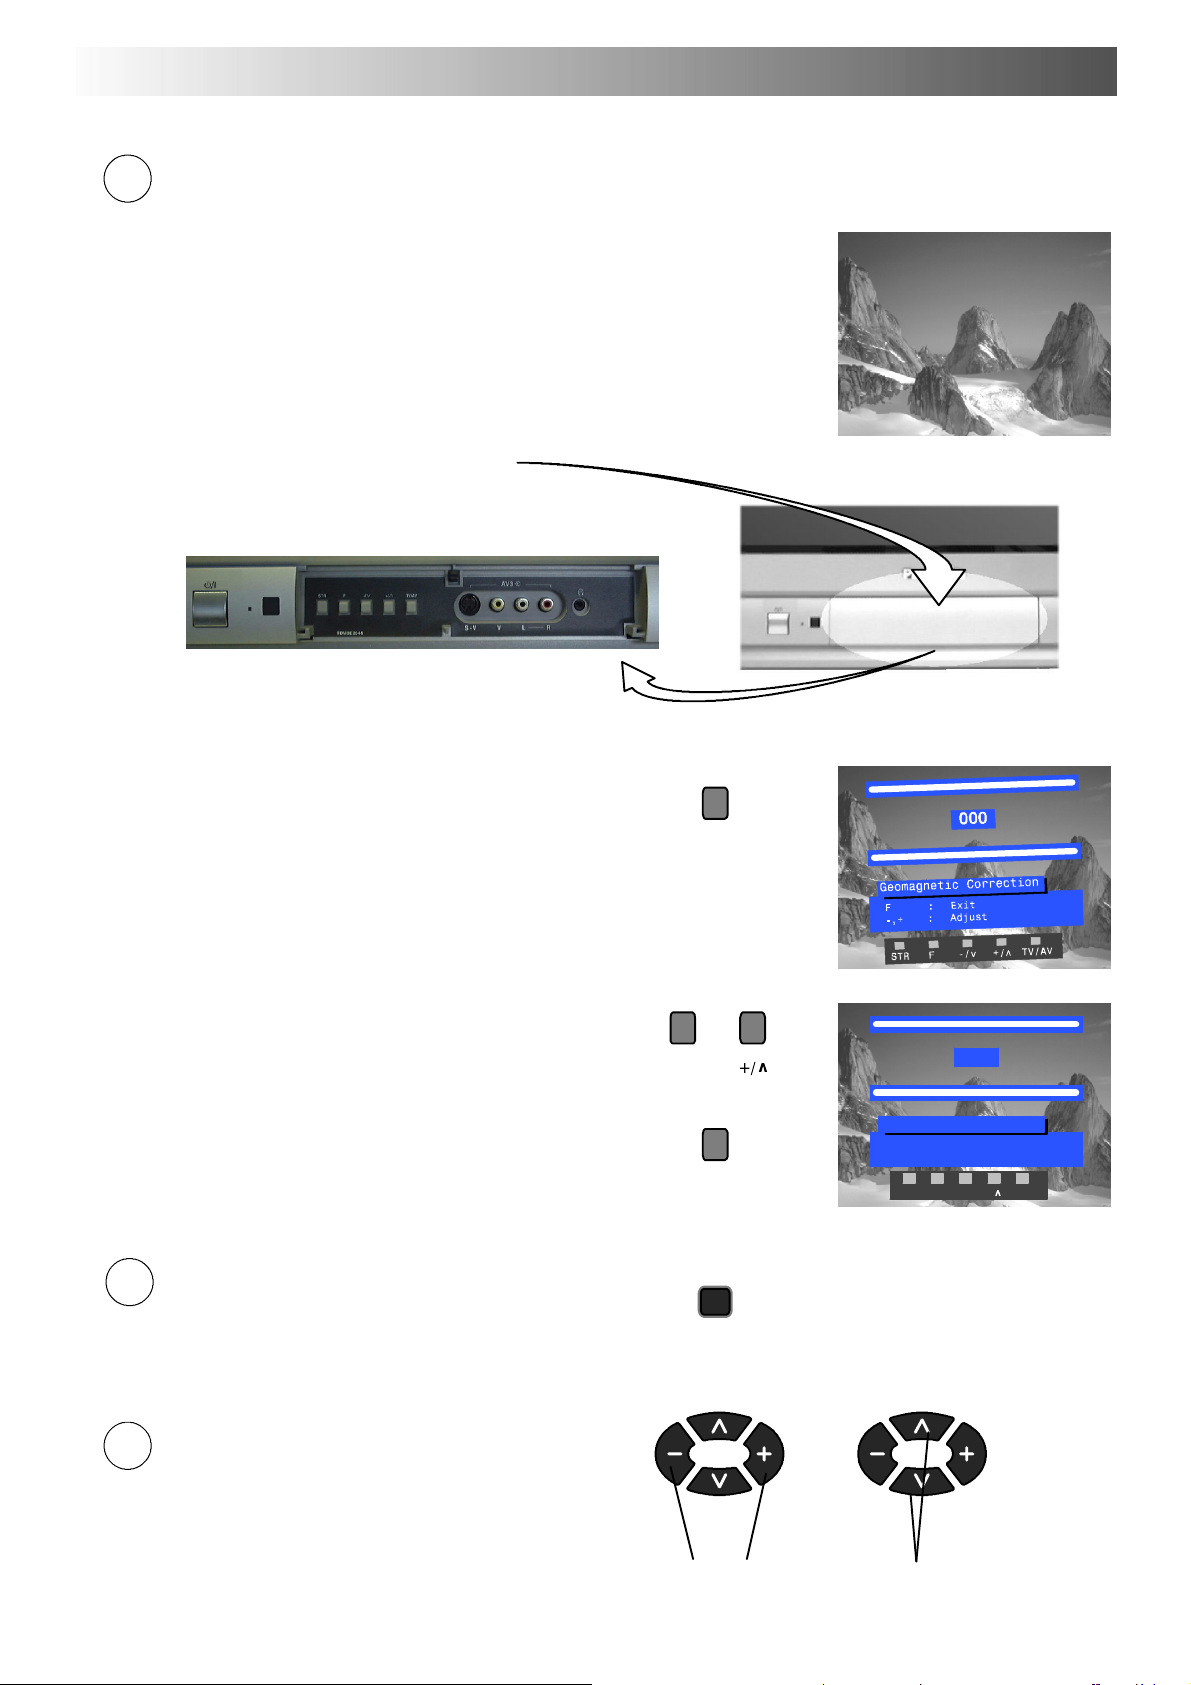
QUICK START GUIDE
6
Slight tilting of the picture may be noticeable or coloured patches may sometimes appear at the corners of the
screen (colour purity). The Geomagnetic Correction feature can be used to eliminate them, if necessary:
First, ensure the ATP and Q --- Link download procedures are complete.
The screen should not be showing any On---Screen Display menus.
Press and release here to open flap
Press the F button repeatedly until the Geomagnetic
Correction feature is displayed
F
Press the + or --- buttons repeatedly until the picture
appears to be level
--- / v
Press the F button again to return to normal viewing.
Close the flap to prevent damage
F
7
We recommend that as soon as the ATP feature is
completed, the picture controls are reset to normal
viewing levels. To do this, press the ”N” button, found
under the remote control’s pull down flap.
N
Geomagnetic correction
F : Exit
--,+ : Adjust
STR F --/v +/ TV/AV
002
8
You are now ready to begin viewing programmes
The cursor controls provide the two basic functions:
Adjust Volume Change Programme
5
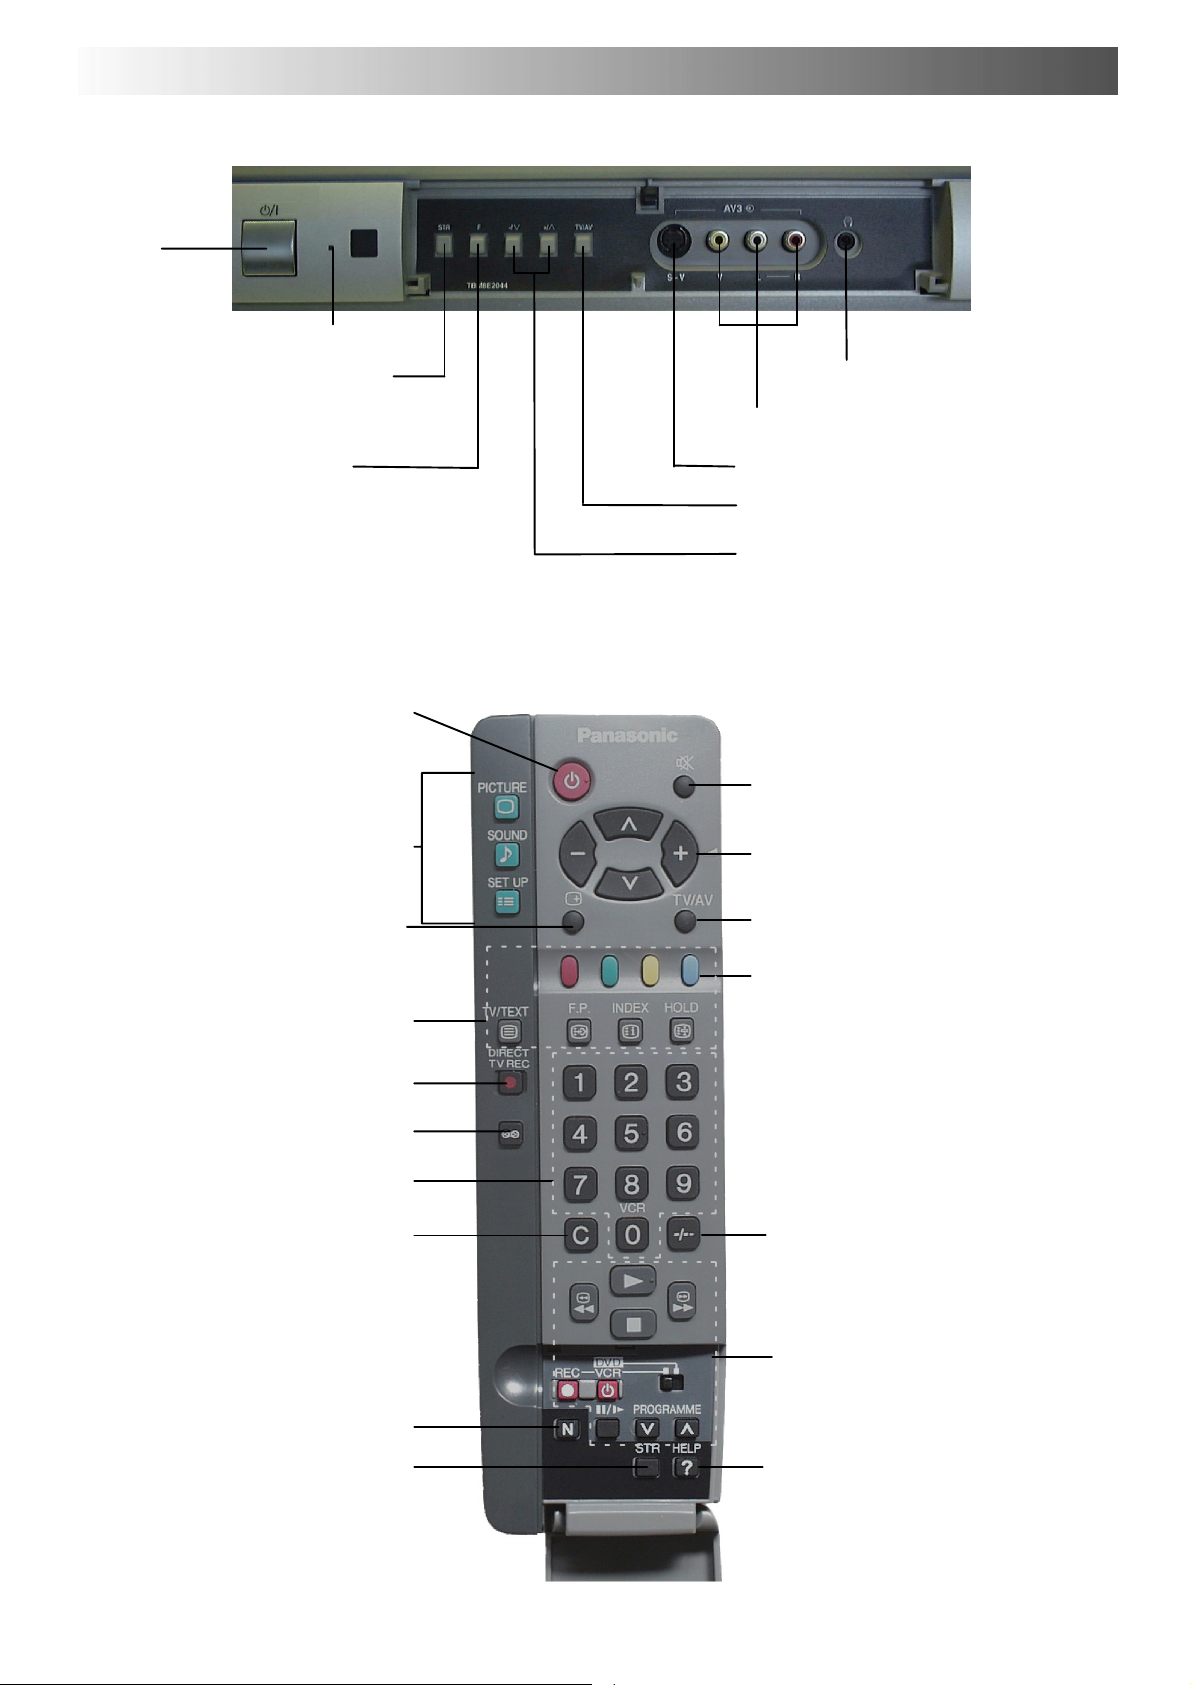
BASIC CONTROLS : FRONT PANEL AND REMOTE CONTROL
MAINS
Power
On/Off
switch
Red light indicates Standby mode.
STR (Normalisation store)
Used to store tuning and other
function settings
F (Function select)
Displays the On Screen Display functions,
use repeatedly to select from the available
functions - Volume, Contrast, Brightness,
Colour, Sharpness, Tint (in NTSC mode),
Bass, Treble, Balance, Tuning mode and
Geomagnetic Correction.
Standby ON/OFF switch
Switches TV On or Off standby.
Menu buttons
Press to access the Picture, Sound
and Setup menus (see page 7)
Status button
Press to display programme position,
programme name, channel number,
TV system, time stereo mode
and programme table
Teletext buttons (see page 22)
Headphonesocket(seepage24)
RCA Audio/Video sockets (page 24)
S - --VHS socket (see page 24)
TV/AV switch (see page 20)
Increases or decreases the programme
position by one. When a function is
already displayed, press to increase or
decrease the selected function.
Sound mute On/Off
Cursor buttons to make selections and
adjustments
Switch between viewing TV or AV input
(see page 20)
Coloured buttons used for
Programme E d it functions (see page 12)
Teletext functions (see p age 22)
AV selection (see page 20)
Direct TV Record button
(see page 19)
Ambience on/off
Programme / channel change
buttons (0- 9) and Teletext page
buttons (see page 22)
Direct Channel Access
During normal TV viewing or when
in the Tuning, Programme edit or
Manual tuning menus, press and
then enter channel number using
the numeric buttons
The N button will recall settings
stored with STR
STR (Normalisation store)
6
Programme position for selection of
two digit progra mmes (10- 99) using
numeric buttons
VCR / DVD buttons
(see page 21)
The Help button provides a
demonstrationofOnScreen
Display menus

USING THE ON SCREEN DISPLAYS
This TV has a comprehensive system of On Screen Display menus to access
adjustments and options
Menu Title
Picture menu
TV/AV
Select
Change
Exit
Instructions
Sub-- menus
Selection bar
Some selections, for example, Contrast, Brightness, Colour and Sharpness
will allow you to increase or decrease their level.
Some selections, for example, Off timer, allow a choice to be made.
Some selections, for example Tuning menu, will lead to a further menu.
The PICTURE, SOUND and SET UP buttons are
used to open the main menus and also to return to
the previous menu.
The up and down cursor buttons are used to move
the cursor up and down the menus.
Contrast
Brightness
Colour
Sharpness
Colour balance Normal
P-- NR Off
AI On
PICTURE
SOUND SET UP
Indicator for options
The left and right cursor buttons are used to access
menus, adjust levels or to select from a range of
options.
The STR button is used to store settings after
adjustments have been made or options have
been set.
The TV/AV button is used to exit the menu system
and return to the normal viewing screen.
The HELP button will run a demonstration of the
menus available. Press the HELP button and
select one of the options.
If the HELP button is pressed whilst a menu is
displayed, the ’Instructions’ box will be hidden
from view. Press the HELP button again to show
the ’Instructions’ box.
STR
TV/AV
HELP
?
7
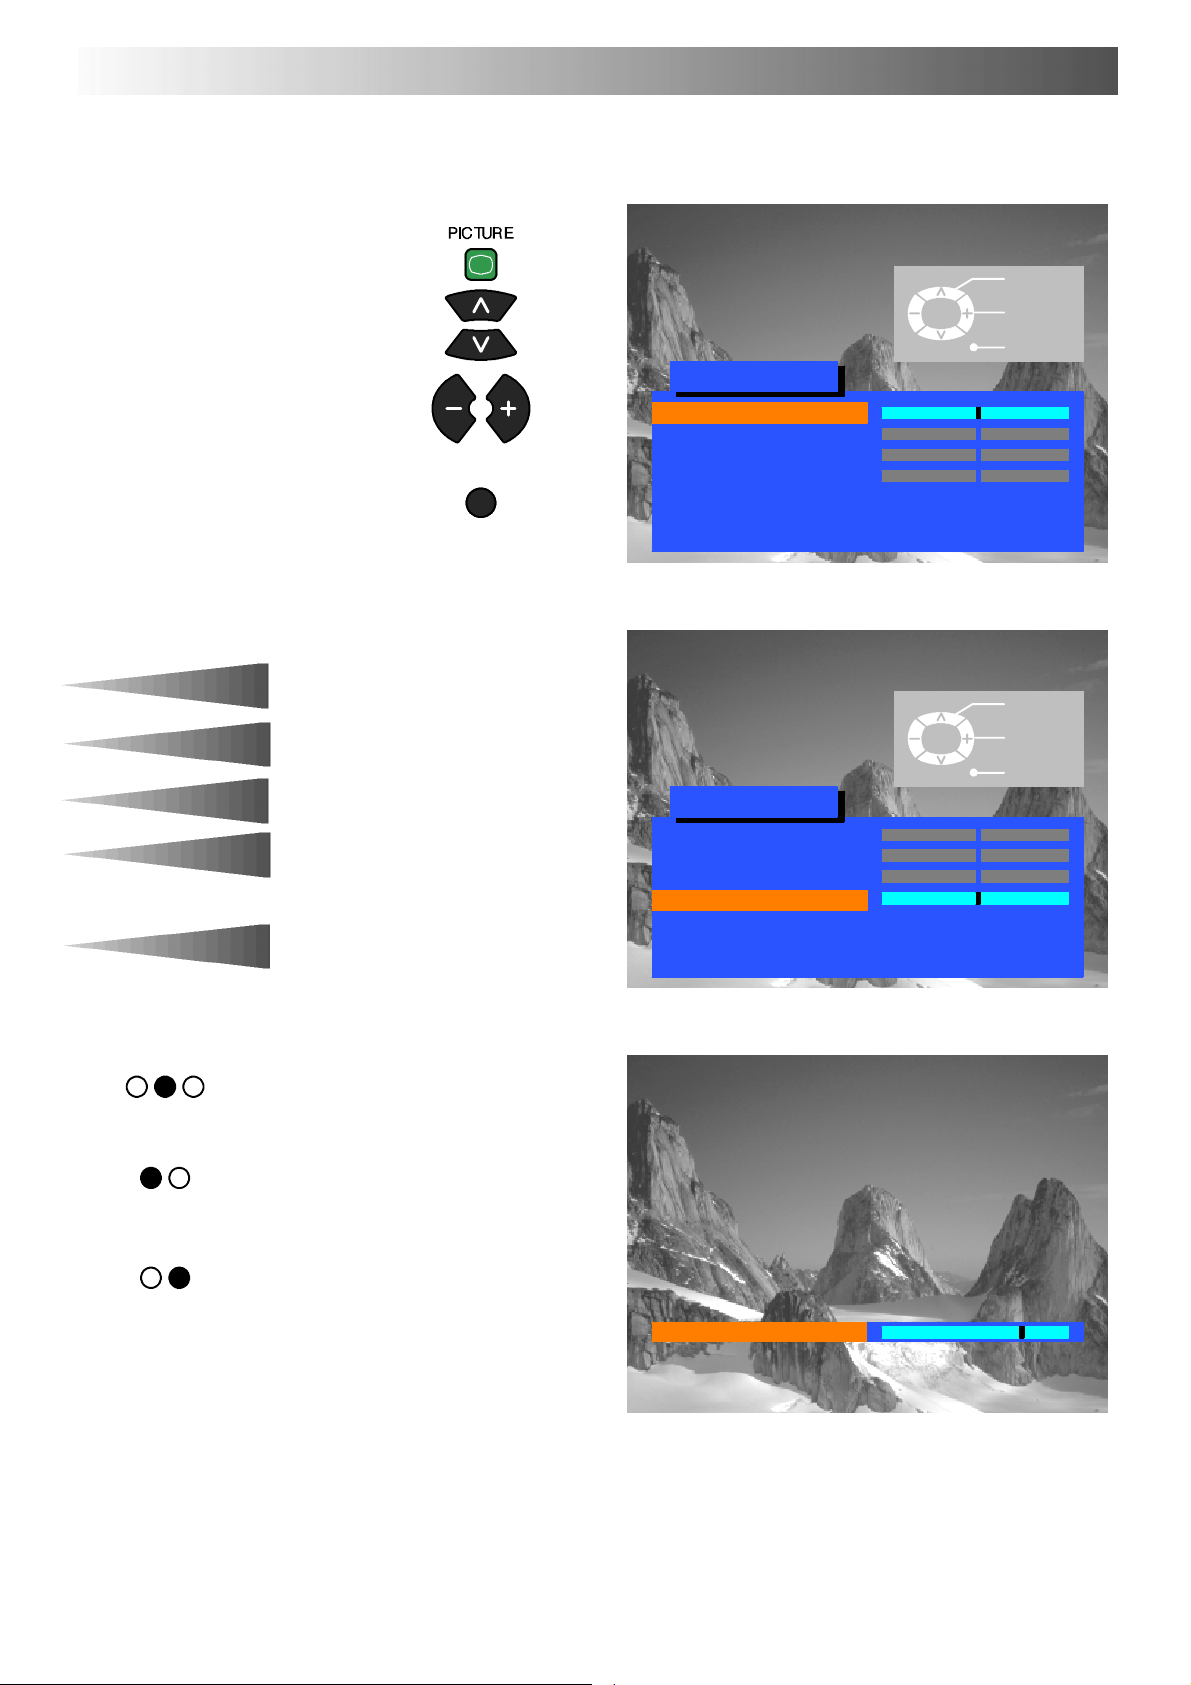
PICTURE M ENU
This menu allows you to make adjustments to the picture quality
Open the Picture menu
Move to your choice
Increase or decrease levels or
set options
Press the TV/AV button to exit
the Picture menu
TV/AV
TV/AV
Picture menu
Contrast
Brightness
Colour
Sharpness
Colour balance Normal
P-- NR Off
AI On
Select
Adjust
Exit
Contrast
Brightness
Colour
Sharpness
Tint
Colour balance
P-- NR
AI
The Contrast, Brightness, Colour and
Sharpness levels can be adjusted to suit
your own preferences and the viewing
conditions.
The Tint adjustment will only appear as
a menu item if you have an NTSC signal
source connected to the TV and will
allow adjustment of the hue.
The Colourbalance settingallows you to
set the overall colour tone of the picture.
P-- NR will automatically reduce
unwanted picture interference.
The AI setting automatically analyses
the incoming picture and processes it to
give improved contrast, optimum depth
of field and vivid colour tones.
TV/AV
Picture menu
Contrast
Brightness
Colour
Sharpness
Colour balance Normal
P-- NR Off
AI On
Sharpness
Select
Adjust
Exit
8
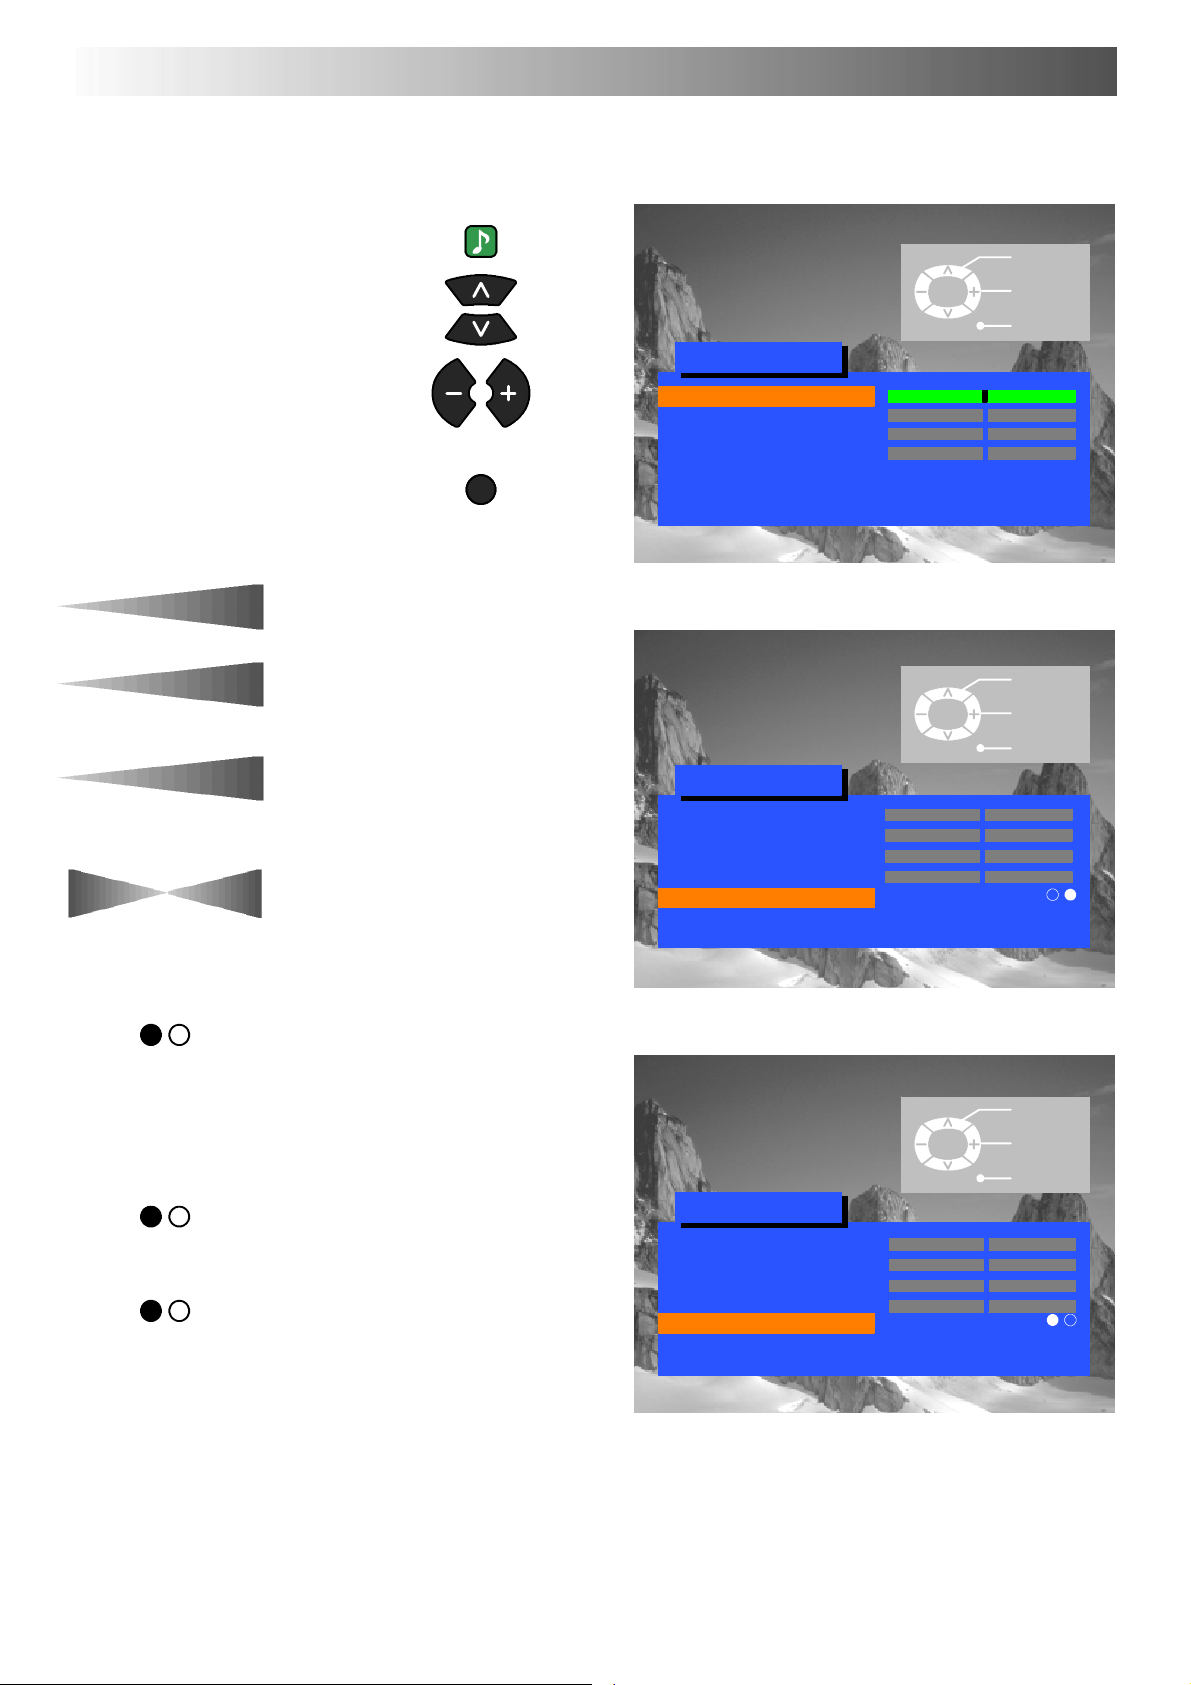
SOUND MENU
The Sound menu will allow you to set your personal preferences for all aspects of sound quality
SOUND
Open the Sound menu
Move to your choice
Increase or decrease levels or
set options
Press the TV/AV button to exit
the Sound menu
TV/AV
TV/AV
Sound menu
Volume
Bass
Treble
Balance
MPX Stereo
Mode Music
Ambience Off
Select
Adjust
Exit
Volume
Treb le
Balance
MPX
Bass
The Volume adjustment sets the overall
output volume.
Bass adjustment will emphasise the
lower, deeper frequencies and can be
increased or decreased.
T reble adjustment will emphasise the
sharper, higher frequencies and can be
increased or decreased.
Balance affects the levels of sound
between the left and right speakers.
Adjustment can be made so that the
level from the speakers will suit your
listening position.
MPX will usually be set to Stereo to
provide the best reproduction, however
if reception deteriorates or if the service
is not available then it is advisable to
switch to Mono. Mono (M1) and (M2)
can also be selected if signals are being
transmitted.
TV/AV
Sound menu
Volume
Bass
Treble
Balance
MPX Stereo
Mode Music
Ambience Off
Select
Change
Exit
Select
Change
Mode
Ambience
The sound can be improved during
Music or Speech mode by selecting the
appropriate function.
Ambience provides a dynamic
enhancer to simulate improved spatial
effects.
TV/AV
Sound menu
Volume
Bass
Treble
Balance
MPX Stereo
Mode Music
Ambience Off
Exit
9
 Loading...