

Page 1
TX---32PB50F
TX---28PB50F
Colour Television
U --- 1
32PB50F
Operating
Instructions
TQB8E3342U---1
Page 2
Welcome
Dear Panasonic Customer,
Wehopethat you havemanyyearsof enjoymentfrom yournew TV.The QuickStart Guidesection at the beginningof thisinstruction
bookwillallowyouto use the TV asquicklyas possible. Werecommendthatyou then read thecompleteinstructionbook,and keep it
to refer to as you explore the range of advanced features that this TV offers.
This TV has a low power consumption making it very cost effective to run. Also, when in Standby mode the
power consumption is merely 2.8W.
MADE FROM
100% RECYCLED PAPER
244 039
Printing paper
Lowemissions during production
This instruction book is produced using recycled paper, made from 100% Post---consumer waste pulp.
De ---inked without bleaching. Free from optical brightening agents (OBA).
Contents
Accessories 2....................................
Warnings and Precautions 3........................
Quick Start Guide 4...............................
Basic controls: front panel and remote control 6......
Using the On Screen Displays 7....................
Picture Menu 8...................................
Sound Menu 9....................................
Setup Menu 10...................................
Tuning Menu --- overview 11........................
Programme edit 12.............................
Auto setup 14.................................
Manual tuning 15..............................
Aspect controls 16................................
Multi window 18..................................
Channel search 19................................
Picture and text 19................................
Still 19...........................................
Strobe 19........................................
Accessories
Q --- Link 20........................................
VCR / DVD operation 21............................
Teletext operation 22...............................
Surround sound systems 24.........................
Surround menu 25.................................
DTS / Dolby Digital and Pro Logic modes 26...........
Simulated mode 26................................
Speaker level setup 26..............................
Audio / video connections 27........................
Front sockets 27................................
Rear sockets 28................................
Connecting external speakers 29.................
Connecting external amplifiers and
speakers 30....................................
Troubleshooting 31.................................
Scart and S---video socket information 32.............
Specifications 32...................................
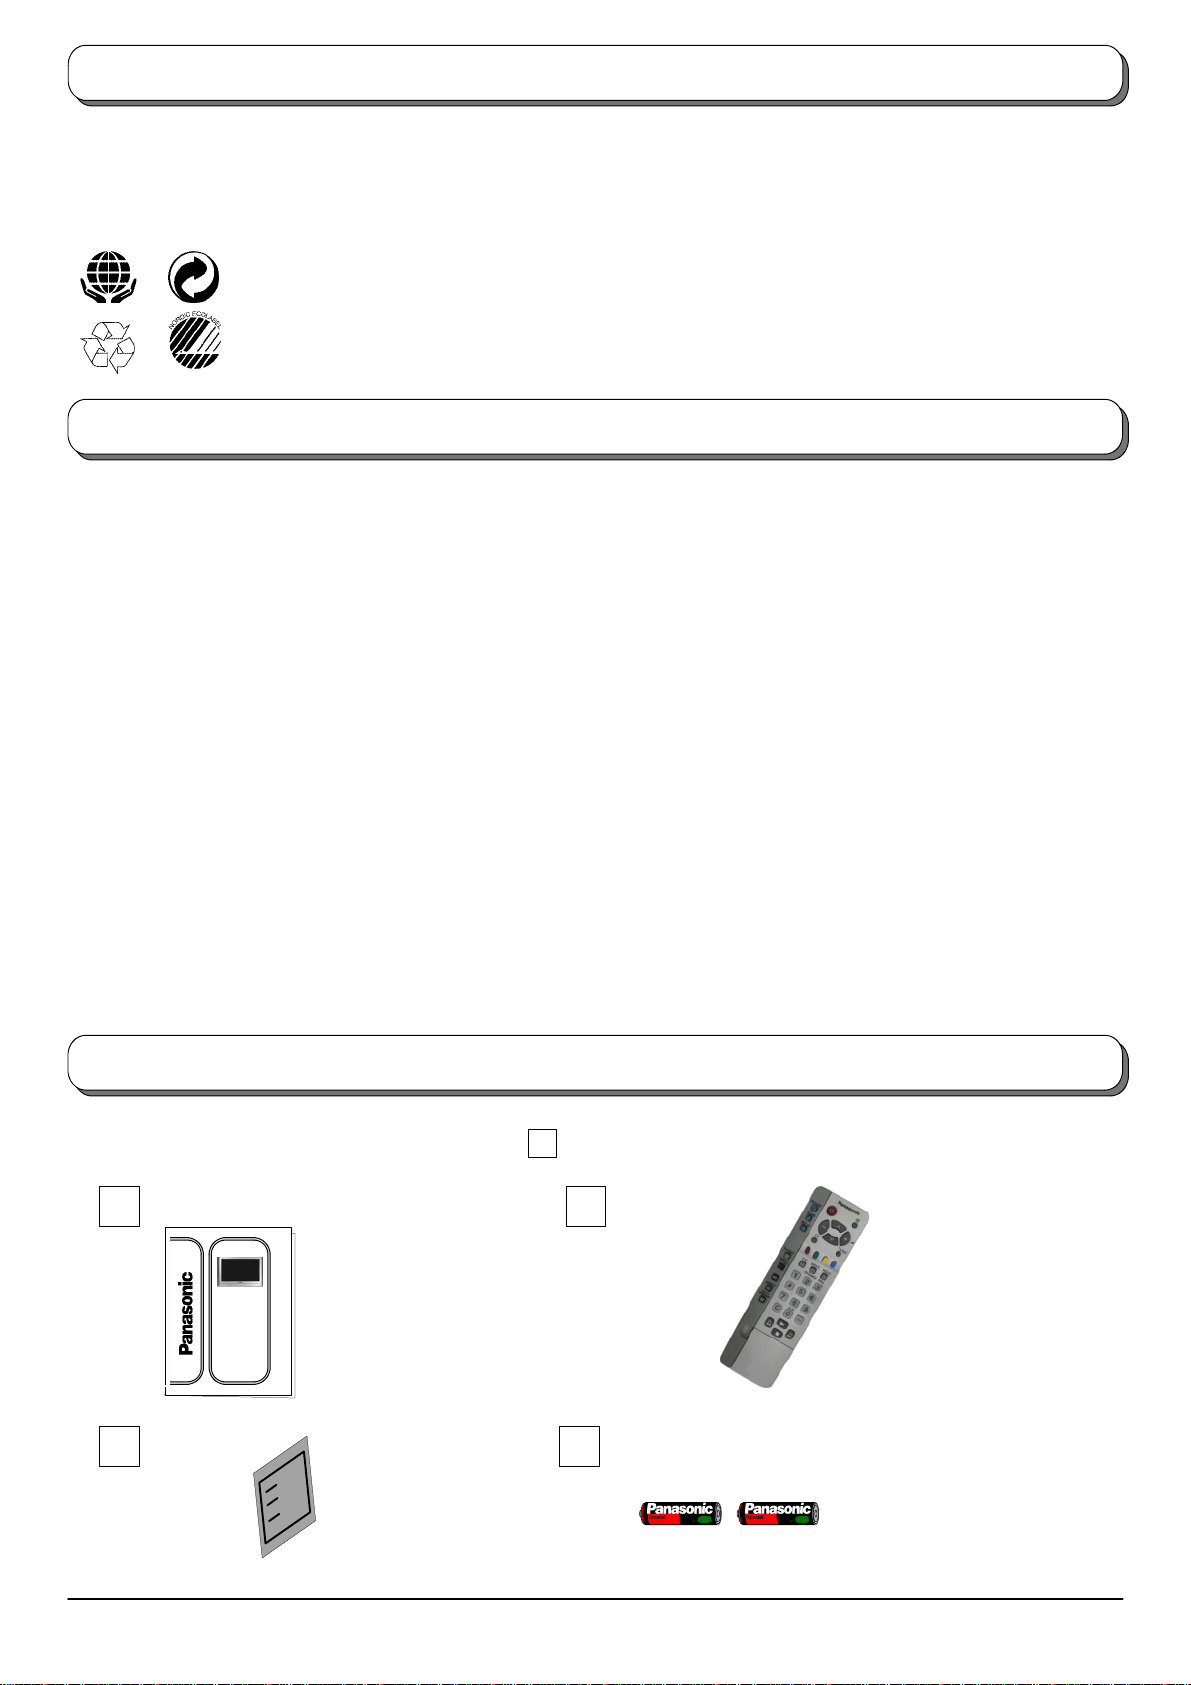
Check that you have the accessories and items shown
Operating Instruction book
TQB8E3342
TX---32PB50F
TX---28PB50F
TV Guarantee
2
n
Remote Control
Transmitter
EUR511224
Batteries for the Remote
Control Transmitter.
(2 x R6 (UM3) size)
Page 3
Warnings and precautions
D ThisTVset is designedtooperate on A.C.220 --- 240V,50Hz.
D To prevent damage which might result in electric shock or
fire, do not expose this TVset to rainor excessive moisture.
ThisTV mustnot be exposedto drippingor splashingwater
and objects filled with liquid, such as vases, must not be
placed on top of or above the TV.
D WARNING : HIGH VOLTAGE !!!
Do not remove the rear cover as live parts are accessible
when it is removed. There are no user serviceable parts
inside.
D TV Games / Home Computers
Extended use of TV games or home computers with any
television set can cause a permanent ‘shadow’ on the
screen.This typeofirreversiblepicturetubedamage,canbe
limited by observing the following points:
D Reducethe brightness andcontrastlevels to aminimum
viewing level.
D Do not operatethe televisionset fora continuousperiod
of time while using TV games or home computers.
D This type of picture tube damage, is not an operating
defect, and as such is not covered by the Panasonic
warranty.
D The On/ Off switchon thismodel does not fully disconnect
the TV from the mains supply. Remove themains plug from
the wall socket when theTV set isnot used for a prolonged
period of time.
Note:
D If the set is not switched off when the TV station stops
transmitting, it will automatically go to standby mode
after 30 minutes.This function will not operate when the
TV is in AV mode.
D Cabinet and picture tube care
Remove the mains plug from the wall socket. The cabinet
and picturetube canbe cleanedwith a soft clothmoistened
with mild detergent and water. Do not use solutions
containing benzol or petroleum.TV sets can produce static
electricity, care must be taken whenever touching the TV
screen.
D Adequate ventilation is essential to prevent failure of
electricalcomponents, we recommendthata gapof atleast
5cm is left all around this television receiver even when it is
placed inside a cabinet or between shelves.
D Avoid exposing the TV set to direct sunlight and other
sources of heat.
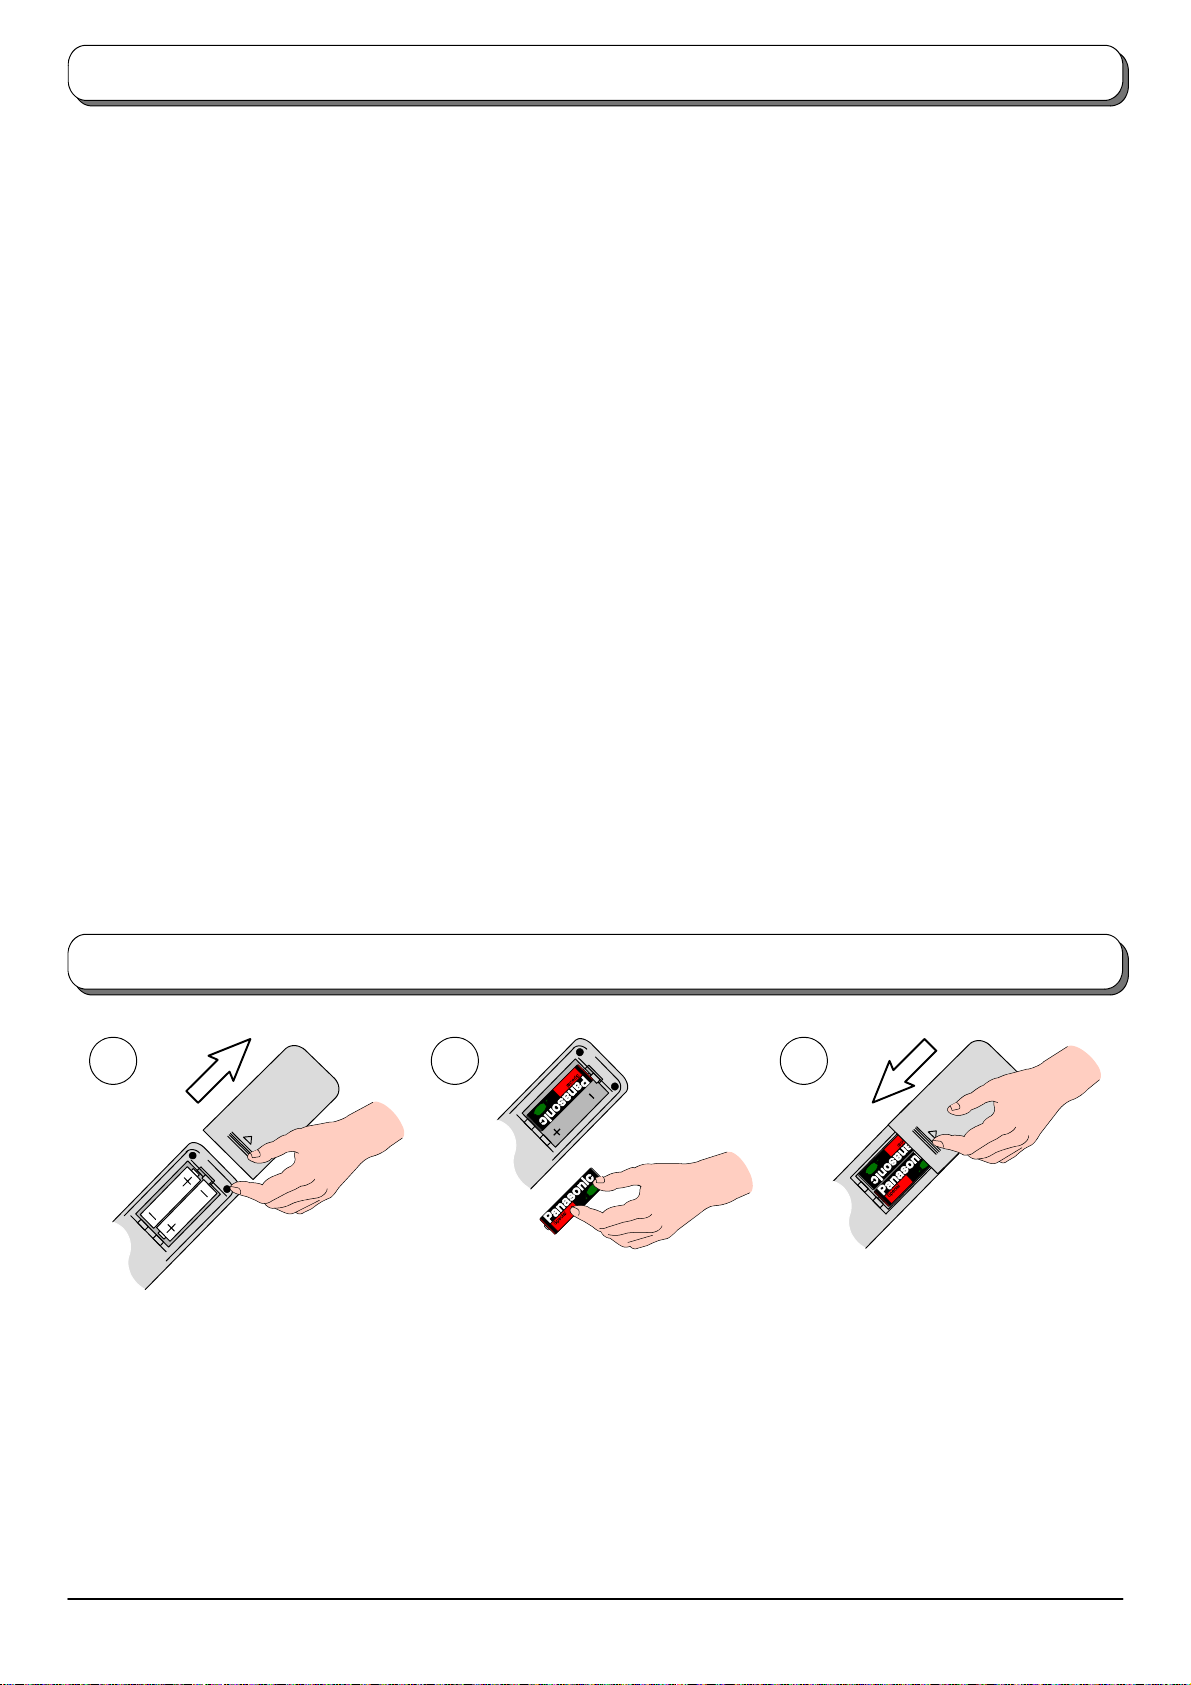
Fitting remote control batteries
1 2 3
ReplacethecoverSlide off the battery cover Insert batteries -- note correct
polarity (+ and -- )
D Make sure that the batteries are fitted the correct way round.
D Do not mix old batteries with new batteries. Remove old, exhausted batteries immediately.
D Do not mix different battery types, i.e. Alkaline and Manganese or use rechargeable (Ni---Cad) batteries.
3
Page 4
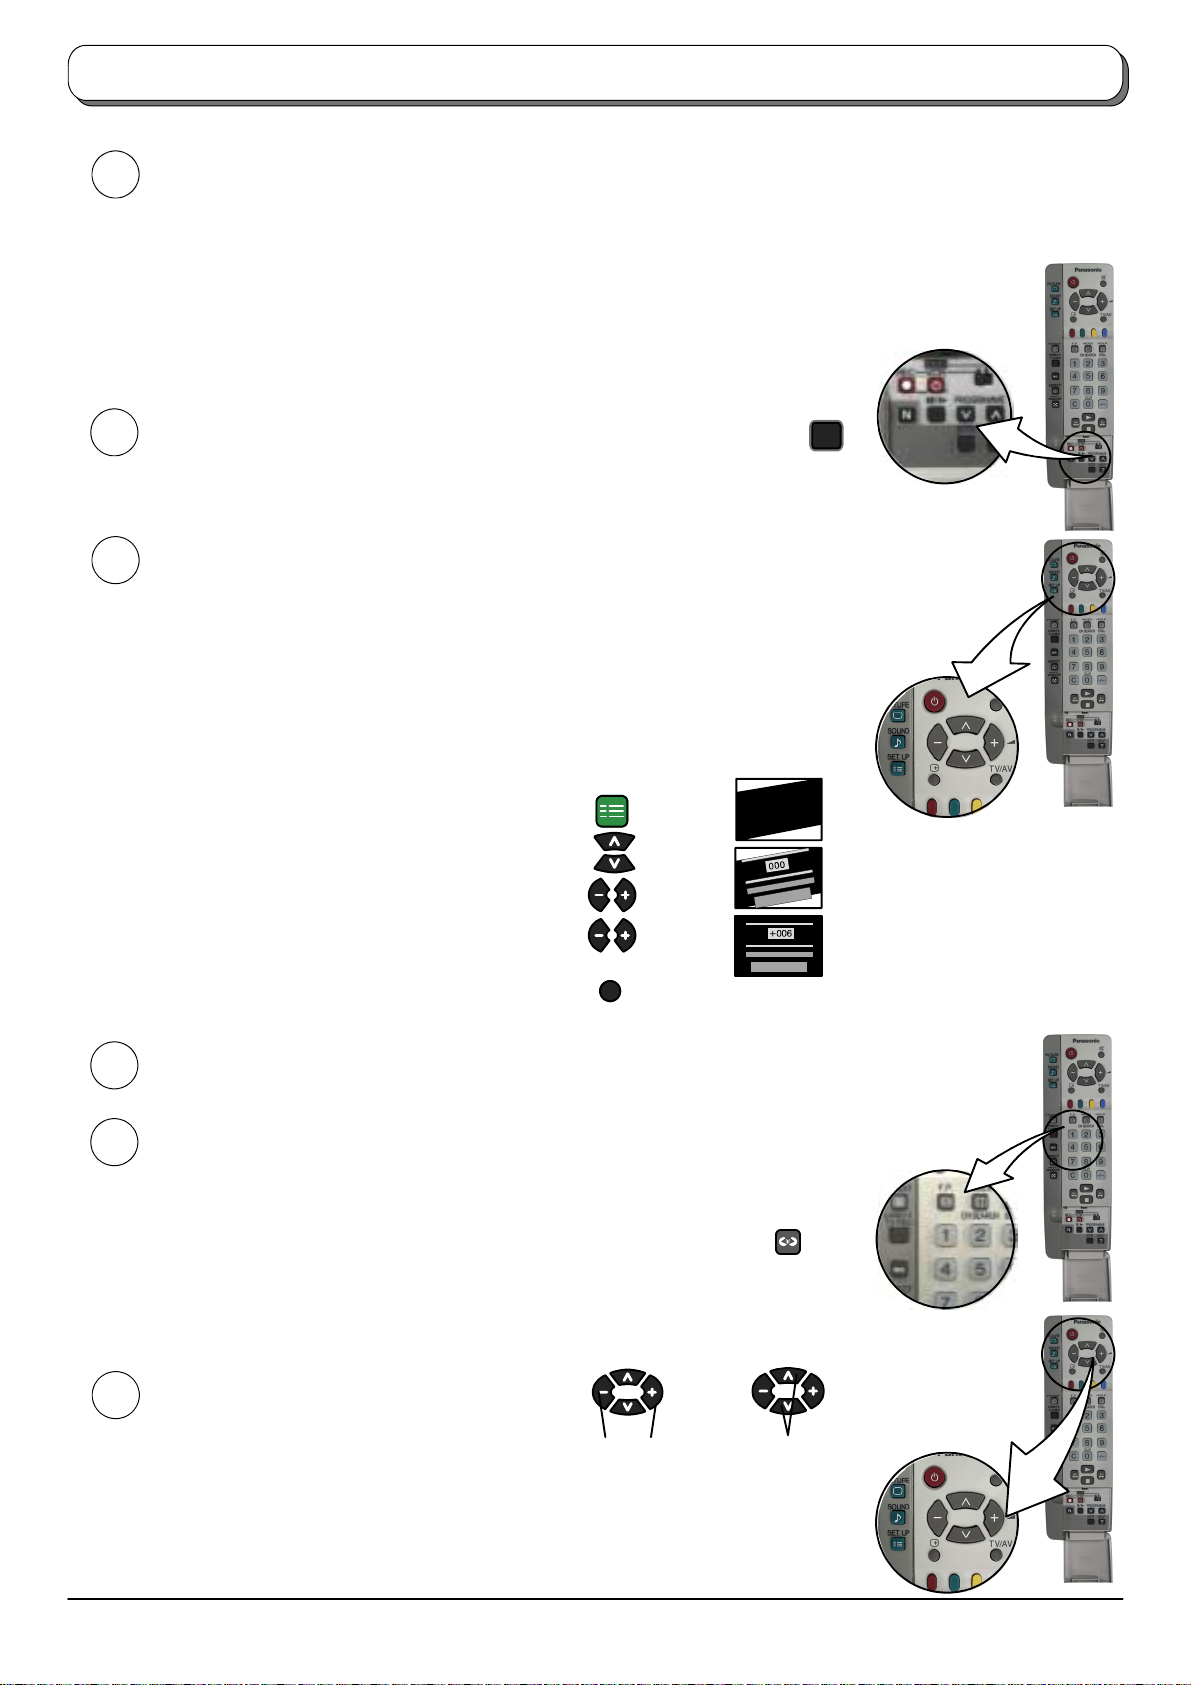
Quick Start Guide
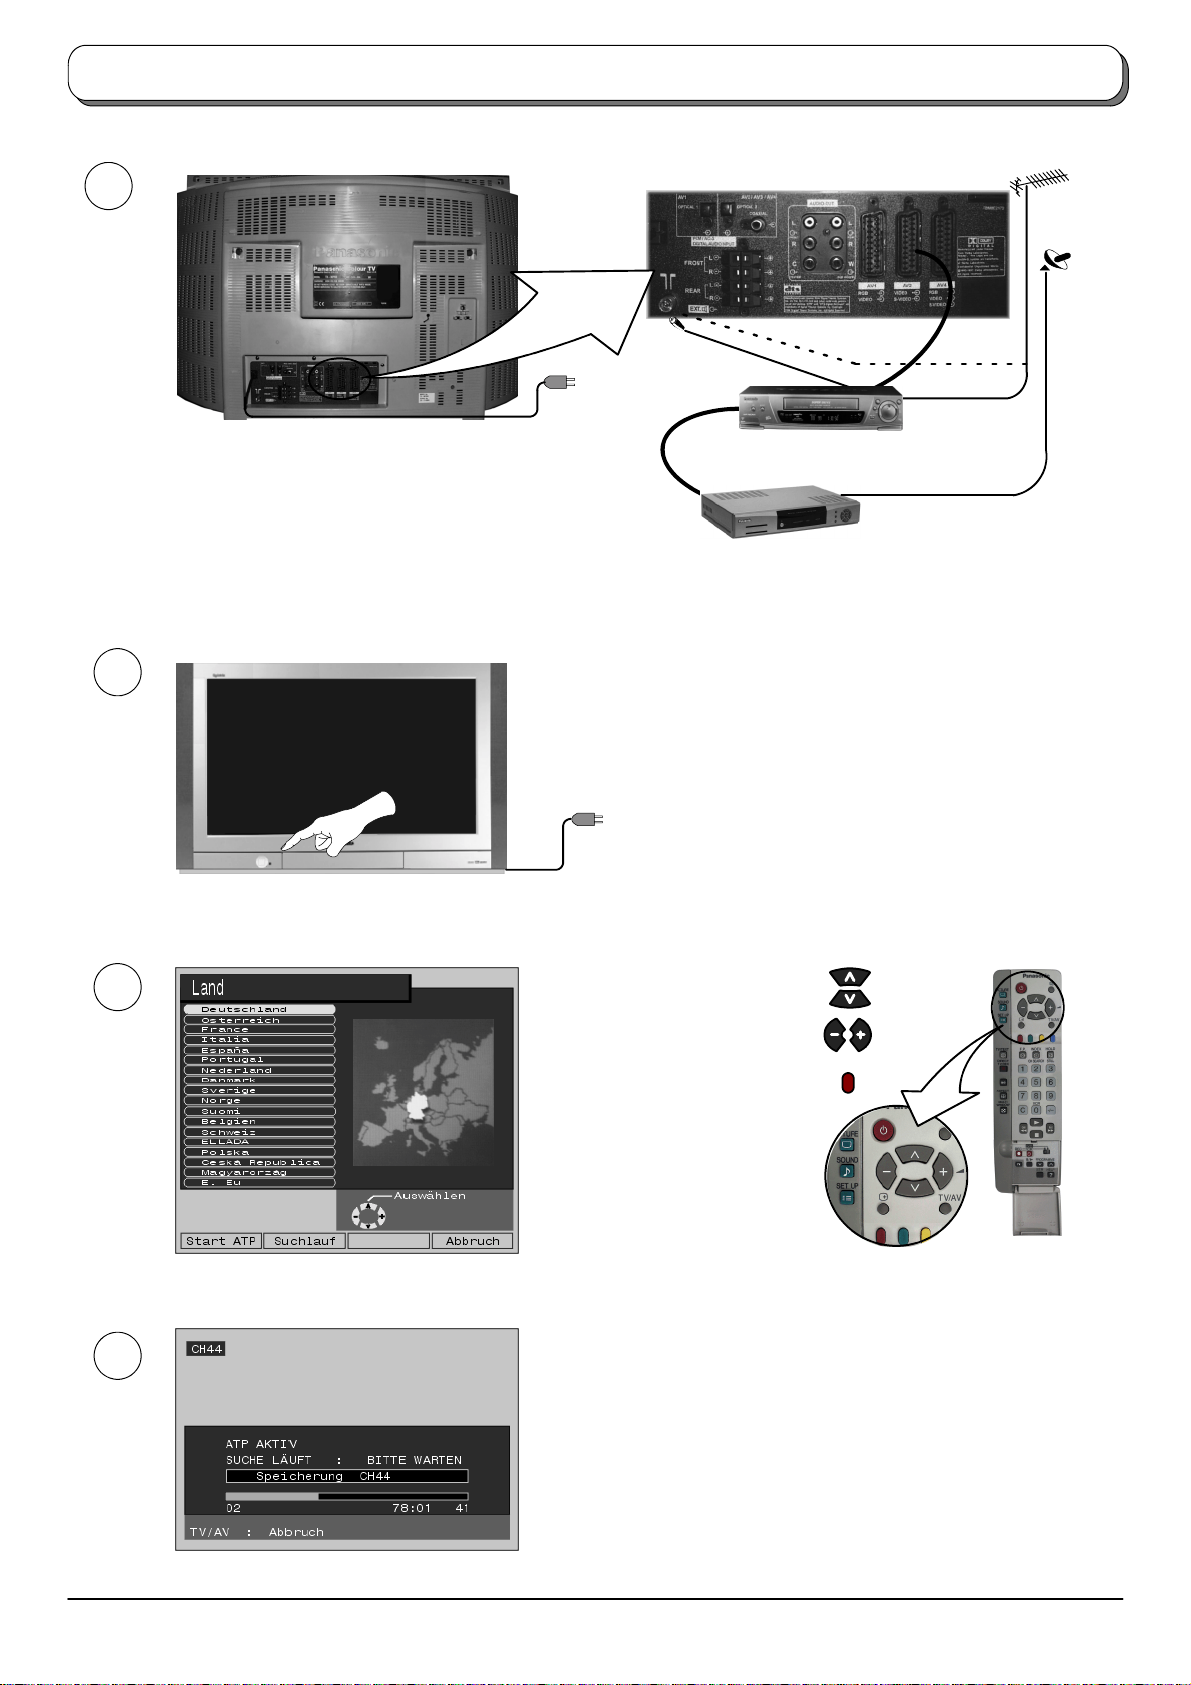
1
OR
VCR
Plug in aerial and connect ancillary equipment
2
3
First, ensure that the VCR is in Standby mode
Plug in TV and switch on
Select your country
For Switzerland and Belgium,
select the desired language
SET TOP BOX
Press the red button
4
Auto setup will begin, your stations will be located and stored.
If a compatible VCR is connected to the AV2 socket,
programme data will be downloaded to the VCR via Q---Link.
Seepage20.
4
Page 5
A
Quick Start Guide
Once
5
D If the VCR has not accepted download data from the TV, you may need to select the download option from the
D If Q --- Li n k is not operating correctly, check it is connected to the television’s AV2 socket, the SCART
D For further information on Q --- Link and connecting equipment, see pages 20, 27 and 28.
6
7
uto setup is complete, if you are installing a new Q---Link compatible VCR, you can now switch it On.
Downloaded tuning data will match the television’s. Not all VCRs suport this download of programme information,
some may require to be started manually. See the VCR instruction book for details.
VCR’s menu.
lead is a “full function” type, and the VCR is compatible with Q---Link,
Askyourdealerforfurtherdetails.
We recommend that as soon as the Auto setup feature is completed, the
picture controls are reset to normal viewing levels. To do this, press the ”N”
button, found under the remote control’s pull down flap.
Slight tilting of the picture may be noticeable, the GeomagneticCorrection feature
can be used to eliminate this, if necessary:
First, ensure the Auto setup and Q --- Li n k download procedures are complete. The
screen should not be showing any On Screen Display menus.
NEXTVIEWLINK or similar technologies.
N
Using the remote control keys indicated, access the Geomagnetic Correction
menu option and follow the procedure below (for a full explanation of the On
Screen Display menu system see page 7) :
SET UP
Press the SETUP menu button
Move to the Geomagnetic menu option
Access the Geomagnetic menu
Adjust the picture tilt as necessary
Press the TV/AV button to exit the SETUP menu
If you wish to connect external amplifiers and speakers, see pages 29 and 30.
8
If you do not wish to connect any external amplifiers and speakers at all, we
9
recommend that you switchSurround sound Off. The sound output will then be two
channel (ie: left and right) stereo or mono.
With theSurround featureswitchedoff someadditional features becomeavailable in
the SOUND menu,seepage9.
Press the Surround button to switch between On and Off
TV/AV
Note:
D Accessing the Surround menu (viathe SOUNDmenu)automatically switchesthe
Surround feature On.
You are now ready to begin viewing programmes
10
The cursor controls provide the two basic functions:
Adjust Volume
Change Programme
5
Page 6
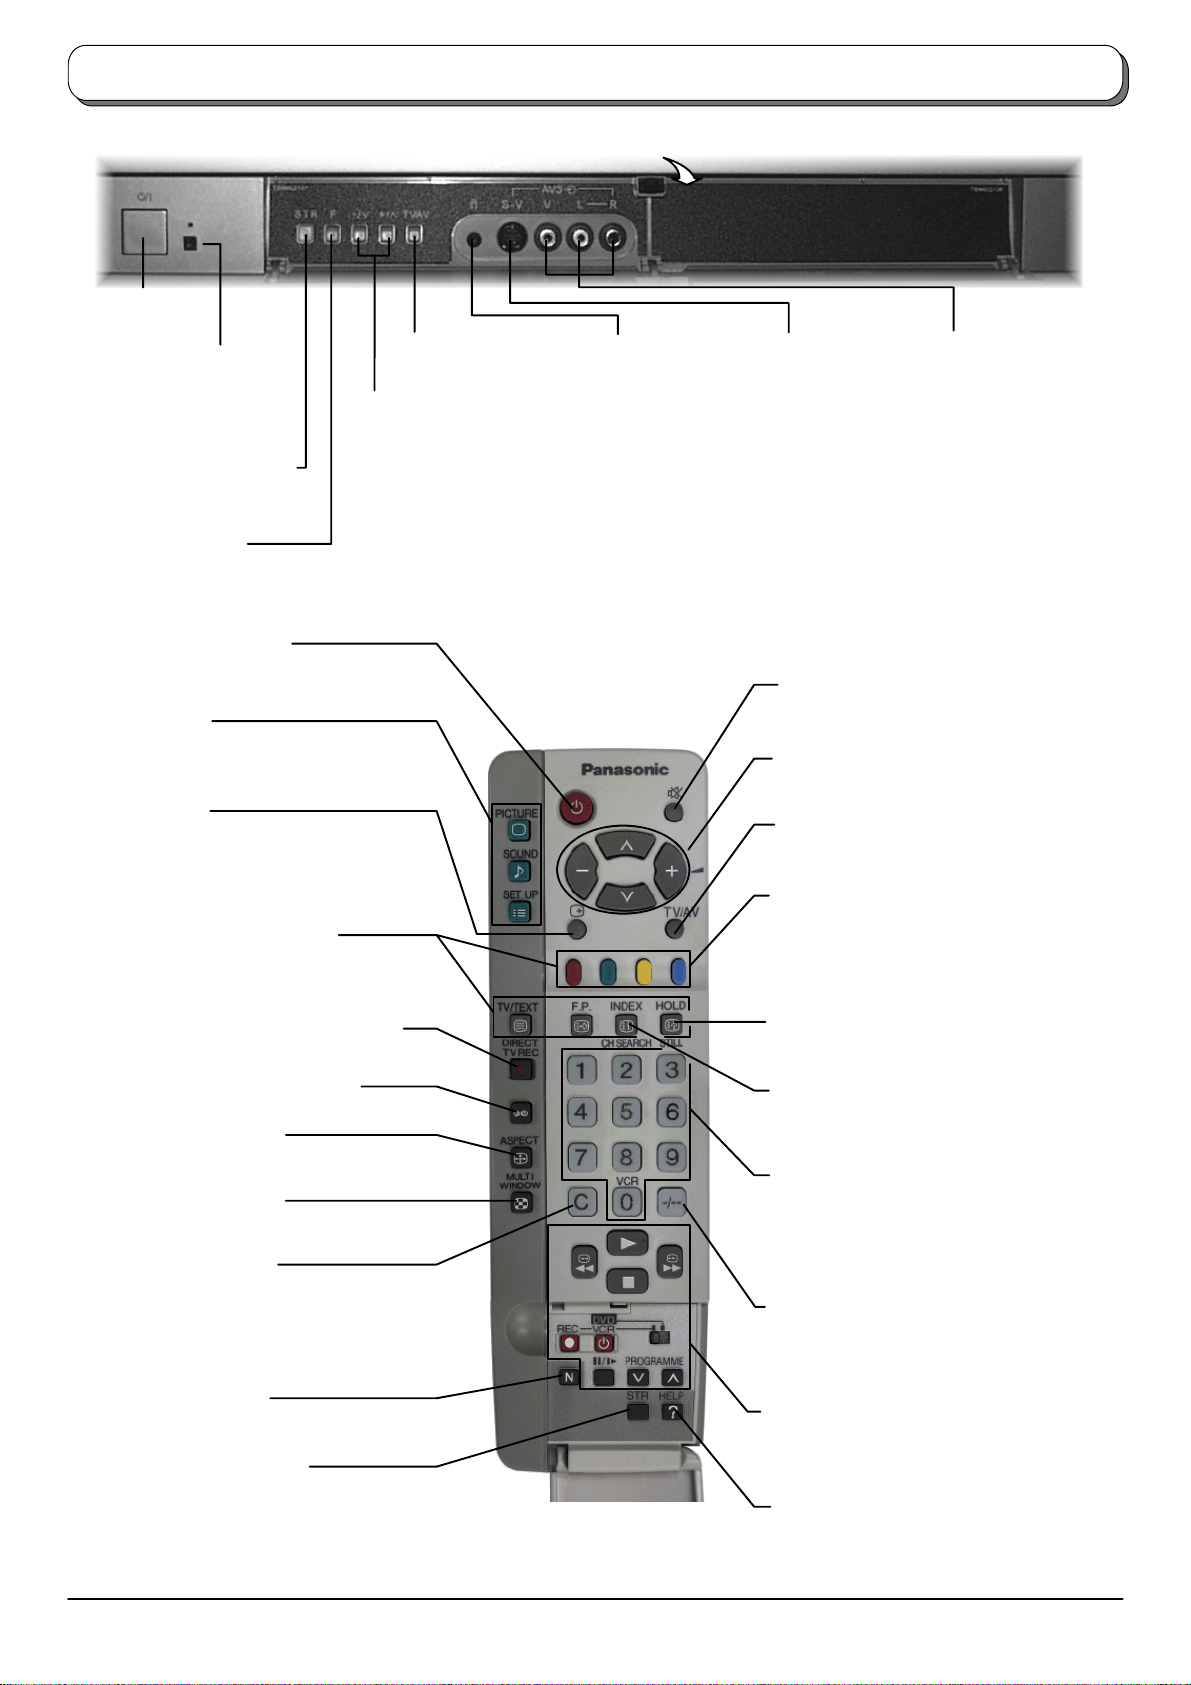
Basic controls: front panel and remote control
Press here to open flap
MAINS Power
On / Off switch
Red light indicates
Standby mode. When
using the remote control,
indicates the TV has
received a command
STR (Normalisation store)
Used to store tuning and
other function settings
F (Function select)
Displays the On Screen Display functions, use repeatedly to select from the available
functions --- Volume, Contrast, Brightness, Colour, Sharpness, Tint (in NTSC mode),
Bass, Treble, Balance, Tuning and Geomagnetic Correction
Standby On / Off switch
Switches TV On or Off standby
TV/AV switch
(see page 27)
Increases or decreases the programme
position by one. When a function is
already displayed, press to increase or
decrease the selected function. When in
Standby mode, switches TV On
Headphone socket
(see page 27)
S --- VHS socket
(see page 27)
Sound mute On / Off
RCA Audio/Video
sockets (page 27)
Menu buttons
Press to access the PICTURE, SOUND
and SETUP menus (see page 7)
Status button
Press to display programme position,
programme name, channel number, time,
MPX mode, Scan mode, Receiving system,
ASPECT mode and programme table
Teletext buttons (see page 22)
Direct TV Record button (see page 20)
Surround On / Off (see page 25)
ASPECT control button
(see page 16)
MULTI WINDOW button
(see page 18)
Direct channel access
During normal TV viewing or when in the
Tuning, Programme edit or Manual
tuning menus, press and then enter
channel number using the numeric
buttons
Cursor buttons to make selectionsand
adjustments
Switch between viewing TV or AV input
(see page 27)
Coloured buttons used for
Aspect functions (see page 16)
Programme edit functions (see page 12)
Teletext functions (see page 22)
AV selection (see page 27)
MULTI WINDOW functions (see page 18)
STILL button (see page 19)
Channel search button (see page 19)
Programme / channel change
buttons (0---9) and Teletext page buttons
(see page 22).
When in Standby mode, switches TV On
Programme position for selection of two
digit programmes (10---99) using
numeric buttons
N (Normalise) button
Resets all settings to their default levels
STR (Normalisation store)
Stores some current settings as the
normalised settings in PICTURE and
SOUND menus. Stores some settings in
Tuning and Programme edit menus,
confirms start of Auto setup
6
VCR / DVD buttons
(see page 21)
The HELP button provides a
demonstration of On Screen
Display menus
Page 7
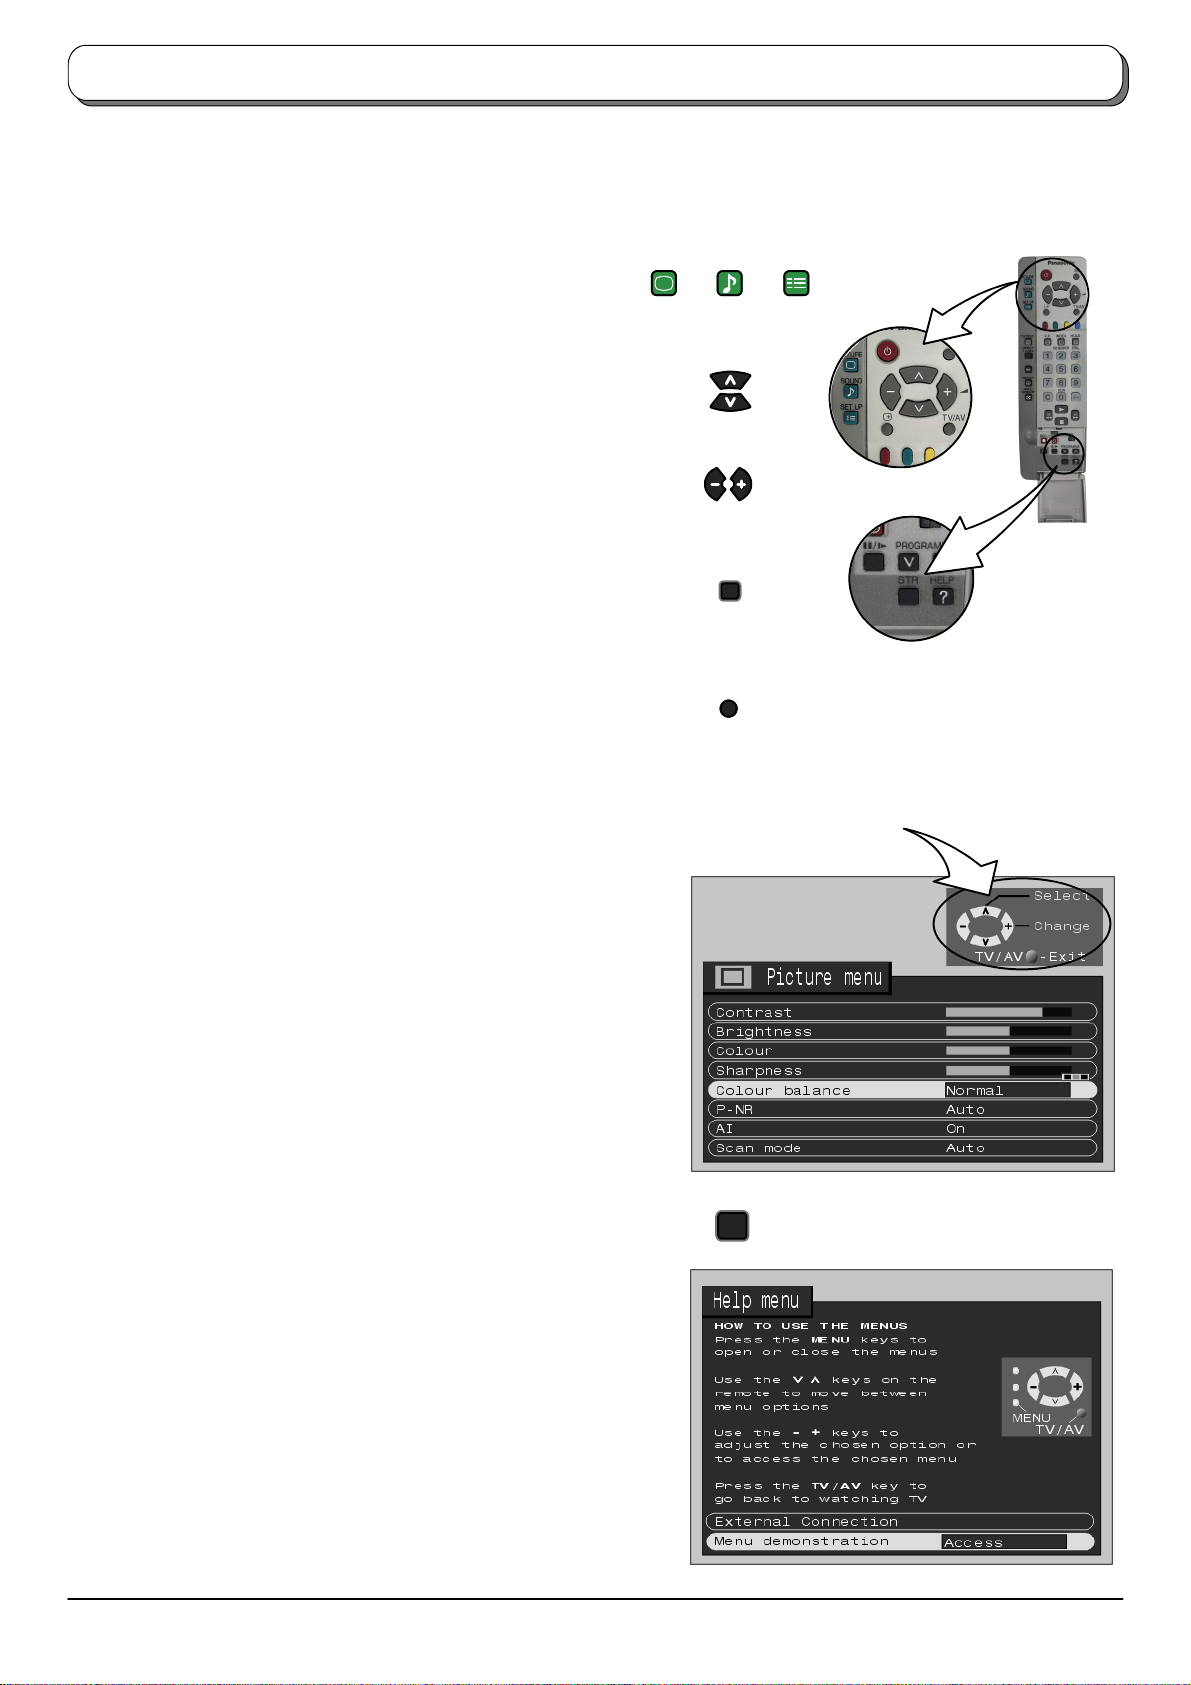
Using the On Screen Displays
ManyfeaturesavailableonthisTV can be accessed viathe On Screen Display menusystem.Usetheremotecontrolas shownbelow
to access and adjust features as desired.
The PICTURE, SOUND and SET UP buttons are used to
open the main menus and also to return to the previous
menu
Theupanddowncursorbuttonsareusedtomovethe
cursor up and down the menus
The left and right cursor buttons are used to access
menus, adjust levels or to select from a range of options
The STR button is used with a number of features to store
settings afteradjustments have been made or options have
been set
The TV/AV button is used to exit the menu system and
return to the normal viewing screen
AnOn ScreenHelpbox isdisplayed whenevera menuisdisplayed
ontheTV. ThisHelp boxindicates which keyson theremote control
are used to navigate the menu shown, see above for descriptions
of button functions.
PICTURE
SOUND
TV/AV
SET UP
STR
ON SCREEN HELP
’Instructions’ box
Note:
D The Help box is not shown in the menu pictures in this
instruction book due to space limitations.
The HELP button runs a demonstration of the menus available.
Press the HELP button and select one of the options
HELP
?
7
Page 8
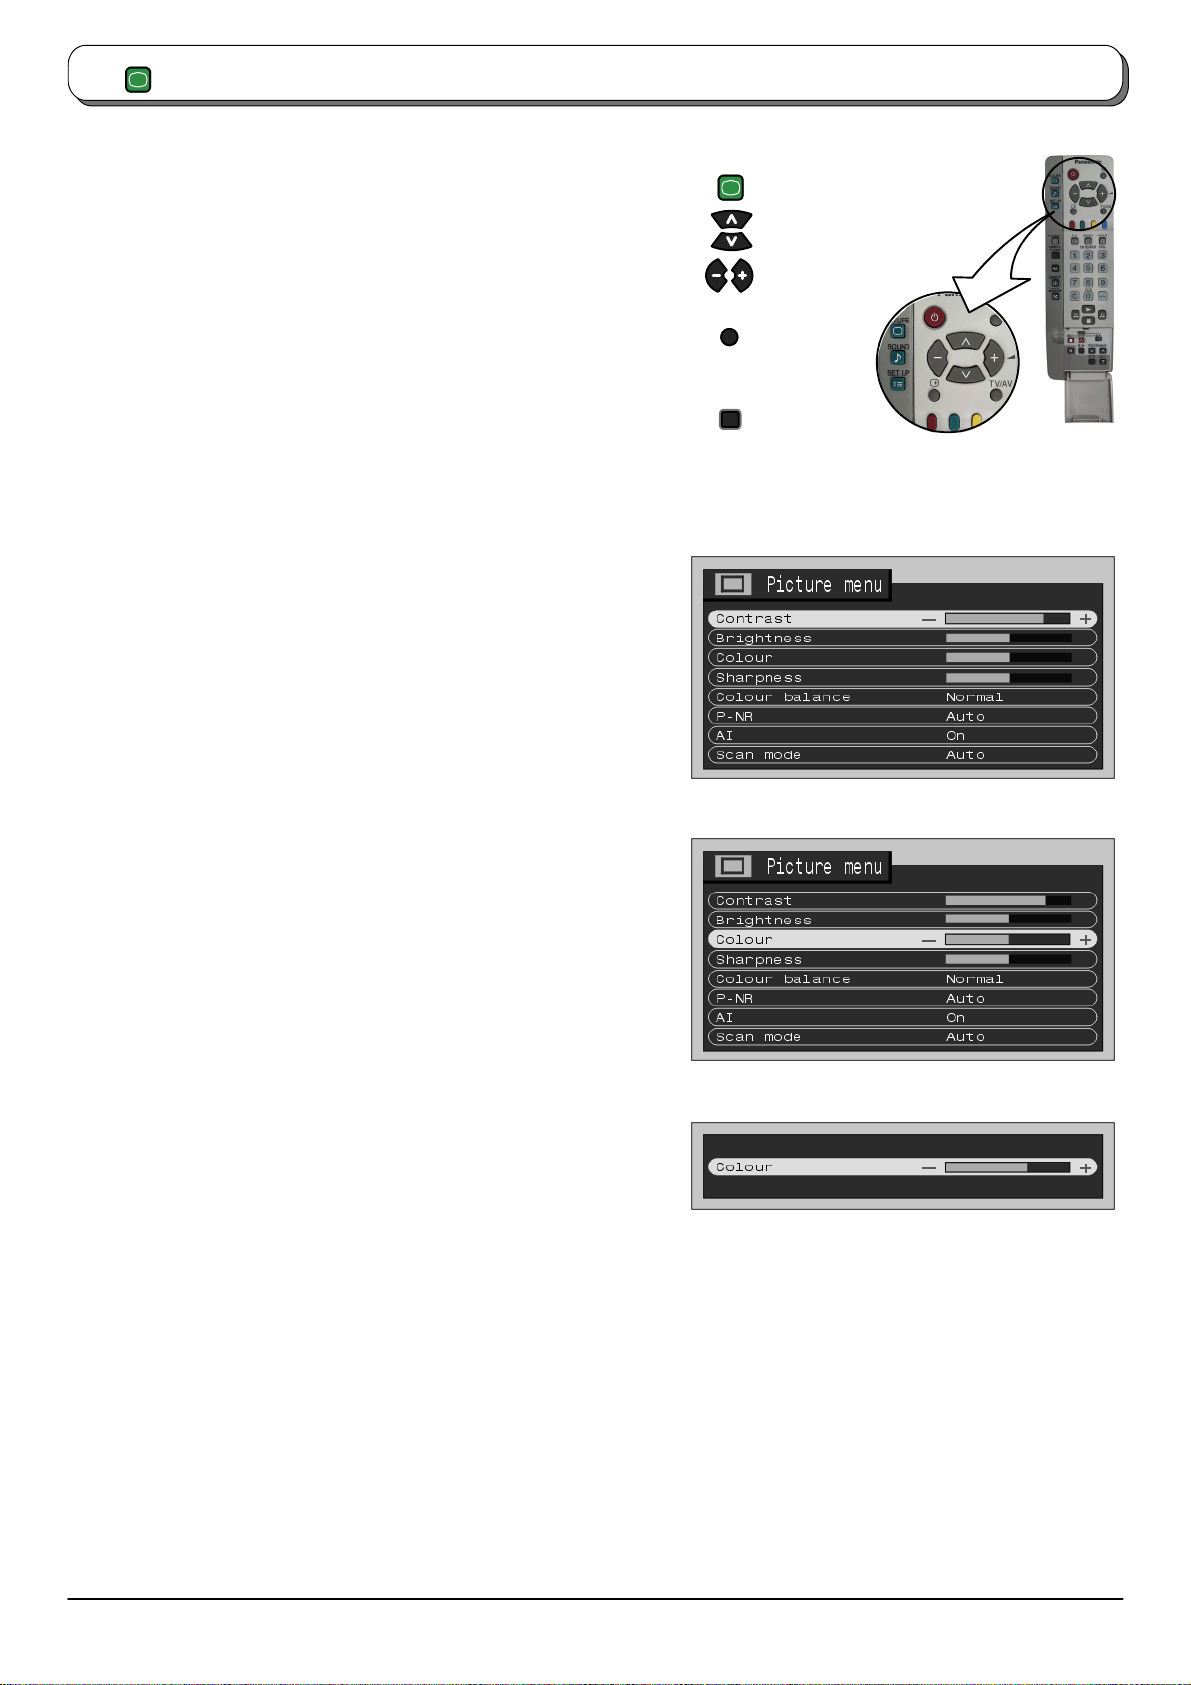
PICTURE
Picture menu
Press the PICTURE menu button
Move to chosen menu option
Adjust chosen option or access chosen menu
Press the TV/AV button at any time to go back to
watching TV
Pressing the STR button after having adjusted a feature
will store the setting as the default (replacing the
factory setting).
Contrast
Increase or decrease the levels of these options
according to your personal preference.
Brightness
Colour
Sharpness
Tint
With an NTSCsignal source connected to the TV,
the picture hue can be adjusted to suit your taste.
PICTURE
TV/AV
STR
Colour
balance
P --- N R
AI
Scan mode
Allows you to set the overall colour tone of the
picture.Choose from Cool, Normaland Warm .
Automatically reduces unwanted picture noise.
Automatically analyses the incoming picture and
processes it to give improved contrast and
optimum depth of field.
Lets you choose the screen refresh method:
in Automode, the TV software will select the best
modefor thesignal being viewed;100Hz willgive
a steadypicture formost signal transmission. We
recommend that you set Scan mode to
Progressive when viewing a PAL 60 or NTSC
transmission.
Whenviewing aPALtransmission(other thanPAL
60) with Scan mode set to Progressive,the
screen will flicker, this is not a fault.
Note:
D When viewing a PAL transmission (other
than PAL 60) with Scan mode set to
Progressive, the screen will flicker, this is
not a fault.
8
Page 9
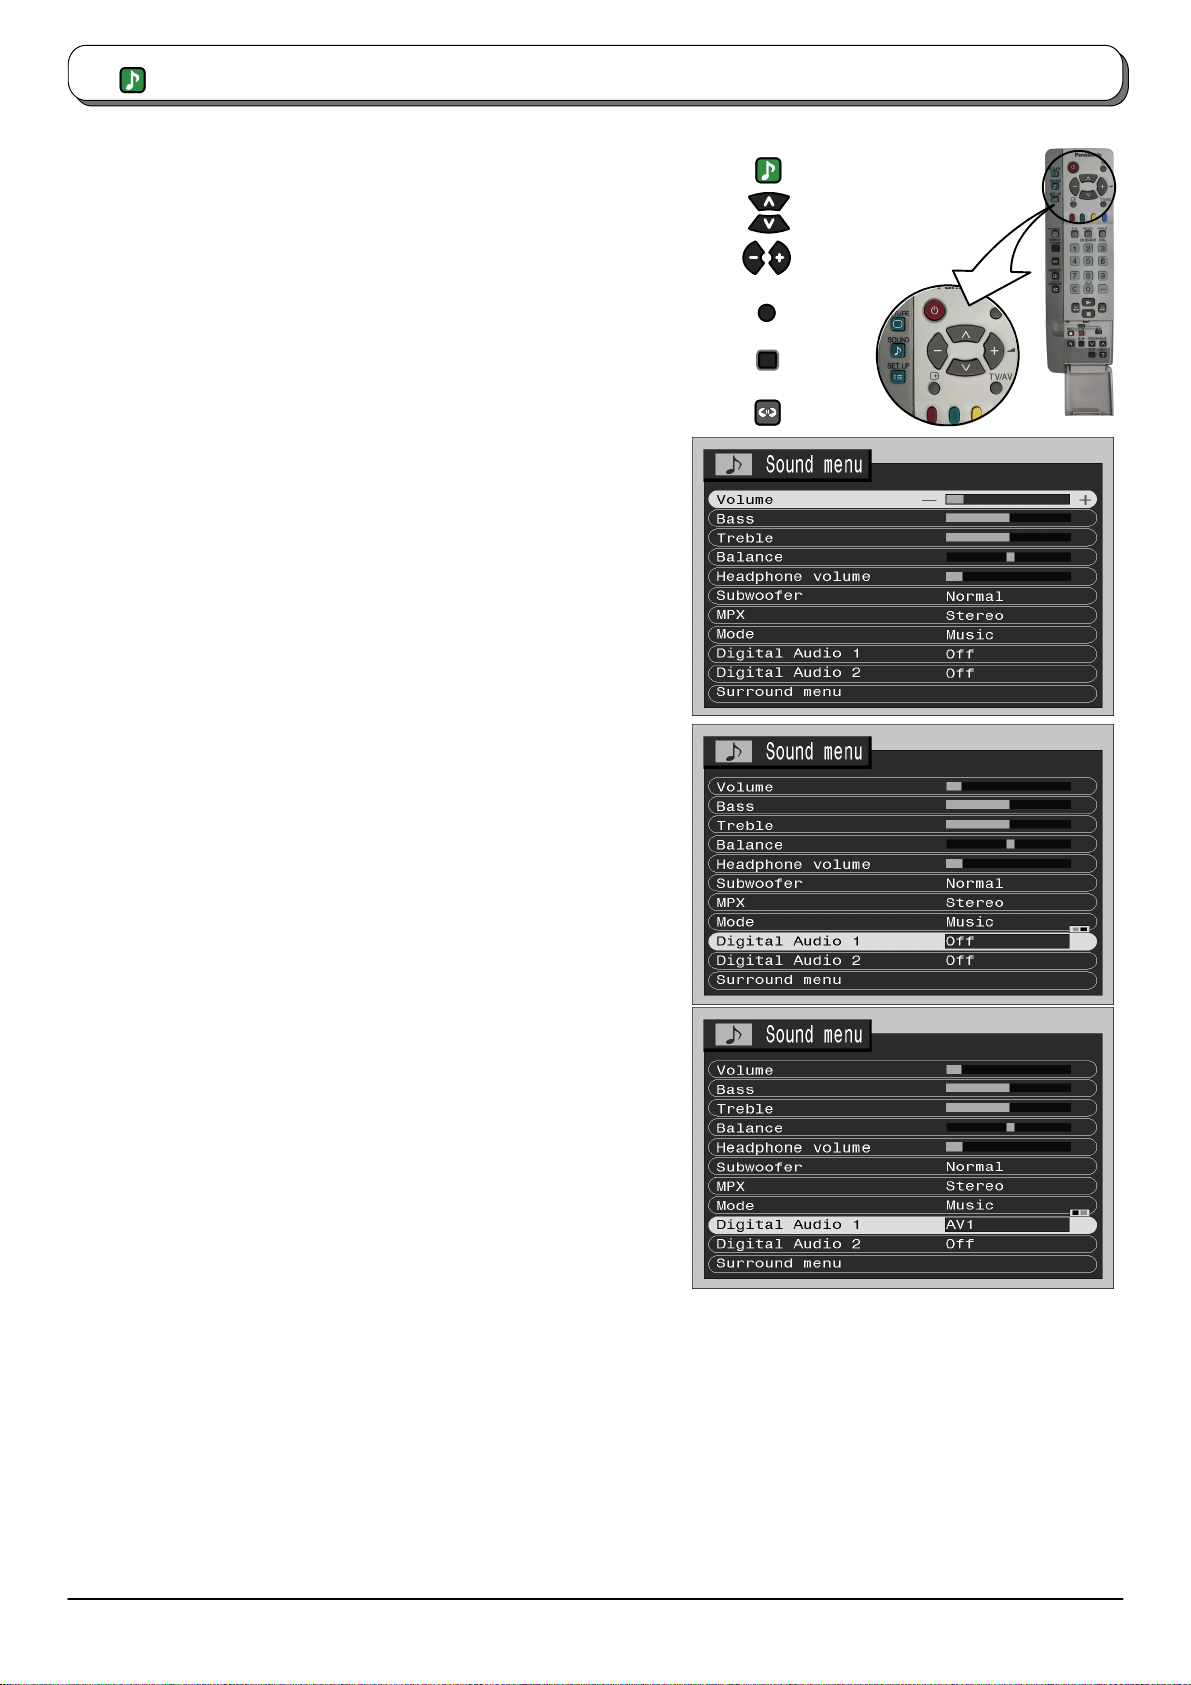
SOUND
Sound menu
Press the SOUND menu button
Move to chosen menu option
Adjust chosen option or access chosen menu
Press the TV/AV button at any time to go back to
watching TV
Pressing the STR button after having adjusted a feature will
store the setting as the default (replacing the factory setting).
Somefeatures areonlyavailablewiththeSurround feature switched
off. Press the Surround button to switch between On and Off
Volume
Bass
Treble
Balance
Lets you set the overall output volume.
Increaseor decreaseleveltoenhanceorminimise
lower, deeper sound output.
Increaseor decreaseleveltoenhanceorminimise
sharper, higher sound output.
With the SurroundfeatureswitchedOff,thelevels
of sound between the left and right speakers can
be adjusted to suit your listening position.
SOUND
TV/AV
STR
Headphone
volume
Subwoofer
MPX
Mode
Digital Audio 1
Digital Audio 2
Surround
menu
Can be adjusted independantly of the TV
speakers so that everyone can enjoy listening at
a levelcomfortable for them. Whenin picture and
picture mode, note thatthe headphones willrelay
the soundtrack for the programme in the left
window (the current programme position). When
usingoneoftheotherdoublewindowfeatures,the
soundtrackfortheprogrammeinthemainwindow
(rather than the smaller window) is relayed.
Choose from Off, Normal and Full.
Off turns Off subwoofer output, Normalprovides
a mid---level bass output and Full provides an
enhanced bass effect.
Usually set to Stereo to provide the best
reproduction,but if receptiondeterioratesor ifthe
service is not available then switch to Mono.
Mono (M1)and(M2) can also be selected if a
mono signal is being transmitted.
With the Surround feature switched Off, sound
quality can be improvedwhen watching musicor
speech by selecting the appropriate mode --Music or Speech.
Digital Audio 1
If you do not have any digital audio input connected to AV1, set to Off.
If you do have a digital audio input connected to the AV1 Scart socket from external equipment such as a
DVD player, Digital Audio 1 lets you turn off the sound input from the AV1 Scart socket. Sound is then
provided via an optical cable connected to the optical only digital audio input. See pages 27 to 28 for
connection details.
Digital Audio 2
If you do not have any digital audio input connected to AV2, AV3 or AV4, set to Off.
Ifyou dohave adigital audioinput connectedto the AV2,AV3 orAV4 Scart socketfrom externalequipment
such as a DVD player, Digital Audio 2 lets you turn off the soundinput fromthe Scartsocket. Sound isthen
provided via the shared optical/coaxial digital audio input. (eg: if you have a DVD player connected to the
AV4 socket, with a coaxial or an optical cable connected to provide digital audio input, select AV4). See
pages 27to 28 for connectiondetails.
Leads to the Surround menu, where you can alter settings relating to the sound system, as described on
pages 25 to 26.
9
Page 10
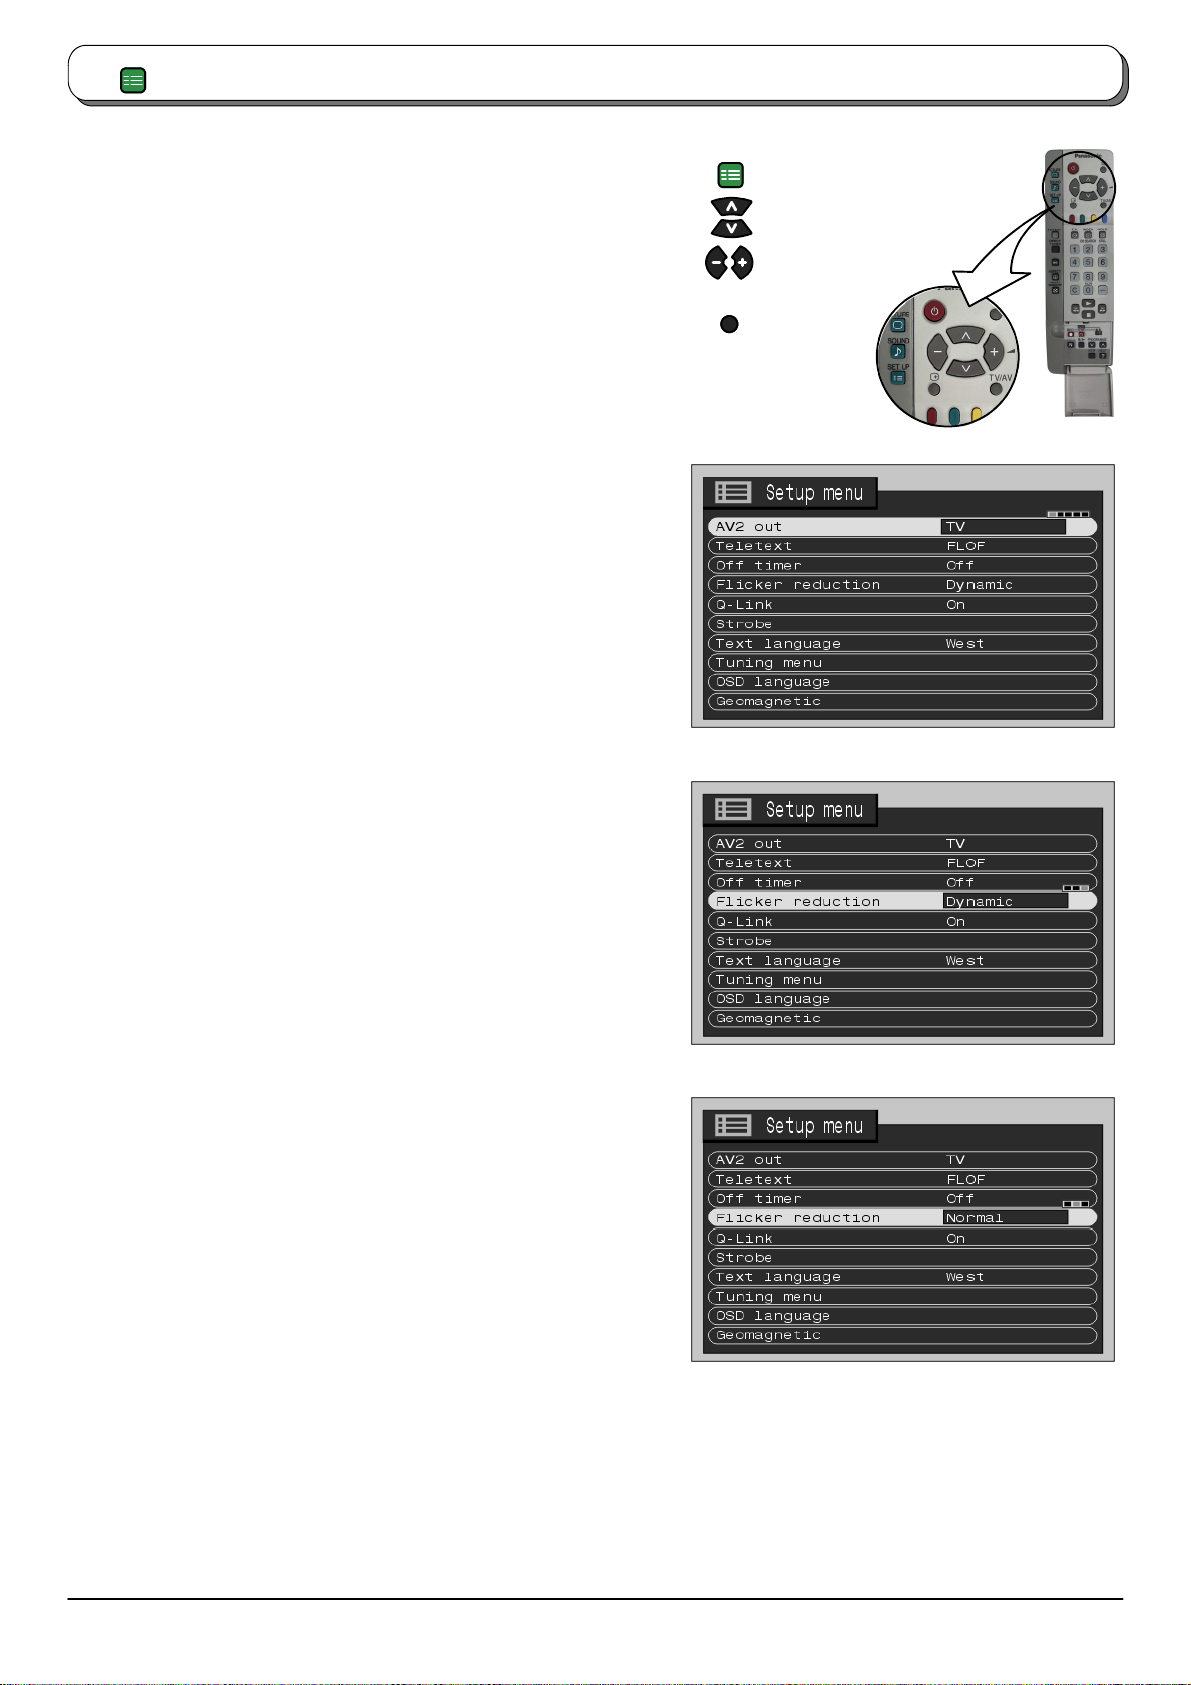
SET UP
Setup menu
Press the SETUP menu button
Move to chosen menu option
Adjust chosen option or access chosen menu
Press the TV/AV button at any time to go back to
watching TV.
SET UP
TV/AV
AV2 out
Teletext
Off timer
Flicker
reduction
Q --- L in k
Strobe
Offersa choiceofsignals tosend to theAV2Scart
socket. You can choose from the current TV
programmeposition,thesignalenteringAV1/AV3
/ AV4 or Monitor --- the picture displayed on
screen.
Allows you to choose between FLOF or LIST
mode. See page 22.
Switchesthe TV offwithin a presettime which you
can choose from between 0 to 90 minutes in 15
minute intervals.
Lets you control any picture movement. Set to
Dynamic to activate motion compensation, to
smooth the image and get rid of picture
movement.Set to Normaltocorrectminor picture
movement, or if slight ghosting of figures occurs
when using the Dynamic setting. Set to Off to
have no flicker reduction at all, occasional
broadcasts may benefit from using this setting.
Allows you to enable or disable data
communicationbetweenthisTVandacompatible
VCR.Seepage20.
Letsyou takea seriesof freeze---frame ’photos’ of
apieceof action (forexample: the finishof arace).
Seepage19.
Text
language
Tuning menu
OSD
language
Geomagnetic
10
Selectcharacterset, so thatall charactersneeded
are availabe for text on teletext pages (eg: cyrillic
characters, etc).
Mode Languages
West: English, French, German, Greek, Italian,
Spanish, Swedish, Turkish
East1: Czech, English, Estonian, Lettish,
Rumanian, Russian, Ukrainian
East2: Czech, English, German, Hungarian,
Lettish, Polish, Rumanian
Providesaccess tomany otherfeatures including
Programme edit and Auto setup. See page 11.
When you first install the TV, the On Screen
Display language is set according to your choice
of country. OSD language lets you change the
language used for On Screen Displays.
Ifyou n otice aslighttilt tothepicture or ifthereare
colouredpatchesatthecorners of thescreen, use
this feature to eliminatethem. See Step6, page 5
(Quick Start Guide).
Page 11
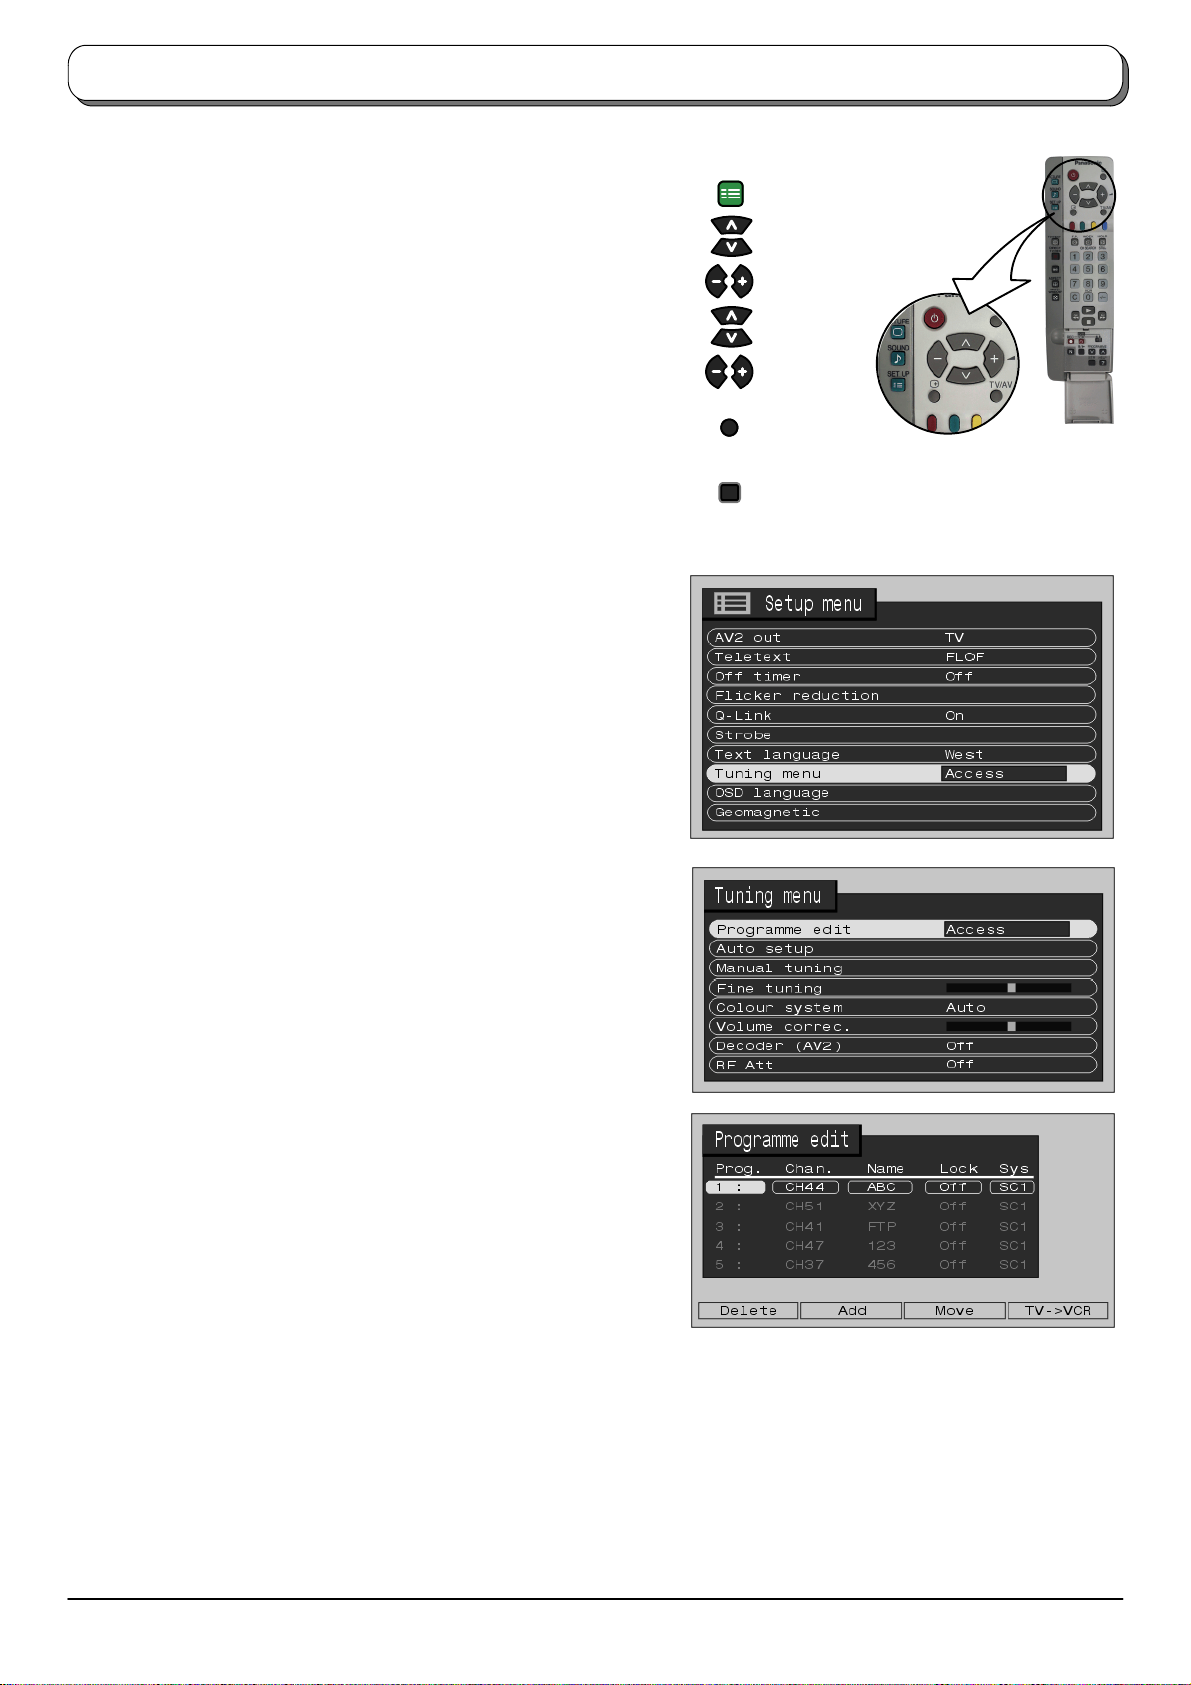
Tuning menu --- overview
Press the SETUP menu button
Move to Tuning menu option
Access Tuning menu
Move to chosen menu option
Adjust chosen option or access chosen menu
Press the TV/AV button at any time to go back to
watching TV
Pressing the STR button after having adjusted some
featureswill storethe setting asthe default (replacing
the factory setting).
Programme
edit
Auto setup
Access in order to customise your programme
settings (eg: adding or deleting a programme
position) See page 12.
Allows you to automatically retune the TV. Useful
if you move house and wish to retune your TV to
the local stations. See page 14.
SET UP
TV/AV
STR
Manual tuning
Fine tuning
Colour system
Volume correc.
Decoder (AV2)
RF Att
Allows individual programme positions to be
tuned manually. See page 15.
Useto make smalladjustments to thetuningof an
individual station (useful for example when
weatherconditions areaffecting reception quality
of a programme).
Lets you select the correct transmission standard
for the transmission signal being received.
Lets you adjust the volume level of individual
stations.Use thisfeature if the volume levelvaries
significantly between stations. Adjusting one
station’s volume to bring it into line with theother
stationsmeansyoucanavoid having toadjustthe
volume each time you change channels.
This optionis used when a decoder is connected
via AV2. Storethe settingas Onso thatevery time
this programme position is selected, the TV
softwareis setto h andle the decoded information
(thisisimportantif your decoderunit isconnected
to AV2 via a Q---Link VCR).
When a strong signal (such as a cable signal) is
received, sometimes two channels transmitted
close together interfere with each other’s picture
(this is the ‘beat’ you see on the picture). Set this
option to On to ’damp down’ the strength of the
signal for the current programme position, so
eliminating the ’beat’. Store the setting as On so
the signal is’damped’ everytime thisprogramme
position is selected.
11
Page 12
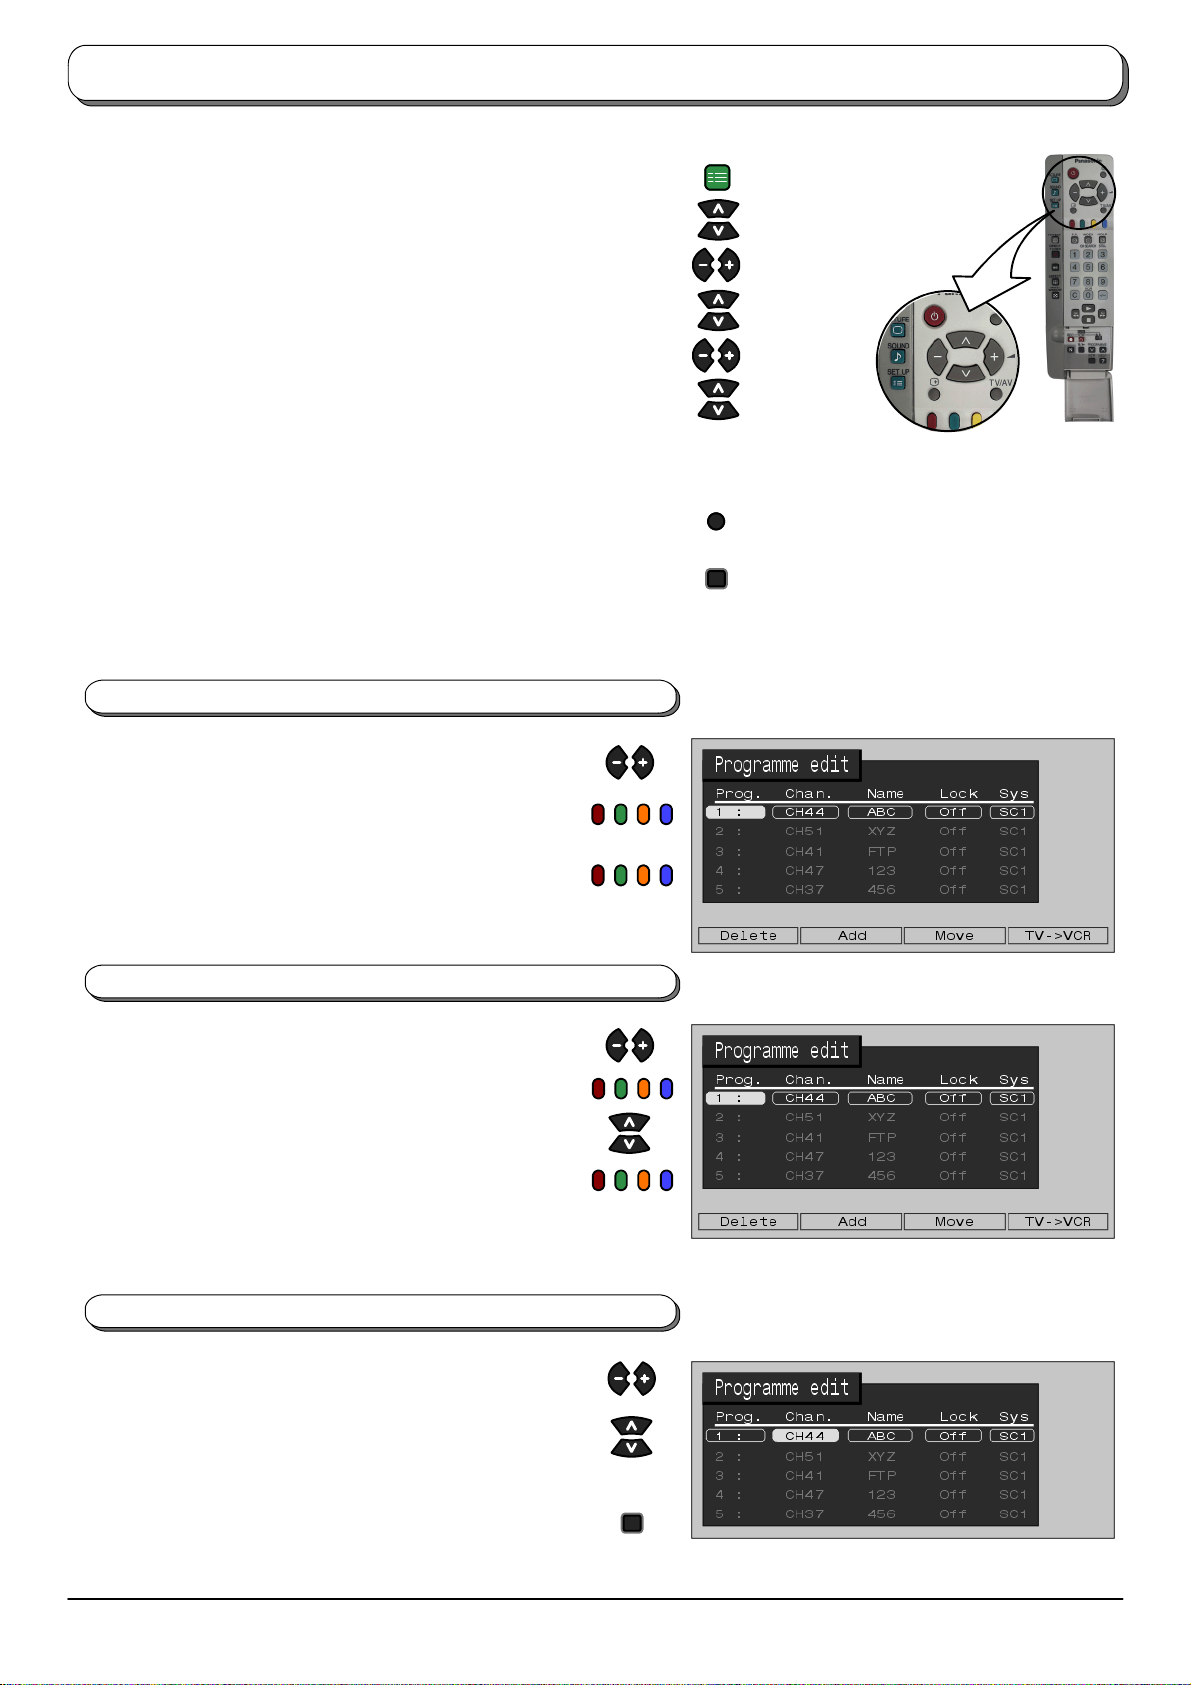
Tuning menu --- Programme edit
Press the SETUP menu button
Move to Tuning menu option
Access Tuning menu
Move to Programme edit option
Access Programme edit
Move to chosen programme position (eg: Prog. 3)
Makerequired change, eg:renamingaprogrammechannel(see
the relevant procedure below)
Press the TV/AV button at any time to go back to watching TV
SET UP
TV/AV
Pressing the STR button after having adjusted some features
stores the change made
Adding / deleting a programme channel
Make sure the cursor is in the Prog. column
Pressthe greenbutton toadd aprogramme channelto the
programme position, or the red button to delete one
Press the same button again to confirm your decision
Moving a programme channel
Make sure the cursor is in the Prog. column
Press the yellow button
Choose the new position for the programme channel
STR
Press the yellow on screen selector key again to confirm
your decision
Tuning a programme channel
Move to the Chan. column
Increaseor decreasetheprogrammechannel number(you
will seethe TV retune to thenew number asyou change it)
oruse theC button for Direct Channel Access(see page 6)
Press STR to store this change
12
STR
Page 13
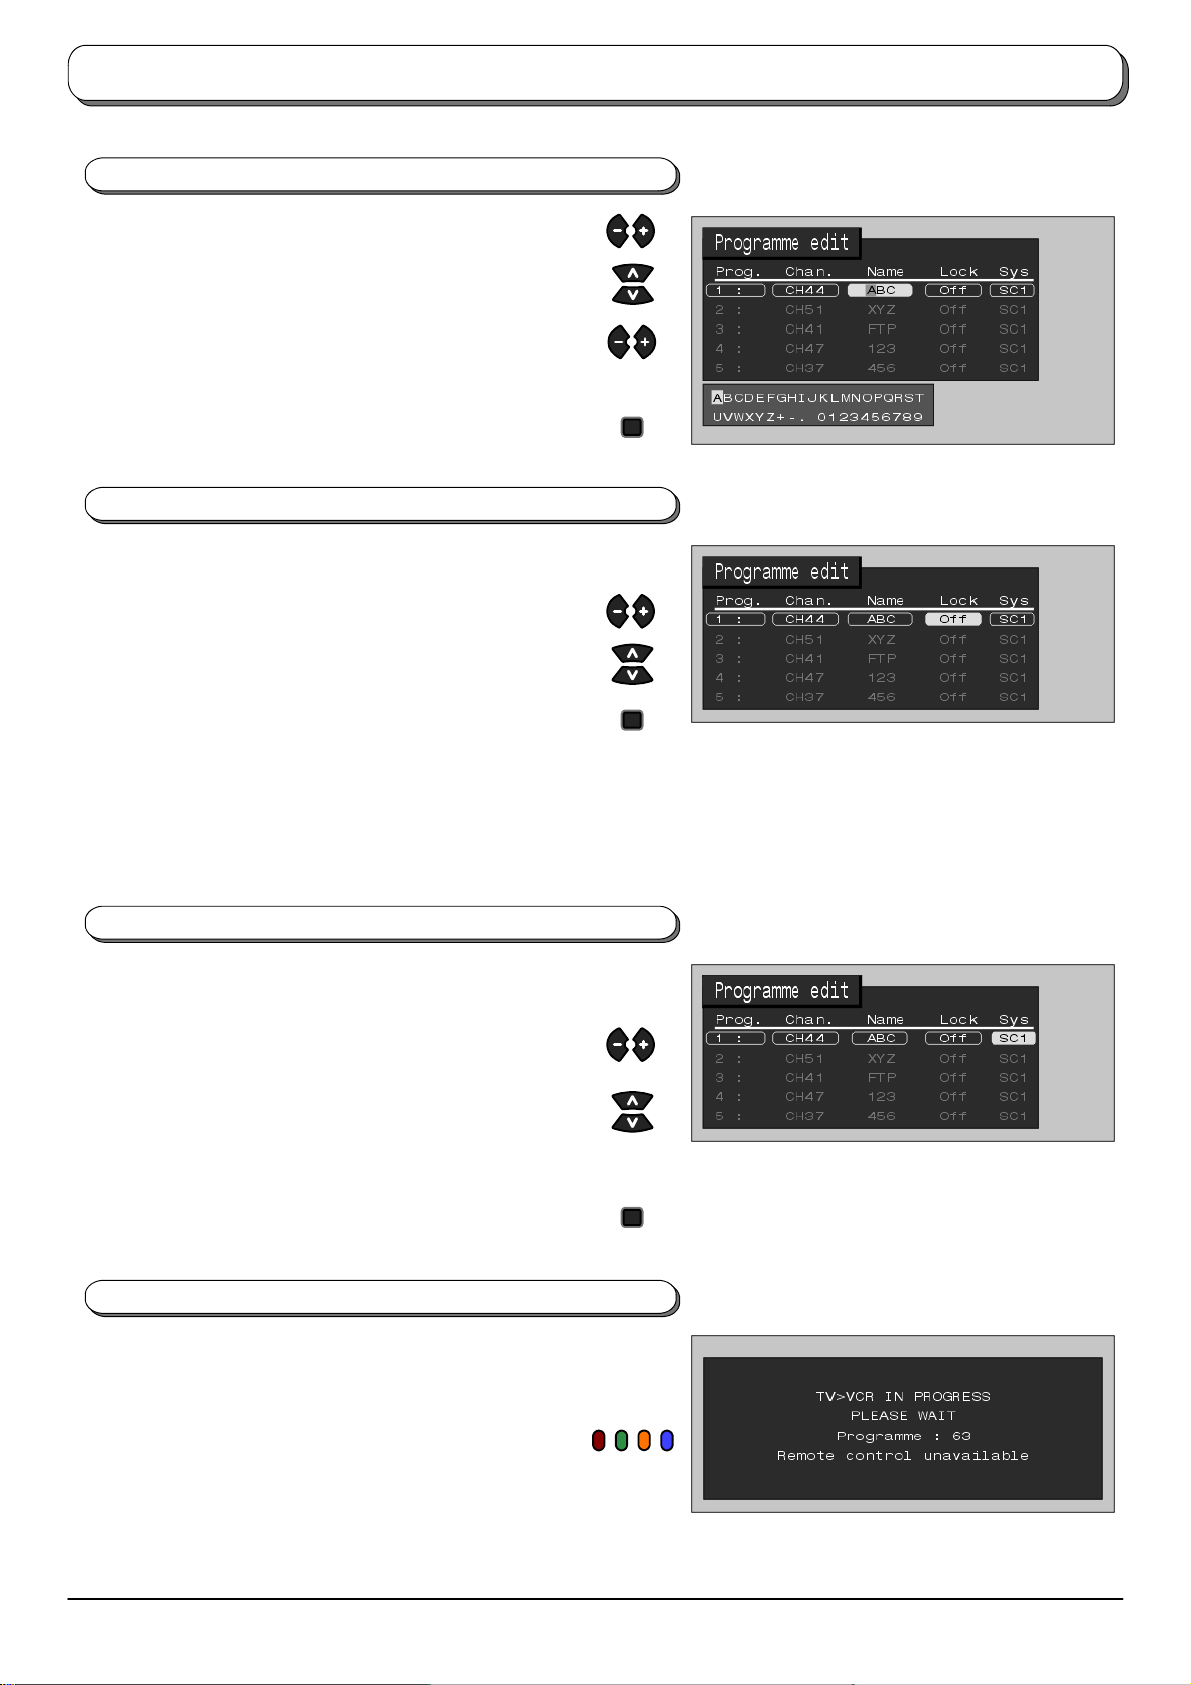
Tuning menu --- Programme edit
Renaming a programme channel
Move to the Name column
Choose the new character. The box at the bottom of the
screen shows the character currently selected.
Move to the next character position
Continue until renaming is done
Press STR to store the new name
Locking a programme channel
You may wish to lock a programme channel to prevent
access to it
Move to the Lock column
STR
Choose between Lock On or Lock Off
Press STR to store the new setting
Note:
D When a programme position is locked, Direct
ChannelAccessusingthe C andnumericbuttonson
the remote control is not available
Changing the sound system for a channel
You can change the sound system used for a programme
channel
Move to the Sys column
Choose the required sound system:
SC1 : PALB,G,H/SECAMB,G
SC2 : PAL I
SC3 : PAL D, K / SECAM D, K
F:SECAML/L’
Press STR to store the new setting
STR
STR
Copying programme information to a VCR
You cancopy programmeinformation toa compatible VCR
connectedto AV2 (seepage 28for connectioninformation)
Press the blue button.
Programme data will now be sent to the VCR. This might
take a few seconds, depending on the number of stations
stored. If the message “Unable to download, check your
VCR” appears on the screen, the television is unable to
send the programme information to the VCR. See the VCR
instruction book for further information.
13
Page 14
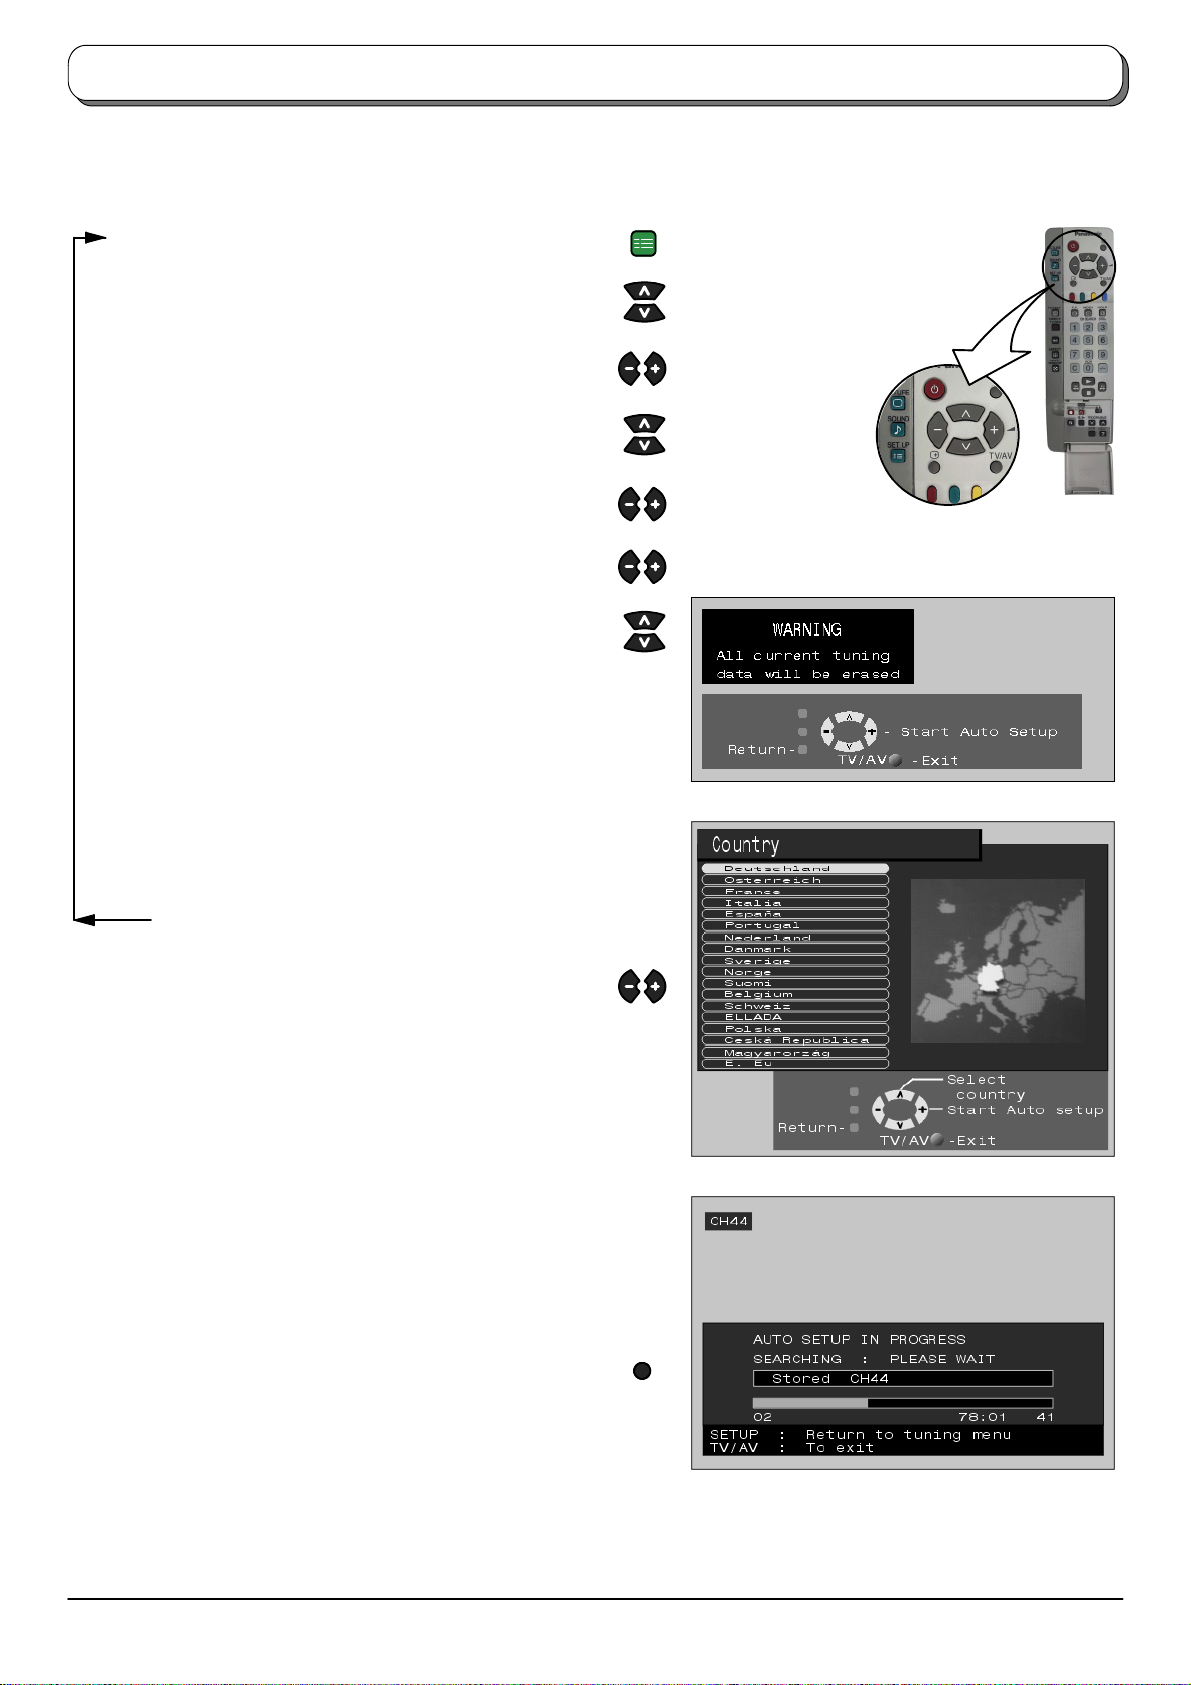
Tuning menu --- Auto setup
AutosetupautomaticallyretunesyourTV. This featureis useful if,for example, youmove house andwish toretune your TVto receive
the local stations.
Press the SETUP menu button
Move to Tuning menu option
Access Tuning menu
Move to Auto setup
Access Auto setup
Press to confirm start
Select your country
Note:
D Ifyouproceedwith the next stepall tuning data
will be erased (allstations and their programme
positions stored in your TV’s memory will be
wiped out so the new settings can be stored).
SET UP
If you exit the procedure after this point and
before Auto setup is complete, no station
information will be stored. Restart and complete
the Auto setup procedure so that the TV is
retuned.
Press to start Auto setup
TheTVwillsearchfor,locate,storeand then sort into
order your local stations.
IfacompatibleVCR isconnectedviatheAV2socket,
programme data will be sent to the VCR via Q-- Link
(see page 20).
Once this operation is completed the TV will
display theprogrammenowstoredonprogramme
position 1.
Press the TV/AV button at any time to go back to
watching TV (please read the Note in the above
procedure)
TV/AV
14
Page 15
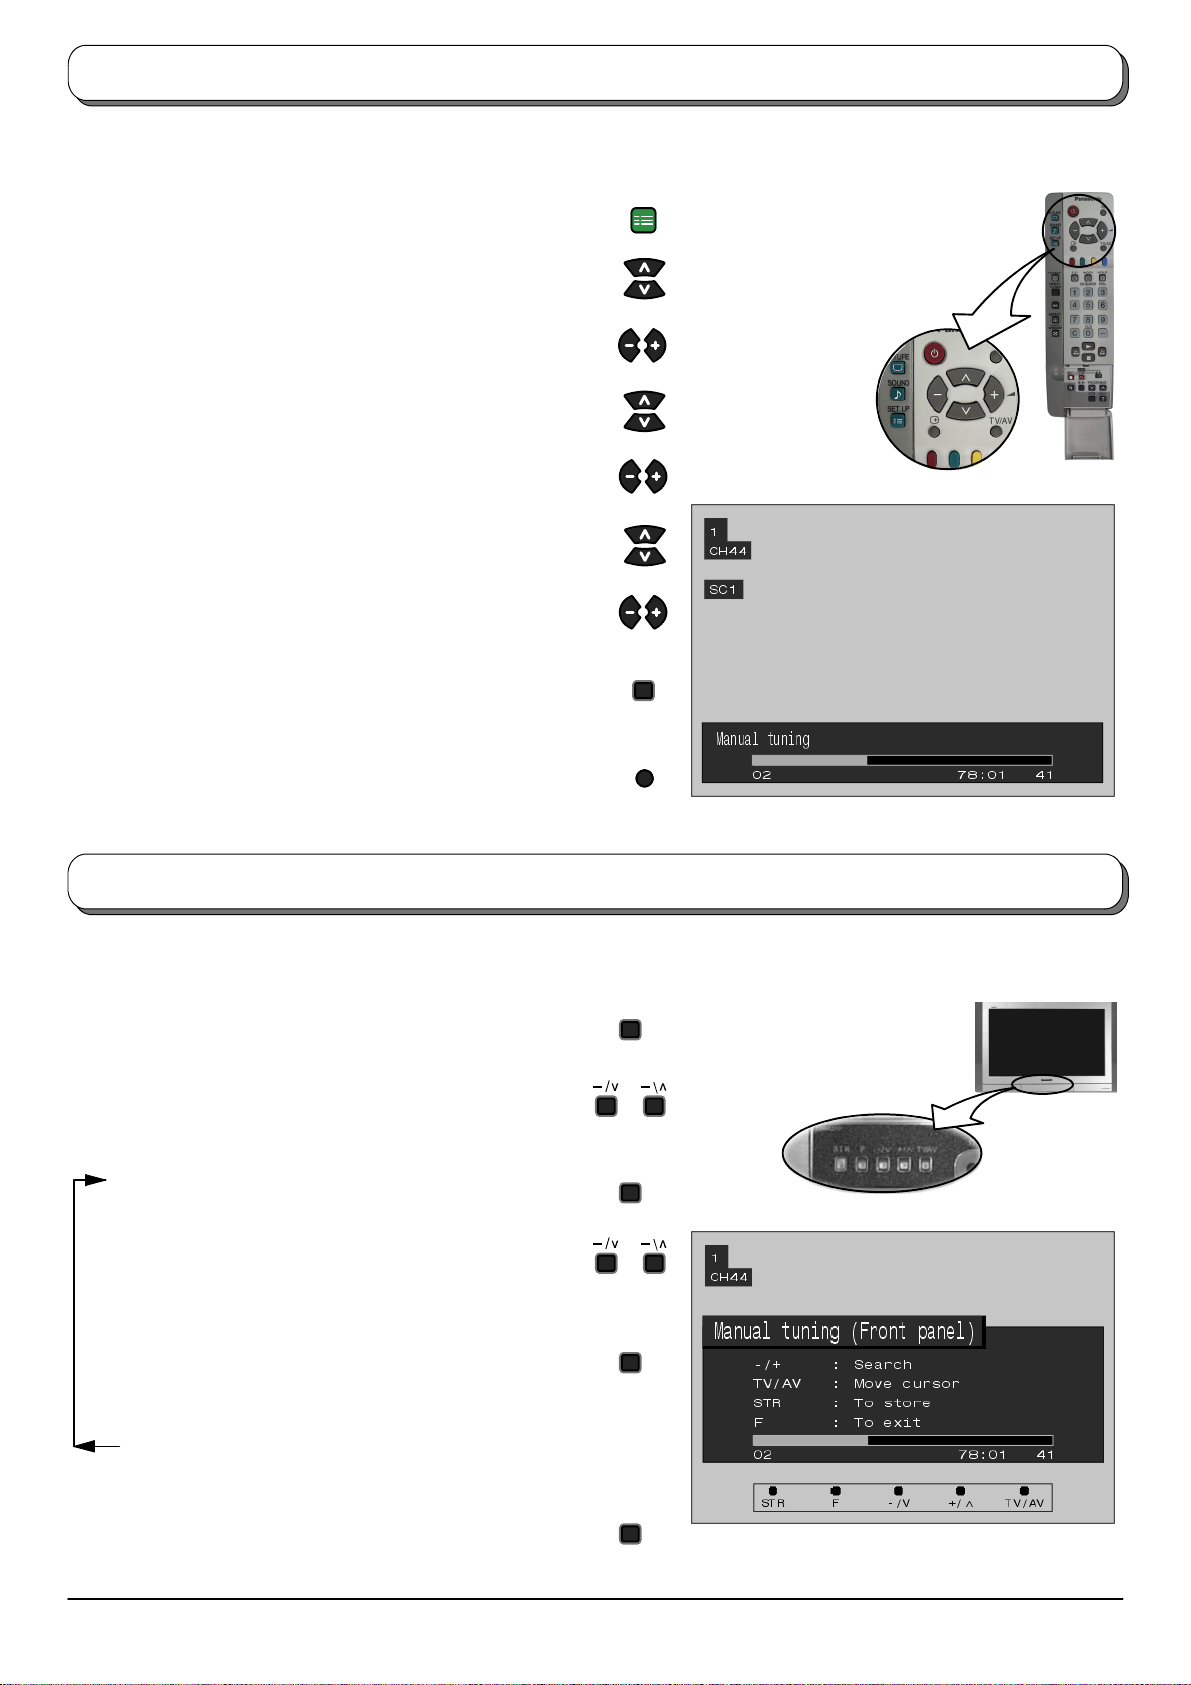
Tuning menu --- Manual tuning
It is possible to retune individual programme positions:
Press the SETUP menu button
Move to Tuning menu option
Access Tuning menu
Move to Manual tuning
Access Manual tuning
Select the programme position to be tuned
Press repeatedly until required station is found
When the desired station is found, press STR to store.
The programme position will flash
Press the TV/AV button at any time to go back to
watching TV
SET UP
STR
TV/AV
Manual tuning (via front panel)
It is also possible to use the control panel buttons on the front of your TV to tune individual programme positions:
Press the F button (Front panel) until Tuning mode is
reached
Press the --- or + button to access Tuning mode
Press the TV/AV button to move between Change
programme, Search and Change TV system
Pressthe --- or + button to change programme position
or start search
When the desired station is found, press STR to store.
The programme position will flash
Repeataboveprocedure to tuneadditionalprogramme
positions
F
TV / AV
STR
Pressthe F buttonat anytime togo back towatching TV
F
15
Page 16
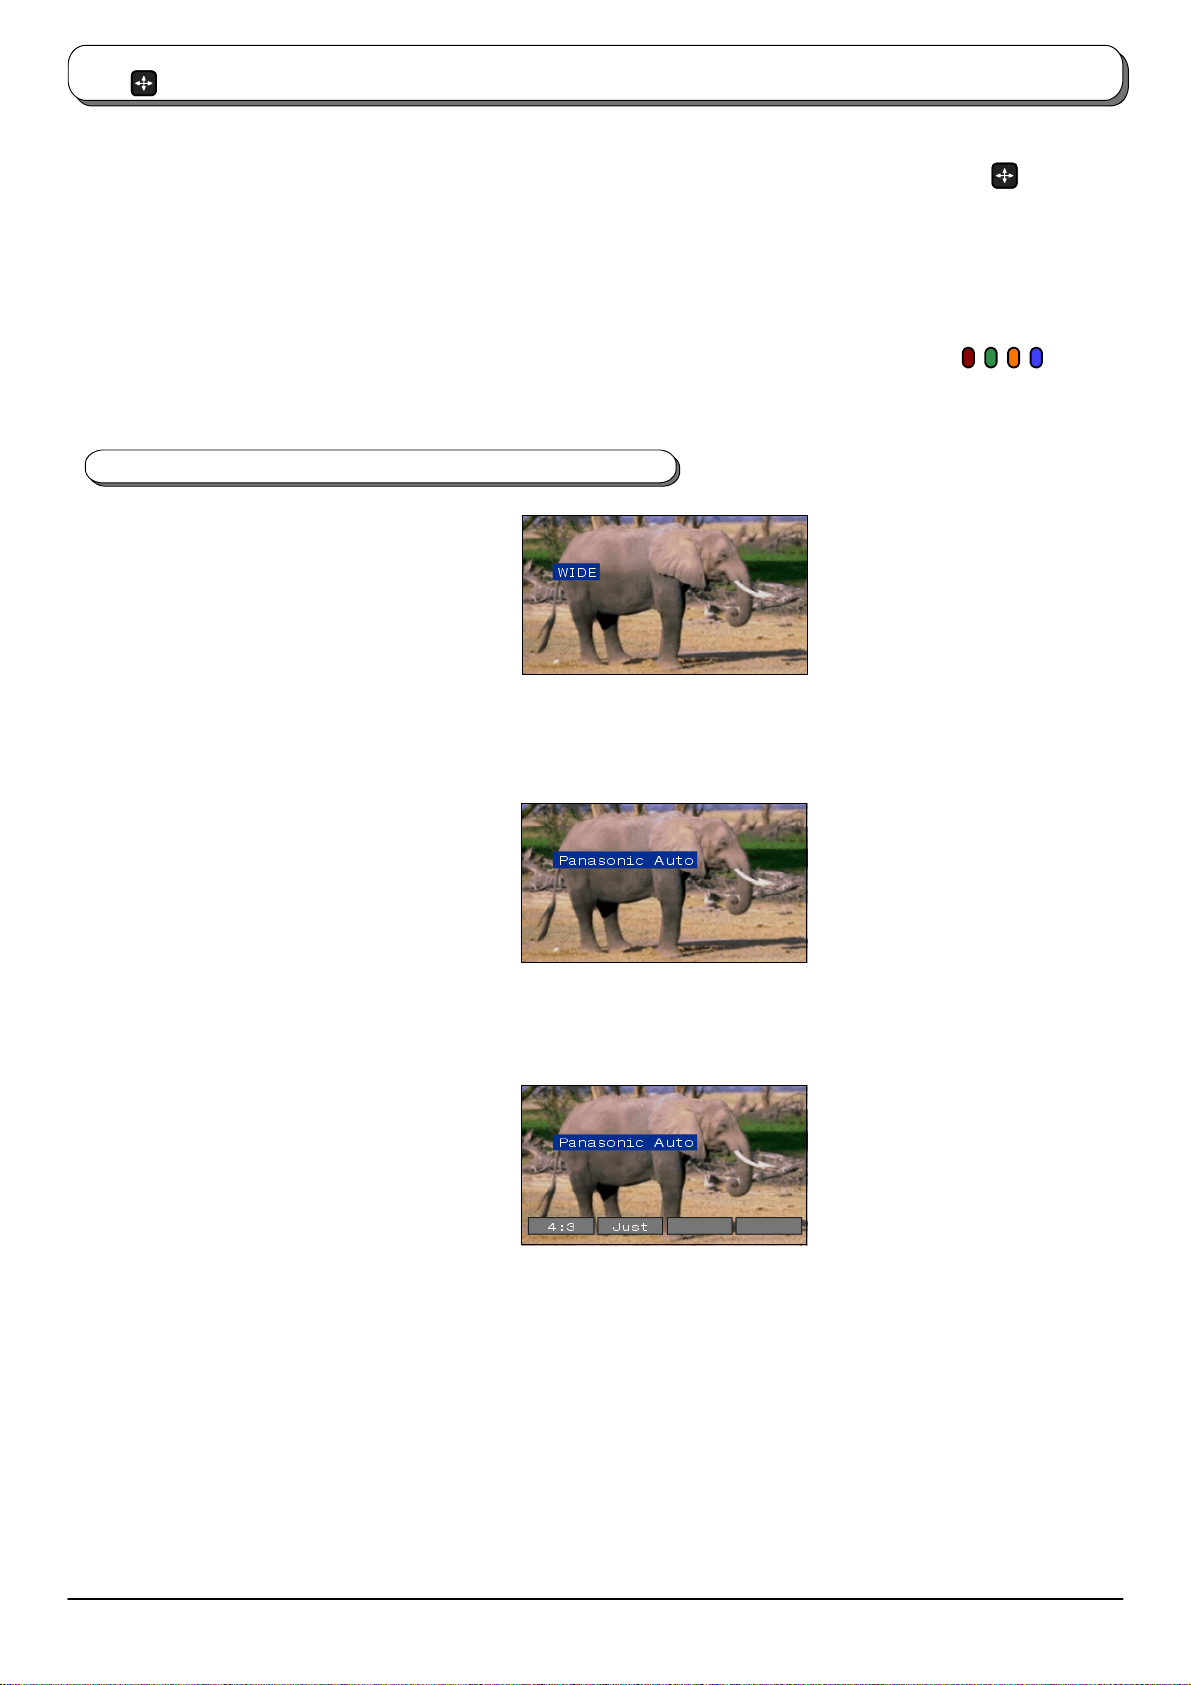
ASPECT
Aspect controls
Press the ASPECT button to move through the six aspect options: Panasonic Auto, 4:3, Zoom,
S --- Zo o m , 16:9 and Just.
Notes:
D If you leave Aspect set to Panasonic Auto, the TV software determines the best ratio for each
programme viewed. In order not to disruptyour viewing, nomode information is displayed while
this is happening (eg: aprogramme may begin in 4:3 mode then seem to jump into Just mode).
Simply press the ASPECT button to display mode information in the top left of the screen.
D A 16:9 picture has been used to illustrate all of the aspect modes described in this section.
The on screen selector keys (corresponding to the four coloured buttons on the remote control) that
appear for some Aspect functionsclear aftera fewseconds. Ifyou wantto selectan operation when the
keys are not shown, press the ASPECT buttononcemoreandthekeyswillreappear.
Panasonic Auto
Panasonic Auto determines the best aspect
ratiotousetodisplaythepictureyouare
viewing.Itdoes this usinga fourstep processto
determine if the picture being viewed is a
widescreen picture.
If Panasonic Auto detects a widescreensignal
it switches into 16:9 widescreen mode. If
Panasonic Auto does not detect a widescreen
signalthenthepicture is displayedinJust or4:3
mode.
Panasonic Auto
’WIDE’appears in thetop left ofthe
screen, Panasonic Auto switches
into 16:9 widescreen ratio.
ASPECT
The text shown on the screen indicates how
PanasonicAuto determined whichratioto use:
’WIDE’ appears in the top left of the screen if a
widescreeen identification signal (WSS) is
found or a signal is found through a Scart
socket. Panasonic Auto switches into 16:9
widescreen ratio.
’Panasonic Auto’ appears in the top left of the
screen if black stripes above and below the
pictureare detected.Panasonic Auto chooses
the best ratio and expands the picture to fill the
screen. This process can take several minutes,
depending how dark the picture is.
’Panasonic Auto’ appears in the top left of the
screen and red and green keys at the bottom if
no indication of a widescreen signal is found,
the picture is displayed in Just or 4:3 mode. If
the picture has astandard 4:3aspect ratiothen
you may prefer to view it at its original size, the
red and green keys that appear allow you to
choosebetween viewingatstandard 4:3 sizeor
expanded in Just mode.
Equally, you may prefer to select one of the
other modes available to view the picture.
Notes:
D If, in Panasonic Auto mode,you experienceproblems with the screen display size whenplaying back widescreen format
recordingsfromyourVCR then itis possiblethat thetracking control of yourVCR requires adjustment(yourVCRinstruction
book will contain adjustment details).
D The widescreen aspect ratios of different films and programmes can vary. If these are wider than a standard 16:9aspect
picture then a black band may be visible at the top and bottom of the screen.
Panasonic Auto
Panasonic Auto
’PanasonicAuto’appearsinthetop
left of the screen. The best ratio is
chosen and the picture expanded
to fill the screen.
’PanasonicAuto’appearsinthetop
left of the screen. The picture is
displayed in Just or 4:3 mode, red
and green keys appear, allowing
switching between Just and 4:3
modes.
16
Page 17
ASPECT
Aspect controls
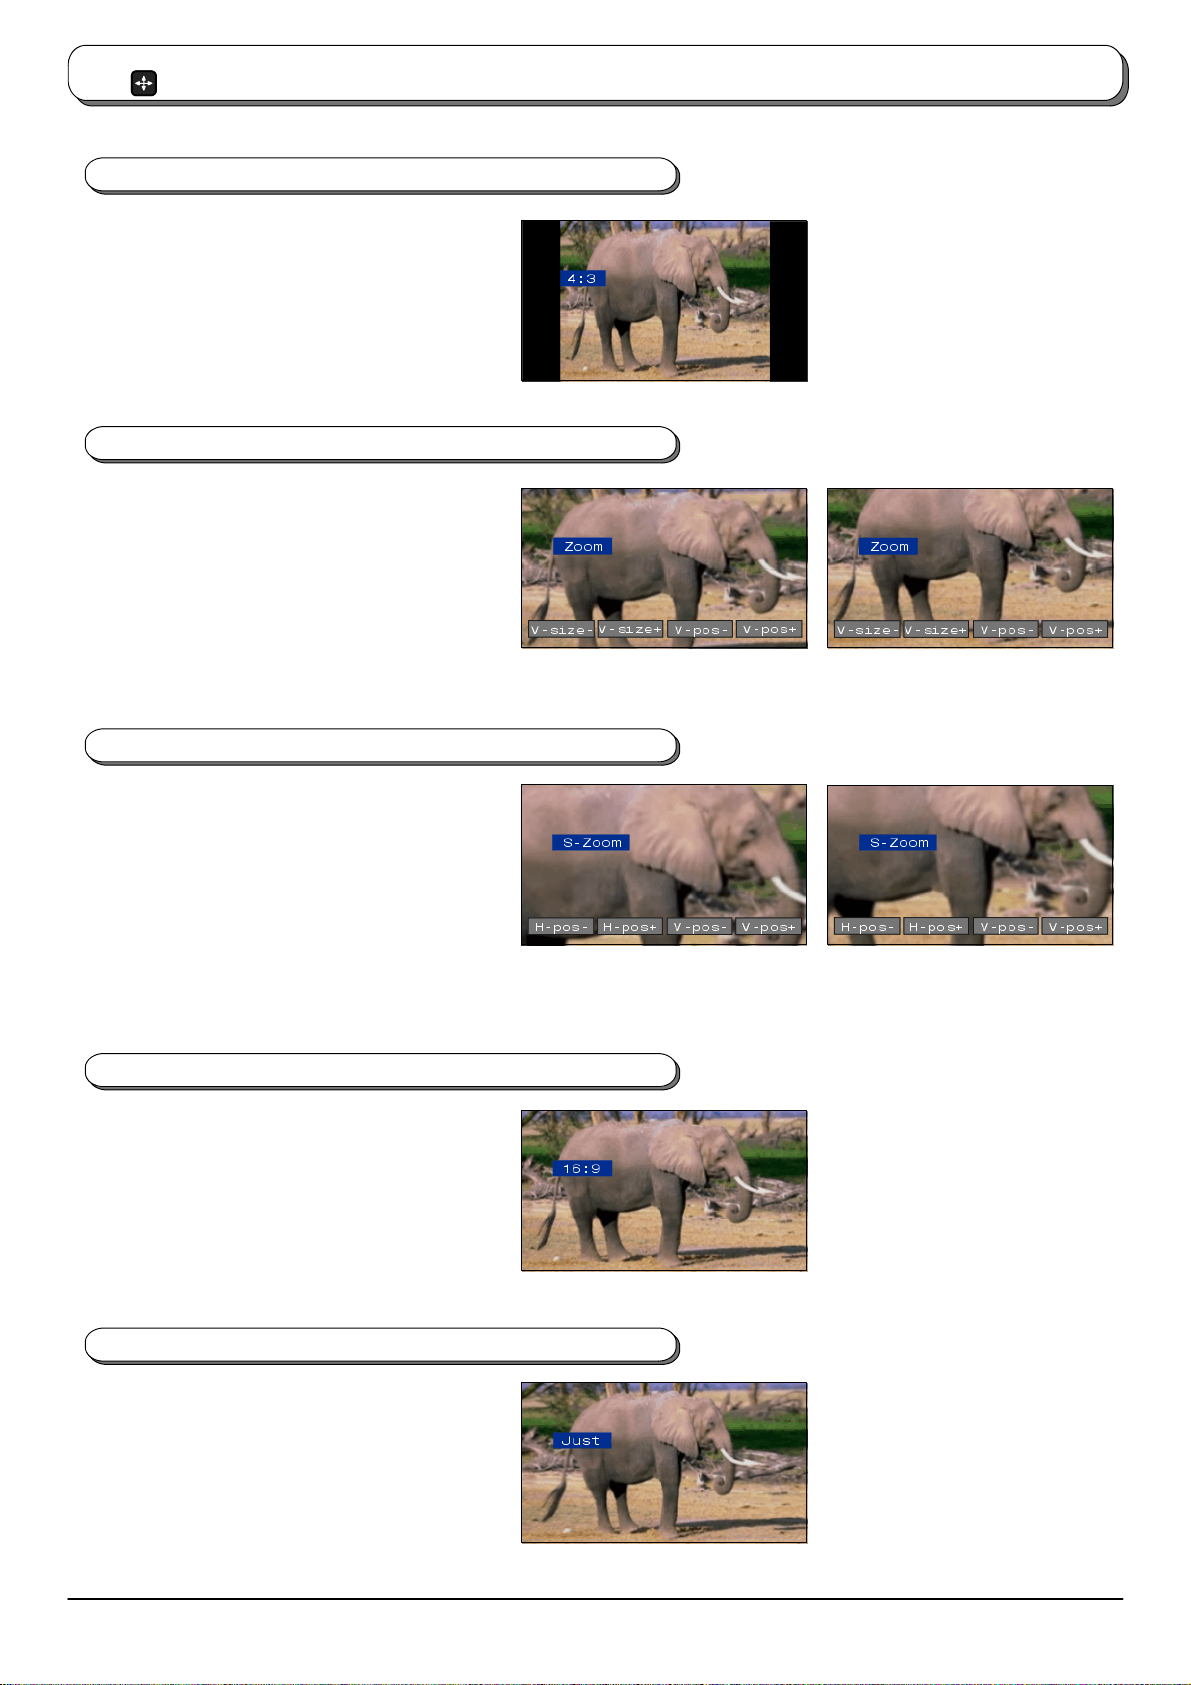
4:3
4:3will display a4:3 picture atitsstandard 4:3size
without any stretching. Blackstripes will be visible
down the left and right sides of the picture.
Zoom
Zoom mode magnifies the central section of the
picture.
Press the red or green buttons to enlarge the
picture vertically. Press the yellow or blue buttons
to move the picture vertically (useful when there
are sub---titles positioned below the picture).
4:3
S --- Zoom
S --- Zo o m displays the picture at a greater
magnification than Zoom mode does.
Pressthe red or green buttonsto move the picture
horizontally. Press the yellow or b lue buttons to
move the picture vertically.
16:9
16:9willdisplaythepictureatitsmaximumsizebut
with slight stretching.
Zoom
S --- Zo o m
Blue button has been pressed to
move picture upwards
Blue button has been pressed to
move picture upwards
Just
Use this mode when you wish to expand a 4:3
picture to fill the whole screen (rather than
watchinga programmewithblackstripesdownthe
left and right sides of the picture). The 4:3 picture
will bestretched horizontally sothat the image fills
the screen, this is done in such a way that the
stretchingisonlyobviousattheleftand right edges
of the screen.
16:9
Just
17
Page 18
MULTI
WINDOW
Multi window
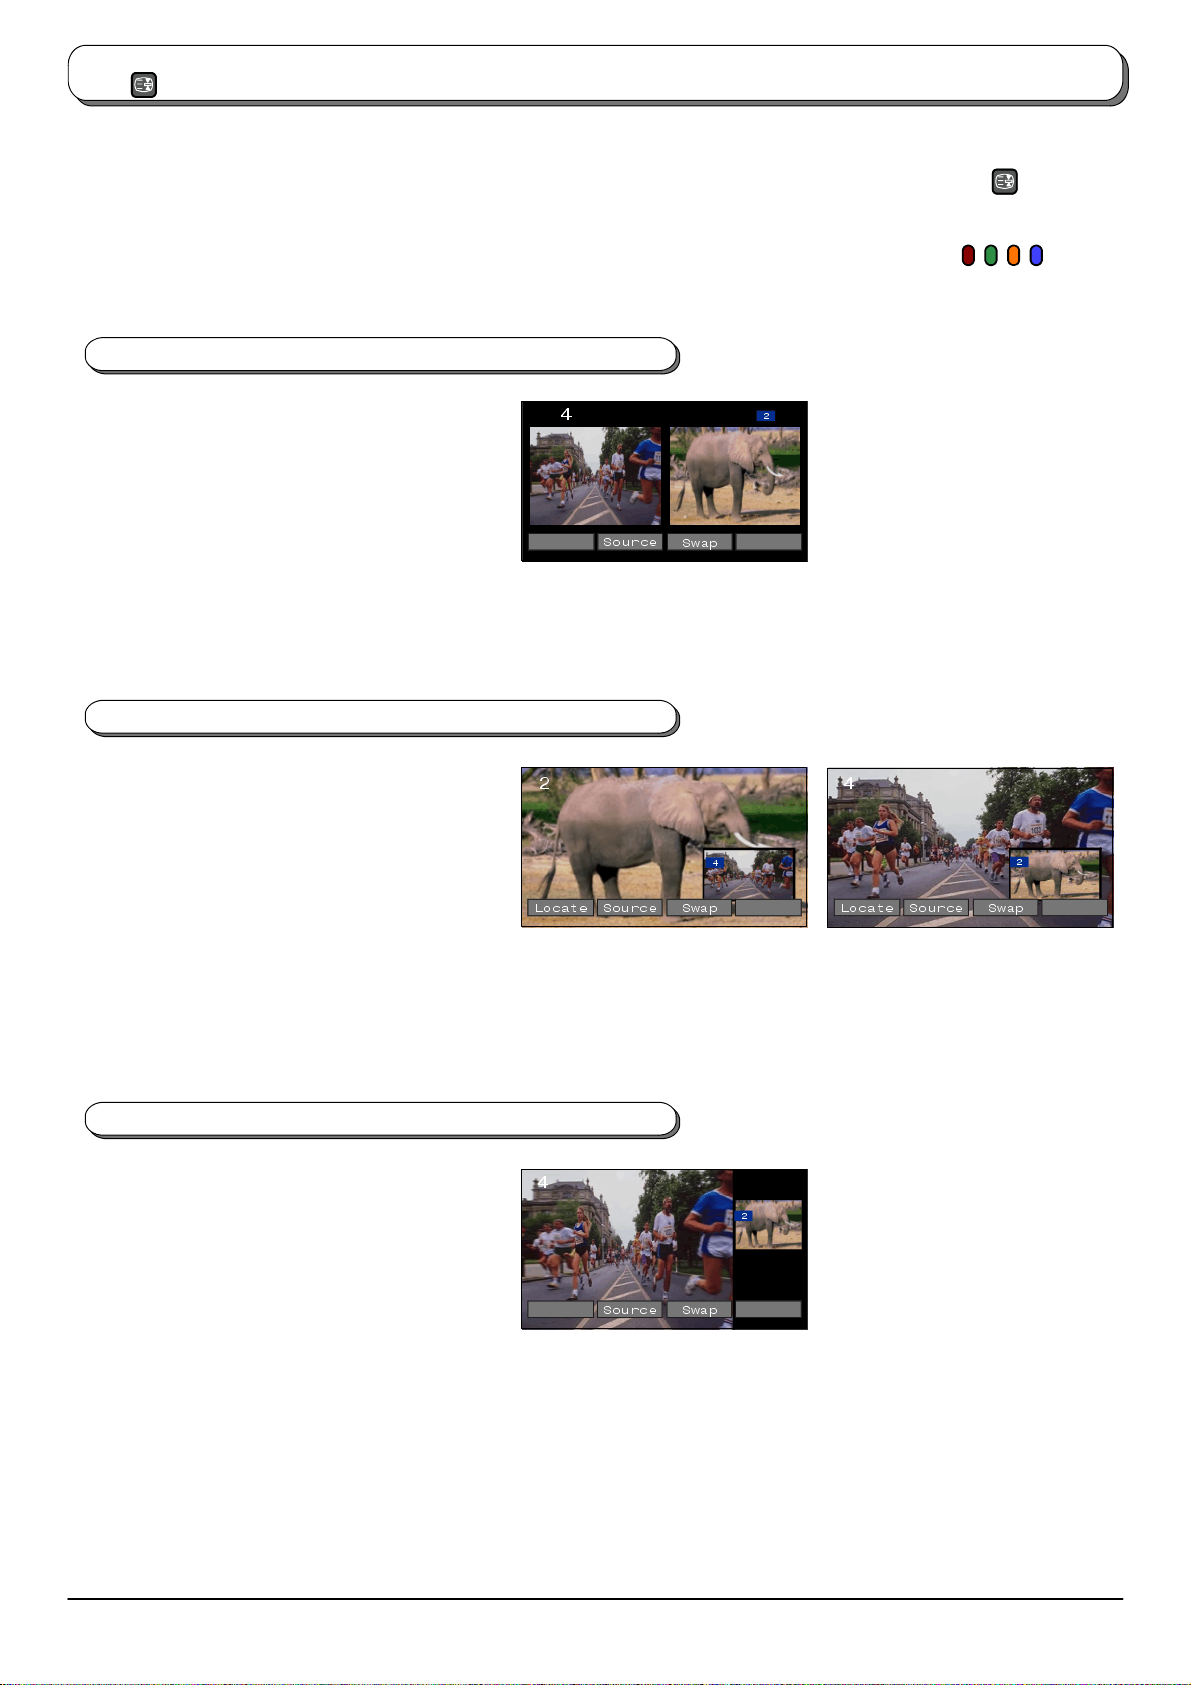
Press the MULTI WINDOW button (whilst the on screen selector keys are on screen) to move between
watchingthe current programme,the picturein picture feature,picture out ofpicture and pictureand
picture feature.
The on screen selector keys (corresponding to the four coloured buttons on the remote control) that
appearfor the featuresclearafter a fewseconds.If youwant to selectan operationwhen the keysarenot
shown, press the MULTI WINDOW buttononcemoreandthekeyswillreappear.
Picture and picture
Allowstwo picturesto beviewed atthe sametime.
Pressthegreen buttontoselect the contentsofthe
right window, switching between displaying a TV
channel and all AV sources in turn. To change the
TV channel: press the green key until thecurrently
selectedTVchannel is shown, thenuse theremote
control to change channel (while the on screen
selector keys are still displayed).
Presstheyellow button toswap thecontents ofthe
two windows.
Usetheremote control to selecta TVchannel oran
AV source to appear in the left window.
Picture and picture mode
Picture in picture
MULTI
WINDOW
Allowstwo picturesto beviewed atthe sametime.
Pressthegreen buttontoselect the contentsofthe
smaller window, switching between displaying a
TV channel and all AV sources in turn. To change
the TV channel: press the green key until the
currently selected TV channel is shown, then use
theremotecontrolto changechannel(while the on
screen selector keys are still displayed).
Press the red button to reposition the smaller
picture on screen.
Presstheyellow button toswap thecontents ofthe
two windows.
Usetheremote control to selecta TVchannel oran
AV source to appear in the main window.
Picture out of picture
Only available in 4:3 aspect mode, this feature
allows two programmes to be viewed at the same
time, as picture in picture does. The differenceis
howthetwoprogrammesaredisplayed:in picture
in picture the smaller window appears within the
main image; in picture out of picture the smaller
window appears to the right of the main image.
Pressthegreen buttontoselect the contentsofthe
smaller window, switching between displaying a
TV channel and all AV sources in turn. To change
the TV channel: press the green key until the
currently selected TV channel is shown, then use
theremotecontrolto changechannel(while the on
screen selector keys are still displayed).
Presstheyellow button toswap thecontents ofthe
two windows.
Usetheremote control to selecta TVchannel oran
AV source to appear in the main window.
Picture in picture mode
Picture out of picture mode
The two programmes have been
swapped, the programme in the
smaller window has become the
main window programme.
18
Page 19
INDEX
CH SEARCH
Channel search
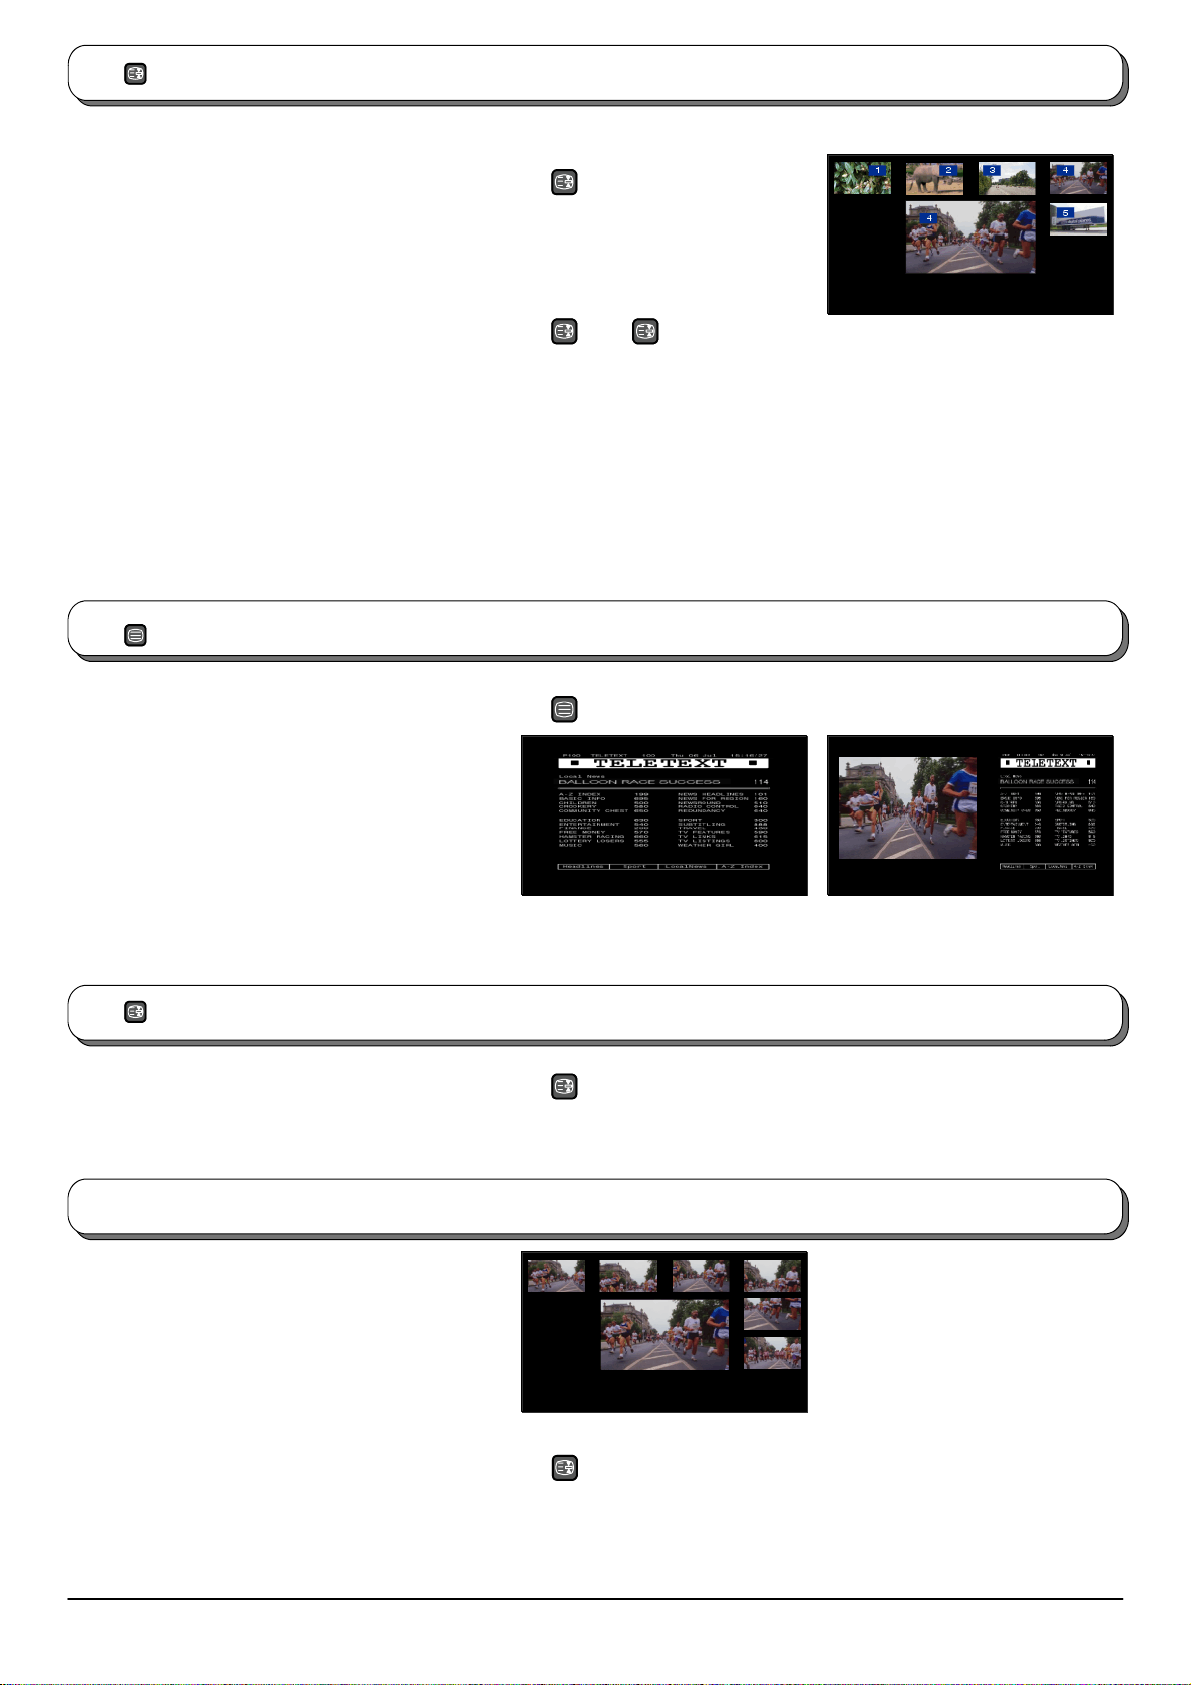
Press the CH SEARCH button to show
freeze---frames of the programmes being
broadcast on all of the stored channels. These
images are displayed in series clockwise around
the edge of the screen, starting from the top left.
The current programmeis displayed in the centre
of the screen, still playing.
The feature cycles through the stored channels
until either the STILL key is pressed to pause the
searchor the CHSEARCHbutton is pressedtoexit
the feature.
Press the red button to select each channel’s
freeze---frame in turn.
Press the green button to watch the selected
channel, exiting the feature.
Press the blue button to watch the current
programme (displayed centre screen), exiting the
feature.
TV/TEXT
Picture and text
Press the TELETEXT button to move between
watching the current programme, viewing teletext
and thepicture and text feature. picture and text
lets you see the current programme and a page of
teletext side by side.
Whilstusing this feature,theremotecontrol affects
the teletext page; if you wish to make changes to
the programme viewed press the TELETEXT
button to return to watching the programmeon its
own then make the desired changes.
INDEX
CH SEARCH
HOLD
STILL
TV/TEXT
INDEX
CH SEARCH
Channel search
TELETEXT mode Picture and text mode
HOLD
Still
STILL
Press to freeze the picture, press again to return
to watching the current programme.
Strobe
(AccessStrobe viatheSetup menu,see page10).
Takes a series of freeze---frame images (one
second delay between each image being taken)
from the current programme watched, these are
displayed in series clockwise around the edge of
the screen, starting from the top left. The current
programme is displayed in the centre of the
screen, still playing.
To pause (freeze) Strobe,presstheSTILL button
on the remote control, press again to continue
taking the freeze---frames. To exit the Strobe
feature and return to watching the current
programme, press any button on the remote
control other than STILL.
HOLD
STILL
HOLD
STILL
Strobe mode
19
Page 20
Q --- Link
This is a Q --- Lin k TV. Q --- Li nk, NEXTVIEWLINK and similartechnologyprovide a way for a TV andVCR tocommunicate, making it
easier to record programmes. In order to be able to exchange information both the TV and the VCR must be fitted with this
technology,andmustbeconnectedwithaSCARTlead(fullfunctiontype)betweentheAV2socketoftheTVandtheappropriate
socket on the VCR (see the VCR instruction book for d etails).
Q ---LinkletsyourTVinstructacompatibleVCRtorecordtheprogrammecurrentlyshownonscreen,nomatterwhatprogramme
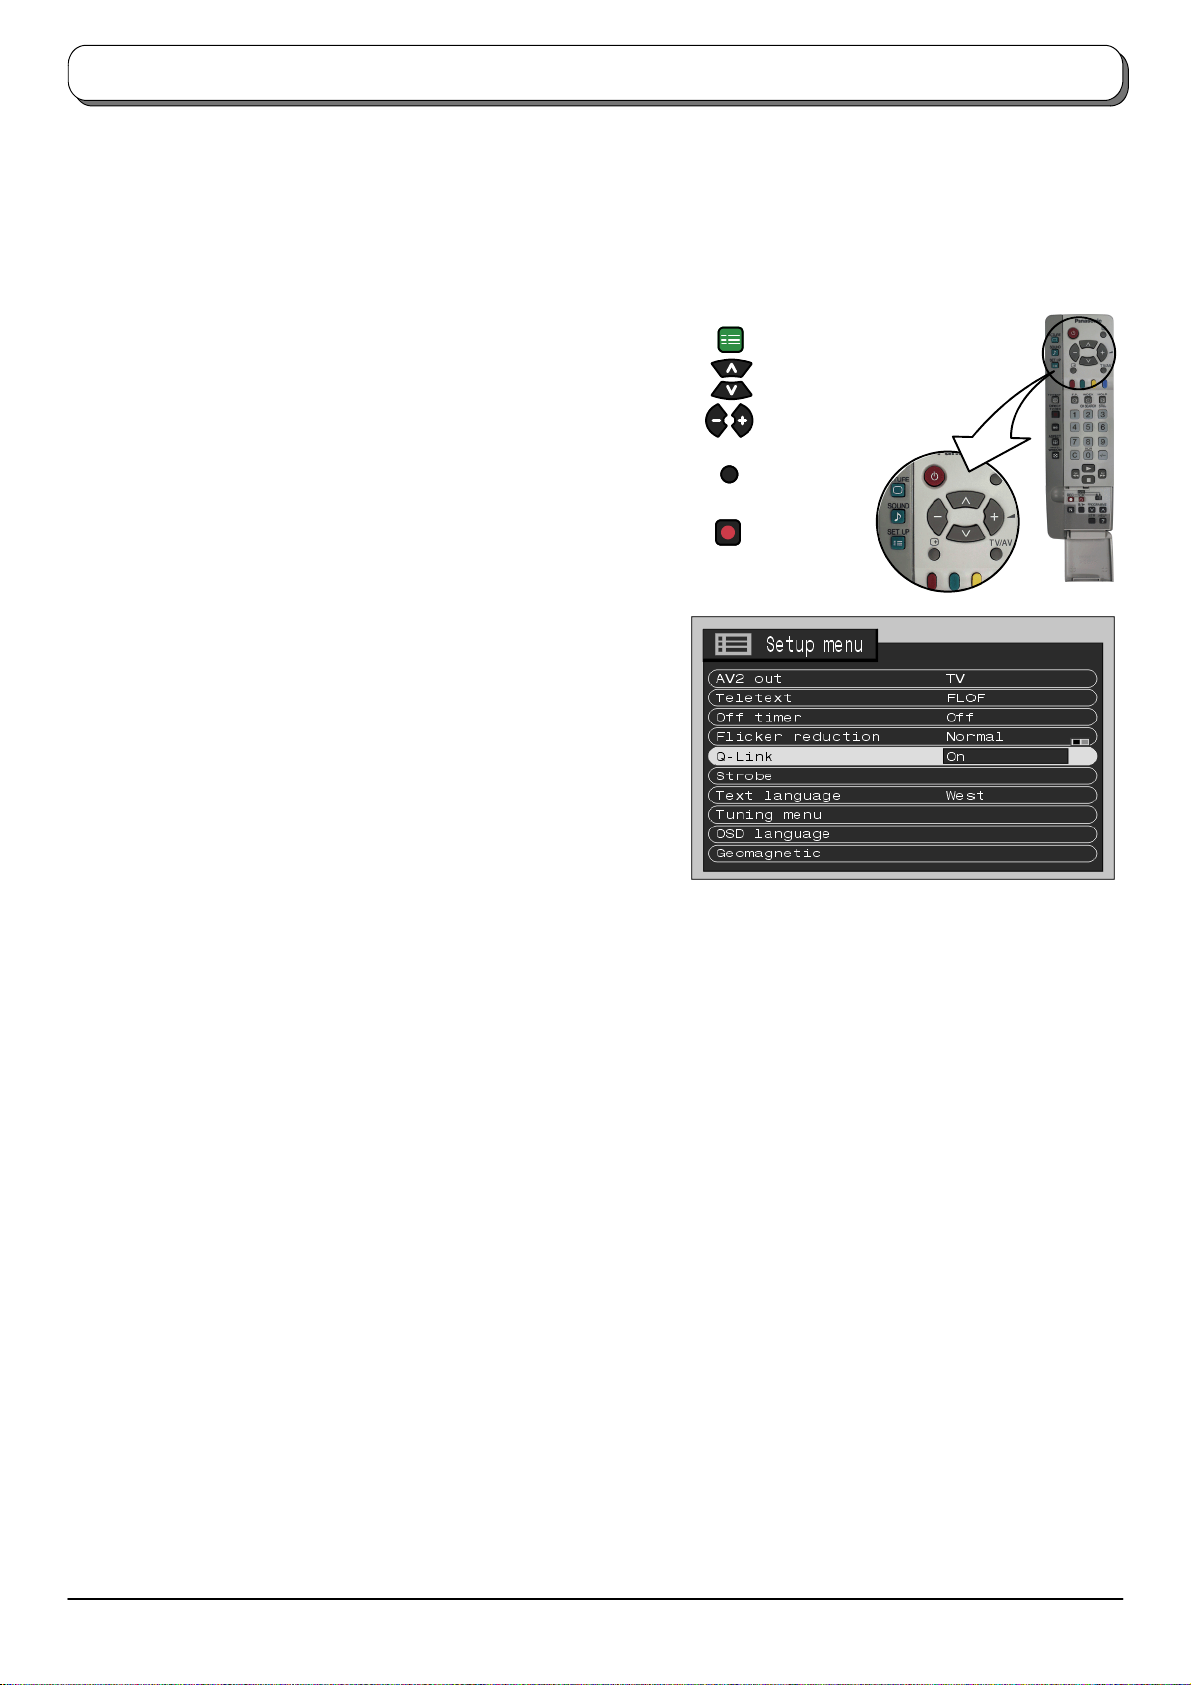
position is set on the V CR. In order to make use of Q --- Li nk, ensure that the Q --- L i nk option is set to On in the SETUP menu:
SET UP
Press the SETUP menu button
Move to Q --- Li n k option
Confirm Q --- L i n k option is set to On
TV/AV
Press the TV/AV button at any time to go back to watching TV.
Press the DIRECT TV REC button
Notes:
D If the VCR is off, it will automatically switch on when you
press the DIRECT TV REC button.
D To ensurecorrect recordingsaremade, thetelevisionand
VCR should share tuning information (see page 13).
D Wheneverthe Auto setupfunction is used,tuningdata will
be downloaded to the VCR (see page 14).
D Ifatanytimeyou wish to turn off theQ --- Link feature, follow
the above procedure to get to the Q --- L i n k menu option,
then set the option to Off.
DIRECT
TV REC
A message, sent from the VCR, will appear on screen showing what is being recorded, or if it is not possible to record:
VCR recording preset prog
VCR recording TV source
No recording TAPE IS
VCR is recording theprogramme signalfrom its own tuner. If you wish you can switch off the
TV and leave the VCR recording in the normal way.
VCRisrecording the programmesignal from thetelevision. Youmustnot change programme
position or switch off the TV:if you do, the VCR will automatically stop recording and switch
off.
The write protection tab on the back of the cassette has been removed.
PROTECTED
No recording NO TAPE
Examples of other messages that might be displayed.
No recording TAPE MAY BE
DAMAGED
Notes:
D With Panasonic Q---Link VCRs these additional features are available:
D If you insert atape inyour VCRand pressthe Playbutton, thetelevision willautomatically switch onand selectthe AV2
input so you can view the tape.
D If you switch off the television whilst the VCR is in Stop, Fast Forward or Rewind modes, the VCR will switch off
automatically.
D NotallVCRssupport thistechnology.Somemaysupportcertainfeatures,butnotothers.SeetheVCRinstructionbookfor
details.
D If Q--- Link is inoperative, firstconfirm that your SCART lead is a full function type. Askyour dealer for further details.
20
Page 21
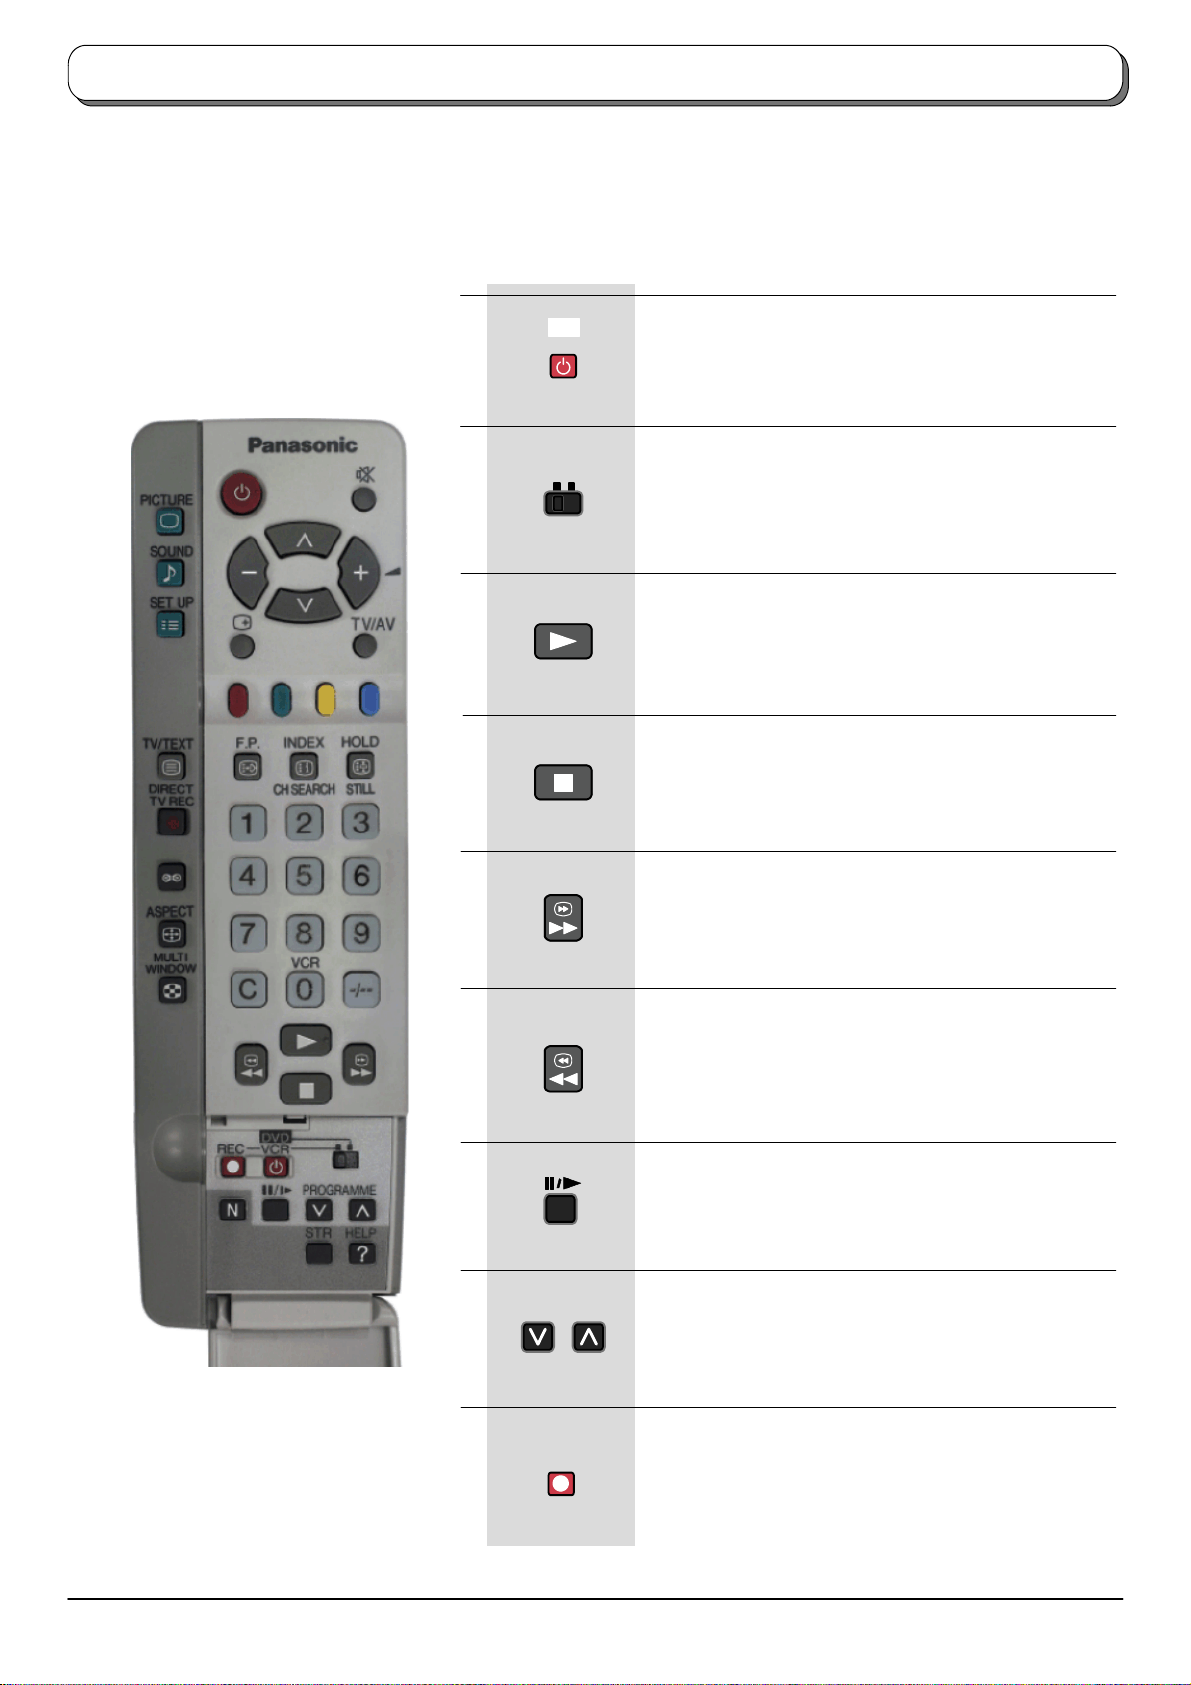
VCR / DVD operation
s
The Remote Control is capable of operating some functions of selected Panasonic VCRs and DVD (Digital Versatile Disc)
equipment. Some VCR and DVD equipment have different functions, so to ensure compatibility please refer to the equipment’s
instruction book or consult your dealer for details.
DVD
VCR
Standby
Press to switch the VCR or DVD to standby mode.
Press again to switch back on.
VCR / DVD switch
Use this switch to select whether controls operate
DVD equipment or your VCR.
Play
Press to playback the tape or DVD.
Stop
Press to stop the tape or DVD.
Skip/FastForward/Cue
VCR: Press to fast forward the tape. In Play mode, pres
to view the picture rapidly forward (Cue).
DVD: Press once to skip to the next track.
REC
Skip / Rewind / Review
VCR: Press to rewind the tape. In Play mode, press to
view the picture rapidly in reverse (Review).
DVD: Press once to skip to the previous track.
Pause / Still
Press in playback mode, the picture will pause.
Press again to restart play.
Programme Up / Down
Press to increase or decrease the VCR programme
position by one.
Record
Press this button to start recording.
21
Page 22
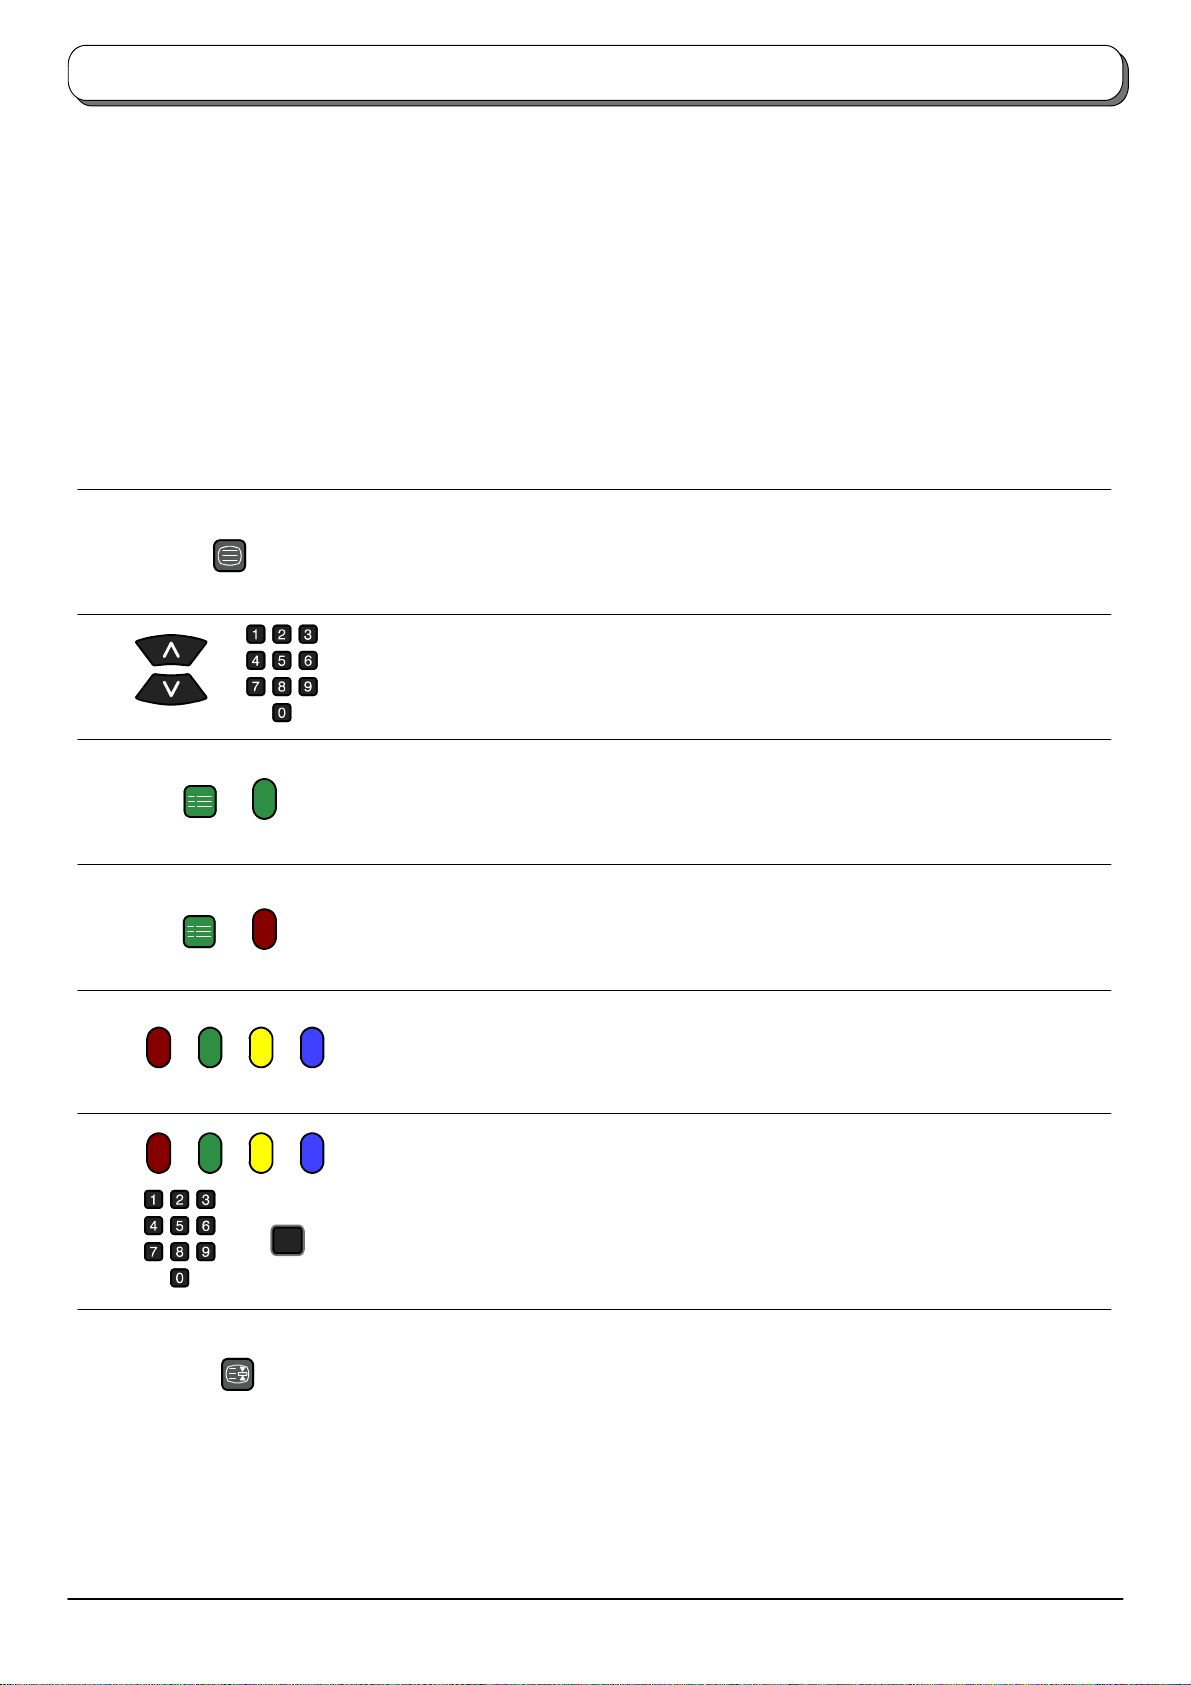
Teletext operation
D Teletext features may vary depending on the Broadcasting Companies and is only available if the channel selected is
transmitting Teletext.
D Pressing the Picture button w hilst in Teletextoperation will display the contrast function with a cyan bar, press A"to alter
the setting as required.
D Pressing the Setup button whilst in Teletext operation will display special function options at the bottom of the screen.
D Pressing the Sound button whilst in Teletext operation will display the volume function with a green bar, press A"to alter
the setting as required.
What is LIST mode ?
InLISTmode, four differentlycoloured pagenumbersare situated at thebottomof the screen.Eachof these numberscan bealtered
andstoredintheTV’smemory.
What is FLOF?
In FLOF mode, fourdifferently coloured subjects are situated at the bottom ofthe display. To accessmore informationabout oneof
these subjects, press the appropriately coloured button. This facility enables fast access to information on the subjects shown.
TV/TEXT
SET UP
SET UP
TV / Teletext mode
Press the TELETEXT button to switch between the current programme, teletext and
the picture and text feature (lets you see the current programme and teletext side by
side, see page 19).
Page Selection
Pages can be selected in two ways :
a. Press the Up / Down buttons to increase or decrease the page number by one.
b. By entering the page number, using 0 ---9 on the remote control.
Full / Top / Bottom
Press the SET UP button to display special functions, followed by the Green button.
Press the Green button again to expand the BOTTOM half.
Press again to return to normal (FULL) size.
Reveal
Press the SET UP button to display special functions, followed by the Red button to
reveal hidden words e.g. quiz page answers. Press again to hide.
Red / Green / Yellow / Blue buttons
In FLOF mode these correspond to the differently coloured subjects.
In LIST mode they correspond to the differently coloured page numbers.
22
HOLD
STR
List Store
In LIST mode the four page numbers can be altered (programme positions 1 --- 25
only).
To do this, press one of the four coloured buttons and enter the new page number.
Press and hold STR, the page numbers will change to white indicating that the page
is stored.
Hold
To hold the Teletext page when viewing multi---page information.
Press again to return to automatic page update.
Page 23
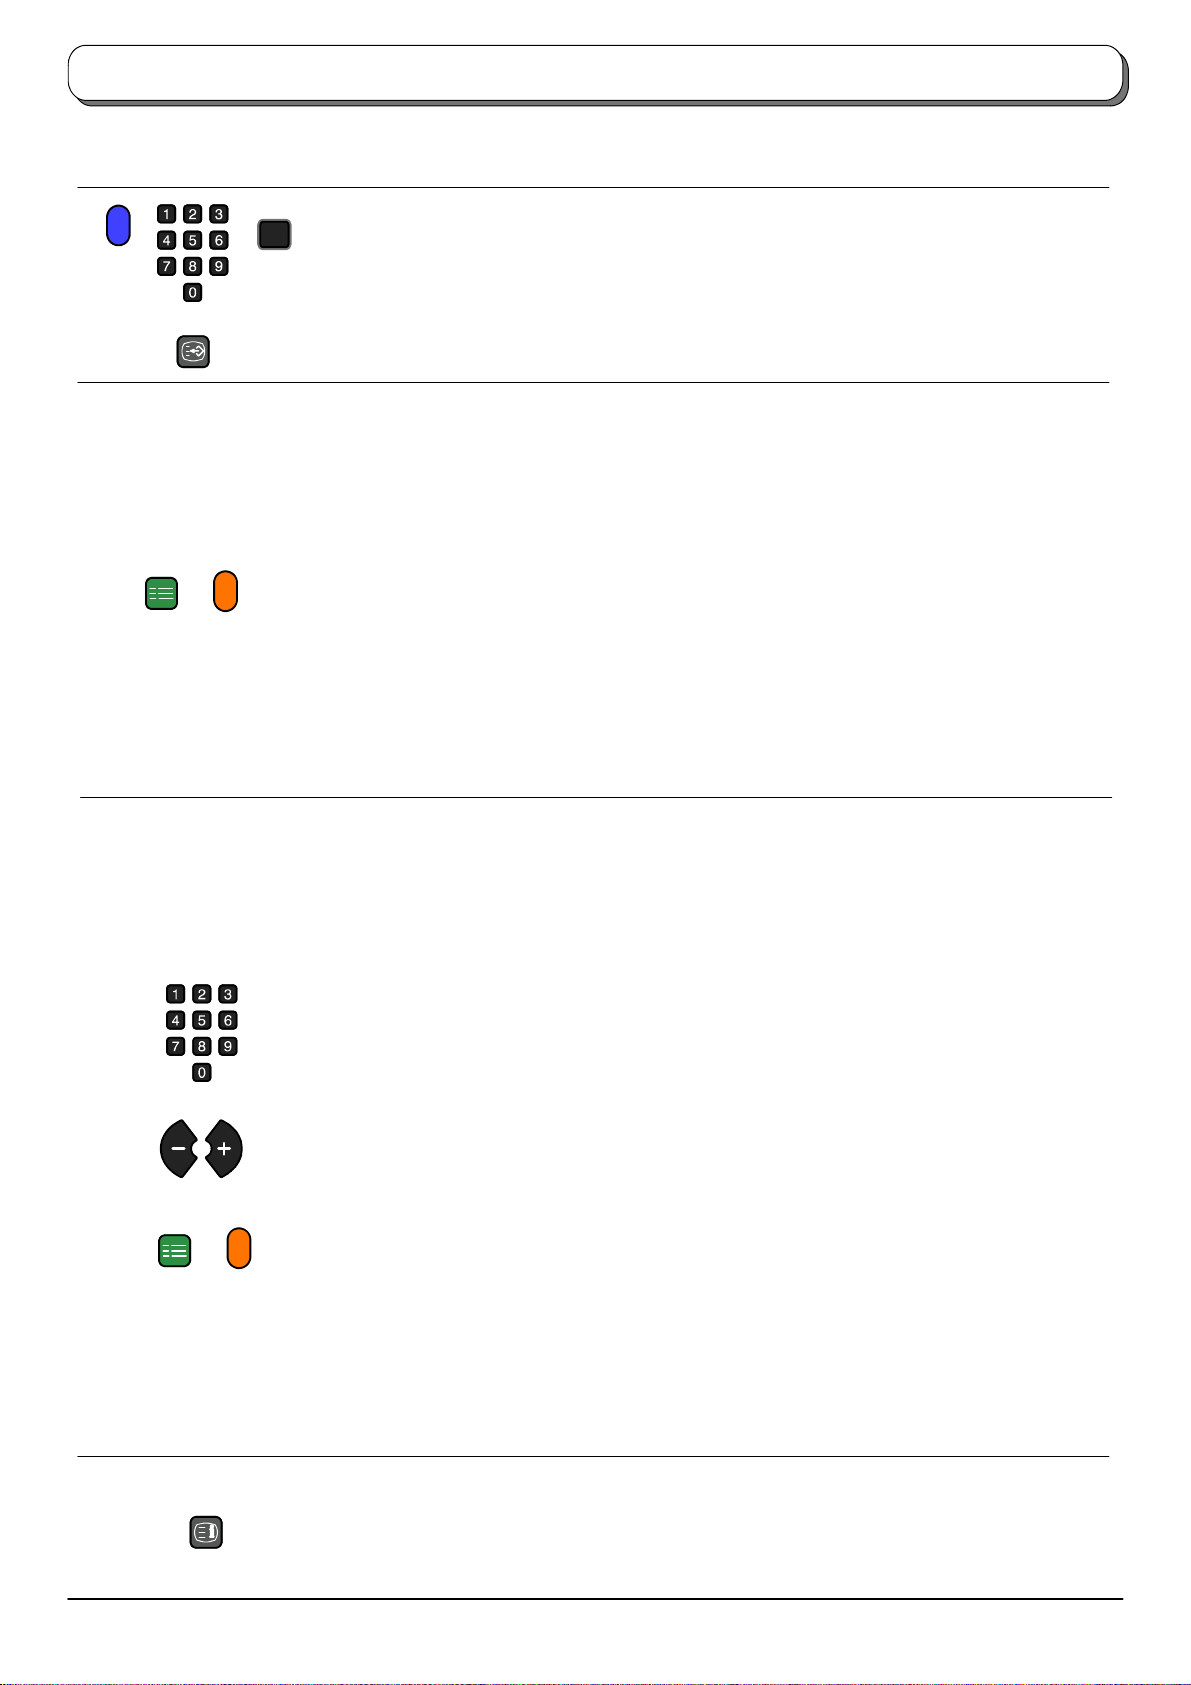
Teletext operation
It is not possible to change the programme position when in News flash, Update or Sub Coded Page Accessoperation.
SET UP
F.P.
STR
Favourite Page (F.P.)
Stores a favourite page in memory for instant recall. To store such a page, the TV must be
in LIST mode, and the programme position must be from 1 --- 25.
Press the Blue button, select the page number, then press and hold the STR button. The
page number is now stored.
Press F.P. to recall this page.
Update Display
Press the SET UP button to display special functions, followed by the Yellow button to view
the TV picture whilst searching for a Teletext page (this is not necessary in picture and text
mode, as the picture is displayed on the left of the screen)
When found, the screen will display the page number at the top left.
Press the Yellow button to view the page.
Press TV / TEXT again to return to normal TV operation.
News Flash
When a news flash page has been selected, press SET UP, Yellow, to view the TV picture.
When an update is received, the page number will be displayed on screen.
Press the Yellow button to display the News Flash
Press TV / TEXT to return to normal TV. operation.
Update
Press SET UP, Yellow to see the update of information on certain pages.
When an update is received, the page number will be displayed at the top left of the screen.
Press the Yellow button to view the page.
Press TV / TEXT to return to normal TV operation.
SET UP
Accessing sub pages
When Teletext information exceeds one page, it may take some time for the automatic
changing of the sub pages to reach the sub page you require. As each sub page is found
its number is displayed at the top of the page so that you may select it; as more sub pages
arepickedup,thedisplayatthetopofthepagechanges,sothatyouarealwaysoffered
the most recently transmitted selection of sub pages.
In picture and text mode, use the left and right cursor buttons to select a sub page from
the range displayed at the top of the Teletext window.
In Teletext operation, use the following procedure to access sub pages:
If the sub page you want to look at is not yet available, press the SETUP button (to display
special functions) followed by the Yellow button to view the TV picture whilst waiting for
more sub pages to be found. The sub pages found will be displayed across the top of the
screen.
When the sub page you are waiting for is available press the Yellow buttontoreturnto
viewing the Teletext pages, then use the left and right cursor buttons to select the sub page
of your choice.
Notes:
D If you do not want the four coloured special function keys to be displayed on the TV
picture while waiting for a sub page to be found, press either the PICTURE, SOUND or
SETUP menu button to clear the keys from the screen. Press the SETUP keyoncemore
to redisplay the keys.
D If you have cleared the special function keys from the screen and then used the left and
right cursor buttons to select a sub page, whilst still viewing the TV picture, you must
press the SETUP buttonthentheYellow button to display the Teletext page again.
D If the top of the page indicates that sub pages are being transmitted but the page
displayed never changes, then the ’sub page number’ is there to show the page
contents have been updated, there are no sub pages.
Press TV/TEXT to return to normal TV operation.
INDEX
Index
When in FLOF operation
Press INDEX to return to the main index page.
Dependingontheway information istransmitted,thismayhave to be pressedmorethanonce
to return to the main index page.
23
Page 24
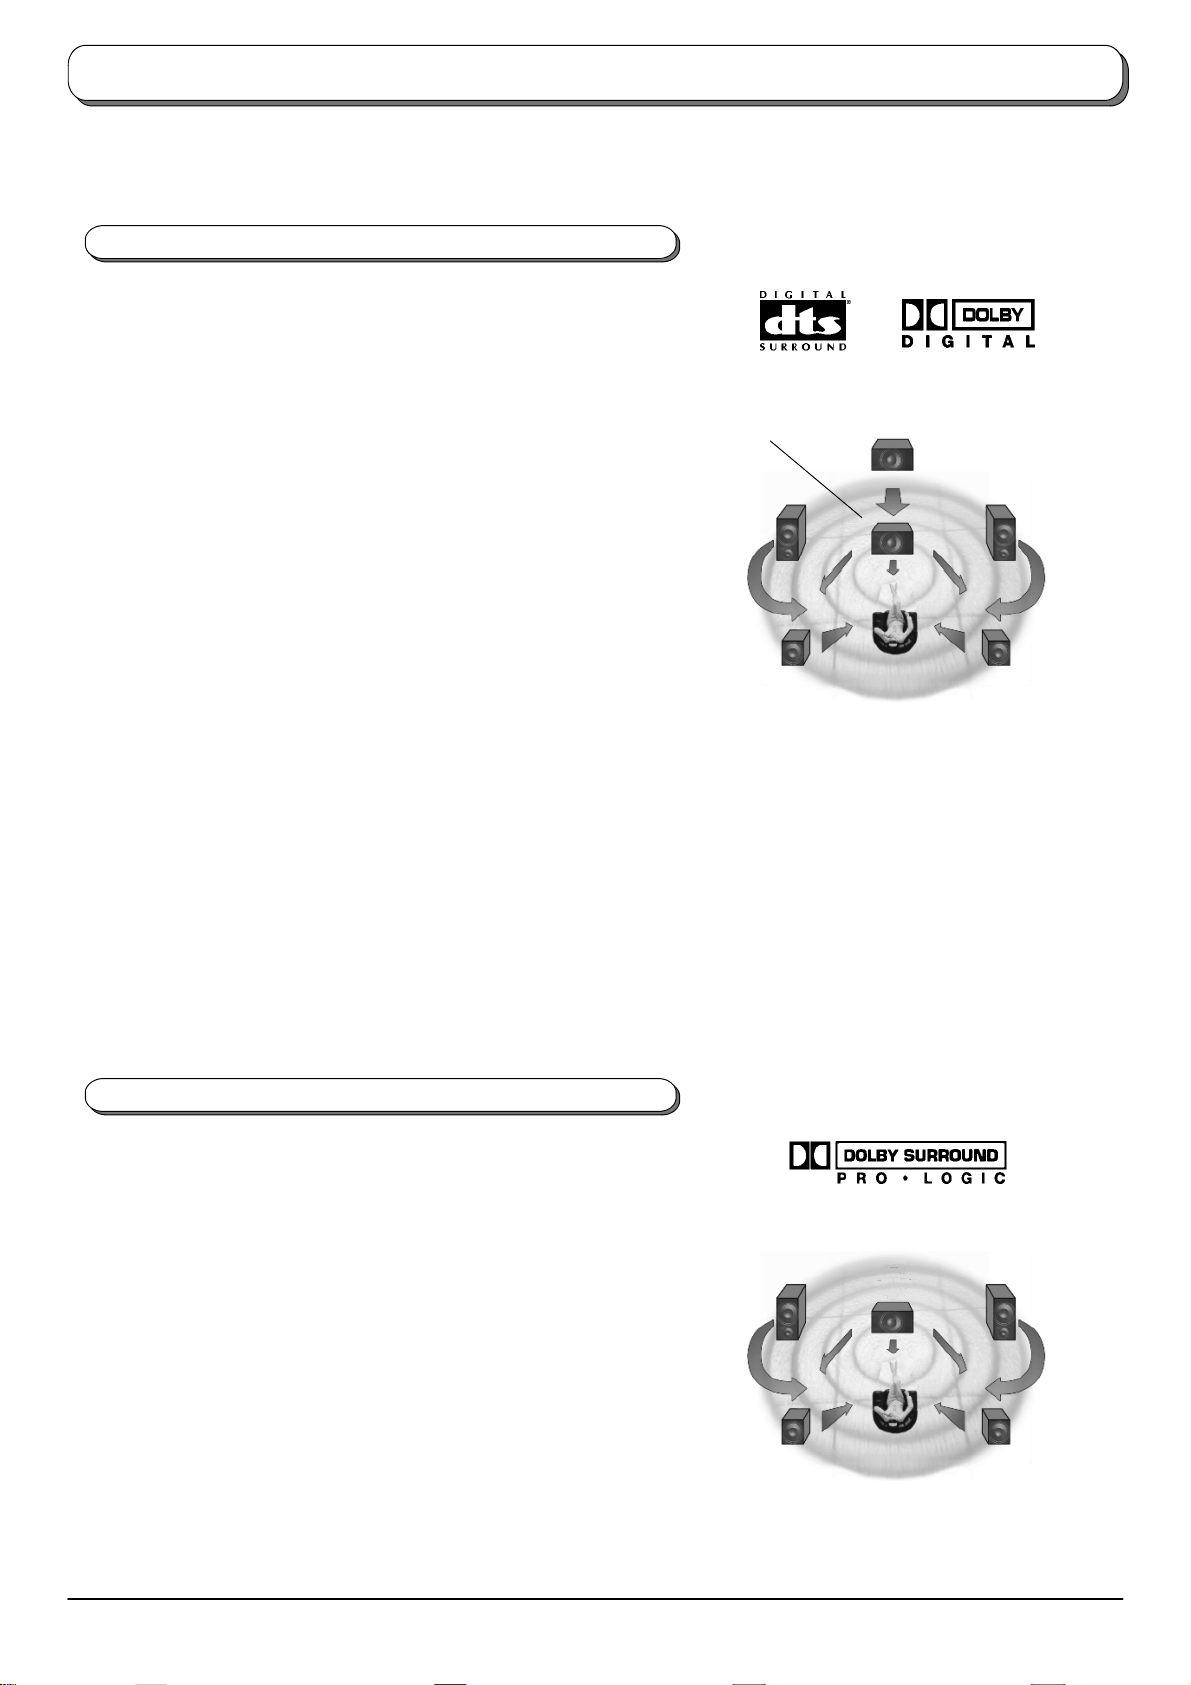
Surround sound systems
Stereo reproduction normally uses left and right speakers, but DigitalTheater Systems(DTS),Dolby Digital and Dolby Pro
Logic Surroundgo further,adding a centre and other channels so you are immersed insound and special effects.
Digital Theater Systems (DTS) / Dolby Digital
Both DTS and Dolby Digital split soundtrack information into 6
separate channelsofsoundwhichareoutputthroughthespeaker
setup: five full range channels (left, centre, right, stereo left and
right surround)and a ’0.1’(ie: limited range)bass channel. This
givesyou superb sound qualityfromDTS/DolbyDigitalencoded
tracks when a compatible speaker system is connected to your
TV.
Most dialogue comesfrom the centre channel, which enhances
dialogue and focuses it so it seems to come from the action on
screen.The separaterear left and right channelsgive a dramatic
sense of space, with sounds travelling in all directions between
front, centre and rear channel speakers (eg: a rocket going
overheadstartsbehind youto theleft and explodes in front ofyou
totheright).The’0.1’Low FrequencyEffects(LFE)channelgives
impactto basssounds and tospecial effectsmore felt than heard
(eg: thethud of a dinosaurfootfall or the rumble of thunder).
While DTSand Dolby Digital are both high quality, ’5.1’channel
surroundsystems, the tw o systems differin howthey breakdow n
and store sound information.
They also differ in how they work with existing speaker setups:
Dolby Digitalhas been developed tobe backwardly compatible
withDolbyPro Logicandconventionalstereosetups.DTS,onthe
other hand, focuses on the high quality, 5.1 channel surround
output; choosing not to develop backward compatibility with
existing sound systems.
Note:
D External equipmentis usually connectedto the TVvia one of
the Scart sockets to provide pictures and sound (eg: a VCR
player connected to AV2). To receive a DTS or Dolby Digital
encoded soundtrack fromcompatible equipment(eg: aDVD
player, aset top box), you willalso needto connectan optical
or coaxial cable to one of the TVs digital audio sockets. See
pages 27 to 28 for connection details, also see the Digital
Audio option in the SOUND menu, page 9.
Subwoofer /
LFE speaker
Front
left
speaker
Rear left
surround
speaker
Centre speaker
Front
right
speaker
Rear right
surround
speaker
Dolby Pro Logic
DolbyProLogicSurroundusesfourchannelsofsound:left,right,
centreanda mono rearchannel, givingexcellent reproduction of
Pro Logic encoded t racks when a compatible speaker system is
connected to your TV. Most dialogue comes from the centre
channel, whichenhances dialogueand focuses itso it seemsto
come from th e action on screen. The rear ch anne l is used to
immerseyouin atmosphere andspecialeffects,the sameoutput
is sentto both rear speakers.
As with Dolby Digital,Pro Logicis backwardly compatible with a
conventional stereo speaker setup.
Notes:
D To get Pro Logic information from Pro Logic encoded TV
programmes, you must be able to receive stereo
transmissions. If stereo transmissions are not transmitted in
yourareathentheProLogicinformationwillnotbepresenton
TVtransmissionsand ProLogic decodingwillonly producea
centre channel output.
D See pages 27 to 28 for connection details.
24
Front
left
speaker
Rear left
surround
speaker
Centre speaker
Front
right
speaker
Rear right
surround
speaker
Page 25
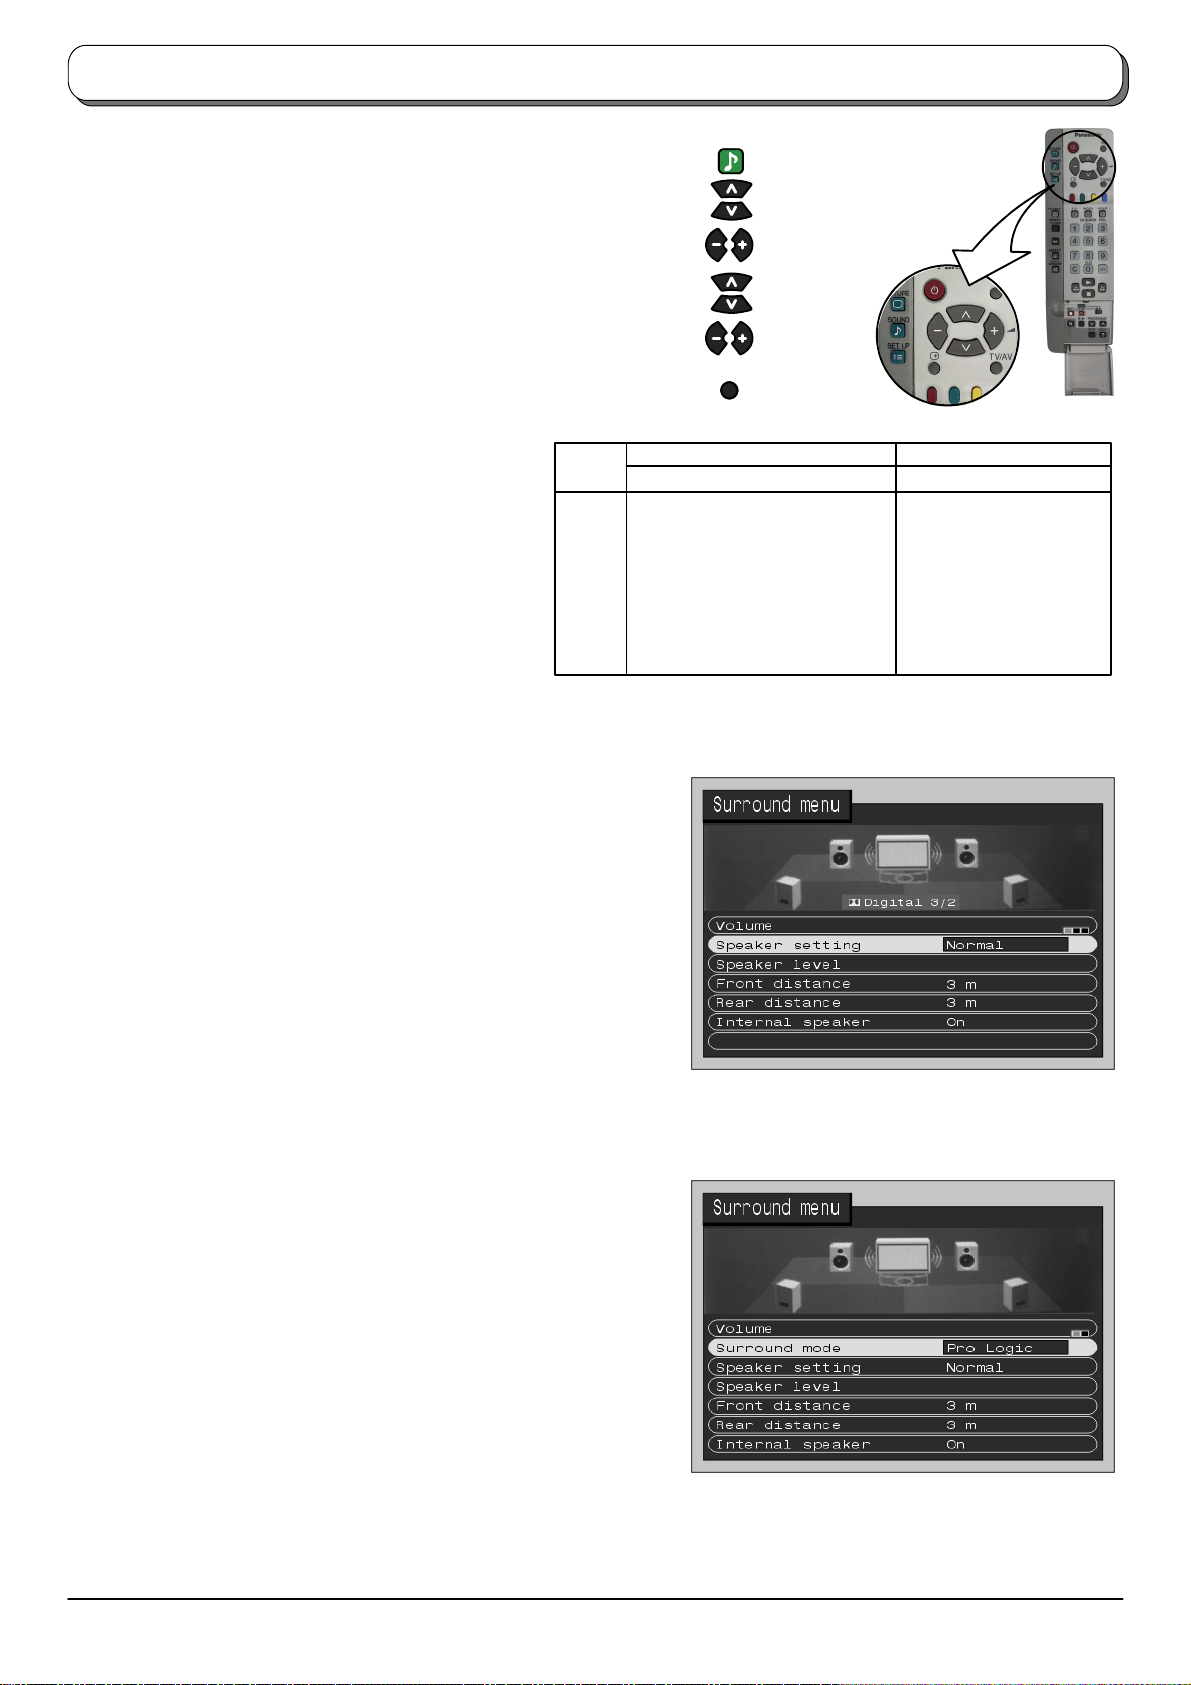
Surround menu
Press the SOUND menu button
Move to Surround menu option
Access Surround menu
Move to chosen menu option
Adjust chosen option or access chosen menu
SOUND
Press the TV/AV button at any time to go back to watching TV
If a DTS / Dolby Digital input is detected the Surround
menu options instantly change --- Surround mode is
notavailable.EnsurethattheDigitalAudiooptioninthe
SOUND menu is set to the correct AV input (see page
9 for details). A message displayed in the centre of the
screenshows whether thesignalisDTSorDolbyDigital,
and gives a code indicating which channels are
detected(seetabletotheright).Subwooferoutput isnot
listed; if a subwoofer channel is detected then its
contentsare output, (thesubwoofer output levelcanbe
adjusted or the subwooferturned off viathe subwoofer
optionintheSOUNDmenu---seepage9fordetails).
Volume
Surround mode
The volume adjustment sets the overall
Surround output volume.
When a DTS / Dolby Digital input is not
detected this option is shown. Choose
between Pro Logic and Simulated.The
mode chosen here dictates the next menu
option.
TV/AV
Code Front outputs Rear surround outputs
Left Right Centre Left Right
1+1 Dual mono output
1/0 Mono output
2/0 nn
3/0 nn n
2/1 nn Mono output
3/1 nn n Mono output
2/2 nn n n
3/2 nn n n n
Speaker setting /
Simulated setting
Speaker level
Front distance
Rear distance
Internal speaker
If a DTS / Dolby Digitalinput is detected, or if
ProLogic is selected inSurround mode, this
menu option is Speaker setting, allowing
selection of Normal, Phantom or 3Stereo
modes, as described on p age 26.
If Simulated is selected in Surround mode,
this menu option is Simulated setting,
allowing selection of Disco, Movie or
Stadium modes, as described on page 26.
Allows adjustment of the volume for each
speaker, as described on page 26.
Allows setting of the distance from the
listening position to the front speakers.
Allows setting of the distance from the
listening position to the rear speakers. If the
rearsurround speakers arecloser toyou than
thecentrespeaker,youmayheardialogue
“leakage” from the rear surround speakers. It
maybenecessarytoreducethevolumeofthe
rear speakers.
If you do not have an externalcentre speaker
connected, set to On. If you wish to connect
an external centre speaker then switch Off,
see page 30 for connection details.
If a DTS / Dolby Digital input is detected, the
Surround menu is as shown above (no Surround
mode available).
If no DTS / Dolby Digitalinput is detected,Surround
mode appearsasamenuoption.
25
Page 26
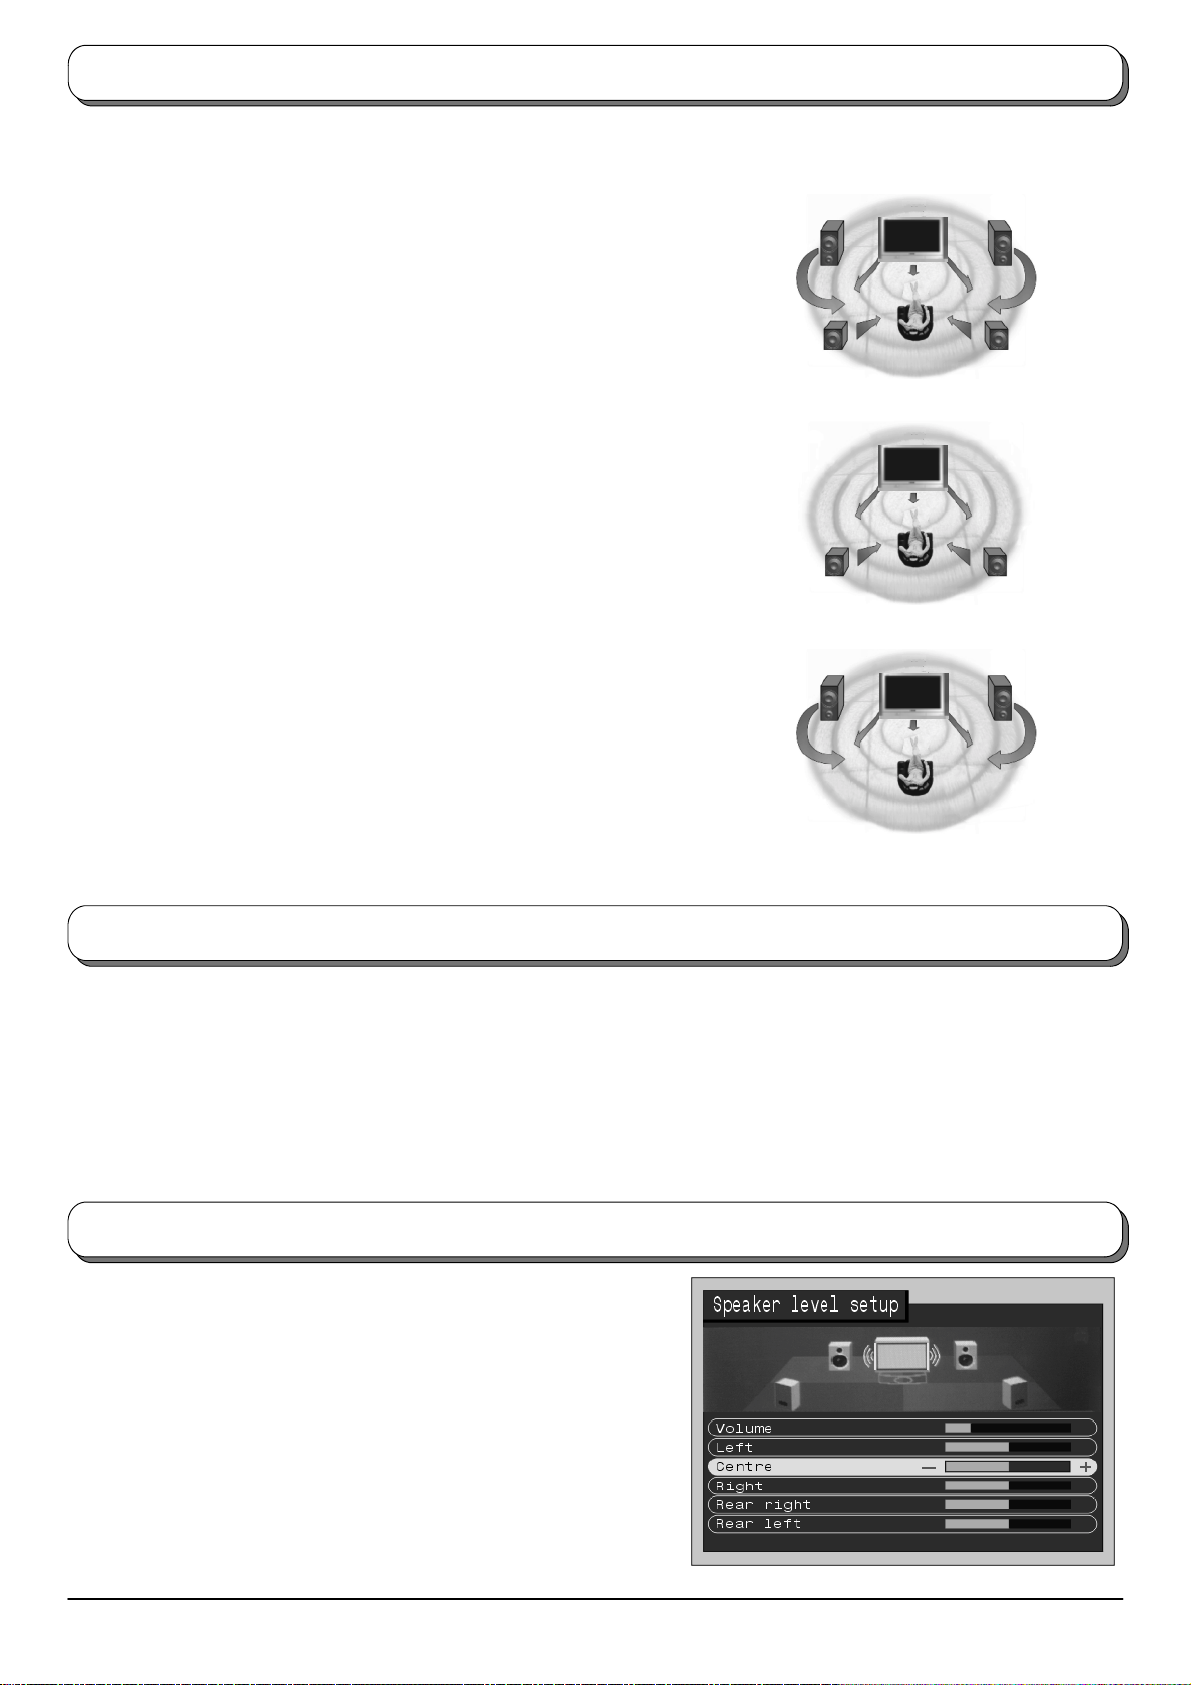
DTS / Dolby Digital and Pro Logic modes
With a DTS / Dolby Digital input or if Pro Logic is selected in Surround mode, the following three modes of operation are
available as the Speaker setting: Normal, Phantom, 3Stereo.
Normal
Phantom
3Stereo
If front and rear speakers are connected, use
Normal mode. Centre speaker information will
be produced by the TV’s internal left and right
speakers. With a DTS / Dolby Digital 5.1 input,
the subwoofer/LFE speaker information is
produced by the TV’s internal subwoofer. Ifthe
internal speaker is switched off (see page 25)
and an external centre speaker used, the
speaker mustbe connectedusing RCAcables,
via an external amplifier (otherwise it will not
outputany sound).Seepage 30for connection
details.
Ifexternalfrontleftandrightspeakersarenot
connected, use Phantommode. Left, right,and
centreinformation willnow beproduced bythe
TVspeakers.Ifyouchoosetousethismodewith
the internal speaker switched off and front left
and right speakers connected, these must be
connected using RCA cables, via an external
amplifier (otherwise they will not output any
sound). Seepage 30 for connection details
Thisis the bestmodeto useifrear speakersare
not connected. When using this mode, the rear
leftand rightsurround informationisredirected
to the front left and right speakers. Centre
information is output by the TV’s internal
speakers. Ifthe internal speaker is switchedoff
(see pa ge 25) and an external centre speaker
used,it mustbe connectedto theTV usingRCA
cables,viaanexternalamplifier(otherwiseitwill
not output any sound). See page 30 for
connection details.
Front
left
speaker
Rear left
surround
speaker
Rear left
surround
speaker
Front
left
speaker
Normal mode
Phantom mode
3Stereomode
Front
right
speaker
Rear right
surround
speaker
Rear right
surround
speaker
Front
right
speaker
Simulated mode
Simulatedsurround modes allowvarioustypes of surroundeffectsto beproducedby mimickingboth thedirect sound,as heardby
theaudience, and thesound reflected backfromthe surrounding wallse.g. ceiling andfloor space ina spacesuchasa disco.There
are three different effects to choose from, each reflecting a different atmosphere:
Setting Appropriate sources Effect
Disco Disco, dance or jazz music A crowded nightclub
Movie All movies or music software recorded without Simulates a surround sound recording
Dolby Surround
Stadium Any live sports occasion A packed sports stadium
Speaker level setup
The speaker output levels from the different options, eg: Left, Centre,
Right, Rear left and Rear right, should be adjusted from your usual
listening position, to obtain the best results. The level can be set using
either the TV sound or the provided test signal.
Notes:
D The adjustments available will vary according to the mode chosen.
D If you have aDTS /Dolby Digital5.1 input,and areusing theinternal
subwoofer to produce the subwoofer/LFE information, you can
change the subwoofer/LFE volume by altering the Subwoofer
setting in the SOUND menu.Seepage9.
D When using external stereo equipment, it is advisable to set the
speaker levels to the midpoint position.
Speaker level setup --- Pro Logic mode
26
Page 27
Audio / video connections
Itis possible toconnecta variety ofadditionalequipment to thisTV. The followingpagesdetail how toconnectexternalequipment to
both the front and rear of the TV.
Once your equipment is connected, use the following procedure to view the input:
Press the TV/AV menu button
Pressthe relevantonscreen selectorkeyto selecttheAV source
you wish to view (for example, press the green button to select
AV2 if you have connected a video recorder to the AV2 SCART
socket).
The on screen selector keys that appear clear after a few
seconds. If you want to select an input when the keys are not
shown, press the TV/AV keyoncemoreandthekeyswill
reappear.
Notes:
D You can also select an AV source using the TV/AV button
on the control panel on the front of your TV.
Press the TV/AV button repeatedly until you reach the AV
source you wish to view.
D When in AV mode a reduced number of o ptions are
available in the SOUND and SETUP menus (eg: in the
Setup menu there is no Tuning menu option).
TV/AV
TV/AV
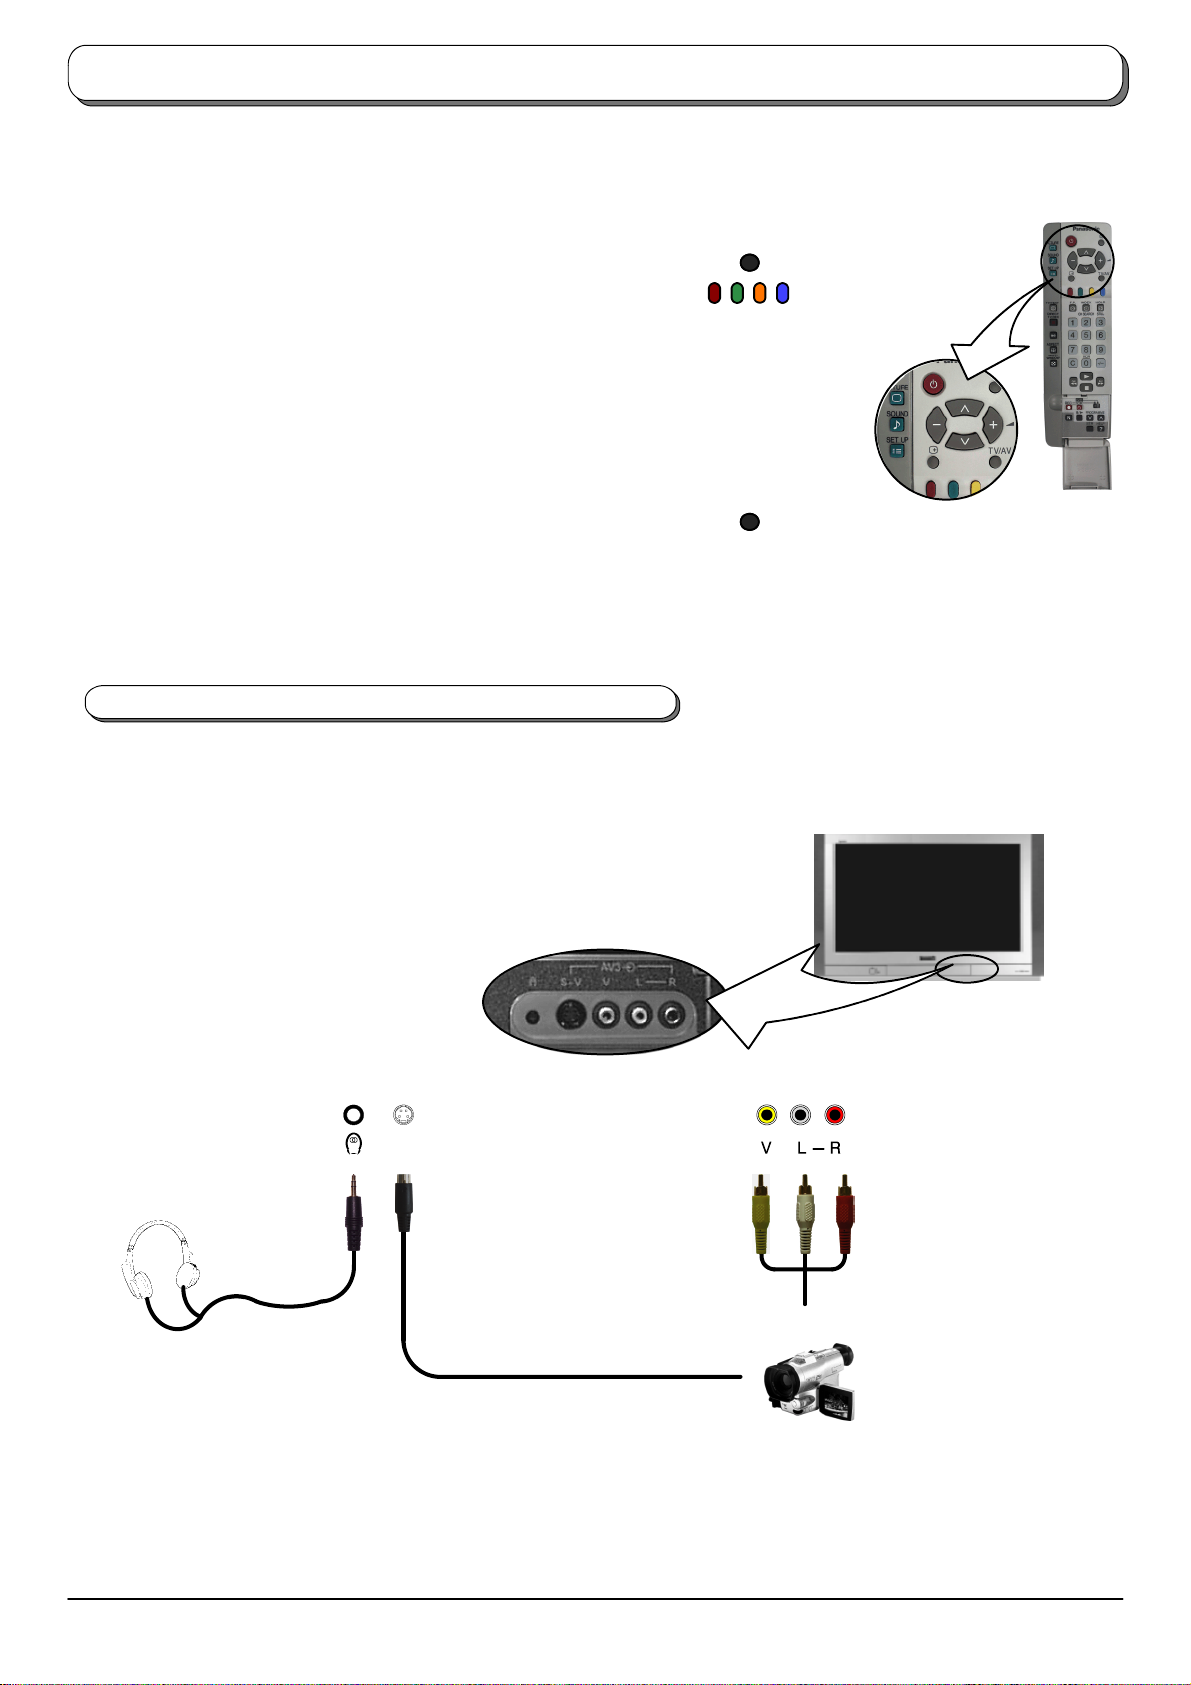
Front sockets
Additionalequipment canbe connected atthe front of the TVvia a4 pin S---Video socket(AV3), RCA Audio / Video sockets (AV3)
and a headphone socket.
Output from
Headphones socket
3.5mm Stereo Plug
S --- V
Video input to
S --- Video socket
Video input
to V socket
RCA
Video
cable
Audio input
to L/Rsockets
2xRCA
Audio
cables
STEREO HEADPHONES
with 3.5mm Plug
Notes:
D Additional equipment and cables shown are not supplied with this TV set.
D For S---Video socket wiring information see page 32.
CAMCORDER
27
Page 28
Audio / video connections
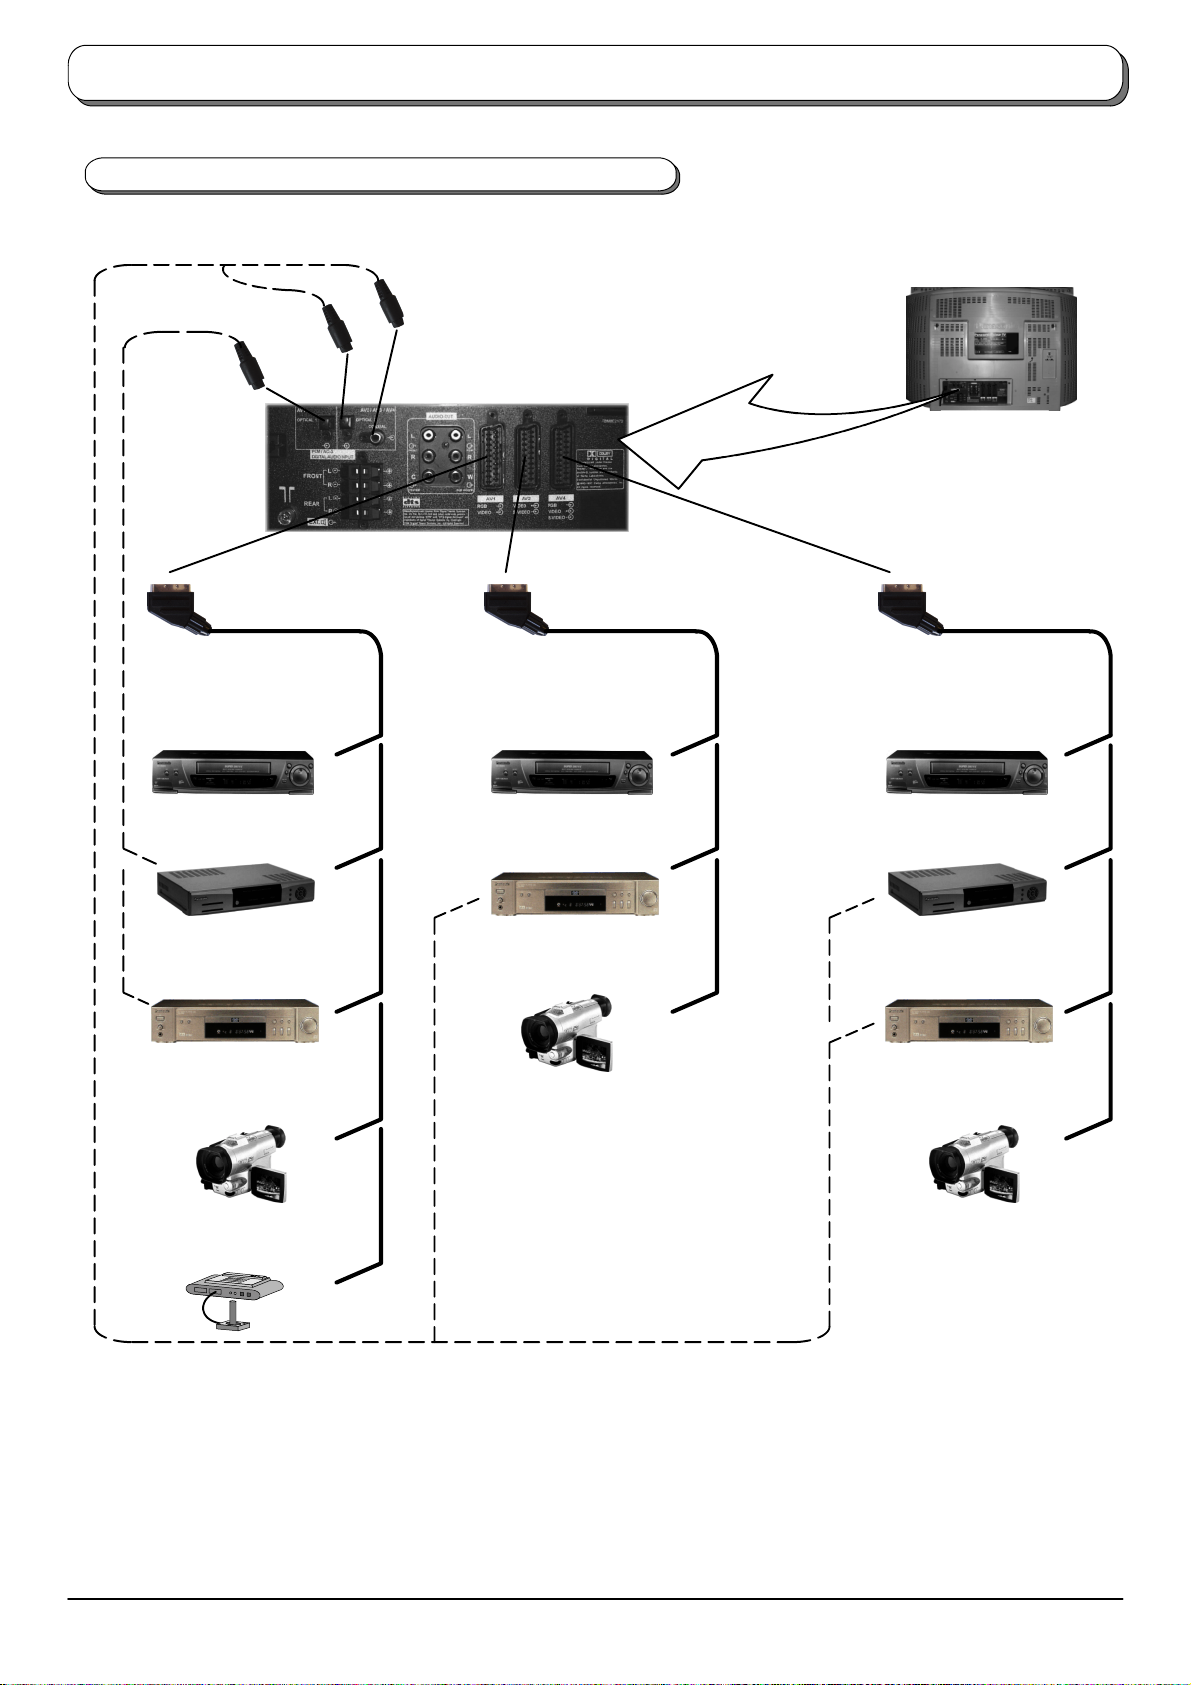
Rear sockets
Additionalequipment canbeconnectedattherearoftheTVviathree 21pinScartsockets,AV1/AV2(S)/AV4(S),andviatwodigital
audio sockets (one optical input for AV1 only and one shared optical/coaxial input for AV2, AV3 and AV4).
Input to shared optical/coaxial
socket(AV2/AV3/AV4)
Input to optical
socket(AV1)
Digital
audio
cable
(optical)
Input/Output from
AV1 Scart Socket
Scart cable Scart cable
S--- VI D E O V CR
VCR
SET TOP BOX
DVD PLAYER
CAMCORDER
Q---LINK COMPATIBLE VCR
DVD PLAYER
S--- VI D E O C AMCORDER
Input/Output from AV2 Scart Socket
Q --- Link d ata
VCR
Input/Output from
AV4 Scart Socket
Scart cable
VCR
S--- VI D E O V CR
SET TOP BOX
DVD PLAYER
S--- VI D E O C AMCORDER
GAMES CONSOLE /
COMPUTER (RGB)
Digital audio cable (coaxial or optical)
Notes:
D Additional equipment and cables shown are not supplied with this TV set.
D Do not connect a computer with TTL output (5V) to this set.
D The AV2 21 pin socket can also be used as an output to Audio/Video equipment; see page 10 for details.
D For Scart socket wiring information see page 32.
D When connecting an optical cable to an optical socket, remove the socket cover before inserting the cable plug.
D Werecommendthat only oneDigitalAudio Input(eithercoaxial or optical)be connectedto thesharedoptical/coaxialinput
of the TV at a time. If there is a coaxial and an opticalinput connected at the same time, the coaxial input will override the
optical input --- the sound from the coaxial input will be heard.
28
Page 29
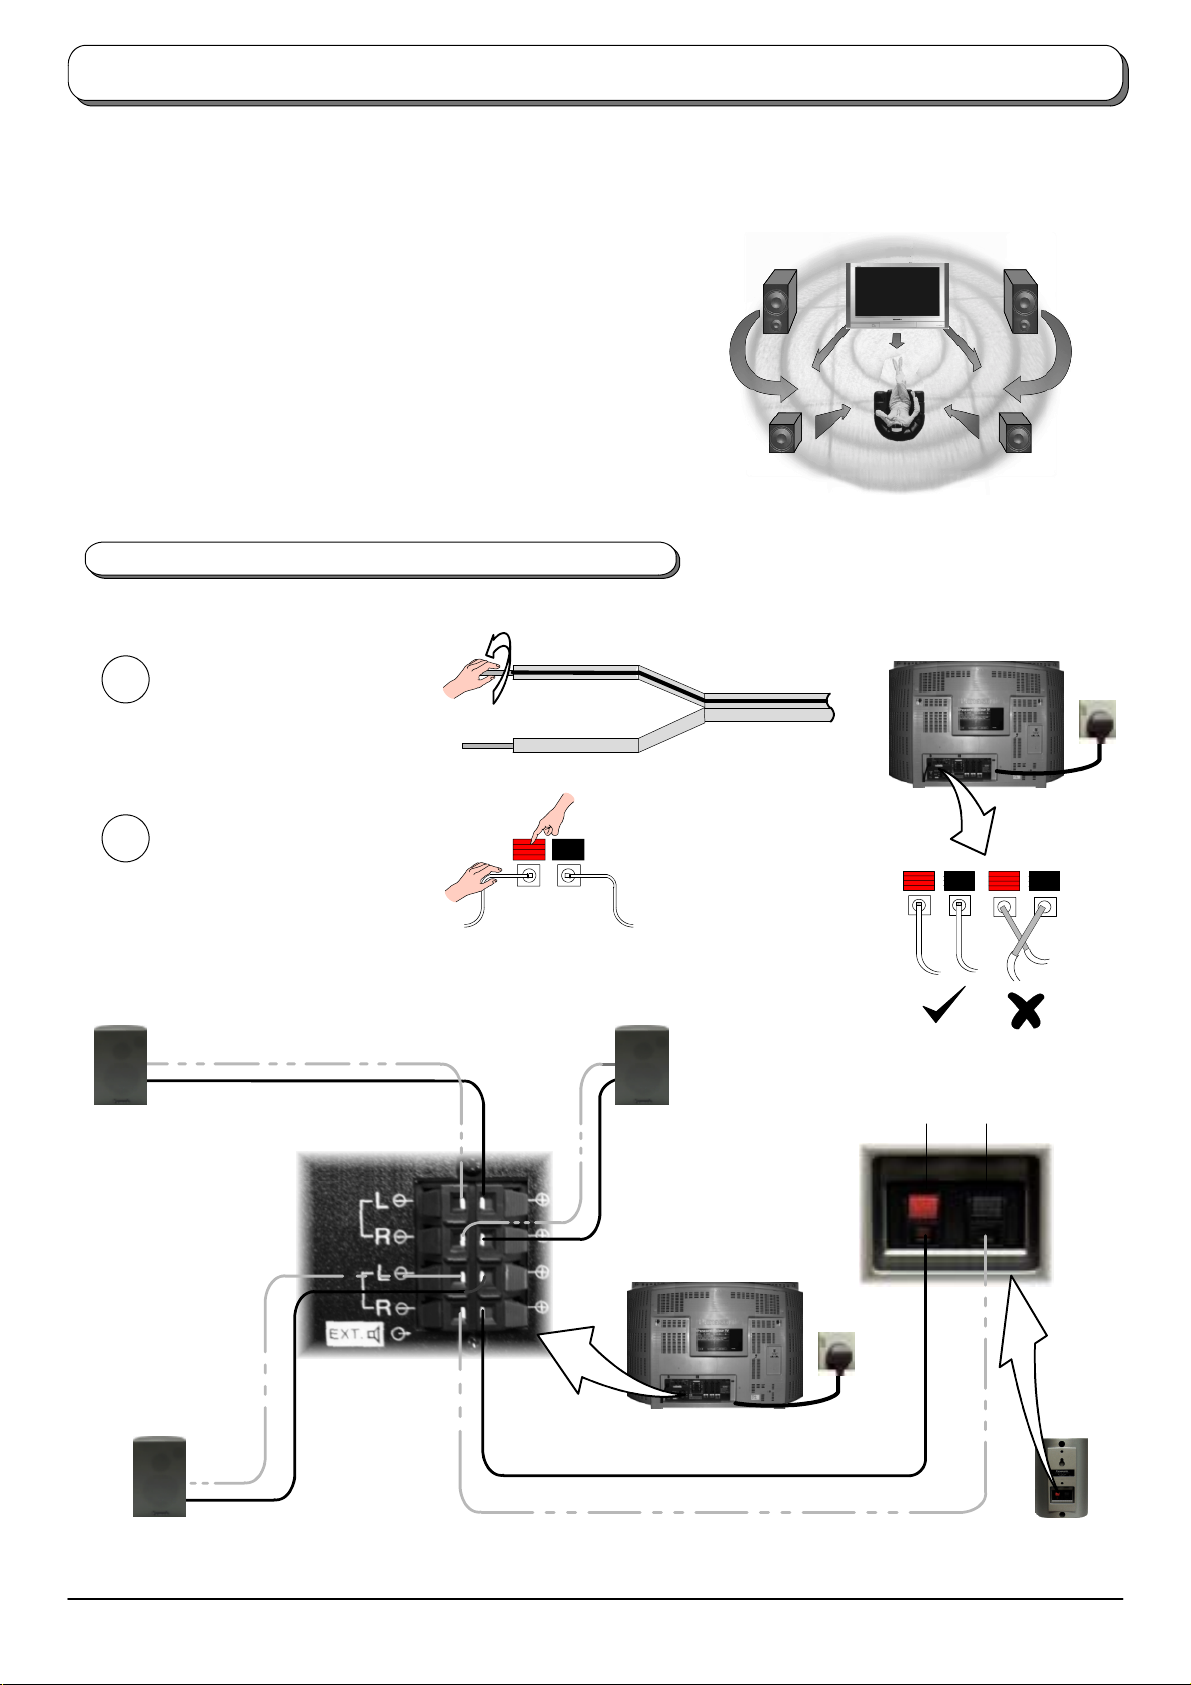
Audio / video connections
The external speaker connections (EXT) on the rear of the TV allow you to create your own system using external speakers.
Connections are provided for front and rear speakers.
You may decide, for example, to connect external front left and
right speakers and rear left and right surround speakers; as
shown here:
Connecting external speakers
TheTVmustbeswitchedOffbeforeconnectingexternalequipment.
Twist the wire ends before
1
inserting.
Frontleftspeaker
(not supplied)
Rear left
surround speaker
(not supplied)
Front right speaker
(not supplied)
Rear right
surround speaker
(not supplied)
TV
Insert into terminals.
2
Ensure that bare speaker
wires are not touching.
Front
left speaker
(not supplied)
Press lever
Insert wire
Front
right speaker
(not supplied)
Black (--)Red (+)
TV
Rear left
surround speaker
(not supplied)
Rear right
surround speaker
(not supplied)
29
Page 30
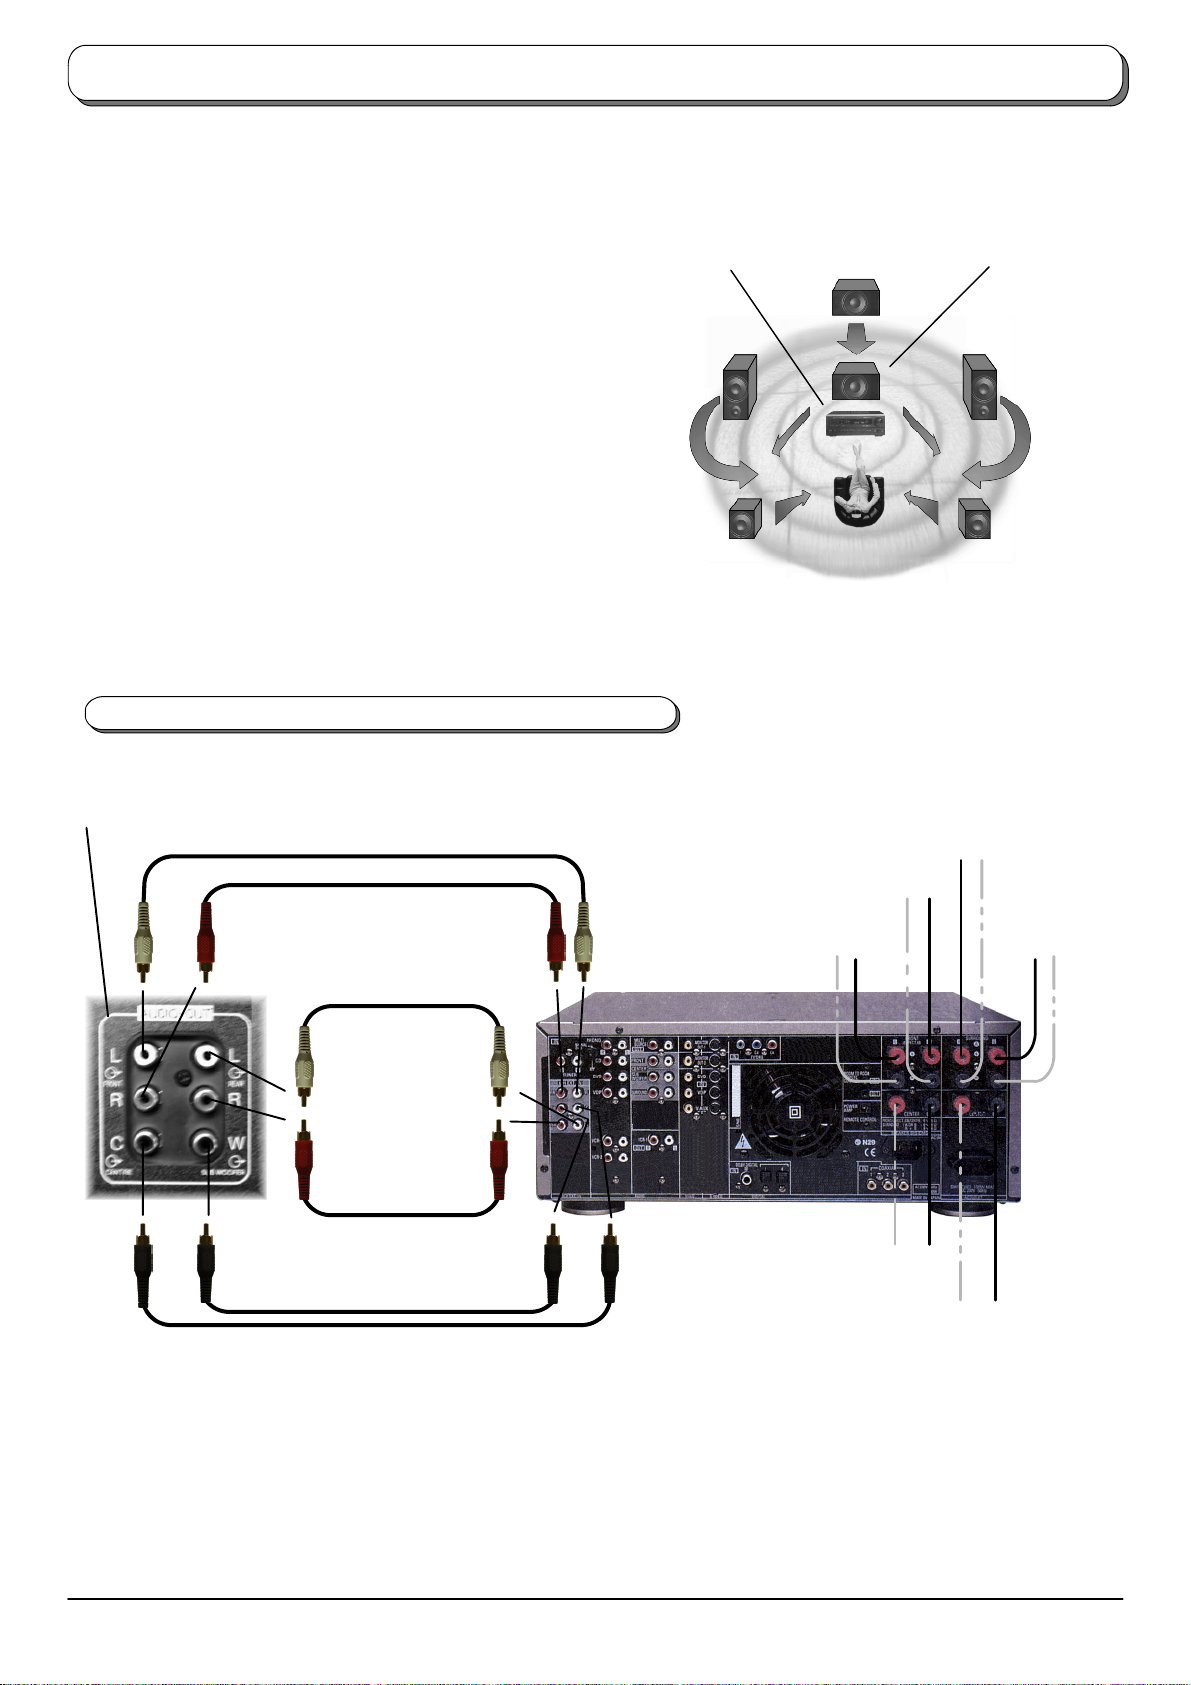
Audio / video connections
The AUDIO OUT socketson the rear of the TV allow you to create a customsound system usingan external amplifierand external
speakers.
You may decide, for example, to use an external DTS /
Dolby Digital amplifier to connect external front left and
right speakers, rear left and right surround speakers, a
centrespeakerandasubwoofer(LFEspeaker);asshown
here:
Connecting external amplifiers and speakers
Output from the AUDIO OUT sockets
Frontleftoutput
Front right output
External DTS /
Dolby Digital amplifier
(not supplied)
Front left
speaker
(not supplied)
Rear left
surround speaker
(not supplied)
Centre speaker
(not supplied)
tofrontleftspeaker
to front right speaker
Subwoofer
(LFE speaker)
(not supplied)
Front right
speaker
(not supplied)
Rear right
surround speaker
(not supplied)
to rear right
surround speaker
to rear left
surround speaker
Rear left surround output
Rear view of external DTS /
Rear right surround output
Subwoofer / LFE output
Centre output
Dolby Digital Amplifier
to centre
speaker
to subwoofer /
LFE speaker
Notes:
D See the DTS / Dolby Digital amplifier instruction book for speaker connection details.
D Connect each output to the corresponding input on the DTS / Dolby Digital amplifier. Use Phono (RCA) connectors (not
supplied)
30
Page 31
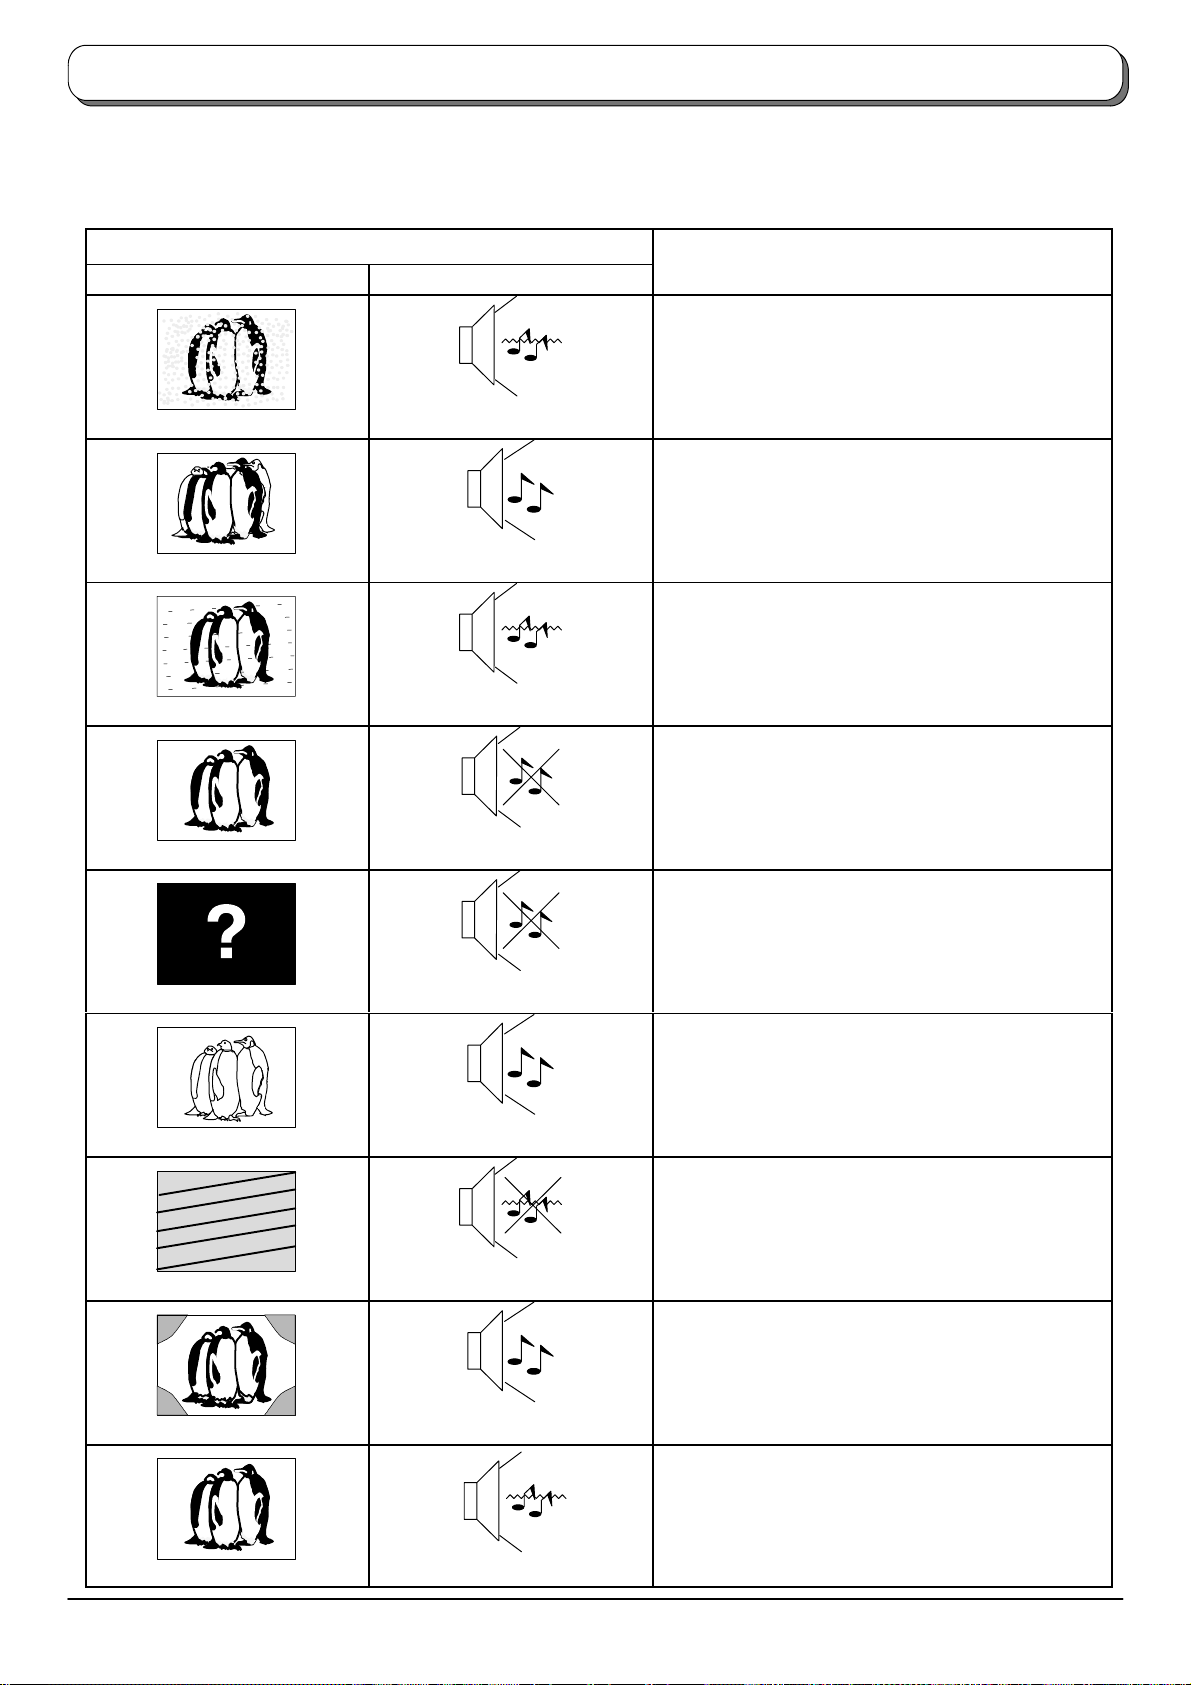
Check
s
Troubleshooting
IfthereisaproblemwithyourTVpleaserefertothetablebelowtodeterminethesymptoms,thencarryoutthesuggested check. If this
doesnotsolvetheproblem, pleasecontactyourlocal Panasonicdealer,quotingthemodelnumberand serialnumber(bothfoundon
the rear of the TV).
Symptoms
Picture Sound
Aerial location, direction or connection
Snowy Picture
Multiple Images
Interference
Normal Picture
No Picture
Noisy Sound
Normal Sound
Noisy Sound
No Sound
No Sound
Aerial location, direction or connection
Electrical appliances
Cars / Motorcycles
Fluorescent lights
Switch on P---NR in Picture menu to reduce picture
noise
Volume level
Sound mute switched on
TV set to AV mode
Not plugged into A.C. outlet
Not switched on
Picture / Sound controls set at minimum levels
Check if in standby mode
No Colour
Poor or Distorted Picture
Coloured Patches
Normal Picture
Normal Sound
Weak or No Sound
Normal Sound
Weak or distorted sound
Colour controls set at minimum levels
Retune Channel(s)
Magnetic Interference from unshielded equipment
Receiver moved while switched ON, switch TV off
for 30 minutes.
If picture is also tilted, use Geomagnetic Correction
feature (see Quick Start Guide, page 5)
Sound reception may have
deteriorated.
Switch MPX setting (Sound menu) to
Off until reception improves.
31
Page 32
A
C
A
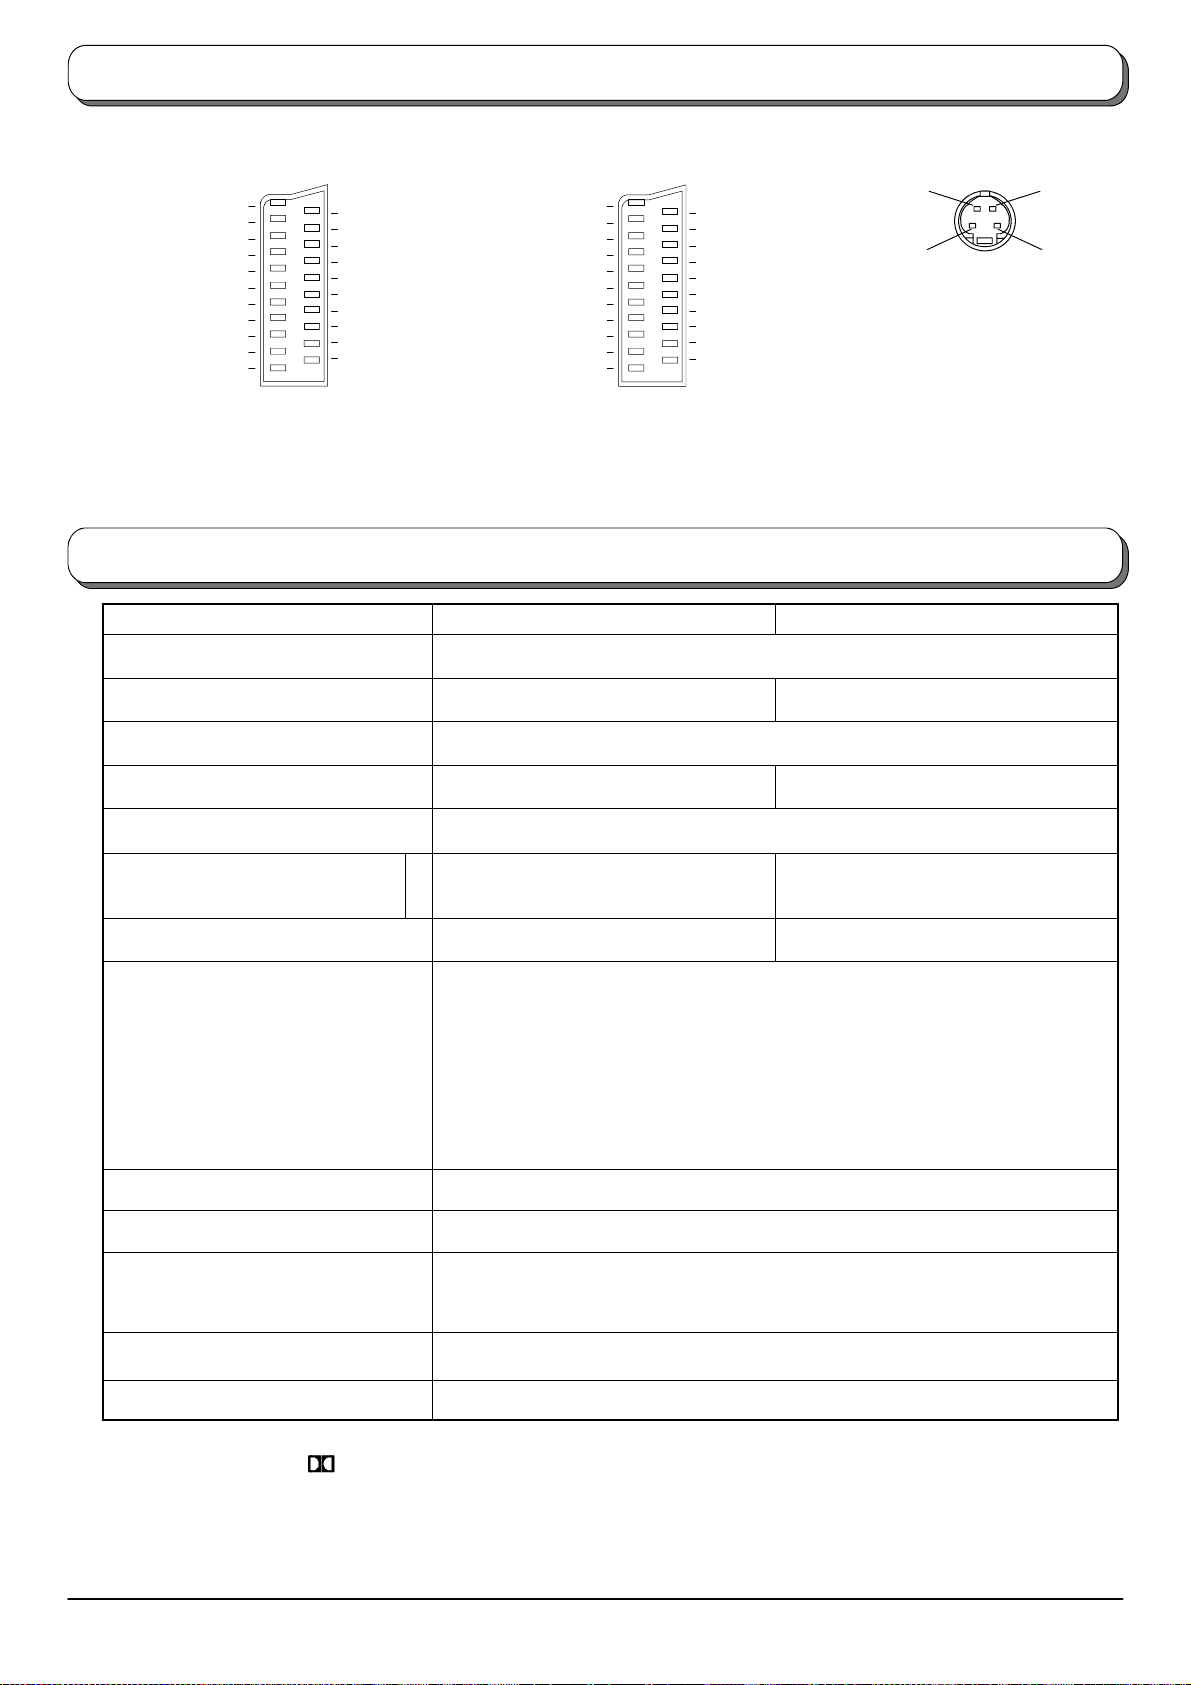
Scart and S---video socket information
AV1 / AV4 Scart socket
AV2 Scart socket (S--Video, Q--Link)
S--Video 4 pin socket
(S--Video -- AV4 only)
Chrominance
Socket Earth
CVBS out (video)
CVBS earth
Red in, S.C. --- In*
Red earth
Green in
Green earth
Blue in
Blue earth
Audio out (L)
Audio out (R)
21
19
17
15
13
11
9
7
5
3
1
CVBS in (video)
20
RGB status earth
18
16
Status RGB
14
Earth
12
--- ---
--- ---
10
Status CVBS
8
6
Audio in (L)
4
Audio earth
Audio in (R)
2
Suitable inputs for AV1 / AV4 include
RGB (Red/Green/Blue).
Socket Earth
CVBS out (video)
CVBS earth
S.C. --- In
Earth
--- ---
Earth
--- ---
Earth
Audio out (L)
Audio out (R)
21
19
17
15
13
11
9
7
5
3
1
CVBS in (video)
20
18
Earth
16
--- ---
14
Earth
12
--- ---
10
Q --- L i n k d a t a
8
Status CVBS
6
Audio in (L)
4
Audio earth
Audio in (R)
2
AV2 --- Pins 15 and 20 are dependent on
AV2 S---VHS / VIDEO switching.
in
Chrominance
earth
S. C . --- In* : on Pin 15 ’S.C.---In’ only
applies to AV4.
AV4 --- Pins 15 and 20 are dependent on
AV4 S---VHS / VIDEO switching.
Specifications
TX--32PB50F TX--28PB50F
Power Source 220 --- 240V 50Hz a.c.
Power Consumption 149W 145W
Luminance
in
Luminance
earth
Standby Consumption
Picture Tube
Visible Diagonal
Audio Output
Music Power
Dimensions
H
W
D
76 cm 66cm
Subwoofer 23W, Centre 20W x 2, External Left / Right 19W x 2,
External Surround 19W x 2, 89 impedance
558 mm
850 mm
549 mm
2.8W
509 mm
763 mm
512 mm
Weight (Kg) 58.5 47.6
PALB,G,H,I,SECAMB,GSECAML/L’
VHF E2 -- E12 VHF H1 -- H2 (ITALY)
VHF A -- H(ITALY) UHFE21-- E69
CATV (S01 -- S05) CATV S1 -- S10 (M1 -- M10)
Receiving
Systems/
Band name
LD,K,SE
P
CATV S11 -- S20 (U1 -- U10) CATV S21 -- S41 (Hyperband)
MD,K
VHF R1 -- R2 VHF R3 -- R5
VHF R6 -- R12 UHF E21 -- E69
PAL 525/60 Playback of NTSC tape from some PAL video recorders (VCR)
M.NTSC Playback from NTSC 4,43 MHz Videorecorders (VCR)
NTSC (AV input only) Playback from NTSC Videorecorders (VCR)
Aerial -- Rear UHF / VHF
Headphones -- Front 3,5mm, 89 impedance
AV1 --- 21 pin socket --- Audio / Vid eo in / ou t, RGB in
AV -- Rear
AV2 --- 21 pin socket --- Audio / Vid eo in/out, S --- Video in, Q --- Link
AV4 --- 21 pin socket --- Audio / Vid eo in / ou t, S--- Video in, RGB in
DIGITAL AUDIO INPUTS --- Coaxial/Optical in, Optical in
Dolby Surround Out -- Rear
External Speaker connections --- 2 x Front, 2 x Rear
6 x Dolby Surround Out RCA
AV -- Front AV3 -- S---Video in, 1 x RCA Video in, 2 x RCA Audio in
Specifications are subject to change without notice. Weight and dimensions shown are approximate.
Dolby,Pro Logic and the
are trademarks of Dolby Laboratories.
Manufactured under license from Dolby Laboratories.
Manufactured under license from Digital Theater Systems, Inc. USPat. No. 5,451,942 andother world---wide patents issued and
pending. “DTS” and “DTS Digital Surround” are trademarks of Digital Theater Systems, Inc. Copyright 1996 Digital Theater
Systems, Inc. All Rights Reserved.
E Matsushita Electric (U.K.) Ltd.
32
 Loading...