

Panasonic TX21FJ50M User Manual

Panasonic
Operating Instruction
Colour Television
TX-21FJ50A
TX-21FJ50M
Please read the operating instructions completely before operating this set.
TQB4G2707
Dear Panasonic customer
Welcome to the Panasonic family of customers. We hope that you will have many years of enjoyment from your
new colour television.
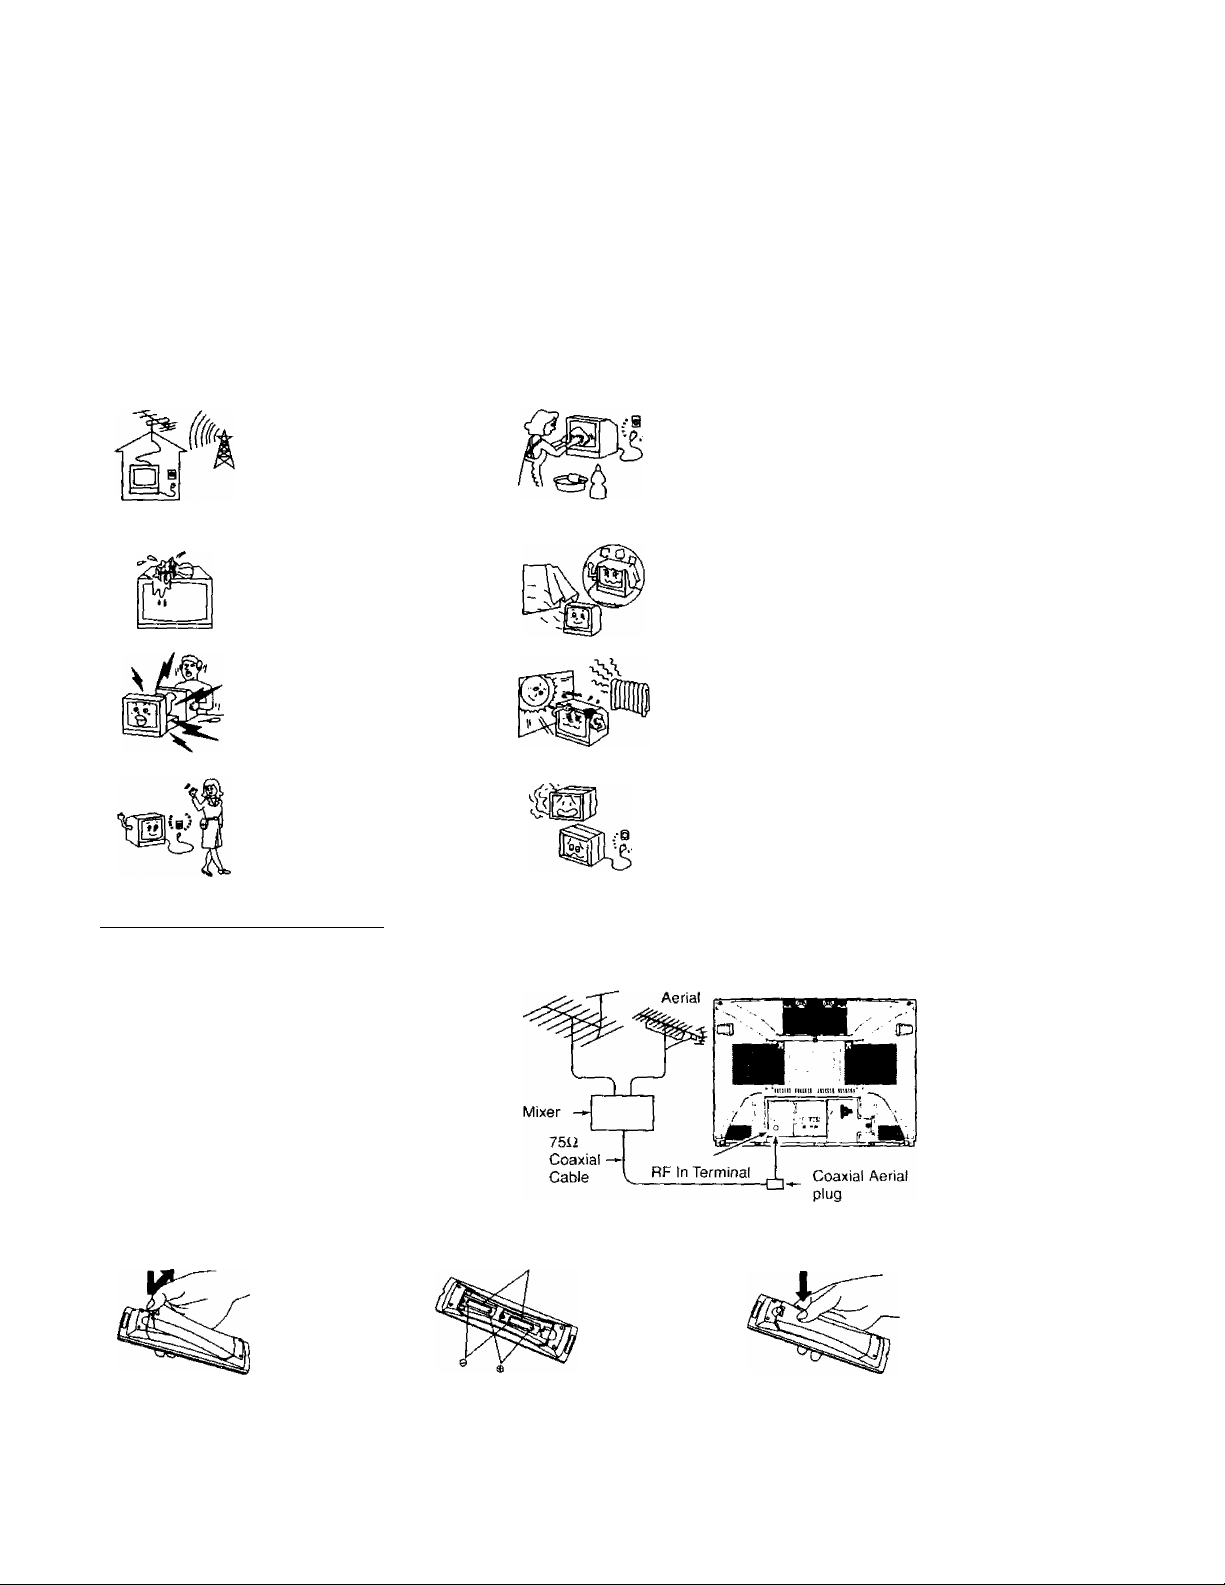
(^Safety Instructions)
The TV set can be operated on AC
AUTO 110-240V, 50/60HZ (TX21FJ50M) or AC SINGLE 230240V, 50Hz (TX-21FJ50A).
The apparatus shall not be
exposed to dripping or splashing
and that no objects filled with
liquids, such as vases, shall be
placed on the apparatus.
Do not remove the rear cover, as
live parts are accessible when it is
removed.
Remove the plug from the wall
outlet (Power point) when the TV
set is not used for a prolonged
period of lime.
(Before Operating This Set ^
■ Connect the Aerial Cable to the RF In Terminal
To obtain the best quality picture and sound, an externa^
antenna, the correct cables (75 ohm coaxial) and the
correct terminating plug will be required.
If a communal antenna system is used, you may require
the correct connection cable and plugs between the wall
antenna socket and your television receiver.
Your local Television Service Dealer may be able to
assist you in obtaining the correct antenna system for
your particular area and accessories required.
Any matters about antenna installation, upgrading of
existing systems or accessories required, and the cost
incurred, are the responsibility of the customer.
■ Battery Installation
VHF Aerial UHF
Two “R6 (AA)" size
The cabinet and picture tube can
be kept in good condition by simply
wiping with a clean, soft cloth
moistened with mild detergent and
water. Do not use solutions
containing benzol, petroleum or a
chemical cloth. For safety, remove
the plug from the wall outlet.
Adequate ventilation is essential to
prevent failure of electrical
components.
Avoid exposing the TV set to direct
sunlight and other source of heat.
Do not use this set if abnormal
operation occurs.
EX: smoke, odd sounds or smells,
turn the power switch off and
disconnect the AC power if you
notice any unusual operation.
Open the cover.
A Cautions
Insert the two batteries.
Do not use rechargeable (Ni-Cd) batteries.
They are different in shape and performance and may fail to ensure correct operation.
The incorrect use of batteries can cause electrolyte leakage which will corrode the Remote
Control or cause the batteries to burst.
Close the cover.
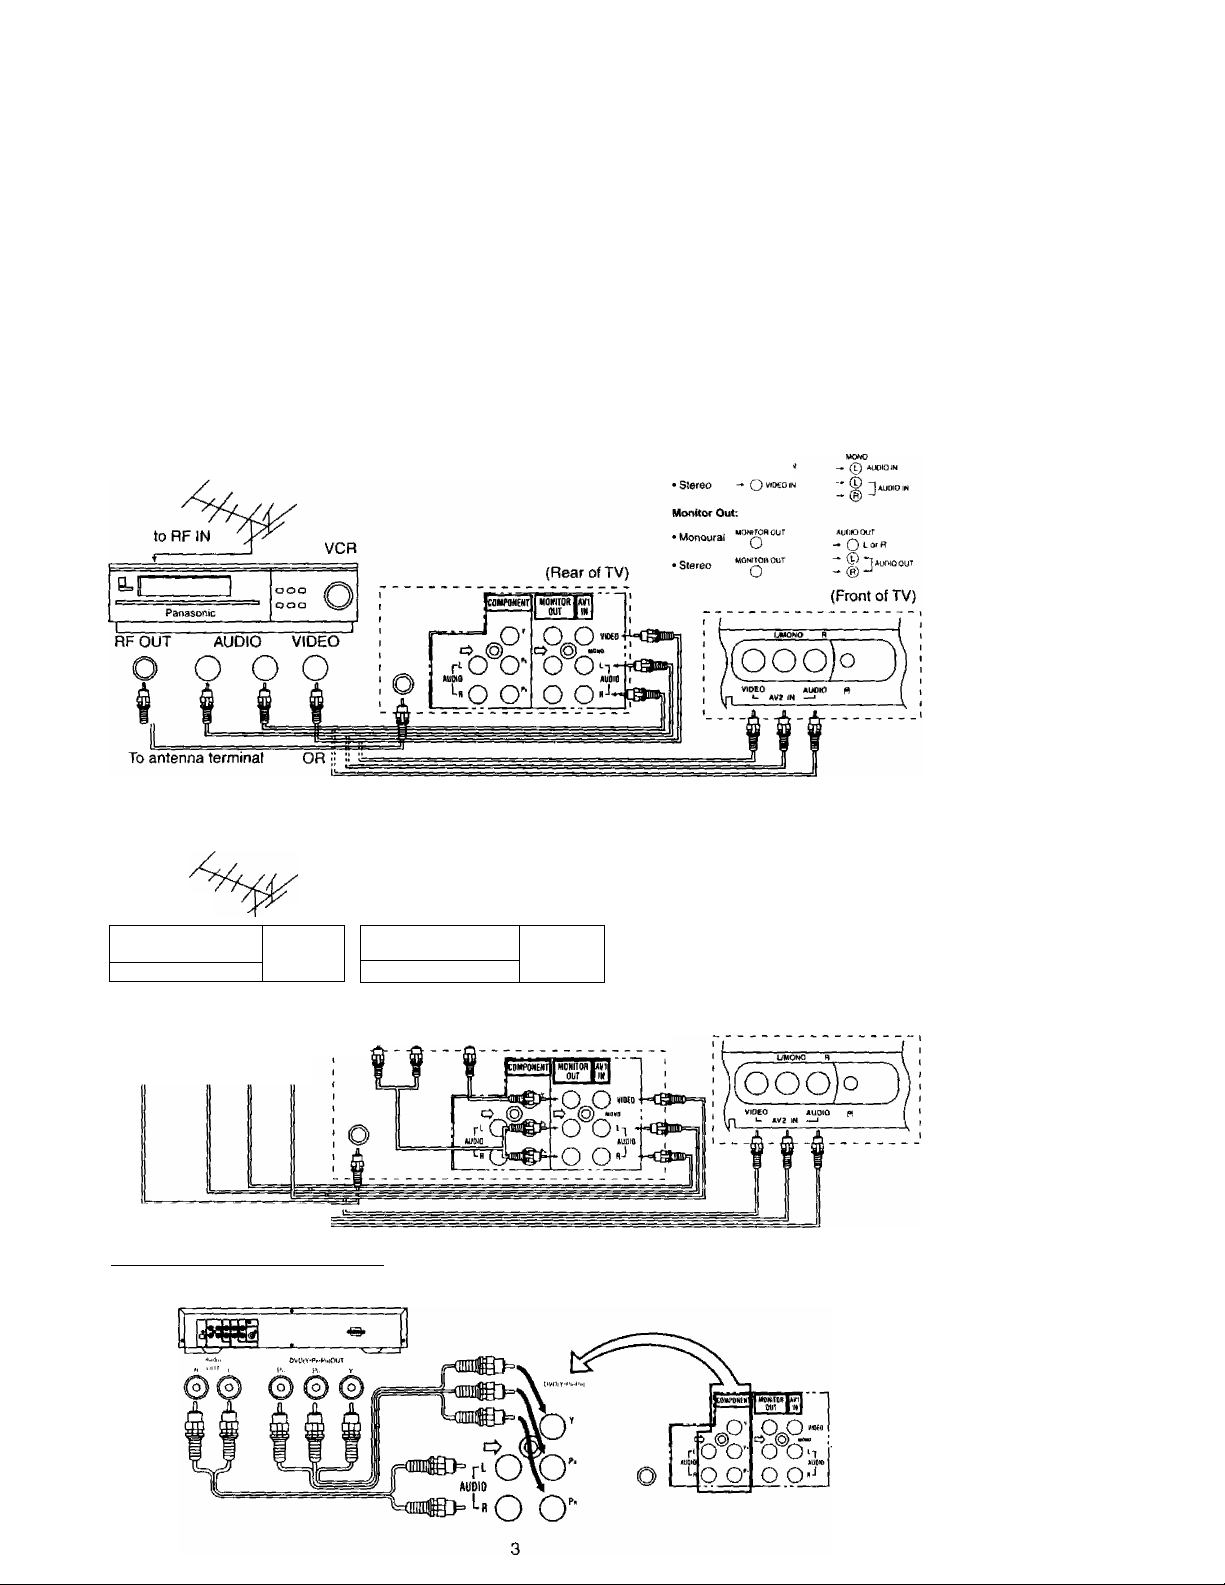
(^Connections (Audio Input and Video Input)^
To watch the VCR picture;
Connect the VCR cable to the AUDIO INPUT and VIDEO INPUT terminals at the rear of TV.
Press the TV/AV selection button, set the VCR to the playback mode. To watch or to return to the TV programme,
press the TV/AV selection button again.
AV Input connection:
•Monooral
(^Recording ^
Follow the connection shown below when you want to copy a programme
from another tape (VCR).
You can either use the AV input at the back or the front of the TV.
Recording equipment (Recording)
to RF IN
VCR
(Playback)
EUi
--------------
Pilnasonic
1
o
Panasonic
RFOUT AUDIO VIDEO AUDIO VIDEO
O O '^O o o
\\ ^ j i
To antenna terminal OR li "
(^Connections (DVD Input)^
DVD player
OOO
ooo
(Rear of TV)
(Front of TV)

(Location of Control (TV))
jcoMniNEin
|mNIT0il|AV1
1 OUT 1 m
cP«iL""
L;0°0'
l“o O' O
■n
Model Name Plate
oolu
f-JW
(Flow Chart of Main Menu )
When the “MENU” button is pressed at the main menu screen, the screen display will return to the normal
viewing condition. When the “MENU” button is pressed at each MENU screen (Picture, Sound, Features,
Language, Preset), the screen display will return to the Main Menu screen.
Note: The Main Menu screen display also can be operated using panel key (MENU, Volume Up or Down and
Programme Number Up or Down buttons).
Press
O
D
Select
Symbol
Mark
On-Screen
Indication
Press
On-Screen
Indication
(example)
OO
^ or 0
[£l3i!jA£]
iYMAMtC 1
COLOUR
NTSC TINT
tf-a 5C
o sri
0H1GMTNE ss
1 00
CONTRAST
tB M SHARPNESS
COiOUR TtVP STf)
(ilD lo
I SOUND I
or (ok]
MU5_[C
ACCfc
ON
_
_
(MENU
LJ GU ’bAI ANCF
HYPLfl f!A;?3 ON
lOUDNfcSS OFF
A'JL
I features!
.OK
(y\\ Gl ’ SACK
ILANGUAGEJ
lENGL ISH^
niw 1 Itui
Tl^MG V1Et
1'.
MALAYS I A
—
V
fl nn 1 tJ l]
ENGLl.^
fflTH f I n ul
Tl ENG V IgT
'l‘t
MALAYS I A
IpresetI
or foK
V
iiu'tO tlJNF
MANUAL TUriL
SOtJNn SYS
COLOUP SYS
FINF TUNF
5K H>
PCS CHANfit
When NTSC
signal is received.
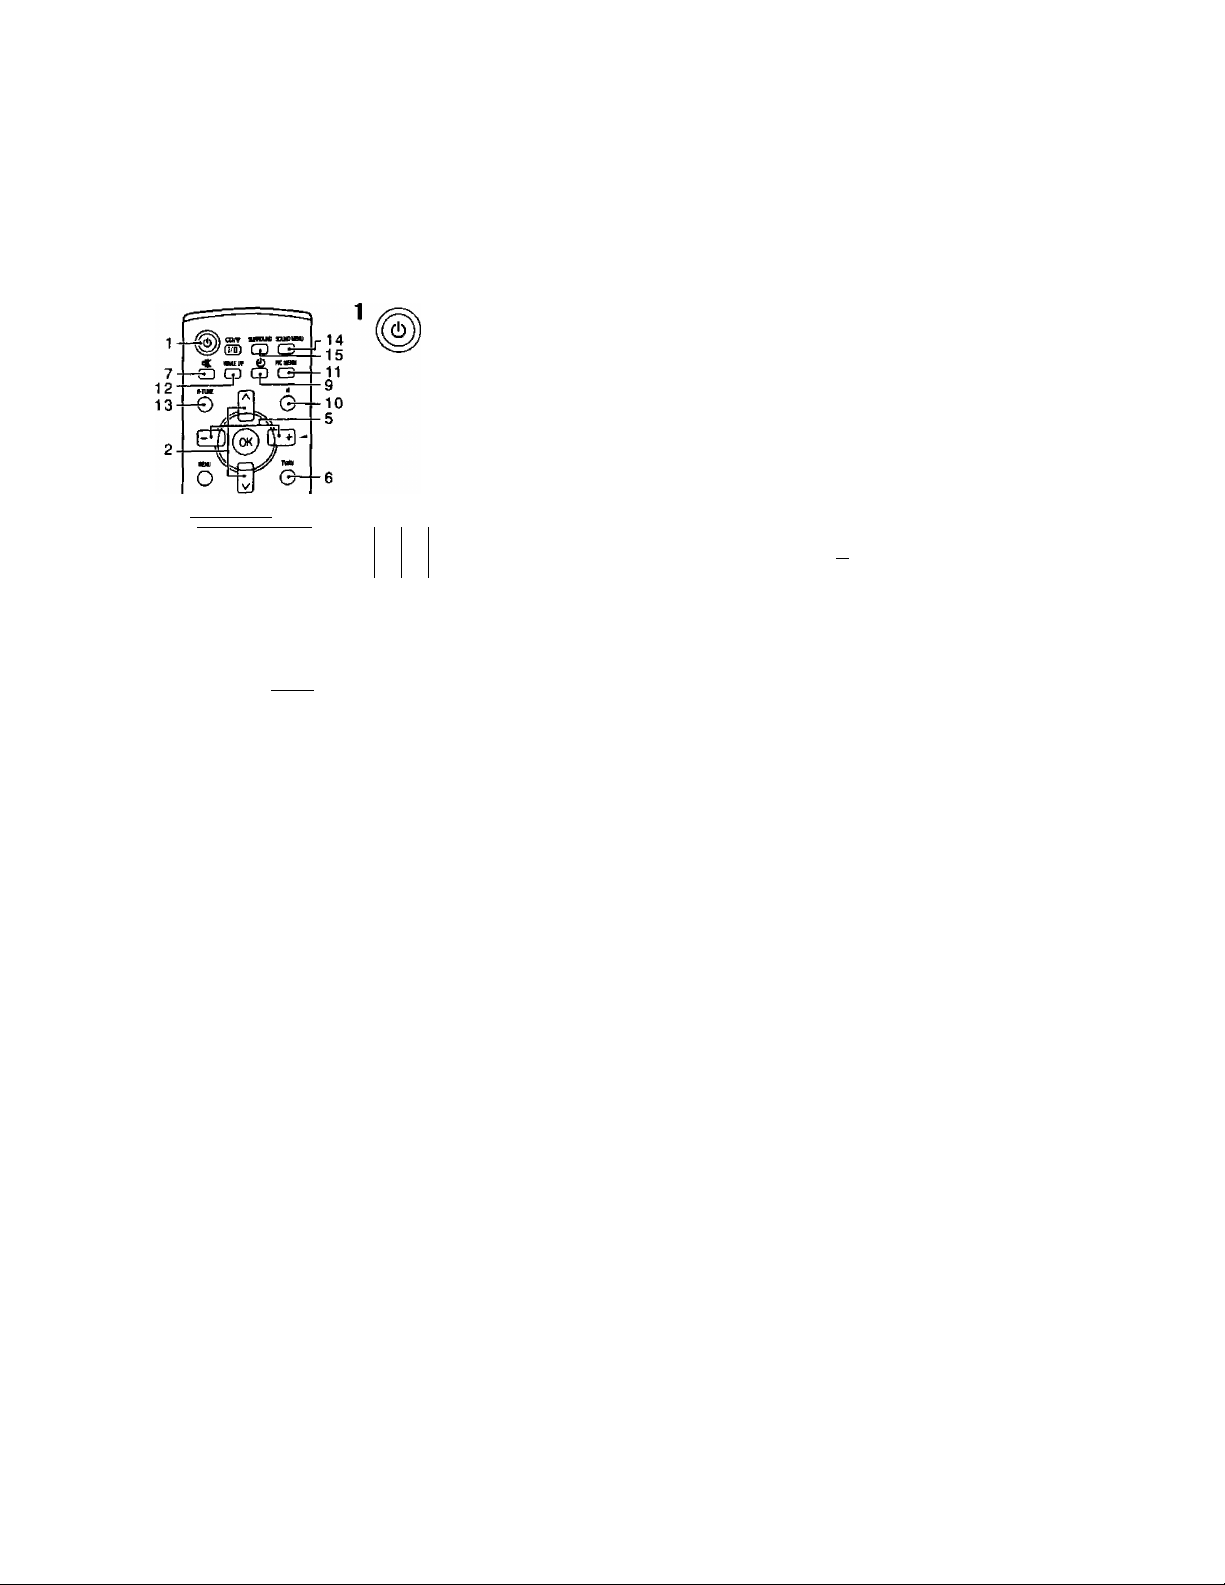
(^General Operation)
fOO CJLJj
wim fp. iiDti iioio
® ®
© ©
0
© © ©
© © ®
^ I ® ©*■
CZ3 cm —11 ft li
scmczDS
Q B CD
—
©
To Switch Power on/off
The TV set must be switched on at the wall outlet and at the Main power
switch. ■
Press this button to turn the TV set ON, from stand-by mode. Press it
again to turn oft.
Power - indicator
STANDBY - RED
Power ON - GREEN
Note: When in the stand-by condition, it is possible to turn the TV set
on by pressing the Direct Programme Number Selection button
(0-9) or the Programme Number Up or Down button.
A
Programme Number Selection |-^
Press the Programme Number Up "A” or Down “V” |a
V
button to select the next higher or lower p
Programme Number.
Direct Programme Number Selection (0 - 9) pj—
e.g. To select Programme Number “1" , press the I
“1" button.
Two Digit Programme Number Selection
e.g. To select Programme Number “18”. )
Press (©) button, button, then button. pri
Setting range
0-99
----------------
-----
1
1
g rr-p| Volume Adjustment
—^ — Press the Volume Up “+” or Down button to increase or decrease the
6 TV/AV TV/AV Selection
O
10
sound volume level.
TV/AV
Press the “TV/AV” button to select TV, AV1, AV2 and COMPONENT input
signal modes sequentially.
o
Sound Mute Button
«
Press this button to mute the Sound completely.
a
Press the button once again to restore the previous
sound level, and cancel the mute.
Recall Button
Press the RECALL button to display the current system status. Press this button until display is
cancelled.
Off-timer Button i
©
The TV set may be preset to switch to stand-by after a fixed period. j
By pressing "Off-Timer” button, you can select the preset time either 30, 60,
or 90 minutes.
Note: Setting Off-Timer to AUTO mode. If the set is not switched off, when the TV station ends
broadcasting, it will automatically go to the stand-by condition after 5 minutes. This AUTO
mode will not operate when the TV receiver is in AV mode/DVD mode.
How to cancel the Off-Timer setting:
1. Set the preset time condition to “0" mode by pressing the Off-Timer button.
2. Turning the TV set off.
Normal ( N ) Button
By pressing the Normal “N" button on the Remote Control while Picture or Sound Control
Function is displayed, the selected function will be changed to the Normal Mode. Normalization
o
will not occur if the function is not displayed when the “N” button is pressed. The Normal mode is
the factory preset condition. Returning to this original condition is called “Normalization’’.
030
t-Q,
060 — 090
0 —Qauto 0
5
^ 5 VOLUME
I ^ 5 VOLUME
[component
The "Mute” symbol
will appear.
(Colour changes to
Red)
__________
^

(^General Operation)
11
PIC MENU
12
WAKE UP
13
saMiew
SURROUND
Picture Menu Operation
a
□
R-7UNE
o
By pressing the PICTURE MENU button, you can sequentially selecUhe Picture menus as
shown below:
On-screen
MENU DYNAMIC
MENU STANDARD
MENU CINEMA
Wake Up Timer Button
1. Press the "WAKE UP TIMER" button.
2. Press the Volume Up or Down button (Remote Control) to select the
Wake Up Timer, Wake Up Timer will increase or decrease by 10 minutes
when Up or Down button is pressed.
Note; Wake Up Timer can be set up to 12 hours.
3. After setting the Wake Up Timer, switch the TV set to stand-by mode. LED
light will blink ON and OFF during stand-by mode.
4. When the Wake Up Timer has elapsed, the set will automatically switch
on. Press any button to cancel the Wake Up Timer on-screen display.
Note;
i) After the Wake Up Timer is set and the TV mode is still not switched off,
the Wake Up Timer will continue to count down until the timer is off.
ii) When Wake Up Timer switch ON the TV set. the Off-Timer is set to 90
minutes mode automatically. Press any button to cancel the Off-Timer. If no button is
pressed, the TV set will switch off (Stand-by mode) automatically after 90 minutes.
5. To cancel the Wake Up Timer. You can choose any of the following:
i) Switch off the main power.
ii) Press the Volume Up or Down button, until OFF is reached, when Wake Up Timer OSD is
displayed.
iii) Press the Normalize button when Wake Up Timer OSD is displayed.
Rapid Tune Button
Press the button to access previously viewed channel.
Present channel FEtvtI ""
being viewed
For watching in brighter environments. This menu selects a higher than
normal level of contrast.
For watching in normal (evening) environments. This menu selects normal
level of contrast.
To realize the presence in a cinema environment when watching movies.
Function
'' ' Last viewed channel
...............................
m
Sound Menu Operation
By pressing the SOUND MENU button, you can sequentially select the Sound menus as shown
o
below:
On-screen
MENU MUSIC
MENU NEWS
MENU CINEMA
Surround Sound Operation
The benefit of surround sound are enormous. With additional speakers you can be completely
□
enveloped in sound; just as if you were at a concert hall or cinema.
On-screen display during surround mode
Type of
broadcast
TV
mode
AV
mode
MONO MONO SURROUND SURROUND OFF
STEREO
Select AV mode
For music programme for example.
Enable spoken voices to be heard more dearly. Perfect for news,
documentaries and talk shows.
Recreates the cinematic sound effect from your TV. This setting provides
clear and crisp dialogue.
STEREO SURROUND SURROUND OFF
STEREO SURROUND < > MONO SURROUND o SURROUND OFF
(
_______
Function
On-screen display
. . _j

(^Tuning Procedure^
■ Position
1
O
UENU
o o
EDO
Press the “MENU" button and Volume
Up “+" or Down button, until
O
PRESET MENU is selected.
!» ^ io®
[PREsin
Press the Channel Up “a” or Down “v"
OO
button, setting to “POSITION”,
0
— Press the Volume Up “+" or Down
o o
OO button to change the position number
that you desired.
Press the "MENU" button twice.
° n
MEW J\^
Automatic Tune
□
MENU
o o
OO
Up V’ or Down button, until
O
PRESET MENU is selected.
Press the “MENU" button and Volume
№W)
Press the Channel Up “a" or Down “v"
button until “AUTO TUNE" function is
B
OO
% p" Press the Volume Up or Down
0
selected.
O O OO button.
rPQS rVtÓN
AUTO TUNÉ
MANUAL TUNE
SOUNÜ SYS
COLOUR SYS
F I NE TUNE
SK IP
POS CHANGE
CPQSj_Tlg.N
AUTO TUNE
MANUAL TUNE
SOUND SYS 5 5
COLOUR SYS AUT
FtNE TUNE
SKIP OFf
POS CHANGE i
m S tt ^ to®
■V
rpRESETi
[ñHÉ.ÍETl
[ I’OS I „ ;:i_'
Auro TitNE
MANIJA!. TUNF
SOUNÍ) SVs
cCMOtnt
PING TUNG
[>n£3fT^
rPB~ÉsTT|
_____
“POSITION” condition.
Note:
aj
Position number also can be
change by using Direct
Programme Number
Selection (0-9) and Two Digit
Programme Number
Selection (-/-).
This returns the set to the
normal viewing condition.
POS I T I^ t
Ayro .FyNEi_
MANUAL TUNE
SOUND SYS S 5
CUJ OUlt RV'-i AOr
FINE lUNi
•sH 1*'
'\NO
)f-F
Search start.
The best tuning position is
automatically memorized.
o o
OO
o
After all stations are tuned, the on-screen
display will automatically change from
"AUTO TUNE" to “SOUND SYS" Position.
If necessary, press the Volume Up
or Down button to improve the
sound quality.
After all stations are tuned, press the
MENU
“MENU" button twice.
n
> J r I
ALMO ItJNE
MANtJAl TUNFSOUNU SYS
cñl.CIfM SYS '
F 1 N1- iUNf
•SK IP
[SNi CHANCU;
f,
AIMO
The sound indicator will
change as follows:
4 5MHi .—Í-5.5MH/
I Í
This returns the set to the
normal viewing condition.
 Loading...