

Page 1
1
2 3
4
5 6
7
8 9
C
0
Operating Instructions
LCD TV
Model No.
TX-14LA1
TX-17LA1
TX-20LA1
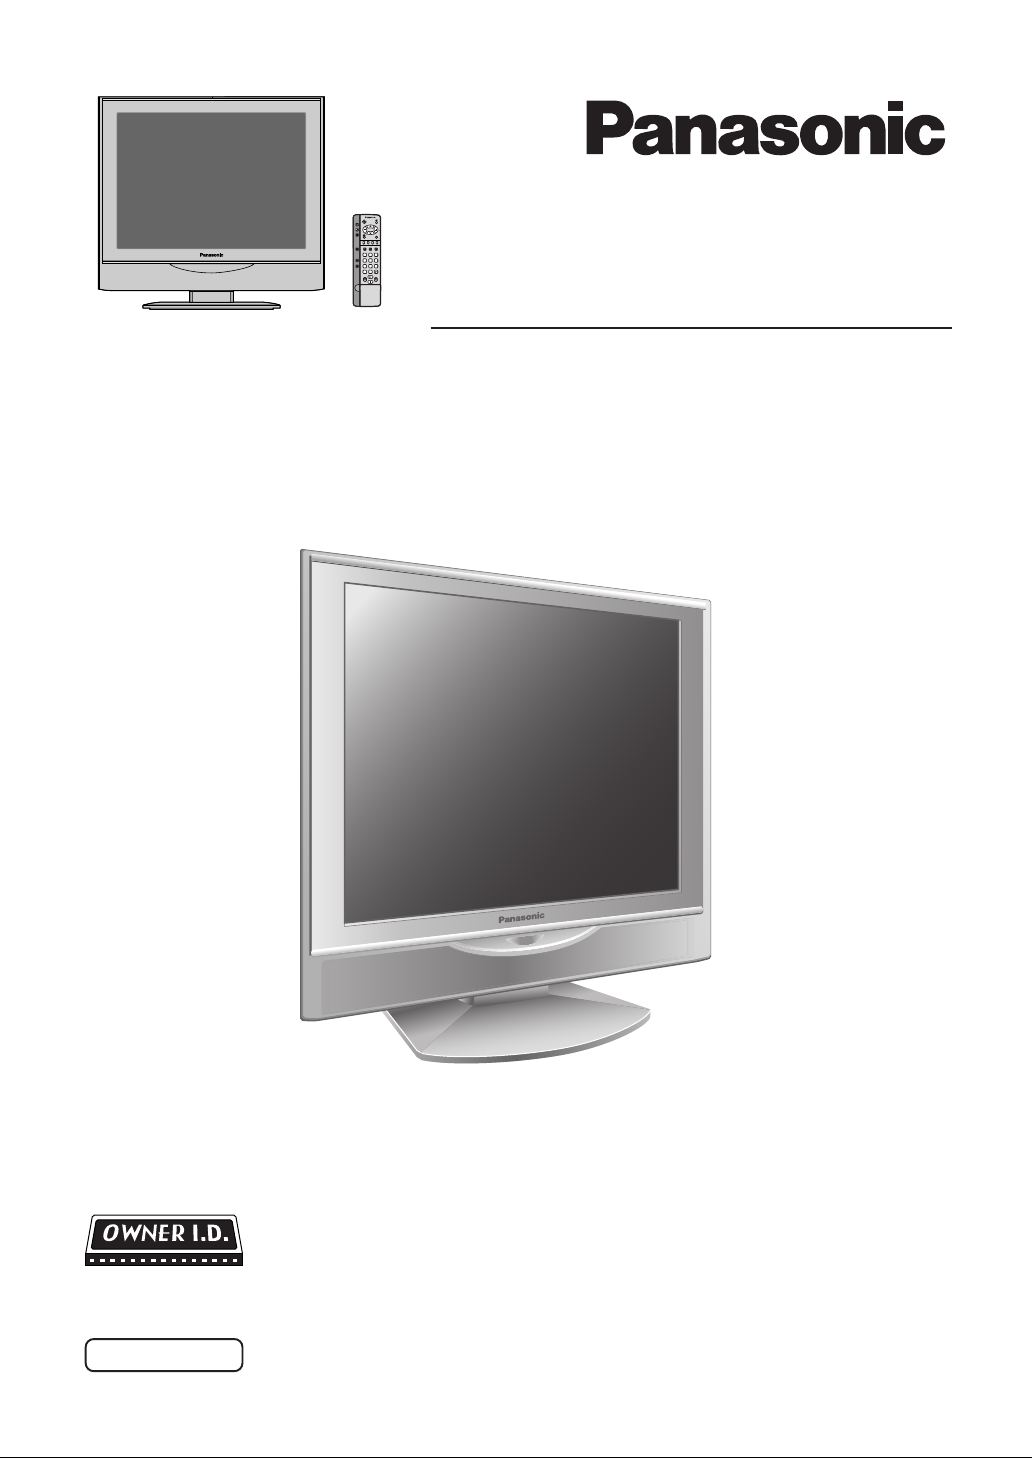
LCD TV shown above is model TX-20LA1.
Please read these instruction before operating your set and retain them for future reference.
English
TQBC0656
Page 2
Welcome
Dear Panasonic Customer,
We hope that you have many years of enjoyment from your new TV. The Quick Start Guide section at the
beginning of this instruction book will allow you to use the TV as quickly as possible.We recommend that you
then read the complete instruction book, and keep it to refer to as you explore the range of advanced features
that this TV offers.
Contents
Accessories.............................................................2
Warnings and Precautions ...................................... 3
Fitting remote control batteries ............................... 4
Antenna cover removal and fitting ..........................5
Cable cover removal and fitting .............................. 5
How to use the LCD stand ...................................... 5
Quick Start Guide....................................................6
Basic controls: top panel and remote control .......... 9
Using the On Screen Displays .............................. 10
Picture menu ......................................................... 11
Sound menu..........................................................12
Setup menu...........................................................13
Tuning menu - overview........................................14
Tuning menu - Programme edit ............................ 15
Adding / deleting a programme channel ............ 15
Moving a programme channel ........................... 15
Renaming a programme channel ...................... 16
Accessories
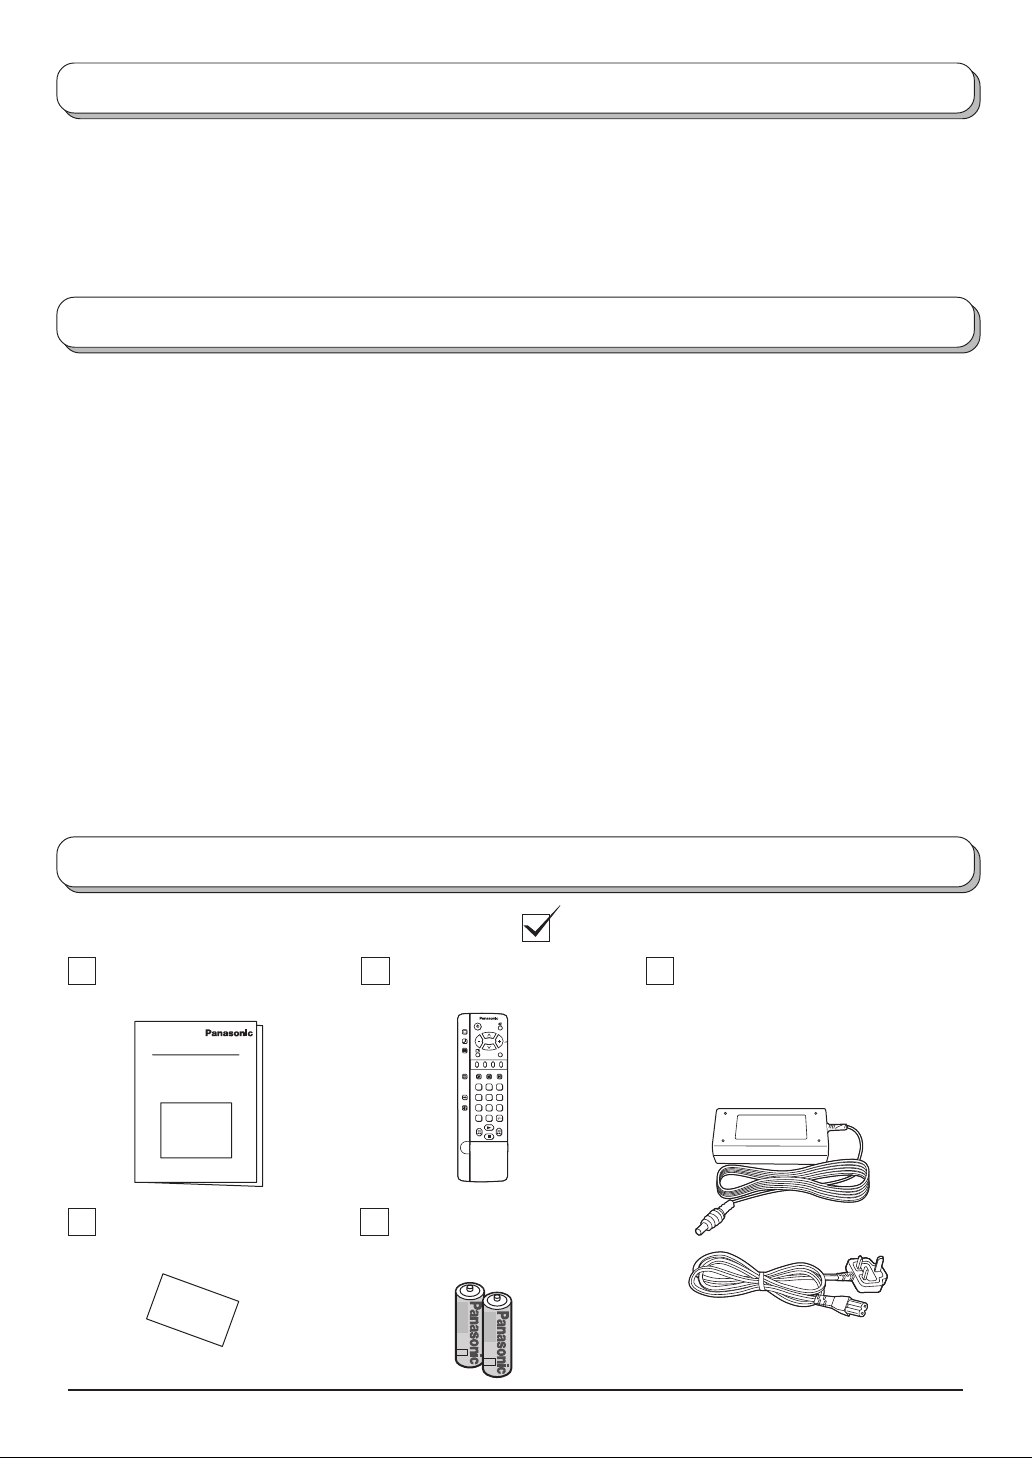
Check that you have the accessories and items shown
Operating Instruction book
(TQBC0656)
Remote Control Transmitter
(EUR511272)
PICTURE
SOUND
SET UP
F.P. INDEX HOLD
TV/TEXT
1
2 3
4
5 6
ASPECT
7
8 9
VCR
C
0
Locking a programme channel .......................... 16
Tuning menu - Auto setup ..................................... 17
Tuning menu - Manual tuning ............................... 18
Manual tuning (via Top panel) ............................... 18
Shipping condition.................................................19
Owner ID ............................................................... 20
Aspect Controls.....................................................21
VCR / DVD operation ............................................ 22
Teletext operation..................................................23
Audio / video connections ..................................... 26
Connecting Headphones / Earphones...............26
How to connect the input terminals ................... 27
Troubleshooting .................................................... 28
Maintenance ......................................................... 29
Scart and S-video socket information ................... 29
Specifications ....................................................... 30
AC Adaptor & Mains Lead
• AC Adaptor:
TX-14LA1: (N0JZHJ000001)
TX-17LA1: (N0JZHK000011)
TV/AV
TX-20LA1: (N0JZHK000011)
• Mains Lead: (K2CT3AA00002)
TV Guarantee
2
Batteries for the Remote
Control Transmitter
(2 × R6 (UM3) size)
Page 3
Warnings and Precautions
FOR YOUR SAFETY PLEASE READ THE FOLLOWING TEXT CAREFULLY
This appliance is supplied with a fitted three pin mains plug for your safety and convenience. A 5 amp fuse is
fitted in this plug. If the fuse is replaced then the replacement fuse must be 5 amp rated and should be approved
by ASTA or BSI to BS1362.
Check for the ASTA mark
If the fitted plug has a removable fuse cover you must ensure that it is refitted when the fuse is replaced. If you
lose the fuse cover the plug must not be used until a replacement cover is obtained. Replacement fuse covers
can be purchased through your local Panasonic dealer.
The plug fitted to this appliance incorporates a mains filter circuit. If this is removed or
replaced with a non-- filtered plug this television will no longer meet the European
standards for Electromagnetic Compatibility (EMC). If the fitted plug is unsuitable for
the socket outlet in your home an appropriate adapter should be used.
Nonetheless, if the fitted plug is replaced, the fuse should be taken out and the cut- off
plug disposed of safely. There is danger of severe electrical shock if the cut off plug is
inserted into any 13 amp socket.
If a new plug is to be fitted please observe the wiring code as shown below.
If in any doubt please consult a qualified electrician.
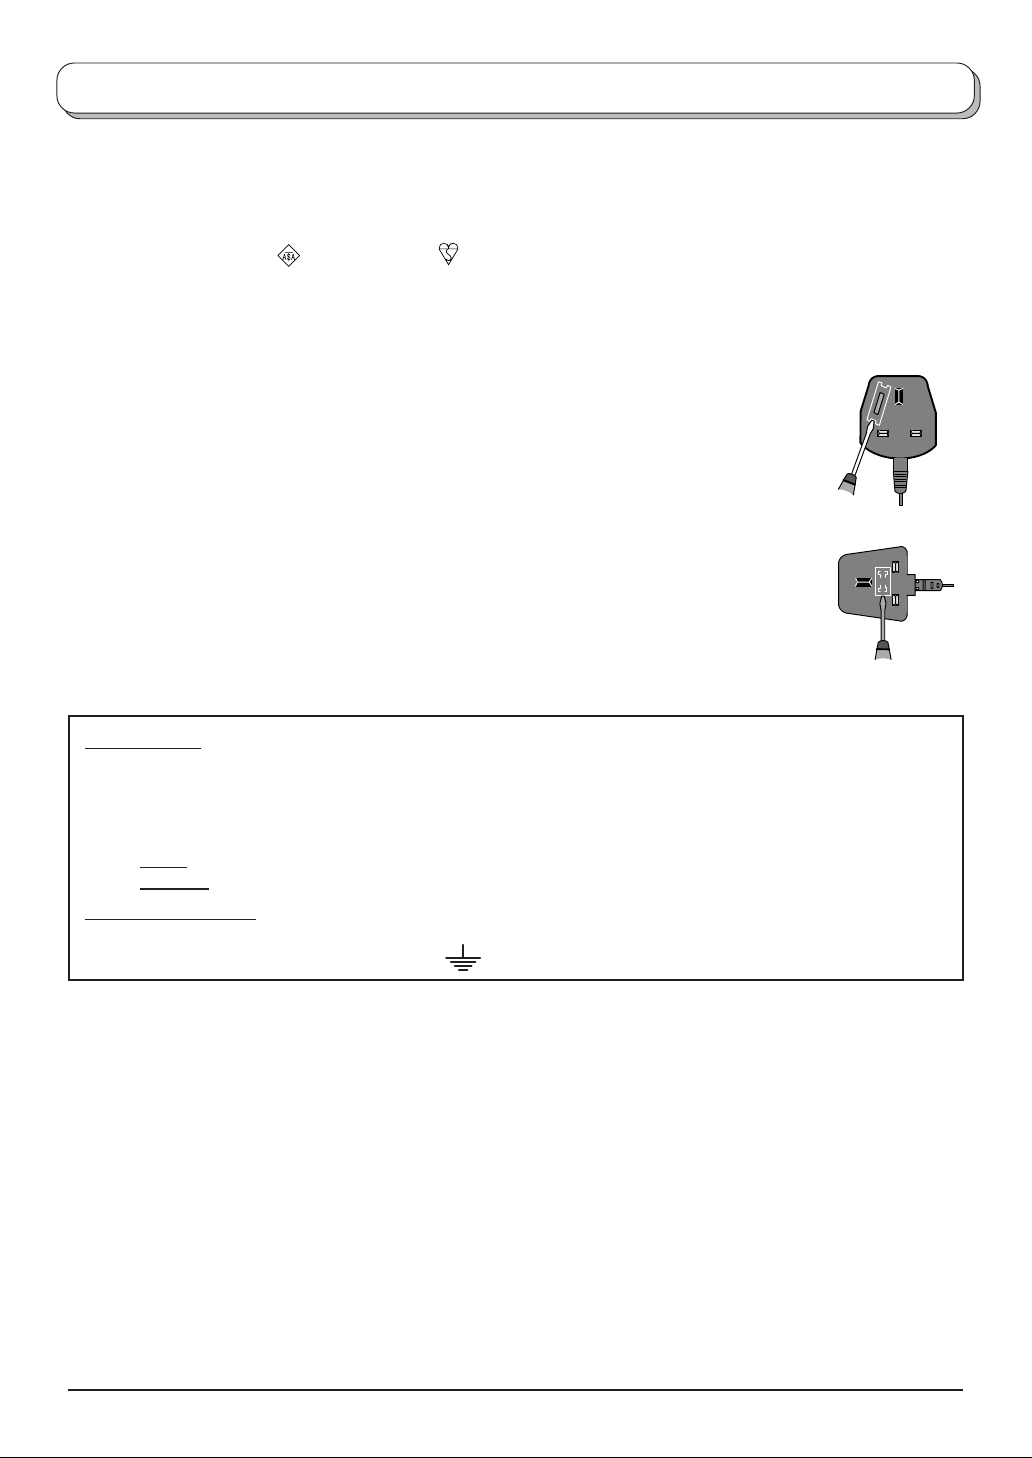
How to replace the fuse (for plug type shown in example 1):
Lift out the removable fuse compartment with a screwdriver and replace the fuse, then refit
securely into the mains plug (see example 1).
How to replace the fuse (for plug type shown in example 2):
Lift open the fuse compartment, in the mains plug, with a screwdriver, and replace the fuse,
then press the fuse cover down securely (see example 2).
or the BSI mark on the body of the fuse.
Example 1
Example 2
IMPORTANT :
-- The wires in the mains lead of this appliance are coloured in accordance with the following code :-BLUE : NEUTRAL BROWN : LIVE
As the colours of the wires in the mains lead of this appliance may not correspond to the markings identifying
the terminals in your plug, proceed as follows :--
BLUE wire must be connected to the terminal marked ‘N’ or coloured black.
1. The
2. The
BROWN wire must be connected to the terminal marked ‘L’ or coloured red.
IMPORTANT NOTE :
Under no circumstances should either of these wires be connected to the Earth terminal of the three pin plug,
marked with the letter ‘E’ or the earth symbol
.
3
Page 4
Warnings and Precautions
• This TV set is designed to operate on DC 15V.
• To prevent damage which might result in electric shock
or fire, do not expose this TV set to rain or excessive
moisture. This TV must not be exposed to dripping
or splashing water and objects filled with liquid, such
as vases, must not be placed on top of or above the
TV.
• WARNING : HIGH VOLTAGE!!!
Do not remove the rear cover as live parts are
accessible when it is removed. There are no user
serviceable parts inside.
• TV Games / Home Computers
Extended use of TV games or home computers with
any television set can cause a permanent ‘shadow’
on the screen. This type of irreversible LCD panel
damage, can be limited by observing the following
points:
• Reduce the brightness and contrast levels to a minimum
viewing level.
• Do not allow a still picture to be displayed for an extended
period, as this can cause a permanent after-image to
remain on the LCD TV screen.
• Examples of still pictures include logos, video games,
computer images, teletext and images displayed in 16:9
mode.
• This type of LCD panel damage, is not an operating defect,
and as such is not covered by the Panasonic warranty.
• The On/Off switch on this model does not fully
disconnect the TV from the mains supply. Remove
the mains plug from the wall socket before connecting
or disconnecting any leads, or if the TV set is not
used for a prolonged period of time.
Note:
If the set is not switched off when the TV station
stops transmitting, it will automatically go to stand-by
mode after 30 minutes. This function will not operate
when the TV is in AV mode.
• Cabinet and LCD panel care
Remove the mains plug from the wall socket. The
cabinet and LCD panel can be cleaned with a soft
cloth moistened with mild detergent and water. Do
not use solutions containing benzol or petroleum.
• When ambient temperature is cool, the picture may
take a short time to reach normal brightness, but this
is not a malfunction. (After brief moment, the picture
will have normal brightness.)
• Adequate ventilation is essential to prevent failure of
electrical components, we recommend that a gap of
at least 10 cm is left all around this television receiver
even when it is placed inside a cabinet or between
shelves.
• Avoid exposing the TV set to direct sunlight and other
sources of heat. To prevent fire, never place any type
of candle or naked flame on top or near the TV set.
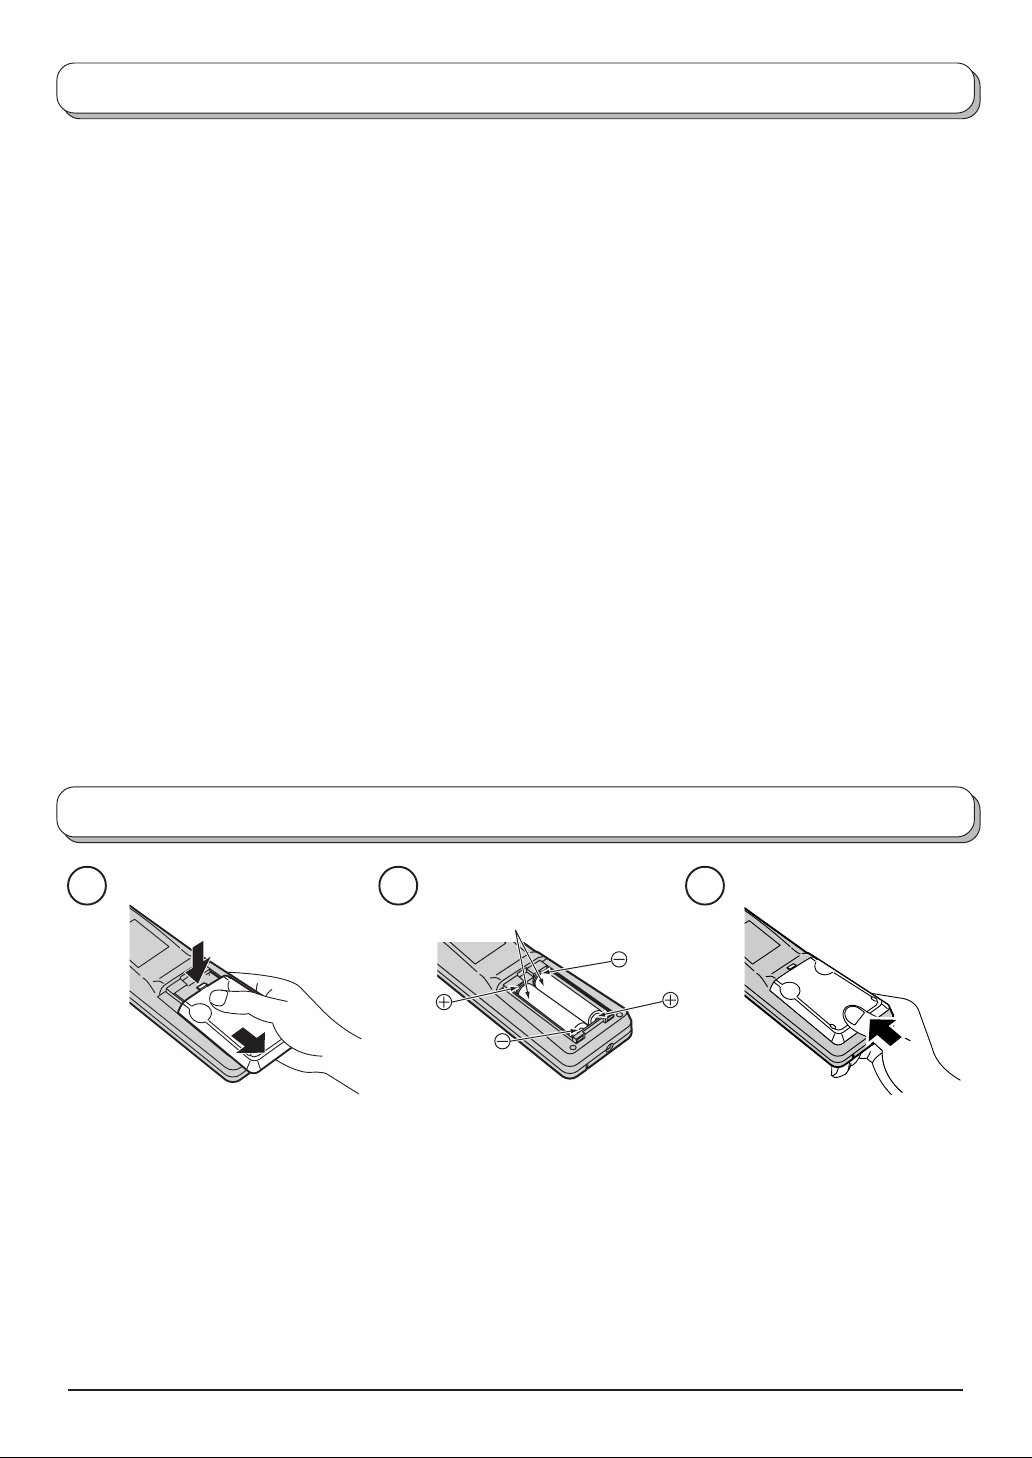
Fitting remote control batteries
1 2 3
Two “R6 (UM3)” size
Slide off the battery cover
• Make sure that the batteries are fitted the correct way round.
• Do not mix old batteries with new batteries. Remove old, exhausted batteries immediately .
• Do not mix different battery types, i.e. Alkaline and Manganese or use rechargeable (Ni - Cad) batteries.
Insert batteries - note correct
polarity (+ and -)
Replace the cover
4
Page 5
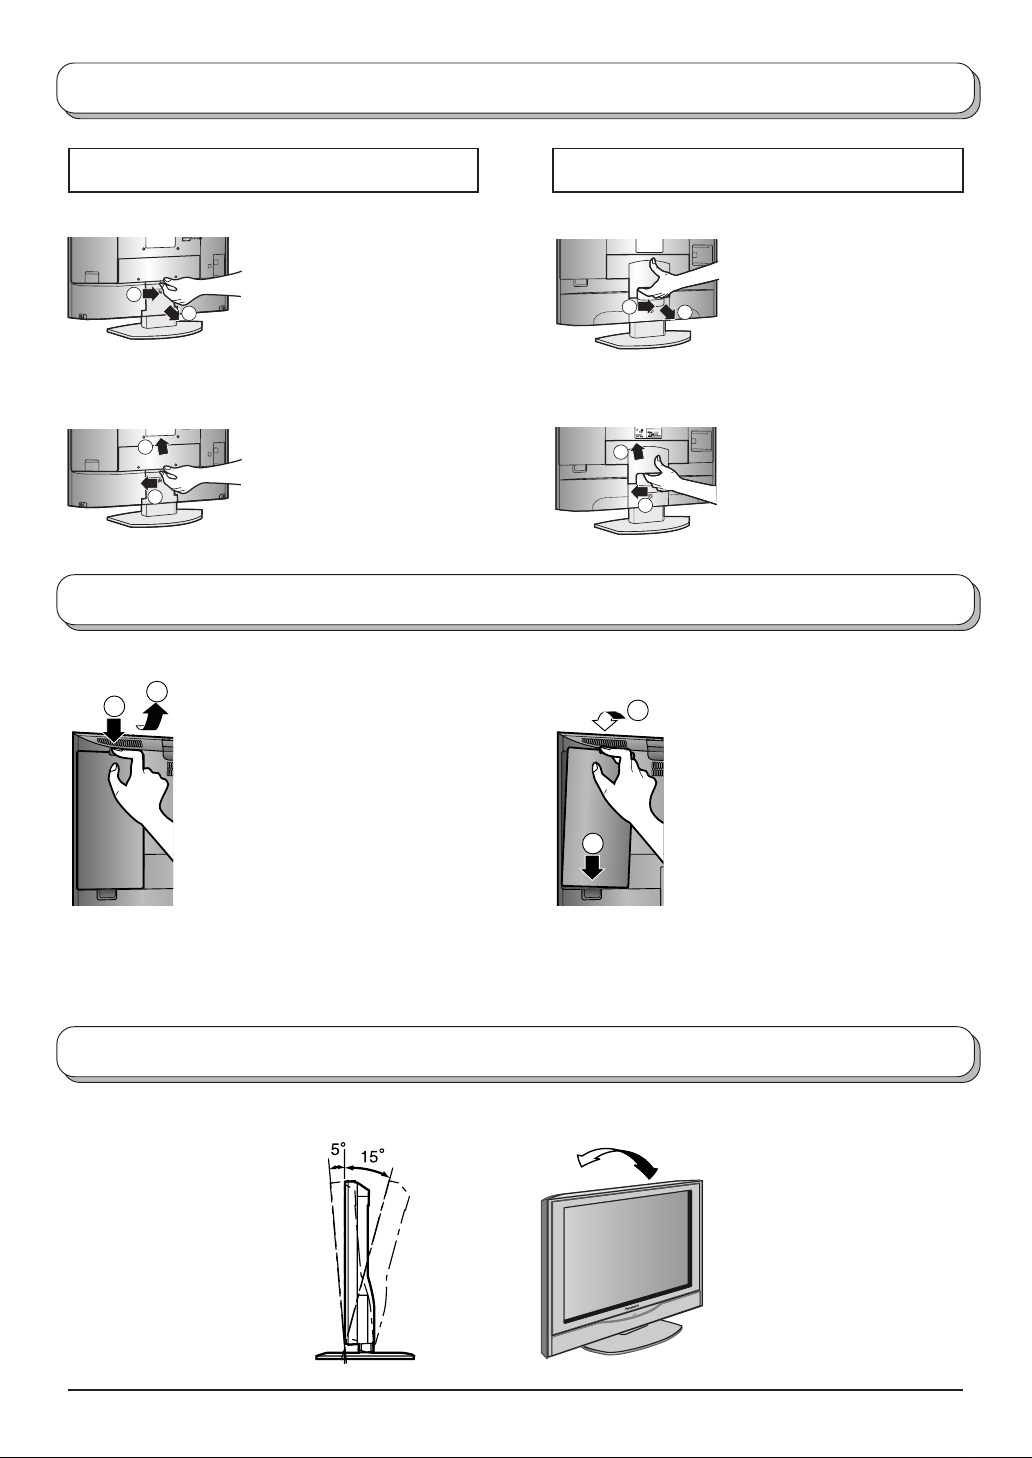
Antenna cover removal and fitting (TX-17LA1, TX-20LA1)
TX-17LA1
Removal Removal
1
2
1. Grasp the cover at the
bottom end and initially
remove by pulling slightly
toward yourself.
2. Slowly pull out in the
downward direction.
TX-20LA1
Fitting Fitting
1
2
1. Insert the claws (at 4
points) at the top end.
2. Push it until click.
1
Cable cover removal and fitting (TX-17LA1, TX-20LA1)
Removal Fitting
2
1
1. Disengage the claws at the
uppermost end.
2. Slowly pull out in the upward
direction.
1. Grasp the opening and
initially pull the cover
slightly towards yourself to
1
2
2
2
disengage the claws (at 2
points on both the left and
right).
2. Slowly pull out in the
downward direction.
1. Insert the claws (at 4
points) at the top end.
2. Push it until click.
1. Insert the claws (at 2 points) at
the bottom.
2. Push it until click.
1
Note:
Depending on the type of cable used it may not be possible to close the cover. In such cases the cable may be
routed through the antenna cover.
How to use the LCD stand
Adjust the stand to your desired angle. The stand angle can be adjusted between 5 ° forward to 15 ° backward.
5
Page 6
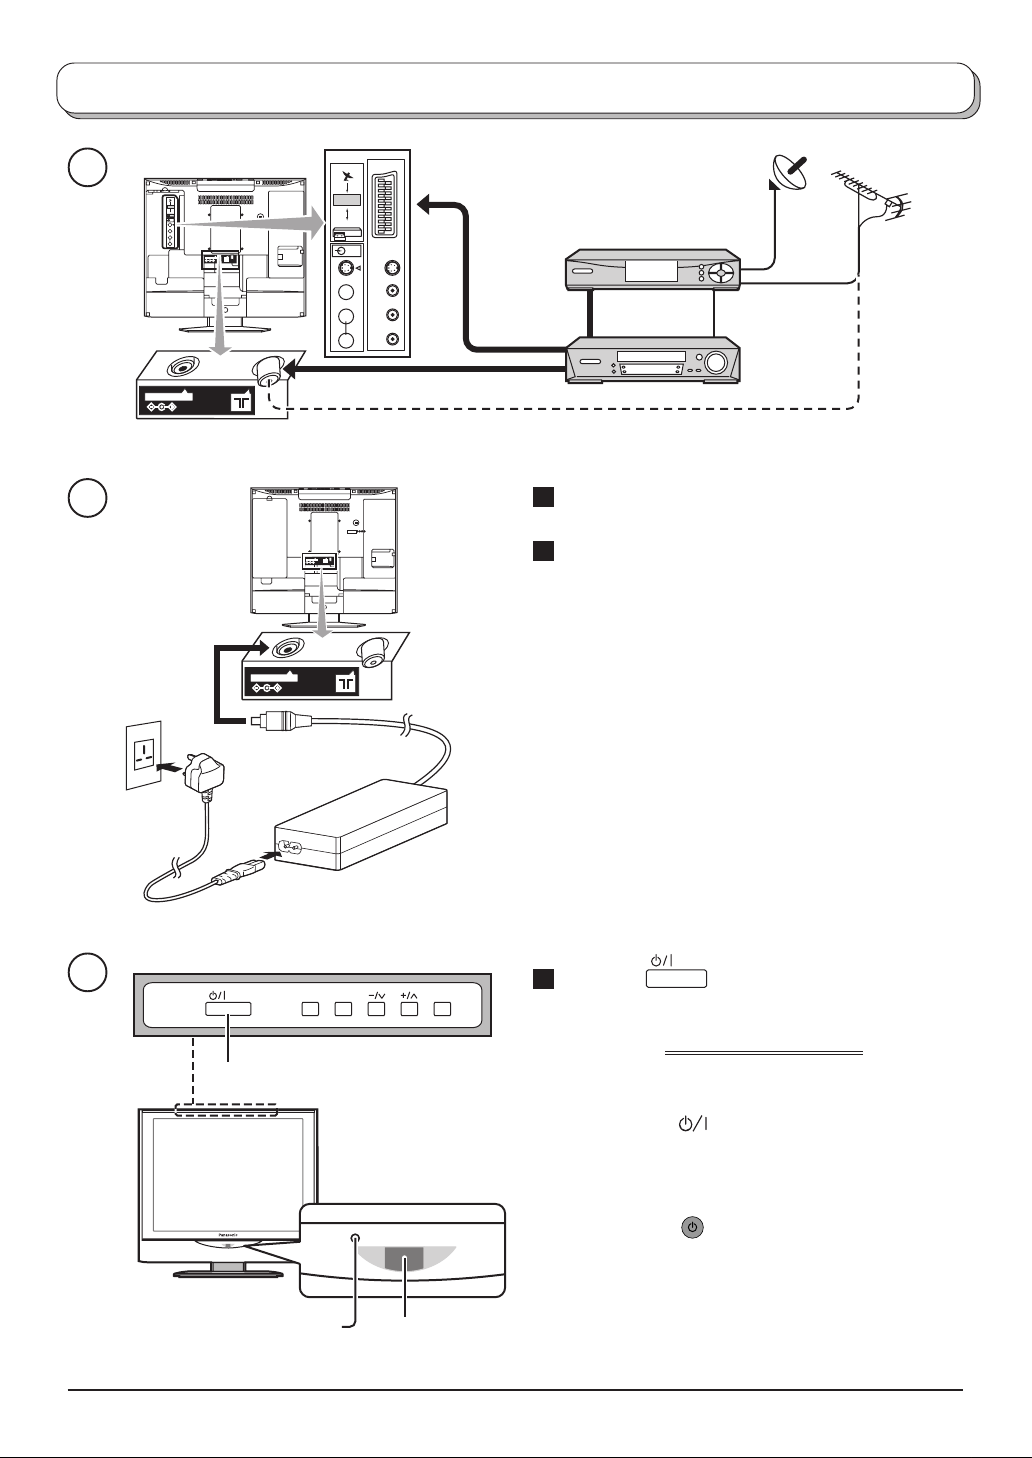
Quick Start Guide
1
R.G.B
AV1
VCR
AV2
S - V
V
L
R
DC IN 15V
R.G.B
AV1
S - V
VCR
AV2
V
L
R
Example : TX-17LA1
Satellite Receiver
Scart leads
(Not supplied)
VCR / DVD
recorder
OR
RF lead
(Not supplied)
Plug in aerial and connect ancillary equipment
2
1 Connect the external equipments, if required,
as shown above.
2 Connect the AC Adaptor DC plug to the DC IN
socket.
Plug into household mains socket.
• Be sure to use the mains lead and AC adaptor
included in the accessories.
DC IN 15V
• Do not use the AC adaptor for other than the
specified equipment.
• Unplug the AC adaptor if it is not used for long time.
• Do not place any objects on the AC adaptor.
• Do not use the AC adaptor outdoors.
• Do not attempt to repair the AC adaptor if it is broken
or malfunctioning. Refer the servicing to the service
representative.
• Do not try to open the AC adaptor.
• Do not use water or wet cloth for cleaning the AC
adaptor.
3
STR F TV/AV
3 Press the switch on the LCD TV to turn
the set on.
IMPORTANT NOTES
On / Off switch
LED Indicator
Adaptor
connection only : Orange
There are two ways to switch the TV set to standby mode.
(A) Press the
switch on the LCD TV and the
amber LED is lit.
STB : Red
On : No Light
(B) Press the
OR
Stand-by button on the remote
control and the Red LED is lit.
The TV set can be switched on by the remote
Power Indicator
Remote control
control, only if it was switched to stand-by using
method (B).
signal sensor
6
Page 7
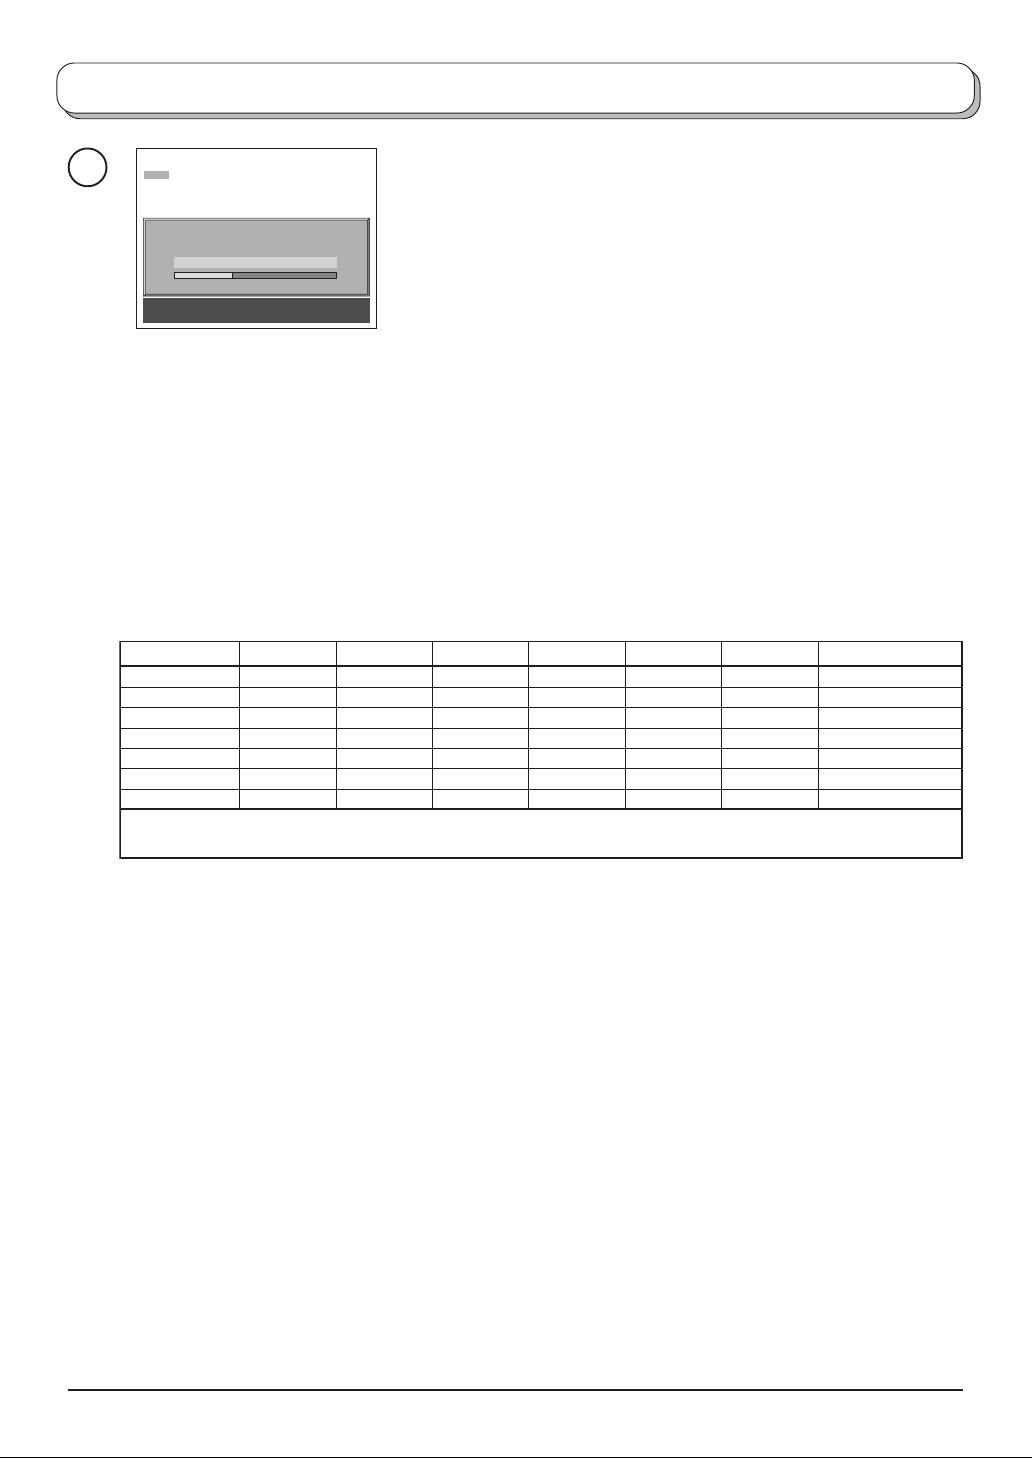
Quick Start Guide
4
CH44
First, ensure that the recording device is in Standby mode.
If the TV has not been programmed for you then Auto setup will
begin, your stations will be located, sorted into order and stored ready
AUTO SETUP IN PROGRESS
SEARCHING : PLEASE WAIT
Stored CH44
21 68
TV/AV : To exit
for use (refer to page 17).
TV to VCR /DVD recorder download
If the recording device has not accepted download data from the TV, you may need to select the
Download option from the device’s menu system.
Refer to the recording device’s operating instruction book.
• The sorted programme order depends upon the TV signal, the broadcasting system, and reception
conditions.
If the order is not to your preference it can be rearranged. Refer to the Programme edit menu - see page
15 for details.
• If you have a digital satellite receiver, you can start Auto setup with the receiver set to any channel. You
will then have to manually name the ‘SAT’ position after Auto setup is complete. Refer to the Programme
edit - see page 16 for details.
Prog. Position
1
2
3
4
5
6
7
All channels
BBC1
BBC2
ITV
CH4
S4C
CH5
SAT
No CH5
BBC1
BBC2
ITV
CH4
S4C
SAT
No CH5/S4C No CH4/CH5
BBC1
BBC2
ITV
CH4
SAT
BBC1
BBC2
ITV
S4C
SAT
No S4C
BBC1
BBC2
ITV
CH4
CH5
SAT
No CH4/S4C No CH4/S4C/CH5
BBC1
BBC2
ITV
CH5
BBC1
BBC2
ITV
SAT
SAT
∗∗∗
Note:
The next available channel will appear, If no other stations are available then the Programme position will remain nunsed.
∗
∗
∗∗∗∗∗∗
7
Page 8
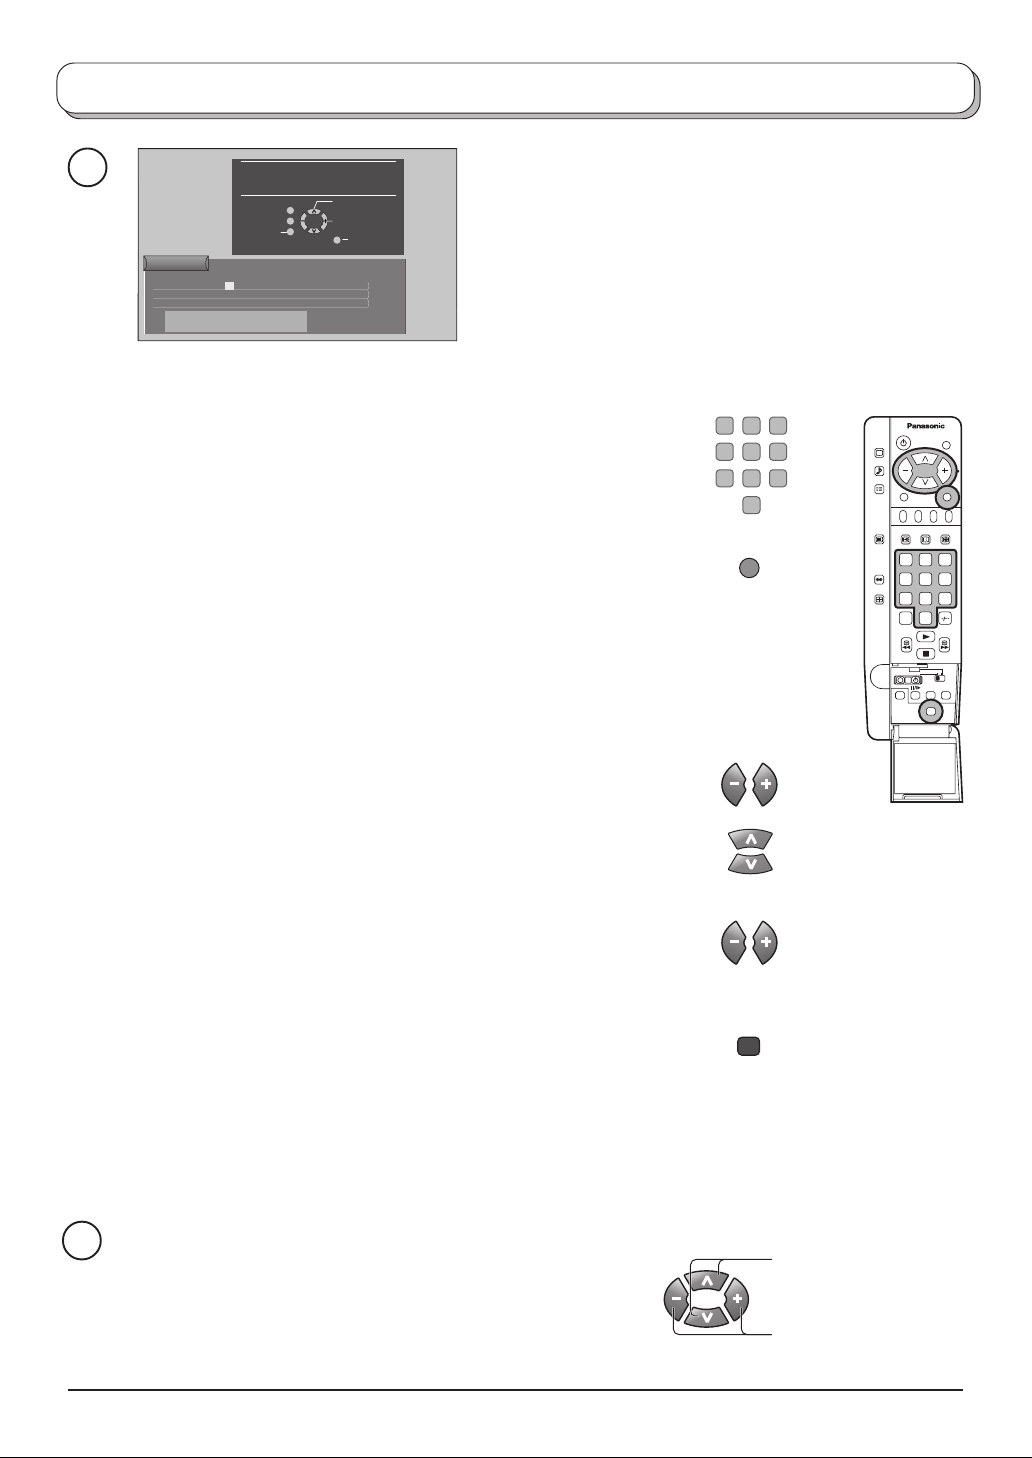
Quick Start Guide
5
Owner ID
PIN NUMBER :
HOUSE NO :
POST CODE :
ABCDEFGHIJKLMNOPQRST
UVWXYZ
You now have the opportunity
to enter your details and
help the police crack crime
see instruction book
Return
'STR' Button - Store Owner ID
∗∗∗∗
NAME :
∗∗∗∗∗∗∗∗∗∗∗∗∗∗
∗∗∗∗∗∗∗∗∗∗∗
∗∗∗∗∗∗∗∗∗∗∗
+− .
0123456789
TV/AV
Change
Character
Select
character
Exit
Enter required 4 digit Owner ID PIN NUMBER (using 0
to 9 on the remote control)
Press the TV/AV button at any time to exit the Owner ID
feature without saving any information you may have
entered.
Enter NAME, HOUSE NUMBER and POSTCODE
If a 4 digit PIN NUMBER was entered above, you will
be taken automatically to the NAME line.
As an added feature, this TV has the option of entering
a security code (Owner ID) and personal details into its
memory, so that in the unfortunate event of theft it will
help the police to trace the owner.
1 2 3
4 5 6
7 8 9
0
TV/AV
1 2 3
4 5 6
7 8 9
C
N
0
If not, move to the NAME line.
Change character.
Select character position.
Repeat above until NAME, HOUSE NUMBER and
POSTCODE are entered.
Press STR to store the details
STR
Press STR again, when you are asked "Are you sure?"
For further information on Owner ID, including how to
view the details you have stored, see page 20.
A space is provided on page 20 to write down your PIN
NUMBER for future reference.
6
You are now ready to begin viewing programmes
The cursor controls provide the two basic functions:
Change Programme
Adjust Volume
8
Page 9
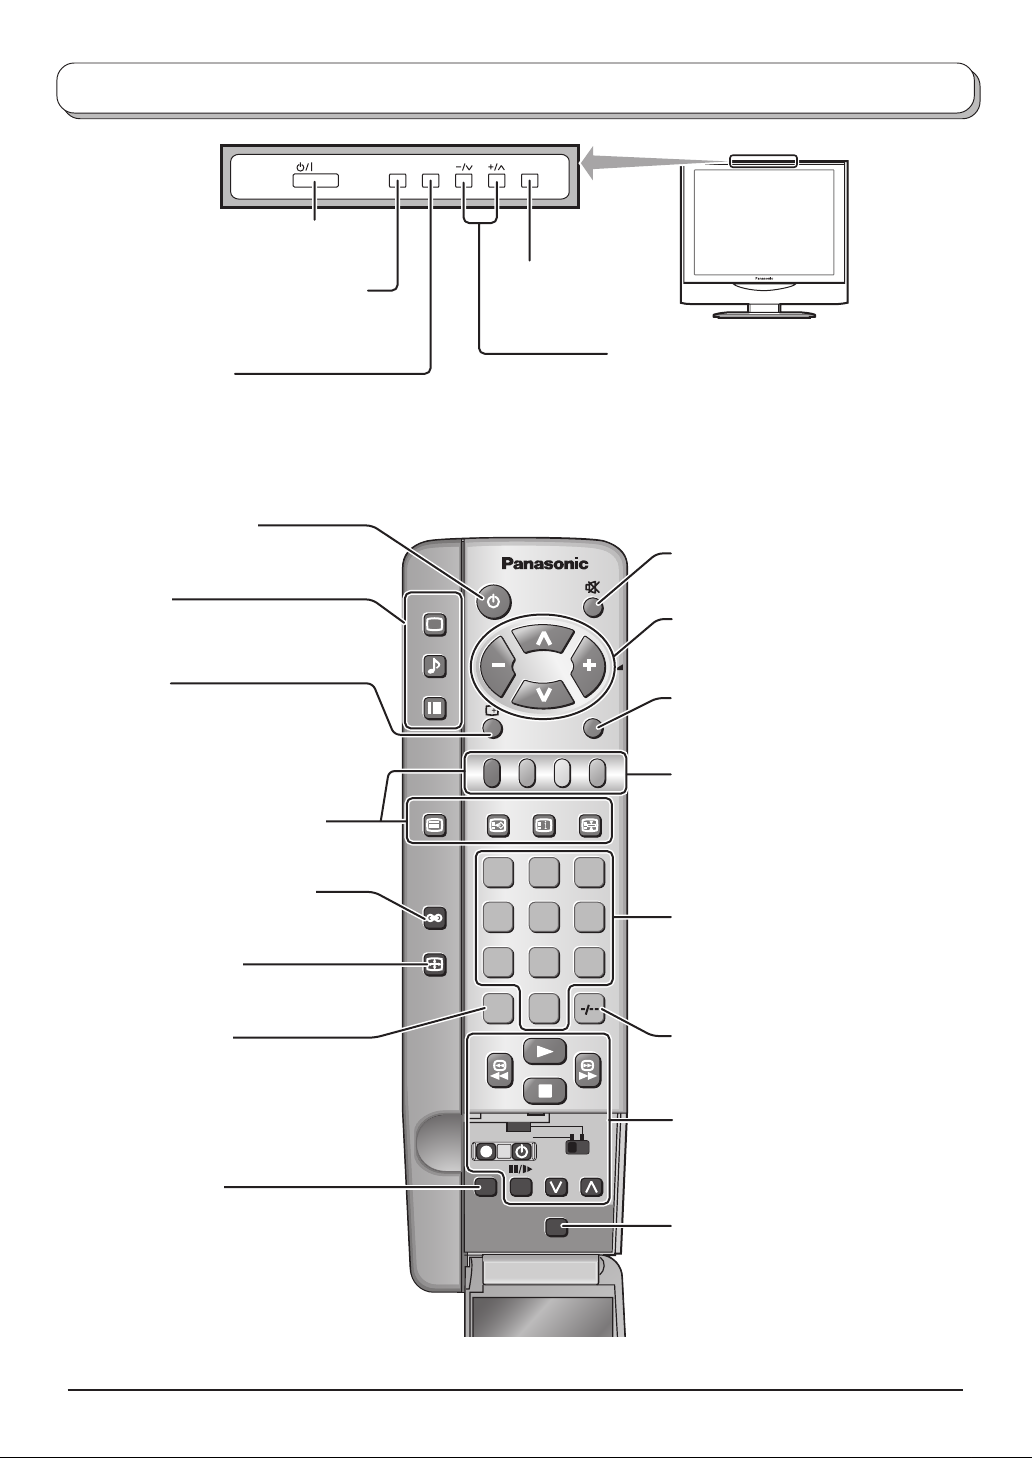
Basic controls: top panel and remote control
STR F TV/AV
On / Off switch
STR (Normalization store)
Used to store tuning and other
function settings
F (Function select)
Displays the On Screen Display functions, use repeatedly to
select from the available functions - Volume, Backlight,
Contrast, Brightness, Colour, Sharpness, Tint (in NTSC
mode), Bass, Treble, Balance and Tuning.
Stand-by On / Off switch
Switches TV On or Off (stand-by)
Menu buttons
Press to access the PICTURE, SOUND
and SETUP menus (see page 10 - 13)
Status button
PICTURE
SOUND
SET UP
Press to display programme position,
programme name, channel number,
time, NICAM mode, ASPECT mode and
programme table
Teletext buttons (see page 23 - 25)
TV/TEXT
TV/AV switch
(see page 26)
INDEX HOLD
F.P.
Increases or decreases the programme
position by one. When a function is already
displayed, press to increase or decrease the
selected function. When in Standby mode,
switches TV On
Sound mute On / Off
Cursor buttons to make selections and
adjustments
TV/AV
Switch between viewing TV or AV input
(see page 26)
Coloured buttons used for
Programme edit functions (see page 15)
Teletext functions (see page 23)
AV selection (see page 26)
Ambience On / Off (see page 12)
ASPECT control button
(see page 21)
Direct channel access
During normal TV viewing or when in the
Tuning or Manual tuning menus, press
and then enter channel number using the
numeric buttons
N (Normalize) button
Resets all settings to their default levels
ASPECT
1 2 3
4 5 6
7 8 9
VCR
0
C
DVD
REC-VCR
N
PROGRAMME
STR
Programme / channel change
buttons (0-9) and Teletext page buttons
(see page 23).
When in Standby mode, switches TV On
Programme position for selection of two
digit programmes (10-99) using
numeric buttons
VCR / DVD buttons
(see page 22)
STR (Normalization store)
Stores some current settings as the
normalized settings in SOUND menu.
Stores some settings in Tuning and
Programme edit menus.
9
Page 10
Using the On Screen Displays
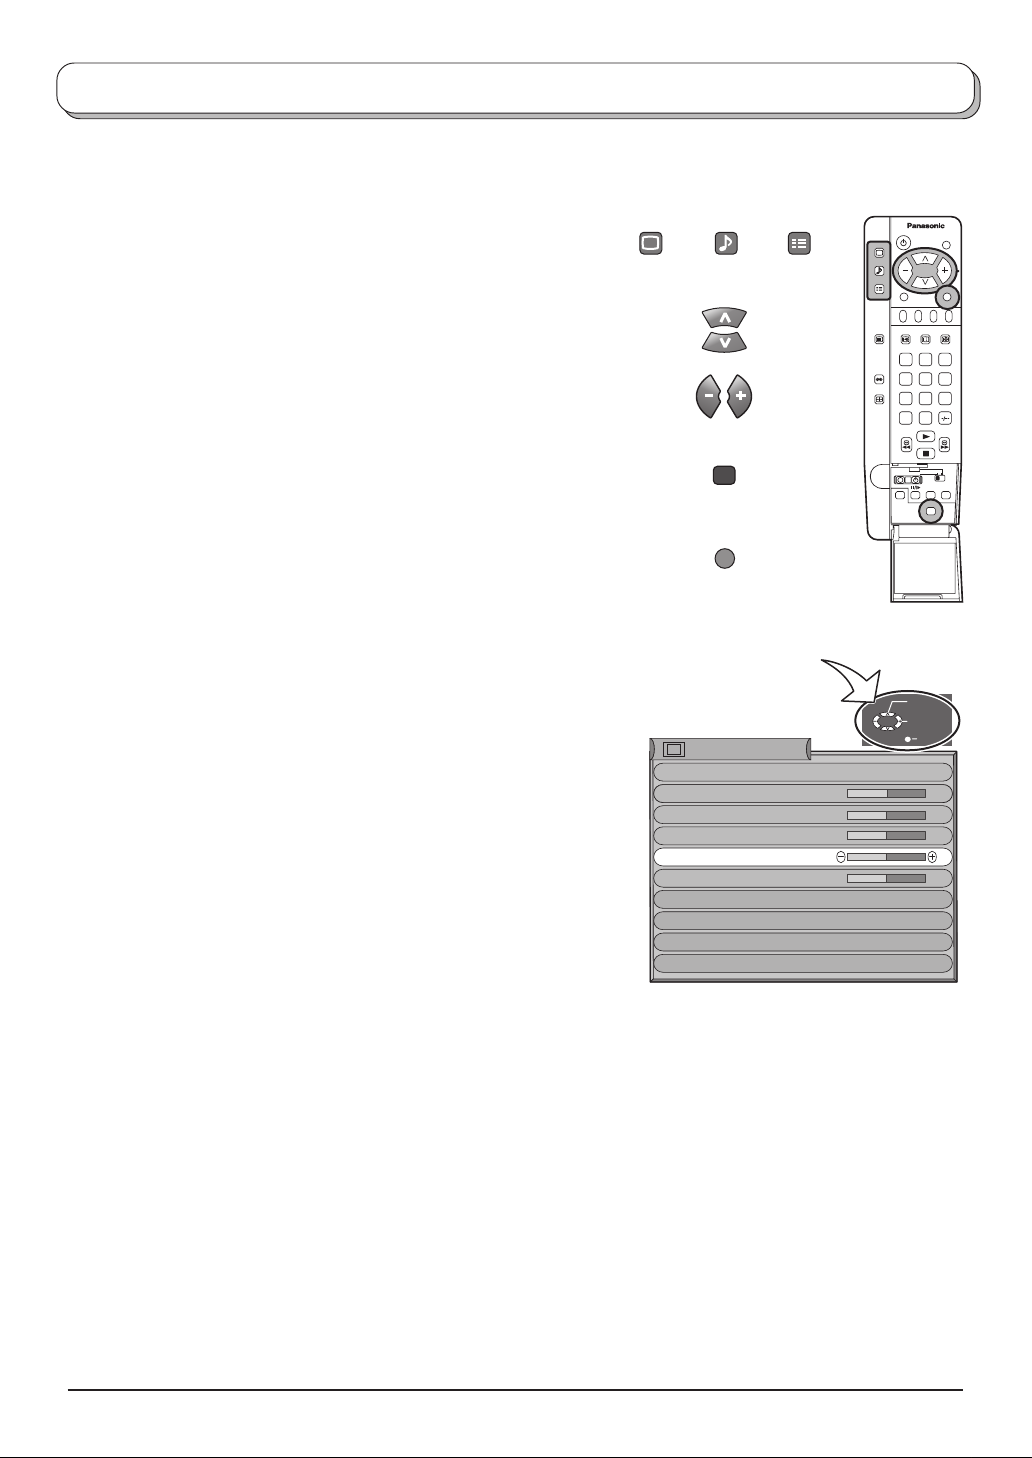
Many features available on this TV can be accessed via the On Screen Display menu system. Use the remote
control as shown below to access and adjust features as desired.
The PICTURE, SOUND and SET UP buttons are used
to open the main menus and also to return to the
previous menu
The up and down cursor buttons are used to move the
cursor up and down the menus
The left and right cursor buttons are used to access
menus, adjust levels or to select from a range of
options
The STR button is used with a number of features to
store settings after adjustments have been made or
options have been set
The TV/AV button is used to exit the menu system and
return to the normal viewing screen
An On Screen Help box is displayed whenever a menu is displayed
on the TV. This Help box indicates which keys on the remote control
are used to navigate the menu shown, see above for descriptions
of button functions.
Note:
The Help box is not shown in the menu pictures in this instruction
book due to space limitations.
PICTURE
SOUND
STR
TV/AV
ON SCREEN HELP
‘Instructions’ box
Picture menu
Viewing mode
Backlight
Backlight
Contrast
Brightness
Colour
Sharpness
Colour balance
AI
P-NR
MPEG NR
SET UP
TV/AV
Dynamic
Normal
On
On
Off
1 2 3
4 5 6
7 8 9
C
N
Select
Adjust
Exit
0
10
Page 11
PICTURE
Picture menu
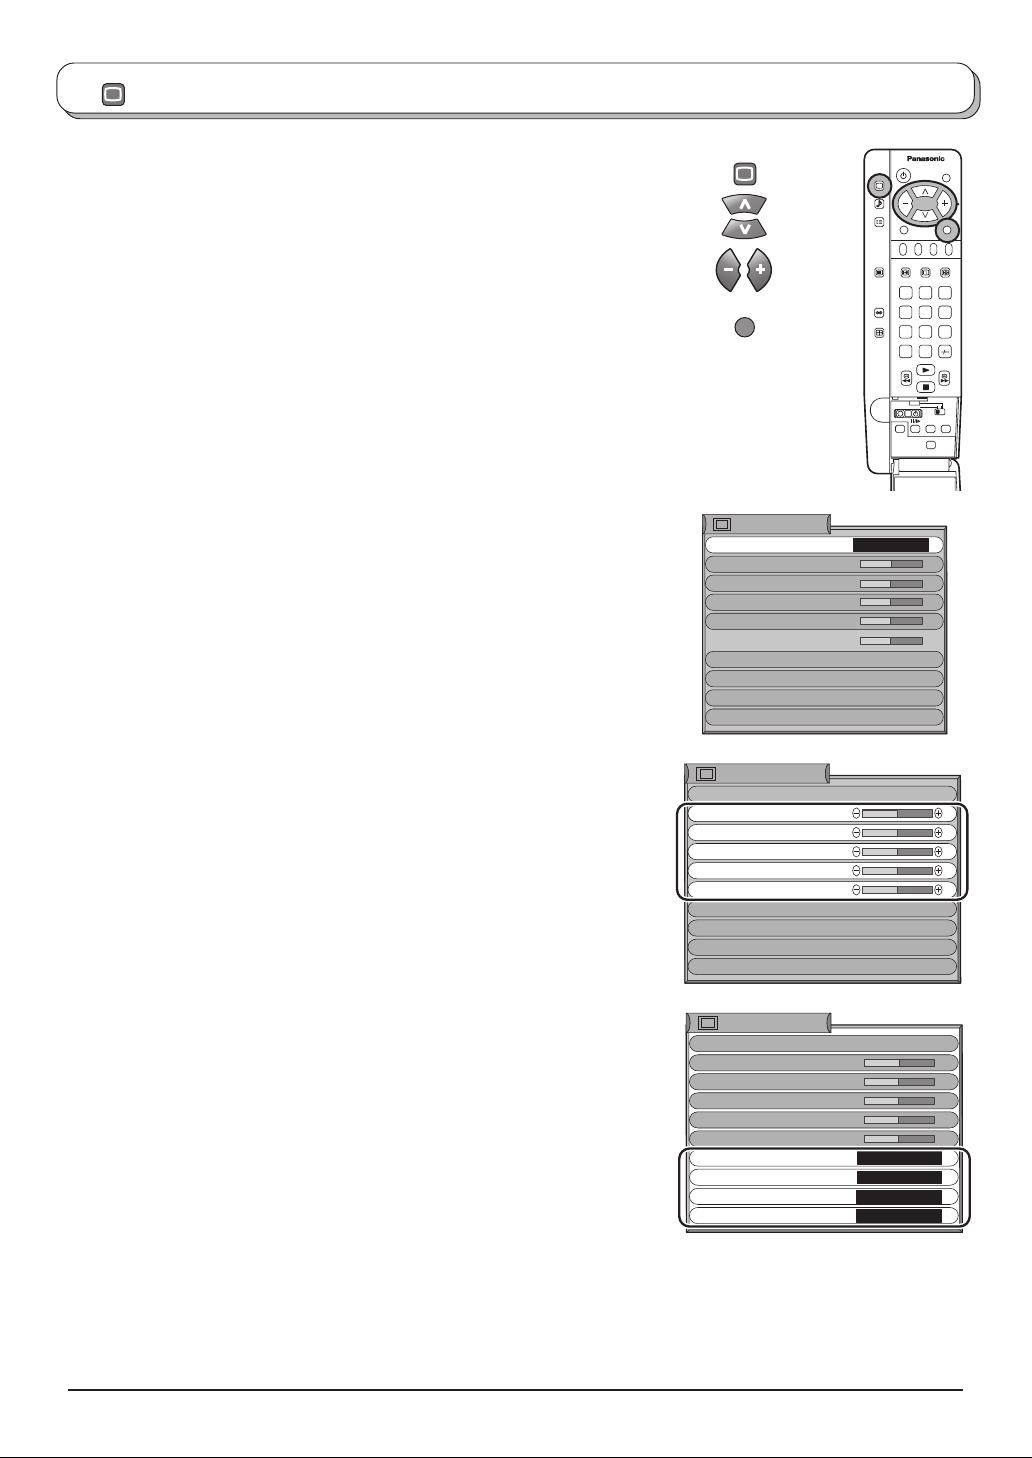
Press the PICTURE menu button
Move to choose menu option
Adjust chosen option or access chosen menu
Press the TV/AV button at any time to go back to watching TV
Viewing Mode
The Viewing mode menu allows you to select three
different screen settings - Dynamic, Normal and
Cinema.
In each Viewing mode setting, Backlight, Contrast,
Brightness, Tint (in NTSC only), Colour, Sharpness,
Colour balance, AI, P-NR and MPEG NR can be
adjusted and stored to suit your particular viewing
requirement (for example, you may require different
settings for viewing sport, films, news etc.)
Viewing mode offers you up to maximum of three
separate settings for each signal source: RF, AV1
(including RGB) and AV2. Changes will be stored
automatically.
By analysing and processing the incoming picture,
all three modes feature automatic enhancement.
PICTURE
TV/AV
Picture menu
Viewing mode
Backlight
Contrast
Brightness
Colour
Sharpness
Colour balance
AI
P-NR
MPEG NR
N
Dynamic
Normal
On
On
Off
1 2 3
4 5 6
7 8 9
0
C
Backlight
Contrast
Brightness
Colour
Sharpness
Tint
Colour balance
AI
P-NR
MPEG NR
Increase or decrease the levels of these options
according to your personal preference.
With an NTSC signal source connected to the TV,
the picture hue can be adjusted to suit your taste.
Allows you to set the overall colour tone of the
picture. Choose from Cool, Normal and Warm.
Automatically analyses the incoming picture and
processes it to give improved contrast and optimum
depth of field.
Automatically reduces unwanted picture noise,
when viewing analogue TV broadcast.
Reduces MPEG noise.
This function is effective in reducing the picture noise
when viewing DVD, VCD or digital broadcasting. The
effect will be changed based on the scene and image.
Note:
MPEG Compression technology of the image
signal adopted by DVD, VCD or digital
broadcasting.
Picture menu
Viewing mode
Backlight
Backlight
Contrast
Brightness
Colour
Sharpness
Colour balance
AI
P-NR
MPEG NR
Picture menu
Viewing mode
Backlight
Contrast
Brightness
Colour
Sharpness
Colour balance
AI
P-NR
MPEG NR
Dynamic
Normal
On
On
Off
Dynamic
Normal
On
On
Off
11
Page 12
SOUND
Sound menu
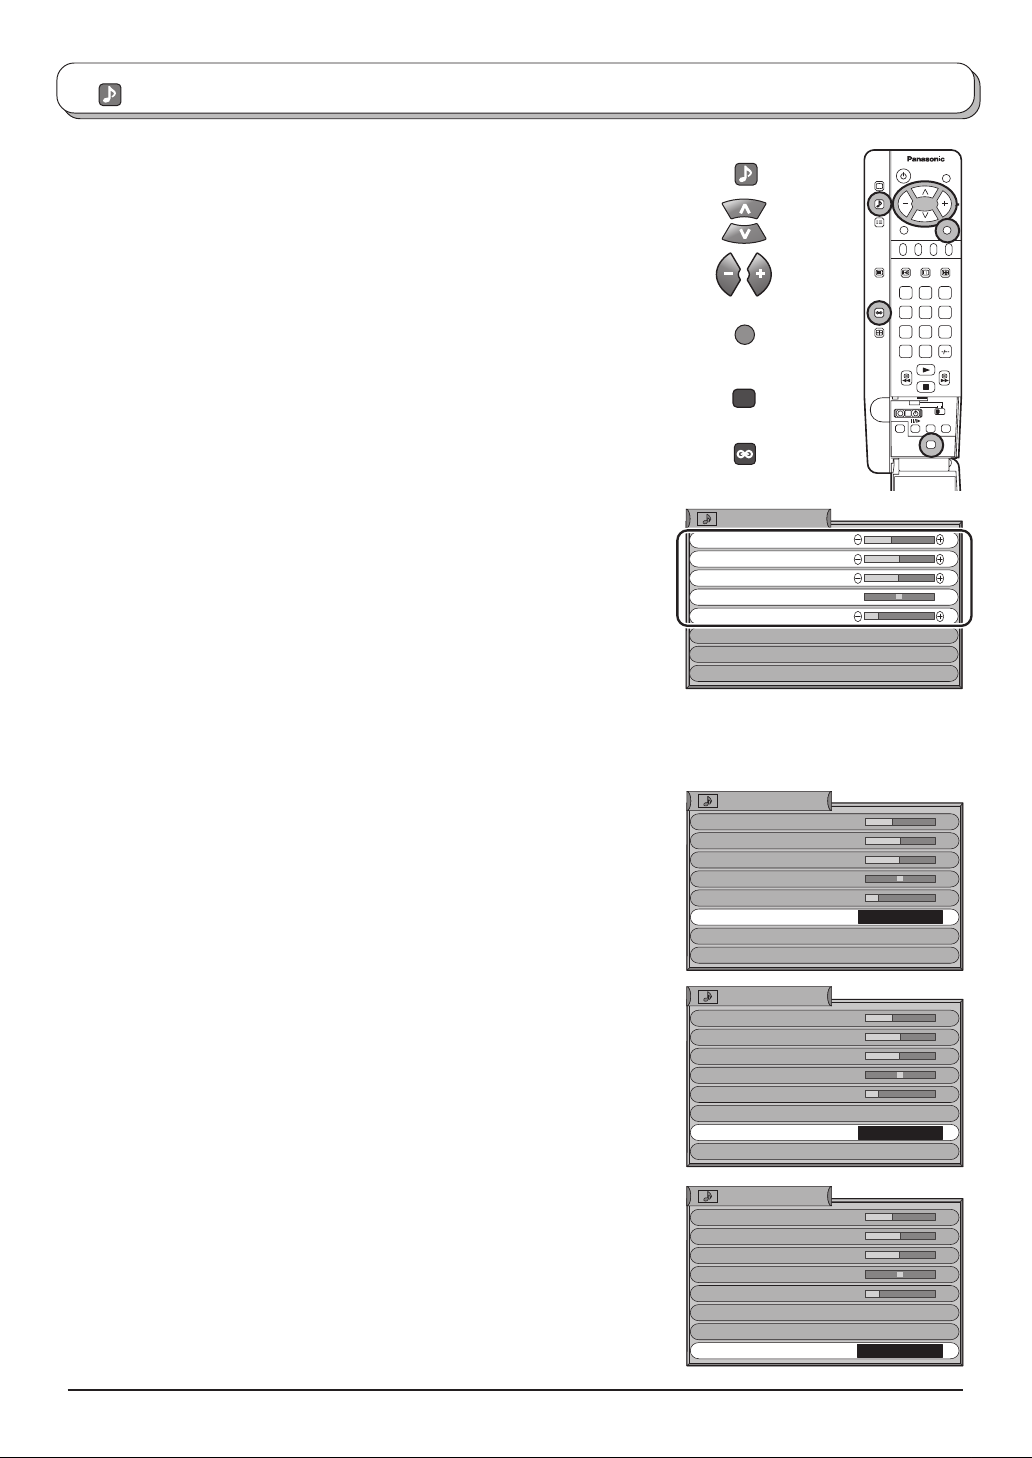
Press the SOUND menu button
Move to choose menu option
Adjust chosen option or access chosen menu
Press the TV/AV button at any time to go back to watching TV
Pressing the STR button after having adjusted a feature will
store the setting as the default (replacing the factory setting).
Volume
Bass
Lets you set the overall output volume.
Increase or decrease level to enhance or minimise
lower, deeper sound output.
Treble
Increase or decrease level to enhance or minimise
sharper, higher sound output.
Balance
The levels of sound between the left and right
speakers can be adjusted to suit your listening
position.
SOUND
1 2 3
TV/AV
STR
4 5 6
7 8 9
C
N
Sound menu
Volume
Bass
Treble
Balance
Headphone volume
NICAM No service
Mode Music
Ambience Off
0
Headphone
volume
NICAM
Mode
Ambience
Can be adjusted independently of the TV speakers
so that everyone can enjoy listening at a level
comfortable for them.
Usually set to On to receive a stereo signal, but if
reception deteriorates or if the service is not available
then switch to Mono. Mono (M1) and (M2) can also
be selected if a mono signal is being transmitted.
Sound quality can be improved when watching music
scene or drama by selecting the appropriate Music
or Speech mode.
To enjoy a concert hall effect, turn Ambience On.
Swiching is also possible by pressing the Ambience
button.
The benefits of Ambience sound are enormous.
You can be completely enveloped in sound; just as
if you were at a concert hall or cinema.
The Ambience effect can be obtained without the
use of external Ambience speakers.
Sound menu
Volume
Bass
Treble
Balance
Headphone volume
NICAM No service
Mode Music
Ambience Off
No service
Sound menu
Volume
Bass
Treble
Balance
Headphone volume
NICAM No service
Mode
Ambience Off
No service
Music
Sound menu
Volume
Bass
Treble
Balance
Headphone volume
NICAM No service
Mode Music
Ambience Off
On
12
Page 13
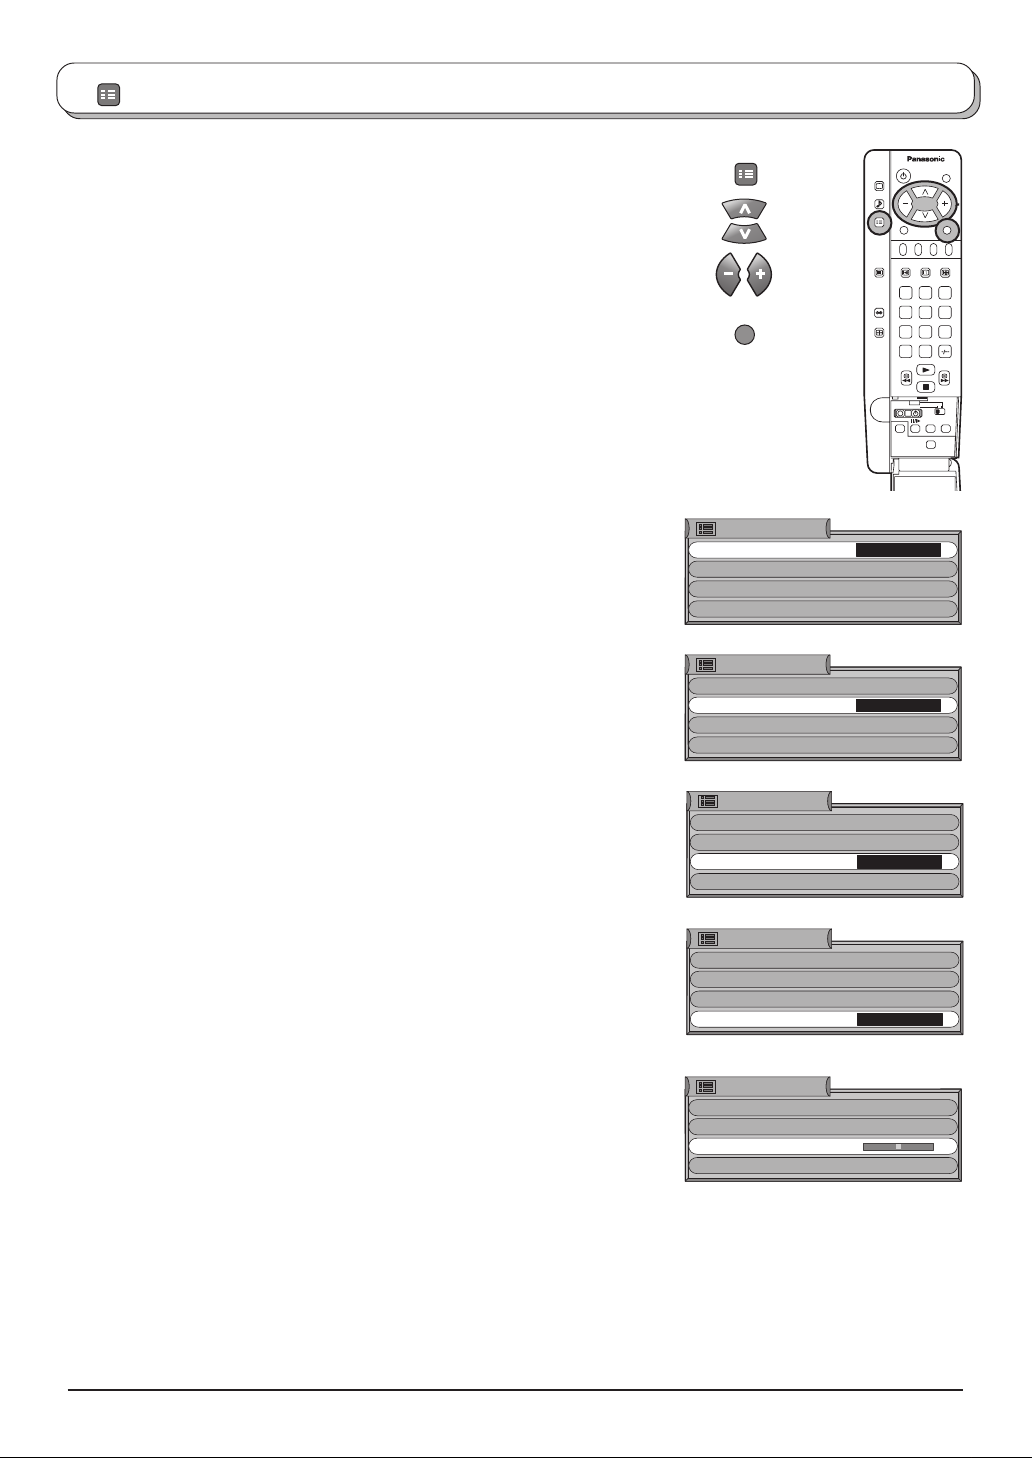
SET UP
Setup menu
Press the SETUP menu button
Move to choose menu option
Adjust chosen option or access chosen menu
Press the TV/AV button at any time to go back to watching TV
Teletext
Allows you to choose between FASTEXT or LIST
mode. See page 23.
Off timer
Switches the TV off within a preset time which you
can choose from between 0 to 90 minutes in 15 minute
intervals.
SET UP
TV/AV
Setup menu
Teletext
Off timer
Comb filter
Tuning menu
Setup menu
Teletext
Off timer
Comb filter
Tuning menu
1 2 3
4 5 6
7 8 9
C
N
FASTEXT
Off
On
FASTEXT
Off
On
0
Comb filter
Tuning menu
Volume
correction
Occasionally, whilst viewing still or slow moving
pictures, colour patterning may be seen. Set Comb
filter to On to display sharper and more accurate
colours.
Provides access to many other features including
Programme edit and Auto setup. See page 15-17.
During AV mode, Volume correction is displayed.
Y ou can adjust volume level of each AV mode. Volume
level is memorised.
Setup menu
Teletext FASTEXT
Off timer
Comb filter
Tuning menu
Off
On
Setup menu
Teletext
Off timer
Comb filter
Tuning menu
FASTEXT
Off
On
Access
Setup menu
Teletext FASTEXT
Off timer
Volume correction
Comb filter
Off
On
13
Page 14
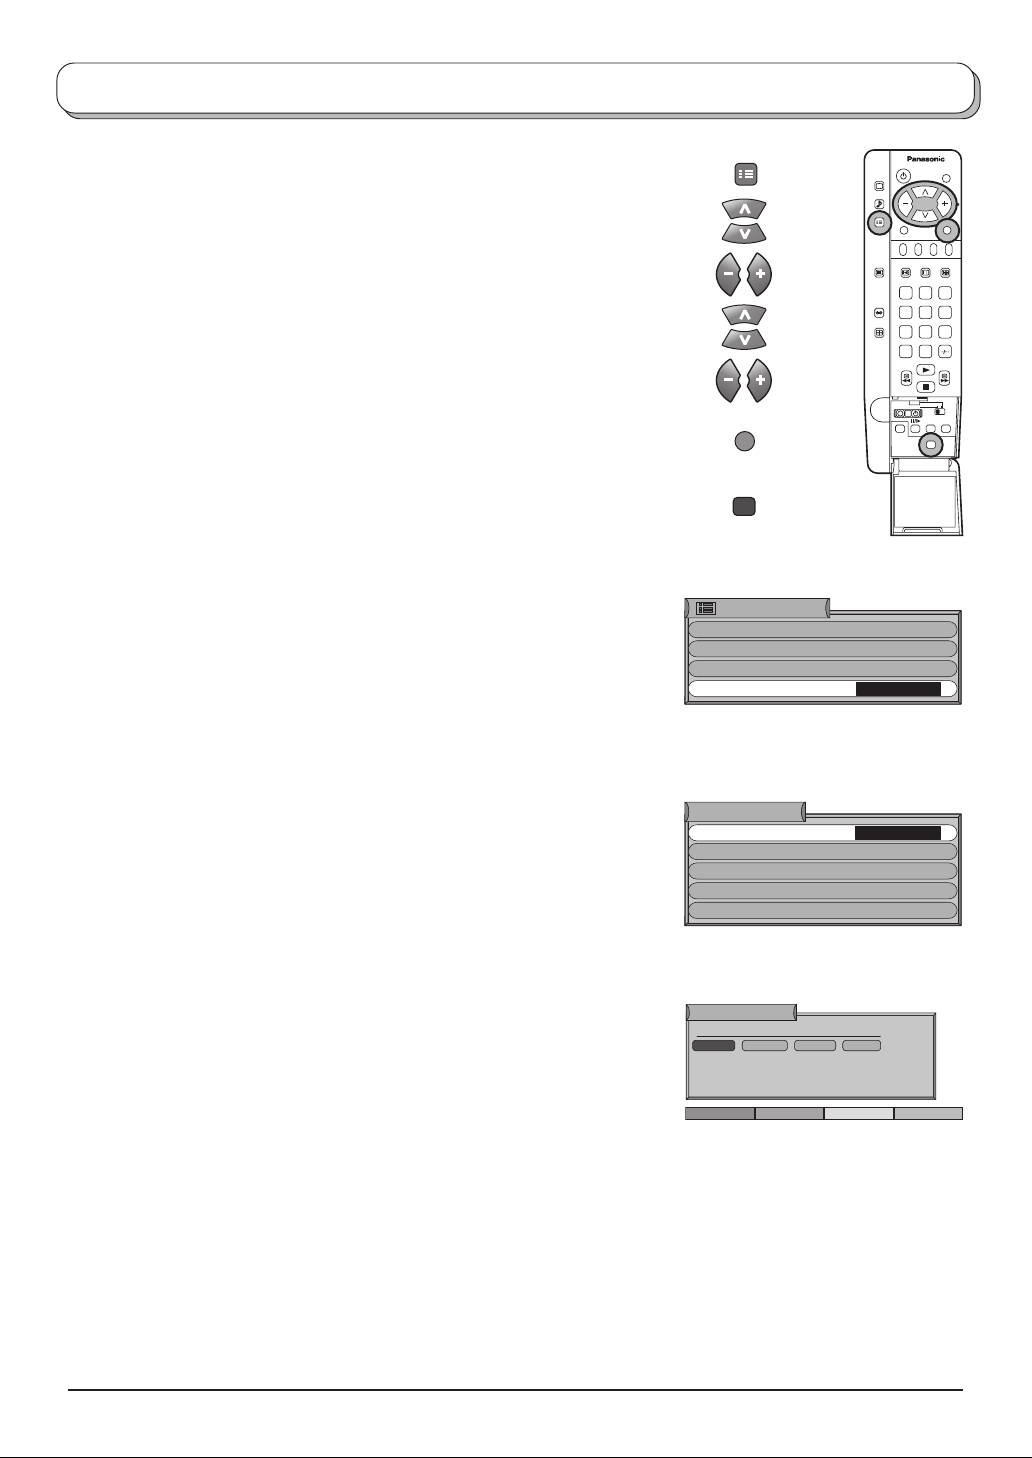
Tuning menu - overview
Press the SETUP menu button
Move to Tuning menu option
Access Tuning menu
Move to choose menu option
Adjust chosen option or access chosen menu
Press the TV/AV button at any time to go back to watching TV
Pressing the STR button after having adjusted some features
will store the setting as the default (replacing the factory setting).
Programme edit
Access in order to customize your programme
settings (eg: adding or deleting a programme position)
See page 15.
Auto setup
Allows you to automatically retune the TV. Useful if
you move house and wish to retune your TV to the
local stations. See page 17.
SET UP
TV/AV
STR
Setup menu
Teletext
Off timer
Comb filter
Tuning menu
1 2 3
4 5 6
7 8 9
C
N
FASTEXT
Off
On
Access
0
Manual tuning
Shipping
condition
Owner ID
Allows individual programme positions to be tuned
manually. See page 18.
Allows you to clear all tuning information and reset
all control levels back to factory settings.
See page 19.
Allows you to enter a security code and address
information. See page 20.
Tuning menu
Programme edit
Auto setup
Manual tuning
Shipping condition
Owner ID
Programme edit
Prog. Chan. Name Lock
CH44
1 :
CH51
2 :
CH41
3 :
CH47
4 :
CH37
5 :
Delete Add Move
ABC
XYZ
FTP
123
456
Off
Off
Off
Off
Off
Access
14
Page 15
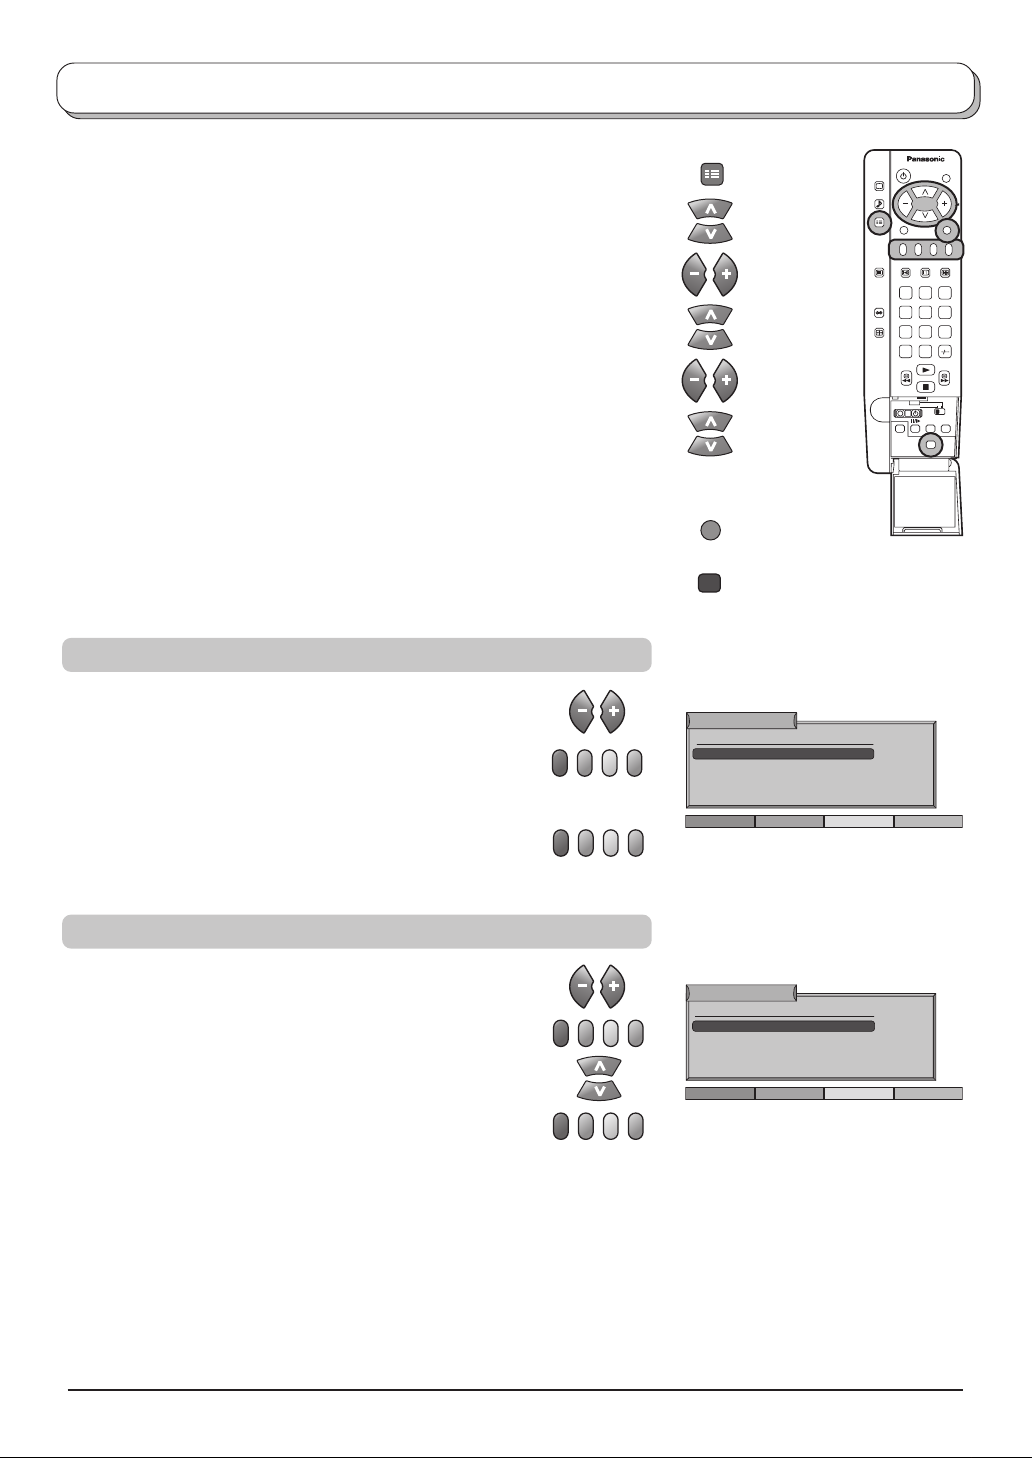
Tuning menu - Programme edit
Press the SETUP menu button
Move to Tuning menu option
Access Tuning menu
Move to Programme edit option
Access Programme edit
Move to choose programme position (eg: Prog. 3)
Make required change, eg: moving a programme channel (see
the relevant procedure below)
Press the TV/AV button at any time to go back to watching TV
Pressing the STR button after having adjusted some features
stores the change made
Adding / deleting a programme channel
Make sure the cursor is in the Prog. column
Press the green button to add a programme channel
to the programme position, or the red button to delete
one
Press the same button again to confirm your decision
SET UP
TV/AV
STR
Programme edit
Prog. Chan. Name Lock
1 :
2 :
3 :
4 :
5 :
CH44
CH51
CH41
CH47
CH37
Add
ABC
XYZ
FTP
123
456
1 2 3
4 5 6
7 8 9
0
C
N
Off
Off
Off
Off
Off
Cancel
Moving a programme channel
Make sure the cursor is in the Prog. column
Press the yellow button
Choose the new position for the programme channel
Press the yellow on screen selector key again to confirm
your decision
Programme edit
Prog. Chan. Name Lock
CH44
1 :
CH51
2 :
CH41
3 :
CH47
4 :
CH37
5 :
ABC
XYZ
FTP
123
456
Off
Off
Off
Off
Off
Confirm
Cancel
15
Page 16
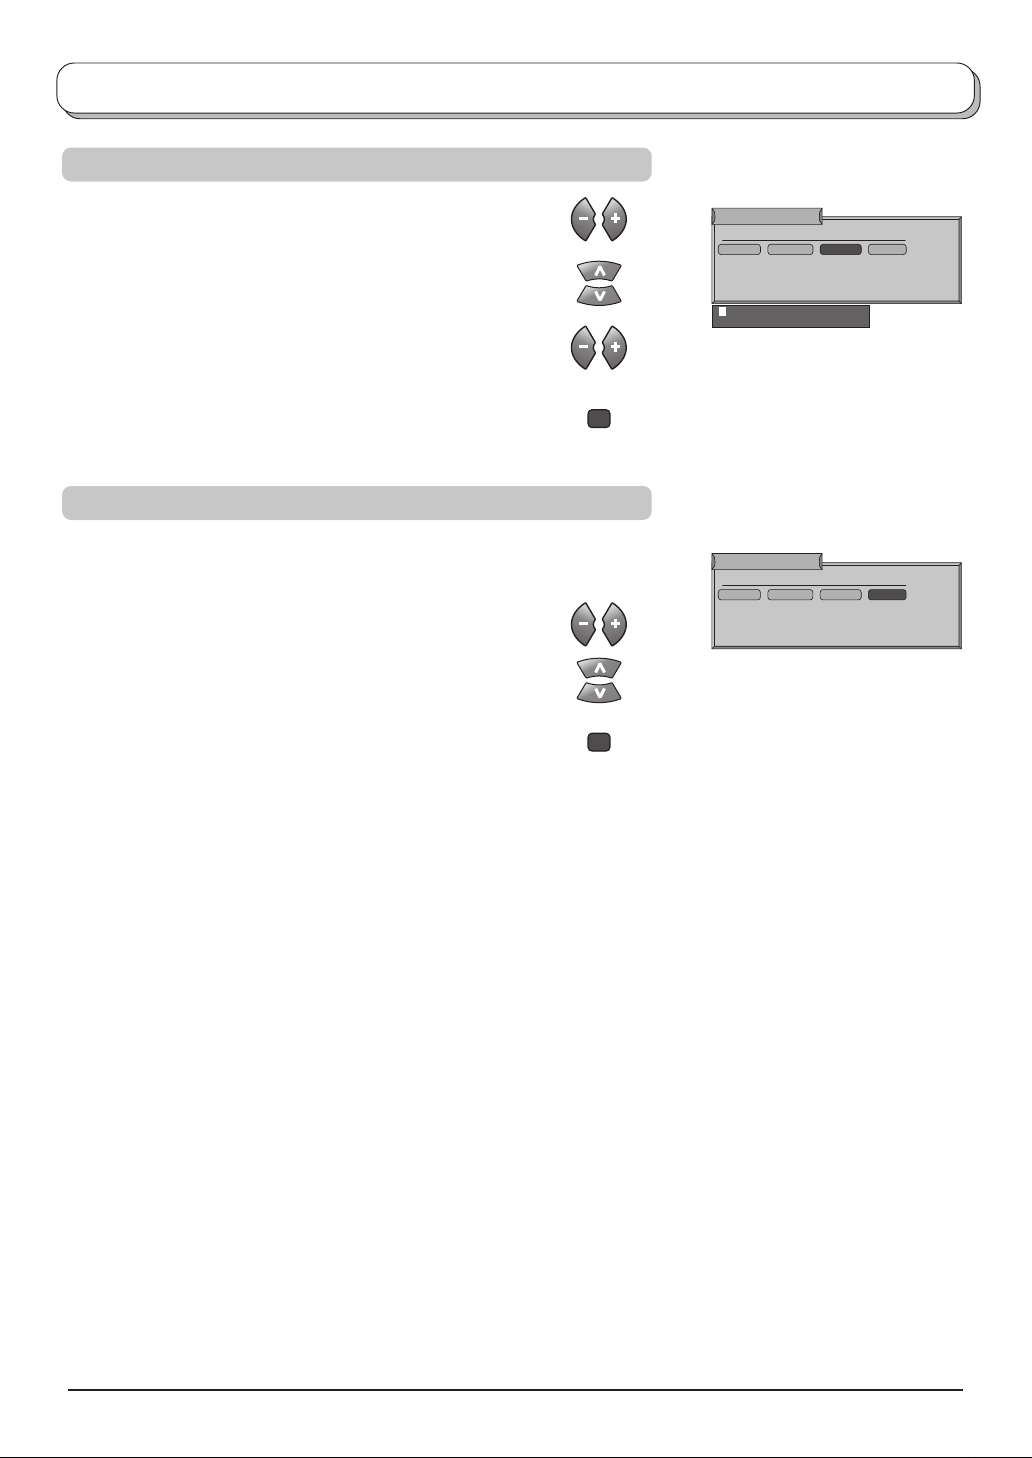
Tuning menu - Programme edit
Renaming a programme channel
Move to the Name column
Choose the new character. The box at the bottom of
the screen shows the character currently selected.
Move to the next character position
Continue until renaming is done
Press STR to store the new name
Locking a programme channel
Y ou may wish to lock a programme channel to prevent
access to it.
Move to the Lock column
Choose between Lock On or Lock Off
Press STR to store the new setting
Note:
When a programme position is locked, Direct Channel
Access using the C and numeric buttons on the remote
control is not available.
STR
STR
Programme edit
Prog. Chan. Name Lock
1 :
2 :
3 :
4 :
5 :
ABCDEFGHIJKLMNOPQRST
UVXWYZ+
Programme edit
Prog. Chan. Name Lock
1 :
2 :
3 :
4 :
5 :
CH44
CH51
CH41
CH47
CH37
-.
CH44
CH51
CH41
CH47
CH37
ABC
XYZ
FTP
123
456
0123456789
ABC
XYZ
FTP
123
456
Off
Off
Off
Off
Off
Off
Off
Off
Off
Off
16
Page 17
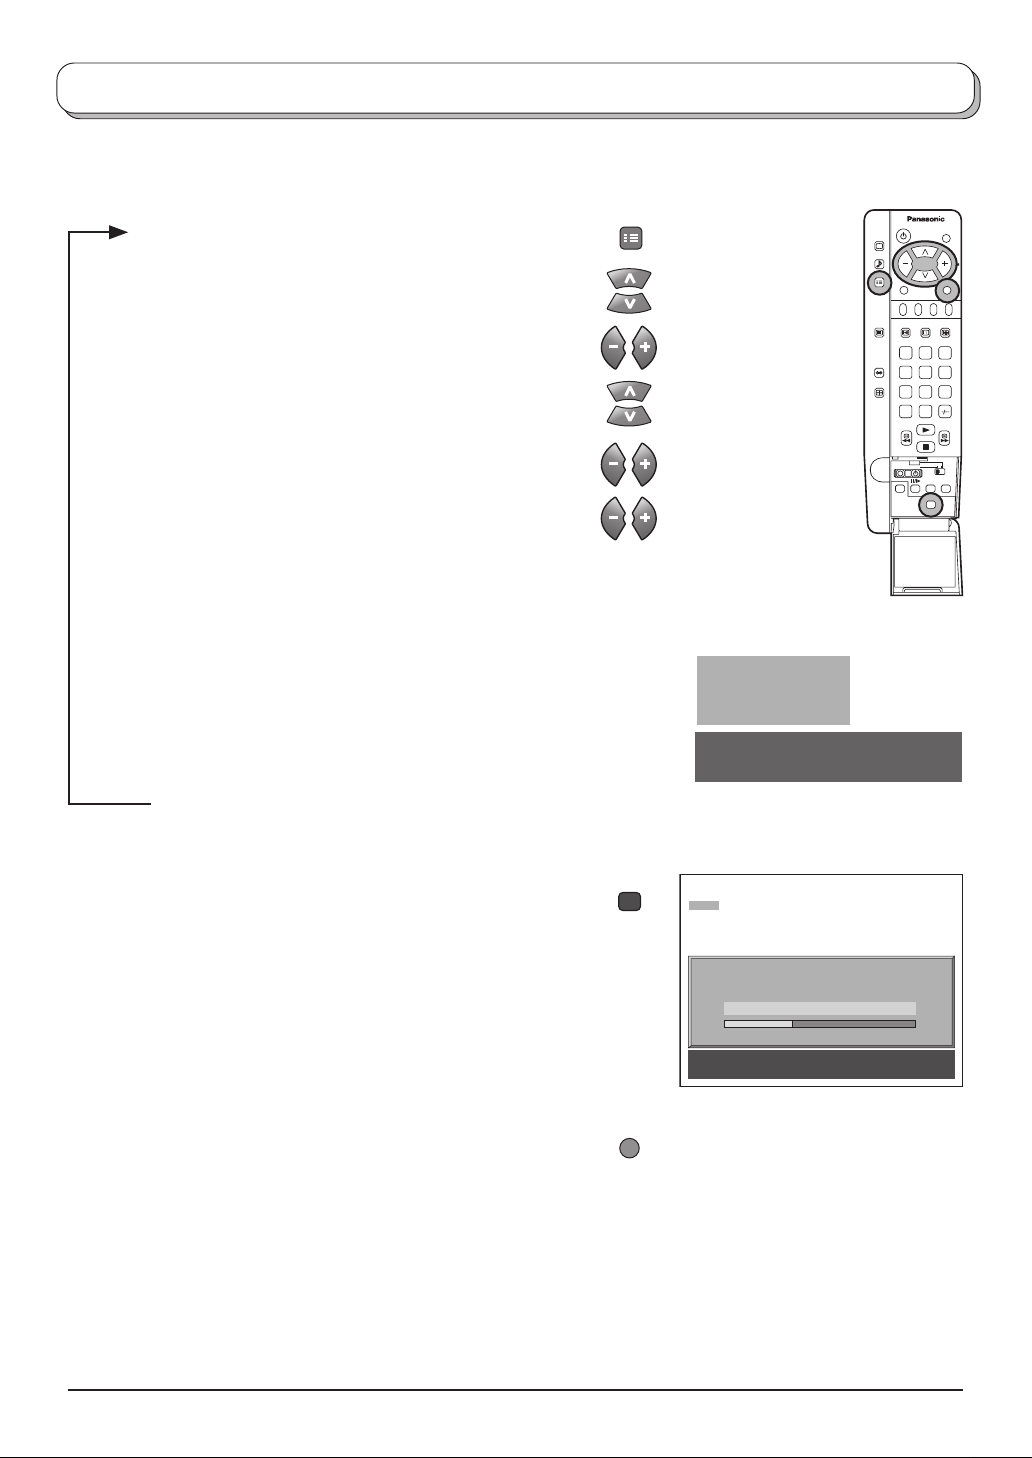
Tuning menu - Auto setup
Auto setup automatically retunes your TV. This feature is useful if, for example, you move house and wish to
retune your TV to receive the local stations.
Press the SETUP menu button
Move to Tuning menu option
Access Tuning menu
Move to Auto setup
Access Auto setup
Press to confirm start
Note:
If you proceed with the next step all tuning data
will be erased (all stations and their programme
positions stored in your TV’s memory will be wiped
out so the new settings can be stored).
If you exit the procedure after this point and before
Auto setup is complete, no station information will
be stored. Restart and complete the Auto setup
procedure so that the TV is retuned.
SET UP
WARNING
All current tuning
data will be erased
STR : Start Auto Setup
TV/AV : To exit
SETUP : Return to tuning menu
1 2 3
4 5 6
7 8 9
C
N
0
Press STR to start Auto setup
The TV will search for, locate, store and then sort
into order your local stations.
Once this operation is completed the TV will
display the programme now stored on programme
position 1.
Press the TV/AV button at any time to go back to
watching TV (please read the Note in the above
procedure)
STR
TV/AV
CH44
AUTO SETUP IN PROGRESS
SEARCHING : PLEASE WAIT
Stored CH44
21 68
SETUP : Return to tuning menu
TV/AV : To exit
17
Page 18
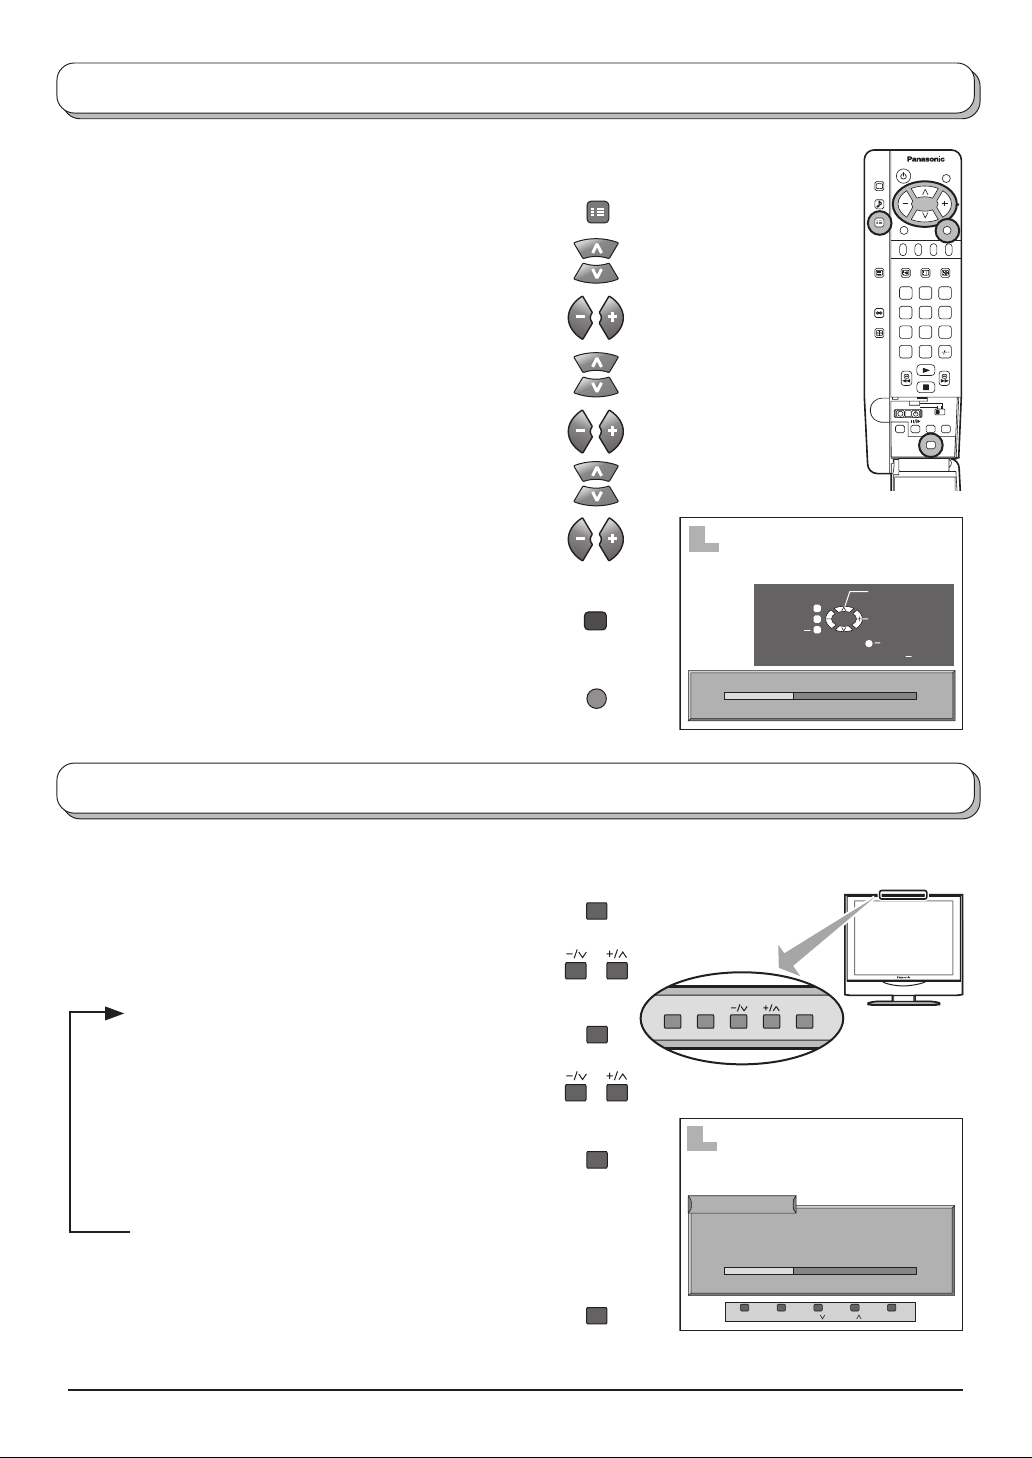
Tuning menu - Manual tuning
STR F TV/AV
It is possible to retune individual programme positions:
Press the SETUP menu button
Move to Tuning menu option
Access Tuning menu
Move to Manual tuning
Access Manual tuning
Select the programme position to be tuned
Press repeatedly until required station is found
When the desired station is found, press STR to store.
The programme position will flash
Press the TV/AV button at any time to go back to
watching TV
SET UP
STR
TV/AV
1
CH44
Return
Manual tuning
21 68
TV/AV
'STR' Button Store
1 2 3
4 5 6
7 8 9
C
N
Programme
down / up
Search
down / up
Exit
0
Manual tuning (via Top panel)
It is also possible to use the control panel buttons on the Top of your LCD TV to tune individual programme positions:
Press the F button (Top panel) until Tuning mode
is reached
-
Press the
or + button to access Tuning mode
Press the TV/AV button to move between Change
programme and Search
Press the
-
or +button to change programme
position or start search
When the desired station is found, press STR to
store.
The programme position will flash
Repeat above procedure to tune additional
programme positions
Press the F button at any time to go back to
watching TV
F
TV/AV
STR
F
1
CH44
Manual tuning
-
/ + : Search
TV / AV : Move cursor
STR : To store
F : To exit
21 68
STR F- / + / TV / AV
18
Page 19
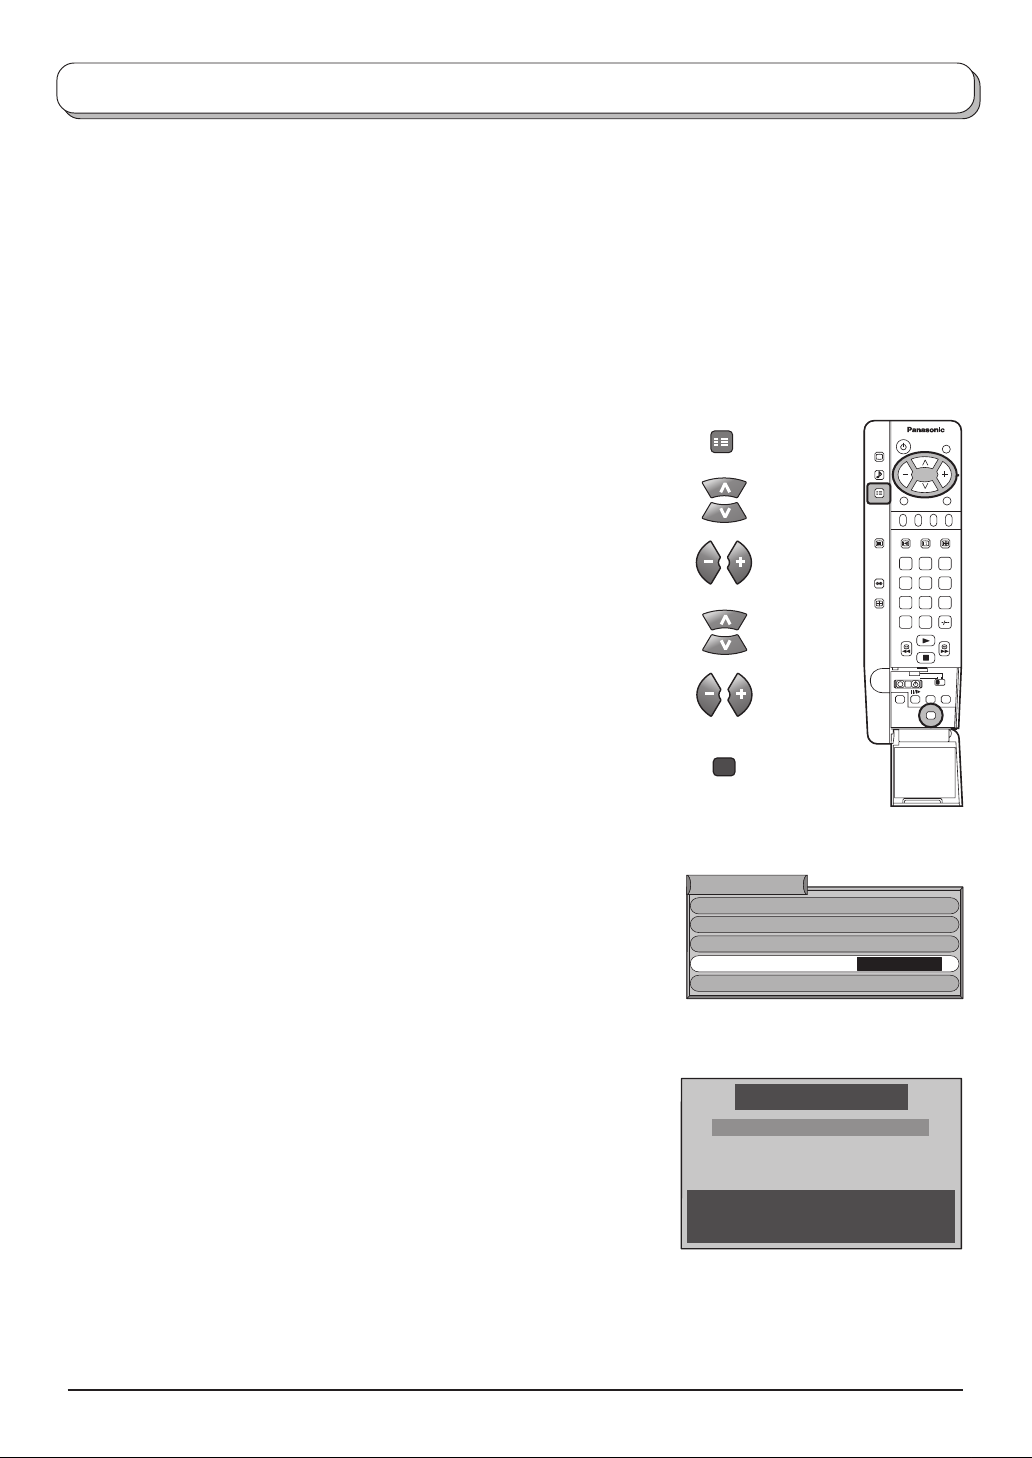
Shipping condition
Shipping condition allows you to reset the TV to its original condition, i.e. no channels tuned in.
This is useful, for example, if you move to a different area when you will probably want the TV to tune itself to
your new local stations.
This can be done either through the Shipping condition menu or through the Auto setup menu.
The Shipping condition menu will reset all data, clearing all tuning information and resetting all control levels
back to factory settings.
You may need to adjust your VCR or programme position '0' VCR after operating the Shipping condition
menu.
Press the SETUP menu button
Move to Tuning menu option
Access Tuning menu
Move to Shipping condition
Access Shipping condition
Press STR to start
Press again, to confirm, each time that you are asked,
"Are you sure?"
Switch TV off and wait for a few seconds
SET UP
STR
Tuning menu
Programme edit
Auto setup
Manual tuning
Shipping condition
Owner ID
Access
1 2 3
4 5 6
7 8 9
C
N
0
Switch TV on again
Auto setup will begin, stations will be located, sorted
and stored ready for use. See page 17.
Shipping condition
All tuning data will be erased
STR : Start
TV/AV : To exit
SETUP : Return to tuning menu
19
Page 20
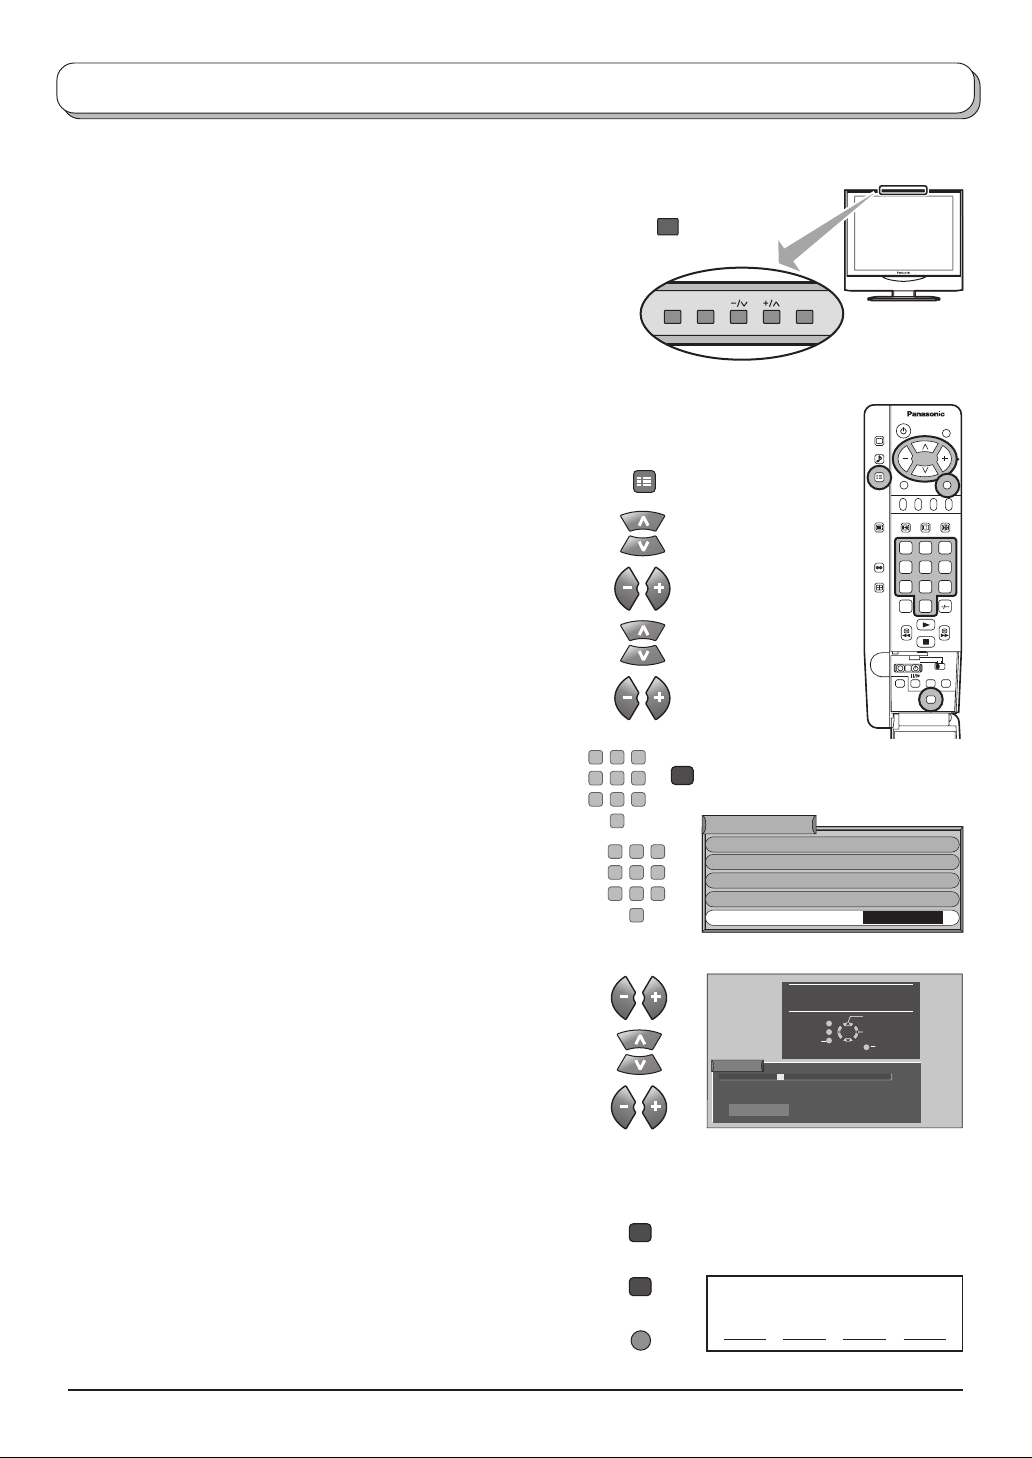
Owner ID
STR F TV/AV
Owner ID allows you to enter a security code(Owner ID) and personal details into its memory, so that in the
unfortunate event of theft it will help the police to trace the owner.
If you wish to check the personal details already
entered into the TV, press the F button(Top panel) and
hold for 6 seconds(initially the volume level function will
appear, as you continue to hold down the F button it will
disappear again, and the Owner ID information will
appear). The details already entered are displayed on
screen.
If Owner ID information was not entered when you switched on
your TV for the first time or it is necessary to alter some of the
information, Owner ID can be re-accessed via the Tuning menu.
Press the SETUP menu button
Move to Tuning menu option
Access Tuning menu
Move to Owner ID
F
SET UP
1 2 3
4 5 6
7 8 9
C
N
0
Access Owner ID
If the Owner ID has previously been set, enter the PIN
NUMBER(using 0 to 9 on the remote control) followed by
STR to proceed, this will take you to the NAME option
If no Owner ID has previously been set, enter the required
4 digit Owner ID PIN NUMBER(using 0 to 9 on the remote
control)
If a 4 digit PIN NUMBER was entered above, you will be
taken automatically to the NAME line
If not, move to the NAME line
Change character
Select character position
Repeat above until NAME, HOUSE NUMBER and
POSTCODE are entered
Press STR to store the details.
Press again when you are asked, "Are you sure?"
The Tuning menu will be displayed
Press the TV/AV button to exit
1 2 3
4 5 6
7 8 9
0
1 2 3
4 5 6
7 8 9
TV/AV
0
STR
STR
STR
Tuning menu
Programme edit
Auto setup
Manual tuning
Shipping condition
Owner ID
Owner ID
Access
You now have the opportunity
to enter your details and
help the police crack crime
PIN NUMBER:
NAME:
HOUSE NO:
POST CODE:
0123456789
see instruction book
Return
’STR’ Button - Store Owner ID
∗∗∗∗
∗∗∗∗∗∗∗∗∗∗∗∗∗∗
∗∗∗∗∗∗∗∗∗∗∗
∗∗∗∗∗∗∗∗∗∗∗
TV/AV
Change
Character
Select
character
Exit
For future reference,
write your PIN NUMBER here
:
20
Page 21
Aspect Controls
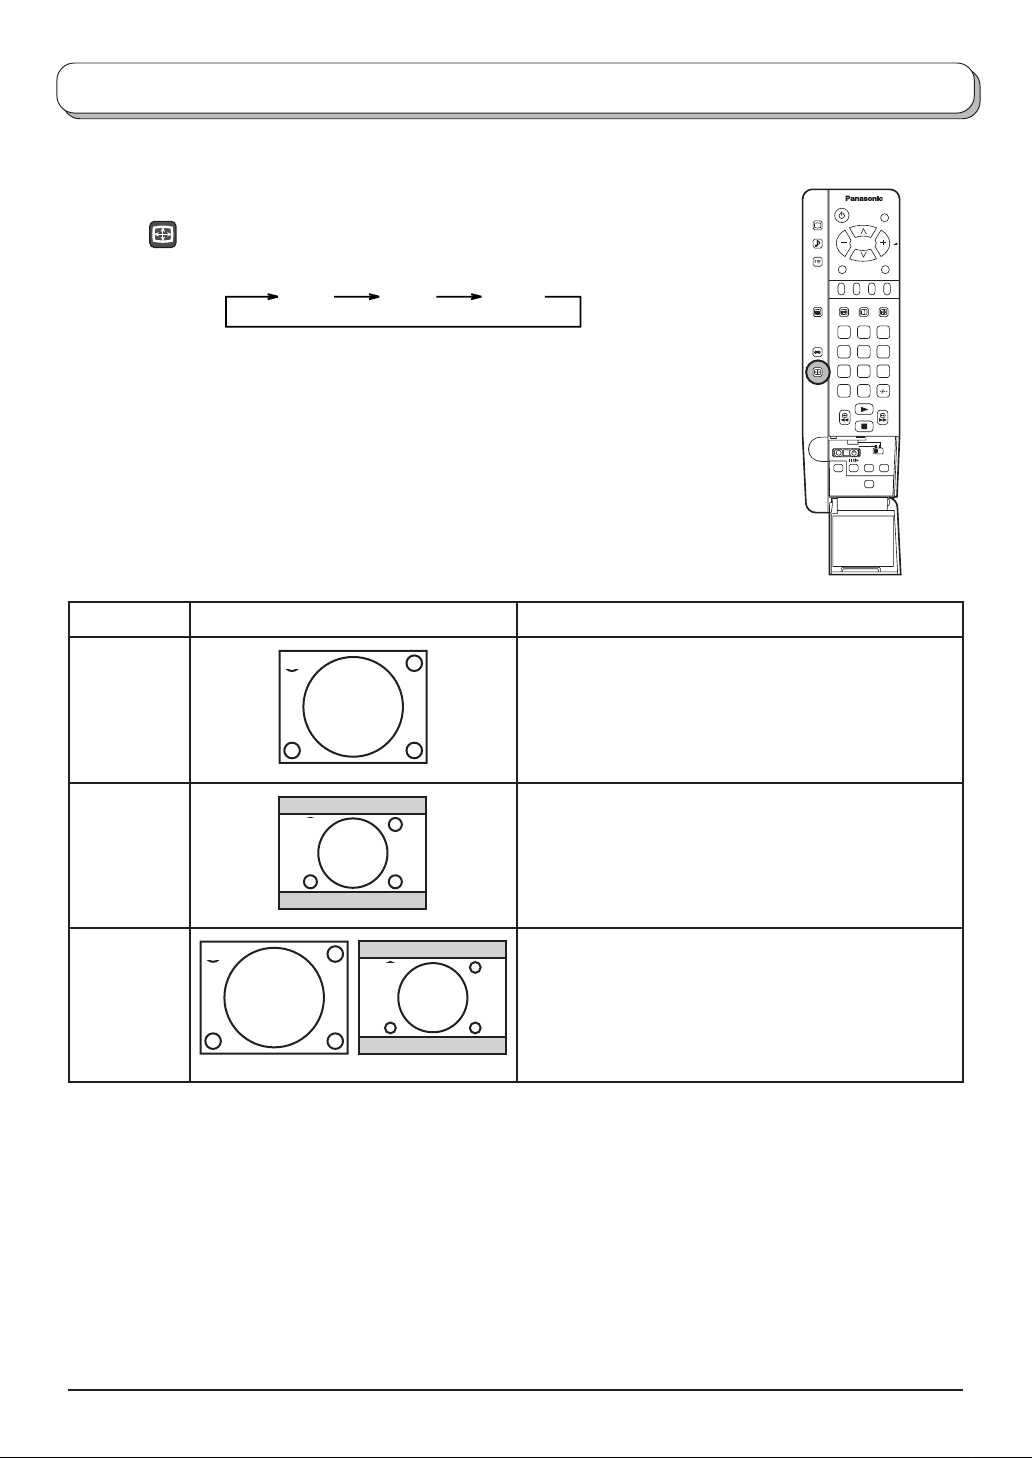
The TV will allow you to enjoy viewing the picture at its optimum size and aspect.
ASPECT
ASPECT button
The aspect mode changes each time the ASPECT button is
pressed.
4 : 3Auto
16 : 9
Mode Picture Explanation
4 : 3
4:3 will display a 4:3 picture at its standard 4:3
size and can be selected if you wish to view in this
4 : 3
format.
1 2 3
4 5 6
7 8 9
0
C
N
16 : 9
Auto
16 : 9
4 : 3
16 : 9
4:3 Signal 16:9 Signal
16:9 will display a 16:9 picture at its standard 16:9
size and can be selected if you wish to view in this
format.
Selecting AUTO mode of this TV will automatically
cause the TV to display any incoming picture at its
correct format, i.e. 16:9 or 4:3.
21
Page 22
VCR / DVD operation
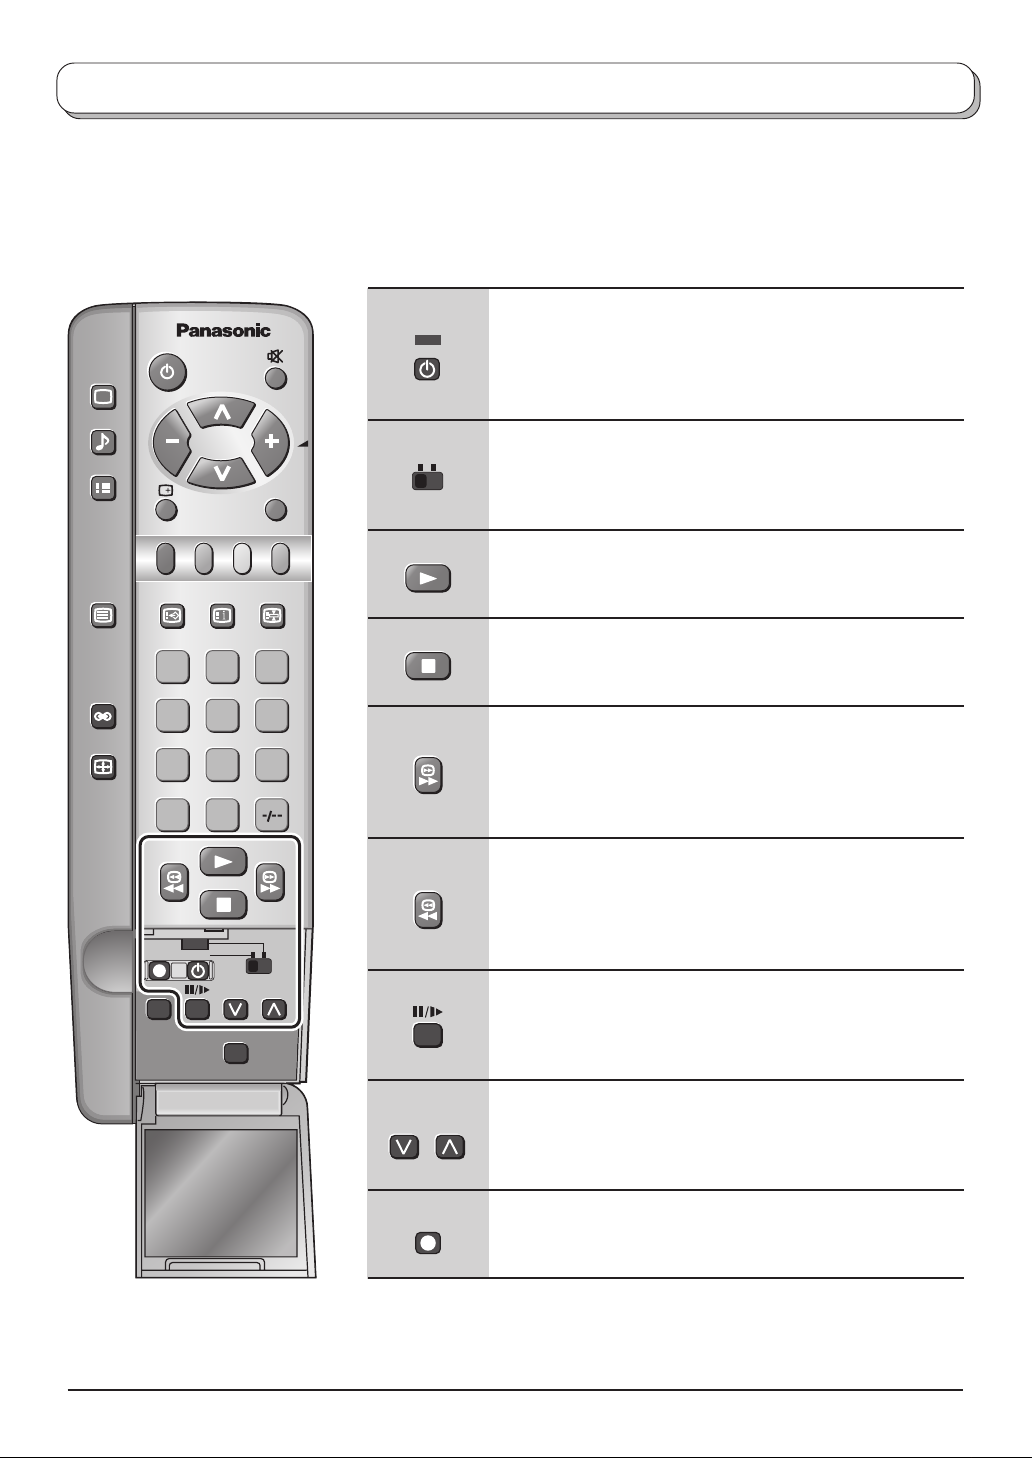
The Remote Control is capable of operating some functions of selected Panasonic VCRs and DVD (Digital
Versatile Disc) equipment. Some VCR and DVD equipment have different functions, so to ensure compatibility
please refer to the equipment’s instruction book or consult your dealer for details.
PICTURE
SOUND
SET UP
TV/TEXT
ASPECT
INDEX HOLD
F.P.
1 2 3
4 5 6
7 8 9
VCR
0
C
DVD
REC-VCR
TV/AV
DVD
VCR
Standby
Press to switch the VCR, DVD or DVD recorder to
standby mode.
Press again to switch back on.
VCR / DVD switch
Use this switch to select whether controls operate
DVD equipment or your VCR.
Play
Press to playback the tape or DVD.
Stop
Press to stop the tape or DVD.
Skip / Fast Forward / Cue
VCR: Press to fast forward the tape. In Play mode,
press to view the picture rapidly forward (Cue).
DVD: Press once to skip to the next track.
Skip / Rewind / Review
VCR: Press to rewind the tape. In Play mode, press to
view the picture rapidly in reverse (Review).
DVD: Press once to skip to the previous track.
22
PROGRAMME
N
STR
PROGRAMME
Pause / Still (VCR only)
Press in playback mode, the picture will pause.
Press again to restart play.
Programme Up / Down (VCR only)
Press to increase or decrease the programme position
by one.
REC
Record (VCR only)
Press this button to start recording.
Page 23
Teletext operation
• Teletext features may vary depending on the Broadcasting Companies and is only available if the channel
selected is transmitting Teletext.
• Pressing the Picture button whilst in Teletext operation will display the backlight function with a white bar and
the contrast function with a cyan bar, press
• Pressing the Setup button whilst in Teletext operation will display special function options at the bottom of the
screen.
• Pressing the Sound button whilst in Teletext operation will display the volume function with a green bar, press
to alter the setting as required.
What is LIST mode ?
In LIST mode, four differently coloured page numbers are situated at the bottom of the screen. Each of these
numbers can be altered and stored in the TV’s memory.
What is FASTEXT?
In FASTEXT mode, four differently coloured subjects are situated at the bottom of the display. To access more
information about one of these subjects, press the appropriately coloured button. This facility enables fast
access to information on the subjects shown.
to alter the setting as required.
SET UP
SET UP
1 2 3
4 5 6
7 8 9
0
TV/TEXT
1 2 3
4 5 6
7 8 9
0
Green
Red
STR
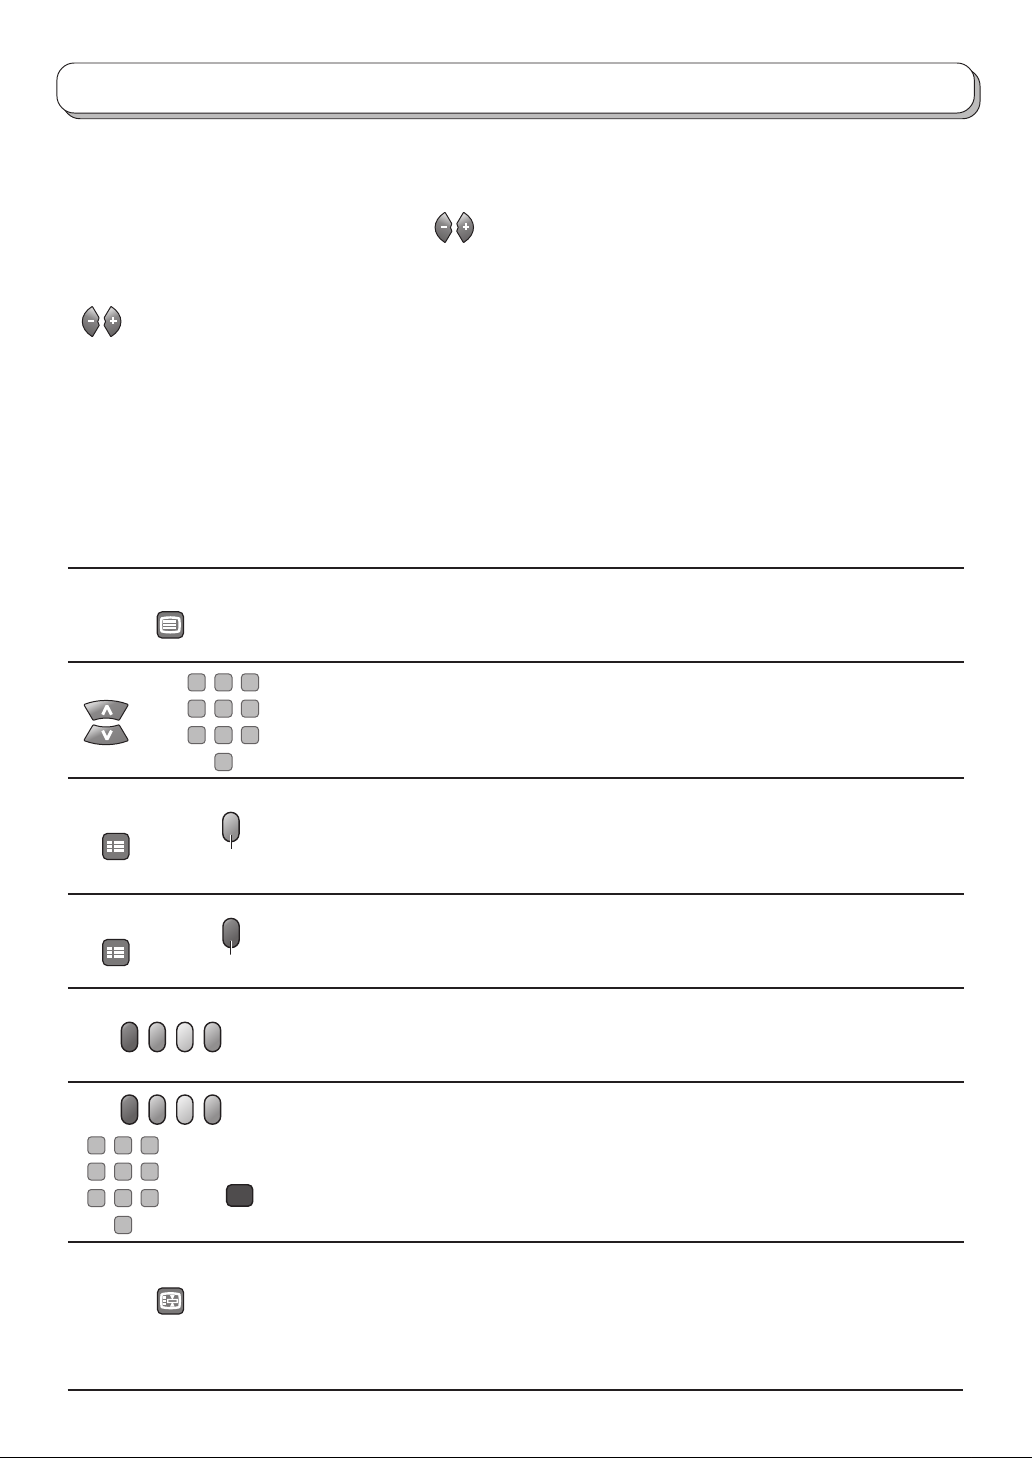
TV / Teletext mode
Press the TV/TEXT button to switch between the current programme and teletext.
Page Selection
Pages can be selected in two ways :
a. Press the Up / Down buttons to increase or decrease the page number by one.
b. By entering the page number, using 0 - 9 on the remote control.
Full / Top / Bottom
Press the SET UP button to display special functions, followed by the Green button.
Press the Green button again to expand the BOTTOM half.
Press again to return to normal (FULL) size.
Reveal
Press the SET UP button to display special functions, followed by the Red button to
reveal hidden words e.g. quiz page answers. Press again to hide.
Red / Green / Yellow / Blue buttons
In FASTEXT mode these correspond to the differently coloured subjects.
In LIST mode they correspond to the differently coloured page numbers.
List Store
In LIST mode the four page numbers can be altered (programme positions 1 - 25
only).
To do this, press one of the four coloured buttons and enter the new page number.
Press and hold STR, the page numbers will change to white indicating that the page is
stored.
HOLD
HOLD
To hold the Teletext page when viewing multi-page information.
Press again to return to automatic page update.
23
Page 24
Teletext operation
It is not possible to change the programme position when in News flash, Update or Sub Coded Page Access
operation.
Blue
1 2 3
4 5 6
7 8 9
SET UP
1 2 3
4 5 6
7 8 9
STR
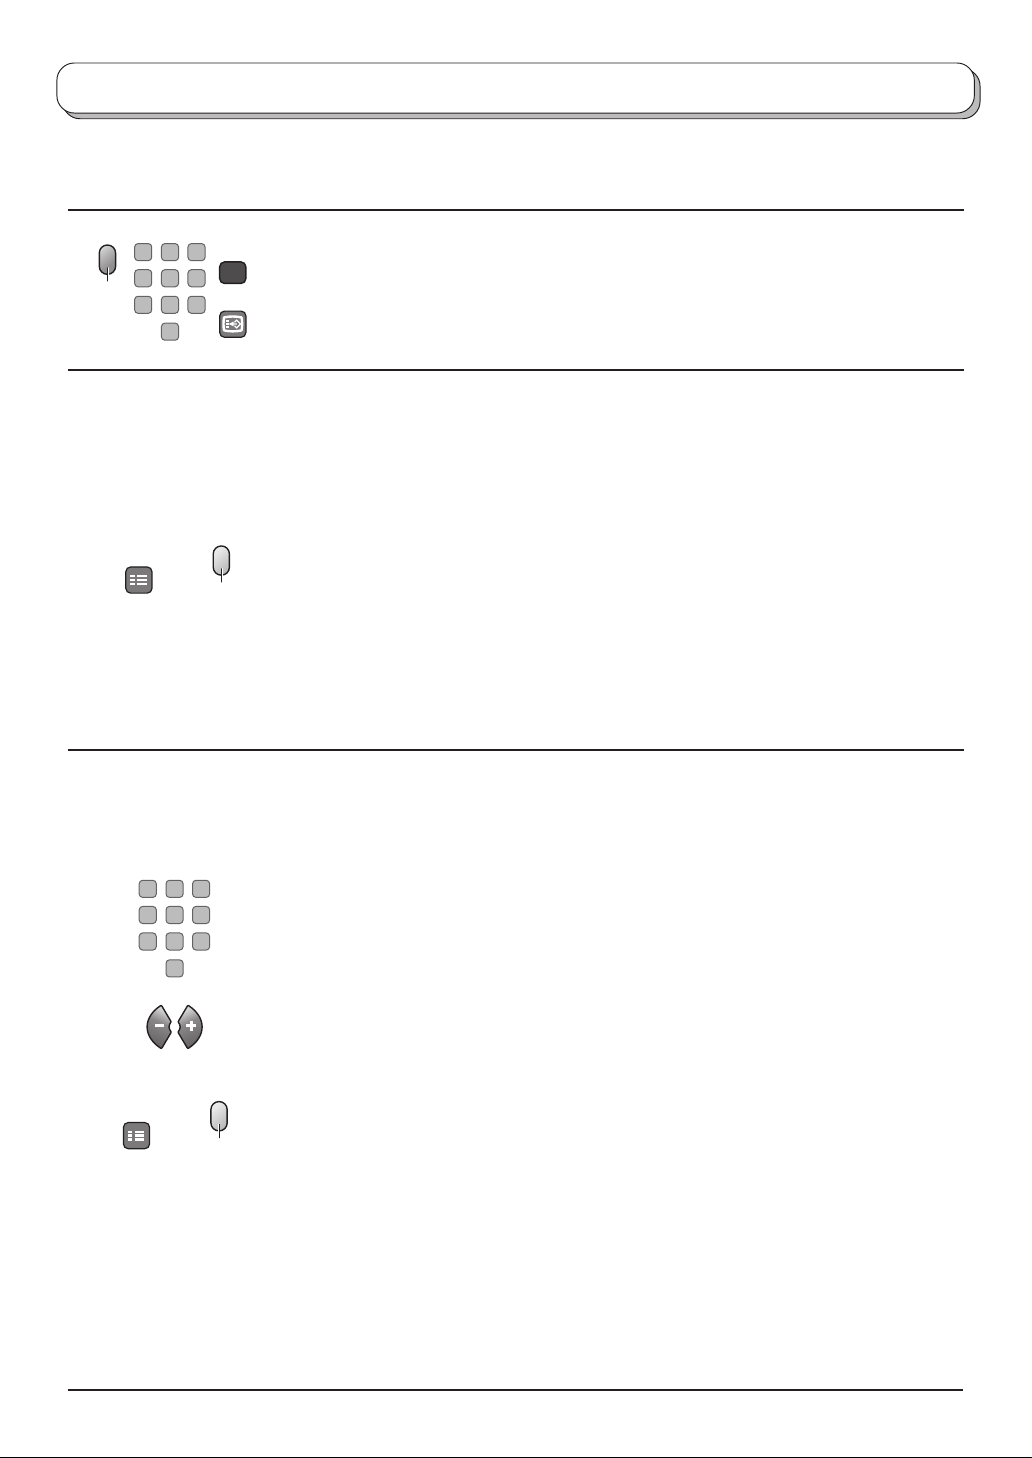
Stores a favourite page in memory for instant recall. To store such a page, the TV
must be in LIST mode, and the programme position must be from 1 - 25.
Favourite Page (F.P.)
F.P.
0
Press the Blue button, select the page number, then press and hold the STR button.
The page number is now stored.
Press F.P. to recall this page.
Update Display
Press the SET UP button to display special functions, followed by the Yellow button
to view the TV picture whilst searching for a Teletext page. When found, the screen
will display the page number at the top left. Press the Yellow button to view the page.
Press TV/TEXT again to return to normal TV operation.
News Flash
When a news flash page has been selected, press SET UP, Yellow, to view the TV
picture. When an update is received, the page number will be displayed on screen.
Press the Yellow button to display the News Flash
Yellow
Press TV/TEXT to return to normal TV operation.
Update
Press SET UP, Yellow to see the update of information on certain pages.
When an update is received, the page number will be displayed at the top left of the
screen.
Press the Yellow button to view the page.
Press TV/TEXT to return to normal TV operation.
Accessing sub pages
When Teletext information exceeds one page, it may take some time for the
automatic changing of the sub pages to reach the sub page you require. As each
sub page is found its number is displayed at the top of the page so that you may
select it; as more sub pages are picked up, the display at the top of the page
changes, so that you are always offered the most recently transmitted selection of
sub pages.
In Teletext operation, use the following procedure to access sub pages:
0
If the sub page you want to look at is not yet available, press the SET UP button (to
display special functions) followed by the Yellow button to view the TV picture
whilst waiting for more sub pages to be found. The sub pages found will be
displayed across the top of the screen.
24
SET UP
Yellow
When the sub page you are waiting for is available press the Yellow button to
return to viewing the Teletext pages, then use the left and right cursor buttons to
select the sub page of your choice.
Notes:
• If you do not want the four coloured special function keys to be displayed on the TV
picture whilst waiting for a sub page to be found, press either the PICTURE, SOUND
or SETUP menu button to clear the keys from the screen. Press the SET UP button
once more to redisplay the keys.
• If you have cleared the special function keys from the screen and then used the left
and right cursor buttons to select a sub page, whilst still viewing the TV picture, you
must press the SET UP button then the Yellow button to display the Teletext page
again.
Page 25
Teletext operation
• If the top of the page indicates that sub pages are being transmitted but the page
displayed never changes, then the ‘sub page number’ is there to show the page
contents have been updated, there are no sub pages.
SET UP
Blue
INDEX
Alternatively, if you know which sub page you require, press the SET UP button (to
display special functions) followed by the Blue button; T**** will be displayed where
the page number is normally found.
Enter desired sub page number before the T**** disappears.
For example, to select page 6 enter 0, 0, 0 and 6.
Press the Yellow button to view the TV picture whilst waiting for more sub pages to
be found. The sub pages found will be displayed across the top of the screen.
When the page is available, press the Yellow button to view the page. Regardless
of how many pages are found, pressing the Yellow button will take you to the sub
page which you requested.
Press TV/TEXT to return to normal TV operation.
Index
When in FASTEXT operation
Press INDEX to return to the main index page.
Depending on the way information is transmitted, this may have to be pressed more
than once to return to the main index page.
25
Page 26
Audio / video connections
It is possible to connect a variety of additional equipment to this TV. The following pages detail how to connect
external equipment to the rear of the TV.
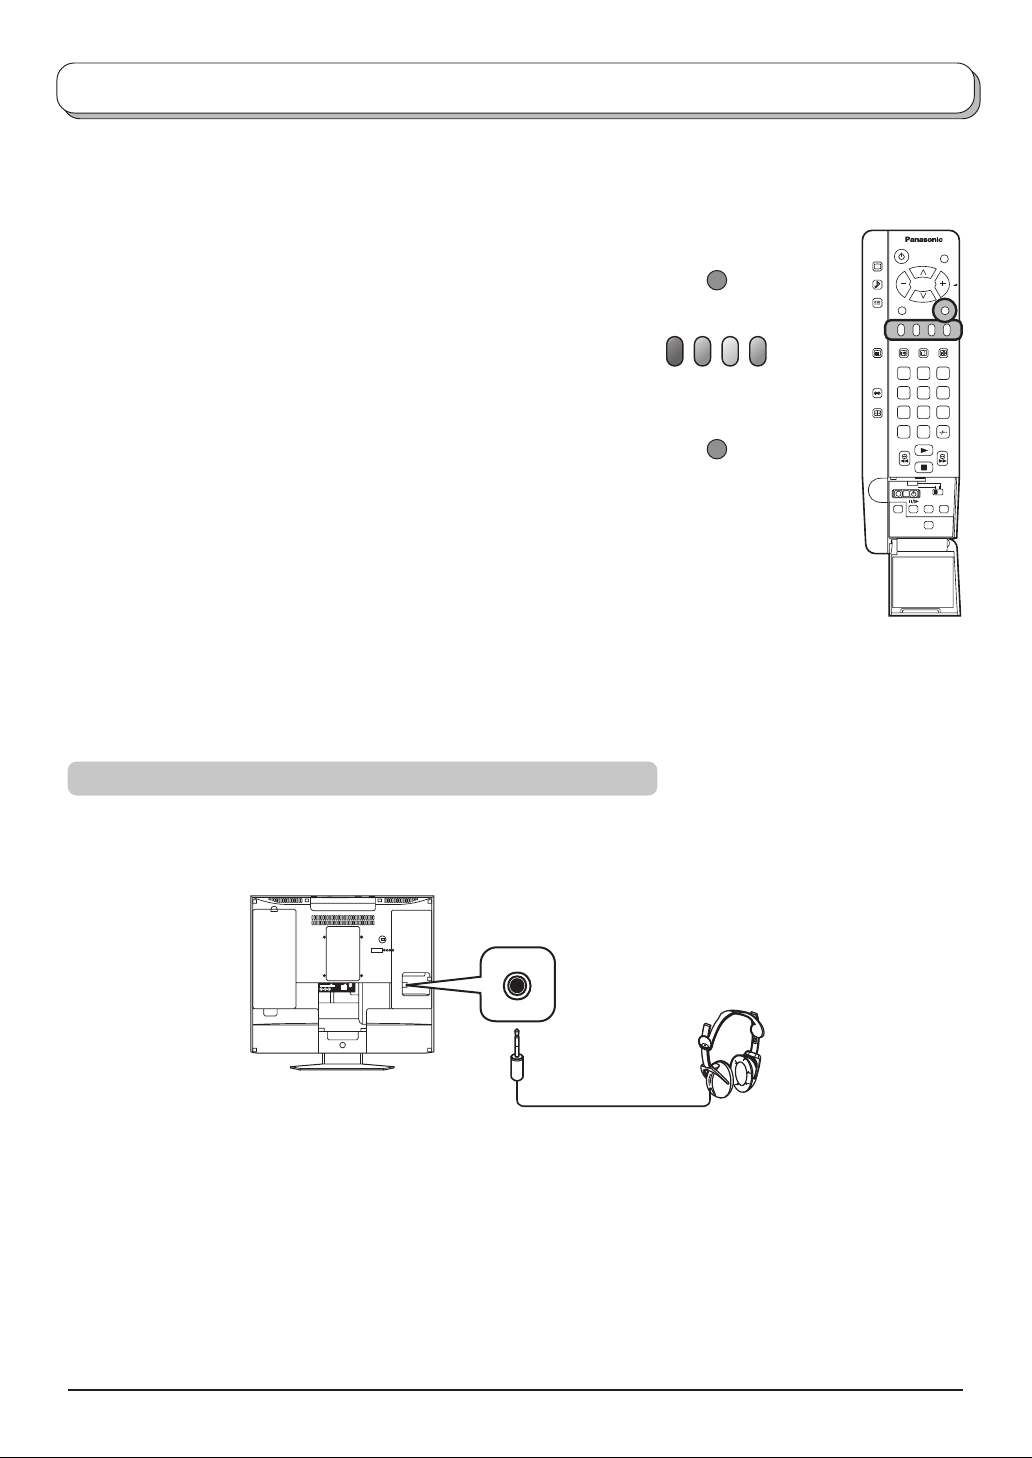
Once your equipment is connected, use the following procedure to view the input:
Press the TV/AV menu button
Press the relevant on screen selector key to select the AV source
you wish to view.
Red: AV1 Scart socket
Green: AV2/S
The on screen selector keys will disappear after a few seconds.
To make them reappear press one of the colour keys on the
remote control.
Notes:
• You can also select an AV source using the TV/AV button
on the control panel on the top of your TV.
Press the TV/AV button repeatedly until you reach the AV
source you wish to view.
• When in AV mode a reduced number of options are
available in the SOUND and SETUP menus (eg: in the
Setup menu there is no Tuning menu option).
Connecting Headphones / Earphones
TV/AV
TV/AV
1 2 3
4 5 6
7 8 9
C
N
0
Connect headphones / earphones as follows.
Example : TX-17LA1
(M3 plug)
(Not supplied)
Notes:
• The volume level of the headphones can be adjusted by selecting “Headphone volume” from the Sound menu.
• Additional equipment and cables shown are not supplied with this TV set.
26
Page 27
Audio / video connections
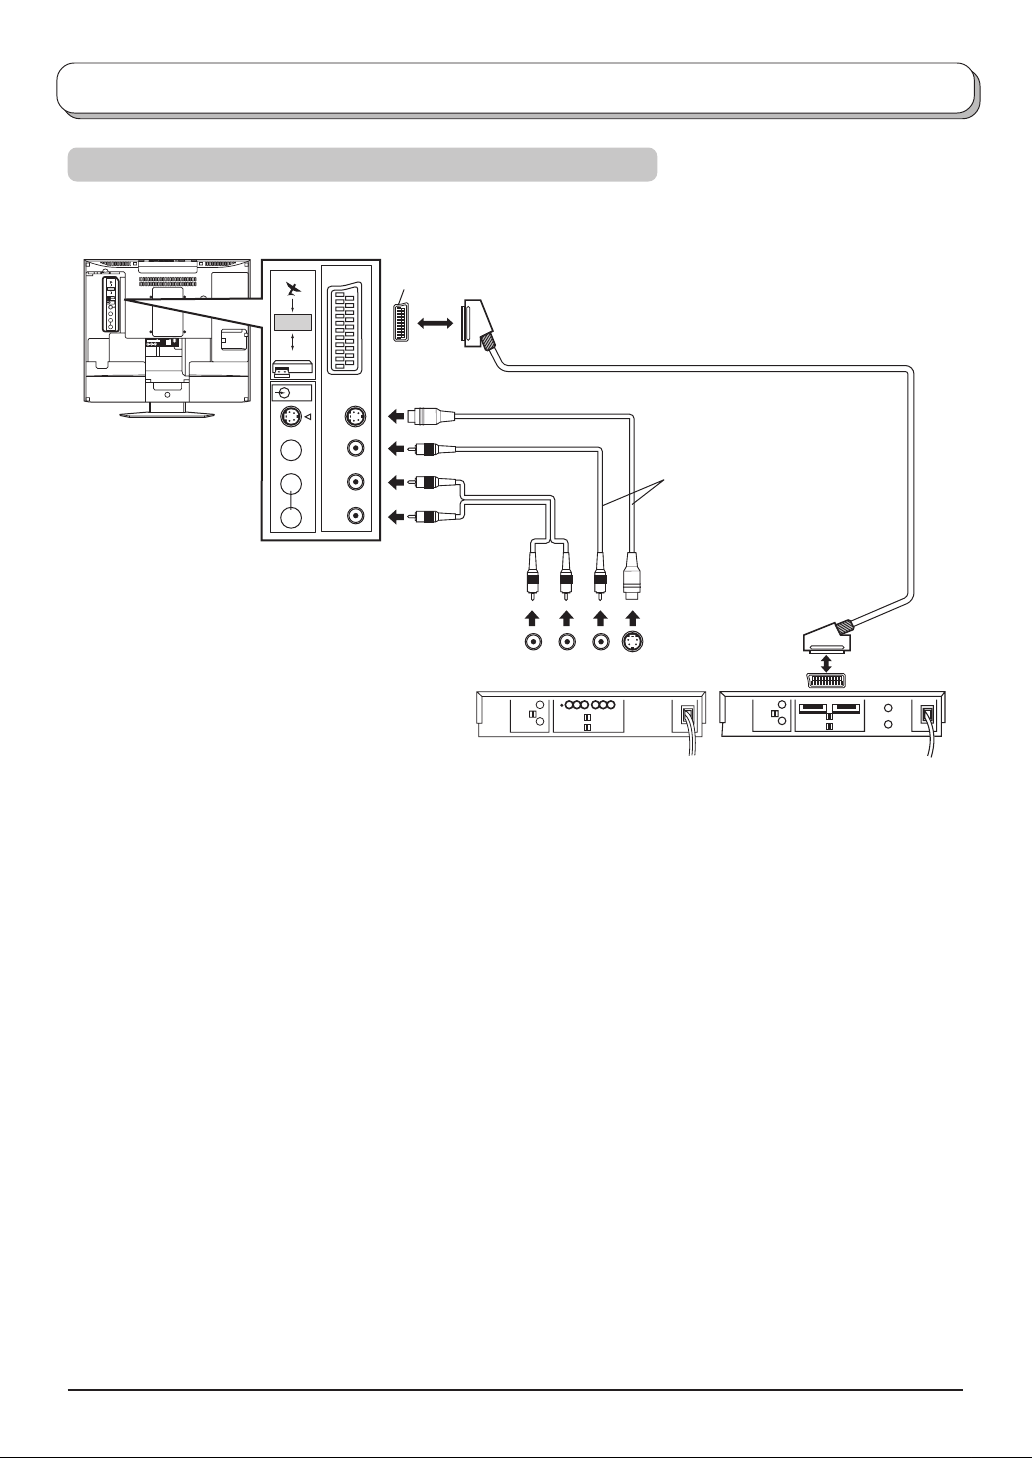
How to connect the input terminals
Example : TX-17LA1
R.G.B
AV1
VCR
AV2
S - V
V
L
R
R.G.B
AV1
VCR
AV2
S - V
V
L
R
Input/Output from
AV1 Scart Socket
S-VIDEO cable
VIDEO
AUDIO
(Examples:)
Scart cable
Connect the S-VIDEO or
VIDEO Terminal
R
VCR/S-VIDEO VCR
SET TOP BOX
DVD PLAYER
CAMCORDER
S-VIDEO CAMCORDER
Audio
OUT
Video
L
S-Video
OUT
OUT
VCR
SET TOP BOX
DVD PLAYER
CAMCORDER
GAMES CONSOLE
Notes:
• Additional equipment and cables shown are not supplied with this TV set.
• Do not connect a computer with TTL output (5V) to this set.
• For Scart socket wiring information see page 29.
27
Page 28
Troubleshooting
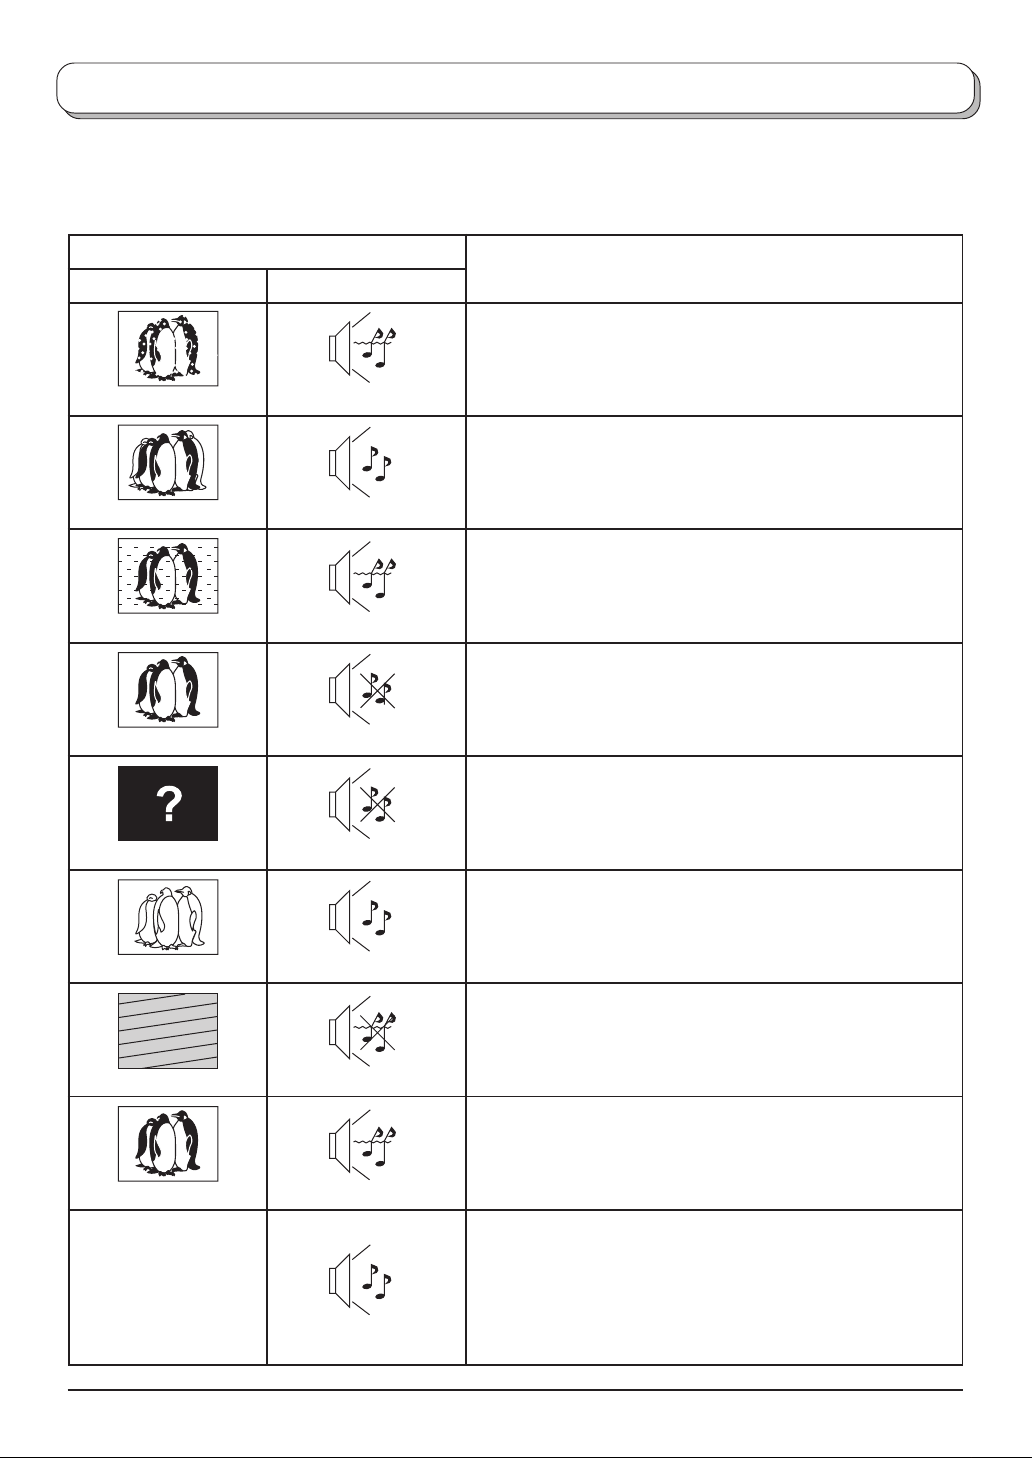
If there is a problem with your TV please refer to the table below to determine the symptoms, then carry out the
suggested check. If this does not solve the problem, please contact your local Panasonic dealer, quoting the
model number and serial number (both found on the rear of the TV).
Symptoms
Picture Sound
Snowy Picture
Multiple Images
Interference
Normal Picture
No Picture
Normal Sound
Noisy Sound
Noisy Sound
No Sound
No Sound
Checks
Aerial location, direction or connection
Aerial location, direction or connection
Electrical appliances
Cars / Motorcycles
Fluorescent lights
Switch on P-NR in Picture menu to reduce picture noise
Volume level
Sound mute switched on
TV set to AV mode
Not plugged into A.C. outlet
Not switched on
Picture / Sound controls set at minimum levels
Check if in standby mode
No Colour
Poor or Distorted Picture
Normal Picture
There may be red
spots, blue spots and
green spots on the
screen
28
Normal Sound
Weak or No Sound
Weak or Distorted Sound
Normal Sound
Colour controls set at minimum levels
Retune Channel (s)
Sound reception may have deteriorated.
Switch NICAM setting (Sound menu) to
Off until reception improves.
This is a characteristic of liquid crystal panels and is not a problem.
The liquid crystal panel is built with very high precision
technology giving you fine picture details. Occasionally, a
few non-active pixels may appear on the screen as a fixed
point of blue, green, or red.
Please note this does not affect the performance of your LCD.
Page 29
Maintenance
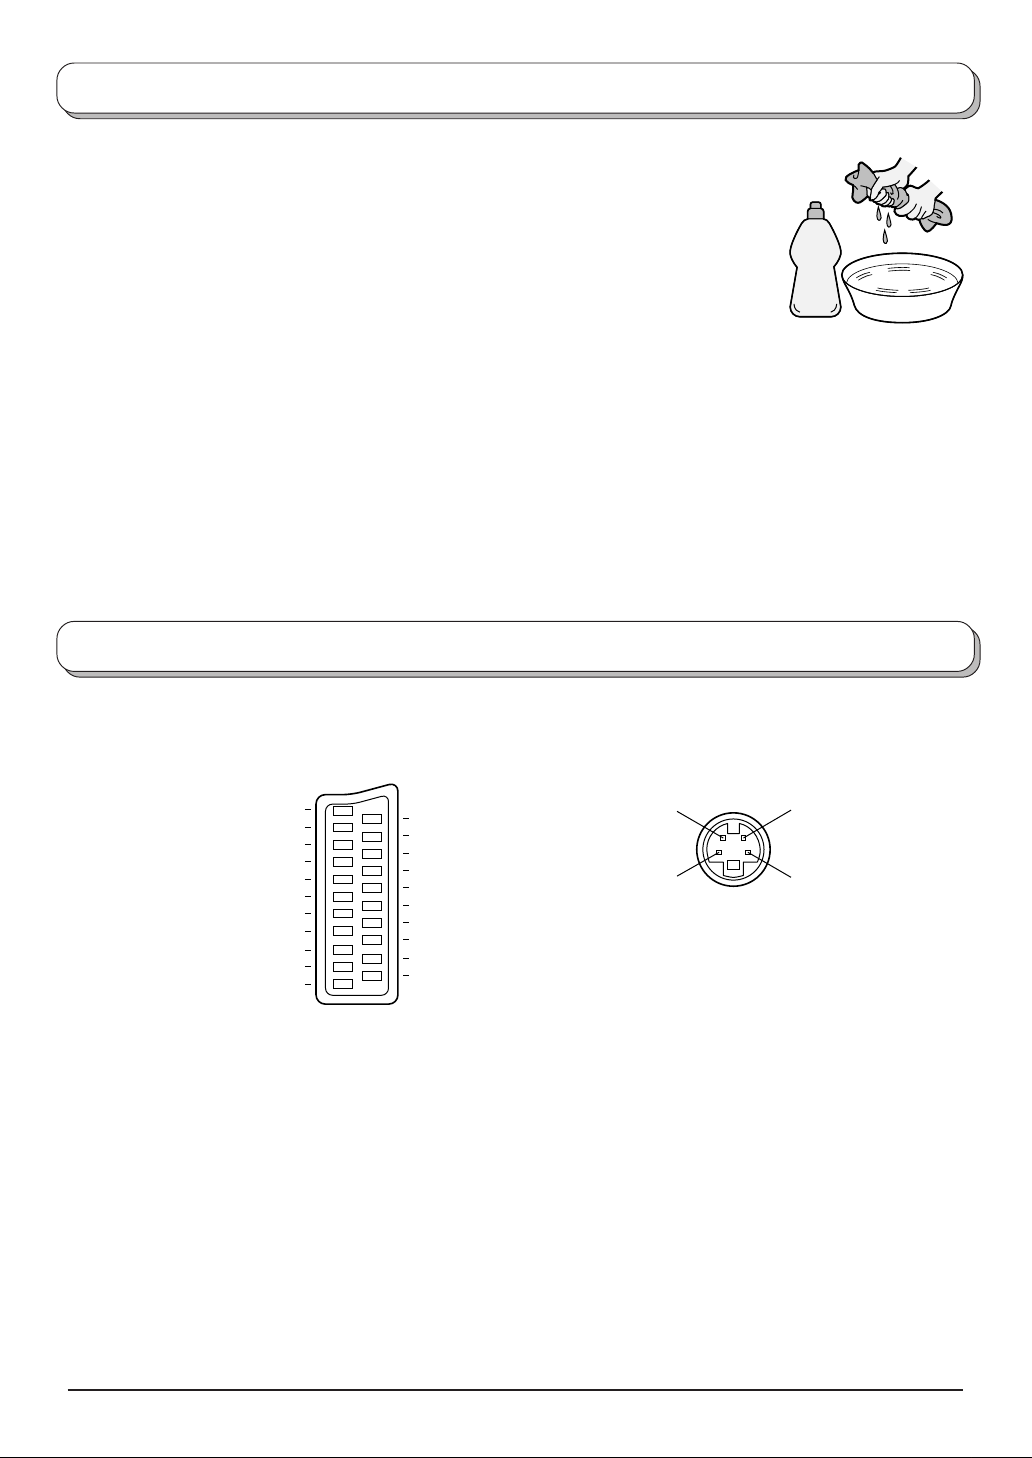
Neutral
detergent
To clean this unit, wipe with a soft, dry cloth.
If the surfaces are extremely dirty, use a soft cloth dipped in soap-and-water solution
or a weak detergent solution.
• Use eyeglass cleaner to remove stubborn dirt from the LCD.
• Never use alcohol, paint thinner or benzine to clean this unit.
• Before using chemically treated cloth, read the instructions that came with the
cloth carefully.
• Do not wipe the LCD with water.
Wipe the cabinet with a soft cloth
If the cabinet is heavily soiled, wipe with a well-wrung soft cloth dipped in kitchen cleanser (neutral) diluted
with water.
CAUTION:
If water or similar substances get inside the monitor via the liquid crystal panel surface, a malfunction may
result.
Scart and S-video socket information
A V1 Scart socket
Socket Earth
CVBS out (video)
CVBS earth
Red in
Red earth
Green in
Green earth
Blue in
Blue earth
Audio out (L)
Audio out (R)
21
19
17
15
13
11
9
7
5
3
1
CVBS in (video)
20
RGB status earth
18
Status RGB
16
Earth
14
- -
12
- -
10
Status CVBS
8
Audio in (L)
6
Audio earth
4
Audio in (R)
2
A V2 S-Video 4 pin soc ket
Chrominance
in
Chrominance
earth
Luminance
in
Luminance
earth
29
Page 30
Specifications
Power Source
Power Consumption
LCD
Screen Size
Channel Capability-100
Sound
Speaker
Audio Output
Headphones
Receiving Systems/
Band name
Aerial - Rear
Operating Conditions
Connection Terminals
AV1 (Scart connecter)
AV2
××
Dimensions ( W
Including TV Stand
TV Set Only
Mass (Weight)
× H
××
××
× D )
××
TX-14LA1 TX-17LA1 TX-20LA1
AC 100 - 240 V, 50 / 60 Hz
Average use : 46 W Average use : 56 W Average use : 60 W
Stand-by condition : 1.8 W Stand-by condition : 1.8 W Stand-by condition : 1.8 W
TV set DC 15 V, 2.6 A max. TV set DC 15 V, 3.2 A max. TV set DC 15 V, 3.4 A max.
14-inch (360 mm) 17-inch (432 mm) 20-inch (510mm)
4 : 3 aspect ratio LCD panel 4 : 3 aspect ratio LCD panel 4 : 3 aspect ratio LCD panel
285.1 mm (W) × 213.8 mm (H) 343.7 mm (W) × 261.6 mm (H) 408.0 mm (W) × 306.0 mm (H)
UHF: 21-68
φ
4 cm, 2 pcs, 16 Ω
4.0 W (2.0 W + 2.0 W), 10 % THD
M3 (3.5 mm) Jack × 1
PAL I UHF E21 - 68
PAL 525/60 Playback of NTSC tape from some PAL video recorders (VCR)
M.NTSC Playback from M.NTSC Videorecorders (VCR)
NTSC (AV input only) Playback from NTSC Videorecorders (VCR)
UHF
Temperature : 5 °C - 35 °C
Humidity : 5 % - 90 % RH (non-condensing)
21 Pin socket (Audio / Video in , TV out , RGB in)
S Video in, 1 × RCA Video in, 2 × RCA Audio in
365 mm × 364 mm × 215 mm 424 mm × 415 mm × 215 mm 494 mm × 461 mm × 255 mm
365 mm × 331 mm × 64 mm 424 mm × 382 mm × 64 mm 494 mm × 422 mm × 82 mm
4.6 kg Net 5.4 kg Net 7.4 kg Net
6.0 W (3.0 W + 3.0 W), 10 % THD
Note:
Specifications are subject to change without notice. Weight and dimensions shown are approximate.
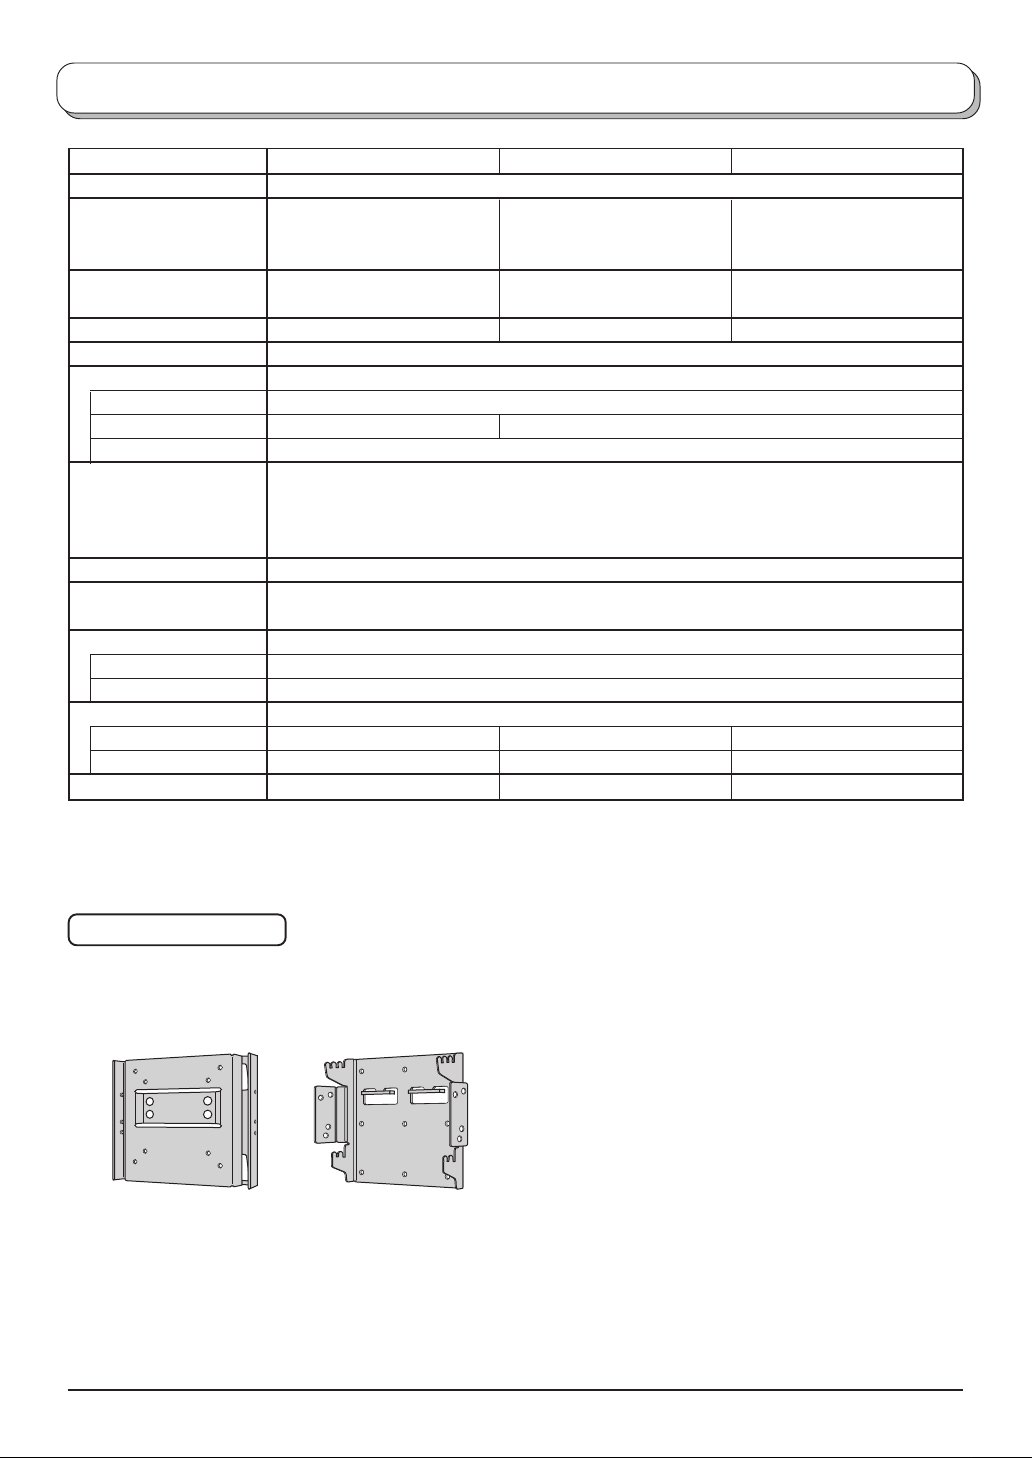
Optional Accessory
• Wall-Hanging Bracket
TY-WK15TA2U
(For use with TX-17LA1 and TX-20LA1 only)
30
Page 31

Page 32
Sales and Support Information
Customer Care Centre
• For UK customers: 08705 357357
• For Republic of Ireland customers: 01 289 8333
• Visit our website for product information
• E-mail: [email protected]
Cookery Advice (For UK and R.O.I customers): 01344 862108
• Provide guidance on queries relating to your oven or recipes
• Staffed by home economists
• Monday – Friday 9:30am – 5:00pm (Excluding public holidays)
Direct Sales at Panasonic UK
• Order accessory and consumable items for your product with
ease and confidence by phoning our Customer Care Centre
Monday – Friday 9:00am – 5:30pm (Excluding public holidays).
• Or go on line through our Internet Accessory ordering
application at www.panasonic.co.uk.
• Most major credit and debit cards accepted.
• All enquiries transactions and distribution facilities are provided
directly by Panasonic UK Ltd.
• It couldn’t be simpler!
• Also available through our Internet is direct shopping for a wide
range of finished products, take a browse on our website for
further details.
Exclusive to Plasma / DVD Ram / LCD Television / LCD Projector product:
Interested in purchasing an extended guarantee? Please contact your dealer
or our Customer Support Department on 01344 476540 or
[email protected] for more details.
Customer’ Record
The model number and serial number of this product can be found on its rear panel. You should note this
serial number in the space provided below and retain this book, plus your purchase receipt, as a permanent
record of your purchase to aid in identification in the event of theft or loss, and for Warranty Service
purposes.
Model Number Serial Number
Panasonic (U. K.) Ltd.
Willoughby Road, Bracknell, Berks RG12 8FP
Web Site http://www.panasonic.co.uk
Printed in Japan
MBS0903S0
 Loading...