

Page 1
R
TU-IRD20
OPERATING
INSTRUCTIONS
Read these instructions completely
before operating this set.
Contents subject to change without notice or obligation.
S A T E L L I T E R E C E I V E R
Copyright 1996 by Matsushita Electric Corporation of America.
All rights reserved. Unauthorized copying and distribution is a violation of law.
Printed in U.S.A.
TQD2AA19009
Page 2
SAFETY INFORMATION
WARNING
To reduce risk of fire or
shock hazard, do not
expose this receiver to
rain or moisture.
Cautions
Note to Cable TV Installer: This reminder is provided to call your attention to Article 820-40 of the
WARNING
RISK OF ELECTRIC SHOCK
DO NOT OPEN
This symbol indicates
“dangerous voltage” inside the
product that presents a risk of
electric shock or personal injury.
Do not stack electronic components or other objects on top of
the DSS Receiver. The slots on top of the receiver must be left
uncovered to allow proper airflow to the unit. Blocking the airflow to the
unit could impair performance or damage your receiver and other
components.
Do not stack the DSS receiver on top of a “hot component” such as an
audio power amplifier.
FCC Regulations state that unauthorized changes or modifications to this
equipment may void the user’s authority to operate it.
National Electrical Code (Section 54 of the Canadian Electrical Code, Part
1) which provides guidelines for proper grounding and, in particular,
specifies that the cable ground shall be connected to the grounding
system of the building as close to the point of cable entry as practical.
TO REDUCE THE RISK OF ELECTRIC SHOCK, DO NOT
REMOVE COVER (OR BACK). NO USER SERVICEABLE
PARTS INSIDE. REFER SERVICING TO QUALIFIED SERVICE
PERSONNEL.
This symbol indicates
important instructions
accompanying the product.
Note to Satellite Dish Installer: This reminder is provided to call your attention to Article 810 and in
particular article 810-15 of the National Electrical Code which covers
proper installation and grounding of television receiving equipment as
well as to article 820-40 of the National Electrical Code which specifies
that the satellite dish cable ground shall be connected to the grounding
system of the building as close to the point of cable entry as practical.
IMPORTANT NOTICE: This device incorporates an anticopy process technology that is protected
by U.S. patents and other intellectual property rights. The anticopy
process is licensed for non-commerical, home use only. Reverse
engineering or disassembly is prohibited.
DSS® is a registered trademark of DIRECTV, Inc., a unit of GM Hughes Electronics
StarSight-Licensed: The manufacture and sale of the television schedule feature of this product was licensed under one or more of the
following patents of StarSight Telecast, Inc.; U.S. Patent Nos. 4,706,121; 4977,455; 5,151,789; and 5,353,121.
i
Page 3
IMPORTANT SAFEGUARDS
In addition to the careful attention devoted to quality standards in the manufacture of your product, safety is a
major factor in the design of every product. However, safety is your responsibility too.
This sheet lists important information that will help to assure your enjoyment and proper use of the product and
accessory equipment. Please read them carefully before operating and using your product.
Installation
1 Read and Follow Instructions—
All the safety and operating
instructions should be read before
the product is operated. Follow all
operating instructions.
2 Retain Instructions—The safety
and operating instructions should be retained for
future reference.
3 Heed Warnings—Comply with all warnings on the
product and in the operating instructions.
4 Polarization/Grounding—This product is equipped
with either a polarized, non-polarized, or a grounding
type power cord plug. If equipped with the nonpolarized type (two blades of identical size), the
following does not apply.
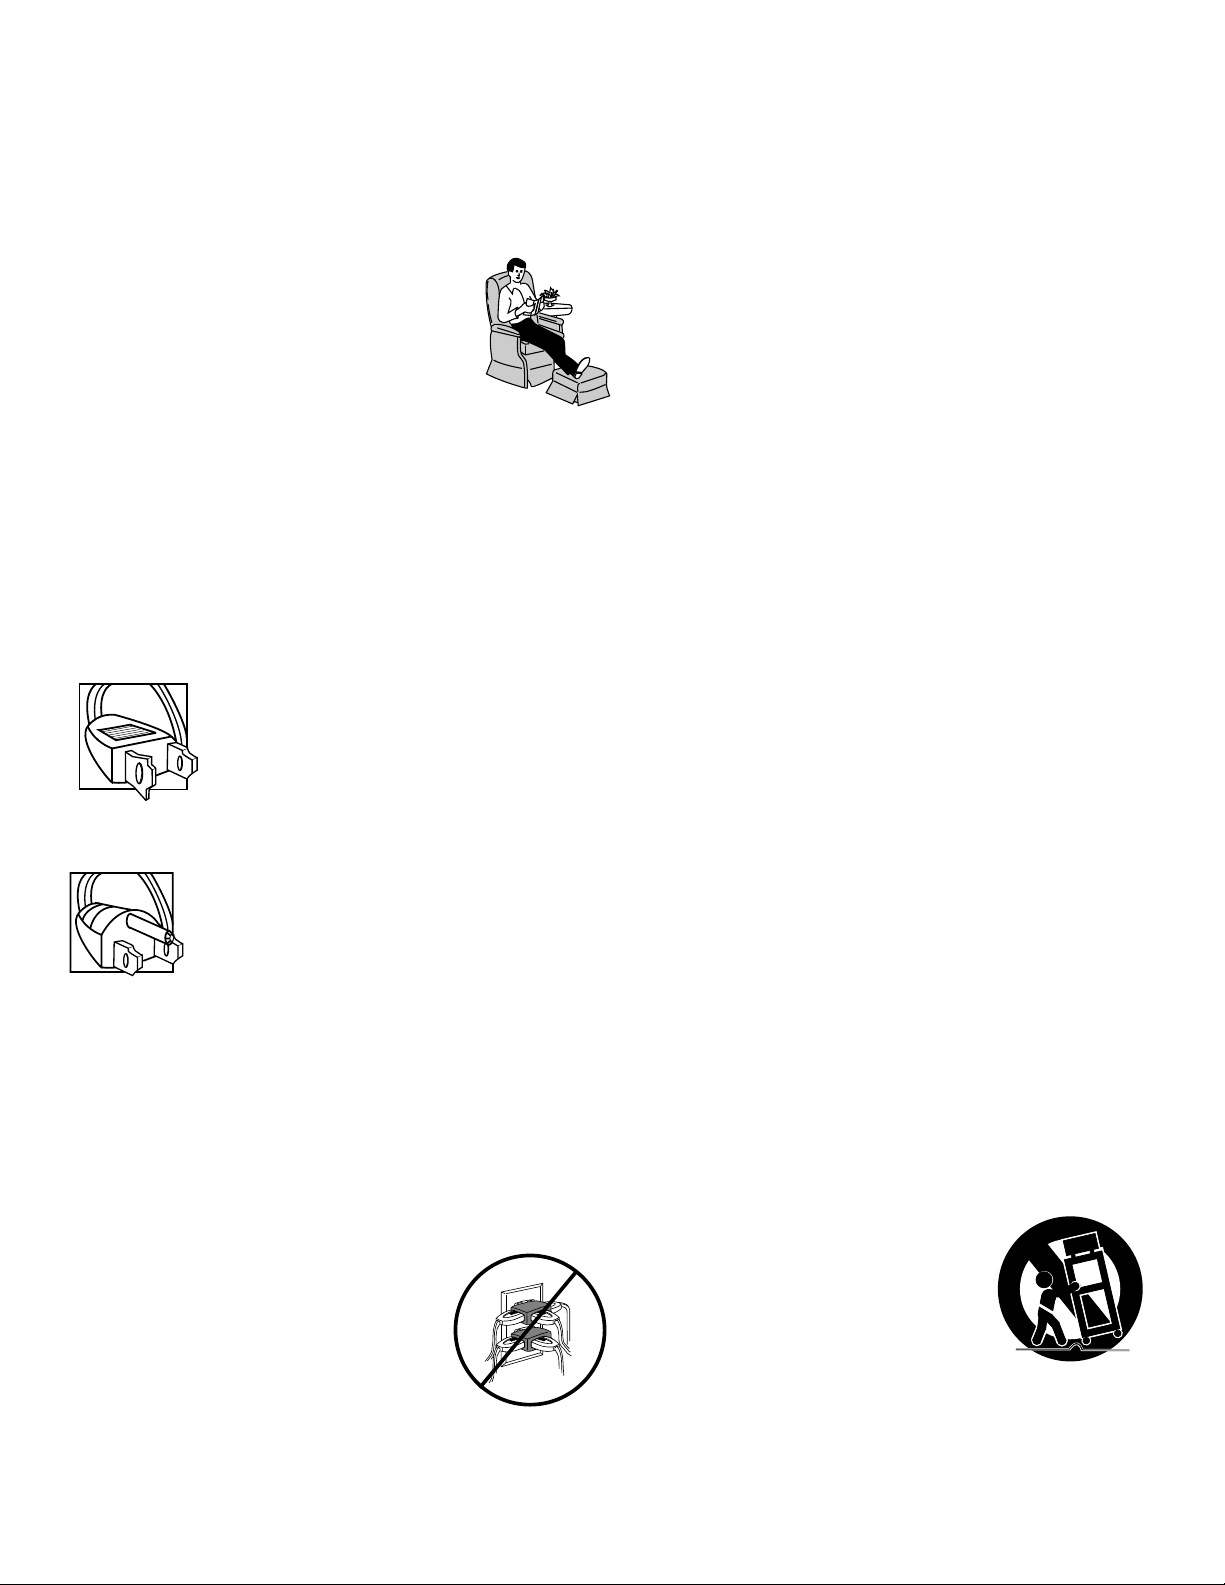
• A polarized power plug (two blades, one
wider than the other) will fit into a power
receptacle only one way. This is a safety
feature. Do not defeat it. If you are unable to
insert the plug fully , try reversing it, or have
an electrician change the receptacle. If you
need an extension cord, use only a polarized extension
cord.
• A grounding type power plug (two blades and
a round pin) will fit only into a grounding type
receptacle with matching openings. This is
safety feature. Do not defeat it. You may need
an electrician to install a grounding type
receptacle. If you need an extension cord, use
only a grounding type extension cord.
5 Power Sources—This product should be operated
only from the type of power source indicated on the
product's marking label. If you are not sure of the type
of power supply to your home, consult your dealer or
local power company. For products intended to
operate from battery power, or other sources, refer
to the operating instructions.
6 Overloading—Do not overload wall outlets or
extension cords as this can result
in a risk of fire or electric shock.
Overloaded AC outlets, extension
cords, frayed power cords,
damaged or cracked wire
insulation, and broken plugs are
dangerous. They may result in a
shock or fire hazard. Periodically
examine the cord, and if its
appearance indicates damage or deteriorated
insulation, have it replaced by your service technician.
7 Power-Cord Protection—Power-supply cords
should be routed so that they are not likely to be
walked on or pinched by items placed upon or
against them. Pay particular attention to cords
where they are attached to plugs, convenience
receptacles and at the point where they exit from
the product.
8 V entilation—Slots and openings in the enclosure
are provided for ventilation to ensure reliable
operation of the product and to protect it from
overheating. These openings must not be blocked
or covered. These openings should never be
blocked by placing the product on a bed, sofa,
rug, or other similar surface. This product should
never be placed near or over a radiator or heat
register, or another heat source (including
amplifiers). This product should not be placed in
a built-in installation such as a bookcase or
equipment rack unless proper ventilation is
provided or the product manufacturer’s
instructions have been followed.
9 Attachments—Do not use attachments unless
recommended by the product manufacturer as
they may cause hazards.
10 Water and Moisture—Do not use this product
near water—for example, near a bath tub, wash
bowl, kitchen sink or laundry tub, in a wet
basement, or near a swimming pool and the like.
11 Accessories—Do not place this product on an
unstable surface or support. The product may fall,
causing serious injury to a child or adult as well
as serious damage to the product. Any mounting
of the product should follow the manufacturer’s
instructions and use only a mounting accessory
recommended by the manufacturer.
11A A product and cart combination should be
moved with care. Quick stops,
excessive force, and uneven
surfaces may cause the product
and cart combination to
overturn.
ii
Page 4
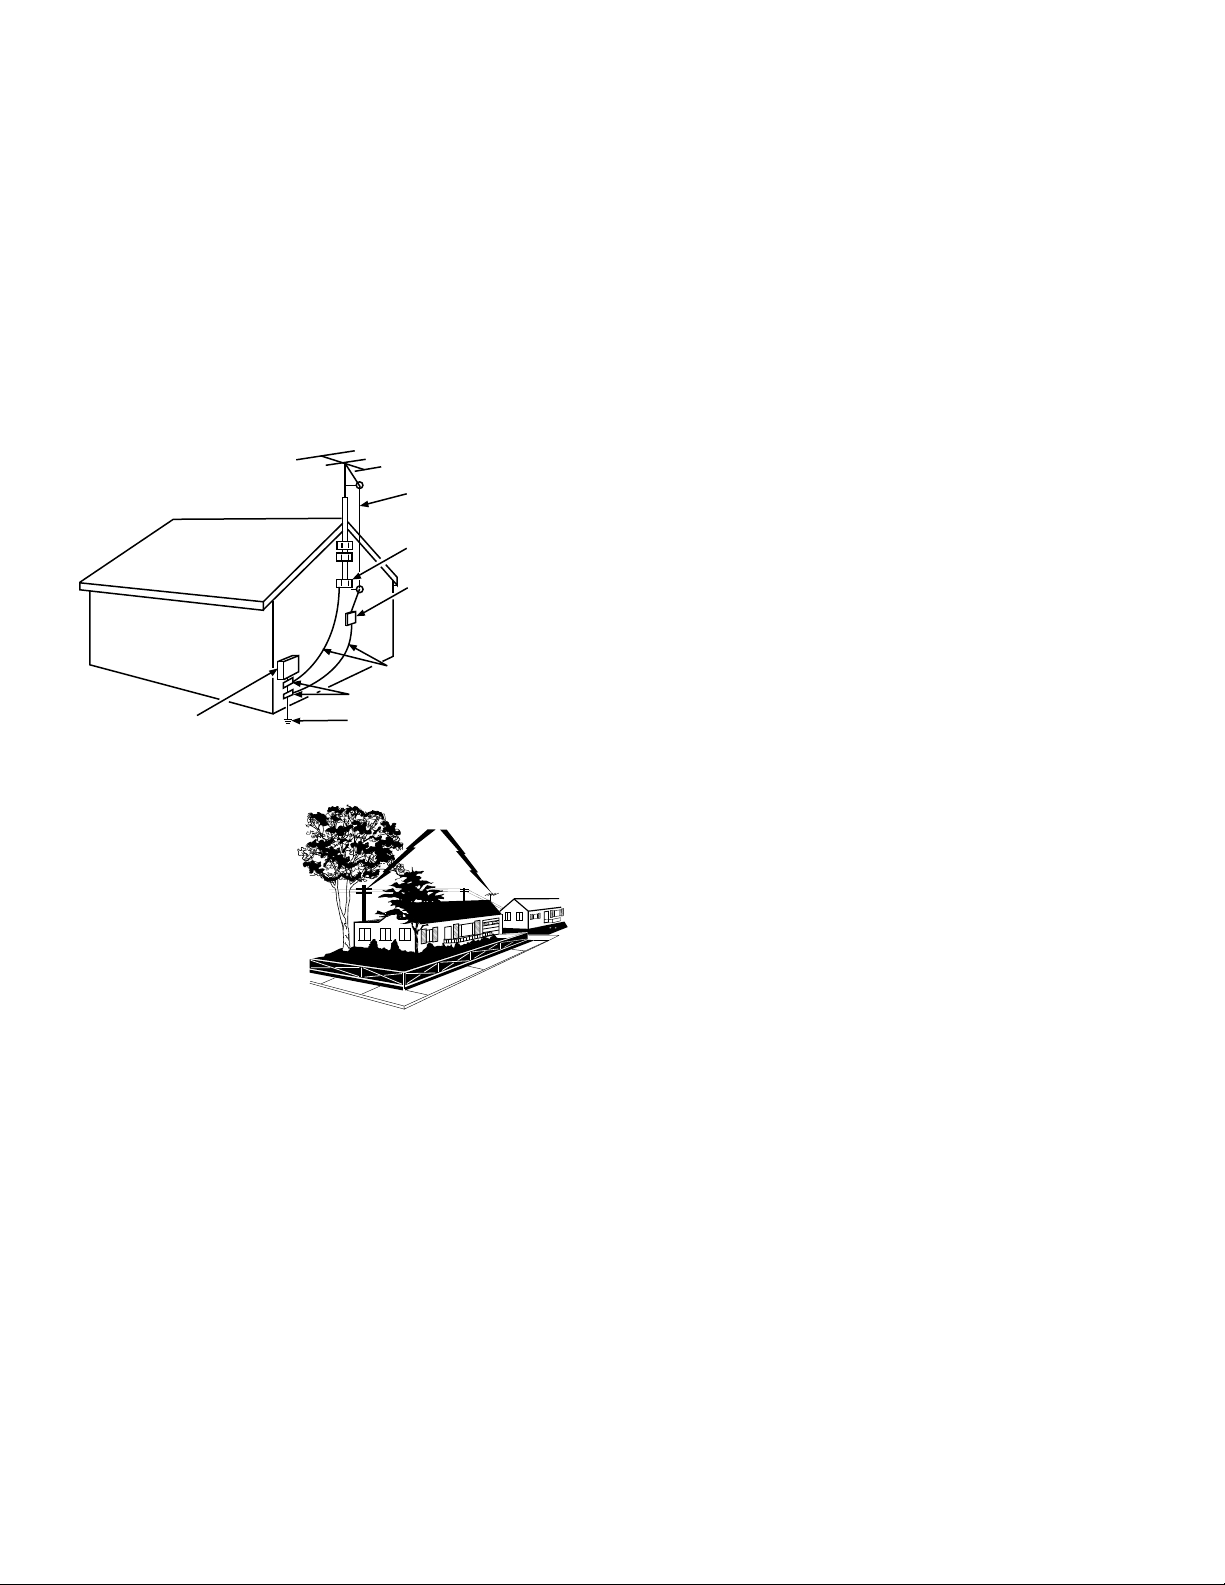
12 Outdoor Antenna Grounding—If an outside
antenna or cable system is connected to the
product, be sure the antenna or cable system is
grounded so as to provide some protection
against voltage surges and built-up static charges.
Section 810 of the National Electrical Code, ANSI/
NFPA No. 70-1984 (Section 54 of Canadian
Electrical Code, Part␣1) provides information with
respect to proper grounding of the mast and
supporting structure, grounding of the lead-in
wire to an antenna-discharge unit, size of
grounding conductors, location of antennadischarge unit, connection to grounding
electrodes, and requirements for the grounding
electrode. See example below.
ANTENNA
LEAD IN
WIRE
GROUND CLAMP
ANTENNA
DISCHARGE UNIT
(NEC SECTION 810-20)
16 Lightning—For added protection for this product
during a lightning storm, or when it is left
unattended and unused for long periods of time,
unplug it from the wall outlet and disconnect the
antenna or cable system. This will prevent
damage to the product due to lightning and power
line surges.
Service
17 Servicing—Do not attempt to service this product
yourself as opening or removing covers may
expose you to dangerous voltage or other
hazards. Refer all servicing to qualified service
personnel.
18 Conditions Requiring Service—Unplug this
product from the wall outlet and refer servicing
to qualified service personnel under the following
conditions.
A. When the power-supply cord or plug is
damaged.
B. If liquid has been spilled, or objects have fallen
into the product.
GROUNDING CONDUCTORS
(NEC SECTION 810-21)
GROUND CLAMPS
ELECTRIC SERVICE
EQUIPMENT
POWER SERVICE GROUNDING
ELECTRODE SYSTEM
(NEC ART 250, PART H)
Example of Antenna Grounding
13 Power Lines—An
outside antenna
system should not
be located in the
vicinity of overhead
power lines, other
electric light or
power circuits, or
where it can fall
into such power
lines or circuits. When installing an outside
antenna system, extreme care should be taken to
keep from touching or approaching such power
lines or circuits as contact with them might be
fatal. Installing an outdoor antenna can be
hazardous and should be left to a professional
antenna installer.
Use
14 Cleaning—Unplug this product from the wall
outlet before cleaning. Do not use liquid cleaners
or aerosol cleaners. Use a damp cloth for cleaning.
15 Object and Liquid Entry—Never push objects
of any kind into this product through openings as
they may touch dangerous voltage or “short-out”
parts that could result in a fire or electric shock.
Never spill liquid of any kind on the product.
C. If the product has been exposed to rain or
water.
D. If the product does not operate normally by
following the operating instructions. Adjust
only those controls that are covered by the
operating instructions. Improper adjustment
of other controls may result in damage and
will often require extensive work by a qualified
technician to restore the product to its normal
operation.
E. If the product has been dropped or the cabinet
has been damaged.
F. When the product exhibits a distinct change
in performance, such as the inability to
perform basic functions—this indicates a need
for service.
19 Replacement Parts—When replacement parts
are required, have the service technician verify
that the replacement parts he uses have the same
safety characteristics as the original parts. Use of
replacements specified by the product
manufacturer can prevent fire, electric shock, or
other hazards.
20 Safety Check—Upon completion of any service
or repairs to this product, ask the service
technician to perform safety checks recommended by the manufacturer to determine that
the product is in safe operating condition.
iii
Page 5

TABLE OF CONTENTS
TABLE OF CONTENTS
Before You Begin...........................................................3
What is the DSS® System? .............................................................3
Ordering DSS® Programming ........................................................3
Installing Batteries In the Remote Control ................................... 4
Precautions on Battery Use.........................................................4
Using This Manual ..........................................................................5
The On-Screen Navigation Method .............................................. 6
Program Guides ............................................................7
What is a Program Guide? .............................................................7
Bringing Up the Program Guides by Using the GUIDE Button .. 7
Using the Program Guides.............................................................7
Changing Channels with the number keys (0-9)....................... 7
Scrolling Channel By Channel ................................................... 7
Scrolling Page By Page ...............................................................8
Tuning to a Program .................................................................... 8
Selecting A Program Guide from the Main Menu ....................... 8
Types of Program Guides............................................................9
The Grid Guide..........................................................................9
The Info Guide ..........................................................................9
The T opic Guide......................................................................10
The Channel Guide .................................................................10
The Attractions Guide ............................................................10
Sorting the Grid and Info Guides................................................ 11
Using the Sorting Buttons.........................................................11
Using the Themes Button .........................................................12
Exiting A Program Guide..............................................................12
The Menu System.......................................................13
Using the Menu System ...............................................................14
Exit and Help ..............................................................................14
Exiting a Screen ......................................................................14
Using Help...............................................................................14
Changing the Main Menu’s Appearance ................................. 15
Menu Descriptions.....................................................................16
Program Guide........................................................................16
Mailbox.................................................................................... 16
Purchases ................................................................................ 16
Timers ......................................................................................16
Lists & Limits ..........................................................................16
Options .................................................................................... 16
Dish Pointing...........................................................................16
Assistance ...............................................................................16
1
Page 6

TABLE OF CONTENTS
Lists & Limits...............................................................17
Controlling The System................................................................17
Setting the Ratings Limit ..............................................................18
Setting Up Spending Limits .........................................................19
Creating Favorite Channel Lists .................................................. 19
Add or Delete All Channels .......................................................20
Parent Approved Channel List .................................................... 21
Selecting a Channel List to Use .................................................. 21
Locking the System.......................................................................21
Unlocking the System ...............................................................22
More Features .............................................................23
Pay-Per-View Programs................................................................ 23
Using the Program Guide for PPV Programs.......................... 24
Using the Purchases Menu .......................................................25
Reviewing and Canceling an Upcoming Purchase................. 25
Timer Feature ................................................................................26
Setting Up Timer Recordings .......................................................26
Selecting a VCR Type ................................................................. 27
Recording with Timer ................................................................ 28
Editing or Canceling a T imer .................................................... 28
One-Button Recording ..................................................................29
Using Logo Tune...........................................................................29
The Mailbox...................................................................................30
Alternate Audio Programs............................................................30
Picture Size ....................................................................................31
System Test ...................................................................................31
New Access Card Setup ...............................................................31
Using On-Line Help.......................................................................32
Connections.................................................................33
Choosing a Connection ................................................................35
Interactive Setup ...........................................................................40
Disabling Interactive Setup .......................................................40
Reference.....................................................................41
Parts of the DSS® System.............................................................42
Controls and Buttons ....................................................................44
Front Panel Controls ..................................................................44
Back Panel ..................................................................................45
Remote Control Buttons............................................................46
Programming the Remote Control Using Access Codes .......... 48
Glossary.........................................................................................52
Troubleshooting ............................................................................54
Index ............................................................................55
FCC Registration Information ................................... 57
2
Page 7

BEFORE YOU BEGIN
BEFORE YOU BEGIN
What is the DSS® System?
Y ou’ ve purchased the DSS® Digital Satellite System, so you already
know a lot of the great things it offers. You know that the DSS
system uses the latest satellite technology to deliver television
programming to your home. And you know that the transmissions
are digital, so the quality of the picture and audio rivals that of
laser discs and CDs. You know the dish is small—18 inches wide—
and that it often can be installed in a matter of hours. (See the
DSS® System Installer Guide for specific information.)
Those are the some of the things you probably know about the
DSS® system. But what about the things you don’t know? For
instance...
• The DSS® system works like your TV. Pick up the remote and push
the DSS button. Press the Channel Up/Down buttons to scan
through the channels. Press the number keys to go directly to
a channel.
• There is an on-screen Program Guide. The Program Guide is
like a TV listing in the newspaper. It is designed to help you
select regular programs and pay-per -view events. Y ou can also
sort the Guide to list only specific types of programs. You can
select Sports, for example, and your guide will show current
and upcoming sports programs only.
®
• There is the on-screen Menu System that allows you to customize
your system. You can set up your system, build channel lists,
preview coming attractions, set spending limits, and receive
mail from your program providers.
• There are three types of On-line Help to assist you in learning
how to use the DSS® system: Auto Help, Help buttons, and the
About DSS menu.
Ordering DSS® Programming
After you have installed your system, you should contact the
service providers, DIRECTV and USSB to receive DSS
programming.
Programming with DIRECTV: Call 1-800-347-3288
Programming with USSB: Call 1-800-204-USSB
When you order programming, you
need to know your Access Card
number. To get the number, select
®
Options from the Main menu, and then
select System Test. Wait for the
system to run all of it’s tests. The
Access Card number is displayed at
the end of the system test.
Write the Access Card number in the
space below for easy reference:
3
Page 8
BEFORE YOU BEGIN
Press down here and
slide cover back
AA Batteries
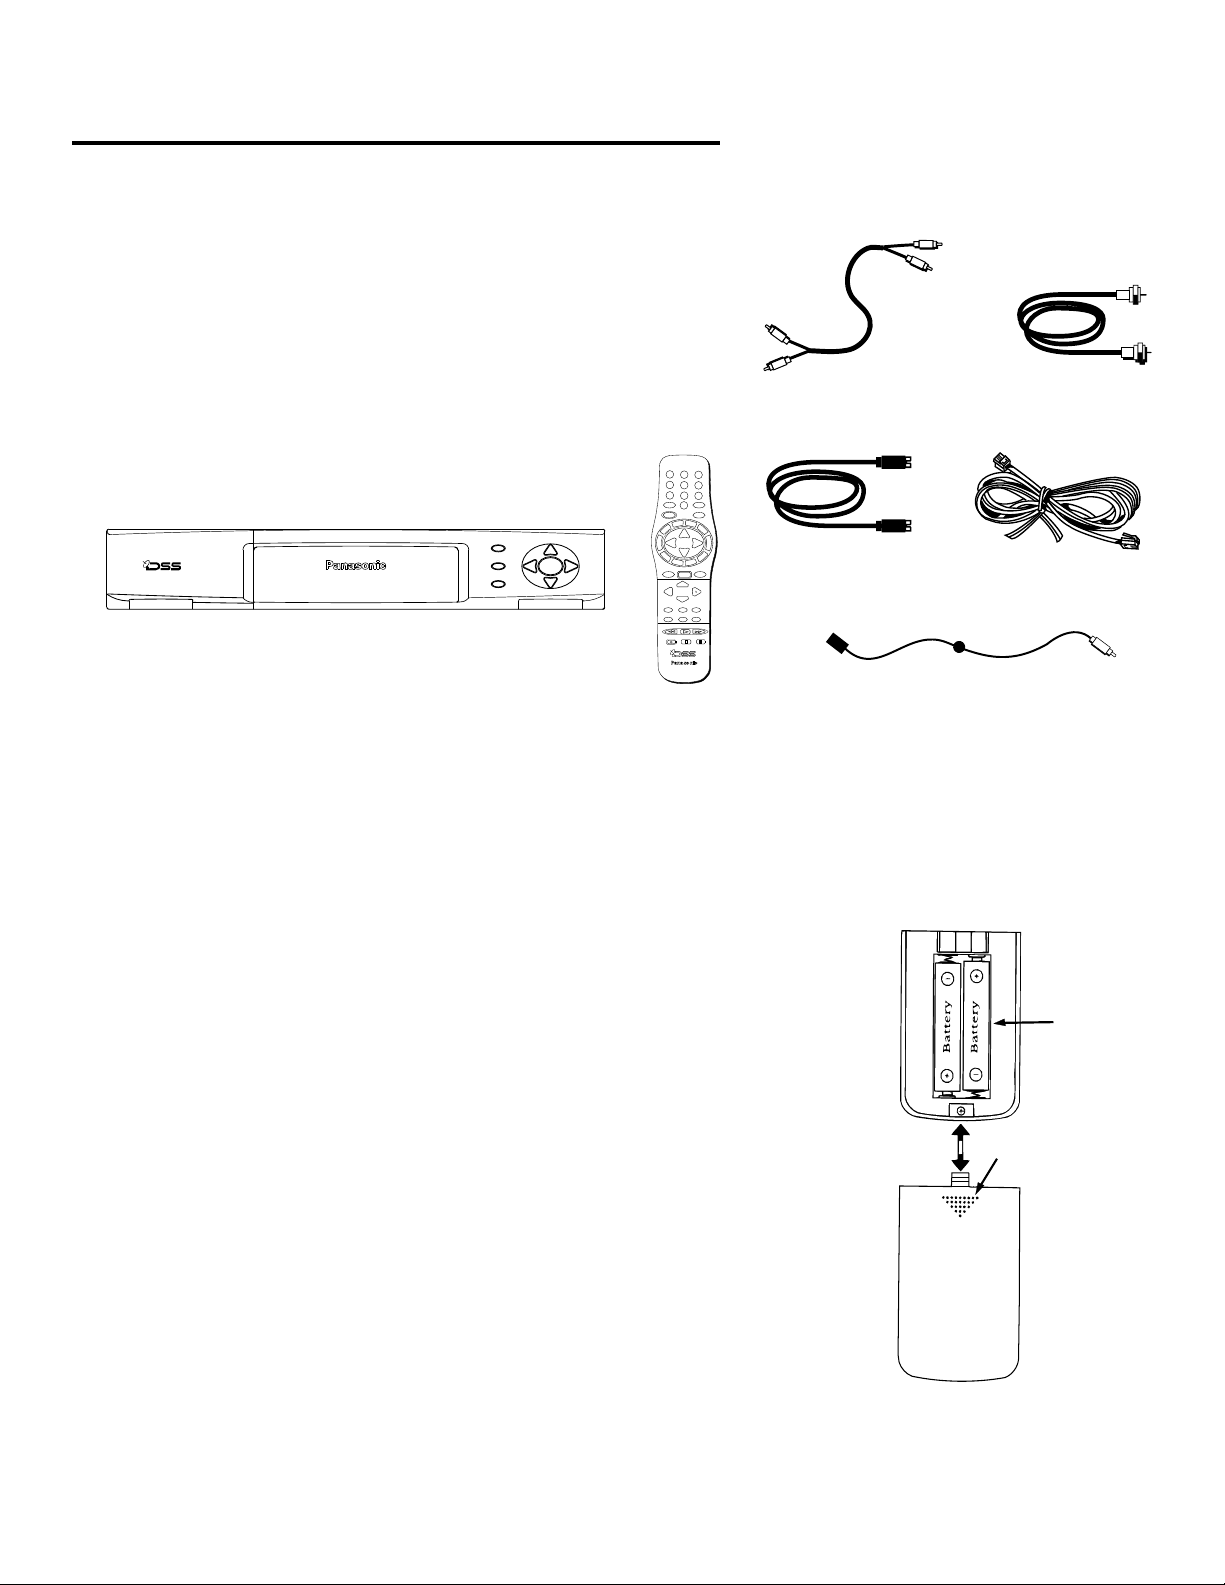
Unpacking the Box
The following items come with your DSS® receiver:
• Receiver (access card inserted) • S-Video Cable
• Remote Control • VCR Controller
• Coaxial (RF) Cable • Audio/Video Cables
• Telephone Line Cord
POWER
RECALL
MENU
SELECT
TV/DSS
Receiver
Remote Control
1
4
7
R-TUNE
POWER
V
T
S
S
D
VOL
V
C
R
1
V
C
R
GUIDE
FAV RECALL
TV/VCR
REW
REC STOP PAUSE
Panasonic
DIGITAL SATELLITE
RECEIVER
Audio/Video Cables
2
3
5
6
8
9
TV/VIDEO
0
MUTE
C
B
L
R
C
V
R
CH
VOL
CH
D
L
X
2
U
A
SELECT
EXIT
MENU
LOGO TUNE
ALT AUD.
TV/DSS
PLAY
FF
S-Video Cable
Coaxial (RF) Cable
Telephone Line Cord
VCR Controller
Installing Batteries In the Remote Control
Follow these steps whenever you need to install or change the
batteries in the remote control.
1. Remove the cover of the battery compartment.
2. Place batteries as shown, matching the + and - end of each
battery in each compartment. Use alkaline batteries.
3. Replace the cover.
Precautions on Battery Use
Incorrect installation can cause battery leakage and corrosion that
will damage the remote control.
Observe the Following Precautions
• Batteries must be replaced as a pair.
• Do not combine a used battery with a new one.
• Do not mix battery types (for example, “zink carbon” with
“alkaline”).
• Do not attempt to charge, short-circuit, disassemble, heat or
burn used batteries.
• Battery replacement is necessary when the remote control
reacts sporadically or stops operating the receiver.
4
Page 9

BEFORE YOU BEGIN
Using This Manual
There are a couple of conventions used in this manual that might
help you read it.
• W ords that appear in ALL CAPS indicate the name of a button.
• The names of on-screen menu option are shown in
italics
.
Important Note about this User’s
Manual
This manual assumes that your DSS® system has been installed,
meaning:
1. The satellite dish has been installed, correctly pointed at the
satellite, and connected to your satellite receiver.
2. The satellite receiver is connected to your television and to a
telephone line.
3. The access card is installed in your satellite receiver.
Y our access card has been matched to your receiver , and should
already be installed when you take the receiver out of the
packing box. The access card should only be taken out of the
receiver when you are issued a new card by your programming
providers.
4. The DSS® remote control has batteries.
If your system has not been installed, refer to the satellite dish
Installer's Guide for information regarding proper installation.
Then, refer to the section, “Connections,” in this manual. See your
dealer for specific information regarding professional installation
or the purchase of a Self-Installer’s Kit.
5
Page 10
BEFORE YOU BEGIN
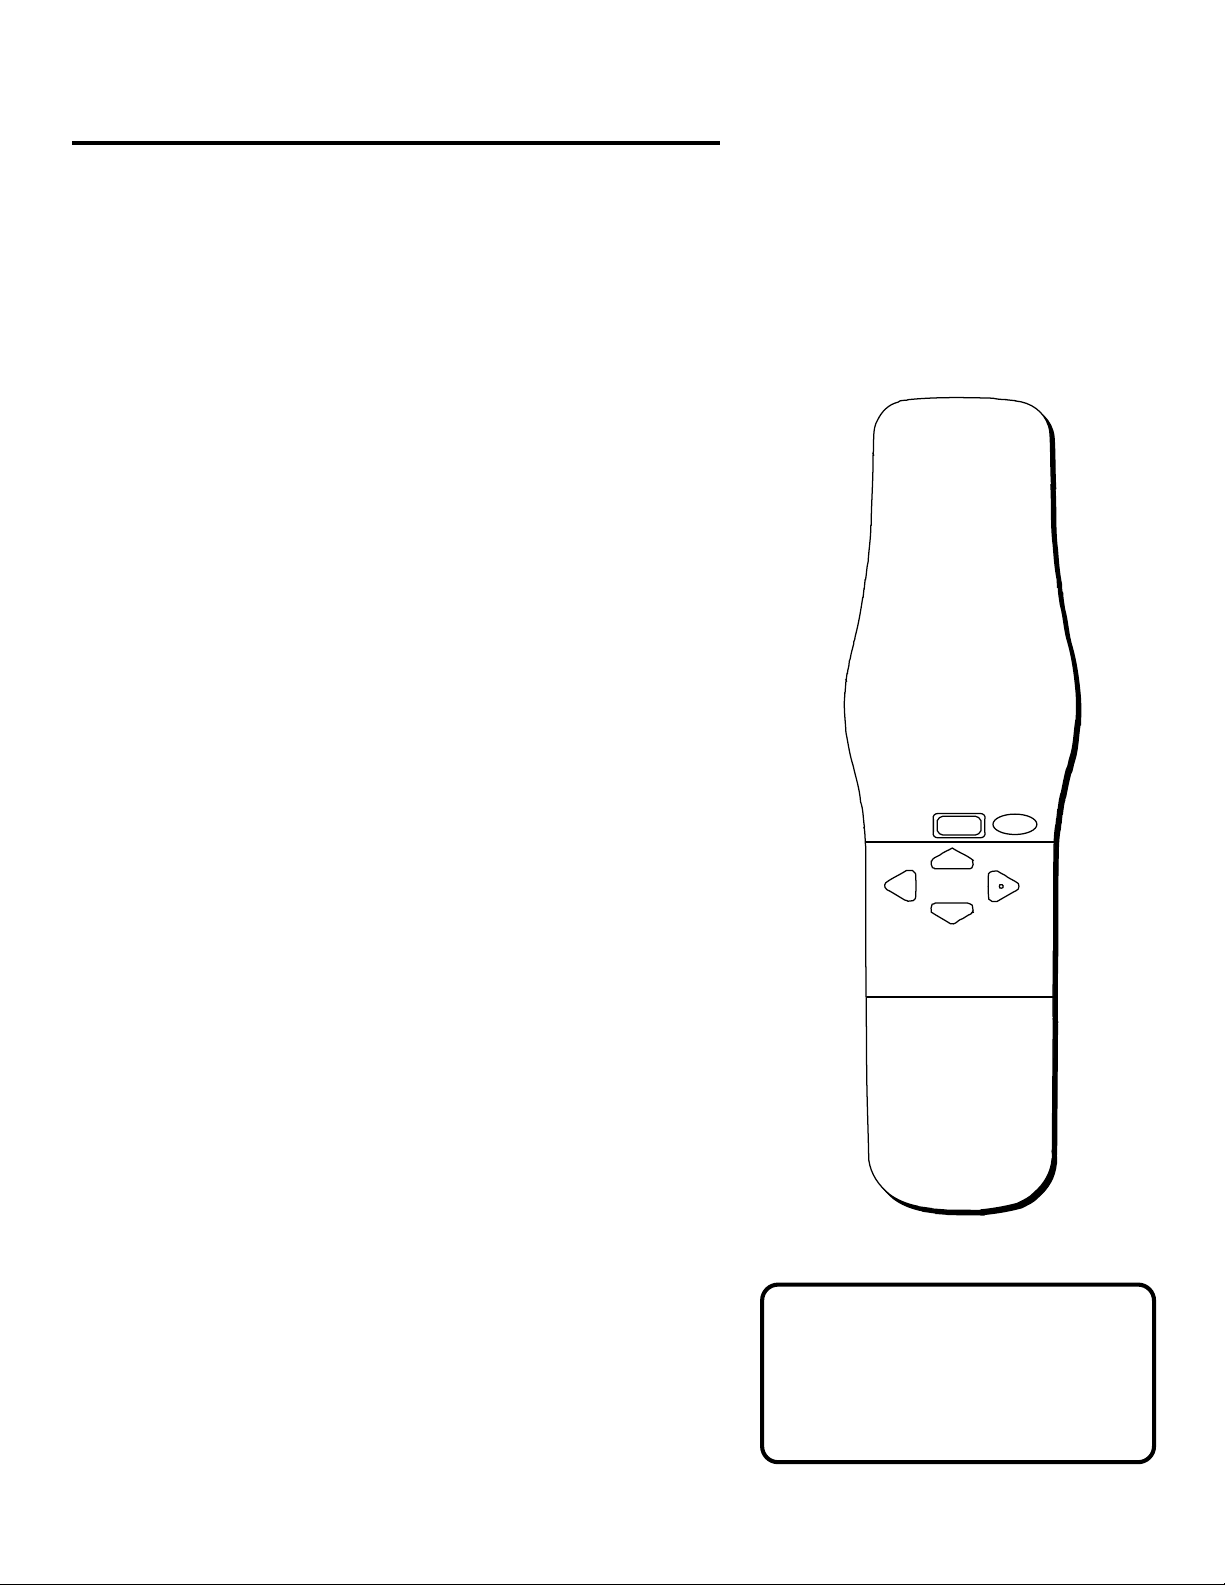
The On-Screen Navigation Method
Point and Select
through the menu system and program guides. Once you
know how to Point and Select, you can explore the menus
to learn more about how your DSS® system works.
is the method you use for navigating
1. Point
You point by pressing the arrow keys on the remote
or front panel. Pressing the arrow keys moves the
on-screen highlight to different items in the Program
Guides and the menu screens. Pressing an arrow once
moves the highlight one space in the direction of the
arrow.
For example, to point down (that is, to move the
highlight toward the bottom of the screen), press the
down arrow. To point right, press the right arrow.
2. Select
Once you have pointed to an item on the screen, select
it by pressing the MENU/SELECT button on the remote
or front panel. Selecting an item tells the menu system
to make the change you have indicated.
SELECT
MENU
EXIT
For example, the instructions in the User’s Manual
might tell you to “Point to the
MENU/SELECT.”
Once you understand the Point and Select method,
you can use any part of the DSS® system, beginning
with the Program Guides.
Help
button and press
ARROW KEYS
Exiting A Screen
Pressing the EXIT button on the
remote takes you out of the menu
system and back to the program you
were watching.
6
Page 11
PROGRAM GUIDES
PROGRAM GUIDES
What is a Program Guide?
A program guide is an on-screen programming schedule. There are
several types of guides, each presenting the schedule in a different
format.
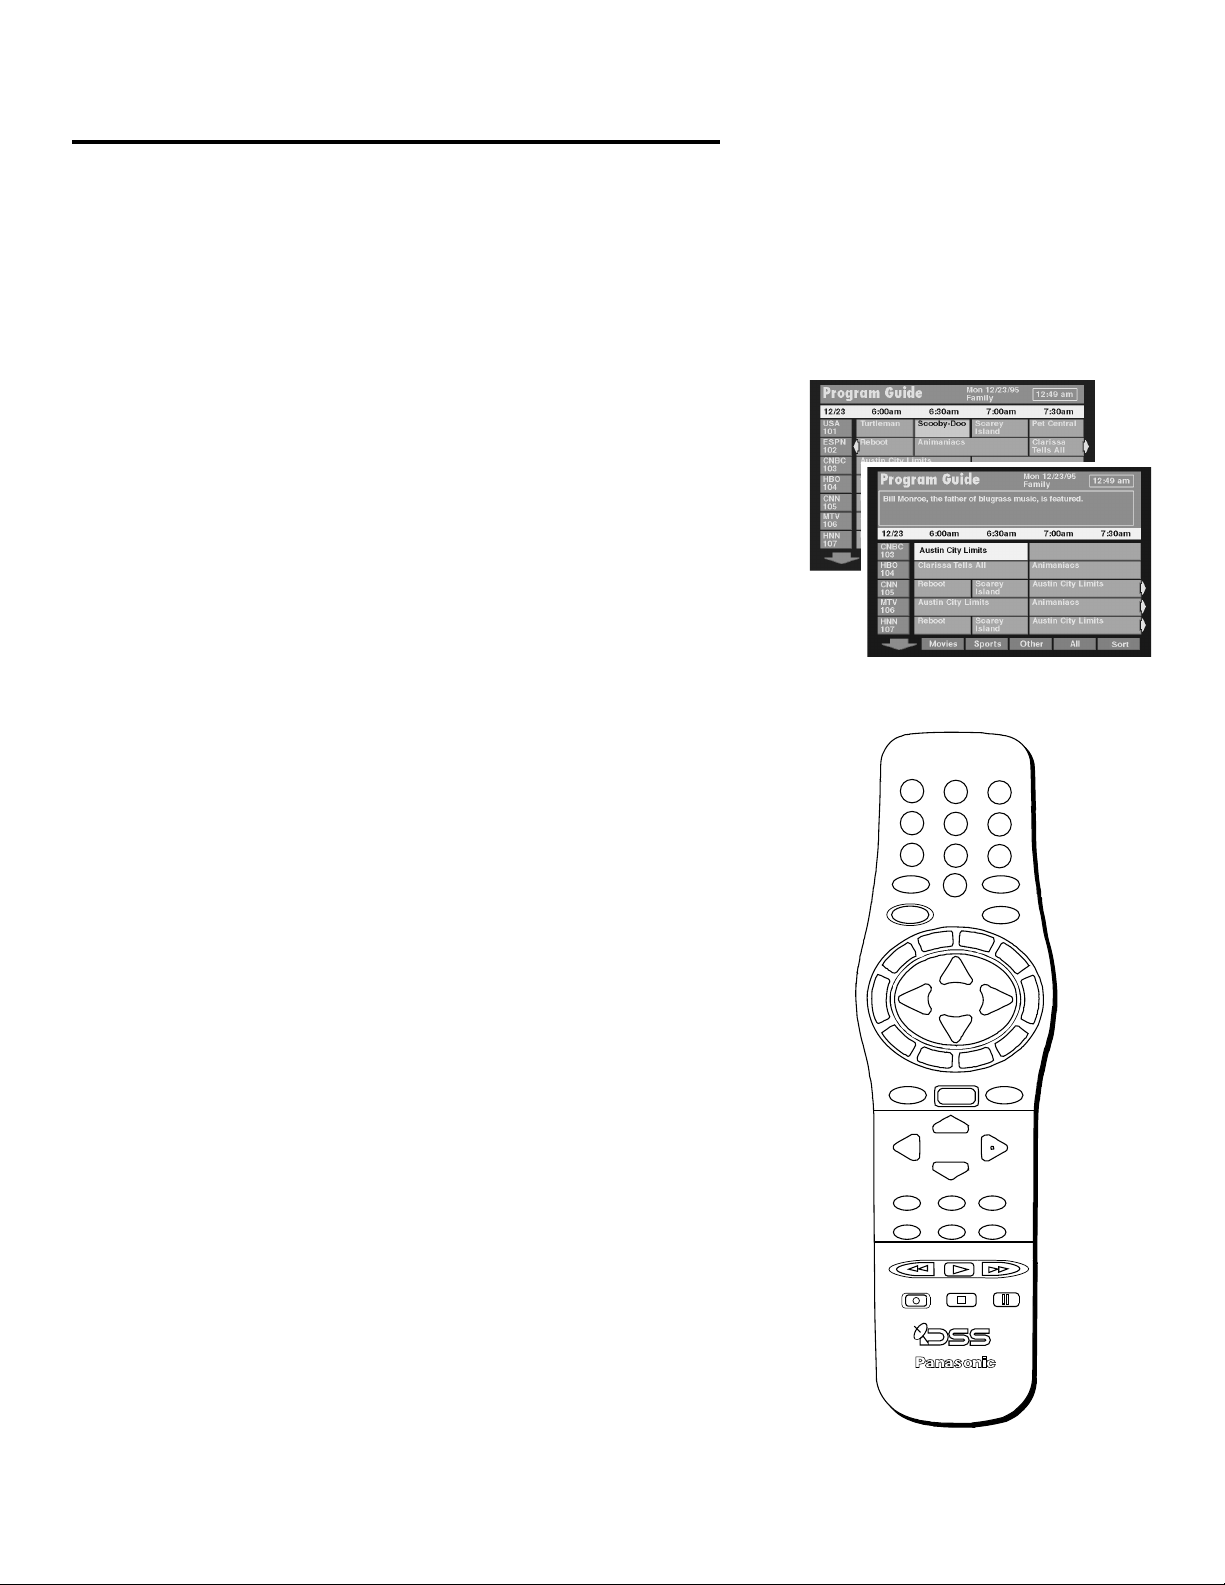
Bringing Up the Program Guides by Using the GUIDE Button
You can access the program guides by using the GUIDE button on
the remote, or by selecting
Each press of the GUIDE button takes you to an alternate type of
program guide:
• Press GUIDE once to see the seven-channel Grid Guide.
• Press GUIDE again to see the five-channel Info Guide which
contains program information.
Program Guide
from the Main menu.
T o switc h the order in which the Grid Guide and the Info Guide appear ,
select
Preferences
keys to set the
from the
Assistance
Guide Format
menu, and then use the arrow
option.
Using the Program Guides
This section tells you how to navigate in the program guides.
Changing Channels with the number keys (0-9)
You can point quickly to any channel in the Program Guide by
entering the channel number with the number keys (0-9). For
example, to point to channel 128, press the numbers 1-2-8 on the
remote. To point to Channel 102, press 1-0-2.
Scrolling Channel By Channel
The programs that you see on the TV screen make up one section—
or page—of the total Program Guide. You can scroll to other sections
using the arrows:
• Point to other times with the left and right arrows.
1
2
4
5
7
8
R-TUNE
0
POWER
C
V
T
S
S
D
CH
VOL
V
CH
C
R
1
V
C
R
2
A
SELECT
GUIDE
MENU
FAV RECALL
TV/VCR
ALT AUD.
REW
PLAY
REC STOP PAUSE
Panasonic
DIGITAL SATELLITE
RECEIVER
TV/VIDEO
MUTE
B
L
VOL
X
U
LOGO TUNE
TV/DSS
FF
3
6
9
EXIT
R
C
V
R
D
L
• Point to other channels with the up and down arrows.
7
Page 12
PROGRAM GUIDES
Scrolling Page By Page
If you want to scroll up or down through the Program Guide more
quickly, press the Channel Up/Down buttons on the remote control.
The highlight scrolls a page at a time. This is called “paging.”
Tuning to a Program
• To tune to a program listed in the guide, point to the program
and press MENU/SELECT.
• To see information about a program in the guide, press RECALL.
Then, you can select
If you select a future program, you are given program details. If you
choose a pay -per-view event, a second screen allows you to buy the
program, find out more information, or return to the Guide.
View Channel
to tune to that channel.
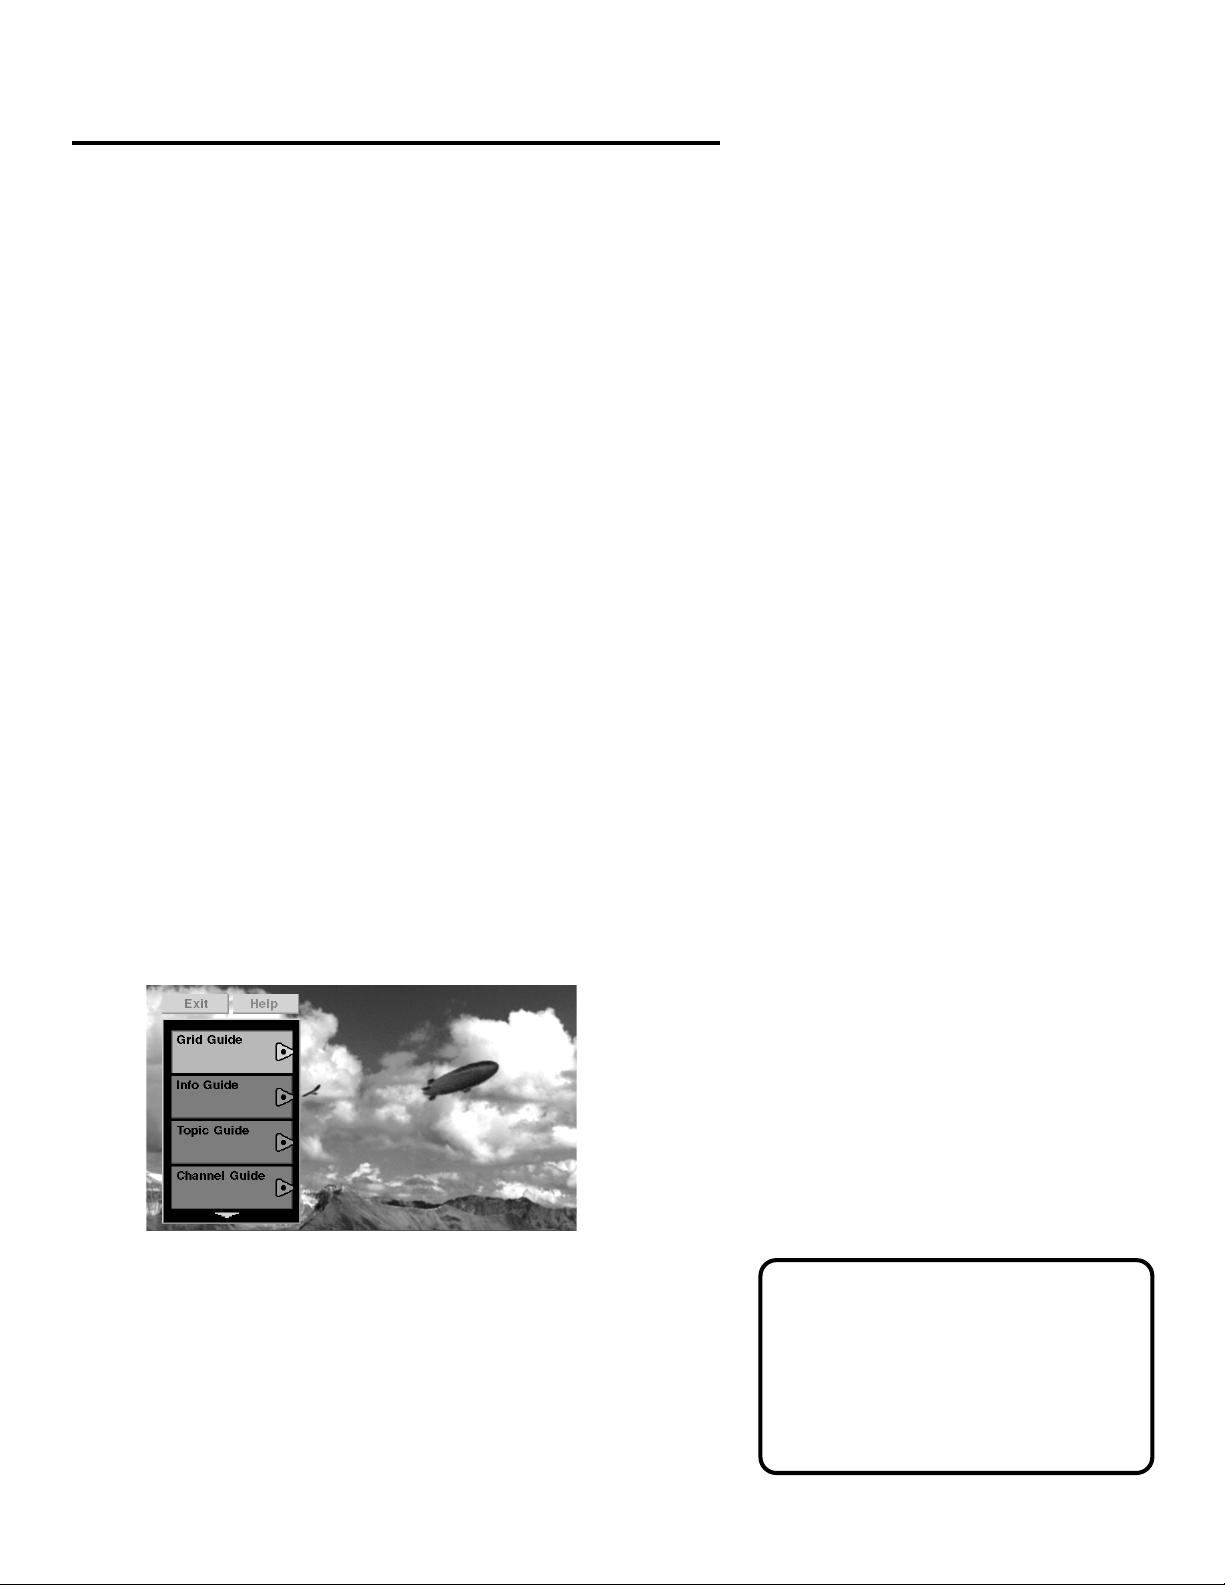
Selecting A Program Guide from the Main Menu
When you access the program guides through the Main menu, you
have more available options:
1. Press MENU/SELECT to bring up the Main menu.
2. Point to
The Program Guides menu screen appears.
This is the Program Guides menu. Use the arrow to
scroll down to see the Attractions Guide option.
Program Guide
and press MENU/SELECT.
If you select a future program, you are
given program details. If you choose a
pay-per-view event, a second screen
allows you to purchase the program,
find out more information, or return to
the Guide.
8
Page 13
PROGRAM GUIDES
Types of Program Guides
There are five types of program guides: the Grid Guide, the Info
Guide, the Topic Guide, the Channel Guide, and the Attractions
Guide.
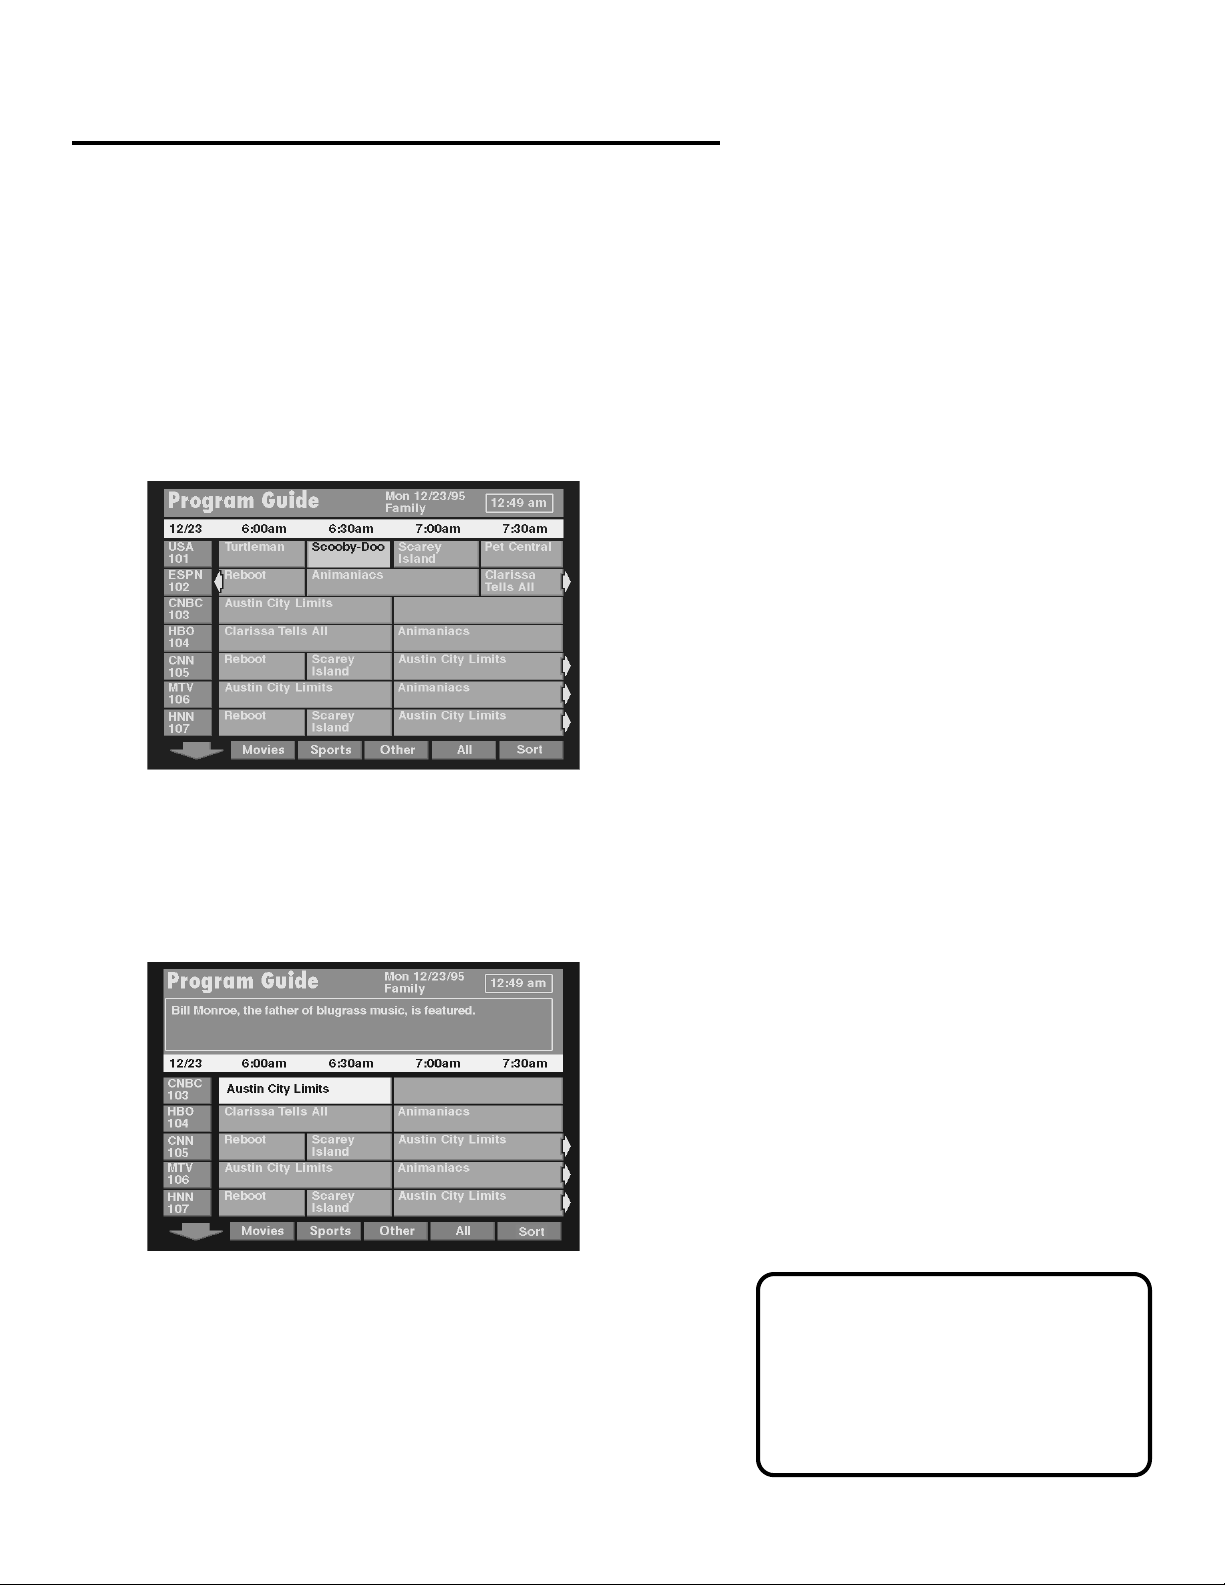
The Grid Guide
Shows the schedule in a time-and-channel format, similar to a TV
schedule listed in a newspaper.
The seven-channel Grid Guide.
The Info Guide
Shows you five channels and includes a brief description of the
selected program.
The five-channel Info Guide gives you a brief
program description.
By default, the Grid Guide appears
when you press the GUIDE button on
the remote. Go to the Preferences
menu (located within the Assistance
Menu) to change the default guide
from the Grid Guide to the Info Guide.
9
Page 14
PROGRAM GUIDES
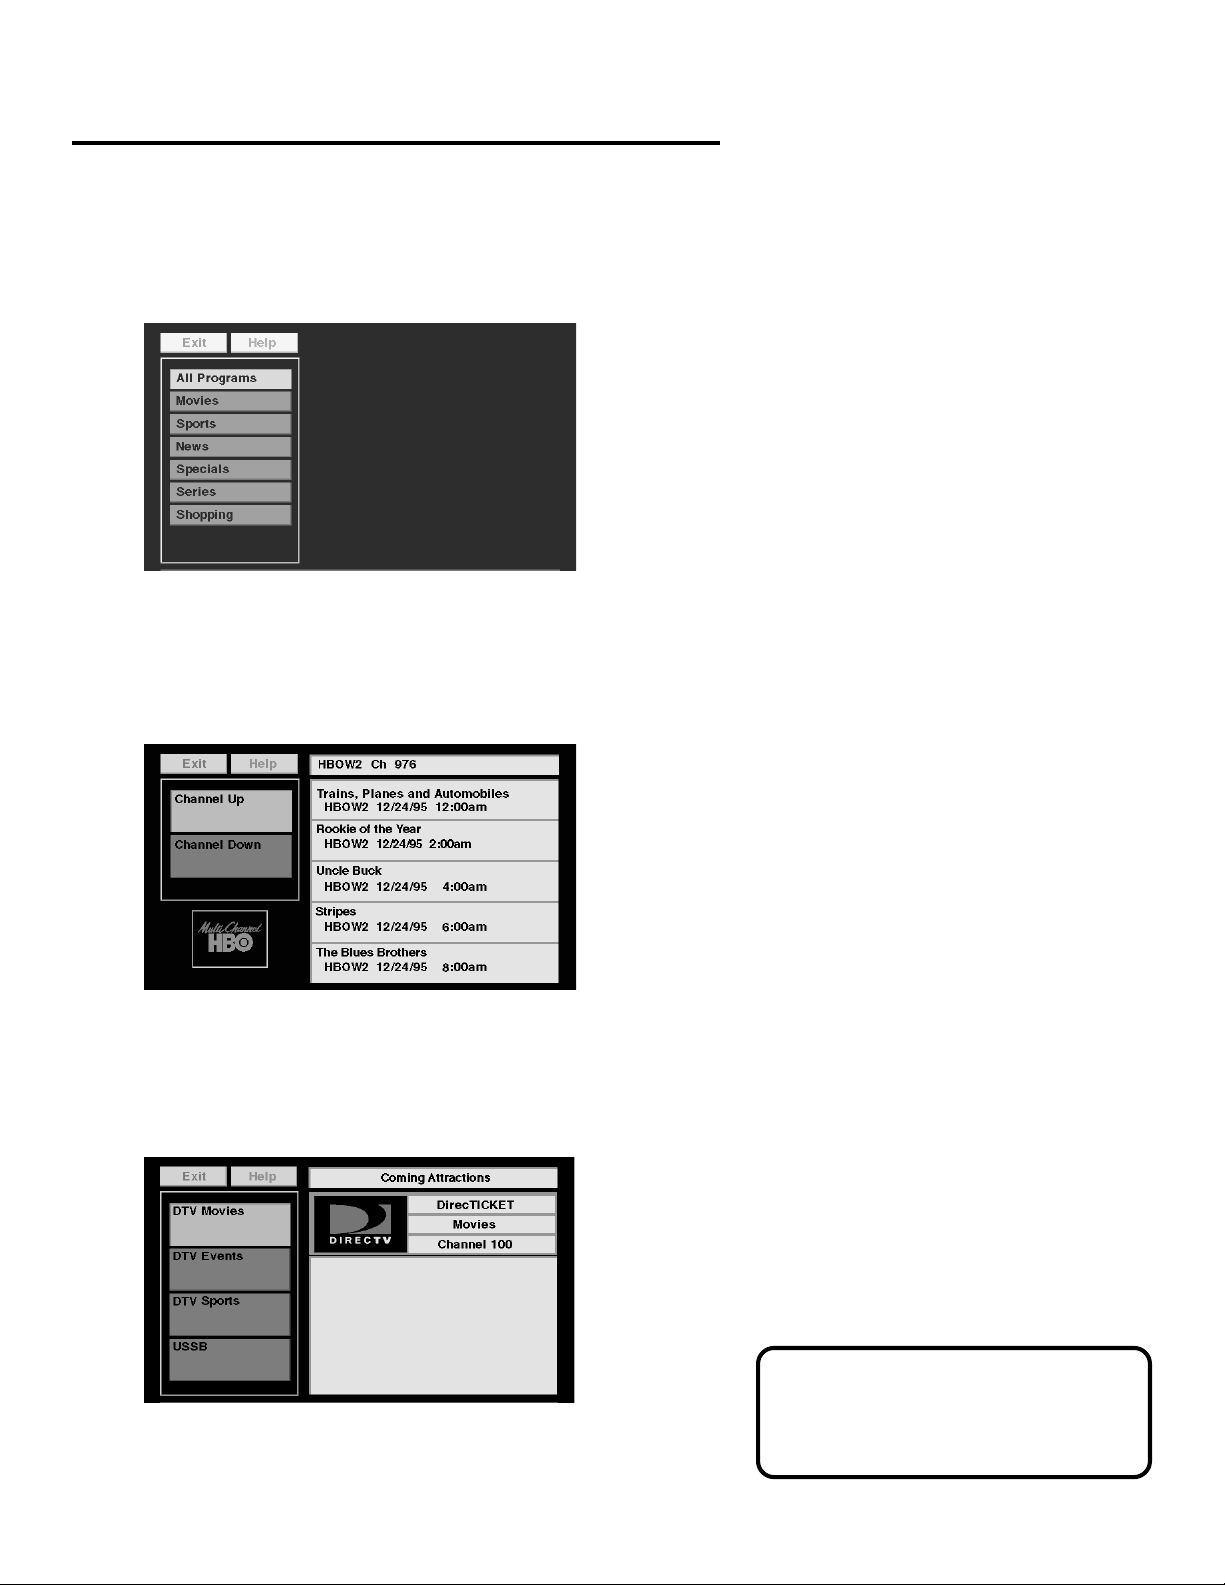
The Topic Guide
Lets you sort the programming schedule to show certain topics,
such as “movies” or “sports.”
The Topic guide.
The Channel Guide
Displays the programming schedule for the selected channel.
The Channel guide.
The Attractions Guide
Displays coming attractions and special events information.
The Attractions guide.
10
See the section on purchasing pay-perview programs for more information
on the Attractions guide.
Page 15
PROGRAM GUIDES
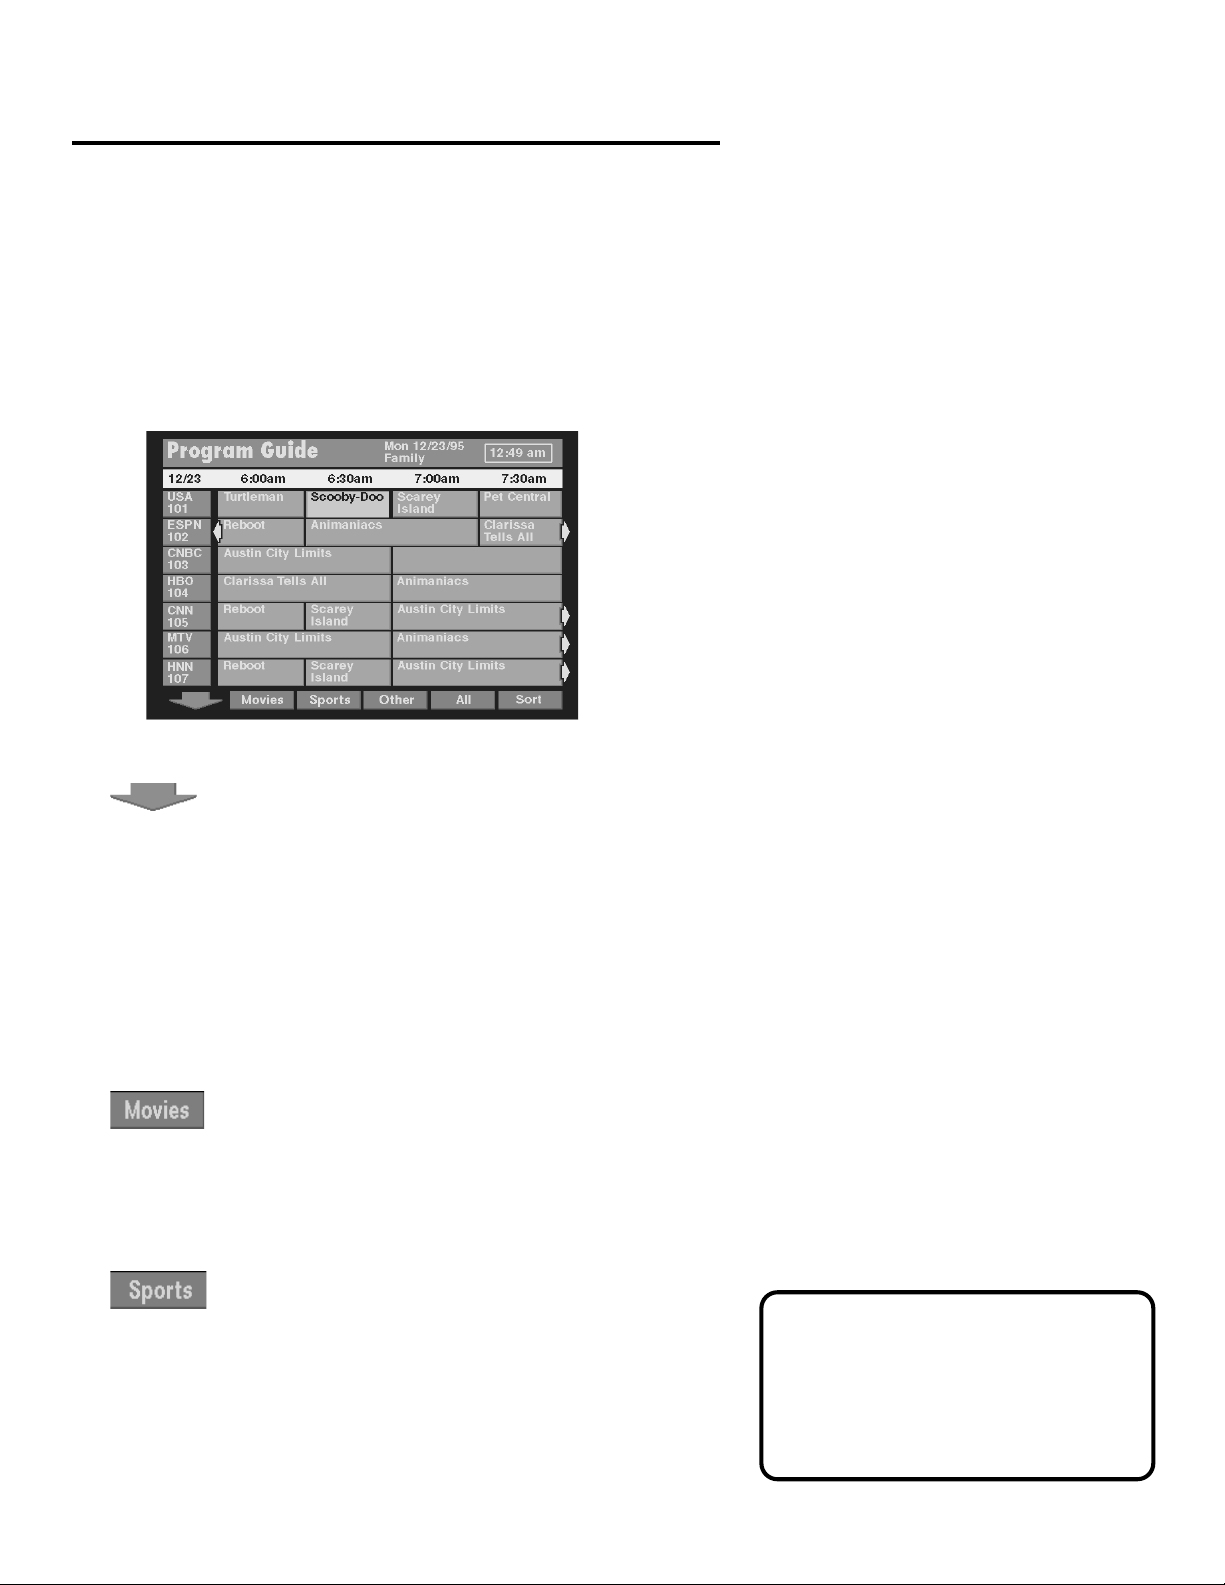
Sorting the Grid and Info Guides
There are six on-screen choices—called “buttons”— at the bottom
of the Grid Guide and the Info Guide: down arrow, Mo vies, Sports,
Other, All, and Sort.
The Sorting buttons are at the bottom of the screen.
The arrow button allows you to scroll down through other channels
in the guide. Point to the down arrow, and then press MENU/
SELECT to scroll down through the program guide.
Using the Sorting Buttons
The remaining buttons at the bottom of the guide are called
“sorting buttons.” These buttons allow you to simplify the guide
to show specific types of information such as movies, or sports.
The Movies button lists movies only.
After selecting Movies, point to the
and press MENU/SELECT to sort the guide to list specific types of
movies, such as comedies or thrillers.
Theme
button that appears
The Sports button lists sporting events only.
After selecting Sports, point to the
press MENU/SELECT to sort the guide to highlight specific types
of sports, such as basketball or soccer.
Theme
button that appears and
TIP
You don’t have to use the one-screen
Down Arrow button to scroll through
the Program Guide. You can use the
Arrow Buttons on the Remote.
11
Page 16

PROGRAM GUIDES
Allows you choose from a list of sorting topics.
Once you have selected a sorting topic from the list, your guide
will be simplified to show only that type of program.
After selecting a topic, a
the
Other
button.
Resets the guide to show all available channels and listings.
Takes you to the guide filter screen.
Themes
button may appear in the place of
Using the Themes Button
After you select one of the sorting buttons, the name of that button
changes into the
sort the Grid or Info Guide to show subtopics (“themes”). For
example, you could simplify the guide to show “baseball” under
the Sports sorting button, or “comedies” under Movies.
Themes
button. Use the
Themes
button to further
Exiting A Program Guide
There are two ways to exit a Program Guide:
• Point to a channel and press MENU/SELECT.
• Press EXIT on the remote.
Program Guide disappears and you are returned to regular
program viewing. If you have selected a pay-per-view program, a
display screen allows you to purchase the selected program.
12
Page 17

THE MENU SYSTEM
THE MENU SYSTEM
What is a Menu?
The DSS® menu is a list of choices, just like a menu in a
restaurant. And, just as a restaurant menu is divided into
sections such as appetizers, entrees, and desserts, the onscreen menus are also separated into sections to help you
find the information you need.
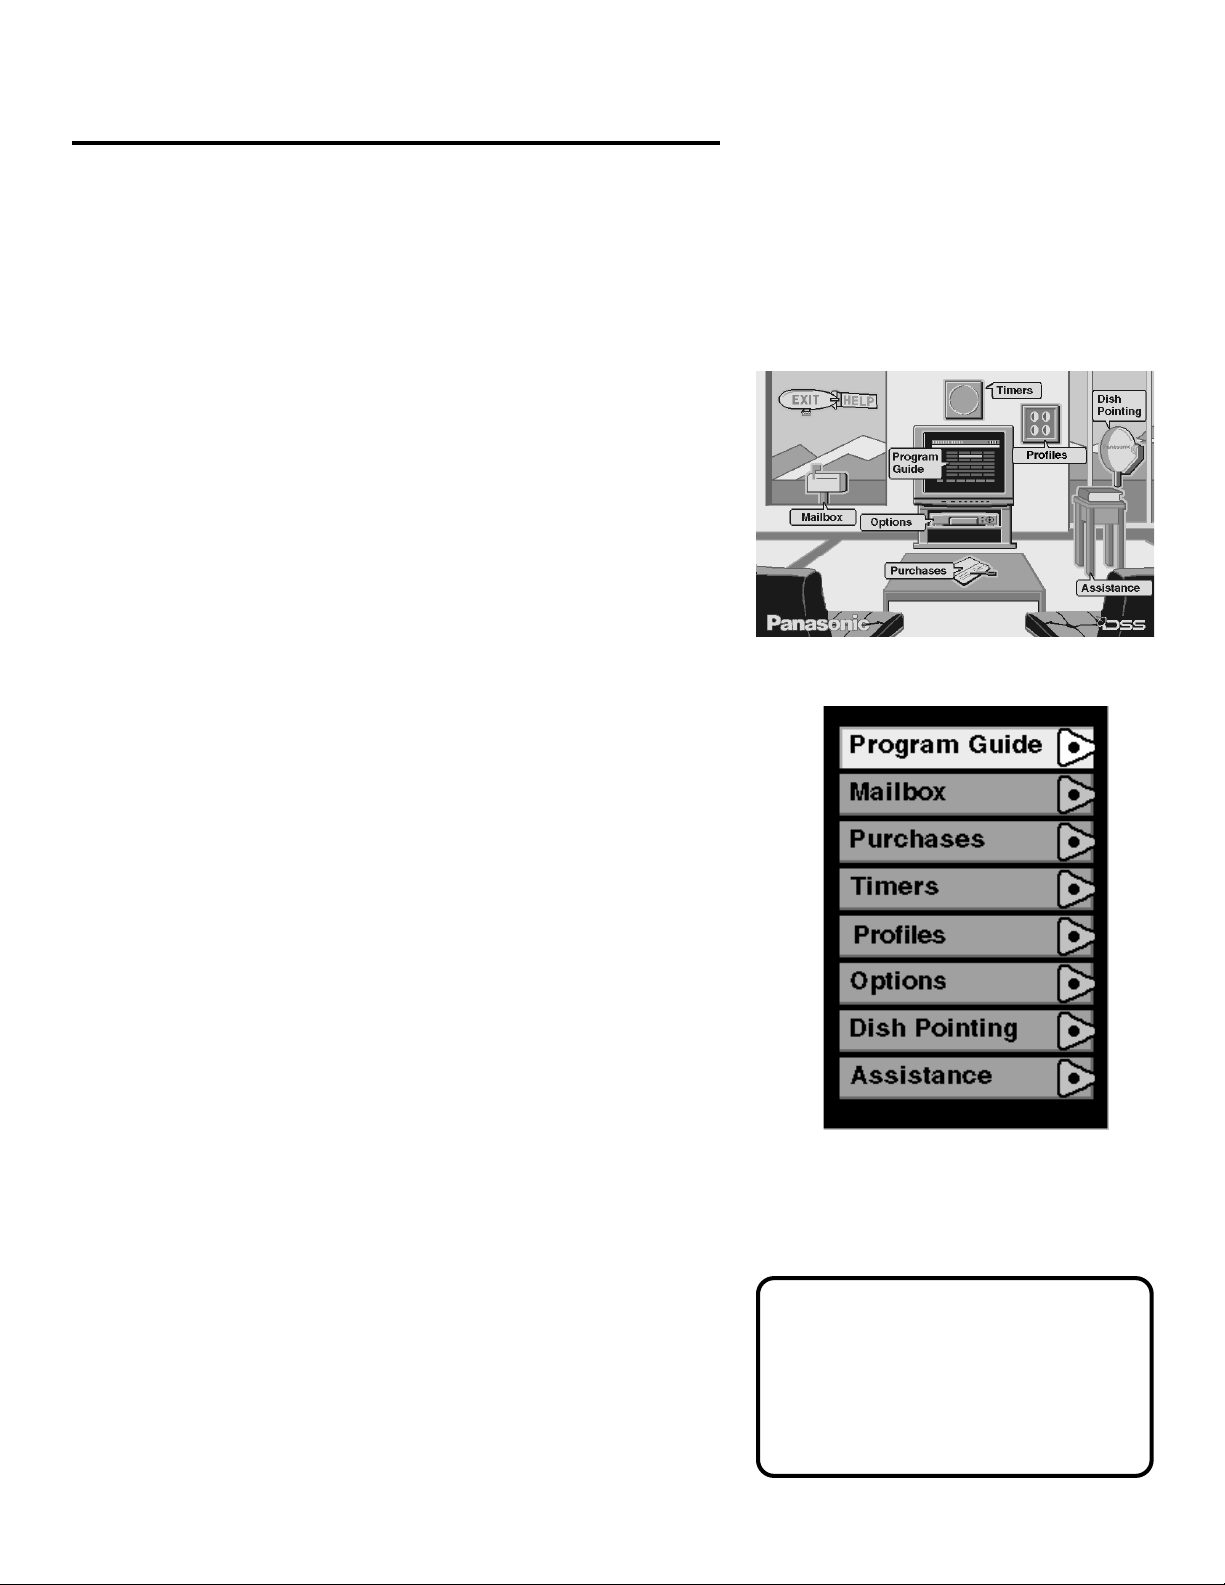
Your On-Screen Living Room
The first menu in this DSS® system looks like a living room.
You might consider this your “home base” for customizing
your DSS® system because you use the Living Room Main
Menu to get to other parts of the system, such as the User
Profiles menu or the Assistance menu.
Use the MENU/SELECT button to
bring up the Living Room main menu,
and then use Point and Select to
choose a menu option.
13
Page 18

THE MENU SYSTEM
1
2
3
4
5
6
7
8
9
0
R-TUNE
TV/VIDEO
POWER
MUTE
V
C
R
1
V
C
R
2
A
U
X
L
D
R
C
V
R
C
B
L
T
V
D
S
S
CH
CH
VOL
VOL
MENU
SELECT
GUIDE
EXIT
FAV RECALL
LOGO TUNE
TV/VCR
ALT AUD.
TV/DSS
REC STOP PAUSE
DIGITAL SATELLITE
RECEIVER
Panasonic
REW
PLAY
FF
Using the Menu System
To bring up the Main Menu, press MENU/SELECT on the remote.
The Living Room Main Menu.
To use the menu system, you need to know the Point and Select
rule. Use the arrows on the remote to point to an item on the
screen, and then press MENU/SELECT to select it.
MENU/SELECT
button
Exit and Help
There are Exit and Help buttons at the top of most screens. Point
to
Help
screen.
Exiting a Screen
There are two ways to exit a menu:
• Point to
• Press the EXIT button on the remote control. The on-screen
Using Help
All menus have a Help button. For example, selecting the Help
button from the Main Menu brings up all of the help balloons for
the Living Room.
1. Press MENU/SELECT to bring up the Living Room Main Menu.
2. Point to the
Exit
and press MENU/SELECT to leave that screen. Point to
and press MENU/SELECT to see more information about that
Exit
and press MENU/SELECT.
displays clear from the screen and you return to satellite TV
viewing.
Help
button and press MENU/SELECT.
Main Menu Won’t Appear?
If the Main Menu doesn’t appear when
you press MENU/SELECT, the remote
might not be in DSS® mode. Try
pressing the DSS button on the
remote, and then MENU/SELECT.
14
Page 19

THE MENU SYSTEM
The Help balloons show all of the menu choices in
the Living Room Main Menu.
3. Press MENU/SELECT again. The help balloons disappear.
The rest of the Help buttons in the menu system bring up helpful
information explaining one aspect of that menu.
Changing the Main Menu’s Appearance
You have the option of using the Li ving Room Main Menu, or a
Control Panel Main Menu.
The Control Panel Main Menu.
Use the
1. Point to
2. Point to
3. Use the arrow keys to change the Main Menu to a
Assistance
Assistance
Preferences
Control Panel.
menu to change the look of the Main Menu:
and press MENU/SELECT.
and press MENU/SELECT.
Don’t Forget about the EXIT
Button
Press the EXIT button on the remote
to remove the on-screen menus and
return to satellite TV viewing.
15
Page 20
THE MENU SYSTEM
Menu Descriptions
This section briefly describes each of the available Main menu
options. Detailed information about each menu is included in the
sections of the manual which describe each menu.
Program Guide
Shows the on-screen programming schedules.
Mailbox
Use to read mail messages sent by your program provider(s).
Purchases
Use to review or cancel upcoming purchases, and to review
past purchases.
Timers
Allows you to schedule the satellite system to tune to a specific
channel at a specific time, and to record that channel. (See
“Recording with Timer.”)
Profiles
Allows you to set rating and spending limits, and to create favorite
channel lists.
Options
Allows you to run the system test or to install a new access card.
Dish Pointing
Use to find your dish pointing coordinates, and to access the
on-screen signal strength meter.
Assistance
Shows you information about using the system and setting the
system to your personal preferences.
Explore, Explore, Explore!
Once you’ve learned the basics, feel free to poke around the menu
system because exploring is the best way to learn. The contextsensitive help at the bottom of the screen provides instructions
for getting through any particular menu or control panel.
Remember , press EXIT at any time to leave the menu system and
return to regular satellite TV viewing.
Context-Sensitive Help
Most of the screens contain information to help you decide what to do
next. If you get stuck, look for the help
text.
16
Page 21

PROFILES
PROFILES
Controlling The System
The Profiles feature lets four members of your household
customize their DSS® viewing by setting up channel lists and
ratings limits which can be password protected.
Especially for Parents
The Profiles feature contains a “Family” profile that is
automatically activated each time the DSS® system is turned
on. Setting up the family profile to reflect what you think is
the appropriate viewing level for the youngest member of
your family can help you to control what they watch.
Also, a password-protected master control lets you lock the
system so that no one can change any of the ratings limits,
spending limits, or channel lists without first entering a fourdigit password.
Profiles puts you in charge of the
viewing habits of your family.
17
Page 22

PROFILES
Creating and Editing a Profile
1. Select
screen.
The System Control screen.
2. Point to
MENU/•SELECT.
Profiles
Edit Users
from the Main Menu to get to the system control
from the system control screen and press
Select a User Name to edit..
3. Point to a user or “Family List” and press MENU/SELECT.
After you choose a user, you can do the following:
• Edit the User’s name (except for Family List).
• Edit the user’s channel list.
• Adjust the user’s ratings limit.
• Set the user’s password (except for Family List).
18
The Family profile does not have its
own password option because each
time you turn on the DSS® receiver , the
system defaults to the Family profile.
Page 23

PROFILES
Editing a User’s Name
1. Point to
Use the arrows to edit a User’s name.
2. Use the arrow keys to enter a new User name. Press MENU/
SELECT when the name has been entered.
Edit Name
and press MENU/SELECT.
Editing the Channel List
The first time that you enter this menu, all of the channels are
selected (check mark ed). To create a customized channel list, you
need to scroll through the list and deselect those channels that
you do not want to appear in the Program Guide.
1. Point to
Edit the User’s channel list.
2. Use the arrow keys to point to a channel, and press MENU/
SELECT to remove (or replace) the check mark.
Edit Channels
and press MENU/SELECT.
Add or Delete All Channels
You might be able to save time when creating a channel list by
using the
add all channels or delete all channels before removing or adding
individual channels.
Add All Chans
option or the
Delete All
option to either
19
Page 24

PROFILES
Setting the Rating Limit
The Rating Limit menu enables you to set a maximum viewing
limit for rated movies (based on the MPAA ratings system), as
long as the program provider has transmitted the proper code.
• Note that the ratings limit cannot be enforced if a program
has not been rated, if rating information for that program is
not transmitted by the program provider, or if the system has
not been locked.
1. Point to
Use the arrow keys to move the selector up and down.
2. Use the up and down arrows to move the rating selector to
the highest rating you want the user to be allowed to view.
Rating Limit
and press MENU/SELECT.
Locking a User’s Profile
Each user can be assigned a personal password to lock their profile.
When a password is assigned, the user must enter it before he or
she can view programs using that profile.
1. Point to
Setting a User’s personal password.
2. Use the arrow or digit keys to select each number of the
password.
Lock User
and press MENU/SELECT.
20
You need to lock the system in order
for rating limits and channel lists to go
into effect. See “Locking the System”
for details
Page 25

PROFILES
Controlling the System
Use the System Control screen to set up a system-wide, per-event
spending limit, and to lock the system in order to put into effect
the channel lists and rating limits you set up in your user profiles.
Setting Up Spending Limits
1. Point to
Set a per-event spending limit.
2. Use the arrow keys to enter a single-program spending limit.
3. When finished you can lock the system, edit a user profile, exit
to the preceding screen, or press EXIT to go back to normal
viewing.
Spending Limit
, and press MENU/SELECT.
Locking the System
Locking the system lets you manage your family’s access to DSS
programming. The User Profile settings for channel lists, ratings
limits, or spending limits go into effect when you lock the system.
®
1. Point to
Enter a four-digit system password to lock the system.
Lock Limits
and press MENU/SELECT.
Unlocking a User’s Profile
If you forget your user password, you
might need to unlock the user in order
to set a new one.
Go the Edit User screen, point to
Unlock User and press the MENU/
SELECT button; then you can enter a
new password.
21
Page 26

PROFILES
2. Use the arrows or the digit keys to enter a four-digit
system password.
3. Enter the password a second time to confirm it.
After the system has been locked, you must enter the correct
password in order to access System Control screen, so Don’t
Forget Your Password! If you do forget your password, contact
your program provider’s authorization center.
Unlocking the System
When the system is unlocked, the spending, rating, and channel
limits that you have set are no longer in effect.
1. Point to
2. Point to
to unlock the system.
Unlock Limits
Y es
and press MENU•SELECT to confirm that you want
and press MENU•SELECT.
Session Unlock
If your system is locked and you attempt to access a channel or
program that is blocked by one or more limits, you are asked to
enter the four-digit system password to override the system lock. If
you enter the password to override the rating, spending, or channel
limit, all limits are unlocked until you turn off the receiver. When
you turn on the receiver again, the system will be locked, and in
family mode.
Choosing Your Profile to Watch
DSS® Programming
Each time that you turn on the DSS® receiver, the Family profile is
selected by default.
1. Press the FA V button on the remote to scroll through the profiles.
2. When your profile appears, enter your four-digit personal
password to activate your profile.
• If the profile is not password protected, you can just press
MENU/SELECT to activate it.
Now, the ratings and channel limits will reflect the chosen profile.
22
Forget Your System Password?
You need to contact your program
provider’ s authorization center to reset
your system if you forget your system
password.
Page 27

MORE FEATURES
MORE FEATURES
Pay-Per-View Programs
A pay-per-view program (PPV) is aprogram that you purchase—
like a movie ticket—on an event-by-event basis. For instance, you
might be able to preview a movie, and then after previewing it,
you can purchase the movie.
Purchasing and Viewing
There are several ways to purchase PPV movies and events:
• Tune to a PPV program by using the channel buttons on the
remote to scan through the channel lists.
• Select a PPV program from the Program Guide.
• Select a coming attraction from the Attractions menu.
Tuning to a PPV Program
When you use the channel buttons or digits on the remote to tune
to a Pay-Per-View channel, you need to press the RECALL button
to bring up the Program Details screen in order to purchase a
program.
Program Details screen.
Follow the on-screen instructions to purchase the selected
program.
Y ou may need to enter your four -digit
system password to order a PPV
program if it costs more than the
spending limit you set up in the
Profiles menu.
23
Page 28

MORE FEATURES
Using the Program Guide for PPV Programs
If you highlight a PPV program in the Program Guide and then
press RECALL on the remote control, you see a program details
screen similar to the following:
Use the Program Guide to get to the PPV Program Details screen.
• Select
program preview (if a preview is available).
• Select
• Select
• Select
View Channel
Channel Guide
Buy Program
Other Times
to purchase the program.
to see additional show times.
to see go to that channel and view a
to go to the channel guide.
Using the Attractions Guide
Y our program providers may offer future programming events not
currently listed in your Program Guide. These events are called
“coming attractions,” and can be previewed and purchased
through the Attractions Guide.
Use Point and Select to go to the
the Program Guide menu).
Attractions Guide
(located within
Buy and Record Option
Your program provider may offer PPV
programs that are coded so that you
cannot record them. When these
programs are offered, an additional
option (
program details screen. Selecting
and Record
program; selecting
allows you only to watch the program.
Buy and Record
allows you to record the
) appears in the
Buy Program
Buy
24
The Attractions Guide is accessed through the Program
Guide menu.
You need to connect your phone line
to your satellite receiver to be able to
order PPV programs by using the onscreen menus.
Page 29

MORE FEATURES
Using the Purchases Menu
The Purchases menu allows you to review upcoming and past
purchases.
The Purchases menu shows you upcoming or past
purchases.
The list of purchases may be longer than one screen; use the down
arrow keys to see more items. The display also shows the title,
channel, date, time, and cost of each program.
• Note that the Past Purchases list might be modified after each
billing cycle and still show purchases for which you have
already paid.
Reviewing and Canceling an Upcoming Purchase
Use Point and Select to choose an upcoming purchase and review
the program description. From the Purchase Edit screen, you can
also cancel an upcoming purchase.
The Purchase Edit screen lets you cancel an
upcoming purchase.
25
Page 30

MORE FEATURES
Timer Feature
The Timer feature allows you to preset your system to
automatically tune to a particular channel at a predetermined
time, and even to record that channel.
To use the Timer feature, select
bring up the Timers screen. Select a Timer (1, 2, 3, or 4) and then
use the arrow keys to complete the on-screen sentence. When
the sentence is complete, select
Complete the sentence to set up the selected timer .
Timers
from the main menu to
Run Timer
.
Setting Up Timer Recordings
The T imer feature allows you to set up timer recordings when
you connect the VCR controller to your DSS® receiver, and tell
the receiver what type of VCR you are using.
Locating the Infrared Remote Control
Sensor on Your VCR
The VCR controller must be affixed directly over the infrared
remote sensor on your VCR.
Some VCRs label the infrared remote sensor, and others do not.
If your VCR is labeled, affix the VCR controller directly over the
sensor.
26
SENSOR
VCR
Infrared Remote Sensor
Page 31

MORE FEATURES
OUT
TO
TV
IN
FROM
ANT
S-VIDEO VIDEO R LAUDIO WIDE BAND DATA
VCR CONTROL
REMOTE IN
SATELLITE IN
LOW SPEED DATA
PHONE JACK
REMOTE SENSOR
VCR
CH3
CH4
For VCRs that do not label the remote sensor, you need to use the
VCR’ s remote to locate the sensor before af fixing the VCR controller .
1. Hold the remote control so that it is touching the front of the
VCR.
2. Slowly move the remote over the front of the VCR while pressing
the remote power button on and off.
3. When your VCR turns off or on, you have located the sensor.
To test the VCR controller, use a piece of clear tape to temporarily
attach the VCR controller to the spot where you think the sensor is
located, and then follow the steps described under “Selecting a
VCR Type.”
Connecting the VCR Controller
In order for the receiver and VCR to communicate, you need to
attach the VCR controller to the back of the satellite receiver.
1. Plug the VCR controller into the VCR CONTROL jack on the back
of the satellite receiver.
2. Affix the other end to the remote sensor on your VCR.
Selecting a VCR Type
Y ou need to tell the satellite receiver which VCR brand you are using
by selecting
The Set VCR Type screen is located in the Options menu.
1. Use the arrows or digit keys to input the correct code for your
VCR brand. The VCR codes are located on the next page.
2. Follow the on-screen instructions to ensure that you are using
the correct code. If the VCR automatically stops tape play, then
you know that the satellite receiver and the VCR are
communicating.
• Some VCR brands may not be capable of being controlled
Set VCR Type
from the
by the satellite receiver.
Options
menu.
Connect the VCR controller to the infrared
remote sensor on your VCR.
27
Page 32

MORE FEATURES
VCR Codes
Aiwa .................................................... 015
Akai............. 003, 017, 022, 023, 063, 066
Audio Dynamics......................... 014, 016
Broksonic ............................................ 010
Candle ........................ 007, 009, 013, 044,
045, 046, 052
Cannon........................................ 008, 053
Capehart.............................................. 001
Citizen......................... 007, 009, 013, 044,
045, 046, 052
Colortyme ........................................... 014
Craig ............................................ 007, 012
Curtis-Mathes .... 000, 007, 008, 014, 015,
044, 046, 053, 064, 067
Daewoo ....................... 013, 045, 052, 076
DBX ............................................. 014, 016
Dynatech ............................................. 015
Electrohome ....................................... 027
Emerson...... 008, 009, 010, 013, 015,020,
023, 027, 034, 041, 042, 047, 049, 057,
062, 065, 067, 068, 070
Fisher.................. 002, 012, 018, 019, 043,
048, 058
Funai.................................................... 015
GE ........................ 000, 007, 008, 032, 053
Goldstar ...................... 009, 014, 046, 060
Harman Kardon.................................. 014
Hitachi ......................... 005, 015, 035, 036
Instant Replay..................................... 008
JCL....................................................... 008
JC Penney .......... 002, 005, 007, 008, 014,
016, 030, 035, 051, 053
JVC ...................... 002, 014, 016, 030, 046
Kenwood..... 002, 014, 016, 030, 044, 046
KLH ...................................................... 073
Lloyd.................................................... 015
Logik.................................................... 031
Magnavox ................... 008, 029, 053, 056
Marantz002, 008, 014, 016, 029, 030, 044,
046, 061
Marta ................................................... 009
MEI ...................................................... 008
Memorex .................... 008, 009, 012, 015
MGA ............................................ 004, 027
Midland ............................................... 032
Minolta ........................................ 005, 035
Mitsubishi ........... 004, 005, 027, 035, 040
Montgomery Ward ............................ 006
MTC ............................................. 007, 015
Multitech ..................... 007, 015, 031, 032
NEC............. 002, 014, 016, 030, 044, 046,
059, 061, 064
Panasonic ................... 008, 053, 075, 077
Pentax ................................. 005, 035, 044
Pentex Research + ............................. 046
Philco........................... 008, 029, 053, 056
Philips.......................................... 008, 029
Pioneer ........................ 005, 016, 033, 050
Portland............................... 044, 045, 052
ProScan............................................... 000
Quartz.................................................. 002
Quasar......................................... 008, 053
RCA..................... 000, 005, 007, 008, 028,
Radio Shack/Realistic 002, 006, 008, 009,
035, 037, 054, 069
012, 015, 019, 027, 043, 053
Samsung............. 007, 013, 022, 032, 042
Sansui ................................................. 016
Sanyo .......................................... 002, 012
Scott .................... 004, 013, 041, 049, 068
Sears .......... 002, 005, 009, 012, 018, 019,
035, 043, 048
Sharp................... 006, 024, 027, 039, 045
Shintom ...................... 017, 026, 031, 055
Sony .................................... 017, 026, 038
Sylvania .............. 008, 015, 029, 053, 056
Symphonic ......................................... 015
Tandy ........................................... 002, 015
Tashiko ................................................ 009
Tatung ................................................. 030
Teac ..................................... 015, 030, 069
Technics .............................................. 008
Teknika ........................ 008, 009, 015, 021
Toshiba ................ 005, 013, 019, 048, 049
Totevision ................................... 007, 009
TMK ..................................................... 067
Unitech................................................ 007
Vector Research ................. 014, 016, 044
Victor ................................................... 016
Video Concepts .................. 014, 016, 044
Videosonic .......................................... 007
Wards ................. 005, 006, 007, 008, 009,
012, 013, 015, 025, 027, 031, 035
Yamaha ............... 002, 014, 016, 030, 046
Zenith .......................... 011, 017, 026. 072
Recording with Timer
If you choose Record instead of W atch when setting the Timer (and
have set up your VCR as previously discussed), the Timer will toggle
on your VCR, then start and stop recording a program.
Y ou need to make sure that a video tape with safety tabs in place is
inserted in the VCR and that the VCR is
• Preset to the satellite receiver ’s output channel (RF or Line).
• OFF at the time the program is to start recording.
Editing or Canceling a Timer
From the Timers screen, select the Timer you want to edit or cancel,
and then do the following:
• Use the arrows keys to edit the Timer, then select
• Select Clear Timer to cancel the timer completely.
28
Run Timer
.
Page 33

MORE FEATURES
One-Button Recording
Press the REC (record) button on the remote while you have a
program selected in the guide to set up a timer program. The
program information (channel, time, etc.) is stored in the first
available timer.
Editing One-Button Recording Settings
A confirmation screen appears when you use one-button recording
indicating in which Timer the information is stored.
REC (record)
button
FAV RECALL
TV/VCR
REW
REC STOP PAUSE
Panasonic
LOGO TUNE
ALT AUD.
TV/DSS
PLAY
DIGITAL SATELLITE
RECEIVER
FF
When you use one-button recording, only the individual program
that you select will be recorded. If you want to record the program
on a daily or weekly basis, go to the
Timers
menu and edit that
program’s timer.
Using Logo Tune
Press the LOGO TUNE button on the remote to bring up the current
channel list in channel logo format. Then Point and Select a channel
from the logo list.
Use Logo Tune to see a logo-based channel list.
One-Button Record Tip
Make sure that the remote control
is in DSS® mode when using onebutton record, or you might
accidentally start recording on your
VCR.
29
Page 34

MORE FEATURES
The Mailbox
The mailbox shows you messages that are sent—or “mailed”—
from your program providers. For example, you may receive a
message calling your attention to a new service.
How to Tell When You Have Mail
There are two ways to tell if you have mail, depending on
whether the satellite receiver is turned on or off.
• If the satellite receiver is turned on, a mail icon appears in
the upper right corner of the channel marker.
• If the satellite receiver is turned off, the POWER light on the
front panel of the receiver flashes.
Checking Your Mail
Select Mailbox on the Main menu to view your mail.
1. Point to a message and press MENU/SELECT. The message
is opened for you to read.
2. Press MENU/SELECT again to close the letter.
After you read a message and want to erase it, point to
Erase
and press MENU/SELECT. When you exit the display
screen, messages not erased are saved in memory.
Alternate Audio Programs
Alternate Audio allows you to select different audio programs
(when available) to be played with the video. For example, audio
broadcast in a second language may be available for certain
programs.
There are two ways to change the audio:
• Press ALT AUD on the remote.
• Select
within the
ALT AUD Remote Button
Alternate Audio
Options
menu).
from the
Preferences
menu (located
Temporary audio selections are made by pressing ALT AUD on
the remote. All the available audio types are selected one after
another as you continue pressing the ALT AUD button. Once
selected, the chosen audio remains selected until it is changed
or until the satellite receiver is turned off.
30
Is your POWER Light Flashing?
Don’t worry, your receiver’s not
broken. It means that you have mail.
Page 35

MORE FEATURES
Alternate Audio Display Screen
When you select Alternate Audio from the
the Alternate Audio display screen comes up.
Point to an audio language, and press MENU/SELECT. A check
mark next to a language option means you have selected that
language. The satellite system will then automatically set the
audio program to the selected audio program type when that
type is available.
Preferences
menu,
Picture Size
The Picture size display screen allows you to choose between a
standard TV screen and a Cinema option. A standard TV screen
has an aspect ratio of 4:3; the Cinema option has an aspect ratio
of 16:9.
System Test
The System T est display screen is accessed through the Options
menu, and allows you to initiate diagnostic procedures on the
satellite system. You should use this feature to get your Access
Card number, or when your receiver doesn’t seem to be working
correctly. There are four separate tests: signal, tuning, phone
connection, and access card.
A message screen appears, telling you whether the system
passed each test. If your system fails a test, run the system test
several times before concluding that there is a problem.
Occasional fluctuations in the phone line or satellite signal can
give temporary false failure readings.
New Access Card Setup
Periodically, your program provider may issue a replacement
access card. The New Access Card Setup display screen allows
you to transfer the information from the old card onto the new
one.
Follow the display screen prompts to initialize your new card.
Once you have transferred the information to the new card, your
old card becomes invalid.
Because your specific account information and custom settings
are stored in the access card, power failures should have no
effect on your satellite system.
Regarding Picture Size...
Y ou should only use the Cinema option
if you have a wide screen TV ; using the
Cinema option on a standard TV screen
could crop the picture.
31
Page 36

MORE FEATURES
Using On-Line Help
On-line Help is available for all of the menus and display
screens. The System provides Auto Help, Help buttons, and
Menu Help.
Auto Help
Most menus contain a short description of that menu.
Help Buttons
Help buttons appear in many display screens. To see
information about the display screen you are using, point to
the Help button and press MENU/SELECT.
Press MENU/SELECT again to remove the message from the
screen.
Menu Help
Select
a list of on-line Help topics. Point and select to find out about
the specific parts of the satellite system, then use the right
arrow key to continue through each of the Help screens or
press MENU/SELECT to return to the Help menu.
Program Guide shows a screen-by-screen overview of the
Program Guide features.
Menu System shows a screen-by-screen overview of the
DSS® menu system.
Remote Control shows an on-screen display of the remote
control. Point to the different remote buttons to see a brief
description of the highlighted button.
Front Panel shows an on-screen display of the satellite
receiver front panel. Point to the different front panel features
to see a brief description of the highlighted feature.
Back Panel shows an on-screen display of the satellite
receiver back panel. Point to the different back panel features
to see a brief description of the highlighted feature.
Glossary shows a list of common DSS® and TV terms. Point
to a glossary item to see a brief description.
About DSS
from the Assistance menu to choose from
Use the
Assistance menu) to learn more about
your system.
About DSS
menu (within the
32
Page 37

CONNECTIONS
CONNECTIONS
Things to Know Before
Connecting Components
Protect Your Components from Power Surges
• Connect all components before plugging any power cords
into the wall outlet.
• Always turn off the satellite receiver, TV and other
components before you connect or disconnect any cables.
Position Cables Correctly to Avoid Audio Hum or
Interference
• Insert all cable plugs firmly into their jacks.
• Place the audio/video cables to the sides of the TV’s back
panel instead of straight down the middle after you connect
your components.
• Try not to coil any twin-lead cables and keep them away
from the audio/video cables as much as possible.
• Make sure all antennas and cables are properly grounded.
Refer to the Safety Tips sheet packed with your unit.
Protect Your Components from Overheating
• Do not block ventilation holes in any of the components.
Arrange the components so that air can circulate freely.
• Do not stack components.
• Allow adequate ventilation when placing your components
in a stand.
• Place an amplifier or satellite receiver on the top shelf of
the stand so heated air rising from it will not flow around
other components.
CAUTION
Do not stack electronic components
or other objects on top of the DSS
Receiver. The slots on top of the
receiver must be left uncovered to
allow proper airflow to the unit.
Blocking the airflow to the unit could
impair performance or damage your
receiver and other components.
Do not stack the DSS receiver on
top of a “hot component” such as an
audio power amplifier.
33
Page 38

CONNECTIONS
Audio/Video Jack
RF Jack
Connecting Your Satellite
Receiver to Your TV
If your satellite system has not been professionally installed, or if
you move your system or add a component, refer to these pages
to help you connect your system.
Jacks and Cables
S-Video Jack and Cable (S-VHS)
The S-Video jac k provides the best picture quality for your satellite
system.
This jack is available on many TVs and is used in conjunction with
audio cables to connect the satellite receiver to your TV . Remember
also to connect the left and right audio cables because the S-Video
jack carries only the picture signal, not the sound.
S-Video Jack
Audio/Video Jacks and Cables (RCA-type)
The audio/video jacks provide very good picture and stereo sound
quality, and should be used if your TV has no S-Video jack.
These jacks are used for most audio/video connections between
components. The satellite receiver audio/video jacks are color
coded (yellow for video, red for right audio, and white for left
audio). If your TV has only one input for audio (mono), connect it
to the right (red) audio jack on the satellite receiver.
RF Jacks and Coaxial Cables (F-type)
The RF jacks provide good picture and mono sound quality, and
are to be used if audio/video connections are not available for your
TV .
These jacks are required for antenna or cable-TV connections. The
RF jacks on the satellite receiver are labeled IN FROM ANT and
OUT TO TV. The coaxial cable supplied with your satellite system
is used to connect the RF jacks between the satellite receiver and
your TV’s antenna input.
34
Page 39

CONNECTIONS
Choosing a Connection
The following pages show four examples of hookups commonly
used to connect the satellite receiver with a TV and other
components. Refer to your TV and VCR Owner’ s Manuals for more
information on hooking up your specific components.
Connection A
Provides the best possible picture and stereo audio quality.
To use Connection A, you must have:
• TV with S-V ideo input, plus separate RF and audio/video inputs
(jacks).
• VCR with RF and audio/video inputs and outputs
• S-Video, coaxial, and audio/video cables
Connection B
Provides very good picture and stereo audio quality.
To use Connection B, you must have:
• TV with separate RF and audio/video inputs (jacks)
• VCR with RF and audio/video inputs and outputs
• Coaxial and audio/video cables
Connection C
Provides good picture and mono audio quality.
To use Connection C, you must have:
• TV with RF input (jack)
• VCR with RF and audio/video inputs
• Coaxial and audio/video cables
Connection D
Provides good picture and mono audio quality.
To use Connection D, you must have:
• TV with RF input (jack)
• Coaxial cables
CAUTION
Do not stack electronic components
or other objects on top of the DSS
Receiver. The slots on top of the
receiver must be left uncovered to
allow proper airflow to the unit.
Blocking the airflow to the unit could
impair performance or damage your
receiver and other components.
Do not stack the DSS receiver on
top of a “hot component” such as an
audio power amplifier.
35
Page 40

CONNECTIONS
VIDEO
DSS
RECEIVER
VCR
IN FROM ANT
OUT TO TV
L
R
S-VIDEO
S-VIDEO
VIDEO
AUDIO
LR
SATELLITE IN
AUDIO
LINRLRVIDEO
AUDIO
AUDIO INVIDEO IN
SATELLITE
DISH
CH3
CH4
TV
OUT TO TV
IN FROM ANT
CABLE
OR
OFF-AIR ANTENNA
CH4
CH3
AUDIO OUTVIDEO OUT
Connection A
Best Picture and Sound Quality
To use this connection you must have:
• TV with separate RF, audio/video, and S-Video inputs (jacks)
• VCR with RF and audio/video inputs
• Coaxial, audio/video, and S-Video cables
To connect TV, VCR and antenna or cable box.
1. Connect coaxial cables as shown.
2. Connect audio/video cables as shown.
3. Connect S-Video cable as shown.
To receive DSS® programming:
1. Tune TV to receive the S-Video output from the satellite
receiver.
2. Tune satellite recei ver to desired channel.
To receive off-air programming (no cable box):
1. Turn off VCR and satellite receiver.
2. Tune TV to desired channel.
To receive off-air programming (with cable box):
1. Turn off VCR and satellite receiver.
2. Tune TV to cable box output channel (usually CH2, CH3,
or CH4).
3. Tune cable box to desired channel.
To record DSS® programming:
1. Tune TV to receive S-Video output from satellite receiver.
2. Tune satellite recei ver to desired channel.
3. Set your VCR to record on line input.
To view VCR programming:
1. Tune TV to VCR output channel (usually CH3 or CH4).
CAUTION
Do not stack electronic components
or other objects on top of the DSS
Receiver. The slots on top of the
receiver must be left uncovered to
allow proper airflow to the unit.
Blocking the airflow to the unit could
impair performance or damage your
receiver and other components.
Do not stack the DSS receiver on
top of a “hot component” such as an
audio power amplifier.
36
Page 41

CONNECTIONS
Connection B
Very Good Picture and Sound Quality
To use this connection you must have:
• TV with separate RF and audio/video inputs (jacks)
• VCR with RF and audio/video inputs
• Coaxial and audio/video cables
To connect TV, VCR and antenna or cable box.
1. Connect coaxial cables as shown.
2. Connect audio/video cables as shown.
To receive DSS® programming:
1. Tune TV to receive line output from satellite receiver
(often called Input 1).
2. Tune satellite recei ver to desired channel.
To receive off-air programming (no cable box):
DSS
RECEIVER
VCR
TV
R
L
VIDEO
AUDIO
SATELLITE
DISH
OUT TO TV
IN FROM ANT
CH4
CH3
IN FROM ANT
CH3
CH4
OUT TO TV
VIDEO
LINRLRVIDEO
AUDIO
SATELLITE IN
LR
AUDIO
AUDIO INVIDEO IN
AUDIO OUTVIDEO OUT
CABLE
OR
OFF-AIR ANTENNA
1. Turn off VCR and satellite receiver.
2. Tune TV to desired channel.
To receive off-air programming (with cable box):
1. Turn off VCR and satellite receiver.
2. Tune TV to cable box output channel (usually CH2, CH3,
or CH4).
3. Tune cable box to desired channel.
To record DSS® programming:
1. Tune TV to record line output from satellite receiver (Input1).
2. Tune satellite recei ver to desired channel.
3. Set your VCR to record on line input.
To view VCR programming:
1. Tune TV to VCR output channel (usually CH3 or CH4).
CAUTION
Do not stack electronic components
or other objects on top of the DSS
Receiver. The slots on top of the
receiver must be left uncovered to
allow proper airflow to the unit.
Blocking the airflow to the unit could
impair performance or damage your
receiver and other components.
Do not stack the DSS receiver on
top of a “hot component” such as an
audio power amplifier.
37
Page 42

CONNECTIONS
Connection C
Good Picture and Sound Quality
To use this connection you must have:
• TV with RF input (jack)
• VCR with RF and audio/video inputs
• Coaxial and audio/video cables
To connect TV, VCR, and antenna or cable box.
1. Connect coaxial cables and audio/video cables as shown.
To receive DSS® programming:
• Tune TV to channel 3 or 4 (depending on how you set the
CH3/CH4 switch on the back of the receiver).
DSS
RECEIVER
VCR
TV
SATELLITE
DISH
OUT TO TV
IN FROM ANT
CH4
CH3
IN FROM ANT
CH3
CH4
OUT TO TV
VIDEO
LINRLRVIDEO
AUDIO
SATELLITE IN
LR
AUDIO
AUDIO INVIDEO IN
AUDIO OUTVIDEO OUT
CABLE
OR
OFF-AIR ANTENNA
To receive off-air programming (no cable box):
1. Turn off VCR and satellite receiver.
2. Tune TV to desired channel.
To receive cable programming (with cable box):
1. Turn off VCR and satellite receiver.
2. Tune TV to cable box output channel (usually CH2, CH3,
or CH4).
3. Tune cable box to desired channel.
To record DSS® programming:
1. Tune TV to the channel on which you receive the DSS
signal.
2. Tune satellite recei ver to desired channel.
3. Set VCR to record on line input.
To view VCR programming:
1. Tune TV to VCR output channel (usually CH3 or CH4).
2. Turn satellite recei ver off.
®
CAUTION
Do not stack electronic components
or other objects on top of the DSS
Receiver. The slots on top of the
receiver must be left uncovered to
allow proper airflow to the unit.
Blocking the airflow to the unit could
impair performance or damage your
receiver and other components.
Do not stack the DSS receiver on
top of a “hot component” such as an
audio power amplifier.
38
Page 43

CONNECTIONS
VIDEO
DSS
RECEIVER
CABLE
OR
OFF-AIR ANTENNA
LR
SATELLITE IN
AUDIO
LINRVIDEO
AUDIO
SATELLITE
DISH
TV
OUT TO TV
IN FROM ANT
CH4
CH3
Connection D
Good Picture and Sound Quality)
To use this connection you must have:
• TV with RF input
• Coaxial cables
To connect TV and antenna or cable box:
1. Connect coaxial cables as shown.
To receive DSS® programming:
• Tune TV to channel 3 or 4 (depending on how you set
the CH3/CH4 switch on the back of the receiver.
To receive off-air programming (no cable box):
1. Turn off satellite receiver.
2. Tune TV to desired channel.
To receive cable programming (with cable box):
1. Turn off satellite receiver.
2. Tune TV to cable box output channel (usually CH2, CH3,
or CH4).
3. Tune cable box to desired channel.
CAUTION
Do not stack electronic components
or other objects on top of the DSS
Receiver. The slots on top of the
receiver must be left uncovered to
allow proper airflow to the unit.
Blocking the airflow to the unit could
impair performance or damage your
receiver and other components.
Do not stack the DSS receiver on
top of a “hot component” such as an
audio power amplifier.
39
Page 44

CONNECTIONS
Interactive Setup
If you self-installed your satellite dish, you may have already used
the interactive setup to find the dish pointing coordinates, acquire
and fine-tune the signal, and run a system test.
If you need to run the interactive setup again, go to the
menu and select
If you just want to check your dish pointing coordinates, or run
the signal strength meter, select
Setup
.
Dish Pointing
from the Main menu.
Assistance
Disabling Interactive Setup
The Interactive Setup menus automatically appear on-screen the
first time you plug in your receiver, and when power is restored
after a power loss.
The final step of the Interactive Setup allows you to disable the
automatic appearance of the Interactive Setup.
To enable it again, select
follow the Interactive Setup routine until the end, where you can
choose to enable the automatic feature.
Setup
from the
Assistance
menu and then
40
Page 45

REFERENCE
REFERENCE
DSS® System Overview
Although the DSS® system is simple to use, there are a
number of parts in the system. Don’t be overwhelmed.
This section explains how these different parts work
together to bring a picture to your screen.
Controls and Buttons
This section also describes the controls located on the front
and back of the receiver.
Programming the Remote
Control
Your remote capable of controlling other devices as well.
This section tells you how to program the remote to control
TVs, VCRs, Laserdisc players, and other equipment.
41
Page 46

REFERENCE
Parts of the DSS® System
One way to understand the DSS® system is to look at the different
parts of the system—from the studio down to the satellite receiver
and remote control in your home.
World View
These parts make up the DSS® system “big picture.”
Uplink Center
Satellite
Satellite Dish Antenna
➣
Authorization Center
Uplink Center Transmits programming up to the satellite.
Satellite Relays the programming signals back to your satellite
dish. The satellite is park ed above the equator, in geostationary
orbit 22,300 miles above the earth.
Satellite Dish Antenna Receives the satellite signals. Because the
satellite is so powerful, the dish can be as small as 18 inches.
Program Provider Authorization Center Processes billing
statements. Y our DSS® system is linked to the Service Center
through the phone jack on the back of your satellite receiver.
42
Page 47

REFERENCE
Home View
These parts are inside of or attached to your house.
Satellite Dish DSS Receiver Telephone Jack
Remote Control
Access Card
and Security Clip
Satellite Dish Picks up the satellite’s coded program information
and relays it to your satellite receiver. (Your satellite dish may be
installed in different locations on or around your house. The
satellite dish must, however, be pointed in a southern direction
toward the satellite.)
Satellite Receiver Receives the TV program information and sends
it to your TV or VCR.
Telephone Jack Connects to the phone jack on the back of the
satellite receiver. The satellite receiver uses a toll-free number once
a month to update your access card. This update only takes a few
seconds and ensures that you will have continuous service. The
system automatically hangs up if you pick up the phone when the
satellite receiver is calling out.
Television If your television is remote controllable, you can
program the remote to change channels and volume.
Home Theater Universal Remote (included with your DSS® system)
Controls the DSS® system as well as most remote controllable
TVs, VCRs, and other devices. Y ou may need to program the remote
to control specific brands of devices you own.
Access Card (installed in satellite receiver) Must be inserted for
you to use the DSS® system! Provides system security and
authorization of DSS® services. Do not remove the card except
when issued a new card as a replacement for the original.
43
Page 48

REFERENCE
Controls and Buttons
This part of the Reference sections discusses the controls and
buttons located on the receiver and the remote control.
POWER
RECALL
TV/DSS
MENU
SELECT
Slide open the door to get to the Access Card.
Front Panel Controls
POWER Turns the satellite receiver’s power on or put
the unit into standby mode.
RECALL Brings up the on-screen channel marker.
TV/DSS Switches the source of the video signal from
DSS® satellite signals to an off-air antenna or cable signal
(if you are using RF output from the satellite receiver).
ARROWS Press the navigation arrows to move the
on-screen highlight up, down, left, or right. Using the
arrows to highlight a menu item is also called “pointing.”
MENU/SELECT Brings up the Main Menu. If you are
already in the menu system (or a program guide), press
MENU/SELECT to select a highlighted choice.
ACCESS CARD Identifies you to your program
providers. The DSS® system requires a valid access card.
44
Page 49

REFERENCE
VCR CONTROL
SATELLITE IN
REMOTE IN
FROM
OUT
TO
TV
S-VIDEO VIDEO R LAUDIO WIDE BAND DATA
IN
CH 4
ANT
CH 3
Back Panel
IN FROM ANT Use to connect an off-air antenna or cable TV signal to
the DSS® system.
OUT TO TV Use to connect the satellite receiver to your TV. However,
if your TV has audio/video jacks, you should use those jacks to get better
picture and sound quality.
CH3/CH4 SWITCH If a coaxial cable is used to connect the satellite
receiver to your TV, you must set the CH3/CH4 SWITCH. For example, to
see the DSS® signal on TV channel 3, set the switch to 3.
S-VIDEO Provides the best picture quality. If your TV has S-VIDEO
capability, use this jack along with the audio/video input jacks to connect
the satellite receiver to your TV.
PHONE JACK
LOW SPEED DATA
VIDEO Provides better picture quality than the OUT TO TV jack. If your
TV has audio/video capability, use this jac k to connect the satellite receiver
to your TV. You must also connect the AUDIO jacks.
AUDIO (R and L) Provide better sound quality than the OUT TO TV
jack. If your TV has audio/video capability, use these jacks to connect the
satellite receiver to your TV. You must also connect the VIDEO jack.
WIDE BAND and LOW SPEED DA TA PORTS These ports allow you
to connect the DSS® system to future services and accessories as they
become available. A shielded cable and additional hardware may be
required.
SA TELLITE IN Use to connect the satellite receiver to the satellite dish.
VCR CONTROL Allows the receiver and VCR to communicat with via
the VCR controller for timer recordings.
REMOTE IN Use in conjunction with remote control signal senders to
control the receiver from another room.
PHONE JACK Use to connect a phone line to the satellite receiver.
The DSS® system uses a phone line connection to periodically call out to
program providers.
45
Page 50

REFERENCE
Remote Control Buttons
DIGIT KEYS (0 - 9) Use the digit keys to tune
1
directly to a channel. If you are in the menu
system, use the digit keys to enter numbers for
the time, date, channel, and passwords.
1
2
3
1
4
5
6
TV/VIDEO Press to select TV or Video input.
2
MUTE Turns off the sound. Press again to
3
restore the sound.
Mode Selection Buttons Selects the
4
operation mode for the remote control.
VOL UP/DOWN Adjusts the audio volume.
5
MENU/SELECT Brings up the Main menu. If
6
you are already in the menu system (or a
program guide), press MENU/SELECT to select
a highlighted choice.
EXIT Removes the on-screen displays and
7
return to normal viewing.
ARROWS Use the navigation arrows to move
8
the on-screen highlight up, down, left, or right.
Using the arrows to highlight a menu item is
also called “pointing.”
RECALL Brings up the on-screen channel
9
marker.
LOGO TUNE Brings up the on-screen logos
10
that correspond to your current channel list.
Use the arrows to point to a logo and tune to
that channel.
7
19
18
4
17
16
R-TUNE
POWER
S
D
V
C
R
GUIDE
S
VOL
1
8
0
V
T
CH
CH
V
C
R
2
SELECT
MENU
C
A
B
L
X
U
9
TV/VIDEO
MUTE
R
C
V
VOL
L
EXIT
2
3
R
5
D
4
6
7
8
9
13
15
FAV RECALL
TV/VCR
14
REW
REC STOP PAUSE
ALT AUD.
PLAY
LOGO TUNE
TV/DSS
FF
10
11
12
46
Panasonic
DIGITAL SATELLITE
RECEIVER
To Maximize Battery Life...
The lights can be turned OFF and ON
by pressing R-TUNE and RECALL at
the same time.
Page 51

REFERENCE
TV/DSS Switches the video input between TV and
11
DSS® mode.
VCR Control Buttons Use when controlling an
12
auxiliary device, such as a VCR or laserdisc player.
AL T AUD (Alternate Audio) Use to step through the
13
available languages or audio types for a program.
TV/VCR Switches the video input between TV and VCR.
14
FAV Use to toggle through the favorite channel lists.
15
GUIDE Brings up the on-screen program guide.
16
Continue to press the GUIDE button to toggle between
the Grid and Info Guide options.
CHAN UP/DOWN Use to scan up and down through
17
the channels in the current channel list. If you are in the
program guide or menu system, use the CHAN UP/
DOWN buttons to page up and down a screen at a time.
POWER T urns the device you are controlling on or off .
18
19
R-TUNE (Rapid Tune) Moves you back and forth
between the last two selected channels.
Helpful Hints
If the selected component does not respond to the remote control,
ensure that the proper mode is selected. First, press the Mode
Selection Button that corresponds to that component. For
example, after first pressing the DSS Mode button, the remote
will remain in DSS® mode for any following commands. If another
mode button is pressed while operating the satellite receiver, the
DSS button must be pressed again to reset the DSS® mode
condition.
47
Page 52

REFERENCE
1
2
3
4
5
6
7
8
9
0
R-TUNE
TV/VIDEO
POWER
MUTE
V
C
R
1
V
C
R
2
A
U
X
L
D
R
C
V
R
C
B
L
T
V
D
S
S
CH
CH
VOL
VOL
MENU
SELECT
GUIDE
EXIT
Programming the Remote Control Using Access Codes
The Mode Selection Buttons control the operation of a TV,
Cable box (CBL), VCR, Receiver (RCVR), Laserdisc player (LD),
and auxiliary devices (AUX) such as a CD player, a Cassette
Player or, a D VD player. The remote mode buttons can be set
to control other manufacturer’s devices by the following
methods.
Remote Code
When the Code is Known
(Preferred Method)
Procedure for setting up remote using the numerical buttons:
• Determine the brand of the device.
• Identify code(s) associated with the brand (see following
pages for code listings). Record the applicable code for
each device.
• Confirm the device is plugged in and operating properly.
1. Press and hold both the MENU/SELECT and the POWER
buttons at the same time for at least five seconds (all mode
buttons will flash); then release both buttons.
2. Press the Mode button that you want to program (DSS,
TV, CBL, RCVR, VCR1, VCR2, AUX, or LD). The selected
mode button will illuminate steadily; all others will go out.
3. Enter the three-digit code for the brand of device (from
the code list on the pages that follow) by using the number
buttons on the remote control.
1
3
2
159
– When a valid code has been entered, the key
illumination will blink twice and then go out.
4. Press POWER to send a test signal. If the code is correct,
the device will respond correctly.
Note that some brands have multiple codes. Repeat the
procedure using each listed code until the device responds
correctly .
– If you enter an incorrect code or incomplete entry after
thirty seconds, the settings will not change.
48
This remote may not operate all
models of the brands that are shown.
Use the codes shown in this manual,
or on the sheet packed with your
remote.
Page 53

REFERENCE
When the Code is Not Known
Procedure for setting up remote using the numerical
buttons:
• Confirm the device is plugged in and operating
properly.
1. Press and hold both the MENU/SELECT and the
POWER button at the same time for at least five
seconds (all mode buttons will flash); then release
both buttons.
2. Press the Mode button that you want to program
(DSS, TV, CBL, RCVR, VCR1, VCR2, AUX, or LD).
The selected mode button will illuminate steadily;
all others will go out.
3. Press the VOL UP button to step to the next code.
4. Press POWER to send a test signal. If the code is
correct, the device respond correctly.
2
4
1
4
7
R-TUNE
POWER
S
S
D
2
3
5
6
8
9
TV/VIDEO
0
MUTE
C
B
V
T
L
R
C
V
CH
R
3
– Repeat the preceding steps until the proper
VOL
device code is found. It may take several
V
attempts before the correct code is found.
C
R
1
V
5. When the correct code has been found, press the
MENU/SELECT button to store the code.
1
GUIDE
For future reference, write down the code numbers for each device in the space provided:
TV
CBL
(cable box)
VCR1
VCR2
C
R
2
SELECT
CH
MENU
5
VOL
D
L
X
U
A
EXIT
RCVR
(Receiver or Amplifier)
other component
LD
(Laser Disc Player)
other component
49
Page 54

REFERENCE
V
C
R
1
V
C
R
2
A
U
X
L
D
R
C
V
R
C
B
L
T
V
D
S
S
Television Infrared Codes Index
The Universal Infrared Remote Control is capable of operating many brands of
televisions. Refer to the preceding pages for programming procedures.
NOTE: The Universal Remote Control memory is limited. Some models of televisions
may not operate. The Universal Remote Control is not designed to control all features
that are available in all models.
NOTE: After entering the proper infrared code, press the Remote TV selection mode
button.
Code Index for Televisions
TV Brand Code(s) TV Brand Code(s) TV Brand Code(s)
A-Mark 003
Admiral 093
Aiko 092
Akai 030
Alleron 179
Anam 180
Anam National 055
AOC 003, 019, 030
Archer 003
Audiovox 003, 180
Belcor 019
Bell & Howell 016, 154
Bradford 180
Brockwood 019
Broksonic 003
Candle 030, 056
Carver 054
Celebrity 000
Citizen 030, 039, 056, 060,
Concerto 056
Contec 180
Craig 180
Crown 039, 180
Curtis Mathes 030, 039, 060, 154
CXC 180
Daewoo 019, 039, 092, 451
Daytron 019
Dumont 017, 019
Electroband 000
Emerson 019, 039, 154, 178,
Envision 030
Fisher 154, 159
Fujitsu 179
Funai 179, 180
Futuretech 180
GE 021, 047, 051, 055,
Gibralter 017, 109, 030
Goldstar 019, 030, 039, 056,
Grunpy 179, 180
Hallmark 178
Harvard 180
Hitachi 056, 145
Ima 180
Infinity 054
092
179, 180, 236, 282,
463
135, 178, 282, 451
178
JBL 054
JCB 000
JVC 053
KEC 180
Kenwood 019, 030
KTV 030, 039, 180
Logik 016
Luxman 056
LXI 047, 054, 154, 156,
178
Magnavox 030, 054
Majestic 016
Marantz 030, 054
Megatron 003, 145, 178
Memorex 016, 056, 150, 154,
178
MGA 019, 030, 150, 178
Midland 017, 039, 047, 051,
135
Minutz 021
Mitsubishi 019, 150, 178
Motorola 055, 093
MTC 019, 030, 056, 060
Multitech 180
NAD 156, 166, 178
NEC 019, 030, 056
Nikko 030, 092, 178
NTC 092
Onwa 180
Optimus 154, 166
Optonica 093, 165
Orion 236
Panasonic 051, 054, 055, 250
Penney 003, 018, 019, 021,
030, 039, 047, 051,
060, 135, 156, 178
Philco 019, 030, 054
Philips 054
Pilot 019, 030, 039
Pioneer 166
Portland 019, 039, 092
Priceclub 060
Prism 051
Proscan 047
Proton 003, 178, 466
Pulsar 017
Pulser 019
Quasar 051, 055, 250
Radio Shack 019, 039, 165, 180
RCA 018, 019, 047, 090,
Realistic 019, 030, 039, 056,
Runco 017, 030
Sampo 030, 039
Samsung 019, 030, 039, 056,
Samsux 039
Sanyo 154, 159
Scimitsu 019
Scotch 178
Scott 019, 178, 179, 180,
Sears 047, 054, 056, 154,
Sharp 039, 093, 165
Shogun 019
Signature 016
Sony 000
Soundesign 178, 179, 180
Spectricon 003
SSS 019, 180
Starlite 180
Supreme 000
Sylvania 030, 054
Tandy 093
Tatung 003, 055
Technics 051, 250
Technol Ace 179
Techwood 051, 056, 003
Teknika 019, 039, 054, 056,
TMK 056, 178
Toshiba 060, 154, 156
Totevision 039
Vector Research 030
Victor 053
Vidikron 054
Vidtech 019, 178
Wards 016, 019, 021, 030,
Yamaha 019, 030
Zenith 016, 017
Zonda 003
135
154, 165, 178, 180
060, 178
236
156, 159, 178, 179,
060, 092, 150, 179,
180
054, 056, 165, 178,
179
50
Page 55

REFERENCE
V
C
R
1
V
C
R
2
A
U
X
L
D
R
C
V
R
C
B
L
T
V
D
S
S
VCR Infrared Codes Index
The Universal Infrared Remote Control is capable of operating many brands of
VCRs. Refer to the preceding pages for programming procedures.
NOTE: The Universal Remote Control memory is limited. Some models of VCRs
may not operate. The Universal Remote Control is not designed to control all
features that are available in all models.
NOTE: After entering the proper infrared code, press the Remote VCR selection
mode button.
Code Index for VCRs
VCR Brand Code(s) VCR Brand Code(s) VCR Brand Code(s)
Adventura 000
Aiko 278
Aiwa 000
Akai 041, 061
American High 035
Asha 240
Audiovox 037
Beaumark 240
Bell & Howell 104
Broksonic 121, 184, 211
Calix 037
Canon 035
Carver 081
CCE 072, 278
Citizen 037, 278
Colt 072
Craig 037, 047, 072, 240
Curtis Mathes 035, 041, 060
Cybernex 240
Daewoo 045, 278
Dynatech 000
Electrohome 037
Electrophonic 037
Emerex 032
Emerson 000, 002, 037, 043,
061, 121, 184, 211,
278, 479
Fisher 047, 104
Fuji 033, 035
Funai 000
Garrard 000
GE 035, 060
Goldstar 037, 038
Gradiente 000
Harley Davidson 000
Harman Kardon 038
Harwood 072
Headquarter 046
HI-Q 047
Hitachi 041, 042
Jensen 041
JVC 041, 067
KEC 037, 278
Kenwood 038, 041, 067
KLH 072
Kodak 035, 037
Lloyd 000
Logik 072
LXI 037
Magnavox 035, 039, 081
Magnin 240
Marantz 035, 081
Marta 037
Matsushita 035
MEI 035
Memorex 000, 035, 037, 039,
046, 047, 048, 104,
240
MGA 043, 061
MGN T echnology 240
Minolta 042
Mitsubishi 043, 061, 067
Motorola 035, 048
MTC 000, 240
Multitech 000, 072
NEC 038, 041, 067, 104
Nikko 037
Noblex 240
Olympus 035
Optimus 037, 048, 104
Orion 479
Panasonic 035, 162, 225, 454
Penney 035, 037, 038, 042,
240
Pentax 043
Philco 035
Philips 035, 081
Pilot 037
Pioneer 067
Protec 072
Pulsar 039
Quarter 046
Quartz 046
Quasar 035
Radio Shack 000, 037
Radix 037
Randex 037
RCA 042, 060
Realistic 000, 035, 037, 046,
047, 048, 104, 240
Ricoh 034
Runco 039
Samsung 045, 240
Sanky 039, 048
Sansui 041, 067
Sanyo 046, 047, 104, 240
Scott 043, 045, 121, 184,
211
Sears 035, 037, 042, 046,
047, 104
Sharp 048
Shintom 072
Shogun 240
Singer 072
Sony 032, 033, 034, 035
STS 042
Sylvania 000, 035, 043, 081
Symphonic 000
Tatung 041
Teac 000, 041
Technics 035, 162
Teknika 000, 035, 037
TMK 240
Toshiba 043, 045
Totevision 037, 240
Unitech 240
Vector 045
Vector Research 038
Video Concepts 045, 061
Videosonic 240
Wards 000, 035, 042, 047,
048, 060, 072, 240
XR-1000 000, 035, 072
Yamaha 038
Zenith 033, 034, 039
51
Page 56

REFERENCE
Cassette Players, CD Players, DVD players
Receivers, and Amplifiers Infrared Codes Index
The Universal Infrared Remote Control is capable of operating many brands of
Cassette Players, CD Players, DVD players, Receivers, or Amplifiers. Refer to the
preceding pages for programming procedures.
NOTE: The Universal Remote Control memory is limited. Some models of Cassette
Players, CD Players, DVD Players, Receivers, or Amplifiers may not operate. The
Universal Remote Control is not designed to control all features that are available
in all models.
NOTE: After entering the proper infrared code, press the Remote AUX selection mode
button to operate a Cassette Player, DVD player, or CD Player.
Code Index for Cassette Players
Brand Code(s)
Panasonic 272
Technics 229
Code Index for DVD
Brand Code(s)
Panasonic 490
Code Index for CD Players
Brand Code(s)
California Audio Lab 029
Marantz 029
MCS 029
Panasonic 029, 367
Quasar 029
Technics 029, 303
C
B
V
T
S
S
D
V
C
R
1
V
C
R
S
S
D
L
R
C
V
R
D
L
X
2
U
A
C
B
V
T
L
R
C
V
R
NOTE: After entering the proper infrared code, press
the Remote RCVR selection mode button to operate a
Receiver or Amplifier.
Code Index for Receivers and Amplifiers
Brand Code(s)
ADC 531
Aiwa 121, 158, 189
Carver 008, 042, 189
Casio 195
Clarinette 195
Denon 004
Fisher 042, 219
Garrard 463
JVC 074
Kenwood 027, 186
Lloyd’s 195
Magnavox 189, 195, 531
Marantz 039, 189
MCS 039
Modulaire 195
NAD 320
Nakamichi 347
Onkyo 135
Optimus 080, 186, 219, 531
V
C
R
1
Brand Code(s)
Panasonic 039
Penney 195
Philips 189
Pioneer 014, 080, 531
Quasar 039
RCA 531
Realistic 195
Sansui 189
Sanyo 219
Sharp 186
Sherwood 502
Sony 158
Teac 463
Technics 039, 208, 309, 518
Victor 074
Wards 014, 042, 080, 158, 189
Yamaha 176, 186
Yorx 195
D
V
C
R
2
L
X
U
A
52
Page 57

REFERENCE
V
C
R
1
V
C
R
2
A
U
X
L
D
R
C
V
R
C
B
L
T
V
D
S
S
V
C
R
1
V
C
R
2
A
U
X
L
D
R
C
V
R
C
B
L
T
V
D
S
S
V
C
R
1
V
C
R
2
A
U
X
L
D
R
C
V
R
C
B
L
T
V
D
S
S
Cable Converter Box Infrared Codes Index
The Universal Infrared Remote Control is capable of operating many brands of Cable
Converter Boxes. Refer to the preceding pages for programming procedures.
NOTE: The Universal Remote Control memory is limited. Some models of Cable
Converter Boxes may not operate. The Universal Remote Control is not designed to
control all features that are available in all models.
NOTE: After entering the proper infrared code, press the Remote CBL selection mode
button to operate a Cable Converter Box.
Code Index for Cable Converter Box
Brand Code(s)
ABC 003, 007, 008, 011, 014,
017
Contec 019
Dae Ryung 008
Everquest 015
Gemini 015
General Instrument 011, 476
Goldstar 144
Hamlin 020
Hitachi 011
Hytex 007
Jerrold 003, 011, 012, 014, 015,
476
Memorex 000
Oak 007, 019
Panasonic 000, 021, 107
Paragon 000
Pioneer 144
Brand Code(s)
RCA 021
Regal 020
Rembrandt 011
Runco 000
Samsung 144
Scientific Atlanta 008, 017, 477
Signal 015
Signature 011
Sprucer 021
Starcom 003, 015
Stargate 015
Starquest 015
Tocom 012
Toshiba 000
Tusa 015
United Artists 007
United Cable 003
Zenith 000
Pulsar 000
Laser Disc Players and DSS and Infrared Remote Codes Index
The Universal Infrared Remote Control is capable of operating many brands of Laser
Disc players and DSS receivers. Refer to the preceding pages for programming
procedures.
NOTE: The Universal Remote Control memory is limited. Some models of Laser Disc
players and DSS receivers may not operate. The Universal Remote Control is not designed
to control all features that are available in all models.
NOTE: After entering the proper infrared code, press the Remote LD or DSS selection
mode button to operate a Laser Disc player, a DSS receiver, or a DVD player.
Code Index for Laser Disc
Brand Code(s)
Mitsubishi 059
NAD 059
Panasonic 204
Pioneer 059
Quasar 204
Sony 201
Code Index for DSS
Brand Code(s)
Panasonic 701
53
Page 58

REFERENCE
Glossary
The following is a list of terms used in this manual. There is also a glossary contained within the
menu of your DSS® system.
Assistance
Access Card
Identifies you to the DSS® service providers and is required for your DSS® system to work. Do not remove the
access card except when a new card has been issued to replace the original.
Alternate Audio
Refers to the different audio channels that may be broadcast in conjunction with a video program. A foreign
language translation is an example.
Attractions
Previews of special programs broadcast by your program provider.
Azimuth
Refers to the left-to-right positioning of your DSS® dish. When you enter your zip code (or latitude and longitude),
the display screen provides the number corresponding to an azimuth setting for your location.
Elevation
Refers to the up and down positioning of your DSS® dish. When you enter your zip code (or latitude and longitude),
the display screen provides the number corresponding to the elevation setting for your location.
Limits
There are three kinds of limits. The Ratings Limit allows you to control program viewing of rated programs by
ratings level. The Spending Limit controls spending on a cost-per-program basis. The Parent Approved channel
list allows you to select which channels can be viewed when the system is locked.
Locks
The means of restricting access to certain features of the DSS® system. The lock is controlled by a 4-digit password.
The closed or open lock icon in the channel marker indicates whether your system is locked or unlocked.
Mailbox
Stores incoming electronic messages sent to you by your program providers. The Mailbox is accessed through
the on-screen menu system, and can store up to ten messages of forty characters each.
Main Menu
The first list of choices in the DSS® on-screen menu system. Press the MENU/SELECT button on the remote or
front panel to bring up the Main menu.
54
Page 59

REFERENCE
Past Purchases
Detailed list of the programs that you have already purchased and viewed.
Point and Select
The method of using the remote control (or front panel) buttons to navigate to and make choices among the
different parts of the on-screen displays.
Profiles
Allows you to customize DSS viewing for as many as four members of your family by creating individual user
names with specific channel lists and rating limits assigned to each.
Program Guides
Lists and updates the programs and services available from your program providers.
Ratings Limit
Provides a means of restricting viewing of rated programs, based on program rating information. The operation
of this feature depends upon the availability and accuracy of data supplied from and broadcast by the program
provider .
Satellite Receiver
Receives, processes, and converts the digitally compressed satellite signals into audio and video.
Signal Meter
An on-screen display that indicates the relative strength of the satellite signal and sounds a test tone to help you
lock in on the satellite signal. The signal meter is used when you adjust your satellite dish.
Spending Limit
Provides a means of restricting viewing; based on cost-per-program limit.
System Test
Provides a diagnostics check that can be used to determine that the main components of the DSS® system—
signal, tuning, phone, and access card—are connected and working properly.
Themes
Provides a way to simplify the Program Guide and make it easier to find programs of special interest to you.
Upcoming Purchases
Detailed list of the programs you have purchased but have not yet been broadcast.
55
Page 60

REFERENCE
Troubleshooting
The DSS® System T est allows you to run a basic diagnostics check
on your DSS® system. If you are experiencing any trouble with
your system, run the system test.
Make sure that
• All connections—jacks, cables, etc. are correctly in place.
• There are batteries in the remote, and that they are working
correctly.
• The access card is installed in the receiver.
Running the System Test
Follow these steps to run the diagnostics system test on your
system.
1. Turn on your TV and the satellite receiver.
2. Press DSS to put remote in DSS® mode, then press
MENU/SELECT to bring up the Main menu.
3. Point to and select
4. Point to and select
after the test is completed.
5. If your system does not pass the system test, check any of
these potential trouble areas: cabling, pointing the satellite dish,
phone connection, and access card.
Options
System T est
.
. Follow the on-screen directions
56
Page 61

WARRANTY INFORMATION
PANASONIC
Digital Satellite Systems
Limited Warranty
Matsushita Consumer Electronics Company (referred to as “The W arrantor”) will repair this product with new or
refurbished parts, free of charge, in the USA from the date of original purchase in the event of a defect in
materials or workmanship as follows:
Parts — New or rebuilt parts in exchange for defective parts for one (1) year from the date of original purchase.
Labor — Mail-in service for ninety (90) days from the date of original purchase for all parts, except for in-home
service on the LNB for 90 days from the date of original purchase. After the ninety (90) day labor warranty period,
purchaser pays for all labor charges.
Batteries (if included) — New rechargeable batteries in exchange for defective rechargeable batteries for ten
(10) days from the date of original purchase. Non-rechargeable batteries are not warranted.
To obtain service in the USA during the warranty period call toll free:
1-888-PANA-DSS
(1-888-7161-377)
This warranty is extended only to the original purchaser. A purchase receipt or other proof of date of original
purchase will be required before warranty service is rendered.
This warranty only covers failures due to defects in materials and workmanship and does not cover normal wear
or cosmetic damages. The warranty does not cover damages which occurred in shipment, or failures which are
caused by products not supplied by Panasonic, or failures which result from accident, misuse, abuse, neglect,
mishandling, faulty installation, set-up adjustments, improper operation or maintenance, customer instruction,
alteration, line power surge, lightning damage, signal reception problems, modification, improper voltage supply ,
commercial use such as hotel, office, restaurant, or other business or rental use of the product, or service by
anyone other than an authorized factory office, restaurant, or other business or rental use of the product, or
service by anyone other than an authorized factory Servicenter, or damage that is attributable to acts of God.
Service calls whic h do not involve defective materials or workmanship as determined by the w arranty, in its sole
discretion, are not covered. Cost of such Service Calls are the responsibility of the purchaser.
Limits and Exclusions
There are no express warranties except as listed above.
P ANA SONIC SHALL NO T BE LIABLE FOR INCIDEN TAL OR CONSEQUENTIAL DAMAGES RESULTING FROM THE
USE OF THIS PRODUCT, OR ARISING OUT OF ANY BREACH OF THIS WARRANTY. ALL EXPRESS AND IMPLIED
WARRANTIES, INCLUDING THE WARRANTIES OF MERCHANTABILITY, ARE LIMITED TO THE APPLICABLE
WARRANTY PERIOD SET FORTH ABOVE.
Some states do not allow the exclusion or limitation of incidental or consequential damages, or limitations on
how long an implied warranty lasts, so the above exclusions or limitations may not apply to you.
This warranty gives you specific legal rights and you may also have other rights which vary from state to state.
If a problem with this product develops during or after the warranty period, you may contact your dealer or
Servicenter . If the problem is not handled to your satisfaction, then write to the Customer Satisfaction Center at
the company address indicated above.
57
Page 62

WARRANTY INFORMATION
PANASONIC
Digital Satellite Systems
Service Directory
Operation Assistance • Diagnostic Assistance • Warranty Service
Call Panasonic on our toll-free telephone number when you need assistance with installation, hook-up, operational
or service information. To expedite your technical support call, please have your model, serial number, and date
of purchase available:
1-888-PANA-DSS
(1-888-7161-377)
8:00 a.m. - 10:00 p.m. Monday - Friday, Eastern Standard Time
10:00 a.m. - 10:00 p.m. Saturday and Sunday, Eastern Standard Time
In the event that our technical representatives are unable to quickly resolve your problem over the telephone,
Panasonic can provide a replacement receiver via a common carrier service. For complete details please
read the Digital Satellite System Replacement Program.
Accessories Purchase
Contact your local Panasonic dealer or dial toll free:
1-800-332-5368 (Consumer Orders Only)
6:00 a.m. - 6:00 p.m. Monday - Friday, Pacific Standard Time
6:00 a.m. - 10:30 a.m. Saturday, Pacific Standard Time
(Visa, Mastercard, Discover Card, Check, or Money Order)
Parts Distribution Locations
To locate a parts distributor in your area (within the USA), dial toll free:
1-800-545-2672
24 hours a day, 7 days a week
Regional Customer Care Departments
EAST (PCE)
2221 Cabot Blvd. West
Suite A
Langhorne PA 19047
Phone (215) 741-0676
Fax (215) 750-6492
COVERS:
CT, DE, ME, MD, MA,
NH, NJ, NY, PA, RI, VT,
VA, DC, WV
EAST (PCE)
1225 Northbrook Parkway
Suite 2-390
Suwanee GA 30174
Phone (770) 338-6860
Fax (770) 338-6548
COVERS:
AL, FL, GA, MS, NC, SC, TN
CENTRAL (PCC)
1703 North Randall Road
Elgin IL 60123
Phone (847) 468-5530
Fax (847) 468-5528
COVERS:
AR, IL, IN, IA, KS, KY, LA, MI,
MN, MO, NE, ND, OK, SD, TX,
WI, OH
WEST (PCW)
6550 Katella Avenue
Cypress CA 90630
Phone (714) 373-7440
Fax (714) 373-7447
COVERS:
AK, AZ, CA, CO , HI, ID, MT,
NV, NM, OR, UT, WA, WY
58
Page 63

WARRANTY INFORMATION
PANASONIC
Digital Satellite Systems
Replacement Program
Matsushita Consumer Electronics Company (referred to as “Panasonic”) offers a customer support toll free
telephone number to assist you with information regarding your Panasonic Digital Satellite System. Our technical
representatives are available seven days a week (excepting holidays) to help you with installation, hook-up,
operational and service questions. To expedite this tec hnical suppor t, please have your model, serial number (on
the rear of the receiver) and date of purchase available when you call Panasonic’s toll free number:
1-888-PANA-DSS
(1-888-7161-377)
If you are experiencing a technical problem, (inclement weather and other factors may affect the quality of your
reception) our representatives will attempt to diagnose your problem(s) over the telephone. In the event that our
technical representative are unable to resolve your problem, Panasonic will repair your receiver or provide you
with a reconditioned replacement receiver by shipping it common carrier, as follows:
In-warranty* after sales support
Panasonic will repair or replace defective receivers that are in-warranty with a new or reconditioned receiver,
(inclusive of all labor and parts), free of charge, for the first ninety days after date of purchase. After the ninety
day period and up to the first year anniversary date of the purchase of the receiver, P anasonic will exchange, free
of charges, replacement parts for all defective parts. During this period of time the customer pays the current
labor rates to replace the defective parts. Panasonic will pay for all in-warranty shipping charges the first year
after date of purchase.
If your receiver qualifies for in-warranty service, Panasonic will arrange for a new or reconditioned replacement
receiver to be shipped by a common carrier Monday through Friday, within the 48 contiguous states, free of
charge. The Customer Support Replacement Program is not available in Hawaii and Alaska because of reception
problems due to the satellite location.
The replacement receiver will be reconditioned to factory specifications, and inspected before shipment. You
can keep this replacement in exchange for your original receiver. The original recei ver must be returned to
Panasonic, using our self addressed label, along with a copy of your purchase receipt and a short description of
the problem. The remote control and access card should not be sent to us unless you are instructed to do so.
If you decide you want your original receiver repaired, Panasonic will repair the receiver and return it to you. The
repair time will be ten (10) business days. Carefully pack and seal your receiver in its original carton and packing
material, properly insure the receiver for its full value and prepay a reliable common carrier. The technical
representative will give you the mailing address. If you choose a replacement receiver, P anasonic will ar range to
have your original receiver picked up by a common carrier.
Out-of-warranty* after sales support
If your receiver is out-of-warranty and you choose the replacement program, you will receiver a new or
reconditioned receiver. You will be charged an inclusive rate for labor and parts for the repair of the original
receiver. Our technical representati ves will inform you of the receiver replacement program’s repair rates. The
shipping charges related to the repair are not included in the repair rate. The shipping charges include; (a) the
common carrier delivery for the replacement receiver to you, (b) the shipping of the original receiver back to
Panasonic.
59
Page 64

WARRANTY INFORMATION
If you want your original receiver repaired, Panasonic will repair it and return the receiver to you. You must
carefully pack and seal your receiver in its original carton and packing material, properly insure the receiver for
its full value, and pre-pay a reliable common carrier. You are responsible for damages to the receiver if not
packed and shipped as recommended by Panasonic. Our technical representative will inform you of Panasonic’ s
inclusive labor and parts rate and provide you the repair depot mailing address. If you decide you want a
replacement receiver, Panasonic will arrange to have your original recei ver pick ed up by a common carrier.
Panasonic will charge you for the common carrier services.
Exclusions to the Replacement Program
Panasonic is not responsible for: installation, mounting and set-up of the antenna, and interconnect wiring of the
system.
To receiver information regarding recommended installers and/or authorized servicers for the antenna dish call
Panasonic’s toll free number.
Receiver replacement program requirements
1. Give our representative a valid credit card number. Your credit card status will be verified prior to shipping
the replacement receiver. In the event that you do not adhere to the terms of this replacement contract your
credit card account will be charged for all applicable costs that were incur red in the testing, repair, replacement
and shipment of the original and replacement receivers.
Acceptable credit cards:
• American express (Optima)
• Visa.
• Discover
• Master card
2. Upon receipt of your replacement receiver, immediately pack, and enclose a copy of your proof of purchase
(if applicable), a brief description of the problem, affix the self addressed label and self your original receiver
in the replacements receiver’s shipping car ton. There are no charges associated with in-warranty labor . Charges
for in-warranty par ts replacement are explained above. If you receiver is out-of-warranty , you will be c harged
for all applicable shipping charges. In all cases the receiver must be packaged in the same carton and manner
as the replacement receiver, utilizing the existing packing materials. You must make your receiver available
for carrier pic k-up within 1 0 days after the receipt of the replacement receiver . If a receiver is not available for
pick-up, you will be responsible for pre-paid insurance and shipment of the replacement receiver back to
Panasonic.
Damage incurred during shipment due to improper or inadequate packing, or loss of receiver, are your
responsibility and will be charged to your credit card as an out-of-warranty cost.
If a receiver is not returned to Panasonic within 1 0 business days after shipment of the replacement receiver ,
your credit card account will be charged at Panasonic’s suggested retail price of the replacement receiver.
3. Any receiver that is replaced without proof of purchase will be subject to out-of-warranty charges. Any
receiver that is replaced, but does not meet the terms and conditions of the limited warranty will be subject
to the out-of-warranty charges that are outlined in this replacement program.
Replacement program is subject to termination at any time without advance notice.
*See terms and conditions in the limited warranty.
60
Page 65

INDEX
A
Access Card 43, 44
new card setup 31
ALT AUD button 30
Alternate Audio display screen 31
Alternate audio programs 30
Attractions Guide 10, 24
Audio/video jacks 34
Auto Help 32
B
Back Panel controls 45
AUDIO RIGHT AND LEFT 45
IN FROM ANT 45
LOW SPEED DATA port 45
OUT TO TV 45
PHONE JACK 45
S-VIDEO 45
SATELLITE IN 45
VIDEO 45
WIDE BAND DATA port 45
Batteries
installing in the remote 4
Buy and Record Option 24
FGR SAMPLE
C
Channel Guide 10
Channel list, creating 19
channel Logos, tuning 30
Cinema screen 31
Coming attractions 24
Control Panel Main Menu 15
E
Editing the channel list 19
Editing the User Profiles 18
Exiting a menu 14
Exiting A Program Guide 12
F
FAV button 22
Flashing POWER light 30
Front Panel controls 44
15167610
G
Grid Guide 9
H
Help 14, 32
auto-help 32
menu help 32
on-line 32
Help balloons 15
Help Buttons 32
I
Info Guide 9
Interactive setup 40
L
Living Room Main menu 15
Locking the system 21
LOGO TUNE button 29
Logo tune feature 29
M
Mailbox 30
checking your mail 30
deleting mail messages 30
Main menu 14
Control panel 15
Living Room 14, 15
switching types 15
Menu Help 32
MENU/SELECT button 6
Menus
Assistance 16
Dish Pointing 16
exiting 14
Mailbox 16
Options 16
Program Guide 16
Purchases 16
Timers 16
61
Page 66

INDEX
O
On-Line Help 32
One-Button Recording
editing or cancelling 29
Ordering DSS programming 3
P
Password, system
forgetting 22
Past purchases 25
Pay-Per-View Programs 23
Personal password 20
Picture Size 31
POWER indicator light, flashing 30
PPV (pay-per-view) 23
Program Guide 7
All Button 12
Arrow button 11
Attractions Guide 10
bringing up 7
Channel guide 10
exiting 12
Grid Guide 9
Other 12
scrolling channel by channel 7
scrolling page by page 8
selecting from the Main Menu 8
sorting 11
Sports button 12
Themes button 12
Topic Guide 10
tuning to a channel 8
Programming the Remote 48
Purchases menu 25
Purchasing a PPV program 23
FGR SAMPLE
R
Rating Limit, setting 20
Recording with Timer 28
Remote control
buttons 46
installing batteries 4
setup 48
15167610
S
S-Video jack 34
Satellite 42
Selecting a user profile 22
Selecting a VCR type 27
Session unlock 22
Set VCR Type menu 27
Setting the rating limit 19, 20
Sorting the Grid and Info Guides 11
Spending limits 21
System controls 21
System lock 21
System Test 31
use to get access card number 31
T
Timer feature
editing or cancelling 28
setting up 26
Timer recording 26
selecting a VCR type 27
Topic Guide 10
Troubleshooting 56
Tuning to a PPV program 23
U
Unlocking the system 22
temporarily 22
Upcoming purchases 25
Uplink Center 42
User Profiles
editing 18, 19
selecting 22
V
VCR controller 27
connecting 27
62
Page 67

FCC REGISTRATION INFORMATION
Your DSS® equipment is registered with the Federal Communications Commission and is in compliance with
parts 15B and 68, FCC Rules and Regulations.
1. Notification to the Local Telephone Company.
On the bottom of this equipment is a label indicating among other information, the FCC Registration number
and Ringer Equivalence Number (REN) for the equipment. You must, upon request, provide this information
to your telephone company.
The REN is useful to determine the number of devices you may connect to your telephone line and still have
all these devices ring when your telephone number is called. In most (but not all) areas, the sum of the RENs
of all devices connected to one line should not exceed 5. To be certain of the number of devices you may
connect to your line as determined by the REN, you should contact your local telephone company.
Notes: This equipment may not be used on coin service provided by the telephone company.
Party lines are subject to state tariffs, and therefore, you may not be able to use your own telephone
equipment if you are on a party line. Check with your local telephone company.
Notice must be given to the telephone company upon permanent disconnection of your DSS® equipment from
your line.
2. Rights of the Telephone Company.
Should your equipment cause trouble on your line which may harm the telephone network, the telephone
company shall, where practicable, notify you that temporary discontinuance of service may be required.
Where prior notice is not practicable and the circumstances warrant such action, the telephone company may
temporarily discontinue service immediately. In case of such temporary discontinuance, the telephone
company must: (1) promptly notify you of such temporary discontinuance (2) afford you the opportunity to
correct the situation and (3) inform you of your right to bring a complaint to the Commission pursuant to
procedures set forth in Subpart E of Part 68, FCC Rules and Regulations.
15167610
The telephone company may make changes in its communications facilities, equipment, operations of
procedures where such action is required in the operation of its business and not inconsistent with FCC Rules
and Regulations. If these changes are expected to affect the use or performance of your telephone
equipment, the telephone company must give you adequate notice, in writing, to allow you to maintain
uninterrupted service.
Radio Interference
This equipment has been type tested and found to comply with the limits for a Class B Digital Device in
accordance with the specifications in Part 15 of FCC Rules. These rules are designed to provide reasonable
protection against radio and television interference in a residential installation. This equipment generates,
uses and can radiate radio frequency energy and, if not installed and used in accordance with the instructions,
may cause harmful interference to radio communications. However, there is no guarantee that interference
will not occur in a particular installation.
If this equipment does cause interference to radio or television reception (which you can determine by turning
the equipment off and on), try to correct the interference by one or more of the following measures.
• Reorient or relocate the receiving antenna (that is, the antenna for radio or television that is “receiving”
the interference).
• Change the position of the DSS® satellite receiver with respect to the radio or television equipment that is
receiving interference.
• Move the DSS® satellite receiver away from the equipment that is receiving interference.
• Plug the DSS® satellite receiver into a different wall outlet so that the DSS® satellite receiver and the
equipment receiving interference are on different branch circuits.
If these measures do not eliminate the interference, please consult your dealer or an experienced radio/
television technician for additional suggestions. Also, the Federal Communications Commission has prepared
a helpful booklet, “How To Identify and Resolve Radio/TV Interference Problems”. This booklet is available
from the U.S. Government Printing Office, Washington, D.C. 20402. Please specify stock number 004-00000345-4 when ordering copies.
FGR SAMPLE
63
Page 68

Matsushita Consumer Electronics
Company, Division of Matsushita
Electric Corporation oa America
One Panasonic Way
Secaucus, New Jersey 07094
TOCOM 15167610
 Loading...