

Panasonic TH-65PY700E User Manual
Operating Instructions
Plasma Television
Model No.
TH-65PY700E
INPUT
OPTION
SD CARD
MULTI WINDOW
EXIT
RETURN
F.P.
English
TV
Please read these instructions before operating your set and retain them for future reference.
The images shown in this manual are for illustrative purposes only.
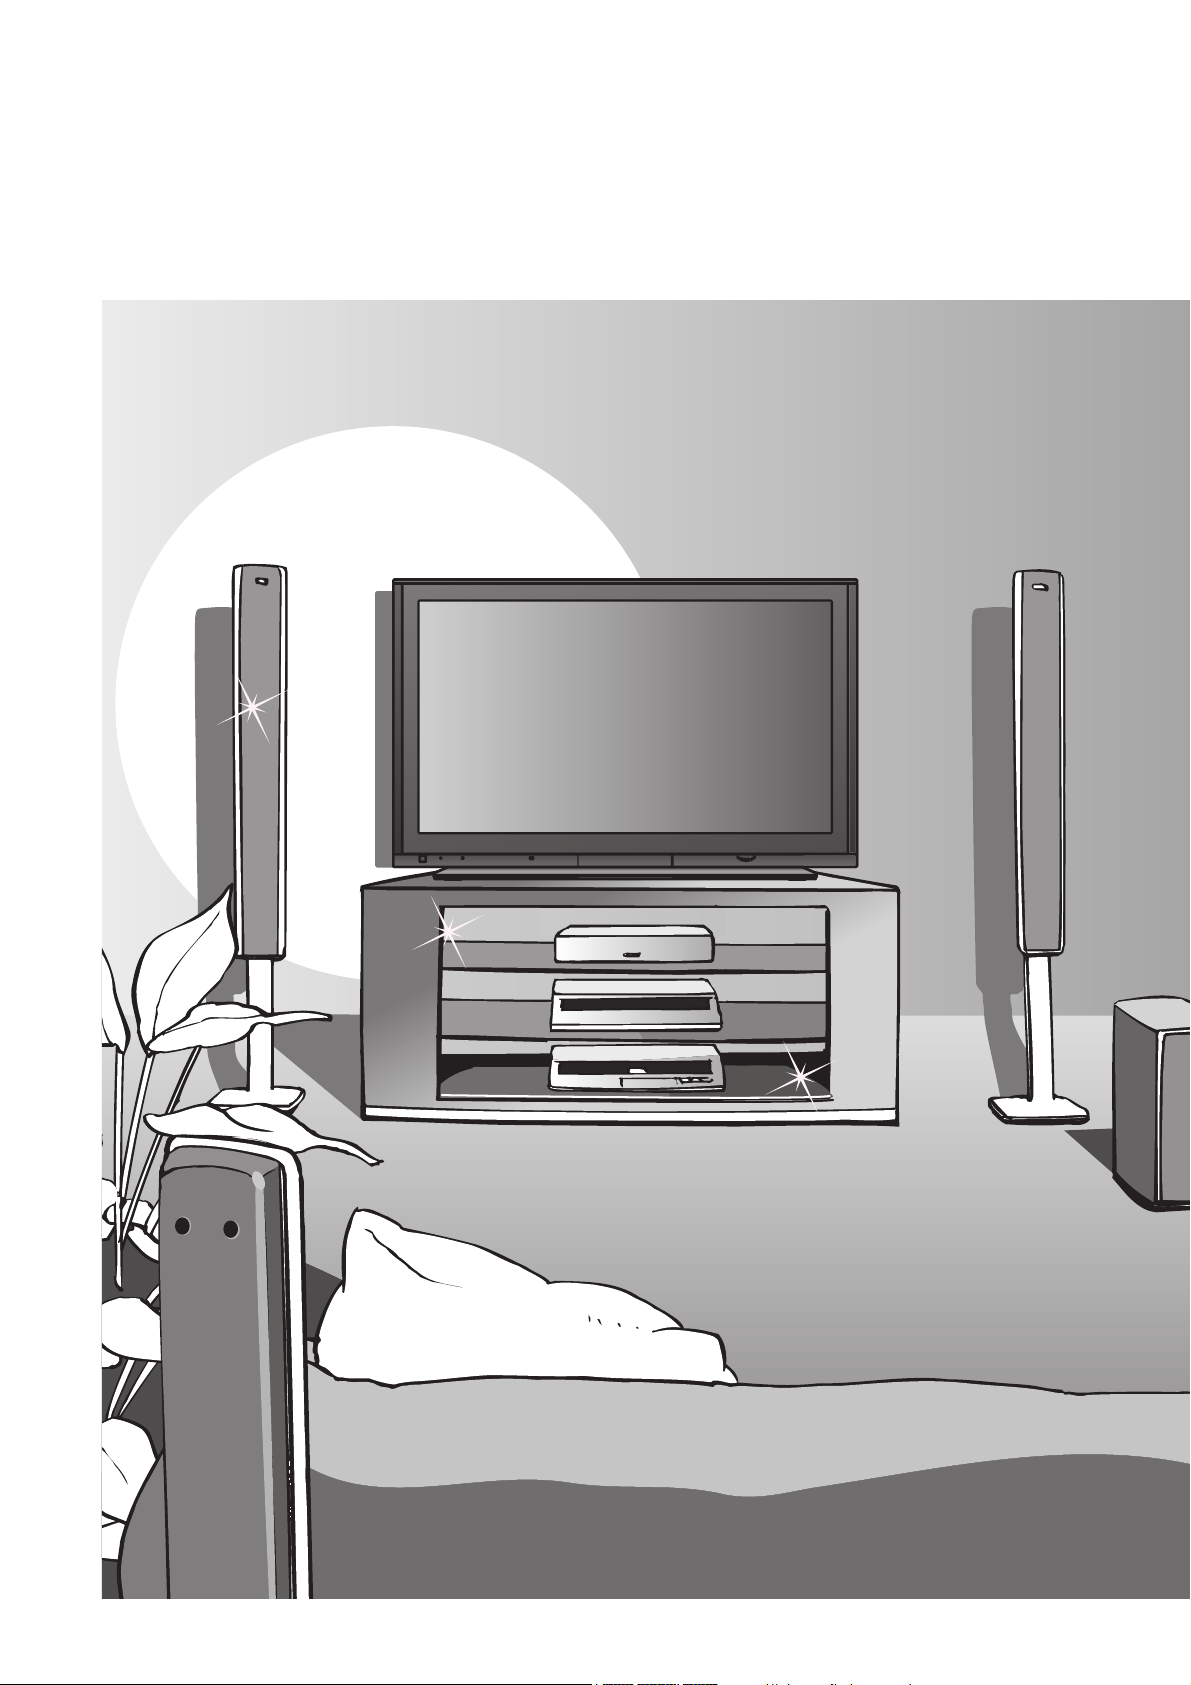
Turn your own living room into a movie theatre!
Experience an amazing level of multi-
2
media excitement
Enjoy rich multi-media
Contents
Be Sure to Read
Safety Precautions ······································ 4
•
(Warning / Caution)
Notes ··························································· 5
•
Maintenance ··············································· 5
•
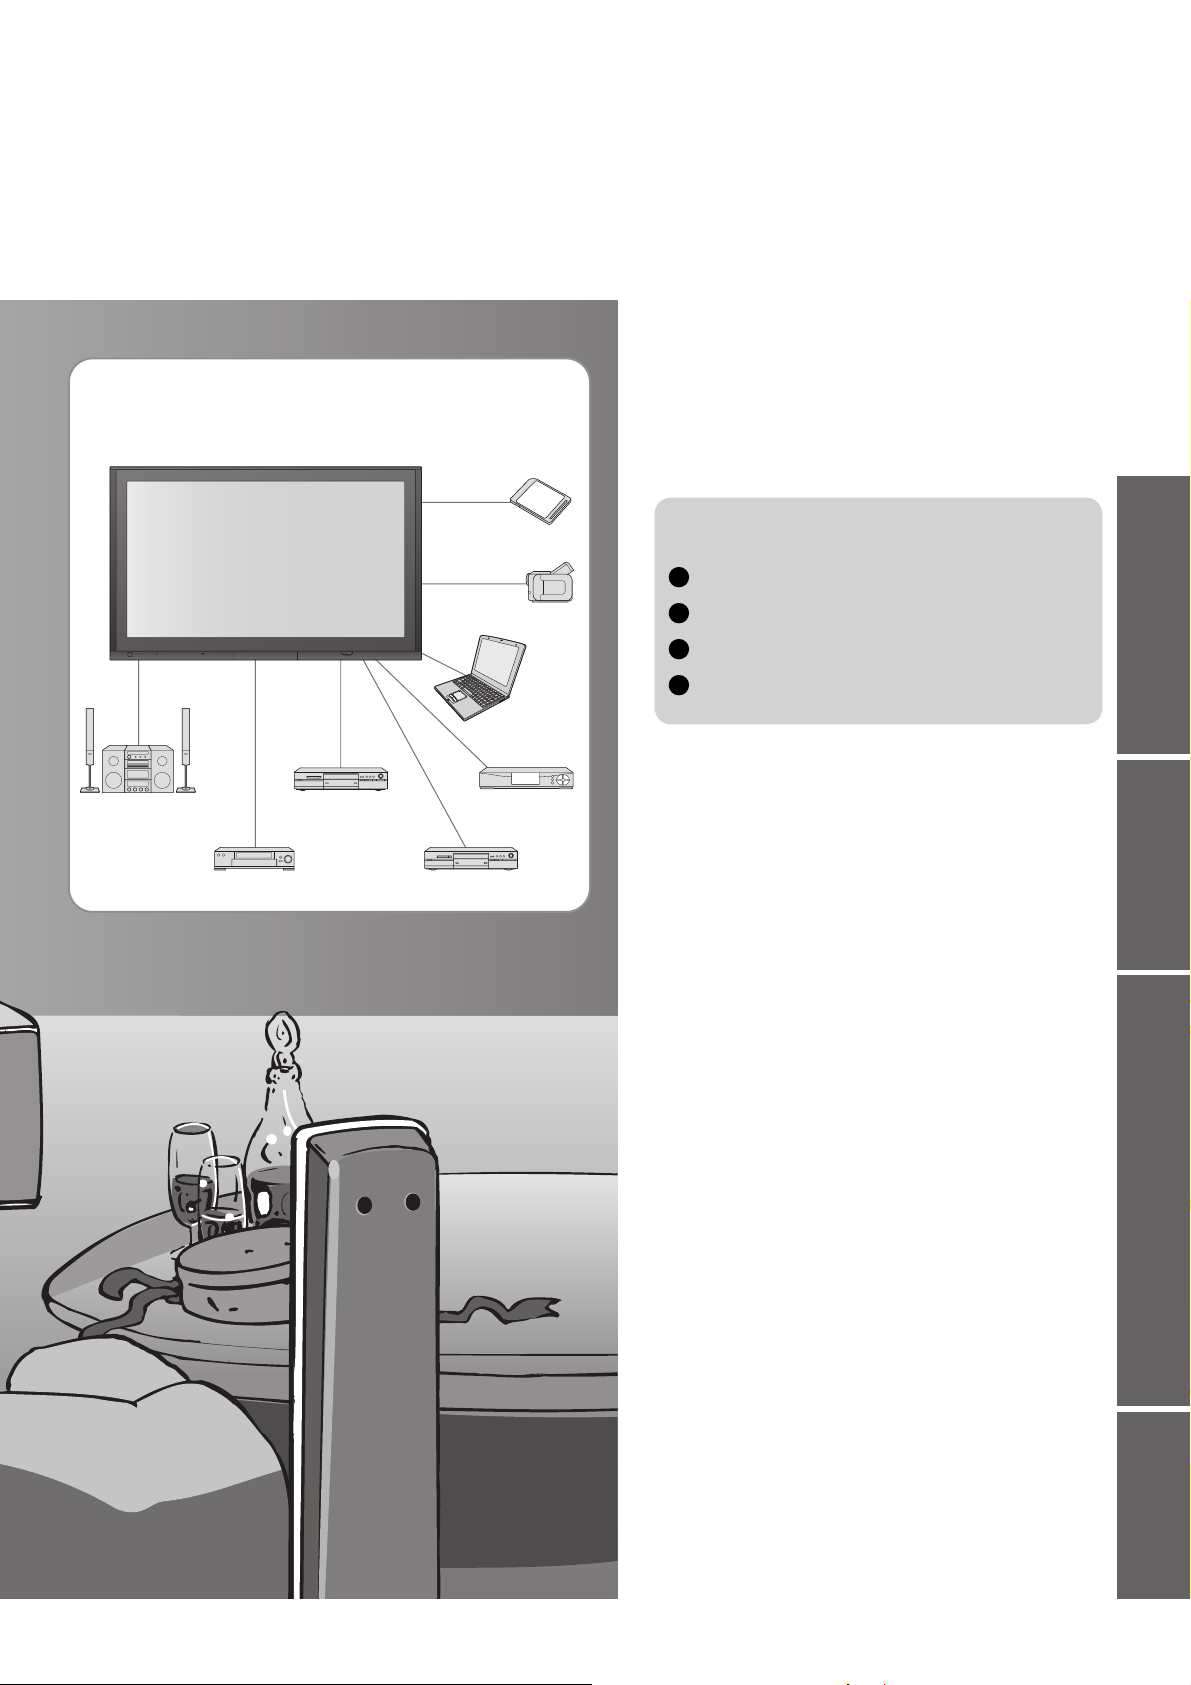
Amplifi er with
Speaker system
VCR
DVD Recorder
SD memory card
Camcorder
Set top box
DVD player
Personal
computer
Quick Start Guide
Accessories / Options
Identifying Controls
Basic Connection
Auto Setup
Enjoy your TV!
Basic Features
Watching TV ·············································· 12
•
Watching Videos and DVDs ······················ 14
•
Viewing Teletext ········································16
······························· 10
··················· 8
·········· 6
··············· 7
•
Advanced Features
How to Use Menu Functions ····················· 18
•
(picture, sound quality, etc.)
Editing and Setting Channels
•
Control Channel Audience ························ 24
•
Restore Settings ······································ 25
•
Input Labels ·············································· 26
•
Displaying PC Screen on TV ····················· 27
•
Viewing from SD Card (Photos and Movies)
•
Q-Link Functions ······································· 30
•
HDMI Functions ·······································31
•
(HDMI terminal / VIERA Link)
External Equipment ··································· 34
······················ 22
•
Viewing Advanced FAQs, etc.Quick Start Guide
··· 28
FAQs, etc.
Technical Information ································36
•
FAQs ·························································40
•
Licence ······················································ 42
•
Specifi cations ············································ 43
•
3
Safety Precautions
Warning
Handling the mains plug and lead
Insert the mains plug fully into the socket outlet. (If the mains plug is loose, it could generate heat and cause fi re.)
Ensure that the mains plug is easily accessible.
Ensure the grounding pin on the mains plug is securely connected to prevent electrical shock.
An apparatus with CLASS I construction shall be connected to a mains socket outlet with a protective
earthing connection.
Do not touch the mains plug with a wet hand. (This may cause electrical shock.)
Do not use any mains lead other than that provided with this TV. (This may cause fi re or electrical shock.)
Do not damage the mains lead. (A damaged lead may cause fi re or electrical shock.)
Do not move the TV with the lead plugged in the socket outlet.
Do not place a heavy object on the lead or place the lead near a high-temperature object.
Do not twist the lead, bend it excessively, or stretch it.
Do not pull on the lead. Hold onto the mains plug body when disconnecting lead.
Do not use a damaged mains plug or socket outlet.
If you fi nd any
abnormality,
remove the mains plug
immediately!
AC 220-240 V
50 / 60 Hz
Do not remove covers
NEVER modify the TV yourself
(High-voltage components may cause serious
electrical shock.)
Have the TV checked, adjusted, or repaired at your
local Panasonic dealer.
Keep liquids away from the TV
To prevent damage which may result in fi re or
shock hazard, do not expose this appliance to
dripping or splashing.
Do not place containers with water (fl ower vase,
cups, cosmetics, etc.) above the TV. (including on
shelves above, etc.)
Do not place foreign objects
inside the TV
Do not let metal or fl ammable objects drop into the
TV through the air vents (fi re or electrical shock
may result).
Do not place the TV on sloped
or unstable surfaces
The TV may fall off or tip over.
Use only the dedicated stands
/ mounting equipment
Using an unauthorized stand or other fi xtures may
make the TV shaky, risking injury. Be sure to ask
your local Panasonic dealer to perform setup.
Use optional stands / mounts (p. 6).
4
Do not expose to direct sunlight
and other sources of heat
Avoid exposing the TV to direct sunlight and other
sources of heat. To prevent fi re never place any
type of candle or naked fl ame on top or near the TV.
Do not allow children to
handle SD card
As with a small object, SD card can be swallowed
by young children. Please remove SD card
immediately after use.

Notes
Caution
When cleaning the TV, remove the
mains plug
( Cleaning an energized TV may cause electrical shock.)
When TV will not be used for a
long time, remove the mains plug
This TV will still consume some power even
in the Off mode, as long as the mains plug is
still connected to a live socket outlet.
Transport only in upright position
Transporting the TV with its display panel
facing upright or downward may cause
damage to the internal circuitry.
Allow suffi cient space around the
TV for radiated heat
Minimum distance
10
10
Do not block the rear air vents
Blocked ventilation by curtains,
etc. may cause overheating, fi re
or electrical shock.
10
7
(cm)
Do not display a still picture for a long time
This causes the image to remain on the plasma
screen (“image retention”).
This is not considered a malfunction and is not
covered by the warranty.
Typical still images
Channel number and other logos
Image displayed in 4:3 mode
Video game
Computer image
To prevent image retention, contrast is lowered
automatically after a few minutes if no signals are
sent or no operations are performed. (p. 40)
Auto power standby function
If no signal is received and no operation is
performed in TV mode for 30 minutes, the TV will
automatically go to standby mode.
Keep the TV away from these equipment
Electronic equipment
In particular, do not place video equipment near the
TV (electromagnetic interference may distort images
/ sound).
Equipment with an infrared sensor
This TV also emits infrared rays (this may affect
operation of other equipment).
Maintenance
First, remove the mains plug from the socket outlet.
Display panel
Regular care: Gently wipe the surface clean of dirt by using a soft cloth.
Major contamination: Wipe the surface clean using a soft cloth dampened with clean water or diluted neutral
detergent by 100 times of water. Then, using a soft dry cloth, evenly wipe the surface clean until it is dry.
Caution
The surface of the display panel has been specially treated and may be easily damaged.
•
Do not tap or scratch the surface with your fi ngernail or other hard object.
Use care not to subject the surface to bug repellent, solvent, thinner, or other volatile substances
•
(this may degrade surface quality).
Cabinet
Regular care: Wipe the surface clean using a soft dry cloth.
Major contamination: Dampen a soft cloth with clean water or water containing a small amount of neutral detergent.
Then, wring the cloth and wipe the surface clean with it. Finally, wipe the surface clean with a dry cloth.
Caution
Use care not to subject the TV's surfaces to detergent.
•
(A liquid inside the TV could lead to product failure.)
Use care not to subject surfaces to bug repellent, solvent, thinner, or other volatile substances
•
(this may deteriorate the surface by peeling the paint).
Do not allow the cabinet to make contact with a rubber or PVC substance for a long time.
•
Mains plug
Wipe the mains plug with a dry cloth at regular intervals. (Moisture and dust may lead to fi re or electrical shock.)
5
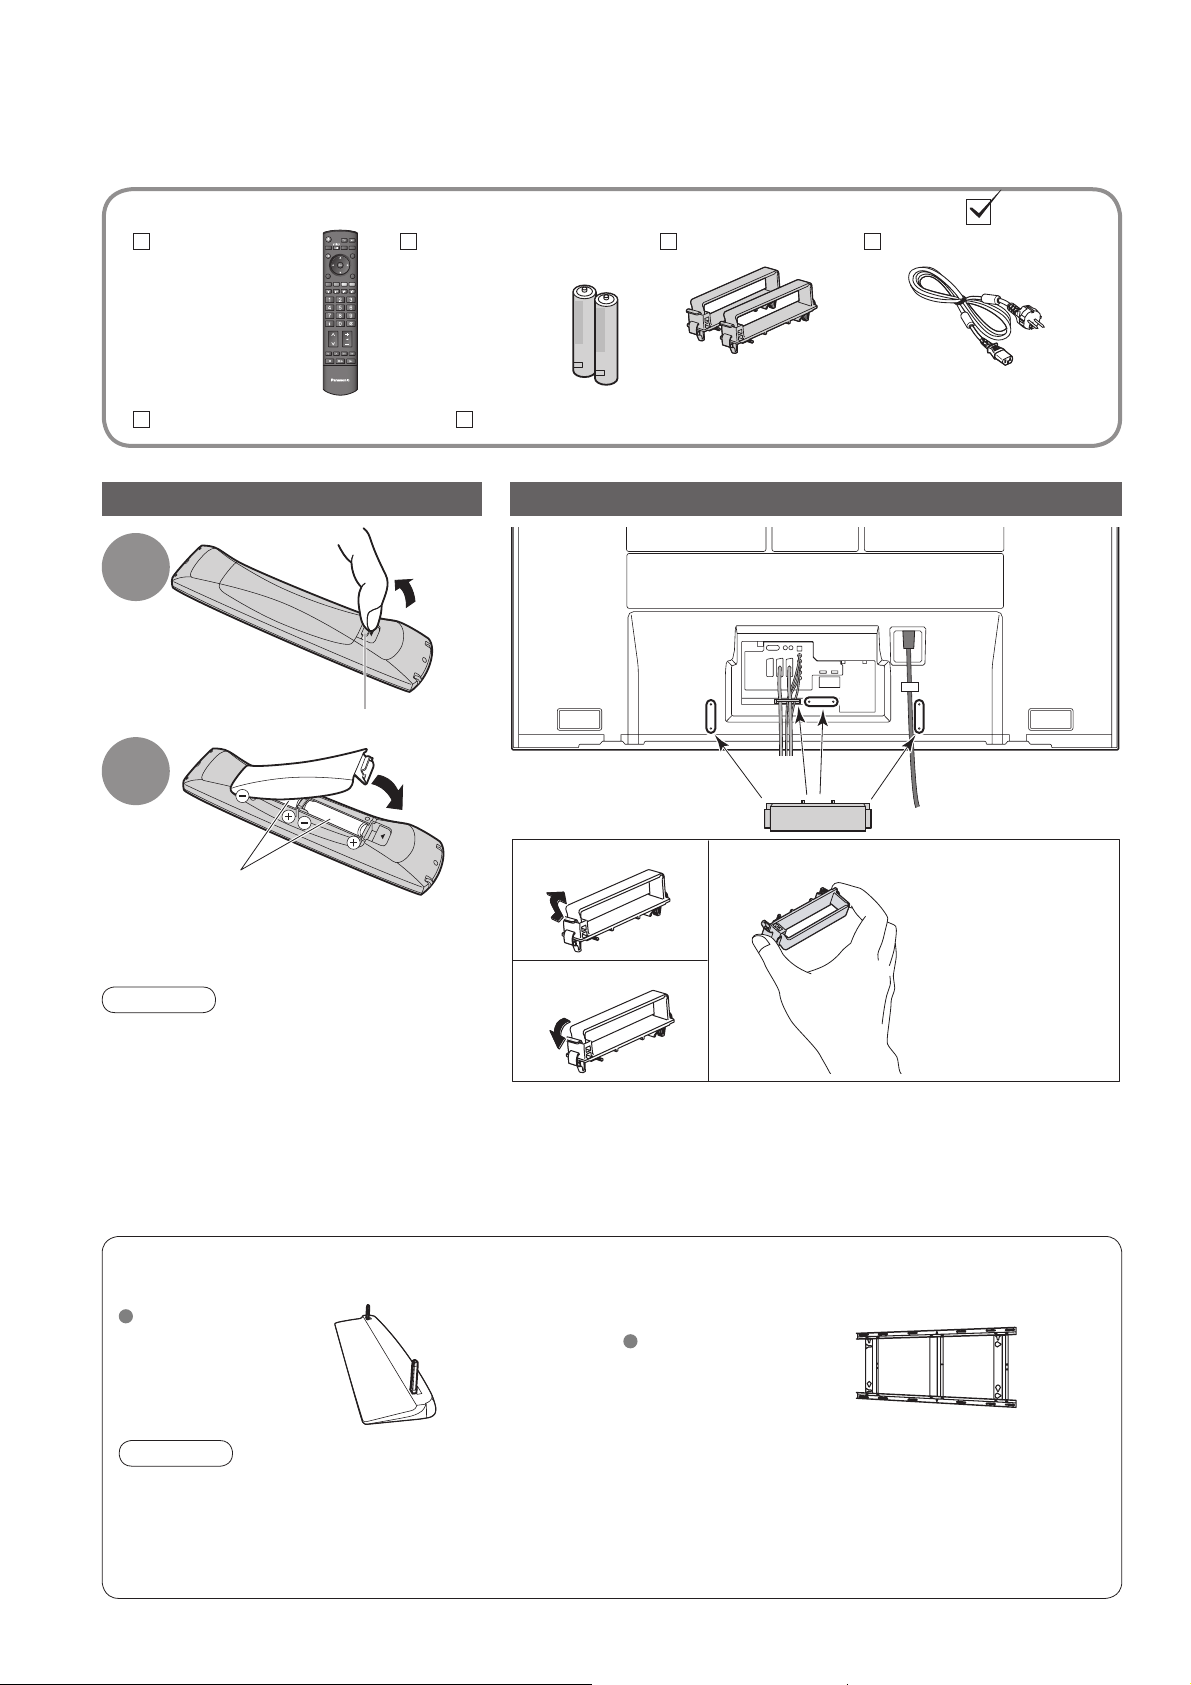
Accessories / Options
Standard accessories
Remote Control
Transmitter
N2QAYB000116
•
TV
Operating Instructions
Installing remote’s batteries
Check that you have the accessories and items shown
Batteries for the
Remote Control
Transmitter
R6 (UM3)
•
Pull
open
1
Hook
Close
2
Clamper (2)
(2)
Pan European Guarantee Card
Using the clamper
Rear of the TV
Mains Lead
Note the correct
polarity (+ or -)
Caution
Incorrect installation may cause battery
•
leakage and corrosion, resulting in
damage to the remote control.
Do not mix old and new batteries.
•
Do not mix different battery types (such
•
as alkaline and manganese batteries).
Do not use rechargeable (Ni-Cd) batteries.
•
Do not burn or breakup batteries.
•
Optional accessories
Pedestal
TY-ST65R2-WG
Snap open
Snap shut
Do not bundle the RF cable and mains lead together (could cause
•
distorted image).
Fix cables with clampers as necessary.
•
When using the optional accessory, follow the option’s assembly
•
manual to fi x cables.
Wall-hanging bracket
(vertical)
TY-WK65PV7
Remove from the TV
Push both side
hooks and pull
out
6
Caution
In order to maintain the unit’s performance and safety, be absolutely sure to ask your dealer or a licenced
•
contractor to secure the wall-hanging brackets.
Carefully read the instructions accompanying the plasma TV stand or pedestal, and be absolutely sure to take
•
steps to prevent the TV from tipping over.
Handle the TV carefully during installation since subjecting it to impact or other forces may cause product damage.
•

P
UL
L
Identifying Controls
SD CARD slot (p. 29)
Function select
Volume / Contrast / Brightness / Colour /
•
Sharpness / Tint (NTSC mode) / Bass /
Treble / Balance / Auto Setup (p. 22)
Lift door to open
Power LED
Standby: red
•
On: green
Mains power
On / Off switch
Standby On / Off switch
(Switches TV On or Off standby)
Multi window (p. 13)
Access VIERA Link Menu (p. 33)
Changes aspect ratio (p. 13)
OK button to confi rm selections and choices
Press after selecting programme positions to
quickly change programme.
Main Menu
Press to access VIERA Link, Picture,
Sound and Setup menus (p. 18)
Teletext (p. 16)
Viewing a favourite teletext channel (p. 17)
Programme / channel change buttons (0-9)
and Teletext page buttons.
When in Standby mode, switches TV On.
Programme Information (p. 13)
Increases or decreases the programme position by one. When a function is already displayed,
press to increase or decrease the selected function. When in Standby mode, switches TV On.
C.A.T.S. (Contrast Automatic Tracking System) sensor
( senses brightness to adjust picture quality in “Auto” Mode in Picture Menu) (p. 20)
(p. 12 and p. 16)
Changes the
input mode
Remote control signal receiver
MULTI WINDOW
ASPECT
Headphones jack
(p. 34)
INPUT
OPTION
SD CARD
EXIT
RETURN
F.P.
AV4 terminals
(p. 34)
Changes the input mode
TV -
changes TV mode
AV - changes AV input mode (p. 14)
Viewing SD Card (p. 28)
Option menu
Sets the preferred settings of viewing
and sound options easily (p. 12)
EXIT (Returns to TV screen)
Cursor buttons to make selections and
adjustments
Returns to the previous menu
Coloured buttons used for the
selection, navigation and operation of
various functions
Still picture (p. 12)
Teletext Hold (p. 17)
Teletext Index (p. 17)
Sound mute On / Off
HDMI3 terminal
(p. 34)
(p. 14)
Quick Start Guide
•
•
Identifying Controls
Accessories / Options
Selects programmes in sequence
VCR / DVD operations (p. 15)
Surround (p. 20)
Volume
DIRECT TV REC
DIRECT TV Recording
To immediately record programme in VCR /
DVD recorder with Q-Link connection
(p. 30)
7
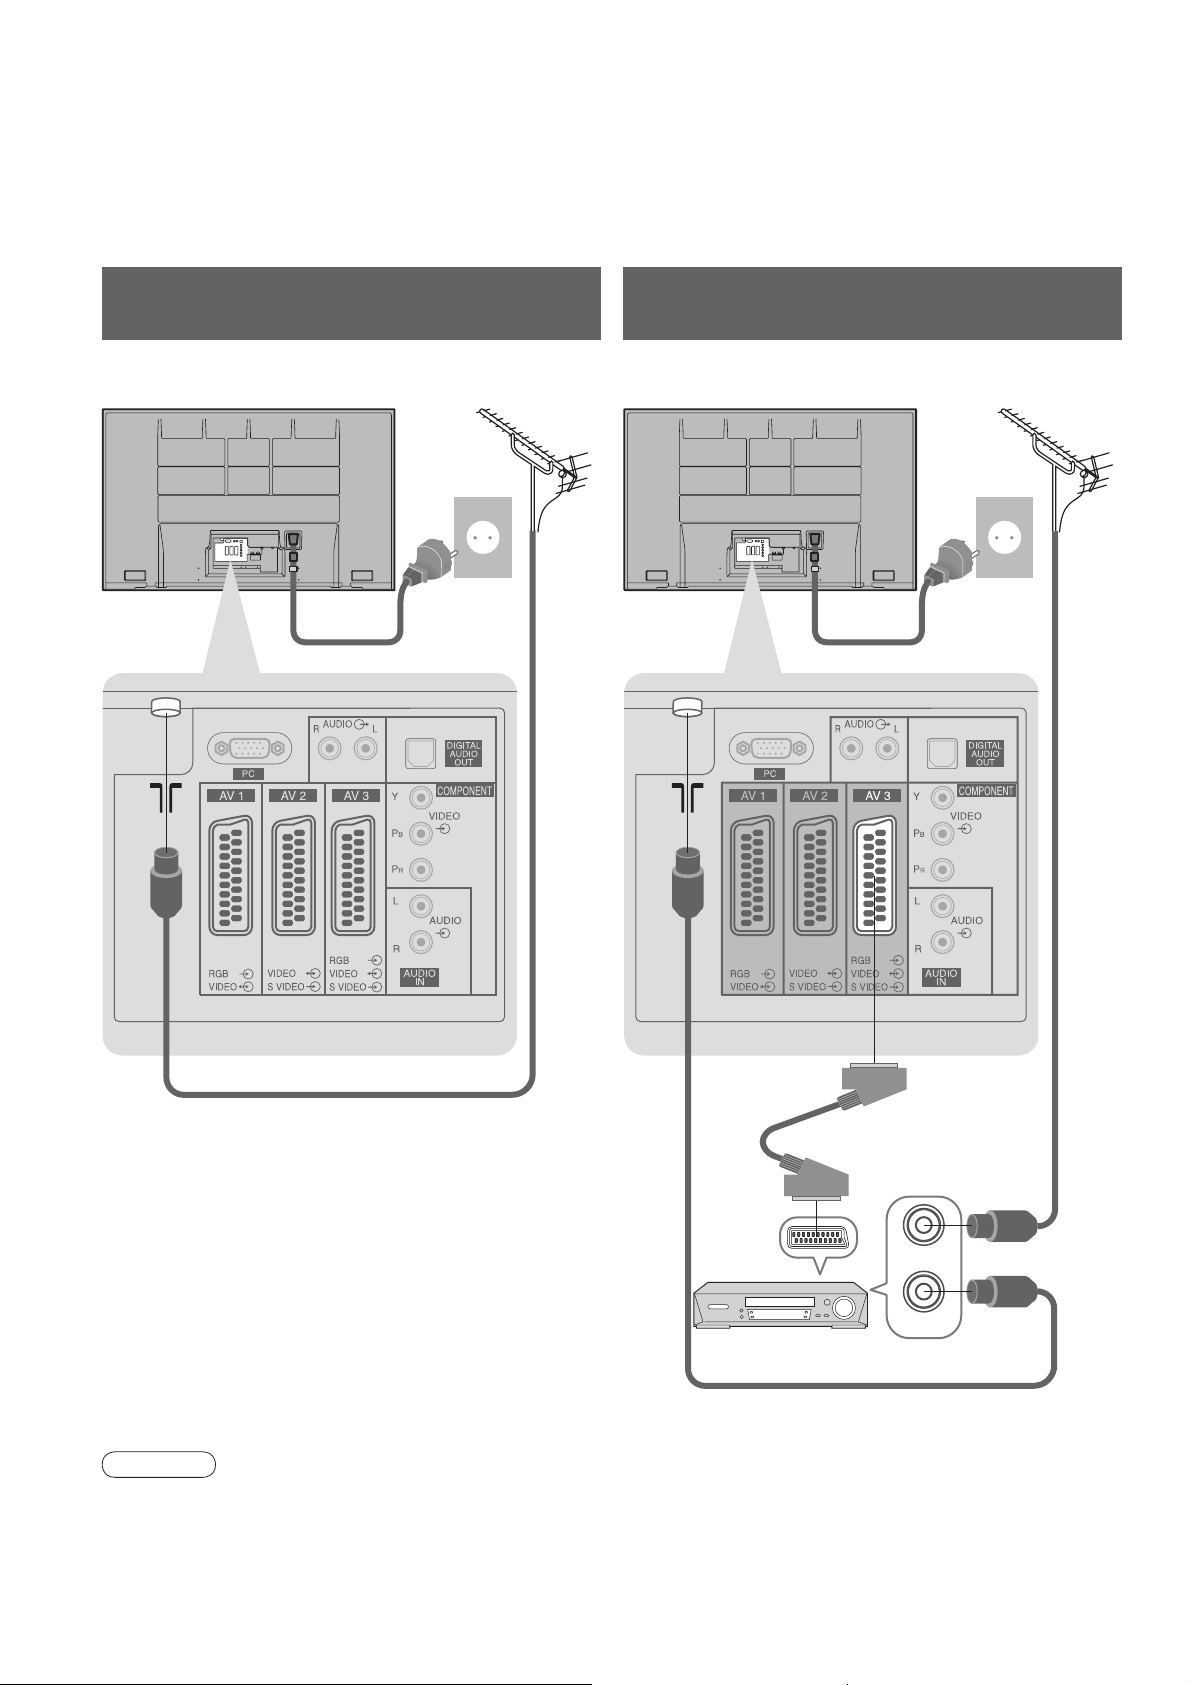
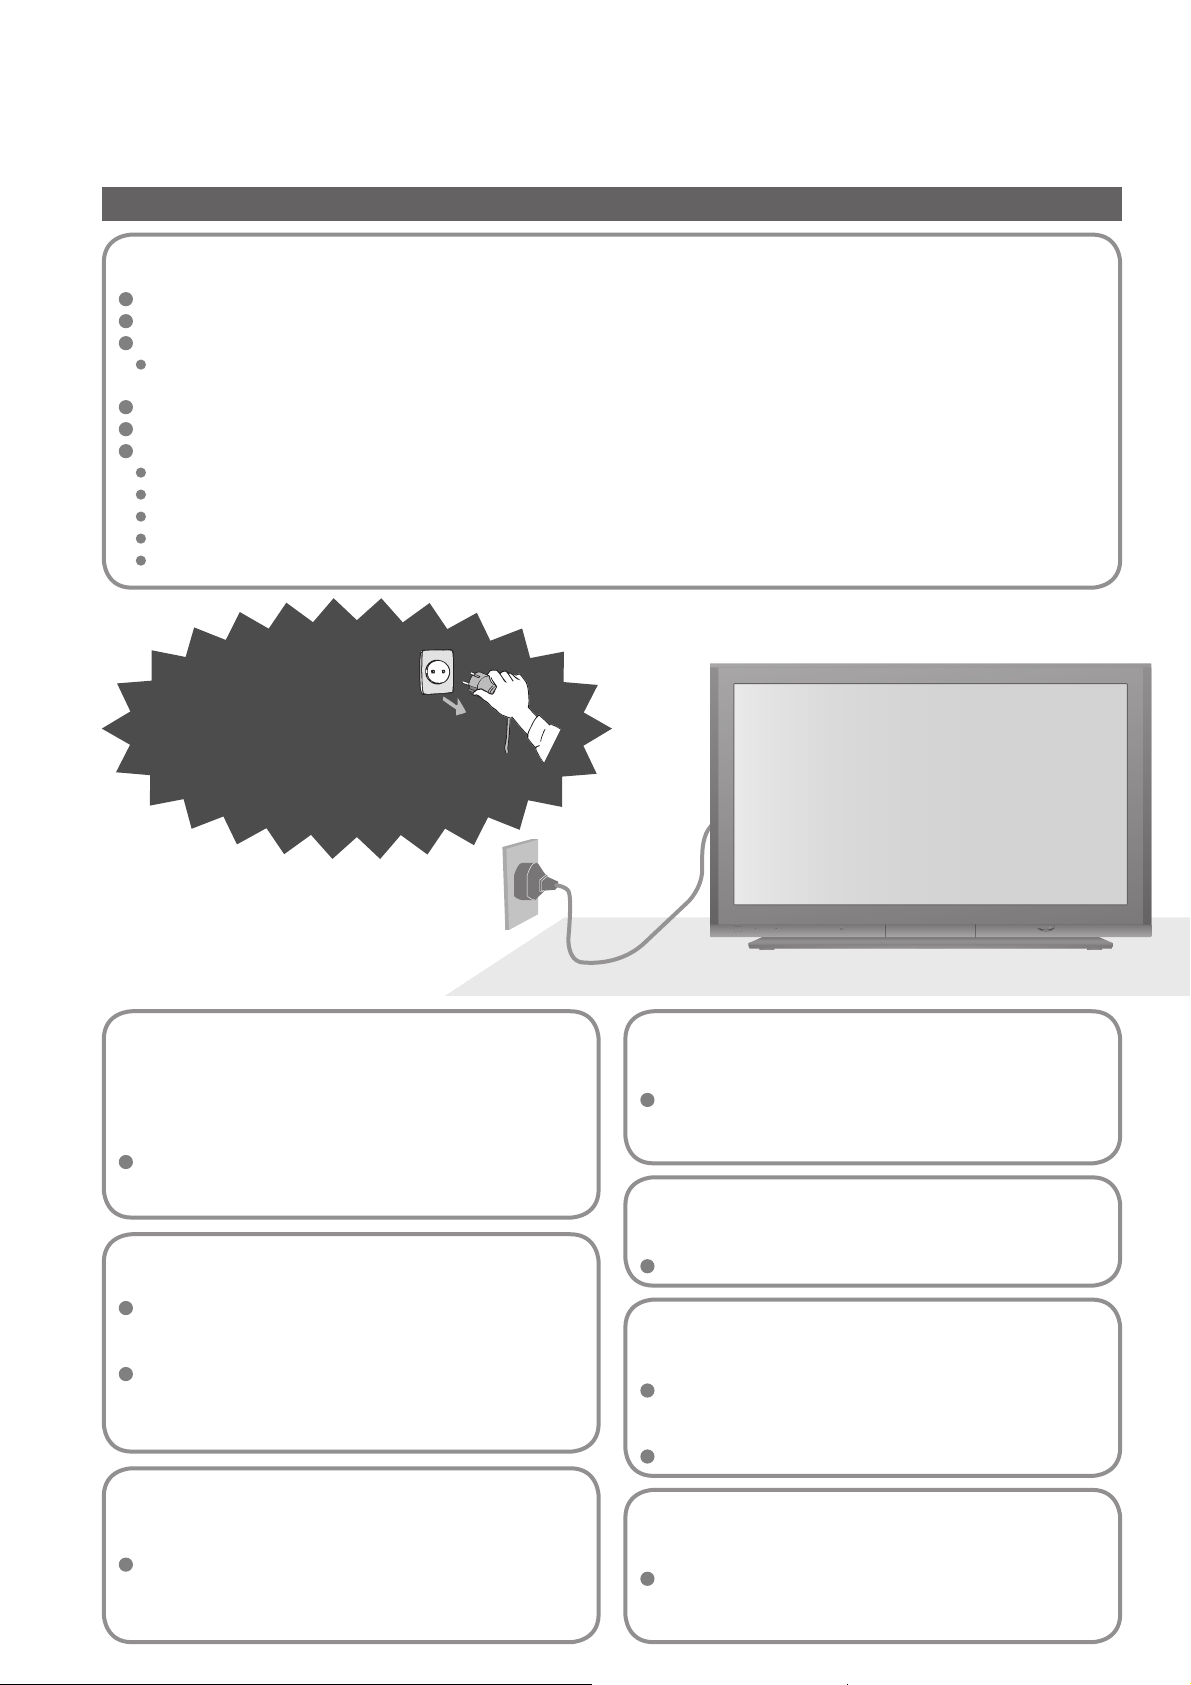
Basic Connection
External equipment and cables shown are not supplied with this TV.
Please ensure that the unit is disconnected from the mains socket before attaching or disconnecting any leads.
When disconnecting the mains lead, be absolutely sure to disconnect the mains plug at the socket outlet fi rst.
Example 1
Connecting aerial
TV only TV, DVD Recorder or VCR
Aerial AerialRear of the TV Rear of the TV
AC 220-240 V
50 / 60 Hz
RF
Mains lead (supplied)
cable
Example 2
Connecting DVD Recorder / VCR
Mains lead (supplied)
AC 220-240 V
50 / 60 Hz
8
DVD Recorder or VCR
Note
Connect to AV2 / 3 for a DVD Recorder / VCR supporting Q-Link (p. 30).
•
SCART cable
(fully wired)
RF cable
RF IN
RF OUT
RF cable
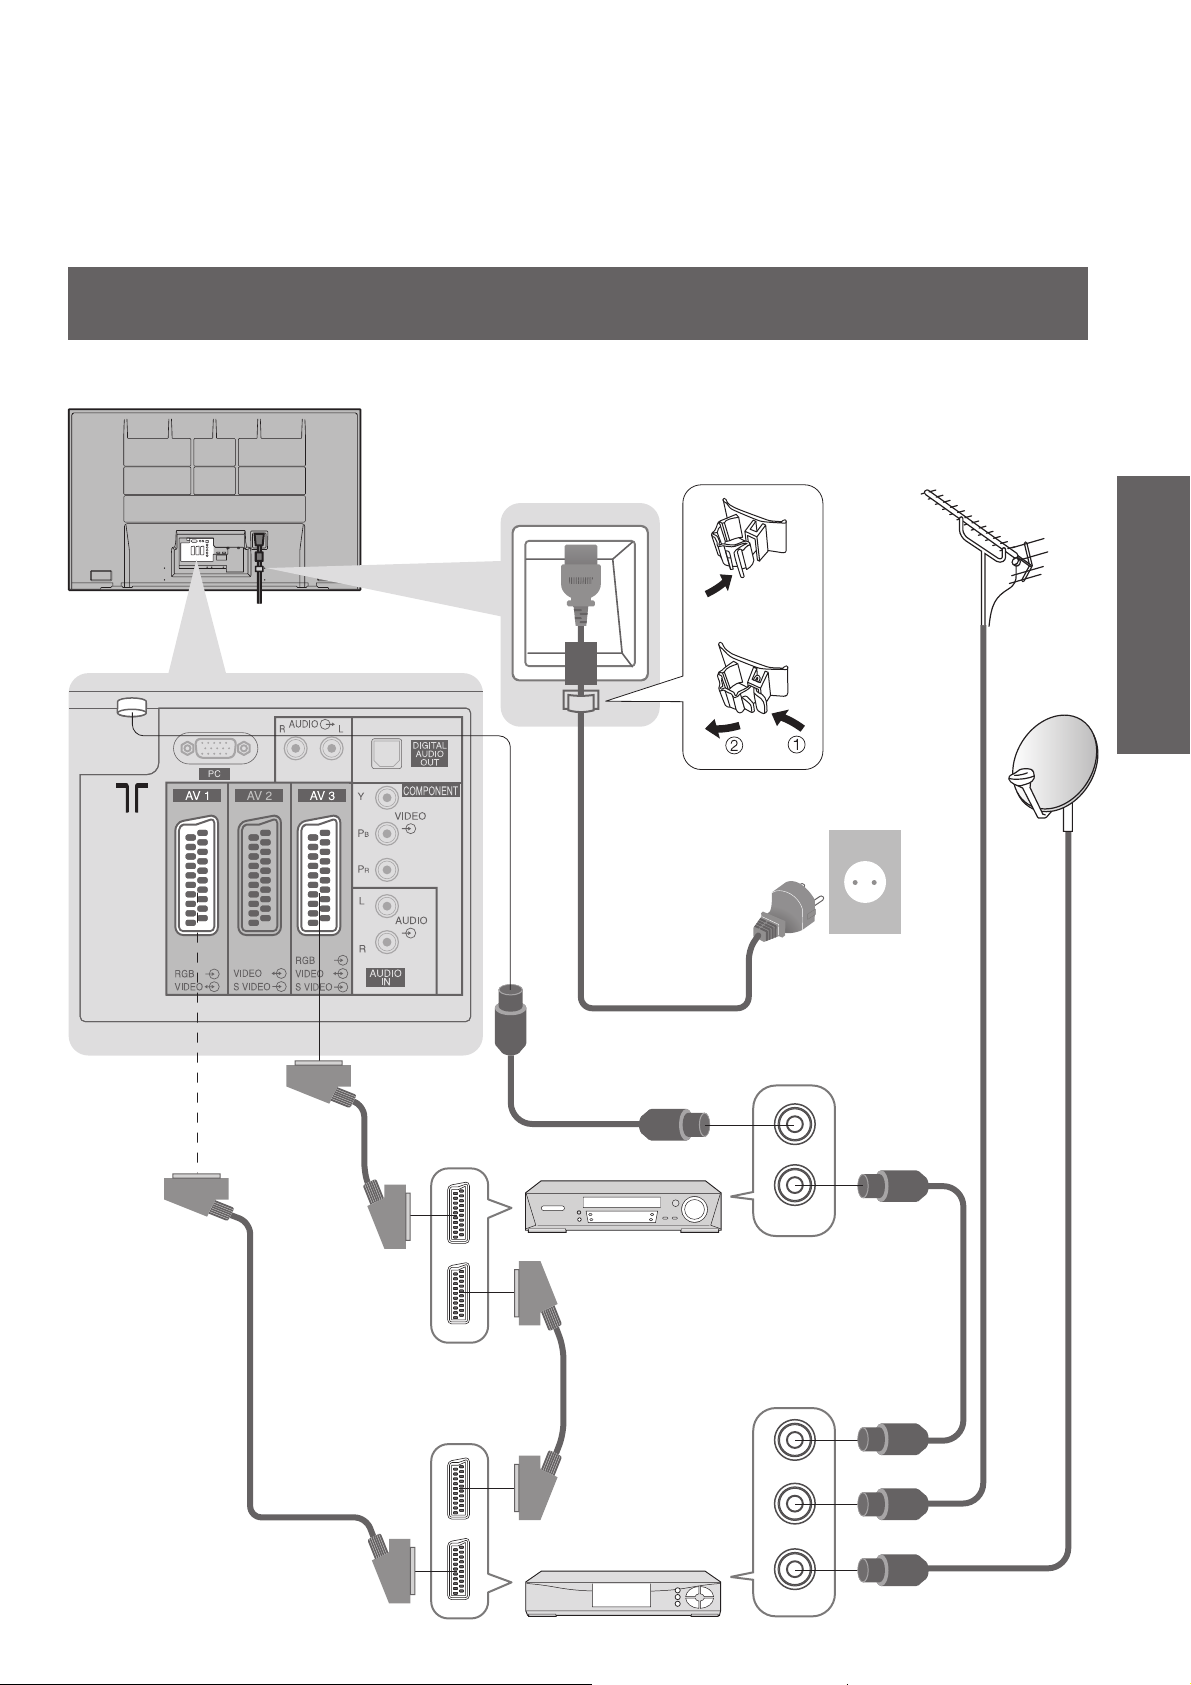
Example 3
Connecting DVD Recorder / VCR and Set top box
TV, DVD Recorder / VCR and Set top box
Rear of the TV
Clamper
To unfasten
•
Mains lead (supplied)
AC 220-240 V
50 / 60 Hz
Aerial
RF cable
Quick Start Guide
•
Basic Connection
SCART cable
(fully wired)
SCART cable
(fully wired)
RF cable
RF OUT
RF IN
DVD Recorder
or VCR
RF cable
SCART cable
(fully wired)
RF OUT
RF IN
RF cable
RF IN
Set top box
9
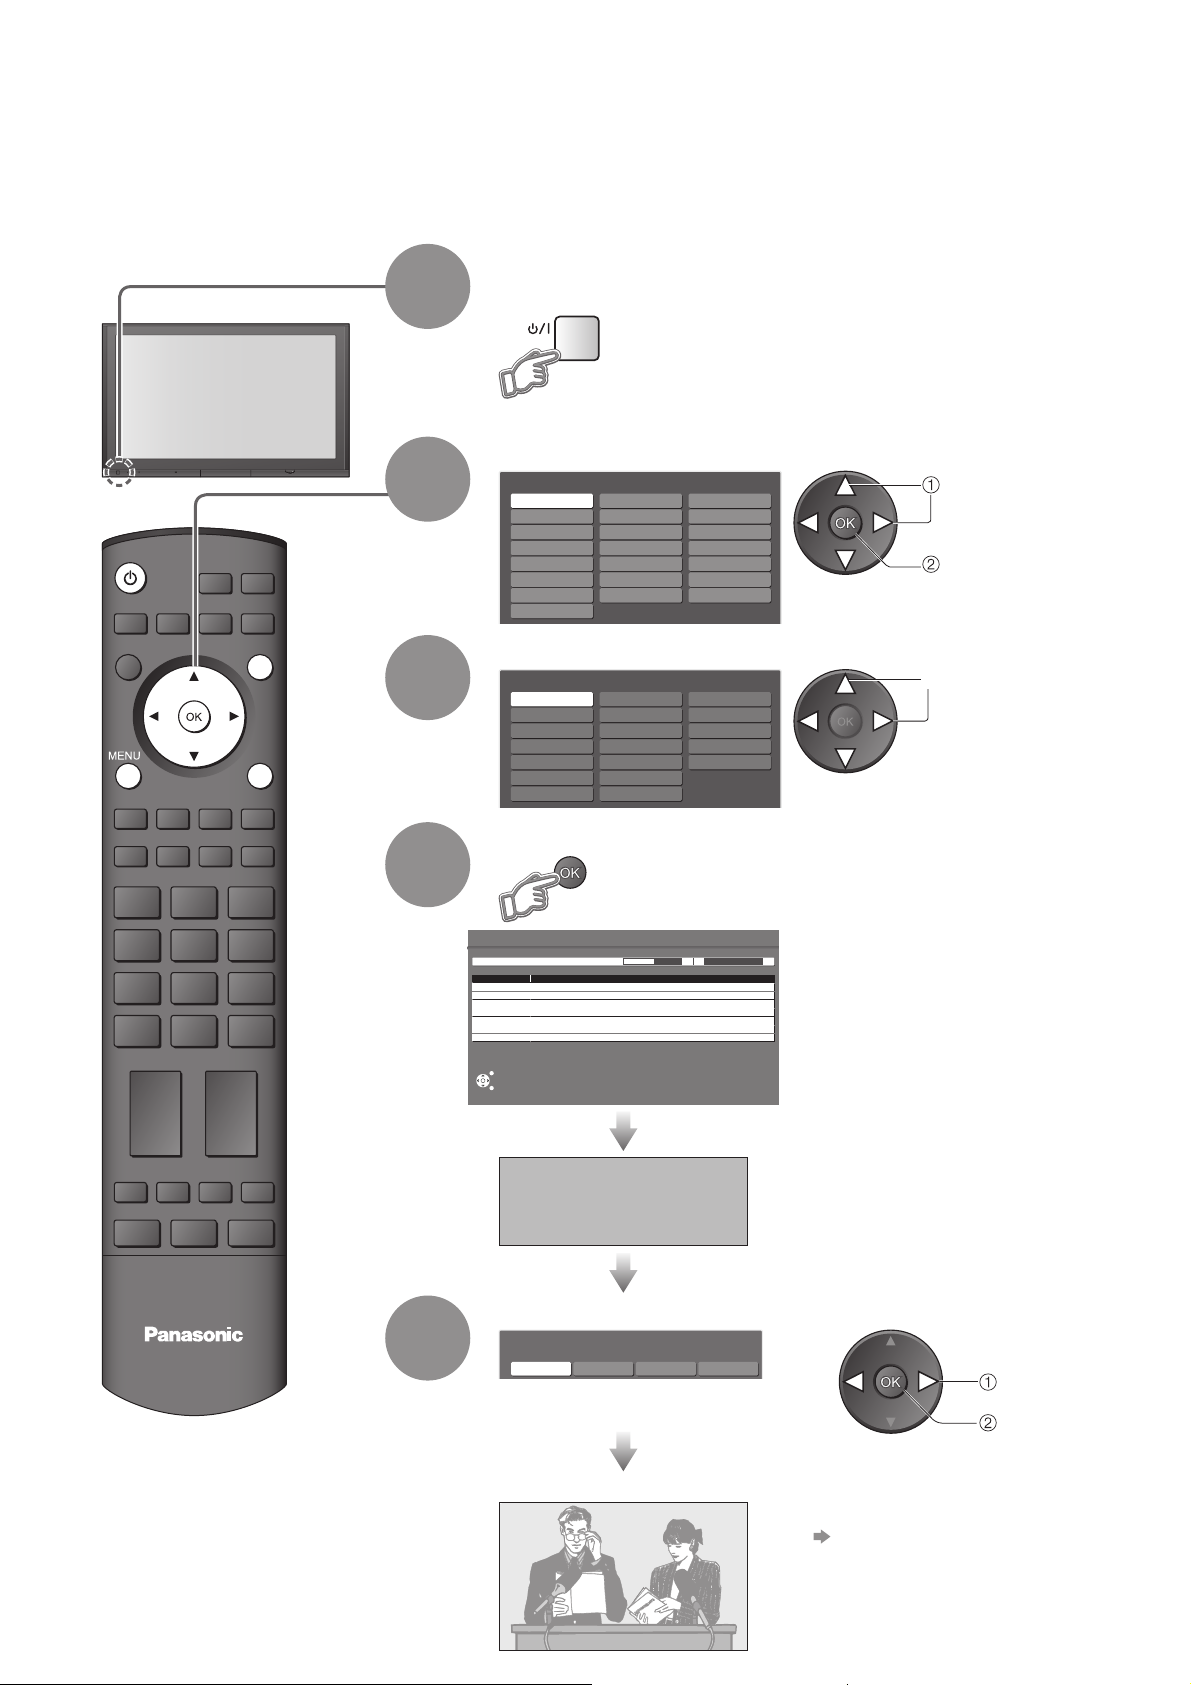
Auto Setup
Search and store TV channels automatically.
These steps are not necessary if the setup has been completed by your local dealer.
Plug the TV into mains socket and switch On
(Takes a few seconds to be displayed)
1
You can now use the remote
•
control to turn On the TV or turn
the TV to standby mode.
(Power LED: On)
Select the language
INPUT
OPTION
SD CARD
2
Menüsprache
Deutsch
English
Français
Italiano
Еλληνικά
čeština
Slovenčina
Srpski
Español
Norsk
Dansk
Svenska
Magyar
Български
Slovenščina
Nederlands
Suomi
Türkçe
Português
Hrvatski
Românǎ
Polski
select
store
EXIT
RETURN
3
4
Select your country
Country
Germany
Austria
France
Italy
Spain
Portugal
Netherlands
Denmark
Sweden
Norway
Finland
Belgium
Switzerland
Greece
Start Auto Setup
Auto Setup
Scan 214178
Channel Service Name
CH 29
CH 33
This will take about 3 mins.
EXIT
RETURN
DOWNLOAD IN PROGRESS
PLEASE WAIT
Programme : 63
Remote control unavailable
Poland
Czech
Hungary
Ireland
E.Eu
select
Auto Setup will start to search for
•
TV channels and store them.
The sorted programme order
depends upon the TV signal,
the broadcasting system and
reception conditions.
If a compatible recording equipment
•
with Q-Link or similar technologies
(p. 30) is connected, channel
information is automatically
downloaded to the equipment.
10
Select the picture setting
TV
5
Viewing Mode
Dynamic Normal Cinema Auto
Also possible to change the setting
•
in Picture Menu (p. 20)
select
set
Auto Setup is now complete and your TV is ready for viewing.
To edit channels
•
Editing and Setting Channels
(p. 22)
Using the
On Screen
Displays
Many features available on this TV can be accessed via the On Screen Display
menu.
How to use remote control
■
Open the main menu
Move the cursor / select the menu
Move the cursor / adjust levels / select from a range of options
Access the menu / store settings after adjustments have been made or options
have been set
RETURN
Return to the previous menu
EXIT
Exit the menu system and return to the normal viewing screen
Quick Start Guide
•
Auto Setup
ON SCREEN HELP Instructions box
■
(example: Sound Menu)
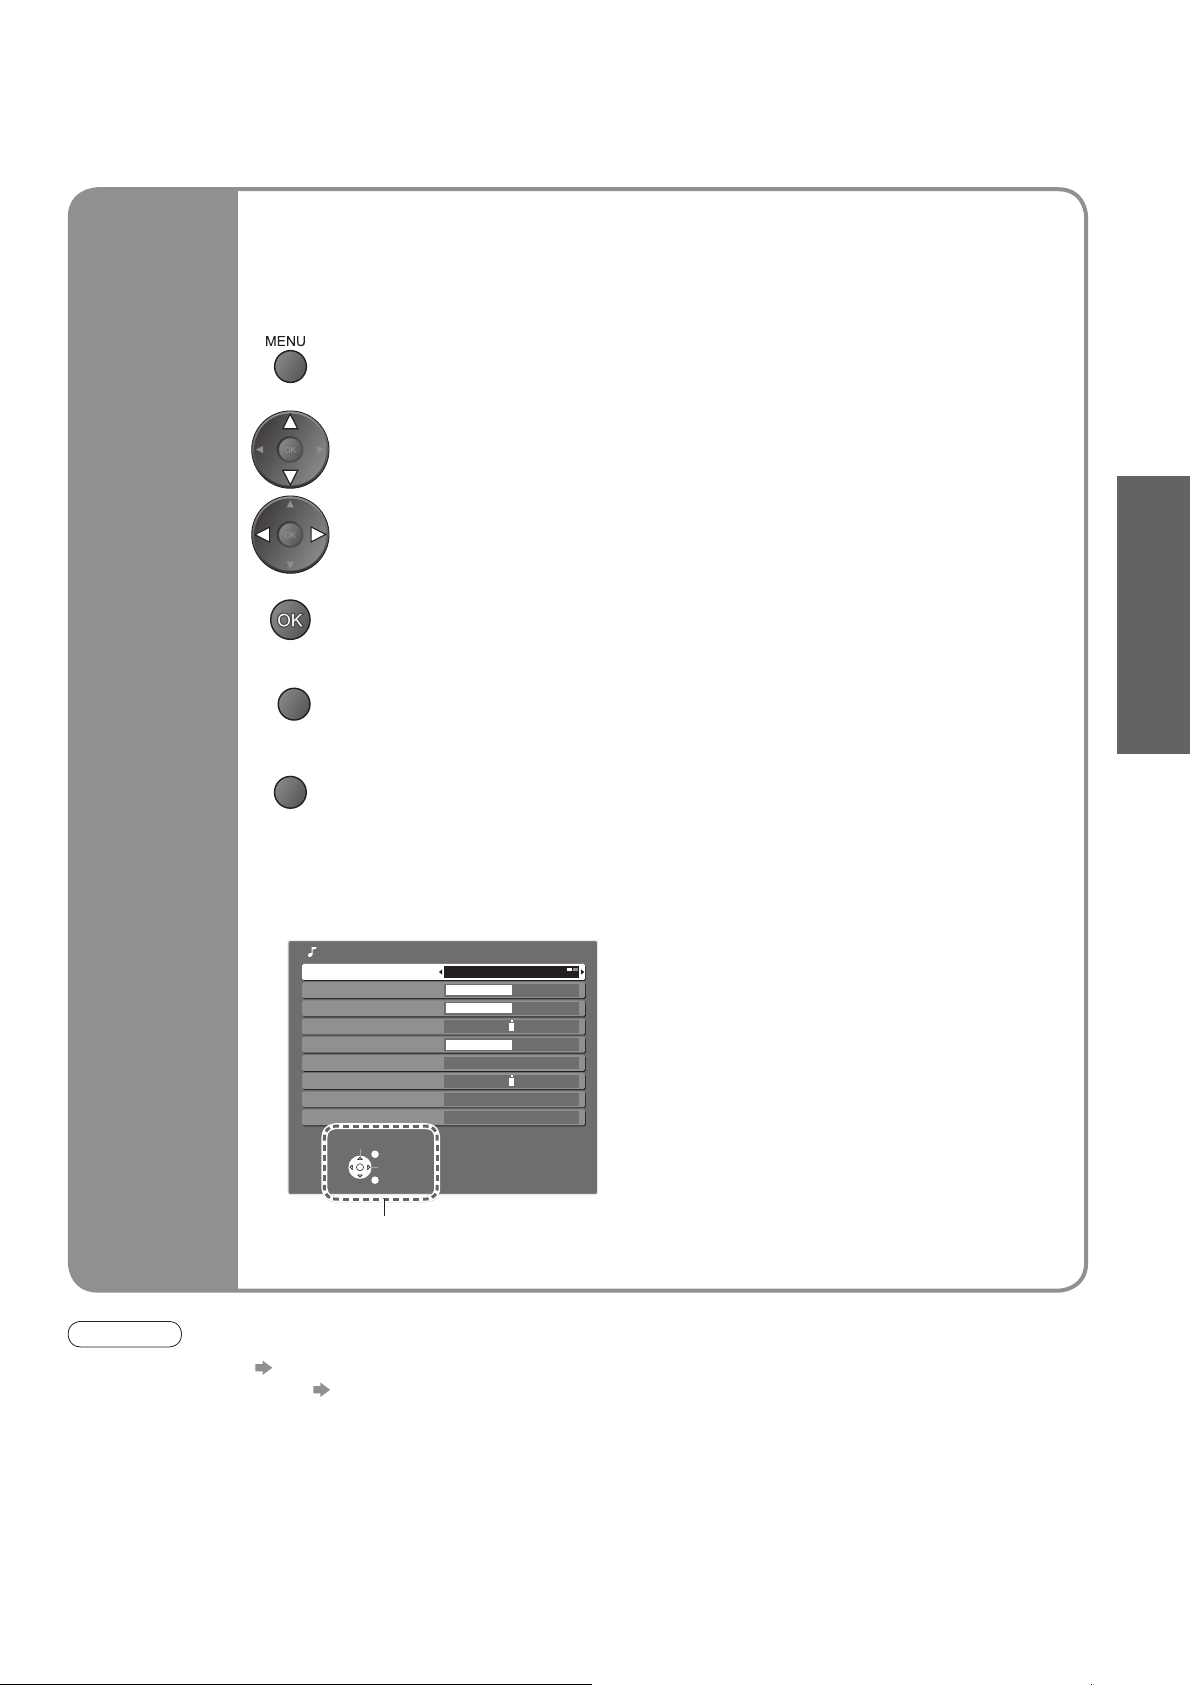
Sound Menu
Mode Music
Bass
Treble
Balance
Headphone Volume
Surround Off
Volume Correction
MPX Stereo
Reset to Default Set
Select
EXIT
Change
RETURN
On-screen operation
guide will help you.
Note
If tuning has failed “Auto Setup” (p. 22).
•
If downloading has failed “Download” (p. 21).
•
If you turned the TV Off during Standby mode last time, the TV will be in Standby mode when you turn the TV On
•
with Mains power On / Off switch.
11

Watching TV
O
Turn power on
MULTI WINDOW
ASPECT
INPUT
OPTION
SD CARD
EXIT
RETURN
1
2
(Press for about 1 second)
Mains power On / Off switch should be On.
1 BBS
CH05 SC1 PAL Corontation Street
Information banner
Select a channel
up
or
down
To select the two-digit programme number, e.g. 39
•
(in a short time)
DIRECT TV REC
Volume
Other useful functions (Operate after )
■
Hold
Display the
current
programme
status
Freeze / unfreeze picture
Check or change the current
programme status instantly
To change
•
Teletext Language
Selects teletext language
MPX
Sound Menu (p. 20)
Volume Correction
Adjusts volume of individual channel or input mode
PTION
change
select
12
Note
Also possible to change the settings in Menu list (p. 20 and p. 21).
•
Other useful functions (Operate after )
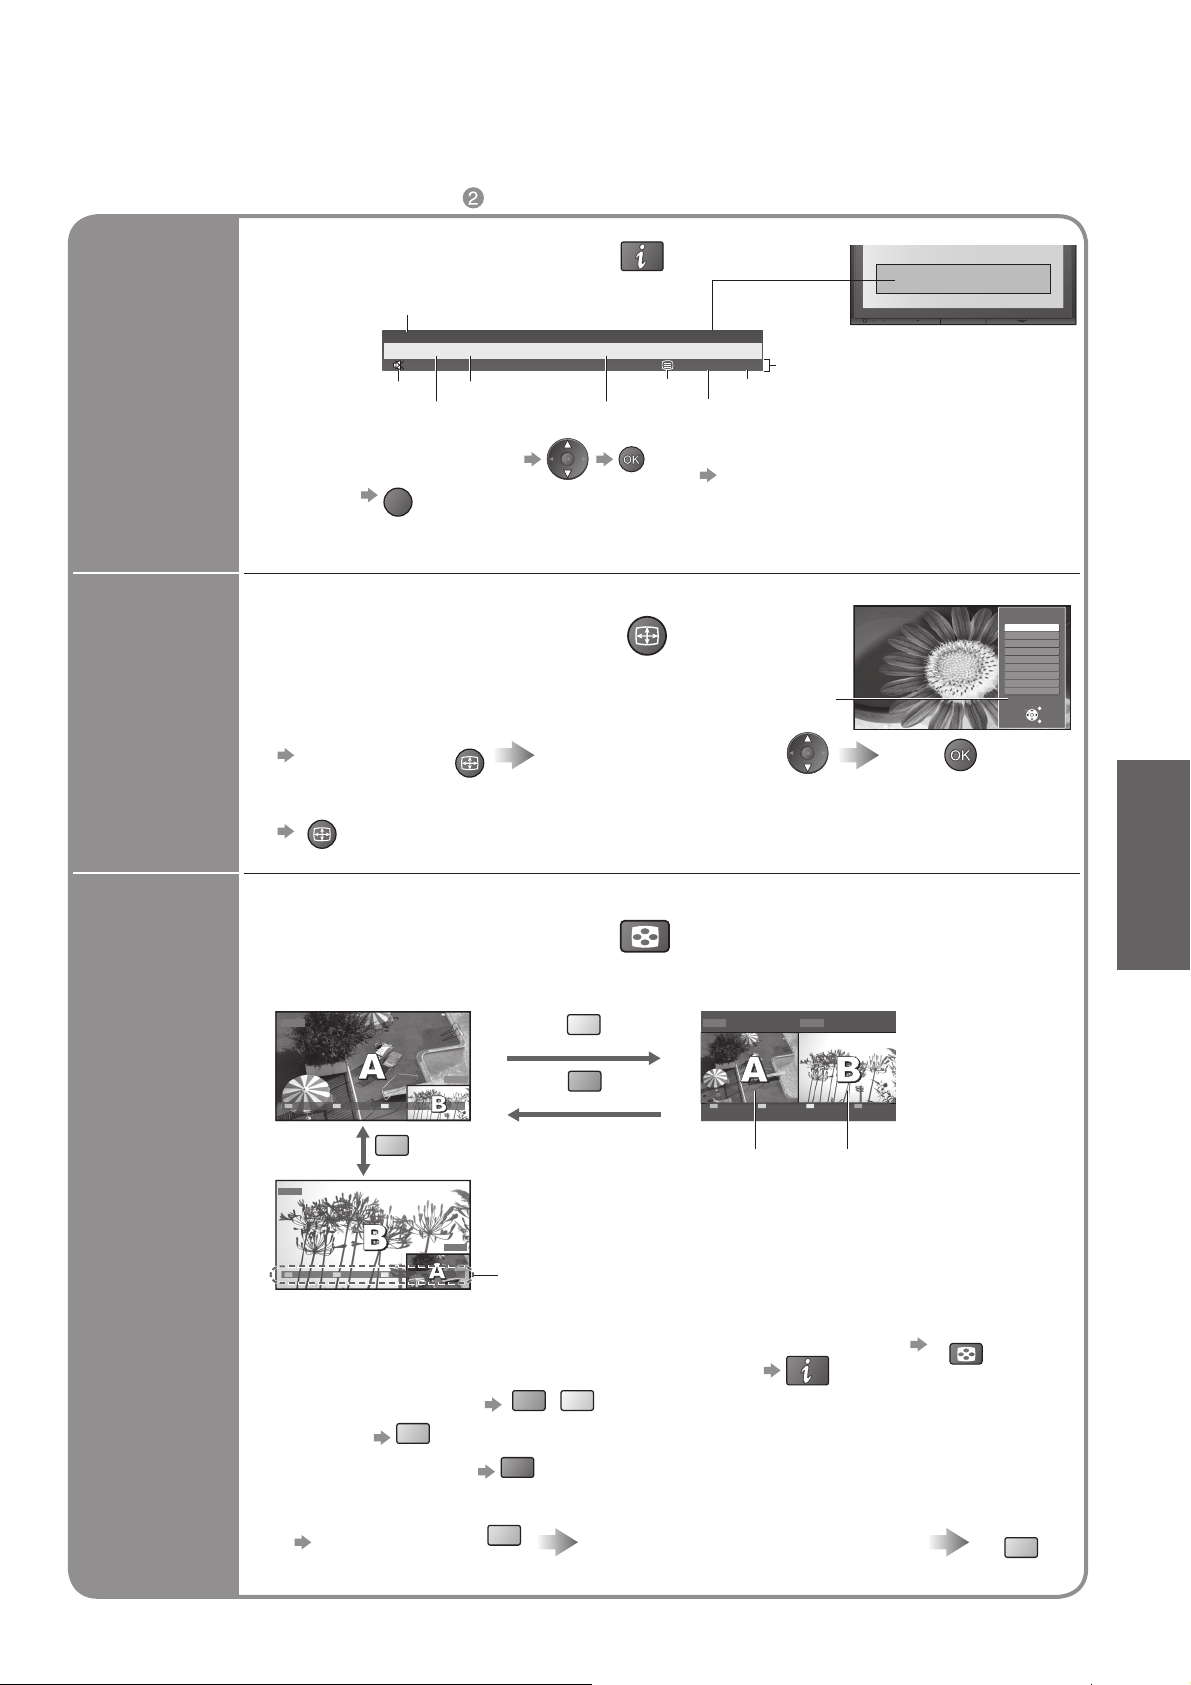
A
A
A
■
Display programme information
Channel
1 BBS
CH05 SC1 PAL Corontation Street
Display
information
Sound mute
Bad Signal Encrypted
Sound system
banner
To select another channel
•
To hide
•
EXIT
STTL
AD TXT Stereo
Colour system Teletext
Programme
•
•
•
Stereo 45
Stereo sound
To set display timeout
“Banner Display Timeout” (p. 21)
Appears also when changing channel.
Programme information is referred to
teletext signal.
Features available
Off timer
Change
aspect
ratio
Watch TV,
DVD, etc.
in multi
window
SPECT
Change the aspect ratio (p. 36)
Enjoy viewing the picture at its optimum size and aspect.
Aspect Selection list
To change the mode
•
Display Aspect
Selection list
To change the mode using the ASPECT button only
•
SPECT
(Press repeatedly until you reach the desired mode)
SPECT
During the list is displayed,
select the mode
MULTI WINDOW
View in multi window (p. 37)
Enjoy viewing two images at once, such as a TV programme and a DVD.
Picture-in-Picture mode (PinP)
DVD
yellow
AV1/RGB
Exit PandP Swap
blue
AV1/RGB
Exit PandP Swap
DVD
Colour bar
green
•
Picture-and-Picture mode (PandP)
DVD AV1/RGB
Exit PinP Swap
Main screen
Remote control operations
apply to the main screen.
Sub screen
Store
Aspect Selection
Auto
16:9
14:9
Just
4:3
4:3 Full
Zoom1
Zoom2
Zoom3
Select
Change
EXIT
RETURN
Viewing
•
Watching TV
Operations in multi window
To exit multi window (return to the single-screen view with main screen)
•
To change the layout, images, fi rst show the colour bar
•
To change the layout
To swap
To exit multi window
To change the input mode or position of sub screen
Swap sub screen
for main screen
blue
blue
green
red
yellow
Change the input mode or position
by the remote control (p. 12 or p. 14)
MULTI WINDOW
Swap again
blue
13
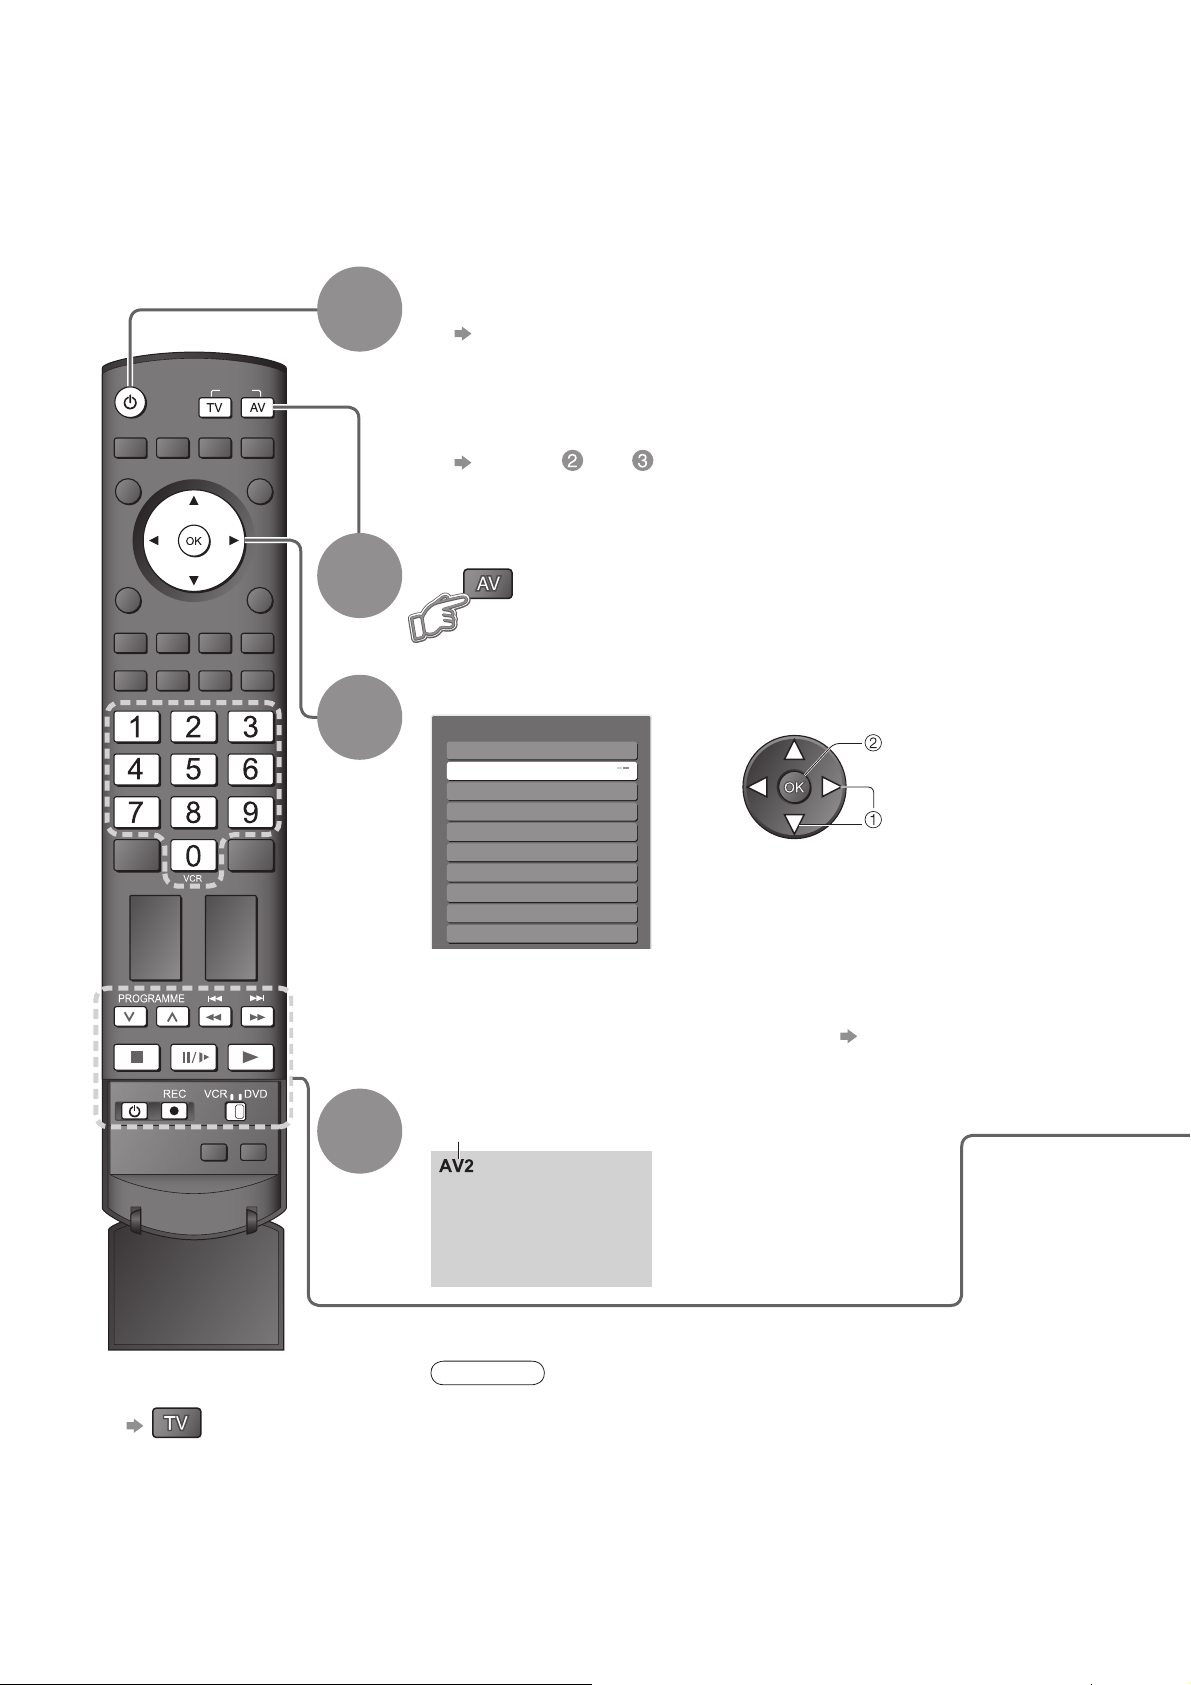
Watching Videos and DVDs
Connect the external equipment (VCRs, DVD equipment, etc.) and you can watch the input.
To connect the equipment (p. 8 and p. 9)
The Remote Control is capable of operating some functions of selected Panasonic external equipment.
Turn the TV on
When connecting with SCART as example 2 or 3 (p. 8 and p. 9)
■
Receives input signals automatically when playback starts
Input signals are automatically identifi ed by the SCART (pin 8)
•
terminal.
This function is also available for HDMI connections (p. 33).
•
If input mode is not switched automatically
■
Perform and
Dependant on the setup of the equipment
•
Display the Input select menu
Select the input mode connected to the equipment
Input Selection
AV1
AV2/AV2S
AV3/AV3S
AV4/AV4S
COMPONENT
PC
HDMI1
HDMI2
HDMI3
TV
You can also select the input using the AV button on the remote
•
control or the front panel of the TV.
Press the button repeatedly until the desired input is selected.
You can label or skip each input modes “Input Labels” (p. 26)
•
watch
select
INPUT
OPTION
1
SD CARD
EXIT
RETURN
2
3
14
MULTI WINDOW DIRECT TV REC
To return to TV
■
4
View
Displays the selected mode
Note
If the external equipment has an aspect adjustment function, set to “16:9”.
•
For details, see the manual of the equipment or ask your local dealer.
•
 Loading...