

Panasonic TH-42PX600, TH-58PX600U, TH-50PX600U, TH-42PX600U Operating Instructions [en, es]
Page 1
Operating Instructions
Digital High Definition Plasma Television
Manual de instrucciones
Televisor digital con pantalla de plasma de alta definición
Model No. TH-42PX600U
Número de modelo TH-50PX600U
TH-58PX600U
English
Español
R
For assistance, please call : 1-888-VIEW-PTV (843-9788)
or contact us at www.panasonic.com/contactinfo (U.S.A.)
For assistance, please call : 787-750-4300
or visit us at www.panasonic.com (Puerto Rico)
For assistance, please call : 1-800-561-5505
or visit us at www.panasonic.ca (Canada)
Para solicitar ayuda, llame al: 1-888-VIEW-PTV (843-9788)
ó visítenos en
Para solicitar ayuda, llame al: 787-750-4300
ó visítenos en www.panasonic.com (Puerto Rico)
www.panasonic.com/contactinfo
Please read these instructions before operating your set and retain them for future reference.
The images shown in this manual are for illustrative purposes only.
Lea estas instrucciones antes de utilizar su televisor y guárdelas para consultarlas en el futuro.
Las imágenes mostradas en este manual tienen solamente fines ilustrativos.
(EE.UU.)
TQB2AA0665
Page 2
Turn your own living room into a movie theater!
Experience an amazing level of multimedia
excitement
2
This product incorporates copyright protection technology that is protected by U.S. patents and other intellectual property rights.
Use of this copyright protection technology must be authorized by Macrovision Corporation, and is intended for home and other
limited viewing uses only unless otherwise authorized by Macrovision. Reverse engineering or disassembly is prohibited.
U.S. Patents Nos. 4,631,603; 4,577,216; 4,819,098; 4,907,093; 6,381,747; and 6,516,132.
In the United States, TV Guide and other related marks are registered marks of Gemstar-TV Guide International,
Inc. and/or one of its affiliates. In Canada, TV Guide is a registered mark of Transcontinental Inc., and is used under
license by Gemstar-TV Guide International, Inc.
TM
The TV Guide On Screen
affiliates.
The TV Guide On ScreenTM system is protected by one or more of the following United States patents 4,908,713; 6,498,895;
6,850,693; 6,396,546; 5,940,073; 6,239,794 to Gemstar-TV Guide International, Inc. and/or its subsidiaries.
Manufactured under license from Dolby Laboratories.
“Dolby” and the double-D symbols are trademarks of Dolby
system is manufactured under license from Gemstar-TV Guide International, Inc. and/or one of its
R
Laboratories.
HDMI, the HDMI logo and High-Definition Multimedia Interface
or registered trademarks of HDMI Licensing LLC.
are trademarks
Page 3
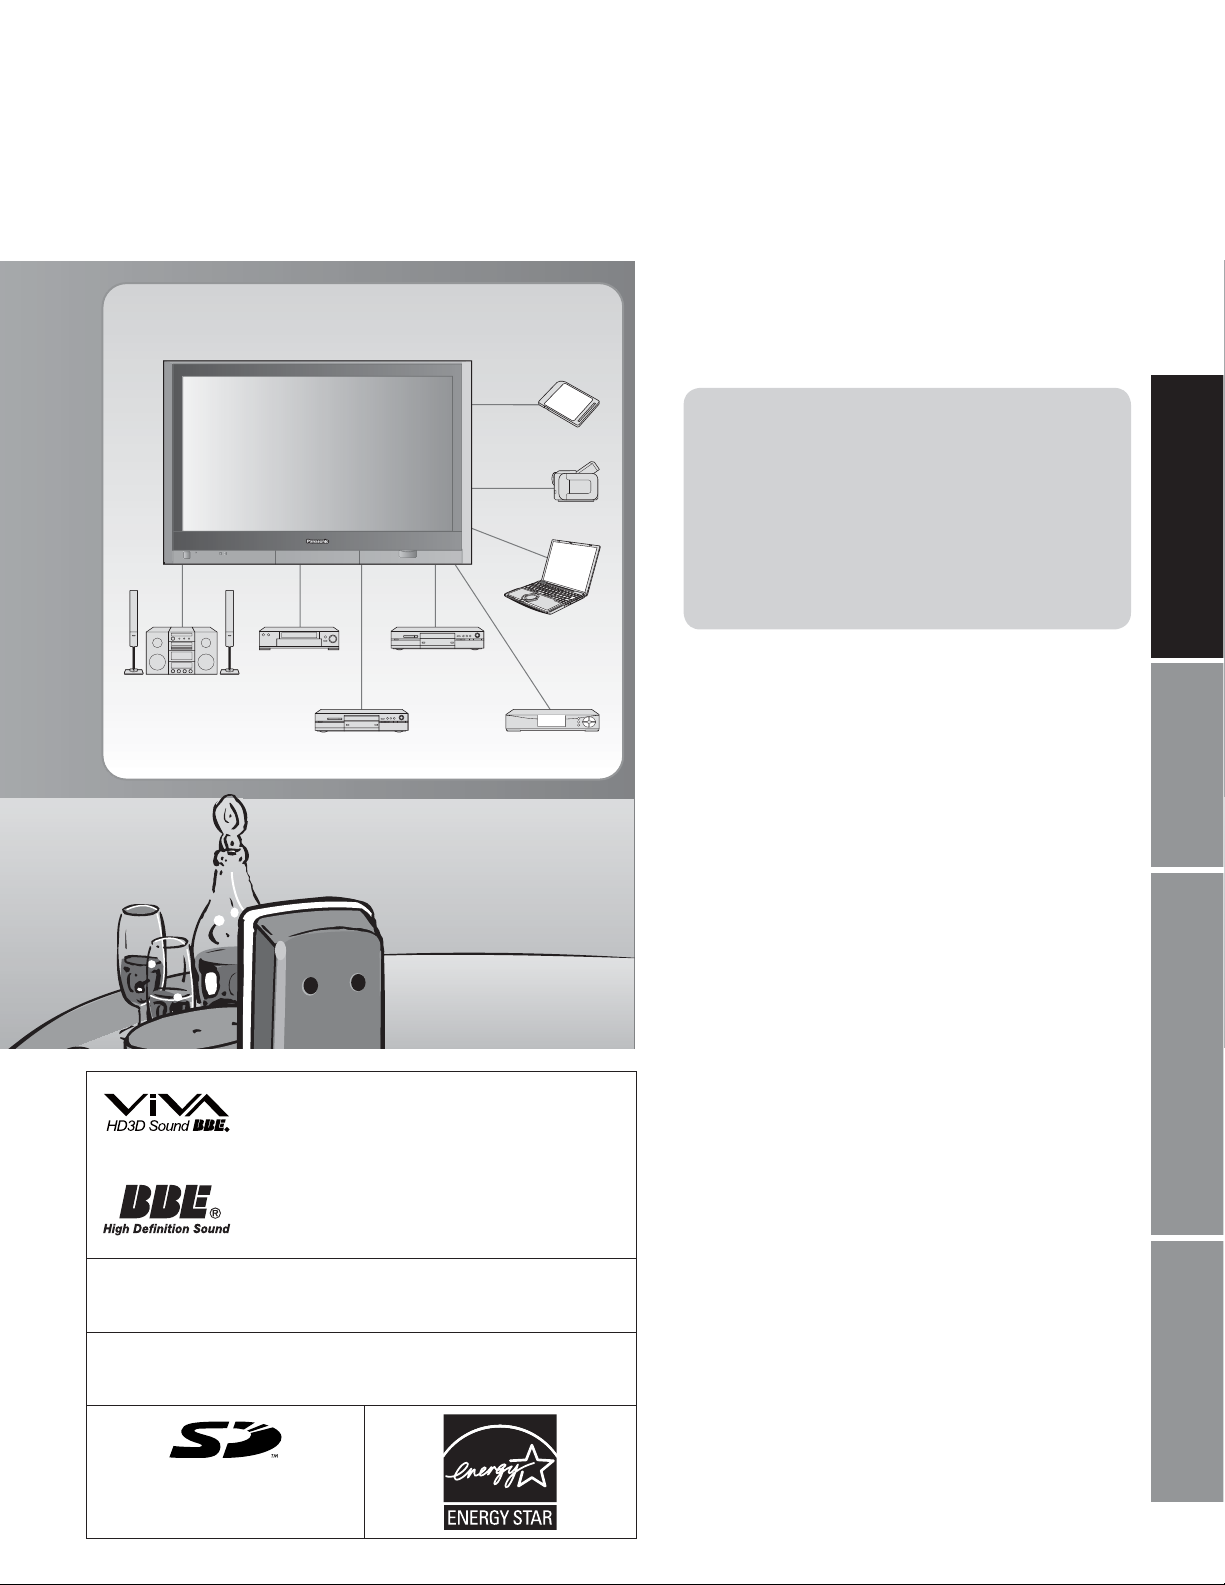
Enjoy rich multimedia
Contents
Please read before using the unit
Safety Precautions ······································· 4
•
(Warning/Caution)
Notes···························································· 5
•
Amplifier
Home theater unit
CableCARD
Inc.
HDAVI Control
Co., Ltd.
SD Logo is a trademark.
TM
is a trademark of Cable Television Laboratories,
TM
is a trademark of Matsushita Electric Industrial
SD memory card
Camcorder
Personal
computer
VCR DVD player
DVD recorder Set Top Box
Manufactured under license from BBE Sound,
Inc.
Licensed by BBE Sound, Inc. under one or
more of the following US patents: 5510752,
5736897.
BBE and BBE symbol are registered
trademarks of BBE Sound, Inc.
Accessories/Options ······················· 6
•
Connection ··························· 10
•
Identifying Controls ······················· 12
•
First Time Setup ················ 13
•
INITIAL GUIDE SETUP
•
for TV Guide
Enjoy your TV !
Basic Features
Watching TV ··············································· 17
•
Using TV Guide ·········································· 20
•
Viewing from SD Card ·······························26
•
SD Card: Notes and Cautions ··················· 28
•
Watching Videos and DVDs ······················· 29
•
Displaying PC Screen on TV ·····················30
························· 15
•
Advanced Features
How to Use Menu Functions
•
(picture, sound quality, etc.) ······················· 32
Control with HDMI “HDAVI ControlTM” ········ 34
•
Channel Lock ············································· 38
•
Editing and Setting Channels ···················· 40
•
Input Labels/Closed Caption ······················ 42
•
Using Timer ················································ 44
•
Operating Peripheral Equipment ··············· 45
•
Recommended AV Connections ················ 46
•
FAQs, etc.
Remote Control Operation/Code List ········· 48
•
Ratings List for Channel Lock ···················· 51
•
Technical Information ································· 52
•
Maintenance ·············································· 57
•
FAQ ···························································· 58
•
Specifications ············································· 61
•
Limited Warranty (for U.S.A.) ····················· 62
•
Customer Services Directory (for U. S. A.)
•
Limited Warranty (for Canada) ··················· 64
•
Viewing Advanced FAQs, etc.Quick Start Guide
·· 63
3
Page 4
Safety Precautions
CAUTION
RISK OF ELECTRIC SHOCK
DO NOT OPEN
WARNING: To reduce the risk of electric shock, do not remove cover or back.
No user-serviceable parts inside. Refer servicing to qualified service personnel.
The lightning flash with
arrow-head within a triangle
is intended to tell the user
that parts inside the product
are a risk of electric shock to
persons.
The exclamation point within
a triangle is intended to
tell the user that important
operating and servicing
instructions are in the papers
with the appliance.
WARNING: To reduce the risk of fire or electric shock, do not expose this apparatus to rain or moisture.
Do not place liquid containers (flower vase, cups, cosmetics, etc.) above the set
(including on shelves above, etc.).
Important Safety Instructions
1) Read these instructions.
2) Keep these instructions.
3) Heed all warnings.
4) Follow all instructions.
5) Do not use this apparatus near water.
6) Clean only with dry cloth.
7) Do not block any ventilation openings. Install in accordance
with the manufacturer’s instructions.
8) Do not install near any heat sources such as radiators, heat
registers, stoves, or other apparatus (including amplifiers)
that produce heat.
9) Do not defeat the safety purpose of the polarized or
grounding-type plug. A polarized plug has two blades with
one wider than the other. A grounding type plug has two
blades and a third grounding prong. The wide blade or the
third prong are provided for your safety. If the provided
plug does not fit into your outlet, consult an electrician for
replacement of the obsolete outlet.
10) Protect the power cord from being walked on or pinched
particularly at plugs, convenience receptacles, and the
point where they exit from the apparatus.
11) Only use attachments / accessories specified by the
manufacturer.
12) Use only with the cart, stand, tripod,
bracket, or table specified by the
manufacturer, or sold with the
apparatus. When a cart is used,
use caution when moving the cart /
apparatus combination to avoid injury
from tip-over.
13) Unplug this apparatus during lightning
storms or when unused for long periods of time.
14) Refer all servicing to qualified service personnel. Servicing
is required when the apparatus has been damaged in any
way, such as power-supply cord or plug is damaged, liquid
has been spilled or objects have fallen into the apparatus,
the apparatus has been exposed to rain or moisture, does
not operate normally, or has been dropped.
15) To prevent electric shock, ensure the grounding pin on the
AC cord power plug is securely connected.
FCC STATEMENT
This equipment has been tested and found to comply with the limits for a Class B digital device, pursuant to Part 15 of the FCC
Rules. These limits are designed to provide reasonable protection against harmful interference in a residential installation.
This equipment generates, uses and can radiate radio frequency energy and, if not installed and used in accordance with the
instructions, may cause harmful interference to radio communications. However, there is no guarantee that interference will not
occur in a particular installation. If this equipment does cause harmful interference to radio or television reception, which can be
determined by turning the equipment off and on, the user is encouraged to try to correct the interference by one or more of the
following measures:
• Reorient or relocate the receiving antenna.
• Increase the separation between the equipment and receiver.
• Connect the equipment into an outlet on a circuit different from that to which the receiver is connected.
• Consult the dealer or an experienced radio/TV technician for help.
This device complies with Part 15 of the FCC Rules. Operation is subject to the following two conditions: (1) This device may
not cause harmful interference, and (2) this device must accept any interference received, including interference that may cause
undesired operation.
4
FCC CAUTION:
Pursuant to 47CFR, Part 15.21 of the FCC rules, any changes or modifications to this TV not expressly approved by
Panasonic Corporation of North America could result in harmful interference and would void the user’s authority to
operate this device.
FCC Declaration of Conformity
Model No. TH-42PX600U, TH-50PX600U, TH-58PX600U
Responsible Party: Panasonic Corporation of North America
One Panasonic Way, Secaucus, NJ 07094
Contact Source: Panasonic Consumer Electronics Company
1-888-VIEW-PTV (843-9788)
email: [email protected]
CANADIAN NOTICE:
For Models TH-42PX600U, TH-50PX600U, TH-58PX600U
This Class B digital apparatus complies with Canadian ICES-003.
Page 5
WARNING/CAUTION
WARNING
SMALL PARTS CAN PRESENT CHOKING HAZARD IF
ACCIDENTALLY SWALLOWED.
KEEP SMALL PARTS AWAY FROM YOUNG CHILDREN.
DISCARD UNNEEDED SMALL PARTS AND OTHER
OBJECTS, INCLUDING PACKAGING MATERIALS AND
PLASTIC BAGS/SHEETS TO PREVENT THEM FROM BEING
PLAYED WITH BY YOUNG CHILDREN, CREATING THE
POTENTIAL RISK OF SUFFOCATION.
Set up
Ŷ
Do not place the Plasma TV on sloped or unstable surfaces.
The Plasma TV may fall off or tip over.
Do not place any objects on top of the Plasma TV.
If water spills onto the Plasma TV or foreign objects get inside
it, a short-circuit may occur which could result in fire or electric
shock. If any foreign objects get inside the Plasma TV, please
consult an Authorized Service Center.
This Plasma TV is for use only with the following
optional accessories. Use with any other type of optional
accessories may cause instability which could result in the
possibility of injury.
(All of the following accessories are manufactured by
Matsushita Electric Industrial Co., Ltd.)
• Wall-hanging bracket (Vertical) TY-WK42PV3U
• Wall-hanging bracket (Angled) TY-WK42PR3U
• Plasma TV stand TY-S42PX600W (TH-42PX600U)
TY-S50PX600W (TH-50PX600U)
TY-S58PX600W (TH-58PX600U)
Always be sure to ask a qualified technician to carry out set-up.
AC Power Supply Cord
Ŷ
The Plasma TV is designed to operate on 120 V AC, 50/60
Hz. Securely insert the power cord plug as far as it will go.
If the plug is not fully inserted, heat may be generated which
could cause fire. If the plug is damaged or the wall socket
plate is loose, they should not be used.
Do not handle the power cord plug with wet hands.
Doing so may cause electric shocks.
Do not do anything that might damage the power cable. When
disconnecting the power cable, hold the plug, not the cable.
Do not make any modifications to, place heavy objects on, place
near hot objects, heat, bend, twist or forcefully pull the power cable.
Doing so may cause damage to the power cable which can cause
fire or electric shock. If damage to the cable is suspected, have it
repaired at an Authorized Service Center.
If problems occur during use
Ŷ
If a problem occurs (such as no picture or no sound), or if
smoke or an abnormal odor is detected from the Plasma
TV, unplug the power cord immediately.
Continued use of the TV under these conditions might cause
fire or permanent damage to the unit. Have the TV evaluated
at an Authorized Service Center. Servicing of the TV by any
unauthorized personnel is strongly discouraged due to its high
voltage dangerous nature.
If water or foreign objects get inside the Plasma TV, if the
Plasma TV is dropped, or if the cabinet becomes damaged,
disconnect the power cord plug immediately.
A short may occur, which could cause fire. Contact an
Authorized Service Center for any repairs that need to be
made.
CAUTION
Do not cover the ventilation holes.
Doing so may cause the Plasma TV to overheat, which can
cause fire or damage to the Plasma TV.
If using the pedestal, leave a space of 3 15/16” (10 cm) or
more at the top, left and right, 2 3/8” (6 cm) or more at the
bottom, and 2 3/4” (7 cm) or more at the rear.
When using the Plasma TV
Ŷ
Be sure to disconnect all cables before moving the Plasma
TV.
Moving the TV with its cables attached might damage the
cables which, in turn, can cause fire or electric shock.
Disconnect the power plug from the wall outlet as a safety
precaution before carrying out any cleaning.
Electric shocks can result if this is not done.
Clean the power cable regularly to prevent it from
becoming dusty.
Built-up dust on the power cord plug can increase humidity
which might damage the insulation and cause fire. Unplug the
cord from the wall outlet and clean it with a dry cloth.
This Plasma TV radiates infrared rays; therefore, it may
affect other infrared communication equipment.
Install your infrared sensor in a place away from direct or
reflected light from your Plasma TV.
Do not climb up onto the television or use it as a step.
(Young children should be made particularly aware of this
caution.)
If the unit falls over or becomes damaged through misuse,
injury may result.
The TV will still consume some power as long as the power
cord is inserted into the wall outlet.
Notes
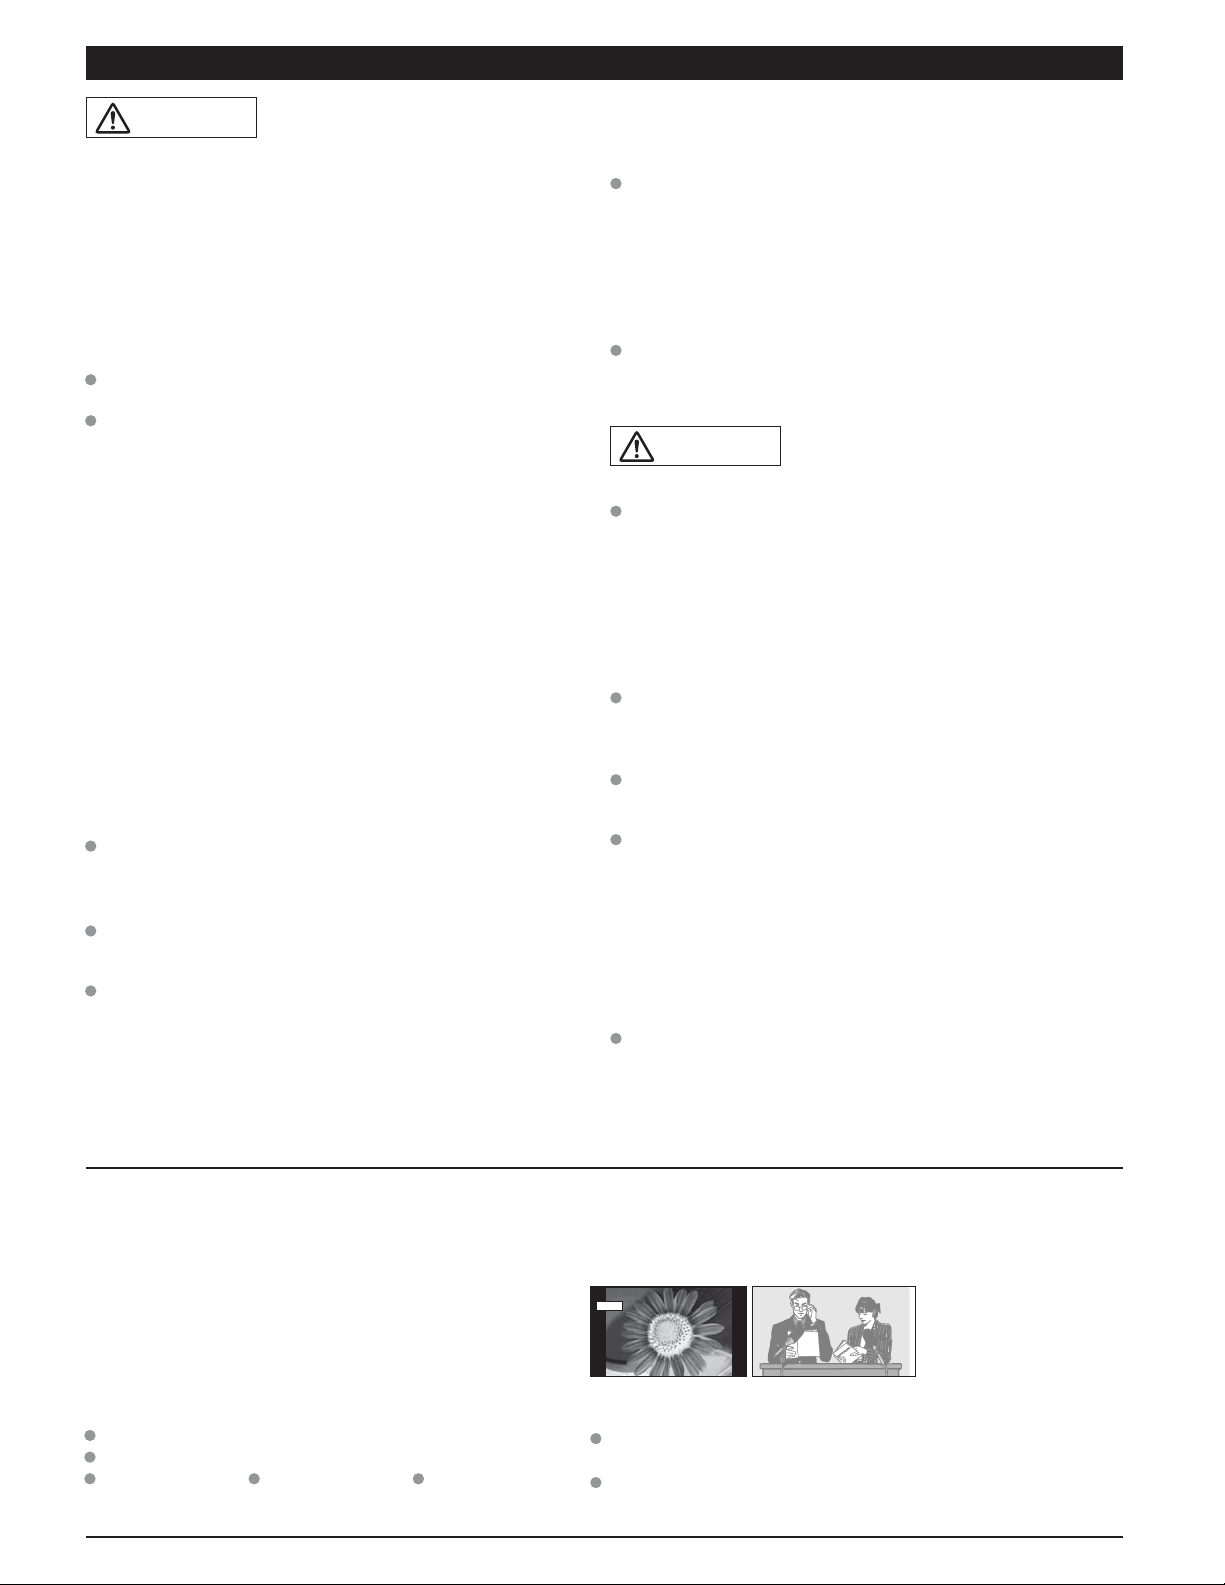
Do not display a still picture for a long time
Ŷ
This causes the image to remain on the plasma screen
(“after image”). This is not considered a malfunction and is
not covered by the warranty.
Typical still images
Channel number and other logos
Image displayed in 4:3 mode
SD Card photo Video game Computer image
4 : 3
Setup
Ŷ
Do not place the unit where it’s exposed to sunlight or other
bright light (including reflections).
Use of some types of fluorescent lighting may reduce the remote
control’s transmission range.
12
To prevent after image,
the screen saver is
automatically activated after
a few minutes if no signals
are sent or no operations
are performed. (p. 59)
5
Page 6
Accessories/Options
Check you have all the items shown.
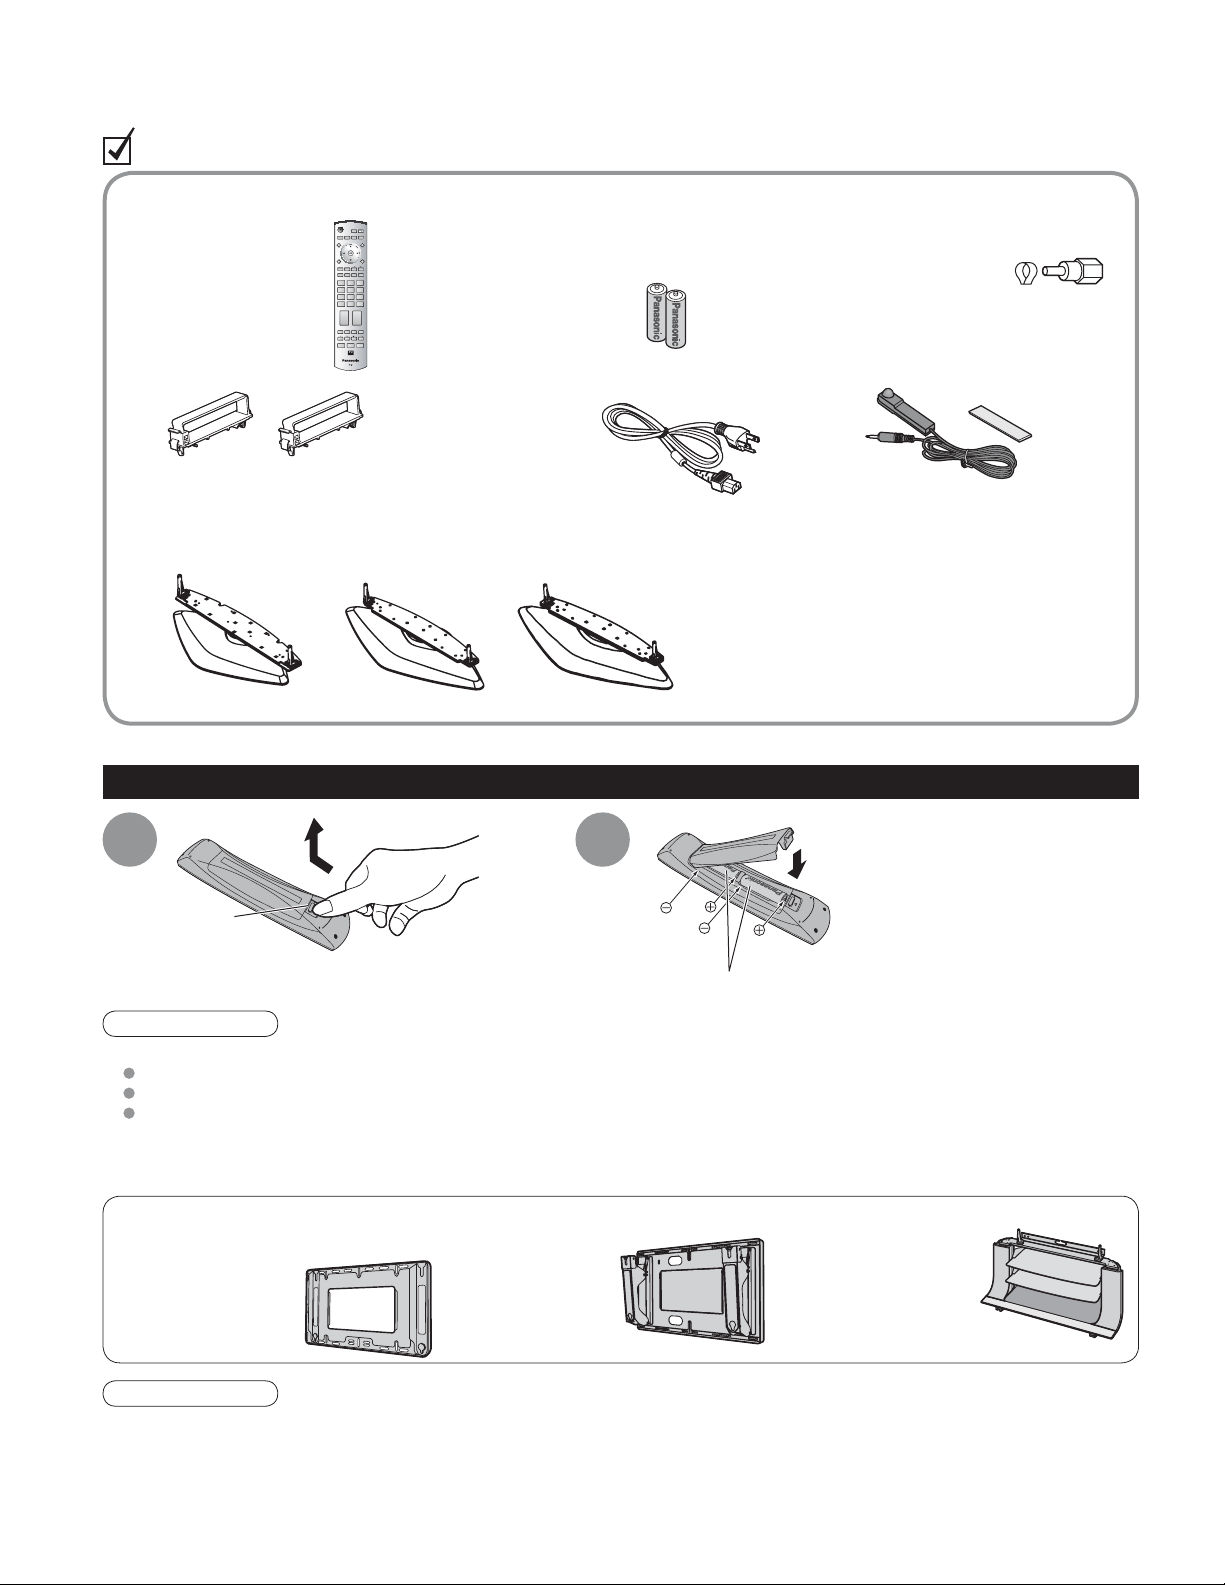
Accessories
Remote Control
Ƒ
Transmitter
EUR7737Z10
•
Cable clamper (2)
Ƒ
Pedestal
Ƒ
TBL2AX00021
•
(TH-42PX600U)
TBL2AX00061
•
(TH-50PX600U)
Batteries for the Remote
Ƒ
Control Transmitter
AA Battery
•
AC cord
Ƒ
TBL2AX00071
•
(TH-58PX600U)
Ƒ
(2)
Ƒ
Ƒ
Ƒ
Ƒ
Antenna Adapter
F-Type
•
for 5C-2V
IR Blaster
Operating Instructions
Product Registration Card
(U.S.A.)
Customer Care Plan Card
(U.S.A.)
Installing remote’s batteries
Open
1
Hook
Caution
Incorrect installation may cause battery leakage and corrosion, resulting in damage to the remote control unit.
•
Do not mix old and new batteries.
Do not mix different battery types (such as alkaline and manganese batteries).
Do not use rechargeable (Ni-Cd) batteries.
Do not burn or break batteries.
•
Make a note of the remote control codes before changing batteries in case the codes are reset. (p. 49-50)
•
Optional accessories
Wall-hanging bracket (vertical)
TY-WK42PV3U
•
(TH-42PX600U,
TH-50PX600U,
TH-58PX600U)
Wall-hanging bracket
(angle)
TY-WK42PR3U
•
(TH-42PX600U,
TH-50PX600U)
2
Note the correct polarity (+ or -).
Plasma TV stand
•
(TH-42PX600U)
•
(TH-50PX600U)
•
(TH-58PX600U)
Close
TY-S42PX600W
TY-S50PX600W
TY-S58PX600W
6
Note
In order to maintain the unit’s performance and safety, be absolutely sure to ask your dealer or a licensed
•
contractor to secure the wall-hanging brackets.
Carefully read the instructions accompanying the plasma TV stand or pedestal, and be absolutely sure to take
•
steps to prevent the TV from tipping over.
Handle the TV carefully during installation since subjecting it to impact or other forces may cause its paneling to
•
crack.
Page 7

Attaching the pedestal to the plasma television
Warning
Do not disassemble or modify the pedestal.
Otherwise the unit may fall over and become damaged, and personal injury may result.
•
Caution
Do not use any television or displays other than those given in this manual.
Otherwise the unit may fall over and become damaged, and personal injury may result.
•
Do not use the pedestal if it becomes warped or physically damaged.
If you use the pedestal while it is physically damaged, personal injury may result. Contact your nearest Panasonic
•
Dealer immediately.
During setting-up, make sure that all screws are securely tightened.
If sufficient care is not taken to ensure screws are properly tightened during assembly, the pedestal will not be strong enough to
•
support the plasma television, and it might fall over and become damaged, and personal injury may result.
Use the accessory fall-prevention brackets to secure the plasma television.
If the unit is knocked or children climb onto the pedestal with the Plasma TV installed, the plasma television may
•
fall over and personal injury may result.
Two or more people are required to install and remove the television.
If two people are not present, the television may be dropped, and personal injury may result.
•
Accessories for pedestal assembly
A
Assembly screw
(4)
Assembly screw
B
(4)
Pole (2)
C
Base (1)
D
Band (2)
E
Quick Start Guide
Accessories/Options
(for 42˝ and 50˝) M5 x 18
(for 58˝) M5 x 25
Assembling the pedestal
1
Using the four assembly screws
illustration below.
Setting-up
2
Pole
a
( )
Align the stamped marks.
Television unit
Pedestal
Front
M5 x 65
, securely fasten the left and right poles to the base, as shown in the
A
A
Pole
B
Rear
Label
Pole
B
Pole
b
)
(
Align the stamped marks.
* Carry out work on a horizontal and level surface.
Lift the television unit above the pedestal
base, with the back of the display unit on
the same side as the Label. Then align the
holes in the television unit with the poles of
the pedestal and lower the television unit into
place.
Use the assembly screws
fasten securely.
Front
B
(M5 x 65) to
7
Page 8
Accessories/Options
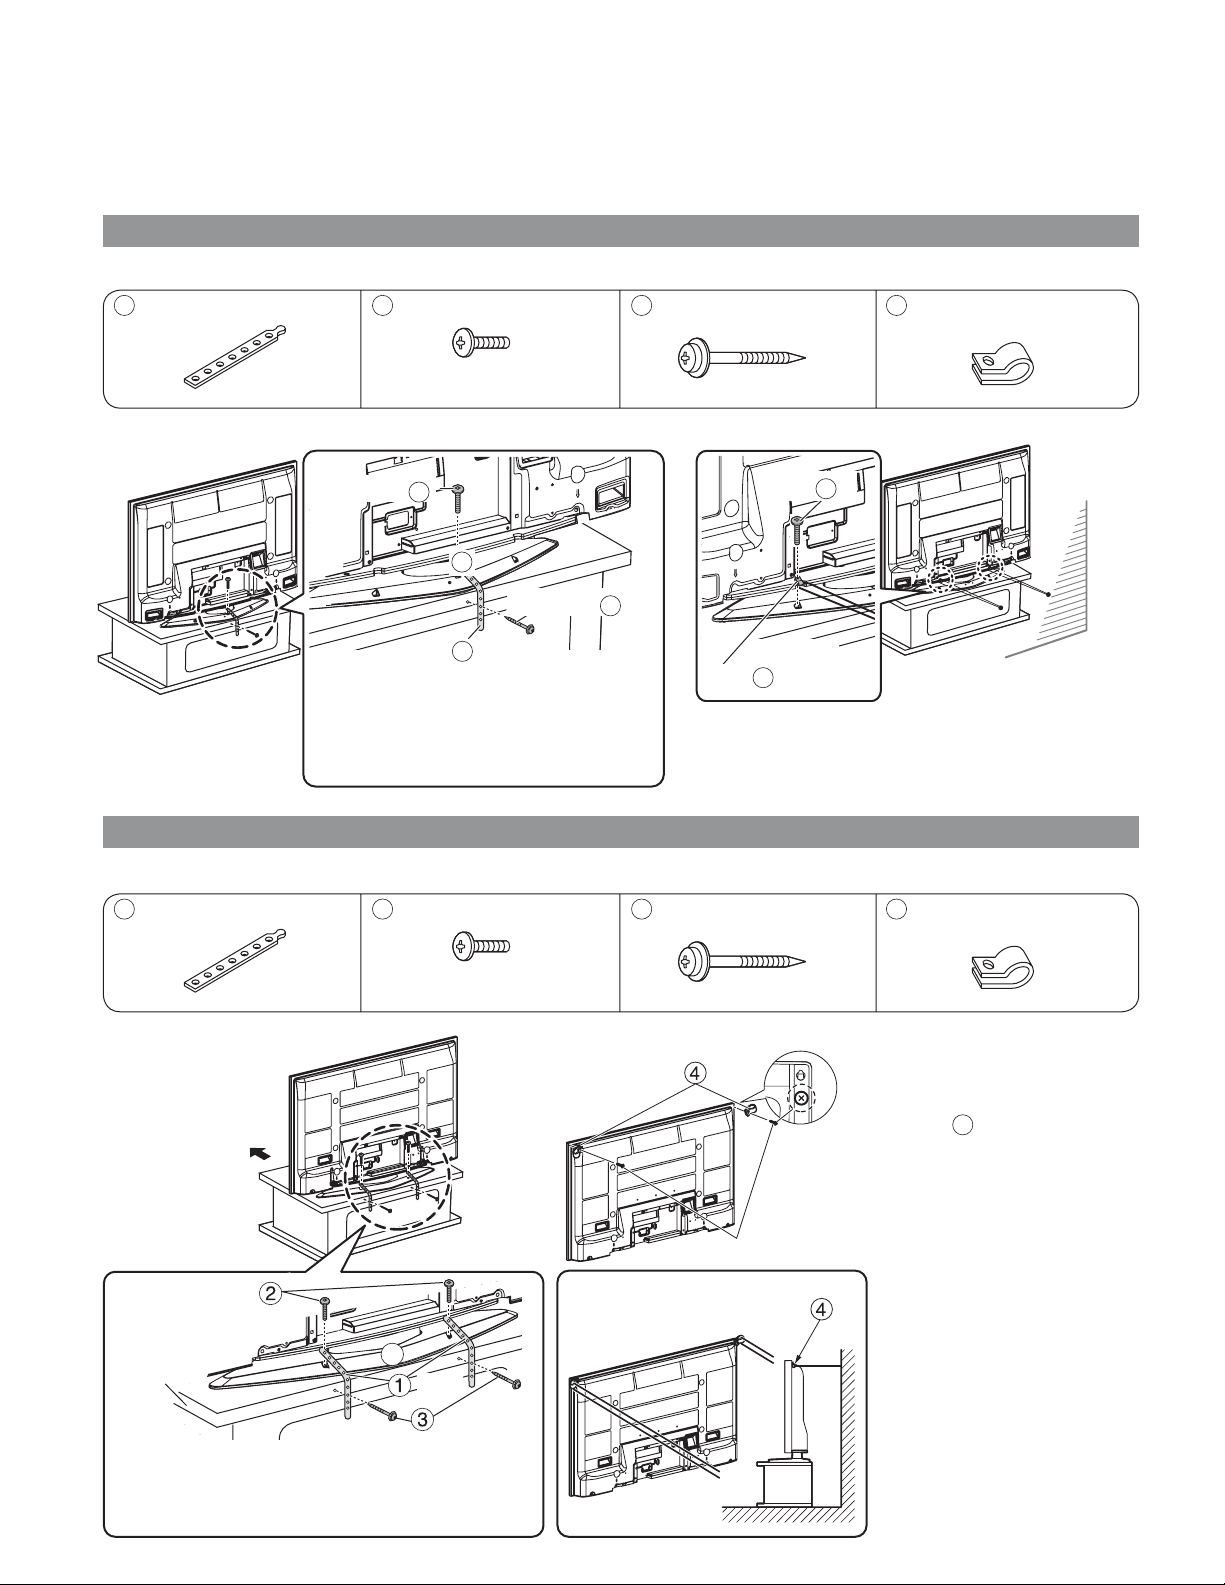
Preventing the plasma television from falling over
* The plasma TV must be fastened to both the base and the wall.
For 42'' Plasma television
Accessories for pedestal security
1
Band (1)
Securing to a base
Ŷ
2
Screw (3)
Nominal diameter
4 mm x 10
3
Wood screw (1)
Securing to a wall
Ŷ
4
Clamp (2)
screw
2
D
Wood screw
Band
1
Fasten with wood screws in the holes
in the back edge of the wood worktop.
If there are no holes, first drill them in
the middle of the thickness of the wood
worktop, and then fasten the strap with
wood screws.
For 50'' Plasma television
Accessories for pedestal security
1
Band (2)
Securing to a base
Ŷ
Front
2
Screw (2)
Nominal diameter
4 mm x 12
3
Clamp
* Use strong wire or chain which is commercially
available to secure the plasma television to a
solid area of the wall or a pillar.
3
Wood screw (2)
Securing to a wall
Ŷ
Clamp
4
screw
2
4
Clamp (2)
* Remove the screws at both
top corners on the rear side of
the plasma TV, and attach the
clamps
using the removed screws.
4
to the plasma TV
Wall
8
Screw
Wood
Worktop
Fasten with wood screws in the holes in the back
edge of the wood worktop. If there are no holes,
first drill them in the middle of the thickness of the
wood worktop, and then fasten the strap with wood
screws.
D
Band
Wood Screw
Screws on main body
• Securing method
Clamp
* Use strong wire or chain which
is commercially available to
secure the plasma television
to a solid area of the wall or a
pillar.
Page 9

For 58'' Plasma television
Accessories for pedestal security
1
Band (3)
Securing to a base
Ŷ
Screw
D
2
Screw (3)
Nominal diameter
4 mm x 12
Ŷ
Band
3
Wood screw (3)
Securing to a wall
Hook
Hook securing
screw
5
• Securing method
4
Hook (2)
5
Hook securing
screw (2)
M8 x 35
* Use a flat-head screwdriver to remove
the caps at the left and right top on the
rear side of the plasma TV, and attach
the hooks
the hook securing screws
the caps you have removed in a safe
place.)
* Use a strong wire or chain which is
commercially available to secure the
hooks4 to a solid area of the wall or
pillar.
to the plasma TV using
4
. (Keep
5
Quick Start Guide
Accessories/Options
Wood
screw
Fasten with wood screws in the holes
in the back edge of the wood worktop.
If there are no holes, first drill them in
the middle of the thickness of the wood
worktop, and then fasten the strap with
wood screws.
Hook
9
Page 10
Connection
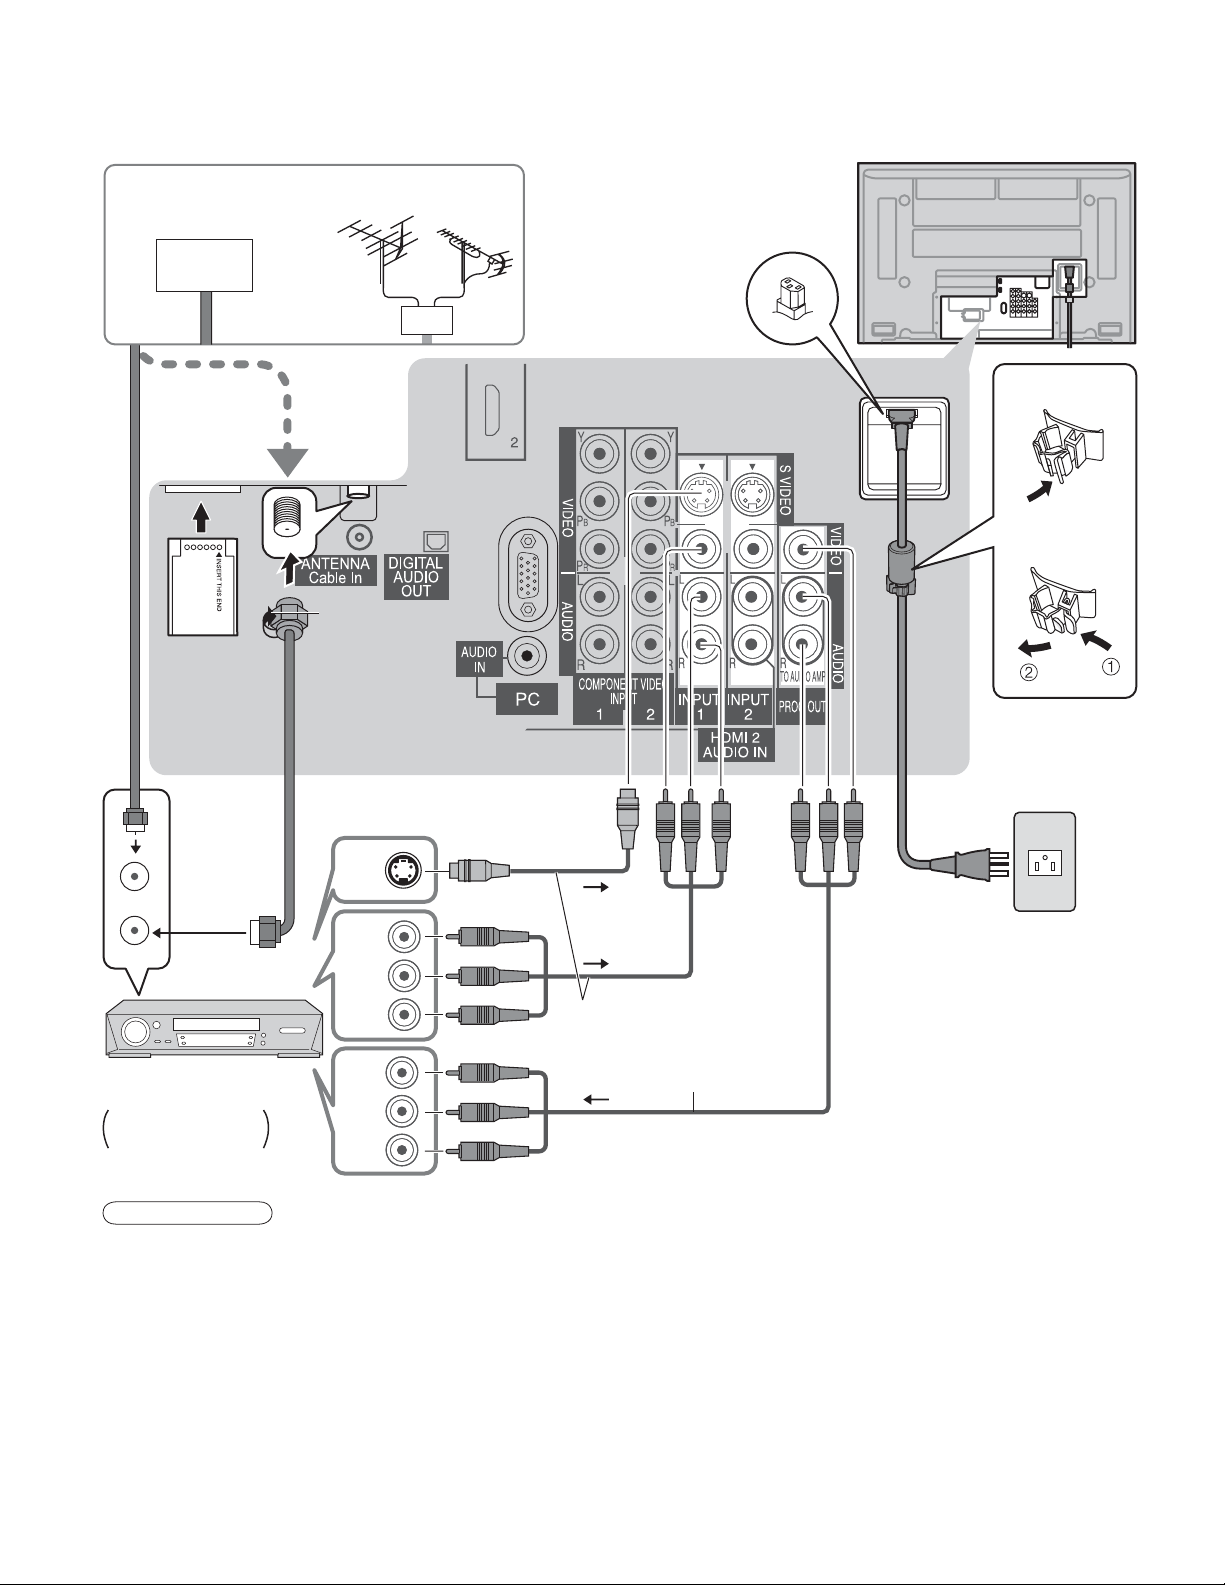
Watching TV
Ŷ
Cable TV
CableCARD™
Back of the unit
VHF/UHF Antenna
or
Fastener
or
To unfasten
•
F-Type
Antenna
Adapter
S-Video
OUT
ANT IN
ANT OUT
Video recorder
with TV Tuner
DVD Recorder /
VCR
Note
All cables and external equipment shown in this book are not supplied with the TV.
•
For additional assistance, visit us at : www.panasonic.com
•
The S Video input will override the composite video signal when S Video cable is connected.
•
Connect either S Video cable or Video cable.
When receiving digital channel signals, all digital formats are down-converted to composite NTSC video to be
•
output through the PROG.OUT terminals.
Some programs contain a copyright protection signal to prevent VCR recording.
•
When the copyright protection program is displayed, do not connect the other TV monitor through a VCR. Video
•
signals fed through VCRs may be affected by copyright protection systems and the picture will be distorted on the
other TV monitor.
Set the TV channel to CH3 or CH4 for using Cable Box Connection.
•
Video
OUT
L
Audio
OUT
R
Video
IN
L
Audio
IN
R
S-Video signals have
priority.
www.panasonic.ca
To record TV shows
AC cord
(Connect after all the
other connections.)
10
Page 11
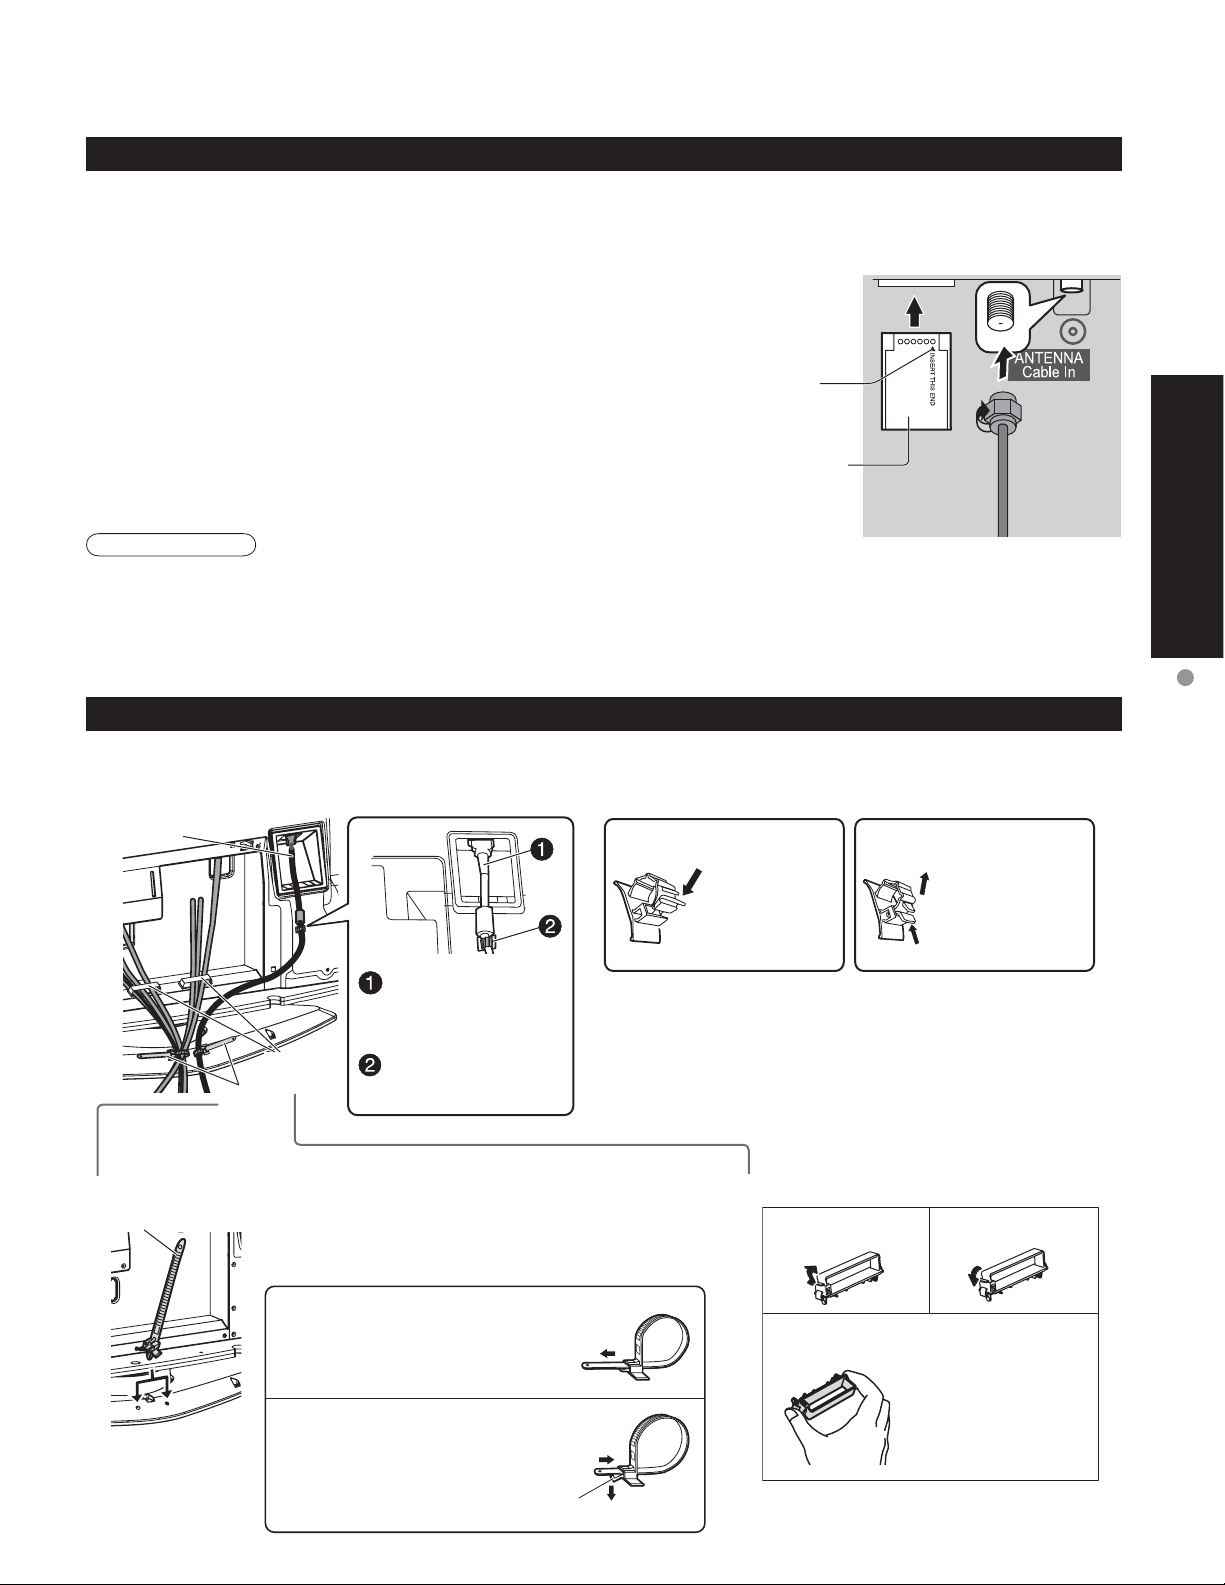
CableCARDTM Connection
CableCARDTM allows you to tune digital and high definition cable channels through the cable antenna.
Consult your cable company on the availability of CableCARD
1. Connect the cable antenna to ANT connector.
2. Turn the TV on (see page 17).
3. Set the input mode to TV (see page 29).
4. Insert the CableCARD
it will go into the CableCARD
Follow the messages displayed on the screen.
Note
If you experience front panel control or remote control function hang-up when using CableCARDTM , unplug the
•
TV and plug it back on and try the controls again. If this condition persists, please call Panasonic Customer Call
Center for further instructions.
Do not insert a PCMCIA card into CableCARDTM slot.
•
TM
(with upper side facing you) as far as
TM
slot on the back of the TV.
Upper side of the card facing you
The CableCARDTM design varies
()
depending on the manufacturer.
TM
.
Insert mark (e.g.)
Back of the TV
Cable Binding Instructions
Quick Start Guide
Connection
Fixing connection cables and AC cord
Ŷ
Example of “connection cable routing”
AC cord
Connect power
plug to the socket
of the main body.
Band
Attach the bands
Ŷ
Band
Cable
clamper
Fastening band
Insert the spigot on the two bands into the
pedestal.
Fastening
push the tip of the band in the
direction indicated by the arrow.
Loosening
While pressing down on the
tab, gently push the tip of the
band in the direction indicated
by the arrow.
Fix the AC cord in
Cable clamper.
Ta b
How to fix:
Fix by pushing
in till a clicking
sound is heard.
Do not bundle the RF cable and AC cord together
•
(could cause distorted image).
Fix cables with Cable clampers as necessary.
•
When using the optional accessory, follow the
•
option’s assembly manual to fix cables.
Attaching the Cable clampers
Ŷ
Snap open
Remove from the TV unit
How to release:
Pull up while
drawing the
knob.
Snap shut
Push both side
hooks and pull out
11
Page 12
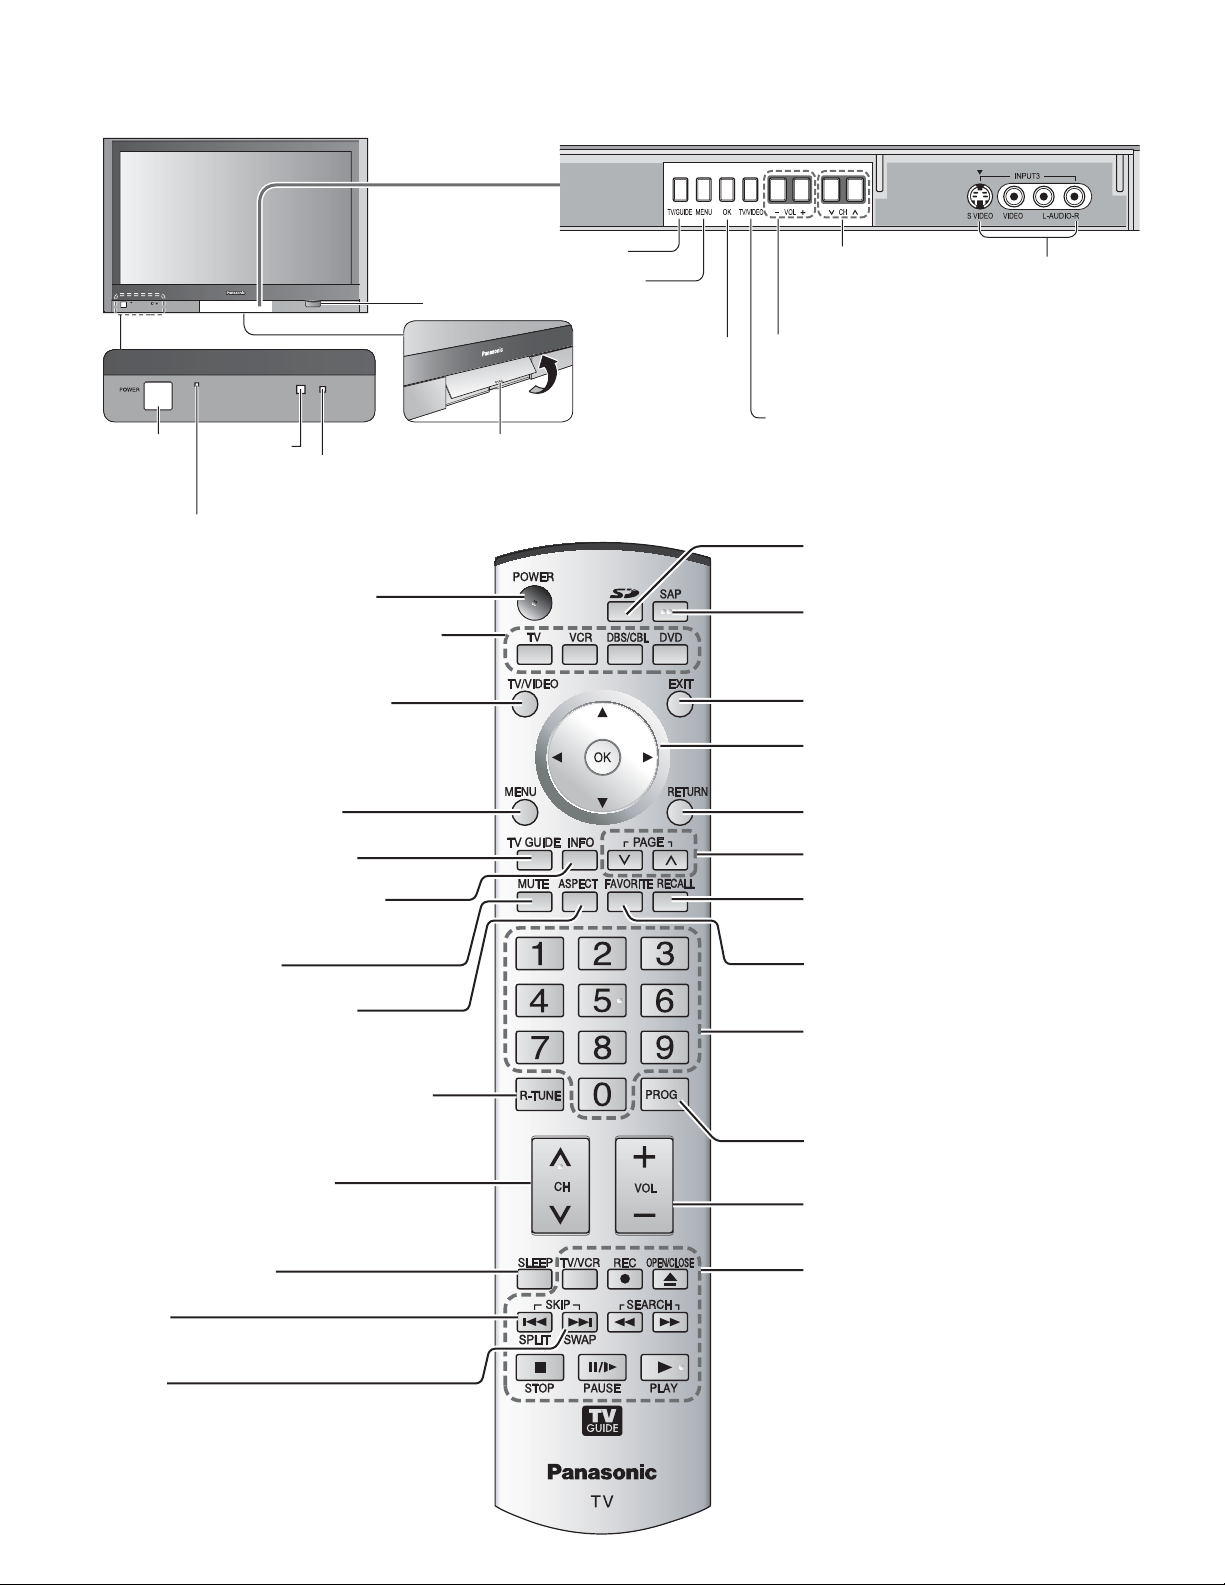
-
Identifying Controls
POWER
button
Power indicator
Switches TV to On or Standby
Sets the remote to communicate with
other equipment (p. 45)
Changes the input mode (p. 29)
Display Main Menu (p. 32)
control
sensor
(on: red, off: no light)
C.A.T.S. sensor
Plasma C.A.T.S. (Contrast Automatic Tracking System).
Display the TV Guide.
Display the Main menu.
SD CARD slot
Choose menu and
submenu entry.
Swing up the door at “PULL”.Remote
Change the TV Channel.
(Move cursor to up
or down during menu
mode.)
Adjust the volume level.
(Move cursor to right or left during menu
mode.)
Changes the input mode.
(p. 32)
Viewing from SD Card (p. 26)
SAP (p. 19)
Exit menus
Select/OK/Change
RETURN (to previous menu)
Video
Input 3
connector
Press to enter the TV Guide
Press to display an information
screen on TV Guide
Sound mute On/Off
Changes aspect ratio (p. 18)
Switch to previously viewed channel
and input modes.
Channel up/down buttons
Sleep Timer (p. 18)
SPLIT
Split Screen (p. 18)
SWAP
Swap pictures in SPLIT operation (p. 18)
Page scroll on TV Guide
Display or remove the channel
banner (p. 18)
Operate the Favorite channel list
function. (p. 19)
Numeric keypad to select any
channel (p. 17) or press to enter
alphanumeric input in menus.
(p. 29, 30, 38, 40, 45)
Direct channel access for DTV and
DBS (p. 17)
Volume
External equipment operations
(p. 29, 48) (VCRs, DVDs, etc.)
12
Page 13
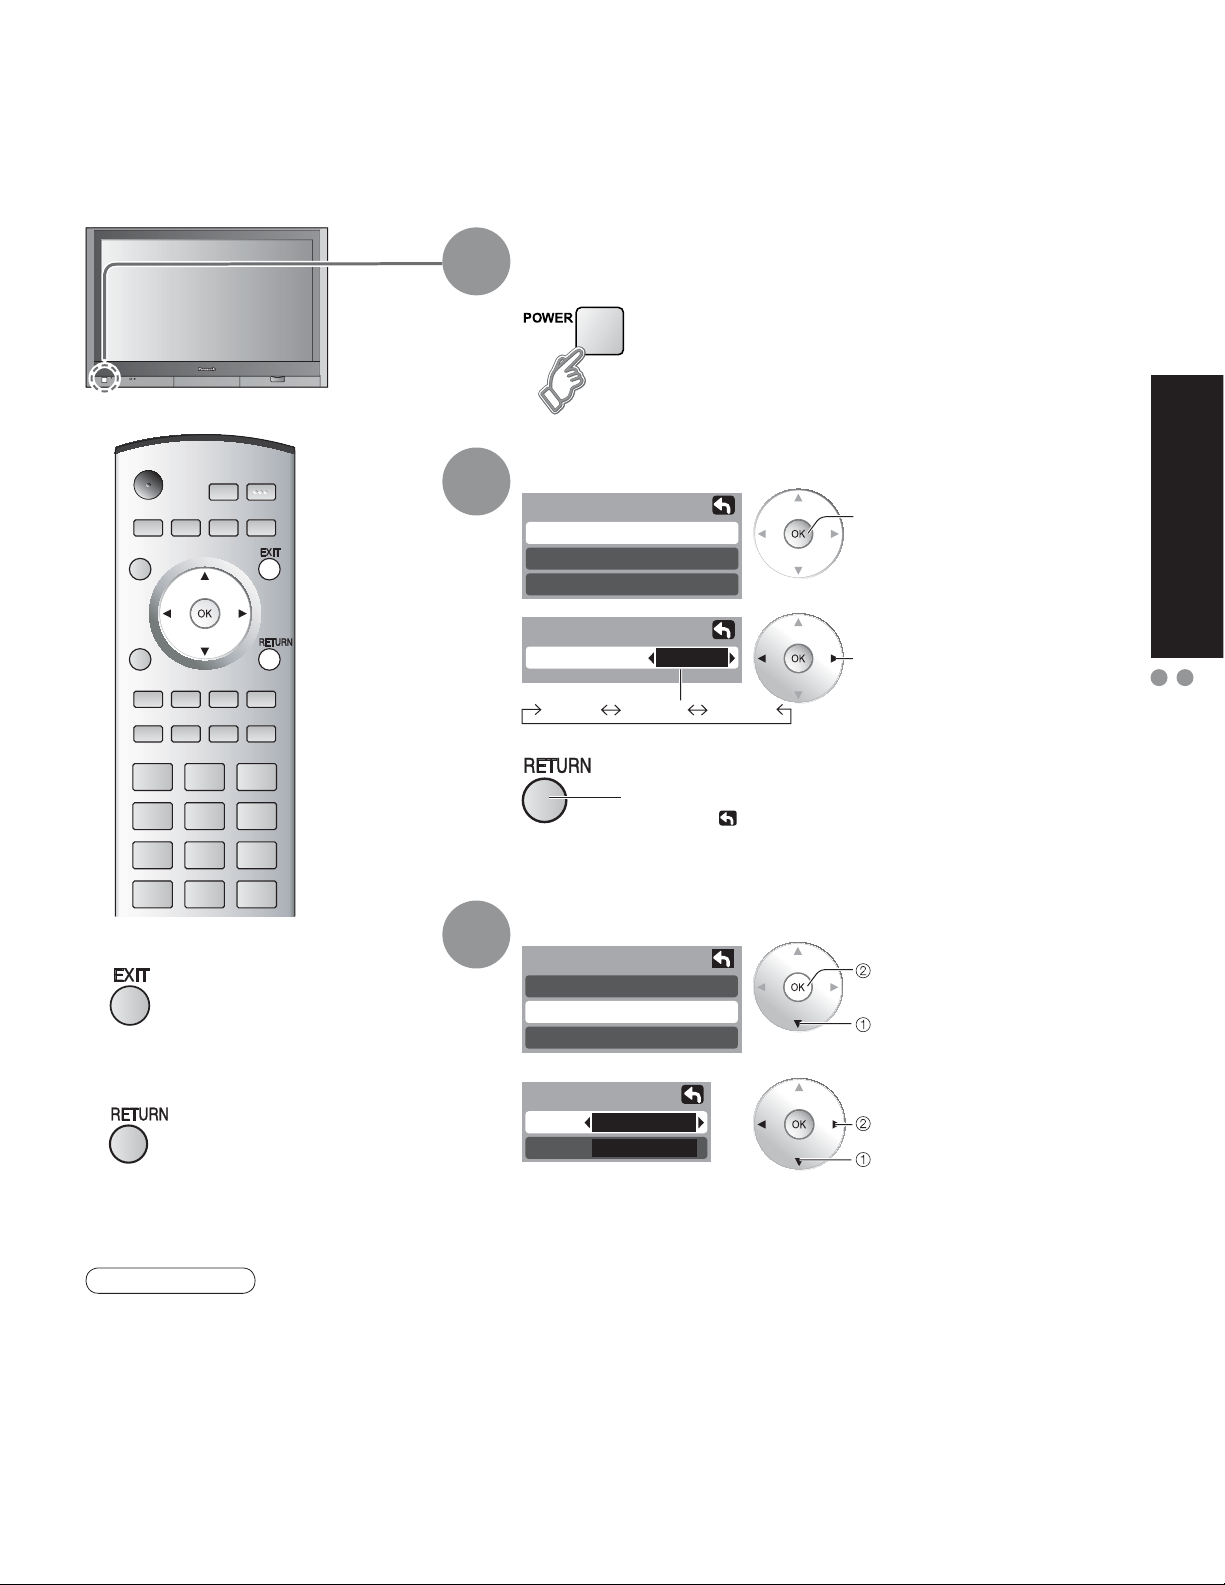
First Time Setup
“First time setup” is displayed only when the TV is turned on for the first time after the AC cord is inserted
into a wall outlet. Available only when “Auto power on” (p. 32) is set to “Off”.
Turn the TV On with the
1
2
POWER button
Select your language
First time setup
Language
Clock
Auto program
Language
Language
English Español Français
English
next
select
Quick Start Guide
First Time Setup
Identifying Controls
Press to exit
Ŷ
Press to return to
Ŷ
previous screen
Note
To change setting
•
(Language/Clock/Auto
program) later, go to
Menu screen
(p. 32)
3
Press to go to previous screen.
Or, select
icon, then press OK for same results.
Adjust the clock
First time setup
Language
Clock
Auto program
Clock
Date
Time
Date: Adjust the date
(Press and hold to change the month.)
Time: Adjust the time
4 / 1 / 2006
9 : 43 AM
(If the button is held, the speed of change increases.)
next
select “Clock”
set
select item
(Continue to next page.)
13
Page 14
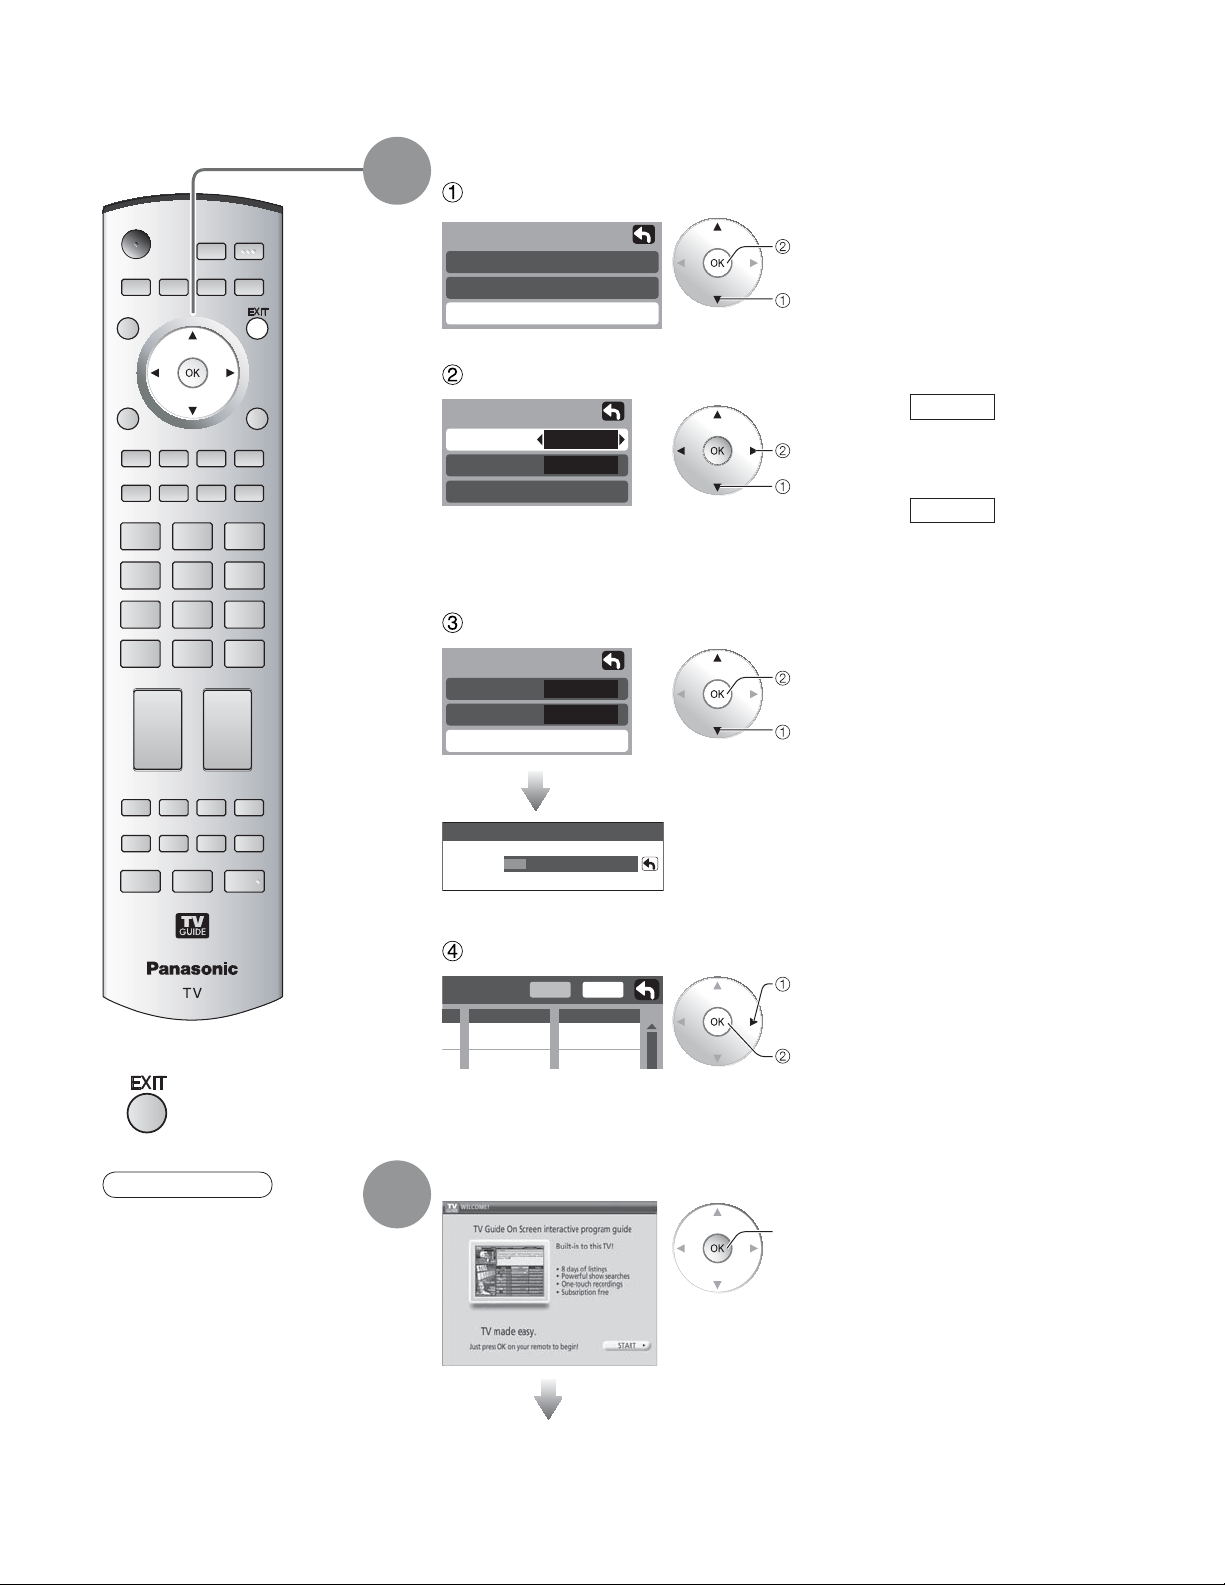
First Time Setup
Auto channel setup
4
Select “Auto program”
First time setup
Language
Clock
Auto program
Select antenna and input modes
Auto program
ANT In
Mode
Start scan
Cable
All
Start scanning the channels
Auto program
ANT In
Mode
Start scan
Cable
All
next
select
ANT In
set
select
start
select “Start scan”
Cable: Cable TV
Antenna: Antenna
All: digital and analog
Analog: analog only
Mode
(Reduces time
for scanning)
14
Press to exit
Ŷ
Note
Auto program is not
•
available while the
CableCARD™ is
inserted.
About broadcasting
•
systems
Analog: traditional TV
system
Digital: new system
that allows
you to view
more channels
featuring highquality video
and sound
5
Now scanning analog channel ...
Progress
Available channels (analog/digital)
•
are automatically set.
Confirm registered channels
Edit
Apply
Favorite
- - -
2
If OK is not pressed after selecting “Apply”, the channels will not be
•
memorized.
Add
No
Yes
select “Apply”
ok
INITIAL GUIDE SETUP for TV Guide
start
Follow the instructions on the screen to perform setup. (p. 20-25)
Page 15
INITIAL GUIDE SETUP for TV Guide
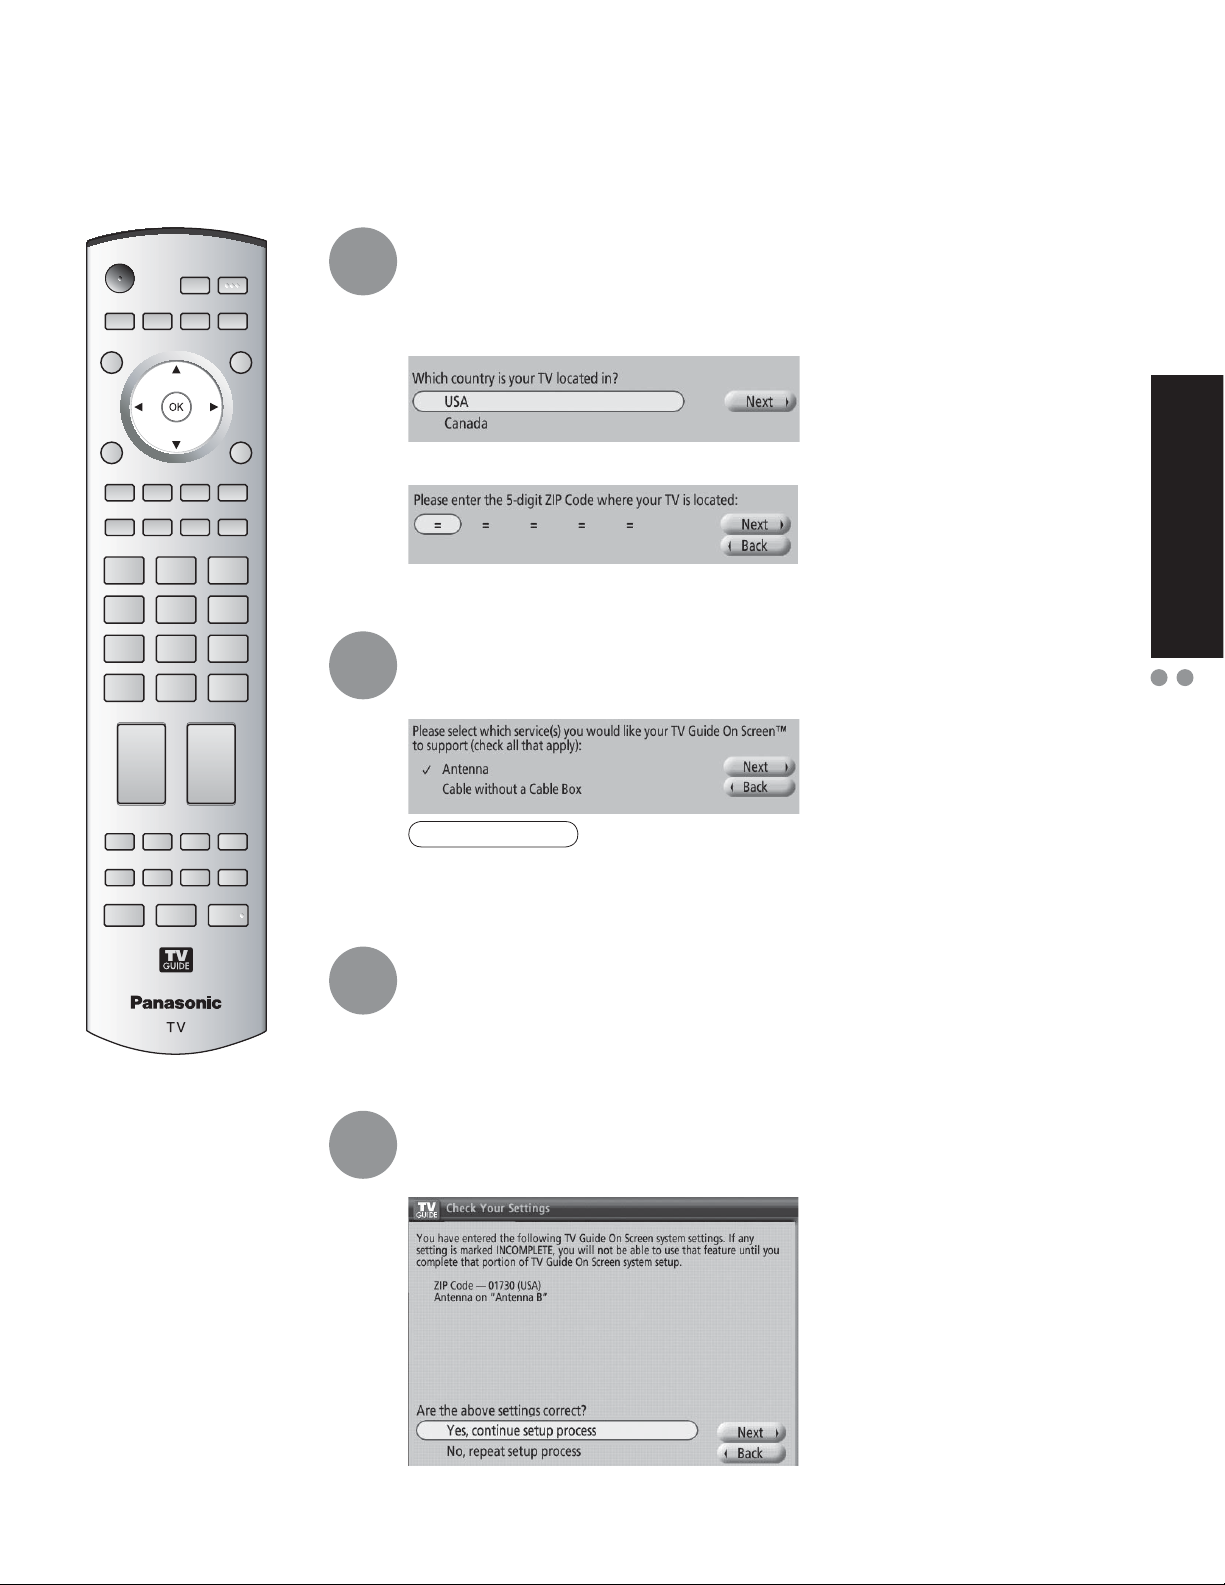
The TV Guide Welcome Screen is displayed when you use TV Guide function for the first time, or at first
time setup. (p. 13)
Identify Your Location
1
2
The Guide uses setup information to provide TV show listings and channel
lineups for your area.
a. Select Your Country
b. Use the numeric keys or Ÿ/ź to enter a ZIP Code or Postal Code.
Select Your Service(s)
Select the connected video source(s) for which you would like to receive show
listings.
Quick Start Guide
INITIAL GUIDE SETUP for TV Guide
First Time Setup
3
4
Note
If you do not have cable, you must select Antenna in order to receive a
•
channel lineup and listings.
Configure Your Service(s)
For each service you chose in Step 2, you are asked to select the corresponding
input.
Additional setup screens appear based on the types of service(s) you selected.
Check Your Settings
After you have configured all services you selected in Step 2 you are asked to
check your settings.
If you select Yes, continue setup process, go to Step 5 (p. 16).
If you select No, repeat setup process, return to Step 1.
15
Page 16
INITIAL GUIDE SETUP for TV Guide
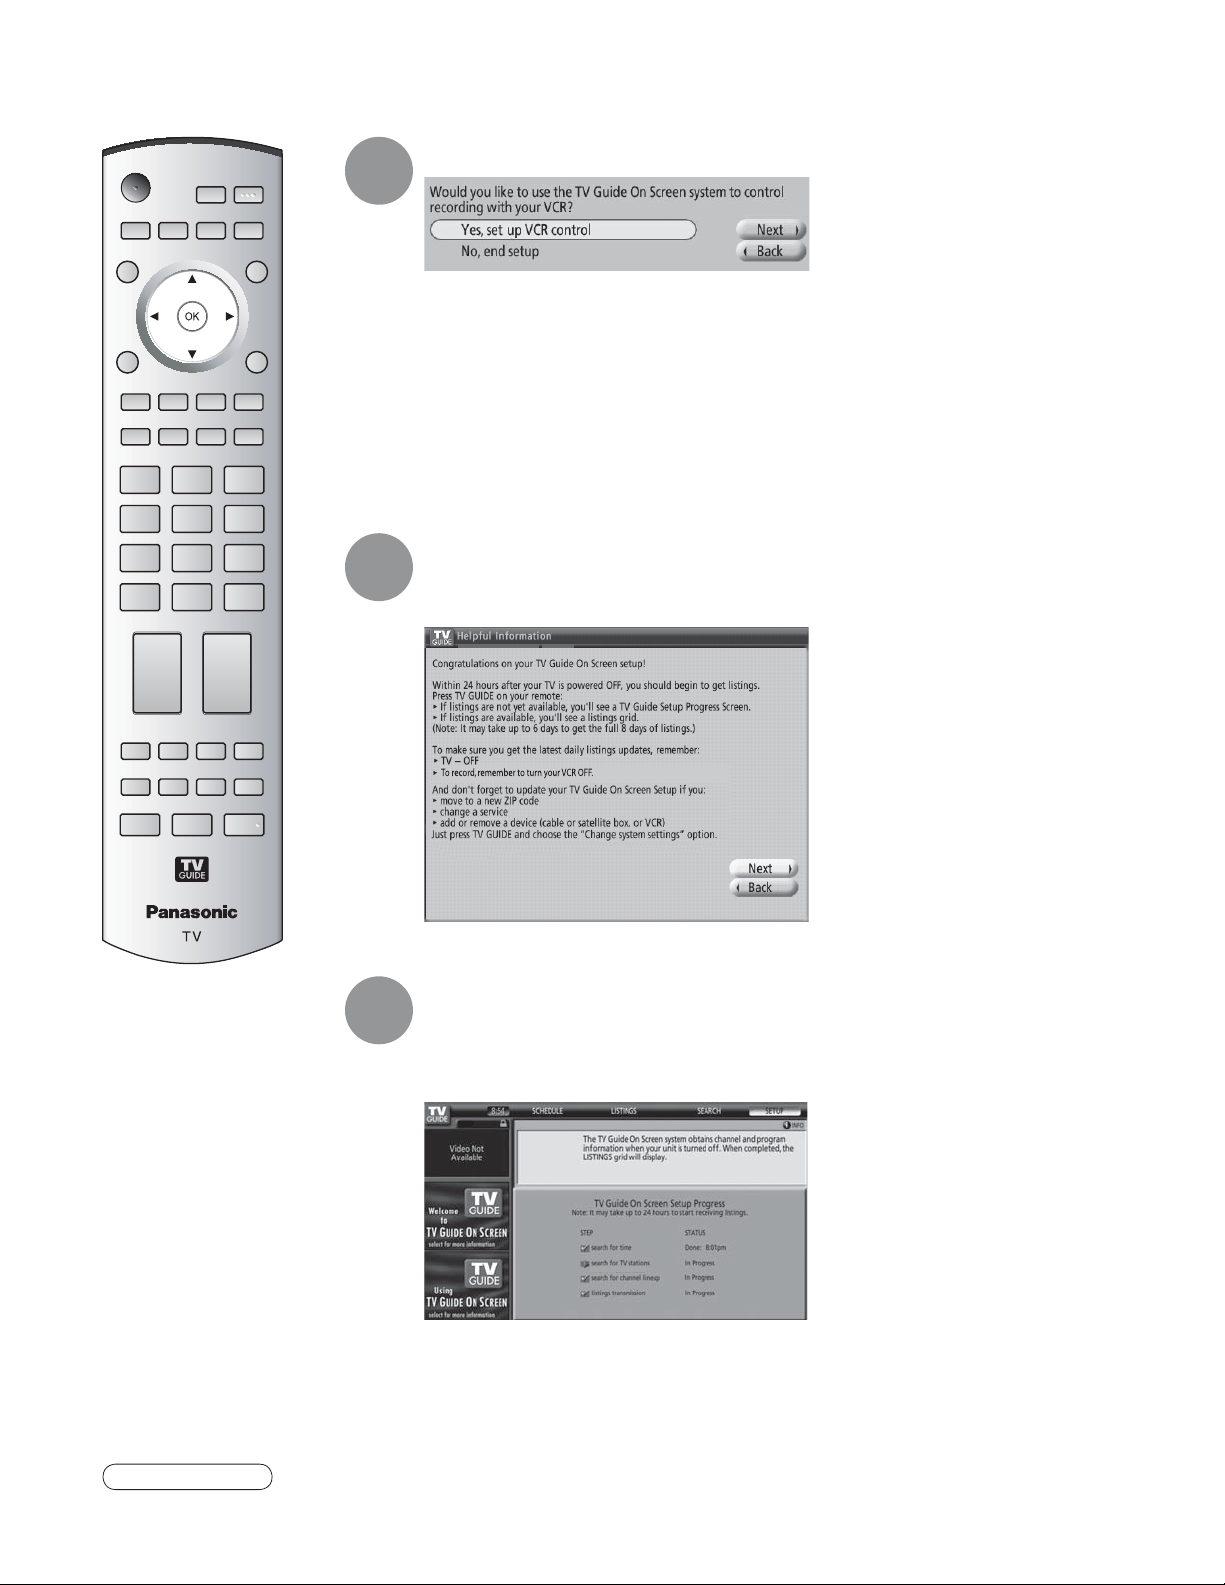
Configure Your VCR
(Continued)
5
If you want to use TV Guide On Screen Listings to schedule recordings to your
VCR, answer Yes, set up VCR control.
Additional screens ask you to
• Confirm remote control options
• Confirm the external connections.
• Select the VCR brand.
• Test and confirm the remote code.
If you do not want the Guide to control recording to your VCR, answer No, end
setup and go to Step 6.
Complete Setup
6
The Helpful Information screen is displayed when you successfully complete
Guide setup.
16
View Setup Progress Screen
7
Caution
In order to begin to receive your listings, power Off the TV when not in use. Within 24 hours, you will begin to
•
receive TV show listings. It may take up to six days to receive the full eight days of initial show listings.
The setup progress screen appears each time you enter the Guide prior
to receiving your initial eight days of show listings. To close the screen
press Ż or [OK].
Page 17
-
Watching TV
-
-
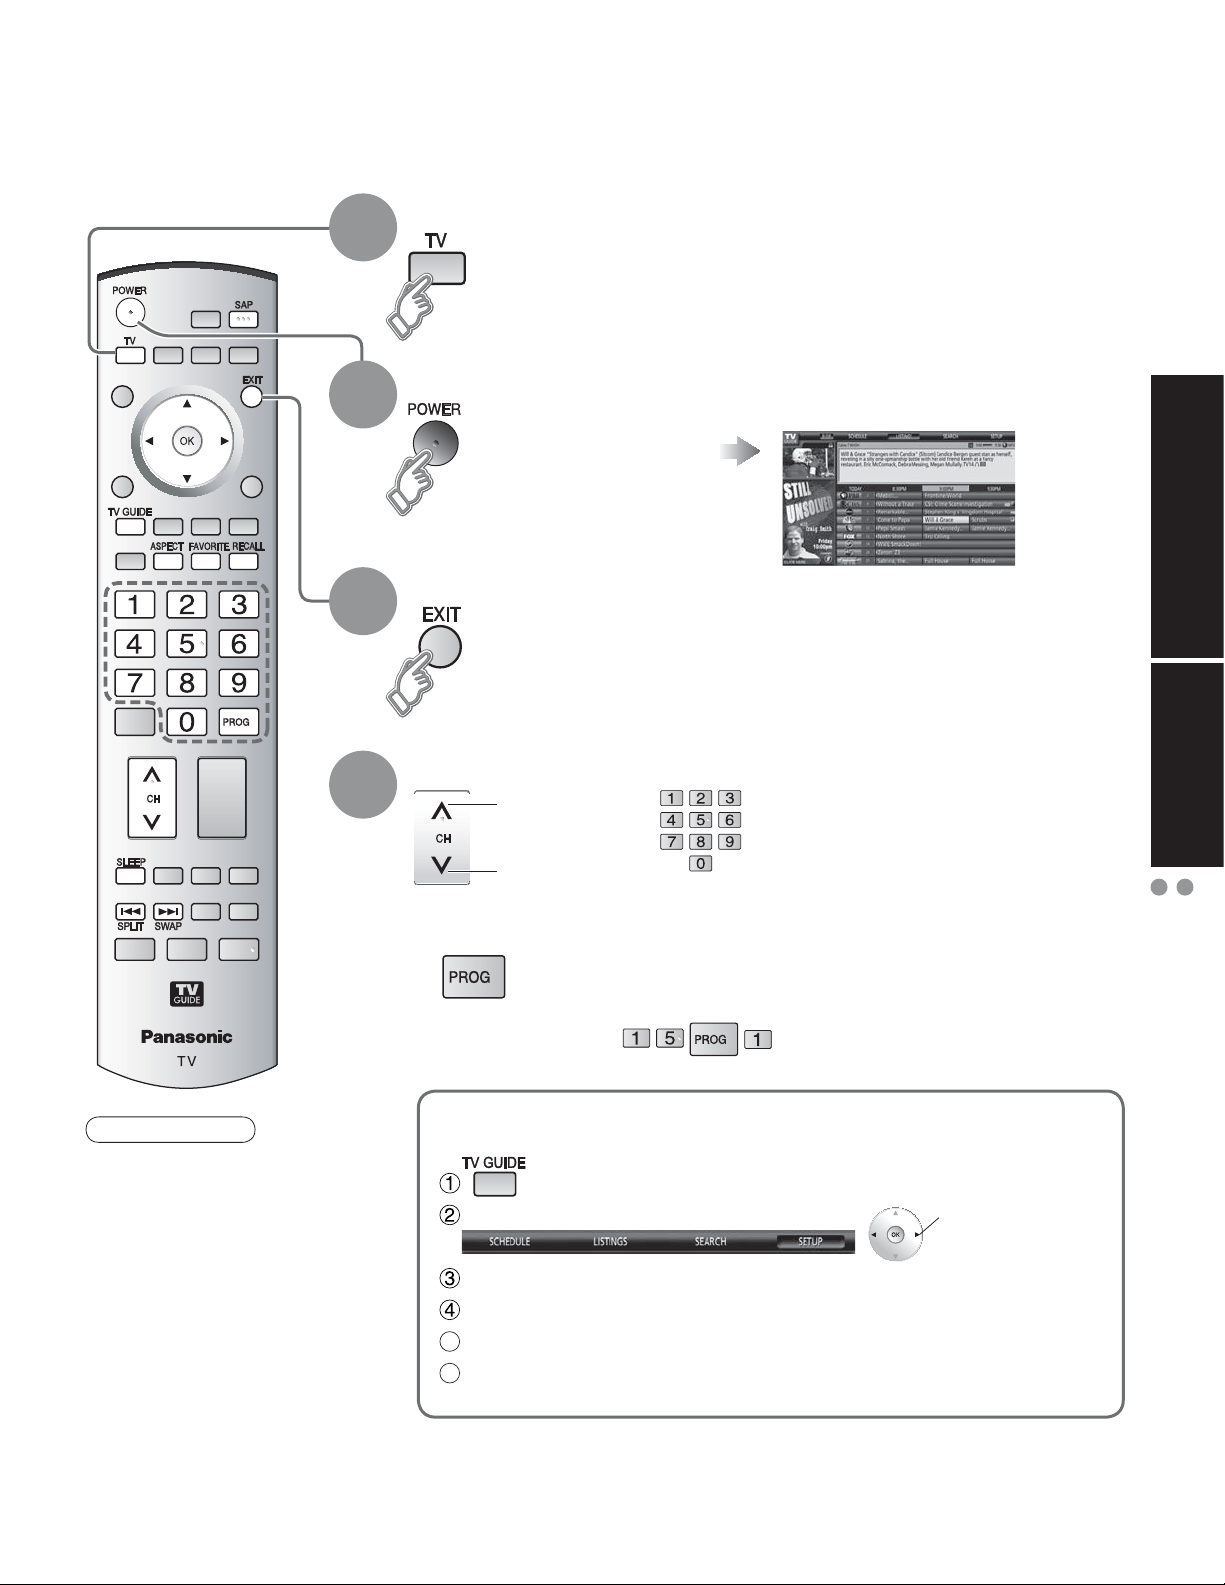
Insert the CableCARD™ when watching cable TV. (p. 11)
Switch to TV mode
1
Quick Start Guide Viewing
2
Turn power on
POWER button on
•
unit should be On.
Close TV Guide
TV Guide open up
3
-
Select a channel number
4
Ŷ
up
or
down
To directly input the digital channel number
Watching TV
INITIAL GUIDE SETUP for TV Guide
Note
Reselect “Cable” or
•
“Antenna” in “ANT
In” of “Auto program”
to switch the signal
reception between
cable TV and antenna.
(p. 14)
The channel number
•
and volume level
remain the same even
after the TV is turned
off.
When tuning a digital channel, press the button to enter
•
the minor number in a compound channel number.
example: CH15-1:
To not display TV Guide when turning power On
Select "SETUP"
Select "Change default options" and press "OK" button
Select "General defaults" and press "OK" button
5
Select "auto guide" and set "off"
6
Select "done" and press "OK" button
select
17
Page 18
Watching TV
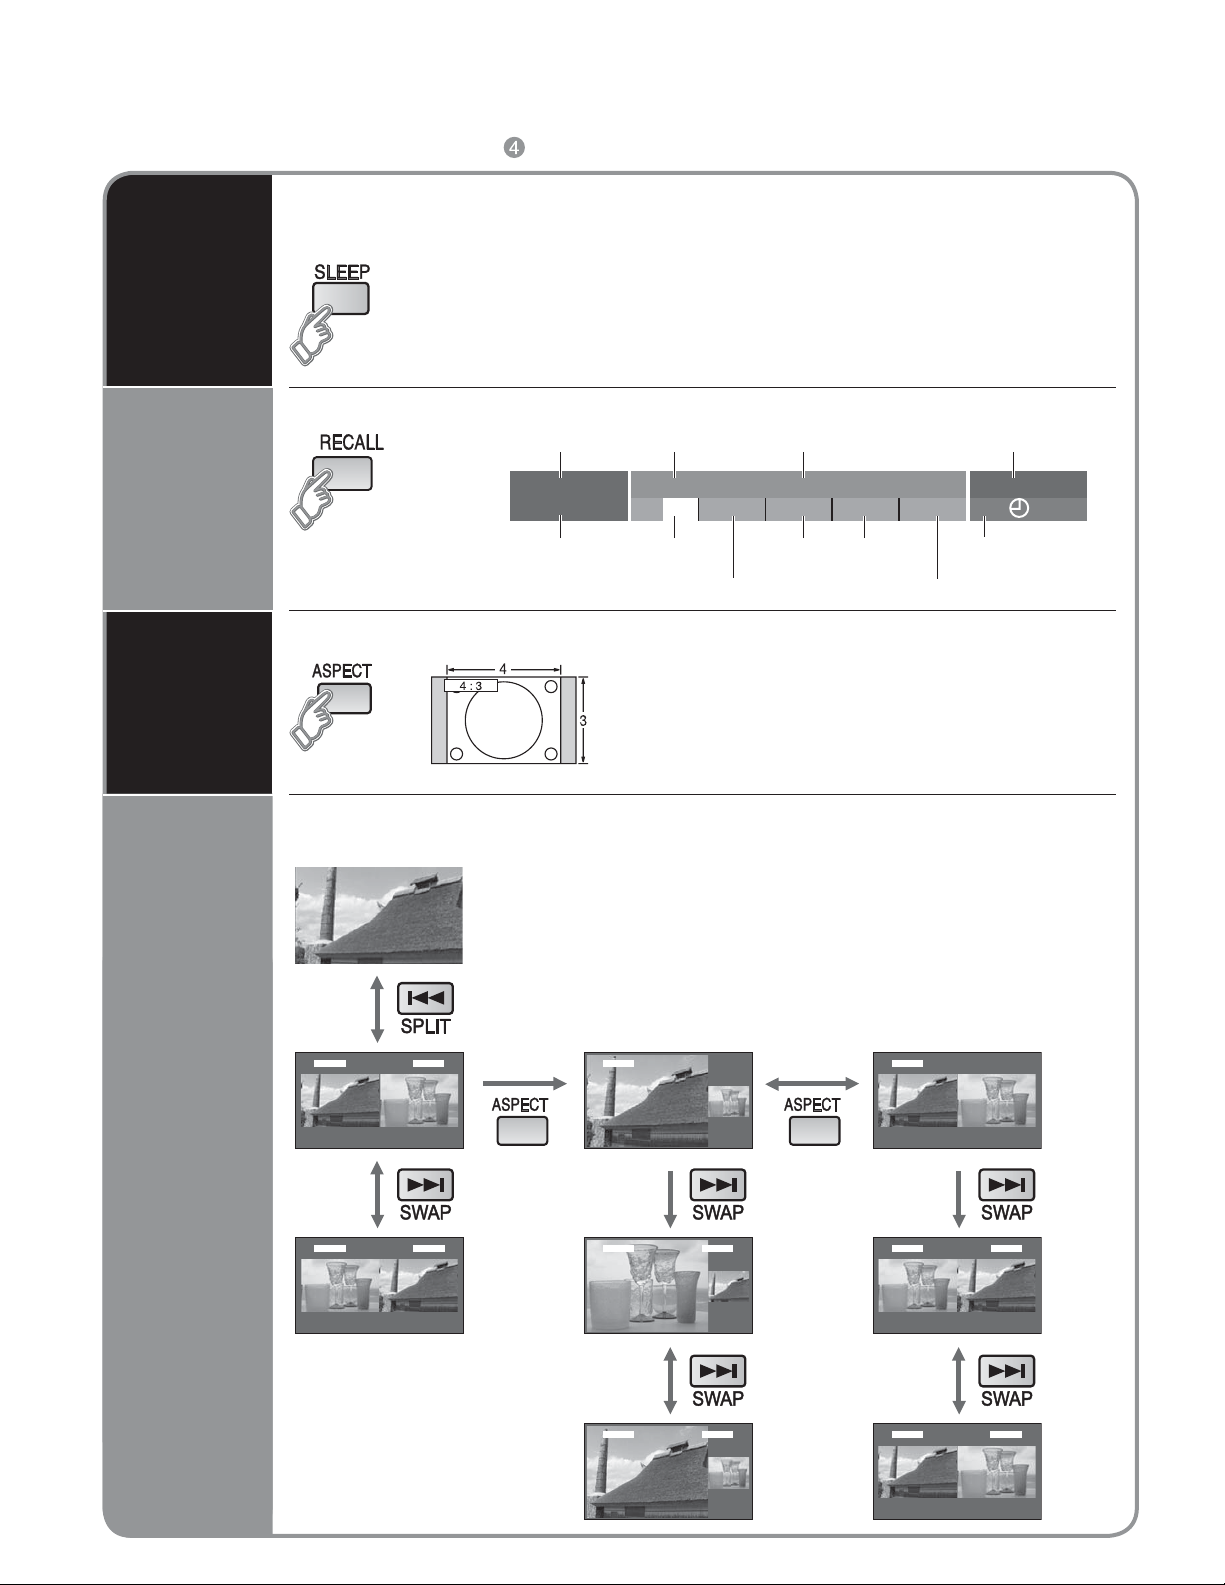
Other Useful Functions (Operate after in p. 17)
Ŷ
Switches the unit OFF in a preset amount of time from 0 to 90 minutes in 30
minute intervals.
Sleep
Timer
Information
Recall
Change
aspect
ratio
0/30/60/90 (minutes)
•
Display or remove the channel banner.
Channel Ending time Show title
15-2
ABC - HD
Station
identifier
Change the aspect (p. 52)
Watch in multi window
(Audio is from Main picture only)
- 10:30
CC SAP
SAP
Rating Level
Press button to cycle through the aspect modes.
•
480i (4:3), 480i (16:9), 480p (4:3), 480p (16:9) :
•
FULL, JUST, 4:3 or ZOOM
1080p / 1080i / 720p : FULL, H-FILL, JUST, 4:3 or
•
ZOOM.
Andrew’ s cooking show
TV-G
1080I
Signal
resolution
Standard
Picture
mode
4 : 3
Sleep timer
remaining time
Aspect ratio
Clock
10:00 am
30
Split Screen
2 Video1
2Video1
Left window (Main picture)
•
Screen enlargement and volume adjustment are available.
Right window (SPLIT frame)
•
The previously selected screen appears.
TV channel or Video input signal can be changed on SPLIT
frame.
P Out P
2 Video1
2Video1
2 Video1
Video1Normal
2Video1
18
Page 19
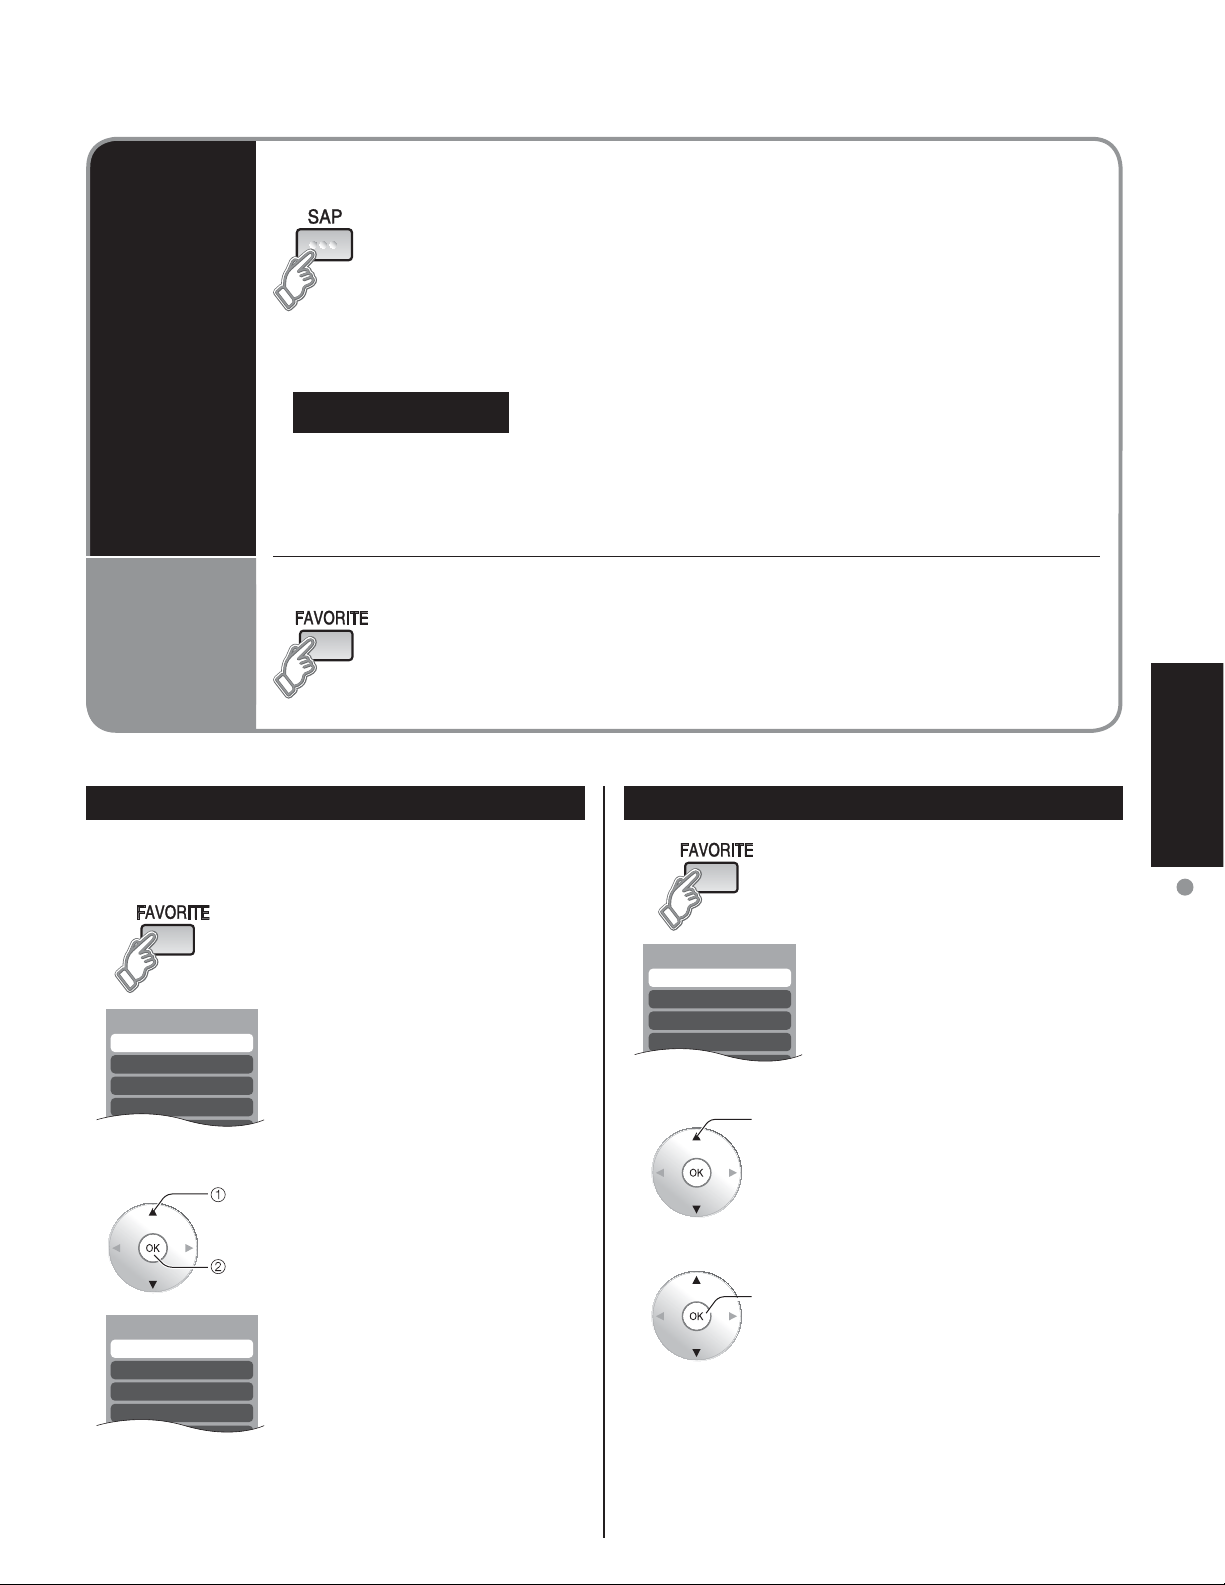
Setting 1/3
[1]
[2]
[3]
[4]
Setting 1/3
[1] 26-1
[2]
[3]
[4]
Favorite 1/3
[1]
[2]
[3]
[4]
Listen
with SAP
(Secondary
Audio
Program)
Call up a
favorite
channel
Select Audio Mode for TV Viewing
Ŷ
Digital mode
•
Press SAP to select the next audio track (if available) when receiving a digital channel.
Audio track 1 of 1
Analog mode
•
Press SAP to select the desired audio mode.
• Press the SAP button to cycle through the audio modes. (Stereo/SAP/Mono).
(English)
FAVORITE
Ŷ
Channel numbers registered in Favorite are displayed on the favorite
tune screen. Select the desired broadcast station with the cursor, or using
number keys. (see below)
Viewing
Set Favorite Feature Use Favorite Feature
1 Display the channel to be placed on the Favorites list.
2 Hold down FAVORITE for several
• Press FAVORITE repeatedly
3 Press Ÿźto highlight a position
• You can also use the NUMBER
select
ok
seconds.
to change between pages (1/3,
2/3, 3/3, or exit). Pressing ŻŹ
also changes the page.
on the list.
Then, press OK to memorize the
displayed CH in that position.
keys (1-9 and 0) to select the
recorded list numbers (1-9 and
0). By doing so, the numbers
will be directly recorded without
having to press the OK key.
1 Press FAVORITE.
• Press FAVORITE repeatedly
2 Press Ÿź or a Numbered key
3 Press OK to display the
select
ok
to change between pages (1/3,
2/3, 3/3, or exit). Pressing ŻŹ
also changes the page.
(1-9 and 0) to highlight a channel
on the list.
• Selecting a channel number
from the list with the Number
keys will display the channel
directly.
highlighted channel.
Watching TV
To delete a favorite channel
•
A memorized channel can be removed from the list by
holding down FAVORITE while its position is highlighted.
19
Page 20
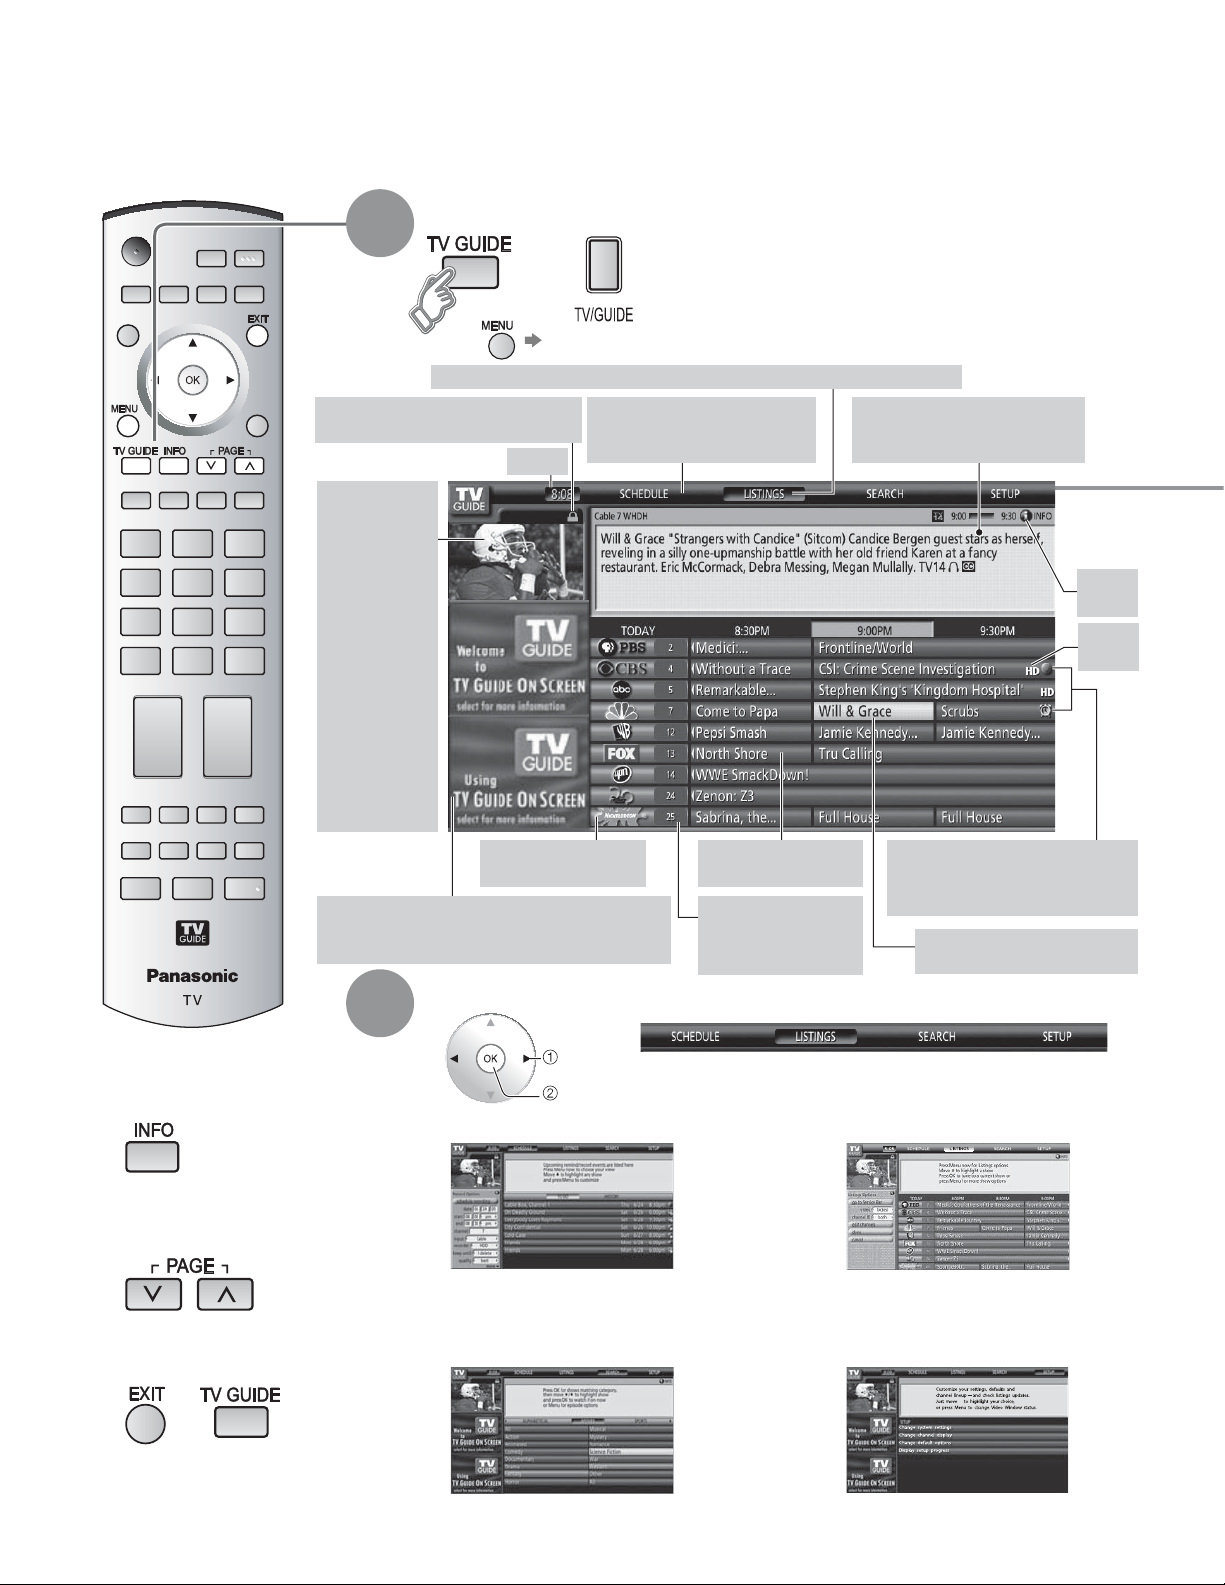
Using TV Guide
TV Guide provides an on-screen listing of shows currently broadcast and to be broadcast over the next
one week. Initial setup (p. 14) is required.
View TV Guide
1
(from the front panel)
or
Or Select "TV Guide" using "TVG/Photo"
•
Current Service LabelIndented to identify the current Service screen
Lock/Unlock icon
Indicates status of the Video Windows
Clock
Video Window
Displays TV
video while
the Guide is
displayed (can
be locked on a
single channel
or unlocked
to preview
channels as
you navigate
LISTINGS
and Channel
Editor)
Note:
Video Window
is not displayed
when an
external input
is selected.
Channel Logo
Identifies network
Ad (Menu)
Location where show- or product-specific information
appears (Location where on-screen menus appear)
Service Bar
Provides access to the main
Guide Services
Title Tile
Displays show title
Channel Number
Identifies channel
number
Info Box
Provides information for a
highlighted item
Record & Remind Icons
Indicates you set a recording or
reminder event for the show
Highlight
Indicates an active tile
Info
Icon
HD
icon
20
To display program
Ŷ
information or HELP
To scroll pages on TV
Ŷ
Guide
To exit TV Guide
Ŷ
or
2
Select the menu item from the service bar
select
set
SCHEDULE
•
Checks or changes the schedule of recording
and reminder reservation and displays what
shows have been recorded. (p. 24)
SEARCH
•
Searches for the show by a type and
category. (p. 23)
(SCHEDULE / LISTINGS / SEARCH / SETUP)
LISTINGS
•
Lists shows of the channel lineup.
(p. 21)
SETUP
•
Make changes to existing Guide
settings. (p. 22)
Page 21
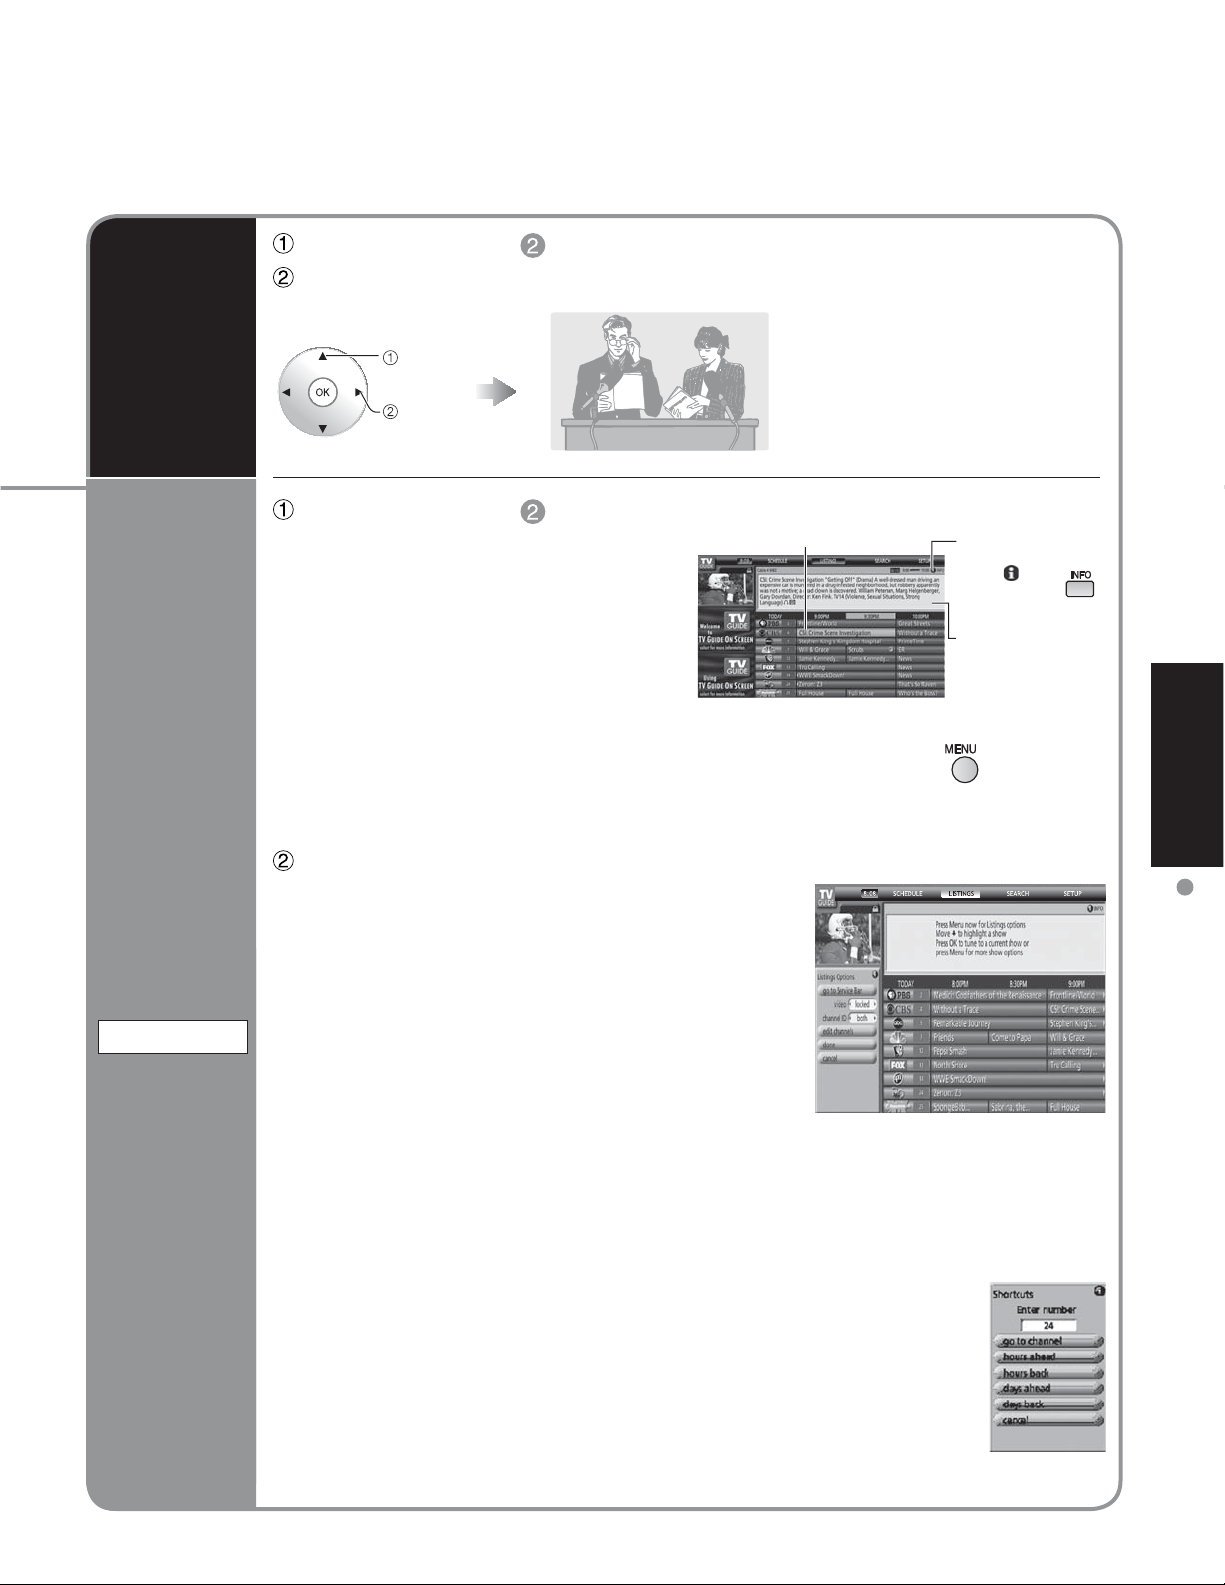
Select "LISTINGS" in (p. 20)
Select the show now on the air
Watch the
show
View
details
of the
show
LISTINGS
(TV screen)
select
set
Select "LISTINGS" in (p. 20)
Listings is always the first Service displayed
in the Guide.
Use to move the highlight within Listings to
• View show listings for today plus 7 days
(8 days total)
• Read show descriptions
• Tune directly to a show currently airing
• Set a show to Remind
• Set a show to Record
• To lock/unlock the Video Window:
Highlight a channel logo on the LISTINGS Service Bar Label and press
the option to lock/unlock the Video Window.
• Access Panel and Channel Ads
Selected show title
Select LISTINGS and press MENU:
Video: Locked (default) – video remains on a
single channel.
Unlocked – video changes channels as
you navigate the grid.
channel ID: Both – both channel logo and number
are displayed in the grid.
Logo – only channel logo is displayed in
the grid.
Number – only channel number is
displayed in the grid.
Further information
appears when you
select
key
Details
using
to display
Viewing
Using TV Guide
edit channels: Change the broadcast service that the Guide uses for any channel.
Edit the channels that appear in the Guide, reorder their position in the
grid, change their tune channel, and, if you have more than one broadcast
service, specify the service and input for each channel. You can modify
settings directly in the Channel Editor screen.
Use the number keys on your remote control to enter the number of the
channel you want to view or enter the number of hours or days you want to
jump ahead or back. The Shortcuts menu appears.
If you entered a channel number press OK when the menu appears to
•
jump directly to the channel.
If you entered a specific number of hours press Ź (jump ahead) or Ż
•
(jump back) when the menu appears to jump directly.
21
Page 22
Using TV Guide (Continued)
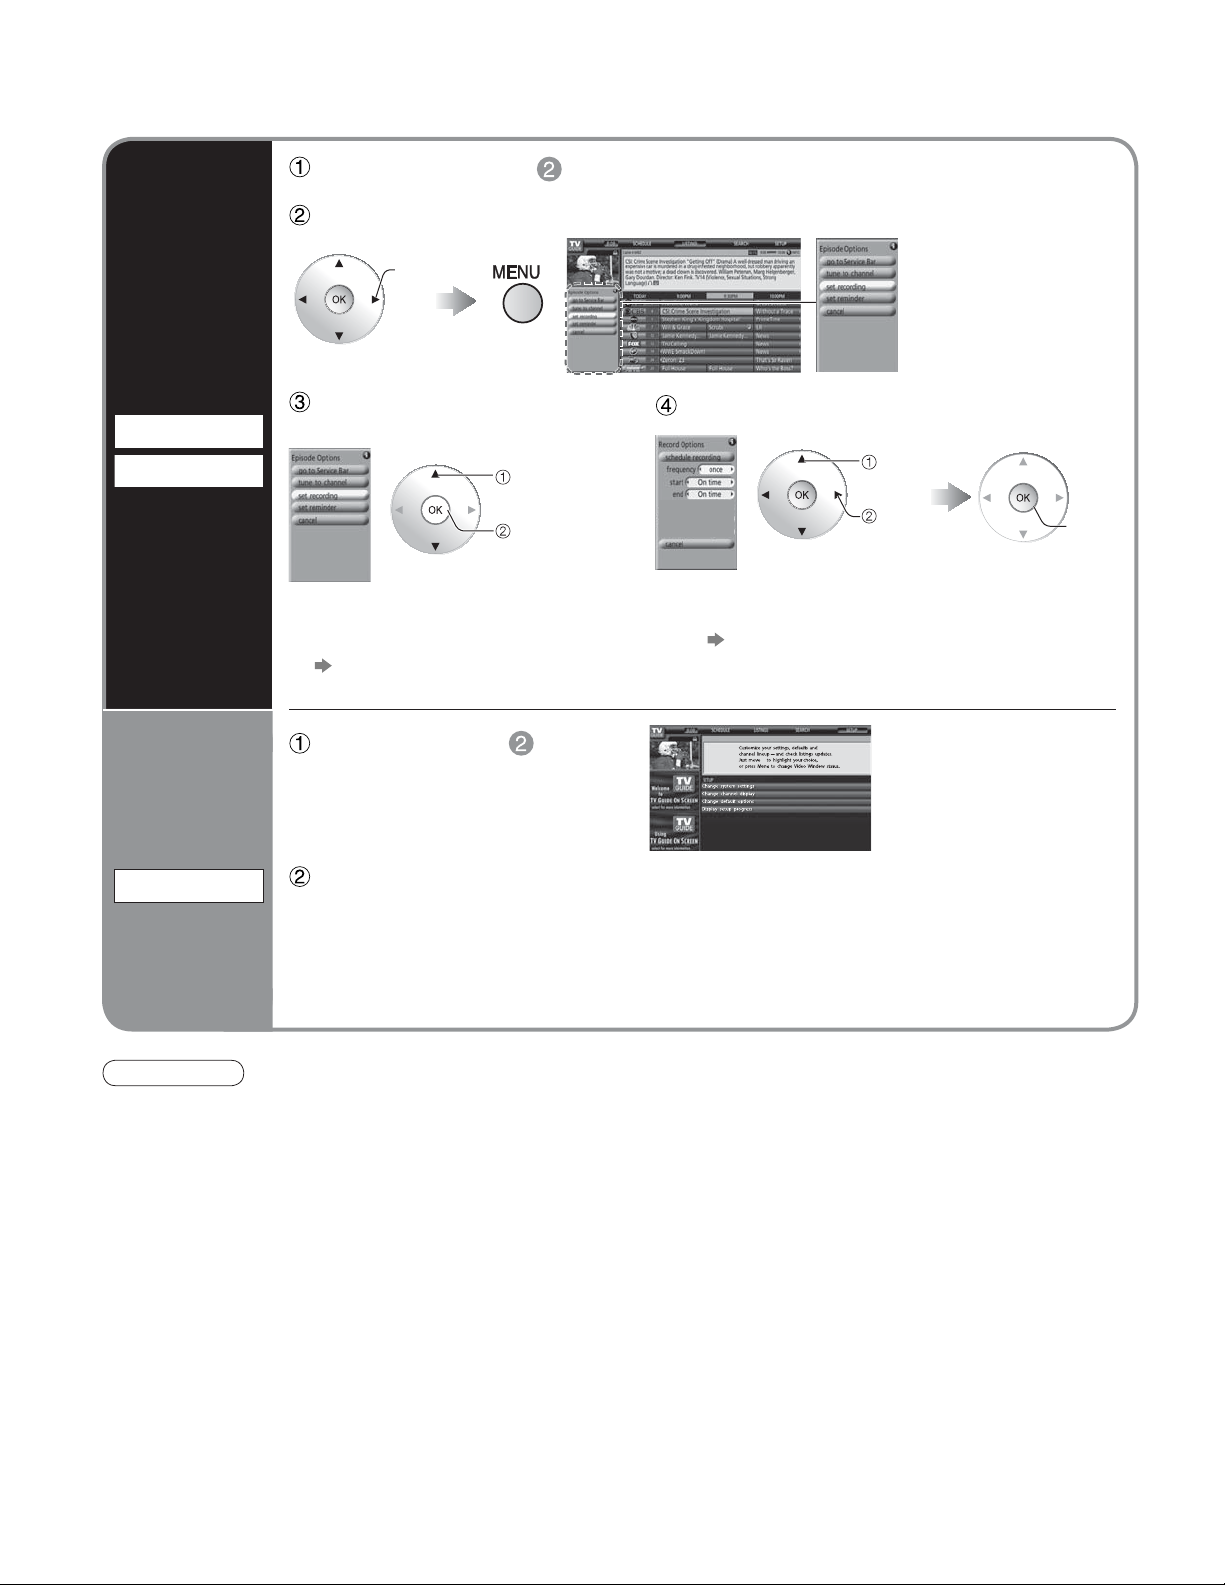
Select "LISTINGS" in (p. 20)
Select the show and display the panel menu
select
Reserve
a show
Recording
Reminder
Select "set recording" or
"set reminder"
select
Select the item and set
select
next
To check/change/delete
Ŷ
reserved contents
"SCHEDULE" (p. 24)
Select "SETUP" in (p. 20)
Change
settings
SETUP
Note
When reserving shows, you must make the proper settings on the external recording equipment connected to the unit.
•
Also read the manual of the recording equipment.
•
Select an item and follow the on-screen instructions for further settings
Change system settings:
•
Change channel display: Modifies your channel settings
•
Change default options: Changes your Guide default settings
•
Display setup progress: Views the Setup Progress screen
•
Changes your system settings, selects an alternate channel lineup
To reserve with input date and time
Ŷ
"Manual Recording"
"Manual Reminder" (p. 25)
set
enter
22
Page 23

Search
for shows
Select "SEARCH" in (p. 20)
Select the search type and category
Category
example: All, Action, Musical...
Search type
example: MOVIES, SPORTS
The show list appears.
To display the desired show
•
Select the show on air and press "OK" button
To reserve shows for recording
•
Select the upcoming show and press "MENU" button
Select "set recording" on the panel menu
Show list
set
select a search type
select a category
Viewing
SEARCH
Searching for a Specific Keyword, Actor, or Director
Ŷ
Select "KEYWORD" in above for category and press "OK" button
Select "new search" and press “OK” button
Make the selections for your search and press “OK” button
- type (title, actor, director, description, all)
- category (movies, sports, series, children, HDTV, all, etc.)
- sub(category) (action, comedy, horror, all, etc.)
Select "enter keyword" and press “OK” button
5
Input the keyword
select
character
input
character
6
Select "DONE" and press “OK” button The show list appears.
Repeat
Using TV Guide
23
Page 24
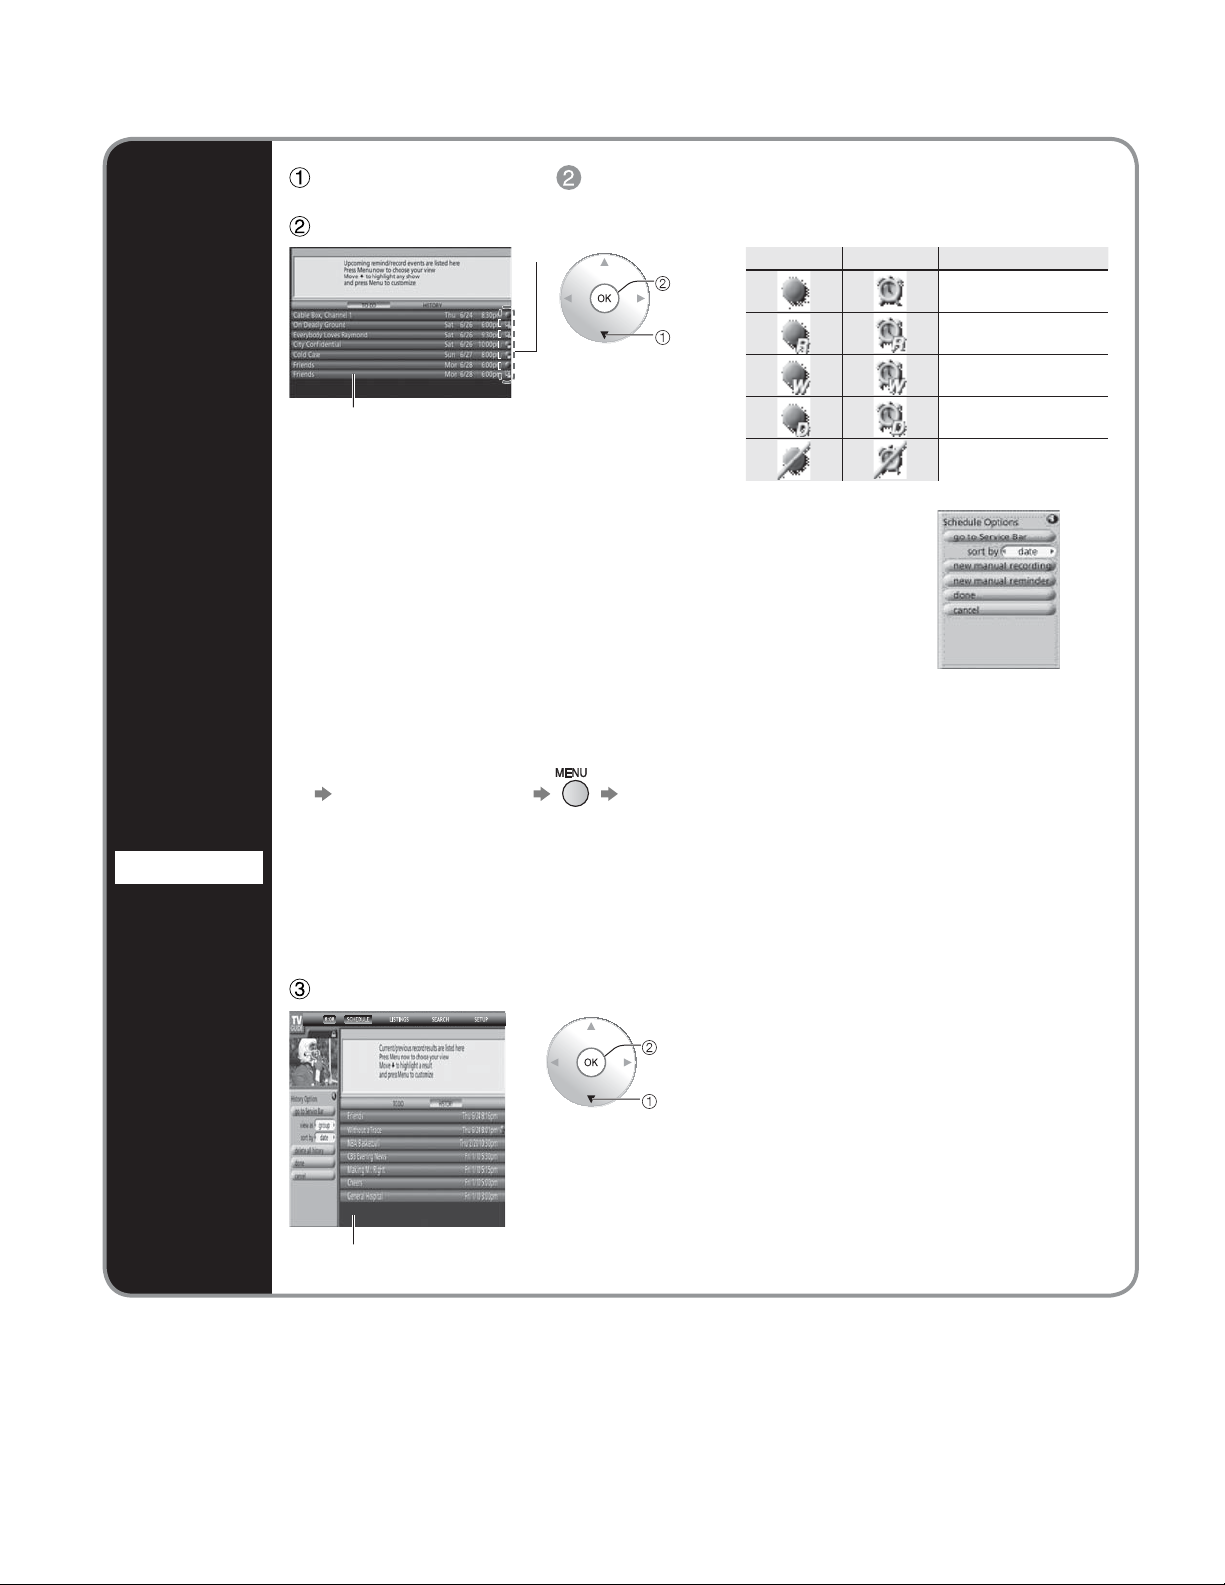
Using TV Guide (Continued)
Select "SCHEDULE" in (p. 20)
Select "TO DO"
Icon
ok
Recording Reminder Description
Once
Check
reservation
SCHEDULE
select
List
From TO DO, press MENU. The Schedule Options menu appears.
You can set sort by, new manual recording, new manual reminder.
To edit/delete reservations
Ŷ
Select the reservation Select on the panel menu
delete manual recording: Deletes the recording reservation
•
edit manual recording: Changes settings of the recording reservation
•
delete manual reminder: Deletes the viewing reservation
•
edit manual reminder: Changes settings of the viewing reservation
•
Regularly
Weekly
Daily
Off
24
Select “HISTORY”
record results
ok
select
Current/previous record results are listed
here.
Press Menu now to choose your view.
Move down to highlight a result and press
Menu to customize.
Page 25

Reserve
with date
and time
Manual
Recording
Manual
Reminder
Select "TO DO" under "SCHEDULE"
(see above) and press
Select "new manual recording" or
frequency
"new manual reminder" and press
"OK" button
Set the date and time, the channel,
and other settings and press "OK"
button
Caution
A conflict message appears when a show you
schedule to
Record overlaps with any part of another show
•
previously set to record
Record overlaps with a reminder previously set to auto
•
tune
Remind and auto tune overlaps another auto-tune
•
reminder
Remind and auto tune overlaps with a scheduled recording
•
once
Cancel
Panel menu
select
set
(example: Manual Recording)
Viewing
To resolve the conflict, you must select one of these options (which vary according to
the type of conflict):
Record anyway - records the specified show and suspends the existing show
•
Don’t record this show - cancels the specified show recording
•
Auto-tune anyway - auto tunes the specified show and suspends the existing
•
Remind, no auto-tune - schedules the specified show reminder but cancels the
•
Don’t set this reminder - cancels the specified reminder
•
recording or auto-tune reminder
show reminder set to auto tune
auto-tune option
Using TV Guide
25
Page 26
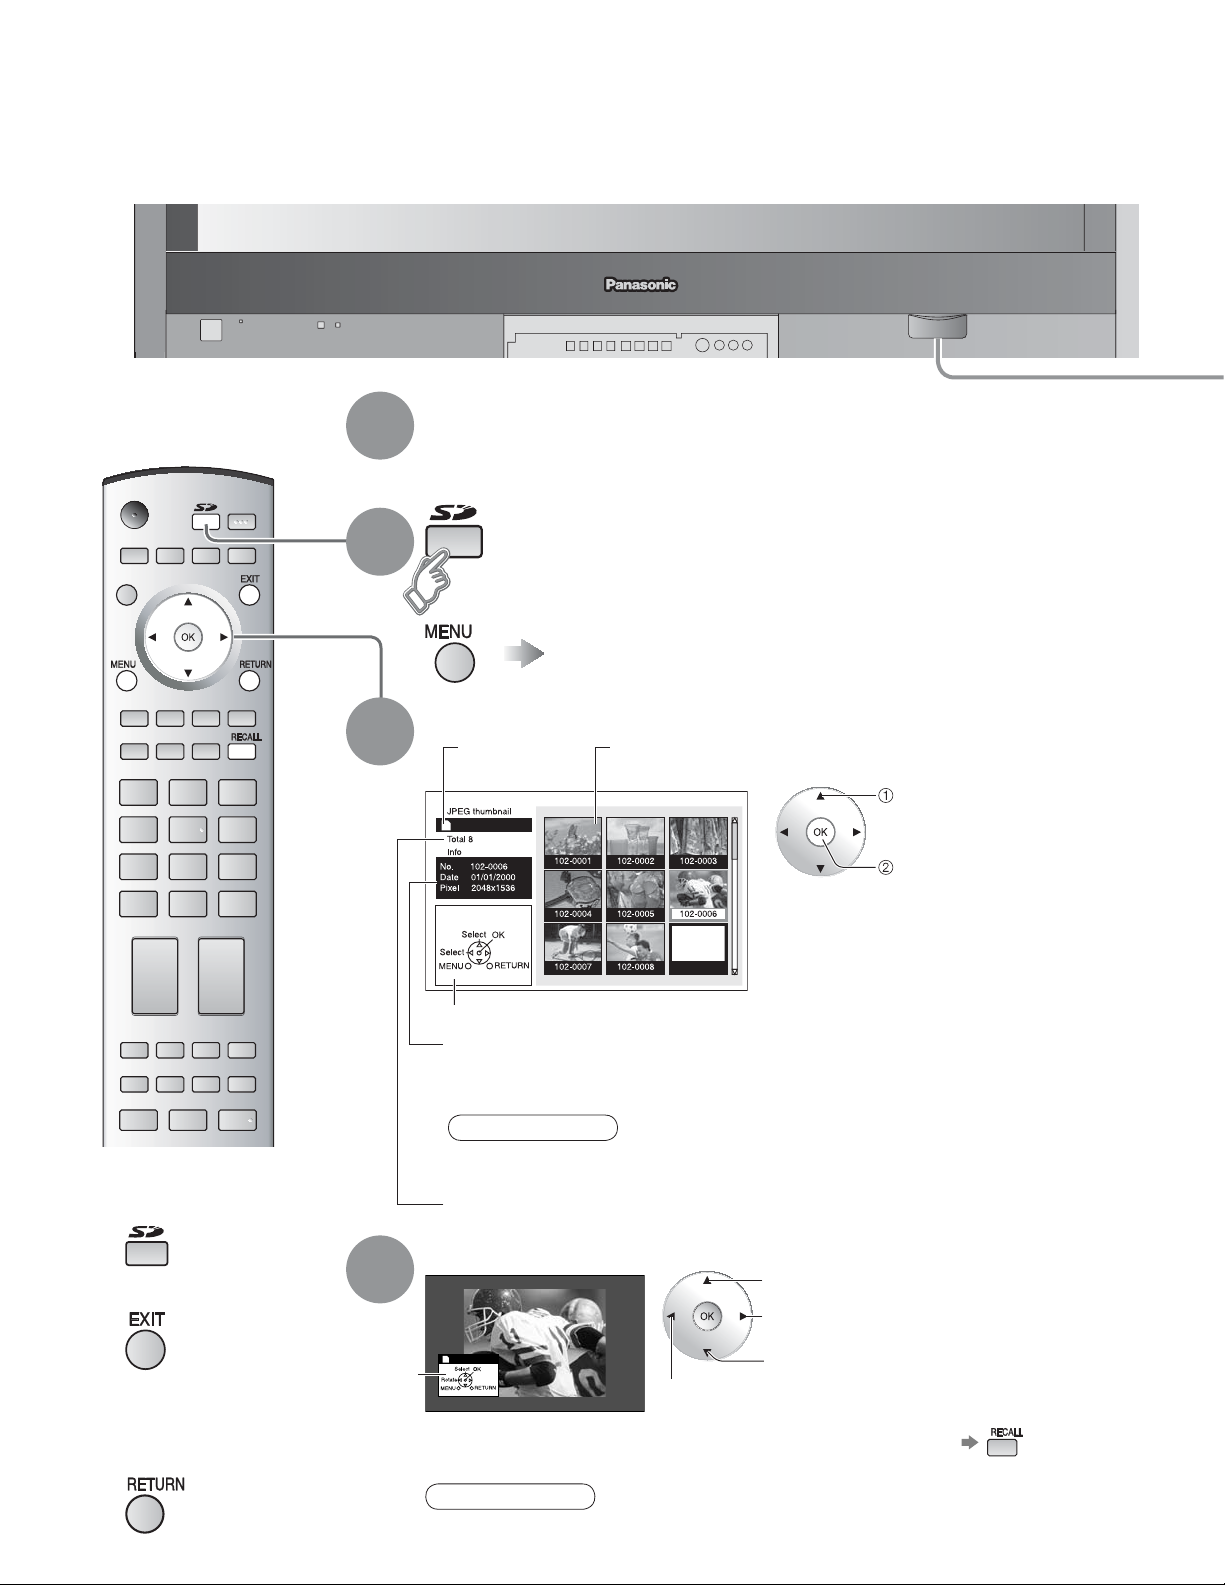
-
Viewing from SD Card
You can view photos taken with a digital camera or a digital video camera saved on SD card.
(Media other than SD Cards may not be reproduced properly.)
Insert the SD Card
1
For cautions and details on SD Cards (p. 28 and 53)
•
2
Select the SD mode
or
Select “Memory card” using “TVG/Photo”
Select the data to be viewed
3
While reading
the data
Accessing
Navigation Area
Selected picture information is displayed.
No. : Image number or file name is displayed.
Date : Date of recording is displayed.
Pixel : Display resolution is displayed.
Thumbnail view
select
view
26
Press to return to
Ŷ
TV
Press to exit
Ŷ
Press to return
Ŷ
to the previous
screen
4
Navigation
Area
Note
Depending on the JPEG type, Info contents may not be displayed correctly.
•
Total number of images
View
To previous photo
Rotate 90 degree
(clockwise)
To next photo
Rotate 90 degree
(counter-clockwise)
Displayed
in slide show
Note
The SD mode can also be selected from the MENU screen.
•
To display/hide Navigation Area
•
Page 27
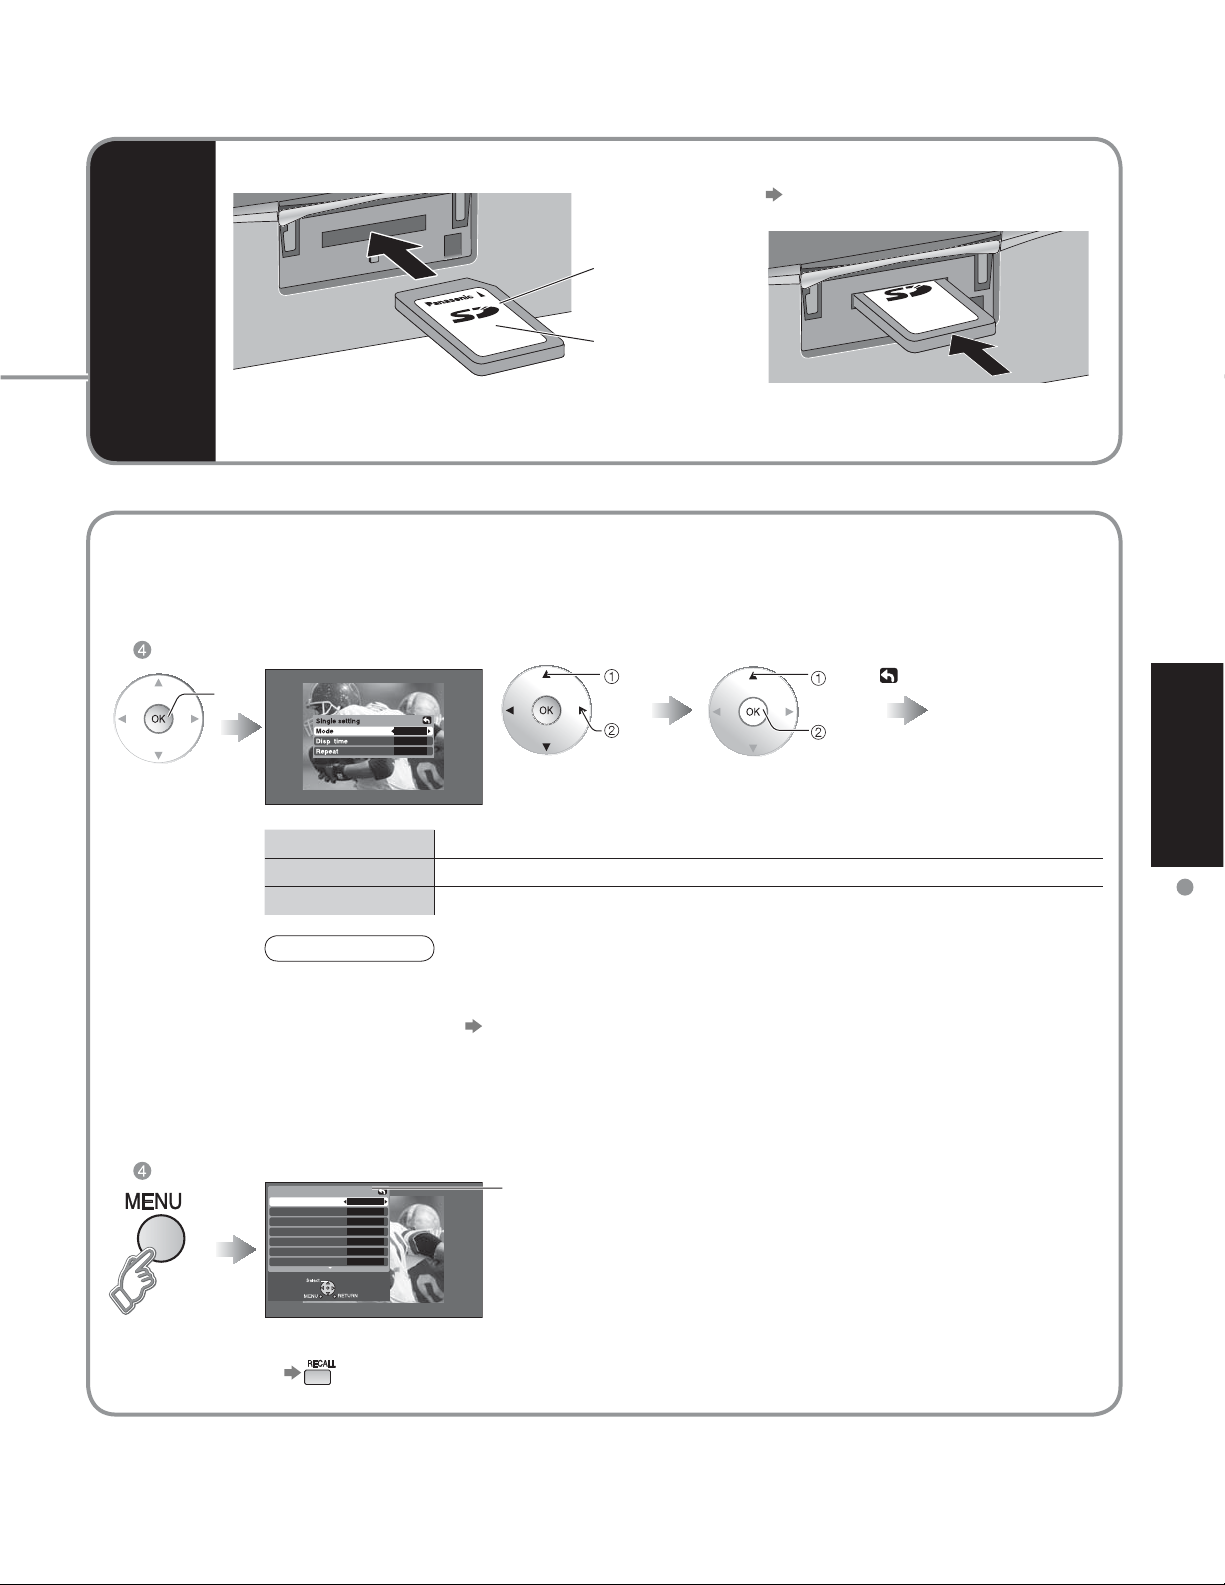
Slide
3
On
SD
Insert the card
•
Label
surface
Remove the card
•
Press in lightly on SD Card, then
release.
Card
Push until a
click is heard
Compliant card type (maximum capacity): SD Card (2 GB), Mini SD Card (1 GB) (requiring mini
•
SD Card adapter)
To change the view (single play mode, adjusting images, etc.)
To watch photos in single play mode
Ŷ
ok
Adjust
Disp time
Mode
Repeat
select
Slide
On
Set to Single/Slide to view single images or perform a slide show.
You can set how many seconds each image is displayed in Slide mode.
Turn the slide show Repeat function On or Off.
set
In
select
ok
Start
single play mode
Viewing
Viewing from SD Card
Note
For large image sizes, the display time will be longer than the number of seconds
•
set.
To stop in mid-cycle Press “OK” button
•
To adjust picture
Ŷ
When MENU is pressed, the Picture Adjust menu is displayed.
In
Picture 1/2
Normal
Pic. mode
Picture
Brightness
Color
Tint
Sharpness
To display/hide Navigation Area
•
Standard
No
+30
0
0
0
+10
Picture menu
(p. 32)
27
Page 28
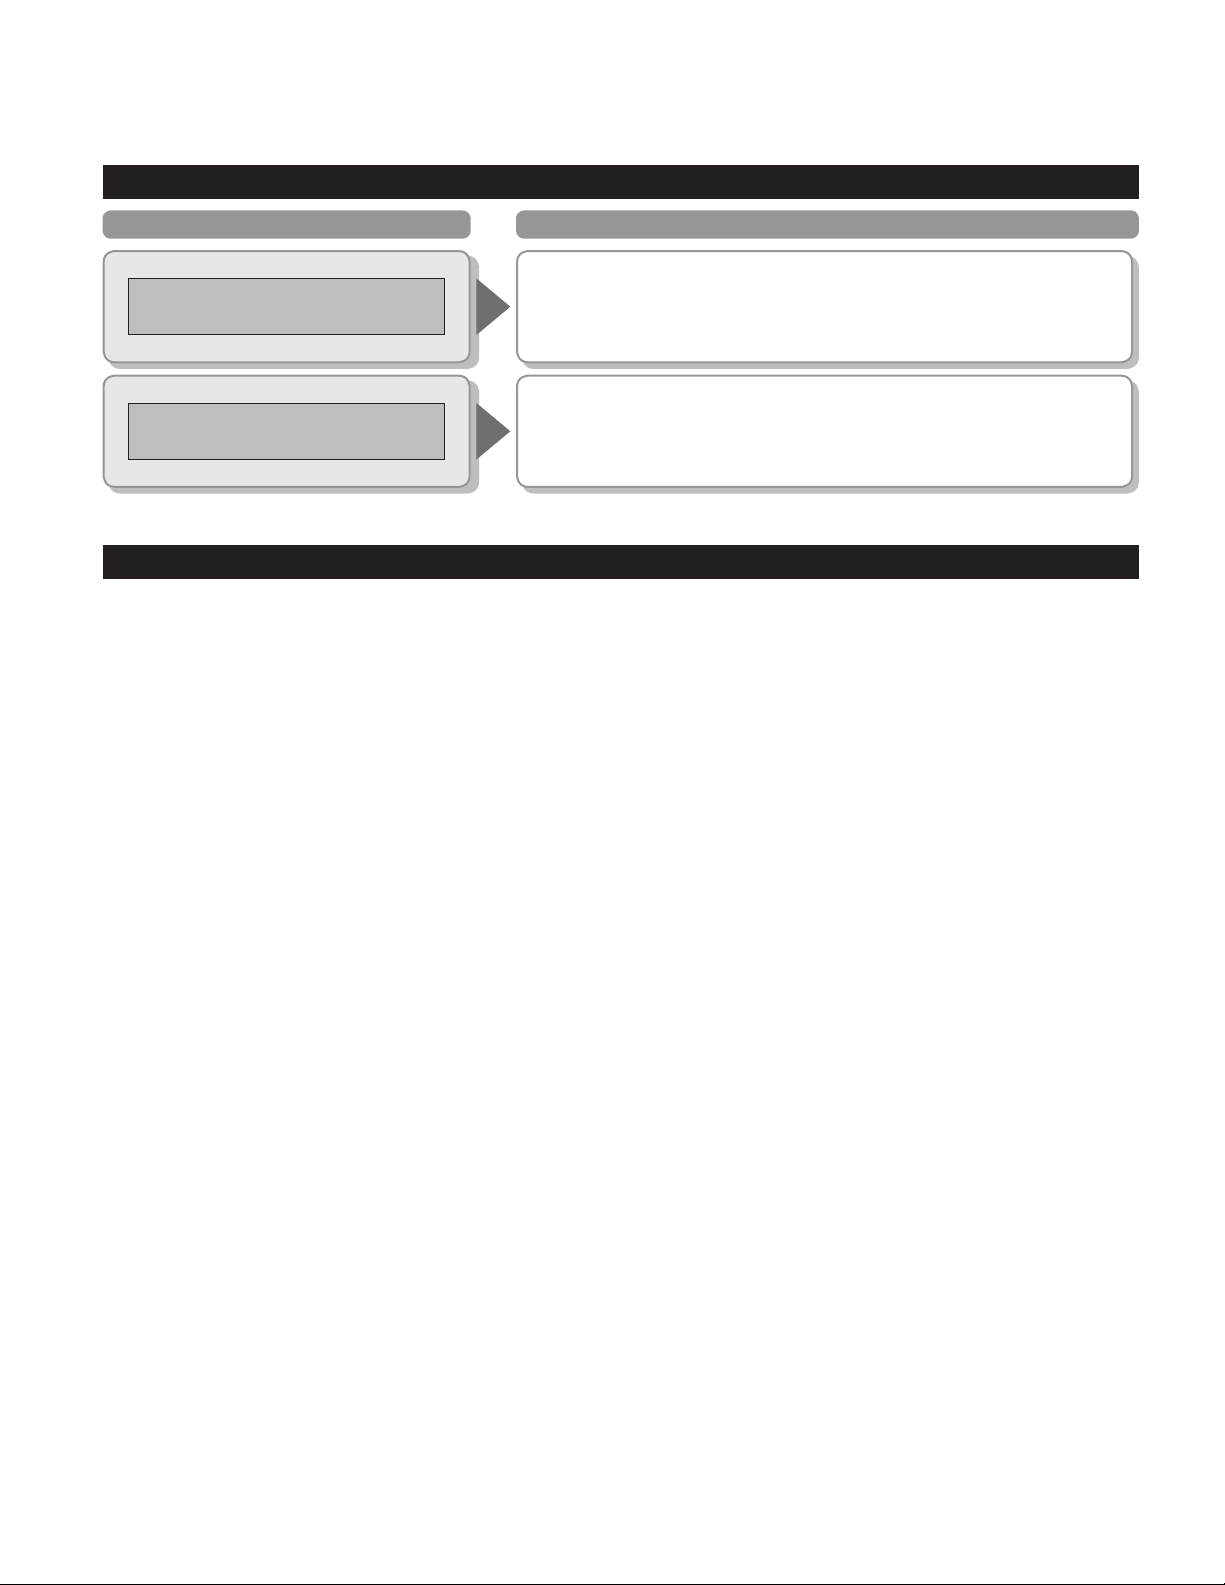
SD Card: Notes and Cautions
Card Warning Messages
Message Meaning
Is memory card in?
No file
Cautions in handling card :
Do not remove the card while the unit is accessing data (this can damage card or unit).
•
Do not touch the terminals on the back of the card.
•
Do not subject the card to a high pressure or impact.
•
Insert the card in the correct direction (otherwise, card may be damaged).
•
Electrical interference, static electricity, or erroneous operation may damage the data or card.
•
Back up the recorded data at regular intervals in case of deteriorated or damaged data or erratic
•
operation of the unit. (Panasonic is not liable for any deterioration or damage of recorded data.)
The card is not inserted or this unit does not support the format.
•
The card has no data or this type of data is not supported.
•
28
Page 29

-
Watching Videos and DVDs
Some Panasonic equipment connected to the TV unit can be operated with the remote control.
Programming the remote control is necessary to operate other manufacturers’ products. (p. 45)
With VCR or DVD turned On
1
2
Switch to external input
Press to display the Input select menu.
Select the input mode
Input select
[1] TV
[2] Component 1
[3] Component 2
[4] HDMI 1
[5] HDMI 2
[6] Video 1
[6] Video 2
[6] Video 3
[9] PC
(Initial screen)
The terminal and label of the connected device is
•
indicated.
To change the input label (p. 42)
or
select
enter
Press corresponding NUMBER
key on the Remote Control to
select the input of your choice.
Press arrow up/down to select
the input of your Choice, then
press “OK”.
If during selection, no action
•
is taken for several seconds,
the Input selection menu is
exited.
Label Terminal
Video 1
VCR
Viewing
Watching Videos and DVDs
Cards: Notes and Cautions
Press to return to
Ŷ
TV
Note
For details, see the
•
manual of the
equipment
or ask your local
dealer.
3
Operate
the VCR or DVD with the remote control
VCR DVD
VCR Record Record
-
-
Rewind/Fast Forward Reverse/Forward
Stop Stop
Pause Pause
Play Play
(For other operations, see p. 48.)
[example]
(example)
Open/Close
Skip Reverse/Forward
29
Page 30
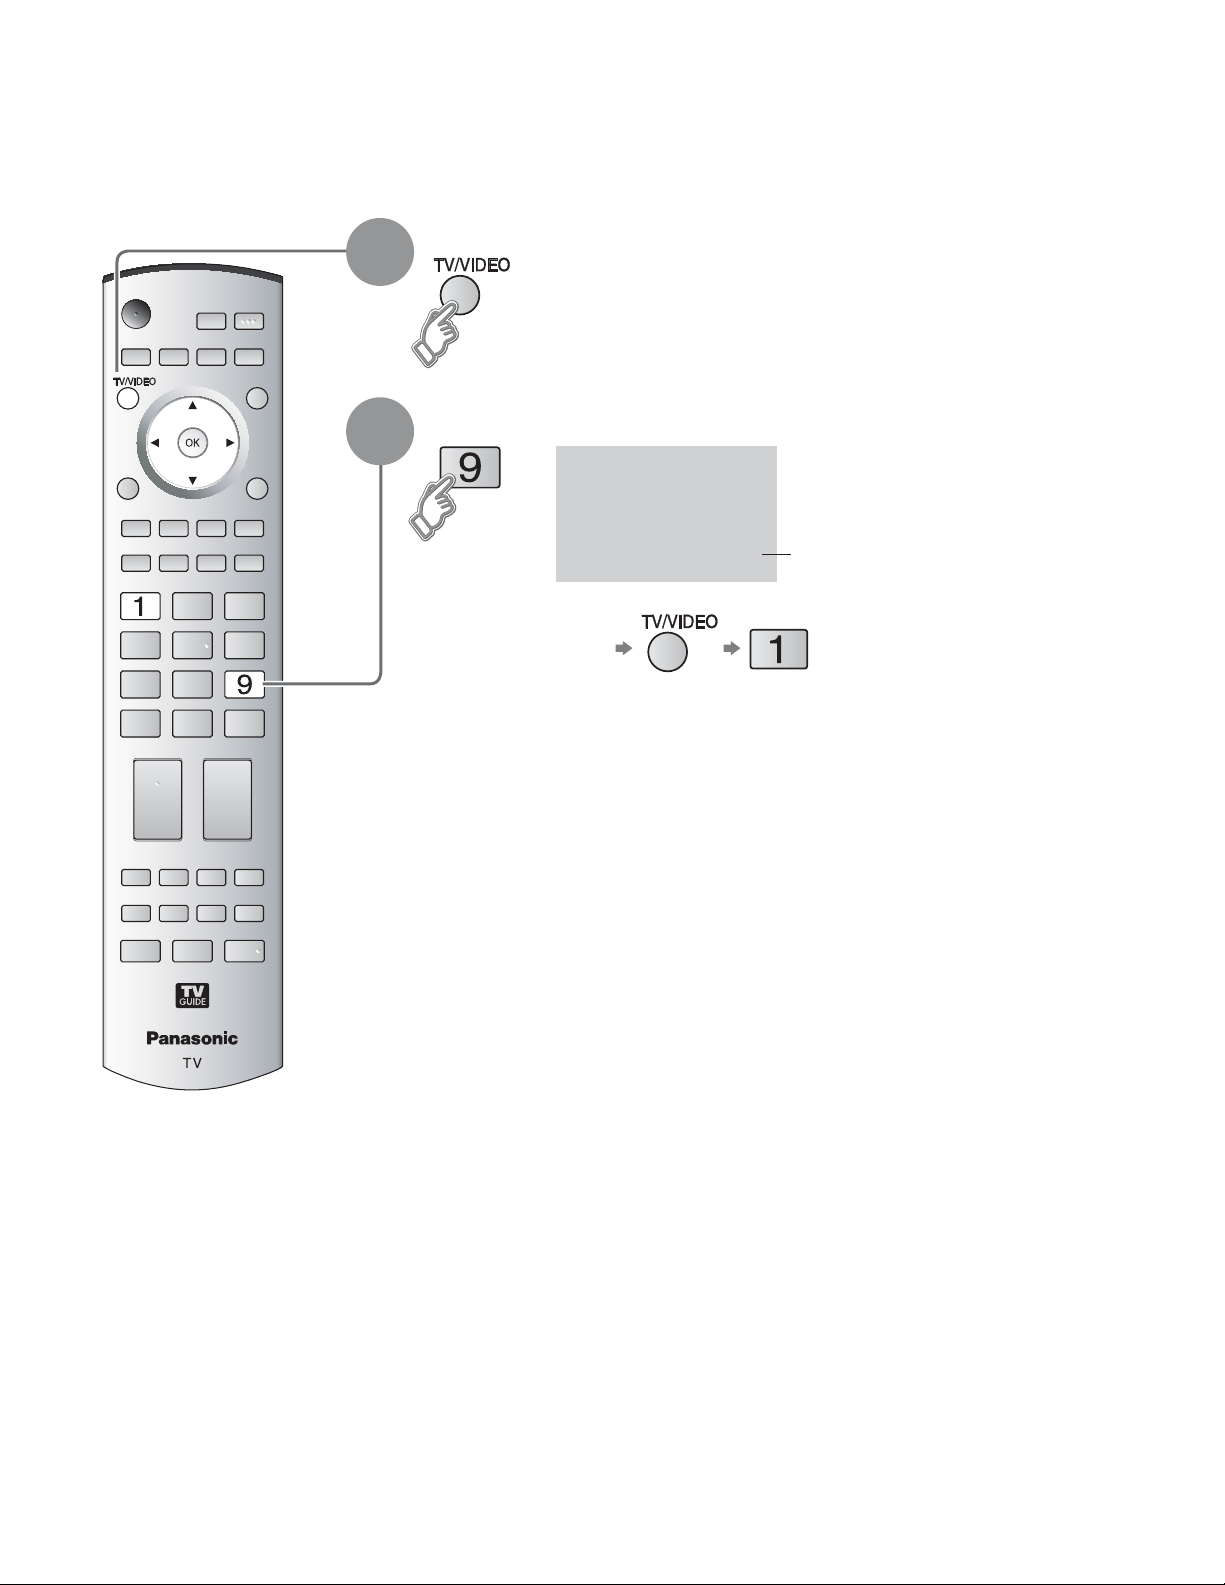
Displaying PC Screen on TV
The screen of the PC connected to the unit can be displayed on the TV.
You can also listen to PC sound with the audio cable connected. To connect PC (p. 46)
Select the external input
1
Select "PC"
2
To return to TV
Ŷ
PC
Corresponding signals
•
(p. 29)
Displays
PC screen
30
Page 31
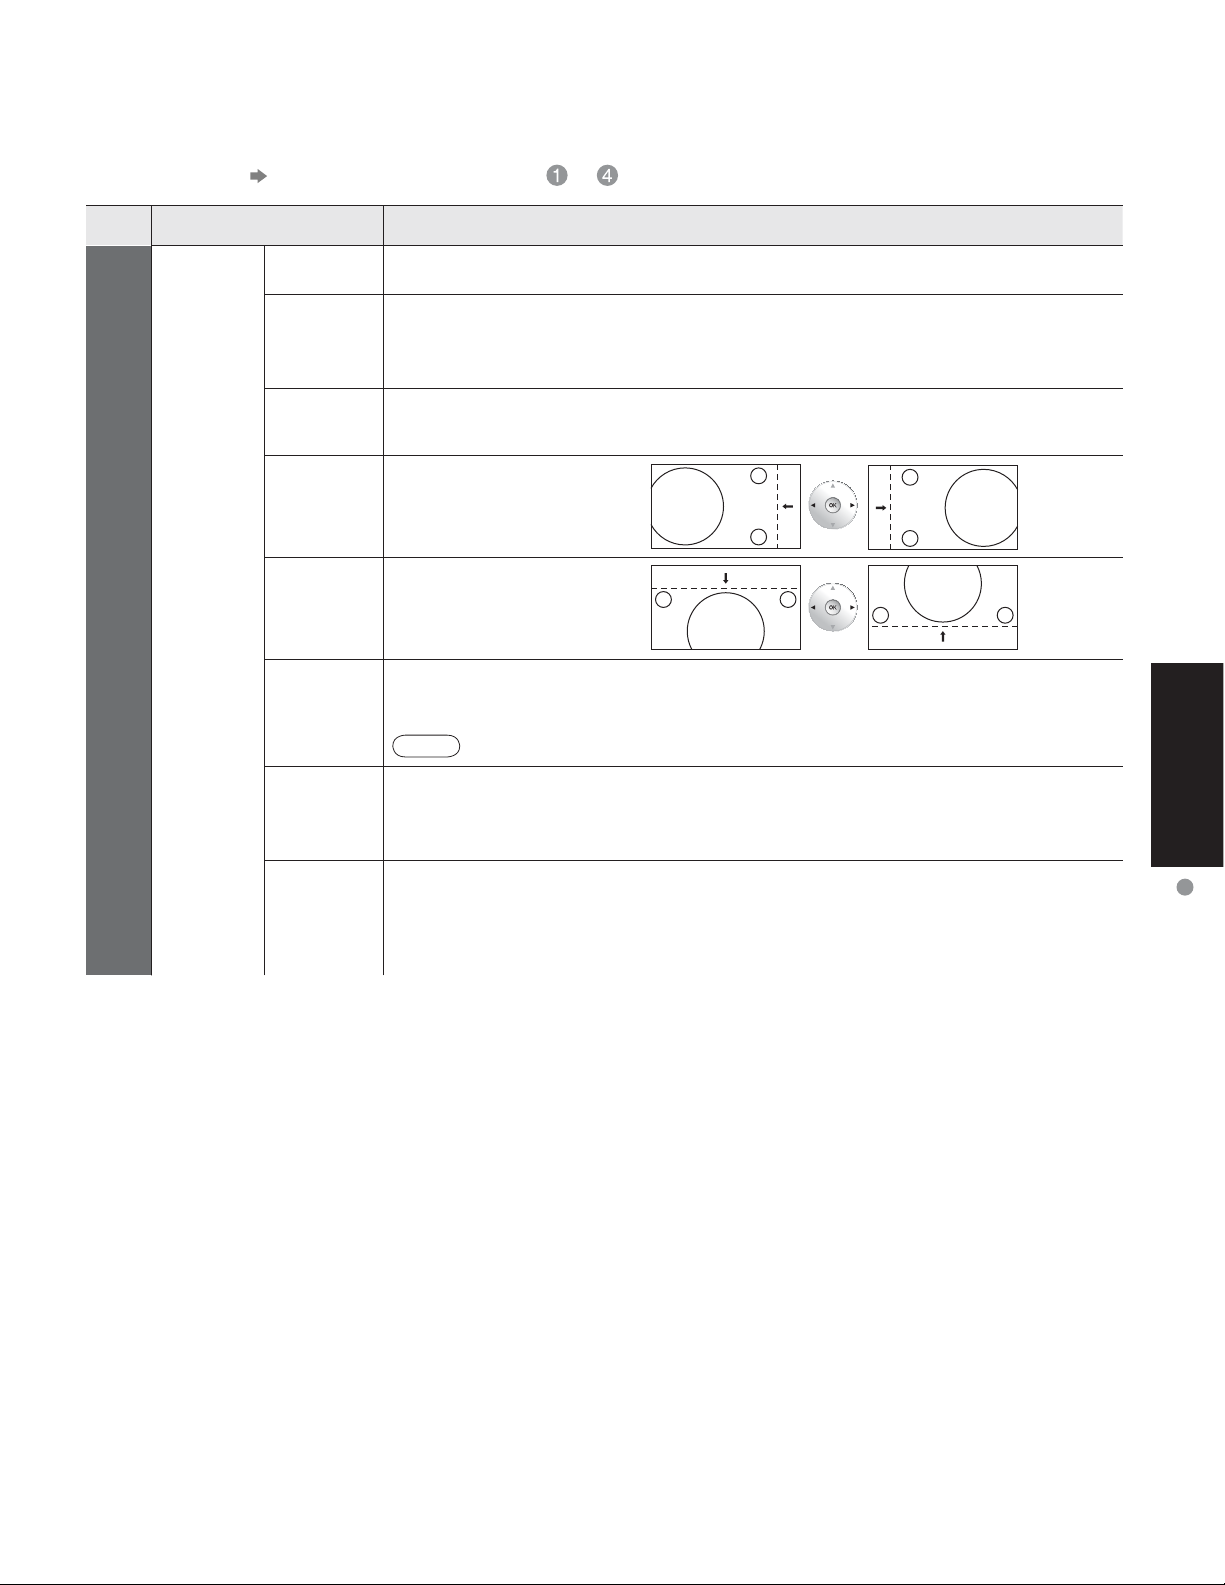
PC menu setting (changed as desired)
Ŷ
Making settings "How to Use Menu Functions" to (p. 32)
•
Menu Item Adjustments/Configurations(options)
Normal Resets PC adjust
H&V : The H and V sync signals are input from the HD/VD connector.
•
Sync
On G : Uses a synchronized signal on the Video G signal, which is input from the G
•
connector.
Picture
PC
adjust
Dot clock
H-position
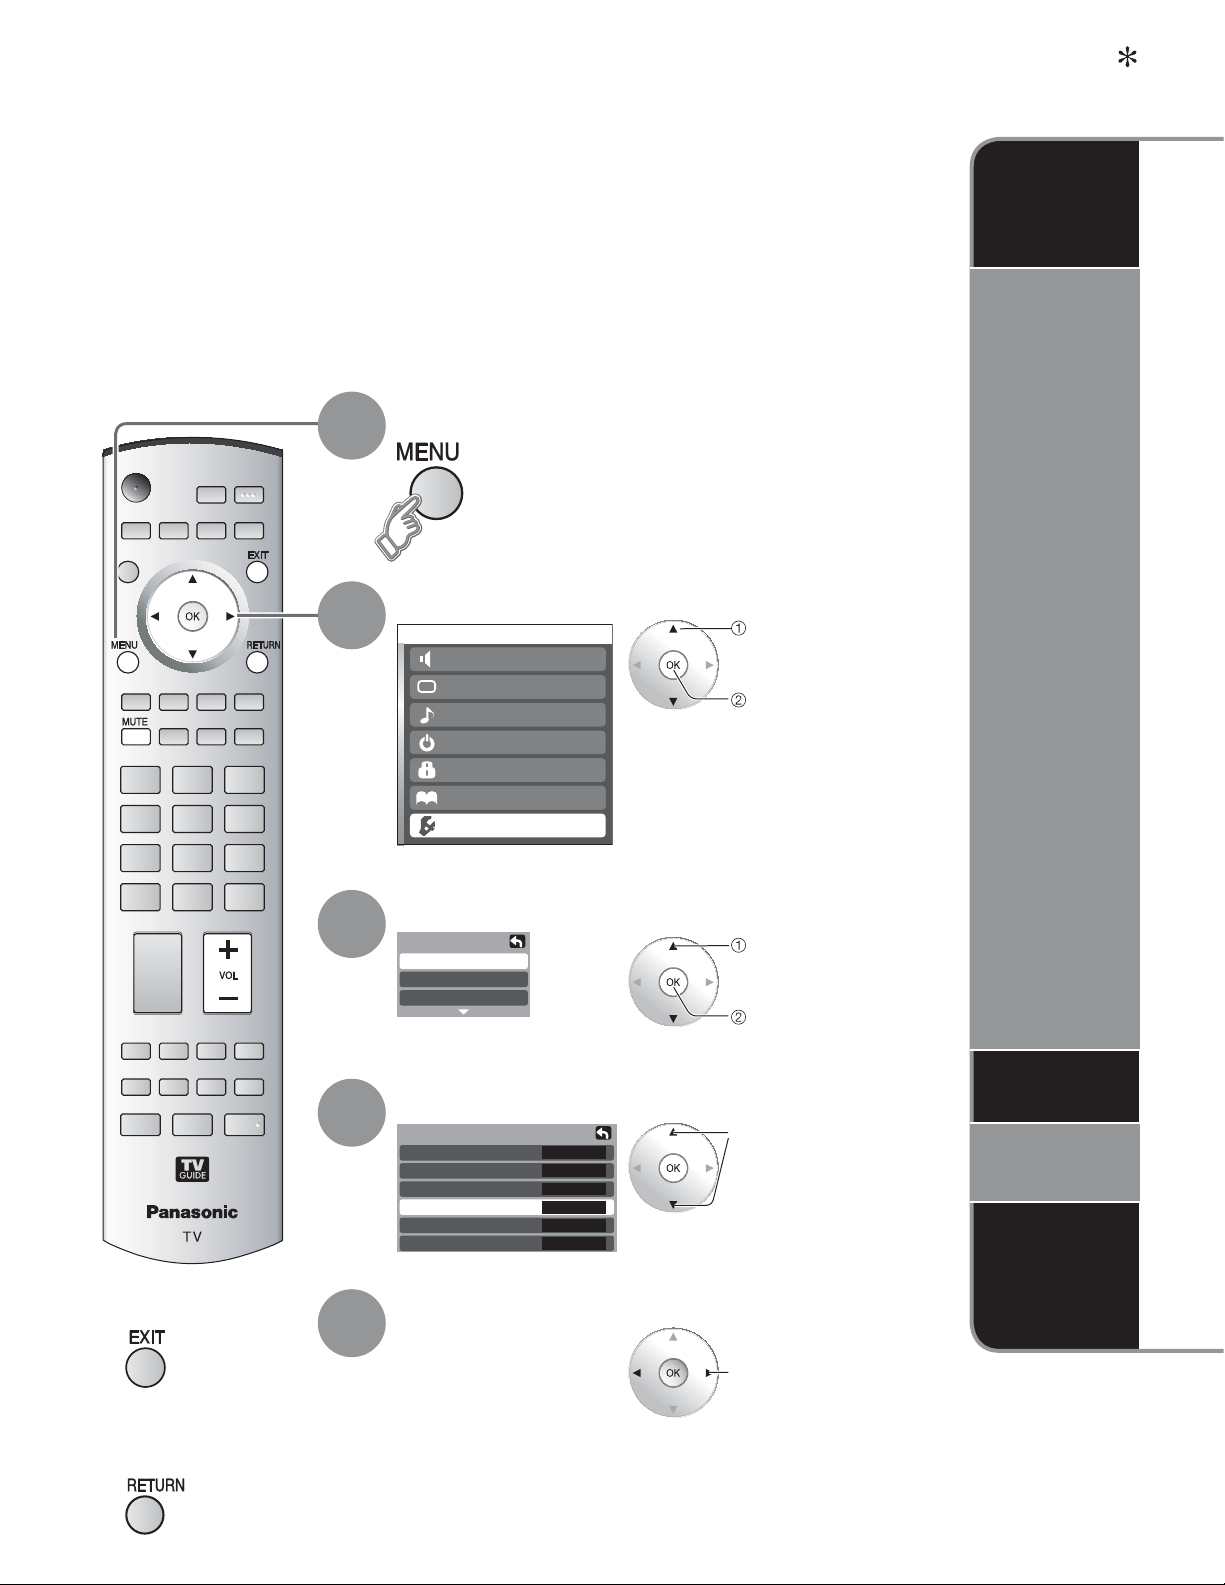
V-position
Clock phase
Input
resolution
H-frequency
V-frequency
Alleviates the problem if a picture appears to be vertically-striped, flickers partially or is
blurred.
Adjust the horizontal position.
Adjust the vertical position.
Alleviates the problem if the whole picture appears to flicker or is blurred.
First adjust the Dot Clock to get the best possible picture, then adjust the
Clock Phase so that a clear picture appears.
It may not be possible to display a clear picture due to poor input signals.
Note
Switches to wide display.
Input signal switched from VGA to WVGA
•
Input signal switched from XGA to WXGA
•
Displays the H (Horizontal)/V (Vertical) frequencies.
Display range
•
Horizontal: 15-110kHz
Vertical: 48-120Hz
Viewing
Displaying PC Screen on TV
Audio menu (p. 32)
•
For PC input, only audio signals can be output from PROG. OUT terminals.
•
31
Page 32
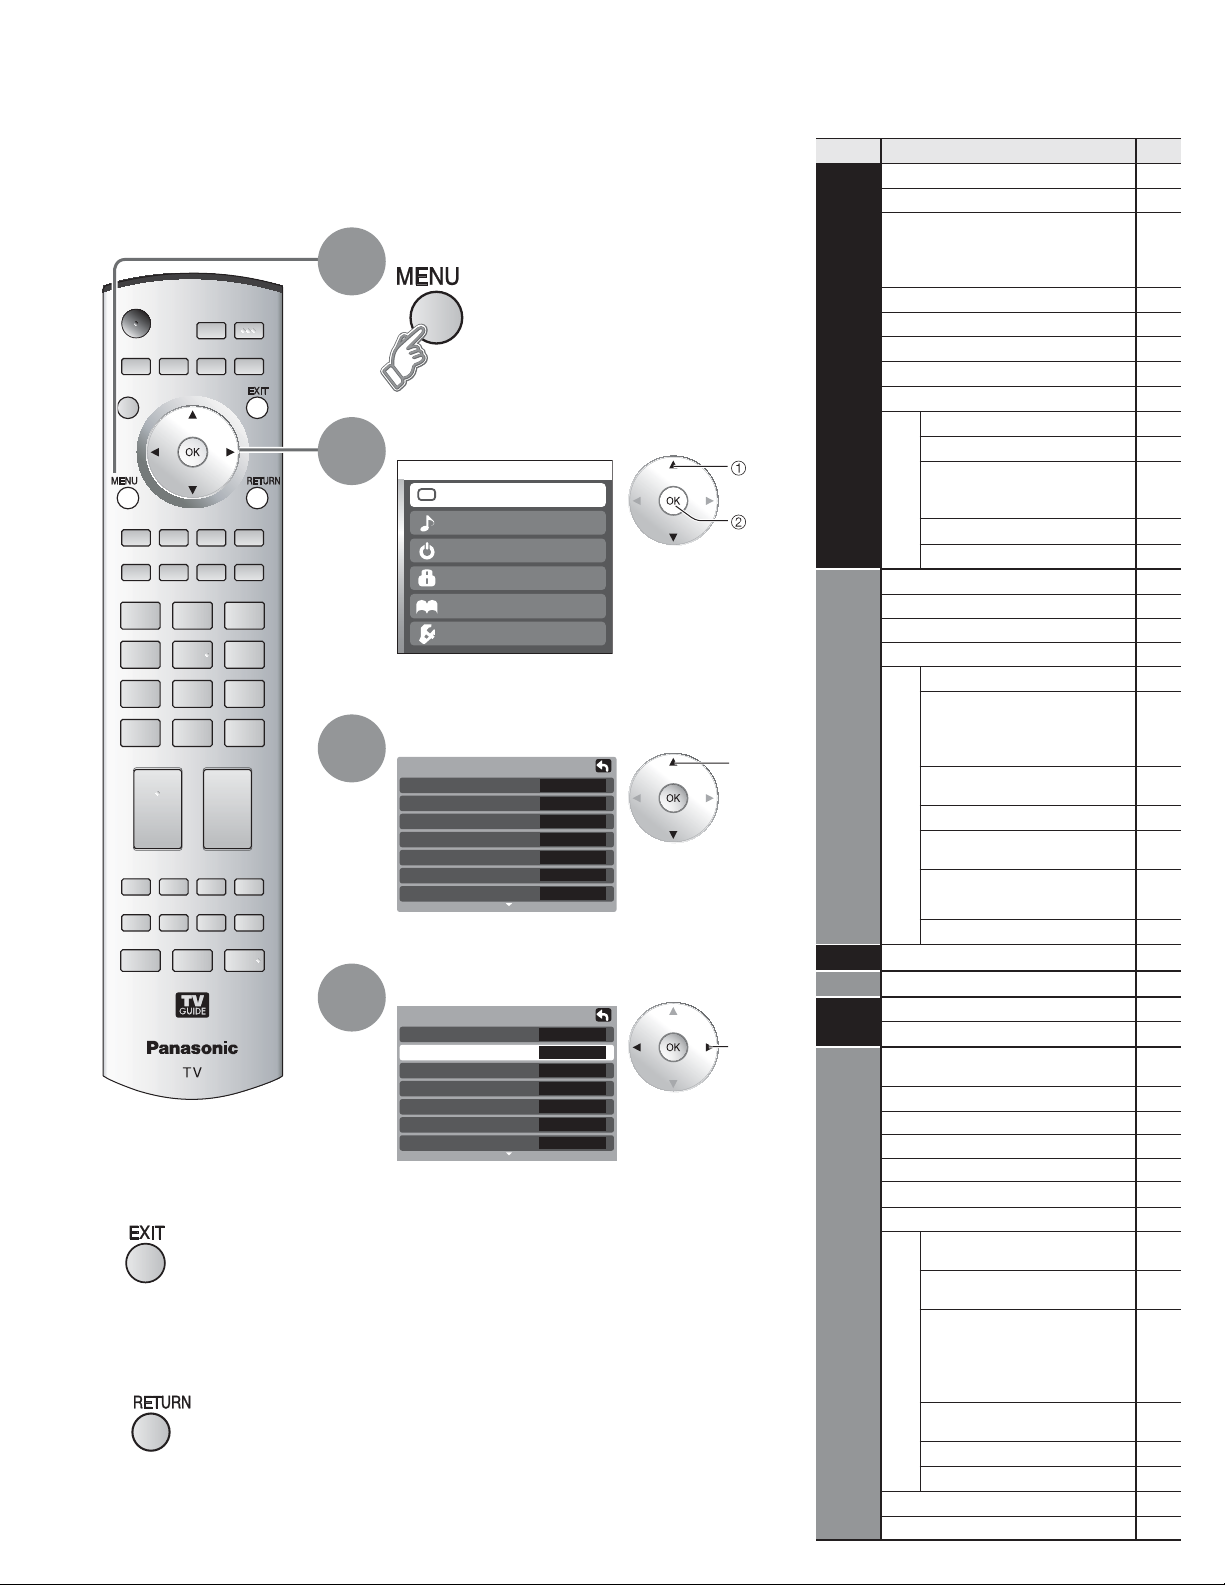
How to Use Menu Functions
Menu list
Ŷ
Various menus allow you to make settings for the picture, sound, and
other functions so that you can enjoy watching TV in your own way.
Menu Item
Normal
Pic. mode
Press to return
Ŷ
to TV
1
2
3
4
Display menu
Displays the functions that
•
can be set (varies according
to the input signal)
Select the menu
Menu
Picture
Audio
Timer
Lock
Memory card
TVG/Photo
Setup
Select the item
Picture 1/2
Normal
Pic. mode
Picture
Brightness
Color
Tint
Sharpness
(example: Picture menu)
No
Standard
+30
+10
Adjust or select
Picture 1/2
Normal
Pic. mode
Picture
Brightness
Color
Tint
Sharpness
(example: Picture menu)
No
Standard
+30
+10
Picture, Brightness,
Color, Tint, Sharpness
Color temp
Picture
Color mng.
C.A.T.S.
Zoom adjust
PC adjust
Other adjust
Video NR
select
next
Audio
select
0
0
0
Timer
3D Y/C filter
Color matrix
MPEG NR
Black level
Normal
Bass
Treble
Balance
AI sound
BBE VIVA 3D
Other adjust
BBE
Surround
Speakers
HDMI1 in
HDMI2 in
Audio leveler
Sleep, Timer1-5
Lock
TVG/
adjust
or
0
0
0
select
Photo
Memory card
TV Guide
CH scan
Language
Clock
Program channel
Input labels
CC
SD card LED
Setup
Auto power on
32
Press to return
Ŷ
to the previous
screen
Side bar
Other adjust
Prog-out stop
Ctrl with HDMI
Power off link
Power on link
About
Reset
Page 33
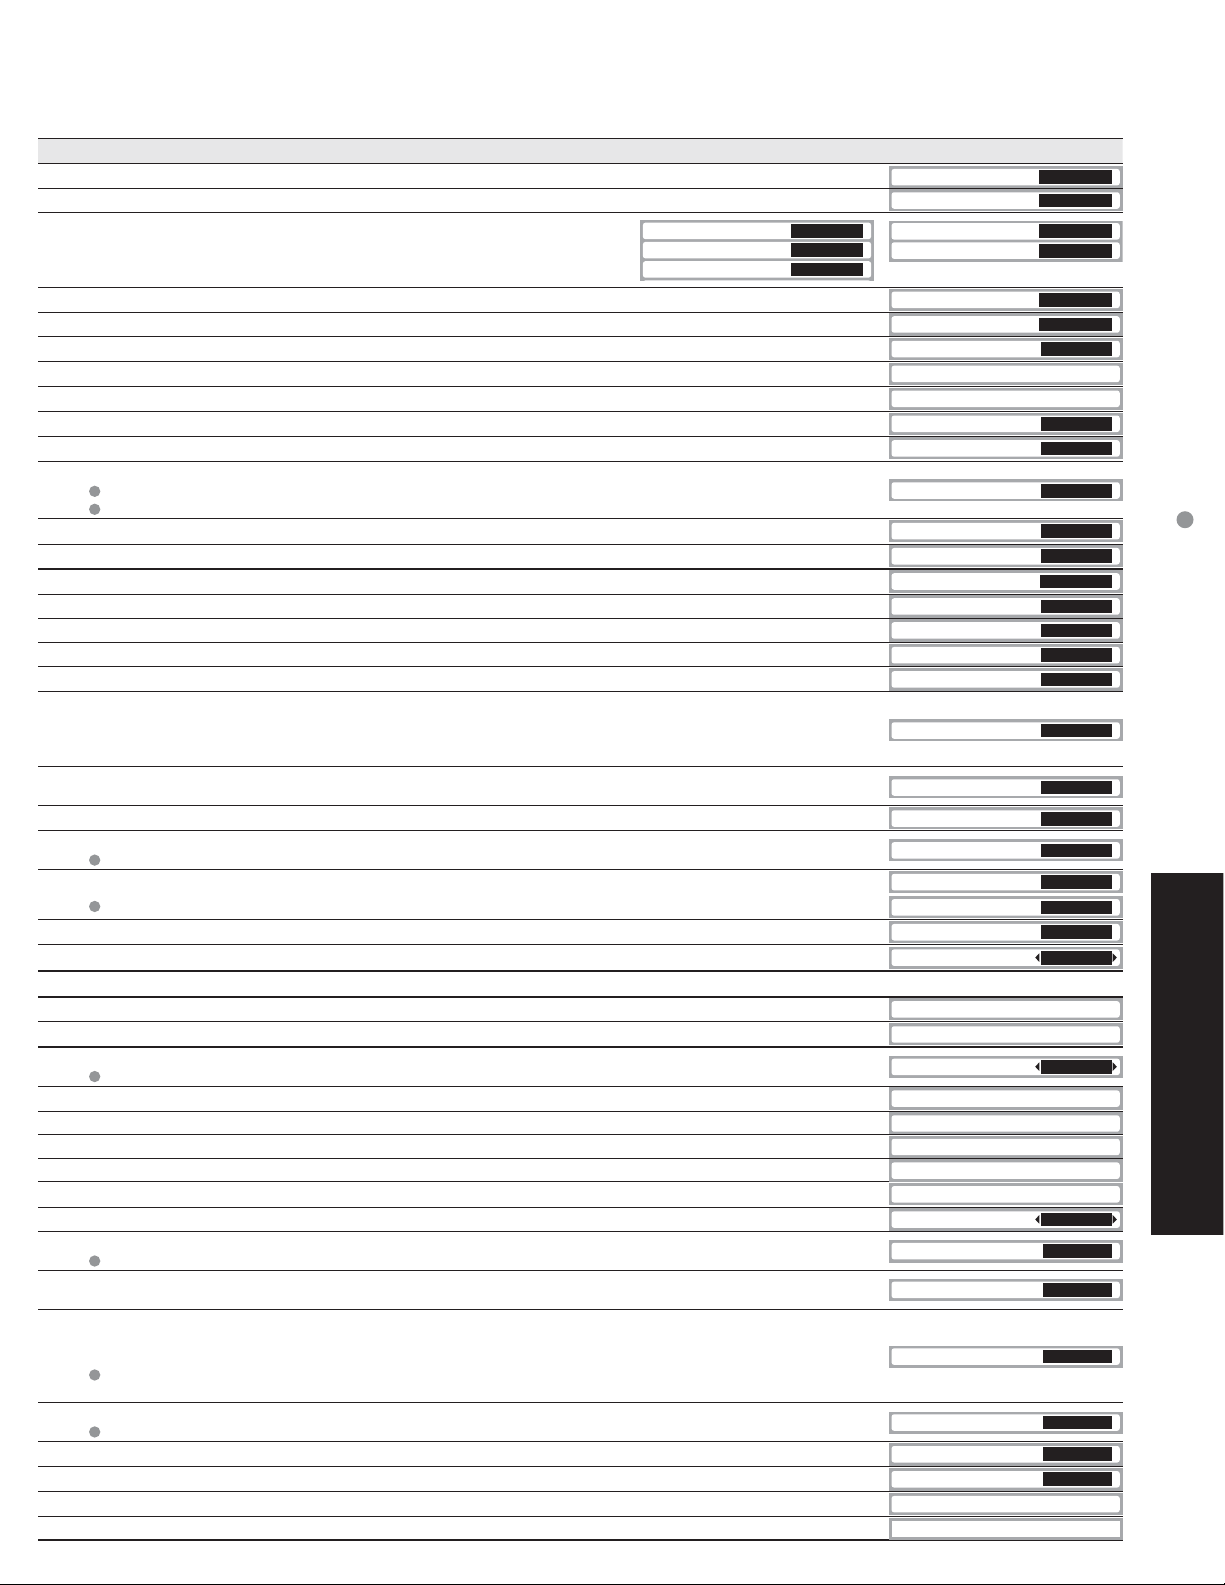
In AV mode, the Audio menu and Setup menu give a smaller number of options.
•
Adjustments/Configurations (alternatives)
Resets all picture adjustments to factory default settings except for “Other adjust”
Basic picture mode (Vivid/Standard/Cinema) (p. 55)
Adjusts color, brightness, etc. for each picture mode to suit your
taste
Selects level of warm colors (red) and cool colors (blue) (Warm/Cool/Normal)
On : enhances green and blue color reproduction, especially outdoor scenes. (On/Off)
Adjusts the brightness and gradation accordingly, to optimize contrast. (On/Off)
Adjusts vertical alignment and size when aspect setting is “ZOOM” (p. 52)
Sets PC display (p. 30)
Reduces noise, commonly called snow. Leave off when receiving a strong signal. (On/Off)
Minimizes noise and cross-color in the picture. (On/Off)
Selects image resolution of component-connected devices (SD/HD)
SD: normal vision HD: high-definition vision
Only 480p signal accepted; regular TV (NTSC) is not available.
Reduces noise of specific digital signals of DVD, STB, etc. (On/Off)
Select Dark or Light. Valid only for external input signals. (Dark/Light)
Reset Bass, Treble and Balance adjustments to factory default settings.
Increase or decrease the bass response.
Increase or decrease the treble response.
Emphasize the left / right speaker volume.
Equalize overall volume levels across all channels and external inputs. (On/Off)
BBE ViVA HD3D (High Definition 3D) Sound provides musically accurate natural 3D image with Hi-Fi sound.
The clarity of the sound is improved by BBE while the width, depth and height of sound image are expanded
by BBE’s proprietary 3D sound process. BBE ViVA HD3D Sound is compatible with all TV programs
including news, music, dramas, movies, sports and electronic games.
BBE High Definition Sound restores clarity and presence for better speech intelligibility and
musical realism. (On/Off)
Enhances audio response when listening to stereo. (On/Off)
Switch to “Off” when using external speakers (On/Off)
“AI sound”, “Surround” and “Audio leveler” do not work if “Off” is selected
Selects according to the signal when HDMI is connected (Auto/Digital/Analog)
Auto: Automatically selects Analog / Digital signal
Minimizes volume disparity after switching to external inputs
The TV can automatically turn On/Off at the designated date and time (p. 44)
Locks the channels and programs (p. 38)
Displays SD card data (p. 26)
Enter the TV Guide
Selects the channel with “Program up/down” button (Fav./All)
Fav.: Only channels registered as FAVORITE (p. 19)
Selects the screen menu language (p. 13)
Adjusts the clock (p. 13)
Sets channels (p. 40)
Select the terminal and the label of the external equipment (p. 42)
Displays subtitles (Closed Caption) (p. 42)
Set to “On”, if you light SD card LED while SD card is inserted. (On/Off)
Turns TV On automatically when the cable box or a connected device is turned On (Set/Off)
The Sleep Timer and On / Off timer will not function if “Auto power on” is set.
Increases the brightness of the side bar (Off/Dark/Mid/Bright) (4:3 mode only)
The recommended setting is Bright to prevent panel “after image”. (P. 55)
To prevent howling and image oscillation, stops output of the pictures and audio specified in this
menu. (p. 47)
(Off/Comp.1/Comp.2/HDMI 1/HDMI 2/Video 1/Video 2/Video 3)
When recording with a VCR using TV Guide, set “Prog-out stop” setting to the terminal
connected the VCR.
Controls equipment connected to HDMI terminals (p. 34) (On/Off)
“Power off link” and “Power on link” do not work if “Off” is selected.
Sets “Power off link” of HDMI connection equipment (p. 34) (Set/No)
Sets “Power on link” of HDMI connection equipment (p. 34) (Set/No)
Displays TV version, software license and CableCARD™ information
Performing Reset will clear all items set with Setup, such as channel settings. (p. 40)
(On/Off)
Picture
Brightness
Color
+30
Tint
0
Sharpness
0
C.A.T.S. Off
Zoom adjust
PC adjust
Video NR Off
3D Y/C filter Off
Color matrix SD
MPEG NR Off
Black level Dark
BBE VIVA 3D On
BBE On
Memory card
TV Guide
CH scan
Language
Clock
Program channel
Input labels
CC
SD card LED
Auto power on
Side bar
Prog-out stop
Ctrl with HDMI
Power off link
Power on link
About
Reset
NoNormal
StandardPic. mode
0
+10
CoolColor temp
OffColor mng.
How to Use Menu Functions
(picture, sound quality, etc.)
SetNormal
+ 7Bass
+ 7Treble
0Balance
OnAI sound
OffSurround
OnSpeakers
AutoHDMI1 in
AutoHDMI2 in
0Audio leveler
60Sleep
Advanced
All
On
Off
Bright
Off
On
Set
Set
33
Page 34
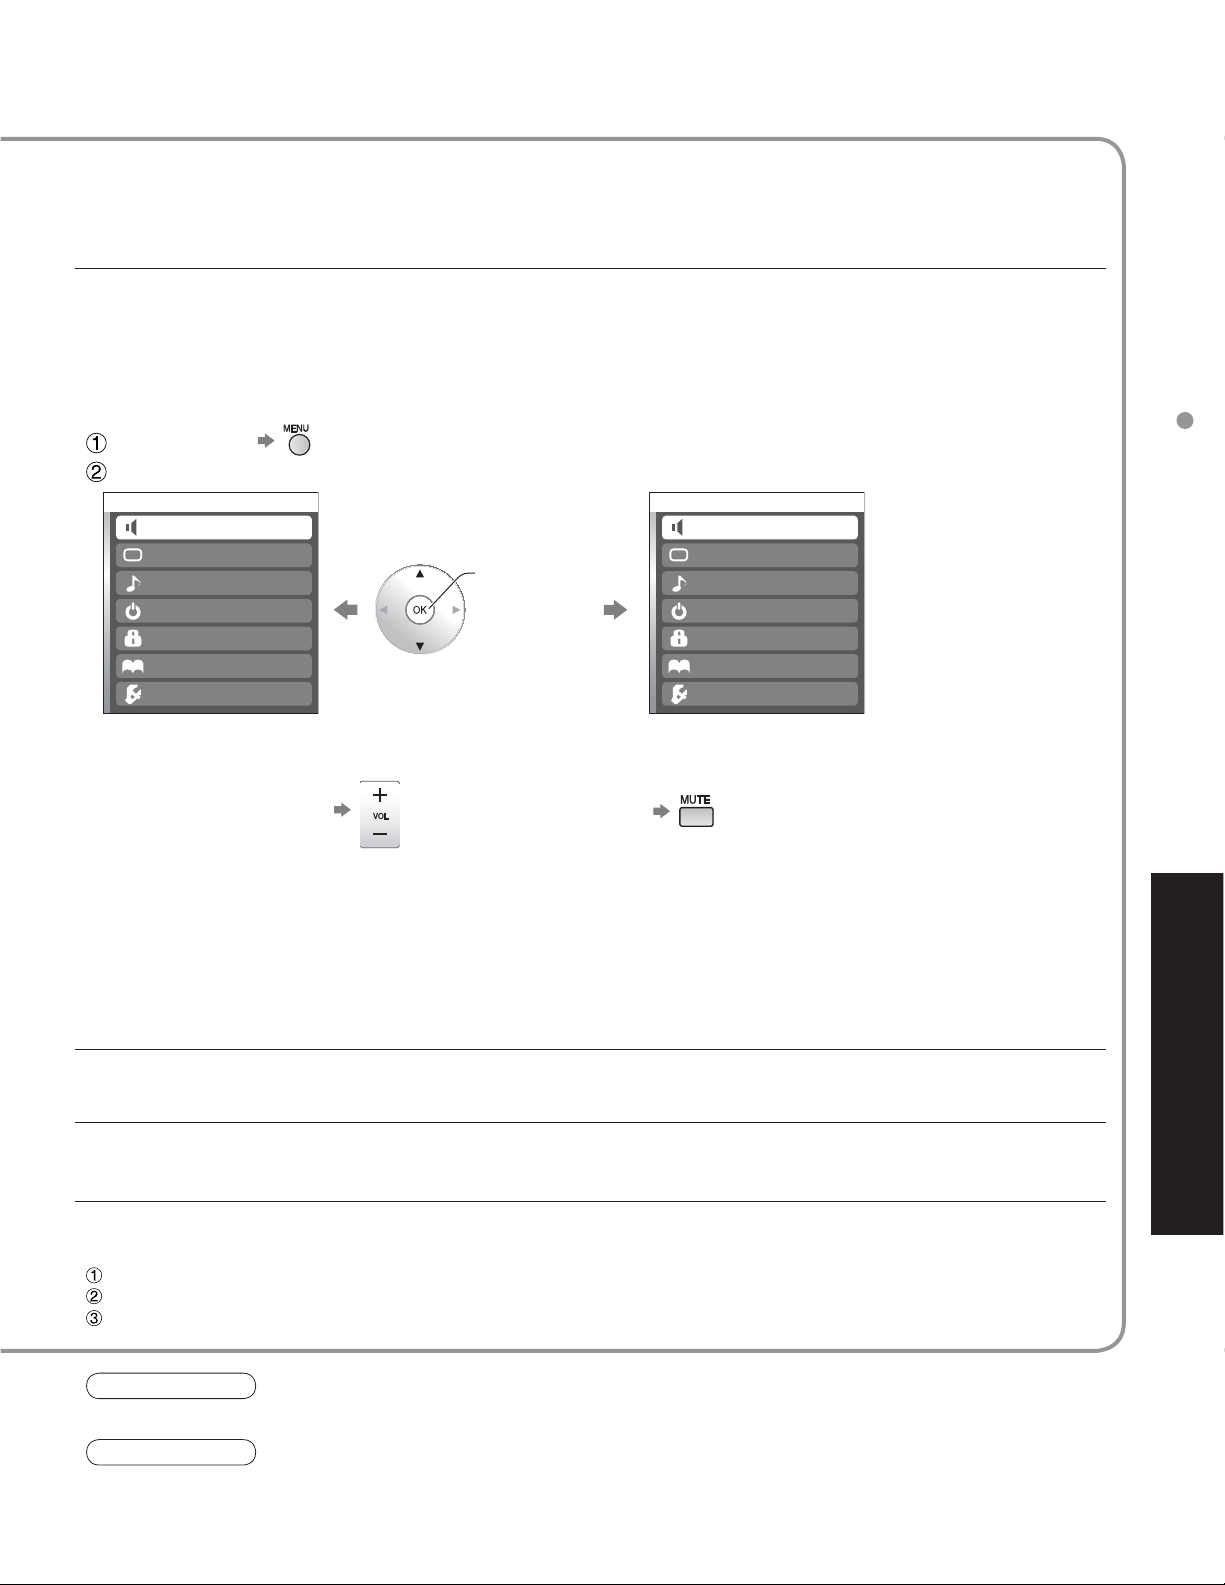
-
TM
Control with HDMI “HDAVI Control
* Simultaneously control all Panasonic “HDAVI Control” equipped components using
one-button on one remote.
Newer Panasonic audio-video products with HDMI output connections can be
controlled using the TV’s remote. Limited features such as home theater system
volume and automatic switching to the TV’s HDMI input are available.
This feature is limited to models incorporating Panasonic’s “Control with HDMI”. Refer to the
•
individual instruction manuals for compatibility information.
Non-HDMI-compliant cables cannot be utilized.
•
It is recommended that you use Panasonic’s HDMI cable.
•
Recommended part number: RP-CDHG15 (1.5 m), RP-CDHG30 (3.0 m), RP-CDHG50 (5.0 m)
Display menu
1
Select “Setup”
2
Menu
Home theater
Picture
Audio
Timer
Lock
Memory card
TVG/Photo
Setup
select
next
Automatic
input
switching
Theater
speaker
”
Press to return
Ŷ
to TV
Press to return
Ŷ
to the previous
screen
3
Select “Other adjust”
Setup
Other adjust
About
Reset
select
next
Power on
4
Select “Ctrl with HDMI”
Other adjust
Auto power on
Side bar
Prog-out stop
Ctrl with HDMI
Power off link
Power on link
Off
Off
Off
On
Set
Set
select
link
Power off
link
One-touch
theater
Select “On”
playback
5
change
Default setting is “On”. If no HDMI equipment is
•
connected or standard HDMI equipment (non- “Control
with HDMI”) is used, set to “Off”.
34
Page 35
At the start of DIGA, Player theater or RAM theater playback, the TV’s input automatically switches to the input
corresponding to the playback equipment.
For RAM theater, the speakers automatically switch to theater.
•
If using DIGA operation, the TV’s input automatically switches to DIGA and the DIGA menu is displayed.
You can control the theater speaker with TV’s remote control.
“Home theater” with speaker icon appears when a Panasonic “Control with HDMI” home theater system is
connected via the HDMI input (1 or 2).
Pressing the OK button toggles between TV and home theater volume control.
“Ctrl with HDMI” must be set to “On”.
•
Limited to newer Panasonic Home Theater, RAM theater and DIGA/DVD models with “Control with HDMI”.
•
Display menu
Select “Home theater” or “TV speakers”
Menu
Home theater
Picture
Audio
Timer
Lock
TVG/Photo
Setup
Home theater:
Ŷ
Adjustment for Panasonic Amplifier, Panasonic Player theater, Panasonic RAM theater
change
Menu
TV speakers
Picture
Audio
Timer
Lock
TVG/Photo
Memory card
Setup
Control with HDMI “HDAVI Control
Volume up / down
TV speakers:
Ŷ
The TV speakers are active.
When selecting “Home theater”, the sound of TV speakers is muted.
•
When “Home theater” is selected, the home theater volume control can be raised or lowered using the TV remote
•
volume button. The TV will display “Home Theater + / -” on screen.
If home theater/RAM theater/Player theater is currently off, selecting the “Home theater” option will automatically
•
turn the equipment on. See “Power on link” below.
If home theater/Player theater/RAM theater power is turned Off, speakers automatically switch to the TV.
•
When “Set” is selected, this allows for the TV to automatically turn on and switch to the appropriate HDMI input
whenever a “Control with HDMI” compatible DVD player/recorder is initially turned on and Play mode is selected.
When “Set” is selected, this allows for the TV to turn off and also turn off the connected home theater/
RAM theater/player theater and/or DIGA-DVD player.
If the “ONE TOUCH PLAY” key is pressed on the AV amp or Player theater remote control, the following sequence of operations
is performed automatically.
Home theater/Player theater power switches On, and playback begins.
TV power switches On, and the playback screen is displayed.
Audio is muted on the TV and switches to theater.
Caution
The TV remains on even if the “Control with HDMI” compatible equipment is turned off.
•
Note
Before using HDMI control functions, the connected equipment (DIGA, RAM theater, Player theater, AV amp) must
•
also be set. For details, see the operation manual for each equipment.
For equipment connection details, see p. 36.
•
Mute
TM
”
Advanced
35
Page 36
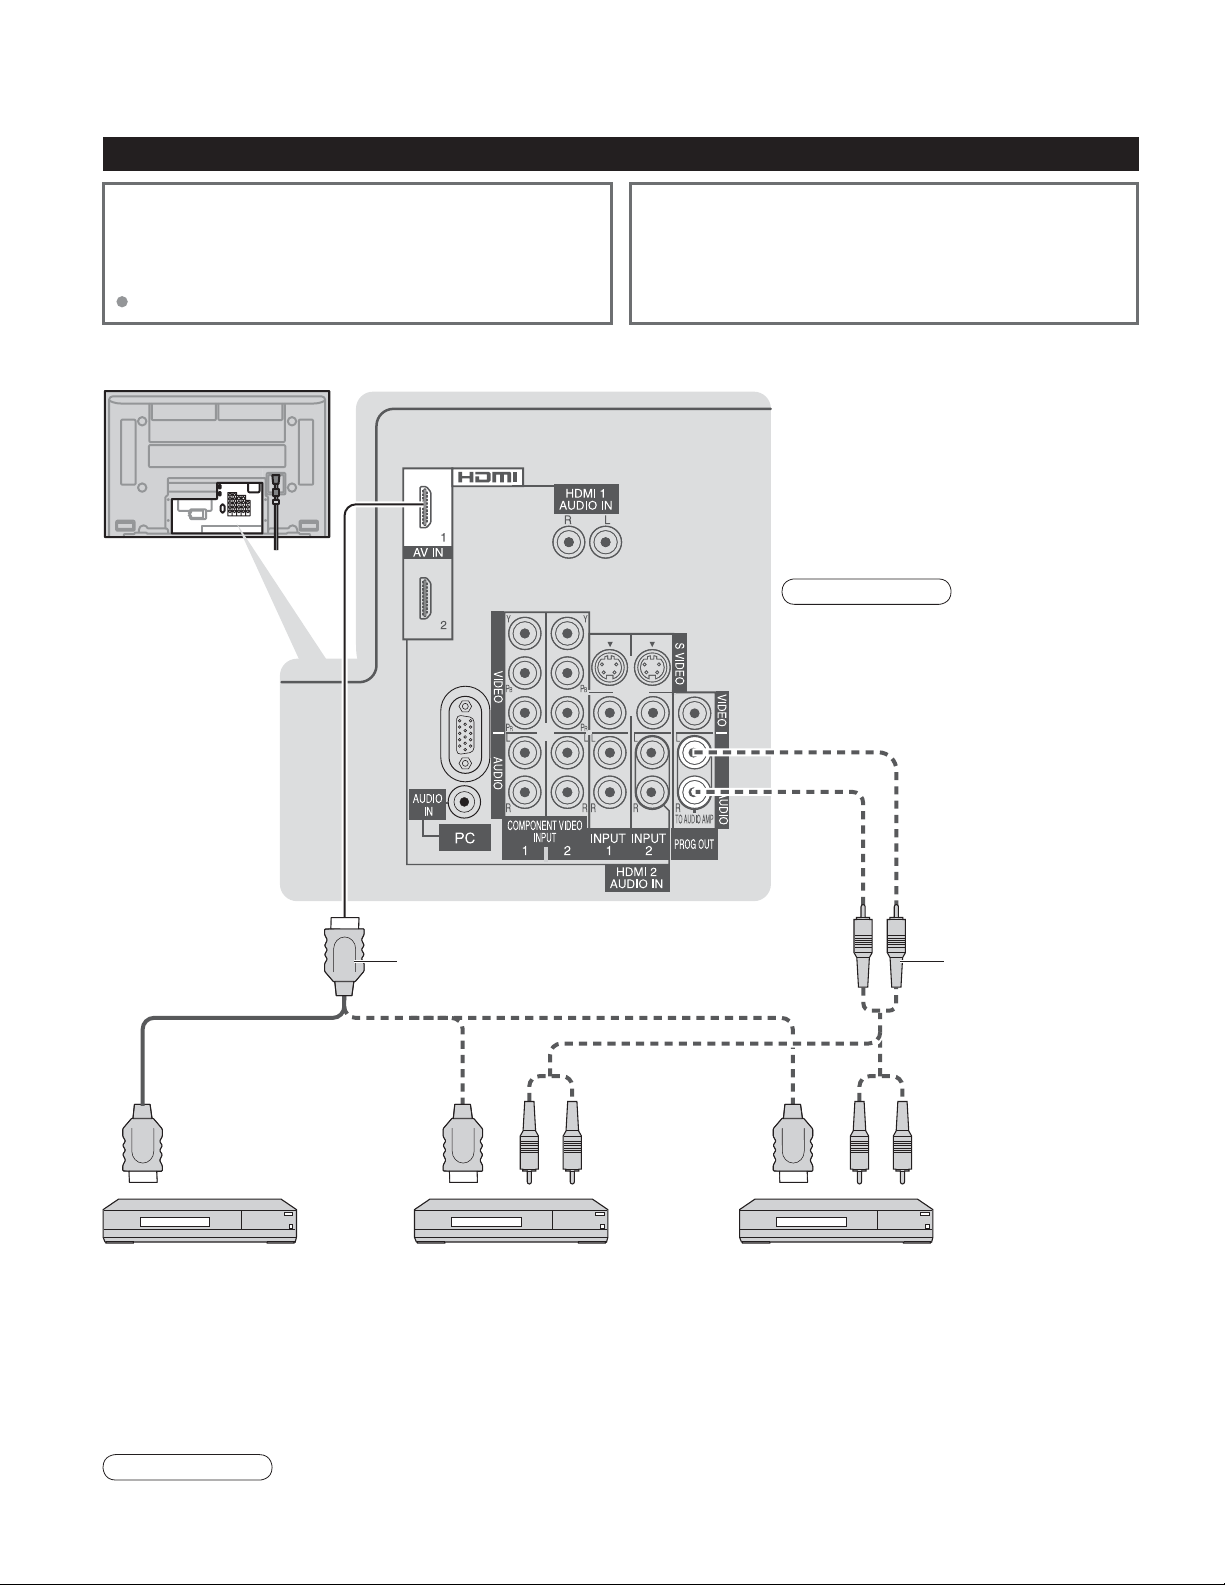
TM
Control with HDMI “HDAVI Control
Recommended HDMI Connections
”
Follow the connection diagrams below for HDMI control of
a single AV piece of equipment such as a Panasonic DIGADVD recorder, RAM Theater or Player Theater system.
Refer to page 34 for Setup Menu settings and additional
control information.
Optional HDMI and/or optical cables are not provided.
Connecting this unit to a DVD recorder, RAM theater or Player theater
Ŷ
If connection (or setting) of equipment compatible with HDMI
control is changed, switch the power of this unit Off then On
again while the power of all equipment is On (so that the
unit can correctly recognize the connected equipment) and
check that DIGA, RAM theater and Player theater playback
operates.
•
•
Connect with HDMI cable and audio
Connect the TV’s PROG. OUT audio
Back of the unit
•
When connecting to HDMI 2, set the
For DIGA :
Connect with HDMI cable
For RAM theater and Player theater :
cable.
(L&R) to listen to the TV program
through the theater system.
Note
HDMI 1 is recommended.
input mode to HDMI 2 (p. 29) initially
before connecting to HDMI 2. After
connection, confirm the HDMI control
functions (p. 34-35).
36
Audio CableHDMI cable
HDMI
(AV OUT)
DIGA
(Panasonic DVD Recorder)
Setting of this unit after connection
Ŷ
After making connections as shown above, set “Ctrl with HDMI” (under “Other adjust”) to “On” using the Setup
menu. (p. 34).
Note
Individual HDMI equipment may require additional menu settings specific to each model. Please refer to their
•
respective operating instruction manuals.
HDMI
(AV OUT)
or or
Panasonic RAM theater Panasonic Player theater
Audio
IN
HDMI
(AV OUT)
Audio
IN
Page 37
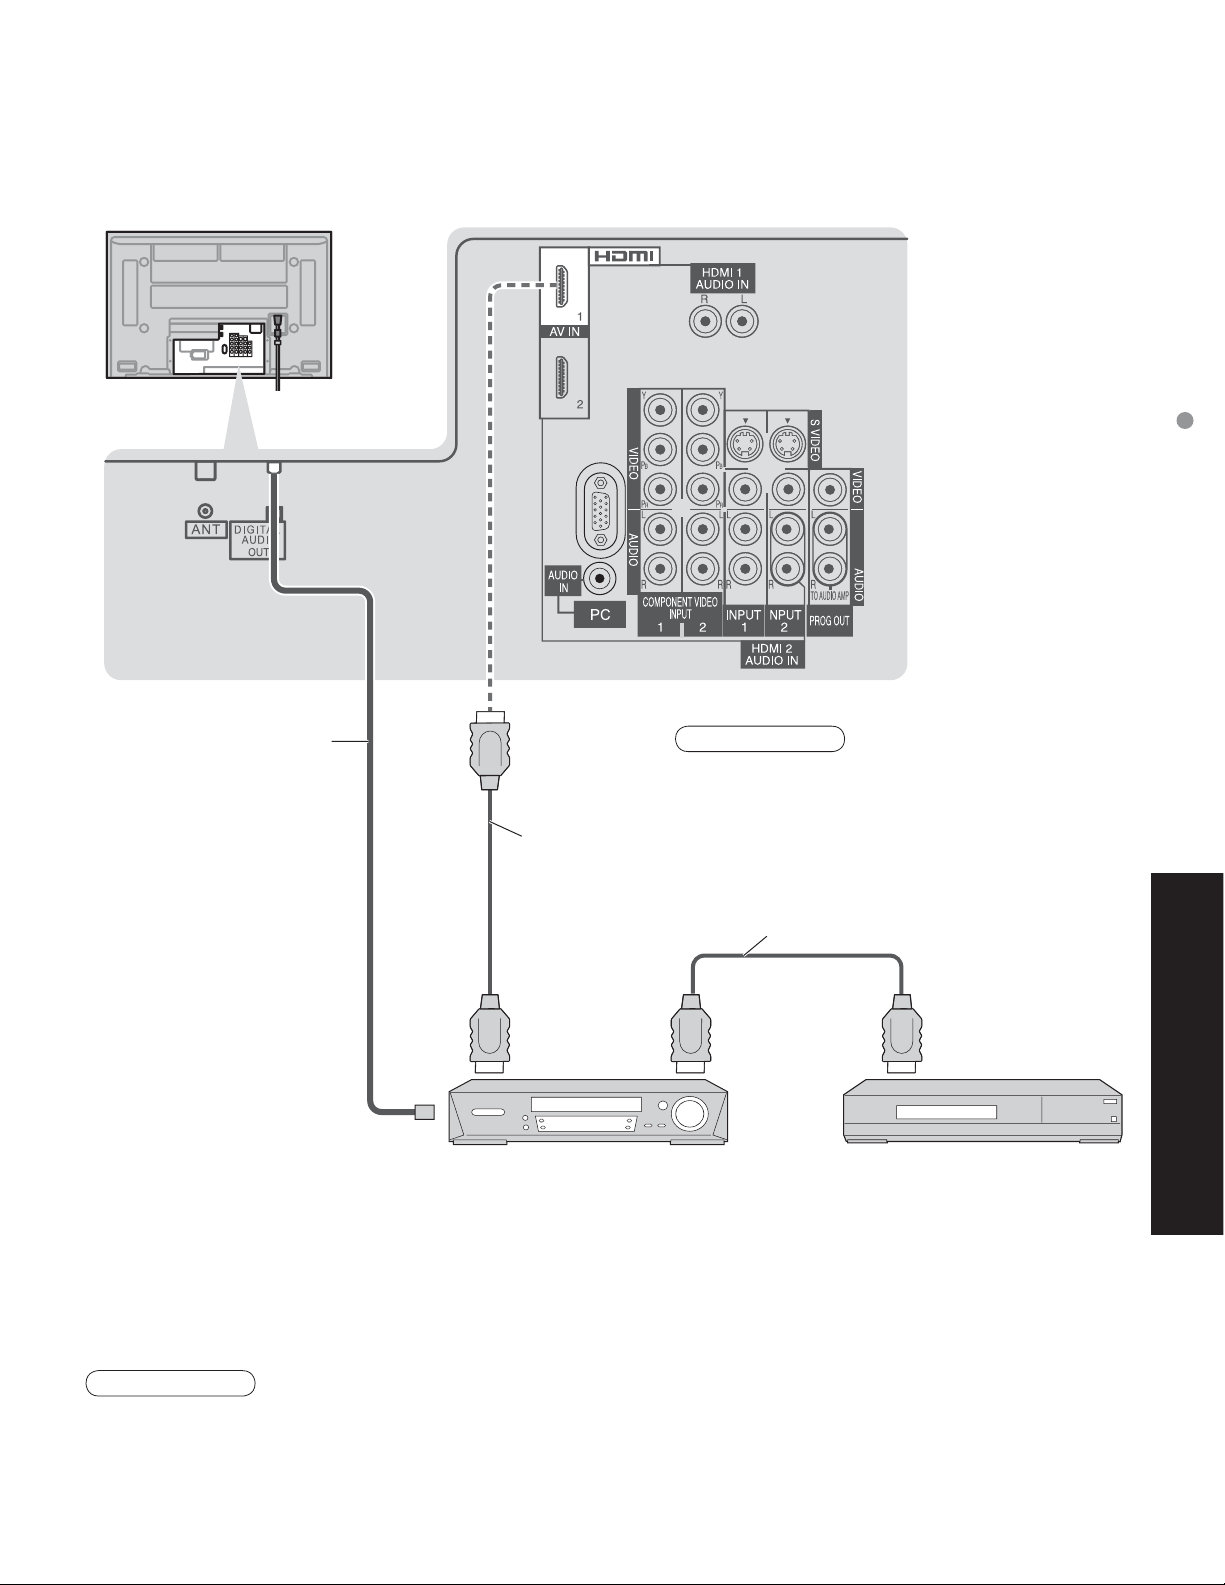
Connecting this unit to a DVD recorder and AV amp
Ŷ
When using an “Control with HDMI” audio-video amplifier and a compatible DIGA recorder, use a daisy chain
connection as shown below.
Control with HDMI “HDAVI Control
Optic fiber
HDMI cable
Digital audio input
(Optic)
HDMI
One AV amp and one
•
DIGA recorder can be
operated with this unit.
Be sure to connect the AV
•
amp between this unit and
the DIGA recorder.
Setting of this unit after connection
Ŷ
After making connections as shown above, set “Ctrl with HDMI” (under “Other adjust”) to “On” using the Setup
menu. (p. 34).
(AV OUT)
Panasonic AV amp
Note
HDMI 1 is recommended.
•
When connecting to HDMI 2, set the input mode
to HDMI 2 (p. 29) initially before connecting to
HDMI 2. After connection, confirm the HDMI
control functions (p. 34-35).
HDMI cable
HDMI
(AV IN)
DIGA (Panasonic DVD Recorder)
HDMI
(AV OUT)
TM
”
Advanced
Note
Individual HDMI equipment may require additional menu settings specific to each model. Please refer to their
•
respective operating instruction manuals.
When audio from other equipment connected to this unit via HDMI is output using “DIGITAL AUDIO OUT” of this
•
unit, the system switches to 2CH audio.
(When connecting to an AV amp via HDMI, you can enjoy higher sound quality.)
37
Page 38
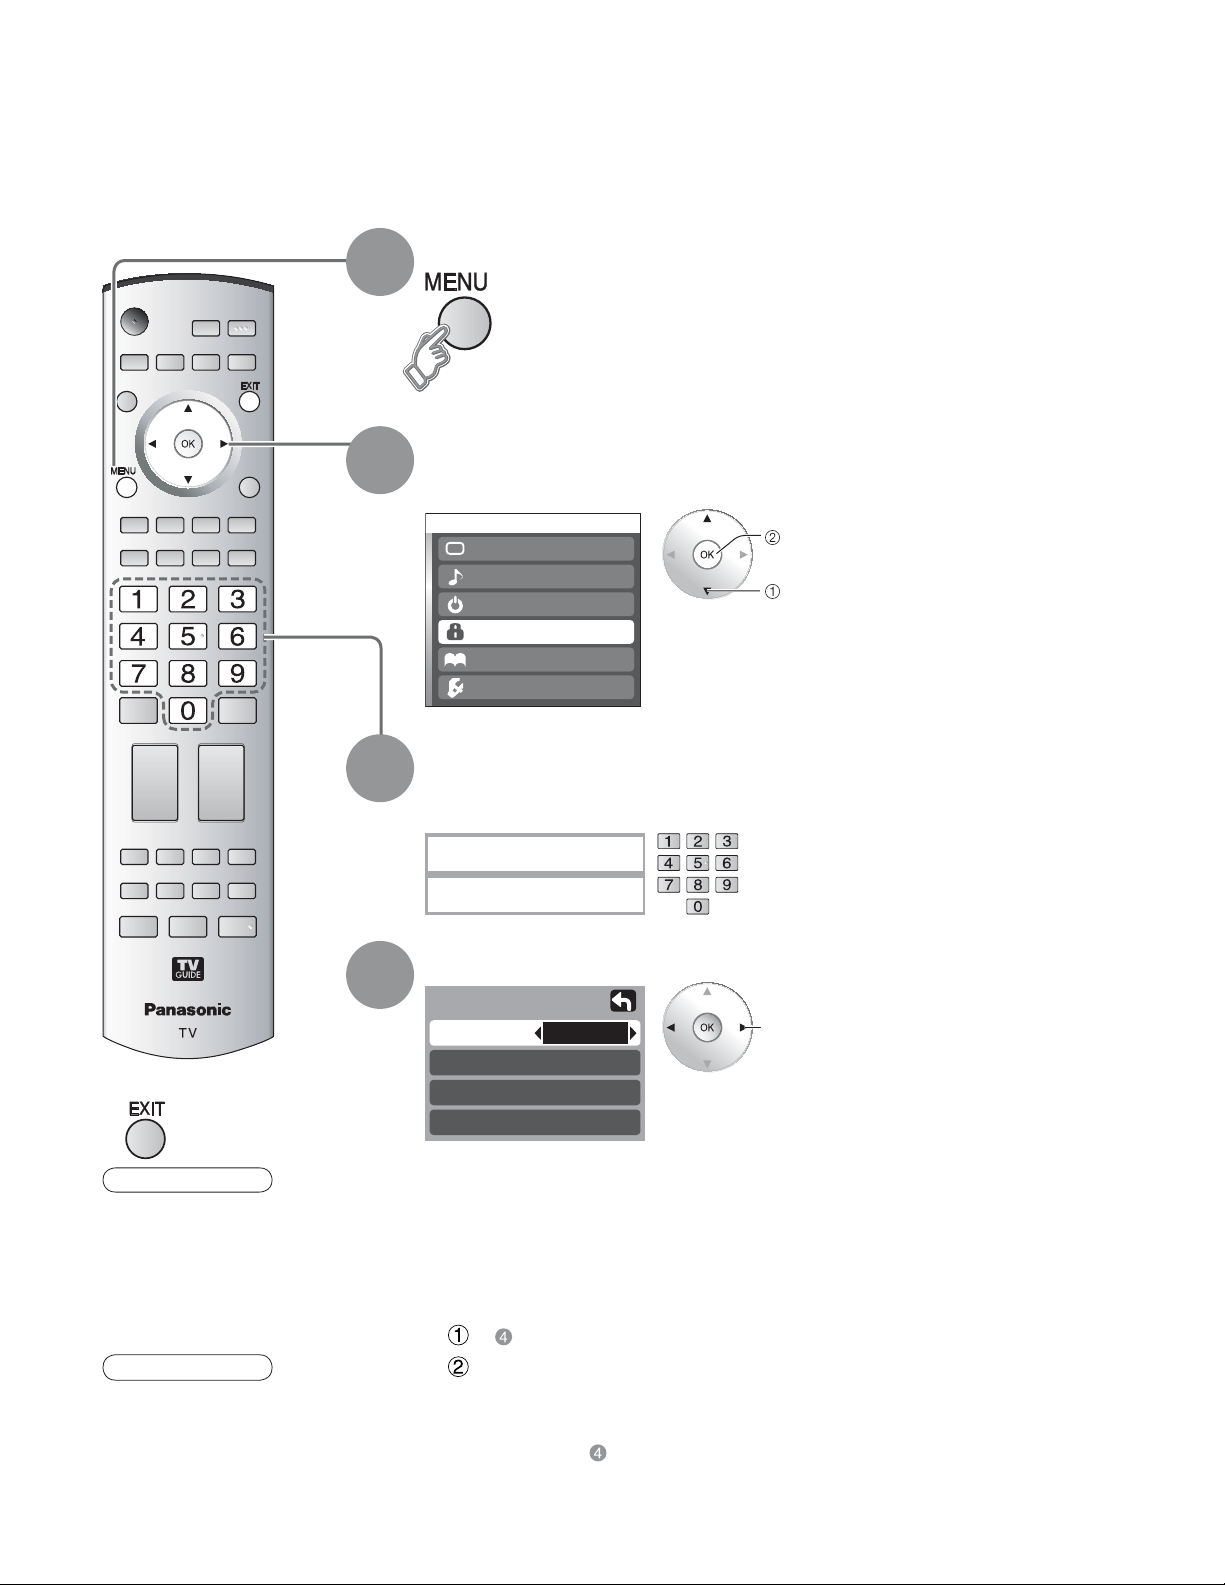
-
Channel Lock
You can lock out specified channels or shows to prevent children from watching objectionable content.
Display menu
1
Select “Lock”
2
You will be asked to enter your password each time you display the Lock menu.
Press to exit
Ŷ
Menu
Picture
Audio
Timer
Lock
TVG/Photo
Memory card
Setup
next
select
Input your 4-digit password
3
A 4-digit code must be entered to view a blocked program or change rating
settings.
Enter password.
----
If it is the first time to enter the
•
password, enter the number twice in
order to register it.
Select the Lock mode
4
Lock
Mode
Channel
Program
Change password
Off
select
38
Caution
Make a note of your
•
password in case
you forget it. (If you
have forgotten your
password, consult your
local dealer.)
Note
When you select a
•
locked channel,
a message will be
displayed that allows
you to view the
channel if you input
your password.
Off: “Channel lock” not activated
•
All: Locks all channels and external inputs
•
Game: Locks CH3, CH4, and external inputs
•
CH: Locks specified channels (analog/digital)
•
To change the password
Ŷ
In , select “Change password” and press “OK” button
Input the new 4-digit password twice
To cancel the “Channel lock”
Ŷ
Select “Off” in
Page 39
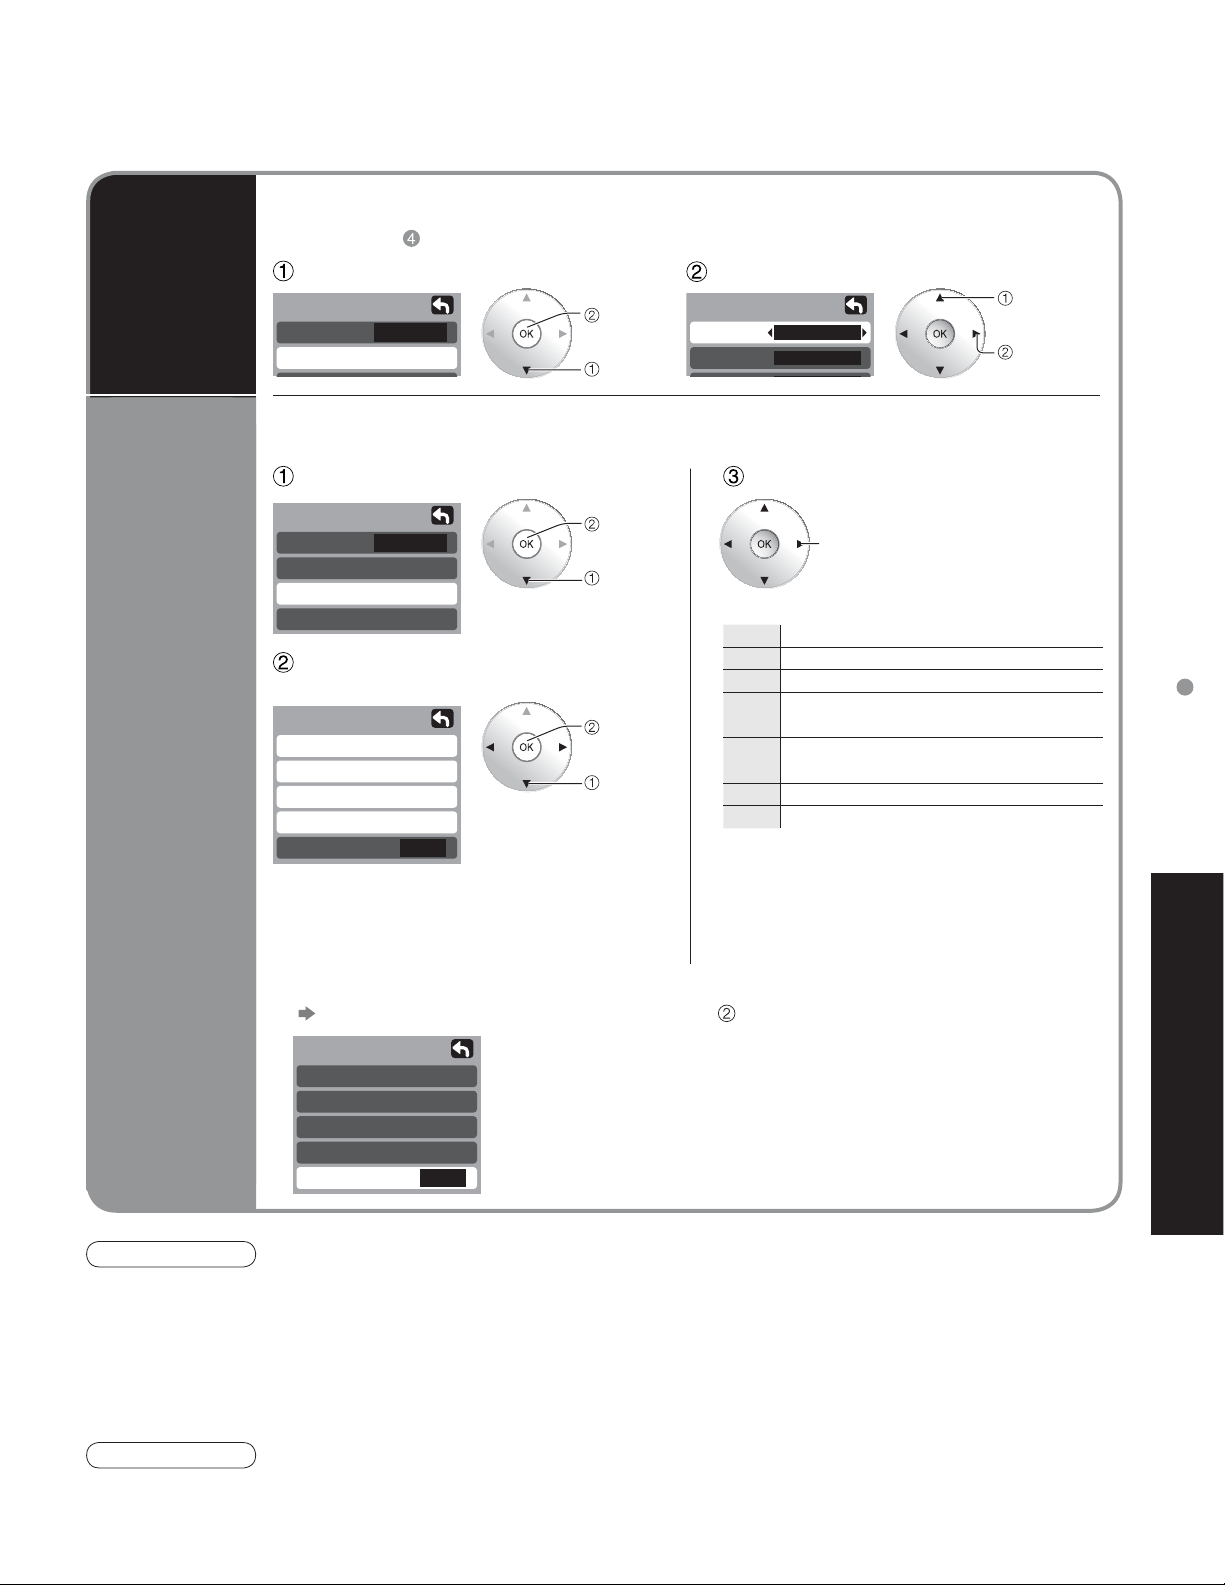
To select the channel or the rating of the program to be locked
Ŷ
Select up to 7 (1-7) channels to be blocked out. These channels will be blocked out regardless
of the program rating.
Channel
Lock
Select “CH” in
Select “Channel”
Lock
Mode
Channel
To set rating level
Ŷ
“V-chip” technology enables restricted shows to be locked according to TV ratings.
Select “Program”
on p. 38
CH
next
select
Channel lock
CH 1
CH 2
Select channel to lock
select
“CH1-7”
3 - 0
select
channel
Select the rating to be locked
Block
program
Lock
Mode
Channel
Program
Change password
Select the rating category you wish
to follow
Program lock
MPAA
U.S.TV
C.E.L.R.
C.F.L.R.
Monitor out
MPAA : U.S movie ratings
•
U.S.TV : U.S TV program ratings
•
C.E.L.R : Canadian English ratings
•
C.F.L.R : Canadian French ratings
•
To disable recording of the locked program
Ŷ
Select “Monitor out” in “Program lock” menu ( )
Program lock
MPAA
U.S.TV
C.E.L.R.
C.F.L.R.
Monitor out
CH
On
Off
next
select
set
select
On : Turns on the monitor terminal output for programs that
have been set to “Blocked.”
Off : Turns off the monitor terminal output for programs that
have been set to “Blocked.”
select
Example of “MPAA” (U.S movie ratings)
Off No rating
G General Audience: All ages admitted
PG Parental Guidance Suggested
PG-13
NC-17 No one 17 and under admitted
•
Parents Strongly Cautioned: Inappropriate
for children under 13
Restricted: Under 17 requires
R
accompanying parent or adult guardian
X Adults only
To get other information (p. 51)
Channel Lock
Advanced
Caution
The V-Chip system that is used in this set is capable of blocking “NR” programs (non rated, not applicable and
•
none) as per FCC Rules Section15.120(e)(2). If the option of blocking “NR” programs is chosen “unexpected and
possibly confusing results may occur, and you may not receive emergency bulletins or any of the following types of
programming:”
• Emergency Bulletins (Such as EAS messages, weather warnings and others)
• Locally originated programming • News • Political • Public Service Announcements • Religious • Sports
• Weather
Note
The Off rating is independent of other ratings.
•
When placing a block on a specific age based rating level, the Off rating and any other more restrictive ratings will
•
also be blocked.
39
Page 40
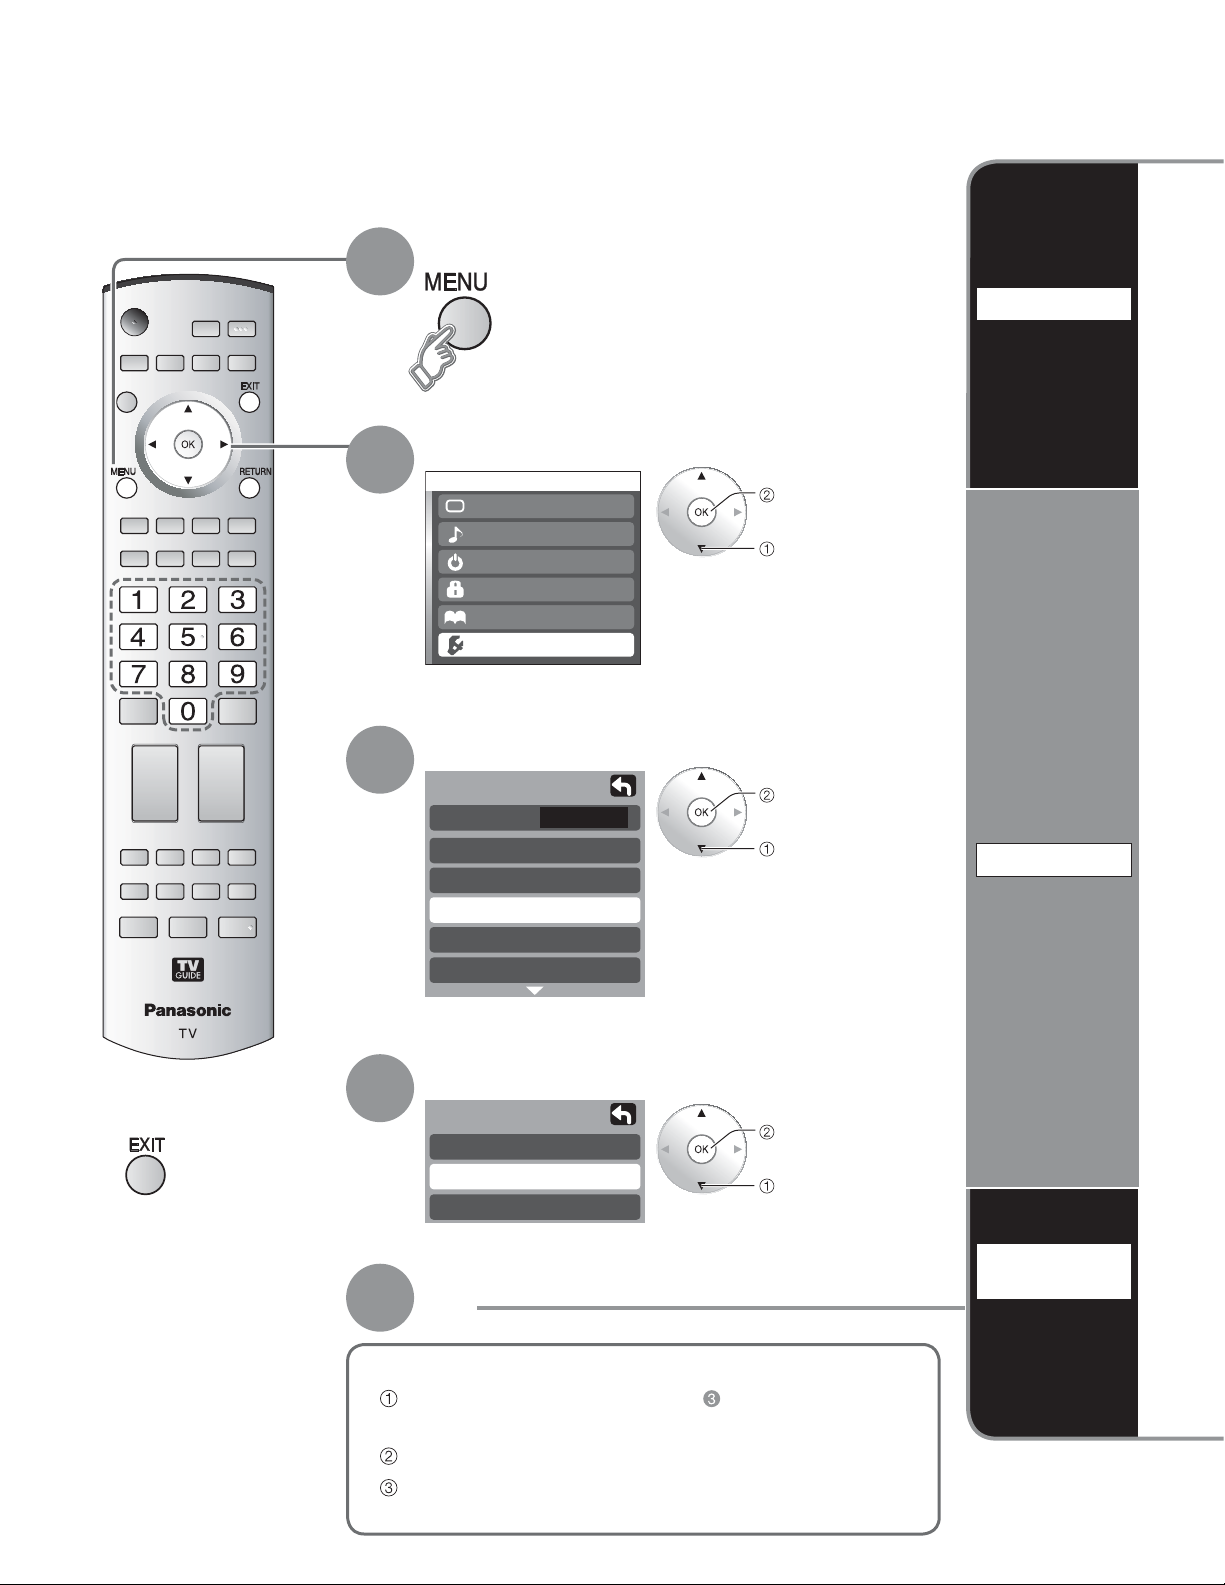
-
Editing and Setting Channels
The current channel settings can be changed according to your needs and reception conditions.
Display menu
1
Auto
Set
automatically
Select “Setup”
2
Menu
Picture
Audio
Timer
Lock
Memory card
TVG/Photo
Setup
next
select
Press to exit
Ŷ
Select “Program channel”
3
Setup
CH scan
Language
Clock
Program channel
Input labels
CC
All
next
select
Manual
Set
manually
Select the function
4
5
Ŷ
Program channel
Auto
Manual
Signal meter
next
select
Set
To reset the settings of Setup menu
Select “Reset” in Setup menu ( ) and press “OK”
button
Input your 4-digit password with number buttons
Select “Yes” on the confirmation screen and press
“OK” button
Signal
meter
Check
signal
strength
40
Page 41
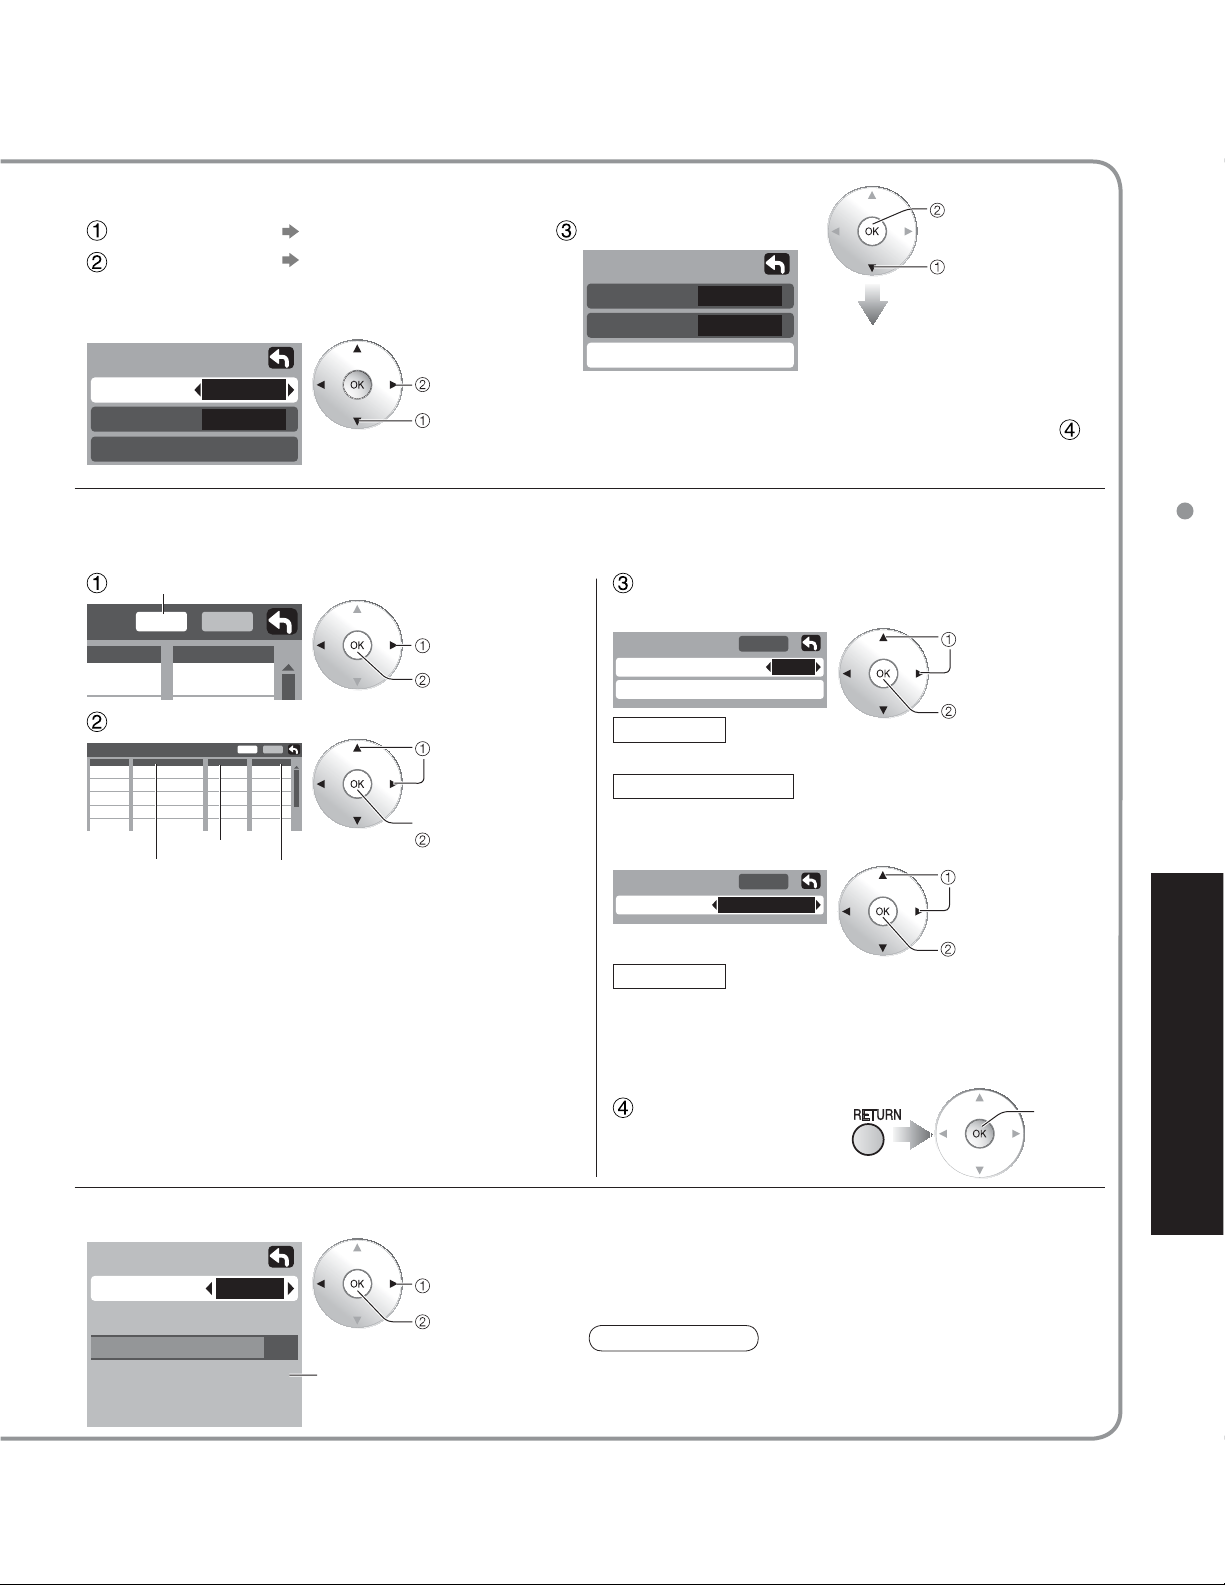
Automatically searches and adds active channels to memory.
Select “ANT In”
Select “Mode”
(Select Cable or Antenna)
Select All or Analog
All: Analog and digital
Analog: Analog only
Select “Start scan”
Auto program
ANT In
Mode
Auto program
ANT In
Mode
Cable
All
set
select
Start scan
Start scan
Cable
All
start
select
Settings are made
automatically
After completing the setting,
•
select “Apply”. (see below
All previous memorized
•
channels are erased.
).
Use this procedure when changing setting of received channels or changing the channel display.
Also, use to add or delete channels from channel list manually.
Select “Edit”
Edit
Apply
avorite
- - -
Add
No
Select the item to be edited
Apply
Edit
Favorite
Caption
CH
1
- - -
2
3
- - -
4
- - -
5
- - -
Caption
Caption:
•
Changes the station identifier
Favorite:
•
Registers channel to Favorites List
Add:
•
Adds or deletes channels
Favorite
Add
- - -
No
2
Yes
- - -
No
- - -
No
- - -
No
Add
select
next
select item to edit
(Caption/Favorite/
Add)
next
Edit
Caption
•
Caption select
Preset
Caption detail
Preset
Select the station identifier
Caption detail
Rename (maximum 7 characters available)
Favorite
•
Favorite
Favorite
Favorite
Select the number
Add
•
Press “OK” button to select “Yes (add)” or “No
•
(delete)”
Apply
---
Apply
12
Select “Apply”
Press to move cursor to
“Apply”
select
set/next
select
next
ok
(to enter
your
program)
Editing and Setting Channels
Advanced
Check the signal strength if interference is found or freezing occurs on a digital image.
Signal meter
CH
Signal strength
2 - 1
select channel
ok
If the signal is weak, check the antenna.
•
If no problem is found, consult your
local dealer.
Note
Current
Peak level
If “Channel lock” (p. 38) is activated and “Auto”, “Manual” or “Signal meter” is selected, “Enter password.” will be
•
displayed.
85 %
85 %
Signal intensity
Not available if “Cable” is selected in “ANT In”
•
(see above).
Effective only for digital antenna channels.
•
41
Page 42
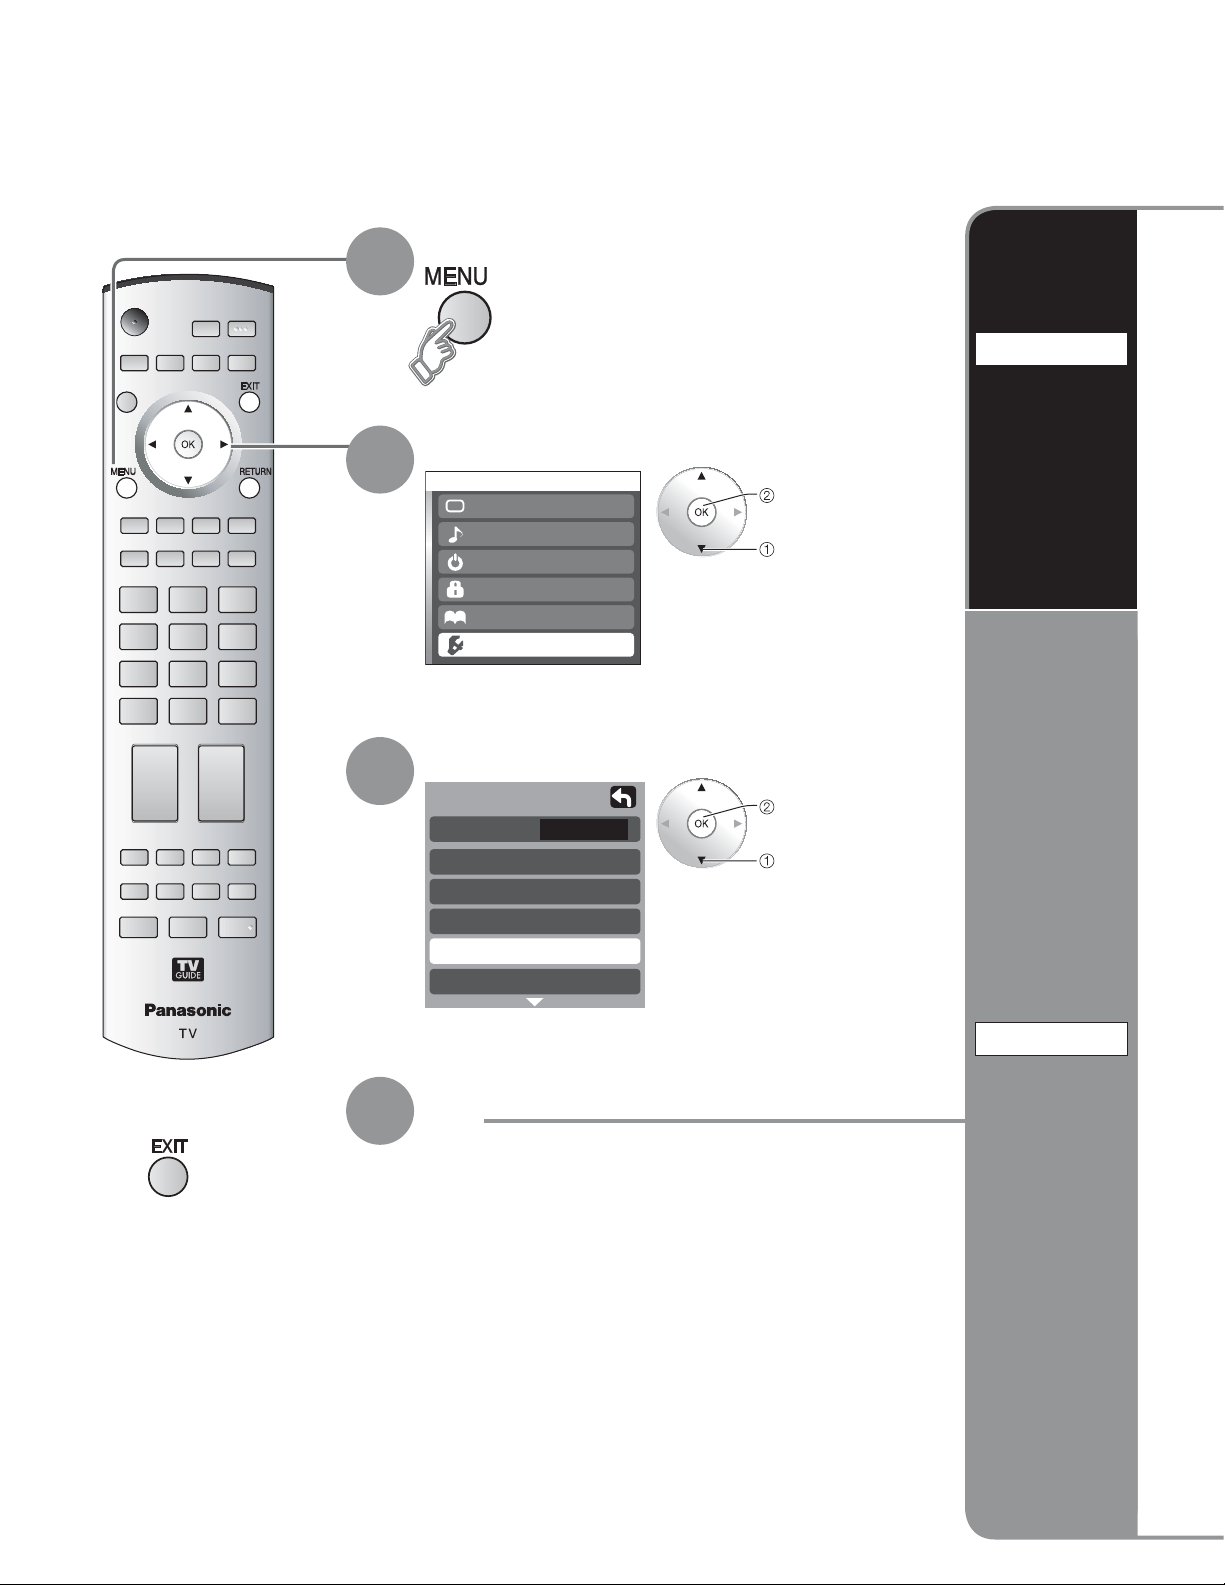
-
Input Labels/Closed Caption
Display menu
1
Input labels
Display
labels of
2
Select “Setup”
Menu
Picture
Audio
Timer
Lock
Memory card
TVG/Photo
Setup
next
select
external
devices
Press to exit
Ŷ
Select “Input labels” or “CC”
3
Setup
CH scan
Language
Clock
Program channel
Input labels
CC
Fav.
next
select
CC
Display
4
Set
Closed
Caption
42
Page 43
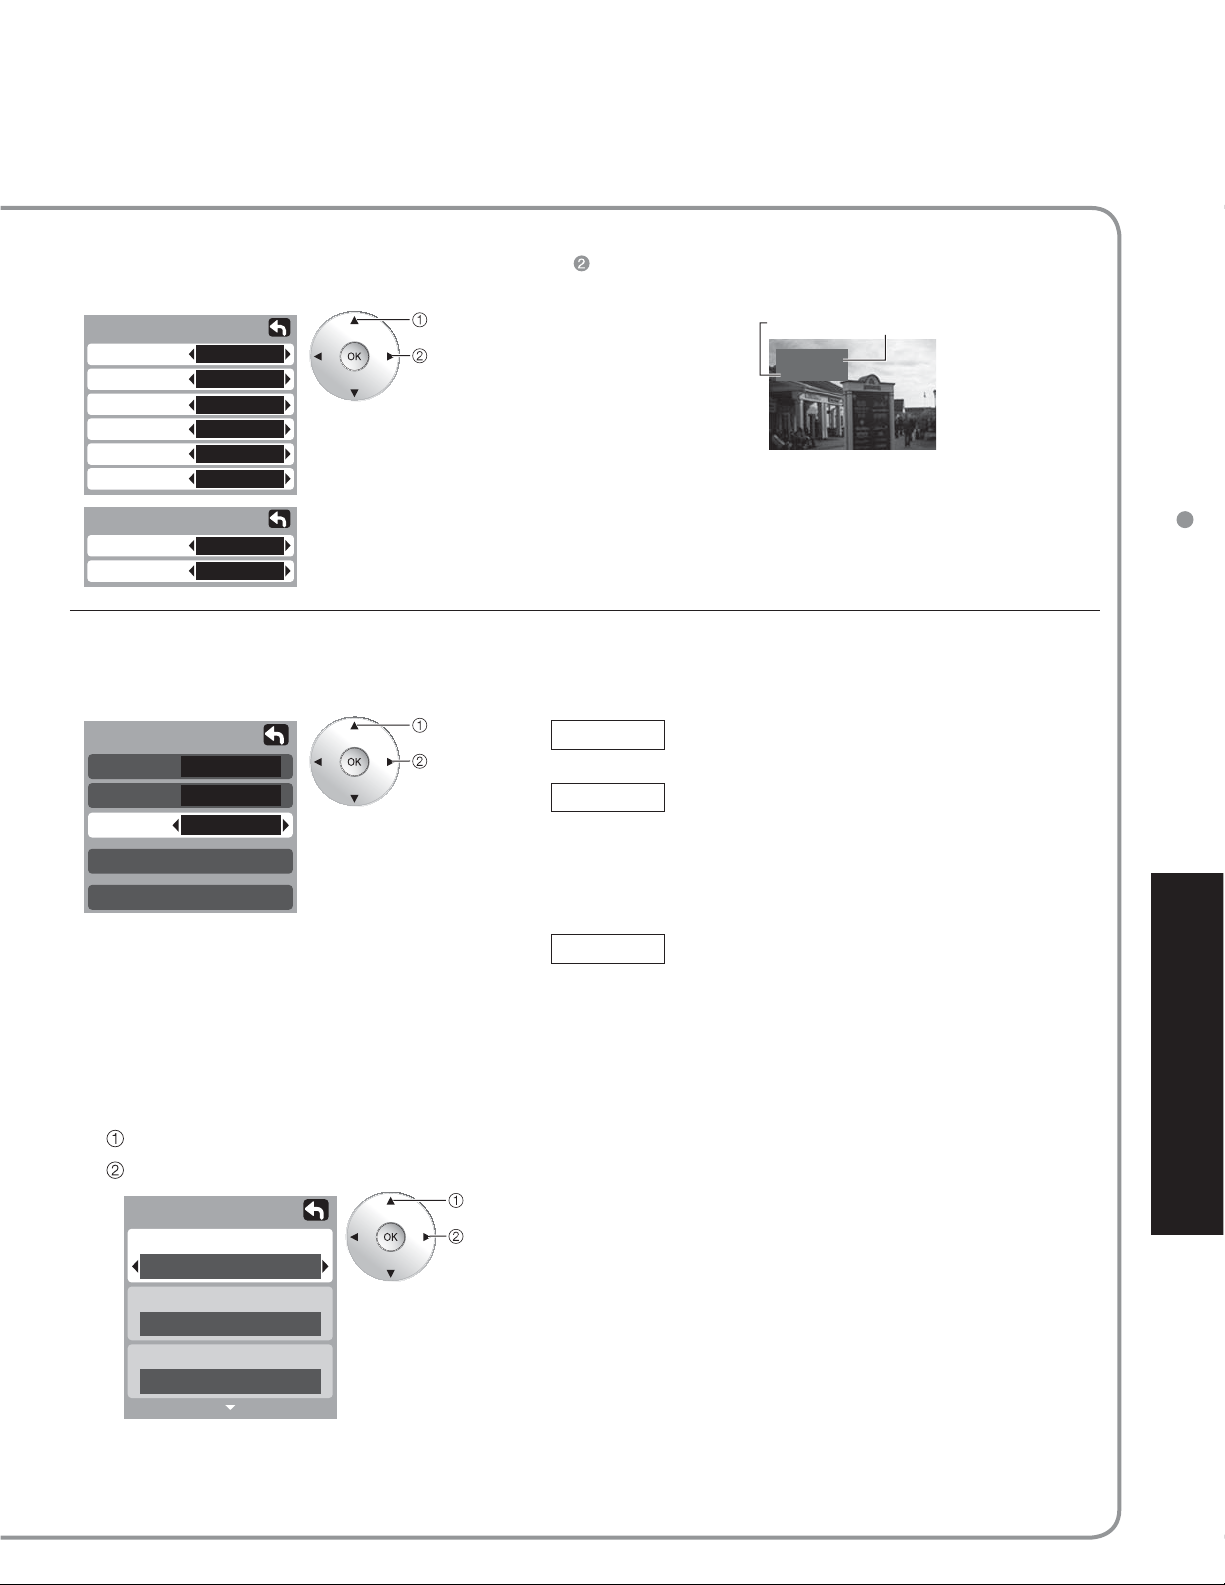
Devices connected to external input terminals can be labeled for easier identification
during input selection. (In selecting input mode of p. 29
Select the terminal and the label of the external equipment
Input labels
Comp. 1
Comp. 2
HDMI 1
HDMI 2
Video 1
Video 2
Input labels
Video 3
PC
The television includes a built-in decoder that is capable of providing a text display of the audio. The program being
viewed must be transmitting Closed Captioning (CC) information. (p. 52)
Select the item and set
Ŷ
CC
Mode
Analog
Digital
Digital setting
CC reset
The settings in “Analog” or “Digital”
•
depend on the broadcaster.
SKIP
SKIP
DVD
AUX
VCR
SKIP
SKIP
SKIP
Off
CC1
Primary
Terminals: Comp.1-2/HDMI 1-2/
•
Video1-3/PC
Label: SKIP*/VCR/DVD/CABLE/
•
* If “SKIP” is selected for a non-connected terminal, its input is skipped when
switched with TV/VIDEO button.
select
set
DBS/PVR/GAME/AUX/[BLANK]
(for PC terminal, only SKIP and [BLANK] are available)
select
set
)
Label Terminal
Video 1
VCR
[example]
Mode
Select “On” (when not using, select “Off”).
Analog
CC1-4: Information related to pictures
T1-4: Textual information
Digital
Select the setting.
“Primary”, “Second.”, “Service 3”, “Service 4”, “Service 5”,
•
“Service 6”
(Choose the closed caption service of Analog
broadcasting.)
(Appears at bottom of screen)
(Appears over entire screen)
(The Digital Closed Caption menu lets you
configure the way you choose to view the digital
captioning.)
Input Labels/Closed Caption
Advanced
To make more in-depth display settings in digital programs
Ŷ
Select “Digital setting” and press “OK” button
Select the item and set
Digital setting
Size
Automatic
Font
Automatic
Style
Automatic
(1/3)
To reset the settings
Ŷ
Select “CC reset” and press “OK” button
select
set
Size: Text size
•
Font: Text font
•
Style: Text style (Raised, Depressed, etc.)
•
Foreground: Color of text
•
Fore opacity: Opacity of text
•
Background: Color of text box
•
Back opacity: Opacity of text box
•
Outline: Outline color of text
•
(Identify the setting options on the screen.)
43
Page 44
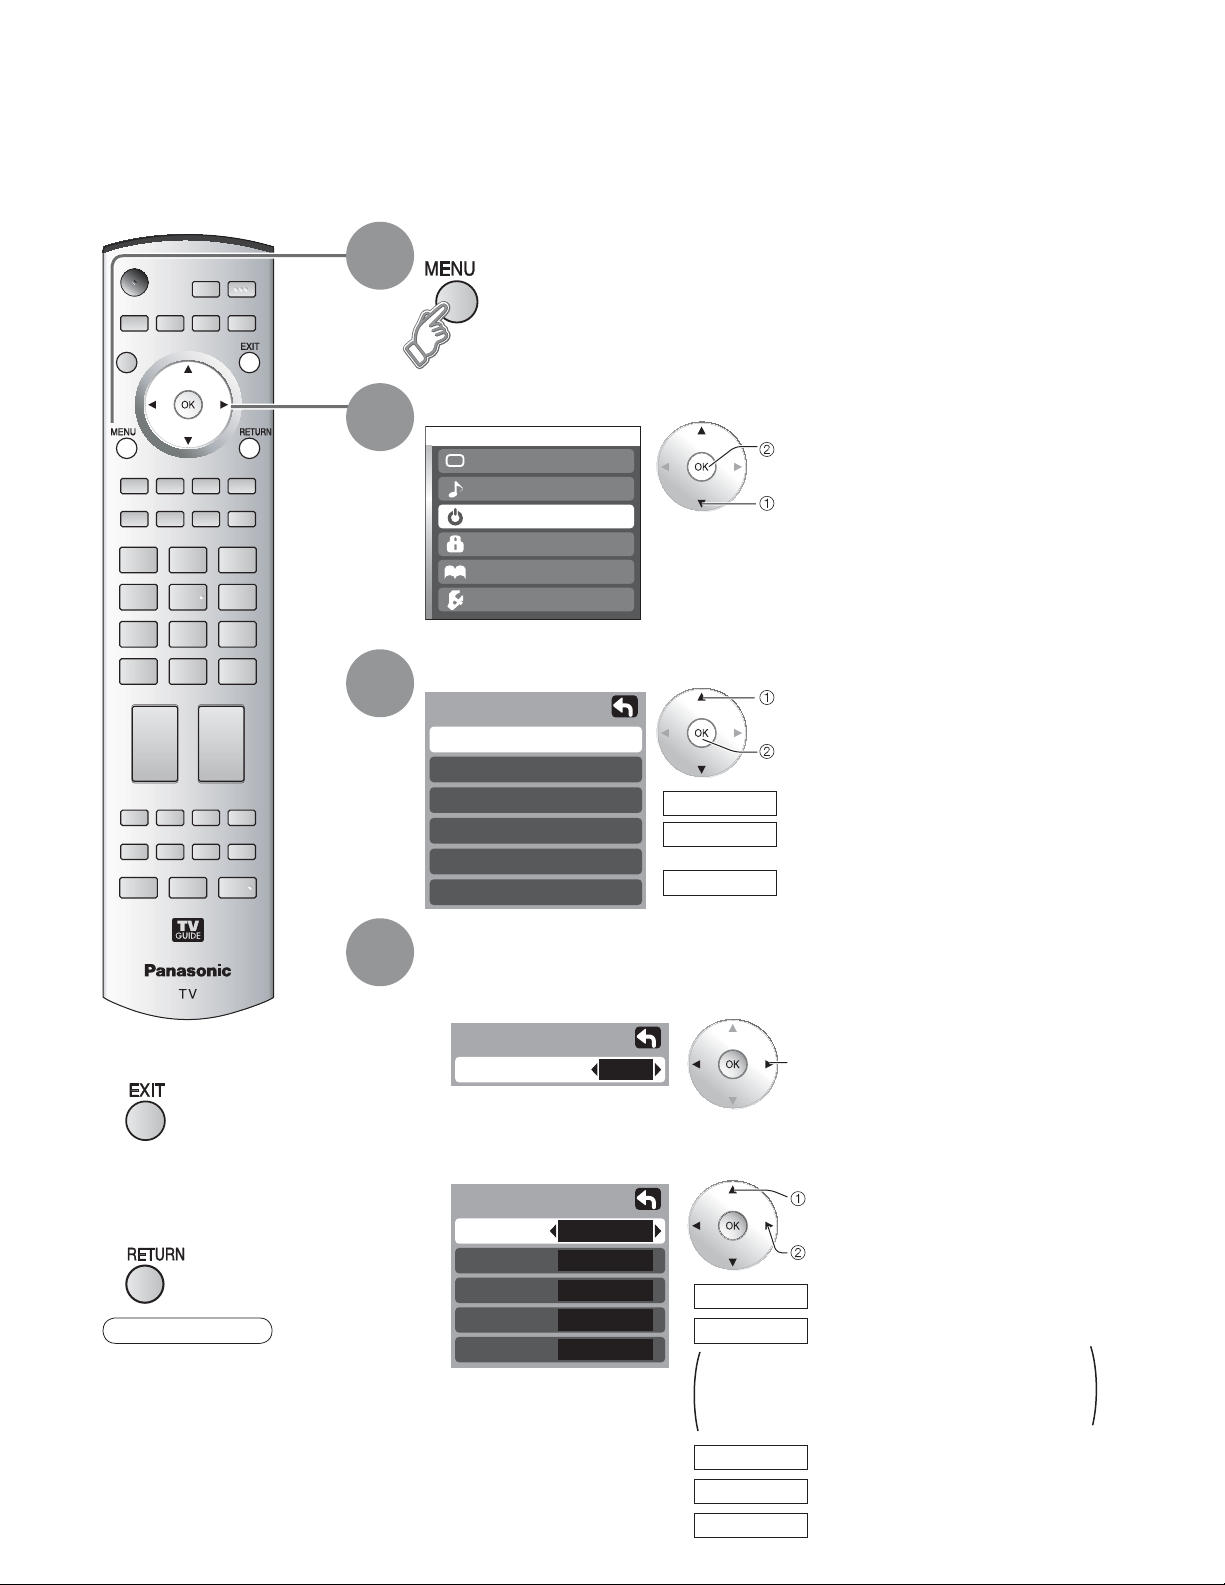
-
Using Timer
The TV can automatically turn On/Off at the designated date and time.
The Clock must be set before On time/Off time settings. (p. 13)
•
Display menu
1
Select “Timer”
2
Menu
Picture
Audio
Timer
Lock
Memory card
TVG/Photo
Setup
next
select
44
Press to exit
Ŷ
Press to return
Ŷ
to the previous
screen
Note
The TV automatically
•
turns Off after 90
minutes when turned
On by the Timer.
This operation will be
cancelled if the Off
time is selected or if a
key is pressed.
3
4
Select the timer to set
Timer
Sleep
Timer 1
Timer 2
Timer 3
Timer 4
Timer 5
Sleep
Timer 1
~
Timer 5
select
next
Turns Off automatically
Turns On/Off automatically
(5 timers can be set.)
Set the timer
To set “Sleep” (Off Timer)
Ŷ
Press to set unit to shut itself off after a preselected amount of time.
Sleep
Sleep
To set “Timer 1-5” (On/Off Timer)
Ŷ
Select the item and set
Timer 1
CH
Day
On time
Off time
Set
60
310 - 1
EVR FRI
10:00 AM
11:00 AM
On
SUN/MON/TUE/WED/THU/FRI/SAT/
MON-FRI/SAT-SUN/DAILY/EVR SUN/
EVR MON/EVR TUE/EVR WED/EVR THU/
EVR FRI/ EVR SAT
On time
Off time
CH
Day
Set
select
select
set
Select the channel
Select the day
The time to turn On
The time to turn Off
Timer setting (On/Off)
0/30/60/90 (minutes)
•
Page 45
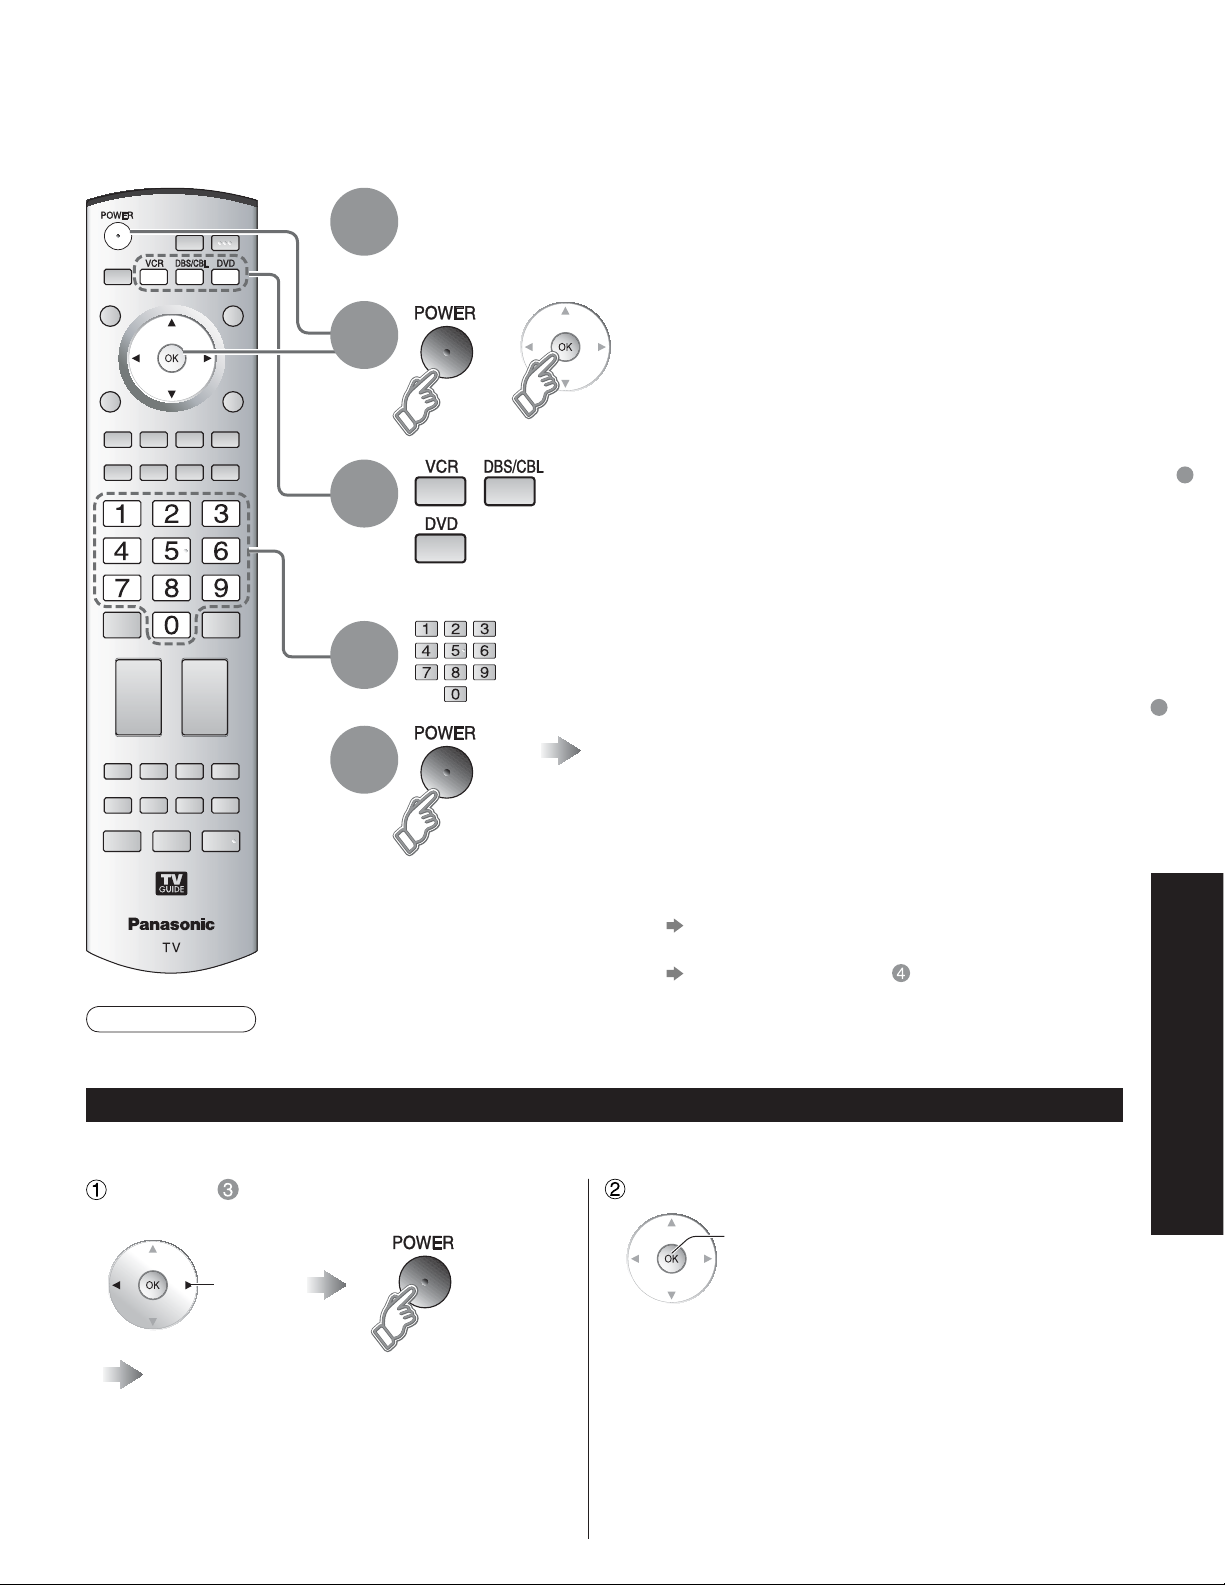
Operating Peripheral Equipment
You can operate other manufacturers’ components using this TV’s remote control.
Connect the external devices to the TV and
1
2
turn Off the external equipment
Press both buttons simultaneously
+
for more than 3 seconds.
Release the buttons when the equipment selection
•
buttons start flashing.
Select the equipment
3
4
5
Caution
Registration will fail if the wrong code is input or it takes more than 30 seconds to register.
•
with the equipment selection button
The selected button remains lit (other buttons are not
•
lit).
Input the equipment’s 4-digit remote
control code
Confirm the equipment with the
remote control
The external equipment turns On.
•
If the equipment does not operate with
Ŷ
remote control
When your equipment has a single code
•
Input the remote control code again
When your equipment has multiple codes
•
Change the code with above and test again
(p. 49-50)
(p. 49-50)
Operating Peripheral Equipment
Using Timer
Advanced
To find a code not listed in the code list
This procedure searches all codes and is called the “sequence method.”
After step above, change the code and
test
change
Operate the equipment with the
remote control (p. 48)
Repeat until the code is found
•
It may take many attempts before the correct
•
code is found
When the correct code is found
store
45
Page 46
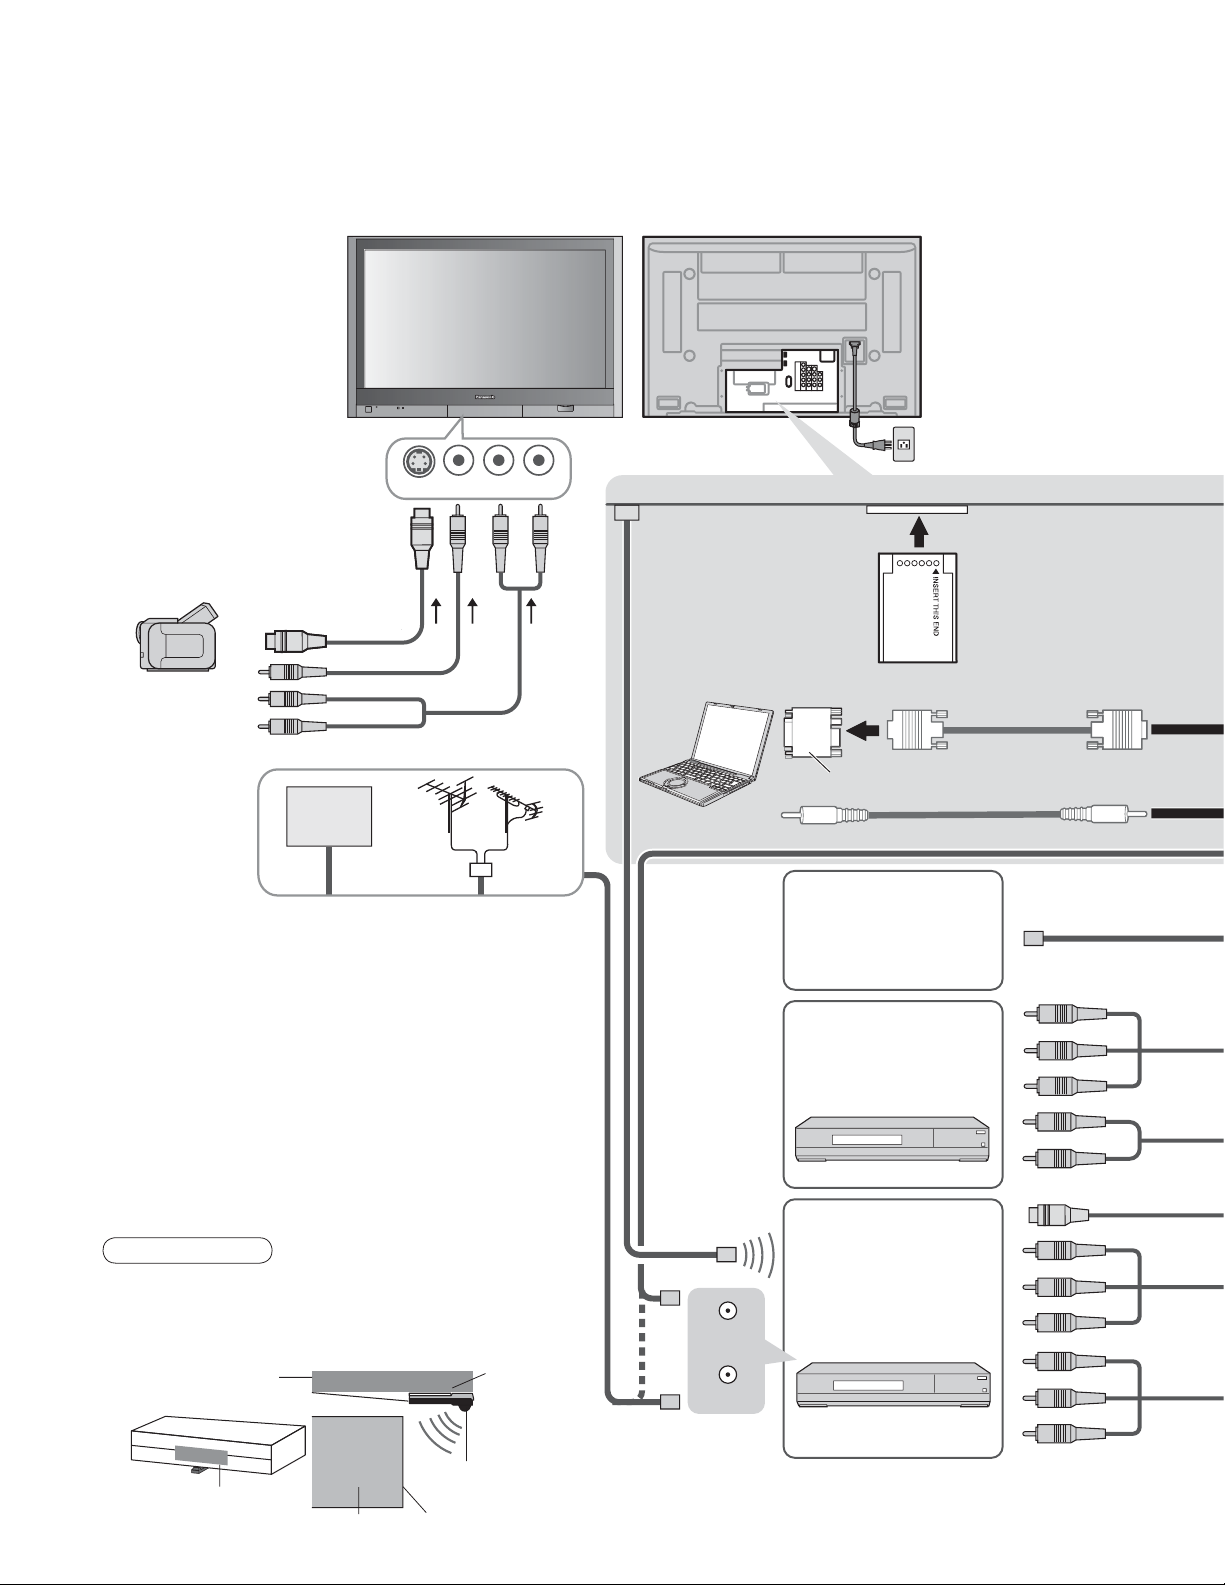
Recommended AV Connections
These diagrams show our recommendations for how to connect the TV unit to your various equipment.
For other connections, consult the instructions of each equipment, and the specifications (p. 61).
For additional assistance, please visit our website at : www.panasonic.com
www.panasonic.ca
INPUT3
To watch camcorder
Ŷ
images
Camcorder
S-Video
Camcorder
VCR/S-Video
VCR
DVD Player
Cable TV
For receiving digital broadcasting of cable TV,
•
connect Cable TV directly to “ANTENNA Cable
In” terminal.
CableCARD™
•
Insert a card to watch cable channels serving digital
high-definition video.
Consult the cable company for information.
IR Blaster (p. 56)
•
You can operate the VCR from the TV remote
control or reserve recording with TV Guide.
Install the light emitting area of the IR Blaster near
the signal-receiving area for the remote control on
the VCR.
Note
To make schedule recording using TV Guide with IR
•
blaster, you have to select in your VCR Line-1 (L-1)
and set your VCR in OFF condition. (Refer to the
Operating Instruction manual of VCR)
Top shelf of TV stand
VCR
or
Mount with
two-sided tape
Back of the unit
G-LINK
IR Blaster
(Supplied)
PC
Ŷ
Computer
(VCR Only)
RF OUT
or
RF IN
To watch
Ŷ
cable TV
CableCARD™
Conversion adapter (if necessary)
• Digital audio amplifier
• Theater system
To watch DVDs
Ŷ
DVD Player
Set Top Box
To record TV
Ŷ
shows
DVD Recorder /
VCR
AC Cord
(Connect after all the other
connections.)
RGB PC cable
Audio cable
46
Signal-emitting area
of remote control
VCR
Signal-emitting
area
Signal-receiving area of
remote control
Page 47
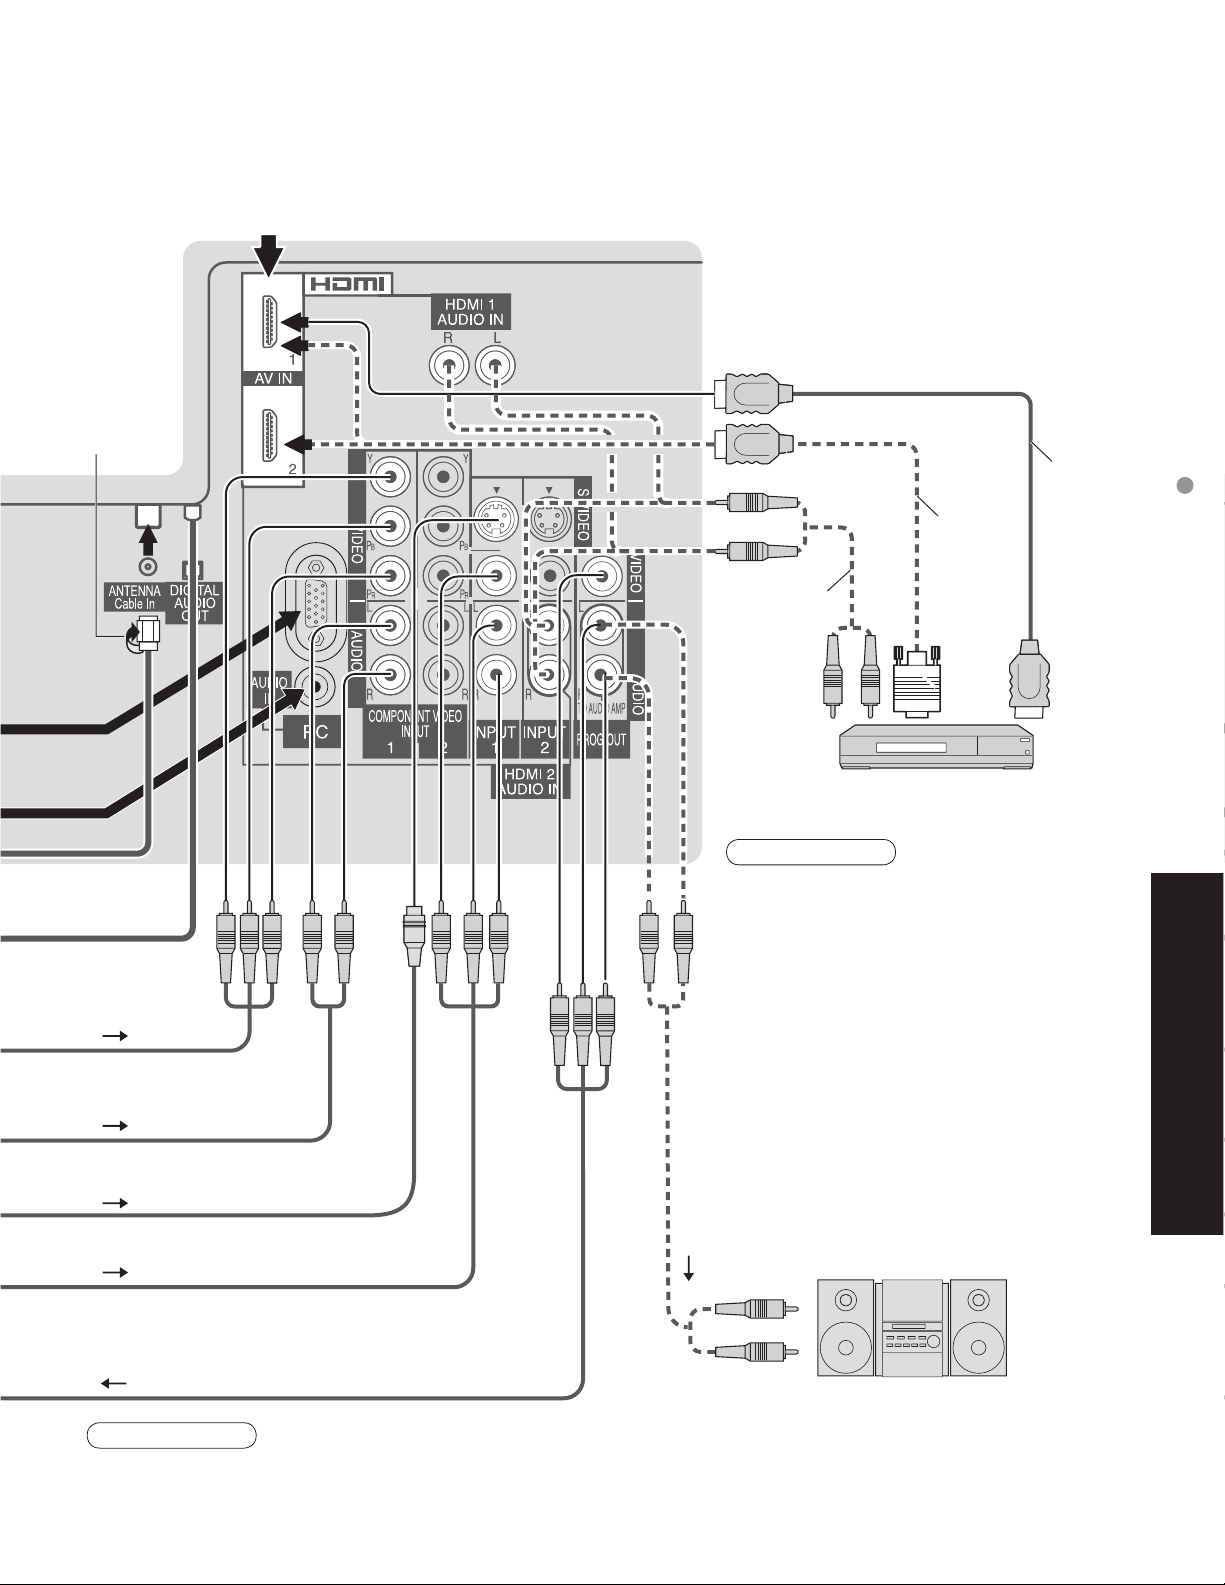
Recommended HDMI Connections (p. 36-37)
Ŷ
To watch digital video image
Ŷ
F-Type
Antenna
Adapter
or
or
or
HDMI
cable
HDMI-DVI
conversion
cable
Audio cable
DVD Player or Set Top Box
(HDMI compatible machines only)
Note
The picture and audio input signals
•
connected to a terminal specified in “Progout stop” (p. 32) cannot be output from
“OUTPUT” terminals. However, audio
output can be obtained from the optical
Digital Audio Out terminal.
To prevent howling and image oscillation, set
•
the “Prog-out-stop” setting when connecting
VCR with loop-connection. (p. 32)
When a device (STB, DVD, etc.) is
•
connected to the HDMI or COMPONENT
terminals, only audio signals will be
output. No video signals will be output.
Recommended AV Connections
Advanced
S-Video signals have priority
Caution
For Antenna connection via VCR, please refer to the Operating Instructions for your VCR.
•
If you use both IR Blaster and “HDAVI Control” (P. 34) for the same Panasonic DIGA (with VCR type), please set
•
“Power off link” (under “Other adjust” of “Setup” menu ) to “No” (P. 34), to avoid failure for your recording.
To listen to the TV through
Ŷ
speakers
Amplifier
Turn Off the TV speakers.
•
(p. 32 “Speakers”)
47
Page 48
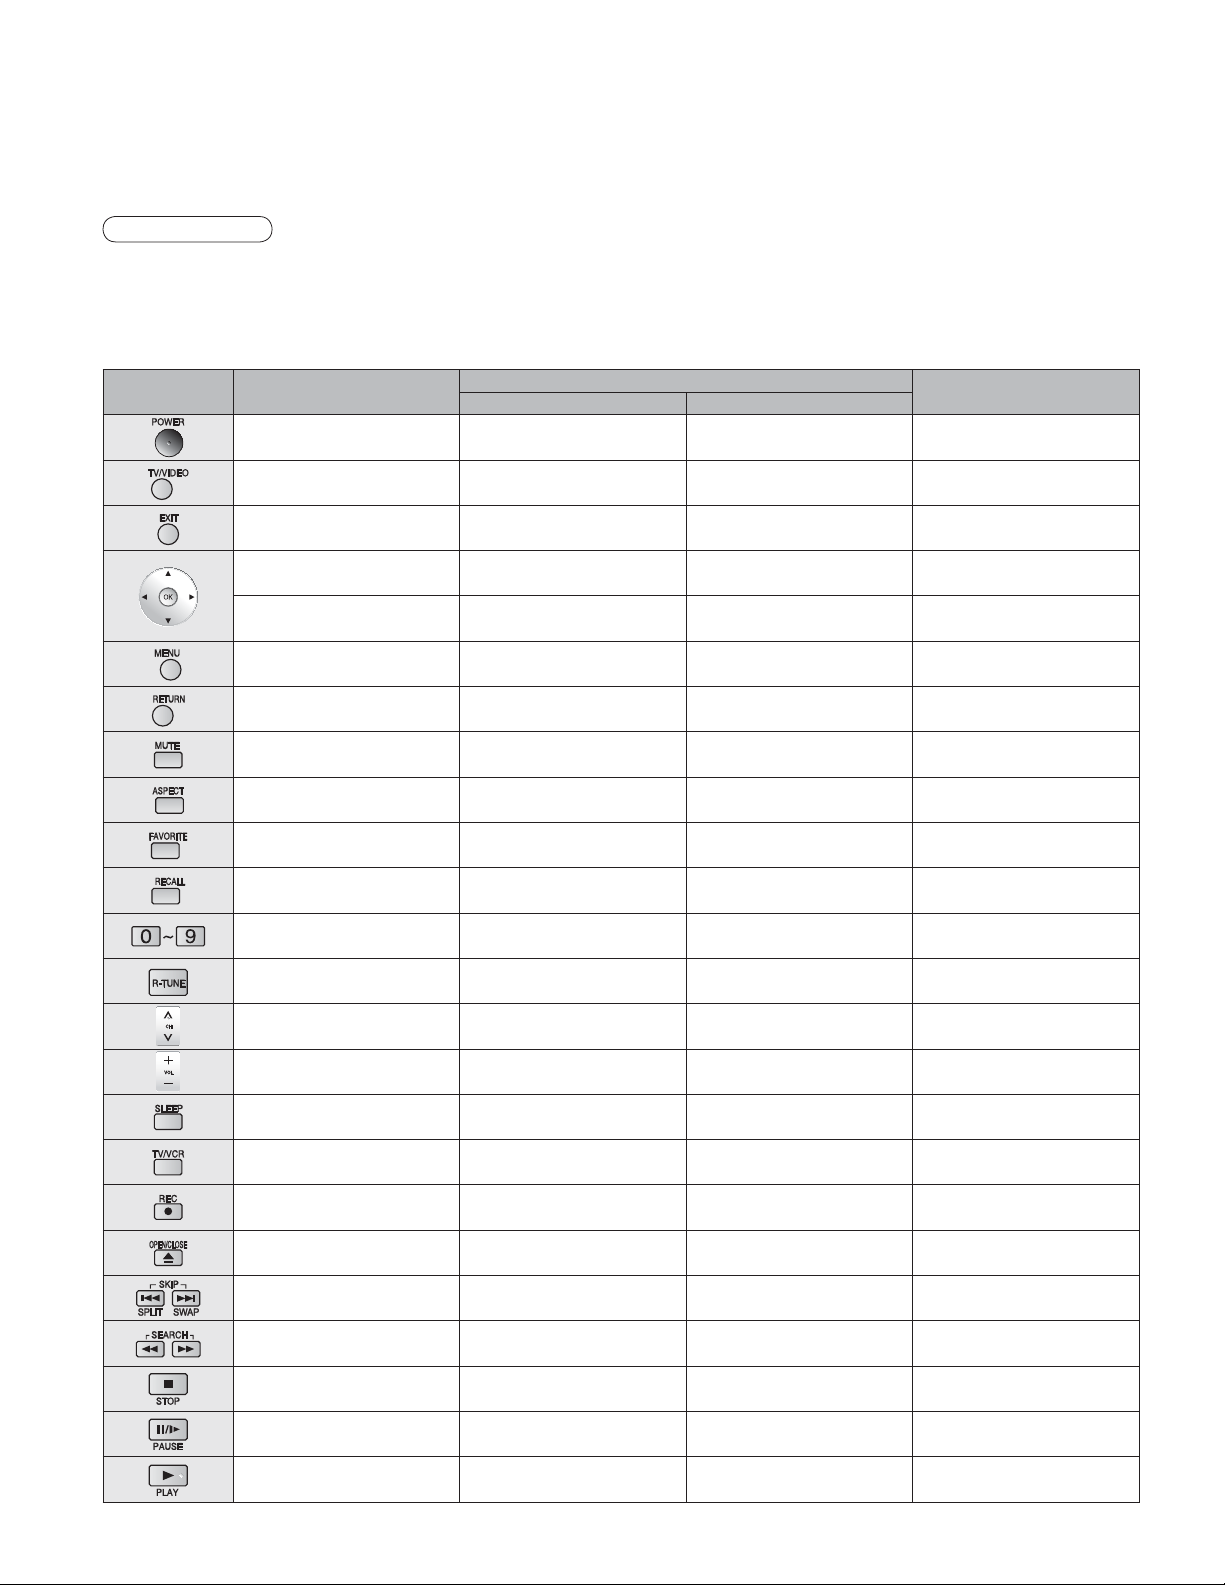
Remote Control Operation/Code List
The following explains how to operate external devices with the remote control.
Register the remote control codes (p. 45) if you want to operate an external device of another manufacturer.
•
(p. 49-50)
Note
Operation may not be possible depending on the available memory size of the remote control.
•
This remote control is not designed to cover operation of all functions of all models.
Remote Control Operation List
Ŷ
This chart defines which keys are operational after programming (if needed),
while in the selected remote control mode, VCR, DBS/CBL, DVD.
KEY NAME VCR MODE
Power Power Power Power
TV Input Switch TV Input Switch TV Input Switch TV Input Switch
(DBS) (CBL)
DBS/CBL MODE
DVD MODE
-
-
-
-
---
TV Mute TV Mute TV Mute TV Mute
-
---
Onscreen Display Onscreen Display Onscreen Display Onscreen Display
0-9 0-9 0-9 0-9
-
Channel Up/Down DBS Channel Up/Down CBL Channel Up/Down Channel Up/Down
TV Volume Up/Down TV Volume Up/Down TV Volume Up/Down TV Volume Up/Down
Exit Exit
DBS Cursor Up/Down/Right/
Left
Ok Ok Ok
DBS Menu CBL Menu DVD Setup Menu
Aspect Aspect DVD Disc Menu
DBS Previous Channel CBL Previous Channel Drive Select
CBL Cursor Up/Down/Right/
Left
-
DVD Cursor Up/Down/Right/
Left
Return, Clear
Title
48
-
TV/VCR Switch TV/DBS Switch TV/CBL Switch
VCR Record PVR Record *
-
---
Reverse/Forward
Stop
Pause
Play
Sleep Sleep
1
Search *
--
--
--
--
1
PVR Record *
Search *
1
-
-
1
Record
Open/Close
Skip Reverse/Forward
Rewind/Fast Forward
Stop
Pause
Play
*1: Combination type
Page 49
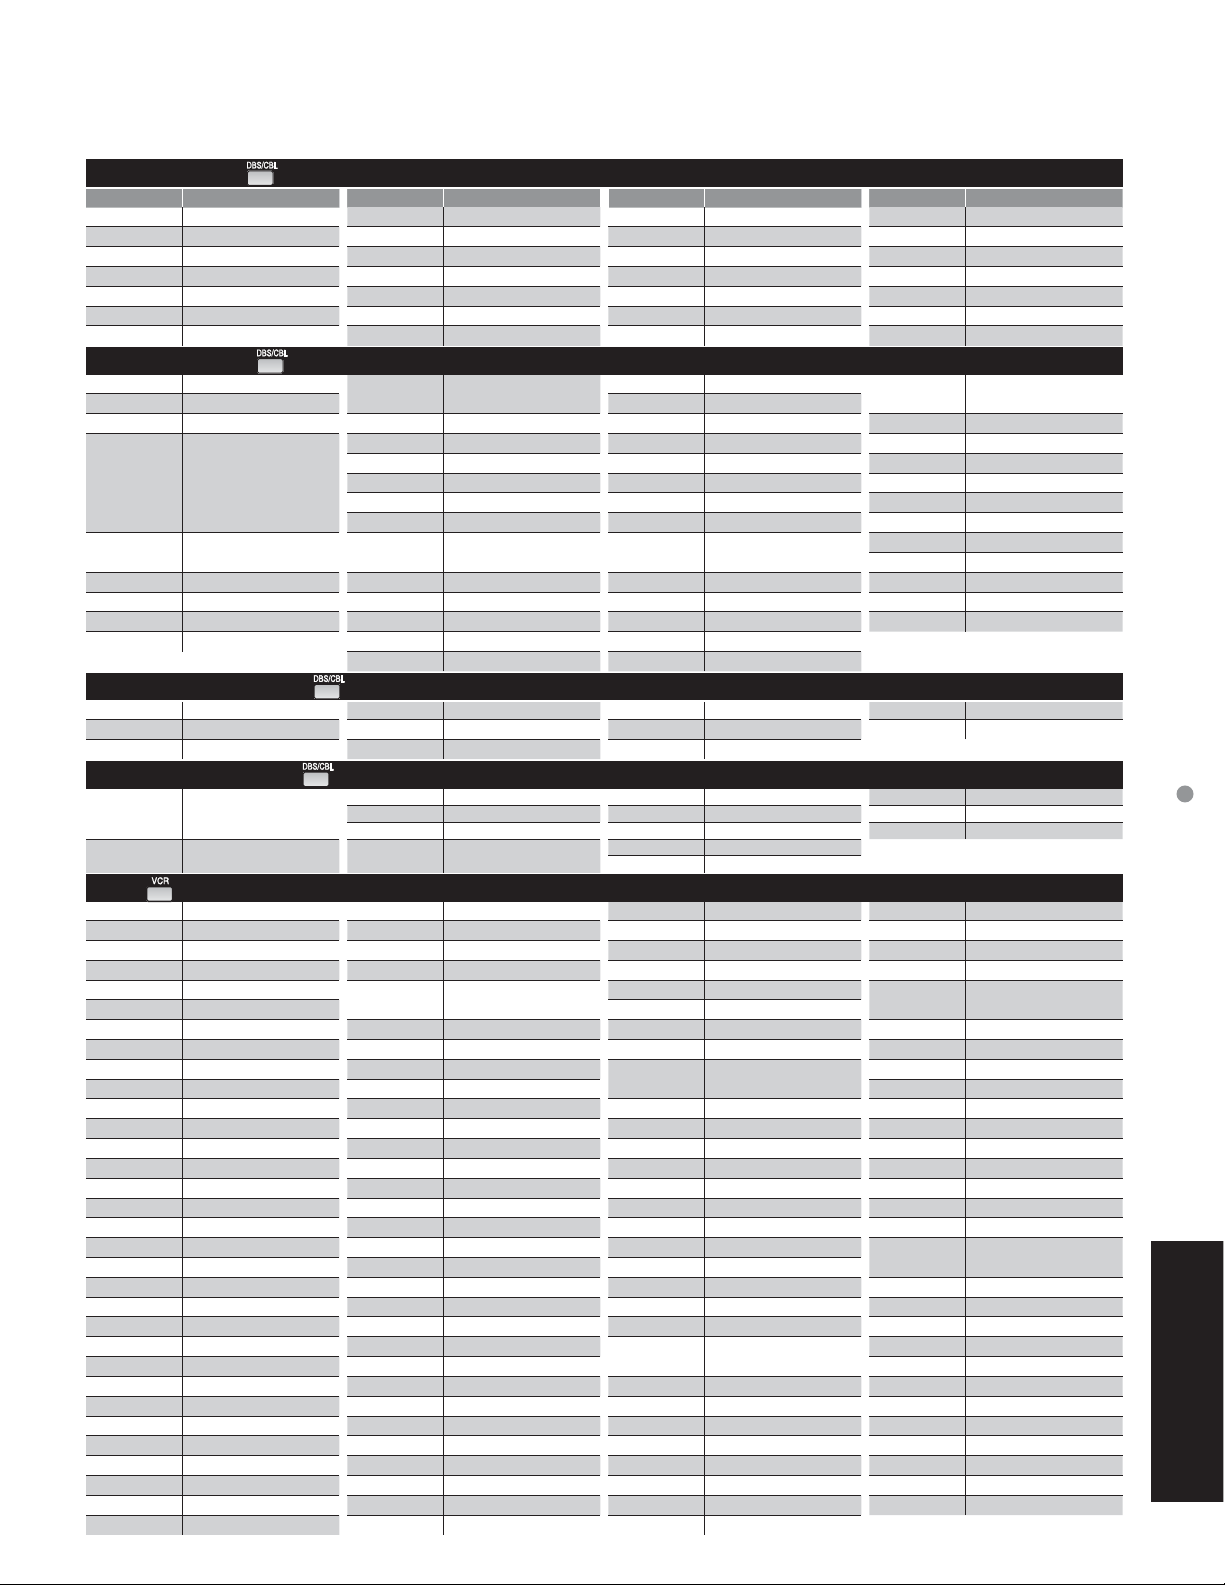
Remote Control Code List
Ŷ
Cable Converter ( )
Brand Code Brand Code Brand Code Brand Code
ABC 0003, 0008
Americast 0899
Bell South 0899
Digeo 1187
Director 0476
General Instrument
GoldStar 0144
0003, 0276, 0476, 0810
Hamlin 0009, 0273
Jerrold
Memorex 0000
Motorola
Pace 0008, 0237, 1877
Panasonic 0000, 0107
Paragon 0000
0003, 0276, 0476, 0810
1376, 0276, 0476, 0810, 1187
Philips 0317, 1305
Pioneer
Pulsar 0000
Quasar 0000
Regal 0273, 0279
Runco 0000
Samsung 0144
0144, 0533, 0877, 1877
Scientific Atlanta
Sony 1006
Starcom 0003
Supercable 0276
Torx 0003
Toshiba 0000
Zenith 0000, 0525, 0899
0008, 0477, 0877, 1877
Satellite Receiver ( )
AlphaStar 0772
Chaparral 0216
Crossdigital 1109
DirecTV
Dish Network
System
Dishpro
Echostar
Expressvu 0775, 1775
GE 0392, 0566
0099, 0247, 0392, 0566,
0639, 0724, 0749, 0819,
1076, 1108, 1109, 1142,
1377, 1392, 1414, 1442,
1443, 1444, 1609, 1639,
1640, 1749, 1856
0775, 1005, 1170,
1505, 1775
0775, 1005, 1505, 1775
0775, 1005, 1170, 1505, 1775
General
Instrument
GOI 0775, 1775
Goodmans 1246
Hisense 1535
Hitachi 0819, 1250
HTS 0775, 1775
Hughes 0749, 1442, 1749
Hughes Network
Systems
iLo 1535
Janeil 0152
Jerrold 0869
JVC 0775, 1170, 1775
LG 1226, 1414
0869
0749, 1142, 1442,
1443, 1444, 1749
Magnavox 0722, 0724
Memorex 0724
Mitsubishi 0749
Motorola 0856, 0869
NEC 1270
Next Level 0869
Panasonic
Paysat 0724
Philips
Pioneer 1442
Proscan 0392, 0566
Proton 1535
RadioShack 0869
RCA
0152, 0247, 0701, 1786
0099, 0722, 0724, 0749,
0819, 1076, 1142, 1442, 1749
0143, 0392, 0566, 0855, 1392
Samsung
Sanyo 1219
Sony 0639, 1639, 1640
Star Choice 0869
Tivo 1142, 1442, 1443, 1444
Toshiba
UltimateTV 1392, 1640
Uniden 0722, 0724
US Digital 1535
USDTV 1535
Voom 0869
Zenith 1856
1108, 1109, 1142, 1276,
1377, 1442, 1609
0749, 0790, 0819, 1285, 1749
Cable/PVR Combination ( )
Americast 0899
Digeo 1187
General Instrument
0476, 0810
Jerrold 0476, 0810
Motorola 0476, 0810, 1187, 1376
Pace 0237, 1877
Pioneer 0877, 1877
Scientific Atlanta
Sony 1006
0877, 1877
Supercable 0276
Zenith 0899
DBS/PVR Combination ( )
DirecTV
Dish Network
System
0099, 0392, 0639, 1076,
1142, 1377, 1392, 1442,
1443, 1444, 1640
0775, 1505
Dishpro 0775, 1505
Echostar 0775, 1170, 1505
Expressvu 0775
Hughes Network
Systems
1142, 1442, 1443, 1444
JVC 1170
Motorola 0869
Philips 1142, 1442
Proscan 0392
RCA 1392
Samsung 1442
Sony 0639, 1640
Star Choice 0869
VCR ( )
ABS 1972
Adventura 0000
Aiwa 0000, 0037, 0124
Akai 0175
Alienware 1972
American High
Audiovox 0037
Broksonic 1479
Calix 0037
Canon 0035
Citizen 0037, 1278
Craig 0037
Curtis Mathes 0035, 0060, 1035
CyberPower 1972
Daewoo 0045, 1278
Dell 1972
Denon 0042
DirecTV 0739
Durabrand 0039
Dynatech 0000
Electrohome 0037, 0043
Electrophonic 0037
Emerex 0032
Emerson
Fuji 0033, 0035
Funai 0000
Garrard 0000
Gateway 1972
GE
GoldStar 0037, 1237
Gradiente 0000
Harley Davidson
0035
0000, 0037, 0043, 1278, 1479
0035, 0060, 0807, 1035, 1060
0000
Hewlett Packard
Hitachi 0000, 0042, 0089
Howard Computers
HP 1972
Hughes
Network Systems
Humax 0739
Hush 1972
iBUYPOWER 1972
JVC 0067
KEC 0037
Kenwood 0067
Kodak 0035, 0037
Linksys 1972
Lloyd’s 0000
LXI 0037
Magnasonic 1278
Magnavox
Marantz 0035
Marta 0037
Matsushita 0035
Media Center PC
MEI 0035
Memorex
MGA 0043
Microsoft 1972
Mind 1972
Minolta 0042
Mitsubishi 0043, 0067, 0807
Motorola 0035
MTC 0000
Multitech 0000
1972
1972
0042, 0739
0000, 0035, 0039, 1781
1972
0000, 0035, 0037, 0039, 1237
NEC 0067
Nikko 0037
Niveus Media 1972
Northgate 1972
Olympus 0035, 0226
Onkyo 0222
Optimus 0037
Orion 1479
Panasonic
Penney
Pentax 0042
Philco 0035
Philips
Pilot 0037
Pioneer 0067
Proscan 0060, 1060
Pulsar 0039
Quasar 0035, 0077, 1035
RadioShack 0000
Radix 0037
Randex 0037
RCA
Realistic 0000, 0035, 0037
ReplayTV 0614, 0616
Ricavision 1972
Runco 0039
Samsung 0045, 0739, 1014
Sanky 0039
Sansui 0000, 0067, 1479
Sanyo 0159
0035, 0077, 0225, 0226,
0227, 0378, 0616, 1035, 1244
0035, 0037, 0042, 1035, 1237
0035, 0618, 0739, 1081, 1181
0042, 0060, 0077, 0807,
0880, 1035, 1060
Scott 0043, 0045
Sears
Sharp 0807, 0848
Sonic Blue 0614, 0616
Sony
Stack 9 1972
STS 0042
Sylvania
Symphonic 0000
Systemax 1972
Tagar Systems
Teac 0000
Technics 0035
Teknika 0000, 0035, 0037
Thomas 0000
Tivo 0618, 0636, 0739
Toshiba
Totevision 0037
Touch 1972
Vector 0045
Video Concepts
Videomagic 0037
Viewsonic 1972
Villain 0000
Voodoo 1972
Wards
XR-1000 0000, 0035
Zenith
ZT Group 1972
0000, 0035, 0037, 0042, 1237
0000, 0032, 0033, 0035,
0636, 1032, 1232, 1972
0000, 0035, 0043, 1781
1972
0043, 0045, 0845,
1008, 1145, 1972
0045
0000, 0035, 0042, 0060
0000, 0033, 0039, 1479
Remote Control Operation/Code List
FAQs, etc.
49
Page 50
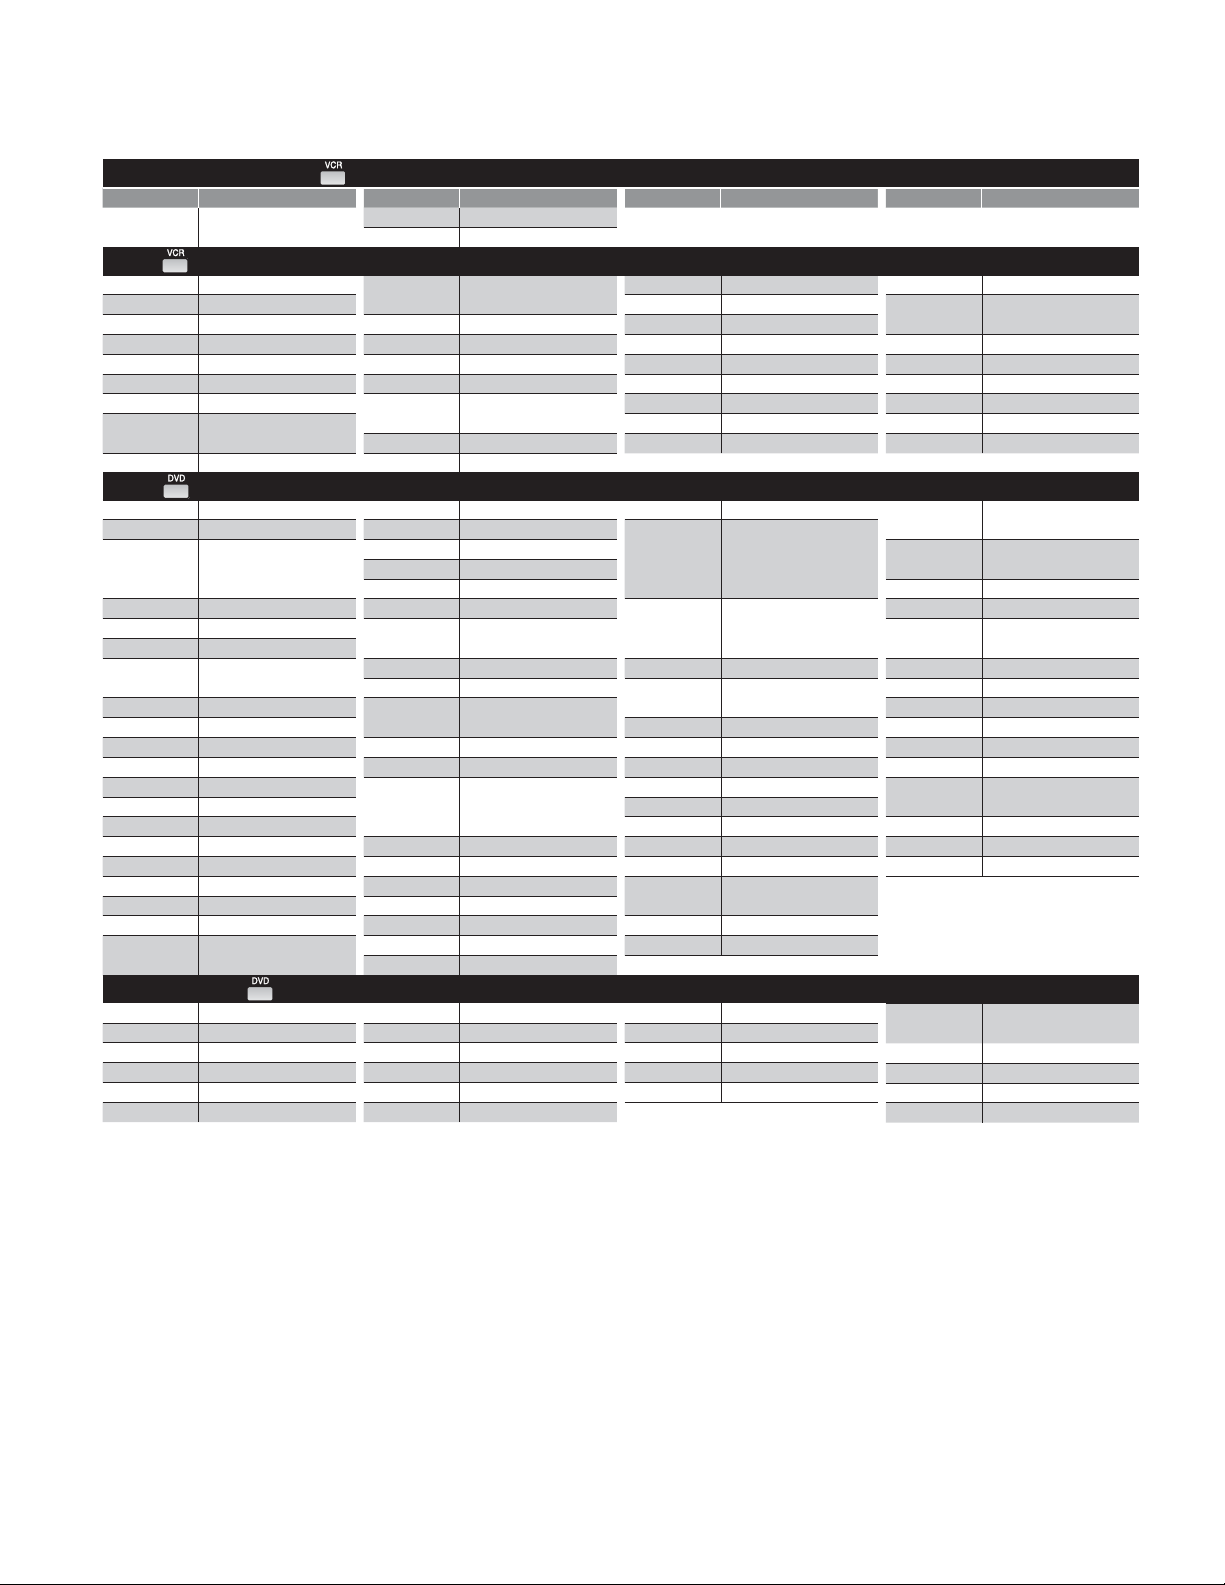
Remote Control Operation/Code List
Remote Control Code List
Ŷ
DBS/PVR Combination ( )
Brand Code Brand Code Brand Code Brand Code
Hughes Network
Systems
0739
PVR ( )
ABS 1972
Alienware 1972
CyberPower 1972
Dell 1972
DirecTV 0739
Gateway 1972
Hewlett Packard
Howard
Computers
HP 1972
1972
1972
DVD ( )
Adcom 1094
Allegro 0869
Apex Digital
Aspire Digital 1168
Blue Parade 0571
Broksonic 0695
California
Audio Labs
CineVision 0833, 0869
Coby 1086
CyberHome 0816, 1023, 1024, 1129
Daewoo 0833, 0869
Denon 0490
Disney 0675
DVD2000 0521
Emerson 0591, 0675
Enterprise 0591
Funai 0675
Gateway 1158
GE 0522
Go Video
0672, 0794, 0796,
0797, 1004, 1056,
1061, 1100
0490
0741, 0833, 0869,
1075, 1158, 1304, 1730
DVD Recorder ( )
Apex Digital 1056
Aspire Digital 1168
Coby 1086
CyberHome 1129
Funai 0675
Gateway 1158
Philips 0739
Samsung 0739
Hughes Network
Systems
Humax 0739
Hush 1972
iBUYPOWER 1972
Linksys 1972
Media Center
PC
Microsoft 1972
Mind 1972
GoldStar 0741
Gradiente 0490
Grundig 0539
Hitachi 0573, 0664
Hiteker 0672
Integra 0571
JVC
Kenwood 0490, 0534
Lecson 1533
LG
LiteOn 1158, 1440
Loewe 0511
Magnavox
Marantz 0539
McIntosh 1533
Memorex 0695
Microsoft 0522
Mitsubishi 0521, 1521
NAD 0591, 0741
NEC 0785
Go Video 0741, 1158, 1304, 1730
JVC 1164, 1275
LG 0741
LiteOn 1158, 1440
Magnavox 0646
Panasonic 0490, 1010, 1011
0739
1972
0558, 0623, 0867, 1164,
1275
0591, 0741, 0801,
0869
0503, 0539, 0646,
0675
Niveus Media 1972
Northgate 1972
Panasonic 0616
Philips 0618, 0739
RCA 0880
ReplayTV 0614, 0616
Sonic Blue 0614, 0616
Sony 0636, 1972
Stack 9 1972
Onkyo 0503, 0792
0490, 0503, 0632,
Panasonic
Philips
PianoDisc 1024
Pioneer
Polaroid 1061, 1086
Polk Audio 0539
Proceed 0672
Proscan 0522
RCA 0522, 0571, 0822
Rio 0869
Rotel 0623
Sampo 0752
Samsung
Sansui 0695
Sanyo 0695, 0873, 1967
Philips 0646
Pioneer 0631
Polaroid 1086
RCA 0522
Samsung 0490
0703, 1010, 1011,
1362, 1462, 1490,
1762, 1967
0503, 0539, 0646,
0675, 1267, 1354
0525, 0571, 0631,
0632
0490, 0573, 0820,
1075
Systemax 1972
Tagar
Systems
Tivo 0618, 0636, 0739
Toshiba 1008, 1972
Touch 1972
Viewsonic 1972
Voodoo 1972
ZT Group 1972
Sensory
Science
Sharp
Shinsonic 0533
Sonic Blue 0869
Sony
Sylvania 0675
Symphonic 0675
Teac 0809
Technics 0490, 0703
Theta Digital 0571
Toshiba 0503, 0695, 1045, 1154
Urban
Concepts
Xbox 0522
Yamaha 0490, 0539, 0545
Zenith 0503, 0591, 0741,0869
Sensory
Science
Sharp 0675
Sony 1033, 1431
Sylvania 0675
Zenith 0741
1972
115 8
0630, 0675, 0752,
1256
0533, 0864, 1033, 1431,
1533
0503
115 8
50
Page 51
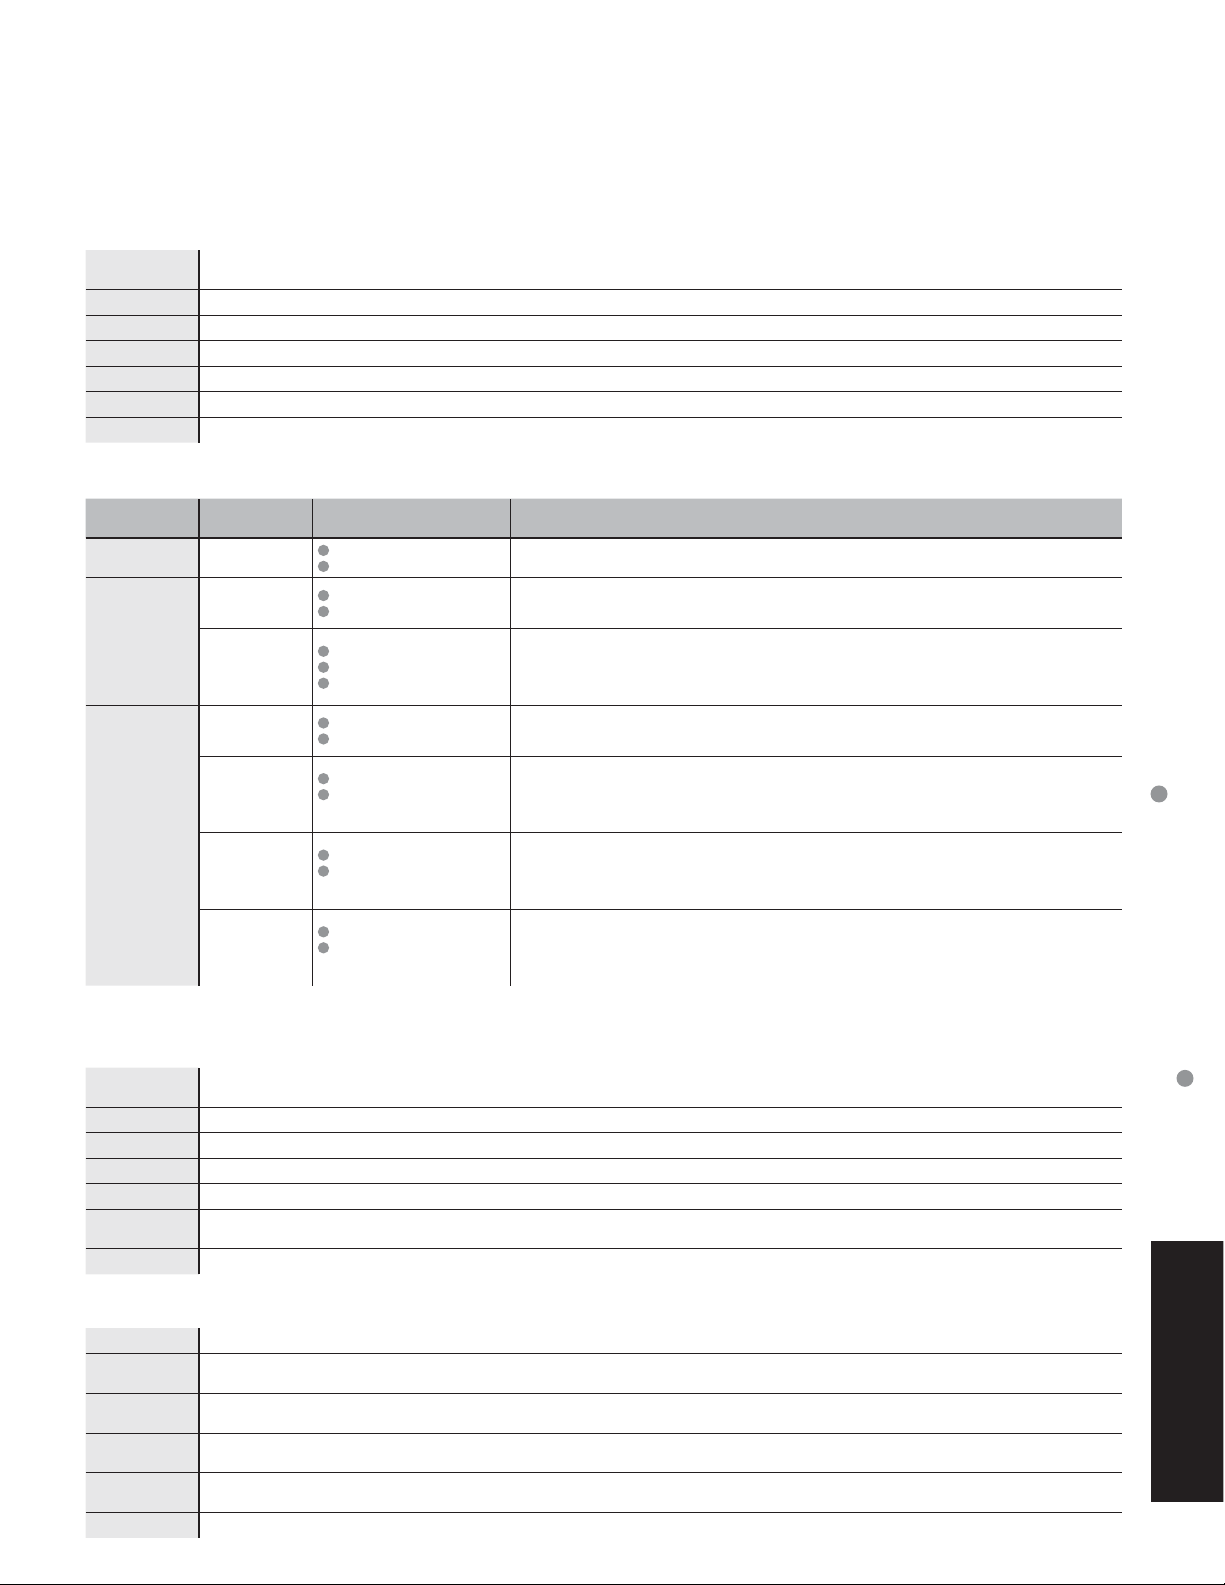
Ratings List for Channel Lock
“V-chip” technology enables you to lock out channels or shows according to
standard ratings set by the entertainment industry. (p. 39)
U.S. MOVIE RATINGS (MPAA)
Ŷ
Off
G
PG
PG-13
R
NC-17
X
U.S. TV PROGRAMS RATINGS (U. S. TV)
Ŷ
Age-based
Group
NR
(Not Rated)
Youth
NO RATING (NOT RATED) AND NA (NOT APPLICABLE) PROGRAMS. Movie has not been rated or
rating does not apply.
GENERAL AUDIENCES. All ages admitted.
PARENTAL GUIDANCE SUGGESTED. Some material may not be suitable for children.
PARENTS STRONGLY CAUTIONED. Some material may be inappropriate for children under 13.
RESTRICTED. Under 17 requires accompanying parent or adult guardian.
NO ONE 17 AND UNDER ADMITTED.
ADULTS ONLY.
Age-based
Ratings
TV-NR
TV-Y
TV-Y7
TV-G
TV-PG
Possible Content
Selections
Viewable
Blocked
Viewable
Blocked
FV Blocked
Viewable
Blocked
Viewable
Blocked
D,L,S,V (all selected)
Any combination of D,
L, S, V
Description
Not Rated.
All children. The themes and elements in this program are specifically
designed for a very young audience, including children from ages 2-6.
Directed to older children. Themes and elements in this program may
include mild physical or comedic violence, or may frighten children under
the age of 7.
General audience. It contains little or no violence, no strong language,
and little or no sexual dialogue or situations.
Parental guidance suggested. The program may contain infrequent
coarse language, limited violence, some suggestive sexual dialogue and
situations.
Remote Control Operation/Code List
Guidance
TV-14
TV-MA
FV: Fantasy/Cartoon Violence. V: Violence S: Sex L: Offensive Language D: Dialogue with sexual content.
D,L,S,V (all selected)
Any combination of D,
L, S, V
D,L,S,V (all selected)
Any combination of L,
S, V
Parents strongly cautioned. This program may contain sophisticated
themes, sexual content, strong language and more intense violence.
Mature audiences only. This program may contain mature themes,
profane language, graphic violence, and explicit sexual content.
CANADIAN ENGLISH RATINGS (C. E. L. R)
E
C
C8+
G
PG
14+
18+
CANADIAN FRENCH RATINGS (C. F. L. R)
Ŷ
E
G
8 ans+
13 ans+
16 ans+
18 ans+
Exempt - Exempt programming includes: news, sports, documentaries and other information programming,
talk shows, music videos, and variety programming.
Programming intended for children under age 8. No offensive language, nudity or sexual content.
Programming generally considered acceptable for children 8 years and over. No profanity, nudity or sexual content.
General programming, suitable for all audiences.
Parental Guidance suggested. Some material may not be suitable for children.
Programming contains themes or content which may not be suitable for viewers under the age of 14. Parents are
strongly cautioned to exercise discretion in permitting viewing by pre-teens and early teens.
18+ years old. Programming restricted to adults. Contains constant violence or scenes of extreme violence.
Exempt - Exempt programming.
General - Programming intended for audience of all ages. Contains no violence, or the violence content is minimal
or is depicted appropriately.
8+ General - Not recommended for young children. Programming intended for a broad audience but contains light
or occasional violence. Adult supervision recommended.
Programming may not be suitable for children under the age of 13 - Contains either a few violent scenes or one or
more sufficiently violent scenes to affect them. Adult supervision strongly suggested.
Programming may not be suitable for children under the age of 16 - Contains frequent scenes of violence or intense
violence.
Programming restricted to adults. Contains constant violence or scenes of extreme violence.
Ratings List
FAQs, etc.
51
Page 52
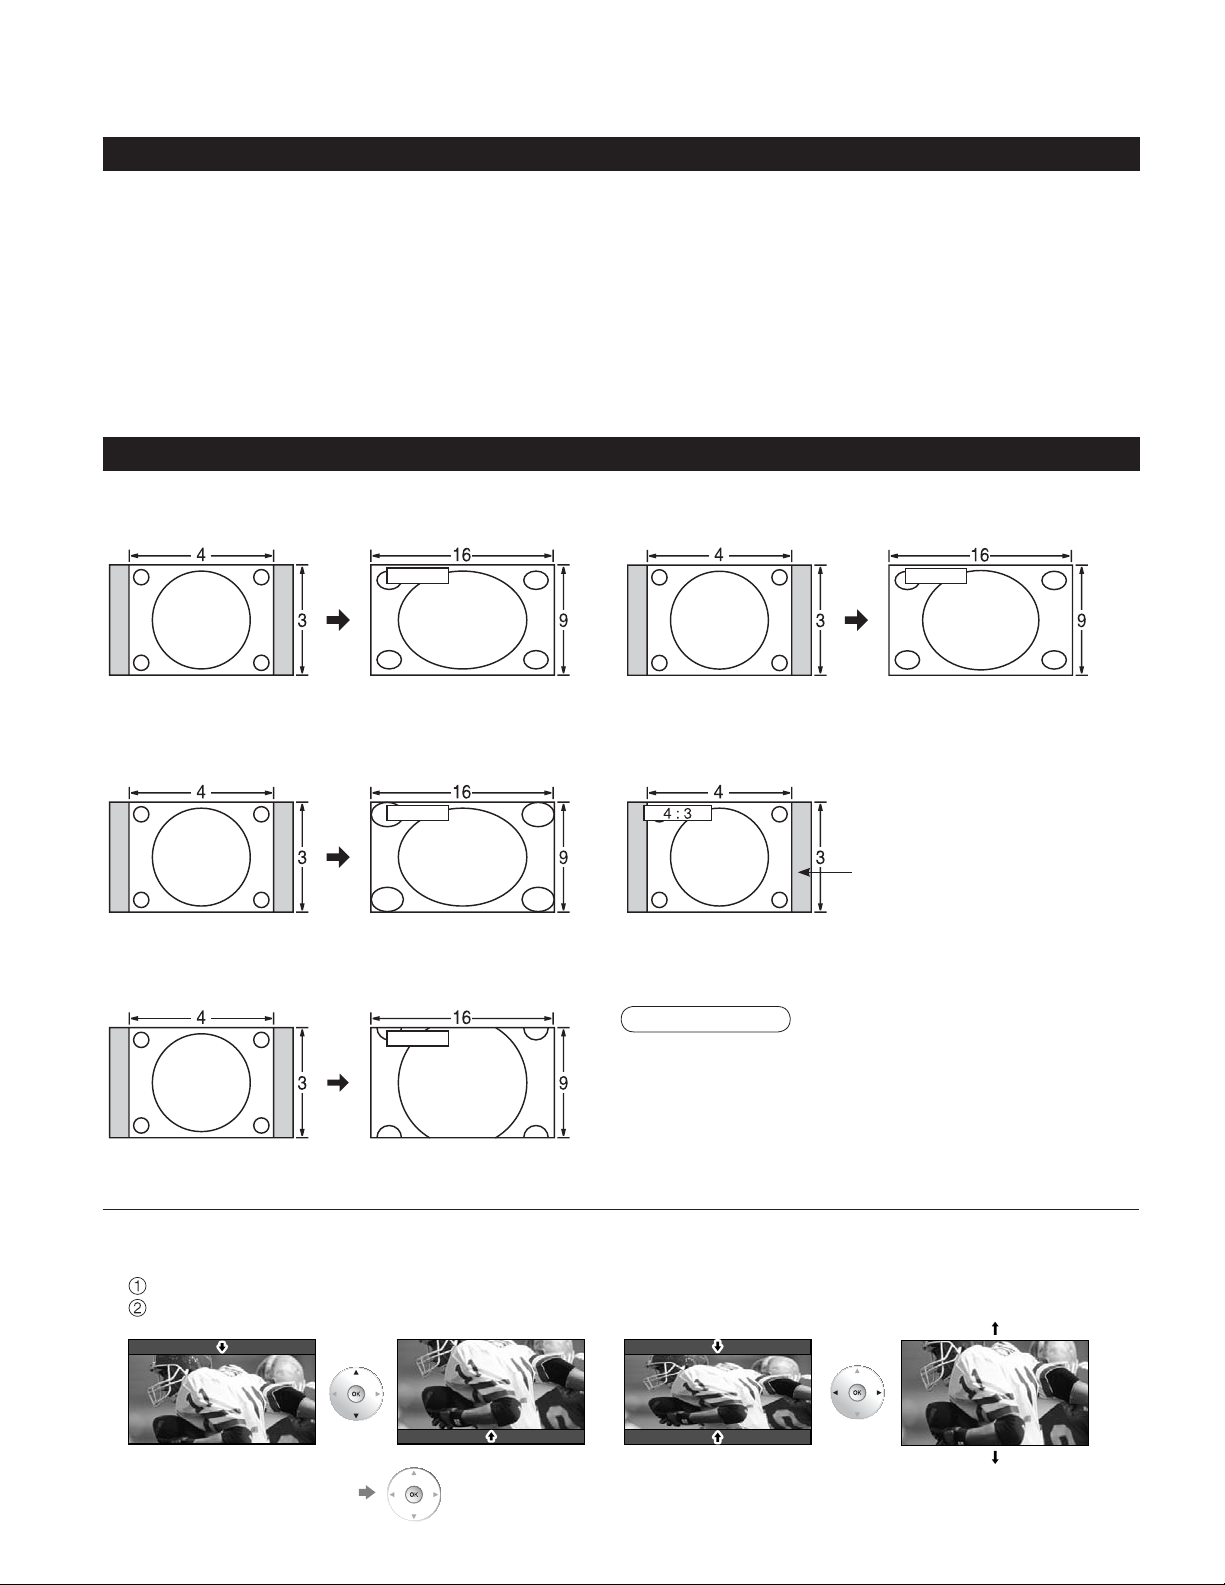
Technical Information
Closed Caption (CC)
For viewing Closed Caption of digital broadcasting, set the aspect ratio to FULL.
•
(If viewing with H-FILL, JUST, ZOOM or 4:3, characters will be cut off.)
The closed caption is not displayed when you use HDMI connection.
•
If analog connected equipment is used for displaying or recording, closed caption (CC) should be set On/Off on the
•
connected equipment.
The CC mode setting of the TV will not affect the analog input.
If a digital program is being output in analog format, the CC data will also be output in analog format.
If digital connected equipment is used for input, CC should be set On on either the connected equipment or the TV.
If CC is set On on both the connected equipment and the TV, captions from each unit will overlap.
Aspect Ratio
Let you choose the aspect depending on the format of the received signal and your preference. (p. 18)
•
FULL
FULL
•
JUST
JUST
Enlarges the 4:3 image horizontally to the screen’s
side edges.
(Recommended for anamorphic picture)
H-FILL
•
H-FILL
Enlarges the 4:3 image horizontally to the screen’s
side edges. The side edges of the image are cut off.
ZOOM
•
ZOOM
Enlarges the 4:3 image to the entire screen.
(Recommended for Letter Box)
Zoom adjust
•
Vertical image position and size can be adjusted in “ZOOM.”
Select “Zoom adjust” on the Picture menu. (p. 32)
Vertical position adjustment Vertical size adjustment
Stretches to justify the 4:3 image to the four corners
of the screen.
(Recommended for normal TV broadcast)
4:3
•
Standard
(Note that “after image” of the side bar may occur from
displaying it for a long time.)
Note
480i (4:3), 480i (16:9), 480p (4:3), 480p (16:9) : FULL,
•
JUST, 4:3 or ZOOM
1080p / 1080i / 720p : FULL, H-FILL, JUST, 4:3 or ZOOM.
•
When the signal is 720p/1080i/1080p, the aspect mode
•
automatically defaults to Full after turning off the TV,
after changing input mode, or after changed signal
resolution other than 720p/1080i/1080p.
Side bar
52
To reset the aspect ratio (OK)
•
Page 53

Data format for Card browsing
Photo: Still images recorded with digital still cameras compatible with JPEG files of DCF* and EXIF
standards
Data format: Baseline JPEG 160X120-2,560X1,920 pixels (Sub-sampling: 4:4:4, 4:4:2 or 4:2:0)
Max. number of files: 9,999
Image resolution: 8 x 8 to 5,120 x 3,840
* DCF (Design rule for camera file system): A Japan Electronics and Information Technology Industries Association’s standard
Caution
A JPEG image modified with a PC cannot be displayed.
•
Partly degraded files might be displayed at a reduced resolution.
•
Note
Folder structure viewed in PC
•
DCIM
100_PANA
Created automatically
3-digit folder number + 5-digit arbitrary characters
P1000001.JPG
P1000002.JPG
P1000003.JPG
P1000004.JPG
The folder and file names may be different depending on the digital camera used.
•
Suitable SD Memory Cards. Please confirm the latest information on the following website.
•
http://panasonic.co.jp/pavc/global/cs (This site is in English only)
You can enjoy your home theater by connecting a Dolby Digital (5.1 channel) decoder and “Multi Channel” amplifier
to the DIGITAL AUDIO OUT terminals.
Caution
Depending on your DVD player and DVD-Audio software the copyright protection function may operate and disable
•
optical output.
External speakers cannot be connected directly to PROG.OUT terminals.
•
When ATSC channel is selected, the output from the DIGITAL AUDIO OUT jack will be Dolby Digital. When NTSC
•
channel is selected, the output will be PCM.
HDMI connections to some Panasonic equipment allow you to enjoy the easy playback or home theater.
Setup the equipment to enable this function. Read the manual of the equipment.
•
Switch the TV unit on again with the equipment on when connection or setup is changed.
•
This function may not work normally depending on the equipment condition.
•
The equipment can be operated by TV’s remote control with this function on even if TV is in Standby mode.
•
Image or sound may not be available for the first few seconds when the playback starts.
•
Image or sound may not be available for the first few seconds when Input mode is switched.
•
Volume function will be displayed when adjusting the volume of the equipment.
•
Easy playback is also available by using the remote control for Amplifier. Read the manuals of Amplifier.
•
4-digit arbitrary characters + 4-digit file number
Usable characters: 1-byte “a to z”, “A to Z”, “0 to 9,” and “_”
•
DIGITAL AUDIO OUT terminals
Control with HDMI “HDAVI ControlTM”
Technical Information
FAQs, etc.
53
Page 54
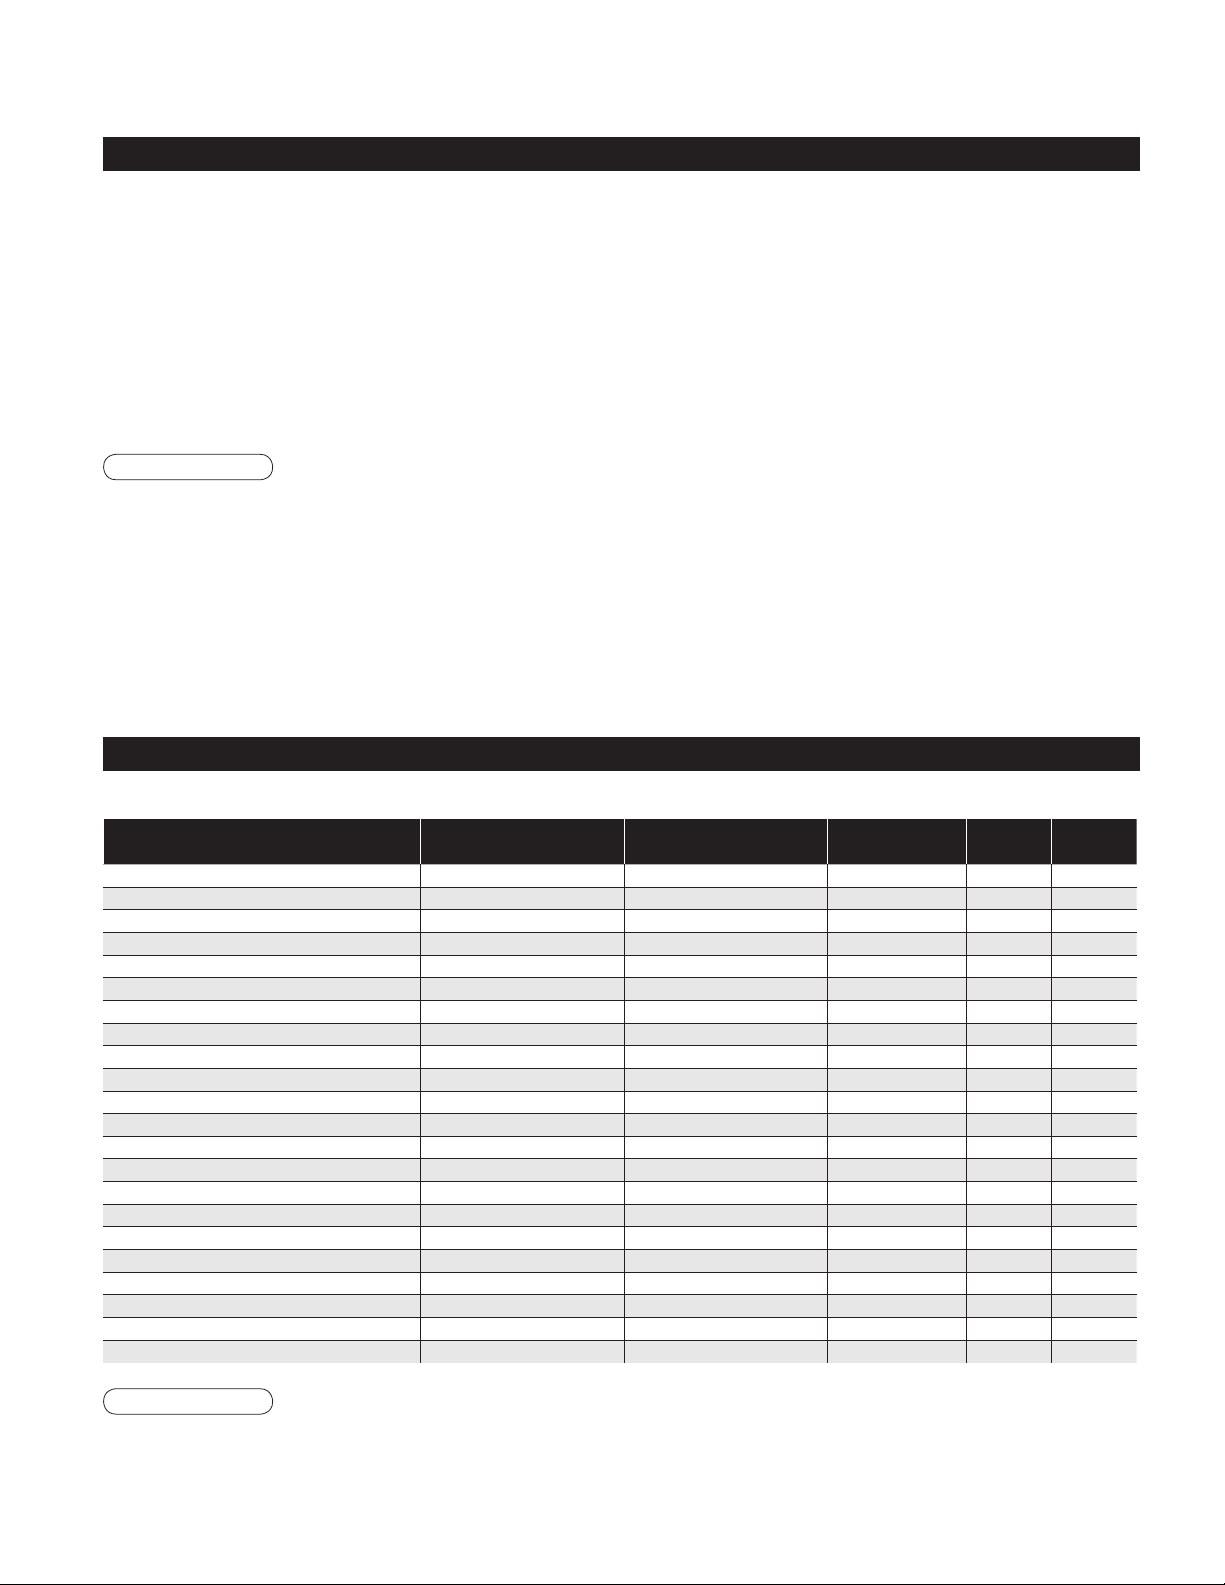
Technical Information
HDMI connection
HDMI (high-definition multimedia interface) allows you to enjoy high-definition digital images and high-quality
sound by connecting the TV unit and the devices.
HDMI-compatible equipment (*1) with an HDMI or DVI output terminal, such as a set top box or a DVD player, can be
connected to the HDMI terminal using an HDMI compliant (fully wired) cable.
HDMI is the world’s first complete digital consumer AV interface complying with a non-compression standard.
•
If the external device has only a DVI output, connect to the HDMI terminal via a DVI to HDMI adapter cable (*2).
•
When the DVI to HDMI adapter cable is used, connect the audio cable to the audio input terminal.
•
Audio settings can be made on the “HDMI1 in” or “HDMI2 in” menu screen. (p. 32)
•
Applicable audio signal sampling frequencies (L.PCM): 48 kHz, 44.1 kHz, 32 kHz
(*1): The HDMI logo is displayed on an HDMI-compliant device.
Caution
Use with a PC is not assumed.
•
All signal is reformatted before being displayed on the screen.
•
If the connected device has an aspect adjustment function, set the aspect ratio to “16:9”.
•
This HDMI connector is “type A”.
•
A device having no digital output terminal may be connected to the input terminal of either “COMPONENT”, “S
•
VIDEO”, or “VIDEO” to receive analog signals.
The HDMI input terminal can be used with only the following image signals: 480i, 480p, 720p, 1080i and 1080p.
•
Match the output setting of the digital device.
For details of the applicable HDMI signals, see below.
•
(*2): Enquire at your local digital device retailer shop.
Input signal that can be displayed
* Mark: Applicable input signal for Component (Y, P
horizontal
frequency (kHz)
525 (480) / 60i 15.73 59.94
525 (480) /60p 31.47 59.94
750 (720) /60p 45.00 59.94
1,125 (1,080) /60i 33.75 59.94
1,125 (1,080) /60p 67.43 59.94
1,125 (1,080) /60p 67.50 60.00
640 × 400 @70 31.47 70.08
640 × 480 @60 31.47 59.94
Macintosh13” (640 × 480) 35.00 66.67
640 × 480 @75 37.50 75.00
852 × 480 @60 31.47 59.94
800 × 600 @60 37.88 60.32
800 × 600 @75 46.88 75.00
800 × 600 @85 53.67 85.08
Macintosh16” (832 × 624) 49.73 74.55
1,024 × 768 @60 48.36 60.00
1,024 × 768 @70 56.48 70.07
1,024 × 768 @75 60.02 75.03
1,024 × 768 @85 68.68 85.00
Macintosh 21” (1,152 × 870) 68.68 75.06
1,280 × 1,024 @60 Hz 63.98 60.02
1,366 × 768 @60 Hz 48.36 60.00
B, PR), and HDMI
vertical
frequency (Hz)
COMPONENT HDMI PC
**
**
**
**
*
*
*
*
*
*
*
*
*
*
*
*
*
*
*
*
*
*
54
Note
Signals other than above may not be displayed properly.
•
The above signals are reformatted for optimal viewing on your display.
•
Page 55
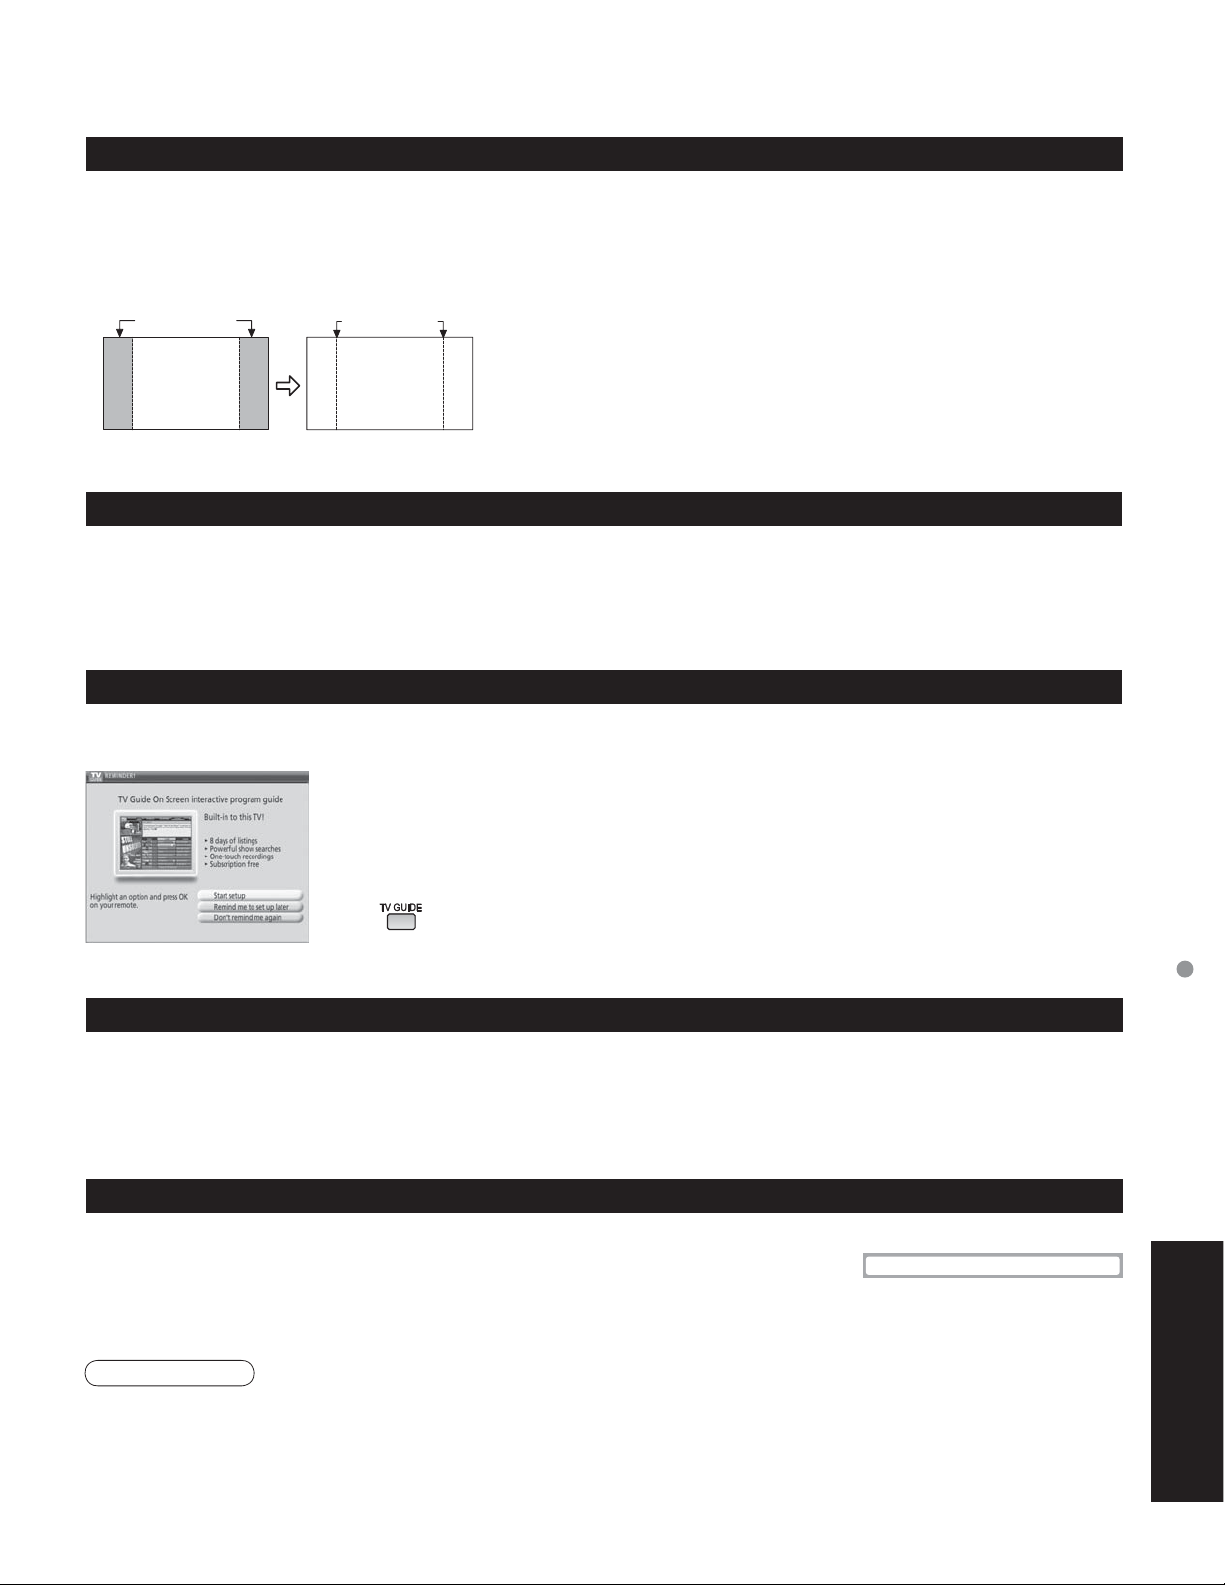
Side Bar
Do not display a picture in 4:3 mode for an extended period, as this can cause an after-image to remain on either or
both sides of the display field.
To reduce the risk of such an after-image, change the brightness of the side bars.
The side bar may flash (alternate black/white) depending on the picture. Using Cinema mode will reduce such
•
flashing (see below).
Side Bar
4:3
Screen
Display
Vivid (default) : Provides enhanced picture contrast and sharpness for viewing in a well-lit room.
•
Standard : Recommended for normal viewing conditions with subdued room lighting.
•
Cinema : For watching movies in a darkened room. It provides a soft, film-like picture.
•
If you skip TV Guide On Screen Setup you see the TV Guide On Screen Reminder screen the next time you power
On your TV.
after-images
Pic. mode
TV Guide (Reminder Screen)
Press Ÿ/ź to highlight an option, and press OK.
Start setup : Begins setup process
•
Remind me to set up later : Closes screen and displays reminder next time you power
•
On the TV
Don’t remind me again : Closes screen and does not display reminder next time you
•
power On the TV
Press
to close the screen.
Split - Screen
TV screen (RF input) cannot be displayed in both main and split frame simultaneously.
•
Split function is not available when HDMI input and PC input is displayed. HDMI signal and PC input cannot be
•
displayed in Split frame.
CableCARD
This menu is used to provide information when a CableCARDTM is inserted
•
into the CableCARD
accessible without inserting a CableCARD
receive the features offered by your cable company, you may have to subscribe
to those services.
Note
Please contact your cable company regarding availability of the CableCARDTM.
The CableCARD
also be able to order call-ahead pay per view events.
TM
slot on the back of the television. “CableCARD” is not
TM
is needed to receive premium digital services (where available) through the Cable input. You may
TM
into the CableCARDTM slot. To
TM
CableCARD
Technical Information
FAQs, etc.
55
Page 56
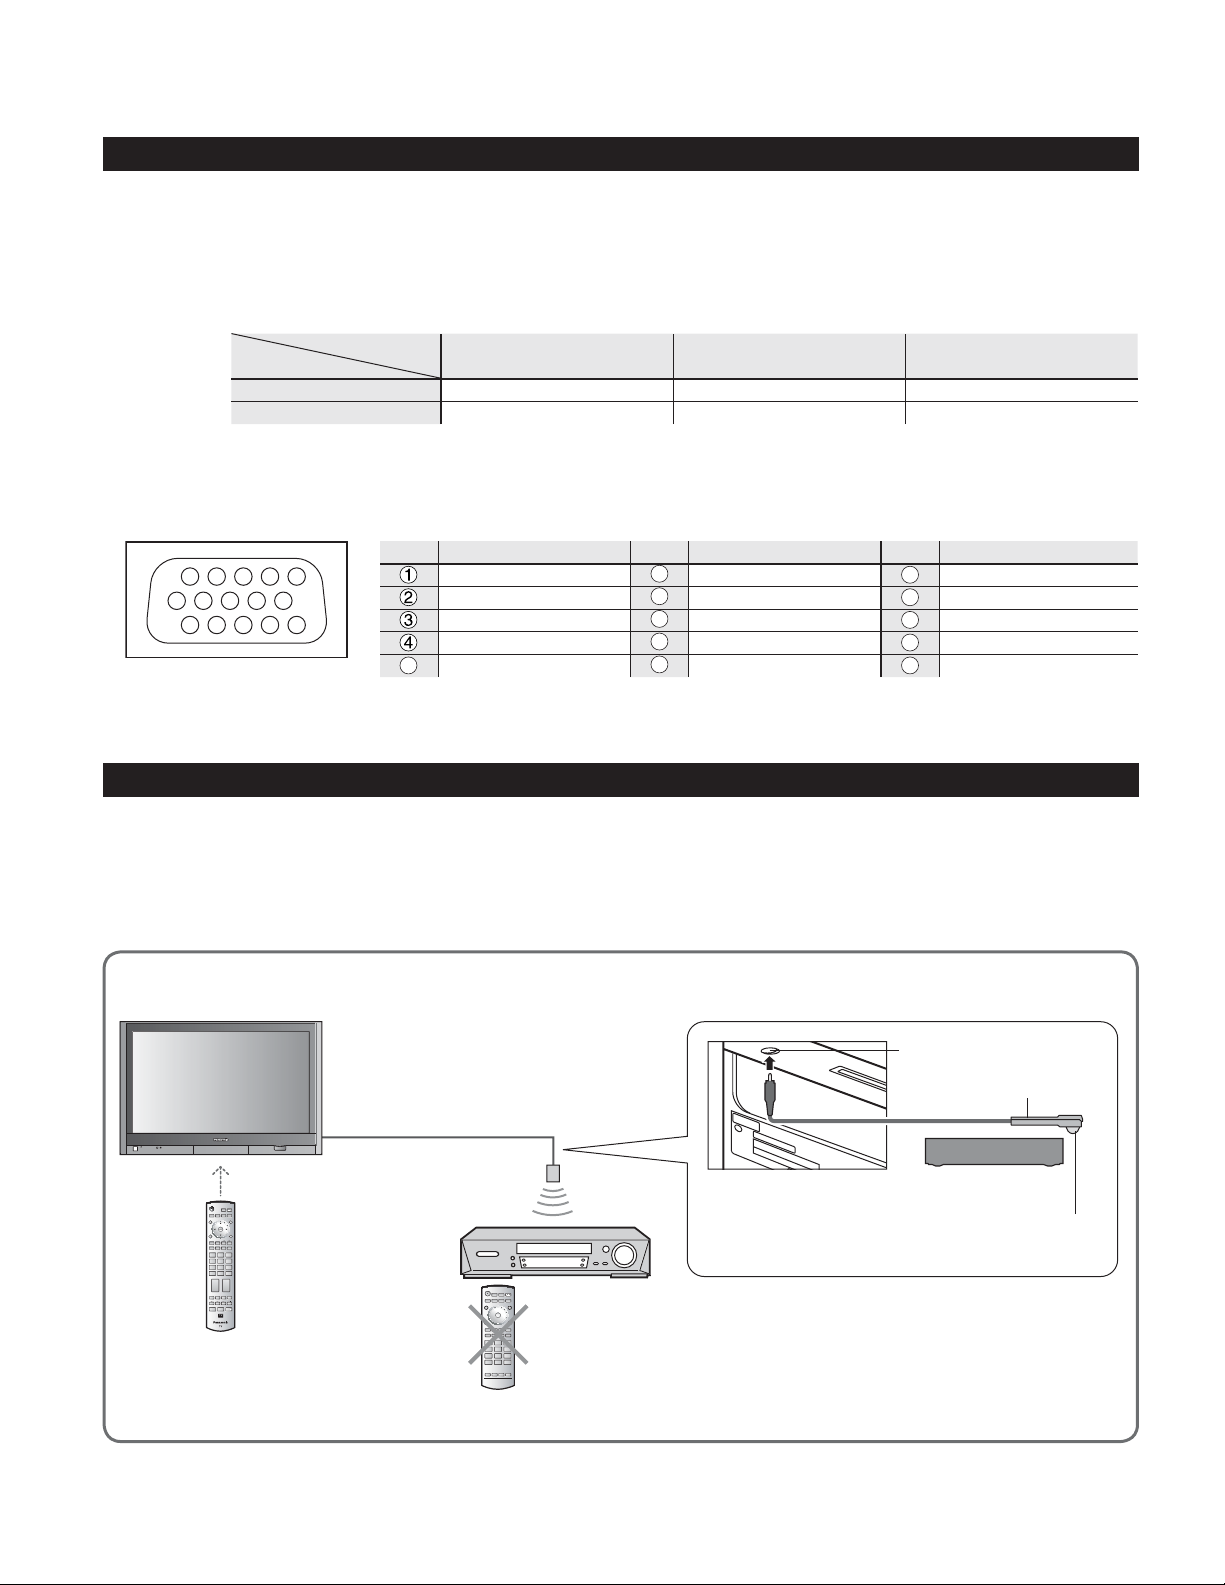
Technical Information
PC Input Terminals Connection
Computer signals which can be input are those with a horizontal scanning frequency of 15 to 110 kHz and vertical
•
scanning frequency of 48 to 120 Hz. (However, the image will not be displayed properly if the signals exceed 1,200
lines.)
Some PC models cannot be connected to the set.
•
There is no need to use an adapter for computers with IBM PC/AT compatible D-sub 15P terminal.
•
The maximum resolution
•
Aspect
If the display resolution exceeds these maximums, it may not be possible to show fine detail with
sufficient clarity.
Signal Names for D-sub 15P Connector
•
1514131211
67839
1
2
Pin Layout for PC Input
Terminal
10
45
Model No.
4:3 768 × 768 1,024 × 768 1,024 × 768
16:9 1,024 × 768 1,366 × 768 1,366 × 768
Pin No.
5
TH-42PX600U TH-50PX600U TH-58PX600U
Signal Name
R
G
B
NC (not connected)
GND (Ground)
Pin No.
6
7
8
9
10
Signal Name
GND (Ground)
GND (Ground)
GND (Ground)
NC (not connected)
GND (Ground)
Pin No.
11
12
13
14
15
NC (not connected)
Signal Name
NC
HD/SYNC
VD
NC
IR Blaster connection
With the IR Blaster connection, scheduled recording can be done easily by using the TV Guide feature in this set.
Connect the IR Blaster if you wish to send remote control signals from the plasma TV to control the recording of a
connected video recorder (VCR).
Position the IR Blaster emitter facing the signal sensor of the video recorder and you will be able to easily record
programs from digital broadcasts. (p. 46)
The TV acts as a proxy for some remote control operations of the VCR.
The TV converts scheduling data
displayed on the TV to a remote
control signal and sends it
TV
Setting the recording time,
channel and recording mode, etc.
VCR
G-LINK
CableCARD
No need to set recording
time or channel on the video
recorder
T
M
G-LINK jack
IR Blaster (Supplied)
Video recorder (VCR)
Infrared emitter
56
Page 57

Maintenance
First, unplug the AC cord plug from the wall outlet.
Display panel
The front of the display panel has been specially treated. Wipe the panel surface gently using only a cleaning cloth or
a soft, lint-free cloth.
If the surface is particularly dirty, soak a soft, lint-free cloth in a weak detergent solution and then wring the cloth to
•
remove excess liquid. Use this cloth to wipe the surface of the display panel, then wipe it evenly with a dry cloth, of
the same type, until the surface is dry.
Do not scratch or hit the surface of the panel with fingernails or other hard objects. Furthermore, avoid contact
•
with volatile substances such as insect sprays, solvents and thinner; otherwise, the quality of the surface may be
adversely affected.
Cabinet
If the cabinet becomes dirty, wipe it with a soft, dry cloth.
If the cabinet is particularly dirty, soak the cloth in a weak detergent solution and then wring the cloth dry.
•
Use this cloth to wipe the cabinet, and then wipe it dry with a dry cloth.
Do not allow any detergent to come into direct contact with the surface of the Plasma TV.
•
If water droplets get inside the unit, operating problems may result.
Avoid contact with volatile substances such as insect sprays, solvents and thinner; otherwise, the quality of the
•
cabinet surface may be adversely affected or the coating may peel off. Furthermore, do not leave it for long periods
in contact with articles made from rubber or PVC.
Pedestal
Cleaning
•
Wipe the surfaces with a soft, dry cloth. If the unit is particularly dirty, clean it using a cloth soaked with water to
which a small amount of neutral detergent has been added, and then wipe with a dry cloth.
Do not use products such as solvents, thinner or household wax for cleaning, as they can damage the surface
coating. (If using a chemically-treated cloth, follow the instructions supplied with the cloth.)
Do not attach sticky tape or labels, as they can make the surface of the pedestal dirty. Do not allow long-term
•
contact with rubber, vinyl products or the like. (Doing so will cause deterioration.)
Technical Information
Maintenance
FAQs, etc.
57
Page 58
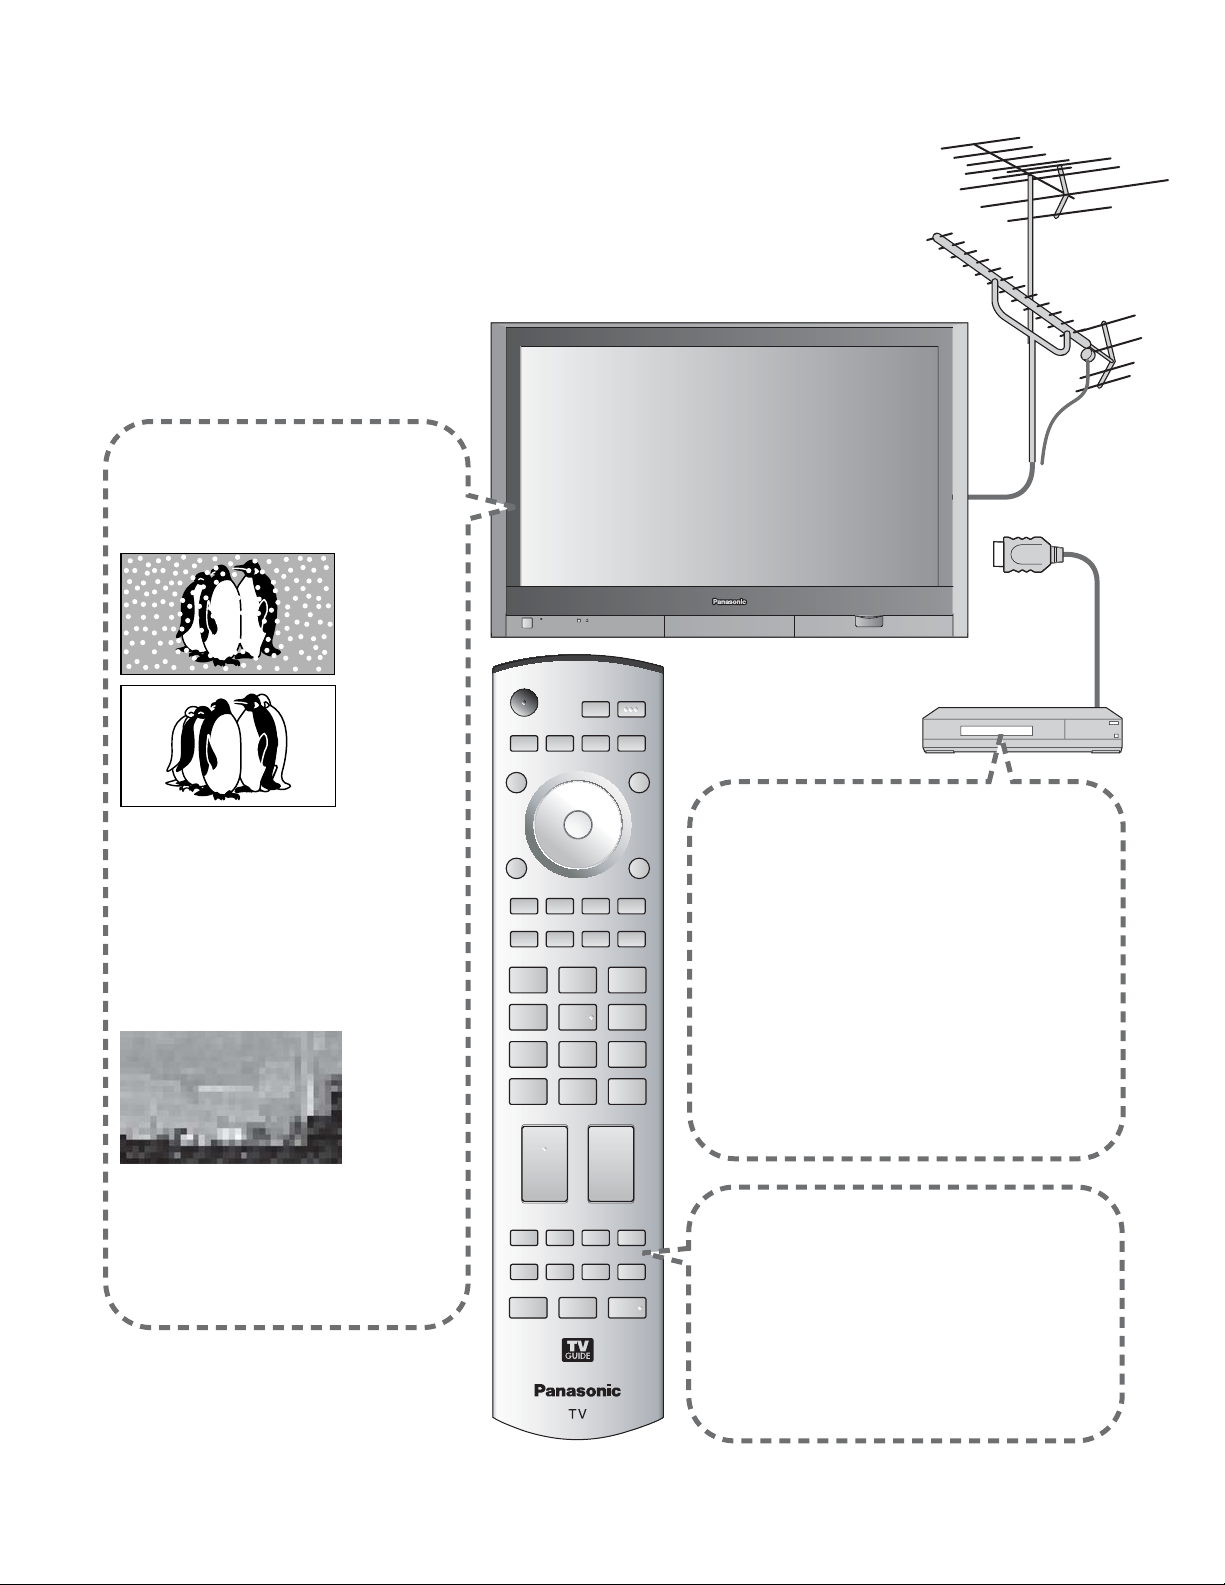
FAQ
Before requesting service or assistance, please follow these simple guides to
resolve the problem.
If problem still persists, please contact your local Panasonic dealer or
Panasonic Service center for assistance. For details (p. 63, 64)
For additional assistance, please contact our website at:
www.panasonic.com/contactinfo
www.panasonic.ca
White spots or
shadow images
(noise)
Check the position, direction,
•
and connection of the aerial.
Interference or
frozen digital
channels
(intermittent sound)
Change the direction of antenna for
•
digital channels .
Check “Signal meter” (p. 41).
•
If the signal is weak, check the
antenna and consult your local
dealer.
Pictures from external
equipment are distorted
when the unit is
connected via HDMI
Is the HDMI cable connected properly?
•
(p. 36-37, 46-47)
Turn Off the TV unit and equipment,
•
then turn them On again.
Check an input signal from the equipment.
•
(p. 36-37, 46-47)
Use a device compliant with
•
EIA/CEA-861/861B.
The remote control
does not work
Are the batteries installed correctly? (p. 6)
•
Has the battery run down?
•
Has the TV POWER button been turned On?
•
To operate external equipment of other
•
manufacturers, register the
remote control codes. (p. 45)
58
Page 59
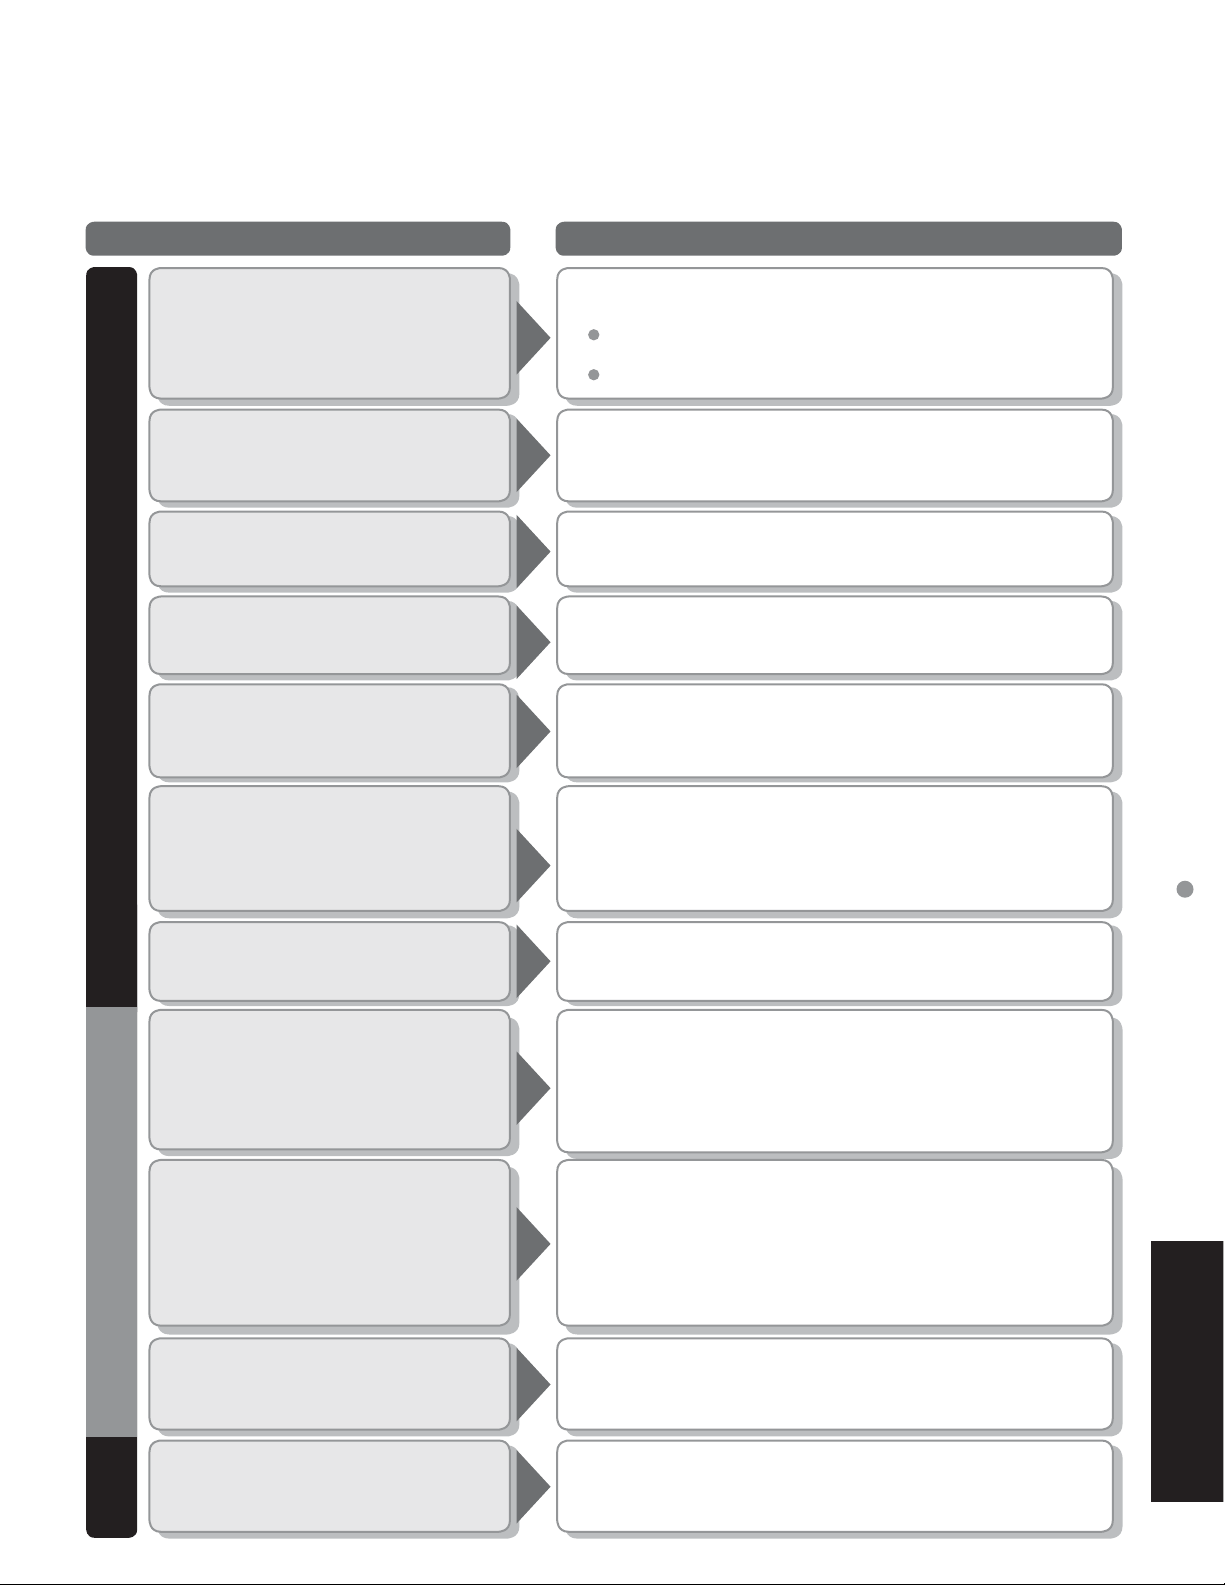
Before requesting service or assistance, please follow these simple guides to resolve the problem.
If problem still persists, please contact your local Panasonic dealer or Panasonic Service center
for assistance. For details (p. 63, 64)
Problem Actions
The function to prevent “after image” is activated.
•
“Press any key to return”
moves on the screen
One spot remains dark
(Not a faulty symptom)
The screen saver is activated if the TV unit is not operated for
a certain time in SD mode.
“after image” (p. 5)
A pixel or luminescent spot can occasionally
•
be missing in plasma displays.
(Not a faulty symptom)
Screen
Chaotic image, noisy
No image can be
displayed
Only spots are displayed
instead of images
Neither image nor
sound is produced
Black Box appears
No sound is produced
Check nearby electrical products
•
(car, motorcycle, fluorescent lamp).
Check Picture menu (p. 32)
•
Check the channel settings. (p. 40)
•
Check the antenna cables.
•
Is the AC power cord plugged into the outlet?
•
Is the TV unit turned On?
•
Check Picture menu (p. 19) and volume.
•
Are the remote control codes correct? (p. 49-50)
•
Change settings of Closed Caption (CC). (p. 42)
•
Is “Sound Mute” active? (p. 12)
•
Is the volume set to the minimum?
•
Is “Speakers” set to “Off”? (p. 32)
•
Change “SAP” settings. (p. 19)
•
Check “HDMI1 in” or “HDMI2 in” settings. (p. 32)
•
Frequently Asked Questions
Sound HDMI
Sound is unusual
Whirling sound is
heard
“Control with HDMI”
function does not work
Set “SAP” setting to “Stereo” or “Mono.”
•
Check the HDMI device connected to the unit.
•
Set the audio setting of the HDMI device to
•
“Linear PCM.”
If digital sound connection has a problem,
•
select analog sound connection.
The sound is from built-in cooling fan
•
(not a sign of faulty operation).
Switch the TV unit on again with the equipment on.
•
Set “Control with HDMI” to “Off”, then set to “On” again.
•
(p. 34)
FAQs, etc.
59
Page 60
FAQ
Problem Actions
Show list disappears
after blackout
Channel display is
not correct
TV Guide
Unable to execute
the reserved recording
Unable to receive
the reserved broadcast
No show list appears in
TV Guide
The list will be downloaded within 24 hours.
•
Set to the correct channel in
•
"Change Channel Display". (p. 22)
Is VCR turned "Off" ?
•
Is the videocassette inserted?
•
Check "Schedule" if the show is set in the list. (p. 24)
•
Check the position of IR Blaster. (p. 46)
•
Check "Schedule" if the show is set in the list. (p. 24)
•
Check the installation of IR Blaster. (p. 46)
•
Has it been 24 hours since completing the initial setup of
•
TV Guide? (Some time is required for list downloading.)
After initial setting, it takes a week to display the entire list
•
for 8 days.
Check the connection of the TV, the cables and the
•
antenna.
60
Page 61
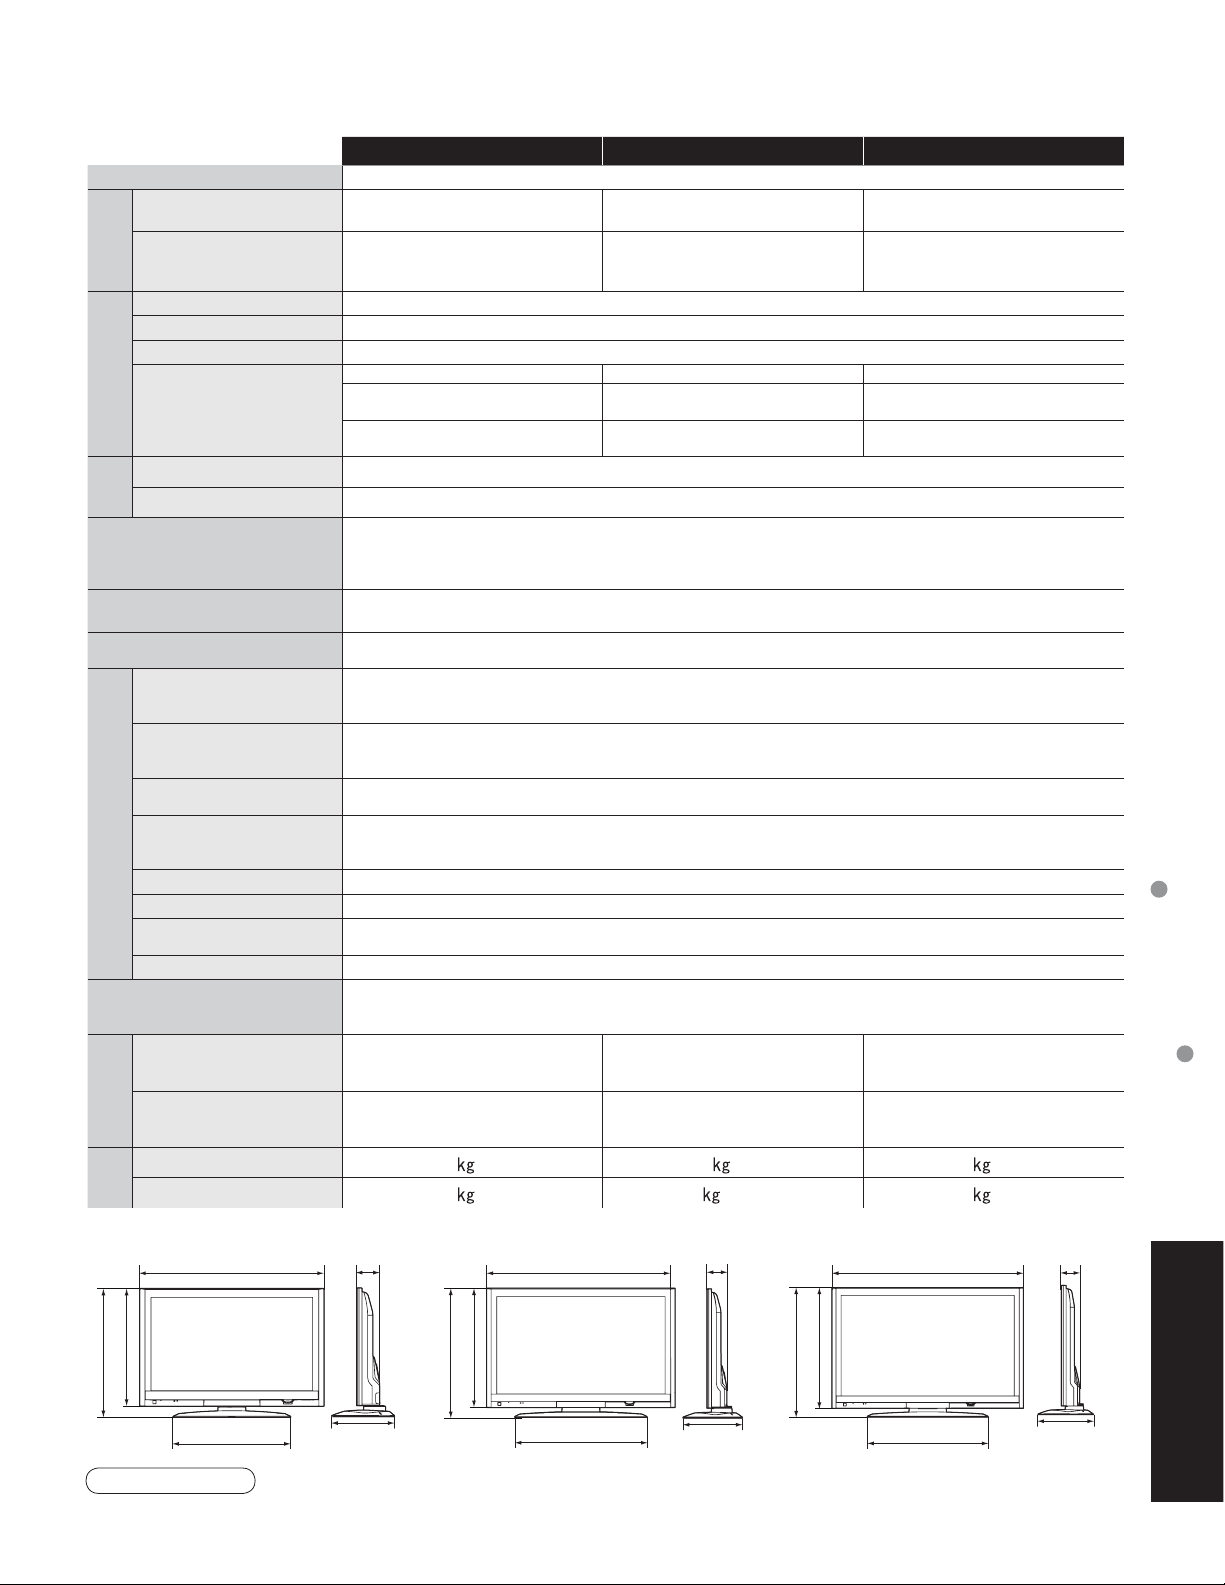
Specifications
TH-42PX600U TH-50PX600U TH-58PX600U
Power Source AC 120 V, 50 / 60 Hz
Power
Consumption
Maximum 399 W 525 W 665 W
Standby condition
Plasma Display
panel
Drive method AC type
Aspect Ratio 16:9
Contrast Ratio (max) 10000:1
Visible screen size
(W × H × Diagonal)
(No. of pixels)
Sound
Speaker Woofer Ɏ 3.2 ” (80 mm) × 2pcs, 8 ȍ Speaker 0.9 ” × 4.0 ” (23 mm × 100 mm) × 2pcs, 8 ȍ
Audio Output 31 W [ 13 W + 2.5 W, 13 W + 2.5 W ] ( 10 % THD )
PC signals
Channel Capability
(Digital/Analog)
Operating Conditions
INPUT 1-3
Connection Terminals
COMPONENT VIDEO
INPUT 1-2
HDMI 1-2
PC
IR Blaster G-LINK Jack × 1
Card slot SD CARD slot × 1, CableCARD™ slot × 1
AV PROG. OUT
DIGITAL AUDIO OUT PCM / Dolby Digital, Fiber Optic
FEATURES
( W × H × D )
Dimensions
Including pedestal
0.2 W
(With CableCARD™: 14.0 W)
106 cmV 127 cmV 148 cmV
36.3 ” × 20.4 ” × 41.6 ”
(920 mm × 518 mm × 1,056 mm)
786,432 (1,024 (W) × 768 (H))
[3,072 × 768 dots]
VGA, SVGA, XGA
SXGA ...... (compressed)
Horizontal scanning frequency 31 - 69 kHz
Vertical scanning frequency 59 - 86 Hz
VHF/ UHF : 2-69, CATV:1-135
Temperature : 32 °F - 104 °F (0 °C – 40 °C)
Humidity : 20 % - 80 % RH (non-condensing)
VIDEO : RCA PIN Type × 1 1.0 V [p-p] (75 ȍ)
S-VIDEO : Mini DIN 4-pin Y:1.0 V [p-p] (75 ȍ) C:0.286 V [p-p] (75 ȍ)
AUDIO L-R : RCA PIN Type × 2 0.5 V [rms]
Y : 1.0 V [p-p] (including synchronization)
B, PR: ±0.35 V [p-p]
P
AUDIO L-R : RCA PIN Type × 2 0.5 V [rms]
TYPE A Connector
AUDIO L-R: RCA PIN Type × 2 0.5 V [rms]
D-SUB 15PIN : R,G,B / 0.7 V [p-p] (75 ȍ)
HD, VD / 1.0 - 5.0 V [p-p] (high impedance)
AUDIO L-R : Stereo Mini Jack (Ɏ3.5 mm) × 1
VIDEO: RCA PIN Type × 1 1.0 V [p-p] (75 ȍ)
AUDIO L-R: RCA PIN Type × 2 0.5 V [rms]
3D Y/C FILTER CableCARD™ slot
CLOSED CAPTION V-Chip Split-Screen
BBE VIVA 3D Photo Viewer TV Guide
42.4 ” × 29.8 ” × 14.6 ”
(1,077 mm × 755 mm × 369 mm)
0.2 W
(With CableCARD™: 14.5 W)
43.6 ” × 24.5 ” × 50.0 ”
(1,106 mm × 622 mm × 1,269 mm)
1,049,088 (1,366 (W) × 768 (H))
[4,098 × 768 dots]
49.9 ” × 34.3 ” × 15.7 ”
(1,266 mm × 870 mm × 399 mm)
0.2 W
(With CableCARD™: 14.5 W)
50.7 ” × 28.5 ” × 58.1 ”
(1,287 mm × 723 mm × 1,476 mm)
1,049,088 (1,366 (W) × 768(H))
[4,098 × 768 dots]
57.3 ” × 38.9 ” × 16.6 ”
(1,454 mm × 986 mm × 420 mm)
Frequently Asked Questions
Specifications
TV Set only
Weight
Including pedestal 98.1 lb. (44.5 ) 123.5 lb. (56 ) 174.2 lb. (79 )
TV Set only 71.7 lb. (32.5
[TH-42PX600U] [TH-50PX600U] [TH-58PX600U]
42.4 ” (1077 mm)
27.2 ” (689 mm)
29.8 ” (755 mm)
27.0 ” (684 mm)
42.4 ” × 27.2 ” × 5.5 ”
(1,077 mm × 689 mm × 138 mm)
) 94.8 lb. (43 ) 136.7 lb. (62 )
5.5 ” (138 mm)
31.6 ” (802 mm)
34.3 ” (870 mm)
14.6 ” (369 mm)
49.9 ” (1266 mm)
35.0 ” (888 mm)
49.9 ” × 31.6 ” × 5.5 ”
(1,266 mm × 802 mm × 138 mm)
5.5 ” (138 mm)
36.2 ” (918 mm)
38.9 ” (986 mm)
15.7 ” (399 mm)
57.3 ” × 36.2 ” × 5.7 ”
(1,454 mm × 918 mm × 143 mm)
57.3 ” (1454 mm)
36.2 ” (918 mm)
5.7 ” (143 mm)
16.6 ” (420 mm)
Note
Design and Specifications are subject to change without notice. Weight and Dimensions shown are approximate.
•
FAQs, etc.
61
Page 62
Limited Warranty (for U.S.A.)
62
PANASONIC CONSUMER ELECTRONICS COMPANY,
DIVISION OF
PANASONIC CORPORATION OF NORTH AMERICA
One Panasonic Way
Secaucus, New Jersey 07094
PANASONIC SALES COMPANY,
DIVISION OF
PANASONIC PUERTO RICO INC.
Ave. 65 de Infanteria, Km. 9.5
San Gabriel Industrial Park
Carolina, Puerto Rico 00985
Panasonic Color Television
Limited Warranty
Limited Warranty Coverage
If your product does not work properly because of a defect in materials or workmanship, Panasonic Consumer
Electronics Company or Panasonic Puerto Rico, Inc. (collectively referred to as “the warrantor”) will, for the length of
the period indicated on the chart below, which starts with the date of original purchase (“Limited Warranty period”),
at its option either (a) repair your product with new or refurbished parts, or (b) replace it with a new or a refurbished
product. The decision to repair or replace will be made by the warrantor.
CATEGORIES
PLASMA DISPLAY 1 (ONE) YEAR 1 (ONE) YEAR
During the “Labor” Limited Warranty period there will be no charge for labor. During the “Parts” Limited Warranty
period, there will be no charge for parts.
You must carry-in your product or arrange for in-home service during the Limited Warranty period. If nonrechargeable batteries are included, they are not warranted. This Limited Warranty only applies to products
purchased and serviced in the United States or Puerto Rico. This Limited Warranty is extended only to the original
purchaser and only covers product purchased as new. A purchase receipt or other proof of the original purchase date
is required for Limited Warranty service.
In-Home or Carry-in Service
For In-Home or Carry-In Service in the United States call 1-888-VIEW-PTV(1-888-843-9788).
For assistance in Puerto Rico call Panasonic Puerto Rico, Inc. (787)-750-4300 or fax (787)-768-2910.
In-Home service requires clear, complete and easy access to the product by the authorized servicer and does
not include removal or re-installation of an installed product. It is possible that certain in-home repairs will not be
completed in-home, but will require that the product, or parts of the product, be removed for shop diagnosis and/or
repair and then returned.
Limited Warranty Limits And Exclusions
This Limited Warranty ONLY COVERS failures due to defects in materials or workmanship, and DOES NOT COVER
normal wear and tear or cosmetic damage, nor does it cover markings or retained images on the picture tube
resulting from viewing fixed images (including, among other things, letterbox pictures on standard 4:3 screen TV’s,
or non-expanded standard 4:3 pictures on wide screen TV’s, or onscreen data in a stationary and fixed location).
The Limited Warranty ALSO DOES NOT COVER damages which occurred in shipment, or failures which are caused
by products not supplied by the warrantor, or failures which result from accidents, misuse, abuse, neglect, bug
infestation, mishandling, misapplication, alteration, faulty installation, set-up adjustments, misadjustment of consumer
controls, improper maintenance, power line surge, lightning damage, modification, or commercial use (such as
in a hotel, office, restaurant, or other business), rental use of the product, service by anyone other than a Factory
Servicenter or other Authorized Servicer, or damage that is attributable to acts of God.
THERE ARE NO EXPRESS WARRANTIES EXCEPT AS LISTED UNDER “LIMITED WARRANTY COVERAGE”.
THE WARRANTOR IS NOT LIABLE FOR INCIDENTAL OR CONSEQUENTIAL DAMAGES RESULTING FROM
THE USE OF THIS PRODUCT, OR ARISING OUT OF ANY BREACH OF THIS LIMITED WARRANTY. (As
examples, this excludes damages for lost time, cost of having someone remove or re-install an installed unit if
applicable, or travel to and from the servicer. The items listed are not exclusive, but are for illustration only.) ALL
EXPRESS AND IMPLIED WARRANTIES, INCLUDING THE LIMITED WARRANTY OF MERCHANTABILITY, ARE
LIMITED TO THE PERIOD OF THE LIMITED WARRANTY.
Some states do not allow the exclusion or limitation of incidental or consequential damages, or limitations on how
long an implied Limited Warranty lasts, so the exclusions may not apply to you.
This Limited Warranty gives you specific legal rights and you may also have others rights which vary from state
to state. If a problem with this product develops during or after the Limited Warranty period, you may contact your
dealer or Servicenter. If the problem is not handled to your satisfaction, then write to the warrantor’s Consumer Affairs
Department at the addresses listed for the warrantor.
PARTS AND SERVICE (INCLUDING COST OF AN IN-HOME SERVICE CALL, WHERE APPLICABLE) WHICH
ARE NOT COVERED BY THIS LIMITED WARRANTY ARE YOUR RESPONSIBILITY.
ALL PARTS EXCEPT
GLASS PANEL OR CRT
LABOR GLASS PANEL OR CRT
GLASS PANEL - 2 (TWO)
YEARS
GLASS PANEL
OR
CRT LABOR
1 (ONE) YEAR IN-HOME OR CARRY-IN
SERVICE
Page 63

Customer Services Directory
Customer Services Directory
Obtain Product Information and Operating Assistance; locate your nearest Dealer or Service center;
purchase Parts and Accessories; or make Customer Service and Literature requests by visiting our Web
Site at:
(for U.S.A.)
http://www.panasonic.com/consumersupport
or, contact us via the web at:
http://www.panasonic.com/contactinfo
You may also contact us directly at:
1-888-VIEW-PTV (843-9788)
Monday-Friday 9 am-9 pm; Saturday-Sunday 10 am-7 pm, EST.
For hearing or speech impaired TTY users, TTY : 1-877-833-8855
Ŷ
Accessory Purchases
Purchase Parts, Accessories and Instruction Books on line for all Panasonic Products by visiting our Web
Site at:
http://www.pasc.panasonic.com
or, send your request by E-mail to:
You may also contact us directly at:
1-800-332-5368 (Phone) 1-800-237-9080 (Fax Only) (Monday - Friday 9 am to 8 pm, EST.)
Panasonic Services Company
20421 84th Avenue South,
Kent, WA 98032
(We Accept Visa, MasterCard, Discover Card, American Express, and Personal Checks)
For hearing or speech impaired TTY users, TTY : 1-866-605-1277
Ŷ
Customer Services Directory (for U.S.A.)
Limited Warranty (for U.S.A.)
Service in Puerto Rico
Panasonic Puerto Rico, Inc.
Ave. 65 de Infantería, Km. 9.5, San Gabriel Industrial Park,
Carolina, Puerto Rico 00985
Phone (787)750-4300, Fax (787)768-2910
FAQs, etc.
63
Page 64
Limited Warranty (for Canada)
Panasonic Canada Inc.
PANASONIC PRODUCT - LIMITED WARRANTY
Panasonic Canada Inc. warrants this product to be free from defects in material and workmanship and agrees to
remedy any such defect for a period as stated below from the date of original purchase.
Plasma TV / Monitor In-home service One (1) year, parts (including Plasma Panel) and labour.
LCD TV (26 in & over) In-home service One (1) year, parts (including LCD Panel) and labour.
LCD TV (25 in & under) Carry-in service only One (1) year, parts (including LCD Panel) and labour.
In-home Service will be carried out only to locations accessible by roads and within 50 km of an authorized
Panasonic service facility.
LIMITATIONS AND EXCLUSIONS
This warranty does not apply to products purchased outside Canada or to any product which has been improperly
installed, subjected to usage for which the product was not designed, misused or abused, damaged during shipping,
or which has been altered or repaired in any way that affects the reliability or detracts from the performance, nor
does it cover any product which is used commercially. Dry cell batteries are also excluded from coverage under this
warranty.
This warranty is extended to the original end user purchaser only. A purchase receipt or other proof of date of original
purchase is required before warranty service is performed.
THIS EXPRESS, LIMITED WARRANTY IS IN LIEU OF ALL OTHER WARRANTIES, EXPRESS OR IMPLIED,
INCLUDING ANY IMPLIED WARRANTIES OF MERCHANTABILITY AND FITNESS FOR A PARTICULAR
PURPOSE. IN NO EVENT WILL PANASONIC CANADA INC. BE LIABLE FOR ANY SPECIAL, INDIRECT OR
CONSEQUENTIAL DAMAGES.
In certain instances, some jurisdictions do not allow the exclusion or limitation of incidental or consequential
damages, or the exclusion of implied warranties, so the above limitations and exclusions may not be applicable.
In-home service requires clear, complete and easy access to the product by the Authorized Servicentre and does not
include removal or re-installation of an installed product. If removal is required to service the product, it will be at the
discretion of the Servicentre and in no event will Panasonic Canada Inc. or the Servicentre be liable for any special,
indirect or consequential damages.
WARRANTY SERVICE
For product operation and information assistance, please contact:
Our Customer Care Centre: Telephone #: (905) 624-5505
1-800 #: 1-800-561-5505
Fax #: (905) 238-2360
Email link: “Customer support” on www.panasonic.ca
FOR PRODUCT REPAIRS, please locate your nearest Authorized Servicentre at www.panasonic.ca :
Link: “Servicentres™ locator” under “Customer support”
Carefully pack and send prepaid, adequately insured and preferably in the original carton.
Include details of the defect claimed, and proof of date of original purchase.
IF YOU SHIP THE PRODUCT TO A SERVICENTRE
64
Page 65

Note
Limited Warranty (for Canada)
FAQs, etc.
65
Page 66

Note
66
Page 67

Note
67
Page 68

,QVWUXFFLRQHVHQ(VSDxRO
7HOHYLVRUGLJLWDOFRQSDQWDOODGH
SODVPDGHDOWDGHILQLFLyQ
1~PHURGHPRGHOR 7+3;8
7+3;8
7+3;8
Page 69
¡Convierta su propia sala de estar en un cine!
Sienta un nivel increíble de excitación multimedia
2
Este producto contiene tecnología de protección de derechos que esta protegida por patentes de los EEUU y otros derechos de
propiedad intelectual. El uso de esta tecnología de protección de derechos debe ser autorizada por Macrovision Corporation,
y es para uso en casa y otros casos limitados a menos que sea autorizado por Macrovision. La ingeniería reversible y
desensamble estan prohibidas.
Patentes de los EEUU. 4,631,603; 4,577,216; 4,819,098; 4,907,093; 6,381,747; y 6,516,132.
En los Estados Unidos de América, TV Guide y otras marcas relacionadas son marcas registradas de Gemstar-TV
Guide International, Inc. y/o una de sus compañías afiliadas. En Canadá, TV Guide es una marca registrada de
Transcontinental Inc., y se utiliza bajo licencia de Gemstar-TV Guide International, Inc.
El sistema TV Guide On ScreenTM se fabrica bajo licencia de Gemstar-TV Guide International, Inc. y/o una de sus compañías afiliadas.
El sistema de Guía de TV en Pantalla está protegido por una o varias de las siguientes patentes estadounidenses: 4,908,713;
6,498,895; 6,850,693; 6,396,546; 5,940,073; 6,239,794 a nombre de Gemstar-TV Guide International, Inc. y/o de sus
compañías afiliadas.
R
Fabricado bajo licencia de Dolby Laboratories.
“Dolby” y el símbolo de la doble D son marcas
comerciales de Dolby Laboratories.
HDMI, el símbolo HDMI y la Interface de
Multimedios de Alta Definición son marcas comerciales
ó marcas registradas de HDMI Licensing LLC.
Page 70
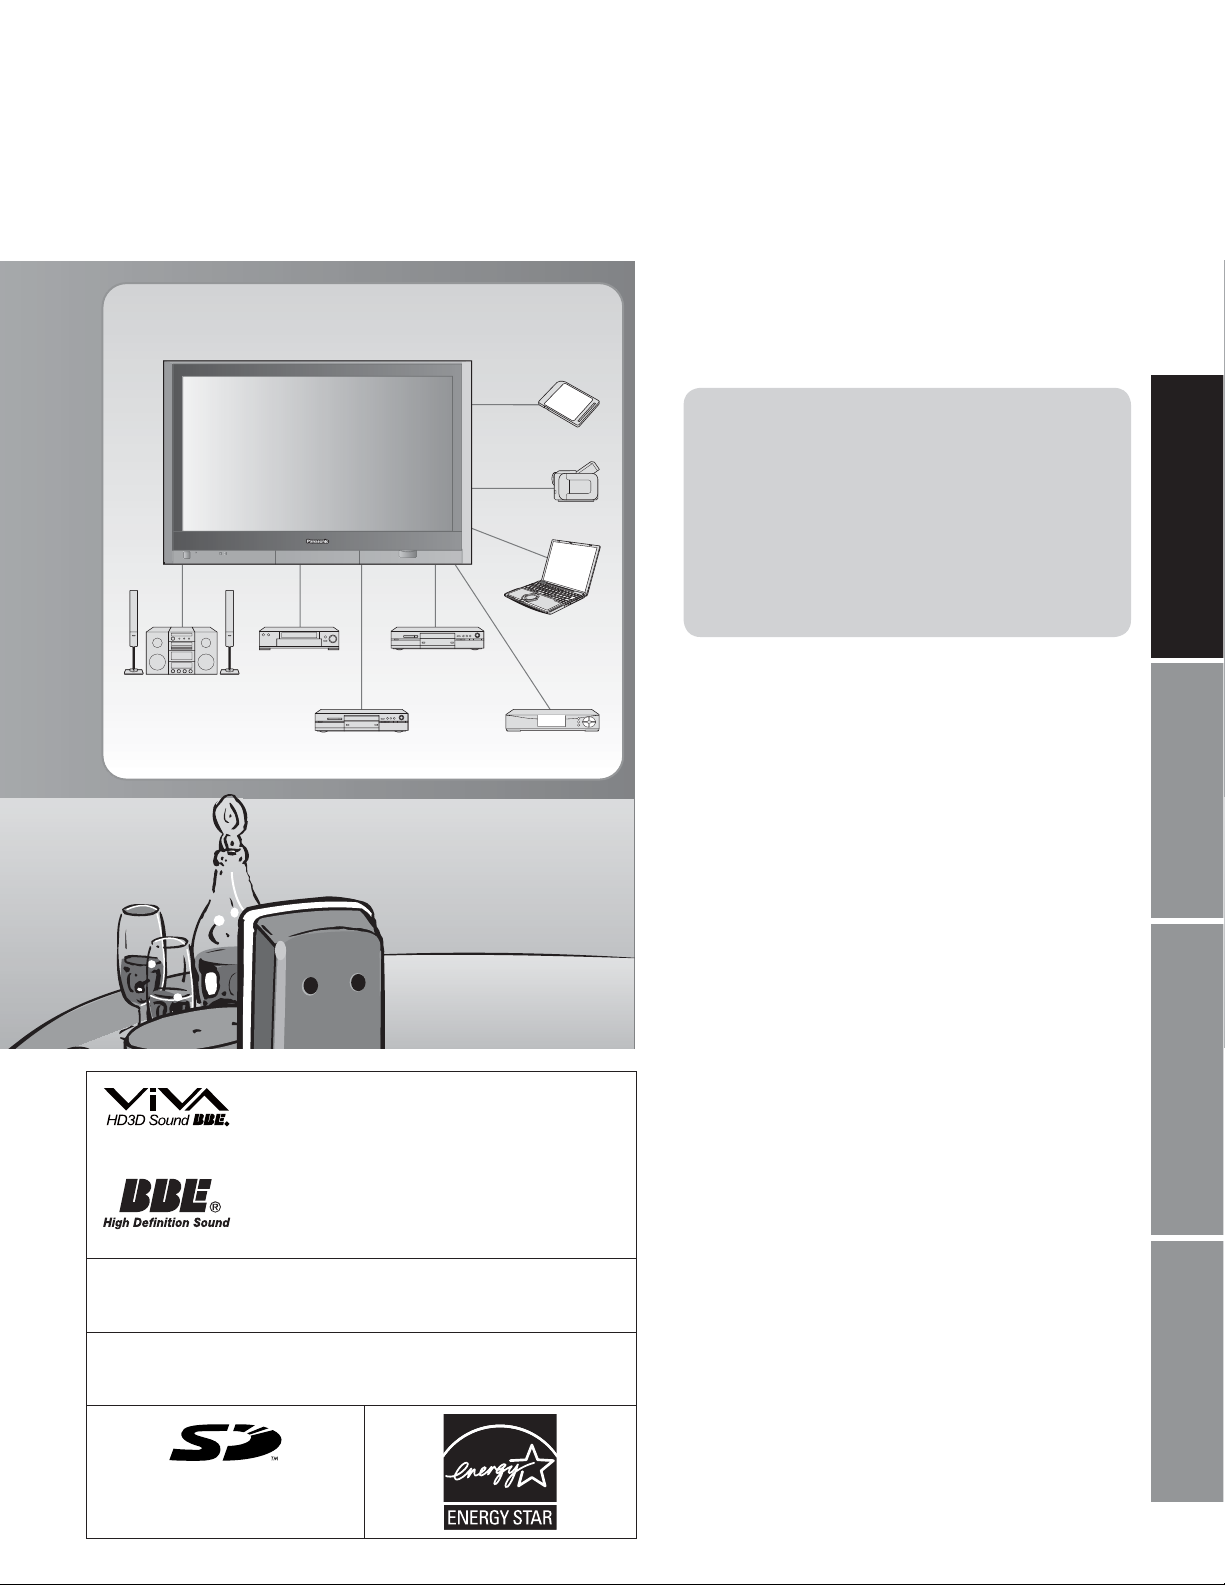
Disfrute de multimedia
Videograbadora Reproductor DVD
Amplificador
Unidad de cine
para casa
Grabadora DVD Receptor digital
Tarjeta de memoria SD
Cámara de vídeo
Ordenador
personal
multimedia
Índice
Asegúrese de leer
Precauciones para su seguridad ·················4
•
(Advertencia/Precaución)
Notas···························································· 5
•
Accesorios/Opciones ······················ 6
•
Conexiones ··························· 10
•
Identificación de los controles ······· 12
•
Configuración por
•
primera vez
AJUSTE DE GUÍA
•
INICIAL para Guía de TV
¡Disfrute de su televisor!
Características básicas
Para ver la televisión ································· 17
•
Utilización de la guía de TV
•
(TV Guide) ·················································20
Para ver imágenes de tarjeta SD ··············· 26
•
Tarjeta SD: Notas y precauciones ············· 28
•
Para ver vídeo y DVDs ······························29
•
Visualización de la pantalla del PC en el televisor
··························· 13
···· 15
··· 30
•
Guía rápida para la
puesta en marcha
Visión
Bajo licencia de BBE Sound, Inc.
Bajo licencia de BBE Sound, Inc. sobre el
numero USP5510752 y 5736897.
BBE y símbolo de BBE son marcas
registradas de BBE Sound, Inc.
TM
CableCARD
Laboratories, Inc.
HDAVI ControlTM es una marca de fábrica de Matsushita Electric Industrial
Co., Ltd.
El logotipo SD es una
es una marca comercial de Cable Television
marca comercial.
Funciones avanzadas
Cómo utilizar las funciones de los menús
•
(imagen, sonido, calidad, etc.) ··················· 32
Control con HDMI “HDAVI ControlTM”········· 34
•
Bloqueo de canales ···································38
•
Edición y configuración de canales ··········· 40
•
Títulos de entradas/Subtítulos ··················· 42
•
Utilización del temporizador ······················· 44
•
Operación del equipo periférico ················· 45
•
Conexiones AV recomendadas ·················· 46
•
Preguntas frecuentes, etc.
Operaciones del mando a distancia/Lista de códigos
•
Lista de clasificaciones para el bloqueo de canales
•
Información técnica ···································· 52
•
Mantenimiento ··········································· 57
•
Preguntas frecuentes ································· 58
•
Especificaciones ········································ 61
·· 48
··· 51
•
avanzadas
Funciones
frecuentes, etc.
Preguntas
3
Page 71
Precauciones para su seguridad
El rayo con punta de flecha dentro
de un triángulo equilátero tiene
ADVERTENCIA
RIESGO DE DESCARGA
ELÉTRICA NO ABRIR
ADVERTENCIA: Para reducir el riesgo de sufrir una descarga eléctrica, no retire
la cubierta ni el panel posterior. En el interior no hay piezas que deba reparar el
usuario. Solicite las reparaciones al personal de servicio calificado.
ADVERTENCIA:
1) Lea estas instrucciones.
2) Guarde estas instrucciones.
3) Cumpla con todas las advertencias.
4) Siga todas las instrucciones.
5) No utilice este aparato cerca del agua.
6) Limpie el aparato solamente con un paño seco.
7) No tape las aberturas de ventilación. Haga la instalación
siguiendo las instrucciones del fabricante.
No instale el aparato cerca de fuentes de calor como, por
8)
ejemplo, radiadores, salidas de aire caliente, estufas y otros
aparatos (incluyendo amplificadores) que produzcan calor.
9)
No anule la característica de seguridad del enchufe polarizado ó del
enchufe del tipo de puesta a tierra. Un enchufe polarizado tiene dos
clavijas, una más ancha que la otra. Un enchufe de puesta a tierra
tiene dos clavijas y una espiga de puesta a tierra. La clavija ancha y la
espiga de estos enchufes han sido suministradas para su seguridad.
Si el enchufe suministrado no puede conectarse al tomacorriente,
consulte a un electricista para que le cambie el tomacorriente obsoleto.
10) Proteja el cable de alimentación para que no lo pisen ni lo
pellizquen, especialmente en el enchufe, tomacorriente y
en el punto donde sale del aparato.
Para reducir el riesgo de que se produzca un incendio ó de sufrir una descarga eléctrica, no exponga
este aparato a la lluvia ni a la humedad. No ponga encima del aparato (incluyendo estanterías que se
encuentren encima del mismo, etc.) recipientes con agua (floreros, tazas, cosméticos, etc.).
Instrucciones de seguridad importantes
11) Utilice solamente los accesorios especificados por el
fabricante.
12) Utilice solamente el aparato con
el carrito, base, trípode, soporte ó
mesa especificado por el fabricante
ó vendido con el aparato. Cuando
se utilice un carrito, tenga cuidado
al mover la combinación del carrito /
aparato para evitar heridas en el caso
de que ésta se dé la vuelta.
13) Desenchufe este aparato durante las tormentas eléctricas ó
cuando no lo utilice durante un largo periodo de tiempo.
Solicite todas las reparaciones al personal de servicio calificado.
14)
Las reparaciones resultan necesarias cuando el aparato se ha
estropeado de cualquier forma: se ha estropeado el cable ó el
enchufe de alimentación, se ha derramado líquido ó han caído
objetos dentro del aparato, el aparato ha quedado expuesto a la
lluvia ó a la humedad, no funciona normalmente ó se ha caído.
15) Para impedir las descargas eléctricas, asegúrese de
que la patilla de puesta a tierra de la clavija del cable de
alimentación de CA esté firmemente conectada.
la finalidad de avisar al usuario
de que hay piezas en el interior
del producto que si las tocan las
personas éstas pueden recibir una
descarga eléctrica.
El signo de exclamación dentro
de un triángulo equilátero tiene la
finalidad de avisar al usuario de
la existencia de instrucciones de
utilización y servicio importantes
en el material impreso que
acompaña al aparato.
DECLARACIÓN DE LA FCC
Este equipo ha sido probado y ha demostrado cumplir con las limitaciones para los dispositivos digitales de la Clase B, de conformidad
con el Apartado 15 de las Normas de la FCC. Estos límites han sido diseñados para proporcionar una protección razonable contra
las interferencias perjudiciales en una instalación residencial. Este equipo genera, utiliza y puede radiar energía radioeléctrica, y si no
se instala y utiliza de acuerdo con las instrucciones, puede causar interferencias perjudiciales en las comunicaciones por radio. Sin
embargo, no existe ninguna garantía de que las interferencias no se produzcan en una instalación particular. Si este equipo causa
interferencias perjudiciales en la recepción de la radio o televisión, lo que se puede determinar apagando y encendiendo el equipo, al
usuario se le recomienda intentar corregir la interferencia tomando una o más de las medidas siguientes:
• Cambie la orientación o el lugar de instalación de la antena.
• Aumente la separación entre el equipo y el receptor.
• Conecte el equipo a una toma de corriente diferente de aquella a la que está conectada el receptor.
• Consulte a su concesionario o a un técnico en radio/televisión con experiencia para solicitar su ayuda.
Este dispositivo cumple con el Apartado 15 de las normas de la FCC. El funcionamiento está sujeto a las dos condiciones
siguientes: (1) este dispositivo no deberá causar interferencias perjudiciales y (2) este dispositivo deberá ser aceptar cualquier
interferencia que reciba, incluyendo la interferencia que pueda causar un funcionamiento no deseado.
Aviso de la FCC:
De conformidad con el artículo 47CFR, Apartado 15.21 de la normativa FCC, cualquier cambio o modificación realizados
en este televisor sin la autorización expresa de Panasonic Corporation of North America podría dar lugar a interferencias
perjudiciales a invalidaría la licencia del usuario a operar este aparato.
Cualquier cambio o modificación hecha en este televisor que no haya sido aprobada expresamente por Panasonic Corporation of
North America podrá causar interferencias perjudiciales y anular la autorizador que tiene el usuario para utilizar este dispositivo.
N.° de modelo TH-42PX600U, TH-50PX600U, TH-58PX600U
Responsable: Panasonic Corporation of North America
Dirección de contacto:
email: [email protected]
Declaración de conformidad de la FCC
One Panasonic Way, Secaucus, NJ 07094
Panasonic Consumer Electronics Company
1-888-VIEW-PTV (843-9788)
4
AVISO PARA CANADÁ:
Para los Modelos TH-42PX600U, TH-50PX600U, TH-58PX600U
Este aparato digital de la Clase B cumple con la norma canadiense ICES-003.
Page 72
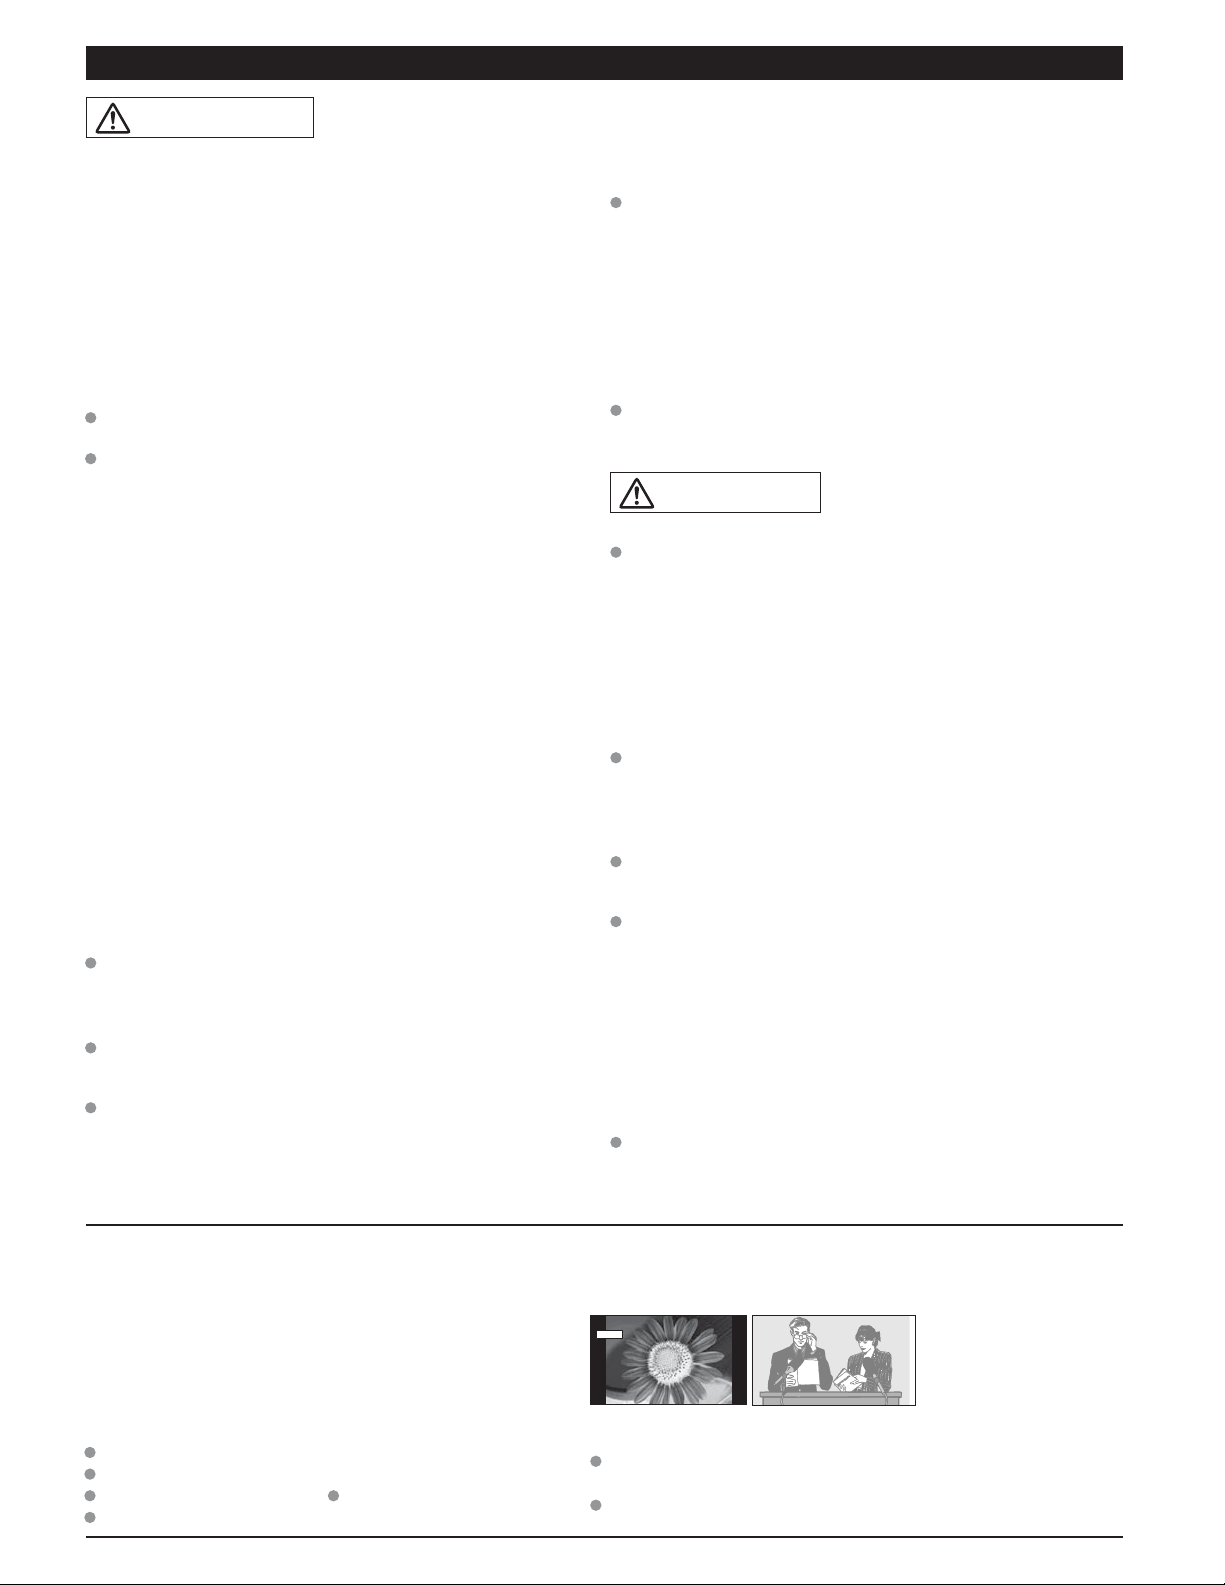
ADVERTENCIA/PRECAUCION
ADVERTENCIA
LAS PIEZAS PEQUEÑAS PUEDEN PRESENTAR UN PELIGRO
DE ASFIXIA SI SE TRAGAN POR ACCIDENTE. GUARDE LAS
PIEZAS PEQUEÑAS DONDE NO PUEDAN ALCANZARLAS
LOS NIÑOS PEQUEÑOS.
TIRE LAS PIEZAS PEQUEÑAS Y OTROS OBJETOS QUE NO
SEAN NECESARIOS, INCLUYENDO LOS MATERIALES DE
EMBALAJE Y LAS BOLSAS/HOJAS DE PLÁSTICO, PARA
IMPEDIR QUE LOS NIÑOS PEQUEÑOS JUEGUEN CON ELLAS
CORRIENDO EL RIESGO DE QUE PUEDAN ASFIXIARSE.
Instalación
Ŷ
No instale la televisor de plasma sobre superficies
inclinadas ó poco estables.
La televisor de plasma puede caerse ó darse vuelta.
No coloque objetos encima de la televisor de plasma.
Si se derrama agua en la televisor de plasma ó entran objetos
extraños en su interior, se puede provocar un cortocircuito que causará
fuego ó descarga eléctrica. Si entran objetos extraños en el interior de
la televisor de plasma, consulte con su tienda local de Panasonic.
Esta la televisor de plasma puede utilizarse sólo con los
siguientes accesorios opcionales. El uso con cualquier
otro tipo de accesorios opcionales puede causar
inestabilidad y terminar provocando daños.
(Matsushita Electric Industrial Co., Ltd. fabrica todos los
accesorios siguientes.)
• Abrazadera de suspensión de pared (Vertical):
TY-WK42PV3U
• Abrazadera de suspensión de pared (Anglado):
TY-WK42PR3U
• Soporte para televisor de pantalla de plasma:
TY-S42PX600W (TH-42PX600U)
TY-S50PX600W (TH-50PX600U)
TY-S58PX600W (TH-58PX600U)
Solicite ayuda de un técnico cualificado para realizar la instalación.
Cable de alimentación de CA
Ŷ
El televisor de plasma fue diseñado para funcionar con una
CA de 120 V, 50/60 Hz .
Inserte completamente el enchufe del cable eléctrico.
Si el enchufe no ha entrado completamente puede generar
calor y ser el origen de un incendio. Si el enchufe está
dañado ó el tomacorriente está flojo, no los utilice.
No toque el enchufe del cable eléctrico con las manos mojadas.
Puede recibir una descargue eléctrica.
No haga nada que pueda dañar el cable eléctrico. Cuando
desenchufe el cable eléctrico, sujete del enchufe y no el cable.
No dañe el cable eléctrico, no lo modifique ni coloque objetos
pesados encima, ni coloque cerca de objetos que desprendan calor,
no tuerza ni tire excesivamente del mismo. Esto puede provocar un
fuego ó descarga eléctrica. Si el cable eléctrico está dañado, solicite
la reparación en su tienda local de Panasonic.
Ŷ
Si se produce un problema (por ejemplo falta la imagen
ó sonido), ó si sale humo ó hay olores no normales de la
televisor de plasma, desenchufe inmediatamente el cable
eléctrico del tomacorriente.
Si entra agua ó materias extrañas en el interior de
la televisor de plasma, si se ha caído la televisor de
plasma ó si el mueble exterior está dañado, desenchufe
inmediatamente el cable eléctrico.
No cubra los orificios de ventilación.
Si se utiliza un pedestal, deje un espacio de 3 15/16” (10
cm) ó más en la parte superior, izquierda y derecha, 2 3/8”
(6 cm) ó más en la parte inferior y 2 3/4” (7 cm) ó más en la
parte posterior.
Ŷ
Desconecte todos los cables antes de mover la televisor de
plasma.
Desenchufe el cable eléctrico del tomacorriente como
medida de seguridad antes de realizar una limpieza.
Limpie el cable eléctrico a intervalos regulares para evitar
que se cubra por el polvo.
Esta televisor de plasma radia rayos infrarrojos, y por lo
tanto puede afectar a otros equipos de comunicación por
infrarrojos. Instale su sensor de infrarrojos en un lugar
alejado de la luz directa de su televisor de plasma ó de la
luz reflejada por ella.
No suba sobre el televisor ó utilice como escalón. (Se debe
tener especial cuidado en el caso de los niños pequeños.)
El televisor consumirá algo de energía siempre que el cable
de alimentación esté conectado a una toma de corriente.
Si se producen problemas durante el uso
El uso continuado del televisor bajo estas condiciones puede
causar un incendio ó un daño permanente en la unidad.
Lleve el televisor a que lo revisen en un centro de servicio
autorizado. La revisión del televisor por cualquier persona sin
autorización no se recomienda en absoluto debido al peligro
que supone la alta tensión que circula por su interior.
Puede provocar un cortocircuito que inicie un incendio. Llame
a su tienda local de Panasonic para hacer las reparaciones
necesarias.
PRECAUCION
La televisor de plasma puede calentarse excesivamente
provocado fuego ó daños en la televisor de plasma.
Cuando utilice la televisor de plasma
Si fuera necesario mover la televisor de plasma a otro lugar y
se dejan algunos cables conectados, éstos pueden dañarse,
provocar un incendio ó una descarga eléctrica.
Puede sufrir una descarga eléctrica si no lo hace.
Si hay acumulación de polvo en el enchufe del cable
eléctrico, la humedad puede acumularse y dañar el
aislamiento, provocando un incendio. Desenchufe el cable
eléctrico del tomacorriente y limpie con un paño seco.
Si la unidad se cae ó se daña por el mal uso, puede sufrir
daños.
Notas
No muestre una imagen fija durante mucho tiempo
Ŷ
Esto hará que la imagen permanezca en la pantalla de plasma
(“imagen remanente”). Esto no se considera como una falla de
funcionamiento y no está cubierto por la garantía.
Imágenes fijas típicas
Números de canales y otros logotipos
Imagen visualizada en el modo 4:3
Fotos de tarjetas SD Videojuego
Imagen de ordenador
4 : 3
Configuración
Ŷ
No ponga la unidad donde quede expuesta a la luz solar directa
ó a luces brillantes (incluyendo reflejos).
La utilización de algunos tipos de iluminación fluorescente
puede reducir el alcance de transmisión del mando a distancia.
12
Para impedir la imagen
remanente, el salvapantallas
se activa automáticamente
después de pasar unos pocos
minutos si no se envían
señales ó no se realizan
operaciones. (pág. 59)
5
Page 73
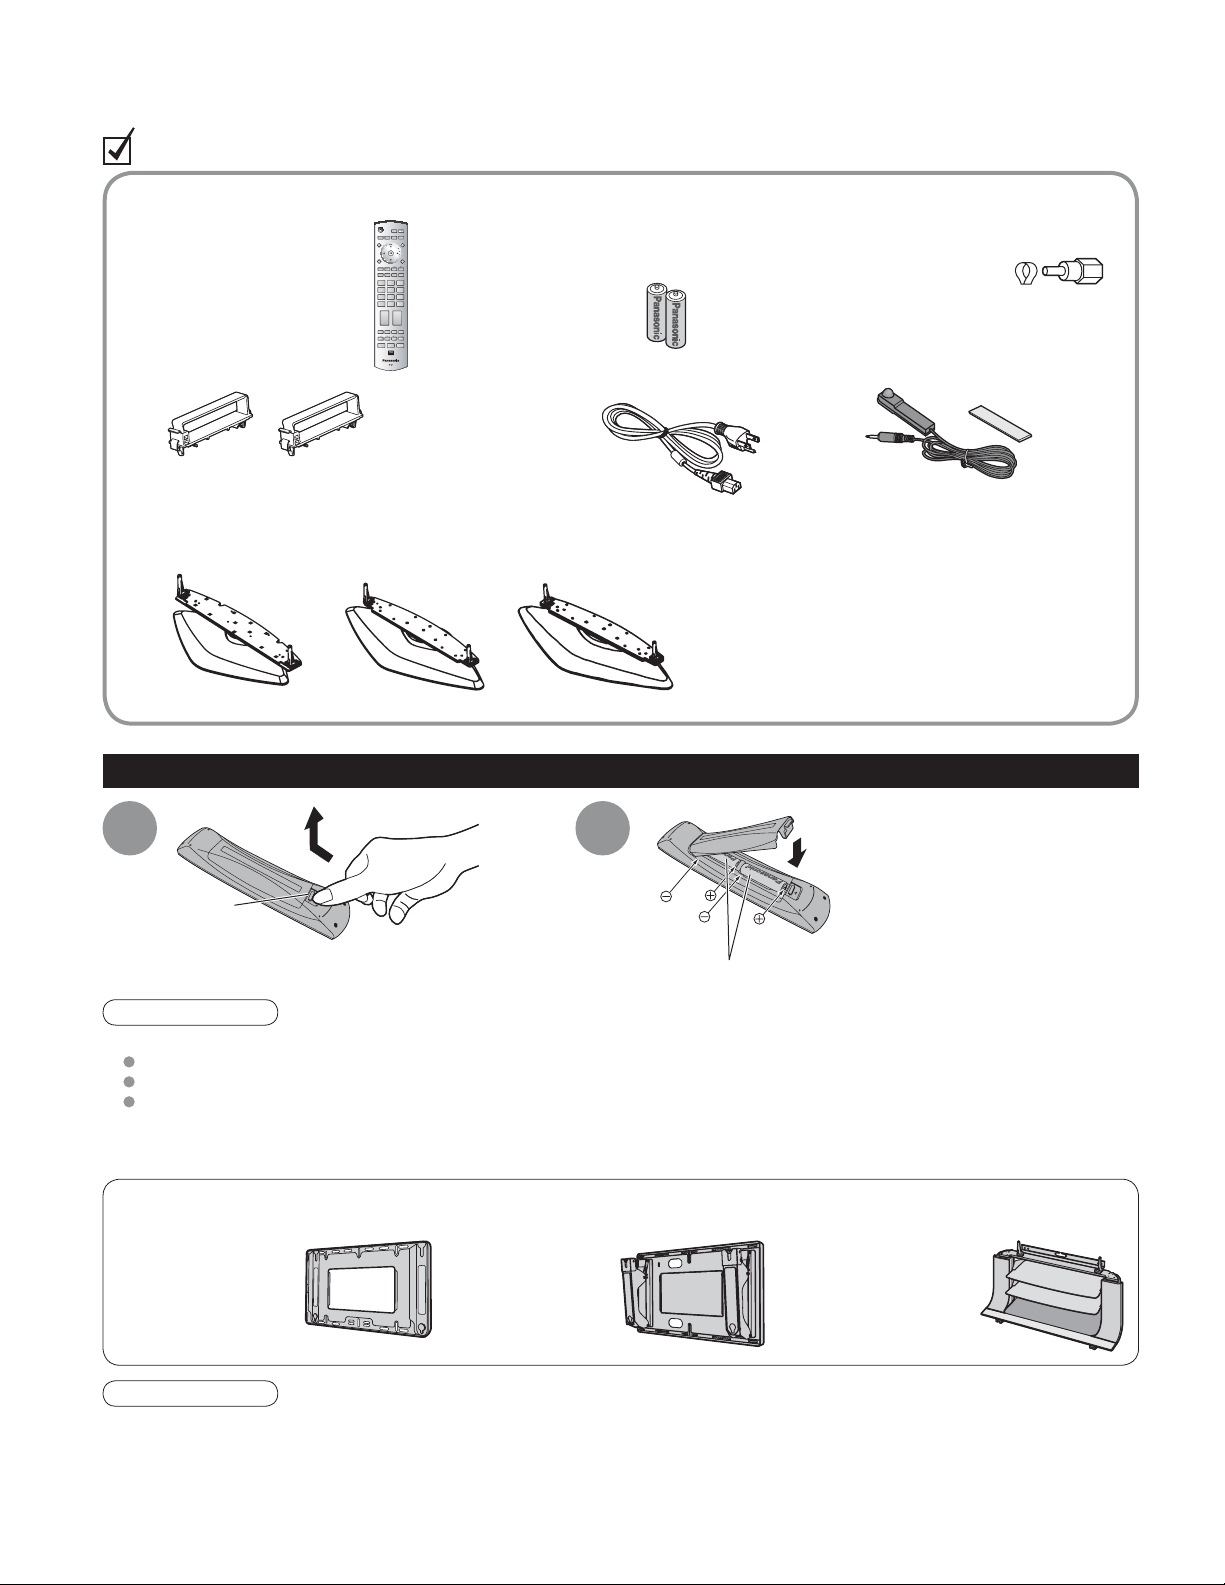
Accesorios/Opciones
Compruebe que ha recibido todos los elementos que se indican.
Accesorios
Transmisor de
Ƒ
mando a distancia
EUR7737Z10
•
Sujetador de cable (2)
Ƒ
Pedestal
Ƒ
TBL2AX00021
•
(TH-42PX600U)
TBL2AX00061
•
(TH-50PX600U)
Pilas para el transmisor
Ƒ
de mando a distancia
Pila AA
•
Cable de CA
Ƒ
TBL2AX00071
•
(TH-58PX600U)
(2)
Ƒ
•
Ƒ
Ƒ
Ƒ
Ƒ
Adaptador de antena
Tipo F
para 5C-2V
IR Blaster
Manual de instrucciones
Tarjeta del cliente
(para EE. UU.)
Tarjeta para el plan de
asistencia al cliente
(para EE. UU.)
Instalación de las pilas del mando a distancia
Abrir.
1
Gancho
Precaución
La instalación mal hecha puede causar fugas de electrolito y corrosión, lo que podría dañar el mando a distancia.
•
No mezcle pilas viejas y nuevas.
No mezcle pilas de tipos diferentes (pilas alcalinas y de manganeso, por ejemplo).
No utilice baterías (Ni-Cd).
No queme ni rompa las pilas.
•
Anote los códigos de mando a distancia antes de cambiar las pilas en el caso de que tenga que restablecer los códigos. (pág. 49-50)
•
Accesorios opcionales
Abrazadera de suspensión de pared
(Vertical)
TY-WK42PV3U
•
(TH-42PX600U,
TH-50PX600U,
TH-58PX600U)
Abrazadera de suspensión
de pared
(Anglado)
TY-WK42PR3U
•
(TH-42PX600U,
TH-50PX600U)
2
Ponga las polaridades (+ ó -)
en las posiciones correctas
Cierre
Soporte para televisor de pantalla de plasma
TY-S42PX600W
•
(TH-42PX600U)
TY-S50PX600W
•
(TH-50PX600U)
TY-S58PX600W
•
(TH-58PX600U)
6
Nota
Para mantener el rendimiento y la seguridad de la unidad, cerciórese absolutamente de pedir a su concesionario o
•
a un contratista cualificado que asegure las abrazaderas de suspensión de pared.
Lea atentamente las instrucciones suministradas con el soporte o pedestal del televisor de pantalla de plasma, y
•
cerciórese absolutamente de tomar los pasos necesarios para impedir que el televisor se caiga.
Maneje cuidadosamente el televisor durante su instalación, ya que si lo somete a impactos u otros esfuerzos su
•
panel podría agrietarse.
Page 74
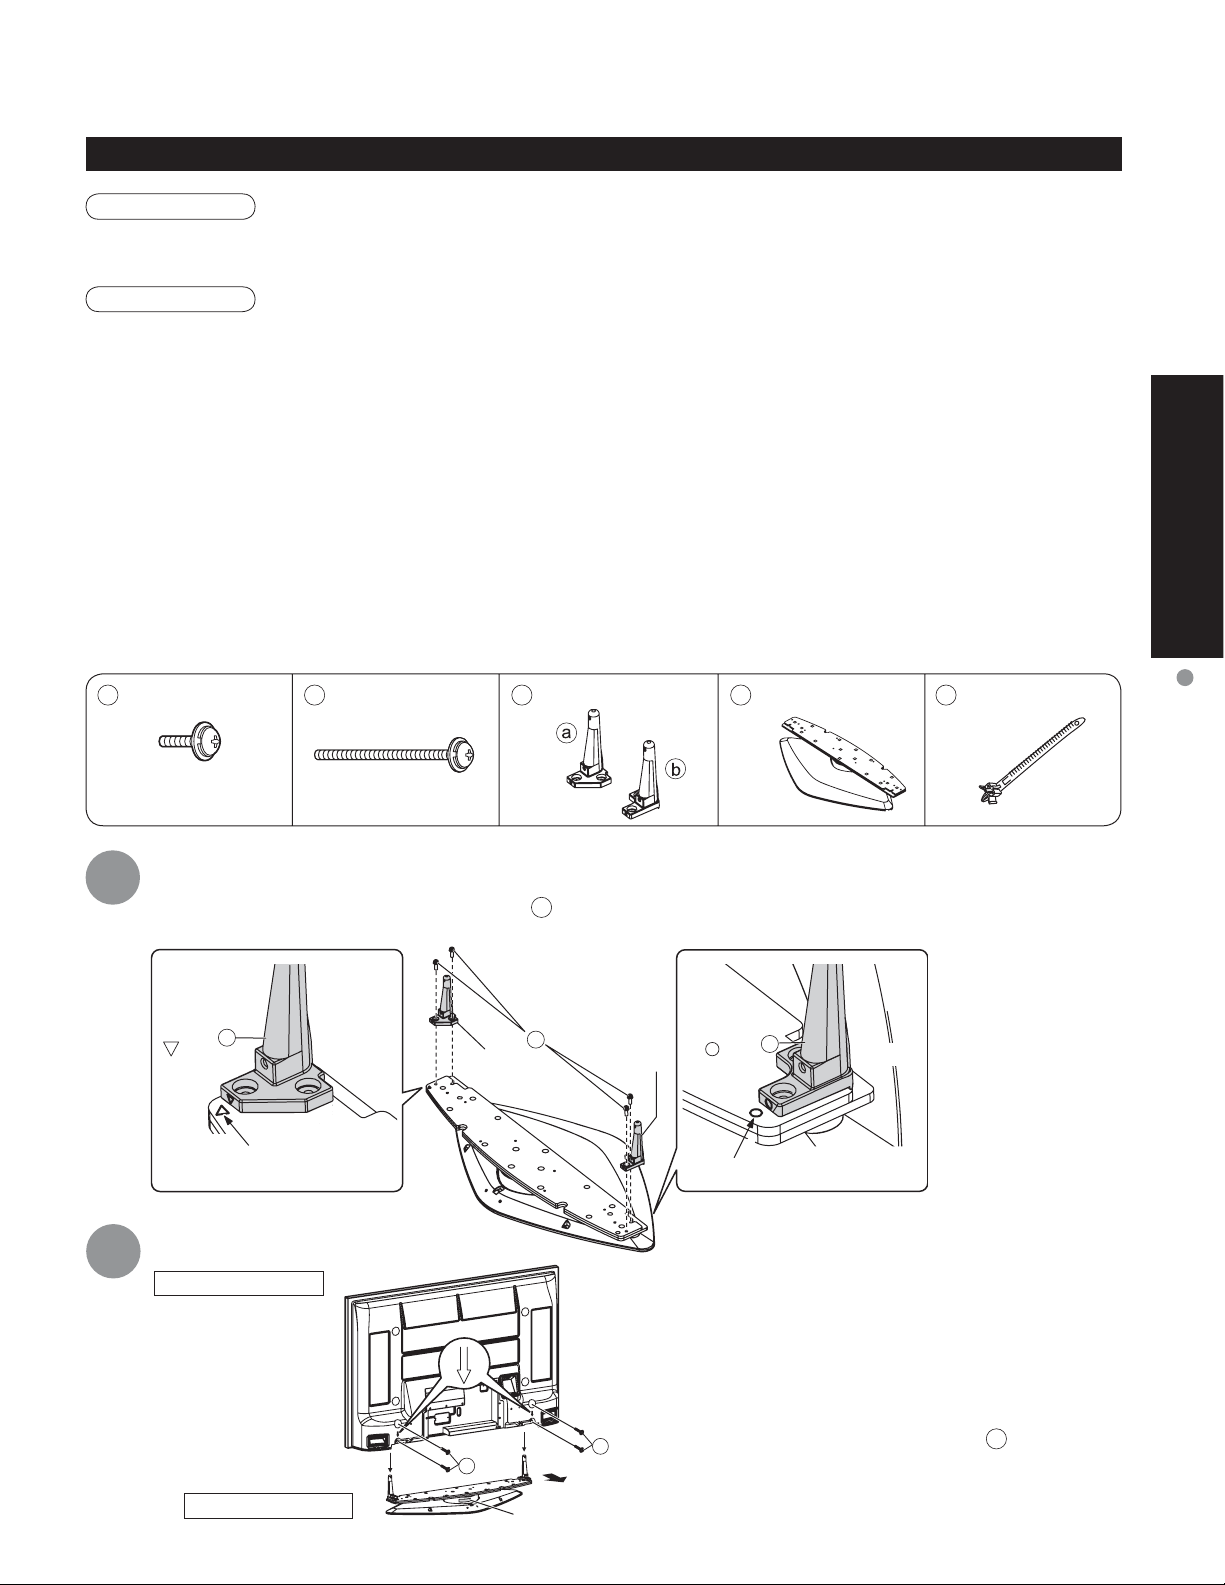
Colocación del pedestal en el televisor con pantalla de plasma
Advertencia
No desarme ni modifique el pedestal.
De lo contrario, la unidad podría caerse y dañarse, y también podría causar heridas a personas.
•
Precaución
No utilice ningún otro televisor ni pantalla que no sea uno de los suministrados en el embalaje.
En caso de no ser asi, Ia unidad puede caerse y dañarse, pudiendo sufrir daños personales.
•
No utilice el pedestal si está doblado, partido o, está roto.
Si utiliza un pedestal roto, puede dañarse todavía más y puede resultar usted dañado. Llame a la tienda donde lo
•
compró, Io antes posible.
Durante la instalación, asegúrese de apretar bien todos los tornillos.
Si no se tiene cuidado y los tornillos no están bien apretados durante el armado, la instalación no será lo suficientemente fuerte
•
como para sostener el televisor con pantalla de plasma y éste podrá caerse y dañarse, y se podrá causar daños a las personas.
Utilice los soportes de fijación para evitar la caída y sostener el televisor con pantalla de plasma.
En caso de terremoto ó cuando los niños se suben al pedestal para televisor con pantalla de plasma instalada, el
•
televisor con pantalla de plasma puede caerse, pudiendo causar daños a las personas.
Es necesaria la ayuda de dos o más personas para instalar y desmontar el televisor.
Si no tiene la ayuda de otra persona, el televisor puede caerse, pudiendo causar daños a las personas.
•
puesta en marcha
Accesorios para el montaje del pedestal
A
Tornillo de montaje
(4)
Tornillo de montaje
B
(4)
Soporte (2)
C
Base (1)
D
Banda (2)
E
Accesorios/Opciones
Guía rápida para la
(42˝, 50˝) M5 x 18
(58˝) M5 x 25
Montaje del pedestal
1
Empleando los cuatro tornillos de montaje
como se muestra en la ilustración de abajo.
Soporte
( )
Alinee las marcas estampadas.
Instalación
2
a
Televisor
Pedestal
Adelante
M5 x 65
B
Soporte
Etiqueta
, apriete firmemente los postes derecho e izquierdo a la base,
A
A
Soporte
B
Atrás
Soporte
(
Alinee las marcas estampadas.
b
)
* Realice el trabajo sobre una superficie plana.
Levante el televisor por encima de la base del
pedestal, con la parte posterior de la pantalla
en el mismo lado que la etiqueta. Alinee
los orificios del televisor con los soportes e
inserte los soportes en los orificios.
Utilice los tornillos de montaje
para apretarlos firmlemente.
Adelante
(M5 x 65)
B
7
Page 75
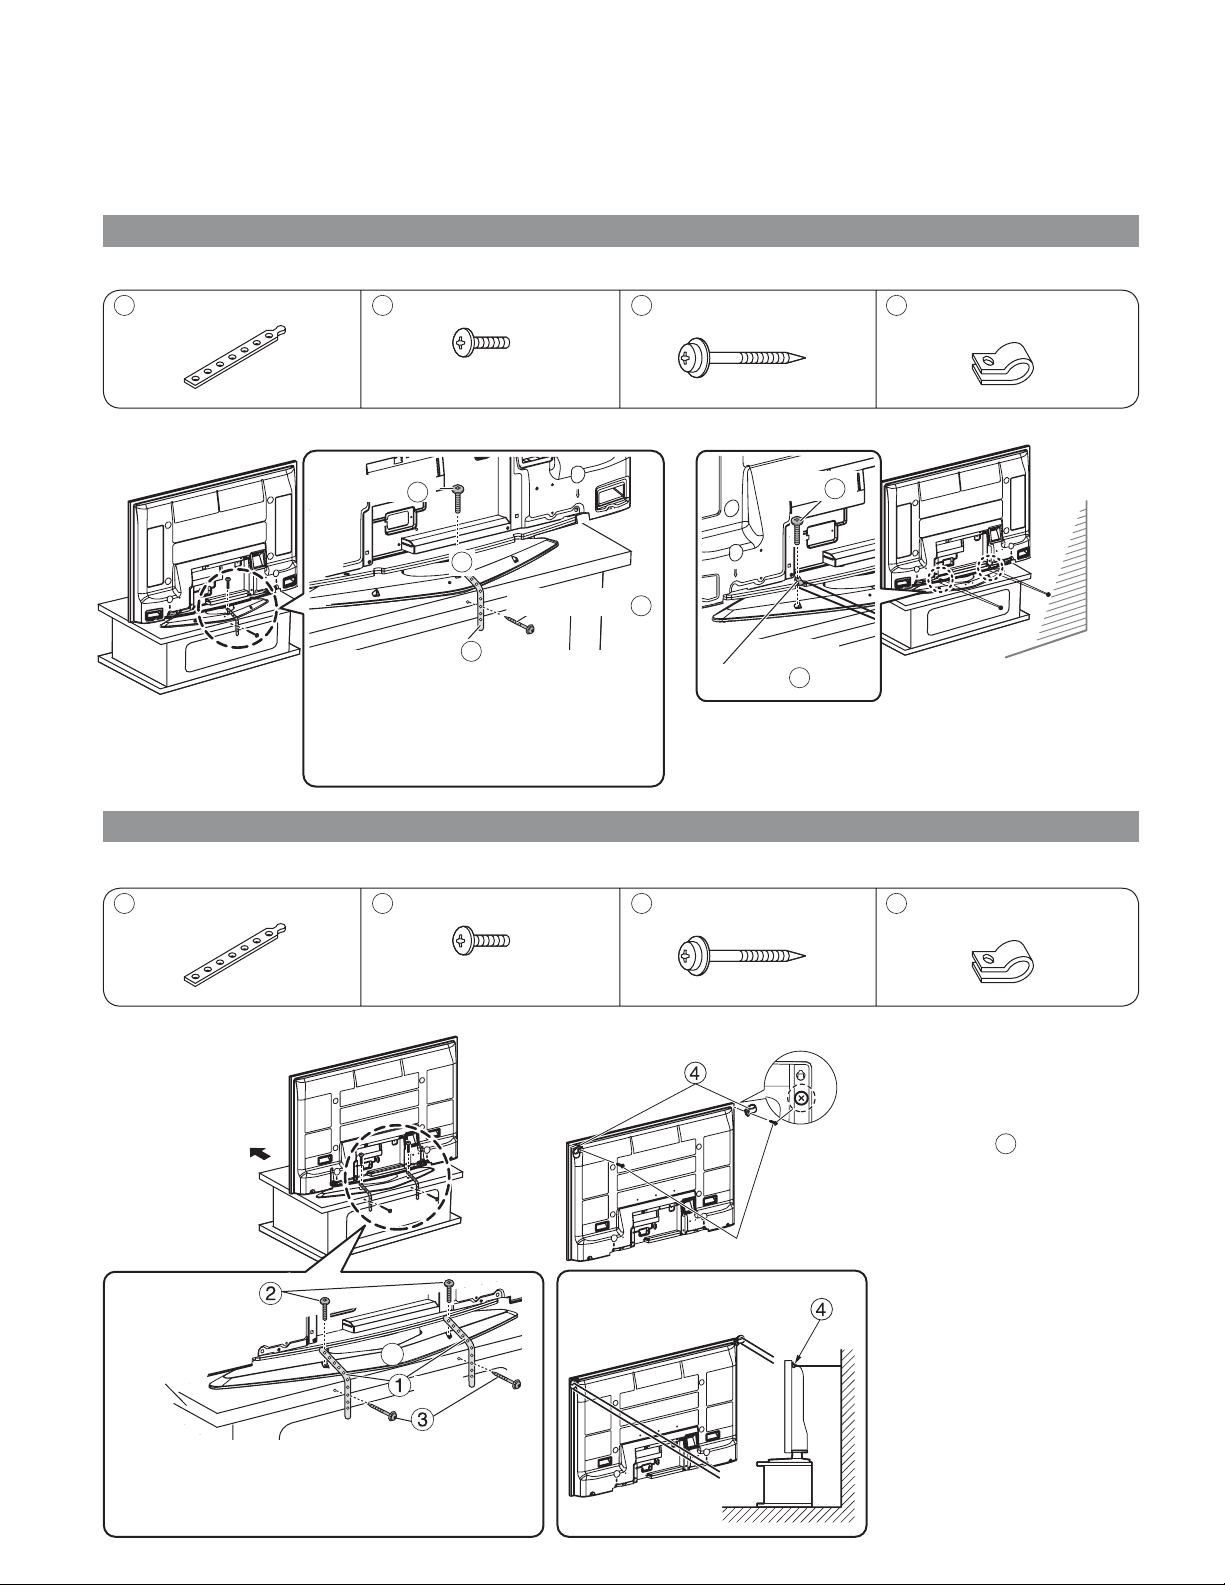
Accesorios/Opciones
Para impedir la caída del televisor de pantalla de plasma
* El televisor con pantalla de plasma deberá apretarse a la base y a la pared.
Para televisor con pantalla de plasma de 42’’
Accessories for pedestal security
1
Banda (1)
Si se asegura a la base
Ŷ
2
Tornillo (3)
Diámetro nominal de
4 mm x 10
3
Tornillo de madera (1)
Si se asegura a una pared
Ŷ
4
Abrazadera (2)
Tornillo
Apriete con tornillos para madera en los
agujeros del borde trasero de la encimera
de madera. Si no hay agujeros, taládrelos
primero en medio de la encimera de
madera y luego apriete la correa con los
tornillos para madera.
2
Banda
D
Tornillo de madera
1
Para televisor con pantalla de plasma de 50’’
Accesorios para soporte de fijación
1
Banda (2)
Si se asegura a la base
Ŷ
Adelante
2
Tornillo (2)
Diámetro nominal de
4 mm x 12
Tornillo
3
Abrazadera
* Utilice un cable ó cadena fuerte de venta en
los comercios para asegurar el televisor con
pantalla de plasma a una parte sólida de la
pared ó pilar.
3
Tornillo de madera (2)
Si se asegura a una pared
Ŷ
Abrazadera
4
2
4
Abrazadera (2)
* Quite los tornillos de ambas
esquinas del lado trasero
del televisor con pantalla
de plasma y coloque las
abrazaderas
con pantalla de plasma
utilizando los tornillos quitados.
4
Muro
en el televisor
8
Tornillo
Encimera de
madera
Apriete con tornillos para madera en los agujeros del borde
trasero de la encimera de madera. Si no hay agujeros,
taládrelos primero en medio de la encimera de madera y
luego apriete la correa con los tornillos para madera.
D
Banda
Tornillo de
madera
• Método de
Tornillos en el cuerpo principal
aseguramiento
Abrazadera
* Utilice un cable ó cadena
fuerte de venta en los
comercios para asegurar
el televisor con pantalla de
plasma a una parte sólida de
la pared ó pilar.
Page 76
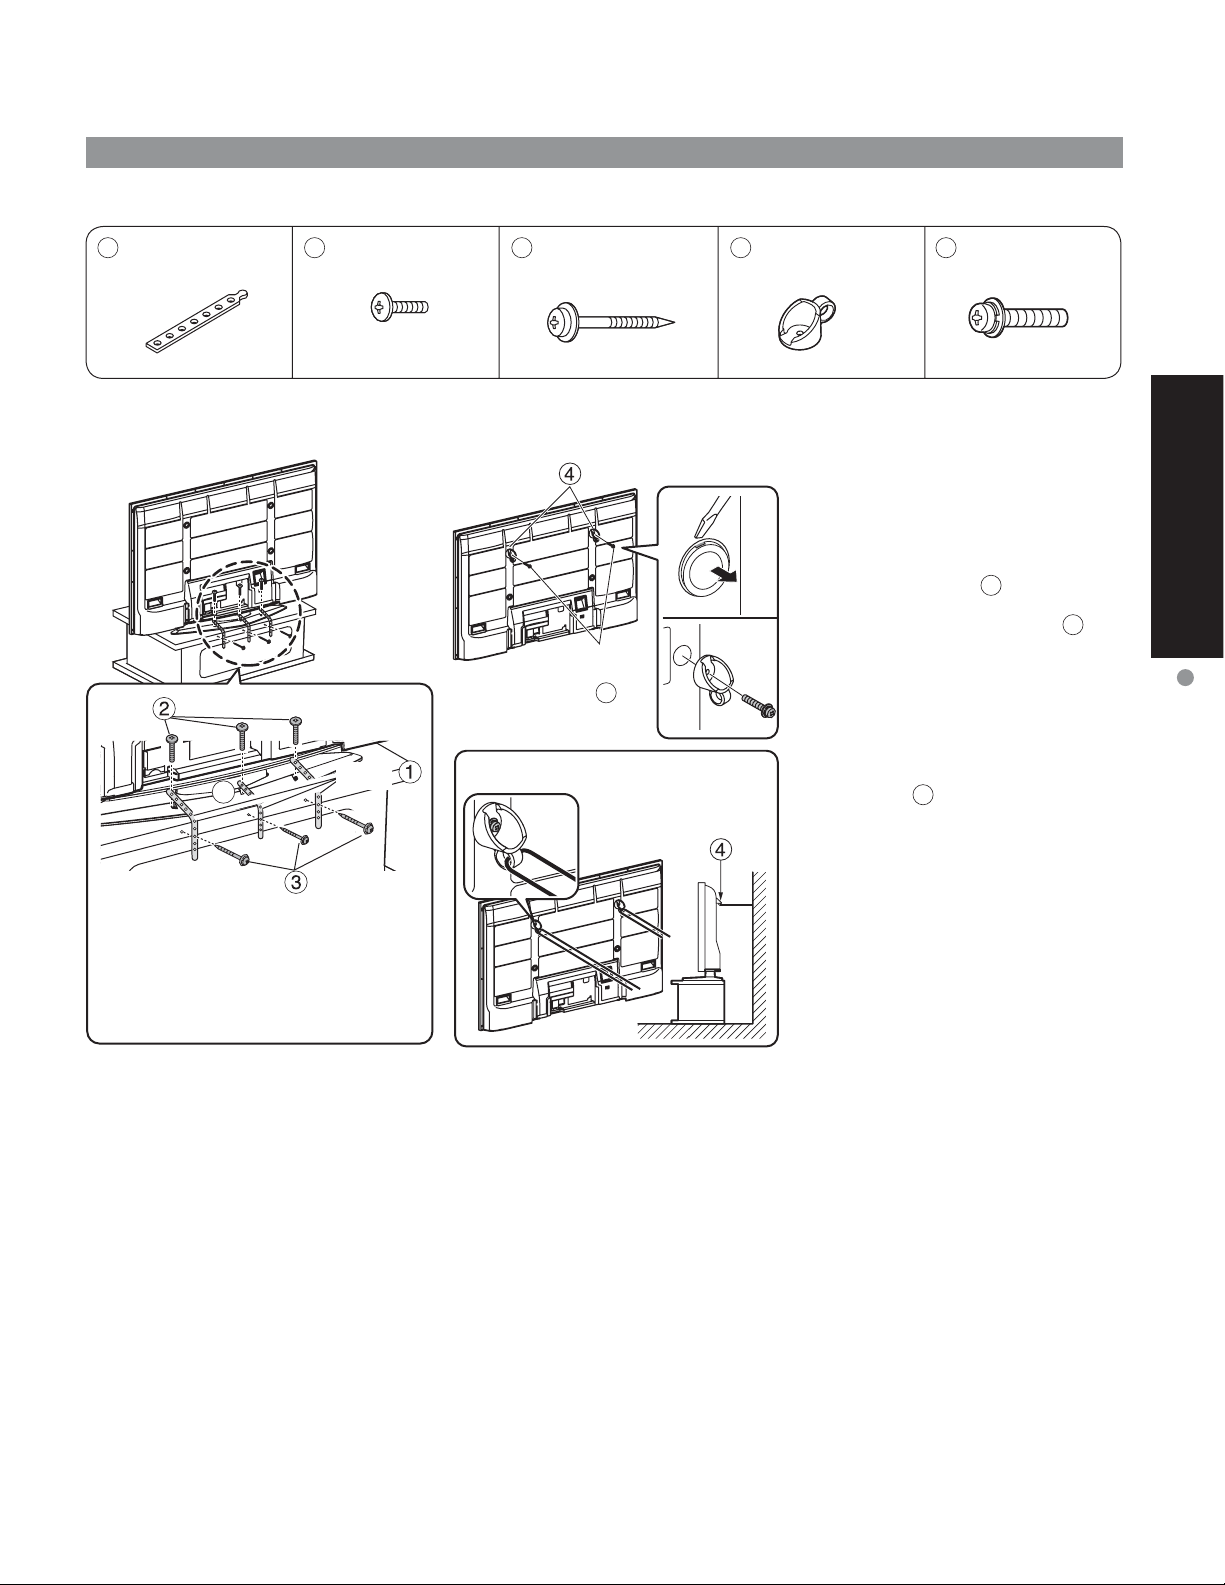
Para televisor con pantalla de plasma de 58’’
Accesorios para soporte de fijación
1
Banda (3)
2
Diámetro nominal de
4 mm x 12
Si se asegura a la base
Ŷ
Tornillo
D
Tornillo (3)
Banda
3
Tornillo de madera
(3)
Si se asegura a una pared
Ŷ
Gancho
Tornillo de
fijación de
gancho
5
• Método de aseguramiento
4
Gancho (2)
* Use un destornillador de punta plana
* Use un cable o cadena fuerte de
5
Tornillo de fijación
de gancho
(2)
M8 x 35
para retirar las tapas de la partes
superiores izquierda y derecha
situadas en la cara posterior del
televisor con pantalla de plasma, y
coloque los ganchos
de pantalla de plasma usando los
tornillos de fijación de ganchos
(Guarde las tapas que haya quitado
en un lugar seguro.)
venta en el comercio para asegurar
los ganchos 4 en una parte sólida de
una pared o una columna.
en el televisor
4
5
.
Guía rápida para la
puesta en marcha
Accesorios/Opciones
Tornillo de
madera
Apriete con tornillos para madera
en los agujeros del borde trasero de
la encimera de madera. Si no hay
agujeros, taládrelos primero en medio de
la encimera de madera y luego apriete la
correa con los tornillos para madera.
Gancho
9
Page 77
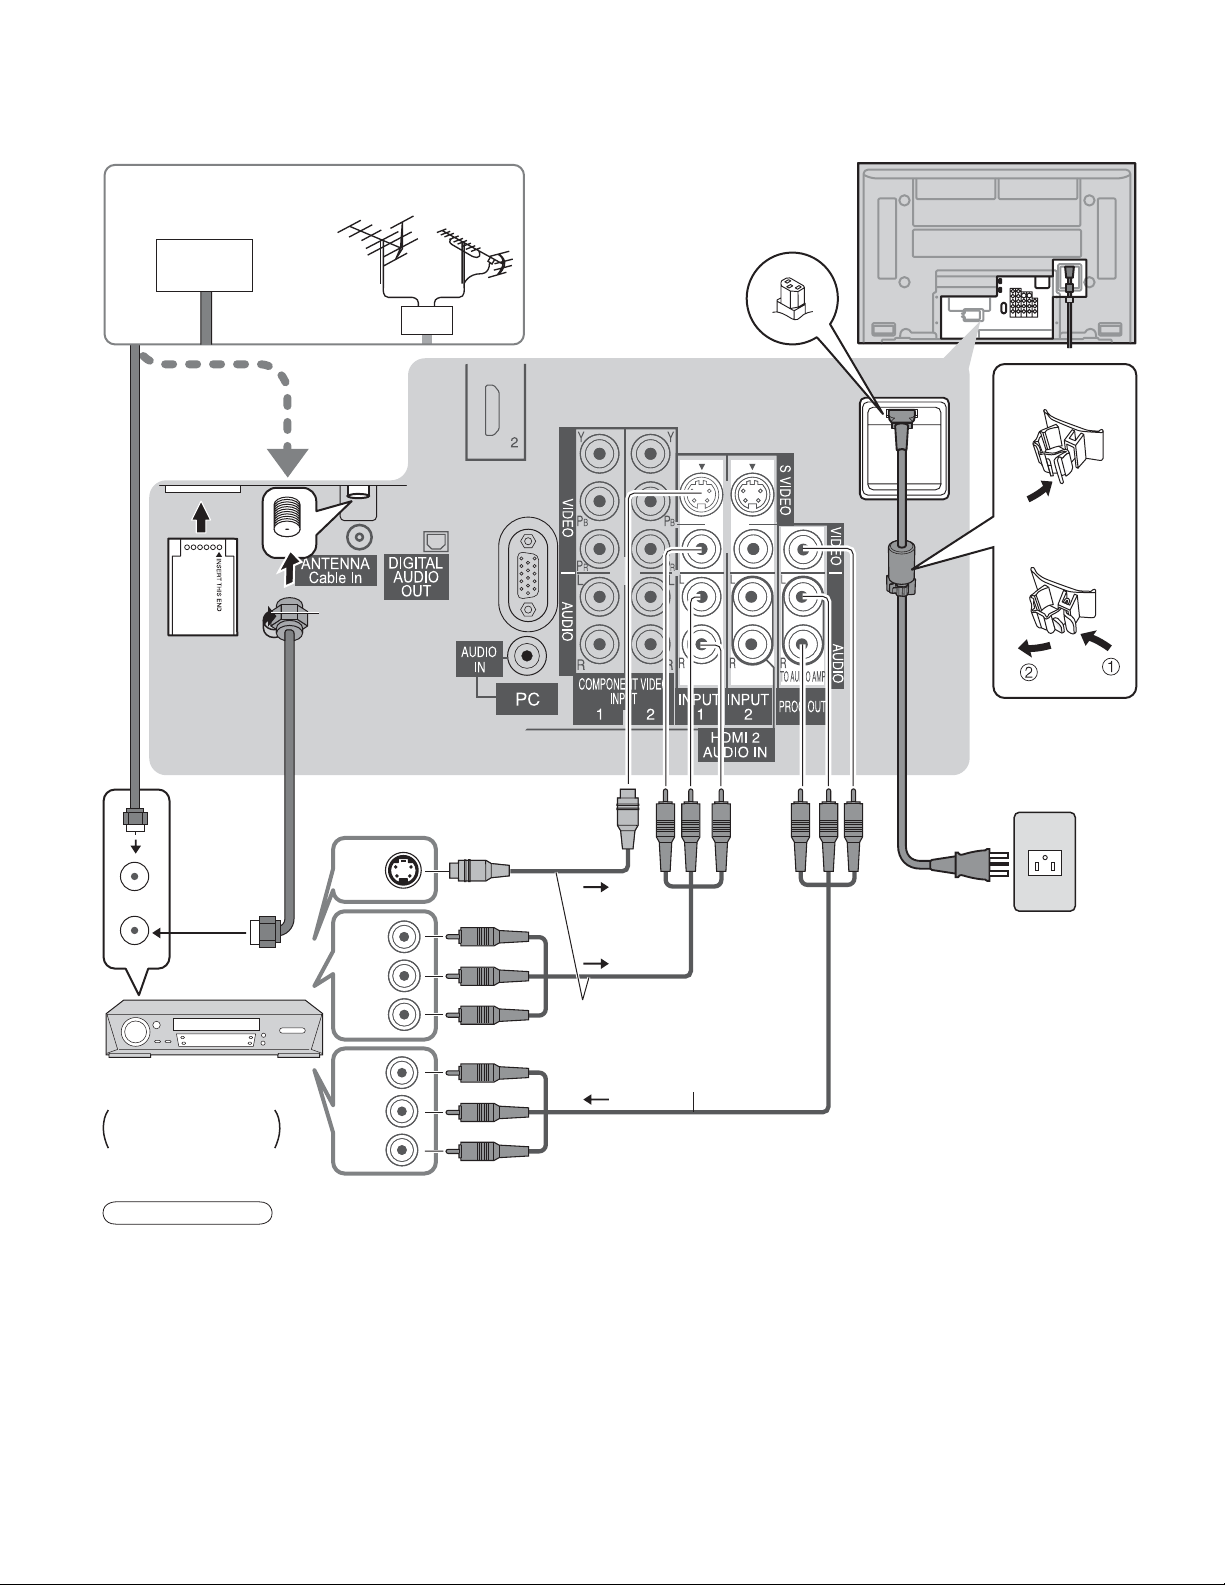
Conexiones
Para ver la televisión
Ŷ
Cable TV
ó
CableCARD™
Antena de VHF / UHF
ó
Adaptador
de antena
tipo F
Parte posterior de la unidad
Fijador
Para soltar
•
10
S-Video
OUT
ANT IN
ANT OUT
Videograbadora con
sintonizador de TV
Grabadora DVD /
Videograbadora
Nota
Con este televisor no se suministran todos cables ni equipos externos mostrados en este manual.
•
Para obtener más ayuda, visítenos en www.panasonic.com
•
La entrada de S vídeo anulará la señal de vídeo compuesto cuando se conecte un cable de S vídeo.
•
Conecte un cable de S vídeo ó uno de vídeo.
Cuando reciba señales de canales digitales, todos los formatos digitales serán convertidos en sentido
•
descendente en vídeo NTSC compuesto que saldrá a través de los terminales de salida de programas.
Algunos programas contienen una señal de protección de derechos de autor para impedir la grabación con una
•
videograbadora.
Cuando se visualiza el programa de protección de los derechos de autor, no conecte el otro monitor de TV a
•
través de una videograbadora. Las señales de vídeo enviadas a través de una videograbadora pueden ser
afectadas por los sistemas de protección de los derechos de autor, y las imágenes se distorsionarán en el otro
monitor de TV.
Ponga el canal de televisión en CH3 ó CH4 para utilizar la conexión del receptor de televisión por cable.
•
Video
OUT
L
Audio
OUT
R
Video
IN
L
Audio
IN
R
Las señales de S-Vídeo
tienen prioridad.
Para reproducir vídeo
Cable de alimentación de CA
(Conéctelo después de
terminar todas las demás
conexiones.)
Page 78
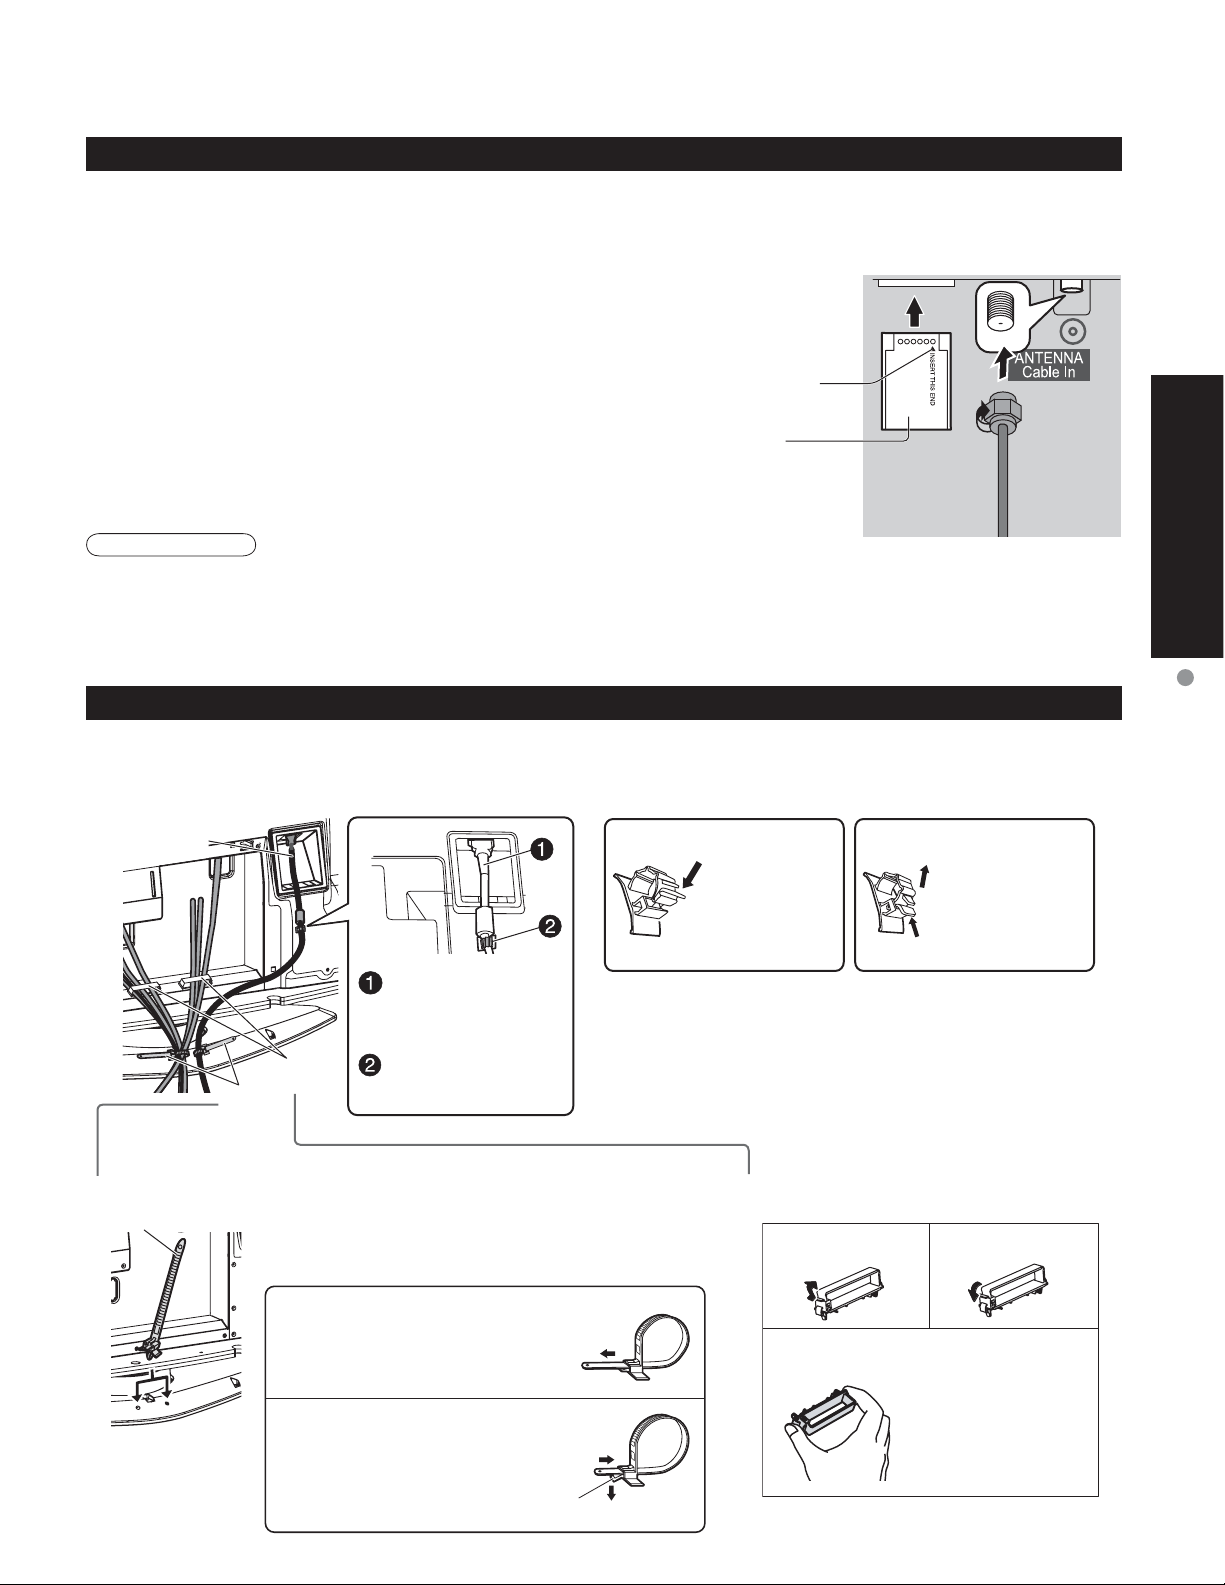
Conexión de CableCARD
CableCARDTM le permite sintonizar canales de cable digitales y de alta definición mediante la antena de cable.
Consulte a su concesionario en lo que se refiere a la disponibilidad de CableCARDTM.
1. Conecte la antena de televisión por cable a conector Antena.
2. Encienda el televisor (vea la página 17).
3. Ponga el modo de entrada en TV (vea la página 29).
4. Inserte la CableCARD
usted) hasta el fondo en la ranura CableCARD
trasera del televisor.
Siga los mensajes visualizados en la pantalla.
Nota
Si tiene problemas con la función de los controles del panel delantero o del control remoto cuando utiliza
•
CableCARD
problema persiste, llame a Centro de Llamadas del Cliente de Panasonic para recibir instrucciones.
No introduzca la tarjeta PCMCIA en la ranura CableCARDTM.
•
TM
, desenchufe el televisor, vuelva a enchufarlo y pruebe otra vez a utilizar los controles. Si el
TM
(con la cara superior indicando hacia
TM
de la parte
Cara superior de la tarjeta
indicando hacia usted
El diseño del CableCARDTM varía
()
según la marca
Marca de insertar (ej.)
TM
El panel posterior del televisor
Instrucciones para sujetar los cables
Guía rápida para la
puesta en marcha
Conexiones
Fijación de los cables de conexión y del cable de CA
Ŷ
Ejemplo de instalación de los cables de conexión
Cable de
alimentación
de CA
Abrazadera
Banda
Coloque las bandas
Ŷ
Banda
Banda de apriete
Inserte los resaltos de las dos bandas en el
pedestal.
Conecte la clavija de
alimentación al zócalo
del cuerpo principal.
Fije el cable de CA
en la abrazadera.
Apriete
Empuje la punta de la banda en
el sentido indicado por la flecha.
Cómo de fijarlo:
No ate juntos el cable de RF y el cable de
•
alimentación porque la imagen podría distorsionarse.
Fije los cables con abrazaderas según sea necesario.
•
Cuando utilice el accesorio opcional, siga las
•
indicaciones del manual de montaje de opciones
para fijar los cables.
Cómo soltarlo:
Fíjelo empujándolo
hasta que se
escuche un sonido
de chasquido.
Colocación de las abrazaderas
Ŷ
Presione hacia
abajo y tire al
mismo tiempo.
de cables
Abrir
Extracción del televisor
Cerrar
Para soltar
Mientras presiona hacia abajo la
lengüeta, empuje suavemente la
punta de la banda en el sentido
indicado por la flecha.
Lengüeta
Empuje ambos
ganchos de los
extremos y tire
hacia fuera.
11
Page 79
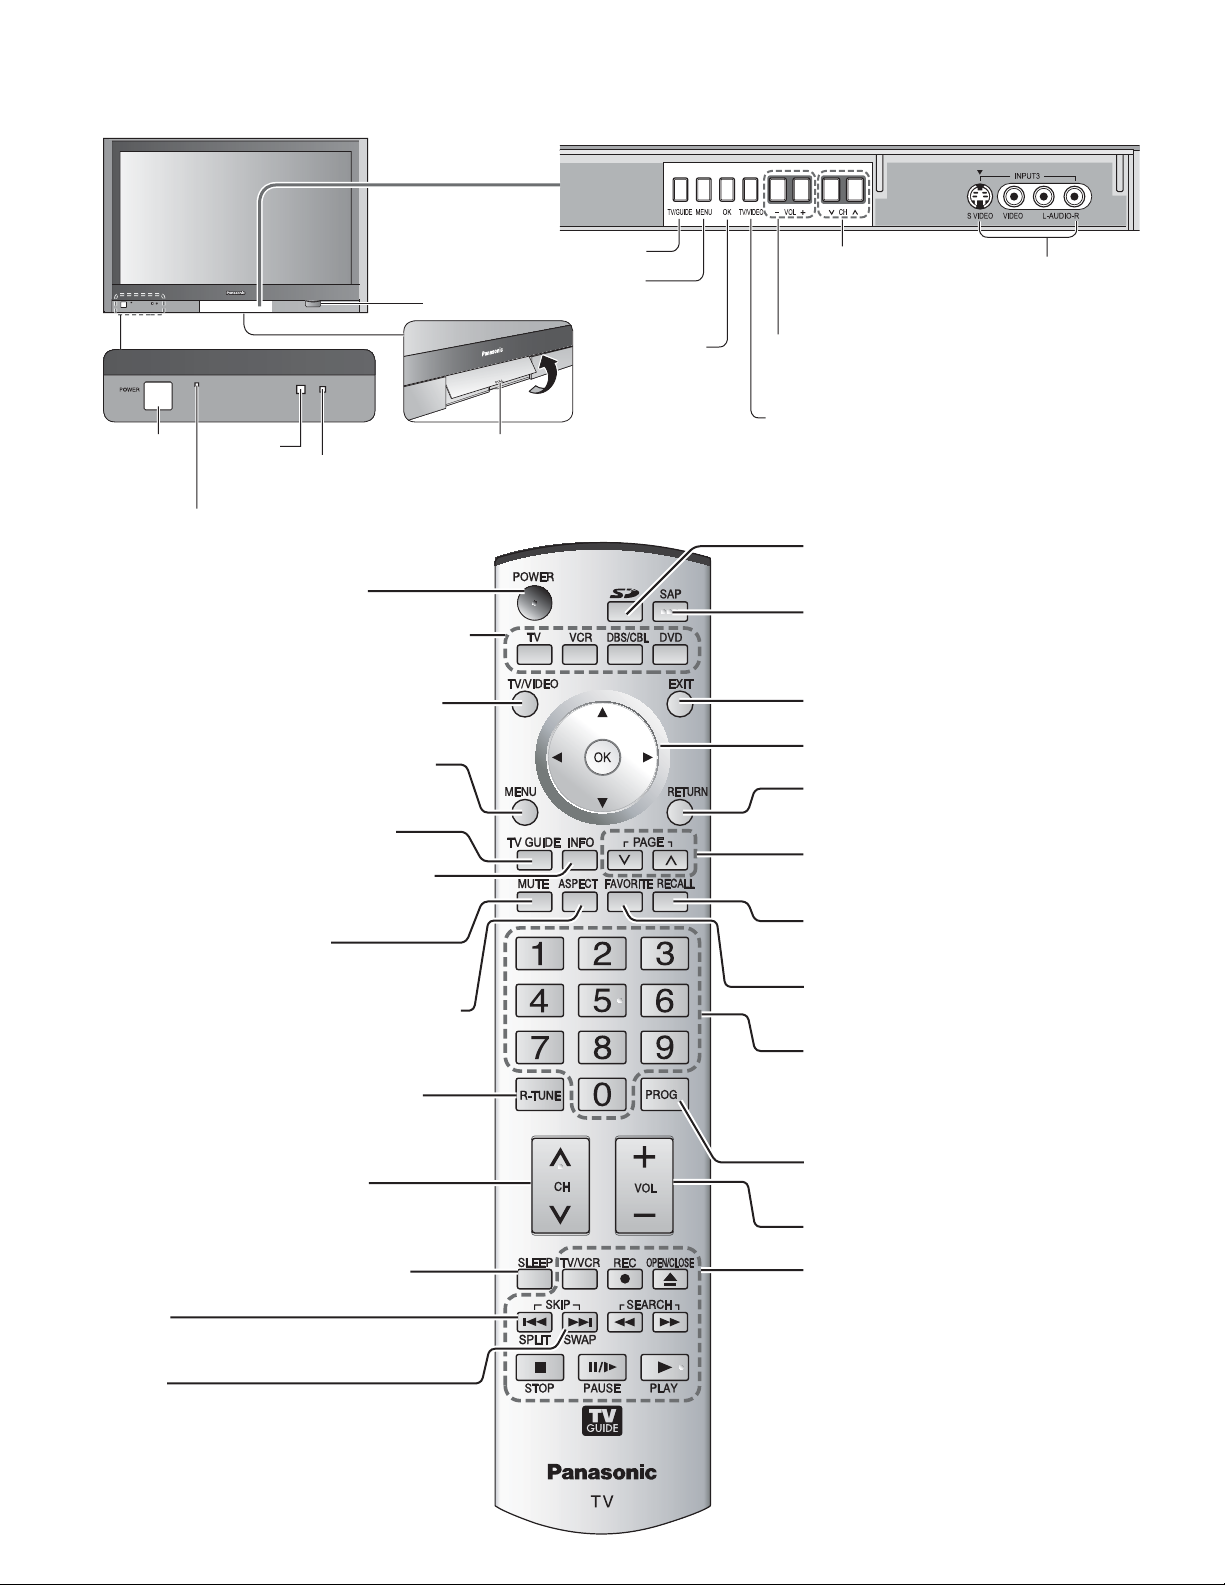
-
Identificación de los controles
Visualiza la guía de televisión.
Visualiza el menú principal.
Ranura de tarjeta SD
El botón
POWER
Indicador de alimentación
Conecta la alimentación del
televisor ó la pone en espera
Configura el mando a distancia para hacer la
comunicación con otros dispositivos. (pág. 45)
Cambia la señal de entrada. (pág. 29)
Visualiza el menú principal. (pág. 32)
Pulse para entrar en Guía de TV
Pulse para visualizar una pantalla de
información en la Guía de TV.
Encendido / Apagado del
silenciamiento del sonido
Cambia la relación de aspecto (pág. 18)
del control
remoto
Sensor del S.S.A.C
El S.S.A.C (sistema de seguimiento automático de contraste).
(conectada: rojo, desconectada: apagado)
Sujete la puerta en “PULL” y ábrala hacia arriba.Sensor
Selecciona el
menú y la entrada
de submenú.
Cambia el canal del televisor.
(Mueve el cursor hacia arriba
o hacia abajo durante el modo
del menú.)
Ajusta el nivel del sonido.
(Mueve el cursor hacia la derecha o hacia
la izquierda durante el modo del menú.)
Cambia el modo de entrada.
(pág. 32)
Visión de imágenes de tarjetas SD
(pág. 26)
SAP (pág. 19)
Menús de salida
Selección/OK/Cambio
RETURN
(para volver al menú anterior)
Desplazamiento de páginas en la
Guía de TV
Visualiza ó elimina la bandera de
canal. (pág. 18)
Controla la función de la lista de
canales favoritos. (pág. 19)
Terminales
INPUT3
12
Cambia al canal visto previamente.
Selecciona canales en orden.
Cronómetro de apagado (pág. 18)
SPLIT
Pantalla dividida (pág. 18)
SWAP
Cambia imágenes en la pantalla dividida.
(pág. 18).
Teclado numérico para seleccionar
cualquier canal ó para hacer
introducciones alfanuméricas en los
menús. (pág. 29, 30, 38, 40, 45)
Acceso directo a canales canales
para DTV y DBS (pág. 17)
Volúmen
Operaciones de equipos externos
(pág. 29, 48)
(Videograbadoras, DVDs, etc.)
Page 80
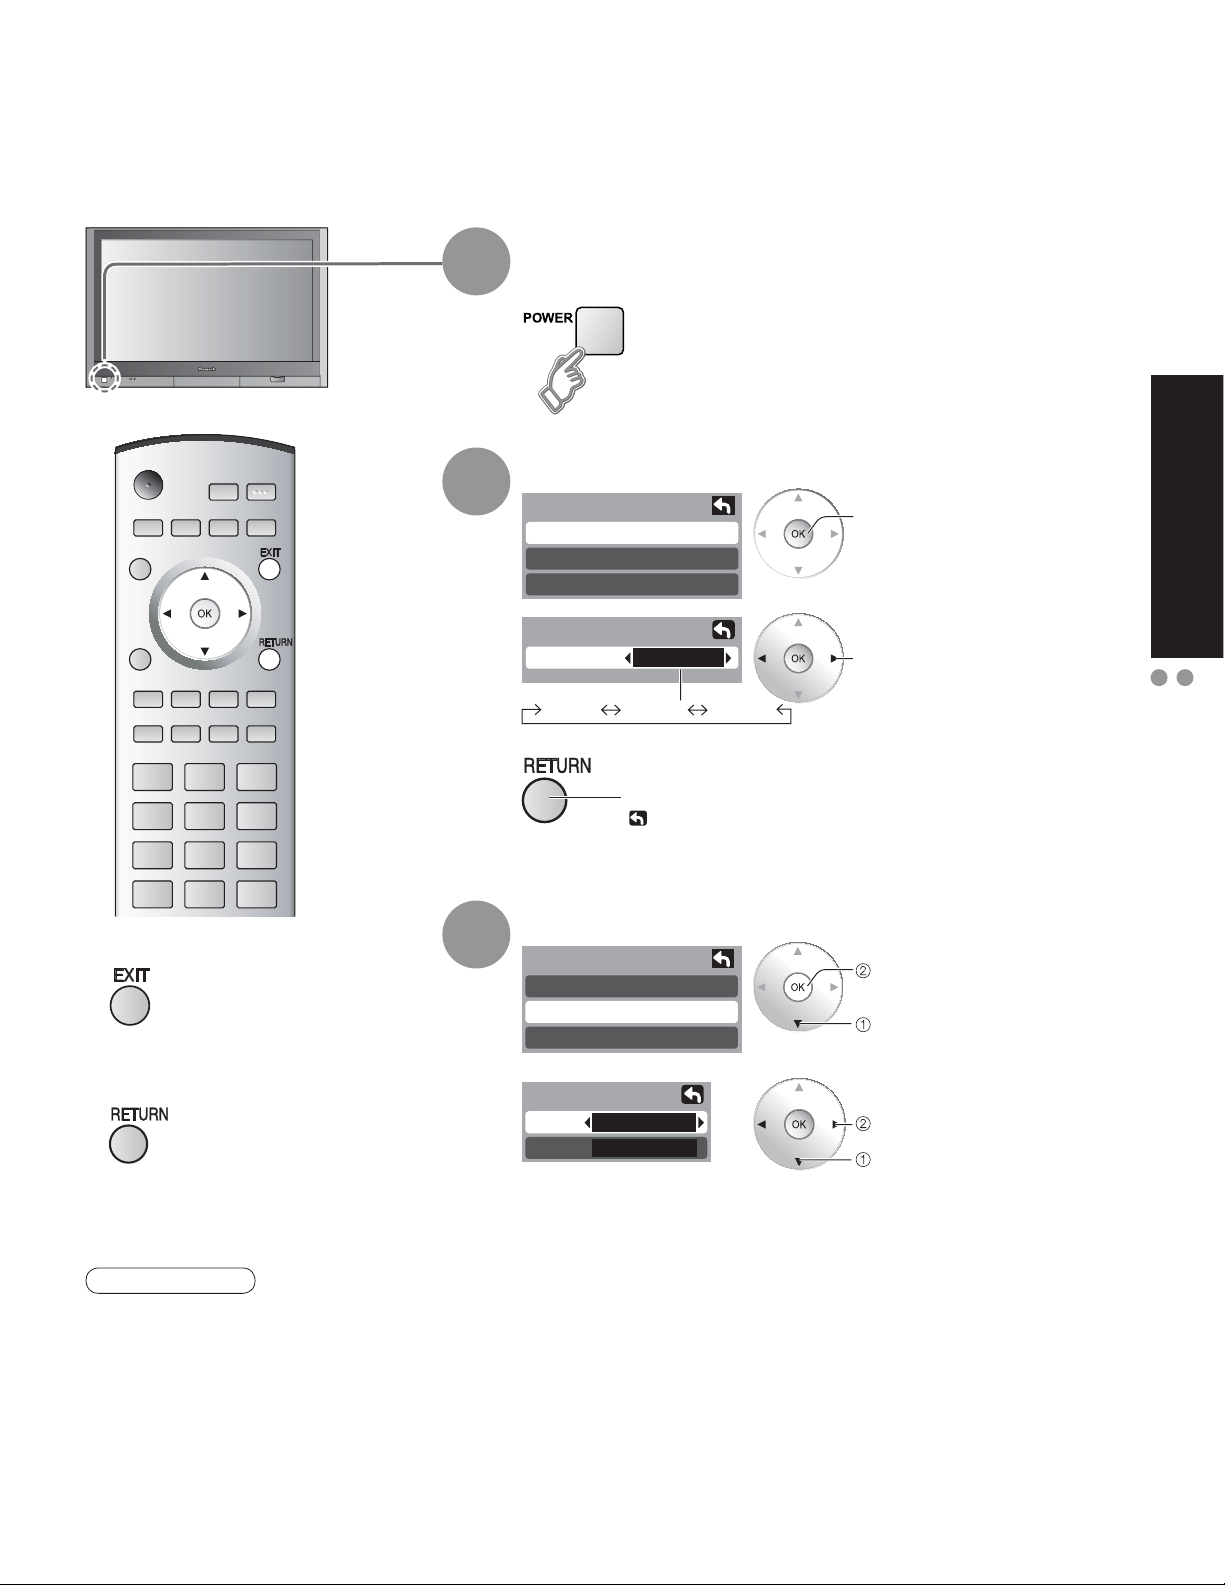
Configuración por primera vez
“Ajuste inicial” sólo se visualiza cuando el televisor se enciende por primera vez después de conectar el cable de
alimentación de CA en una toma de corriente. Sólo disponible cuando “Autoencendido” (pág. 32) está en “No”.
Encienda el televisor con el
1
2
interruptor POWER.
Seleccione su idioma.
Ajuste inicial
Idioma
Reloj
Programa auto
Idioma
Idioma
English Español Français
Español
puesta en marcha
Siguiente
Seleccione
Identificación de los controles
Guía rápida para la
Configuración por primera vez
Para salir
Ŷ
Para volver a la
Ŷ
pantalla anterior
Nota
Para cambiar la
•
configuración
(idioma/reloj/
programa auto)
más adelante, vaya
a la pantalla de
menú. (pág. 32).
3
Pulse para ir a la pantalla anterior ó seleccionar un
icono, y luego pulse OK para obtener el mismo
resultado.
Ajuste el reloj.
Ajuste inicial
Idioma
Reloj
Programa auto
Reloj
Fecha
Hora
Fecha: Ajuste la fecha.
Hora: Ajuste la hora.
4 / 1 / 2006
9 : 43 AM
(Cambie el mes con una pulsación larga.)
(Cambie la hora rápidamente con una pulsación larga.)
Siguiente
Seleccione “Reloj”.
Establezca
Seleccione el elemento.
(Continúa en la página siguiente.)
13
Page 81
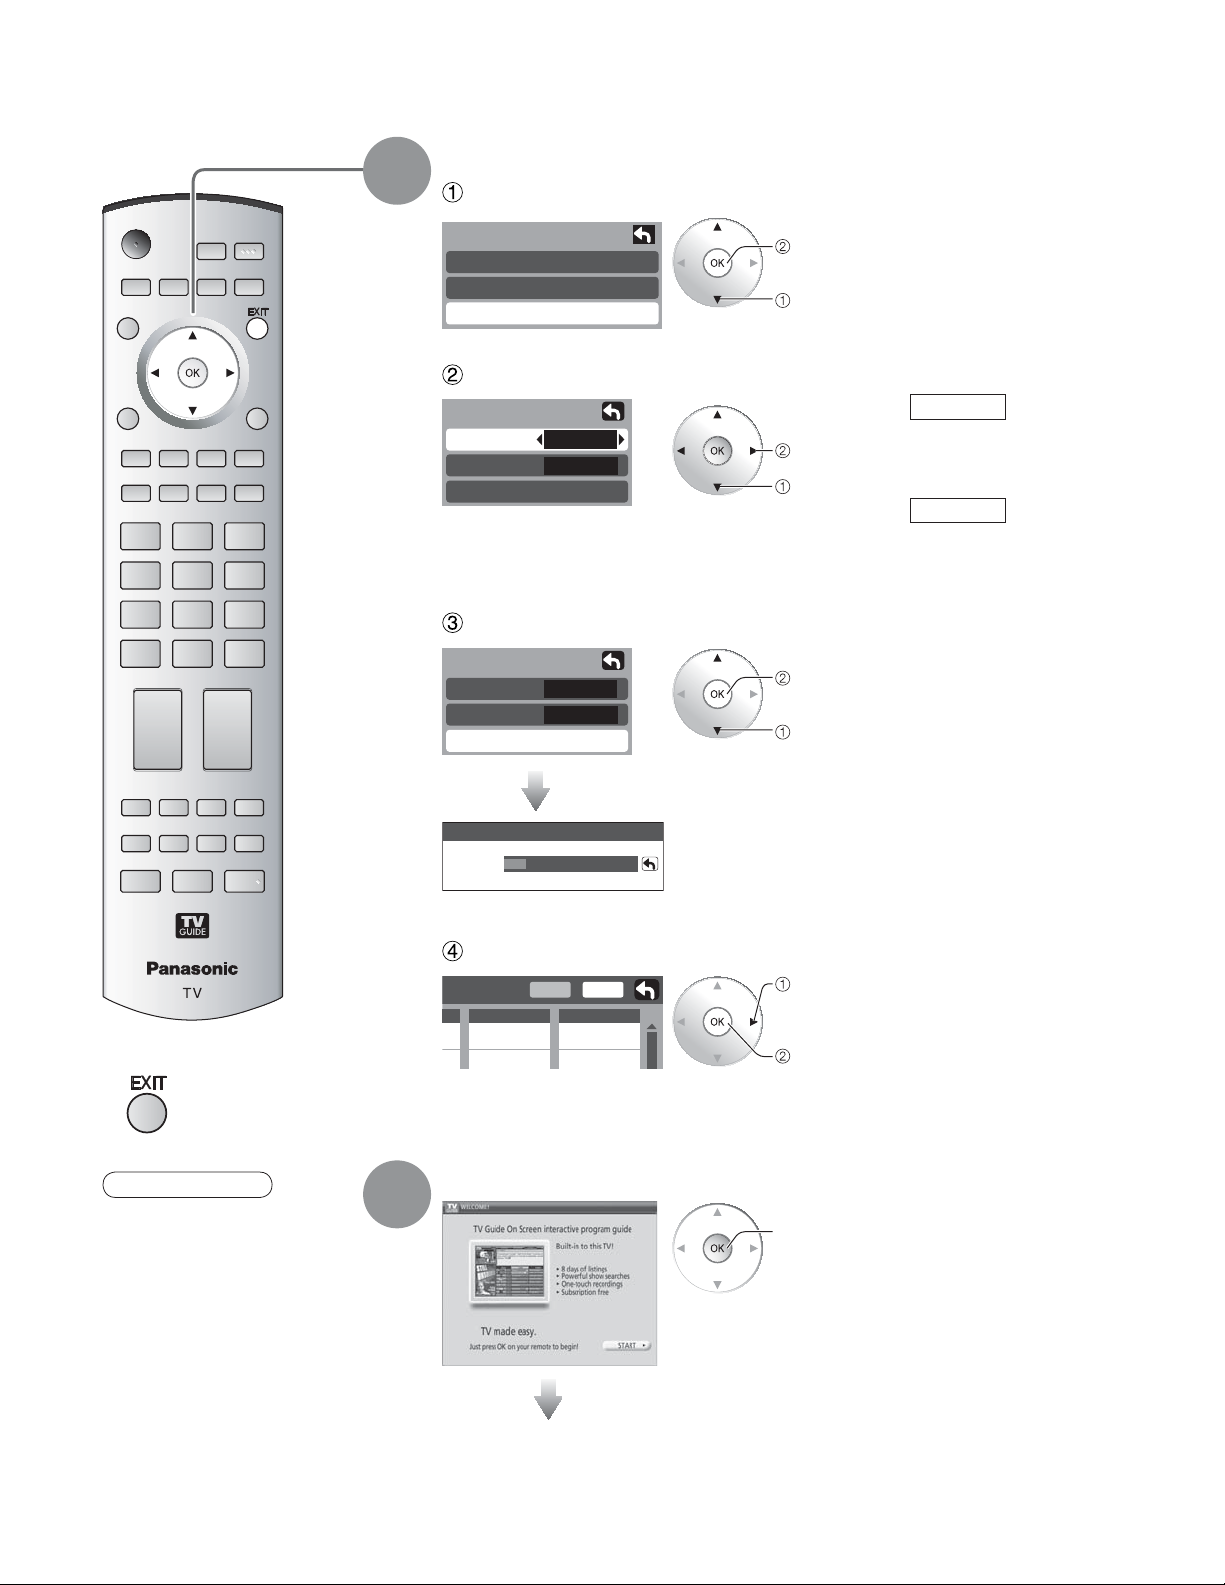
Configuración por primera vez
Configuración automática de canales
4
Seleccione “Programa auto”.
Ajuste inicial
Idioma
Reloj
Programa auto
Siguiente
Seleccione
Seleccione la antena y los modos de entrada
Programa auto
Ent. ANT
Modo
Iniciar escaneo
Cable
Tod os
Establezca
Seleccione
Inicie la exploración de los canales.
Programa auto
Ent. ANT
Modo
Iniciar escaneo
Tod os
Cable
Inicie
Seleccione “Iniciar
escaneo”
Ent. ANT
Cable: Televisión por cable
Antena: Antena
Modo
Todos: Digital y analógico
Análogo:Analógico solamente
(Reduce el
tiempo para la
recepción)
14
Para salir
Ŷ
Nota
“Programa auto” no se
•
encuentra disponible
mientras está insertada la
CableCARD™.
Acerca de los sistemas
•
de emisión
Analógico:
Digital:
Sistema de
televisión
tradicional
Un sistema
nuevo que le
permite ver más
canales con
imagen y sonido
de alta calidad.
5
Escaneando canales análogos...
Progress
Los canales disponibles (analógicos/digitales) se
•
establecen automáticamente.
Confirme los canales registrados.
Editar
Aceptar
Favoritos
- - -
2
Si no se pulsa OK después de seleccionar “Aceptar”, los canales no se
•
memorizarán.
Agregar
No
Sí
Seleccione “Aceptar”.
Aceptar
AJUSTE DE GUÍA INICIAL para Guía de TV
Inicie
Siga las instrucciones de la pantalla para hacer el ajuste. (pág. 20-25)
Page 82
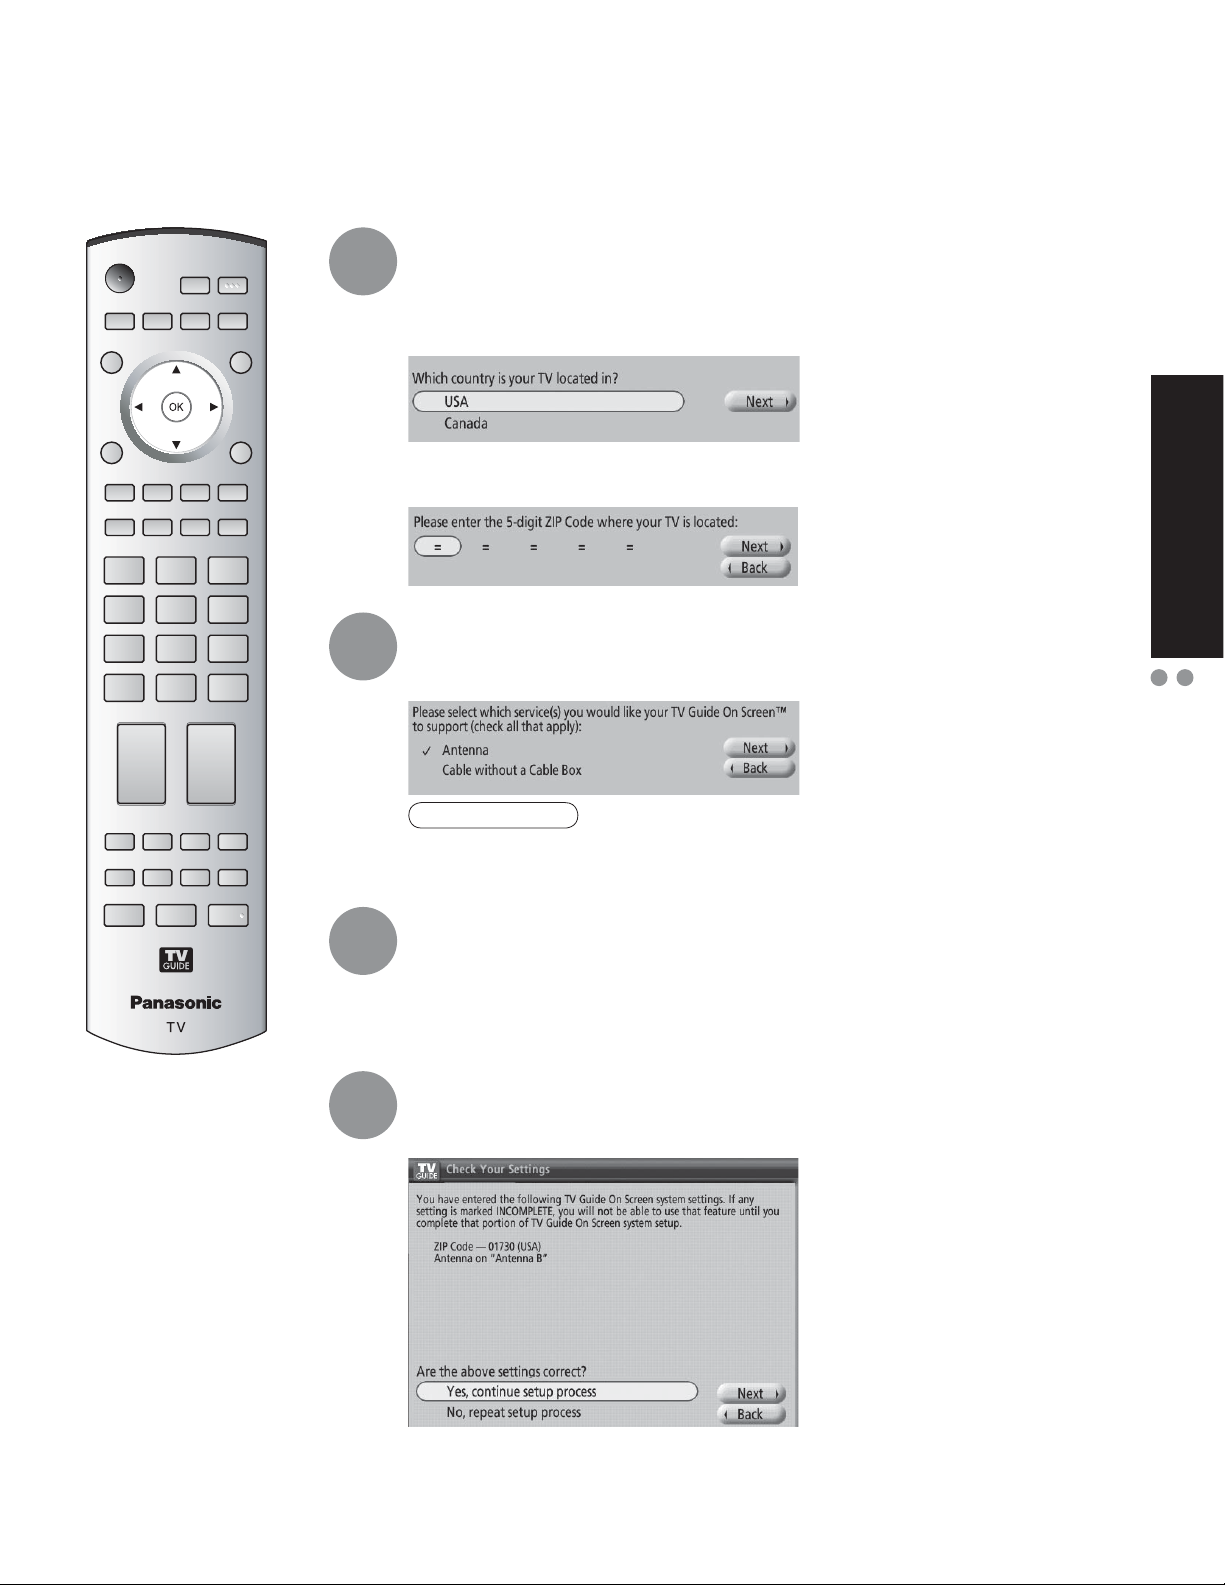
AJUSTE DE GUÍA INICIAL para Guía de TV
La pantalla de bienvenida de la Guía de TV se visualiza cuando usted utiliza la función de la Guía de TV
por primera vez, o al hacer el ajuste inicial. (pág. 13)
Identifique su ubicación.
1
2
La guía utiliza información de configuración para proporcionar listas de
programas y grupos de canales de TV para su área.
a. Seleccione su país.
b. Utilice las teclas numéricas o Ÿ/ź para introducir el número del distrito
postal o el código postal.
Seleccione su servicio, o servicios.
Seleccione la fuente, o fuentes, de vídeo conectadas para las que usted quiere
recibir listas de programas.
Guía rápida para la
puesta en marcha
AJUSTE DE GUÍA INICIAL para Guía de TV
Configuración por primera vez
3
4
Nota
Si no tiene televisión por cable tendrá que seleccionar Antenna para recibir
•
listas de programas y grupos de canales.
Configura su servicio, o servicios.
Para cada servicio que usted elija en el paso 2 se le pedirá seleccionar la
entrada correspondiente.
Aparecerán pantallas de configuración adicionales basadas en los tipos de
servicio que usted seleccione.
Compruebe su configuración.
Después de configurar todos los servicios que seleccionó en el paso 2 se le
pedirá que compruebe su configuración.
Si selecciona Yes, continue setup process (Sí, continuar el proceso de
configuración), vaya al paso 5 (pág. 16).
Si selecciona No, repeat setup process (No, repetir el proceso de
configuración), vuelva al paso 1.
15
Page 83
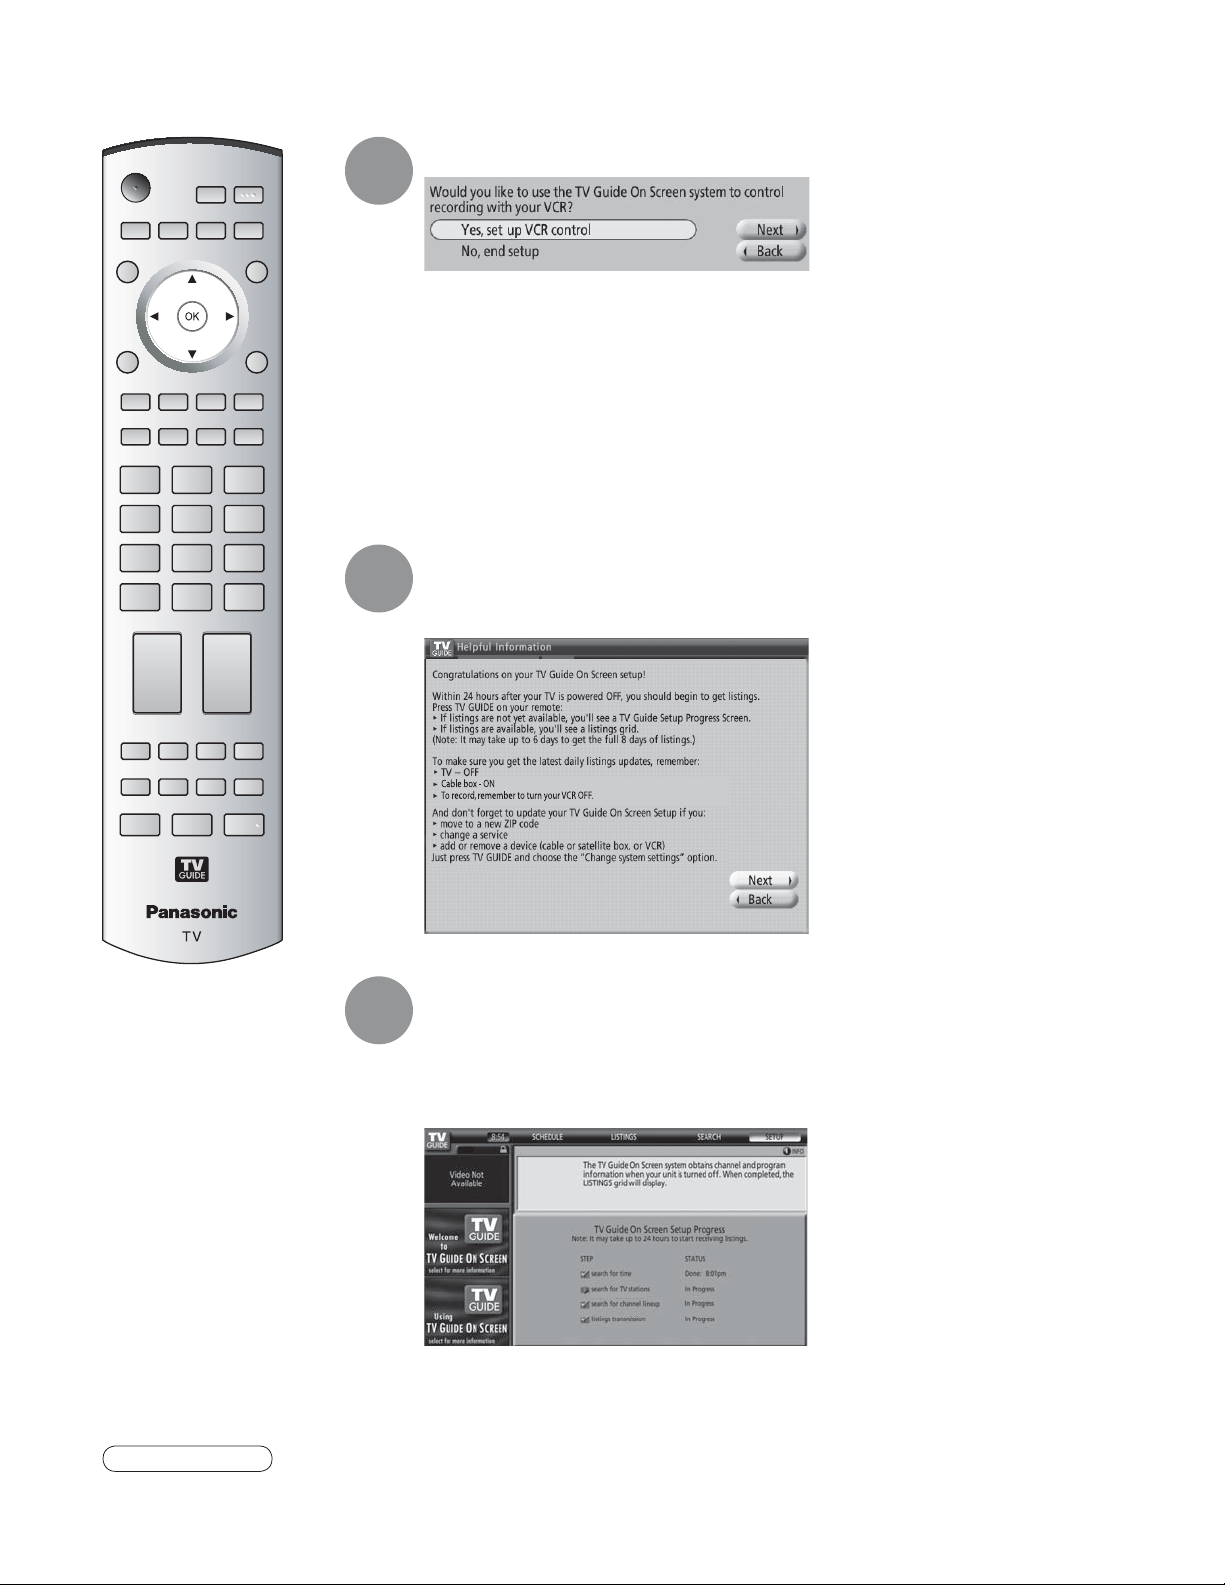
AJUSTE DE GUÍA INICIAL para Guía de TV (Continuación)
Configure su videograbadora.
5
Si quiere utilizar las listas de la guía de TV en pantalla para programar
grabaciones en su videograbadora, responda Yes, set up VCR control (Sí,
configurar el control del VCR).
Las pantallas adicionales le preguntarán lo siguiente:
• Confirmar las opciones de control remoto.
• Confirmar las conexiones externas.
• Seleccionar la marca de la videograbadora.
• Probar y confirmar el código remoto.
Si no quiere que la guía controle la grabación en su videograbadora, conteste
No, end setup (No, terminar la configuración) y vaya al paso 6.
Termine la configuración.
6
La pantalla Helpful Information se visualiza cuando usted ha terminado
correctamente la configuración de la guía.
16
Vea la pantalla de progreso de la configuración.
7
Precaución
Para empezar a recibir sus listas, apague el televisor cuando no lo utilice. Antes de que pasen 24 horas empezará
•
a recibir listas de programas de TV. Recibir las listas de programas iniciales correspondientes a ocho días
completos puede tardar hasta seis días.
La pantalla de progreso de la configuración aparece cada vez que
usted entra en la guía antes de recibir sus listas de programas
correspondientes a los ocho días iniciales. Para cerrar la pantalla, pulse
Ż u [OK].
Page 84
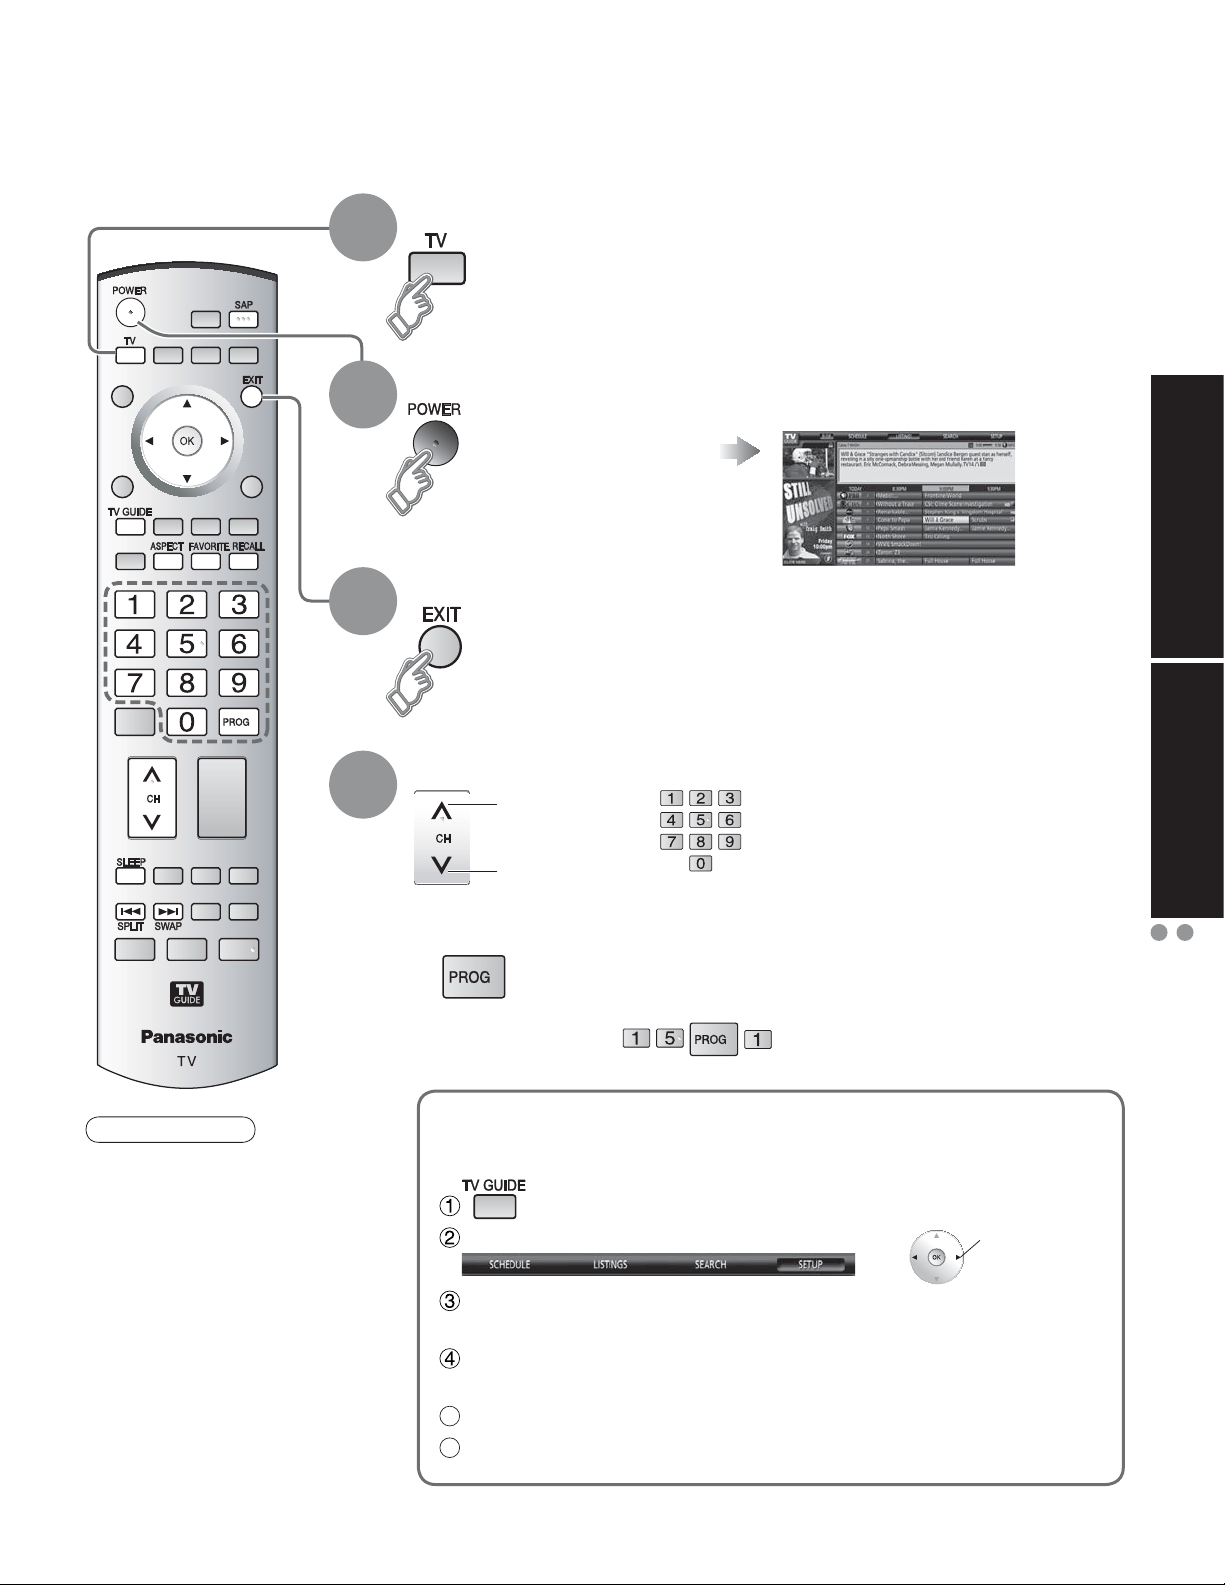
-
Para ver la televisión
-
-
Conecte el receptor de televisión por cable cuando vaya a ver televisión por cable. (pág. 11)
Cambie al modo de televisión.
1
Guía rápida para la
puesta en marcha
2
Conecte la alimentación
El botón POWER
•
de la unidad deberá
estar activado.
Abra la guía de TV.
Cierre la guía de TV.
3
-
Seleccione un número de canal.
4
Ŷ
Arriba
ó
Abajo
Para introducir directamente el número de un canal digital.
Visión
Para ver la televisión
AJUSTE DE GUÍA INICIAL para Guía de TV
Nota
Vuelva a seleccionar
•
“Cable” ó “Antena”
en “Ent. ANT” de
“Programa auto” para
cambiar la recepción
de la señal entre
televisión por cable y
antena. (pág. 14)
El número del canal y
•
el nivel del volúmen se
fijan incluso después
de apagar el televisor.
Cuando se sintonicen canales digitales, presione el botón para
•
introducir el número menor en un número de canal complejo.
example: CH15-1:
Para no visualizar la guía de TV cuando se conecta la
alimentación
Seleccione “SETUP” (CONFIGURACIÓN).
Seleccione “Change default options” (Cambiar opciones
predeterminadas) y pulse el botón “OK”.
Seleccione “General defaults” (Preconfiguraciones generales)
y pulse el botón “OK”.
5
Seleccione “auto guide” (autoguía) y elija “off”.
6
Seleccione “done” (hecho) y pulse el botón “OK”.
Seleccionar
17
Page 85
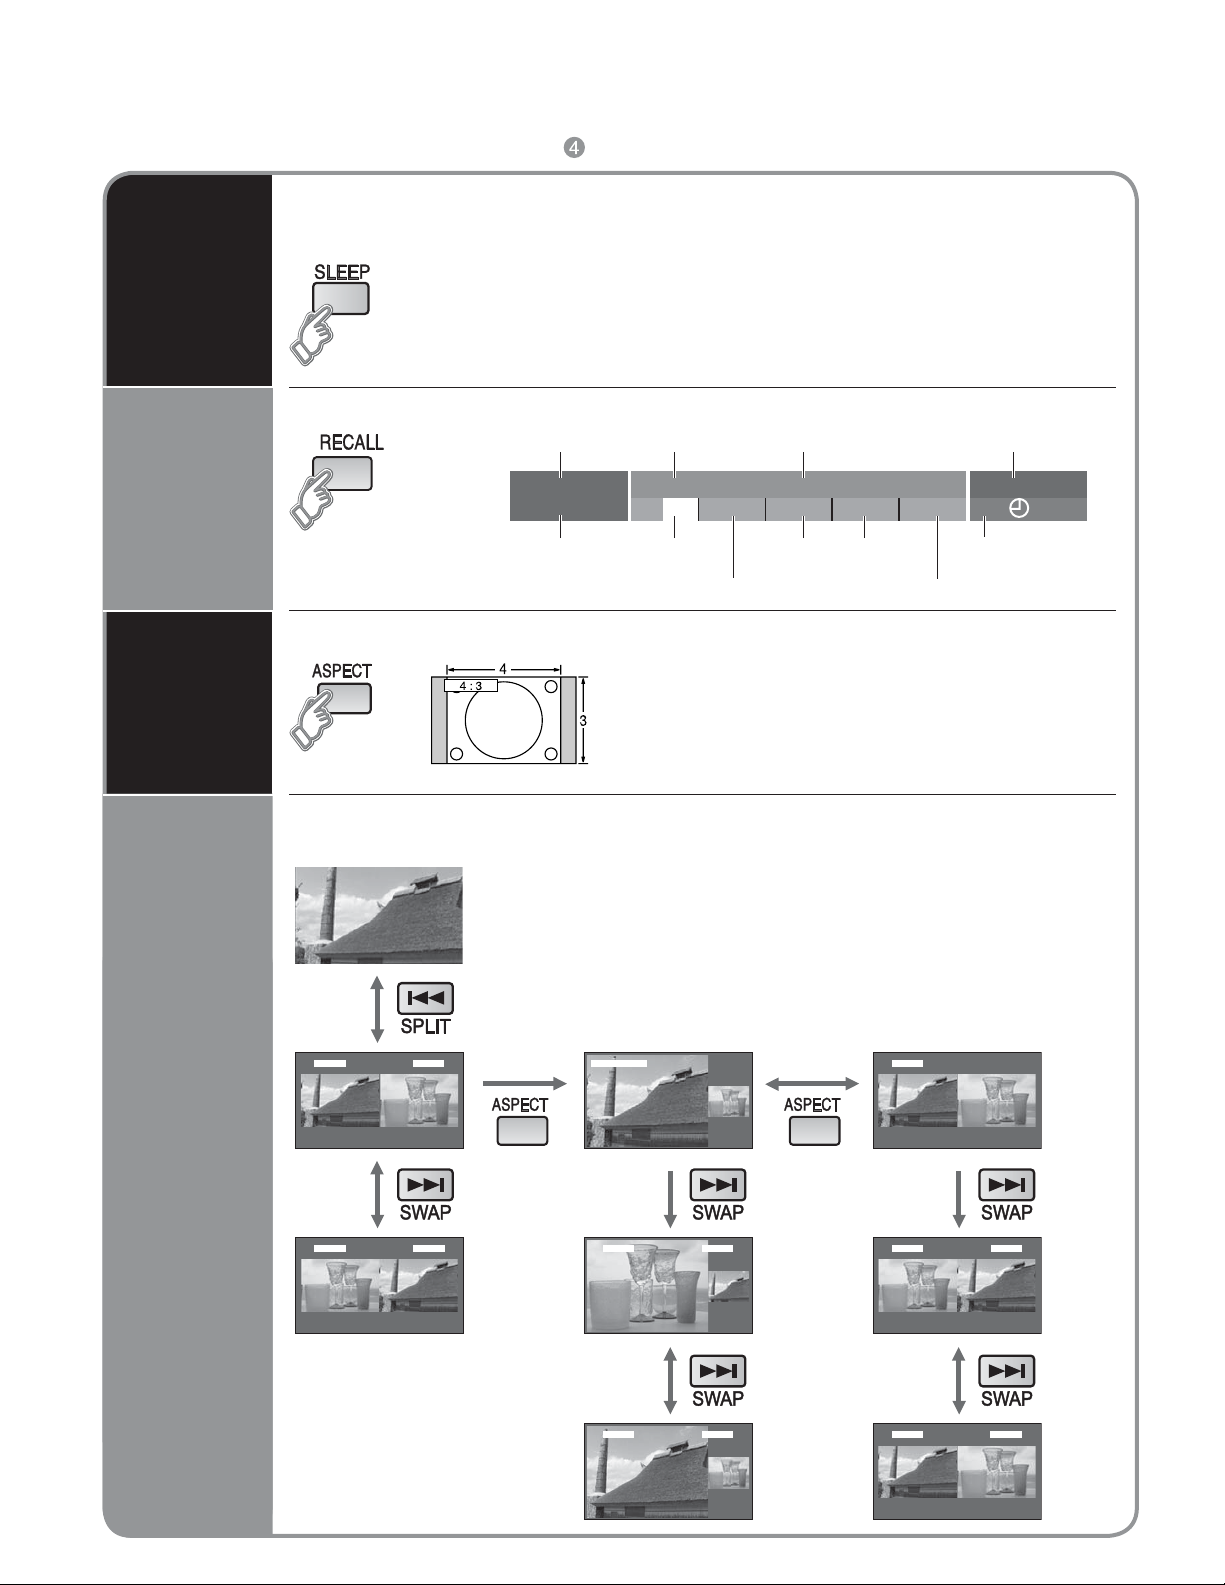
Para ver la televisión
Otras funciones útiles (Utilícelas después de en la pág. 17)
Ŷ
Apaga la unidad después de pasar un periodo de tiempo de 0 a 90 minutos que
puede ajustarse a intervalos de 30 minutos.
Cronómetro
de apagado
0/30/60/90 (minutos)
•
Recuperación
de
información
Cambio de
la relación
de aspecto
Visualice ó elimine la bandera de canales.
Canal
15-2
ABC - HD
Identificador
de emisora
Cambie la relación de aspecto (pág. 52).
Para ver en múltiples pantallas
(El sonido corresponde a la imagen principal solamente.)
•
•
Hora de
finalización
- 10:30
CC SPA
SAP
Nivel de
clasificación
El modo cambia con cada pulsación.
•
480i (4:3), 480i (16:9), 480p (4:3), 480p (16:9) :
•
COMP, JUSTO, 4:3 ó ACERC
1080p / 1080i / 720p : COMP, H-LLENO, JUSTO, 4:3
•
ó ACERC.
Ventana izquierda (Imagen principal)
Se puede ampliar la pantalla y ajustar el volumen.
Ventana derecha (Imagen dividida)
Aparece la pantalla seleccionada previamente.
El canal de televisión o la señal de entrada de vídeo se
pueden cambiar en la imagen dividida.
Título del
programa
Andrew’s cooking show
T V -G
Resolución
de señales
1080I
Estander
Modo de
imagen
Reloj
10:00 am
4 : 3
Tiempo restante del
temporizador para acostarse
Relación de aspecto
30
18
Pantalla
dividida
2 Video1
2Video1
Imagen Externa
2 Video1
Video1Normal
2Video1
2 Video1
2Video1
Page 86
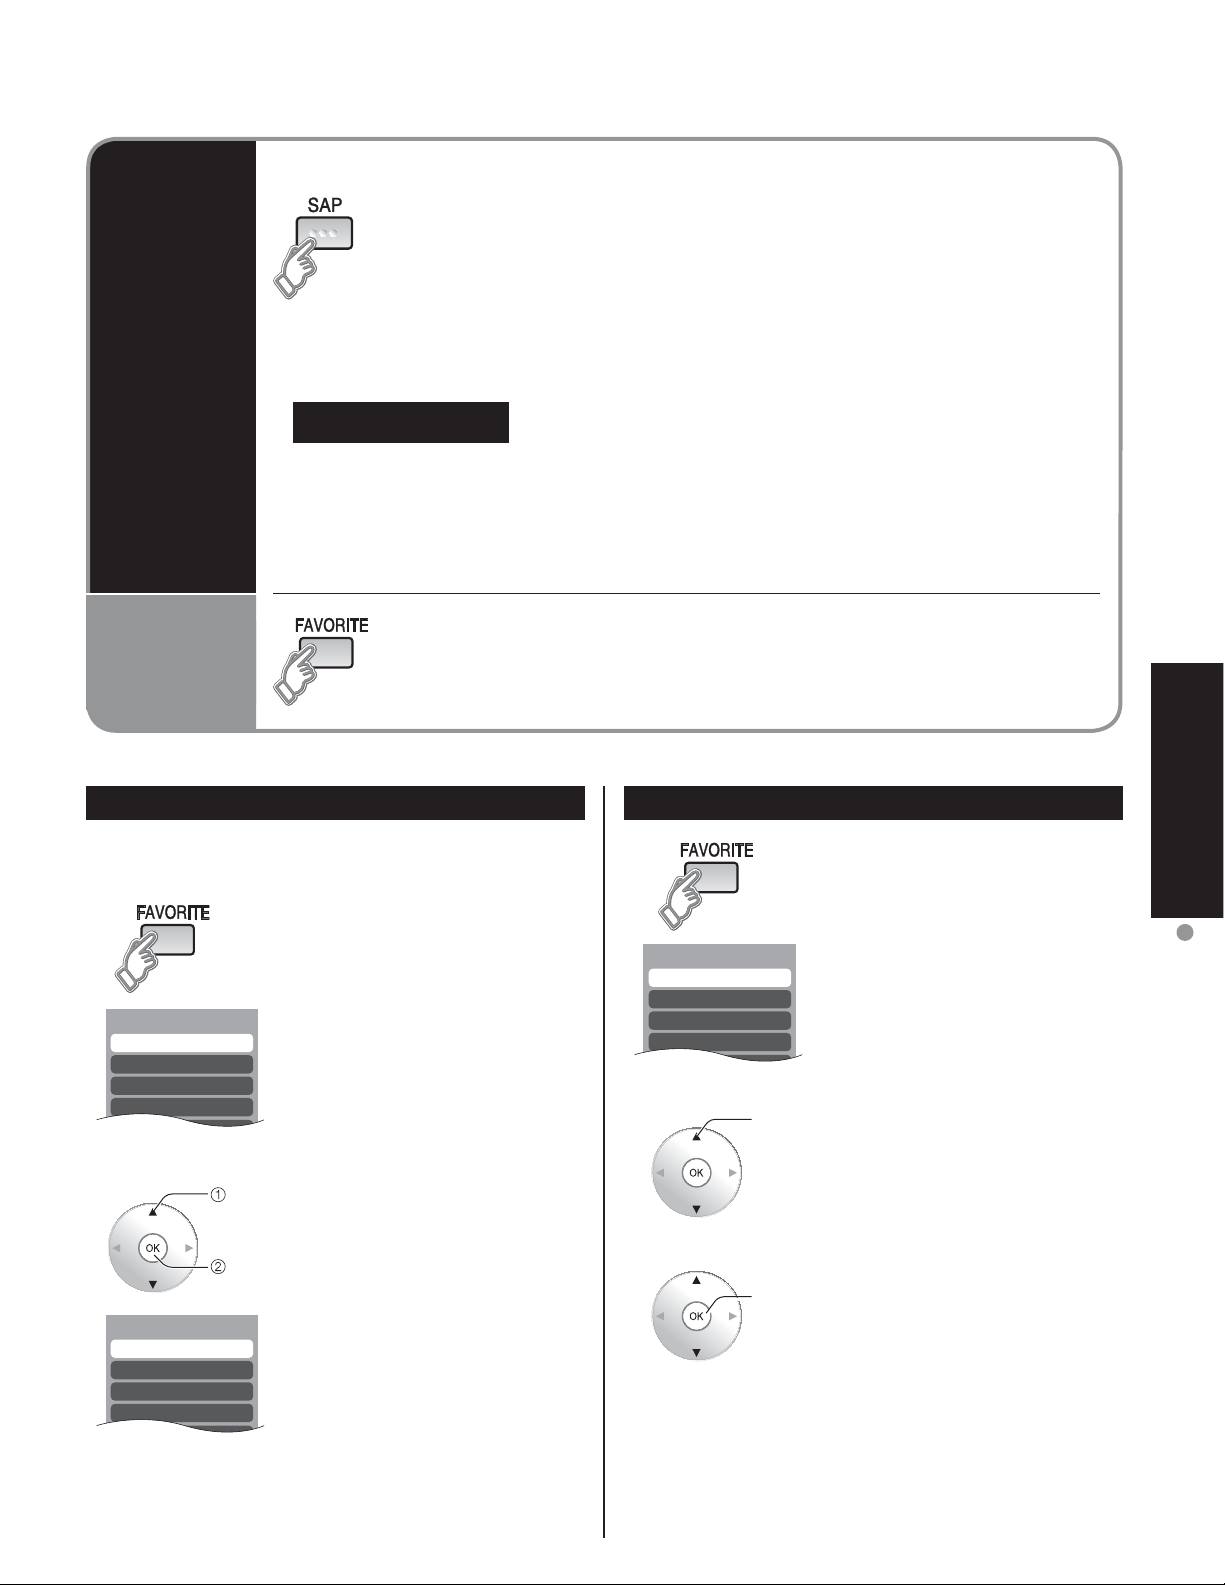
Ajustes 1/3
[1]
[2]
[3]
[4]
Ajustes 1/3
[1] 26-1
[2]
[3]
[4]
Favoritos 1/3
[1]
[2]
[3]
[4]
Escucha
con SAP
(Programa
de audio
secundario)
Llamada
a un canal
favorito
Seleccione el modo de audio para ver la televisión.
Ŷ
Modo digital
•
Pulse SAP para seleccionar la siguiente pista de audio (si está disponible) cuando se
recibe un canal digital.
Pista de audio 1 de 1
Modo analógico
•
Pulse SAP para seleccionar el modo de audio como se describe a continuación.
• Cada vez que se pulsa el botón SAP, el modo de audio cambiará como se muestra a
continuación. (Estéreo/SPA/Mono)
(Ingles)
FAVORITOS
Ŷ
Los números de canales de Favoritos se visualizan en la pantalla de
sintonización de favoritos. Seleccione la emisora deseada con el cursor ó
usando las teclas de números. (vea debajo)
Visión
Configuración de la función de favoritos Utilización de la función de favoritos
1 Visualice el canal que va a colocar en la lista de favoritos.
2 Mantenga pulsado FAVORITE
• Pulse repetidamente FAVORITE
3 Pulse Ÿźpara resaltar una
• También puede utilizar las
Seleccione
Aceptar
durante varios segundos.
para cambiar entre las páginas
(1/3, 2/3, 3/3 ó salir). Al pulsar
ŻŹ también cambia la página.
posición en la lista. Y luego pulse
OK para memorizar el canal
visualizado en esa posición.
teclas numéricas (1-9 y 0) para
seleccionar los números de lista
grabados (1-9 y 0). Al hacer
esto, los números se grabarán
directamente sin tener que
pulsar la tecla OK.
1 Pulse FAVORITE.
• Pulse repetidamente FAVORITE
2 Pulse Ÿź ó una tecla numerada
3 Pulse OK para visualizar el canal
Seleccione
Aceptar
para cambiar entre las páginas
(1/3, 2/3, 3/3 ó salir). Al pulsar
ŻŹ también cambia la página.
(1-9 y 0 ) para resaltar un canal
de la lista.
Al seleccionar un número de
•
canal de la lista con las teclas
numeradas se visualizará
directamente el canal.
resaltado.
Para ver la televisión
•
Para eliminar un canal favorito
Un canal memorizado se podrá eliminar de la lista manteniendo
pulsado FAVORITE mientras su posición está resaltada.
19
Page 87
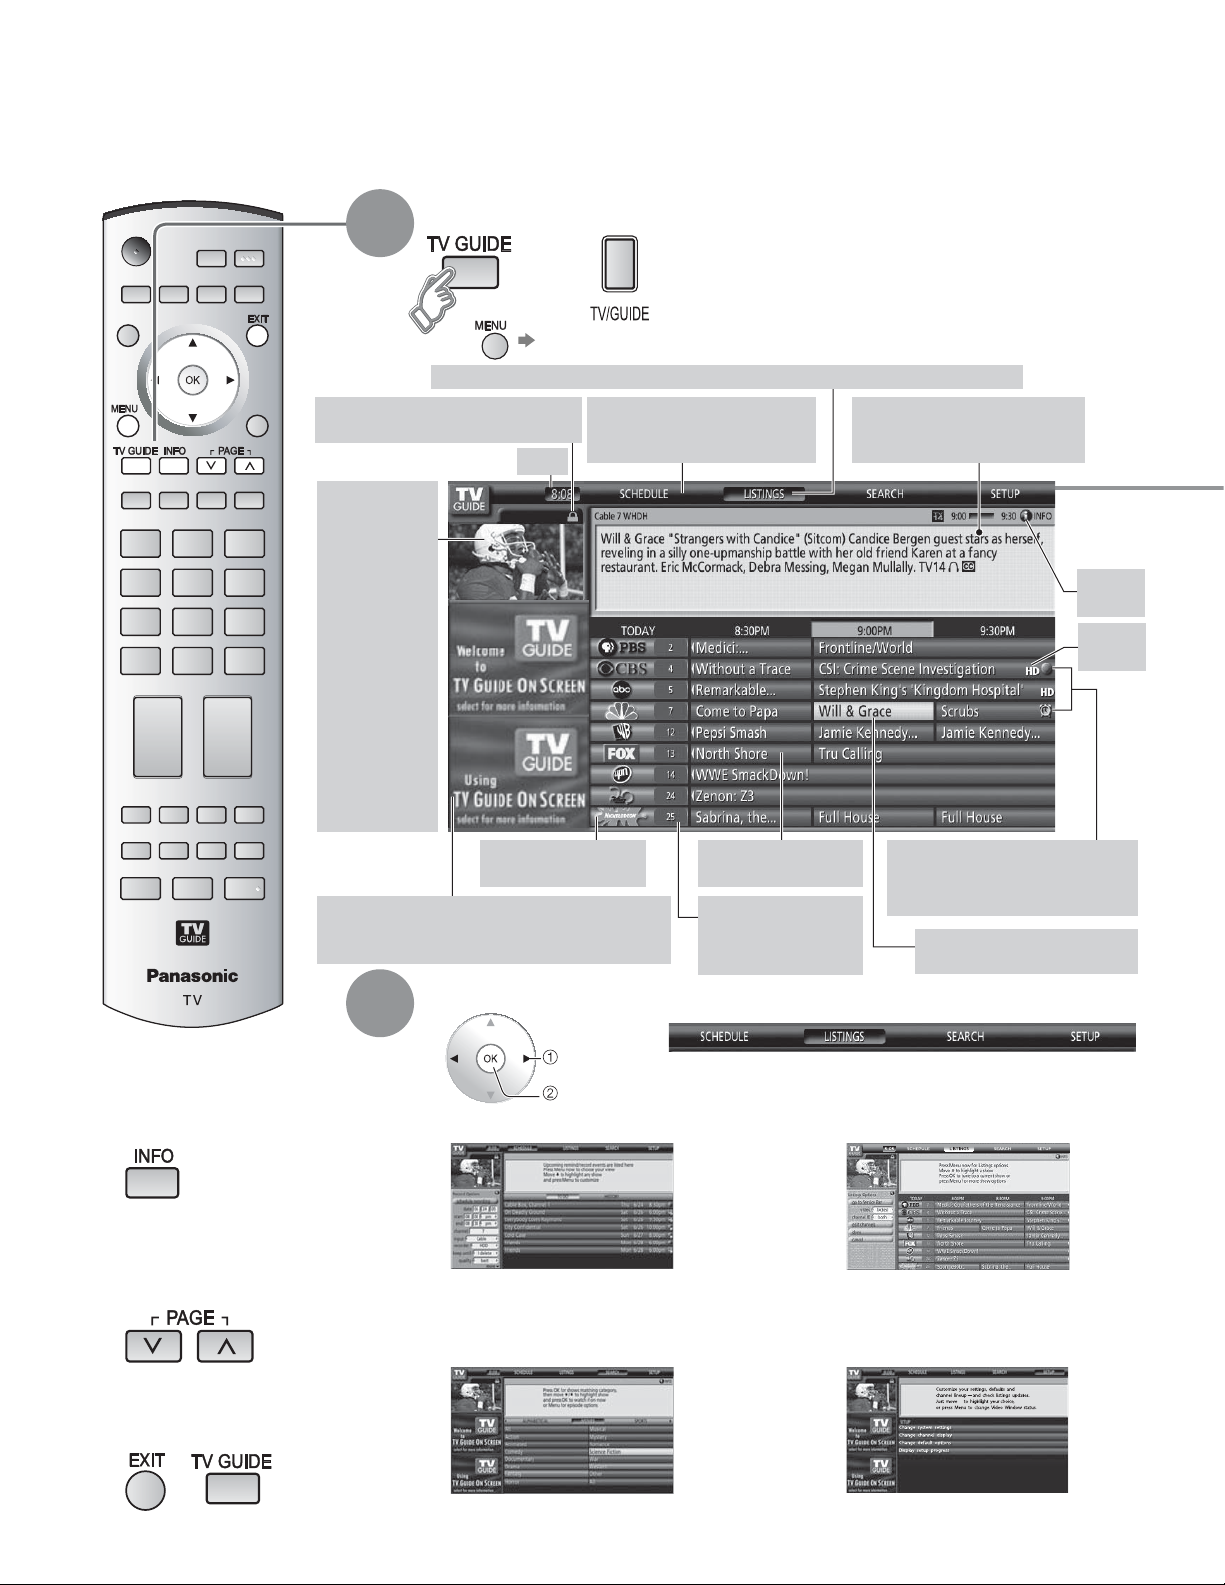
Utilización de la guía de TV
La guía de TV muestra en la pantalla una lista de los programas que están siendo emitidos y de los que
se emitirán en la semana próxima. Se necesita hacer la configuración inicial (pág. 14).
Vista de la guía de TV (TV Guide)
1
ó
Ó Seleccione “TV Guide” utilizando “TVG/Foto”.
•
Etiqueta de servicio actualIndentada para indicar el servicio actual visualizado
(desde el panel delantero)
Icono de bloqueo/desbloqueo
Indica el estado de las ventanas de vídeo.
Reloj
Ventana de vídeo
Muestra imágenes
de TV mientras
se visualiza la
guía (se puede
bloquear en
un solo canal
o desbloquear
para presentar
preliminarmente
canales mientras
usted navega
por las listas y el
editor de canales).
Nota:
La ventana de vídeo
no se visualiza
cuando se selecciona
una fuente de
entrada externa.
Logotipo de canales
Identifica la red
Adición
Lugar donde aparece información específica de programas
o productos (y también donde aparece el menú de panel)
Barra de servicio
Proporciona acceso a los
servicios de guía principales
Mosaico
Visualiza un título de un programa
Número de canal
Identifica el número
del canal.
Cuadro de información
Proporciona información para
un elemento resaltado
Iconos de grabación/recordatorio
Indica que un programa ha sido
programado para ser grabado o
como recordatorio
Resalto
Indica un mosaico activo
Icono de
información
Icono
HD
20
Para visualizar
Ŷ
información de
programas o ayuda
Para desplazar
Ŷ
páginas en la guía de
TV
Para salir de la guía
Ŷ
de TV
ó
2
Seleccione el elemento del menú desde la barra de servicio.
Seleccione
Establezca
SCHEDULE (PROGRAMACIÓN)
•
Comprueba o cambia la programación de la
grabación y la reserva de recordatorios, y muestra
los programas que se han grabado. (pàg. 24)
SEARCH (BUSCAR)
•
Busca el programa conforme al criterio de tipo
y categoría. (pàg. 23)
(SCHEDULE / LISTINGS / SEARCH / SETUP)
LISTINGS (LISTADOS)
•
Se lista los programas de grupo de
canales. (pàg. 21)
SETUP (CONFIGURACIÓN)
•
Hacer cambios en la configuración
vigente de la Guía. (pàg. 22)
Page 88
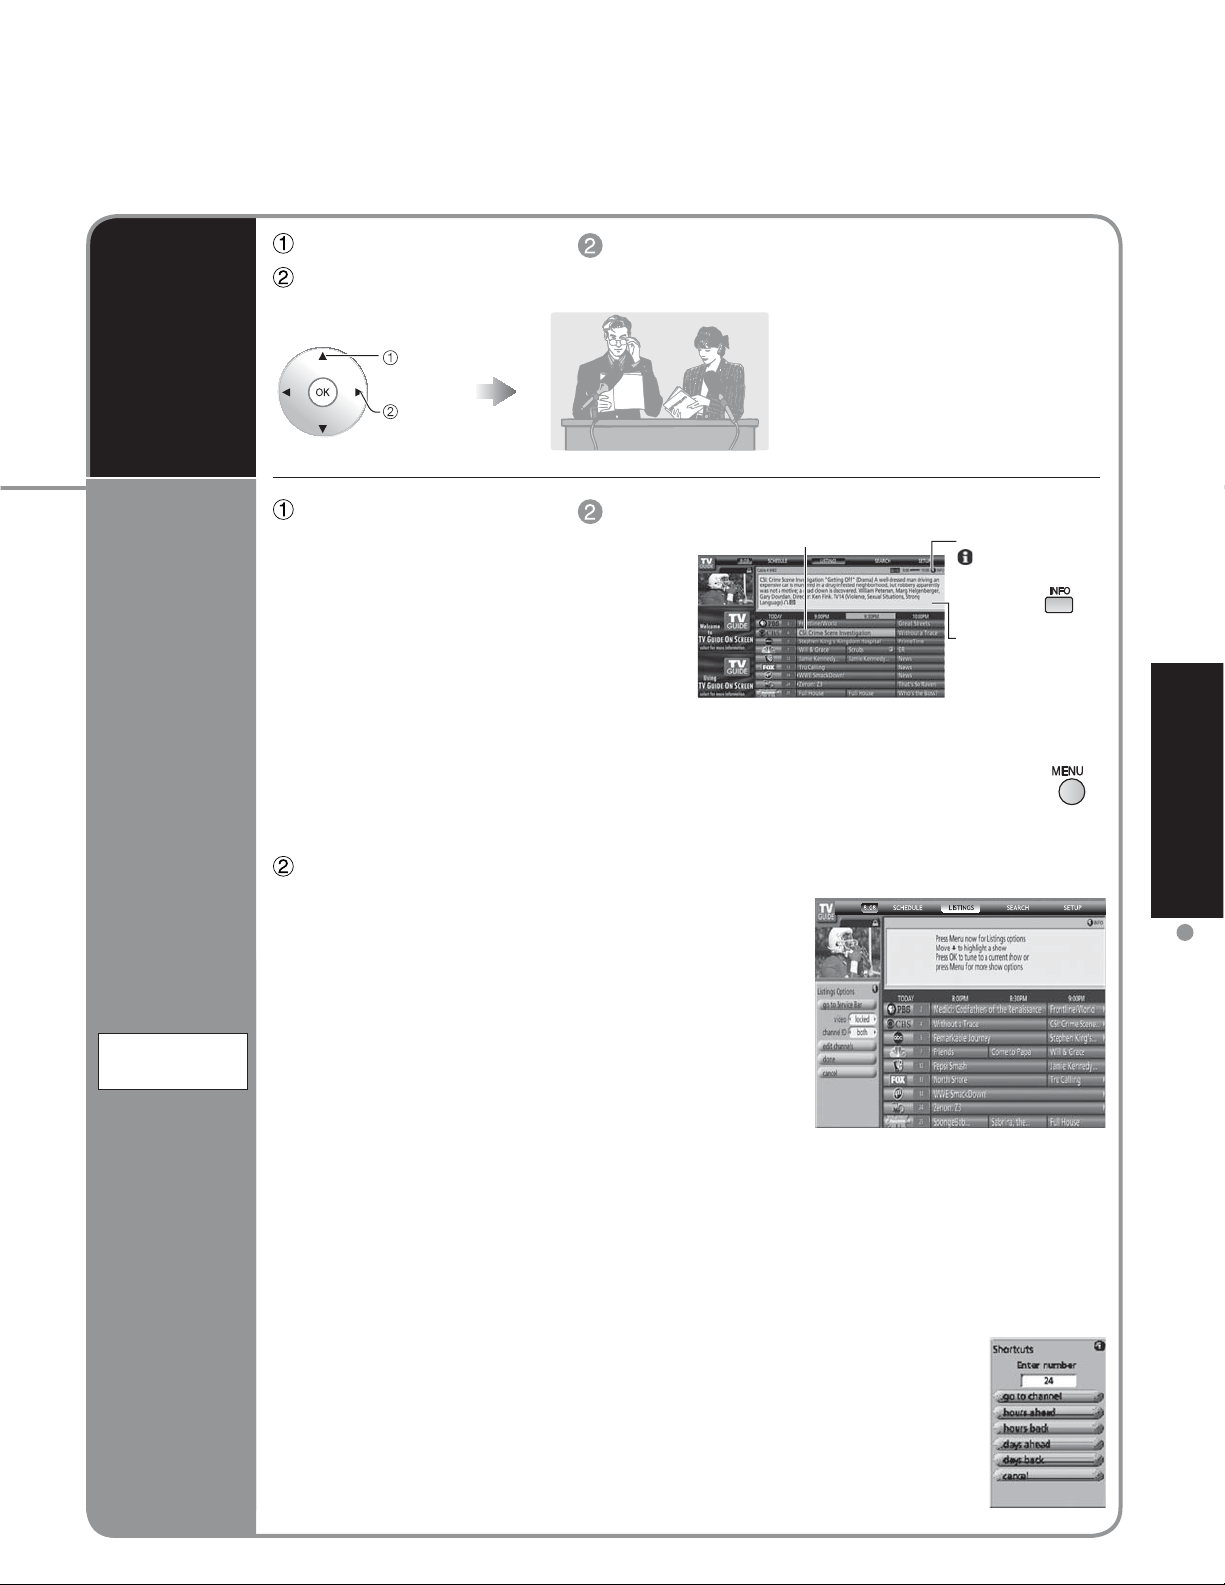
Seleccione “LISTINGS” en . (pág. 20)
Seleccione el programa que se emite.
Para ver el
programa
(Pantalla de TV)
Seleccione
Establezca
Seleccione “LISTINGS” en . (pág. 20)
Las listas son siempre el primer servicio
visualizado en la guía.
Mueva el resalto entre las listas para
• Ver las listas de programas para hoy más
7 días (8 días en total)
• Leer descripciones de programas
• Sintonizar directamente un programa que
está siendo emitido
• Poner un programa para recordarlo
• Poner un programa para su grabación
• Para bloquear/desbloquear la ventana de vídeo:
Resalte un logotipo de canal o la etiqueta de la barra de servicio LISTINGS y pulse
para visualizar la opción y bloquear/desbloquear la ventana de vídeo.
• Panel de acceso y adición de canales
Título del programa seleccionado
Cuando selecciona
con la tecla
INFO aparece más
información
Detalles
Seleccione LISTINGS y pulse MENU:
Visión
Para ver
detalles
del
programa
LISTINGS
(LISTADOS)
Video:
(Vídeo) (Bloqueado)
channel ID: Both – el logotipo y el número del canal
(ID de canal)
Number – sólo el número del canal se visualiza en la cuadrícula.
edit channels: Cambia el servicio de emisión que la guía usa para cada canal. Edite los
(editar canales)
Utilice las teclas de números de su mando a distancia para introducir el
número de canales que quiere ver o introduzca el número de horas y días
que quiere avanzar o retroceder. Aparece el menú Shorcuts.
Si introdujo un número de canal, pulse OK cuando aparezca el menú para
•
saltar directamente al canal.
Si introdujo un número específico de horas, pulse Ź (para avanzar) o Ż
•
(para retroceder) cuando aparezca el menú para saltar directamente.
Locked (predeterminado)
Unlocked – el vídeo va cambiando
(Desbloqueado)
(Ambos)
Logo – sólo el logotipo del canal se
(Logo)
(Número)
canales que aparecen en la guía, ordene sus posiciones en la cuadrícula,
cambie su canal de sintonización y, si tiene más de un servicio de emisión,
especifique el servicio y la entrada para cada canal. Puede modificar la
configuración directamente en la pantalla Channel Editor.
de canal según usted va
navegando por la cuadrícula.
se visualizan en la cuadrícula.
visualiza en la cuadrícula.
– el vídeo
permanece en
un solo canal.
Utilización de la guía de TV
21
Page 89
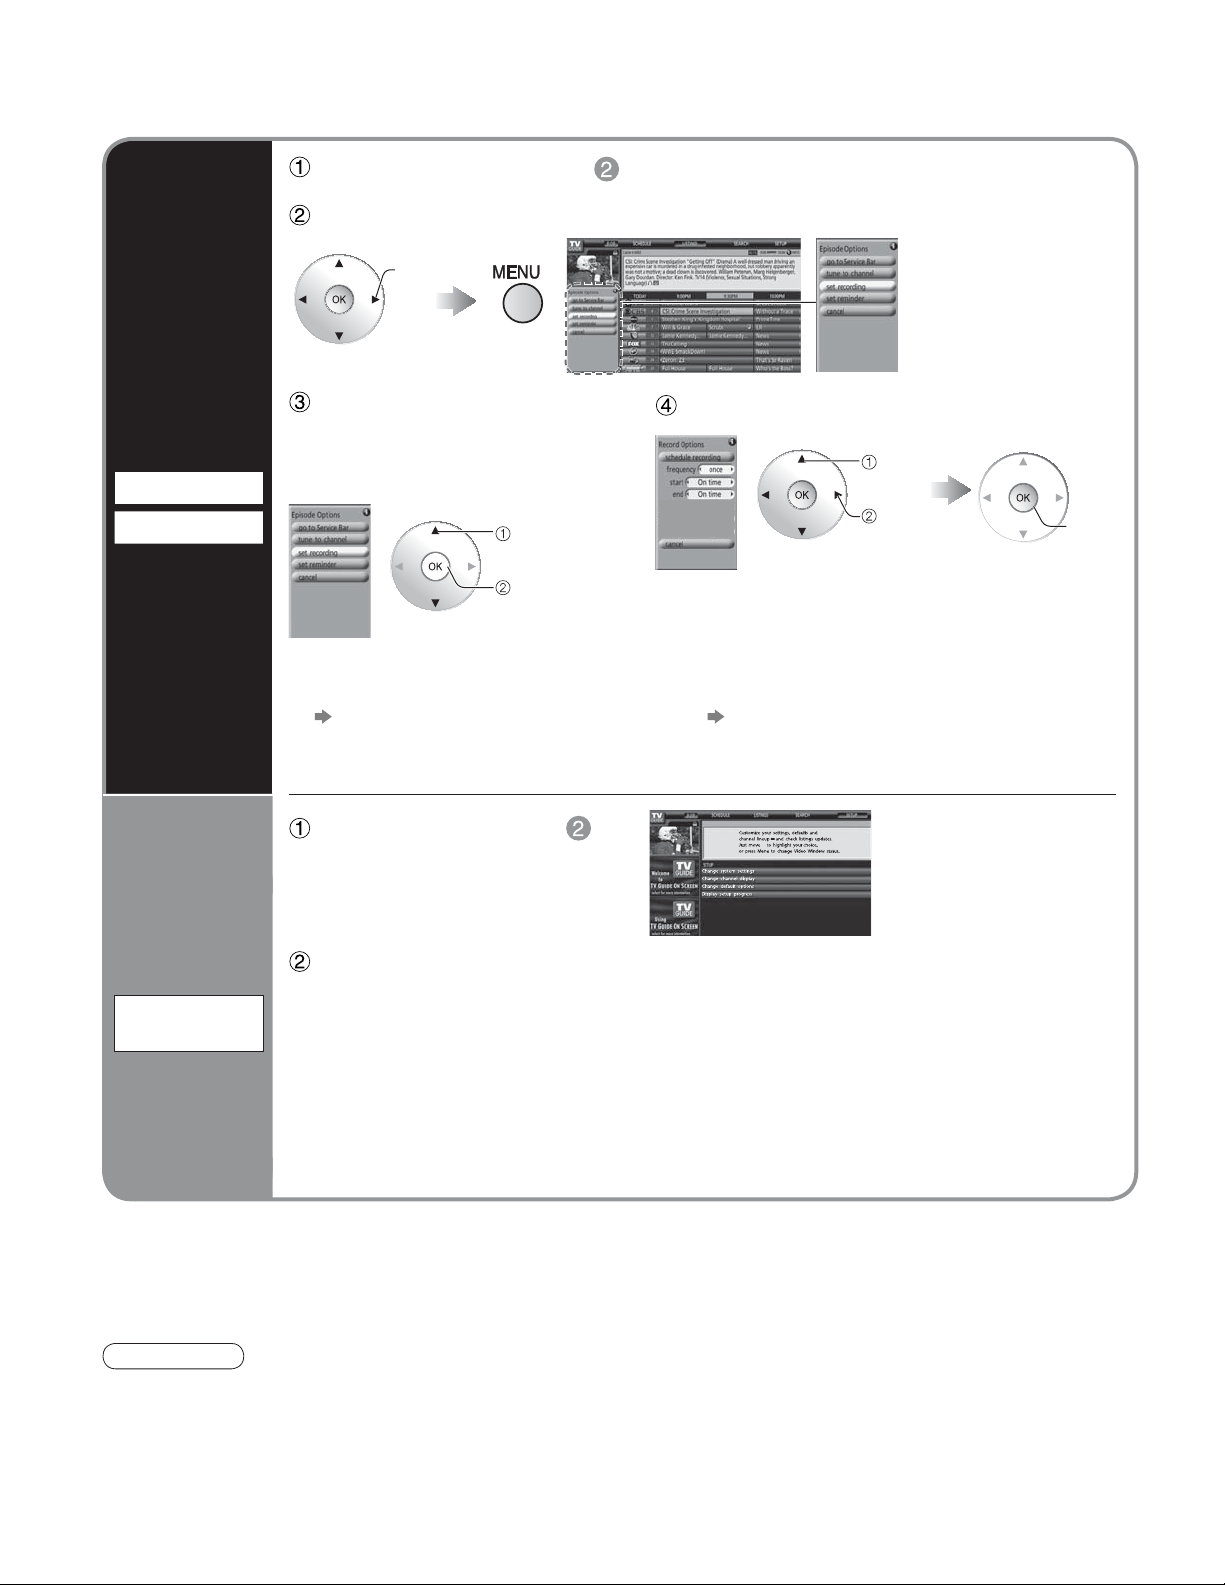
Utilización de la guía de TV
Seleccione “LISTINGS” en . (pág. 20)
Seleccione el programa y visualice el menú del panel.
Seleccione
(Continuación)
Reserva de
un programa
Recording
Reminder
Seleccione “set recording”
(establecer grabación) o
“set reminder” (establecer
recordatorio).
Para comprobar/cambiar/
Ŷ
eliminar el contenido reservado
Seleccione “SETUP” en .
(pág. 20)
Cambio de
configuración
SETUP
(CONFIGURACIÓN)
Seleccione un elemento y siga las instrucciones de la pantalla para seguir
configurando.
Change system settings:
•
(Cambiar configuraciones del sistema)
Change channel display:
•
(Cambiar visualización de canales)
Change default options:
•
(Cambiar opciones predeterminadas)
Display setup progress:
•
(Mostrar progreso de configuración)
Seleccione
Siguiente
"SCHEDULE" (pág. 24)
Seleccione un elemento y establézcalo.
Seleccione
Establezca
Para reservar con la fecha y la hora de
Ŷ
la introducción
"Manual Recording" (Grabación manual)
"Manual Reminder" (Recordatorio manual)
(pág. 25)
Cambia la configuración de su sistema y selecciona
un grupo de canales alternativo.
Modifica su configuración de los canales.
Cambia su configuración predeterminada de la guía.
Muestra la pantalla del progreso de la configuración.
Introducir
22
Nota
Cuando reserve programas tendrá que hacer las configuraciones apropiadas en el equipo de grabación externo
•
conectado a la unidad.
Lea también el manual del equipo de grabación.
•
Page 90
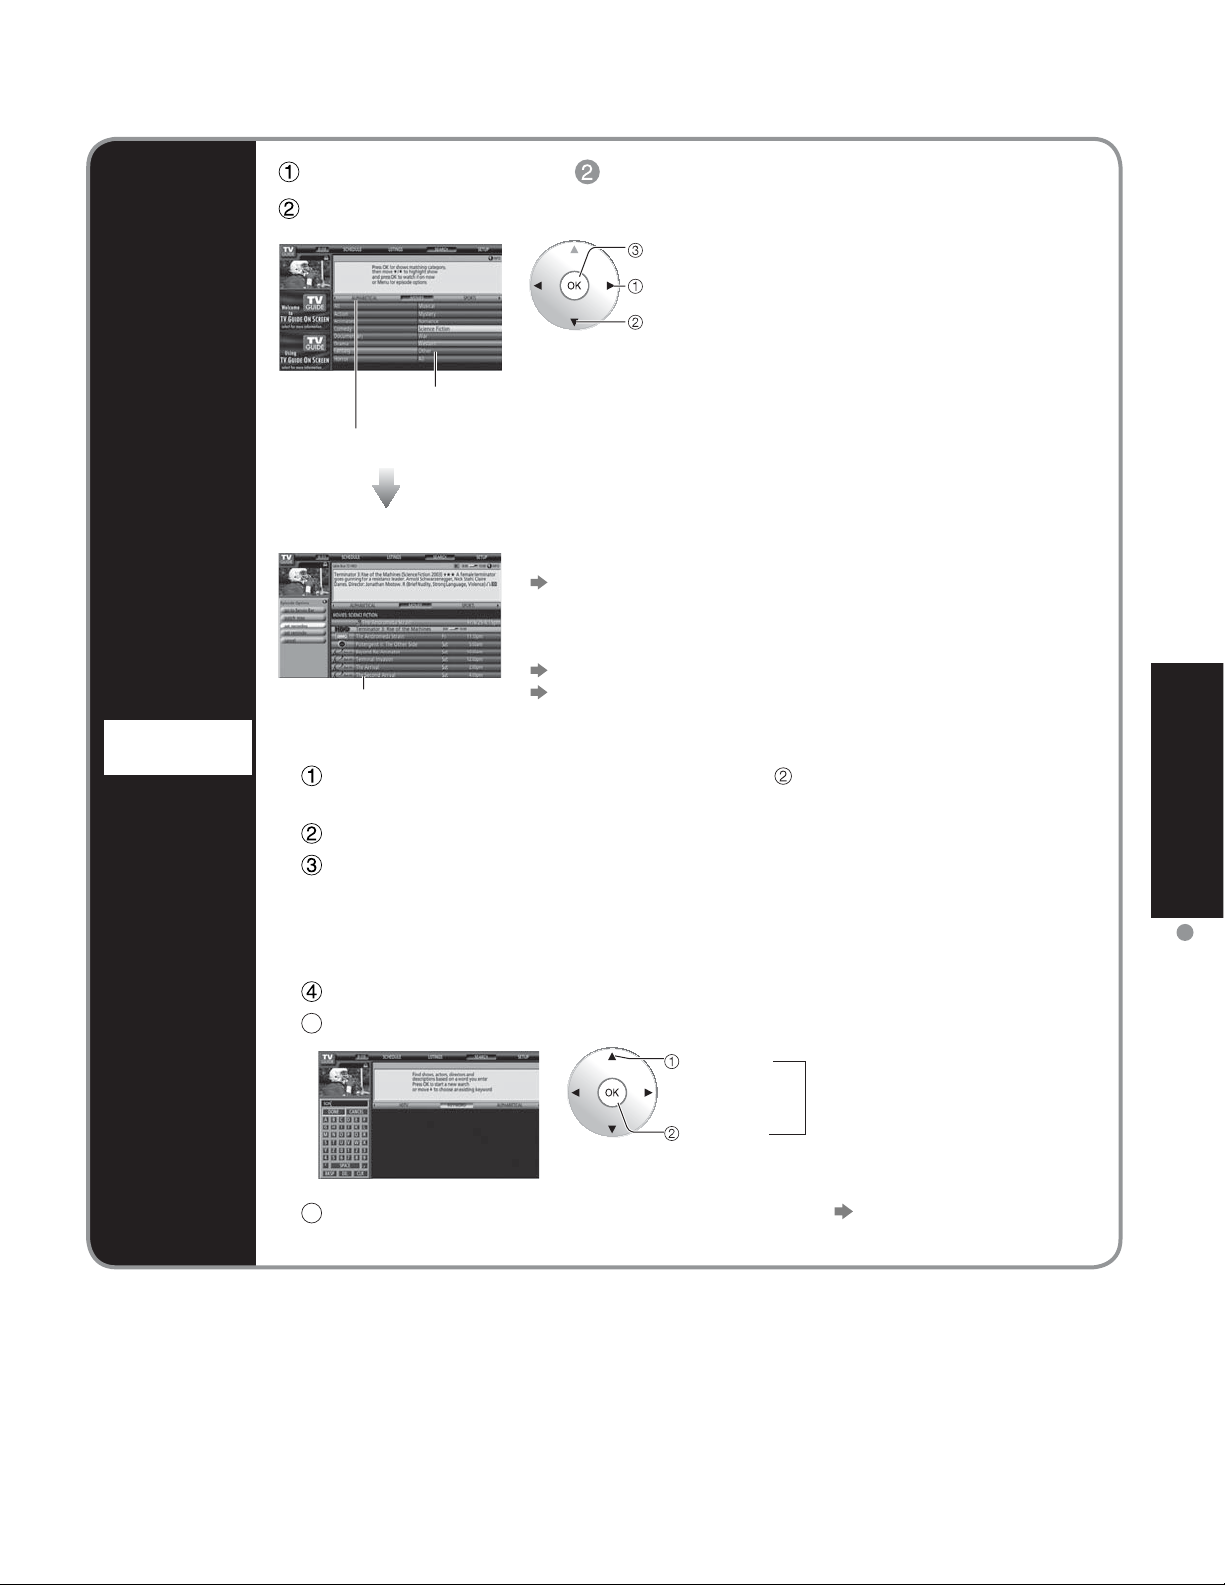
Búsqueda de
programas
Seleccione “SEARCH” en . (pág. 20)
Seleccione el tipo de búsqueda y la categoría.
Establezca
Seleccione un tipo de búsqueda
Seleccione un tipo de categoría
Ejemplo de subcategoría: Todo, acción, musicales…
Ejemplo de categoría:
PELÍCULAS, DEPORTES
Aparece la lista de programas.
Para visualizar el programa deseado
•
Seleccione el programa que está emitiéndose y pulse el botón
“OK”.
Para reservar programas y grabarlos
•
Seleccione el programa próximo y pulse el botón “MENU”.
Lista de programas
Seleccione “set recording” en el menú del panel.
SEARCH
(BUSCAR)
Búsqueda de una palabra clave, actor o director específico
Ŷ
Seleccione “KEYWORD” (PALABRA CLAVE) en de más arriba para la categoría y
pulse el botón “OK”.
Seleccione “new search” (nueva búsqueda) y pulse el botón “OK”.
Haga las selecciones para su búsqueda y pulse el botón “OK”.
- tipo (título, actor, director, descripción, todo)
- categoría (películas, deportes, series, niños, TV de alta definición, todo, etc.)
- sub(categoría) (acción, comedia, horror, todo, etc.)
Seleccione “enter keyword” (introducir palabra clave) y pulse el botón “OK”.
5
Introduzca la palabra clave.
Seleccione
caracteres
Introduzca
caracteres
6
Seleccione “DONE” (HECHO) y pulse el botón “OK” Aparece la lista de
programas.
Repita
Visión
Utilización de la guía de TV
23
Page 91
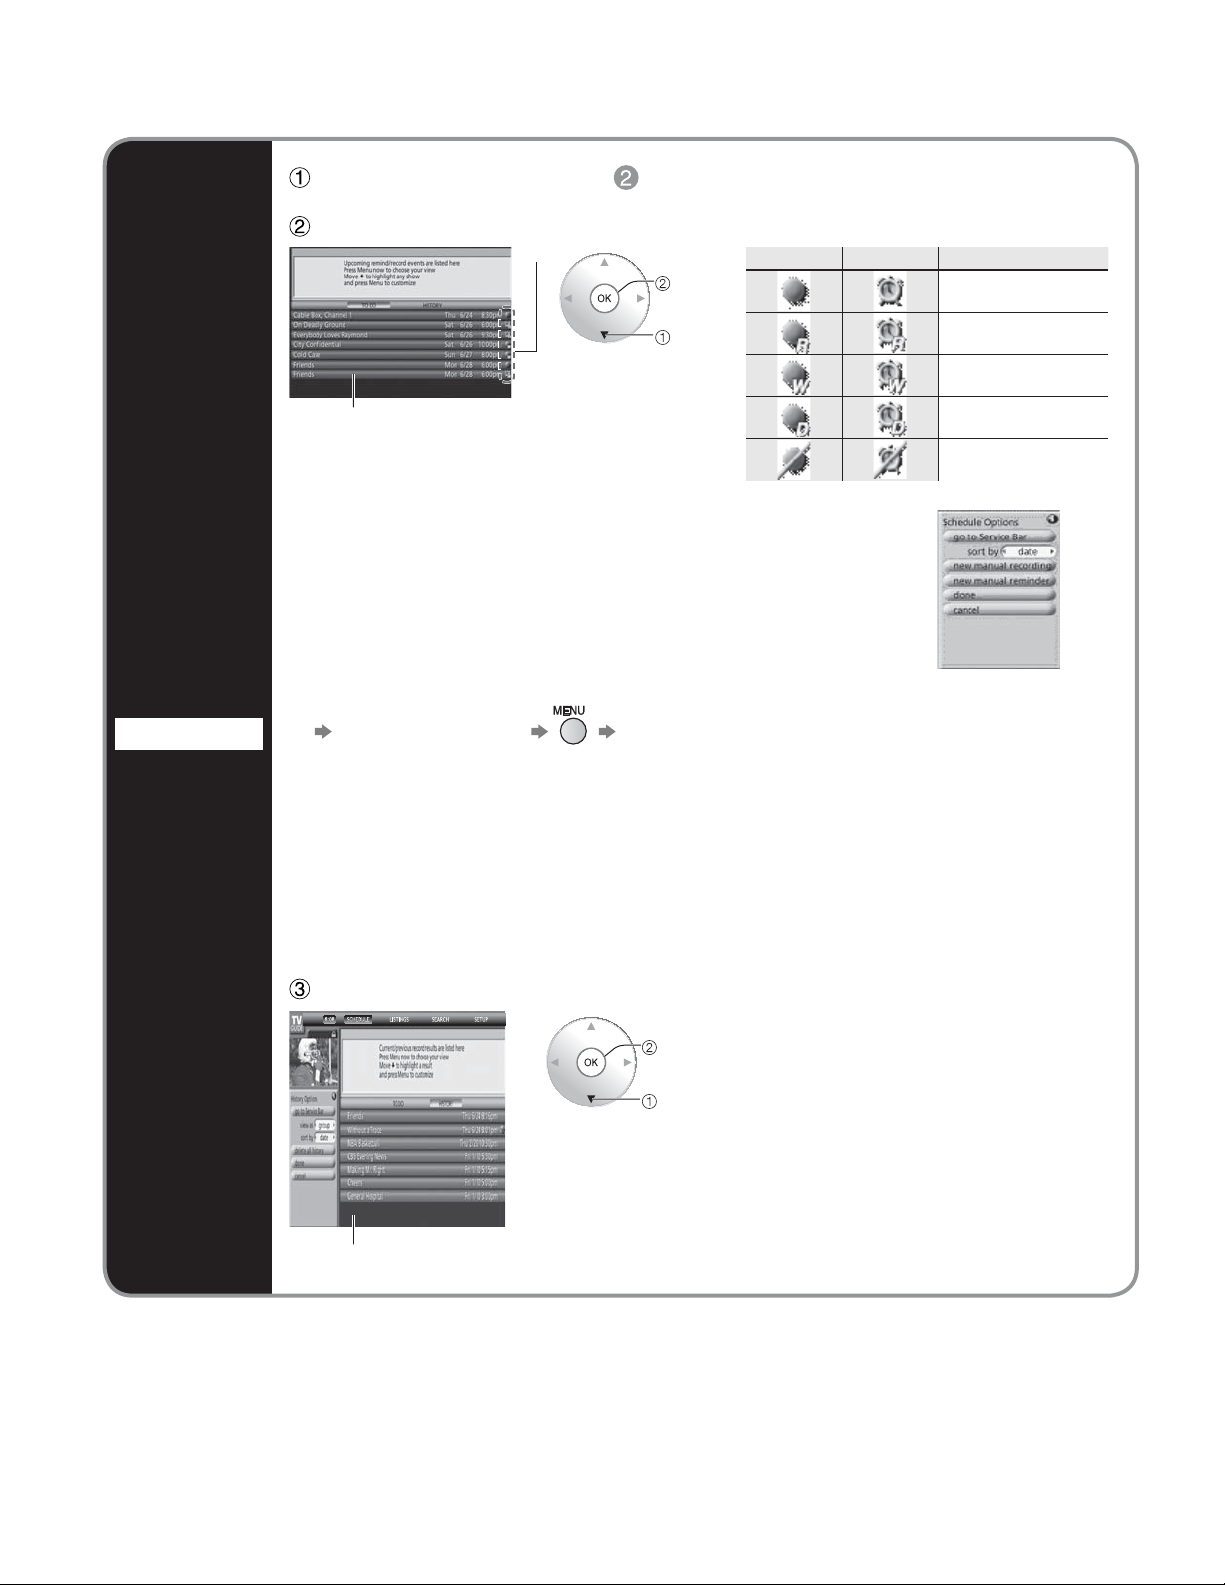
Utilización de la guía de TV
Seleccione “SCHEDULE” en . (pág. 20)
Seleccione “TO DO” (POR HACER).
Icono
ok
Grabación
(Continuación)
Recordatorio
Descripción
Una vez
Desde TO DO, pulse MENU. Aparece el menú Schedule Options.
Puede establecer la clasificación mediante la grabación manual nueva
o el recordatorio manual nuevo.
Comprobación
de reserva
SCHEDULE
Ŷ
Seleccione
Lista
Para editar/eliminar reservas
Seleccione la reserva Seleccione en el menú del panel
delete manual recording:
•
(eliminar grabación manual)
edit manual recording:
•
(editar grabación manual)
delete manual reminder:
•
(eliminar recordatorio manual)
edit manual reminder:
•
(editar recordatorio manual)
Elimina la reserva de la grabación.
Cambia la configuración de la reserva de grabación.
Elimina la reserva de visión.
Cambia la configuración de la reserva de visión.
Regularmente
Semanalmente
Diariamente
Apagado
24
Seleccione “HISTORY”.
Resultado de la grabación
Aceptar
Seleccione
“Aquí se listan los resultados de la
grabación actual/anterior.
Pulse Menu ahora para elegir su vista.
Muévase hacia abajo para resaltar
un resultado y pulse Menu para
personalizar”.
Page 92
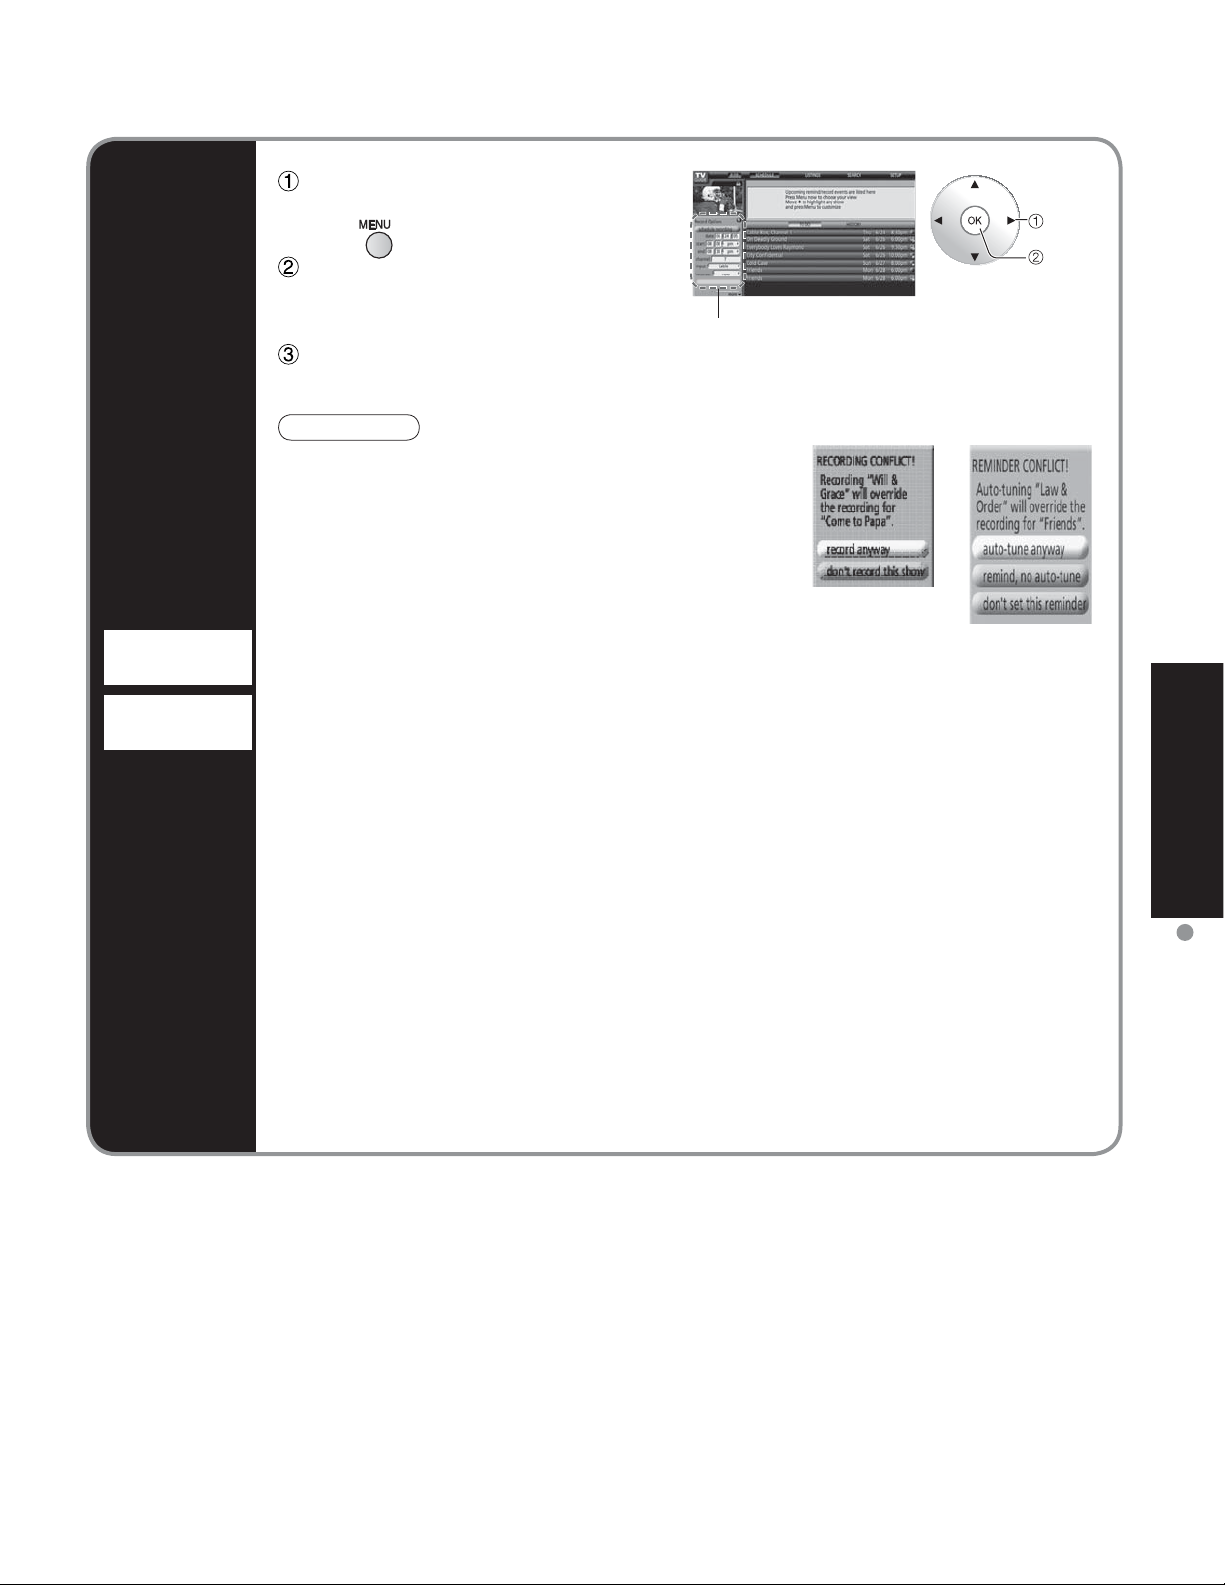
Reserva
con fecha
y hora
Manual
Recording
Manual
Reminder
Seleccione “TO DO” bajo
“SCHEDULE” (vea más arriba) y
pulse
frequency
Seleccione “new manual recording”
o “new manual reminder” y pulse el
botón “OK”.
Ponga la fecha, la hora, el canal y
otros datos y pulse el botón “OK”.
Precaución
Aparece un mensaje de conflicto en los casos
siguientes:
Cuando un programa que usted ha programado para
•
grabar se superpone con alguna parte de otro programa
programado previamente para ser grabado.
Cuando un programa que usted ha programado para
•
grabar se superpone con un recordatorio programado
previamente para ser sintonizado automáticamente.
Cuando un recordatorio y sintonización automática se superponen con
•
otro recordatorio de sintonización automática.
Cuando un recordatorio y sintonización automática se superponen con una grabación
•
programada.
Para solucionar el conflicto tendrá que seleccionar una de las opciones siguientes
(las cuales cambian según el tipo de conflicto):
once
Cancel
Menú del panel
(Ejemplo: Grabación manual)
Seleccione
Establezca
Visión
Record anyway
•
(Grabar de todas formas)
Don’t record this show
•
(No grabar este programa)
Auto-tune anyway
•
(Autosintonizar de todas formas)
Remind, no auto-tune
•
(Recordar sin autosintonizar)
Don’t set this reminder
•
(No establecer este recordatorio)
-
graba el programa especificado y suspende la grabación
del programa existente o el recordatorio de sintonización
automática.
- cancela la grabación del programa especificado.
- sintoniza automáticamente el programa especificado
y suspende el recordatorio de programa existente
programado para la sintonización automática.
- programa el recordatorio de programa especificado
pero cancela la opción de sintonización automática.
- cancela el recordatorio especificado.
Utilización de la guía de TV
25
Page 93
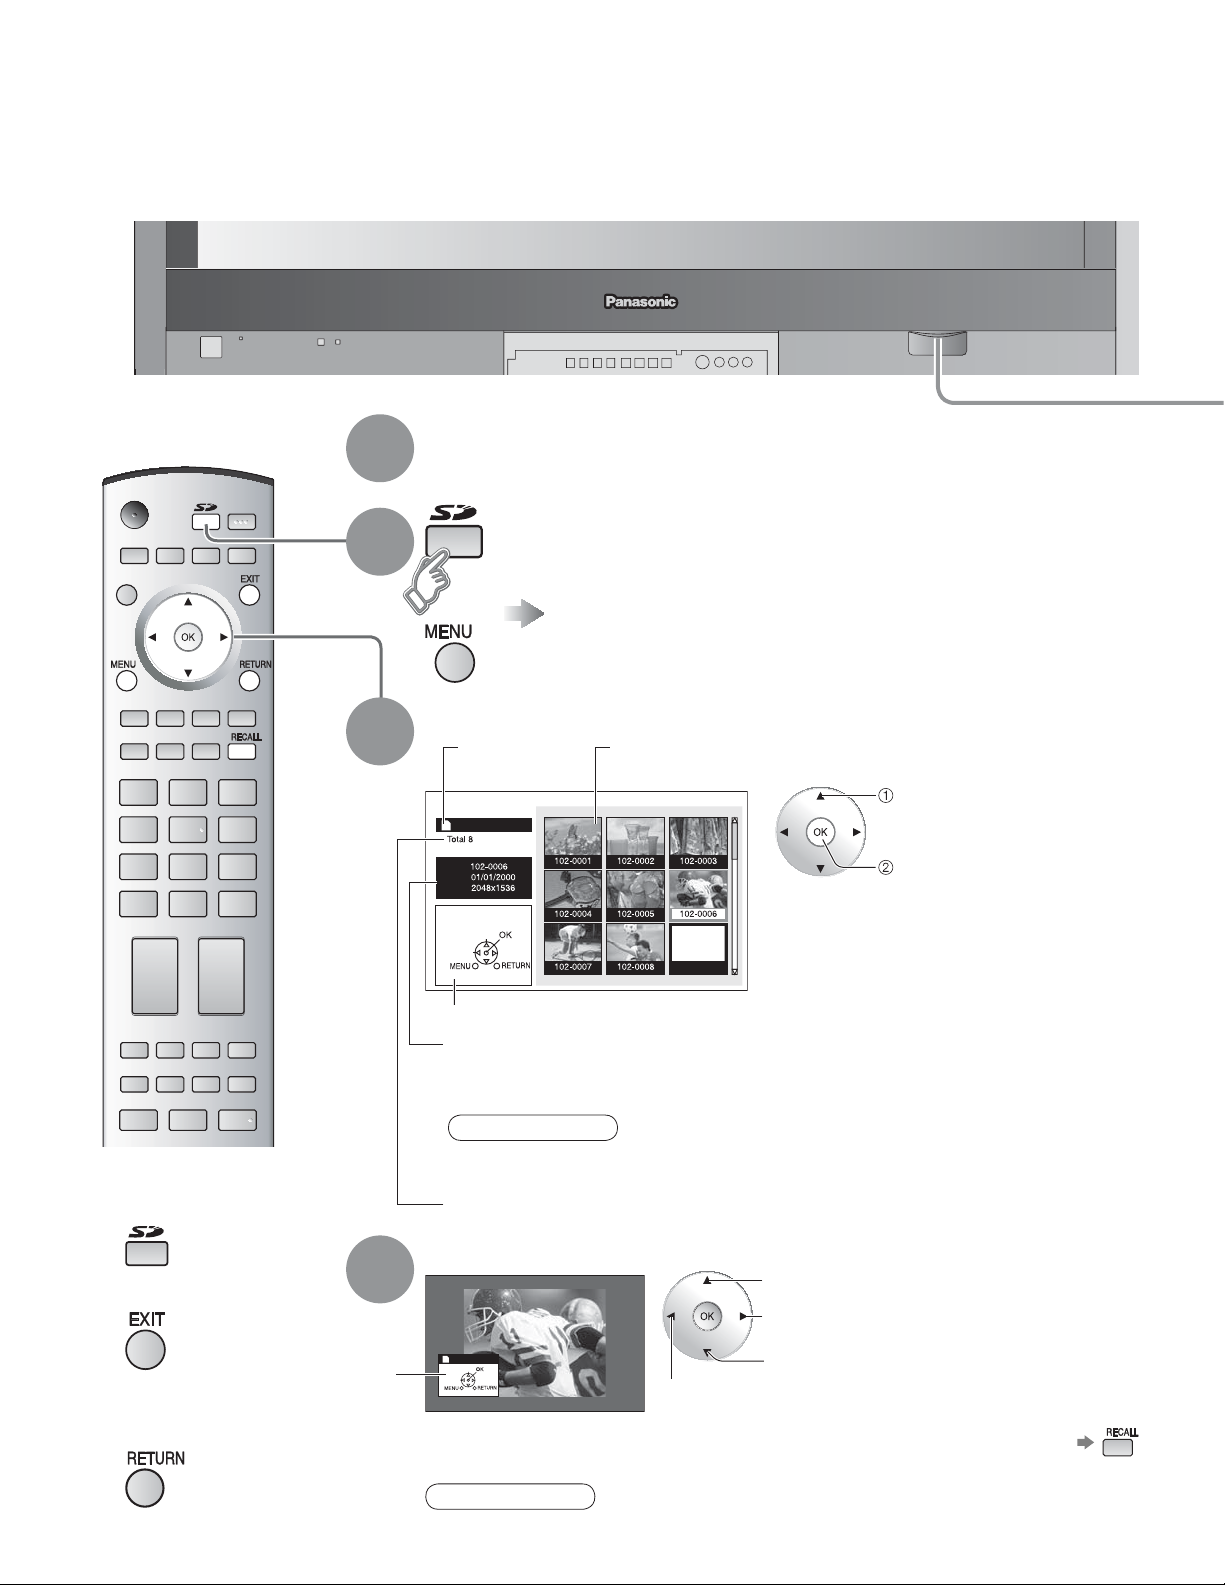
-
Para ver imágenes de tarjeta SD
Puede ver fotos tomadas con una cámara digital ó con una cámara de vídeo digital que estén guardadas
en una tarjeta SD.
(El contenido de otros medios que no sean tarjetas SD puede que no se reproduzca correctamente.)
Inserte la tarjeta SD.
1
Para precauciones y detalles relacionados con las tarjetas SD. (pág. 28 y 53)
•
2
Seleccione el modo SD.
ó
Seleccione “Trjt Memoria” utilizando “TVG/Foto”.
Seleccione los datos que va a ver.
3
Mientras se
leen los datos
Indice de JPEG
Adquiriendo
Información
Num.
Fecha
Pixel
Selección
Selección
Área de navegación
Se visualiza información de la imagen seleccionada.
Num. : Se visualiza el número de la imagen ó el nombre del archivo.
Fecha : Se visualiza la fecha de la grabación.
Pixel : Se visualiza la resolución de la visualización.
Vista de imagen
miniatura
Seleccione
Ver
26
Para volver al
Ŷ
televisor
Para salir
Ŷ
Para volver a la
Ŷ
pantalla anterior
4
Área de
navegación
Nota
Dependiendo del tipo JPEG, puede que el contenido de la información no
•
se visualice correctamente.
Número total de imágenes
Vea la imagen.
A la foto anterior
Gire 90°
(a la derecha)
Selección
Rotación
Visualizado en
diaporama
Nota
El modo SD se puede seleccionar también desde la pantalla MENU.
•
Gire 90° (hacia la izquierda)
Para visualizar/ocultar el área de navegación
•
A la siguiente foto
Page 94
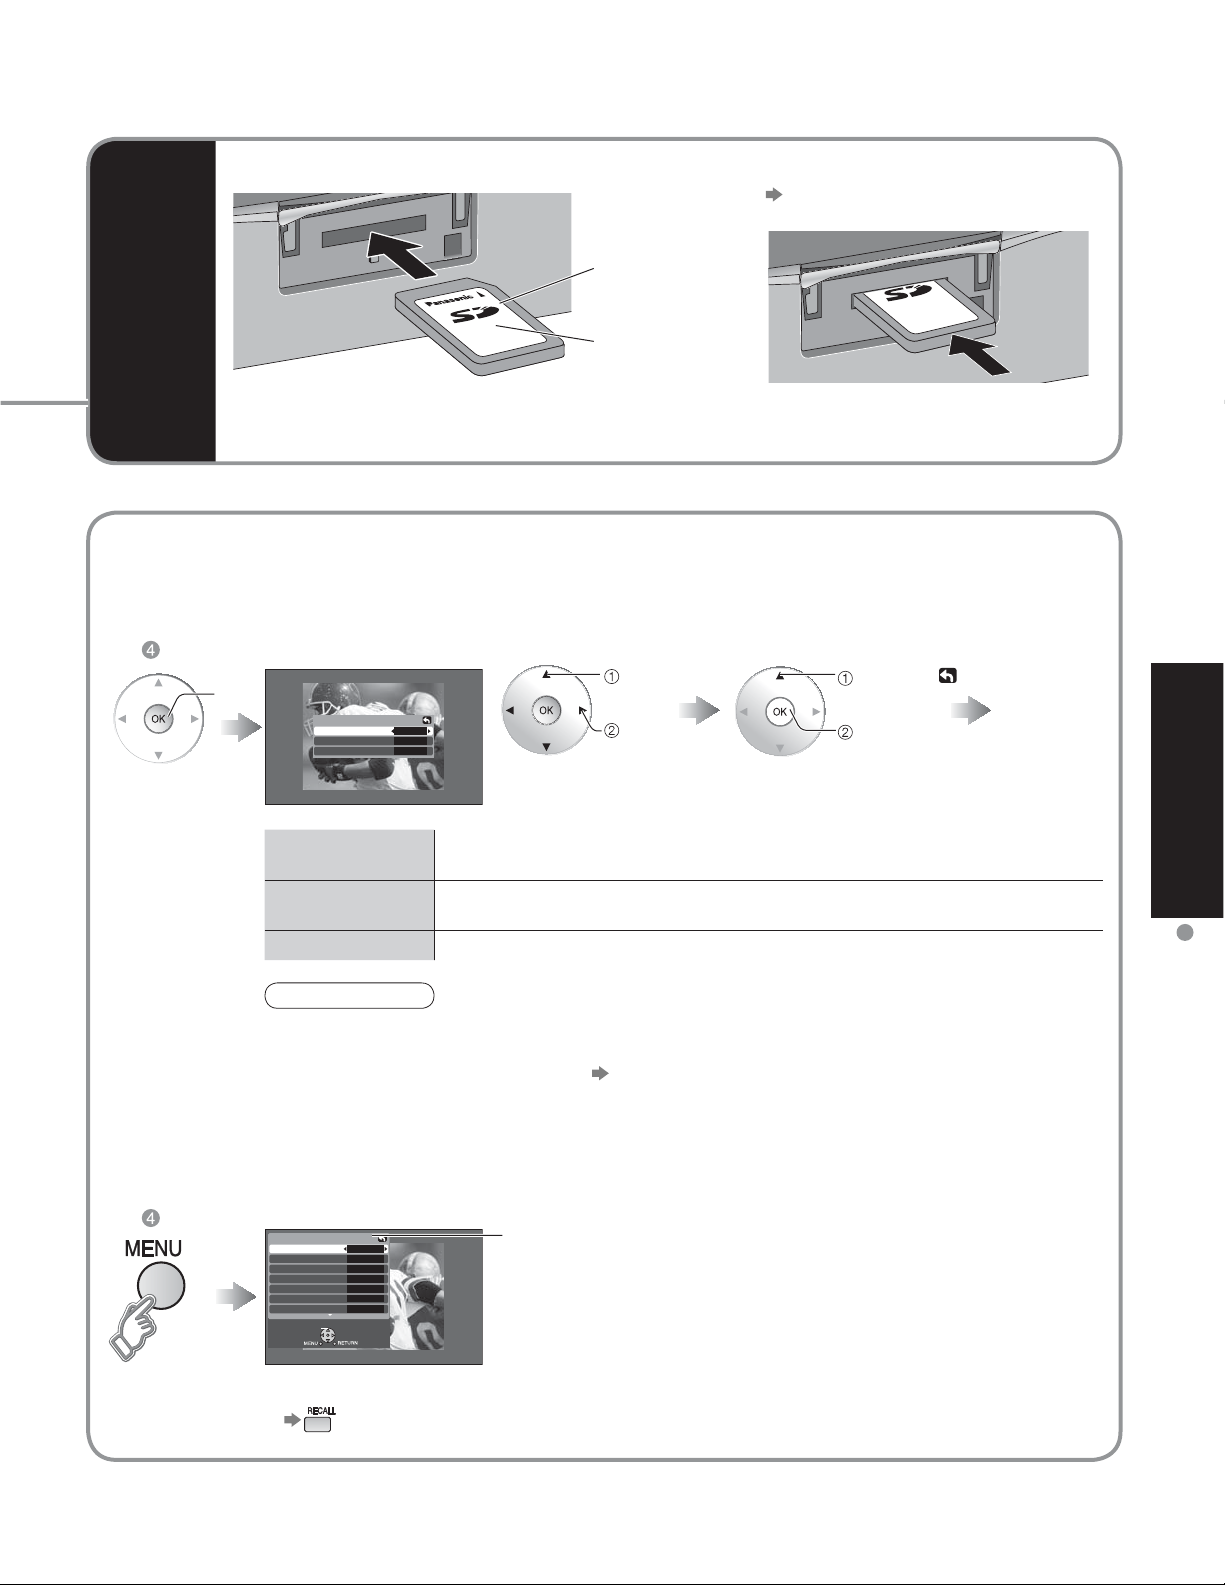
Tarjeta
Inserte la tarjeta.
•
Superficie de
la etiqueta
Retire la tarjeta.
•
Pulse ligeramente sobre la tarjeta
SD y luego suéltela.
SD
Empuje hasta oír
un ruido seco
Tarjetas que pueden utilizarse (capacidad máxima): Tarjeta SD (2 GB), minitarjeta SD (1 GB)
•
(se requiere adaptador para minitarjeta SD)
Para cambiar la vista (modo de reproducción sencilla, ajuste de imágenes, etc.)
Para ver fotos en el modo de reproducción sencilla
Ŷ
Aceptar
Ajuste
Ajuste individual
Modo
Tiempo desp.
Repetir
Modo
Tiempo desp.
Repetir
Individual
1
No
Seleccione
Establecer
Seleccione
Aceptar
Ponga Individual/Diapositiva para ver imágenes individuales ó hacer
diapositivas.
Puede ajustar los segundos que se va a visualizar cada imagen en el
modo de diapositiva.
Sí ó No la función de repetición de diapositiva.
En
Inicie el
diaporama.
Visión
Para ver imágenes de tarjeta SD
Nota
Para las imágenes de tamaño grande, el tiempo de visualización será superior al
•
número de segundos establecido.
Para detenerse en medio del ciclo Pulse el botón “OK”
•
Para ajustar la imagen
Ŷ
Cuando se pulse MENU se visualizará el menú de ajuste de imagen.
En
Imagen 1/2
Normal
Modo
Contraste
Brillo
Color
Tinte
Nitidez
Selección
Para visualizar/ocultar el área de navegación
•
Estándar
Si
+30
0
0
0
+10
Menú Picture
(pág. 32)
27
Page 95
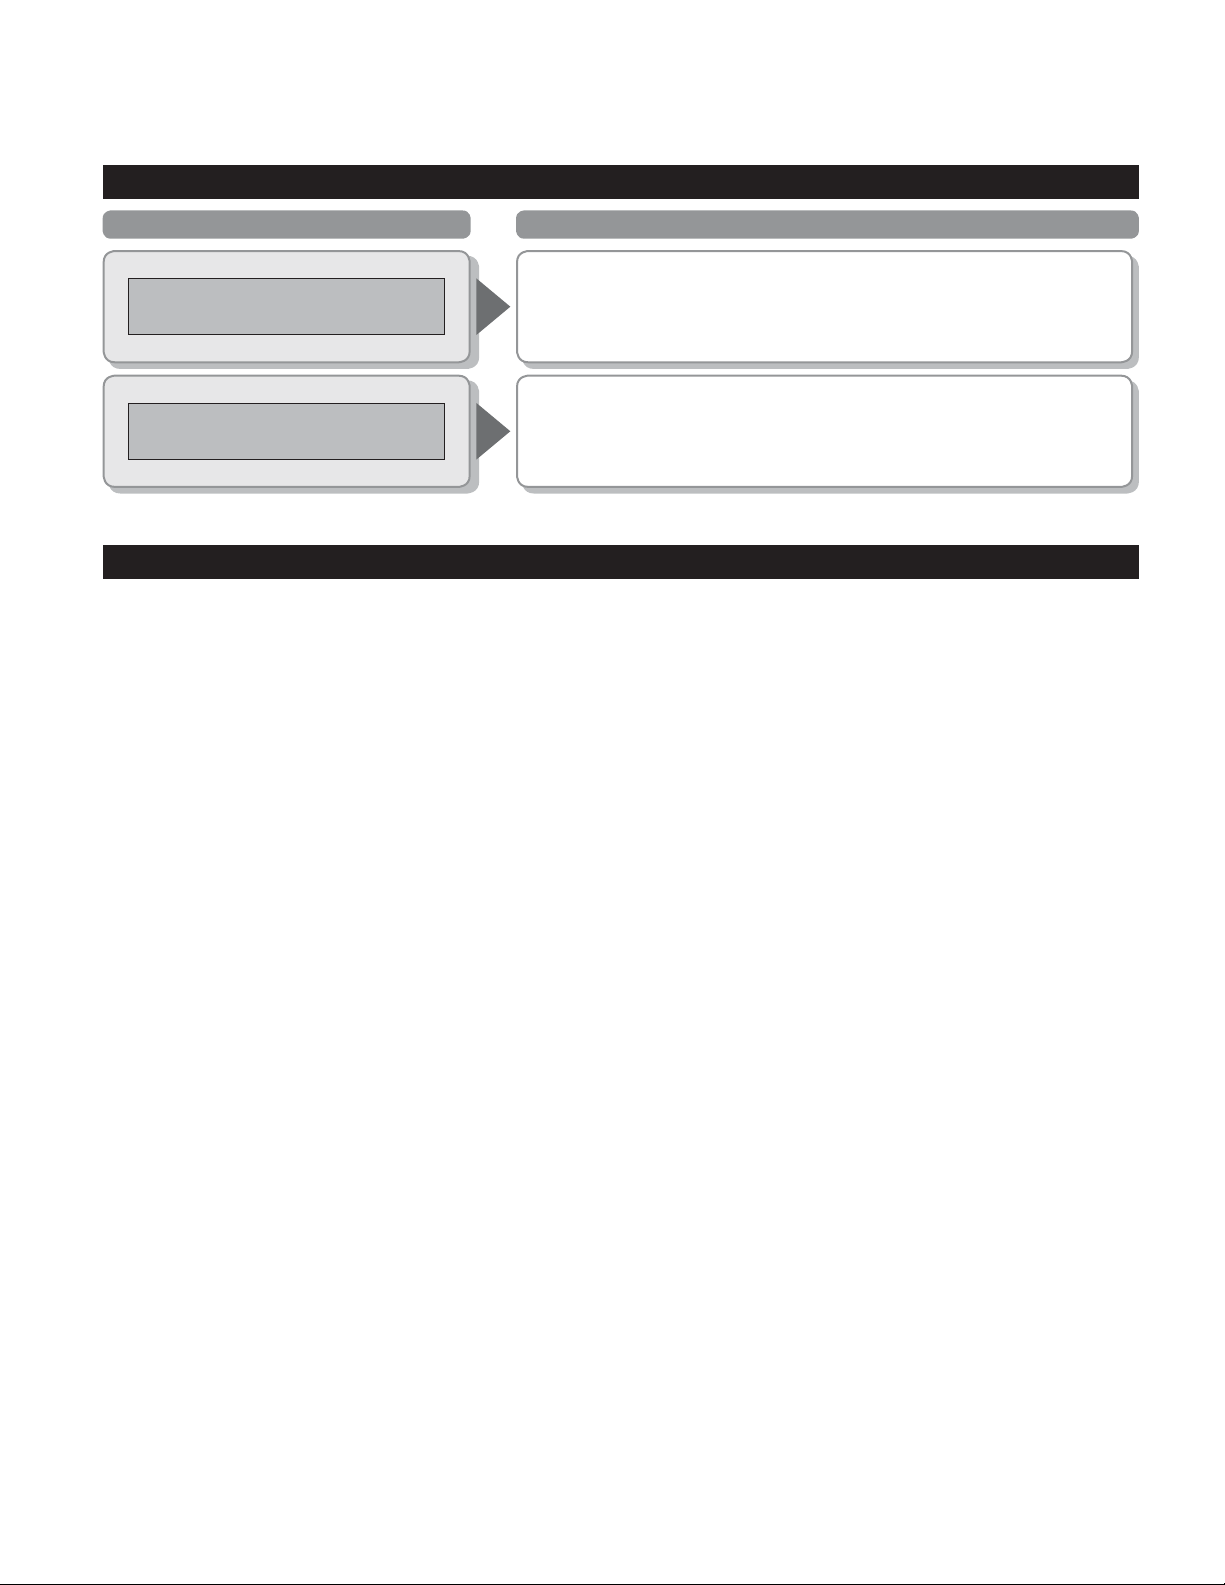
Tarjeta SD: Notas y precauciones
Mensajes de advertencia de tarjeta
Mensaje Significado/Acción
Tarjeta de memoria presente?
No existe archivo
Cuidados al manejar la tarjeta:
No retire la tarjeta mientras la unidad está accediendo a los datos (esto puede dañar la tarjeta ó la unidad).
•
No toque las terminales de la parte posterior de la tarjeta SD.
•
No ejerza sobre la tarjeta una presión fuerte ni la golpee.
•
Inserte la tarjeta en el sentido correcto (de lo contrario, la tarjeta podría dañarse).
•
La interferencia eléctrica, la electricidad estática ó el funcionamiento erróneo pueden dañar los datos ó la tarjeta.
•
Haga una copia de seguridad de los datos grabados a intervalos regulares por si estos se deterioran ó se dañan,
•
ó por si la unidad funciona de forma errática. (Panasonic no acepta ninguna responsabilidad por el deterioro ó
daño que puedan sufrir los datos grabados.)
La tarjeta no está insertada ó esta unidad no es compatible con
•
el formato.
La tarjeta no tiene datos ó este tipo de datos no es compatible.
•
28
Page 96
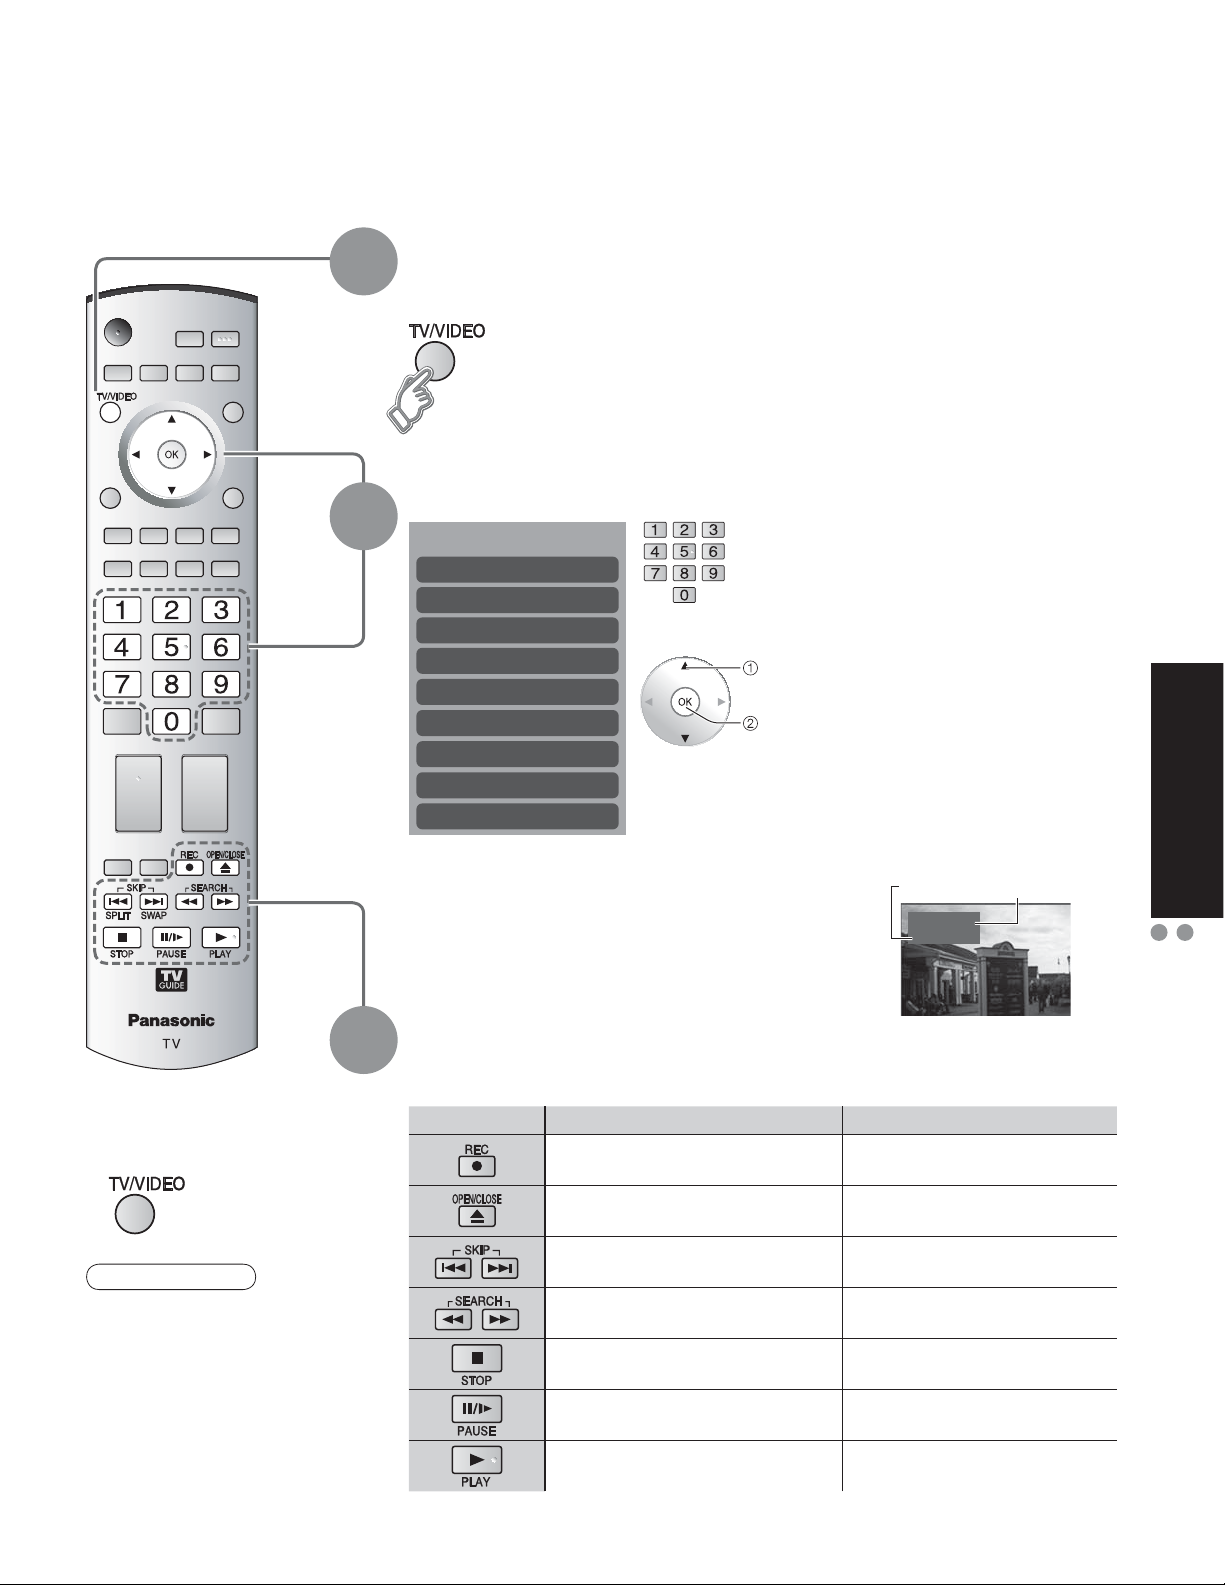
-
Para ver vídeos y DVDs
Algunos dispositivos de Panasonic conectados al televisor pueden ser controlados con el mando a
distancia.
Para controlar los productos de otros fabricantes se necesita programar el mando a distancia. (pág. 45)
Con la videograbadora ó DVD encendido
1
2
Cambie a entrada externa
Pulse para visualizar el menú de selección de entrada.
Seleccione el modo de entrada.
Seleccionar entrada
[1] TV
[2] Componente 1
[3] Componente 2
[4] HDMI 1
[5] HDMI 2
[6] Video 1
[7] Video 2
[8] Video 3
[9] PC
(Pantalla inicial)
La terminal y la etiqueta del dispositivo
•
conectado se indican.
Para cambiar la etiqueta de entrada (pág. 42)
ó
Seleccione
Introducir
Pulse la tecla de número
correspondiente en el mando
a distancia para seleccionar la
entrada de su elección.
Pulse la flecha ascendente/
descendente para seleccionar
la entrada de su elección, y
luego pulse “OK”.
Si, durante la selección, no se
•
realiza ninguna acción durante
varios segundos, se saldrá
del menú de selección de
entrada y la entrada actual se
seleccionará automáticamente.
Etiqueta Terminal
Video 1
VCR
Visión
Para ver vídeos y DVDs
Tarjeta SD: Notas y precauciones
Para volver al
Ŷ
televisor
Nota
Para conocer detalles,
•
vea el manual del
equipo ó pregunte a su
concesionario local.
3
Utilice
la videograbadora ó DVD con el mando a distancia
Videograbadora DVD
Grabación de
videograbadora
-
-
Retroceso/Avance rápido Retroceso/Avance
Parada Parada
Pausa Pausa
Reproducción Reproducción
(Para hacer otras operaciones, vea la pág. 48.)
Grabación
Abertura/Cierre
Salto hacia adelante/atrás
[ejemplo]
(ejemplo)
29
Page 97
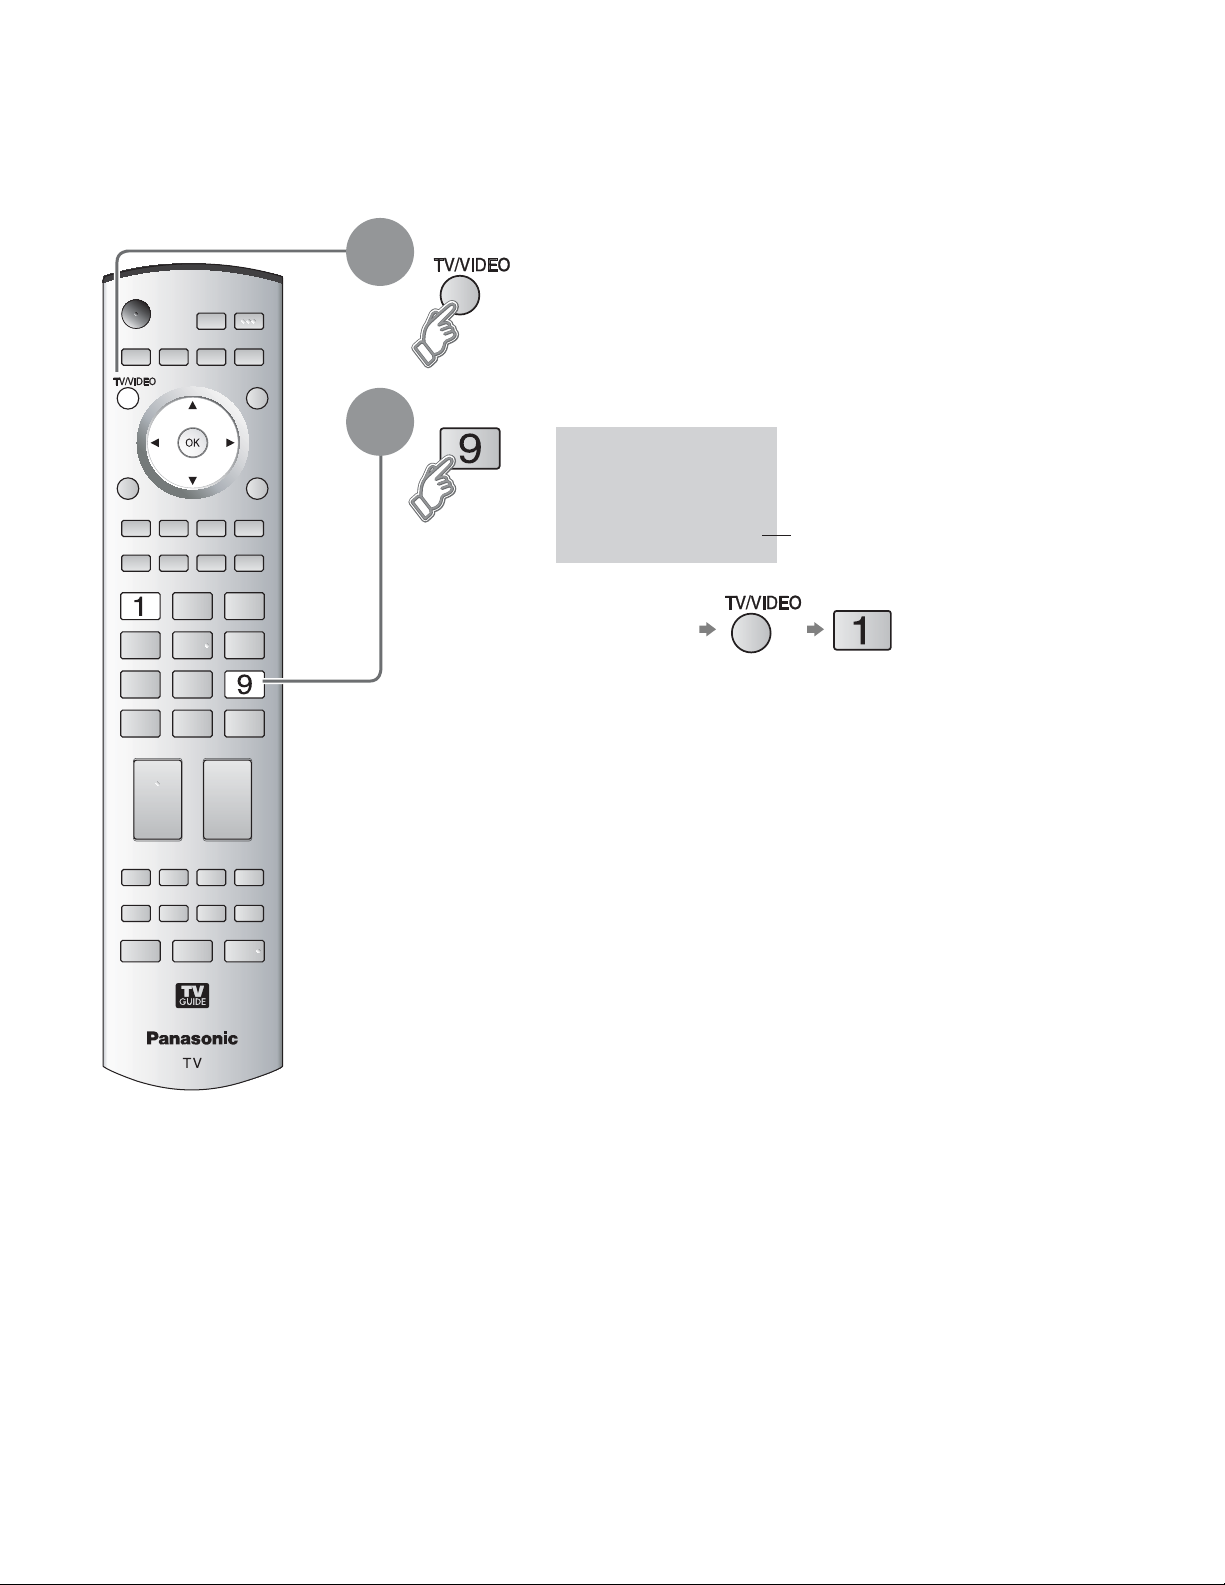
Visualización de la pantalla del PC en el televisor
La pantalla del PC conectado a la unidad se podrá visualizar en el televisor.
También podrá escuchar el sonido del PC con el cable de audio conectado. Para conectar el PC (pág. 46)
Seleccione la entrada externa.
1
Seleccione “PC”.
2
PC
Para volver al televisor
Ŷ
Señales correspondientes
•
(pág. 29)
Visualiza la
pantalla del PC.
30
Page 98
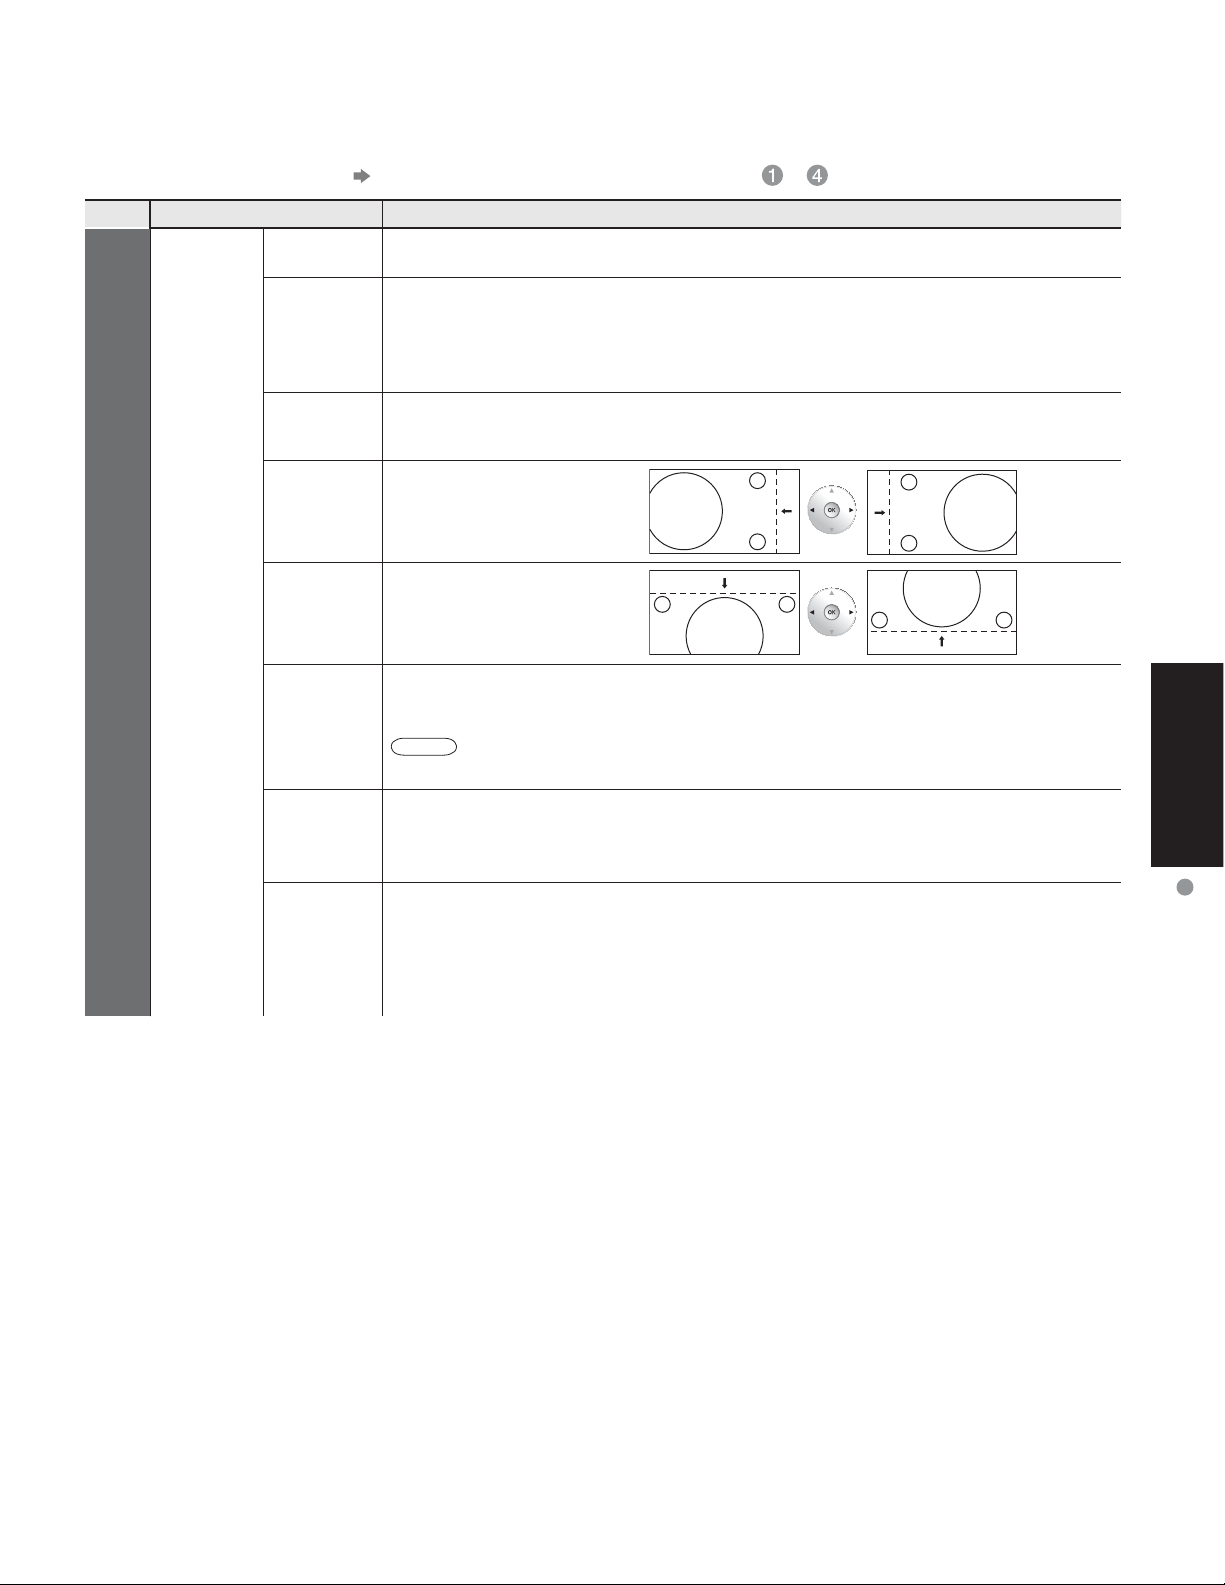
Configuración del menú del PC (cambiado según se desee)
Ŷ
Para hacer configuraciones "Cómo utilizar las funciones de los menús" a (pág. 32)
•
Menú Elemento Ajustes / Configuraciones (alternativas)
Normal Repone el ajuste del PC
Imagen
Ajuste PC
Sincronía
Pto. de Reloj
Pos. Horiz.
Posición Vert
Fase de
Reloj
Resolución
Frecuencia
H/Frecuencia V
H / V
•
En Verde : Utiliza una señal sincronizada en la señal G de vídeo que fue introducida por
•
Alivia el problema si una imagen parece que tiene franjas verticales o parpadea o queda
borrosa parcialmente.
Ajusta la posición horizontal.
Ajusta la posición vertical.
Alivia el problema si toda la imagen parece que parpadea o está borrosa.
Ajuste primero el reloj de puntos para obtener una imagen tan buena como sea posible, y
luego ajuste la fase de reloj para que aparezca una imagen clara.
Nota
Cambia a visualización panorámica.
Señal de entrada cambiada de VGA a WVGA
•
Señal de entrada cambiada de XGA a WXGA
•
(Visualiza las frecuencias de la señal de PC que está siendo ajustada.)
Visualiza las frecuencias H (horizontal)/V (vertical).
Gama de visualizaciones
•
Horizontal 15 - 110 kHz
Vertical 48 - 120 Hz
: Las señales de sincronización horizontal y vertical se introducen desde el
conector HD/VD.
el conector G.
Tal vez no sea posible visualizar una imagen clara debido a que las señales de
entrada no son buenas.
Visión
Visualización de la pantalla del PC en el televisor
Menú de audio (pág. 32)
•
Para la entrada de PC sólo se puede dar salida a señales de audio desde los terminales PROG. OUT.
•
31
Page 99
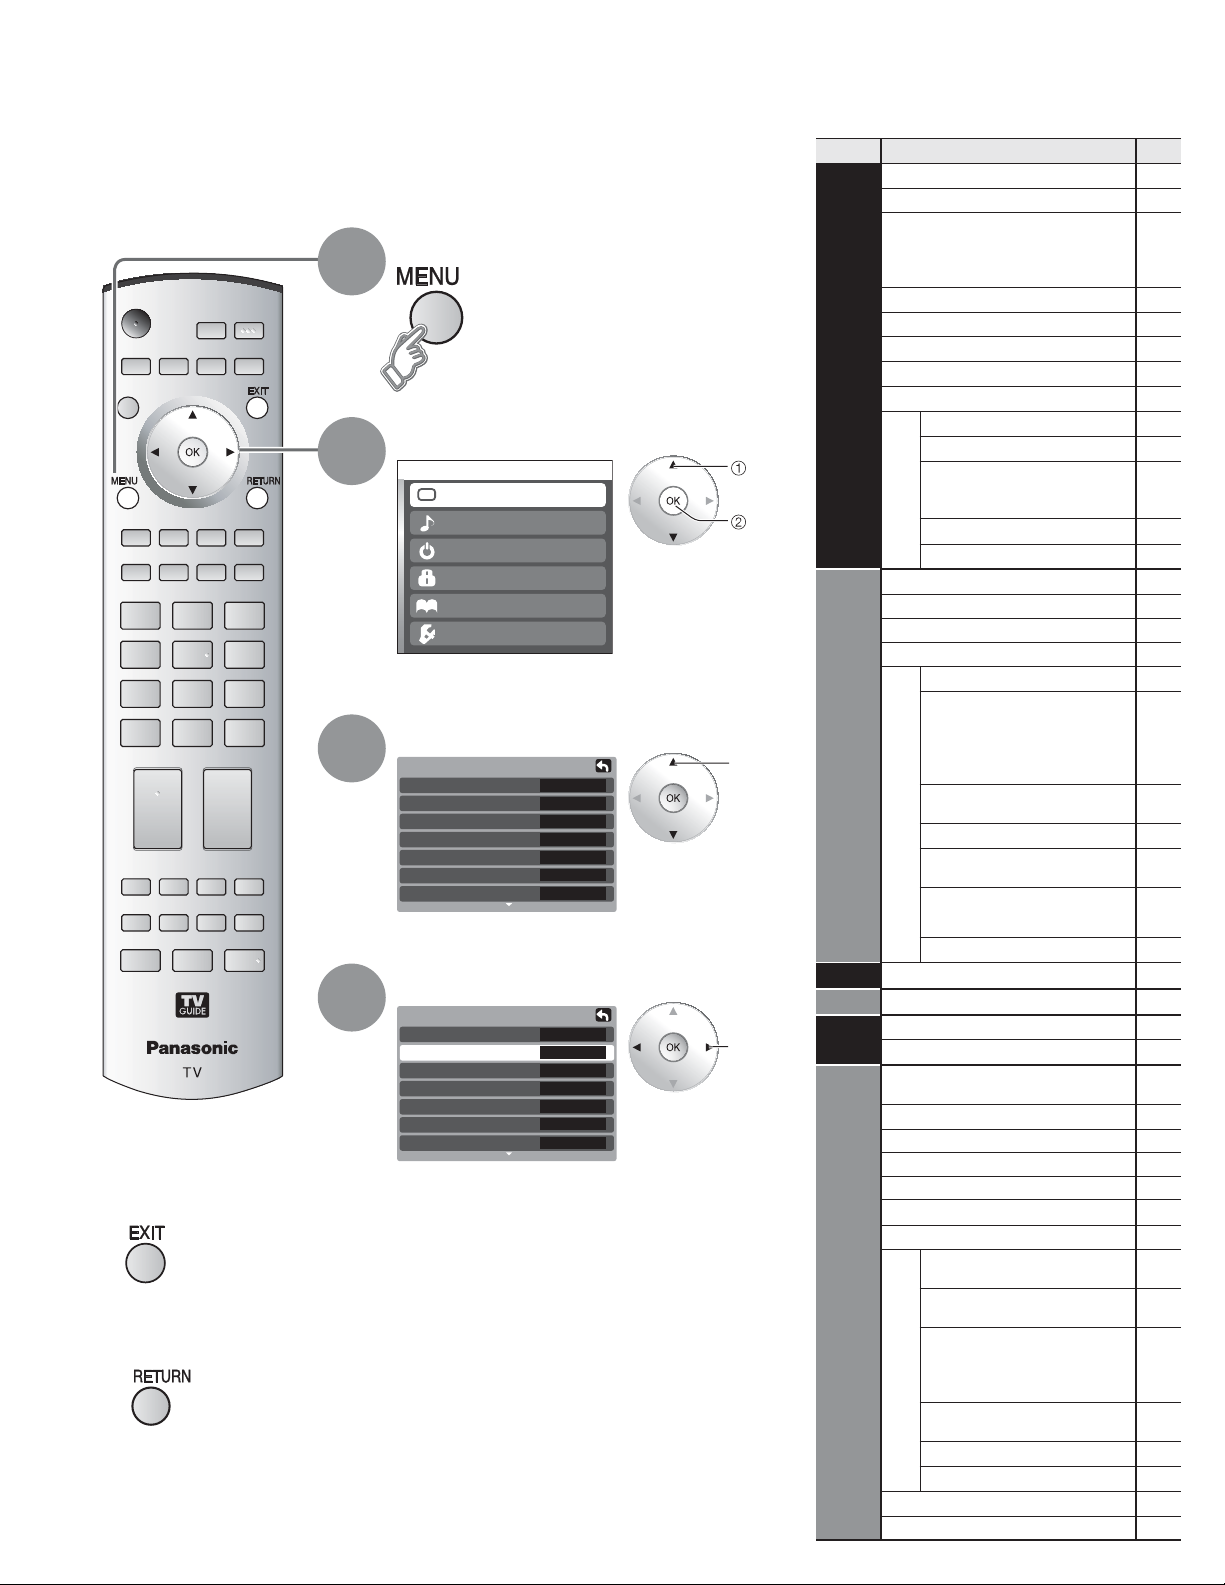
Cómo utilizar las funciones de los menús
Lista de menús
Ŷ
Varios menús le permiten seleccionar configuraciones para la imagen,
el sonido y otras funciones, para que usted pueda disfrutar viendo la
televisión como usted desee.
Menú Elemento
Normal
Modo
Para volver al
Ŷ
televisor
Para volver a la
Ŷ
pantalla anterior
1
2
3
4
Visualice el menú
Visualiza las funciones que pueden
•
establecerse (cambia según la
señal de entrada).
Seleccione el menú
Menú
Imagen
Audio
Cronόmetro
Bloqueo
TVG/Foto
Ajuste
Seleccione el elemento
Imagen 1/2
Normal
Modo
Contraste
Brillo
Color
Tinte
Nitidez
(Ejemplo: Menú Imagen)
Si
Estándar
+30
0
0
0
+10
Ajuste ó seleccione
Imagen 1/2
Normal
Modo
Contraste
Brillo
Color
Tinte
Nitidez
(Ejemplo: Menú Imagen)
Estándar
Standard
+30
+10
Si
0
0
0
Seleccione
Siguiente
Seleccione
Ajuste ó
Seleccione
Contraste, Brillo,
Color, Tinte,Nitidez
Temp color
Imagen
Admi. colores
S.S.A.C
Ajuste acerc.
Ajuste PC
Otros ajustes
Reduc de ruido
3D Y/C filtro
Matriz color
MPEG NR
Nivel obscuro
Normal
Bajos
Altos
Balance
Sonido IA
Audio
Cronómetro
BBE VIVA 3D
Otros ajustes
BBE
Envolvente
Altavoces
Ent. HDMI1
Ent. HDMI2
Norm. de audio
Apagado, Cronómetro1-5
Bloqueo
TVG/
Foto
Trjt Memoria
TV Guide
Búsqueda
Idioma
Reloj
Programa canal
Títulos de entradas
CC
Luz tarj SD
Ajuste
Autoencendido
Otros ajustes
Barra lateral
Para prog-out
.
32
Ctrl con HDMI
Apaga control
Prende control
Acerca de
Restaurar
Page 100
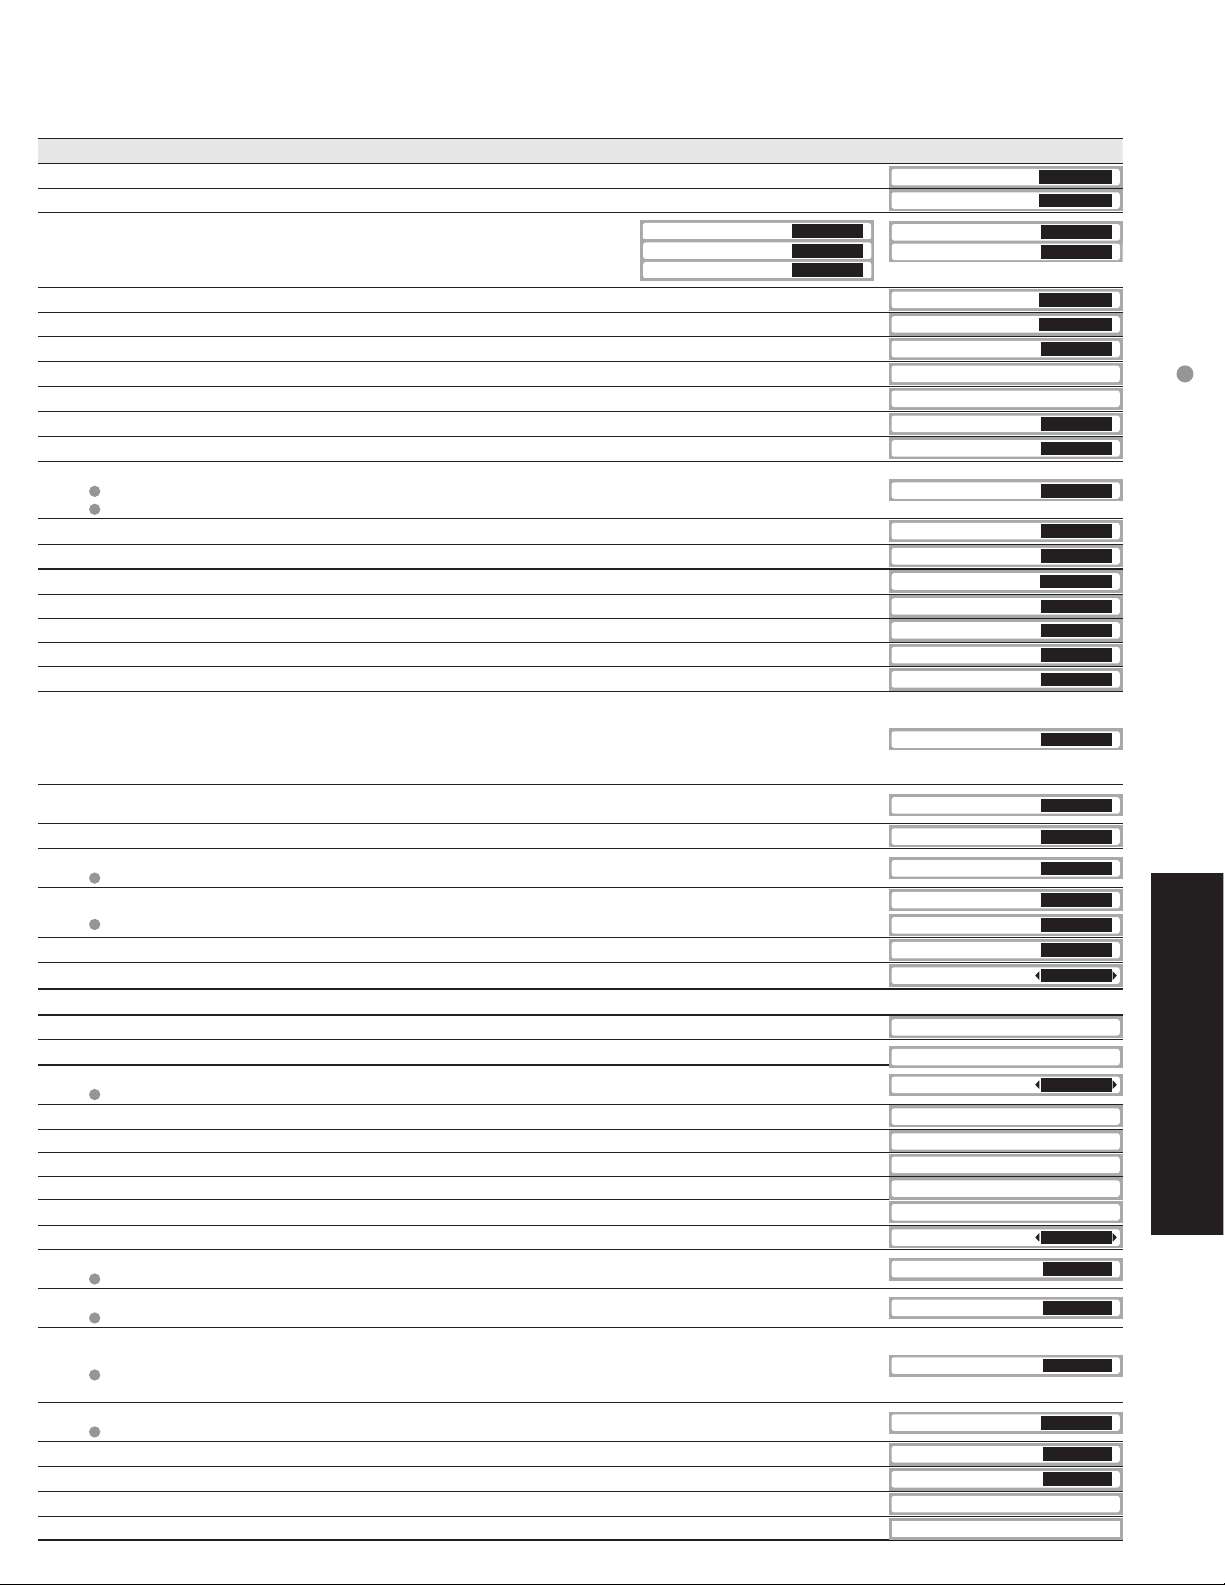
En el modo AV, el menú Audio y el menú Ajuste ofrecen un número menor de opciones.
•
Ajustes / Configuraciones (alternativas)
Restablece la configuración del menú de imagen (excepto para “Otros ajustes”).
Modo de imagen básico (Vívido/Estándar/Cinema) (pág. 55)
Ajusta el color, el brillo, etc. para que cada modo de imagen se
ajuste a sus gustos.
Selecciona el nivel de los colores cálidos (rojo) y de los colores fríos (azul). (Rojo/Azul/Normal)
Admi. colores realza la reproducción de los colores verde y azul, especialmente las escenas exteriores. (Sí/No)
Ajusta el brillo y la gradación en consecuencia para poder optimizar el contraste. (Sí/No)
Ajusta la alineación vertical y el tamaño cuando el ajuste del aspecto es “ACERC” (pág. 52)
Establece la pantalla del PC (pàg. 30)
Reduce el ruido en el canal, comúnmente llamado efecto de nieve. Permanece en No cuando se recibe una señal intensa. (Sí/No)
Minimiza el ruido y la diafotía cromática de la imagen. (Sí/No)
Selecciona la resolución de la imagen de los dispositivos conectados a componentes. (SD/HD)
SD: Visión normal HD: Visión de alta definición
Sólo se acepta la señal 480p, la televisión convencional (NTSC) no se está disponible.
Reduce el ruido de las señales digitales específicas de DVD, STB, etc. (Sí/No)
Seleccione Obscuro ó Claro. Sólo es válido para las señales de entrada externas. (Obscuro/Claro)
Repone los ajustes de Bajos, Altos y Balance los ajustes predeterminados en la fábrica.
Aumenta ó disminuye la respuesta de los graves.
Aumenta ó disminuye la respuesta de los agudos.
Realza el volúmen de los altavoces izquierdo / derecho.
Iguale los niveles del sonido en todos los canales y entradas VIDEO. (Sí/No)
BBE ViVA HD3D (High Definition 3D) Sound proporciona una imagen tridimensional natural de música
precisa con sonido de alta fidelidad. BBE mejora la claridad del sonido, mientras que la anchura, la
profundidad y la altura de la imagen de sonido son expandidas mediante el proceso de sonido tridimensional
exclusivo de BBE. BBE ViVA HD3D Sound es compatible con todos los programas de TV, incluyendo los de
noticias, música, dramas, películas y deportes, y también juegos electrónicos.
El sonido de alta definición BBE restablece la claridad y la presencia para entender mejor las
palabras habladas y dar más realismo a la música. (Sí/No)
Mejora la respuesta de audio cuando se escucha sonido estéreo. (Sí/No)
Cambia a “No” cuando se utilizan altavoces externos. (Sí/No)
“Sonido IA”, “Envolvente” y “Norm. de audio” no funcionan si se selecciona “No”.
Selecciona según la señal cuando está conectado HDMI. (Auto/Digital/Análogo)
Auto: Selecciona automáticamente la señal analógica/digital.
Minimiza la diferencia de volúmen después de cambiar a entradas externas.
Enciende/Apaga automáticamente el televisor (pág. 44)
Bloquea canales y programas. (pág. 38)
Visualiza datos de tarjetas SD. (pág. 26)
Introduce la guía de TV.
Selecciona el canal con el botón “Program up/down”. (Fav./Todos)
Fav.: Sólo cuando se registran canales como FAVORITE (pág. 19).
Selecciona el idioma para los menús de la pantalla. (pág. 13)
Ajusta el reloj (pág. 13)
Establece los canales (pág. 40)
Seleccione la terminal y la etiqueta del equipo externo. (pág. 42).
Visualiza subtítulos (pág. 42).
Póngalo en “Sí” si se enciende el LED de la tarjeta SD mientras ésta se inserta. (Sí/No)
Enciende automáticamente el televisor cuando se enciende el receptor de televisión por cable ó un dispositivo conectado. (Sí/No)
El cronómetro de apagado y el temporizador de encendido / apagado no funcionará si se establece “ Autoencendido”.
Aumenta el brillo de la barra lateral. (No/Bajo/Medio/Alto) (modo 4:3 solamente)
El ajuste recomendado es alto para impedir la “imagen remanente”. (pág.55)
Para impedir el aullido y la oscilación de la imagen, detenga la salida de la imagen y el sonido especificados
en este menú
(pág. 47).(No/Comp.1/Comp.2/HDMI 1/HDMI 2/Video 1/Video 2/Video 3)
Cuando grabe con una videograbadora utilizando la guía de TV, establezca la configuración
“Prog-out-stop” para el terminal conectado a la videograbadora.
Controla los equipos conectados a los terminales HDMI (pág. 34). (Sí/No)
“Apaga control” y “Prende control” no funcionan si se selecciona “No”.
Establece “Apaga control” de los equipos de conexión HDMI (pág. 34). (Fijar/No)
Establece “Prende control” de los equipos de conexión HDMI (pág. 34). (Fijar/No)
Visualiza versiones de TV, licencia de software e información de CableCARD™.
Al realizar la reposición se cancelarán todos los elementos establecidos con Ajuste como, por ejemplo, los ajustes de canales. (pág. 40)
Contraste
Brillo
Color
(Sí/No)
+30
Tinte
0
Nitidez
0
S.S.A.C. No
Ajuste acerc.
Ajuste PC
Reduc de ruido No
3D Y/C filtro No
Matriz color SD
MPEG NR No
Nivel obscuro Obscuro
BBE VIVA 3D Sí
BBE Sí
Trjt Memoria
TV Guide
Búsqueda
Idioma
Reloj
Programa canal
Títulos de entradas
CC
Luz tarj SD
Autoencendido
Barra lateral
Para prog-out
Apaga control
Prende control
Acerca de
Restaurar
EstándarModo
Tod os
60Apagado
Alto
+10
AzulTemp color
AutoEnt. HDMI1
AutoEnt. HDMI2
Sí
Fijar
Fijar
NoNormal
0
NoAdmi. colores
Cómo utilizar las funciones de los menús
(imagen, sonido, calidad, etc.)
SíNormal
+ 7Bajos
+ 7Altos
0Balance
SíSonido IA
NoEnvolvente
Si Altavoces
Funciones avanzadas
0Norm. de audio
No
No
SíCtrl con HDMI
33
 Loading...