

Page 1

■
ivi; ■; ■;. ^:■:i
Operating Instructions
TV/VCR Combination
. I
■ i
ii
|i
Si'.'' \.' '■■■■-.;■"¡'rv.\:,: ■ s
i
I
i-
■ i
iii ■
■'■■V
vsq|i; ■
■ i ■ ■■
■ if
ifi ' ■ ■
i- ■
if ■
i
ffi
i'-i
fiW
■ v::; ■
iffNi-.'-iiS"! 'iTSiS-
■ ■ ■ s;:
iV -
. II
■ ■ if
if
fi^
^ 1
1
i.
if
. fl
y -
m
?:s-
t':
i-
w';
i'
i:-'
■si
ft
iit
I
. i
', "T’ ," ^
\
t?
1
iitv-
:
■
f i
i
if •
1
■ ■
.
■ ■ . ft
• r'
1 ■
■ iS: ■
. ;;s| - ■
' ;'■■
■'.M i■ ■■.■■.
t
a
1
. ■ ■ ii
■■■‘■' i. ■"■ V' C;' I
■ It
■ f
I
||
■ S
I
■;'i ■ : ■t'yy:
, ;;■•'. ’ I - --T r ’I -,
■ VK'!
i|
i
. i
%
U ■
.
iii
if
J!
1
if
ii
-if ■‘iS-fiSJi'isisvrs: iSftt 'my<"y:o
c; - ;;,j iff
^ i
if
fi
li
I
№
SS
■ I
I
fi:
S'ii'SVSiS-.'ii'Sii-S'S'-ii:-
wym:M
B
if
iS;
ii;
iff
fi
i
ft
Please read these instructions
before operating this set and
retain them for future reference.
TQB620896-2
Page 2

Page 3

Dear Panasonic Customer
Welcome to the Panasonic family of Customers.
We hope that you will have many years of enjoyment from your new
TV/VCR Combination.
To obtain the maximum from your new set, read these Instructions
before making for any adjustments and retain them for future reference.
Retain your purchase receipt also, and note down the Serial Number of
your set in the space provided on the rear cover of these Instructions.
HQ (High Quality) Picture System
Video recorders carrying the HQ symbol mark feature the VHS High Quality Picture System. This system
assures complete compatibility with VCRs that use the conventional VHS system.
Copyright
You may use pre-recorded TV broadcasts and musical programmes for your personal entertainment only.
However, you are not permitted to utilize them for any other purpose without the consent of the copyright
holder.
Page 4

Connect the Aeriai Cable to the RF In Terminal
Connect the Plug to the wall outlet
How to turn the Power On
First Switch on from NEW
Battery Installation
Battery precautions...................................................................................................................................................8
...............................................................................................................................................
...
........................................................................................................................... 7
....
.................................................................................................................
..................................................................................................................................7
...................................................................................................
6
7
8
Front Control Panel ..............................................................................................................................................
How to open the Control Panel Cover.................................................................................................................
How to insert or eject a video cassette
Remote Control.......................................................................................................................................................12
Buttons located under the Remote Control’s door
Controls and Terminals on the TV........................................................................................................................
How to connect; the Video and Audio Input Terminals
the Monitor Out Terminals
Reproducing a tape: using another VCR and recording to this VCR
using this VCR and recording to another VCR
Connecting microphones
Country System Selection...................................................................................................................................
Automatic Search...................................................................................................................................................
Manual Search ....................................................................................................................................................
Fine Tuning
How to Cancel the Fine Tuning Function
Programme Number Skip
How to Cancel the Skip Function..........................................................................................................................
....................................................................................................................................................
......................................................................................................................................
......................................................................................................................................30
...............................................................................................................11
..........................................................................................
......................................................................................18
.....................................................................................................19
...............................................................
.............................................................. 20
.............................................................................................................29
10
10
14
16
20
21
......
22
24
26
28
31
How to switch ON or OFF from STAND-BY mode
Programme Number Selection
Direct Programme Number Selection.................................................................................................................. 32
Two Digit Programme Number Selection
Channel Select
Volume .................................................................................................................................................................34
TV/AV Selection
Normal
Mute
Recall.....................................................................................................................................................................
Off Timer
Sound System Selection
Colour System Selection.......................................................................................................................................39
..........................................................................................................................
.........................................................................................................................................................................
......................................................................................................................................................
....................................................................................................................................................34
................................................................................................................................................................
............................................................................................................................
............................................................................................................
.......................................................................................................................................38
..............................................................................................32
32
32
34
........................................
34
36
36
36
Page 5

Picture Menu Selection
Feature Menu (Picture)
Feature Menu (VCFVGAME, NOISE TIMER and BLUE BACK)
Feature Menu (P.NR)
.........................................................................................................................................
...
.......................................................................................................................................
...
...................................................................................................................................... 46
.....
....................................................................
40
42
44
Play ........................................................................................................................................................................
Stop/Eject
FF (Fast Forward)
Rew (Rewind)/Review
Pause/Stil! ........................................................................
Rec (Record)
Repeat................................................................................................................................................................. 52
F. ADV (Frame Advance)
Monitor ................................................................................................................................................................ 52
Slow
Tracking
SP/LP (Standard Play/Long Play)
Using the tape position Counter............................................................................................................................ 54
Skip Search ...................................................................................................................................................... 55
Blank Search..........................................................................................................................................................55
Time Search
Auto Index Search............................................................................................................................................... 57
Auto Intro Search
index Search
Intro Search
............................................................................................................................................................. 50
....................................................................................................................................................
...........................................................................................................................................
........
.............................................................................51
..........................................................................................................................................................51
.......................................................................................................................................52
................................................................................................................................................................... 53
.................................................................................................................................................................
......................................................................................................................... 53
........................................................................................................................................................ 56
.................................................................................................................................................57
...........................................................................................................................................................
..........................................................................................................................................................
50
50
51
53
58
58
Preparation...................................................................
ECHO Level
MIC Level
..............................................................................................................................................................
................................................................................................................................................................71
..........................................................................................
70
71
Page 6
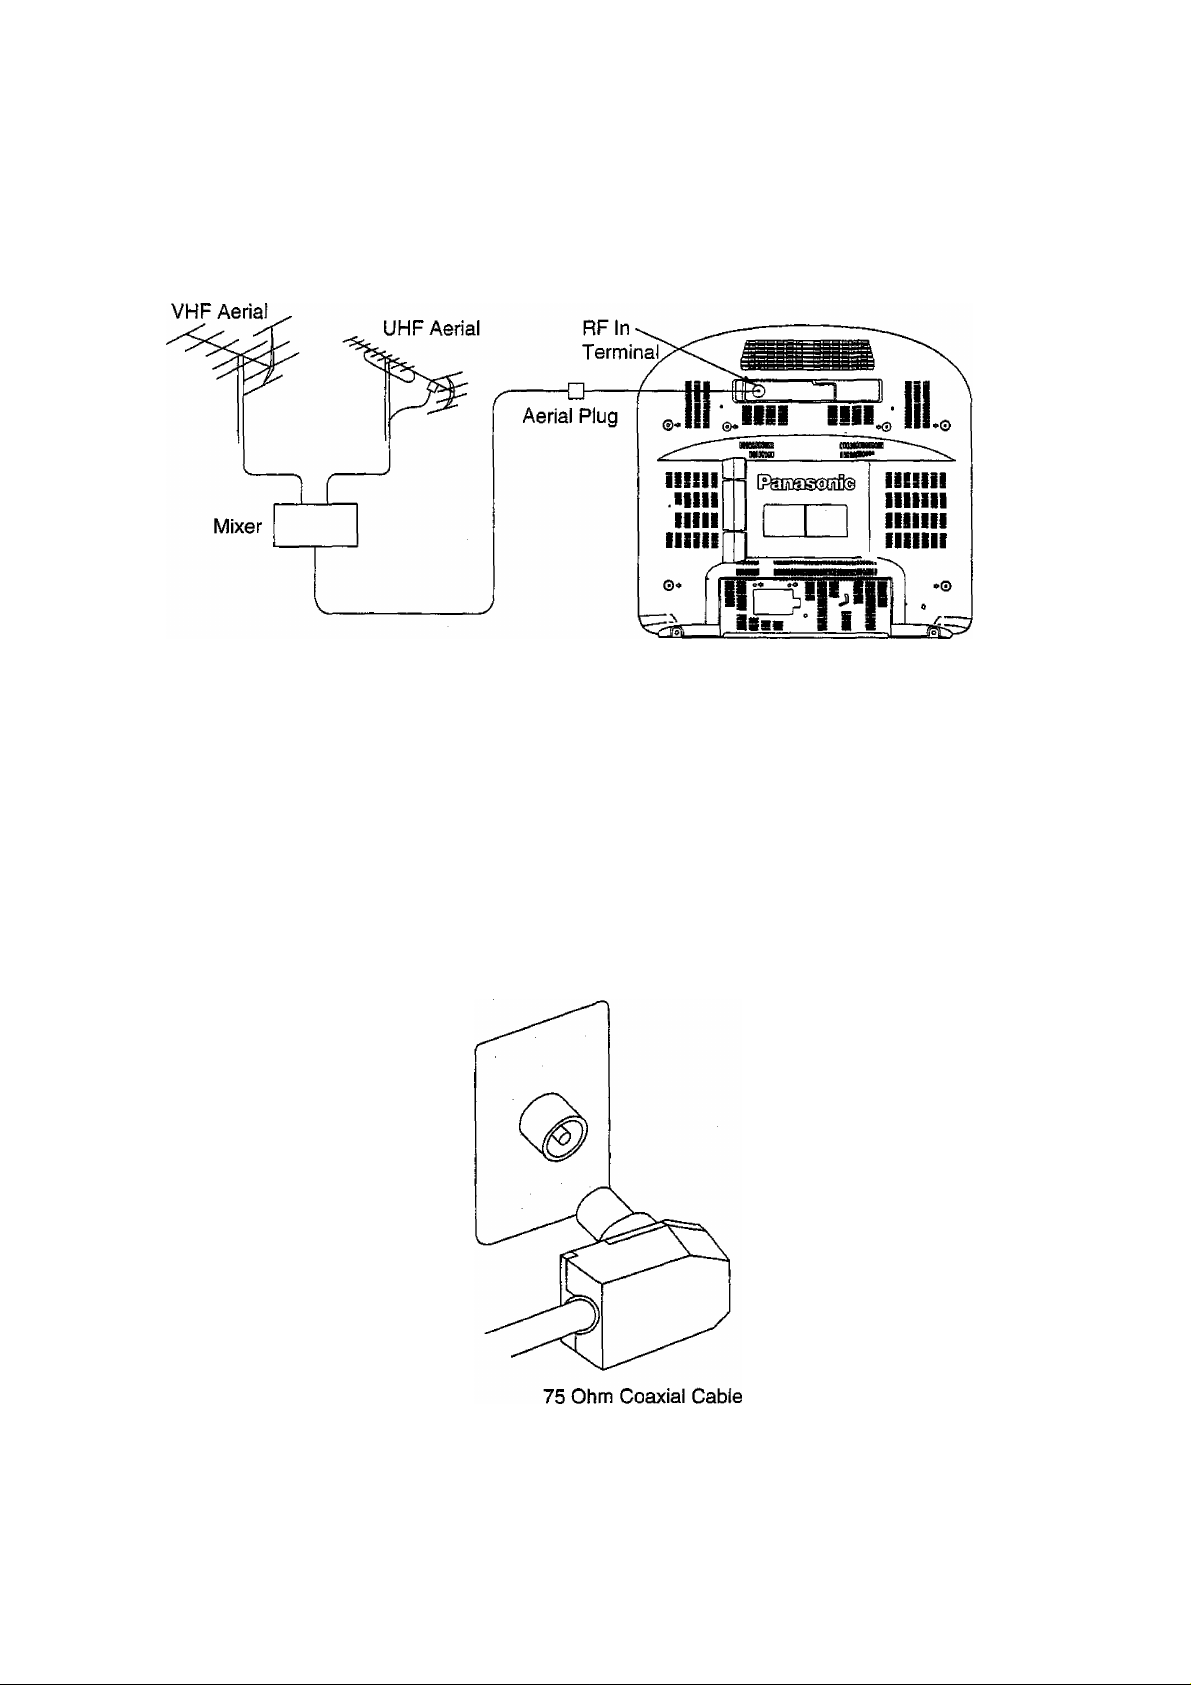
Connect the Aerial Cable to the RF In Terminal
To obtain optimum quality picture and sound, an Aerial, the correct cable {75 Ohm coaxial) and the correct
terminating plug are required.
Your local Authorised Service Centre or Dealer may be able to assist you in obtaining the correct Aerial system for
your particular area and any accessories required.
Any matters regarding Aerial installation, upgrading of existing systems or accessories required, and the costs
incurred, are the responsibility of you, the Customer.
If a communal Aerial system is used, you may require the correct connection cable and plug between the wall Aerial
socket and your television receiver.
^■|v
Page 7
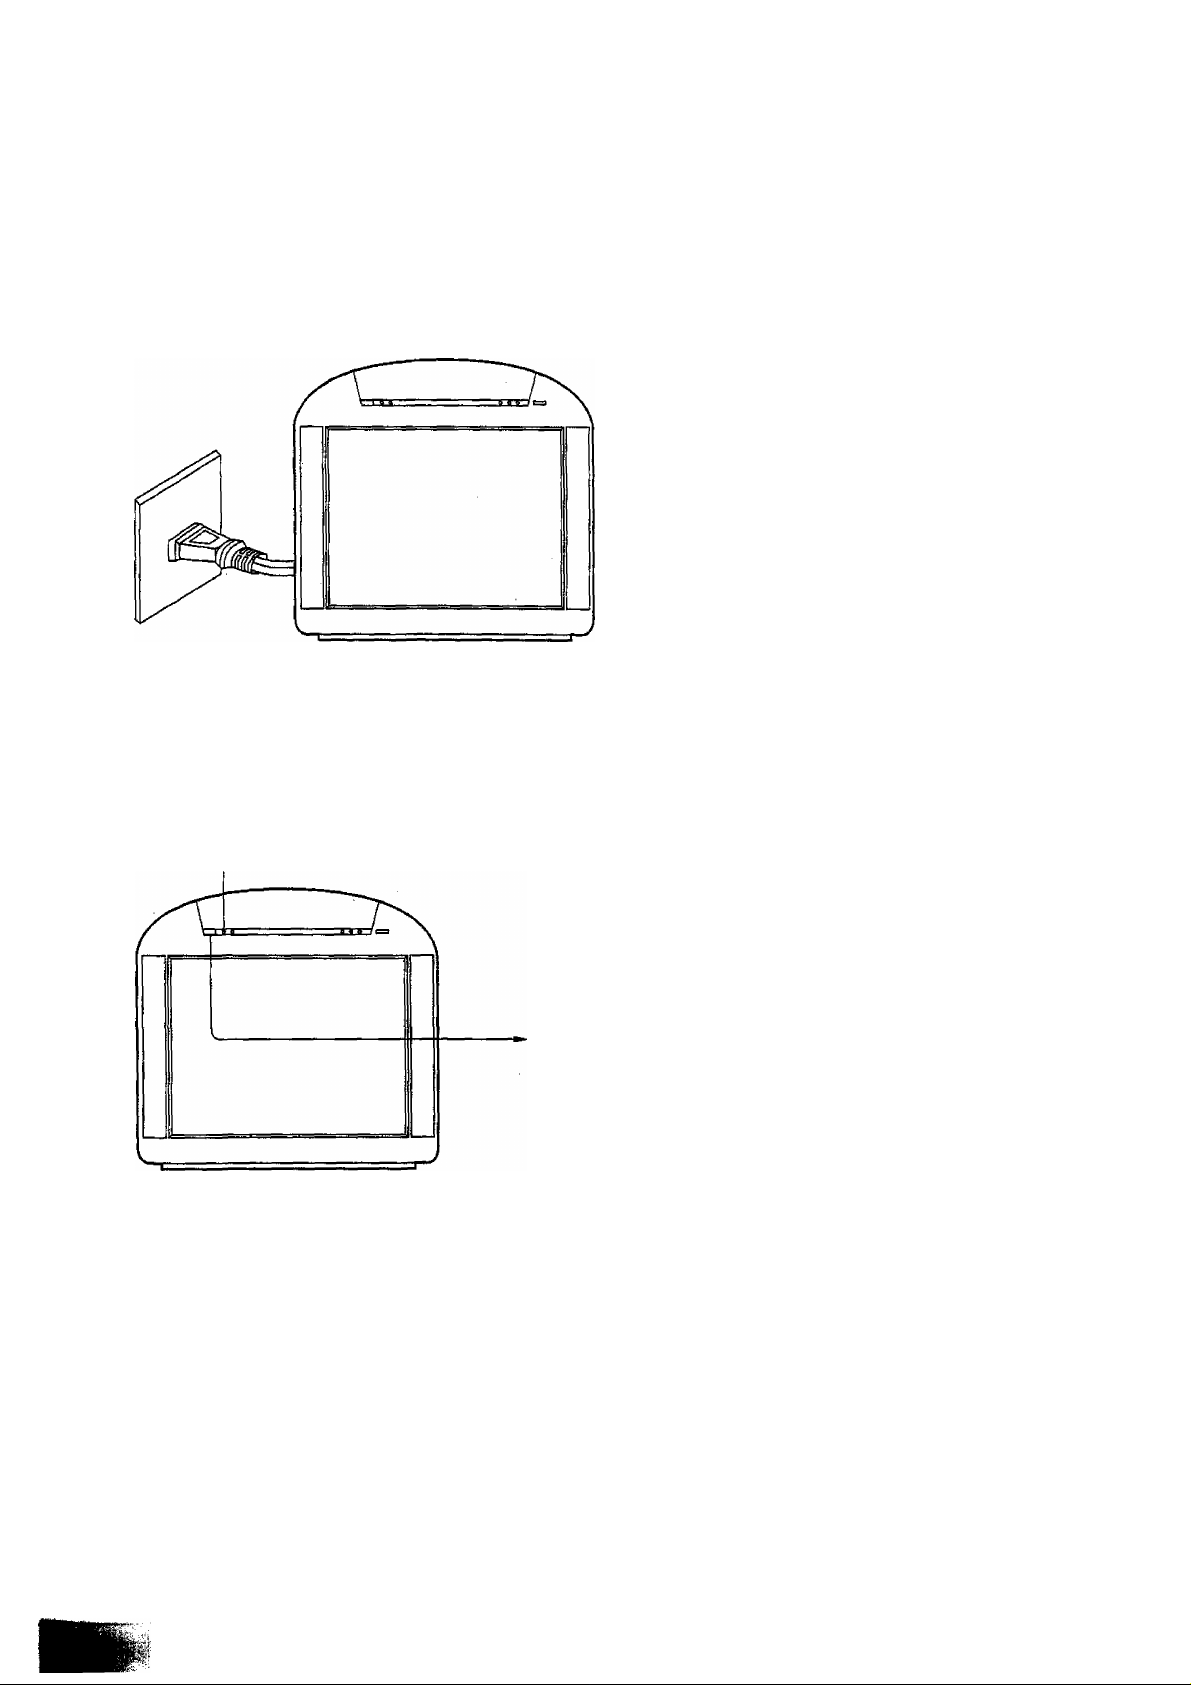
Connect the Plug to the wall outlet
How to turn the Power On
For Power Source details, refer to page 78.
Note;
Mains plug types vary between countries.
The mains plug shown at left may therefore
not be the type fitted to your Unit.
Power Indicator
Push the Power switch on the Television to
turn the set on.
The Power Indicator will light.
Stand-by
Power On
Note:
When in the Stand-by condition, it is possible
to turn the TV set on by pushing
* the “Power (Stand-by)“ button
* any of the "Direct Programme Number
Selection” buttons (0-9)
* the Programme Number Up and Down
buttons.
-------------
------------
Red
Green
First Switch on from NEW
After you first switch on your Unit from NEW, and then push the ‘VCR" button (refer to pages 15 and 64), the
TV/VCR will automatically turn on to “VCR CLOCK SET” Mode.
Refer to page 48 on how to Set the Clock.
If the “VCR” button is not pushed, the TVAfCR Unit will operate normally.
However the Clock will not be set, and this will inhibit such functions as Timer Recording.
Page 8
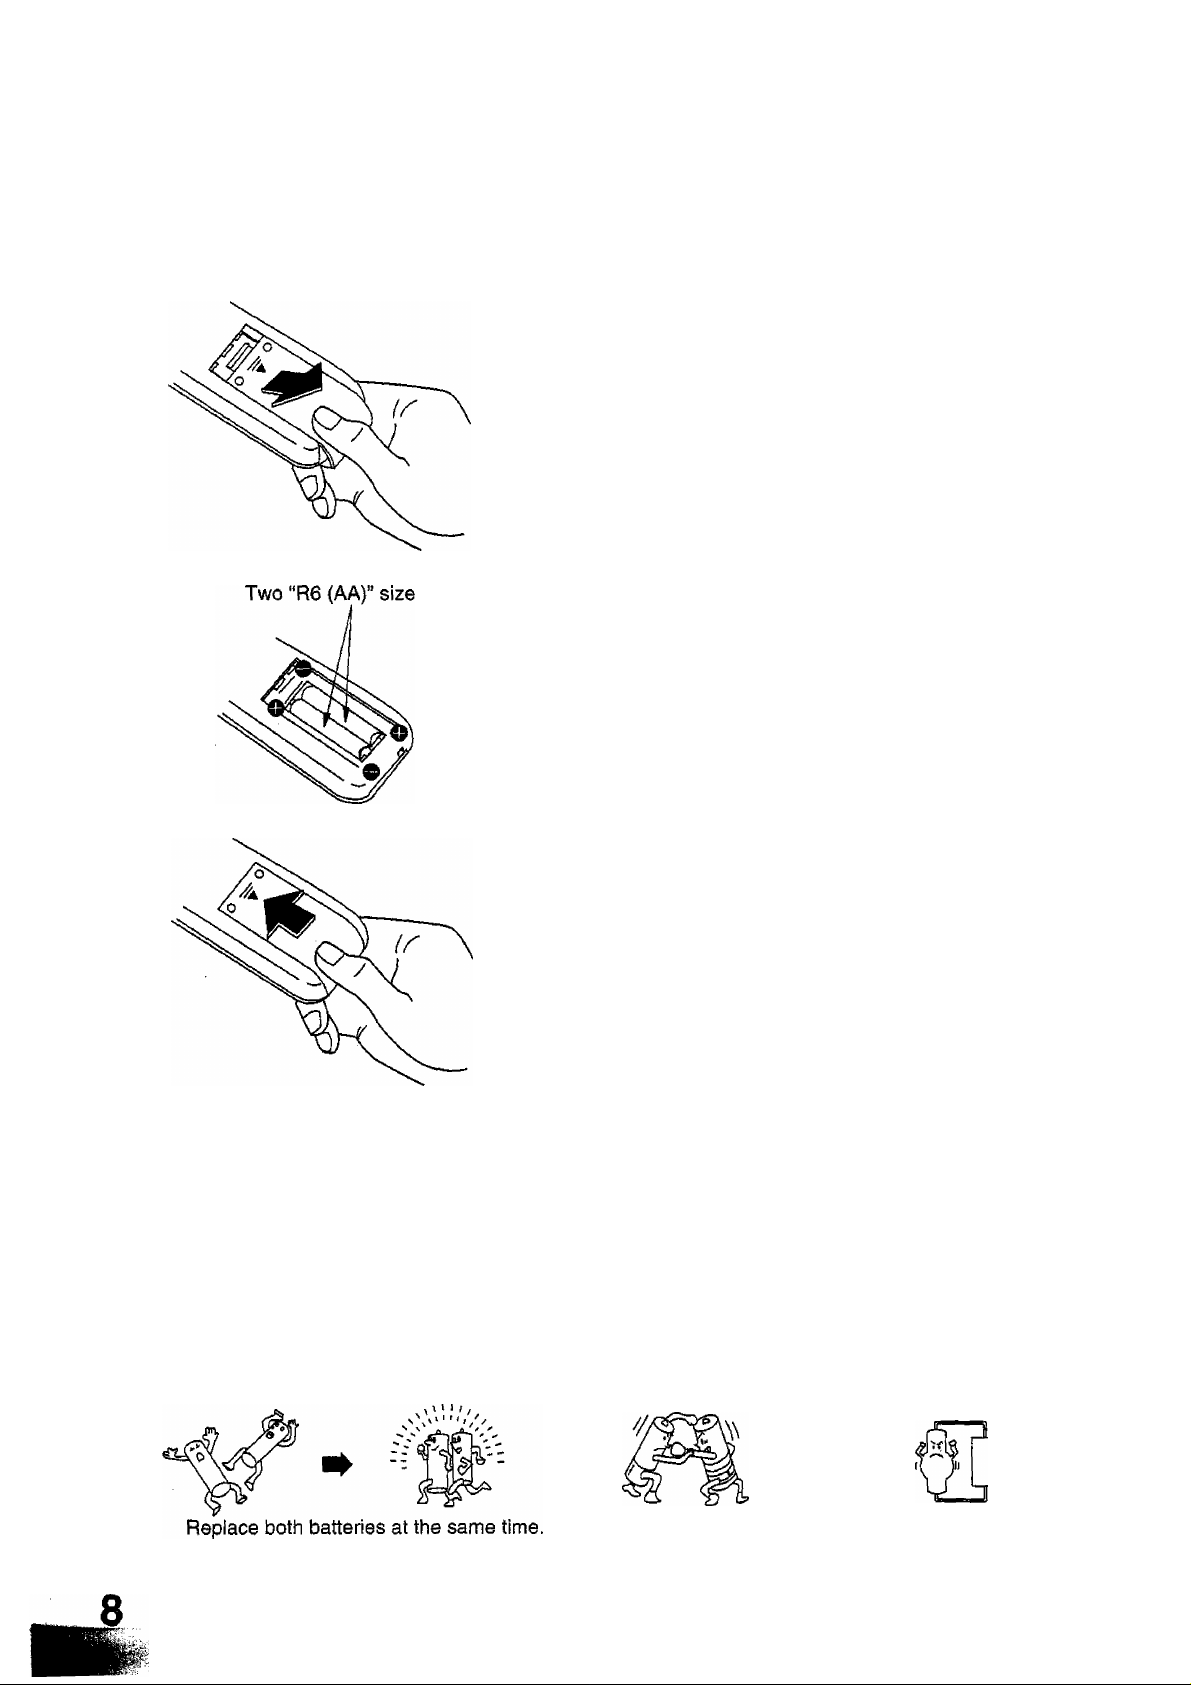
Battery Installation
1
Open the cover.
A slight downward pressure while pulling towards the bottom
will ensure easy removal.
Batteries: Use two “R6 (AA)” size batteries.
Replace the batteries.
Insert the batteries ensuring correct polarity.
This is identifiable by the V andsymbols on both the
batteries and inside the battery compartment.
Replace the cover.
Do not use rechargeable (Ni-Cd) batteries.
They are different in shape and performance and may fail to ensure correct operation.
Battery precautions
The incorrect use of batteries can cause electrolyte leakage which will corrode the Remote Control or cause the
batteries to burst. The following precautions must be observed carefully:
Old Batteries
New Batteries
Don’t mix battery types Don’t Recharge,
(alkaline with carbon zinc, etc.)
Page 9

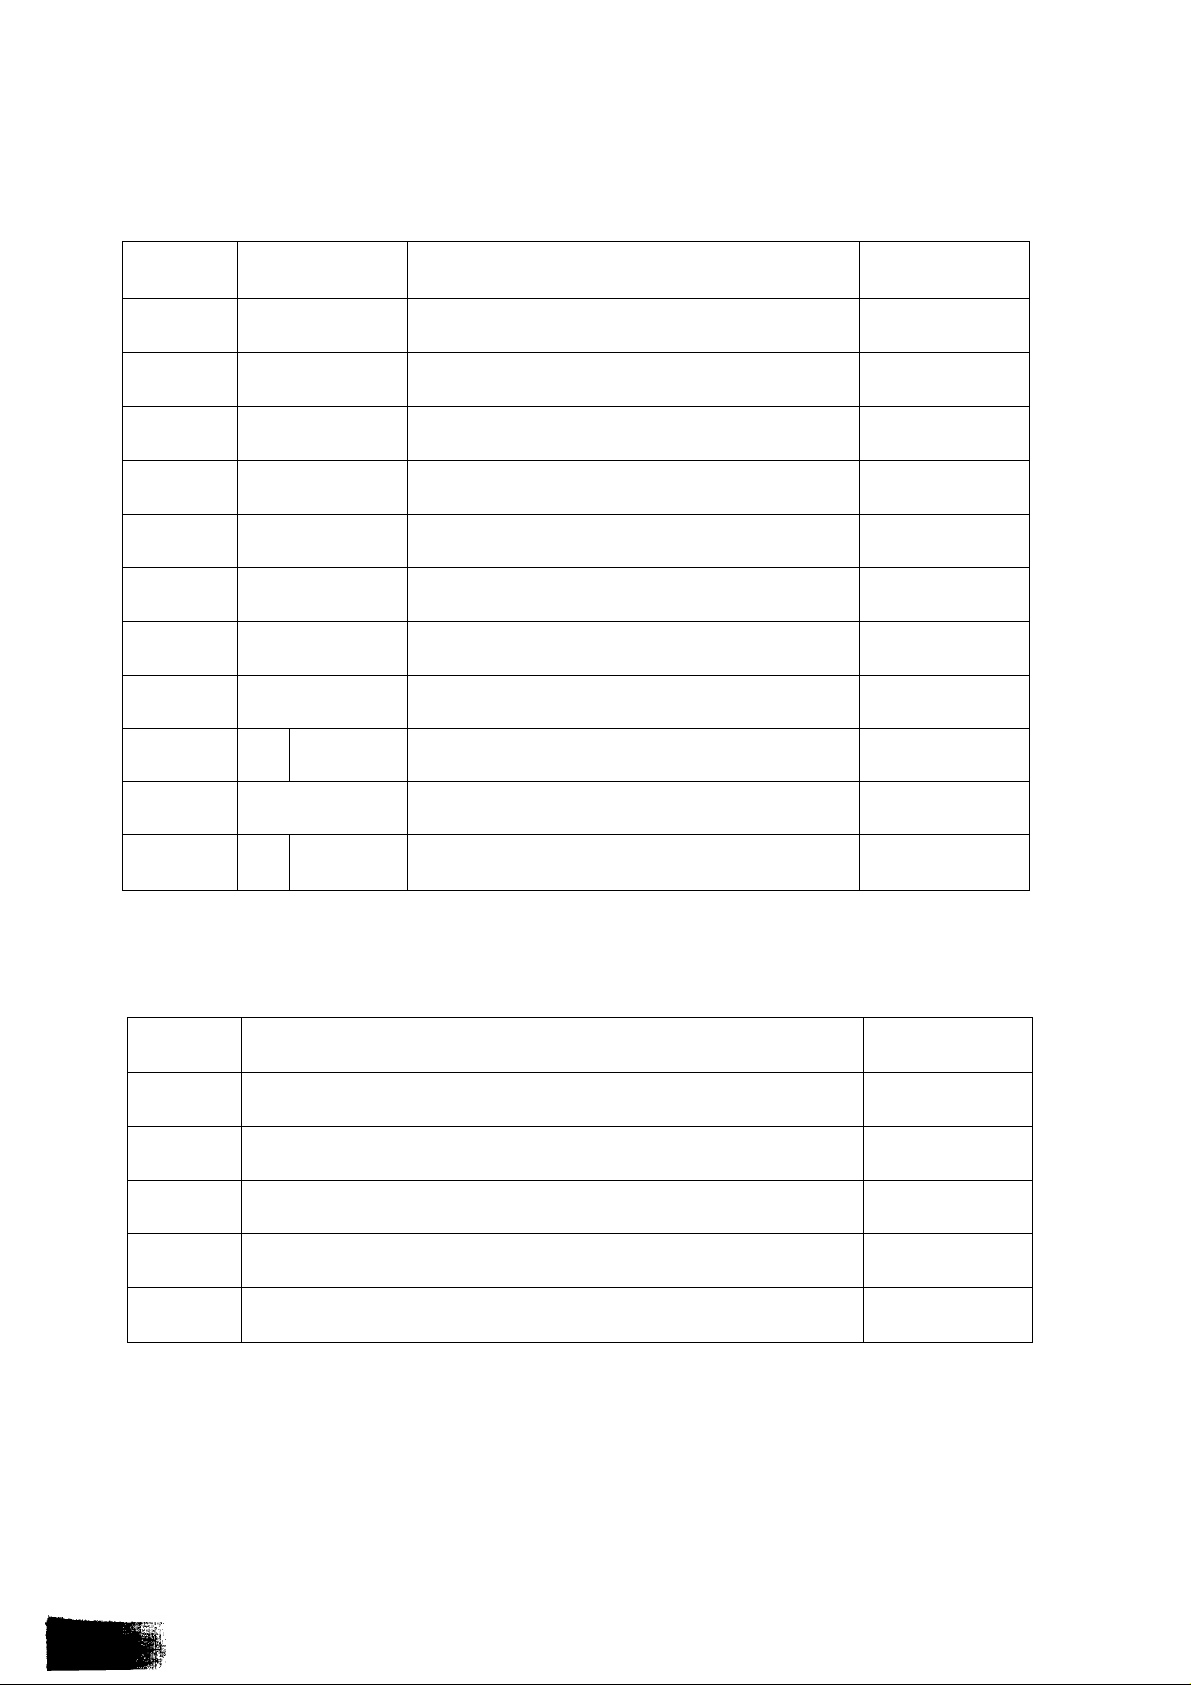
Name
Ref. Page
Function
AUTO
POWER
ON
AUTO
COUNTER
RESET
AUTO
EJECT
REWIND
SHUT OFF
AUTO PLAY
TC-W21
Feature
TC-W21
Feature
TC-W21
Feature
Page 51
TC-W21
Feature
When the unit is in Stand-by, the power is automatically on the moment the video
cassette tape is inserted.
When a video cassette tape is inserted, the counter is reset to “0:00,00”
autonnatically.
When a tape without erasure prevention tab comes to an end, the tape is
automatically rewound to the start and is then ejected.
When the power is switched off during rewinding, the power of the TV is shut off
immediately, but the power of the VCR will be shut off only after completion of
tape rewinding.
When a tape without erasure prevention tab is inserted, playback starts
automatically.
AUTO
REWIND
AUTO REC
EJECT
AFC
i MENU
: COLOUR
, SYSTEM
i SOUND
S SYSTEM
TC-W21
Feature
TC-W21
Feature
Page 28
Page 40-47
Page 39
Page 38
When the tape comes to an end after playback or fast forwarding, the tape is
rewound to the start automatically.
When the tape reaches its end during recording, it will automatically be rewound
to the beginning and the tape will then be ejected.
When the memory is set, the counter stops at “0:00,00”.
Automatic Frequency Control, also known as AFT (Automatic Fine Tuning),
automatically keeps the TV tuned to the strongest part of a broadcast
transmission.
A list of available functions, displayed on the TV screen.
Selecting a menu item in some cases brings up a second, more detailed Menu.
Different countries encode the colour information content of the TV picture
differently.
The basic systems are; PAL, NTSC and SECAM, but there are many variations
on these.
Different countries encode TV sound differently.
The basic systems are; 4.5, 5.5, 6.0 and 6.5 MHz.
(MHz = Mega Herts)
Page 10
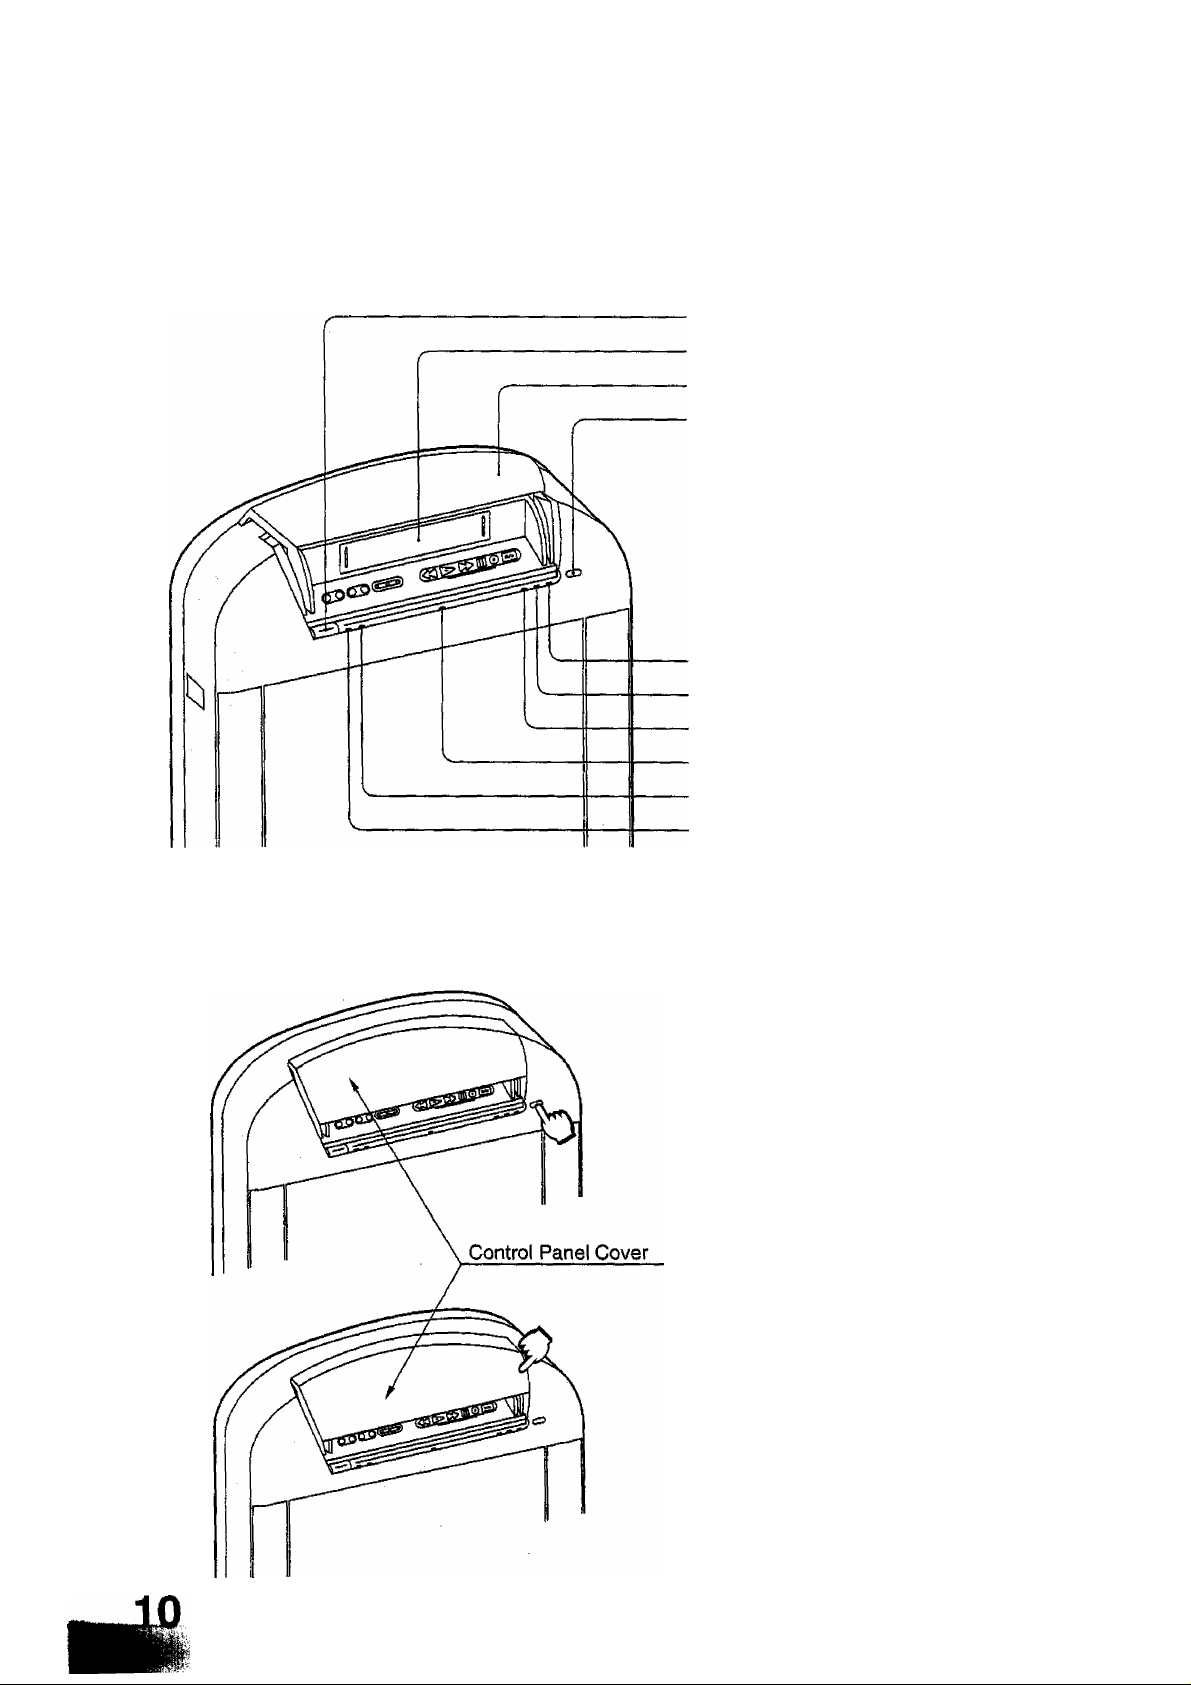
Front Control Panel
Main power button
Insertion slot for cassette tape
Cover
Opening button for the Cover
KARAOKE Indicator
Timer setting Indicator
Picture recording Indicator
Receiver for signals from the Remote Control
Power Indicator for the clock
Stand-by/Power On Indicator
Stand-by
Power On
-------
------
Red
Green
How to open the Control Panel Cover
Push the button to open the Control Panel
Cover.
Push the cover to close it.
Page 11
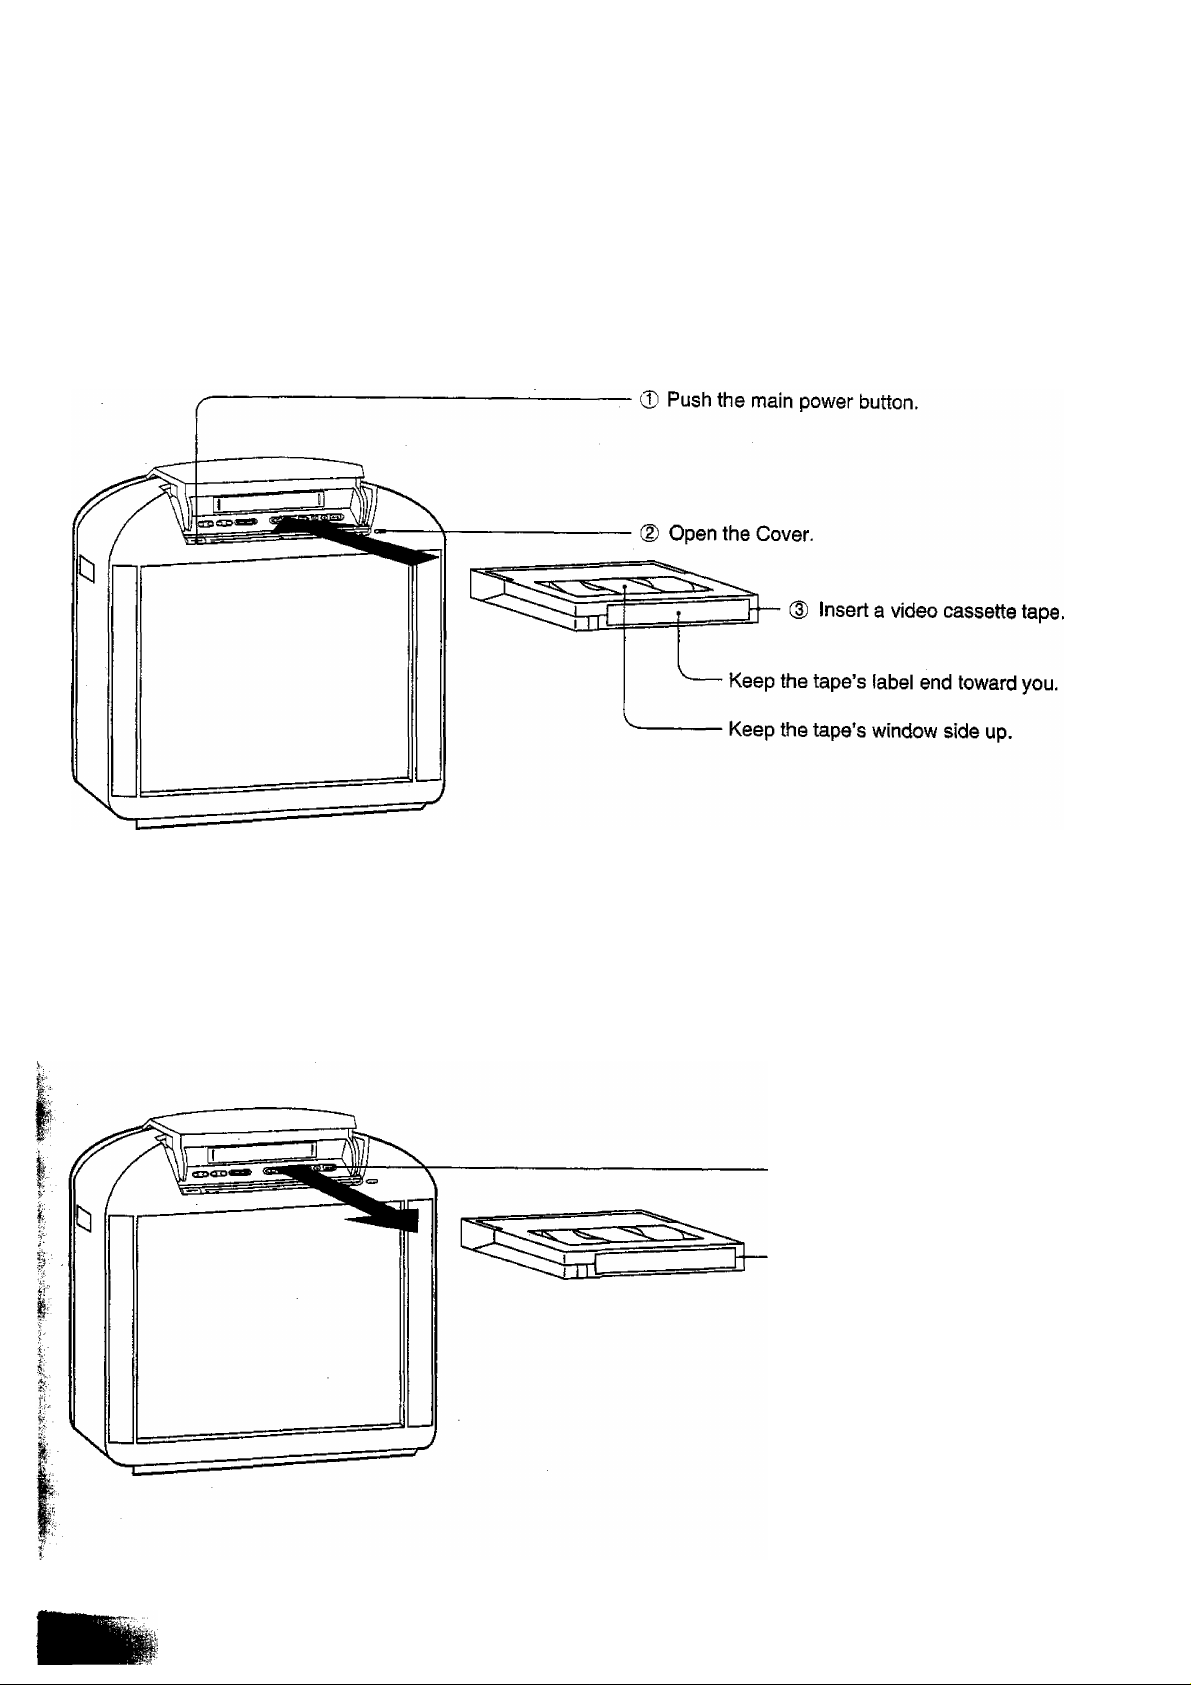
How to insert a Video Cassette Tape
How to eject the Video Cassette Tape
(D Push the STOP/EJECT button.
Take out the video cassette tape.
11
Page 12
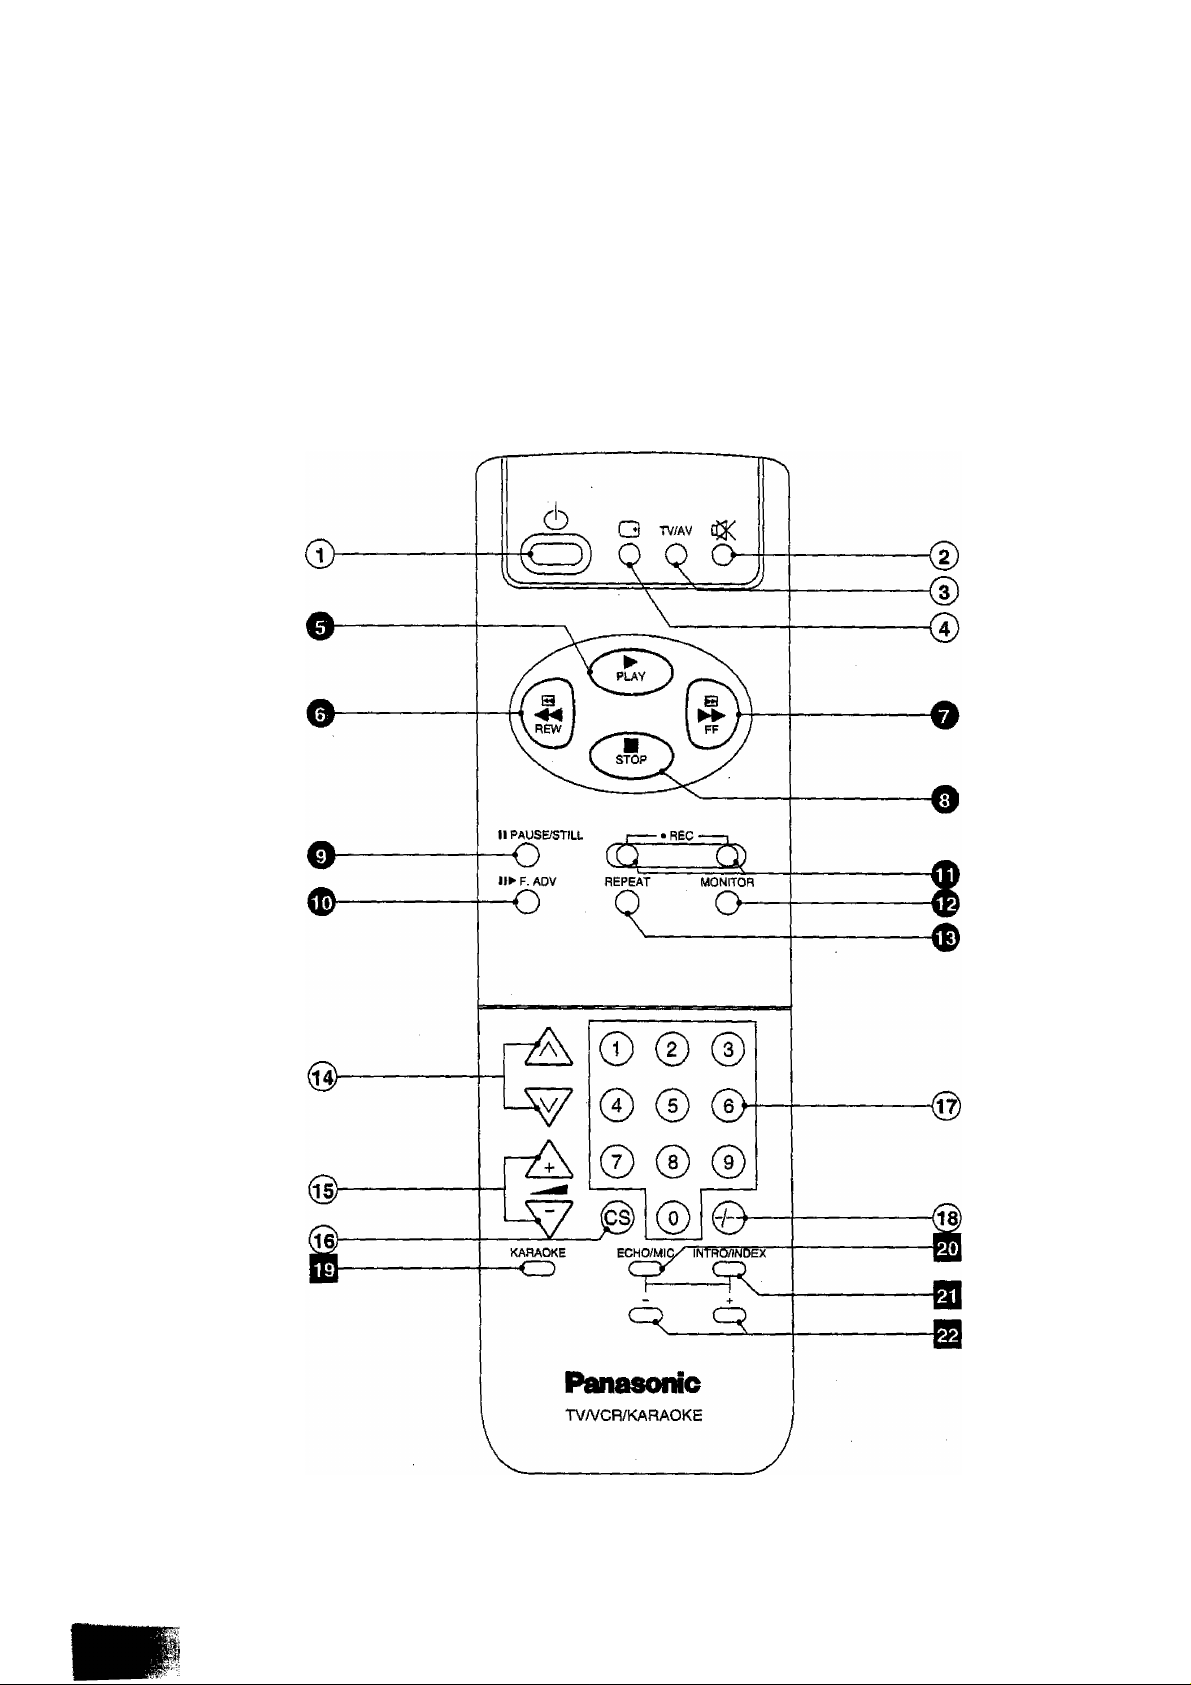
Remote Control
12
Page 13

Item
No.
©
®
Key
6
o
43<
O
TVMV
0
Q
O
Power (Stand-by)
Sound Mute
TV/AV Selection
Recall (Status Display)
Function
Refer to Page
32
36
34
36
e
o
o
o
o
<E>
<D
/hi
(«
\ BEW j
^ STOP }
tl PAUSeSTlLL
o
IIPF, ADV
O
(ST^
MONITOR
o
REPEAT
O
A
V
A
Play
Rew (Rewind)/Review
FF (Fast Forward)/Cue
_
Stop
Pause/Stitl
Frame Advance
REC (Record) Buttons
TV Monitor
Tape Repeat
Programme Number Up and Down Buttons
Volume Up and Down 34
50
51
50
50
51
52
51
52
52
32
i--:
I @
m
m
@
®o
.......
®
©
KARAOKE
CD
ECHO/MIC
CD
INTROANDEX
CD
CD CD
Direct Channel Selection
Direct Programme Number Selection Buttons
Two Digit Programme Numbers Button
KARAOKE 70
ECHO/MIC (Microphone) Level Adjust 71
INTRO/INDEX
Menu and Level Up and Down Buttons
34
32
32
57, 58
58, 71
13
Page 14
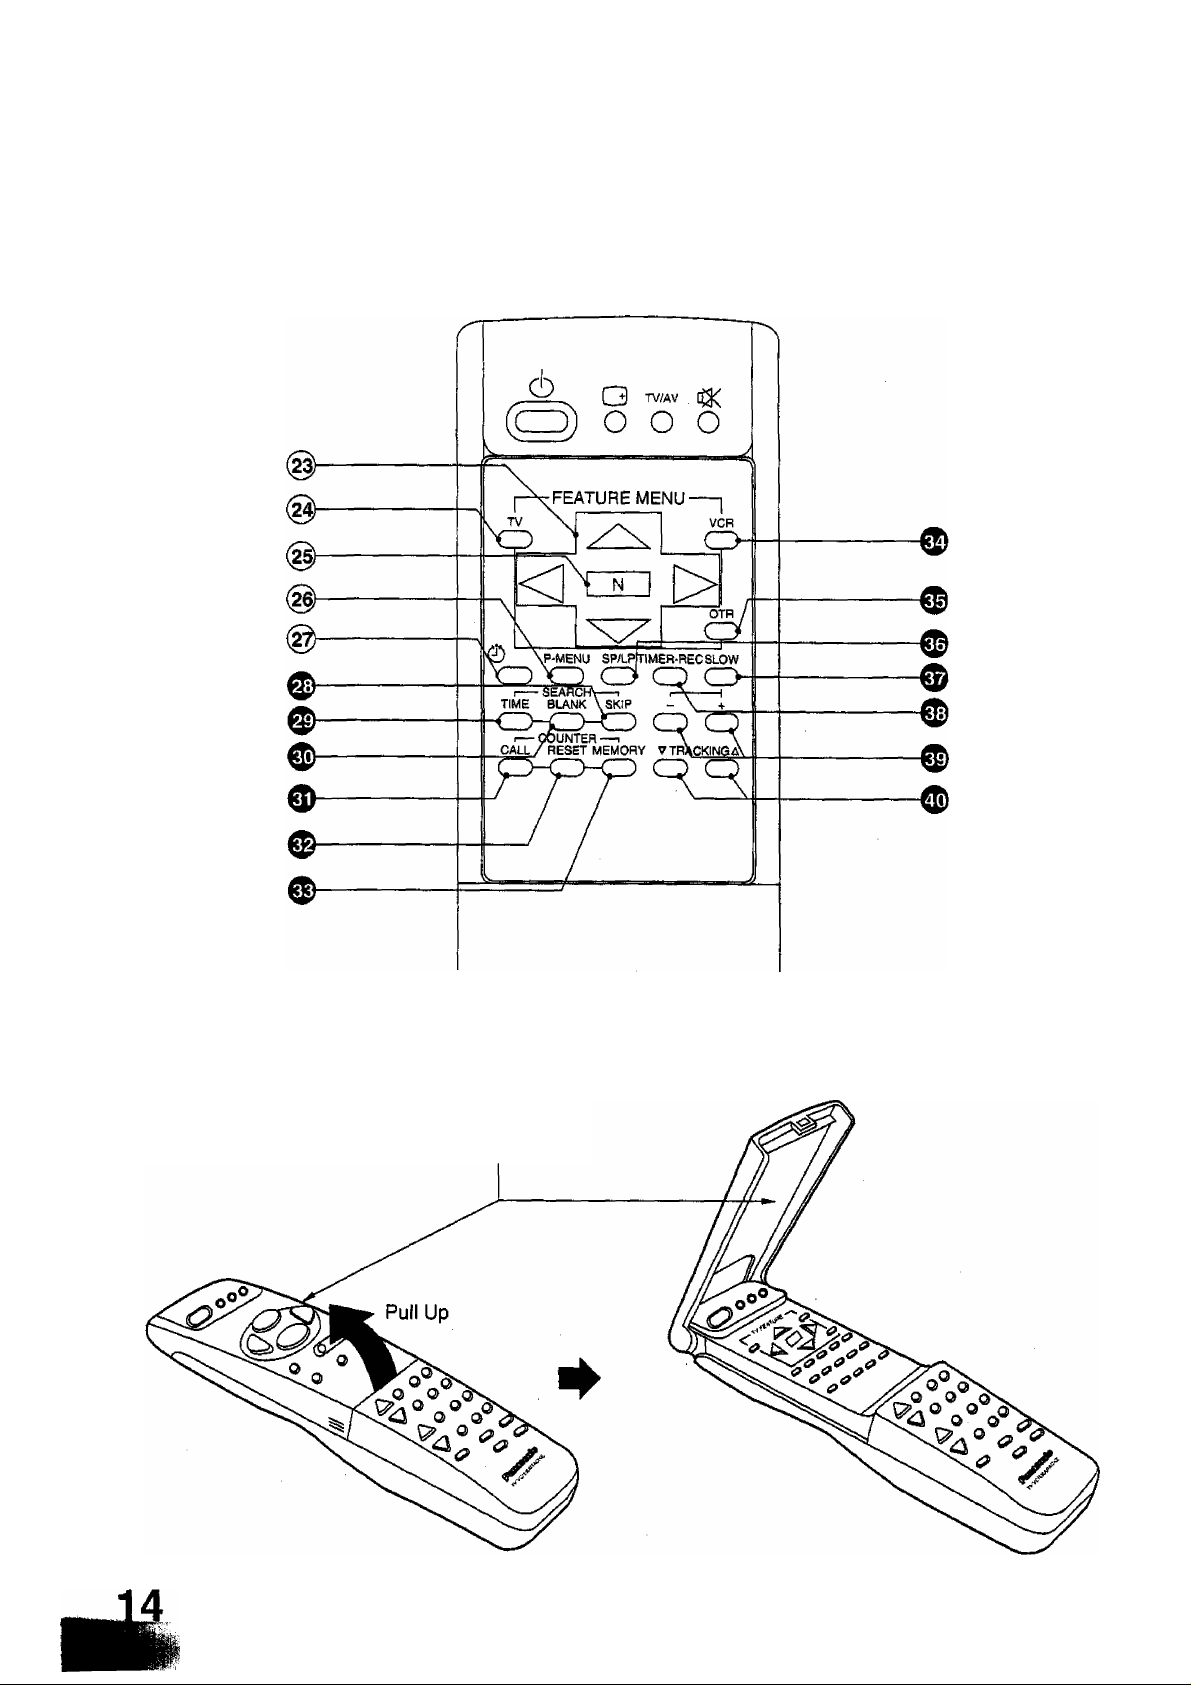
Buttons located under the Remote Control door
¥
t.
Helpful Hint
How to open the door on the Remote Control.
Remote Control door
Page 15

Item
No.
Key
Function
Refer to Page
@)
@
@
TV
o
N
P-MENU
o
®
O
SKIP
o
TIME
o
BLANK
o
CALL
o
RESET
o
MEMORY
o
VCR
o
OTR
o
SP/LP
o
SLOW
o
TIMER-REC
o
Position Buttons
TV Feature Menu
Normalisation
Picture Menu
Off Tmer
Skip Search
42
42
42
40
36
55
Time Search
Blank Search
Counter Call
Counter Reset
Counter Memory
VCR Feature Menu 64
One-Touch Timer Recording
Recording Standard or Long Play Selection
Slow Playback
Timer Record 67
56
55
54
54
54
60
53
53
c±) (±)
V TRACKING A
o o
Slow Level Up and Down Buttons
Tracking Adjustment Buttons
* SPECIAL NOTE:
If this button is pushed after your Unit is first switched on from NEW, it will automatically go
Into 'VCR CLOCK SET’ Mode, Refer to page 48 on how to set the Clock.
iP.Vi
53
53
15
Page 16
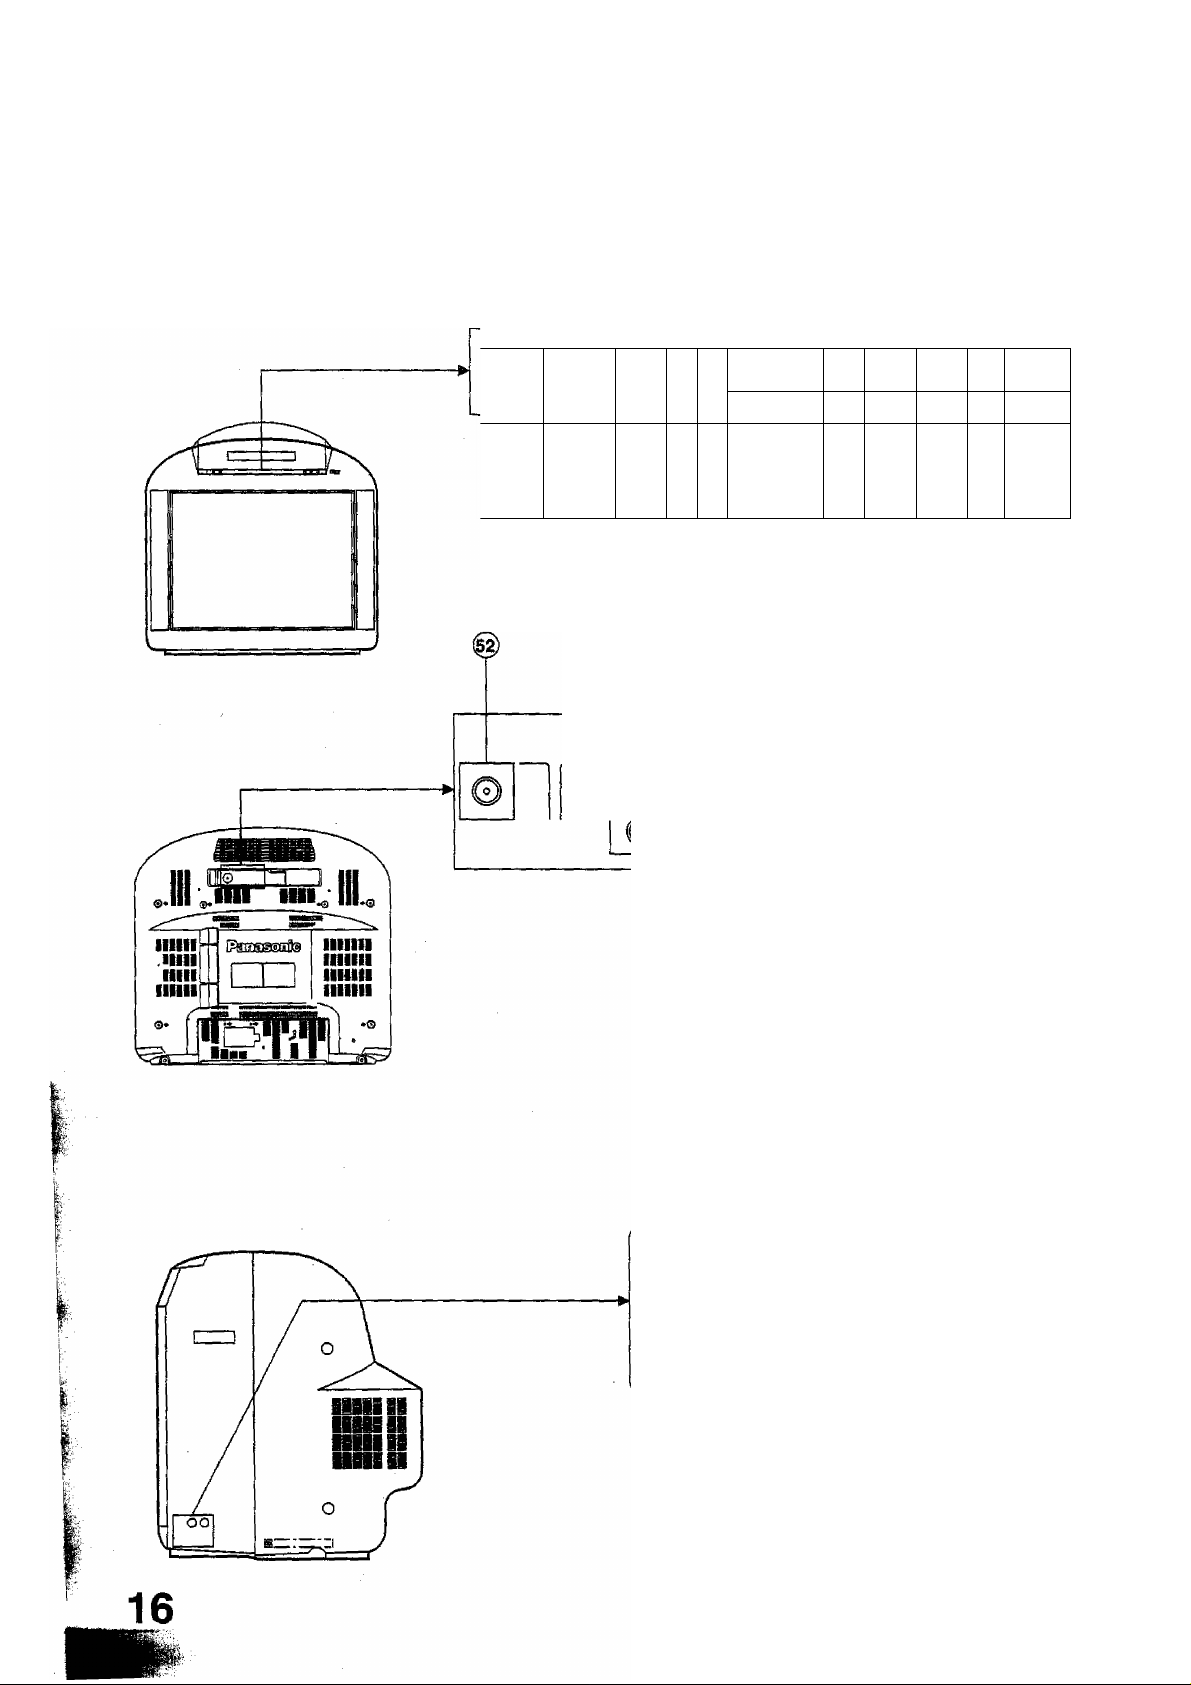
Controls and Terminals on the TV
+ PR Sffr Nr»WAL TV
} <
pc p
0
.) ./1
€ ) ^ })^
AUDIO VIDEO
b i!
OUT
IN
) <
D <1
s> o
MlC-1
MlC-2
m
Page 17
item
No.
@
Key
V A
© ®
- -1-
o ©
pflEser
o
NORMAL
o
TViAV
o
Function
Programme Number Up and Down Buttons
Volume Up and Down Buttons
Preset
Normalisation
TV/AV Selection
Refer to Page
32
34
22, 24
34
34
%
0
0
Item
No.
(§)
<03
g>
s>
^SE/STIU.
p
iTOP^JECT
m /±
Aerial Terminal (RF In Terminal)
AV Output Terminals
Rew (Rewind)/Review
Play
FF (Fast Forward)/Cue
Pause/Still
Record
Stop/Eject
Description
51
50
50
51
51
50
Refer to Page
6
19
m
AV Input Terminals 18
Microphone 1 Socket
Microphone 2 Socket
21
17
Page 18
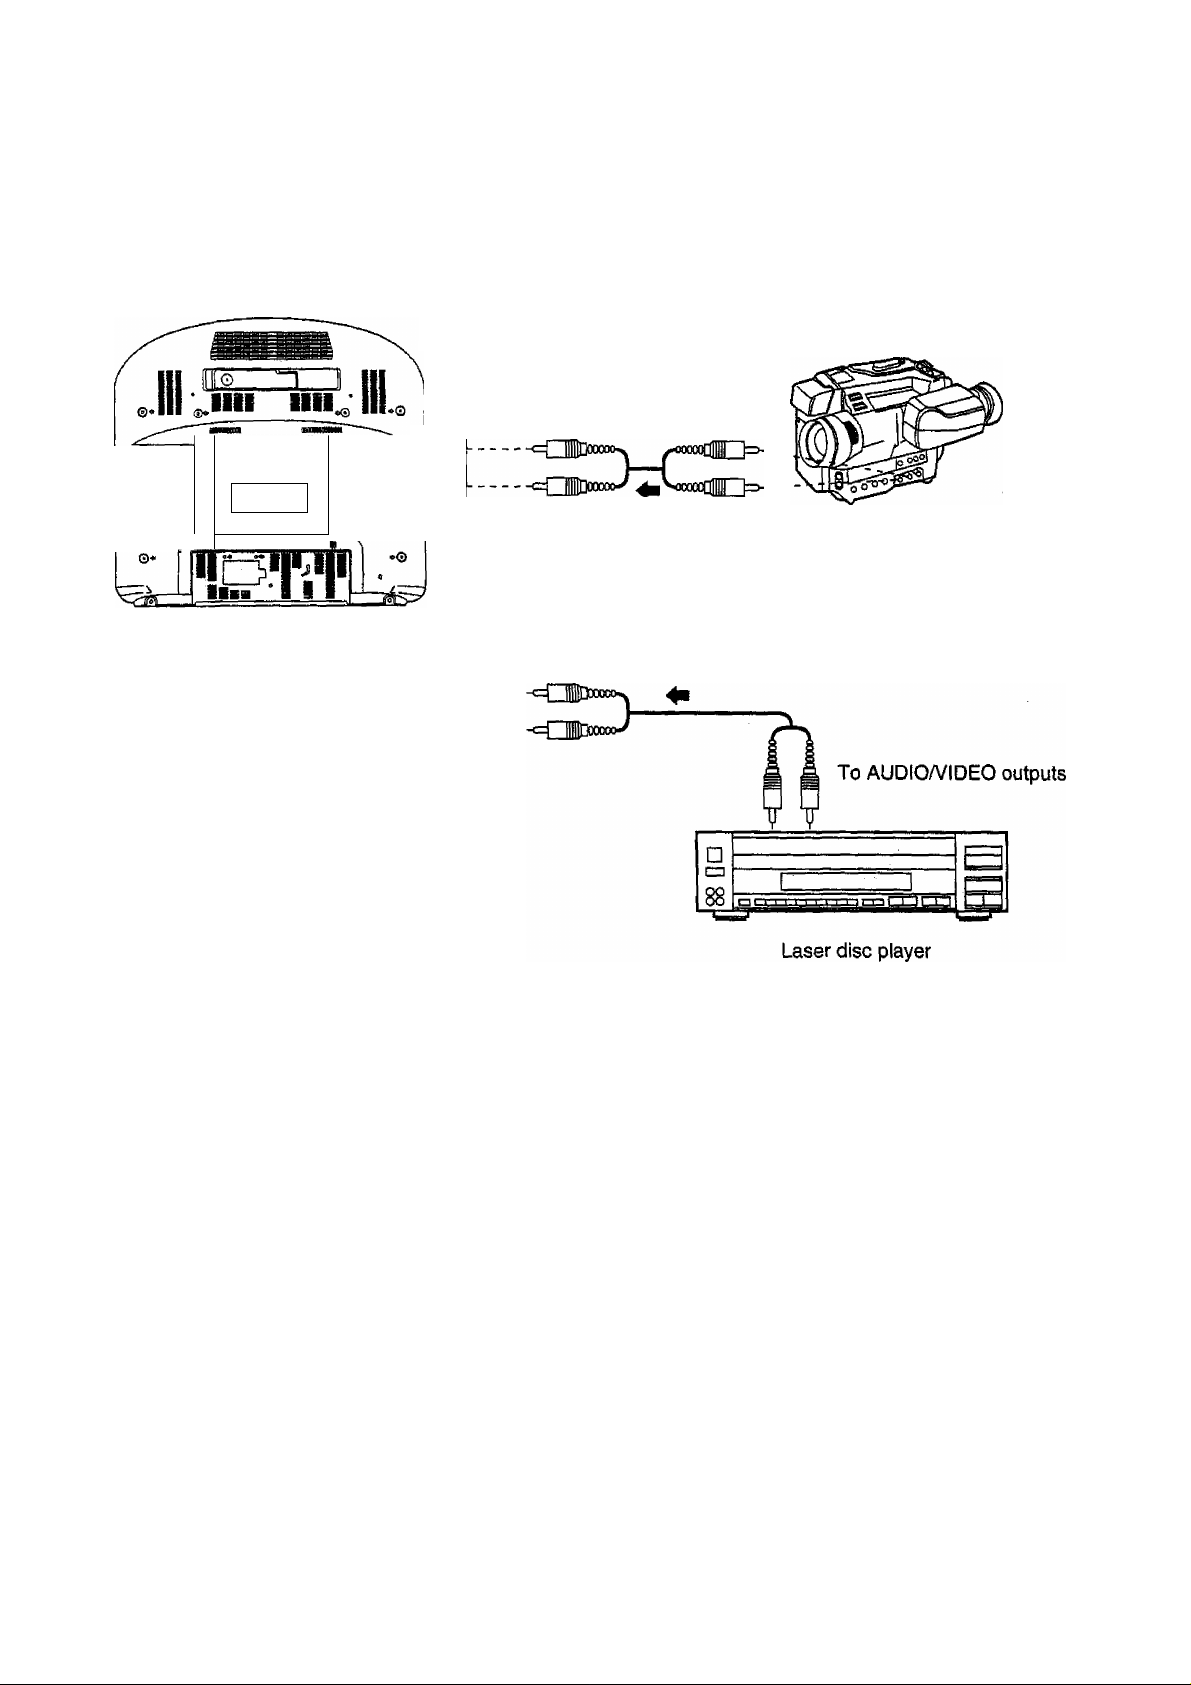
How to connect the “AV” (Video and Audio) input Terminals to other equipment.
When reproducing a tape from a video camera;
To AUDIO/VIDEO outputs
iliiil
Jilll
Hill
illlll
AUDIO VIDEO
Note;
(1) When an AV mode is selected, and that AV mode has no input picture signal, the Background Colour of the TV
screen will change. (When the Blue-Back function is set to the ON condition; refer to pages 44 and 46 for
details.)
(2) Select AV Input by pushing the TV/AV button; refer to page 34.
(3) Refer to the Instruction Manual supplied with each item of other equipment to be connected, for specific
connection and operational details of that equipment.
lllllll
lllllll
lllllll
lllllll
Video camera
When recording a tape from a laser disc player;
\
Playback Operation
1. Select AV Mode.
2. Push the “PLAY” Button on the connected Playback Equipment.
15
Page 19
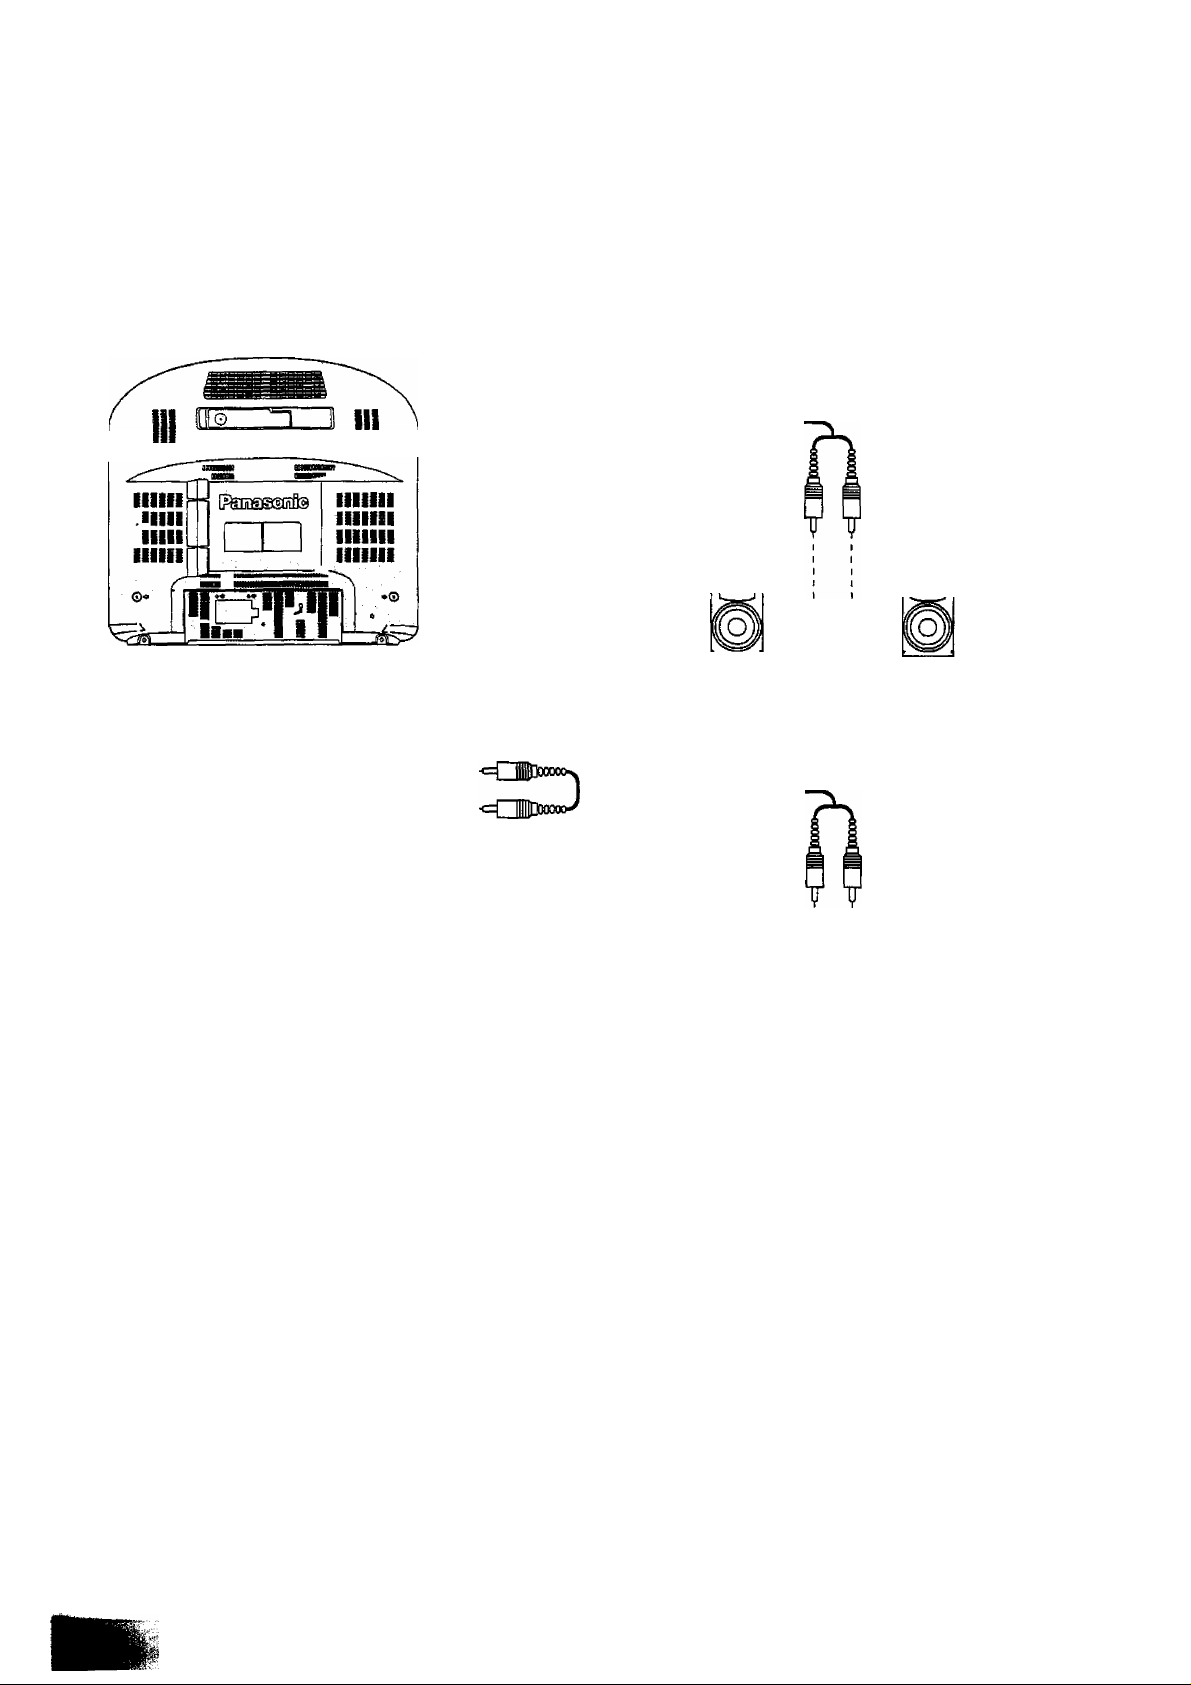
How to connect the AV Monitor Output Terminals from the TV to other equipment.
The “Monitor Ouf Terminals output the same signals as are on the TV screen at that time.
g)—OUT
AUDIO VIDEO
)—IN
^1111 iiii^
^ To AUDIO output
- <=Q1I3qocmo—
OR
When listening to a video cassette
tape through an Audio System;
To the Auxiliary inputs
o
o
Audio System
When monitoring a video cassette
tape using another TV;
o
o
To the AUDiOA/IDEO
inputs
>s
TV
Note:
• Never connect the same video recorder to both the VIDEO IN and VIDEO OUT Terminals on this TV set, as this
couid cause incorrect operation.
19
Page 20
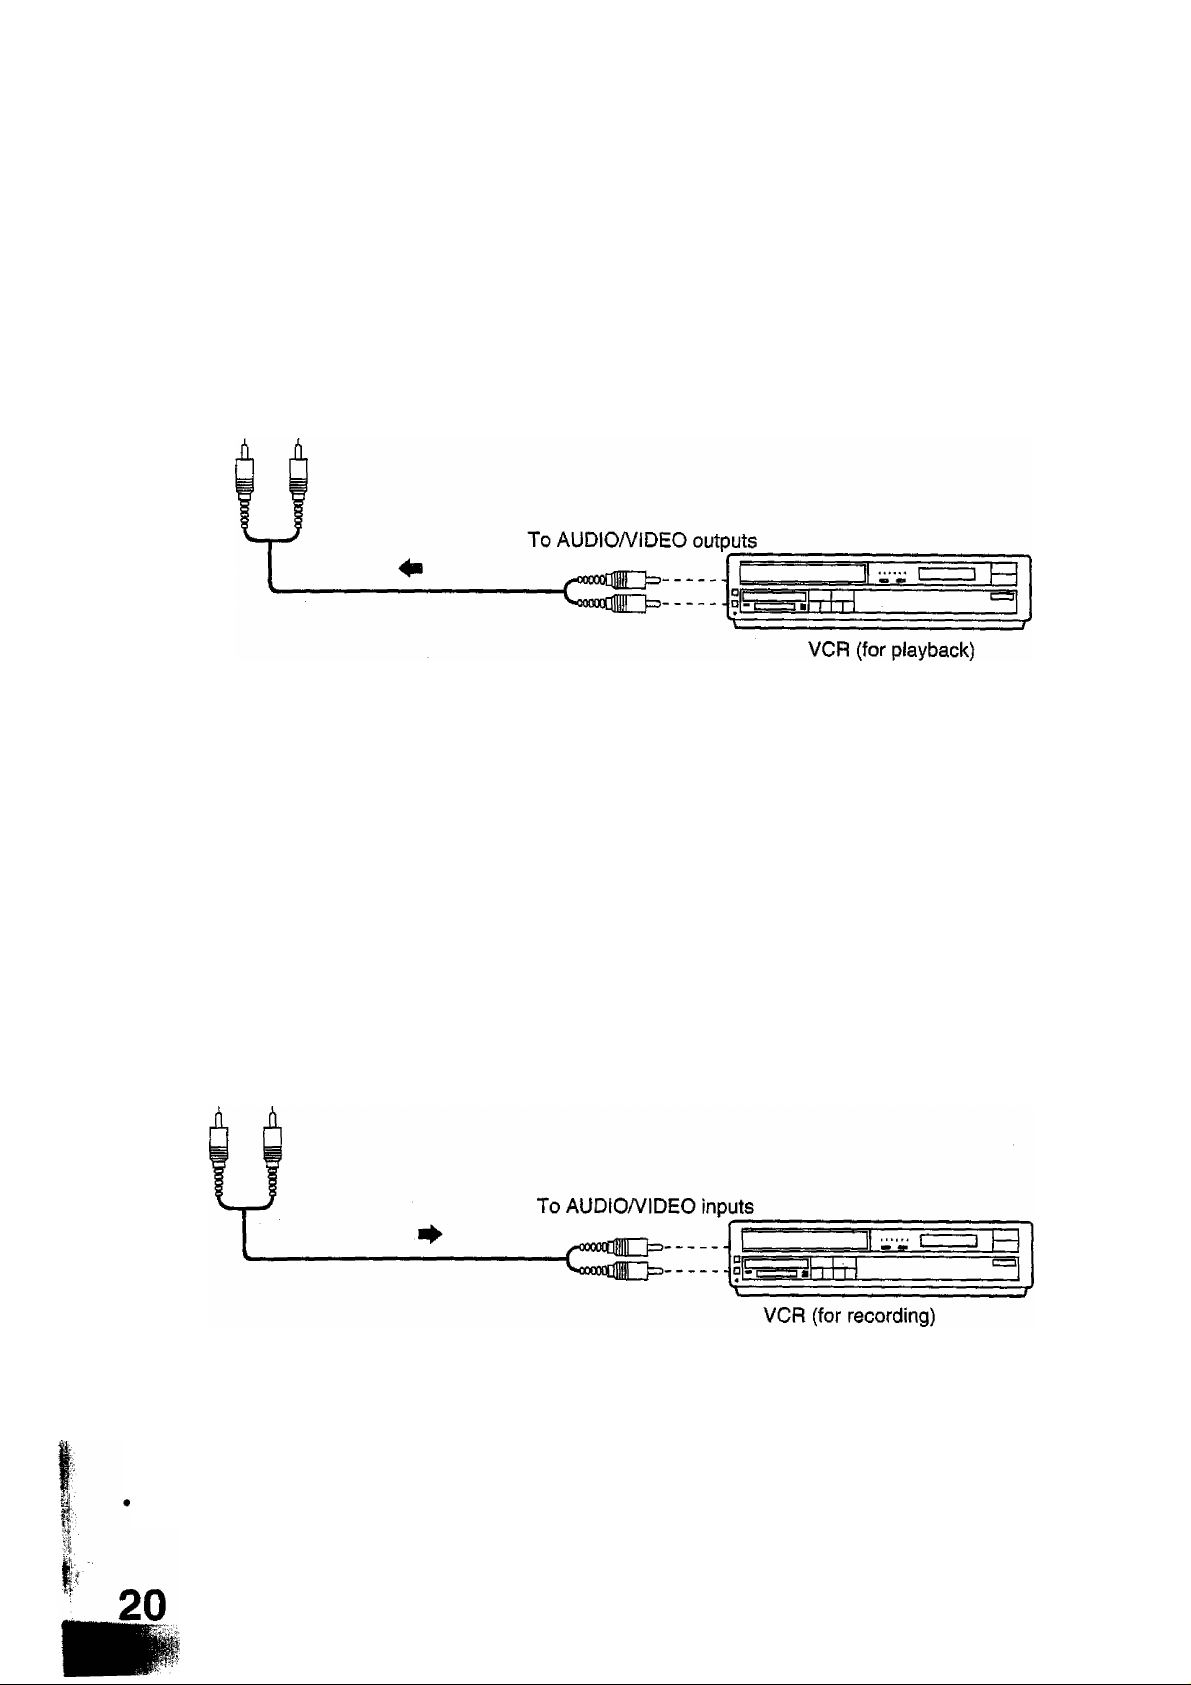
When reproducing a tape played on another VCR and recording to this VCR.
AUDIO VIDEO
i—IN
Operation
1. Set AV Mode using TV/AV button, and set this VCR to Recording Mode.
Refer to page 60 when recording.
2. Set the VCR for playback to PLAY Mode.
Note:
• Refer to the Instruction Manual supplied with the VCR, used for Playback, if necessary.
When reproducing a tape piayed on this VCR and recording to another VCR.
)-(^-OUT
AUDIO VIDEO
—IN
Operation
1. Set the VCR for recording to the RECORD Mode.
2. Set this VCR to PLAY Mode. (Refer to page 50)
Note;
Refer to the instruction Manual supplied with the VCR, used for Recording, if necessary.
Page 21
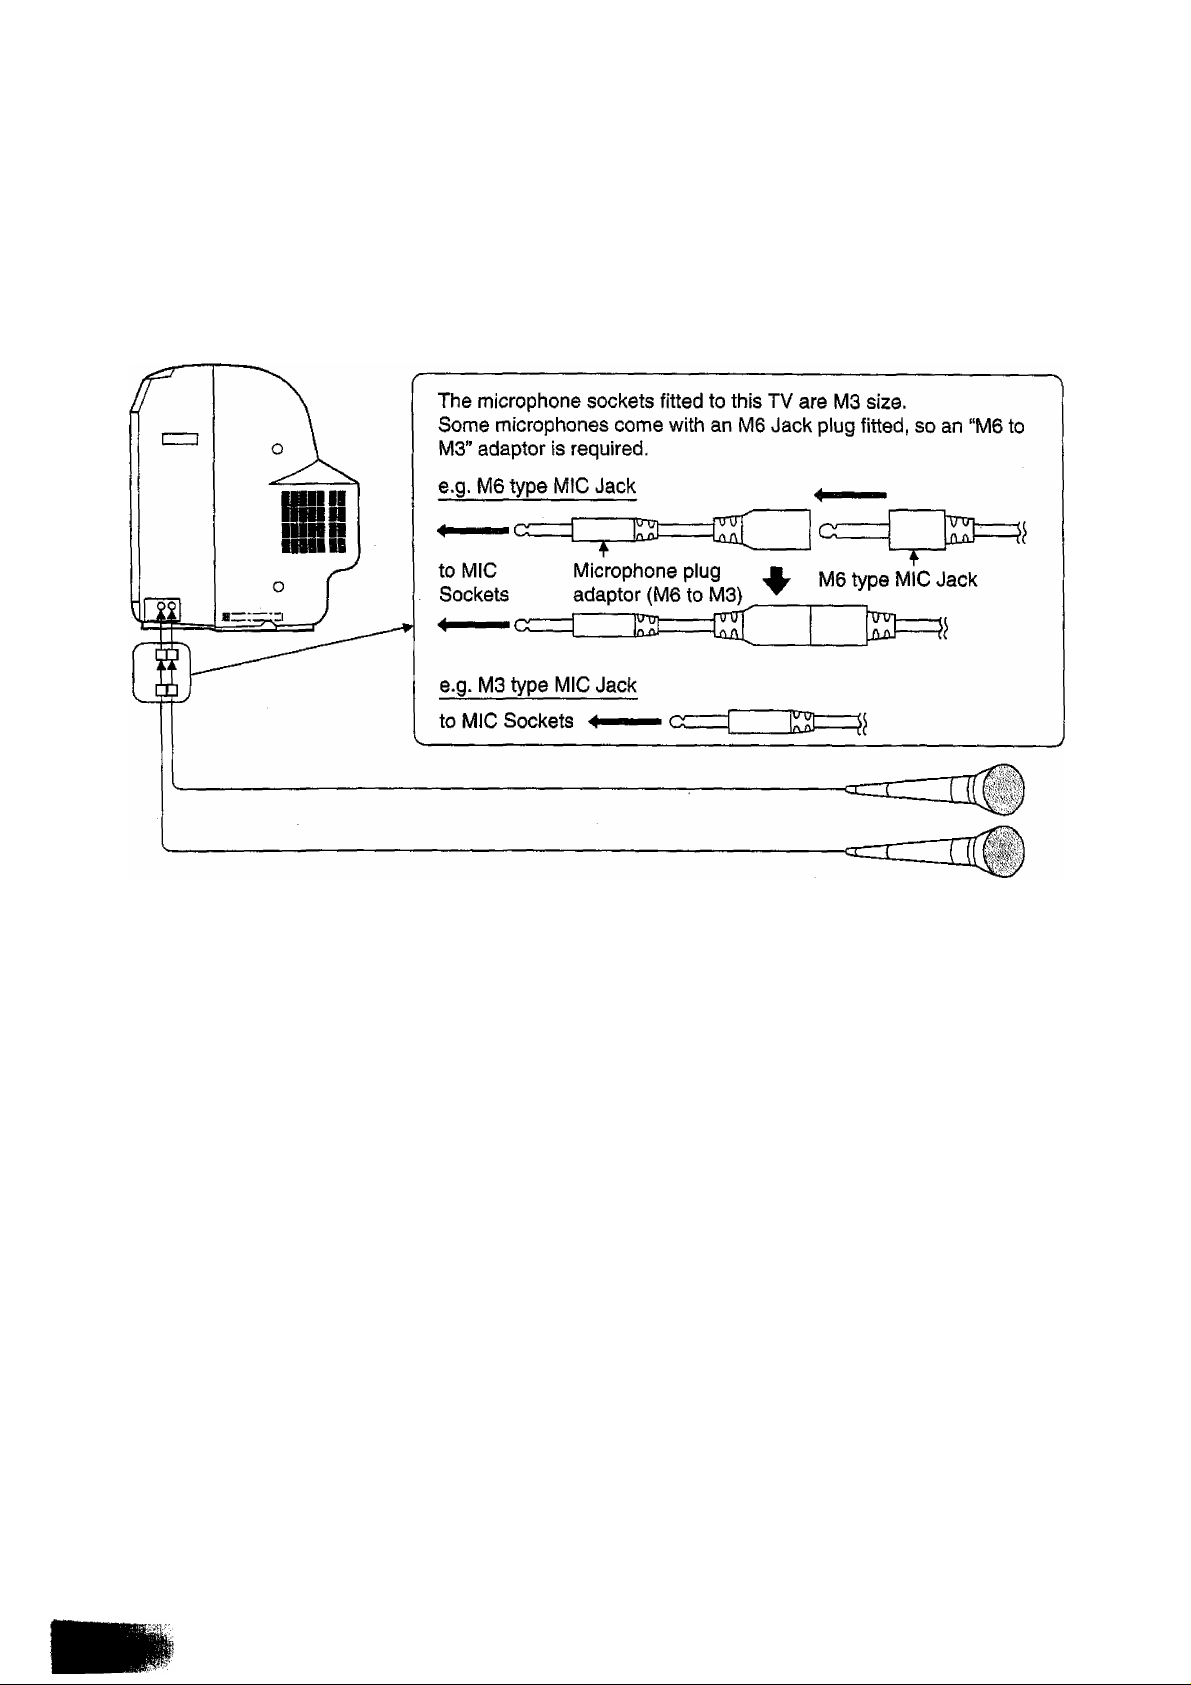
Connecting Microphones
Note:
• An “M6 to M3” adaptor is supplied with the TVA/CR combination Unit.
Use it with microphones fitted with M6 Jack plugs.
• “M6” type Jack plugs are also variously known as “Standard” or "6.5 mm” Jack plugs, and occasionally as “6.35
mm” Jack plugs.
• “M3” type Jack plugs are also variously known as “Mini”, “Miniature” or, more correctly, “3.5 mm" Jack plugs.
21
Page 22
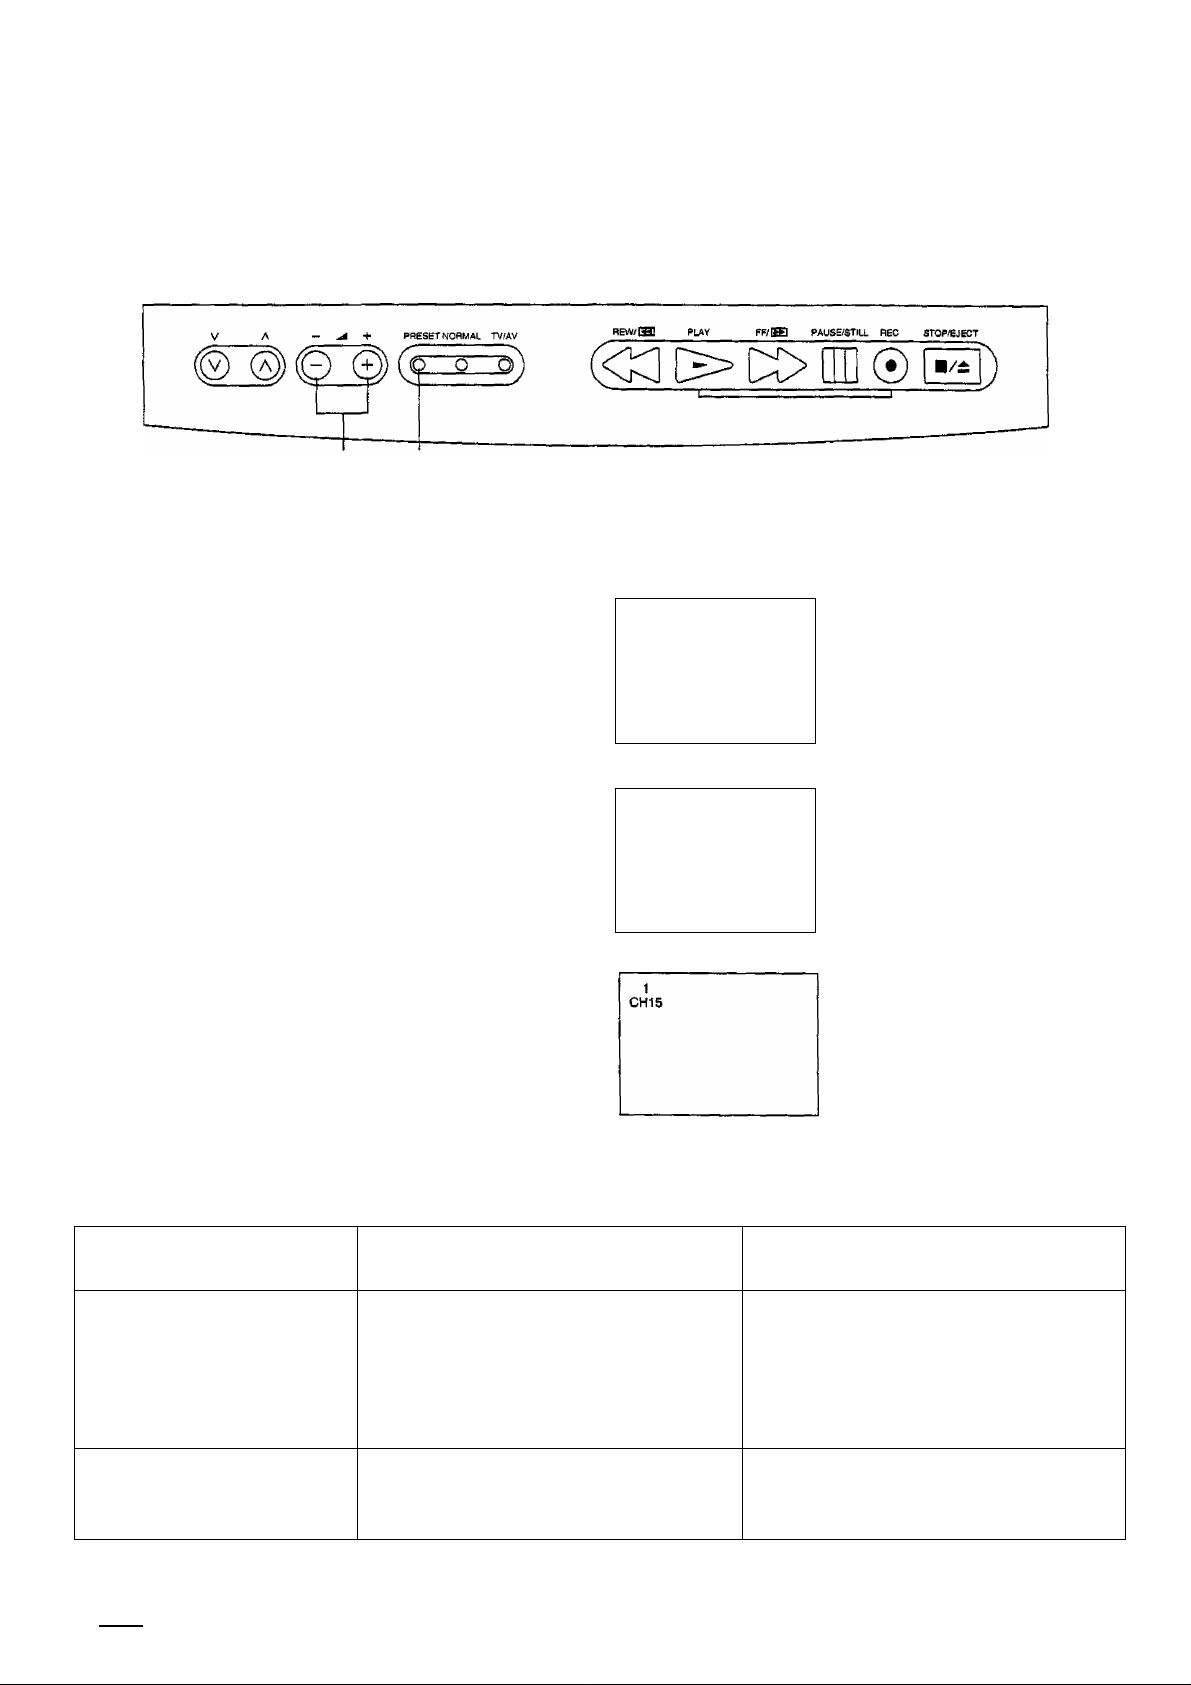
Country System Selection
2 1,3
Before AUTO SEARCH and MANUAL SEARCH, set the “SYSTEM SELECT” mode.
1
PRESET
Push the ‘‘PRESET’ Button.
The menu as shown at right will
appear on the screen.
%
Select the appropriate System,
refering to “System Select by
country" as shown below and on
O
the next page.
Push the “PRESET Button 7 times
PRESET
until the “PRESET MENU” on
screen display disappears.
System Select by Country
1
CHI5 PRESET
SYS SELECT
AUTO TUNE
MANUAL TUNE
SOUND SYS
COLOUR SYS
FINE TUNE
SKIP
1
CH15 PRESET
SYS SELECT
AUTO TUNE
MANUAL TUNE
SOUND SYS
COLOUR SYS
FINE TUNE
SKIP
CHINA
5.5MHz
AUTO
OFF
COR
5.5MHz
AUTO
OFF
System Select Condition
The highlight cursor is on
“SYS SELECT
Select between “CCIR" and
“CHINA".
Return to normal viewing.
SYSTEM
{On-screen Indication)
COUNTRY
WHAT YOU SHOULD
SELECT
22
CCIR
Hong Kong
Australia
New Zealand
Singapore
Indonesia
Thailand
Malaysia
If you are in any of the above countries,
you should select "CCIR”.
CHINA
China
If you are in the above country, you
should select "CHINA".
Page 23
Note:
• “CCIR” is an abbreviation of the French Words for International Radio Consultative Committee. Here the term is
used to refer to a (chiefly European) Standard for broadcast television channels.
Some countries employ Slightly different TV channel designation numbers to those of the CCIR International
Standard, for example Australia and New Zealand.
Your combination TV/VCR employs the CCIR International Standard.
Consequently, if you are in Australia or New Zealand, you should use the following Consequently, if you are in
Australia or New Zealand you should use the following cross reference charts when using the “CS” Channel
Select feature, detailed on page 34.
• The receiving channels are as follows;
The On Screen Display shows the CCIR channel numbers. Use this table to Select equivalent Australian and New
Zealand broadcast television channels.
TV Broadcasts Channel No.
3
CCIR
2
4 76
78
80
85
5 6
7
8
9
10
11 12
N.Z.
Australia
CCIR
Australia
CCIR
Australia
CCIR
Australia
Continued with the “Auto Search" Operation on pages 24 and 25, or with the “Manual Search" Operation on pages
26 and 27.
1
0
28
28
41
43
54
58
29
29
42
44
3
2
1
30 31 31/32 32
30 31
43
45 46
55
56
60 61
59
3
2
44
57
4
5 5A
TV Broadcast Channei No.
32
33
45 45/46
47
48
58
59 59/60 60
62
63
33
34
46
49
64
4 5
6 7
34
35
35 36
47 48
50 51
61
66
65
6
8
36
37
49
52
62
67
7
9
37
38
50
53
63
68
8
9
10
38 38/39
39
40
52
51
54
55
64
69
11
39
41
52/53 53
56
40
42
57
23
Page 24
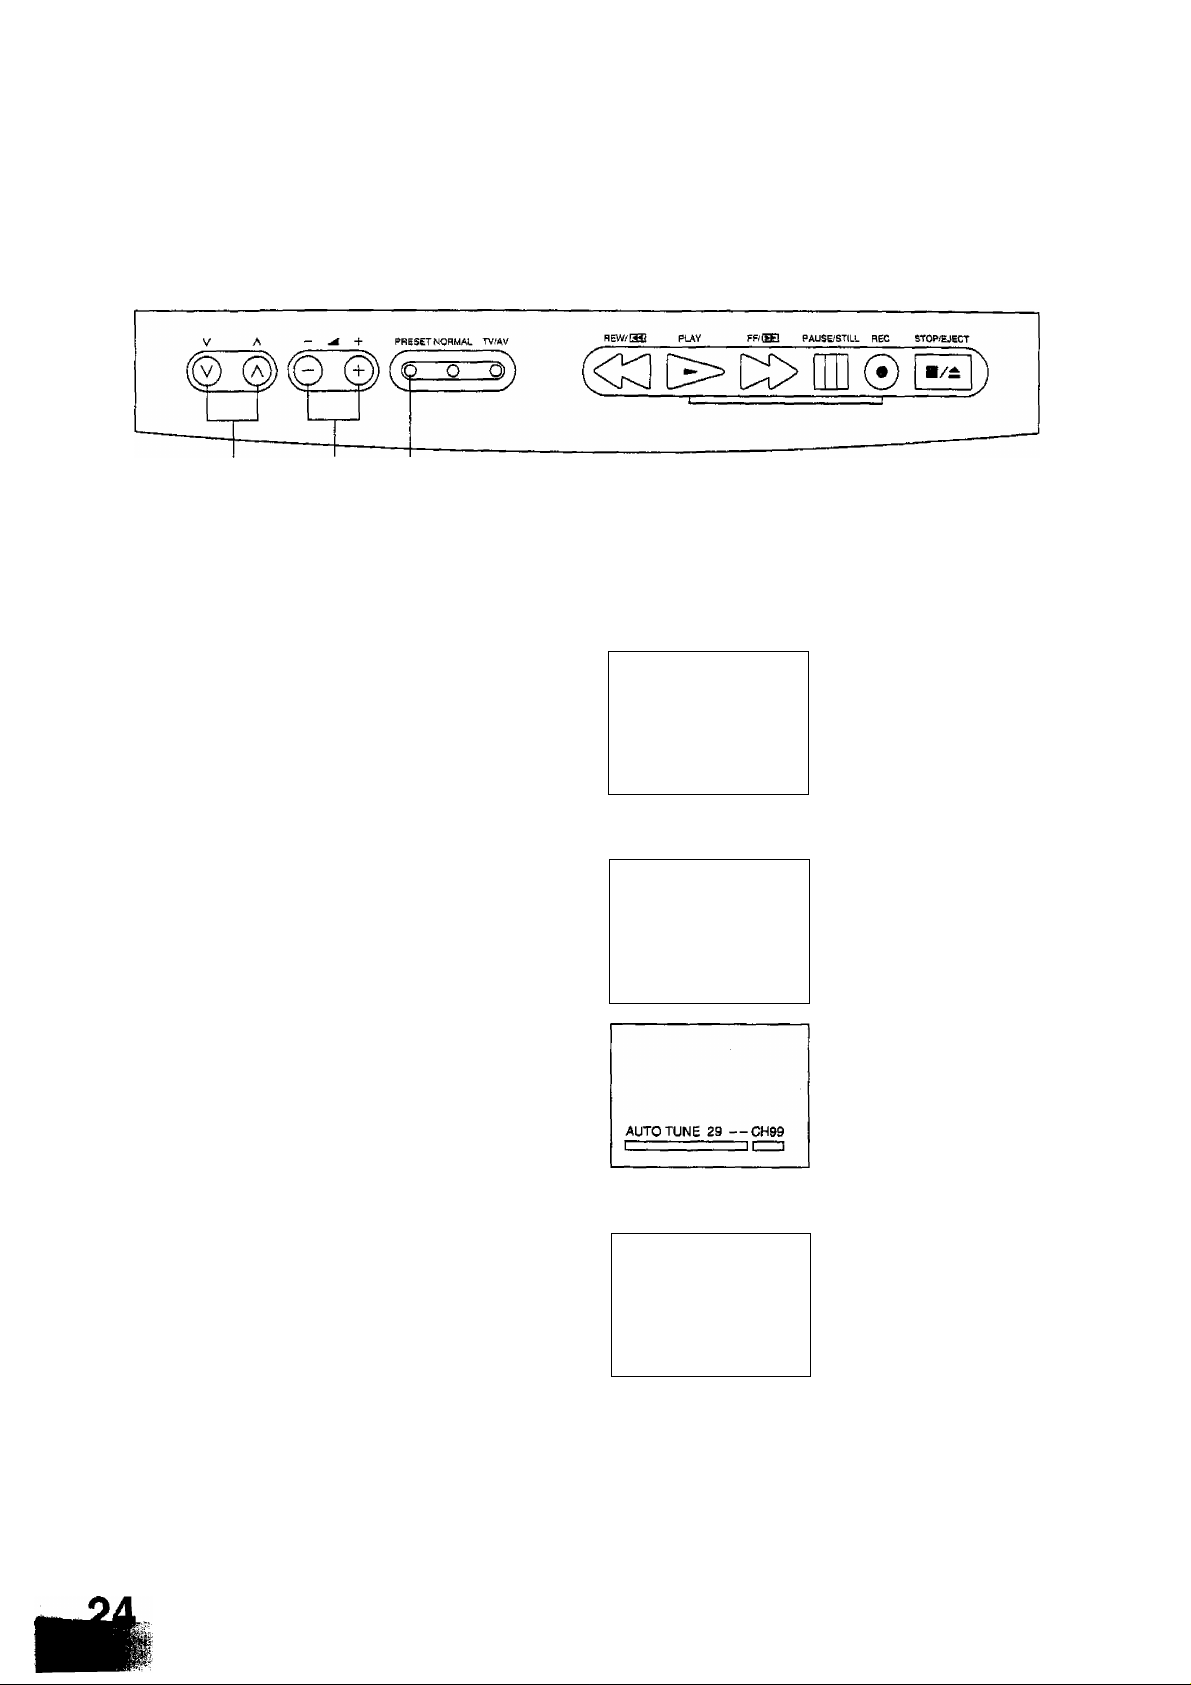
Automatic Search
3,5 2,4,51,6
This TV set will search automatically through all of the VHF and UMF bands.
After completion, the best tuning position is automatically memorised on each Programme Number
sequentially.
After the “SYSTEM SELECT” Operation, carry out this procedure (or Manual Search).
1
PRESET
I
©<1
Push the "PRESET” Button
twice.
Push the Volume Up or
Down Button.
1
CH15 PRESET
SYS SELECT
AUTO TUNE
MANUALTUNE
SOUND SYS
COLOUR SYS AUTO
RNETUNE
SKIP OFF
1
CH15 PRESET
SYS SELECT
AUTO TUNE
MANUAL TUNE
SOUND SYS 5.5MHz
COLOUR SYS AUTO
FINE TUNE
SKIP
COIR
5.5MHz
CCIR
OFF
The highlight cursor moves
to the AUTO TUNE position.
Start automatic tuning
search.
The best tuning position is
automatically memorised.
V A
After all stations are tuned,
the on-screen display will
automatically change from
the “AUTO TUNE" to the
“SOUND SYS” Position.
Confirm the sound condition
of each Programme Number
by using the Programme
Number Up “a” Button.
If the Sound is not clear or
no sound is produced on a
Programme Number, then
follow the next step, Step 4.
29
CH99 PRESET
SYS SELECT
AUTO TUNE
MANUAL TUNE
SOUND SYS 5.5MHz
COLOUR SYS
FINE TUNE
SKIP OFF
CCIR
AUTO
The highlight cursor moves
to the SOUND SYS
position.
Page 25

- -- +
0
3 4
If necessary, push the
Volume Up or Down
Button, to improve the
Sound quality.
Use the Programme
Number Up V’ button to
sequentially check each
station.
If necessary, repeat step 4
for each Programme
Number.
29
CH99 PRESET
SYS SELECT
AUTO TUNE
MANUAL TUNE
SOUND SYS
COLOUR SYS
FINE TUNE
SKIP
CCIR
5.5MHz
AUTO
OFF
The sound indicator will
change as follows.
4.5MHz 05.5IVlHz^
->6.5MHz^6.0MHzf
Refer to page 9 for an
explanation of these
systems.
6
PRESET
After all stations are tuned,
push the “PRESET' Button
4 times.
This returns the set to the
normal viewing condition.
A maximum of 29 channels
can be programmed.
Helpful Hint
(1) If a clear picture cannot be obtained even when a Broadcast or AV signal is received, refer to the "Colour System
Selection” Operation on page 39.
(2) After the Automatic Search is finished, push the Programme Number “Up” Button to confirm the tuning condition
for each Programme Number. If a Programme Number is unused, it is possible to skip such Programme
Numbers.
Please refer to the Programme Number Skip Operation on page 30.
(3) The Menu on the screen during this procedure is called the "Preset Menu”.
You can select Items or further (Sub-) Menus from it by repeated pushing of the “Preset” button, which wiil take
you through the following Items;
r>SYS SELECT-^ AUTO TUNE MANUAL TUNE ^ SOUND SYS ^ COLOUR SYS-j
-----------------------TV MODE<
-------------
SKIP <
------------
FINE TUNE ^——
---------------
25
Page 26

Manual Search
1 3,5 2,4,6
After the “SYSTEM SELECT” Operation, carry out this procedure (or Auto Search).
1
V A
©<1
PRESET
%
- ^ +
0
Push either the Programme
Number Up “a” or Down “v”
Button.
Push the “PRESET Button
3 times.
Push the Voiume Up or
Down Button.
Volume V’: Next higher
Channel
Volume Next lower
Channel
Note:
You can also select a
specific channel by pushing
the desired channel number
after pushing the CS button.
{Refer to page 34 and, if
necessary, consult the
cross-reference charts on
page 23)
1
CHI5 PRESET
SYS SELECT
AUTO TUNE
MANUAL TUNE
SOUND SYS
COLOUR SYS
FINE TUNE
SKIP OFF
1
CHI 5 PRESET
SYS SELECT
AUTO TUNE
MANUALTUNE
SOUND SYS 5.5MH2
COLOUR SYS
FINE TUNE
SKIP
MANUAL TUNE 1 —CHI 6
r~ni ~ 1' :i
CCIR
S.SMHz
AUTO
CCIR
AUTO
OFF
Select the desired
Programme Number.
The highlight cursor moves
to the MANUAL TUNE
position.
Start manual tuning Search.
The best tuning position is
automatically memorised.
PRESET
I)
Push the “PRESET Button.
1
CH16 PRESET
SYS SELECT
AUTO TUNE
MANUAL TUNE
SOUND SYS
COLOUR SYS AUTO
FINE TUNE
SKIP
CCIR
5.5MHz
OFF
The highlight cursor moves
to the SOUND SYS
position.
Page 27

If the sound is not clear or
no sound is produced on a
Programme Number
Position, push the Volume
Up V or Down Button.
1
CH16 PRESET
SYS SELECT
AUTO TUNE
MANUALTUNE
SOUND SYS
COLOUR SYS
FINE TUNE
SKIP
COR
5.5MHz
AUTO
OFF
You may improve the Sound
quality.
The sound indicator will
change as follows.
r>4.5MHzf^5.5MHzfi
->6.5MHzO6.0MHz<-
PRESET
Push the “PRESEr Button
4 times.
This returns the set to the
normal viewing condition.
I
Helpful Hint
(1) If a clear picture cannot be obtained even when a Broadcast or AV signal is received, refer to the “Colour System
Selection” Operation on page 39.
(2) After the Manual Search is finished, push the Programme Number “Up” Button to confirm the tuning condition for
each Programme Number. If a Programme Number is unused, it is possible to skip such Programme Numbers.
Please refer to the Programme Number Skip Operation on page 30.
27
Page 28

Fine Tuning
1 3 2,4
Under normal reception conditions this function is not used.
However, in areas of poor reception or constant interference, a slight adjustment of the tuning may improve
the picture and sound quality.
1
PRESET
— -^4"
0
Select the channel which
A
you want to improve.
Select the desired
Programme Number.
Programme Number
Push the “PRESET” Button
6 times.
Push and hold the Volume
1
CH15 PRESET
SYS SELECT
AUTO TUNE
MANUALTUNE
SOUND SYS
COLOUR SYS AUTO
FINE TUNE
. SKIP OFF
CCIR
5.5MHz
The highlight cursor moves
to the FINE TUNE position.
Start Fine tuning.
Up “+” or Down Button
until a clearer picture is
received.
FINE TUNE
C
1-CHI5
PRESET
Push the “PRESET” Button
twice.
■1
CH15 PRESET
SYS SELECT
AUTO TUNE
MANUAL TUNE
SOUND SYS
COLOUR SYS
FINE TUNE
SKIP
CCIR
5.5MHz
AUTO
OFF
The AFC (Automatic
Frequency Control) function
is deactivated, and the
symbol appears to the left of
the Programme Number.
This returns the set to the
normal viewing condition.
Programme Number with
AFC OFF indicator
Page 29

How to Cancel the Fine Tuning Function
1 3 2,4
Cancelling previously adjusted (manually) fine tuning, means re-activating the AFC (Automatic frequency Control) Function, also known as AFT (Automatic Fine Tuning).
1
PRESET
0
%
Select the “AFC OFF”
Programme Number which
you want to return to
Automatic Frequency
Control (cancel the manual
fine tuning).
Push the “PRESET” Button
3 times.
Push the Volume Up V or
DownButton, briefly.
Manually tune away from
the broadcast transmission,
then change buttons and
tune back to it.
•1
CHI5 PRESET
SYS SELECT
AUTO TUNE
MANUAL TUNE
SOUND SYS
COLOUR SYS
FINE TUNE
SKIP
■1
CH15 PRESET
SYS SELECT COIR
AUTO TUNE
MANUALTUNE
SOUND SYS
COLOUR SYS
FINE TUNE
SKIP OFF
COIR
5,5MHz
AUTO
OFF
5,5MHz
AUTO
When a Programme
Number with AFC set to
OFF is selected, the
symbol appears to the left of
the Programme Number.
The highlight cursor moves
to the MANUAL TUNE
position.
Such adjustment of
MANUAL TUNE
automatically restores AFC
to the ON condition and
cancels previous manual
fine tuning.
PRESET
I)
Push the “PRESET’ Button
5 times.
This returns the set to the
norma! viewing condition.
No means AFC is set
ON
29
Page 30

Programme Number Skip
2,4 3,4 1,5
This function makes it possibie to skip Programme Numbers on which no TV stations are tuned.
The function is only effective when selecting TV stations by pushing the Programme Number Up or Down
Buttons either on the TV set or the Remote control.
1
PRESET
V A
©
Push the “PRESET’ Button
7 times.
Select a Programme
Number you want to skip.
Push the Volume Up “+” or
Down Button.
1
CHI5 PRESET
SYS SELECT
AUTO TUNE
MANUALTUNE
SOUND SYS 5.5MH2
COLOUR SYS AUTO
FINE TUNE
SKIP
1
CH15 PRESET
SYS SELECT
AUTO TUNE
MANUALTUNE
SOUND SYS
COLOUR SYS AUTO
FINE TUNE
SKIP
1
CHI 5 PRESET
SYS SELECT
AUTO TUNE
MANUAL TUNE
SOUND SYS S.5MHZ
COLOUR SYS AUTO
FINE TUNE
SKIP
1
CH15 PRESET
SYS SELECT
AUTO TUNE
MANUALTUNE
SOUND SYS
COLOUR SYS AUTO
FINE TUNE
SKIP ON
CCIR
OFF
CCIR
5.5MHz
OFF
COIR
OFF
COR
5.5MHz
The highlight cursor moves
to the SKIP position.
The highlighted "OFF’
condition changes to “ON”.
The skip function is now set,
for that particular
Programme Number.
2 3
PRESET
%
Repeat Steps 2 and 3 for
the remaining Programme
Numbers for which the Skip
function is desired.
After the Skip Operation is
completed, push the
“PRESET Button.
This returns the set to the
normal viewing condition.
Page 31

How to Cancel the Skip Function
1
V A - ^ + PRESET NORMAL TV/AV BewSm PLAY
«a[>DC>
2,4 3,4 1,5
PRESET
%
Push the “PRESET” Button
7 times.
Select the skipped
Programme Number.
1
1
_________________
CH15 PRESET
SYS SELECT
AUTO TUNE
MANUALTUNE
SOUND SYS
COLOUR SYS
FINE TUNE
SKIP
CHI5 PRESET
SYS SELECT
AUTO TUNE
MANUAL TUNE
SOUND SYS
COLOUR SYS
FINE TUNE
SKIP
FF/gl PAUSBSTILL REC STQPffiJECT
The highlight cursor moves
CC!R
5.5MH2
AUTO
ON
to the SKIP position.
The “SKIP ON” indicator will
CCIR
5.5MHz
AUTO
ON
appear on the screen.
o
2 3
PRESET
%
Push the Volume Up
Button.
Repeat Steps 2 and 3, if you
wish to cancel the skip
function on any other
Programme Number.
After the Skip Cancel
Operation is completed,
push the “PRESET* Button.
1
CHI5 PRESET
SYS SELECT
AUTO TUNE
MANUAL TUNE
SOUND SYS 5.5MHz
COLOUR SYS
FINE TUNE
SKIP ON
1
CHI 5 PRESET
SYS SELECT
AUTO TUNE
MANUALTUNE
SOUND SYS 5.SMHZ
COLOUR SYS
FINE TUNE
SKIP
CCIR
AUTO
CCIR
AUTO
OFF
The highlighted “ON”
condition changes to “OFF".
The skip function is now
cancelied, for that particular
Programme Number.
This returns the set to the
normal viewing condition.
31
Page 32

1
(The TV set must be turned on.)
How to switch ON or OFF from
STAND-BY mode.
Push this button to turn the TV set
ON from STAND-BY mode.
Push it again to return the TV set
to STAND-BY mode.
Power for the TV is separated
from that for the VCR section.
When the power is switched off
during recording/rewinding, power
for the TV is shut off immediately,
but the power for the VCR is shut
off after compietion of recording/
rewinding.
Programme Number Selection
(Select your desired
programme number)
Push the Programme Number Up
“a” or Down V Button to select
the next higher or lower tuned
channel.
3
4
Direct Programme Number
Selection
(Programme Numbers 0-9)
e.g. To select Programme
Number "7”, push the “7”
Button.
Two Digit Programme Number
Selection
e.g. To select Programme
Number “24”;
Push the Button, then
push the “2” Button, and then
push the "4” Button.
32
Page 33

It is also possible to turn the TV set on by pushing the “Direct
Programme Number Selection” Buttons (0-9) or the
“Programme Number Up or Down" Buttons.
Note:
1. Do not leave the television in the Stand-by condition for
extended periods of time.
It is also recommended that you turn the Television Off,
for a short (approximately 1 hour) period, using the Main
Power ON/OFF Switch periodically (e.g. weekly).
2. This allows, when the television is again turned on.
Automatic Demagnetization of the picture tube to be
carried out.
if the television is not turned Off at the Power switch for
an extended period, poor picture Colour Quality may
become evident through residual magnetism within the
picture tube.
Start
Button
Note:
If the SKIP function has been set in either the next higher or
lower Programme Number, then that skipped Programme
Number will not be shown.
V Button
You can select the numbers 0 to 9 directly, by pushing the
corresponding number on the Remote Control.
You can select a two digit Programme Number.
24
Continued on the next page.
33
Page 34

Channel Select Button
You can select the actual channel
number which can be received in
your area directly with the Remote
Control.
Push the “CS (Channel Select)”
Button.
Then select the desired channel
directly. (Refer “Note”)
e.g. To select Channel Number
“12”.
Push the “CS" Button, then
push the “1” Button, and then
push the “2” Button.
Note:
You may need to refer to the cross
reference tables listed on page
23, for Australian and NZ use.
%\°%
TV/AV
8 NORMAL
TV/AV
Volume
Push the Volume Up “a” or Down
“v” Button to increase or decrease
the sound volume level.
TV/AV Selection
Push the ’TV/AV” Button to select
TV, AV input signal modes.
Normal Button (On the TV itself)
When this button is pushed, the
Picture menu will change to
Picture 2 (DYNAMIC), and each
control level will be changed to
the standard factory setting. For
Picture menu details, refer to
page 40.
Page 35

CH_^
CH 1 ^
CHia
1
CH12
AV
♦
Note:
If the sound is not clear or no sound is produced on a
Channei position, refer to the “Sound System Seiection"
Operation on page 38.
♦
Channeis selected by using the "CS” button foliow the CCIR
channel numbering system.
For information on how to relate CCIR channel numbers to
Australian and New Zealand channel numbers, refer to page
23.
Note:
The on-screen display will indicate both numerically and
graphically the volume level. Numeric levels start at “0” for
no sound, and will increase up to 63 which is the maximum
sound level.
You can sequentially select TV and AV modes.
Note:
(1) When AV mode is selected and the selected AV mode
has no picture signal, the Background colour of the TV
screen will change. (When Blue Back is set to the ON
condition. Refer to pages 44 and 45.)
(2) When TV mode is selected again, the previous
Programme Number will re-appearon the screen.
Note:
The function of the Normal button on the TV itself differs to
that of the Normal button on the Remote Control.
For Normal button function using the Remote Control, refer
to pages 42 and 43.
Continued on the next page.
35
Page 36

9
Mute Button
Push this button once to mute the
sound by 50%.
Push again to mute the sound
completely.
Push once again to restore the
previous sound level, and cancel
the mute.
Note;
The illustration shows the buttons inside the
Remote Control door. For the method for
opening the door, refer to page 14.
10
11 ffl
Recall Button
Push the “Recall” Button.
Information about the current
status of the Unit will appear on
the screen.
When the On-screen is displayed,
push the Recall Button until the
On-screen disappear.
Off Timer Button
The TV set may be preset to
switch off after a fixed period.
To confirm the remaining time,
push the “Recall” Button.
When the timer is preset during
recording, recording continues till
the end time of the timer preset
and then the power of the VCR is
shut off.
36
Page 37

Yellow
i
Red
The on-screen display will appear Yellow for 2-3 seconds,
followed by the Yellow mute symbol, which will remain while
the mute function is active.
The previous sound level will appear in Red.
The “Mute” symbol will remain unchanged.
1
VOLUME
Note:
In the “Mute” condition, you can use the Volume “Down”
Button, which won’t cancel the mute function.
Using the Volume “Up” Button, the "Mute” will be cancelled.
VCR/GAME Indicator (Page 44)
O
Programme Number (Page 32)
m
Programme Name (Page 34)
0
Colour System (Page 39)
o
Sound System (Page 38)
Picture Menu (Page 40)
P.NR on or off (Page 46)
o
REC Indicator (Page 60)
0
OFF Timer (Page 36)
©
Present date (Page 48)
By pushing the "OFF-Timer'’ Button, you can select the
preset times of either “30”, “60” or “90” minutes.
30 ^ 60 90
t_0^
Note:
The Pre-set time may be cancelled by setting the Preset time
condition to “0” using the “Off timer” Button, or by switching
the set OFF.
The OFF Timer clock will flash prior to automatic turn off.
37
Page 38

Sound System Selection
2 1,3
1
0
PRESET
PRESET
(This function is used only in
the TV mode.)
When the Sound is not clear
or no sound is produced on
a Programme Number, push
the “PRESET” Button 4
times.
Push the Volume Up “+” or
Down Button repeatedly
until the optimum sound is
obtained.
Push the “PRESET’ Button
4 times.
1
CHI 5 PRESET
SYS SELECT
AUTO TUNE
MANUALTUNE
SOUND SYS 5,5MHz
COLOUR SYS
FINE TUNE
SKIP OFF
1
CHI5 PRESET
SYS SELECT
AUTO TUNE
MANUALTUNE
SOUND SYS
COLOUR SYS AUTO
FINE TUNE
SKIP
CCIR
AUTO
CCIR
6.0MHz
OFF
The highlight cursor moves
to the SOUND SYS
position.
You may improve the sound
condition.
The sound system will
change as shown.
j->4.5MHz05.5MHzfj
^6.5MHzO6.0MHzf
This returns the set to the
normal viewing condition.
Note:
Refer to page 9 for an explanation of “Sound System”.
The selected sound system
is automatically memorised.
Page 39

Colour System Selection
2 1,3
PRESET
— jéÈ -j-
PRESET
if a clear picture cannot be
obtained when a Broadcast
or AV signal is received,
push the “PRESET’ Button
5 times.
Push the Volume Up V’ or
Down Button repeatedly
until the optimum image is
produced.
Push the “PRESET’ Button
3 times.
1
CH15 PRESET
SYS SELECT
AUTO TUNE
MANUAL TUNE
SOUND SYS 5.5MH2
COLOUR SYS
FINE TUNE
SKIP
1
CHI 5 PRESET
SYS SELECT
AUTO TUNE
MANUAL TUNE
SOUND SYS
COLOUR SYS
FINE TUNE
SKIP OFF
CCIR
AUTO
OFF
CCIR
5.5MHz
PAL
The highlight cursor moves
to the COLOUR SYS
position.
You may improve the colour
condition.
The colour system will
change as shown.
AUTO O PAL
"CNTSci
This returns the set to the
normal viewing condition.
%
Note:
Refer to page 9 for an explanation of “Colour System”.
The selected colour system
is automatically memorised.
39
Page 40

Picture Menu Selection
1
P-MENU
Picture Menu Select Operation
By pushing the “PICTURE MENU"
Button, you can sequentially
select any one of the three Picture
Menus (STANDARD, DYNAMIC
or MILD).
You can change the level of each
Function for each Picture Menu.
Please refer to pages 42 and 43.
Controllable Functions include
COLOUR, NTSC-TINT,
BRIGHTNESS, CONTRAST and
picture SHARPNESS.
PICTURE 1 (STANDARD)
For watching in normal (evening
lighting) environments. This menu
selects the normal level of
Brightness and Contrast.
Note;
The illustration shows the buttons inside the
Remote Control door. For the method for
opening the door, refer to page 14.
PICTURE 2 (DYNAMIC)
For watching in brighter (daylight)
environments. This menu selects
a higher level of Brightness and
Contrast.
PICTURE 3 (MILD)
For watching in a dark room. This
menu selects reduced levels of
Brightness and Contrast.
lili
Page 41

41
Page 42

Feature Menu Operation (Picture)
1
o
o
TV
(3 ™av
o o o
■FEATURE MENUcp
o D>
P-MENU SP/LPTtMER-RECSLOW
)
-------
SEARCH
TIME BLANK SKIP - +
00-0 o o
I— COUNTER —1
CD O O O O
--------------- I
CALL RESET MEMORY VTRACKINGA
----------------
o o
VCR
1—
OTR
1
<] ra p>
TV
Push the ‘TV FEATURE MENU”
Button.
Push again to cancel.
Select the Feature you wish to
change (Picture) by using the
cursor Up "A ” or Down “ V ”
Button.
2, 3, 4,5
Push the cursor Left *‘<I" or Right
1
<]
“t>” Button.
Arrow is at the NO position
Not Active
Arrow is at the YES position
NEXT Menu
Note:
The illustration shows the buttons inside the
Remote Control door. For the method for
opening the door, refer to page 14.
<] cm [>
<3
Heipfui Hint
Select the Function you wish to
change by pushing the cursor Up
“A” or Down" V ’’Button.
By pushing the cursor Left “<" or
Right “ > ” Button, you can select
the desired level of the function
you have selected.
By pushing the Normal "N” Button
on the Remote Control while the
Picture menu is displayed, the
selected menu will be changed to
the Normal Mode.
Normalisation will not occur if the
menu is not displayed when the
“N” Button is pushed.
Page 43

TV MENU
PICTURE
VCR/GAME
NOISE TIMER ON
BLUE BACK ON
P.NR
MENU
► NO YES
ON
ON
ON OFF
OFF
OFF
OFF
OFF
The “MENU” screen will appear.
You can change/select the condition of each item on the
Menu.
TV MENU
PICTURE
VCR/GAME
NOISE TIMER
SLUE BACK
P.NR .
MENU
PICTURE
VCR/GAME
NOISE TIMER ON
BLUE BACK
P.NR
MENU
PICTURE 1 (STANDARD)
332 COLOUR
lti)32 NTSC-TINT
ii5‘32 BRIGHT
[J47 CONTRAST
□ 32 SHARPNESS
TV MENU
► NO
► NO
YES
OFF
ON
OFF
ON
ON OFF
OFF
ON
OFF
ON
YES
OFF
ON
OFF
OFF
ON
OFF
ON
ON
OFF
The background colour of the selected Feature will change
to Black. You can select the desired Feature.
The Feature Menu will change as follows;
j-^PICTURE ^ VCR/GAME NOISE TIMER
P.NR^
BLUE BACK<-
]
Note:
Even if the TV is not set to “NTSC" mode, “NTSC-TINT” will
be displayed and level adjustment of the on screen display is
possible.
However this has no effect on the picture.
■ft-
COLOUR
032 CI=! CZ
PICTURE 1 (STANDARD)
032 COLOUR
[¿j32 NTSC-TINT
■jit 32 BRIGHT
347 CONTRAST
□ 32 SHARPNESS
NORMAL
e.g. Colour adjustment.
The Norma! mode is the factory preset condition. Returning
to this original condition is called “Normalisation”.
e.g. Normalised levels for Picture Menu 1.
Continued on the next page.
43
Page 44

Feature Menu Operation (VCR/GAME, NOISE TIMER and BLUE BACK)
1,
2,3
1
<1 CK3 [>
<] ra
Push the ‘TV FEATURE MENU’
Button.
Select the Feature you wish to
change (VCR/GAME, NOISE
TIMER, BLUE BACK) by using
the cursor Up “A ” or Down “ V
Button.
Push the cursor Left ” or Right
“l>” Button.
Arrow is at the OFF position
Not Active
Arrow is at the ON position
Active
VCR/GAME Mode
Reproduction of irregular signals,
such as certain TV games and
rental video tapes, may be
improved.
Note;
The illustration shows the buttons inside the
Remote Control door. For the method for
opening the door, refer to page 14.
NOISE TIMER Mode
If the set is not switched off when
the TV station stops broadcasting,
it will automatically go to Stand-by
Mode after 5 minutes.
Note:
This function will not operate
when the Television receiver is in
AV Mode.
BLUE BACK Mode
When no picture Signal is input, or
the Signal is weak, the screen
reverts to a blue background
colour.
Disable this Feature to continue
watching very weak signals.
Push the “TV FEATURE MENU”
button again, or select MENU
OFF to cancel the Feature Menu,
and return to normal viewing.
Page 45

TV MENU
PICTURE ►
VCR/GAME ON
NOISE TIMER
SLUE BACK
P.NR
MENU
NO
ON
ON
ON
ON
YES
OFF
OFF
OFF
OFF
OFF
The “TV FEATURE MENU” screen will appear.
You can change/select the condition of each item on the
Menu.
TV MENU
PICTURE
VCR/GAME
NOSE TIMER
BLUE BACK ON OFF
P.NR
MENU ON OFF
PICTURE NO YES
VCR/GAME
NOISE TIMER
BLUE BACK ON OFF
P.NR ON OFF
MENU ON OFF
PICTURE
VCR/GAME ON
NOISE TIMER
BLUE BACK
P.NR
MENU
NO
YES
ON►OFF
ON
OFF
ON OFF
TV MENU
► ON OFF VCR/GAME
ON OFF
TV MENU
NO
YES
OFF
► ON
OFF
OFF
ON
ON
OFF
ON
OFF
J к
NOISE TIMER ON OFF
BLUE BACK
P.NR ON OFF
MENU
VCR/GAME indicator
Programme Number
TV MENU
PICTURE NO YES
ON►OFF
ON OFF
ON OFF
The background colour of the selected Feature will change
to Black.
e.g. VCR/GAME Feature Selection
This Feature is oniy effective when the RF iN Terminai is
used, i.e. does not operate for signais input from the AV
terminals.
To STAND-BY after 5 minutes.
TV MENU
PICTURE
VCR/GAME ON
NOISE TIMER
BLUE BACK
P.NR ON
MENU
NO
ON
► ON
ON
YES
OFF
OFF
OFF
OFF
OFF
Blue if no input picture signal or input signal is weak.
Note:
If BLUE BACK Mode is set on while a VCR signal is being
viewed, selecting CUE or REVIEW may cause the screen to
revert to the blue background colour. Disable this feature to
view correctly.
45
Page 46

Feature Menu Operation (P. NR)
1,
2,3
1
<] ra [>
TV
Push the ‘TV FEATURE MENU"
Button.
Select the P. NR Feature by using
the cursor Up “A" or Down “ V ”
Buttons.
Push the cursor Left "<]” or Right
Button.
Arrow is at the OFF position
Not Active
Arrow is at the ON position
Active
Note:
The illustration shows the buttons inside the
Remote Control door. For the method for
opening the door, refer to page 14.
TV
P. NR Mode
The Picture Noise Reduction
System is designed to reduce
picture noise during poor quality
reception conditions.
Push the "TV FEATURE MENU”
button again, or select MENU
OFF to cancel the Feature Menu,
and return to normal viewing.
Page 47

TV MENU
PICTURE ► NO
VCFVGAME
NOISE TIMER
BLUE BACK
P.NR
MENU
YES
ON
OFF
OFF
ON
ON
OFF
OFF
ON
ON
OFF
You can change/select the condition of each item on the
Menu.
The “TV FEATURE MENU" screen will appear.
TV MENU
PICTURE
VCR/GAME
NOISE TIMER
BLUE BACK
P.NR
MENU
TV MENU
PICTURE
VCR/GAME
NOISE TIMER
BLUE BACK
P.NR
MENU
PICTURE NO
VCR/GAME
NOISE TIMER
BLUE BACK
P.NR
MENU
► ON
TV MENU
► ON
NO
ON
ON
ON
ON ►OFF
ON
NO
ON
ON
ON
ON
ON
ON
ON
ON
YES
OFF
OFF
OFF
OFF
OFF
YES
OFF
OFF
OFF
OFF
OFF
YES
OFF
OFF
OFF
OFF
The background colour of the selected Feature will change
to Black.
When the Picture Noise Reduction System is ON, picture
noise will be softened and less sharp.
TV MENU
PICTURE
VCR/GAME
NOISE TIMER
BLUE BACK
P.NR
MENU
NO
ON
ON
ON
ON ►OFF
ON
YES
OFF
OFF
OFF
OFF
When the Picture Noise Reduction System is OFF, the
picture will be sharper.
47
Page 48

Note:
When the “VCR” button is
pushed after your Unit is first
switched on from NEW, it
automatically enters this clock
setting Mode.
Q TV/AV
(S) o o o
VCR
Push the “VCR Feature Menu”
Button.
Set the cursor to CLOCK by
using the cursor buttons “A"
and “ V ” and then select
“YES” by using the cursor
buttons" <l ” and" >
Push the button once again to
cancel.
Note:
Start from Step 2 when you first
switched the main power (i.e.
from “New”).
VCR MENU
CLOCK
PROGRAMME NO
MENU
► NO
► ON
YES
YES
OFF
1
TV
Q
2~7
'<! ra l>i
® P-MENU SP/LPTlMER-flECSLOW
o o o o o
1
------------
•FEATURE MENU
SEARCH-------1 1
TIME BLANK SKIP - +
1—COUNTER—t
CALL RESET MEMORY V TRACKING A
Note:
The illustration shows the buttons inside
the Remote Control door.
For the method for opening the door,
refer to page 14.
--------------
o o
OTR
5^
1
2 ^
Set the “YEAR” by using the
cursor buttons “ < ” and “ > ”.
> — Raise the figure.
<l — Lower the figure.
d Set the cursor to “MONTH” by
^ nn cursor buttons “A ”
^ and “ V ”.
Set the “MONTH” by using the
<] ra
cursor buttons “ <l" and “ l> ”.
> —Raise the figure.
< —Lower the figure.
5 Set the cursor to “DATE” by
nri [> using the cursor buttons “A ”
and“ V
6 ^
< 1 m
Set the “DATE” by using the
cursor buttons “ <1 ” and “ >
> —Raise the figure.
<1 —Lower the figure.
YEAR
MONTH 1
DATE 1 (WED)
TIME
MENU
YEAR
MONTH 1
DATE
TIME —
MENU
YEAR
CLOCK
1392
► ON OFF
CLOCK
1992
1 (WED)
► ON OFF
CLOCK
MONTH
DATE 1 (TUE)
TIME
MENU ► ON OFF
YEAR 1992
MONTH
DATE
TIME
MENU ► ON OFF
YEAR 1992
MONTH
DATE 31 (THU)
TIME
MENU
1992
12
CLOCK
12
1 (TUE)
CLOCK
12
► ON OFF
—
7 XAv Set the cursor to "TIME” by
<3 rin using the cursor buttons “A ”
and “ V
YEAR 1992
MONTH
DATE
TIME
MENU ► ON OFF
CLOCK
12
31 (THU)
Page 49

Set the “HOUR” by using the
cursor buttons and “ l>
> — Raise the figure.
a — Lower the figure.
YEAR
MONTH
DATE
TIME
MENU
CLOCK
1992
12
31 (THU)
19: —
►ON OFF
9
Change to adjustment of the
“MINUTE” by using the cursor
<]
10
<] ra
buttons “A ” and" V
Set the “MINUTE” by using the
cursor buttons “< ” and “ I>
> — Raise the figure.
< — Lower the figure.
11 Set the cursor to "MENU” by
^ ro using the cursor buttons "A"
^ ^ ^ and “ V
YEAR
MONTH
DATE
TIME
MENU
YEAR
MONTH
DATE
TIME
MENU
YEAR
MONTH
DATE
TIME
MENU
CLOCK
1992
12
31 (THU)
19:--
►ON OFF
CLOCK
1992
12
31 (THU)
19:00
► ON OFF
CLOCK
1992
12
31 (THU)
19:00
► ON OFF
Note:
The illustration shows the buttons inside
the Remote Control door.
For the method for opening the door,
refer to page 14.
12^
a m
Seiect “OFF” by using the
cursor buttons "O ” and “ >
The ciock starts and the TV
picture re-appears.
Note:
• The Unit will accept dates from 1990 through to December 31,
2089.
• Designation of a date outside these limits, or not selecting even one
of the time settings, will cause the Unit-to not accept your settings,
and not set the clock.
49
Page 50

1
PLAY
PLAY Button
Push this button to playback the
tape.
-PLAY
Note:
Whenever playing a tape, the
mode is automatically switched
over to the “VIDEO” mode even if
the TV is set to the “TV” mode.
3
2
2
STOP/EJECT
1
STOP/EJECT Button
Push the “STOP" Button to stop
the tape.
■STOP
Push the STOP/EJECT button to
eject the tape.
iEJECT
FF (Fast ForwardyCue Button
Push this button to fast forward
the tape.
During playback mode, holding
this button down will allow you to
view the picture in the forward
direction rapidly.
FF
Page 51

REW (Rewlnd)/Revlew Button
Push this button to rewind the
tape.
During playback mode, holding
this button down will allow you to
view the picture in reverse rapidly.
Note:
When the power is switched off
during rewinding, the power of the
TV is shut off immediately, but the
power of the VCR section is shut
off only after completion of
rewinding (REWIND SHUT OFF).
PAUSE/STItL Button
Push to stop the tape temporarily
pAusE^iLL |iipause/still during playback and recording.
During playback; Still picture.
•*4 REW
PLAY REC
During recording: To interrupt
recording
II PAUSE
Note:
When Pause is continued for
more than 5 minutes, it is
automatically cancelled for
protection of the tape.
When Still is continued for more
than 3 minutes, it is automatically
cancelled for protection of the
tape.
REC (Record) Buttons
Recording is started by pushing
these 2 buttons at the same time.
• REC
Note:
When a tape with erasure
prevention tab is inserted, the
tape is automatically ejected,
insert a tape with the erasure
prevention tab still in place.
Continued on the next page.
51
Page 52

8
7
6 Q „„V |Q(
(Q) o o o
II PAUSE/STILL . I
О dEz32)
!!► F. ADV REPEAT MONITOR
■ O ^ Cb
--------------------------
-
НЕС
A © © ©
-------
REPEAT
1
8
!!► F. ADV
REPEAT Button
When the REPEAT button is
pushed during playback, the tape
is played back repeatedly from the
start to the end of the recorded
content.
PLAY
Note:
When either the REPEAT,
PAUSE, FAST FORWARD,
REWIND or STILL buttons are
pushed during repeat playback,
repeat playback is cancelled. The
operation mode changes to that
determined by the button pushed.
F. ADV Button (Frame Advance)
Push this button during Still Mode.
Each time you push this button,
the Still picture is advanced,
frame by frame.
V ® © ©
A ©
V @ © ©
KARAOKE
o
ECRO/MIC (NTROANDEX
cb ci)
TV/VCR/KARAOKE
MONITOR
MONITOR Button
When the MONITOR button is
pushed during playback of a tape,
you can watch the TV picture for a
moment while the button is held
down.
Use this function to briefly check
or monitor the TV broadcast
picture while playing and viewing
a tape.
Note:
Holding the monitor button in the
pushed condition for extended
periods will result in shortened
Remote Control battery life.
Page 53

13
Q TVMV [Q<
(Q o o o
I
----
FEATURE MENU
TV ^ VCR
o o
< 3
ra [>
P-MENu\ SP/LPTIMER-REC SLOW
O O CD O (Z>
I
-----
SEARCH
-------
TIME BLANK SKIP
CALL RESET MEMORY VTRACKINGA
1
---
10
j
OTR
o
SLOW
11
10
11
O
Slow Button
When the SLOW button is pushed
during playback, playback
continues at a slower speed.
When it is pushed during a Still
picture, the picture is forwarded
frame by frame. When the button
is held down, continuous frame
forwarding occurs.
When Slow playback is continued
for more than 3 minutes, it is
automatically cancelled for
protection of the tape.
—When this button is held
down the speed of Slow
playback will be increased.
— When this is held down the
speed wilt be decreased.
Note:
The illustration shows the buttons inside the
Remote Control door. For the method for
opening the door, refer to page 14.
I!
12
12
13
VTRACKINGA
CD
SP/LP
TRACKING Button
When the playback picture is not
clear, push the TRACKING
buttons and V to adjust for
best picture.
SP/LP Button
The recording time can be altered
as follows.
SP —Standard Mode
LP —Twofold Mode (PAL)
Threefold Mode (NTSC)
Helpful Hint
SP (STANDARD PLaIy) —When recording a programme
which you want to preserve, or
when recording a programme for
editing in the future, etc.
LP (LONG PLAY)
Note;
Picture and tone quality are inferior to those of tape recorded
in Standard Play (SP] Mode.
-—When recording a long duration
programme on a tape, etc.
53
Page 54

Using the Tape Position Counter.
1
CALL
RESET
MEMORY
Displaying the Tape Counter.
Make sure that a tape is inserted.
The playback time after insertion
of the tape is shown after pushing
the CALL button. Push the button
once again to cancel.
■STOP
0:10.00
Resetting the Tape Counter.
Push the RESET button; the
counter resets to "0:00.00”.
■STOP
0:00.00
Making the VCR memorise this
position.
Push the Memory button to
memorise the RESET position.
“M” appears on the screen to
indicate such memory to you.
4
■STOP
M 0:00.00
When either the FAST FORWARD
or REWIND button is pushed, the
tape automatically stops at
“0:00.00”, after such position has
been memorised.3
Page 55

Skip Search
Push the SKIP button to skip commercials etc. during
playback.
1
SKIP
The skip time can be selected by
repeatedly pushing the SKIP
button.
30 sec. (once) 60 sec. (twice)
^ 90 sec. (three times) -^120
sec. (four times)
»■SKIP SEARCH 30S
The tape returns to normal
playback after advancing the
selected skip time.
Blank Search
For urgent recording, you can search for an unused part of a
tape by one-touch control.
Note:
The illustration shows the buttons inside the
Remote Control door. For the method for
opening the door, refer to page 14.
BLANK
Insert the video cassette tape
concerned.
Push the BLANK button.
The VCR will search for an
unused part of the tape
automatically.
FF-»^ BLANK
Note:
When more than one programme is recorded on a tape and
there is more than 3 sec. of unrecorded tape between two
such programmes, the tape will stop at that intermediate
point.
55
Page 56

Q_^ СЭ TV/AV
(O) O O O
FEATURE MENU-
© P-MENU 3P/LPTIMER-RECSL0W
o o o o o
1
-------
SEARCH
---
1 I
TIME BLANK SKIP - +
(— COUNTER —1
CALL RESET MEMORY V TRACKING A
----------
o o
o o
TIME SEARCH
When the position of the recorded portion of a tape that you
want to see is known, that point can be easily found after fast
forward or rewinding.
1
1
TIME
<]
Push the Tíme button during
either Stop Mode or Playback.
Input the amount of playback time
between the current and the
desired tape positions.
> —Raise the figure.
< —Lower the figure.
Setting range;
0:00-9:59
O- C3
(O) o o o
II PAUSe/STILL I--------• REC
-----------
1
о (ХЕЗз
IIP F. ADV REPEAT MONITOR
О О О
Decide which direction to make
the tape advance, and use the
Fast Forward or Rewind buttons
accordingly.
(Example) Rewinding:
Push the REW button. Rewinding
starts and the remaining time for
time search is indicated.
REW-* 0:21
When the remaining time
becomes “0:00", the Mode
changes to Playback.
Note;
The counter stops at any portion of the tape where no
programme is recorded. The time search does not include
the time of such tape portions.
Page 57

Auto Index Search Operation (When KARAOKE Mode is
switched OFF.)
In INDEX SEARCH Mode, the first 10 seconds of each
programme are played back, consecutively.
3
2
1
iNTRO/INDEX
Auto Intro Search Operation (When KARAOKE Mode is
switched ON.)
Push the INTRO/
INDEX Button.
Push the FF {Fast
Forward) Button or
REW (Rewind)
Button, depending
on which direction
you wish to search in
Press the PLAY
button when your
desired Programme
is reached.
INDEX SEARCH 0
FF->-AUT0
► PLAY
!<♦
1
In INTRO SEARCH Mode, the first 10 seconds of each
music piece are played back.
1
iNTRom^Ex iNQEX" Button.
Push the “INTRO/
Push the “FF (Fast
Forward)” Button or
“REW (Rewind)”
Button.
When a programme
number is selected,
the tape is searched
automatically to
access the beginning of
that programme.
^ INTRO SEARCH 0
■ FF->.AUT0
► PLAY
57
Page 58

Index Search Operation (When KARAOKE Mode is
switched OFF.)
When a Programme Number is selected, the tape is searched
automatically to access the beginning of that Programme.
Insert a recorded cassette tape with index signals.
1 INTRO/INDEX
o
Push the INTRO/
INDEX Button.
Select the
Programme Number
to Search for, by
pushing the V’
button repeatedly.
Setting range;
INDEX SEARCH 0
INDEX SEARCH 5
1~20
Decide the direction
to search in and use
either the "REW
(Rewind)” or “FF
(Fast Forward)”
Buttons accordingly.
Intro Search Operation (When KARAOKE Mode is switched ON.)
►► FF-^5
1
2
The tape is searched automatically for blanks (no sound) of
more than 6 seconds duration to enable access to the
beginning of a desired tune.
INTRO/INDEX
1
Push the “INTRO/
INDEX” Button
INTRO SEARCH 0
o
«0
Designate the order
of music by pushing
the “+” orbutton.
Setting range;
INTRO SEARCH 5
1-20
Decide the search
direction by using
either the “REW
(Rewind)” or “FF
(Fast Forward)”
Buttons.
(Example)
FAST FORWARD
FF-^5
Page 59

Recording of index Signals
Index signals will be recorded automatically in the following cases;
• At the tape position at which the Record Button is pushed to start recording.
• At the tape position at which a Timer Recording is started.
In the following cases, the Intro Search function may not work correctly:
• When using a tape recorded in the LP mode. (It is recommended that you use tapes recorded in the SP mode.)
• When some loud sounds are recorded between programmes or Karaoke tracks or at the beginning of
programmes.
• When the search for a Programme or Karaoke track is started from close to the beginning of the tape or close to
an interval between programmes.
• When a Programme or Karaoke track is very short (less than 40 seconds).
• When using tapes with poor quality, for example tapes that have been dubbed repeatedly.
• When there are passages with very weak sound or passages without any sound in a Programme or Karaoke
track.
• When the intervals between Programmes or Karaoke tracks are shorter than 6 seconds.
• When using tapes recorded with the Fade-in or Fade-out recording function.
• When some narration has been recorded at the beginning of the Programmes or Karaoke tracks.
• When using a tape recorded in the NTSC system.
59
Page 60

The One-Touch Timer Recording function is useful when you
want to record a programme today or the day after. You can
easily preset the timer recording by setting the start time and
recording time (in 30 minute increments).
1
4
<3
OTR
SP/LP
Select the desired channel.
(Example):
When receiving Channel 2.
You can also select the desired
channel fay pushing the channel
Up “a” and Down V’ Button or the
CS (Channel Select) Button,
Push the OTR (One-Touch Timer
Becording) button.
Select the desired record Mode.
Use the SP/LP Button.
SP
------
Standard mode
LP
------
Twofold mode (PAL)
Threefold mode (NTSC)
Set the start time.
You can select the desired start
time in 30 minute increments from
the current time.
Note:
Set “START NOW” Mode when
you want to record at once.
60
<] Ш [>
<]
Set the cursor to REC H by using
the cursor buttons “A ” and “ V ”,
Set the recording time.
You can select the recording time
in 30 minute increments at every
push of the cursor buttons"
and “ t>
0:00 <-> 0:30 O 1:00 ^ 1 ;30 ^ 2:00
^ END (TAPE END) O 4:00 O 3:30<-'
Recording will now start when the
start time arrives.
< 1
”
Page 61

OTR
POS
START NOW
RECH 0:00
SPEED SP
POS
START NOW
REC0
SPEED LP
POS
START
RECB
SPEED LP
POS
START
REG a
SPEED LP
OTR
OTR
OTR
2-CH2
2-CH2
0:00
2-CH2
14:00
0:00
2-CH2
14:00
2:00
Note:
• When the current time has not previously been preset, the
Menu for “Setting the clock” is displayed. First, set the
clock while referring to "How to set the clock” on page 48
and 49.
• When a tape with erasure prevention tab removed is
inserted and you set the “OTR”, the tape is automatically
ejected. Insert a tape with the erasure prevention tab still in
place.
• You can not select One-Touch Timer Recording while the
timer is preset. Cancel the timer first.
• Picture recording is not cancelled by pushing the STOP
button.
• When the recording time is set to S END (tape end), the
remaining time is not indicated.
• One Touch Timer Recording can not be performed when
the Karaoke Mode is ON. Turn the Karaoke Mode OFF.
61
Page 62

When you want to check the remaining OTR recording time.
1
1
OTR
The remaining time
is indicated by
pushing the “OTR”
Button.
POS
START NOW
ЯЕСН
SPEED SP
When you want to
extend the recording
time, set the cursor to
REC S by pushing the
cursor button “ V ” and
then change the
recording time by
pushing the cursor
buttons “<]” and
When you want to stop in the middle of recording
"I OTR Show the remaining
time by pushing the
“OTR” Button.
POS
START
REC0
SPEED
ОТП
OTR
2-CH2
0:25
2-CH2
NOW
0:20
SP
Note:
The illustration shows the buttons inside the
Remote Control door. For the method for
opening the door, refer to page 14.
Set the recording time to
“0:00” by pushing the ”N"
Button. Recording will
stop immediately.
Page 63

63
Page 64

Programme Timer Recording is a function which enables you
to record TV programmes, or from the external input up to 6
programmes, on optional days, everyday, or every week, for up
to a month in advance.
1
VCR Push the'VCR FEATURE
MENU” Button, Select
Programme "YES” by
CLOCK NO YES
PROORAMME NO YES
MENU ► ON OFF
using the cursor buttons
"<”and“>”. Push the
button once again to
cancel, by selecting
programme "NO".
1
2
jnumber by using the
<]
~~ cursor button “A" and
Select the programme
NO POS DATE STi
Recording is executed by
using the cursor button
“O” and“t>".
VCfl MENU
PROGRAM
SORT^N
MENU^O
ME
STOP
0 Yt
N 0■SrF
Note:
The illustration shows the buttons inside the
Remote Control door. For the method for
opening the door, refer to page 14.
3
4
<
< 3
The channel to be
reserved can be selected
by repeated pushing of the
cursor buttons “ <l” and
Set the cursor to “DATE"
nn I
by using the cursor button
“V ”. The present day is
displayed.
The recording date can be
selected by repeated
ra
pushing of the cursor
О buttons and" t> ”. The
recording date can be
PROGRAMME No 1
POS 1 (CH 1)
DATE
START —;—
STOP
SPEED ► SP LP
MENU ►ON OFF
PROGRAMME No 1
POS 1(CH1)
DATC
START
STOP
SPEED ► SP LP
MENU PON OFF
PROGRAMME No 1
POS 1 (CH 1)
DATE EVERYDAY
START —;—
STOP —:—
SPEED ► SP LP
MENU ►ONOFF
selected, from today,
yesterday of the next
month, everyday, Monday
to Saturday, Monday to
Friday, every week, or
from Sunday to Saturday.
Page 65

<] cm [>
Set the cursor to “HOUR”
of the start time by using
the cursor button “ 7 ”.
The present time is
displayed.
PROGRAMME No 1
POS KCH1)
DATE EVERY DAY
START —:—
STOP —:—
SPEED ► SP LP
MENU ► ON OFF
(Q o o o
■FEATURE MENU
TV
o
6-11
Note:
The illustration shows the buttons inside the
Remote Control door. For the method for
opening the door, refer to page 14.
<] ra l>
1 1
___
----------
0 P-MENU SP/LPTiMER-RECSLOW
o o o o o
1
--------
SEARCH
TIME BLANK SKIP - +
I— COUNTER —I
CALL RESET MEMORY V TRACKING A
-----
o o
o
Q
VCR
OTR
1
u
<] cm
The start time can be
selected by repeated
pushing of the cursor
buttons “<i” and
PROGRAMME No 1
POS 1 (CH 1)
DATE EVERY DAY
START 19;-STOP
SPEED ► SP LP
MENU ► ON OFF
D> —Raise the figure.
< —Lower the figure.
8
9 ^
<l Cn3
Set the cursor to
"MINUTE” of the start
time by pushing the
cursor button “ V
The "MINUTE” of the
start time can be selected
by repeated pushing of
the cursor button “ <1”
PROGRAMME No 1
POS 1(CH1)
DATE EVERY DAY
START 19;- STOP —
SPEED ► SP LP
MENU ► ON OFF
PROGRAMME No 1
POS 1 (CH 1>
DATE EVERY DAY
START 19:30
STOP —
SPEED ► SP LP
MENU ► ON OFF
and “ > ”.
c>
■Raise the figure.
<1
■Lower the figure.
10^
<l C5D
>
11
<] i
Continued on the next page.
Set the cursor to “HOUR”
of the end time by
pushing the cursor button
“V ”.
The “HOUR” of the end
time can be selected by
repeatedly pushing of the
cursor buttons “ < ” and
!> —Raise the figure.
< --Lower the figure.
PROGRAMME No 1
POS 1 (CH 1)
DATE EVERY DAY
START 19:30
STOP
SPEED *■ SP LP
MENU ► ON OFF
PROGRAMME No 1
POS 1 (CH 1)
DATE EVERY DAY
START 19:30
STOP 21:—
SPEED ► SP LP
MENU ► ON OFF
65
Page 66

12^
<! m
Set the cursor to
1^ “MINUTE” of the end
time by pushing the
cursor button “ V
PROGRAMME No t
POS 1(CH1)
DATE EVERY DAY
START 19:30
STOP 21:—
SPEED ► SP LP
MENU ►ONOFP
O O TV/AV
(S) 0 0 0
■FEATURE MENU
TV
12-17
?
O m D>
P-MENU SP/LP TIMER-RECSLOW
CD CD CD CD CD
I
--------
SEARCH
------
TIME BLANK SKIP - +
O-CZMZ)
.— COUNTER—1
CALL RESET MEMORY V TRACKING A
( I
o o
o o
Note:
The illustration shows the buttons inside the
Remote Control door. For the method for
opening the door, refer to page 14.
----------
o
VCR
OTR
1
13 The “MINUTE” of the end
time can be selected by
<d - I repeated pushing of the
x;;/' Q cursor buttons “ <3 ’’ and
“ >
!> —Raise the figure.
<1 —Lower the figure.
14
Set the cursor to SPEED
by using the cursor
button “V
15 . The recording time of the
___
tape can be selected by
^ ^ repeated pushing of the
^ cursor buttons “ <1 ” and
“ >
SP—Standard mode
LP --Twofold mode
(PAL)
Threefold mode
(NTSC)
PROGRAMME No 1
POS 1 (CH 1)
DATE EVERY DAY
START 1S;30
STOP 21:30
SPEED ► SP LP
MENU ►ONOFF
PROGRAMME No
POS 1 (CH 1)
DATE EVERY DAY
START 18:30
STOP 21:30
SPEED ► SP LP
MENU ►ON OFF
PROGRAMME No 1
POS
1 (CHI)
DATE EVERY DAY
START
19:30
STOP
21:30
SPEED SP^LP
MENU ► ON OFF
1
16 Set the cursor to “MENU”
by using the cursor
<C] nri [> button “ V ”,
17
rm
^N7
Select “MENU OFF” by
using the cursor buttons
<!” and “I>”.
PROGRAMMENol
POS 1 (CH 1)
DATE
EVERY DAY
START
19:30
STOP 21:30
SPEED
SP^LP
MENU
► ON OFF
PROGRAMME
NO POS DATE START STOP
1
1 DAY 19:302130
2
3
4
s
8
SORTANO
MENU►ON
YES
off
Page 67

18
zx
<] QJ
Set the cursor to “MENU”
by pushing the cursor
button “ V
PROGRAMME
NO POS DATi START STOP
1
1 DAY 19-.30
£
3
4
5
e
SORT NO
MENU ►ON
2V.30
YES
OFF
Note:
The illustration shows the buttons inside the
Remote Control door. For the method for
opening the door, refer to page 14.
19
20
zz
<] cx:
hmewrec
Select “MENU OFF’ by
using the cursor buttons
and
Push the TIMER-REC
button and the
programme reservation is
executed. The TIMER-
REC Indicator (Orange)
lights up and the VCR is
standing by ready for
recording.
Note:
Switch off the power
when you are not
watching the TV or will be
absent during recording.
Note:
• Adjustment of the programme memory can not be
conducted during picture recording.
• Set the end time of any recording to be within 23 hours
and 30 minutes from the start time.
• When the present clock time is changed after adjustment
of the programme memory, the preset programmes are left
as they were, or otherwise cancelled.
• When a tape with erasure prevention tab removed is set
for timer recording, the TIMER-REC Indicator blinks and
the tape is automatically ejected. Insert a tape with erasure
prevention tab in place.
• When programme times overlap, the programme with the
lower programme number is given priority.
• Programme Timer Recording can not be performed when
the Karaoke Mode is ON.
Turn the Karaoke Mode OFF.
67
Page 68

Programme checking
Note:
The illustration shows the buttons inside the
Remote Control door. For the method for
opening the door, refer to page 14.
1
1
VCR
Push the “VCR
FEATURE MENU”
button.
Note:
When the timer is preset,
the programme table
appears immediately.
2
CHU
<
Select YES by using the
cursor buttons “
“ !>" and the programme
table appears.
Note:
The content of the
applicable line blinks
while that programme is
being executed.
Programme cancellation
1
VCR
Push the “VCR
FEATURE MENU” Button
and select Programme
YES by using the cursor
buttons and‘‘i>”.
The programme table
appears.
Note:
Cancel the timer first
when a reserved
programme is being
executed (when the timer
is preset).
2
nn
Select the programme to
be cancelled by using the
cursor buttons “A" and
" V " and execute
cancellation by using the
cursor buttons" < ” and
“ !>
< 1
” and
VCR MENU
CLOCK NO YES
PROGRAMME ► NO YES
MENU ► ON OFF
PROGRAMME
NO POS DATE START STOP
1
1 DAY 12:00
2
3 10 17:00
3
T MON 20:00
—
4
5
—
6
SORT►NO
MENU^ON OFF
PROGRAMME
NO POS DATE START STOP
1
3 10 19:00
2
3
4
5
6
SORT►NO
MENU►ON
PROGRAMME No 1
P08 3(CH3)
DATE 10 (SAT)
START 19:00
STOP 20:00
SPEED ► SP LP
MENU ► ON OFF
13:00
18:00
21:00
YES
20:00
YES
OFF
68
Push the "N” Button and
cancel the contents of the
programme.
Note:
Ail the programmes 1-6
can not be cancelled
collectively. Cancel each
programme separately.
PROGRAMME No 1
POS 3 (CH 3)
DATE
START —:—
STOP —;—
SPEED ► SP LP
MENU ►ON OFF
Page 69

Programme rearrangement
Note:
The illustration shows the buttons inside the
Remote Control door. For the method for
opening the door, refer to page 14.
1
VCR
Push the “VCR” Button
and select
VCR MENU
CLOCK NO YES
PROGRAMMED NO YES
PROGRAMME.
<] C
3
<]
Select “YES" by using the
cursor buttons “ <i ’’ and
“ > ’’ and the programme
table appears.
Set the cursor to “SORT’
by pushing the cursor
buttons "A” and “ V
Rearrangement can then
be carried out by using
PROGRAMME
NO POS DATE START STOP
1
2 12 18:00
2
3
5 2 21:00
4
s
6
SORT► HO
MENUDON
PROGRAMME
NO POS DATE START STOP
1
2
12 18:00
2
3
5
4
5
e
SORT►NO YES
MENUDON OFF
the cursor buttons “ <! ”
and “ > ”.
Note:
The order of priority for
rearrangement is as
follows:
0 Recording date
PROGRAMME
NO POS DATE START STOP
1
S
2 2
12 18:00
3
4
5
6
SORT NO
MENUDON OFF
CD Start time of recording
For daily and weekly
recordings, the first
recording date is judged
by comparison.
Cancellation of Timer Recording after recording or
before execution of a programme reservation
2 21:00
2 21:00
19:00
22:00
YES
OFF
19:00
22:00
22:00
19:00
YES
TIMER/REC
Push the “TIMER-REC"
Button. The "TIMER-
REC” indicator goes off
and reservation via the
timer is cancelled.
Note;
Unless reservation via
the timer is cancelled, it
is impossible to operate
the VCR and to eject the
tape.
69
w
Page 70

Preparation
1
1
KARAOKE
Connect a microphone to the
microphone Jack on the TV set.
(One or Two Microphones may be
so connected)
Refer also to page 21 “Connecting
Microphones”.
Push the “KARAOKE” Button to
turn the KARAOKE Mode on.
KARAOKE
^ 15 MIC
ECHO
Insert a KARAOKE video cassette
tape.
• When a tape with removed
erasure prevention tab is
inserted, playback starts
automatically.
• In the case of a cassette tape
with intact erasure prevention
tab, push the PLAY button.
Page 71

о
6
Q TV/AV
о о о
---------
■ ■
ECHO Level Adjustment
It is recommended that you adjust the volume of the backing
band sound to a level which is a little lower than that of your
voice. The mixing balance wii! become better, and sufficient
echo effect will be obtained.
JJ
1
ECHO/MIC
Push the "ECHO/
MIC” Button twice.
KARAOKE
^ OMIC
*iDi>OECHO
1
II PAUSE/STILL j
-----
• REC
---------
1
О d£i3)
!!► F. ADV REPEAT MONITOR
О О О
A
V
A
V
KARAOKE
a
© © ©
© ® ®
© ® ©
@) ©
ECHQrt^lC intro/inde:
TV/VCR/KARAOKE
0
By pushing the
О
MIC Level Adjustment
Adjust the volume of the Microphone to a suitable level with
the Microphone Level Control, while singing.
ЕСНОДЛ1С
О
Note:
• If the volume is set too high, the sound from the speaker
may become distorted.
• If acoustic feedback (howling) occurs, turn the microphone
volume down, use the microphone farther away from the
speakers, hold the microphone so that it is not pointed
toward the speakers, or turn the volume of the TV set
down.
(If the sound is produced through a stereo amplifier, turn
the volume of the stereo amplifier down.)
or Button you can
increase or decrease
the ECHO Level.
Setting range;
0~63
Push the “ECHO/
MIC” Button
By pushing the “+”
orButton you can
increase or decrease
the MIC Level.
Setting range,
0--63
ECHO
SiTI'32 C
KARAOKE
OMIC
^ECHO
MIC
^32
ZD C
Helpful Hint
By pushing this button, the selected
“KARAOKE Mode ON” will be changed to
the Normal Mode. The Normal setting for
MIC/ECHO Level; is “32”, as shown on the
on screen Display.
71
Page 72

When a dew condensation
phenomenon occurs, indication of
“dew condensation” appears and the
cassette tape is ejected, indication of
“dew condensation" ceases soon.
When you want to operate the VCR,
push the “COUNTER CALL” button
and wait for a while until the said
indication ceases.
While “dew condensation" is
indicated, the VCR does not work
even if you push any operation
buttons, but you can watch the TV.
Indication of “dew condensation” will
cease within several hours at latest.
Such time may differ according to
circumstances.
As generally dew condensation
advances gradualiy, and indication of
“dew condensation” may appear 10-
15 minutes after the beginning of dew
condensation.
Conditions which cause dew
condensation are as follows.
It may occur if the TVA/CR and the
cassette tape were moved to another
place where there are great changes
of temperature and humidity.
• A humid place where the air is thick
with steam.
• When the TVA/CR was suddenly
moved from an air-conditioned
room to a hot and humid place.
• The room was heated quickly.
When the rotary cylinder is stained
with condensation droplets, the tape
may adhere to the rotary cylinder. It
may interfere with normal forwarding
of the tape and the tape may be
damaged.
Do not put the TV/VCR set in a place
where it is exposed to the direct rays
of the sun for a long time.
Do not put the TVA/CR set in a place
which is dirty or damp or near a
strongly magnetic object.
Always remove connection cable
when moving the TV/VCR. When you
carry the TV/VCR to a distant place,
always wrap it in a blanket or
something protective.
Do not give the TV/VCR a physical
shock while carrying it.
Do not put the TV/VCR set in a place
where it is exposed to a spotlight,
heating appliance, smoke, steam etc.
Do not block the ventilating holes.
Do not put heavy objects on the
TVA/CR.
Do not spray insecticide or volatile
solvent upon the TV/VCR. Do not
allow rubber and vinyl products to
contact the TV/VCR for long periods.
They may cause changes in quality
and peeling of the paint.
Page 73

Always pull out the power plug by
holding the plug itself. Do not pull the
cord.
Do not open the cabinet.
• To touch the inside is extremely
dangerous.
Do not bring a heating appliance
close to the power cord.
Do not place heavy objects across
the power cord.
Wipe off any dirt on the cabinet and
operation panel with a soft cloth.
• When you use a chemical
dustcloth, read the that is supplied
with it manual carefully.
• When the dirt does not come off,
soak the cloth in a neutral detergent
diluted with water and squeeze it
dry and then wipe off the dirt. Then,
wipe with a dry cloth.
Do not alter the power cord.
Do not insert anything except a video
cassette tape into the insertion slot.
• Especially, take care that your child
does not put his/her hand into it.
He/she may get hurt.
Wipe dirt from the surface of the
picture tube with a soft dry cloth.
You may feel weak electricity when
you touch the surface of the picture
tube. Static electricity is responsibie
for it. However, it does not have a bad
influence on a person.
Do not put any vessel containing
water on or near the TV set.
Do not use this set if abnormal
operation occurs.
Ex: Smoke, odd sounds, or smells.
Turn the power switch off and
disconnect the AC plug, if you
notice any unusual operation.
73
Page 74

When you suspect the TV is out of order, check the following points before requesting Service.
Refer to either the shop where the pruchase was made or the nearest Authorised Service Centre if the malfunction
cannot be corrected.
Symptoms
The power is not supplied.
The programme selected is
not displayed clearly.
Spots appear on the screen.
The picture has double or
treble images.
Interference pattern appears
Checks
Is the power plug disconnected?
Is the main power switched ON?
Is the aerial connected properly?
Is the received signal weak?
Is the reception being disrupted by car, train, high tension cable, neon light
interference?
Has the direction of the aerial been changed? It may change after a severe
wind.
Signal reflection from surrounding mountains or building may affect on the
picture.
Such symptoms may occur when the transmitting aerial for a radio station or
a ham operator is near the TV.
The channel number does not
disappear from the screen.
Inferior tint, light coiour Have the Coiour and Tint been adjusted? (Check the adjustment values.)
The TV sometimes produces
a cracking sound.
The Remote Control does not
work.
Is the RECALL Button pressed?
Push it again.
If the picture and sound are normal, it may probably be the sound from the
cabinet which expands and contracts according to change of room
temperature. This is not a malfunction.
Is the transmitter oriented toward the receiving window on the TV?
Do you operate the Remote Control within 7 m from the receiving window?
(within 30° from right and left: within 5 m from the receiving window)
(7 m range on axis, 5 m at 30°)
Are there any obstacles between the Remote Control and the receiving
window?
Are the batteries dead?
Are the batteries fitted properly?
Is the receiving window being exposed to sunlight or strong fluorescent light?
Page 75

Symptoms Checks
The cassette tape is ejected
immediately after insertion.
The TV does not operate
although the power is switched
on.
PICTURE RECORDING Mode
can not be switched on.
TIMER RECORDING Mode
can not be switched on.
Is DEW CONDENSATION displayed on the screen?
Push the COUNTER CALL Button and wait for a while until the indication
disappears.
Is PICTURE RECORDING mode on?
When a tape with erasure prevention tab removed has been inserted, in
ONE-TOUCH RECORDING, ONE-TOUCH TIMER RECORDING or
PROGRAM TIMER RECORDING Modes, the tape is automatically ejected.
Various safety devices have been triggered.
Switch off the main power supply and switch on it once again, after waiting
a few minutes.
Has the record tab been removed from the tape?
Is the TIMER RECORDING Mode on?
Is the present time set properly?
Has the record tab been removed from the tape?
Are the starting time and ending time set properly?
Has the TIMER RECORDING Button been pushed?
Is either ONE-TOUCH RECORDING or ONE-TOUCH TIMER RECORDING
Mode set on?
No colour in picture
reproduction, on tape playback.
Snowy picture on tape
playback
Flickering
The digits of the tape counter
do not change, during tape
playback.
The picture sourced from on
AV INPUT shakes or does not
appear.
When a tape recorded by PAL
system of 3 times the normal
speed is playback after fast
forwarding or rewinding, the
colour tends to fade out.
The KARAOKE Mode is ON, isn’t it? Turn the KARAOKE mode OFF.
Has tracking been adjusted?
Adjust the tracking.
Are the video heads dirty?
^ Request professional Service.
Are the video heads worn out? Replace them.
Is the tape old?
Is the tape old?
Is a non-recorded part of the tape being played back?
When a non-recorded part of the tape is played back, the screen becomes
blue and the tape counter does not advance.
Such symptoms may occur when the input is set to AV INPUT and no signal is
received at the video input terminals.
This is caused by safety devices triggered by erroneous functioning.
75
Page 76

Picture
Symptoms
Sound
Checks
Aerial Location, direction
or Connections
Snowy Picture
Multiple Image
Interference
Normal Picture
No Picture
Noisy Sound
Normal Sound
№
Noisy Sound
No Sound
No Sound
Aerial Location, direction or Connections
Electrical Appliances
Cars/Motorcycles
Fluorescent Lamps
Volume
{Check whether the Mute function has been
activated on the Remote Control.)
Not plugged into the AC outlet
Not switched on.
Contrast and BrightnessA/olume setting
(Check by pushing the Power Switch or
Stand-by Button on the Remote Control.)
No Colour
Scrambled
Coloured Patches
No Colour
Normal Sound
Normal or
Weak Sound
Normal Sound
Noisy Sound
Colour Control
Retune Channels
Magnetic interference from unshielded
equipment
Receiver moved while “ON”
Turn the TV set off for 30 mins, using the
“Power" Button on the TV set.
Sound System (Refer to page 38)
Colour System (Refer to page 39)
Page 77

77
Page 78

Model No.
TC-W21
Power Source
Power Consumption
Receiving System 7 Systems
Receiving Channels
AC 200-220 V 50 Hz (Hong Kong, China)
AC 220-240 V 50 Hz (Australia, New Zealand, Southeast Asia)
110 W (AC 200-220 V)
115 W (AC 220-240 V)
PAL B,G
PALI
PALO
NTSCM
NTSC 3.58/5.5 MHz
NTSC 3.58/6.0 MHz
NTSC 3.58/6.5 MHz
VHF BAND
2-12 PAL B
0- 11 PAL B (AUST)
1- 9 PALB(NZ)
1-12 PAL D
1- 12NTSCM (Japan)
2- 13NTSCM(U.S.A.)
Stand-by condition 7 W
Function
Reception of broadcasts and
Playback from Video Tape Recorders.
Playback from Special Video Tape
Recorders.
UHF BAND
21-69 PAL G. I
28-69 PAL B (AUST)
13-57 PAL D
13- 62 NTSC M (Japan)
14- 69 NTSC M (U.SA)
Tuning System
Picture Tube Overall Picture tube measured diagonally
Audio Output
Microphone
Aerial Impedance
Video/Audio Terminals
Frequency synthesizer
Viewable Picture measured diagonally
CRT Deflection
4 W (max.)
Impedance 600 O
75 Q Unbalanced coaxial
Video In
AV
Audio in
Video Out
Monitor Out
Audio Out
54 cm
51 cm
90'
1 Vp-p, 75 O
Approx. 300 mV 50 KO
1 Vp-p, 75 Q
Approx. 500 mV 1 KO
Page 79

Video Recording System
2 heads azimuth recording system
Tape Speed
Tape Format
Record/Playback Time
FF/REWTtme
Television System
Modulation System
Audio Track
Audio Characteristics
NTSC PAL
SP 3.33 cm/sec SP 2.339 cm/sec
LP 1.11 cm/sec
VHS Tape
NTSC PAL
SP 120 min. with T-120
LP 360 min. with T-120
Approx. 3.5 min. with E-180
NTSC 525 lines, 60 fields
PAL 625 lines, 50 fields
Luminance; FM azimuth recording
Colour Signal; converted subcarrier phase shift recording
1 track (mono only)
Frequency response
SP 100 Hz^SOOO KHz (-10dB)
LP 100 Hz-5000 KHz (-lOdB)
LP 1.169 cm/sec
SP 240 min. with E-240
LP 480 min. with E-240
Wow and flutter
Operating Temperature 5 “C~40 °C
Operating Humidity 35 %-80 %
Accessories Supplied Aust, NZ, Southeast Asia
Remote Control
R6 (AA) Battery x 2
Microphone plug adaptor (M6 to M3)
x2
Dimensions (W x D x H)
Weight (Mass) 28.0 Kg (Net)
Note:
Design and Specifications are subject to change without notice.
Weight and Dimensions shown are approximate.
534 mm x 482 mm x 492 mm
SP 0.25 %
LP 0.35 %
China, Hong Kong
Remote Control
R6 (AA) Battery x 2
Microphone
Microphone plug adaptor (M6 to M3)
79
Page 80

Customer’s Record
The Serial Number of this product can be found on its rear cover. You should note this Serial Number in
the space provided below and retain this book plus your purchase receipt as a permanent record of your
purchase to aid in identification in the event of theft or ioss, and for Warranty Service purposes.
Model Number TC-W21 Sériai Number
Matsushita Electric Industrial Co., Ltd.
Centra! P.O. Box 288, Osaka 530-91, Japan
Printed in Japan
SI 292
 Loading...