

Page 1

EXAMPLE OF ANTENNA
Scan, watch and discover
how to get the most out of
your TV
http://SCN.BY/9T9AB0HTW8JBKI
U.S. and Canada only
Operating Instructions
LCD TV
Standard accessories
Check that you have the accessories and
items shown
Remote Control
N2QAYB000820
MEDIA
PLAYER
CC SAP
OPTION
Pedestal
Power cord
Model No.
TC-L39EM60
TC-L50EM60/TC-L50EM60E
Batteries for the
Remote Control (2)
• (AA)
Assembly screws
(
4 of each)
A
Operating
Instructions
English
Thank you for purchasing this Panasonic product.
Please read these instructions before operating your set
and retain them for future reference. The images shown
in this manual are for illustrative purposes only.
B
USA Only: Disposal may be regulated in your
community due to Environmental considerations.
For disposal or recycling information, please visit
Panasonic website: http://www.panasonic.com/
environmental or call 1-888-769-0149.
Register online at
www.panasonic.com/register
(U.S.customers only)
HDA70F3902I
Page 2

EXAMPLE OF ANTENNA
This product incorporates some kinds of open source
software. The software is distributed in the hope that it
will be useful, but WITHOUT ANY WARRANTY, without
even the implied warranty of MERCHANTABILITY or
FITNESS FOR A PARTICULAR PURPOSE. Please refer
to the detailed terms and conditions thereof shown in the
"License" menu on this product.
Panasonic does not guarantee operation and performance
of peripheral devices made by other manufacturers; and
we disclaim any liability or damage arising from operation
and/or performance from usage of such other maker’s
peripheral devices.
HDMI, the HDMI logo and High- Definition Multimedia
Interface are trademarks or registered trademarks of
HDMI Licensing LLC in the United States and other
countries.
Manufactured under license from Dolby Laboratories.
Dolby and the double-D symbol are trademarks of Dolby
Laboratories.
Energy Star is a joint program of the
US Environmental Protection Agency
and the U.S. Department of Energy. It
is administered in Canada by Natural
Resources Canada (NRC) through
the Office of Energy Efficiency (OEE).
This program is helping to protect
the environment and save money
through energy efficient products and
practices. This product qualifies for
ENERGY STAR in the “Home Use”
setting and this is the setting in which
energy savings will be achieved. Any
modifications to the “Home Use” setting
or other factory default settings could
result in greater energy consumption
beyond levels that meet ENERGY STAR
qualifications.
Manufactured under license under U.S. Patent Nos:
5,956,674; 5,974,380; 6,487,535 & other U.S. and
worldwide patents issued & pending. DTS, the Symbol, &
DTS and the Symbol together are registered trademarks
& DTS 2.0+Digital Out is a trademark of DTS, Inc. Product
includes software. © DTS, Inc. All Rights Reserved.
Contents
Safety Precautions
Note to CATV System Installer
Secure Ventilation
Important Safety Instructions
FCC STATEMENT
CHILD SAFETY
Attaching the pedestal to TV
Connection Panels
AV cable connection
Audio connection
Audio ARC connection........................................ 6
Using Controls on the TV
Indicators on the TV
Power cord connection
Installing the remote’s batteries
Remote control
First Time Setup
Watching TV
Listen with SAP
Closed Caption (CC)
Displaying information
Display the “Options menu”
Call up a Favorite channel
Password setting/entering
Set the “Sleep timer”
How to Use Menu Functions
Using Media player
Specifications
Supported file format in Media Player
Customer Services Directory
(for U.S.A. and Puerto Rico)
Accessory Purchases
(United States and Puerto Rico)
.............................................. 2
............................ 2
............................................... 2
.............................. 2
................................................ 3
................................................... 3
............................... 4
.............................................. 5
........................................... 5
................................................ 6
.................................... 6
............................................ 6
....................................... 6
.......................... 6
.................................................... 7
.................................................. 7
........................................................ 8
(Secondary Audio Programming)
...8
.......................................... 8
........................................ 8
................................ 8
.................................. 8
.................................. 8
........................................... 8
............................... 9
........................................... 11
................................................... 13
............... 14
............................. 15
....................... 15
1
Page 3
Safety Precautions
EXAMPLE OF ANTENNA
CAUTION
RISK OF ELECTRIC SHOCK
DO NOT OPEN
WARNING: To reduce the risk of electric shock, do not remove cover or back.
No user-serviceable parts inside. Refer servicing to qualified service personnel.
The lightning flash with arrowhead within a triangle is
intended to tell the user that parts inside the product
are a risk of electric shock to persons.
The exclamation point within a triangle
is intended to tell the user that important operating
and servicing instructions are in the papers with the
appliance.
Note to CATV System Installer
This reminder is provided to direct the CATV system installer’s
attention to Article 820-40 of the NEC that provides guidelines for
proper grounding and, in particular, specifies that the cable ground
shall be connected to the grounding system of the building, as close to
the point of cable entry as practical.
Secure Ventilation
Slots and openings in the cabinet and the back or bottom are provided for
ventilation, and to ensure reliable operation of the LCD TV and to protect it
from overheating. These openings must not be blocked or covered. There
should be at least 10 cm of space around the TV. The openings should
never be blocked by placing the LCD TV on a bed, sofa, rug or other similar
surface. This LCD TV should not be placed in a built-in installation such as
a bookcase unless proper ventilation is provided.
Important Safety Instructions
1) Read these instructions.
2) Keep these instructions.
3) Heed all warnings.
4) Follow all instructions.
5) Do not use this apparatus near water.
6) Clean only with dry cloth.
7) Do not block any ventilation openings. Install in accordance with the
manufacturer’s instructions.
8) Do not install near any heat sources such as radiators, heat
registers, stoves or other apparatus (including ampliers) that
produce heat.
9) Do not defeat the safety purpose of the polarized or grounding-type
plug. A polarized plug has two blades with one wider than the other.
A grounding type plug has two blades and a third grounding prong.
The wide blade or the third prong are provided for your safety. If the
provided plug does not t into your outlet, consult an electrician for
replacement of the obsolete outlet.
10) Protect the power cord from being walked on or pinched particularly
at plugs, convenience receptacles, and the point where they exit
from the apparatus.
11) Only use attachments / accessories specied by the manufacturer.
12) Use only with the cart, stand, tripod, bracket or table
specied by the manufacturer, or sold with the apparatus.
When a cart is used, use caution when moving the cart /
apparatus combination to avoid injury from tip-over.
13) Unplug this apparatus during lightning storms or when unused for
long periods of time.
14) Refer all servicing to qualied service personnel. Servicing is
required when the apparatus has been damaged in any way, such
as power-supply cord or plug is damaged, liquid has been spilled
or objects have fallen into the apparatus, the apparatus has been
exposed to rain or moisture, does not operate normally, or has
been dropped.
15) Operate only from the type of power source indicated on the
marking label. If you are not sure of the type of power supplied to
your home consult your television dealer or local power company.
16) Follow all warnings and instructions marked on the LCD TV.
17) Never push objects of any kind into this LCD TV through cabinet
slots as they may touch dangerous voltage points or short out
parts that could result in a re or electric shock. Never spill liquid
of any kind on the LCD TV.
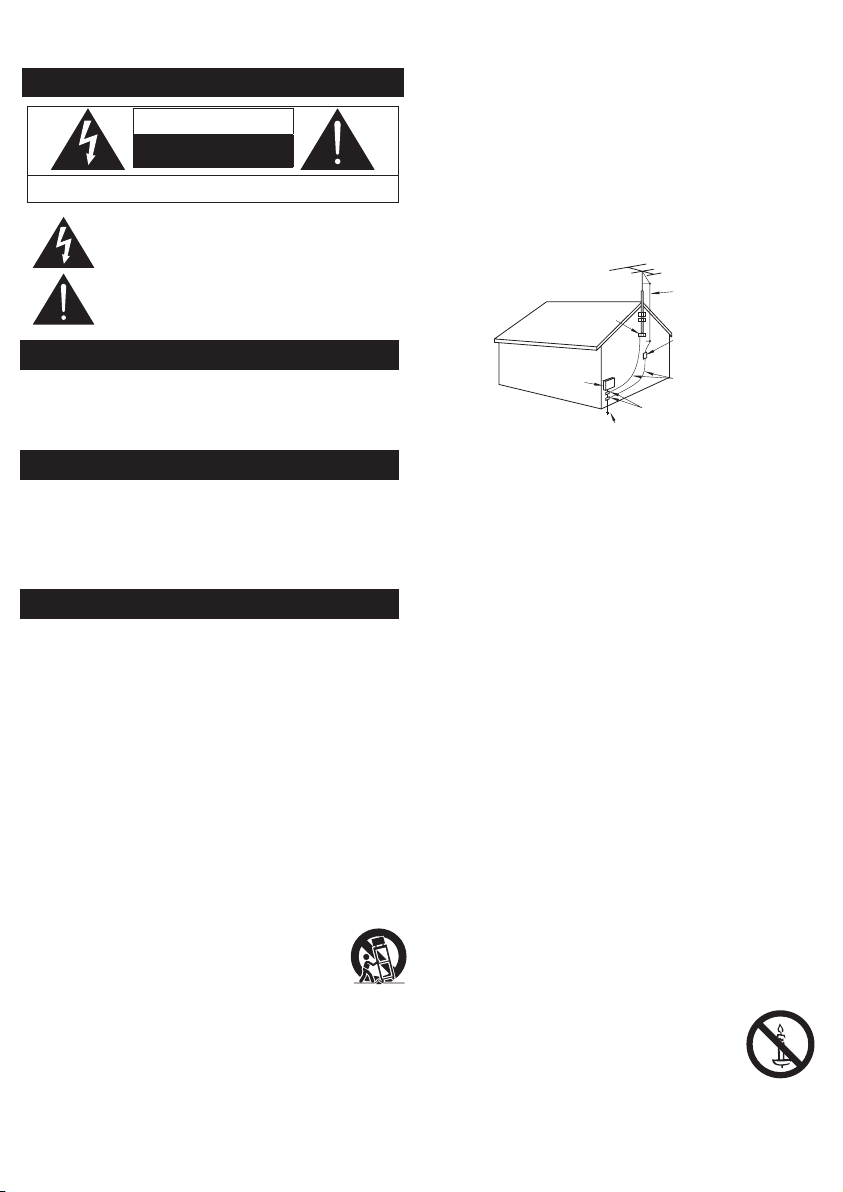
18) If an outside antenna is connected to the television equipment,
be sure the antenna system is grounded so as to provide some
protection against voltage surges and built up static charges.
In the U.S. Section 810-21 of the National Electrical Code
provides information with respect to proper grounding of the mast
and supporting structure, grounding of the lead-in wire to an
antenna discharge unit, size of grounding conductors, location of
antenna discharge unit, connection to grounding electrodes, and
requirements for the grounding electrode.
GROUNDING AS PER
(NEC) NATIONAL
ELECTRICAL
CODE
GROUND CLAMP
ELECTRIC
SERVICE
EQUIPMENT
POWER SERVICE GROUNDING
ELECTRODE SYSTEM
(NEC ART 250, PART H)
19)
An outside antenna system should not be located in the vicinity of
overhead power lines, other electric light, power circuits, or where it
can fall into such power lines or circuits. When installing an outside
antenna system, extreme care should be taken to keep from
touching such power lines or circuits as contact with them might be
fatal.
20) Unplug this LCD TV from the wall outlet and refer servicing to
qualied service personnel under the following conditions:
a. When the power cord or plug is damaged or frayed.
b. If liquid has been spilled into the LCD TV.
c. If the LCD TV has been exposed to rain or water.
d.
If the LCD TV does not operate normally by following the
operating instructions.
Adjust only those controls that are covered by the operating
instructions as improper adjustment of other controls may
result in damage and will often require extensive work by
a qualied technician to restore the LCD TV to normal
operation.
e. If the LCD TV has been dropped or the cabinet has been
damaged.
f. When the LCD TV exhibits a distinct change in performance
- this indicates a need for service.
21) When replacement parts are required, be sure the service
technician uses replacement parts specied by the manufacturer
that have the same characteristics as the original parts.
Unauthorized substitutions may result in re, electric shock, or
other hazards.
22)
WARNING: TO REDUCE THE RISK OF FIRE OR ELECTRIC
SHOCK, DO NOT EXPOSE THIS APPARATUS TO RAIN,
MOISTURE, DRIPPING OR SPLASHING. DO NOT PLACE
LIQUID CONTAINERS (FLOWER VASES, CUPS, COSMETICS,
ETC.) ABOVE THE SET (INCLUDING ON SHELVES ABOVE,
ETC.).
23) WARNING: SMALL PARTS CAN PRESENT CHOKING
HAZARD IF ACCIDENTALLY SWALLOWED. KEEP SMALL
PARTS AWAY FROM YOUNG CHILDREN. DISCARD
UNNEEDED SMALL PARTS AND OTHER OBJECTS,
INCLUDING PACKAGING MATERIALS AND PLASTIC
BAGS/SHEETS TO PREVENT THEM FROM BEING PLAYED
WITH BY YOUNG CHILDREN, CREATING THE
POTENTIAL RISK OF SUFFOCATION.
24) WARNING:
ANTENNA
LEAD-IN WIRE
ANTENNA
DISCHARGE UNIT
(NEC SECTION 810-20)
GROUNDING
CONDUCTORS
(NEC SECTION 810-21)
GROUND CLAMPS
To prevent the spread of re, keep
candles or other open ames away
from this product at all times.
25) WARNING: A warning that batteries (battery pack
or batteries installed) shall not be exposed to
excessive heat such as sunshine, re or the like.
2
Page 4
26) CAUTION: The Power switch on this unit will not completely
shut off all power from AC outlet. Since the power cord serves as
the main disconnect device for the unit, you will need to unplug it
from the AC outlet to shut down all power. Therefore, make sure
the unit has been installed so that the power cord can be easily
unplugged from AC outlet in case of an accident. To avoid re
hazard, the power cord should also be unplugged from the AC
outlet when left unused for a long period of time (for example,
when on vacation).
27) CAUTION: TO PREVENT ELECTRIC SHOCK, DO NOT USE
THIS PLUG WITH A RECEPTACLE OR OTHER OUTLET
UNLESS THE BLADES CAN BE FULLY INSERTED TO
PREVENT BLADE EXPOSURE.
28) CAUTION: USE WITH OTHER STAND MAY RESULT IN
INSTABILITY POSSIBLY CAUSING INJURY.
29) CAUTION: DANGER OF EXPLOSION IF BATTERY IS
INCORRECTLY REPLACED. REPLACE ONLY WITH THE
SAME OR EQUIVALENT TYPE.
NOTE:
This equipment is designed to operate in North America
z
and other countries where the broadcasting system and AC
house current are exactly the same as in North America.
FCC STATEMENT
This equipment has been tested and found to comply with the
limits for a Class B digital device, pursuant to Part 15 of the
FCC Rules. These limits are designed to provide reasonable
protection against harmful interference in a residential
installation. This equipment generates, uses and can radiate radio
frequency energy and, if not installed and used in accordance
with the instructions, may cause harmful interference to radio
communications. However, there is no guarantee that interference
will not occur in a particular installation. If this equipment does
cause harmful interference to radio or television reception, which
can be determined by turning the equipment off and on, the user is
encouraged to try to correct the interference by one or more of the
following measures:
• Reorient or relocate the receiving antenna.
• Increase the separation between the equipment and receiver.
• Connect the equipment into an outlet on a circuit different
from that to which the receiver is connected.
•
Consult the dealer or an experienced radio/TV technician for help.
This device complies with Part 15 of the FCC Rules. Operation
is subject to the following two conditions: (1) This device may
not cause harmful interference, and (2) this device must accept
any interference received, including interference that may cause
undesired operation.
FCC Caution:To assure continued compliance, follow
the attached installation instructions and use only
shielded interface cables when connecting to computer
or peripheral devices. Any changes or modifications not
expressly approved by Panasonic Corp. of North America
could void the user’s authority to operate this device.
Models: TC-L39EM60/TC-L50EM60/TC-L50EM60E
Responsible
Party:
Contact
Source:
email: consumerproducts@panasonic.com
Panasonic Corporation of North America
One Panasonic Way, Secaucus, NJ 07094
Panasonic Consumer Marketing Company of
North America
1-877-95-VIERA (958-4372)
CHILD SAFETY:
It Makes A Difference How and Where
You Use Your Flat Panel Display
Congratulations on your purchase! As you enjoy your new
product, please keep these safety tips in mind:
THE ISSUE
• The home theater entertainment
experience is a growing trend
and larger flat panel displays
are popular purchases.
However, flat panel displays
are not always supported on
the proper stands or installed
according to the manufacturer’s
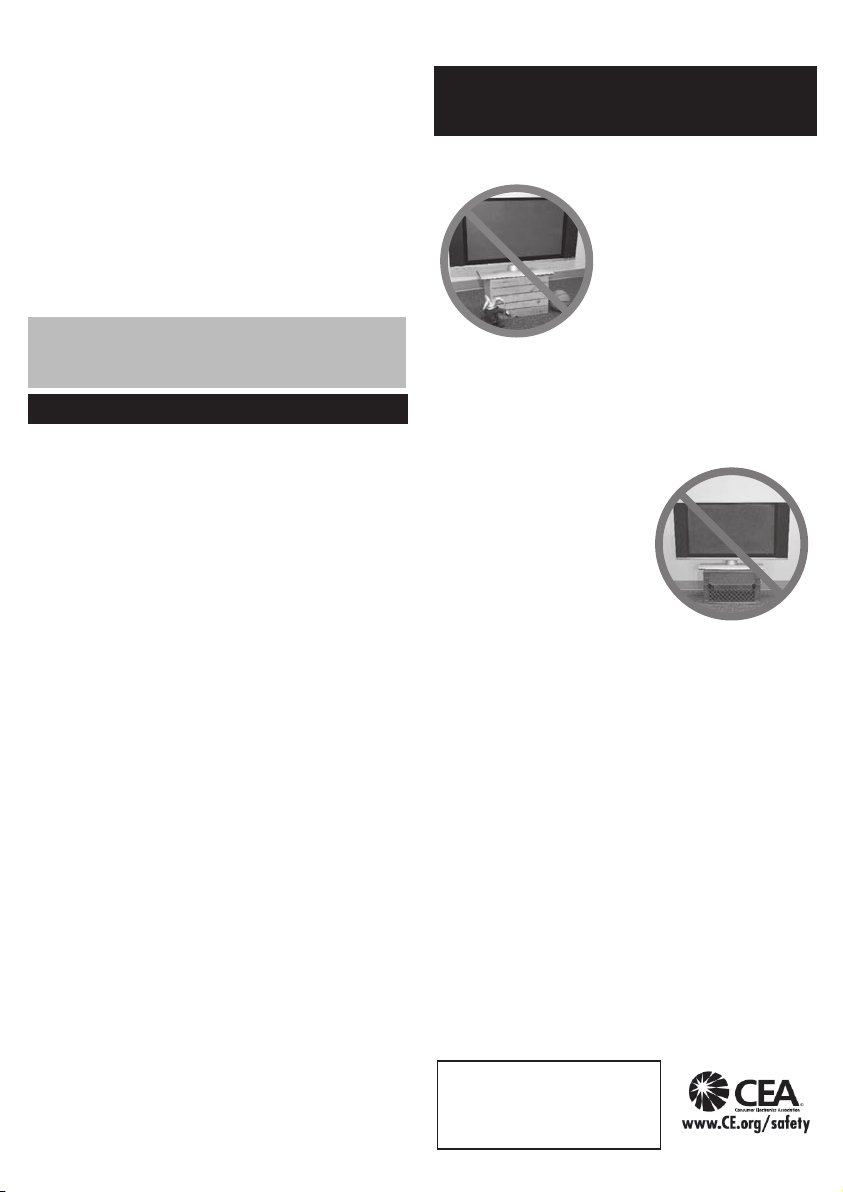
• Flat panel displays that are improperly situated on
dressers, bookcases, shelves, desks, speakers, chests
or carts may fall over and cause injury.
THIS MANUFACTURER CARES!
• The consumer electronics industry is committed to
making home entertainment enjoyable and safe.
TUNE INTO SAFETY
• One size does NOT fit all.
Follow the manufacturer’s
recommendations for the safe
installation and use of your flat
panel display.
• Carefully read and understand
all enclosed instructions for
proper use of this product.
• Don’t allow children to climb on
or play with furniture and television sets.
• Don’t place flat panel displays on furniture that can easily
be used as steps, such as a chest of drawers.
• Remember that children can become excited while
watching a program, especially on a “larger than life” flat
panel display. Care should be taken to place or install
the display where it cannot be pushed, pulled over, or
knocked down.
• Care should be taken to route all cords and cables
connected to the flat panel display so that they cannot be
pulled or grabbed by curious children.
WALL MOUNTING: IF YOU DECIDE TO WALL MOUNT
YOUR FLAT PANEL DISPLAY, ALWAYS:
• Use a mount that has been recommended by the display
manufacturer and/or listed by an independent laboratory
(such as UL, CSA, ETL).
• Follow all instructions supplied by the display and mount
manufacturers.
• If you have any doubts about your ability to safely
install your flat panel display, contact your retailer about
professional installation.
• Make sure that the wall where you are mounting the
display is appropriate.
Some wall mounts are not designed to be mounted to
walls with steel studs or old cinder block construction. If
you are unsure, contact a professional installer.
• A minimum of two people are required for installation. Flat
panel displays can be heavy.
The American Academy of
Pediatrics discourages media
viewing for children younger
than 2 years. For more details,
see www.aap.org
recommendations.
3
Page 5
EXAMPLE OF ANTENNA
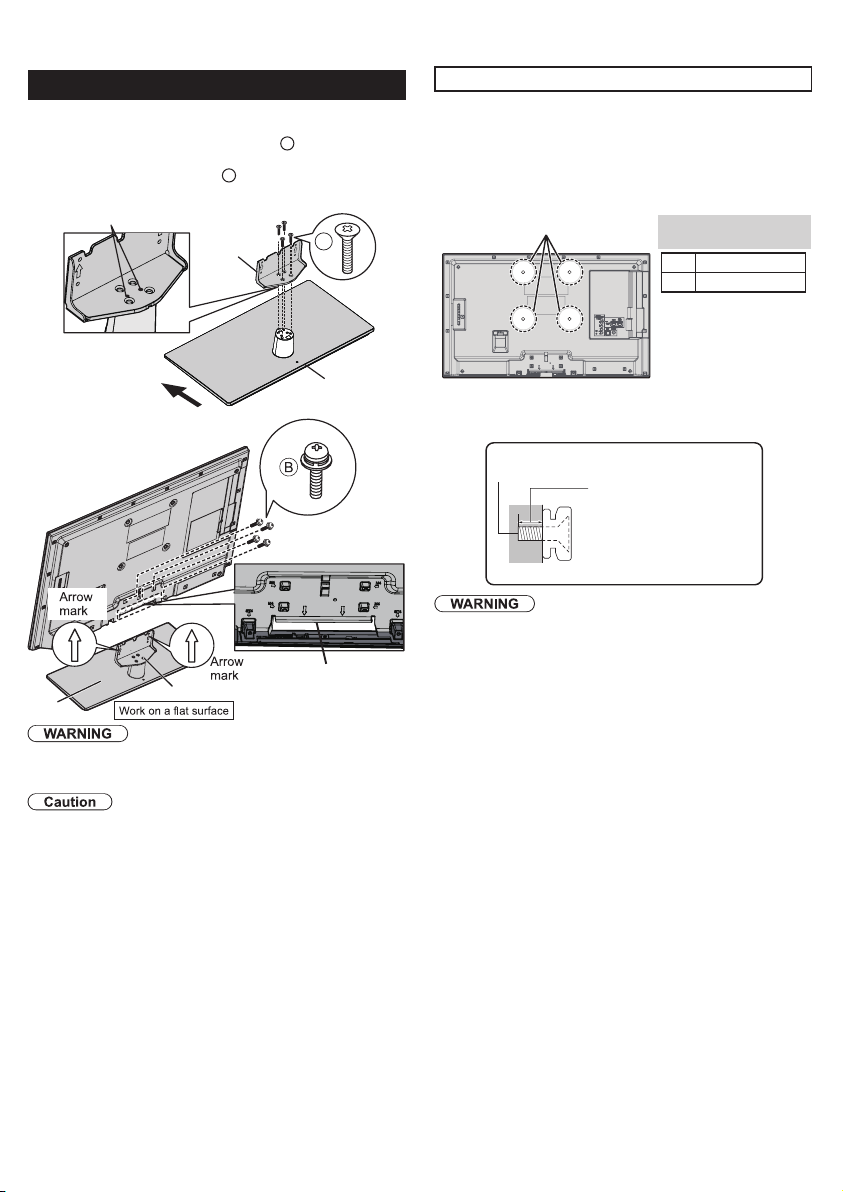
Attaching the pedestal to TV
Protrusion of Neck (Bottom)
1 2
Picture Quality
Stereo System
1 2
Insert the power cord plug
(included) firmly into place.
●
When disconnecting the power
cord, be absolutely sure to
disconnect the power cord plug
from the wall outlet first.
●
The included power cord is for
use with this unit only.
Pull open
MEDIA
PLAYER CC SAP
OPTION
3
4
6
7
8
11
9
10
2
5
13
15
12
14
18
17
16
20
21
1
19
Set-up
Fix securely with assembly screws
z
Tighten screws firmly.
z
Tighten assembly screws
z
first, then tighten them firmly to fix securely.
B
Bracket
Front
Rear side
Bracket
Base
Do not disassemble or modify the pedestal.
Otherwise the TV may fall over and become damaged, and
z
personal injury may result.
Do not use any pedestal other than that provided with this TV.
Otherwise the TV may fall over and become damaged, and
z
personal injury may result.
Do not use the pedestal if it becomes warped or physically
damaged.
If you use the pedestal when it is physically damaged,
z
personal injury may result. Contact your nearest Panasonic
Dealer immediately.
During set-up, make sure that all screws are securely tightened.
If sufficient care is not taken to ensure screws are properly
z
tightened during assembly, the pedestal will not be strong
enough to support the TV, and it might fall over and become
damaged, and personal injury may result.
. (Total 4 screws)
A
(total 4 screws) loosely at
A
Base
Hole for pedestal
installation
Optional accessories
Wall-hanging bracket (not supplied)
Use the screws that are threaded into the stand-mounting inserts
on the back of your LCD TV to secure it to a Wall Mounting kit.
It is safe to use long screws for this product.
When using long screws, the two bottom screws may loosen, but
the top two will remain tightly in place to secure the mounted TV.
Wall Mounting Inserts
Please contact your nearest Panasonic dealer to purchase the
recommended wall-hanging bracket. For additional details, please
refer to the wall-hanging bracket installation manual.
Screw for fixing the TV onto the
wall-hanging bracket
(not supplied with the TV)
(View from the side)
Always be sure to ask a qualified technician to carry out set up.
z
Incorrect fitting may cause equipment to fall, resulting in injury
and product damage. Any damage resulting from not having a
professional installer mount your unit will void your warranty.
Do not mount the unit directly below ceiling lights (such as
z
spotlights, floodlights or halogen lights) which typically give off
high heat. Doing so may warp or damage plastic cabinet parts.
Take care when fixing wall brackets to the wall. Always ensure
z
that there are no electrical cables or pipes in the wall before
hanging bracket.
When using an angled-type wall hanging bracket, please ensure
z
that there is sufficient space for the connecting cables so that
they do not press against the wall when the TV is tilted forward.
For safety reasons, remove units no longer being used from
z
their wall-mounted locations.
Depth of screw:
39” Minimum: 0.75 ” (19.0 mm)
39” Maximum: 0.79 ” (20.0 mm)
M6
50” Minimum: 0.71 ” (18.0 mm)
50” Maximum: 0.79 ” (20.0 mm)
VESA standard
interface
39” 200 x 200 mm
50” 400 x 200 mm
Mounting screws
measurements:
M6 x 4
4
Page 6

EXAMPLE OF ANTENNA
Connection Panels
1 2
Picture Quality
Stereo System
1 2
Insert the power cord plug
(included) firmly into place.
●
When disconnecting the power
cord, be absolutely sure to
disconnect the power cord plug
from the wall outlet first.
●
The included power cord is for
use with this unit only.
Pull open
MEDIA
PLAYER CC SAP
OPTION
3
4
6
7
8
11
9
10
2
5
13
15
12
14
18
17
16
20
21
1
19
1 Video IN / COMPONENT IN
2 HDMI 1 - 2
3 USB port
3
4
4 ANTENNA / CABLE IN
5 DIGITAL AUDIO OUT
Best
Good
Basic
(Not
HD)
5
Back of the TV
AV cable connection
A
To use HDMI terminals
B
C
To use COMPONENT input terminals
green
blue
red
white
red
To use VIDEO input terminals
yellow
white
red
HDMI-DVI
Conversion cable
Note:
When using a Cable box, external equipment and
z
video cables shown in this manual are not supplied
with the TV.
For additional assistance, visit us at:
z
www.panasonic.com/help
www.panasonic.ca
AV Equipment
e.g. Blu-ray Disc
player
AV Equipment
e.g. Blu-ray Disc
player
AV Equipment
e.g. Blu-ray Disc
player
AV Equipment
e.g. DVD Recorder
or
e.g. VCR
green
blue
red
white
red
yellow
white
red
green
blue
red
white
red
yellow
white
red
HDMI
AV OUT
DVI OUT
L
L
AUDIO OUT
R
R
Y
B
P
COMPONENT
VIDEO OUT
P
R
L
AUDIO
OUT
R
COMPOSITE
VIDEO OUT
L
AUDIO
AUDIO
R
OUT
OUT
5
Page 7

EXAMPLE OF ANTENNA
Listen to your TV through your stereo
Stereo System
1 2
Insert the power cord plug
(included) firmly into place.
●
When disconnecting the power
cord, be absolutely sure to
disconnect the power cord plug
from the wall outlet first.
●
The included power cord is for
use with this unit only.
Pull open
MEDIA
PLAYER CC SAP
OPTION
3
4
6
7
8
11
9
10
2
5
13
15
12
14
18
17
16
20
21
1
19
z
Listen to your TV through your HDMI AMP
z
Audio connection
DIGITAL
Optical cable
AUDIO IN
Audio ARC connection
HDMI
TV OUT
HDMI cable
e.g. Amplifier
Amplifier with
Speaker system
Using Controls on the TV
1 Changes the input mode
2 Channel up/down
3 Volume up/down
4 Power button
Chooses menu and submenu entries, and returns (Press and
z
hold down for MENU function)
Indicators on the TV
1 Remote control signal receiver
Remote control sensor range is about 23 feet (7 meters) in
z
front of the TV set
2 Power LED
ON:
red
z
OFF:
no light
z
Note:
The TV consumes a small amount of electric energy even
z
when turned off.
Do not place any objects between the TV remote control
z
sensor and remote control.
Power cord connection
1
2
3
4
Installing the remote’s batteries
Close
Hook
Caution:
Incorrect installation may cause battery leakage and
z
corrosion, resulting in damage to the remote control.
z
Do not mix old and new batteries.
z
Do not mix different battery types (such as alkaline and
manganese batteries).
z
Do not use rechargeable (Ni-Cd) batteries.
Do not burn or break batteries.
z
Note the correct polarity
(+ or -).
6
Page 8

MEDIA
PLAYER CC SAP
OPTION
3
4
6
7
8
11
9
10
2
5
13
15
12
14
18
17
16
20
21
1
19
Remote control
POWER - Switches TV On or Off
1無
MEDIA PLAYER - Viewing media contents from a USB.
2無
MENU - Press to display the menu screen .
3無
INFO
-
4無
5無
6無
7無
8無
9無
10無
11無
12無
13無
14無
15無
16無
17無
18無
19無
20無
21無
Displays TV status information as well as
program details.
SLEEP - Accesses the sleep timer.
OPTION
- Displays Options menu for special functions
(when available)
COLOR KEY -
function.
Volume Up / Down (VOL+ / - ) - Press to decrease or
increase the audio volume.
MUTE - Turns off/on the sound.
Channel Numbers - Directly tune channels.
-
Use for digital channels.
CC - Switches the Closed Caption mode On or Off.
SAP - Select the Audio mode for watching TV. (SAP :
Secondary Audio Programming).
INPUT -
”HDMI 2”, ”Component”, ”Video” by pressing INPUT button
on Remote Control.
EXIT - Exit from the menu screen.
FAVORITE - Accesses the favorite channels.
OK / - Selects/OK/Change.
RETURN - Press to return to previous menu.
Channel Up / Down (CH
last or next channel.
FORMAT - To cycle through the aspect ratio modes.
LAST - Switches to previously viewed channel or input.
Red/Green/Yellow/Blue key for various
Select input sources “ANT/Cable in”, ”HDMI 1”,
.
V
/ V
) - Press to switch to the
First Time Setup
First time setup screen is only displayed automatically after
the power cord is inserted into a wall outlet and the TV is
turned on for the first time.
Turn the TV On with the “POWER” button
Select your language
English/Español/Français
Set viewing mode
Select your viewing mode (Be sure to select “Home use”)
1無
Please confirm your selection (Home use) before pressing
2無
the OK button.
zIf you select “ Store demonstration” by mistake in “Set viewing
mode”, confirmation screen will be displayed.
• Select “No” and return to previous screen “Set viewing
mode”.
• If you select “Yes”, screen enters the store
demonstration mode.
To display the “Set viewing mode” screen again as shown
z
above and select “
in the “
Setup
• If you perform “Reset to defaults”, please do not unplug
the AC Cord while the TV is being reset.
ANT/Cable setup (Auto channel setup)
Select signal type “Over-the-Air” or “Cable service”.
1無
Select “Auto program” and start scanning, the channel
2無
scanning starts.
Finished First time setup.
” menu.
Home use
Congratulations! Setup is complete.
To watch TV via a Cable box, Satellite receiver, or any other
source (DVD, DVR, gaming device, etc.), press the INPUT
button and select the appropriate input.
Note:
If you turn the TV off before completing “First time setup”, the
z
initial setup will not launch again the next time you power on
the unit.
You can repeat “First time setup” by selecting “Reset to
z
defaults” in the “Setup” menu.
After “First time setup”, you can also change “Language”
z
and “ANT/Cable setting” from the “Setup” and “TV” menus
respectively.
About broadcasting systems
z
Analog (NTSC): Conventional broadcasting
Digital (ATSC): Digital TV Standards include digital high-
definition television (HDTV), standard-definition television
(SDTV), data broadcasting, multi-channel surround sound
audio and interactive television.
”, perform “
Reset to defaults
”
7
Page 9

Watching TV
14-1
ABC-HD
Anten na
7:00 AM - 8:00 AM SAP
TV-G CC1 480i SD
The News 480i
Station
identifier
Channel Program Program duration SAP indication
Rating
level
Favorite
channel
Closed
Caption
Signal
resolution
Input
signal
Visually impaired、
Hearing impaired
Menu bar
Enter submenu
Insert
straight in
Pull straight
out
MEDIA
PLAYER
Photos Music
Media select
USB
EXIT
Select
RETURN
Access
Videos
Media player Photos All photos
INFO
OPTION
2010/10/23
2010/11/24
2010/10/25
2010/12/01
2010/11/01
2010/12/03
2010/11/05
2010/12/20
2010/11/10
2010/12/22
2010/11/22 2010/11/23
Media player Photos
USB
EXIT
Select RETURN
View selectSlideshow
Info
View
Slideshow settings
Drive select Media select
Select
Display thumbnails of the
selected folder
Select
OK
Turn
z
To directly enter the digital channel number
Also press CH
CH V buttons on Remote Controls to select programs.
● Press CH
● Press CH
For Cable/Satellite box connection-
Use your connected box’s remote control.
Note:
z
z
power on
Select correct input.
Select a channel number
V
/
CH V buttons on Side Controls or CH
V
button to select next channel.
V
button to select previous channel.
Reselect “Cable” or “Antenna” in “ANT in” of “TV” settings menu
to switch the signal reception between cable TV and antenna.
The channel number and volume level remain the same even
after the TV is turned off.
Listen with SAP (Secondary
Audio Programming)
Select the Audio mode for watching TV
Digital mode
Press [SAP] to select next Audio track (if available) when
receiving a digital channel.
Analog mode
Press [SAP] to select the desired Audio mode.
● Each press of [SAP] will change the Audio mode.
(“Stereo” / “SAP” / “Mono”)
The selected mode is only set for the program you are
z
watching at the moment.
SAP is not available when watching TV with a Cable or
z
Satellite box connected via HDMI.
Contact your Cable or Satellite operator for instructions on
z
enabling SAP with their box.
Closed Caption (CC)
Press [CC] to select the CC1/CC2/CC3/
CC4, receiving mode and CC setting in
menu.
The selected mode is only set for the program you are
z
watching at the moment.
Closed Caption is not available when watching TV with a
z
Cable or Satellite box connected via HDMI.
Contact your Cable or Satellite operator for instructions on
z
enabling CC with their box.
The CC service is depend on the input signal.
z
Displaying information
Displays or hides information. Shows the
channel banner when watching programs
via the Antenna/Cable input.
Display the “Options menu”
Press [OPTION] to show the “Options
menu”
This menu consists of shortcuts to convenient functions.
This menu is only available when the TV is using the Antenna/
V
/
Cable input, not when using Cable or Satellite box.
Channel surf mode
Specify favorites or type of channels to view when pressing the
[
/ Left / Right] button.
● “All” / “Favorite” / “Digital only” / “Analog only”
“Favorite”: Only channels registered as FAVORITE.
Signal meter
Check the signal strength if interference is found or freezing
occurs on a digital image.
If the signal is weak, check the antenna. If a problem is found,
z
consult your local dealer.
Call up a Favorite channel
FAVORITE
Channel numbers registered in Favorite are displayed on the
“Favorite list” screen. Select the desired channel
with the up/down cursor.
To set Favorite channels
While viewing the channel that you want to set:
● “All” / “Favorite” / “Digital only” / “Analog only”
“Favorite”: Only channels registered as FAVORITE.
When watching a Favorite channel, the icon “
z
displayed on the channel banner.
You can set up to 10 channels as Favorite.
z
If you set a new channel in a used slot, the original Favorite
z
channel will be deleted first then you can add a new one.
You can set Favorite channels when using Cable or Satellite
z
box.
To delete Favorite channels
Select the channel you want to remove, then press OK button.
z
The icon “
z
” will be removed from the channel banner.
Password setting/entering
You need to enter the password when you access locked
channel or inputs.
Input your 4-digit password
If it is your first time entering the password, please enter “1234”.
z
This is the default password.
To change password - Input the new 4-digit password twice.
z
Make a note of your password. Do not forget it. (If you have
z
forgotten your password, consult your local dealer.)
When you select a locked channel, a message will be displayed
z
that allows you to view the channel after you input your password.
Set the “Sleep timer”
The TV automatically goes into Standby after the selected
period.
Press [SLEEP] repeatedly until the
desired time appears.
Note:
It is also possible to set the time from “Sleep timer” in the “Setup”
z
menu.
To cancel, set to “Off ” or turn off the TV.
z
When the remaining time is within 3 minutes, the remaining time
z
will flash on screen.
● “Off ” / “15” / “30” / “60” / “90” (minutes)
” will be
8
Page 10

How to Use Menu Functions
Menu bar
Enter submenu
Insert
straight in
Pull straight
out
MEDIA
PLAYER
Photos Music
Media select
USB
EXIT
Select
RETURN
Access
Videos
Media player Photos All photos
INFO
OPTION
2010/10/23
2010/11/24
2010/10/25
2010/12/01
2010/11/01
2010/12/03
2010/11/05
2010/12/20
2010/11/10
2010/12/22
2010/11/22 2010/11/23
Media player Photos
USB
EXIT
Select RETURN
View selectSlideshow
Info
View
Slideshow settings
Drive select Media select
Select
Display thumbnails of the
selected folder
Select
OK
Various menus allow you to make settings for the picture, sound, and
other functions so that you can enjoy watching TV best suited for you.
Press MENU button, the menu will be displayed.
1無
Press ▲▼ buttons to select item desired.
2無
Press ◄► buttons to adjust value.
3無
Press RETURN button return to the previous menu.
4無
Display the menu
Shows the functions that can be adjusted.
z
Some functions will be disabled depending on the type of
z
input signal.
Menu structure
Press [OK] or [right cursor] to move to the menu items.
Reset to defaults
Pictu re
Pictu re mode
Audi o
Back l ight
Contr ast
Lock
Brig htness
Color
TV
Tint
Sharpn ess
Setup
Color temp.
Pictu re Adjust ReturnSelect
Vivid
Cool
OK
/
(example: “Picture” menu)
Select the menu
Picture
Picture settings
Audio
Audio settings
Lock
Lock settings
(Channel, Program, etc.)
TV
TV settings
(Tuning, Audio language, Preferred audio type)
Setup
Setup (other settings)
Adjust or select a menu item
Reset to defa ults
Pictur e
Pictur e mode Vivid
Audio
Back li ght
Contras t
Lock
Brigh tness
Color
TV
Tint
Sharpnes s
Setup
Color t emp.
Pictur e ReturnSelect
Some items have submenus, press the [OK] button to enter
z
the submenu.
Pictur e
A.I. picture On
Audio
Advanced picture
Lock
TV
Setup
Pictur e Retu rnSelect
Cool
/
WeakVideo NR
/
100
100
60
60
0
70
Menu items
Press [OK] to enter
100
submenu page
100
60
if available.
60
0
70
Intensity bar
Item option
Operation guide
Adjust or select option
Select item
Settings Items Option
Picture
Reset to defaults Resets all picture adjustments
to factory default settings.
Picture mode Vivid/Standard/Cinema/Game/
Custom
Back light [Adjusts the luminance of the
back light.]
Contrast,
Brightness,
Color,
Tint,
[Adjusts the color, brightness, etc.
for each picture mode to suit your
preference]
Sharpness
Color temp. Cool/Normal/Warm
• Selects a choice of Cool (blue),
Normal, or Warm (red) color.
A.I. picture Off/On
• Controls dark areas without
affecting the black level or
brightness in the overall picture.
Video NR
(DOT NOISE
REDUCTION)
• Some menus are grayed out depending on the input
signal or condition.
Advanced
picture
Off/Weak/Medium/Strong
• Reduces noise, commonly called
snow. Leave it off when receiving a
strong signal.
3D Y/C Filter :
and cross-color in the picture.
Color matrix :
resolution of component-connected
devices.
SD: Standard -Definition
HD: High-Def inition
Only used with 480p video signal.
Black level :
Light. Valid only for external input
signals.
MPEG NR :
in MPEG-compressed video.
• For Digita l TV only
3:2 pulldown :
the picture recorded in 24 fps for
optimum quality.
Motion picture setting :
Weak/Medium/Strong) Improves
motion picture quality by reducing
motion blur.
Aspect adjustments :
Screen format (FULL/4:3/ JUST/
ZOOM/H-FILL) Changes the format
(aspect ratio). Lets you choose the
aspect depending on the format of
received signal.
H size (Size1/Size2) Adjusts the
horizontal display range to reduce
noise of both side edges of an image.
Size 2: Adjusts the image size
according to the aspect mode to
reduce noise.
HD size (Size1/Size2) 1: Display
95% of HD signal, to trim noise at the
edges of the screen.
2: Full image.
Zoom adjustments
V-size) Adjusts vertical alignment
and size when aspect setting is
“Zoom”.
Minimizes noise
Selects image
Selects Dark or
Reduces picture noise
(Off/Auto) Adjusts
(Off/
(V-position/
Page 11

Settings Items Option
Insert
straight in
Pull straight
out
MEDIA
PLAYER
Photos Music
Media select
USB
EXIT
Select
RETURN
Access
Videos
Media player Photos All photos
INFO
OPTION
2010/10/23
2010/11/24
2010/10/25
2010/12/01
2010/11/01
2010/12/03
2010/11/05
2010/12/20
2010/11/10
2010/12/22
2010/11/22 2010/11/23
Media player Photos
USB
EXIT
Select RETURN
View selectSlideshow
Info
View
Slideshow settings
Drive select Media select
Select
Display thumbnails of the
selected folder
Select
OK
Audio
Reset to defaults
Bass
Treble
Balance
Surround
TV speakers
Digital audio
out
Resets all audio adjustments to
factory default settings.
[Increases or decreases the
bass response.]
[Increases or decreases the
treble response.]
[Emphasizes the left / right
speaker volume.]
Off/On
Enhances audio L/R response when
listening to stereo.
Off/On
Switches to “Off” when using
external spe akers.Off: “Surround”
does not work if “Off” is selected.
Bypass DTS signal if input
Auto :
source is DTS format, or fixed output
to Dolby Digital besides DTS source.
Digital output signal is fixed
PCM :
to PCM.
HDMI1-2 in : Digital/Analog
Audio input
You will be asked to enter your password each time you display
the “Lock” menu.
Select audio input terminal when
DVI cable is connected.
(Analog audio input signal)
Settings Items Option
Unlocks all the Lock settings
Lock
Mode
Channel
(These channels
will be blocked
regardless of the
program rating.)
Program
(To set a rating
level)
Off :
of “Channel”, “Program” and “Input”
Locks all the inputs regardless
All :
of the Lock settings of “Channel”,
“Program” and “Input”.
Custom :
“Channel”, “Program” and “Input”.
Locks specified inputs of
[Select a channel to lock.]
Mode: (Off/On)
status. “V-chip” technology enables
restricted shows to lock according to
TV ratings.
On: Set each rating leve l (U.S.TV
Ratings, U.S. Movie Ratings,
Canadian English ratings., Canadian
French ratings.)
U.S.TV ratings/U.S. Movie
Set program lock
ratings/Canadian English
ratings/Canadian French ratings
Input
Change
password
HDMI1/HDMI2/Component/
Video
Locks external inputs accordingly.
[Changes the password. Input
the new 4-digit password twice.]
• This television is designed to support the “Downloadable U.S.
Region Rating System” when available.(Available only in the U.S.A.)
• The Off rating is independent of other ratings.
• When placing a lock on a specific-age-based-rating level, the Off
rating and any other more restrictive ratings will also be blocked.
Settings Items Option
TV
ANT in Cable/Antenna
Auto program
Manual Program
Automatically retune the channels
received in the area.
Set Analogue channel manually
after Automatic Channel Search.
MTS Stereo/SAP/Mono
Audio Language
English/Spanish/French
Main audio/Hearing impaired/
Visually impaired
Narration settings for impaired users
Preferred
audio type
Hearing Impa ired: Activates closed
captioning when available on
broadcasts.
Visual Impaired: Activates the
narration soundtrack when available
on broadcasts.
• For Digita l TV only.
Settings Items Option
Setup
Language English/Español/Français
Sleep Timer : (Off/15/30/60/90
(minutes))
No signal for 10 minutes :
on/ Power TV off)
To conserve energy, the TV automatically turns
Timer set
.
off when NO SIGNAL and NO OPERATION
continue for more than 10 minutes.
No activity for 3 hours : (Stay
on/ Power TV off)
To conserve energy, the TV automatically
turns off when no operation of remote and side
panel key continues for more than 3 hours.
Closed Caption Displays subtitles (Closed caption)
Input labels
HDMI control
About
You can label the terminal with the
type of equipment connected to it.
CEC function
TV is turned on automatically and
switches to the appropriate HDMI
input whenever an HDMI connected
equipment is initially turned on and
the Play mode is selected.
Power off link : (No/Yes)
On: When the TV is turned off, all
HDMI connected equipment is also
automatically turned off.
• A Panasonic DVD Recorder will not
turn off if it is still in Rec mode.
• The TV remains on even if the HDMI
connected equipment is turned off.
: (Off/On) On: The
Displays TV version and
software license.
Performing reset will clear all
settings made in the “Setup”
Reset to
defaults
menu, such as channel
settings.
After reset, “First time setup”
will launch when you next
power on the TV.
• The television includes a built-in decoder that is capable of
providing a text display of the audio. The program being viewed
must be transmitting the Closed Caption (CC) information.
• The settings in “Analog” or “Digital” depend on the broadcaster.
(Stay
10
Page 12

Using Media player
Insert
straight in
Pull straight
out
MEDIA
PLAYER
Photos Music
Media select
USB
EXIT
Select
RETURN
Access
Videos
Media player Photos All photos
INFO
OPTION
2010/10/23
2010/11/24
2010/10/25
2010/12/01
2010/11/01
2010/12/03
2010/11/05
2010/12/20
2010/11/10
2010/12/22
2010/11/22 2010/11/23
Media player Photos
USB
EXIT
Select RETURN
View selectSlideshow
Info
View
Slideshow settings
Drive select Media select
Select
Display thumbnails of the
selected folder
Select
OK
Media player allows you to enjoy photos, videos or
music recorded on a USB Flash Memory.
The picture may not appear correctly on this TV
depending on the recording equipment used.
Display may be delayed when there are many files and folders.
z
Partly degraded files might be displayed at a reduced resolution.
z
Picture settings may not take effect depending on the
z
conditions.
The folder and file names may be different depending on the
z
digital camera or digital video camera used.
Starting Media Player
Insert the USB Flash Memory to the TV
Insert the device
z
Media player only supports USB Mass storage class devices.
z
COMPLIANCE:
- Supports only USB1.1 or USB2.0 standard.
- Supports file format of FAT16 or FAT32.
- Maximum USB capacity supported is 32GB.
- USB Hub or card adapter is not supported.
Viewing Contents
Start Media Player
Remove the device
z
Photos view
Supported file format (p.14)
The thumbnail of all the photos in the USB Flash
Memory will be displayed.
View
EXIT
RETURN
Select
Slideshow View select
Info
Slideshow settings
Media selectDrive select
Operation guide
Features
● Slideshow
● View select
● Drive select
● Media select
: Error display
Displays data information (file name, date, size,
etc.) and differs depending on selected data.
[View select]
Display the viewing mode selection screen
1無
USB
Select the contents
Select the data [Photos] / [Music] / [Videos]
How to view the data differs depending on data storage
conditions.
Select Title/Folder
1無
Select file
2無
View or play
Thumbnail / Playback view image and operation differ
depending on selected contents.
Select the view type
2無
Folders
Folder view: Displays the thumbnails grouped by folders
z
Select folder view to display the thumbnails of the selected
3無
Select
OK
group
• To return to the thumbnail of all photos
119
Page 13

Select
Adjust
Pictu re
Audi o
Pictu re ReturnSelect
/
Cool
Back l ight
100
100
60
60
0
70
Contr ast
Brig htnes s
Color
Tint
Sharpn ess
Color temp.
Pictu re mod e Vivid
Rese t to def ault s
14-1
ABC-HD
Anten na
7:00 AM - 8:00 AM SAP
TV-G CC1 480i SD
The News 480i
Station
identifier
Channel Program Program duration SAP indication
Rating
level
Favorite
channel
Closed
Caption
Signal
resolution
Input
signal
Visually impaired、
Hearing impaired
Menu bar
Enter submenu
Insert
straight in
Pull straight
out
MEDIA
PLAYER
Photos Music
Media select
USB
EXIT
Select
RETURN
Access
Videos
Media player Photos All photos
INFO
OPTION
2010/10/23
2010/11/24
2010/10/25
2010/12/01
2010/11/01
2010/12/03
2010/11/05
2010/12/20
2010/11/10
2010/12/22
2010/11/22 2010/11/23
Media player Photos
USB
EXIT
Select RETURN
View selectSlideshow
Info
View
Slideshow settings
Drive select Media select
Select
Display thumbnails of the
selected folder
Select
OK
[Slideshow settings]
OPTION
Operation guide
OPTION
Select
Video options
Repeat Off
My Music_1 My Music_2 My Music_3
Media player sredloF cisuM
USB
EXIT
Select
RETURN
yalP
Info
Access
Music options
Drive select
Operation guide
Media selectfolder
OPTION
Music options
Repeat One
Select
Display the “Slideshow settings” screen
1無
Select the items and set
2無
Slides how settings
Transi tion effect Wipe
Photo size Normal
Displ ay int erval
Repeat Off
Background music Off
5 secon ds
Select
OK
Features
● Play folder
● Drive select
● Media select
● Aspect change
[Video options]
Display the “Video options” screen
1無
Transition effect
Effect for photo switching during slideshow. [None] /
[Dissolve] / [Wipe g] / [Wipe ] / [Wipe h] / [Wipe ] /
[Box in] / [Box out] / [Random]
Photo size
Selects enlarged or normal viewing mode on Single view
and Slideshow. [Normal] / [Zoom]
• Depending on the photo size, the photo may not be
enlarged.
Display interval
Sets the interval for each image to be displayed in the
Slideshow mode. [5] / [10] / [15] / [30] / [60] / [90] / [120]
(seconds)
Repeat
Turn the slideshow repeat (cycle) function on or off.
[Off] / [On]
Background music
Selects the background music during Photo mode
[Off] / [Type1] / [Type2] / [Type3]
• [Type1], [Type2] and [Type3] are the fixed music each
installed in this TV.
Note:
Picture quality may suffer depending on the slideshow settings.
z
Picture setting may not work depending on the slideshow
z
settings.
Videos view
Supported file format (p.14)
The thumbnail of all the Videos in the USB Flash
Memory will be displayed.
Media player
Trip1
Trip2
Videos
Trip3
Trip4
Trip5
Room
Title/Folders view
Nature1
Set the play repeat function to your preference
2無
Repeat (“Off” / “On”)
z
Music play
Supported file format (p.14)
Music folders in the USB Flash Memory will be
displayed.
Features
● Play folder
● Drive select
● Media select
[Music options]
Display the “Music options” screen
1無
Nature2
Nature3
Nature4
Nature5
Nature6
2010_4
2010_9
Access
EXIT
RETURN
Select
Play folder Drive select
Info
OPTION
Video options
2010_7
Media select
USB
Set the play repeat mode to your preference
2無
Repeat
([Off] / [One] / [Folder])
[Other settings in Media player]
Display the menu
1無
Page 14

Select the “Picture” item
Select
Adjust
Pictu re
Audi o
Pictu re ReturnSelect
/
Cool
Back l ight
100
100
60
60
0
70
Contr ast
Brig htnes s
Color
Tint
Sharpn ess
Color temp.
Pictu re mod e Vivid
Rese t to def ault s
Menu bar
Enter submenu
Insert
straight in
Pull straight
out
MEDIA
PLAYER
Photos Music
Media select
USB
EXIT
Select
RETURN
Access
Videos
Media player Photos All photos
INFO
OPTION
2010/10/23
2010/11/24
2010/10/25
2010/12/01
2010/11/01
2010/12/03
2010/11/05
2010/12/20
2010/11/10
2010/12/22
2010/11/22 2010/11/23
Media player Photos
USB
EXIT
Select RETURN
View selectSlideshow
Info
View
Slideshow settings
Drive select Media select
Select
Display thumbnails of the
selected folder
Select
OK
2無
Picture
Audio
Lock
TV
Set
3無
Select
Next
Adjust the Picture and Audio
Some items are grayed out to indicate that these items are not
z
available. Availability depends on the contents you are enjoying.
Specifications
Power rating
AC 110-127 V, 60 Hz
Rated Power Consumption
Watts ; 50” : 105 Watts
39” : 70
Standby condition
39” : 0.3
Visible screen size (diagonal)
39” class : 38.5 inch (98cm)
50” class : 49.5 inch (127cm)
Number of pixels
39” / 50” FHD (1920X1080)
Dimensions (W × H × D) (Including Stand)
39” : 35.1” × 23.4” × 8.6” (890 mm × 593 mm × 217 mm)
50” : 44.6” × 28.7” × 10.9” (1131 mm × 729 mm × 275 mm)
Net Weight
39” : 27.6Ib. (12.5 kg) (Including Stand)
39” : 24.3Ib. (11 kg) (TV only)
50” : 47.4Ib. (21.5 kg) (Including Stand)
50” : 40.8Ib. (18.5 kg) (TV only)
Sound System
1-way 2 bottom SP System
Channel Capability-ATSC/NTSC (Digital/Analog)
VHF/UHF: 2 - 69, CATV: 1 - 135
Sound Output
39” / 50” : 10W+10W
Maximum Visible Range
39” : 33.8” × 19.0” (857 mm x 482 mm)
50” : 43.3” × 24.4” (1099 mm x 619 mm)
Operating Conditions
•
Specifications are subject to change without notice.
•
The On-Screen Menu and figures in this manual may differ
slightly from the product.
•
USB Flash Memory format :
exFAT or NTFS)
•
Some USB devices (USB HUB or card adapter) or some USB
stick may not be used with this TV.
Watts ; 50” : 0.3 Watts
Temperature: 32° F - 95° F( 0°C to 35°C)
Humidity: 20 % - 80 % RH (non-condensing)
FAT16, FAT32 (no support
.
13
Page 15

Insert
straight in
Pull straight
out
MEDIA
PLAYER
Photos Music
Media select
USB
EXIT
Select
RETURN
Access
Videos
Media player Photos All photos
INFO
OPTION
2010/10/23
2010/11/24
2010/10/25
2010/12/01
2010/11/01
2010/12/03
2010/11/05
2010/12/20
2010/11/10
2010/12/22
2010/11/22 2010/11/23
Media player Photos
USB
EXIT
Select RETURN
View selectSlideshow
Info
View
Slideshow settings
Drive select Media select
Select
Display thumbnails of the
selected folder
Select
OK
Supported file format in Media Player
Photos
Format File extension Image resolution (pixel) Details / Restrictions
JPEG
.jpg
.jpeg
Videos
Container File extension Video codec Audio codec Details / Restrictions
AVI
<4 ref frame
.avi H.264 BP/MP/HP
MKV .mkv H.264 BP/MP/HP
MP4
.mp4
.m4v
.ts
TS
.tp
.trp
.mpg
PS
.mpeg
.vro
.vob
WAV .wav --- DTS CD --FLV
.flv
.f4v
Music
Codec File extension Restrictions
MP3 .mp3
Note:
Some files may not be played back even if they fulfill these conditions.
z
Do not use two-byte characters or other special codes for data.
z
The device may become unusable with this TV if the file or folder names are changed.
z
The picture may not appear correctly on this TV depending on the recording equipment used.
z
Display may take some time when there are many files and folders.
z
The function cannot display Motion JPEG and still image not DCF formatted (i.e. TIFF, BMP).
z
Data modified with a PC may not be displayed.
z
Images imported from a PC must be compatible with EXIF 2.0, 2.1 and 2.2.
z
Partly degraded files might be displayed at a reduced resolution.
z
All “.JPG” extension data in the USB flash memory will be read in Photo viewer Mode.
z
The folder and file names may be different depending on the digital camera used.
z
Baseline jpeg:
4 x 4 to 15,360 x 8,640
Progressive jpeg:
4 x 4 to 4,000 x 4,000
DCF and EXIF standards
Sub-sampling: 4:4:4, 4:2:2, 4:2:0
Progressive JPEG is not supported.
z
MP3
MPEG1 Layer1/2
AC3
MP3
MPEG1 Layer1/2
DTS Core
AC3
H.264 BP/MP/HP MP3
MPEG2 MP@HL
H.264 BP/MP/HP
MPEG1
MPEG2 MP@HL
MP3
AC3
MPEG1 Layer1/2
DVD LPCM
AC3
H.264 BP/MP/HP MP3 ---
Compatible con tasa de bits
● 32/40/48/56/64/80/96/112/128/160/192/224/256/320kbits/s
● VBR no support
---
---
● This TV supports this
container recorded by
Panasonic products. For details,
read the manual of the products
---
---
1412
Page 16

Insert
straight in
Pull straight
out
MEDIA
PLAYER
Photos Music
Media select
USB
EXIT
Select
RETURN
Access
Videos
Media player Photos All photos
INFO
OPTION
2010/10/23
2010/11/24
2010/10/25
2010/12/01
2010/11/01
2010/12/03
2010/11/05
2010/12/20
2010/11/10
2010/12/22
2010/11/22 2010/11/23
Media player Photos
USB
EXIT
Select RETURN
View selectSlideshow
Info
View
Slideshow settings
Drive select Media select
Select
Display thumbnails of the
selected folder
Select
OK
Customer Services Directory
(for U.S.A. and Puerto Rico)
Obtain Product Information and Operating Assistance; locate your nearest Dealer or Service Center; purchase Parts and
Accessories; or make Customer Service and Literature requests by visiting our Web Site at:
http://www.panasonic.com/help
or, contact us via the web at:
http://www.panasonic.com/contactinfo
You may also contact us directly at:
1-877-95-VIERA (958-4372)
Monday-Friday 9 am-9 pm; Saturday-Sunday 10 am-7 pm, EST.
For hearing or speech impaired TTY users, TTY: 1-877-833-8855
Accessory Purchases (United States and Puerto Rico)
Purchase Parts, Accessories and Instruction Books on line for all Panasonic Products by visiting our Web Site at:
http://www.pstc.panasonic.com
or, send your request by E-mail to:
npcparts@us.panasonic.com
You may also contact us directly at:
1-800-332-5368 (Phone) 1-800-237-9080 (Fax Only) (Monday - Friday 9 am to 9 pm, EST.)
Panasonic National Parts Center
20421 84th Ave. S., Kent, WA 98032
(We Accept Visa, MasterCard, Discover Card, and American Express)
For hearing or speech impaired TTY users, TTY: 1-866-605-1277
Customer’s Record
The model number and serial number of this product can be found on its back cover. You should note this serial number in the space
provided below and retain this book, plus your purchase receipt, as a permanent record of your purchase to aid in identification in the event
of theft or loss, and for Warranty Service purposes.
Model Number Serial Number
Panasonic Consumer Marketing Company of North America,
Division of Panasonic Corporation of North America
One Panasonic Way, Secaucus
New Jersey 07094 U.S.A.
© 2013 Panasonic Corporation of North America. All Rights Reserved. Printed in China
Panasonic Canada Inc.
5770 Ambler Drive
Mississauga, Ontario
L4W 2T3 CANADA
M0212-0
15
 Loading...