

Page 1
Panasonic
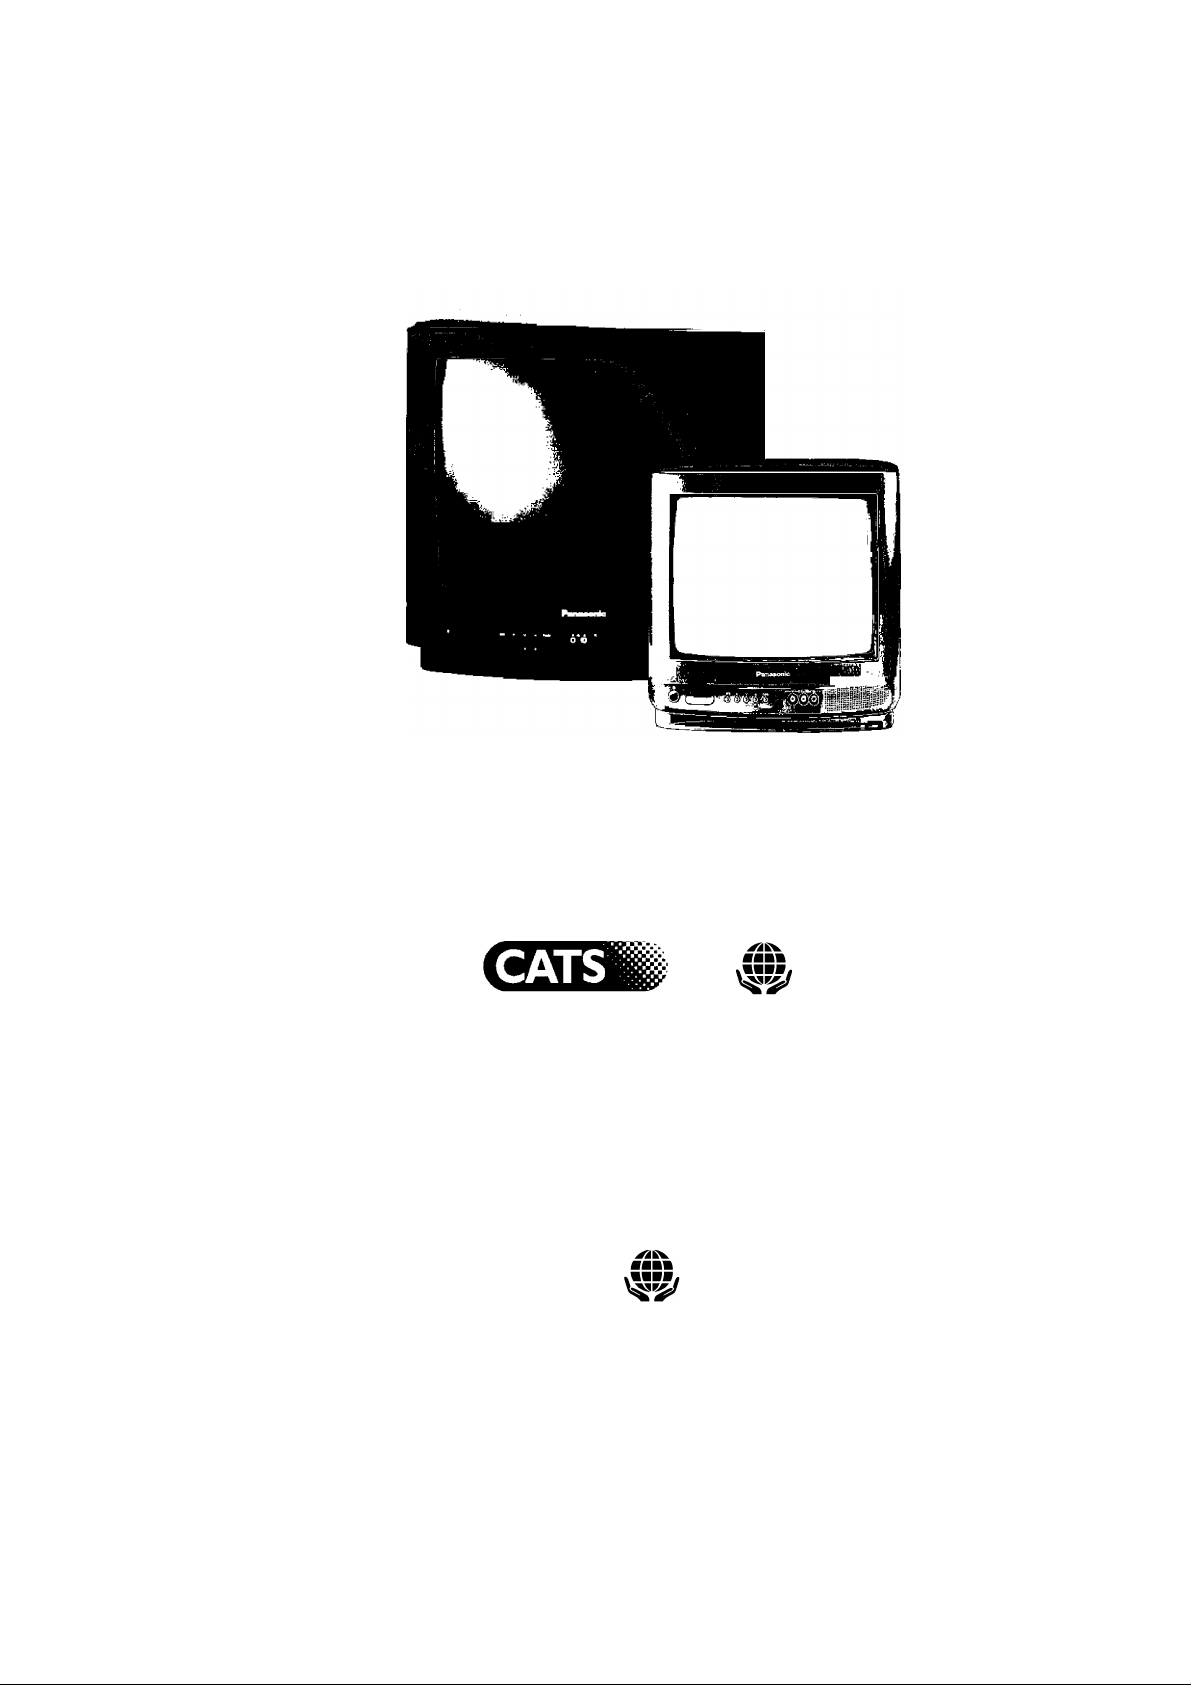
TC-21S3RP
Contrast Auto Tracking System
TC-14S3RP
Please read these instructions completely before use and retain them for future
reference.
TQB8E2442
Przeczytaj ponizszq instrukcj^ w calosci przed zastosowaniem jej w przyszlosci.
Pred uvedenim zarizeni do provozu si peclive prectete tyto pokyny a uschovejte je pro
moznost ziskavani dalsich informaci.
Page 2

Dear Panasonic Customer,
Welcome to the Panasonic family of customers. We hope that you have many years of enjoyment from your new colour television.
The best way to understand the features of this television is to read this book thoroughly, before operating the set.
This television has a low power consumption making it very cost effective to run.
tsSSBSsf To this end, the standby power consumption is merely 1 watt.
CONTENTS
Warnings and Precautions ...................................3
General Information
.............................................
3
Accessories...........................................................4
Fitting Remote Control Batteries
Installation and Set-up
..........................................
.........................
4
5
Location of Controls..............................................&
Menu Operation
...................................................
8
Audio / Video Connections....................................10
Trouble-shooting
Scart Terminal Information
...................................................
..................................
11
11
Specifications .......................................................12
Page 3

WARNINGS AND PRECAUTIONS
This TV. is designed to operate on A.C. 220 - 240V, 50Hz.
Do not expose this TV set to rain or excessive moisture.
WARNING: HIGH VOLTAGE !
Do not remove the rear cover, there are no user
serviceabie parts inside.
Avoid exposing the TV set to direct suniight or other
sources of heat.
Remove the mains piug from the waii socket when the TV
set is notto be used for a proionged period of time. Do not
puii the power cabie to remove the mains piug from the
socket, aiways remove it by the piug.
CABINET AND PICTURE TUBE CARE
Remove the mains piug from the waii socket. The cabinet
and picture tube can be cieaned with a soft cioth
moistened with miid detergent and water. Do not use
soiutions containing benzoi or petroieum. TV sets can
produce static eiectricity, care must be taken whenever
touching the TV screen.
Adequate ventiiation is essentiai to prevent faiiure of
eiectricai components. We recommend that a gap of at
ieast 5cm is ieft aii around this TV even when it is piaced
inside a cabinet or between sheives.
GENERAL INFORMATION
Sleep Feature
If the set is not switched off when the TV station stops transmitting , it wiii automaticaiiy go to standby mode after 30 minutes. This
function wiii not operate when in AV mode.
Last Position Memory
Certain functions have a iast position memory, i.e. the setting at the time of switch off wiii be the setting used when the receiver is
switched on again:
Programme position
Contrast
Sharpness
Coiour
Brightness
Status
Voiume
Standby
C-A-T-S (TC-21S3RP)
Page 4
ACCESSORIES
Check that you have the accessories and items shown
Remote Controi Transmitter
TNQ8E0460
Operating Instruction
book
(^sorac|
FITTING REMOTE CONTROL BATTERIES
Batteries for the
Remote Controi Transmitter.
(2 X R6 (UM3) size)
Siide off the battery cover Insert batteries - note correct poiarity Repiace the cover
Make sure that the batteries are fitted the correct way round.
Do not mix oid batteries with new batteries. Remove oid, exhausted batteries immediateiy.
Do not mix different battery types, i.e. Aikaiine and Manganese. Do not use rechargeabie (Ni-Cad) batteries.
Page 5
INSTALLATION AND SET-UP
TV only
Connect Aerial co-axial cable direct
to TV RF IN socket.
OR
USING A VCR
Connect aerial co-axial cable to RF Input socket of
VCR and a RF co-axial cable from VCR RF Out
socket to TV RF IN socket.
The VCR can also be connected to the TV using a
SCARTto SCARTlead.
Further details of Audio/ Video connections
can be found on page 10.
Ancillary equipment and leads are not supplied.
We recommend that you switch ON the VCR’s test signal - refer to your VCR instruction book.
Page 6
INSTALLATION AND SET-UP
Choose the desired language from the
OSD language selection.
Press TV/AV button to start ATF.
OSD Laiguage
PL CZ RO
H PY G B
TV stations will be located and stored ready
for use.
The first available channel wil
displayed.
Switch the VCR test signal 'Off'.
The TV stations will be stored in the order that
they have been found, if the order is not to your
preference it can be rearranged. Refer to the
Tuning menu Swap feature - see page 9 for
details.
be
Programme change
Volume adjust
IT IS IMPORTANT that you only use TV programme position ‘O' to view your VCR. If your VCR picture does not appear on
programme position ‘O' (the VCR position), it will be necessary to either adjust the RF channel of the VCR or to adjust the tuning of
the TV's programme position 'O' until the RF output of the VCR is received.
6
Page 7
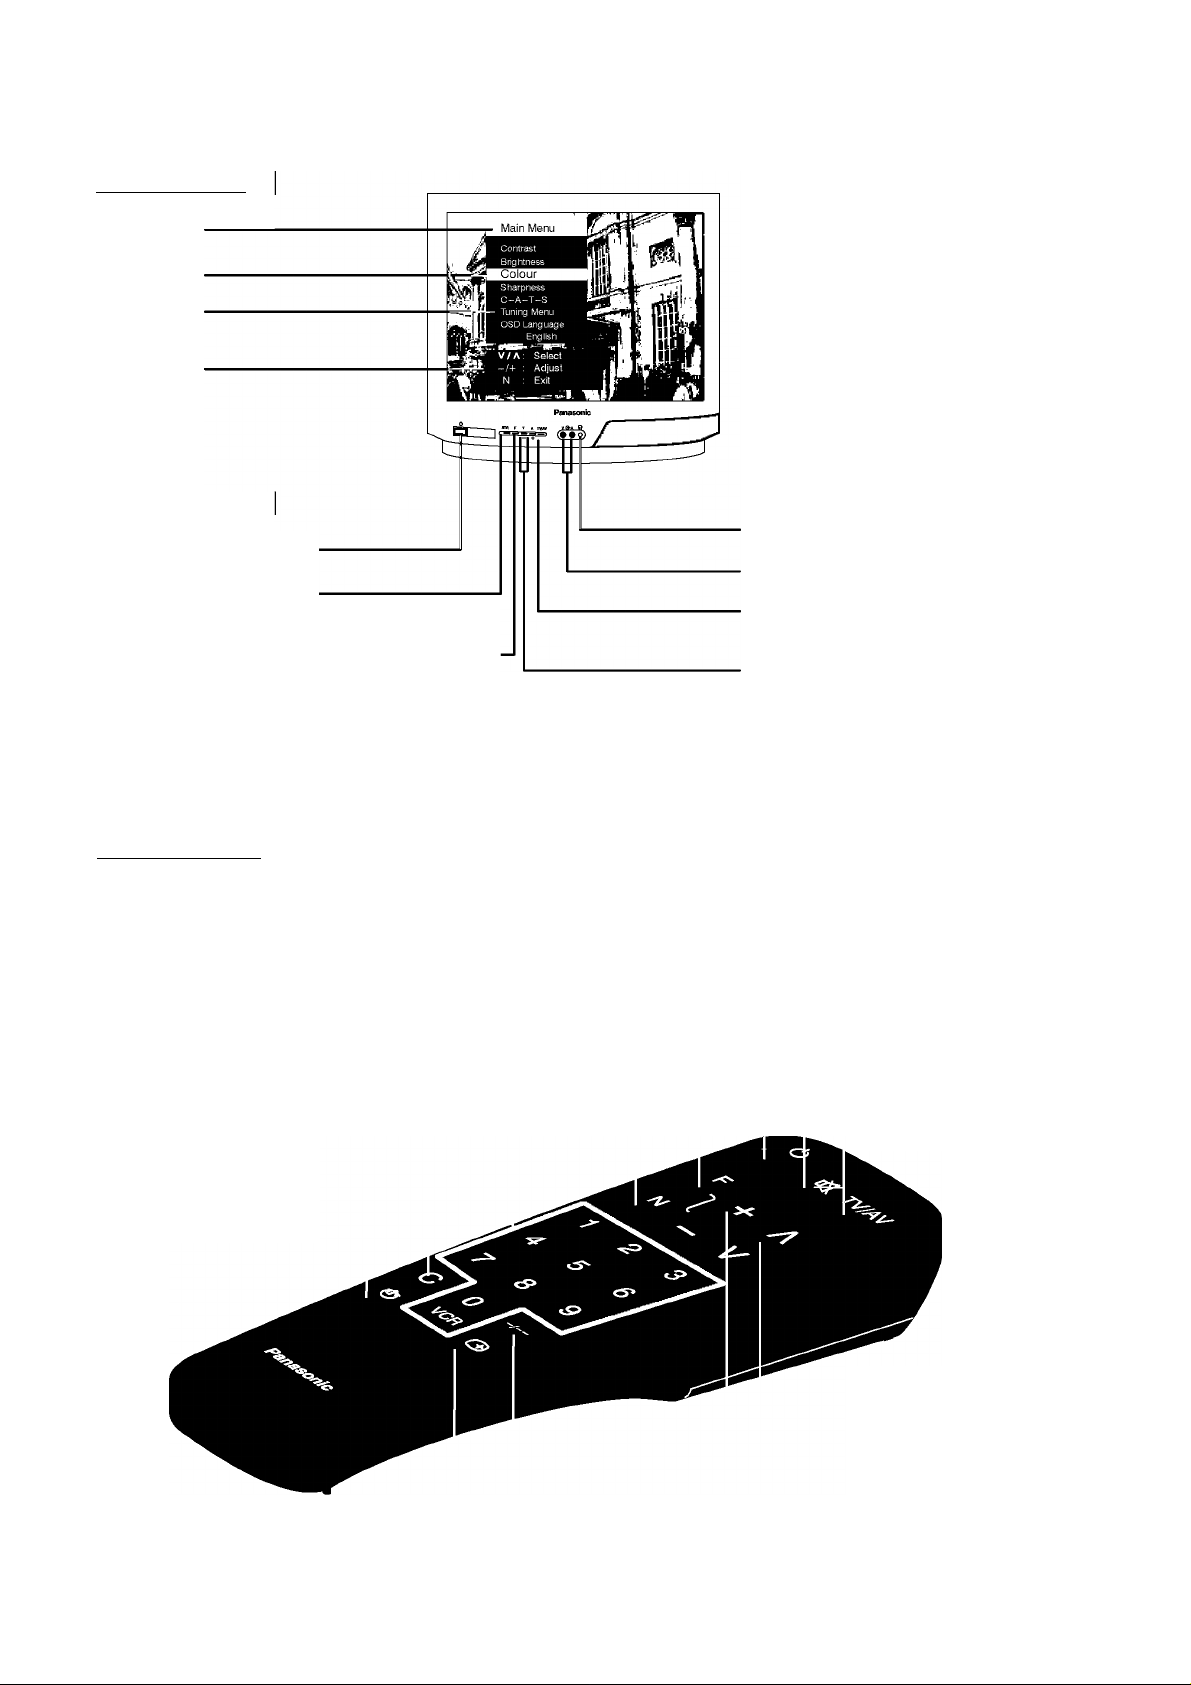
LOCATION OF CONTROLS
On Screen Displays
Menu Title
Cursor Bar
Sub Menu
Commands
Front Panel Controls
Mains Power On/Off switch
STR
Stores tuning and other function settings
Headphone socket
RCA Audio/Video sockets
TV/AV
Switches between TV and AV modes
Selects a function from :
Volume, Contrast, Brightness, Colour, Sharpness,
C-A-T-S (TC-21S3RP)
and Manual Tuning.
Remote Control keys|
Function Select
Press to display the On Screen Menus
(Page 8)
Numeric keys for:
Programme change
Direct channel access
Direct channel access
Press and enter channel
number using numeric keys
Off timer
Restores the levels previously
set with STR (TV front panel)
V/-, A/+
Programme up / down.
When a function is already displayed,
allows adjustment of the function.
Standby On/Off
Sound mute On/Off
Switches between TV
and AV modes
(Page 10)
Status : Displays programme
position and channel number.
Channel up/down and
Menu option select
Adjusts currently selected
function. Adjusts the
volume if no function is
selected
Selection of programmes
10-60 using numeric keys
Page 8
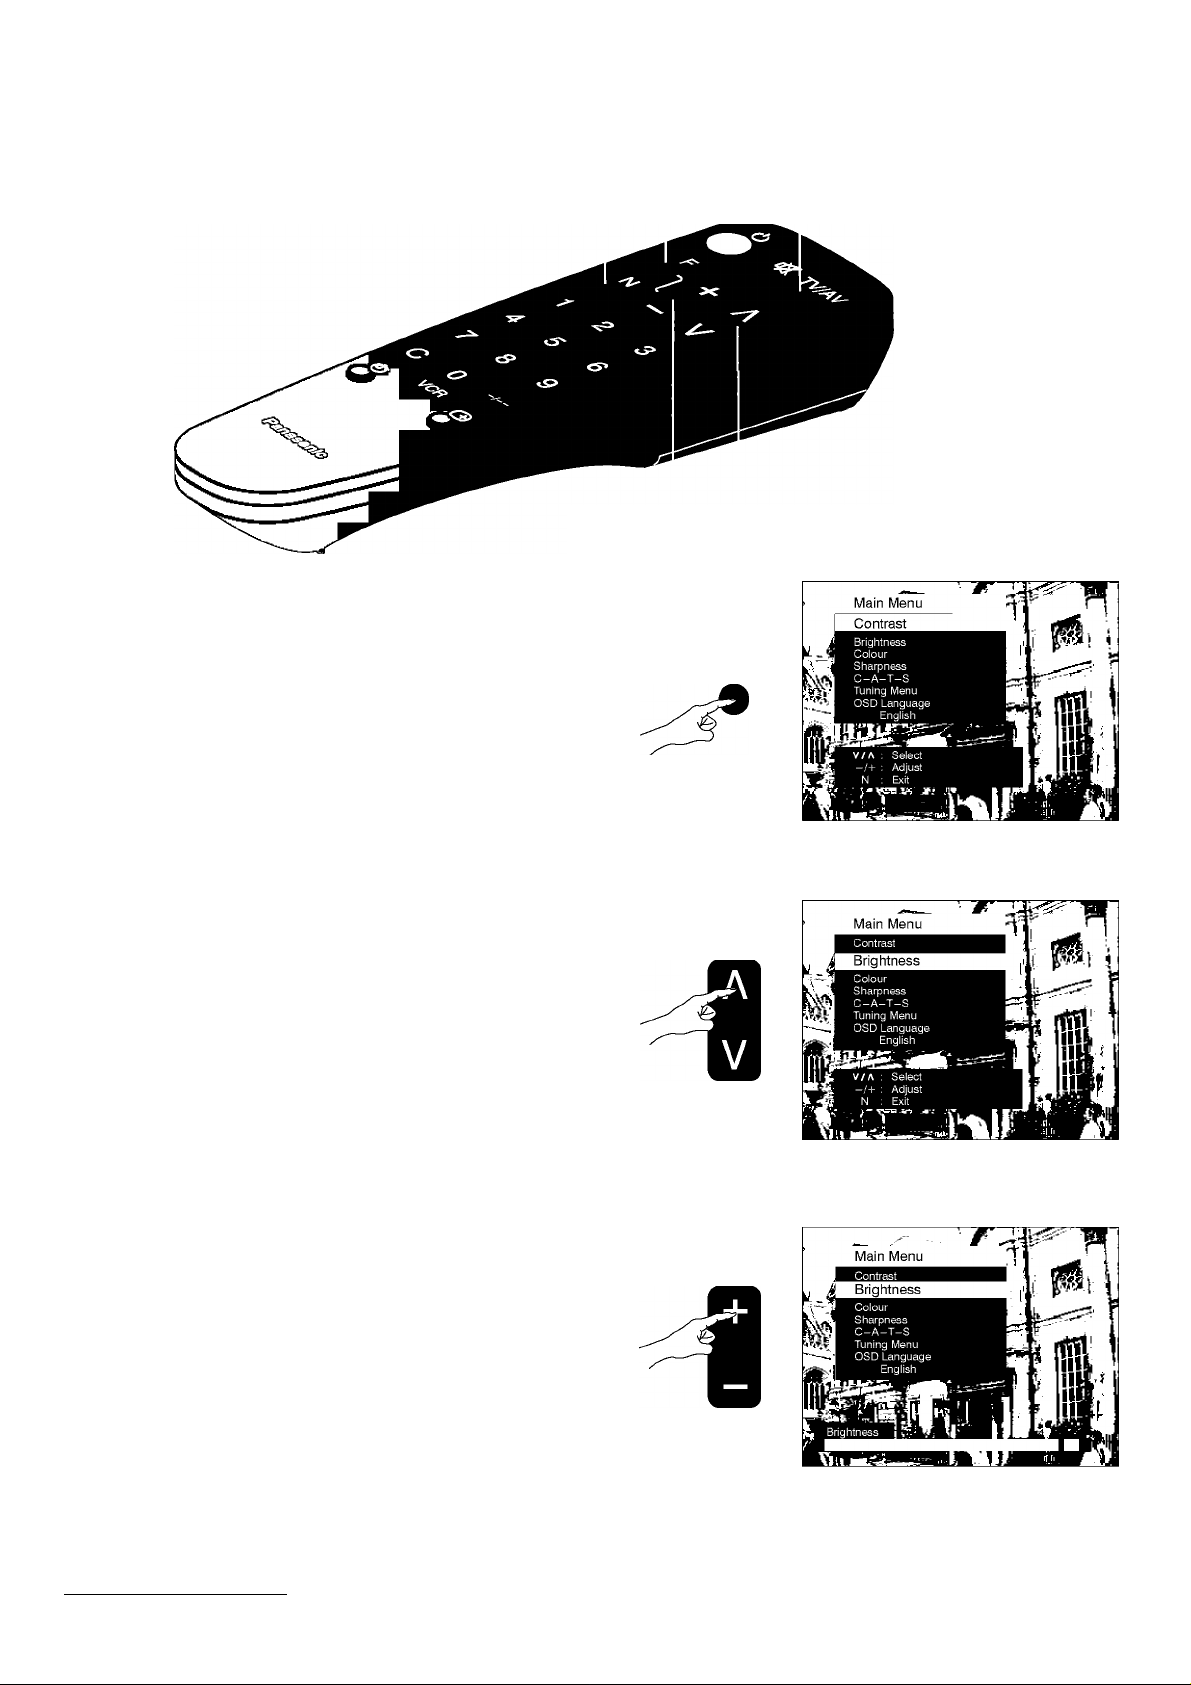
MENU OPERATION
Main Menu
Contrast
Brightness
Exit Menu Display Menu /
Previous Menu
Adjust / Access Select
ATP start
Manual Tuning store
Programme Swap
Colour
Sharpness
The Contrast, Brightness, Colour and Sharpness may be altered
to suit the viewing conditions and personal preferences.
C-A-T-S : Contrast Auto Tracking System
(TC-21S3RP)
Automatically adjusts the contrast setting to compensate for
any changes in the ambient lighting of the surroundings.
To obtain best results first set the Contrast to maximum, to
allow a greater operating range for C-A-T-S, then select
one of the 3 settings as desired.
Off
Medium Sensitivity
High Sensitivity
OSD language
The OSD language menu will allow you to change the language
used for all on screen menus.
PL - Polish
CZ - Czech
RO H - Hungarian
PY - Russian
GB - English
Romanian
8
Page 9
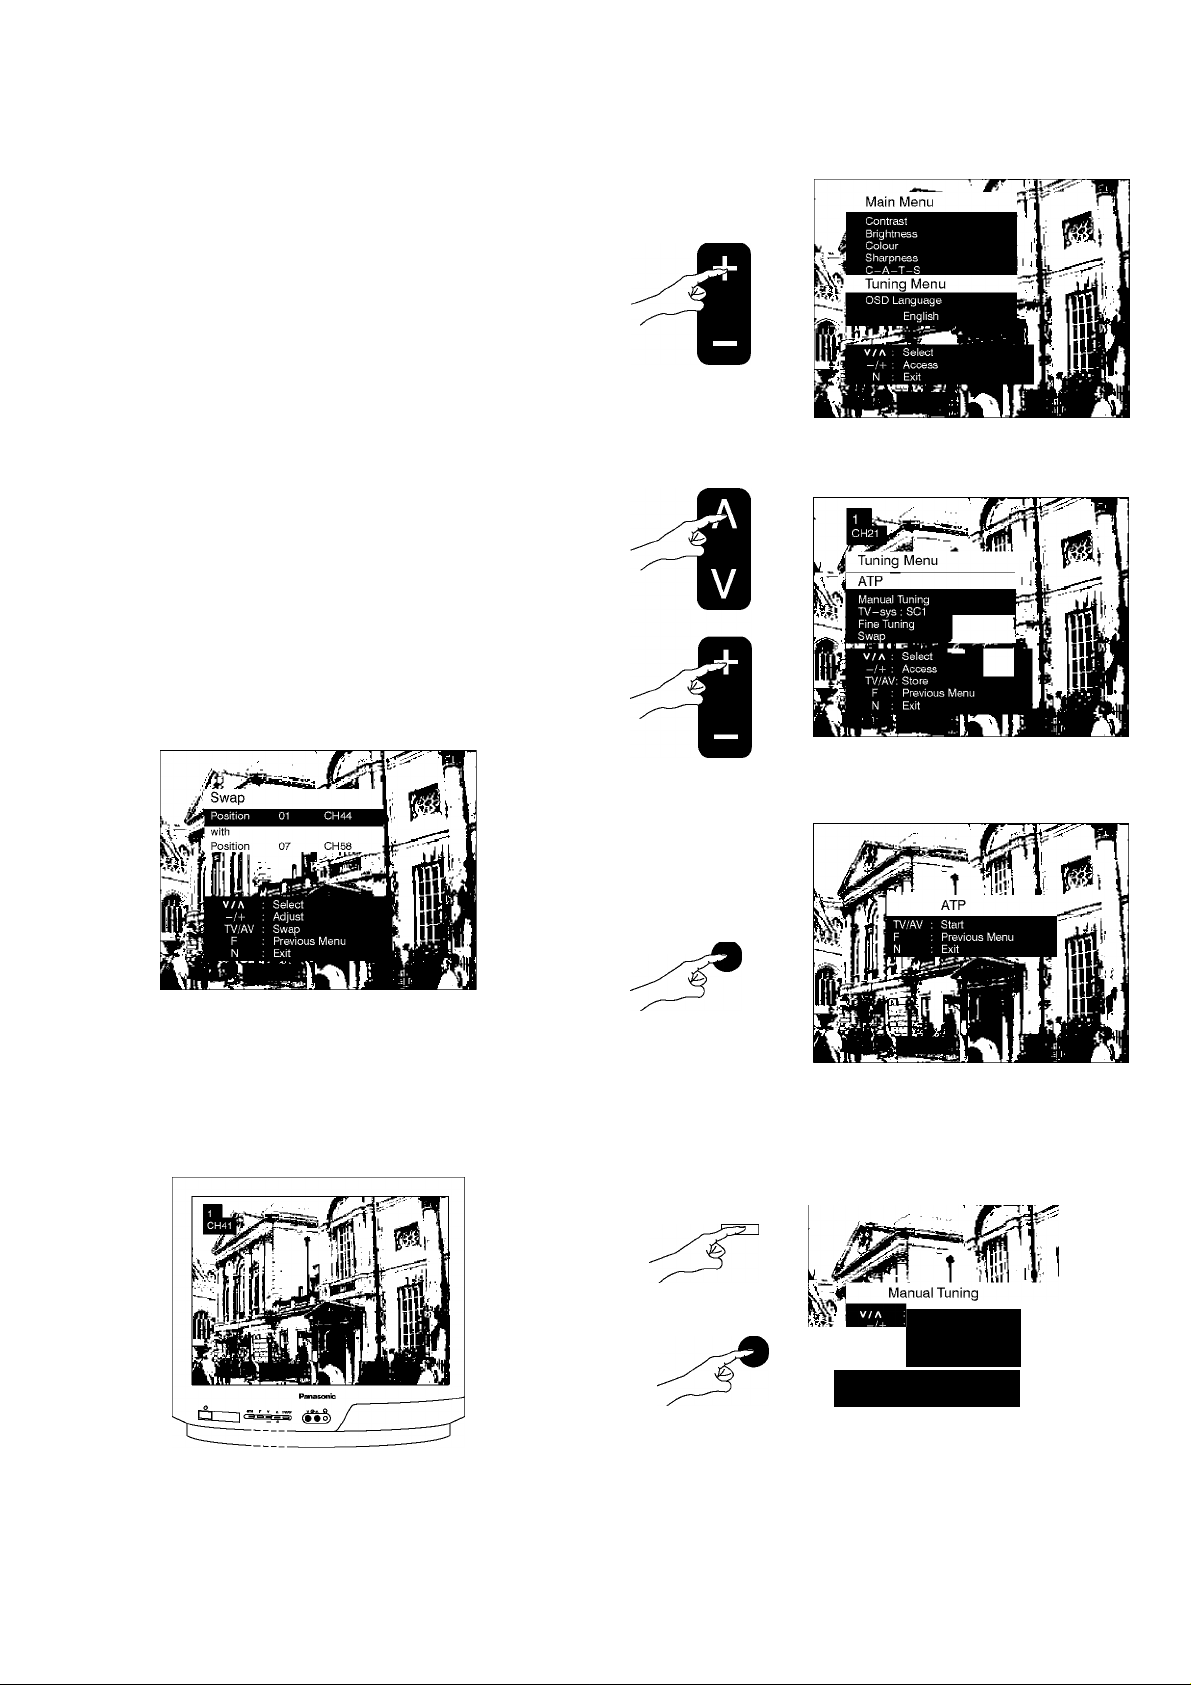
MENU OPERATION
Tuning Menu
TheTuning menu provides access to both manual and automatic
tuning menus.
ATP
The ATP menu allows you to automatically retune the TV,
particularly useful if you move to an area that is served by a
different transmitter.
Manual Tuning
The Manual tuning menu allows individual programme positions
to be tuned manually.
TV-sys
Press to select the correct sound system.
SCI - PAL / SECAM D, K.
SC2 - PAL / SECAM B, G.
Fine Tuning
Stations can be finely tuned using the Fine tuning adjustment.
Swap
If the programme order after Auto Setup is not to your preference
you can swap programmes between positions.
Manual Tuning (front panel of the television)
The stations may also be manually tuned using the controls on
the front of the television.
Press the F key (Front panel) until “Manual Tuning” is reached.
Press - or + to access “Manual Tuning”.
Store
Function select /
Exit
Change programme position
Search
TV/AV
(TC-14S3RP)
Programme Position
Search
Store
Previous Menu
Exit
Ё' Ж-Ж! I
Page 10
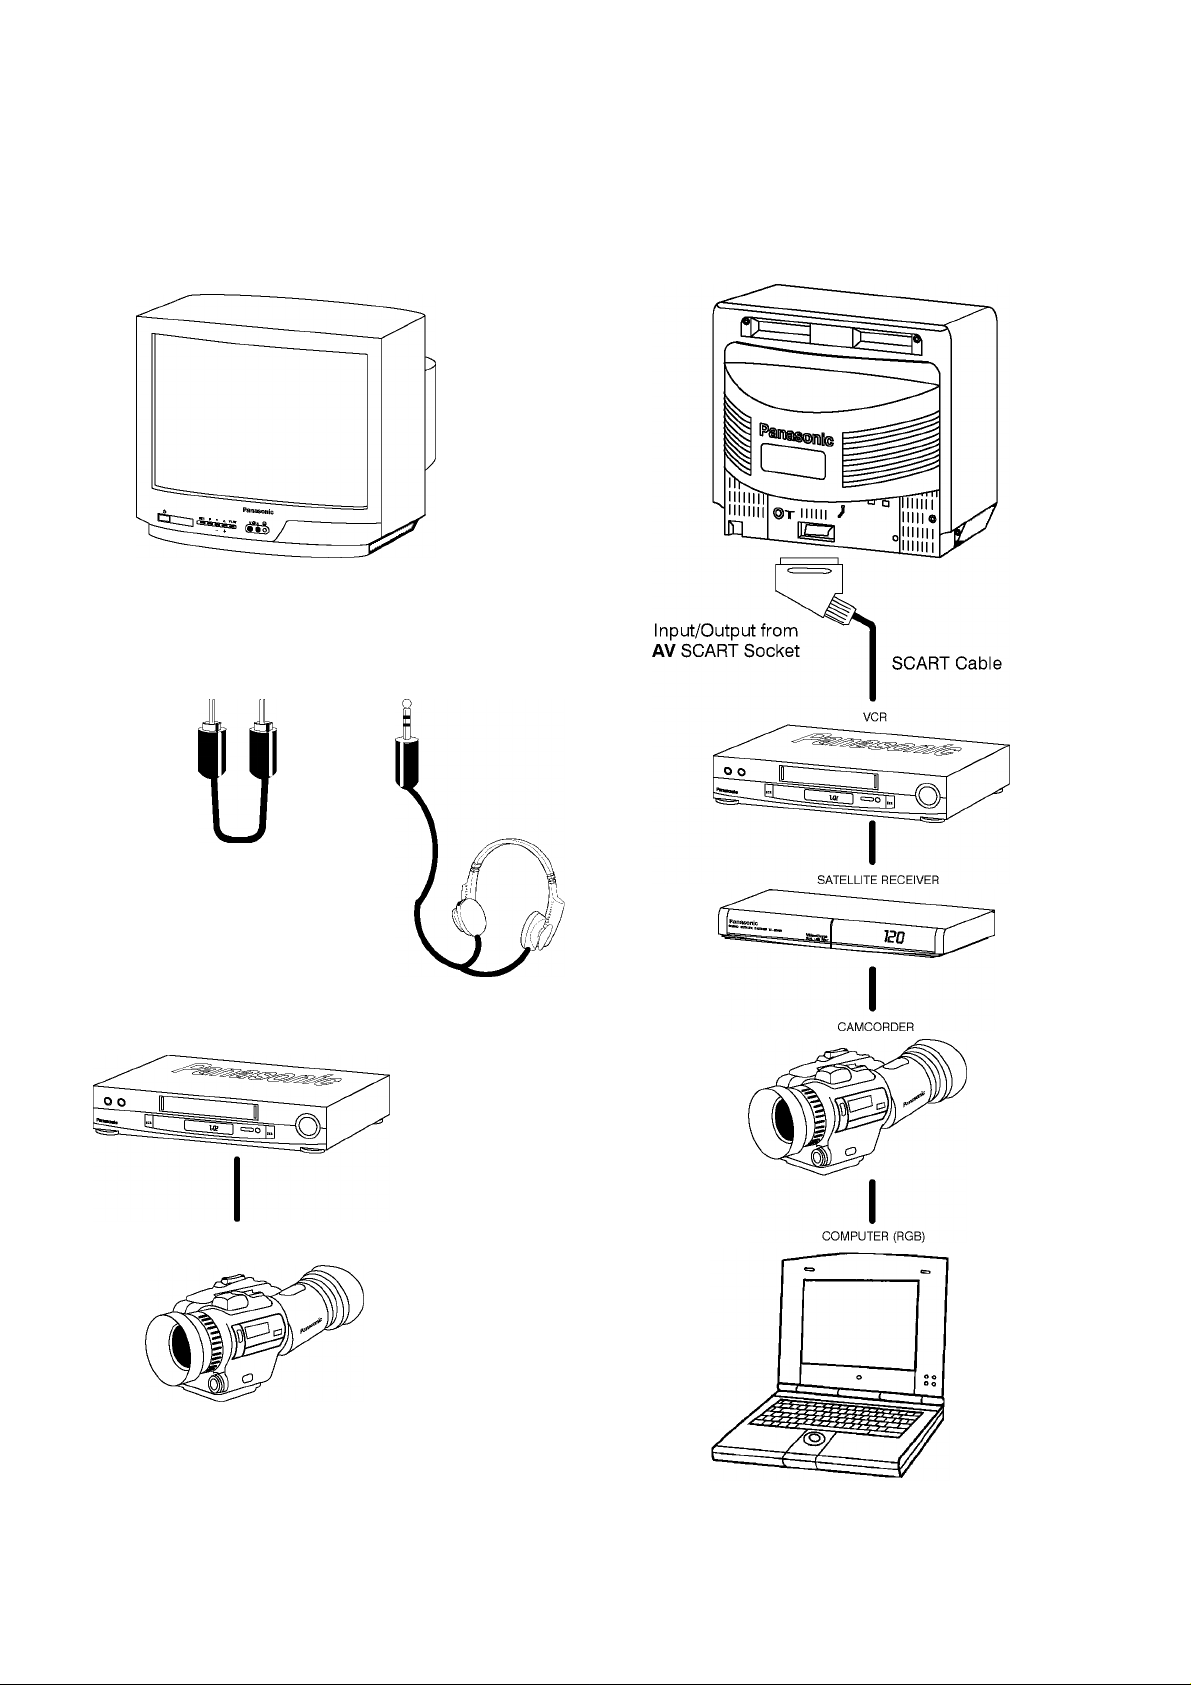
AUDIO / VIDEO CONNECTIONS
AV (Audio / Video) is a dedicated input for VCR’s, Sateiiite Receivers and other Audio / Video equipment.
This TV is capabie of switching to AV operation automaticaiiy if the equipment connected provides a switching signai to the SCART
socket.
In this condition the dispiay wiii show EC and it is possibie to change the programme position of the TV without changing the dispiayed
picture.
Video input
to V socket
RCA Video
Cabie
Audio input
to A socket
RCA
Audio Cabie
Output from
Headphone
socket
Headphones
with 3.5mm piug
CAMCORDER
Anciiiary equipment and cabies shown are not suppiied with this TV set.
Do not connect a computer with TTL output (5V) to this TV set.
The TV’s speaker wiii be automaticaiiy disconnected whiist the headphones are connected.
Do not connect front and rear AV inputs simuitaneousiy, as the sound and pictures wiii be mixed.
10
Page 11

TROUBLE-SHOOTING
Before calling for service, determine the symptoms and make a few simple checks as shown below. For service please contact your local
Panasonic dealer quoting the model number and serial number (both are located at the rear of the TV).
Symptoms
Picture Sound
Snowy Picture
or
Multiple Images
Interference Noisy Sound Electrical appliances, vehicles, fluorescent lights
Normal Picture Noisy or No Sound Volume level or sound muted
No Picture No Sound
No Colour Normal Sound Colour controls set at minimum levels
Scrambled Normal or Weak Sound Retune channel(s)
Noisy Sound
or
Normal Sound
SCART TERMINAL INFORMATION
Checks
Aerial location, direction or connection
Not plugged into A.C. outlet, not switched on
picture / sound controls set at minimum levels
20 1816 1412 10 8 6 4 2
III I I I I I I I
D D D
D D D D D D
D
1 D D D D D D D D D D
I I I I I I II III
21 19 171513 11 9 7 5 3 1
1. Audio out (R) 12.
2. Audio in (R)
Audio out (L) 14. Ground
3.
4. Audio earth
Blue earth 16. Status RGB
5.
6. Audio in (L) 17.
&. Blue in 18. RGB Status earth
8. Status CVBS 19. CVBS out (video)
9. Green earth
10.
11. Green in
—
Red earth
13.
Red in
15.
CVBS earth
CVBS in (video)
20.
21. Socket earth
11
Page 12

SPECIFICATIONS
Model Number:
Power Source : 220-240V50HZ A.C.
Power Consumption : 76.5W 47W
Standby Power Consumption :
Picture Tube : 51cm visibie diagonai 34cm visibie diagonai
Audio Output (music) : 6W, 8X impedance, mono
Dimentions : 480 (H) ' 520 (W) ' 485 (D) mm 364 (H) ' 389 (W) ' 384 (D) mm
Weight:
Receiving Systems :
Aeriai Rear: UHF/VHF
Headphones Front: 3,5mm, 8 Ohm impedance, mono
AW - Rear: 21 pin terminai - Audio/Video in/out, RGB in
AW - Front: RCA Audio in/RCA Video in
PAG B / G SECAM B / G
VHFE2-E12 VHF H1 - H2 (ITALY)
VHF A - H (ITALY) UHF E21 - E69
CATV (S01 - S05) CATV S1 - S10 (M1 - M10)
CATVS11 - S20 (U1 - U10) CATVS21 - S41 (Hyperband)
PAG 525/60 Piayback of NTSC tape from PAL Video recorders (VCR)
PAG D / K SECAM D / K
VHF R1 - R2 VHF R3 - R5
VHFR6-R12 UHFE21-E69
TC-21S3RP TC-14S3RP
1W
20 kg
10 kg
Design and specifications are subject to change without notice.
Weight and dimensions shown are approximate.
12
Page 13

Szanowny Kliencie firmy Panasonic,
Witaj w rodzinie klientow firmy Panasonic. Mamy nadziej^, ze b^dziesz czerpat wieie radosci z nowego koiorowego teiewizora. Aby
najiepiej poznac i zrozumiecwszystkie cechy orazfunkcjp tego teiewizoru, przeczytaj doktadnie catq instrukcjp, zanim przystqpisz do
eksploatacji.
Teiewizor Panasonic pobiera bardzo matq iiosc energii eiektrycznej, dzipki czemu jego uzytkowanie jest
(sissBCsf niezwykle oszczpdne. Pobor energii podczas funkcji czuwania wynosi zaledwie 1 Wat.
SPIS TRESCI
Ostrzezenia i zalecenia ........................................14
Informacje ogolne
Akcesoria
..............................................................
Wktadanie baterii do pilota
Instalacja i podtqczenie
.................................................
..................................
........................................
14
15
15
16
Rozmieszczenie przyciskow.................................18
Funkcje menu
......................................................
19
Przytqcza Audio/Video.........................................21
Rozwiqzywanie problemow
Informacje o potqczeniu SCART
..................................
.........................
22
22
Dane techniczne ..................................................23
1 3
Page 14

OSTRZEZENIA I ZALECENIA
Telewizor moze pracowac pod napipciem 220 - 240 V,
przy czpstotliwosci 50 Hz.
Nie narazaj telewizora na deszcz lub nadmiernq wilgoc.
UWAGA: WYSOKIE NAPI^CIE ! Nie otwieraj tyinej
pokrywy. Nie matamzadnych urzqdzen przeznaczonych
dia obstugi posiadacza.
Unikaj wystawiania odbiornika na bezposrednie
promienie stoneczne iub inne zrodta ciepta.
Wyjmuj wtyczkp z gniazda prpdu, zawsze gdy nie
bpdziesz ogiqdatteiewizji przez dtuzszy czas. Nigdy nie
cipgnij za kabel. Zawsze trzymaj za wtyczkp.
CZYSZCZENIE KINESKOPU. Wyjmuj wtyczkp z
gniazda prqdu. Kineskop mozna czyscic za pomocq
mipkkiej szmatki nasqczonej delikatnym detergentem
iub wodq. Nie stosuj srodkow zawierajqcych benzoi iub
ropp. Odbiornik moze wytwarzac statyczne poie
magnetyczne. Naiezy zachowac ostroznosc przy
dotykaniu ekranu.
W ceiu zapewnienia odpowiedniego dziatania czpsci
eiektrycznych, zaieca sip umoziiwienie wtasciwej
wentylacji. Zalecamy, aby w ustawieniu zabudowanym,
np. wewnqtrz segmentu mebiowego zachowac wokot
telewizora okoto 5cm wolnej przestrzeni.
INFORMACJE OGOLNE
Funkcja czuwania.
Jezeii nie wytqczysz odbiornika wtedy , kiedy stacja teiewizyjna zakoinczy nadawanie programu, po uplywie 30 minut automatycznie
uruchomi sip funkcja czuwania. Funkcja ta jest niedostppna podczas korzystania z funkcji AV.
Pamipc ostatniego ustawienia
Niektore funkcje posiadajp pamipc ostatniego ustawienia, np. podczas ponownego wtpczenia odbiornika bez zmian pozostanp
ustawienia wykonane poprzednio, np.:
Ustawienie kanatu Koior Gtosnosc
Kontrast Jasnosc Czuwanie
Ostrosc Status
Automatyczny System Ustawiania Kontrastu (CATS) (TC-21S3RP)
14
Page 15

AKCESORIA
Sprawdz, czy posiadasz wszystkie akcesoria przedstawione ponizej.
Pilot zdalnego sterowania
TNQ8E0460
Instrukcja obstugi
WKtADANIE BATERII DO PILOTA
Baterie do pilota zdalnego
* sterowania
(2 X R6 (UM3))
Otwórz pokrywp pilota. Wtóz baterie; pamiçtaj о odpowiednim
ustawieniu ich biegunów.
Upewnij sip, czy baterie zostaly wtozone prawidtowo.
Nie stosuj baterii nowych ze starymi. Baterie zuzyte nalezy natychmiast usunqc.
Nie tqcz róznych rodzajów baterii, np. alkalicznych i manganowych. Nie uzywaj tadowalnych baterii (Ni-Cad).
Zamknij pokrywp pilota.
15
Page 16

INSTALACJA I USTAWIENIE
Tylko TV
Potqcz koncentryczny przewod antenowy, z gniazdem
TV RF IN
lub
Uzywaj£!C magnetowidu
Potqcz przewod antenowy z gniazdem wejscia RF
znajdujqcy sip w magnetowidzie, po czym potqcz
przewod RF z wyjscia RF magnetowidu do gniazda
wejscia TV RF.
Magnetowid mozna podtqczyc rowniez za pomocq
euroztpcza.
Dalsze szczegoty na temat potEiczeh Audio / Video
mozesz znaiezc na stronie 21.
Wtyki i przewody nie naiezq do wyposazenia teiewizora.
Radzimy, abys wtqczyt sygnat probny magnetowidu - informacjp na ten temat znajdziesz w instrukcji magnetowidu.
16
Page 17

INSTALACJA I USTAWIENIE
Wybierz odpowiedni jpzyk z menu jpzyków
OSD. Wciénij przycisk TV/AV, aby
rozpoczqc pracp w trybie ATR
J^zyk OSD
PL CZ RO
H PY G B
Stacje telewizyjne zostanq odnalezione i
zapisane do pamipci
Pierwszy, dostppny program telewizyjny
zostanie wtqczony. Wytqcz sygnat próbny
znajdujqcy sip w magnetowidzie.
Stacje telewizyjne zostanq zapisane do
pamipci w tej kolejnosci, w której zostaty
odnalezione. Jezeli wybrana automatycznie
kolejnoéc nie odpowiada Paristwu, mozna
jp zmienic. Patrz funkcjp zamiany ("Swap”)
w menu dostrajania ("Tuning menu”);
szczegóty podano na stronie 20.
Zmiana programów
Ustawianie gtosnosci
Pamiptaj, ze ustawienie numero moze bye uzywane tylko do odbioru z magnetowidu. Jezeli sygnatz magnetowidu nie pojawi sip
na kanale 0 (kanatVCR), musisz albo ustawic kanat RF magnetowidu lub ustawic kanattelewizora tak, aby pojawitsip sygnat
VCR.
1 7
Page 18

ROZMIESZCZENIE PRZYCISKOW
Komunikaty na ekranie
Tytut menu.
Okno kursora
Pod-menu —
Komendy
Przyciski na tablicy przedniej
Gtowny wtqcznik / wytqcznik zasilania
STR -------------------------------------------------------------przechowuje ustawienia dostrajania i inne
funkcje
F------------------------------------------------------------------Wybiera jednq z funkcjp : Gtosnosc, Kontrast,
Jasnosc, Kolor, Ostrosc, C-A-T-S
(TC-21S3RP) oraz dostrajanie rpczne .
Wejscie na stuchawki
Gniazda RCA Audio / Video
TV/AV
przetqcza mipdzy trybami TV i AV
V/-, A/+
program nastppny lub poprzedni.
Mozesz skorzystac z tej funkcji,
gdy jest ona wyswietlona.
Klawisze Funkcji Pilot
Przyciski numerowe do: zmiany
programow, bezposredniego
wtqczenia programu
Bezposrednie wtqczenie kanatu.
Wcisnij i wybierz dowoiny kanatza
pomocq przyciskow numerowych.
Wyfqcznik czasowy
Wybor funkcji. Wcisnij, aby wyswietiic
menu na ekranie. (Strona 19)
Wfqcznik / wyfqcznik funkcji czuwania.
Zachowuje poprzednio ustawiony
poziom w STR (tablica przednia Tv)
Wfqcznik / wyfqcznik gfosu.
Przetqcznik mipdzy TV
a AV. (strona 21)
Program nastppny lub
poprzedni. Wybor opcji
menu.
1 8
Status: wyswietia na ekranie
numer pozycji programatora oraz
numer kanatu
Wybieranie programow od
10 - 60 za pomocq
przyciskow numerowych
Ustawia aktuainie wybranq
funkcjp. Ustawia gtosnosc,
jezeii nie zostata wybrana
do tego funkcja.
Page 19

FUNKCJE MENU
Gtówne menu
Kontrast
Jasnosé
Wyjdz z menu Wybierz Start ATFi- Zachowywanie
strojenia r^cznego i
przetqczania programów.
Wyswietl menu /
Poprzednie menu.
Ustawienie / Dostpp
Kolor
Ost rosé
Nasilenie kontrastu, jasnoéci, koloru, ostrosci mozeszzmieniac
wedtug wtasnych upodoban.
System C-A-T-S (TC-21S3RP)
Automatycznie ustawia nasilenie kontrastu po to, aby
skompensowac wszelkie zmiany w oswietleniu lub otoczeniu.
Aby uzyskac najlepsze rezultaty ustaw najpierw maksymalny
kontrast, dzipki czemu system C-A-T-S ma wipcej
moziiwosci. Nastppnie wybierz jedno ztrzech ustawien
_________
Wytqczony
Menu gtOwne ( ]
J^zyk OSD
Menu jpzyka OSD pozwala na zmianp jpzyka uzywanego we
wszystkich menu na ekranach.
PL - poiski
CZ - czeski
RO H - wpgierski
PY - rosyjski
GB - angielski
rumunski
19
Page 20

FUNKCJE MENU
Menu dostrajania
Umozliwia dost^p do menu dostrajania rpcznego i
automatycznego
ATP
Umozliwia automatyczne ponowne strojenie kanatow. Jest
bardzo korzystne w sytuacji, gdy bpdziesz ogiqdattelewizjp w
miejscu, w ktorym pracuje inny nadajnik telewizyjny.
Dostrajanie r^czne
Pozwala na ustawienie rpczne dowolne] kolejnosci programow.
Sys. TV
Wybrac wtasciwy system dzwi^ku wciskajqc.
SCI - PAL / SECAM D, K.
SC2 - PAL / SECAM B, G.
Dostrajanie typu “Fine”
Dostraja programy dzipki funkcji strojenia “Fine”
Dostrajanie typu “Swap”
Jezeli kolejnosc kanatow po ustawieniu automatycznym nie
bpdzie Ci odpowiadata, mozesz zmienic ich kolejnosc.
Dostrajanie r^czne (przednia tablica
telewizora)
Kanaty mozna ustawic rowniez za pomocq przyciskow
znajdujqcych sip na przedniej tablicy telewizora.
Wcisnij klawisz F (tablica przednia) i poczekaj, az pojawi sip
napis Dostrajanie rpczne”. Wcisnij znak - lub + aby wejsc do
Dostrajania Rpcznego.
Zachowaj
Wybor funkcji /
Wyjscie
Zmiana ustawienia
programu
Szukaj
TV/AV
(TC-14S3RP)
20
Page 21

POtACZENIA AUDIO / VIDEO
Wejscie AV (Audio/Video) stuzy do podtqczenia magnetowidu, tunera do odbioru telewizji satelitarnej oraz innego sprzptu Audio /
Video. Naszodbiorniktelewizyjny moze automatyczniewtqczycfunkcjp AV, jezeii podtqczony sprzpt umoziiwia przetqczeniesygnatu do
gniazda SCART. W tej sytuacji zostanie wyswietione EC, po czym moziiwa jest zmiana pozycji kanatu bez zmiany wyswietianego
obrazu.
Wejscie Video Wejscie audio Wtyczka cd
do gniazda V do gniazda A stuchawek
Przewod
Video RCA
Magnetowid
Kamera
Stuchawki z wejsciem
typu “jack” 3.5 mm
Wszystkie sprzpty oraz przewody, ktore zostaty przedstawione powyzej, nie naiezq do wyposazenia odbiornika.
Nie podtqczaj do gniazda odbiornika komputera z wyjsciem TTL (5V).
Gtosnik teiewizora zostanie wytqczony po podtqczeniu stuchawek.
Nie podtqczaj jednoczesnie przednich i tyinych wejsc AV, poniewaz sygnaty gtosu i obrazu zostanq wymieszane.
21
Page 22

ROZWIAZYWANIE PROBLEMOW
Zanim zadzwonisz do serwisu, zbadaj sam kilka podstawowych faktow, przedstawionych ponizej. W celu uzyskania pomocy,
skontaktuj sipziokalnymserwisemfirmy PANASONIC, podajqc numerseryjny oraz numer modelu urzqdzeniaznajdujqcesip natyinej
czpsci obudowy.
Usterka
Obraz Dzwipk
Obraz sniezy,
odbicia na ekranie
Zaktocenia Szumiqcy dzwipk Urzqdzenia elektryczne, swiatto fluoroscencyjne
Normalny obraz Szumiqcy lub brak dzwipk Wytqczony gtos lub poziom gtosnosci
Brak obrazu Brak dzwipku
Brak koloru Normalny dzwipk Nasilenie kolorow jest minimalne
Odbicia Dzwipk normalny lub staby Dostroj ponownie kanat
Niewyrazny dzwipk
lub
Normalny dzwipk
INFORMACJE O POtACZENIU SCART
Sprawdz
Antena, jej podtqczenie, kierunek lokalizacji
Brak podtqczenia do zrodta zasilania, odbiornik nie
zostat wtqczony, gtos i obraz zmniejszone do minimum
20 1816 1412 10 8 6 4 2
III I I I I I I I
D D D
D D D D D D
D
1 D D D D D D D D D D
I I I I I I II III
21 19 171513 11 9 7 5 3 1
1. Wyjscie Audio ( R) 12.
2. Wejscie Audio ( R)
Wyjscie Audio (L) 14. Uziemnienie
3.
4. Ziemia Audio
Ziemia niebieski (Blue) 16. Status RGB
5.
6. Wejscie Audio (L) 17. Ziemia CVBS
&. Wejscie niebieski (Biue) 18. Status uziemnienia RGB
8. Status CVBS 19. Wyjscie CVBS (video)
9. Ziemia zielony (Green)
10.
11. Wejscie zieiony (Green)
—
Ziemia czerwony (Red)
13.
Wejscie czerwony (Red)
15.
Wejscie CVBS (video)
20.
21. Gniazdo uziemnienia
22
Page 23

DANE TECHNICZNE
Numer modelu :
Zrodto zasilania: 220-240V 50Hz
Pobor energii : 76.5W 47W
Pobor energii podczas czuwania: .SSS5,
Kineskop : przekqtna o dtugosci 51 cm przekqtna o dtugosci 34cm
Wyjscie audio (Music) : 6W, 8fi, mono
Wymiary:
Waga:
System odbioru :
Pasmo anteny : UHF/VHF
Wyjscie stuchawkowe : 3,5mm, 8fi, mono
AV - tyine : 21 pin terminai - wejscie/ wyjscie Audio/Video; wejscie RGB
AV - przOd : wejscie Audio RCA / wejscie Video RCA
480 (wys.)-520 (szer.)-485 mm
PAG B / G SECAM B / G
VHFE2-E12 VHFH1-H2
VHF A - H(W1ochy) UHF E21 - E69
CATV (S01 - S05) CATV S1 - S10 (M1 - M10)
CATVS11 - S20 (U1 - U10) CATVS21 - S41 (hiperpasmo)
PAG 525/60 Odtwarzacz w systemie NTSC z systemu PAG (VCR)
PAG D / K SECAM D / K
VHF R1 - R2 VHF R3 - R5
VHFR6-R12 UHFE21-E69
TC-21S3RP TC-14S3RP
1W
364(wys.)- 389(szer.)- 384 mm
20 kg
10 kg
Dane techniczna mogq ulec zmianie bez uprzedzenia.
Waga i wymiary telewizora zostaty podane w przyblizeniu.
23
Page 24

Vàzeny zàkazniku firmy Panasonic,
vitame Vàs do rodiny nasich zàkazniku. Doufàme, ze Vàs novy barevny televizorVàm bude po radu let prinàset dobré zàzitky. Nejlepsi
cestou k poznàni vlastnosti tohoto televizoru je peclivé procteni prediozeného nàvodu - jestè pred zahàjenim provozu soupravy.
«n Tentotelevizorjev provozu ùsporny, nebot’ màvelmi nizkou spotrebu elektrického proudu.
Navic je jeho spotreba v pohotovostnim rezimu (stand-by) pouze 1 Watt.
OBSAH
Upozornèni a varovàni..........................................25
Vseobecné informace
Dodàvané prislusenstvi
VIozeni baterii do dàikového oviadace
Instalace a nastaveni
Umistèni oviàdacich prvkù
...........................................
.......................................
.................
............................................
...................................
25
26
26
27
29
Oviàdàni pomoci nabidek.....................................31
Konektory audio / video (AV) ...............................32
Odstranovàni nedostatkù......................................33
Informace o konektoru SCART.............................33
Technické ùdaje ...................................................34
24
Page 25

UPOZORNENI A VAROVANI
Tento televizor je urceny prò provoz s napàjenim
stridavym napètim 220 Volt az 240 Volt, 50 Hz.
Nevystavujte televizor desti nebo nadmèrné vlhkostl.
VYSTRAHA: VYSOKE NAPETI!
Nesnimejte zadni kryt, nejsou zde zàdné prvky, které by
mèl uzivatel upravovat.
Predchàzejte pùsobeni primého slunecniho svètia nebo
jinych zdroju tepla na televizor.
VSEOBECNE INFORMACE
Pokud televizor nebudete delsi dobu pouzivat, odpojte
privodni napajeci kabel ze zasuvky. Netahejte tento
privod primo za kabel, ale vzdy za sit'ovou zastrcku.
PÉCE O SKRÌNKU A O OBRAZOVKU
Vypojte privodni kabel ze zasuvky. Skrinku a obrazovku
je mozné cistit mèkkym hadrikem, navlhcenym vodou
s jemnym cisticim pripravkem. Nepouzivejte cistici
pripravky, které obsahuji benzoi nebo petrolej. Televizor ^
mùze vytvàfet statickou elektrlnu, proto je tfeba prl
zachàzeni s obrazovkou postupovat opatrnè.
Potfebna ùroven vètrani zafizeni je zakladnim
pozadavkem pro predchazeni poruchàm elektronickych
prvkù. Doporucujeme proto okolotelevizoru zachovavat
mezeru nejménè 5 cm I prl jeho umistèni ve vnltfnim
prostoru V nàbytku nebo mezi polickaml.
Funkce vypnuti do pohotovostniho rezimu
Pokud neni televizor v dobè ukonceni vysilàni televizni stanice vypnuty, potom automaticky po nàsiedujicich 30 minutàch prejde do
klldového stavu (pohotovostniho rezimu). Tento stav automaticky nenastane prl provozu v AV módu.
Pamèt’ polohy posledniho nastaveni
Urcité funkce maji pamèt’ polohy svého posledniho nastaveni. To znamena, ze hodnoty tèchto funkci prl vypnutitelevizoru budou ph
jeho nasledujicim zapnuti nastaveny stejnè:
Program
Kontrast
Ostrost
Barva
Jas
Stav
Hlasitost
Pflp raven est
C-A-T-S (TC-21S3RP)
25
Page 26

л V л V
DODAVANE PRISLUSENSTVI
Prekontrolujte úpinost príslusenství a zobrazenÿch predmètû
Prutová pokojová anténa
Návod к pouzití
(TC-14S3RP)
TSA-120026
Dálkovy oviadac
TNQ8E0460
Baterie pro dálkovy oviadac
(2 clánky o rozméru R6 - UM3)
V r
VLOZENI BATERII DO DALKOVEHO OVLADACE
Odsuñte kryt prostoru
baterií stranou
Vlozte baterie - vénujte pozornost
jejich správné polarité
Vrat’te kryt prostoru baterií
na své misto
Ujistéte se, ze baterie jsou správné na svém misté.
Nezamíchejte к sobé staré baterie s novymi. Staré vypotrebované baterie ihned vyméñte.
Nepouzívejte spolecné rúzné typy baterií - alkalické s manganovymi. Nepouzívejte nabíjecí akumulátorové (NiCd) baterie.
26
Page 27

INSTALACE A NASTAVENI
Pouze TV prijimac
Souosy anténní privod pripojte primo do zdifky
TV RF IN (vstup televizniho signálu)
nebo
Pouziti s videorekordérem
Souosy anténní privod pripojte primo do vstupni
zdifky RF IN na videorekordéru a souosy kabel
zvystupni zdifky RF OUT videorekordéru pfipojte do
vstupni zdifky TV RF IN na televizoru.
Videorekordér je к televizoru rovnèz mozné pfipojit
pouzitím kabelu a zástrcek SCART.
Dalsí podrobnosti к moznostem pfipojení
audio/video signálú najdete na strane 32.
Dopiñková zafízení a kabely nejsou soucástí dodávky.
Poznámka *: Doporucujeme vám na videorekordéru zapojit testovací signál - pfíslusné pokyny naleznete vinstrukcní pfírucce
videorekordéru.
27
Page 28

INSTALACE A NASTAVENI
Z nabidky na obrazovce (OSD) si vyberte
pomoci dálkového oviadace Vasi voibu
jazykové verze pro nastavování teievizoru.
Pro zahájení proceso automatického
iadèni (ATP) stisknète tiacítko TV/AV
Jazyk menu
PL CZ RO
H PY G B
Teievizní stanice bodou automaticky vyhiedány
a uchovány v pamèti, pripraveny ke siedování.
Zobrazi se prvni dostupny teievizní kanái.
Vypnète testovaci signài videorekordéru
(poioha OFF = VYPNUTO).
Teievizní stanice bodoo oiozeny v pamèti
ve stejném pofadi, jak byiy objeveny. Kdyz
Vàm nebode tote poradi vyhovovat, piatné
ocísiování teieviznich stanic moie byt
pozmènèno, viz operace Swap (Zámena)
V Toning meno (meno Nastaveni);
podrobnèjsi informace je na str. 31
Voiba programo
Nastaveni hiasitosti
Jedóiezité, abyste pro signài videorekordéro poozivaii programcisio”0”. Pokod se signài vasehovideorekordéro neobjevojena
poioze ”0” (poioha pro videorekordér - VCR), je potreba pro prevedeni prijmo kanàio VCR na tote poioho programo bod’to
naiadit kanái na videorekordéro nebo doiadit programovoo poioho ”0” na teievizoro.
28
Page 29

UMISTENI OVLADACICH PRVKU
Zobrazeni na obrazovce
Název nabidky
Lista se znázornením
promènné veliciny
Podrobnèjsi nabidka
Pfikazy
STR
Zàznam nastavené polohy ladini a ostatnich funkci
Zdirka pro sluchátka.
Audio a video zdirky v normi RCA.
TV/AV
Pfepinà mezi provoznimi módy TV a AV.
Voli funkce: hiasitost, kontrast, jas, barva, ostrost,
funkce CATS (TC-21S3RP) a rucni ladini.
TIaèitka dàikového oviadace
Obnovi úrovni drive nastaveni
Cislicovi klivesnice
pro: zminu programu,
primou volbu kanilu
Primi volba kanilu: stisknite
a cislicovou klivesnici zadejte
cislo kanilu.
Casovac pro odpojeni.
pomoci tlacitka STR (na ceini
strani televizoru).
Volba funkce: Stisknite
pro zobrazeni nabidky na
obrazovce (strana 30).
V/—, A/+
Volba vyssiho nebo nizsiho cisla programu.
Pokud je privi zobrazena urciti funkce,
pouzivi se pro jeji nastavovini.
Prechod do stavu
pripravenosti (stand-by)
anebo do provozniUo stavu.
Utlumeni Ulasitosti a jeji obnoveni.
Pfepini mezi provoznimi módy
TV a AV (strana 32).
Status: ukazuje poradovi cislo programu
a cislo televizniho vysilaciho kanilu
Volba vyssiho nebo nizsiho
cisla kanilu nebo volba mista
v nabidce.
Slouzi k nastavovini privi
zvoleni funkce. Pokud neni
zvoleni zidni funkce, oviidi
nastaveni hlasitosti.
Volba programu 10 az 60
pouzitim cislicovi klivesnice.
29
Page 30

DALKOVY OVLADAC
Hlavni nabidka
Kontrast
Jas
Odchod z nabidky Volba.
Zahajeni procesu automatického
ladini ATR zaznamenani rucniho
naladeni, premisteni programu,
zaznam v nabidce ladini.
Zobrazeni nabidky / predchazejici nabidky.
Nastaveni / pfistup.
Barva
Ostrost
Kontrast, jas, barva a ostrost se mohou nastavovat podle
podminek pozorovani obrazu a podle osobnich pozadavku.
Funkce CATS (system automatickeho dolad’ovani kontrastu)
(TC-21S3RP) :
Automaticky upravuje nastaveni kontrastu podle jakychkollv
zmin osvitleni v okolnim prostredi.
Pro dosazeni nejiepsich vysledku nejdrive nastavte hodnotu
kontrastu na maximum, aby funkce CATS ziskala dostatecny
prostor ke svemu provozu, potom podle pozadavku zvolte jednu
ze tfi nabizenych moznosti:
_________
Vypnuto
Jazyk nabidky na obrazovce
Moznost volby jazykovi verze vam dovoluje zvolIt znini, kteri se
bude pouzivat pro uvadini nabidky na obrazovce (OSD):
PL - polsky
CZ - cesky
RO H - mad’arsky
PY - rusky
GB - anglicky
rumunsky
30
Page 31

DALKOVY OVLADAC
Nabidka pro ladèni
Nabidka pro ladini umozñuje pristup k moznostem rucniho
i automatického zpusobu ladini.
ATP
NabidkaATPvàm umozñuje znovu automaticky naiadittelevizor,
pokud jste se napriklad prestihovall do mista, ve kterim jsou
dostupni jini televizni vysilace.
Rucni ladèni
Nabidka rucniho ladini dovoluje rucni naiadini jednotlivych
poloh programu.
TV-Sys
TIsknutim zvolte spràvnou normu prijmu zvuku.
SCI PAL / SECAM D, K.
SC2 PAL/SECAM B, G.
Jemné ladèni
Pouzitim tito funkce je mozni stanice jemni doladit.
Premistèni programu (Swap)
Pokud serazeni programu po provedenim automatlckim
nastaveni neodpovidà vasim pozadavkum, muzete programy
mezi jejich polohami pfemistit (najlni cislo).
Ruèni ladèni (na èeini stranè televizoru)
Stanice je mozni nastavit I rucni, pouzitim ovlàdacich prvku na
celni strani televizoru.
TIsknite tlacitko ”F” (na ceinim panelu) az do dosazeni polohy
"rucni ladini”. Pro rucni ladini pouzivejte tlacitka - nebo +.
Zaznamenàni
do pamiti.
Volba funkce /
odchod z nabidky.
Zmina polohy programu.
Hledàni.
TV/AV
(TC-14S3RP)
31
Page 32

KONEKTORY AUDIO / VIDEO (AV)
Vstupy audio / video (AV) jsou urcené pro napojeni videorekordéru, sateiitniho prijimace a pro daisi audiovizuaini zarizeni.
Tento teievizor ma schopnost automati ckéhoprepojeniAV provozu, pokud pripojené zarizeni vydanazastrcce SCART prepinacisignai.
V tom pripade se zobrazi EC a je mozné mènit voibu programu teievizoru bez zmeny prijimaného obrazu.
Vstup video Vstup audio Vystup ze zdifky
(obraz) na (zvuk) na pro siuchatka.
zdifku V. zdifku A.
Videokabei
podie normy
RCA.
Videorekordér.
Videokamera.
Audiokabei
podie normy
RCA.
Siuchatka se
zastrckou (samecek)
3,5 mm.
Pocitac (norma RGB)
Zobrazovana dopihkovà zarizeni a kabeiy se s teievizorem nedodàvaji.
Nepripojujte k temuto teievizoru pocitac s vystupem v norme TTL (5 Voit).
Pri pripojeni siuchatek se automaticky odpojuje reproduktor v teievizoru.
Nezapojujte soucasne AV vstupy na ceini a na zadni strane prijimace, zvukové a obrazové signàiy by se pomichaiy.
32
Page 33

ODSTRANOVANI NEDOSTATKU
Nez budete volât opraváre, zjistète priznaky nedostatkû a proved’te jednoduchou kontrolu podle násiedujících pokynû. Pro potreby
opravy se spojte s vasim prodejcem Panasonic, sdèlte typové oznaceni a vÿrobni oíslo pristroje (oba ùdaje jsou uvedené na zadni
strani televizoru).
Priznaky nedostatkû
Obraz Zvuk
V obraze "snizi” nebo se objevuje vícenásobny obraz "duch”
Ruseni Sum ve zvuku Elektricke ruseni, dopravni prostredky, vybojky
Normáiní obraz Sum ve zvuku nebo zàdnÿ zvuk Hlasitost je stazena dolu nebo je zvuk umiceny
Neni obraz Neni zvuk
Nejsou barvy Normáiní zvuk Nastaveni urovne barevje stazene na minimum
Zarusenÿ obraz Zvuk normáiní nebo spatnÿ Obnovte naladeni kanalu (nebo kanalu)
Sum ve zvuku nebo je zvuk dobry
INFORMACE O KONEKTORU SCART
Opatreni
Provide umisteni anteny, jeji nasmerovani a antenni
privod
Televizor neni pripojeny na napajeci sit’, neni zapnuty,
nebo oviadaci prvky obrazu a zvuku jsou stazene na
nulu
20 1816 1412 10 8 6 4 2
III I I I I I I I
D D D
D D D D D D
D
1 D D D D D D D D D D
I I I I I I II III
1. vystup audio (R - prava) 12.
2. vstup audio (R - prava)
vystup audio (L - leva) 14. uzemneni
3.
4. zem audio
zem pro modrou (B) 16. stavovy signal RGB
5.
6. vstup audio (L - leva) 17. zem pro CVBS
&. vstup mod re (B) 18. zem pro stav RGB
8.
stavovy signal CVBS
9. zem pro zelenou
10.
11. vstup zelene (G)
21 19 171513 11 9 7 5 3 1
—
zem pro cervenou (R)
13.
vstup cervene (R)
15.
19. vystup CVBS (video signal)
vstup CVBS (video signal)
20.
21. uzemneni zastrcky
33
Page 34

TECHNICKE UDAJE
Typové cislo modelu :
Napajeni : 220-240V 50Hz
Pfikon : 76.5W 47W
Spotreba v pohotovostnim stavu : SSSJ
Obrazovka : viditelna uhlopficka 51cm 34cm viditelna uhlopficka
Vystup zvuku (hudebni) : 6W, 8fi impedance, mono
Rozmery :
Vaha :
Pfijimané systémy (normy) :
Pfipojka antény (na zadni strane) : UHP/VHP
Pfipojka sluchatek (na ceini strane) : 3,5 mm, impedance 8 W, signal mono
Pfipojka AV (na zadni strane) : pfipojka 21 koliku, audio a video vstup a vystup, RGB vstup
Pfipojka AV (na ceini strane) : vstup video RCA, vstup audio RCA
vasw
480 (vyska) * 520 (sifka) 485 (hloubka) mm 364 (vyska) X 389 (sifka) x 384 (hloubka)
PAL B / G SECAM B / G
VHP E2 - E12 VHP HI - H2 (Italic)
VHP A - H (Italic) UHP E21 - E69
CATV (SOI - 305) CATV SI - S10 (Ml - M10)
CATVS11 - S20 (U1 - U10) CATVS21 - S41 (Hyperband)
PAL 525/60 Pfehravani signalu NTSC z videorekorderu PAL
PAL D / K SECAM D / K
VHP R1 - R2 VHP R3 - R5
VHPR6-R12 UHPE21-E69
TC-21S3RP TC-14S3RP
1W
mm
20 kg
10 kg
Konstrukce a specifikace se mohou zmenit bez zviastniho upozorneni.
Uvedené udaje o vaze a o rozmerech jsou pouze priblizné.
34
Page 35

35
Page 36

97CX
 Loading...