

Panasonic
KEYBOARD
sx-MBl 00
MW
ct
Before connecting, operating or adjusting this product, please read these
instructions completely. Please keep this manual for future reference.
DIG ITA L A UDI O
rpsui
m
M Q OTG 0626A

Dear customer
Thank you for purchasing this product.
For optimum performance and safety, please read
these instructions carefully.
Table of contents
BASIC FUNCTIONS
PRECAUTIONS..................................................5
Getting started.....................................................6
Modes
.................................................................
Controls and functions
Listen to a CD
Performing with a CD (remix play)
Beat Master.......................................................14
Listen to the FM radio
...................................................
........................................
....................
.......................................
7
8
10
12
17
m Supplied accessory
Please check the supplied accessory.
EH Music stand
EH AC adaptor
® ^ EH Remix Demo CD
Note: The included AC adaptor is for use with
this unit only. Do not use it with other equipment.
2
QQTG0626
PRACTICAL APPLICATIONS
Selecting sounds...............................................18
Tuning
...............................................................
Transpose
Selecting rhythms..............................................20
Automatic CD tempo detection
Changing the CD playback mode
Automatic Accompaniment
Storing FM station settings
Other Settings
Connection terminals and optional accessories..30
Symptoms which appear to e signs of trouble....31
Error messages.................................................32
Index
Specifications....................................................34
.........................................................
.........................
.....................
...............................
...............................
...................................................
.................................................................
19
19
22
23
24
26
27
33

BEF O RE YOU P L A Y, PL E AS E R EA D T H E
C A U TI O NA RY C O PY A PP EA RI N G O N
PAGE 5 .
CAUTION:
This equipment has been tested and found to
comply with the limits for a Class B digital device,
pursuant to Part 15 of the FCC Rules, These limits
are designed to provide reasonable protection
against harmful interference in a residential
installation. This equipment generates, uses and
can radiate radio frequency energy and, if not
installed and used in accordance with the
instructions, may cause harmful interference to
radio communications. However, there is no
guarantee that interference will not occur in a
particular Installation. If this equipment does cause
harmful interference to radio or television
reception, which can be determined by turning the
equipment off and on, the user is encouraged to
try to correct the interference by one of the
following measures:
— Reorient or relocate the receiving antenna.
— Increase the separation between the
equipment and receiver.
— Connect the equipment into an outlet on a
circuit different from that to which the
receiver is connected.
— Consult the dealer or an experienced
radio/TV technician for help.
CAUTION!
THIS PRODUCT UTILIZES A LASER.
USE OF CONTROLS OR ADJUSTMENTS
OR PERFORMANCE OF PROCEDURES
OTHER THAN THOSE SPECIFIED HEREIN
MAY RESULT IN HAZARDOUS RADIATION
EXPOSURE.
DO NOT OPEN COVERS AND DO NOT RE
PAIR YOURSELF. REFER SERVICING TO
QUALIFIED PERSONNEL.
WARNING;
TO REDUCE THE RISK OF FIRE, ELEC
TRIC SHOCK OR PRODUCT DAMAGE,
DO NOT EXPOSE THIS APPLIANCE TO
RAIN, SPLASHING, DRIPPING OR MOIS
TURE.
Any unauthorized changes or modifications to this
equipment would void the user's authority to
operate this device.
This device complies with Part 15 of the FCC Rules.
Operation is subject to the following two conditions:
(1) This device may not cause harmful interference,
and (2) this device must accept any interference
received, including interference that may cause
undesired operation.
The model number and serial number are found
underneath the keyboard.
Please note the model and serial numbers in the
space provided below and retain this sheet as a
permanent record of your purchase to aid
identification in the event of theft.
MODEL NUMBER
SERIAL NUMBER
___________________________
QQTG0626
3

Panasonic
OWNER'S MANUAL
Before you play
For long and pleasurable use of this instrument, and to gain a thorough understanding of your MB100
Keyboard, it is strongly recommended that you read through this Owner’s Manual once.
The Owner’s Manual is comprised of the following parts.
BASIC FUNCTIONS
This part includes an explanation of basic procedures and points you should be aware of for
proper operation of your instrument.
PRACTICAL APPLICATIONS
This part comprises a detailed explanation of sound, rhythm, CD player, FM tuner and Setting
functions.
REFERENCE GUIDE (separate booklet)
Reference guide for the contents of the Sound and Rhythm List, “Remix Demo CD”, MIDI
Implementation Chart.
This product may receive radio interference caused by Mobile telephone during use. If such
interference is apparent, please increase separation between the product and Mobile telephone.
4
QQTG0626
PRECAUTIONS
Before using this unit please read these operating
instructions carefully.
Take special care to follow the warnings indicated on
the unit itself as well as the safety suggestions listed
below.
Afterwards keep them handy for future reference.
Safety
1. Power Source—The unit should be connected to
power supply only of the type described in the
operating instructions or as marked on the unit.
2. Polarization—If the unit is equipped with a
polarized AC power plug (a plug having one blade
wider than the other), that plug will fit into the AC
outlet only one way. This is a safety feature. If you
are unable to insert the plug fully into the outlet,
try reversing the plug. If the plug should still fail to
fit, contact your electrician to replace your obsolete
outlet. Do not defeat the safety purpose of the
polarized plug.
3. Power Cord Protection—AC power supply cords
should be routed so that they are not likely to be
walked on or pinched by items placed upon or
against them. Never take hold of the plug or cord
if your hand is wet, and always grasp the plug body
when connecting or disconnecting it.
4. Nonuse Periods—When the unit is not used, turn
the power off. When left unused for a long period
of time, the unit should be unplugged from the
household AC outlet.
IhstsUatipn
Placement
1. Ventilation—The unit should be situated so that
its location or position does not interfere with its
proper ventilation. Allow 10 cm (4“) clearance from
the rear of the unit.
2. Foreign Material—Care should be taken so that
objects do not fall into and liquids are not spilled
into the unit. Do not subject this unit to excessive
smoke, dust, mechanical vibration, or shock.
3. Magnetism—The unit should be situated away
from equipment or devices that generate strong
magnetic fields.
4. Stacking—Do not place heavy objects, other than
system components, on top of the unit.
5. Surface—Place the unit on a flat, level surface.
6. Carts and Stands—The unit should be used only
with a cart or stand that is
recommended by the manu
facturer. The unit and cart combi
nation should be moved with care.
Quick stops, excessive force, and
uneven surfaces may cause the unit
and cart combination to overturn.
7. Wall or Ceiling Mounting—The unit should not be
mounted to a wall or ceiling, unless specified in
this operating instructions.
Maintenance
Clean the cabinet, panel and controls with a soft cloth
lightly moistened with mild detergent solution.
Do not use any type of abrasive pad, scouring powder
or solvent such as alcohol or benzine.
Environment
1. Water and Moisture—Do not use this unit near
water.for example, near a bathtub, washbowl,
swimming pool, or the like.
Damp basements should also be avoided.
2. Condensation—Moisture may form on the lens in
the following condition...
• immediately after a heater has been turned on.
• in a steamy or very humid room.
• when the unit is suddenly moved from a cold
environment to a warm one.
If moisture forms inside this unit, it may not operate
property. To correct this problem, turn on the power
and wait about one hour for the moisture to
evaporate.
3. Heat—The unit should be situated away from heat
sources such as radiators and the like. It also
should not be placed in temperatures less than 5“C
or greater than 35°C (95“F).
Service
1. Damage Requiring Service.The unit should be
serviced by qualified service personnel when:
(a) The AC power supply cord or the plug has been
damaged;
or
(b) Objects have fallen or liquid has been spilled
into the unit; or
(c) The unit has been exposed to rain; or
(d) The unit does not appear to operate normally
or exhibits a marked change in performance; or
(e) The unit has been dropped, or the enclosure
damaged.
2. Servicing—The user should not attempt to service
the unit beyond that described in the operating
instructions. All other servicing should be referred
to an authorized service personnel.
For the address of an authorized servicenter:
In the U.S.A., call 1-800-211-7262,
e-mail: consumerproducts@panasonic.com,
or visit www.panasonic.com
In Canada, call 905-624-5505
or visit www.panasonic.ca
5
QQTG0626
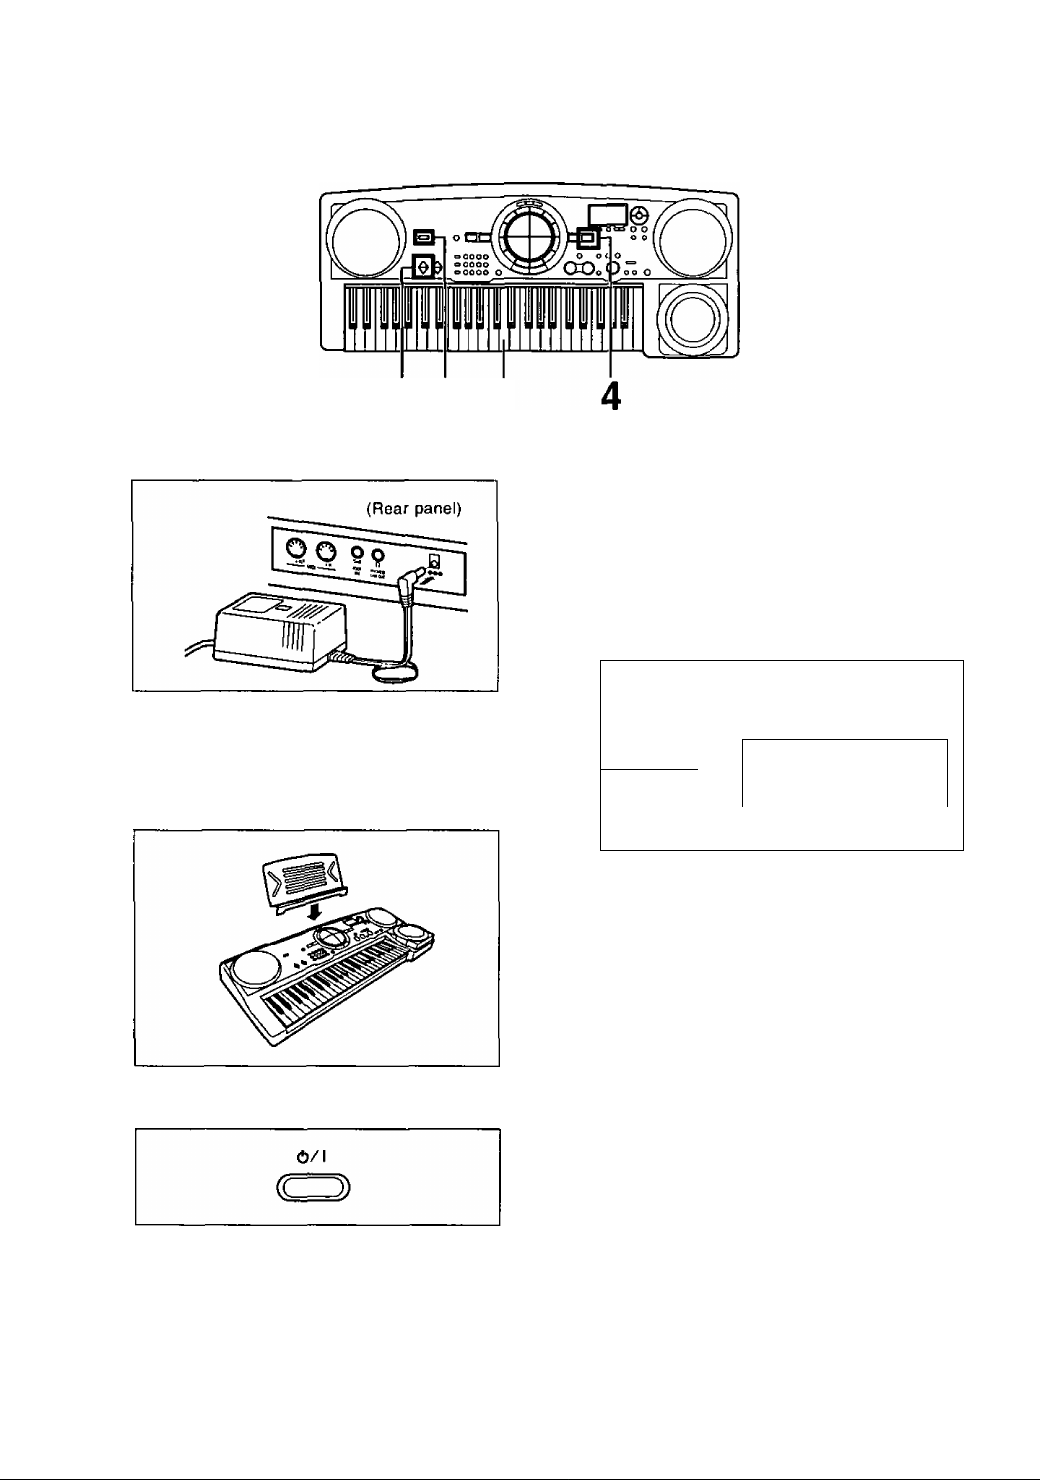
Getting started
6 3 5
Connect the AC adaptor (included).
1
• Do not disconnect and connect the AC adap
tor when the power button is on, as doing so
may cause the the programmed settings and
recorded contents to be deleted.
Affix the music stand as shown.
Press the CD S KEYBOARD button to turn it
on.
4
Play the keyboard.
5
Use the KEYBOARD VOLUME controls to ad
just the volume (0 to 20).
6
KEYBOARD
VOLUME
UP
A
• After a few seconds, the display returns to the
previous display.
• These buttons do not function when the FM
TUNER mode is selected.
■ Light Show
If the power is left on and the soundless state con
tinues for several minutes, the panel buttons flicker in
a “light show".
V 1
DOWN /
/
/
/
<Display>
1
Keyboard volume
I Turn the power on.
The unit is in the standby condition when the AC
adaptor is connected. The primary circuit is always
"live" as long as the AC adaptor is connected to an
electrical outlet.
6
QQTG0626
To turn off the tight show
The light show can be disabled with the MENU func
tion. (Refer to pages 27, 29.)
■ Memory function
The settings of this instrument are retained as long as
the AC adaptor remains connected to an electrical out
let.
When leaving the product unused for a long time,
turn off the power button of the unit and pull the AC
adaptor out of the socket for power saving.
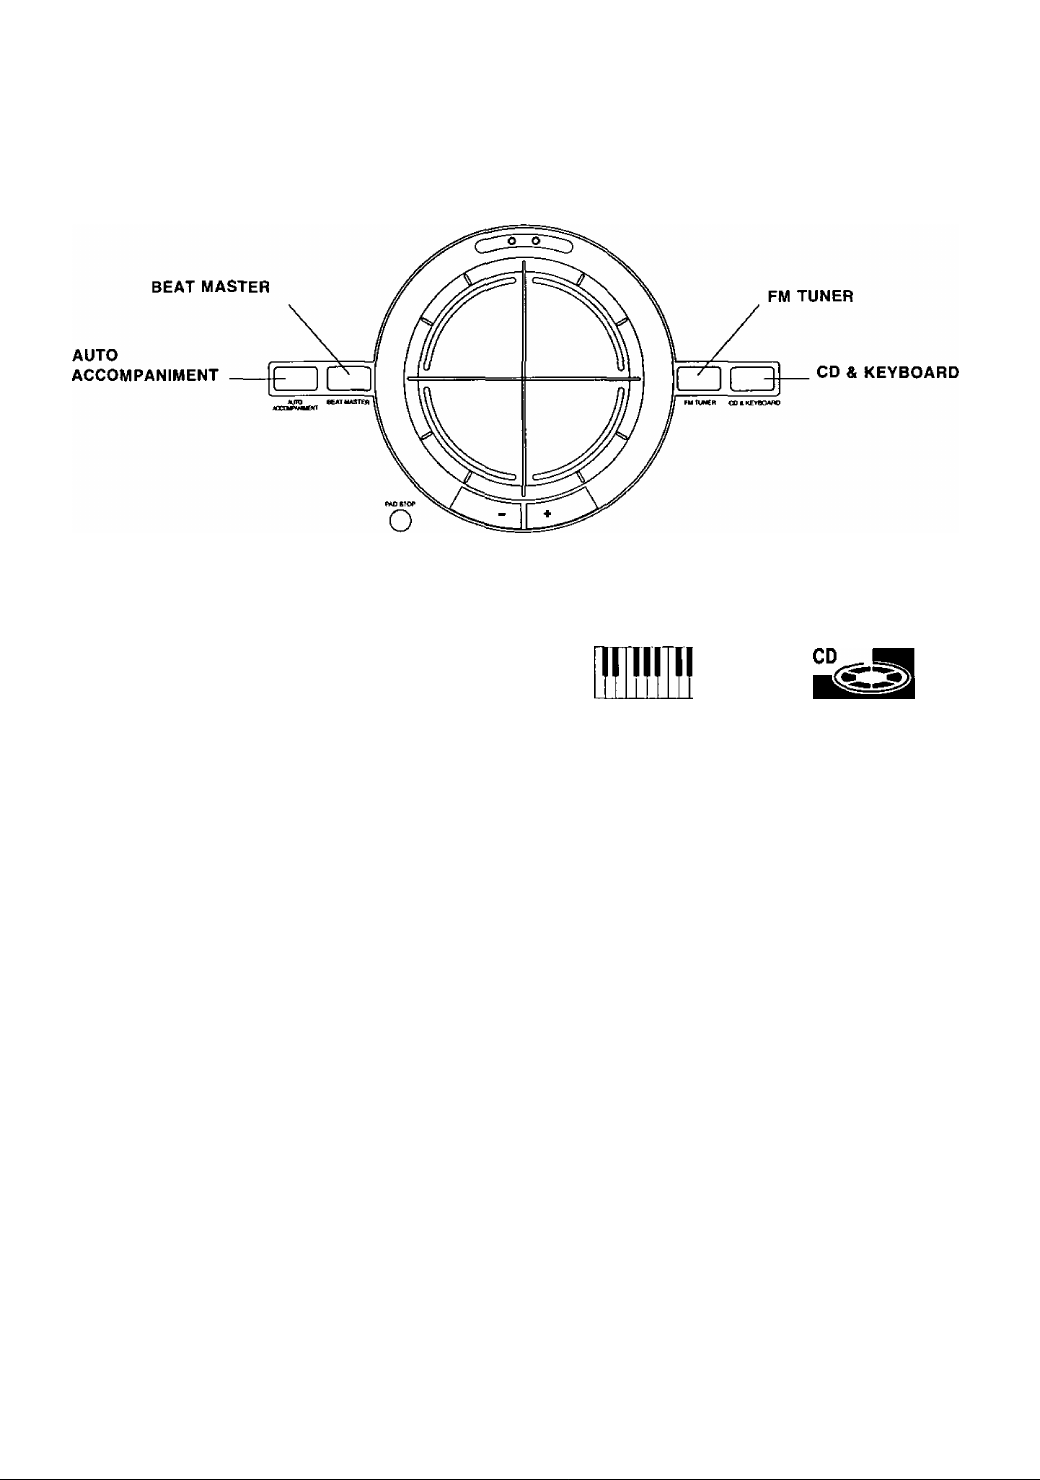
Modes
This instrument has four operating modes, which are selected with the respective mode buttons.
LlStEN n>Y
PERFOnilANCt M06 / BEAT MASTER
BEAT MASTER
BEAT^
MASTER
Select this mode to play a game that uses the pad but
tons. (Refer to page 14.)
AUTO ACCOMPANIMENT
m ^
ACCOMI^
This mode is for a performance that uses the automat
ic accompaniment function. (Refer to page 24.)
CD & KEYBOARD
The CD playback and keyboard performance mode.
This mode is also for performing on the keyboard,
rhythm and/or pad buttons while playing a CD (remix
play). (Refer to pages 10, 12.)
• If you exit or switch to this mode during a rhythm or
pad performance, the respective playback stops.
FM TUNER
TUNER
Select this mode to listen to FM radio broadcasts.
(Refer to page 17.)
• The keyboard keys and rhythm performance do not
function when this mode is selected.
QQTG0626
7
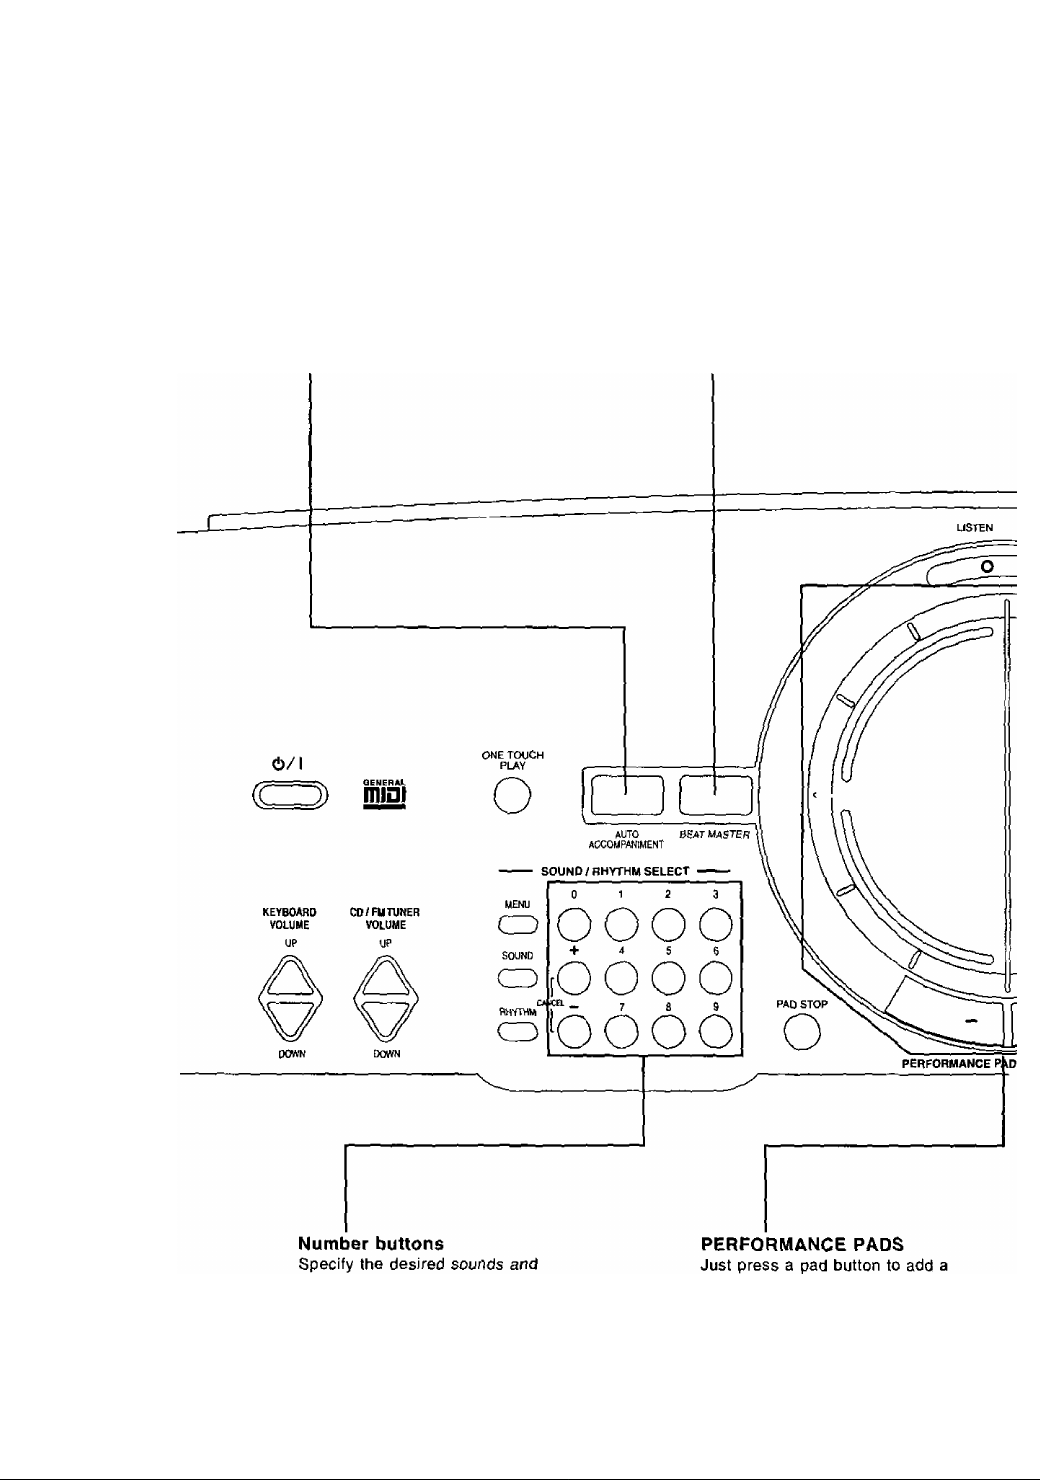
Controls and functions
AUTO ACCOMPANIMENT
An automatic accompaniment is added to
your playing melody by your specifying a
chord. (Refer to page 24.)
BEAT MASTER
A fun way to develop your sense of
rhythm. {Refer to page 14.)
8
OQTGQ626
rhythms by number.
phrase to your playing. (Refer to
page 13.)
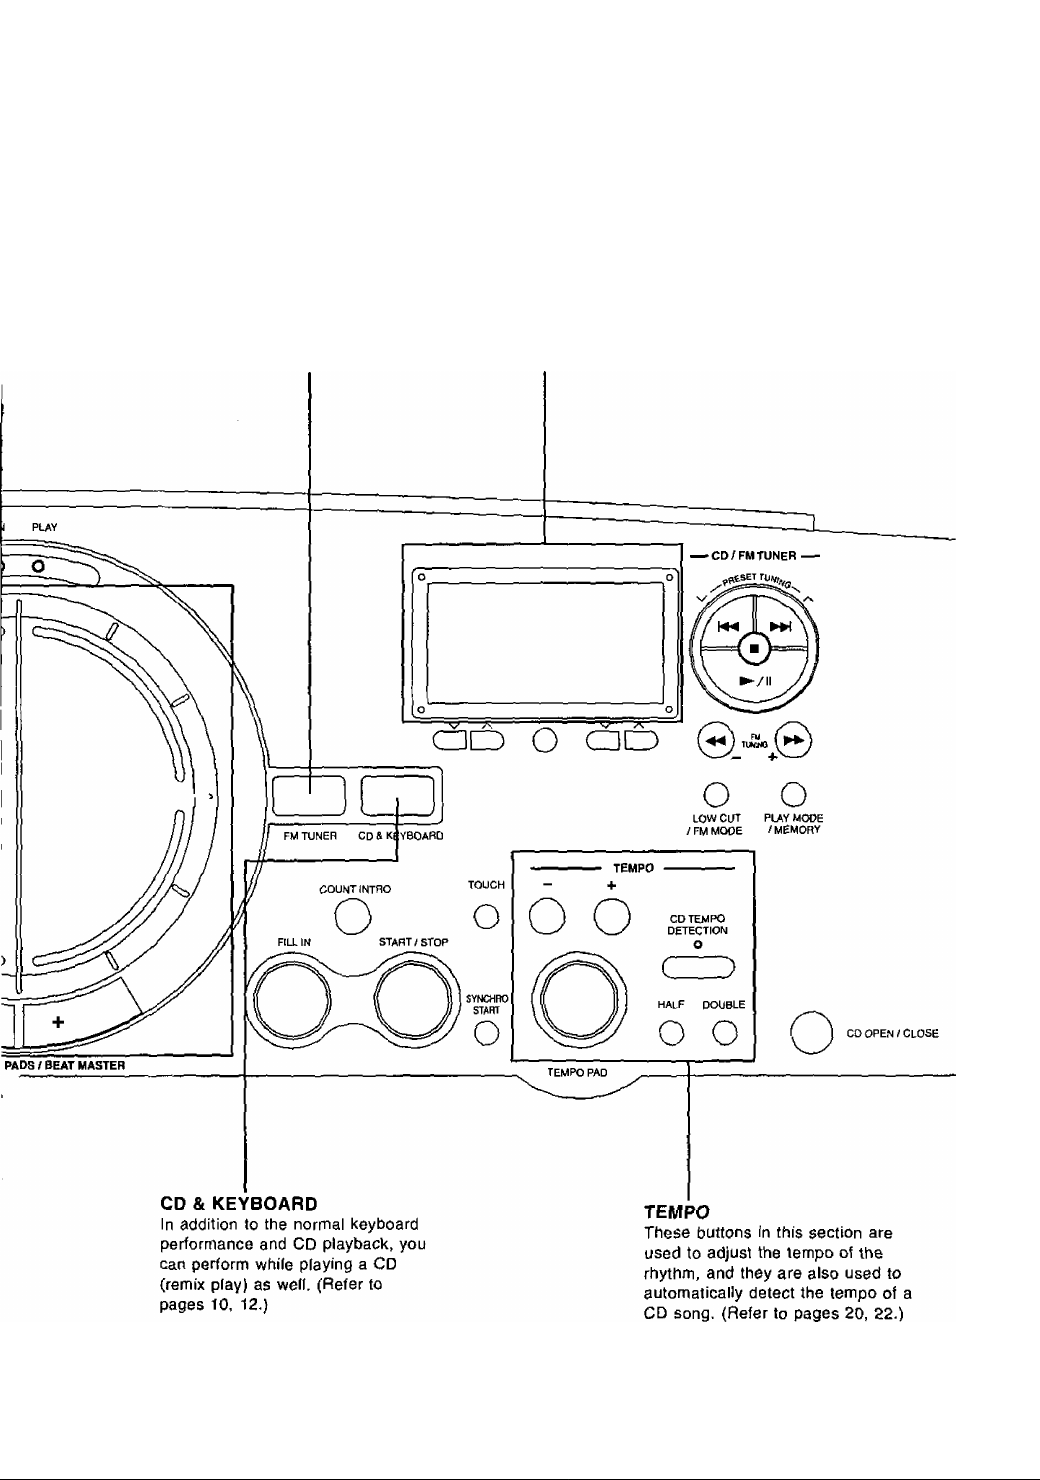
FM TUNER
You can listen to FM broadcasts.
(Refer to page 17.)
Display
The display shows the status of
your instrument and is also used
for setting the various tunctions.
QQTG0626
9
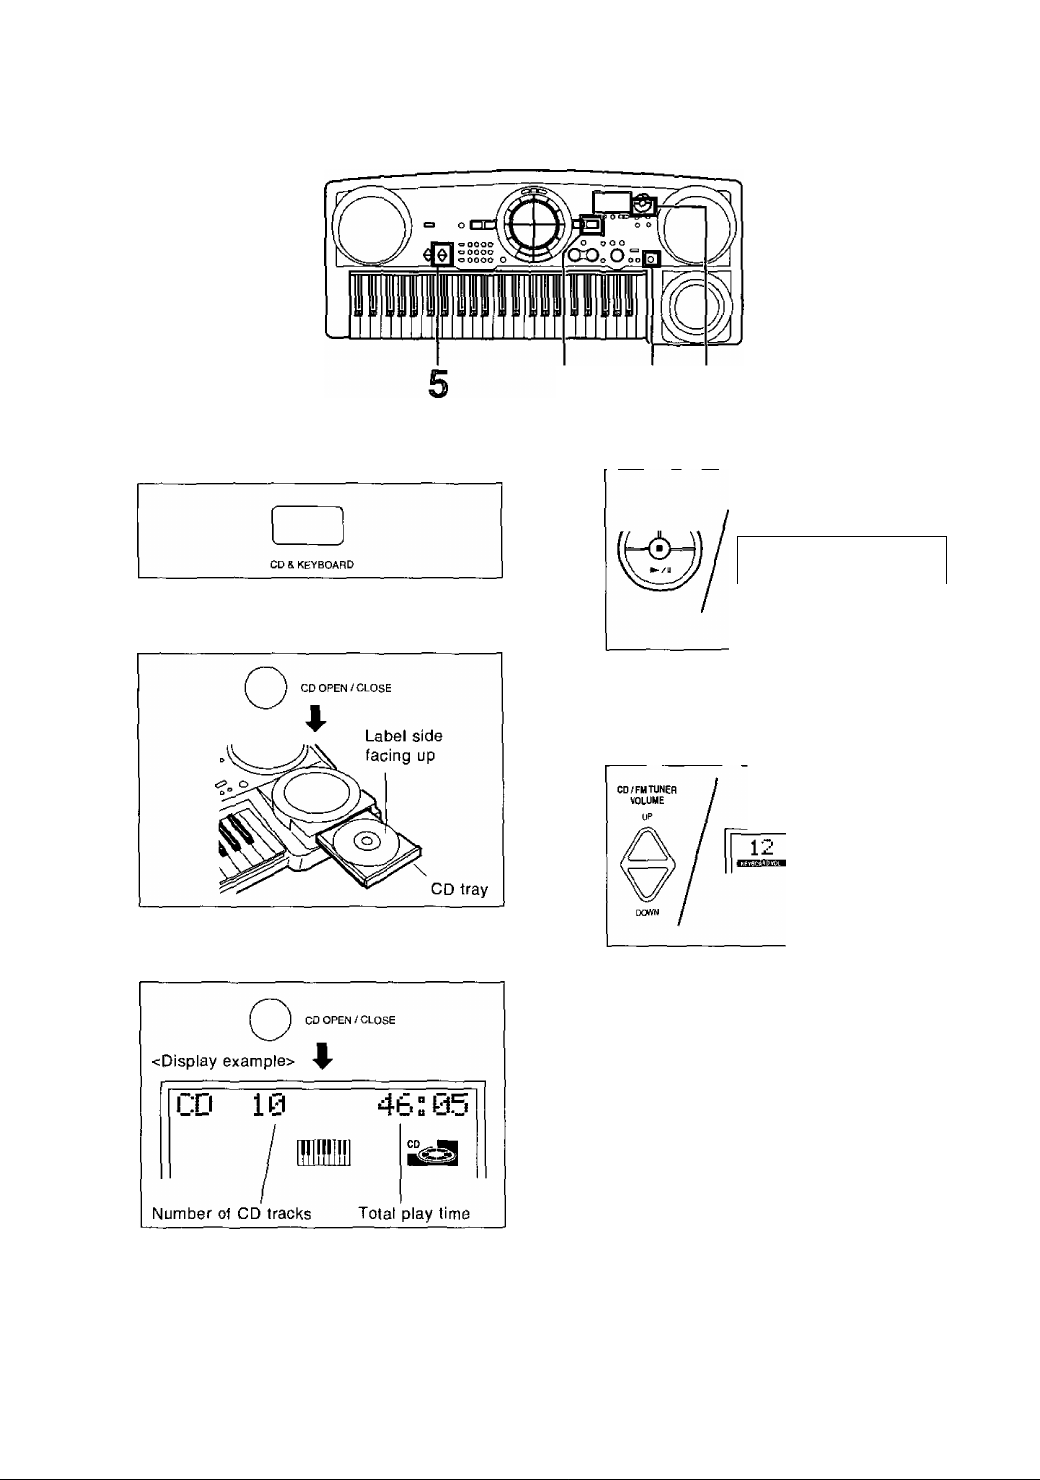
LsBteii to a CD
1 2-3 4
Press the CD & KEYBOARD button to turn it
on.
1
Press the CD OPEN/CLOSE button to open the
CD tray. Insert a CD in the tray.
Press the CD OPEN/CLOSE button again to
close the CD tray.
Press the ►/ii button to begin playback.
<Display example>
ICD 1 0:0il
1 / / 1
Current track Elapsed
• The CD stops playing after the last track has
played.
Use the CD/FM TUNER VOLUME buttons to ad
just the volume (0 to 20).
<Display>
CD/FM tuner volume
After a few seconds, the display returns to the
previous display.
■ These buttons do not function when BEAT
MASTER or ACCOMPANIMENT mode is
selected.
playing time
• “PLEASE WAIT!” is shown on the display
while the CD information is being accessed.
10
QQTG0626
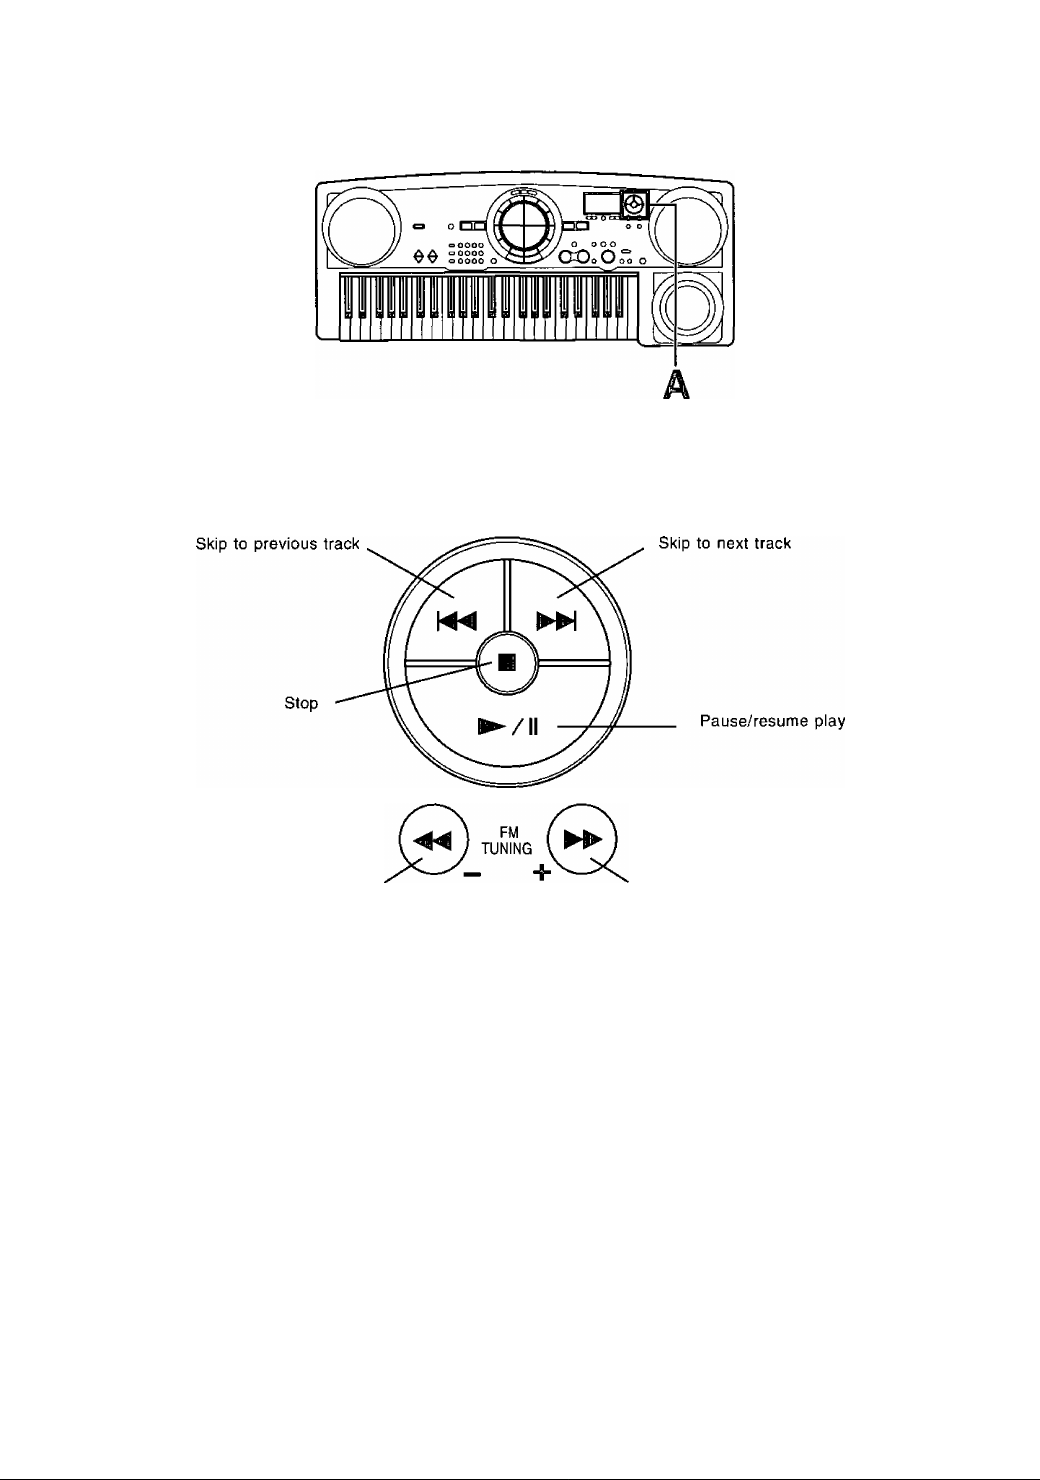
Playback operation
Press and hold for fast
rewind (disabled during
stop)
Press and hold for fast forward
(disabled during stop)
This unit can play CD-DA format audio CD-R and
CD-RW that hve been finalized* upon completion
of recording.
It may not be able to play some CD-R or CD-RW
due to the condition of the recording.
* Finalizing is a process that enables CD-R/CD-RW
players to play audio CD-R and CD-RW.
11
QQTG0626

Performing with a CD [remix play)
15 2 4
• Switch from one type to another by pressing
the button. The name of the setting type is
Press the CD & KEYBOARD button to turn it
on.
Press the CD OPEN/CLOSE button; insert the
included “Remix Demo CD."
Song name list
1
Fill The Groove
Fill The Groove (Remix with MB100)
2
We Haven’t Got Bebap
3
4 We Haven’t Got Bebap (Remix with MB100)
Say What?
5
Say What? (Remix with MB100)
6
• "Remix with MB100” in 2, 4 and 6 are remix
examples. For remix play select 1, 3 or 5.
shown on the display.
• For this example, select "Pop Groove Style.”
Press the CD TEMPO DETECTION button to
turn it on.
Press the ONE TOUCH PLAY button to select
the settings for remix.
• There are three types of settings for remixing.
• Detailed information about the “Remix Demo CD”
can be found in the separate Reference Guide pro
vided.
• The tempo of other CDs can be detected, with ex
ceptions depending on the particular song.
12
QQTG0626
The indicator flashes, and automatic tempo de*
tection begins. When the CD tempo is de
tected, the four PERFORMANCE PADS flash
in time with the defected tempo.
• For details about automatic tempo CD detection
refer to page 22.
• The ONE TOUCH PLAY button has a different func
tion when the auto accompaniment is active. (Refer
to page 25.)

в 6 A
Press the PERFORMANCE PADS in time with
the beginning of each measure.
A phrase will sound in the same tempo that
was detected in the CD song.
Each pad button produces a different phrase.
Some phrases may be played repeatedly in a
loop.
When the PAD STOP button is pressed,
phrase playback stops.
You can use the + and - buttons below the
pad buttons to switch to a different bank.
(Refer to page 18.)
Rhythm remix
• If the FILL IN button is pressed, the pattern
changes briefly.
• The rhythm stops when the START/STOP but
ton is pressed again.
• You can also select the desired rhythm.
(Refer to page 20.)
■ LOW CUT
If you wish to eliminate the lower range tones
(drums, bass, etc.) from the CD playback
sound, press the LOW CUT button to turn it on.
О
LOW CUT
/ FM MODE
• When the LOW CUT button is on, LOW CUT
is shown on the display.
Sound remix
Play the keyboard in time with a song.
; • You can also select the desired sounds,
В
i
(Refer to page 18.)
Start the rhythm playback by pressing the
START/STOP button in time with the beginning
A
of a measure.
The CD volume can be adjusted with the CO/FM
TUNER VOLUME buttons, and the rhythm pads and
keyboard sound volumes can be adjusted with the
KEYBOARD VOLUME buttons.
13
QQTG0626

Beat Master
BEAT MASTER is a function that helps develop your sense of rhythm while you enjoy playing.
This illustration shows how the MB100 first models the beat, and then how you mimic it.
MB100
MB100
The 4 pad buttons in the middle of the panel are used for the game. As the instrument models the rhythm, the
corresponding pad indicators light. Then it's your turn—use your fingers to try to tap the same pad buttons using
the same timing. As you tap the pad buttons, the melody is played in time with your rhythm. It’s almost like playing
a duet with the MB100.
<MB100: LiSTEN>
J J J i
J M J
<You: PLAY>
You
You
j J J ?
J M J
0
To learn how to use the BEAT MASTER, begin with the song "1:Warm Up". The structure of this song is shown
below, so take a minute to look it over before starting the lesson (following).
Number: Pad number
Note: Beat timing
I INTRO
IPHRASE 31
© © ©
J i J J
LISTEN
14
QQTG0626
I PHRASE 11
© © @
J J J i PLAY
LISTEN
IPHRASE 4l
© © ©
PLAY
J i J J
© © ©
J i J J
LISTEN
J J J
© © ®
J i J J
© © ©
PLAY
IPHRASE 2l
© © ©
J J J
LISTEN
I
ENDING I
PLAY
J J J
© © @

Press the BEAT MASTER button to turn it on.
• The indicators for the pads light, and the BGM
song plays.
Use the BEAT MASTER + and - buttons to
select a song number.
• Select a song number from 01 to 10. The
higher the number, the more difficult the song.
Confirm that the pad buttons light (LISTEN).
LISTEM PtAV
• You can also select the song number with the
VALUE buttons, located below the display to
the right.
PEHF№MANCC PADS / BEÀ7 MASTER
\A/atch the timing of the pad indicators and try
to remember it. While the MB100 plays the
model phrase, the LISTEN indicator is lit.
(Continued on the next page)
15
QQTG0626

Mimic the model phrase by tapping the same
pad buttons using the same timing (PLAY),
• The PLAY indicator is lit to indicate that it’s
your turn to perform.
• In time with your performance, an answering
phrase for the MB100 performance is played.
• Your performance of each phrase is assessed
as "Bravo" (excellent), “Good” (good), or
"Poor" (need more practice).
Repeat steps 4 and 5.
• For some tunes, the phrases may extend over
multiple measures.
• Some songs may have a "bridge” in which an
answering performance is not required, giving
you a chance to catch your breath.
When the song ends, an evaluation of your per
formance is shown on the display.
• Your performance is assessed as “Master!"
(expert), “Good” (skillful), “Fair" (average), or
“Practice” (needs more practice).
• To try the same lesson again, press the
START/STOP button. Or you can return to
step 2 and fry another song.
MEMO
• If you wish to slow down the tempo, you can use the
TEMPO + and - buttons to adjust it.
16
QQTG0626

Listen to the FM radio
1
Press the FM TUNER button to turn it on.
• When this button is on, all other operations
such as keyboard performance and CD play
back are completely disabled.
Use the FM TUNING + and - buttons to select
a station to listen to.
<Display example>
FM
Lights when a clear signal is received.
■ Press the buttons only briefly to select a sta
tion. If the buttons are pressed too long, auto
tuning will be activated.
80. 2 MHz ■ Frequency
Lights during a
stereo broadcast
aimo
Use the CD/FM TUNER VOLUME buttons to ad
just the volume {0 to 20).
<Display>
/
CD/FM tuner volume
• After a few seconds, the display returns to the
previous display.
Auto tune
Press and hold the FM TUNING + or - button, and re
lease it when the frequency begins to change.
• The frequency automatic stops at the first station
that is received.
• If you press the button again, automatic tune stops.
• In some cases when there is signal interference, the
signal scan may stop even though a station signal is
not being received. In this case you can intermit
tently tap the button to select the next station.
MEMO
• When reception is poor, try to improve it by adjust
ing the length and direction of the radio antenna.
The radio signal is likely to be strongest if the instru
ment is situated next to a window.
You can store your favorite frequency settings in the
memory. (Refer to page 26.)
17
QQTG0626

Selecting sounds
There are 150 difierent sounds permanently stored in this instrument to enhance your playing enjoyment.
« This operation is not possible when the FM TUNER or BEAT MASTER mode is selected.
Soun ds
1 .Press the SOUND button. Use the number buttons to
select a sound number (three digits).
• A SOUND list is printed on the control panel. For a
detailed list of the sounds, refer to the separate Ref
erence Guide provided.
---------
SOUND/RHYTHM SELECT
0 13 3
---------------
o oooo
SOUND +456
^ lO o o o
^'o666
• Enter three digits to specify the sound. For example,
for sound number003, press 0, 0, 3. Forsound number
030, press 0, 3, 0.
• The + and - buttons can be used to increase or
decrease the number. When a button is pressed and
held, the numbers change quickly.
• If you wish to cancel the number you are in the midst
of entering, press the + and - buttons at the same
time (CANCEL). If you pause in the midst of entering
a number, the entry may automatically be canceled
after a few seconds.
• The selected sound number and sound name are
shown on the display,
<Display exampte>
•
Touch
You can add dynamics to the sound by varying the key
board touch.
• The initialized setting is ON.
=>Use the TOUCH button to switch between ON and
OFF.
O
When set to on, TOUCH is shown on the display.
This function is also effective in the BEAT MASTER
mode.
Pad B an k
The different types of phrases are classified into banks
in the PERFORMANCE PADS. When you switch to a
different bank, the phrase in each pad button changes.
001 Grand Piano
i~~S0UND I
2.Play the keyboard.
• Non-pitched (percussion) sounds are also available.
18
QQTG0626
>Change to a different bank with the + and - buttons
beneath the pad buttons.
A PADS BANK list is printed on the control panel.
While you are selecting a different bank, the name of
the current bank is shown on the display.

Tuning
etOOOO \
A A ooooo \j^
V V oOOOO O
J 0 o om
o
The tuning (pitch) of the entire instrument can be finely adjusted, which is useful during remix play with the CD or when
performing along with other instruments, etc.
=>Use the TUNING A and V buttons, below the display
to the right, to fine-adjust the tuning,
<Display example>
Adjust the tuning while playing the keyboard to confirm
that it is correct.
Pressing both buttons at the same time will reset the
tuning to the standard 440.0 Hz.
A few moments after you finish adjusting the tuning,
the instrument automatically exits the setting mode.
When VALUE is shown on the display above the but
tons, these buttons are used for various settings and
cannot be used for TUNING. To access the TUNING
function in this case, first exit the setting mode.
Transpose
rooysr O O
~XFk
A A
V V BOOOO o
90000 \
/ Q Moo
The TRANSPOSE buttons are used to change the key of the entire instrument in semitone steps across an entire
octave.
Suppose you learn to play a song—in the key of C, for example—and decide you want to sing it, only to find that it’s
either too high or too low for your voice. Your choice is to either learn the song all over again in a different key, or to
use the TRANSPOSE feature.
?Use the TRANSPOSE A and V buttons, below the
display to the left, to change to a different key.
<Display example>
• When ITEM is shown on the display above the buttons,
these buttons are used for various settings and cannot
be used for TRANSPOSE. To access the TRANS
POSE function in this case, first exit the setting mode.
<Example: transposed to D>
Played keys: C major
.
F=P
_____
Each press of the A button raises the key in semitone
steps, and each press of the V button lowers the key
Notes that sound: D major
in semitone steps , within a one-octave range.
If the two buttons are pressed at the same time, the
key returns to C.
When the TRANSPOSE function is active (that is,
when not the key of C), the transpose mark is shown
on the display.
19
QQTG0626

Selecting rhythms
l^oopofs.
ДУЧ leooool\]^
v” |o oooolo
There are 100 rhythms stored in the memory of this instrument.
• This operation is not possible when the FM TUNER or BEAT MASTER mode is selected.
Rhyt hm
1. Press the RHYTHM button. Use the number buttons
to select a rhythm number (three digits).
• The list of RHYTHM is shown near the left end of the
panel.
SOUND / RHYTHM SELECT
MENU .__ ^____ .
C3 oooo
SOUND -t- 4 5 6
___
^ ^^
• The + and - buttons can be used to increase or
decrease the number. When a button is pressed and
held, the numbers change quickly.
• To cancel a number you are entering, press the and
- buttons at the same time (CANCEL).
2.Press the START/STOP button.
START; STOP
\\ W 0 03 о о
' 'Я j 1
______11_
о о о о|
ЗИсо.оЬп
Щ о о
o [O o o o
CANCEL _ 7 o Q
RHYTHM I ^
^ O O O
Enter three digits to specify the rhythm. For example,
for rhythm number 003, press 0, 0, 3. For rhythm
number 030, press 0, 3, 0.
The rhythm number and name are shown on the dis
play.
ЙЙ1
У E'031 Pop
I RHYTHM I ’
Temp o
^Use the TEMPO + and - buttons to adjust the tempo
(J = 40 to 300).
О о
• The tempo is shown on the display.
The selected rhythm pattern begins to play.
The BEAT indicators light to indicate the beat.
TEMPO I ТП BEAT* • • •
ICU
beat
You can stop the rhythm by pressing the START/STOP
button again to turn it off.
TEMPO PA D
By tapping the TEMPO PAD button a few times at the
speed you wish to perform, you can easily specify the
rhythm tempo.
TEMPO I Tn BEAT* • • •
J= icu
• This function is also effective in the BEAT MASTER
mode.
20
QQTG0626
• The length of the intervals in which you tap is detected.
• This function is also effective in the BEAT MASTER
mode.

TEVl PO HAL F/D OUBL E feat ur e
One press of a button can double or halve the rhythm
tempo.
counnr
You can begin the rhythm performance with a onemeasure count.
IRTT RO
HALF DOUBLE
o o
• Press the HALF button to slow down the tempo to half
speed, or press the DOUBLE button to increase it to
double speed.
• These buttons are convenient in case the auto detect
(page 22} detects a CD tempo that is half or double
the actual tempo.
• If by pressing either button the resulting tempo would
be less than J = 40 or more than j = 300, the tempo
will not change.
• This function is also effective in the BEAT MASTER
mode.
SY1U CHR0 ST AR T
With the synchronized start feature, the rhythm pattern
starts when you play a key on the keyboard.
1 .Select a rhythm.
2.Press the SYNCHRO START button.
O
• When SYNCHRO START is on, SYNCHRO is shown
on the display.
1 .During rhythm stop, press the COUNT INTRO button
to turn it on.
I I I
o
When COUNT is on, COUNT is shown on the display.
2.Start the rhythm.
• A one-measure count is played, after which the rhythm
performance begins.
• When the rhythm begins, the COUNT indication turns
off.
You can insert a fill-in pattern during the rhythm perform
ance.
1 .start the rhythm.
2. Press the FILL IN button.
•
gnrr^rra'.'a
■▼HJKWG
3.Play a key to the left of the keyboard split point (the
initialized split point is G3).
G 3
▼
C2 C6
The rhythm pattern begins to play.
When the rhythm begins, the SYNCHRO indication
turns off.
• A fill-in pattern is played for the remainder of the
measure.
• When the FILL IN button is pressed on the last beat
of a measure, the fill-in pattern continues to the end
of the following measure.
21
QQTG0626

Automatic CD tempo detection
For remix play of the pads and rhythm with a CD, the tempo in a song you are playing from the CD can be automatically
detected.
• This operation is enabled in the CD & KEYBOARD mode.
CD T EMPO D ETE CTIO N
1 .On the CD player in this instrument, play the desired
track.
2. Press the CD TEMPO DETECTION button.
CD TEMPO
DETECTION
О
• The indicator flashes, and auto detect begins.
3.Confirm that the four pad indicators flash in time with
the tempo.
• The CD TEMPO DETECTION indicator stops flashing
and remains lit.
• If the detected tempo is double or half the actual
tempo, use the HALF or DOUBLE button to correct it.
4.Perform remix play in time with the CD song (page
13).
• Play the pads and rhythm in time with the beginning
of the measure. If the timing is incorrect, turn off the
pad and rhythm once, and then restart them.
• If you sense that the two tempos are out of sync, use
the TEMPO + and - buttons to adjust the instrument
tempo.
• if the tempo changes during the song, for example,
the CD tempo and instrument tempo may not match.
In this case, use the TEMPO and TEMPO PAD buttons
to adjust the tempo, or start the pad or rhythm again
at the beginning of a measure.
• When CD TEMPO DETECTION is on, each time the
song changes, auto tempo detection is executed. This
function can be set to ON or OFF. (Refer to pages 27,
29.)
HALF DOUBLE
О о
■ If auto detect fails to work
In “FAILED, TRY AGAIN” appears on the display;
1) Tap the TEMPO PAD button in time with the CD song.
2) Press the CD TEMPO DETECTION button.
3) When the indicator starts to flash, immediately press
it again.
• Begin when the four pad indicators flash in the tempo
that you specify,
NOTE
You may find that the auto detect function does not
work well with some types of songs.
The auto detect function may not work well even for
some songs having a comparatively stable tempo, for
example due to slight tempo differences in a live per
formance, or depending on the configuration of the
instruments. In such cases, follow the same proce
dure as when the FAILED, TRY AGAIN message ap
pears following auto detect failure, and tap out the
tempo on the TEMPO PAD.
• For best results, select songs having a very distinct
cymbal or hi-hat performance.
22
QQTG0626

Changing the CD playback mode
»0000
> 0000
aOOOO O
Repeat playback and random order playback are possible with this instrument's CD player.
• This operation is enabled in the CD & KEYBOARD mode.
• For basic CD playback, refer to page 10.
OfUE SO niG RE PEA T
1. Select the track you wish to have played back re
peatedly,
2. Use the PLAY MODE button to show the one sorig
repeat mark on the display.
O
play mode
/MEMORY
One song repeat mark
3.lf playback Is stopped, press the button.
/II
The selected song is played back repeatedly.
CD RE PEA T
1.Use the PLAY MODE button to show the all songs
repeat mark on the display.
KUBid
o
PLAY MODE
/MEMORY
RAfU DOM PLA Y
1 .Use the PLAY MODE button to show the random play
mark on the display.
■HEEia
Random play mark
2.Press the
• The tracks on the CD are played back In random order,
after which playback stops.
• In RANDOM play, it is not possible to skip to the
previous song, nor is it possible to skip to the end of
the current song if it is the last song.
■ To exit any of the above modes
Press the PLAY MODE button several times. Each time
the button is pressed, the play indication on the display
changes as follows: 1 song repeat all songs repeat
random play -> (off).
/11 button.
o
PUVY MODE
tMEMORY
All songs repeat mark
2.If playback is stopped, press the ►/ii button.
All the songs on the CD are played back repeatedly.
23
QQTG0626

Automatic Accompaniment
When you play a chord on the keyboard, this function automaticaiiy piays an accompaniment pattern that matches
your seiected rhythm. With a reai accompaniment as a background, you can concentrate on piaying the meiody.
• This operation is enabled in the AUTO ACCOMPANIMENT mode.
Play ing ch ord s
You can piay a chord with just one finger.
■ One-finger mode
A major chord can be piayed just by pressing the key for
its root note.
Minor, seventh and minor seventh chords are also easily produced.
minor chord seventh chord minor seventh chord
Piay the root note plus a black
key to the left of it.
Play the root note plus a white
key to the left of it.
Play the root note plus a black
key and a white key to the left
of it.
Example: Cm Example: C7
I
■ Fingered mode
Specify the chord by playing all the notes in the chord.
Specify the chord by playing at least three notes.
The following played chords can be detected for each
key (C is given as an example):
C, Cm, C7, Cm7, Cm7“^, C6, Cm6, CM7, Csus4,
Caug, Cm C7sus4, Caug7, Cdim, C C7
CmM7, CM7 CM7+^ CmM7 etc.
Example: Cm7
n
n
24
QQTG0626

How t o use th e a utom at ic acc omp ani men t
1. Press the AUTO ACCOMPANIMENT button to turn It
on.
ALTTO
ACCOMPANIMENT
2.Select the desired rhythm and sound(s), and set the
tempo.
3.Start the rhythm.
• You can also start the rhythm with a one-measure
count. {Refer to page 21.)
• If the SYNCHRO START is used, the rhythm begins
as soon as a chord is played. {Refer to page 21.)
4.Specify a chord.
G3
T
C2
chord
Specify the chord on the keyboard section to the left
of the split point (the initialized split point is G3). The
split point can be changed. {Refer to pages 27, 29.)
An accompaniment pattern in the specified chord is
automatically played. Play the melody with your right
hand.
melody
C6
• The name of the specified chord is shown in the
CHORD column on the display.
<Display example>
• There are some chords that are not displayed even
though they are successfully detected.
• An automatic accompaniment is also used in the FILL
IN patterns.
• Even if you release the chord keys, the accompani
ment continues to play until you specify another chord.
5.To stop the automatic accompaniment, press the
START/STOP button.
• The volume of the automatic accompaniment can be
changed. (Refer to pages 27, 28.)
• The automatic accompaniment is comprised of five
parts: DRUMS, BASS, ACCOMP 1, ACCOMP 2 and
ACCOMP 3. The volume of each of these parts can
be adjusted. (Refer to pages 27, 28.)
One Tnu ch P la y
ONE TOUCH PLAY automatically sets the sounds, etc.
that match your chosen rhythm. Just by pressing a button
you can immediately perform using the automatic accom
paniment.
• Note that when the automatic settings are executed,
the previous settings are canceled.
1 .With the rhythm stopped, select a rhythm pattern.
2. Press the ONE TOUCH PLAY button.
ONE TOUCH
PLAY
o
Sounds and tempo etc. that match your selected
rhythm are automatically set, and the SYNCHRO
START is turned on.
3.Play the keyboard.
• When you specify a chord,
begins to play immediately.
When the CD & KEYBOARD button is on, the ONE
TOUCH PLAY button becomes button to select rec
ommended settings for a CD remix performance.
(Refer to page 12.)
the automatic rhythm
QOTG0626
25

storing FM station settings
store the settings for your favorite FM stations so they are easy to recall.
• This operation is enabled in the FM TUNER mode.
• For basic radio operation, refer to page 17.
Stori ng a sta tio n s ett ing .
1. Press the FM TUNER button to turn it on.
2.Use the FM TUNING + and - buttons to select an FM
radio station.
<Display example>
a tuKkj B
• You can also use the auto tune feature to automatically
find a station, (Refer to page 17.)
3. Press the MEMORY (PLAY MODE) button.
O
PLAY MODE
iMEMORY
5. Press the EXECUTE button.
ao ao
• "COMPLETED!” is shown on the display.
• The storing procedure is completed, and the instru
ment exits the store memory mode. Note that if the
EXECUTE button is not pressed, the preset channel
is not stored, and after a few seconds the instrument
exits the store memory mode.
6. Repeat steps 2 to 5 to store station settings in each
preset channel, as desired.
Reca llin g stor ed sta ti on s et ting s
1. Press the FM TUNER button to turn in on,
2. Use the PRESET TUNING buttons to select a preset
channel.
<Display example>
4. Use the ITEM buttons, below the display to the left, to
select a channel for the station (1 to t2).
<Display example>
Flashing
26
QQTG0626

F№l MOD E
Use this mode to reduce spurious noise in the FM stereo
broadcasts.
Chang in g t he tun ing in tep val
The tuning frequency intervai can be changed from 0.1
MHz to 0.2 MHz, and vice versa.
■ Press the FM MODE button.
O
LOW CUT
/FMUOOE
Monaural indication
The sound changes to monaurai output, but spurious
noise is reduced, making the radio station easier to
iisten to.
Exit the FM MODE by pressing the button again. (This
is the normai setting for this button.)
Station settings cannot be stored as presets when the
monaural status is active.
=> Press and hoid the FM TUNER button (about 10 sec
onds).
• After about 5 seconds, 87.9/87.50 wiil flash on the
display. If you continue to press and hold the button,
after about 10 seconds the indication will change to
87.50/87.9 and the operation to change the tuning
frequency interval is complete. If you release the but
ton before this indication appears, the frequency step
remains unchanged.
• You can repeat this procedure to return to the original
setting,
• Note that this procedure will erase the preset channel
memories.
Other Settings
Various menu functions enhance the capabilities of your instrument.
« This operation is not available in the FM TUNER or BEAT MASTER mode.
Outli ne of th e p poce du re
1. Press the MENU button to turn it on.
---------
SOUND / RHYTHM SELECT
MENU
---------
oooo
o O 6 6 6
s“ib666
2.Use the number buttons to enter the menu number for
the function you wish to set (2 digits).
• The + and - buttons can also be used to specify the
menu number.
■ Menu list
01: RHY&PAD VOL
Overall volume setting for the automatic accom
paniment and pads.
02: PART VOLUME
Adjust the volume of each part.
03: PART SOUND
Adjust the sound for each part.
04: PART PANPOT
Adjust the stereo balance of each part.
05: SPLIT POINT
Change the keyboard split point.
06; TEMPO DETECT
Specify whether or not CD tempo detect func
tions each time the song changes.
07: FOOT SWITCH
Assign a function to the Foot Switch (separately
sold option).
08: LCD CONTRAST
Adjust the readability of the display.
09: LIGHT SHOW
Specify whether or not the light show (indicators
flicker when this instrument has been silent for a
while) is enabled.
10: ALL INITIAL
Return all the instrument functions and settings
to their factory-preset status.
^ \ 1 ^ o
—JJ o
COo O oo O
(Continued on the next page)
27
QQTG0626

3. Press the EXECUTE button.
ГТЕМЖ '^ЕХЕЙ
—^----------------------------
---------
1-----------------------
QD Q
• The display changes to show the setting display for
the selected menu.
4. Use the ITEM, VALUE, and/or EXECUTE buttons
below the display, as well as the number buttons, to
change the settings (explained in detail below).
5. When you have finished changing the settings, press
the MENU button again to turn it off.
Ч/ ^
Flashing
■ About the parts
This instrument is formed of the following sound gener
ator parts.
—Performance parts (PART 1 to 16)
—Automatic accompaniment parts (ACCOMP 1 to 3,
BASS, DRUM)
— PERFORMANCE PADS part (PAD)
• Use PART 1 to 16 when external MIDI equipment is
used to make this instrument function as a 16-part GM
sound generator.
• PART 1 is used for this instrument’s sounds.
• PART 16 is the drums part.
RHYTH M & P AD VOL UME
RHYSPflD U0L= 20
1 MENU 1
>Use the VALUE buttons or the number buttons (2
digits) to adjust the volume (0 to 20).
This setting changes the total volume for the automatic
accompaniment and the pads.
PART VOL UM E
1 UOL“ 121
1 .Use the ITEM buttons to select a part.
• ACMP is the abbreviation for ACCOMP.
• PAD is the abbreviation for PERFORMANCE PADS.
2.Use the VALUE buttons or the number buttons (3
digits) to adjust the volume for the selected part (0 to
127).
• Repeat the above steps for each part, as desired.
• If the VALUE Л and V buttons are pressed simul
taneously, the volume for the selected part is muted.
When muting is active, “
play. Muting can be canceled by pressing either button.
e
в
MENU I
---------
" is shown on the dis
PART SOU ND
PART 1 SOUND:001
1 .Use the ITEM buttons to select a part (PART 1-16).
2. Use the VALUE buttons or the number buttons to select
a sound for the part (001 to 150).
• For PART 16, only the DRUM KITS sound can be
selected.
[MENU 1
PART PA NPO T
FRN
1 .Use the ITEM buttons to select a part (PART 1-15).
• PART 16 cannot be selected.
2.Use the VALUE buttons or the number buttons (3
digits) to adjust the stereo balance.
• The sound is completely to the left at 0, exactly in the
center at 64, and completely to the right at 127.
• If the VALUE A and V buttons are pressed simul
taneously, the stereo balance is set to 64 (center).
a
в
__
[MENU I
b4
28
QQTG0626

SPLIT POINT
UGHT SHOW
SPLIT POINT: G 3 LIGHT SHCii.i.l: ON
=> Press a key on the keyboard to specify the desired
split point.
• The name of the specified key is indicated on the
display.
• The factory-preset (initialized) split point is at G3.
• The key at the split point is the lowest note of the right
keyboard section.
TEMPO D ETEC T
1 MENU 1
>Use the VALUE buttons to set the UGHT SHOW to
ON or OFF.
ON; When the power is on, if this instrument has been
silent for a while, the pad buttons and the indicators
start to flash in a kind of “light show".
OFF: The light show does not start.
ALL INI TIAL
flUTili retry: on
rw]
>Use the VALUE buttons to switch the CD TEMPO DE
TECT function ON or OFF.
ON: Tempo detect works each time the CD song
changes (initialized setting).
OFF: Tempo detect does not work when the CD song
changes.
FOOT SWI TC H
FOOT Sl.i.l= SUSTRIH
=>Use the VALUE buttons to assign a function to the
Foot Switch (separately sold option).
• Select from SUSTAIN, START/STOP [ST/STOP], and
GLIDE.
• If the polarity of the switch is reversed, select a function
name that is preceded by a - mark.
• When the Foot Switch is depressed, the specified
function will turn on,
• The glide effect “bends” the pitch down by about one
semitone. (This effect may not work for some sounds.)
• For Foot Switch connection, refer to page 30.
[menuI
=>Press the EXECUTE button.
• "COMPLETE” is shown on the display, and all the
settings of this instrument are reset to their factorypreset status.
• The settings can also be initialized by turning off the
power once, then turning on the power again while
depressing both TEMPO + and - buttons.
• Playback will stop if this operation is performed while
a CD is being played.
• The following settings will be initialized by this proce
dure.
— KEYBOARD VOLUME
— CD/FM TUNER VOLUME
— FM PRESET TUNING memories
— LIGHT SHOW on/off setting
n Memory function
The settings of this instrument are retained as long as
the AC adaptor remains plugged into an electrical outlet.
O
1 MENU 1
LCD CONTRAS T
LuD UUHTRFlbT
»Use the VALUE buttons to adjust the display so that
it is easy to read (1 to 10).
MENU
• The following settings are retained even when the AC
adaptor is disconnected from the electrical outlet.
— FM PRESET TUNING memories
— LIGHT SHOW on/off setting
. I
29
QQTG0626

Connection terminals and optional accessories
Conn ect ion te rml nal o
MIDI OUT
Used for transmitting MIDI data. Connect the other end
of the MIDI cable to the MIDI IN terminal of another in
strument. This terminal is used, for example, to generate
sound from a connected instrument by playing this in
strument.
MIDI IN
Used for receiving MIDI data. Connect the other end of
the MIDI cable to the MIDI OUT terminal of another in
strument. This terminal is used, for example, to generate
sound from this instrument by playing a connected in
strument.
• A MIDI cable is used for MIDI connections.
Separ at ely so ld o pti on
FOOT SW
An optional SZ-P1 Foot Switch (sold separately) can be
connected to this terminal to control various functions.
PHONES/LINE OUT (output level 1.5 Vrms, 16 O)
Headphones, a keyboard amplifier, or stereo equipment
can be connected to this terminal. When another appara
tus is connected to this terminal, the speaker system is
automatically switched off, and sound is heard only
through the connected device.
For the various functions that can be controlled with
a Foot Switch, refer to pages 27, 29.
30
QQTG0626

Symptoms which appear to he signs of troubie
The following changes in performance may occur but do not indicate trouble.
Phenomenon
The buttons, keys, etc. do not
function.
No sound is produced when the
keys are pressed.
■D
CQ
O
Only percussion instrument
n
sounds are produced when the
>>
0)
keyboard is played.
The rhythm does not play.
The CD tempo cannot be
detected.
No sound is produced.
The CD does not play back
correctly.
Performance is not possible.
Even with a CD inserted, the
track number, etc is not shown
a
o
on the display.
A particular portion of the CD
cannot be played.
No sound is heard. • The CD/FM TUNER VOLUME is set to the minimum level. Set it to a suitable
<D
Spurious noise makes station
C
3
selection difficult.
s
Spurious noise makes listening
u.
difficult.
• Turn off the power once, then turn it on again. If this procedure is not
successful, turn off the power once. Then, while pressing both TEMPO +
and - buttons at the same time, turn the power on again.
• The KEYBOARD VOLUME is set to the minimum level. Set it to a suitable
level.
• The volume for PART 1 is set to the minimum level or is muted. Set it to a
suitable level. (Refer to pages 27, 28.)
• The FM TUNER mode is selected. Select a different mode.
• The DRUM KITS sound (139-150) is selected. Select another sound.
• The DRUM part volume is set to the minimum level or is muted. Set it to
a suitable level. (Refer to pages 27, 28.)
• If “FAILED, TRY AGAIN” is shown on the display, the auto detect was not
successful. Use the TAP TEMPO or TEMPO buttons to set the correct
tempo. (Refer to page 22.)
• The CD/FM TUNER VOLUME is set to the minimum level. Set it to a suitable
level.
• Press the CD OPEN/CLOSE button to open the CD tray, and then press It
once again to reload the CD.
• The CD has been inserted upside down,
• The inserted CD is not a standard audio CD.
• A CD which is extremely warped or scratched cannot be used.
• If the CD or the instrument was suddenly moved from a very cold to a very
warm place, moisture may have formed on the CD player lens. Walt for one
hour and try again.
• The CD may require cleaning. Use a soft cloth to wipe it.
level.
• Try moving the antenna direction to improve reception.
• The noise from a TV or video deck may be interfering with FM reception.
Try turning off any such devices.
Cause or Remedy
31
QQTG0626

Error messages
Indication Contents
PLEASE WAIT!
COMPLETED!
Appears when it takes some time to complete an
operation.
Appears when an operation has been completed.
NO DISC
SO RRY!
FAILED, TRY AGAIN
ERROR!
You have attempted to play a CD in the CD &
KEYBOARD mode, but no CD is inserted.
During CD play, the instrument was jarred and sound
was interrupted.
Appears when the CD tempo was unable to be
detected within a given time, and the instrument
automatically exits the CD tempo detect mode.
Appears briefly when some other error is detected.
About the CD
n COMPACT
[iId§(E
DIGITAL AUDIO
Use a CD which has this mark.
• Please do not use a CD with a heart or other
special mark, asdoing so may result in damage.
X
B To avoid injuring your CD, as weil as damag
ing your instrument, please heed the following
points.
• Do not use a pencil or ball point pen to write on the CD.
• Do not wipe with record cleaner, thinner, benzene or alcohol.
It soiled, use a clean damp cloth to wipe it clean, and polish
it with a soft, dry cloth.
• Do not affix paper or stickers (decals). (Do not use a CD
from which cellophane tape or a glue-backed label has been
peeled off, as the residual glue may result in damage.)
• Do not insert more than one CD at a time.
• Be sure to remove the CD from the tray before
moving or tilting the instrument.
About the ANTI-SKIP SYSTEM
The ANTI-SKIP SYSTEM minimizes any interrup
tion to the sound due to vibration by using pre
sampled (up to 10 seconds) performance data.
• The ANTI-SKIP SYSTEM in this instrument is
always active whenever the power is on. (The
function cannot be disabled.)
• If the instrument is subjected to consecutive
shocks, “SORRY” may appear on the display
and the sound interrupted.
Note: The ANTI-SKIP SYSTEM in this instrument
uses digital compression technology.
32
QQTG0626

A
AUTO ACCOMPANIMENT
B
BEAT MASTER
................................................
...............................
24
14
PAD STOP.........................................................13
PERFORMANCE PADS
PHONES............................................................30
PLAY MODE......................................................23
PRESET TUNING..............................................26
....................................
13
c
CANCEL
CD OPEN/CLOSE
CD/FM TUNER VOLUME
CD&KEYBOARD
CD TEMPO DETECTION
COUNT INTRO.................................................21
D
DOUBLE
F
FILL IN
FOOT SW.........................................................30
FM MODE.........................................................27
FM TUNER
FM TUNING.......................................................17, 26
H
HALF................................................................21
K
KEYBOARD VOLUME........................................6
...........................................................
............................................
..................................
...............................................
..................................
..........................................................
.............................................................
.......................................................
18
10
10, 17
10, 12
12, 22
21
21
17
R
RHYTHM
SOUND..............................................................10
SOUND/RHYTHM SELECT
START/STOP
SYNCHRO START............................................21
TEMPO
TEMPO PAD......................................................20
TOUCH
...........................................................
..........................
....................................................
..............................................................
..............................................................
20
18, 20
20
20
18
L
LINE OUT
LOW CUT
.........................................................
.........................................................
M
MENU
...............................................................
MEMORY..........................................................26
MIDI
..................................................................
o
ONE TOUCH PLAY
...........................................
30
13
27
30
12, 25
33
QQTG0626

Specifications
KEYBOARD
MAX. POLYPHONY
SOUNDS
TRANSPOSE ±1 OCTAVES
RHYTHMS 100 RHYTHMS
RHYTHM CONTROLS
TEMPO CONTROLS
OTHER FUNCTIONS
PADS
DISPLAY
TERMINALS
OUTPUT
SPEAKERS
POWER REQUIREMENT
POWER CONSUMPTION
DIMENSIONS (W X H X D)
NET WEIGHT
ACCESSORIES
Design and specifications are subject to change without notice.
49 KEYS (WITH INITIAL TOUCH)
32 NOTES
150 SOUNDS
SYNCHRO START, START/STOP, COUNT INTRO. FILL IN
+, HALF, DOUBLE. TEMPO PAD, CD TEMPO DETECTION
BEAT MASTER, AUTO ACCOMPANIMENT, ONE TOUCH PLAY,
KEYBOARD VOLUME, CD/FM TUNER VOLUME, MENU
4 PADS, 10 BANKS
CUSTOM LCD (WITH BACKLIGHT)
MIDI IN, MIDI OUT, FOOT SW, PHONES/LINE OUT
5 W (2.5W X 2)
12 cm X 2
DC IN 12 V (WITH EXCLUSIVE AC ADAPTOR)
16 W (WHEN THE POWER IS OFF: ABOUT 4 W)
96.0 cm X 16.7 cm X 43.1 cm (37-25/32” x 6-9/16" x 16-3/32")
6.1 kg (13.4 lbs)
AC ADAPTOR, MUSIC STAND, REMIX DEMO CD
SX-MB100
FM TUNER
CD PLAYER
FREOUENCY RANGE
SAMPLING FREQUENCY 44.1 kHz
DECODING
BEAM SOURCE
NO. OF CHANNELS
WOW AND FLUTTER
D/A CONVERTER
EXCLUSIVE AC ADAPTOR
PART NO.
QFAG028A
QFAG029A
QFAG030A
QFAG031A
QFAG032A
QFAG038B
Q FAG039B
NORTH AMERICA, MEXICO
UNITED KINGDOM
EUROPE, SOUTH AFRICA
AUSTRALIA. NEW ZEALAND
TAIWAN, MALAYSIA, SINGAPORE, ETC,
SAUDI ARABIA, KUWAIT, HONG KONG
ARGENTINA
FM: 87.5-108.00 MHz (50 kHz STEPS)
16 bit LINEAR
SEMICONDUCTOR LASER (WAVELENGTH 780 nm)
2 CHANNEL. STEREO
BELOW MEASURABLE LIMIT
16 bit DAC
REGION
VOLTAGE
120 V
230 - 240 V
230 V
230 - 240 V
120/220/230/240 V
120/220/230/240 V
120/220/230/240 V
34
QQTG0626

35
QQTG0626

PANASONIC CONSUMER ELECTRONICS COMPANY
DIVISION OF MATSUSHITA ELECTRIC CORPORATION OF AMERICA
One Panasonic Way, Secaucus, New Jersey 07094
Consumerproducts@Panasonic.com
ENGLISH
SeOSOISO QQTG0G26A
 Loading...