

Page 1
Technics
Compact Disc Player
SL-PG340
Operating Instructions
Diomu. AUDIO
Before Operating this unit, please read these instructions- com*
pletely.
Page 2

Thank you for purchasing this product.
For optimum performance and safety, please read
these instructions carefully.
Table of Contents
Suggestions for Safety..............................................3
Instaliatioii
Preparations...............................................................4
Front Panel Controls and Functions
Basic Operating Procedure
(Sequential Piay)
.................................................................
.......................
...................................................
CAUTION:
The AC voitage is different according to the
area.
Be sure to set the proper voltage in your
area before use.
(For details, please refer to the page 5.)
CAUTION!
THIS PRODUCT UTILIZES A LASER.
USE OF CONTROLS OR ADJUSTMENTS OR PER
FORMANCE OF PROCEDURES OTHER THAN THOSE
SPECIFIED HEREIN MAY RESULT IN HAZARDOUS
RADIATION EXPOSURE.
DO NOT OPEN COVERS AND DO NOT REPAIR YOUR
SELF. REFER SERVICING TO QUALIFIED PERSONNEL.
Random Piay ........................................................... 9
4
6
7
Program Piay
Search/Skip Function ..............................................12
Speciai Features ......................................................13
Recording from Compact Discs
Concerning Compact Discs
Technical Specifications.........................................23
Troubleshooting Guide............................Back cover
Maintenance
DANGER-InvisiUe
later ruliation when
AVOiO DIRECT EX
POSURE TO BEAM.
{Inside of product)
...........................................................
............................
...................................
.............................................
Back cover
10
16
23
Page 3

Suggestions for Safety
■ Use a standard AC wall outlet
1. Use from an AC power source of high voltage, such as that
used for an air conditioner, is very dangerous.
A fire might be caused by such a connection.
2. A DC power source cannot be used.
Be sure to check the power source carefully, especially on a
ship or other place where DC is used.
■ Grasp the plug when disconnecting the power
supply cord
1. Wet hands are dangerous.
A dangerous electric shock may result if the plug is touched by
wet hands.
2. Never place heavy items on top of the power supply cord,
nor force it to bend sharply.
■ Place the unit where it wiil be weil ventilated
Place this unit at least 10 cm (4") away from wall surfaces, etc.
■ Avoid pieces such as the foiiowlng:
In direct sunlight or in other places where the temperature is
high.
In places where there is excessive vibration or humidity.
Such conditions might damage the cabinet and/or other component
parts and thereby shorten the unit’s service life.
■ Be sure to piece the unit on a fiat, ievel surface
If the surface is inclined, a malfunction may result.
■ Never attempt to repair nor reconstruct this
unit
A serious electric shock might occur if this unit is repaired, dis
assembled or reconstructed by unauthorized persons, or if the
Internal parts are accidentally touched.
■ Take particuiar care if chiidren are present
Never permit children to put anything, especially metal, inside this
unit. A serious electric shock or malfunction could occur if articles
such as coins, needles, screwdrivers, etc. are inserted through the
ventilation holes, etc. of this unit.
■ If water is spilled on the unit
Be extremely careful if water is spilled on the unit, because a fire or
serious electric shock might occur. Immediately disconnect the
power cord plug, and consult with your dealer.
■ Avoid spray-type insecticides
Insecticides might cause cracks or “cloudiness” in the cabinet and
plastic parts of this unit. The gas used in such sprays might,
moreover, be ignited suddenly.
■ Never use alcohoi or paint thinner
These and similar chemicals should never be used, because they
might cause flaking or doudiness of the cabinet finish,
■ Disconnect the power supply cord if the unit
will not be used for a long time
If the unit is left for a long time wWi the power ON, this not only will
shorten its useful operation life, but also may cause other trouble.
■ If trouble occurs
If, during operation, the sound is interrupted or indicators no longer
illuminate, or If an abnormal odour or smoke is detected, imme
diately disconnect the power cord plug, and contact with your
dealer or an Authorized Service Center.
Page 4
Installation
Notes of placement
■ This unit Is a precision Instrument. Be sure to place It on a
flat surface.
■ Avoid places such as the following:
•Near any equipment or device that generates strong magnetism.
•On any heat-generating equipment or device, or in any place
where the temperature is high (35“C or higher).
•Extremeiy coid place {5“C or below).
•Near a tuner or TV. (It may cause noise in the broadcast, or
disturbance of the TV picture.)
■ When carrying or storing the unit, handle it with care so it is
not subiected to any strong bumps.
Always remove the disc before storing the unit for any period of
time.
■ To avoid problems due to vibration.
• Do not place a book or similar object under this unit.
• Do not route the connection cables (of this or other units) across
the operation panel, across the top, or under the unit.
Preparations
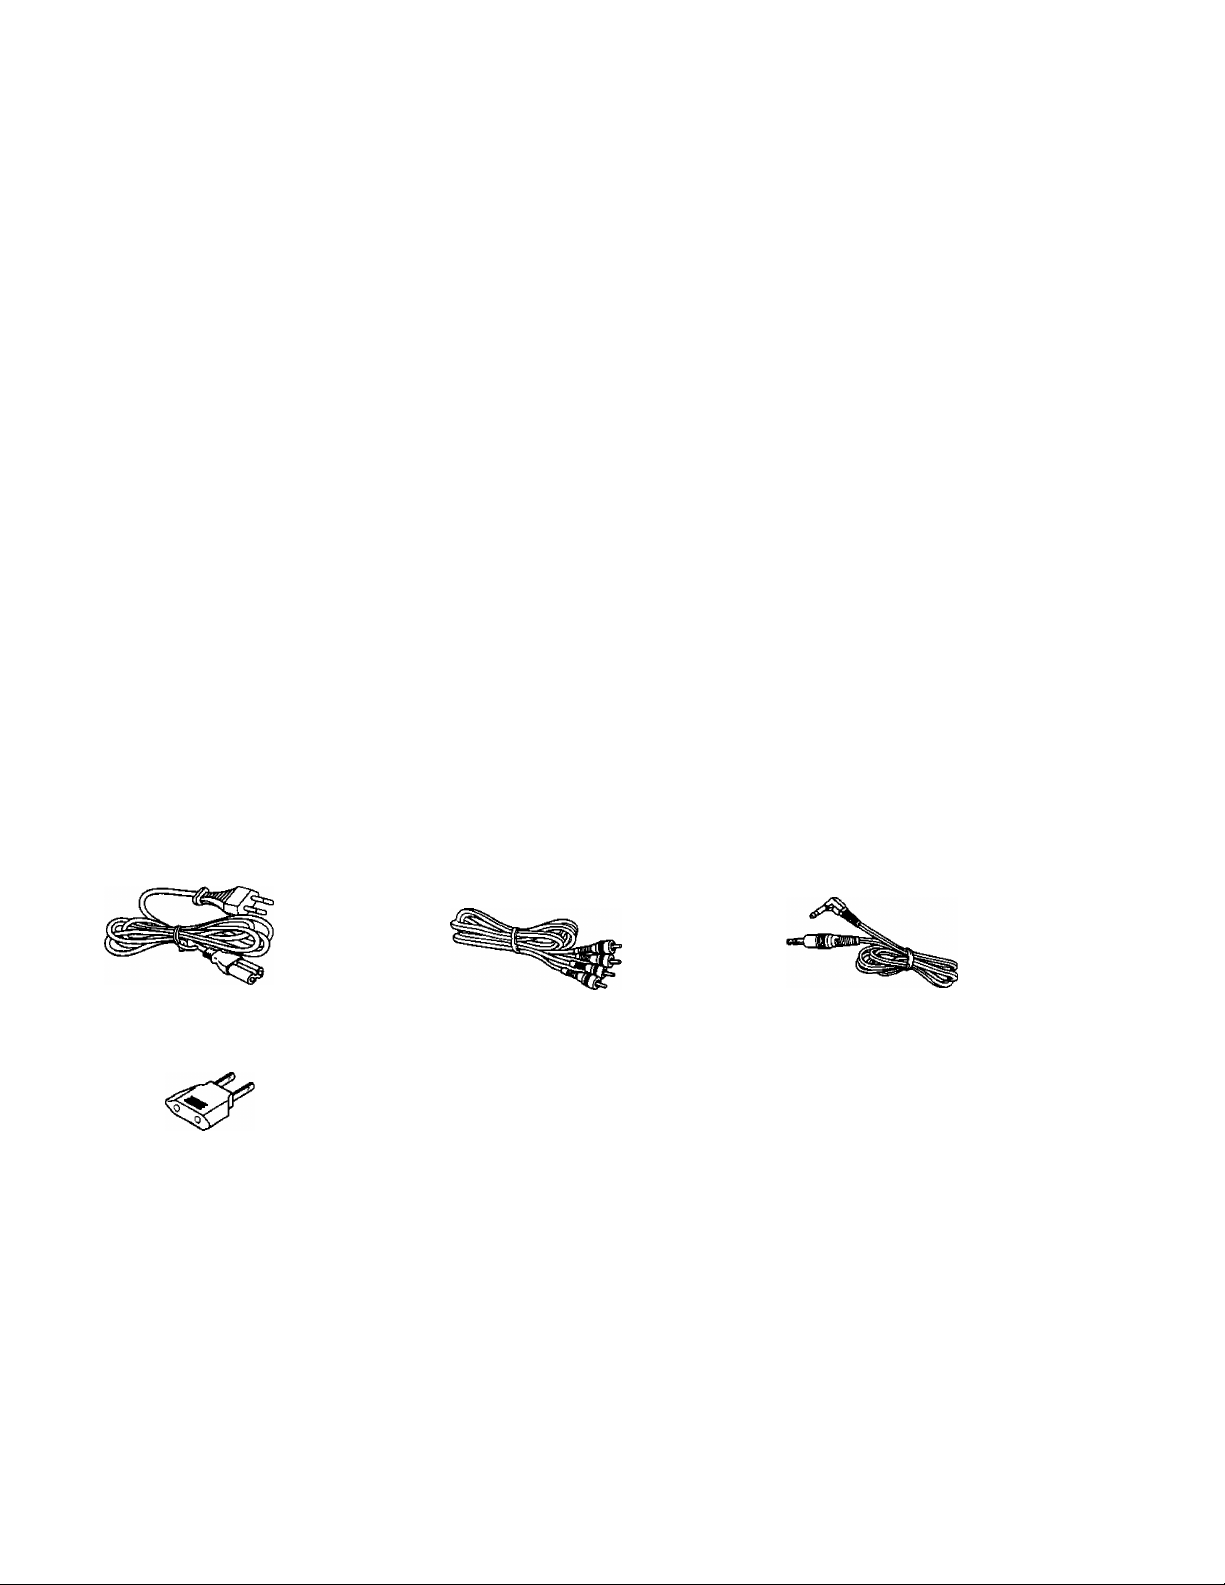
Supplied accessories
About moisture
Moisture may form on the lens In the following cases...
• Immediately after a heater has been turned on.
•In a steamy or very humid room.
•When the unit is suddenly moved from a cold environment to a
warm one.
If moisture forms inside this unit, it may not work properly. In this
case, turn on the power and wait about one hour for the moisture to
evaporate.
Check the packing carton for these accessories.
Note:
The configuration of the AC outlet and AC power supply cord
differs according to area.
AC power supply cord 1
Power plug adaptor 1
(For areas except Australia and New Zealand)
Stereo connection cable 1
Remote control cable 1
Page 5
Connections
Before making connections, be sure that the power of this unit and
ail other system components is first turned off.
See the operating instructions of the amplifier or the cassette deck
for details.
Note:
The configuration of the AC outlet and AC power supply cord
differs according to area.
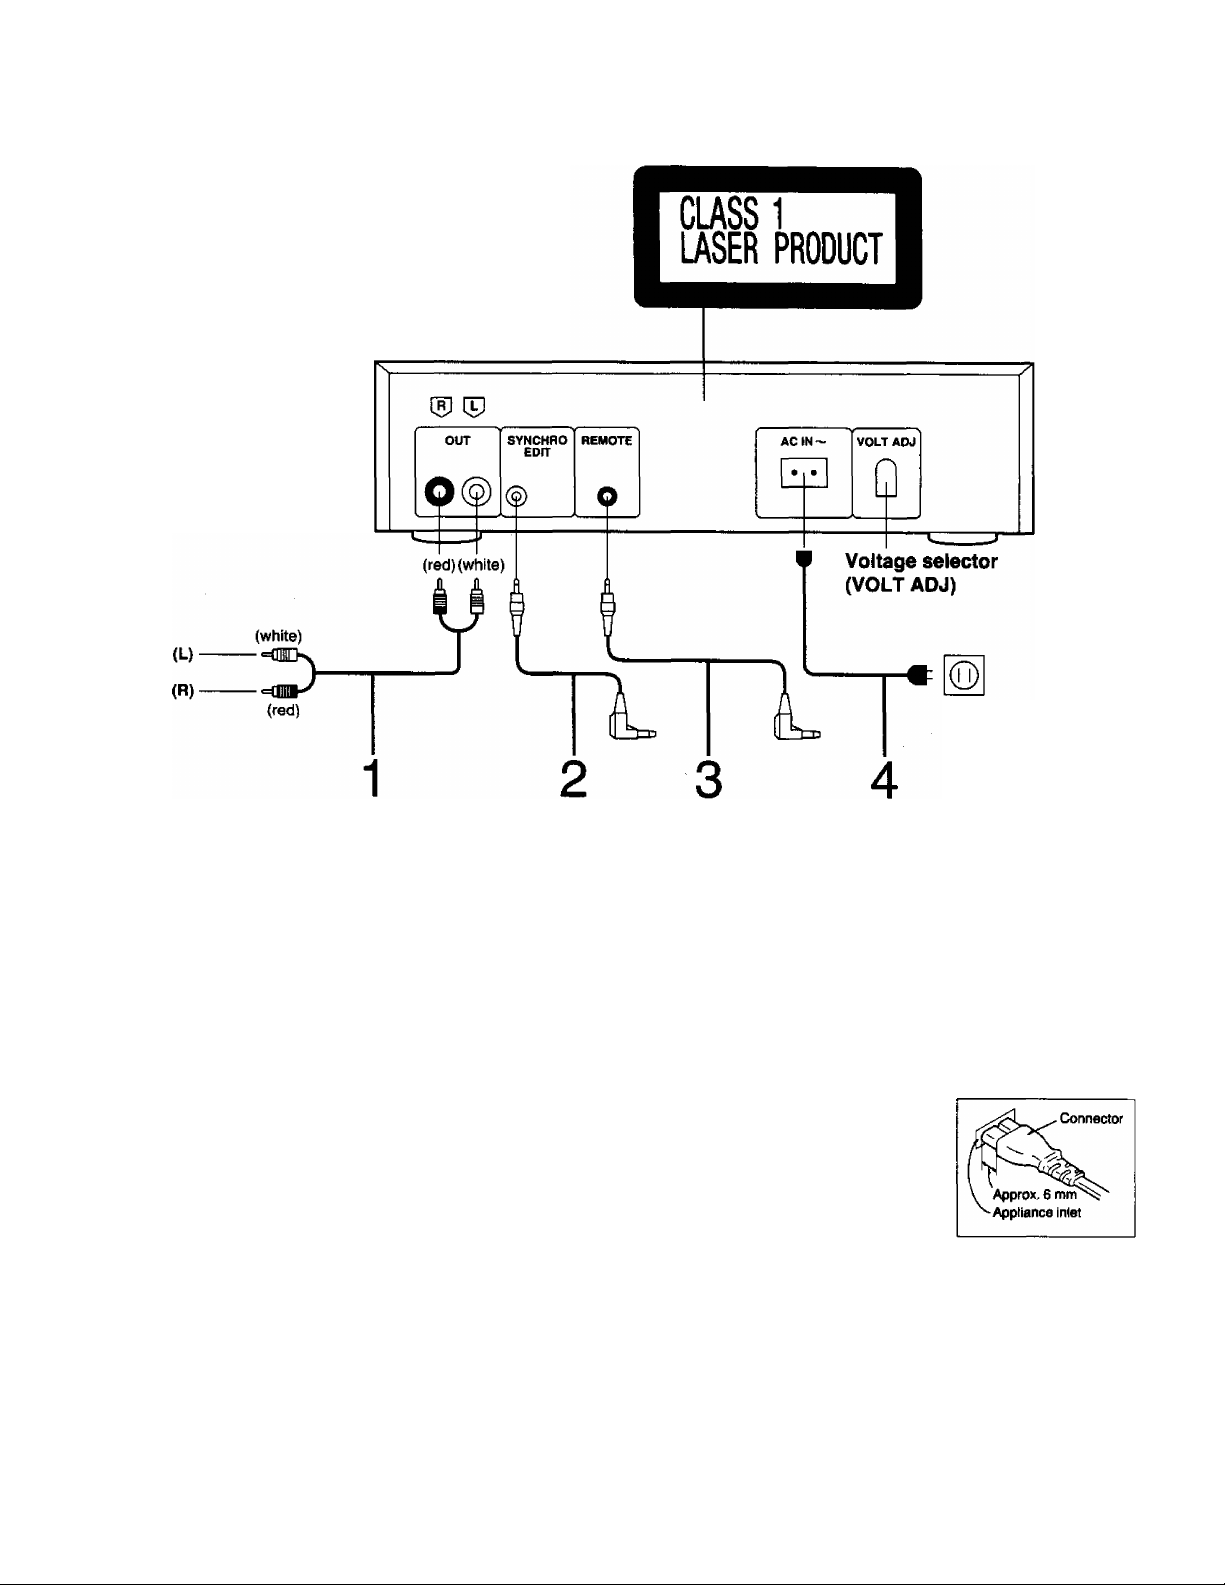
Rear panel
of this unit
1 Connect the stereo connection cable (in
cluded) to the “CD” or “AUX” terminals of the
amplifier.
2 Connect the synchro edit cable (included with
the cassette deck) to the “SYNCHRO EDIT”
terminal of the Technics cassette deck.
3 Connect the remote control cable (included)
to the “REMOTE” terminal of the Technics
receiver or cassette deck.
For areas except Australia and New Zealand
Set the voltage selector (VOLT ADJ) to the volt
age setting for the area in which the unit wili be
used.
•Use a minus (-) screwdriver.
• Note that this unit will be seriously damaged if this setting is not
made correctly.
•If the power supply in your area is 117 V or 120 V, set to the “127
V” position.
Household
AC outlet
Connect the AC power supply cord (included)
to the “AC OUTLET” of the amplifier or the
household AC outlet.
For areas except Australia and New Zealand
If the power plug will not fit your socket, use the power plug
adaptor (Included).
Ee
Insertion of Connector
Even when the connector is perfectiy inserted, depending on the
type of inlet used, the front part of
the connector may jut out as
shown in the drawing.
However there is no problem
using the unit.
Page 6
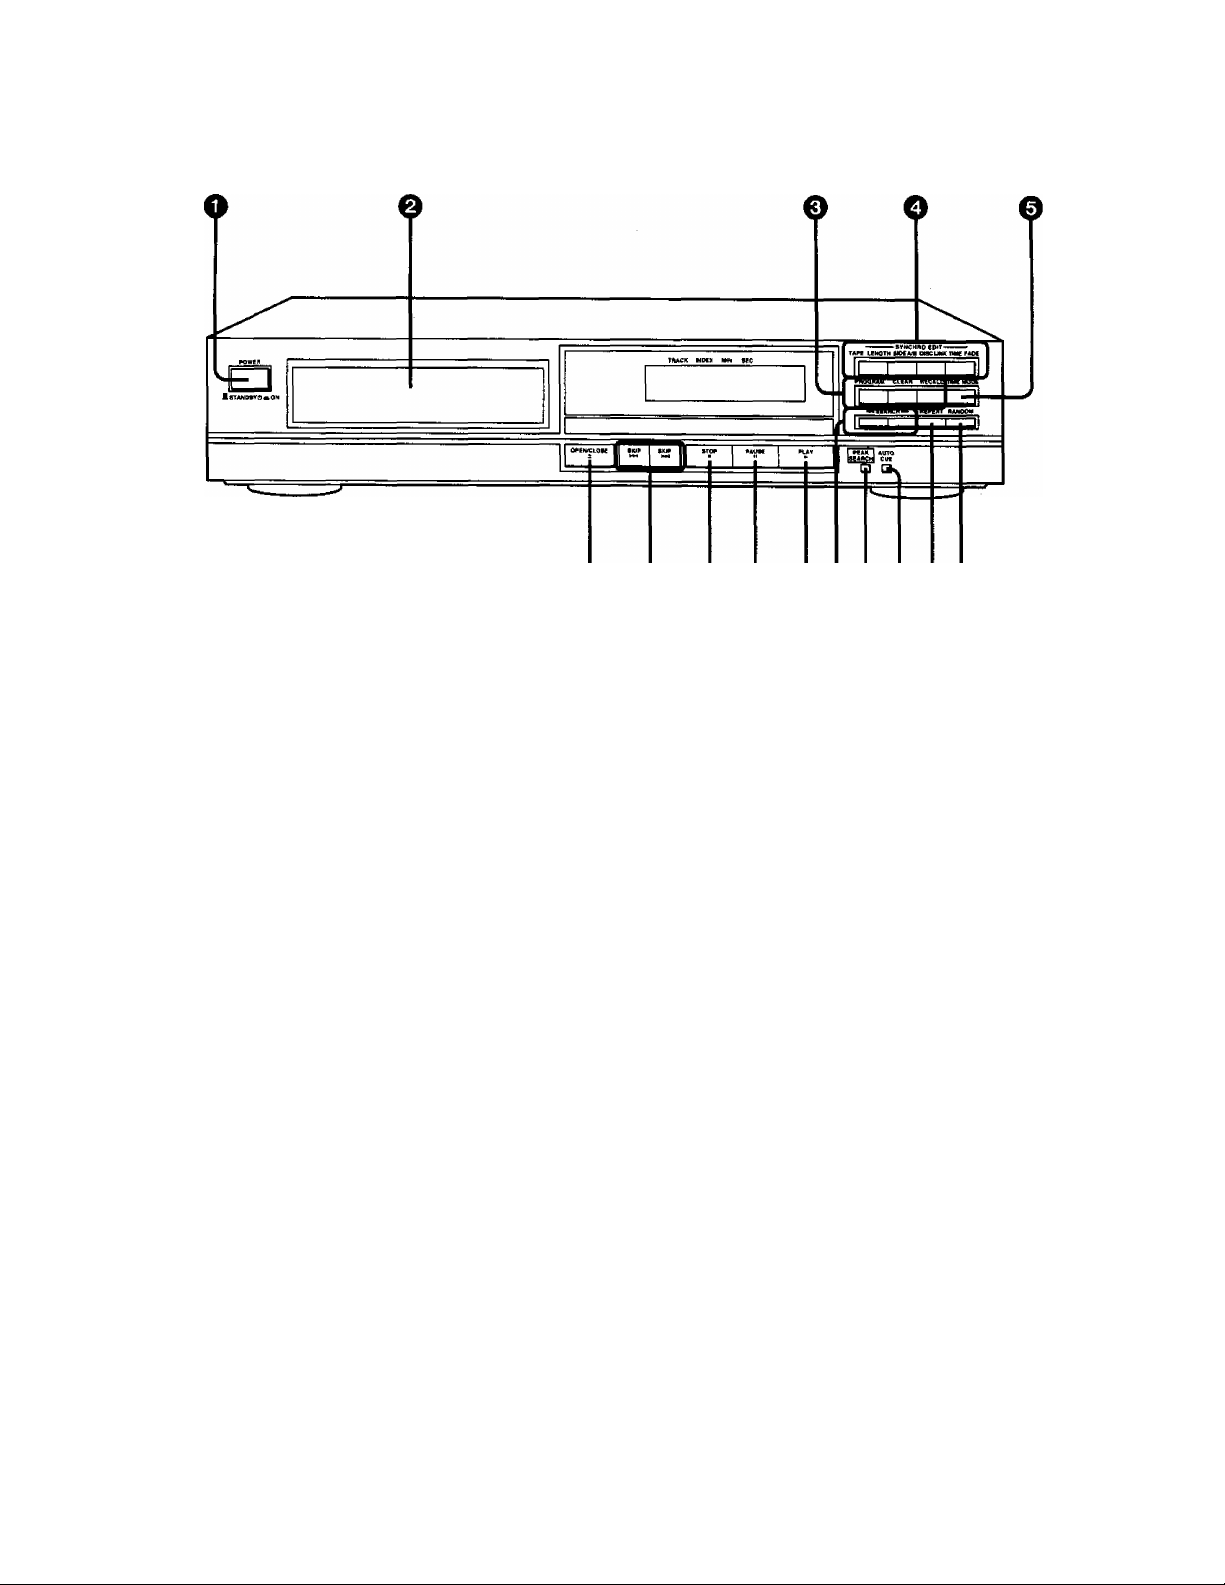
Front Panel Controls and Functions
O O O
Control section
O Power “STANDBY (b/ON” switch
(POWER, A STANDBY 6 ^ ON)
This switch switches ON and OFF the secondary circuit power
only. The unit is in the “standby” condition when this switch is
set to the STANDBY (!) position. Regardless of the switch
setting, the primary circuit is always “live" as long as the
power cord is connected to an electrical outlet.
e Disc tray
e Buttons for program function
•Program button (PROGRAM)
•Clear button (CLEAR)
•Recall button (RECALL)
O Buttons for CD-Edit function
•Tape length button (TAPE LENGTH)
•Tape side select button (SIDE A/B)
•Disc link button (DISC LINK)
•Time fade button (TIME FADE)
0
Time mode select button (TIME MODE)
0
Disc tray open/close button (^ OPEN/CLOSE)
O Skip buttons ( hd^SKIP, ►N SKIP)
0
Stop button (■ STOP)
© Pause button (I I PAUSE)
© Play button (P-PLAY)
© Search buttons (^^ SEARCHPP)
© Peak search button (PEAK SEARCH)
© Auto cue button (AUTO CUE)
© Repeat button (REPEAT)
© Random play button (RANDOM)
Page 7
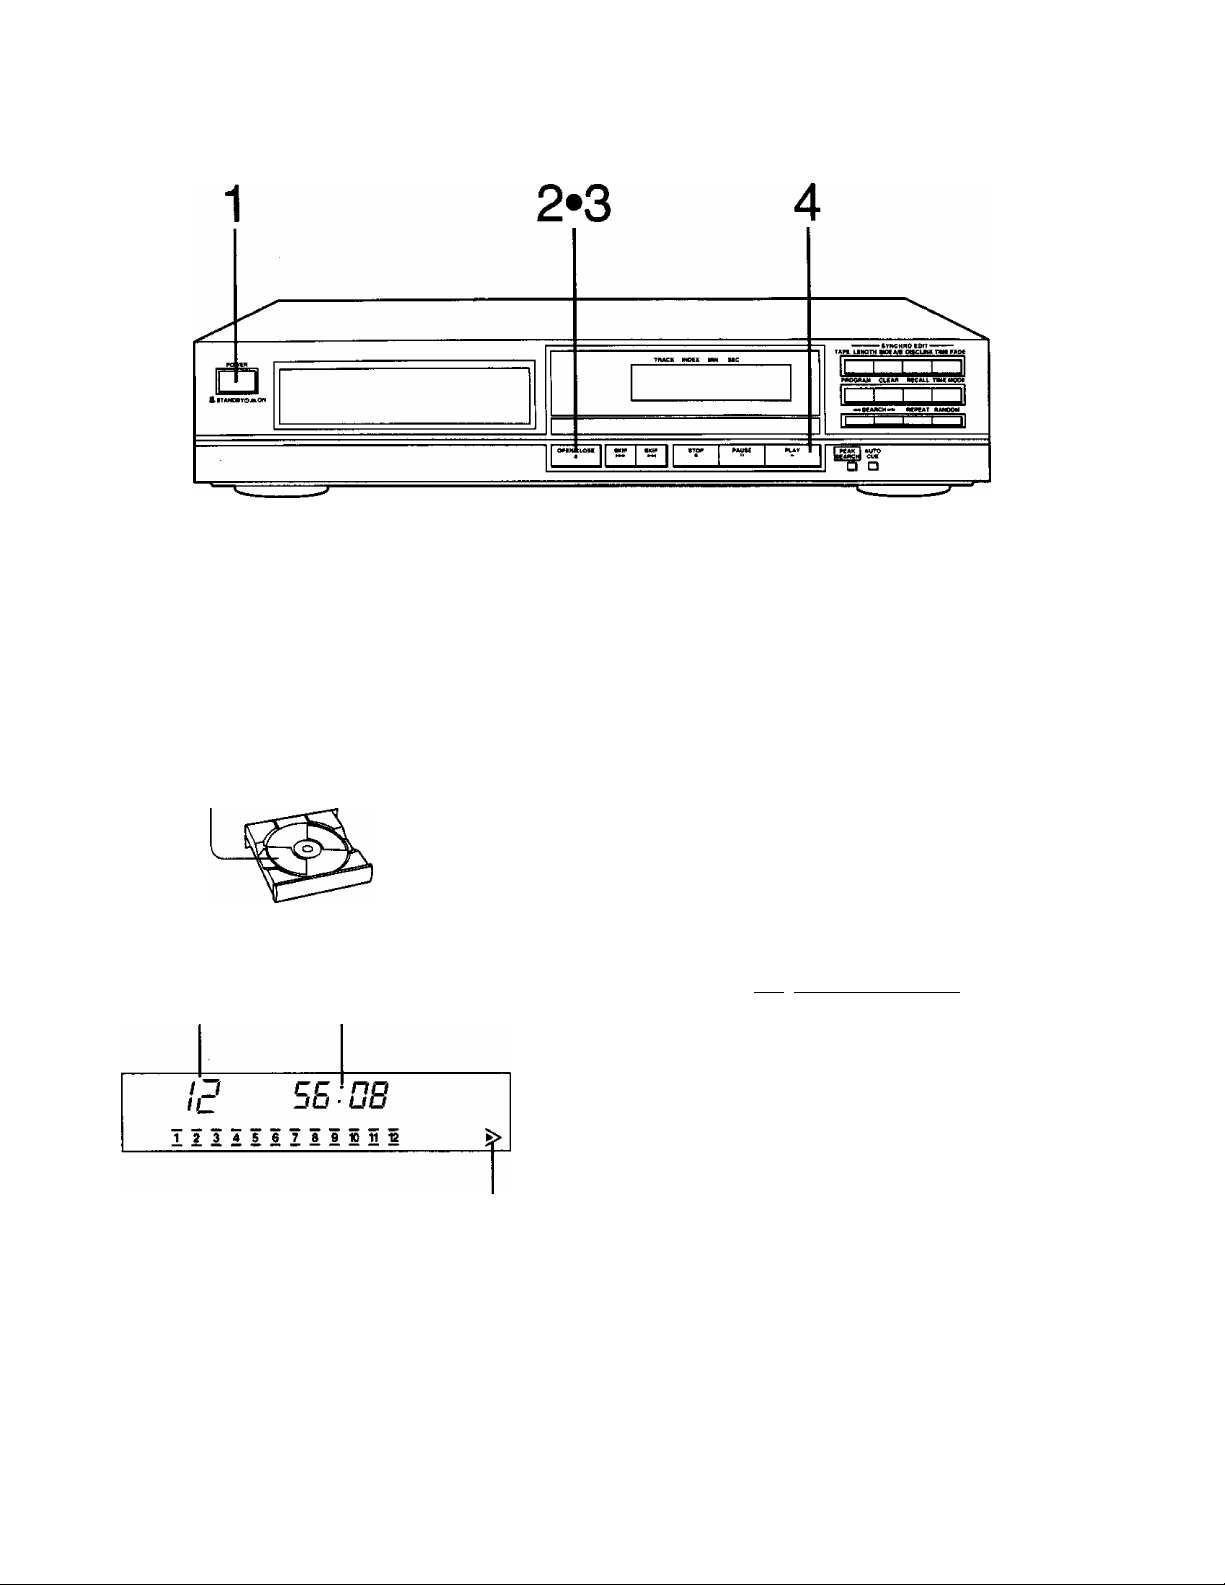
Basic Operating Procedure
•The total playing time displayed includes the silent sections
1 Press POWER to switch on the power.
If there is a disc in the disc tray, play will start from the first
track.
2 Press ^ OPEN/CLOSE to open the disc tray
and insert a disc.
between tracks. For this reason, it may be a few seconds
longer than the playing time indicated on the disc.
•You can skip this step and press ^ PLAY. The disc tray will
be automatically closed and then play will start from the first
track.
4 Press ► PLAY.
(Sequential Play)
Label must face upward
3 Press ^ OPEN/CLOSE again to ciose the disc
tray.
Total number of tracks Total playing time
Lights when the total number of tracks exceeds 17
Index number
(For discs without index number,
“ j " will be continuously displayed.)
Track number in play Elapsed time Play indicator
I 1^ n n I
I u - U t
\_Lx___
-1-e3456 78910 11 13
-------
,------------------------------------------,
The unit stops automatically when the last track finishes
playing.
Page 8
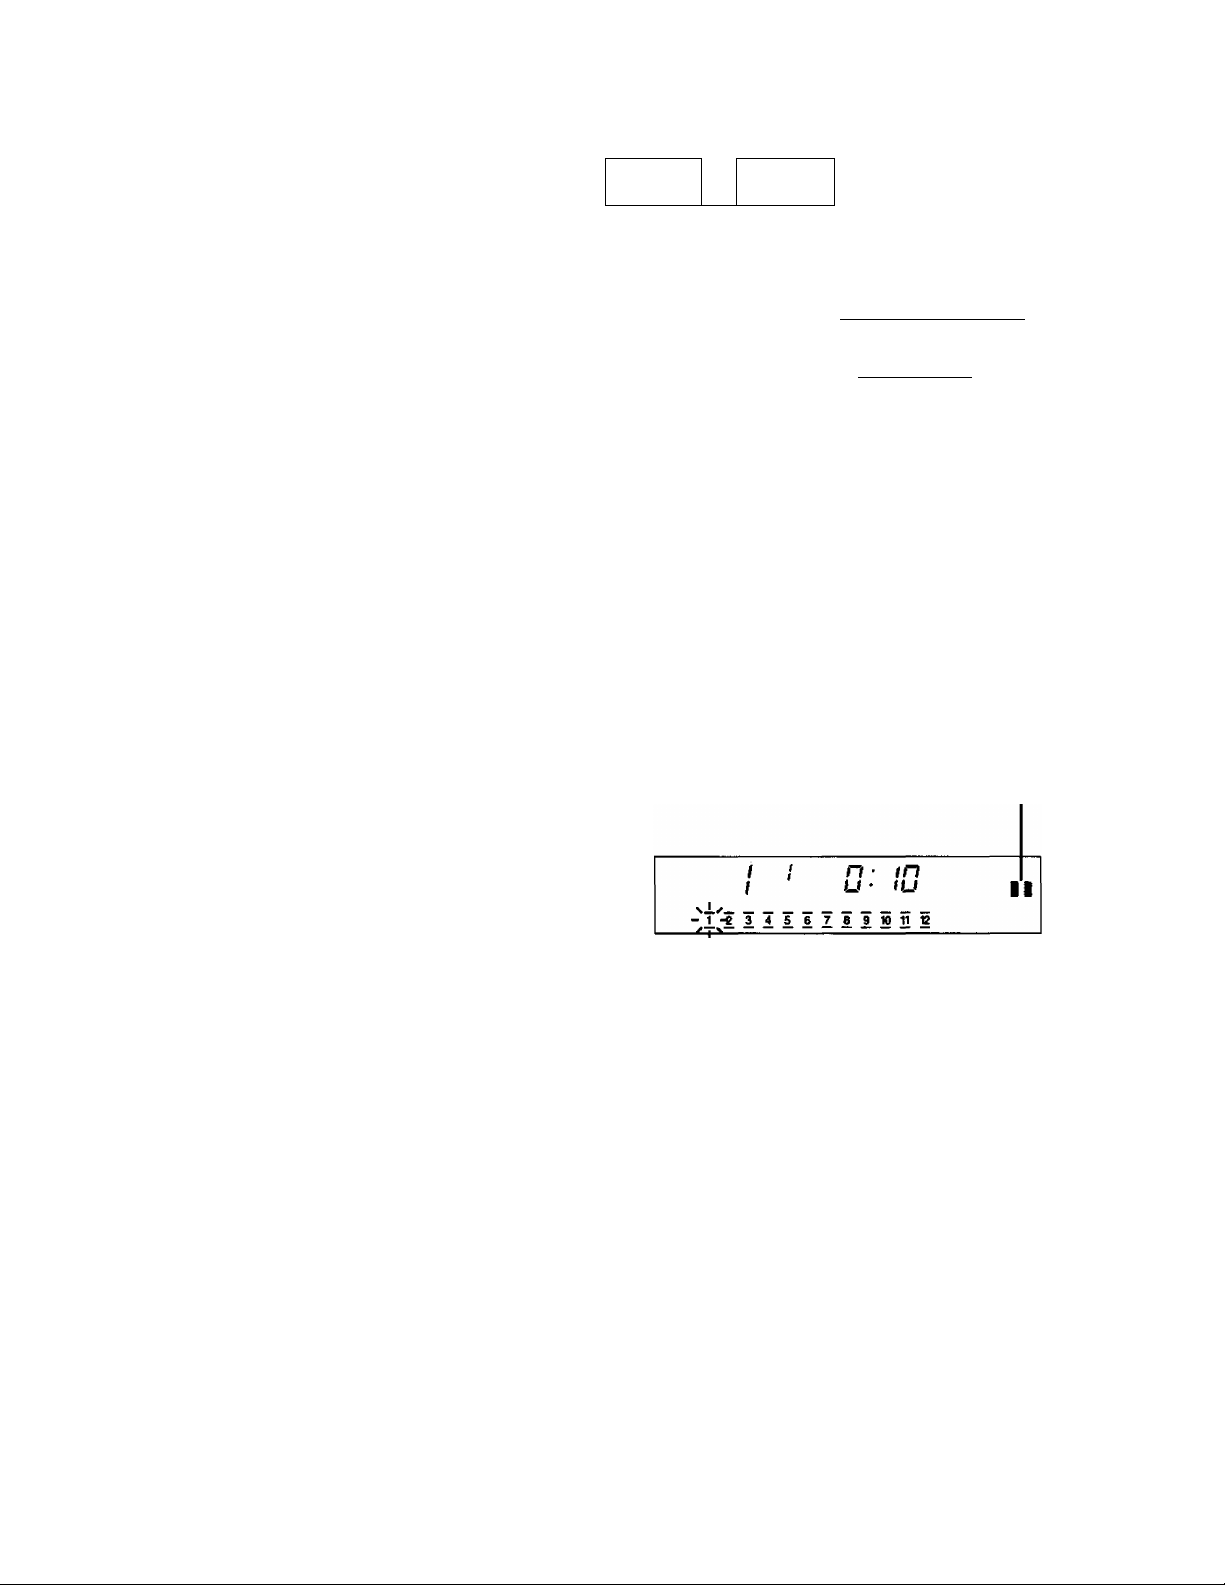
Basic Operating Procedure
(continued)
D
To Stop disc play
Press ■ STOP.
STOP
O^iNlCLDIC
STOP
■
PAUSE
II
»yUCHWO tPiT —
T*X Llt»aTH >IOt*^ DWCLIWK THK f J^DC
I T"! II
piioomw cctrii
..................................
■ *»11 aw;hi ^ mwDiMi
I ntK I *UTO
To temporarily stop disc play
Press II PAUSE.
PAUSE
Press ► PLAY to resume play.
Pause indicator
8
Page 9

Random Play
The unit will automatically select the sequence of selections to be
played from the disc In a random manner.
Before beginning, follow steps 1-3 of “Basic Op
erating Procedure” on page 7.
Press RANDOM in play or stop mode.
Illuminates
c
u
_
________ — —
1 2 3 4S-6-7 8 910 1112
----------------------
The unit stops automatically when all tracks have played once.
(Random play mode will be cancelled.)
•In the program play mode (See page 10.):
The unit plays only the programmed tracks in random manner.
n • n I
u ‘ u I
____________________
-----------------------------------
IRANDOMII
To cancel random play
Press ■ STOP.
STOP
When you press RANDOM in the play mode, play continues from
subsequent tracks in the normal order to the end of the disc.
Page 10

Program Play
You can program up to 20 tracks in any order you desire.
Before beginning, follow steps 1-3 of ''Basic Op
erating Procedure” on page 7.
1 In the stop mode, press PROGRAM.
If you press this button in the play mode, the track in play will
be programmed.
Illuminates
P&M
n
n
u
u No.
45678910 11 12
2 3
2 Press SKIP ) to select the track
number.
For example: To select the 3rd track, press ^ SKIP
3 times.
3 Press PROGRAM. 4 Repeat steps 2 and 3 until the desired prog
ram is completed.
For example, if you enter tracks 5,3 and 2:
The last track in programmed order
Number o
ProgrammTced tracks pr
PGM
If you enter a wrong number by mistake, press CLEAR,
•When the 21st program has been performed, the following
display Indicates that no more tracks can be added.
•If the total playing time exceeds 99 minutes 59 seconds or if
the track number 21 or higher has been specified, the display
reads as follows:
Press P* PLAY to start.
•The unit stops automatically when all the programmed tracks
have finished playing.
• Even after play is completed, the program sequence will
remain in the unit’s memory. You can play the sequence
again by pressing ^ PLAY,
Lp :
L. No.
1114]
i» / i.
[ 6 7 8 9
ital playing time of
ogrammed tracks
V7
13-
10 11 12
10
Page 11

To switch to sequential mode during play
Press PROGRAM.
PROGRAM
_____
To enter additional tracks
In the stop mode, press SKIP ^ ) to
specify the track number and then press PRO
GRAM.
(See page 10.)
This clears all programmed contents from memory.
To cancel the program play mode
Press ■ STOP.
STOP
Press once in the stop mode and twice during play.
This clears all programmed contents from memory.
Turning off the power will also cancel the program play mode.
To confirm the program
Press RECALL.
RECALL
Each time you press RECALL, the display shows programmed
track number and its sequence, so that you can verify the entire
program.
For example:
The diagram shows a program consisting of tracks S, 3,2.
To clear the entry
To clear the last track In the sequence, press
CLEAR in the stop mode.
CLEAR
To cancel a track in the middle of the sequence,
press RECALL repeatedly until the display
shows the track number to be cancelled, then
press CLEAR.
RECALL CLEAR
] ❖ □
To cancel all the programmed tracks, press
PROGRAM twice In the stop mode and return to
step 2 on the previous page.
PROGRAM
Programmed track number Programmed sequence
V
Press RECALL,
5 '■
Press RECALL
again.
o
Press RECALL
again.
__
The normal display will resume in about 4 seconds.
J
1 i34Bg78««H11
p 3
L. No.
1334S67SB101111
11
Page 12

Search/Skip Function
SKIP
Search Function
In play or pause mode, you can search rapidly forward or backward
on the disc for specific sections.
SKIP
^ SEARCH
Skip Function
To skip forward, press SKIP.
SKIP
Press « SEARCH
^ SEARCH —
(Backward) (Forward)
•You can search slowly at first and then rapidly if the button is held
down for more than about three seconds.
• In the pause mode, no sound is heard. It remains at the point
where you release the button.
•In the random and program play mode:
You can search forward and backward within the track in play.
You can skip as many tracks as the number of times you press the
button.
To skip backward, press SKIP.
SKIP
You can skip to the beginning of the track being played. If you press
this button again quickly, you can skip to the beginning of the
previous track. Remember that in a backward skip, the track in play
is included in the count.
•In the pause mode:
The unit will move to the beginning of the selected track and switch
back to the pause mode.
•In the stop mode:
The unit displays only the selected track number. Press ► PLAY to
start.
•In the program play mode:
You can skip forward and backward in the programmed sequence.
•In the random play mode:
►W : You can skip to the beginning of a track in random manner.
: You can skip to the beginning of the track in play.
12
Page 13

Special Features
Auto cue
The auto cue function allows the unit to wait in a standby condition
at ihe beginning of each track so as to start play right when you are
ready.
When each track finishes playing, the unit skips to the beginning of
the next track and switches to the play standby mode.
Press AUTO CUE.
Illuminates
ID
1 2 3 4 5
1^ A.C
cc * no
UE ■ UO
6 7 8 S 10 11 12
Select the desired play mode.
•To play desired track, press SKiP(M^, ►w)and^ PLAY.
•To play track 1, press ► PLAY.
(Also available during program play. See page 10.)
•To play the disc randomly, press RANDOM.
The unit switches to the play standby mode.
Press PLAY to start.
Press ► PLAY at the beginning of each track.
To cancel auto cue
Press AUTO CUE again.
AUTO
CUE
□
Note:
The auto cue may fail to function at the proper point if the selected
track begins with a very soft passage or if there Is a lot of back
ground noise.
Page 14

Special Features
(continued)
TIME MODE
Repeat function
Press REPEAT.
Illuminates
IE SE:ü8¿
1 2345678910 11 12
During program play, the unit plays only the programmed tracks
repeatedly.
To cancel repeat function, press REPEAT again.
REPEAT
Time mode selection
Press TIME MODE in the play or pause mode.
Each time you press the button, the Information will change as
follows.
•When the track In play Is number 21 or higher;
The "
---
:—" indication will appear on display @.
•In the random play mode:
The “
---
:—” indication will appear on display ® and"—;—" on
display ®.
•In the fade out mode:
The remaining time till the fade-out will appear between the displays
® and
•In the edit nwde:
The remaining time of each side of the tape will appear on display
14
•In the program play mode:
The information displayed on displays © and ® is only within the
programmed tracks.
Page 15

Time fade function
The time fade function allows the unit to finish the play with fadeout.
You can specify the time (from 5 sec. to 99 min. 59 sec,) when the
fade-out of 5 seconds is finished.
1 Press TIME FADE in the pause or stop mode.
The “—:—” indication will be shown on the display panel.
2 Press SKIP (K^, and TIME FADE to
enter the desired time.
For example: If you want the fade-out to be finished 30 min
utes later, follow the procedure described as
below.
1) Keep pressing SKIP until the display shows “ 3Ü
Pressing SKIP starts the countdown from 99.
2) Press TIME FADE to enter “30”.
3) Press ►>! SKIP to specify“ GO
Pressing SKIP starts the countdown from 59.
4) Press TIME FADE to enter “00”.
The time fade indicator on the display panel illuminates.
Time fade indicator
If you want to change the time while entering, press CLEAR to
cancel it.
3 Press ► PLAY.
The fade-out begins 5 seconds before the specified time.
The time fade indicator flashes on and off.
After the fade-out is finished, the unit goes into the pause
mode. The time fade indicator goes out.
■ To see the remaining time
Press TIME MODE three times In the play mode.
(See page 14.)
TIME MODE
Remaining time
\ ' /_ _ _ _ _ _
-1-B3456789
---------------------------±__________
-гs■
ZLSl
10 11 13
■ To cancel time fade function
Press ■ STOP.
STOP
1 T5A0E 1
15
Page 16

Recording from Compact Discs
The edit function of this unit is used when recording from compact
discs to tape. Tracks can be recorded on both sides (sides A and B)
of the tape, considering the length of the tape used, so that there is
no interruption of tracks at the end of one tape side.
Prepare the
1
cassette deck.
4 5 2
If you use this unit in combination with the Technics cassette deck
which has the SYNCHRO EDIT terminal, recording on the cassette
deck wiil start automatically at the same time you start CD play
(synchro recording function).
Also, if you set the cassette deck to the auto-reverse mode, both
sides of the tape will automatically be recorded.
The maximum numbers of tracks allowable for editing is 20 and the
biggest track number allowable for editing is 20. The edit function
does not work for more than 20 tracks nor the track number over
20.
1 Prepare the cassette deck for recording.
(See next page.)
2 Press TAPE LENGTH to select the tape length.
Each time the button is pressed the tape length indicator
changes as follows. Choose the length of the tape to be used.
r -> C-46 C> C-60 O C-90 O C“
To enter desired recording time, see next page.
The unit will calculate how many tracks can be entered onto
tape side A and B, and then program ttiem automatically.
Number of tracks to be
recorded on side A
Last track of side A Remaining time on side A
• In the edit mode, silent gaps of approximately 3 seconds wiil
be automatically inserted between tracks automatically (auto
space function).
•To enter additional tracks at the tape end of side B, see “To
change the programmed contents" on page ^ 9.
Press PEAK SEARCH to search for the peak
point then adjust the recording level on the
cassette deck.
It takes about 1.5 minutes to find the peak point for a 60-min
ute compact disc.
Illuminates
•When the peak point is found, the unit repeatedly produces
the sound for about 6 seconds around the peak point.
•As there are many peak points on the disc, each time you
make a new peak level search the unit might find a different
point as the peak point.
(Refer to operating instructions for the cassette deck to find
out how to adjust the recording level.)
4 Press ■ STOP.
POM c 5
EDtT^*T i" 3 4[T
Side A —^ on side A (upper bars) on side B (lower bars)
__
f No.
T racks to be recorded Tracks to be recorded
5 BE
1111 il,f* ®
16
5 Press ^ PLAY to start.
Recording on the cassette deck will start at the same time.
•If the cassette deck is set to the auto-reverse mode, recording
from tape side B wilt follow automatically.
•When recording from tape side B is finished, the CO player will
automatically stop and the cassette deck will switch to recording
standby mode.
Page 17

To cancel the edit mode
Press ■ STOP after recording has finished.
STOP
To enter desired recording time other than 46,60 or 90 minutes
Press TAPE LENGTH to select “C
pressing SKIP () to enter the tape’s total
playing time in minutes.
--------
” then keep
How to prepare the cassette deck for recording
1. Insert the cassette tape into the cassette holder of the deck for
the synchro-edit-recording. (Be sure the tape is rewound.)
2. Select the noise-reduction system and the reverse mode
( CtD).
3. Check to be sure that the fonward-side indicator (►) of the deck
to be used is illuminated.
4. Set the cassette deck to the recording standby mode.
(Refer to operating instructions for the cassette deck to be used.)
If the cassette deck has no SYNCHRO EDIT terminal
Press the play button of the cassette deck at the
same time as pressing ^ PLAY on the CD player
to start recording.
•When the deck has reverse mode, set to one-way ( ).
•When the recording for side A is finished, the CD player will go to
the pause mode. The cassette deck will keep recording.
•To record on side B, first press the stop button on the cassette
deck, then start recording again on side B while at the same time
pressing ► PLAY on the CD player,
TAPE LENGTH
o
SKIP
For example:
When the total recording time of the tape to be used is 52 minutes,
keep pressing SKIP until the display shows “C- Sc*".
SKIP
17
Page 18

Recording from Compact Discs
(continued)
Prepare the
1
cassette deck.
Enter the
track numbers.
Adjust the
recording level.
5
□
SKIP SKIP STOP
Program editing
You can make an original tape consisting of your favorite tracks, in
any sequence desired.
The maximum number of tracks allowable for editing is 20 and the
biggest track number allowable for editing is 20. The edit function
does not work for more than 20 tracks nor the track number over
20.
1 Prepare the cassette deck for recording.
(See page 17.)
6 34
AM .£*>OTWMI Ml PtlCUWt TMj f,
3
rj
PROGRAM CLEAR RECALL
Press SIDE A/B to view the time remaining on
side B.
A minus (-) sign on the remaining time display indicates that
the total time of programmed tracks exceeds the tape length,
and the programmed contents should be changed.
(See page 19.)
Minus sign
2 Enter the desired track numbers and the de
sired sequence.
(See page 10.)
Total number of
programmed tracks
In the edit mode, silent gaps of approximately 3 seconds will
be automatically inserted between tracks automatically (auto
space function).
Press TAPE LENGTH to select the tape length.
(See step 2 on page 16.)
Number of tracks to be recorded on side A
Last track of side A Remaining time on side A
Total time of programmed tracks
5
Adjust the recording level on the cassette
deck.
(Follow steps 3 and 4 on page 16.)
6
Press ► PLAY to start.
Recording on the cassette deck will start at the same time.
• If the cassette deck is set to auto-reverse, recording on tape side
B will begin automatically.
•When recording on tape side B has finished, the CD player will
automatically stop and the cassette deck will switch to recording
standby mode.
18
Page 19

To cancel the edit mode
To change the programmed contents
Press ■ STOP after recording has finished.
STOP
If the cassette deck has no SYNCHRO
EDIT terminal
Press the play button of the cassette deck at the
same time as pressing PLAY on the CD player
to start recording.
•When the deck has reverse mode, set to one-way ( *=^ ).
•When the recording for side A is finished, the CD player will go to
the pause mode. The cassette deck will keep recording.
•To record on side B, first press the stop button on the cassette
deck, then start recording again on side B while at the same time
pressing ► PLAY on the CD player.
Press SIDE A/B to Indicate the desired tape
side.
SIDEA/B
■ To enter additional tracks at the end of side A
or B, press SKIP (1«, P>|) and PROGRAM.
{See page 10.)
■ To clear the last track on the tape side A or B,
press CLEAR.
CLEAR
To clear and re-enter the last track on side A or
B, press CLEAR and press SKIP (K^, ^>|)
and PROGRAM for the new track.
CLEAR
o
SKIP SKIP
[=>
PROGRAM
]
To clear a track in the middle of the sequence,
press RECALL to display the track number to
be cleared and then press CLEAR.
RECALL
CLEAR
] ^
19
Page 20

Recording from Compact Discs
(continued)
Prepare the cassette deck.
1
You can record desired tracks from multiple discs, keeping the total
playing time for ali discs in memory.
For example, to record a 60 minute disc on a 90 minute tape and
to record another disc in the space remaining on the tape:
Adjust the
2 3
Replace the disc with another.
1. After recording is completed, press A OPEN/CLOSE.
2. Replace the disc.
3. Press ^ OPEN/CLOSE again.
The disc link function works and the display shows the number
of tracks to be recorded on the remaining time.
1 Prepare the cassette deck for recording.
(See page 17.)
2
Press TAPE LENGTH to select the tape length.
(See step 2 on page 16.)
Press DISC LINK.
3
Disc link indicator
4 Adjust the recording level on the cassette
deck.
(Follow the steps 3 and 4 on page 16.)
5 Press ► PLAY.
Recording on the cassette deck will start at the same time.
•If the cassette deck is set to the auto-reverse mode, recording on
tape side B will be automatically made.
•When recording on tape side B has finished, the CD player will
automatically stop and the cassette deck will switch to recording
standby mode.
Number of tracks to be recorded
in the remaining space on side B
PGM ~t Ò
UNK —,
EOIT^bI 1 ¿ 'I ® ®
NO.
7 8
E:
IH
7 Adjust the recording level on the cassette
deck.
(Follow the steps 3 and 4 on page 16.)
8 Pross ► PLAY.
To record more discs if the remaining time of the tape allows,
repeat the steps 6-8 .
Note:
Use of the link function cannot be continued when the disc is
changed over near the end of side A and the remaining time on that
side is shorter than the play time of the track or tracks which are to
be edited. At times like this, fast forward the tape to the beginning of
side B and resume the recording.
20
Page 21

■ Example:
Recording the desired tracks from 3 discs on
60 minute tape
Recording for disc 1
1 Prepare the cassette deck for recording.
2 Enter the desired track number in desired sequence.
In this example;
T racks 3^ 10-» 7—> 5
3 Press TAPE LENGTH twice to seiect “C-60”.
4 Press Disc LiNK.
5 Adjust the recording level on the cassette deck.
6 Press PLAY to start recording.
Recording for disc 2
1 After recording is completed, press ^ OPEN/CLOSE.
2 Replace disc 1 with disc 2.
3 Press A OPEN/CLOSE again.
The unit automatically programs tracks on the remaining
space and the display shows the number ot tracks to be
recorded, in normal sequence.
4 Press CLEAR to cancel the tracks automatically pro
grammed.
Press the button repeatedly until the display shows "0”.
5 Enter the track number for side A.
In this example:
Track 2
6 Press SIDE A/B to switch the display.
7 Press CLEAR to cancel the tracks automatically pro
grammed.
8 Enter the track number for side B.
In this example:
Tracks 9“» 6
Recording for disc 3
1 After recording is completed, press ^ OPEN/CLOSE.
2 Replace disc 2 with disc 3.
3 Press ¿i OPEN/CLOSE again.
4 Press CLEAR until the display shows “0”.
5 Enter the track number.
In this example:
Tracks 4—^5—»1
6 Adjust the recording level on the cassette deck.
7 Press PLAY to start recording.
Notes:
•The “0” may appear on the track display after you replace the
disc. This means that the first track on that disc is longer than the
remaining space of the tape. In this case, press ■ STOP to
cancel the edit mode.
•If the cassette deck has no synchro edit terminal, the tape will
keep running even after disc play has been completed. Press the
stop button on the cassette deck.
•Do not forget to stop the tape and rewind it to the position where
the recording was completed. If the deck is not equipped with an
auto reverse mode, change the tape over to side B when the
recording on side A is finished.
■ To cancel the link function
Press ■ STOP after recording has finished.
STOP
The edit mode will be also cancelled.
9 Adjust the recording level on the cassette deck.
10 Press > PLAY to start recording.
<Z>
21
Page 22

Recording from Compact Discs
Prepare the
1
cassette deck.
(continued)
2 4
You can enter an additional track and record them with the fade-out
at the end of each side of the tape.
For example, to add track 3 on the remaining time and to set the
fade-out on each tape side.
I Side A (30 minutes) j | Side В (30 minutes) |
M I2I3I4I5I6I7I8) I 8 I 9 I 10"ПЛ
Î
Fade-out
Prepare the cassette deck for recording.
(See page 17.)
Press TAPE LENGTH to select the tape length.
(See step 2 on page 16.)
Remaining time on side A
(Time for recording an additional track)
Fade-out
3 Enter the additional track to be recorded on
the remaining time on side A.
(See page 19.)
For example, if you enter track 3:
Minus indication
4 Press TIME FADE.
Time fade indicator
If you want to add a track on №e remaining time on side B,
press SIDE A/B then repeat steps 3 and 4.
5
Adjust the recording level on the cassette
deck.
(Follow steps 3 and 4 on page 16.)
Press > PLAY to start recording.
6
• Recording on the cassette deck will start at the same time.
•The fade-out begins 5 seconds before the end of the tape.
Flashes on and off
■ To cancel the fade out editing
Press ■ STOP after recording has finished.
STOP
The edit mode will also be cancelled.
Page 23

Concerning Compact Discs
Only compact discs having this mark can be
used with this unit.
fplnsiB
mOITAL AUDIO
Handling precautions
To open the case, gently press the sides of the top, holding the top
at both sides.
•To remove the disc from the case, press the center holder and lift
the disc, holding by the edges.
•To store the disc to the case, insert the disc with label facing up
and press downward at the center.
•Hold compact discs by the edges so the surface is not soiled with
fingerprints. Fingerprints, dirt and scratches can cause skipping
and distortion.
Do not use record cleaning sprays, benzine, thinner, static electric
ity prevention liquids or any other solvent.
If the surface is soiled, wipe gently with a soft, damp (water only)
cloth.
Always move the cloth directly outward from the center of the disc,
not in a circular motion as with standard phonograph records.
• If the disc is brought from a cold to a warm environment, moisture
may form on the disc. Wipe this off with a soft, dry, lint-free doth
before using the disc.
• Do not write on the label side with a ball-point pen or other writing
utensil.
Storage precautions
Be sure to store discs in their cases to protect them from dust,
scratches and warping.
Do not place or store discs in the following places:
1) Locations exposed to direct sunlight.
2) Humid or dusty locations.
3) Locations directly exposed to a heat outlet or heating appliance.
4) In the glove compartment or rear ledge of ^ automobile.
Technical Specifications
■ Audio
No. of channels
Frequency response
Output voltage
Dynamic range
S/N
Total harmonic distortion
Wow and flutter
DA converter
Output impedance
Load Impedance
2 (left and right, stereo)
2-20,000 Hz, ±1 dB
2 V (at 0 dB)
92 dB
tOOdB
0.007% (1 kHz, 0 dB)
Below measurable limit
MASH (1 bit)
Approx. 1 kQ
More than 10 kO
Wavelength
■ Pickup
780 nm
■ General
Power consumption
For Australia and New Zealand; 13 W
For others; 14 W
Power supply
For Australia and New Zealand; AC 50/60 Hz, 230-240 V
For others; AC 50/60 Hz, 110 V/127 V/220 V/240 V
Dimensions (WxHXD) 430x 102.6x 260 mm
Weight 3.4 kg
Note:
Specifications are subject to change without notice.
Weight and dimen^ons are approximate.
23
Page 24

Troubleshooting Guide
Before requesting service tor this unit, ched( the chart below tor a possible cause of the problem you are experiencing. Some simple checks or a
minor adjustment on your part may eliminate the problem and restore proper operation.
If you are in doubt about some of the check points, or if the remedies indicated in the chart do not solve the problem, refer to the directory of
Authorized Service Centers (enclosed with this unit) to locate a convenient service center, or consult your dealer for instructions.
Problem
The disc in the unit wiil not
play.
A certain music passage
won’t play correctly.
There is noise from the
tuner or disturbance on the
TV screen.
Moisture has condensed in the unit.
The disc is upside down.
The disc is dirty.
The disc is scratched.
The disc is warped.
The disc is not within specified standards.
The disc is dirty.
The disc is scratched.
Caused by high-trequency signals of this unit.
Probable cause(s)
Suggested remedy
•Switch ON and allow the unit to dry out for about
one hour before using the unit.
•Be sure the label is facing upward.
•Wipe the disc with a soft cloth.
• Replace the disc with a new disc.
•Wipe the disc with a soft cloth.
•Replace the disc with a new one.
•Use the unit farther away from the tuner or TV.
• If the tuner's or TV’s antenna is the indoor type, use
an outdoor one.
Maintenance
To clean this unit, use a soft, dry cloth. If the surfaces are extremely dirty, use a soft cloth, dipped into a soap-and-water solution or weak detergent
solution. Wring the cloth well before wiping the unit. Wipe once again with a soft, dry cloth.
Never use alcohol, paint thinner, benzine, nor a chemically treated cloth to clean this unit.
Such chemicals may damage the finish of your unit.
Matsushita Electric Industrial Co., Ltd.
Centra! P.O. Box 288, Osaka 530-91, Japan
Printed in Japan
RQT1757-L
 Loading...