

Page 1
Operating Instructions
Microwave Oven
Models: NN-P794/SN747/SN757/
SN797/T945/SN947/
SN957/SN977
Safety Information
Precautions.........................Inside cover
Important Safety Instructions .........1-3
Installation and Grounding
Instructions.......................................3-4
Safety Precautions...........................5-6
Operation
Control Panel.........................................9
Starting to Use Your Oven...................10
Setting the Clock .................................10
Function Features...........................10-11
Selecting Power & Cook Time.............12
Quick Min Feature ...............................12
Keep Warm Feature ............................12
Popcorn Feature..................................13
More/Less Feature ..............................13
Beverages ...........................................13
Inverter Turbo Defrost Feature............14
Defrosting Tips & Techniques.........14-15
Sensor Reheat Feature .......................16
Sensor Cook Feature ..........................16
Sensor Cook Chart..............................17
Operation
Microwave Recipes .............................18
Timer Feature (Kitchen Timer/Stand
Time/Delay Start).................................19
Microwave Shortcuts......................20-21
Food Characteristics............................22
Cooking Techniques .......................22-23
Quick Guide to Operation....................27
Maintenance
Care and Cleaning of Your Microwave
Oven ....................................................24
Accessory Purchases..........................24
Before Requesting Service..................25
Limited Warranty & Customer Service
Directory ..............................................26
General Information
Cookware Guide....................................7
Oven Components Diagram..................8
Specifications ......................................28
User’s Record......................................28
READ ALL INSTRUCTIONS CAREFULLY BEFORE USING THE OVEN.
Para instrucciones en español, voltee el libro.
For assistance, please call: 1-800-211-PANA(7262)
or send e-mail to: [email protected]
or visit us at www.panasonic.com (U.S.A)
For assistance, please call:
or visit us at www.panasonicpr.com (Puerto Rico)
787-750-4300
F00038N50AP
iPress0307-0
Printed in China
Page 2
Microwave Oven Safety
Your safety and the safety of others are very important.
We have provided important safety messages in this manual and on your
appliance. Always read and obey all safety messages.
This is the safety alert symbol. It is used to alert you to potential hazards that can kill or hurt you and others.
All safety messages will follow the safety alert symbol and
either the word “DANGER”, “WARNING” or “CAUTION”. These
words mean:
DANGER
WARNING
CAUTION
All safety messages will tell you what the potential hazard is, tell you how to
reduce the chance of injury, and tell you what can happen if the instructions
are not followed.
You can be killed or seriously injured if
you don’t immediately
You can be killed or seriously injured if
you don’t follow instructions.
CAUTION indicates a potentially hazardous situation which, if not avoided,
may result in minor or moderate injury.
follow instructions.
PRECAUTIONS TO AVOID
POSSIBLE EXPOSURE TO
EXCESSIVE MICROWAVE ENERGY
(a) Do not attempt to operate this oven with the door open since open-door
operation can result in harmful exposure to microwave energy. It is important not to defeat or tamper with the safety interlocks.
(b) Do not place any object between the oven front face and the door or allow
soil or cleaner residue to accumulate on sealing surfaces.
(c) Do not operate the oven if it is damaged. It is particularly important that
the oven door close properly and that there is no damage to the:
(1) door (bent),
(2) hinges and latches (broken or loosened),
(3) door seals and sealing surfaces.
(d) The oven should not be adjusted or repaired by anyone except properly
qualified service personnel.
© Copyrighted by Matsushita Electric Industrial Co., Ltd. 2007.
Page 3

Thank you for purchasing a Panasonic Microwave Oven.
Your microwave oven is a cooking appliance and you should use as much care
as you use with a stove or any other cooking appliance. When using this electric
appliance, basic safety precautions should be followed, including the following:
IMPORTANT SAFETY INSTRUCTIONS
WARNING
shock, fire, injury to persons, or exposure to excessive microwave energy:
1. Read all instructions before using this appliance.
2. Read and follow the specific “PRECAUTIONS TO AVOID POSSIBLE EXPOSURE TO EXCESSIVE MICROWAVE ENERGY,” found on the inside front
cover.
3. This appliance must be grounded. Connect only to a properly grounded outlet.
See “GROUNDING INSTRUCTIONS” found on page 4.
4. As with any cooking appliance, DO NOT leave oven unattended while in use.
5. Install or locate this appliance only in accordance with the installation instructions found on page 3.
6. DO NOT cover or block any openings on this appliance.
7. DO NOT store this appliance outdoors. DO NOT use this product near water—
for example, near a kitchen sink, in a wet basement, or near a swimming pool
or similar locations.
8. Use this appliance only for its intended use as described in this manual. DO
NOT use corrosive chemicals, vapors, or non-food products in this appliance.
This type of oven is specifically designed to heat, or cook food. It is not
designed for industrial or laboratory use. The use of corrosive chemicals in
heating or cleaning will damage the appliance and may result in radiation
leaks.
9. When cleaning surfaces of the door and oven that come together on closing
the door, use only mild, non-abrasive soaps or detergents applied with a
sponge or soft cloth.
10. DO NOT allow children to use this appliance, unless closely supervised by an
adult. DO NOT assume that because a child has mastered one cooking skill
he/she can cook everything.
11. DO NOT operate this appliance if it has a damaged cord or plug, if it is not
working properly, or if it has been damaged or dropped.
12. DO NOT immerse cord or plug in water.
13. Keep cord away from heated surfaces.
14. DO NOT let cord hang over edge of a table or counter.
15. This appliance should be serviced only by qualified service personnel. Contact
the nearest authorized service center for examination, repair or adjustment.
16. Some products such as whole eggs with or without shell, narrow neck bottles
and sealed containers—for example, closed glass jars—may explode and
should not be heated in this oven.
17. To reduce the risk of fire in the oven cavity:
(a) Do not overcook food. Carefully attend appliance when paper, plastic, or
other combustible materials are placed inside the oven to facilitate cooking.
(b) Remove wire twist-ties from paper or plastic bags before placing bag in
oven.
(c) If material inside the oven ignites, keep oven door closed, turn oven
off, and disconnect the power cord, or shut off power at the fuse or
circuit breaker panel.
(d) DO NOT use the cavity for storage purposes. DO NOT leave paper
products, cooking utensils or food in the cavity when not in use.
—To reduce the risk of burns, electric
1
Page 4
IMPORTANT SAFETY INSTRUCTIONS
(continued)
18. Liquids, such as water, coffee, or tea are able to be overheated beyond the
boiling point without appearing to be boiling. Visible bubbling when the container is removed from the microwave oven is not always present. THIS
COULD RESULT IN VERY HOT LIQUIDS SUDDENLY BOILING OVER
WHEN THE CONTAINER IS DISTURBED OR A UTENSIL IS INSERTED
INTO THE LIQUID.
To reduce the risk of injury to persons:
(a) STIR THE LIQUID BOTH BEFORE AND HALFWAY THROUGH
HEATING IT.
(b) Do not heat water and oil, or fats together. The film of oil will trap
steam, and may cause a violent eruption.
(c) Do not use straight-sided containers with narrow necks.
(d) After heating, allow the container to stand in the microwave oven for a
short time before removing the container.
19. DO NOT cook directly on the turntable. It can crack, cause injury or damage
to the oven.
WARNING
TO AVOID THE RISK OF SHOCK:
DO NOT remove outer panel from oven. Repairs must be done only by a qualified serv-
ice person.
TO REDUCE THE RISK OF EXPOSURE TO MICROWAVE
ENERGY:
DO NOT tamper with, or make any adjustments or repairs to Door,
Control Panel Frame, Safety Interlock Switches, or any other part
of oven, microwave leakage may result.
TO AVOID THE RISK OF FIRE:
1. DO NOT operate the oven empty. The microwave energy will
reflect continuously throughout the oven causing overheating and
damage, if food or water is not present to absorb energy.
2. DO NOT store flammable materials next to, on top of, or in the
oven.
3. DO NOT dry clothes, newspapers or other materials in the oven, or use newspaper or
paper bags for cooking.
4. DO NOT hit or strike Control Panel. Damage to controls may occur.
5. DO NOT use recycled paper products unless the paper product is labeled as safe for
microwave oven use. Recycled paper products may contain impurities which may
cause sparking.
TO AVOID THE RISK OF SCALDING:
POT HOLDERS should always be used when removing items from the oven. Heat is
transferred from the HOT food to the cooking container and from the container to the
Glass Tray. The Glass Tray can also be very HOT after removing the cooking container
from the oven.
SAVE THESE INSTRUCTIONS
For proper use of your oven read remaining safety cautions and operating instructions.
2
Page 5
IMPORTANT SAFETY INSTRUCTIONS
(continued)
Glass Tray
1. DO NOT operate the oven without the Roller Ring and the Glass Tray in
place.
2. DO NOT operate the oven without the Glass Tray fully engaged on the drive
hub. Improper cooking or damage to the oven could result. Verify that the
Glass Tray is properly engaged and rotating by observing its rotation when
you press Start. Note: The Glass Tray can turn in either direction.
3. Use only the Glass Tray specifically designed for this oven. DO NOT substi-
tute any other glass tray.
4. If the Glass Tray is hot, allow to cool before cleaning or placing in water.
5. DO NOT cook directly on the Glass Tray. Always place food in a microwave
safe dish, or on a rack set in a microwave safe dish.
6. If food or utensil on the Glass Tray touches oven walls, causing the tray to
stop moving, the tray will automatically rotate in the opposite direction.
Roller Ring
1. The Roller Ring and oven floor should be cleaned frequently to prevent
excessive noise.
2. Always replace the Roller Ring and the Glass Tray in their proper positions.
3. The Roller Ring must always be used for cooking along with the Glass Tray.
INSTALLATION AND
GROUNDING INSTRUCTIONS
Examine Your Oven
Unpack oven, remove all packing material and examine the oven for any damage such as dents, broken door latches or cracks in the door. Notify dealer
immediately if oven is damaged. DO NOT install if oven is damaged.
Placement of Oven
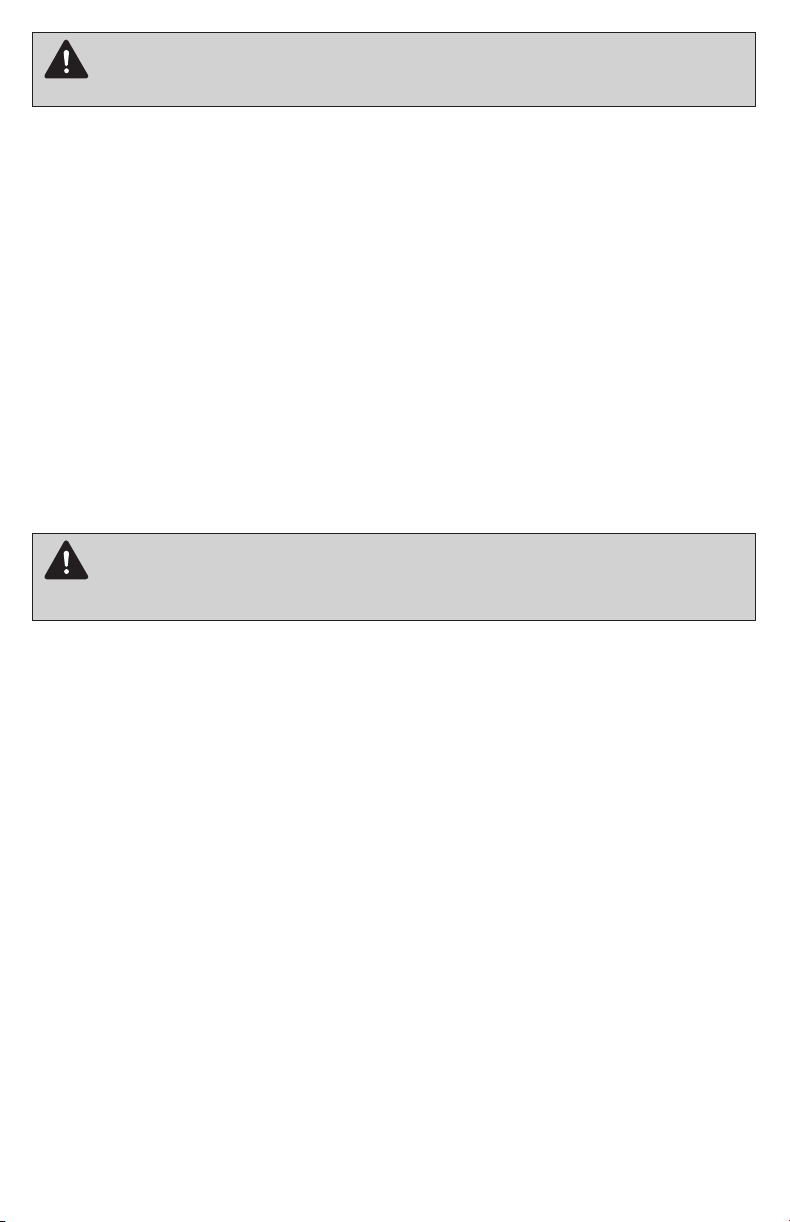
1. The oven must be placed on a flat, stable surface. Place the front surface of
the door three inches or more from the counter top edge to avoid accidental
tipping of the microwave oven during normal use. For proper operation, the
oven must have sufficient air flow. Allow 3-inches (7.6 cm) of space on both
sides of the oven and 1-inch (2.5 cm) of space on top of the oven.
(a) DO NOT block air vents. If they are blocked during operation, the oven
may be overheated and damaged.
(b) DO NOT place oven near a hot, damp surface such as a gas or electric
range, or dishwasher.
(c) DO NOT operate oven when room humidity is excessive.
2. This oven is manufactured for household use only. It is not approved or tested
for mobile vehicle, marine, or commercial use.
Installation
1. DO NOT block air vents. If they are blocked during operation, the oven may
overheat. If the oven overheats, a thermal safety device will turn the oven off.
The oven will remain inoperable until it has cooled.
2. If the oven is designed for installation into a wall cabinet by using the proper
trim kit available from a local Panasonic dealer. Follow all instruction packed
with the kit.
3
Page 6
INSTALLATION AND GROUNDING
INSTRUCTIONS
WARNING
CAN RESULT IN A RISK OF ELECTRIC SHOCK.
Consult a qualified electrician or service person if the grounding instructions are not completely understood, or if doubt exists as to whether the appliance is properly grounded. If it
is necessary to use an extension cord, use only a three wire extension cord that has a
three prong polarized grounding plug, and a three slot receptacle that will accept the plug
on the appliance. The marked rating of the extension cord should be equal to or greater
than the electrical rating of the appliance.
—IMPROPER USE OF THE GROUNDING PLUG
(continued)
Grounding Instructions
THIS APPLIANCE MUST BE GROUNDED. In the event of an electrical short circuit,
grounding reduces the risk of electric shock by providing an escape wire for the electric
current. This appliance is equipped with a cord having a grounding wire with a grounding
plug. The plug must be plugged into an outlet that is properly installed and grounded.
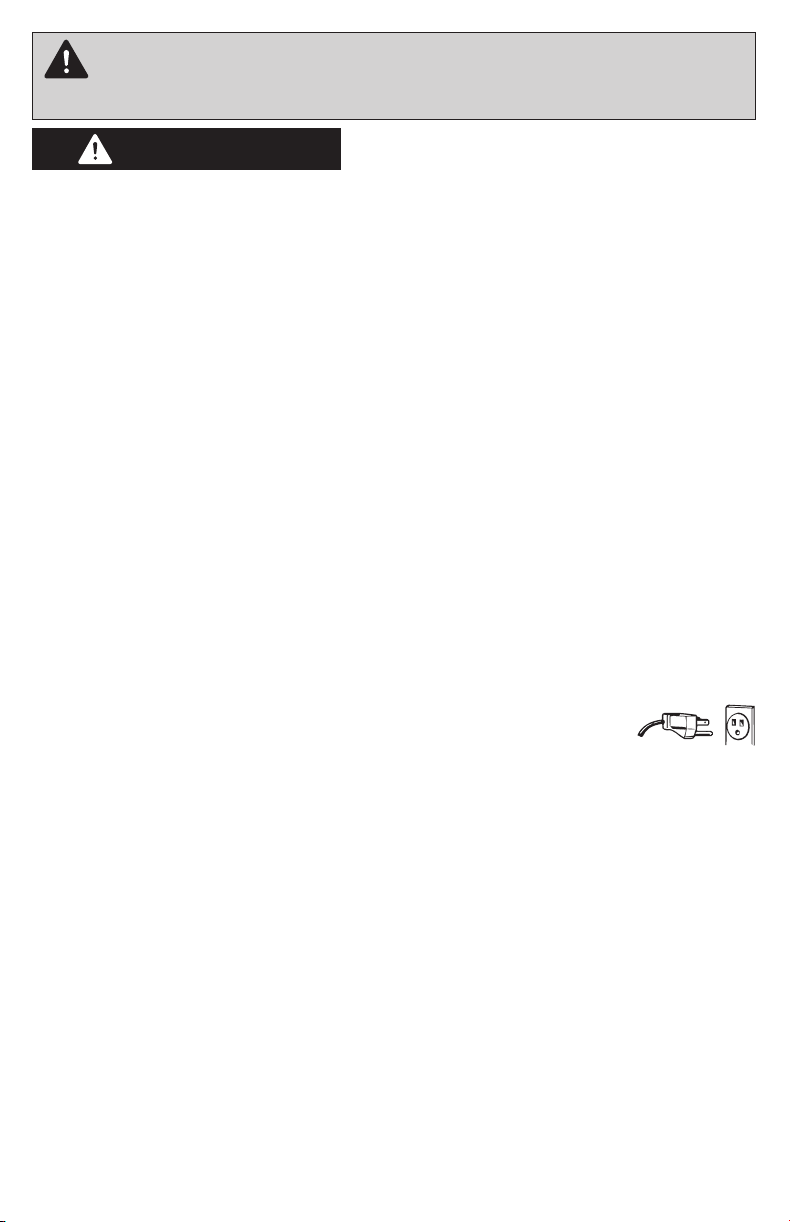
• Plug into properly installed and grounded 3 prong outlet.
• DO NOT remove ground prong.
• DO NOT use an adapter.
Power Supply
1. A short power-supply cord is provided to reduce the risks resulting from becoming
entangled in or tripping over a longer cord.
2. Longer cord sets or extension cords are available and may be used if care is exercised
in their use. Do not let cord hang over edge of a table or counter.
3. If a long cord or extension cord is used, (1) the marked electrical rating of the cord set
or extension cord should be at least as great as the electrical rating of the appliance, (2)
the extension cord must be a grounding-type 3-wire cord, and (3) the longer cord
should be arranged so that it will not drape over the counter top or tabletop where it can be pulled on by children or tripped over accidentally.
Wiring Requirements
The oven must be operated on a SEPARATE CIRCUIT. No other appliance should share
the circuit with the microwave oven. If it does, the branch circuit fuse may blow or the circuit breaker may trip. The oven must be plugged into at least a 20 AMP, 120 VOLT, 60 Hz
GROUNDED OUTLET. Where a standard two-prong outlet is encountered, it is the
personal responsibility and obligation of the consumer to have it replaced with a properly
grounded three-prong outlet. The VOLTAGE used must be the same as specified on this
microwave oven (120 V, 60 Hz). Using a higher voltage is dangerous and may result in a
fire or oven damage. Using a lower voltage will cause slow cooking. Panasonic is NOT
responsible for any damages resulting from the use of the oven with any voltage other
than specified.
TV / Radio Interference
1. Operation of the microwave oven may cause interference to your radio, TV or similar
equipment.
2. When there is interference, it may be reduced or eliminated by taking the following
measures:
(a) Place the radio, TV, etc. away from the microwave oven as far as possible.
(b) Use a properly installed antenna to obtain stronger signal reception.
(c) Clean door and sealing surfaces of the oven. (See Care and Cleaning of Your
Microwave Oven)
4
Page 7
Safety Precautions
Follow These Safety Precautions When Cooking in Your Oven.
IMPORT
Proper cooking depends upon the power, the time setting and quantity of
food. If you use a smaller portion than recommended but cook at the time
for the recommended portion, fire could result.
1) HOME CANNING / STERILIZING / DRYING FOODS /
• DO NOT use your oven for home canning. Your oven cannot maintain the food
at the proper canning temperature. The food may be contaminated and then
spoil.
• DO NOT use the microwave oven to sterilize objects (baby bottles, etc.). It is
difficult to keep the oven at the high temperature needed for sterilization.
• DO NOT dry meats, herbs, fruits or vegetables in your oven. Small quantities
of food or foods with low moisture content can dry out, scorch or catch on fire if
overheated.
2) POPCORN
Popcorn may be popped in a microwave oven corn popper. Microwave popcorn which pops in its own package is also available. Follow popcorn manufacturers’ directions and use a brand suitable for the cooking power of your
microwave oven.
CAUTION: When using pre-packaged microwave popcorn, you can follow
recommended package instructions or use the popcorn pad (refer to page 13).
Otherwise, the popcorn may not pop adequately or may ignite and cause a
fire. Never leave oven unattended when popping popcorn. Allow the popcorn
bag to cool before opening, always open the bag facing away from your face
and body to prevent steam burns.
ANT
SMALL QUANTITIES OF FOODS
3) DEEP FAT FRYING
• DO NOT deep fat fry in your microwave oven. Cooking oils may burst into flames
and may cause damage to the oven and perhaps result in burns. Microwave utensils
may not withstand the temperature of the hot oil, and can shatter or melt.
4) FOODS WITH NONPOROUS SKINS
• DO NOT COOK/REHEAT WHOLE EGGS, WITH OR WITHOUT THE SHELL.
Steam buildup in whole eggs may cause them to explode, and possibly damage the
oven or cause injury. Reheating SLICED hard-boiled eggs and cooking SCRAMBLED
eggs is safe.
• Potatoes, apples, whole squash and sausages are examples of foods with non-
porous skins. These types of foods must be pierced before microwave cooking to
prevent them from exploding.
CAUTION: Cooking dry or old potatoes can cause fire.
5
Page 8

Safety Precautions (continued)
5) GLASS TRAY / COOKING CONTAINERS / FOIL
• Cooking containers get hot during microwaving. Heat is transferred from the
HOT food to the container and the Glass Tray. Use pot holders when removing
containers from the oven or when removing lids or plastic wrap covers from
cooking containers, to avoid burns.
• The Glass Tray will get hot during cooking. It should be allowed to cool before
handling or before paper products, such as paper plates or microwave popcorn
bags, are placed in the oven for microwave cooking.
• When using foil in the oven, allow at least 1-inch (2.5 cm) of space between
foil and interior oven walls or door.
• Dishes with metallic trim should not be used, as arcing may occur.
6) PAPER TOWELS / CLOTHS
• DO NOT use paper towels or cloths which contain a synthetic fiber woven into
them. The synthetic fiber may cause the towel to ignite. Use paper toweling
under supervision.
7) BROWNING DISHES / OVEN COOKING BAGS
• Browning dishes or grills are designed for microwave cooking only. Always fol-
low instructions provided by the manufacturer. DO NOT preheat browning dish
more than 6 minutes.
• If an oven cooking bag is used for microwave cooking, prepare according to
package directions. DO NOT use a wire twist-tie to close bag, instead use
plastic ties, cotton string or a strip cut from the open end of the bag.
8) THERMOMETERS
• DO NOT use a conventional meat thermometer in your oven. Arcing may
occur. Microwave safe thermometers are available for both meat and candy.
9) BABY FORMULA / BABY FOOD
• DO NOT heat baby formula or baby food in the microwave oven. The glass jar
or surface of the food may appear warm while the interior can be so hot as to
burn the infant’s mouth and esophagus.
10) REHEATING PASTRY PRODUCTS
• When reheating pastry products, check temperatures of any fillings before eat-
ing. Some foods have fillings which heat faster and can be extremely hot, while
the surface remains warm to the touch (ex. Jelly Donuts).
11) GENERAL OVEN USAGE GUIDELINES
• DO NOT use the oven for any purpose other than the preparation of food.
6
Page 9
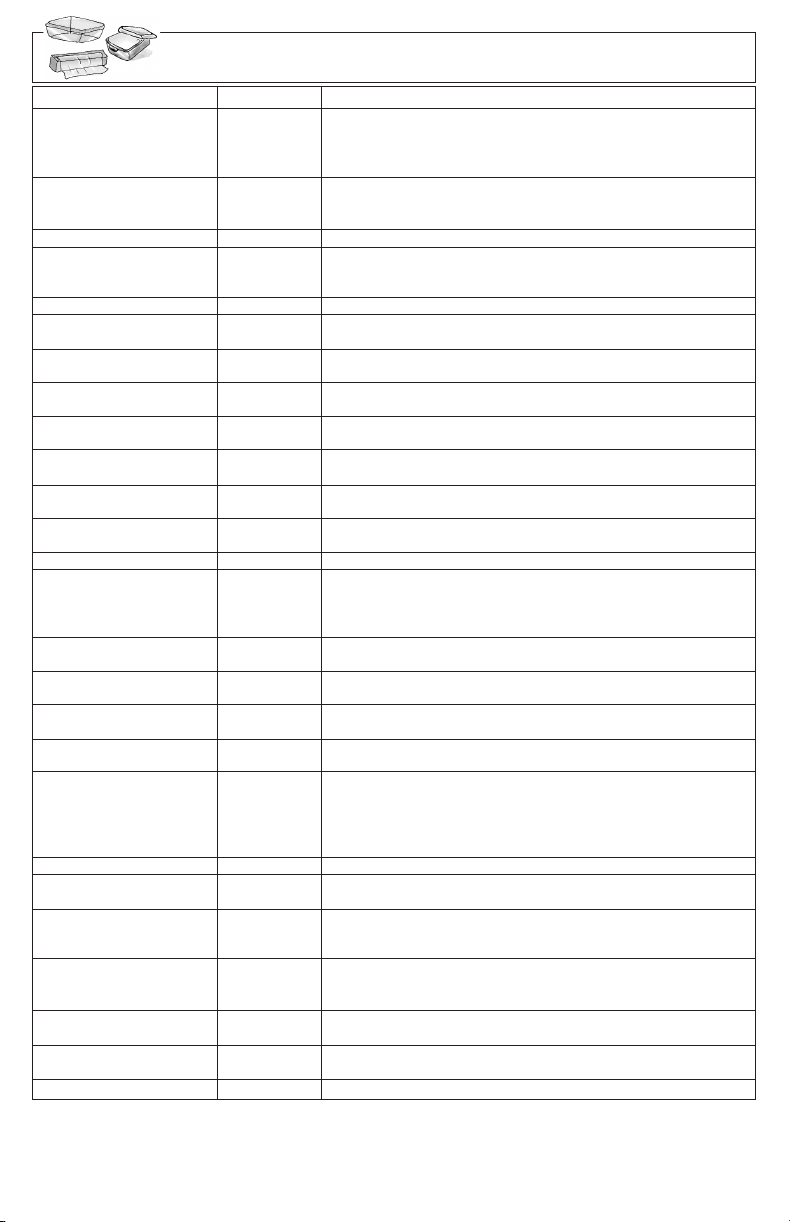
Cookware Guide
ITEM MICROWAVE COMMENTS
Aluminum Foil Shielding meat or poultry to prevent overcooking. Arcing can occur
Browning Dish Yes only. Check browning dish information for instructions
Brown paper bags No May cause a fire in the oven.
Dinnerware: Check manufacturers' use and care directions for use in
Labeled Yes microwave heating. Some dinnerware may state on the
“Microwave Safe” back of the dish, “Oven-Microwave Safe”.
Unlabeled Dinnerware ? Use CONTAINER TEST below.
Disposable polyester Yes Some frozen foods are packaged in these dishes. Can be
Paperboard Dishes purchased in grocery stores.
Fast Food Carton
with Metal Handle
Frozen Dinner Tray
Metal
Frozen Dinner Tray
Microwave safe
Glass Jars No
Heat Resistant Oven
Glassware & Ceramics (See CONTAINER TEST below)
Metal Bakeware
Metal Twist-Ties No May cause arcing which could cause a fire in the oven.
Oven Cooking Bag Yes
Paper Plates & Cups Yes
Paper Towels & Napkins Yes
Recycled Paper Towels
& Napkins cause sparks.
Parchment Paper
Plastic: Should be labeled, "Suitable for Microwave Heating." Check
Microwave Safe Yes, manufacturers’ directions for recommended uses.
Cookware use caution Some microwave safe plastic containers are not suitable for
Plastic, Melamine No This material absorbs microwave energy. Dishes get HOT!
Plastic Foam Cups
Plastic Wrap Yes prevent spattering. Should be labeled “Suitable for
Straw, Wicker, Wood
Thermometers-
Microwave safe
Thermometers-
Conventional and get hot.
Wax paper Yes Use as a cover to prevent spattering and to retain moisture.
TO TEST A CONTAINER FOR SAFE MICROWAVE OVEN USE: Fill a microwave safe cup with cool water
and place it in the microwave oven alongside the empty container to be tested; heat one (1) minute at P10
(HIGH). If the container is microwave oven safe (transparent to microwave energy), the empty container
should remain comfortably cool and the water should be hot. If the container is hot, it has absorbed some
microwave energy and should NOT be used. This test cannot be used for plastic containers.
Yes for Small strips of foil can be molded around thin parts of
only if foil is too close to oven wall or door and damage to your
No Metal handle may cause arcing.
No Metal can cause arcing and damage to your oven.
Yes Heat only 1 tray in the oven at one time.
Yes
No
No
Yes
Yes, Plastic foam will melt if foods reach a high temperature. Use
use caution to reheat foods to a low serving temperature only.
Yes,
use caution
Yes
No
oven will result.
Browning dishes are designed for microwave cooking
and heating chart. Do not preheat for more than 6 minutes.
Most glass jars are not heat resistant. Do not use for
cooking or reheating.
Ideal for microwave cooking and browning.
Not recommended for use in microwave ovens. Metal can
cause arcing and damage to your oven.
Follow manufacturers' directions. Close bag with the nylon
tie provided, a strip cut from the end of the bag, or a piece
of cotton string. Do not close with metal twist-tie. Make six
1
/2-inch (1 cm) slits near the closure.
Use to warm cooked foods, and to cook foods that require
short cooking times such as hot dogs.
Use to warm rolls and sandwiches, only if labeled safe for
microwave use.
Recycled paper products may contain impurities which may
Use as a cover to prevent spattering. Safe for use in
microwave, microwave/convection and conventional ovens.
cooking foods with high fat or sugar content. The heat from
hot food may cause the plastic to warp.
Use to cover food during cooking to retain moisture and
Microwave Heating”. Check package directions.
Use only for short term reheating and to bring food to a low
serving temperature. Wood may dry out & split or crack
when used.
Use only microwave safe meat and candy thermometers.
Not suitable for use in microwave oven, will cause sparks
CONTAINER TEST
7
Page 10
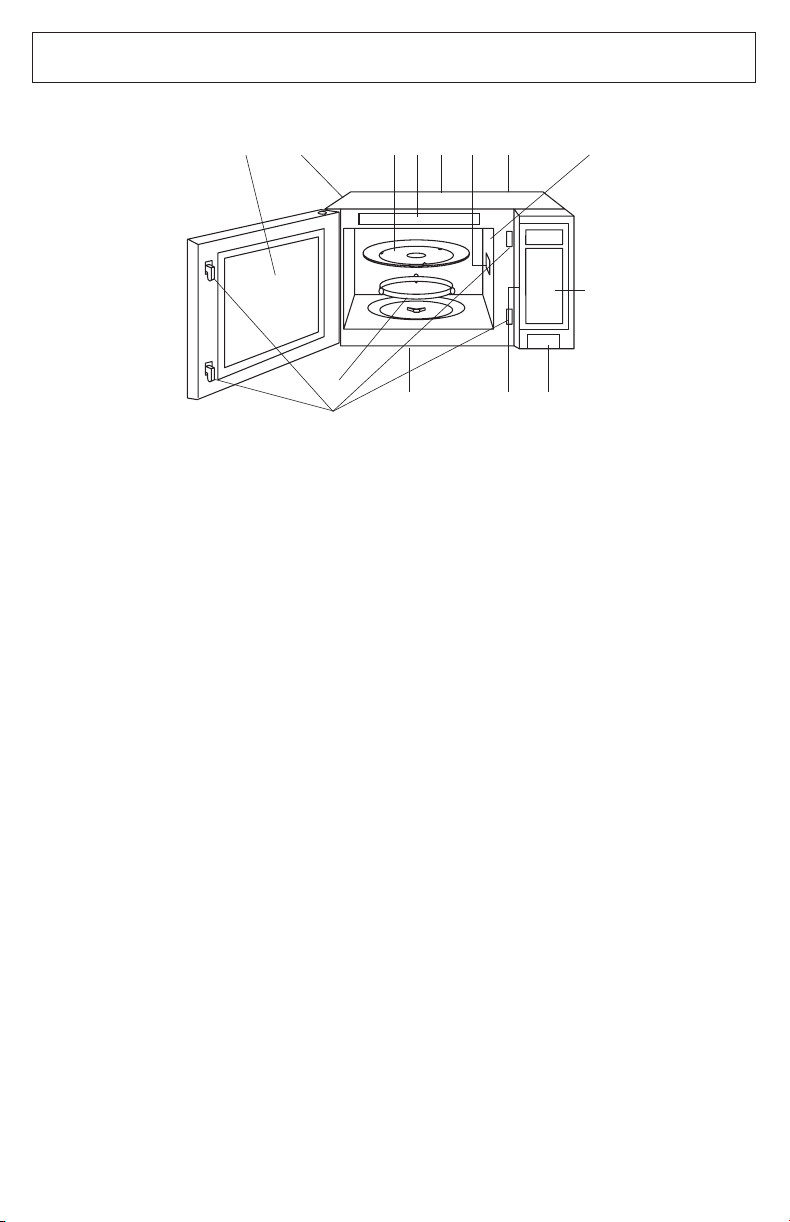
Oven Components Diagram
fmjd h k ab
e
aa
External Air Vent
bb
Internal Air Vent
cc
Door Safety Lock System
dd
Exhaust Air Vent
ee
Control Panel
ff
Identification Plate
(Alternate location)
gg
Identification Plate
(Alternate location)
c
i
d lg
hh
Glass Tray
ii
Roller Ring
jj
Heat/Vapor Barrier Film
(do not remove)
kk
Waveguide Cover (do not remove)
ll
Door Release Button
mm
Warning Label
8
Page 11
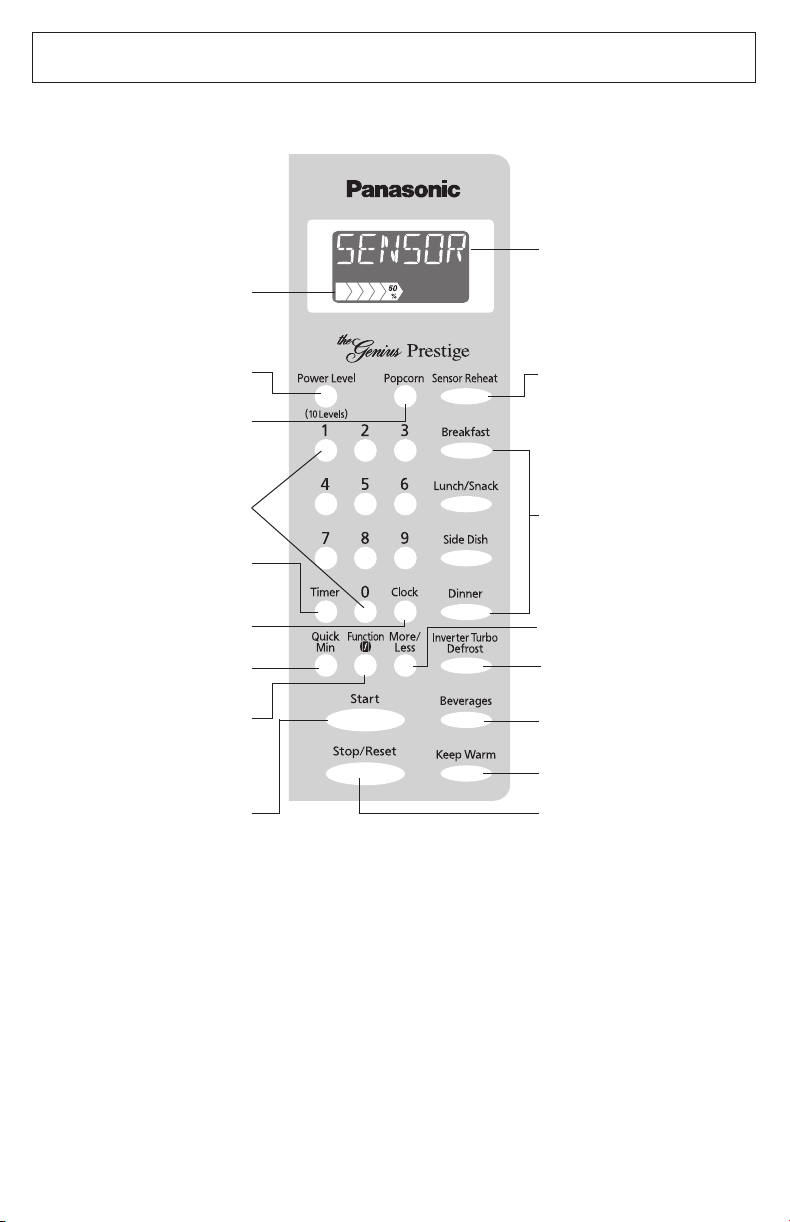
* The control panel of
NN-P794/SN747/SN757/
T945/SN947/SN957/SN977
has the same key layout as
NN-SN797.
Power Level
Control Panel
NN-SN797
Display Window
Step by step
instructions scroll
for easy operation.
Power Level Pad
(☛ page 12)
Sensor Reheat Pad
(☛ page 16)
Popcorn Pad
(☛ page 13)
Number Pads
Sensor Cook Pads
(☛ page 16)
Timer Pad
(☛ page 19)
Clock Pad
(☛ page 10)
Quick Min Pad
(☛ page 12)
Function Pad
(☛ page 10)
More/Less Pad
(☛ page 13)
Inverter Turbo
Defrost Pad
(☛ page 14)
Beverages Pad
(☛ page 13)
Keep Warm Pad
(☛ page 12)
Start Pad
One tap allows oven to
begin functioning. If door is
opened or Stop/Reset Pad
is pressed once during
oven operation, Start Pad
must be pressed again to
restart oven.
temporarily stops the cooking
process. Another tap cancels
all your instructions and time
of day or colon appears in the
Stop/Reset Pad
Before cooking: One tap
clears memory.
During cooking: One tap
Display Window.
Beep Sound:
When a pad is pressed correctly, a beep will be heard.
If a pad is pressed and no beep is heard, the unit did not or cannot accept the instruction.
When operating, the oven will beep twice between programmed stages. At the end of any
complete program, the oven will beep 5 times.
Note:
If an operation is set and start pad is not pressed, after 6 minutes, the oven will automatically
cancel the operation. The display will revert back to clock or colon mode.
9
Page 12
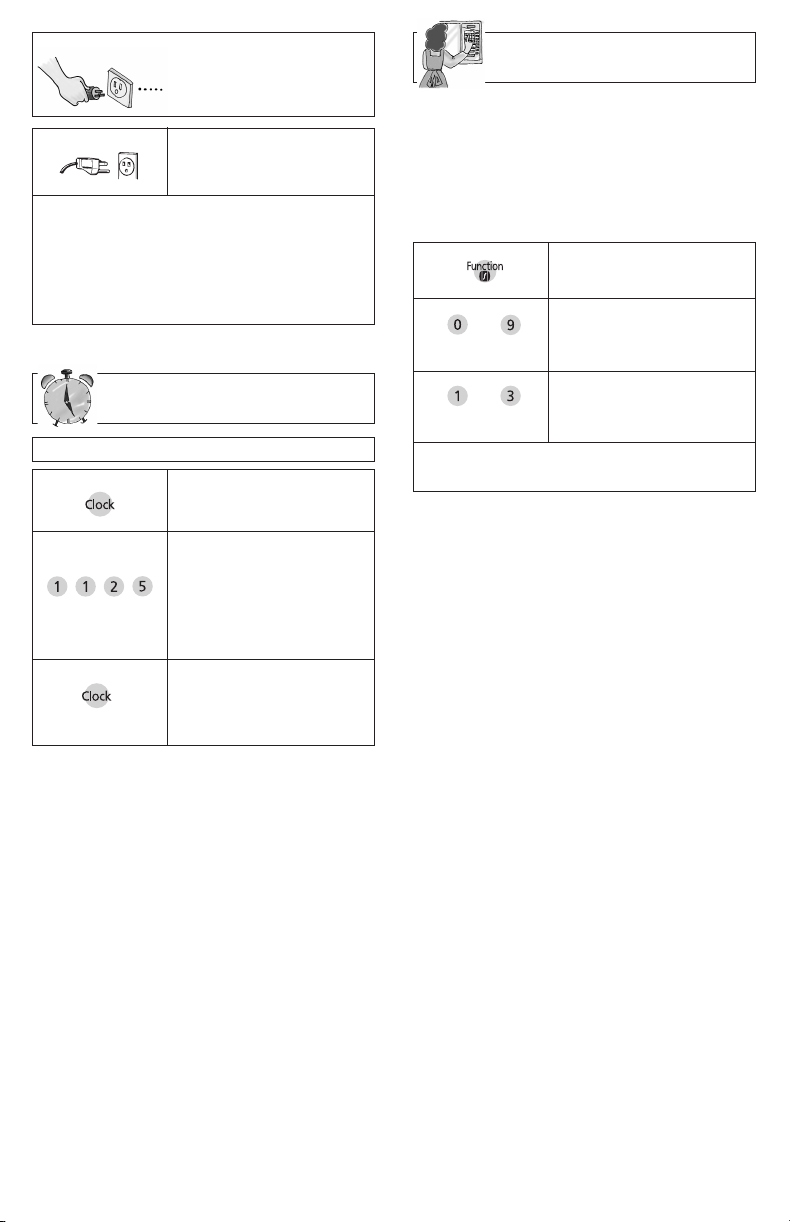
Starting to Use
Function Features
Your Oven
1.
2.
“WELCOME TO PANASONIC...”
message scrolls across display
window.
At the end of the “WELCOME...”
message, a colon appears in the
display window.
• Plug into a properly
grounded electrical
outlet.
Setting the Clock
Example: To set 11:25 a.m. or p.m.
1.
2.
3.
NOTES:
1. To reset the clock, repeat step 1-3.
2. The clock will retain the time of day as
long as the oven is plugged in and
electricity is supplied.
3. Clock is a 12 hour display.
4. Oven will not operate while colon is
flashing.
• Press Clock once.
➤ Colon flashes.
• Enter time of day using
the number pads.
➤ Time appears in
the display window;
colon continues
flashing.
• Press Clock.
➤ Colon stops flash-
ing; time of day is
entered.
This unique function of your PANASONIC
microwave oven allows you to establish
the initial non-cooking features of your
oven such as CHILD LOCK, WORD
SPEED, LANGUAGE CHOICE (ENGLISH, FRENCH OR SPANISH), plus
many more. See next page.
1.
2.
3.
to
Press
to
Press
• Press Function.
• Press selection by
number pad (see
chart on next page).
• Press selection.
4. If other options are desired, repeat
steps 1-3 for additional selections.
10
Page 13
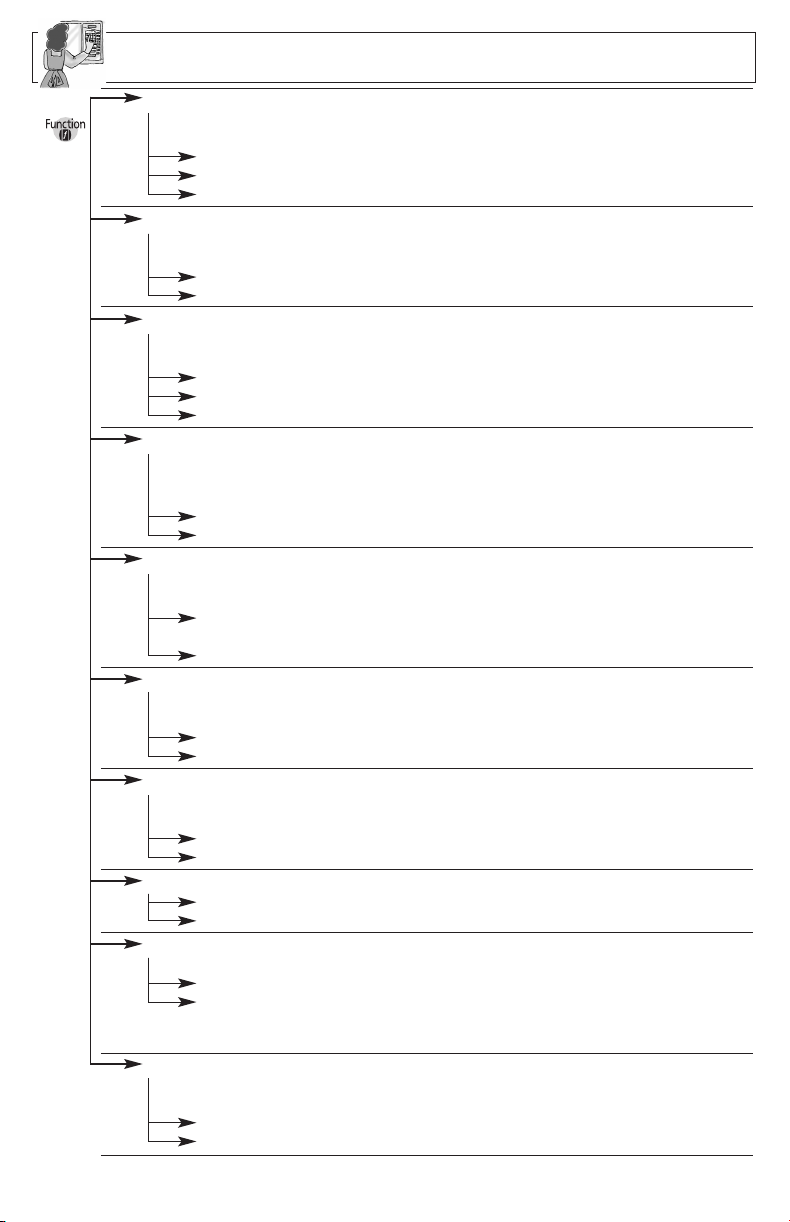
Function Features
1 LANGUAGE CHOICE
The oven has a choice of English, French or Spanish display. The
display appears in English when you plug-in.
1 ENGLISH ➻ Display appears in English.
*
2 FRANCAIS ➻ Display appears in French.
3 ESPANOL ➻ Display appears in Spanish.
LB/KG CHOICE
2
The oven has both imperial and metric weight measurements. The
oven displays the weight in imperial when you plug it in.
1 LB ➻ Weight can be set in oz/lb, (Imperial).
*
2 KG ➻ Weight can be set in g/kg, (Metric).
3 WORD SPEED
The speed of word scrolling on the Display Window can be sped up
or slowed down.
1 QUICK ➻ Words scroll quickly.
2 MEDIUM ➻ Scrolling speed returns to initial setting.
*
3 SLOW ➻ Words scroll slowly.
4 MENU ACTION ON/OFF
MENU ACTION SCREEN helps you to program your oven by
prompting the next step to be taken. When you become familiar
with your oven, the prompt can be turned off.
1 ON ➻ Prompting Guide will appear.
*
2 OFF ➻ Prompting Guide will not appear.
5 CHILD LOCK ON/OFF
The oven has a Child Safety Lock feature which prevents use by
children. It does not lock the door.
1 ON ➻ Child Lock has been set and operation will not
2 OFF ➻ Child Lock has been cancelled.
*
6 BEEP ON/OFF
If you wish to have the oven operate with no beep, it can be
eliminated.
1 ON ➻ Beep sound will reactivate.
*
2 OFF ➻ Beep sound will not be heard.
7 REMINDER BEEP ON/OFF
A reminder beep works to remind you to remove the food from the
oven after the completion of cooking. It will occur every 15 seconds.
1 ON ➻ Reminder beep will work.
2 OFF ➻ Reminder beep will not work.
*
8 DAYLIGHT SAVING ON/OFF
1 ON ➻ Time of day will advance one hour.
2 OFF ➻ Time of day returns to original setting.
*
9 CLOCK ON/OFF
Clock display can be turned off.
1 ON ➻ Clock display will appear on the Display Window.
*
2 OFF ➻ Clock display will not appear on the Display
Time of day will be stored in memory while the display is off.
0 DEMO MODE ON/OFF
Demo mode is designed for retail store display. In this mode, the
oven can be demonstrated with no power in the oven.
1 ON ➻ The oven is in Demo mode.
2 OFF ➻ The oven is not in Demo mode.
*
* DEFAULT MODE
be accepted.
Window.
11
Page 14
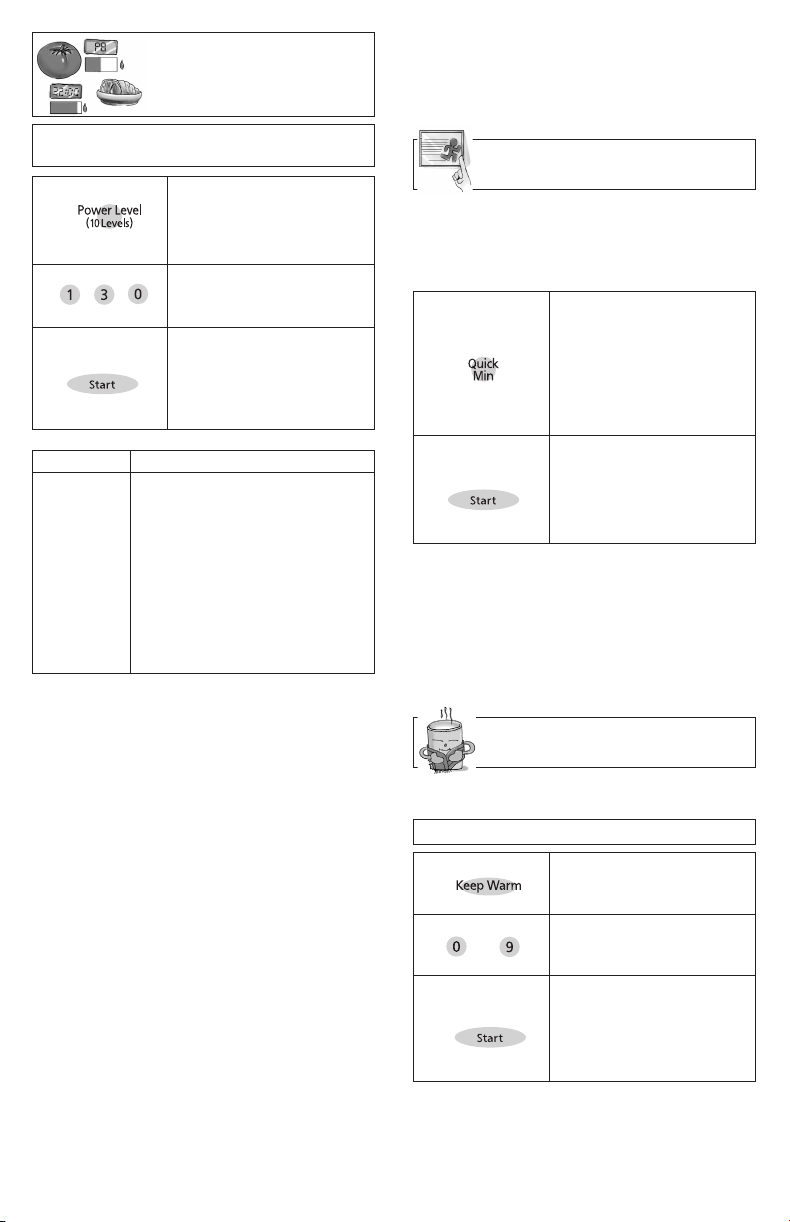
Selecting Power
& Cook Time
Example: To cook at P 6 (MEDIUM)
1.
Press 5 times.
2.
3.
3 times
4 times
5 times
6 times
7 times
8 times
9 times
10 times
NOTES:
1. For more than one stage cooking, repeat
steps 1 and 2 for each stage of cooking
before pressing Start Pad. The maximum number of stages for cooking is 5.
When operating, two beeps will sound
between each stage. Five beeps will
sound at the end of the entire sequence.
2. When selecting P10 (HIGH) power for
the first stage, you may begin at step 2.
3. When selecting P10 (HIGH) power, the
maximum programmable time is 30 minutes. For other power levels, the maximum time is 99 minutes and 99 seconds.
4. For reheating, use P10 (HIGH) for liquids, P7 (MEDIUM-HIGH) for most foods
and P6 (MEDIUM) for dense foods.
5. For defrosting, use P3 (MEDIUM-LOW).
DO NOT OVER COOK. This oven requires
less time to cook than an older unit. Over
cooking will cause food to dry out and may
cause a fire. A microwave oven’s cooking
power tells you the amount of microwave
power available for cooking.
power for 1 minute 30 seconds
• Press Power Level
until the desired
power level appears
in the display window.
• Set Cooking Time
using number pads.
• Press Start.
➤Cooking will start.
The time in the
display window will
count down.
Press
once
twice
P3
Power Level
P10 (HIGH)
P9
P8
P7 (MEDIUM-HIGH)
P6 (MEDIUM)
P5
P4
(MEDIUM-LOW)/DEFROST
P2
P1 (LOW)
Automatic features are provided for your
convenience. If results are not suitable to
your individual preference or if serving size
is other than what is listed on page 17,
please refer to manual cooking.
Quick Min Feature
This feature allows you to set or add
cooking time in 1 minute increments up to
10 minutes.
To Set Cooking Time:
1.
2.
NOTES:
1. If desired, you can use other power
levels. Select desired power level
before setting cooking time.
2. After setting the time by Quick Min
Pad, you cannot use Number Pads.
3. Quick Min Pad can be used to add
more time during manual cooking.
• Press Quick Min until
the desired cooking
time (up to 10 minutes) appears in the
display window.
Power Level is pre-set
at P10.
Press Start.
Cooking begins and the
time will count down.
At the end of cooking,
5 beeps sound.
Keep Warm Feature
This feature will keep food warm for up to
30 minutes after cooking.
Example: To keep 2 cups of gravy warm
1.
2.
to
3.
NOTE:
Keep Warm can be programmed as the
final stage after cook time/s have been
manually entered. It cannot be used in
combination with sensor or auto features.
12
• Press Keep Warm.
• Set warming time, up
to 30 minutes.
• Press Start.
➤ Keep Warm will
start. The time in
the display window
will count down.
Page 15
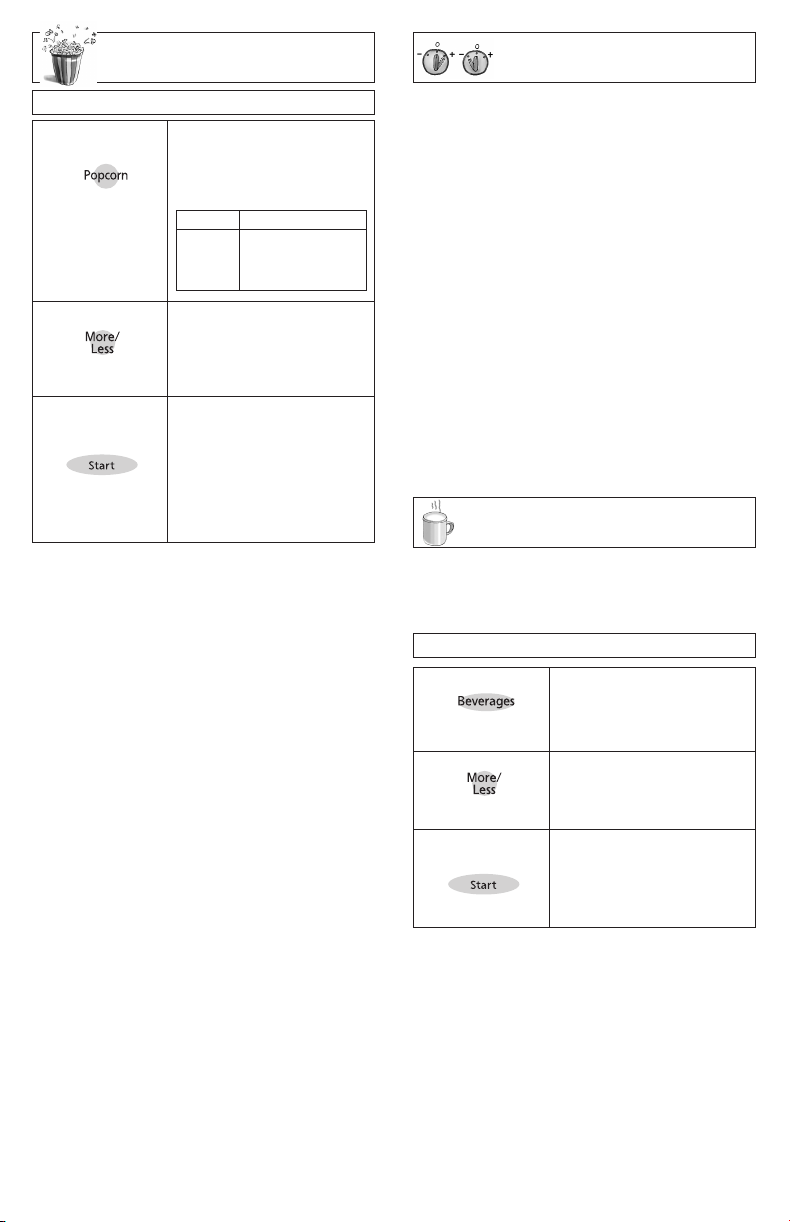
Popcorn Feature
More/Less Feature
Example: To pop 3.5 oz. of popcorn
1.
2.
Optional
3.
NOTES ON POPCORN FEATURE:
1. Pop one bag at a time.
2. Place bag in oven according to manufacturers’ directions.
3. Start with popcorn at room temperature.
4. Allow popped corn to sit unopened for
a few minutes.
5. Open bag carefully to prevent burns,
because steam will escape.
6. Do not reheat unpopped kernels or
reuse bag.
NOTE:
If popcorn is of a different weight than listed, follow instructions on popcorn package. Never leave the oven unattended.
If popping slows to 2 to 3 seconds
between pops, stop oven. Overcooking
can cause fire.
REMARKS:
When popping multiple bags one right
after the other, the cooking times may
vary slightly. This does not affect the popcorn results.
• Press Popcorn until
the desired size
appears in the display
window.
Press
once
twice
3 times
(see More/Less
Feature.)
• Press Start .
➤ After several
seconds, cooking
time appears in the
display window and
begins to count
down.
Weight
3.5 oz (99 g)
3.0 oz (85 g)
1.75 oz (50 g)
For Popcorn:
By using the More/Less Pad, the programs
can be adjusted to cook popcorn for a
longer or shorter time if desired.
1 tap = Adds Approx. 10 secs.
2 taps = Adds Approx. 20 secs.
3 taps = Subtracts Approx. 10 secs.
4 taps = Subtracts Approx. 20 secs.
5 taps = original setting
Press More/Less pad before pressing Start.
For Sensor Reheat/Cook:
Preferences for food doneness vary with
each individual. After having used the
Sensor Reheat/Cook feature a few times,
you may decide you would prefer your food
cooked to a different doneness.
1 tap = More (Adds Approx. 10% time)
2 taps = Less (Subtracts Approx. 10% time)
3 taps = original setting
Press More/Less pad before pressing Start.
Beverages
This feature allows you to reheat 1 cup
(250 ml) or 2 cups (500 ml) of room temperature beverages without setting power
and time.
Example: To reheat 2 cups of beverage
1.
Press twice.
2.
Optional
3.
NOTE:
1. Use a microwave safe cup.
2. Heated liquids can erupt if not mixed with
air. Do not heat liquids in your microwave
oven without stirring before and halfway
through heating.
3. Care must be exercised not to overheat
liquids when using the Beverage feature.
It is programmed to give proper results
when heating 1 cup (250 ml) or 2 cups
(500 ml) of liquid, starting from room temperature. Overheating will cause an
increased risk of scalding, or water eruption. Refer to page 2, item 18.
13
• Press Beverages until
the desired number of
servings appears in
the display window.
(see More/Less
Feature.)
• Press Start.
➤ Cooking time
appears in the
display window and
begins to count down.
Page 16
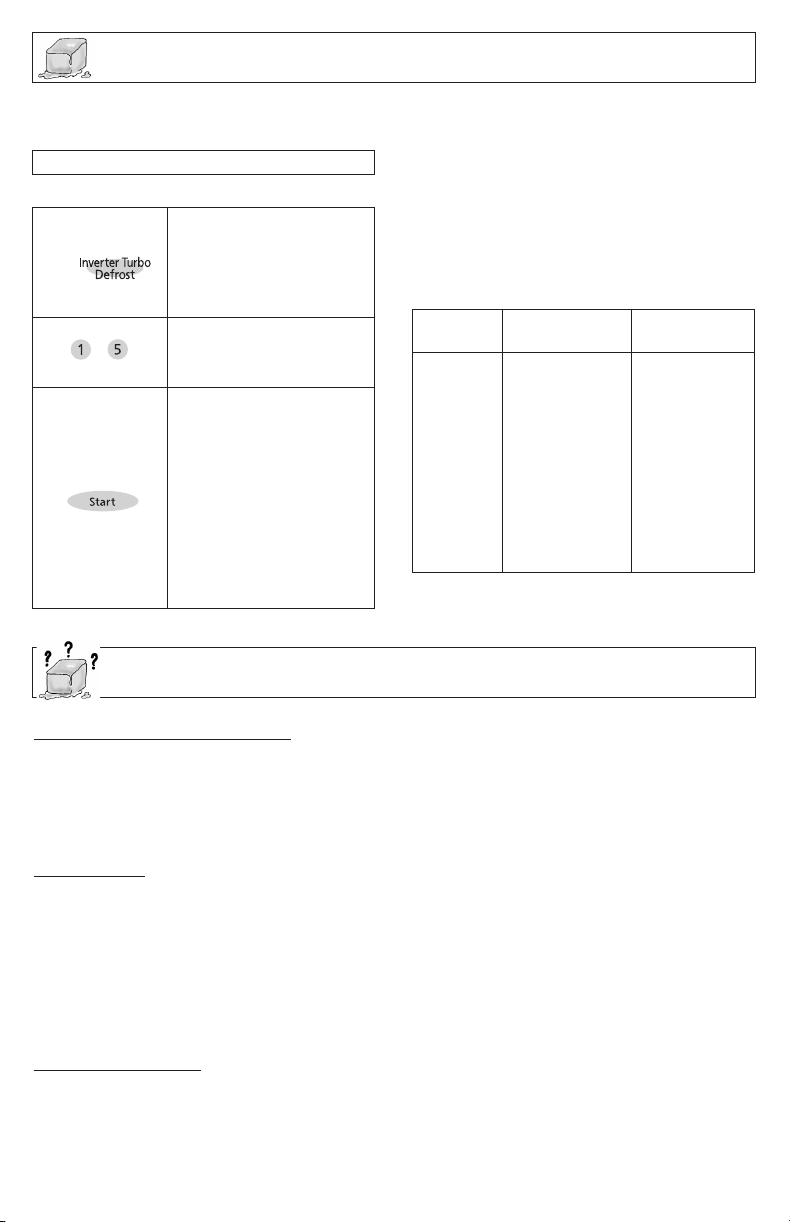
Inverter Turbo Defrost Feature
This feature allows you to defrost foods such as: meat, poultry and seafood simply by
entering the weight.
Example: To defrost 1.5 pounds of meat
Place food on microwave safe dish.
1.
2.
3.
• Press Inverter Turbo
Defrost.
• Enter weight of the
food using the number pads.
• Press Start.
Defrosting will start.
The time will count
down. Larger weight
foods will cause a signal midway through
defrosting. If 2 beeps
sound, turn over,
rearrange foods or
shield with aluminum
foil.
Conversion Chart:
Follow the chart to convert ounces or
hundredths of a pound into tenths of a
pound. To use Inverter Turbo Defrost,
enter the weight of the food in lbs. (1.0)
and tenths of a lb. (0.1). If a piece of
meat weighs 1.95 lbs. or 1 lb. 14 oz.,
enter 1.9 lbs.
Ounces
0
1 - 2
3 - 4
5
6 - 7
8
9 - 10
11 - 12
13
14 - 15
Hundredths
of a Pound
.01 - .05
.06 - .15
.16 - .25
.26 - .35
.36 - .45
.46 - .55
.56 - .65
.66 - .75
.76 - .85
.86 - .95
Tenths of
a Pound
Defrosting Tips & Techniques
Preparation For Freezing:
1. Freeze meats, poultry, and fish in packages with only 1 or 2 layers of food. Place
wax paper between layers.
2. Package in heavy-duty plastic wraps, bags (labeled “For Freezer”), or freezer paper.
3. Remove as much air as possible.
4. Seal securely, date, and label.
0.0
0.1
0.2
0.3
0.4
0.5
0.6
0.7
0.8
0.9
To Defrost:
1. Remove wrapper. This helps moisture to evaporate. Juices from food can get hot and
cook the food.
2. Set food in microwave safe dish.
3. Place roasts fat-side down. Place whole poultry breast-side down.
4. Select power and minimum time so that items will be under-defrosted.
5. Drain liquids during defrosting.
6. Turn over (invert) items during defrosting.
7. Shield edges and ends if needed. (See Cooking Techniques).
After Defrosting:
1. Large items may be icy in the center. Defrosting will complete during STANDING TIME.
2. Let stand, covered, following stand time directions on page 15.
3. Rinse foods indicated in the chart.
4. Items which have been layered should be rinsed separately or have a longer stand time.
14
Page 17
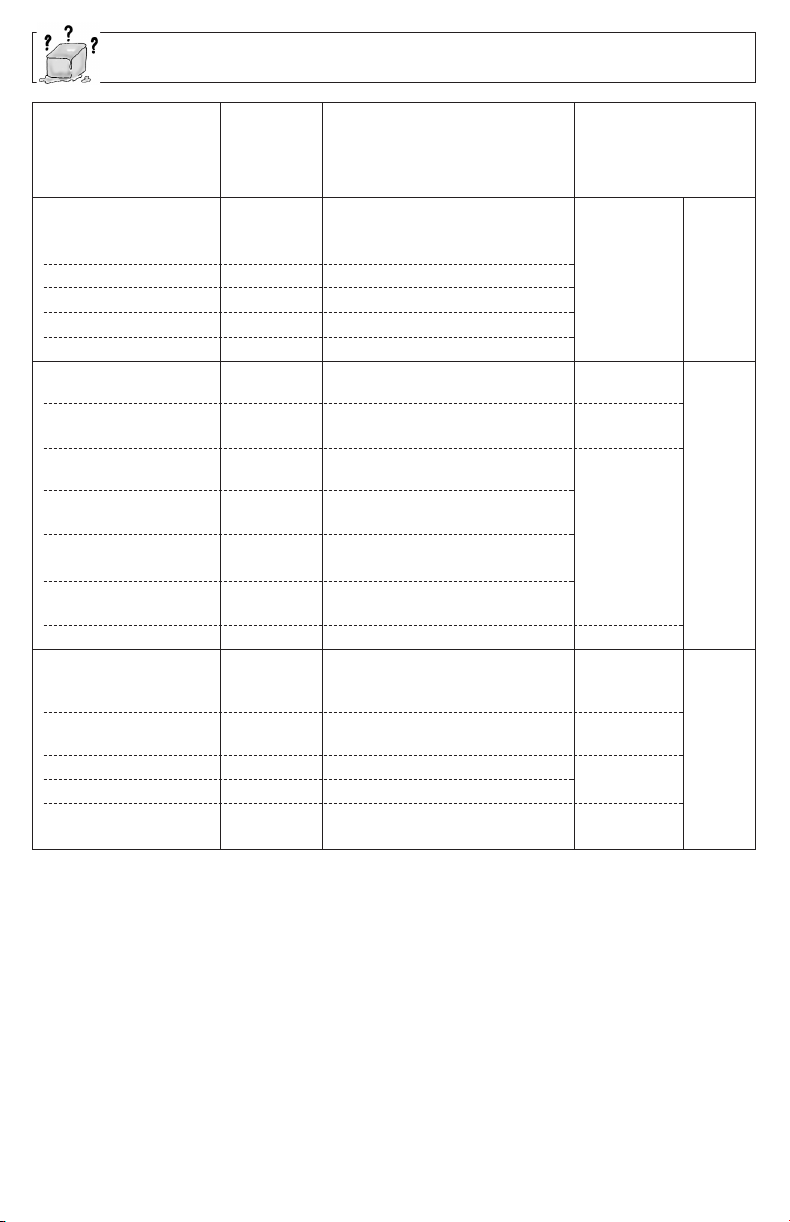
Defrosting Tips & Technique
s
(continued)
FOOD TIME at P3 DURING DEFROSTING
Fish and Seafood
[up to 3 lbs. (1.4 kg)]
Crabmeat 6 Break apart/Rearrange
Fish Steaks 4 to 6 Turn over
Fish Fillets 4 to 6 Turn over/Rearrange/Shield ends
Sea Scallops 4 to 6
Whole fish 4 to 6 Turn over
Meat Turn over/Remove defrosted
Ground Meat 4 to 5 portion/Shield edges
Roasts 4 to 8 Turn over/Shield ends and
[21/2-4 lbs. (1.1-1.8 kg)] defrosted surface
Chops/Steak 6 to 8 Turn over/Rearrange/Shield ends
Ribs/T-bone 6 to 8 Turn over/Rearrange/Shield ends
Stew Meat 4 to 8 Break apart/Rearrange/
Liver (thinly sliced) 4 to 6 Drain liquid/Turn over/
Bacon (sliced) 4 Turn over - - - -
Poultry
Chicken, Whole 4 to 6 Turn over/Shield
[up to 3 lbs. (1.4 kg)]
Cutlets 4 to 6 Break apart/Turn over/
Pieces 4 to 6 Break apart/Turn over/Shield
Cornish Hens 6 to 8 Turn over/Shield
Turkey Breast 6 Turn over/Shield
[5-6 lbs. (2.3-2.7 kg)]
DEFROST AFTER DEFROSTING
mins (per lb) Stand Time Rinse
5 min. YES
Break apart/Remove defrosted pieces
10 min.
30 min. in refrig.
and defrosted surface
and defrosted surface
Remove defrosted pieces
Separate pieces
Remove defrosted Pieces
5 min. NO
20 min. in refrig.
5 min.
10 min.
20 min. in refrig.
YES
15
Page 18
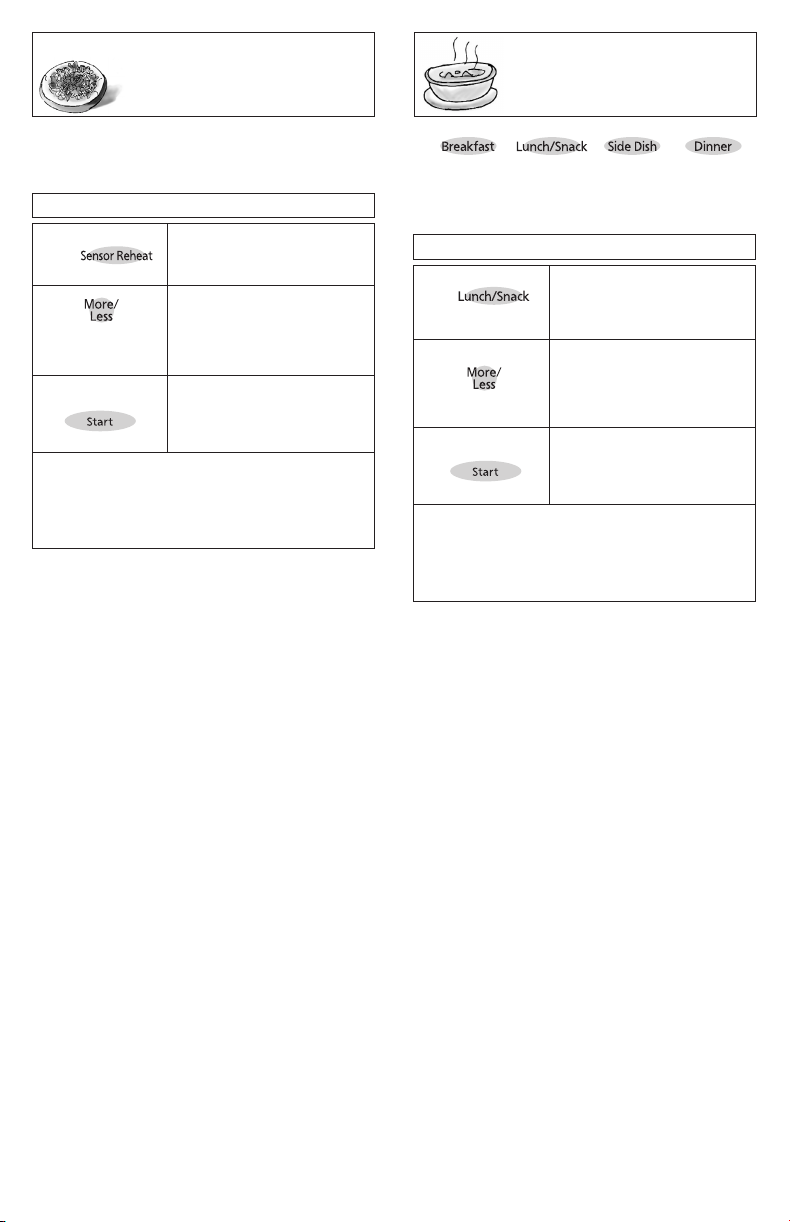
Sensor Reheat
Sensor Cook
Feature
This sensor feature allows you to reheat
food without setting time. The oven simplifies programming.
Example: To reheat a plate of food
1.
2.
Optional
3.
After steam is detected by the Genius
Sensor, 2 beeps sound.
The remaining cooking time appears in the
display window and begins to count down.
At the end of cooking, five beeps sound.
NOTE:
Casseroles - Add 3 to 4 tablespoons of liquid,
cover with lid or vented plastic wrap. Stir when
time appears in the display window.
Canned foods - Empty contents into casserole dish or serving bowl, cover dish with lid or
vented plastic wrap. After reheating, let stand
for a few minutes.
Plate of food - Arrange food on plate; top with
butter, gravy, etc. Cover with lid or vented
plastic wrap. After reheating, let stand for a
few minutes.
DO NOT USE SENSOR REHEAT:
1. To reheat bread and pastry products. Use
manual power and time for these foods.
2. For raw or uncooked foods.
3. If oven cavity is warm.
4. For beverages.
5. For frozen foods.
• Press Sensor Reheat.
(see More/Less
Feature)
(☛page 13)
• Press Start.
➤ Cooking starts.
Feature
This sensor feature allows you to cook
food without setting time. The oven simplifies programming.
Example: To cook Frozen Entrées
1.
Press twice
2.
Optional
3.
After steam is detected by the Genius
Sensor, 2 beeps sound.
The remaining cooking time appears in the
display window and begins to count down.
At the end of cooking, five beeps sound.
For the best results with the
GENIUS SENSOR, follow these recommendations.
BEFORE Reheating/Cooking:
1. The room temperature surrounding the
oven should be below 95° F (35° C).
2. Food weight should exceed 4 oz. (110 g).
3. Be sure the glass tray, the outside of the
cooking containers and the inside of the
microwave oven are dry before placing
food in the oven. Residual beads of moisture turning into steam can mislead the
sensor.
4. Cover food with lid, or with vented plastic
wrap. Never use tightly sealed plastic
containers—they can prevent steam from
escaping and cause food to overcook.
DURING Reheating/Cooking:
DO NOT open the oven door until 2 beeps
sound and cooking time appears on the
Display Window. Doing so will cause inaccurate cooking since the steam from food is
no longer contained within the oven cavity.
Once the cooking time begins to count
down, the oven door may be opened to stir,
turn, or rearrange foods.
AFTER Reheating/Cooking:
All foods should have a stand time.
• Press until the desired
category appears on
the display window.
(see More/Less
Feature)
(☛page 13)
• Press Start.
➤ Cooking starts.
16
Page 19
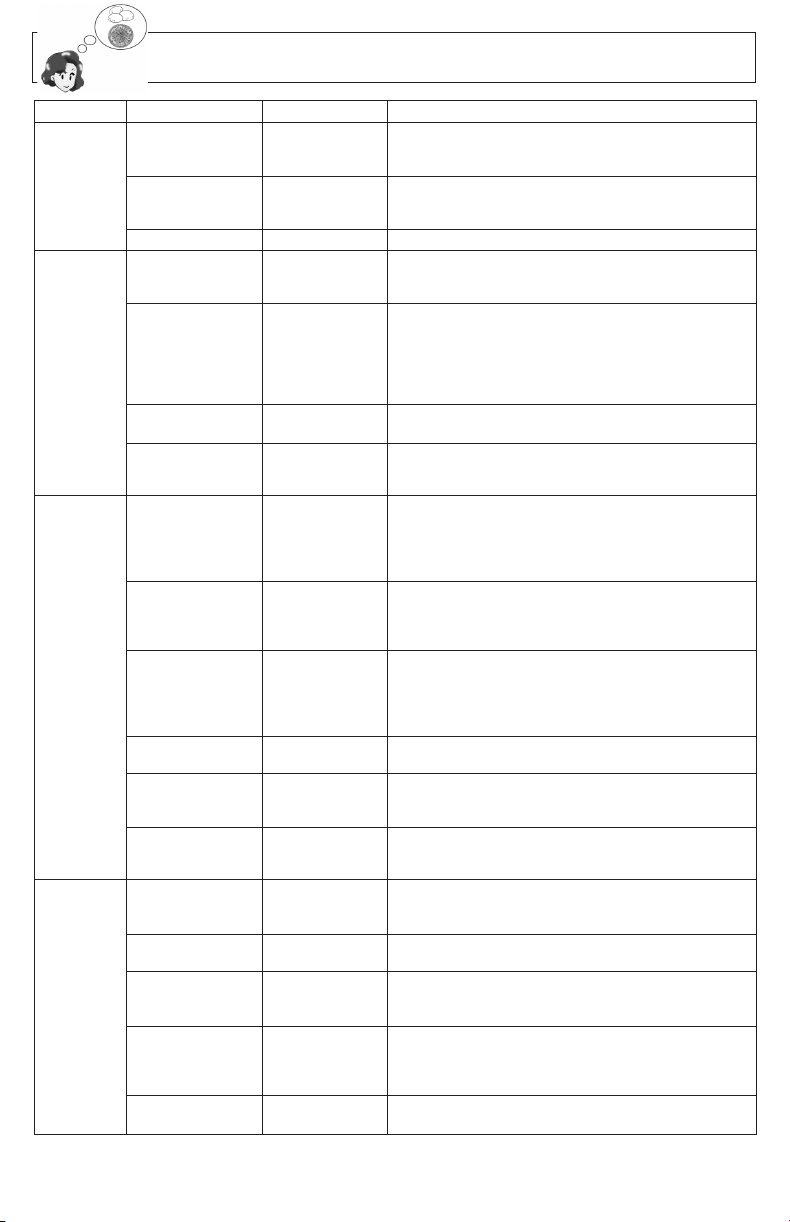
Sensor Cook Chart
Pad Recipe Serving/Weight Hints
1
Breakfast 1. Oatmeal
/2 - 1 cup Place inside a microwave safe serving bowl with
(40 - 80 g) no cover. Follow manufacturers’ directions for
preparation.
2. Breakfast 2 - 8 links Follow manufacturers’ directions for preparation of
Sausage pre-cooked breakfast sausage. Place in a radial
pattern.
3. Omelet 2, 4 eggs Follow Basic Omelet recipe on page 18.
Lunch 4. Soup 1 - 2 cups Pour soup into a microwave safe serving bowl.
/Snack (250 - 500 ml) Cover with lid or vented plastic wrap. Stir after
cooking.
5. Frozen 8 - 32 oz. Follow manufacturers’ directions for preparation.
Entrées (225 - 900 g) After 2 beeps, stir or rearrange. Be careful when
removing the film cover after cooking. Remove
facing away from you to avoid steam burns.
If additional time is needed, continue to cook
manually.
6. Frozen Pizza 8 oz. Follow manufacturers’ directions for preparation.
(single) (225 g)
7. Frozen Pocket 1 sandwich Follow manufacturer's directions for preparation.
Sandwich (4.5 oz.)
(128 g)
Side Dish 8. Potatoes 4 maximum Pierce each potato with a fork 6 times spacing
(6 - 8 oz. each) around surface. Place potato or potatoes around
(170 - 225 g) the edge of paper-towel-lined glass tray
(Turntable), at least 1 inch (2.5 cm) apart. Do not
cover. Let stand 5 minutes to complete cooking.
9. Fresh 4 - 16 oz. All pieces should be the same size. Wash
Vegetables (110 - 450 g) thoroughly, add 1 tbsp. of water per
1
/2 cup of
vegetables, and cover with lid or vented plastic
wrap. Do not salt/butter until after cooking.
10. Frozen 6 - 16 oz. Wash thoroughly, add 1 tbsp. of water per
1
/2
Vegetables (170 - 450 g) cup of vegetables, and cover with lid or vented
plastic wrap. Do not salt/butter until after cooking.
(Not suitable for vegetables in butter or sauce.)
After 2 beeps, stir or rearrange.
11. Canned 15 oz. Empty contents into microwave safe serving bowl.
Vegetables (430 g) Do not cover.
12. White Rice
1
/2 - 11/2 cups Place rice with hot tap water in a microwave safe
(110 - 335 g) casserole dish. Cover with lid or vented plastic
wrap. Let stand 5 to 10 minutes before serving.
13. Brown Rice
1
/2 - 11/2 cups Place rice with hot tap water in a microwave safe
(110 - 335 g) casserole dish. Cover with lid or vented plastic
(maxium) wrap. Let stand 5 to 10 minutes before serving.
Dinner 14. Frozen 11 - 16 oz. Follow manufactures’ directions for covering or
Dinners (300 - 450 g) removing covers. Do not use frozen foods
packaged in foil trays.
15. Pasta 2 - 8 oz. Place pasta with hot tap water in a microwave safe
(56 - 225 g) casserole dish. Cover with lid or vented plastic wrap.
16. Stew 1 -2 cups Pour contents from can into microwave safe
serving bowl. Cover with lid or vented plastic wrap.
Stir after cooking.
17. Ground Meat 16 - 32 oz. Break apart in glass bowl or colander. Cover with
(450 - 900 g) lid or vented plastic wrap. After 2 beeps, stir.
Re-cover and press Start. Juices should be clear.
Drain.
18. Fish Fillets 4 - 16 oz. Arrange in a single layer. Cover with lid or vented
(110 - 450 g) plastic wrap.
17
Page 20
Microwave Recipes
OMELET
Basic Omelet
1 tablespoon butter or margarine
2 eggs
2 tablespoons milk
salt and ground black pepper, if desired
Heat butter in a microwave safe 9-inch pie
plate, 20 seconds at P10, or until melted.
Turn the plate to coat the bottom with butter.
Meanwhile, combine the remaining
ingredients in a separate bowl, beat together
and pour into the pie plate.
Cook, covered with vented plastic wrap,
using OMELET selection. Let stand 2 minutes. With a spatula, loosen the edges of the
omelet from the plate, fold into thirds to
serve. Always use scrambled eggs.
Yield: 1 serving
Approx. cooking time: 4 minutes.
NOTE: Double ingredients for a 4 egg
Omelet.
CASSEROLE
Shepherd’s Pie
1 pound lean ground beef
1
/2 cup frozen peas, thawed
1
cup chopped onion
/4
1 tablespoon gravy powder
1
/2 teaspoon curry powder
1
teaspoon salt
/4
1
teaspoon ground black pepper
/4
2 cups mashed potatoes
In a 2-Qt. casserole dish, crumble the
ground beef and cook for 5-7 minutes at P6
or until the meat is cooked, stirring twice.
Add the remaining ingredients, except for
potatoes. Stir well, and then spread the
potatoes evenly on the top. Cover with a lid
or vented plastic wrap and cook at P6 power
for 16-18 minutes.
Yield: 4 servings
Macaroni and Cheese
1
/4 cup butter
2 tablespoons chopped onion
1 clove minced garlic
1
/4 cup all-purpose flour
1 teaspoon dry mustard
1 teaspoon salt
1
/4 teaspoon ground black pepper
2 cups milk
2 cups grated cheddar cheese
8 oz. (
1
/3 cup bread crumbs
1 teaspoon paprika
1
/2 lb dry weight) macaroni, cooked
and drained
In a 2-Qt. casserole, melt the butter for
40 seconds at P10. Add onion and garlic
and cook for 1 minute at P10. Stir in flour,
mustard, salt and pepper, and gradually add
the milk. Cook for 3-4 minutes at P10 until
sauce thickens, stirring once. Add the
cheddar cheese, stirring thoroughly. Pour
and stir the sauce into the macaroni, in a 3Qt. casserole.Top with bread crumbs and
paprika. Cover with lid or vented plastic
wrap. Cook at P6 power for 16-18 minutes.
Yield: 6 servings
Beef and Macaroni Casserole
1 pound lean ground beef
1 small onion, chopped
1
green bell pepper, chopped
/2
1 cup chopped celery
2 15 oz. cans tomato sauce
1
1
/4 cups water
1 cup uncooked elbow macaroni
1 teaspoon parsley
1
/2 teaspoon salt
1
/4 teaspoon ground black pepper
1
/2 cup grated cheddar cheese
Crumble the ground beef in a 3-Qt.
casserole. Cook for 5-7 minutes at P6 or
until the meat is cooked, stirring twice.
Stir in onion, peppers and celery. Cook for
3-4 minutes at P10. Stir in the remaining
ingredients, except cheese. Cover with lid or
vented plastic wrap. Cook at P6 power for
16-18 minutes. Sprinkle with cheese. Cover
and let stand 5 minutes.
Yield: 4-6 servings
Tuna Casserole
16 oz. can tuna, drained and flaked
4 cups cooked and drained noodles
3
110
14 oz. can mushroom pieces and stems,
1 16 oz. package frozen peas, defrosted
3
4 cup milk
/
1 cup crushed potato chips
1
/2 cup grated cheddar cheese
In a 3-Qt. casserole, combine tuna,
noodles, soup, mushrooms, peas and milk;
mix well. Cover with lid or vented plastic
wrap. Cook at P6 power for 16-18 minutes.
Top with potato chips and cheese before
serving.
Yield: 4-6 servings
oz. can condensed cream of
/4
mushroom soup
drained
18
Page 21
Timer Feature
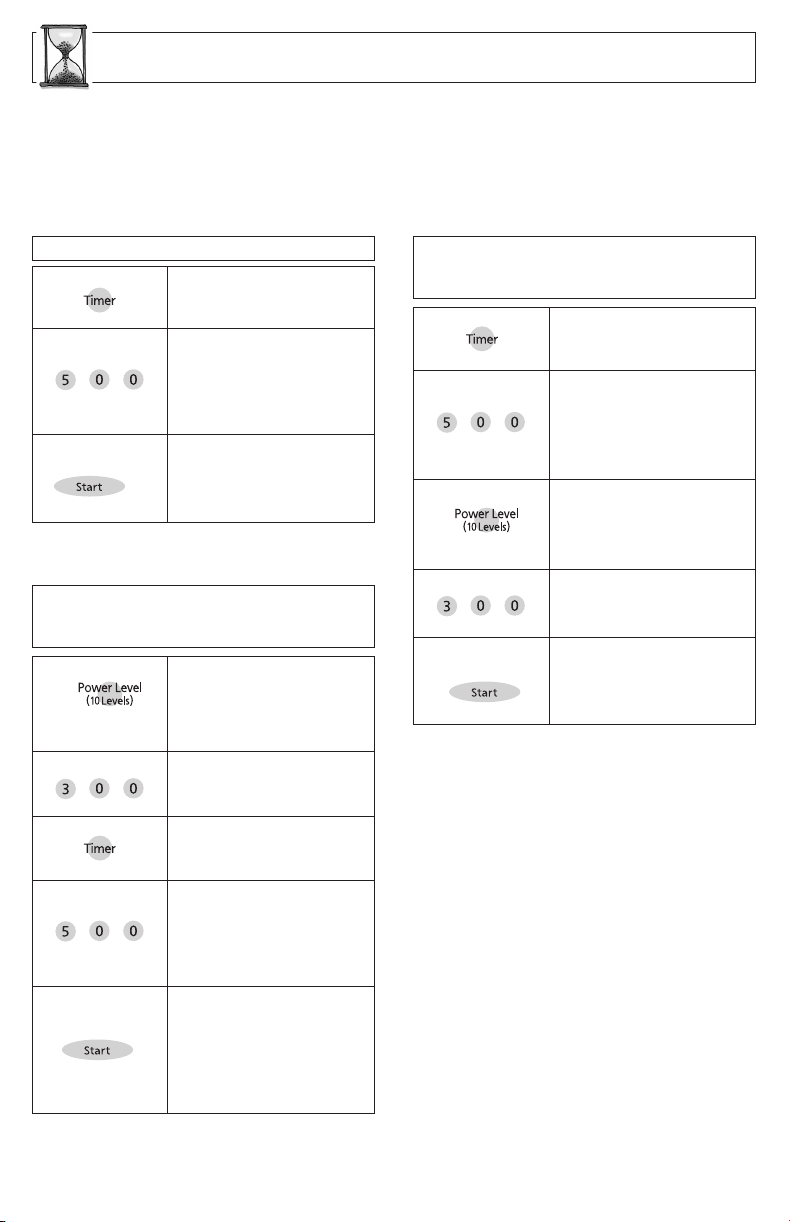
This feature allows you to program the
oven as a kitchen timer. It can also be
used to program a standing time after
cooking is completed and/or to program a
delay start.
To Use as a Kitchen Timer:
Example: To count down 5 minutes.
1.
2.
3.
• Press Timer.
• Set desired amount of
time using number
pads.
(up to 99 minutes and
99 seconds).
• Press Start.
➤ Time will count
down without oven
operating.
To Set Stand Time:
Example: To cook at P6 power for 3
1.
Press 5 times
2.
3.
4.
5.
minutes, with stand time of
5 minutes.
• Enter the desired
Power Level (see
page 12 for directions).
Set desired cooking time
using number pads.
• Press Timer.
• Set desired amount of
Stand Time using
number pads. (up to
99 minutes and 99
seconds)
• Press Start.
➤ Cooking will start.
After cooking, stand
time will count down
without oven
operating.
CAUTION:
If oven lamp is lit while using the timer
feature, the oven is incorrectly programed. Stop oven immediately and
re-read instructions.
To Set Delay Start:
Example: To delay the start of cooking
1.
2.
3.
Press 5 times
4.
5.
NOTE:
1. When each stage finishes, a two-beep
signal sounds. At the end of the program, the oven will beep five times.
2. If the oven door is opened during
Stand Time, Kitchen Timer or Delay
Time, the time on the display will continue to count down.
3. Stand time and Delay start cannot be
programmed before any automatic
Function. This is to prevent the starting
temperature of food from rising before
defrosting or cooking begins. A change
in starting temperature could cause
inaccurate results.
for 5 minutes, and cook at P6
power for 3 minutes.
• Press Timer.
• Enter desired amount
of delay time using
number pads. (up to
99 minutes and 99
seconds)
• Enter the desired
Power Level (see
page 12 for directions).
Set desired cooking time
using number pads.
• Press Start.
➤ Delay time will
count down. Then
cooking will start.
19
Page 22
Microwave Shortcuts
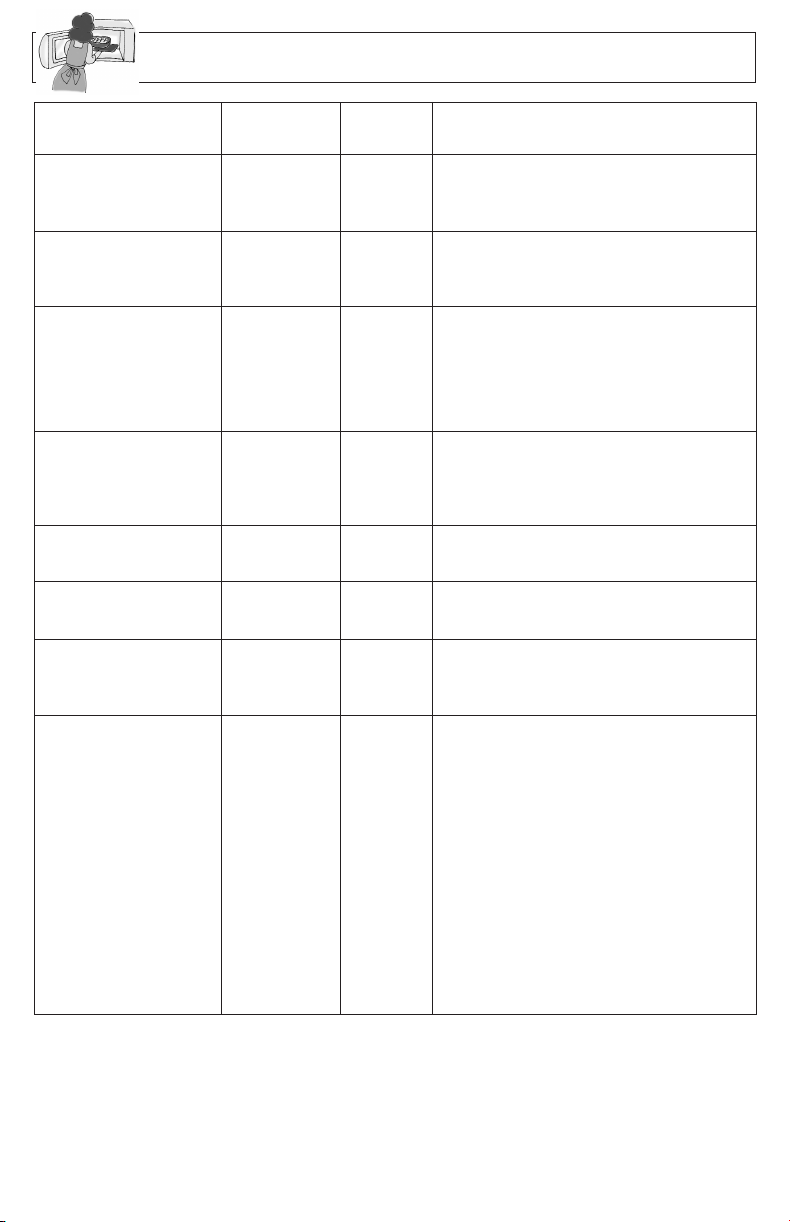
FOOD POWER TIME DIRECTIONS
(in mins.)
To separate refrigerated P10 (HIGH) 30 sec. Remove wrapper and place in microwave
Bacon, safe dish. After heating, use a plastic
1 pound (450 g) spatula to separate slices.
To soften Brown Sugar P10 (HIGH) 20 - 30 sec. Place brown sugar in microwave safe dish
1 cup (250 ml) with a slice of bread. Cover with lid or
plastic wrap.
To soften refrigerated Butter,
1 stick, 1/4 pound (110 g)
To melt refrigerated Butter,
1 stick, 1/4 pound (110 g)
P3 (MED-LOW) 1 Remove wrapper and place butter in a
microwave safe dish.
P6 (MEDIUM) 11/2 - 2 Remove wrapper and place butter in a
microwave safe dish covered with lid or
vented plastic wrap.
1
Remove wrapper and place chocolate
To melt Chocolate, P6 (MEDIUM) 1 - 1
1 square, 1 oz. (28 g) in a microwave safe dish. After heating, stir
To melt Chocolate, P6 (MEDIUM) 1 - 1
1
cup (125 ml) chips holds its shape even when softened.
/2
To toast Coconut, P10 (HIGH) 1 Place in a microwave safe dish.
1
cup (125 ml) Stir every 30 seconds.
/2
To soften Cream Cheese,
P3 (MED-LOW) 1 - 2 Remove wrapper and place in a
/2
1
/2 until completely melted. Note: Chocolate
8 oz. (225 g) microwave safe bowl.
To brown Ground Beef, P10 (HIGH) 4 - 5 Crumble into a microwave safe colander
1 pound (450 g) set into another dish. Cover with plastic
wrap. Stir twice. Drain grease.
To cook Vegetables,
Fresh P8 3
1
lb) thoroughly, add 1 tbsp of water per
/2
(
1
/2 - 4 All pieces should be the same size. Wash
1
cup
/2
(225 g) of vegetables, and cover with lid or vented
plastic wrap. Do not salt/butter until after
cooking.
1
Frozen P8 3
(10 oz)
/2 - 4 Wash thoroughly, add 1 tbsp of water per
1
/2 cup of vegetables, and cover with lid or
(285 g) vented plastic wrap. Do not salt/butter until
after cooking. (Not suitable for vegetables in
butter or sauce.)
1
Canned P8 3
/2 - 4 Empty contents into microwave safe serving
(15 oz) bowl. Do not cover.
(430 g)
20
Page 23
Microwave Shortcuts
(continued)
FOOD POWER TIME DIRECTIONS
(in mins.)
To cook baked Potato, Pierce each potato with a fork 6 times
(6 - 8 oz. each) spacing around surface. Place potato or
(170 - 225 g) potatoes around the edge of paper-towel1P83
1
/2 - 4 lined glass tray (Turntable), at least 1 inch
(2.5 cm) apart. Do not cover. Let stand 5
2P86 - 7 minutes to complete cooking.
To steam Hand Towels - 4
P10 (HIGH) 20 - 30 sec. Soak in water, then wring out excess.
Place on a microwave safe dish.
Heat. Present immediately.
1
To soften Ice Cream, P3 (MED-LOW) 1 - 1
1
/2 gallon (2 L)
/2 Check often to prevent melting.
Cup of liquid
To boil water, broth, etc.
1 cup, 8 oz. (250 ml) P10 (HIGH) 11/2 - 2 Heated liquids can erupt if not stirred.
2 cups, 16 oz. (500 ml)
P10 (HIGH) 21/2 - 3 Do not heat liquids in microwave oven
without stirring before heating.
Cup of liquid
To warm Beverage,
1 cup, 8 oz. (250 ml) P7 (MED-HIGH) 1
2 cups, 16 oz. (500 ml)
To roast Nuts, P10 (HIGH) 3 - 4 Spread nuts into a 9-inch (23 cm)
1
/2 cups (375 ml) microwave safe pie plate.
1
P7 (MED-HIGH) 21/2 - 3
1
- 2
/2
Stir occasionally.
To toast Sesame Seeds, P10 (HIGH) 2 - 2
1
cup (60 ml) Stir twice.
/4
1
/2 Place in a small microwave safe bowl.
To skin Tomatoes, P10 (HIGH) 30 sec. Place tomato into a microwave safe bowl
(one at a time) containing boiling water. Rinse and peel.
Repeat for each tomato.
To remove Cooking Odors,
P10 (HIGH) 5 Combine 1 to 11/2
cups (250 - 375 ml)
water with the juice and peel of one lemon
in a 2 quart microwave safe bowl.
After water finishes boiling, wipe interior of
oven with a cloth.
21
Page 24
Food Characteristics Cooking Techniques
Bone and Fat
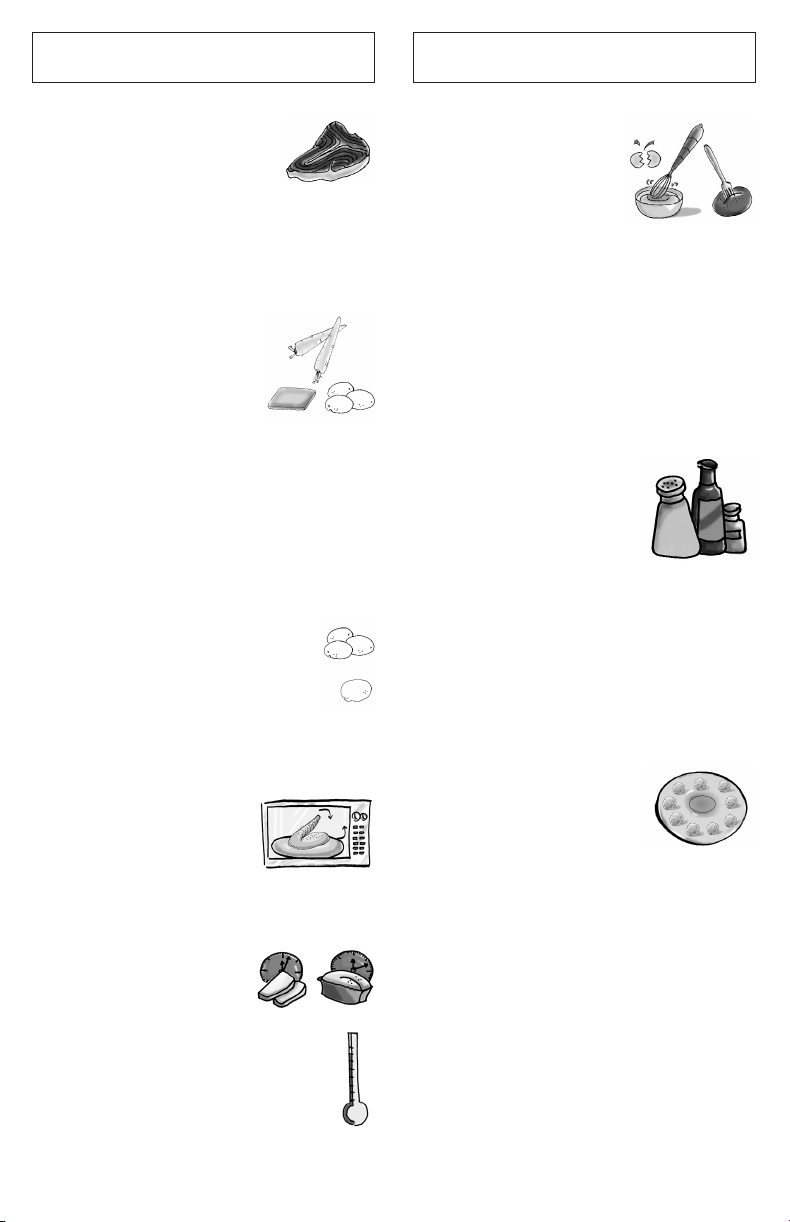
Both bone and fat affect cooking. Bones may cause irregular cooking. Meat next to the
tips of bones may overcook
while meat positioned under a large bone,
such as a ham bone, may be undercooked. Large amounts of fat absorb
microwave energy and the meat next to
these areas may overcook.
Density
Porous, airy foods such as
breads, cakes or rolls take
less time to cook than
heavy, dense foods such as
potatoes and roasts. When
reheating donuts or other
foods with different centers be very careful. Certain foods have centers made with
sugar, water, or fat and these centers
attract microwaves (For example, jelly
donuts). When a jelly donut is heated, the
jelly can become extremely hot while the
exterior remains warm to the touch. This
could result in a burn if the food is not
allowed to cool properly in the center.
Quantity
Two potatoes take longer to cook
than one potato. As the quantity of
the food decreases so does the
cooking time. Overcooking will
cause the moisture content in the
food to decrease and a fire could result.
Never leave microwave unattended while
in use.
Shape
Uniform sizes heat more
evenly. The thin end of a
drumstick will cook more
quickly than the meaty
end. To compensate for irregular shapes,
place thin parts toward the center of the
dish and thick pieces toward the edge.
Piercing
Foods with skins or membranes must be pierced
scored or have a strip of
skin peeled before cooking to allow steam to
escape. Pierce clams,
oysters, chicken livers, whole potatoes
and whole vegetables. Whole apples or
new potatoes should have a 1-inch strip
of skin peeled before cooking. Score
sausages and frankfurters. Do not
Cook/Reheat whole eggs with or without
the shell. Steam build up in whole eggs
may cause them to explode, and possibly
damage the oven or cause injury.
Reheating SLICED hard-boiled eggs and
cooking SCRAMBLED eggs is safe.
Browning
Foods will not have the
same brown appearance as
conventionally cooked foods
or those foods which are
cooked utilizing a browning
feature. Meats and poultry
may be coated with browning sauce,
Worcestershire sauce, barbecue sauce or
shake-on browning sauce. To use, combine browning sauce with melted butter or
margarine and brush on before cooking.
For quick breads or muffins, brown sugar
can be used in the recipe in place of
granulated sugar, or the surface can be
sprinkled with dark spices before baking.
Spacing
Individual foods, such as
baked potatoes, cupcakes
and appetizers, will cook more
evenly if placed in the oven
equal distances apart. When
possible, arrange foods in a circular pattern.
Size
Thin pieces cook more
quickly than thick pieces.
Starting Temperature
Foods that are at room temperature
take less time to cook than if they
are chilled, refrigerated, or frozen.
22
Page 25
Cooking Techniques
(continued)
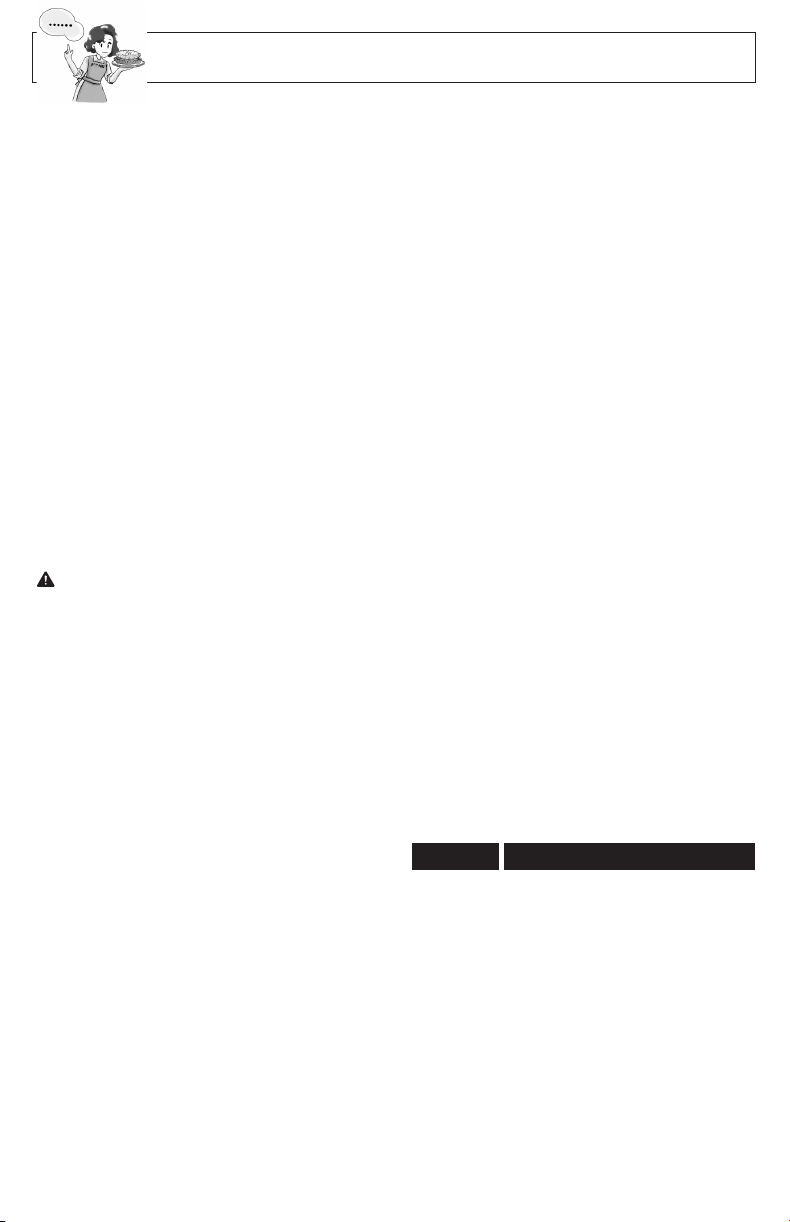
Covering
As with conventional cooking, moisture
evaporates during microwave cooking.
Casserole lids or plastic wrap are used for a
tighter seal. When using plastic wrap, vent
the plastic wrap by folding back part of the
plastic wrap from the edge of the dish to
allow steam to escape. Loosen or remove
plastic wrap as recipe directs for stand time.
When removing plastic wrap covers, as well
as any glass lids, be careful to remove them
away from you to avoid steam burns.
Various degrees of moisture retention are
also obtained by using wax paper or paper
towels.
Shielding
Thin areas of meat and poultry cook more
quickly than meaty portions. To prevent
overcooking, these thin areas can be shielded with strips of aluminum foil. Wooden
toothpicks may be used to hold the foil in
place.
CAUTION is to be exercised when
using foil. Arcing can occur if foil is too close
to oven wall or door and damage to your
oven will result.
Cooking time
A range of cooking time is given in each
recipe. The time range compensates for the
uncontrollable differences in food shapes,
starting temperature, and regional preferences. Always cook food for the minimum
cooking time given in a recipe and check for
doneness. If the food is undercooked, continue cooking. It is easier to add time to an
undercooked product. Once the food is
overcooked, nothing can be done.
Stirring
Stirring is usually necessary during
microwave cooking. Always bring the
cooked outside edges toward the center
and the less cooked center portions toward
the outside of the dish.
Rearranging
Rearrange small items such as chicken
pieces, shrimp, hamburger patties, or pork
chops. Rearrange pieces from the edge to
the center and pieces from the center to the
edge of the dish.
Turning
It is not possible to stir some foods to distribute the heat evenly. At times, microwave
energy will concentrate in one area of the
food. To help insure even cooking, these
food need to be turned. Turn over large
foods, such as roasts or turkeys, halfway
through cooking.
Stand Time
Most foods will continue to cook by conduction after the microwave oven is turned off.
In meat cookery, the internal temperature
will rise 5°F to 15°F (3°C to 8°C), if allowed
to stand, tented with foil, for 10 to 15 minutes. Casseroles and vegetables need a
shorter amount of standing time, but this
standing time is necessary to allow foods to
complete cooking to the center without overcooking on the edges.
Test for Doneness
The same tests for doneness used in conventional cooking may be used for
microwave cooking. Meat is done when
fork-tender or splits at fibers. Chicken is
done when juices are clear yellow and
drumstick moves freely. Fish is done when it
flakes and is opaque. Cake is done when a
toothpick or cake tester is inserted and
comes out clean.
ABOUT FOOD SAFETY AND
COOKING TEMPERATURE
• Check foods to see that they are cooked
to the United States Department of
Agriculture’s recommended temperatures.
TEMP FOOD
160˚F ...for fresh pork, ground meat,
boneless white poultry, fish,
seafood, egg dishes and
frozen prepared food.
165˚F ...for leftover, ready-to-reheat
refrigerated, and deli and
carryout “fresh” food.
170˚F ...white meat of poultry.
180˚F ...dark meat of poultry.
To test for doneness, insert a meat thermometer in a thick or dense area away from
fat or bone. NEVER leave the thermometer
in the food during cooking, unless it is
approved for microwave oven use.
23
Page 26
Care and Cleaning of Your Microwave Oven
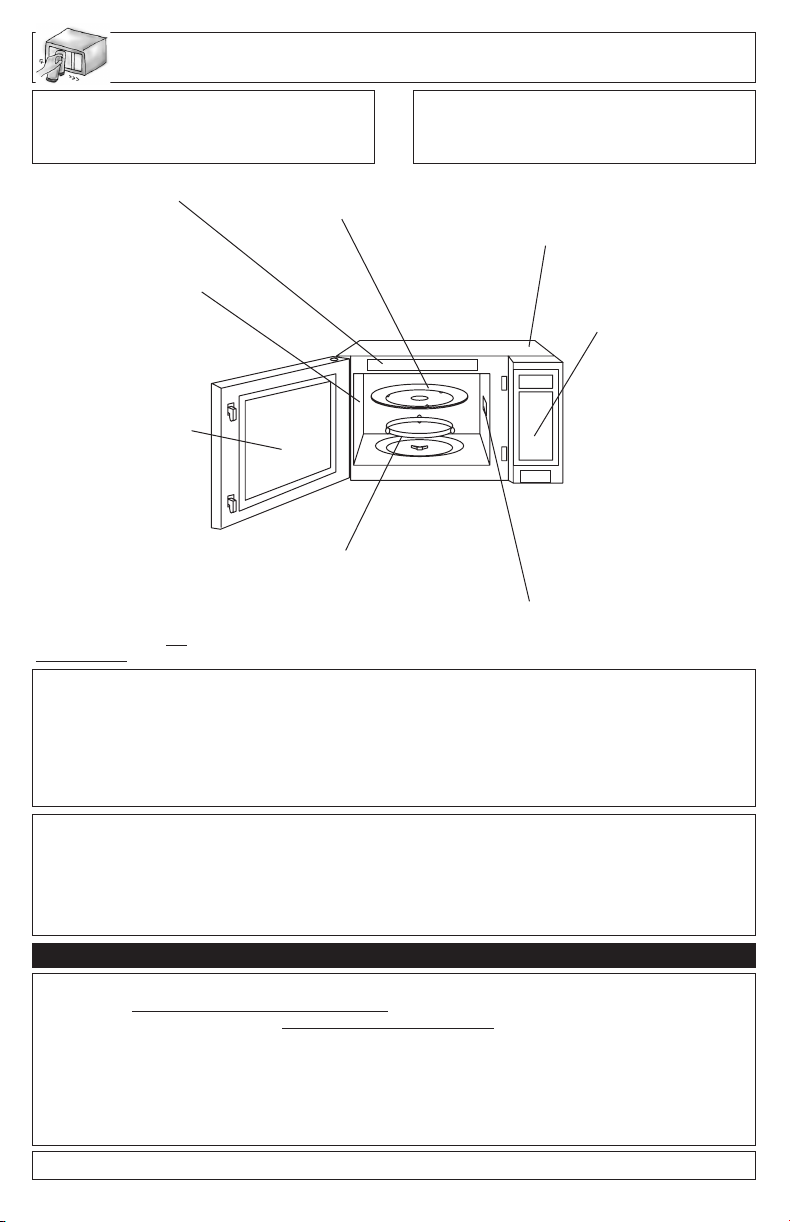
BEFORE CLEANING:
Unplug oven at wall outlet. If outlet is inaccessible, leave oven door open while cleaning.
Warning Label:
Do not remove, wipe with a
damp cloth.
Inside of the oven:
Wipe with a damp cloth
after using. Mild detergent
may be used if needed.
Do not use harsh detergents or abrasives.
Oven Door:
Wipe with a soft dry
cloth when steam
accumulates inside or
around the outside of
the oven door. During
cooking, especially
under high humidity
conditions, steam is
given off from the
food. (Some steam
will condense on cooler surfaces, such as
the oven door. This is
normal.)
Inside surface is covered with a heat and
vapor barrier film. Do
not remove.
Glass Tray:
Remove and wash in warm soapy
water or in a dishwasher.
Roller Ring and oven cavity floor:
Clean the bottom surface of the oven
with mild detergent water or window
cleaner, and dry. Roller Ring may be
washed in mild soapy water or dishwasher. These areas should be kept
clean to avoid excessive noise.
AFTER CLEANING:
Be sure to place the Roller Ring and the Glass
Tray in the proper position and press
Stop/Reset Pad to clear the Display.
Outside oven surfaces:
Clean with a damp cloth.
To prevent damage to the
operating parts inside the
oven, water should not be
allowed to seep into ventilation openings.
Control Panel:
* Covered with a
removable protective
film to prevent
scratches during
shipping. Small bubbles may appear
under this film.
(Hint - To remove
film, apply masking
or clear tape to an
exposed corner and
pull gently.)
* If the Control Panel
becomes wet, clean
it with a soft dry
cloth. Do not use
harsh detergents or
abrasives.
Do not remove waveguide cover:
It is important to keep cover
clean in the same manner as the
inside of the oven.
IT IS IMPORTANT TO KEEP THE OVEN CLEAN AND DRY.
FOOD RESIDUE AND CONDENSATION MAY CAUSE RUSTING
OR ARCING AND DAMAGE TO THE OVEN. AFTER USE, WIPE
DRY ALL SURFACES-INCLUDING VENT OPENINGS, OVEN
SEAMS, AND UNDER GLASS TRAY.
PARTS DESCRIPTION PART NUMBER
Instructions / Operating Manual (this book) F00038N50AP
Glass Tray A06014A00AP (NN-P794/SN747/SN757/SN797)
Roller Ring Assembly F290D9330AP
Accessory Purchases
Purchase Parts, Accessories and Instruction Books online for all Panasonic Products by visiting our
Web Site at: http://www.pstc.panasonic.com
or, send your request by E-mail to: [email protected]
You may also contact us directly at:
1-800-332-5368 (Phone) 1-800-237-9080 (Fax Only) (Monday-Friday 9 am to 8 pm, EST.)
Panasonic Service and Technology Company
20421 84th Avenue South,
Kent, WA 98032
(We Accept Visa, MasterCard, Discover Card, American Express, and Personal Checks)
For hearing or speech impaired TTY users, TTY: 1-866-605-1277
A06014M00AP (NN-T945/SN947/SN957/SN977)
24
Page 27
Before Requesting Service
These things are normal:
The oven causes Some radio and TV interference might occur when you cook
interference with with the microwave oven. This interference is similar to the
my TV. interference caused by small appliances such as mixers,
Steam accumulates During cooking, steam and warm air are given off from the
on the oven door and food. Most of the steam and warm air are removed from the
warm air comes from oven by the air which circulates in the oven cavity. However,
the oven vents. some steam will condense on cooler surfaces such as the
PROBLEM POSSIBLE CAUSE REMEDY
Oven will not turn on.
Oven will not start
cooking.
The Glass Tray
wobbles.
When the oven is
operating, there is
noise coming from
the glass tray.
The word “LOCK”
appears in the
Display Window.
The oven stops cooking
by microwave and "H97"
or "H98" appears in the
display window.
vacuums, blow dryers, etc. It does not indicate a problem with
your oven.
oven door. This is normal. After use, the oven should be
wiped dry (see page 24).
The oven is not plugged in Remove plug from outlet, wait
securely. 10 seconds and re-insert.
Circuit breaker or fuse is Reset circuit breaker or replace
tripped or blown. fuse.
There is a problem with the Plug another appliance into the
outlet. outlet to check if it is working.
The door is not closed Close the oven door securely.
completely.
Start Pad was not pressed Press Start Pad.
after programming.
Another program is already Press Stop/Reset Pad to cancel
entered into the oven. the previous program and enter
The program is not correct. Program again according to the
Stop/Reset Pad has been Program oven again.
pressed accidentally.
The Glass Tray is not Take out Glass Tray and Roller
positioned properly on the Ring. Wipe with a damp cloth and
Roller Ring or there is food reset Roller Ring and Glass Tray
under the Roller Ring. properly.
The Roller Ring and oven Clean these parts according to
bottom are dirty. Care and Cleaning of your
The CHILD LOCK was See Function Pad on page 11.
activated.
This display indicates a
problem with the microwave
generation system.
new program.
Operating Instructions.
Microwave Oven (see page 24).
Please contact an authorised
Service Center (see page 26).
25
Page 28
Limited Warranty & Customer Services Directory
PANASONIC CONSUMER ELECTRONICS COMPANY, PANASONIC SALES COMPANY,
DIVISION OF PANASONIC CORPORATION OF DIVISION OF PANASONIC PUERTO
NORTH AMERICA RICO, INC.
One Panasonic Way Ave. 65 de Infanteria, Km. 9.5
Secaucus, New Jersey 07094 San Gabriel Industrial Park
Panasonic Microwave Oven Product
Limited Warranty
Limited Warranty Coverage
If your product does not work properly because of a defect in materials or workmanship, Panasonic
Consumer Electronics Company or Panasonic Sales Company (collectively referred to as “the warrantor”)
will, for the length of the period indicated on the chart below, which starts with the date of original purchase
("warranty period"), at its option either (a) repair your product with new or refurbished parts, or (b) replace it
with a new or a refurbished product. The decision to repair or replace will be made by the warrantor.
ALL PARTS (EXCEPT MAGNETRON TUBE) 1 (ONE) YEAR 1 (ONE) YEAR
MAGNETRON TUBE 5 (FIVE) YEAR 1 (ONE) YEAR
During the "Labor" warranty period there will be no charge for labor. During the "Parts" warranty period,
there will be no charge for parts. You must carry-in or mail-in your product during the warranty period. This
warranty only applies to products purchased and serviced in the United States or Puerto Rico. This warranty
is extended only to the original purchaser of a new product which was not sold "as is". A purchase receipt or
other proof of the original purchase date is required for warranty service.
Carry-In or Mail-In Service
For Carry-In or Mail-In Service in the United States call 1-800-211-PANA(7262) or visit Panasonic Web Site:
http://www.panasonic.com
For assistance in Puerto Rico call Panasonic Sales Company (787)-750-4300 or fax (787)-768-2910.
Limited Warranty Limits And Exclusions
This warranty ONLY COVERS failures due to defects in materials or workmanship, and DOES NOT COVER
glass, plastic parts, temperature probes(if included) and normal wear and tear or cosmetic damage. The warranty ALSO DOES NOT COVER damages which occurred in shipment, or failures which are caused by
products not supplied by the warrantor, or failures which result from accidents, misuse, abuse, neglect, mishandling, misapplication, alteration, faulty installation, set-up adjustments, misadjustment of consumer controls, improper maintenance, power line surge, lightning damage, modification, or commercial use (such as
in a hotel, office, restaurant, or other business), rental use of the product, service by anyone other than a
Factory Service center or other Authorized Servicer, or damage that is attributable to acts of God.
THERE ARE NO EXPRESS WARRANTIES EXCEPT AS LISTED UNDER “LIMITED WARRANTY COVERAGE". THE WARRANTOR IS NOT LIABLE FOR INCIDENTAL OR CONSEQUENTIAL DAMAGES
RESULTING FROM THE USE OF THIS PRODUCT, OR ARISING OUT OF ANY BREACH OF THIS WARRANTY. (As examples, this excludes damages for lost time, cost of having someone remove or re-install an
installed unit if applicable, or travel to and from the servicer. The items listed are not exclusive, but are for
illustration only.) ALL EXPRESS AND IMPLIED WARRANTIES, INCLUDING THE WARRANTY OF MER-
CHANTABILITY, ARE LIMITED TO THE PERIOD OF THE LIMITED WARRANTY.
Some states do not allow the exclusion or limitation of incidental or consequential damages, or limitations on
how long an implied warranty lasts, so the exclusions may not apply to you.
This warranty gives you specific legal rights and you may also have others rights which vary from state to
state. If a problem with this product develops during or after the warranty period, you may contact your dealer or Service center. If the problem is not handled to your satisfaction, then write to the warrantor's
Consumer Affairs Department at the addresses listed for the warrantor.
PARTS AND SERVICE WHICH ARE NOT COVERED BY THIS LIMITED WARRANTY ARE YOUR
RESPONSIBILITY.
Customer Services Directory
Obtain Product Information and Operating Assistance; locate your nearest Dealer or servicenter; purchase Parts and Accessories; or make Customer Service and Literature requests by visiting our Web
Site at: http://www.panasonic.com/consumersupport
or, contact us via the web at: http://www
You may also contact us directly at: 1-800-211-PANA(7262),
Monday-Friday 9 am-9 pm; Saturday-Sunday 10 am-7 pm, EST.
For hearing or speech impaired TTY users, TTY: 1-877-833-8855
.panasonic.com/contactinfo
Carolina, Puerto Rico 00985
PARTS LABOR
Service in Puerto Rico
Panasonic Puerto Rico, Inc.
Ave. 65 de Infantería, Km. 9.5, San Gabriel Industrial Park, Carolina, Puerto Rico 00985
Phone (787)750-4300, Fax (787)768-2910
26
Page 29
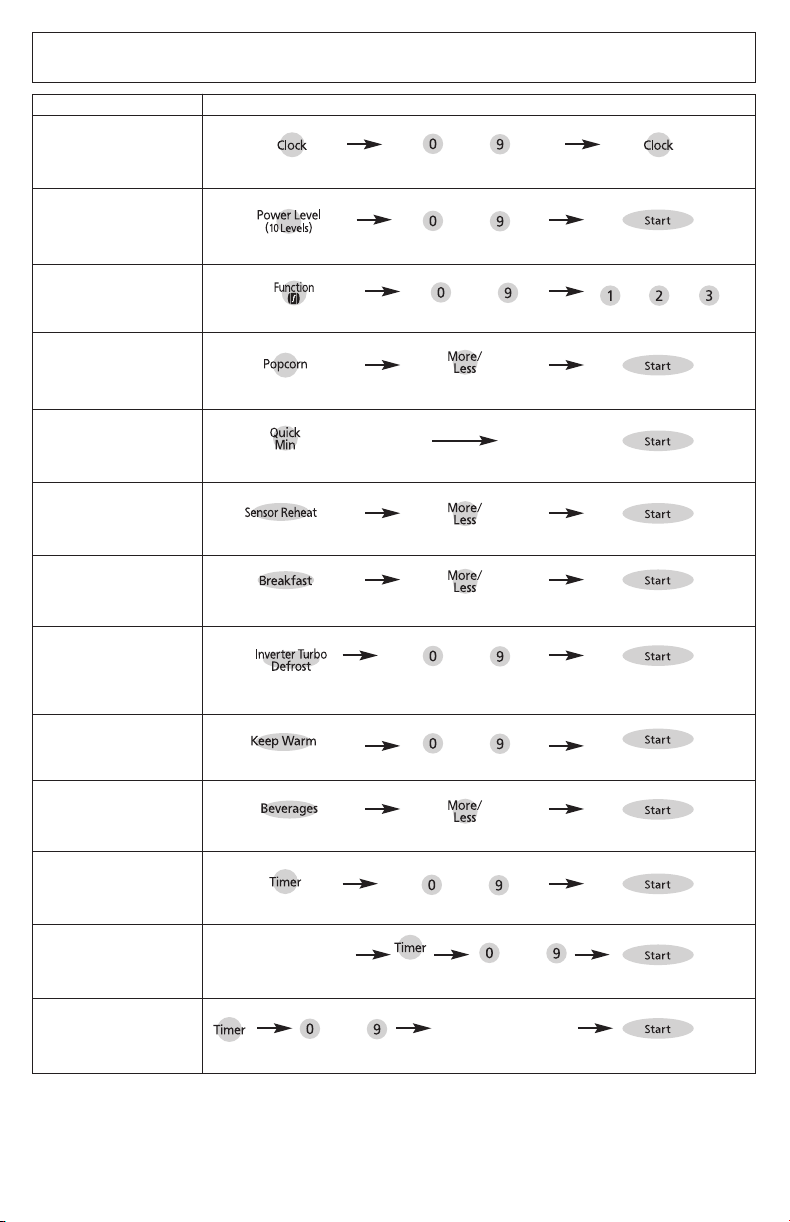
QUICK GUIDE TO OPERATION
Feature
To set
Clock
(☛page 10)
To set
Power and Time
(☛page 12)
To Use Function
(☛page 10)
To cook using
Popcorn
(☛page 13)
To cook using
Quick Min
(☛page 12)
To reheat using
Sensor Reheat
(☛page 16)
To cook using
Sensor Cook
(☛page 16)
To defrost using
Inverter Turbo
Defrost
(☛page 14)
To use
Keep Warm
(☛page 12)
How to Operate
Thru
Press once. Enter time of day. Press once.
Thru
Press to select Power Level.
Press. Select category. Select option.
Select weight. Optional. Press.
(up to 10 min.) Press.
Press once. Optional. Press.
e.g.
Select Category.
Press once. Set weight. Press.
Press once.
Set keep warm time. (up to 30 min.)
Set cooking time. Press.
Thru
Optional. Press.
Thru
Thru
or or
Press.
To use Beverages
(☛page 13)
To use as a
Kitchen Timer
(☛page 19)
To Set
Stand Time
(☛page 19)
To Set
Delay Start
(☛page 19)
Press to select servings. Press.
Press once. Set time. Press.
Input up to
4-stage cooking
()
programs.
Press once. Set time. Press.
Press once. Set time. Press.
Thru
Optional.
Thru
Thru
Input up to
4-stage cooking
()
programs.
27
Page 30
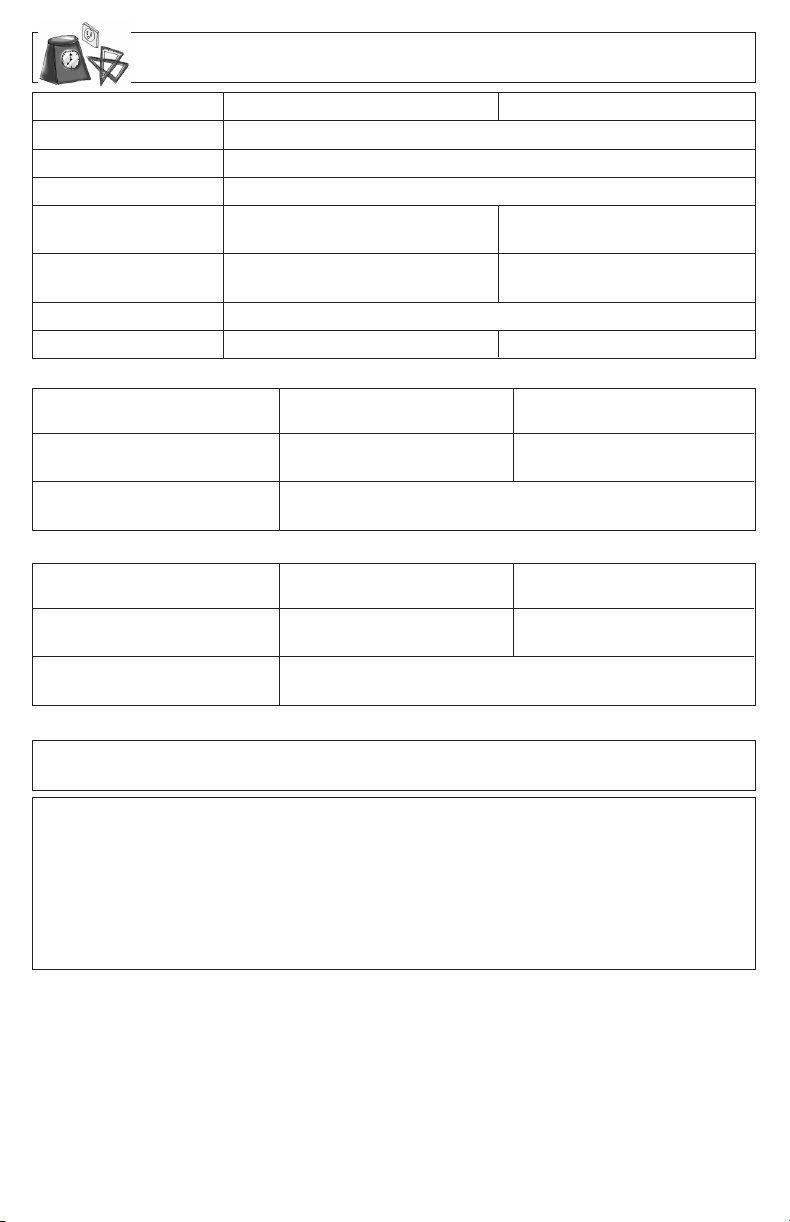
Specifications
NN-P794/SN747/SN757/SN797 NN-T945/SN947/SN957/SN977
Power Source:
Power Consumption:
Cooking Power:*
Outside Dimensions
(H x W x D):
Oven Cavity Dimensions
(H x W x D):
15
11
/
(304 mm x 555 mm x 493 mm) (356 mm x 606 mm x 493 mm)
9" x 167/16 " x 181/2 "10
(228 mm x 418 mm x 470 mm) (278 mm x 469 mm x 470 mm)
16 " x 21
7
8 " x 19
/
Operating Frequency:
Net Weight:
Approx. 32 lbs (14.3 kg) Approx. 36 lbs (16.7 kg)
*Trim Kit for NN-P794/SN747/SN757/SN797:
Model Number:
Outside Dimension:
NN-TK729SF NN-TK739SF
(Stainless) (Stainless)
27" x 161/2
(685 mm x 419 mm) (762 mm x 419 mm)
Cabinet Opening:
*Trim Kit for NN-T945/SN947/SN957/SN977:
Model Number:
Outside Dimension:
NN-TK929SF NN-TK939SF
(Stainless) (Stainless)
27" x 189/16
(685 mm x 472 mm) (762 mm x 472 mm)
Cabinet Opening:
*IEC Test procedure Specifications subject to change without notice.
120 V, 60 Hz
12.7 Amps, 1,460 W
1,250 W
7
16 "14" x 23
/
15
7
8 " x 19
/
7
/
/16 " x 187/16 " x 181/2 "
2,450 MHz
"30" x 16
7
" x 15
/8
5
" x 21"
/16
24
1
"
/2
(632 mm x 389 mm x 533.4 mm)
" 30" x 18
9
"
/16
247/8" x 173/8 " x 21"
(632 mm x 441.5 mm x 533.4 mm)
16 "
User’s Record
The serial number of this product may
be found on the back side of the oven
or on the left side of the control panel.
You should note the model number and
the serial number of this oven in the
space provided and retain this book as
a permanent record of your purchase
for future reference.
Panasonic Consumer Electronics Panasonic Sales Company, Division
Company, Division of Panasonic of Panasonic Puerto Rico, Inc. (“PSC”)
Corporation of North America Ave. 65 de Infanteria, Km. 9.5
One Panasonic Way San Gabriel Industrial Park,
Secaucus, New Jersey 07094 Carolina, Puerto Rico 00985
Matsushita Electric Industrial Co., Ltd.
Panasonic Home Appliances Microwave Oven (Shanghai) Co., Ltd.
898 Long Dong Road, Pu Dong, Shanghai, China 201203
Web Site: http://www.panasonic.co.jp/global
Model No. __________________
Serial No. __________________
Date of Purchase ____________
28
 Loading...