

Panasonic SL-SW851C User Manual
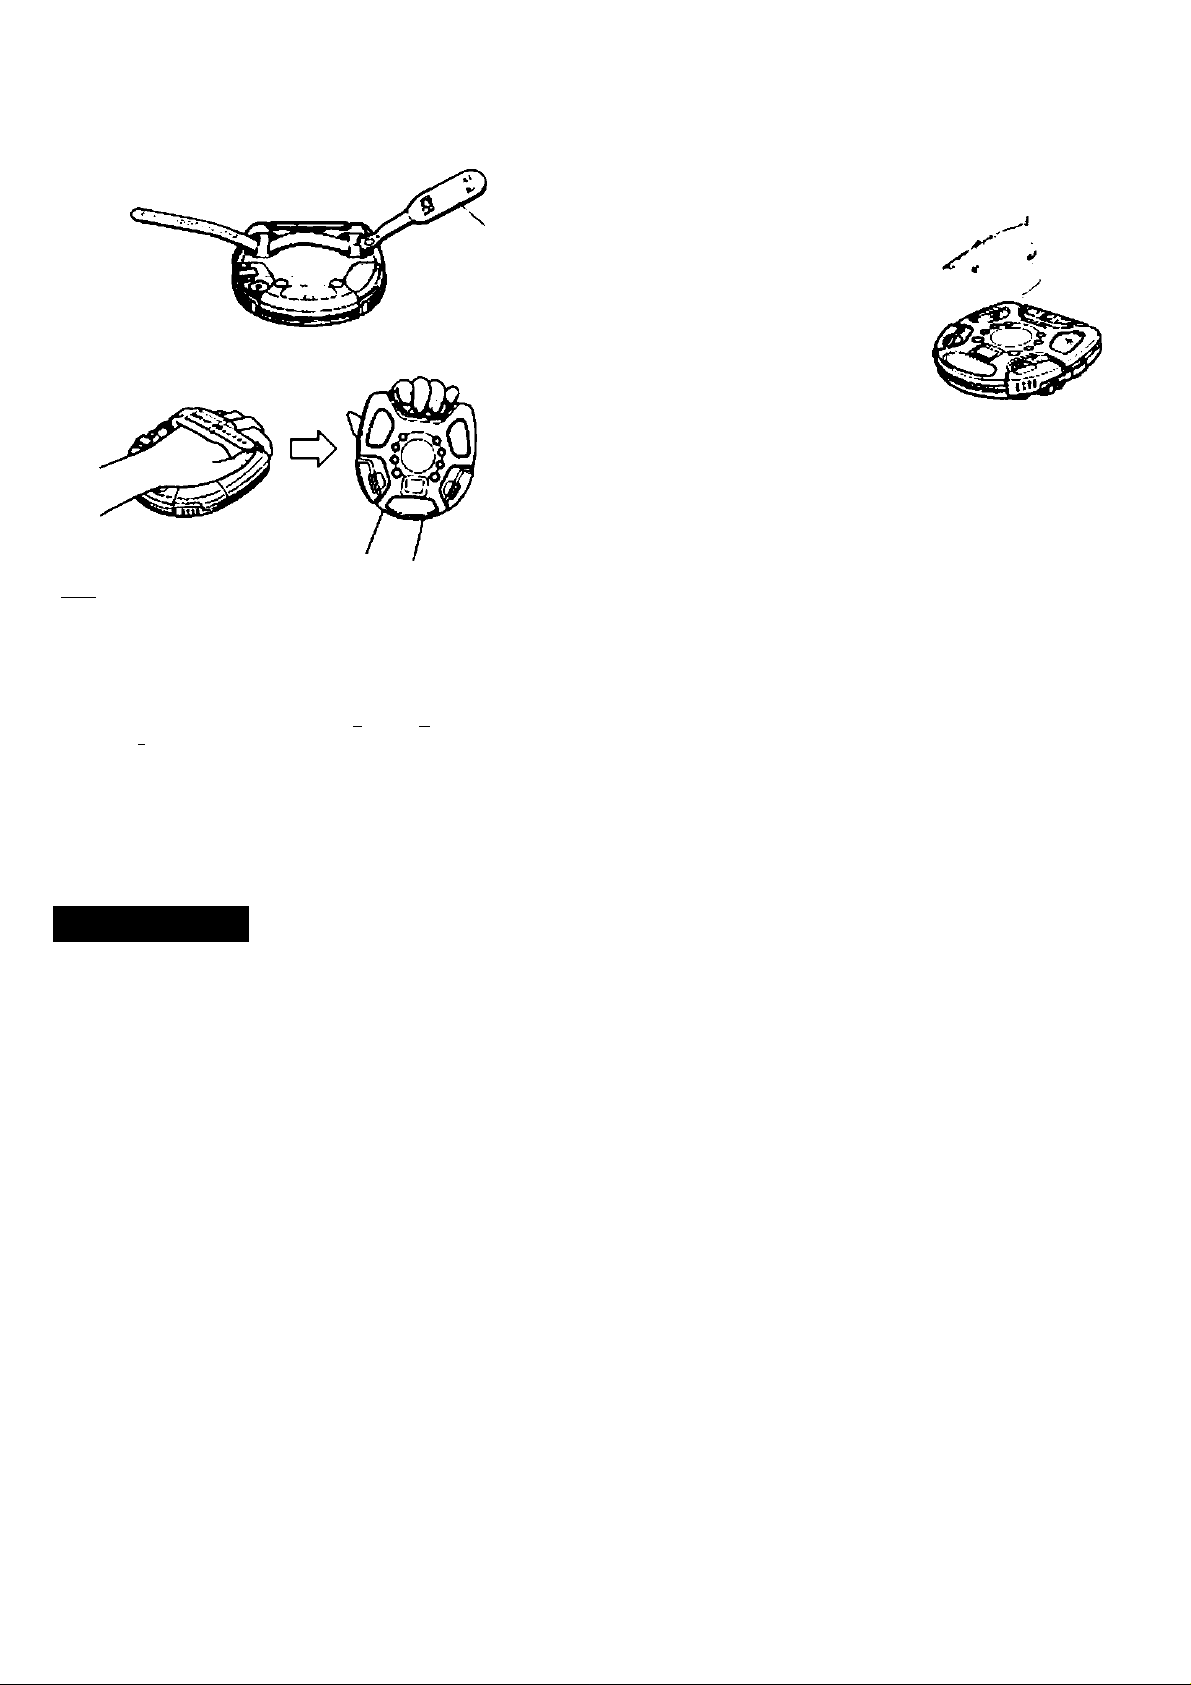
Attaching the hand grip (SL-SW870/SL-SW850)
AOisftfwvKi -i-ina'tfsrifjorrdMKMSiedocarrywKiotDggng
•CC Thread the strap through the loops on the bottom of
the unit.
Нйпл
Portable CD Player
Dear Customer
Thank you lor purcnusmg tnia produci
Por optir:jm perloimiTicu orHl Spiciy.
pleaae read these insliuctio'i» curu'u'ly.
SL-SWaeiC OMLV
To awM tas product m a ear, pieaae
refer Id tie Insta*at дг» inafiudkire*
(attached aheel).
Panasonic'
Operating Instructions
SL-SW870/5L-5W850
SL-SW851C
BotiO'^otthwuHt
Adjust the buckle and fix It in place.
W4e logging.
iMfc: ;Д11 us
•howp
ГЯЯ
Го wftvnn' «Hirtd D*^ng irt*fri.w*c •л^ It jogg ng. tjrr on int t*«i-»ho« furc-
1ЮП (pcigo 5)
Panttonk Conaumer Eieetrontet Company. Orvision of
Uatauahita Eltctric Corporation ol Amtrica
Oc PafkAUH; War SauaA.». Nvw J«tm CTOO* MlfijSWmWfitttMOOie con*
Panasonic Salta Company. Divtaton of Matausiirta Electric of
Puerto Rico. Ir>e. ("PSC")
Arc as at yifMitmtA. K/r 9.S Sdii caiMei > idwtitei HiA. carsM-a Pjer? Hoe ixnwa
Panasonic Canada Inc.
S770 Aiiilila Onve. {.XMAIO L4W XI '* www.p»n»MtMe.e.a
CÈ_n)
The SLSW^lC model <s only for
Canada
11'« rrKidci n jmlxN anc onnoi ■ч»тпп1'
ul I'w pioduct coo bo ‘cuoo on егш'-
Ihe buck or Uiu Ьо1каи gl txi iir l
^taasa rote the*" n lie hmco p'ovid
ed эекм ano keep tor fixu*e '«ter
enee
SfOOEL NUMBER
SHtlAL NUMBER
Supplied Accessories
Check the packing canon for these acceaaoriea.
AC adaplor iRREA4tOC-S) .... i pc
$VKAO headptyvies
For SL-SWS70 For U S A ;RH:V5C5f’-SS: For Cararta :RFEV5f»P KS:
For $L-SW8S(VSL-SW6SIC iPFEVTCdP HSi
SL-SW87(VSL-SW6S0
Hand gnp (RGQTOOCC K;....................... ...................................................I pc.
SL-SW851C ONLV
Cor adopter ($H-COC 11 RCYi ....................................................................i pt.
Cu! aie'uocossciic ¡vinp*ot iSH-CDMioBPYK;...........................................»pc.
Uwi iiumOcis rKKatOd r parentheses A'ner ask ng ^o' tplacement oa'ty
(Onty for U.5.A) To order acceaaorfea contoct i-MK>-332-S36e or wed
before connecting эрегвигд or udjusdng product, p^^oeao
lead these nstructicnt compl#te»>’. Rease save this mur^uu
............................
affe fAftp;i9Www.parMaoruc.com^
... 1 pc
ß .:W.lo
[p I IPCI
RQT5062-P
F0k»9R0(D|
Precautions
Before uiirg this ur<t. he sure :o read the applicable
itomsol iho opo'oling instiuctioos arxl tiioeo sofoty $uggestioru ca'afully.
Atierwords Aoop tiem handy tor luturo io<ererxo. Take
specuM care to te4ow the i*amr>gs ndCMd on die unit
us «re* 4) ri fo oporukng ■'«vucacM«
Safety
1. Power Source—The uni: snould be conrected to
pokvei supply pr'ly ol ’.tie type Jo«c'iPud hi Рш opeioi
mg iT(ir.jcii3rs nr as ггАгчеО on me ur-i Use oni>'
Ihu AC eOuptu* O' cur iKkg:H>' oo>ciAkmI hi Fxi opc<
e«>g natnicaona when redvargmg
2. PdarUation ii9ìeun4iseQU9pedwehaaoiart2ed
AC power pkjg (a olug hawng one MkM> wider than
the other;, that p jg w 1 ft into the AC oulet or у ore
way Th>s le a SAfeiy feaii.re if you ere unah*e to irv
ser. the plug fully into the outlel. try reversing ttie
plug I* ihr> okig shculd $iili fan to In comae угн;г
elecl'«4ir to reoluce your obsolete out-et. Do not do
lea* the <uUeiY nu'pose of d>e рмапмк! plug
3. Cere of AC edapfor Take care I*w1 die co'd ol
AC adepiM shouM he rauied sn rten they a’e net fetety lo oe waved on or p-iched by itorm piacoO upon
or arpunm then*.. Ne’/er lake hold of me AC adaptor if
yuui 'lurvl nt wgi. «nü ujwtíys giuap iho ulug body
when connecting or disconnecting it.
4. Nonuse Perioda vviioti not n uvu be n'^nv x dut
carnee the AC adapior f'om the AC powe' oudei.
S. Balteries—II the set •$ iiul used to* a long peiiod ol
limo Ol d used only irom an AC pnv/er source, re'nova all the Qattenes ю prevent pcleiHiai darn^ig«
duo to oc$sat4e oahery 'Oakage Do nor mr* banenet
¡old and 'wa; or drlere’X types ot batteries
InstallaHon
■ Environment
1. Water and Moisture—Co rot use this unit raa'
wu'.w’ 'q' example, neur e bal'ilub. was’ibowl.
kwimmrg .'»noi. or the ke Damp haseme'e.s shouta
eleo be avoided.
2. Condeneatton—kio«si.He may form on r« lent m
tw fdowing corvMons
emvneeoteiy a^er a hearer nea tM«n tumea on
•m a steamy or wey humio room
ewbfir the umi is s.idoenly moved from a cold envi*
'onri’ent to a wa'm one. It moistuie for-’-a inside this
uwi. It may not opeiate properly Tn correct ihif
problem wail about эле hour tor 'iie motslure to
evaporate
3. Heat -Nrre* use o' place t*» un* г>ев' e beat
«Л1*се Do not leave e n an anvynobie evpnsac to
dvecl sjrr ght 'o' a long yn« wrth the ootys and we<
rk>w$ cktsert as this may delmm l^a cab net
■ Placement
1. Foreign Material—C.^m stvimd be Mken so that ob-
)VCtv du гчА tall into u'Mi IkjiitM a«u nol spilled ntc Itw
uruf. Do not suoiect dvt urm to eKeswe smo«e
dual, nvchanicai wbtetiorx. or shock.
2. Magnetism—The les: styturl he srtuated awAr fmm
е0чнр'’п«п1 O' devkea that gtrw’ate strer'g magneic
Moa
3. Slacking - Do not place any oojects. on юр ol the
unii
Mainfenance
{See oage E for detAés.)
Clear, re сяьлм. pArtM ard cora*ols wch A soft aofn
IgMy mo>st«ned neV' mid detergent soknion
Do net i»e any type of Abrawe fwtd scour ng powder
or sohrent such as alcohol or berixirw
Service
1. Damage Requiring Service li>c mx: snoJo bo
sevead by quaited sendee oersonref «ften
(a) The AC Adaptor • damaged, or
fb) Objects nave talen or ix|Lid has baer speed
■ntc the unti; or
{et The unK nas hear exocsed to rar.. or
{d) Thu .in>i duud nut uppcoi :o opciatc ')C'<nniiy oi
axhinitSA e-arked cnange in perlormanca: or
» Tiw uti l 'uis been U'oppod. ot the wncuvu'u
damaged
2. Servicing The uw Wwk) nol aCorrtA (o ee*v<e
the unr oeyono that besi'ited in the ooaraing kv
«tructicns. All ot’w sf'vc ng shoulo be 'ffet’ed to
an auX’onzed service personnel
For Iho address ol on atrfhorirod servicentor;
IntheU.S.A. ^^800■2t 1-7262 or web aitt
(hhp:ff
www.panMSonie.com)
In Canada 90SS24-550S or web aiie
(
www.panasonk.ee)
PRINIIO WITH
SOY INK
Ш
This manual was pnntet) wrh soy baser) rk
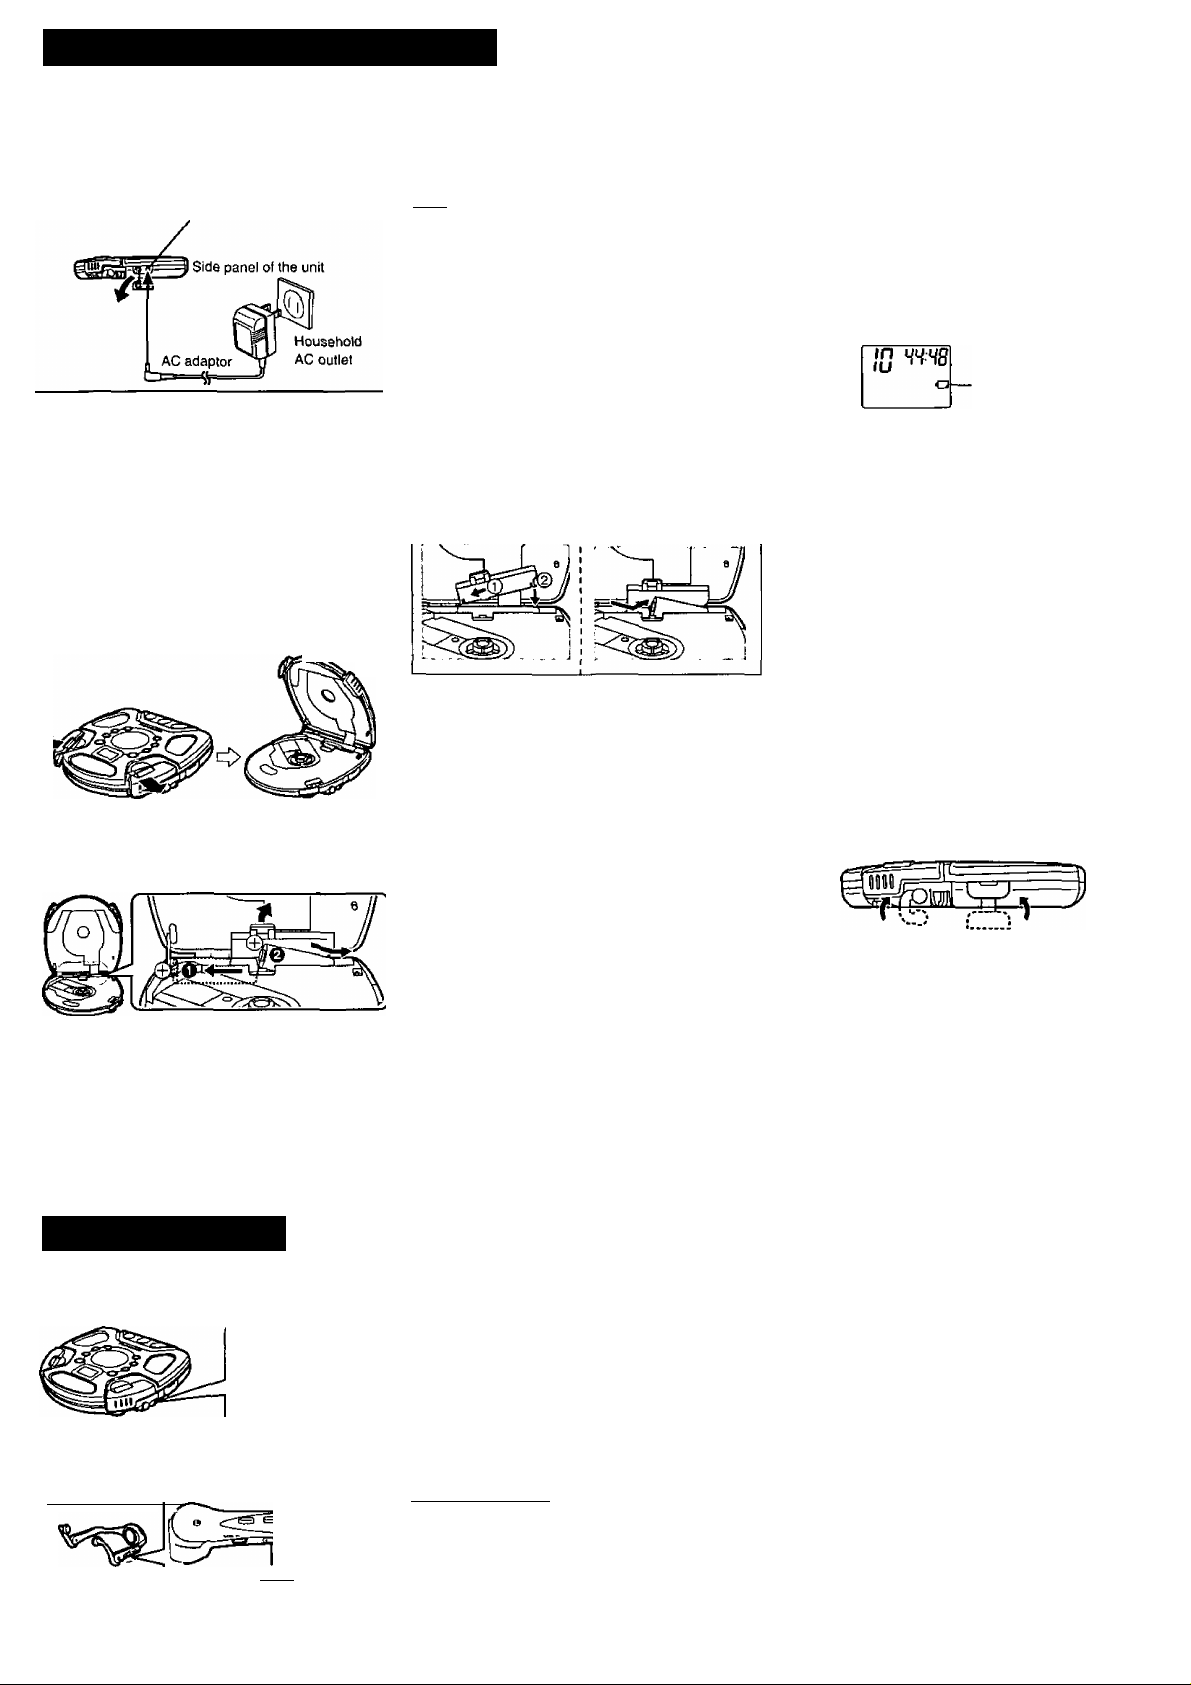
Power Supply Preparations
Refer to the specifications (page 8) for information on operating times when using rechargeable batteries or dry-cell batteries.
Using the AC adaptor
Take off the attached rubber cap
and
connect the AC adaptor supplied.
DC IN jack (DC IN 4.5 V )
Using rechargeable batteries
(not included]
Obtain the optional rechargeable batteries.
•Optional batteries (P-3GAVA/2B, SH-CDB8D)
Make sure to recharge the batteries before using them.
The unit cannot be used to charge rechargeable batter
ies other than those specifically designed for it.
Recharging procedure
1 Open the disc lid.
open and close dual locks firmly using both hands
at the same time.
2 Open the battery lid, and place the
rechargeable batteries inside the
unit.
4 When recharging is complete, un
plug the AC adaptor from the power
outlet and the DC IN jack.
PRfl
•Rechargeable batteries have a service life of approxi
mately 300 charge-discharge cycles. If the operating
time on one full charge becomes noticeably shorter
than it used to be, the battery has reached the end of
its service life and should be replaced.
•Recharging only be performed when the unit is pow
ered off. (It is not possible to recharge the batteries
while playing a CD.)
•The AC adaptor and rechargeable batteries may be
come warm while recharging is in progress. This is not
a malfunction.
If the battery lid
comes loose
Insert the protrusions
on the lid into the
cutouts on both sides
of the compartment.
Using the car adaptor
The SL-SW851C comes with a car adaptor. Be sure to
use the adaptor specially designed for this model.
(Refer to the separate installation instructions.)
Be sure to obtain the car adaptor (SH-CDC9), available
as an optional accessory for SL-SW870 and
SL-SW850. The car adaptor can be used to recharge
the unit’s batteries while in the car.
For SL-SW870/SL-SW850
Removing
batteries
Push up on the battery
in the direction
indicated by the arrow,
then lift out.
Using dry-cell batteries
(not included)
After disconnecting the AC adaptor, insert two "AA"
(LR6) alkaline batteries.
The procedure for inserting and removing
dry-cell batteries is identical to that for
rechargeable batteries.
Battery indicator
Battery indicator
This indicator flashes on and off when the batteries are
almost out of power. Power is cut off completely a short
while later.
Rechargeable batteries: Recharge batteries.
Dry-cell batteries: Replace batteries with new
ones.
•The length of time the unit will continue to operate be
tween when the battery indicator starts flashing and
when the power is cut off differs depending on the
type of batteries used,
•The battery indicator may not flash if rechargeable
batteries, other than those designated by Panasonic,
are used.
If the unit malfunctions or freezes during use,
then disconnect the power sources (the AC
adaptor and batteries).
Re-connect the power source and continue op
eration.
Be sure to close the battery ltd properly.
3 Take off the attached rubber
cap and connect the AC adap
tor.
Refer to “Using the AC adaptor" for connection in
structions.
When recharging starts, the "ra” charging indica
tor flashes on and off on the unit's display.
HOLD Function
Hold mode
15L-fe\Va~o 6klV 1
t4HOLDl
Hold mode
CAUTION:
Use only car adaptor. Model: SH-CDC9 manufac
tured by Matsushita Electric Industrial Co., Ltd.
This function causes the unit to ignore short, accidental
button presses. (The disc lid can still be opened and
closed.)
The HOLD function prevents the following;
• Powering on the unit accidentally (which can cause
the batteries to go dead).
•Play being cut off unexpectedly in the middle of a se
lection.
To use the HOLD function
Set [HOLD] to the HOLD position.
I ¿L-SWa/b 6MLY1
The unit and stereo headphone with remote control
have [HOLD] switches, each of which works indepen
dently.
Side panel of the unit
1
Be sure to cover the headphones jack, ,
OUT jack and DC IN jack with the rubber i
caps when they are not in use. '
“ho 1 d" indication
When the unit is in hold status, pressing any button
causes the indication to appear on the display.
When the unit is powered off
The “ho ld" indication appears only when [^ll] is
pressed.
Before operating the buttons
Be absolutely sure to move HOLD to release the
unit from the hold mode.
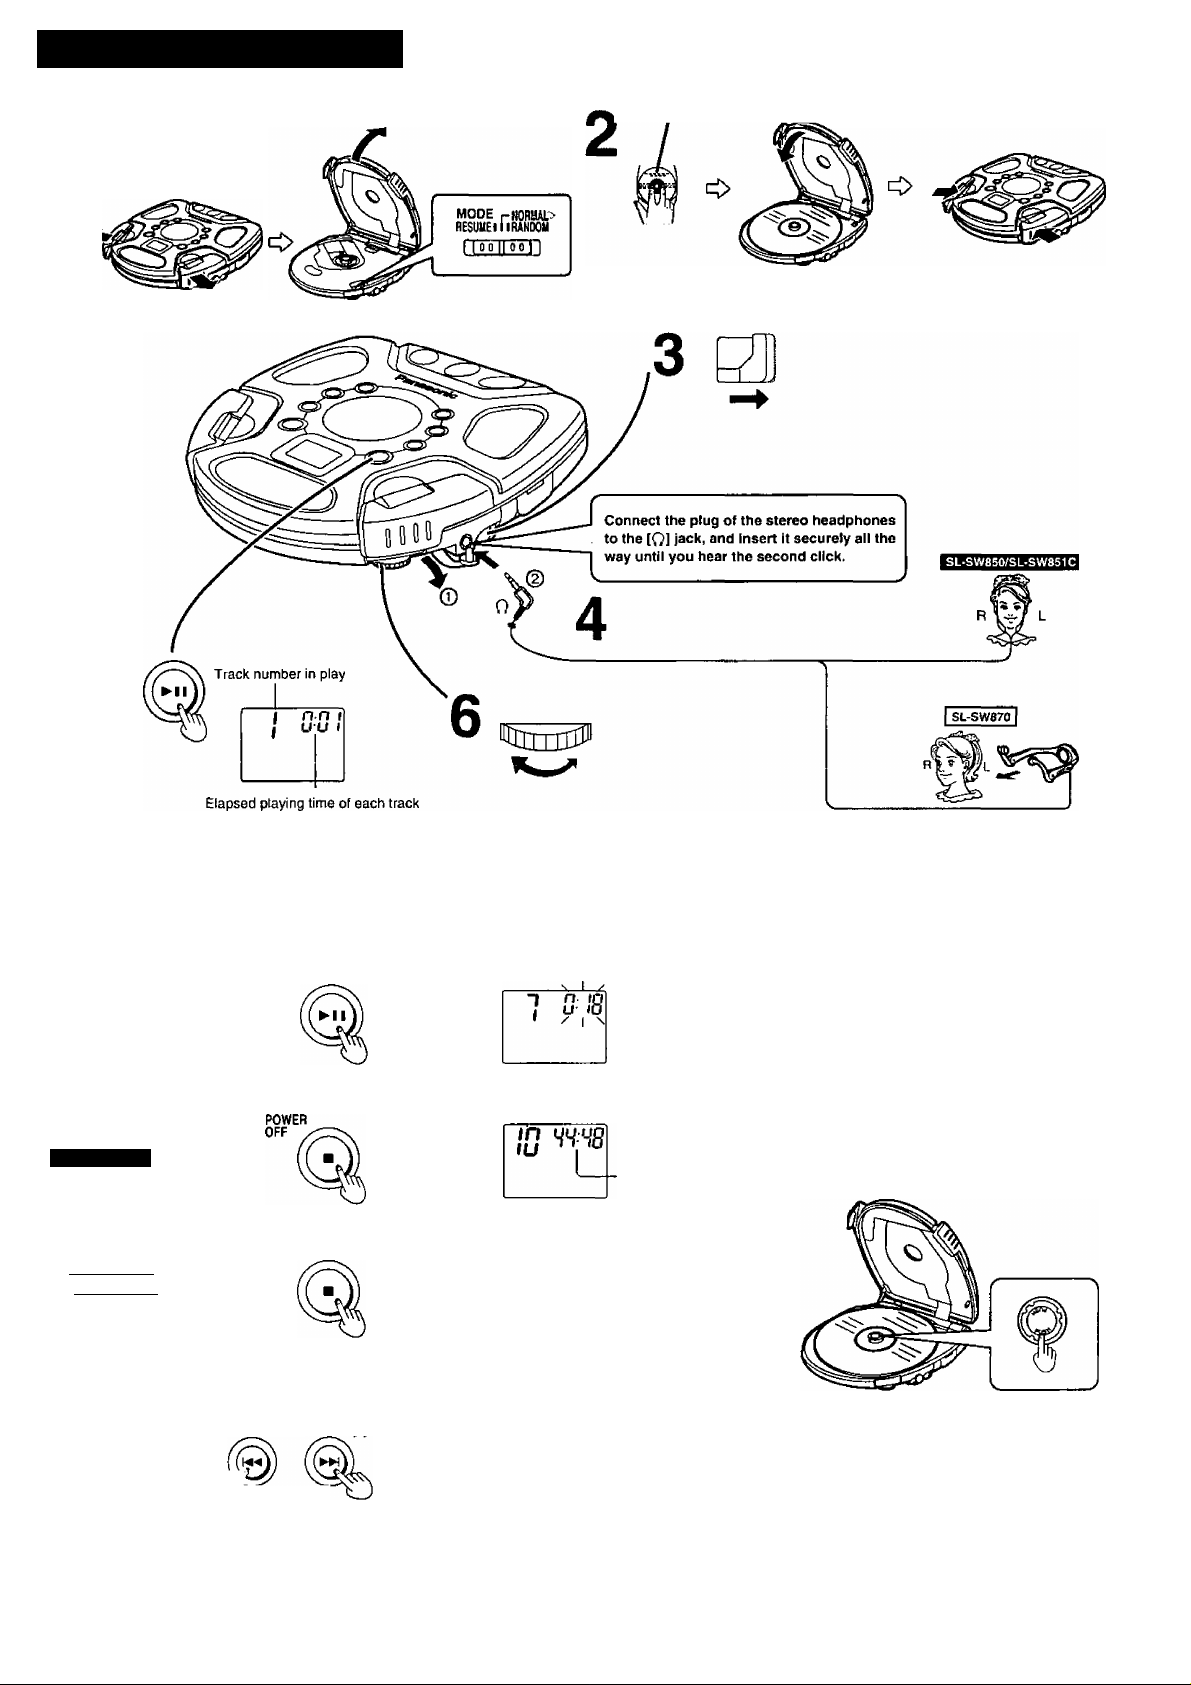
Sequential Play I Basic Play
1
Label must face upward
■HOLD
Follow steps 1-6.
•Play stops automatically when all the tracks have been played.
• If the unit has been connected to the car audio system, adjust the volume level between 5 and 8 on the unit, then
adjust the volume level on the system, (The numbers indicating volume are on the bottom of the dial.)
OperaHon
Press during play
To pause play
Press during play
Button
Display/reference
Press again to
restart play
Total number of tracks
I
To stop play
Stop mode
Total playing time
Press during
To turn off the
unit I Off model
Skip forward/
backward
(skip function)
Rapid forward/
backward
(search function)
stop mode POWER
Press during play
(Backward) (Fonward)
Keep depressed during play
OFF
•During program play, these buttons are used to
skip forward or back through the programmed se
quence of tracks.
•During random play, the skip buttons cannot be
used to skip back to tracks that were played pre
viously in the random sequence.
• During program play, random play or 1 track re
peat play, search operation is limited to the cur
rent track only.
(See page 4.)
For your reference:
“"o indication
This indication appears for about 30 seconds if [► 11] is
pressed when no disc is loaded in the unit or if the disc
is not completely seated,
“iJPf/7” indication
This indication appears for about 10 minutes when the
cover is opened, (However, the indication does not ap
pear when the unit is powered off.)
Never insert foreign objects into the unit body.
Removing discs
After the disc has stopped rotating, press [PUSH] to re
lease the disc. (To protect the disc, never open the
cover while it is playing.)
Auto power off function
If the unit is left in stop or paused status tor approxi
mately 10 minutes, the unit powers itself off auto
matically in order to prevent the battery from
running down.
(If no disc is loaded in the unit, it powers itself off in
about 30 seconds.)
 Loading...