

Page 1

1
Model No. SL-MP353J
Portable CD player
Operating Instructions
Dear customer
Thank you for purchasing this product.
For optimum performance and safety,
please read these instructions carefully.
Safety
1. Power source— Connect the unit to a power source
of the type described in these instructions or as
marked on the unit.
2. Polarization— The unit is equipped with a polarized
power plug where one blade is wider than the other.
This safety feature ensures that the plug fits into your
household AC outlet only one way. If the plug doesn’t fit one way, try reversing it. If the plug still doesn’t
fit, contact an electrician to replace the obsolete outlet. Do not attempt to defeat the safety purpose of
the plug.
3. Power cord protection—Route the AC power supply cord so that it will not be walked on or pinched by
items placed on or against it. Never take hold of the
plug or cord with wet hands. Always grasp the plug
body firmly when connecting and disconnecting it.
4. Overloading—When connecting the AC power supply cord, be careful not to overload the household
AC outlet, extension cord, or outlet from any other
device as this can result in fire or electric shock.
5. Nonuse periods— Turn the unit off when it is not in
use. Unplug the unit from the household AC outlet if
it is not to be used for a long time. Unplug the unit
during lightning storms. Leaving the unit connected
to a household AC outlet for extended periods can
cause battery fluid leakage.
6. Attachments and accessories—Use only the attachments and accessories recommended in these
operating instructions.
Installation
Placement
1. Foreign material—Ensure objects and liquids do
not get into the unit. Avoid exposing the unit to excessive smoke, dust, mechanical vibration, and
shock.
2. Magnetism— Situate the unit away from equipment
and devices that generate strong magnetic fields.
3. Stacking—Do not place anything on top of this unit.
4. Wall and ceiling mounting—Do not mount the unit
on walls or ceilings unless specified in the instructions.
Environment
1. Water and moisture—Do not use the unit near
water, such as near a bathtub or swimming pool.
Avoid damp basements.
2. Heat—Situate the unit away from heat sources, such
as radiators. Do not leave it in an automobile exposed to direct sunlight with the doors and windows
closed as this may deform the cabinet.
2. Do not situate where temperatures fall below 5 oC
(41 oF) or rise above 35 oC (95 oF).
Maintenance
(See page 8 for details.)
Unplug the unit from the household AC outlet before
cleaning.
Clean with a damp cloth.
Do not use abrasive pads, scouring powders, or solvents.
Service
1. Damage requiring service—The unit should be
serviced by qualified service personnel if:
1. (a) The AC power supply cord or AC adaptor has
been damaged; or
1. (b) Objects or liquids have gotten into the unit; or
1. (c) The unit has been exposed to rain; or
1. (d) The unit does not operate normally or exhibits a
marked change in performance; or
1. (e) The unit has been dropped or the cabinet dam-
aged.
2. Servicing—Do not attempt to service the unit beyond that described in these operating instructions.
Refer all other servicing to authorized servicing personnel.
3. Replacement parts—When parts need replacing
ensure the servicer uses parts specified by the manufacturer or parts that have the same characteristics
as the original parts. Unauthorized substitutes may
result in fire, electric shock, or other hazards.
4. Safety check—After repairs or service, ask the servicer to perform safety checks to confirm that the unit
is in proper working condition.
IMPORTANT SAFETY INSTRUCTIONS
Read these operating instructions carefully before using the unit. Follow the safety instructions on the unit and the safety precautions listed below. Keep these operating instructions handy for future reference.
This model can play MP3 files.
See pages 4 to 6 for details.
This manual was printed with soy based ink.
Supplied Accessories
Check the packing carton for these accessories.
Before connecting, operating or adjusting this product, please read these
instructions completely. Please keep this manual for future reference.
The model number and serial number
of this product can be found on either
the back or the bottom of the unit.
Please note them in the space provided below and keep for future reference.
MODEL NUMBER
SERIAL NUMBER
Stereo headphones . . . . . . . . . . . . 1
(L0BAD0000159)
Wired remote control . . . . . . . . . . . 1
(N2QCBD000010)
Jogger case . . . . . . . . . . . . . . . . . . 1
(RFC0060-K)
Use numbers indicated in parentheses when asking for replacement parts.
To order accessories contact 1-800-332-5368 or web site
(http://www.panasonic.com).
Panasonic Consumer Electronics Company,
p
Division of Matsushita Electric Corporation of America
One Panasonic Way Secaucus, New Jersey 07094 http://www.panasonic.com
Panasonic Sales Company, Division of Matsushita Electric of Puerto Rico, Inc. (“PSC”)
Ave. 65 de Infantería, Km. 9.5 San Gabriel Industrial Park, Carolina, Puerto Rico 00985
© 2002 Matsushita Electric Industrial Co., Ltd.
RQT6548-P
F0402YH0
Printed in Japan
SL-MP353J
P
Using the jogger case
1 Be sure the CD player is placed in
the pouch so that the buttons are
facing away from your body.
2 Fasten the neoprene sport belt
securely around your waist so that
the unit fits snugly against your
body.
3 Before jogging with this unit, allow
sufficient time for the memory
buffer to fill up completely. (See
page 4.)
4 This unit is designed for light jog-
ging, but not for serious running. It
may occasionally skip if you are
an aggressive runner, or have a
heavy, jarring stride.
Notei
≥Do not machine wash.
≥Fading and loss of shape can
occur.
≥Do not expose the pouch to high
temperatures when a player and
CDs are inside.
≥The player and CDs can be dam-
aged and it can lead to fire. Be especially careful not to leave the
pouch near heaters, in a car, or in
the sun.
≥Do not drop or hit the pouch while a
player and CDs are inside.
≥This can seriously damage the play-
er and CDs.
≥Discontinue use if a rash or skin irri-
tation develops.
≥Take special care when listening
around traffic.
O
P
E
N
H
O
L
D
HOL
D
N
E
P
O
Page 2

2
Power Supply Preparations
Refer to the specifications (page 8) for information on operating times when using rechargeable batteries or dry cell batteries.
Using the AC adaptor
(not included)
Use only the recommended AC adaptor. Using other AC
adaptors can damage the unit.
To order the optional AC adaptor RP-AC46 contact
1-800-332-5368 or web site (http://www.panasonic com).
Connect the AC adaptor.
2 Connect the AC adaptor.
(Refer to “Using the AC adaptor”.) Recharging
starts and the “
” flashes on the display.
When the rechargeable batteries fully recharge the
charging indicator disappears.
3
When charging is complete, unplug
the AC adaptor from the household
AC outlet and DC IN jack.
Note!
≥Rechargeable batteries have a service life of approxi-
mately 300 charge-discharge cycles. The batteries
have reached the end of their operational life if they
last for a noticeably shorter time after recharging, or if
they cannot be recharged at all. Replace the batteries.
≥Recharging may only be performed when the unit is off.
≥It is normal for the AC adaptor and rechargeable bat-
teries to become warm during recharging.
≥Leaving the AC adaptor connected can cause the bat-
teries to go flat. After recharging the batteries and disconnecting the AC adaptor from the household AC
outlet, ensure you disconnect the AC adaptor from the
unit’s [DC IN 4.5 V
K
] terminal.
Battery indicator
This indicator flashes when the batteries are almost fully
discharged. Replace with fresh dry cell batteries or
recharge.
Note!
≥The time between when the indicator starts flashing
and when the power is cut off depends on the type of
batteries you are using.
≥This indicator may not function correctly if you use bat-
teries other than the specified rechargeable batteries.
Using the car adaptor
(not included)
Be sure to obtain the car adaptor (SH-CDC9) available
as an optional accessory.
The car adaptor can be used to recharge the unit’s batteries while in the car.
Use only the recommended car adaptor. Use of other
car adaptors can damage the unit.
Removing batteries
Push up on the battery
in the direction indicated by the arrow. Then
lift it out.
If the battery lid
comes loose
Slide the lid back into
place horizontally.
If the unit malfunctions or freezes during
use, disconnect the power source (the AC
adaptor or batteries). Re-connect the
power source and continue operation.
DC IN 4.5 V
K
DC IN jack (DC IN 4.5 V K)
Back panel of the unit
Household
AC outlet
AC adaptor
O
P
E
N
O
P
E
N
T
R
A
C
K
A
L
B
U
M
M
P
3
M
1
R
N
D
S
-
X
B
S
Battery indicator
Conserving power
To save power when the unit is not to be used for a long
time, unplug the AC adaptor from the household AC outlet.
Note!
Turn the unit off before connecting or disconnecting the
AC adaptor.
O
P
E
N
GHF
E
A
B
D
E
C
L
J
J
K
F
I
M
N
H
O
L
D
A
B
H
EQ
HOLD
VOL
A
BC
D
E
G
F
DC IN 4.5 V
K
P
Q
O
P
E
N
HOLD
O
Using rechargeable batteries
(not included)
Obtain the optional rechargeable Ni-Cd batteries.
Make sure to recharge the batteries before using them.
Optional batteries: P-3GAVA/2B
Recharging procedure
1 Insert the special rechargeable bat-
teries.
Using dry cell batteries
(not included)
After disconnecting the AC adaptor, insert two “LR6,
AA, UM-3” alkaline batteries.
The procedure for inserting and removing dry cell
batteries is identical to that for rechargeable batteries.
CAUTION:
Use only car adaptor, Model: SH-CDC9 manufactured by Matsushita Electric Industrial Co., Ltd.
O
P
E
N
1
O
P
E
N
+
-
2
3
Back panel
of the unit
≥Never mix dry cell and rechargeable batteries.
≥Turn the unit off before replacing the recharge-
able batteries.
HOLD Function
This function causes the unit to ignore accidental button presses. (The disc lid can
still be opened and closed.)
To use the HOLD function
Set [HOLD] to the HOLD position. When the unit is in HOLD mode, pressing any button causes the indication “ ” to appear on the display.
You still can operate the unit with the remote control when the main unit’s HOLD
function is on and vice versa.
When the unit is off
The “ ” indication appears only when [
1/;
] is pressed.
Before operating the buttons
Be sure to move [HOLD] to release the unit from the HOLD mode.
Main unit A
A Memory/recall button
(MEMORY)
B Mode button (MODE)
C Display
D S-XBS button (S-XBS)
E Headphone volume control
(i, VOLUME, j)
F Skip/search buttons
(:, 9)
G Play/pause button (1/;)
H Stop/operation off button (∫)
I Open switch (OPEN 1)
J Album skip buttons
(MALBUM L)
K Display button (DISPLAY)
L Album mode button
(ALBUM MODE)
M Headphone jack (Ë)
N Hold switch (HOLD)
O CD release button (PUSH)
P Hole for car mounting base
Q DC IN jack
(DC IN 4.5 V K)
Wired remote control B
A Skip/search buttons
(:, 9)
B Play/stop/operation off button
(∫/1)
C Volume control buttons
(j, VOL, i)
D Headphone jack
E Clip
F Hold switch (HOLD)
G EQ button (EQ)
H Plug
O
P
E
N
HOLD
EQ
HOLD
HOLD
HOLD
HOLD mode HOLD mode
Location of Controls
Page 3
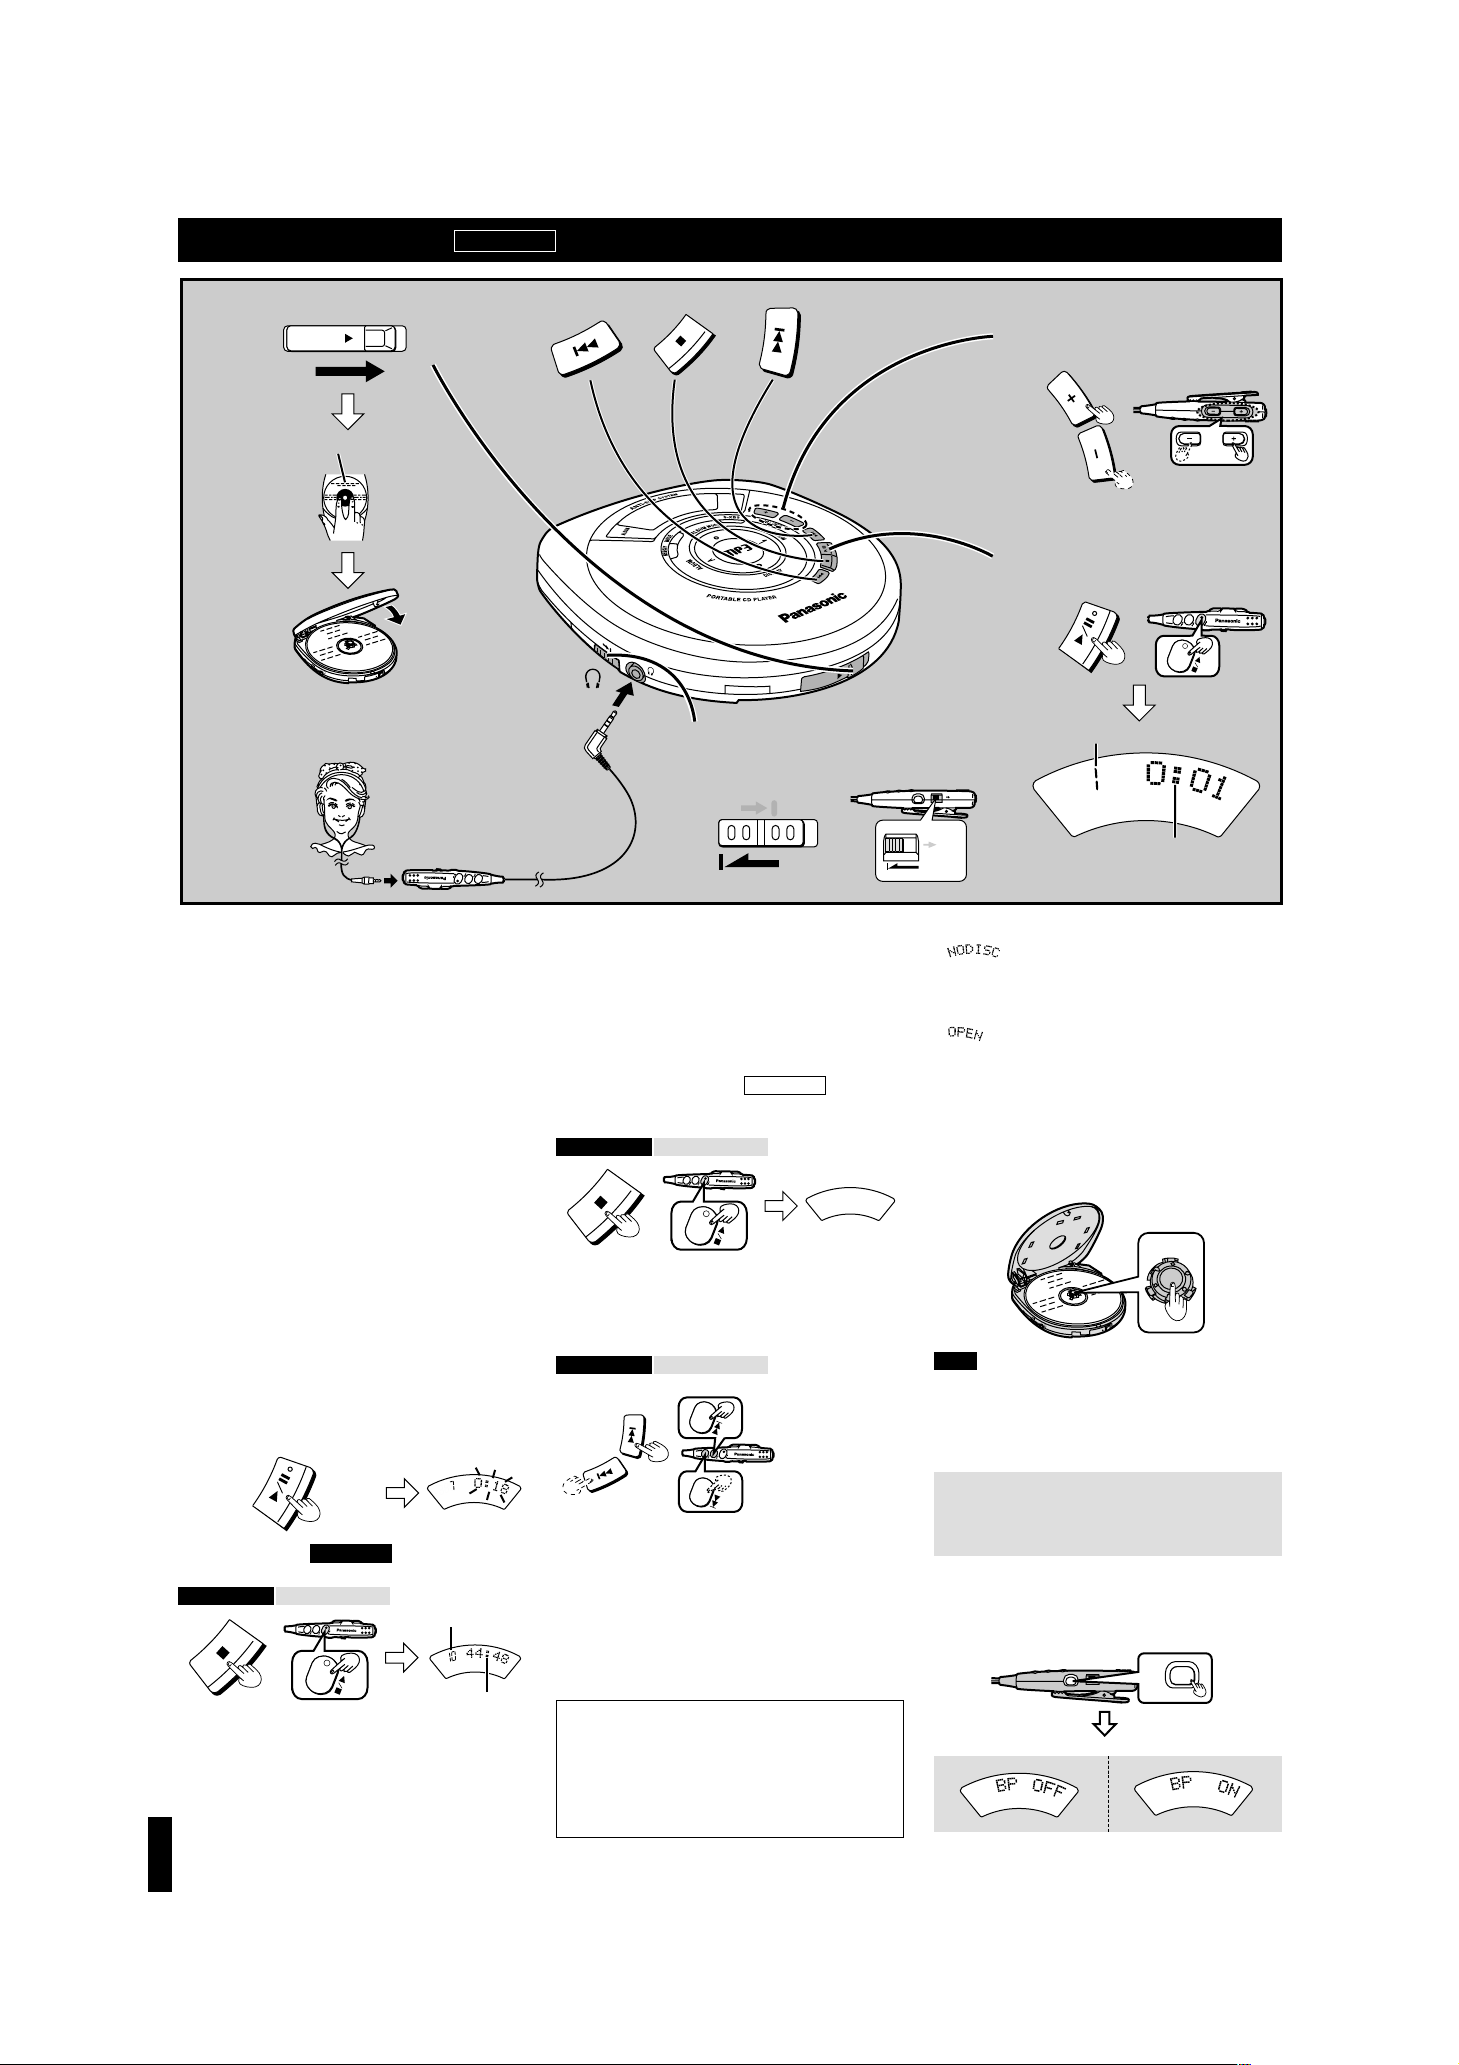
Sequential Play
Basic Play
3
4
5
2
1
OPEN
O
P
E
N
V
O
L
U
M
E
OPEN
/
T
R
A
C
K
A
L
B
U
M
M
P
3
M
1
R
N
D
S
-
X
B
S
HOLD
H
O
L
D
V
O
L
VOL
HOLD
EQ
HOLD
HOLD
VOL
L
R
V
O
L
Label must face upward.
Track number in play
Elapsed playing time of each track
3
Plug type:
3.5 mm (1/8 in.) stereo
Close the lid.
For your reference:
“ ” indication
This indication appears for about 30 seconds if you
press [1/;] (main unit) or [∫/1] (remote control)
when no disc is loaded or if the disc is not properly secured.
“ ” indication
This indication appears for about 10 minutes when you
open the lid (unless the unit is off).
Removing discs
1
Press [∫] to stop play and disc rotation.
2
Slide [OPEN 1] to open the lid.
3
Press [PUSH] to release the disc.
Do not stop the disc by hand or try to remove it before it
stops rotating. This can damage CDs.
Note!
Never insert foreign objects into the unit.
Auto-off function
To save batteries, the unit turns off after about 10 minutes after being stopped (30 seconds if a disc is not
loaded).
O
P
E
N
P
U
S
H
P
U
S
H
H
O
L
D
CD-R and CD-RW discs
This unit can play CD-DA (digital audio) format
audio CD-R and CD-RW that have been finalized(a
process that enables CD-R and CD-RW players to
play audio CD-R and CD-RW) upon completion of
recording. It may not be able to play some CD-R/
CD-RW due to the condition of the recording.
1 Slide [OPEN1] to open the lid, and
insert the disc.
2 Connect the wired remote control
and the stereo headphones to [Ë].
(Plug in firmly.)
3 Release [HOLD].
4 Press [
1/
;
] (main unit) or press
[
∫/1
] (remote control) to start play.
≥The music symbols flash randomly during play.
≥Play stops automatically when all the tracks
have been played.
5 Adjust the volume.
i : To increase the volume level
j : To decrease the volume level
≥The volume range is 0-25. (Press and hold to
change the volume successively.)
≥A tone (beep-beep) sounds when you reach the
minimum or maximum volume when using the
remote control.
≥The volume changes when pressed while the
level is displayed. If any other display is shown, it
changes to show the current level.
∫ To pause play (main unit only)
Press during play. (Press again to restart play.)
∫ To stop play
Press during play.
Resume function
The unit stores the track where you stopped play and if
you press [1/;] (main unit) or [∫/1] (remote control),
play resumes from the beginning of that track.
Resume function notes
≥Opening the lid while stopped or replacing the disc
while off cancels the function. (It may remain active if
you replace a disc in the off mode.)
≥Play may resume from the beginning of the next track
if you stopped play near the end of a track.
≥The resume function is automatic and you cannot turn
it off.
∫ To turn off the unit
Press while stopped (main unit) or press and hold
while playing or stopped (remote control).
∫ Skip / Search function
Skip : Press during play. (Press [:] twice to skip
to the beginning of the previous tracks.)
Search : Press and hold during play.
≥During program play (page 4), these buttons are used
to skip forward or backward through the programmed
sequence of tracks.
≥You cannot skip to tracks that have been played in
random or random repeat play (page 4).
≥During program play, 1-track repeat play, random play
and random repeat play (page 4), search operation is
limited to the current track only.
A
L
B
U
M
M
P
3
M
1
R
N
D
S
-
X
B
S
Forward
Backward
T
R
A
C
K
A
L
B
U
M
M
P
3
M
1
R
N
D
S
-
X
B
S
V
O
L
V
O
L
V
O
L
Forward
Backward
(Beep...Beep)
(Beep...Bee...p)
(Beep Beep Beep)
(Beep Beep)
Operation confirmation tones
This tone sounds when a button on the remote control is pressed. Refer to the parentheses in the illustration for the different types of confirmation tones.
Total number of tracks
Total playing time
No indicator
is shown.
∫ Turning the operation tones off and on
» While stopped or during play
» Press and hold [EQ] on the remote control for 5 sec-
onds until the display appears. The tone sounds
when the setting is changed.
To turn the tone off To turn the tone on
EQ
HOLD
EQ
(Beep) (Beep)
(Beep)
(Beep)
Remote controlMain unit
Remote controlMain unit
Remote controlMain unit
Stop mode
Off mode
M
U
B
L
A
S
3
P
M
K
C
A
R
T
D
N
1
R
S
B
X
M
-
K
C
A
R
T
M
U
D
N
1
B
R
S
L
B
X
M
-
A
S
3
P
M
Page 4
4
Playing MP3 files
What is MP3?
A method of compressing audio, MPEG Audio Layer 3
(MP3) allows audio to be reduced to up to one tenth its
original size when a compression rate of 128 kbps is
used, without overtly hurting audio quality.
When creating MP3 files to play
on this unit
≥Disc formats: ISO9660 level 1 and level 2 (except for
extended formats)
≥Files: MP3 files with the suffix “.mp3” or “.MP3”
≥MP3 files may not be played in the order you recorded
them. Note the following if you want the files to play in
the order you record them.
≥1 Use software that records the files to the disc in file
name order.
≥2 Prefix folder and file names with 3-digit numbers in
the order you want to play them.
≥3 Give the files and folders names with 8 characters
or less, including the 3-digit prefix.
≥4 It is better not to create folders (albums) within fold-
ers (such as shown in example 2).
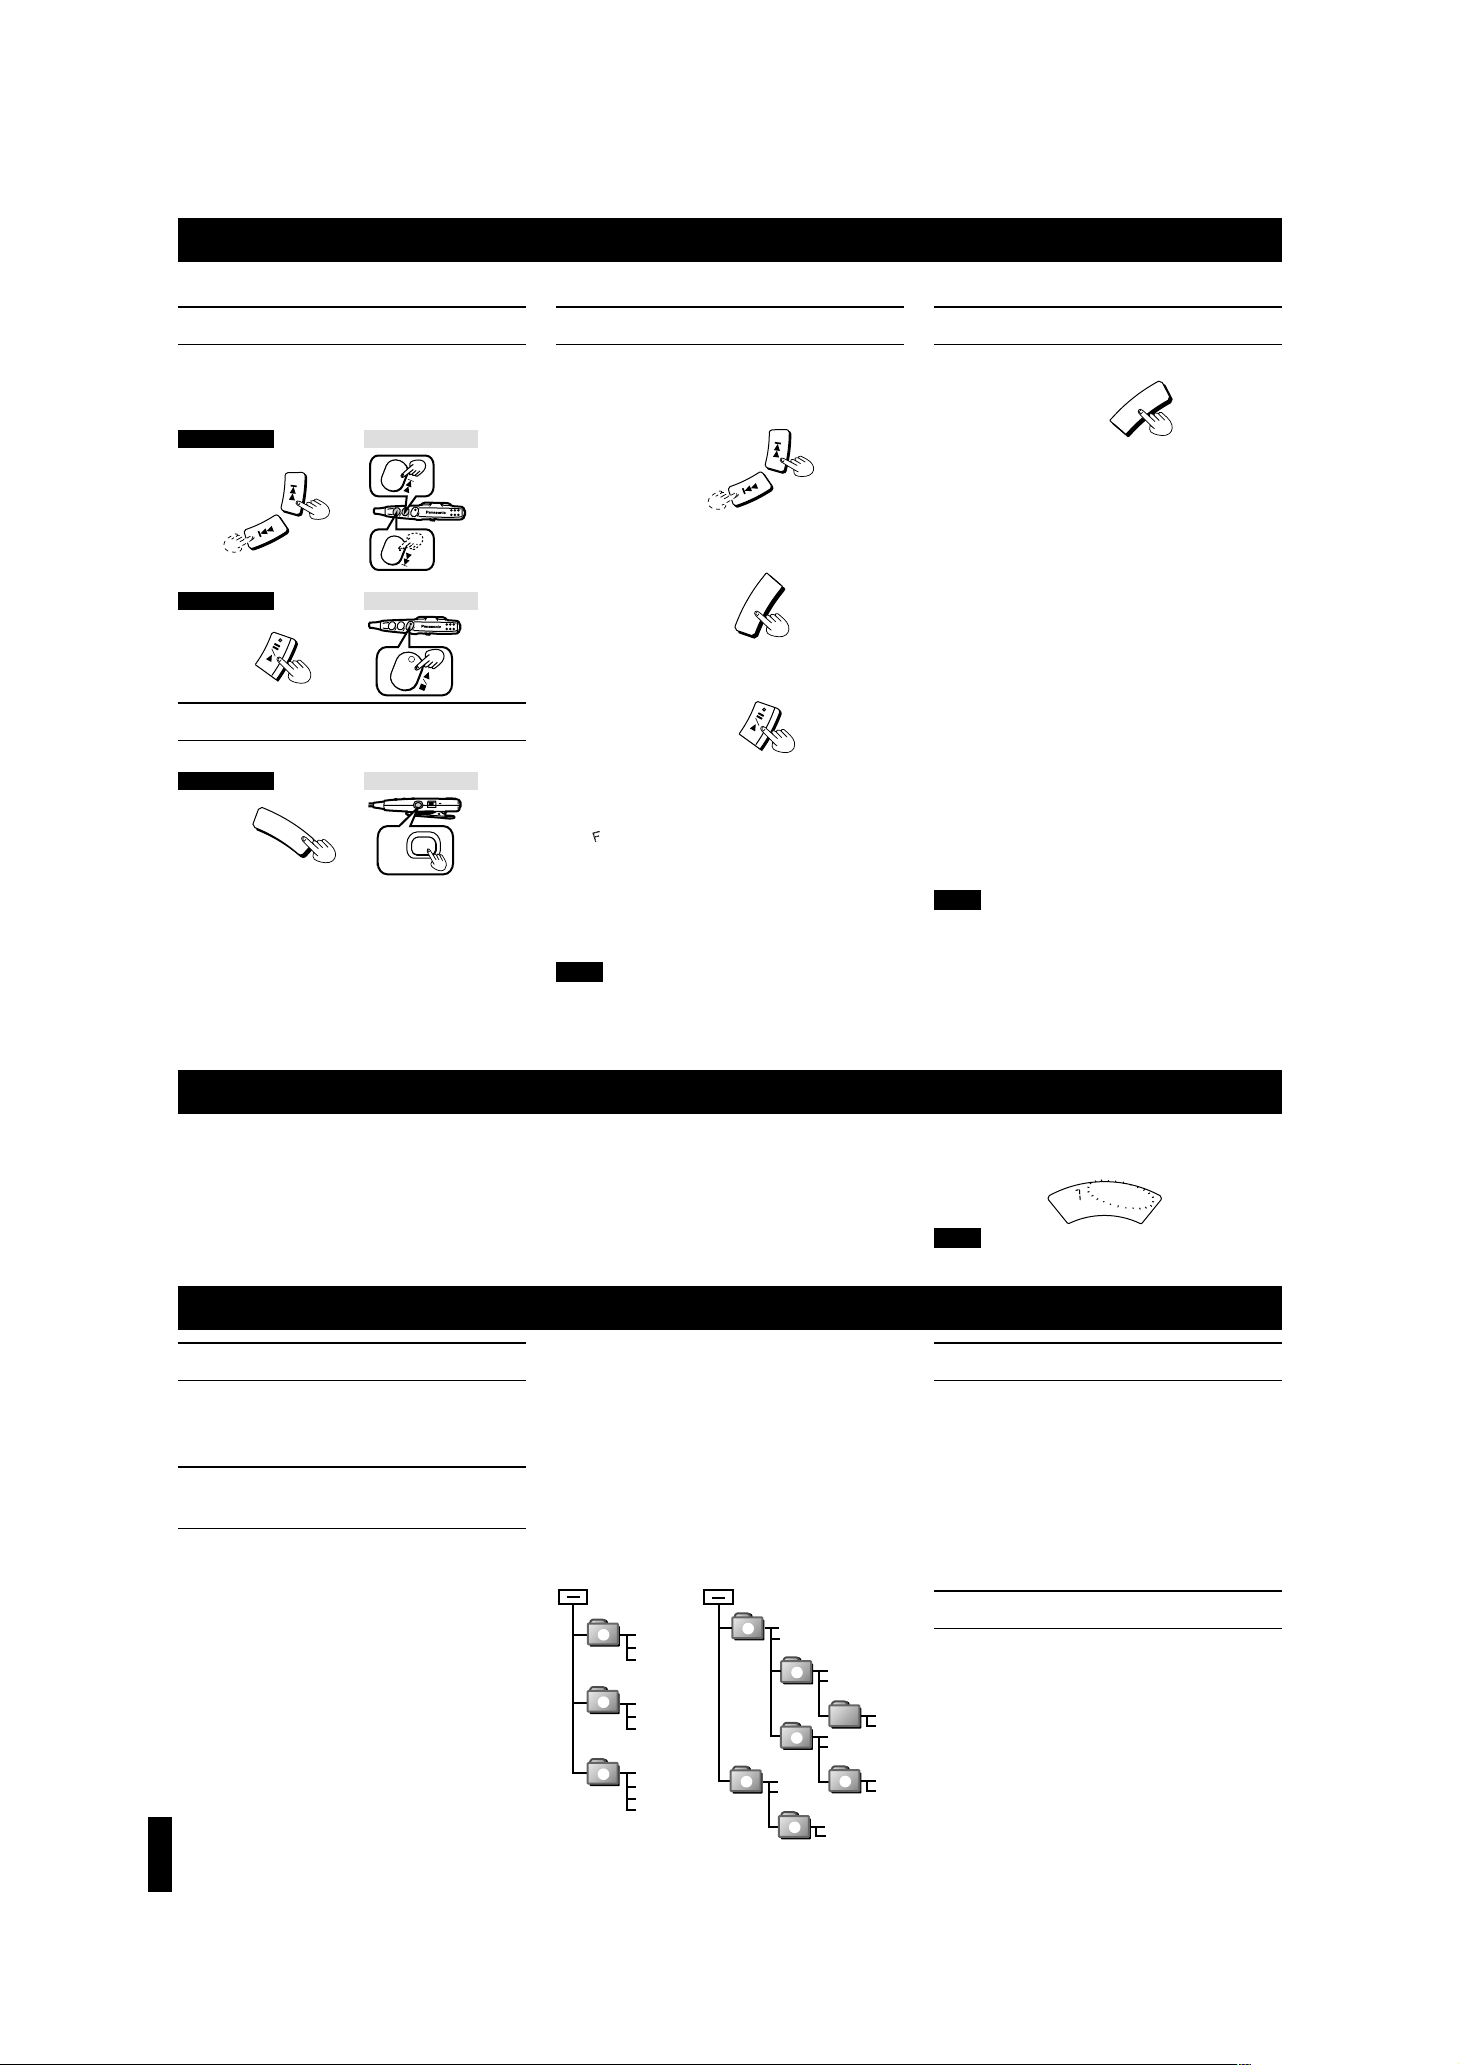
This unit plays MP3 files in the following order.
Numbers such as 1 show the order folders (albums) and
files (tracks) within them are played.
Example1: Recommended method when creating MP3
discs.
Example2: A disc not created in the recommended way.
≥Play will be in the order shown in the below diagram,
irrespective of folder and track names, so the order of
play in this example will be A#C#G#D, not
A#B#C#D. Folders and files in the same level will
be played in order according to their names.
≥Folders that do not contain MP3 files ( “Falbum” in the
example) are skipped.
Example2Example1
Limitations on MP3
≥This unit cannot play files if they have a suffix other
than “.mp3” or “.MP3”.
≥This unit cannot play files that have the suffix “.mp3”
or “.MP3” if they are not MP3 files.
≥This unit can display album and track titles with ID3
tags (version 1.0 and 1.1). Titles including text data
the unit doesn’t support cannot be displayed.
≥This unit is compatible with multi-session but if there
are a lot of sessions it takes more time for play to
start. Keep the number of sessions to a minimum to
avoid this.
≥This unit cannot play files recorded using packet write.
.
Frequently asked questions
Q. Can I play a disc if it has both audio data and
MP3 data?
Yes, but only the data type used for the first track is
played.
Q. Is there a limit on the number of albums and tracks?
This unit can play a maximum of 999 albums and
999 tracks. The unit cannot play albums or tracks
beyond these limits.
Q. Why is sound interrupted between tracks?
The pick-up lens has to move to find the next track
so a few seconds of silence is normal.
Q. Can I use 700-MB data?
Yes, you can.
001track.mp3
002track.mp3
003track.mp3
001album
002album
003album
004track.mp3
005track.mp3
006track.mp3
007track.mp3
008track.mp3
009track.mp3
010track.mp3
CD-ROM drive
1
2
3
1
Aalbum
????.mp3
????.mp3
CD-ROM drive
4
Dalbum
????.mp3
????.mp3
????.mp3
????.mp3
2
Calbum
????.mp3
????.mp3
3
Galbum
????.wav
????.wav
Falbum
5
Balbum
????.mp3
????.mp3
????.mp3
????.mp3
6
Ealbum
(Skipped)
Other Play Methods
Repeat play/Random play
Press during play or stop mode.
The setting switches as shown below each time you
press the button.
1-track repeat (1 `)(----------------]
One track is repeated. |
v|
All-track repeat (`) |
All the tracks on the disc are repeated. |
v |
Random (RND) |
The tracks play once each in random |
order and then play stops. |
v |
Random repeat (RND `) |
The tracks play repeatedly in random |
order. |
v |
Cancel (no indicator is shown)
--------------}
When pressed during program play
The setting switches as shown below each time you
press the button.
1-track repeat (1 `M)(------------]
One track is repeated. |
v|
Memory repeat (`M) |
The programmed tracks are repeated. |
v
|
Cancel (
M) -------------------------------------------}
Note!
≥You can select the first track to play in random play
and random repeat play by pressing [9] while the
disc is stopped. All the tracks are played.
≥You cannot select random play or random repeat play
during program play.
≥The resume function does not work when random or
random repeat are on.
≥The mode cancels when you disconnect the power
source or open the lid.
B
M
O
D
E
Program play
Up to 20 tracks can be entered in the programmed sequence.
Preparation: Put unit in stop mode.
1
Select a track.
2
Register in sequence.
(“M” and the programmed sequence appear on
the display.)
3 Repeat steps 1 and 2 to program
other tracks.
4
∫ To program the same track in the se-
quence more than once
∫ After step 2, press [MEMORY] the desired number of
times.
∫ “” is displayed
∫ If more tracks can be programmed.
∫ To check the contents of the program
∫ Press [MEMORY] during play. The track numbers
and their sequence appear in order, one after the
other.
∫ To clear the program
∫ Press [∫].
Note!
The repeat and random play modes are canceled after
steps 1 and 2.
F
A
M
E
M
O
R
Y
G
Anti-Skip System
This system deals with skipping in a variety
of ways:
≥An anti-skip mechanism prevents skipping caused
when play speed changes due to swinging of the unit.
≥A recovery system immediately returns the laser pick-
up to its original position if it is knocked off the track by
a strong shock.
≥The anti-skip memory (maximum 45 seconds when
playing CD-DA and maximum 100 seconds when
playing 128 kbps MP3) fills in interruptions caused by
bumps and vibrations.
The anti-skip system works automatically while the
system is on and cannot be canceled.
T
R
A
C
K
A
L
B
U
M
M
P
3
M
1
R
N
D
S
-
X
B
S
Note!
The anti-skip memory compresses digital signals.
When bumps continue repeatedly
The elapsed playing time disappears and sound is interrupted.
The letters such as F in the various illustrations refer to the descriptions in the “Location of Controls” section (see page 2).
Skip play
Plays from the selected track through to the last track
on the disc.
Preparation: Put unit in stop mode.
1
Select a track.
2
Changing the sound quality
Press during play or stop mode.
The setting switches as shown below each time you
press the button.
S-XBS <>Cancel (no indicator is shown)
S-XBS:
Select this setting to boost the low frequency range response.
G
F
V
O
L
(Beep Beep
Beep)
(Beep Beep)
V
O
L
(Beep)
Remote control
Remote control
D
S
-
X
B
S
Main unit Remote control
EQ
HOLD
EQ
(Beep)
Main unit
Main unit
Page 5
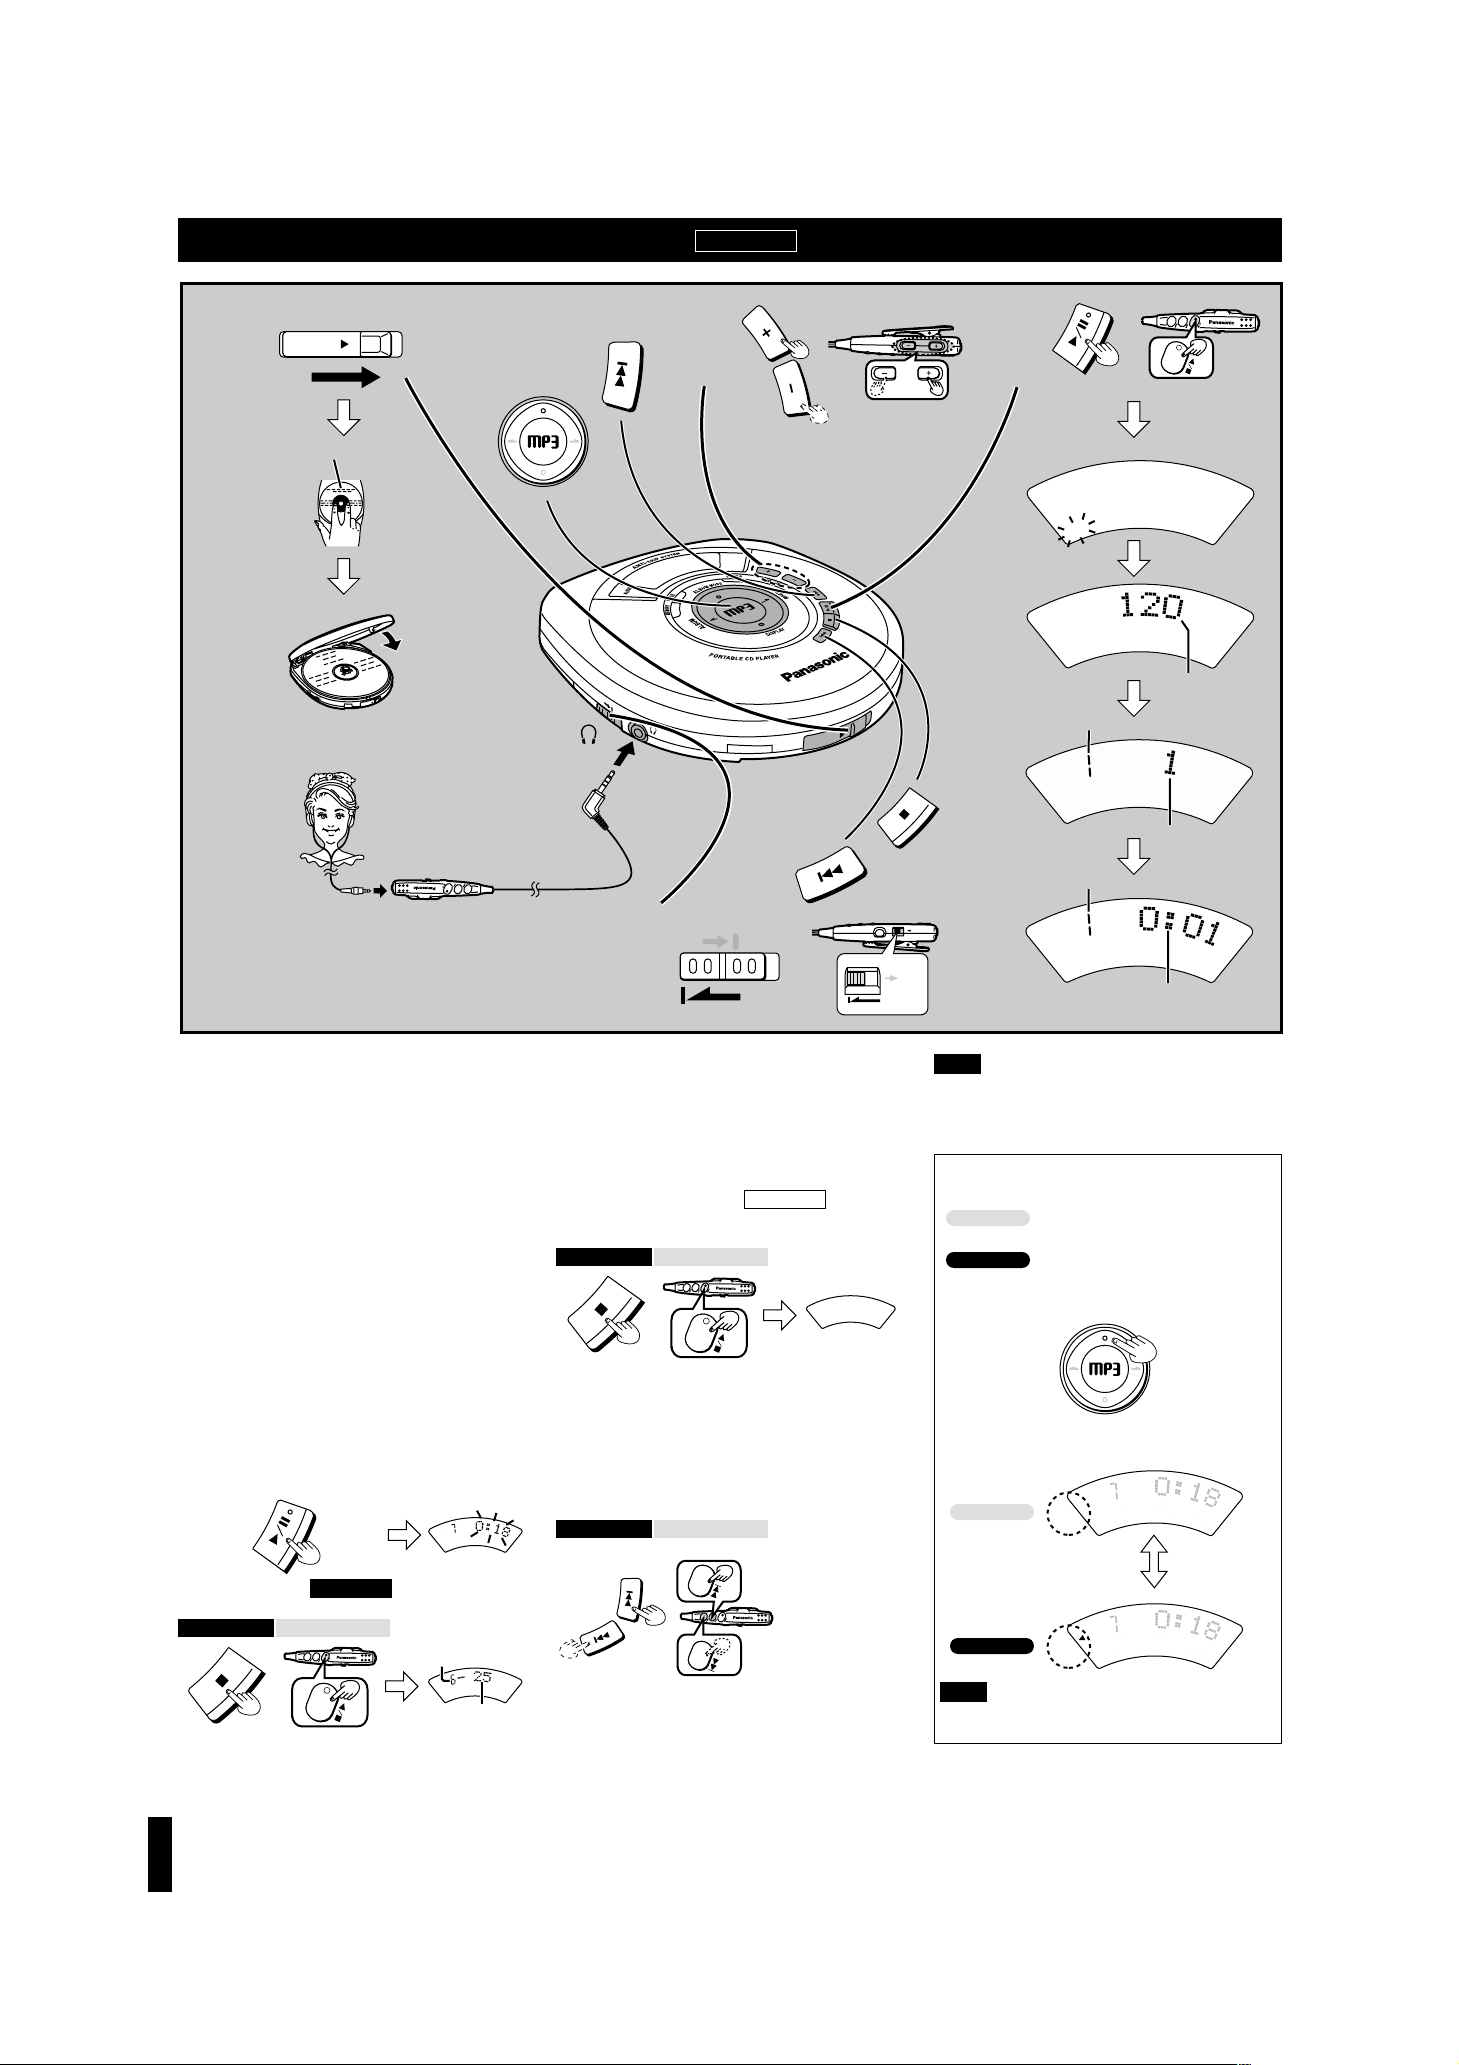
5
RQT6548
Sequential Play with MP3 files
Basic Play
T
R
A
C
K
A
L
B
U
M
M
P
3
M
1
R
N
D
S
-
X
B
S
T
R
A
C
K
A
L
B
U
M
M
P
3
M
1
R
N
D
S
-
X
B
S
T
R
A
C
K
A
L
B
U
M
M
P
3
M
1
R
N
D
S
-
X
B
S
T
R
A
C
K
A
L
B
U
M
M
P
3
M
1
R
N
D
S
-
X
B
S
5
OPEN
4
A
L
B
U
M
M
O
D
E
DISPLAY
ALBUM
ALBUM
3
2
1
OPEN
O
P
E
N
HOLD
H
O
L
D
V
O
L
U
M
E
/
V
O
L
VOL
HOLD
EQ
HOLD
HOLD
VOL
L
R
V
O
L
Album number
Track number
Track number in play
Elapsed playing time of each track
Label must face upward.
Plug type:
3.5 mm (1/8 in.) stereo
To switch between Disc and
Album mode
Plays all the tracks on the disc.
Plays all the tracks in the current album.
Press during play or while stopped.
The setting switches as shown below each time you
press the button.
A
L
B
U
M
M
O
D
E
DISPLAY
ALBUM
ALBUM
T
R
A
C
K
A
L
B
U
M
M
P
3
M
1
R
N
D
S
-
X
B
S
A
L
B
U
M
T
R
A
C
K
A
L
B
U
M
M
P
3
M
1
R
N
D
S
-
X
B
S
A
L
B
U
M
Album mode
Disc mode
Album mode
Disc mode
Display while reading files
Counts the files
(tracks) on the disc
Close the lid.
Note!
You cannot do the operation above during program
play (page 6).
Note!
≥You cannot search when playing MP3 files.
≥If the disc is scratched or the condition of the record-
ing is poor, some noise may occur before the unit
goes to stop mode.
1 Slide [OPEN1] to open the lid, and
insert the disc.
2
Connect the wired remote control
and the stereo headphones to [Ë].
(Plug in firmly.)
3 Release [HOLD].
4 Press [
1/
;
] (main unit) or press
[
∫/1
] (remote control) to start play.
≥The time until play starts depends on the num-
ber of files on the disc. If the unit cannot read the
disc correctly (it is scratched or dirty or the unit is
bumped), some files may be left unread or the
disc may not be read at all.
≥The music symbols flash randomly during play.
≥If in Disc mode, play stops after the last track on
the disc. If in Album mode, play stops after the
last track in the album.
5 Adjust the volume.
∫ To pause play
(main unit only)
Press during play. (Press again to restart play.)
∫ To stop play
Press during play.
Resume function
The unit stores the track where you stopped play and if
you press [1/;] (main unit) or [∫/1] (remote control),
play resumes from the beginning of that track.
Resume function notes
≥Opening the lid while stopped or replacing the disc
while off cancels the function. (It may remain active if
you replace a disc in the off mode.)
≥Play may resume from the beginning of the next track
if you stopped play near the end of a track.
≥The resume function is automatic and you cannot turn
it off.
∫ To turn off the unit
Press while stopped (main unit) or press and hold
while playing or stopped (remote control).
≥The unit stores data it has read so play can start again
immediately when you press [1/;] (main unit) or
[∫/1] (remote control).
≥(This stored data is lost after 10 minutes when using
batteries.)
∫ Skip function
Press during play. (Press [:] twice to skip to the
beginning of the previous tracks.)
≥You can only skip tracks in the current album when in
album mode.
≥During program play (page 6), these buttons are used
to skip forward or back through the programmed sequence of tracks.
≥During random repeat play (page 6), the skip buttons
cannot be used to skip back to tracks that were played
previously in the random sequence.
Off mode
A
L
B
U
M
M
P
3
M
1
R
N
D
S
-
X
B
S
Forward
Backward
T
R
A
C
K
A
L
B
U
M
M
P
3
M
1
R
N
D
S
-
X
B
S
V
O
L
V
O
L
V
O
L
Forward
Backward
(Beep...Beep)
(Beep...Bee...p)
(Beep Beep Beep)
(Beep Beep)
Total number of tracks
Total number
of albums
Stop mode
No indicator
is shown.
(Beep)
(Beep)(Beep)
Remote controlMain unit
Remote controlMain unit
Remote controlMain unit
Page 6
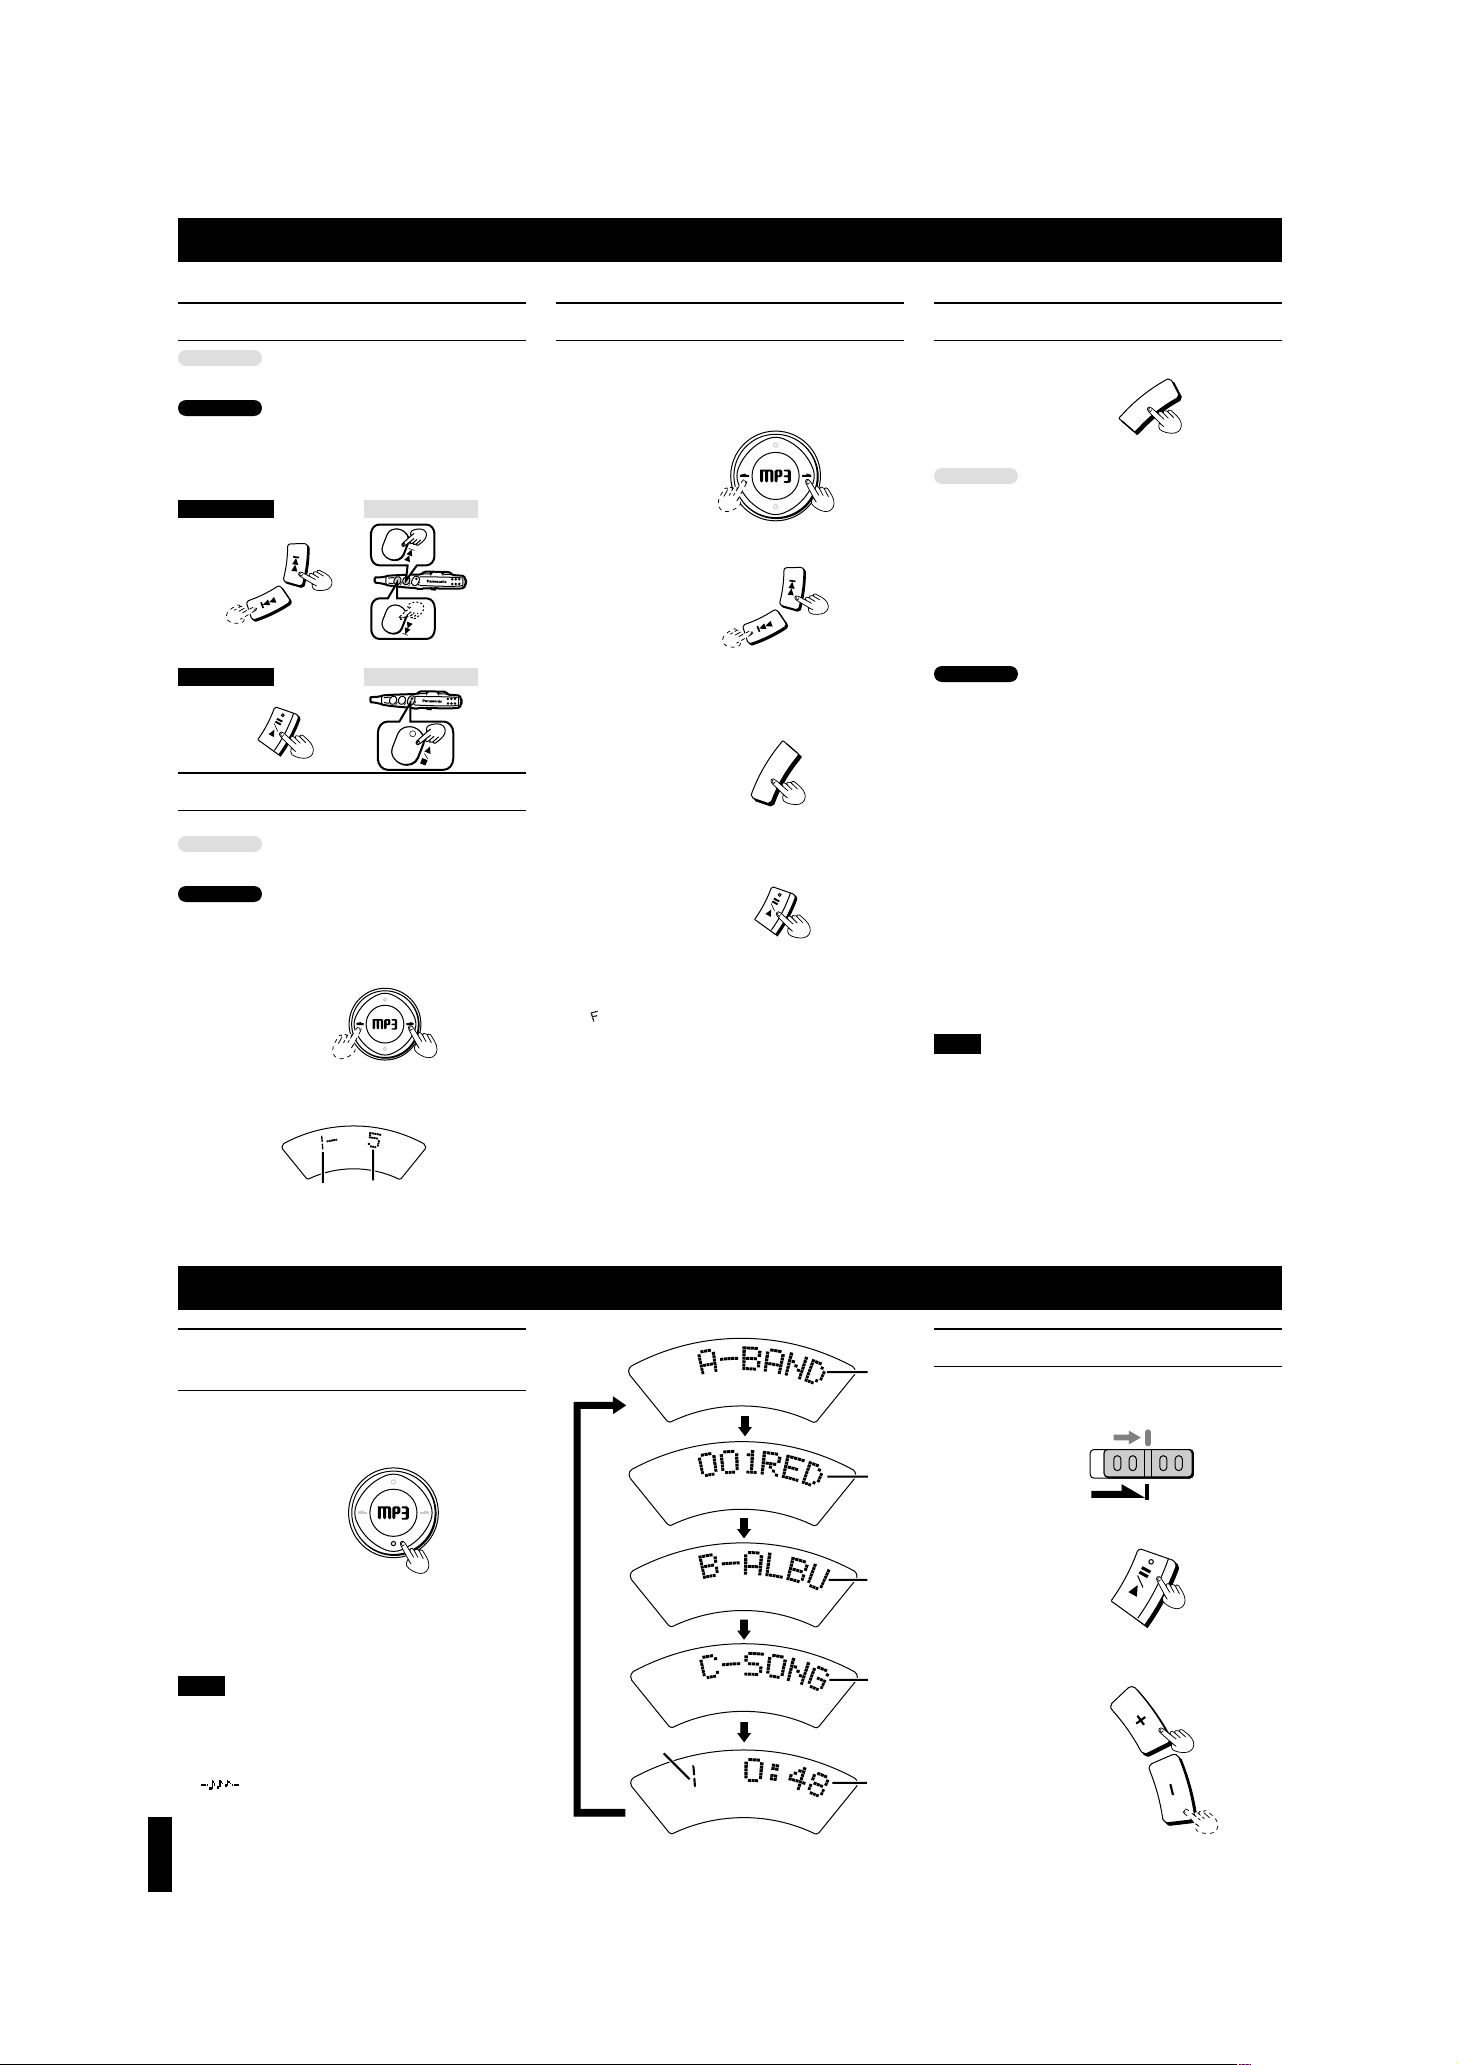
6
Other Play Methods with MP3 files
Track skip play
Plays from the selected track through to the last track
on the disc.
Plays from the selected track through to the last track in
the current album.
Preparation: Put unit in stop mode.
1 Select a track.
2
Album skip play
You can skip album to album.
Plays from the first track of the selected album through
to the last track on the disc.
Plays from the first track of the selected album through
to the last track in the current album.
Press during play or stop mode to select the desired album.
When pressed while stopped
The album number and the total number of tracks within
it appear on the display.
Press [1/;] to start play from the first track in the album.
Press [:] or [9] first to select another track to start play.
The letters such as F in the various illustrations refer to the descriptions in the “Location of Controls” section (see page 2).
F
G
Program play
Up to 20 tracks can be entered in the programmed sequence.
Preparation: Put unit in stop mode.
1
Select a album.
2 Select a track.
3 Register in sequence.
(“M” and the programmed sequence appear on
the display.)
4 Repeat steps 1, 2 and 3 to program
other tracks.
5
∫ To program the same track in the se-
quence more than once
∫ After step 3, press [MEMORY] the desired number
of times.
∫ “” is displayed
∫
If more tracks can be programmed.
∫ To check the contents of the program
∫ Press [MEMORY] during play. The album and track
numbers and their sequence appear in order, one
after the other.
∫ To clear the program
∫ Press [∫].
For your reference:
≥If album mode was engaged, disc mode is engaged
automatically when you press [MEMORY].
≥The random repeat play mode is canceled after steps
1, 2 and 3.
F
A
M
E
M
O
R
Y
G
Album mode
Disc mode
Album mode
Disc mode
A
L
B
U
M
M
O
D
E
DISPLAY
ALBUM
ALBUM
J
A
L
B
U
M
M
O
D
E
DISPLAY
ALBUM
ALBUM
J
T
R
A
C
K
A
L
B
U
M
M
P
3
M
1
R
N
D
S
-
X
B
S
Album number Number of tracks in album 1
Repeat play/Random play
Press during play or stop mode.
The setting switches as shown below each time you
press the button.
1-track repeat (1 `)(----------------]
One track is repeated. |
v|
All-track repeat (`) |
All the tracks on the disc are repeated. |
v |
Random repeat (RND `) |
The tracks on the disc play repeatedly |
in random order. |
v
|
Cancel (no indicator is shown)
--------------}
1-track repeat (1 `)(----------------]
One track is repeated. |
v|
All-track repeat (`) |
All the tracks in the album are repeated.|
v |
Random repeat (RND
`
)
|
The tracks in the current album play |
repeatedly in random order. |
v
|
Cancel (no indicator is shown)
--------------}
When pressed during program play
The setting switches as shown below each time you
press the button.
1-track repeat (1 `M)(------------]
One track is repeated. |
v|
Memory repeat (`M) |
The programmed tracks are repeated. |
v
|
Cancel (
M) -------------------------------------------}
Note!
≥You can select the first track to play in random repeat
play by pressing [MALBUM L] and [9] while the
disc is stopped.
≥Tracks in an album or disc are played randomly until
you release the mode or press [∫] in random repeat
play.
≥You cannot select random repeat play during program
play.
≥The resume function does not work when random re-
peat is on.
≥The mode cancels when you disconnect the power
source or open the lid.
Album mode
Disc mode
B
M
O
D
E
Other Useful Functions
Changing the contrast
1 While stopped, set [HOLD] to the
hold position. (See page 2.)
2 Press and hold [1/;] and...
3 Press [i, VOLUME, j].
i: darker, j: lighter
T
R
A
C
K
A
L
B
U
M
M
P
3
M
1
R
N
D
S
-
X
B
S
T
R
A
C
K
A
L
B
U
M
M
P
3
M
1
R
N
D
S
-
X
B
S
T
R
A
C
K
A
L
B
U
M
M
P
3
M
1
R
N
D
S
-
X
B
S
T
R
A
C
K
A
L
B
U
M
M
P
3
M
1
R
N
D
S
-
X
B
S
T
R
A
C
K
A
L
B
U
M
M
P
3
M
1
R
N
D
S
-
X
B
S
a
b
c
d
f
e
HOLD
N
G
V
O
L
U
M
E
E
Changing the information
displayed for MP3 tracks
You can show album and track titles.
Press during play.
The information changes each time you press the button.
a Album title
b Track title
c ID3 album title
d ID3 track title
e Track number in play
f Elapsed playing time of each track
Note!
≥The display shows up to 6 characters at once. Longer
titles scroll from right to left.
≥This unit can display up to 30 characters each for
album, track, ID3 album, and ID3 track titles. (“~” appears at the end of the title if it is longer than this.)
≥“ ” is displayed if titles with ID3 tags haven’t
been entered.
≥Titles entered with 2-byte code cannot be shown cor-
rectly on this unit.
V
O
L
(Beep Beep
Beep)
(Beep Beep)
V
O
L
(Beep)
Remote control
Remote control
A
L
B
U
M
M
O
D
E
DISPLAY
ALBUM
ALBUM
K
Main unit
Main unit
Page 7
7
WARNING:
TO REDUCE THE RISK OF FIRE, ELECTRIC SHOCK OR PRODUCT DAMAGE, DO NOT EXPOSE THIS APPARATUS TO RAIN,
MOISTURE, DRIPPING OR SPLASHING AND THAT NO OBJECTS
FILLED WITH LIQUIDS, SUCH AS VASES, SHALL BE PLACED ON
THE APPARATUS.
CAUTION!
THIS PRODUCT UTILIZES A LASER.
USE OF CONTROLS OR ADJUSTMENTS OR PERFORMANCE OF
PROCEDURES OTHER THAN THOSE SPECIFIED HEREIN MAY
RESULT IN HAZARDOUS RADIATION EXPOSURE.
DO NOT OPEN COVERS AND DO NOT REPAIR YOURSELF.
REFER SERVICING TO QUALIFIED PERSONNEL.
CAUTION:
This equipment has been tested and found to comply with the limits for a Class B
digital device, pursuant to Part 15 of the FCC Rules.
These limits are designed to provide reasonable protection against harmful interference in a residential installation. This equipment generates, uses and can radiate radio frequency energy and, if not installed and used in accordance with
the instructions, may cause harmful interference to radio communications.
However, there is no guarantee that interference will not occur in a particular
installation. If this equipment does cause harmful interference to radio or television reception, which can be determined by turning the equipment off and on, the
user is encouraged to try to correct the interference by one or more of the following measures:
≥Reorient or relocate the receiving antenna.
≥Increase the separation between the equipment and receiver.
≥Connect the equipment into an outlet on a circuit different from that to which the
receiver is connected.
≥Consult the dealer or an experienced radio/TV technician for help.
Any unauthorized changes or modifications to this equipment would void the
user’s authority to operate this device.
This device complies with Part 15 of the FCC Rules. Operation is subject to the
following two conditions: (1) This device may not cause harmful interference, and
(2) this device must accept any interference received, including interference that
may cause undesired operation.
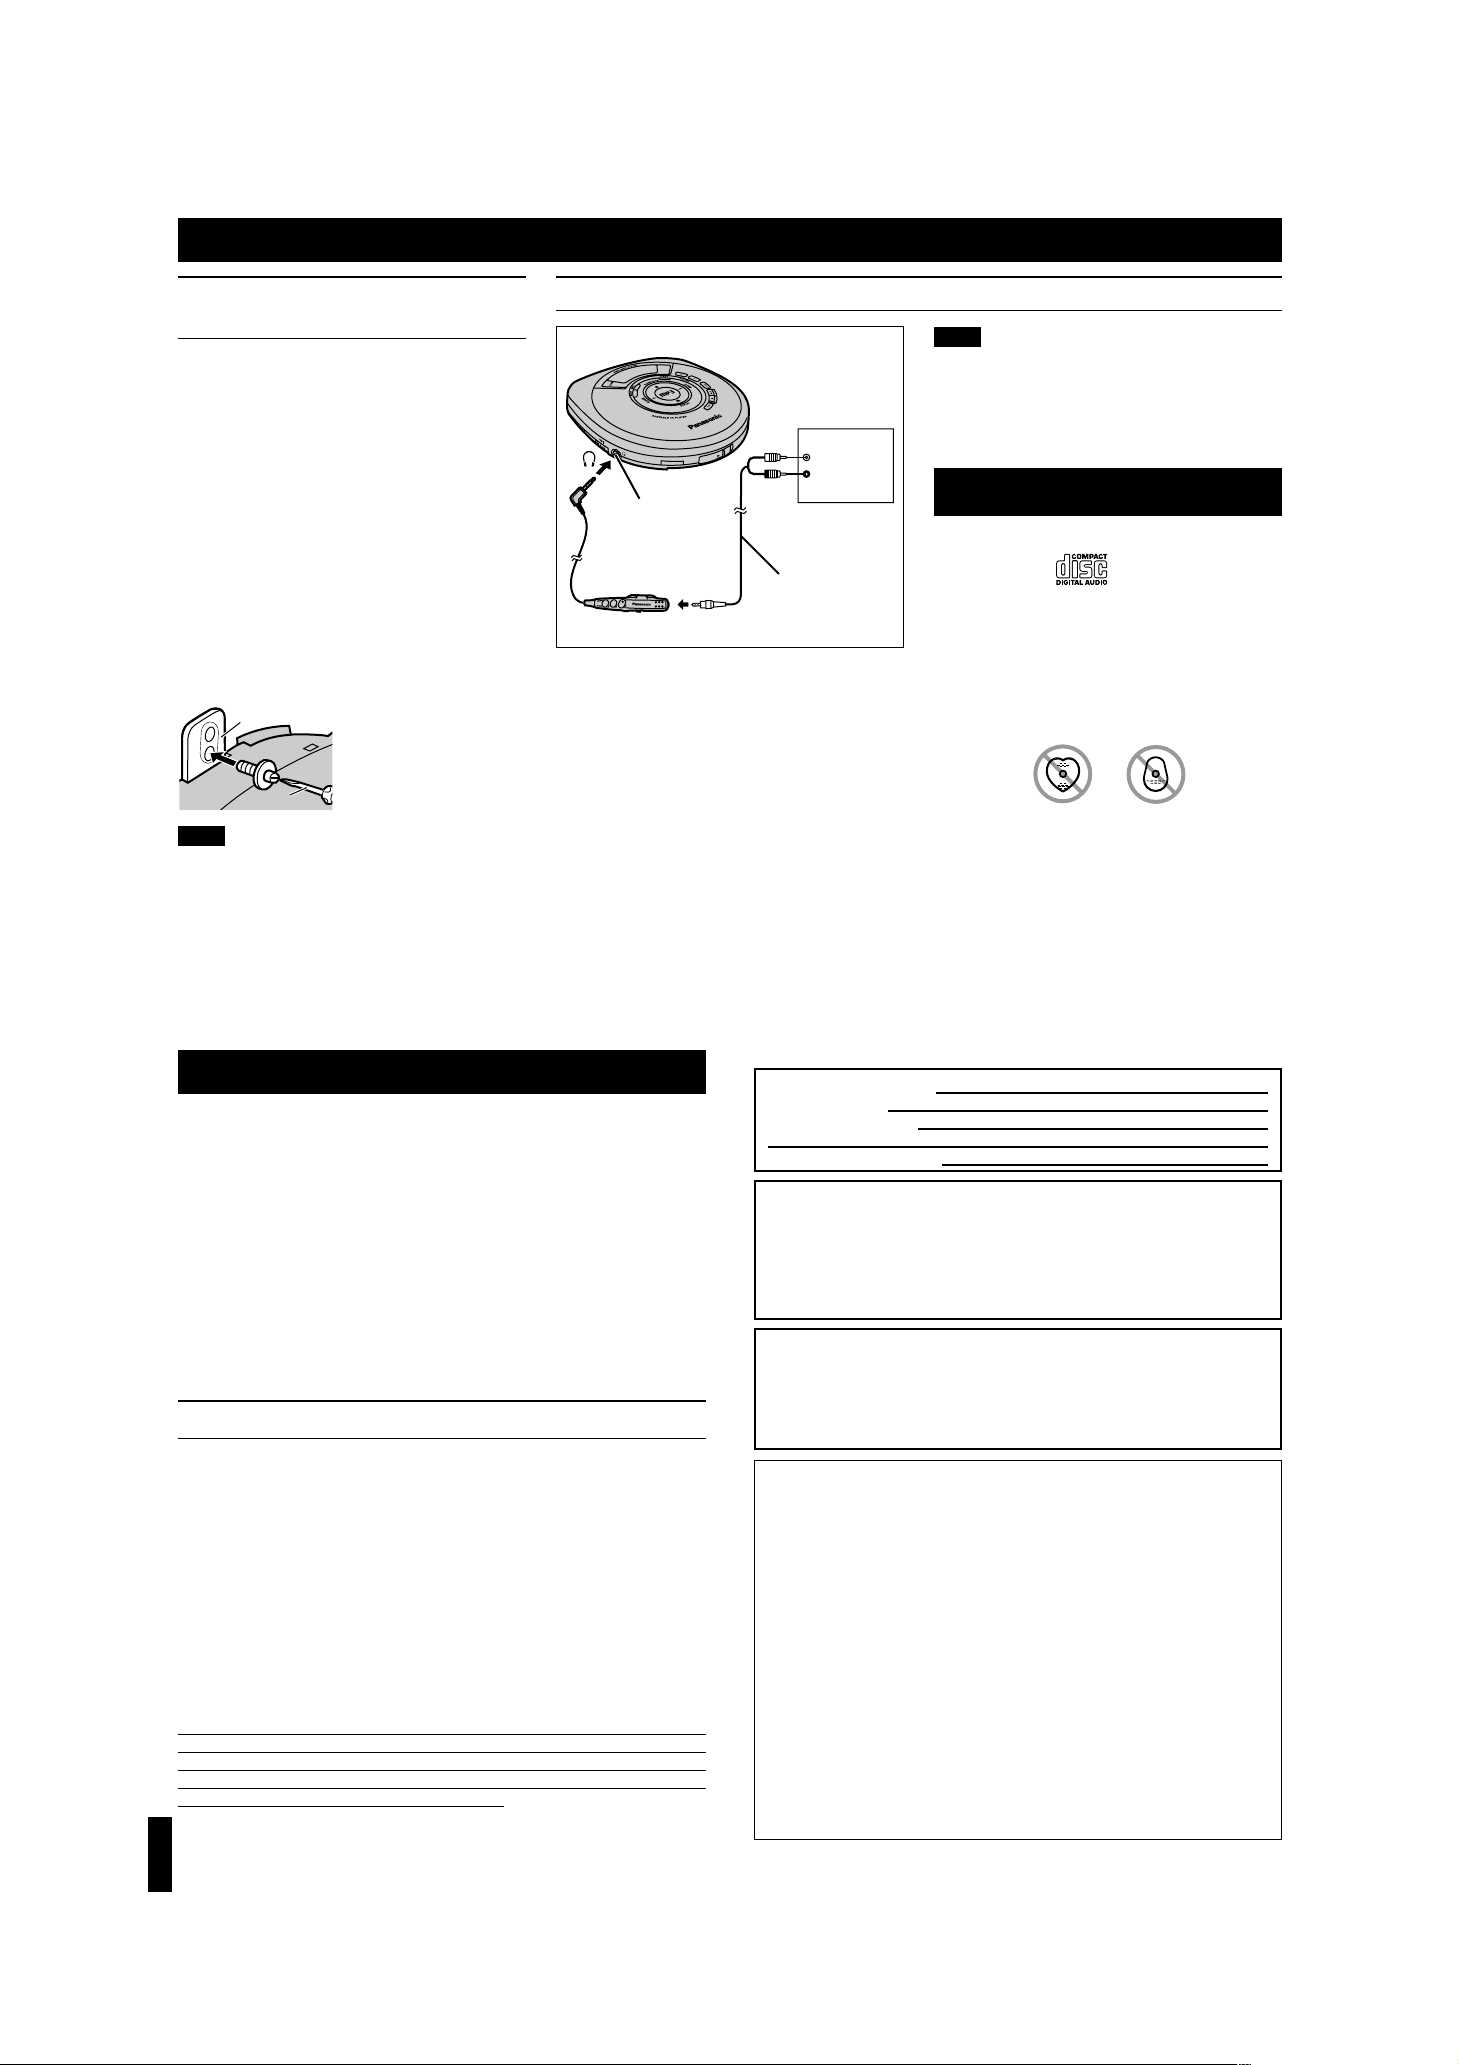
Using the Unit with Optional Accessories
Using the unit with a car audio
system
Obtain the following, available as optional accessories
(part numbers are indicated in parentheses).
Use only the recommended car adaptor. Use of other
car adaptors can damage the unit.
For connection to the car audio system
Car stereo cassette adaptor (SH-CDM10A)
Connect the car stereo cassette adaptor to the
headphone jack of the remote control and connect
it to [Ë] on the unit.
Turn the operation tones off (see page 3) so they are
not heard when you press buttons on the remote control.
For securing the unit and connecting to the power
supply
≥Car adaptor (SH-CDC9)
≥Car mounting kit (SH-CDF20)
Note when using the car mounting kit (SH-CDF20)
Note!
≥When you switch off the car, the resume function may
work even if you change the disc.
≥It may not be possible to use the unit with some types
of car stereos owing to restrictions imposed by the
construction of the car stereo cassette adaptor.
For further details, refer to the instructions of the part
concerned.
Headphone jack [Ë]
Other equipment
(White)
(Red)
Stereo connection
cable (not included)
AUX IN
Product Service
1. Damage requiring service—The unit should be serviced by qualified service per-
sonnel if:
1. (a) The AC power supply cord or AC adaptor has been damaged; or
1. (b) Objects or liquids have gotten into the unit; or
1. (c) The unit has been exposed to rain; or
1. (d) The unit does not operate normally or exhibits a marked change in perfor-
mance; or
1. (e) The unit has been dropped or the cabinet damaged.
2. Servicing—Do not attempt to service the unit beyond that described in these op-
erating instructions. Refer all other servicing to authorized servicing personnel.
3. Replacement parts—When parts need replacing ensure the servicer uses parts
specified by the manufacturer or parts that have the same characteristics as the
original parts. Unauthorized substitutes may result in fire, electric shock, or other
hazards.
4. Safety check—After repairs or service, ask the servicer to perform safety checks
to confirm that the unit is in proper working condition.
Product information
For product information or assistance with product operation:
Contact the Panasonic Customer Call Center at 1-800-211-7262, or
e-mail [email protected], or web site (http://www.panasonic.com).
For assistance in the continental U.S.A. in obtaining repairs please ship the product
to:
Panasonic Services Company - Customer Servicenter
Suite B 4900 George McVay Drive
McAllen, TX 78503
In Puerto Rico contact the Panasonic Sales Company.
Tel. (787) 750-4300 Fax. (787) 768-2910
When shipping the unit carefully pack and send it prepaid, adequately insured and
preferably in the original carton. Include a letter detailing the complaint and provide a
day time phone number where you can be reached.
IF REPAIR IS NEEDED DURING THE WARRANTY PERIOD THE PURCHASER
WILL BE REQUIRED TO FURNISH A SALES RECEIPT/PROOF OF PURCHASE
INDICATING DATE OF PURCHASE, AMOUNT PAID AND PLACE OF PURCHASE. CUSTOMER WILL BE CHARGED FOR THE REPAIR OF ANY UNIT RECEIVED WITHOUT SUCH PROOF OF PURCHASE.
Also, the purchaser will be responsible for shipping the unit to the above address.
DATE OF PURCHASE
DEALER NAME
DEALER ADDRESS
TELEPHONE NUMBER
User memo:
1Remove the screw from
the bracket at the rear of
the car mounting base.
2Replace the screw in the
lower hole of the bracket.
Bracket
Screwdriver
Concerning CDs
Using the unit with an audio system
Note!
≥Obtain the optional connecting cable if the other
equipment comes with mini-phone jacks.
≥If you connect speakers (active or otherwise) directly
to [Ë] on the unit, ensure they have an impedance of
1 k≠ or less.
Using a stereo connection cable (not included), you can
listen to CDs on your audio system.
Turn off this unit and the other equipment before connection.
1 Connect the remote control to [Ë] on the
unit.
2Connect the stereo connection cable to the
remote control and the other equipment.
≥The unit may malfunction if you connect this cable
directly to the unit.
≥Do not connect the cable to the PHONO jacks on an
amplifier.
≥Turn the operation tones off (see page 3) so they
are not heard when you press buttons on the remote control.
3Adjust the volume on the other equipment.
Wired remote control
Choose CDs with this mark:
Do not;
≥use CDs with labels and stickers that are coming off or
with adhesive exuding from under labels and stickers.
≥attach scratch-proof covers or any other kind of acces-
sory.
≥write anything on the CD.
≥clean CDs with liquids. (Wipe with a soft, dry cloth.)
≥use irregularly shaped CDs.
Do not store;
≥In direct sunlight,
≥In humid or dusty locations,
≥In locations directly exposed to heating appliances,
≥On the dashboard or rear deck of a car.
HOLD
V
OL
N
E
P
O
L
R
Page 8
≥Remove the batteries if you do not intend to use the
unit for a long time.
≥Do not throw into fire, short-circuit, disassemble, or
subject to excessive heat.
≥Do not attempt to recharge dry cell batteries.
≥Do not allow metal objects to touch the battery termi-
nals as this may cause short-circuiting which is dangerous.
≥When carrying batteries in a pocket or bag, ensure no
metal objects such as necklaces are placed together
with them. Contact with metal may cause short-circuiting which can cause a fire.
When driving a car
In the interest of traffic safety, do not operate the unit
while driving.
Specifications Troubleshooting Guide
Before requesting service, make the below checks. If you are in doubt about some of
the check points, or if the remedies indicated in the chart do not solve the problem,
contact the Panasonic Customer Call Center at 1-800-211-7262, or e-mail
[email protected], or web site (http://www.panasonic.com).
Listening caution
Do not play your headphones or earphones at a high
volume. Hearing experts advise against continuous extended play.
If you experience a ringing in your ears, reduce volume
or discontinue use.
Do not use while operating a motorized vehicle. It may
create a traffic hazard and is illegal in many areas.
You should use extreme caution or temporarily discontinue use in potentially hazardous situations.
Even if your headphones or earphones are the open-air
type designed to let you hear outside sounds, don’t turn
up the volume so high that you can’t hear what’s around
you.
Sound can be deceiving. Over time your hearing “comfort level” adapts to higher volumes of sound. So what
sounds “normal” can actually be loud and harmful to
your hearing.
Guard against this by setting your equipment at a safe
level BEFORE your hearing adapts.
To establish a safe level:
≥Start your volume control at a low setting.
≥Slowly increase the sound until you can hear it com-
fortably and clearly, and without distortion.
Once you have established a comfortable sound level:
≥Leave it there.
Cautions
∫ Selection
As a safety precaution, the portable CD players made
by Panasonic are constructed so it is impossible to
recharge ordinary batteries.
Only batteries especially designed for this unit can be
recharged.
Special rechargeable Ni-Cd batteries:
P-3GAVA/2B (set of 2)
For details, check with your dealer.
≥If rechargeable battery play time is short after recharg-
ing, the batteries have reached the end of their service
life. Replace them with the recommended replacements.
≥Play time may be shorter than usual after recharging
batteries for the first time or after they have been unused for a long time. Repeatedly recharge and discharge the batteries if this occurs to restore them to
normal.
∫ Care
To prevent battery damage, electrolyte leakage and
short-circuiting, heed the following points.
≥Do not peel off the covering on batteries and do not
use if the covering has been peeled off.
≥Align the poles + and - correctly when inserting the
batteries.
≥Do not mix different types of batteries or old and new
batteries.
Audio (CD-DA)
No. of channels: 2 (left and right, stereo)
Frequency response: 20 to 20,000 Hz
(i0.5 dB to j7 dB)
DA converter: 1 bit, MASH
Headphone
output level: RMS max. 6 mWi6 mW/
16 ≠ (adjustable)
Pickup
Light source: Semiconductor laser
Wavelength: 780 nm
MP3
Maximum number of items
(sum of folders and files): 999
Maximum album levels: 100
Supported bit-rates: 32 kbps to 320 kbps
(128 kbps is recommended)
General
Operational temperature
range: 0 eC–40 eC
(32 eF–104 eF)
Rechargeable temperature
range: 5 eC–40 eC
(41 eF–104 eF)
Power supply: DC 4.5 V with optional
AC adaptor RP-AC46
Play time:
[Approximate operating time in hours (in
hold mode with S-XBS canceled, at
25 oC (77 oF) on a flat, stable surface)]
≥The play time may be less depending
on the operating conditions.
≥Play time will be considerably reduced
when playing CD-RW.
Recharging time: 3 to 4 hours
Dimensions
(WaHaD): 128a29.1a131.5 mm
(5
1
⁄32za15⁄32za53⁄16z)
Mass: 263 g (9.3 oz.)
(with batteries)
217 g (7.7 oz.)
(without batteries)
Note:
Specifications are subject to change
without notice.
Mass and dimensions are approximate.
8
Selection and care of rechargeable/dry cell batteries
Batteries
used
2 optional
alkaline
batteries
2 optional
rechargeable
batteries
(P-3GAVA/2B)
CD-DA
disc
30
12
MP3
disc
40
16
Maintaining the Lens
Open the lid and clean the lens as shown in the figure.
Use a cotton swab to gently wipe off any finger-prints.
Recommended product: Lens cleaner kit (SZZP1038C)
O
P
E
N
HOLD
Air blower for
camera lens
Lens
Lens
Discontinue use if you experience discomfort with
the headphones or any other parts that directly contact your skin. Continued use may cause rashes or
other allergic reactions.
Problem
Cannot close the lid.
Cannot play discs.
Tracks on disc do not
play in order, starting
with the first track.
Cannot hear music—
too noisy.
TV picture is distorted.
Radio reception is
noisy.
Titles are cutoff or not
displayed correctly.
Check this
Is the disc properly secured in place?
≥Is the unit in HOLD mode?
≥Is the disc properly secured in place?
≥Is there condensation on the lens?
≥(Wait for about an hour and then try again.)
≥Is the disc dirty or scratched or the lens dirty?
(Wipe the disc clean and clean the lens. If it is an
MP3 disc and it is badly scratched, rerecord the
files onto a fresh disc.)
≥Is the random play mode on?
≥Did you stop play in the middle of the disc last
time?
≥Are the headphone and wired remote control plugs
inserted all the way?
≥Are the plugs dirty? (Wipe away dirt on plug.)
≥Separate the unit from mobile phones.
Are you using the unit too near a TV or tuner?
(Keep the unit away from the TV or tuner.)
≥The title exceeds the 30-character limit of this unit.
≥This unit cannot display some characters entered
with computers and other equipment (e.g., 2-byte
code).
Ordinary dry cell
batteries/rechargeable
batteries
Special rechargeable
batteries
EST. 1924
 Loading...