

Page 1
Turntable System
Operating Instructions
Model No.
SL-1200MK5
SL-1210MK5
SL-1200MK5
EB E
GN
Note:
“EB” on the packaging indicates the United Kingdom.
Before connecting, operating or adjusting this product, please read these instructions completely.
Please keep this manual for future reference.
RQT7017-B
Page 2

Dear customer
Supplied accessories
Thank you for purchasing this product.
For optimum performance and safety, please read these instructions
carefully.
SL-1200MK5 Silver model
SL-1210MK5 Black model
Table of contents
Supplied accessories................................................................... 2
Caution for AC mains lead .......................................................... 4
Safety precautions ....................................................................... 4
Features ......................................................................................... 5
Preparation of the cartridge ........................................................ 5
Controls ......................................................................................... 5
Putting the player together ......................................................... 6
Connections and installation ...................................................... 6
Connecting to an amplifier and AC mains lead ......................... 6
Connecting to an Audio Mixer (not included) ............................ 7
Installation .................................................................................. 7
Preparatory adjustments ............................................................. 7
Horizontal balance and stylus pressure .................................... 7
Anti-skating ................................................................................ 8
Armlift height .............................................................................. 8
Tone arm height ......................................................................... 8
Fit the dust cover ....................................................................... 8
Playing records............................................................................. 9
Adjustments while using the unit............................................. 10
Pitch control ............................................................................. 10
Adjusting the turntable brake speed ........................................ 10
Maintenance .................................................................................11
Troubleshooting guide................................................................ 11
Specifications .............................................................................. 11
Please check and identify the supplied accessories.
For the United Kingdom only:
Use numbers indicated in parentheses when
asking for replacements parts.
Turntable ................. 1pc.
(SFTE172-01Z1)
Turntable mat.......... 1pc.
(RGS0008)
Disc slip sheet set
(RGS0005Z-1) ................ 1
•Disc slip sheet
•Transparent sheet
Dust cover ............... 1pc.
(RYF0370B-X)
Head shell
(SFPCC31001K) ...... 1pc.
A cartridge is not included.
Balance weight ....... 1pc.
(SFPWG17201K)
Auxiliary weight ...... 1pc.
(SFPWG17202)
EP record adaptor
(SFWE010) ............... 1pc.
Shell weight ............ 1pc.
(SFPZB3501)
Overhang gauge ..... 1pc.
(SFK0135-01)
Screw set for cartridge
........................................ 1
•Nuts(RHN26003)
•
Screws-short(SFCZV8801-1)
•
Screws-long(SFPEV9801-1)
•Washers(SFPEW9601)
Sticker ...................... 1pc.
(RQLC0142-1)
2
RQT7017
For United Kingdom and Republic of Ireland
www.panasonic.co.uk
(for UK customers only)
•
Order accessory and consumable items for your product with ease and confidence by telephoning our Customer Care Centre Mon–Friday 9:00am–5:30pm.(Excluding public holidays.)
•
Or go on line through our Internet Accessory ordering application.
•
Most major credit and debit cards accepted.
•
All enquiries transactions and distribution facilities are provided directly by Panasonic UK Ltd.
•
It couldn’t be simpler!
Customer Care Centre
For UK customers: 08705 357357
For Republic of Ireland customers: 01 289 8333
Technical Support
For UK customers: 0870 1 505610
This Technical Support Hot Line number is for Panasonic PC software related products only.
For Republic of Ireland, please use the Customer Care Centre number listed above
for all enquiries.
For all other product related enquiries, please use the Customer Care Centre numbers listed above.
Page 3

CAUTION!
•DO NOT INSTALL OR PLACE THIS UNIT IN A
BOOKCASE, BUILT-IN CABINET OR IN ANOTHER
CONFINED SPACE. ENSURE THE UNIT IS WELL
VENTILATED. TO PREVENT RISK OF ELECTRIC SHOCK
OR FIRE HAZARD DUE TO OVERHEATING, ENSURE
THAT CURTAINS AND ANY OTHER MATERIALS DO
NOT OBSTRUCT THE VENTILATION VENTS.
•DO NOT OBSTRUCT THE UNIT’S VENTILATION
OPENINGS WITH NEWSPAPERS, TABLECLOTHS,
CURTAINS, AND SIMILAR ITEMS.
•DO NOT PLACE SOURCES OF NAKED FLAMES, SUCH
AS LIGHTED CANDLES, ON THE UNIT.
•DISPOSE OF BATTERIES IN AN ENVIRONMENTALLY
FRIENDLY MANNER.
WARNING:
TO REDUCE THE RISK OF FIRE, ELECTRIC SHOCK OR
PRODUCT DAMAGE, DO NOT EXPOSE THIS APPARATUS
TO RAIN, MOISTURE, DRIPPING OR SPLASHING AND
THAT NO OBJECTS FILLED WITH LIQUIDS, SUCH AS
VASES, SHALL BE PLACED ON THE APPARATUS.
This product may receive radio interference caused by
mobile telephones during use. If such interference is
apparent, please increase separation between the product
and the mobile telephone.
THIS UNIT IS INTENDED FOR USE IN MODERATE CLIMATES.
SUOMI
VAROITUS!
•ÄLÄ ASENNA TAI LAITA TÄTÄ LAITETTA
KABINETTITYYPPISEEN KIRJAKAAPPIIN TAI MUUHUN
SULJETTUUN TILAAN, JOTTA TUULETUS ONNISTUISI.
VARMISTA, ETTÄ VERHO TAI MIKÄÄN MUU
MATERIAALI EI HUONONNA TUULETUSTA, JOTTA
VÄLTETTÄISIIN YLIKUUMENEMISESTA JOHTUVA
SÄHKÖISKU- TAI TULIPALOVAARA.
•ÄLÄ PEITÄ LAITTEEN TUULETUSAUKKOJA
SANOMALEHDELLÄ, PÖYTÄLIINALLA, VERHOLLA TAI
MUULLA VASTAAVALLA ESINEELLÄ.
•ÄLÄ ASETA PALAVAA KYNTTILÄÄ TAI MUUTA
AVOTULEN LÄHDETTÄ LAITTEEN PÄÄLLE.
•HÄVITÄ PARISTOT LUONTOA
VAHINGOITTAMATTOMALLA TAVALLA.
VAROITUS:
TULIPALO-, SÄHKÖISKUVAARAN TAI TUOTETTA
KOHTAAVAN MUUN VAHINGON VÄHENTÄMISEKSI EI
LAITETTA SAA ALTISTAA SATEELLE, KOSTEUDELLE,
VESIPISAROILLE TAI ROISKEELLE, EIKÄ NESTETTÄ
SISÄLTÄVIÄ ESINEITÄ, KUTEN ESIMERKIKSI
MALJAKOITA, SAA ASETTAA LAITTEEN PÄÄLLE.
TÄMÄ LAITE ON TARKOITETTU KÄYTETTÄVÄKSI
LEUDOSSA ILMASTOSSA.
NORSK
ADVARSEL!
•APPARATET MÅ IKKE PLASSERES I EN BOKHYLLE, ET
INNEBYGGET KABINETT ELLER ET ANNET LUKKET
STED HVOR VENTILASJONSFORHOLDENE ER
UTILSTREKKELIGE. SØRG FOR AT GARDINER ELLER
LIGNENDE IKKE FORVERRER
VENTILASJONSFORHOLDENE, SÅ RISIKO FOR
ELEKTRISK SJOKK ELLER BRANN FORÅRSAKET AV
OVERHETING UNNGÅS.
•APPARATETS VENTILASJONSÅPNINGER MÅ IKKE
DEKKES TIL MED AVISER, BORDDUKER , GARDINER
OG LIGNENDE.
•PLASSER IKKE ÅPEN ILD, SLIK SOM LEVENDE LYS,
OPPÅ APPARATET.
•BRUKTE BATTERIER MÅ KASSERES UTEN FARE FOR
MILJØET.
ADVARSEL:
FOR Å REDUSERE FAREN FOR BRANN, ELEKTRISK
STØT ELLER SKADER PÅ PRODUKTET, MÅ DETTE
APPARATET IKKE UTSETTES FOR REGN, FUKTIGHET,
VANNDRÅPER ELLER VANNSPRUT. DET MÅ HELLER
IKKE PLASSERES GJENSTANDER FYLT MED VANN,
SLIK SOM BLOMSTERVASER, OPPÅ APPARATET.
DETTE APPARATET ER BEREGNET TIL BRUK UNDER
MODERATE KLIMAFORHOLD.
3
RQT7017
Page 4
Caution for AC mains lead
Safety precautions
(For the United Kingdom)
(“EB” area code model only)
For your safety, please read the following text carefully.
This appliance is supplied with a moulded three pin mains plug for
your safety and convenience.
A 5-ampere fuse is fitted in this plug.
Should the fuse need to be replaced please ensure that the
replacement fuse has a rating of 5-ampere and that it is approved
by ASTA or BSI to BS1362.
Check for the ASTA mark m or the BSI mark o on the body of the fuse.
If the plug contains a removable fuse cover you must ensure that it
is refitted when the fuse is replaced.
If you lose the fuse cover the plug must not be used until a
replacement cover is obtained.
A replacement fuse cover can be purchased from your local dealer.
CAUTION!
IF THE FITTED MOULDED PLUG IS UNSUITABLE FOR
THE SOCKET OUTLET IN YOUR HOME THEN THE FUSE
SHOULD BE REMOVED AND THE PLUG CUT OFF AND
DISPOSED OF SAFELY.
THERE IS A DANGER OF SEVERE ELECTRICAL SHOCK
IF THE CUT OFF PLUG IS INSERTED INTO ANY 13AMPERE SOCKET.
If a new plug is to be fitted please observe the wiring code as
stated below.
If in any doubt please consult a qualified electrician.
IMPORTANT
The wires in this mains lead are coloured in accordance with the
following code:
Blue: Neutral, Brown: Live.
As these colours may not correspond with the coloured markings
identifying the terminals in your plug, proceed as follows:
The wire which is coloured Blue must be connected to the terminal
which is marked with the letter N or coloured Black or Blue.
The wire which is coloured Brown must be connected to the terminal
which is marked with the letter L or coloured Brown or Red.
WARNING: DO NOT CONNECT EITHER WIRE TO THE
EARTH TERMINAL WHICH IS MARKED WITH THE
LETTER E, BY THE EARTH SYMBOL
GREEN OR GREEN/YELLOW.
THIS PLUG IS NOT WATERPROOF—KEEP DRY.
Before use
Remove the connector cover.
nn
n OR COLOURED
nn
Placement
Set the unit up on an even surface away from direct sunlight,
high temperatures, high humidity, and excessive vibration. These
conditions can damage the cabinet and other components, thereby
shortening the unit’s service life.
Do not place heavy items on the unit.
Voltage
Do not use high voltage power sources. This can overload the
unit and cause a fire.
Do not use a DC power source. Check the source carefully when
setting the unit up on a ship or other place where DC is used.
AC mains lead protection
Ensure the AC mains lead is connected correctly and not damaged. Poor connection and lead damage can cause fire or electric
shock. Do not pull, bend, or place heavy items on the lead.
Grasp the plug firmly when unplugging the lead. Pulling the AC
mains lead can cause electric shock.
Do not handle the plug with wet hands. This can cause electric
shock.
Foreign matter
Do not let metal objects fall inside the unit. This can cause electric shock or malfunction.
Do not let liquids get into the unit. This can cause electric shock
or malfunction. If this occurs, immediately disconnect the unit from
the power supply and contact your dealer.
Do not spray insecticides onto or into the unit. They contain flammable gases which can ignite if sprayed into the unit.
Service
Do not attempt to repair this unit by yourself. If sound is interrupted, indicators fail to light, smoke appears, or any other problem
that is not covered in these operating instructions occurs, disconnect the AC mains lead and contact your dealer or an authorized
service center. Electric shock or damage to the unit can occur if the
unit is repaired, disassembled or reconstructed by unqualified persons.
Extend operating life by disconnecting the unit from the power
source if it is not to be used for a long time.
4
RQT7017
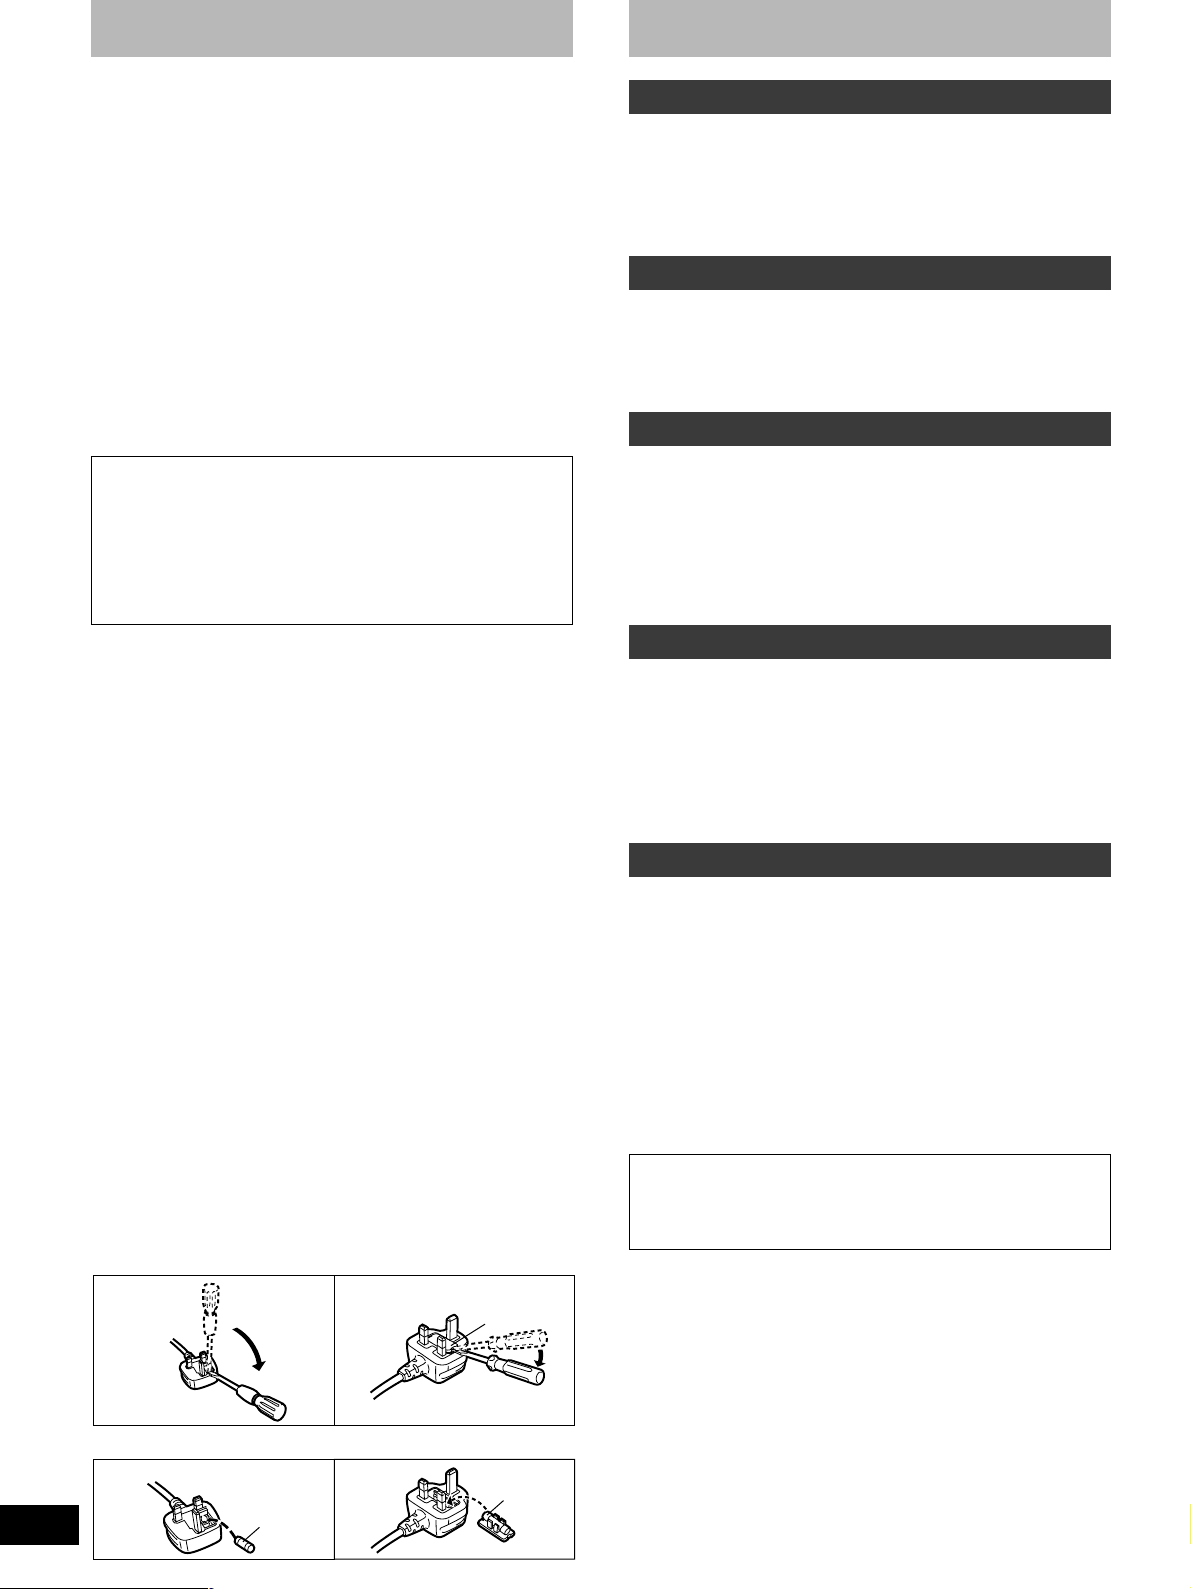
How to replace the fuse
The location of the fuse differ according to the type of AC mains
plug (figures A and B). Confirm the AC mains plug fitted and follow
the instructions below.
Illustrations may differ from actual AC mains plug.
1. Open the fuse cover with a screwdriver.
Figure A
2. Replace the fuse and close or attach the fuse cover.
Figure A
Fuse
(5 ampere)
Figure B
Figure B
Fuse cover
Fuse
(5 ampere)
CAUTION:
The AC voltage is different according to the area. Be sure
to set the proper voltage in your area before use.
(For details, please refer to page 6.)
Page 5

Features
+8
A masterpiece amongst turntables with a worldwide reputation.
Highly accurate turntable speed maintained continuously
with a quartz pitch control.
•The pitch can be varied throughout the range maintaining perfect
accuracy.
•Pitch can be instantly reset to the rated speed (33 1/3 or 45 r/min)
with the reset button.
The direct drive produces high torque.
•Wow and flutter below 0.01 %. Starting torque of 1.5 kg-cm en-
abling the turntable to reach 33 1/3 r/min in 0.7 seconds.
•Smooth stops are achieved with a fully electronic braking system.
The braking speed can be adjusted with the brake speed control
knob.
Tone arm with gimbal suspension
•Using the balance weight control measurement units on the tone
arm, you can quickly change stylus pressure settings to the appropriate pressure.
•Stylus skipping can be reduced using horizontal weight control for
scratch play.
•The tone arm can be finely adjusted in a range of 6 millimeters
with the lockable height control.
Anti-vibration design with 3 layer cabinet construction
and large insulating legs.
Pop-up stylus light.
•A light illuminates the stylus.
Preparation of the cartridge
1 Attach a cartridge (not included).
Follow the cartridge’s instructions to correctly attach it to the
head shell.
•Use the included shell weight when using a light cartridge
(3.5 to 6.5 grams).
Screws
Head shell
Shell
weight
Lead wire
Terminal
Cartridge
Stylus
2 Adjust the overhang.
Fit the included overhang gauge to the head shell. Adjust the
overhang and facing of the cartridge and tighten the screws.
•Line the stylus tip up with the end of the gauge.
•The cartridge should be parallel on the shell head.
Controls
-8
6
4
2
2
4
6
+8
No. Name Reference page(s)
EP record adaptor . . . . . . . . . . . . . . . . . . . . . . . . . . . 9
Turntable base . . . . . . . . . . . . . . . . . . . . . . . . . . . . . . 5
Turntable mat (Or disc slip sheet) . . . . . . . . . . . . . . 6
Turntable . . . . . . . . . . . . . . . . . . . . . . . . . . . . . . . . . . . 6
Center spindle . . . . . . . . . . . . . . . . . . . . . . . . . . . . . . 6
Strobe mirrors . . . . . . . . . . . . . . . . . . . . . . . . . . . . . 10
Power switch (power) . . . . . . . . . . . . . . . . . . . . . . . . 9
Strobe light, pilot lamp . . . . . . . . . . . . . . . . . . . . . . . 9
Start-stop button (start-stop) . . . . . . . . . . . . . . . . . . 9
Speed select buttons (33, 45) . . . . . . . . . . . . . . . . . . 9
Shell stand . . . . . . . . . . . . . . . . . . . . . . . . . . . . . . . . . 5
Arm-height control . . . . . . . . . . . . . . . . . . . . . . . . . . . 8
Balance weight . . . . . . . . . . . . . . . . . . . . . . . . . . . . . . 6
Stylus pressure control . . . . . . . . . . . . . . . . . . . . . . . 7
Arm lock . . . . . . . . . . . . . . . . . . . . . . . . . . . . . . . . . . . 8
Anti-skating control . . . . . . . . . . . . . . . . . . . . . . . . . . 7
Cue lever . . . . . . . . . . . . . . . . . . . . . . . . . . . . . . . . . . . 7
Arm clamp . . . . . . . . . . . . . . . . . . . . . . . . . . . . . . . . . . 7
Arm rest . . . . . . . . . . . . . . . . . . . . . . . . . . . . . . . . . . . . 7
Tone arm . . . . . . . . . . . . . . . . . . . . . . . . . . . . . . . . . . . 6
Pitch indicator . . . . . . . . . . . . . . . . . . . . . . . . . . . . . 10
Pitch control (pitch adj.) . . . . . . . . . . . . . . . . . . . . . 10
Reset button (reset) . . . . . . . . . . . . . . . . . . . . . . . . . . 9
Locking nut . . . . . . . . . . . . . . . . . . . . . . . . . . . . . . . . . 6
Head shell . . . . . . . . . . . . . . . . . . . . . . . . . . . . . . . . . . 6
Stylus light switch . . . . . . . . . . . . . . . . . . . . . . . . . . . 9
Stylus light . . . . . . . . . . . . . . . . . . . . . . . . . . . . . . . . . 9
Stylus tip
Screws
Overhang
gauge
52 mm
5
RQT7017
Page 6

Putting the player together
In order to prevent damage during shipping some of the equipment
has been disassembled.
Put the player together in the following order.
•Do not connect the AC mains lead until set up is complete.
•Leave the dust cover off until set up and adjustments are com-
plete.
1
Center spindle
Turntable mat
Turntable
3
2
Magnet
Screws
Tone arm
1 Fit the turntable and turntable mat.
Put the turntable on the center spindle and then lay the mat
on top.
•Be very careful when putting the turntable on the main unit.
The magnet on the bottom of the turntable is finely adjusted
and sharp contact can cause it to move and lead to poor
operation. Ensure the magnet remains free from dust and
iron particles.
•Do not adjust the screws attaching the magnet to the turn-
table. The rated performance of the unit cannot be guaranteed if the magnet is moved.
2 Attach the head shell.
Fit the head shell into the tone arm, keep it horizontal and
tighten the locking nut.
Locking nut
Head shell
3 Attach the balance weight to the rear
of the tone arm.
If the cartridge weighs between 10 and 13 grams, attach the
included auxiliary weight to the main balance weight.
Balance weight
Connections and installation
Connecting to an amplifier and AC mains lead
1. Connect the PHONO earth lead and stereo PHONO
cables to the amplifier PHONO terminals.
Stereo phono cable
•If the earth lead isn’t connected, a hum will be heard from the
AC power source.
•You will not have adequate volume or sound quality if connect-
ing to an amplifier that has no PHONO terminals.
For the United Kingdom:
BE SURE TO READ THE CAUTION FOR THE AC MAINS
LEAD ON PAGE 4 BEFORE PROCEEDING TO STEP 2.
2. Connect the AC mains lead.
•Connect this cord only after all other connections are complete.
•Confirm the wattage of AC outlets on amplifiers and receivers
before using them for this unit. This unit consumes 14 W.
White (L)
Red (R)
To household
mains socket
2
This unit
Earth lead
Stereo phono cable
Amplifier
(not included)
(L) (R)
Auxiliary weight
SIGNAL GND
PHONO TUNER
1
1
6
RQT7017
For your reference
There is an AC line-voltage selector under the turntable. This allows
you to change the voltage if you move to an area with a lower voltage. Check the voltage of your area before using the unit. If the
selector needs to be changed, turn it with a screwdriver.
Page 7

Connections and installation
Connecting to an Audio Mixer (not
included)
•Disconnect all units from the power source before making any con-
nections.
•Reconnect the AC mains leads after all other connections are com-
plete.
Unit
Earth lead
Audio mixer
Unit
Installation
•Install the unit on a horizontal surface protected from vibrations.
•Keep this unit as far as possible from speakers.
•Ensure the unit is not exposed to direct sunlight, dust, humidity,
and heat from a heating appliance.
•This unit may pick up interference from a radio if there is one nearby.
Keep radios as far as possible from this unit.
Adjusting the height of the insulators
Place the unit where it is to be used and adjust the height of the legs
to make the unit horizontal.
Preparatory adjustments
Horizontal balance and stylus pressure
1 Release the tone arm.
1. Remove the stylus cover, taking care not to damage the stylus, then release the arm clamp.
2. Free the tone arm from the arm rest.
Arm clamp
2 Adjust horizontal balance
1. Push the cue lever down.
2. Turn the anti-skating control to “0”.
3. Turn the balance weight until the arm is approximately horizontal.
Take care at this time not to allow the stylus to touch the unit.
Balanced
Too far forward
Too far back
3 Turn the stylus pressure control to “0”
1. Return the tone arm to the arm rest and fix it
with the arm clamp.
2. Turn the stylus pressure control to “0”.
Hold the balance weight still while doing this.
Balance weight
Turn stylus
Center line
Arm clamp
pressure
control
4 Adjust stylus pressure
Turn the balance weight to adjust to the appropriate pressure for the cartridge you are using.
See the cartridge’s instructions for recommended stylus pressure.
The stylus pressure control will turn at the same time. Stop
when the center line points to the required pressure.
Arm clamp
Arm rest
Cue lever
Anti-skating control
Turn
balance
weight
Center line
7
RQT7017
Page 8

Preparatory adjustments
Using the balance weight control
Make note of the balance weight setting for your stylus cartridge,
you can quickly change the stylus pressure without having to readjust the horizontal balance of the arm each time you remove and
re-attach the stylus cartridge.
Attach the cartridge to the tone arm you are using.
Turn the balance weight control to the setting you previously
used to balance the weight including cartridge.
Turn the stylus pressure control dial to the setting you previ-
ously used to balance the weight including cartridge.
Balance weight
measurement units
Anti-skating
Adjust the dial to the same value as the stylus pressure
control when playing normal music.
For scratch play
Adjust the control to reduce skipping.
Tone arm height
1. Release the arm lock.
2. Adjust the arm height.
•Adjust the ring using the chart
below as reference so the arm
height matches the indicated
height of the cartridge. Measurements are marked on the
arm height control ring in 0.5
millimeter intervals.
Cartridge height
(H) in millimeters
17
18
19
20
21
22
23
•If you do not know the height of your cartridge, rest the stylus on
a record and adjust the height control until the tone arm and
record are parallel.
Tone arm and record parallel.
Released
Index line
Arm height control ring
1
Locked
Height control
position
0
1
2
3
4
5
6
3
Armlift height
Preparation
1. Put a record on the turntable.
2. Take off the stylus cover and release the arm clamp.
Use a screwdriver to turn the armlift screw.
Make this adjustment only if the cartridge you are using makes it
necessary.
•Turning the screw clockwise lowers the armlift.
•Turning the screw anti-clockwise raises the armlift.
Armlift screw
Armlift
Armlift height (the distance between the record and stylus when the
cue lever is raised) is set to between 8 and 13 millimeters at time of
shipment.
3. Lock the arm after adjusting the height.
Fit the dust cover
Hold the dust cover with both hands and fit it over the
player from directly above.
8
RQT7017
Page 9

Playing records
Preparation
1. Put a record on the turntable.
2. Take off the stylus cover and release the arm clamp.
1
3
2
4,5
1 Turn [power] to turn the unit on.
•The pilot lamp comes on.
•
33 1/3 r/min is automatically selected and the indicator lights.
•Press [45] if you are playing a 45 r/min record.
on
o
w
r
e
Pilot lamp
Indicator
lights
33 45
off
p
2 Press [start-stop].
The turntable starts revolving.
start • stop
33
3 Press [reset] to light the pitch control
green LED lamp.
The pitch returns to 33 1/3 or 45 r/min.
Green
LED indicator
reset
Use the above indicated
pitch for playing standard
music.
To temporarily stop play
Lift the cue lever.
The stylus lifts off the record.
Refer to page 10 for fine adjustments to the pitch
When using EP records
1. Take the EP record adaptor out
of its holder and fit it over the
center spindle.
2. Press [45] to change the speed.
When play finishes
1. Lift the cue lever and move the tone arm back to the arm rest.
2. Press [start-stop].
The electronic brake gently stops the turntable.
3. Turn [power] to turn the unit off.
4. Clamp the tone arm and put the stylus cover back on.
When the player is to be used for scratch play.
Use the disc slip sheet instead of the turntable mat. This enables
the record to be easily moved during play.
•Top (printed side): Lay the record on this side.
•Bottom: Slippery side.
For a different kind of slip
Put the transparent sheet under
the disc slip sheet.
EP record adaptor
Disc slip sheet
4 Lift the cue lever and move the tone arm
over the record.
Cue lever
5 Lower the cue lever.
The tone arm moves down and play starts.
To light up the stylus
•Press the stylus light switch. The stylus light rises up and illumi-
nates the stylus.
•When the light is not required, press it down. The light also goes
out.
Press the switch firmly. If the switch is lightly pressed, the light may
come on but not rise up.
Transparent sheet
Stylus light
Stylus light switch
9
RQT7017
Page 10

Adjustments while using the unit
BRAKE
S
F
Pitch control
Fine adjustment to the number of revolutions per minute.
1 Press [reset] to turn off the green LED
light.
Green
LED indicator
Pitch control
reset
2 Slide [pitch adj.] while the turntable is
revolving.
Move the control to the required position.
•The numbers represent approximate percentages.
•Pitch can be adjusted between –8 % and +8 %.
To reset pitch to the preset value
Press [reset].
The green LED indicator lights and the pitch immediately returns to
the set value (33 1/3 or 45 r/min), regardless of any adjustments
made with [pitch adj.].
Press [reset] again and pitch returns to the adjusted value.
Adjusting the turntable brake speed
Brake speed can be adjusted by pressing [start-stop] until the turntable stops.
Use a small screwdriver in the hole on the turntable to adjust the
brake speed.
S: Slow stop
F: Fast stop
To measure pitch
The four rows of strobe mirrors around the edge of the turntable can
assist you in measuring pitch.
+
6.4 % change in pitch when stationary
+
3.3 % change in pitch when stationary
Normal turntable speed when stationary
_
3.3 % change in pitch when stationary
They are lit by the strobo light as they pass and each row appears to
stand still at a different pitch.
on
off
p
o
r
e
w
Read the pitch control slider replacement instructions that comes
with this product carefully when replacing the pitch control slider.
Strobo light
10
RQT7017
Page 11

Maintenance
Care of the parts
To clean this unit, wipe with a soft, dry cloth.
•Never use alcohol, paint thinner, or benzine to clean this unit.
•Before using chemically treated cloth, read the instructions that
came with the cloth carefully.
Do not wipe the dust cover while playing a record.
This can cause static electricity. This static can cause the tone arm
to be attracted towards the cover.
Wipe the head shell terminals occasionally.
Use a soft cloth. Turn the amplifier off before fitting or removing the
head shell.
•Damage to your speakers can occur if the head shell is moved
while the volume is turned up.
•Leave the stylus cover on while handling the head shell to prevent
damaging the stylus.
Oiling the center spindle.
Apply 2 or 3 drops every 2000 hours of operation. Use SFW0010 oil
(not included).
Thoroughly clean dust off the stylus and record.
•
Use a soft brush to clean the stylus. Brush from the base to the tip.
•Use a good quality record cleaner to keep your records clean.
Moving the unit
Repackage the unit in the packaging it came in.
Oil
Head shell
terminals
If you no longer have the packaging, do the following:
•Return the tone arm to the arm rest and tape it in place.
•Remove the balance weight and head shell from the tone arm and
carefully wrap them.
•Take off the turntable and turntable mat and carefully wrap them.
•Carefully wrap the main unit in a blanket or paper.
Troubleshooting guide
Before requesting service for this unit, check the chart below for a possible cause of the problem you are experiencing. Some simple checks
or a minor adjustment on your part may eliminate the problem and restore proper operation.
If you are in doubt about some of the check points, or if the remedies indicated in the chart do not solve the problem, refer to the directory of
Authorized Service Centers (enclosed with this unit) to locate a convenient service center, or consult your dealer for instructions.
Reference
page(s)
6
No power.
Problem
Probable cause(s)
Is the AC mains lead plugged in?
Suggested remedy
Plug the cord in firmly.
There is power but no sound.
Sound is weak.
Left and right sounds are reversed.
Humming heard during play.
Are connections to the amplifier/receiver’s
PHONO terminals correct?
Are the stereo phono cable connections to
the amplifier or receiver reversed?
Are there other appliances or their AC mains
leads near the stereo phono cable?
Is the earth lead connected?
Specifications
Turntable section
Type Quartz direct drive
Drive method Direct drive
Motor Brushless DC motor
Turntable platter Aluminum diecast
Turntable speeds 33 1/3 r/min, 45 r/min
Variable range pitch ±8 %
Starting torque 1.5 kg·cm
Build-up characteristics 0.7 s. from standstill to 33 1/3 r/min
Braking system Electronic brake
Wow and flutter 0.01 % WRMS
Rumble –56 dB (IEC 98A Unweighted)
\\
\
\\
This rating refers to turntable assembly alone, excluding effects
of record, cartridge or tonearm, but including platter. Measured
by obtaining signal from built-in frequency generator of motor
assembly.
0.025 % WRMS (JIS C5521)
±0.035 % peak (IEC 98A Weighted)
–78 dB (IEC 98A Weighted)
Manual turntable
Diameter 33.2 cm
Mass 1.7 kg
Connect the stereo pin cables to the amplifier’s
PHONO terminals.
Double check all connections.
Separate the appliances and their AC mains
leads from this unit.
Make sure the earth lead is correctly connected.
6
6
6
Tonearm section
Type Universal
Effective length 230 mm
Arm height adjustment range 0 – 6 mm
Overhang 15 mm
Effective mass 12 g (without cartridge)
Offset angle 22°
Friction Less than 7 mg (lateral, vertical)
Tracking error angle
Stylus pressure adjustment range 0 – 4 g
\
Applicable cartridge weight range 3.5 – 13 g
(with auxiliary weight) 9.5 – 13 g
(with shell weight) 3.5 – 6.5 g
Headshell weight 7.5 g
Within 2° 32' (at the outer groove of 30 cm record)
Within 0° 32' (at the inner groove of 30 cm record)
11 – 20.5 g (including headshell)
17 – 20.5 g (including headshell)
11 – 14 g (including headshell)
General
Power supply AC 110 – 127 V/220 – 240 V, 50 Hz
Power consumption 14 W
Dimensions (W
Mass 12 kg
××
××
×H
×D) 45.3 × 17.2 × 35.5 cm
××
××
Specifications are subject to change without notice.
Mass and dimensions are approximate.
11
RQT7017
Page 12

Matsushita Electric Industrial Co., Ltd.
Web Site : http://www.panasonic.co.jp/global/
En
RQT7017-B
M0203TK0
 Loading...