

Panasonic RQT7230-3Y, SH-MZ1200 User Manual

Operating Instructions
DJ Mixer
The photograph shows the silver model.
Model No.
SH-MZ1200
This manual was printed with soy based ink.
PP
Before connecting, operating or adjusting this product, please read the
instructions completely.
Please keep this manual for future reference.
RQT7230-3Y
Dear customer
Thank you for purchasing this product.
For optimum performance and safety, please read these instructions
carefully.
Table of contents
Supplied accessories ................................................................... 2
IMPORTANT SAFETY INSTRUCTIONS ....................................... 3
Product service ............................................................................. 4
Main features ................................................................................ 4
Component part names ............................................................... 5
Connections .................................................................................. 7
Output side connections ............................................................ 7
Input side connections ............................................................... 8
Mixing (Basic operations) ........................................................... 9
Using the microphone .............................................................. 10
Recording and playing on external equipment ........................ 10
Additional mixing operations .................................................... 11
Adjusting the effect ................................................................... 11
Adjusting the monitor ................................................................ 11
Using play mode functions ....................................................... 12
Individually adjusting the left (L) and right (R) input ............... 12
Output separation (dual output separation) ............................ 12
Fader start function .................................................................... 13
Start using the channel fader................................................... 13
Start using the cross fader ....................................................... 13
Block diagram ............................................................................. 14
Specifications ............................................................................. 15
Maintenance ................................................................................ 15
Troubleshooting guide............................................................... 15
Warranty (U.S.A.) ......................................................... Back cover
WARNING:
TO REDUCE THE RISK OF FIRE, ELECTRIC
SHOCK OR PRODUCT DAMAGE, DO NOT
EXPOSE THIS APPARATUS TO RAIN,
MOISTURE, DRIPPING OR SPLASHING AND
THAT NO OBJECTS FILLED WITH LIQUIDS,
SUCH AS VASES, SHALL BE PLACED ON THE
APPARATUS.
CAUTION!
DO NOT INSTALL OR PLACE THIS UNIT IN A
BOOKCASE, BUILT-IN CABINET OR IN
ANOTHER CONFINED SPACE. ENSURE THE
UNIT IS WELL VENTILATED. TO PREVENT
RISK OF ELECTRIC SHOCK OR FIRE HAZARD
DUE TO OVERHEATING, ENSURE THAT
CURTAINS AND ANY OTHER MATERIALS DO
NOT OBSTRUCT THE VENTILATION VENTS.
Although the AC power switch is in the “OFF” position, the
unit is not completely disconnected from the mains. Remove
the plug from the main electrical outlet if you will not be
using the unit for an extended period of time. Place the unit
so the plug can be easily removed.
CAUTION
Supplied accessories
Please check and identify the supplied
accessories.
Use numbers indicated in parentheses when
asking for replacements parts.
In U.S.A. to order accessories, refer to
“Accessory Purchases” on back cover.
AC power supply cord (K2CB2CB00006) ..................... 1
Note
The included AC power supply cord is for use with this unit only.
Do not use it with other equipment.
User memo:
DATE OF PURCHASE
DEALER NAME
DEALER ADDRESS
RISK OF ELECTRIC SHOCK
DO NOT OPEN
CAUTION: TO REDUCE THE RISK OF ELECTRIC
SHOCK, DO NOT REMOVE SCREWS.
NO USER-SERVICEABLE PARTS
INSIDE.
REFER SERVICING TO QUALIFIED
SERVICE PERSONNEL.
The lightning flash with arrowhead symbol, within
an equilateral triangle, is intended to alert the user
to the presence of uninsulated “dangerous voltage”
within the product’s enclosure that may be of sufficient magnitude to constitute a risk of electric shock
to persons.
The exclamation point within an equilateral triangle
is intended to alert the user to the presence of
important operating and maintenance (servicing)
instructions in the literature accompanying the
appliance.
2
RQT7230
TELEPHONE NUMBER
The model number and serial number of this product can be found
on either the back or the bottom of the unit.
Please note them in the space provided below and keep for future
reference.
MODEL NUMBER
SERIAL NUMBER
SH-MZ1200

IMPORTANT SAFETY INSTRUCTIONS
Read these operating instructions carefully before using the unit. Follow the safety instructions on the unit and the applicable safety instructions
listed below. Keep these operating instructions handy for future reference.
1) Read these instructions.
2) Keep these instructions.
3) Heed all warnings.
4) Follow all instructions.
5) Do not use this apparatus near water.
6) Clean only with dry cloth.
7) Do not block any ventilation openings. Install in accordance with
the manufacturer’s instructions.
8) Do not install near any heat sources such as radiators, heat registers, stoves, or other apparatus (including amplifiers) that produce heat.
9) Do not defeat the safety purpose of the polarized or groundingtype plug. A polarized plug has two blades with one wider than
the other. A grounding-type plug has two blades and a third
grounding prong. The wide blade or the third prong are provided
for your safety. If the provided plug does not fit into your outlet,
consult an electrician for replacement of the obsolete outlet.
10) Protect the power cord from being walked on or pinched particularly at plugs, convenience receptacles, and the point where
they exit from the apparatus.
11) Only use attachments/accessories specified by the manufacturer.
12) Use only with the cart, stand, tripod, bracket, or
table specified by the manufacturer, or sold with
the apparatus. When a cart is used, use caution
when moving the cart/apparatus combination to
avoid injury from tip-over.
13) Unplug this apparatus during lightning storms or when unused
for long periods of time.
14) Refer all servicing to qualified service personnel. Servicing is
required when the apparatus has been damaged in any way,
such as power-supply cord or plug is damaged, liquid has been
spilled or objects have fallen into the apparatus, the apparatus
has been exposed to rain or moisture, does not operate normally, or has been dropped.
THE FOLLOWING APPLIES ONLY IN THE U.S.A.
CAUTION:
This equipment has been tested and found to comply with
the limits for a Class B digital device, pursuant to Part 15 of
the FCC Rules.
These limits are designed to provide reasonable protection
against harmful interference in a residential installation.
This equipment generates, uses and can radiate radio
frequency energy and, if not installed and used in
accordance with the instructions, may cause harmful
interference to radio communications. However, there is no
guarantee that interference will not occur in a particular
installation. If this equipment does cause harmful
interference to radio or television reception, which can be
determined by turning the equipment off and on, the user is
encouraged to try to correct the interference by one or more
of the following measures:
チReorient or relocate the receiving antenna.
チIncrease the separation between the equipment and re-
ceiver.
チConnect the equipment into an outlet on a circuit different
from that to which the receiver is connected.
チConsult the dealer or an experienced radio/TV technician
for help.
Any unauthorized changes or modifications to this
equipment would void the user’s authority to operate this
device.
This device complies with Part 15 of the FCC Rules.
Operation is subject to the following two conditions: (1) This
device may not cause harmful interference, and (2) this
device must accept any interference received, including
interference that may cause undesired operation.
3
RQT7230

Listening caution
Main features
I
N
C
I
D
N
U
O
S
R
T
T
R
C
I
E
E
L
S
E
•
•
A
EST. 1924
N
S
O
S
I
O
T
C
A
I
Selecting fine audio equipment such as the unit you’ve just purchased is only the start of your musical enjoyment. Now it’s time
to consider how you can maximize the fun and excitement your
equipment offers. This manufacturer and the Electronic Industries
Association’s Consumer Electronics Group want you to get the
most out of your equipment by playing it at a safe level. One that
lets the sound come through loud and clear without annoying
blaring or distortion—and, most importantly, without affecting your
sensitive hearing.
We recommend that you avoid prolonged exposure to excessive
noise.
Sound can be deceiving. Over time your hearing “comfort level”
adapts to higher volumes of sound. So what sounds “normal” can
actually be loud and harmful to your hearing.
Guard against this by setting your equipment at a safe level
BEFORE your hearing adapts.
To establish a safe level:
チStart your volume control at a low setting.
チSlowly increase the sound until you can hear it comfortably and
clearly, and without distortion.
Once you have established a comfortable sound level:
チSet the dial and leave it there.
Taking a minute to do this now will help to prevent hearing
damage or loss in the future. After all, we want you listening for a
lifetime.
Product service
1. Damage requiring service—The unit should be serviced by
qualified service personnel if:
(a) The AC power supply cord or AC adaptor has been
damaged; or
(b) Objects or liquids have gotten into the unit; or
(c) The unit has been exposed to rain; or
(d) The unit does not operate normally or exhibits a marked
change in performance; or
(e) The unit has been dropped or the cabinet damaged.
2. Servicing —Do not attempt to service the unit beyond that
described in these operating instructions. Refer all other servicing to authorized servicing personnel.
3. Replacement parts—When parts need replacing ensure the
servicer uses parts specified by the manufacturer or parts that
have the same characteristics as the original parts.
Unauthorized substitutes may result in fire, electric shock, or
other hazards.
4. Safety check—After repairs or service, ask the servicer to
perform safety checks to confirm that the unit is in proper
working condition.
A 4 channel universal type DJ oriented DJ mixer providing new audio
performance and functional with the Technics SL-DZ1200 direct drive
digital turntable (Not included) hereinafter referred to as the digital
turntable.
Robust basic functions
Input-output features
•12 input terminals are available, 2 for CD/LINE input, 3 for LINE
input, 3 for PHONO input, 2 for microphone input and 2 for digital
input.
•Digital output, audio recording output, monitor output, headphone
output, master 1 and 2 output, and a pro-spec engineered XLR
terminal which all function independently.
•An EFFECT SEND, EFFECT RETURN terminals have also been
added for use with an external effector.
3 Band equalizer for sound-source level
•A HIGH, MID, LOW equalizer is provided for each channel. A wide
variety of possibilities are provided for sound as the attenuation
range is set to a high -24 dB (12 dB/oct).
Robust monitor features for play
•Monitoring of the desired channel can be done quickly now that a
CUE button has been added to each channel and to the effect
function.
•Using the MONITOR MIXING control knob you can mix the master
output and the channel selected with the CUE button. Using MONO
SPLIT MODE, you can monitor master output and the selected
channel split separately into the left and right channels.
Support for an external effector
•You can turn EFFECT on and off for each channel. Select PRE or
POST connection for the effector and adjust the SEND, RETURN
level control.
Digitally controlled fader components that are robust and
functional
•A C. FADER CURVE switch has been added to the cross fader to
provide 3 new types of cross fader curve settings.
•A reverse switch has been added for each channel fader and the
cross fader.
•Through the use of an engineered VCA control, volume can be
controlled with very little loss in audio quality using the channel
fader or cross fader.
•Reliability improvements have been made to the cross fader through
the adoption of optical cross fader circuits and a highly durable 45
mm stroke fader providing smooth operation.
Providing new audio performance using the channel
fader and cross fader
Use the channel fader to control the left (L) and right (R) channels
individually
•With the PLAY MODE function the selected channels can be
separated and the L or R volume can be controlled individually
using the channel fader.
Control the FRONT and REAR output for two channel output using
master 1, 2
•By turning the SEPARATE OUT switch to on, you can separate
CH1 and CH2 output to the front and CH3 and CH4 output to the
rear, providing you with new sound field performance in combination
with the feature of being able to adjust the left (L) and right (R)
channels individually.
4
RQT7230
Product information
For product information or assistance with product operation:
In the U.S.A., refer to “Customer Services Directory” on back cover.
In Canada, contact the Panasonic Canada Inc. Customer Care Centre
at 905-624-5505, or visit the website (www.panasonic.ca), or an
authorized Servicentre closest to you.
Linked play on the connected digital turntable
Real-time start and stop control using the fader
•You start and stop the digital turntable by operating the channel
fader or cross fader when connected to a digital turntable with a
control cable.
•A maximum of 2 digital turntables can be linked digitally through 2
digital inputs.
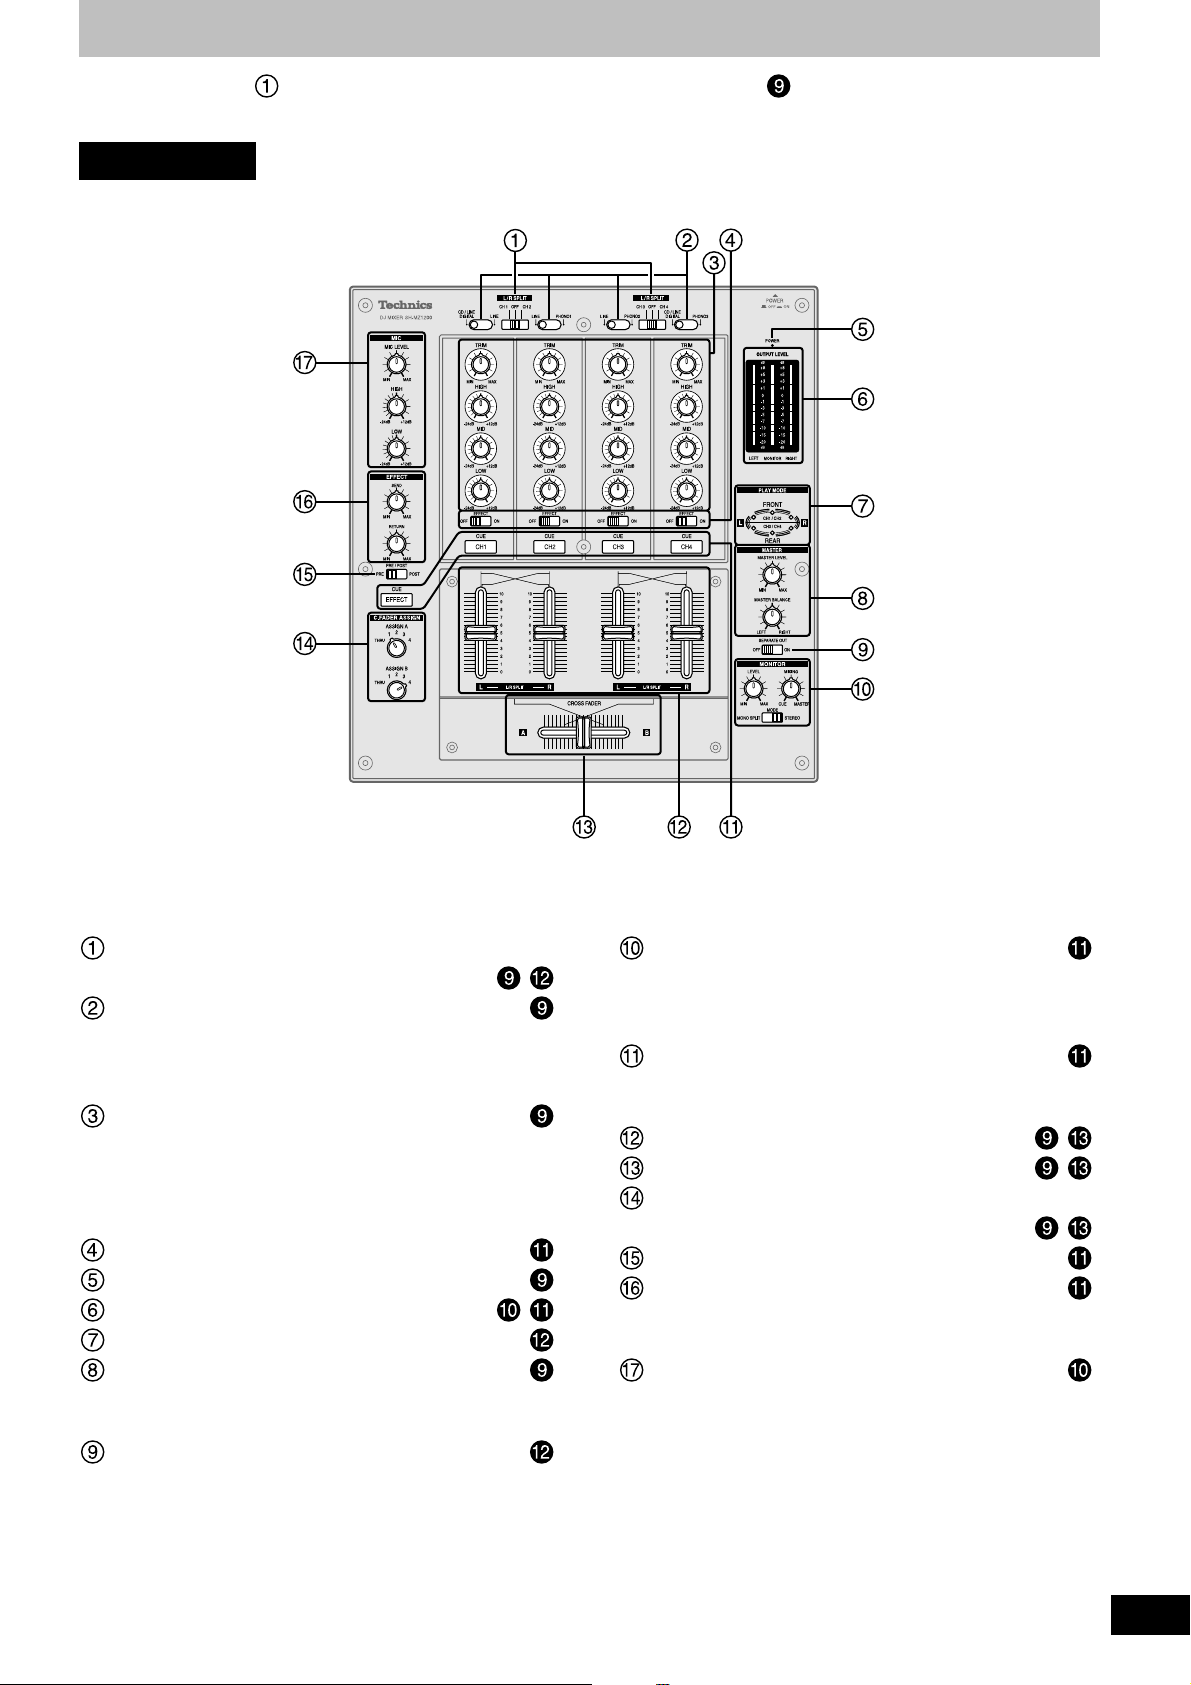
Component part names
The unshaded numbers etc, correspond to the numbered illustrations. The shaded numbers etc, are reference pages.
Control panel
Input switch for adjusting left and right input
individually (L/R SPLIT)...................................
Input switch (CH1-CH4) ..........................................
CD/LINE DIGITAL: Line or CD input, Digital input
LINE: Line input
PHONO 1-3: Turntable phono input
Input control knob (CH1-CH4) ...............................
Input level control knob (TRIM)
High-tone input control knob (HIGH)
Mid-tone input control knob (MID)
Low-tone input control knob (LOW)
Channel effect (CH1-CH4) switch (EFFECT) ........
Power indicator lamp (POWER) ............................
Output level meter (OUTPUT LEVEL) ............ ,
Play mode lamp (PLAY MODE) ..............................
Master output control knob (MASTER) .................
Master level volume control knob (MASTER LEVEL)
Master balance control knob (MASTER BALANCE)
Output separation ON, OFF switch (SEPARATE OUT)
Monitor control knob (MONITOR)..........................
,
Monitor level volume control knob (LEVEL)
Monitor mixing control knob (MIXING)
Monitor mode switch (MODE)
Monitor select button-display lamp (CUE) ...........
CH1-CH4: CH1-CH4 monitor selector
EFFECT: Effector monitor selector
Channel fader (CH1 - CH4) .............................. ,
Cross fader (CROSS FADER) ......................... ,
Cross fader Assign A, B switch
(C. FADER ASSIGN) .........................................
Effector output switch (PRE/POST) ......................
Input-output effect control knob (EFFECT) ..........
Output effect control knob (SEND)
Input effect control knob (RETURN)
Microphone input control knob (MIC) ...................
Microphone level volume control knob (MIC LEVEL)
High-tone microphone control knob (HIGH)
Low-tone microphone control knob (LOW)
,
5
RQT7230
 Loading...