

Page 1
3DQDVRQLF
®
User G uide
Section 750
Key T elephone
User Guide
ICX (International)
Version 3.5
Issued Ma rch, 1999
Page 2

The contents of this manu al are sub ject to c hange withou t notice an d do not c onstitute
a commitment on the part of Matsushita Communication Industrial Co. Ltd (MCI).
Every effort has been made to ensure the accuracy of this document. However, due to
ongoing product improvements and revisions, Panasonic cannot guarantee the accuracy of printed material after the date of publication, nor can it accept responsibility for
errors or omissions. Pan asonic will update and revise this document as needed.
The software and hardware described in this document may be used or copied only in
accordance with the terms of the license pertaining to the said software or hardware.
Reproduction, publication, or duplication of this manual, or any part thereof, in any
manner, mechanically, electronically, or photographically, is prohibited without permission of the Matsushita Communication Industrial Co. Ltd (MCI).
©Copyright 1999 by Matsushita Communication Industrial Co. Ltd (MCI)
All rights reserved.
Page 3

CONTENTS
Chapter 1. Contents 3
Chapter 2. Preface 7
How to Use This Manual . . . . . . . . . . . . . . . . . . . . . . . . . . . . . . . . . . . . . . . . . . . . . 7
What This Manual Contains . . . . . . . . . . . . . . . . . . . . . . . . . . . . . . . . . . . . . . . . . . 7
Notation Used . . . . . . . . . . . . . . . . . . . . . . . . . . . . . . . . . . . . . . . . . . . . . . . . . . . . . . 8
For More Information . . . . . . . . . . . . . . . . . . . . . . . . . . . . . . . . . . . . . . . . . . . . . . . 8
Chapter 3. Understanding Your Phone 9
Non-Display Phones . . . . . . . . . . . . . . . . . . . . . . . . . . . . . . . . . . . . . . . . . . . . . . . . . 9
Small-Display Phones. . . . . . . . . . . . . . . . . . . . . . . . . . . . . . . . . . . . . . . . . . . . . . . 11
Changing the Default Display . . . . . . . . . . . . . . . . . . . . . . . . . . . . . . . . . . . . . . . 13
Understanding Display Information. . . . . . . . . . . . . . . . . . . . . . . . . . . . . . . . . . . 13
Using Variable Mode. . . . . . . . . . . . . . . . . . . . . . . . . . . . . . . . . . . . . . . . . . . . . . 14
Large-Display Phones. . . . . . . . . . . . . . . . . . . . . . . . . . . . . . . . . . . . . . . . . . . . . . . 15
Changing the Default Display . . . . . . . . . . . . . . . . . . . . . . . . . . . . . . . . . . . . . . . 17
Understanding Display Information. . . . . . . . . . . . . . . . . . . . . . . . . . . . . . . . . . . 18
Chapter 4. Setting Up Your Phone 21
Adjusting Volume and Display Settings . . . . . . . . . . . . . . . . . . . . . . . . . . . . . . . . 21
Setting Up Flexible Function Keys . . . . . . . . . . . . . . . . . . . . . . . . . . . . . . . . . . . . 22
Setting Up One-touch Keys . . . . . . . . . . . . . . . . . . . . . . . . . . . . . . . . . . . . . . . . . . 23
Setting Up Speed Dialling. . . . . . . . . . . . . . . . . . . . . . . . . . . . . . . . . . . . . . . . . . . . 25
Assigning and Deleting PSD Numbers . . . . . . . . . . . . . . . . . . . . . . . . . . . . . . . . 25
Assigning SSD Numbers . . . . . . . . . . . . . . . . . . . . . . . . . . . . . . . . . . . . . . . . . . . 28
Linking System Speed Dial Numbers . . . . . . . . . . . . . . . . . . . . . . . . . . . . . . . . . 28
Assigning and Deleting Names for PSD Numbers . . . . . . . . . . . . . . . . . . . . . . . 29
Chapter 5. Placing Outside Calls 35
Accessing an Outside Line. . . . . . . . . . . . . . . . . . . . . . . . . . . . . . . . . . . . . . . . . . . 35
Using Account Codes . . . . . . . . . . . . . . . . . . . . . . . . . . . . . . . . . . . . . . . . . . . . . . . 36
Non-verified Account Codes . . . . . . . . . . . . . . . . . . . . . . . . . . . . . . . . . . . . . . . . 36
Verified Account Codes. . . . . . . . . . . . . . . . . . . . . . . . . . . . . . . . . . . . . . . . . . . . 37
Redialing Outside Numbers. . . . . . . . . . . . . . . . . . . . . . . . . . . . . . . . . . . . . . . . . . 37
Using Speed Dialling . . . . . . . . . . . . . . . . . . . . . . . . . . . . . . . . . . . . . . . . . . . . . . . 38
Dialling Speed Dial Numbers. . . . . . . . . . . . . . . . . . . . . . . . . . . . . . . . . . . . . . . 38
ICX-35-750 ICX (International), issued March 1999 3
Page 4

Contents
Checking Speed Dial Numbers . . . . . . . . . . . . . . . . . . . . . . . . . . . . . . . . . . . . . . 40
Chapter 6. Handling Incoming Calls 43
Answering Calls . . . . . . . . . . . . . . . . . . . . . . . . . . . . . . . . . . . . . . . . . . . . . . . . . . . 43
Using Call Hold. . . . . . . . . . . . . . . . . . . . . . . . . . . . . . . . . . . . . . . . . . . . . . . . . . . . 44
Transferring Calls. . . . . . . . . . . . . . . . . . . . . . . . . . . . . . . . . . . . . . . . . . . . . . . . . . 45
Supervised Transfers . . . . . . . . . . . . . . . . . . . . . . . . . . . . . . . . . . . . . . . . . . . . . . 45
Unsupervised Transfers . . . . . . . . . . . . . . . . . . . . . . . . . . . . . . . . . . . . . . . . . . . . 46
Call Pickup . . . . . . . . . . . . . . . . . . . . . . . . . . . . . . . . . . . . . . . . . . . . . . . . . . . . . . . 47
Extension Group Pickup . . . . . . . . . . . . . . . . . . . . . . . . . . . . . . . . . . . . . . . . . . . 47
Extension Direct Pickup. . . . . . . . . . . . . . . . . . . . . . . . . . . . . . . . . . . . . . . . . . . . 48
Trunk Group Pickup. . . . . . . . . . . . . . . . . . . . . . . . . . . . . . . . . . . . . . . . . . . . . . . 48
Trunk Direct Pickup. . . . . . . . . . . . . . . . . . . . . . . . . . . . . . . . . . . . . . . . . . . . . . . 48
Call Park . . . . . . . . . . . . . . . . . . . . . . . . . . . . . . . . . . . . . . . . . . . . . . . . . . . . . . . . . 49
Chapter 7. Communicating Within Your Office 51
Calling Other Extensions. . . . . . . . . . . . . . . . . . . . . . . . . . . . . . . . . . . . . . . . . . . . 51
. . . . . . . . . . . . . . . . . . . . . . . . . . . . . . . . . . . . . . . . . . . . . . . . . . . . . . . . . . . . . . . 51
Switching Between Tone and Voice Calling. . . . . . . . . . . . . . . . . . . . . . . . . . . . 52
Using Paging . . . . . . . . . . . . . . . . . . . . . . . . . . . . . . . . . . . . . . . . . . . . . . . . . . . . . . 53
Answering a Page (Meet-Me Answer). . . . . . . . . . . . . . . . . . . . . . . . . . . . . . . . . 53
Answering a Page with Universal Night Answer. . . . . . . . . . . . . . . . . . . . . . . . . 54
Making Announcements to Busy Extensions. . . . . . . . . . . . . . . . . . . . . . . . . . . . 54
Answering an Announcement . . . . . . . . . . . . . . . . . . . . . . . . . . . . . . . . . . . . . . . 54
Transferring Calls with an Announcement . . . . . . . . . . . . . . . . . . . . . . . . . . . . . 55
Using Call Forwarding. . . . . . . . . . . . . . . . . . . . . . . . . . . . . . . . . . . . . . . . . . . . . . 55
Using Camp-on (Call Waiting) . . . . . . . . . . . . . . . . . . . . . . . . . . . . . . . . . . . . . . . 57
Using Message Waiting/Callback . . . . . . . . . . . . . . . . . . . . . . . . . . . . . . . . . . . . . 59
Using Do-Not-Disturb. . . . . . . . . . . . . . . . . . . . . . . . . . . . . . . . . . . . . . . . . . . . . . . 61
Using Absence Messages . . . . . . . . . . . . . . . . . . . . . . . . . . . . . . . . . . . . . . . . . . . . 61
Locking Your Extension. . . . . . . . . . . . . . . . . . . . . . . . . . . . . . . . . . . . . . . . . . . . . 63
Chapter 8. Using Additional Features 65
Using the MIC Key. . . . . . . . . . . . . . . . . . . . . . . . . . . . . . . . . . . . . . . . . . . . . . . . . 65
Using Off-Hook Monitor . . . . . . . . . . . . . . . . . . . . . . . . . . . . . . . . . . . . . . . . . . . . 66
Using Handsfree Answerback and Handsfree Operation . . . . . . . . . . . . . . . . . . 66
Using Voice Recognition. . . . . . . . . . . . . . . . . . . . . . . . . . . . . . . . . . . . . . . . . . . . . 67
Using the Flash Feature . . . . . . . . . . . . . . . . . . . . . . . . . . . . . . . . . . . . . . . . . . . . . 67
Making Conference Calls. . . . . . . . . . . . . . . . . . . . . . . . . . . . . . . . . . . . . . . . . . . . 67
Controlling Background Music. . . . . . . . . . . . . . . . . . . . . . . . . . . . . . . . . . . . . . . 68
4 ICX (International), issued March 1999 ICX-35-750
Page 5

Contents
Using Timed Reminders. . . . . . . . . . . . . . . . . . . . . . . . . . . . . . . . . . . . . . . . . . . . . 69
Using Caller ID . . . . . . . . . . . . . . . . . . . . . . . . . . . . . . . . . . . . . . . . . . . . . . . . . . . . 69
Caller ID Call Log . . . . . . . . . . . . . . . . . . . . . . . . . . . . . . . . . . . . . . . . . . . . . . . . 69
Call Log Operation for a Small-display Phones . . . . . . . . . . . . . . . . . . . . . . . . . 70
Call Log Format for the Large-Display Phone . . . . . . . . . . . . . . . . . . . . . . . . . . 71
Walking TRS (Call BArring) Class of Service. . . . . . . . . . . . . . . . . . . . . . . . . . . 72
Using Directory Numbers . . . . . . . . . . . . . . . . . . . . . . . . . . . . . . . . . . . . . . . . . . . 73
Using Zip Mode. . . . . . . . . . . . . . . . . . . . . . . . . . . . . . . . . . . . . . . . . . . . . . . . . . . . 76
ICX-35-750 ICX (International), issued March 1999 5
Page 6

Contents
This page intentionally left blank.
6 ICX (International), issued March 1999 ICX-35-750
Page 7

PREFACE
The Key T elephone User Guide is for anyone who uses a Panasonic digital telephone
in conjunction with the Panaso nic ICX. Th e ICX is a telephon e system that pro vides
you with a powerful set of features for handling calls.
This manual provides an overview of the following digi tal phones and offers
detailed infor m ation about using the fe atures provided by the ICX:
U.K.
• 12 key-Standar d VB-D41 1 U K
• 12 key-Speakerphone VB-44221
• 12 key-Display Speakerphone VB-D411DSUK VB-44223
• 12 key-Large Display Speakerphone VB-D411LDSUK VB-44225
• 12 key-Soft key Display Speakerphone VB-D411DSVUK VB-44224
• 24 key-Disp lay VB-D611DUK
• 24 key-Display Speakerphone VB-D611DSUK VB-44233
• EM24-24 key Expansion Module VB-D331UK VB-44310
• DSS-72 key DSS /BLF VB-D631UK VB-44320
Hong Kong/
Other
HOW TO USE THIS MANUAL
We recommend that you read the entire manual before using your digital phone, in
order to get a clear idea of its capabilities.
WHAT THIS MANUAL CONTAINS
This manual contains the following chapters:
• Chapter 1, “Understanding Your Phone” - Describes features of Panasonic
digital telephones.
• Chapter 2, “Setting Up Your Phone” - Provides procedures for setting up
telephone featur es such as Flexible Functi on (FF) keys.
ICX-35-750 ICX (International), issued March 1999 7
Page 8

Notation Used
• Chapter 3, “Placing Outside Calls” - Provides procedures for making outside
calls.
• Chapter 4, “Handling Incoming Cal ls” - Provides several procedures for
answering calls.
• Chapter 5, “Communicating Within Your Office” - Provides procedures for
handling internal calls.
• Chapter 6, “Using Additional Features” - Provides procedures for using
additional features.
• Appendix A, “Dial Code List.” - Provides a list of dial codes used for
programming FF ke ys.
• Appendix B, “Customized PSD Bin Numbers.” - Provides a table for
documenting or tracking your personalized lis t of speed dial numbers.
NOTATION USED
This user guide uses the following conventions:
• References to chapters and sections are enclosed in quotation marks and
include the title and pa ge numbe r . For e xample: “Se tting Up Flex ible Func tion
Keys” on page 22 .
• References to information you are to en ter or dial are printed in boldface,
mixed-case characters. Fo r example: Enter 73*.
• References to the telephone keypad are printed in bold, upper case characters.
For example: Press the HOLD key.
FOR MORE INFORMATION
For more information about features available with the Panasonic ICX system and
digital phones, contact your system administrator or ICX dealer, or refer to the
Panasonic publi c ation Feature Operation (Section 70 0).
8 ICX (International), issued March 1999 ICX-35-750
Page 9

1. UNDERSTANDING YOUR PHONE
The following information in this chapter will familiarize you with your Panasonic
digital phone and enable you to effectively use its call-handling features:
• Non-Display Phones (page 9)
• Small-Display Phon es (page 11)
• Large-Display Phones (page 15 )
• Using Variable Mode (page 14)
• Changing the Default Display (pages 13 and 17)
• Understanding Display Information (pages 13 and 18).
NON-DISPLAY PHONES
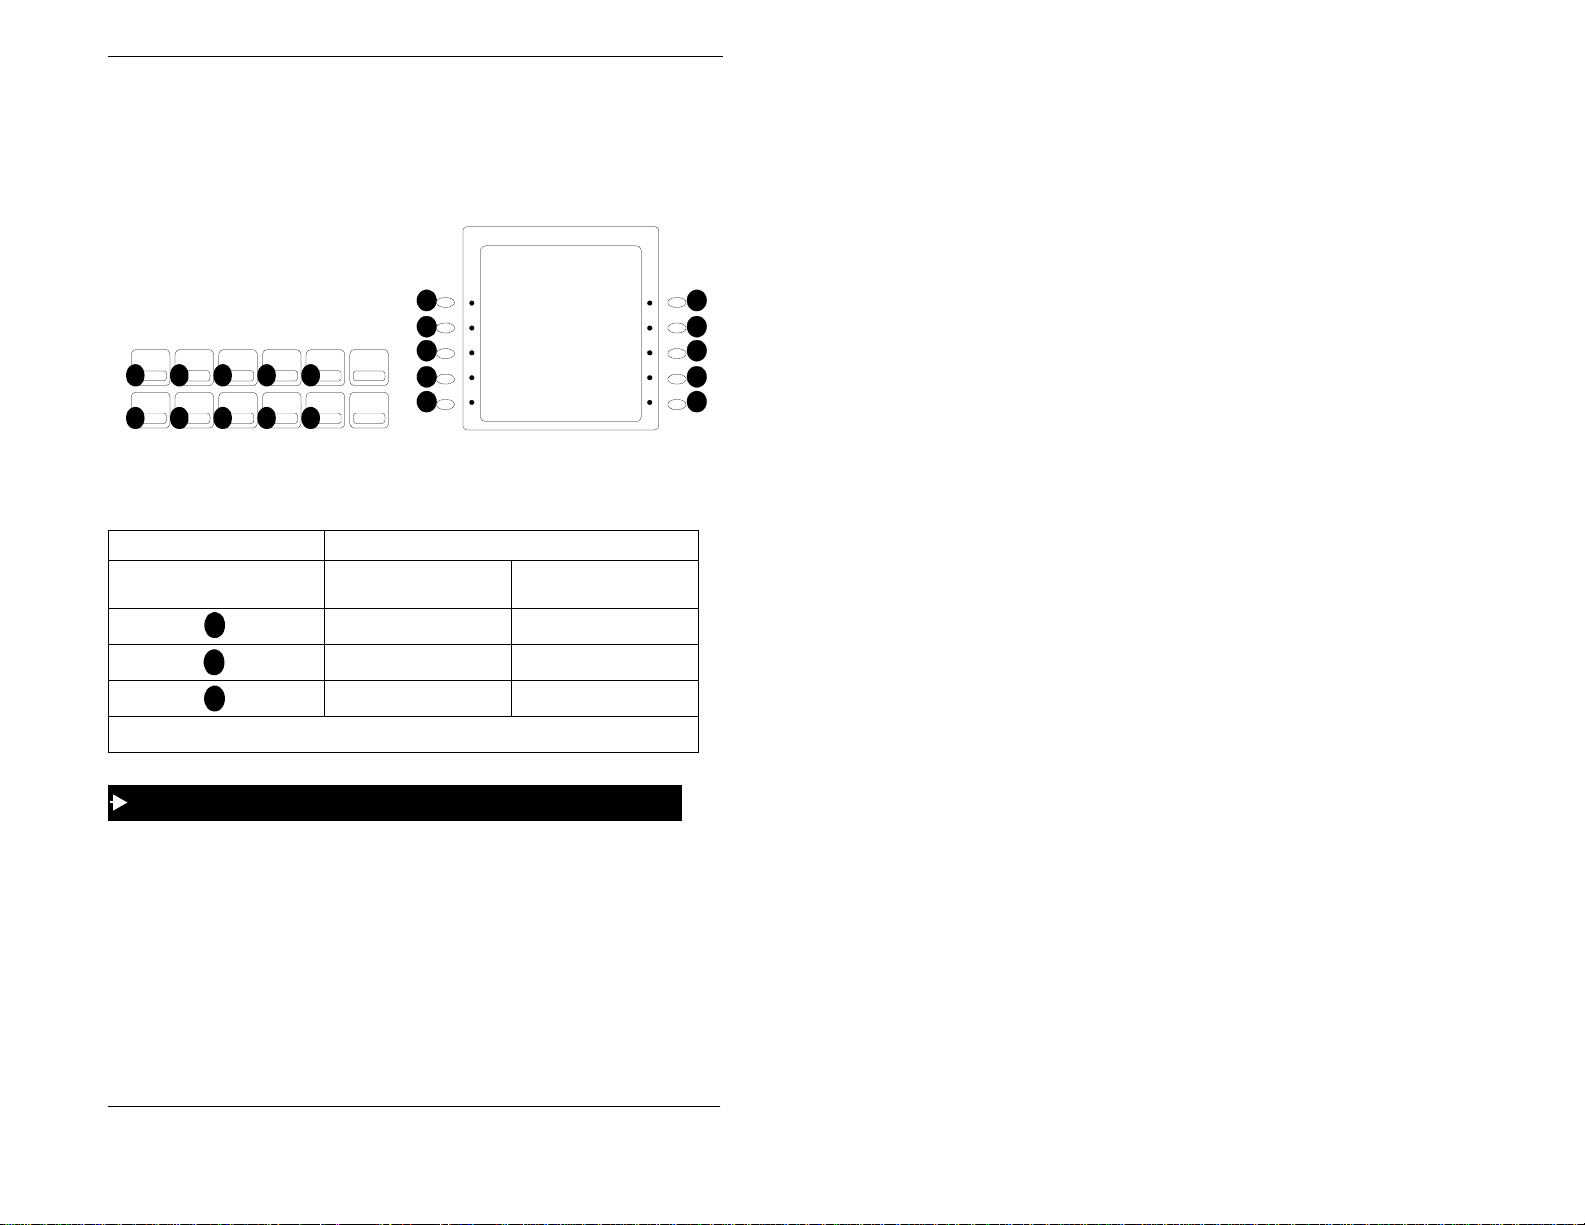
Non-display phones do not have a Liquid Crystal Displa y (LCD). Table 1 on page
10 describes the features (1-18 below) that are typical of non-display phones.
Figure 1. Non-display ph one
ICX-35-750 ICX (International), issued March 1999 9
Page 10

1. Understanding Your Phone
Table 1. Non-di s pla y phone features
# Feature Description
1
Message Waiting Indicator Indicates that you have a message .
PROG Key Used to program Flexible Func ti on (FF) and one-
2
CONF Key Used to establish conferenc e ca l ls and to check FF
3
One-Touch Keys Used to make outside calls or to access system fea-
4
Flexible Function (FF)
5
Keys
DND/CF Indicator Indicates that Do-Not-Disturb (DND) or Call For-
6
MIC Indicator Indicates that your voice is not muted (i.e., party on
7
INT Indicator Lights when you are on a call and flashes when you
8
9
ON/OFF Indicator Lights when the ON/OFF key has been press ed.
FL/R Key Used to end an outside call and to either restore out-
10
11
REDIAL Key Used to redial the last number dialled.
MEMORY Key Used to access speed dialling or enter account
12
ON/OFF Key Used to make a call without lifting the handset or to
13
14
LINE Key Used to seize a free outside line.
VOLUME Key Used to adjust the level of tones, background
15
HOLD Key Used to hold calls, to retrieve hel d calls, and to
16
Microphone Used to talk to anot he r pa rty without using the
17
18
Speaker Outputs tones and voice at your extension.
touch keys, to adjus t ringer volume, and to send a
flash signal. Depending on t he se tup of your system, may also be used to transfer calls.
key and one-touch feature s.
tures.
Used to access outside lines or to access system fea-
tures.
warding is set.
the other end can hear yo u). Goes off when your
hands-free microphon e is m ut ed and flashes when
your handset is muted.
hold a call.
side dial tone or switch to ext er nal dial tone status
without hanging up the receiver.
codes.
turn the speaker on and off.
music, ringing, receiver volume, and display contrast.
complete FF key programming.
handset.
10 ICX (International), issued March 1999 ICX-35-750
Page 11

1. Understanding Your Phone
SMALL-DISPLAY PHONES
Small-display phon es have a disp lay cont aini ng tw o l ines of text. Ta ble 2 on pa ge 1 1
describes the features (1-22 below) that are typi cal of small-display phones.
Figure 2. Small-display phone
4
5
55
6
47 129 7XH 3;=57
4:6 6DQG\
352*
9
&21)
:
8
;
(1'02'(
7
<
6
9
<
92/80(
'()
012
:;<
'1'2&)
43
,17
44
0,&
45
46
)/25
5(',$/
0(025<
2122))
+2/'
47
48
49
4:
4;
4
-
$%&
5
-./
*+,
7
8
789
356
:
;
23(5
3
/,1(
4< 53
54
Table 2. Small-display phone features
# Feature Description
1
Message Waiting Indicator Indicates that you have a message .
Display Displays information about the phone’s status,
2
MODE Key Used to change display modes from Default Mode
3
END Key Used to exit Directo ry Mode and return the display
4
ICX-35-750 ICX (International), issued March 1999 11
menus, and dialling direct or ies.
to Speed Dial Mode or Extensi on Directory Mode.
to Default Mode.
Page 12

1. Understanding Your Phone
# Feature Description
5
Soft Keys Used to select spee d dial directories or numbers.
PROG Key Used to program Flexible Func ti on (FF) and one-
6
CONF Key Used to establish conferenc e ca l ls and to check FF
7
One-Touch Keys Used to make outside calls or to access system fea-
8
Flexible Function (FF)
9
Keys
DND/CF Indicator Indicates that Do-Not-Disturb (DND) or Call For-
10
INT Indicator Lights when you are on a call and flashes when you
11
MIC Indicator Indicates that your voice is not muted (i.e., party on
12
13
ON/OFF Indicator Lights when the ON/OFF key has been press ed.
FL/R Key Used to end an outside call and to either restore out-
14
15
REDIAL Key Used to redial the last number dialled.
16
MEMORY Key Used to access speed dialling or enter account
ON/OFF Key Used to make a call without lifting the handset or to
17
18
LINE Key Used to seize a free outside line.
VOLUME Key Used to adjust the level of tones, background
19
HOLD Key Used to hold calls, to retrieve hel d calls, and to
20
Microphone Used to talk to anot he r pa rty without using the
21
22
Speaker Outputs tones and voice at your extension.
touch keys, to adjus t ringer volume, and to send a
flash signal. Depending on t he se tup of your system, may also be used to transfer calls.
key and one-touch feature s.
tures.
Used to access outside lines or to access system fea-
tures.
warding is set.
hold a call.
the other end can hear yo u). Goes off when your
hands-free microphon e is m ut ed and flashes when
your handset is muted.
side dial tone or switch to ext er nal dial tone status
without hanging up the receiver.
codes.
turn the speaker on and off.
music, ringing, receiver volume, and display contrast.
complete FF key programming.
handset.
12 ICX (International), issued March 1999 ICX-35-750
Page 13

1. Understanding Your Phone
Changing the Default Display
The MODE key enables you to change the software mod e of the display from
Default Mode (i.e., time and date) to Directory Mode (i.e., System Speed Dial
[SSD], Personal Speed Dial [PSD], or Extension directories). The END key enables
you to return the display to Default Mode.
While in Directory Mode, the soft keys enable you to view either the SSD, PSD, or
Extension directories. After selecting the desired direc tory, the soft keys also enable
you to either view or dial speed dial or extension numbers. (For more information on
using directories to make calls, see “Dialling Speed Dial Numbers” on page 38 and
“Calling Other Extensions” on page 51.)
While in Variable Mode, you can also use the soft keys to access various system
features.
Notes:
• Y ou must be in Directory Mode to view speed dial and extension directories or
dial speed dial numbers usi ng the soft keys.
• The system fea tu r e s dis p la ye d in Variab le Mo de re qu ir e s yste m pr o gra m m ing.
To display the Directory Mode on a small-display phone
1. (A)Press the MODE key one time to access the speed dial directories. (66'
and 36' appear on the second line of the display.)
OR
(B) Press the MODE key twice to access the Extension Directory. ((;7 appears
on the second line of the display.)
2. Press the END key to return to Default Mode.
Understanding Display Information
Display information indicates the status of the phone. However, this information
will vary depending on how the phone is programmed and its status. Several of the
more common displays are illustrated below.
Figure 3. Idle condition for small-display phone (display default)
###4:#####0$5#####:HG################43=67#
Extension
ICX-35-750 ICX (International), issued March 1999 13
446
######%UDQG\
User name
Page 14
1. Understanding Your Phone
Figure 4. Messages received for small-display phone
Number of
messages
###4:#####0$5#####:HG################43=67#
06* &DUWHU
Figure 5. Reminder alarm for small-display phone
###4:#####0$5#####:HG################43=67#
Alarm time
$ODUP#####45=6330
Figure 6. Incoming outside call for small-display phone
Incoming outside
call
,1&0#&2
446
&36
%UDQG\
Figure 7. Outside call in progress for small-display phone
Outside call
in progress
2Q#/LQH
446 %UDQG\
3·48
Figure 8. Internal calling in use for small-display phone
Intercom call
7DON
*UHJ
446 %UDQG\
Person that
left the first
message
Alarm
indicator
Outside line
number
Call
duration
Called
party
Using Variable Mode
Using Variable Mode allows you to use the soft keys to access programmed system
features when your phone is in the following states:
• During an intercom call
• During a trunk dial tone
• During a trunk call
• After dialling a busy extension.
To activate Variable Mode on a small-display phone
1. Lift the handset or press the ON/OFF key.
14 ICX (International), issued March 1999 ICX-35-750
Page 15

1. Understanding Your Phone
2. Press the Variable Mode Key.
3. Replace the handset or press the ON/OFF key.
To use Variable Mode on a small-display phone
1. After turning Variable Mo de o n, the d ispla y will reflect the programmed fe ature s
during an intercom call, trunk dial tone, trunk call, or after dialling a busy
extension.
2. Press the > or < key next to the desired feature.
LARGE-DISPLAY PHONES
Large-display phones are distinguished by their large displays. Table 3 on page 16
describes the features (1-23 below) that are typi cal of large-display phones.
Figure 9. Large-display phone
4
47 129 7KX 35=5;
56
4:6 /D QJIR UG 6
3(5621$/
6<67(0',$/
(;7(16,21
)81&7,21 6<67(0
)81&7,2 1 (;7
&21) 0( 18
352* 0,&
8
7
',$/
5
35(9 1(;7
<;:9
66
43
4
*+,
7
356
:
-
/,1( 9 2/8 0(
4<
$%&
6
5
012
-./
9
8
:;<
789
<
;
23( 5
3
53
)/25
44
45
46
47
5(',$/
0(025<
2122) )
+2/'
48
49
4:
4;
,17
0,&
54
'1'2&)
'()
55
ICX-35-750 ICX (International), issued March 1999 15
Page 16

1. Understanding Your Phone
Table 3. Large-display phone featu r es
# Feature Description
1
Message Waiting Indicator Indicates that you have a message .
Display Displays information about the phone’s status,
2
Soft Keys Used to select menus, directories, speed dial num-
3
PROG Key Used to program FF and one-touch keys, to adjust
4
CONF Key Used to establish conferenc e ca l ls and to check
5
MIC Key Used to activate/deactivate the Microphone/Mute
6
MENU Key Used to return to the default Main Menu screen
7
8
PREV Key Used to return to the previous screen.
9
NEXT Key Used to advance to the next screen.
Flexible Function (FF)
10
Keys
DND/CF Indicator Indicates that Do-Not-Disturb (DND) or Call For-
11
INT Indicator Lights when you are on a call and flashes when you
12
MIC Indicator Indicates that your voice is not muted (i.e., party on
13
14
ON/OFF Indicator Lights when the ON/OFF key has been press ed.
FL/R Key Used to end an outside call and to either restore out-
15
16
REDIAL Key Used to redial the last number dialled.
menus, and dialling direct or ies.
bers, and to access call-ha ndl ing features.
ringer volume and to send a flash signal. Depending
on the setup of your system, may also be used to
transfer calls.
Flexible Function (FF) and one-t ouch key settings.
function. When activated, the party on the other end
can hear you. (See item 13 , MIC Indi cator.)
which contains the following items:
• Personal Dial
• System Dial
• Extension
• Function Syste m
• Function Ext
Used to access outside lines or to access system features.
warding is set.
hold a call.
the other end can hear yo u). Goes off when your
hands-free microphon e is m ut ed and flashes when
your handset is muted.
side dial tone or switch to ext er nal dial tone status
without hanging up the receiver.
16 ICX (International), issued March 1999 ICX-35-750
Page 17

1. Understanding Your Phone
# Feature Description
17
MEMORY Key Used to access speed dialling or enter account
ON/OFF Key Used to make a call without lifting the handset or to
18
19
LINE Key Used to seize a free outside line.
VOLUME Key Used to a dj ust level of tones, background music,
20
HOLD Key Used to hold calls, to retrieve hel d calls, and to
21
Microphone Used to talk to anot he r pa rty without using the
22
23
Speaker Outputs tones and voice at your extension.
codes.
turn the speaker on and off.
ringing, receiver vo lume, and display contrast.
complete FF key programming.
handset.
Changing the Default Display
The ten soft keys located alongside the displa y on a lar g e -dis p la y ph on e allow you
to change the software mode of the display. Instead of displaying the Main Menu
(Default Mode) for instance, you can set your phone to display one of the following
directories or menus:
• Personal Dial - Allows you to program, view, or dial PSD numbers using the
soft keys.
• System Dial - Allows you to view or dial SSD numbers using the soft keys.
• Extension - Allows you to view or dial other extensions using the soft keys.
• Function System - Allows you to access most key telephone features, such as
Call Forwarding, Do-Not-Disturb (DND), Microphone Mute, Background
Music, Call Pickup, Account Codes, etc.
• Function Extension - Allows you to assign frequently us ed phone features for
easy access. Most items found under the Function System Menu can be
assigned to the Function Extension Menu in any order you desire.
To display a directory or menu on a large-display phone
1. Press the soft key to the left of the desired directory or menu. (The selected
directory or menu o f feature displays.)
2. Press the MENU key to return to the Main Menu.
Note: Menus are programm able or customizable per extension. Therefore, the
actual menu that displays depends on your system configuration.
ICX-35-750 ICX (International), issued March 1999 17
Page 18
1. Understanding Your Phone
Understanding Display Information
Display information indicates the status of the phone. However, this information
will vary depending on how the phone is programmed and its status. Several of the
more common displays are illustrated below.
Figure 10. Idle condi tion for large-display phone (di s play default)
###4:######0$5#####:HG#################43=67#
Extension
446
%UDQG\
3(5621$/#',$/
6<67(0#',$/
(;7(16,21
)81&7,21#6<67(0
)81&7,21#(;7
Figure 11. Messages received for large-display phone
User name
Number of
messages
##4:#####0$5######:HG#################43=67#
06* &DUWHU
3(5621$/#',$/
6<67(0#',$/
(;7(16,21
)81&7,21#6<67(0
)81&7,21#(;7
Figure 12. Reminder al arm f or large-display phone
##4:#####0$5######:HG#################43=67#
Alarm time
$ODUP#####45=6330#
3(5621$/#',$/
6<67(0#',$/
(;7(16,21
)81&7,21#6<67(0
)81&7,21#(;7
Person that
left the first
message
Alarm
indicator
18 ICX (International), issued March 1999 ICX-35-750
Page 19
1. Understanding Your Phone
Figure 13. Incoming outside cal l for large-display phone
Incoming outside
call
,1&0#&2
&36
446 #%UDQG\
3(5621$/#',$/
6<67(0#',$/
(;7(16,21
)81&7,21#6<67(0
)81&7,21#(;7
Figure 14. Outsid e call in progress for large-display phone
Outside call
in progress
2Q#/LQH
3·48
#446###########################%UDQG\
3(5621$/#',$/
6<67(0#',$/
(;7(16,21
)81&7,21#6<67(0
)81&7,21#(;7
Figure 15. Intercom calling in use for large-display phone
Intercom call
7DON
*UHJ
446 %UDQG\
3(5621$/#',$/
6<67(0#',$/
(;7(16,21
)81&7,21#6<67(0
)81&7,21#(;7
Outside line
number
Call
duration
Called
party
ICX-35-750 ICX (International), issued March 1999 19
Page 20

1. Understanding Your Phone
This page intentionally left blank.
20 ICX (International), issued March 1999 ICX-35-750
Page 21

2. SETTING UP YOUR PHONE
You can use the procedures in this chapter to customize your phone for the
following:
• Adjusting Volume and Display Settings (page 21)
• Setting Up Flexible Function Keys (page 22)
• Setting Up One-touch Keys (page 23)
• Setting Up Speed Dialling (page 25)
• Assigning and Deleting Personal Speed Dial (PSD) Numbers (page 25)
• Linking System Speed Dial Numbers (page 28)
• Assigning and Deleting Names for PSD Numbers (page 29).
ADJUSTING VOLUME AND DISPLAY SETTINGS
Yo u can adjust the volume or display of the following by pressing the
VOLUME
• Intercom and incoming ringer
• Handset
• Speaker
• Display cont r ast of yo ur ph one.
To adjust the volume of your phone while it is in use
1.
Press the
a.
b.
To adjust the ringer volume of your phone while it is idle
1.
Press the
2.
Press the
3.
Enter 9, then 1 to adjust the incoming ring tone. (The phone produces a tone.)
key:
VOLUME
During ringing to adjust the intercom or incoming ring tone.
During a call to adjust the handset or speaker volume .
ON/OFF
PROG
key:
key.
key.
OR
ICX-35-750 ICX (International), issued March 1999 21
Page 22

2. Setting Up Your Phone
Enter 9, then 2 to adjust the intercom ring ton e . (The phone produces a tone.)
4. Press the VOLUME key.
5. Press the ON/OFF key.
To adjust the display contrast of your phone
Note: This task requires a display phone.
1. While the phone is idle, press the # key.
2. Press the VOLUME key several times as needed.
SETTING UP FLEXIBLE FUNCTION KEYS
You can set up Flexible Function (FF) keys to initiate system features or to assign
specific extension numbers.
Note: You cannot set up FF keys that are dedicated to outside lines. Contact your
system administrator or ICX dealer to make changes to dedicated FF keys.
To set up FF keys
1. Pickup the handset or press the ON/OFF key.
2. Press the PROG key.
3. Press the FF key to be programmed.
4. Do one of the following:
If . . . Then . . .
For a fixed dial code, press the
You want one-key assess to a certain feature:
Notes:
• You must enter a dial code when
assigning features. (See Appendix A,
“Dial Code List” on pag e 77.)
• Not all dial codes can be stored in FF
keys
You want one-key access to a specifi c
**
extension number , plus the ability to pick up
the extension’s calls and know when the
extension is busy:
22 ICX (International), issued March 1999 ICX-35-750
a.
key. For a flexible dial code, proceed to
step b.
Enter one of the dial codes listed in
b.
Appendix A, “Di al Code List” on page
77.
Enter the extens ion number.
REDIAL
Page 23

2. Setting Up Your Phone
If . . . Then . . .
If you assign an extension numbe r to an FF key, the FF key will l igh t red when the exten-
**
sion is busy. It will light green when Do-Not-Disturb (DND) or Call Forwarding is set. In
addition, you can pick up a call that is ringing or on hold at the extension by simply pressing
the FF key when it is flashing.
5. Press the HOLD key.
6. Repeat steps 2-5 to program additional keys.
7. Replace the hand set or press the ON/OFF key.
To clear an FF key’s programming
1. Pick up the handset or press the ON/OFF key.
2. Press the PROG key.
3. Press the desired FF key.
4. Press the HOLD key.
5. Replace the handset or press the ON/OFF key.
To check the FF key’s setup
Note: This task requires a display phone.
1. Pick up the handse t or press the ON/OFF key.
2. Press the CONF key.
3. Press the FF key. The assigned function appears on the display.
4. Replace the handset or press the ON/OFF key.
SETTING UP ONE-TOUCH KEYS
You can set up one-touch keys on a non-display or small-display phone to store
phone numbers, speed dial numbers, or feature access codes.
To program a one-touch key for an outside phone number
1. Pickup the handset or press the ON/OFF key.
2. Press the PROG key.
3. Press the one-touch key to be programmed.
ICX-35-750 ICX (International), issued March 1999 23
Page 24

2. Setting Up Your Phone
4. Dial the phone number to be stored.
5. Press the HOLD key.
6. Replace the handset or press the ON/OFF key.
To assign an SSD number to a one-touch key
1. Pickup the handset or press the ON/OFF key.
2. Press the PROG key.
3. Press the one-touch key to be programmed.
4. Press the MEMORY key.
5. Enter the SSD bin number to be programmed.
6. Press the HOLD key.
7. Replace the handset or press the ON/OFF key.
To assign a feature code or extension number to a one-touch
Note: **When the system is set up for MCO Code level, one-touch keys
automatically dial an outside line. (MCO Code level requires system programming.)
1. Pickup the handset or press the ON/OFF key.
2. Press the PROG key.
3. Press the one-touch key to be programmed.
4. **If the feature functions at the MCO Code level, press MEMORY * #.
5. Enter the desir e d feature code or extension numbe r.
6. Press the HOLD key.
7. Replace the handset or press the ON/OFF key.
To check a programmed one-touch key
Note: This task requires a display phone.
1. Pickup the handset or press the ON/OFF key.
2. Press the CONF key.
24 ICX (International), issued March 1999 ICX-35-750
Page 25

2. Setting Up Your Phone
3. Press the one-touch key to be checked. (Programme d data appears on the
display.)
4. Replace the handset or press the ON/OFF key.
SETTING UP SPEED DIALLING
Yo u can set up the following speed dial features using your phone’s one-touch or
soft keys:
• Speed dial numbers
• Speed dial linking
• Speed dial names
Assigning and Deleting PSD Numbers
You can assign frequently called numbers (or System Speed Dial [SSD] numbers) to
your phone’s one-touch or soft ke ys. These keys are preprogrammed to correspond
to specific PSD codes or bins. You store your PSD numbers in these bins. When you
press a one-touch or soft key containing a PSD number, the PSD bin associated with
that key is accessed and the speed dial number is dialled.
Yo u can assign up to 10 PSD numbers to the on e-touch keys on a non-display or
small-display phone (PSD bins 80-89) and up to 20 PSD numbers to the soft keys on
a large-display phone (PSD bins 80-99).
When in the PSD Directory Mode, yo u can view the PSD bin numbers on the
display. On a small-display phone, two bins are displayed at a time. To display the
next two bins, press the # key. To display the previous two bins, press the * key. On
a large-display phone, 10 PSD bins are displayed at a time. To display the next 10
bins, press the NEXT key. To display the previous 10 bins, press the PREV key.
For a list of corresponding PSD bin numbers and one-touch or soft keys, see Figure
16 and Table 4 on page 26.
Notes:
• On a small-display phone, you must be in the PSD Directory Mode to assign,
access, or view numbers in PSD bins 90-99. On a non-display phone, you
access or assign numbers to PSD bins 90-99 by pressing the MEMORY key
and entering the PSD bin number. (To review the PSD numbers on nondisplay phones, refer to your customized list of PSD numbers in Appendix B
“Customized PSD Bin Numbers” on page 83.)
• Until you assign a name or string of cha ra ct ers to a PSD nu mbe r, the PSD bin
number will display when you press the one-touch or soft key. For more
information, see “Assigning and Deleting Names for PSD Numbers” on page
29.
ICX-35-750 ICX (International), issued March 1999 25
Page 26
2. Setting Up Your Phone
• You can check PSD numbers or names that have been assigned to one-touch
or soft keys. For more information, see “Checking Speed Dial Numbers” on
page 40.
Figure 16. One-touch and soft key numbering scheme
02:28 Thu N O V 14
Langfor d S 173
1
2
PROG
109876
2 3
CONF
541
Small-display phone one-touch keys
3
4
5
Large-display phone soft keys
Table 4. Corresponding one- touch or soft keys and PSD bin numbers
One-touch or soft key Corresponds to PSD bin on ...
etc.
1
2
3
Small-display and
non-display phones
80 80 or 90
81 81 or 91
82 82 or 92
Large-display phone
6
7
8
9
10
To assign a PSD number to a one-touch or soft key
Note: Before assigning PSD numbers, you must de te rmine whether the system is
set up for Intercom Level (programmed to dial an inside line) or MCO Code level
(programmed to dia l an outside line). Depending on the system set up, you must
include the appropriate dialling code as part of the PSD number. To determine which
code to use, see Table 5 on page 27.
1. Pick up the handset o r p ress the ON/OFF key.
2. Either:
• Press the PROG key and then press the MEMORY key.
26 ICX (International), issued March 1999 ICX-35-750
Page 27

2. Setting Up Your Phone
OR
• Enter the Speed Dial Set/Clear code (default = 710 (HK/UK) or 710#).
3. Enter the PSD bin number (80-99).
4. Enter the phone number you want to be speed-dialled (m aximum length = 16
characters). Remember to include the Intercom Level or MCO Code level code
depending on how the system is set up. (Refer to the following table.)
Table 5. Characters allowed when assigning PSD numbers
To insert a . . . Enter/Press...
Digit or character
Intercom Level*
MCO Code
nesia) **
MCO Code 81**
MCO Code 82**
MCO Code 83**
MCO Code 84**
Pause
DP - DTMF Code
SSD Code
Hyphen (-)
Display Number (Start / Stop) ***
DTMF Conversion After the Other Party Answers
Indicates that the digits that follow are either a feature acc ess code or extension
*
number. (Do not include if system is set for Inter com Level.)
Indicates that the digits that follow are for an outside number. (Do not include if
**
system is set for Trunk Level.)
(UK/HK), 0 (Taiwan, Malaysia, Indo-
9
0, 1-9, *, #
MEMORY * #
MEMORY * 0
MEMORY * 7
MEMORY * 7
MEMORY * 7
MEMORY * 74
FL/R
MEMORY * *
MEMORY NN(N)
PROG
MEMORY * 2
MEMORY * 3
and higher)
1
2
3
(Version 3.5
***Indicates that the enclosed digits should not be displayed during dialling. Must
precede and follow the digits that you do not want displayed.
ORY *2 555-4143 MEMORY *2.
Example: MEM-
5. Press the HOLD key.
6. Replace the handset or press the ON/OFF key.
ICX-35-750 ICX (International), issued March 1999 27
Page 28

2. Setting Up Your Phone
To delete a PSD number assigned to a one-touch or soft key
Note: When deleting a PSD numbe r from a non- display phone , be sure to rec ord t he
change in your personalized list of PSD numbers. (See Appendix B, “Customized
PSD Bin Numbers” on page 83.)
1. Pick up the handset o r p ress the ON/OFF key.
2. Either:
• Press the PROG key and then press the MEMORY key.
OR
• Enter the Speed Dial Set/Clear code (default = 710 (HK/UK) or 710#).
3. Enter the PSD bin number (80-99).
4. Press the HOLD key.
5. Replace the handset or press the ON/OFF key.
Assigning SSD Numbers
Note: SSD numbers re quire system programming.
SSD numbers are numbers that are frequently called by many different individuals
at your location; such as a branch or corporate office, a package delivery service, or
a travel agent. SSD numbers must be programmed from the attendant’s phone. Once
programmed, they are available for everyone to use.
A maximum of 80 or 80 0 SSD num b ers a re allo wed , de pen ding on the sy ste m. I n an
80 SSD number system, SSD numbers are stored in bins 00-79. In an 800 SSD
system, SSD numbers are stored in bins 000-799. Y ou dial SSD numbers by entering
the appropriate bin number or by using one-touch or soft keys. For more
information, see “ D ialling Speed Dial Numbers” on pa ge 38.
Note: To dial an SSD number using the one-touch keys on a non-display or smalldisplay phone, you must first assign the SSD number to a PSD bin number . For more
information, see “Assigning and Deleting PSD Numbers” o n page 25.
Linking System Speed Dial Numbers
To handle phone numbers longer than 25 characters, you can link up to six SSD
numbers in on e PSD bi n. You can then dial the entir e number (each SSD nu mber
contained in the chain) by pressing the programmed PSD key or by entering the
speed dial bin number.
28 ICX (International), issued March 1999 ICX-35-750
Page 29

2. Setting Up Your Phone
Notes:
• Before linking multiple SSD numbers to a PSD bin, the SSD bins must
already have been programmed with the appropriate speed dial information.
(This requires system programming.)
• If numbers do not appear on the display (00-79 or 000-799) when you use
SSD codes, your extension is not programmed to disp lay tha t da ta .
To link speed dial numbers to a PSD bin
1. Pick up the handset or press the ON/OFF key.
2. Either:
• Press the PROG key and then press the MEMORY key.
OR
• Enter the Speed Dial Set/Clear code (default = 710 (HK/UK) or 710#).
3. Press the soft or one-touch key (for the PSD bin [ 80-99]) to be programmed.
4. Press the MEMORY key.
5. Enter the SSD bin number tha t con tai ns th e fi rst pa rt o f the nu m ber to be dialled.
(If a pause is required, press the REDIAL key.)
6. Repeat steps 4-5 (up to 5 more times) for each remaining SSD number to be
linked.
7. Press the HOLD key when yo u are finished.
8. Replace the handset or press the ON/OFF key.
To use a PSD key that links multiple speed dial numbers
1. If necessary, select the trunk group (9 [UK/HK], 0 [Tawain, Malays ia, Indonis ia],
or 81-84) to access an outside line. (Normally the trunk is selected by the speed
dial numbers.)
2. Press the PSD key.
Assigning and Deleting Names for PSD Numbers
After assigning a PSD number to a one-touch or soft key, you can assign a name to
the key (e.g., “Home,” “John,” etc.). You can then view the assigned PSD name
when you are in the PSD Directory mode.
ICX-35-750 ICX (International), issued March 1999 29
Page 30

2. Setting Up Your Phone
Note: You need to know the PSD bin number for PSD number in order to assign a
name to it. To determine the bin number, see “Checking Speed Dial Numbers” on
page 40.
To assign a name to a PSD number
Note: This task requires a display phone.
1. Pick up the handse t or press the ON/OFF key.
2. Press the PROG key.
3. Press the * key.
4. Enter 0 for the Name Assignment mode.
5. Press the VOLUME key until the desired PSD bin number (80-99) is displayed.
6. Press the FL/R key to clear the current/default data.
7. (A) For a small-display phone (see Figure 17 on page 31 for an example):
a. Press the appropriate one-touch key for the desired group of letters.
b. Use the bottom row of FF keys to define your selection.
c. Repe at ste ps a-b as many times as necessary to enter the desired name.
• Press the * key to erase an entry.
• Press the # key to enter a space.
(B) For a large-display phone (see Figure 18 on pag e 32 for an example):
a. Press the appropriate soft key next to the desired row of letter s .
b. Use the bottom row of FF keys to define your selection.
c. Repeat steps a-b as many ti mes as necessary to enter the desired name.
• Press the * key to erase an entry.
• Press the # key to enter a space.
8. Press the HOLD key when the name is complete.
9. To enter another speed dial name, repeat steps 5-8.
10. Hang up or press the ON/OFF key.
30 ICX (International), issued March 1999 ICX-35-750
Page 31

2. Setting Up Your Phone
Figure 17. Name assignment example - small-display phone
To enter a D:
Press the first one- touch key from the left on the bott om row.
a
Press the fourth FF key from the left on the bottom row.
b
To enter an o:
Press the third one-touch key from the left on the top row.
c
Press the third FF key from the left on the bottom row.
d
a-f
a b c d e f g h i j k l m n o p q r s t u v w x y z : & / sp
A-F
g-l
G-L
G H I J K L M N O P Q R S T U V W XA B C D E F Y Z . , ’ -
m-r
M-R
s-x
S-X
y-sp
Y- -
ICX-35-750 ICX (International), issued March 1999 31
Page 32

2. Setting Up Your Phone
Figure 18. Name assignment example - large-display phone
To enter a D:
Press the first soft key on the top left.
a
Press the fourth FF key from the left on the bottom row.
b
T o enter an o:
Press the third soft key from the top right.
c
Press the third FF key from the left on the bottom row.
d
To delete a name assigned to a PSD number
Notes:
• This task requires a disp lay phone.
32 ICX (International), issued March 1999 ICX-35-750
Page 33

2. Setting Up Your Phone
• Yo u need to know the PSD bin number for the PSD number in order to delete
an assigned name. To check the bin number for a key, see “Checking Speed
Dial Numbers” on page 40.
1. Pick up the handset o r p ress the ON/OFF key.
2. Press the PROG key.
3. Press the * key.
4. Enter 0 for the Name Assignment mode.
5. Press the VOLUME key until the desired PSD bin number (80-99) is displayed.
6. Press the FL/R key to clear the current/default data.
7. Press the HOLD key.
Notes:
• It is strongly recommended that you assign the PSD bin number as a name for
the key at this point so tha t it will appe ar on the displa y for fu ture us e. The bi n
number should be entered in the following format: “-PSDxx (or xxx)” where
xx or xxx = the actual bin number. Example: “-PSD901”. For more
information, see “Assigning and Deleting Names for PSD Numb ers” on page
29.
• If using a large-display phone, press the MENU key, then the key to the left
of 3(5621$/#',$/ to have the change reflected on the display.
ICX-35-750 ICX (International), issued March 1999 33
Page 34

2. Setting Up Your Phone
This page intentionally left blank.
34 ICX (International), issued March 1999 ICX-35-750
Page 35

3. PLACING OUTSIDE CALLS
Your digital phone, in conjunction with the ICX, provides the following ways for
you to place outside calls:
• Accessing an Outside Line (pag e 35)
• Using Account Codes (page 36)
• Redialing Outside Numbers (pag e 37)
• Using Speed Dialling (page 38).
ACCESSING AN OUTSIDE LINE
You can place outside calls using the following features or under the following
conditions:
• Outside line access group code
• Flexible Function (FF) keys
• Open line call back.
To make an outside call using an outside line access code
1. Pick up the handset or press the ON/OFF key.
2. Enter an access code for an outside line acc ess group (9 [UK/HK], 0 [Taiwan,
Malaysia, Indonesia], or 81-84).
3. Dial the phone number.
Notes:
• If all outside lines in the group are busy, you will hear a busy tone.
• If the system is set up for Automatic Route Selection (ARS), dialling 9 (UK/
HK) or 0 (Taiwan, Malaysia, Indonesia) automatically routes your call to a
selected outside line.
To make an outside call using an FF key
1. Pick up the handset o r press the ON/OFF key.
2. Press an FF key that is ded icated to an outside line or to a group of outside lines.
3. Dial the phone num be r.
ICX-35-750 ICX (International), issued March 1999 35
Page 36

3. Placing Outside Calls
To have a busy outside line call you back once it is open
1. Pick up the handset or press the ON/OFF key.
2. Attempt to access an outside line.
3. When you hear the busy tone, enter the Callb ack Request code (default = 3 (HK/
UK) or 3#).
4. Press the ON/OFF key again and wait for the callback tone. (When the outside
line is available, your phone rings and the FF key for the outside line flashes.)
5. Pick up the handset o r press the ON/OFF key.
6. Dial the phone number .
Note: You must respond to the callback tone within 15 second s.
To cancel a callback request (Version 3.0 and higher)
1. Pick up the handset or press the ON/OFF key.
2. Dial the Callback cancellation code (default = 769 (HK/UK) or 769#).
3. Replace the handset.
USING ACCOUNT CODES
You can assign account codes (both non-verified acco unt codes and verified ID
codes) to clients to help track a variety of information; such as, call dates and times,
numbers called, and outsi de li ne n umbers u se d. Th is in forma tio n is th en p rinted for
each account on a System Message Detail Recording (SMDR) (Call Logging)
record.
Note: An SMDR (Call Logging) printer or external call accounting system is
required to collect accoun t co de records.
Non-verified Account Codes
Non-verified acco unt codes are voluntary and do not have to be entered before you
make a call. They can also be assigned to both incoming and outgoing calls.
You can enter a non-verified account code before making a call or during a call.
To enter a non-verified account code before making a call
1. Pick up the handset o r press the ON/OFF key.
2. Enter the Account Code code (default = 8#).
36 ICX (International), issued March 1999 ICX-35-750
Page 37

3. Placing Outside Calls
3. Enter the Account Code (up to 10 digits).
4. Press the # key.
5. Dial 9 (UK/HK) or 0 (Taiwan, Malaysia, Indonesia) or press an FF key that is
dedicated to an outside line.
6. Dial the phone number.
To enter a non-verified account code during a call
1. During a call, press the MEMORY key.
2. Press the # key.
3. Enter the Account Code (up to 10 digits).
4. Press the # key.
Verified Account Codes
Verified ID codes are required by extensions that have restrictions on placing
outgoing calls (i.e., a specific code is required to place an outgoing call).
To make an outside call that requires an account code
1. Pick up the handset or press the ON/OFF key.
2. Enter the Verified Account ID Code feature access code (default = 8#).
3. Enter the Verified Account code. The entered code may be up to 10 digits.
4. Press the # key.
5. Dial 9 (UK/HK) or 0 (Taiwan, Malaysia, Indonesia) or press an FF key that is
dedicated to an outside line.
6. Dial the phone number.
REDIALING OUTSIDE NUMBERS
You can use the REDIAL key to redial the last number dialled or to redial a busy
number.
To redial the last number dialled
1. Pick up the handset or press the ON/OFF key.
2. Access an outside line.
ICX-35-750 ICX (International), issued March 1999 37
Page 38

3. Placing Outside Calls
3. Press the REDIAL key. (The phone displays and dials the last outside number
dialled.)
To automatically redial a busy number
Note: The system will continue to redial the busy number until you hang up the
phone, the called party answers the call, or a maximum of 15 redial attempts is made.
1. Pickup the handset or press the ON/OFF key.
2. Access an outside line.
3. Dial the phone number.
4. After hearing the busy tone, p ress the REDIAL key . (The phone continues to dial
the busy number until the calle r answers or the redial timer times out.)
To cancel automatic repeat dialling
1. Replace the handset or press the ON/OFF key.
USING SPEED DIALLING
After PSD numbers and SSD numbers have been assigned, you can quickly dial the
number by pressing the appropriate one-touch or soft key or by entering the
appropriate speed dial bin number. (For information on assigning PSD and SSD
numbers, see “Setting Up Speed Dialling” on page 25.) You can also check and see
what PSD and SSD number or na me is assigned to specific one-touch or soft k eys.
Notes:
• For information on deleting PSD numbers, see “Assigning and Deleting PSD
Numbers” on page 25.
• You cannot delete SSD numbers assigned to one-touch or soft keys. These
numbers are programmed from the attendant’s phone.
Dialling Speed Dial Numbers
Yo u can dial speed dial numbers by using preassigned one-touch keys on nondisplay or small-display phones, using soft keys and speed dial directories, or by
entering speed dial bin numbers.
To dial a speed dial number by pressing a one-touch key
1. Pickup the handset or press the ON/OFF key.
2. If necessary, access an outside line.
38 ICX (International), issued March 1999 ICX-35-750
Page 39

3. Placing Outside Calls
3. Press the desire d one-touch key.
To dial a speed dial number using the soft keys on a small-
display phone
1. Press the MODE key one time. (66' and 36' appear on the second line of the
display.)
2. Press the soft key next to 66' or 36'. (The first two speed dial entries appear
on the second line of the display.)
3. Scroll through the speed dial directory until the desired speed dial entry is
displayed. (To display the next two entries, press the # key. To display the
previous two entries, press the * key.)
4. Pick up the handset o r p ress the ON/OFF key.
5. If necessary, access an outside line.
6. Press the soft key next to the desired speed dial en try to initiate dialling.
To dial a speed dial number using the soft keys on a large-
display phone
1. From the Main Menu, press the soft key to the left of 6<67(0#',$/ or
3(5621$/#',$/. (In the PSD directory, the first 10 speed dial entries are
displayed. In the SSD directory, 10 alphabetical entries are displayed.)
2. For the PSD directo ry, proceed to step 3.
For the SSD directory , press the soft key to the left of the desired group of letters
to display the first five speed dial entries.
3. Scroll through the speed dial directory until the desired speed dial entry is
displayed. (To scroll forward in either directory, press the NEXT key. To scroll
backwards in either directory, press the PREV key. )
4. Pick up the handset or press the ON/OFF key.
5. If necessary, access an outside line.
6. Press the soft key next to the desired speed dial en try to initiate dialling.
ICX-35-750 ICX (International), issued March 1999 39
Page 40

3. Placing Outside Calls
To dial a speed dial number by entering the speed dial bin number
Note: You must know the PSD or SSD bin number for the number to be dialled to
perform this task. For information on determining speed dial numbers, see
““Checking Speed Dial Numbers” on page 40.
1. Pick up the handset o r press the ON/OFF key.
2. If necessary, access an outside line.
3. Press the MEMORY key.
4. Enter the appropriate three digi t speed dial bin number (PSD bins 80-99 or SSD
bins 00-79 or 000-799).
Checking Speed Dial Numbers
After speed dial numbers have been assigned, you can check to see what number has
been programmed by using soft keys or by entering the speed dial bin number.
Note: The following tasks require a display phone. To check speed dial numbers on
a non-display phone, see Appendix B, “Customized PSD Bin Numbers” on page 83
for your personal ized list of speed dial numbers.
To check a speed dial number using the soft keys on a small-
display phone
1. Press the MODE key one time. (66' and 36' appear on the second line of the
display.)
2. Press the soft key next to 66' or 36'. (The first two speed dial entries appear
on the second line of the display.)
3. Scroll through the speed dial directory unt il the desired speed dial bin entry is
displayed. (To display the next two entries, press the # key. To display the
previous two entries, press the * key.)
4. Pick up the handset o r p ress the ON/OFF key.
5. Press the CONF key.
6. Press the soft key next to the speed dial entry. (The speed dial number appears on
the display.)
40 ICX (International), issued March 1999 ICX-35-750
Page 41

3. Placing Outside Calls
To check a speed dial number using the soft keys on a large-
display phone
1. From the Main Menu, press the soft key to the left of 6<67(0#',$/ or
3(5621$/#',$/. (In the PSD directory, the first 10 speed dial entries are
displayed. In the SSD directory, 10 alphabetical entries are displayed.)
2. For the PSD directo ry, proceed to step 3.
For the SSD directory , press the soft key to the left of the desired group of letters
to display the first five speed dial entries.
3. Scroll through the speed dial directory until the desired speed dial entry is
displayed. (To scroll forward in either directory, press the NEXT key. To scroll
backwards in either directory, press the PREV key. )
4. Pick up the handset or press the ON/OFF key.
5. Press the CONF key.
6. Press the soft key next to the speed dial entry. (The speed dial number appears on
the first line of the display . The speed dial bin number appears on the second line
of the display, along with any name that has been assigned to the speed dial
number.)
To check speed dial entries by entering the speed dial bin number
1. Pick up the handset o r p ress the ON/OFF key.
2. Press the CONF key.
3. Press the MEMORY key.
4. Enter the appropriate PSD bin number (80-99) or SSD bin number (00-79 or 000-
799). (The speed dial numb er appears on the first line of the display. The speed
dial bin number appears on the second line of the display, along with any name
that has been assigned to the speed dial number.)
ICX-35-750 ICX (International), issued March 1999 41
Page 42

3. Placing Outside Calls
This page intentionally left blank.
42 ICX (International), issued March 1999 ICX-35-750
Page 43

4. HANDLING INCOMING CALLS
Yo u can handle calls that reach your phone in a variety of ways:
• Answer Calls (page 43)
• Use Call Hold (page 44)
• Transfer Calls (page 45)
• Use Call Pickup (page 47)
• Use Call Park (page 49).
ANSWERING CALLS
You can answer various types of calls using t he f ollowing procedure:
To answer a call
1. Pick up the handset o r p ress the ON/OFF key.
2. Do one of the following:
To answer . . . Do the following . . .
Press the flashing FF key.
A call ringing at someone
else’s phone
A call ringing a phone within
your call pickup group
An external call ringing a
phone within your call pickup
group
A call ringing outside your call
pickup group
a.
Enter the Direct Call Pickup Set code (default
a.
=
704
Dial the number of the ringing extension.
b.
Enter the All Calls Pickup Set c ode (default =
(HK/UK) or
701
Enter the External Call Pickup Set code (default =
(HK/UK) or
702
Enter the Specified Group Pickup Set code
a.
(default =
Enter the number of the call pickup group (01-
b.
) where the phone is rin ging.
72
OR
(HK/UK) or
701#
702#
(HK/UK) or
703
704#
).
).
).
).
703#
3. Complete the call, and replace the handset or press the ON/OFF ke y.
ICX-35-750 ICX (International), issued March 1999 43
Page 44

4. Handling Incoming Calls
USING CALL HOLD
Depending on the set up of your system, you can put one or more calls on hold and
retrieve those calls using the HOLD key or a designated Floating Hold key.
Notes:
• The Floating Hold feature assigns a Floating Hold number (001-576) to a
specific FF key. By placing a call on hold using the Floating Hold key, you
can retrieve the call from any phone that has an FF key that is assigned the
same Floating Hold number or by simply entering the Floating Hold number.
• Floating Hold requ ires system programming.
•The EXT indicator flashes when you hold an inte rn al call or an outside line
that is not assigned to an F F key.
• If you do not pick up a held call in a certain period of time, you will hear a
tone indicating that the call is still waiting.
To place a call on hold
1. While on a call, press the HOLD key or the Floating Hold FF key.
To use Broker’s Hold and toggle between two calls
1. While on a call, press the HOLD key to put the first call on hold.
2. Press the FF key that is fla s hing green to answer the second call.
3. Press the HOLD key to put the second call on hold.
4. Press the FF key that is flashing green to return to the first call.
To retrieve a call placed on hold, do one of the following:
To retrieve a call . . . Do . . .
From the extension that placed
the call on hold
44 ICX (International), issued March 1999 ICX-35-750
Press the FF key that is flashing gree n.
OR
Press the
key (if no FF key is flashing).
HOLD
Page 45

4. Handling Incoming Calls
To retrieve a call . . . Do . . .
From a different extensi on
than the one that placed the
call on hold
From Floating Hold (also
known as Station P ark Pick
Up)
Press the FF key that is flashing red.
Press the Floating Hold FF key.
a.
Enter the Floating Hold Answer code (default
a.
= *9).
Enter the Floating Hold orbit number (
b.
576
099
the note below .
OR
[CPC-288/576],
[CPC-288/576] or
01-96
01-09
[CPC-96] or
[CPC-96]. See
001-
001-
Note: The number of floating hold orbits available may very depending on the
Station Park/Floating Ho ld Pickup setting (F F1-0-02-002 5). The stat ion park/flo ating
hold pickup code can be set to *9 (default), 733 (UK/HK), or 733#. The floating hold
pickup code (*9) operates as follows:
System Size Virtual Line Number and Operation
96 01-09 Floating Hold pick up
10-96: Station Park Hold pick up purp ose
Above 96 001-099 Floating Hold pic k up
100-576: Station Park Hold pick up purpose
TRANSFERRING CALLS
You can transfer a call to an open extension, a busy extension, or an outside line.
These transfers can be either supervised or unsupervised.
Note: If a transferred call is not answered within a specified time, the call rings
again at the extension that transferred it.
Supervised Transfers
In a supervised transfer, you announce the call before transferring it. This allows
you to give the recipient information about the call.
To supervise the transfer of a call to another extension or an
outside number
1. While on a call, press the HOLD ke y.
ICX-35-750 ICX (International), issued March 1999 45
Page 46

4. Handling Incoming Calls
2. Either dial the extension numb er or the o utside line num ber to whic h the call will
be transferred.
3. When the recipient answers, announce the call.
4. Complete t he call by doing one of the following:
a. If On-hook Transfer is enabled for your extension, replace the handset or
press the ON/OFF key.
If On-hook Transfer is disabled for your extension, press the PROG key.
b.
Note: On-hook Transfer requires system programming.
Unsupervised Transfers
In an unsupervised transfer, you do not announce the call to the person receiving the
transfer. You ha ng up before the recipient answers t he call.
To transfer a call to another extension or an outside number
without supervising the call
1. While on a call, press the HOLD key.
2. Either dial the extension numb er or the outside line num ber to whic h the ca ll will
be transferred.
3. Complete the call by doing one of the following:
a. If On-hook Transfer is enabled for your extension, replace the handset or
press the ON/OFF key.
If On-hook Transfer is disabled for your extension, press the PROG key.
b.
Note: On-hook Transfer requires system programming.
To transfer a call to a busy extension
1. While on a call, press the HOLD key.
2. Dial the extension number to which the call will be transferred.
3. If your extension does not have Auto Camp-on activated, enter the Camp-on
(Call Waiting) Set code (default = 2 (HK/UK) or 2#). Otherwise proceed to step
4.
4. Complete the call by doing one of the following:
46 ICX (International), issued March 1999 ICX-35-750
Page 47

4. Handling Incoming Calls
a. If On-hook Transfer is enabled for your extension, replace the handset or
press the ON/OFF key.
If On-hook Transfer is disabled for your extension, press the PROG key.
b.
Note: On-hook Transfer requires system programming.
CALL PICKUP
The System allows the following types of Call Pickup:
• Extension Group Pickup
• Extension Direct Pickup
• Trunk Group Pickup
• Trunk Direct Pickup.
Extension Group Pickup
Extension Gro up Pickup allows you to pick up a direct ringing call (within your
extension pickup g roup or in a different extension pickup group) without having to
dial the number of the ringing extension.
Three types of Extension Group Pickup are available:
• Call Pickup-All Calls: you can pick up a direct call ringing anywhere within
your own extension group.
• Call Pickup-External Calls: You can pick up only di rect external calls
ringing within your own extension group.
• Specified Group Pickup: You can pick up a call ringing to an extension in
another extension gr oup.
To use Extension Group Pickup - All Calls
1. Lift the handset or press the ON/OFF key.
2. Enter the Extension Group Pickup- All Calls code (default = 701 (HK/UK) or
701#).
3. Complete the call and replace handset or press the ON/OFF key.
To use Extension Group Pickup - External Calls
1. Lift the handset and press the ON/OFF key.
2. Enter the Extension Group Pickup-External Calls code (default = 702 (HK/UK)
or 702#).
ICX-35-750 ICX (International), issued March 1999 47
Page 48

4. Handling Incoming Calls
3. Complete the call and replace the handset or press the ON/OFF key.
To use Specified Group Pickup All Calls
1. Lift the handset or press the ON/OFF key .
2. Enter the Specified Group Pickup access code (default = 703 (HK/UK) or 703# ).
3. Enter the number of the Call Pickup Group (01-72) where the call is ringing.
4. Complete the call and replace the handset or press the ON/OFF key.
Extension Direct Pickup
Extension Direct Pickup allows you to answer a call to ano ther extension by dialling
the number of the ringing extension.
To use Extension Direct Pickup
1. Lift the handset or press the ON/OFF key.
2. Enter the Extension Direct Call Pickup code (default = 704 (HK/UK) or 704#).
3. Dial the number of the ringing extension.
4. Complete the call and replace the handset or press the ON/OFF key.
Trunk Group Pickup
Trunk Group P ickup allows y ou to answer c alls ringing to any extension with in your
own MCO incoming trunk group.
To use Trunk Group Pickup
1. Lift the handset or press the ON/OFF key .
2. Enter the Trunk Group Pickup code (default = 709 (HK/UK) or 709#).
3. Complete the call and replace the handset or press the ON/OFF key.
Trunk Direct Pickup
Trunk Direct Pickup allows you to answer calls ringing on a specific trunk number.
To use Trunk Direct Pickup
1. Lift the handset or press the ON/OFF key.
2. Enter the Trunk Direct Pickup code (default = *0).
48 ICX (International), issued March 1999 ICX-35-750
Page 49

4. Handling Incoming Calls
3. Dial the number of the ringing trunk.
4. Complete the call and replace the handset or press the ON/OFF key.
CALL PARK
You can use the Call Park function to transfer a call, even if you cannot locate the
intended recipient of the call.
There are two ways for an extension to park a call on the ICX. One way is to park
the call at the receiving extension and to retrieve the call at another extension by
dialling the park answer code plus the parking extension nu mbe r. The other way is
to park the call at another extension and dial the park transfer answer code at the
other extension to retrieve the call.
To park a call on this extension
1. While on a call, press the HOLD key.
2. Enter Call Park access code (default = 771 (HK/UK) or 7711#) or press the
PARK HOLD key.
3. If necessary, page the party that needs to receive the call.
To retrieve a call parked at another Extension
1. Lift the handset or press the ON/OFF ke y.
2. Enter the Call Park Answer/Other Extension access code (default =773 (HK/UK)
or 773#).
OR
Enter the Call Park/Floating Hold Answer feature access code (default =
).
*9
3. Dial the number of the extension that parked the call.
To park a call at another extension
1. While on a call, press the HOLD key.
2. Enter the Call Park Transfer access code (default = 774 (HK/UK) or 774#)
followed by the extension number to receive the parked call.
ICX-35-750 ICX (International), issued March 1999 49
Page 50

4. Handling Incoming Calls
To retrieve a call parked on this extension
1. At the extension with the transferred park call, lift the handset or press the ON/
OFF key.
2. Enter the Call Park Answer/Self Access Code (default = 772 (HK/UK) or 772#).
3. If necessary, page the party that needs to retrieve the call.
50 ICX (International), issued March 1999 ICX-35-750
Page 51

5. COMMUNICATING WITHIN YOUR OFFICE
The ICX provides a variety of ways to handle calls within your office:
• Calling Other Extensions (page 51)
• Switching Between Tone and Voice Calling (page 52)
• Using Paging (page 53)
• Answering a Page with Universal Night Answer (page 54)
• Making Announcements to Busy Extensions (page 54 )
• Using Call Forwarding (page 55)
• Using Camp-on (Call Waiting) (page 57)
• Using Message Waiting/Callback (page 59)
• Using Do-Not-Disturb (page 61)
• Using Absence Messages (page 61)
• Locking Your Extension (page 63).
CALLING OTHER EXTENSIONS
Yo u can call other extensions by entering the extension number or by using the soft
keys and Extension Directory. While making a call, you can also specify whether to
use tone calling or voice calling.
To call another extension by entering the extension number
1. Pick up the handset or press the ON/OFF key.
2. Dial the desired extension or dial 0 for the operator.
To c all another exte nsion usi ng the soft keys o n a small-d isplay
phone
1. Press the MODE key twice. ((;7 appears on the second line of the display.)
2. Press the soft key next to (;7. (The first two extension entries appear on the
second line of the display.)
3. Scroll through the directory until the desired extension entry is displayed. (To
display the next two entries, press the # key. To display the previous two entries,
press the * key.)
ICX-35-750 ICX (International), issued March 1999 51
Page 52

5. Communicating Within Your Office
4. Pick up the handset or press the ON/OFF key.
5. Press the soft key next to the desired extension entry to initiate dialling.
To call another extension using the soft keys on a large-di spla y
phone
1. From the Main Menu, press the soft key to the left of (;7(16,21. (10
alphabetical entries are displayed.)
2. Press the soft key to the left o f t he d esi red g rou p o f le tters to display the first five
extension entries.
3. Scroll through the extension directory until the desired extension entry is
displayed. (To scroll forward, press the NEXT key. To scroll backwards, press
the PREV key.)
4. To scroll forward in the directory, press the NEXT key. To scroll backwards in
the directory, press the PREV key.
5. Pick up the handset or press the ON/OFF key.
6. Press the soft key next to the desired extension entry to initiate dialling.
Switching Between Tone and Voice Calling
You can call another extension using tone calling or voice calling. Tone calling
sends a ringing tone to the called extension, where voice calling performs like an
intercom call and connects immediately without ringing the extension. (If desired,
the called party can answer a voice cal l without lifting the handset.)
System programming determines the default calling mode; however, you can switch
between tone and voice calling by entering 1.
To switch between tone to voice calling
1. Lift the handset or press the ON/OFF key .
2. Dial the extension number.
3. If your phone is set for tone calling and you want to make a voice call, enter 1.
(Or if your phone is set for voice calling and you want to make a tone call, enter
1.)
4. Speak when the call is answered.
5. Replace the handset or pr e s s the ON/OFF key.
52 ICX (International), issued March 1999 ICX-35-750
Page 53

5. Communicating Within Your Office
USING PAGING
Yo u can make both internal and external pages and announcements. Internal pages
are made via the key telephone speakers and external pages are made through the
speakers of an external paging system connected to the ICX system. When you issue
a page, you specify a paging group so that your announcement is heard only on the
phones that are members of that group.
You can answer a page from any extension using the Meet-Me Answer feat ure.
Note: Yo u can belong to more than one paging group.
To page another party or make an announcement
1. Pick up the handset or press the ON/OFF key.
2. Enter the Page Group code (default = #).
3. Enter the number of the desired page group (0-9).
4. Make your anno uncement.
5. Do one of the following:
If . . . Then . . .
You want to end the page Replace the handset or press the
You want to get a response from someone answering the page at an extension
key.
OFF
To avoid an abrupt “hang-up”
Note:
sound, press the
replacing the handset.
Do not hang up; wait for the paged party
to answer.
FL/R
key before
ON/
Answering a Page (Meet-Me Answer)
You can answer a page from any extension using the Meet-Me Answer feat ure.
To answer a page using Meet-Me Answer
1. Pick up the handset o r press the ON/OFF key.
2. Enter the Meet-Me Answer code (default = ##). (You are connected to the party
trying to reach you.)
ICX-35-750 ICX (International), issued March 1999 53
Page 54

5. Communicating Within Your Office
ANSWERING A PAGE WITH UNIVERSAL NIGHT ANSWER
During night mode, Universal Night Answer (UNA) sends incoming calls for
selected trunks to ring ex ternal paging speakers.
UNA calls can be picked up from any extension, provided the extension’s COS
allows UNA answer.
To answer a UNA call
1. Pick up the handset or press the ON/OFF key.
2. Enter the UNA to Page Pickup code (default = 705 [HK/UK] or 705#).
MAKING ANNOUNCEMENTS TO BUSY EXTENSIONS
Note: This feature requires system programming or a specific ICX configuration,
and may not be available. For information, see your system administrator or ICX
dealer.
This feature (also kn own as Off-Hook Voice Announce [OHVA]) allows you to
make an announcement t o a busy extension.
If party you called is using a digital key telephone, the announcement is heard only
by the called party, not by the other party he or she is talking to. If, however, the
party you called is using a single-line telephone, both the called party and the party
he or she is talking to will hear the announcement.
To make an announcement
1. Pick up the handset or press ON/OFF.
2. Dial the extension number.
3. Press 8 if you hear the busy tone.
4. Make your announcement. (Your voice is heard on the extension, not on the other
line.)
Answering an Announcement
To answer an announcement, yo u can use the OHVA Split key to speak to the
announcing party or you may send a text message.
The OHVA Split key is an FF key tha t has b een assi gned t o the OHVA function. The
OHVA function is typically used in situations where the extensio n u ser must h andl e
54 ICX (International), issued March 1999 ICX-35-750
Page 55

5. Communicating Within Your Office
more than one call. The Split k ey must be set up by the system administrator or
dealer.
To speak to the announcing party
1. While on a call, press the OHVA Split key.
2. Speak with the announcing party.
3. Press the OHVA Split key to return to the original call.
Transferring C alls with an Announcement
Note: This feature requires system programming or a specific ICX configuration,
and may not be available. For information, see your system administrator or ICX
dealer.
To transfer a call while making an announcement
1. While remaining on the line with the original party, press the HOLD key.
2. Dial the extension number.
3. When you hear a busy tone, press 8.
4. Make your anno uncement.
5. When you are connected to the called party, replace the handset or press the ON/
OFF key.
USING CALL FORWARDING
You can send or forward your calls to another extension, an outside line, or to voice
mail from either your extension or from an alternate extension.
Notes:
• Any outside number used for Call Forwarding must already be programmed
into system speed dialling.
• Calls cannot be forwarded to an extension that already has Call Forwarding
set or Do-Not-Disturb (DND) turned on.
• The system allows you to cancel Call Forwarding and DND for your
extension in one step.
To set Call Forwarding
1. Pick up the handset or press the ON/OFF key.
ICX-35-750 ICX (International), issued March 1999 55
Page 56

5. Communicating Within Your Office
2. Do one of the foll owing:
To forward . . . Do . . .
All incoming calls Enter the appropriate Call Forwarding - All Calls Set
All incoming calls that ring a
busy extensio n
All incoming calls that ring an
extension that doesn ’t answer
code:
• For your ext ensi on, enter
• For anothe r extension, enter
741#
Enter the appropriate Call For warding - Busy Set code:
• For your ext ensi on, enter
• For anothe r extension, enter
742#
Enter the appropriate Call Forward in g - No Answe r Set
code:
(HK/UK) or
721
(HK/UK) or
741
(HK/UK) or
722
(HK/UK) or
742
721#
722#
• For your ext ensi on, enter
• For anothe r extension, enter
743#
(HK/UK) or
723
743
723#
(HK/UK) or
3. If setting Call Forwarding for another extension, enter the number of the
extension whose calls you are forwarding. Otherwise, proceed to step 4.
4. Enter the destination code:
• If you are forwarding to another extension, enter the extension number.
• If you are forwarding to an outside number, press the # key and enter the
system speed dial code.
5. Replace the handset or press the ON/OFF key.
To cancel Call Forwarding
1. Pick up the handset or press the ON/OFF key.
2. Do one of the following:
To cancel call forwarding . . . Do . . .
For all incoming calls Enter the appropriate Cancel Call Forwarding - All Calls
code:
• For your ext ensi on, enter
• For anothe r extension, enter
751#
(HK/UK) or
731
751
731#
(HK/UK) or
56 ICX (International), issued March 1999 ICX-35-750
Page 57

5. Communicating Within Your Office
p
To cancel call forwarding . . . Do . . .
For all incoming calls that ring a
busy extensio n
For all incoming calls that ring an
extension that doesn ’t answer
Enter the appropriate Cancel Call Forwarding - Busy
code:
• For your ext ensi on, enter
• For anothe r extension, enter
752#
Enter the appropriate Cancel Call Forwarding - No
Answer code:
(HK/UK) or
732
752
732#
(HK/UK) or
• For your ext ensi on, enter
• For anothe r extension, enter
753#
(HK/UK) or
733
753
733#
(HK/UK) or
3. If cancelling Call Forwarding for another extension, enter the extension number
whose Call Forwarding you are cancelling. Otherwise, proceed to step 4.
4. Replace the handset or press the ON/OFF key.
To cancel Call Forwarding and DND for your extension in o ne ste
1. Pick up the handset or press the ON/OFF key.
2. Enter the Cancel Call Forwarding - DND code (default = 7**).
USING CAMP-ON (CALL WAITING)
Camp-on (Call Waiting) allows you to send a call waiting tone to a busy extension
indicating that they hav e a call wait ing. You then “camp-on” or stay on the line until
the party you are trying to reach answers the call.
Note: Camp-on (Call Waiting) can be set manually or automatically. However,
automatic Camp-on (Call Waiting) requires system programming.
Beginning with C PC Version 3.0, you ca n lea ve a text me ssa ge that displays on the
busy phone. Any one of the following messages can be selected. Me ssages 6 to 9
and 0 have no default message text. All the messages can be changed th rough
system programming.
Table 6. Send Text Messages
Message No. Message T ext Message No. Message T ext
1 Visitor Here 6 User Defined
2 N eed He lp 7 User Defined
ICX-35-750 ICX (International), issued March 1999 57
Page 58

5. Communicating Within Your Office
Message No. Message T ext Message No. Message T ext
3 Important 8 User Defined
4 Urgent 9 User Defined
5 Emergency 0 User Defined
Also beginning with CPC Version 2.0, t he busy party can reply with a text me ssage
that displays on the campi ng on phone. Any one of the following messages can be
selected. Messages 6 to 9 and 0 have no default message text. All the messages can
be changed through syst em programming.
Table 7. Text Message Replies
Message No. Message T ext Message No. Message T ext
1 Take A Message 6 User Defined
2 Please Hold 7 User Defined
3 Will Call Back 8 User Defined
4 Transfer 9 User Defined
5 Unavailable 0 User Defined
T o man ually camp -on to a line and notify a party that the y have
a call waiting
1. Pick up the handset or press the ON/OFF key.
2. Dial the extension number.
3. After you hear a busy tone, enter the Camp-on (Call Waiting) Set code (default =
2 [HK/UK] or 2#). (The Called party hears an alert tone and you hear a ringback
tone.)
4. Stay on the line until the called party answer.
Notes:
• If call waiting is accepted, the busy tone changes to a ringing tone.
• You cannot send a call waiting message to an extension that has DND turned
on.
58 ICX (International), issued March 1999 ICX-35-750
Page 59

5. Communicating Within Your Office
To use Automatic Camp-on (Call Waiting)
Note: Automatic Camp-on (Call Waiting) requires system programming.
1. Pick up the handse t or press the ON/OFF key.
2. Dial the extension number. (The called party hears an alert tone and you hear
ringback tone.)
3. Remain on the line until the called party answers.
To leave a text message while camp-on
Press the
1.
MSG
key
.
2. Enter the send text message number ( 1-9, 0). (See T able 6 on page 57 for the send
text messages.)
To reply to a text message
Press the
1.
MSG
key
.
2. Enter the reply text messag e nu mber (1-9, 0). (See T able 7 on page 58 for the text
message replies.)
To answer a Camp-on (Call Waiting) signal
1. Do one of the following:
To . . . Do . . .
After receiving an alert tone, replace the handset or
Answer a call
Toggle between two calls (using
Broker’s Hold)
a.
press the
Lift the handset or press the
b.
connect to the waiting call..
After receiving an alert tone, press the
a.
put the first call on hold.
Press the
b.
key to end the first call.
ON/OFF
ON/OFF
key to pick up the seco nd ca ll.
ON/OFF
key again to
key to
HOLD
USING MESSAGE WAITING/CALLBACK
You can leave a callback request message (or message waiting indica tion) for a b usy
extension or one that does no t answer. After sending the callback message, you hang
up the phone and wait for the call back. The called party’s message indicator lamp
then flashes that a message has been received.
ICX-35-750 ICX (International), issued March 1999 59
Page 60

5. Communicating Within Your Office
When the message indicator lamp flashes, it indicates either a callback message
from another extension or, if your system uses voice mail, a voice message. For a
callback message, the display reflects the extension or name that sent the message.
For a voice message, the displ ay reflects that a new message has been received.
If multiple messages have been received, the display reflects the number of
messages and indicates the origin of the first message (i.e., the extension number or
voice mail).
Note: You can use the MSG key to answer call back requests.
To send a Message Waiting/Callback request
1. Pick up the handset o r p ress the ON/OFF key.
2. Dial the extension number.
3. While the phone is still ringing or when you hear the busy tone, enter the
Message Wait code (default = 4 [HK/UK] or 4#). (The message lamp flashes at
the called extension.) (Note: You may nee d to dia l 1 to change to tone calling
before sending the message.)
4. Replace the handset or press the ON/OFF key.
To respond to a Message Waiting/Callback request
Note: Multiple messages are accessed in the order in which they are received.
1. Pick up the handset o r press the ON/OFF key.
2. Do one of the following:
To . . . Do . . .
Answer a callback request Enter the Message W a it/Call back S et co de (de fault = *6).
Cancel a Message Waiting/
*
Callback request
Only the person receiving a Message Waiting/Callback request can cancel the request. (The
*
sender of a callback reque st ca nnot cancel the request once it has been sent .)
Or, press the
• Phone automatically dials the extension that sent
the callback request
• Message lamp goes off when the call is answered
Enter the Cancel Message Waiting/Callba ck code
(d
efault = *5).
MSG
key.
3. Replace the handset or press the ON/OFF key.
60 ICX (International), issued March 1999 ICX-35-750
Page 61

5. Communicating Within Your Office
USING DO-NOT -DISTURB
Use DND to temporarily stop calls from coming to your extension.
Note: If your phone is set for Call Forwarding-No Answer or Busy (such as to
voice mail), only calls from other extensions will be blocked. External calls will still
ring through to your extension before being forwarded to voice mail. Permanent call
forwarding is determined through system programming.
To turn DND on
1. Pick up the handset o r p ress the ON/OFF key.
2. Do one of the following
To turn DND on . . . Do . . .
For your extension Enter the DND Set code (default =
For another extension
).
720#
Enter the DND Set by Other Phone code (default =
a.
[HK/UK] or
740
Dial the extension number.
b.
740#
).
3. Replace the handset or press the ON/OFF key.
[HK/UK] or
720
To cancel DND
1. Pick up the handset or press the ON/OFF key.
2. Do one of the following
To cancel DND . . . Do . . .
For your extension Enter the Cancel DND code (default =
For another extension
).
720#
Enter the Cancel DND Set by Other Phone code
a.
(default =
Dial the extension number.
b.
[HK/UK] or
750
750#
).
[HK/UK] or
720
3. Replace the handset or press the ON/OFF key.
USING ABSENCE MESSAGES
Absence messages appear on the display of any internal caller who calls your
extension.
ICX-35-750 ICX (International), issued March 1999 61
Page 62

5. Communicating Within Your Office
To assign the Absence Message
1.
Lift the handset or press the
2.
Enter the Absence Message code (d efault
3.
Enter the Absence Message number. (See Table 8 on page 62)
4.
If desired, enter the 4-digit returning time
5.
6.
Note:
HOLD
Press
key.
Replace the handset or pr ess the
Five absence messages (0-4) are supplied with the DBS. Messages 5 to 9
ON/OFF
ON/OFF
key
= 729
key .
[UK/HK] or
729#
).
have no default message text. All the messages can be changed throug h system
programming.
Table 8. Absence Messages
Message No. Message T ext Message No. Message T ext
0 In Meeting 5 Absence_No_5
1 At Lunch 6 Abse nce_No_5
2 Out of Office 7 Absence_No_5
3 Vacation 8 Absence_No_5
4 Another Office 9 Absence_No_5
Optionally, a return time can be input. Example Return Times for Absence
Messages include:
Input Display
No input Return
9 Return 9:00
11 Return 11:00
615 Return 6:15
1035 Return 10:35
To cancel the Absence Message
1. Lift the handset or press the
2.
Enter the Absence Message code (d efault =
62 ICX (International), issued March 1999 ICX-35-750
ON/OFF
key .
729
[UK/HK] or
729#
).
Page 63

5. Communicating Within Your Office
3. Press HOLD key.
4. Replace the handset or press the ON/OFF key.
LOCKING YOUR EXTENSION
Use the Station Lockout feature to limit use of your phone by others when you are
away from your telephone. When the Station Lockout feature is in use, the Toll
Restriction Service (TRS) (Call Barring) Class of your telephone is changed.
Anyone using your telephone is limited to the calling abilities defined by this
Lockout TRS (Call Barring) Class.
In addition, with the appropriate COS, you can set or cancel Station Lock out for
other telephones.
To activate the Station Lockout feature
Lift the handset or press the ON/OFF key.
1.
2. Dial the Station Lockout Set feature code (default =746 [HK/UK] or 746#).
3. Replace the handset or press the ON/OFF key.
To cancel the Station Lockout feature
ift the handset or press the ON/OFF key.
L
1.
2. Dial the Station Lockout Cancel feature code (default = 746 [HK/UK] or 746#).
3. Dial the Walking TRS (Call Barring)/Station Lockout security code.
4. Replace the handset or press the ON/OFF key.
To activate the Station Lockout feature for another extension
Lift the handset or press the ON/OFF key.
1.
2. Dial the Station Lockout Set for Another Extension feature code (defa ul t = 747
[HK/UK] or 747#).
3. Dial the extension number to activate station lockout.
4. Replace the hand set or press the ON/OFF key.
To cancel the Station Lockout feature for another extension
Lift the handset or press the ON/OFF key.
1.
ICX-35-750 ICX (International), issued March 1999 63
Page 64

5. Communicating Within Your Office
2. Dial the Station Lockout Cancel for Another Extension feature code (default =
748 (HK/UK) or 748#).
3. Dial the extension number to activate station lockout.
4. Dial the Walking TRS (Call Barring)/Station Lockout security code.
5. Replace the handset or press the ON/OFF key.
To change the Walking TRS/Station Lockout security code
1. Lift the handset or press the ON/OFF key.
2. Dial the Station Lockout Security Code change code (default = 749 [HK/UK] or
749#).
3. Dial the current Walking TRS (Call Barring)/Station Lockout security code.
4. Dial the new Walk ing TRS (Call Barring )/Sta ti on Locko ut secur ity cod e.
5. Replace the ha ndset or press the ON/OFF key.
64 ICX (International), issued March 1999 ICX-35-750
Page 65

6. USING ADDITIONAL FEATURES
The ICX provides a variety of additional features that you can use in your daily
work:
• MIC or MIC Key (page 65)
• Off-Hook Monitor (page 66)
• Handsfree Answerback and Operation (page 66)
• Voice Recognition (page 67)
• Flash Feature (page 67)
• Conference Calls (page 67)
• Background Music (page 68)
• Timed Reminders (page 69)
• Caller ID (page 69)
• Waking Class of Service (72)
• Using Directory Numbers (page 73)
• Using Zip Mode (page 76)
USING THE MIC KEY
You can use the MIC key on your phone or an FF key assigned as a MIC key to
mute the handset or microphone so that the party on the other end cannot hear you.
(The MIC indicator flashes when using handset mute and goes off when the
microphone is muted.)
Note: To use handset mute, you must assign an FF key as a Mute key.
To block outgoing audio using the MIC key
1. Pick up the handset o r p ress the ON/OFF key.
2. Dial the desired number.
3. To mute your conversation:
• Using the handset mute, press the MIC FF key.
• Using the microphone mute, press the MIC key.
4. To turn the mute function off:
ICX-35-750 ICX (International), issued March 1999 65
Page 66

6. Using Additional Features
• Using the handset mute, press the MIC FF key.
• Using the microphone mute, press the MIC key.
USING OFF-HOOK MONITOR
Off-Hook Monitor allows you to play a called or calling party’s voice through the
speaker on your phone, even if you are using the handse t. This allows a third party
to hear both sides of a conversation.
Note: Off-Hook Monitor does not activate your phone’s microphone. The party at
the other end will hear only audio transmitted through your handset.
To put a call on speaker
1. During a handset ca ll, pres s the ON/OFF key . (The o ther p arty is audibl e thro ugh
the speaker, but the handset is mute.)
2. Press the ON/OFF key again, to take the caller back off speaker and continue the
call through the handset.
USING HANDSFREE ANSWERBACK AND HANDSFREE OPERATION
You can answer intercom calls as well as access all available system features
without lifting the handset.
Note: To answer intercom calls withou t lifting the handset, the system must be
programmed for Voice Calling. You must press 1 during a call to switch from Tone
Calling to Voice Calling. (For more information, see Using Voice Recognition
below.)
To answer calls without lifting the handset
1. When the intercom call arrives, make sure the MIC LED is on. (If it is not lit,
press the MIC key to turn it on.)
2. Speak into the microphone to answer the call.
To use system features without lifting the handset
1. Press the ON/OFF key.
66 ICX (International), issued March 1999 ICX-35-750
Page 67

6. Using Additional Features
USING VOICE RECOGNITION
With the installation of additional hardware, you can use verbal commands to dial
extensions, speed dial nu mbers, and access various phone features.
Note: This feature requires system programming and addition hardware (VB-44224
Telephone and VM-44101 Voice Recognition Adaptor). For more information, see
your system administrator or ICX dealer.
USING THE FLASH FEATURE
You can send a signal to your phone to release an outside line by pressing the FL/R
key or the PROG key. Once you press either key, your phone will either reseize the
same outside line or switch to extension dial tone status.
Note: This feature requires system programming. For more information, see your
system administrator or ICX dealer.
MAKING CONFERENCE CALLS
You can use your phone to create conference calls that include up to three parties.
(With the installation of an optional 8-party conference card, you can include up to
eight parties.)
Notes:
• When no optional conference card is installed, the System supports the
following types of 3-party conference calls :
• 3 extensions
• 2 extensions and 1 ou tside line
• 1 extension and 2 outside lines
• When the optional 8-party conference card is installed, the System supports
any combination of conference calls, except all outside lines.
The Version 3.0 software release allo ws an y co m bi na tio n of ex tens io ns an d trunk
lines be in the conference as long as the original extension is in the conference and
the total number of par ties does not exceed 8. With Version 3.0 software, only one
operation is used to establish and add to a conference. You simply have to place the
current call on hold, dial the next party and press the CONF key. No different
operation or access code is required to add additional parties to the call.
To establish a conference call
1. While on a call, press the HOLD key or the outside line key you are using.
2. If adding an outside party, press a vacant trunk key or dial a trunk access code.
ICX-35-750 ICX (International), issued March 1999 67
Page 68

6. Using Additional Features
3. Dial the number of the party you want to add to the call.
4. Press the CONF key when your call is answered. (You are connected to the
called party.)
5. To add another party repeat steps 1-4.
6. For 3-party Conference Call Only:
T o release a conference member, press PROG + 1 to release conference member
1 or press PROG + 2 to release conference member 2, etc.
Note: The conference member numbers are shown on the display.
7. To drop out of the conference call, hang up.
To establish a two party private conversation from a 3-party
conference (Version 3.5 and higher)
1. While on a call, press the CONF + 1 (2) to have a private conversa tio n wi th the
CNF 1 (2) party.
2. To reestablish the conference, press CONF.
To remove a busy tone (hang up) from an 8-party conference
(Version 3.5 and higher)
1. During an conference with more than 3 parties, press CONF + (n) (where n is the
number 1-8 for the conference parties) to individually select a conference party.
2. If you did not select the conference party that is giving busy tone, re-enter the
conference by pressing CONF.
3. If you selected the conference party that is giving busy tone, hang up and then go
off-hook again and press CONF to re-enter the conference call.
To drop out of a conference call
Note: If the originating party hangs up, all conference calls will be terminated.
1. Hang up or press the FL/R key or the ON/OFF key.
CONTROLLING BACKGROUND MUSIC
If your system is set up with a music source, you can play music over the speaker of
your phone. (If Music On Hold is provided with your system, callers will
automatically hear music when you place them on hold.)
68 ICX (International), issued March 1999 ICX-35-750
Page 69

6. Using Additional Features
To turn background music on or off
1. Pick up the handset or press the ON/OFF key.
2. Enter the Background Music cod e (default = *30).
3. Replace the handset or press the ON/OFF key.
Note: On a large-display phone, you can turn background music on or off by
pressing the BGM soft key while in the Function System menu.
USING TIMED REMINDERS
You can program your phone to act as an alarm clock and alert you at a desi gnated
time with an audible tone.
To set a timed reminder (reminder alarm)
1. Pick up the handset o r p ress the ON/OFF key.
2. Enter the Timed Reminder Set code (default = *31).
3. Enter the time, in 24 hour form a t, y ou wa nt the time d remin der (ala rm ) to sou nd.
(For example, 0100 = 1:00 am, 1300 = 1:00 pm)
4. Replace the handset or press the ON/OFF key.
To cancel a timed reminder
1. Pick up the handset or press the ON/OFF key.
2. Enter the Cancel Timed Reminder code (default = *39).
3. Replace the handset or press the ON/OFF key.
USING CALLER ID
When the Caller ID feature is activated, your teleph on e di splays Cal ler ID
information as incoming calls ring at your extension. You also have access to
previous call information via the Caller ID Call Log feature.
Caller ID Call Log
Note: This feature requires system programming or a specific ICX configuration,
and may not be available. For information, see your system administrator or ICX
dealer.
ICX-35-750 ICX (International), issued March 1999 69
Page 70

6. Using Additional Features
The Call Log keeps a record of Caller ID calls that ring your phone. You can access
this log by assigning an FF key to flash when there is a new entry in the log. When
you press the key to access the log , the LED turns off.
Each Call Log entry includes the following call information:
• Calling number
• Calling name (if provided)
• Time and date
• How the call was answered
• How the call was routed.
Call Log Operation for a Small-display Phones
You can view both the calling number information as well as the detailed
information on each e ntry. In addition, you can outdial th e display ed number or store
the displayed number in a personal speed dial bin.
To view, dial or store the call log entry for a small-display
1. Go off-hook or press ON/OFF .
2. Dial the Call Log feature code (default = CONF 96)
The following displays:
Call Result
(blank) - Answered
- Calling Party
Hung Up
###4:####0$5#####:HG###############43=67#
01:2015553678
Time and Dat e
of Call
Calling Number
- Answered by
Someone Else
Call Log Entry Number (01 - 10)
3. Press # to move forward in the call log and press * to move back in the call log.
4. To outdial the displayed call log number,
Press the left EXEC key to outdial a leading digit (d ial 9 or 0 [T aiwan, Indonesia,
Malaysia]), dial the add digits (usually 1, only in the USA), and dial the
displayed caller ID number.
OR
70 ICX (International), issued March 1999 ICX-35-750
Page 71

6. Using Additional Features
Press the right EXEC key to outdial a leading digit (usually 9 [UK/HK] or 0
[Taiwan, Indonesi a, or Malaysia]) and dial the dis pl ay e d calle r ID nu m ber.
5. To store the displayed call log number in a personal speed dial bin,
Press the PROG key , the speed dial bin number (80-90) and press the left EXEC
key to dial the add digits (usual ly an area code) and press the HOLD key.
OR
Press the PROG key, the speed dial bin number (80-90), press the right EXEC
key, and press the HOLD key.
6. To exit the Call Log, go on hook or press ON /OFF.
Call Log Format for the Large-Display Phone
You can view both the calling number information as well as the detailed
information on each e ntry. In addition, you can outdial th e display ed number or store
the displayed number in a personal speed dial bin.
To view, dial or store call log entry for a large-display phone
1. Go off-hook or press ON/OFF .
2. Dial the Call Log feature code (default = CONF 96).
The following displays:
Call Result
(blank) - Answered
- Calling Party
Hung Up
- Answered by
Someone Else
3. Press # to move forward in the call log and press * to move back in the call log.
4. Press NEXT to view the next 5 calls and PREV to view the previous 5 calls.
ICX-35-750 ICX (International), issued March 1999 71
:
Call Log Entry Number (01 - 10)
###4:####0$5#####:HG#############43=67#
01:2015553678 Calling Number
01:2015553678
02:2015554444
03:2015553456
04:4045554321
05:4045557654
Time and Date
of Call
Page 72

6. Using Additional Features
5. To outdial the displayed call log number,
Press the left soft key to outdial a leading digit (dial 9 [UK/HK] or 0 [Taiwan,
Indonesia, Malaysia]) dial add digits (usually 1 in the USA), and dial the
displayed caller ID number.
OR
Press the right soft key to outdial a leading digit (dial 9 [UK/HK] or 0 [Taiwan,
Indonesia, Malaysia]) and dial the displayed caller ID number.
6. To store the displayed call log number in a personal speed dial bin,
Press the PROG key, the speed dial bin number (80-90), and press the l
key to dial the add digits (usual ly an area code) and press the HOLD key.
OR
Press the PROG key, the speed dial bin number (80-90), press the right soft key
and press HOLD.
7. To exit the Call Log, go on hook or pre ss ON/OFF.
eft soft
WALKING TRS (CALL BARRING) CLASS OF SERVICE
Walking Toll Restriction Service (TRS) (Call Barring) Class of Service (COS)
allows you to use your own calling privileges at anothe r phone. For example, you
may be allowed to make long-distance calls from your phone, but a phone in your
company’s warehouse may be restricted from long-distan ce calls.
To make long-distance calls from the restricted phone, you can go to that phone and
enter a Walking TRS (Call Barring) COS code before dialling the number.
Notes:
• Before using this feature, a Walking TRS (Call Barring) COS must be
assigned for your phone by the system administrator of ICX dealer.
• The same Wa lking TRS (Call Barring) COS code may be used by more than
one extension.
To use a Walking TRS (Call Barring) COS code
1. From an extension other than your own, pick up the ha ndset or press the ON/
OFF key.
2. Enter the Walking TRS (Call Barring) access code (default = 87).
3. Dial your extension num be r.
4. Enter your Walking TRS (Call Barring) COS code.
72 ICX (International), issued March 1999 ICX-35-750
Page 73

6. Using Additional Features
5. Press the # key.
6. Access an outside line.
7. Dial the phone number.
The Walking TRS (Call Barring) COS will remain in effect until you hang up.
USING DIRECTORY NUMBERS
A Directory Number (DN) allows extension numbers to be used on a key basis. The
same DN may be assigned to multiple keys on the same telephone and to keys on
other telephones.
When a telephone’s extension number is assigned to a key on the same tele ph on e, it
is considered a Primary Directory Number (PDN). Up to three appearances of the
PDN may be assigned to keys on a key telephone. This allows for multiple calls on
the same Directory Number.
When a DN is assigned to an FF key on another telephone, it is considered a NonPrimary Directory Number (NPDN). Up t o t hree NPDN appearances of the same
DN may be assigned to keys on a telephone. This allows calls to the DN to appear
on multiple telephones. The calls ring in on a specified basis - immediate, delayed,
or no-ring.
A telephone may only have one PDN (on up to three keys) but may have multiple
NPDNs with up to three appearances of any one NPDN.
ICX-35-750 ICX (International), issued March 1999 73
Page 74

6. Using Additional Features
Figure 19. Example Directory Number assignments for Extension 200
When a caller originates a call, the call appears on the first available PDN key. If all
PDNs are unavailable, the call will select the INT LED.
When calls come in to a DN, the call appears on the first available DN key. If the
call is to your PDN and no PDN key is available, the call appears on the INT LED.
Directory numbers may be assigned to FF keys 25-32. These are non-appearing
keys.
Intercom voice calls only go to the PDN extension but light the corresponding
NPDN keys red. A tone call follows the appropriate ring status (immediate ring,
delayed ring, etc. ) for any extension.
To originate a call
1. Lift the handset or press the ON/OFF key.
2. If dialing an outside call, dial the outside line group access code (9 [UK/HK], 0
[Taiwan, Indonesia, Malaysia], o r 81-84).
3. Dial the phone number or extension number.
74 ICX (International), issued March 1999 ICX-35-750
Page 75

6. Using Additional Features
To receive a call to a directory number (PDN or NPDN)
1. If ringing, go off -hook or press the gree n blinking PDN or NPDN key.
If not ringing, press the red blinking PDN or NPDN key.
To originate a call using a non-primary directory number
1. Lift the handset or press the ON/OFF key.
2. Press the desired NPDN key.
3. If dialing an outside call, dial the outside line group access code (9, 0 [Taiwan,
Indonesia, or Mala ys ia ], 81-84).
4. Dial the phone number or extension number.
To receive a call using a non-primary directory number
1. Lift the handset or press the ON/OFF key.
2. Press the desired NPDN key.
To call a primary directory number extension (NPDNs not
called)
1. Lift the handset or press the ON/OFF key .
2. Dial the Direct Call to PDN access code (default = 766 [HK/UK] or 76 6# ) or
press the Direct Call to PDN key.
3. Dial the extension number.
To transfer a call to the primary directory number extension
(NPDNs not called)
1. Place the current call on hold.
2. Dial the Direct Call to PDN access code (default = 766 [HK/UK] or 766#) or
press the Direct Call to PDN key.
3. Dial the extension number.
4. If desired, wait until the PDN Extension answers and introduce the call.
5. Hang up.
ICX-35-750 ICX (International), issued March 1999 75
Page 76

6. Using Additional Features
USING ZIP MODE
The Zip mode feature ( CPC versi on 3.5 or hig her) auto matically answers ca lls when
operating a Key Telephone in headset mode.
To enter or cancel Zip mode
1. Press the ON/OFF key.
2. Press the PROG key and dial 80.
OR
Press the ZIP key.
3. Press the ON/OFF key.
76 ICX (International), issued March 1999 ICX-35-750
Page 77

Appendix A. Dial Code List
This appendix summa rizes the most common ly used dial codes. Additiona l featu res
may be programmed as described in Section 700 - Featu re Operation.
The table includes the following information:
• Function - Lists the name of the function or feature
• Fixed Dial Code - This dial code is hard-coded and cannot be changed.
• Flexible Dial Code - This d ial code can be used as a default or it can be
customized.
• Customised Dial Code - This dial cod e is customised by the system
programmer.
Notes:
• Fixed dial codes and flexible dial codes require different procedures. Be sure
to determine which dial codes your system uses to ensure the use of the
appropriate procedure for a specific task.
• Default dial codes use the same procedures as flexible dial codes.
Table 9. Dial Code Table
Function Fixed Dial Code
Account Codes *57 8#
Alarm Set *22 *31
Alarm Clear *23 *39
Answer Key *69
Background Music Set/
Cancel
BLF/DSS Outgoing 9 + extension number
BLF/DSS Immediate Ring 81 + extension number
BLF Delayed Ring 82 + extension number
BLF/DSS No Ring 83 + extension number
Busy Override Set *53
Call Forward (All Calls): Set 70 + extension number
Call Forward (All Calls):
Cancel
Call Forward ( All Ca lls ): Set
from another ext.
ICX-35-750 ICX (International), issued March 1999 77
(REDIAL + )
*24 *30
*09 701 (HK/UK) or 701#
*10 741 (HK/UK) or 741#
Flexible Dial Code Customized
721 (HK/UK) or 721#
+ extension number
+ extension number
Dial Code
Page 78

Dial Code
Flexible Dial Code Customized
(REDIAL + )
*11 751 (HK/UK) or 751#
*21 7**
Function Fixed Dial Code
Call Forward (All Calls):
Cancel from another ext.
Call Forward (All/Busy/No
Answer/DND): Clear (Prior
to Ver 3.0)
Call Forward (All/Busy/No
Answer/DND and Absence
Message): Clear (Ver 3.0 and
Appendix A. Dial Code List
higher)
+ extension number
+ extension number
*16 742 (HK/UK) or 742#
Call Forward (Busy): Set 72 + extension number 72 2 (HK/UK) or 722 #
Call Forward (Busy): Cancel *15 732 (HK/UK) or 732#
Call Forward (Busy): Set
from another ext.
+ extension number
+ extension number
+ extension number
+ extension number
*17 752 (HK/UK) or 752#
71 + extension number 72 3 (HK/UK) or 723 #
*12 733 (HK/UK) or 733#
*13 743 (HK/UK) or 743#
*14 753 (HK/UK) or 753#
Call Forward (Busy): Cancel
from an other ext.
Call Forward (No Answer):
Set
Call Forward (No Answer):
Cancel
Call Forward (No Answer):
Set from another ext.
Call Forward (No Answer):
Cancel from another ext.
Call Park Hold/Answer *63
*65 772
*66 773
Call Park Hold *64 771
Call Park Answer (Own
Ext.)
Call Park Answer (0ther
*31 701 (HK/UK) or 701#
Ext.)
Call Park Transfer *67 774
Call Pickup Group (All
Calls)
703 (HK/UK) or 703#
*32 702 (HK/UK) or 702#
*33 + (call pickup
group 1-99)
Call Pickup Group (CO
Calls only)
Call Pickup Group
(designated)
Call Pickup - Direct Trunk *34 *0
Callback at Busy Tone *49 N/A N/A
Camp-on at BusyTone *50 N/A N/A
Conference Key *36
78 ICX (International), issued March 1999 ICX-35-750
Page 79

Appendix A. Dial Code List
Dial Code
Flexible Dial Code Customized
Function Fixed Dial Code
(REDIAL + )
# + (zone number)
*25 760 (HK/UK) or 760#
Day1/Night Toggle (Prior to
Ver 3 .0)
Day 1/Day 2/Night Toggle
(Ver 3.0. and higher)
Day2 *26 761 (HK/UK) or 761#
Direct Call Pick-Up 73 + extension number 704 (HK/UK) or 704 #
*41
DND: Set/Cancel *18 720 (HK/UK) or 720#
Extension Call Extension number N/A N/A
Extension Directory Name
*04 *9
Assignment
Recall/FL/R Key *39
Floating Hold: Answe r Ca ll
Park Pickup (Ver 3.0 and
higher)
Headset Mode *35
*07 *5
Meet-Me Answer *30 ##
Message W aiting (Callback):
*51
*55
Cancel
Message Waiting (Callback) *08 *6
Message Waiting Set at Busy
Tone
Message Waiting Set at
Ringback Tone
*28 763 (HK/UK) or 763#
Night 1 *27 762 (HK/UK) or 762#
Night 2 (for Built-In Voice
Mail messages)
Off-Hook Voic e Announce *70
number)
Paging *29 + (page group
Program Key *38
PSD Name Assignment *40 N/A
Release K ey *68
*42
*22 *31
*23 *39
Speed Dial Send *01 80
Split Key *71
System Sp eed Dial Name
Assignment
Timed Reminder (alarm) -
Set
Timed Reminder (alarm) -
Cancel
ICX-35-750 ICX (International), issued March 1999 79
Page 80

Dial Code
Flexible Dial Code Customized
(REDIAL + )
Number
Number
Function Fixed Dial Code
Tone/Voice Switch *54 N/A
Transfer Key *37
Variable Mode *61
Voi ce Ma il Transfer Key 1 74 + Extension
Voi ce Ma il Transfer Key 2 75 + Extension
Appendix A. Dial Code List
Walking TRS Key *72
*#01 746 (HK/UK) or 746#
*#02 747 (HK/UK) or 747#
*#03 748 (HK/UK) or 748#
*#04 749 (HK/UK) or 749#
Note: The following feature keys were added with version 3.0
Station Lockout Set (Own
Ext.)
Station Lockout Set (Other
Ext.)
Station Lockout Cancel
(Other Ext.)
Walking TRS (Call Barring)/
Station Lockout Security
Code Change
Callback Cancellatiion *58 769 (HK/UK) or 769#
Zip Mode On/Off (toggle) *73 Version 3.5 and higher
Direct Call to a PDN Ext. *74 766 (HK/UK) or 766#
UNA Pickup *77 705 (HK/UK) or 705#
(Version 3.5 and
higher)
*79 767 (HK/UK) or 767#
Absence Message Code *78 729 (HK/UK) or 729#
Network Flash during Talk
on FF-Key
PDN #1 Key 01
PDN #2 Key 02
PDN #3 Key 03
NPDN #1 Key 01 + (Ext No. 0-9999)
NPDN #2 Key 02 + (Ext. No. 0-9999)
NPDN #3 Key 03 + (Ext. No. 0-9999)
ACD-1 Wrap Key *#83 Version 3.5 and higher
0-9)
ACD-21 Wrap Key *#883 Version 3.5 and higher
Text Message Send *75 + (Msg Code No.
80 ICX (International), issued March 1999 ICX-35-750
Page 81

Appendix A. Dial Code List
Flexible Dial Code Customized
Function Fixed Dial Code
Dial Code
(REDIAL + )
0-9)
Text Message Reply *76 + (Msg Code No.
Login Key for CTAPI *#90 Ve r sion 3.5 and higher
ICX-35-750 ICX (International), issued March 1999 81
Page 82

Appendix A. Dial Code List
This page intentionally left blank.
82 ICX (International), issued March 1999 ICX-35-750
Page 83

Appendix B. Customized PSD Bin Numbers
This appendix contains a tab le for documenting the Personal Speed Dial (PSD)
numbers that you assign to PSD bins on non-display phones. When making changes
to PSD numbers, be sure to record the change in this following table.
Table 10. Customised PSD numbers (assigned to PSD bins)
PSD Bin
Number PSD Number PSD Name
80
81
82
83
84
85
86
87
88
89
90
91
92
93
94
95
96
97
98
99
ICX-35-750 ICX (International), issued March 1999 83
Page 84

Appendix B. Customized PSD Bin Numbers
This page intentionally left blank.
84 ICX (International), issued March 1999 ICX-35-750
Page 85

Index
Numerics
Conference call 67, 68
A
Absence Message
assigning 62
Absence Messages 61
Accessing an outside line 35
using an FF key 35
using an outside line access code 35
Account Codes
using 36
Account codes
entering non-verfied codes
before making a call 36
during a call 37
entering verfied ID codes 37
Non-verfied 36
Verfied ID codes 37
Additional Features
using 65
Adjusting
display 21
display contrast 22
sound 21
Alarms
cancelling timed/reminder 69, 70, 71,
72, 73, 74, 75, 76
setting timed/reminder 69
timed/reminder 69
Announcement to busy extension
answering 54
transferring calls with 55
Ansence Messages
cancelling 62
Answering
announcement to busy extension 54
off-hook voice announcement 54
Answering a message waiting/callback
request 60
Answering calls 43
a call ringing a phon e outside your
extension group 43
a call ringing a phon e w ith in your
extension group 43
a call ringing someone else’s phone 43
an external call ringin g a ph o ne with in
your extension group 43
handsfre e 66
Answering page from any extension 53
Assigning
feature code
to one-touch key 24
PSD names to PSD number
large-display phone 30
PSD names to PSD numbers
small-display phone 30
PSD numbers
to one-touch or sof t keys 26
SSD number
to one-touch key 24
Assigning names to PSD numbers 29
large-display example 32
small-display example 31
Assigning PSD names 29
Assigning PSD numbers 25
Assigning SSD Numbers 28
Auto-Redial 37
B
Background music 68
turning on/off 69
Blocking outgoing audio
mute key 65
Breaking into an outside call 55
Broker’s hold
Toggling between two calls 44
Busy outside line 36
ICX-35-750 ICX (International), issued March 1999 97
Page 86

Index
Busy override, using 55
C
Call forward
all incoming calls 56
all incoming calls to a busy extension
56
Call Forwarding
cancelling 57, 59
using 55
Call hold
broker’s ho ld 44
floating hold key 44
holding calls 44
using broker’s hold 44
retrieving 44
from a different extension than the
one that placed call on hold 45
from broker’s hold 45
from extension that placed call on
hold 44
using 44
Call transfer
to a busy extension 46
Call Waiting
answering a call waiting signal 59
automatically camping on a line 59
manaually camping on a line 58
receiving text message 58
sending text messages 57
using 57
Callback messages 59
responding to a callback request 60
sending a callback request 60
Callback request
busy outs ide line 36
cancel 36
Calling Forwarding
setting up 55
Calling other extensions 51
entering extension number 51
using soft key
large-display phone 52
using soft keys
small-display phone 51
Camp-on
answering a call waiting signal 59
leaving text message 59
receiving text message 58
replying to a text message 59
sending text messages 57
using 57
using automatic camp-on 59
using manual camp-on 58
cancelling
alarms - timed/reminder 69, 70, 71, 72,
73, 74, 75, 76
automatic redial 38
call forwarding 57, 59
DND 57, 59
Chaining/linking
SSD numbers
to PSD bin 29
using assigned PSD key 29
Chaining/linking SSD numbers 28
Changing modes (display)
large-display phone 17
small-display phone
Displaying a directory
small-display phone 13
Checking speed dial numbers 40
entering speed dial bi n number 41
using soft keys
large-display phone 41
small-display phone 40
Communicating within your office 51
Conference calls
3-party 67
8-party 67
dropping out of 68
establishing a 2-party private
98 ICX (International), issued March 1999 ICX-35-750
Page 87

Index
conversation 68
establishing a 3-p a r ty ca ll 67
making 67
Conference callsremoving a busy tone
from an 8-party conference 68
D
Deleting
PSD names assigned to PSD numbers
32
PSD numbers
assigned to one-touch or soft keys
28
Deleting names a ssign ed to PSD nu mbers
32
Deleting PSD Names 29
Deleting PSD Numbers 25
Dial code list 77, 83
Dialling speed dial numbers 38
entering speed dial bin number 40
using one-touch ke ys 38
using soft keys
large-display ph on e 39
small-display phone 39
Direct outside line key 35
Directory Numbers
calling a primary director y nu m ber
extension (NPDNs not
called) 75
originating a call 74
originating a call using a non-primary
directory number 75
receiving a call to a directory number
75
receiving a callusing a non-primary
directory number 75
transfering a call to the primary
directory number
extension (NPDNs not
called) 75
Display
contrast adjustment 22
large 15
small 11
Display Information
large-display ph on e 18
Displaying a directory
large-display ph on e 17
Do-Not-Distrub (DND)
cancelling 61
setting up 61
Do-Not-Disturb
cancelling 57, 59
Do-not-disturb (DND)
using 61
E
Entering speed dial numbers
to check SSD entries 41
to dial speed dial number s 40
Establishing a 2-party private
conversation 68
F
FF key
accessing an outside line 35
direct outside line 35
feature codes 77, 83
Flash feature 67
Floating hold key 44
H
Handling incoming calls 43
Handsfree answerback/operation
answering calls 66
using 66
using system features 66
I
In-office communications 51
Internal
ICX-35-750 ICX (International), issued March 1999 99
Page 88

Index
communications 51
tone/voice switching 52
L
Large-display phone 15
Linking/chaining
SSD numbers
to PSD bin 29
using assigned PSD key 29
Linking/chaining SSD numbers 28
Locking Your Extension 63
M
Meet-Me Answer 53
Message waiting 59
responding to a callback request 60
sending a callback request 60
Monitor, off-hook 66
Music
background 68
Mute key
blocking out going audio 65
using 65
N
Non-verfied account code
entering before making a call 36
entering during a call 37
Non-verfied account codes 36
O
Off-hook monit or
putting a call on speaker 66
using 66
Off-hook voice announcement
answering 54
transferring calls with 55
One-touch key s
assigning a feature code 24
assigning an SSD number 24
checking 24
progamming for outside p hone numbe r
23
setting up 23
Outside call
breaking into 55
Outside calls
placing 35
Outside line access code 35
Outside line key, direct 35
P
Paging
answering from any extension 53
meet-me an s w e r 53
using 53
Personal Speed Dial (PSD)
assigning PSD names to PSD number
large-display phone 30
small-display phone 30
assigning PSD numbers
to one-touch keys 26
deleting PSD names assigned to PSD
number 32
deleting PSD numbers
assigned to one-touch keys 28
Personal Speed Dial (PSD) keys
that link multiple speed dial numbers
29
Personal Speed Dialling (PSD)
assigning names 29
assigning numbers 25
deleting names 29
deleting numbers 25
Placing outside calls 35
accessing an outside line 35
R
Redial
Auto 37
Redialling
automatically redia lling a bu sy number
100 ICX (International), issued March 1999 ICX-35-750
Page 89

Index
38
cancelling automatic redial 38
last outside numbe r dialled 37
Redialling outside numbers 37
Reminder alarm 69
cancelling 69, 70, 71 , 72, 73, 74, 75, 76
setting 69
Removing a busy tone 68
Retrieving calls on hold 44
S
Sending a message w aiting/callback
request 60
Setting up
3-party conference call 67
alarms - timed/reminder 69
call forwarding 55
forwarding all incoming calls 56
forwarding all incoming calls th at
ring busy extension 56
DND 61
one-touch keys 23
speed dialling 25
telephone 21
Small-display phone 11
Speaker phone
putting a call on 66
Speed dial numbers
dialling 38
entering speed dial bin number 40
using one-touch ke ys 38
using soft keys
large-display ph on e 39
small-display phone 39
Speed dialling
checking numbers 40
entering speed dial numbers 41
using soft keys on large-display
phone 41
using soft keys on small-display
phone 40
setting up 25
Station Lockout 63
Activating 63
activating for another extension 63
cancelling 63
cancelling for another ex tens io n 63
changing security code 64
Supervised call transfer 45
to another extensio n or o utside numb er
45
Switching from tone to voice calling 52
System Speed Dial (SSD)
chaining/linking
to PSD bin 29
using assigned PSD key 29
chaining/linking numbers 28
System Speed Dial (SSD) Numbers
Assigning 28
T
Telephone
large-display 15
parts 9
setting up 21
small-display 11
Timed reminder
cancelling 69, 70 , 71 , 72 , 73, 74, 75, 7 6
setting 69
Timed reminders 69
Tone calling 52
Transfering calls
supervised transfers 45
to a busy extension 46
unsupervised transfers 46
Transferring
with announceme nt to bu sy ex te ns io n
55
with off-hook voice announce 55
Transferring calls 45
U
Understanding your phone 9
ICX-35-750 ICX (International), issued March 1999 101
Page 90

Index
Unsupervised call transfer 46
to another extension or outside number
46
V
Verbal commands 67
Verfied ID codes 37
Voice calling 52
Voice recognition 67
Volume
handset 21
receiver 21
ringer 21
speaker 21
W
Walking TRS (Call Barring)/Station
Lockout
changing security code 64
Z
Zip Mode
using 76
102 ICX (International), issued March 1999 ICX-35-750
 Loading...