

Page 1
Automatic Bread Maker
OPERATING INSTRUCTIONS AND RECIPES (Household Use)
Brotbackautomat
BEDIENUNGSANLEITUNG UND REZEPTE (Hausgebrauch)
Automatische Broodbakoven
GEBRUIKSAANWIJZING EN RECEPTEN (voor huishoudelijk gebruik)
Machine à pain automatique
NOTICE D’UTILISATION ET RECETTES (usage domestique)
Macchina per pane automatica
ISTRUZIONI D’USO E RICETTE (utilizzo domestico)
Máquina panificadora automática
INSTRUCCIONES DE FUNCIONAMIENTO Y RECETAS (uso doméstico)
Model No./Modell Nr./Modelnr.
Modèle n°/Modello n°/N.° de modelo
SD-ZB2502
Deutsch NederlandsEnglish Français Italiano Español
Importer’s name & address pursuant to the EU GPSD
directive 2001/95/EC/Art.5
Panasonic Marketing Europe Gmbh
Hagenauer Str.43 65203 WiesbadenF.R.Germany
Panasonic Corporation
Web Site: http://panasonic.net
DZ50B165
F0311S0
Printed in China
↨
Page 2
Contents
Thank you for purchasing this Panasonic product.
Please read these instructions carefully before using this
product and save this manual for future use.
This product is intended for household use only.
Wir danken Ihnen für den Kauf dieses Panasonic-Produkts.
Bitte lesen Sie diese Bedienungsanleitung vor der
Verwendung dieses Produktes sorgfältig durch und bewahren
Sie dieses Handbuch für zukünftige Konsultationen auf.
Dieses Produkt ist nur für Haushaltsgebrauch vorgesehen.
Hartelijk dank voor uw aankoop van een Panasonic product.
Gelieve deze gebruiksaanwijzing zorgvuldig te lezen alvorens
dit apparaat in gebruik te nemen en deze handleiding te
bewaren zodat u deze ook in de toekomst kunt raadplegen.
Dit product is alleen bestemd voor huishoudelijk gebruik.
Nous vous remercions d’avoir choisi ce produit Panasonic.
Veuillez lire cette notice soigneusement avant d’utiliser ce
produit et conservez-la pour toute utilisation future.
Ce produit est destiné aux particuliers uniquement.
Inhalt
Inhoud
Table des matières
Before Use
Safety Instructions ········································································5
Accessories/Parts Identification ···················································· 8
Bread-making Ingredients ··························································10
How to Use
List of Bread Types and Baking Options ····································12
Baking Bread ··············································································14
When adding extra ingredients ···················································16
Baking Brioche ···········································································17
Making Dough ············································································18
Making Brioche Dough ······························································· 19
Baking Cake ··············································································· 20
Making Jam ················································································ 21
Making Compote ········································································22
Recipes
Bread Recipes ············································································23
Dough Recipes ···········································································25
Cake Recipe ···············································································25
Gluten Freee Recipes·································································26
AVEVE Recipes ·········································································· 27
Jam Recipes ···············································································29
Compote Recipes ·······································································30
Vor der Inbetriebnahme
Sicherheitshinweise ···································································· 37
Schematische Ansicht des Gerätes ············································40
Zutaten der Brotherstellung ························································42
Bedienung
Liste von Brotarten und Backoptionen·······································44
Brot backen ················································································46
Bei Zugabe zusätzlicher Zutaten ················································48
Brioche backen ··········································································· 49
Herstellung von Teig ··································································· 50
Mischen von Brioche-Teig ··························································51
Kuchen backen ··········································································· 52
Kochen von Marmelade······························································53
Kochen von Kompott ·································································· 54
Rezepte
Brot Rezepte···············································································55
Aurora Brotbackmischnugen Rezepte ········································ 58
Glutenfreie Rezepte····································································59
Teig Rezepte ···············································································60
Kuchen Rezepte ·········································································61
Marmeladenrezepte····································································62
Kompottrezepte ·········································································· 62
Voor gebruik
Veiligheidsinstructies ··································································69
Accessoires/Onderdelen·····························································72
Ingrediënten voor het maken van brood ····································· 74
De machine gebruiken
Lijst met broodsoorten en bakopties···········································76
Brood bakken ·············································································78
Extra ingrediënten toevoegen·····················································80
Brioches bakken ·········································································81
Deeg maken ··············································································· 82
Briochedeeg maken····································································83
Cake bakken···············································································84
Jam maken ·················································································85
Compote maken ········································································· 86
Recepten
Brood Recepten··········································································87
Deeg Recepten···········································································89
Cake Recept ··············································································· 89
Glutenvrije Recepten ··································································90
AVEVE Recepten ········································································ 91
Jamrecepten ··············································································· 93
Compoterecepten ·······································································94
Avant l’utilisation
Consignes de sécurité ······························································101
Description de la machine à pain et des accessoires···············104
Ingrédients pour la fabrication du pain ·····································106
Mode d’emploi
Liste des types de pains et des options de cuisson ·················108
Cuisson du pain ········································································ 110
Ajout d’ingrédients en cours de pétrissage ······························· 112
Cuisson de la brioche ······························································· 113
Préparation de pâtes ································································ 114
Faire de la pâte à brioche ························································· 115
Cuisson de gâteaux ································································· 116
Faire de la confiture ·································································· 117
Faire de la compote ·································································· 118
Recettes
Recettes de pain······································································· 119
Recettes de pâtes·····································································121
Recette de gâteaux ··································································121
Recettes sans gluten ································································122
AVEVE Recettes ·······································································123
Recettes de confiture································································125
Recettes de compotes ······························································ 126
Deutsch NederlandsEnglish Français
How to Clean
Care & Cleaning ········································································31
To Protect the Non-stick Finish
To protect the non-stick finish ····················································32
Troubleshooting
Troubleshooting ·········································································33
2 3
Reinigung
Pflege & Reinigung ····································································· 63
Schutz der Antihaftbeschichtung
Schutz der Antihaftbeschichtung ················································64
Fehlerbehebung
Fehlerbehebung ·········································································65
De machine schoonmaken
Onderhoud & Reiniging ······························································ 95
Om de antiaanbaklaag te beschermen
Om de antiaanbaklaag te beschermen·······································96
Problemen oplossen
Problemen oplossen ··································································· 97
Nettoyage
Entretien & Nettoyage ·····························································127
Pour protéger le revêtement antiadhésif
Pour protéger le revêtement antiadhésif ··································128
Problémes et solutions
Problémes et solutions ····························································· 129
Page 3
Indice
Grazie per aver acquistato questo prodotto Panasonic.
Leggere attentamente le presenti istruzioni prima dell’utilizzo
del prodotto e conservare il manuale per riferimento futuro.
Questo prodotto è destinato esclusivamente a un uso
domestico.
Gracias por comprar este producto Panasonic.
Lea atentamente estas instrucciones antes de usar el
producto y guarde este manual para futuras consultas.
Este producto se ha diseñado exclusivamente para un uso
doméstico.
Índice
Safety Instructions
Please make sure to follow these instructions.
Prima dell’utilizzo
Istruzioni per la sicurezza ·························································133
Accessori/Identificazione delle parti··········································136
Ingredienti per la preparazione del pane ··································138
Modalità d’uso
Elenco dei tipi di pane e opzioni di cottura ······························· 140
Cottura del pane ·······································································142
Aggiunta di ulteriori ingredienti ················································· 144
Cottura di brioche ····································································· 145
Preparazione dell’impasto ························································ 146
Preparazione dell’impasto per brioche ····································· 147
Cottura di torte ·········································································· 148
Preparazione di marmellate······················································149
Preparazione di composte ························································ 150
Ricette
Ricette per pane ······································································· 151
Ricette per impasti ···································································· 153
Ricetta per torte ········································································153
Ricette per composti privi di glutine ·········································· 154
Ricette AVEVE ··········································································155
Ricette per marmellate ·····························································157
Ricette per composte································································158
Antes del uso
Instrucciones de seguridad·······················································165
Identificación de accesorios/piezas ··········································168
Ingredientes para hacer pan·····················································170
Modo de uso
Lista de tipos de pan y opciones de cocción ····························172
Cocción del pan ········································································ 174
Cuando se añaden ingredientes adicionales····························176
Cocer Brioche ··········································································· 177
Hacer masa ·············································································· 178
Hacer masa para brioche ························································· 179
Cocer pasteles··········································································180
Hacer mermelada ·····································································181
Hacer compota ········································································· 182
Recetas
Recetas de pan ········································································183
Recetas de masa······································································185
Receta de pasteles ··································································· 185
Recetas sin gluten ····································································186
Recetas AVEVE ········································································187
Recetas de mermelada ····························································189
Recetas de compota·································································190
In order to prevent accidents or injuries to the user, other people, and damage to property, please follow the instructions
below.
English
The following charts indicate the degree of damage caused by wrong operation.
Warning:
death.
Indicates serious injury or
Caution:
Indicates risk of injury or
property damage.
The symbols are classified and explained as follows.
This symbol indicates prohibition.
This symbol indicates requirement that must be
followed.
Warning
Do not use the appliance if the power cord or power plug is damaged or the power
plug is loosely connected to the power outlet.
(It may cause an electric shock, or fire due to short circuit.)
If the supply cord is damaged, it must be replaced by the manufacturer, its service agent or similarly qualified
person in order to avoid a hazard.
Pulizia della macchina
Conservazione e pulizia ···························································159
Protezione del rivestimento antiaderente
Protezione del rivestimento antiaderente ································· 160
Risoluzione dei problemi
Risoluzione dei problemi ··························································161
Limpieza
Limpieza y cuidados ·································································191
Protección del acabado antiadherente
Protección del acabado antiadherente ·····································192
Resolución de problemas
Resolución de problemas ·························································193
Do not damage the power cord or power plug.
(It may cause an electric shock, or fire due to short circuit.)
Following actions are strictly prohibited. (Modifying, placing near heating elements, bending, twisting, pulling,
putting heavy objects on top, and bundling the cord.)
Do not plug or unplug the power cord with wet hands.
(It may cause an electric shock.)
Do not exceed voltage on the outlet and do not use alternate current other than
listed on the appliance.
(It may cause an electric shock or fire.)
●
Make sure the voltage supplied to the appliance is the same as your local supply.
●
Plugging other devices into the same outlet may cause an electric overheating.
Italiano Español
Insert the power plug firmly.
(Otherwise it may cause an electric shock and fire caused by the heat that may generate around the plug.)
Clean the power plug regularly.
(A soiled power plug may cause insufficient insulation due to the moisture and lint build-up, which may cause a
fire.)
Unplug the power plug, and wipe with the dry cloth.
4 5
Page 4
Safety Instructions
Please make sure to follow these instructions.
Warning
Discontinue using the appliance immediately and unplug in the unlikely event that
this appliance stops working properly.
(It may cause smoking, fire, electric shock or burn.)
e.g. for abnormal or breaking down
●
The power plug and the power cord become abnormally hot.
●
The power cord is damaged or power failure.
●
The main body is deformed or is abnormally hot.
●
The appliance makes abnormal turning noise during use.
Unplug the appliance immediately and consult the place of purchase or a Panasonic service centre for the check or the repair.
Do not touch, block or cover the steam vent holes during use.
(It may cause a burn.)
●
Especially pay attention for children.
Do not disassemble, repair or modify this appliance.
(It may cause a fire, electric shock or injury.)
Consult the place of purchase or a Panasonic service centre.
Do not immerse the appliance in water or splash it with water.
(It may cause an electric shock, or catch a fire due to short circuit.)
Caution
Do not use the appliance on following places.
●
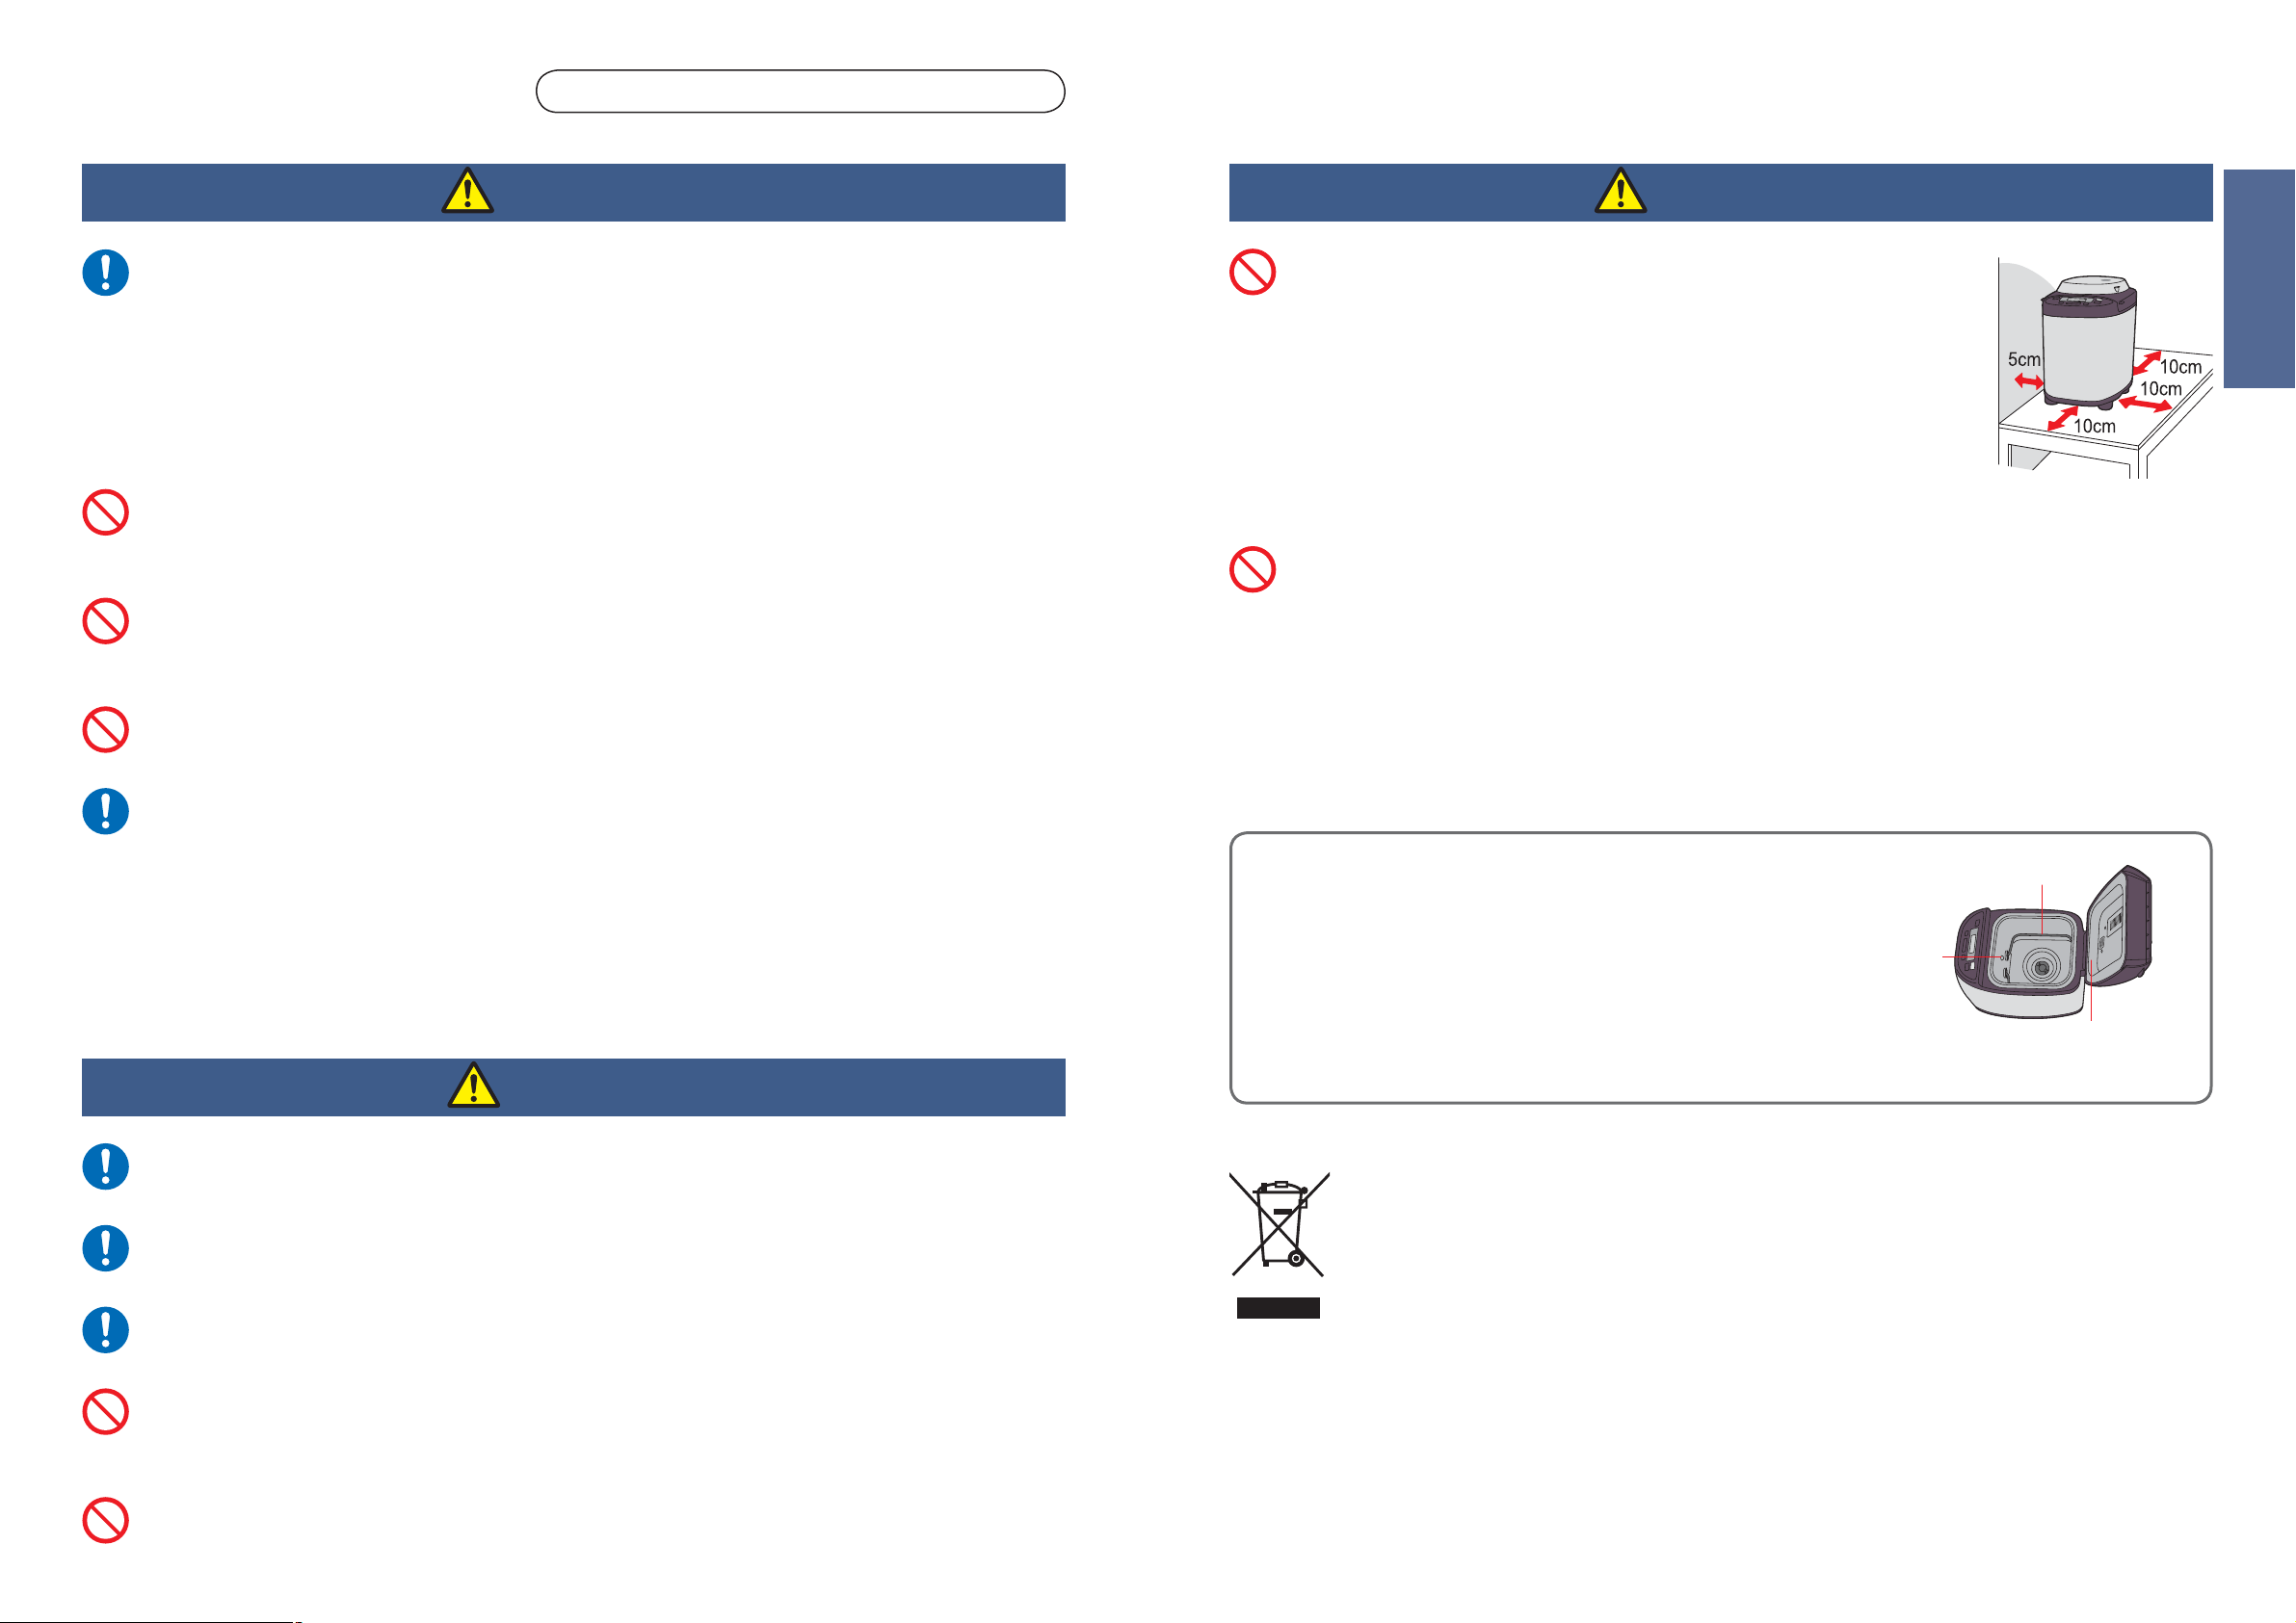
Position the Bread Maker on a firm, dry, clean, flat heatproof worktop at least
10 cm (4 inches) from the edge of the worktop.
(It may cause the appliance to slip and fall from the worktop.)
●
Do not place on unstable surfaces, on electrical appliances such as a refrigerator,
on materials such as tablecloths or on carpet, etc.
(It may cause falling or a fire.)
●
During baking the unit heats up. The Bread Maker should be placed at least 5 cm
(2 inches) from adjacent walls and other objects.
(It may cause a discoloration or deformation.)
Do not touch hot area such as bread pan, inside of unit, heating element or inside
of the lid while the appliance is in use or after cooking.
The temperature of accessible surfaces may be high when the appliance is
operating.
(It may cause a burn.)
To avoid burns, always use oven gloves when removing the bread pan or the finished bread.
(Do not use wet oven gloves.)
Also take care when removing the finished bread or kneading blade.
English
This appliance is not intended for use by persons (including children) with reduced
physical, sensory or mental capabilities, or lack of experience and knowledge,
unless they have been given supervision or instruction concerning use of the
appliance by a person responsible for their safety. Children should be supervised
to ensure that they do not play with the appliance.
(It may cause a burn, injury or electric shock.)
Caution
Make sure to hold the power plug when unplugging the power plug.
(Otherwise it may cause an electric shock, or fire due to short circuit.)
Unplug the power plug when the appliance is not in use.
(Otherwise it may cause an electric shock, or fire due to electric leakage.)
Please unplug and allow the appliance to cool down before cleaning it.
(It may cause a burn.)
Do not allow the power cord to hang over the edge of the table or touch a hot
surface.
(It may cause a burn or injury.)
Do not remove the bread pan or unplug the Bread Maker during use.
(It may cause a burn or injury.)
Important Information
Do not use the appliance outdoors, in the immediate vicinity of heat sources
or in rooms of high humidity.
(It may cause a malfunction or deformation.)
Do not use excessive force on the parts as is illustrated on the right.
(It may cause a malfunction or deformation.)
This appliance is not intended to be operated by means of an external timer or separate remote-control system.
Information on Disposal for Users of Waste Electrical & Electronic Equipment (private households)
This symbol on the products and/or accompanying documents means that used electrical and electronic products should not be
mixed with general household waste.
For proper treatment, recovery and recycling, please take these products to designated collection points, where they will be
accepted on a free of charge basis. Alternatively, in some countries you may be able to return your products to your local
retailer upon the purchase of an equivalent new product.
Disposing of this product correctly will help to save valuable resources and prevent any potential negative effects on human
health and the environment which could otherwise arise from inappropriate waste handling. Please contact your local authority
for further details of your nearest designated collection point.
Penalties may be applicable for incorrect disposal of this waste, in accordance with national legislation.
For business users in the European Union
If you wish to discard electrical and electronic equipment, please contact your dealer or supplier for further information.
Information on Disposal in other Countries outside the European Union
This symbol is only valid in the European Union.
If you wish to discard this product, please contact your local authorities or dealer and ask for the correct method of disposal.
Temperature sensor
Heating element
Inside of the lid
]
6
7
Page 5

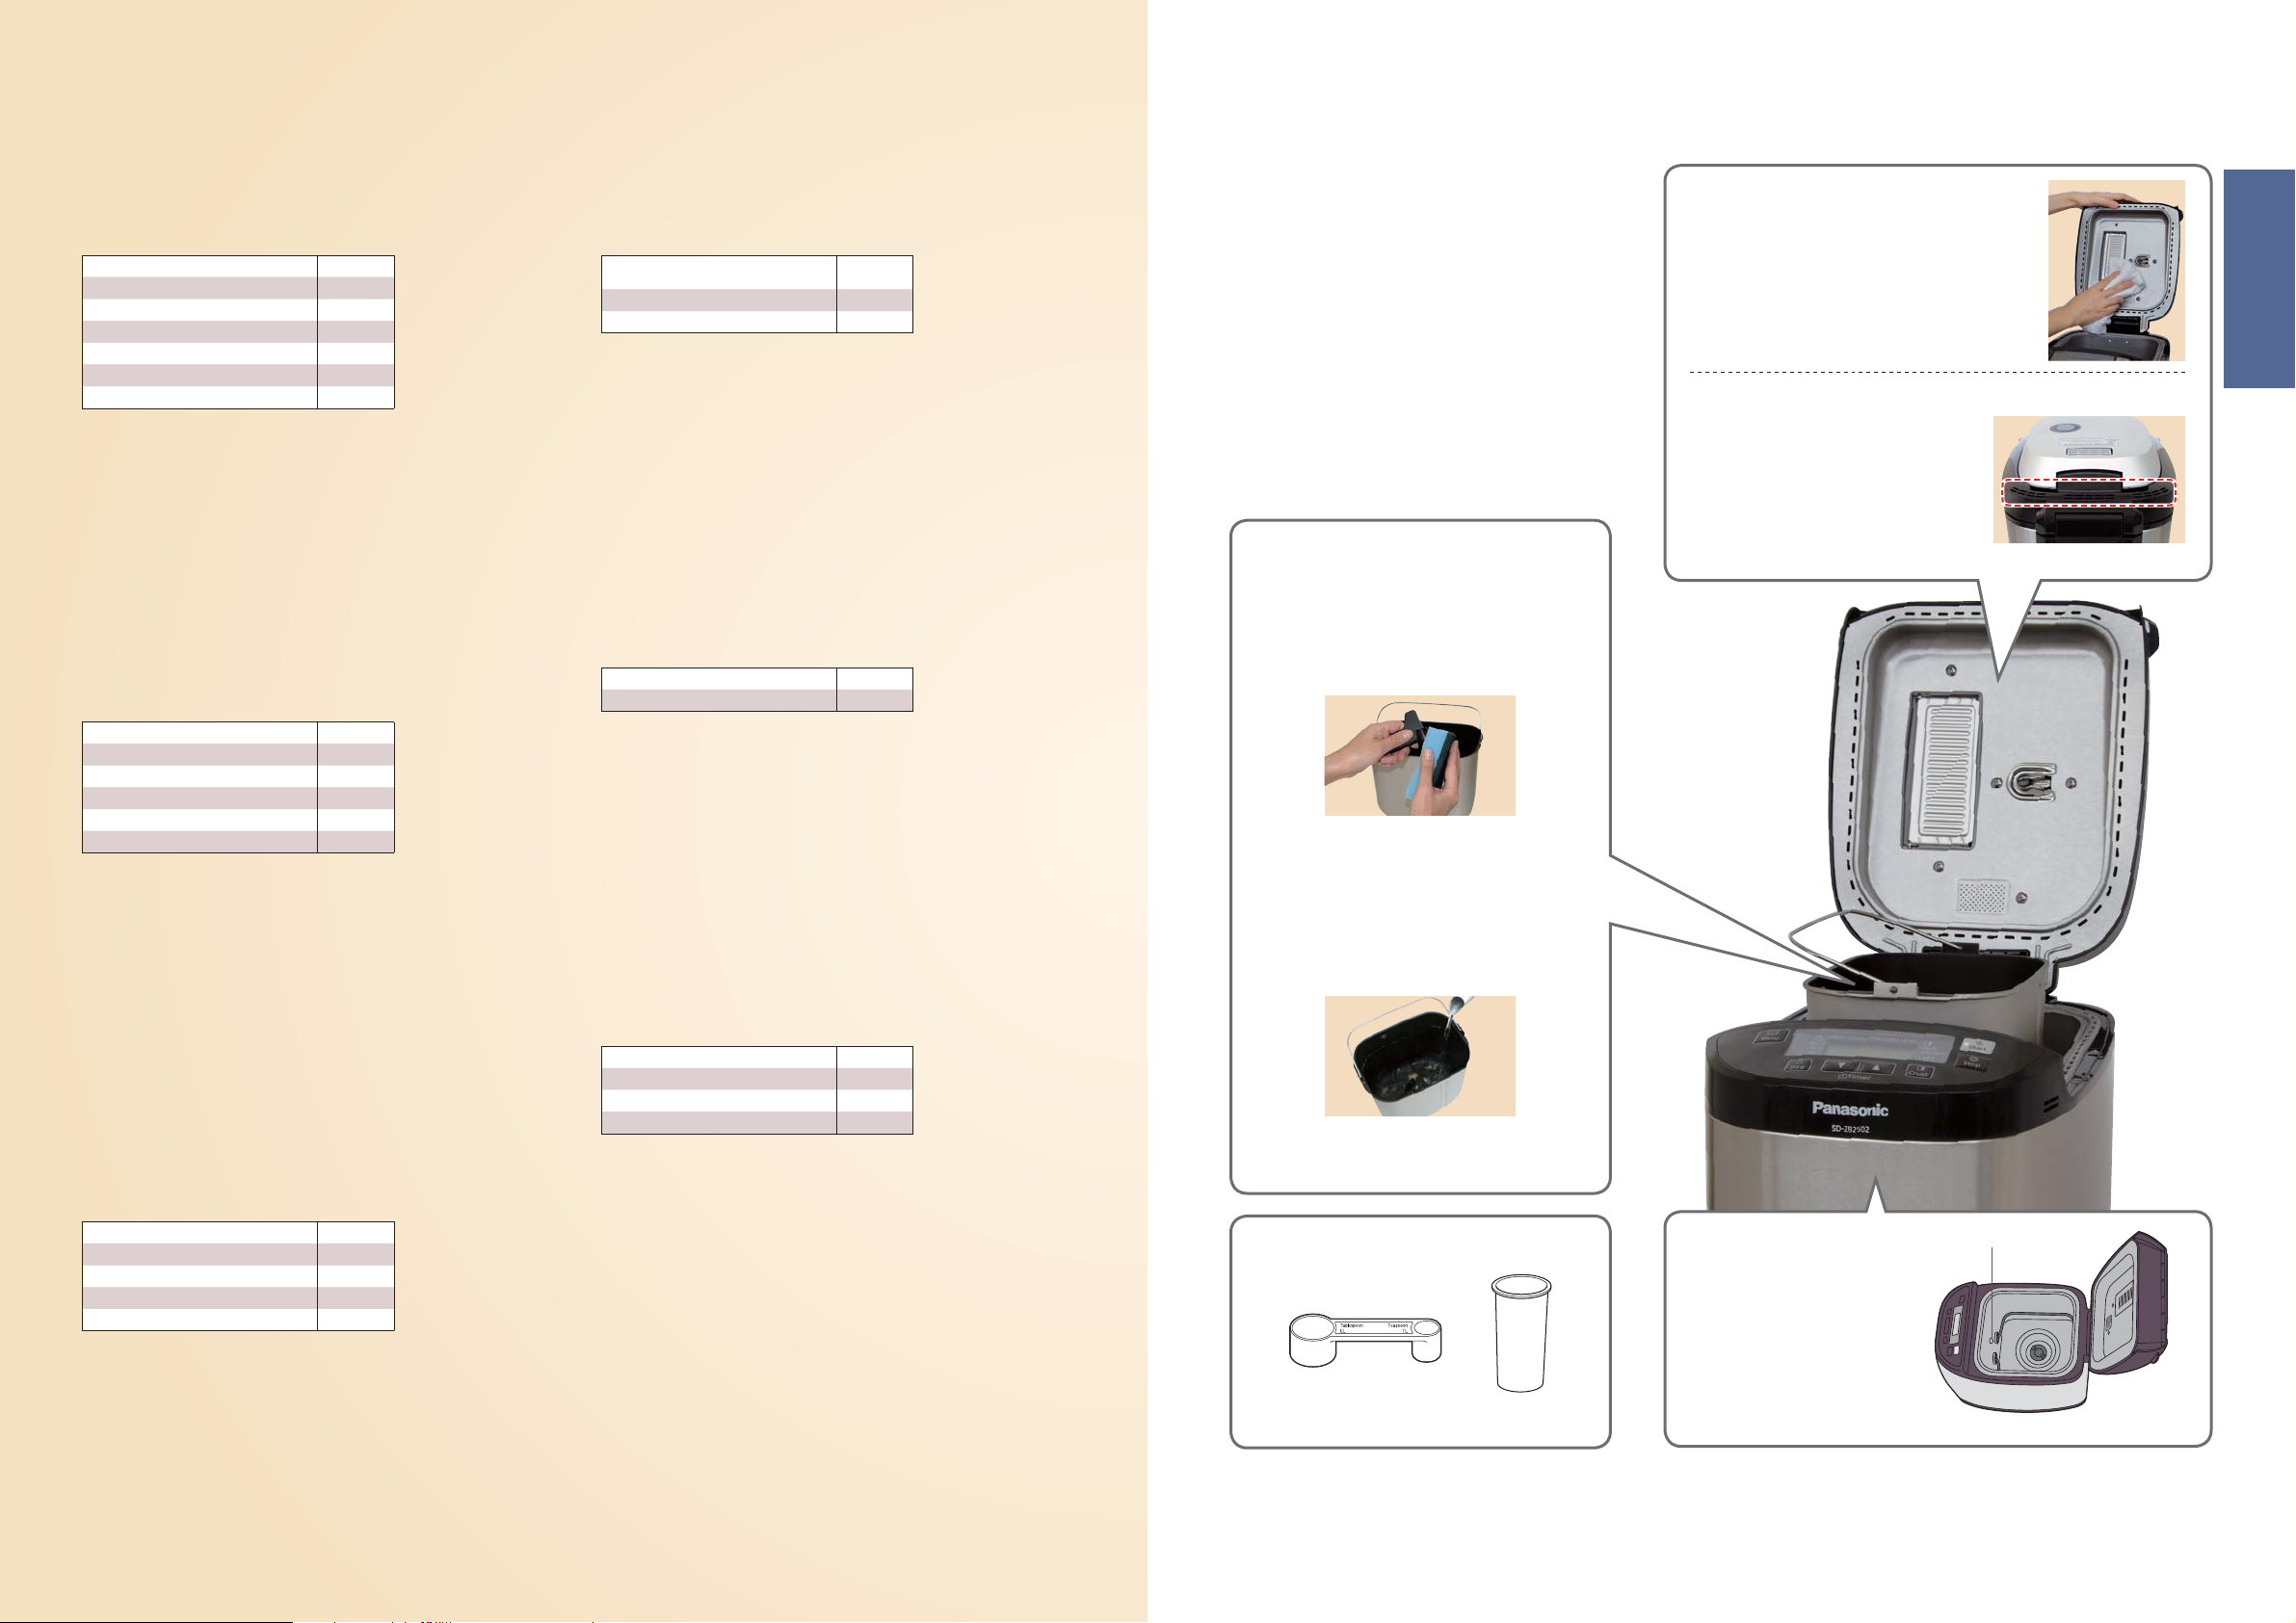
Accessories/Parts Identification
Main Unit
Raisin nut dispenser
The ingredients placed in the raisin nut dispenser will drop into the bread pan automatically upon selecting the
menu with raisin (03, 06, 14, 17, 19 and 25).
Turn to P. 16 for ingredients which may be placed in the raisin nut dispenser.
Dispenser lid
Yeast dispenser
Control Panel
Operation status
: displayed for the current stage of the program. Ingredients are being regulated on
the ‘Rest’ stage before kneading.
: displayed when there is a problem with the power supply.
: displayed when adding ingredients manually on menu 11 and 23.
Time remaining until ready
Also when adding ingredients manually,
display will show the time until adding extra
ingredients in the program.
English
Accessories
Measuring cup
To measure out liquids
Lid
Raisin nut dispenser
flap
Kneading blade
(rye bread)
Kneading blade
(wheat bread)
Handle
Bread pan
Control panel
Measuring spoon
To measure out sugar, salt, yeast, etc.
(15 mL) (5 mL)
Size
Press this pad to choose
size. See P. 12 for
available menu.
•
XL
•
L
•
M
Menu
Press this pad to choose menu. Menu number will
display and each time this pad is pressed, menu
number will change to the next choice.
(Hold the pad to advance more quickly)
See P. 12 and 13 for menu number.
Crust
Press this pad to
choose crust colour.
See P. 12 for available
menu.
•
Dark
•
Medium
•
Light
Timer
Set delay timer (time until bread is
ready) or set the baking/cooking
time for menu 15, 26 and 27.
‘▲’ Press this pad to increase the
time.
‘▼’ Press this pad to decrease
the time.
Start
Press this pad to start
the program.
Stop
Press this pad to cancel/stop the
program.
(To cancel/stop, hold for more
than 1 second.)
(max. 310 mL)
Tablespoon
•
•
10 mL increments
1⁄2 marking
8
Teaspoon
•
1⁄4, 1⁄2, 3⁄4
markings
Plug
This picture shows all words and symbols, but during operation only those relevant will be displayed.
9
Page 6
Bread-making Ingredients
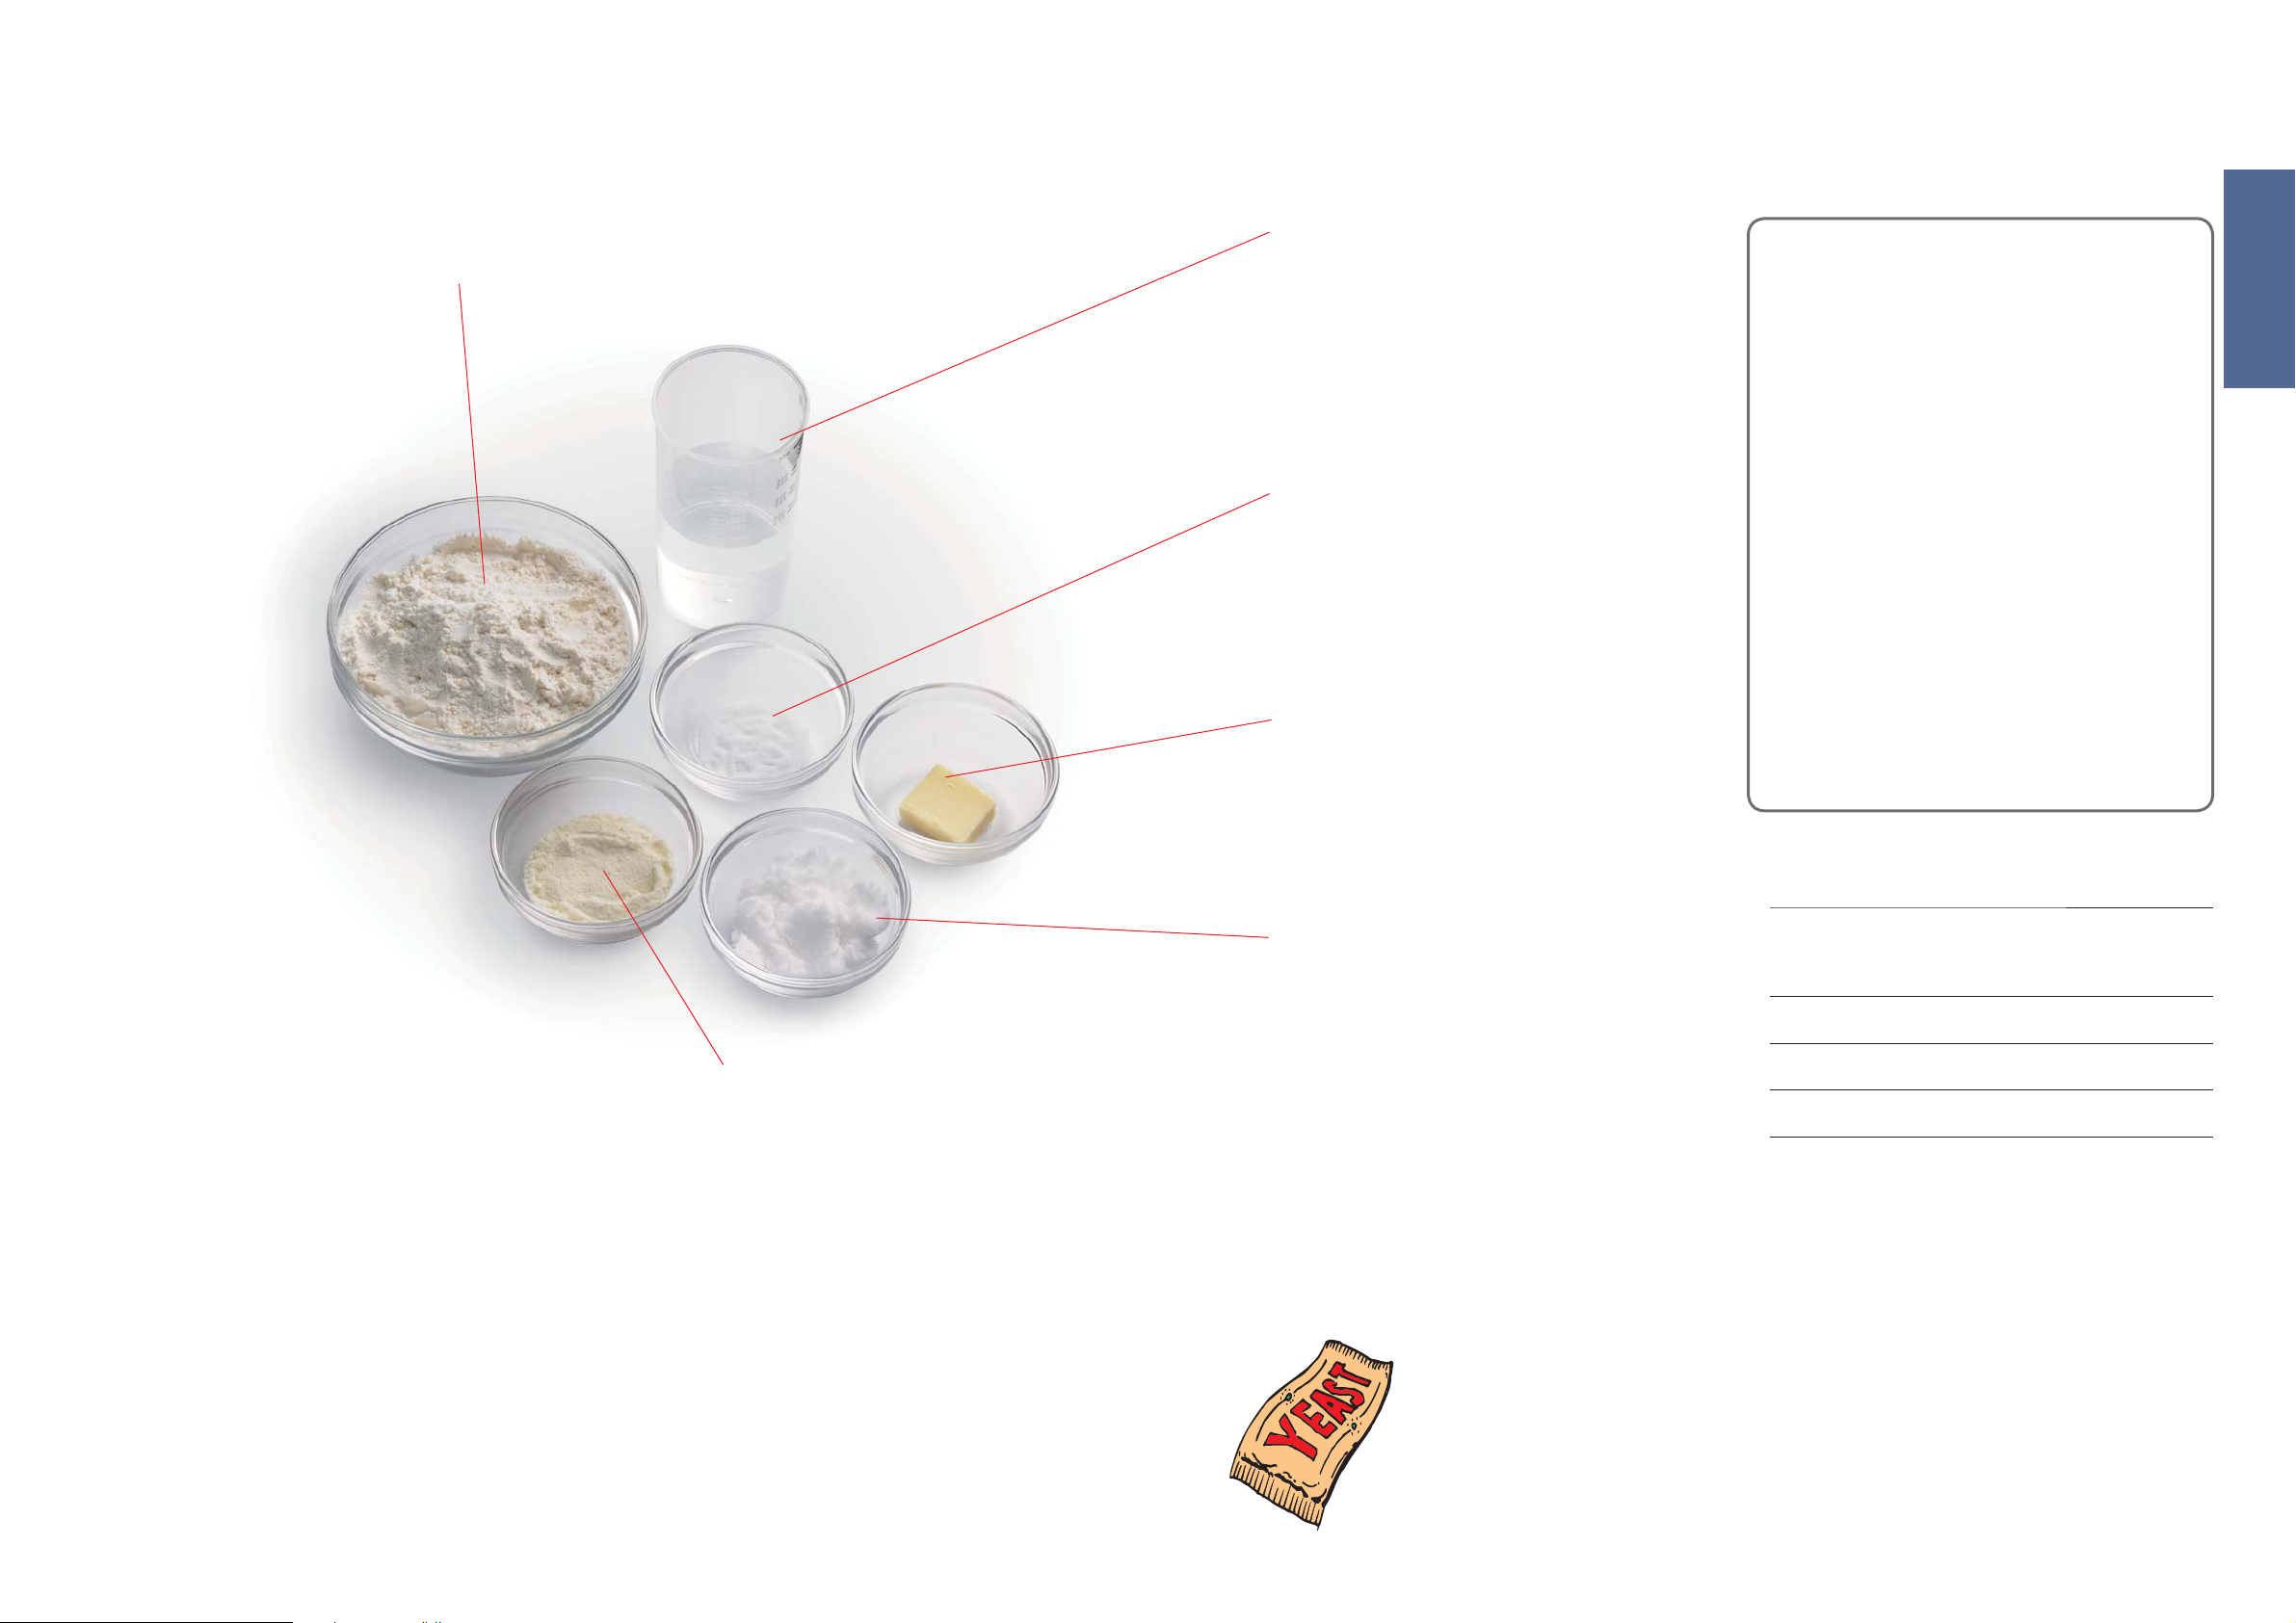
Flour
Main ingredient of bread, produces gluten. (helps the bread to rise,
gives it a firm texture)
Use strong flour. Do not use soft or plain flour.
Flour must be weighed on scales.
Strong flour is milled from hard wheat
and has a high content of protein which is
necessary for the development of gluten.
Carbon dioxide produced during fermentation
is trapped within the elastic network of
gluten, thus making the dough rise.
White flour
Made by grinding wheat
kernel, excluding bran and
germ. The best kind of flour
for baking bread is a flour
marked ‘for bread baking’.
Do not use plain or self-raising
flour as a substitute for bread
flour.
Water
Use normal tap water.
Use tepid water if using menu 02, 05, 07, 12 or 20 in a cold room.
Use chilled water if using menu 07, 08, 11, 13, 14, 20, 21, 23, 24
or 25 in a hot room.
Always measure out liquids using the measuring cup provided.
If using a bread mix...
Bread mixes including yeast
Place the mix in the bread pan, then add water. (Follow
Select the menu 02, choose a size according to the
With some mixes, it is not clear how much yeast is
Salt
Improves the flavour and strengthens gluten to
help the bread rise.
The bread may lose size/flavour if measuring is inaccurate.
Fat
Adds flavour and softness to the bread.
Using butter or magarine is recommended.
Bread mix with separate yeast sachet
First place the bread mix in the bread pan, then the
Baking brioche with brioche mix
Select the menu 11 or 02 ‘MEDIUM’ size-‘LIGHT’ crust
English
instructions on the packet for the quantity of water)
volume of the mix, and start the baking.
•
600 g – XL • 500 g – L
included, so some trial and error may be required to
obtain optimum results.
water. Then place the measured yeast in the yeast
dispenser.
Set the machine according to the type of flour included
in the mix, and start the baking.
•
White flour, brown flour menu 01
•
Whole wheat, multigrain flour menu 04
•
rye flour menu 07
colour. (P.35)
Whole wheat
flour
Made by grinding entire
wheat kernel, including bran
and germ. Makes very healthgiving bread.
This bread is lower in height and
heavier than bread baked with
white flour.
Dairy Products
Rye flour
Made by grinding rye kernel. Contains more iron,
magnesium and potassium, which are necessary for human’s
health, than white flour. But there isn’t enough gluten.
Makes dense, heavy bread. Do not use more than stated quantity
(could overload motor).
Add flavour and nutritional value.
If you use milk instead of water, the nutritional value of
the bread will be higher, but do not use in timer setting as
it may not keep fresh overnight.
Reduce the amount of water proportionally to the
amount of milk.
Spelt flour
In the wheat family but is a completely different species genetically.
Although it contains gluten some gluten-intolerant people can digest it. (Consult your doctor.)
Makes loaves with a flat/slightly sunken crust.
Spelt wholegrain flour bread becomes low height and dense compare with spelt white flour bread .
We will recommend spelt white flour to be used more than the half of the entire flour.
There is Spelt (Triticum spelta) suitable for baking bread and Einkorm wheat (Triticum monococcum: also it is called small spelt) which is not
suitable for baking bread are sold as spelt. Please use spelt. (use in menu 13, 14, 24 or 25)
(granulated sugar, brown sugar, honey,
Sugar
Food for the yeast, sweetens and adds flavour to
the bread, changes the colour of the crust.
Use less sugar if using raisins or other fruits, which contain
fructose.
treacle etc)
Dry Yeast
Enables the bread to rise.
Be sure to use dry yeast that does not require pre-fermentation (do not use fresh yeast or dry yeast requiring
fermentation before using)
Yeast which has ‘instant yeast’ written on the packet is recommended.
When using yeast from sachets, seal the sachet again immediately after use, and keep in the fridge. (Use within the
manufacturer’s recommended time)
You can make your bread taste better by adding other
ingredients:
Eggs
Bran
Wheat germ
Spices
Improve the nutritional value and
colouring of the bread. (Water amount
must be reduced proportionally)
Beat eggs when adding them.
Increases the bread’s fibre content.
•
Use max. 75 mL (5 tbsp).
Gives the bread a nuttier flavour.
•
Use max. 60 mL (4 tbsp).
Enhance the flavour of the bread.
•
Only use a small amount (1-2 tbsp).
10
11
Page 7

List of Bread Types and Baking Options
Function Availability and Time Required
•Time required for each process will differ according to room temperature.
Options Processes
English
Options Processes
Menu
Number
01 Basic
02 Basic Rapid
03 Basic Raisin
04 Whole wheat
Whole wheat
05
Rapid
Whole wheat
06
Raisin
07 Rye
08 French
Bake
09 Italian
10 Sandwich
11 Brioche
12 Gluten Free
13 Speciality
Speciality
14
Raisin
15 Bake only
Menu
Size Crust
1
——
——
——
——
—
—
——————
Timer
30 min–
60 min
——
30 min–
60 min
—
——
—
1
2
—
—
1 hr–
1 hr 40 min
15 min–
25 min
1 hr–
1 hr 40 min
45 min–
60 min
40 min–
2 hr 5 min
30 min–
1 hr
1 hr–
1 hr 40 min
30 min
—
——
30 min–
1 hr 15 min
30 min–
1 hr 15 min
Rest Knead Rise Bake Total
1 hr 50 min–
3
15–30 min
15–20 min
15–30 min
15–25 min
15–25 min
15–25 min
approx.
10 min
10–20 min
10–15 min
15–25 min
25–45 min
15–20 min 40 - 45 min 50–55 min
15–30 min
15–30 min
2 hr 20 min
approx. 1 hour
1 hr 50 min–
3
2 hr 20 min
2 hr 10 min–
3
2 hr 50 min
1 hr 30 min–
3
1 hr 40 min
2 hr 10 min–
3
2 hr 50 min
1 hr 20 min–
1 hr 35 min
2 hr 45 min–
4 hr 10 min
2 hr 25 min–
3 hr
2 hr 10 min–
3
2 hr 50 min
3
1 hr 25 min 50 min 3 hr 30 min
1 hr 50 min–
3
2 hr 45 min
1 hr 50 min–
3
2 hr 45 min
50–55 min
35–40 min
50 min 4 hours
50 min 5 hours
45 min 3 hours
50 min 5 hours
1 hour 3 hr 30 min
55 min 6 hours
50 min 4 hr 30 min
50 min 5 hours
55 min 4 hr 30 min
55 min 4 hr 30 min
30 min–
1 hr 30 min
4 hr–
4 hr 5 min
1 hr 55 min–
2 hours
1 hr 50 min–
1 hr 55 min
30 min–
1 hr 30 min
Menu
Number
16 Basic
17 Basic Raisin
18 Whole wheat
Whole wheat
19
Raisin
20 Rye
21 French
22 Pizza
Dough
23 Brioche
24 Speciality
Speciality
25
Raisin
26 Jam
27 Compote
Menu
Size Crust
———
———
———
———
———
———
——
———
———
———
Timer
Rest Knead Rise Bake Total
30 min–
50 min
30 min–
50 min
55 min–
1 hr 25 min
55 min–
1 hr 25 min
45 min–
60 min
40 min–
1 hr 45 min
(Knead)
10–18 min
30 min
30 min–
1 hr 5 min
30 min–
1 hr 5 min
15–30 min
15–30 min
15–25 min
15–25 min
approx.
10 min
10–20 min
(Rise)
7–15 min
25–45 min
15–30 min
15–30 min
1 hr 10 min–
3
1 hr 30 min
1 hr 10 min–
3
1 hr 30 min
1 hr 30 min–
3
2 hr
1 hr 30 min–
3
2 hr
——
1 hr 35 min–
2 hr 40 min
(Knead)
approx. 10 min
3
35 min
1 hr 10 min–
3
1 hr 55 min
1 hr 10 min–
3
1 hr 55 min
—
—
—
—
—
(Rise)
approx. 10 min
—
—
—
——— — — — —
——— — — — —
2 hr 20 min
2 hr 20 min
3 hr 15 min
3 hr 15 min
2 hours
3 hr 35 min
45 min
1 hr 50 min
2 hr 45 min
2 hr 45 min
1 hr 30 min–
2 hr 30 min
1 hr–
1 hr 40 min
Only ‘Light’ or ‘Medium’ available. Only ‘Medium’ or ‘Dark’ available. There is a period of rise during the knead period.
• The Bread Maker will operate for a short time during the rise period (to ensure optimal gluten development).
12
13
Page 8
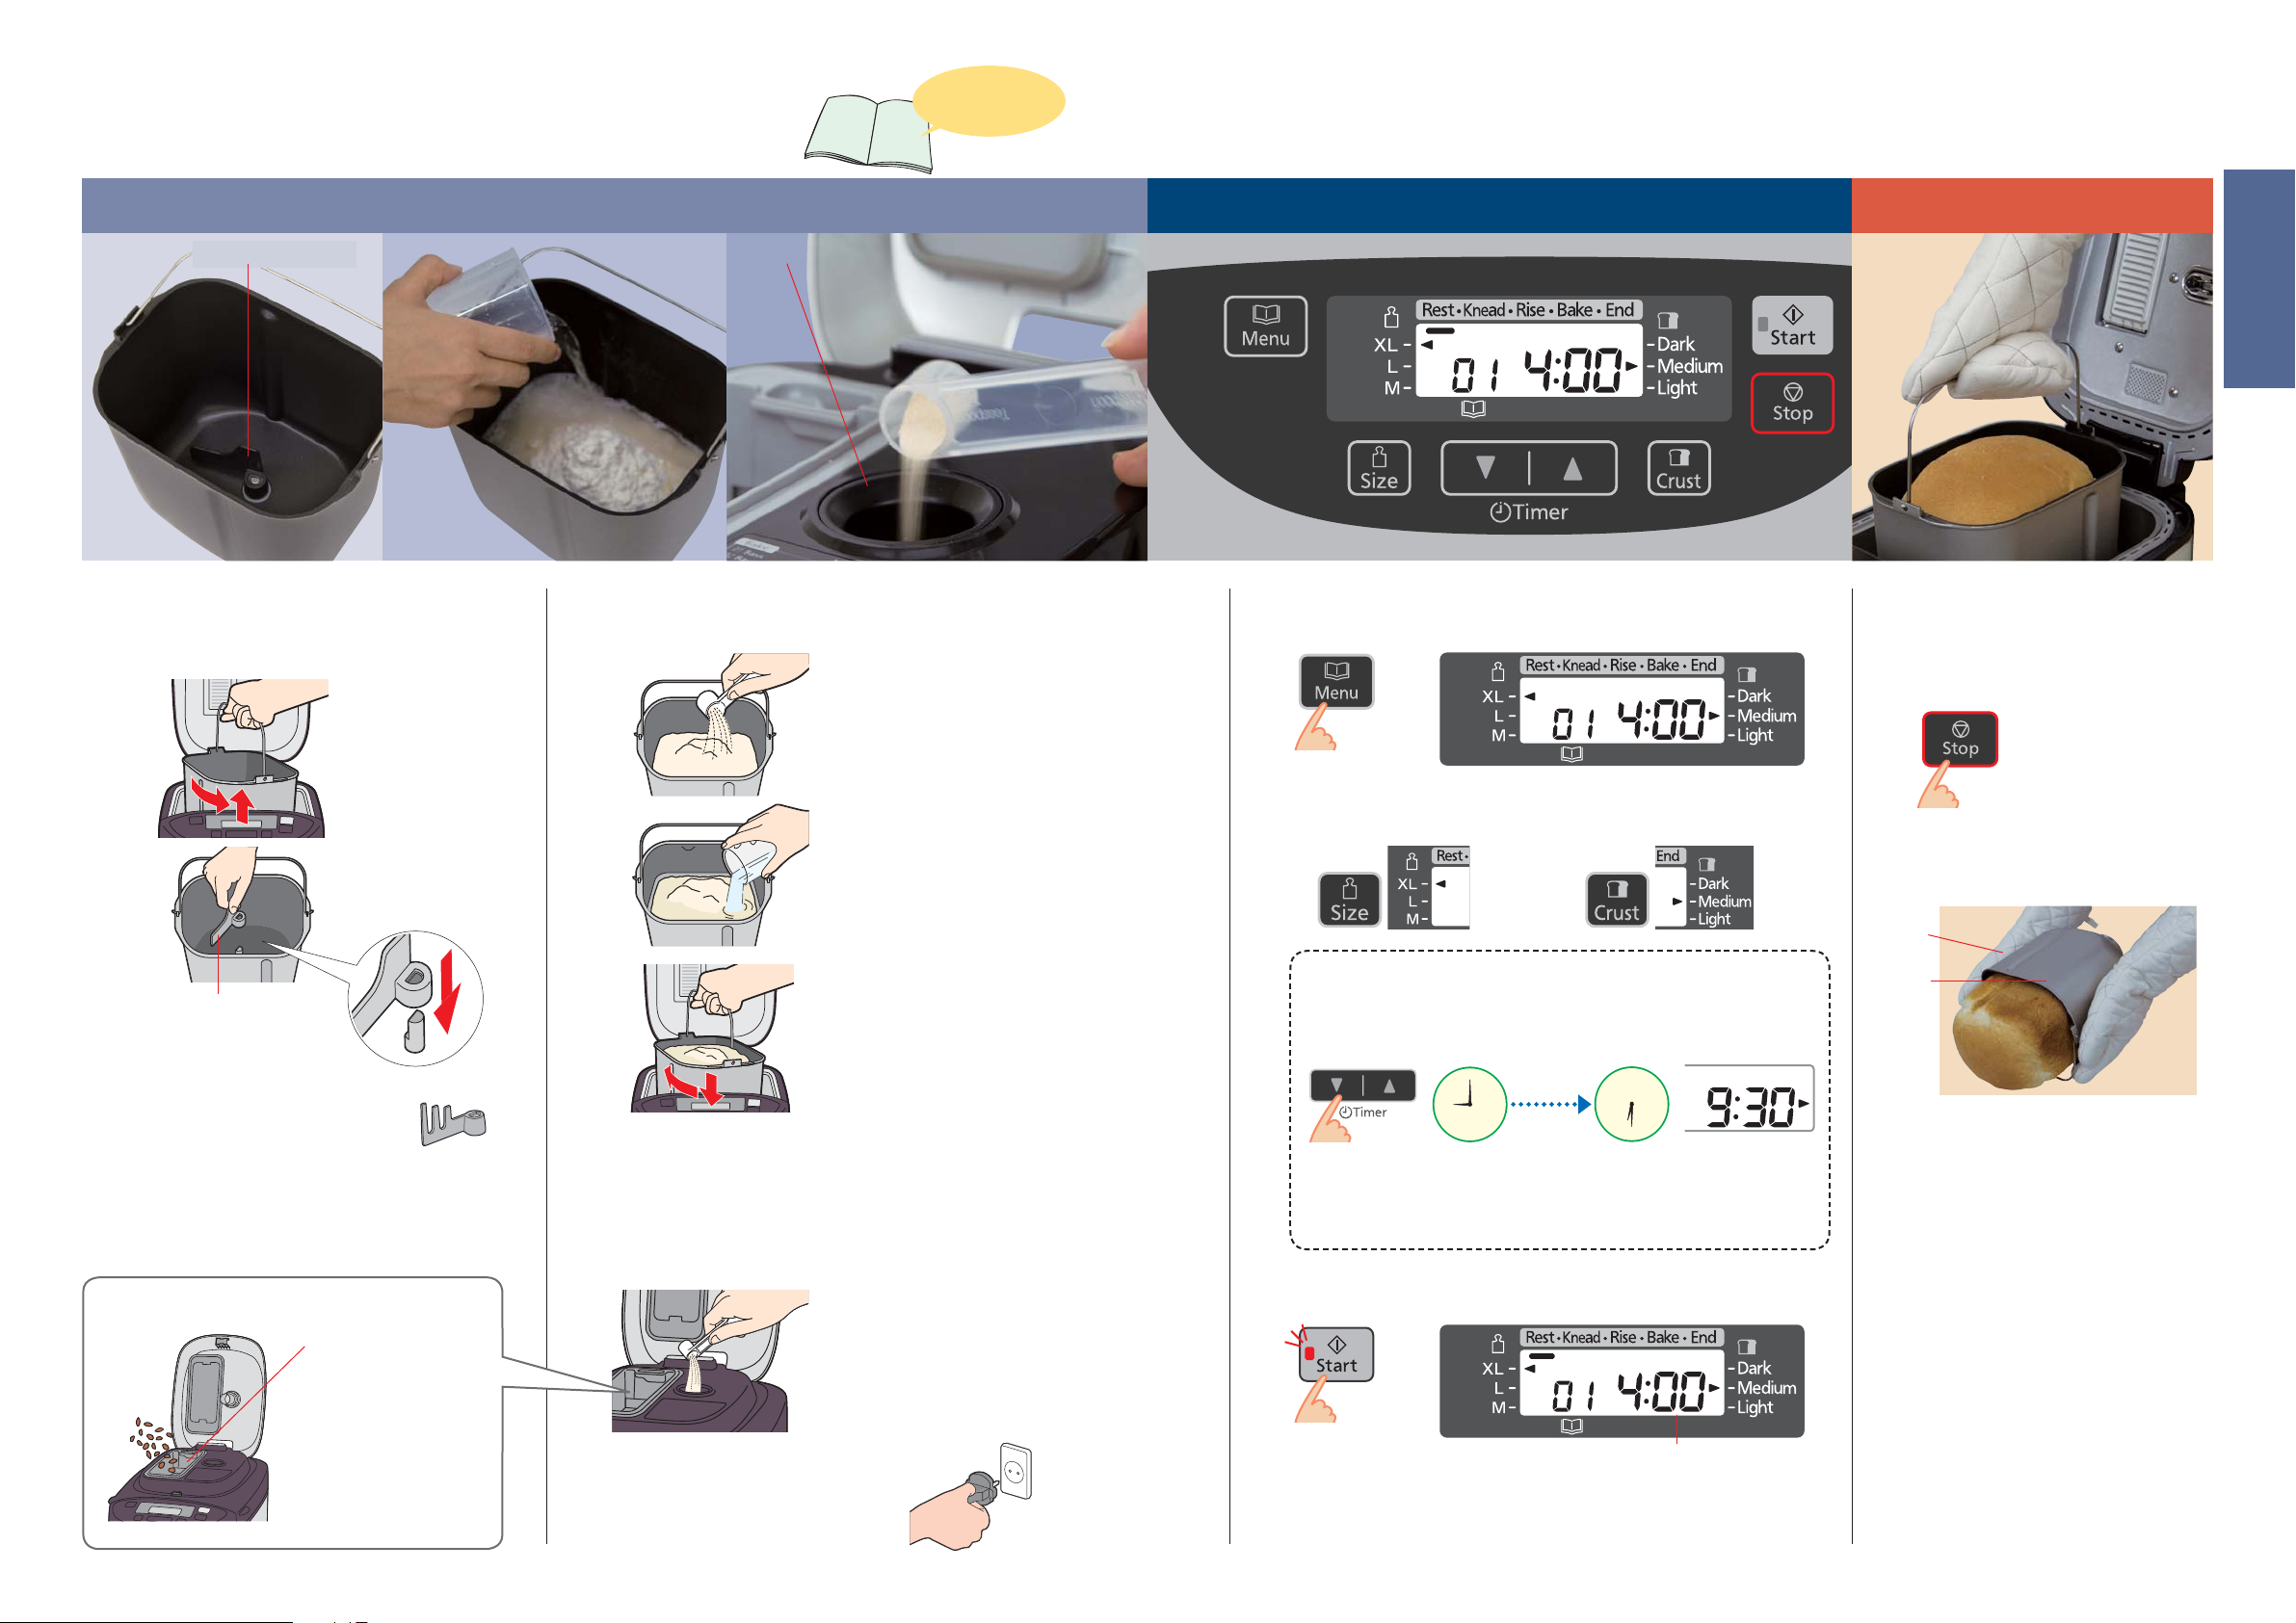
Baking Bread
Place the ingredients in the bread pan Set the program and start Remove the bread
Kneading blade Yeast dispenser
Turn to P. 23, 24
for bread recipes
English
Remove the bread pan and
1
set the kneading blade
Check around the shaft
and inside the kneading
blade and ensure that
they are clean. (P.31)
•
When baking rye bread, use the
specified kneading blade.
• The kneading blade fits loosely into place, but it must
touch the bottom of the bread pan.
Baking bread with added ingredients (P. 16)
Twist the bread pan round.
Remove the bread pan.
Place the kneading
blade firmly into the shaft.
Clean and dry
beforehand
Open the dispenser lid.
Place the ingredients.
Close the lid.
Place the measured ingredients
in the bread pan
2
Place the dry ingredients
except dry yeast.
(flour, sugar, salt, etc.)
• Flour must be weighed on
scales.
Pour in the water and any other
liquids.
Wipe off any moisture and flour
from the outside of the bread
pan.
Place the bread pan inside
the Bread Maker by turning it
slightly from right to left. Fold
the handle down.
Close the lid.
• Don’t open the lid until bread
is complete (affects bread
quality).
Place the dry yeast in the yeast
3
dispenser
If the yeast dispenser is wet, absorb
wetness with tissue etc.
(Do not rub the yeast dispenser,
otherwise the yeast will not drop
into the bread pan due to static.)
Plug the Bread Maker
4
into a 230 V socket
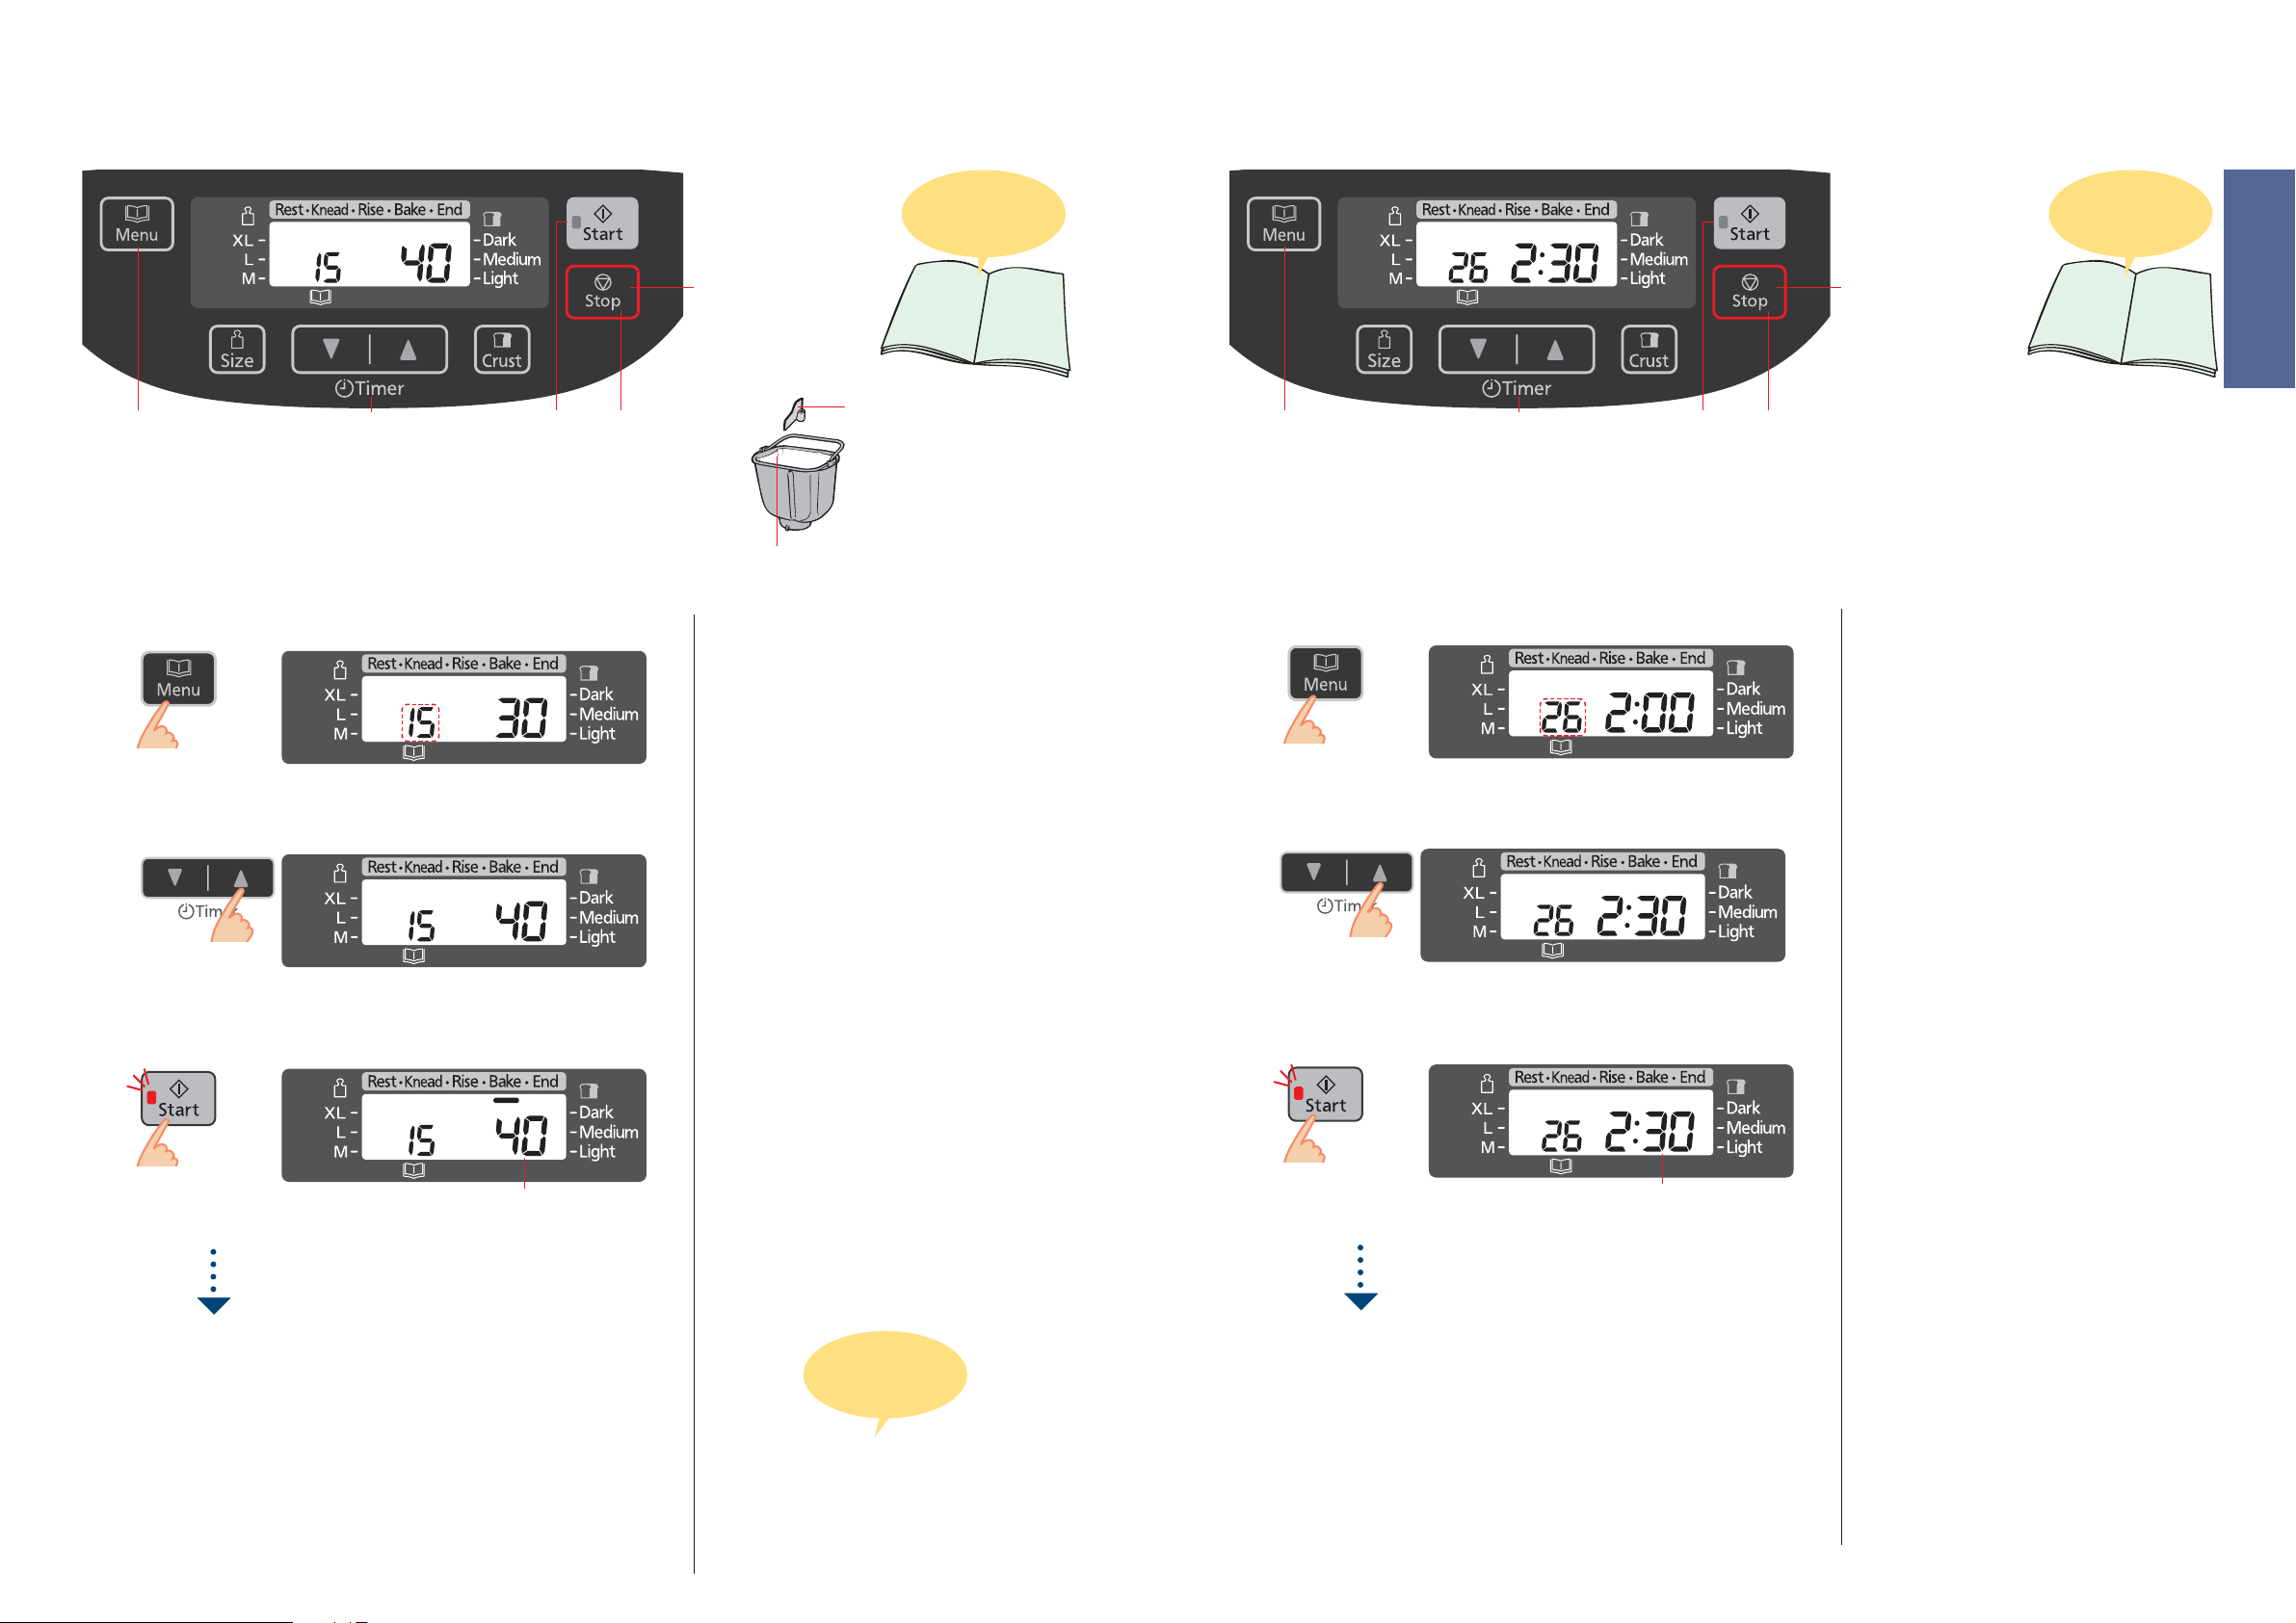
Select a bake menu
(The display shows when menu ‘01’ is selected.)
5
See P. 12 for menu, availability of size and crust.
To change the size
To set the timer
e.g. It is 9:00 PM now, and you want the bread to be ready at 6:30 the next
morning.
Set the timer to ‘9:30’ (9 hours 30 minutes from now).
12
9
Current time Ready time
•
Pressing the pad once will advance the timer by 10 minutes (hold to
advance more quickly).
3
6
To change the crust colour
12
9
9hr 30min
from now
3
6
Press ‘Start’
6
Estimated time until the selected program is complete
When ‘Start’ was pressed at first, menu 01 will start.
Turn off the power
when the bread is ready
7
(machine beeps 8 times and the bar at
‘End’ flashes.)
Remove the bread
8
immediately,
Oven glove
Bread pan
allow to cool, for example, on a wire rack
Unplug (holding the
9
plug) after use
If you do not press ‘stop’ and remove the
bread from the unit to cool it, the Bread
Maker will proceed to keep warm to
reduce condensation of steam within the
loaf.
However, this will accelerate the
browning of the crust, therefore, upon
completion of baking, switch off the unit,
remove the bread immediately from the
unit to cool it.
If you leave the bread to cool down in
the breadpan, it will cause condensation.
Therefore, cool on a wire rack to ensure
optimum quality of the loaf.
14
15
Page 9
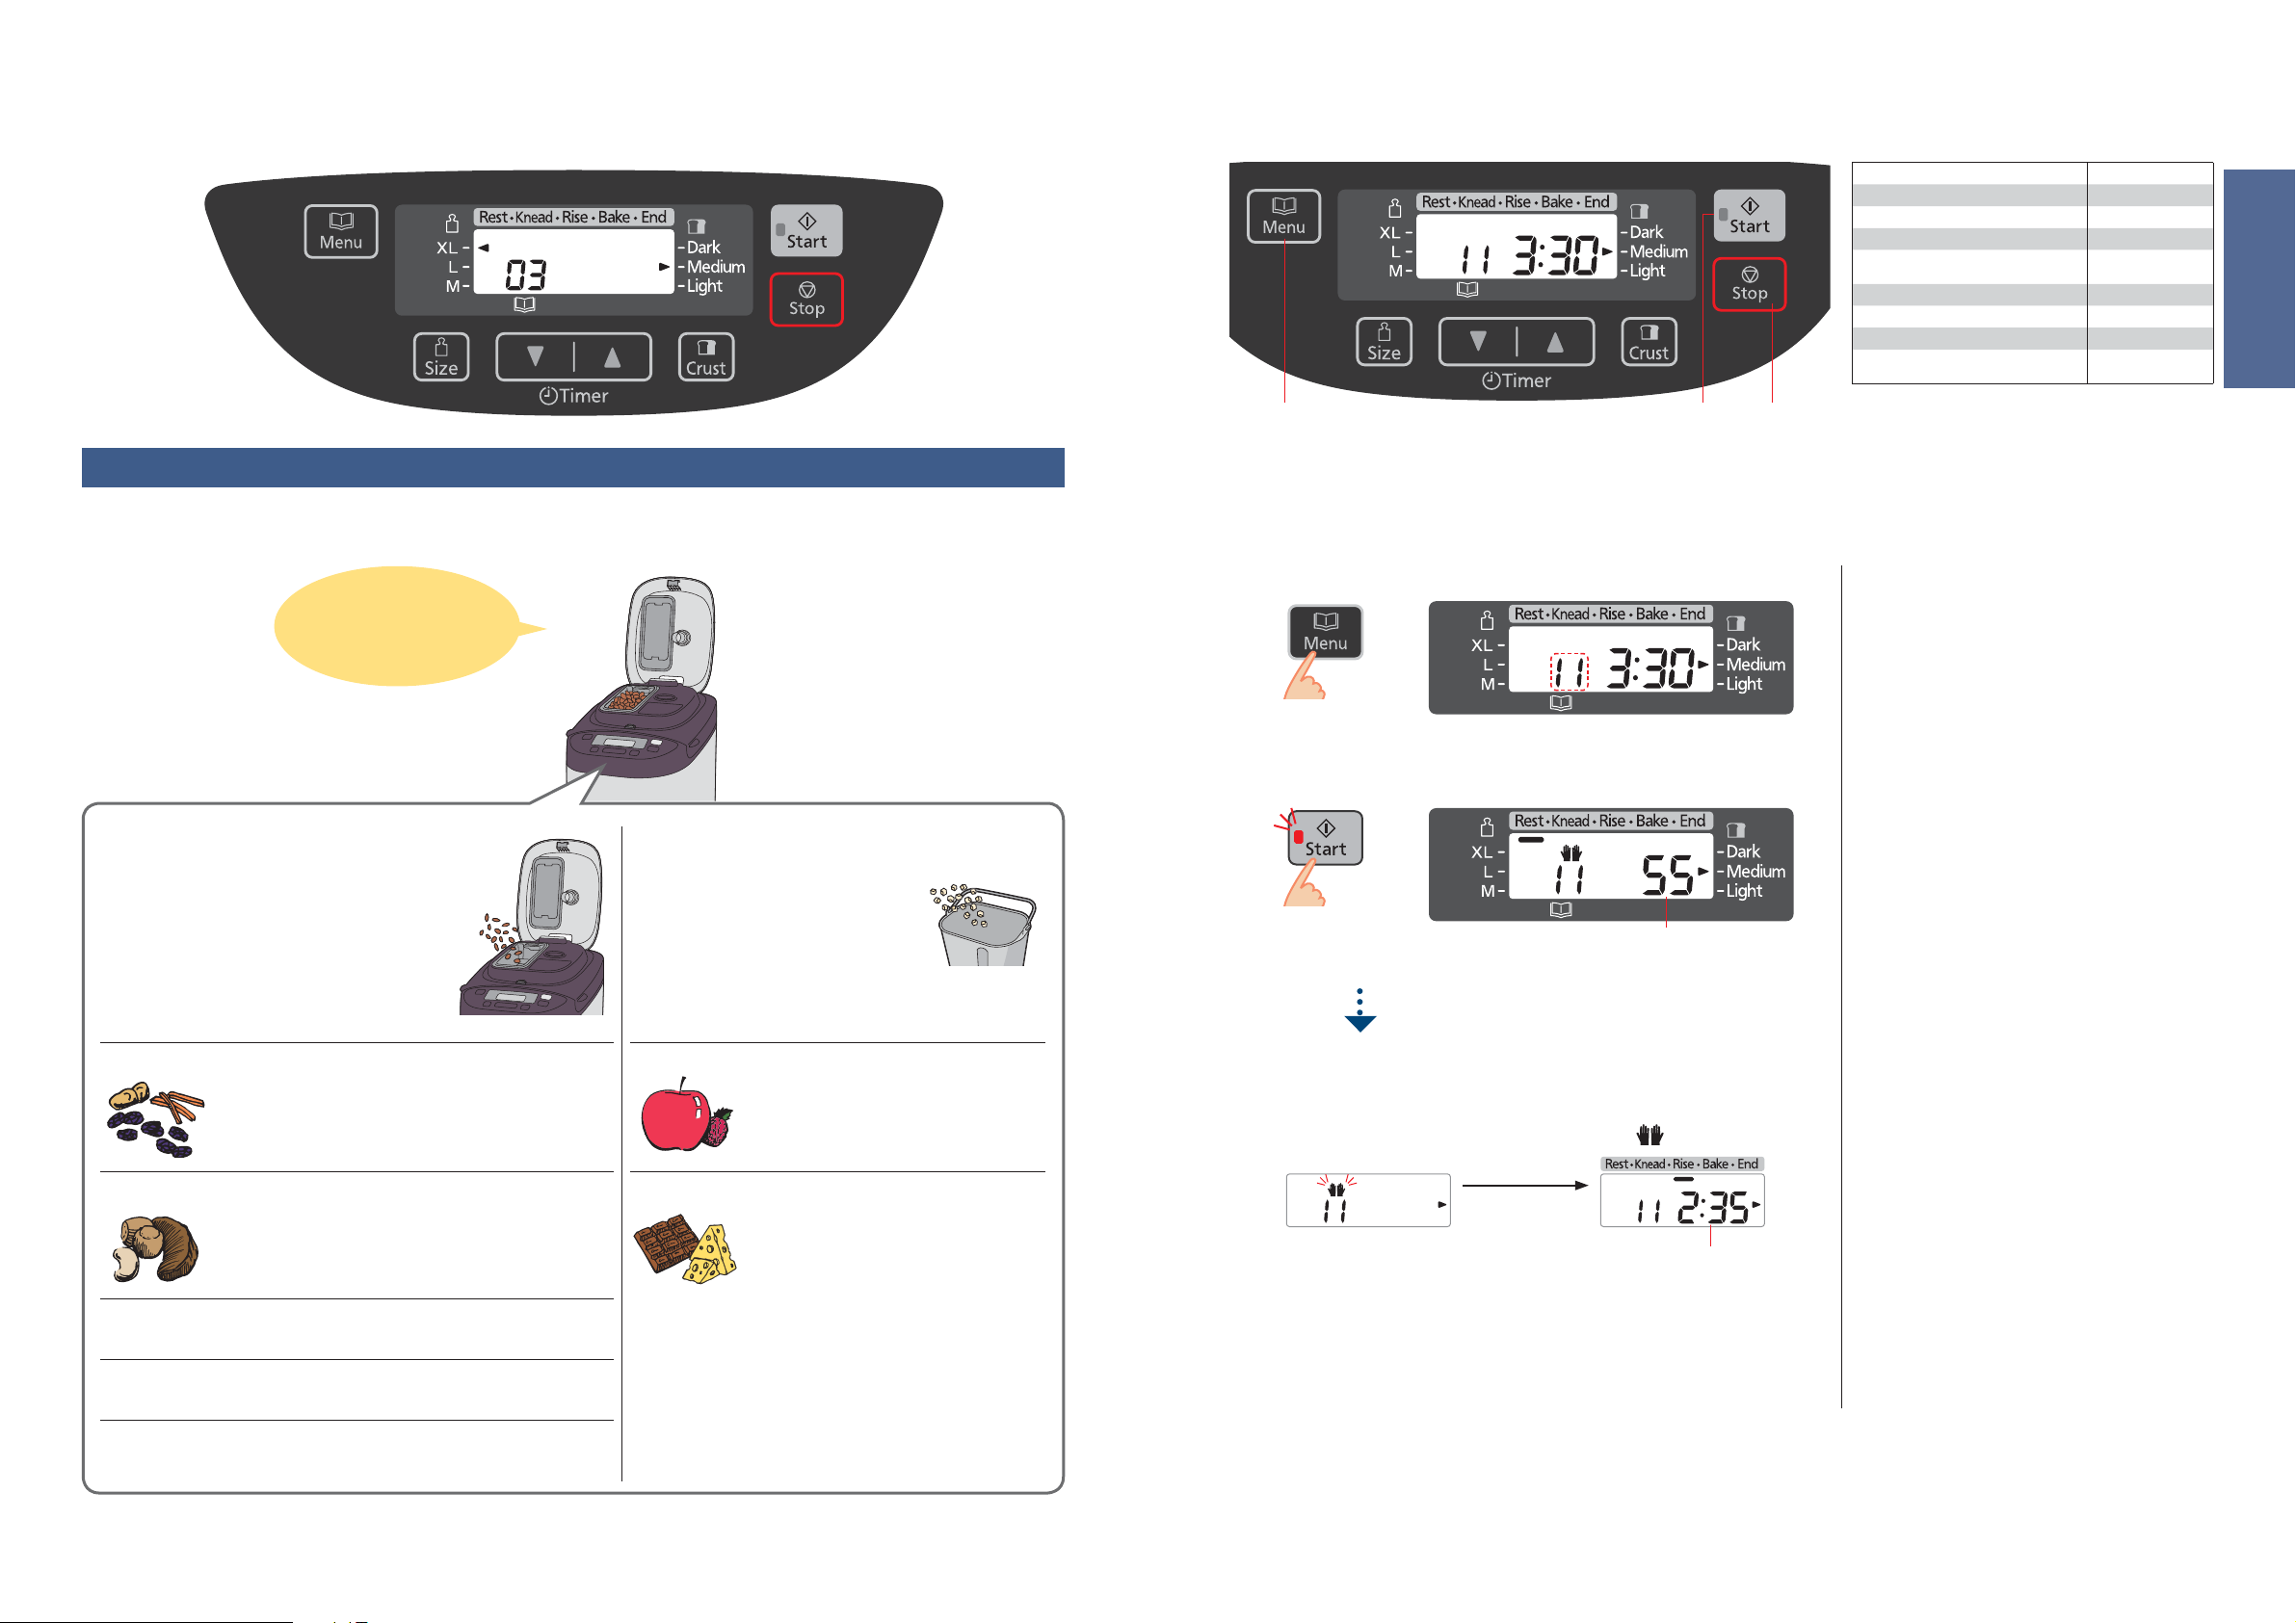
When adding extra ingredients
Baking Brioche
Adding extra ingredients to bread or dough
By selecting a menu with Raisin (03, 06, 14, 17, 19 or 25), you can mix your favourite ingredients into the dough to make all kinds of flavoured
breads.
Simply place the extra
ingredients in the dispenser or
the bread pan before start
Dry ingredients,
insoluble ingredients
Place the extra ingredients in the raisin nut
dispenser and set the machine.
Moist/viscous ingredients, soluble
ingredients*
Place these ingredients together
with the others into the bread pan.
1
Preparations
(P. 14)
Select menu ‘11’
Cut the butter for adding later for 1–2 cm cubes and keep them in fridge.
Set the kneading blade into the bread pan.
Place the ingredients in the bread pan in the order listed in the recipe.
Set the bread pan into the main unit, and plug the machine into the socket.
1
Start the machine
2
The start light will come on.
strong white bread flour, type 550 400 g
teaspoons of salt 1
tablespoons of sugar 4
tablespoons of skim milk (dry) 2
butter (cut into 2 cm cubes and keep in
fridge)
water 180 mL
egg (beaten) ;medium 2 (100 g)
teaspoons of dry yeast 1
butter for adding later (cut into 1–2 cm
cubes and keep in fridge)
42, 3
[Simple way to bake brioche]
Add butter with other
ingredients at the beginning.
* When butter is added at the beginning, flavour,
Time until adding the extra butter or ingredients
1
⁄2
English
50 g
1
⁄4
70 g
Cut the butter into 2 cm cubes and place them
into the bread pan at the same time as the other
ingredients.
Follow the steps shown on the left. However,
when the machine beeps on step 3 to add extra
butter, please leave as it is.
Time required for completion is 3 hrs 30 minutes.
texture and rising of bread are a little different from
the time bread is baked with extra butter added in
later.
A ‘Rest’ process will begin immediately after
starting, followed by ‘Knead’ and ‘Rise’.
Dried fruits
Nuts
Seeds
Herbs
Bacon, salami
•
Follow the recipe for the quantities for each ingredient.
Cut up roughly into approx. 5mm cubes.
Sugar-coated ingredients may stick to the raisin nut
dispenser and not fall into the bread pan.
Chop finely.
Nuts impair the effect of gluten, so avoid using too
much.
Using large, hard seeds may scratch the coating of
the dispenser and bread pan.
Use up to 1–2 tbsp of dried herbs. For fresh herbs,
follow the instructions in the recipe.
Sometimes oily ingredients may stick to the raisin nut
dispenser and not fall into the bread pan.
16
Fresh fruits, fruits pickled in alcohol
Only use quantities as in the recipe, as
the water content of the ingredients will
affect your bread.
Cheese, chocolate
* These ingredients cannot be placed in the raisin nut
dispenser as they would stick to it and not fall into the
bread pan.
Adding additional butter when the beep
3
sounds, then press ‘Start’ again
Complete placing the additional cubed butter while ‘ ’ is flashing.
After the Start
pad is pressed
Display indicates remaining time until completion of the program
Press
when machine beeps 8 times and the bar at ‘End’ flashes
4
The flashing start light will go off.
‘Stop’ and remove bread
When adding extra ingreadients such as raisins,
add them with the butter. (Use max. 150 g for
ingredients)
Even without pressing the Start pad, kneading
will continue after 5 min. It does not continue
kneading immediately, even if the Start pad is
pressed after adding butter or ingredients.
Do not add butter after display show remaining
time. (P.35)
17
Page 10
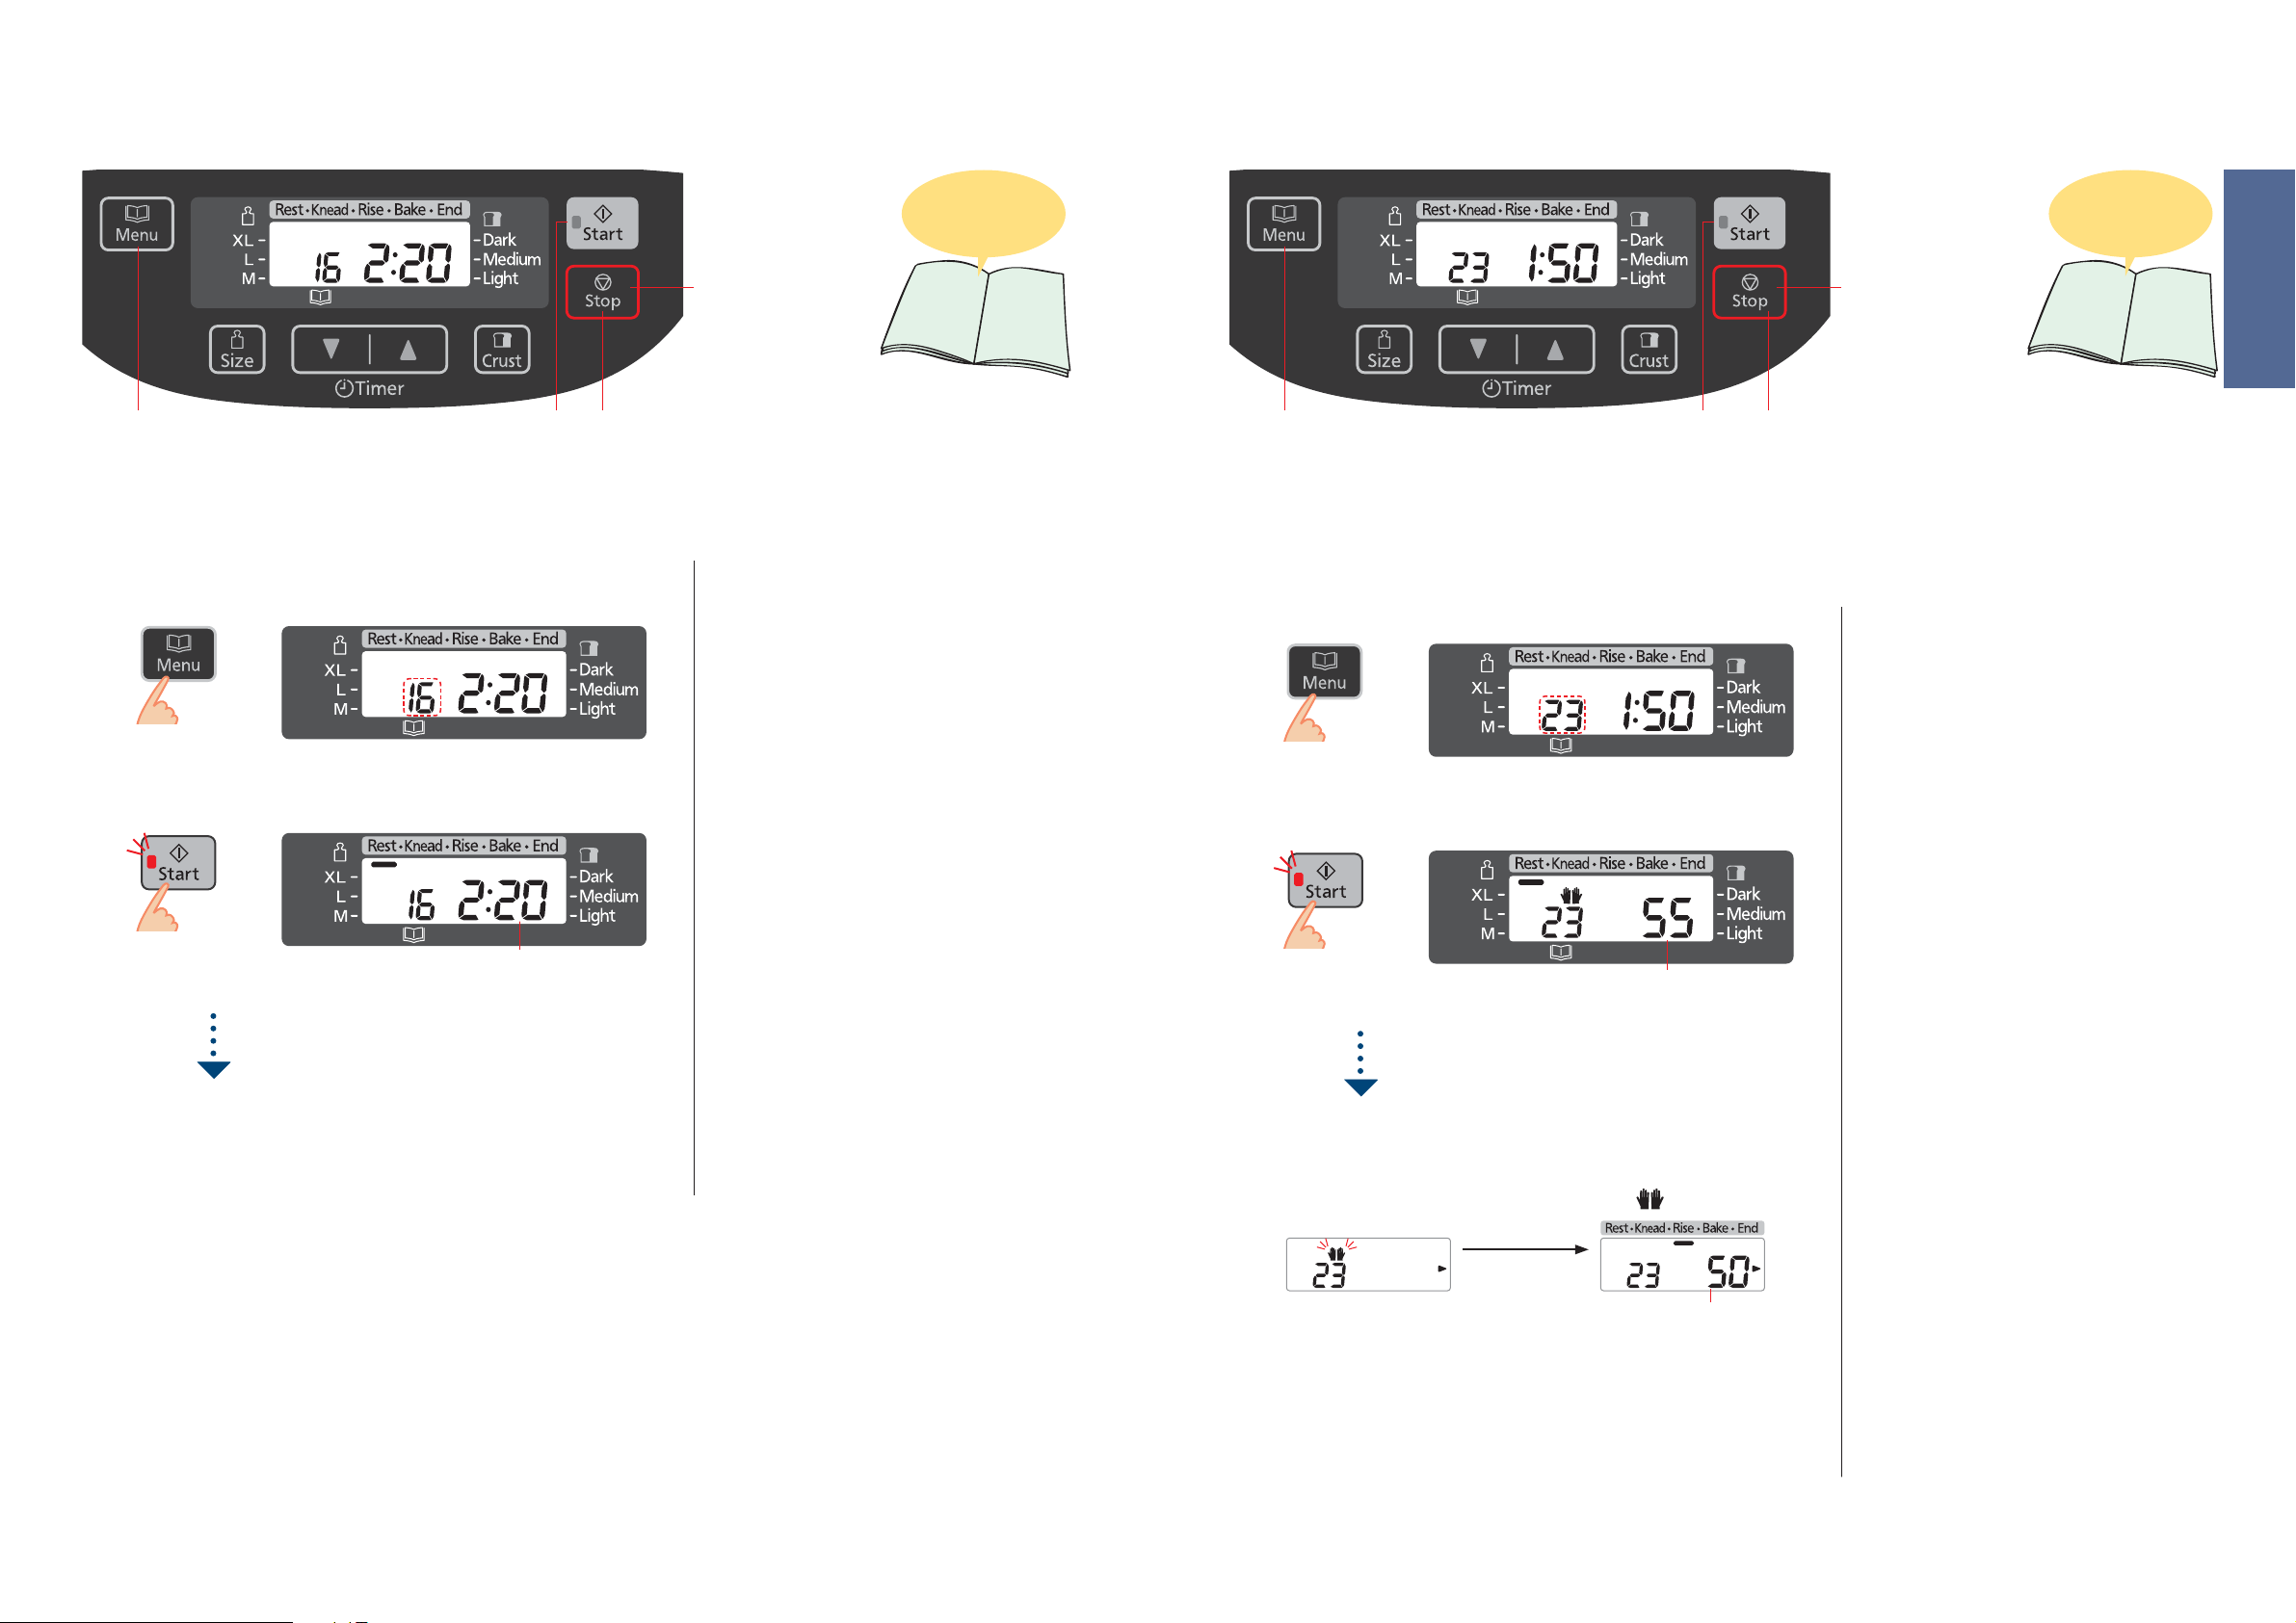
Making Dough
Making Brioche Dough
1
Preparations
(P. 14)
Select dough menu
(The display shows when menu ‘16’ is selected.)
1
Start the machine
Place the kneading blade into the bread pan.
Place the ingredients in the bread pan in the order listed in the recipe.
Set the bread pan into the main unit, and plug the machine into the socket.
2
Estimated time until the selected program is complete
The start light will come on.
Turn to P. 25 for
dough recipes
To cancel/stop once
started
(hold for more than
1 second)
32
Timer is not available on Dough menus
(except menu 22).
If you would like to add extra ingredients to your
dough, see P. 16.
For menus other than 22, 26 and 27, a ‘Rest’
process will begin immediately after starting,
followed by ‘Knead’ and ‘Rise’.
1
Preparations
(P. 14)
Select
Cut the butter for adding later for 1–2 cm cubes and keep them in fridge.
Set the kneading blade into the bread pan.
Place the ingredients in the bread pan in the order listed in the recipe.
Set the bread pan into the main unit, and plug the machine into the socket.
menu ‘23’
1
Start the machine
2
The start light will come on.
Time until adding the extra butter or ingredients
42, 3
To cancel/stop once
started
(hold for more than
1 second)
[Simple way to make brioche]
Add butter with other
ingredients at the beginning.
Cut the butter into 2 cm cubes and place them
into the bread pan at the same time as the other
ingredients.
Follow the steps shown on the left. However,
when the machine beeps on step 3 to add extra
butter, please leave as it is.
Time required for completion is 1 hr 50 minutes.
* When butter is added at the beginning, flavour,
texture and rising of bread are a little different from
the time bread is baked with extra butter added in
later.
A ‘Rest’ process will begin immediately after
starting, followed by ‘Knead’ and ‘Rise’.
Turn to P. 25 for
dough recipes
English
18
Press ‘Stop’ and remove dough
when machine beeps 8 times and the bar at ‘End’ flashes
3
The flashing start light will go off.
Shape the finished dough and allow it to rise for
the second time according to the recipe, then
bake in the oven.
Adding additional butter when the beep
3
sounds, then press ‘Start’ again
Complete placing the additional cubed butter while ‘ ’ is flashing.
After Start pad
is pressed
Display indicates remaining time until completion of the program
Press ‘Stop’ and remove dough
when machine beeps 8 times and the bar at ‘End’ flashes
4
The flashing start light will go off.
When adding extra ingredients such as raisins,
add them with the butter. (Use max. 150 g for
ingredients)
Even without pressing the Start pad, kneading
will continue after 5 min. It does not continue
kneading immediately, even if the Start pad is
pressed after adding butter or ingredients.
Do not add butter after display shows remaining
time. (P. 35)
Shape the finished dough and allow it to rise for
the second time according to the recipe, then
bake in the oven.
19
Page 11
Baking Cake
Making Jam
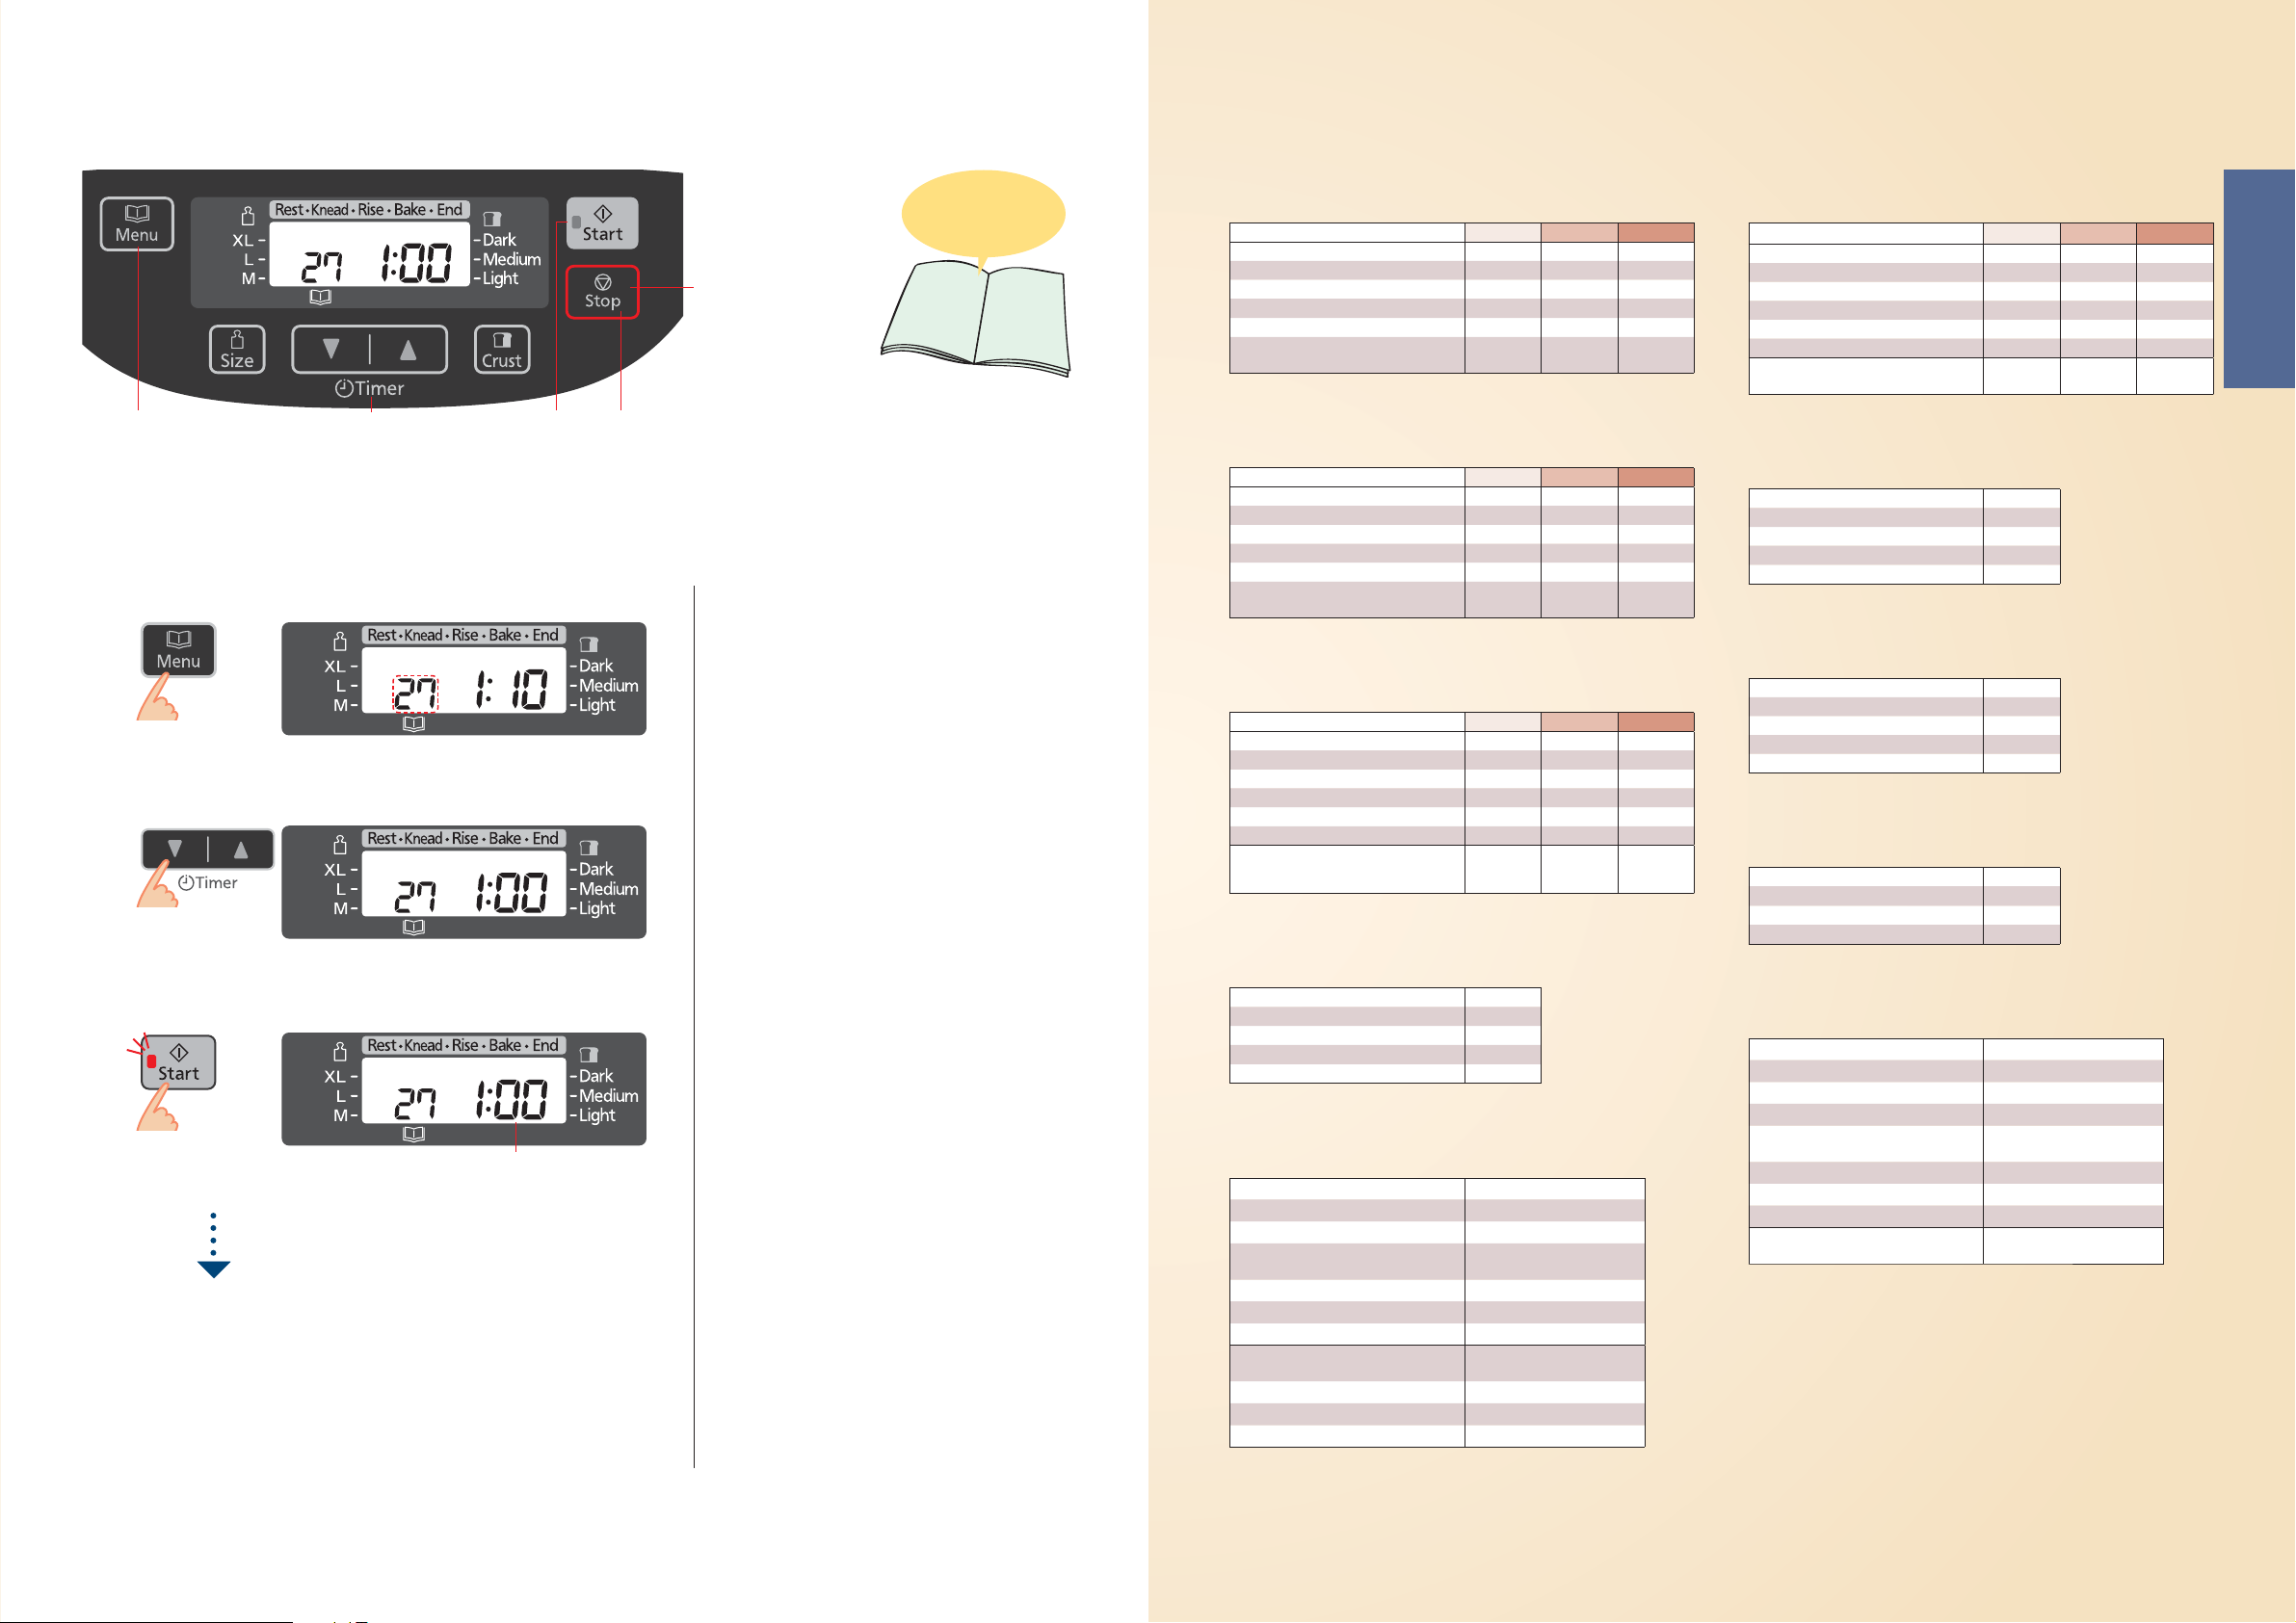
1
Preparations
Select menu ‘15’
Prepare the ingredients according to the recipe.
Line the bread pan with greaseproof paper
and pour in the mixed ingredients.
Set the bread pan into the main unit, and plug the machine
into the socket.
1
Set the baking time
2
Start the machine
3
Estimated time until the selected program is complete
The start light will come on.
2
3
4
Turn to P. 25 for
cake recipe
To cancel/stop once
started
(hold for more than
1 second)
•
Remove the kneading blade
•
Line with greaseproof paper. (Cake or tea bread
will burn if directly touches the bread pan.)
Timer is not available on menu 15.
(The Timer pad only sets the duration of the
baking time.)
1
Preparations
Select menu ‘26’
Prepare the ingredients according to the recipe.
Put the kneading blade into the bread pan.
Place the ingredients into the bread pan in the following order:
half of the fruits → half of the sugar →remainder of fruits → remainder of sugar.
Set the bread pan into the main unit, and plug the machine into the socket.
1
Set the cooking time
2
Start the machine
3
Estimated time until the selected program is complete
The start light will come on.
2
3
4
Turn to P. 29 for
jam recipes
To cancel/stop once
started
(hold for more than
1 second)
Timer is not available on menu 26.
(The Timer pad only sets the duration of the
cooking time.)
It is necessary to have an adequate amount of
sugar, acid, and pectin to make firm set jam.
Fruits with a high level of pectin set easily. Fruits
with less pectin do not set well.
Use freshly ripened fruits. Over or under ripe
fruits do not set firmly.
The recipes in this book make soft set jams.
This is due to lower levels of sugar.
Follow the recipe for the quantity for each
ingredient.
•
Do not increase or decrease the quantities
of fruits. It may cause the jam to boil over or
scorch.
•
Do not increase the quantity of sugar more than
half quantities of fruits.
It may cause boil over or scorch.
When decrease the quantity of sugar, jam does
not set firm.
* When the acidity of the fruit is strong, you can
decrease quantity of the lemon juice but if it is
decreased too much, jam does not set firm.
When the cooking time is short, fruit bits can
remain partially and the jam may become watery.
•
The jam will continue to set as it cools.
Be careful not to over cook.
English
20
Press ‘Stop’ when the machine beeps and the bar at
4
check that baking is complete, and
‘End’ flashes,
remove the bread pan
The flashing start light will go off.
If baking is not complete Repeat steps 1–3
(Additional cooking time can be made up to twice.
Each time should be within 50 minutes.
The timer will start again from 1 minute when the unit is hot.
Increase the time by pressing the timer pad as required.)
Take care!
It’s hot!
To check whether baking is complete, insert a
skewer into the centre of the cake or tea bread
– it is ready if there is no mixture stuck to the
skewer when you remove it.
Press ‘Stop’ and remove jam
when machine beeps 8 times and the bar at ‘End’ flashes
4
The flashing start light will go off.
If the cooking is not complete Repeat steps 1–3
(Additional cooking time can be made up to twice. Each time should be
within 10–40 minutes. The timer will start again from 1 minute when the unit
is hot. Increase the time by pressing the timer pad as required.)
Put the finished jam into the container as soon as
possible. Please take care of the burn when you
take out jam.
Jam can burn if it is left in the bread pan.
Store the jam in a cool, dark place. Due to the
lower levels of sugar the shelf life is not as long
as shop bought varieties. Once open, refrigerate
and consume shortly after opening.
21
Page 12
Making Compote
Bread Recipes
1
Preparations
2
Prepare the ingredients according to the recipe. (Remove the kneading blade.)
Place the ingredients into the bread pan in the following order:
fruits → sugar →liquid.
Set the bread pan into the main unit, and plug the machine into the socket.
3
Select menu ‘27’
1
Set the cooking time
2
Start the machine
3
Estimated time until the selected program is complete
The start light will come on.
Press ‘Stop’ and remove compote
when machine beeps 8 times and the bar at ‘End’ flashes
4
The flashing start light will go off.
If the cooking is not complete Repeat steps 1–3
(Additional cooking time can be made up to twice. Each time should be
within 10–40 minutes. The timer will start again from 1 minute when the unit
is hot. Increase the time by pressing the timer pad as required.)
4
Turn to P. 30 for
compote recipes
To cancel/stop once
started
(hold for more than
1 second)
Timer is not available on menu 27.
(The Timer pad only sets the duration of the
cooking time.)
Follow the recipe for the quantities for each
ingredient.
•
Do not increase or decrease the quantities of
fruits. It may cause the compote to boil over or
scorch.
WHITE BREAD
Select menu ‘01’ or ‘02’
strong white bread flour, type 550 400 g 500 g 600 g
teaspoons of salt 1
tablespoons of sugar 1 11⁄2 2
butter 20 g 30 g 40 g
water 280 mL 350 mL 420 mL
teaspoons of dry yeast
(teaspoons for BAKE RAPID option)
MLXL
1
⁄2 11⁄2 2
1
(2)
1
(2)
11⁄2
(21⁄2)
WHOLE WHEAT BREAD
Select menu ‘04’ or ‘05’
strong whole wheat bread flour 400 g 500 g 600 g
teaspoons of salt 1
tablespoons of sugar 1 11⁄2 2
butter 20 g 30 g 40 g
water 280 mL 350 mL 420 mL
teaspoons of dry yeast
(teaspoons for BAKE RAPID option)
MLXL
1
⁄2 11⁄2 2
1
(11⁄2)
1
(11⁄2)
11⁄4
(2)
WHOLE WHEAT RAISIN BREAD
Select menu ‘06’
strong whole wheat bread flour 400 g 500 g 600 g
teaspoons of salt 1
tablespoons of sugar 1 1
butter 20 g 30 g 40 g
water 280 mL 350 mL 420 mL
teaspoons of dry yeast 1 1 11⁄4
addition (place in raisin nut dispenser):
raisin 80 g 100 g 120 g
MLXL
1
⁄2 11⁄2 2
1
⁄2 2
FRENCH BREAD
Select menu ‘08’
strong white bread flour, type 550 300 g
teaspoons of salt 1
butter 20 g
water 220 mL
teaspoons of dry yeast
3
⁄4
PANNETTONE
Select menu ‘11’
strong white bread flour, type 550 400 g
tablespoons of sugar 4
teaspoons of salt 1
butter(cut into 2cm cubes and keep in
fridge)
egg (beaten) ;medium 2 (100 g)
milk 200 mL
teaspoons of dry yeast 1
additional butter
(cut into 1-2cm cubes and keep in fridge)
orange peel; chopped finely* 50 g
brown saltana* 50 g
dryed black currant* 50 g
* : added with additional butter
1
50 g
1
70 g
⁄2
⁄2
RAISIN BREAD
Select menu ‘03’
MLXL
strong white bread flour, type 550 400 g 500 g 600 g
teaspoons of salt 1
tablespoons of sugar 1 1
butter 20 g 30 g 40 g
water 280 mL 350 mL 420 mL
teaspoons of dry yeast 1 1 11⁄2
addition (place in raisin nut dispenser):
raisin
1
⁄2 11⁄2 2
80 g 100 g 120 g
1
⁄2 2
ITALIAN BREAD
Select menu ‘09’
strong white bread flour, type 550 400 g
teaspoons of salt 11⁄2
tablespoons of olive oil 11⁄2
water 260 mL
teaspoons of dry yeast 1
SANDWICH BREAD
Select menu ‘10’
strong white bread flour, type 550 380 g
tablespoons of sugar 2
butter 30 g
water 250 mL
teaspoons of dry yeast 1
GLUTEN FREE BREAD
Select menu ‘12’
water 430 mL
tablespoons of oil 1
gluten free bread mix 500 g
teaspoons of dry yeast 2
BASIC BRIOCHE
Select menu ‘11’
strong white bread flour, type 550 400 g
tablespoons of sugar 4
tablespoons of dry milk 2
teaspoons of salt 1
butter (cut into 2cm cubes and keep in
fridge)
egg (beaten) ;medium 2 (100 g)
water 180 mL
teaspoons of dry yeast 1
additional butter
(cut into 1-2cm cubes and keep in fridge)
50 g
1
70 g
⁄4
English
22 23
Page 13
Bread Recipes
Dough Recipes
SPELT WHITE BREAD
Select menu ‘13’
MLXL
spelt white flour 400 g 500 g 600 g
teaspoons of sugar 1
teaspoons of salt 1
butter 5 g 10 g 10 g
water 260 mL 340 mL 400 mL
teaspoons of
dry yeast
1
⁄2 22
1
⁄4 11⁄2 1
1
11
⁄4 11⁄2
3
⁄4
WHOLE SPELT BREAD
Select menu ‘13’
MLXL
spelt wholegrain flour 200 g 250 g 300 g
spelt white flour 200 g 250 g 300 g
teaspoons of sugar 1
teaspoons of salt 1
tablespoons of oil 2 3 3
water 250 mL 320 mL 380 mL
teaspoons of
dry yeast
1
⁄2 22
1
⁄4 11⁄2 1
1
11
⁄4 11⁄2
3
⁄4
RYE AND SPELT (forbid delay timer)
Select menu ‘13’
MLXL
spelt white flour 275 g 350 g 425 g
rye flour 125 g 150 g 175 g
teaspoons of sugar 1
teaspoons of salt 1
butter 5 g 10 g 10 g
plain yogult 120 g 150 g 180 g
water 180 mL 230 mL 270 mL
teaspoons of
dry yeast
1
⁄2 22
1
⁄4 11⁄2 1
11
1
⁄4 11⁄2
3
⁄4
SEEDED BUCKWHEAT AND SPELT
Select menu ‘13’
MLXL
spelt white flour 320 g 400 g 480 g
buckwheat flour 80 g 100 g 120 g
teaspoons of honey 1 1 1
teaspoons of salt 1
tablespoons of
sesami seed
tablespoons of linseed 11⁄2 2 2
tablespoons of
poppy seed
tablespoons of oil 2 3 3
water 250 mL 320 mL 380 mL
teaspoons of
dry yeast
1
⁄4 11⁄2 1
1
⁄2 22
1
1
⁄2 2 21⁄2
1
11
1
⁄4 11⁄2
1
⁄2
3
⁄4
1
⁄2
RICE AND SPELT WITH PINE NUT AND FRIED ONION
Select menu ‘14’
MLXL
spelt white flour 320 g 400 g 480 g
brown rice flour 80 g 100 g 120 g
teaspoons of sugar 1
teaspoons of salt 1
butter 5 g 10 g 10 g
water 260 mL 340 mL 400 mL
teaspoons of
dry yeast
addition (place in
raisin nut dispenser):
pine nut
tablespoons of
fried onion
1
⁄2 22
1
⁄4 11⁄2 1
1
11
40 g
3 4 5
⁄4 11⁄2
50 g
3
60 g
⁄4
LEMON AND POPPY SEED SPELT
Select menu ‘13’
MLXL
spelt white flour 400 g 500 g 600 g
teaspoons of sugar 1
teaspoons of salt 1
butter 5 g 10 g 10 g
grated zest from
lemon
lemon juice 20 mL 20 mL 30 mL
tablespoons of
poppy seed
water 250 mL 330 mL 380 mL
teaspoons of
dry yeast
1
⁄2 22
1
⁄4 11⁄2 1
111
23 3
1
11
⁄4 11⁄2
3
⁄4
FRUITY SPELT
Select menu ‘14’
MLXL
spelt white flour 400 g 500 g 600 g
teaspoons of sugar 1
teaspoons of salt 1
butter 5 g 10 g 10 g
teaspoons of
mixed spice
water 270 mL 350 mL 400 mL
teaspoons of
dry yeast
addition (place in
raisin nut dispenser):
mixed dried fruits 100 g
1
⁄2 22
1
⁄4 11⁄2 1
1
22
11
⁄2 3
1
⁄4 11⁄2
125 g
3
⁄4
150 g
BASIC DOUGH
Select menu ‘16’
strong white bread flour, type 550 500 g
teaspoons of salt 11⁄2
tablespoons of sugar 11⁄2
butter 30 g
water 310 mL
teaspoons of dry yeast 1
BASIC RAISIN DOUGH
Select menu ‘17’
strong white bread flour, type 550 500 g
teaspoons of salt 1
tablespoons of sugar 11⁄2
butter 30 g
water 310 mL
teaspoons of dry yeast 1
addition (place in raisin nut dispenser):
raisin 100 g
1
⁄2
FRENCH DOUGH
Select menu ‘21’
strong white bread flour, type 550 300 g
teaspoons of salt 1
butter 20 g
water 180 mL
teaspoons of dry yeast
3
⁄4
WHOLE WHEAT DOUGH
Select menu ‘18’
strong whole wheat bread flour 500 g
teaspoons of salt 2
tablespoons of sugar 1
butter 30 g
water 340 mL
teaspoons of dry yeast 1
1
⁄2
1
⁄2
WHOLE WHEAT RAISIN DOUGH
Select menu ‘19’
strong whole wheat bread flour 500 g
teaspoons of salt 2
tablespoons of sugar 1
butter 30 g
water 340 mL
teaspoons of dry yeast 1
addition (place in raisin nut dispenser):
raisin 100 g
1
⁄2
1
⁄2
Cake Recipe
CHERRY & MARZIPAN CAKE
Select menu ‘15’
golden caster sugar 50 g
butter 175 g
eggs 3
self-raising flour 225 g
glace cherries, chopped 100 g
marzipan, grated 75 g
milk 60 mL
toasted, flaked almonds 15 g
PIZZA DOUGH
Select menu ‘22’
strong white bread flour, type 550 450 g
teaspoons of salt 2
tablespoons of plant oil 4
water 240 mL
teaspoons of dry yeast 1
English
BRIOCHE DOUGH (CHOCOLATE CHIP BRIOCHE ROLL)
; for 12 rolls
Select menu ‘23’
strong white bread flour, type 550 400 g
tablespoons of sugar 4
teaspoons of salt 1
butter (cut into 2cm cubes and keep in
fridge)
egg (beaten) ;medium 3 (150 g)
milk 90 mL
tablespoons of rum (dark) 1
teaspoons of dry yeast 1
additional butter
(cut into 1-2cm cubes and keep in fridge)
chocolate chips* 120 g
* After removed dough, sprinkle the chocolate bits and fold the bottom one third up
and the top one third down. Then fold it in half.
70 g
1
50 g
⁄2
SPELT TABLE ROLL
; for 8 rolls
Select menu ‘24’
spelt white flour 500 g
teaspoons of sugar 1
teaspoons of salt 11⁄2
butter 10 g
water 310 mL
teaspoons of dry yeast 1
1
⁄2
1
⁄4
24 25
Page 14

Gluten Free Recipes
Making gluten free bread is very different from the normal way of producing bread.
It is very important if you are making gluten free bread for health reasons that you have consulted your doctor and follow the guidelines below.
• This program has been developed especially for certain gluten free mixes, therefore using your own mix may not produce such good results.
• When ‘gluten free’ is selected, the details for each recipe must be followed carefully. (Otherwise, the bread may not turn out well.)
There are two types of gluten-free baking mixtures; mixtures with low content of gluten and mixtures which do not consist of wheat and contain
no gluten. If you have to pick one out using this baking program, please consult your doctor beforehand.
• The baking results and appearance of the loaf may differ according to the type of mix.
Occasionally a loaf may have some flour remaining on the side.
The wheat free mixes can produce more variable results.
• Wait for the loaf to cool before slicing it for the better performance.
• The bread should be stored in a cool dry place and used within 2 days. If you will not be able to use up all the loaf within that time it can be put
into freezer bags, in convenient sized portions, and frozen.
Warning for the users who use this program for health reasons:
When using the gluten free program, make sure to consult your doctor or the Caeliac Association and only use the ingredients which
are suitable for your health conditions.
Panasonic will not be responsible for any consequences resulting from ingredients that have been used without professional
consultation.
It is very important to avoid cross contamination with flours that contain gluten if bread is being made for dietary reasons. Particular attention
must be paid to the cleaning of the bread pan and kneading blade as well as any utensils that are used.
For customers in Belgium
The gluten free recipes below have been developed using commercially prepared gluten free bread mixes of AVEVE.
It is available from chemists, health food stores and occasionally large supermarkets.
For more information about the products of AVEVE, please contact 0800/0229210.
GLUTEN FREE BREAD
Select menu ‘12’
water 320 mL
tablespoons of oil 1
gluten free flour 500 g
teaspoons of yeast 2
NOTE
You cannot select the size for this program.
GLUTEN FREE BREAD WITH EGG
Select menu ‘12’
water 100 mL
milk 180 mL
eggs 2
tablespoons of oil 1
gluten free flour 500 g
teaspoons of yeast 2
AVEVE Recipes
[01 Basic]
[02 Basic Rapid]
WHITE BREAD
Select menu ‘01’ or ‘02’
teaspoons of sugar 1 2 2
AVEVE ‘Surfina’ flour 400 g 500 g 600 g
water 250 mL 320 mL 380 mL
tablespoons of butter 1 1 1
teaspoons of salt 1 11⁄2 2
teaspoons of dry yeast
(teaspoons for BAKE RAPID option)
NOTE
In that case the bread will not rise as much and will be less soft.
MLXL
1
⁄2
3
⁄4
(11⁄2)
1
(13⁄4)
11⁄4
(2)
[04 Whole wheat]
[05 Whole wheat Rapid]
WHOLE WHEAT BREAD
Select menu ‘04’ or ‘05’
AVEVE fine whole wheat flour 300 g 400 g 450 g
AVEVE ‘Frans krokant’ flour 100 g 100 g 150 g
teaspoons of sugar 1 2 2
tablespoons of butter 1 1 2
teaspoons of salt 1 1 2
water 250 mL 320 mL 380 mL
teaspoons of dry yeast
(teaspoons for BAKE RAPID option)
NOTE
In that case the bread will not rise as much and will be less soft. This program is
more suitable for semi-whole wheat bread.
A little white flour is always added in the recipe described above. If you don’t want to
do that, substitute the white flour with whole wheat flour, but the bread will be smaller
and denser. If you add more white flour, use a little less water (since whole wheat
flour absorbs more water than white flour).
MLXL
1
(11⁄2)
11⁄4
(13⁄4)
11⁄2
(2)
[08 French]
FRENCH ROLLS
Select menu ‘08’
AVEVE ‘Frans krokant’ flour 400 g
water 260 mL
teaspoons of salt 1
tablespoons of butter 1
teaspoons of dry yeast 1
NOTE
For this program you cannot select the size or crust.
This recipe gives very light bread which rises well and does not keep for long.
[09 Italian]
ITALIAN BREAD
Select menu ‘09’
AVEVE ‘Frans krokant’ flour 400 g
water 240 mL
teaspoons of salt 1
tablespoons of olive oil 11⁄2
teaspoons of dry yeast
NOTE
For this program you cannot select the size or crust.
This recipe gives very light bread which rises well and does not keep for long.
[10 Sandwich]
BASIC SANDWICH
Select menu ‘10’
teaspoons of sugar 1
AVEVE ‘Surfina’ flour 400 g
water 250 mL
tablespoons of butter 1
teaspoons of salt 1
teaspoons of dry yeast
NOTE
For this program you cannot select the size or crust.
This recipe gives soft (quite moist) bread with a brown crust, ideal for making toast.
* These recipes are basically for customers in Belgium.
For further information, contact AVEVE on 0800/0229210.
English
1
⁄2
3
⁄4
3
⁄4
26 27
Page 15
AVEVE Recipes
* These recipes are basically for customers in Belgium.
For further information, contact AVEVE on 0800/0229210.
Jam Recipes
[16 Basic]
TART DOUGH (dough for 2 tarts)
Select menu ‘16’
sugar 60 g
pastry flour 500 g
milk 100 mL
eggs 3
butter 100 g
teaspoons of salt 1
teaspoons of dry yeast 2
1
⁄2
[18 Whole wheat]
WHOLE WHEAT DOUGH
Select menu ‘18’
tablespoons of sugar 1
AVEVE ‘Frans krokant’ flour 250 g
AVEVE ‘Boerebruin’ flour 250 g
water 280 mL
teaspoons of salt 1
teaspoons of dry yeast 2
Method
Divide the dough into balls of around 50 g. Then allow the dough to rise under a linen
cloth. Bake for 15-20 minutes at 220°C in a preheated oven.
1
⁄2
[15 Bake only]
Select menu 15. A baking time of 30 minutes is shown.
Keep pressing ‘timer’ to increase the baking time
(in 1 minute increments) up to 1 hour and 30 minutes.
RECIPE FOR CAKE
Select menu ‘15’
eggs 3
tablespoons of milk 3
soft butter 200 g
‘ANCO CAKE MIX’ pack 1
Method
Select menu 15 and enter 1 hour and 10 minutes on the timer.
After the beep, remove the bread pan from the Bread Maker and allow to cool. When
the bread pan is cool, take out the cake and allow it to cool on a grille.
[22 Pizza]
PIZZA DOUGH
Select menu ‘22’
AVEVE ‘Frans krokant’ flour 500 g
water 290 mL
teaspoons of salt 1
tablespoons of butter 1
teaspoons of dry yeast 2
Method
Roll out the pizza dough and put it in a pizza mould. Prick the dough with a fork.
Spread with tomato sauce and add desired toppings. Bake for 20-25 minutes at
220°C in a preheated oven.
1
⁄2
[26 Jam]
STRAWBERRY JAM
Select menu ‘26’
strawberries, finely chopped 600 g
sugar 400 g
powdered pectin 13 g
Place half of the fruit into the bread pan, then add half of the
sugar. Repeat with the remaining fruit and sugar.
1
Sprinkle the pectin onto the ingredients in the bread pan.
2
Select menu 26 and enter
1 hour and 40 minutes on the timer.
3
BLUEBERRY JAM
Select menu ‘26’
blueberries 700 g
sugar 400 g
Place half of the fruit into the bread pan, then add half of the
sugar. Repeat with the remaining fruit and sugar.
1
Select menu 26 and enter
1 hour and 50 minutes on the timer.
2
APPLE AND BLACKBERRY JAM
Select menu ‘26’
apples, grated or finely chopped 300 g
blackberries 400 g
sugar 300 g
powdered pectin 6 g
Place half of the fruit into the bread pan, then add half of the
sugar. Repeat with the remaining fruit and sugar.
1
Sprinkle the pectin onto the ingredients in the bread pan.
2
Select menu 26 and enter
1 hour and 40 minutes on the timer.
3
PEACH MELBA
Select menu ‘26’
peaches, finely chopped 500 g
raspberries 200 g
sugar 300 g
powdered pectin 8 g
Place half of the fruit into the bread pan, then add half of the
sugar. Repeat with the remaining fruit and sugar.
1
Sprinkle the pectin onto the ingredients in the bread pan.
2
Select menu 26 and enter
1 hour and 40 minutes on the timer.
3
PLUM JAM
Select menu ‘26’
plums, finely chopped 700 g
sugar 350 g
powdered pectin 6 g
Place half of the fruit into the bread pan, then add half of the
sugar. Repeat with the remaining fruit and sugar.
1
Sprinkle the pectin onto the ingredients in the bread pan.
2
Select menu 26 and enter
3
FROZEN BERRY JAM
Select menu ‘26’
frozen mixed berries 700 g
sugar 400 g
powdered pectin 10 g
Place half of the fruit into the bread pan, then add half of the
sugar. Repeat with the remaining fruit and sugar.
1
Sprinkle the pectin onto the ingredients in the bread pan.
2
Select menu 26 and enter
3
REDCURRANT AND CHILLI JAM
Select menu ‘26’
redcurrants, roughly mashed 300 g
medium red chilli, finely chopped 1-2
root ginger, finely grated 4 cm
oranges, juice and finely grated zest 2
sugar 150 g
powdered pectin 3 g
Place all the ingredients expect sugar and pectin into the
bread pan.
1
Add the sugar and sprinkle the pectin onto the ingredients in
the bread pan.
2
Select menu 26 and enter
3
APRICOT JAM
Select menu ‘26’
apricots, finely chopped 500 g
sugar 250 g
powdered pectin 6 g
Place half of the fruit into the bread pan, then add half of the
sugar. Repeat with the remaining fruit and sugar.
1
Sprinkle the pectin onto the ingredients in the bread pan.
2
Select menu 26 and enter
3
English
1 hour and 40 minutes on the timer.
1 hour and 40 minutes on the timer.
1 hour and 40 minutes on the timer.
1 hour and 30 minutes on the timer.
28 29
Page 16
Compote Recipes
Care & Cleaning
[27 Compote]
SPICED APPLE COMPOTE
Select menu ‘27’
apples, peeled, cored and diced 1000 g
cinnamon stick 1
cloves 2
lemon, zest only 1
lemon juice 2 tbsp
sugar 100 g
water 75 mL
Remove the kneading blade from the bread pan.
1
Place ingredients in the bread pan in the order listed above.
Pour water over ingredients.
2
Select menu 27 and enter
1 hour and 20 minutes on the timer.
3
Stir after cooking is completed.
4
RED FRUITS COMPOTE
Select menu ‘27’
plums, stone removed and cut in halves 300 g
cherries, stone removed 250 g
strawberries, stalk removed 250 g
golden caster sugar 75 g
water 75 mL
raspberries (added after cooking) 200 g
Remove the kneading blade from the bread pan.
1
Place ingredients in the bread pan in the order listed above.
Pour water over ingredients.
2
Select menu 27 and enter
1 hour on the timer.
3
Stir after cooking is completed.
4
Add raspberries.
5
RHUBARB AND GINGER COMPOTE
Select menu ‘27’
rhubarb, cut into 2 cm lengths 700 g
orange juice 2 tbsp
crystallised ginger, finely chopped 20 g
sugar 100 g
water 100 mL
Remove the kneading blade from the bread pan.
1
Place ingredients in the bread pan in the order listed above.
Pour water over ingredients.
2
Select menu 27 and enter
1 hour and 40 minutes on the timer.
3
Stir after cooking is completed.
4
30
MIXED BERRY COMPOTE
Select menu ‘27’
mixed berries
e.g. strawberries, raspberries, blueberries
sugar 75 g
water 2 tbsp
Remove the kneading blade from the bread pan.
800 g
1
Place ingredients in the bread pan in the order listed above.
Pour water over ingredients.
2
Select menu 27 and enter
1 hour on the timer.
3
Stir after cooking is completed.
4
APPLE SAUCE
Select menu ‘27’
bramley apples, peeled, cored and diced 1000 g
water 2 tbsp
Remove the kneading blade from the bread pan.
1
Place the apple in the bread pan. Pour water over
ingredients.
2
Select menu 27 and enter
1 hour and 20 minutes on the timer.
3
Stir after cooking is completed.
4
PEACH IN VANILLA SYRUP
Select menu ‘27’
peaches, stone removed and cut into
sugar 100 g
vanilla pod
water 125 mL
Remove the kneading blade from the bread pan.
1
⁄8 1000 g
1
⁄2
1
Place ingredients in the bread pan in the order listed above.
Pour water over ingredients.
2
Select menu 27 and enter
1 hour on the timer.
3
When cooking is complete, remove the peaches with a
slotted spoon. Carefully pour the syrup over the fruit.
4
Leave to cool.
Before cleaning, unplug your Bread Maker and allow
it to cool down.
To avoid damaging your Bread Maker...
Do not use anything abrasive!
(cleansers, scouring pads etc)
Do not wash any part of your
Bread Maker in the dishwasher!
Do not use benzine, thinners, alcohol, or bleach!
After rinsing the washable parts, wipe with cloth.
Always keep the Bread Maker parts clean and dry.
Bread pan &
kneading blade
Remove any leftover dough, and wash with
water.
If difficult to remove the kneading blade, soak
in warm water for 5-10 minutes. Do not
submerge the bread pan in water.
Measuring spoon & cup
Wash with water.
Not dishwasher safe
Lid
Wipe with a damp cloth
Steam vent
Wipe with a damp cloth
Body
Wipe with a damp cloth
Wipe gently to avoid
damaging the temperature
sensor.
English
Temperature sensor
•
The colour of the inside of the unit may change with use.
31
Page 17
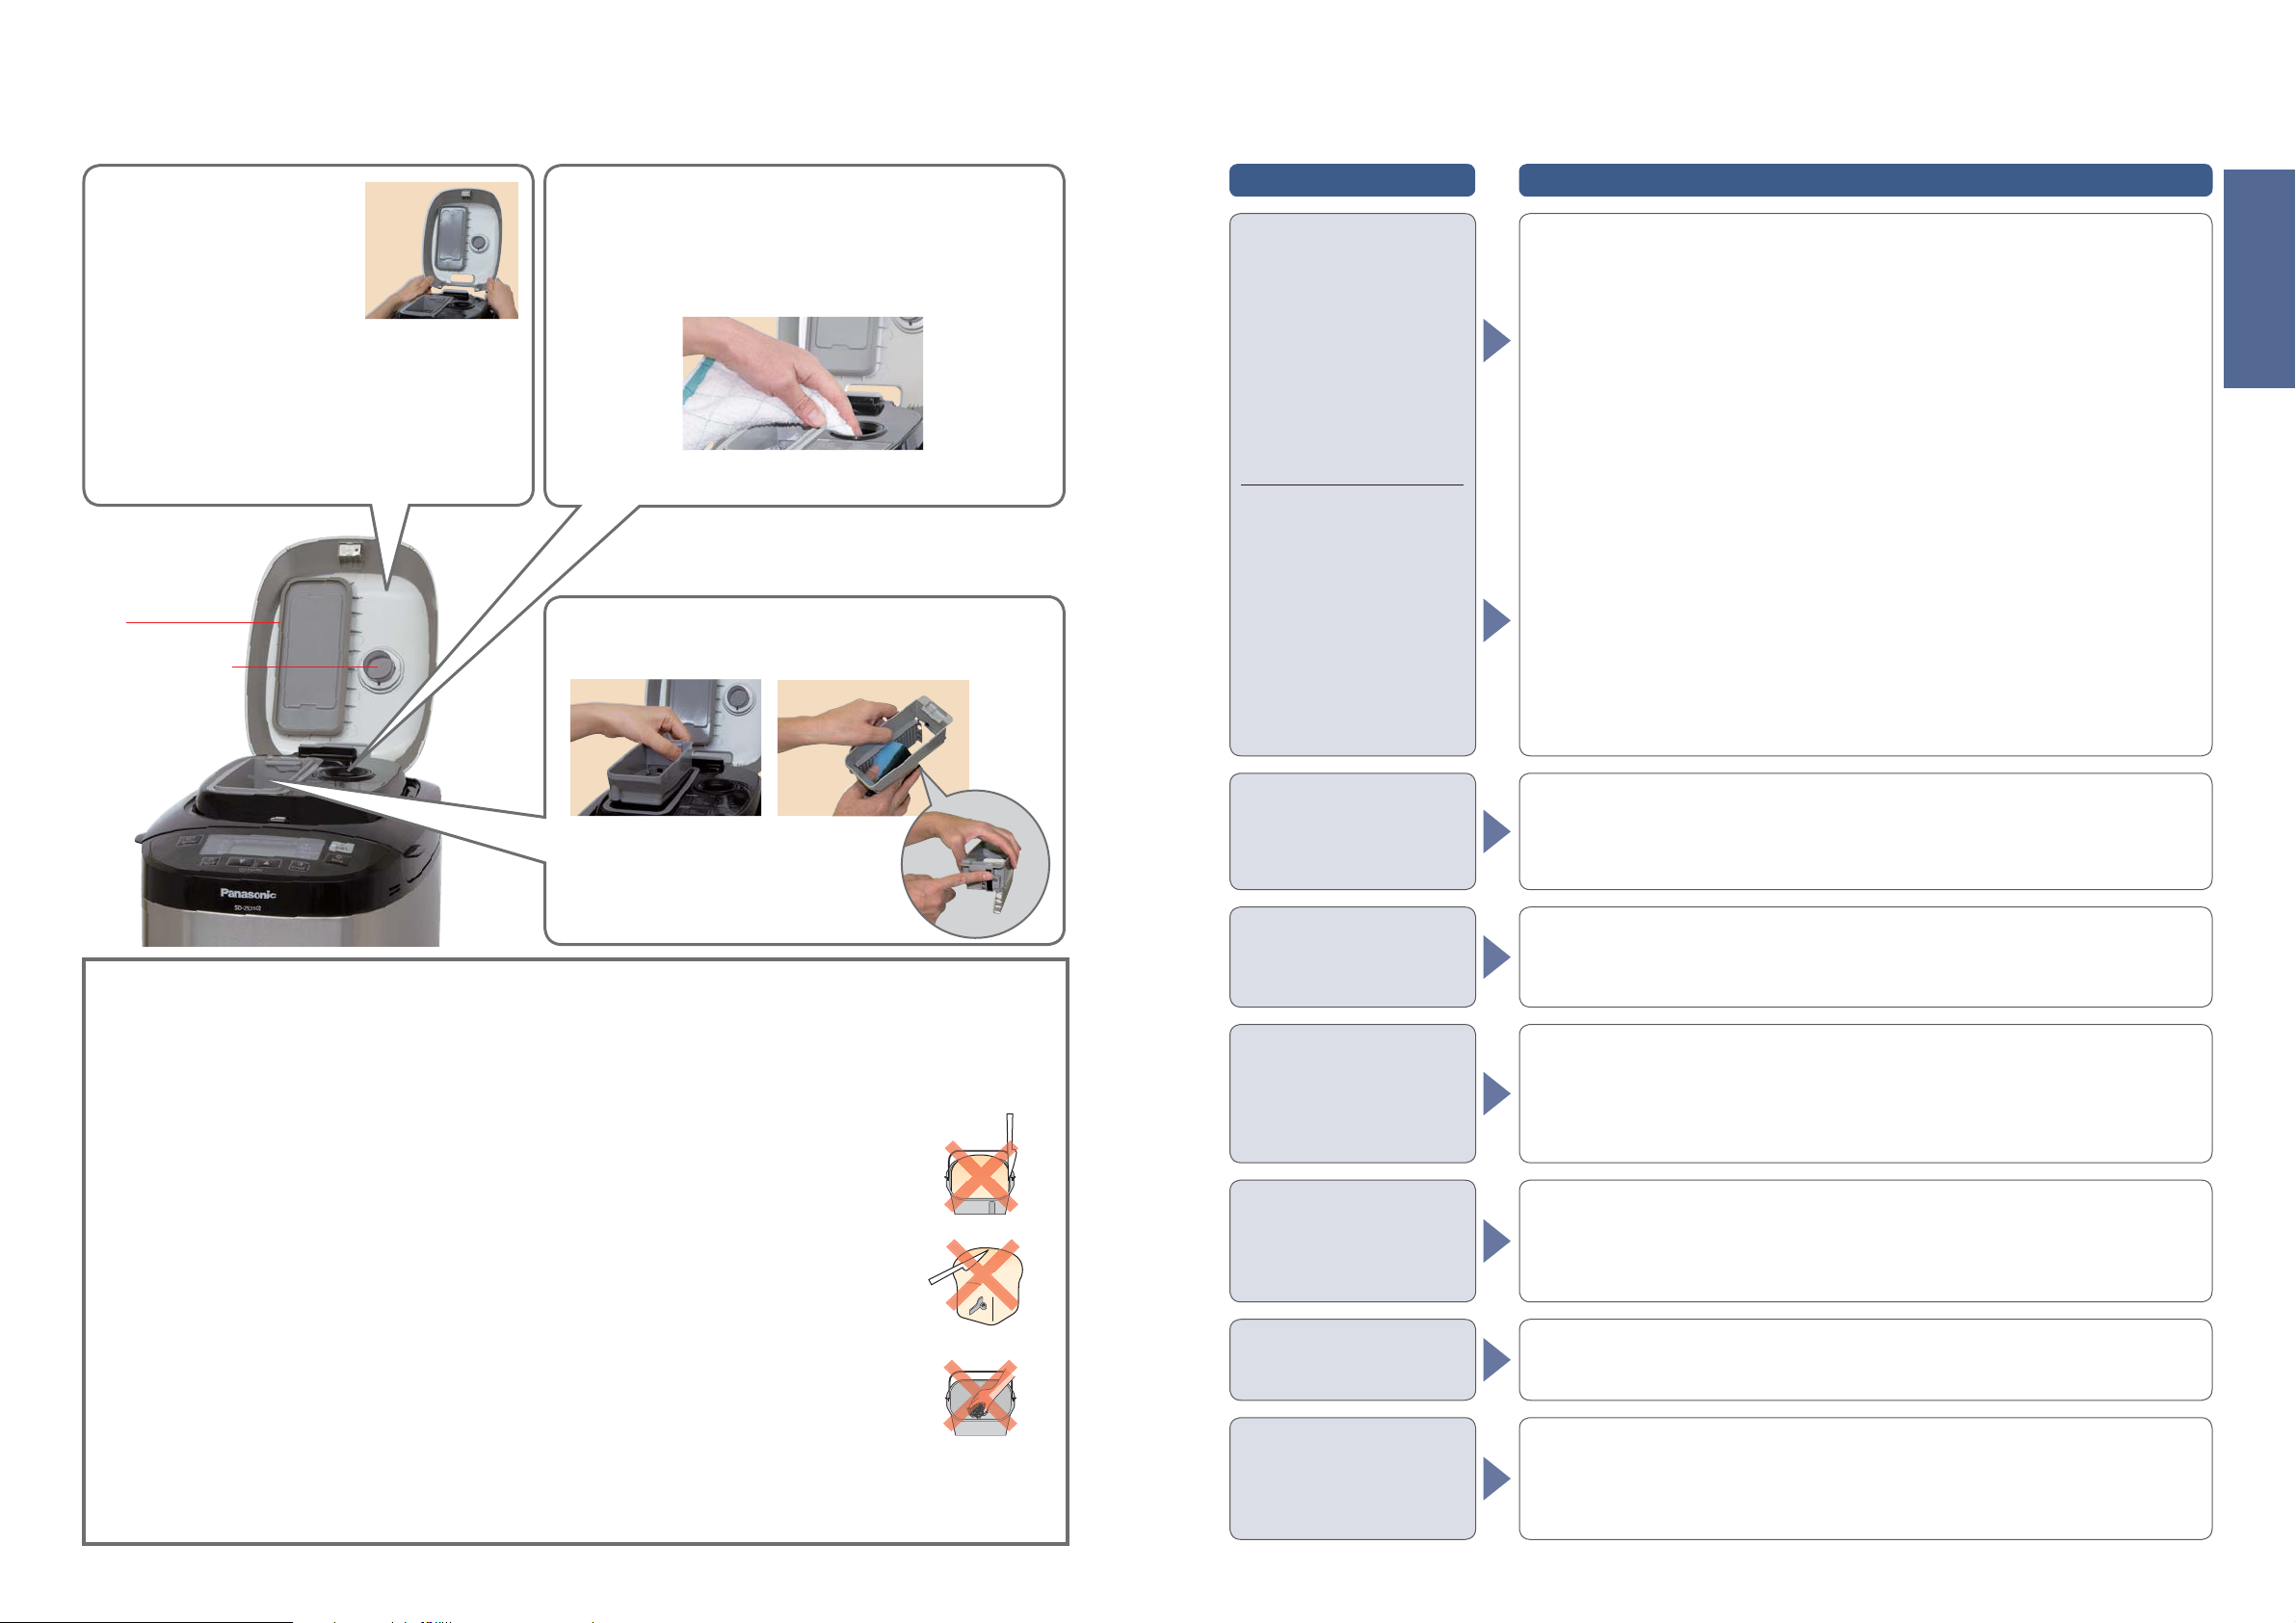
Care & Cleaning
Troubleshooting
Before calling for service, please check through this section.
Dispenser lid
Remove and wash with water.
Raise the dispenser lid to an
angle of approximately 75
degrees. Align the connections
and pull towards you to remove
or push carefully back at the same angle to attach.
(Wait until the machine has cooled down first, because
it will be very hot immediately after use)
Take care not to damage or pull the seal. (Damage
could lead to leakage of steam, condensation, or
deformation)
Seal
Wipe with dry cloth
when it is wet.
Yeast dispenser
Wipe with a damp cloth and dry naturally.
If wipe with a dry cloth, dry yeast will not drop into the bread pan
due to static.
Raisin nut dispenser
Remove and wash with water.
Problem
My bread does not rise
The top of my bread is uneven
Cause Action
[All bread]
The quality of the gluten in your flour is poor, or you have not used strong flour. (Gluten quality
can vary depending on temperature, humidity, how the flour is stored, and the season of
harvest)
Try another type, brand or another batch of flour.
The dough has become too firm because you haven’t used enough liquid.
Stronger flour with higher protein content absorbs more water than others, so try adding an
extra 10-20 mL of water.
You are not using the right type of yeast.
Use a dry yeast from a sachet, which has ‘instant yeast’ written on it.
This type does not require pre-fermentation.
You are not using enough yeast, or your yeast is old.
Use the measuring spoon provided. Check the yeast’s expiry date. (Keep in fridge)
The yeast has touched the liquid before kneading.
Check that you have put in the ingredients in the correct order according to the instructions.
(P. 14)
You have used too much salt, or not enough sugar.
Check the recipe and measure out the correct amounts using the measuring spoon provided.
Check that salt and sugar is not included in other ingredients.
[Speciality bread]
Einkorn wheat was used when baking speciality bread and/or a lot of flour other than spelt flour
were used.
The spelt flour should be up to 60% of the entire flour when you use more than two kinds of
flour other than spelt. The rye and the rice flour should be up to 40% of the entire flour and
buckwheat flour should be up to 20% of the entire flour.
English
Wash after each use to remove any residue.
To protect the non-stick finish
Bread pan and kneading blade are coated with a non-stick finish to avoid stains and to make it easier when
removing bread.
To avoid damaging it, please follow the instructions below.
• Do not use hard utensils such as a knife or a fork when removing the bread from the bread pan.
When you have hard time taking out the bread from the bread pan, see P. 35.
•
Ensure that the kneading blade is not embedded in the bread loaf before slicing it.
If it is embedded, wait for the loaf to cool and remove it.
(Do not use hard or sharp utensils such as a knife or a fork.)
Be careful not to get burns as the kneading blade may still be hot.
•
Use the soft sponge when cleaning the bread pan and the kneading blade.
Do not use anything abrasive such as cleansers or scouring pads.
My bread is full of air holes
My bread seems to have
collapsed after rising.
My bread has risen too much.
Why is my bread pale and
sticky?
There is excess flour around the
bottom and sides of my bread.
You have used too much yeast.
Check the recipe and measure out the correct amount using the measuring spoon provided.
You have used too much liquid.
Some types of flour absorb more water than others, so try using 10-20 mL less water.
The quality of your flour isn’t very good.
Try using a different brand of flour.
You have used too much liquid.
Try using 10-20 mL less water.
You have used too much yeast/water.
Check the recipe and measure out the correct amount using the measuring spoon (yeast)/
cup (water) provided.
Check that excess water amount is not included in other ingredients.
You have not used enough flour.
Carefully weigh the flour using scales.
You are not using enough yeast, or your yeast is old.
Use the measuring spoon provided. Check the yeast’s expiry date. (Keep in fridge)
There has been a power failure, or the machine has been stopped during breadmaking.
The machine switches off if it is stopped for more than 10 minutes. You will need to remove
the bread from the bread pan and start again with new ingredients.
You have used too much flour, or you are not using enough liquid.
Check the recipe and measure out the correct amount using scales for the flour or the
measuring cup provided for liquids.
32
Hard, coarse or large ingredients such as flours with whole or ground grains, sugar, or the addition of nuts and seeds may damage
the non-stick finish of the bread pan. If using large chunk of ingridient, break into small pieces. Please make sure to follow the recipe
quantities stated.
Why has my bread not mixed
properly?
You haven’t put the kneading blade in the bread pan.
Make sure the kneading blade is in the bread pan before you put in the ingredients.
There has been a power failure, or the machine has been stopped during breadmaking.
The machine switches off if it is stopped for more than 10 minutes. You might be able to start
the loaf again, though this might give poor results if kneading had already begun.
33
Page 18

Troubleshooting
Before calling for service, please check through this section.
Problem
My bread has not been baked.
Dough leaks out of the bottom of
the bread pan.
Cause Action
The dough menu was selected.
The dough menu does not include a baking process.
There has been a power failure, or the machine has been stopped during breadmaking.
The machine switches off if it is stopped for more than 10 minutes. You can try baking the
dough in your oven if it has risen and proved.
There is not enough water and the motor protection device has activated.
This only happens when the unit is overloaded and excessive force is applied to the motor.
Visit place of purchase for a service consultation. Next time, check the recipe and measure
out the correct amount using the measuring cup provided.
You have forgotten to attach the kneading blade.
Make sure you attach the kneading blade first (P. 14).
The kneading mounting shaft in the bread pan is stiff and does not rotate.
If the kneading mounting shaft does not rotate when the kneading blade is attached, you will need
to replace the kneading mounting shaft unit. (Consult the place of purchase or a Panasonic service
centre.)
A small amount of dough will escape through the ventilation holes (so that it does not stop
the rotating parts from rotating). This is not a fault, but check occasionally that the kneading
mounting shaft rotate properly.
If the kneading mounting shaft does not rotate when the kneading blade is attached, you
will need to replace the kneading mounting shaft unit. (Consult the place of purchase or a
Panasonic service centre.)
(Bottom of bread pan)
Kneading
mounting shaft
Kneading
mounting shaft unit
Kneading mounting shaftVentilation holes (4 in total)
Part no. ADA29E165
Problem
There is excess oil on the
bottom of brioche.
The crust is oily.
My bread has big holes.
My brioche did not turn out well
when using bread mix.
The bread does not come out.
When cooking jam, it has
scorched or the kneading blade
fixes and it doesn’t come off.
The jam has boiled over.
Cause Action
Did you add butter within 5 min of the beep?
Do not put butter when display show remaining time until ready. (P. 17)
Butter flavor might be weak, but it can bake.
Try following things.
It might be baked better if yeast is decreased a little when using menu 11 or 23. (If adding
yeast separately.)
Follow the recipe on the bread mix, but the bread mix should be between 350-500 g.
Place the dry yeast (If adding yeast separately) in the yeast dispenser, and dry ingredients
and butter in the bread pan. Then place water. When adding the extra ingredients, add them
later. (P. 17 or 19)
The completion is different according to recipe on the bread mix.
If the bread cannot be easily removed from the bread pan, leave the bread pan for
5–10 minutes to cool, making sure that it is not left unattended where somebody or something
may get burnt.
After that, shake the bread pan several times using oven gloves.
(Hold the handle down so that it does not get in the way of bread.)
The amount of the fruit was a too little, or the amount of sugar is too much.
Place the bread pan in the sink and half fill the bread pan with warm water. Leave the
bread pan to soak until the cooked on mixture or kneading blade loosens. After scorching is
relieved, wash it with a soft sponge etc. Please be aware of the hot water.
Too much fruit or sugar has been used.
Only use the amounts of fruit and sugar specified in the recipes on P. 29.
English
The sides of my bread have
collapsed and the bottom is
damp.
The kneading blade rattles.
I can smell burning while the
bread is baking.
Smoke is coming out of the
steam vent.
The kneading blade stays in the
bread when I remove it from the
bread pan.
The crust creases and goes soft
on cooling.
How can I keep my crust crispy?
My bread is sticky and slices
unevenly.
You have left the bread in the bread pan for too long after baking.
Remove the bread promptly after baking.
There has been a power failure, or the machine has been stopped during breadmaking.
The machine switches off if it is stopped for more than 10 minutes. You may try baking the
dough in your oven.
This is because the kneading blade fits loosely on the kneading mounting shaft. (This is not a fault)
Ingredients may have been spilt on the heating element.
Sometimes a little flour, raisins or other ingredients may be flicked out of the bread pan during
mixing. Simply wipe the heating element gently after baking once the Bread Maker has cooled down.
Remove the bread pan from the Bread Maker to place ingredients.
The dough is a little stiff.
Allow the bread to cool completely before removing the kneading blade carefully.
Some types of flour absorb more water than others, so try adding an extra 10-20 mL of water next time.
Crust has built up underneath the kneading blade.
Wash the kneading blade and its spindle after each use.
The steam remaining in the bread after baking can pass into the crust and soften it slightly.
To reduce the amount of steam, try using 10-20 mL less water or half the amount of sugar.
To make your bread crispier, you could use the menu 08 or the ‘Dark’ crust colour option, or
even bake it in the oven at 200°C/gas mark 6 for an extra 5-10 minutes.
It was too hot when you sliced it.
Allow your bread to cool on rack before slicing to release the steam.
Jam is too runny and not firmly
set.
Can frozen fruits be used?
What kinds of sugar can we use
on jam?
When making jam, can we use
fruits are pickled in alcohol?
The fruit has collapsed when
making fruit in syrup.
Dry yeast will not drop into the
bread pan.
The fruit was under or over ripe.
Sugar was decreased too much.
Cooking time was insufficient.
Fruit with a low pectin content was used.
Use the runny jam as a sauce for desserts.
Leave the jam to cool completely. The jam will continue to set as it cools.
It is possible to use them.
White caster and granulated can be used.
Do not use brown sugar, diet sugar, and low calorie sugar or artificial sweetener.
Do not use them. The quality is not satisfactory.
The cooking time was too long. The fruit may have been over ripe.
The timing of yeast dispenser activation is different depending on the menu program and room
temperature.
Yeast dispenser is wet, or there may be a static build up.
Wipe with a damp cloth and dry naturally.
Dry yeast is damped.
Use new dry yeast.
Extra ingredients are not mixed
properly in brioche.
34
Some of the bread mix dough is harder to mixed extra ingredients in or to flick out some of them.
Decreased the extra ingredients into half.
35
Page 19
Troubleshooting
Before calling for service, please check through this section.
Sicherheitshinweise
Bitte befolgen Sie diese Anweisungen.
Problem
appears on the display.
01 appears on the display.
H01–H02 appears on the
display.
U50 appears on the display.
Cause Action
There has been a power failure for approx. 10 minutes (the plug has been accidentally pulled
out, or the breaker has been activated), or there is another problem with the power supply.
The operation will not be affected if the problem with the power supply is only momentary.
The Bread Maker will operate again if its power is restored within 10 minutes, but the end
result may be affected.
There has been a power failure for a certain amount of time (differs depending on the
circumstances - e.g. mains power failure, unplugging, malfunctioning fuse or breaker).
Remove the dough and start again using new ingredients.
The display indicates a problem with the Bread Maker.
Consult the place of purchase or a Panasonic service centre.
The unit is hot (above 40°C/105°F). This may occur with repeated use.
Allow the unit to cool down to below 40°C/105°F before using it again (U50 will disappear).
Um Unfälle oder Verletzungen des Benutzers und anderer Personen und Sachschäden zu vermeiden, befolgen Sie bitte
folgende Anweisungen.
Die folgenden Symbole weisen auf das mögliche Ausmaß der Folgen unsachgemäßer
Bedienung hin.
Warnung:
Die Symbole werden wie folgt kategorisiert und erläutert:
Dieses Symbol weist auf ein Verbot hin.
Weist auf die Möglichkeit schwerer
Verletzungen oder Tod hin.
Achtung:
Dieses Symbol weist auf eine erforderliche
Anweisung hin, die befolgt werden muss.
Weist auf die Möglichkeit von
Verletzungen oder Sachschäden hin.
English
Deutsch
Warnung
Verwenden Sie das Gerät nicht, wenn das Netzkabel oder der Netzstecker
beschädigt oder der Netzstecker nur lose in der Netzsteckdose steckt.
(Es besteht die Gefahr von elektrischem Schlag oder Brand aufgrund von Kurzschluss.)
Wenn die Netzleitung beschädigt ist, muss sie vom Hersteller, einem Servicebeauftragten oder einer ähnlich
qualifizierten Person ersetzt werden, um Gefahren zu vermeiden.
Beschädigen Sie nicht das Netzkabel oder den Netzstecker.
(Es besteht die Gefahr von elektrischem Schlag oder Brand aufgrund von Kurzschluss.)
Folgende Aktionen sollten auf keinen Fall ausgeführt werden. (Modifizieren des Kabels, Verlegen des
Kabels in der Nähe von Heizelementen, Verbiegen, Verdrehen, Ziehen des Kabels, Platzieren von schweren
Gegenständen auf dem Kabel und Bündelung des Kabels.)
Das Netzkabel darf nicht mit feuchten Händen eingesteckt oder getrennt werden.
(Es besteht die Gefahr von elektrischem Schlag.)
Überschreiten Sie nicht die Netzspannung, und verwenden Sie keine andere
Wechselstromversorgung, die nicht den Angaben auf dem Gerät entspricht.
(Es besteht die Gefahr von elektrischem Schlag oder Brand.)
●
Vergewissern Sie sich, dass die Spannung für das Gerät der des örtlichen Stromnetzes entspricht.
●
Werden anderen Geräte an derselben Netzsteckdose angeschlossen, kann dies zu elektrischer Überhitzung
führen.
Stecken Sie den Netzstecker fest ein.
(Andernfalls besteht die Gefahr von elektrischem Schlag und Brand durch die Wärmeentwicklung im Bereich
des Steckers.)
Reinigen Sie den Netzstecker regelmäßig.
(Bei verschmutztem Netzstecker kann die Isolierung aufgrund von Feuchtigkeits- und Flusenbildung
beeinträchtigt sein. Es besteht Brandgefahr.)
Ziehen Sie den Netzstecker, und reinigen Sie ihn mit einem trockenen Tuch.
36
37
Page 20
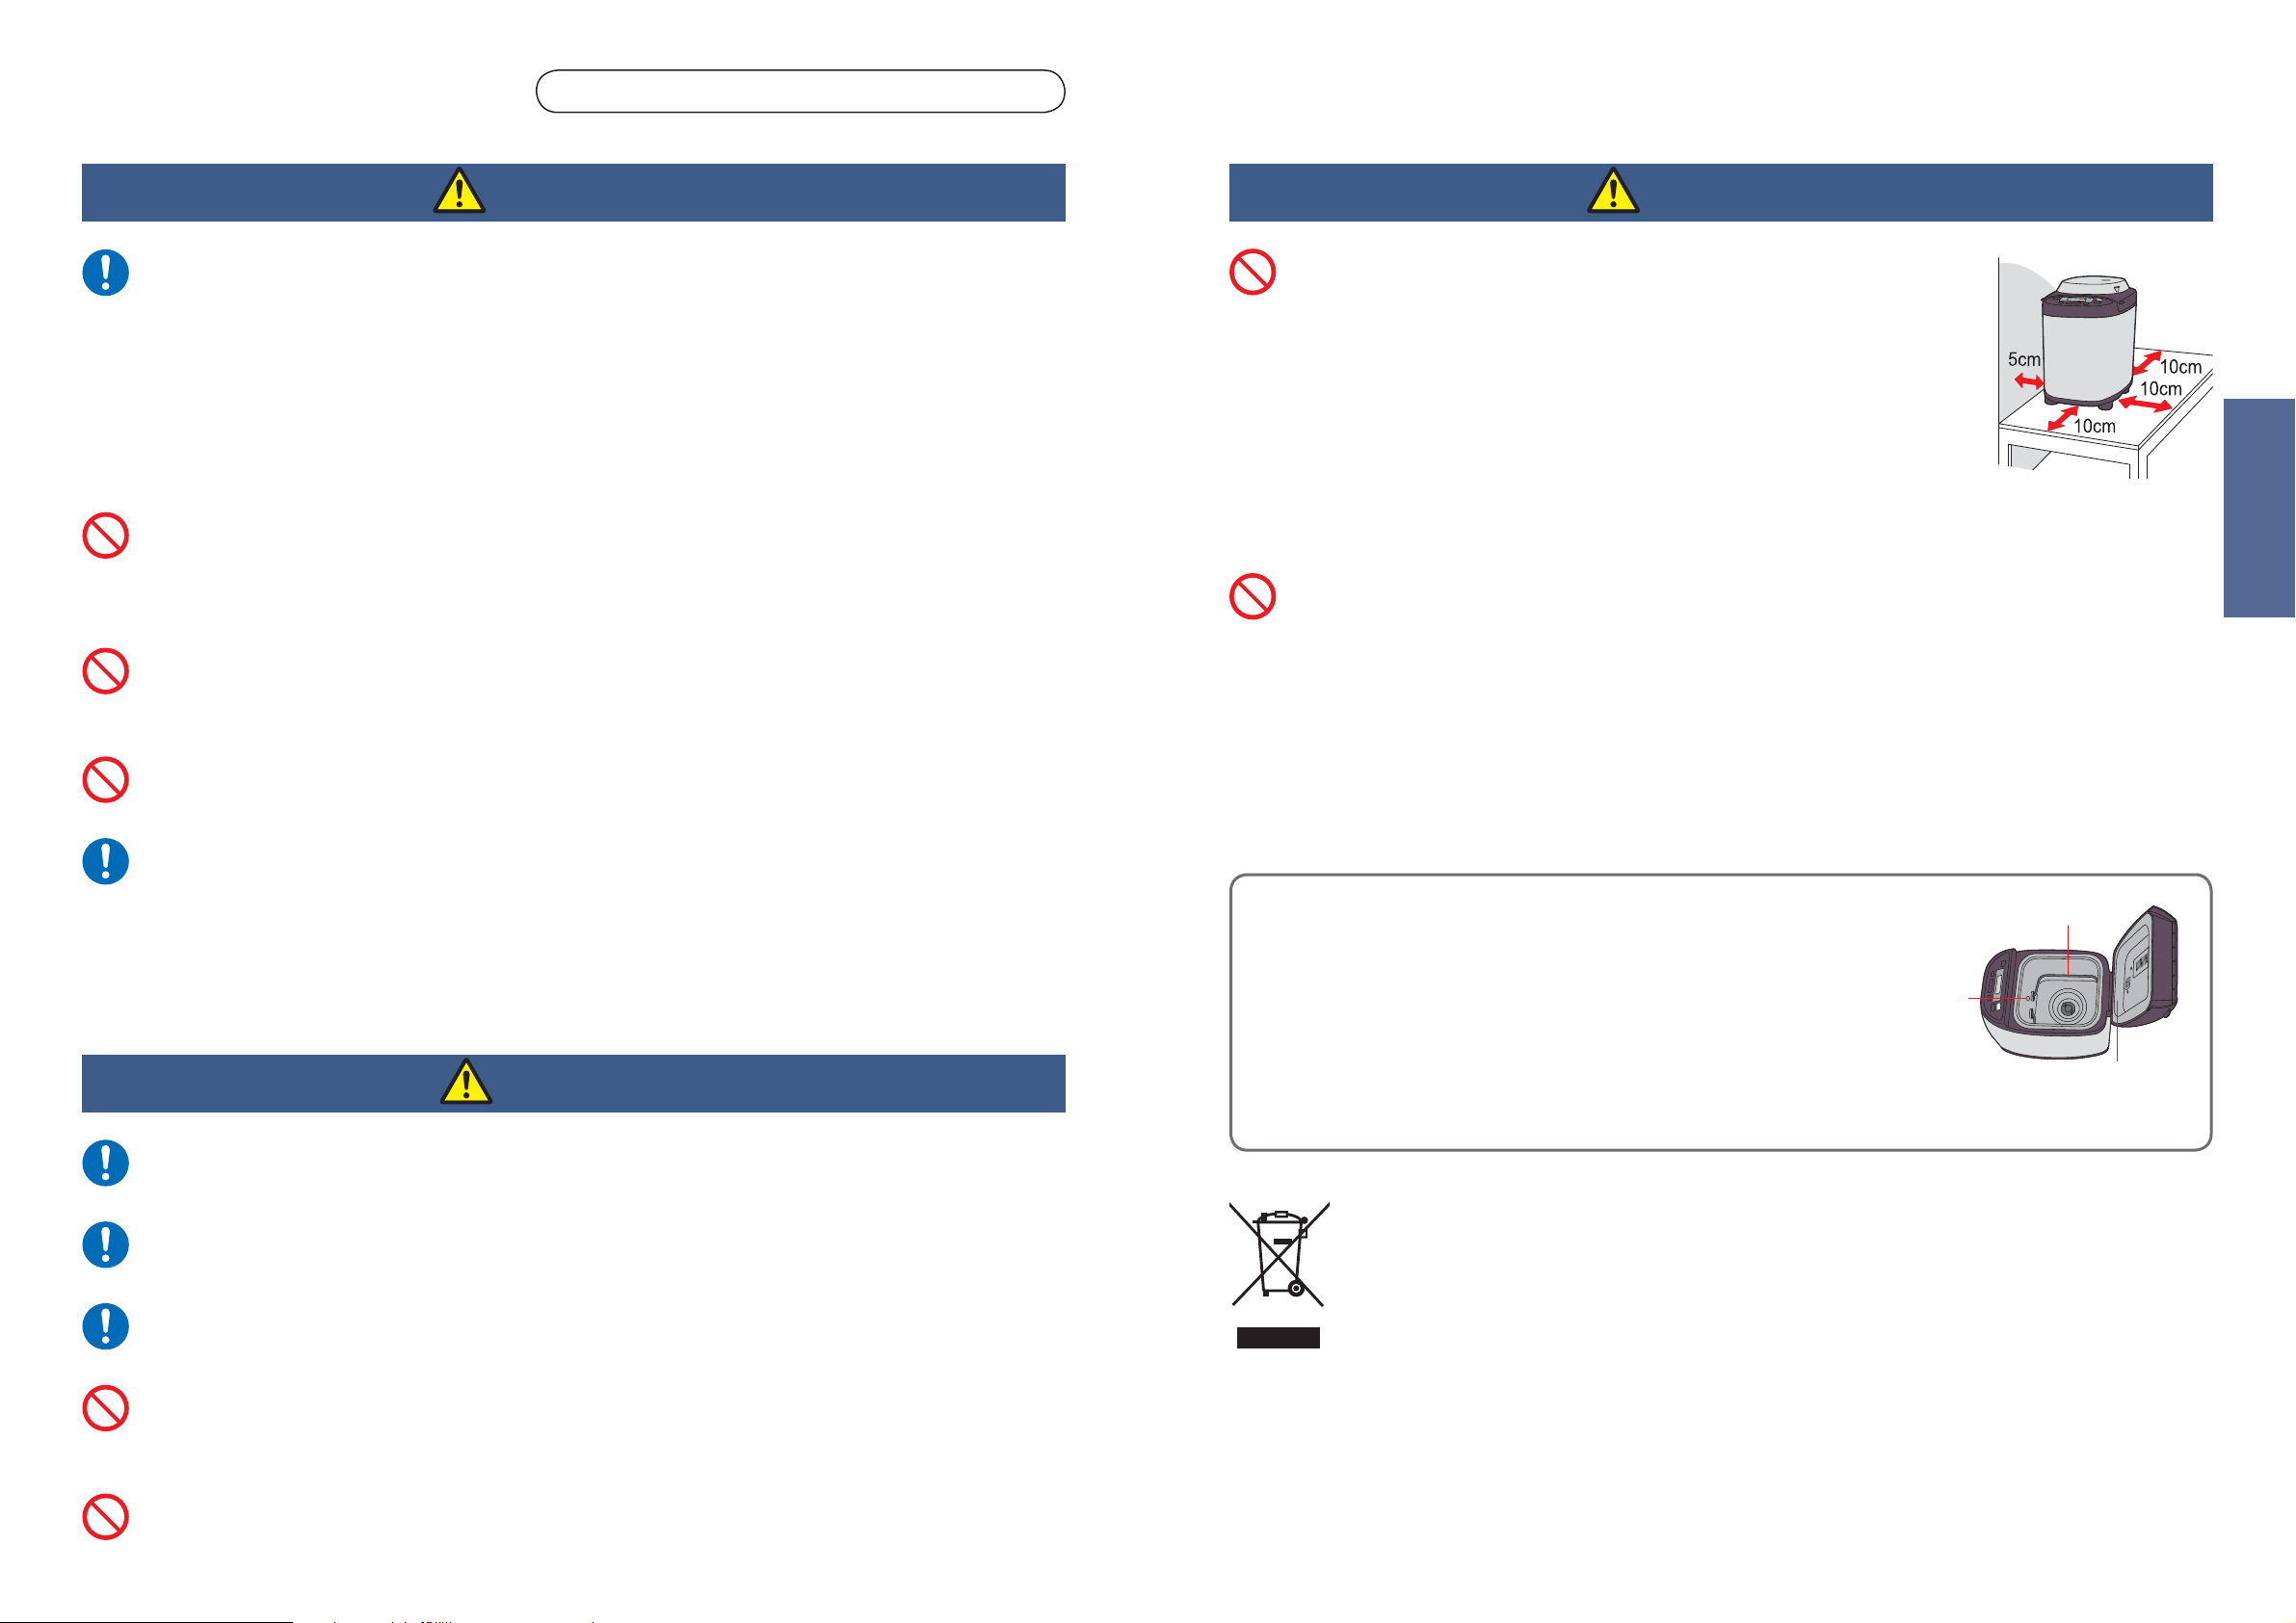
Sicherheitshinweise
Bitte befolgen Sie diese Anweisungen.
Warnung
Sollte das Gerät nicht mehr ordnungsgemäß funktionieren, verwenden Sie es nicht
mehr, und ziehen Sie den Netzstecker.
(Es besteht die Gefahr von Rauchentwicklung, Brand, elektrischem Schlag oder Verbrennungen.)
z. B. bei Fehlfunktionen oder Ausfall
●
Der Netzstecker und das Netzkabel werden ungewöhnlich heiß.
●
Das Netzkabel ist beschädigt, oder die Stromversorgung ist ausgefallen.
●
Die Gerätebasis ist verformt oder ungewöhnlich heiß.
●
Bei der Verwendung des Geräts treten ungewöhnliche Drehgeräusche auf.
Trennen Sie sofort das Gerät vom Netz, und wenden Sie sich an den Verkäufer des Geräts oder an ein Panasonic Servicecenter,
um das Gerät überprüfen und reparieren zu lassen.
Verwenden Sie das Gerät nicht an folgenden Orten.
●
Stellen Sie den Brotbackautomaten in mindestens 10 cm (4 Zoll) Abstand von
der Plattenkante auf eine feste, trockene, saubere, flache und wärmebeständige
Arbeitsplatte.
(Es besteht die Gefahr, dass das Gerät abrutscht und herunterfällt.)
●
Stellen Sie das Gerät nicht auf eine instabile Fläche, auf Elektrogeräte, wie z. B.
einen Kühlschrank, oder auf Stoffe, wie z. B. ein Tischtuch.
(Es besteht Sturz- oder Brandgefahr.)
●
Während des Backvorgangs heizt sich das Gehäuse auf. Der Brotbackautomat
Achtung
Deutsch
sollte mindestens 5 cm (2 Zoll) von Wänden oder anderen Gegenständen entfernt aufgestellt werden.
Die Dampfabzugsöffungen dürfen während der Verwendung nicht berührt, blockiert
oder abgedeckt werden.
(Es besteht die Gefahr von Verbrennungen.)
●
Achten Sie insbesondere auf Kinder.
(Es besteht die Gefahr von Verfärbung oder Verformung.)
Berühren Sie während der Verwendung oder direkt nach dem Backen/Kochen keine
heißen Bereiche wie die Backform, die Innenseite des Geräts, das Heizelement
oder die Innenseite des Deckels.
Demontieren, reparieren oder modifizieren Sie niemals dieses Gerät.
(Es besteht die Gefahr von Brand, elektrischem Schlag oder Verletzungen.)
Wenden Sie sich an den Verkäufer oder ein Panasonic Servicecenter.
Tauchen Sie das Gerät nicht in Wasser, und bespritzen Sie es nicht mit Wasser.
(Es besteht die Gefahr von elektrischem Schlag oder Brand aufgrund von Kurzschluss.)
Die Temperatur von zugänglichen Oberflächen kann bei Betrieb des Geräts hoch
sein.
(Es besteht die Gefahr von Verbrennungen.)
Um Verbrennungen zu vermeiden, verwenden Sie beim entfernen der Backform und des fertigen Brotes
immer Ofenhandschuhe.
(Verwenden Sie keine nassen Ofenhandschuhe.)
Lassen Sie beim Entnehmen des fertigen Brots oder des Knethakens Vorsicht walten.
Dieses Gerät darf von Personen (einschließlich Kindern) mit erheblichen
körperlichen oder geistigen Behinderungen oder von Personen ohne jegliche
Erfahrung im Umgang mit solchen Geräten nur unter Aufsicht und nach einer
fachkundigen Einweisung verwendet werden. Kinder sollten das Gerät nur unter
Aufsicht verwenden.
(Es besteht die Gefahr von Verbrennungen, Verletzungen oder elektrischem Schlag.)
Achtung
Wichtige Informationen
Verwenden Sie dieses Gerät nicht im freien, nicht in der Nähe von Hitzequellen
oder in Räumen mit hoher Luftfeuchtigkeit.
(Es besteht die Gefahr von Fehlfunktion oder Verformung.)
Vermeiden Sie übermäßige Krafteinwirkungen auf die in der rechten
Abbildung aufgeführten Teile.
(Es besteht die Gefahr von Fehlfunktion oder Verformung.)
Dieses Gerät ist nicht für den Betrieb mit externen Zeitschaltuhren oder separaten Fernbedienungen gedacht.
Temperatursensor
Heizelement
Innenseite des
Deckels
]
Stellen Sie sicher, dass Sie beim Ziehen des Netzsteckers den Netzstecker erfassen.
(Andernfalls besteht die Gefahr von elektrischem Schlag oder Brand aufgrund von Kurzschluss.)
Benutzerinformationen zur Entsorgung von elektrischen und elektronischen Geräten (private Haushalte)
Ziehen Sie den Netzstecker, wenn das Gerät nicht verwendet wird.
(Andernfalls besteht die Gefahr von elektrischem Schlag oder Brand aufgrund von Fehlerstrom.)
Trennen Sie das Gerät vom Netz, und lassen Sie es abkühlen, bevor Sie es reinigen.
(Es besteht die Gefahr von Verbrennungen.)
Lassen Sie das Netzkabel nicht über die Tischkante hängen oder mit einer heißen
Oberfläche in Berührung kommen.
(Es besteht die Gefahr von Verbrennungen oder Verletzungen.)
auf Mensch und Umwelt, die sich aus einer unsachgemäßen Handhabung der Geräte am Ende Ihrer Lebensdauer ergeben könnten.
Genauere Informationen zur nächstgelegenen Sammelstelle bzw. Recyclinghof erhalten Sie bei Ihrer Gemeindeverwaltung.
Für Geschäftskunden in der Europäischen Union
Bitte treten Sie mit Ihrem Händler oder Lieferanten in Kontakt, wenn Sie elektrische und elektronische Geräte entsorgen möchten. Er hält
weitere Informationen für sie bereit.
Entsprechend der grundlegenden Firmengrundsätzen der Panasonic-Gruppe wurde ihr Produkt aus hochwertigen Materialien
und Komponenten entwickelt und hergestellt, die recycelbar und wieder verwendbar sind.
Dieses Symbol auf Produkten und/oder begleitenden Dokumenten bedeutet, dass elektrische und elektronische Produkte am
Ende ihrer Lebensdauer vom Hausmüll getrennt entsorgt werden müssen.
Bringen Sie bitte diese Produkte für die Behandlung, Rohstoffrückgewinnung und Recycling zu den eingerichteten kommunalen
Sammelstellen bzw. Wertstoffsammelhöfen, die diese Geräte kostenlos entgegennehmen.
Die ordnungsgemäße Entsorgung dieses Produkts dient dem Umweltschutz und verhindert mögliche schädliche Auswirkungen
Entnehmen Sie nicht die Backform, und trennen Sie nicht den Brotbackautomat
vom Netz, während er verwendet wird.
(Es besteht die Gefahr von Verbrennungen oder Verletzungen.)
Informationen zur Entsorgung in Ländern außerhalb der Europäischen Union
Dieses Symbol ist nur in der Europäischen Union gültig.
38 39
Page 21
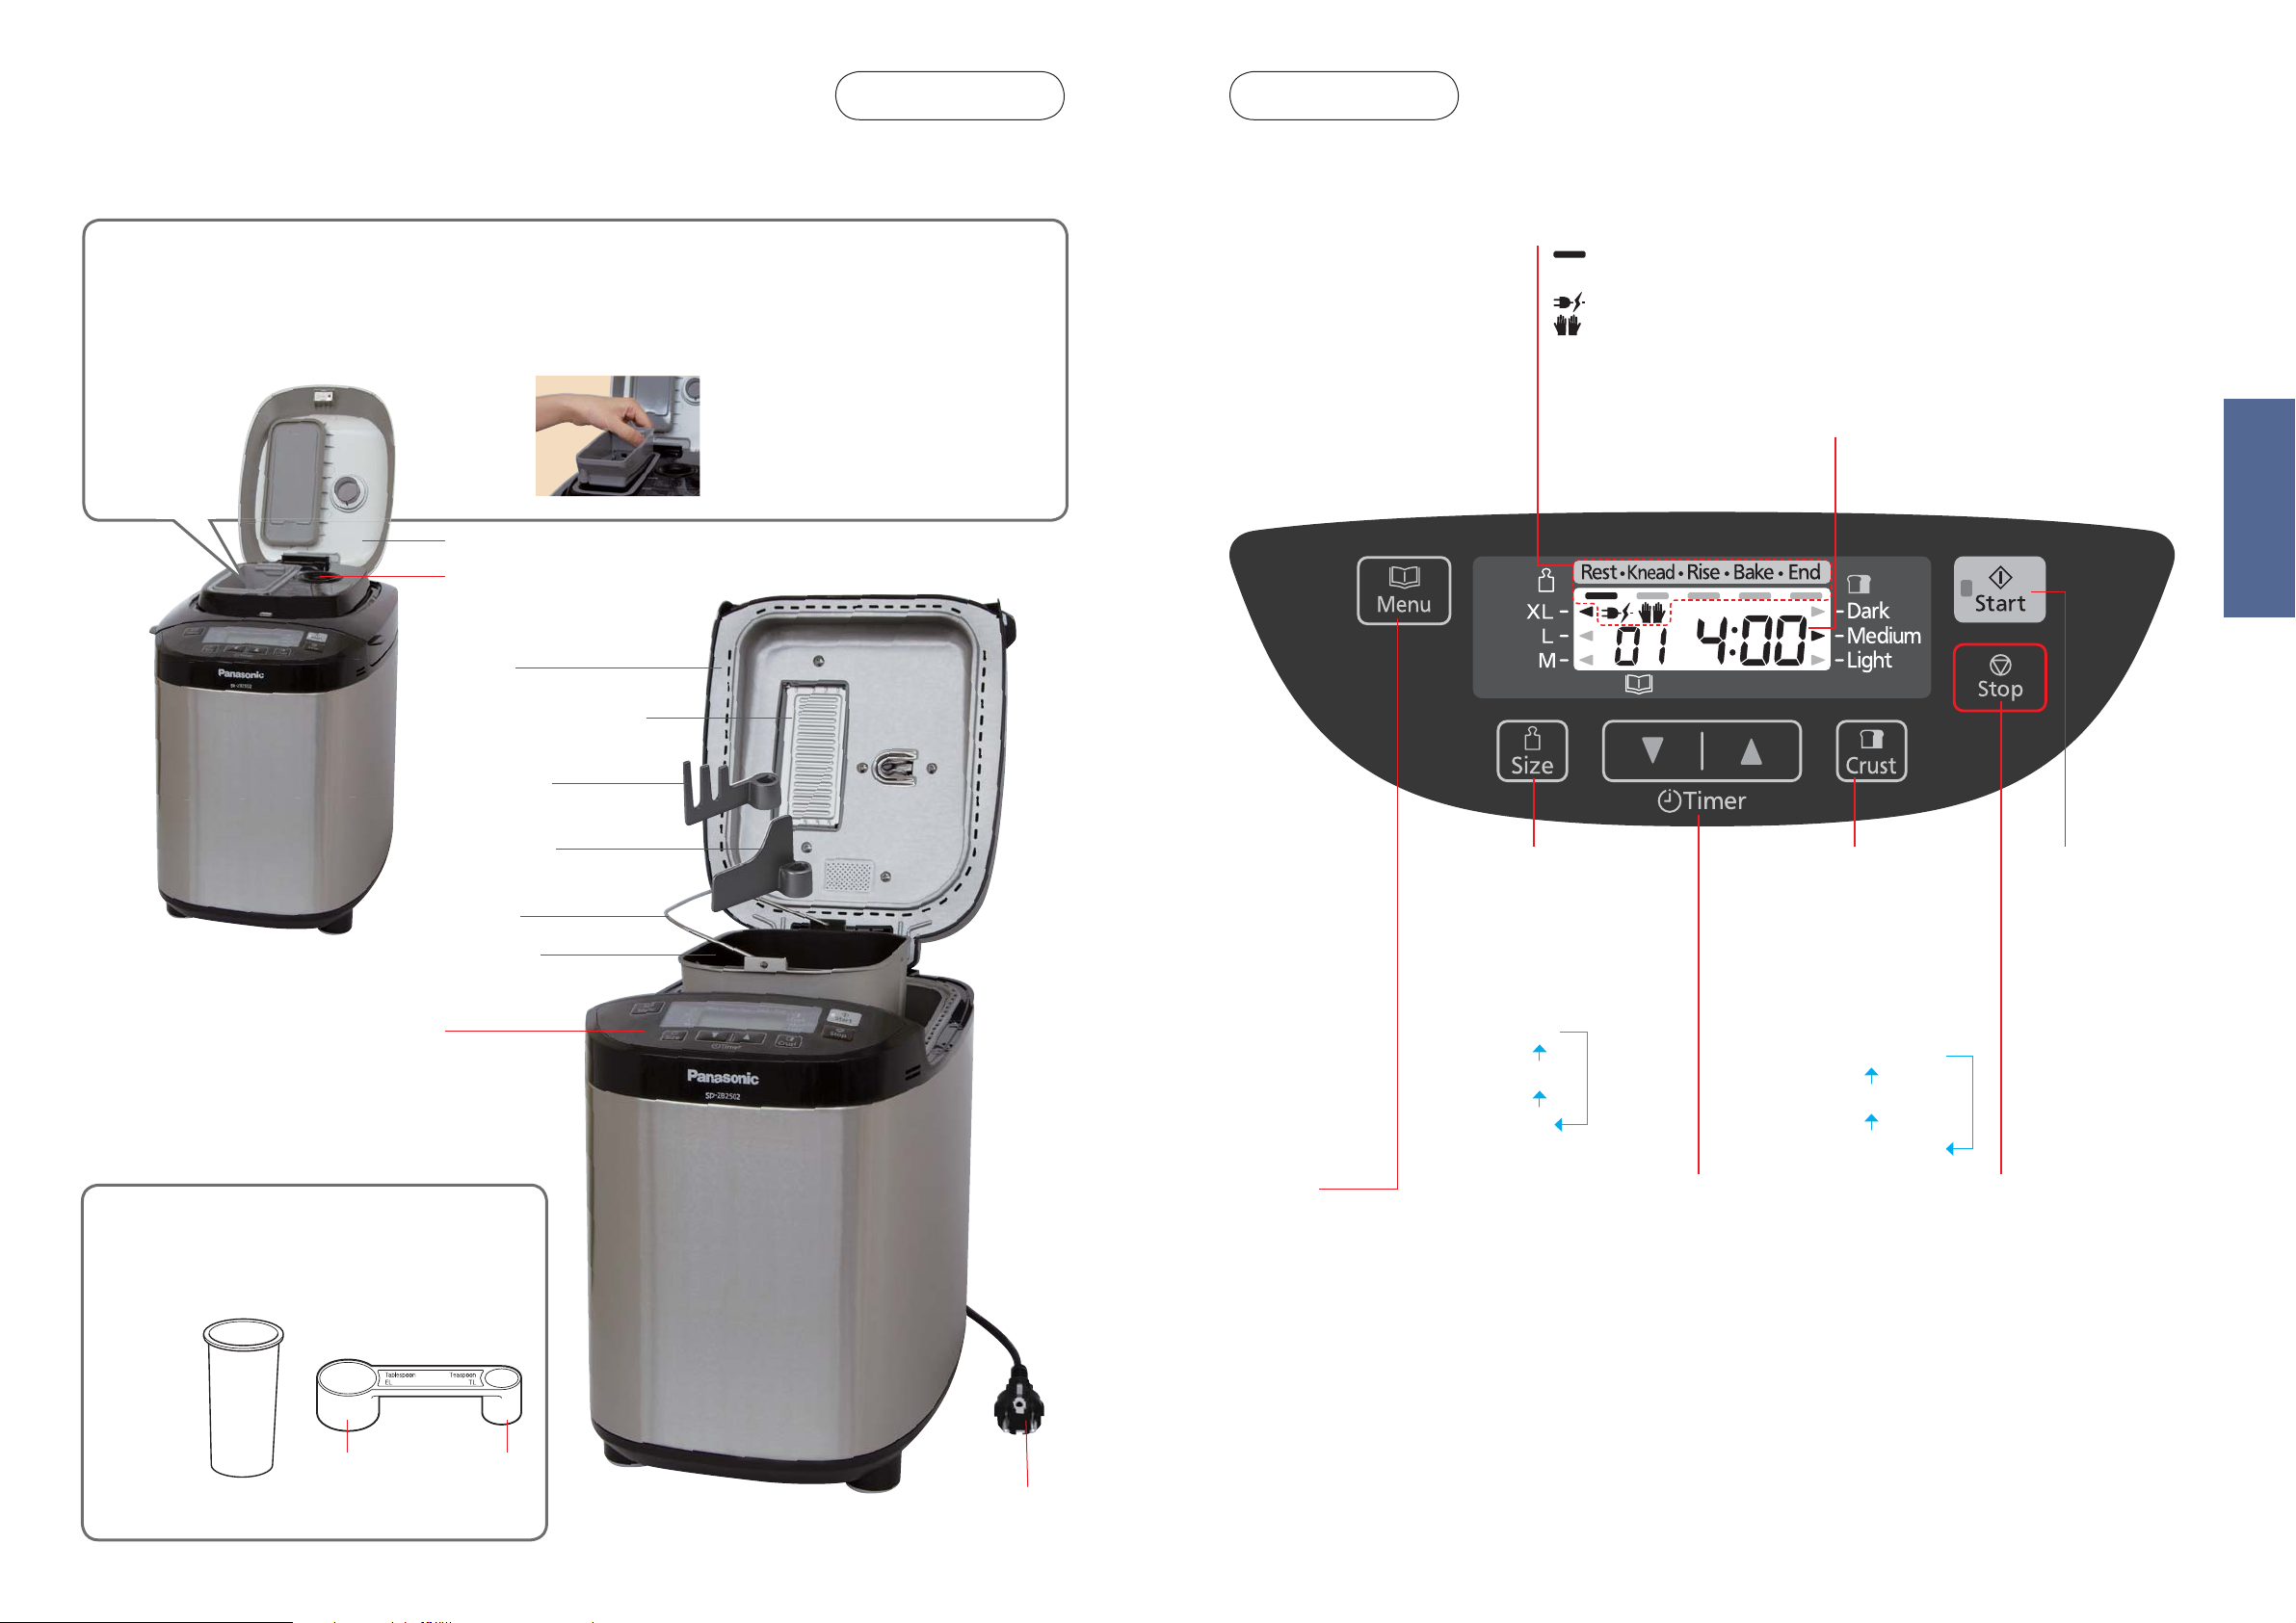
Schematische Ansicht des Gerätes
Hauptgerät
Rosinen-Nuss-Verteiler
Die Zutaten aus dem Rosinen-Nuss-Verteiler werden automatisch in die Backform eingefüllt, wenn ein Menü mit
Rosinen (03, 06, 14, 17, 19 und 25) ausgewählt ist.
Siehe auf S. 48 welche Zutaten in den Rosinen-Nuss-Verteiler gegeben werden können.
Verteilerdeckel
Hefe-Verteiler
Bedienfeld
Betriebszustand
: wird für die aktuelle Stufe des Programms angezeigt. Zutaten werden in der
‘Rest’ (Ruhen) stufe vor dem Kneten geregelt.
: wird bei Problemen mit der Stromversorgung angezeigt
: wird angezeigt, wenn Zutaten im Menü 11 und 23 manuell hinzugefügt werden.
Verbleibende Zeit bis zur Fertigstellung
Auch wenn Sie Zutaten manuell hinzugeben, zeigt
die Anzeige die Zeit an, bis laut Programm die
extra Zutaten beigefügt werden müssen.
Deutsch
Zubehör
Messbecher
Zum Abmessen von Flüssigkeiten
(max. 310 mL)
Deckel
Zuführklappe RosinenNuss-Verteiler
Knethaken
(Roggenbrot)
Knethaken
(Weizenbrot)
Henkel
Backform
Bedienfeld
Messlöffel
Zum Abmessen von Zucker, Salz,
Hefe u.s.w.
(15 mL) (5 mL)
Größe
Drücken Sie diese
Taste, um die Größe
auszuwählen.
Informationen zum
verfügbaren Menü finden
Sie auf Seite 44.
•
XL
•
L
•
M
Menü
Drücken Sie diese Taste, um das Menü
auszuwählen. Die Menünummer wird angezeigt.
Bei jedem Drücken der Taste springt die
Menünummer zur nächsten Wahlmöglichkeit.
(Halten Sie die Taste gedrückt, um schneller weiter
zu springen.)
Informationen zu den Menünummern finden Sie auf
den Seiten 44 und 45.
Bräunung
Drücken Sie diese
Taste, um die
Krustenbräunung
auszuwählen.
Informationen zum
verfügbaren Menü
finden Sie auf Seite 44.
•
Dark (Dunkel)
•
Medium (Medium)
•
Light (Hell)
Zeitvorwahl
Stellen Sie die Zeitvorwahl ein
(Zeit der Fertigstellung), oder
legen Sie für Menü 15, 26 und 27
die Backzeit/Kochzeit fest.
‘▲’ Drücken Sie diese Taste, um
die Zeit zu verlängern.
‘▼’ Drücken Sie diese Taste, um
die Zeit zu verringern.
Start
Drücken Sie diese Taste,
um das Programm zu
starten.
Stop
Drücken Sie diese Taste, um
das Programm abzubrechen/zu
starten.
(Um das Programm abzubrechen/
stoppen, die Taste länger als
1 Sekunde halten)
Teelöffel
•
Markierung
1
⁄4, 1⁄2, 3⁄4
Stecker
Dieses Bild zeigt alle Begriffe und Symbole, während des Betriebs werden aber nur die Relevanten angezeigt.
•
10 mL Schritte
Esslöffel
•
Markierung 1⁄2
40 41
Page 22
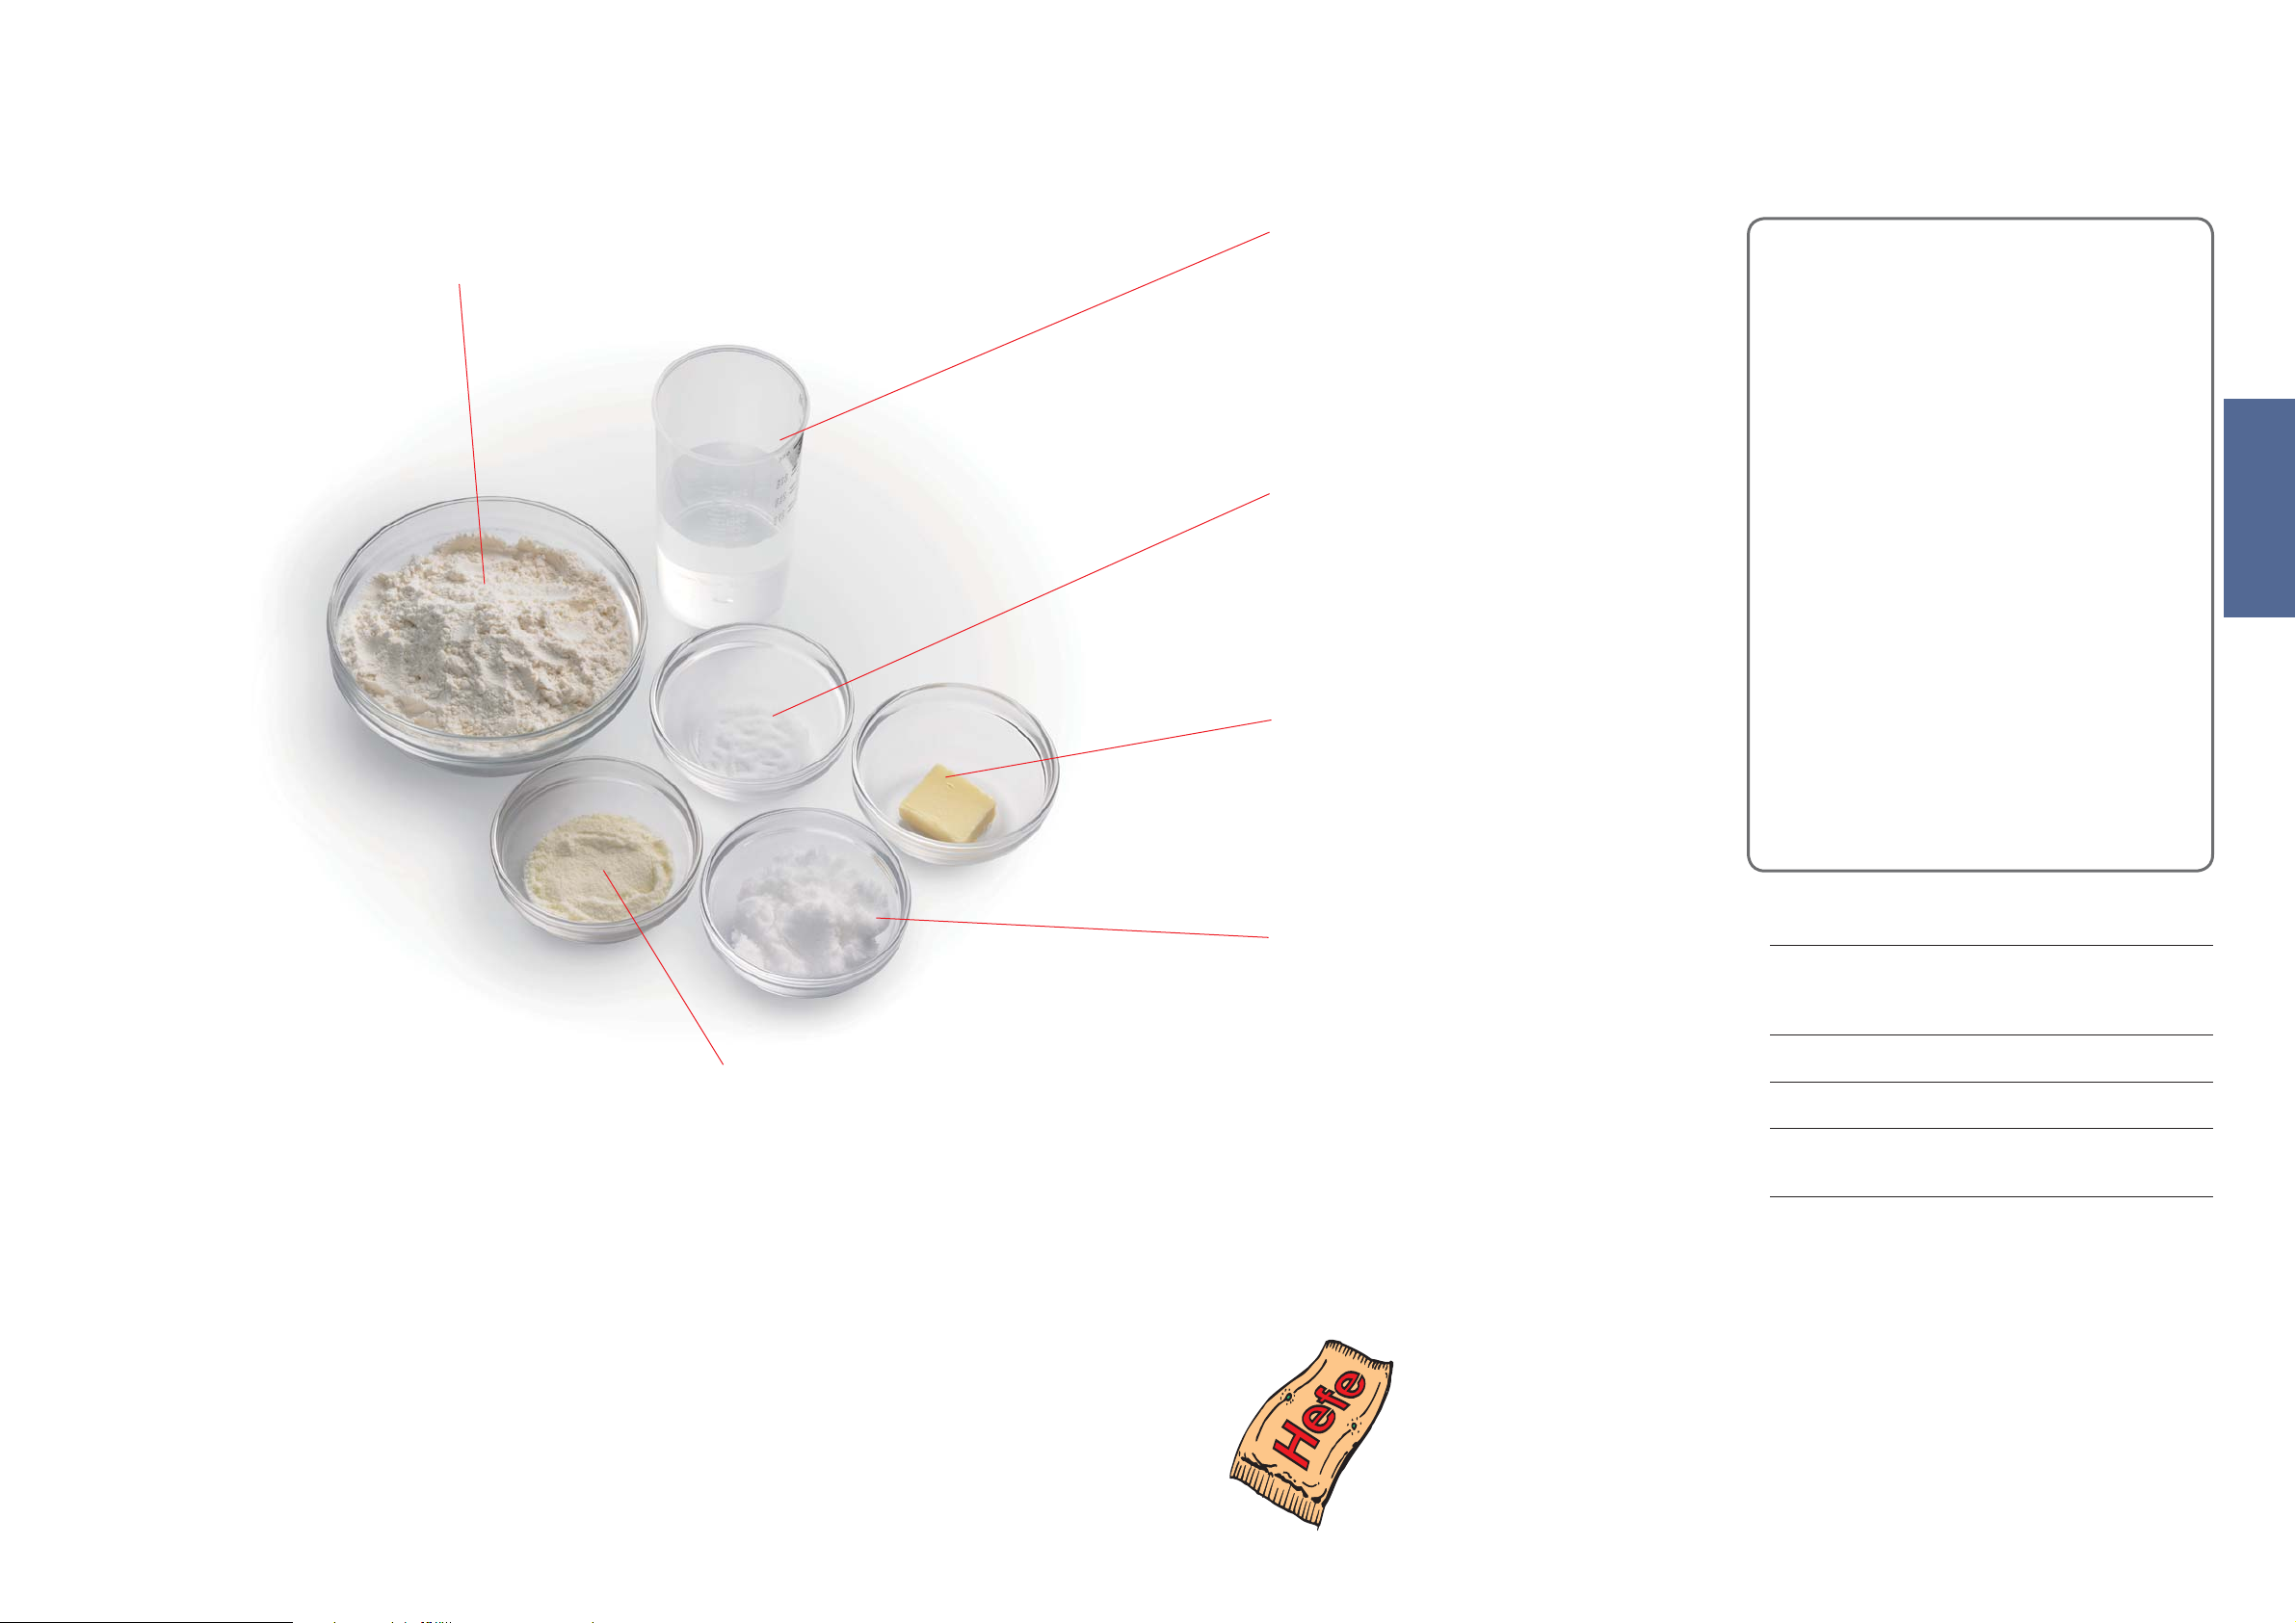
Zutaten der Brotherstellung
Mehl
Hauptzutat von Brot, enthält Gluten. (hilft dem Brot aufzugehen,
gibt ihm eine feste Struktur)
Verwenden Sie Mehl mit hohem Proteingehalt.
Das Mehl muss auf einer Waage abgewogen
werden.
Starkmehl wird aus Hartweizen
gemahlen und besitzt einen
hohen Gehalt an Protein,
das für die Entwicklung von
Gluten notwendig ist. Das
während der Fermentierung
erzeugte Kohlendioxid wird
im elastischen Netzwerk von
Gluten festgehalten und lässt
den Teig aufgehen.
Helles Mehl
Wird durch mahlen von
Getreidekörnern ohne
Kleie und Keim gewonnen.
Die beste Mehlart zum
Brotbacken ist die
mit ‘zum Brotbacken’
gekennzeichnete.
Verwenden Sie kein proteinarmes
oder selbstgärendes Mehl zur
Herstellung von Brot.
Vollwertmehl
Wird durch mahlen von Getreidekörnern einschließlich Kleie und
Keim gewonnen. Stellt ein sehr gesundes Brot her.
Dieses Brot ist flacher und schwerer als mit hellem Mehl
gebackenes Brot.
Roggenmehl
Enthält mehr Eisen, Magnesium und Kalium als helles Mehl,
wichtig für die Gesundheit. Es enthält jedoch nicht genügend
Gluten.
Macht das Brot sehr dicht und schwer. Nicht mehr als die
angegebene Menge verwenden (kann den Motor überlasten).
Milchprodukte
Ergänzt Geschmack und Nährwert.
Wenn Sie Milch anstatt Wasser verwenden, ist der
Nährwert des Brotes höher. Es sollte jedoch nicht die
Zeitvorwahl verwendet werden, weil es über Nacht nicht
frisch bleiben könnte.
Reduzieren Sie die Menge an Wasser proportional zur
Menge an Milch.
Wasser
Verwenden Sie normales Leitungswasser.
Verwenden Sie bei Menü 02, 05, 07, 12 oder 20 lauwarmes
Wasser in einem kalten Raum.
Verwenden Sie bei Menü 07, 08, 11, 13, 14, 20, 21, 23, 24 oder
25 gekühltes Wasser in einem warmen Raum.
Messen Sie Flüssigkeiten immer mit dem mitgelieferten
Messbecher ab.
Salz
Verbessert das Mehl und verstärkt das Gluten um
der Gärung zu helfen.
Bei einer falschen Menge verliert das Brot Größe/
Geschmack.
Verwendung einer
Brotmischung...
Geben Sie die Mischung in die Backform, fügen Sie
Bei einigen Mischungen ist nicht klar wie viel Hefe
Füllen Sie zunächst die Brotmischung in die Backform
Fett
Ergänzt den Geschmack und das Brot wird weicher.
Verwenden Sie Butter oder Margarine.
Wählen Sie Menü 11 oder 02, ‘Medium’, Größe- ‘Light’
Sie können den Geschmack des Brotes durch andere
(Raffinade Zucker, Brauner Zucker,
Zucker
Nahrung für die Hefe, süßt und ergänzt den
Geschmack des Brotes und ändert die Farbe der
Kruste.
Verwenden sie weniger Zucker wenn Sie Rosinen oder
fructosehaltige Früchte verwenden.
Honig Sirup u.s.w.)
Brotmischungen mit Hefe
dann Wasser hinzu. (Verwenden Sie die auf der
Packung angegebene Wassermenge)
Wählen Sie Menü 02 aus. Wählen Sie eine Größe aus,
die dem Mischungsmenge entspricht, und starten Sie
den Backvorgang.
•
600 g – XL • 500 g – L
enthalten ist, weshalb einige Versuche nötig sein
können, bis das Ergebnis optimal ist.
Brotmischung mit extra Hefebeutel
und dann das Wasser.
Füllen Sie dann die abgemessene Trockenhefe in den
Hefe-Verteiler ein
Stellen Sie die Maschine entsprechend der Mehlart der
Mischung ein und starten Sie den Backvorgang.
•
Weißes Mehl, Braunes Mehl Menü 01
•
Vollwertmehl, Vielkornmehl Menü 04
•
Roggenmehl Menü 07
Brioche mit Briochemischung backen
(Hell) aus Krustenbräunung. (S. 67)
Zutaten verbessern
Eier
Kleie
Keime
Gewürze
Erhöht den Nährwert des Brotes und
verändert die Farbe. (Die Wassermenge
muss proportional verringert werden)
Eier vor dem Hinzugeben schlagen.
Erhöht den Ballaststoffgehalt des Brotes.
•
Verwenden Sie max. 75 mL (5 El.).
Gibt dem Brot ein nussiges Aroma.
•
Verwenden Sie max. 60 mL (4 El.).
Verbessert den Geschmack des Brotes.
•
Verwenden sie nur eine kleine Menge
(1-2 El.).
Deutsch
Trockenhefe
Dinkelmehl
Gehört zur Weizenfamilie, ist jedoch genetisch eine andere Spezies. Dinkel enthält zwar Gluten, ist aber trotzdem für
einige Personen mit Glutenallergie verträglich. (Wenden Sie sich an Ihren Arzt.)
Brot aus Dinkelmehl hat eine flache/leicht eingesunkene Kruste.
Im Vergleich zu Brot mit weißem Dinkelmehl hat Brot aus Dinkelvollkornmehr eine geringe Höhe und Dichte.
Es wird empfohlen, das mehr als die Hälfte der gesamten Mehlmenge weißes Dinkelmehl ist.
Dinkel (Triticum spelta) ist zum Backen von Brot geeignet. Einkorn (Tricicum monococcum) wird zwar ebenfalls als Dinkel verkauft, ist jedoch
nicht zum Backen von Brot geeignet. Verwenden Sie bitte den echten Dinkel. (Verwenden Sie Menü 13, 14, 24 oder 25.)
42 43
Ermöglicht dem Brot zu gären.
Verwenden Sie keine Trockenhefe welche eine Vorgärung erfordert (verwenden Sie keine Frischhefe)
Es wird Hefe mit der Aufschrift Trockenhefe empfohlen.
Wenn Hefe aus Tüten verwendet wird, schließen Sie die Tüte sofort nach der Verwendung und bewahren Sie sie im
Kühlschrank auf. (Verwenden Sie sie innerhalb des Haltbarkeitsdatums)
Page 23

Liste von Brotarten und Backoptionen
Verfügbarkeit der Funktion und erforderliche Zeit
• Die erforderliche Zeit für jeden Prozess hängt von der Raumtemperatur ab.
Menünummer
Menü
01 Basic
02
Basic Rapid
03
Basic Raisin
04
Whole wheat
Whole wheat
05
Rapid
Whole wheat
06
Raisin
07 Rye
08 French
Backen
09 Italian
10 Sandwich
11 Brioche
12
Gluten Free
13 Speciality
Speciality
14
Raisin
15 Bake only
Optionen Prozesse
Größe
Bräunung
——
——
——
——
—
—
Zeitvorwahl
30 Min.–
60 Min.
——
1
—
——
—
1
2
—
—
30 Min.–
60 Min.
1 Std.–
1 Std. 40 Min.
15 Min.–
25 Min.
1 Std.–
1 Std. 40 Min.
45 Min.–
60 Min.
40 Min.–
2 Std. 5 Min.
30 Min.–
1 Std.
1 Std.–
1 Std. 40 Min.
30 Min.
—
——
30 Min.–
1 Std. 15 Min.
30 Min.–
1 Std. 15 Min.
Ruhen Kneten Gären Backen Gesamt
1 Std. 50 Min.–
3
15–30 Min.
15–20 Min. ca. 1 Stunde 35–40 Min.
15–30 Min.
15–25 Min.
15–25 Min.
15–25 Min.
ca. 10 Min.
10–20 Min.
10–15 Min.
15–25 Min.
25–45 Min.
15–20 Min. 40 - 45 Min. 50–55 Min.
15–30 Min.
15–30 Min.
2 Std. 20 Min.
1 Std. 50 Min.–
3
2 Std. 20 Min.
2 Std. 10 Min.–
3
2 Std. 50 Min.
1 Std. 30 Min.–
3
1 Std. 40 Min.
2 Std. 10 Min.–
3
2 Std. 50 Min.
1 Std. 20 Min.–
1 Std. 35 Min.
2 Std. 45 Min.–
4 Std. 10 Min.
2 Std. 25 Min.–
3 Std.
2 Std. 10 Min.–
3
2 Std. 50 Min.
3
1 Std. 25 Min. 50 Min. 3 Std. 30 Min.
1 Std. 50 Min.–
3
2 Std. 45 Min.
1 Std. 50 Min.–
3
2 Std. 45 Min.
——— — — —
50–55 Min.
50 Min. 4 Stunden
50 Min. 5 Stunden
45 Min. 3 Stunden
50 Min. 5 Stunden
1 Stunde 3 Std. 30 Min.
55 Min. 6 Stunden
50 Min. 4 Std. 30 Min.
50 Min. 5 Stunden
55 Min. 4 Std. 30 Min.
55 Min. 4 Std. 30 Min.
30 Min.–
1 Std. 30 Min.
4 Std.–
4 Std. 5 Min.
1 Std. 55 Min.–
2 Std.
1 Std. 50 Min.–
1 Std. 55 Min.
30 Min.–
1 Std. 30 Min.
Menünummer
16 Basic
Basic
17
Raisin
Whole
18
wheat
Whole
19
wheat
Raisin
20 Rye
21 French
Teig
22 Pizza
23 Brioche
24 Speciality
Speciality
25
Raisin
26 Jam
27 Compote
Menü
Optionen Prozesse
Größe
Bräunung
———
———
———
———
———
———
——
———
———
———
Zeitvorwahl
30 Min.–
50 Min.
30 Min.–
50 Min.
55 Min.–
1 Std. 25 Min.
55 Min.–
1 Std. 25 Min.
45 Min.–
60 Min.
40 Min.–
1 Std. 45 Min.
10–18 Min.
30 Min.
30 Min.–
1 Std. 5 Min.
30 Min.–
1 Std. 5 Min.
Ruhen Kneten Gären Backen Gesamt
(Kneten)
3
15–30 Min.
15–30 Min.
15–25 Min.
15–25 Min.
ca. 10 Min.
10–20 Min.
7–15 Min.
25–45 Min.
15–30 Min.
15–30 Min.
(Gären)
3
3
3
3
3
3
1 Std. 10 Min.–
1 Std. 30 Min.
1 Std. 10 Min.–
1 Std. 30 Min.
1 Std. 30 Min.–
2 Std.
1 Std. 30 Min.–
2 Std.
—
—
—
—
——
1 Std. 35 Min.–
2 Std. 40 Min.
(Kneten)
ca. 10 Min.
35 Min.
1 Std. 10 Min.–
1 Std. 55 Min.
1 Std. 10 Min.–
1 Std. 55 Min.
—
(Gären)
ca. 10 Min.
—
—
—
——— — — — —
——— — — — —
2 Std. 20 Min.
2 Std. 20 Min.
Deutsch
3 Std. 15 Min.
3 Std. 15 Min.
2 Stunden
3 Std. 35 Min.
45 Min.
1 Std. 50 Min.
2 Std. 45 Min.
2 Std. 45 Min.
1 Std. 30 Min.–
2 Std. 30 Min.
1 Std.–
1 Std. 40 Min.
Nur ‘Light’ (Hell) oder ‘Medium’ verfügbar. Nur ‘Medium’ oder ‘Dark’ (Dunkel) verfügbar.
Während der Knetzeit wird eine Zeit zum Aufgehen eingelegt.
• Während der Aufgehzeit arbeitet der Brotbackautomat eine kurze Zeit (um eine optimale Glutenentwicklung sicherzustellen).
44 45
Page 24
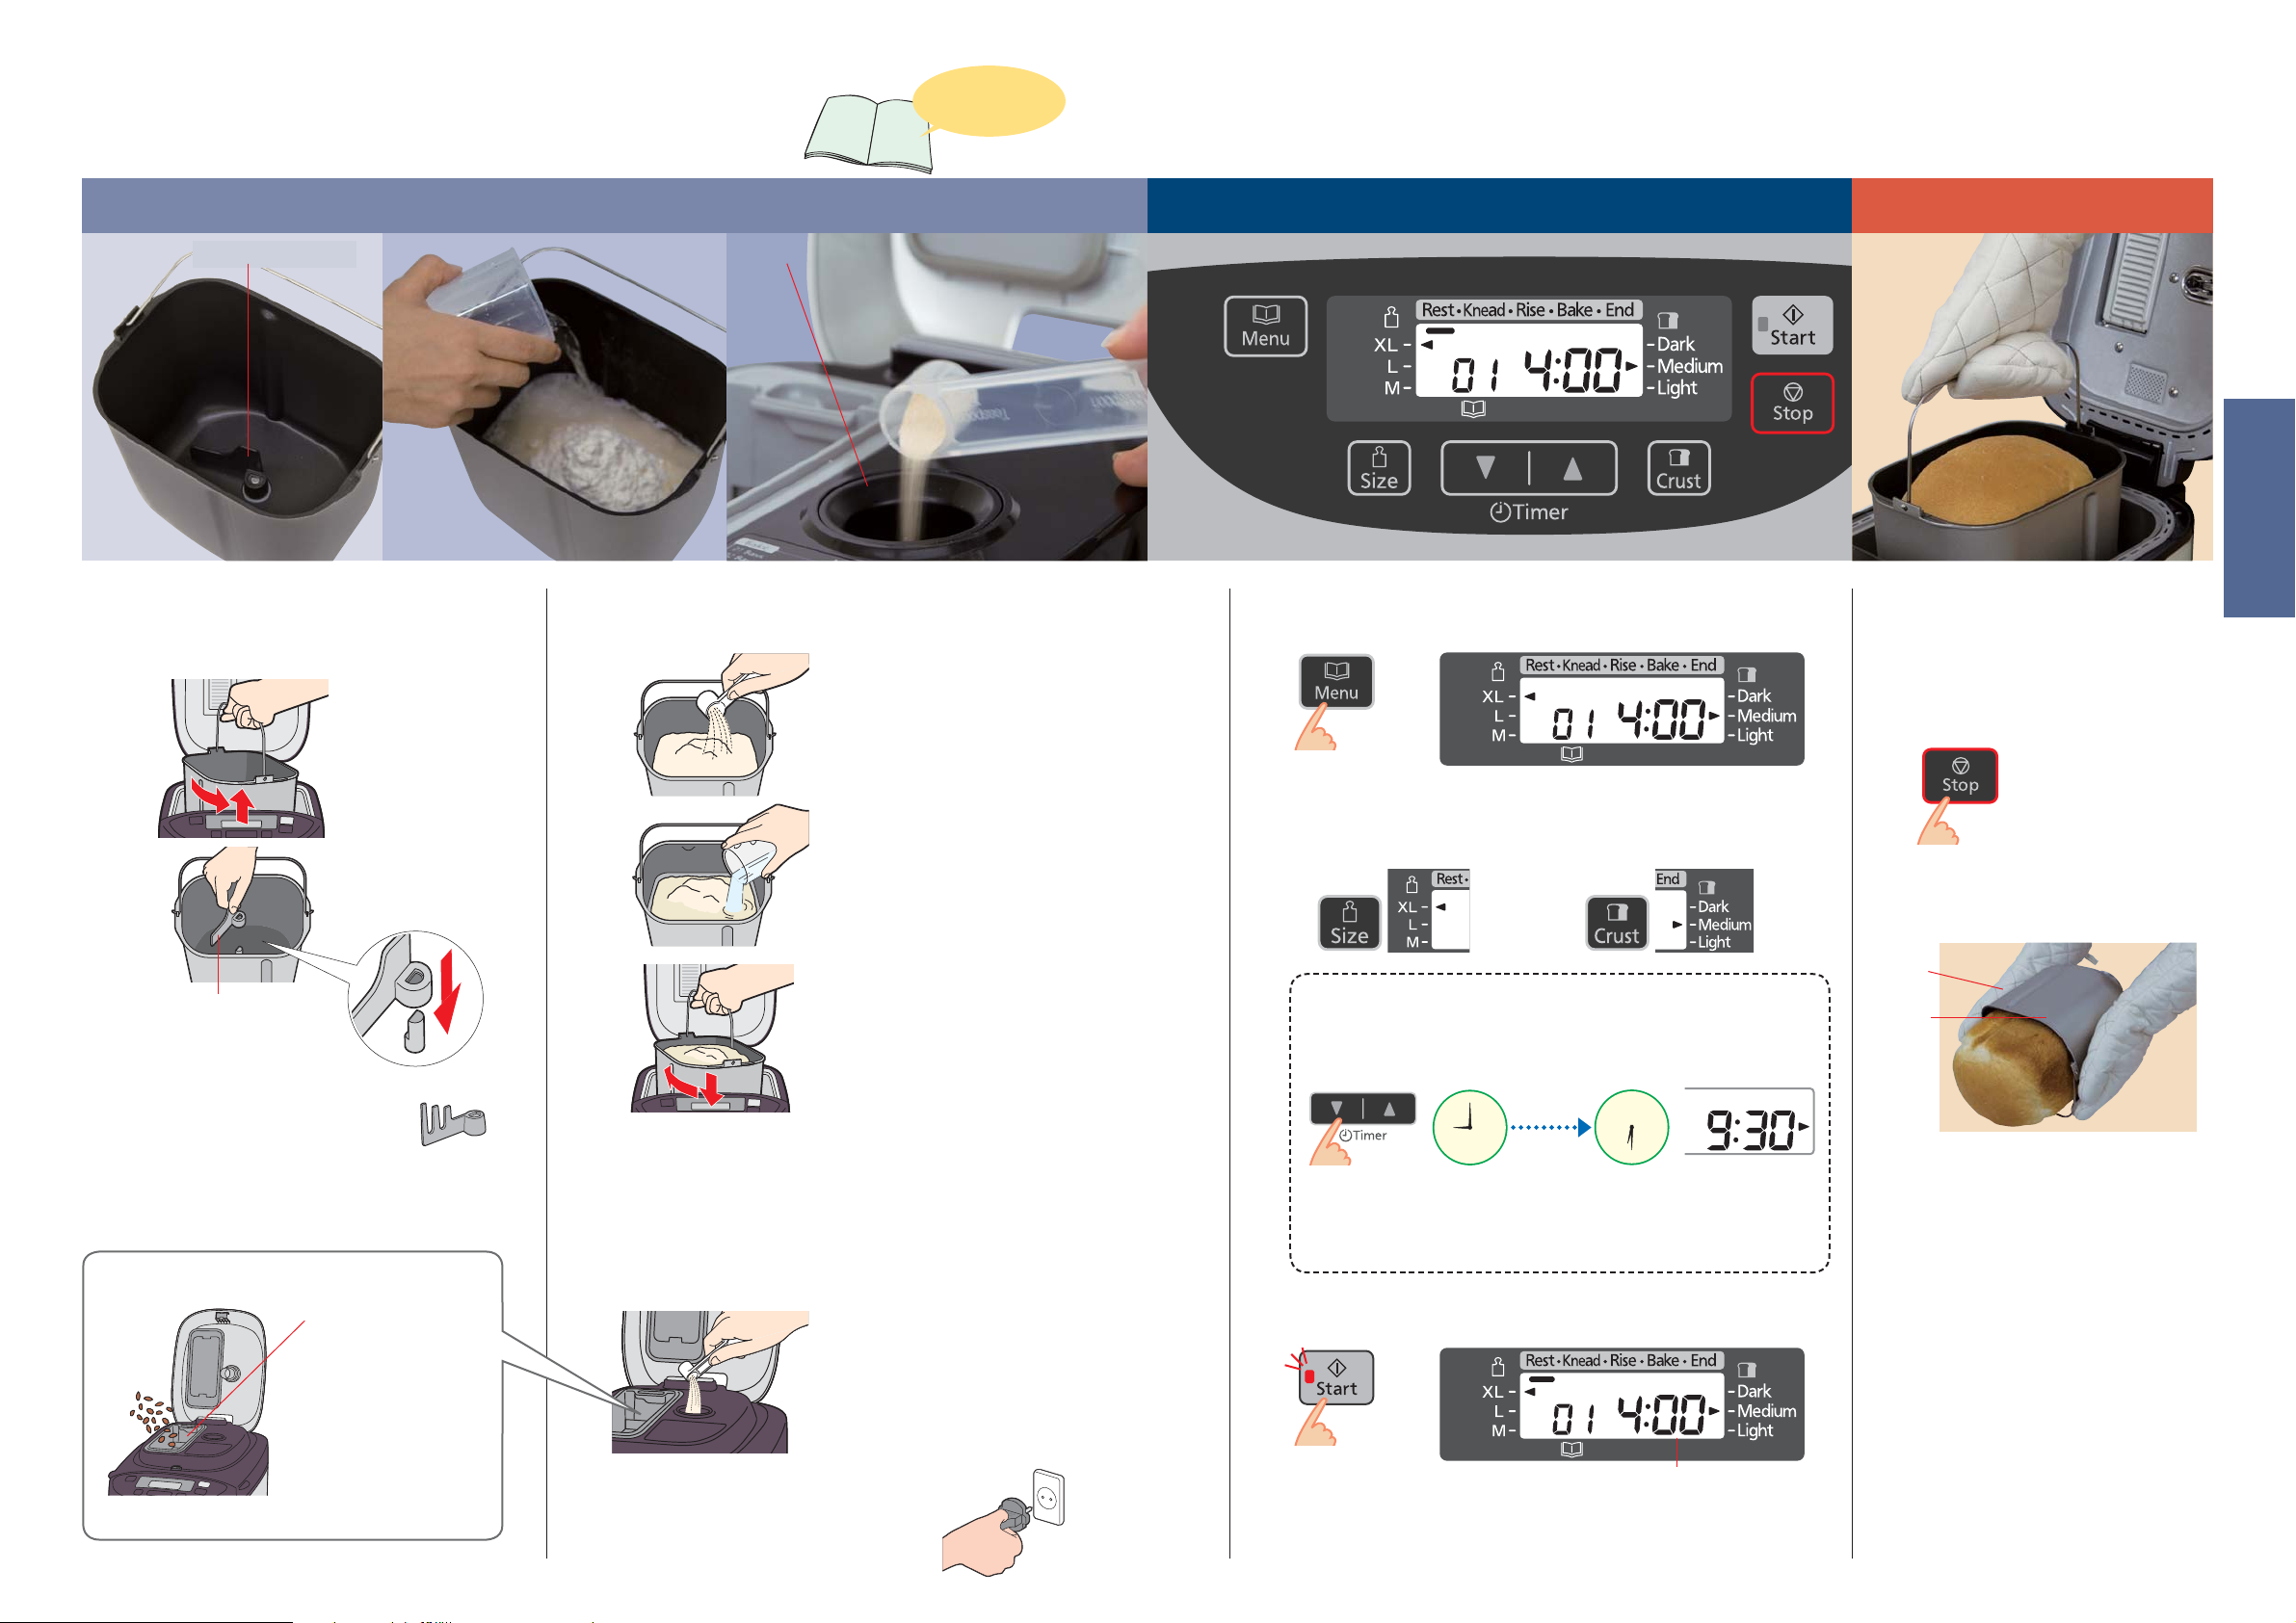
Brot backen
Brot rezepte finden
Sie auf Seite 55-58.
Geben Sie die Zutaten in die Backform Programm einstellen und starten
Knethaken Hefe-Verteiler
Entfernen Sie die Backform und
1
bringen Sie den Knethaken an
Drehen Sie die Backform
herum.
Entfernen Sie die Form.
Geben Sie die abgemessenen Zutaten
in die Backform hinein
2
Füllen Sie die Trockenzutaten
außer Trockenhefe ein.
(Mehl, Zucker, Salz u.s.w.)
• Das Mehl muss auf einer
Waage abgewogen werden.
Wählen Sie ein Backmenü aus
(Das Display wird mit ausgewähltem Menü ‘01’ angezeigt.)
5
Entfernen Sie das Brot
Schalten Sie das
7
Gerät aus
wenn das Brot fertig ist
[Das Gerät piept 8 Mal, und der Balken
blinkt unter ‘End’ (Ende).]
Deutsch
Informationen zum Menü, zur Verfügbarkeit von Größe und Kruste finden Sie
Gießen Sie das Wasser und
alle anderen Flüssigkeiten ein.
Stecken Sie den
Knethaken fest auf den
Schaft.
Entfernen Sie Feuchtigkeit und
Mehl von der Außenseite der
Form.
Stecken Sie die Form in den
Brotbackautomaten, indem Sie
sie leicht von rechts nach links
drehen. Legen Sie den Henkel
um.
Schließen Sie den Deckel.
• Öffnen Sie den Deckel nicht,
bis das Brot fertig ist (wirkt
sich auf die Brotqualität aus).
Überprüfen sie den
Schaft und die Innenseite
des Knethakens auf
Verschmutzung. (S. 63)
•
Verwenden Sie bei Roggenbrot
den dafür vorgesehenen Knethaken.
• Der Haken wird locker aufgesteckt, muss aber den
Boden der Backform berühren.
Füllen Sie Trockenhefe in den
Brot mit zusätzlichen Zutaten Backen (S. 48)
Zuvor reinigen und
trocknen
Öffnen Sie den
Verteilerdeckel.
Geben Sie die Zutaten
hinein.
Schließen Sie den Deckel.
46 47
3
Hefe-Verteiler ein
Wenn der Hefe-Verteiler feucht ist,
nehmen Sie die Feuchtigkeit mit
einem Tuch usw. auf.
(Reiben Sie nicht im Hefe-Verteiler,
da sonst die Hefe aufgrund der
statischen Aufladung nicht in die
Backform fällt.)
Stecken Sie den Stecker
4
des Brotbackautomaten in eine 230 V Steckdose
6
Beim ersten Drücken von ‘Start’ wird Menü 01 gestartet.
auf Seite 44.
Ändern der Größe
Ändern der Krustenfarbe
8
Einstellen der Zeitvorwahl
z.B. Es ist jetzt 21:00 und Sie möchten Ihr Brot am nächsten morgen um
6:30.
Stellen Sie die Zeitvorwahl auf ‘9:30’ (9 Stunden 30 Minuten ab jetzt).
12
9
Gegenwärtige Uhrzeit Zeit der Fertigstellung
•
Bei jedem Tastendruck schreitet die Zeitvorwahl um 10 Minuten voran
(für schnellen Vorlauf gedrückt halten).
3
6
9Std. 30Min.
Drücken Sie ‘Start’
Geschätzte Zeit bis das gewählte Programm fertig ist
ab jetzt
12
9
6
Ofenhandschuhe
Backform
3
Abkühlen lassen, z. B. auf einem Drahtgestell
9
Wenn Sie nicht ‘Stop’ drücken und das
Entfernen Sie das
Brot sofort,
Nach Gebrauch
Stecker abziehen
Brot zum Abkühlen nicht aus dem Gerät
nehmen, bleibt der Brotbackautomat
warm, um die Dampfkondensation
innerhalb des Laibs zu reduzieren.
Dies beschleunigt jedoch die Bräunung
der Rinde, weshalb Sie nach Abschluss
des Backens das Gerät ausschalten und
das Brot sofort herausnehmen sollten,
um es abkühlen zu lassen.
Wird das Brot zum Abkühlen im Brottopf
gelassen, entsteht Kondensation.
Lassen Sie daher das Brot auf einem
Drahtgestell abkühlen, um optimale
Qualität des Laibs zu gewährleisten.
Page 25
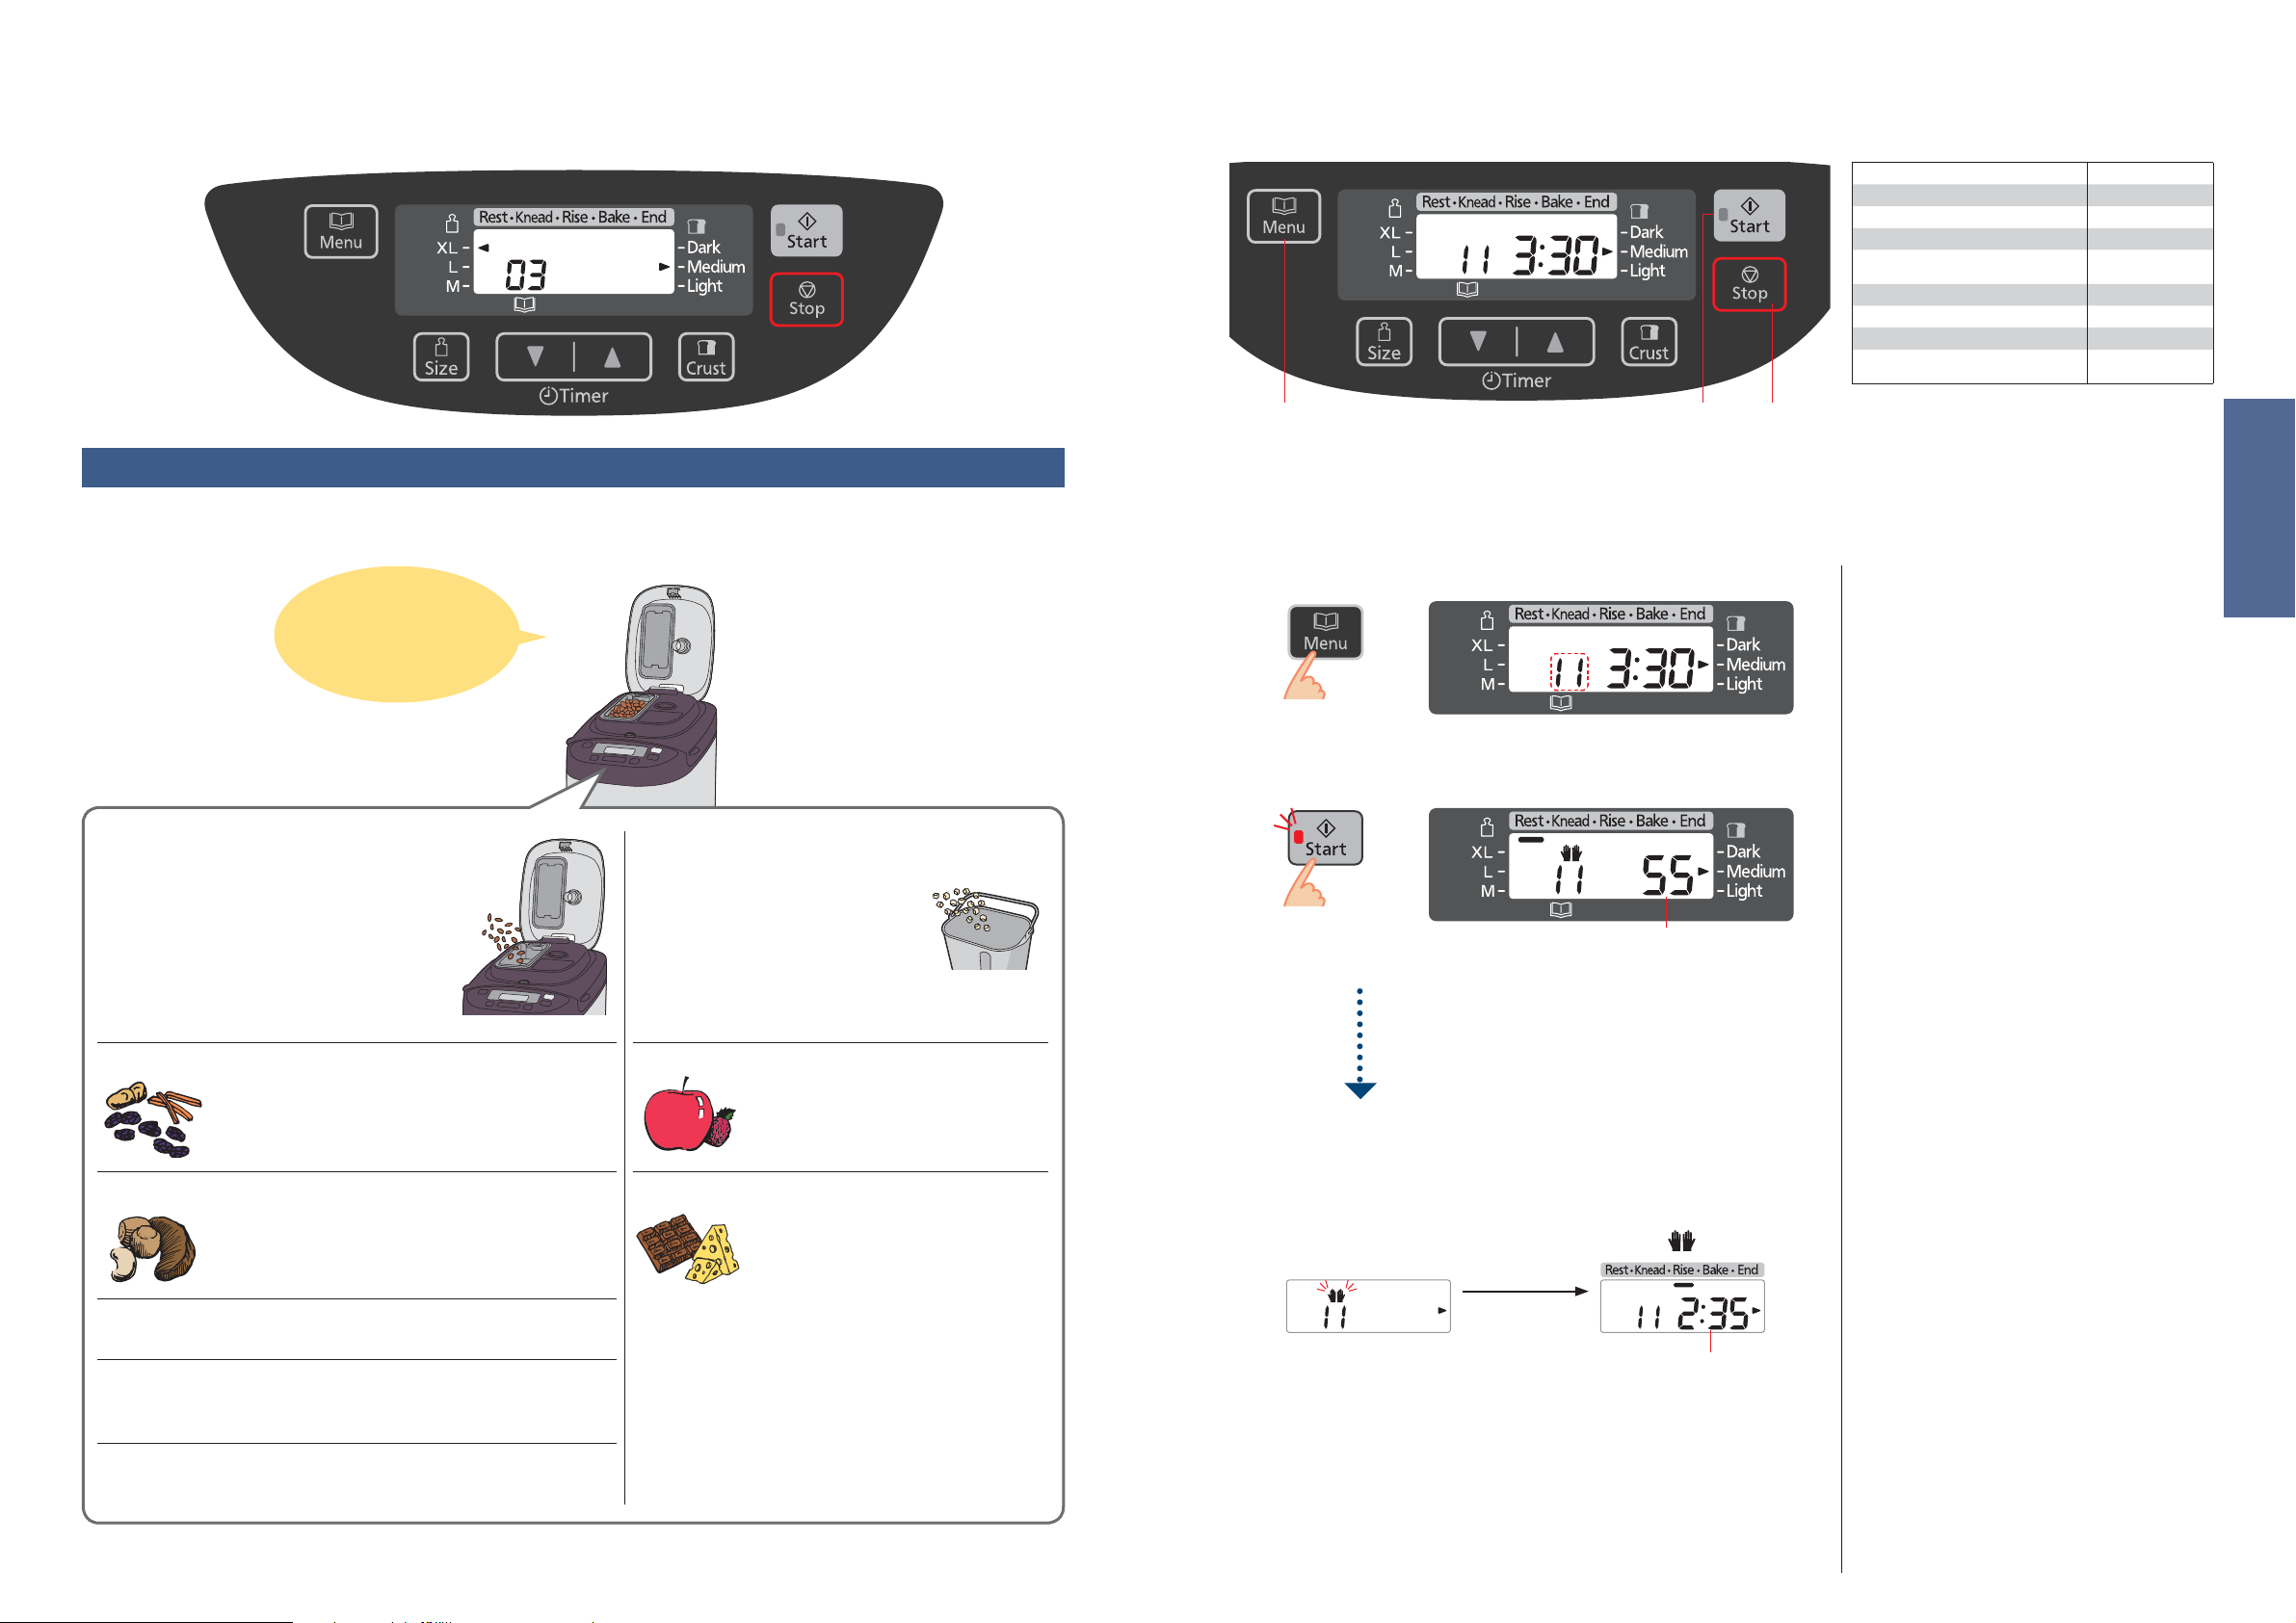
Bei Zugabe zusätzlicher Zutaten
Brioche backen
Hinzugeben von zusätzlichen Zutaten zum Brot oder Teig
Durch Auswählen der Menüs mit rosinen (03, 06, 14, 17, 19 oder 25) können Sie Ihre Lieblingszutaten in den Teig mischen, um spezielle
Brotsorten zu backen.
Geben sie die zusätzlichen
Zutaten vor dem Start einfach
in den Verteiler oder die
Backform
Trockene Zutaten,
unlösliche Zutaten
Füllen Sie die zusätzlichen Zutaten in den
Rosinen-Nuss-Verteiler, und stellen Sie das
Gerät ein.
Trockenfrüchte
Nüsse
Samen
Kräuter
Grob in ca. 5mm Würfel schneiden.
Kandierte Zutaten können am Verteiler hängen
bleiben und nicht in die Backform fallen.
Fein hacken.
Nüsse verringern den Effekt von Gluten, verwenden
Sie nicht zu viel.
Große harte Samen könnten die Beschichtung des
Verteilers und der Backform beschädigen.
Verwenden Sie bis zu 1-2 El. getrocknete Kräuter.
Bei frischen Kräutern, folgen Sie den Anweisungen
des Rezeptes.
Feuchte/Klebrige Zutaten, lösliche
Zutaten*
Geben Sie diese Zutaten zusammen
mit den anderen in die Backform.
Frische Früchte, in Alkohol eingelegte Früchte
Verwenden Sie nur die im Rezept
angegebenen Mengen, da der
Wassergehalt der Zutaten das Brot
beeinflusst.
Käse, Schokolade
* Diese Zutaten können nicht in den Rosinen Nuss Verteiler
gegeben werden, weil sie den Verteiler verstopfen und
nicht in die Backform fallen.
1
Vorbereitung
(S. 46)
Weizenmehl, Typ 550 400 g
Teelöffel Salz 1
Esslöffel Zucker 4
Esslöffel Magermilch (trockene) 2
Butter (in 2 cm große Würfel schneiden
und kühl lagern)
Wasser 180 mL
Ei (geschlagen), mittelgroß 2 (100 g)
Teelöffel Trockenhefe 1
Butter für spätere Zugabe (in 1–2 cm
große Würfel schneiden und kühl lagern)
42, 3
Die Butter für spätere Zugabe in 1–2 cm große Würfel schneiden und gekühlt lagern.
Bringen Sie den Knethaken in der Backform an.
Geben Sie die Zutaten in der im Rezept aufgelisteten Reihenfolge in die Backform.
Stellen Sie die Backform in das Gerät, und stecken Sie den Netzstecker ein.
1
⁄2
50 g
1
⁄4
70 g
Deutsch
Wählen Sie Menü ‘11’
1
Starten Sie die Maschine
2
Zeit bis zur Zugabe von Butter oder Zutaten
Die Start-Lampe leuchtet auf.
[Einfache Möglichkeit, Brioche
zu backen]
Fügen Sie die Butter zusammen
mit den anderen Zutaten zu
Beginn hinzu.
Würfeln Sie die Butter (etwa 2 cm), und füllen Sie
sie zur gleichen Zeit wie die anderen Zutaten in
die Backform ein.
Folgen Sie den links aufgeführten Schritten.
Wenn das Gerät in Schritt 3 durch Piepen zum
Hinzufügen von weiterer Butter auffordert,
unternehmen Sie jedoch nichts.
Erforderliche Zeit beträgt 3 Stunden und 30 Minuten.
* Wenn die Butter zu Beginn hinzugefügt wird,
unterscheiden sich Geschmack, Konsistenz und
Aufgehen des Brots etwas vom Backvorgang, bei
dem Butter später hinzugefügt wird.
Der ‘Rest’ (Ruhen) Vorgang beginnt sofort nach
dem Start und wird vom ‘Knead’ (Kneten) und
‘Rise’ (Gären) gefolgt.
Wenn der Piepton ertönt, wird weitere
3
Butter hinzugefügt, drücken Sie dann die
‘Start’ erneut
Geben Sie die weitere gewürfelte Butter hinzu, solange ‘ ’ blinkt.
Nach dem Drücken
der Starttaste
Auf dem Display wird die verbleibende Zeit bis zum Ende des
Programms angezeigt.
Fügen Sie zusätzliche Zutaten, wie Rosinen,
mit der Butter hinzu. (Max. 150 g für Zutaten
verwenden)
Auch wenn die Starttaste nicht gedrückt wird,
wird der Knetvorgang nach 5 Minuten fortgesetzt.
Der Knetvorgang wird auch dann nicht sofort
fortgesetzt, wenn nach dem Hinzufügen von
Butter oder Zutaten die Starttaste gedrückt wird.
Keine Butter nach Anzeige der Restzeit zugeben.
(S. 67)
Speck, Salami
•
Den Mengenangaben der verschiedenen Rezepte folgen.
48 49
Ölige Zutaten können am Verteiler hängen bleiben
und nicht in die Backform fallen.
Drücken Sie ‘Stop’ und entfernen Sie das
4
Brot
wenn das Gerät 8 Mal piept und der Balken unter ‘End’ (Ende) blinkt.
Die blinkende Start-Lampe erlischt.
Page 26
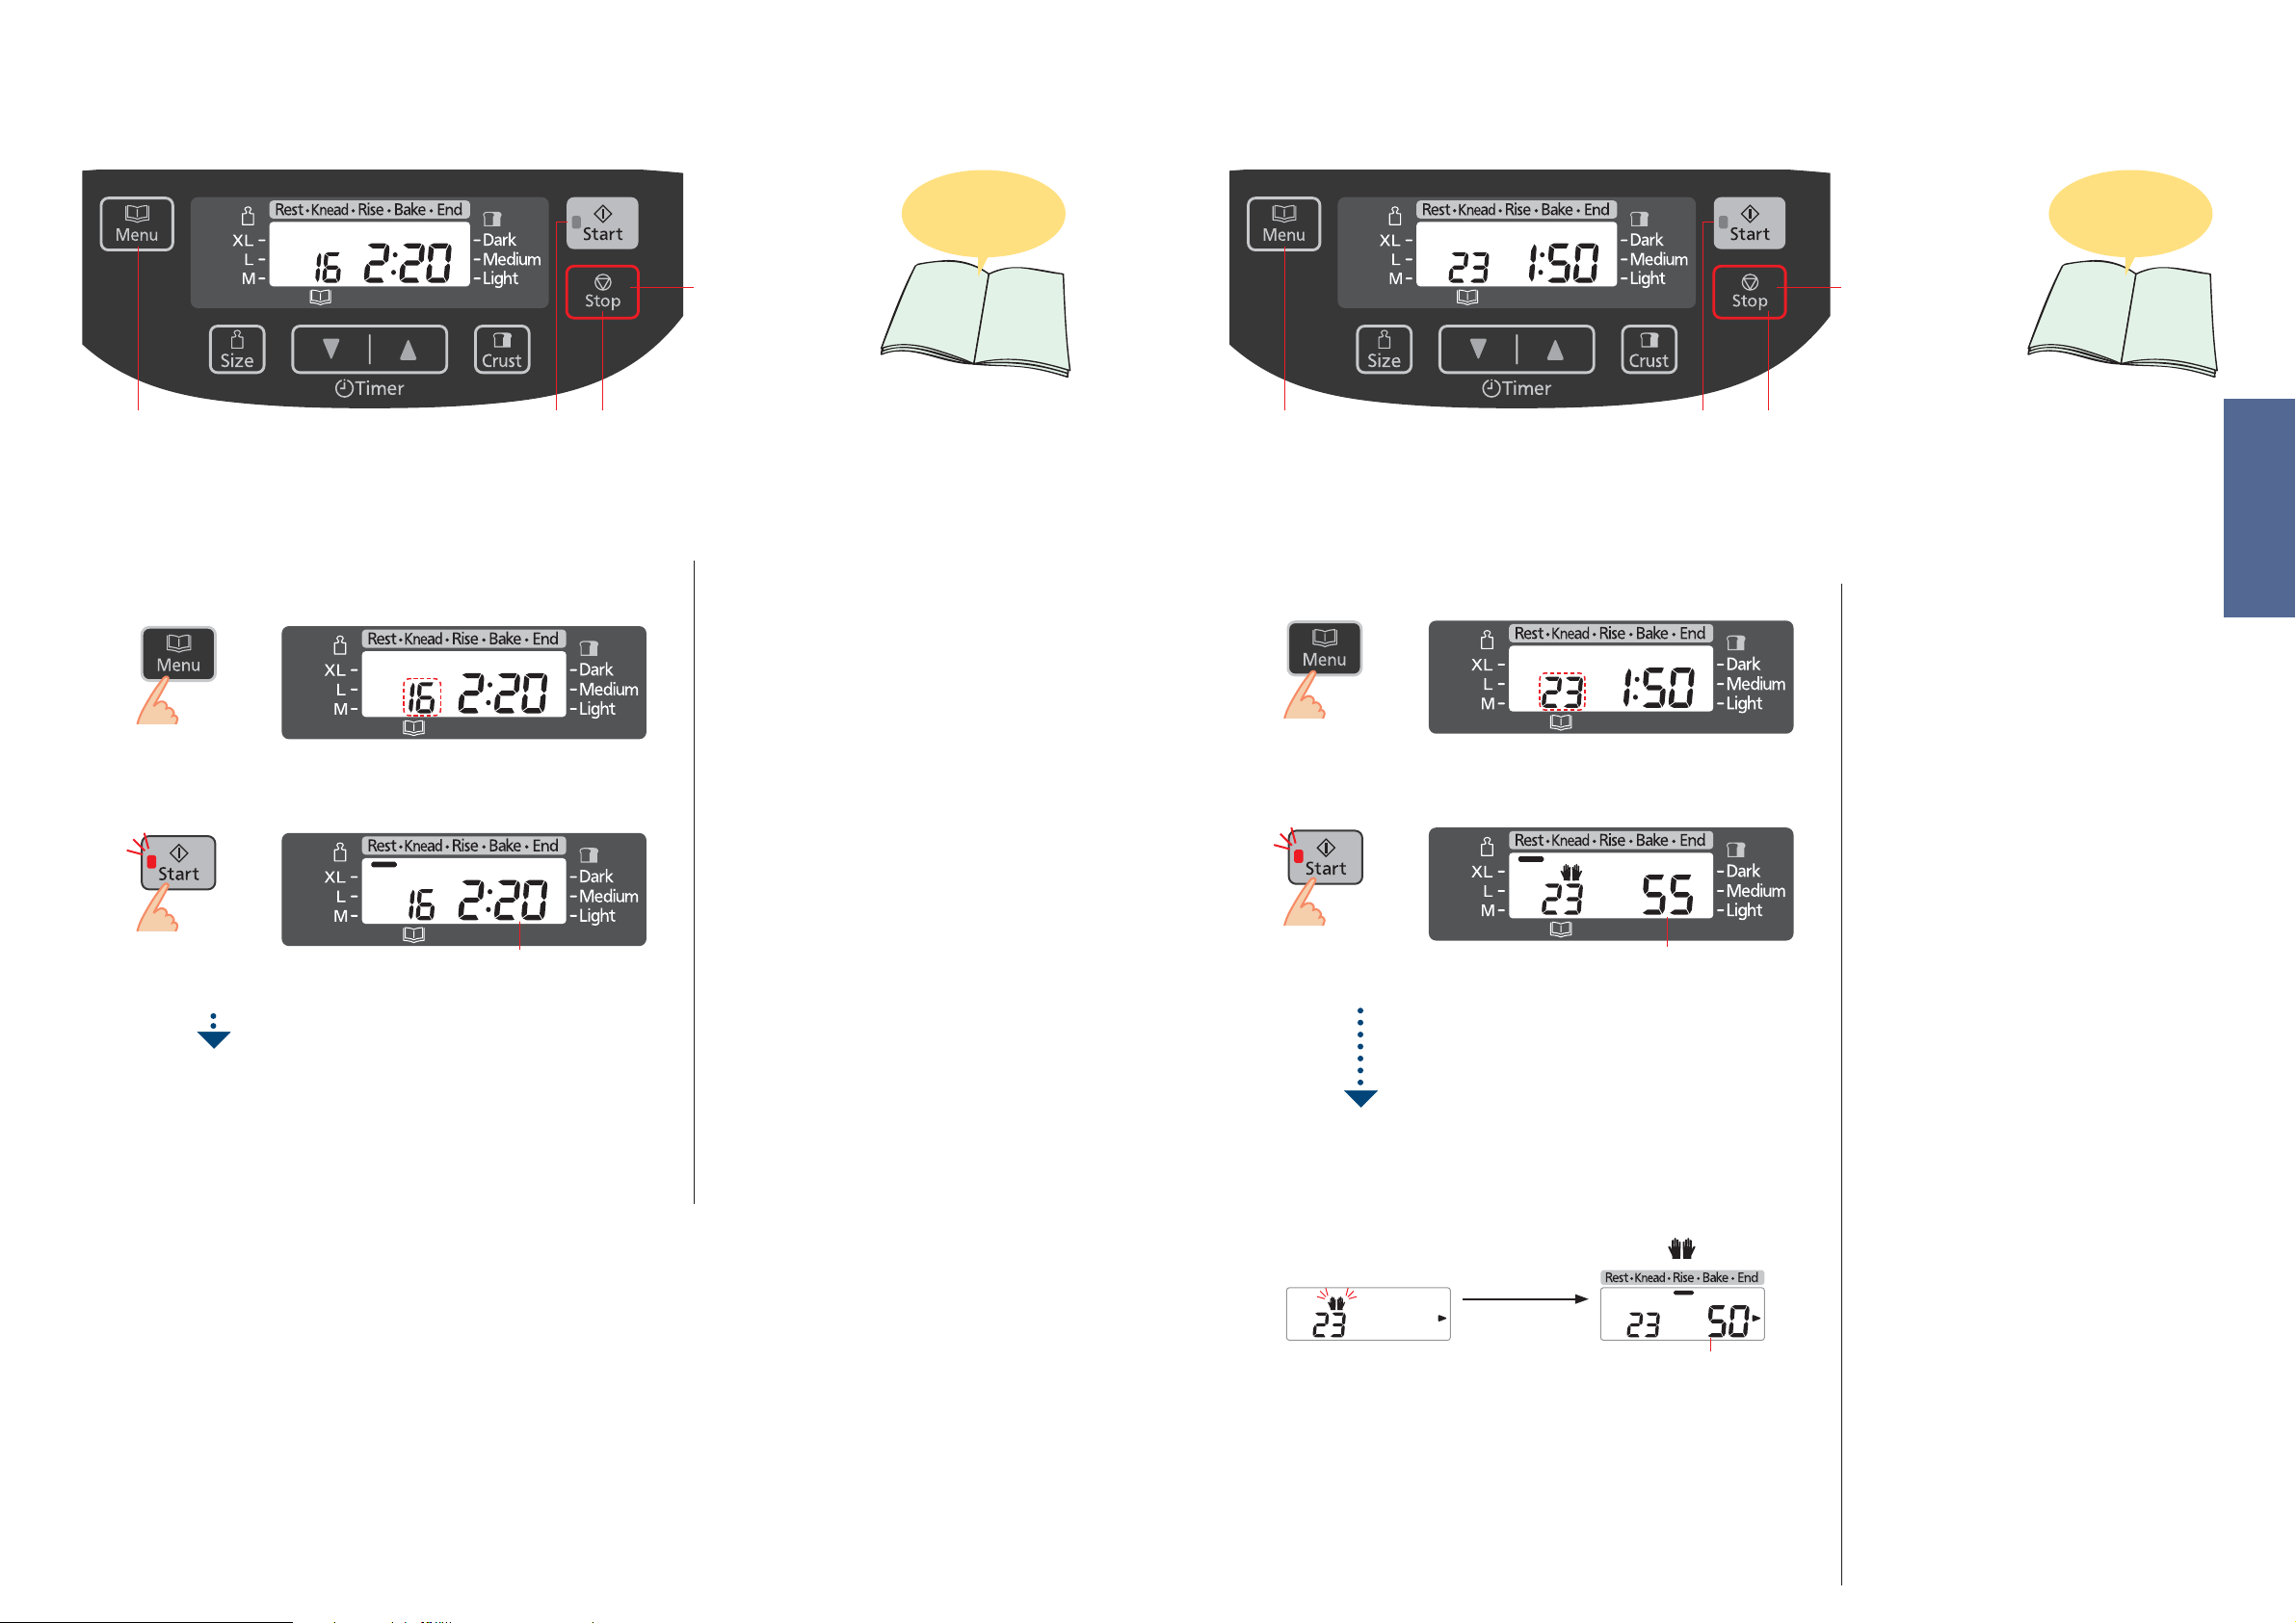
Herstellung von Teig
Mischen von Brioche-Teig
1
Vorbereitung
(S. 46)
Bringen Sie den Knethaken in der Backform an.
Geben Sie die Zutaten in der im Rezept aufgelisteten Reihenfolge in die Backform.
Stellen Sie die Backform in das Gerät, und stecken Sie den Netzstecker ein.
32
Wählen Sie das Teigmenü aus
(Das Display wird mit ausgewähltem Menü ‘16’ angezeigt.)
1
Starten Sie die Maschine
2
Geschätzte Zeit bis das gewählte Programm fertig ist
Die Start-Lampe leuchtet auf.
Drücken Sie ‘Stop’ und entfernen Sie den
3
Teig
wenn das Gerät 8 Mal piept und der Balken unter ‘End’ (Ende) blinkt.
Die blinkende Start-Lampe erlischt.
Teig rezepte finden
Sie auf Seite 60, 61
Nach dem Start
Abbrechen/Stoppen
(mehr als 1 Sekunde
gedrückt halten)
Für Teigmenüs ist die Zeitvorwahl nicht verfügbar.
(Ausnahme: Menü 22.)
Informationen zum Hinzufügen von zusätzlichen
Zutaten zum Teig finden Sie auf Seite 48.
Bei anderen Menüs als 22, 26 und 27 beginnt
nach dem Start das ‘Rest’ (Ruhen). Danach
erfolgt das ‘Knead’ (Kneten) und ‘Rise’ (Gären).
Formen Sie den fertigen Teig, lassen Sie ihn je
nach Rezept ein zweites mal gären und backen
Sie ihn dann im Ofen.
1
Vorbereitung
(S. 46)
Wählen
Die Butter für spätere Zugabe in 1–2 cm große Würfel schneiden und gekühlt lagern.
Bringen Sie den Knethaken in der Backform an.
Geben Sie die Zutaten in der im Rezept aufgelisteten Reihenfolge in die Backform.
Stellen Sie die Backform in das Gerät, und stecken Sie den Netzstecker ein.
Sie Menü ‘23’
42, 3
1
Starten Sie die Maschine
2
Zeit bis zur Zugabe von Butter oder Zutaten
Die Start-Lampe leuchtet auf.
Wenn der Piepton ertönt, wird weitere
3
Butter hinzugefügt, drücken Sie dann die
‘Start’ erneut
Geben Sie die weitere gewürfelte Butter hinzu, solange ‘ ’ blinkt.
Nach dem Drücken
der Starttaste
Auf dem Display wird die verbleibende Zeit bis zum Ende des
Programms angezeigt.
Teig rezepte finden
Sie auf Seite 61
Nach dem Start
Abbrechen/Stoppen
(mehr als 1 Sekunde
gedrückt halten)
Deutsch
[Einfache Möglichkeit, BriocheTeig zu mischen]
Fügen Sie die Butter zusammen
mit den anderen Zutaten zu
Beginn hinzu.
Würfeln Sie die Butter (etwa 2 cm), und füllen Sie
sie zur gleichen Zeit wie die anderen Zutaten in
die Backform ein.
Folgen Sie den links aufgeführten Schritten.
Wenn das Gerät in Schritt 3 durch Piepen zum
Hinzufügen von weiterer Butter auffordert,
unternehmen Sie jedoch nichts.
Erforderliche Zeit beträgt
* Wenn die Butter zu Beginn hinzugefügt wird,
unterscheiden sich Geschmack, Konsistenz und
Aufgehen des Brots etwas vom Backvorgang, bei
dem Butter später hinzugefügt wird.
Der ‘Rest’ (Ruhen) Vorgang beginnt sofort nach
dem Start und wird vom ‘Knead’ (Kneten) und
‘Rise’ (Gären) gefolgt.
Fügen Sie zusätzliche Zutaten, wie Rosinen,
mit der Butter hinzu. (Max. 150 g für Zutaten
verwenden)
Auch wenn die Starttaste nicht gedrückt wird,
wird der Knetvorgang nach 5 Minuten fortgesetzt.
Der Knetvorgang wird auch dann nicht sofort
fortgesetzt, wenn nach dem Hinzufügen von
Butter oder Zutaten die Starttaste gedrückt wird.
Keine Butter nach Anzeige der Restzeit zugeben.
(S.67)
1 stunde und 50 minuten
.
Drücken Sie ‘Stop’ und entfernen Sie den
4
Teig
wenn das Gerät 8 Mal piept und der Balken unter ‘End’ (Ende) blinkt.
50 51
Die blinkende Start-Lampe erlischt.
Formen Sie den fertigen Teig, lassen Sie ihn je
nach Rezept ein zweites mal gären und backen
Sie ihn dann im Ofen.
Page 27
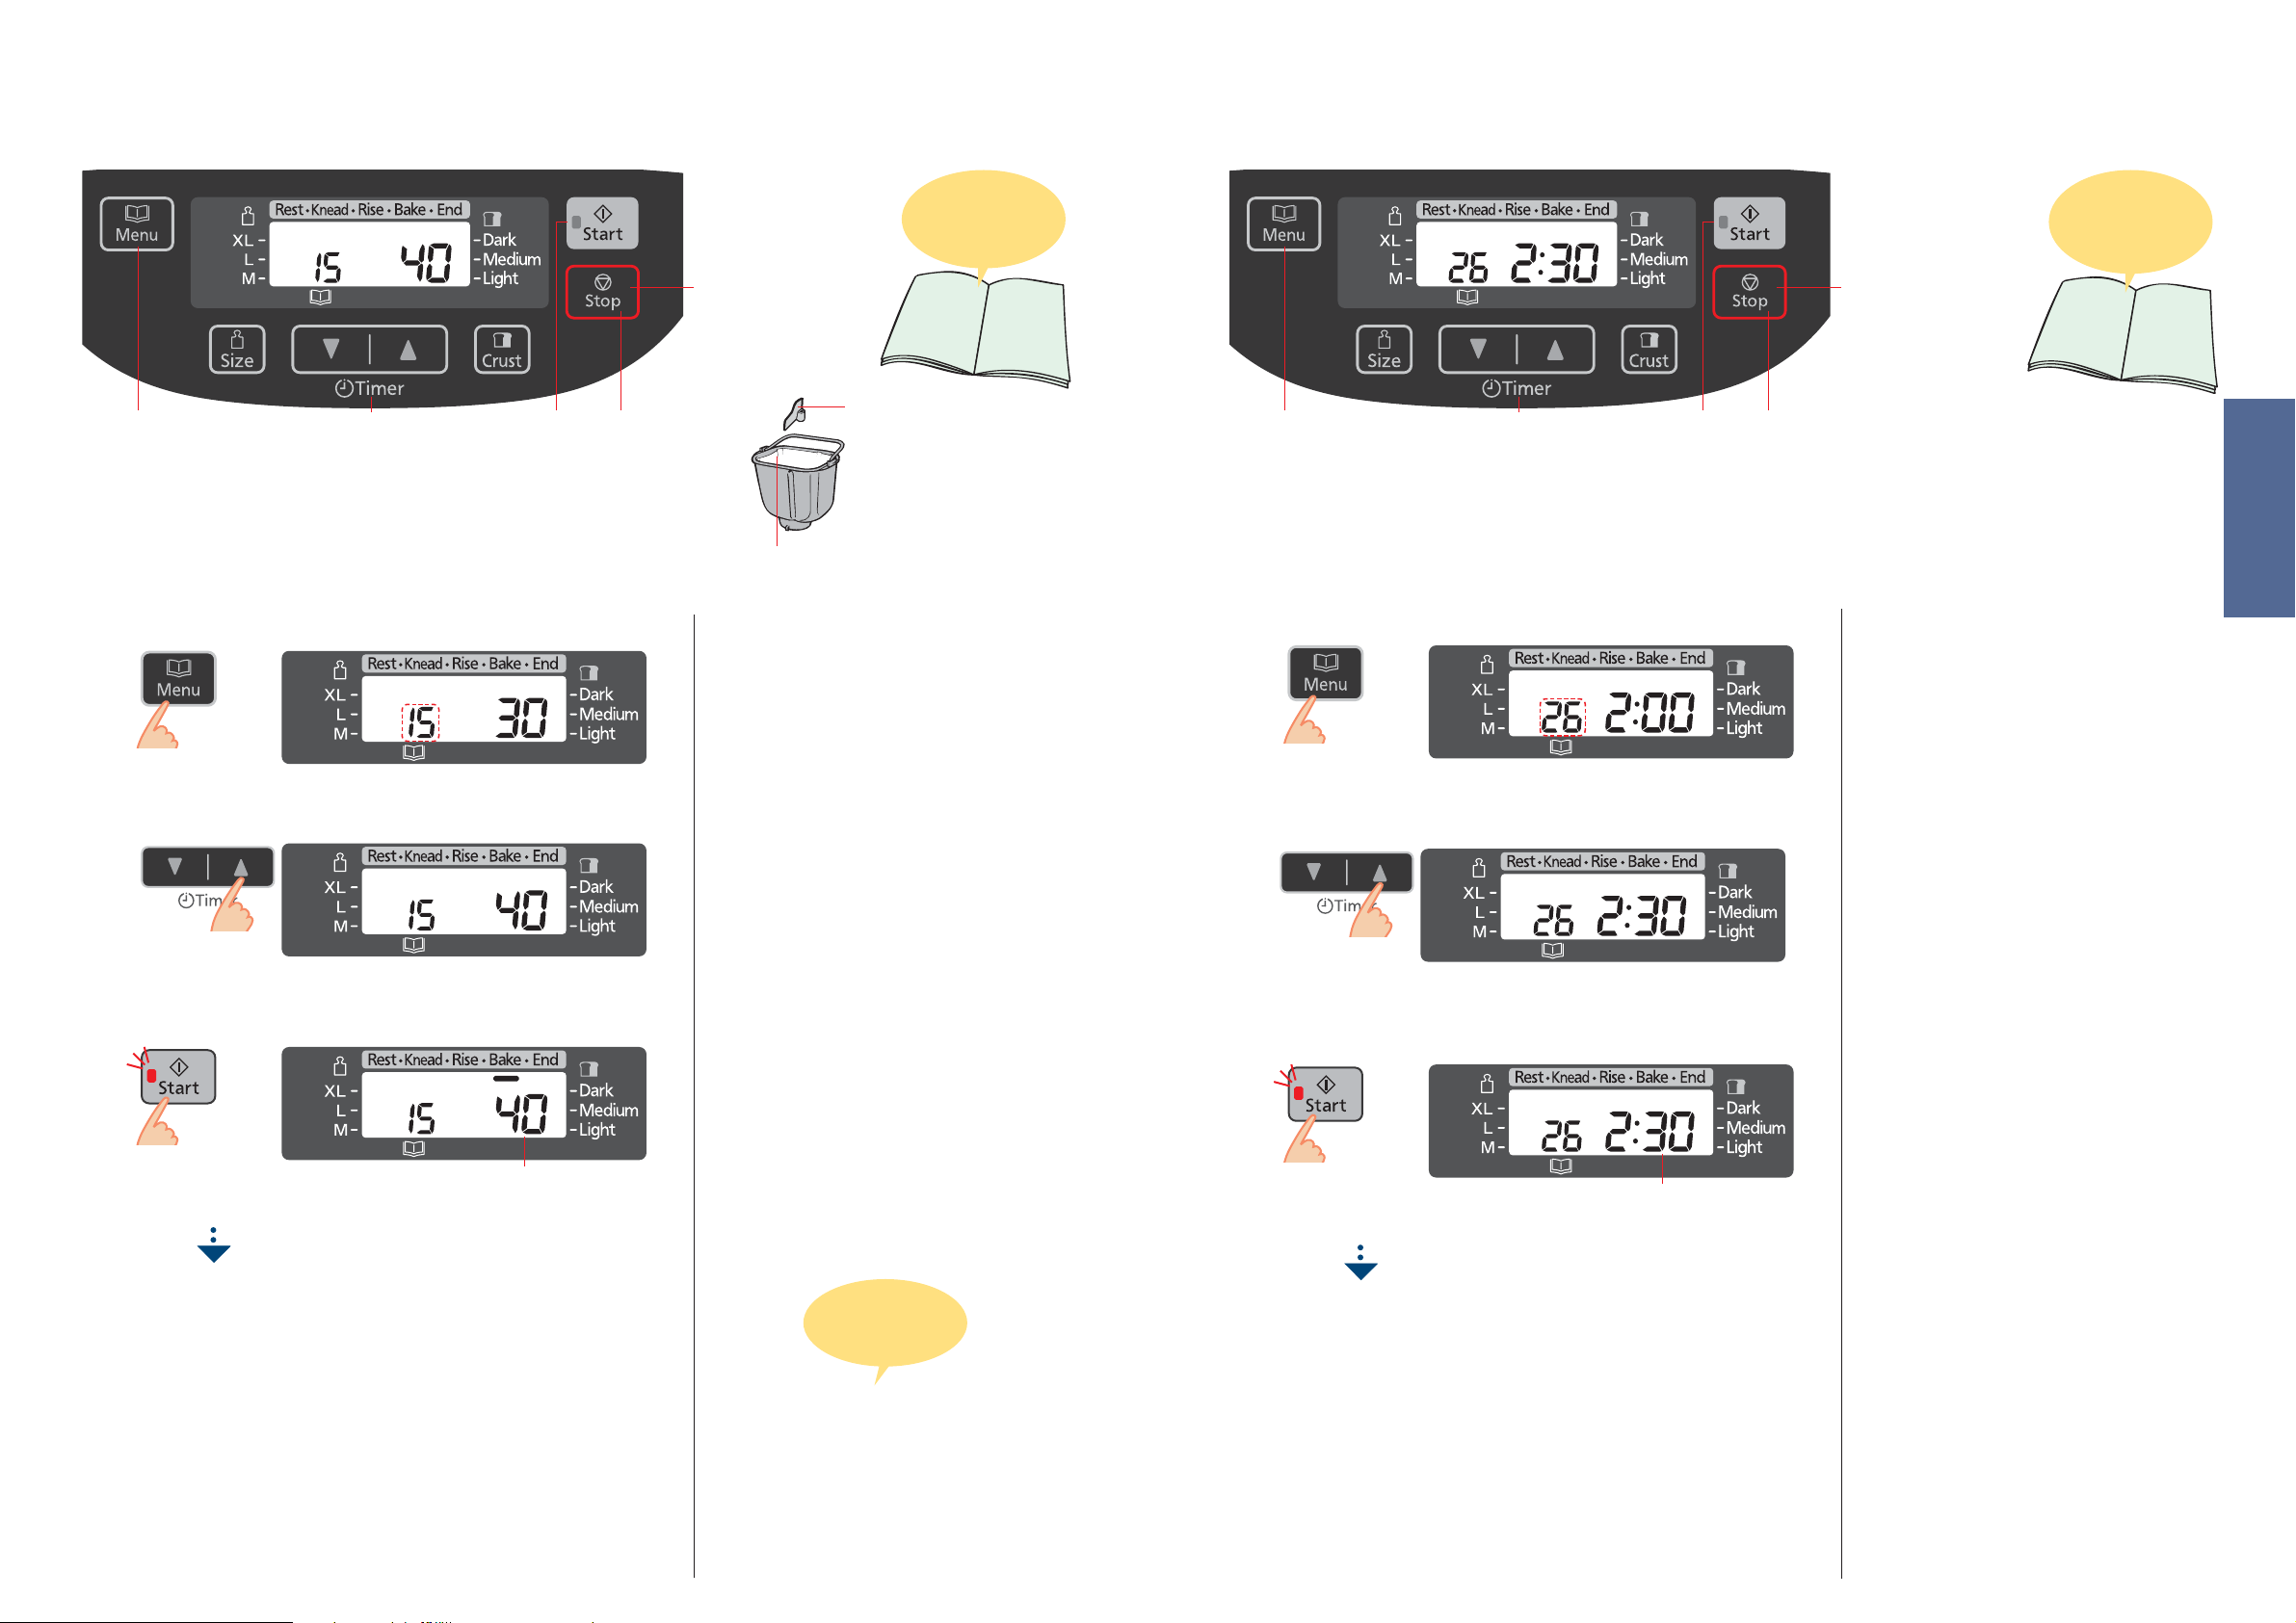
Kuchen backen
Kochen von Marmelade
Kuchen rezepte
finden Sie auf
Seite 61
Nach dem Start
Abbrechen/Stoppen
(mehr als 1 Sekunde
gedrückt halten)
•
Entfernen Sie den Knethaken
1
Vorbereitung
Bereiten Sie die Zutaten entsprechend des Rezeptes vor.
Legen Sie die Backform mit Backpapier aus und geben Sie
die gemischten Zutaten hinzu.
Stellen Sie die Backform in das Gerät, und stecken Sie den
Netzstecker ein.
2
Wählen Sie Menü ‘15’
1
Stellen Sie die Backzeit ein
2
3
4
•
Mit Backpapier auslegen.
(Kuchen oder Teebrot brennt bei direktem Kontakt zur
Backform an.)
Für Menü 15 ist keine Zeitvorwahl verfügbar.
(Mit der Zeitvorwahltaste wird nur die Dauer der
Backzeit festgelegt.)
1
Vorbereitung
Bereiten Sie die Zutaten entsprechend des Rezeptes vor.
Bringen Sie den Knethaken in der Backform an.
Füllen Sie die Zutaten in der folgenden Reihenfolge in die Backform:
Hälfte der Früchte → Hälfte des Zuckers → verbleibende Früchte → verbleibender Zucker.
Stellen Sie die Backform in das Gerät, und stecken Sie den Netzstecker ein.
2
Wählen Sie Menü ‘26’
1
Stellen Sie die Kochzeit ein
2
3
4
Starten Sie die Maschine
Starten Sie die Maschine
3
3
Geschätzte Zeit bis das gewählte Programm fertig ist
Die Start-Lampe leuchtet auf.
Drücken Sie ‘Stop’, wenn das Gerät piept und der Balken unter
4
Vergewissern Sie sich, dass der
‘End’ (Ende) blinkt.
Achtung! Heiß!
Backvorgang abgeschlossen ist, und
entnehmen Sie die Backform
Die blinkende Start-Lampe erlischt.
Wenn der Backvorgang nicht komplett ist
Wiederholen Sie Schritte 1 bis 3
(Die Backzeit/Kochzeit kann zweimal verlängert werden. Jede Verlängerung
kann nicht länger als 50 Minuten sein. Wenn das Gerat heis ist, startet die
Zeitvorwahl von 1 Minute. Erhohen Sie die Zeitdauer durch Drucken der
52 53
Zeitvorwahltaste.)
Um zu überprüfen ob, der Backvorgang komplett
ist, stecken Sie einen Spieß in die Mitte des
Kuchens – wenn er fertig ist, bleibt am Spieß
keine Backmischung hängen.
Die Start-Lampe leuchtet auf.
Drücken Sie ‘Stop’, und entnehmen Sie
4
die Marmelade
wenn das Gerät 8 Mal piept und der Balken unter ‘End’ (Ende) blinkt.
Die blinkende Start-Lampe erlischt.
Wenn der Kochvorgang noch nicht abgeschlossen ist
Wiederholen Sie Schritte 1 bis 3
(Die Backzeit/Kochzeit kann zweimal verlängert werden. Jede Verlängerung
kann zwischen 10 und 40 Minuten sein. Wenn das Gerät heiß ist, startet
die Zeitvorwahl von 1 Minute. Erhöhen Sie die Zeitdauer durch Drücken der
Zeitvorwahltaste.)
Geschätzte Zeit bis das gewählte Programm fertig ist
Nach dem Start
Abbrechen/Stoppen
(mehr als 1 Sekunde
gedrückt halten)
Für Menü 26 ist keine Zeitvorwahl verfügbar.
(Mit der Zeitvorwahltaste wird nur die Dauer der
Kochzeit festgelegt.)
Für eine gute, ausreichend gelierte Marmelade ist
eine ausreichende Menge von Zucker, Säure und
Pektin erforderlich.
Früchte mit einem hohen Pektinanteil gelieren leicht.
Früchte mit weniger Pektin gelieren nicht so leicht.
Verwenden Sie frische, reife Früchte. Überreife
oder unreife Früchte gelieren nicht so gut.
Die Rezepte in diesem Buch ergeben leicht gelierte
Marmelade. Grund ist der geringe Zuckergehalt.
Beachten Sie die Mengenangaben für jede Zutat
in den Rezepten.
•
Verändern Sie nicht die Menge der Früchte.
Dadurch könnte die Marmelade überkochen
oder anbrennen.
•
Erhöhen Sie die Zuckermenge nicht auf mehr
als die Hälfte der Früchtemenge. Dadurch
könnte die Marmelade überkochen oder
anbrennen. Wenn Sie die Zuckermenge
reduzieren, geliert die Marmelade nicht richtig.
* Bei Früchten mit hohem Säuregehalt können
Sie die Menge des Zitronensafts reduzieren. Bei
zu starker Reduzierung geliert die Marmelade
jedoch nicht richtig.
Bei zu kurzer Kochzeit können Fruchtstücke
verbleiben und die Marmelade wässrig werden.
•
Die Marmelade geliert beim Abkühlen weiter.
Achten Sie darauf, sie nicht zu lange zu kochen.
Füllen Sie die fertige Marmelade so schnell wie
möglich in die Behälter. Achten Sie darauf, dass
die Marmelade beim Entnehmen nicht anbrennt.
In der Backform verbleibende Marmelade kann
anbrennen.
Bewahren Sie die Marmelade kühl und dunkel
auf. Aufgrund des geringeren Zuckergehalts
ist die Marmelade nicht so lange haltbar
wie gekaufte Marmelade. Bewahren Sie die
Marmelade nach dem Öffnen gekühlt auf, und
verbrauchen Sie sie so schnell wie möglich.
Marmeladenrezepte
finden Sie auf
Seite 62
Deutsch
Page 28
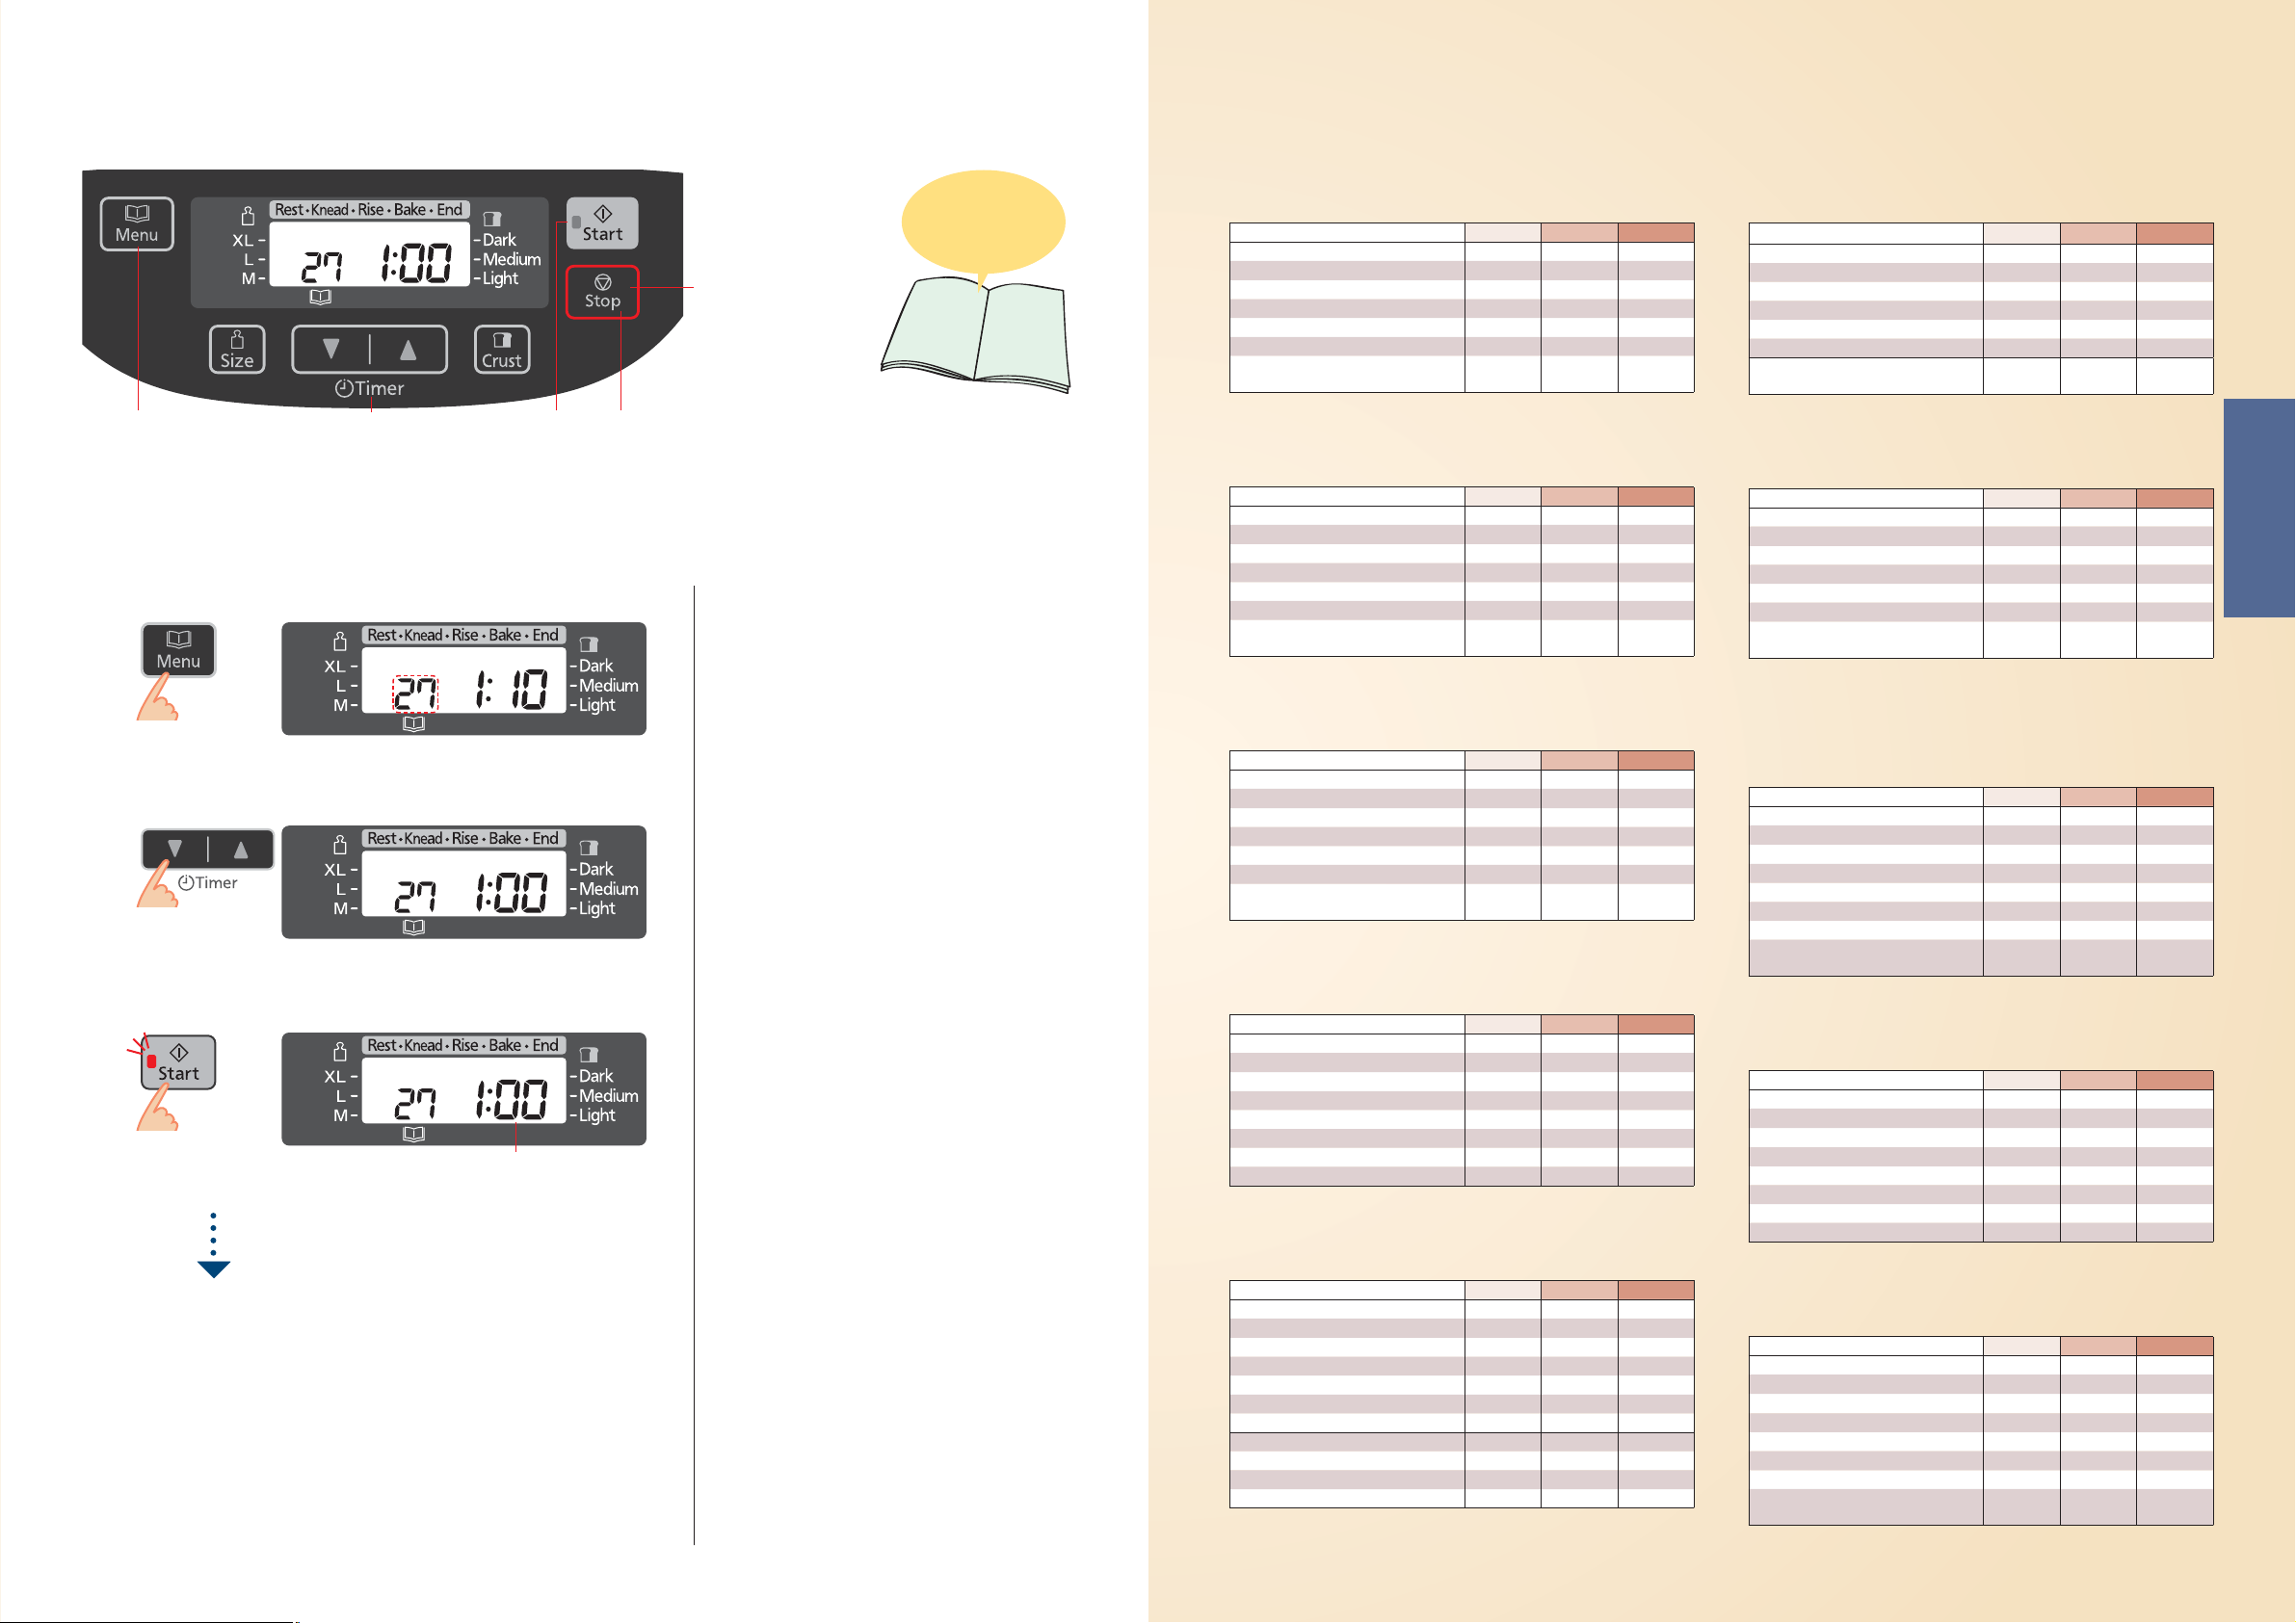
Kochen von Kompott
Brot Rezepte
1
Vorbereitung
2
Bereiten Sie die Zutaten entsprechend des Rezeptes vor. (Entnehmen Sie den Knethaken.)
Füllen Sie die Zutaten in der folgenden Reihenfolge in die Backform:
3
4
Früchte → Zucker → Flüssigkeit.
Stellen Sie die Backform in das Gerät, und stecken Sie den Netzstecker ein.
Wählen Sie Menü ‘27’
1
Stellen Sie die Kochzeit ein
2
Starten Sie die Maschine
3
Geschätzte Zeit bis das gewählte Programm fertig ist
Die Start-Lampe leuchtet auf.
Drücken Sie ‘Stop’, und entnehmen Sie
4
die Kompott
wenn das Gerät 8 Mal piept und der Balken unter ‘End’ (Ende) blinkt.
Die blinkende Start-Lampe erlischt.
Wenn der Kochvorgang noch nicht abgeschlossen ist
Wiederholen Sie Schritte 1 bis 3
(Die Backzeit/Kochzeit kann zweimal verlängert werden. Jede Verlängerung
kann zwischen 10 und 40 Minuten sein. Wenn das Gerät heiß ist, startet
die Zeitvorwahl von 1 Minute. Erhöhen Sie die Zeitdauer durch Drücken der
Zeitvorwahltaste.)
Kompottrezepte
finden Sie auf
Seite 62
Nach dem Start
Abbrechen/Stoppen
(mehr als 1 Sekunde
gedrückt halten)
Für Menü 27 ist keine Zeitvorwahl verfügbar.
(Mit der Zeitvorwahltaste wird nur die Dauer der
Kochzeit festgelegt.)
Beachten Sie die Mengenangaben für jede Zutat
in den Rezepten.
•
Verändern Sie nicht die Menge der Früchte.
Dadurch könnte das Kompott überkochen oder
anbrennen.
WEIßBROT
Wählen Sie Menü ‘01’ oder ‘02’
Weizenmehl, Typ 550 400 g 500 g 600 g
Teelöffel Salz 11⁄2 11⁄2 2
Esslöffel Zucker 1 1
Butter 20 g 30 g 40 g
Wasser 280 mL 350 mL 420 mL
Teelöffel Trockenhefe 1 1 1
(Normal Brot schnell)
Teelöffel Trockenhefe
MLXL
1
⁄2 2
1
⁄2
1
222
⁄2
MILCHSTUTEN
Wählen Sie Menü ‘01’ oder ‘02’
Weizenmehl, Typ 550 400 g 500 g 600 g
Teelöffel Salz 1 11⁄2 2
Esslöffel Zucker 1 1
Butter 20 g 30 g 40 g
Vollmilch 280 mL 350 mL 420 mL
Teelöffel Trockenhefe
(Normal Brot schnell)
Teelöffel Trockenhefe
MLXL
1
⁄2 2
1
⁄2 11
222
1
⁄2
1
⁄2
DUNKLES WEIZENMEHLBROT
Wählen Sie Menü ‘01’ oder ‘02’
Weizenmehl, Typ 1050 400 g 500 g 600 g
Teelöffel Salz 1 11⁄2 2
Esslöffel Zucker 1 1
Butter 20 g 30 g 40 g
Vollmilch 280 mL 350 mL 420 mL
Teelöffel Trockenhefe 1 1 11⁄2
(Normal Brot schnell)
Teelöffel Trockenhefe
MLXL
1
⁄2 2
1
222
⁄2
ZWIEBELBROT
Wählen Sie Menü ‘01’
Dunkles Roggenmehl, Typ 997 80 g 100 g 150 g
Weizenmehl, Typ 550 320 g 400 g 450 g
Teelöffel Salz 1 1
Esslöffel Zucker 1 1 1
Esslöffel Ö l 11⁄2 22
Röstzwiebeln 40 g 55 g 70 g
Wasser 240 mL 300 mL 360 mL
Teelöffel Trockenhefe 1 1 1
MLXL
1
⁄2 2
1
⁄2
1
⁄2
1
⁄2
WEIHNACHTSBROT
Wählen Sie Menü ‘03’
Weizenmehl, Typ 550 350 g 450 g 550 g
Teelöffel Salz 1 11⁄2 2
Esslöffel Honig 2
Butter 20 g 30 g 40 g
Esslöffel Spekulatiusgewürz 11⁄2 22
Wasser 240 mL 300 mL 380 mL
Teelöffel Trockenhefe 1 1 1
ZUGABEN (Rosinen-Nuss-Verteiler) :
Haselnüsse, grob gehackt 20 g 30 g 40 g
Walnüsse, grob gehackt 20 g 30 g 40 g
Mandel, gehackt 20 g 30 g 40 g
MLXL
1
⁄2 33
1
⁄2
1
⁄2
1
⁄2
ROSINENBROT
Wählen Sie Menü ‘03’
MLXL
Weizenmehl, Typ 550 400 g 500 g 600 g
Teelöffel Salz 1
Esslöffel Zucker 1 1
Butter 20 g 30 g 40 g
Wasser 280 mL 350 mL 420 mL
Teelöffel Trockenhefe 1 1 11⁄2
ZUGABE (Rosinen-Nuss-Verteiler) :
Rosinen
1
⁄2 11⁄2 2
80 g 100 g 120 g
1
⁄2 2
VOLLWERTBROT
Wählen Sie Menü ‘04’ oder ‘05’
Vollkornweizenmehl 400 g 500 g 600 g
Teelöffel Salz 11⁄2 11⁄2 2
Esslöffel Zucker 1 1
Butter 20 g 30 g 40 g
Wasser 280 mL 350 mL 420 mL
Teelöffel Trockenhefe 1 1 1
(Vollwert Brot schnell)
Teelöffel Trockenhefe
Ersetzen Sie zu Gunsten besserer Backergebnisse ein Drittel bis die Hälfte des
Vollkornweizenmehls durch Weizenmehl der Sorte 550.
MLXL
1
⁄2 2
1
⁄4
1
⁄2 11⁄2 2
1
Deutsch
WEIZENBROT
Wählen Sie Menü ‘04’ oder ‘05’
Weizenmehl, Typ 550 100 g 150 g 180 g
Vollkornweizenmehl 300 g 350 g 400 g
Teelöffel Salz 1 1
Esslöffel Zucker 1 1
Butter 20 g 30 g 40 g
Vollmilch 280 mL 350 mL 420 mL
Teelöffel Trockenhefe 1 1 1
(Vollwert Brot schnell)
Teelöffel Trockenhefe
MLXL
1
⁄2 2
1
⁄2 2
1
⁄4
1
⁄2 11⁄2 2
1
KÜMMELBROT
Wählen Sie Menü ‘04’
Weizenmehl, Typ 550 80 g 100 g 120 g
Dunkles Weizenmehl, Typ 1050 320 g 400 g 480 g
Teelöffel Salz 1 1
Esslöffel Zucker 1 1
Esslöffel Pflanzenöl 2
Esslöffel Kümmel, ganz 1 11⁄2 2
Wasser 280 mL 350 mL 420 mL
Teelöffel Trockenhefe 1 1 11⁄2
MLXL
1
⁄2 2
1
1
⁄2 33
⁄2 2
1
⁄2
WEIZENVOLLKORNBROT MIT HAFER
Wählen Sie Menü ‘04’ oder ‘05’
Weizenvollkornmehl 350 g 450 g 550 g
Teelöffel Salz 1 11⁄2 2
Esslöffel Honig 2
Butter 20 g 30 g 40 g
Haferkörner, o. Einweichwasser 60 g 80 g 100 g
Wasser 240 mL 310 mL 380 mL
Teelöffel Trockenhefe 1 1 1
(Vollwert Brot schnell)
Teelöffel Trockenhefe
MLXL
1
⁄2 33
1
⁄2 11⁄2 2
1
1
⁄2
1
⁄4
54 55
Page 29

Brot Rezepte
Brot Rezepte
MÜSLI-BROT
Wählen Sie Menü ‘04’ oder ‘05’
Weizenmehl, Typ 550 160 g 200 g 250 g
Vollkornweizenmehl 190 g 250 g 300 g
Teelöffel Salz 1 1
Esslöffel Honig 2
Butter 20 g 30 g 40 g
Müsli 60 g 80 g 100 g
Vollmilch 300 mL 380 mL 460 mL
Teelöffel Trockenhefe 1 1 1
(Vollwert Brot schnell)
Teelöffel Trockenhefe
MLXL
1
1
⁄2 33
1
⁄2 11⁄2 2
1
⁄2 2
1
⁄2
1
⁄2
KÄSEBROT
Wählen Sie Menü ‘04’ oder ‘05’
Dunkles Roggenmehl, Typ 997 120 g 150 g 180 g
Weizenmehl, Typ 550 280 g 350 g 420 g
Teelöffel Salz 1 1 1
Butter 20 g 30 g 40 g
Emmentaler, gerieben 30 g 40 g 50 g
Parmesan, gerieben 30 g 40 g 50 g
Wasser 270 mL 340 mL 400 mL
Teelöffel Trockenhefe 1 1 1
(Vollwert Brot schnell)
Teelöffel Trockenhefe
MLXL
1
⁄2
1
⁄4
1
⁄2 11⁄2 2
1
BUCHWEIZENBROT
Wählen Sie Menü ‘04’ oder ‘05’
Buchweizengrütze 35 g 50 g 60 g
Buchweizenmehl 35 g 50 g 60 g
Vollkornweizenmehl 120 g 160 g 120 g
Weizenmehl, Typ 550 180 g 240 g 380 g
Teelöffel Salz 1 1
Esslöffel Zucker 1 11⁄2 2
Butter 35 g 40 g 45 g
Wasser 220 mL 290 mL 360 mL
Teelöffel Trockenhefe 1 1 1
(Vollwert Brot schnell)
Teelöffel Trockenhefe
MLXL
1
⁄2 2
1
⁄4
1
⁄2 11⁄2 2
1
WEIZENMISCHBROT MIT ROGGENMEHL
Wählen Sie Menü ‘04’ oder ‘05’
Dunkles Weizenmehl, Typ 1050 280 g 350 g 420 g
Dunkles Roggenmehl, Typ 997 120 g 150 g 180 g
Teelöffel Salz 1 1
Esslöffel Zucker 1 1
Butter 20 g 30 g 40 g
Flüssiger Sauerteig 40 g 50 g 60 g
Wasser 240 mL 300 mL 360 mL
Teelöffel Trockenhefe 1 1 1
(Vollwert Brot schnell)
Teelöffel Trockenhefe
MLXL
1
⁄2 2
1
⁄2 2
1
⁄4
1
⁄2 11⁄2 2
1
WEIZENMISCHBROT MIT SCHROTANTEILEN
BIER-BROT
Wählen Sie Menü ‘04’ oder ‘05’
Weizenmehl, Typ 550 150 g 200 g 250 g
Weizenvollkornmehl 120 g 150 g 180 g
Roggenvollkornschrot 80 g 100 g 120 g
Teelöffel Salz 1 1 1
Esslöffel Zucker 1 1 11⁄2
Butter 20 g 30 g 40 g
Flüssiger Sauerteig 60 g 75 g 90 g
Bier (Pils) 120 mL 150 mL 180 mL
Vollmilch 120 mL 150 mL 180 mL
Teelöffel Trockenhefe 1 1 1
(Vollwert Brot schnell)
Teelöffel Trockenhefe
MLXL
1
⁄2
1
⁄4
1
⁄2 11⁄2 2
1
SONNENBLUMENKERNBROT
Wählen Sie Menü ‘06’
Vollkornweizenmehl 400 g 500 g 600 g
Teelöffel Salz 1 1
Esslöffel Zucker 1 1
Butter 20 g 30 g 40 g
Wasser 280 mL 350 mL 420 mL
Teelöffel Trockenhefe 1 1 1
ZUGABEN (Rosinen-Nuss-Verteiler) :
Sonnenblumenkerne
MLXL
1
⁄2 2
1
⁄2 2
1
⁄4
55 g 70 g 85 g
VITALBROT
Wählen Sie Menü ‘06’
Dunkles Weizenmehl, Typ 1050 120 g 150 g 190 g
Vollkornweizenmehl 230 g 300 g 360 g
Teelöffel Salz 1 1
Esslöffel Honig 21⁄2 33
Butter 20 g 30 g 40 g
Leinsamen 10 g 20 g 30 g
Sesam 10 g 20 g 30 g
Hirse, ohne Einweichwasser 20 g 30 g 40 g
Wasser 240 mL 310 mL 380 mL
Teelöffel Trockenhefe 1 1 1
ZUGABEN (Rosinen-Nuss-Verteiler) :
Sonnenblumenkerne
MLXL
1
⁄2 2
20 g 30 g 35 g
1
⁄2
1
⁄2
ADVENTSBROT
Wählen Sie Menü ‘06’
Dunkles Weizenmehl, Typ 1050 380 g 450 g 550 g
Teelöffel Salz 1
Butter 20 g 30 g 40 g
Marzipanrohmasse, gewürfelt 60 g 80 g 100 g
Wasser 270 mL 310 mL 390 mL
Teelöffel Trockenhefe 1 1 1
ZUGABEN (Rosinen-Nuss-Verteiler) :
Rosinen 25 g 30 g 40 g
Orangenat 30 g 30 g 40 g
Zitronat 30 g 30 g 40 g
MLXL
1
⁄2 11⁄2 2
1
⁄2
ROGGENBROT
Wählen Sie Menü ‘07’
Roggenmehl, Typ1150 400 g
Roggenvollkornschrot 100 g
Vollkorn–Roggen 100 g
Teelöffel Salz 1
Esslöffel Zucker 1
Butter 20 g
Flüssiger Sauerteig 75 g
Wasser 300 mL
Teelöffel Trockenhefe 1
1
⁄2
FRANZÖSISCHES BROT
Wählen Sie Menü ‘08’
Weizenmehl, Typ 550 300 g
Teelöffel Salz 1
Butter 20 g
Wasser 220 mL
Teelöffel Trockenhefe
3
⁄4
ITALIENISCHES BROT
Wählen Sie Menü ‘09’
Weizenmehl, Typ 550 400 g
Teelöffel Salz 1
Esslöffel Olivenöl 11⁄2
Wasser 260 mL
Teelöffel Trockenhefe 1
1
⁄2
TOASTBROT
Wählen Sie Menü ‘10’
Weizenmehl, Typ 550 380 g
Esslöffel Zucker 2
Butter 30 g
Wasser 250 mL
Teelöffel Trockenhefe 1
EINFACHES BRIOCHE
Wählen Sie Menü ‘11’
Weizenmehl, Typ 550 400 g
Esslöffel Zucker 4
Teelöffel Salz 1
Esslöffel Magermilch Pulver 2
Butter (gewürfelt, 2 cm, im
Kühlschrank aufbewahren)
Wasser 180 mL
Ei (geschlagen), mittelgroß 2 (100 g)
Teelöffel Trockenhefe 1
zusätzliche Butter
(gewürfelt, 1 bis 2 cm, im
Kühlschrank aufbewahren)
50 g
1
70 g
⁄4
PANNETTONE
Wählen Sie Menü ‘11’
Weizenmehl, Typ 550 400 g
Esslöffel Zucker 4
Teelöffel Salz 1
Butter
(gewürfelt, 2 cm, im
Kühlschrank aufbewahren)
Ei (geschlagen), mittelgroß 2 (100 g)
Milch 200 mL
Teelöffel Trockenhefe 1
zusätzliche Butter
(gewürfelt, 1 bis 2 cm, im
Kühlschrank aufbewahren)
Orangenschale, fein gehackt* 50 g
Braune Sultaninen* 50 g
Getrocknete schwarze
Johannisbeeren*
* : mit der zusätzlichen Butter hinzuzufügen
50 g
1
70 g
50 g
⁄2
DINKELVOLLKORNBROT
Wählen Sie Menü ‘13’
Vollkornweizenmehl 400 g 500 g 600 g
Teelöffel Salz 1
Teelöffel Zucker 11⁄2 22
Butter 20 g 30 g 40 g
Wasser 270 mL 350 mL 410 mL
Teelöffel Trockenhefe 1 1
MLXL
1
⁄4 11⁄2 13⁄4
1
⁄4 11⁄2
LEINSAMEN-SESAM-BROT
Wählen Sie Menü ‘13’
MLXL
Vollkorndinkelmehl 400 g 500 g 600 g
Teelöffel Salz 1 1
Esslöffel Honig 21⁄2 33
Butter 20 g 30 g 40 g
Leinsamen 20 g 30 g 40 g
Sesam 20 g 30 g 40 g
Wasser 270 mL 350 mL 410 mL
Teelöffel Trockenhefe 1 1
1
⁄2 2
1
⁄4 11⁄2
1
⁄2
ROGGEN- UND DINKELBROT
Wählen Sie Menü ‘13’
MLXL
Vollkorndinkelmehl 240 g 300 g 360 g
Roggenvollkornschrot 80 g 100 g 120 g
Dunkles Roggenmehl,
Typ 1150
Teelöffel Zucker 1
Teelöffel Salz 1
Butter 5 g 10 g 10 g
Naturjoghurt 120 g 150 g 180 g
Wasser 180 mL 230 mL 270 mL
Teelöffel Trockenhefe 1 1
80 g 100 g 120 g
1
⁄2 22
1
⁄4 11⁄2 13⁄4
1
⁄4 11⁄2
Deutsch
Wählen Sie Menü ‘04’ oder ‘05’
Weizenmehl, Typ 550 280 g 350 g 420 g
Roggenvollkornschrot 120 g 150 g 180 g
Teelöffel Salz 1 1
Esslöffel Zucker 1 1
Butter 20 g 30 g 40 g
Flüssiger Sauerteig 60 g 75 g 90 g
Wasser 240 mL 300 mL 360 mL
Teelöffel Trockenhefe 1 1 11⁄4
(Vollwert Brot schnell)
Teelöffel Trockenhefe
56 57
MLXL
1
⁄2 2
1
⁄2 2
1
⁄2 11⁄2 2
1
Page 30

Brot Rezepte
Glutenfreie Rezepte
FRUCHTIGES DINKELBROT
Wählen Sie Menü ‘14’
MLXL
Dinkelmehl, Typ 630 400 g 500 g 600 g
Teelöffel Zucker 1
Teelöffel Salz 1
Butter 5 g 10 g 10 g
Teelöffel Gewürzmischung 2 2
Wasser 270 mL 350 mL 400 mL
Teelöffel Trockenhefe 1 1
ZUGABEN
(Rosinen-Nuss-Verteiler) :
Trockenobstmischung
1
⁄2 22
1
⁄4 11⁄2 13⁄4
1
⁄2 3
1
⁄4 11⁄2
100 g 125 g 150 g
REIS- UND DINKELBROT MIT PINIENKERNEN UND
RÖSTZWIEBELN
Wählen Sie Menü ‘14’
MLXL
Vollkorn Dinkelmehl 320 g 400 g 480 g
Naturreismehl 80 g 100 g 120 g
Teelöffel Zucker 1
Teelöffel Salz 1
Butter 5 g 10 g 10 g
Wasser 260 mL 340 mL 400 mL
Teelöffel Trockenhefe 1 1
ZUGABEN
(Rosinen-Nuss-Verteiler) :
Pinienkerne
Elsässer Röstzwiebeln 3 4 5
1
⁄2 22
1
⁄4 11⁄2 13⁄4
1
⁄4 11⁄2
40 g 50 g 60 g
Aurora Brotbackmischnugen Rezepte
ELSÄSSER LANDBROT
Wählen Sie Menü ‘01’ oder ‘02’
Elsässer Landbrot 400 g 500 g 600 g
Wasser 240 mL 300 mL 360 mL
Teelöffel Trockenhefe 1 1 1
(Vollwert Brot schnell)
Teelöffel Trockenhefe
MLXL
1
⁄2
1
222
⁄2
VOLLKORN-BUTTER-TOASTBROT
Wählen Sie Menü ‘10’
Vollkornweizenmehl 400 g
Esslöffel Zucker 2
Butter 40 g
Wasser 240 mL
Teelöffel Trockenhefe 1
Die Herstellung von glutenfreiem Brot unterscheidet sich stark von der normalen Brotherstellung.
Es ist sehr wichtig, daß Sie sich, wenn Sie glutenfreies Brot aus gesundheitlichen Gründen backen wollen, von Ihrem Arzt beraten lassen und
die folgenden Richtlinien beachten.
• Dieses Programm wurde speziell für bestimmte glutenfreie Brotmischungen entwickelt; bei Verwendung eigener Rezepturen kann es
vorkommen, daß Sie keine guten Ergebnisse erzielen.
• Wenn “glutenfrei” gewahlt ist, müssen die unten stehenden Angaben für jedes Rezept genau befolgt werden.
(Andernfalls kann es sein, daß das Brot nicht gut wird.)
Es gibt zwei Typen glutenfreier Backmischungen; Backmischungen auf Weizenmehl basierend mit “niedrigem Glutengehalt” und
Backmischungen, die “glutenfrei” sind und nicht aus Weizenmehl bestehen.
Falls Sie eine Spezialdiät einhalten müssen und dieses Backprogramm aus Gesundheitsgründen verwenden möchten, sprechen Sie bitte
zuvor mit Ihrem Arzt.
• Die unten stehenden glutenfreien Rezepte wurden mit kommerziell hergestellten Brotmischungen wie das Backmix-Weissbrot von
Hammermühle entwickelt.
Es ist ratsam, diese Mischungen für beste Ergebnisse zu verwenden.
Sie sind in Drogerien, Reformhäusern und gelegentlich in großen Supermärkten erhältlich.
Hammermühle
Brotbackmischungen sind auch im Internet www.hammermuehle.de zu bestellen.
• Die Backergebnisse und das Aussehen des Brotlaibes kann sich je nach Backgemisch verändern.
Gelegentlich kann auf der Oberfläche eines Laibs etwas Mehl anhaften.
• Warten Sie, bis sich das Brot abgekühlt hat, bevor Sie es schneiden. So geht es besser.
• Das Brot sollte an einem trockenen kühlen Ort gelagert und innerhalb von 2 Tagen verzehrt werden. Wenn Sie den gesamten Laib nicht
innerhalb dieser Zeit verzehren können, kann er in einen Tiefkühlbeutel gelegt, in praktische Teile geschnitten und eingefroren werden.
Deutsch
SCHWARZWALD-LAIB
Wählen Sie Menü ‘04’ oder ‘05’
Schwarzwald-Laib 400 g 500 g 600 g
Wasser 260 mL 330 mL 400 mL
Teelöffel Trockenhefe 1 1 1
(Vollwert Brot schnell)
Teelöffel Trockenhefe
MLXL
1
⁄2 11⁄2 2
1
BUTTER-TOASTBROT
Wählen Sie Menü ‘10’
Weizenmehl, Typ 550 400 g
Esslöffel Zucker 2
Butter 50 g
Wasser 240 mL
Teelöffel Trockenhefe 1
DUNKLES WEIZENMEHL TOASTBROT
Wählen Sie Menü ‘10’
Dunkles Weizenmehl, Typ 1050 400 g
Esslöffel Zucker 2
Butter 40 g
Wasser 210 mL
Teelöffel Trockenhefe 1
VOLLWERT TOASTBROT
Wählen Sie Menü ‘10’
Vollkornweizenmehl 400 g
Teelöffel Salz 1
Butter 20 g
Wasser 250 mL
Teelöffel Trockenhefe 1
FRANZÖSISCHES WEISSBROT
Wählen Sie Menü ‘08’
Weizenmehl, Typ 550 300 g
Teelöffel Salz 1
Butter 20 g
Wasser 220 mL
Teelöffel Trockenhefe
3
⁄4
FRANZÖSISCHES WEIZENBROT
Wählen Sie Menü ‘08’
Dunkles Weizenmehl, Typ 1050 350 g
Teelöffel Salz 1
Butter 20 g
Wasser 250 mL
Teelöffel Trockenhefe 1
Warnung für Personen welche dieses Programm aus gesundheitlichen Gründen verwenden:
Wenn Sie ein glutenfreies Programm verwenden, holen Sie zuvor medizinischen Rat ein und verwenden Sie nur Zutaten die sich
für Ihren Gesundheitszustand eignen.
Panasonic haftet nicht für Konsequenzen welche aus der Verwendung von Zutaten entstanden sind, die ohne professionellen Rat
verwendet wurden.
Es ist sehr wichtig, Mischungen mit glutenhaltigen Mehlen zu vermeiden, wenn das Brot aus gesundheitsbedingten Gründen verwendet wird.
Besondere Aufmerksamkeit muß der Reinigung der Backform und des Knethakens ebenso wie aller anderen verwendeten Utensilien gewidmet
werden.
GLUTENFREIES WEISSBROT
Wählen Sie Menü ‘12’
Wasser 430 g
Esslöffel Ö l 1
Hammermühle Back-Mix Weissbrot 500 g
Teelöffel Trockenhefe 2
58 59
Page 31

Teig Rezepte Teig Rezepte
NORMAL TEIG
Wählen Sie Menü ‘16’
Weizenmehl, Typ 550 500 g
Teelöffel Salz 11⁄2
Esslöffel Zucker 11⁄2
Butter 30 g
Wasser 310 mL
Teelöffel Trockenhefe 1
BREZEL
6 Stück: Wählen Sie Menü ‘16’
Weizenmehl, Typ 550 150 g
Weizenmehl, Typ 1050 150 g
Teelöffel Salz 1
Teelöffel Zucker
Butter 20 g
Wasser 180 mL
Teelöffel Trockenhefe 1
RESTLICHE ZUTATEN :
etwas Ö l
Esslöffel grobes Salz 1
Weiterverarbeitung:
Anschließend den Teig auf einer bemehlten Arbeitsfläche durchkneten und in 6
gleichgroße Stücke teilen. Aus den Teigstücken jeweils ca. 50 cm lange Rollen
drehen und Brezeln daraus formen, auf ein gefettetes Backblech legen und bei
Zimmertemperatur ca. 1 Std. gehen lassen.
Brezeln mit Ö l bestreichen, mit Salz bestreuen und im vorgeheizten Backofen bei
200°C (Ober-/Unterhitze) in ca. 30 Min. backen.
1
⁄2
VOLLWERT TEIG
Wählen Sie Menü ‘18’
Vollkornweizenmehl 500 g
Teelöffel Salz 2
Esslöffel Zucker 1
Butter 30 g
Wasser 340 mL
Teelöffel Trockenhefe 1
KÜRBISKERNBRÖTCHEN
Wählen Sie Menü ‘18’
Vollkorndinkelmehl 450 g
Teelöffel Salz
Esslöffel Zucker 1
Butter 30 g
Esslöffel Kürbiskerne 3
Wasser 290 mL
Teelöffel Trockenhefe 1
RESTLICHE ZUTATEN :
Wasser zum Bestreichen
Esslöffel Kürbiskerne 3
Weiterverarbeitung:
Anschließend den Teig auf einer bemehlten Arbeitsfläche durchkneten und in 12
gleichgroße Stücke teilen.
Runde Brötchen formen, auf ein gefettetes Backblech setzen und bei
Zimmertemperatur ca. 1 Std. gehen lassen.
Brötchen mit Wasser bestreichen, kreuzweise einschneiden und mit Kürbiskernen
bestreuen. Im vorgeheizten Backofen bei 200°C (Ober-/Unterhitze) in ca. 20 Min.
backen.
HEFEZOPF
Wählen Sie Menü ‘16’
Weizenmehl, Typ 405 500 g
Teelöffel Salz
Zucker 70 g
Butter 50 g
Ei, Größe L 1
Vanillezucker 1 P.
Wasser 200 mL
Teelöffel Trockenhefe 1
RESTLICHE ZUTATEN :
Butter zum Bestreichen
Hagelzucker 30 g
Weiterverarbeitung:
Anschließend den Teig auf einer bemehlten Arbeitsfläche durchkneten und in 3
gleichgroße Stücke teilen. Daraus jeweils ca. 50 cm lange Rollen drehen und einen
Zopf flechten. Auf ein gefettetes Backblech legen und bei Zimmertemperatur ca. 1
Std. gehen lassen.
Hefezopf mit Butter bestreichen, mit Hagelzucker bestreuen und im vorgeheizten
Backofen bei 200°C (Ober-/Unterhitze) in ca. 25 Min. backen. Nach 15 Min.
Backzeit den Hefezopf mit Alufolie abdecken.
1
⁄2
1
⁄2
FRANZÖSISCHER TEIG
Wählen Sie Menü ‘21’
Weizenmehl, Typ 550 300 g
Teelöffel Salz 1
Butter 20 g
Wasser 180 mL
Teelöffel Trockenhefe
PIZZA TEIG
Wählen Sie Menü ‘22’
Weizenmehl, Typ 550 450 g
Teelöffel Salz 2
Esslöffel Pflanzenöl 4
Wasser 240 mL
Teelöffel Trockenhefe 1
VOLLKORN-PIZZATEIG
Wählen Sie Menü ‘22’
Vollkornweizenmehl 400 g
1
⁄2
1
⁄2
1
⁄2
Teelöffel Salz 2
Teelöffel Zucker 1
Esslöffel Olivenöl 3
Wasser 280 mL
Teelöffel Trockenhefe 1
RESTLICHE ZUTATEN :
Belag nach Belieben
Weiterverarbeitung:
Anschließend den Teig auf einer bemehlten Arbeitsfläche durchkneten, auf ein
gefettetes Backblech geben und gleichmäßig ausrollen.
Den Pizzateig bei Zimmertemperatur ca. 1 Std. gehen lassen und nach Belieben
belegen.
Im vorgeheizten Backofen bei 200°C (Ober-/Unterhitze) in 25 - 30 Min. backen.
1
⁄2
BRIOCHE-TEIG (BRIOCHE-BRÖTCHEN MIT
SCHOKOSPLITTERN)
; für 12 Brötchen
Wählen Sie Menü ‘23’
Weißmehl, Typ 550 400 g
Esslöffel Zucker 4
Teelöffel Salz 1
Butter (gewürfelt, 2 cm, im
Kühlschrank aufbewahren)
Ei (geschlagen), mittelgroß 3 (150 g)
Milch 90 mL
Esslöffel Rum (dunkel) 1
Teelöffel Trockenhefe 1
zusätzliche Butter
(gewurfelt, 1 bis 2 cm, im
Kuhlschrank aufbewahren)
Schokosplitter* 120 g
* Streuen Sie die Schokosplitter nach dem Entnehmen des Teigs auf den Teig, und
falten Sie das untere Drittel des Teigs nach oben und das obere Drittel nach unten.
Falten Sie den Teig dann zur Hälfte um.
1
70 g
1
50 g
⁄2
⁄2
Deutsch
Kuchen Rezepte
Das menü 15 ermöglicht Ihnen das Backen von kleinen, kompakten Kuchen im Brotbackautomaten.
Halten Sie sich dabei unbedingt an die unten angegebenen Rezepte. Durch die starke Hitzeeinwirkung an den Backformseiten (in Höhe der
Heizschlange) sind diese Kuchen an den Seiten sehr dunkel gebräunt. Für die Zubereitung von lockeren Rührkuchen und Biskuit empfehlen wir
das herkömmliche Backen in Ihrem Backofen.
FRÜCHTE-RUM-KUCHEN
Wählen Sie Menü ‘15’
Backzeit : ca. 50 Min.
getrocknete Früchte, z.B. 100 g
3
⁄4
Aprikosen, Apfelringe
Rum 50-70 mL
Butter 80 g
Zucker 80 g
Eier, Größe L 3
Weizenmehl, Typ 1050 150 g
Teelöffel Backpulver 1
Zubereitung:
Getrocknete Früchte würfeln und in Rum ca. 1⁄2 Stunde einweichen. Butter mit
Zucker schaumig rühren. Eier nacheinander zufügen und unterrühren. Anschließend
Mehl, Backpulver sowie Rumfrüchte mit Flüssigkeit untermengen.
Den Knethaken aus der Backform nehmen und den Teig in die Form füllen. Die
Backform in den Brotbackautomaten stellen und den Deckel schließen. Das
Programm “Backen” wählen und den Teig ca. 50 Min. backen.
TIP: Anschließend nach Belieben mit Zuckerglasur bestreichen.
ORANGENKUCHEN
Wählen Sie Menü ‘15’
Backzeit : ca. 60 Min.
Butter 150 g
Puderzucker 150 g
Vanillezucker 1 P.
Eier, Größe L 2
Weizenmehl, Typ 405 150 g
Teelöffel Backpulver 1
abgeriebene Schale und Saft
einer Orange
Zubereitung:
Butter mit Puderzucker schaumig rühren. Eier nacheinander zufügen und
unterrühren. Mehl, Backpulver sowie Orangenschale und -saft untermengen.
Den Knethaken aus der Backform nehmen und Teig in die Form füllen. Die Backform
in den Brotbackautomaten stellen un den Deckel schließen. Das Programm “Backen”
wählen und den Teig ca. 60 Min. backen.
TIP: Anschließend nach Belieben mit Orangen-Zuckerglasur bestreichen.
NORMAL ROSINEN TEIG
Wählen Sie Menü ‘17’
Weizenmehl, Typ 550 500 g
Teelöffel Salz 1
Esslöffel Zucker 11⁄2
Butter 30 g
Wasser 310 mL
Teelöffel Trockenhefe 1
ZUGABE (Rosinen-Nuss-Verteiler) :
Rosinen
1
⁄2
100 g
60 61
Page 32

Marmeladenrezepte
Pflege & Reinigung
ERDBEERMARMELADE
Wählen Sie Menü ‘26’
Erdbeeren, fein gehackt 600 g
Zucker 400 g
Pektinpulver 13 g
Füllen Sie die Hälfte der Früchte in die Backform, und fügen Sie
die Hälfte des Zuckers hinzu. Wiederholen Sie diesen Schritt
1
mit den verbleibenden Früchten und dem verbleibenden Zucker.
Streuen Sie das Pektin auf die Zutaten in der Backform.
2
Wählen Sie Menü 26 aus, und geben Sie 1 Stunde und
40 Minuten für die Zeitvorwahl ein.
3
BLAUBEERMARMELADE
Wählen Sie Menü ‘26’
Blaubeeren 700 g
Zucker 400 g
Füllen Sie die Hälfte der Früchte in die Backform, und fügen Sie
die Hälfte des Zuckers hinzu. Wiederholen Sie diesen Schritt
1
mit den verbleibenden Früchten und dem verbleibenden Zucker.
Wählen Sie Menü 26 aus, und geben Sie 1 Stunde und
50 Minuten für die Zeitvorwahl ein.
2
PFLAUMENMARMELADE
Wählen Sie Menü ‘26’
Pflaumen, fein gehackt 700 g
Zucker 350 g
Pektinpulver 6 g
Füllen Sie die Hälfte der Früchte in die Backform, und fügen Sie
die Hälfte des Zuckers hinzu. Wiederholen Sie diesen Schritt
1
mit den verbleibenden Früchten und dem verbleibenden Zucker.
Streuen Sie das Pektin auf die Zutaten in der Backform.
2
Wählen Sie Menü 26 aus, und geben Sie 1 Stunde und
40 Minuten für die Zeitvorwahl ein.
3
APRIKOSENMARMELADE
Wählen Sie Menü ‘26’
Aprikosen, fein gehackt 500 g
Zucker 250 g
Pektinpulver 6 g
Füllen Sie die Hälfte der Früchte in die Backform, und fügen Sie
die Hälfte des Zuckers hinzu. Wiederholen Sie diesen Schritt
1
mit den verbleibenden Früchten und dem verbleibenden Zucker.
Streuen Sie das Pektin auf die Zutaten in der Backform.
2
Wählen Sie Menü 26 aus, und geben Sie 1 Stunde und
30 Minuten für die Zeitvorwahl ein.
3
Vor der Reinigung ziehen Sie den Netzstecker und
lassen Sie das Gerät abkühlen.
Um den Brotbackautomaten vor Schäden zu
bewahren...
Verwenden Sie keine schmirgelnden Gegenstände!
(Scheuermilch, Scheuerpads u.s.w.)
Reinigen Sie kein Teil des Brotbackautomaten
in der Spülmaschine!
Verwenden Sie kein Benzin, keine Verdünner, keinen
Alkohol und keine Bleichmittel.
Nach dem Abspülen der Waschbaren Teile mit einem
trockenen Tuch nachwischen.
Die Teile des Brotbackautomaten immer sauber
und trocken halten.
Backform &
Knethaken
Alle Teigreste entfernen und mit Wasser
Waschen.
Deckel
Mit einem feuchten Tuch abwischen
Dampfabzugsöffnung
Mit einem feuchten Tuch abwischen
Deutsch
Kompottrezepte
KOMPOTT AUS ROTEN FRÜCHTEN
Wählen Sie Menü ‘27’
Pflaumen, entsteint und halbiert 300 g
Kirschen, entsteint 250 g
Erdbeeren, ohne Blütenansatz 250 g
Zucker 75 g
Wasser 75 mL
Himbeeren (nach dem Kochen
hinzufügen)
Entnehmen Sie den Knethaken aus der Backform.
200 g
1
Füllen Sie die Zutaten in der oben aufgeführten Reihenfolge
in die Backform. Gießen Sie Wasser über die Zutaten.
2
Wählen Sie Menü 27 aus, und geben Sie 1 Stunde für die
Zeitvorwahl ein.
3
Rühren Sie, bis der Kochvorgang abgeschlossen ist.
4
Fügen Sie Himbeeren hinzu.
5
RHABARBER-INGWER-KOMPOTT
Wählen Sie Menü ‘27’
Rhabarber, in Stücken von 2 cm 700 g
Esslöffel Orangensaft 2
Kristallisierter Ingwer, fein gehackt 20 g
Zucker 100 g
Wasser 100 mL
Entnehmen Sie den Knethaken aus der Backform.
1
Füllen Sie die Zutaten in der oben aufgeführten Reihenfolge
in die Backform. Gießen Sie Wasser über die Zutaten.
2
Wählen Sie Menü 27 aus, und geben Sie 1 Stunde und
40 Minuten für die Zeitvorwahl ein.
3
Rühren Sie, bis der Kochvorgang abgeschlossen ist.
4
APFELMUS
Wählen Sie Menü ‘27’
Bramley-Äpfel, geschält, entkernt und
gewürfelt
Esslöffel Wasser 2
1000 g
Wenn der Knethaken nicht entfernt werden
kann, 5-10 Minuten in warmen Wasser
einweichen. Die Backform nicht in Wasser
tauchen.
Messlöffel und Becher
Mit Wasser Waschen.
Gehäuse
Mit einem feuchten Tuch
abwischen
Vorsichtig wischen, um den
Temperatursensor nicht zu
beschädigen.
Temperatursensor
Entnehmen Sie den Knethaken aus der Backform.
1
Geben Sie die Äpfel in die Backform. Gießen Sie Wasser
über die Zutaten.
2
Wählen Sie Menü 27 aus, und geben Sie 1 Stunde und
20 Minuten für die Zeitvorwahl ein.
3
Rühren Sie, bis der Kochvorgang abgeschlossen ist.
62 63
4
Nicht Spülmaschinenfest
•
Die Farbe des Geräteinneren kann sich während des Gebrauchs verändern.
Page 33

Pflege & Reinigung
Fehlerbehebung
Vor der Verständigung des Kundendienstes, bitte diesen Abschnitt überprüfen.
Verteilerdeckel
Entfernen und mit Wasser waschen
Den Verteilerdeckel auf einen
Winkel von ca. 75 Grad anheben.
Die Halterungen ausrichten und
zum Entfernen auf sich zu ziehen
bzw. zum Anbringen im gleichen Winkel wieder
vorsichtig zurückschieben. (Erst warten bis die
Maschine abgekühlt ist, weil sie sofort nach der
Verwendung sehr heiß ist)
Achten Sie darauf, die Dichtung weder zu beschädigen
noch zu ziehen. (Eine Beschädigung führt zum
Entweichen von Dampf, Kondensation oder Verformung)
Dichtung
Wischen Sie es mit
einem trockenen
Tuch ab, wenn es
feucht ist.
Hefe-Verteiler
Wischen Sie ihn mit einem feuchten Lappen ab, und lassen Sie ihn
trocknen.
Wenn Sie ihn mit einem trockenen Lappen abwischen, fällt die
Trockenhefe aufgrund der statischen Aufladung nicht in die
Backform.
Rosinen-Nuss-Verteiler
Entfernen und mit Wasser waschen
Problem
Mein Brot geht nicht auf
Die Oberfläche des Brotes ist
uneben
Ursache Abhilfe
[Alle Brotsorten]
Die Qualität des Gluten in Ihrem Mehl ist schlecht, oder Sie haben kein Proteinreiches Mehl
verwendet. (Die Glutenqualität hängt von der Temperatur, Luftfeuchtigkeit, Lagerung und
Jahreszeit der Ernte ab)
Versuchen Sie eine andere Sorte, Marke oder Charge.
Der Teig wurde zu hart, weil nicht genügend Flüssigkeit hinzugegeben wurde.
Proteinhaltiges Mehl absorbiert mehr Wasser als anderes Mehl, also fügen Sie 10-20 mL
Wasser zusätzlich hinzu.
Sie verwenden nicht die richtige Hefe.
Verwenden Sie Hefe aus einer Tüte mit der Aufschrift ‘Instant Hefe’.
Diese Art erfordert keine Vorgärung.
Sie verwenden nicht genug Hefe oder Ihre Hefe ist alt.
Verwenden Sie den mitgelieferten Messlöffel. Überprüfen Sie das Haltbarkeitsdatum der
Hefe. (Im Kühlschrank aufbewahren)
Die Hefe hat die Flüssigkeit vor dem Kneten berührt.
Vergewissern Sie sich, dass Sie die Zutaten in der richtigen Reihenfolge (siehe
Anweisungen) hinzugefügt haben. (S. 46)
Sie haben zu viel Salz oder zu wenig Zucker verwendet.
Überprüfen sie das Rezept und messen Sie die korrekten Mengen mit dem mitgelieferten
Messlöffel ab.
Überprüfen Sie, ob Salz und Zucker nicht in anderen Zutaten enthalten ist.
[Spezialbrot]
Beim Backen von Spezialbrot wurde Einkorn und/oder eine große Menge anderer Mehlsorten
als Dinkelmehl wurden verwendet.
Der Anteil des Dinkelmehls sollte bis zu 60 % der gesamten Mehlmenge betragen, wenn
Sie mehr als zwei andere Mehlsorten verwenden. Der Anteil von Roggen- und Reismehl
sollte bis zu 40 % der gesamten Mehlmenge und Buchweizen bis zu 20 % der gesamten
Mehlmenge betragen.
Deutsch
Nach jeder Verwendung waschen, um alle
Rückstände zu entfernen
Schutz der Antihaftbeschichtung
Brotbehälter und Knethaken sind mit einer Antihaftbeschichtung versehen, die der Vermeidung von Flecken und
dem einfachen Entnehmen des Brotes dient.
Um eine Beschädigung dieser Beschichtung zu vermeiden, beachten Sie folgende Anweisungen.
• Verwenden Sie zum Entfernen des Brotes aus dem Behälter keine harten Gegenstände wie z.B. Messer oder Gabel.
Wenn sich das Brot nur schwer aus der Backform entnehmen lässt, schlagen Sie auf Seite 67 nach.
•
Vergewissern Sie sich, dass der Knethaken sich nicht im Brotlaib befindet, bevor Sie diesen anschneiden.
Befindet er sich im Brotlaib, dann lassen Sie diesen vor dem Entfernen des Knethakens abkühlen.
(Keine harten Gegenstände wie Messer oder Gabel verwenden.)
Vorsicht vor Verbrennungen durch den möglicherweise noch heißen Knethaken.
•
Reinigen Sie Brotbehälter und Knethaken mit einem weichen Schwamm.
Verwenden Sie keine Scheuermittel, Reiniger usw.
Mein Brot hat viele Luftlöchers
Mein Brot ist zusammengefallen
nachdem es aufgegangen ist
Mein Brot ist zu sehr
aufgegangen
Warum ist mein Brot so blass
und pappig?
Sie haben zu viel Hefe verwendet
Überprüfen sie das Rezept und messen Sie die korrekten Mengen mit dem mitgelieferten
Messlöffel ab.
Sie haben zu viel Flüssigkeit verwendet.
Einige Mehlsorten absorbieren mehr Wasser als andere, versuchen Sie es mit 10-20 mL
weniger Wasser.
Die Qualität ihres Mehls ist nicht sehr gut.
Versuchen Sie eine andere Mehlmarke.
Sie haben zu viel Flüssigkeit verwendet.
Versuchen Sie es mit 10-20 mL weniger Wasser.
Sie haben zu viel Hefe/Wasser verwendet.
Überprüfen sie das Rezept und messen Sie die korrekten Mengen mit dem mitgelieferten
Messlöffel (Hefe)/Messbecher (Wasser) ab.
Überprüfen Sie, ob Wasser nicht in anderen Zutaten enthalten ist.
Sie haben nicht genug Mehl verwendet.
Wiegen Sie das Mehl mit einer Waage.
Sie verwenden nicht genug Hefe oder Ihre Hefe ist alt.
Verwenden Sie den mitgelieferten Messlöffel. Überprüfen Sie das Haltbarkeitsdatum der
Hefe. (Im Kühlschrank aufbewahren)
Es gab einen Stromausfall oder die Maschine wurde während des Backens gestoppt.
Die Maschine schaltet sich aus, wenn sie mehr als 10 Minuten gestoppt ist. Sie müssen das
Brot aus der Form entfernen und mit neuen Zutaten erneut beginnen.
Harte, grobe oder große Zutaten, wie Mehl mit ganzen oder gemahlenen Körnern, Zucker, oder die Zugabe von Nüssen und Kernen
können die Antihaftbeschichtung der Backform beschädigen. Sollen große Klumpen einer Zutat verwendet werden, brechen Sie diese
in kleine Stücke auf. Bitte befolgen Sie die Mengenangabe in Rezepten.
Am Boden und an den
Seiten meines Brotes ist ein
Mehlüberschuss.
Sie haben zu viel Mehl verwendet, oder nicht genügend Flüssigkeit.
Überprüfen Sie das Rezept und messen Sie die Menge des Mehl mit der Waage und die der
Flüssigkeit mit dem Messbecher.
64 65
Page 34

Fehlerbehebung
Vor der Verständigung des Kundendienstes, bitte diesen Abschnitt überprüfen.
Problem
Warum ist mein Brot nicht
korrekt gemischt?
Mein Brot wurde nicht gebacken
Teig tritt aus dem Boden der
Backform aus
Die Seiten meines Brotes sind
eingefallen und der Boden ist
feucht
Der Teighaken rattert
Ursache Abhilfe
Sie haben den Knethaken nicht in die Backform gesteckt.
Vergewissern Sie sich vor Einfüllen der Zutaten, dass der Knethaken in die Backform
eingesetzt ist.
Es gab einen Stromausfall oder die Maschine wurde während des Backens gestoppt.
Die Maschine schaltet sich aus, wenn sie mehr als 10 Minuten gestoppt ist. Sie könnten
den Laib erneut bearbeiten, was aber zu keinem guten Ergebnis führen könnte, wenn der
Knetvorgang bereits begonnen hat.
Das Teigmenü wurde ausgewählt.
Das Teigmenü umfasst keinen Backvorgang.
Es gab einen Stromausfall oder die Maschine wurde während des Backens gestoppt.
Die Maschine schaltet sich aus, wenn sie mehr als 10 Minuten gestoppt ist. Wenn der Teig
aufgegangen ist, können Sie ihn in Ihrem Ofen backen.
Es ist nicht genug Wasser vorhanden und die Motorschutzsicherung wurde aktiviert.
Dies passiert nur wenn das Gerät überlastet ist und der Motor extremer Belastung ausgesetzt ist.
Wenden Sie sich an den Verkäufer für eine Serviceberatung. Überprüfen Sie nächstes Mal
das Rezept und messen Sie die korrekten Mengen mit dem mitgelieferten Messbecher ab.
Sie haben vergessen den Knethaken einzusetzen.
Setzen Sie zuerst den Knethaken ein (S. 46).
Der Montageschaft des Knethakens in der Backform sitzt fest und dreht sich nicht.
Wenn der Montageschaft des Knethakens fest sitzt und sich nicht dreht, wenn der Haken
befestigt ist, muss die Einheit des Montageschaftes ersetzt werden (Wenden Sie sich an den
Verkäufer oder ein Panasonic Servicecenter).
Eine kleine Menge Teig tritt durch die Lüftungslöcher aus (dies behindert die drehenden
Teile jedoch nicht). Dies ist kein Fehler, aber überprüfen Sie von Zeit zu Zeit, dass sich der
Befestigungsschaft korrekt dreht.
Wenn sich der Befestigungsschaft für den Knethaken bei aufgesetztem Knethaken nicht
dreht, muss die Befestigungsschafteinheit ausgetauscht werden. (Wenden Sie sich an den
Verkäufer oder ein Panasonic Servicecenter.)
(Boden der Backform)
Befestigungsschaft
des Knethakens
Einheit Befestigungsschaft
des Knethakens
Befestigungsschaft des KnethakensLüftungslöcher (4 Stück)
Sie haben das Brot nach dem Backen zu lange in der Backform gelassen.
Entfernen Sie das Brot sofort nach dem Backen.
Es gab einen Stromausfall oder die Maschine wurde während des Backens gestoppt.
Die Maschine schaltet sich aus, wenn sie mehr als 10 Minuten gestoppt ist. Sie können
versuchen den Teig in Ihrem Ofen zu backen.
Grund hierfür ist, dass der Knethaken locker auf dem Befestigungsschaft sitzt. (Diest ist kein
Fehler)
Teilnr. ADA29E165
Problem
Die Kruste knittert und wird beim
Abkühlen weich
Wie bleibt meine Kruste
knusprig?
Mein Brot ist klebrig und die
Scheiben bröslig
Extra-Zutaten werden in der
Brioche nicht richtig vermischt.
Überschüssiges Öl haftet an der
Unterseite der Brioche.
Die Kruste ist ölig.
Mein Brot hat große Löcher.
Meine Brioche ist bei
Verwendung von Brotmischung
nicht gut gelungen.
Das Brot lässt sich nicht
entnehmen.
Beim Kochen von Marmelade ist
die Marmelade angebrannt oder
der Knethaken sitzt fest und
lässt sich nicht entfernen.
Ursache Abhilfe
Der nach dem Backen im Brot verbliebene Dampf kann in die Kruste gelangen und sie leicht
aufweichen.
Um die Dampfmenge zu reduzieren, versuchen Sie es mit 10-20 mL weniger Wasser oder
mit der halben Menge Zucker.
Damit das Brot knuspriger wird, können Sie das Menü 08 oder die Option ‘Dark’ (Dunkel) für die
Krustenbräunung verwenden. Sie können das Brot auch bei 200°C/Gas Stufe 6 weitere 5 bis
10 Minuten im Backofen backen.
Es war beim Aufschneiden zu heiß.
Lassen Sie Ihr Brot vor dem Schneiden abkühlen, damit der Dampf entweichen kann.
Bei manchen Brotmischungsteigen lassen sich Extra-Zutaten nur schwer untermischen oder
herausnehmen.
Verringern Sie die Extra-Zutaten auf die Hälfte.
Haben Sie Butter innerhalb von 5 Minuten nach dem Piepton hinzugefügt?
Butter nicht hinzugeben, wenn das Display die Restzeit bis zur Fertigstellung anzeigt. (S. 49)
Der Buttergeschmack ist evtl. schwach, aber Backen ist möglich.
Versuchen Sie Folgendes.
Bei Verwendung von Menü 11 oder 23 kann eine reduzierte Hefemenge zu besseren
Backergebnissen führen.
(bei getrennter Zugabe von Hefe).
Folgen Sie dem Rezept auf der Brotmischung, aber die Brotmischung sollte zwischen
350-500 g betragen.
Füllen Sie die Trockenhefe (bei getrennter Zugabe von Hefe) in den Hefe-Verteiler und
trockene Zutaten in die Backform. Füllen Sie dann das Wasser ein. Extra-Zutaten sind später
hinzuzufügen. (S. 49 oder 51)
Die Fertigstellung hängt vom Rezept der jeweiligen Brotmischung ab.
Wenn das Entfernen des Brotes aus dem Brotbehälter Schwierigkeiten bereitet, lassen Sie den
Brotbehälter 5 bis 10 Minuten abkühlen, jedoch nicht unbeaufsichtigt, falls die Gefahr besteht,
dass andere Personen oder Gegenstände Verbrennungen erleiden können.
Danach den Behälter mit Topflappen anfassen und ein paar Mal schütteln.
(Den Griff dabei nach unten halten, so dass er dem Brot nicht im Weg ist.)
Die Fruchmenge war zu gering oder die Zuckermenge zu hoch.
Stellen Sie die Backform in die Spüle, und füllen Sie sie zur Hälfte mit warmem Wasser.
Lassen Sie die Backform einweichen, bis sich die angebrannte Mischung oder der
Knethaken lösen lässt. Wenn das Angebrannte gelöst ist, waschen Sie es mit einem weichen
Schwamm ab. Lassen Sie bei heißem Wasser die nötige Vorsicht walten.
Deutsch
Es wurden zu viele Früchte oder Zucker verwendet.
Während des Backens riecht es
verbrannt
Rauch kommt aus der
Entlüftung
Der Knethaken bleibt im Brot
stecken, wenn ich es aus der
Backform nehme
Zutaten könnten auf das Heizelement gelangt sein.
Manchmal fallen kleine Mengen Mehl, Rosinen oder andere Zutaten während des Mischens
aus der Backform.
das Heizelement einfach vorsichtig ab.
Nehmen Sie die Backform aus dem Brotbackautomat heraus, um Zutaten zuzugeben.
Der Teig ist etwas steif.
Lassen Sie das Brot vollständig auskühlen, bevor Sie vorsichtig den Knethaken entfernen.
Einige Mehlsorten absorbieren mehr Wasser als andere, versuchen Sie es das nächste Mal,
mit 10-20 mL mehr Wasser.
Unterhalb des Knethakens hat sich Kruste gebildet.
Reinigen Sie den Knethaken und seine Spindel nach jeder Verwendung.
Wischen Sie nach dem Backen und nach dem Abkühlen des Brotbackautomats
Die Marmelade ist übergekocht.
Marmelade ist zu flüssig und
nicht richti geliert.
Verwenden Sie nur die in den Rezepten auf Seite 62 angegebenen Mengen von Früchten
und Zucker.
Die Früchte waren unreif oder überreif.
Die Zuckermenge wurde zu stark reduziert.
Die Kochzeit hat nicht ausgereicht.
Früchte mit einem geringen Pektingehalt wurden verwendet.
Verwenden Sie die flüssige Marmelade als Dessertsauce.
Lassen Sie die Marmelade vollständig abkühlen. Die Marmelade geliert beim Abkühlen
weiter.
66 67
Page 35

Fehlerbehebung
Vor der Verständigung des Kundendienstes, bitte diesen Abschnitt überprüfen.
Veiligheidsinstructies
Houdt u zich aan de volgende instructies.
Problem
Können gefrorene Früchte
verwendet werden?
Welche Zuckersorten können für
Marmelade verwendet werden?
Können zum Kochen von
Marmelade in Alkohol eingelegte
Früchte verwendet werden?
Die Früchte sind beim
Kochen von Früchten in Sirup
zusammengefallen.
Trockenhefe fällt nicht in die
Backform.
erscheint auf dem
Anzeigefeld
01 erscheint auf dem
Anzeigefeld
H01–H02 wird auf dem Display
angezeigt.
Ursache Abhilfe
Sie können verwendet werden.
Weißer Streuzucker oder Kristallzucker kann verwendet werden.
Verwenden Sie keine braunen Zucker, Diätzucker, Zucker mit reduziertem Kaloriengehalt oder
künstlichen Süßstoff.
Sie sollten nicht verwendet werden. Die Qualität ist nicht ausreichend.
Die Kochzeit war zu lang. Die Früchte waren möglicherweise überreif.
Der Zeitpunkt der Aktivierung des Hefe-Verteilers unterscheidet sich je nach Menüprogramm und
Raumtemperatur.
Der Hefe-Verteiler ist feucht oder statisch aufgeladen.
Wischen Sie ihn mit einem feuchten Lappen ab, und lassen Sie ihn trocknen.
Die Trockenhefe ist feucht geworden.
Verwenden Sie neue Trockenhefe.
Es gab eine Stromunterbrechung für ca. 10 Minuten (der Stecker wurde versehentlich gezogen,
oder eine Sicherung hat sich gelöst) oder ein anderes Problem mit der Stromversorgung.
Der Betrieb wird nicht beeinflusst, wenn das Problem der Stromversorgung nur kurzzeitig ist.
Der Brotbackautomat arbeitet weiter, wenn die Stromversorgung innerhalb von 10 Minuten
wieder hergestellt ist, aber die Qualität könnte beeinträchtigt werden.
Es gab für eine bestimmte Zeit einen Stromausfall (abhängig von den Umständen z.B.
Netzausfall, Stecker gezogen, defekte Sicherung).
Entfernen Sie den Teig und starten Sie mit neuen Zutaten erneut.
Das Display weist auf ein Problem mit dem Brotbackautomat hin.
Wenden Sie sich an den Verkäufer oder ein Panasonic Servicecenter.)
Volg de onderstaande instructies om ongelukken of verwondingen aan gebruikers en andere mensen, evenals
beschadigingen aan uw eigendom te voorkomen.
De volgende tabellen laten zien hoeveel schade verkeerd gebruik kan veroorzaken.
Waarschuwing:
de dood aan.
Geeft ernstig letsel of
Let op:
Geeft risico op letselschade of
eigendommen aan.
De symbolen worden als volgt ingedeeld en omschreven.
Dit symbool geeft een verbod aan.
Dit symbool geeft een vereiste aan dat moet
worden nageleefd.
Deutsch
Waarschuwing
Gebruik het apparaat niet als het netsnoer of de stekker is beschadigd, of de
stekker niet vast zit in het stopcontact.
(Dit kan een elektrische schok veroorzaken, of brand, door kortsluiting.)
Als de voedingskabel beschadigd is, moet deze uit voorzorg worden vervangen door de fabrikant, iemand
van de technische dienst van de fabrikant of iemand met vergelijkbare bevoegdheden.
Beschadig het netsnoer of de stekker niet.
(Dit kan een elektrische schok veroorzaken, of brand, door kortsluiting.)
De volgende handelingen zijn streng verboden. (Aanpassen, plaatsen naast verwarmingselementen, buigen,
draaien, trekken, zware objecten bovenop leggen en het snoer verkeerd oprollen.)
Steek de stekker niet met natte handen in het stopcontact of haal deze er uit.
(Dit kan een elektrische schok veroorzaken.)
Nederlands
U50 erscheint auf dem
Anzeigefeld
68
Das Gerät ist heiß (über 40°C/105°F). Dies tritt bei wiederholtem Bebrauch auf.
Lassen Sie Ihr Gerät auf unter 40°C/105°F abkühlen, bevor Sie es erneut verwenden
(U50 verschwindet).
Zet niet meer spanning op het stopcontact dan toegestaan en gebruik geen andere
wisselstroom dan die op het apparaat vermeld staat.
(Dit kan een elektrische schok of brand veroorzaken.)
●
Zorg dat de voedingsspanning naar het apparaat overeenkomt met het voltage ter plaatse.
●
Door meerdere apparaten in dezelfde contactdoos te steken kan elektrische oververhitting ontstaan.
Steek de stekker stevig in het stopcontact.
(Anders kan het elektrische schokken en brand veroorzaken door hitte die rond de stekker kan ontstaan.)
Maak de stekker regelmatig schoon.
(Door een smerige stekker kan onvoldoende isolatie ontstaan vanwege het vocht en de ophoping van stof en
pluizen, waardoor brand kan ontstaan.)
Trek de stekker uit het contact en veeg het schoon met een droge doek.
69
Page 36

Veiligheidsinstructies
Houdt u zich aan de volgende instructies.
Waarschuwing
Gebruik het apparaat niet meer en strek de stekker uit het stopcontact in het
onwaarschijnlijke geval dat dit apparaat niet naar behoren functioneert.
(Dit kan rook, brand, elektrische schokken of brandwonden veroorzaken.)
bijvoorbeeld bij abnormale werking of demontage.
●
De stekker en het netsnoer kunnen abnormaal heet worden.
●
Het netsnoer is beschadigd of er is een stroomstoring.
●
Het hoofdgedeelte is misvormd of abnormaal heet.
●
Het apparaat maakt tijdens gebruik abnormaal geluid tijdens draaien.
Ontkoppel het apparaat direct en neem contact op met de verkoper of een servicecentrum van Panasonic om het te laten controleren of repareren.
Raak de luchtgaten voor stoom niet aan en blokkeer of bedek deze niet tijdens het gebruik.
(Dit kan brandwonden veroorzaken.)
●
Let vooral op kinderen.
Dit apparaat niet repareren, demonteren of wijzigen.
(Dit kan brand, elektrische schokken of letsel veroorzaken.)
Neem contact op met de verkoper of een servicecentrum van Panasonic.
Zet het apparaat niet in water en zorg dat er geen water op komt.
(Dit kan een elektrische schok veroorzaken, of brand vanwege kortsluiting.)
Dit toestel is niet geschikt om te worden gebruikt door personen (met inbegrip van
kinderen) met fysieke, sensorische of geestelijke beperkingen of door personen
met te weinig ervaring en kennis, tenzij iemand die garant staat voor hun veiligheid
toezicht houdt of uitleg heeft gegeven over het gebruik van de machine. Kinderen
moeten onder toezicht staan om te voorkomen dat zij de machine als speelgoed
gebruiken.
(Dit kan brandwonden, letsel of elektrische schokken veroorzaken.)
Let op
Let op
Gebruik het apparaat niet op de volgende plaatsen.
●
Plaats de broodbakmachine op een stevig, droog, schoon en hittebestendig
werkvlak, niet te dicht bij de rand maar minstens 10 cm (4 inches) er vandaan.
(Het apparaat kan glijden en van het werkblad vallen.)
●
Nooit neerzetten op een onstabiele ondergrond, op textiel zoals een tafellaken, of
bovenop elektrische apparaten zoals een koelkast.
(Het apparaat kan vallen of brand veroorzaken.)
●
Tijdens het bakken wordt de buitenkant van de machine warm. Er moet ten
minste 5 cm (2 inches) afstand zijn tussen de Broodbakoven en muren of andere
voorwerpen.
(Dit kan verkleuring of misvorming veroorzaken.)
Raak geen hete delen aan zoals het bakblik, de binnenkant van het apparaat, het
verwarmingselement of de deksel, als het apparaat in gebruik is of net gebruikt is.
De temperatuur van bereikbare oppervlakken kan hoog zijn als het apparaat in
werking is.
(Dit kan brandwonden veroorzaken.)
Gebruik altijd ovenhandschoenen als u het bakblik en het gemaakte brood uit de machine neemt om te
voorkomen dat u zich brandt.
(Gebruik geen natte ovenwanten.)
Let ook goed op tijdens het verwijderen van het gebakken brood of kneedmes.
Belangrijke informatie
Gebruik de machine niet buiten, in de directe nabijheid van warmtebronnen en
in ruimtes met een hoge luchtvochtigheid.
(Dit kan een storing of misvorming veroorzaken.)
Gebruik geen excessieve kracht op de onderdelen zoals rechts staat afgebeeld.
(Dit kan een storing of misvorming veroorzaken.)
Dit toestel is niet geschikt voor bediening door middel van een externe timer of een afzonderlijk afstandsbedieningssysteem.
Temperatuurmeter
Verwarmingselement
Binnenkant van
het deksel
Nederlands
]
70
Houd de stekker vast als u het uit het stopcontact trekt.
(Anders kan er een elektrische schok of brand ontstaan, vanwege kortsluiting.)
Trek de stekker uit het stopcontact als het apparaat niet in gebruik is.
(Anders kan er een elektrische schok of brand ontstaan, vanwege lekstroom.)
Trek de stekker uit het stopcontact en laat het apparaat voor reiniging afkoelen.
(Dit kan brandwonden veroorzaken.)
Laat de stekker niet over een tafel hangen of in aanraking komen met een heet oppervlak
(Dit kan brandwonden of letsel veroorzaken.)
Tijdens het gebruik mag het bakblik niet verwijderd worden of de stekker uit het
stopcontact getrokken worden.
(Dit kan brandwonden of letsel veroorzaken.)
Informatie over het weggooien van elektrische en elektronische apparatuur (particulieren)
Dit symbool op de producten en/of de bijbehorende documenten betekent dat gebruikte elektrische en elektronische producten
niet bij het normale huishoudelijke afval mogen.
Lever deze producten in bij de aangewezen inzamelingspunten, waar ze gratis worden geaccepteerd en op de juiste manier
worden verwerkt, teruggewonnen en hergebruikt. In sommige landen kunt u uw producten bij een lokale winkelier inleveren bij
de aanschaf van een equivalent nieuw product.
Wanneer u dit product op de juiste manier als afval inlevert, spaart u waardevolle hulpbronnen en voorkomt u potentiële
negatieve gevolgen voor de volksgezondheid en het milieu, die anders kunnen ontstaan door een onjuiste verwerking van
afval. Neem contact op met uw gemeente voor meer informatie over het dichtstbijzijnde inzamelingspunt.
Er kunnen boetes gelden voor een onjuiste verwijdering van dit afval, in overeenstemming met de nationale wetgeving.
Voor zakelijke gebruikers in de Europese Unie
Neem voor het weggooien van elektrische en elektronische apparatuur contact op met uw leverancier voor verdere informatie.
Informatie over verwijdering van afval in landen buiten de Europese Unie
Dit symbool is alleen geldig in de Europese Unie.
Neem wanneer u dit product wilt weggooien, contact op met de lokale overheid of uw leverancier en vraag wat de juiste verwijderingsmethode
is.
71
Page 37

Accessoires/Onderdelen
Hoofdgedeelte
Rozijnen-notenstrooier
De ingrediënten die in de rozijnen-notenstrooier zijn gestopt vallen in het bakblik, nadat het menu met rozijnen is
gekozen (03, 06, 14, 17, 19 en 25).
Op pag. 80 ziet u welke ingrediënten in de rozijnen-notenstrooier gedaan kunnen worden.
Deksel van strooier
Gistdispenser
Bedieningspaneel
Gebruiksstatus
: weergegeven voor de huidige stap van het programma. Ingrediënten worden voor
het kneden gereguleerd bij de stap ‘Rest’ (Rust).
: Wordt weergegeven als er een probleem is met de stroomtoevoer.
: weergegeven bij het toevoegen van ingrediënten bij menu 11 en 23.
Resterende tijd totdat het product
gereed is
Ook als ingrediënten manueel worden bijgevoegd,
zal de display de tijd tonen tot de extra
ingrediënten in het programma zijn bijgevoegd.
Accessoires
Maatbeker
Voor het afpassen van vloeistoffen
(max. 310 mL)
Deksel
Klepje van rozijnennotenstrooier
Kneedmes
(roggebrood)
Kneedmes
(volkorenbrood)
Handvat
Bakblik
Bedieningspaneel
Maatlepeltje
Voor het afpassen van suiker, zout,
gist etc.
(15 mL) (5 mL)
Formaat
Druk op deze knop om
het formaat te kiezen.
Zie pag. 76 voor het
beschikbare menu.
•
XL
•
L
•
M
Menu
Druk op deze knop om een menu te kiezen. Het
menunummer wordt getoond en iedere keer
als deze knop wordt ingedrukt veranderd het
menunummer naar de volgende keuze.
(Houd de knop ingedrukt om sneller naar de
volgende keuze te gaan)
Zie pag. 76 en 77 voor het menunummer.
Korst
Druk op deze knop om
de kleur van de korst
te kiezen. Zie pag. 76
voor het beschikbare
menu.
•
Dark (Donker)
•
Medium (Medium)
•
Light (Lichtbruin)
Timer
Stel de vertragingstimer in (tijd
totdat het brood klaar is) of stel de
bak/kooktijd in voor menu 15, 26
en 27.
‘▲’ Druk op deze knop om het
programma te verlengen.
‘▼’ Druk op deze knop om de tijd
te verkorten.
Nederlands
Start
Druk op deze knop
om het programma te
starten.
Stop
Druk op deze knop om het
programma te annuleren/stoppen.
(Het programma wordt
geannuleerd/gestopt als de toets
langer dan 1 seconde ingedrukt
blijft.)
72
•
10 mL -maatstreepjes
Eetlepel
•
1⁄2 -maatstreepje
Theelepel
•
1⁄4, 1⁄2, 3⁄4 -
maatstreepjess
Stekker
Op deze afbeelding worden alle termen en symbolen weergegeven maar tijdens het gebruik van de machine worden alleen de relevante termen en symbolen weergegeven.
73
Page 38

Ingrediënten voor het maken van brood
Bloem
Hoofdbestanddeel van brood, geeft kleefstoffen af (zorgen ervoor
dat het brood kan rijzen en geven stevigheid aan het brood)
Gebruik harde bloem. Gebruik geen zachte bloem.
Bloem moet worden afgewogen met een weegschaal.
Harde bloem wordt gemalen uit hard graan,
en het heeft een hoog eiwitgehalte, wat
nodig is voor de ontwikkeling van gluten. Het
koolzuurgas dat bij de gisting vrijkomt wordt
vastgehouden door de veerkrachtige
structuur van de gluten, hetgeen
zorgt voor het rijzen van het
deeg.
Witte bloem
Ontstaat door het vermalen
van tarwekorrels waarbij de
zemelen en kiemen worden
uitgezeefd. De meest geschikte
soort bloem voor het bakken
van brood is bloem waarop staat
aangegeven ‘voor het bakken
van brood’.
Gebruik geen zachte bloem in plaats van broodbloem.
Volkoren-bloem
Ontstaat door het vermalen van hele tarwekorrels
waarbij de zemelen en kiemen niet worden uitgezeefd.
Zorgt voor heel gezond brood.
Het brood is lager en zwaarder dan brood dat is gemaakt met witte
bloemsoorten.
Roggebloem
Ontstaat door het vermalen van roggekorrels.
Bevat in vergelijking met witte bloem meer ijzer, magnesium en
kalium, stoffen die een mens nodig heeft om gezond blijven. Deze
soort bloem bevat echter niet genoeg kleefstoffen.
Geeft een dicht, zwaar brood. Gebruik niet meer dan de
aangegeven hoeveelheid (de motor kan anders overbelast raken).
Zuivelproducten
Verhogen de smaak en de voedingswaarde.
Door melk in plaats van water te gebruiken stijgt de
voedingswaarde van het brood. Gebruik echter geen
melk als u de timer instelt, de melk kan bederven.
Verminder de hoeveelheid water evenredig met de
hoeveelheid melk die u toevoegt.
Water
Gebruik gewoon kraanwater.
Gebruik lauw water indien u menu 02, 05, 07, 12 of 20 in een
koude ruimte gebruikt.
Gebruik gekoeld water indien u menu 07, 08, 11, 13, 14, 20, 21,
23, 24 of 25 in een warme ruimte gebruikt.
Pas vloeistoffen altijd af met behulp van de meegeleverde
maatbeker.
Als u een broodmix gebruikt...
Doe de mix in het bakblik en voeg water toe.
Het is niet altijd duidelijk hoeveel gist een mix bevat,
Zout
Verrijkt de bloem en versterkt de kleefstoffen zodat
het brood beter rijst.
Het brood kan kleiner worden of smaak verliezen als het
zout niet goed wordt afgepast.
Doe eerst de broodmix in de broodpan en vervolgens
Stel de machine in afhankelijk van de soort bloem die
Vet
Maakt het brood smaakvoller en zachter.
Aanbevolen wordt boter of margarine te gebruiken.
(kristalsuiker, bruine suiker, honing,
Suiker
stroop etc.)
Voeding voor de gist, maakt het brood zoeter en
smaakvoller, verandert de kleur van de korst.
Gebruik minder suiker als u rozijnen of andere
fructosehoudende vruchten gebruikt.
Selecteer het menu 11 of 02 ‘Medium’
U kunt uw brood nog lekkerder maken door andere
ingrediënten toe te voegen:
Eieren
Zemelen
Tarwekiemen
Kruiden
Broodmixen met gist
(Raadpleeg de aanwijzingen op het pak voor de juiste
hoeveelheid water)
Selecteer menu 02, kies een formaat die past bij de
inhoud van de mix en start het bakproces.
•
600 g – XL • 500 g – L
dus u moet misschien wat experimenteren om het beste
resultaat te bereiken.
Broodmix met een apart zakje gist
het water.
Doe dan de afgemeten gist in de giststrooier.
de mix bevat en start het bakken.
•
Witte bloem, bruine bloem menu 01
•
Volkoren, meergranenbloem menu 04
•
roggebloem menu 07
Brioches bakken met een brioche-mix
formaat-‘Light’ (Lichtbruin) korstkleur. (P. 99)
Verhogen de voedingswaarde en
geven het brood een mooiere kleur.
(De hoeveelheid water moet evenredig
worden verminderd)
Klop de eieren los voordat u ze toevoegt.
Maken het brood vezelrijker.
•
Gebruik max. 75 mL (5 el).
Geven het brood een meer nootachtige
smaak.
•
Gebruik max. 60 mL (4 el)
Maken het brood smaakvoller.
•
Gebruik slechts een kleine hoeveelheid
(1-2 el).
Nederlands
Speltbloem
Komt uit de tarwefamillie maar is genetisch gezien een totaal andere soort.
Alhoewel het gluten bevat kunnen sommige mensen met glutenallergie het toch verteren. (Raadpleeg uw arts.)
Brood maken met een platte/licht ingedrukte korst.
Een volkorenbrood van spelt wordt klein en compact in vergelijking met witbrood van spelt.
We adviseren om van de totale hoeveelheid bloem, meer dan de helft witte speltbloem te gebruiken.
Er bestaat Spelt (Triticum spelta) dat geschikt is voor broodbakken en er is eenkorentarwe (Triticum monococcum: wordt ook wel ‘kleine spelt’
genoemd), dat niet geschikt is voor broodbakken; beide worden als spelt verkocht. Gebruik spelt dat geschikt is voor broodbakken. (gebruik
menu 13, 14, 24 of 25)
74
Droge gist
Zorgt ervoor dat het brood kan rijzen.
Gebruik droge gist die niet hoeft voor te gisten (gebruik geen verse gist of droge gist die voor gebruik moet
vergisten)
Aanbevolen wordt gist te gebruiken waarop staat ‘kant-en-klare gist’.
Als u gist uit een zakje gebruikt, sluit het zakje dan onmiddellijk na gebruik en bewaar het in de koelkast. (Gebruik
het voor de door de fabrikant aangegeven uiterste datum)
75
Page 39

Lijst met broodsoorten en bakopties
Beschikbare functies en vereiste tijd voor ieder programma
•De benodigde tijd per proces varieert afhankelijk van de kamertemperatuur.
Menunummer
Menu
01 Basic
02 Basic Rapid
03 Basic Raisin
04 Whole wheat
Whole wheat
05
Rapid
Whole wheat
06
Raisin
07 Rye
08 French
Bakken
09 Italian
10 Sandwich
11 Brioche
12 Gluten Free
13 Speciality
Speciality
14
Raisin
15 Bake only
Opties Processen
Formaat Korst
—
——
—
——
——
——
——
—
—
—
—
Timer
Rust Kneden Rijzen Bakken Totaal
30 min–
60 min
——
1
1
2
30 min–
60 min
1 u–
1 u 40 min
15 min–
25 min
1 u–
1 u 40 min
45 min–
60 min
40 min–
2 u 5 min
30 min–
1 u
1 u–
1 u 40 min
30 min
—
——
30 min–
1 u 15 min
30 min–
1 u 15 min
1 u 50 min–
3
15–30 min
15–20 min
15–30 min
15–25 min
15–25 min
15–25 min
ca. 10 min
10–20 min
10–15 min
15–25 min
25–45 min
15–20 min 40 - 45 min 50–55 min
15–30 min
15–30 min
2 u 20 min
ca. 1 uur
1 u 50 min–
3
2 u 20 min
2 u 10 min–
3
2 u 50 min
1 u 30 min–
3
1 u 40 min
2 u 10 min–
3
2 u 50 min
1 u 20 min–
1 u 35 min
2 u 45 min–
4 u 10 min
2 u 25 min–
3 u
2 u 10 min–
3
2 u 50 min
3
1 u 25 min 50 min 3 u 30 min
1 u 50 min–
3
2 u 45 min
1 u 50 min–
3
2 u 45 min
——— — — —
50–55 min
35–40 min
50 min 4 uur
50 min 5 uur
45 min 3 uur
50 min 5 uur
1 uur 3 u 30 min
55 min 6 uur
50 min 4 u 30 min
50 min 5 uur
55 min 4 u 30 min
55 min 4 u 30 min
30 min–
1 u 30 min
4 u–
4 u 5 min
1 u 55 min–
2 uur
1 u 50 min–
1 u 55 min
30 min–
1 u 30 min
Menunummer
Menu
16 Basic
17 Basic Raisin
18 Whole wheat
Whole wheat
19
Raisin
20 Rye
21 French
Deeg
22 Pizza
23 Brioche
24 Speciality
Speciality
25
Raisin
26 Jam
27 Compote
Opties Processen
Formaat Korst
———
———
———
———
———
———
——
———
———
———
Timer
Rust Kneden Rijzen Bakken Totaal
30 min–
50 min
30 min–
50 min
55 min–
1 u 25 min
55 min–
1 u 25 min
45 min–
60 min
40 min–
1 u 45 min
(Kneden)
10–18 min
30 min
30 min–
1 u 5 min
30 min–
1 u 5 min
15–30 min
15–30 min
15–25 min
15–25 min
ca. 10 min
10–20 min
(Rijzen)
7–15 min
25–45 min
15–30 min
15–30 min
1 u 10 min–
3
1 u 30 min
1 u 10 min–
3
1 u 30 min
1 u 30 min–
3
2 u
1 u 30 min–
3
2 u
——
1 u 35 min–
2 u 40 min
(Kneden)
ca. 10 min
3
35 min
1 u 10 min–
3
1 u 55 min
1 u 10 min–
3
1 u 55 min
—
—
—
—
—
(Rijzen)
ca. 10 min
—
—
—
——— — — — —
——— — — — —
2 u 20 min
2 u 20 min
3 u 15 min
3 u 15 min
2 uur
3 u 35 min
Nederlands
45 min
1 u 50 min
2 u 45 min
2 u 45 min
1 u 30 min–
2 u 30 min
1 u–
1 u 40 min
Alleen ‘Light’ (Lichtbruin) of ‘Medium’ beschikbaar. Alleen ‘Medium’ of ‘Dark’ (Donker) beschikbaar.
Tijdens het kneden is er een moment dat het product rijst.
• De Broodbakoven zal kort in bedrijf zijn in de tijd dat het product rijst (voor een optimale verdeling van de gluten).
76
77
Page 40

Brood bakken
Ga naar pag. 87 – 88
voor brood recepten
78
Doe de ingrediënten in het bakblik
Kneedmes Gistdispenser
Neem het bakblik uit de machine en
1
plaats het kneedmes
Controleer of het gedeelte
rondom de houder en de
binnenkant van het
kneedmes schoon zijn. (P. 95)
•
Als u roggebrood gaat maken, moet
u het speciale kneedmes gebruiken.
• Het mes zit losjes op de houder maar moet wel de
bodem van het bakblik raken.
Brood bakken met extra ingrediënten (P. 80)
Eerst schoonmaken
en droog maken
Open het deksel van de
strooier.
Doe de ingrediënten erin.
Sluit het deksel.
Draai het bakblik een slag.
Neem het bakblik uit de
machine.
Plaats het kneedmes
stevig op de houder.
Doe de afgepaste ingrediënten
in het bakblik
2
Doe de droge ingrediënten erin
behalve de droge gist.
(bloem, suiker, zout etc.)
• Bloem moet worden
afgewogen met een
weegschaal.
Voeg het water en eventuele
andere vloeistoffen toe.
Verwijder eventueel vocht en
bloem die op de buitenkant van
het bakblik is terechtgekomen.
Plaats het bakblik in de
Broodbakoven door het een
beetje van rechts naar links te
kantelen. Klap het handvat naar
beneden.
Sluit het deksel.
• Open het deksel pas als het
brood klaar is (anders gaat het
ten koste van de kwaliteit van
het brood)
Plaats de droge gist in de
3
gistdispenser
Maak de gistdispenser droog
met bijvoorbeeld een doekje als
deze nat is. (wrijf niet lang over
de gistdispenser, anders valt de
gist niet in het bakblik vanwege
statische elektriciteit.)
Sluit de Broodbakoven
4
aan op een stopcontact van 230 V
Stel het programma in en druk op start
Selecteer een bakmenu
(Het display geeft aan wanneer het menu ‘01’ is geselecteerd.)
5
Zie pag. 76 voor menu, beschikbare afmetingen en korst.
Om het formaat te wijzigen
Om de timer in te stellen
bijv. het is nu 9:00 uur en u wilt dat het brood de volgende ochtend om
6:30 uur klaar is.
Stel de timer dan in op ‘9:30’ (9 uur en 30 minuten na nu).
12
9
•
Als de toets één keer wordt ingedrukt, gaat de timer 10 minuten vooruit
(als u de toets vasthoudt, gaat de timer sneller vooruit)
3
6
huidige tijd tijd gereed
Om de korstkleur te wijzigen
12
9
9u 30m
na nu
3
6
Druk op ‘Start’
6
Geschatte tijd dat het geselecteerde programma is voltooid
Als aan het begin op ‘Start’ is gedrukt, begint menu 01.
Neem het brood uit de machine
Zet de machine uit
wanneer het brood klaar is
7
[de machine piept 8 keer en de balk
‘End’ (Einde) knippert.]
Nederlands
Neem het brood
onmiddellijk uit de
8
machine,
Ovenhandschoen
Bakblik
en laat het afkoelen, bijvoorbeeld op een
open rekje.
Trek na gebruik de stekker
uit het stopcontact (trek
9
niet aan het snoer)
Als u niet op ‘stop’ drukt en dan het brood
uit de machine verwijdert om het te laten
afkoelen, zal de Broodbakoven het brood
blijven verwarmen, om dampvorming
binnenin het brood te voorkomen.
Hierdoor zal echter de korst verder
aanbruinen, dus is het aanbevolen om
onmiddellijk na afloop van het bakken de
machine uit te schakelen en het brood er
uit te nemen om het te laten afkoelen.
Als u het brood in het bakblik laat afkoelen,
zal er waterdamp in condenseren. Om een
perfect gebakken brood te verkrijgen, laat
u het afkoelen op een open rekje.
79
Page 41

Extra ingrediënten toevoegen
Brioches bakken
Extra ingrediënten aan brood of deeg toevoegen
Door het menu met rozijnen te selecteren (03, 06, 14, 17, 19 of 25) kunt u uw favoriete ingrediënten door het deeg mengen om brood in
verschillende smaken te maken.
Doe de extra ingrediënten
eenvoudig in de strooier of in het
bakblik voordat u de machine
start
Droge ingrediënten,
onoplosbare ingrediënten
Plaats de extra ingrediënten in de
rozijnen-notenstrooier en stel de machine in.
Gedroogde
vruchten
Noten
Zaden
Kruiden
Bacon, salami
•
Wijk niet af van de hoeveelheden die voor elk ingrediënt in het recept worden genoemd.
Snijd deze in blokjes van circa 5 mm.
Ingrediënten die bedekt zijn met een suikerlaagje
kunnen aan de strooier blijven kleven en niet in het
bakblik vallen.
Hak deze fijn.
Noten verminderen het effect van kleefstoffen,
gebruik daarom niet teveel.
Grote, harde zaden kunnen het beschermlaagje van
de strooier en het bakblik beschadigen.
Gebruik max. 1-2 el gedroogde kruiden. Als u verse
kruiden gebruikt, volg dan de aanwijzingen in het
recept.
Olieachtige ingrediënten kunnen soms aan de
strooier blijven kleven en niet in het bakblik vallen.
Vochtige/kleverige ingrediënten,
oplosbare ingrediënten*
Doe deze ingrediënten met de andere
ingrediënten in het bakblik.
Verse vruchten, ingemaakte vruchten
Wijk niet af van de hoeveelheden die in
het recept worden genoemd omdat het
vocht in de ingrediënten invloed heeft op
het brood.
Kaas, chocolade
* Deze ingrediënten kunnen niet in de rozijnen-notenstrooier
worden gedaan omdat ze eraan zouden blijven kleven en
niet in het bakblik zouden vallen.
1
Voorbereiding
(P. 78)
harde bloem voor witbrood, type 550 400 g
theelepel met zout 1
eetlepel met suiker 4
eetlepel met magere melk (droge) 2
boter (in blokjes van 2 cm gesneden en in
de koelkast bewaard)
water 180 mL
eieren (geklopt) ;medium 2 (100 g)
theelepel met gedroogde gist 1
boter om later toe te voegen
(in blokjes van 1-2 cm gesneden en in de
koelkast bewaard)
42, 3
Snijd de boter om later toe te voegen in blokjes van 1-2 cm en bewaar ze in de koelkast.
Plaats het kneedmes in het bakblik.
Doe de ingrediënten in het bakblik in de volgorde zoals aangegeven in het recept.
Plaats het bakblik in de machine en sluit deze aan op het stopcontact.
1
50 g
1
70 g
⁄2
⁄4
Selecteer menu ‘11’
1
Start de machine
2
Resterende tijd voor het toevoegen van boter of andere ingrediënten
Het Start-lichtje gaat branden.
[Eenvoudige manier om brioche
bakken]
Voeg boter en andere
ingrediënten toe aan het begin.
Snijd de boter in blokjes van 2 cm en leg ze in
het bakblik op hetzelfde moment als de andere
ingrediënten.
Volg de stappen die aan de linkerkant beschreven
staan. Als de machine echter piept bij stap 3 om
extra boter toe te voegen, laat het dan zoals het is.
Tijd die nodig is voor voltooiing is 3 uur en 30
minuten.
* Als boter wordt toegevoegd aan het begin is
smaak, textuur en het rijzen van het brood iets
anders dan brood dat wordt gebakken met extra
boter dat later wordt toegevoegd.
Een ‘Rest’ (Rust)-proces begint direct na het
starten, gevolgd door ‘Knead’ (Kneden) en
‘Rise’ (Rijzen).
Nederlands
Voeg extra boter toe als de pieptoon
3
klinkt, druk daarna nogmaals op de ‘Start’
Voltooi het proces en plaats de extra blokjes boter terwijl ‘ ’ knippert.
Na de Startknop
wordt ingedrukt
Het display geeft de resterende tijd tot
de voltooiing van het programma aan
Wanneer u extra ingrediënten zoals rozijnen e.d.
toevoegt, doet u dit dan tegelijk met de boter.
(Gebruik niet meer dan 150 gram aan extra
ingrediënten)
Zelfs zonder de Startknop in te drukken blijft
het kneden na 5 min. doorgaan. Het gaat niet
onmiddellijk verder met kneden, zelfs als de
Startknop wordt ingedrukt na de toevoeging van
boter of ingrediënten.
Voeg geen boter toe nadat de resterende tijd al
wordt aangegeven. (P. 99)
Druk op ‘Stop’ en neem het brood uit de
4
machine
als de machine 8 keer piept en de balk ‘End’ (Einde) knippert
Het knipperende Start-lichtje dooft nu.
80
81
Page 42

Deeg maken
Briochedeeg maken
1
Voorbereiding
(P. 78)
Plaats het kneedmes in het bakblik.
Doe de ingrediënten in het bakblik in de volgorde zoals aangegeven in het recept.
Plaats het bakblik in de machine en sluit deze aan op het stopcontact.
32
Selecteer het menu Deeg
(Het display geeft aan wanneer het menu ‘16’ is geselecteerd.)
1
Start de machine
2
Geschatte tijd dat het geselecteerde programma is voltooid
Het Start-lichtje gaat branden.
Druk op ‘Stop’ en neem het deeg uit de
3
machine
als de machine 8 keer piept en de balk ‘End’ (Einde) knippert
Het knipperende Start-lichtje dooft nu.
Ga naar pag. 89 voor
deeg recepten
Annuleren/
stoppen nadat het
programma is gestart
(langer dan 1 seconde
ingedrukt houden)
Timer is niet beschikbaar in Deegmenu’s
(behalve menu 22).
Indien u extra ingrediënten wilt toevoegen aan uw
deeg, zie pag. 80.
Voor andere menu’s dan 22, 26 en 27 begint een
‘Rest’ (Rust)-proces direct na het starten, gevolgd
door ‘Knead’ (Kneden) en ‘Rise’ (Rijzen).
Kneed het deeg in vorm en laat het nog een keer
rijzen volgens recept. Bak het brood vervolgens
in de oven.
1
Voorbereiding
(P. 78)
Select
Snijd de boter om later toe te voegen in blokjes van 1-2 cm en bewaar ze in de koelkast.
Plaats het kneedmes in het bakblik.
Doe de ingrediënten in het bakblik in de volgorde zoals aangegeven in het recept.
Plaats het bakblik in de machine en sluit deze aan op het stopcontact.
eer menu ‘23’
42, 3
1
Start de machine
2
Resterende tijd voor het toevoegen van boter of andere ingredienten
Het Start-lichtje gaat branden.
Voeg extra boter toe als de pieptoon
3
klinkt, druk daarna nogmaals op de ‘Start’
Voltooi het proces en plaats de extra blokjes boter terwijl ‘ ’ knippert.
Na de Startknop
wordt ingedrukt
Het display geeft de resterende tijd tot
de voltooiing van het programma aan
Ga naar pag. 89 voor
deeg recepten
Annuleren/
stoppen nadat het
programma is gestart
(langer dan 1 seconde
ingedrukt houden)
[Eenvoudige manier om
briochedeeg te maken]
Voeg boter aan de andere
ingrediënten toe aan het begin.
Snijd de boter in blokjes van 2 cm en leg ze in
het bakblik op hetzelfde moment als de andere
ingrediënten.
Volg de stappen die aan de linkerkant beschreven
staan. Als de machine echter piept bij stap 3 om
extra boter toe te voegen, laat het dan zoals het is.
Tijd die nodig is voor voltooiing is 1 uur en
50 minuten.
* Als boter wordt toegevoegd aan het begin is
smaak, textuur en het rijzen van het brood iets
anders dan brood dat wordt gebakken met extra
boter dat later wordt toegevoegd.
Een ‘Rest’ (Rust)-proces begint direct na het
starten, gevolgd door ‘Knead’ (Kneden) en
‘Rise’ (Rijzen).
Wanneer u extra ingrediënten zoals rozijnen e.d.
toevoegt, doet u dit dan tegelijk met de boter.
(Gebruik niet meer dan 150 gram aan extra
ingrediënten)
Zelfs zonder de Startknop in te drukken blijft
het kneden na 5 min. doorgaan. Het gaat niet
onmiddellijk verder met kneden, zelfs als de
Startknop wordt ingedrukt na de toevoeging van
boter of ingrediënten.
Voeg geen boter toe nadat de resterende tijd al
wordt aangegeven. (P. 99)
Nederlands
82
Druk op ‘Stop’ en neem het deeg uit de
4
machine
als de machine 8 keer piept en de balk ‘End’ (Einde) knippert
Het knipperende Start-lichtje dooft nu.
Kneed het deeg in vorm en laat het nog een keer
rijzen volgens recept. Bak het brood vervolgens
in de oven.
83
Page 43

Cake bakken
Jam maken
1
Voorbereiding
Selecteer menu ‘15’
Zet de ingrediënten die in het recept staan klaar.
Bekleed het bakblik met vetvrij papier en doe de gemengde
ingrediënten erin.
Plaats het bakblik in de machine en sluit deze aan op het stopcontact.
1
Stel de baktijd in
2
Start de machine
3
Geschatte tijd dat het geselecteerde programma is voltooid
Het Start-lichtje gaat branden.
2
3
4
Ga naar pag. 89 voor
cake recept
Annuleren/
stoppen nadat het
programma is gestart
(langer dan 1 seconde
ingedrukt houden)
•
Neem het kneedmes uit de machine
•
Bekleed het bakblik met vetvrij papier.
(Cake of teabread verbrandt als het rechtstreeks in
aanraking komt met het bakblik.)
Timer is niet beschikbaar bij menu 15.
(De timerknop stelt alleen de baktijd in.)
1
Voorbereiding
Selecteer menu ‘26’
Zet de ingrediënten die in het recept staan klaar.
Plaats het kneedmes in het bakblik.
Plaats de ingrediënten in deze volgorde in het bakblik:
de helft van het fruit → de helft van de suiker →het overgebleven fruit → de overgebleven suiker.
Plaats het bakblik in de machine en sluit deze aan op het stopcontact.
1
Stel de kooktijd in
2
Start de machine
3
Geschatte tijd dat het geselecteerde programma is voltooid
Het Start-lichtje gaat branden.
2
3
4
Ga naar pag. 93 voor
Jamrecepten
Annuleren/
stoppen nadat het
programma is gestart
(langer dan 1 seconde
ingedrukt houden)
Timer is niet beschikbaar bij menu 26.
(De timerknop stelt alleen de kooktijd in.)
De juiste hoeveelheid suiker, zuur en pectine is
noodzakelijk om goed stevige jam te maken.
Fruit met een hoog gehalte pectine kan makkelijk
indikken. Fruit met minder pectine kan slecht
indikken.
Gebruik verse, rijpe vruchten. Overrijpe of niet
rijpe vruchten kunnen niet makkelijk indikken.
De recepten in dit boek zijn voor zachte soorten jam.
Dit komt doordat er minder suiker in zit.
Volg het recept met betrekking tot de
hoeveelheden voor ieder ingrediënt.
•
Gebruik geen grotere of kleinere hoeveelheden
fruit. Hierdoor kan de jam overkoken of
verbranden.
•
Gebruik niet meer suiker dan de helft van het
fruit. Dit kan leiden tot overkoken of verbranden.
Als minder suiker wordt gebruikt kan de jam niet
stevig worden.
* Als de zuurgraad van het fruit sterk is, kunt u de
hoeveelheid citroensap verminderen, maar als er te
weinig citroensap overblijft wordt de jam niet stevig.
Als de kooktijd kort is, kunnen stukjes fruit
overblijven en kan de jam waterig worden.
•
De jam blijft indikken tijdens het afkoelen.
Wees voorzichtig en laat het niet overkoken.
Nederlands
84
Druk op ‘Stop’ als de machine piept en de balk bij ‘End’ (Einde) knippert,
4
controleer of het bakken is voltooid en
verwijder het bakblik
Het knipperende Start-lichtje dooft nu.
Als het bakken niet is voltooid Herhaal stappen 1–3
(Aanvullende kooktijd kan tot twee keer worden ingesteld. Iedere tijd moet
binnen 50 minuten liggen. De timer begint opnieuw bij 1 minuut als het
apparaat heet is. Verhoog de tijd door de gewenste tijd op de timer in te
drukken.)
Om te controleren of de cake of het teabread
klaar is, kunt u er een satéprikker in steken – als
de prikker er droog uitkomt, is het product klaar.
Voorzichtig!
Heet!
Druk op ‘Stop’ en verwijder de jam
als de machine 8 keer piept en de balk ‘End’ (Einde) knippert
4
Het knipperende Start-lichtje dooft nu.
Als de kooktijd niet is voltooid→Herhaal stappen 1–3
(Aanvullende kooktijd kan tot twee keer worden ingesteld. Iedere tijd moet
binnen 10-40 minuten liggen. De timer begint opnieuw bij 1 minuut als het
apparaat heet is. Verhoog de tijd door de gewenste tijd op de timer in te
drukken.)
Stop de jam zo snel mogelijk na bereiding in een
pot(je). Maak eventuele aanbrandresten schoon bij
het verwijderen van de jam.
Jam kan aanbranden als het in het bakblik blijft
zitten.
Bewaar jam op een koele, donkere plaats.
Vanwege de lagere suikerniveaus is de
houdbaarheid minder lang als in de winkel
gekochte producten. Na open in de koelkast
bewaren en niet te lang bewaren.
85
Page 44

Compote maken
Brood Recepten
1
Voorbereiding
Selecteer menu ‘27’
Zet de ingrediënten die in het recept staan klaar. (Verwijder het kneedmes.)
Plaats de ingrediënten in deze volgorde in het bakblik:
Fruit → suiker → vloeistoffen.
Plaats het bakblik in de machine en sluit deze aan op het stopcontact.
1
Stel de kooktijd in
2
2
3
4
Ga naar pag. 94 voor
compoterecepten
Annuleren/
stoppen nadat het
programma is gestart
(langer dan 1 seconde
ingedrukt houden)
Timer is niet beschikbaar bij menu 27.
(De timerknop stelt alleen de kooktijd in.)
Volg het recept met betrekking tot de
hoeveelheden voor ieder ingrediënt.
•
Gebruik geen grotere of kleinere hoeveelheden
fruit. Hierdoor kan de compote overkoken of
verbranden.
WIT BROOD
Selecteer menu ‘01’ of ‘02’
harde bloem voor witbrood, type 550 400 g 500 g 600 g
theelepel met zout 1
eetlepel met suiker 1 11⁄2 2
boter 20 g 30 g 40 g
water 280 mL 350 mL 420 mL
theelepel met gedroogde gist
(theelepel met voor de BAKE RAPID
optie)
MLXL
1
⁄2 11⁄2 2
1
(2)
1
(2)
1
⁄2
1
(21⁄2)
VOLKORENBROOD
Selecteer menu ‘04’ of ‘05’
harde bloem voor volkorenbrood 400 g 500 g 600 g
theelepel met zout 1
eetlepel met suiker 1 11⁄2 2
boter 20 g 30 g 40 g
water 280 mL 350 mL 420 mL
theelepel met gedroogde gist
(theelepel met voor de BAKE RAPID
optie)
MLXL
1
⁄2 11⁄2 2
1
(11⁄2)
1
(11⁄2)
11⁄4
(2)
VOLKORENROZIJNENBROOD
Selecteer menu ‘06’
harde bloem voor volkorenbrood 400 g 500 g 600 g
theelepel met zout 1
eetlepel met suiker 1 1
boter 20 g 30 g 40 g
water 280 mL 350 mL 420 mL
theelepel met gedroogde gist 1 1 1
toevoeging
(in rozijnen-notenstrooier doen):
rozijnen
MLXL
1
⁄2 11⁄2 2
80 g
1
⁄2 2
100 g
1
⁄4
120 g
ROZIJNENBROOD
Selecteer menu ‘03’
MLXL
harde bloem voor witbrood, type 550 400 g 500 g 600 g
theelepel met zout 1
eetlepel met suiker 1 1
boter 20 g 30 g 40 g
water 280 mL 350 mL 420 mL
theelepel met gedroogde gist 1 1 11⁄2
toevoeging
(in rozijnen-notenstrooier doen):
rozijnen
1
⁄2 11⁄2 2
80 g
1
⁄2 2
100 g
120 g
ITALIAANS BROOD
Selecteer menu ‘09’
harde bloem voor witbrood, type 550 400 g
theelepel met zout 11⁄2
eetlepel met olijfolie 11⁄2
water 260 mL
theelepel met gedroogde gist 1
SANDWICH BROOD
Selecteer menu ‘10’
harde bloem voor witbrood, type 550 380 g
eetlepel met suiker 2
boter 30 g
water 250 mL
theelepel met gedroogde gist 1
BROOD ZONDER KLEEFSTOFFEN
Selecteer menu ‘12’
water 430 mL
eetlepel met olie 1
kleefstoffenvrije broodmix 500 g
theelepel met gedroogde gist 2
Nederlands
Start de machine
3
Geschatte tijd dat het geselecteerde programma is voltooid
Het Start-lichtje gaat branden.
Druk op ‘Stop’ en verwijder de compote
als de machine 8 keer piept en de balk ‘End’ (Einde) knippert
4
Het knipperende Start-lichtje dooft nu.
Als de kooktijd niet is voltooid→Herhaal stappen 1–3
(Aanvullende kooktijd kan tot twee keer worden ingesteld. Iedere tijd moet
binnen 10-40 minuten liggen. De timer begint opnieuw bij 1 minuut als het
apparaat heet is. Verhoog de tijd door de gewenste tijd op de timer in te
drukken.)
PISTOLET BROOD
Selecteer menu ‘08’
harde bloem voor witbrood, type 550 300 g
theelepel met zout 1
boter 20 g
water 220 mL
theelepel met gedroogde gist
3
⁄4
PANNETTONE
Selecteer menu ‘11’
harde bloem voor witbrood, type 550 400 g
eetlepel met suiker 4
theelepel met zout 1
boter (in blokjes van 2 cm gesneden en
in de koelkast bewaard)
eieren (geklopt) ;medium 2 (100 g)
melk 200 mL
theelepel met droge gist 1
extra boter
(in blokjes van 1-2 cm gesneden)
sinaasappelschil; fijn gehakt* 50 g
bruine saltana* 50 g
gedroogde zwarte bes* 50 g
* : met extra boter toegevoegd
1
50 g
1
70 g
⁄2
⁄2
BASIS BRIOCHE
Selecteer menu ‘11’
harde bloem voor witbrood, type 550 400 g
eetlepel met suiker 4
eetlepel met poedermelk 2
theelepel met zout 1
boter (in blokjes van 2 cm gesneden en
in de koelkast bewaard)
eieren (geklopt) ;medium 2 (100 g)
water 180 mL
theelepel met droge gist 1
extra boter
(in blokjes van 1-2 cm gesneden en in de
koelkast bewaard)
50 g
1
70 g
⁄4
86 87
Page 45

Brood Recepten
Deeg Recepten
WIT SPELTBROOD
Selecteer menu ‘13’
MLXL
Witte speltbloem 400 g 500 g 600 g
theelepel met suiker 1
theelepel met zout 1
boter 5 g 10 g 10 g
water 260 mL 340 mL 400 mL
theelepel met
droge gist
1
⁄2 22
1
⁄4 11⁄2 1
1
11
⁄4 11⁄2
3
⁄4
HEEL SPELTBROOD
Selecteer menu ‘13’
MLXL
Volkoren speltbloem 200 g 250 g 300 g
Witte speltbloem 200 g 250 g 300 g
theelepel met suiker 1
theelepel met zout 1
eetlepel met olie 2 3 3
water 250 mL 320 mL 380 mL
theelepel met
droge gist
1
⁄2 22
1
⁄4 11⁄2 1
1
11
⁄4 11⁄2
3
⁄4
ROGGE EN SPELT (zonder vertragingstimer)
Selecteer menu ‘13’
MLXL
Witte speltbloem 275 g 350 g 425 g
roggebloem 125 g 150 g 175 g
theelepel met suiker 1
theelepel met zout 1
boter 5 g 10 g 10 g
gewone yogult 120 g 150 g 180 g
water 180 mL 230 mL 270 mL
theelepel met
droge gist
1
⁄2 22
1
⁄4 11⁄2 1
11
1
⁄4 11⁄2
3
⁄4
BOEKWEIT EN SPELT MET ZAADJES
Selecteer menu ‘13’
MLXL
Witte speltbloem 320 g 400 g 480 g
Boekweitmeel 80 g 100 g 120 g
theelepel met honing 1 1 1
theelepel met zout 1
eetlepel met
sesamzaad
eetlepel met lijnzaad 11⁄2 2 2
eetlepel met
papaverzaad
eetlepel met olie 2 3 3
water 250 mL 320 mL 380 mL
theelepel met
droge gist
1
⁄4 11⁄2 1
1
⁄2 22
1
1
⁄2 2 21⁄2
1
11
1
⁄4 11⁄2
1
⁄2
3
⁄4
1
⁄2
RIJST EN SPELT MET PIJNBOOMZAAD EN
GEFRITUURDE UI
Selecteer menu ‘14’
MLXL
Witte speltbloem 320 g 400 g 480 g
bruin rijstmeel 80 g 100 g 120 g
theelepel met suiker 1
theelepel met zout 1
boter 5 g 10 g 10 g
water 260 mL 340 mL 400 mL
theelepel met
droge gist
toevoeging (in
rozijnen-notenstrooier
doen):
pijnboompitten
eetlepel met
gefrituurd ui
1
⁄2 22
1
⁄4 11⁄2 1
1
11
40 g
3 4 5
⁄4 11⁄2
50 g
3
60 g
⁄4
CITROEN EN PAPAVERZAAD SPELT
Selecteer menu ‘13’
MLXL
Witte speltbloem 400 g 500 g 600 g
theelepel met suiker 1
theelepel met zout 1
boter 5 g 10 g 10 g
geraspte schil van
citroen
citroensap 20 mL 20 mL 30 mL
eetlepel met
papaverzaad
water 250 mL 330 mL 380 mL
theelepel met
droge gist
1
⁄2 22
1
⁄4 11⁄2 1
111
23 3
1
11
⁄4 11⁄2
3
⁄4
VRUCHTENSPELT
Selecteer menu ‘14’
MLXL
Witte speltbloem 400 g 500 g 600 g
theelepel met suiker 1
theelepel met zout 1
boter 5 g 10 g 10 g
theelepel met
gemengde kruiden
water 270 mL 350 mL 400 mL
theelepel met
droge gist
toevoeging (in
rozijnen-notenstrooier
doen):
gemengde droge
vruchten
1
⁄2 22
1
⁄4 11⁄2 1
1
22
11
100 g
⁄2 3
1
⁄4 11⁄2
125 g
3
⁄4
150 g
BASIS DEEG
Selecteer menu ‘16’
harde bloem voor witbrood, type 550 500 g
theelepel met zout 11⁄2
eetlepel met suiker 11⁄2
boter 30 g
water 310 mL
theelepel met gedroogde gist 1
BASISROZIJNENDEEG
Selecteer menu ‘17’
harde bloem voor witbrood, type 550 500 g
theelepel met zout 11⁄2
eetlepel met suiker 11⁄2
boter 30 g
water 310 mL
theelepel met gedroogde gist 1
toevoeging (in rozijnen-notenstrooier doen):
rozijnen 100 g
FRANS DEEG
Selecteer menu ‘21’
harde bloem voor witbrood, type 550 300 g
theelepel met zout 1
boter 20 g
water 180 mL
theelepel met gedroogde gist
3
⁄4
VOLKORENDEEG
Selecteer menu ‘18’
harde bloem voor volkorenbrood 500 g
theelepel met zout 2
eetlepel met suiker 1
boter 30 g
water 340 mL
theelepel met gedroogde gist 1
1
⁄2
1
⁄2
VOLKOREN-ROZIJNENDEEG
Selecteer menu ‘19’
harde bloem voor volkorenbrood 500 g
theelepel met zout 2
eetlepel met suiker 1
boter 30 g
water 340 mL
theelepel met gedroogde gist 1
toevoeging (in rozijnen-notenstrooier doen):
rozijnen 100 g
1
⁄2
1
⁄2
Cake Recept
KERSEN-MARSEPEINCAKE
PIZZA DEEG
Selecteer menu ‘22’
harde bloem voor witbrood, type 550 450 g
theelepel met zout 2
eetlepels plantaardige olie 4
water 240 mL
theelepel met gedroogde gist 1
BRIOCHE DEEG (CHOCOLADESTUKJE BRIOCHE ROL)
; voor 12 rollen
Selecteer menu ‘23’
harde bloem voor witbrood, type 550 400 g
eetlepel met suiker 4
theelepel met zout 1
boter (in blokjes van 2 cm gesneden en
in de koelkast bewaard)
eieren (geklopt) ;medium 3 (150 g)
melk 90 mL
eetlepel met (donkere) rum 1
theelepel met droge gist 1
extra boter
(in blokjes van 1-2 cm
gesneden en in de koelkast
bewaard)
chocoladestukjes* 120 g
* Als het deeg eruit is gehaald, strooi de chocoladestukjes en vouw de bodem een
derde omhoog en de bovenkant een derde omlaag. Vouw het daarna in tweeën
70 g
1
50 g
⁄2
Nederlands
SPELT TAFELROL
; voor 8 rollen
Selecteer menu ‘24’
Witte speltbloem 500 g
theelepel met suiker 1
theelepel met zout 11⁄2
boter 10 g
water 310 mL
theelepel met droge gist 1
1
⁄2
1
⁄4
Selecteer menu ‘15’
lichtbruine basterdsuiker 50 g
boter 175 g
eieren 3
zelfrijzend bakmeel 225 g
geglaceerde kersen, gesnipperd 100 g
marsepein, geraspt 75 g
melk 60 mL
geschaafde amandelen, geroosterd 15 g
88 89
Page 46

Glutenvrije Recepten
AVEVE Recepten
Brood zonder kleefstoffen maken is zeer verschillend van de normale manier waarop u brood bakt.
Het is zeer belangrijk dat u uw arts raadpleegt en de volgende richtlijnen opvolgt indien u dieetbrood zonder kleefstoffen voor uw gezondheid
maakt.
• Dit programma is speciaal ontworpen voor bepaalde ‘gluten free’ mix en daardoor kan bij gebruik van uw eigen mengsel of mix het resultaat
niet optimaal zijn.
• Met ‘gluten free’ (zonder kleefstoffen) gekozen, moeten de details van ieder recept exact worden opgevolgd. (Het brood zal anders niet goed
zijn.)
Er zijn twee soorten mix zonder kleefstoffen; een ‘laag kleefstoffen’ mix die gebaseerd is op granenmeel en een ‘zonder kleefstoffen’ mix,
gebaseerd op meel zonder granen.
U dient uw arts te raadplegen welke mix voor u de juiste is indien u een speciaal dieet volgt en dit programma gebruikt voor het bakken van
brood om gezondheidsredenen.
• Het resultaat is afhankelijk van de mix die u gebruikt.
Het is mogelijk dat er wat bloem aan de kant van het brood overblijft.
[01 Basic (Basis)]
[02 Basic Rapid (Basis snel)]
WIT BROOD
Selecteer menu ‘01’ of ‘02’
theelepel met suiker 1 2 2
‘Surfina’ bloem (AVEVE) 400 g 500 g 600 g
water 250 mL 320 mL 380 mL
eetlepel met boter 1 1 1
theelepel met zout 1 11⁄2 2
theelepel met gedroogde gist
(theelepel met voor de BAKE RAPID
optie)
OPMERKING
In dat geval zal het brood iets minder hoog uitvallen en minder luchtig zijn.
• Voor een beter resultaat, wacht tot het brood afgekoeld is voor het snijden.
• Het brood moet op een koele droge plaats worden bewaard en binnen 2 dagen worden gebruikt.
U kunt het brood in diepvrieszakjes of doosjes invriezen indien u het brood niet binnen twee dagen gaat gebruiken.
Waarschuwing als u dit programma uit gezondheidsoverwegingen gebruikt:
Als u het kleefstoffenvrije programma gebruikt, raadpleeg dan eerst uw arts of de Coeliakie Vereniging en gebruik alleen ingrediënten
die geen schade kunnen toebrengen aan uw gezondheid.
Panasonic is niet verantwoordelijk voor eventuele schade als gevolg van het gebruik van ingrediënten waarvoor niet van tevoren
toestemming is gevraagd aan een arts.
U moet het mengen met bloem die wel kleefstoffen bevat voorkomen indien u het brood voor uw dieet zonder kleefstoffen moet maken. Let
vooral op dat het bakblik, kneedmes en andere te gebruiken voorwerpen goed schoon zijn.
Voor klanten die in België woonachtig zijn
Voor de kleefstoffenvrije recepten hieronder zijn commercieel klaargemaakte kleefstoffenvrije broodmixen van AVEVE gebruikt.
Deze zijn verkrijgbaar bij de drogist, bij natuurvoedingswinkels en soms bij grote supermarkten.
Voor meer informatie over AVEVE producten, kunt u het op 0800/0229210.
BROOD ZONDER KLEEFSTOFFEN
Selecteer menu ‘12’
water 320 mL
eetlepel met olie 1
meel zonder kleefstoffen 500 g
theelepel met gist 2
OPMERKING
Voor dit programma is er geen mogelijkheid om het formaat te bepalen.
BROOD ZONDER KLEEFSTOFFEN MET EIEREN
Selecteer menu ‘12’
water 100 mL
melk 180 mL
eieren 2
eetlepel met olie 1
meel zonder kleefstoffen 500 g
theelepel met gist
2
[04 Whole wheat (
[05 Whole wheat Rapid (
VOLKORENBROOD
Selecteer menu ‘04’ of ‘05’
voltarwe bloem fijn gemalen (AVEVE) 300 g 400 g 450 g
bloem ‘Frans krokant’ (AVEVE) 100 g 100 g 150 g
theelepel met suiker 1 2 2
eetlepel met boter 1 1 2
theelepel met zout 1 1 2
water 250 mL 320 mL 380 mL
theelepel met gedroogde gist
(theelepel met voor de BAKE RAPID
optie)
OPMERKINGEN
In dat geval zal het brood iets minder hoog uitvallen en minder luchtig zijn. Dit
programma is meer geschikt voor de halfgrijze broden.
Bij de bovenstaande recept is steeds wat witte bloem toegevoegd. Indien u dit niet
wenst mag de hoeveelheid witte bloem vervangen worden door grijze bloem, maar
dan zal het brood kleiner en vaster van structuur zijn. Indien u meer witte bloem
toevoegt, dient u iets minder water te gebruiken (grijze bloem neemt immers meer
vocht op dan witte).
MLXL
3
⁄4
(11⁄2)
Volkoren
)]
Volkoren Snel
MLXL
1
(11⁄2)
1
(13⁄4)
1
1
(13⁄4)
* Deze recepten zijn vooral bedoeld voor Belgische klanten.
Neemt u voor meer informatie contact op met AVEVE via
telefoonnummer 0800/0229210.
[08 French (Frans)]
PISTOLET BROOD
Selecteer menu ‘08’
bloem ‘Frans krokant’ (AVEVE) 400 g
water 260 mL
theelepel met zout 1
eetlepel met boter 1
theelepel met gedroogde gist 1
OPMERKING
Voor dit programma is er geen mogelijkheid om het formaat en de korst te bepalen.
Dit recept geeft een zeer luchtig en hoog brood, dat echter niet lang te bewaren is.
11⁄4
(2)
1
⁄2
[09 Italian (Italiaans)]
ITALIAANS BROOD
Selecteer menu ‘09’
bloem ‘Frans krokant’ (AVEVE) 400 g
)]
water 240 mL
theelepel met zout 1
eetlepel met olijfolie 11⁄2
theelepel met gedroogde gist
OPMERKING
Voor dit programma is er geen mogelijkheid om het formaat en de korst te bepalen.
Dit recept geeft een zeer luchtig en hoog brood, dat echter niet lang te bewaren is.
1
⁄2
3
⁄4
Nederlands
[10 Sandwich]
⁄4
1
(2)
1
⁄2
BASIS SANDWICH
Selecteer menu ‘10’
theelepel met suiker 1
‘Surfina’ bloem (AVEVE) 400 g
water 250 mL
eetlepel met boter 1
theelepel met zout 1
theelepel met gedroogde gist
OPMERKING
Voor dit programma is er geen mogelijkheid om het formaat en de korst te bepalen.
Dit recept geeft een mals brood (redelijk vochtig) met een bruine korst, ideaal om te
roosteren.
3
⁄4
90 91
Page 47

AVEVE Recepten
* Deze recepten zijn vooral bedoeld voor Belgische klanten.
Neemt u voor meer informatie contact op met AVEVE via
telefoonnummer 0800/0229210.
Jamrecepten
[16 Basic (Basis)]
TAARTENDEEG (Deeg voor 2 taarten)
Selecteer menu ‘16’
suiker 60 g
patisserie bloem 500 g
melk 100 mL
eieren 3
boter 100 g
theelepel met zout 1
theelepel met gedroogde gist 2
1
⁄2
[18 Whole wheat (Volkoren)]
VOLKORENDEEG
Selecteer menu ‘18’
eetlepel met suiker 1
bloem ‘Frans krokant’ (AVEVE) 250 g
bloem ‘Boerebruin’ (AVEVE) 250 g
water 280 mL
theelepel met zout 1
theelepel met gedroogde gist 2
Werkwijze
Het deeg verdelen in bolletjes van ongeveer 50 g. Vervolgens het deeg laten rijzen
onder een linnen doek. Bakken gedurende 15 à 20 minuten in een op 220 graden
voorverwarmde oven.
1
⁄2
[15 Bake only (Alleen bakken)]
Selecteer menu 15. Er verschijnt een baktijd van
30 minuten.
Door op de ‘Timer’ blijven drukken, kan men de baktijd
verhogen (met stappen van 1 minuut) tot 1 uur en
30 minuten.
CAKE
Selecteer menu ‘15’
eieren 3
eetlepels melk 3
zachtgemaakte boter 200 g
pak ‘ANCO CAKE MIX’ 1
Werkwijze
Selecteer menu 15 en stel de timer in op 1 uur en 10 minuten.
Na de pieptoon het bakblik uit de broodbakautomaat nemen en zo laten afkoelen.
Eens het bakblik afgekoeld, de cake eruit laten glijden en laten afkoelen op een
rooster.
[22 Pizza]
PIZZA DEEG
Selecteer menu ‘22’
bloem ‘Frans krokant’ (AVEVE) 500 g
water 290 mL
theelepel met zout 1
eetlepel met boter 1
theelepel met gedroogde gist 2
Werkwijze
Het pizza deeg uitrollen en in een pizza vorm leggen, inpikken met een vork.
Instrijken met een tomatencoulis en beleggen naar keuze. Bakken gedurende 20 à
25 minuten in een op 220 graden voorverwarmde oven.
92 93
1
⁄2
[26 Jam]
Aardbeienjam
Selecteer menu ‘26’
aardbeien, fijngehakt 600 g
suiker 400 g
gepoederde pectine 13 g
Plaats de helft van het fruit in het bakblik en voeg daarna de
helft van de suiker toe. Doe hetzelfde met het overgebleven
1
fruit en suiker.
Strooi de pectine op de ingrediënten in het bakblik.
2
Selecteer menu 26 en stel de timer in op 1 uur en 40 minuten.
3
Bosvruchtenjam
Selecteer menu ‘26’
Bosvruchten 700 g
suiker 400 g
Plaats de helft van het fruit in het bakblik en voeg daarna de
helft van de suiker toe. Doe hetzelfde met het overgebleven
1
fruit en suiker.
Selecteer menu 26 en stel de timer in op 1 uur en 50 minuten.
2
APPEL- EN BRAMENJAM
Selecteer menu ‘26’
appels, geraspt of fijngehakt 300 g
bramen 400 g
suiker 300 g
gepoederde pectine 6 g
Plaats de helft van het fruit in het bakblik en voeg daarna de
helft van de suiker toe. Doe hetzelfde met het overgebleven
1
fruit en suiker.
Strooi de pectine op de ingrediënten in het bakblik.
2
Selecteer menu 26 en stel de timer in op 1 uur en 40 minuten.
3
PECHE MELBA
Selecteer menu ‘26’
perziken, fijngehakt 500 g
frambozen 200 g
suiker 300 g
gepoederde pectine 8 g
Plaats de helft van het fruit in het bakblik en voeg daarna de
helft van de suiker toe. Doe hetzelfde met het overgebleven
1
fruit en suiker.
Strooi de pectine op de ingrediënten in het bakblik.
2
Selecteer menu 26 en stel de timer in op 1 uur en 40 minuten.
3
PRUIMENJAM
Selecteer menu ‘26’
pruimen, fijngehakt 700 g
suiker 350 g
gepoederde pectine 6 g
Plaats de helft van het fruit in het bakblik en voeg daarna de
helft van de suiker toe. Doe hetzelfde met het overgebleven
1
fruit en suiker.
Strooi de pectine op de ingrediënten in het bakblik.
2
Selecteer menu 26 en stel de timer in op 1 uur en 40 minuten.
3
BEVROREN BESSENJAM
Selecteer menu ‘26’
bevroren gemengde bessen 700 g
suiker 400 g
gepoederde pectine 10 g
Plaats de helft van het fruit in het bakblik en voeg daarna de
helft van de suiker toe. Doe hetzelfde met het overgebleven
1
fruit en suiker.
Strooi de pectine op de ingrediënten in het bakblik.
2
Selecteer menu 26 en stel de timer in op 1 uur en 40 minuten.
3
RODE BESSEN- EN CHILLIJAM
Selecteer menu ‘26’
rode aalbessen, grof gestampt 300 g
middelgrote rode chilipeper, fijngehakt 1-2
gemberwortel, fijn geraspt 4 cm
sinaasappelen, sap en fijn geraspte schil 2
suiker 150 g
gepoederde pectine 3 g
Doe alle ingrediënten behalve suiker en pectine in de
broodpan.
1
Voeg de suiker toe en strooi de pectine op de ingrediënten in
het bakblik.
2
Selecteer menu 26 en stel de timer in op 1 uur en 40 minuten.
3
ABRIKOZENJAM
Selecteer menu ‘26’
abrikozen, fijngehakt 500 g
suiker 250 g
gepoederde pectine 6 g
Plaats de helft van het fruit in het bakblik en voeg daarna de
helft van de suiker toe. Doe hetzelfde met het overgebleven
1
fruit en suiker.
Strooi de pectine op de ingrediënten in het bakblik.
2
Selecteer menu 26 en stel de timer in op 1 uur en 30 minuten.
3
Nederlands
Page 48

Compoterecepten
Onderhoud & Reiniging
[27 Compote]
GEKRUIDE APPELCOMPOTE
Selecteer menu ‘27’
appels, geschild, zonder klokhuis en in
blokjes
kaneelstokje 1
kruidnagels 2
citroen, alleen schil 1
citroensap 2 el
suiker 100 g
water 75 mL
Verwijder het kneedmes uit het bakblik.
1000 g
1
Plaats de ingrediënten in het bakblik in de hierboven
aangegeven volgorde. Giet water over de ingrediënten.
2
Selecteer menu 27 en stel de timer in op 1 uur en 20
minuten.
3
Roeren nadat het koken is voltooid.
4
RODE VRUCHTEN COMPOTE
Selecteer menu ‘27’
pruimen, pit verwijderd en in tweeën
gesneden
kersen, pit verwijderd 250 g
aardbeien, steel verwijderd 250 g
lichtbruine (basterd) suiker 75 g
water 75 mL
frambozen (toegevoegd na het koken) 200 g
Verwijder het kneedmes uit het bakblik.
300 g
1
Plaats de ingrediënten in het bakblik in de hierboven
aangegeven volgorde. Giet water over de ingrediënten.
2
Selecteer menu 27 en stel de timer in op 1 uur.
3
Roeren nadat het koken is voltooid.
4
Voeg frambozen toe.
5
RABARBER- EN GEMBERCOMPOTE
Selecteer menu ‘27’
rabarber, gesneden in stukjes van 2 cm 700 g
sinaasappelsap 2 el
gekonfijte gember, fijngehakt 20 g
suiker 100 g
water 100 mL
Verwijder het kneedmes uit het bakblik.
1
Plaats de ingrediënten in het bakblik in de hierboven
aangegeven volgorde. Giet water over de ingrediënten.
2
Selecteer menu 27 en stel de timer in op 1 uur en
40 minuten.
3
Roeren nadat het koken is voltooid.
4
GEMENGDE BESSENCOMPOTE
Selecteer menu ‘27’
gemengde bessen
bijv. aardbeien, frambozen, bosbessen
suiker 75 g
water 2 el
Verwijder het kneedmes uit het bakblik.
800 g
1
Plaats de ingrediënten in het bakblik in de hierboven
aangegeven volgorde. Giet water over de ingrediënten.
2
Selecteer menu 27 en stel de timer in op 1 uur.
3
Roeren nadat het koken is voltooid.
4
APPELMOES
Selecteer menu ‘27’
bramley appels, geschild, zonder klokhuis
en in blokjes
water 2 el
Verwijder het kneedmes uit het bakblik.
1000 g
1
Plaats de appel in het bakblik. Giet water over de
ingrediënten.
2
Selecteer menu 27 en stel de timer in op 1 uur en
20 minuten.
3
Roeren nadat het koken is voltooid.
4
PERZIK IN VANILLESIROOP
Selecteer menu ‘27’
perziken, pit verwijderd en in 1⁄8 delen
gesneden
suiker 100 g
vanillestokje
water 125 mL
Verwijder het kneedmes uit het bakblik.
1000 g
1
⁄2
1
Plaats de ingrediënten in het bakblik in de hierboven
aangegeven volgorde. Giet water over de ingrediënten.
2
Selecteer menu 27 en stel de timer in op 1 uur.
3
Als het koken klaar is, verwijdert u de perziken met een
schuimspaan. Giet voorzichtig de siroop over het fruit. Laat
4
afkoelen.
Neem de stekker uit het stopcontact en laat
de machine afkoelen voordat u deze gaat
schoonmaken.
Voorkom beschadiging van uw Broodbakoven...
Gebruik geen schuurmiddelen!
(schoonmaakmiddelen, schuursponsjes etc.)
Was geen enkel onderdeel van uw Broodbakoven in de
vaatwasser!
Gebruik geen benzine, verdunners, alcohol of
bleekwater!
Neem de machine af met een doek nadat u de wasbare
onderdelen hebt afgespoeld. Zorg ervoor dat de
onderdelen van de Broodbakoven schoon en droog
blijven.
Bakblik & kneedmes
Verwijder eventuele achtergebleven deegresten
en was de onderdelen af met water.
Als het kneedmes vast zit, laat het dan
5-10 minuten in warm water weken. Dompel
het bakblik niet in water onder.
Maatlepeltje & maatbeker
Was deze af met water.
Niet geschikt voor de vaatwasser
Deksel
Neem deze af met een vochtige doek
Stoomventiel
Neem deze af met een vochtige doek
Nederlands
Behuizing
Neem deze af met een vochtige
doek
Doe dat voorzichtig
om te voorkomen dat
de temperatuurmeter
beschadigd raakt.
•
De binnenzijde van de machine kan verkleuren naarmate u de machine langer gebruikt.
Temperatuurmeter
94
95
Page 49

Onderhoud & Reiniging
Problemen oplossen
Raadpleeg dit gedeelte alvorens de technische dienst te bellen.
Deksel van strooier
Neem de strooier uit de machine
en spoel deze af met water
Til het deksel van de strooier op
tot een hoek van ongeveer 75
graden. Zorg dat de scharnierpunten precies recht zitten
en trek het deksel naar u toe om het te verwijderen of
druk het in dezelfde stand voorzichtig vast om het te
bevestigen. (Wacht eerst totdat de machine is afgekoeld,
deze is namelijk onmiddellijk na gebruik nog zeer heet)
Pas op dat u het dichtingsmateriaal niet beschadigt of
lostrekt. (Beschadiging kan leiden tot het ontsnappen
van stoom, condensvorming of misvormd brood)
Dichtingsmateriaal
Droog met een
droge doek als het
vochtig is.
Gistdispenser
Afvegen met een vochtige doek en gewoon laten opdrogen.
Als met een droge doek wordt geveegd zal de droge gist niet in
het bakblik vallen vanwege statische elektriciteit.
Rozijnen-notenstrooier
Neem de strooier uit de machine en spoel deze af met water
Probleem
Mijn brood rijst niet
De bovenkant van mijn brood is
niet egaal
Oorzaak Actie
[Alle broden]
De kleefstoffen in uw bloem zijn niet van goede kwaliteit of u hebt geen harde bloem gebruikt.
(De kwaliteit van kleefstoffen kan variëren afhankelijk van de temperatuur, vochtigheid, hoe de
bloem wordt bewaard en de periode waarin het is geoogst)
Probeer eens een andere soort, een ander merk of een andere partij bloem.
Het deeg is te hard geworden omdat u niet genoeg vloeistof hebt gebruikt.
Hardere bloem met een hoger bestanddeel proteïne neemt meer water op dan andere bloem;
probeer 10-20 mL water toe te voegen.
U gebruikt niet de juiste soort gist.
Gebruik droge gist uit een zakje waarop ‘kant-en-klare gist’ staat.
Deze soort gist hoeft niet voor te rijzen.
U gebruikt niet genoeg gist of de gist die u gebruikt is oud.
Gebruik het meegeleverde maatlepeltje. Controleer de vervaldatum van de gist.
(Bewaar deze in de koelkast)
De gist is voor het kneden in contact gekomen met de vloeistof.
Controleer of u de ingrediënten in de juiste volgorde volgens de instructies hebt toegevoegd.
(P. 78)
U hebt teveel zout of te weinig suiker gebruikt.
Controleer het recept en pas de juiste hoeveelheden af met behulp van het meegeleverde
maatlepeltje.
Controleer of de andere ingrediënten niet al zout en suiker bevatten.
[Speciale broden]
Eenkorentarwe werd gebruikt bij het bakken speciaal brood en/of wanneer veel andere soorten
meel dan speltmeel werden gebruikt.
De speltmeel moet minstens 60% van alle bloem zijn indien u meer dan twee andere soorten
bloem gebruikt (anders dan spelt). De rogge en de rijstmeel moet tot 40% van alle bloem zijn
en boekweitmeel moeten tot 20% van alle bloem zijn.
Nederlands
Spoel de strooier na elk gebruik af om
eventueel achtergebleven restjes te
verwijderen.
Om de antiaanbaklaag te beschermen
De broodpan en het kneedmes zijn voorzien van een antiaanbaklaag, om vlekken te voorkomen en het brood
Mijn brood zit vol luchtgaten
Mijn brood lijkt te zijn ingezakt
na het rijzen
gemakkelijker uit de pan te kunnen nemen.
Om te voorkomen dat deze laag beschadigd raakt, verzoeken wij u vriendelijk de onderstaande aanwijzingen op te
volgen.
Mijn brood is te veel gerezen
• Gebruik geen harde voorwerpen zoals messen of vorken om het brood uit de broodpan te nemen.
Als u het brood moeilijk uit het bakblik kunt halen: zie pag. 99.
•
Controleer of het kneedmes niet in het brood zit voordat het wordt gesneden.
Wanneer het kneedmes in het brood zit, moet het brood eerst afkoelen waarna het mes kan worden verwijderd.
(Gebruik geen harde voorwerpen zoals messen en vorken.)
Zorg ervoor dat u zich niet brandt aangezien het kneedmes nog steeds erg heet kan zijn.
•
Gebruik een zachte spons om de broodpan en het kneedmes schoon te maken.
Het gebruik van schurende middelen als schuurmiddel of schuursponsjes moet ten strengste worden afgeraden.
Waarom is mijn brood zo licht
en plakkerig?
U hebt teveel gist gebruikt.
Controleer het recept en pas de juiste hoeveelheden af met behulp van het meegeleverde
maatlepeltje.
U hebt teveel vloeistof gebruikt.
Sommige soorten bloem nemen meer water op dan andere; probeer eens 10-20 mL minder
water te gebruiken.
Uw bloem is niet van goede kwaliteit.
Probeer eens een ander merk bloem.
U hebt teveel vloeistof gebruikt.
Probeer eens 10-20 mL minder water te gebruiken.
U hebt teveel gist/water gebruikt.
Controleer het recept en pas de juiste hoeveelheid af met behulp van het meegeleverde
maatlepeltje (gist) of met behulp van de meegeleverde maatbeker (water).
Controleer of andere ingrediënten niet ook al water bevatten.
U hebt niet genoeg bloem gebruikt.
Weeg de bloem zorgvuldig af met behulp van een weegschaal.
U gebruikt niet genoeg gist of de gist die u gebruikt is oud.
Gebruik het meegeleverde maatlepeltje. Controleer de vervaldatum van de gist. (Bewaar deze
in de koelkast)
Er is een stroomstoring geweest of de machine is tijdens het maken van het brood uitgezet.
De machine gaat uit als deze gedurende meer dan 10 minuten wordt stopgezet. U moet het
brood uit het bakblik verwijderen en opnieuw beginnen met nieuwe ingrediënten.
96
Harde, grove of grofkorrelige ingrediënten zoals bloem met hele graan- of suikerkorrels, of toegevoegde noten of zaden zouden de
anti-aanbaklaag van het bakblik kunnen beschadigen. Breek ingrediënten die nogal groot zijn eerst in kleinere stukjes. Houd u aan de
hoeveelheid die het recept voorschrijft.
De onderkant en de zijkanten
van mijn brood zijn met teveel
bloem bedekt.
U hebt teveel bloem gebruikt of u gebruikt niet genoeg vloeistof.
Controleer het recept en pas de juiste hoeveelheid af met behulp van een weegschaal voor
de bloem of met behulp van de maatbeker voor de vloeistoffen.
97
Page 50

Problemen oplossen
Raadpleeg dit gedeelte alvorens de technische dienst te bellen.
Probleem
Waarom zijn de ingrediënten
van mijn brood niet goed
gemengd?
Mijn brood is niet gebakken
Er lekt deeg uit de bodem van
het bakblik
Oorzaak Actie
U hebt het kneedmes niet in het bakblik geplaatst.
Zorg ervoor dat het kneedmes in het bakblik zit voordat u de ingrediënten er in stopt.
Er is een stroomstoring geweest of de machine is tijdens het maken van het brood uitgezet.
De machine gaat uit als deze gedurende meer dan 10 minuten wordt stopgezet. U kunt
misschien met het brood doorgaan maar het resultaat kan tegenvallen als het kneden al was
gestart.
Het deegmenu werd geselecteerd.
In het deegmenu zit geen bakproces.
Er is een stroomstoring geweest of de machine is tijdens het maken van het brood uitgezet.
De machine gaat uit als deze gedurende meer dan circa 10 minuten wordt stopgezet. U kunt
proberen het deeg in uw oven te bakken als het al is gerezen.
Er is niet genoeg water en de beveiligingsinrichting voor de motor is in werking getreden. Dit
gebeurt alleen wanneer de machine overbelast is en de motor te veel onder druk komt te staan.
Ga naar de zaak waar u de machine hebt gekocht om naar de machine te laten kijken.
Controleer in het vervolg het recept en pas de juiste hoeveelheid af met behulp van de
meegeleverde maatbeker.
U hebt vergeten het kneedmes in de machine te plaatsen.
Plaats het mes eerst (P. 78).
De kneedmeshouder in het bakblik zit vast en draait niet rond.
Als de houder niet draait wanneer het mes erop wordt bevestigd, moet de houder vervangen worden.
(Raadpleeg de zaak waar u de Broodbakoven hebt gekocht of een servicedienst van Panasonic.)
Een kleine hoeveelheid deeg komt via de ventilatiegaatjes naar buiten (zodat het deeg
de draaiende delen niet blokkeert). Dit is geen storing maar controleer wel af en toe of de
kneedmeshouder goed draait.
Als de montage-as van het kneedmes niet draait als het kneedmes is bevestigd, moet u het
montage-as gedeelte vervangen. (Raadpleeg de zaak waar u de Broodbakoven hebt gekocht
of een servicedienst van Panasonic.)
(Bodem van bakblik)
Kneedmeshouder
Probleem
De korst wordt rimpelig en wordt
zacht als het brood afkoelt
Hoe kan ik de korst van mijn
brood knapperig houden?
Mijn brood is plakkerig en ik
kan geen gelijkmatige plakken
snijden
Extra ingrediënten worden niet
goed gemengd in de brioches.
De onderkant van de brioches is
te vettig, olieachtig.
De korst is olieachtig.
Er zijn grote gaten in het brood.
Het bakken van brioches lukt
niet wanneer ik broodmix
gebruik.
Oorzaak Actie
De damp die na het bakken in het brood vrijkomt, kan naar de korst gaan waardoor die wat
zachter wordt.
Probeer eens 10-20 mL minder water of de helft minder suiker te gebruiken om de
hoeveelheid damp te verminderen.
Om het brood knapperiger te maken kunt u menu 08 of de optie ‘Dark’ (Donker) korstkleur
selecteren, of kunt u het zelfs 5-10 minuten extra bakken in de oven op 200°C/gas, stand 6.
Het brood was te warm toen u het sneed.
Laat uw brood op een rekje afkoelen voordat u het gaat snijden zodat de damp kan
ontsnappen.
Bepaald deeg op basis van broodmix kan minder geschikt zijn voor het mengen van extra
ingrediënten, soms zodanig dat ze er uit gewerkt worden.
Verminder de hoeveelheid extra ingrediënten tot de helft.
Hebt u boter toegevoegd binnen 5 minuten na de pieptoon?
Geen boter toevoegen wanneer de resterende tijd tot voltooiing al wordt aangegeven
(zie pag. 81).
De botersmaak kan minder zijn, maar het bakken zal best lukken.
Probeer de volgende oplossingen.
Het zal waarschijnlijk beter bakken als iets minder gist wordt gebruikt bij menu 11 of 23.
(Indien u de gist apart toevoegt.)
Volg het recept dat voor de broodmix voorgeschreven is, maar zorg dat de broodmix tussen
de 350 – 500 gram blijft.
Plaats de droge gist (indien het toevoegen van gist apart geschied) in de gistdispenser, en de
droge ingrediënten en boter in het bakblik. Doe er daarna water bij. Extra ingrediënten kunt u
beter iets later toevoegen (zie pag. 81 of 83).
Het resultaat kan verschillen, afhankelijk van het recept vermeld op de broodmix.
Nederlands
Mijn brood is aan de zijkanten
ingezakt en de onderkant is
vochtig
Het kneedmes ratelt
Ik ruik een brandlucht tijdens het
bakken van het brood
Er komt rook uit het stoomgat
Het kneedmes blijft in het brood
zitten als ik het uit het bakblik
neem
Groep
kneedmeshouder
KneedmeshouderVentilatiegaatjes (4 in totaal)
U hebt het brood te lang in het bakblik gelaten nadat het bakken voltooid was.
Neem het brood na het bakken onmiddellijk uit de machine.
Er is een stroomstoring geweest of de machine is tijdens het maken van het brood uitgezet.
De machine gaat uit als deze gedurende meer dan 10 minuten wordt stopgezet. U kunt
proberen het deeg in uw oven te bakken.
Dit komt doordat het kneedmes losjes op de montage-as past. (Dit is geen fout)
Er zijn misschien ingrediënten op de hittebron terechtgekomen.
Tijdens het mengen kan er soms een kleine hoeveelheid bloem, rozijnen of andere
ingrediënten uit het bakblik worden geworpen. Veeg gewoon voorzichtig het
verwarmingselement schoon, nadat de Broodbakoven is afgekoeld.
Neem het bakblik uit de broodbakmachine voordat u de ingrediënten er in doet.
Het deeg is een beetje stijf.
Laat het brood helemaal afkoelen voor het voorzichtig verwijderen van het kneedmes.
Sommige soorten bloem nemen meer water op dan andere; probeer in het vervolg dus
10-20 mL extra water toe te voegen.
Er hebben zich korsten onder het mes opgehoopt.
Was het kneedmes en het draaiende gedeelte na ieder gebruik.
Artikelnr. ADA29E165
Het brood komt niet uit het blik
Tijdens het koken van de jam is
het verbrand of het kneedmes
blijft vastzitten en kan niet
worden verwijderd.
De jam is overgekookt.
De jam is te dun en niet goed
ingedikt.
Kan bevroren fruit gebruikt
worden?
Als het brood niet gemakkelijk uit de broodpan kan worden verwijderd, laat het dan 5-10 minuten
afkoelen, waarbij u de pan niet onbeheerd mag laten staan om te voorkomen dat iemand zich
aan de pan brandt. Hierna kunt u het brood verwijderen door de pan met ovenwanten op te
pakken en enkele keren goed te schudden. (Zorg ervoor dat het handvat omlaag staat, zodat dit
geen obstakel voor het brood kan vormen.)
Er zat te weinig fruit in of de hoeveelheid suiker is te veel.
Plaats het bakblik in de gootsteen en vul het bakblik voor de helft met warm water. Laat het
bakblik weken totdat het bovenliggende mengsel of het kneedmes loslaat. Als het verbrande
gedeelte heeft geweekt, was het met een zachte spons etc. Denk aan het hete water.
Er is teveel fruit of suiker gebruikt.
Gebruik alleen de hoeveelheden fruit en suiker die staan omschreven in de recepten op
pag. 93.
Het fruit is niet rijp of overrijp.
Er zit te weinig suiker in.
De kooktijd was ontoereikend.
Er is fruit met laag pectinegehalte gebruikt.
Gebruik de dunne jam als saus voor de desserts.
Laat de jam helemaal afkoelen. De jam blijft indikken tijdens het afkoelen.
U kunt het gebruiken.
98
99
Page 51

Problemen oplossen
Raadpleeg dit gedeelte alvorens de technische dienst te bellen.
Consignes de sécurité
Veuillez vous assurer de suivre ces instructions.
Probleem
Welke soorten suiker kunnen we
gebruiken op jam?
Kunnen we bij het maken van
jam fruit gebruiken die in alcohol
is gedompeld?
Het fruit is in elkaar gezakt bij
het maken van fruit in siroop.
Droge gist valt niet in het
bakblik.
Op het display wordt
weergegeven.
Op het display wordt 01
weergegeven
H01–H02 verschijnt op het
display.
Op het display wordt U50
weergegeven.
Oorzaak Actie
Witte basterdsuiker en kristalsuiker.
Gebruik geen bruine suiker, dieetsuiker of kunstmatige zoetstoffen.
Gebruik deze niet. De kwaliteit is niet goed.
De kooktijd was te lang. Het fruit is mogelijk overrijp.
De timing van het activeren van de gistdispenser verschilt, afhankelijk van het programmamenu
en de kamertemperatuur.
De gistdispenser is nat of er sprake van statische elektriciteit.
Afvegen met een vochtige doek en gewoon laten opdrogen.
Droge gist is vochtig.
Gebruik nieuwe droge gist.
Er is gedurende ca. 10 minuten een stroomstoring geweest (de stekker is per ongeluk uit het
stopcontact getrokken of de stroomonderbreker is in werking getreden) of er is een ander
probleem met de stroomtoevoer.
De machine blijft gewoon werken als het probleem met de stroomtoevoer tijdelijk is. De
Broodbakoven werkt weer als de stroomtoevoer binnen 10 minuten wordt hersteld maar het
eindresultaat kan tegenvallen.
Er is gedurende enige tijd een stroomstoring geweest (varieert afhankelijk van de
omstandigheden - bijv. storing van de stroomtoevoer, stekker verwijderd, mankerende stop of
stroomonderbreker).
Neem het deeg uit de machine en begin opnieuw met nieuwe ingrediënten.
Het display geeft aan dat er een probleem is met de Broodbakoven.
Raadpleeg de zaak waar u de Broodbakoven hebt gekocht of een servicedienst van
Panasonic.
De machine is heet (meer dan 40°C/105°F). Dit kan gebeuren als de machine meerdere malen
achter elkaar wordt gebruikt.
Laat de machine afkoelen tot minder dan 40°C/105°F voordat u de machine opnieuw gaat
gebruiken (U50 verdwijnt).
Afin d’empêcher des dommages matériels, des accidents ou des dommages à l’utilisateur ou d’autres personnes,
veuillez suivre les instructions ci-dessous.
Les diagrammes suivants indiquent le degré de dommages provoqué par une
utilisation incorrecte.
Avertissement:
blessures ou la mort.
Indique de sérieuses
Attention:
Indique un risque de blessure
ou de dommages matériels.
Les symboles sont classifiés et expliqués comme suit.
Ce symbole indique une interdiction.
Ce symbole indique les conditions préalables à
suivre.
Avertissement
N’utilisez pas l’appareil si le cordon d’alimentation ou la prise d’alimentation est
endommagé ou si la prise d’alimentation n’est pas reliée solidement à la prise de
courant.
(Cela peut causer une décharge électrique, ou un incendie dû à un court-circuit.)
Si le cordon d’alimentation est abîmé, il doit être remplacé par le fabricant, son réparateur agréé ou une
personne qualifiée de façon à éviter tout danger.
N’endommagez pas le cordon d’alimentation ou la prise d’alimentation.
(Cela peut causer une décharge électrique, ou un incendie dû à un court-circuit.)
Les actions suivantes sont strictement interdites. (Modifier, placer près d’éléments chauffant, plier, tordre, tirer,
poser des objets lourds dessus, et mettre en boule la corde.)
Ne pas brancher ou débranchez le cordon d’alimentation avec les mains mouillées.
(Cela peut causer une décharge électrique.)
Ne dépassez pas la tension sur la prise et n’utilisez pas de courant alternatif autre
qu’énuméré sur l’appareil.
(Cela peut causer une décharge électrique ou un incendie.)
●
Assurez-vous que la tension fournie à l’appareil est identique à votre alimentation locale.
●
Brancher d’autres dispositifs à la même prise peut causer une surchauffe électrique.
Nederlands
Français
100
Insérez la prise d’alimentation fermement.
(Autrement cela peut causer une décharge électrique et un incendie provoqués par la chaleur qui peut se
produire autour de la prise.)
Nettoyez régulièrement la prise d’alimentation.
(Une prise d’alimentation salie peut causer une isolation insuffisante due à l’humidité et à une accumulation de
fibres, pouvant entrainer un incendie.)
Débranchez la prise d’alimentation et essuyez-la avec un tissu sec.
101
Page 52

Consignes de sécurité
Veuillez vous assurer de suivre ces instructions.
Avertissement
Arrêter l’appareil immédiatement et débranchez-le dans le cas improbable que
l’appareil cesse de fonctionner correctement.
(Cela peut causer de la fumée, une décharge électrique, un incendie ou des brulures.)
p. ex. pour quelque chose d’anomal ou une panne
●
La prise d’alimentation et le cordon d’alimentation deviennent anormalement chauds.
●
Le cordon d’alimentation est endommagé ou panne de courant.
●
L’unité principale est déformée ou est anormalement chaude.
●
L’appareil fait un bruit de rotation anormal pendant son utilisation.
Débranchez l’appareil immédiatement et consultez le lieu où vous l’avez acheté ou un centre de service de Panasonic pour un
contrôle ou une réparation.
Ne touchez pas, ne bloquez pas ou ne couvrez pas les trous de passage de la
vapeur pendant l’utilisation.
(Cela peut causer une brulure.)
●
Faites tout particulièrement attention aux enfants.
Ne pas démonter, réparer ou modifier cet appareil.
(Cela peut causer un incendie, une décharge électrique ou des blessures.)
Consultez votre revendeur ou un centre d’assistance Panasonic.
N’immergez pas l’appareil dans l’eau ou ne l’éclaboussez pas avec de l’eau.
(Cela peut causer une décharge électrique, ou un allumer un incendie dû à un court-circuit.)
Attention
N’utilisez pas l’appareil aux endroits suivants.
●
Installez la machine à pain sur un plan de travail ferme, sec, propre, plat et
résistant à la chaleur, à au moins 10 cm (4 pouces) du bord du plan de travail.
(Cela peut faire glisser et tomber l’appareil du plan de travail.)
●
Ne pas placer la machine à pain sur une surface instable, sur un appareil
électrique comme un réfrigérateur, ou sur du tissu comme une nappe.
(Cela peut causer une chute ou un incendie.)
●
Pendant la cuisson, l’appareil devient chaud. L’appareil doit être placé à au moins
5 cm (2 pouces) des murs et autres objets.
(Cela peut causer une décoloration ou une déformation.)
Ne touchez pas de zones sensibles telles que le moule à pain, l’intérieur de l’unité,
l’élément chauffant ou l’intérieur du couvercle pendant que l’appareil est en service
ou après la cuisson.
La température des surfaces accessibles peut être élevée quand l’appareil fonctionne.
(Cela peut causer une brulure.)
Pour éviter toute brûlure, utilisez toujours des maniques ou des gants de protection pour enlever le moule à
pain et le pain cuit.
(N’utilisez pas de gants de cuisine humides)
Faites également attention en enlevant le pain fini ou le bras pétrisseur.
102
Cet appareil n’est pas prévu pour être utilisé par des personnes (y compris les
enfants) dont les capacités physiques, sensorielles ou mentales sont réduites, ou des
personnes dénuées d’expérience ou de connaissance, sauf si elles ont pu bénéficier,
par l’intermédiaire d’une personne responsable de leur sécurité, d’une surveillance
ou d’instructions préalables concernant l’utilisation de l’appareil.
Il convient de surveiller les enfants pour s’assurer qu’ils ne jouent pas avec l’appareil.
(Cela peut causer une brulure, une blessure ou une décharge électrique.)
Attention
Assurez-vous de tenir la prise d’alimentation en la débranchant.
(Autrement cela peut causer une décharge électrique ou un incendie dû à un court-circuit.)
Débrancher la prise d’alimentation lorsque l’appareil ne fonctionne pas.
(Autrement cela peut causer une décharge électrique ou un incendie dû à une fuite électrique.)
Veuillez débrancher et laisser l’appareil refroidir avant de le nettoyer.
(Cela peut causer une brulure.)
Ne laissez pas le cordon d’alimentation pendre au-dessus du bord de la table ou
toucher une surface chaude.
(Cela peut causer une brulure ou une blessure.)
N’enlevez pas le moule à pain ou ne débranchez pas la machine à pain pendant
l’utilisation.
(Cela peut causer une brulure ou une blessure.)
Information importante
N’utilisez pas cet appareil en extérieur ou à proximité immédiate de sources de chaleur ou dans des
pièces présentant une humidité élevée.
(Cela peut causer un dysfonctionnement ou une déformation.)
N’utilisez pas de force excessive sur les pièces comme illustré sur la droite.
(Cela peut causer un dysfonctionnement ou une déformation.)
Cet appareil ne doit pas être utilisé avec un programmateur ou une télécommande séparée.
Informations relatives à l’évacuation des déchets, destinées aux utilisateurs d’appareils électriques et électroniques
(appareils ménagers domestiques)
Lorsque ce symbole figure sur les produits et/ou les documents qui les accompagnent, cela signifie que les appareils
électriques et électroniques ne doivent pas être jetés avec les ordures ménagères.
Pour que ces produits subissent un traitement, une récupération et un recyclage appropriés, envoyez-les dans les points de
collecte désignés, où ils peuvent être déposés gratuitement. Dans certains pays, il est possible de renvoyer les produits au
revendeur local en cas d’achat d’un produit équivalent.
En éliminant correctement ce produit, vous contribuerez à la conservation des ressources vitales et à la prévention des
éventuels effets négatifs sur l’environnement et la santé humaine qui pourraient survenir dans le cas contraire.
Afin de connaître le point de collecte le plus proche, veuillez contacter vos autorités locales.
Des sanctions peuvent être appliquées en cas d’élimination incorrecte de ces déchets, conformément à la législation nationale.
Utilisateurs professionnels de l’Union européenne
Pour en savoir plus sur l’élimination des appareils électriques et électroniques, contactez votre revendeur ou fournisseur.
Informations sur l’évacuation des déchets dans les pays ne faisant pas partie de l’Union européenne
Ce symbole n’est reconnu que dans l’Union européenne.
Pour vous débarrasser de ce produit, veuillez contacter les autorités locales ou votre revendeur afin de connaître la procédure d’élimination à
suivre.
Capteur de
température
Élément chauffant
Français
]
Intérieur du
couvercle
103
Page 53

Description de la machine à pain et des
Panneau de commande
accessoires
Unité principale
Distributeur de fruits secs et de graines
Les ingrédients placés dans le distributeur de fruits secs et de graines tomberont dans le moule à pain
automatiquement lors de la sélection d’un menu avec raisin sec (03, 06, 14, 17, 19 et 25).
Voir P. 112 les ingrédients pouvant être utilisés.
Couvercle du distributeur
Distributeur de levure
Couvercle
Message d’état de la machine
: affiché pour l’étape en cours du programme. Les ingrédients sont régulés sur l’étape
‘Rest’ (Repos) avant le pétrissage.
: s’affiche en cas de coupure de courant.
: affiché lors de l’ajout manuel d’ingrédients aux menus 11 et 23.
Temps restant avant la fin du programme
choisi
En outre, quand des ingrédients doivent être ajoutés
manuellement, l’affichage indique le moment auquel
le faire dans le programme.
Accessoires
Gobelet doseur
Il permet de doser les liquides
(maxi 310 mL)
Volet du distributeur
de fruits secs/graines
Bras pétrisseur
(pain de seigle)
Bras pétrisseur
(pain blanc ou complet)
Poignée
Moule à pain
Panneau de commande
Cuillère doseuse
Permet de mesurer le sucre, le sel, la
levure etc.
(15 mL) (5 mL)
Taille
Pressez ce bouton pour
choisir la taille. Voir P. 108
pour un menu disponible.
•
XL
•
L
•
M
Menu
Pressez ce bouton pour choisir le menu. Le numéro
de menu s’affichera et chaque fois que ce bouton
sera pressé, le numéro de menu passera au choix
suivant.
(Maintenez le bouton enfoncé pour avancer plus
rapidement)
Voir P. 108 et 109 pour les numéros de menus.
Croûte
Pressez ce bouton
pour choisir la couleur
de la croûte.
Voir P. 108 pour un
menu disponible.
•
Dark (Sombre)
•
Medium (Moyen)
•
Light (Clair)
Départ différé
Réglez le départ différé (temps
jusqu’à ce que le pain soit prêt) ou
réglez le temps de cuisson pour
les menus 15, 26 et 27.
‘▲’ Pressez ce bouton pour
augmenter le temps.
‘▼’ Pressez ce bouton pour
diminuer le temps.
Marche
Pressez ce bouton pour
démarrer le programme.
Français
Arrêt
Pressez ce bouton pour annuler/
arrêter le programme.
(Pour annuler/arrêter, maintenir
enfoncé pendant plus de
1 seconde.)
104
•
Graduations de 10 mL
Cuillère à soupe
• Marque
1⁄2
Cuillère à café
•
Marques
1
⁄4, 1⁄2, 3⁄4
Prise
Cette image montre tous les mots et les symboles, mais pendant le fonctionnement, seules les indications utiles à ce moment-là s’affichent.
105
Page 54

Ingrédients pour la fabrication du pain
Farine
Ingrédient principal du pain, elle contient du gluten (qui contribue à
faire lever le pain, et lui donne une texture élastique)
Utilisez de la farine de blé dur. N’utilisez pas
de farine de blé tendre.
La farine doit être pesée avec une balance.
La farine boulangère est moulue à partir de
blé dur à forte teneur en protéines, qui sont
nécessaires au développement du gluten.
Le gaz carbonique produit pendant la
fermentation est piégé dans le
réseau élastique du gluten; c’est
ce qui fait lever la pâte.
Farine blanche
Obtenue par mouture des
grains de blé, après
séparation du son et des
germes. Le meilleur type de
farine pour la fabrication du pain
est la farine portant l’indication
‘farine à pain’ (type 55 à 110).
N’utilisez pas de farine à pâtisserie ou à gâteau en
remplacement de la farine à pain.
Farine complète
Type 110 à 150, appelée complète ou intégrale,
obtenue par mouture des grains de blé entier, avec
le son et les germes. Elle donne un pain très bon pour la santé.
Ce pain est moins volumineux et plus lourd que le pain à base de
farine blanche.
Farine de seigle
Obtenue par mouture de grains de seigle.
Elle contient plus de fer, de magnésium et de potassium, éléments
nécessaires à la santé, que la farine blanche. Mais elle contient
peu de gluten.
Elle donne un pain dense et lourd. N’utilisez pas une quantité
supérieure à la quantité indiquée (cela pourrait surcharger le
moteur).
Laitages
Ils permettent d’améliorer le goût et la valeur
nutritionnelle.
Si vous utilisez du lait au lieu de l’eau, la valeur
nutritionnelle du pain en sera améliorée, mais dans ce
cas-là il ne faut pas utiliser la cuisson temporisée car la
pâte pourrait tourner pendant la nuit.
Réduisez la quantité d’eau proportionnellement à la
quantité de lait.
Eau
Utilisez de l’eau normale du robinet.
Utilisez de l’eau tiède lors de l’utilisation des menus 02, 05, 07,
12 ou 20 dans une pièce froide.
Utilisez de l’eau fraîche lors de l’utilisation des menus 07, 08, 11,
13, 14, 20, 21, 23, 24 ou 25 dans une pièce chaude.
Dosez toujours les liquides au moyen du gobelet doseur fourni.
Sel
Il améliore le goût et renforce l’action du gluten,
favorisant la levée du pain.
Le pain pourrait perdre de son volume/goût si le dosage
est incorrect.
Utilisation de préparation pour
pain (aussi appelées Mix)
Préparations pour pain contenant de la levure
Placez la préparation dans le moule à pain, puis
Caines préparations, la quantité de levure contenue
Préparations pour pain avec sachet de levure
Placez d’abord la préparation de pain dans le moule à
Matière grasse
Elle ajoute du goût et du moelleux au pain.
L’utilisation de beurre ou de margarine est conseillée.
Mais vous pouvez aussi dans certaines recettes utiliser de
l’huile d’olive ou de noix.
(sucre blanc, roux, miel, sirop d’érable,
Sucre
mélasse etc.)
Nourrit la levure, il adoucit et ajoute du goût au
pain, il modifie la couleur de la croûte.
Réduisez la quantité de sucre si vous utilisez d’autres
fruits, qui contiennent du fructose.
Cuisson de la brioche à partir d’une préparation
Vous pouvez améliorer le goût de votre pain en
ajoutant d’autres ingrédients:
Œufs
Son
Germes de blé
Epices
ajoutez l’eau. (Suivez les instructions figurant sur
l’emballage en ce qui concerne la quantité d’eau)
Choisissez le menu 02, choisissez une taille selon le
volume du mélange, et commencez la cuisson au four.
•
600 g – XL • 500 g – L
n’est pas claire, quelques essais peuvent être
nécessaires pour optimiser le résultat.
séparé
pain, puis l’eau.
Placez ensuite la levure mesurée dans le distributeur
de levure.
Réglez l’appareil selon le type de farine de la
préparation, puis lancez la cuisson.
•
Farine blanche, farine bise menu 01
•
Farine complète, farine multicéréales menu 04
•
Farine de seigle menu 07
pour brioche
Sélectionnez le menu 11 ou 02 ‘Medium’ (Moyen) taille
‘Light’ (Clair) couleur de croûte. (P. 131)
Ils permettent d’améliorer la valeur
nutritionnelle et la couleur du pain.
(La quantité d’eau doit être réduite en
proportion)
Quand vous ajoutez des œufs, battez-les
préalablement.
Il permet d’augmenter la teneur en fibres
du pain.
•
N’ajoutez pas plus de 75 mL (5 c. à s.).
Ils donnent au pain un goût de noisette.
•
N’utilisez pas plus de 60 mL (4 c. à s.)
Elles renforcent le goût du pain.
•
En petite quantité (1 à 2 c. à c.)
Français
Farine d’épeautre
Appartient à la famille du blé mais est une espèce complètement différente génétiquement.
Bien qu’il contienne du gluten certaines personnes intolérantes au gluten peuvent le digérer. (Consultez votre docteur.)
Fait des pains avec une croûte plate/légèrement creuse.
Le pain de farine grain entier d’épeautre aura une petite taille et dense comparé au pain de farine blanche d’épeautre.
Nous recommandons d’utiliser la farine blanche d’épeautre pour plus de la moitié de toute la farine.
Il y a l’épeautre (Triticum spelta) approprié pour la cuisson au four du pain et l’engrain (Triticum monococcum : également appelé petit
épeautre) qui est inapproprié pour la cuisson au four du pain, sont vendus comme épeautre. Veuillez utiliser de l’épeautre. (utilisez les menus
13, 14, 24 ou 25)
106
Levure sèche
Elle permet de faire lever le pain.
Veillez à utiliser de la levure sèche ne nécessitant pas de pré-fermentation (n’utilisez pas de levure fraîche ou de
levure sèche devant fermenter avant l’utilisation)
Nous vous conseillons d’utiliser de la levure portant l’indication ‘levure instantanée’ ou ‘Superactive’ ou ‘Express’ sur
l’emballage.
Si vous utilisez de la levure en sachet, veillez à bien refermer le sachet immédiatement après l’utilisation et à ne le
conserver que 2 à 3 jours. (Respectez la date de péremption)
Vous pouvez aussi utiliser du levain fermentescible en vente dans les magasins bio.
107
Page 55

Liste des types de pains et des options de cuisson
Options disponibles et durées correspondantes
•La durée des programmes varie selon la température ambiante.
Numéro
de menu
Menu
01 Basic
02 Basic Rapid
03 Basic Raisin
04 Whole wheat
Whole wheat
05
Rapid
Whole wheat
06
Raisin
07 Rye
08 French
Cuisson
09 Italian
10 Sandwich
11 Brioche
12 Gluten Free
13 Speciality
Speciality
14
Raisin
15 Bake only
Options Processus
Départ
différé
Repos Pétrissage Levee Cuisson Total
30 min–
60 min
——
1
1
2
30 min–
60 min
1 hr–
1 hr 40 min
15 min–
25 min
1 hr–
1 hr 40 min
45 min–
60 min
40 min–
2 hr 5 min
30 min–
1 hr
1 hr–
1 hr 40 min
30 min
—
——
30 min–
1 hr 15 min
30 min–
1 hr 15 min
1 hr 50 min–
3
15–30 min
15–20 min
15–30 min
15–25 min
15–25 min
15–25 min
env. 10 min
10–20 min
10–15 min
15–25 min
25–45 min
15–20 min 40 - 45 min 50–55 min
15–30 min
15–30 min
2 hr 20 min
env. 1 heure
1 hr 50 min–
3
2 hr 20 min
2 hr 10 min–
3
2 hr 50 min
1 hr 30 min–
3
1 hr 40 min
2 hr 10 min–
3
2 hr 50 min
1 hr 20 min–
1 hr 35 min
2 hr 45 min–
4 hr 10 min
2 hr 25 min–
3 hr
2 hr 10 min–
3
2 hr 50 min
3
1 hr 25 min 50 min 3 hr 30 min
1 hr 50 min–
3
2 hr 45 min
1 hr 50 min–
3
2 hr 45 min
Taille Croûte
—
——
—
——
——
——
——
—
—
—
—
——— — — —
50–55 min
35–40 min
50 min 4 heures
50 min 5 heures
45 min 3 heures
50 min 5 heures
1 heure 3 hr 30 min
55 min 6 heures
50 min 4 hr 30 min
50 min 5 heures
55 min 4 hr 30 min
55 min 4 hr 30 min
30 min–
1 hr 30 min
4 hr–
4 hr 5 min
1 hr 55 min–
2 heures
1 hr 50 min–
1 hr 55 min
30 min–
1 hr 30 min
Numéro
de menu
Menu
16 Basic
17 Basic Raisin
18 Whole wheat
Whole wheat
19
Raisin
20 Rye
21 French
Pâtes
22 Pizza
23 Brioche
24 Speciality
Speciality
25
Raisin
26 Jam
27 Compote
Options Processus
Taille Croûte
———
———
———
———
———
———
——
———
———
———
Départ
différé
Repos Pétrissage Levee Cuisson Total
30 min–
50 min
30 min–
50 min
55 min–
1 hr 25 min
55 min–
1 hr 25 min
45 min–
60 min
40 min–
1 hr 45 min
(Pétrissage)
10–18 min
30 min
30 min–
1 hr 5 min
30 min–
1 hr 5 min
15–30 min
15–30 min
15–25 min
15–25 min
env. 10 min
10–20 min
(Levee)
7–15 min
25–45 min
15–30 min
15–30 min
1 hr 10 min–
3
1 hr 30 min
1 hr 10 min–
3
1 hr 30 min
1 hr 30 min–
3
2 hr
1 hr 30 min–
3
2 hr
——
1 hr 35 min–
2 hr 40 min
(Pétrissage)
env. 10 min
3
35 min
1 hr 10 min–
3
1 hr 55 min
1 hr 10 min–
3
1 hr 55 min
—
—
—
—
—
(Levee)
env. 10 min
—
—
—
——— — — — —
——— — — — —
2 hr 20 min
2 hr 20 min
3 hr 15 min
3 hr 15 min
2 heures
3 hr 35 min
45 min
1 hr 50 min
2 hr 45 min
2 hr 45 min
1 hr 30 min–
2 hr 30 min
1 hr–
1 hr 40 min
Français
Seules les options ‘Light’ (Clair) ou ‘Medium’ (Moyen) sont disponibles. Seules les options
Il y a une période de levée au cours de la période de pétrissage.
• La machine à pain fonctionnera pendant un court moment au cours de la période de levée (pour assurer le développement optimal de gluten).
‘Medium’ (Moyen)
ou ‘Dark’ (Sombre) sont disponibles.
108
109
Page 56

Cuisson du pain
Reportez-vous
P. 119 –120 pour les
recettes de pain
Placez les ingrédients dans le moule à pain
Bras pétrisseur Distributeur de levure
Sortez le moule à pain et
1
installer le bras pétrisseur
Faites pivoter le moule à
pain.
Enlevez le moule.
Versez les ingrédients dosés
dans le moule à pain
2
Placez les ingrédients secs
excepté la levure en poudre.
(farine, sucre, sel etc.)
• La farine doit être pesée avec
une balance.
Sélectionnez le programme et démarrez
Choisissez un menu de cuisson
(L’affichage montre quand le menu ‘01’ est choisi.)
5
Enlevez le pain
Eteignez l’appareil
quand le pain est prêt
7
[la machine fait bip-bip 8 fois et la barre sur
‘End’ (Fin) clignote.]
Placez le bras
pétrisseur fermement
sur l’axe.
Contrôlez l’axe et
l’intérieur du bras pour
vous assurer qu’ils sont
bien propres. (P. 127)
•
Pour la cuisson de pain de seigle,
utilisez le bras pétrisseur spécial.
• Le bras pétrisseur n’est pas bloqué mais il doit toucher
le fond du moule.
Cuisson du pain avec ajout d’ingrédients (P. 112)
Veillez d’abord à
nettoyer et à essuyer
Ouvrez le couvercle du
distributeur.
Placez les ingrédients.
Fermez le couvercle.
Versez l’eau et les autres
liquides éventuels.
Essuyez l’humidité et la farine
résiduelles sur le pourtour du
moule.
Placez le moule à l’intérieur
de l’appareil en le tournant
légèrement de droite à gauche.
Abaissez la poignée.
Fermez le couvercle.
• N’ouvrez pas le couvercle
pendant la cuisson du pain
(la qualité du pain en serait
affectée).
Placez la levure en poudre dans le
3
distributeur de levure
Si le distributeur de levure est
humide, absorbez l’humidité avec
un tissu etc. (Ne frottez pas le
distributeur de levure, autrement la
levure ne tombera pas dans le moule
à pain à cause de la charge statique.)
Branchez l’appareil
4
dans une prise 230 V
Voir P. 108 pour le menu, la disponibilité de la taille et la croûte.
Modifier la taille
Modifier la couleur de la croûte
8
Régler le départ différé (facultatif)
par ex. Il est 21:00, et vous voulez que le pain soit prêt à 6:30 le
lendemain matin.
Réglez la durée sur ‘9:30’ (9 heures 30 minutes à compter de
maintenant).
12
9
Heure actuelle Heure pain prêt
•
Une pression sur le bouton rallonge la durée de 10 minutes (maintenez-
le enfoncé pour avancer plus vite)
3
6
à compter de maintenant
9h 30m
12
9
6
3
Pressez ‘Start’ (Marche)
6
Durée prévue avant la fin du programme sélectionné
Quand ‘Start’ (Marche) a été pressé au début, le menu 01 commence.
Gant de
protection
Moule à
pain
laissez refroidir, par exemple sur une grille
9
Si vous n’appuyez pas sur ‘Stop’ (Arrêt)
Enlevez le pain
immédiatement,
Français
Débranchez l’appareil
(en tirant sur la fiche)
après utilisation
et ne sortez pas le pain de l’appareil
pour le refroidir, la machine à pain
le gardera au chaud pour réduire la
condensation de vapeur dans la miche.
Cependant, la croûte deviendra de
plus en plus foncée. Une fois que
le pain est cuit, il convient donc de
débrancher l’appareil et de sortir le pain
immédiatement pour le refroidir.
Si vous laissez le pain refroidir dans le
moule, de la condensation se produira.
C’est pourquoi il est conseillé de laisser
la miche refroidir sur une grille pour
assurer un pain d’une qualité optimale.
110
111
Page 57

Ajout d’ingrédients en cours de pétrissage
Cuisson de la brioche
Ajouter des ingrédients supplémentaires au pain ou à la pâte
En choisissant un menu avec raisins secs (03, 06, 14, 17, 19 ou 25), vous pouvez mélanger vos ingrédients préférés dans la pâte pour faire
toutes sortes de pains aromatisés.
Placez les ingrédients
additionnels dans le distributeur
ou dans le moule à pain avant
de démarrer
Ingrédients secs,
ingrédients non solubles
Placez les ingrédients supplémentaires dans
le distributeur de fruits secs et de graines et
réglez la machine.
Fruits secs
Découpez en cubes d’environ 5 mm.
Les ingrédients enrobés de sucre risquent d’adhérer
au distributeur et ne pas tomber dans le moule.
Ingrédients aqueux ou collants,
ingrédients solubles*
Placez ces ingrédients avec les autres
dans le moule.
Fruits frais, fruits confits ou à l’eau de vie
Respectez les quantités indiquées dans
la recette, car la teneur en eau des
ingrédients affecte le pain.
1
Préparations
(P. 110)
farine à pain blanche à base de blé dur,
type 550
c. à c. de sel 1
c. à s. de sucre 4
c. à s. de lait écrémé (sèche) 2
beurre (coupé en cubes de 2 cm et
réfrigéré)
eau 180 mL
oeufs (battu) ; moyen 2 (100 g)
c. à c. de levure 1
beurre à ajouter plus tard (coupé en
cubes de 1-2 cm et réfrigéré)
42, 3
Coupez le beurre à ajouter ultérieurement en cubes de 1-2 cm et gardez-le au réfrigérateur.
Placez le bras pétrisseur dans le moule à pain.
Placez les ingrédients dans le moule à pain dans leur ordre d’apparition dans la recette.
Placez le moule à pain dans l’appareil et branchez la machine.
400 g
1
⁄2
50 g
1
⁄4
70 g
Sélectionnez le menu ‘11’
1
Pressez Marche
2
Le voyant ‘Start’ (Marche) s’allume.
Temps restant jusqu’à l’ajout du beurre ou d’autres ingrédients.
[Moyen simple de confectionner
une brioche]
Ajoutez le beurre avec d’autres
ingrédients au début.
Coupez le beurre en cubes de 2cm et placez-les
dans le moule à pain en même temps que les
autres ingrédients.
Suivez les étapes sur la gauche. Cependant,
quand la machine fait bip-bip à l’étape 3 pour
ajouter le beurre supplémentaire, veuillez laisser
tel quel.
le temps requis pour l’achèvement est de 3
heures 30 minutes.
* Quand du beurre est ajouté au début, la saveur, la
texture et la montée du pain sont un peu différentes
du temps où le pain est cuit au four avec du beurre
supplémentaire ajouté plus tard.
Un processus de ‘Rest’ (Repos) commencera
juste après le démarrage, suivi du
‘Knead’ (Pétrissage) et de la ‘Rise’ (Levée).
Français
Noisettes
Graines
Fines herbes
Lardons,
salami en dés
•
Reportez-vous aux recettes pour les quantités des divers ingrédients.
Broyez finement.
Les noix/noisettes ont tendance à couper le réseau
élastique formé par le gluten et produisent un pain
plus tassé. N’utilisez qu’en petite quantité.
Sachez que l’utilisation de graines longues et dures
(tournesol, courge) peuvent, à la longue, rayer le
revêtement du moule.
N’ajoutez pas plus d’une à deux cuillérées à
soupe. Pour les herbes fraîches, reportez-vous aux
instructions de la recette.
Il peut arriver que ces ingrédients adhèrent aux parois
du distributeur et ne tombent pas dans le moule.
112
Fromage, chocolat
* Ces ingrédients ne peuvent pas être placés dans le
distributeur de fruits secs/graines car ils risqueraient en
fondant d’adhérer aux parois du distributeur et de ne pas
tomber dans le moule.
Ajouter le beurre supplémentaire quand
3
le signal sonore retentit, puis appuyez de
nouveau sur le ‘Start’ (Marche)
Finissez de placer le beurre en cube supplémentaire pendant que ‘ ’ clignote.
Une fois le bouton
Start pressé
L’affichage indique le temps restant jusqu’à la fin du programme
Appuyez sur ‘Stop’ (Arrêt) et retirez le
4
pain
quand la machine fait bip-bip 8 fois et la barre sur ‘End’ (Fin) clignote
Le voyant ‘Start’ (Marche) clignotant s’éteint.
Si vous ajoutez des ingrédients supplémentaires,
comme des raisins secs, incorporez-les en même
temps que le beurre. (Utilisez 150 g d’ingrédients
maximum.)
Même sans presser le bouton Start, le pétrissage
continuera après 5 mn. Il ne continue pas à
pétrir immédiatement, même si le bouton Start
est pressé après avoir ajouté le beurre ou des
ingrédients.
N’ajoutez pas de beurre quand l’affichage indique
le temps restant. (P. 131)
113
Page 58

Préparation de pâtes
Faire de la pâte à brioche
1
Préparations
(P. 110)
Choisissez le menu pâte
(L’affichage montre quand le menu ‘16’ est choisi.)
1
Pressez Marche
Placez le bras pétrisseur dans le moule à pain.
Placez les ingrédients dans le moule à pain dans leur ordre d’apparition dans la recette.
Placez le moule à pain dans l’appareil et branchez la machine.
2
Durée prévue avant la fin du programme sélectionné
Le voyant ‘Start’ (Marche) s’allume.
Appuyez sur ‘Stop’ (Arrêt) et retirez le
3
pâton
quand la machine fait bip-bip 8 fois et la barre sur ‘End’ (Fin) clignote
Le voyant ‘Start’ (Marche) clignotant s’éteint.
Voir P. 121 pour les
recettes de pâtes
Pour annuler/arrêter
après le démarrage
(maintenez enfoncé plus
de 1 seconde)
32
Le départ différé n’est pas disponible avec les
menus Pâte. (sauf menu 22)
Si vous voulez ajouter des ingrédients
supplémentaires à votre pâte, voir P. 112.
Pour les menus autres que 22, 26 et 27 un
processus de ‘Rest’ (Repos) commencera juste
après le démarrage, suivi du ‘Knead’ (Pétrissage)
et de la ‘Rise’ (Levée).
Donnez forme à la pâte terminée et laissez-la
lever une deuxième fois selon la recette, puis
cuisez-la au four.
1
Préparations
(P. 110)
Sélectionnez le menu
Coupez le beurre à ajouter ultérieurement en cubes de 1-2 cm et gardez-le au réfrigérateur.
Placez le bras pétrisseur dans le moule à pain.
Placez les ingrédients dans le moule à pain dans leur ordre d’apparition dans la recette.
Placez le moule à pain dans l’appareil et branchez la machine.
‘23’
1
Pressez Marche
2
Temps restant jusqu’a l’ajout du beurre ou d’autres ingredients.
Le voyant ‘Start’ (Marche) s’allume.
Ajouter le beurre supplémentaire quand
3
le signal sonore retentit, puis appuyez de
42, 3
nouveau sur le ‘Start’ (Marche)
Finissez de placer le beurre en cube supplémentaire pendant que ‘ ’ clignote.
Une fois le bouton
Start pressé
L’affichage indique le temps restant jusqu’à la fin du programme
Pour annuler/arrêter
après le démarrage
(maintenez enfoncé plus
de 1 seconde)
[Moyen simple de confectionner
de la pâte à brioche]
Ajoutez le beurre avec d’autres
ingrédients au début.
Coupez le beurre en cubes de 2cm et placez-les
dans le moule à pain en même temps que les
autres ingrédients.
Suivez les étapes sur la gauche. Cependant, quand
la machine fait bip-bip à l’étape 3 pour ajouter le
beurre supplémentaire, veuillez laisser tel quel.
le temps requis pour l’achèvement est de 1 heure
50 minutes.
* Quand du beurre est ajouté au début, la saveur, la
texture et la montée du pain sont un peu différentes
du temps où le pain est cuit au four avec du beurre
supplémentaire ajouté plus tard.
Un processus de ‘Rest’ (Repos) commencera
juste après le démarrage, suivi du
‘Knead’ (Pétrissage) et de la ‘Rise’ (Levée).
Si vous ajoutez des ingrédients supplémentaires,
comme des raisins secs, incorporez-les en même
temps que le beurre. (Utilisez 150 g d’ingrédients
maximum.)
Même sans presser le bouton Start, le pétrissage
continuera après 5 mn. Il ne continue pas à
pétrir immédiatement, même si le bouton Start
est pressé après avoir ajouté le beurre ou des
ingrédients.
N’ajoutez pas de beurre quand l’affichage indique
le temps restant. (P. 131)
Voir P. 121 pour les
recettes de pâtes
Français
114
Appuyez sur ‘Stop’ (Arrêt) et retirez le
4
pâton
quand la machine fait bip-bip 8 fois et la barre sur ‘End’ (Fin) clignote
Le voyant ‘Start’ (Marche) clignotant s’éteint.
Donnez forme à la pâte terminée et laissez-la
lever une deuxième fois selon la recette, puis
cuisez-la au four.
115
Page 59

Cuisson de gâteaux
Faire de la confiture
1
Préparations
Préparez les ingrédients selon la recette.
Graissez généreusement le moule avant d’y verser les ingrédients mélangés du gâteau.
Vous pouvez aussi chemiser le moule de papier sulfurisé (papier cuisson).
Placez le moule à pain dans l’appareil et branchez la machine.
2
Sélectionnez le menu
‘15’
3
1
Affichez le temps de cuisson
2
Pressez Marche
3
Durée prévue avant la fin du programme sélectionné
Le voyant ‘Start’ (Marche) s’allume.
Pressez ‘Stop’ (Arrêt) quand la machine fait bip-bip et la barre sur
4
clignote,
enlevez le moule à pain
vérifiez que la cuisson est finie et
Le voyant ‘Start’ (Marche) clignotant s’éteint.
Si la cuisson n’est pas terminée Répétez les étapes 1 à 3
(Il est possible d’ajouter jusqu’à deux périodes de cuisson supplémentaires.
Chaque période doit faire moins de 50 minutes. Le depart differe
recommencera a partir d’une minute quand l’unite sera chaude. Augmentez
la duree en pressant le bouton de depart differe au besoin.)
4
‘End’ (Fin)
Voir P. 121 pour les
recette de gâteaux
Pour annuler/arrêter
après le démarrage
(maintenir enfoncé
pendant plus de
1 seconde)
•
Enlevez le bras pétrisseur
•
Vous pouvez chemiser le moule
de papier cuisson pour réduire
le risque de brûlure des côtés du
gâteau
Le départ différé n’est pas disponible avec le
menu 15.
(Le bouton du départ différé règle seulement le
temps de cuisson au four.)
Attention!
Risque de brûlure!
Pour contrôler si la cuisson est terminée, plongez
la lame d’un couteau au milieu du gâteau – il est
prêt si la lame est sèche quand vous l’enlevez.
1
Préparations
Préparez les ingrédients selon la recette.
Placez le bras pétrisseur dans le moule à pain.
Placez les ingrédients dans le moule à pain dans l’ordre suivant :
moitié des fruits → moitié du sucre →restants des fruits → restant du sucre.
Placez le moule à pain dans l’appareil et branchez la machine.
2
Sélectionnez le menu
‘26’
3
1
Réglez le temps de cuisson
2
Pressez Marche
3
Durée prévue avant la fin du programme sélectionné
Le voyant ‘Start’ (Marche) s’allume.
Pressez ‘Stop’ (Arrêt) et enlevez la
4
confiture
quand la machine fait bip-bip 8 fois et la barre sur ‘End’ (Fin) clignote
Le voyant ‘Start’ (Marche) clignotant s’éteint.
Si la cuisson n’est pas finie Répétez les étapes 1 à 3
(Il est possible d’ajouter jusqu’à deux périodes de cuisson supplémentaires.
Chaque période doit durer entre 10 et 40 minutes. Le départ différé
recommencera à partir d’une minute quand l’unité sera chaude. Augmentez
la durée en pressant le bouton de départ différé au besoin.)
4
Voir P. 125 pour les
recettes de
confiture
Pour annuler/arrêter
après le démarrage
(maintenez enfoncé plus
de 1 seconde)
Le départ différé n’est pas disponible avec le
menu 26. (Le bouton du départ différé règle
seulement le temps de cuisson.)
Il est nécessaire d’avoir une quantité appropriée
de sucre, d’acide et de pectine pour faire une
confiture bien prise.
Les fruits dotés d’un niveau élevé de pectine
prennent facilement. Les fruits dotés de moins de
pectine ne prennent pas bien.
Utilisez des fruits fraîchement à maturité. Les fruits
trop mûrs ou pas assez ne prennent pas fermement.
Les recettes dans ce livre font des confitures
douces et bien prises. Cela est dû à des niveaux
de sucre moins élevés.
Suivez la recette au niveau des quantités pour
chaque ingrédient.
•
N’augmentez pas ou ne diminuez pas les
quantités de fruits. Cela pourrait faire déborder
la confiture ou la brûler.
•
N’augmentez pas la quantité de sucre de plus la
moitié de la quantité de fruits.
Cela pourrait faire déborder ou brûler
La confiture ne prend pas bien avec une
quantité de sucre moindre.
*
Quand l’acidité du fruit est forte, vous pouvez
diminuer les quantités du jus de citron mais si elles
sont trop diminuées, la confiture ne prend pas bien.
Quand le temps de cuisson est court, des
morceaux de fruit peuvent demeurer partiellement
et la confiture peut devenir trop liquide.
•
La confiture va continuer à prendre en
refroidissant. Attention de ne pas trop la cuire.
Mettez la confiture cuite dans le récipient dès que
possible. Veuillez faire attention de ne pas vous
brûlez quand vous sortez la confiture.
La confiture peut brûler si elle est laissée dans le
moule à pain.
Stockez la confiture dans un endroit frais et sombre.
En raison des niveaux de sucre moins élevés, la
durée de conservation n’est pas aussi longue que
celle des variétés disponibles en magasin. Une fois
ouverte, placez-la au réfrigérateur et consommez-la
peu de temps après l’ouverture.
Français
116
117
Page 60

Faire de la compote
Recettes de pain
1
Préparations
2
Préparez les ingrédients selon la recette. (Enlevez le bras pétrisseur.)
Placez les ingrédients dans le moule à pain dans l’ordre suivant :
3
fruits → sucre → liquide.
Placez le moule à pain dans l’appareil et branchez la machine.
Sélectionnez le menu ‘27’
1
Réglez le temps de cuisson
2
Pressez Marche
3
Durée prévue avant la fin du programme sélectionné
Le voyant ‘Start’ (Marche) s’allume.
Pressez ‘Stop’ (Arrêt) et enlevez la
4
compote
quand la machine fait bip-bip 8 fois et la barre sur ‘End’ (Fin) clignote
Le voyant ‘Start’ (Marche) clignotant s’éteint.
Si la cuisson n’est pas finie Répétez les étapes 1 à 3
(Il est possible d’ajouter jusqu’à deux périodes de cuisson supplémentaires.
Chaque période doit durer entre 10 et 40 minutes. Le départ différé
recommencera à partir d’une minute quand l’unité sera chaude. Augmentez
la durée en pressant le bouton de départ différé au besoin.)
4
Voir P. 126 pour les
recettes de
compotes
Pour annuler/arrêter
après le démarrage
(maintenez enfoncé plus
de 1 seconde)
Le départ différé n’est pas disponible avec le
menu 27. (Le bouton du départ différé règle
seulement le temps de cuisson.)
Suivez la recette au niveau des quantités pour
chaque ingrédient.
•
N’augmentez pas ou ne diminuez pas les
quantités de fruits. Cela pourrait faire déborder
la compote ou la brûler.
PAIN BLANC
Sélectionnez le menu ‘01’ ou ‘02’
farine à pain blanche à base de blé dur, type
550 (ou farine type 55, 65, 70, 80 ou 110)
c. à c. de sel 1
c. à s. de sucre 1 11⁄2 2
beurre 20 g 30 g 40 g
eau 280 mL 350 mL 420 mL
c. à c. de levure
(c. à c. pour BAKE RAPID)
MLXL
400 g 500 g 600 g
1
⁄2 11⁄2 2
1
(2)
1
(2)
1
⁄2
1
(21⁄2)
PAIN COMPLET
Sélectionnez le menu ‘04’ ou ‘05’
farine à pain intégrale à base de blé dur
(ou farine type 130 ou 150)
c. à c. de sel 1
c. à s. de sucre 1 1
beurre 20 g 30 g 40 g
eau 280 mL 350 mL 420 mL
c. à c. de levure
(c. à c. pour BAKE RAPID)
MLXL
400 g 500 g 600 g
1
⁄2 11⁄2 2
1
(11⁄2)
1
⁄2 2
1
(11⁄2)
11⁄4
(2)
PAIN COMPLET AUX RAISINS
Sélectionnez le menu ‘06’
farine à pain intégrale à base de blé dur
(ou farine type 130 ou 150)
c. à c. de sel 1
c. à s. de sucre 1 11⁄2 2
beurre 20 g 30 g 40 g
eau 280 mL 350 mL 420 mL
c. à c. de levure 1 1 1
à placer dans le distributeur de fruits
secs/graines:
raisins secs
MLXL
400 g 500 g 600 g
1
⁄2 11⁄2 2
1
80 g
100 g
⁄4
120 g
PAIN PISTOLET
Sélectionnez le menu ‘08’
farine à pain blanche à base de blé dur,
type 550 (ou type 55)
c. à c. de sel 1
beurre 20 g
eau 220 mL
c. à c. de levure
300 g
3
⁄4
PANETTONE
Sélectionnez le menu ‘11’
farine à pain blanche à base de blé dur, type
550 (ou farine type 55, 65, 70, 80 ou 110)
c. à s. de sucre 4
c. à c. de sel 1
beurre (coupé en cubes de 2 cm et
réfrigéré)
oeufs (battu) ; moyen 2 (100 g)
lait 200 mL
c. à c. de levure 1
beurre supplémentaire
(coupe en cubes de 1 a 2 cm
et refrigere)
orange épluchée, finement hachée* 50 g
rhum saltana brun* 50 g
raisin noir de corinthe* 50 g
400 g
1
⁄2
50 g
1
⁄2
70 g
PAIN AUX RAISINS
Sélectionnez le menu ‘03’
MLXL
farine à pain blanche à base de blé dur,
type 550 (ou farine type 55, 65, 70, 80
ou 110)
c. à c. de sel 1
c. à s. de sucre 1 1
beurre 20 g 30 g 40 g
eau 280 mL 350 mL 420 mL
c. à c. de levure 1 1 1
à placer dans le distributeur de fruits
secs/graines:
raisins secs
400 g 500 g 600 g
1
⁄2 11⁄2 2
80 g
1
⁄2 2
100 g
1
⁄2
120 g
PAIN ITALIEN
Sélectionnez le menu ‘09’
farine à pain blanche à base de blé dur,
type 550 (ou type 55)
c. à c. de sel 1
c. à s. de huile d’olive 11⁄2
eau 260 mL
c. à c. de levure 1
400 g
1
⁄2
PAIN SANDWICH
Sélectionnez le menu ‘10’
farine à pain blanche à base de blé dur,
type 550 (ou type 55)
c. à s. de sucre 2
beurre 30 g
eau 250 mL
c. à c. de levure 1
380 g
PAIN SANS GLUTEN
Sélectionnez le menu ‘12’
eau 430 mL
c. à s. de huile 1
préparation pour pain sans gluten 500 g
c. à c. de levure 2
BRIOCHE BASIQUE
Sélectionnez le menu ‘11’
farine à pain blanche à base de blé dur,
type 550 (ou farine type 55, 65, 70, 80
ou 110)
c. à s. de sucre 4
c. à s. de lait en poudre 2
c. à c. de sel 1
beurre (coupé en cubes de 2 cm et
réfrigéré)
oeufs (battu) ; moyen 2 (100 g)
eau 180 mL
c. à c. de levure 1
beurre supplémentaire
(coupé en cubes de 1 à 2 cm et réfrigéré)
400 g
50 g
1
⁄4
70 g
Français
118 119
* : ajouté avec du beurre supplémentaire
Page 61

Recettes de pain
Recettes de pâtes
PAIN BLANC D’ÉPEAUTRE
Sélectionnez le menu ‘13’
MLXL
farine blanche
d’épeautre
c. à c. de sucre 1
c. à c. de sel 1
beurre 5 g 10 g 10 g
eau 260 mL 340 mL 400 mL
c. à c. de levure 1 1
400 g 500 g 600 g
1
⁄2 22
1
⁄4 11⁄2 1
1
⁄4 11⁄2
3
⁄4
PAIN À L’ÉPEAUTRE ENTIER
Sélectionnez le menu ‘13’
MLXL
farine grain entier
d’épeautre
farine blanche
d’épeautre
c. à c. de sucre 1
c. à c. de sel 1
c. à s. de huile 2 3 3
eau 250 mL 320 mL 380 mL
c. à c. de levure 1 1
200 g 250 g 300 g
200 g 250 g 300 g
1
⁄2 22
1
⁄4 11⁄2 1
1
⁄4 11⁄2
3
⁄4
SEIGLE ET ÉPEAUTRE (pas de départ différé)
Sélectionnez le menu ‘13’
MLXL
farine blanche
d’épeautre
farine de seigle 125 g 150 g 175 g
c. à c. de sucre 1
c. à c. de sel 1
beurre 5 g 10 g 10 g
yaourt nature 120 g 150 g 180 g
eau 180 mL 230 mL 270 mL
c. à c. de levure 1 1
275 g 350 g 425 g
1
⁄2 22
1
⁄4 11⁄2 1
1
⁄4 11⁄2
3
⁄4
SARRASIN ÉGRAINÉ ET ÉPEAUTRE
Sélectionnez le menu ‘13’
MLXL
farine blanche
d’épeautre
farine de sarrasin 80 g 100 g 120 g
c. à c. de miel 1 1 1
c. à c. de sel 1
c. à s. de
graine de sésame
c. à s. de lin 11⁄2 2 2
c. à s. de
graine de pavot
c. à s. de huile 2 3 3
eau 250 mL 320 mL 380 mL
c. à c. de levure 1 1
320 g 400 g 480 g
1
1
⁄4 11⁄2 1
1
⁄2 22
1
1
⁄2 2 21⁄2
1
1
⁄4 11⁄2
⁄2
3
⁄4
1
⁄2
RIZ ET ÉPEAUTRE AVEC PIGNON ET OIGNON FRIT
Sélectionnez le menu ‘14’
MLXL
farine blanche
d’épeautre
farine de riz brun 80 g 100 g 120 g
c. à c. de sucre 1
c. à c. de sel 1
beurre 5 g 10 g 10 g
eau 260 mL 340 mL 400 mL
c. à c. de levure 1 1
placer dans le
distributeur de fruits
secs/graines:
pignon
c. à c. de oignon frit 3 4 5
320 g 400 g 480 g
1
⁄2 22
1
⁄4 11⁄2 1
1
⁄4 11⁄2
40 g
50 g
3
60 g
⁄4
CITRON ET ÉPEAUTRE GRAINE DE PAVOT
Sélectionnez le menu ‘13’
MLXL
farine blanche
d’épeautre
c. à c. de sucre 1
c. à c. de sel 1
beurre 5 g 10 g 10 g
zeste râpé de
citron
jus de citron 20 mL 20 mL 30 mL
c. à s. de
graine de pavot
eau 250 mL 330 mL 380 mL
c. à c. de levure 1 1
400 g 500 g 600 g
1
⁄2 22
1
⁄4 11⁄2 1
111
23 3
1
⁄4 11⁄2
3
⁄4
ÉPEAUTRE FRUITÉ
Sélectionnez le menu ‘14’
MLXL
farine blanche
d’épeautre
c. à c. de sucre 1
c. à c. de sel 1
beurre 5 g 10 g 10 g
c. à c. de
épices mélangées
eau 270 mL 350 mL 400 mL
c. à c. de levure 1 1
placer dans le
distributeur de fruits
secs/graines:
fruits secs mélangés
400 g 500 g 600 g
1
⁄2 22
1
⁄4 11⁄2 1
1
22
100 g
⁄2 3
1
⁄4 11⁄2
125 g
3
⁄4
150 g
PÂTE À PAIN STANDARD
Sélectionnez le menu ‘16’
farine à pain blanche à base de blé dur, type 550
(ou farine type 55, 65, 70, 80 ou 110)
c. à c. de sel 1
c. à s. de sucre 11⁄2
beurre 30 g
eau 310 mL
c. à c. de levure 1
500 g
1
⁄2
PÂTE À PAIN AUX RAISINS STANDARD
Sélectionnez le menu ‘17’
farine à pain blanche à base de blé dur, type 550
(ou type 55)
c. à c. de sel 1
c. à s. de sucre 11⁄2
beurre 30 g
eau 310 mL
c. à c. de levure 1
à placer dans le distributeur de fruits secs/graines:
raisins secs 100 g
500 g
1
⁄2
PATE PAIN CROUSTILLANT
Sélectionnez le menu ‘21’
farine à pain blanche à base de blé dur, type 550
(ou type 55)
c. à c. de sel 1
beurre 20 g
eau 180 mL
c. à c. de levure
300 g
3
⁄4
PÂTE À PAIN COMPLET OU INTÉGRAL
Sélectionnez le menu ‘18’
farine à pain intégrale à base de blé dur
(ou farine type 130 ou 150)
c. à c. de sel 2
c. à s. de sucre 1
beurre 30 g
eau 340 mL
c. à c. de levure 1
500 g
1
⁄2
1
⁄2
PÂTE À PAIN COMPLET AUX RAISINS
Sélectionnez le menu ‘19’
farine à pain intégrale à base de blé dur
(ou farine type 130 ou 150)
c. à c. de sel 2
c. à s. de sucre 1
beurre 30 g
eau 340 mL
c. à c. de levure 1
à placer dans le distributeur de fruits secs/graines:
raisins secs
500 g
1
⁄2
1
⁄2
100 g
Recette de gâteaux
GÂTEAU AUX CERISES ET À LA PÂTE D’AMANDES
Sélectionnez le menu ‘15’
sucre roux en poudre 50 g
beurre 175 g
oeufs 3
farine avec levure incorporée 225 g
cerises confites, hachées 100 g
pâte d’amandes, émiettée 75 g
lait 60 mL
amandes grillées, effilées 15 g
PÂTE A PIZZA
Sélectionnez le menu ‘22’
farine à pain blanche à base de blé dur,
type 550 (ou farine type 55, 65, 70, 80
ou 110)
c. à c. de sel 2
cuillères à soupe d’huile d’olive 4
eau 240 mL
c. à c. de levure 1
450 g
PÂTE DE BRIOCHE (PETIT PAIN DE BRIOCHE AVEC
COPEAUX DE CHOCOLAT)
; pour 12 rouleaux
Sélectionnez le menu ‘23’
farine à pain blanche à base de blé dur,
type 550 (ou farine type 55, 65, 70, 80
ou 110)
c. à s. de sucre 4
c. à c. de sel 1
beurre (coupé en cubes de 2 cm et
réfrigéré)
oeufs (battu) ; moyen 3 (150 g)
lait 90 mL
c. à s. de rhum (brun) 1
c. à c. de levure 1
beurre supplémentaire
(coupe en cubes de 1 a 2 cm
et refrigere)
copeaux de chocolat* 120 g
* Après avoir enlevé la pâte, saupoudrez de copeaux de chocolat et pliez le fond un
tiers vers le haut et un tiers vers le bas. Ensuite, pliez-le en deux.
400 g
70 g
1
⁄2
50 g
PETIT PAIN D’ÉPEAUTRE DE TABLE
; pour 8 rouleaux
Sélectionnez le menu ‘24’
farine blanche d’épeautre 500 g
c. à c. de sucre 1
c. à c. de sel 11⁄2
beurre 10 g
eau 310 mL
c. à c. de levure 1
1
⁄2
1
⁄4
Français
120 121
Page 62

Recettes sans gluten
La confection du pain sans gluten est très différente de la méthode normale de production du pain.
Si l’on doit confectionner du pain sans gluten pour des raisons de santé, il importe de consulter le médecin et de suivre les conseils ci-dessous.
• Ce programme est spécialement conçu pour certains mélanges sans gluten (appelés aussi Mix, mélanges panifiables), par conséquent, il est
déconseillé de vouloir élaborer et faire cuire avec ce programme son propre mélange sans gluten.
• Lorsqu’on choisit l’option ‘gluten free’ (sans gluten), les détails pour chaque recette doivent être suivis scrupuleusement. (Autrement, le pain
risque de ne pas être satisfaisant).
Il existe deux sortes de préparations exemptes de gluten, celles contenant de la farine de blé à ‘faible teneur en gluten’ et celles contenant
d’autres farines exemptes de gluten (farine de riz, de maïs, etc...).
Vous devez consulter votre médecin pour savoir ce qui vous convient le mieux si vous suivez un régime spécial et si vous utilisez ce
programme pour la cuisson du pain pour des raisons de santé.
• Les résultats dépendent du type de préparation. La plupart des fabricants de ces Mixes indiquent sur l’emballage le mode de préparation en
machine à Pain.
Il peut arriver que de la farine reste collée sur les parois du moule en fin de cuisson. Cela est dû à la texture particulière de la farine sans
gluten.
• Pour obtenir de meilleurs résultats, attendez que le pain soit froid avant de le couper en tranches.
• Le pain doit être gardé dans un endroit frais et sec et consommé dans les 2 jours qui suivent.
Si l’on ne peut le consommer dans cet intervalle de temps, on peut le conserver dans des sacs spéciaux convenablement dimensionnés puis
placés dans un congélateur.
Avertissement pour les utilisateurs utilisant ce programme pour des raisons de santé:
Quand vous utilisez le programme sans gluten, consultez au préalable votre docteur ou une association spécialisée et n’utilisez que
les ingrédients appropriés pour votre état de santé.
Panasonic décline toute responsabilité concernant les conséquences résultant d’ingrédients utilisés sans les conseils d’un
professionnel.
Il importe d’éviter la contamination croisée avec des farines contenant du gluten si le pain a un but diététique. Prendre un soin particulier pour
nettoyer le moule à pain, le bras pétrisseur ainsi que tous les ustensiles devant servir à cette fin.
Pour les clients en Belgique
Les recettes sans gluten ci-dessous ont été développées en utilisant des préparations pour pain sans gluten vendues dans le commerce
par AVEVE.
Elles sont disponibles chez les pharmaciens, les magasins de produits diététiques et dans certains hypermarchés.
Pour de plus amples informations sur les produits AVEVE, veuillez contacter 0800/0229210.
PAIN EXEMPT DE GLUTEN
Sélectionnez le menu ‘12’
eau 320 mL
c. à s. de huile 1
farine exempte de gluten 500 g
c. à c. de levure 2
REMARQUE
Ce programme ne permet pas de déterminer la taille du pain.
PAIN EXEMPT DE GLUTEN AVEC ŒUFS
Sélectionnez le menu ‘12’
eau 100 mL
lait 180 mL
œufs 2
c. à s. de huile 1
farine exempte de gluten 500 g
c. à c. de levure
2
AVEVE Recettes
[01 Basic (base)]
[02 Basic Rapid (Rapide de base)]
PAIN BLANC
Sélectionnez le menu ‘01’ ou ‘02’
cuillère à thé de sucre 1 2 2
de farine ‘Surfina’ (AVEVE) 400 g 500 g 600 g
d’eau 250 mL 320 mL 380 mL
cuillère à soupe de beurre 1 1 1
cuillère à thé de sel 1 11⁄2 2
cuillère à thé de levure sèche
(cuillère à thé pour RAPID option)
REMARQUE
Le pain est alors moins levé et moins aéré.
[04 Whole wheat (
blé complet
MLXL
1
⁄2
3
⁄4
(11⁄2)
1
(13⁄4)
11⁄4
(2)
)]
[05 Whole wheat Rapid
(
Rapide au blé complet
PAIN AU BLÉ ENTIERs
Sélectionnez le menu ‘04’ ou ‘05’
de farine intégrale fine (AVEVE) 300 g 400 g 450 g
de farine ‘Crousty Français’ (AVEVE) 100 g 100 g 150 g
cuillère à thé de sucre 1 2 2
cuillère à soupe de beurre 1 1 2
cuillère à thé de sel 1 1 2
d’eau 250 mL 320 mL 380 mL
cuillère à thé de levure sèche
(cuillère à thé pour BAKE RAPID option)
REMARQUES
Le pain est alors moins levé et moins aéré. Ce programme est plus adapté aux pains
demi-gris.
Toutes les recette ci-dessus utilisent la farine blanche. Si vous le souhaitez, vous
pouvez la remplacer par de la farine complète, mais le pain sera alors plus petit et
d’une structure plus ferme. Bien entendu, plus vous ajoutez de farine blanche, moins
vous devez employer d’eau (la farine complète absorbe davantage d’eau que la
farine blanche).
1
(11⁄2)
)]
MLXL
1
1
(13⁄4)
⁄4
1
(2)
1
⁄2
[08 French (Pain parisien)]
PAIN PISTOLET
Sélectionnez le menu ‘08’
de farine ‘Crousty Français’ (AVEVE) 400 g
d’eau 260 mL
cuillère à thé de sel 1
cuillère à soupe de beurre 1
cuillère à thé de levure sèche 1
REMARQUE
Ce programme ne permet pas de déterminer la taille ou la couleur de la croûte du
pain.
Cette recette vous donne un pain levé et très aéré, mais impossible à conserver.
[09 Italian (Italien)]
PAIN ITALIEN
Sélectionnez le menu ‘09’
de farine ‘Crousty Français’ (AVEVE) 400 g
d’eau 240 mL
cuillère à thé de sel 11⁄2
cuillère à soupe de huile d’olive 11⁄2
cuillère à thé de levure sèche3⁄4
REMARQUE
Ce programme ne permet pas de déterminer la taille ou la couleur de la croûte du
pain.
Cette recette vous donne un pain levé et très aéré, mais impossible à conserver.
[10 Sandwich]
SANDWICH ORDINAIRE
Sélectionnez le menu ‘10’
cuillère à thé de sucre 1
de farine ‘Surfina’ (AVEVE) 400 g
d’eau 250 mL
dcuillère à soupe de beurre 1
cuillère à thé de sel 1
cuillère à thé de levure sèche
REMARQUE
Ce programme ne permet pas de déterminer la taille ou la couleur de la croûte du
pain.
Cette recette vous donne un pain moelleux (relativement humide) avec une croûte
foncée, idéale pour faire des toasts.
* Ces recettes sont fondamentalement pour les clients résidant en
Belgique.
Pour plus de renseignements, contactez AVEVE au 0800/0229210.
Français
3
⁄4
122 123
Page 63

AVEVE Recettes
* Ces recettes sont fondamentalement pour les clients résidant en
Belgique.
Pour plus de renseignements, contactez AVEVE au 0800/0229210.
Recettes de confiture
[16 Basic (Base)]
PÂTE A TARTE (Pour 2 tartes)
Sélectionnez le menu ‘16’
de sucre 60 g
de farine patissière 500 g
de lait 100 mL
œufs 3
de beurre 100 g
cuillère à thé de sel 1
cuillère à thé de levure sèche 2
1
⁄2
[18 Whole wheat (blé complet)]
PÂTE AU BLÉ ENTIER
Sélectionnez le menu ‘18’
cuillère à soupe de sucre 1
de farine ‘Crousty Français’ (AVEVE) 250 g
de farine ‘Gris Fermier’ (AVEVE) 250 g
d’eau 280 mL
cuillère à thé de sel 1
cuillère à thé de levure sèche 2
Méthode
Diviser la pâte en boules d’environ 50 grammes. Les laisser ensuite lever sous un
linge. Cuire 15 à 20 minutes dans un four préchauffé à 220 degrés.
1
⁄2
[15 Bake only
Sélectionnez le menu 15. Un temps de cuisson de
30 minutes s’affiche.
Maintenez la touche ‘Timer’ enfoncée pour augmenter
le temps de cuisson jusqu’à 1 heure et 30 minutes, par
incrément de 1 minute.
GÂTEAU
Sélectionnez le menu ‘15’
œufs 3
cuillères à soupe de lait 3
de beurre ramolli 200 g
paquet ‘ANCO CAKE MIX’ 1
Méthode
Selectionnez le menu 15 et entrez 1 heure et 10 minutes sur le depart differe.
Lorsque le signal sonore retentit, retirer le moule du four à pain et le laisser refroidir.
Dès qu’il est refroidi, démouler le gâteau, puis le laisser refroidir sur une grille.
[22 Pizza]
PÂTE A PIZZA
Sélectionnez le menu ‘22’
de farine ‘Crousty Françcais’ (AVEVE) 500 g
d’eau 290 mL
cuillère à thé de sel 1
cuillère à soupe de beurre 1
cuillère à thé de levure sèche 2
Méthode
Etendre la pâte à pizza, puis déposer dans un moule à pizza et la piquer avec une
fourchette.
Enduire la pâte d’un coulis de tomate et la garnir selon votre goût. Cuire 20 à
25 minutes dans un four préchauffé à 220 degrés.
1
⁄2
(Mode cuisson uniquement)]
[26 Jam (confiture)]
CONFITURE DE FRAISES
Sélectionnez le menu ‘26’
fraises, finement hachées 600 g
de sucre 400 g
pectine en poudre 13 g
Placez la moitié du fruit dans le moule à pain, puis ajoutez la
moitié du sucre. Répétez l’opération avec le fruit et le sucre
1
restants.
Saupoudrez la pectine sur les ingrédients dans le moule à
pain
2
Sélectionnez le menu 26 et entrez 1 heure et 40 minutes sur
le départ différé.
3
CONFITURE DE MYRTILLES.
Sélectionnez le menu ‘26’
Myrtilles 700 g
de sucre 400 g
Placez la moitié du fruit dans le moule à pain, puis ajoutez la
moitié du sucre. Répétez l’opération avec le fruit et le sucre
1
restants.
Sélectionnez le menu 26 et entrez 1 heure et 50 minutes sur
le départ différé.
2
CONFITURE DE POMMES ET MÛRES
Sélectionnez le menu ‘26’
pommes, râpées ou finement hachées 300 g
mûres 400 g
de sucre 300 g
pectine en poudre 6 g
Placez la moitié du fruit dans le moule à pain, puis ajoutez la
moitié du sucre. Répétez l’opération avec le fruit et le sucre
1
restants.
Saupoudrez la pectine sur les ingrédients dans le moule à
pain
2
Sélectionnez le menu 26 et entrez 1 heure et 40 minutes sur
le départ différé.
3
PÊCHE MELBA
Sélectionnez le menu ‘26’
pêches, finement hachées 500 g
framboises 200 g
de sucre 300 g
pectine en poudre 8 g
Placez la moitié du fruit dans le moule à pain, puis ajoutez la
moitié du sucre. Répétez l’opération avec le fruit et le sucre
1
restants.
Saupoudrez la pectine sur les ingrédients dans le moule à
pain
2
Sélectionnez le menu 26 et entrez 1 heure et 40 minutes sur
le départ différé.
3
CONFITURE DE PRUNE
Sélectionnez le menu ‘26’
prunes, finement hachées 700 g
de sucre 350 g
pectine en poudre 6 g
Placez la moitié du fruit dans le moule à pain, puis ajoutez la
moitié du sucre. Répétez l’opération avec le fruit et le sucre
1
restants.
Saupoudrez la pectine sur les ingrédients dans le moule à
pain
2
Sélectionnez le menu 26 et entrez 1 heure et 40 minutes sur
le départ différé.
3
CONFITURE DE BAIES SURGELÉES
Sélectionnez le menu ‘26’
baies surgelées mélangées 700 g
de sucre 400 g
pectine en poudre 10 g
Placez la moitié du fruit dans le moule à pain, puis ajoutez la
moitié du sucre. Répétez l’opération avec le fruit et le sucre
1
restants.
Saupoudrez la pectine sur les ingrédients dans le moule à
pain
2
Sélectionnez le menu 26 et entrez 1 heure et 40 minutes sur
le départ différé.
3
CONFITURE DE GROSEILLE ROUGE ET DE PIMENTS
Sélectionnez le menu ‘26’
groseilles rouges, grossièrement écrasées
piments rouges moyens, finement hachés 1-2
racine de gingembre, finement râpée 4 cm
oranges, jus et zeste finement râpé 2
de sucre 150 g
pectine en poudre 3 g
Placez tous les ingrédients excepté le sucre et la pectine
dans le moule à pain.
1
Ajoutez le sucre et saupoudrez la pectine sur les ingrédients
dans le moule à pain
2
Sélectionnez le menu 26 et entrez 1hr 40min sur le départ
différé.
3
CONFITURE D’ABRICOTS
Sélectionnez le menu ‘26’
abricots, finement hachés 500 g
de sucre 250 g
pectine en poudre 6 g
Placez la moitié du fruit dans le moule à pain, puis ajoutez la
moitié du sucre. Répétez l’opération avec le fruit et le sucre
1
restants.
Saupoudrez la pectine sur les ingrédients dans le moule à
pain
2
Sélectionnez le menu 26 et entrez 1 heure et 30 minutes sur
le départ différé.
3
300 g
Français
124 125
Page 64

Recettes de compotes
Entretien & Nettoyage
[27 Compote]
COMPOTE DE POMMES ÉPICÉE
Sélectionnez le menu ‘27’
pommes, épluchées, évidées et
découpées
bâton de cannelle 1
clous de girofle 2
citron, zeste seulement 1
jus de citron 2 càs
de sucre 100 g
d’eau 75 mL
Enlevez le bras pétrisseur du moule à pain.
1000 g
1
Placez les ingrédients dans le moule à pain dans l’ordre
énuméré ci-dessus. Versez l’eau sur les ingrédients.
2
Sélectionnez le menu 27 et entrez 1 heure et 20 minutes sur
le départ différé.
3
Remuez une fois la cuisson terminée.
4
COMPOTE DE FRUITS ROUGE
Sélectionnez le menu ‘27’
prunes, dénoyautées et coupées en deux 300 g
cerises, dénoyautées 250 g
fraises, tige enlevée 250 g
sucre de canne brut moulu 75 g
d’eau 75 mL
framboises (ajoutées après la cuisson) 200 g
Enlevez le bras pétrisseur du moule à pain.
1
Placez les ingrédients dans le moule à pain dans l’ordre
énuméré ci-dessus. Versez l’eau sur les ingrédients.
2
Sélectionnez le menu 27 et entrez 1 heure sur le départ différé.
3
Remuez une fois la cuisson terminée.
4
Ajoutez des framboises.
5
COMPOTE DE RHUBARBE ET DE GINGEMBRE
Sélectionnez le menu ‘27’
rhubarbe, coupée en longueurs de 2 cm 700 g
jus d’orange 2 càs
gingembre cristallisé, finement haché 20 g
de sucre 100 g
d’eau 100 mL
Enlevez le bras pétrisseur du moule à pain.
1
Placez les ingrédients dans le moule à pain dans l’ordre
énuméré ci-dessus. Versez l’eau sur les ingrédients.
2
Sélectionnez le menu 27 et entrez 1 heure et 40 minutes sur
le départ différé.
3
Remuez une fois la cuisson terminée.
4
126
COMPOTE DE BAIES MÉLANGÉES
Sélectionnez le menu ‘27’
baies mélangées
p. ex. fraises, framboises, myrtilles
de sucre 75 g
d’eau 2 càs
Enlevez le bras pétrisseur du moule à pain.
800 g
1
Placez les ingrédients dans le moule à pain dans l’ordre
énuméré ci-dessus. Versez l’eau sur les ingrédients.
2
Sélectionnez le menu 27 et entrez
différé.
3
Remuez une fois la cuisson terminée.
1 heure sur le départ
4
SAUCE AUX POMMES
Sélectionnez le menu ‘27’
pommes Bramley, épluchées, évidées et
découpées
d’eau 2 càs
Enlevez le bras pétrisseur du moule à pain.
1000 g
1
Placez la pomme dans le moule à pain. Versez l’eau sur les
ingrédients.
2
Sélectionnez le menu 27 et entrez 1 heure et 20 minutes sur
le départ différé.
3
Remuez une fois la cuisson terminée.
4
PÊCHE AU SIROP DE VANILLE
Sélectionnez le menu ‘27’
pêches, dénoyautées et coupées en 8 1000 g
de sucre 100 g
cosse de vanille
d’eau 125 mL
Enlevez le bras pétrisseur du moule à pain.
1
⁄2
1
Placez les ingrédients dans le moule à pain dans l’ordre
énuméré ci-dessus. Versez l’eau sur les ingrédients.
2
Sélectionnez le menu 27 et entrez 1 heure sur le départ
différé.
3
Quand la cuisson est terminée, enlevez les pêches avec une
écumoire. Versez soigneusement le sirop sur le fruit. Laissez
4
refroidir.
Avant de nettoyer l’appareil, débranchez-le et
laissez-le refroidir.
Pour éviter d’abîmer votre machine à pain...
N’utilisez rien d’abrasif! (produits, éponges etc.)
Ne lavez aucune partie de l’appareil dans le
lave-vaisselle!!
N’utilisez pas de benzine, de diluants, d’alcool, ou de
javel !
Après avoir rincé les parties lavables, essuyez-les
avec un chiffon. Maintenez toutes les pièces de la
machine propres et sèches.
Moule à pain &
bras pétrisseur
Enlevez toute la pâte résiduelle et lavez à l’eau.
Si vous n’arrivez pas à retirer le bras
pétrisseur, faites le tremper avec de l’eau
chaude pendant 5-10 minutes. Le moule à
pain ne doit pas être immergé complètement
dans l’eau.
Cuillère doseuse & gobelet
Lavez à l’eau.
Ne pas laver en lave-vaisselle
Couvercle
Essuyez avec un chiffon humide
Bouche de vapeur
Essuyez avec un chiffon humides
Unité
Essuyez avec un chiffon humide
Essuyez doucement pour
éviter d’abîmer le capteur
de température.
•
La couleur de l’intérieur de la cuve peut s’altérer avec le temps.
Capteur de température
Français
127
Page 65

Entretien & Nettoyage
Problémes et solutions
Avant d’appeler le service après-vente, consultez les paragraphes ci-dessous.
Couvercle du distributeur
Enlevez et lavez à l’eau
Soulevez le couvercle selon
un angle d’environ 75 degrés.
Alignez les raccordements et tirez
le couvercle vers vous pour l’ôter,
ou enfoncez-le avec précautions selon le même angle
pour le mettre en place. (N’effectuez cette opération
que sur une machine froide)
Faites attention de ne pas endommager ou de ne
pas tirer le joint. (Sa détérioration pourrait provoquer
des fuites de vapeur, de la condensation voire une
déformation)
Joint
En présence
Distributeur de levure
Essuyez avec un tissu humide et laissez sécher naturellement.
Si vous essuyez avec un tissu sec, la levure en poudre ne
tombera pas dans le moule à pain à cause de la charge statique.
Distributeur de fruits secs/graines
Enlevez et lavez à l’eau
d’humidité, essuyez
avec un tissu sec.
Lavez après chaque utilisation pour
enlever tous résidus.
Pour protéger le revêtement antiadhésif
Problème
Le pain ne lève pas
La surface du pain est
irrégulière
La mie est pleine de gros trous
Cause Action
[Tous les pains]
La qualité du gluten de votre farine est médiocre ou vous n’avez pas utilisé de farine à pain.
(La qualité du gluten peut varier selon la température, l’humidité, le mode de conservation de la
farine et l’année de moisson)
Essayez un autre type, une autre marque ou un autre lot de farine.
La pâte est devenue trop dure parce que vous n’avez pas utilisé assez de liquide.
Les farines à pain à fort taux de protéines absorbent plus d’eau que les autres, il convient
donc d’ajouter 10-20 mL en plus d’eau.
Vous n’utilisez pas le type de levure requis.
Utilisez une levure deshydratée en sachet portant l’indication ‘levure instantanée ou
superactive ou Express’.
Ce type de levure ne nécessite pas de pré-fermentation.
Vous n’utilisez pas assez de levure, ou votre levure est périmée.
Utilisez la cuillère doseuse fournie. Contrôlez la date de péremption de la levure.
(Conservez-la à température ambiante une fois le sachet entamé et utilisez -la dans les
48 heures)
La levure est entrée en contact avec le liquide avant le pétrissage.
Vérifiez que vous avez mis les ingrédients dans l’ordre correct selon les instructions. (P. 110)
Vous avez utilisé trop de sel, ou pas assez de sucre.
Vérifiez la recette et dosez correctement les quantités au moyen de la cuillère doseuse
fournie.
Assurez-vous que les autres ingrédients ne contiennent pas de sel et de sucre.
[Spécialité de pain]
Du blé d’engrain a été utilisé pour la cuisson de la spécialité de pain et/ou beaucoup de farine
autre que la farine d’épeautre ont été utilisées.
La farine doit être composée de 60 % de farine d’épeautre maximum lorsque vous utilisez
plus de deux sortes de farines autres que l’épeautre. Le seigle et la farine de riz devraient
composer jusqu’à 40% de toute la farine et la farine de sarrasin devrait composer jusqu’à
20% de toute la farine.
Vous avez utilisé trop de levure.
Vérifiez la recette et dosez correctement les quantités au moyen de la cuillère doseuse
fournie.
Vous avez utilisé trop de liquide.
Certains types de farine absorben t plus d’eau que d’autres, il convient dans ce cas de
réduire la quantité d’eau de 10 à 20 mL.
Français
128
Le moule à pain et le bras malaxeur sont recouverts d’un revêtement antiadhésif non salissant et qui permet
d’enlever le pain plus facilement. Pour éviter de l’abîmer, veuillez suivre les instructions ci-après:
• Ne pas utiliser d’ustensiles comme un couteau ou une fourchette lorsque vous sortez le pain du moule à pain.
Quand il vous est difficile de sortir le pain de le moule à pain, voir P. 131.
•
S’assurer que le bras malaxeur n’est pas pris dans la miche de pain, avant de couper celle-ci.
S’il est pris dans la miche de pain, attendre que celle-ci refroidisse et l’enlever.
(Ne pas utiliser des ustensiles coupants ou pointus comme un couteau ou une fourchette.)
Faites attention de ne pas vous brûler car le bras malaxeur risque d’être encore chaud.
•
Nettoyer le moule à pain et le bras malaxeur à l’aide d’une éponge souple.
Ne pas utiliser de matières abrasives comme des détergents ou des tampons à récurer.
Des ingrédients durs ou à gros grains comme les farines contenant des grains entiers ou moulus, le sucre ou l’ajout de fruits secs et de
graines peuvent endommager le revêtement antiadhésif du moule à pain. Si vous utilisez un ingrédient en gros morceaux, prenez soin
de le casser en petits morceaux. Prière de respecter les quantités indiquées dans les recettes.
Le pain semble s’être affaissé
après avoir levé
Le pain a trop levé
Pourquoi le pain est-il pâle et
collant ?
La qualité de votre farine est en cause.
Utilisez une autre marque de farine.
Vous avez utilisé trop de liquide.
Il convient donc de réduire la quantité d’eau de 10 à 20 mL.
Vous avez utilisé trop de levure ou d’eau.
Vérifiez la recette et dosez correctement les quantités au moyen de la cuillère doseuse
(levure)/du gobelet doseur (eau) fournis.
Assurez-vous que les autres ingrédients ne contiennent pas trop d’eau.
Vous n’avez pas utilisé assez de farine.
Pesez soigneusement la farine au moyen d’une balance.
Vous n’utilisez pas assez de levure, ou votre levure est périmée.
Utilisez la cuillère doseuse fournie. Contrôlez la date de péremption de la levure.
(Conservez-le paquet ouvert 48 h maximum)
Il y a eu une panne de courant, ou la machine a été arrêtée pendant la préparation du pain.
La machine s’éteint si elle est arrêtée pendant plus de 10 minutes. Vous devez enlever le
pain du moule et recommencer avec de nouveaux ingrédients.
129
Page 66

Problémes et solutions
Avant d’appeler le service après-vente, consultez les paragraphes ci-dessous.
Problème
Il reste de la farine sur le
dessous et les côtés du pain
Pourquoi les ingrédients
n’ont-ils pas été mélangés
correctement ?
Le pain n’a pas été cuit.
La pâte fuit par le fond du moule
à pain.
Les côtés du pain se sont
affaissés et le dessous est
humide.
Le bras pétrisseur fait un bruit
de cliquètement.
Cause Action
Vous avez utilisé trop de farine, ou pas assez de liquide.
Vérifiez la recette et dosez correctement les quantités au moyen d’une balance pour la farine
ou du gobelet doseur fourni pour les liquides.
Vous n’avez pas mis le bras pétrisseur dans le moule à pain.
Assurez-vous que le bras pétrisseur est dans le moule à pain avant que vous ne mettiez les
ingrédients.
Il y a eu une panne de courant, ou la machine a été arrêtée pendant la préparation du pain.
La machine s’éteint si elle est arrêtée pendant plus de 10 minutes. Vous pouvez peut-être
redémarrer le programme tout en sachant, que si le pétrissage était déjà commencé, le
résultat risque d’être peu satisfaisant.
Le menu pâte a été sélectionné.
Le menu pâte n’inclut pas de processus de cuisson.
Il y a eu une panne de courant, ou la machine a été arrêtée pendant la préparation du pain.
La machine s’éteint si elle est arrêtée pendant plus de 10 minutes. Vous pouvez essayer de
cuire la pâte dans votre four si elle a levé.
Il n’y a pas assez d’eau et le dispositif de protection du moteur s’est activé.
Cela se produit uniquement quand l’appareil est surchargé et qu’une force excessive est
appliquée sur le moteur.
Rendez-vous sur le lieu d’achat pour un examen de l’appareil. La prochaine fois, vérifiez la
recette et dosez la quantité voulue au moyen du gobelet doseur fourni.
Vous avez oublié de fixer le bras pétrisseur.
Veillez à fixer le bras pétrisseur au préalable (P. 110).
L’axe du bras pétrisseur dans le moule à pain est bloqué et ne tourne pas.
Si l’axe ne tourne pas quand le bras pétrisseur est installé, vous devez remplacer le
remplacer. (Consultez votre revendeur ou un centre d’assistance Panasonic.)
Une petite quantité de pâte sort par les orifices d’aération (si bien qu’elle n’empêche pas la
rotation des pièces). Cela n’est pas un défaut, mais il convient de contrôler de temps en temps
la rotation correcte de l’axe du bras pétrisseur.
Si l’axe du pétrisseur ne tourne pas quand le bras pétrisseur est attaché, vous devrez
remplacer l’unité de l’axe de pétrissage. (Consultez votre revendeur ou un centre
d’assistance Panasonic.)
(Fond du moule à pain)
Axe du bras
pétrisseur
Unité axe du
bras pétrisseur
Axe du bras pétrisseurOrifices d’aération (4 au total)
Vous avez laissé le pain dans le moule à pain trop longtemps après la cuisson.
Enlevez le pain rapidement après la cuisson.
Il y a eu une panne de courant, ou la machine a été arrêtée pendant la préparation du pain.
La machine s’éteint si elle est arrêtée pendant plus de 10 minutes. Essayez de cuire la pâte
dans votre four.
C’est parce que le bras pétrisseur n’est pas serrée à l’axe du pétrisseur. (Ce n’est pas un défaut)
Pièce n° ADA29E165
Problème
Le bras pétrisseur reste fiché
dans le pain quand on l’enlève
du moule à pain.
La croûte se plisse et devient
molle lors du refroidissement.
Comment peut-on garder une
croûte croustillante?
Le pain est collant et ne se
découpe pas bien.
Des ingrédients
supplémentaires ne sont pas
bien mélangés à la brioche.
Il y a un résidus huileux au bas
de la brioche.
La croûte est huileuse.
Mon pain présente de gros trous.
Ma brioche n’est pas très
réussie quand j’utilise une
préparation.
Le pain ne sort pas.
En faisant cuire la confiture, elle
a brulé ou le bras pétrisseur se
bloque et elle ne se dégage pas.
Cause Action
La pâte est un peu trop dense.
Laissez le pain refroidir complètement avant d’enlever soigneusement le bras pétrisseur.
Certains types de farine absorbent plus d’eau que d’autres, essayez d’ajouter 10-20 mL
supplémentaires d’eau la prochaine fois.
Une croûte s’est formée sous le bras pétrisseur.
Lavez le bras pétrisseur et son axe après chaque utilisation.
La vapeur restant dans le pain après la cuisson peut passer dans la croûte et la ramollir
légèrement.
Pour réduire la quantité de vapeur, essayez d’utiliser 10-20 mL en moins d’eau ou moitié
moins de sucre.
Pour rendre votre pain plus croustillant, vous pourriez employer le mode du menu 08 ou l’option
de couleur de croûte ‘Dark’ (Sombre), ou bien faites-le cuire au four à 200°C /marque de gaz 6
pour 5-10 minutes supplémentaires.
Il était trop chaud quand vous l’avez découpé.
Faites refroidir le pain sur une grille avant de le découper pour permettre l’élimination de la vapeur.
Selon la préparation, il arrive que les ingrédients supplémentaires ne se mélangent pas bien ou
qu’ils soient projetés hors du moule à pain.
Diminuez de moitié la quantité d’ingrédients supplémentaires.
Avez-vous ajouté du beurre dans les 5 minutes suivant le bip?
N’ajoutez pas de beurre quand le temps restant est affiché (P. 113).
Le pain n’aura pas le goût du beurre, mais il pourra cuire sans beurre.
Essayez ce qui suit.
Il pourrait être mieux cuit si la levure est diminuée en utilisant les menus 11 ou 23. (Si la
levure est ajoutée séparément.)
Suivez la recette indiquée pour la préparation, mais la quantité de préparation devrait se
situer entre 350 et 500 g.
Placez la levure en poudre (en cas d’ajout de levure séparé) dans le distributeur de levure, et
les ingrédients secs et le beurre dans le moule à pain. Ajoutez ensuite l’eau. Si vous utilisez
des ingrédients supplémentaires, ajoutez-les plus tard (P. 113 ou 115).
L’opération peut se dérouler différemment en fonction de la préparation.
Si le pain s’enlève difficilement du moule, laisser refroidir ce dernier pendant 5 à 10 minutes, en
s’assurant qu’il ne reste pas sans surveillance, pour éviter toute brûlure.
Secouer alors le moule à plusieurs reprises, pour ce faire, utiliser une manique.
(Tenir la poignée vers le bas pour qu’elle n’empêche pas de sortir le pain.)
La quantité de fruit était trop faible, ou la quantité de sucre est trop élevée.
Placez le moule à pain dans l’évier et remplissez à moitié le moule à pain avec de l’eau
chaude. Laissez le moule à pain tremper jusqu’à ce que le mélange cuit ou le bras pétrisseur
se desserre. Une fois le roussissement dissipé, lavez-le avec une éponge molle etc. Veuillez
faire attention à l’eau chaude.
Français
Il y a une odeur de brûlé
pendant la cuisson du pain.
De la fumée sort des trous
d’aération.
130
Des ingrédients peuvent avoir été renversés sur l’élément chauffant.
Parfois, un peu de farine, des raisins secs ou d’autres ingrédients peuvent être projetés hors
du moule à pain pendant le pétrissage.
après la cuisson une fois que la machine à pain a refroidi.
Sortez le moule à pain de la machine à pain pour y mettre les ingrédients.
Essuyez simplement l’élément chauffant doucement
La confiture a débordé.
Trop de fruits ou de sucre ont été utilisés.
Utilisez uniquement les quantités de fruits et de sucre indiquées dans les recettes à la P. 125
131
Page 67

Problémes et solutions
Avant d’appeler le service après-vente, consultez les paragraphes ci-dessous.
Istruzioni per la sicurezza
Attenersi alle presenti istruzioni.
Problème
La confiture est trop liquide et
n’a pas bien pris.
Les fruits surgelés peuvent-ils
être utilisés ?
Quelle sorte de sucre pouvonsnous utiliser pour la confiture ?
En faisant a confiture, pouvonsnous utiliser des fruits qui ont
mariné dans l’alcool ?
Le fruit s’est cassé en faisant du
fruit au sirop.
La levure en poudre ne tombera
pas dans le moule à pain
Cause Action
Le fruit était trop mûr ou pas assez
Le sucre a trop diminué.
Le temps de cuisson était insuffisant.
Un fruit contenant peu de pectine a été utilisé.
Utilisez la confiture liquide comme une sauce pour les desserts.
Laissez la confiture refroidir complètement. La confiture va continuer à prendre en
refroidissant.
Il est possible de les utiliser.
Il est possible d’utiliser du sucre semoule blanc ou granulé.
N’utilisez pas de sucre brun, du sucre de régime et du sucre peu calorifique ou un édulcorant
artificiel.
Ne pas en utiliser. La qualité n’est pas satisfaisante.
Le temps de cuisson était trop long. Il est possible que le fruit était trop mûr.
Le moment d’activation du distributeur de levure est différent selon le programme de menu et la
température ambiante.
Le distributeur de levure est humide ou il peut y avoir une accumulation de charge statique.
Essuyez avec un tissu humide et laissez sécher naturellement.
La levure en poudre est humide.
Utilisez une nouvelle levure en poudre.
Per evitare incidenti o infortuni all’utente o ad altre persone e danni a oggetti, è necessario attenersi alle istruzioni
riportate di seguito.
Gli schemi seguenti mostrano l’entità dei danni causati da operazioni sbagliate.
Avvertenza:
mortali.
Indica infortuni gravi o
Attenzione:
Indica il rischio di infortuni
o danni agli oggetti.
I simboli sono classificati e spiegati come segue.
Questo simbolo indica divieto.
Questo simbolo indica la necessità di adottare
determinati accorgimenti.
Avvertenza
Non utilizzare l’apparecchio se il cavo di alimentazione o la spina sono danneggiati
o se quest’ultima è collegata scorrettamente alla presa elettrica.
(in tal caso potrebbero verificarsi scosse elettriche o incendi dovuti a cortocircuiti.)
Se il cavo di alimentazione è danneggiato, deve essere sostituito dal produttore, da un centro di assistenza
autorizzato o da un tecnico qualificato per evitare pericoli.
Non danneggiare il cavo di alimentazione o la spina.
(in tal caso potrebbero verificarsi scosse elettriche o incendi dovuti a cortocircuiti.)
Le seguenti operazioni sono severamente vietate: modificare, posizionare in prossimità di fonti di calore,
piegare, attorcigliare, tirare, appoggiare oggetti pesanti e affastellare il cavo.
apparaît sur l’afficheur.
01 apparaît sur l’afficheur.
H01–H02 apparait sur
l’affichage.
U50 apparaît sur l’afficheur.
Il y a eu une panne de courant pendant env. 10 minutes (la prise a été débranchée par erreur
ou le disjoncteur s’est déclenché), ou il y a un autre problème lié à l’alimentation électrique.
Le fonctionnement n’est pas affecté si le problème d’alimentation électrique n’est que
momentané. L’appareil fonctionne de nouveau si l’alimentation est rétablie dans les
10 minutes qui suivent, mais le résultat final peut être compromis.
Il y a eu une coupure de courant pendant un certain temps (différent selon les circonstances -
p. ex. panne de secteur, débranchement, fusible ou coupe-circuit défectueux).
Enlevez la pâte et recommencez avec de nouveaux ingrédients.
L’affichage indique un problème avec la machine à pain.
Consultez votre revendeur ou un centre d’assistance Panasonic.
L’unité est trop chaude (plus de 40°C/105°F). Cela peut se produire en cas d’utilisation répétée.
Attendez que l’appareil ait refroidi à moins de 40°C/105°F avant de le réutiliser
(U50 disparaîtra à ce moment-là).
Non collegare o scollegare il cavo di alimentazione con le mani bagnate.
Français
(questa operazione potrebbe causare scosse elettriche.)
Non superare il voltaggio indicato sulla presa e non utilizzare corrente alternata
diversa da quella specificata sull’apparecchio.
(questa operazione potrebbe causare scosse elettriche o incendi.)
●
Verificare che la tensione dell’apparecchio corrisponda a quella della rete di alimentazione locale.
●
Il collegamento di altri dispositivi alla stessa presa potrebbe causare surriscaldamento.
Italiano
Inserire saldamente la spina di alimentazione.
(in caso contrario potrebbero verificarsi scosse elettriche o incendi causati dal calore che potrebbe crearsi
attorno alla spina.)
Pulire regolarmente la spina di alimentazione.
(Una spina sporca potrebbe determinare un isolamento insufficiente per l’accumulo di umidità e polvere e
causare incendi.)
Scollegare la presa di alimentazione e pulirla con un panno asciutto.
132
133
Page 68

Istruzioni per la sicurezza
Attenersi alle presenti istruzioni.
Avvertenza
Interrompere immediatamente l’utilizzo dell’apparecchio e scollegarlo dalla presa
elettrica nel caso in cui smetta di funzionare correttamente.
(in caso contrario potrebbe prodursi fumo o potrebbero verificarsi incendi, scosse elettriche o ustioni.)
ad es. per anomalie o guasti
●
La spina e il cavo di alimentazione si surriscaldano in maniera anomala.
●
Il cavo di alimentazione è danneggiato o si è verificata un’interruzione dell’alimentazione.
●
Il corpo principale è deformato o surriscaldato in maniera anomala.
●
L’apparecchio produce un rumore anomalo durante l’utilizzo.
Scollegare immediatamente l’apparecchio e rivolgersi al rivenditore o a un centro assistenza Panasonic per un controllo o per la
riparazione.
Non toccare, ostruire o coprire le aperture per la fuoriuscita del vapore durante
l’utilizzo dell’apparecchio.
(queste operazioni potrebbero provocare ustioni.)
●
Prestare particolare attenzione in presenza di bambini.
Non utilizzare l’apparecchio nei posti seguenti.
●
Posizionare la macchina per il pane su un piano di lavoro solido, asciutto, pulito,
con superficie piana e resistente al calore ad almeno 10 cm dal bordo del piano di
lavoro stesso.
(in caso contrario l’apparecchio potrebbe scivolare e cadere dal piano di lavoro.)
●
Non posizionarlo su superfici poco stabili, su apparecchi elettrici quali frigoriferi,
su materiali come tovaglie o tappeti, ecc.
(la mancata osservanza di questi accorgimenti potrebbe provocare incendi o la
caduta dell’apparecchio.)
●
Durante la cottura l’unità si riscalda. La macchina per il pane dovrebbe essere posizionata ad almeno 5 cm
dalle pareti adiacenti e da altri oggetti.
(la mancata osservanza di questo accorgimento potrebbe causarne lo scolorimento o la deformazione.)
Attenzione
Non toccare le parti calde quali ad esempio il cestello del pane, l’interno dell’unità,
la serpentina o la parte interna del coperchio quando l’apparecchio è in funzione o
Non smontare, riparare o modificare l’apparecchio.
(tali operazioni potrebbero provocare incendi, scosse elettriche o infortuni.)
Rivolgersi al rivenditore o a un centro assistenza Panasonic.
Non immergere l’apparecchio in acqua e non spruzzarlo con acqua.
(tali operazioni potrebbero provocare scosse elettriche o incendi dovuti a cortocircuiti.)
Questo apparecchio non è destinato a essere utilizzato da persone (bambini
dopo la cottura degli alimenti.
La temperatura delle superfici accessibili potrebbe essere elevata quando
l’apparecchio è in funzione.
(queste operazioni potrebbero provocare ustioni.)
Per evitare ustioni, utilizzare sempre guanti da forno quando si rimuove il cestello del pane o il pane cotto.
(non utilizzare guanti da forno bagnati.)
Prestare particolare attenzione anche quando si rimuove il pane cotto o la lama impastatrice.
inclusi) con ridotte capacità fisiche, sensoriali o mentali, o con esperienza e
conoscenze insufficienti, se non dietro sorveglianza e istruzioni di un soggetto
responsabile della loro incolumità. I bambini devono essere sorvegliati per evitare
che giochino con l’apparecchio.
(in caso contrario potrebbero verificarsi ustioni, infortuni o scosse elettriche.)
Attenzione
Accertarsi di afferrare saldamente la spina di alimentazione quando la si scollega
dalla presa.
(in caso contrario potrebbero verificarsi scosse elettriche o incendi dovuti a cortocircuiti.)
Scollegare la spina di alimentazione quando l’apparecchio non è in funzione.
(in caso contrario potrebbero verificarsi scosse elettriche o incendi dovuti a dispersioni elettriche.)
Scollegare e lasciar raffreddare l’apparecchio prima di pulirlo.
(queste operazioni potrebbero provocare ustioni.)
Non lasciare che il cavo di alimentazione penda dal bordo del tavolo o sia a
contatto con una superficie calda.
(la mancata osservanza di questo accorgimento potrebbe provocare ustioni o infortuni.)
Non rimuovere il cestello del pane né scollegare l’apparecchio mentre è in funzione.
(la mancata osservanza di questo accorgimento potrebbe provocare ustioni o infortuni.)
Informazioni importanti
Non utilizzare l’apparecchio all’aperto, in prossimità di fonti di calore o in ambienti con
umidità elevata.
( la mancata osservanza di questi accorgimenti potrebbe causarne il
malfunzionamento o la deformazione.)
Non esercitare una pressione eccessiva sulle parti come illustrato nella
figura a destra. (la mancata osservanza di questi accorgimenti potrebbe
causarne il malfunzionamento o la deformazione.)
Questo apparecchio non è stato progettato per funzionare con un timer esterno o con un sistema di controllo remoto separato.
Informazioni per gli utenti sullo smaltimento di apparecchiature elettriche ed elettroniche obsolete
(per i nuclei familiari privati)
Questo simbolo sui prodotti e/o sulla documentazione di accompagnamento significa che i prodotti elettrici ed elettronici usati
non devono essere mescolati con i rifiuti domestici generici.
Per un corretto trattamento, recupero e riciclaggio, portare questi prodotti ai punti di raccolta designati, dove verranno accettati
gratuitamente. In alternativa, in alcune nazioni potrebbe essere possibile restituire i prodotti al rivenditore locale, al momento
dell’acquisto di un nuovo prodotto equivalente.
Uno smaltimento corretto di questo prodotto contribuirà a far risparmiare preziose risorse ed evitare potenziali effetti negativi
sulla salute umana e sull’ambiente, che potrebbero derivare, altrimenti, da uno smaltimento inappropriato. Per ulteriori dettagli, contattare la
propria autorità locale o il punto di raccolta designato più vicino.
In caso di smaltimento errato di questo materiale di scarto, potrebbero venire applicate delle penali, in base alle leggi nazionali.
Per gli utenti aziendali nell’Unione Europea
Qualora si desideri smaltire apparecchiature elettriche ed elettroniche, contattare il rivenditore o il fornitore per ulteriori informazioni.
Informazioni sullo smaltimento in nazioni al di fuori dell’Unione Europea
Questo simbolo è valido solo nell’Unione Europea.
Qualora si desideri smaltire questo prodotto, contattare le autorità locali o il rivenditore e chiedere informazioni sul metodo corretto di smaltimento.
Sensore della
temperatura
Serpentina
Interno del coperchio
]
Italiano
134 135
Page 69

Accessori/Identificazione delle parti
Unità principale
Dosatore di uvetta e noci
Gli ingredienti inseriti nel dosatore di uvetta e noci cadranno automaticamente nel cestello del pane quando si
seleziona il menu con uvetta (03, 06, 14, 17, 19 e 25).
Fare riferimento alla P. 144 per gli ingredienti che possono essere inseriti nel dosatore di uvetta e noci.
Coperchio del dosatore
Dosatore del lievito
Pannello di controllo
Stato di funzionamento
: indica la fase attuale del programma. Gli ingredienti sono nella fase ‘Rest’ (Riposo)
prima dell’impastatura.
: viene visualizzato in caso di problemi di alimentazione.
:
viene visualizzato quando si aggiungono ingredienti manualmente con il menu 11 e 23.
Tempo rimanente alla fine della cottura
Inoltre, quando si aggiungono gli ingredienti
manualmente, il display indicherà il tempo
rimanente fino al momento del programma in cui
sarà possibile introdurre gli ingredienti aggiuntivi.
Accessori
Bicchiere dosatore
Per misurare liquidi
(max. 310 mL)
Coperchio
Linguetta del dosatore
di uvetta e noci
Lama impastatrice
(pane di segale)
Lama impastatrice
(pane bianco)
Maniglia
Cestello del
pane
Pannello di controllo
Cucchiaio dosatore
Per misurare zucchero, sale, lievito,
ecc.
(15 mL) (5 mL)
Dimensioni
Premere questo tasto per
selezionare le dimensioni.
Fare riferimento alla P.
140 per i menu disponibili.
•
XL
•
L
•
M
Menu
Premere questo tasto per selezionare i menu. Verrà
visualizzato il numero del menu che cambierà ad
ogni pressione di questo tasto per mostrare quello
successivo. (tenere premuto il tasto per avanzare
più rapidamente)
Fare riferimento alle P. 140 e 141 per i numeri dei
menu.
Crosta
Premere questo tasto per
selezionare il colore della
crosta.
Fare riferimento alla P. 140
per i menu disponibili.
•
Dark (Scura)
•
Medium (Media)
•
Light (Dorata)
Timer
Impostazione del delay timer
(tempo rimanente fino a cottura
ultimata del pane) o impostazione
del tempo di cottura per i menu
15, 26 e 27.
‘▲’ Premere questo tasto per
aumentare il tempo.
‘▼’ Premere questo tasto per
diminuire il tempo.
Avvio
Premere questo
tasto per avviare il
programma.
Italiano
Arresto
Premere questo tasto
per cancellare/arrestare il
programma.
(per cancellare/arrestare il
programma, tenere premuto il
tasto per più di 1 secondo).
Cucchiaino
•
1⁄4, 1⁄2, 3⁄4 marcature
Spina
Questa immagine mostra tutti i termini e i simboli. Tuttavia durante il funzionamento dell’apparecchio verranno visualizzati soltanto quelli pertinenti.
•
incrementi da 10 mL
Cucchiaio
•
1⁄2 marcatura
136 137
Page 70

Ingredienti per la preparazione del pane
Farina
E’ l’ingrediente principale del pane, contiene glutine (che favorisce
la lievitazione del pane donandogli una consistenza solida)
Utilizzare farina di semola di grano duro. Non utilizzare farina di grano tenero
tipo “0” o “00”.
La farina deve essere pesata sulla bilancia.
La farina di semola di grano duro viene
prodotta dalla macinazione del grano duro
e presenta un elevato contenuto di proteine
necessarie per la formazione del glutine.
L’anidride carbonica prodotta durante la
fermentazione viene intrappolata nel
tessuto elastico del glutine e
consente all’impasto di lievitare.
Farina bianca
Viene prodotta macinando
il chicco del grano, esclusa
crusca e germe. Il tipo
migliore di farina per la
preparazione del pane è la
farina ‘speciale per pane’.
Non utilizzare farina tipo ‘0’ o farina autolievitante in
sostituzione della farina per pane.
Acqua
Utilizzare la normale acqua di rubinetto.
Utilizzare acqua tiepida con i menu 02, 05, 07, 12 o 20 in un
ambiente freddo.
Utilizzare acqua fredda con i menu 07, 08, 11, 13, 14, 20, 21, 23,
24 o 25 in un ambiente caldo.
Misurare sempre i liquidi con il bicchiere dosatore fornito in
dotazione.
Utilizzo di miscele per pane...
Porre la miscela nel cestello del pane, quindi
La quantità di lievito contenuta in alcune miscele non è
Sale
Arricchisce il gusto e dà maggiore forza all’azione
del glutine contribuendo a far lievitare il pane.
Il pane potrebbe risultare di dimensioni minori/perdere
gusto se la misurazione non è precisa.
Miscele per pane con sacchetto di lievito separato
Porre per prima la miscela per pane nel cestello, quindi
Grassi
Arricchisce il sapore e la morbidezza del pane.
Si consiglia di utilizzare burro o magarina.
Selezionare il menu 11 o 02 dimensione ‘Medium’
Miscele per pane contenenti lievito
aggiungere acqua. (Seguire le istruzioni riportate sulla
confezione per la quantità di acqua necessaria)
Selezionare il menu 02, scegliere una dimensione in
base al volume della miscela e iniziare la cottura.
•
600 g – XL • 500 g – L
specificata in maniera esatta; potrebbe pertanto essere
necessario fare alcune prove prima di ottenere i risultati
desiderati.
aggiungere l’acqua.
Introdurre successivamente il lievito dosato nel
dosatore del lievito.
Impostare la macchina in base al tipo di farina
contenuta nella miscela e iniziare la cottura.
•
Farina bianca, farina scura menu 01
•
Farina integrale, farina ai cereali menu 04
•
farina di segale menu 07
Cottura di brioche con miscela per brioche
(Media) - ‘Light’ (Dorata) colore della crosta. (P. 163)
Farina integrale
Viene prodotta macinando il chicco intero del grano,
inclusi crusca e germe. Da questa farina si ottiene un
pane molto salutare.
Questo pane è più basso e più pesante rispetto a
quello ottenuto con la farina bianca.
Farina di segale
Viene prodotta macinando il chicco di segale. Rispetto alla farina
bianca contiene una maggiore quantità di ferro, magnesio e
potassio, elementi indispensabili per la salute dell’uomo. Non
contiene però una quantità sufficiente di glutine. Da questo tipo di
farina si ottiene un pane denso e pesante. Non utilizzare quantità
superiori rispetto a quelle specificate (altrimenti si rischia di
sovraccaricare il motore).
Prodotti caseari
Maggior sapore e valore nutrizionale.
Se si utilizza il latte al posto dell’acqua, il valore
nutrizionale del pane sarà maggiore; in tal caso non
utilizzare l’impostazione ‘in timer’ poiché non potrebbe
mantenersi fresco per tutta la notte.
Ridurre la quantità di acqua in misura proporzionale
rispetto a quella del latte.
Farina di farro
Il farro appartiene alla famiglia delle graminacee ma dal punto di vista genetico è una specie completamente diversa.
Pur contenendo glutine risulta in genere digeribile dai celiaci. (Consultare il proprio medico.)
Da questo tipo di farina si ottengono pagnotte con una crosta piatta, leggermente incavata.
Il pane preparato con farina di farro integrale risulta più basso e denso rispetto a quello preparato con farina di farro bianco.
Si consiglia di utilizzare la farina di farro bianco in quantità superiori alla metà della farina totale.
In commercio vengono vendute indistintamente come farro due qualità diverse: il farro grande (Triticum spelta) adatto per la preparazione del
pane e il Triticum monococcum, (chiamato anche piccolo farro) non indicato per la preparazione del pane. Utilizzare il farro grande.
(utilizzare i menu 13, 14, 24 o 25)
È possibile arricchire il sapore del pane aggiungendo
altri ingredienti:
(zucchero semolato, zucchero di canna,
Zucchero
miele, melassa, ecc.)
Uova
Aumenta l’azione lievitante, addolcisce e aggiunge
gusto al pane, cambiandone il colore della crosta.
Utilizzare quantità minori di zucchero se si aggiungono
all’impasto uvetta o altri frutti contenti fruttosio.
Crusca
Germe di grano
Spezie
Lievito in polvere
Fa lievitare il pane.
Accertarsi di utilizzare lievito in polvere che non necessiti di prefermentazione (non adoperare lievito fresco o lievito
in polvere che necessita di prefermentazione prima dell’utilizzo)
Si consiglia l’utilizzo del lievito con la dicitura ‘lievito istantaneo’ sulla confezione.
Quando si adopera il lievito in bustine, richiudere immediatamente la bustina dopo l’utilizzo e conservarla in
frigorifero. (Utilizzare entro la data di scadenza consigliata dal produttore)
Aumentano il valore nutrizionale e
migliorano il colore del pane. (la quantità
di acqua deve essere ridotta in misura
proporzionale) Sbattere le uova prima di
aggiungerle all’impasto.
Aumenta il contenuto in fibre del pane.
•
Utilizzare al max. 75 mL (5 cucchiai).
Dona al pane un sapore simile a quello
della noce.
•
Utilizzare al max. 60 mL (4 cucchiai).
Arricchiscono il gusto del pane.
•
Utilizzare solo in piccole quantità
(1-2 cucchiai).
Italiano
138 139
Page 71

Elenco dei tipi di pane e opzioni di cottura
Funzioni e tempi
•Il tempo necessario per ogni processo varia in base alla temperatura dell’ambiente.
Numero
dei menu
Menu
01 Basic
02 Basic Rapid
03 Basic Raisin
04 Whole wheat
Whole wheat
05
Rapid
Whole wheat
06
Raisin
07 Rye
08 French
Cottura
09 Italian
10 Sandwich
11 Brioche
12 Gluten Free
13 Speciality
Speciality
14
Raisin
15 Bake only
Opzioni Processi
Dimensioni
——
——
——
——
—
—
Crosta
Timer
Riposo Impasto
30 min–
60 min
——
1
—
——
—
1
2
—
—
30 min–
60 min
1 ora–
1 ora 40 min
15 min–
25 min
1 ora–
1 ora 40 min
45 min–
60 min
40 min–
2 ore 5 min
30 min–
1 ora
1 ora–
1 ora 40 min
30 min
—
——
30 min–
1 ora 15 min
30 min–
1 ora 15 min
Lievitazione
1 ora 50 min–
3
15–30 min
15–20 min
15–30 min
15–25 min
15–25 min
15–25 min
circa
10 min
10–20 min
10–15 min
15–25 min
25–45 min
15–20 min 40 - 45 min 50–55 min
15–30 min
15–30 min
2 ore 20 min
circa 1 ora
1 ora 50 min–
3
2 ore 20 min
2 ore 10 min–
3
2 ore 50 min
1 ora 30 min–
3
1 ora 40 min
2 ore 10 min–
3
2 ore 50 min
1 ora 20 min–
1 ora 35 min
2 ore 45 min–
4 ore 10 min
2 ore 25 min–
3 ore
2 ore 10 min–
3
2 ore 50 min
3
1 ora 25 min 50 min 3 ore 30 min
1 ora 50 min–
3
2 ore 45 min
1 ora 50 min–
3
2 ore 45 min
——— — — —
Cottura Totale
50–55 min
35–40 min
50 min 4 ore
50 min 5 ore
45 min 3 ore
50 min 5 ore
1 ora 3 ore 30 min
55 min 6 ore
50 min 4 ore 30 min
50 min 5 ore
55 min 4 ore 30 min
55 min 4 ore 30 min
30 min–
1 ora 30 min
4 ore–
4 ore 5 min
1 ora 55 min–
2 ore
1 ora 50 min–
1 ora 55 min
30 min–
1 ora 30 min
Numero
dei menu
Menu
16 Basic
17 Basic Raisin
18 Whole wheat
Whole wheat
19
Raisin
20 Rye
21 French
22 Pizza
Impasto
23 Brioche
24 Speciality
Speciality
25
Raisin
26 Jam
27 Compote
Opzioni Processi
Dimensioni
———
———
———
———
———
———
——
———
———
———
Crosta
Timer
Riposo Impasto
30 min–
50 min
30 min–
50 min
55 min–
1 ora 25 min
55 min–
1 ora 25 min
45 min–
60 min
40 min–
1 ora 45 min
(Impasto)
10–18 min
30 min
30 min–
1 ora 5 min
30 min–
1 ora 5 min
15–30 min
15–30 min
15–25 min
15–25 min
circa
10 min
10–20 min
(
Lievitazione
7–15 min
25–45 min
15–30 min
15–30 min
Lievitazione
1 ora 10 min–
3
1 ora 30 min
1 ora 10 min–
3
1 ora 30 min
1 ora 30 min–
3
2 ore
1 ora 30 min–
3
2 ore
——
1 ora 35 min–
2 ore 40 min
)
(Impasto)
circa 10 min
3
35 min
1 ora 10 min–
3
1 ora 55 min
1 ora 10 min–
3
1 ora 55 min
Cottura Totale
—
—
—
—
—
(
Lievitazione
circa 10 min
—
—
—
——— — — — —
——— — — — —
2 ore 20 min
2 ore 20 min
3 ore 15 min
3 ore 15 min
2 ore
3 ore 35 min
)
45 min
1 ora 50 min
2 ore 45 min
2 ore 45 min
1 ora 30 min–
2 ore 30 min
1 ora–
1 ora 40 min
Italiano
Disponibili solo ‘Light’ (Dorata) o ‘Medium’ (Media). Disponibili solo ‘Medium’ (Media) o ‘Dark’ (Scura).
La fase di impastatura comprende un periodo di lievitazione.
• La macchina per il pane funzionerà per un breve periodo durante la lievitazione (per garantire lo sviluppo ottimale del glutine).
140 141
Page 72

Cottura del pane
Fare riferimento
alle P. 151-152 per le
ricette per pane
Porre gli ingredienti nel cestello del pane
Lama impastatrice Dosatore del lievito
Rimuovere il cestello del pane e
1
posizionare la lama impastatrice
Far ruotare il cestello del
pane.
Rimuovere il cestello del
pane.
Introdurre gli ingredienti dosati
nel cestello del pane
2
Introdurre gli ingredienti secchi
tranne il lievito in polvere.
(farina, zucchero, sale, ecc.)
• La farina deve essere pesata
sulla bilancia.
Impostare il programma e avviare la macchina
Selezionare un menu di cottura
(il display indica quando viene selezionato il menu ‘01’).
5
Rimuovere il pane
Spegnimento
quando il pane è pronto [la macchina emette
7
8 segnali acustici e la barra in corrispondenza
della dicitura ‘End’ (Termine) lampeggia.]
Fare riferimento alla P. 140 per menu, dimensioni e crosta.
Versare l’acqua e tutti gli altri
liquidi.
Fissare saldamente la
lama impastatrice al
perno.
Eliminare i residui di condensa
Controllare la superficie
intorno al perno e la
parte interna della
lama impastatrice e
accertarsi che siano
pulite. (P.159)
•
Quando si prepara il pane di segale,
utilizzare l’apposita lama impastatrice.
•
La lama impastatrice non si fissa facilmente in posizione
ma è ncessario che tocchi il fondo del cestello del pane.
Cottura del pane con ingredienti aggiunti (P. 144)
Pulire e asciugare
prima dell’utilizzo
Aprire il coperchio del
dosatore.
Introdurvi gli ingredienti.
Chiudere il coperchio.
142 143
Introdurre il lievito in polvere nel
3 dosatore del lievito
Collegare la spina della
4
macchina del pane
a una presa elettrica 230 V
e farina dalla superficie esterna
del cestello del pane.
Inserire il cestello del pane nella
macchina facendolo ruotare
leggermente da destra a sinistra.
Piegare la maniglia verso il basso.
Chiudere il coperchio.
• Non aprire il coperchio finché
il pane non è cotto (questa
operazione potrebbe influire
sulla qualità del pane).
Se il dosatore del lievito è bagnato,
asciugare l’umidità con della carta ecc.
(Non strofinare la superficie del
dosatore del lievito poiché si formerebbe
elettricità statica che impedirebbe al
lievito di cadere nel cestello del pane).
6
Quando si preme il tasto ‘Start’ (Avvio) si avvia il menu 01.
Modifica delle dimensioni
Impostazione del timer
ad es. Ora sono le 21:00 e si desidera avere il pane pronto alle 6:30 della
mattina successiva.
Impostare il timer alle ‘9:30’ (fra 9 ore e 30 minuti).
12
9
•
Premendo il tasto una volta il timer avanza di 10 minuti (tenerlo premuto
per avanzare più velocemente).
3
9 ore 30 min da
6
Ora attuale Ora della cottura ultimata
questo momento
Premere ‘Start’ (Avvio)
Tempo stimato per il completamento del programma selezionato
Modifica del colore della
crosta
12
9
3
6
Rimuovere
8
immediatamente il pane,
Guanti da
forno
Cestello del
pane
lasciar raffreddare, ad esempio su una
griglia metallica
Scollegare la
macchina (tenendo
9
saldamente la spina)
dopo l’utilizzo
Se non si preme il tasto ‘Stop’ (Arresta)
e non si rimuove il pane dall’unità per
raffreddarlo, la macchina per il pane
continuerà a mantenere il calore per ridurre
la condensa prodotta dal vapore della
pagnotta.
Questo processo accelera però la
doratura della crosta; si consiglia pertanto
di spegnere l’unità a cottura ultimata e
rimuovere immediatamente il pane per
raffreddarlo.
Se si lascia il pane a raffreddare all’interno
del cestello si formerà della condensa.
Si consiglia pertanto di lasciar raffreddare il
pane su una griglia metallica per garantirne
la qualità ottimale.
Italiano
Page 73

Aggiunta di ulteriori ingredienti
Cottura di brioche
Aggiunta di ulteriori ingredienti al pane o all’impasto
Selezionando i menu con uvetta (03, 06, 14, 17, 19 or 25), è possibile mescolare all’impasto gli ingredienti preferiti per preparare tutti i tipi di
pane aromatizzato.
Introdurre gli ingredienti aggiuntivi
nel dosatore o nel cestello del pane
prima di avviare la macchina
Ingredienti in polvere, ingredienti
non solubili
Introdurre gli ingredienti aggiuntivi nel dosatore
di uvetta e noci e impostare la macchina.
Frutta secca
Tagliare grossolanamente a cubetti di circa 5 mm.
Gli ingredienti ricoperti di zucchero potrebbero
aderire alle pareti del dosatore e non cadere nel
cestello del pane.
Ingredienti umidi/viscosi, ingredienti
solubili*
Unire questi ingredienti a tutti gli
altri all’interno del cestello del pane.
Frutta fresca, frutta sotto spirito
Utilizzare soltanto le quantità specificate
nella ricetta poiché il contenuto in acqua
di questi ingredienti potrebbe modificare
il pane.
1
Preparazioni
(P. 142)
Selezionare il menu ‘11’
Tagliare il burro a cubetti di 1–2 cm da aggiungere successivamente e riporli nel frigorifero.
Fissare la lama impastatrice all’interno del cestello del pane.
Introdurre gli ingredienti nel cestello del pane secondo l’ordine specificato nella ricetta.
Posizionare il cestello del pane nell’unità principale e collegare la macchina alla presa elettrica.
1
Azionare la macchina
2
Tempo rimanente all’aggiunta di ulteriore burro o ingredienti
La spia del tasto ‘Start’ (Avvio) si accenderà.
farina di grano duro per pane bianco,
tipo 550
cucchiaini di sale 1
cucchiai di zucchero 4
cucchiaini di latte scremato (in polvere) 2
burro (tagliato in cubetti da 2 cm e
conservato in frigorifero)
acqua 180 mL
uova (battute); medie 2 (100 g)
cucchiaini di lievito in polvere 1
burro da aggiungere successivamente
(tagliato in cubetti da 1–2 cm e
conservato in frigorifero)
400 g
1
⁄2
50 g
1
⁄4
70 g
42, 3
[Sistema semplice per cuocere
brioche]
Aggiungere subito il burro agli
altri ingredienti.
Tagliare il burro in cubetti di 2 cm e introdurlo nel
cestello del pane contemporaneamente agli altri
ingredienti.
Seguire i passaggi mostrati a sinistra. Ignorare
però il 3° segnale acustico emesso dalla
macchina per l’aggiunta di ulteriore burro.
Sono necessarie 3 ore e 30 minuti per completare
la cottura.
* Quando il burro viene aggiunto all’inizio, il
sapore, la consistenza e la lievitazione del pane
sono leggermente diversi rispetto a quelli che si
ottengono con il sistema che prevede la cottura
del pane con l’aggiunta di ulteriore burro in un
momento successivo.
All’accensione della macchina viene
immediatamente avviato un processo di ‘Rest’
(Riposo) seguito da quello dell’‘Knead’ (Impasto)
e della ‘Rise’ (Lievitazione).
Noci
Semi
Erbe
aromatiche
Pancetta,
salame
•
Seguire la ricetta per le quantità dei singoli ingredienti.
Tritare finemente.
Le noci riducono l’effetto del glutine; si consiglia
pertanto di non utilizzarle in grandi quantità.
L’utilizzo di semi grandi e duri potrebbe graffiare il
rivestimento del dosatore e del cestello del pane.
Utilizzare un massimo di 1–2 cucchiai di erbe
aromatiche secche. Per quelle fresche, seguire le
istruzioni indicate nella ricetta.
A volte gli ingredienti oleosi potrebbero aderire alle
pareti del dosatore e non cadere nel cestello del pane.
Formaggio, cioccolato
* Questi ingredienti non possono essere introdotti nel
dosatore di uvetta e noci poiché aderirebbero alle pareti
del dosatore e non cadrebbero nel cestello del pane.
Aggiungere ulteriore burro dopo il
3
segnale acustico, quindi premere di
nuovo il tasto ‘Start’ (Avvio)
Introdurre i cubetti di burro aggiuntivi quando la spia ‘ ’ lampeggia.
Dopo aver premuto
il tasto ‘Start’
Il display indica il tempo rimanente alla fine del programma
Premer
4
pane
quando la macchina emette 8 segnali acustici e la barra in corrispondenza del
tasto ‘End’ (Termine) lampeggia
La spia del tasto ‘Start’ (Avvio) smetterà di lampeggiare.
e ‘Stop’ (Arresta) e rimuovere il
Introdurre gli ingredienti aggiuntivi insieme al
burro. (non utilizzare quantità superiori ai 150 g
per gli ingredienti aggiuntivi)
L’impastatura continuerà dopo 5 min. anche
senza premere il tasto ‘Start’ (Avvio). Non
continuerà invece a impastare immediatamente
anche se è stato premuto il tasto ‘Start’ (Avvio)
dopo l’aggiunta di burro o degli altri ingredienti.
Non aggiungere burro dopo che il display ha
indicato il tempo rimanente. (P.163)
Italiano
144 145
Page 74

Preparazione dell'impasto
Preparazione dell'impasto per brioche
1
Preparazioni
(P. 142)
Fissare la lama impastatrice all’interno del cestello del pane.
Introdurre gli ingredienti nel cestello del pane secondo l’ordine specificato nella ricetta.
Posizionare il cestello del pane nell’unità principale e collegare la macchina alla presa elettrica.
32
Selezionare il menu per l’impasto
(il display indica quando viene selezionato il menu ‘16’).
1
Azionare la macchina
2
Tempo stimato per il completamento del programma selezionato
La spia del tasto ‘Start’ (Avvio) si accenderà.
Premere ‘Stop’ (Arresta) e rimuovere
3
l’impasto
quando la macchina emette 8 segnali acustici e la barra in corrispondenza del
tasto ‘End’ (Termine) lampeggia
La spia del tasto ‘Start’ (Avvio) smetterà di lampeggiare.
Fare riferimento
alla P. 153 per le ricette
per impasti
Per cancellare/
arrestare dopo l’avvio
(tenere premuto per più di
1 secondo)
Per i menu degli impasti il timer non è disponibile
(fatta eccezione per il menu 22).
Se si desidera aggiungere ulteriori ingredienti
all’impasto, consultare la P. 144.
All’accensione della macchina viene
immediatamente avviato un processo di ‘Rest’
(Riposo) seguito da quello dell’‘Knead’ (Impasto)
e della ‘Rise’ (Lievitazione) per tutti i menu tranne
per il 22, 26 e 27.
Modellare l’impasto finito e lasciarlo lievitare per
la seconda volta in base a quanto indicato nella
ricetta, quindi infornarlo.
1
Preparazioni
(P. 142)
Selezi
Fissare la lama impastatrice all’interno del cestello del pane.
Introdurre gli ingredienti nel cestello del pane secondo l’ordine specificato nella ricetta.
Posizionare il cestello del pane nell’unità principale e collegare la macchina alla presa elettrica.
onare il menu ‘23’
42, 3
1
Azionare la macchina
2
Tempo rimanente all’aggiunta di ulteriore burro o ingredienti.
La spia del tasto ‘Start’ (Avvio) si accenderà.
Aggiungere ulteriore burro dopo il
3
segnale acustico, quindi premere di
nuovo il tasto ‘Start’ (Avvio)
Introdurre i cubetti di burro aggiuntivi quando la spia ‘ ’ lampeggia.
Dopo aver premuto
il tasto ‘Start’
Il display indica il tempo rimanente alla fine del programma
Fare riferimento
alla P. 153 per le ricette
per impasti
Per cancellare/
arrestare dopo l’avvio
(tenere premuto per più di
1 secondo)
[Metodo semplice per la
preparazione dell’impasto per
brioche]
Aggiungere subito il burro agli
altri ingredienti.
Tagliare il burro in cubetti di 2 cm e introdurlo nel
cestello del pane contemporaneamente agli altri
ingredienti.
Seguire i passaggi mostrati a sinistra. Ignorare
però il 3° segnale acustico emesso dalla
macchina per l’aggiunta di ulteriore burro.
Sono necessarie 1 ora e 50 minuti per completare
la cottura.
* Quando il burro viene aggiunto all’inizio, il
sapore, la consistenza e la lievitazione del pane
sono leggermente diversi rispetto a quelli che si
ottengono con il sistema che prevede la cottura
del pane con l’aggiunta di ulteriore burro in un
momento successivo.
All’accensione della macchina viene
immediatamente avviato un processo di ‘Rest’
(Riposo) seguito da quello dell’‘Knead’ (Impasto)
e della ‘Rise’ (Lievitazione).
Introdurre gli ingredienti aggiuntivi insieme al
burro. (non utilizzare quantità superiori ai 150 g
per gli ingredienti aggiuntivi)
L’impastatura continuerà dopo 5 min. anche
senza premere il tasto ‘Start’ (Avvio). Non
continuerà invece a impastare immediatamente
anche se è stato premuto il tasto ‘Start’ (Avvio)
dopo l’aggiunta di burro o degli altri ingredienti.
Non aggiungere burro dopo che il display ha
indicato il tempo rimanente. (P.163)
Italiano
Premere ‘Stop’ (Arresta) e rimuovere
4
l’impasto
quando la macchina emette 8 segnali acustici e la barra in corrispondenza del
tasto ‘End’ (Termine) lampeggia
La spia del tasto ‘Start’ (Avvio) smettera di lampeggiare.
146 147
Modellare l’impasto finito e lasciarlo lievitare per
la seconda volta in base a quanto indicato nella
ricetta, quindi infornarlo.
Page 75

Cottura di torte
Preparazione di marmellate
1
Preparazioni
2
Preparare gli ingredienti in base alla ricetta.
Rivestire il cestello del pane con carta forno e versarvi gli
ingredienti mescolati.
Posizionare il cestello del pane nell’unità principale e
collegare la macchina alla presa elettrica.
3
Selezionare il menu ‘15’
1
Impostazione dell’orario di cottura
2
Azionare la macchina
3
Tempo stimato per il completamento del programma selezionato
La spia del tasto ‘Start’ (Avvio) si accenderà.
4
Fare riferimento
alla P. 153 per le
ricetta per torte
Per cancellare/
arrestare dopo l’avvio
(tenere premuto per più di
1 secondo)
•
Rimuovere la lama
impastatrice
•
Rivestire con carta forno. (torte o pasticcini bruciano
se sono a diretto contatto con il cestello del pane.)
Il timer non è disponibile per il menu 15.
(il tasto del timer imposta soltanto la durata del
tempo di cottura).
1
Preparazioni
2
Preparare gli ingredienti in base alla ricetta.
Fissare la lama impastatrice all’interno del cestello del pane.
Introdurre gli ingredienti nel cestello del pane in base al seguente ordine:
metà della frutta → metà dello zucchero →quantità rimanente della frutta → quantità rimanente dello zucchero.
Posizionare il cestello del pane nell’unità principale e collegare la macchina alla presa elettrica.
3
Selezionare il menu ‘26’
1
Impostazione del tempo di cottura
2
Azionare la macchina
3
Tempo stimato per il completamento del programma selezionato
La spia del tasto ‘Start’ (Avvio) si accenderà.
4
Fare riferimento
alla P. 157 per le ricette
per marmellate
Per cancellare/
arrestare dopo l’avvio
(tenere premuto per più di
1 secondo)
Il timer non è disponibile per il menu 26.
(Il tasto del timer imposta soltanto la durata del
tempo di cottura.)
Per ottenere una marmellata densa è necessario che le
quantità di zucchero, acido e pectina siano ben dosate.
La frutta con un elevato livello di pectina si
addensa facilmente. La frutta con quantità minori
di pectina non si addensa facilmente.
Utilizzare frutta fresca e matura. La frutta troppo
matura o acerba non si addensa.
Le ricette contenute in questo libro consentono di
preparare marmellate dalla consistenza morbida,
grazie al basso contenuto di zucchero.
Seguire la ricetta per le quantità dei singoli ingredienti.
• Non aumentare né diminuire le quantità di frutta
poiché la marmellata potrebbe traboccare o bruciarsi.
•
Non utilizzare quantità di zucchero superiori a
quelle della metà della frutta.
In tal caso la marmellata potrebbe traboccare o bruciarsi.
Se si diminuiscono le quantità di zucchero, la
marmellata non si addensa.
*
Se l’acidità della frutta è elevata, si può ridurre la
quantità di succo di limone; tuttavia, se questa viene
diminuita troppo la marmellata non si addensa.
Se il tempo di cottura è breve, alcuni pezzi di
frutta potrebbero restare interi e la marmellata
potrebbe risultare troppo liquida.
• Durante il raffreddamento la marmellata continuerà ad
addensarsi. Fare attenzione a non cuocerla troppo.
Italiano
Premere
e la barra in corrispondenza del tasto ‘End’ (Termine) lampeggia,
4
verificare che la cottura sia ultimata e
‘Stop’ (Arresta) quando la macchina emette un segnale acustico
Attenzione!
È caldo!
rimuovere il cestello del pane
La spia del tasto ‘Start’ (Avvio) smetterà di lampeggiare.
Se la cottura non è completa Ripetere i passaggi 1–3
(il tempo di cottura aggiuntivo può essere raddoppiato. Ogni volta non potrà
comunque superare i 50 minuti. Il timer ripartira da 1 minuto quando l’unita
e calda. Aumentare il tempo secondo la necessita premendo il tasto del
timer.)
148 149
Per verificare che la cottura sia completa, inserire
uno stuzzicadenti al centro della torta o del
pasticcino che saranno pronti se sullo stecchino
estratto non sono presenti residui di impasto.
Premere ‘Stop’ (Arresta) e rimuovere la
4 marmellata
quando la macchina emette 8 segnali acustici e la barra in corrispondenza del
tasto ‘End’ (Termine) lampeggia
La spia del tasto ‘Start’ (Avvio) smetterà di lampeggiare.
Se la cottura non è completa Ripetere i passaggi 1–3
(Il tempo di cottura aggiuntivo può essere raddoppiato. Ogni volta non può
comunque superare i 10–40 minuti. Il timer ripartirà da 1 minuto quando l’unità
è calda. Aumentare il tempo secondo la necessità premendo il tasto del timer.)
Versare prima possibile la marmellata pronta in
un contenitore. Fare attenzione a non ustionarsi
quando si travasa la marmellata.
La marmellata potrebbe bruciarsi se lasciata
all’interno del cestello del pane.
Conservare la marmellata in un ambiente fresco
e buio. A causa del basso contenuto di zucchero
la data di scadenza non potrà essere lunga come
quella delle confezioni acquistate nei negozi.
Una volta aperta, conservare in frigorifero e
consumare in breve tempo.
Page 76

Preparazione di composte
Ricette per pane
PANE BIANCO
Selezionare il menu ‘01’ oppure ‘02’
farina di grano duro per pane bianco,
tipo 550
cucchiaini di sale 1
cucchiai di zucchero 1 11⁄2 2
burro 20 g 30 g 40 g
acqua 280 mL 350 mL 420 mL
cucchiaini di lievito in polvere
(cucchiaini per l’opzione COTTURA
RAPIDA)
MLXL
400 g 500 g 600 g
1
⁄2 11⁄2 2
1
(2)
1
(2)
11⁄2
(21⁄2)
PANE INTEGRALE
Selezionare il menu ‘04’ or ‘05’
Farina di grano duro per pane integrale 400 g 500 g 600 g
cucchiaini di sale 1
cucchiai di zucchero 1 1
burro 20 g 30 g 40 g
acqua 280 mL 350 mL 420 mL
cucchiaini di lievito in polvere
(cucchiaini per l’opzione COTTURA
RAPIDA)
MLXL
1
⁄2 11⁄2 2
1
(11⁄2)
1
⁄2 2
1
(11⁄2)
11⁄4
(2)
PANE INTEGRALE CON UVETTA
Selezionare il menu ‘06’
Farina di grano duro per pane integrale 400 g 500 g 600 g
cucchiaini di sale 1
cucchiai di zucchero 1 11⁄2 2
burro 20 g 30 g 40 g
acqua 280 mL 350 mL 420 mL
cucchiaini di lievito in polvere 1 1 1
aggiunta (introdurre nel dosatore di
uvetta e noci):
uvetta
MLXL
1
⁄2 11⁄2 2
1
80 g
100 g
⁄4
120 g
PANE FRANCESE
Selezionare il menu ‘08’
farina di grano duro per pane bianco,
tipo 550
cucchiaini di sale 1
burro 20 g
acqua 220 mL
cucchiaini di lievito in polvere
300 g
3
⁄4
PANNETTONE
1
Preparazioni
2
Preparare gli ingredienti in base alla ricetta. (Rimuovere la lama impastatrice.)
Introdurre gli ingredienti nel cestello del pane in base al seguente ordine:
3
frutta → zucchero →liquidi.
Posizionare il cestello del pane nell’unità principale e collegare la macchina alla presa elettrica.
Selezionare il menu ‘27’
1
Impostazione del tempo di cottura
2
Azionare la macchina
3
Tempo stimato per il completamento del programma selezionato
La spia del tasto ‘Start’ (Avvio) si accenderà.
4
Fare riferimento
alla P. 158 per le ricette
per composte
Per cancellare/
arrestare dopo l’avvio
(tenere premuto per più di
1 secondo)
Il timer non è disponibile per il menu 27.
(Il tasto del timer imposta soltanto la durata del
tempo di cottura.)
Seguire la ricetta per le quantità dei singoli
ingredienti.
•
Non aumentare né diminuire le quantità di frutta
poiché la composta potrebbe traboccare o
bruciarsi.
Selezionare il menu ‘11’
farina di grano duro per pane bianco,
tipo 550
Premere ‘Stop’ (Arresta) e rimuovere la
4
composta
quando la macchina emette 8 segnali acustici e la barra in corrispondenza del
tasto ‘End’ (Termine) lampeggia
La spia del tasto ‘Start’ (Avvio) smetterà di lampeggiare.
Se la cottura non è completa Ripetere i passaggi 1–3
(Il tempo di cottura aggiuntivo può essere raddoppiato. Ogni volta non può
comunque superare i 10–40 minuti. Il timer ripartirà da 1 minuto quando
l’unità è calda. Aumentare il tempo secondo la necessità premendo il tasto
del timer.)
150 151
cucchiai di zucchero 4
cucchiaini di sale 1
burro (tagliato in cubetti da 2 cm e
conservato in frigorifero)
uova (battute); medie 2 (100 g)
latte 200 mL
cucchiaini di lievito in polvere 1
burro aggiuntivo
(tagliato in cubetti da 1–2 cm e
conservato in frigorifero)
buccia d’arancia; tagliata a pezzetti* 50 g
uvetta sultanina* 50 g
ribes nero estratto secco* 50 g
* : aggiunta insieme all’ulteriore quantità di burro
400 g
1
⁄2
50 g
1
⁄2
70 g
PANE CON UVETTA
Selezionare il menu ‘03’
MLXL
farina di grano duro per pane bianco,
tipo 550
cucchiaini di sale 1
cucchiai di zucchero 1 1
burro 20 g 30 g 40 g
acqua 280 mL 350 mL 420 mL
cucchiaini di lievito in polvere 1 1 11⁄2
aggiunta (introdurre nel dosatore di
uvetta e noci):
uvetta
400 g 500 g 600 g
1
⁄2 11⁄2 2
80 g
1
⁄2 2
100 g
120 g
PANE ITALIANO
Selezionare il menu ‘09’
farina di grano duro per pane bianco,
tipo 550
cucchiaini di sale 1
cucchiai di olio d’oliva 11⁄2
acqua 260 mL
cucchiaini di lievito in polvere 1
400 g
1
⁄2
PANE IN CASSETTA
Selezionare il menu ‘10’
farina di grano duro per pane bianco,
tipo 550
cucchiai di zucchero 2
burro 30 g
acqua 250 mL
cucchiaini di lievito in polvere 1
380 g
PANE SENZA GLUTINE
Selezionare il menu ‘12’
acqua 430 mL
cucchiai di olio 1
miscela per pane senza glutine 500 g
cucchiaini di lievito in polvere 2
BRIOCHE SEMPLICE
Selezionare il menu ‘11’
farina di grano duro per pane bianco,
tipo 550
cucchiai di zucchero 4
cucchiai di latte in polvere 2
cucchiaini di sale 1
burro (tagliato in cubetti da 2 cm e
conservato in frigorifero)
uova (battute); medie 2 (100 g)
acqua 180 mL
cucchiaini di lievito in polvere 1
burro aggiuntivo
(tagliato in cubetti da 1–2 cm
conservato in frigorifero)
e
400 g
50 g
1
⁄4
70 g
Italiano
Page 77

Ricette per pane
Ricette per impasti
PANE BIANCO CON FARRO
Selezionare il menu ‘13’
MLXL
farina di farro bianca 400 g 500 g 600 g
cucchiaini di zucchero 1
cucchiaini di sale 1
burro 5 g 10 g 10 g
acqua 260 mL 340 mL 400 mL
cucchiaini di
lievito in polvere
1
⁄2 22
1
⁄4 11⁄2 1
1
11
⁄4 11⁄2
3
⁄4
PANE AL FARRO INTEGRALE
Selezionare il menu ‘13’
MLXL
farina di farro integrale 200 g 250 g 300 g
farina di farro bianca 200 g 250 g 300 g
cucchiaini di zucchero 1
cucchiaini di sale 1
cucchiai di olio 2 3 3
acqua 250 mL 320 mL 380 mL
cucchiaini di
lievito in polvere
1
⁄2 22
1
⁄4 11⁄2 1
1
11
⁄4 11⁄2
3
⁄4
SEGALE E FARRO (delay timer non disponibile)
Selezionare il menu ‘13’
MLXL
farina di farro bianca 275 g 350 g 425 g
farina di segale 125 g 150 g 175 g
cucchiaini di zucchero 1
cucchiaini di sale 1
burro 5 g 10 g 10 g
yogurt magro 120 g 150 g 180 g
acqua 180 mL 230 mL 270 mL
cucchiaini di
lievito in polvere
1
⁄2 22
1
⁄4 11⁄2 1
11
1
⁄4 11⁄2
3
⁄4
SEMI DI GRANO SARACENO E FARRO
Selezionare il menu ‘13’
MLXL
farina di farro bianca 320 g 400 g 480 g
farina di grano saraceno
cucchiaini di miele 1 1 1
cucchiaini di sale 1
cucchiai di
semi di sesamo
cucchiai di semi di lino 11⁄2 2 2
cucchiai di
semi di papavero
cucchiai di olio 2 3 3
acqua 250 mL 320 mL 380 mL
cucchiaini di
lievito in polvere
80 g 100 g 120 g
1
⁄4 11⁄2 1
1
⁄2 22
1
1
⁄2 2 21⁄2
1
11
1
⁄4 11⁄2
1
⁄2
3
⁄4
1
⁄2
RISO E FARRO CON SEMI DI PINO E CIPOLLE FRITTE
Selezionare il menu ‘14’
MLXL
farina di farro bianca 320 g 400 g 480 g
farina di riso nero 80 g 100 g 120 g
cucchiaini di zucchero 1
cucchiaini di sale 1
burro 5 g 10 g 10 g
acqua 260 mL 340 mL 400 mL
cucchiaini di
lievito in polvere
aggiunta (introdurre
nel dosatore di uvetta
e noci):
semi di pino
cucchiai di
cipolle fritte
1
⁄2 22
1
⁄4 11⁄2 1
1
11
40 g
3 4 5
⁄4 11⁄2
50 g
3
60 g
⁄4
FARRO CON LIMONE E SEMI DI PAPAVERO
Selezionare il menu ‘13’
MLXL
farina di farro bianca 400 g 500 g 600 g
cucchiaini di zucchero 1
cucchiaini di sale 1
burro 5 g 10 g 10 g
buccia di limone
grattuggiata
succo di limone 20 mL 20 mL 30 mL
cucchiai di
semi di papavero
acqua 250 mL 330 mL 380 mL
cucchiaini di
lievito in polvere
1
⁄2 22
1
⁄4 11⁄2 1
111
23 3
1
11
⁄4 11⁄2
3
⁄4
FARRO FRUTTATO
Selezionare il menu ‘14’
MLXL
farina di farro bianca 400 g 500 g 600 g
cucchiaini di zucchero 1
cucchiaini di sale 1
burro 5 g 10 g 10 g
cucchiaini di
miscela di spezie
acqua 270 mL 350 mL 400 mL
cucchiaini di
lievito in polvere
aggiunta (introdurre
nel dosatore di uvetta
e noci):
frutta secca mista
1
⁄2 22
1
⁄4 11⁄2 1
1
22
11
100 g
⁄2 3
1
⁄4 11⁄2
125 g
3
⁄4
150 g
IMPASTO BASE
Selezionare il menu ‘16’
farina di grano duro per pane bianco, tipo 550 500 g
cucchiaini di sale 11⁄2
cucchiai di zucchero 11⁄2
burro 30 g
acqua 310 mL
cucchiaini di lievito in polvere 1
IMPASTO BASE CON UVETTA
Selezionare il menu ‘17’
farina di grano duro per pane bianco, tipo 550 500 g
cucchiaini di sale 11⁄2
cucchiai di zucchero 11⁄2
burro 30 g
acqua 310 mL
cucchiaini di lievito in polvere 1
aggiunta (introdurre nel dosatore di uvetta e noci):
uvetta 100 g
IMPASTO PER PANR FRANCESE
Selezionare il menu ‘21’
farina di grano duro per pane bianco, tipo 550 300 g
cucchiaini di sale 1
burro 20 g
acqua 180 mL
cucchiaini di lievito in polvere
3
⁄4
IMPASTO CON FARINA INTEGRALE
Selezionare il menu ‘18’
Farina di grano duro per pane integrale 500 g
cucchiaini di sale 2
cucchiai di zucchero 1
burro 30 g
acqua 340 mL
cucchiaini di lievito in polvere 1
1
⁄2
1
⁄2
IMPASTO CON FARINA INTEGRALE E UVETTA
Selezionare il menu ‘19’
Farina di grano duro per pane integrale 500 g
cucchiaini di sale 2
cucchiai di zucchero 1
burro 30 g
acqua 340 mL
cucchiaini di lievito in polvere 1
aggiunta (introdurre nel dosatore di uvetta e noci):
uvetta 100 g
1
⁄2
1
⁄2
Ricetta per torte
TORTA ALLA CILIEGIA E MARZAPANE
Selezionare il menu ‘15’
zucchero di canna bianco 50 g
burro 175 g
uova 3
farina autolievitante 225 g
ciliege candite, a pezzettini 100 g
marzapane, tritato 75 g
latte 60 mL
mandorle tostate a scaglie 15 g
IMPASTO PER PIZZA
Selezionare il menu ‘22’
farina di grano duro per pane bianco, tipo 550 450 g
cucchiaini di sale 2
cucchiai di olio vegetale 4
acqua 240 mL
cucchiaini di lievito in polvere 1
IMPASTO PER BRIOCHE
(GIRELLE CON PEZZETTI DI CIOCCOLATO)
per 12 girelle
Selezionare il menu ‘23’
farina di grano duro per pane bianco,
tipo 550
cucchiai di zucchero 4
cucchiaini di sale 1
burro (tagliato in cubetti da 2 cm e
conservato in frigorifero)
uova (battute); medie 3 (150 g)
latte 90 mL
cucchiai di rum (scuro) 1
cucchiaini di lievito in polvere 1
burro aggiuntivo
(tagliato in cubetti da 1–2 cm e
conservato in frigorifero)
pezzetti di cioccolato* 120 g
* Dopo aver rimosso l’impasto, cospargere con i pezzetti di cioccolato e ripiegare un
terzo della parte inferiore verso l’alto e un terzo della parte superiore verso il basso.
Quindi piegare a metà.
400 g
70 g
1
⁄2
50 g
GIRELLE AL FARRO
per 8 girelle
Selezionare il menu ‘24’
farina di farro bianca 500 g
cucchiaini di zucchero 1
cucchiaini di sale 11⁄2
burro 10 g
acqua* 310 mL
cucchiaini di lievito in polvere 1
1
⁄2
1
⁄4
Italiano
152 153
Page 78

Ricette per composti privi di glutine
Il procedimento per la preparazione del pane senza glutine è molto diverso rispetto a quello del pane normale.
Se si prepara pane senza glutine per motivi di salute è molto importante aver consultato il proprio medico e seguire le linee guida indicate di
seguito.
• Questo programma è stato sviluppato in particolare per determinati tipi di miscele senza glutine; pertanto con l’utilizzo delle proprie miscele
potrebbe non essere possibile ottenere gli stessi buoni risultati.
• Quando si seleziona l’opzione ‘senza glutine’, è necessario seguire attentamente le indicazioni di ciascuna ricetta. (altrimenti il pane potrebbe
non riuscire bene).
Esistono due tipi di miscele pronte: miscele a basso contenuto di glutine e miscele preparate senza farina che non contengono glutine. Se è
necessario scegliere una delle due per utilizzare questo programma di cottura, consultare prima il proprio medico.
• I risultati di cottura e l’aspetto del pane possono variare in base al tipo di miscela utilizzata.
Occasionalmente potrebbe rimanere della farina su un lato della pagnotta.
Le miscele senza farina producono risultati maggiormente variabili.
• Per ottenere un risultato migliore, attendere che la pagnotta si sia raffreddata prima di tagliarla a fette.
• Il pane deve essere conservato in un luogo fresco e asciutto e consumato entro 2 giorni. Qualora non si utilizzi l’intera pagnotta entro il periodo
di tempo sopra specificato, è possibile suddividere la parte avanzata in comode porzioni e congerlarle servendosi degli appositi sacchetti per
congelatore.
Avvertenza per gli utenti che utilizzano questo programma per motivi di salute:
Quando si segue il programma ‘Senza glutine’, è necessario consultare il proprio medico o l’Associazione Celiachia e utilizzare
esclusivamente gli ingredienti adatti alle proprie condizioni di salute.
Panasonic non si assume alcuna responsabilità per eventuali conseguenze derivanti da ingredienti utilizzati senza aver consultato
professionisti del settore sanitario.
È estremamente importante evitare la contaminazione con farine contenenti glutine nel caso in cui il pane venga preparato per determinati
motivi alimentari. È necessario prestare particolare attenzione alla pulizia del cestello del pane e della lama impastatrice nonché a tutti gli
utensili che vengono utilizzati.
Per i clienti del Belgio
Le ricette senza glutine riportate di seguito sono state create utilizzando le miscele commerciali per pane senza glutine della marca
AVEVE.
Disponibili nelle farmacie, nei negozi di alimenti naturali e occasionalmente anche in grandi supermercati.
Per maggiori informazioni sui prodotti di AVEVE, telefonare al numero 0800/0229210.
PANE SENZA GLUTINE
Selezionare il menu ‘12’
acqua 320 mL
cucchiai di olio 1
farina senza glutine 500 g
cucchiaini di lievito in polvere 2
NOTA
Non è possibile selezionare le dimensioni per questo programma.
PANE SENZA GLUTINE CON UOVA
Selezionare il menu ‘12’
acqua 100 mL
latte 180 mL
uova 2
cucchiai di olio 1
farina senza glutine 500 g
cucchiaini di lievito in polvere 2
* Queste ricette sono indicate in particolar modo per i clienti residenti in Belgio.
Ricette AVEVE
[01 Basic (Cottura base)]
[02 Basic Rapid (Cottura base veloce)]
PANE BIANCO
Selezionare il menu ‘01’ oppure ‘02’
cucchiaini di zucchero 1 2 2
farina ‘Surfina’ AVEVE 400 g 500 g 600 g
acqua 250 mL 320 mL 380 mL
cucchiai di burro 1 1 1
cucchiaini di sale 1 11⁄2 2
cucchiaini di lievito in polvere
(cucchiaini per l’opzione COTTURA
RAPIDA)
NOTA
In tal caso il pane non sarà altrettanto ben lievitato e risulterà meno soffice.
MLXL
1
⁄2
3
⁄4
(11⁄2)
1
(13⁄4)
11⁄4
(2)
Per maggiori informazioni, contattare AVEVE al numero 0800/0229210.
[08 French (Francese)]
PANINI FRANCESI
Selezionare il menu ‘08’
farina ‘Frans krokant’ AVEVE 400 g
acqua 260 mL
cucchiaini di sale 1
cucchiai di burro 1
cucchiaini di lievito in polvere 1
NOTA
Per questo programma non è possibile selezionare le dimensioni del pane o il tipo
di crosta.
Con questa ricetta si ottiene un pane molto leggero che lievita bene e non si
mantiene a lungo.
[09 Italian (Italiano)]
[04 Whole wheat (Pane integrale)]
[05 Whole wheat Rapid (Pane integrale veloce)]
PANE INTEGRALE
Selezionare il menu ‘04’ oppure ‘05’
farina integrale fina AVEVE 300 g 400 g 450 g
farina ‘Frans krokant’ AVEVE 100 g 100 g 150 g
cucchiaini di zucchero 1 2 2
cucchiai di burro 1 1 2
cucchiaini di sale 1 1 2
acqua 250 mL 320 mL 380 mL
cucchiaini di lievito in polvere
(cucchiaini per l’opzione COTTURA
RAPIDA)
NOTA
In tal caso il pane non sarà altrettanto ben lievitato e risulterà meno soffice. Questo
programma è maggiormente adatto per pane semi-integrale.
Nelle ricetta descritte sopra viene sempre aggiunta un po’ di farina bianca. Se lo
si desidera, è possibile sostituire la farina bianca con quella integrale, ma il pane
risulterà più piccolo e denso. Se si aggiunge una quantità maggiore di farina bianca,
utilizzare meno acqua (poiché la farina integrale assorbe più acqua rispetto alla
farina bianca).
MLXL
1
(11⁄2)
1
1
(13⁄4)
⁄4
1
(2)
1
⁄2
PANE ITALIANO
Selezionare il menu ‘09’
farina ‘Frans krokant’ AVEVE 400 g
acqua 240 mL
cucchiaini di sale 1
cucchiai di olio d’oliva 11⁄2
cucchiaini di lievito in polvere
NOTA
Per questo programma non è possibile selezionare le dimensioni del pane o il tipo
di crosta.
Con questa ricetta si ottiene un pane molto leggero che lievita bene e non si
mantiene a lungo.
[10 Sandwich (Sandwich)]
PANINO SEMPLICE
Selezionare il menu ‘10’
cucchiaini di zucchero 1
farina ‘Surfina’ AVEVE 400 g
acqua 250 mL
cucchiai di burro 1
cucchiaini di sale 1
cucchiaini di lievito in polvere
NOTA
Per questo programma non è possibile selezionare le dimensioni del pane o il tipo
di crosta.
Con questa ricetta si ottine un pane soffice (abbastanza umido) con una crosta
colorita, ideale per preparare toast.
1
⁄2
3
⁄4
3
⁄4
Italiano
154 155
Page 79

Ricette AVEVE
* Queste ricette sono indicate in particolar modo per i clienti residenti in Belgio.
Per maggiori informazioni, contattare AVEVE al numero 0800/0229210.
Ricette per marmellate
[16 Basic (Impasto base)]
IMPASTO PER TORTINI (impasto per 2 tortini)
Selezionare il menu ‘16’
zucchero 60 g
farina per dolci 500 g
latte 100 mL
uova 3
burro 100 g
cucchiaini di sale 1
cucchiaini di lievito in polvere 2
1
⁄2
[18 Whole wheat (Pane integrale)]
IMPASTO CON FARINA INTEGRALE
Selezionare il menu ‘18’
cucchiai di zucchero 1
farina ‘Frans krokant’ AVEVE 250 g
farina ‘Boerebruin’ AVEVE 250 g
acqua 280 mL
cucchiaini di sale 1
cucchiaini di lievito in polvere 2
Metodo
Dividere l’impasto in palline di circa 50 g. Quindi lasciarlo lievitare coperto da un telo
di lino. Cuocere per circa 15–20 minuti a 220 °C in forno preriscaldato.
1
⁄2
[15 Bake only (Solo cottura)]
Selezionare il menu 15. Verrà visualizzato un tempo di
cottura di 30 minuti.
Continuare a premere il ‘timer’ per aumentare il tempo
di cottura (in incrementi di 1 minuto) fino a 1 ora e
30 minuti.
RICETTA PER TORTE
Selezionare il menu ‘15’
uova 3
cucchiai di latte 3
burro ammorbidito 200 g
bustina di miscela ‘ANCO CAKE MIX’ 1
Metodo
Selezionare il menu 15e digitare 1 ora e 10 minuti sul timer.
Dopo il segnale acustico, rimuovere il cestello del pane dalla macchina per il pane
e lasciar raffreddare. Quando il cestello del pane è freddo, tirare fuori la torta e
lasciarla raffreddare su una griglia.
[22 Pizza (Pizza)]
IMPASTO PER PIZZA
Selezionare il menu ‘22’
farina ‘Frans krokant’ AVEVE 500 g
acqua 290 mL
cucchiaini di sale 1
cucchiai di burro 1
cucchiaini di lievito in polvere 2
Metodo
Stendere l’impasto e metterlo in una teglia per pizza. Bucherellare l’impasto con
una forchetta. Distribuirvi sopra del sugo di pomodoro e aggiungere il condimento
desiderato. Cuocere per circa 20–25 minuti a 220 °C in forno preriscaldato.
156 157
1
⁄2
[26 Jam (Marmellata)]
MARMELLATA DI FRAGOLE
Selezionare il menu ‘26’
fragole, tagliate a pezzetti 600 g
zucchero 400 g
pectina in polvere 13 g
Introdurre metà della frutta nel cestello del pane, quindi
aggiungere la metà dello zucchero. Ripetere l’operazione con
1
il resto della frutta e dello zucchero.
Distribuire la pectina su tutti gli ingredienti contenuti nel
cestello del pane.
2
Selezionare il menu 26 e
digitare 1 ora e 40 minuti sul timer.
3
MARMELLATA DI MIRTILLI
Selezionare il menu ‘26’
mirtilli 700 g
zucchero 400 g
Introdurre metà della frutta nel cestello del pane, quindi
aggiungere la metà dello zucchero. Ripetere l’operazione con
1
il resto della frutta e dello zucchero.
Selezionare il menu 26 e
digitare 1 ora e 50 minuti sul timer.
2
MARMELLATA DI MELE E MORE
Selezionare il menu ‘26’
mele, grattate o tagliate a pezzetti 300 g
more 400 g
zucchero 300 g
pectina in polvere 6 g
Introdurre metà della frutta nel cestello del pane, quindi
aggiungere la metà dello zucchero. Ripetere l’operazione con
1
il resto della frutta e dello zucchero.
Distribuire la pectina su tutti gli ingredienti contenuti nel
cestello del pane.
2
Selezionare il menu 26 e
digitare 1 ora e 40 minuti sul timer.
3
PESCA MELBA
Selezionare il menu ‘26’
pesche, tagliate a pezzetti 500 g
lamponi 200 g
zucchero 300 g
pectina in polvere 8 g
Introdurre metà della frutta nel cestello del pane, quindi
aggiungere la metà dello zucchero. Ripetere l’operazione con
1
il resto della frutta e dello zucchero.
Distribuire la pectina su tutti gli ingredienti contenuti nel
cestello del pane.
2
Selezionare il menu 26 e
digitare 1 ora e 40 minuti sul timer.
3
MARMELLATA DI PRUGNE
Selezionare il menu ‘26’
prugne, tagliate a pezzetti 700 g
zucchero 350 g
pectina in polvere 6 g
Introdurre metà della frutta nel cestello del pane, quindi
aggiungere la metà dello zucchero. Ripetere l’operazione con
1
il resto della frutta e dello zucchero.
Distribuire la pectina su tutti gli ingredienti contenuti nel
cestello del pane.
2
Selezionare il menu 26 e
digitare 1 ora e 40 minuti sul timer.
3
MARMELLATA DI FRUTTI DI BOSCO CONGELATI
Selezionare il menu ‘26’
frutti di bosco congelati 700 g
zucchero 400 g
pectina in polvere 10 g
Introdurre metà della frutta nel cestello del pane, quindi
aggiungere la metà dello zucchero. Ripetere l’operazione con
1
il resto della frutta e dello zucchero.
Distribuire la pectina su tutti gli ingredienti contenuti nel
cestello del pane.
2
Selezionare il menu 26 e
digitare 1 ora e 40 minuti sul timer.
3
MARMELLATA DI RIBES ROSSI E PEPERONCINO
Selezionare il menu ‘26’
ribes rossi, schiacciati 300 g
peperoncino medio rosso, finemente tritato
zenzero fresco, finemente grattato 4 cm
arance, succo e buccia finemente grattata 2
zucchero 150 g
pectina in polvere 3 g
Introdurre tutti gli ingredienti, tranne lo zucchero e la pectina,
nel cestello del pane.
1
Aggiungere lo zucchero e distribuire la pectina su tutti gli
ingredienti contenuti nel cestello del pane.
2
Selezionare il menu 26 e
1–2
Italiano
digitare 1 ora e 40 minuti sul timer.
3
MARMELLATA DI ALBICOCCHE
Selezionare il menu ‘26’
albicocche, tagliate a pezzetti 500 g
zucchero 250 g
pectina in polvere 6 g
Introdurre metà della frutta nel cestello del pane, quindi
aggiungere la metà dello zucchero. Ripetere l’operazione con
1
il resto della frutta e dello zucchero.
Distribuire la pectina su tutti gli ingredienti contenuti nel
cestello del pane.
2
Selezionare il menu 26 e digitare 1 ora e 30 minuti sul timer.
3
Page 80

Ricette per composte
Conservazione e pulizia
[27 Compote (Composta di frutta)]
COMPOSTA DI MELE SPEZIATE
Selezionare il menu ‘27’
mele, sbucciate, senza torsolo e tagliate
a dadini
bastoncino di cannella 1
chiodi di garofano 2
limone, soltanto la buccia 1
succo di limone 2 cucchiai
zucchero 100 g
acqua 75 mL
Rimuovere la lama impastatrice dal cestello del pane.
1000 g
1
Introdurre gli ingredienti nel cestello del pane secondo
l’ordine specificato sopra. Versare acqua sugli ingredienti.
2
Selezionare il menu 27 e
digitare 1 ora e 20 minuti sul timer.
3
Mescolare a cottura ultimata.
4
COMPOSTA DI FRUTTI ROSSI
Selezionare il menu ‘27’
prugne, denocciolate e tagliate a metà 300 g
ciliege, denocciolate 250 g
fragole, senza picciolo 250 g
zucchero di canna bianco 75 g
acqua 75 mL
lamponi (aggiunti dopo la cottura) 200 g
Rimuovere la lama impastatrice dal cestello del pane.
1
Introdurre gli ingredienti nel cestello del pane secondo
l’ordine specificato sopra. Versare acqua sugli ingredienti.
2
Selezionare il menu 27 e
digitare 1 ora sul timer.
3
Mescolare a cottura ultimata.
4
Aggiungere i lamponi.
5
COMPOSTA DI RABARBARO E ZENZERO
Selezionare il menu ‘27’
rabarbaro, tagliato in lunghezze da 2 cm 700 g
succo d’arancia 2 cucchiai
zenzero cristallizzato, a pezzetti 20 g
zucchero 100 g
acqua 100 mL
Rimuovere la lama impastatrice dal cestello del pane.
1
Introdurre gli ingredienti nel cestello del pane secondo
l’ordine specificato sopra. Versare acqua sugli ingredienti.
2
Selezionare il menu 27 e
digitare 1 ora e 40 minuti sul timer.
3
Mescolare a cottura ultimata.
4
COMPOSTA DI FRUTTI DI BOSCO
Selezionare il menu ‘27’
frutti di bosco
ad es. fragole, lamponi, mirtilli
zucchero 75 g
acqua 2 cucchiai
Rimuovere la lama impastatrice dal cestello del pane.
800 g
1
Introdurre gli ingredienti nel cestello del pane secondo
l’ordine specificato sopra. Versare acqua sugli ingredienti.
2
Selezionare il menu 27 e
digitare 1 ora sul timer.
3
Mescolare a cottura ultimata.
4
SALSA DI MELE
Selezionare il menu ‘27’
mele bramley, sbucciate, senza torsolo e
tagliate a dadini
acqua 2 cucchiai
Rimuovere la lama impastatrice dal cestello del pane.
1000 g
1
Introdurre le mele nel cestello del pane. Versare acqua sugli
ingredienti.
2
Selezionare il menu 27 e
digitare 1 ora e 20 minuti sul timer.
3
Mescolare a cottura ultimata.
4
PESCA IN SCIROPPO VANIGLIATO
Selezionare il menu ‘27’
pesche, senza nocciolo e tagliate in
zucchero 100 g
bacca di vaniglia
acqua 125 mL
Rimuovere la lama impastatrice dal cestello del pane.
1
⁄8 1000 g
1
⁄2
1
Introdurre gli ingredienti nel cestello del pane secondo
l’ordine specificato sopra. Versare acqua sugli ingredienti.
2
Selezionare il menu 27 e
digitare 1 ora sul timer.
3
A cottura ultimata, rimuovere le pesche con una schiumarola.
Versare lentamente lo sciroppo sulla frutta. Lasciar
4
raffreddare.
Prima di pulire la macchina per il pane, scollegarla
dalla presa e lasciarla raffreddare.
Per evitare di danneggiare la macchina per il
pane...
Non utilizzare prodotti abrasivi!
(detergenti, pagliette in lana d’acciaio ecc.)
Non lavare nessun componente della macchina per il
pane in lavastoviglie!
Non utilizzare benzina, diluenti, alcol o candeggina!
Dopo aver sciacquato le parti lavabili, asciugarle con un
panno.
Mantenere sempre le parti della macchina del pane
pulite e asciutte.
Cestello del pane e lama impastatrice
Rimuovere i residui dell’impasto e lavare con
acqua.
Se risulta difficile rimuovere la lama
impastatrice, immergerla in acqua calda per
5–10 minuti. Non immergere il cestello del
pane in acqua.
Cucchiaio e bicchiere dosatore
Lavare con acqua.
Non lavabili in lavastoviglie
Coperchio
Pulire con un panno umido
Aperture per la fuoriuscita del vapore
Pulire con un panno umido
Corpo
Pulire con un panno umido
Pulire delicatamente per
evitare di danneggiare il
sensore della temperatura.
Italiano
Sensore della temperatura
•
Il colore della parte interna dell’unità potrebbe cambiare con l’utilizzo.
158 159
Page 81

Conservazione e pulizia
Risoluzione dei problemi
Prima di rivolgersi al servizio assistenza, consultare questa sezione.
Coperchio del dosatore
Rimuovere e lavare con acqua.
Sollevare il coperchio del
dosatore a un angolo di circa
75 gradi. Allineare le giunture e
tirare verso di sé per rimuoverlo o
spingere verso lo stesso angolo per fissarlo. (attendere
prima che la macchina si sia raffredata poiché subito
dopo l’utilizzo è molto calda)
Non tirare la guarnizione e fare attenzione a non
danneggiarla. (danni alla guarnizione possono
determinare fuoriuscita di vapore, condensa o
deformazione)
Guarnizione
Se è bagnato,
asciugare con un
panno asciutto.
Dosatore del lievito
Lavare con un panno umido e lasciar asciugare naturalmente.
Se viene pulito con un panno asciutto, il lievito in polvere non
cadrebbe nel cestello del pane a causa della formazione di
elettricità statica.
Dosatore di uvetta e noci
Rimuovere e lavare con acqua.
Problemi
Il pane non lievita
La superficie del pane è
irregolare
Causa Soluzione
[Tutti i tipi di pane]
La qualità del glutine presente nella farina impiegata è scadente oppure non è stata utilizzata
farina di grano duro. (la qualità del glutine può variare in base alla temperatura, all’umidità, alla
modalità di conservazione della farina e alla stagione del raccolto)
Provare un altro tipo, un’altra marca o un’altra partita di farina.
L
’impasto è diventato troppo duro perché non è stata utilizzata una quantità sufficiente di liquido.
La farina di grano duro con contenuto proteico più elevato assorbe più acqua rispetto alle
altre; si consiglia di aggiungere altri 10–20 mL di acqua.
Non si sta utilizzando il giusto tipo di lievito.
Utilizzare lievito in polvere in bustina con la dicitura ‘lievito istantaneo’ sulla confezione.
Questo tipo di lievito non necessita di pre-fermentazione.
Non si sta utilizzando una quantità sufficiente di lievito oppure il lievito impiegato è vecchio.
Utilizzare il cucchiaio dosatore fornito in dotazione. Controllare la data di scadenza del lievito.
(conservarlo in frigorifero)
Il lievito è entrato a contatto con del liquido prima dell’impastatura.
Verificare di aver inserito gli ingredienti in base al corretto ordine indicato nelle istruzioni. (P. 142)
È stato utilizzato troppo sale o una quantità insufficiente di zucchero.
Rileggere la ricetta e misurare le giuste quantità utilizzando il cucchiaio dosatore fornito in
dotazione.
Verificare che sale e zucchero non siano inclusi in altri ingredienti.
[Tipi di pane speciale]
Per la preparazione di un pane particolare è stata utilizzata farina di farro piccolo e/o una
notevole quantità di farina di versa da quella di farro.
La quantità di farina di farro non deve essere superiore al 60% di tutta la farina quando si
utilizzano più di due tipi di farina diverse da quella di farro. La quantità di farina di segale
non deve essere superiore al 40% di tutta la farina impiegata e quella di grano saraceno non
deve superare il 20%.
Lavare dopo ciascun utilizzo per rimuovere
eventuali residui.
Il pane è pieno di bolle d’aria
Protezione del rivestimento antiaderente
Il cestello del pane e la lama impastatrice sono dotati di un rivestimento antiaderente per impedire la formazione di
macchie e rendere più semplice rimuovere il pane.
Per evitare di danneggiare il rivestimento, seguire le istruzioni riportate di seguito.
• Non utilizzare utensili duri come coltelli o forchette per rimuovere il pane dal cestello del pane.
Se risulta difficile tirare fuori il pane dal cestello, consultare la P. 163.
•
Prima di affettare il pane, accertarsi che la lama impastatrice non sia rimasta incastrata al suo interno.
Se è rimasta incastrata, attendere che il pane si sia raffredato, quindi rimuoverla.
(Non utilizzare utensili duri o taglienti come coltelli o forchette.)
Fare attenzione a non ustionarsi poiché la lama impastatrice potrebbe essere ancora calda.
•
Utilizzare una spugna morbida per la pulizia del cestello del pane e della lama impastatrice.
Non utilizzare prodotti abrasivi come detergenti o pagliette di lana d’acciaio.
Il pane sembra essersi sgonfiato
dopo la lievitazione.
Il pane è lievitato troppo.
Perché il pane è biancastro e
appiccicoso?
È stato utilizzato troppo lievito.
Rileggere la ricetta e misurare la giusta quantità utilizzando il cucchiaio dosatore fornito in
dotazione.
È stato utilizzato troppo liquido.
Alcuni tipi di farine assorbono una maggiore quantità di acqua rispetto alle altre; si consiglia
pertanto di utilizzare 10–20 mL di acqua in meno.
La qualità della farina non è molto buona.
Provare a utilizzare una marca diversa di farina.
È stato utilizzato troppo liquido.
Provare a utilizzare 10–20 mL in meno di acqua.
È stato utilizzato/a troppo/a lievito/acqua.
Rileggere la ricetta e misurare le giuste quantità utilizzando il cucchiaio dosatore (lievito)/
bicchiere dosatore (acqua) forniti in dotazione.
Verificare che la quantità di acqua in eccesso non sia contenuta in altri ingredienti.
Non è stata utilizzata una quantità sufficiente di farina.
Misurare attentamente la farina utilizzando la bilancia.
Non si sta utilizzando una quantità sufficiente di lievito oppure il lievito impiegato è vecchio.
Utilizzare il cucchiaio dosatore fornito in dotazione. Controllare la data di scadenza del lievito.
(conservarlo in frigorifero)
Si è verificata un’interruzione di corrente o la macchina è stata arrestata durante la lavorazione
del pane.
La macchina si spegne se viene fermata per più di 10 minuti. È necessario rimuovere il pane
dal cestello e ricominciare con nuovi ingredienti.
Italiano
Ingredienti duri, granulosi o grossi come farine con chicci di grano interi o macinati, zucchero, oppure l’aggiunta di noci e semi
potrebbero danneggiare il rivestimento antiaderente del cestello del pane. Se si utilizzano ingredienti in pezzi grossi, tagliarli in pezzi
piccoli. Attenersi alle quantità indicate nelle ricette.
160 161
Page 82

Risoluzione dei problemi
Prima di rivolgersi al servizio assistenza, consultare questa sezione.
Problemi
C’è troppa farina intorno alla
base e ai lati del pane.
Perché il pane non risulta
omogeneo?
Il pane non si è cotto.
Causa Soluzione
È stata utilizzata troppa farina o non si sta utilizzando una quantità sufficiente di liquido.
Rileggere la ricetta e misurare le giuste quantità utilizzando una bilancia per la farina o
l’apposito bicchiere dosatore per i liquidi.
La lama impastatrice non è stata inserita nel cestello del pane.
Accertarsi che la lama impastatrice sia nel cestello del pane prima di versarvi gli ingredienti.
Si è verificata un’interruzione di corrente o la macchina è stata arrestata durante la lavorazione del pane.
La macchina si spegne se viene fermata per più di 10 minuti. Dovrebbe essere possibile
ricominciare il processo di panificazione, anche se si potrebbero ottenere risultati poco
soddisfacenti nel caso in cui l’impastatura era già iniziata.
È stato selezionato il menu ‘Impasto’.
Il menu ‘Impasto’ non comprende il processo di cottura.
Si è verificata un’interruzione di corrente o la macchina è stata arrestata durante la lavorazione
del pane.
La macchina si spegne se viene fermata per più di circa 10 minuti. Se l’impasto è lievitato
correttamente si può provare a cuocerlo nel proprio forno.
Non c’è una quantità di acqua sufficiente e si è attivato il dispositivo di protezione del motore.
Ciò si verifica soltanto quando l’unità è troppo piena e il motore viene sottoposto a uno sforzo eccessivo.
Recarsi presso il negozio del rivenditore per il servizio di assistenza. La prossima volta rileggere
la ricetta e misurare le giuste quantità utilizzando il bicchiere dosatore fornito in dotazione.
La lama impastatrice non è stata fissata.
Accertarsi per prima cosa di aver fissato la lama impastatrice (P. 142).
Il perno su cui poggia la lama impastatrice è duro e non ruota.
Se il perno su cui poggia la lama impastatrice non ruota quando la lama è fissata, è
necessario sostituirle tutto il blocco del perno. (Rivolgersi al rivenditore o a un centro
assistenza Panasonic.)
Quando si rimuove il pane dal
cestello la lama impastatrice
rimane incastrata al suo interno.
La crosta raggrinzisce e diventa
morbida quando il pane si
raffredda.
Come si può mantenere
croccante la crosta?
Il pane è appiccicoso e non è
possibile tagliare delle fette regolari.
Gli ingredienti aggiuntivi
non sono stati mescolati
adeguatamente nella brioche.
C’è troppo olio alla base della
brioche.
La crosta è oleosa.
Il pane ha buchi molto grandi.
Problemi
Causa Soluzione
L’impasto è leggermente duro.
Lasciar raffreddare completamente il pane prima di rimuovere adeguatamente la lama impastatrice.
Alcuni tipi di farine assorbono maggiori quantità di acqua rispetto ad altre; la prossima volta si consiglia
pertanto di aggiungere altri 10–20 mL di acqua.
La crosta si è accumulata sotto la lama impastatrice.
Lavare la lama impastatrice e il relativo mandrino dopo ogni utilizzo.
Il vapore che rimane all’interno del pane dopo la cottura può passare nella crosta e
ammorbidirla leggermente.
Per ridurre la quantità di vapore, provare a utilizzare 10–20 mL di acqua in meno o metà
quantità di zucchero.
Per rendere la crosta più croccante, si può utilizzare il menu 08 o l’opzione ‘Dark’ (Scura) del
colore della crosta oppure mettere il pane nel forno a 200 °C/manopola del gas 6 per altri
5–10 minuti.
Era troppo caldo quando è stato tagliato a fette.
Lasciar raffreddare il pane su una griglia prima di tagliarlo per far dissolvere il vapore.
L’impasto per il pane è troppo duro e non consente di aggiungere ulteriori ingredienti o di
toglierne alcuni.
Dimezzata la quantità degli ingredienti aggiuntivi.
È stato aggiunto del burro entro 5 minuti dal segnale acustico?
Non introdurre burro quando il display indica il tempo rimanente per il termine della cottura.
(P.145)
Il sapore del burro potrebbe essere impercettibile, ma potrebbe essersi cotto nel forno.
L’impasto è fuoriuscito dalla
base del cestello del pane.
I lati del pane si sono abbassati
e la base è umida.
La lama impastatrice fa un
rumore metallico.
Si avverte odore di bruciato
durante la cottura del pane.
Esce fumo dalle aperture per la
fuoriuscita del vapore.
Una piccola quantità d’impasto fuoriesce dalle bocchette di ventilazione (ma non
impedisce allae parti rotanti di ruotare). Non si tratta di un difetto; tuttavia è bene verificare
occasionalmente che il perno su cui poggia la lama impastatrice ruoti correttamente.
Se il perno su cui poggia la lama impastatrice non ruota quando la lama è fissata, è
necessario sostituirle tutto il blocco del perno. (Rivolgersi al rivenditore o a un centro
assistenza Panasonic).
(Base del cestello del pane)
Perno di appoggio del
meccanismo di impastatura
Unità di appoggio del
meccanismo di impastatura
Bocchette di ventilazione (4 in totale)
Il pane è stato lasciato per troppo tempo nel cestello dopo la cottura.
Rimuovere immediatamente il pane dopo la cottura.
Si è verificata un’interruzione di corrente o la macchina è stata arrestata durante la lavorazione del pane.
La macchina si spegne se viene fermata per più di 10 minuti. Si può provare a cuocere
l’impasto nel proprio forno.
Ciò si verifica perché la lama impastatrice non è fissata saldamente al perno su cui poggia. (non
si tratta di un difetto)
Gli ingredienti potrebbero essere fuoriusciti ed essersi incastrati sulla serpentina.
A volte piccole quantità di farina, uvetta o altri ingredienti potrebbero schizzare fuori dal
cestello del pane durante la fase in cui vengono mescolati. Pulire delicatamente la serpentina
dopo la cottura, quando la macchina per il pane si è raffreddata.
Rimuovere il cestello del pane dalla macchina per introdurvi gli ingredienti.
Perno di appoggio del meccanismo
di impastatura
Parte n. ADA29E165
La brioche non viene bene se si
utilizza la funzione ‘Bread mix’.
Non si riesce a tirare fuori il
pane.
Durante la cottura la marmellata
si è bruciata oppure la lama
impastatrice si è bloccata e non
si stacca.
La marmellata è traboccata.
Provare i seguenti accorgimenti.
Potrebbe cuocersi meglio diminuendo leggermente la quantità di lievito quando si utilizzano i
menu 11 o 23 (se si aggiunge il lievito separatamente).
Seguire la ricetta basata sulla miscela pronta per pane, ma la quantità di quest’ultima deve
essere compresa tra 350 e 500 g.
Introdurre il lievito in polvere (se aggiunto separatamente) nel dosatore del lievito e gli
altri ingredienti secchi e il burro nel cestello del pane. Quindi aggiungere l’acqua. Se si
aggiungono ingredienti extra, introdurli in un secondo momento. (P.145 o 147)
Il completamento è diverso a seconda della ricetta su cui si basa la miscela pronta per il pane.
Se il pane non può essere facilmente rimosso dal cestello, lasciarlo raffreddare per 5–10 minuti,
facendo attenzione a non lasciarlo incustodito in un ambiente dove qualcuno potrebbe rischiare
di ustionarsi o dove oggetti potrebbero incendiarsi.
In seguito, scuotere diverse volte il cestello del pane servendosi dei guanti da forno.
(Tenere abbassata la maniglia in modo che non ostacoli il pane.)
La quantità di frutta era insufficiente oppure quella dello zucchero era troppa.
Mettere il cestello del pane nel lavandino e riempirlo a metà con acqua calda. Lasciare a bagno il
cestello del pane finché i residui non si staccano o la lama impastatrice non si svita. Dopo aver staccato
i residui bruciati, lavarlo con una spugna morbida o panno simile. Fare attenzione all’acqua calda.
È stato/a utilizzato/a troppo zucchero o troppa frutta.
Utilizzare esclusivamente le quantità di frutta e zucchero indicate nelle ricette a P. 157.
Italiano
162 163
Page 83

Risoluzione dei problemi
Prima di rivolgersi al servizio assistenza, consultare questa sezione.
Instrucciones de seguridad
Asegúrese de seguir estas instrucciones.
Problemi
La marmellata è troppo liquida e
non si è addensata.
È possibile utilizzare frutta
congelata?
Quali tipi di zucchero si possono
usare per la marmellata?
Per la preparazione della
marmellata è possibile utilizzare
frutta sotto spirito?
La frutta si è disfatta durante la
preparazione dello sciroppo di
frutta.
Il lievito in polvere non cade nel
cestello del pane.
Causa Soluzione
La frutta era acerba o troppo matura.
La quantità di zucchero è stata diminuita troppo.
Il tempo di cottura non era sufficiente.
È stata utilizzata frutta a basso contenuto di pectina.
Utilizzare la marmellata troppo liquida come salsa per dessert.
Lasciar raffreddare completamente la marmellata. Durante il raffreddamento la marmellata
continuerà ad addensarsi.
È possibile utilizzarli.
Può essere utilizzato zucchero di canna bianco e semolato.
Non utilizzare zucchero di canna scuro, zucchero dietetico, zucchero a basso contenuto di
calorie o dolcificanti.
Non utilizzarli. La qualità non è soddisfacente.
Il tempo di cottura era troppo lungo. La frutta poteva essere troppo matura.
I tempi di attivazione del dosatore del lievito sono diversi a seconda del menu e della temperatura
dell’ambiente.
Il dosatore del lievito è bagnato o potrebbe esservi elettricità statica.
Lavare con un panno umido e lasciar asciugare naturalmente.
Il lievito in polvere è umido.
Utilizzare nuovo lievito in polvere.
Para evitar accidentes o lesiones al usuario, a otras personas y daños materiales, siga las instrucciones que se indican
a continuación.
Los siguientes gráficos indican el nivel del daño causado por un uso incorrecto.
Advertencia:
muerte.
Indica lesiones graves o la
Precaución:
Indica riesgo de lesiones o
daños materiales.
Los símbolos se clasifican y explican a continuación.
Este símbolo indica prohibición.
Este símbolo indica un requisito que debe
cumplirse.
Advertencia
No utilice el aparato si el cable de alimentación está dañado o si el enchufe no está
firmemente conectado a la toma de corriente.
(Puede causar una descarga eléctrica o un incendio debido a un cortocircuito.)
Si el cable de alimentación está dañado, debe sustituirlo el fabricante, su técnico de mantenimiento o una
persona con una cualificación similar para evitar riesgos.
No dañe el cable de alimentación ni el enchufe.
(Puede causar una descarga eléctrica o un incendio debido a un cortocircuito.)
Las siguientes acciones están estrictamente prohibidas. (Modificar el cable, colocarlo cerca de dispositivos de
calefacción, doblarlo, retorcerlo, tirar de él, colocar objetos pesados encima o mezclarlo con otros cables.)
appare sul display.
01 appare sul display.
H01–H02 appare sul display.
U50 appare sul display.
Si è verificata un’interruzione di corrente per circa 10 minuti (la spina è stata scollegata
accidentalmente oppure si è attivato il breaker), o vi è un altro tipo di problema con l’alimentazione.
L’operazione non sarà compromessa se il problema di alimentazione è temporaneo. La
macchina per il pane riprenderà a funzionare se l’alimentazione viene ristabilita entro
10 minuti, ma il risultato finale potrebbe essere compromesso.
Si è verificata un’interruzione di corrente per un determinato periodo di tempo (di durata
variabile in base alle circostanze: ad es. interruzione della rete elettrica, spina scollegata,
malfunzionamento del fuso o del breaker).
Rimuovere l’impasto e ricominciare utilizzando nuovi ingredienti.
Il display indica la presenza di un problema con la macchina per il pane.
Rivolgersi al rivenditore o a un centro assistenza Panasonic.
L’unità è molto calda (circa 40 °C
macchina.
Lasciar raffreddare l’unità fino a una temperatura inferiore ai 40°C/105 °F prima di riutilizzarla
(apparirà U50).
/105 °F
). Ciò potrebbe verificarsi con un utilizzo ripetuto della
No enchufe ni desenchufe el cable de alimentación con las manos mojadas.
(Puede causar una descarga eléctrica.)
No supere la tensión en la toma de corriente ni utilice una corriente distinta de la
que se indica en el aparato.
(Puede causar una descarga eléctrica o un incendio.)
●
Asegúrese de que la tensión suministrada al aparato es la misma que la de su suministro local.
●
Si conecta otros dispositivos en la misma toma de corriente se puede producir un sobrecalentamiento
eléctrico.
Inserte el enchufe con firmeza.
(Si no lo hace así, se puede producir una descarga eléctrica y un incendio causado por el calor que se puede
generar alrededor del enchufe.)
Limpie el enchufe regularmente.
(Si el enchufe está sucio, el aislamiento puede ser insuficiente debido a la acumulación de humedad y pelusa,
que puede causar un incendio.)
Desenchufe el enchufe y límpielo con un paño seco.
EspañolItaliano
164
165
Page 84

Instrucciones de seguridad
Asegúrese de seguir estas instrucciones.
Advertencia
Interrumpa el uso del aparato de inmediato y desenchúfelo en el caso improbable
de que deje de funcionar correctamente.
(Puede producirse humo, un incendio, una descarga eléctrica o quemaduras.)
por ejemplo, en caso de funcionamiento inusual o avería
●
El enchufe y el cable de alimentación están inusualmente calientes.
● El cable de alimentación está dañado o hay un corte del suministro eléctrico.
● El cuerpo principal está deformado o inusualmente caliente.
● El aparato hace un ruido inusual al girar durante el uso.
Desenchufe el aparato inmediatamente y póngase en contacto con el vendedor o con un servicio técnico de Panasonic para una
revisión o reparación.
No utilice el aparato en los siguientes lugares.
●
Coloque la máquina panificadora sobre una encimera a prueba de calor plana,
limpia, seca y firme a por lo menos 10 cm (4 pulgadas) del borde.
(Si no lo hace así, el aparato puede deslizarse y caer desde la encimera.)
●
No lo coloque sobre superficies inestables, sobre otros aparatos eléctricos como
una nevera, sobre materiales como un mantel ni sobre una alfombra, etc.
(Puede causar una caída o un incendio.)
●
La unidad se calienta durante la cocción. La máquina panificadora debe
colocarse a por lo menos 5 cm (2 pulgadas) de las paredes adyacentes y otros
Precaución
objetos.
No toque, bloquee ni cubra los orificios de salida de vapor de agua durante el uso.
(Puede causar una quemadura.)
●
Preste una atención especial a los niños.
No desmonte, repare ni modifique este aparato.
(Puede producirse un incendio, una descarga eléctrica o lesiones.)
Póngase en contacto con el vendedor o con un servicio técnico de Panasonic.
(Puede causar una decoloración o deformación.)
No toque las zonas calientes como el recipiente del pan, el interior de la unidad,
los elementos de calentamiento ni la parte interior de la tapa mientras se esté
utilizando el aparato o después de cocinar.
La temperatura de las superficies accesibles puede ser alta cuando el aparato está
en funcionamiento.
(Puede causar una quemadura.)
No sumerja el aparato en agua ni lo salpique con agua.
(Puede causar una descarga eléctrica o un incendio debido a un cortocircuito.)
Para evitar las quemaduras, utilice siempre guantes de horno para extraer el recipiente del pan o para tocar
el pan acabado.
(No utilice guantes de horno mojados.)
Este aparato no se ha diseñado para que lo utilicen personas (incluidos los niños)
También deber tener cuidado al extraer el pan acabado o la pala de amasar.
con capacidad física, sensorial o mental reducida o carezcan de la experiencia
y los conocimientos necesarios, a menos que hayan recibido instrucción sobre
el uso del aparato o estén bajo la supervisión de una persona responsable de su
seguridad. Los niños deben estar bajo supervisión para impedir que jueguen con
el aparato.
(Puede causar quemaduras, lesiones o una descarga eléctrica.)
Precaución
Información importante
No utilice el aparato en el exterior, en las proximidades de fuentes
de calor ni en habitaciones con mucha humedad.
(Puede causar un funcionamiento incorrecto o deformaciones.)
No ejerza una fuerza excesiva sobre las piezas que se ilustran a la derecha.
(Puede causar un funcionamiento incorrecto o deformaciones.)
Este aparato no se ha diseñado para funcionar mediante un temporizador externo ni con un sistema de control remoto independiente.
Sensor de
temperatura
Elemento de calentamiento
Interior de la tapa
]
Asegúrese de sujetar el enchufe cuando lo desconecte de la red.
(Si no lo hace así, puede causar una descarga eléctrica o un incendio debido a un cortocircuito.)
Información sobre la eliminación para los usuarios de equipos eléctricos y electrónicos usados (particulares)
Desconecte el enchufe cuando no esté utilizando el aparato.
(Si no lo hace así, puede causar una descarga eléctrica o un incendio debido a fugas eléctricas.)
Desenchufe el aparato y espere a que se enfríe antes de limpiarlo.
(Puede causar una quemadura.)
No permita que el cable de alimentación cuelgue del borde de la mesa ni esté en
contacto con una superficie caliente.
(Puede causar una quemadura o lesiones.)
No extraiga el recipiente del pan ni desenchufe la máquina panificadora durante el uso.
(Puede causar una quemadura o lesiones.)
Póngase en contacto con su autoridad local para que le informen detalladamente sobre el punto de recogida designado más cercano.
De acuerdo con la legislación nacional, podrían aplicarse multas por la eliminación incorrecta de estos desechos.
Para empresas de la Unión Europea
Si desea desechar equipos eléctricos y electrónicos, póngase en contacto con su distribuidor o proveedor para que le informe detalladamente.
Información sobre la eliminación en otros países no pertenecientes a la Unión Europea
Este símbolo sólo es válido en la Unión Europea.
Si desea desechar este producto, póngase en contacto con las autoridades locales o con su distribuidor para que le informen sobre el método
correcto de eliminación.
La aparición de este símbolo en un producto y/o en la documentación adjunta indica que los productos eléctricos y electrónicos
usados no deben mezclarse con la basura doméstica general.
Para que estos productos se sometan a un proceso adecuado de tratamiento, recuperación y reciclaje, llévelos a los puntos
de recogida designados, donde los admitirán sin coste alguno. En algunos países existe también la posibilidad de devolver los
productos a su minorista local al comprar un producto nuevo equivalente.
Si desecha el producto correctamente, estará contribuyendo a preservar valiosos recursos y a evitar cualquier posible efecto negativo
en la salud de las personas y en el medio ambiente que pudiera producirse debido al tratamiento inadecuado de desechos.
Español
166 167
Page 85

Identificación de accesorios/piezas
Unidad principal
Dispensador de uvas pasas y nueces
Los ingredientes que se pongan en el dispensador de uvas pasas y nueces caerán en el recipiente del pan
automáticamente al seleccionar la opción con uvas pasas en el menú (03, 06, 14, 17, 19 y 25).
Vaya a la página 176 para ver los ingredientes que se pueden poner en el dispensador de uvas pasas y nueces.
Tapa del dispensador
Dispensador de levadura
Panel de control
Estado de funcionamiento
: muestra la fase actual del programa. Los ingredientes se están regulando en la fase
de ‘Rest’ (Reposo) antes del amasado.
: se muestra cuando hay algún problema con la fuente de alimentación.
: se muestra cuando se añaden ingredientes manualmente en los menús 11y 23.
Tiempo restante hasta que el pan esté
listo
Además, cuando se añadan ingredientes
adicionales de forma manual, la pantalla mostrará
el tiempo que falta para añadir los ingredientes.
Vaso de medir
Para medir líquidos
(máx. 310 mL)
Panel de control
Accesorios
Cuchara de medir
Para medir azúcar, sal, levadura, etc.
(15 mL) (5 mL)
Tapa
Lengüeta del dispensador
de uvas pasas y nueces
Pala de amasar
(harina de centeno)
Pala de amasar
(harina de trigo)
Asa
Recipiente del
pan
Tamaño
Pulse este botón para
elegir tamaño. Consulte
los menús disponibles en
la página 172.
•
XL
•
L
•
M
Menú
Pulse este botón para elegir el menú. Aparecerá
el número de menú y cada vez que se pulse este
botón el número de menú cambiará al siguiente.
(Mantenga pulsado el botón para avanzar más
rápidamente.)
Consulte los números de menú en las páginas 172
y 173.
Corteza
Pulse este botón para
elegir el color de la
corteza. Consulte los
menús disponibles en
la página 172.
•
Dark ( Oscuro)
•
Medium (Medio)
•
Light (Claro)
Temporizador
Ajuste el temporizador de retardo
(tiempo hasta que el pan está
listo) o ajuste el tiempo de
cocción/cocinado para los menús
15, 26 y 27.
‘▲’ Pulse este botón para
aumentar el tiempo.
‘▼’ Pulse este botón para reducir
el tiempo.
Iniciar
Pulse este botón para
iniciar el programa.
Parar
Pulse este botón para cancelar/
parar el programa.
(Para cancelar/parar, manténgalo
pulsado durante más de
1 segundo.)
Español
Cucharilla
•
Marcas de
¼, ½ y ¾
Enchufe
Esta imagen muestra todas las palabras y símbolos, pero durante el funcionamiento solo se mostrarán los que son pertinentes.
•
Incrementos de 10 mL
Cuchara
•
Marca de ½
168 169
Page 86

Ingredientes para hacer pan
Harina
Principal ingrediente del pan, produce gluten. (ayuda a que suba
el pan y le da una textura firme)
Utilice harina fuerte. No utilice harina suave ni
harina pura.
La harina debe pesarse en una báscula.
La harina fuerte se obtiene al moler trigo
duro y tiene un alto contenido de proteínas
que es necesario para la producción de
gluten.
El dióxido de carbono que se
produce durante la fermentación
queda atrapado dentro de la
red elástica del gluten y de
ese modo sube la masa.
Harina blanca
Se obtiene al moler sémola de
trigo, excluyendo el salvado y el
germen. El mejor tipo de harina
para cocer pan es el que lleva la
marca ‘para hacer pan’.
No utilice harina pura ni harina leudante
como sustituto de la harina para pan.
Agua
Utilice agua corriente normal.
Utilice agua tibia si va a emplear los menús 02, 05, 07, 12 o 20
en una habitación fría.
Utilice agua fría si va a emplear los menús 07, 08, 11, 13, 14, 20,
21, 23, 24 o 25 en una habitación caliente.
Mida siempre los líquidos utilizando el vaso incluido.
Sal
Mejora el sabor y refuerza el gluten ayudando a
que suba el pan.
El pan puede perder sabor/tamaño si se mide de forma
inexacta.
Si va a utilizar una mezcla para
pan...
Mezclas para pan que incluyen levadura
Coloque la mezcla en el recipiente del pan y a
En algunas mezclas no se especifica con claridad
Mezcla para pan con bolsita de levadura
Ponga la mezcla para el pan en la bandeja del pan y a
Grasa
Aporta sabor y suavidad al pan,
Se recomienda el uso de mantequilla o margarina.
Cocción de brioches con mezcla para brioches
Seleccione los menús 11 o 02 de tamaño ‘Medium’
continuación añada agua. (Siga las instrucciones del
envase respecto a la cantidad de agua.)
Seleccione el menú 02, escoja un tamaño según el
volumen de la mezcla e inicie la cocción.
•
600 g – XL • 500 g – L
la cantidad de levadura que llevan, por lo que es
necesario hacer pruebas hasta que se obtienen
resultados óptimos.
separada
continuación añada agua.
Después ponga la levadura medida en el dispensador
de levadura.
Ajuste la máquina según el tipo de harina que incluya
la mezcla e inicie la cocción.
•
Harina blanca, harina morena menú 01
•
Harina integral, harina multigrano menú 04
•
Harina de centeno menú 07
(Medio) - ‘ Light’ (Claro) color de la corteza. (página 195)
Harina integral
Se obtiene al moler sémola de trigo
entera, incluyendo el salvado y el germen.
Permite hacer un pan muy sano.
Este pan tiene una altura inferior y es más
pesado que el pan de harina blanca.
Harina de centeno
Se obtiene al moler sémola de centeno. Contiene más hierro,
magnesio y potasio, que son necesarios para la salud humana,
que la harina blanca. Pero no tiene suficiente gluten.
El pan es denso y pesado. No se debe utilizar más cantidad que
la indicada
(se podría sobrecargar el motor).
Productos lácteos
Aportan sabor y tienen un gran valor nutritivo.
Si utiliza leche en lugar de agua, el valor nutricional del
pan será mayor, pero no se debe utilizar en el ajuste con
temporizador, ya que es posible que no se mantenga
fresca toda la noche.
Reduzca la cantidad de agua en proporción a la
cantidad de leche.
Azúcar
Es un alimento para la levadura, endulza y aporta
sabor al pan, cambia el color de la corteza.
Utilice menos azúcar si va a añadir uvas pasas u otras
frutas que contengan fructosa.
Harina escanda
Pertenece a la familia del trigo pero genéticamente es una especie completamente diferente.
Aunque contiene gluten, algunas personas que no lo toleran la pueden digerir. (Consulte con su médico.)
Las barras de pan tienen una corteza plana/ligeramente hundida.
El pan de harina escanda de grano entero pesa poco y es denso en comparación con el pan de harina blanca escanda.
Recomendamos que más de la mitad de la harina escanda sea blanca en lugar de entera.
Hay escanda (Triticum spelta) que es adecuada para hacer pan y trigo Einkorm (Triticum monococcum: también conocido como escanda
menor) que no es adecuado para cocer pan. Utilice la escanda. (utilice los menús 13, 14, 24 o 25)
(azúcar en grano, azúcar moreno, miel,
melaza, etc.)
Puede mejorar el sabor del pan añadiendo otros
ingredientes:
Huevos
Salvado
Germen de trigo
Especias
Mejoran el valor nutricional y el color del
pan. (La cantidad de agua debe reducirse
proporcionalmente.)
Bata los huevos antes de añadirlos.
Aumenta el contenido en fibra del pan.
•
Utilice un máx. de 75 mL (5 cucharas
grandes).
Le da al pan un sabor a nueces.
•
Utilice un máx. de 60 mL (4 cucharas
grandes).
Las especias mejoran el sabor del pan.
•
Utilice solo una pequeña cantidad
(1–2 cucharas pequeñas).
Levadura seca
Permite que suba el pan
Asegúrese de utilizar levadura seca que no requiera una fermentación previa (no utilice levadura fresca ni levadura
seca que requiera fermentación antes de su uso).
Se recomienda la levadura que lleva la frase ‘levadura instantánea’ escrita en el envase.
Cuando utilice bolsitas de levadura, selle la bolsita inmediatamente después de utilizarla y guárdela en el frigorífico.
(Utilícela antes de la fecha de caducidad recomendada por el fabricante)
Español
170 171
Page 87

Lista de tipos de pan y opciones de cocción
Disponibilidad de las funciones y tiempo necesario
•El tiempo necesario para cada proceso será distinto según la temperatura de la habitación.
Número
de Menu
01 Basic
02 Basic Rapid
03 Basic Raisin
04 Whole wheat
Whole wheat
05
Rapid
Whole wheat
06
Raisin
07 Rye
08 French
Cocción
09 Italian
10 Sandwich
11 Brioche
12 Gluten Free
13 Speciality
Speciality
14
Raisin
15 Bake only
Menú
Opciones Procesos
Tamaño
Corteza
Temporizador
——
1
—
——
——
——
——
—
—
——
—
1
—
2
——
—
—
——————
Reposo Amasar Subir Cocer Total
30 min–
60 min
30 min–
60 min
1 h–
1 h 40 min
15 min–
25 min
1 h–
1 h 40 min
45 min–
60 min
40 min–
2 h 5 min
30 min–
1 h
1 h–
1 h 40 min
30 min
30 min–
1 h 15 min
30 min–
1 h 15 min
15–30 min
15–20 min
15–30 min
15–25 min
15–25 min
15–25 min
aprox.
10 min
10–20 min
10–15 min
15–25 min
25–45 min
15–20 min 40 - 45 min 50–55 min
15–30 min
15–30 min
1 h 50 min–
3
2 h 20 min
aprox. 1 hora
1 h 50 min–
3
2 h 20 min
2 h 10 min–
3
2 h 50 min
1 h 30 min–
3
1 h 40 min
2 h 10 min–
3
2 h 50 min
1 h 20 min–
1 h 35 min
2 h 45 min–
4 h 10 min
2 h 25 min–
3 h
2 h 10 min–
3
2 h 50 min
3
1 h 25 min 50 min 3 h 30 min
1 h 50 min–
3
2 h 45 min
1 h 50 min–
3
2 h 45 min
50–55 min
35–40 min
50 min 4 horas
50 min 5 horas
45 min 3 horas
50 min 5 horas
1 hora 3 h 30 min
55 min 6 horas
50 min 4 h 30 min
50 min 5 horas
55 min 4 h 30 min
55 min 4 h 30 min
30 min–
1 h 30 min
4 h–
4 h 5 min
1 h 55 min–
2 horas
1 h 50 min–
1 h 55 min
30 min–
1 h 30 min
Número
de Menu
16 Basic
17 Basic Raisin
18 Whole wheat
Whole wheat
19
Raisin
20 Rye
21 French
Masa
22 Pizza
23 Brioche
24 Speciality
Speciality
25
Raisin
26 Jam
27 Compote
Menú
Opciones Procesos
Tamaño
Corteza
Temporizador
———
———
———
———
———
———
——
———
———
———
Reposo Amasar Subir Cocer Total
30 min–
50 min
30 min–
50 min
55 min–
1 h 25 min
55 min–
1 h 25 min
45 min–
60 min
40 min–
1 h 45 min
(Amasar)
10–18 min
30 min
30 min–
1 h 5 min
30 min–
1 h 5 min
15–30 min
15–30 min
15–25 min
15–25 min
aprox.
10 min
10–20 min
7–15 min
25–45 min
15–30 min
15–30 min
(Subir)
1 h 10 min–
3
1 h 30 min
1 h 10 min–
3
1 h 30 min
1 h 30 min–
3
2 h
1 h 30 min–
3
2 h
——
1 h 35 min–
2 h 40 min
(Amasar)
aprox. 10 min
3
35 min
1 h 10 min–
3
1 h 55 min
1 h 10 min–
3
1 h 55 min
—
—
—
—
—
(Subir)
aprox. 10 min
—
—
—
——— — — — —
——— — — — —
2 h 20 min
2 h 20 min
3 h 15 min
3 h 15 min
2 horas
3 h 35 min
45 min
1 h 50 min
2 h 45 min
2 h 45 min
1 h 30 min–
2 h 30 min
1 h–
1 h 40 min
Español
Solo ‘ Light’ (Claro) o ‘Medium’ (Medio) disponibles. Solo ‘Medium’ (Medio)’ u ‘Dark’ ( Oscuro) disponibles.
Hay un período de subida durante la fase de amasado.
• La máquina de amasado funcionará un tiempo breve durante el período de subida (para garantizar el desarrollo óptimo del gluten).
172 173
Page 88

Cocción del pan
Ponga los ingredientes en el recipiente del pan Ajuste el programa e inícielo Extraiga el pan
Vaya a las páginas
183 y 184 para ver las
recetas de pan
Pala de amasar
Extraiga el recipiente del pan y
1
coloque la pala de amasar
Gire el recipiente del pan.
Extraiga el recipiente del
pan.
Coloque la pala de
amasar firmemente en
el eje.
Dispensador de levadura
Ponga los ingredientes medidos
en el recipiente del pan
2
Ponga los ingredientes secos
excepto la levadura seca.
(harina, azúcar, sal, etc.)
• La harina debe pesarse en
una báscula.
Vierta el agua y cualquier otro
líquido.
Seleccione un menú de cocción
(La pantalla muestra cuando se selecciona el menú ‘01’.)
5
Vea los menús, la disponibilidad de tamaños y la corteza en la página 172.
Para cambiar el tamaño Para cambiar el color de la corteza
Apague la alimentación
cuando el pan esté listo
7
[la máquina emite 8 pitidos y parpadea la
barra de ‘End’ (Fin).]
Extraiga el pan
8
inmediatamente,
Guante de
horno
Seque la humedad y limpie
Compruebe la zona
próxima al eje y la parte
interior de la pala de
amasar y asegúrese
de que están limpias.
(página 191)
•
Cuando vaya a cocer pan de
centeno, utilice la pala de
amasar especificada.
•
La pala de amasar encaja holgadamente en su posición,
pero debe tocar el fondo de recipiente del pan.
Cocción de pan con ingredientes añadidos
(página 176)
Limpie y seque
previamente el
dispensador
Abra la tapa del
dispensador.
Ponga los ingredientes.
Cierre la tapa.
174 175
Ponga la levadura seca en el
3
dispensador de levadura
Enchufe la máquina
4
panificadora
en una toma de corriente de 230 V
la harina del exterior del
recipiente del pan.
Coloque el recipiente del pan en
la posición de cocción girándolo
ligeramente de derecha a
izquierda. Pliegue el asa.
Cierre la tapa.
• No abra la tapa hasta que
termine de hacerse el pan
(afecta a la calidad del pan).
Si el dispensador de levadura está
mojado, absorba la humedad con
una servilleta de papel, etc.
(No frote el dispensador de lavadura,
ya que eso impediría que cayese
la levadura en el recipiente del pan
debido a la electricidad estática.)
6
Cuando se pulsa ‘Start’ (Iniciar) por primera vez, se iniciará el menú 01.
Para ajustar el temporizador
por ejemplo, ahora son las 9:00 de la noche y usted desea que el pan está
listo a las 6:30 de la mañana al día siguiente.
Ajuste el temporizador en ‘9:30’ (9 horas y 30 minutos a
partir e ahora).
12
9
•
Al pulsar el botón una vez el temporizador avanzará 10 minutos
(si mantiene pulsado el botón avanzará más rápido).
3
9 h y 30 min
6
a partir de ahora
Hora actual Hora a la que el pan estará listo
12
9
3
6
Pulse ‘Start’ (Iniciar)
Tiempo previsto hasta el final del programa seleccionado
Recipiente
del pan
Espere hasta que se enfríe sobre una
rejilla metálica, por ejemplo
Desenchufe la máquina
9
(sujetando el enchufe)
después del uso
Sin embargo, esto acelerará el
Si no pulsa ‘Stop’ (Parar) y no retira el
pan de la unidad para que se enfríe,
la máquina panificadora se mantendrá
templada para reducir la condensación de
vapor de agua dentro de la barra de pan.
oscurecimiento de la corteza, por lo que
se debe apagar la unidad al finalizar la
cocción y retirar el pan inmediatamente
para que se enfríe.
Si deje que el pan se enfríe en el
recipiente del pan, se generará
condensación. Por lo tanto, enfríe el pan
en una rejilla metálica para obtener una
calidad óptima.
Español
Page 89

Cuando se añaden ingredientes adicionales
Cocer Brioche
Añadir ingredientes adicionales al pan o a la masa
Al seleccionar un número del menú con uvas pasas (03, 06, 14, 17, 19 o 25), podrá mezclar sus ingredientes favoritos con la masa para hacer
todo tipo de panes con sabores.
Solo tiene que poner los
ingredientes adicionales en el
dispensador o en el recipiente del
pan antes de empezar
Ingredientes secos,
ingredientes insolubles
Ponga los ingredientes adicionales en el
dispensador de uvas pasas y nueces y
ajuste la máquina.
Frutos secos
Nueces
Semillas
Hierbas
Córtelas en cubos de aproximadamente 5 mm.
Los ingredientes recubiertos de azúcar pueden
pegarse al dispensador y es posible que no caigan al
recipiente del pan.
Píquelas en trozos pequeños.
Las nueces reducen el efecto del gluten, por lo que
se debe evitar utilizar demasiadas.
Si se utilizan semillas grandes y duras, éstas pueden
dañar el revestimiento del dispensador y el recipiente
del pan.
Utilice 1 o 2 cucharadas pequeñas de hierbas secas.
Para las hierbas frescas, siga las instrucciones de la
receta.
Ingredientes húmedos/viscosos,
ingredientes solubles*
Ponga estos ingredientes junto a los
demás en el recipiente del pan.
Frutos frescos, frutas conservadas en alcohol
Utilice solo las cantidades indicadas en
la receta, ya que el contenido de agua de
los ingredientes puede afectar al pan.
Queso, chocolate
* Estos ingredientes no se pueden poner en el dispensador
de uvas pasas y nueces, ya que se pegarían y no caerían
al recipiente del pan.
harina blanca para pan fuerte, tipo 550 400 g
cucharillas de sal 1
cucharas pequeñas de azúcar 4
cucharas pequeñas de leche desnatada
(en polvo)
mantequilla (córtela en cubos de 2 cm y
manténgala en el frigorífico)
agua 180 mL
huevo (batido); medio 2 (100 g)
cucharillas de levadura seca 1
mantequilla para añadir más tarde
(córtela en cubos de 1–2 cm y
manténgala en el frigorífico)
1
Preparativos
(página 174)
Corte la mantequilla para añadir más tarde en cubos de 1–2 cm y manténgala en el frigorífico.
Coloque la pala de amasar dentro del recipiente del pan.
Ponga los ingredientes en el recipiente del pan en el orden que se indica en la receta.
Introduzca el recipiente del pan en la unidad principal y enchufe la máquina a la toma de corriente.
42, 3
Seleccione el menú ‘11’
1
Inicie la máquina
2
Tiempo que falta para añadir la mantequilla o ingredientes
Se encenderá la luz de inicio.
[Método simple para cocer
brioches]
Añada la mantequilla junto
con los demás ingredientes al
principio.
Corte la mantequilla en cubos de 2 cm e
introdúzcalos en el recipiente del pan al mismo
tiempo que los demás ingredientes.
Siga los pasos que se muestran a la izquierda.
Sin embargo, cuando la máquina pite en el paso
3 para añadir la mantequilla adicional, no haga
nada.
El tiempo necesario para la elaboración es de 3
horas y 30 minutos.
* Cuando se añade la mantequilla al principio,
el sabor, la textura y la elevación del pan son
algo diferentes a cuando el pan se cuece con la
mantequilla adicional añadida más tarde.
Un proceso de ‘Rest’ (Reposo) comenzará
inmediatamente después de inicio, seguido por el
‘Knead’ (Amasar) y la ‘Rise’ (Subir).
Añada la mantequilla adicional cuando se
3
oiga el pitido y pulse otra vez el botón Iniciar
Termine de poner la mantequilla adicional en cubos mientras ‘ ’ está
parpadeando.
Después de pulsar
el botón Iniciar
La pantalla indica el tiempo que falta hasta que termine el programa
Cuando vaya a añadir ingredientes adicionales
como las pasas, incorpórelas con la mantequilla.
(Utilice como máximo 150 g de ingredientes)
Aunque no pulse el botón Iniciar, el amasado
continuará después 5 min. En amasado no
continúa inmediatamente, aunque de pulse el
botón Iniciar después de añadir mantequilla u
otros ingredientes.
No añada mantequilla después de que la pantalla
muestre el tiempo restante. (página 195)
1
⁄2
2
50 g
1
⁄4
70 g
Español
Panceta,
embutidos
•
Respete las cantidades de cada ingrediente que se indican en la receta.
A veces los ingredientes grasientos pueden pegarse
al dispensador y es posible que no caigan al
recipiente del pan.
Pulse ‘Stop’ (Parar) y extraiga el pan
cuando la máquina emita 8 pitidos y parpadee la barra de ‘End’ (Fin)
4
Se apagará la luz de inicio parpadeante.
176 177
Page 90

Hacer masa
Hacer masa para brioche
1
Preparativos
(página 174)
Seleccione el menú de masa
(La pantalla muestra cuando se selecciona el menú ‘16’.)
1
Inicie la máquina
Introduzca la pala de amasar en el recipiente del pan.
Ponga los ingredientes en el recipiente del pan en el orden que se indica en la receta.
Introduzca el recipiente del pan en la unidad principal y enchufe la máquina a la toma de corriente.
2
Tiempo previsto hasta el final del programa seleccionado
Se encenderá la luz de inicio.
Consulte las
recetas de masa en la
página 185
Para cancelar/parar
después del inicio
(mantenga pulsado el
botón durante más de
1 segundo)
32
El temporizador no está disponible en los menús
de masa (excepto el menú 22).
Si desea añadir ingredientes adicionales a la
masa, consulte la página 176.
1
Preparativos
(página 174)
Seleccione el menú ‘23’
Corte la mantequilla para añadir más tarde en cubos de 1–2 cm y manténgala en el frigorífico.
Coloque la pala de amasar dentro del recipiente del pan.
Ponga los ingredientes en el recipiente del pan en el orden que se indica en la receta.
Introduzca el recipiente del pan en la unidad principal y enchufe la máquina a la toma de corriente.
1
42, 3
Inicie la máquina
En los menús que no sean el 22, 26 y 27,
un proceso de ‘Rest’ (Reposo) comenzará
inmediatamente después del inicio, seguido por
el ‘Knead’ (Amasar) y la ‘Rise’ (Subir).
2
Tiempo que falta para anadir la mantequilla o ingredientes
Se encenderá la luz de inicio.
Para cancelar/parar
después del inicio
(mantenga pulsado el
botón durante más de
1 segundo)
[Método simple para hacer masa
de brioches]
Añada la mantequilla junto
con los demás ingredientes al
principio.
Corte la mantequilla en cubos de 2 cm e
introdúzcalos en el recipiente del pan al mismo
tiempo que los demás ingredientes.
Siga los pasos que se muestran a la izquierda. Sin
embargo, cuando la máquina pite en el paso 3 para
añadir la mantequilla adicional, no haga nada.
El tiempo necesario para la elaboración es de
1 hora y 50 minutos.
* Cuando se añade la mantequilla al principio,
el sabor, la textura y la elevación del pan son
algo diferentes a cuando el pan se cuece con la
mantequilla adicional añadida más tarde.
Un proceso de ‘Rest’ (Reposo) comenzará
inmediatamente después de inicio, seguido por el
‘Knead’ (Amasar) y la ‘Rise’ (Subir).
Consulte las
recetas de masa en la
página 185
Pulse ‘Stop’ (Parar) y extraiga la masa
cuando la máquina emita 8 pitidos y parpadee la barra de ‘End’ (Fin)
3
Se apagará la luz de inicio parpadeante.
Dé forma a la masa acabada y deje que suba por
segunda vez según la receta y después cuézalo
en el horno.
Añada la mantequilla adicional cuando se
3
oiga el pitido y pulse otra vez el botón Iniciar
Termine de poner la mantequilla adicional en cubos mientras ‘ ’ está
parpadeando.
Después de pulsar
el botón Iniciar
La pantalla indica el tiempo que falta hasta que termine el programa
Cuando vaya a añadir ingredientes adicionales
como las pasas, incorpórelas con la mantequilla.
(Utilice como máximo 150 g de ingredientes)
Aunque no pulse el botón Iniciar, el amasado
continuará después 5 min. En amasado no
continúa inmediatamente, aunque de pulse el
botón Iniciar después de añadir mantequilla u
otros ingredientes.
No añada mantequilla después de que la pantalla
muestre el tiempo restante. (página 195)
Español
Pulse ‘Stop’ (Parar) y extraiga la masa
cuando la máquina emita 8 pitidos y parpadee la barra de ‘End’ (Fin)
4
Se apagará la luz de inicio parpadeante.
178 179
Dé forma a la masa acabada y deje que suba por
segunda vez según la receta y después cuézalo
en el horno.
Page 91

Cocer pasteles
Hacer mermelada
Consulte las
receta de pasteles en
la página 185
Para cancelar/parar
después del inicio
(mantenga pulsado el
botón durante más de
1 segundo)
•
Retire la pala de amasar
1
Preparativos
2
Prepare los ingredientes según la receta.
Recubra el recipiente del pan con papel encerado y
vierta la mezcla de ingredientes.
Introduzca el recipiente del pan en la unidad principal
y enchufe la máquina a la toma de corriente.
3
Seleccione el menú ‘15’
1
Ajuste del tiempo de cocción
2
Inicie la máquina
3
Tiempo previsto hasta el final del programa seleccionado
Se encenderá la luz de inicio.
Pulse ‘Stop’ (Parar) cuando la máquina emita un pitido y la barra de ‘End’ (Fin)
parpadee,
4
compruebe que la cocción esta completa
y extraiga el recipiente del pan
Se apagará la luz de inicio parpadeante.
Si la cocción no está completa Repita los pasos 1–3
(Puede añadirse más tiempo de cocción hasta dos veces.
Cada vez no deberá ser más de 50 minutos. El temporizador se iniciara otra
vez a partir de 1 minuto cuando la unidad este caliente. Aumente el tiempo
pulsando el boton del temporizador las veces que sea necesario.)
180 181
4
•
Recubra con papel encerado.
(El pastel o bizcocho se quemará si toca directamente
el recipiente del pan.)
El temporizador no está disponible en el menú
15.
(El botón del temporizador solo ajusta la duración
del tiempo de cocción.)
¡Tenga cuidado!
¡Está caliente!
Para comprobar si está completa la cocción,
inserte una brocheta en el centro del pastel o
bizcocho. Está listo si no hay restos de mezcla
pegados en la broqueta al extraerla.
1
Preparativos
Prepare los ingredientes según la receta.
Coloque la pala de amasar dentro del recipiente del pan.
Ponga los ingredientes en el recipiente del pan en el orden siguiente:
la mitad de las frutas → la mitad del azúcar → el resto de las frutas → el resto del azúcar.
Introduzca el recipiente del pan en la unidad principal y enchufe la máquina a la toma de corriente.
2
Seleccione el menú ‘26’
1
Ajuste del tiempo de cocción
2
Inicie la máquina
3
Tiempo previsto hasta el final del programa seleccionado
Se encenderá la luz de inicio.
Pulse ‘Stop’ (Parar) y extraiga la
4
mermelada
cuando la máquina emita 8 pitidos y parpadee la barra de ‘End’ (Fin)
Se apagará la luz de inicio parpadeante.
Si la cocción no está completa Repita los pasos 1–3
(Puede añadirse más tiempo de cocción hasta dos veces. Cada vez deberá
ser entre 10 y 40 minutos. El temporizador se iniciará otra vez a partir de
1 minuto cuando la unidad esté caliente. Aumente el tiempo pulsando el
botón del temporizador las veces que sea necesario.)
3
4
Para cancelar/parar
después del inicio
(mantenga pulsado el
botón durante más de
1 segundo)
El temporizador no está disponible en el menú 26.
(El botón del temporizador solo ajusta la duración
del tiempo de cocción.)
Es necesario tener una cantidad adecuada de
azúcar, ácido y pectina para hacer mermelada
cuajada con firmeza.
Las frutas con un alto nivel de pectina cuajan
fácilmente. Las frutas con menos pectina no
cuajan bien.
Utilice frutas maduras frescas. Las frutas demasiado
maduras o verdes no cuajan con firmeza.
Las recetas incluidas en este libro son para
mermeladas blandas. Esto se debe a los menores
niveles de azúcar.
Respete las cantidades de cada ingrediente que
se indican en la receta.
•
No aumente ni reduzca las cantidades de las
frutas. Esto puede hacer que la mermelada se
derrame al hervir o que se queme.
•
No aumente la cantidad del azúcar más que
medias cantidades de frutas.
Esto puede hacer que se derrame al hervir o
que se queme.
Cuando se reducen las cantidades de azúcar, la
mermelada no queda firme.
* Cuando la acidez de la fruta es fuerte, puede
reducir las cantidades del zumo de limón, pero si se
reducen demasiado, la mermelada no queda firme.
Cuando el tiempo de cocción es breve, pueden
quedar trozos de fruta y la mermelada puede
quedar aguada.
•
La mermelada continuará cuajando mientras se
enfría. Tenga cuidado de no cocerla demasiado.
Introduzca la mermelada acabada en un
recipiente lo antes posible. Tenga cuidado de no
quemarse cuando extraiga la mermelada.
La mermelada puede quemarse si se deja en el
recipiente del pan.
Guarde la mermelada en un lugar fresco y
oscuro. Debido a los menores niveles de azúcar,
su duración es inferior a la delas variedades
comerciales. Una vez abierta, consérvela en el
frigorífico y consúmala antes de que pase mucho
tiempo.
Consulte las
recetas de mermelada
en la página 189
Español
Page 92

Hacer compota
Recetas de pan
1
Preparativos
2
Prepare los ingredientes según la receta. (Retire la pala de amasar.)
Ponga los ingredientes en el recipiente del pan en el orden siguiente:
fruta → azúcar → líquido.
Introduzca el recipiente del pan en la unidad principal y enchufe la máquina a la toma de corriente.
3
4
Seleccione el menú ‘27’
1
Ajuste del tiempo de cocción
2
Inicie la máquina
3
Tiempo previsto hasta el final del programa seleccionado
Se encenderá la luz de inicio.
Pulse ‘Stop’ (Parar) y extraiga la compota
cuando la máquina emita 8 pitidos y parpadee la barra de ‘End’ (Fin)
4
Se apagará la luz de inicio parpadeante.
Si la cocción no está completa Repita los pasos 1–3
(Puede añadirse más tiempo de cocción hasta dos veces. Cada vez deberá
ser entre 10 y 40 minutos.) El temporizador se iniciará otra vez a partir de
1 minuto cuando la unidad esté caliente. Aumente el tiempo pulsando el
botón del temporizador las veces que sea necesario.)
Consulte las
recetas de compota en
la página 190
Para cancelar/parar
después del inicio
(mantenga pulsado el
botón durante más de
1 segundo)
El temporizador no está disponible en el menú 27.
(El botón del temporizador solo ajusta la duración
del tiempo de cocción.)
Respete las cantidades de cada ingrediente que
se indican en la receta.
•
No aumente ni reduzca las cantidades de las
frutas. Esto puede hacer que la compota se
derrame al hervir o que se queme.
PAN BLANCO
Seleccione el menú ‘01’ o ‘02’
harina blanca para pan fuerte, tipo 550 400 g 500 g 600 g
cucharillas de sal 1
cucharas de azúcar 1 11⁄2 2
mantequilla 20 g 30 g 40 g
agua 280 mL 350 mL 420 mL
cucharillas de levadura seca
(cucharillas con la opción BAKE RAPID)
MLXL
1
⁄2 11⁄2 2
1
(2)
1
(2)
11⁄2
(21⁄2)
PAN DE TRIGO INTEGRAL
Seleccione los menús ‘‘04’ o ‘05’
harina de trigo integral fuerte 400 g 500 g 600 g
cucharillas de sal 1
cucharas de azúcar 1 11⁄2 2
mantequilla 20 g 30 g 40 g
agua 280 mL 350 mL 420 mL
cucharillas de levadura seca
(cucharillas con la opción BAKE RAPID)
MLXL
1
⁄2 11⁄2 2
1
(11⁄2)
1
(11⁄2)
11⁄4
(2)
PAN DE TRIGO INTEGRAL CON PASAS
Seleccione el menú ‘06’
harina de trigo integral fuerte 400 g 500 g 600 g
cucharillas de sal 1
cucharas de azúcar 1 1
mantequilla 20 g 30 g 40 g
agua 280 mL 350 mL 420 mL
cucharillas de levadura seca 1 1 11⁄4
adición (colóquela en el dispensador de
uvas pasas y nueces):
uvas pasas
MLXL
1
⁄2 11⁄2 2
80 g
1
⁄2 2
100 g
120 g
PAN FRANCÉS
Seleccione el menú ‘08’
harina blanca para pan fuerte, tipo 550 300 g
cucharillas de sal 1
mantequilla 20 g
agua 220 mL
cucharillas de levadura seca
3
⁄4
PANETTONE
Seleccione el menú ‘11’
harina blanca para pan fuerte, tipo 550 400 g
cucharas de azúcar 4
cucharillas de sal 1
mantequilla (cortada en cubos de 2 cm y
mantenida en el frigorífico)
huevo (batido); medio 2 (100 g)
leche 200 mL
cucharillas de levadura seca 1
mantequilla adicional
(cortada en cubos de 1–2 cm y
mantenida en el frigorífico)
piel de naranja picada en trozos
pequeños*
uvas pasas sultanas* 50 g
grosellas negras secas* 50 g
1
⁄2
50 g
1
⁄2
70 g
50 g
PAN DE UVAS PASAS
Seleccione el menú ‘03’
MLXL
harina blanca para pan fuerte, tipo 550 400 g 500 g 600 g
cucharillas de sal 1
cucharas de azúcar 1 1
mantequilla 20 g 30 g 40 g
agua 280 mL 350 mL 420 mL
cucharillas de levadura seca 1 1 11⁄2
adición (póngalas en el dispensador de
uvas pasas y nueces):
uvas pasas
1
⁄2 11⁄2 2
80 g
1
⁄2 2
100 g
120 g
PAN ITALIANO
Seleccione el menú ‘09’
harina blanca para pan fuerte, tipo 550 400 g
cucharillas de sal 1
cucharas de aceite de oliva 11⁄2
agua 260 mL
cucharillas de levadura seca 1
1
⁄2
PAN DE SÁNDWICH
Seleccione el menú ‘10’
harina blanca para pan fuerte, tipo 550 380 g
cucharas de azúcar 2
mantequilla 30 g
agua 250 mL
cucharillas de levadura seca 1
PAN SIN GLUTEN
Seleccione el menú ‘12’
agua 430 mL
cuchara de aceite 1
mezcla para pan sin gluten 500 g
cucharillas de levadura seca 2
BRIOCHE BÁSICO
Seleccione el menú ‘11’
harina blanca para pan fuerte, tipo 550 400 g
cucharas de azúcar 4
cucharas de leche en polvo 2
cucharillas de sal 1
mantequilla (cortada en cubos de 2 cm y
mantenida en el frigorífico)
huevo (batido); medio 2 (100 g)
agua 180 mL
cucharillas de levadura seca 1
mantequilla adicional
(cortada en cubos de 1–2 cm y
mantenida en el frigorífico)
50 g
1
70 g
⁄4
Español
* : añadidas con azúcar adicional
182 183
Page 93

Recetas de pan
Recetas de masa
HARINA BLANCA ESCANDA
Seleccione el menú ‘13’
MLXL
harina blanca
escanda
cucharillas de azúcar 1
cucharillas de sal 1
mantequilla 5 g 10 g 10 g
agua 260 mL 340 mL 400 mL
cucharillas de
levadura seca
400 g 500 g 600 g
1
⁄2 22
1
⁄4 11⁄2 1
1
11
⁄4 11⁄2
3
⁄4
PAN ESCANDA INTEGRAL
Seleccione el menú ‘13’
MLXL
harina de grano
entero escanda
harina blanca
escanda
cucharillas de azúcar 1
cucharillas de sal 1
cucharas de aceite 2 3 3
agua 250 mL 320 mL 380 mL
cucharillas de
levadura seca
200 g 250 g 300 g
200 g 250 g 300 g
1
⁄2 22
1
⁄4 11⁄2 1
1
11
⁄4 11⁄2
3
⁄4
CENTENO Y ESCANDA
(se prohíbe temporizador de retardo)
Seleccione el menú ‘13’
MLXL
harina blanca
escanda
harina de centeno 125 g 150 g 175 g
cucharillas de azúcar 1
cucharillas de sal 1
mantequilla 5 g 10 g 10 g
yogurt natural 120 g 150 g 180 g
agua 180 mL 230 mL 270 mL
cucharillas de
levadura seca
275 g 350 g 425 g
1
⁄2 22
1
⁄4 11⁄2 1
11
1
⁄4 11⁄2
3
⁄4
TRIGO SARRACENO Y ESCANDA CON SEMILLAS
Seleccione el menú ‘13’
MLXL
harina blanca
escanda
harina de trigo
sarraceno
cucharillas de miel 1 1
cucharillas de sal 11⁄4 11⁄2 1
cucharas de
semillas de sésamo
cucharas de linaza 11⁄2 2 2
cucharas de
semillas de amapola
cucharas de aceite 2 3 3
agua 250 mL 320 mL 380 mL
cucharillas de
levadura seca
320 g 400 g 480 g
80 g 100 g 120 g
11⁄2
3
⁄4
1
⁄2 22
1
1
⁄2 2 21⁄2
1
11
1
⁄4 11⁄2
1
⁄2
ARROZ Y ESCANDA CON SEMILLAS DE PINO Y
CEBOLLA FRITA
Seleccione el menú ‘14’
MLXL
harina blanca
escanda
harina de arroz
moreno
cucharillas de azúcar 1
cucharillas de sal 1
mantequilla 5 g 10 g 10 g
agua 260 mL 340 mL 400 mL
cucharillas de
levadura seca
adicion (pongalas en
el dispensador de
uvas pasas y nueces):
semillas de pino
cucharas de
cebolla frita
320 g 400 g 480 g
80 g 100 g 120 g
1
⁄2 22
1
⁄4 11⁄2 1
1
11
40 g
3 4 5
⁄4 11⁄2
50 g
3
60 g
⁄4
ESCANDA CON LIMÓN Y SEMILLAS DE AMAPOLA
Seleccione el menú ‘13’
MLXL
harina blanca
escanda
cucharillas de azúcar 1
cucharillas de sal 1
mantequilla 5 g 10 g 10 g
ralladura de limón 1 1 1
zumo de limón 20 mL 20 mL 30 mL
cucharas de
semillas de amapola
agua 250 mL 330 mL 380 mL
cucharillas de
levadura seca
400 g 500 g 600 g
1
⁄2 22
1
⁄4 11⁄2 1
23 3
1
11
⁄4 11⁄2
3
⁄4
ESCANDA FRUTAL
Seleccione el menú ‘14’
MLXL
harina blanca
escanda
cucharillas de azúcar 1
cucharillas de sal 1
mantequilla 5 g 10 g 10 g
cucharillas de
mezcla especias
agua 270 mL 350 mL 400 mL
cucharillas de
levadura seca
adicion (pongalas en
el dispensador de
uvas pasas y nueces):
mezcla de frutas
secas
400 g 500 g 600 g
1
⁄2 22
1
⁄4 11⁄2 1
1
22
11
100 g
⁄2 3
1
⁄4 11⁄2
125 g
3
⁄4
150 g
184 185
MASA BÁSICA
Seleccione el menú ‘16’
harina blanca para pan fuerte, tipo 550 500 g
cucharillas de sal 11⁄2
cucharas de azúcar 11⁄2
mantequilla 30 g
agua 310 mL
cucharillas de levadura seca 1
MASA BÁSICA CON UVAS PASAS
Seleccione el menú ‘17’
harina blanca para pan fuerte, tipo 550 500 g
cucharillas de sal 11⁄2
cucharas de azúcar 11⁄2
mantequilla 30 g
agua 310 mL
cucharillas de levadura seca 1
adición (póngalas en el dispensador de
uvas pasas y nueces):
uvas pasas
100 g
MASA FRANCESA
Seleccione el menú ‘21’
harina blanca para pan fuerte, tipo 550 300 g
cucharillas de sal 1
mantequilla 20 g
agua 180 mL
cucharillas de levadura seca
3
⁄4
MASA DE TRIGO INTEGRAL
Seleccione el menú ‘18’
harina de trigo integral fuerte 500 g
cucharillas de sal 2
cucharas de azúcar 1
mantequilla 30 g
agua 340 mL
cucharillas de levadura seca 1
1
⁄2
1
⁄2
MASA DE TRIGO INTEGRAL CON UVAS PASAS
Seleccione el menú ‘19’
harina de trigo integral fuerte 500 g
cucharillas de sal 2
cucharas de azúcar 1
mantequilla 30 g
agua 340 mL
cucharillas de levadura seca 1
adición (póngalas en el dispensador de
uvas pasas y nueces):
uvas pasas
1
⁄2
1
⁄2
100 g
Receta de pasteles
PASTEL DE CEREZAS Y MAZAPÁN
Seleccione el menú ‘15’
azúcar dorado en polvo 50 g
mantequilla 175 g
huevos 3
harina leudante 225 g
cerezas glaseadas, picadas 100 g
mazapán, picado 75 g
leche 60 mL
almendras en escamas tostadas 15 g
MASA DE PIZZA
Seleccione el menú ‘22’
harina blanca para pan fuerte, tipo 550 450 g
cucharillas de sal 2
cucharas de aceite vegetal 4
agua 240 mL
cucharillas de levadura seca 1
MASA DE BRIOCHES (BRIOCHE CON TROZOS DE
CHOCOLATE)
; para 12 bollos
Seleccione el menú ‘23’
harina blanca para pan fuerte, tipo 550 400 g
cucharas de azúcar 4
cucharillas de sal 1
mantequilla (cortada en cubos de 2 cm y
mantenida en el frigorífico)
huevo (batido); medio 3 (150 g)
leche 90 mL
cucharas de ron (tostado) 1
cucharillas de levadura seca 1
mantequilla adicional
(cortada en cubos de 1–2 cm y
mantenida en el frigorifico)
trozos de chocolate*
* Después de extraer la masa, espolvoree los trozos de chocolate y pliegue la parte
inferior un tercio hacia arriba y la parte superior un tercio hacia abajo. Después
pliéguelo por la mitad.
70 g
1
⁄2
50 g
120 g
BOLLO DE ESCANDA
; para 8 bollos
Seleccione el menú ‘24’
harina blanca escanda 500 g
cucharillas de azúcar 1
cucharillas de sal 11⁄2
mantequilla 10 g
agua 310 mL
cucharillas de levadura seca 1
1
⁄2
1
⁄4
Español
Page 94

Recetas sin gluten
La elaboración de pan sin gluten es muy distinta de la forma habitual de hacer pan.
Es muy importante que si va a hacer pan sin gluten por motivos de salud consulte a su médico y sigua las pautas que se indican a
continuación.
• Este programa se ha creado especialmente para ciertas mezclas sin gluten, por lo que si usa su propia mezcla es posible que no obtenga tan
buenos resultados.
• Cuando seleccione ‘sin gluten’, deberá seguir minuciosamente cada receta. (Si no lo hace así, es posible que el resultado no sea bueno.)
Hay dos tipos de mezclas sin gluten; las mezclas con bajo contenido de gluten y las mezclas que no lleva trigo y por lo tanto no contienen
gluten. Si tiene que escoger una al usar este programa de cocción, consulte antes con su médico.
• Los resultados de la cocción y la apariencia del pan pueden ser distintos en función del tipo de mezcla.
En algunas ocasiones la barra de pan puede tener restos de harina en los lados.
Las mezclas sin trigo pueden producir resultados más variables.
• Espere a que la barra se enfríe para cortarla en rebanadas con mayor facilidad.
• El pan deberá guardarse en un lugar fresco y seco y consumirse antes de 2 días. Si no puede consumir toda la barra antes de ese tiempo, se
puede congelar en bolsas con porciones del tamaño conveniente.
Advertencia para los usuarios de este programa por motivos de salud:
Cuando utilice el programa sin gluten, consúltelo con su médico o con la Asociación de Celíacos y utilice solo los ingredientes que
sean adecuados para su estado de salud.
Panasonic no se hace responsable de las consecuencias que se puedan derivar del uso de ingredientes sin asesoramiento
profesional.
Es muy importante evitar la contaminación con harinas que contengan gluten si se está haciendo pan por motivos dietéticos. Debe prestarse
especial atención a la limpieza del recipiente del pan y la pala de amasar, así como de los demás utensilios que se usen.
Para clientes de Bélgica
Las recetas sin gluten se han creado utilizando mezclas para pan sin gluten preparadas comercialmente de AVEVE.
Se pueden adquirir en farmacias, tiendas de comida sana y ocasionalmente en grandes supermercados.
Si desea más información sobre los productos de AVEVE, llame al número 0800/0229210.
PAN SIN GLUTEN
Seleccione el menú ‘12’
agua 320 mL
cucharas de aceite 1
harina sin gluten 500 g
cucharillas de levadura seca 2
NOTA
En este programa no se puede seleccionar el tamaño.
PAN SIN GLUTEN CON HUEVO
Seleccione el menú ‘12’
agua 100 mL
leche 180 mL
huevos 2
cucharas de aceite 1
harina sin gluten 500 g
cucharillas de levadura seca 2
* Estas recetas son básicamente para usuarios de Bélgica. Si desea más
Recetas AVEVE
[01 Basic (Básico)]
[02 Basic Rapid (Básico rápido)]
PAN BLANCO
Seleccione el menú ‘01’ o ‘02’
cucharillas de azúcar 1 2 2
harina ‘Surfina’ de AVEVE 400 g 500 g 600 g
agua 250 mL 320 mL 380 mL
cucharas de mantequilla 1 1 1
cucharillas de sal 1 11⁄2 2
cucharillas de levadura seca
(cucharillas con la opción BAKE RAPID)
NOTA
En ese caso el pan no subirá tanto y será menos blando.
MLXL
1
⁄2
3
⁄4
(11⁄2)
1
(13⁄4)
11⁄4
(2)
información, póngase en contacto con AVEVE llamando al número 0800/0229210.
[08 French (Francés)]
BOLLOS FRANCESES
Seleccione el menú ‘08’
harina ‘Frans krokant’ de AVEVE 400 g
agua 260 mL
cucharillas de sal 1
cucharas de mantequilla 1
cucharillas de levadura seca 1
NOTA
En este programa no se puede seleccionar el tamaño ni la corteza.
Con esta receta se obtiene un pan muy ligero que sube bien y no se conserva
mucho tiempo.
[09 Italian (Italiano)]
[04 Whole wheat (
Pan integral
)]
[05 Whole wheat Rapid (Pan integral rápido)]
PAN DE TRIGO INTEGRAL
Seleccione los menús ‘04’ o ‘05’
harina fina de trigo integral de AVEVE 300 g 400 g 450 g
harina ‘Frans krokant’ de AVEVE 100 g 100 g 150 g
cucharillas de azúcar 1 2 2
cucharas de mantequilla 1 1 2
cucharillas de sal 1 1 2
agua 250 mL 320 mL 380 mL
cucharillas de levadura seca
(cucharillas con la opción BAKE RAPID)
NOTA
En ese caso el pan no subirá tanto y será menos blando. Este programa es más
adecuado para pan de trigo semi-integral.
Se añade siempre una pequeña cantidad de harina blanca en las receta descritas
anteriormente. Si no desea hacer esto, puede sustituir la harina blanca por harina de
trigo integral, pero el pan será más pequeño y denso. Si añade más harina blanca,
utilice un poco menos de agua (ya que la harina de trigo integral absorbe más agua
que la harina blanca.)
MLXL
1
(11⁄2)
11⁄4
(13⁄4)
11⁄2
(2)
PAN ITALIANO
Seleccione el menú ‘09’
harina ‘Frans krokant’ de AVEVE 400 g
agua 240 mL
cucharillas de sal 11⁄2
cucharas de aceite de oliva 11⁄2
cucharillas de levadura seca
NOTA
En este programa no se puede seleccionar el tamaño ni la corteza.
Con esta receta se obtiene un pan muy ligero que sube bien y no se conserva
mucho tiempo.
[10 Sandwich (Sándwich)]
SÁNDWICH BÁSICO
Seleccione el menú ‘10’
cucharillas de azúcar 1
harina ‘Surfina’ de AVEVE 400 g
agua 250 mL
cucharas de mantequilla 1
cucharillas de sal 1
cucharillas de levadura seca
NOTA
En este programa no se puede seleccionar el tamaño ni la corteza.
Con esta receta se obtiene pan blando (bastante húmedo) con corteza marrón, ideal
para hacer tostadas.
3
⁄4
3
⁄4
Español
186 187
Page 95

Recetas AVEVE
* Estas recetas son básicamente para usuarios de Bélgica. Si desea más
información, póngase en contacto con AVEVE llamando al número 0800/0229210.
Recetas de mermelada
[16 Basic (Básico)]
MASA PARA TARTALETAS (masa para 2 tartaletas)
Seleccione el menú ‘16’
azúcar 60 g
harina de pastelería 500 g
leche 100 mL
huevos 3
mantequilla 100 g
cucharillas de sal 1
cucharillas de levadura seca 2
1
⁄2
[18 Whole wheat (Pan integral)]
MASA DE TRIGO INTEGRAL
Seleccione el menú ‘18’
cucharas de azúcar 1
harina ‘Frans krokant’ de AVEVE 250 g
harina ‘Boerebruin’ de AVEVE 250 g
agua 280 mL
cucharillas de sal 1
cucharillas de levadura seca 2
Método
Divida la masa en bolas de aproximadamente de 50 g. Después deje que la masa
suba debajo de un paño de lino. Cuézala durante 15–20 minutos a 220 °C en un
horno precalentado.
1
⁄2
[15 Bake only (Cocción solo)]
Seleccione el menú 15. Aparecerá un tiempo de cocción
de 30 minutos.
Continúe pulsando el ‘temporizador’ para aumentar el
tiempo de cocción. (en incrementos de 1 minuto) hasta
1 hora y 30 minutos.
RECETA PARA PASTEL
Seleccione el menú ‘15’
huevos 3
cucharas de leche 3
mantequilla blanda 200 g
paquete ‘ANCO CAKE MIX’ 1
Método
Seleccione el menu 15 e introduzca 1 hora y 10 minutos en el temporizador.
Después de oír el pitido, extraiga el pan de la máquina panificadora y espere a que
se enfríe. Cuando el pan esté frío, extraiga el pastel y deje que se enfríe sobre una
rejilla.
[22 Pizza]
MASA DE PIZZA
Seleccione el menú ‘22’
harina ‘Frans krokant’ de AVEVE 500 g
agua 290 mL
cucharillas de sal 1
cucharas de mantequilla 1
cucharillas de levadura seca 2
Método
Extienda la masa de pizza y póngala en un molde de pizza. Pinche la masa con un
tenedor. Extienda salsa de tomate y añada los ingredientes que desee. Cuézala
durante 20–25 minutos a 220 °C en un horno precalentado.
188 189
1
⁄2
[26 Jam (Mermelada)]
MERMELADA DE FRESA
Seleccione el menú ‘26’
fresas picadas en trozos pequeños 600 g
azúcar 400 g
pectina en polvo 13 g
Ponga la mitad de la fruta en el recipiente del pan y añada la
mitad del azúcar. Repita el proceso con el resto de la fruta y
1
el azúcar.
Espolvoree la pectina sobre los ingredientes del recipiente
del pan.
2
Seleccione el menú 26 e introduzca 1 hora y 40 minutos en
el temporizador.
3
MERMELADA DE ARÁNDANOS
Seleccione el menú ‘26’
arándanos 700 g
azúcar 400 g
Ponga la mitad de la fruta en el recipiente del pan y añada la
mitad del azúcar. Repita el proceso con el resto de la fruta y
1
el azúcar.
Seleccione el menú 26 e introduzca 1 hora y 50 minutos en
el temporizador.
2
MERMELADA DE MANZANA Y MORAS
Seleccione el menú ‘26’
manzanas, ralladas o picadas en trozos
pequeños
moras 400 g
azúcar 300 g
pectina en polvo 6 g
Ponga la mitad de la fruta en el recipiente del pan y añada la
mitad del azúcar. Repita el proceso con el resto de la fruta y
1
el azúcar.
Espolvoree la pectina sobre los ingredientes del recipiente
del pan.
2
Seleccione el menú 26 e introduzca 1 hora y 40 minutos en
el temporizador.
3
MELBA DE MELOCOTÓN
Seleccione el menú ‘26’
melocotones picados en trozos pequeños 500 g
frambuesas 200 g
azúcar 300 g
pectina en polvo 8 g
Ponga la mitad de la fruta en el recipiente del pan y añada la
mitad del azúcar. Repita el proceso con el resto de la fruta y
1
el azúcar.
Espolvoree la pectina sobre los ingredientes del recipiente
del pan.
2
Seleccione el menú 26 e introduzca 1 hora y 40 minutos en
el temporizador.
3
300 g
MERMELADA DE CIRUELA
Seleccione el menú ‘26’
ciruelas picadas en trozos pequeños 700 g
azúcar 350 g
pectina en polvo 6 g
Ponga la mitad de la fruta en el recipiente del pan y añada la
mitad del azúcar. Repita el proceso con el resto de la fruta y
1
el azúcar.
Espolvoree la pectina sobre los ingredientes del recipiente
del pan.
2
Seleccione el menú 26 e i
el temporizador.
3
MERMELADA DE BAYAS CONGELADAS
Seleccione el menú ‘26’
mezcla de bayas congeladas 700 g
azúcar 400 g
pectina en polvo 10 g
Ponga la mitad de la fruta en el recipiente del pan y añada la
mitad del azúcar. Repita el proceso con el resto de la fruta y
1
el azúcar.
Espolvoree la pectina sobre los ingredientes del recipiente
del pan.
2
Seleccione el menú 26 e i
el temporizador.
3
MERMELADA DE GROSELLAS ROJAS Y CHILE
Seleccione el menú ‘26’
grosellas rojas en puré grueso 300 g
chile rojo medio, picado muy fino 1–2
jengibre rallado muy fino 4 cm
ralladura fina y zumo de naranja 2
azúcar 150 g
pectina en polvo 3 g
Ponga todos los ingredientes en el recipiente del pan excepto
el azúcar y la pectina.
1
Añada el azúcar y espolvoree la pectina sobre los
ingredientes del recipiente del pan.
2
Seleccione el menú 26 e introduzca 1 hora y 40 minutos en
el temporizador.
3
MERMELADA DE ALBARICOQUE
Seleccione el menú ‘26’
albaricoques picados en trozos pequeños 500 g
azúcar 250 g
pectina en polvo 6 g
Ponga la mitad de la fruta en el recipiente del pan y añada la
mitad del azúcar. Repita el proceso con el resto de la fruta y
1
el azúcar.
Espolvoree la pectina sobre los ingredientes del recipiente
del pan.
2
Seleccione el menú 26 e introduzca 1 hora y 30 minutos en
el temporizador.
3
ntroduzca 1 hora y 40 minutos en
ntroduzca 1 hora y 40 minutos en
Español
Page 96

Recetas de compota
Limpieza y cuidados
[27 Compote (Compota)]
COMPOTA DE MANZANA CON ESPECIAS
Seleccione el menú ‘27’
manzanas peladas sin el centro y
cortadas en dados
barra de canela 1
clavos 2
ralladura de limón 1
zumo de limón 2 cucharas
azúcar 100 g
agua 75 mL
Retire la pala de amasar del recipiente del pan.
1000 g
1
Ponga los ingredientes en el recipiente del pan en el orden
indicado anteriormente. Vierta agua sobre los ingredientes.
2
Seleccione el menú 27 e introduzca 1 hora y 20 minutos en
el temporizador.
3
Remueva después de que termine la cocción.
4
COMPOTA DE FRUTAS ROJAS
Seleccione el menú ‘27’
ciruelas, sin hueso y cortadas en mitades 300 g
cerezas, sin hueso 250 g
fresas, sin tallo 250 g
azúcar dorado en polvo 75 g
agua 75 mL
frambuesas (se añaden después de la
cocción)
Retire la pala de amasar del recipiente del pan.
200 g
1
Ponga los ingredientes en el recipiente del pan en el orden
indicado anteriormente. Vierta agua sobre los ingredientes.
2
Seleccione el menú 27 e introduzca 1 hora en el
temporizador.
3
Remueva después de que termine la cocción.
4
Añada frambuesas.
5
COMPOTA DE RUIBARBO Y JENGIBRE
Seleccione el menú ‘27’
ruibarbo, cortado en trozos de 2 cm 700 g
zumo de naranja 2 cucharas
jengibre cristalizado, picado en trozos
pequeños
azúcar 100 g
agua 100 mL
Retire la pala de amasar del recipiente del pan.
20 g
1
Ponga los ingredientes en el recipiente del pan en el orden
indicado anteriormente. Vierta agua sobre los ingredientes.
2
Seleccione el menú 27 e introduzca 1 hora y 40 minutos en
el temporizador.
3
Remueva después de que termine la cocción.
COMPOTA DE BAYAS VARIADAS
Seleccione el menú ‘27’
bayas variadas
por ejemplo, fresas, frambuesas,
arándanos
azúcar 75 g
agua 2 cucharas
Retire la pala de amasar del recipiente del pan.
800 g
1
Ponga los ingredientes en el recipiente del pan en el orden
indicado anteriormente. Vierta agua sobre los ingredientes.
2
Seleccione el menú 27 e introduzca 1 hora en el
temporizador.
3
Remueva después de que termine la cocción.
4
SALSA DE MANZANA
Seleccione el menú ‘27’
manzanas Bramley peladas sin el centro
y cortadas en dados
agua 2 cucharas
Retire la pala de amasar del recipiente del pan.
1000 g
1
Ponga la manzana en el recipiente del pan. Vierta agua
sobre los ingredientes.
2
Seleccione el menú 27 e introduzca 1 hora y 20 minutos en
el temporizador.
3
Remueva después de que termine la cocción.
4
SIROPE DE MELOCOTÓN EN VAINILLA
Seleccione el menú ‘27’
melocotones, sin hueso y cortados en
azúcar 100 g
vaina de vainilla
agua 125 mL
Retire la pala de amasar del recipiente del pan.
1
⁄8 1000 g
1
⁄2
1
Ponga los ingredientes en el recipiente del pan en el orden
indicado anteriormente. Vierta agua sobre los ingredientes.
2
Seleccione el menú 27 e introduzca 1 hora en el
temporizador.
3
Al finalizar la cocción, retire los melocotones con una
espumadera. Vierta el sirope sobre la fruta con cuidado.
4
Espere a que se enfríe.
Antes de la limpieza, desenchufe la máquina
panificadora y espere a que se enfríe.
Para evitar dañar la máquina panificadora...
¡No utilice nada que sea abrasivo!
(productos de limpieza, estropajos, etc.)
¡No lave ninguna pieza de la
máquina panificadora en el lavavajillas!
¡No utilice bencina, disolventes, alcohol ni lejía!
Después de enjuagar las piezas lavables, séquelas con
un paño.
Mantenga siempre las piezas de la máquina panificadora
limpias y secas.
Recipiente del pan y
pala de amasar
Retire los restos de masa y lávelos con agua.
Si es difícil extraer la pala de amasar,
sumérjala en agua templada durante
5–10 minutos. No sumerja en agua el
recipiente del pan.
Vaso y cuchara de medir
Lávelos con agua.
No aptos para el lavavajillas
Tapa
Límpiela con un paño húmedo
Orificio de salida de vapor
Límpielo con un paño húmedo
Cuerpo
Límpielo con un paño húmedo
Frote con suavidad para
evitar dañar el sensor de
temperatura.
Sensor de temperatura
•
El color del interior de la unidad puede cambiar con el uso.
Español
4
190 191
Page 97

Limpieza y cuidados
Resolución de problemas
Antes de llamar al servicio técnico, compruebe esta sección.
Tapa del dispensador
Retírela y lávela con agua.
Levante la tapa del dispensador
hasta un ángulo de
aproximadamente 75 grados.
Alinee las conexiones y tire hacia
usted para quitarla o empújela suavemente hacia atrás
en el mismo ángulo para ponerla.
(Espere hasta que la máquina se haya enfriado, ya que
estará muy caliente inmediatamente después de utilizarla)
Tenga cuidado de no dañar la junta ni tirar de ella.
(Si se daña podrían producirse fugas de vapor,
condensación o deformaciones)
Junta
Limpie con un
paño seco cuando
esté húmedo.
Dispensador de levadura
Límpielo con un paño húmedo y séquelo de forma natural.
Si lo limpia con un paño seco, la levadura seca no caerá al
recipiente del pan debido a la electricidad estática.
Dispensador de uvas pasas y nueces
Retírelo y lávelo con agua.
Problema
El pan no sube
La parte superior del pan es
irregular
Causa Acción
[Todo el pan]
El gluten de su harina es de mala calidad o no ha utilizado harina fuerte. (La calidad del gluten
varía en función de la temperatura, la humedad, la forma de almacenar la harina y la estación
de la cosecha.)
Pruebe con otro tipo, marca u otro lote de harina.
La masa ha quedado demasiado firme porque no ha utilizado suficiente líquido.
La harina más fuerte con un mayor contenido de proteínas absorbe más agua que otras,
pruebe a añadir 10–20 mL más de agua.
No está utilizando el tipo correcto de levadura.
Utilice una levadura seca de una bolsita que lleve escrito ‘levadura instantánea’.
Este tipo no requiere fermentación previa.
No está utilizando suficiente levadura o la levadura está caducada.
Utilice la cuchara de medir suministrada. Compruebe la fecha de caducidad de la levadura.
(Manténgala en el frigorífico)
La levadura ha tocado el líquido antes del amasado.
Compruebe que ha puesto los ingredientes en el orden correcto según las instrucciones.
(página 174)
Ha utilizado demasiada sal o no ha puesto azúcar suficiente.
Compruebe la receta y mida las cantidades correctas con la cuchara de medir suministrada.
Compruebe que los demás ingredientes no contienen sal ni azúcar.
[Pan especial]
Se utilizó trigo Einkorn para cocer pan especial y/o se utilizó un lote de harina que no era
escanda.
La harina escanda debe ser el 60% del total de la harina cuando se utilizan varios tipos de
harina que no son escanda. La harina de arroz y de centeno debe ser el 40% del total de la
harina y la harina de trigo sarraceno el 20%.
Lávelo después de cada uso para eliminar
los residuos.
Protección del acabado antiadherente
El pan está lleno de burbujas
de aire
El pan parece haberse venido
abajo después de subir.
El recipiente del pan y la pala de amasar están recubiertos con un acabado antiadherente para evitar las manchas
y para facilitar la extracción del pan.
Para evitar que se dañe, siga las instrucciones que se indican a continuación.
El pan ha subido demasiado.
• No utilice utensilios duros como un cuchillo o un tenedor cuando extraiga el pan del recipiente del pan.
Cuando tenga dificultades para extraer el pan del recipiente del pan, consulte la página 195.
•
Asegúrese de que la pala de amasar no está incrustada en la barra de pan antes de cortarla.
Si está incrustada, espere hasta que se enfríe la barra de pan y extráigala.
(No utilice utensilios duros ni afilados como un cuchillo o un tenedor.)
Tenga cuidado de no quemarse, ya que la pala de amasar puede estar caliente.
•
Utilice una esponja suave cuando limpie el recipiente del pan y la pala de amasar.
No utilice nada abrasivo, como por ejemplo productos de limpieza o estropajos.
Los ingredientes duros, gruesos o grandes como las harinas con grano integral o molido, el azúcar o la adición de nueces y semillas
pueden dañar el acabado antiadherente del recipiente del pan. Si va a utilizar algún ingrediente de gran tamaño, pártalo en trozos
pequeños. respete las cantidades indicadas en la receta.
¿Por qué el pan es de color
amarillento y está pegajoso?
Hay demasiada harina el la
parte inferior y en los lados del
pan.
Ha utilizado demasiada levadura.
Compruebe la receta y mida las cantidades correctas con la cuchara de medir
suministrada.
Ha utilizado demasiado líquido.
Algunos tipos de harina absorben más agua que otros, pruebe a utilizar 10–20 mL menos
de agua.
La calidad de la harina no es muy buena.
Pruebe a utilizar una marca de harina diferente.
Ha utilizado demasiado líquido.
Pruebe a utilizar 10–20 mL menos de agua.
Ha utilizado demasiada levadura/agua.
Compruebe la receta y mida las cantidades correctas con la cuchara de medir (levadura)/
vaso (agua) suministrados.
Compruebe que los demás ingredientes no contienen más agua.
No ha utilizado suficiente harina.
Pese con cuidado la harina utilizando una báscula.
No está utilizando suficiente levadura o la levadura está caducada.
Utilice la cuchara de medir suministrada. Compruebe la fecha de caducidad de la levadura.
(Manténgala en el frigorífico)
Ha habido un corte de corriente o la máquina se ha parado mientras se hacía el pan.
La máquina se apaga si está parada durante más de 10 minutos. Deberá retirar el pan del
recipiente del pan y empezar otra vez con nuevos ingredientes.
Español
Ha utilizado demasiada harina o no ha puesto suficiente líquido.
Compruebe la receta y mida la cantidad correcta utilizando una báscula para la harina o el
vaso de medir suministrado para los líquidos.
192 193
Page 98

Resolución de problemas
Antes de llamar al servicio técnico, compruebe esta sección.
Problema
¿Por qué no se ha mezclado
correctamente la harina?
El pan no se ha cocido.
La masa sale por el fondo del
recipiente del pan.
Los lados del pan se han caído
y la parte inferior está húmeda.
La pala de amasar traquetea.
Huele a quemado cuando se
está cociendo el pan.
Sale humo del orificio de salida
de vapor.
La pala de amasar se queda en
el pan al extraerlo del recipiente
del pan.
Causa Acción
No ha puesto la pala de amasar en el recipiente del pan.
Asegúrese de que la pala de amasar está en el recipiente del pan antes de poner los
ingredientes.
Ha habido un corte de corriente o la máquina se ha parado mientras se hacía el pan.
La máquina se apaga si está parada durante más de 10 minutos. En principio es posible
volver a empezar con la misma barra, pero el resultado podría no ser bueno si ya había
empezado el amasado.
Se seleccionó el menú de masa.
El menú de masa no incluye un proceso de cocción.
Ha habido un corte de corriente o la máquina se ha parado mientras se hacía el pan.
La máquina se apaga si está parada durante más de 10 minutos. Puede intentar cocer la
masa en el horno si ya ha subido.
No hay agua suficiente y se ha activado el dispositivo de protección del motor.
Esto solo ocurre cuando la unidad está sobrecargada y se aplica demasiada fuerza al motor.
Acuda a la tienda donde compró el aparato y solicite asistencia. La próxima vez compruebe
la receta y mida las cantidades correctas con el vaso de medir suministrada.
Ha olvidado colocar la pala de amasar.
Asegúrese de que ha colocado la pala de amasar (página 174).
El eje de montaje de amasado está rígido y no gira.
Si el eje de montaje de amasado no gira cuando se coloca la pala de amasar, tendrá que
sustituirlo. (Póngase en contacto con el vendedor o con un servicio técnico de Panasonic.)
Una pequeña cantidad de masa saldrá por los orificios de ventilación (para que no impida que
las piezas giratorias sigan girando). Esto no es un fallo, pero compruebe ocasionalmente que el
eje de montaje de amasado gira correctamente.
Si el eje de montaje de amasado no gira cuando se coloca la pala de amasar, tendrá que
sustituirlo. (Póngase en contacto con el vendedor o con un servicio técnico de Panasonic.)
(Fondo del recipiente del pan)
Eje de montaje
de amasado
Unidad de eje de
montaje de amasado
Eje de montaje de amasadoOrificios de ventilación (4 en total)
Ha dejado en pan en el recipiente del pan durante demasiado tiempo después de la cocción.
Retire el pan lo antes posible después de la cocción.
Ha habido un corte de corriente o la máquina se ha parado mientras se hacía el pan.
La máquina se apaga si está parada durante más de 10 minutos. Puede intentar cocer la
masa en el horno.
Esto se debe a que la pala de amasar encaja holgadamente en el eje de montaje de amasado. (No
se trata de un fallo.)
Pueden haberse derramado los ingredientes sobre el dispositivo de calentamiento.
A veces una pequeña cantidad de harina, uvas pasas u otros ingredientes puede caer del recipiente
del pan durante la mezcla. Limpie el dispositivo de calentamiento con suavidad después de la
cocción una vez que se haya enfriado la máquina panificadora.
Retire el recipiente del pan de la máquina panificadora para poner los ingredientes.
La masa está un poco rígida.
Espere a que el pan se enfríe por completo antes de extraer la pala de amasar con cuidado.
Algunos tipos de harina absorben más agua que otros, pruebe a añadir 10–20 mL más de agua la
próxima vez.
Se ha acumulado corteza debajo de la pala de amasar.
Lave la pala de amasar y su husillo después de cada uso.
Ref. ADA29E165
Problema
La corteza se arruga y se
ablanda al enfriarse.
¿Cómo puedo conseguir que la
corteza sea crujiente?
El pan está pegajoso y se corta
de forma irregular.
Los ingredientes adicionales no
se mezclan correctamente en el
brioche.
Hay un exceso de aceite en la
parte inferior del brioche.
la corteza está aceitosa.
El pan tiene grandes agujeros.
El brioche no quedó bien al
utilizar la mezcla para pan.
El pan no se puede extraer.
Al hacer mermelada, ésta
se ha chamuscado o la pala
de amasar se ha quedado
atascada.
La mermelada se ha derramado
al hervir.
La mermelada está demasiado
líquida y no ha cuajado con
firmeza.
¿Se pueden utilizar frutas
congeladas?
Causa Acción
El vapor de agua que queda en el pan después de la cocción puede pasar a la corteza y
ablandarla ligeramente.
Para reducir la cantidad de vapor, pruebe a utilizar 10–20 mL menos de agua o la mitad del
azúcar.
Para que el pan quede más crujiente, puede utilizar el modo de menú 08 o la opción de color
de corteza ‘Dark’ (Oscuro), o incluso cocerlo en el horno a 200 °C/marca de gas 6 durante 5–10
minutos más.
Estaba demasiado caliente cuando lo cortó.
Deje que el pan se enfríe en una rejilla antes de cortarlo para que expulse el vapor de agua.
Algunos tipos de masa con mezcla para pan son difíciles de mezclar con los ingredientes
adicionales.
Reduzca los ingredientes adicionales a la mitad.
¿Añadió mantequilla antes de que pasaran 5 minutos desde el pitido?
No añada harina cuando la pantalla muestra el tiempo restante hasta que esté listo el pan.
(página 177)
El sabor a mantequilla puede ser débil, pero se puede cocer.
Pruebe a hacer lo siguiente.
Se puede cocer mejor si se reduce un poco la cantidad de levadura cuando se utilizan los
menús 11 o 23. (Si se añade la levadura por separado.)
Siga la receta de la mezcla para pan, pero la mezcla debe pesar entre 300–500 g.
Ponga la levadura seca (si se añade por separado) en el dispensador de levadura y los
ingredientes secos y la mantequilla en el recipiente del pan. A continuación vierta el agua.
Añada los ingredientes adicionales más tarde. (páginas 177 o 179)
La elaboración es diferentes según la receta de la mezcla para pan.
Si el pan no se puede extraer fácilmente del recipiente para pan, deje que el pan se enfríe
durante 5–10 minutos y no lo deje sin vigilancia en un lugar donde alguien o algo se pueda
quemar.
Después, agite el recipiente del pan varias veces utilizando guantes de horno.
(Sujete el asa de modo que no impida la salida del pan.)
Había poca cantidad de fruta o demasiado azúcar.
Coloque el recipiente del pan en el fregadero y llénelo hasta la mitad con agua templada.
Deje que recipiente del pan se empape hasta que se desprenda la mezcla cocida o la pala
de amasar. Una vez que se haya desprendido la parte chamuscada, limpie con una esponja.
Tenga cuidado con el agua caliente.
Se ha utilizado demasiada fruta o azúcar.
Utilice solo las cantidades de fruta o azúcar especificadas en las recetas de la página 189.
La fruta estaba verde o demasiado madura.
Se redujo demasiado el azúcar.
El tiempo de cocción fue insuficiente.
Se utilizó fruta con un bajo contenido en pectina.
Utilice la mermelada demasiado líquida como salsa para postres.
Espere hasta que la mermelada se enfríe por completo. La mermelada continuará cuajando
mientras se enfría.
Es posible utilizarlas.
Español
194 195
Page 99

Resolución de problemas
Antes de llamar al servicio técnico, compruebe esta sección.
Problema
¿Qué tipos de azúcar se pueden
usar en la mermelada?
¿Se pueden utilizar frutas
maceradas en alcohol para
hacer mermelada?
La fruta se ha deshecho al
hacer fruta en sirope.
La levadura seca no cae al
recipiente del pan.
Aparece en la pantalla.
Causa Acción
Se puede utilizar azúcar blanco en polvo o en grano.
No utilice azúcar moreno, azúcar bajo en calorías ni edulcorante artificial.
No las utilice. La calidad no es satisfactoria.
El tiempo de cocción fue demasiado. Es posible que la fruta estuviese demasiado madura.
La sincronización de la activación del dispensador e levadura es diferente según el programa de
menú y la temperatura de la habitación.
El dispensador de levadura está mojado o puede haber una acumulación de electricidad estática.
Límpielo con un paño húmedo y déjelo secar al aire.
La levadura seca está húmeda.
Utilice otra levadura seca.
Ha habido un corte de corriente durante aproximadamente 10 minutos (el enchufe se ha
desconectado accidentalmente o se ha activado el disyuntor) o hay otro problema con la
alimentación eléctrica.
El funcionamiento no se verá afectado si el problema de alimentación eléctrica es solo
momentáneo. La máquina panificadora funcionará de nuevo si se restablece la alimentación
eléctrica antes de que pasen 10 minutos, pero el resultado puede verse afectado.
Aparece 01 en la pantalla.
Aparece H01–H02 en la
pantalla.
Aparece U50 en la pantalla.
Ha habido un corte de corriente durante cierto tiempo (es distinto según las circunstancias, por
ejemplo, corte de corriente, desconexión, funcionamiento incorrecto del fusible o el disyuntor).
Retire la masa y empiece otra vez con nuevos ingredientes.
La pantalla indica que hay un problema en la máquina panificadora.
Póngase en contacto con el vendedor o con un servicio técnico de Panasonic.
La unidad está caliente (más de 40 °C/105 °F). Esto puede ocurrir con el uso repetido.
Espere a que la unidad se enfría hasta una temperatura inferior a 40 °C/105 °F antes de
volver a utilizarla (U50 desaparecerá).
Español
196 197
Page 100

Specification
Caractéristiques techniques
Power supply 230 V 50 Hz
Power consumed 550 W
Capacity (Strong flour) max. 600 g min. 300 g
(Dry yeast) max. 7.5 g min. 2.25 g
Capacity of raisin nut dispenser max. 150 g raisins
Timer Digital timer (up to 13 hours)
W
Dimensions (H
Weight approx. 7.6 kg
Accessories Measuring cup, measuring spoon
D) approx. 38.225.638.9 cm
Daten
Stromversorgung 230 V 50 Hz
Leistungsaufnahme 550 W
Kapazität (Mehl) max. 600 g min. 300 g
(Trockenhefe) max. 7.5 g min. 2.25 g
Kapazität des Rosinen-Nuss Verteilers max. 150 g Rosinen
Zeitvorwahl Digitale Zeitschaltuhr (bis zu 13 Stunden)
Abmessungen (H
Gewicht ca. 7,6 kg
Zubehör Messbecher, Messlöffel
B
T) ca. 38,225,638,9 cm
Alimentation électrique 230 V 50 Hz
Puissance absorbée 550 W
Contenance (Farine à pain) maxi 600 g mini 300 g
(Levure sèche) maxi 7.5 g mini 2.25 g
Contenance du distributeur de raisins secs / noisettes 150 g maxi de raisins secs
Départ différé Programmateur digital (jusqu’à 13 heures)
Dimensions (H
Poids env. 7,6 kg
Accessoires Gobelet doseur, cuillère doseuse
L
P) env. 38,225,638,9 cm
Specifiche tecniche
Alimentazione 230 V 50 Hz
Consumo energetico 550 W
Capienza (farina di grano duro) max. 600 g min. 300 g
(Lievito in polvere) max. 7,5 g min. 2,25 g
Capienza del dosatore di uvetta e noci max. 150 g di uvetta
Timer Timer digitale (fino a 13 ore)
Dimensioni (Altezza
Peso circa 7,6 kg
Accessori Bicchiere dosatore, cucchiaio dosatore
LarghezzaProfondità) circa 38,225,638,9 cm
Specificatie
Stroomtoevoer 230 V 50 Hz
Verbruikte stroom 550 W
Inhoud (Harde bloem) max. 600 g min. 300 g
(Droge gist) max. 7.5 g min. 2.25 g
Inhoud van rozijnen-notenstrooier max. 150 g rozijnen
Timer Digitale timer (max. 13 uur)
Afmetingen (H
Gewicht ca. 7,6 kg
Accessoires Maatbeker, maatlepeltje
B
D) ca. 38,225,638,9 cm
Especificaciones
Alimentación 230 V 50 Hz
Consumo de energía 550 W
Capacidad (Harina fuerte) máx. 600 g min. 300 g
(Levadura seca) máx. 7,5 g min. 2,25 g
Capacidad del dispensador de uvas pasas y nueces máx. 150 g de uvas pasas
Temporizador Temporizador digital (hasta 13 horas)
Dimensiones (AL×An×Pr)
Peso aprox. 7,6 kg
Accesorios Vaso de medir, cuchara de medir
aprox. 38,2
25,638,9 cm
198 199
 Loading...