

Page 1

Operating Instructions
SD Video Camera
Model No. SDR-S7
Before use, please read these instructions completely.
VQT1R71
Page 2

Information for your safety
WARNING:
TO REDUCE THE RISK OF FIRE, ELECTRIC SHOCK OR PRODUCT
DAMAGE,
● DO NOT EXPOSE THIS APPARATUS TO RAIN, MOISTURE, DRIPPING
OR SPLASHING AND THAT NO OBJECTS FILLED WITH LIQUIDS,
SUCH AS VASES, SHALL BE PLACED ON THE APPARATUS.
● USE ONLY THE RECOMMENDED ACCESSORIES.
● DO NOT REMOVE THE COVER (OR BACK); THERE ARE NO USER
SERVICEABLE PARTS INSIDE. REFER SERVICING TO QUALIFIED
SERVICE PERSONNEL.
Warning
Risk of fire, explosion and burns. Do not disassemble, heat above 60 ˚C or
incinerate.
CAUTION!
● DO NOT INSTALL OR PLACE THIS UNIT IN A BOOKCASE, BUILTIN CABINET OR IN ANOTHER CONFINED SPACE. ENSURE THE
UNIT IS WELL VENTILATED. TO PREVENT RISK OF ELECTRIC
SHOCK OR FIRE HAZARD DUE TO OVERHEATING, ENSURE THAT
CURTAINS AND ANY OTHER MATERIALS DO NOT OBSTRUCT THE
VENTILATION VENTS.
● DO NOT OBSTRUCT THE UNIT’S VENTILATION OPENINGS WITH
NEWSPAPERS, TABLECLOTHS, CURTAINS, AND SIMILAR ITEMS.
● DO NOT PLACE SOURCES OF NAKED FLAMES, SUCH AS LIGHTED
CANDLES, ON THE UNIT.
● DISPOSE OF BATTERIES IN AN ENVIRONMENTALLY FRIENDLY
MANNER.
Use only the recommended accessories.
● Do not use any other AV cables and USB connection cables except the
supplied one.
● When you use the cable which are sold separately, please make sure to use
the one whose length is less than 3 m.
● Keep the Memory Card out of reach of children to prevent swallowing.
How to replace the Fuse(Only for Hong Kong Special
Administrative Region of China and Saudi Arabia)
The location of the fuse differ according to the type of AC mains plug
(figures A and B).Confirm the AC mains plug fitted and follow the
instructions below.Illustrations may differ from actual AC mains plug.
1) Open the fuse cover with a
screwdriver.
Figure A Figure B
Fuse cover
2) Replace the fuse and close or
attach the fuse cover.
Figure A Figure B
Fuse
(5 ampere)
Fuse
(5 ampere)
The socket outlet shall be installed near the equipment and easily
accessible.
The mains plug of the power supply cord shall remain readily operable.
To completely disconnect this apparatus from the AC Mains,
disconnect the power supply cord plug from AC receptacle.
2 VQT1R71 3VQT1R71
Page 3

PRECAUTIONS
IMPORTANT
● Indemnity concerning recording content
The manufacturer shall in no event be liable for the loss of recordings due to
malfunction or defect of this unit, its accessories or recordable media.
● Carefully observe copyright laws
Whatever you have recorded and created can be used for your personal
entertainment only. Under copyright laws, other materials cannot be used
without obtaining permission from the holders of the copyrights.
For the purposes of these operating instructions
SD Memory Card and SDHC Memory Card are referred to as the “SD card”.
Camera and SD card (sold separately) temperature
After use and battery charging, the battery will be hot. Also, during use,
although the unit’s body and SD card become hot, there is nothing wrong with
the unit.
LCD monitor
Due to limitations in LCD production technology, there may be some tiny bright
or dark spots on the LCD monitor screen. However, this is not a malfunction
and does not affect the recorded picture.
-If you see this symbol-
Information on Disposal for Users of Waste Electrical & Electronic
Equipment (private households)
This symbol on the products and/or accompanying documents
means that used electrical and electronic products should not
be mixed with general household waste.For proper treatment,
recovery and recycling, please take these products to
designated collection points, where they will be accepted on a
free of charge basis. Alternatively, in some countries you may
be able to return your products to your local retailer upon the
purchase of an equivalent new product.
Disposing of this product correctly will help to save valuable resources and
prevent any potential negative effects on human health and the environment
which could otherwise arise from inappropriate waste handling. Please
contact your local authority for further details of your nearest designated
collection point.
Penalties may be applicable for incorrect disposal of this waste, in
accordance with national legislation.
For business users in the European Union
If you wish to discard electrical and electronic equipment, please contact
your dealer or supplier for further information.
Information on Disposal in other Countries outside the European Union
This symbol is only valid in the European Union.
If you wish to discard this product, please contact your local authorities or
dealer and ask for the correct method of disposal.
• SDHC Logo is a trademark.
• miniSD Logo is a trademark.
• Microsoft
Microsoft Corporation in the United States and/or other countries.
• IBM and PC/AT are registered trademarks of International Business Machines
Corporation of the U.S.
• Celeron
trademarks of the Intel Corporation in the United States and other countries.
• Apple and MacOS are trademarks of Apple Inc.
• Microsoft product screen shot(s) reprinted with permission from Microsoft Corporation.
• Other names of systems and products mentioned in these instructions are usually the
registered trademarks or trademarks of the manufacturers who developed the system or
product concerned.
®
, Windows® and DirectX® are either registered trademarks or trademarks of the
®
, Intel®, Intel® Core™ Solo and Pentium® are the registered trademarks or
4 VQT1R71 5VQT1R71
Page 4

Contents
Information for your safety ........ 2
PRECAUTIONS ........................... 4
Before using
Accessories ................................ 8
Parts identification and
handling ....................................... 8
Using the hand strap
(supplied) ................................. 10
Using the LCD monitor ............. 10
How to use the lens cover open
lever ......................................... 11
Applicable SD cards
(sold separately) ....................... 12
Setup
Charging .................................... 14
Charging time, recordable time
and Remaining battery capacity
indication ................................... 16
Inserting/Removing SD cards
(sold separately) ....................... 17
Turning the unit ON/OFF
(Selecting modes)..................... 18
Quick starts ..............................19
Setting from the menu, changing
the display language
Setting the date and time and
adjusting the LCD monitor ...... 22
.................. 20
Recording
Before recording....................... 24
Basic stance ............................. 24
Automatic recording
(motion pictures) ...................... 26
Recording mode and recording
times ......................................... 27
Automatic recording
(still pictures) ............................ 28
Picture quality ........................... 29
Zoom/avoid jitter/maintain
picture brightness in dark
locations .................................... 30
Other recording options .......... 32
Fade-in/Fade-out ...................... 33
Backlight compensation
function ..................................... 34
Self-timer .................................. 34
Soft skin mode ......................... 35
Colour night view function ........ 35
PRE-REC function ................... 36
Self-portrait recording function
Recording manually
(motion/still pictures) ............... 38
Adjusting focus manually
(manual focus adjustment) ....... 38
Using situation-specific settings
(scene mode) ........................... 39
Achieve natural colours
(white balance) ......................... 40
Adjusting shutter speed
(shutter speed) ......................... 42
Adjusting brightness
(iris/gain) .................................. 43
Useful functions ....................... 44
Recording dates and times at
travel destinations
(set world time) ......................... 44
View slants and composition
(guide lines) .............................. 45
Avoid wind noise (wind noise
reduction function) .................... 45
.. 37
Playback
Viewing motion pictures .......... 46
Displaying thumbnails by date
Fast forward/rewind playback .. 48
Slow-motion playback .............. 48
Frame-by-frame playback ........ 48
Resuming the previous
playback ................................... 48
Viewing still pictures ................ 49
.. 47
Editing
Deleting motion/still pictures .. 50
Deleting one picture at a time .. 50
Deleting all pictures .................. 51
Selecting and deleting multiple
pictures ..................................... 51
Preventing accidental deletion
of motion/still pictures
Formatting cards ...................... 52
Setting DPOF for still pictures
.. 53
With other products
Playback on TV ......................... 54
Copying to video recorders or
DVD recorders .......................... 55
Printing pictures from
PictBridge printers ................... 56
Using DVD burners
(sold separately) ....................... 58
With a computer
Software on the CD-ROM ......... 64
End User License Agreement .. 65
Operating environment ............ 66
Installing MotionSD STUDIO ... 68
Using MotionSD STUDIO ......... 70
Using this unit as an external
drive (Mass storage)................. 72
Checking the connections ....... 74
Connecting to a Macintosh
computer ................................... 75
Others
Menus ........................................ 76
Recording menu ....................... 76
Playback menu ......................... 76
SETUP menu ........................... 78
LCD monitor displays .............. 80
When recording ........................ 80
During playback ....................... 81
Messages .................................. 82
Troubleshooting ...................... 84
Cautions for use ....................... 90
Specifications ........................... 94
Before usingSetupRecordingPlaybackEditingWith other
products
With a
computer
Others
6 VQT1R71 7VQT1R71
Page 5

Accessories
Parts identification
and handling
Make sure all of the following
accessories were included in the
product package.
• Battery pack
• AC adaptor
• AC cable
• AV cable
• Hand strap
• USB cable
• CD-ROM
Software
• CD-ROM
Operating Instructions
DC input terminal
[DC IN 5.0 V] (P.15)
Audio-video output
terminal [A/V] (P.54, 55)
USB terminal
] (P.56, 59, 70)
[
• Do not use any other AC adaptors
except the supplied one.
Card access lamp
[ACCESS] (P.17, 25)
Card/battery door lever
[
Battery slot
[BATTERY] (P.14)
] (P.14, 17)
Card/Battery door
(P.14, 17)
Card slot
[SD CARD]
(P.17)
Tripod mounting hole
For tripod (sold separately) mounting
instructions, see the user’s guide of
the tripod. (With some tripods, the
card/battery door cannot be opened
when the unit is mounted on the tripod.
In such case, insert the SD card and
battery before mounting the unit on the
tripod.)
Strap fixture
(P.10)
LCD monitor (P.10)
Menu button
[MENU] (P.20)
Auto button
[AUTO] (P.38)
Manual button
[MANUAL AF/MF]
(P.38)
Delete button
] (P.50)
[
Cursor buttons (P.20)
Lens cover open lever
(P.11)
Lens
White balance sensor
(P.24)
Microphone
(built-in, stereo)
Sub record button (P.24)
(Same as record button)
When recording: Zoom button
[T/W] (P.30)
During playback: Volume button
[+VOL–] (P.46)
Speaker
Terminal cover (P.15)
Record button
(P.26, 28)
Status indicator
(P.15, 18, 22)
Mode dial (P.18)
: Motion picture
recording (P.26)
: Motion picture
playback (P.46)
: Still picture recording
(P.28)
: Still picture playback
(P.49)
: Turning the unit OFF
(P.18)
8 VQT1R71 9VQT1R71
Page 6

Parts identification and handling (cont.)
Using the hand strap (supplied)
Using as strap
Fit over your wrist and adjust the
length of the strap.
Using the LCD monitor
Images can be checked on the LCD monitor when recording.
Open the LCD monitor. Adjust the angle.
Up to 180 ˚
Up to 90 ˚
How to use the lens cover open lever
Before recording, open the
lens cover.
Open the lens cover by sliding
the lens cover open lever to the
] position.
[
● In order to protect the lens, slide
the lens cover open lever to the
] position when the unit is not
[
in use, and close the lens cover.
● Forcing the LCD monitor open or rotating it past the angle to which it can be
rotated will cause trouble or malfunctioning.
● Brightness and colour density can be adjusted. (P.23)
10 VQT1R71 11VQT1R71
Page 7

Applicable SD cards (sold separately)
The following SD and SDHC Memory Cards can be used.
Type of card Capacity
SD Memory Card
(SD speed Class 2 or higher recommended)
SDHC Memory Card
(Use cards bearing the
• 8 MB and 16 MB SD Memory Cards are for still picture recording only.
• With 32 MB, 64 MB and 128 MB SD Memory Cards, still pictures can be
recorded, but motion picture recording may stop during use.
• Multimedia cards cannot be used.
logo.)
256 MB
512 MB
1 GB
2 GB
4 GB
8 GB
16 GB
Recommended Panasonic SD/SDHC Memory Cards
(as of February 2008)
The following Panasonic SD/SDHC Memory Cards and SD speed Class 2 or
higher Memory Cards are recommended for this unit. With other types of SD
cards, motion picture recording may stop during use.
SD Memory Card SD/SDHC Memory Card
High Speed Class 2 Class 4 Class 6
256 MB RP-SDH256 RP-SDR256 ――
512 MB RP-SDK512 RP-SDR512 ――
1 GB RP-SDH01G RP-SDR01G ― RP-SDV01G
2 GB RP-SDK02G RP-SDR02G RP-SDM02G RP-SDV02G
4 GB ― RP-SDR04G RP-SDM04G RP-SDV04G
8 GB ―――RP-SDV08G
16 GB ―――RP-SDV16G
● Please confirm the latest information on the following website. (This website
is in English only.)
http://panasonic.jp/support/global/cs/e_cam
Precautions in handling
• Do not touch the terminals on the back of the card. Also, prevent dirt, water
and foreign matter from adhering to terminals.
• Do not leave cards in the following areas:
· Where exposed to direct sunlight
· Humid or dusty places
· Near heaters and sources of heat
· Where subjected to sharp temperature changes (condensation can occur)
· Where exposed to static electricity or electromagnetic waves
• After use, return cards to their pouch or case.
• SD card data may be corrupted or lost due to electrical noise, static
electricity, damage to the unit or card, etc. Save important data on a PC
using the supplied USB cable, MotionSD STUDIO, etc. (P.70)
Write-protecting cards
When the write-protect switch on the SD card is set to the LOCK position,
data cannot be written onto or deleted from the card, and the card cannot be
formatted.
Write-protect switch
● SDHC Memory Cards can be used only with SDHC devices.
Be careful when sharing cards between devices.
● Be sure to format SD cards with this unit only.
If cards are formatted on a PC or other device, recording may take time and
the card may become unusable with the unit.
● Before using an SD card from another device, copy the data onto a PC or
other storage device and then format the card with this unit.
● Keep the Memory Card out of reach of children to prevent swallowing.
● This unit supports SD Memory Cards formatted to FAT12 or FAT16 file
systems and SDHC Memory Cards formatted to a FAT32 file system.
● SD speed Class 2
Class 2 speed standard for SD cards. This and higher types of SD cards
operate stably in devices for which Class 2 or higher SD cards are
recommended such as this unit.
12 VQT1R71 13VQT1R71
Page 8

Setup
Charging
1
The battery is not charged at the time of purchase. Be sure to charge it
before use.
For charging time (P.16)
The unit is in the standby condition when the AC adaptor is connected. The
primary circuit is always “live” as long as the AC adaptor is connected to an
electrical outlet.
Insert the battery into the unit and charge it.
Set the mode dial to [OFF].
1
The unit runs on AC power (status indicator lit red) and
the battery cannot be charged when the mode dial is set
to any position other than [OFF].
Open the card/battery
2
door.
Open the door by sliding the card/
battery door lever to the “OPEN”
position.
Insert the battery.
3
Ensure that battery is oriented
correctly, and push it into the
compartment in the direction of the
[▲] until it snaps into place and it is
locked by the lever.
(To remove the battery, press the
lever in the direction of the [
Close the card/battery
4
door.
Close the card/battery door and
slide the card/battery door lever to
the “LOCK” position.
Connect the AC adaptor
5
(supplied).
Connect the AC cable to the AC
adaptor and then to an AC outlet.
To AC outlet
* Do not use the AC cable and AC adaptor of this unit with other devices. Also, do not use
the AC cables and AC adaptors of other devices with this unit.
].)
Lever
AC adaptor
AC cable
*
Small gap here.
We recommend using Panasonic batteries (VW-VBJ10).
If you use other batteries, we cannot guarantee the quality of this product.
CAUTION
Danger of explosion if battery is incorrectly replaced. Replace only with the
same or equivalent type recommended by the manufacturer. Dispose of used
batteries according to the manufacturer's instructions.
● Do not heat or expose to flame.
● Do not leave the battery in an automobile exposed to direct sunlight for a long
period of time with doors and windows closed.
Open the terminal cover.
6
Plug the DC plug into the DC
7
input terminal on the unit.
Status indicator
Flashing red at approx. 1 second intervals
: Charging in progress
Off : Charging complete
If the status indicator does the following:
Does not flash:
Remove and reinsert the battery, and disconnect and reconnect the AC adaptor.
If the status indicator still does not flash, contact your dealer.
Flashes rapidly at approx. 0.25 seconds intervals:
The battery cannot be charged. Try doing the following.
• Remove and reinsert the battery, and try recharging the battery.
• The battery temperature or surrounding temperature is too high/low, therefore wait until
the unit and the battery are at suitable temperatures and try recharging the battery.
If battery charging still does not commence, contact your dealer.
Flashes slowly at approx. 3 seconds intervals:
Charging requires time for the following reasons:
• The battery has been excessively discharged.
• The battery temperature or ambient temperature is too high/low.
● If power to the unit is activated while the battery is charging, the AC power
supply will be used and charging interrupted.
14 VQT1R71 15VQT1R71
Page 9

Setup
Charging time, recordable time and
2
Remaining battery capacity indication
Setup
Inserting/Removing SD
3
cards (sold separately)
Charging time and recordable time
Times are given for a temperature of 25 ˚C and humidity of 60 %. The charging
time shown in the table are approximations. In high or low temperatures,
charging requires more time.
● Supplied battery VW-VBJ10 (3.6 V, 1000 mAh)
Charging time Approx. 2 h 15 min
Maximum continuously
Recordable time
● Actual recordable time includes recording and stopping, turning the unit ON/
OFF, zooming and other operations.
● Recordable time varies according to conditions of use. For example, the
recordable time shortens when the [POWER LCD] setting is on while
recording.
● The recordable time shortens in some environments (i.e., low temperatures,
etc.), therefore it is recommended to charge a spare battery.
Remaining battery capacity indication
The battery indication changes, as the remaining battery power decreases.
High Low
recordable time
Approx. 1 h 10 min Approx. 40 min
Actual recordable time
Flashing (Charge battery.)
SD cards are sold separately.
Preparations: Set the mode dial to [OFF].
Inserting or removing an SD card with the power ON may
damage the unit and destroy data on the card.
Open the card/battery
1
door.
Open the door by sliding the card/
battery door lever to the “OPEN”
position.
Insert/Remove the SD
2
card.
• To insert:
Face the label upwards and slide
the card in straight until hearing it
catch.
• To remove:
Press the centre of the SD card and
pull the card out straight.
Close the card/battery
3
door.
• Close the card/battery door and
slide the card/battery door lever to
the “LOCK” position.
• If the door does not close
completely, remove the SD card,
check its orientation and reinsert it
into the slot.
(Check that the status indicator is out.)
Place label upwards.
● While the card access lamp is lit, reading, recording, playback, deletion
or other processing is being executed. Performing the following
operations while the lamp is lit may damage the SD card and its content
and the unit may not function properly.
• Turning off the unit
• Removing battery or AC adaptor
• Opening card/battery door and removing SD card
• Rotating the mode dial
• Shaking or impacting the unit
Card access lamp
16 VQT1R71 17VQT1R71
Page 10

Setup
Turning the unit ON/OFF
4
(Selecting modes)
Rotate the mode dial to motion picture recording/playback, still picture
recording/playback or turning the unit OFF.
Rotate the mode dial slowly but surely to the desired position without turning it
recklessly.
Set to icon of desired mode.
Turning the unit OFF
Motion picture recording mode
(P.26)
Motion picture playback mode
Status indicator
• When turning the unit ON: Lit red
(When selecting
• When turning the unit OFF: Off
● The very first time that power is turned ON, a message appears prompting
you to set the date and time. (P.22)
)
(P.46)
Still picture recording mode
(P.28)
Still picture playback mode
(P.49)
Quick starts
Quick starts are available when the mode is set to [ ] and [ ].
When [QUICK START] is [ON], the unit responds as follows to LCD monitor
operations:
LCD monitor
operation
When opened Shooting can start in approx. 0.6 second. Lit red
When closed
* The unit consumes about half as much power as when recording is stopped.
Setting [QUICK START]
The unit goes on quick start standby
Unit response
*
.
Status
indicator
Flashing green
Make settings from the
menus. (P.20)
→[SETUP]→
[QUICK START]→[ON]
(To turn OFF, select [OFF].)
• [QUICK START] is [ON] at the time of purchase.
● The quick start standby is cancelled and the unit turns OFF (status indicator
out) in the following situations.
• When quick start standby mode continues for more than about 5 minutes
Turning the unit ON/OFF from the LCD monitor
When [ ] or [ ] is selected, the unit turns ON when the LCD monitor is
opened and OFF when it is closed. (During motion picture recording, the unit
does not turn OFF when the LCD monitor is closed.)
• When [QUICK START] (next page) is [ON], the unit goes on quick start
standby when the LCD monitor is closed.
• When not in use, set the mode dial to [OFF].
• When the mode dial is rotated
● When white balance is set to [
source differs from that prior to quick starting, because automatic adjustments
are performed. (However, automatic adjustments are not performed when
using the Colour night view function.)
● Starting may require more time than usual if the unit is impacted.
● Zoom magnification becomes 1x after quick starts.
● If [POWER SAVE] (P.78) is set to [5 MINUTES] and the unit automatically
goes on quick start standby, close and reopen the LCD monitor.
], quick starts require more time if the light
18 VQT1R71 19VQT1R71
Page 11

Setup
The menu cannot be displayed during recording or playback.
For menu items (P.76 “Menu List”)
Setting from the menu,
5
changing the display language
The cursor buttons are used to select functions, execute operations and
make menu settings.
To return to the previous screen
To quit an operation halfway
through
Display the menu.
1
The menu displayed differs
according to mode.
Select the top menu.
2
(Top menu for [ ] and [ ]
modes)
Enter the top menu.
3
or
Select a submenu.
4
Select an item.
6
Enter the selected item.
7
Using the cursor buttons
The cursor buttons are used to select and enter items on menus or
thumbnail displays.
Upwards
Left Right
Downwards
● To move the cursor
The cursor moves in the direction of the
respective cursor buttons
when pressed.
● Pressing the centre enters the selection.
Close the menu.
8
Enter the selected
5
submenu.
or
● Do not rotate the mode dial while menus appear on the LCD monitor.
● You cannot record or perform other operations while menus appear on the
LCD monitor.
Changing the display language
The display and menu language can be changed.
→[LANGUAGE]
20 VQT1R71 21VQT1R71
Page 12

Setup
Setting the date and time and adjusting the LCD monitor
6
Setting the date and time
Before recording, check that the date and time have been set.
The very first time that power is turned ON, a message appears prompting you
to set the date and time. Select [YES], press the centre of the cursor buttons
and proceed to step
To change the date and time
display
● To change an item
→[SETUP]→
[DATE/TIME]
[OFF] : Date and time are not
[D/T] : Date and time are
[DATE] : Only the date is displayed.
● To change the date format
displayed.
displayed.
→[SETUP]→
[DATE FORMAT]
Format
indication
[Y/M/D] 2008.12.15
[M/D/Y] 12.15.2008
[D/M/Y] 15.12.2008
.
3
Appearance on
LCD monitor
Set to [ ] or [ ].
1
Select the desired menu.
2
→[BASIC]→
[CLOCK SET]→[YES]
Set the date and time.
3
To select settings To change
The year is displayed up to 2099
and the 24-hour system is used
to display the time.
Enter the date and time.
4
• The clock function starts at [00]
seconds.
• After pressing the [MENU]
button and closing the menu,
check the date and time
displays.
numerical values
● After setting the date and time, summer time can be set as in “Setting home
city and region” of the world time function (P.44).
● If [
] is displayed for the date and time, the built-in lithium battery has run
down. Charge the battery and set the time as follows. The built-in lithium
battery is charged when the AC adaptor is connected to the unit or when a
battery is inserted into the unit. If charged for about 24 hours, the date and
time can be saved in memory for about 6 months. (The battery is charged
even if the unit is turned OFF.)
Adjusting the LCD monitor
LCD monitor colour and brightness can be adjusted. (Settings do not affect
recorded images.) For setting from the menu (P.20)
The LCD monitor cannot be adjusted for self-portrait recording (P.37).
Select the desired menu.
1
→[SETUP]→
[LCD SET]→[YES]
Select and adjust the
2
item.
Select an item. To adjust
[BRIGHTNESS]:
Adjusts brightness.
[COLOUR]:
Adjusts colour density.
The bar moves.
If the LCD monitor is hard to
see in bright places (POWER
LCD)
Brighten the entire LCD monitor.
→[SETUP]→
[POWER LCD]
: Normal brightness
: The LCD monitor brightens.
: The LCD monitor brightens
more.
] is automatically selected
• [
when the AC adaptor is used.
22 VQT1R71 23VQT1R71
Page 13

Recording
Before recording
1
Record motion and still pictures onto the SD card.
Recorded motion and still pictures are referred to as “scenes” with this unit.
Basic stance
Hold the unit firmly
with both hands
White balance
sensor
Microphone
Be careful not to block
microphone or sensor
● Before recording, open the lens cover.
Stand with back
to sun to avoid
subject being in
shadow
Keep elbows close to
body
Using the “sub record”
button can be helpful
when recording at
waist height
Stand with legs slightly
apart for stability
Recording can be done in two ways: “Automatic recording”
or “Manual recording”.
Automatic recording (motion/still pictures)
(This is the default setting at the time of purchase)
● To have colouring, focus, and brightness settings made
automatically
See
P.26-29
Manual recording (motion/still pictures)
(Manually adjust settings such as focus, white balance, shutter speed,
iris/gain, etc.)
● To record with your own settings
● When automatic recording is unsatisfactory
● To use settings for particular scenes (scene mode)
See
P.38-43
Note
Do not perform any of the following operations while the SD card
is being accessed (card access lamp illuminated). Performing
these actions may damage the card and its data.
• Turning off the unit
• Removing battery or AC adaptor
• Opening card/battery door and removing
SD card
• Rotating the mode dial
• Shaking or impacting the unit
Card access lamp
Card/battery door
● For SD cards applicable with this unit (P.12)
24 VQT1R71 25VQT1R71 25VQT1R71
Page 14

Recording
2
Automatic recording
(motion pictures)
Record motion picture with settings such as focus and colouring made
automatically.
For maximum recording times with battery see (P.16)
Before recording, open the lens cover.
Set to [ ].
1
2
Press .
Start recording.
3
To change aspect ratio to 4:3
→[ADVANCED]→
[REC ASPECT]→[4:3]
Default aspect ratio at the time of
purchase is set to 16:9 (widescreen).
To remove sound when record
button is pressed
→[SETUP]→
[BEEP SOUND]→[OFF]
To remove on-screen display
→[SETUP]→
[DISPLAY]→[OFF]
To ensure that you won’t pass
up any recording opportunities
PRE-REC function (P.36)
● When the unit is running on battery power, the unit is automatically turned
OFF to conserve battery life if no operations are performed for about 5
minutes. To reuse the unit, set the mode dial to [OFF] and then reselect a
mode.
To prevent the unit from turning OFF automatically: (P.78 [POWER SAVE])
● The interval between starting and stopping recording is recorded as one single
scene. The counter is reset to “0h00m00s” after each scene.
Recording continues even if the
LCD monitor is closed.
Stop recording.
4
The unit is still recording if [ ] is
red. Do not move the unit.
Recording
mode Time elapsed
Recording in
progress (red)
Time remaining (flashes
red when under 1 minute)
Paused (green)
Recording mode and recording times
Recording times depend on the recording mode selected.
Recording times for Panasonic SD cards (approximate)
Recording mode
SD card
capacity
256 MB 3 min 6 min 12 min
512 MB 6 min 12 min 25 min
1GB 12 min 25 min 50 min
2GB 25 min 50 min 1 h 40 min
4GB 50 min 1 h 40 min 3 h 20 min
8GB 1 h 40 min 3 h 20 min 6 h 40 min
16 GB 3 h 20 min 6 h 40 min 13 h 20 min
● If a single scene exceeds 4 GB during motion picture recording, recording
continues as a separate scene.
● Recording fast-moving objects or repeatedly writing on the same SD card
numerous times shortens recording time.
● Mosaic-like interference may be generated on playback screens in the
following circumstances:
• Complicated pictures in background
• The unit is moved greatly or quickly
• Recording is of a rapidly moving object (particularly if recording mode is set
])
to [
To change recording mode
→[BASIC]→[REC MODE]→[ ] / [ ] / [ ]
If recording stops
• Recording may stop suddenly if an incompatible SD card has been inserted
(P.12).
• Even with usable SD cards, recording may stop if you repeatedly write on
the same SD card. Copy data onto a PC using MotionSD STUDIO, then
format the SD card with this unit. (When formatted, all data on the SD card
is erased.)
(Highest picture
quality)
(Standard)
(Longest recording
time)
26 VQT1R71 27VQT1R71 27VQT1R71
Page 15

Recording
3
Automatic recording
(still pictures)
Take still pictures with settings such as focus and colouring made
automatically.
For maximum recording times with battery see (P.16)
Before recording, open the lens cover.
To remove shutter sound
→[ADVANCED]→[SHTR
EFFECT]→[OFF]
To remove on-screen display
→[SETUP]→
[DISPLAY]→[OFF]
Set to [ ].
1
2
Press .
Take picture.
3
Focus is aligned to object in
centre of shot.
Picture
resolution
Pictures remaining
(flashes red when zero)
Picture quality
Picture quality
Picture size is 640×480 (0.3 M). The number of pictures that may be recorded
depends on the picture quality selected.
Picture quality and number of pictures for Panasonic SD cards
SD card capacity
(highest picture quality)
8MB 37 75
16 MB 92 185
32 MB 200 410
64 MB 430 850
128 MB 820 1640
256 MB 1710 3410
512 MB 3390 6780
1GB 6790 13580
2GB 13820 27640
4GB 27150 54290
8GB 55260
16 GB
● Pictures taken with the [ ] setting may suffer a mosaic-like effect for certain
objects.
● Depending on the object, the number of pictures that may be recorded may
vary if a mixture of [
*This unit can record only up to 99,999 still pictures in these SD cards.
] and [ ] settings have been used.
(approximate)
Picture quality
High
99999
Standard
(largest number of pictures)
*
99999
99999
*
*
To change picture quality
→[BASIC]→[PICT.QUALITY]→[ ] / [ ]
To avoid jitter
(The image stabilizer function (P.31) cannot be used during still picture
recording.)
• Hold the unit firmly with both hands, and keep elbows close to your body.
• Jitter becomes particularly difficult to avoid with zoom ratios of 4x and
above. It is recommended that you reduce the zoom ratio and move closer
● Sound is not recorded.
● Recorded still pictures are referred to as “scenes” with this unit.
to the object.
• Try using a tripod.
28 VQT1R71 29VQT1R71 29VQT1R71
Page 16
Recording
indicates functions used with motion pictures and functions used with
still pictures.
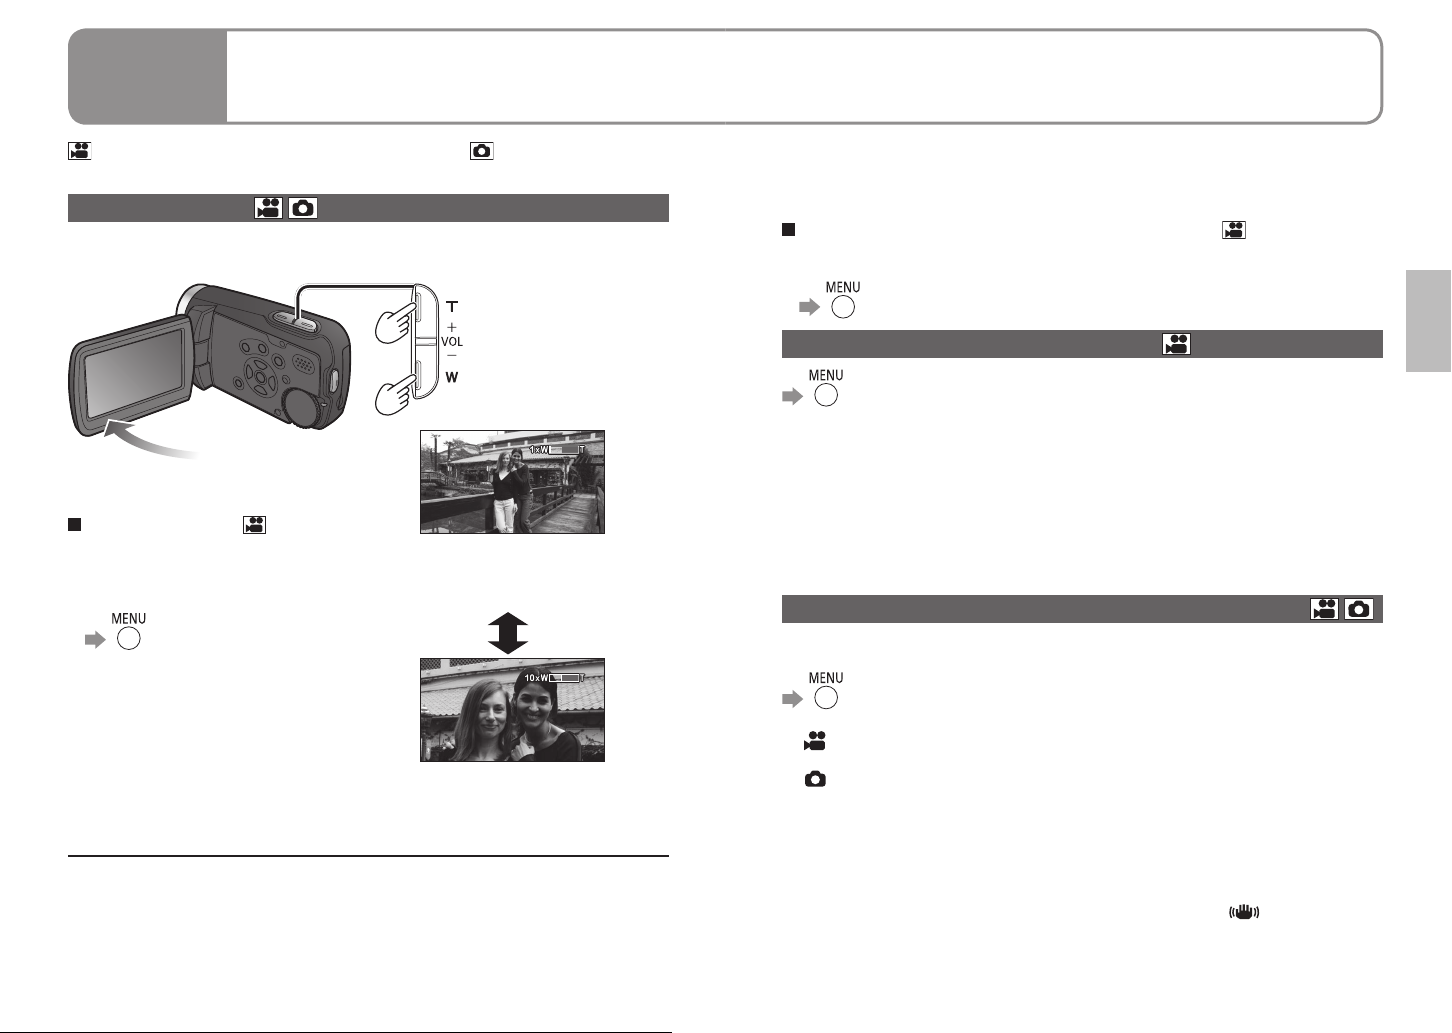
Zoom/avoid jitter/maintain picture brightness in dark locations
4
Enlarging (zoom)
Optical zoom can be used to enlarge objects by up to 10 times without
degradation.
Apply zoom effect to sounds (zoom microphone)
Synched with zooming operations, distance sounds are recorded when
enlarging and peripheral sounds are recorded at wide angles.
Enlarge
Restore
To enlarge further
Digital zoom can be used to enlarge
objects by a maximum of 700 times.
(Cannot be used during still picture
recording.)
→[ADVANCED]→[D.ZOOM]
[OFF] : No digital zoom
[25x] : Up to maximum of 25x
[700x] : Up to maximum of 700x
• Picture quality will be reduced by
the same factor as the zoom ratio is
increased by.
• The digital zoom range is displayed
in blue in the zoom bar on the LCD
monitor.
● Release zoom button quietly (any sounds may be recorded).
● The image stabilizer function is recommended for motion picture recording at
high zoom rates.
● Focus may not be aligned if zooming in too quickly.
● Zooming has two speeds. When the buttons are pressed lightly, zooming is
done at slow speed. When pressed strongly, zooming is done at high speed.
Zoom ratio: 1x
This unit can focus on a subject
approx. 4 cm away from the
lens.
After enlarging the image, the
subject is brought into focus at
1.0 m or greater distance.
→[ADVANCED]→[ZOOM MIC]→[ON]
Avoid jitter (image stabilizer function)
→[ADVANCED]→[SIS]→[ON]
● Default setting at time of purchase is [ON].
● The image stabilizer function cannot be used in shooting still pictures or with
Colour night view.
● Brightness may change and colouring may appear unnatural when using
beneath fluorescent lighting.
● The image stabilizer function may not perform successfully in the following
circumstances:
• Using digital zoom • Location is extremely dark
• Jitter is significant • When following moving object
Maintain brightness in dark locations (auto slow shutter)
Shutter speed is automatically slowed in dark places in order to brighten
captured images.
→[ADVANCED]→[AUTO SLW SHTR]→[ON]
● Default setting at time of purchase is [ON].
]:
( When [ON], shutter speed is automatically adjusted between 1/25 and 1/350.
[
When [OFF], shutter speed is automatically adjusted between 1/50 and 1/350.)
[ ]:
( When [ON], shutter speed is automatically adjusted between 1/25 and 1/500.
● Focus may not be aligned perfectly in extremely dark locations or where there
● When shutter speed is 1/25 - 1/49:
• Images may appear as if frames were skipped and ghost images may
• The image stabilizer function does not work even when [
● During manual recording, shutter speed can be adjusted manually. The range
When [OFF], shutter speed is automatically adjusted between 1/50 and 1/500.)
is little contrast.
appear.
] appears.
in which shutter speed may be adjusted depends on the auto slow shutter
setting. (P.42)
30 VQT1R71 31VQT1R71 31VQT1R71
Page 17
Recording
Other recording options
5
Operation icons can be used to set effects, compensate brightness or
perform other operations in one easy step.
indicates functions used with motion pictures and functions used with
still pictures.
During
motion
picture
recording
During still
picture
recording
While recording is paused
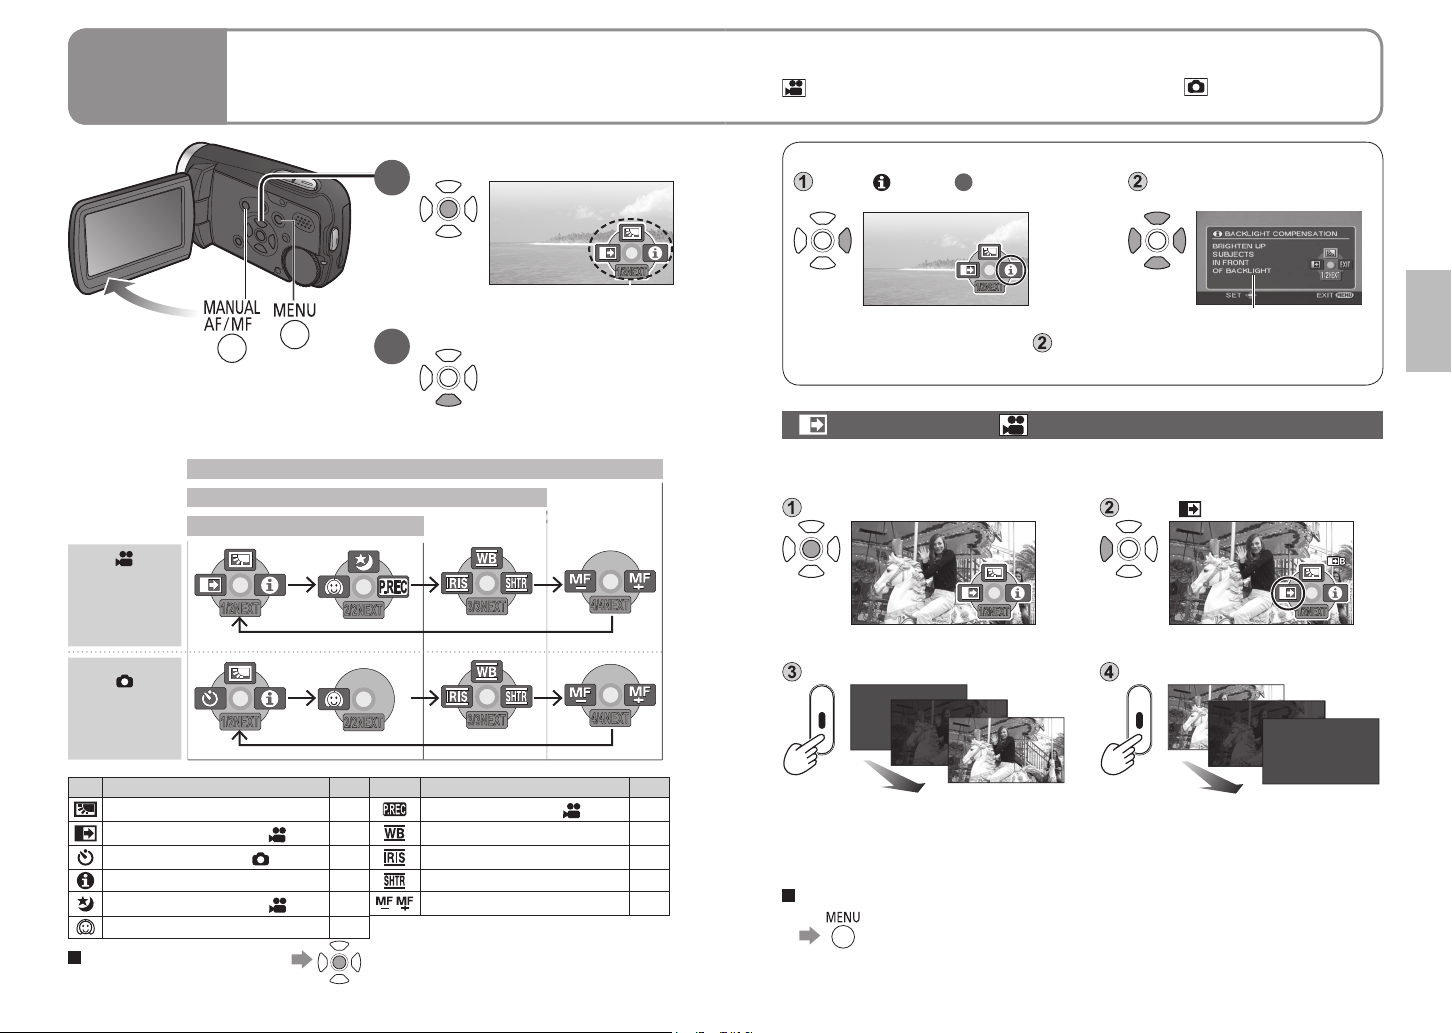
Display operation icons.
1
Operation icons
Change operation icons.
2
For manual focus mode (Press [MANUAL AF/MF] two times).
For manual mode (Press [MANUAL AF/MF] one time).
In automatic recording
1/2NEXT
1/2NEXT
2/2NEXT
2/2NEXT
Icons change with each
press, as displayed
below.
3/3NEXT
3/3NEXT
1/2NEXT
4/4NEXT
4/4NEXT
View explanations of functions during automatic recording (help mode)
Select [ ] in step 1 on the previous
page.
1/2NEXT
● To close, select [EXIT] in step , or press the [MENU] button.
● Functions cannot be set nor can pictures be taken in the help mode.
Select function to be
explained.
Next
Explanation is displayed
Fade-in/Fade-out
This function gradually fades images and audio in and out at the very beginning
and very end of recording.
Display operation icons.
1/2NEXT 1/2NEXT
Start recording.
Select [ ].
Selecting again cancels setting.
Stop recording.
Icon Function Page Icon Function Page
Backlight compensation function 34
Fade in/fade out function ([ ] only)
Self-timer recording ([ ] only)
Help mode 33 Shutter speed 42
Colour night view function ([ ] only)
Soft skin mode 35
33 White balance 40
34
35
PRE-REC function ([ ] only)
Brightness (iris/gain) 43
Manual focus adjustment 38
36
● Cannot be used during still picture recording.
● Thumbnail can be either black or white.
● Setting is cancelled after recording is stopped or the unit is turned off.
To change the fade-in and fade-out image colour to black or white
→[ADVANCED]→[FADE COLOUR]→[WHITE] / [BLACK]
To hide operation icons
32 VQT1R71 33VQT1R71 33VQT1R71
Page 18
Recording
Other recording options
5
(cont.)
Operation icons can be used to set effects, compensate brightness or
perform other operations in one easy step.
indicates functions used with motion pictures and functions used with
still pictures.
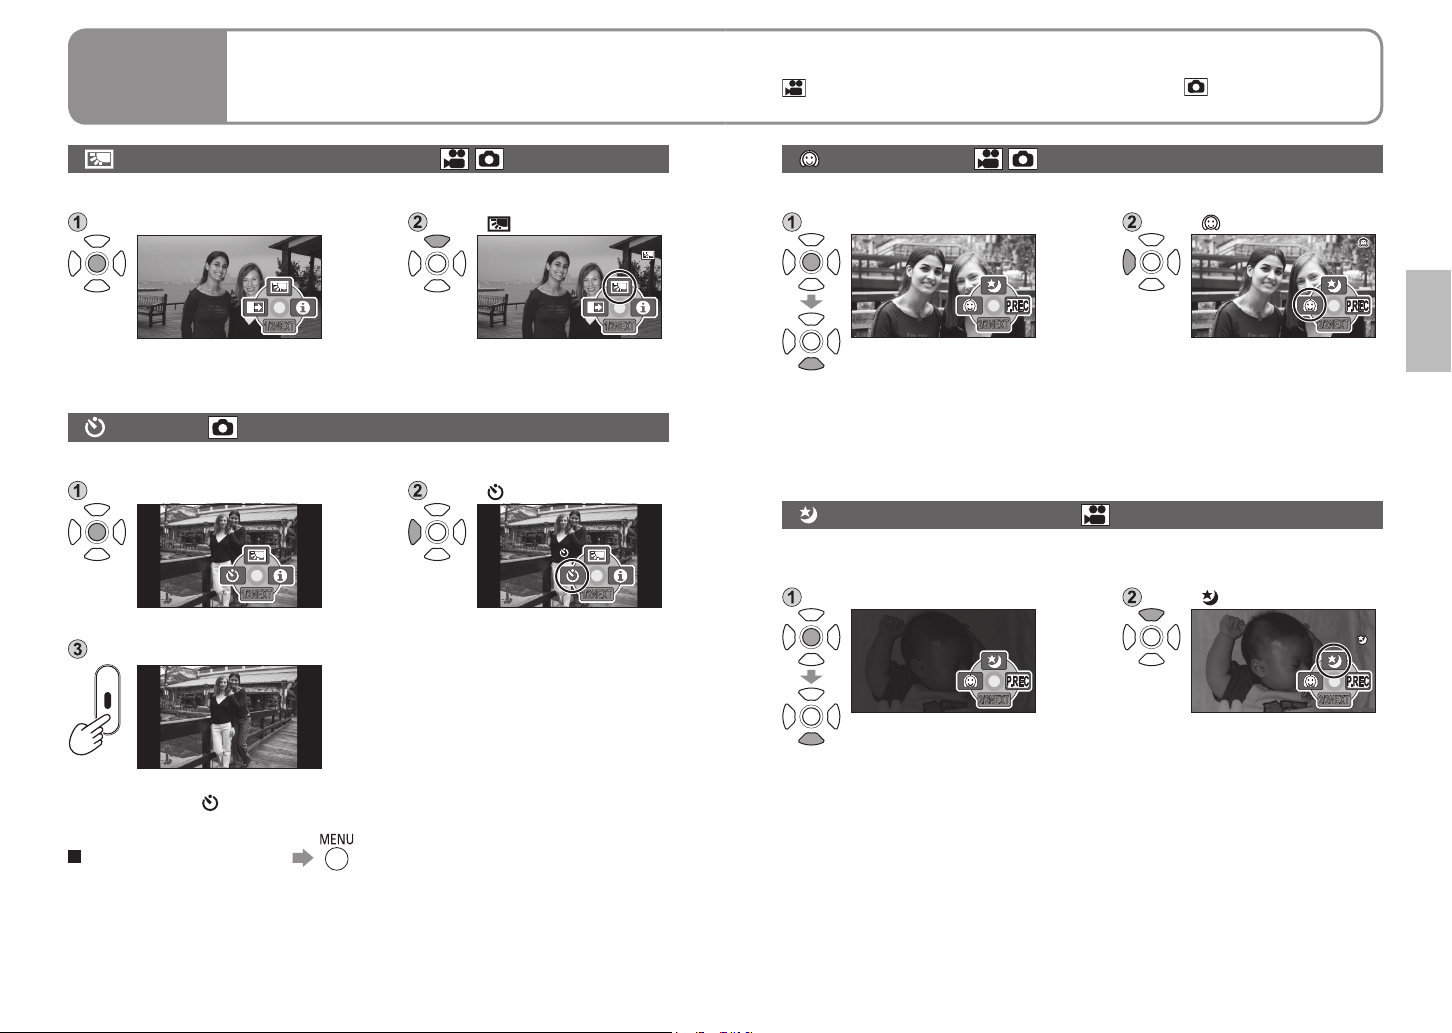
Backlight compensation function
Brightens objects that appear dark against backlighting.
Display operation icons. Select [ ].
1/2NEXT 1/2NEXT
Selecting again cancels setting.
● Turning off the unit rotating the mode dial cancels the setting.
Self-timer
Still pictures may be taken using the self-timer.
Display operation icons. Select [ ].
1/2NEXT 1/2NEXT
Selecting again cancels setting.
Take picture.
Soft skin mode
Softens skin colours when people’s faces are prominent in picture.
Display operation icons. Select [ ].
2/2NEXT 2/2NEXT
Selecting again cancels setting.
● Background colours that are close to skin colours may also be softened.
● Faces may be blurred if people in picture are distant.
● Function may not be effective in locations with insufficient brightness.
● The setting is not cancelled even when the unit is turned OFF or the mode dial
is rotated.
Colour night view function
Colours can be brought out even in dark locations (brightness of at least 2 lx).
(Recorded scene is seen as if frames were missed.)
Display operation icons. Select [ ].
2/2NEXT 2/2NEXT
Selecting again cancels setting.
Picture is taken approx. 10
seconds after [
flash.
To quit halfway through
● Cannot be used during motion recording.
● Setting is cancelled once picture is taken or the unit is turned off.
] begins to
● Cannot be used during still picture recording.
● Normally invisible spots of light may become visible.
● Using a tripod is recommended.
● If focus does not successfully align automatically, adjust using manual focus
(P.38).
● The screen may appear white momentarily if using in bright locations.
● Turning OFF the unit or rotating the mode dial cancels the setting.
34 VQT1R71 35VQT1R71 35VQT1R71
Page 19
Recording
Other recording options
5
(cont.)
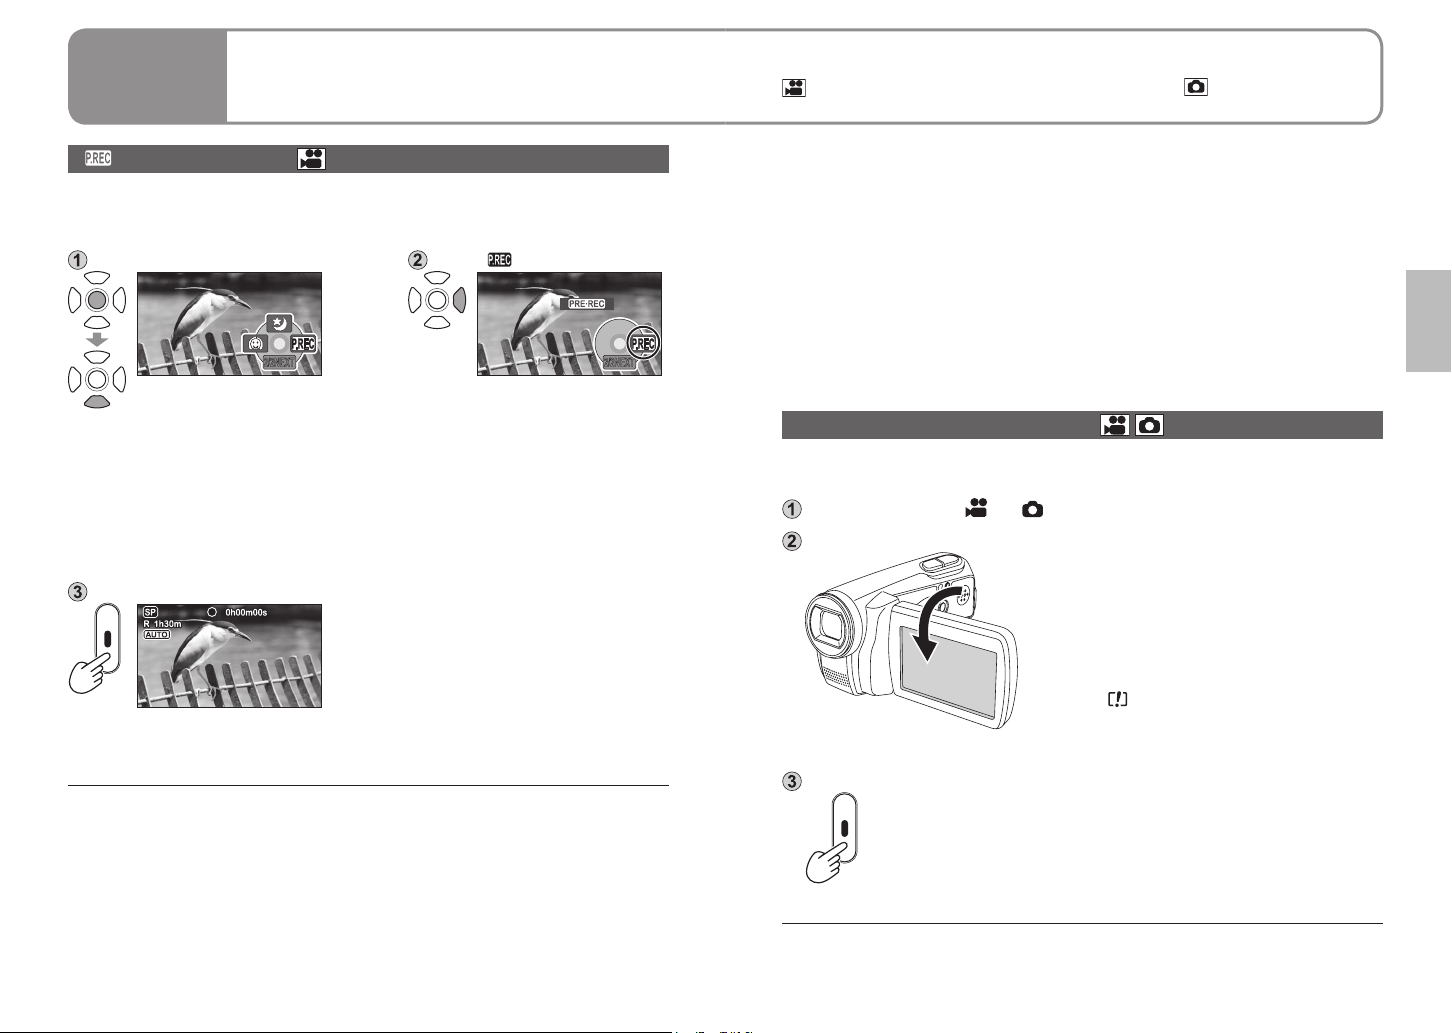
PRE-REC function
To ensure that you won’t pass up any recording opportunities, the picture
and sound are recorded starting about 3 seconds before the record button is
pressed.
Display operation icons. Select [ ].
2/2NEXT 2/2NEXT
Operation icons can be used to set effects, compensate brightness or
perform other operations in one easy step.
indicates functions used with motion pictures and functions used with
still pictures.
● It is not possible to set the PRE-REC function when less than one minute is
left for recording pictures.
● When recording has been started within 3 seconds after the PRE-REC
function was set, the scenes starting from the moment when this function was
set will be recorded.
● The camera shake which occurs when the record button is pressed or the
sound of the button being operated may be recorded.
● It is not possible to add any fade effects (P.33).
● “PRE-REC” is displayed on the LCD monitor screen.
● The picture and sound are recorded starting about 3 seconds before the
record button is pressed.
● Aim this unit at the subject and position it securely.
● The power save function does not work.
● When the function is selected again while it has been set, it will be released.
● The function is released if recording is not started within 3 hours after the
function was set.
Start recording.
● The beep sound does not sound.
● The PRE-REC function setting is released when recording is started. To use
the function again, set it again.
● Cannot be used during still picture recording.
● The PRE-REC function setting is released in the following situations.
· When the mode dial is rotated
· When the unit is turned off
· When the card/battery door is opened
· When the MENU button is pressed
· When the unit has been connected to another device using the USB
connecting cable
Self-portrait recording function
If you turn the LCD monitor toward the lens side, you can record pictures of
yourself as you look at the LCD monitor.
Set the mode dial to [ ] or [ ].
Turn the LCD monitor toward you (toward the lens side).
● The picture you will see displayed on the
LCD monitor is an image of yourself with
the left and right sides reversed just like
when you look at your reflection in a mirror.
(The image which is recorded is the normal
image of yourself.)
● Only part of the screen display appears.
When [
monitor back in the direction of normal
recording, and check what the message
says.
Start recording.
● No operation icons are displayed during self-portrait recording even when the
cursor buttons are pressed.
] is displayed, turn the LCD
36 VQT1R71 37VQT1R71 37VQT1R71
Page 20
Recording
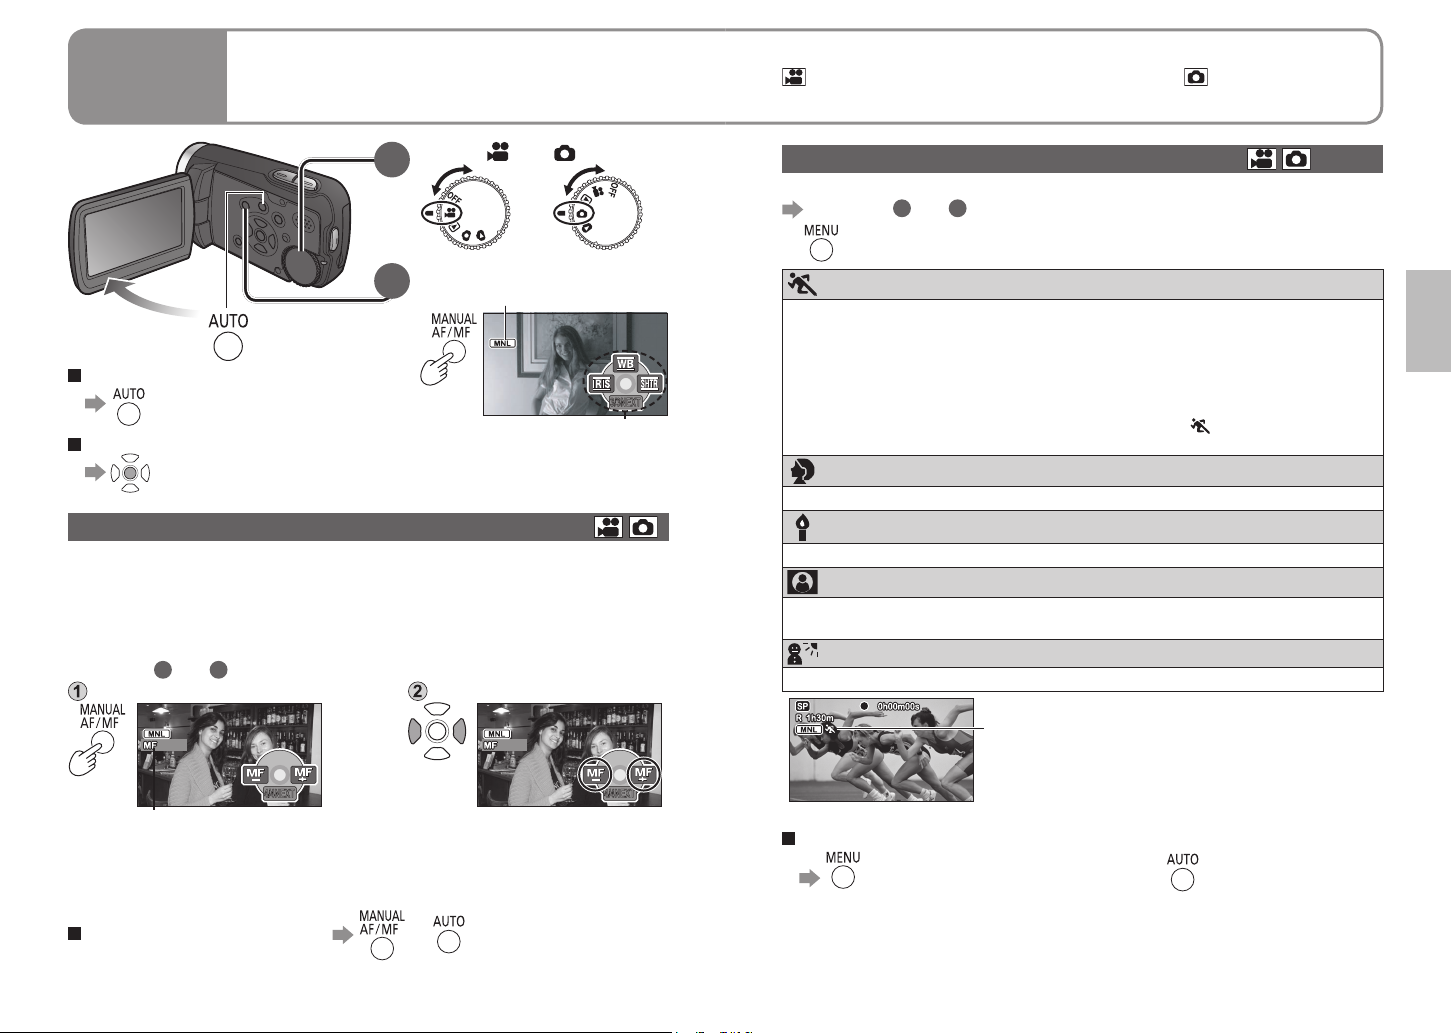
Recording manually
6
(motion/still pictures)
Focus, colouring, shutter speed and brightness can be manually adjusted.
indicates functions used with motion pictures and functions used with
still pictures.
Set to [ ] or [ ].
1
Select manual recording.
2
To return to automatic recording
To hide operation icons
MNL displayed
3/3NEXT
Operation icons
Adjusting focus manually (manual focus adjustment)
Manually focus the subject if it cannot be brought into focus by automatic focus.
For example, focusing is hard in the following situations:
• Mixture of close and distant objects • Objects beyond unclear glass
• Bright peripheral lights • Dark locations
• Fast-moving objects • Objects with little contrast
1
2
After steps
Display MF. Adjust focus.
and
Using situation-specific settings (scene mode)
Already prearranged settings can be used.
After steps 1 and 2 (previous page)
→[BASIC]→[SCENE MODE]→select from the five modes below:
Sports
• Avoids blurring during slow-motion playback or playback pause. (In normal
playback, image movement may not look smooth.)
• Avoid fluorescent, mercury, and sodium lighting. Such lighting conditions
may affect colouring and brightness.
• Vertical bands of light may appear during playback on shining or highly
reflective objects.
• This function may not work if lighting is insufficient ([
• Screen may flicker if using indoors.
Portrait
• Screen may flicker if using indoors.
Low light
• May not function successfully in extremely dark scenes.
Spotlight
• Pictures may appear white when object is extremely bright. Peripheries may
also appear extremely dark.
Surf & snow
• Pictures may appear white when object is extremely bright.
For fast-moving scenes
] flashes).
Blurs background to make people stand out
Brightens dark scenes such as evening skies
For people beneath spotlights, etc.
For bright locations such as beaches and ski slopes
The icon of the selected scene mode
appears on the LCD monitor.
4/4NEXT
MF displayed
● Focuses adjusted on wide-angle settings may become unaligned when
subsequently zooming in. Focuses adjusted when zoomed in will be
unaffected when subsequently zooming back out.
To return to automatic focus or
4/4NEXT
To cancel the setting
→[BASIC]→[SCENE MODE]→[OFF] or
38 VQT1R71 39VQT1R71 39VQT1R71
Page 21
Recording
Recording manually
6
(motion/still pictures) (cont.)
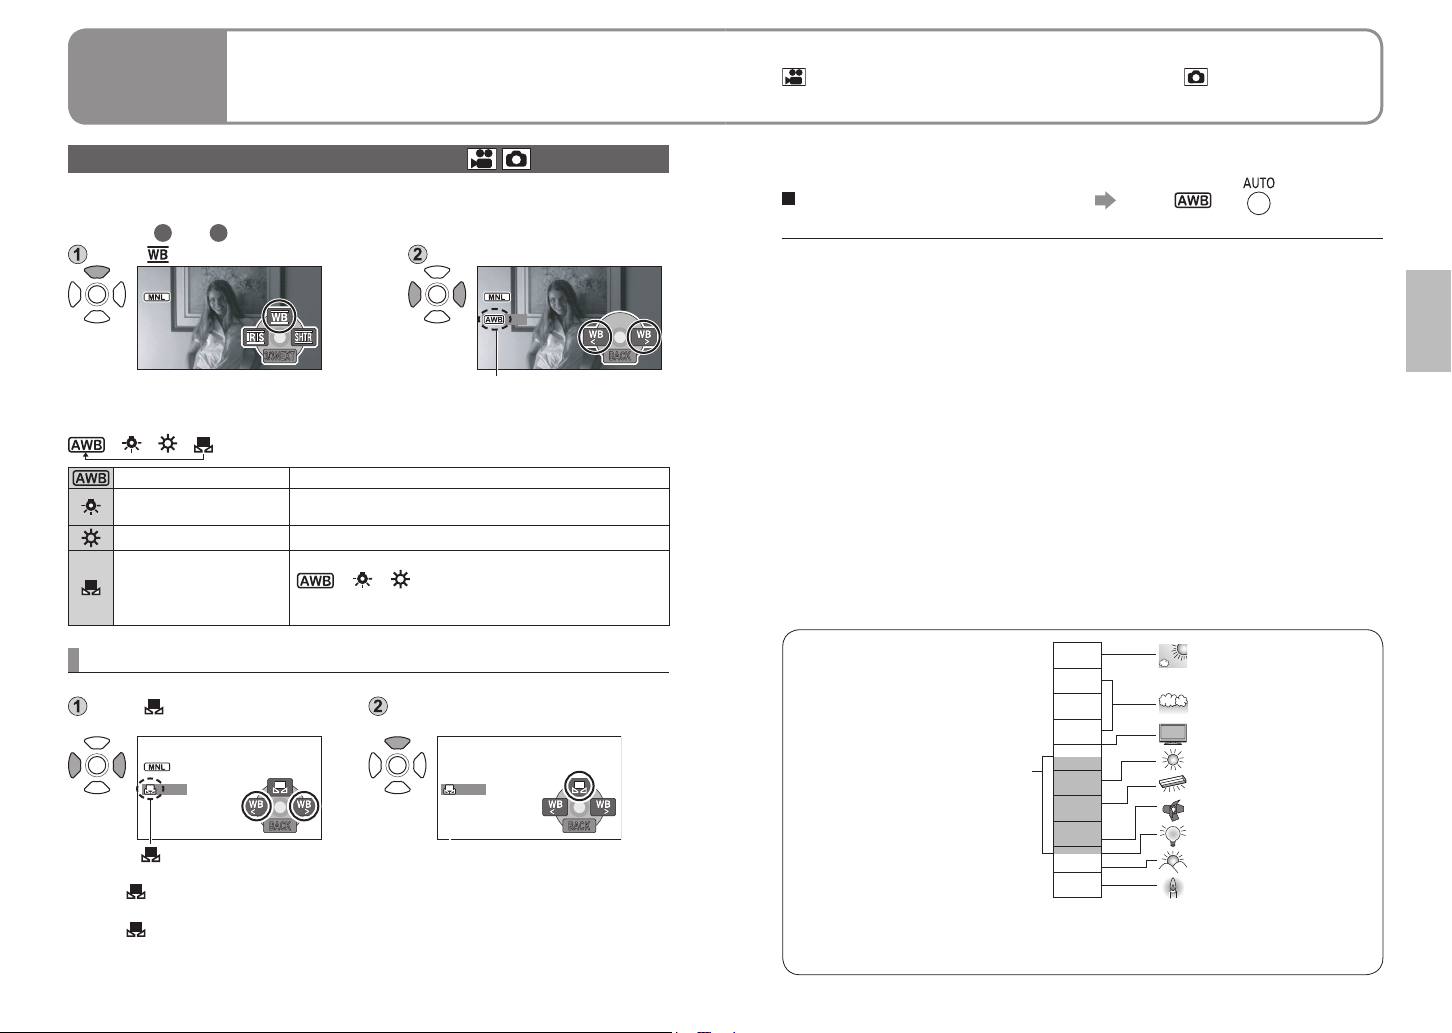
Achieve natural colours (white balance)
Restore natural colours according to the light source when colouring has
become unnatural.
1
After steps
Select [ ]. Set the mode.
The mode is changed by one setting in the following sequence each time any
cursor button is pressed.
→ → →
and 2 (P.38)
3/3NEXT BACK
Mode displayed
Automatic Adjusted automatically
Indoor
(incandescent lighting)
In locations with incandescent or halogen lighting
Outdoor In bright, outdoor conditions
When ideal results cannot be produced with
Set manually
(see below)
], [ ], [ ] modes (Mercury lighting, sodium
[
lighting, fluorescent lighting, hotel lighting,
spotlights, sunsets, sunrises, etc.)
Focus, colouring, shutter speed and brightness can be manually adjusted.
indicates functions used with motion pictures and functions used with
still pictures.
To return to automatic adjustment Set to [ ] or .
● Please adjust white balance first if using in conjunction with iris/gain setting.
Setting manually
Set colours based on white objects within the required lighting environment.
Set to [ ]. Fill the entire display with white
BACK
BACK
[ ] flashes.
• If the [ ] continues flashing after setting begins, the setting cannot be
made. (Because the range is too dark, etc.)
• If the [
] flashes during recording, adjustments cannot be completed for
the current subject. Remake the setting until matching the subject.
subject and begin making setting.
BACK
BACK
Setting complete when flashing
stops.
10 000K
9 000K
8 000K
7 000K
Auto white balance range
When out of range, images become reddish or bluish. Moreover, the mode does not
work properly even when within range if multiple light sources are used. In such cases,
adjust images manually.
6 000K
5 000K
4 000K
3 000K
2 000K
1 000K
Blue sky
Cloudy sky (Rain)
TV screen
Sunlight
White fluorescent lamp
Halogen light bulb
Incandescent light bulb
Sunrise, sunset
Candlelight
40 VQT1R71 41VQT1R71 41VQT1R71
Page 22
Recording
Recording manually
6
(motion/still pictures) (cont.)
Focus, colouring, shutter speed and brightness can be manually adjusted.
indicates functions used with motion pictures and functions used with
still pictures.
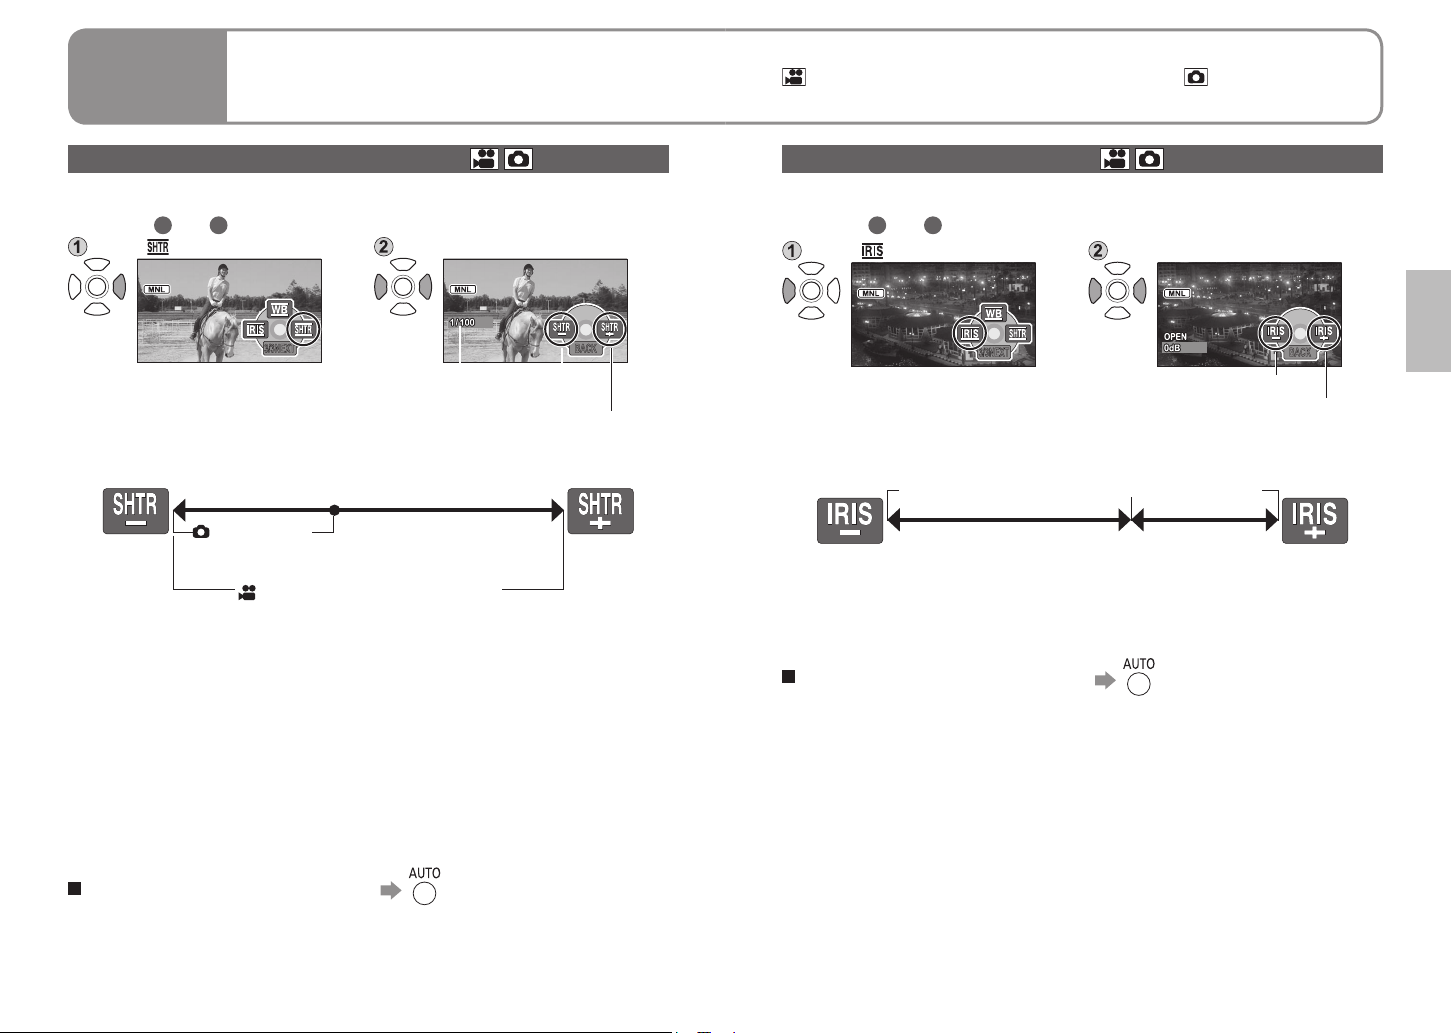
Adjusting shutter speed (shutter speed)
Adjust shutter speed to record fast-moving objects, etc.
After steps
Select [ ]. Adjust shutter speed.
● When adjusting both shutter speed and brightness (iris and gain), adjust the
shutter speed first.
● Interference may increase with faster shutter speeds (as sensitivity becomes
lower and gain value rises automatically).
● Vertical bands of light may appear during playback on shining or highly
reflective objects.
● Avoid fluorescent, mercury, and sodium lighting. Such lighting conditions may
affect colouring and brightness.
● In normal playback, image movement may not look smooth.
● Colours may change and flicker when recording in extremely bright locations.
Set the shutter speed between 1/50 and 1/100.
1
and 2 (P.38)
3/3NEXT BACK
Shutter speed
SHTR–: Slower
SHTR+: Faster
Shutter speed adjustment range
*
1/50
Slower Faster
* Slower extreme becomes 1/25 when auto slow shutter (P.31) is set to [ON].
During still
picture
recording
1/500 1/8000
During motion picture recording
Adjusting brightness (iris/gain)
Adjust iris/gain (sensitivity) settings if location is too bright or too dark.
After steps
Select [ ]. Adjust brightness.
● Depending on the zoom magnification, some iris values (F number) may not
be displayed.
● Interference will increase as gain value is raised.
To return to automatic adjustment
1
and 2 (P.38)
3/3NEXT BACK
IRIS–: Darker
IRIS+: Brighter
Iris/gain value adjustment range
CLOSE……F16……F2.0…OPEN (0 dB)………18 dB
Darker Brighter
Iris adjustment
Gain adjustment
To return to automatic adjustment
42 VQT1R71 43VQT1R71 43VQT1R71
Page 23
Recording
Useful functions
7
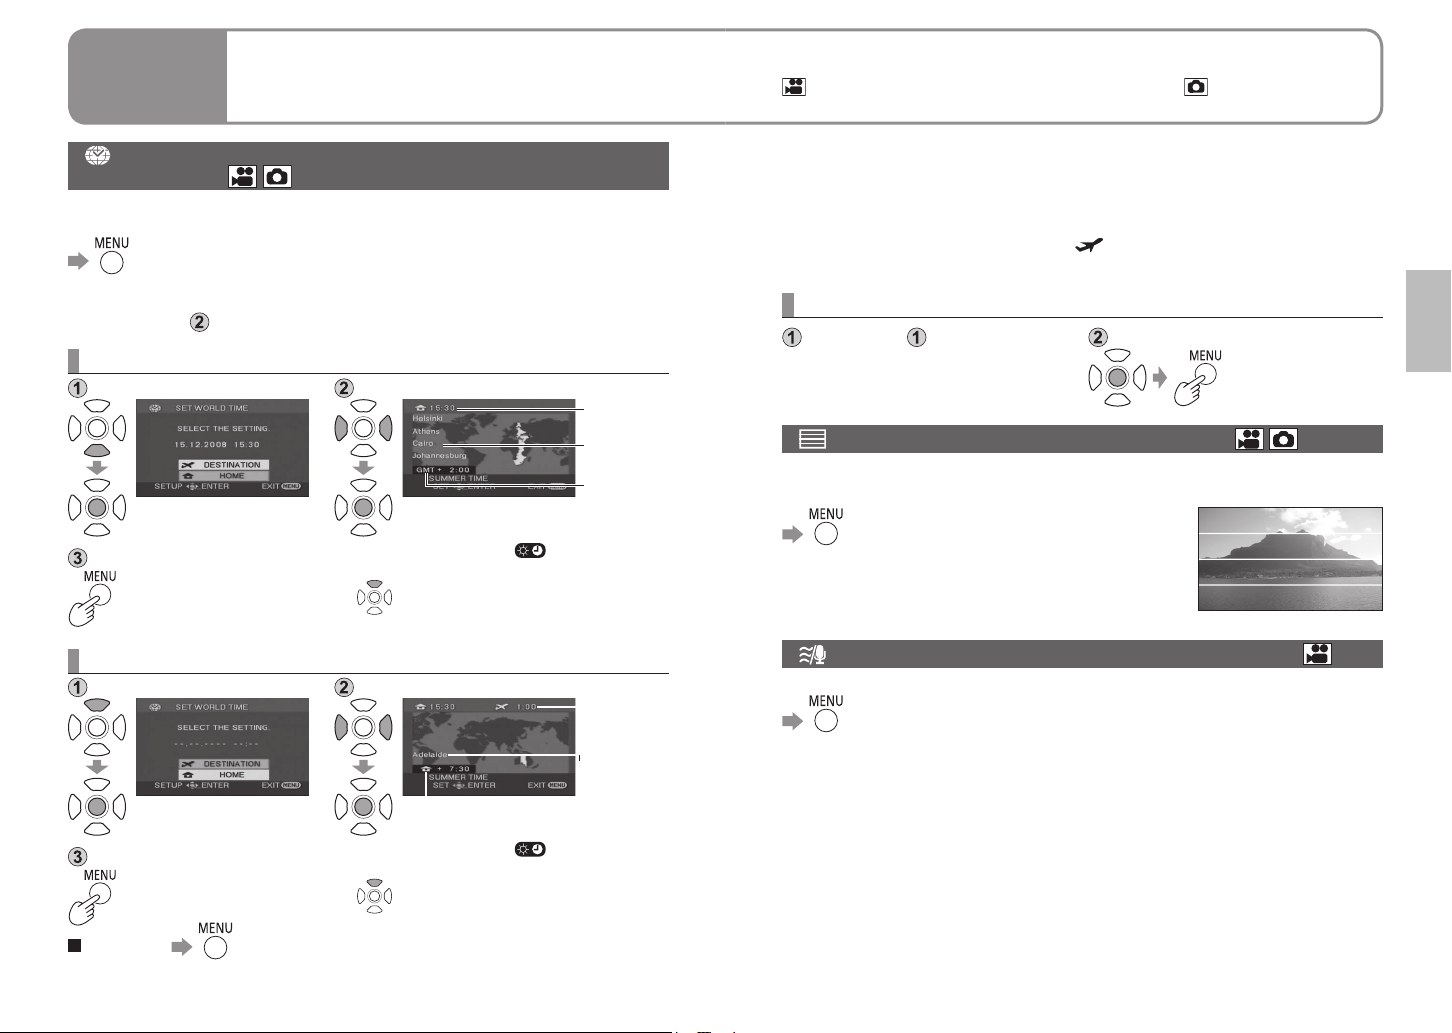
Recording dates and times at travel destinations (set
world time)
By setting your travel destination, the time difference is automatically calculated
and displayed accordingly. Time settings (P.22) must be made first.
→[BASIC]→[SET WORLD TIME]→[YES]
When making the setting the very first time, press the centre of the cursor
buttons after [SET HOME LOCATION.] appears on the LCD monitor and
proceed to step
in “Setting home city and region”.
Setting home city and region
Select [HOME]. Set your home city and region.
Current time
City/region
name
Difference
from
Greenwich
Mean Time
Close the menu.
To set summer time [ ]
(The clock advances by 1 hour.)
(Press again to cancel.)
The date and time of travel destinations can be recorded, guidelines
displayed and the sound of the wind reduced.
indicates functions used with motion pictures and functions used with
still pictures.
● When setting the travel destination, if the city and region of your travel
destination do not appear, select another city and region in the same time
zone.
● After the destination has been set, a [
time indication.
] appears before the recording date/
Restoring local date and time after returning home
Perform step in “Setting
home city and region”
(P.44).
Close the map and menu.
View slants and composition (guide lines)
Guide lines are displayed so you can check for image tilting and balance
composition.
→[BASIC]→[GUIDE LINES]→[ON]
● Default setting at the time of purchase is [OFF].
● Guide lines will not be recorded.
● The guide lines are not displayed during self-portrait
recording (P.37).
Setting the city and region of your travel destination
Select [DESTINATION]. Set city and region.
Difference from home time
Close the menu.
To cancel
To set summer time [ ]
(The clock advances by 1 hour.)
(Press again to cancel.)
Current time
at selected
location
City/region
name
Avoid wind noise (wind noise reduction function)
Reduces the sound of wind hitting the microphone.
→[ADVANCED]→[WIND CUT]→[ON]
● Default setting at the time of purchase is [ON].
● Stereo effects may be reduced in strong winds as sound of wind is
automatically reduced according to wind strength.
44 VQT1R71 45VQT1R71 45VQT1R71
Page 24
Playback
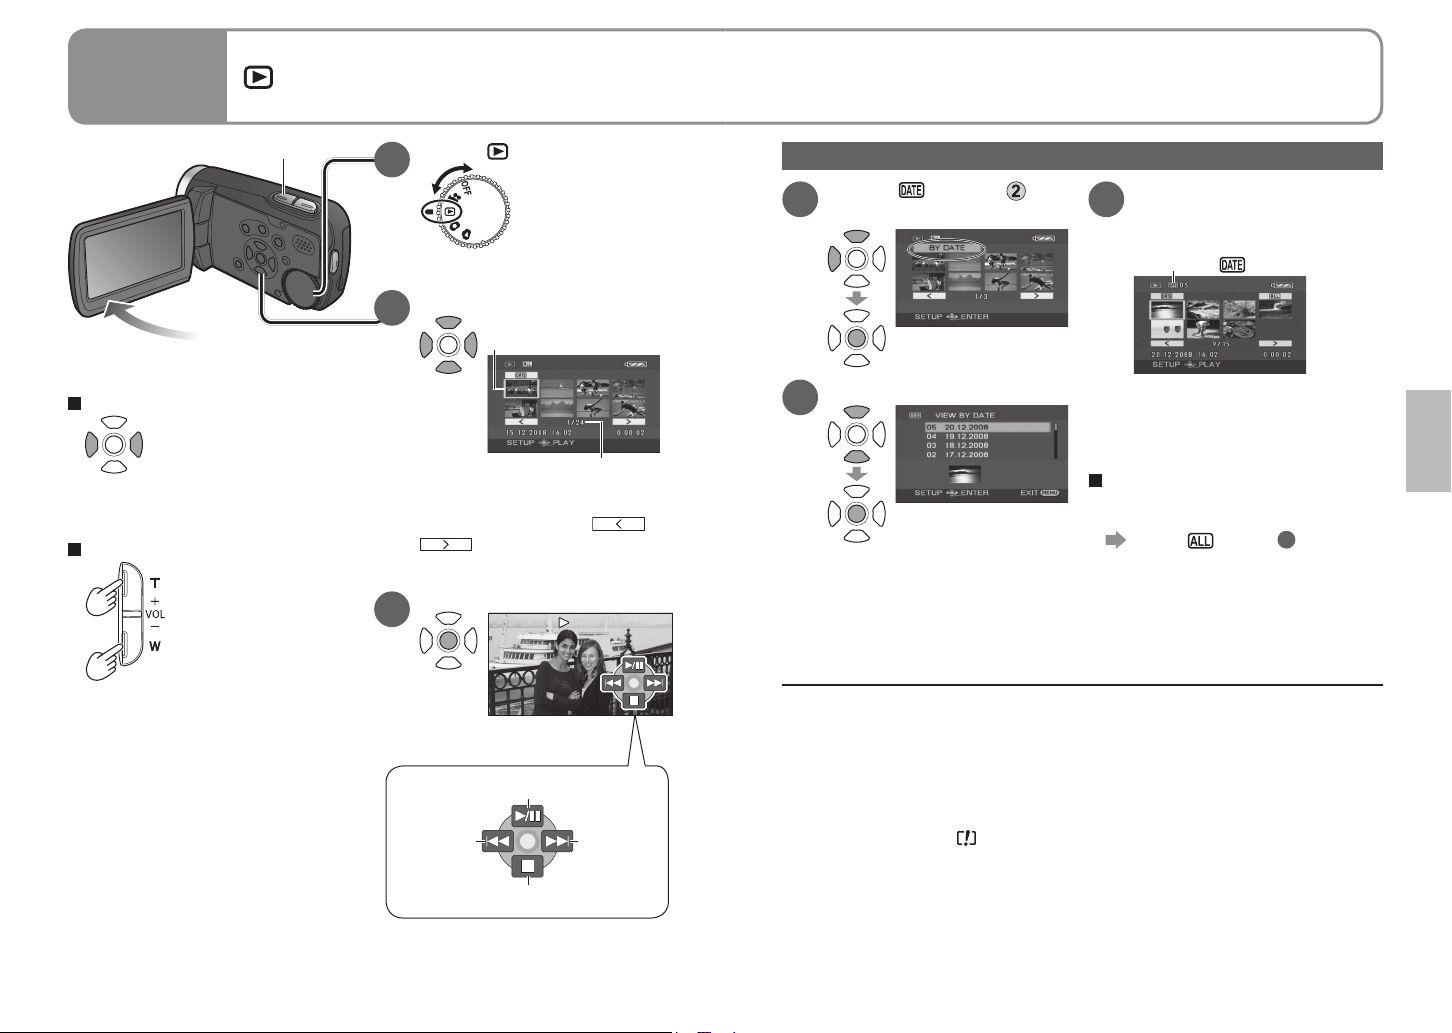
1
Viewing motion pictures
Recorded motion pictures (scenes) can be played back on the unit.
Do not remove the SD card while it is being accessed (card access lamp
lit).
Volume adjustment
To fast-forward/rewind
While pressed and held,
only the scene No.
changes rapidly.
Release the cursor button when
the desired scene No. appears.
To adjust the volume
T (+) side:
Increases the volume.
W (–) side:
Decreases the volume.
• Audio is output only during
normal playback.
• The volume display appears on
the LCD monitor while adjusting
the volume.
Set to [ ].
1
Thumbnails are displayed.
Select the desired scene.
2
To move to the next page:
either press the left and right
cursor button or select
the cursor button.
Enter the picture to view.
3
To previous
A yellow frame appears
around the selected scene.
and press the centre of
Playback/Pause
scene
Return to thumbnail
Scene No.
To next
scene
or
Displaying thumbnails by date
Select [ ] in step
1
(P.46).
Only thumbnails of
3
motion pictures recorded
that day appear.
Display [ ].
Select the date to display.
2
● This unit complies with the SD-Video standard and can play back MPEG2
movies.
“MPEG” is the acronym for the “Moving Pictures Experts Group” and is a
compressed movie format of 25 fps.
● Some motion pictures recorded on other devices may not play back correctly.
Similarly, motion pictures recorded on this unit may not play back correctly on
other devices.
● Thumbnails in which [
● Some motion pictures of short recording time cannot be played back.
● If the unit is running on battery power, [POWER SAVE] (P.78) is set to [5
MINUTES] and play pause is continued for 5 minutes, the unit turns off.
● The unit does not turn off when the LCD monitor is closed.
● The time and date is recorded when the record button is pressed. When using
the PRE-REC function, the displayed time and date for thumbnail images or
playback images will be a few seconds later from the time of recording.
] appears cannot be played back.
If more than 99 motion pictures
are recorded on the same day,
they are divided into separate
displays.
To quit displaying thumbnails
by date (To display all
thumbnails)
Select [ ] in step 3 above and
press the centre of the cursor
button.
46 VQT1R71 47VQT1R71 47VQT1R71
Page 25
Playback
1
Viewing motion pictures
(cont.)
Playback
2
Viewing still pictures
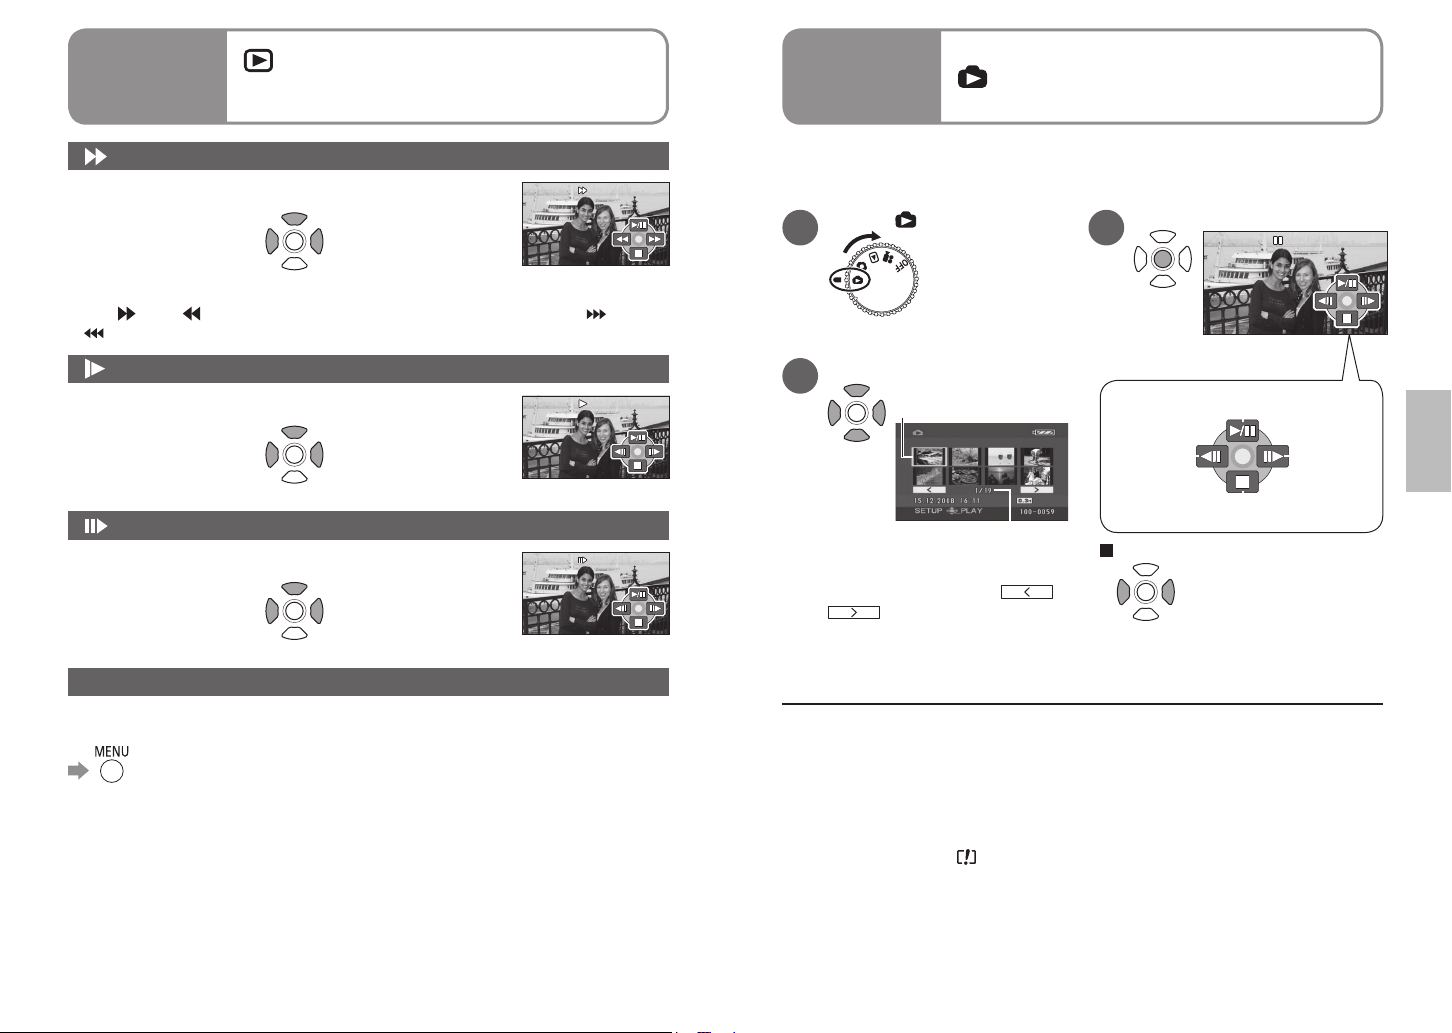
Fast forward/rewind playback
During playback
● Pressing the buttons again changes to fast-forward (fast-rewind) speed.
] and [ ] buttons appearing on the LCD monitor change to [ ] and
The [
].
[
Returns to normal playback.
Press and hold
to fast-rewind.
Press and hold
to fast-forward.
Slow-motion playback
While playback is paused
Press and hold for
slow-motion playback
Returns to normal playback.
Press and hold for
slow-motion playback
in reverse
in the forward direction
Frame-by-frame playback
While playback is paused
Returns to normal playback.
Press to
return one frame.
Press to
advance one frame.
Resuming the previous playback
If playback was stopped halfway through a motion picture, it can be resumed
from the point where it was stopped.
→[SETUP]→[RESUME PLAY]→[ON]
● An “R” appears in the thumbnail of the scene that was stopped halfway
through.
● The memory of the resume position is erased by rotating the mode dial or
performing other operations. (Menu settings do not change.)
● When an SD card is write-protected, [RESUME PLAY] is automatically set to
[OFF].
Recorded still pictures (scenes) can be played back on the unit.
Do not remove the SD card while it is being accessed (card access lamp
lit).
Set to [ ].
1
Thumbnails are displayed.
Select the desired scene.
2
To move to the next page:
either press the left and right
cursor button or select
the cursor button.
● This unit complies with the unified standard DCF (Design rule for Camera File
system) established by JEITA (Japan Electronics and Information Technology
Industries Association) and can play back JPEG pictures. (Some JPEG
pictures cannot be played back.)
● Some still pictures recorded on other devices may not play back correctly.
Similarly, still pictures recorded on this unit may not play back correctly on
other devices.
● Thumbnails in which [
● Time may be required to play back some still pictures depending on the
number of recorded pixels.
● If the unit is running on battery power, [POWER SAVE] (P.78) is set to [5
MINUTES] and play pause is continued for 5 minutes, the unit turns off.
● The unit does not turn off when the LCD monitor is closed.
● Do not rotate the mode dial during slideshows.
A yellow frame appears
around the selected scene.
Scene No.
or
and press the centre of
] appears cannot be played back.
Enter the picture to view.
3
Slideshow start/pause
To previous
scene
Return to thumbnail
To fast-forward/rewind
While pressed and held,
only the scene No.
changes rapidly.
Release the cursor button when
the desired scene No. appears.
To next
scene
48 VQT1R71 49VQT1R71 49VQT1R71
Page 26
Editing
1
Deleting motion/still
pictures
Deleted pictures cannot be restored.
Locking pictures (P.52) you do not want to delete prevents them from being
deleted accidentally.
Use a sufficiently charged battery or the AC adaptor.
Do not turn off the unit or open the card/battery door while the unit is
deleting pictures.
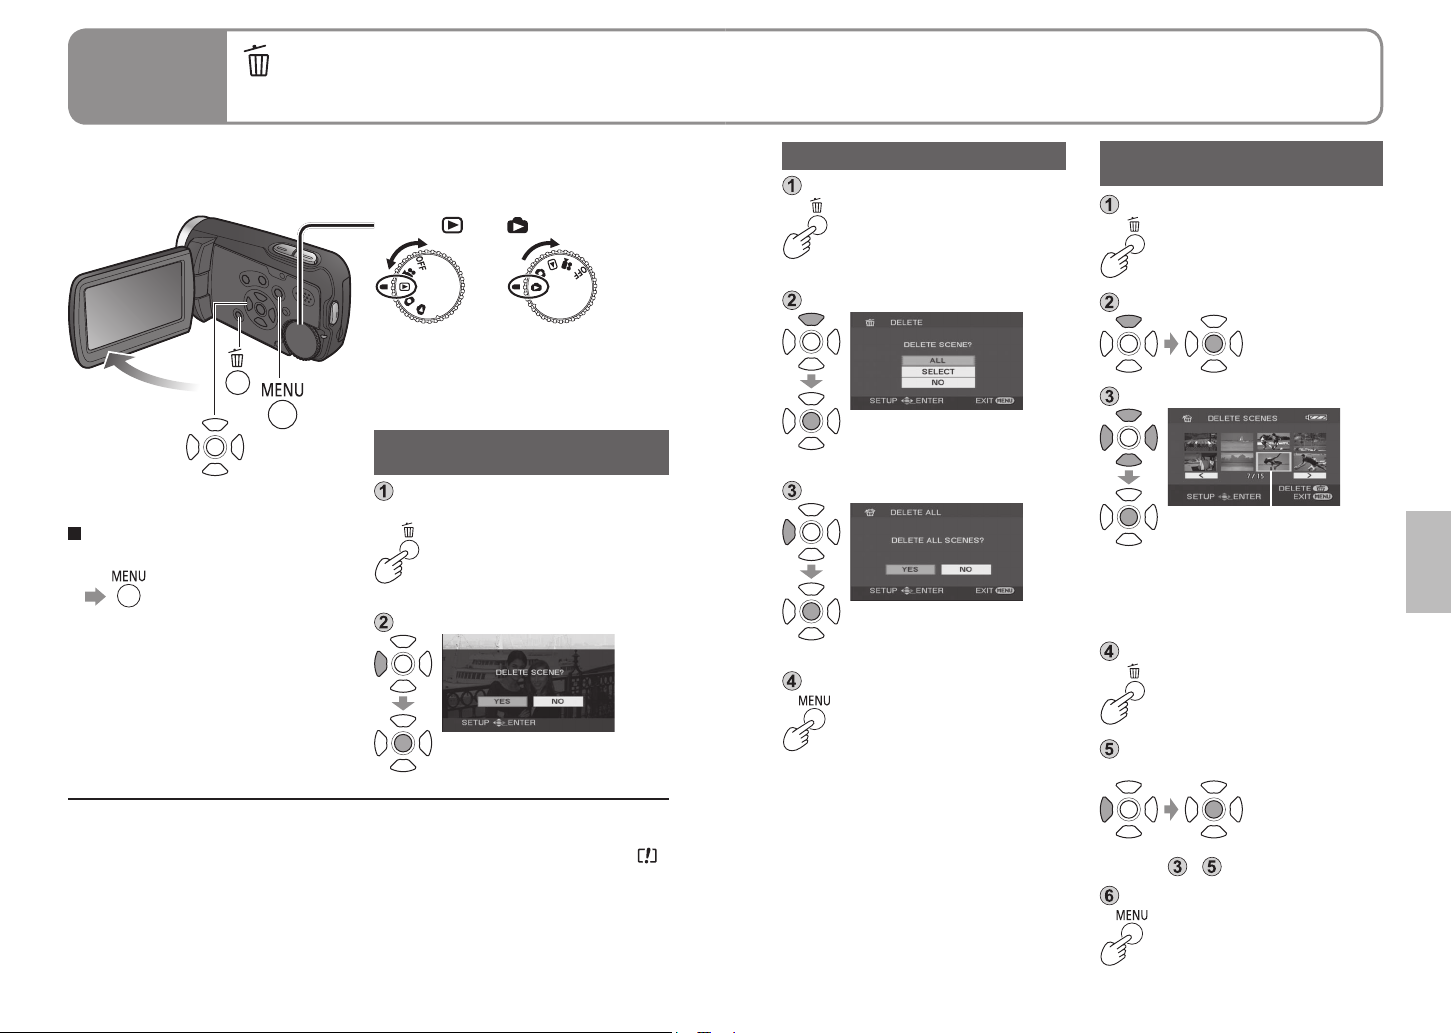
Set to [ ] or [ ].
Deleting one picture at a time
While playing back the picture to be
deleted
To cancel deletion halfway
through
Pictures that were already deleted
before the deletion operation was
cancelled cannot be restored.
Select [YES].
Deleting all pictures
With thumbnails displayed
Select [ALL].
Select [YES].
End deleting.
Selecting and deleting multiple pictures
With thumbnails displayed
Select [SELECT].
Select the pictures to delete.
A red frame appears around the
selected pictures.
• Selecting a picture a second
time deselects it from deletion.
• Up to 50 pictures can be
selected at a time.
Delete the selected pictures.
When the message appears,
select [YES].
To delete other pictures, repeat
steps
End deleting.
- .
● Only motion pictures can be deleted from the menu. ([DELETE] under [EDIT
SCENE] P.76)
● Pictures that cannot be played back such as thumbnails appearing with a [
cannot be deleted.
(Non-JPEG still pictures recorded with other devices may be deleted.)
● When pictures recorded on other devices are deleted, related information,
such as management information, may be deleted as well.
● When DCF pictures are deleted, all related information, such as management
information, is deleted as well.
Deletion may take time depending
on the number of pictures to
delete.
],
50 VQT1R71 51VQT1R71 51VQT1R71
Page 27
Editing
2
Preventing accidental deletion
of motion/still pictures
Formatting cards
Editing
3
Setting DPOF for still
pictures
Preventing accidental
deletion
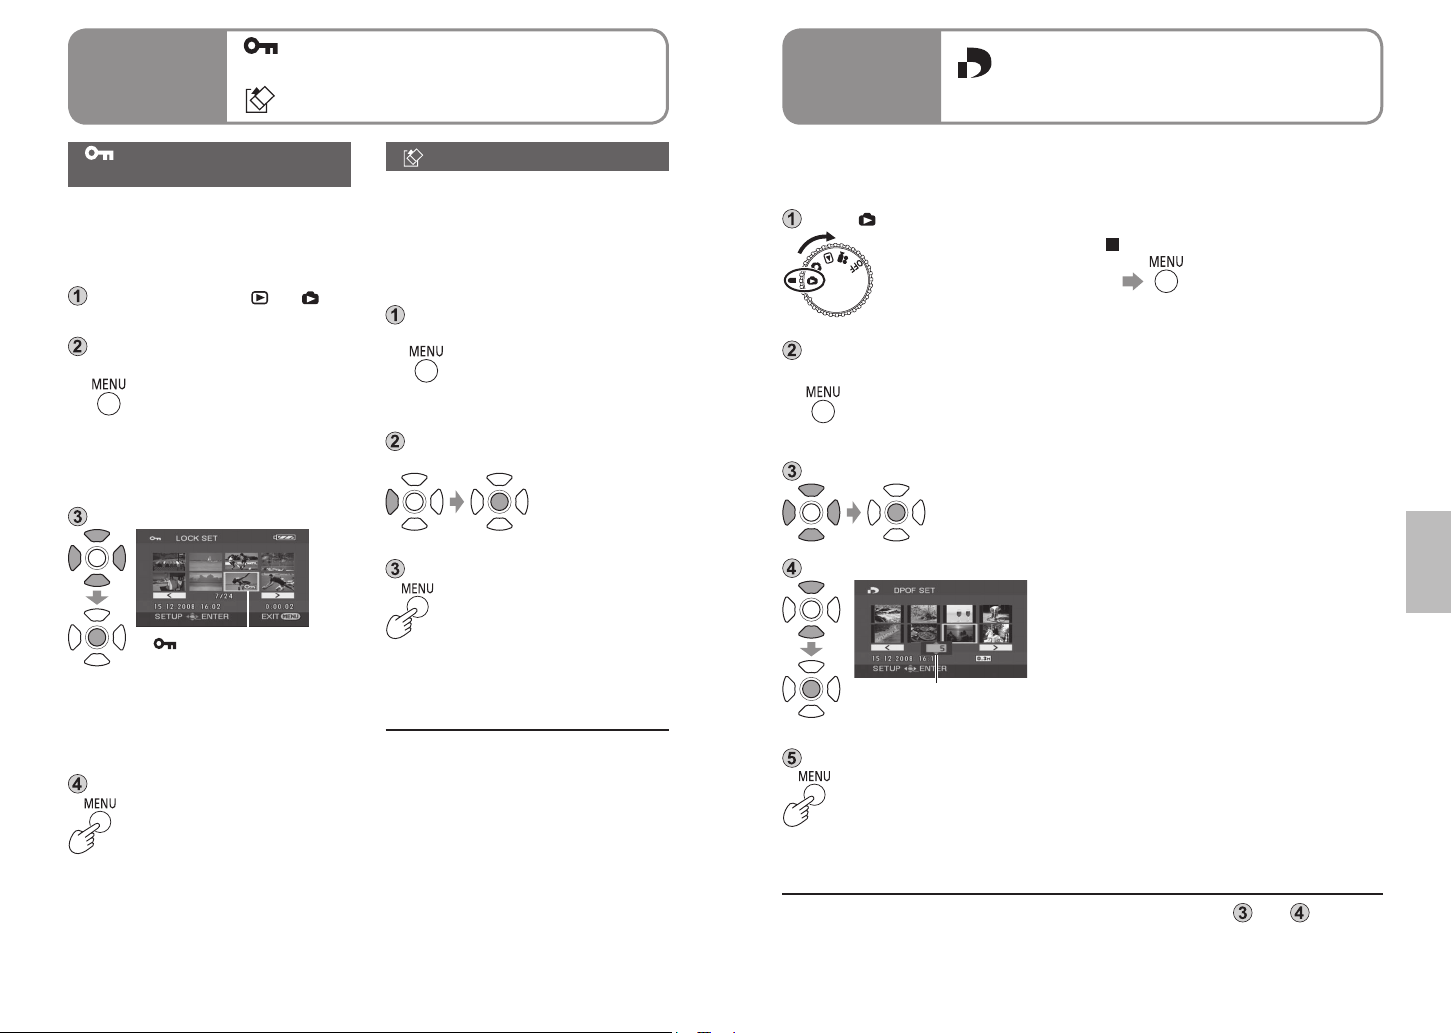
Locking important pictures prevents
them from being deleted accidentally.
Even locked pictures are deleted
when SD cards are formatted.
Set the mode dial to [ ] or [ ].
Make settings from the menus.
(P.20)
→[EDIT SCENE]
(For still pictures,
[PHOTO SETUP])→
[LOCK SET]→[YES]
Select the picture to lock.
A [ ] appears on selected
pictures.
• Selecting a picture a second
time deselects it from locking.
• Multiple pictures can be selected
at a time.
End locking.
Formatting cards
All data, including locked pictures,
are deleted and cannot be restored
when SD cards are formatted.
Save important data on a PC ahead
of time using the MotionSD STUDIO,
etc.
Make settings from the menus.
(P.20)
→[SETUP]→
[FORMAT CARD]→[YES]
When the message appears,
select [YES].
End formatting.
● Use a sufficiently charged battery
or the AC adaptor. Do not turn
the unit off or open the card/
battery door while formatting
cards.
● Format SD cards with this unit.
If cards are formatted on a PC
or other device, recording may
take time and the cards may be
unusable with the unit.
● Some SD cards require time to
format.
DPOF is the acronym for Digital Print Order Format and designates which still
pictures are to be printed and how many copies are to be made on SD cards.
This information can be used by DPOF printers and stores.
Set to [ ].
To cancel the setting
→[PHOTO SETUP]→
[DPOF SET]→[CANCEL ALL]
When the message appears,
Make settings from the menus.
(P.20)
→[PHOTO SETUP]→
[DPOF SET]→[SET]
Select the still pictures to print.
Set the number of copies.
Number of copies (Up to 999)
Set “0” to not print the picture.
End setting.
● Up to 999 still pictures can be selected by repeating steps and .
● You cannot add the recording date to pictures for printing.
● DPOF settings made on other devices may not be recognised. Make settings
with this unit.
select [YES].
52 VQT1R71 53VQT1R71 53VQT1R71
Page 28
With other
products
Playback on TV
1
With other
products
Copying to video recorders
2
or DVD recorders
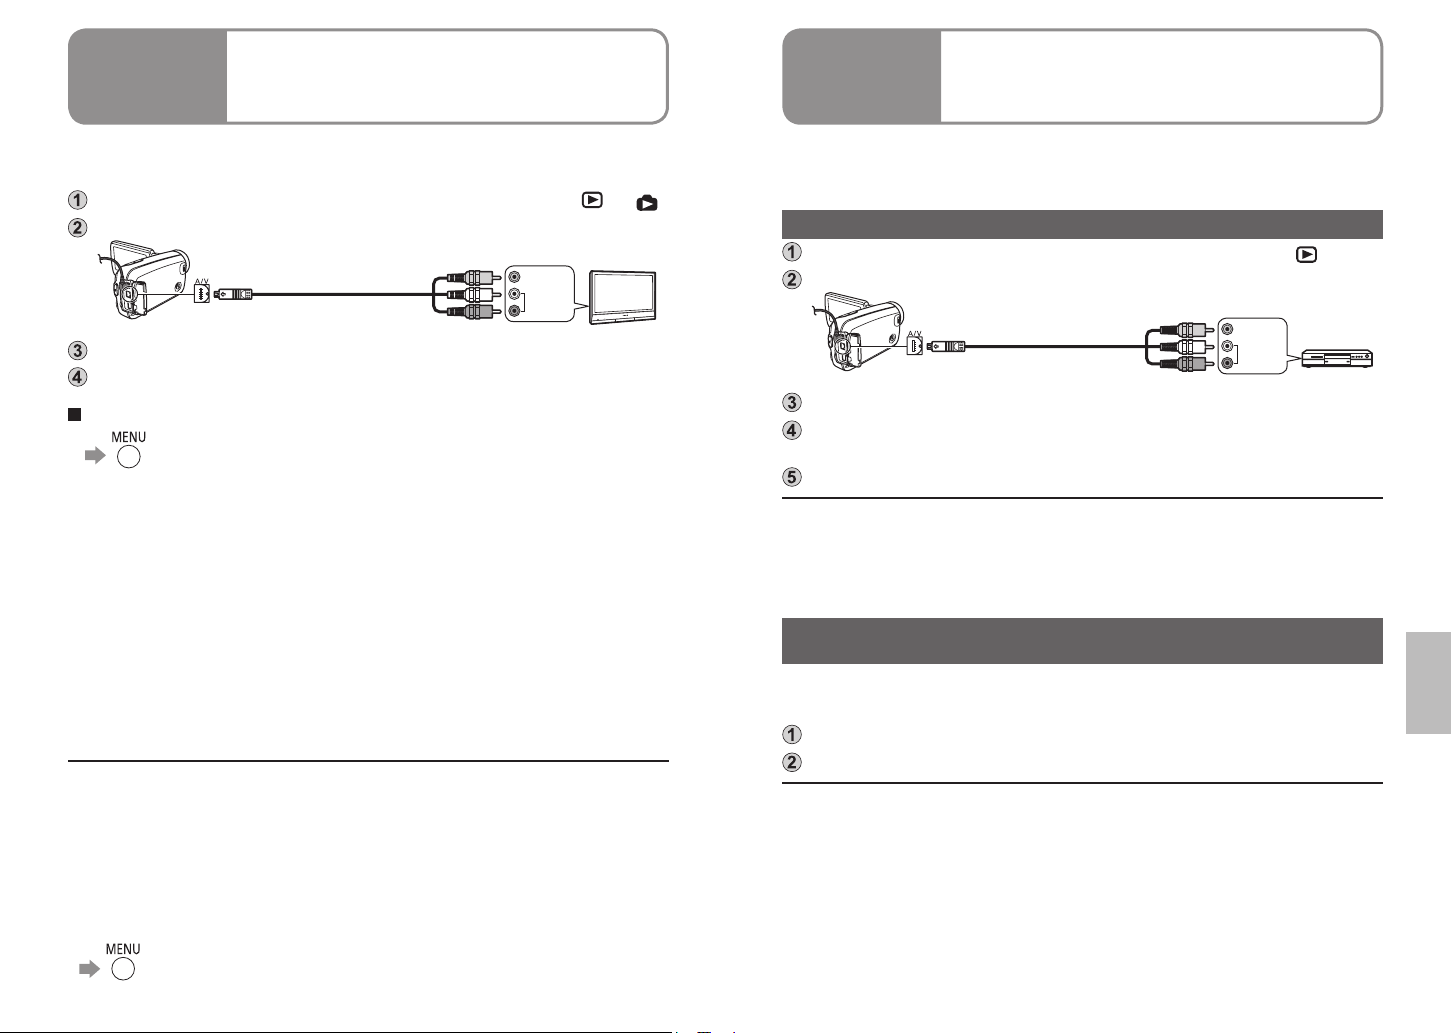
Motion pictures and still pictures recorded with this unit can be viewed on TV.
For TV settings, see the operating instructions of the TV.
Connect the unit and AC adaptor (P.14) and set the mode dial to [ ] or [ ].
Connect the unit and TV with the AV cable (supplied).
VIDEO IN
Insert the plugs as far as they will go.
Change the input mode on the TV.
Play back motion pictures or still pictures from the unit. (P.46, 49)
To display LCD monitor information on TV
→[SETUP]→[EXT. DISPLAY]→[ON]
• To not display the date, time and icons (P.22, 26)
● Do not use any other AV cables except the supplied one.
● If images or audio are not output, check the following:
• That the plugs on the AV cable are inserted into terminal as far as they can
go
• That the plugs on the AV cable are connected to the correct terminals
• That input settings and the selected input channel of the TV are correct
● If pictures are not displayed correctly on a wide-screen TV, adjust the display
settings of the TV.
● If the image stretched in the vertical direction on TVs of a 4:3 aspect ratio
AUDIO IN
Motion pictures recorded with this unit can be copied to TV video recorders and
DVD recorders (hereinafter referred to as “recorder”). For recorders settings,
see the operating instructions of the recorders.
Copying pictures using the AV cable (supplied)
Connect the unit and AC adaptor (P.14) and set the mode dial to [ ].
Connect the unit and recorder with the AV cable (supplied).
VIDEO IN
Insert the plugs as far as they will go.
Change the input mode on the TV and recorder.
Play back motion pictures from the unit (P.46) and start recording on the
recorder.
After ending recording on the recorder, stop playback from the unit.
● Do not use any other AV cables except the supplied one.
● When copied motion pictures are played back on a wide-screen TV, the image
may be stretched in the vertical direction. In such case, see the operating
instructions of the recorder. Also, see the operating instructions of the widescreen TV and set aspect ratio to 16:9 (full).
AUDIO IN
Copying (dubbing) pictures using DVD recorders with SD
card slot
By inserting SD cards recorded on this unit into DVD recorders with an SD card
slot, pictures can be copied onto hard disk drives and DVDs.
After turning off the unit, eject the recorded SD card. (P.17)
Insert the SD card into the SD card slot of the DVD recorder.
● For details, see the operating instructions of the DVD recorder.
● The video format is converted when motion pictures recorded with this unit are
copied onto hard disk drives or DVDs. The converted motion picture cannot be
copied at high speed onto DVD-R discs.
Moreover, motion pictures that are copied back onto SD cards using a
computer or other device do not play back on this unit.
→[SETUP]→[TV ASPECT]→[4:3]
54 VQT1R71 55VQT1R71
Page 29
With other
products
Printing pictures from
3
PictBridge printers
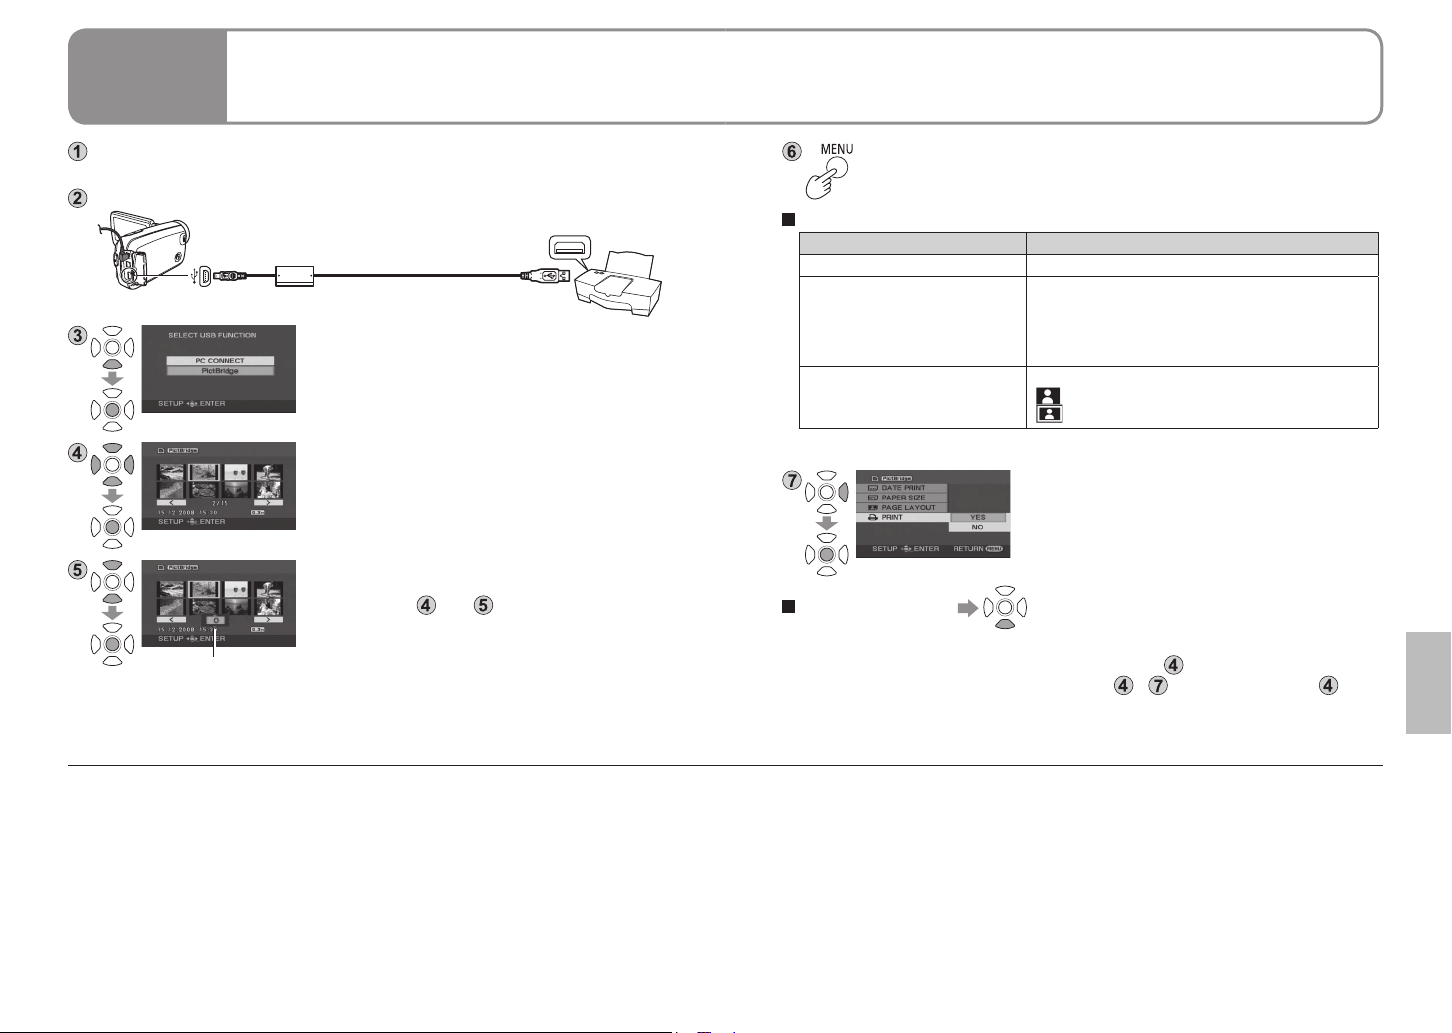
Still pictures recorded with this unit can be printed by connecting the unit
directly to a printer that supports PictBridge.
Connect the unit and AC adaptor (P.14), and set the mode dial to a setting
other than [OFF].
Connect the unit and printer with the USB cable (supplied).
Insert the plugs as far as they will go.
Select [PictBridge].
Select the still pictures to print.
Set the number of copies.
• To not print the picture, set “0”.
• Repeat steps
pictures for printing.
Number of
copies (Max. 9)
and to select up to 8 still
Display the PictBridge menu.
Make print settings.
Print settings
Item Available settings
DATE PRINT OFF/ON
PAPER SIZE STANDARD: Prioritize printer setting.
PAGE LAYOUT STANDARD: Prioritize printer setting.
● Settings not supported by the printer cannot be selected.
To cancel printing
A confirmation message appears.
[YES]: Cancels print settings and returns to step
[NO]: Saves print settings made in steps
4×5 INCH: L size
5×7 INCH: 2L size
4×6 INCH: Postcard size
A4: A4 size
[
]: No frame print
[
]: Frame print
[PRINT]→[YES]
When printing is complete, disconnect the USB
cable (supplied) and exit [PictBridge].
.
- and returns to step .
● Do not use any other USB connection cables except the supplied one.
(Operation is not guaranteed with any other USB cables.)
● Connect the unit directly to the printer without going through a USB hub.
● For paper size and print quality, etc., check printer settings.
● Avoid the following operations during printing. Otherwise, pictures will not print
correctly:
• Disconnecting the USB cable
• Opening the card/battery door
• Rotating the mode dial
• Turning off the unit
● Still pictures recorded with other devices may not be printed.
● DPOF settings (P.53) cannot be used while this unit is directly connected to a
PictBridge printer.
56 VQT1R71 57VQT1R71
Page 30
With other
products
Using DVD burners
4
(sold separately)
Motion pictures and still pictures recorded with this unit can be copied to
discs using DVD burners (sold separately).
Required equipment (as of February 2008)
• DVD burner (VW-BN1*)
• Mini AB USB connection cable (included with DVD burner)
* Use with the VW-BN1 DVD burner is recommended. No guarantees are given for
operations involving the use of any other DVD burner.
Supported discs: 12 cm disc
Motion pictures and
still pictures
Motion pictures only
Still pictures only
* The recording mode used for the DVD-RW is “video mode.”
● +RW/+R/+R DL discs or 8 cm discs cannot be used for copying.
● All content written on discs is erased before coping begins. Check whether
data is needed or not before using the disc.
● When copying is finished, finalizing is initiated automatically. Finalized discs
can be played back only. No further motion pictures or still pictures can then
be added to these discs.
● For the following, see the operating instructions of the DVD burner:
• Recommended discs and disc handling
• Connections to DVD burners using the mini AB USB connection cable
• Operation of the DVD burner itself
DVD-RAM New or previously used discs
DVD-R, DVD-R DL New discs only
DVD-RW
CD-RW New or previously used discs
CD-R New discs only
*
New or previously used discs
Time required for copying (Reference)
(When a 4 GB motion picture has been copied to a disc using the VW-BN1
drive)
Disc type DVD-RAM DVD-RW DVD-R
Copying time Approx. 40 to 90 min Approx. 30 to 60 min Approx. 15 to 60 min
● The time taken to copy a disc differs depending on the number of scenes
recorded, the types of discs used, the number of discs needed for copying
and the ambient temperature.
● Copying to DVD-R DL discs may take 1.5 to 2 times longer than for DVD-R
discs.
● In order for the copied data to be verified, the copying process may take
longer than the recording time. Wait until the data copied message appears.
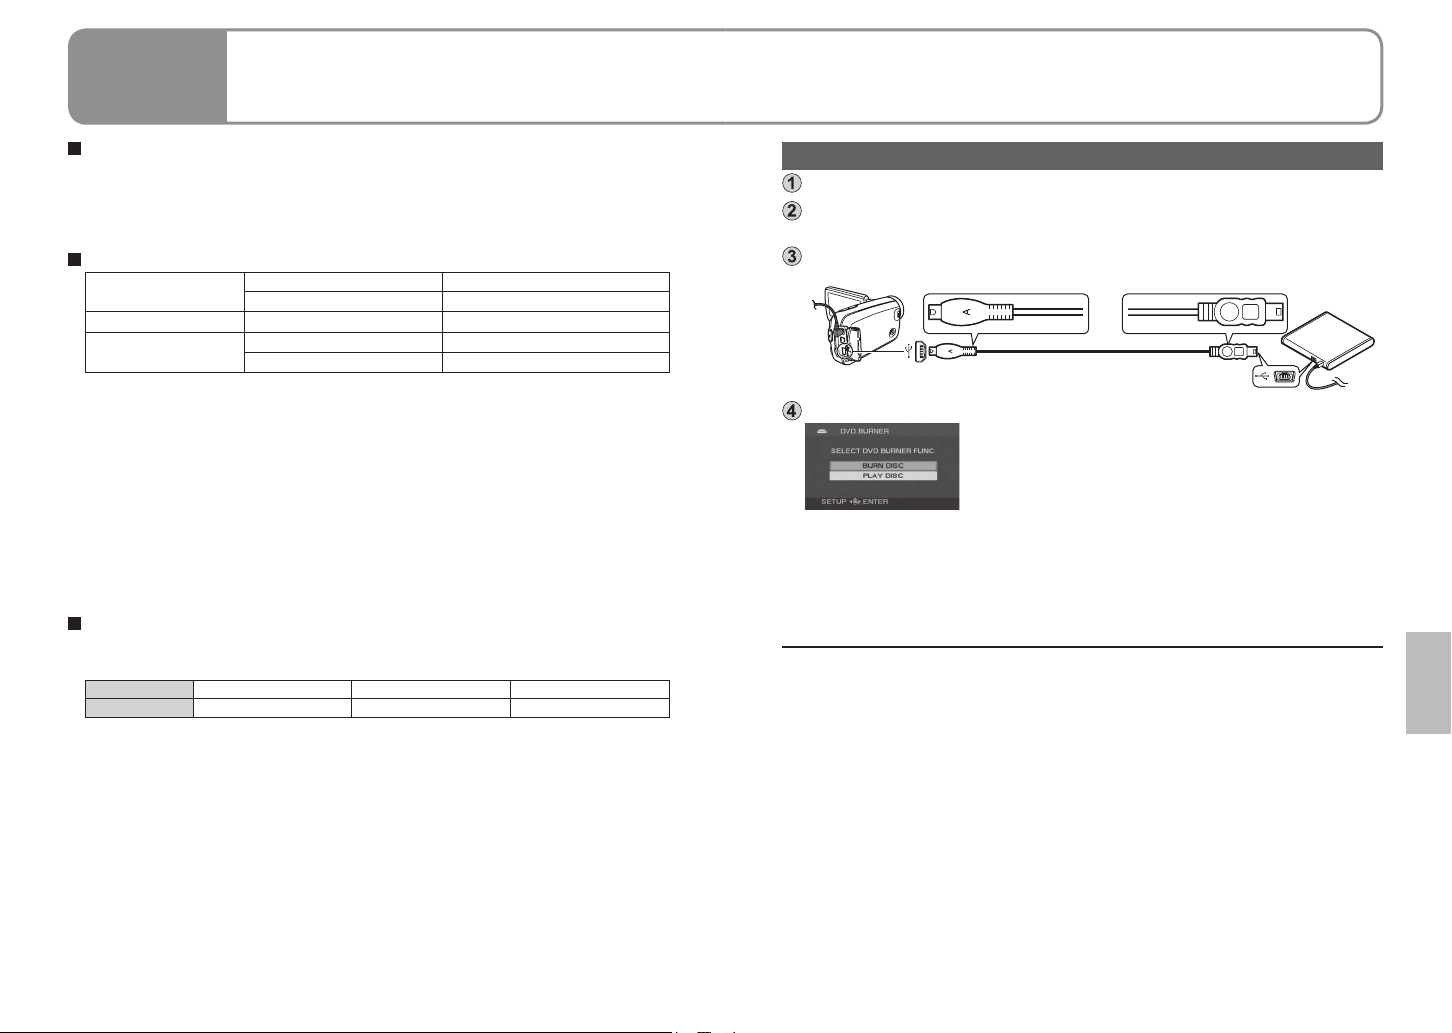
Connecting this unit and a DVD burner
Connect the AC adaptor provided with the DVD burner to the DVD burner.
Connect the unit and AC adaptor (P.14) and set the mode dial to a position
other than [OFF].
Connect this unit and the DVD burner with the mini AB USB connection
cable.
Mini-A plug Mini-B plug
Insert the plugs as far as they will go.
Insert a disc into the DVD burner.
[DVD BURNER] display
● Use the mini AB USB connection cable that comes with the DVD burner (sold
separately). Operation is not guaranteed with other cables.
● Connect the unit directory to the DVD burner without going through a USB
hub.
● Ensure without fail that only the AC adaptors designed solely to be used with
the unit and DVD burner are connected. Power cannot be supplied from the
unit to the DVD burner using a USB connection. While powered by the battery,
the unit and DVD burner cannot be connected for use.
● If the DVD burner is connected to this unit with a disc already inserted, the
message “CANNOT CHECK CONNECTED DEVICE. DISCONNECT THE
USB CABLE FROM THIS UNIT.” may be displayed after “Please Wait.” is
displayed for over a minute. When this happens, disconnect the Mini AB USB
Connection Cable from the unit and remove the disc from the DVD burner to
make sure the disc is usable and was not inserted upside down.
● If “READING DISC...” is displayed on the screen for more than 2 minutes,
remove the disc from the DVD burner and make sure the disc is usable and
was not inserted upside down.
• Once connected, the [DVD BURNER] display
appears on the LCD monitor of the unit. If it
does not appear, reconnect the mini AB USB
connection cable.
• First connect the DVD burner to the unit, and
then insert the disc.
58 VQT1R71 59VQT1R71
Page 31
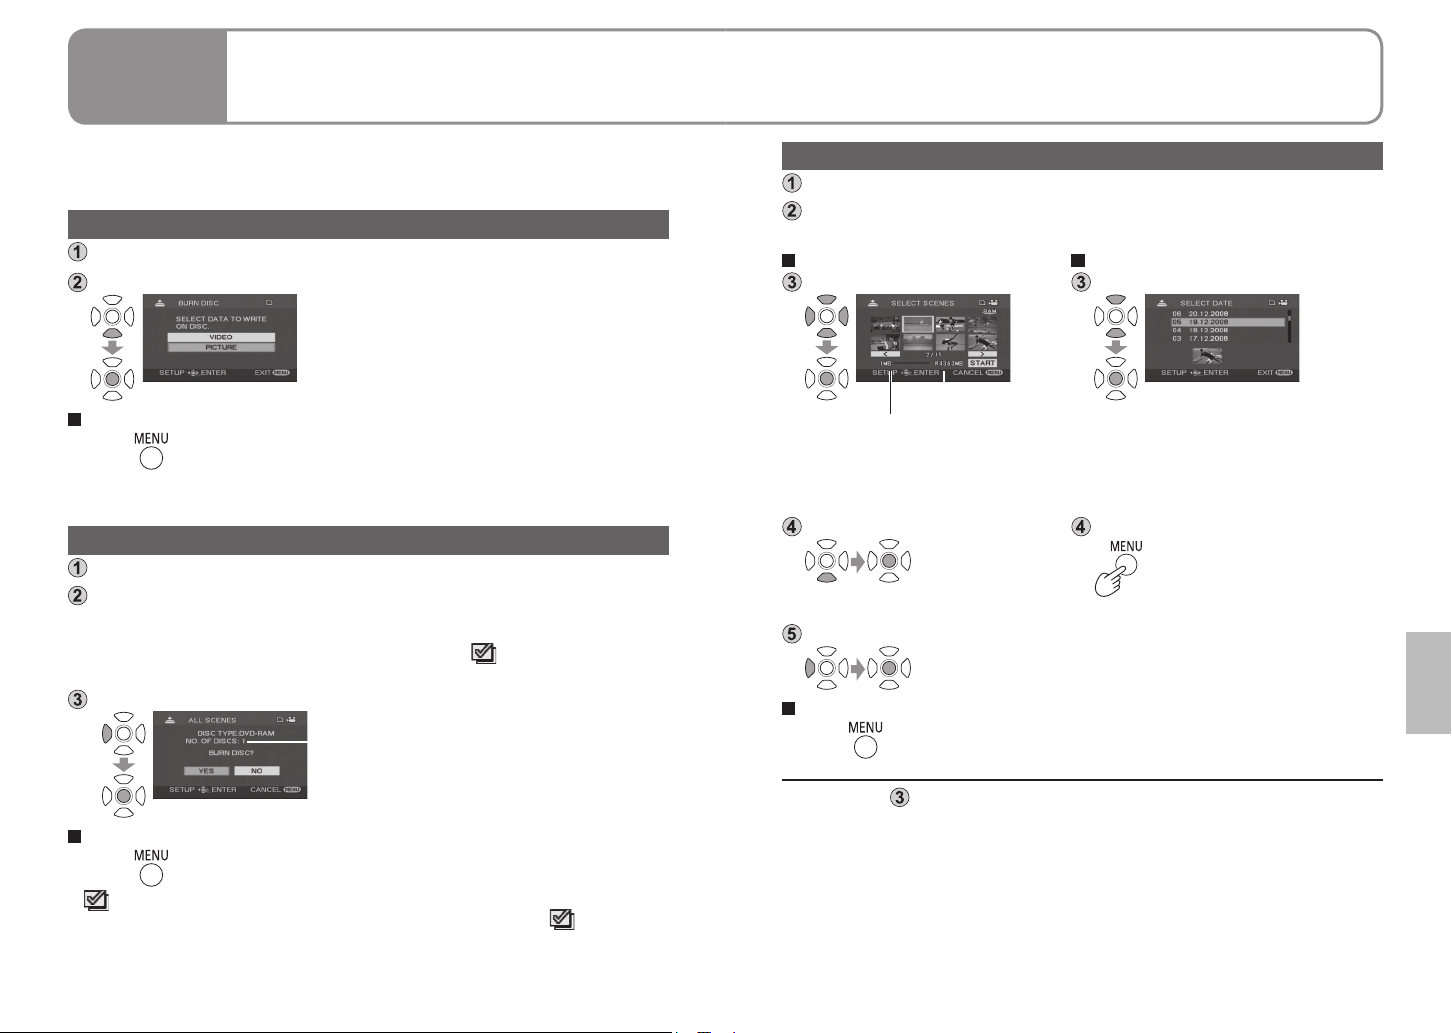
With other
products
Using DVD burners
4
(sold separately) (cont.)
Motion pictures and still pictures recorded with this unit can be copied to
discs using DVD burners (sold separately).
With still pictures, all scenes are copied at once. With motion pictures, either
all scenes can be copied or specific scenes or scenes on specific dates can be
selected and copied.
Copying still pictures to discs
Select [BURN DISC] on the [DVD BURNER] display (P.59).
Select [PICTURE].
To cancel copying
Press . The [DVD BURNER] display now returns.
● After copying the still pictures, another disc with the same pictures can be
created.
Copying begins. Hereafter, operate the unit as
instructed by the displayed messages.
Copying all motion pictures to discs
Select [BURN DISC] on the [DVD BURNER] display (P.59).
Select [VIDEO] → [DVD COPY] → [ALL SCENES] or [ADDED SCENES].
[ALL SCENES]: All the motion pictures are copied.
[ADDED SCENES]: Motion pictures additionally recorded after copying using
Select [YES].
Hereafter, operate the unit as instructed by the displayed messages.
To cancel copying
Press . The [DVD BURNER] display now returns.
● [
] is displayed for the thumbnails of motion pictures which have already
been copied using [DVD COPY]. All motion pictures for which [
can be deleted together. (P.63)
● After copying the motion pictures, another disc with the same pictures can be
created.
[DVD COPY] (ones for which [
copied onto another disc.
The number of discs required for the copying
is displayed. If two or more discs are required,
change over the discs as instructed by the
displayed messages.
] is not indicated) are
] is indicated
Copying selected motion pictures to discs
Select [BURN DISC] on the [DVD BURNER] display (P.59).
Select [VIDEO] → [FAVOURITE SCENES] → [SELECT SCENES] or
[SELECT DATE].
SELECT SCENES SELECT DATE
Select thumbnails. Select a date.
Remaining disc space
Scene size
The selected thumbnail is enclosed
in a red frame. The frame is
released when the centre of the
cursor button is pressed again.
Enter selections. Enter selections.
When [START]
is selected, a
confirmation
message appears.
Copying begins.
Select [YES] and operate the unit as instructed by the
displayed messages.
To cancel copying
Press . The [DVD BURNER] display now returns.
● Repeat step
scenes can be selected at a time when “SELECT SCENES” is selected and
up to 50 days of motion pictures when “SELECT DATE” is selected.
With [SELECT SCENES], the scenes are copied onto one disc. If the total size of the
●
motion picture exceeds the disc capacity, “Remaining disc space” appears in red,
and the exceeded capacity is displayed. Select the scenes that will fit onto one disc.
● With [SELECT DATE], the number of discs required for copying is displayed.
If two or more discs are required, change over the discs as instructed by the
displayed messages.
After copying the motion pictures, another disc with the same pictures can be created.
●
to select multiple motion pictures. Up to 50 motion picture
The selected date is enclosed in a red
frame. The frame is released when
the centre of the cursor button is
pressed again.
When pressed, a
confirmation message
appears.
60 VQT1R71 61VQT1R71
Page 32
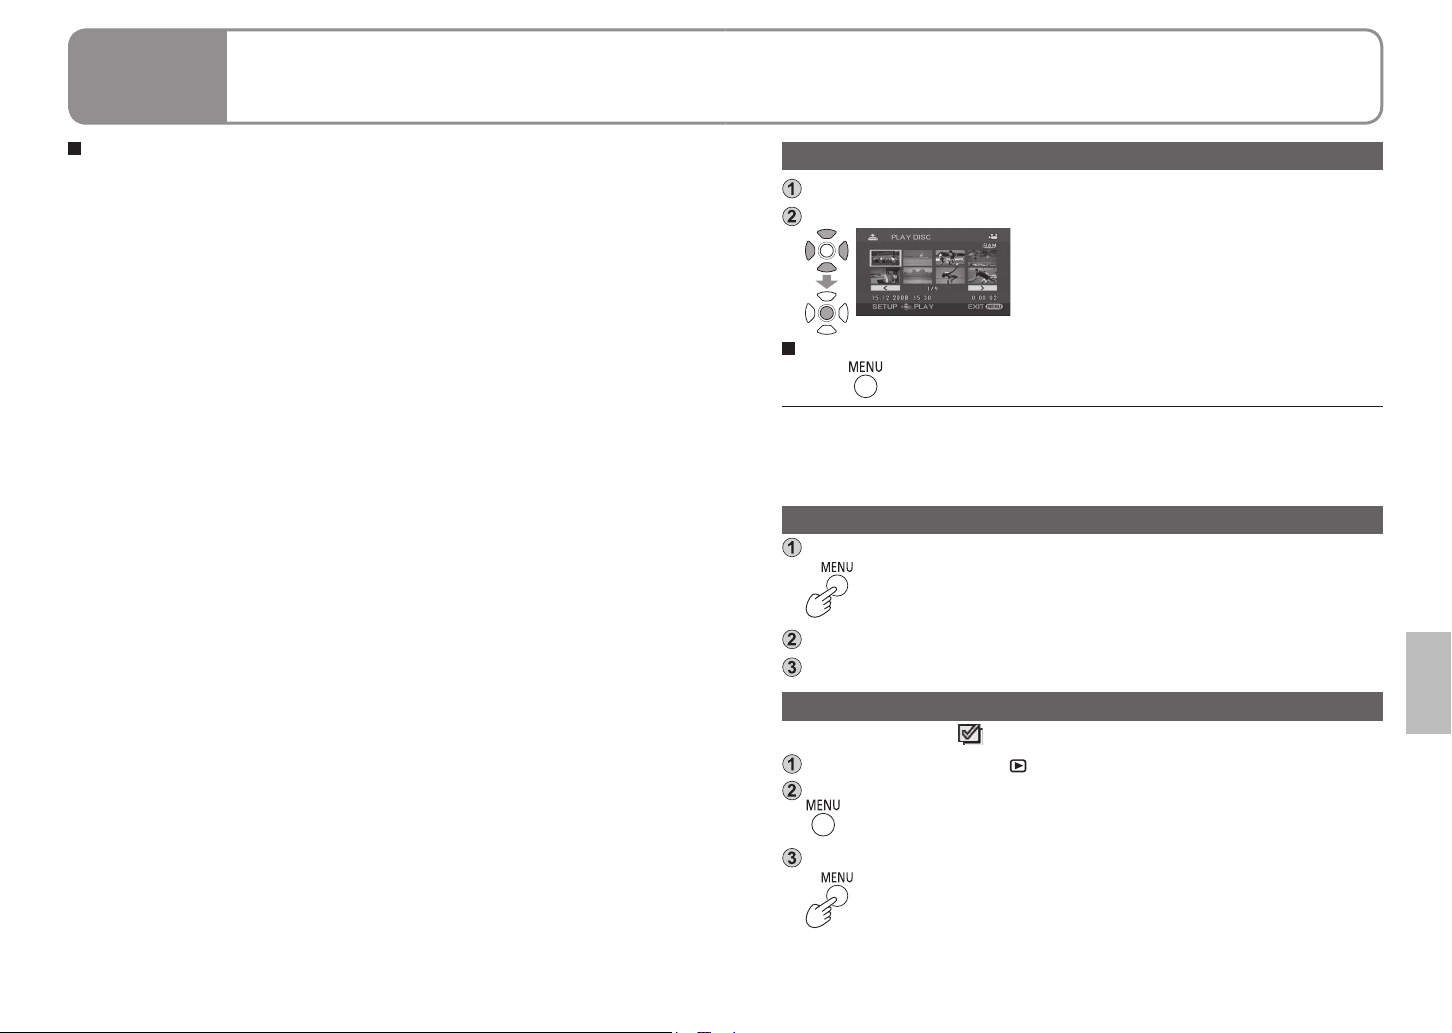
With other
products
Using DVD burners
4
(sold separately) (cont.)
Motion pictures and still pictures recorded with this unit can be copied to
discs using DVD burners (sold separately).
Copying using a DVD burner
● After copying is complete but before erasing the data on the SD card, check
that the disc plays back and that data was copied correctly. (P.63)
● While copying is underway, do not turn off the unit or DVD burner or
disconnect the mini AB USB connection cable. Also, do not subject the unit
or DVD burner to impact.
● While copying is underway, the disc cannot be removed.
● Pictures are copied in the order in which they were recorded. Copying
sequence cannot be changed.
● Pictures from multiple SD cards cannot be copied onto the same disc.
● Motion pictures and still pictures cannot be copied onto the same disc.
● A maximum of 9,999 pictures can be copied onto a single disc.
● If two or more discs are required for copying, the motion picture which will
be copied last on each disc will be automatically split up.
● The recording date for scenes or files copied to a disc using the DVD burner
with this unit is the date that the scene or file was copied. This date may not
be displayed properly depending on the software used.
● Motion pictures that are copied back to an SD card using the software
packaged with the unit cannot be copied to discs on a DVD burner.
● It may not be possible to copy data which has been recorded by another
unit. Such data may not be played back even if it is copied successfully.
● When still pictures have been copied onto an SD card using a computer, for
instance, whatever is not displayed by the unit cannot be copied onto a disc.
● Depending on the playback device, it may not be possible to play back discs
which have been created by connecting the DVD burner and the unit.
● When a disc that was created with this unit and the DVD burner is inserted
into the DVD recorder, a message may be displayed prompting you to
format the disc. Do not format the disc because all data will be erased and
cannot be recovered.
Refer to the operating instructions of the DVD recorder for details.
Playing back discs
Select [PLAY DISC] on the [DVD BURNER] display (P.59).
Select a thumbnail and play back the picture.
For details, see the pages below:
• Viewing motion pictures (P.46)
• Viewing still pictures (P.49)
To cancel
Press . The [DVD BURNER] display now returns.
● When discs containing motion pictures and still pictures copied from other
devices are played back from the unit, only the motion pictures are played
back. It may not be possible to play back the discs which have been recorded
by other units.
Exiting
Display the [DVD BURNER] display. (P.59)
Remove the disc from the DVD burner.
Disconnect the mini AB USB connection cable.
Deleting copied motion pictures
Motion pictures with a [ ] can be deleted all at once.
Set the unit’s mode dial to [ ].
Make menu selections. (P.20)
→[EDIT SCENE]→[DELETE]→[COPIED]→[YES]
End deleting.
62 VQT1R71 63VQT1R71
Page 33
With a
computer
Software on the CD-ROM
1
With a
computer
End User License
2
Agreement
The supplied CD-ROM contains the software below:
This CD-ROM can only be used on Windows computers.
Video editing software MotionSD STUDIO 1.3E
This software allows motion pictures and still pictures to be acquired from this
unit, edited and output.
The acquired motion pictures and still pictures can also be attached to e-mail
or edited and saved on DVD.
For information about how to use MotionSD STUDIO, read the PDF operating
instructions.
DirectX (For Windows 2000)
To use MotionSD STUDIO, you must have Microsoft DirectX 9.0b or 9.0c.
If it is not installed on your computer, install it as follows:
• Install DirectX when installing MotionSD STUDIO.
• Click [DirectX] in the Setup Menu to install.
● Depending on the operating environment, software applications supporting
older versions of DirectX may not run properly after installing DirectX 9.0b
or 9.0c. If this happens, contact the manufacturer of these applications.
(Your computer must support DirectX 9.0b or 9.0c.)
● This unit does not have a card writing function. You cannot write data to the
SD card in this unit. (EG/E/EP only)
● We cannot guarantee proper operation of this unit if you use software other
than that supplied.
Before opening the CD-ROM package, please read the following.
End User License Agreement
You (“Licensee”) are granted a license for the Software defined in this End User License
Agreement (“Agreement”) on condition that you agree to the terms and conditions of this
Agreement. If Licensee does not agree to the terms and conditions of this Agreement,
promptly return the Software to Matsushita Electric Industrial Co., Ltd. (“Matsushita”), its
distributors or dealers from which you made the purchase.
Article 1 License
Licensee is granted the right to use the Software, including the information recorded
or described on the CD-ROM, instruction manuals, and any other media provided
to Licensee (collectively “Software”), but all applicable rights to patents, copyrights,
trademarks and trade secrets in the Software are not transferred to Licensee.
Article 2 Use by a Third Party
Licensee may not use, copy, modify, transfer or allow any third party, whether free of
charge or not, to use, copy or modify the Software, except as expressly provided for in this
Agreement.
Article 3 Restrictions on Copying the Software
Licensee may make a single copy of the Software in whole or in part solely for back-up
purpose.
Article 4 Computer
Licensee may use the Software only on one computer, and may not use it on more than
one computer.
Article 5 Reverse Engineering, Decompiling or Disassembly
Licensee may not reverse engineer, decompile, or disassemble the Software, except
to the extent either of them is permitted under law or regulation of the country where
Licensee resides.
Matsushita, or its distributors will not be responsible for any defects in the Software
or damage to Licensee caused by Licensee’s reverse engineering, decompiling, or
disassembly of the Software.
Article 6 Indemnification
The Software is provided “AS-IS” without warranty of any kind, either expressed or
implied, including, but not limited to, warranties of non-infringement, merchantability and/or
fitness for a particular purpose. Further, Matsushita does not warrant that the operation
of the Software will be uninterrupted or error free. Matsushita or any of its distributors
will not be liable for any damage suffered by Licensee arising from or in connection with
Licensee’s use of the Software.
Article 7 Export Control
Licensee agrees not to export or re-export to any country the Software in any form without
the appropriate export licenses under regulations of the country where Licensee resides,
if necessary.
Article 8 Termination of License
The right granted to Licensee hereunder will be automatically terminated if Licensee
contravenes any of the terms and conditions of this Agreement. Upon termination hereof,
Licensee must destroy the Software and related documentation together with all the
copies thereof at Licensee’s own expense.
64 VQT1R71 65VQT1R71
Page 34
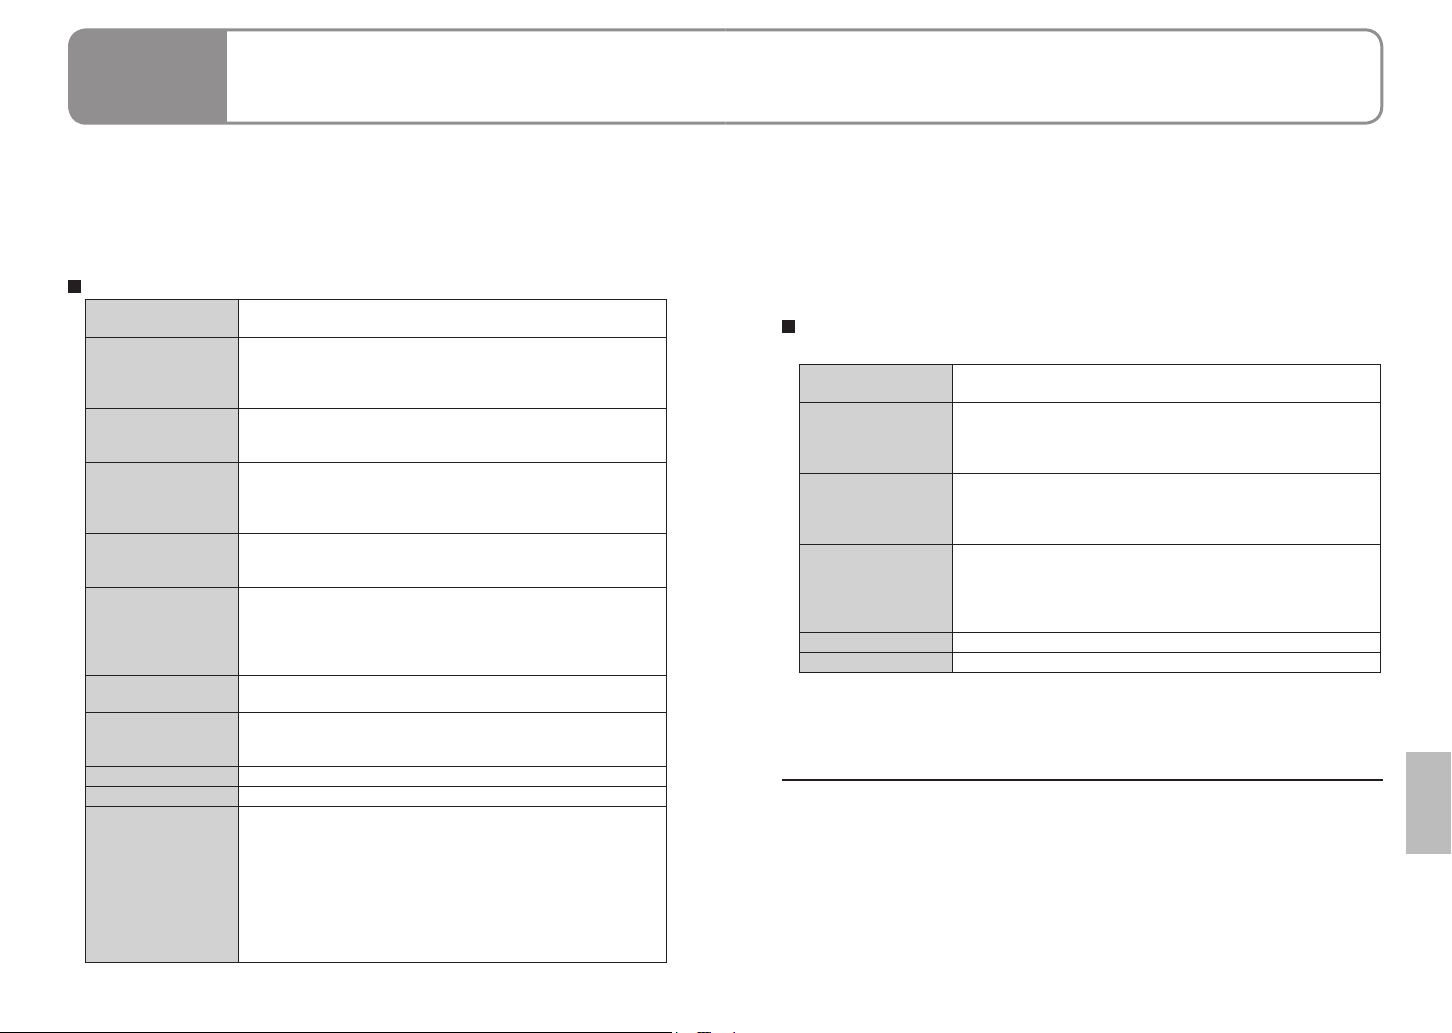
With a
computer
Operating environment
3
A computer with the specifications below is required to use this software.
● Even if the system requirements mentioned in these operating instructions are
fulfilled, some personal computers cannot be used.
● This software is not compatible with Microsoft Windows 3.1, Windows 95,
Windows 98/98SE, Windows Me and Windows NT.
● Operation on an upgraded OS is not guaranteed.
● Operation on an OS other than the one pre-installed is not guaranteed.
Operating environment required for MotionSD STUDIO
Supported
computers
OS Microsoft
CPU Intel
RAM Windows 2000 / XP : 256 MB or more
Free hard disk
space
Display High Colour (16 bit) or more (32 bit recommended)
Sound Sound device compatible with Windows (DirectSound
Drive CD-ROM drive (for installation)
Interface USB port (Hi-Speed USB (USB 2.0) recommended)
Other requirements Mouse or equivalent pointing device
Necessary software Windows 2000 / XP : DirectX
IBM PC/AT or compatible preinstalled with the OS below
®
Windows® 2000 Professional SP4
Microsoft
Microsoft
Home Basic/Home Premium
(including compatible CPUs. Intel
®
Windows® XP Professional/Home Edition SP2
®
Windows Vista
®
Pentium® III 800 MHz or higher
®
®
Pentium® 4 1.6 GHz or
higher recommended)
(512 MB or more recommended)
Windows Vista : 512 MB or more
(1 GB or more recommended)
Ultra DMA-33 or more (100 or more is recommended)
640MB or more (When writing to DVD, the same amount of
free space as the disc is necessary.)
Desktop resolution of 1024 x 768 pixels or more (1280x1024
pixels or more recommended)
Graphic accelerator supporting DirectX 9.0b or 9.0c, and
DirectDraw overlay
®
support)
When writing to DVD, a compatible drive and media are
necessary.
®
9.0b or 9.0c (9.0c is already
installed with Windows
Windows Vista : DirectX
● If this software is installed on a PC that does not support
®
DirectX
versions above, the PC may not operate properly.
®
10 (already installed with Windows
®
Vista
)
®
XP SP2)
If you are unsure if your personal computer is compatible,
contact the maker.
Microsoft
®
Windows Media® Player 6.4 to 11
● Supplied CD-ROM is available for Windows only.
● When two or more USB devices are connected to one PC, or when
devices are connected through USB hub or by using USB extension cable,
operation is not guaranteed.
● This software is not compatible with a multi-CPU environment.
● This software is not compatible with a multi-boot environment.
● Operation is not guaranteed on Microsoft Windows XP Media Centre
Edition, Tablet PC Edition and not compatible with 64 bit operation systems.
Operating environment for the card reader function (EG/E/EP only),
the card reader/writer function (GC only) (Mass storage)
Supported
computers
OS Microsoft
CPU Windows 2000 / XP : Intel
RAM Windows 2000 / XP : 128 MB or more (256MB or more
Interface USB port
Other requirements Mouse or equivalent pointing device
IBM PC/AT or compatible preinstalled with the OS below
®
Windows® 2000 Professional SP4
Microsoft
Microsoft
Ultimate/Business/Enterprise
Windows Vista : Including compatible CPUs. Intel
®
Windows® XP Home Edition/Professional
®
Windows® Vista® Home Basic/Home Premium/
®
Pentium® III 450 MHz or higher or
®
Intel
Celeron® 400 MHz or higher
®
Pentium® 4
1.6 GHz or higher recommended
recommended)
Windows Vista Home Basic : 512 MB or more
Windows Vista Ultimate, Business, Home Premium, Enterprise
: 1 GB or more
● USB connection: Data can be written to a computer.
● Microsoft
DirectDraw
of Microsoft Corporation in the United States and/or other countries.
● IBM
Machines Corporation of the U.S.
● Intel
®
, Windows®, Windows Vista®, Windows Media®, DirectX®,
®
and DirectSound® are either registered trademarks or trademarks
®
and PC/AT are registered trademarks of International Business
®
and Pentium® and Celeron® are registered trademarks or trademarks of
Intel Corporation in the United States and other countries.
● Other names of systems and products mentioned in these instructions are
usually the registered trademarks or trademarks of the manufacturers who
developed the system or product concerned.
66 VQT1R71 67VQT1R71
Page 35
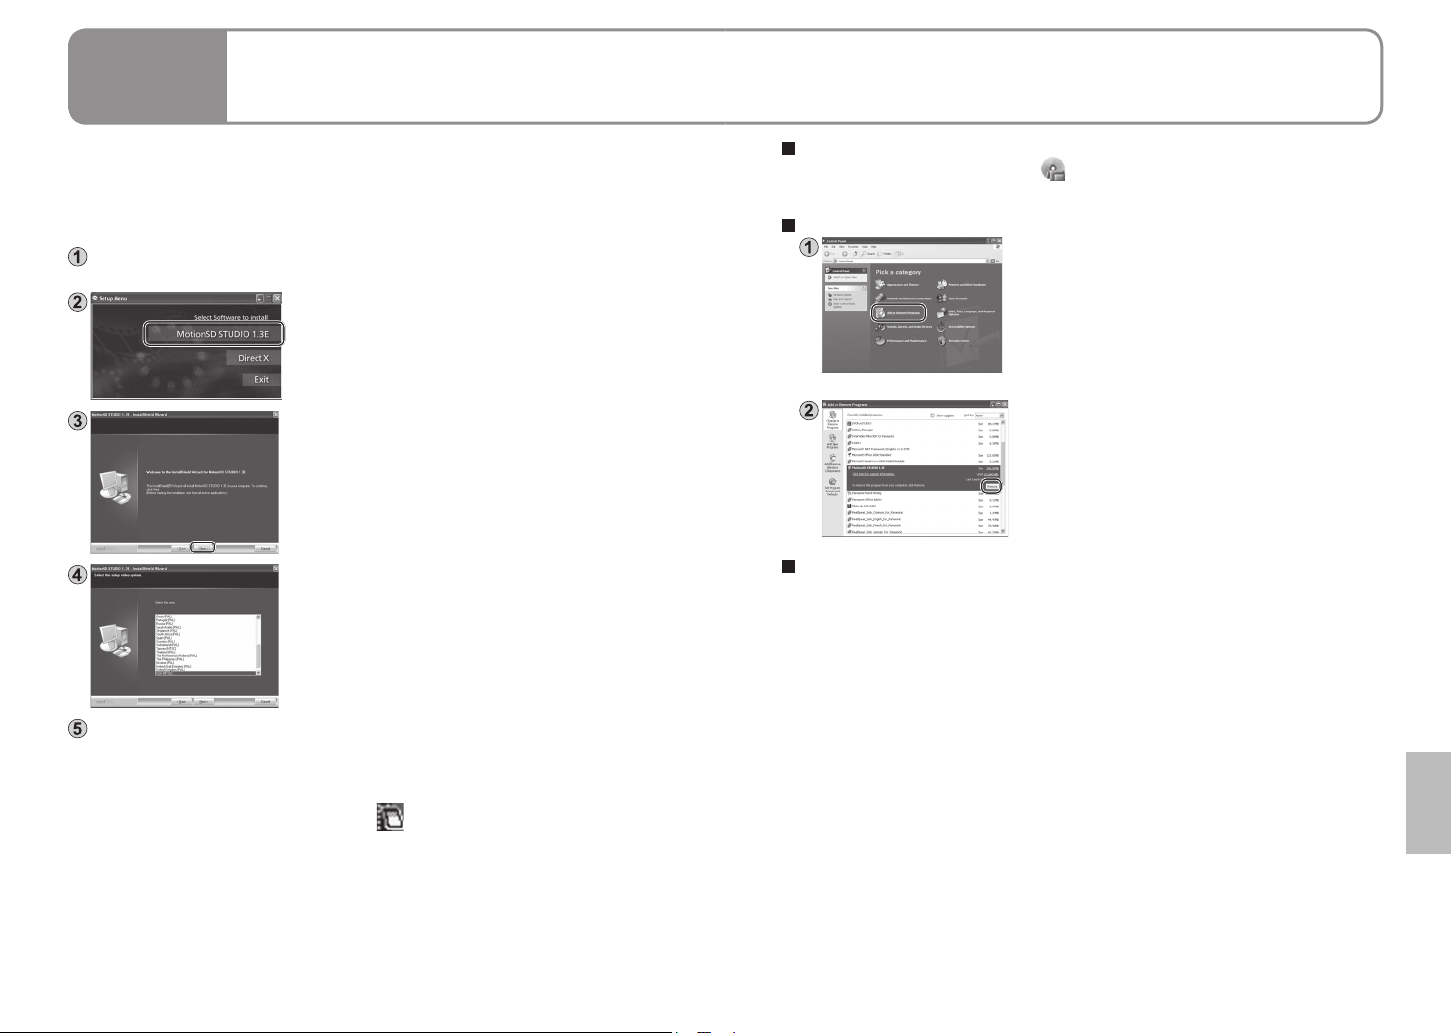
With a
computer
Installing MotionSD
4
STUDIO
● MotionSD STUDIO only runs on Windows computers.
● Install and uninstall the software with administrator authorization.
● Before installing the software, check your operating environment (P.66) and
close any other software applications which are running.
● Do not perform other computer operations while installing the software.
● Do not connect this unit to the computer until installation is complete.
● Install MotionSD STUDIO only from the supplied CD-ROM.
Insert the supplied CD-ROM into your computer.
The Setup Menu starts automatically.
Click [MotionSD STUDIO 1.3E].
If installation is stopped halfway through, the
software may not run properly.
Click [Next].
Continue to follow the on-screen messages to
install it.
• Depending on the operating environment, you
may be required to install DirectX.
If so, click [Yes] and install it.
Select a video system and click [Next].
[Readme.txt] is displayed when installation is
complete. Be sure to check the contents.
Click [Finish].
Selecting “Yes, I want to restart my computer now.” automatically restarts the
computer and completes installation.
Eject the CD-ROM from the computer.
If the Setup Menu does not start up automatically
Double-click the CD-ROM icon [ ] containing the CD-ROM drive in [My
Computer].
Uninstalling the software
● For Windows 2000 or XP
Click [Start] → ([Settings] →) [Add or Remove
Programs (Applications)] in the [Control Panel].
● For Windows Vista
From the Start menu, select [Control Panel] →
[Programs] → [Uninstall Program].
Select [MotionSD STUDIO 1.3E] and click
[Remove] or [Uninstall/Remove].
Continue to follow the on-screen messages to
uninstall it.
After uninstalling the software, restart the
computer.
Reading the MotionSD STUDIO operating instructions (PDF file)
Click [All Programs (or [Programs])] → [Panasonic] → [MotionSD STUDIO
1.3E] → [Manual] from the Start menu in Windows.
Or, select [Manual] from the [Help] menu at the top of the [Edit Screen]
windows in MotionSD STUDIO.
• Adobe Acrobat Reader 5.0 or later or Adobe Reader 7.0 or later is required
to read the PDF operating instructions.
After the installation is finished, the icon [
When this unit and the computer are connected with the USB cable, the [SD
Browser auto start] dialog box appears. (P.70)
After installation is complete, clicking on [MotionSD STUDIO 1.3E] in the Setup
menu starts up the Uninstaller. Click [EXIT] in the Setup menu to close the
menu.
] is displayed in the task tray.
68 VQT1R71 69VQT1R71
Page 36
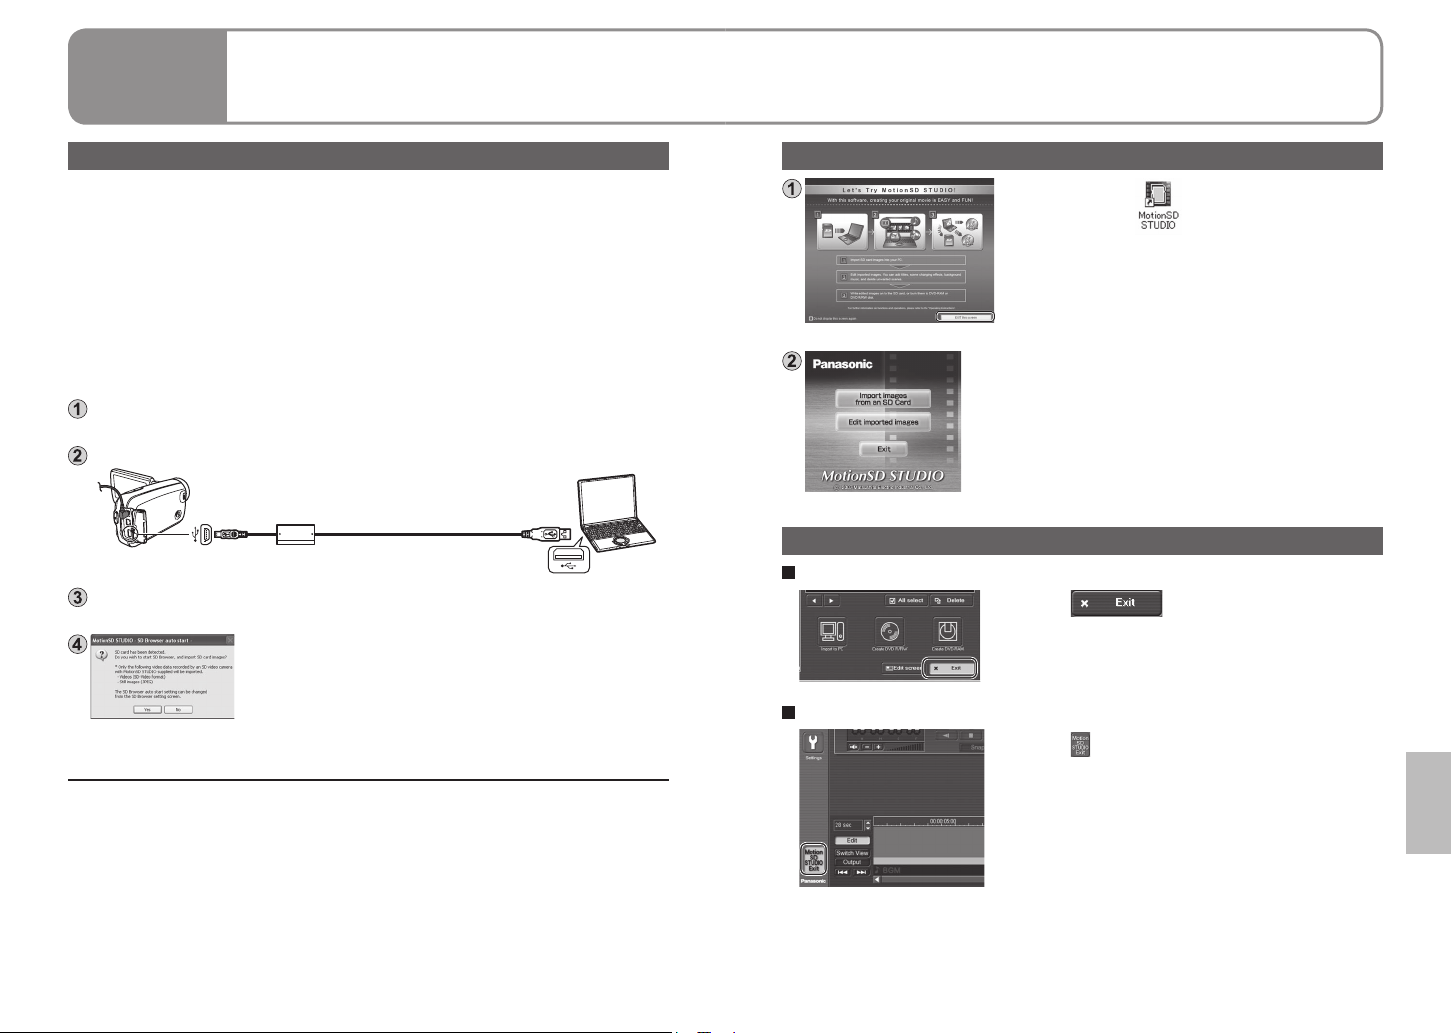
With a
computer
Using MotionSD STUDIO
5
For a detailed explanation on how to use the software, see the MotionSD
STUDIO operating instructions (PDF file). (P.69)
Importing motion pictures and still pictures
When this unit is connected to the computer, MotionSD STUDIO starts up
automatically.
● To use the application with Windows Vista, log on with administrator
authorization or via a standard user account. Guest accounts cannot be used.
To use the application with Windows XP or 2000, log on with administrator
authorization.
● Before using MotionSD STUDIO, please read [Readme First] by selecting
from the start menu. This file contains additional instructions or updated
information.
● The very first time that the software is started up, the End User License
Agreement is displayed. Read it carefully and click [I agree].
Connect the unit and AC adaptor (P.14) and set the mode dial to a position
other than [OFF].
Connect this unit and a computer with the USB cable (supplied).
Insert the plugs as far as they will go.
Select [PC CONNECT] on the [SELECT USB FUNCTION] screen of the unit.
The [SD Browser auto start] dialog box appears.
Click [Yes].
The [SD Browser] window appears, therefore do
as instructed by displayed messages.
● Do not use any other USB connection cables except the supplied one.
(Operation is not guaranteed with any other USB cables.)
● Do not disconnect the USB cable or turn off the unit while the card
access lamp is lit.
● The first time the unit is connected to the computer, the computer may have to
be restarted.
● To output motion pictures edited with MotionSD STUDIO to SD cards, use an
applicable SD card. (P.12)
● When outputting a large number of scenes to an SD card, DVD-R/RW or
DVD-RAM, it may take time to display thumbnails or to output.
Editing motion pictures and still pictures
Double-click the icon on the desktop.
The window at left appears.
• If the icon does not appear on the desktop,
select [All Programs (or [Programs])] →
[Panasonic] → [MotionSD STUDIO 1.3E] →
[MotionSD STUDIO] from the start menu.
Click [EXIT this screen].
The startup window appears.
Closing MotionSD STUDIO
From the [SD Browser] screen
Click in the lower righthand corner of the screen.
From the [Edit Screen] screen
Click in the lower left-hand corner
of the screen.
Or, select [Exit] from the [File] menu.
70 VQT1R71 71VQT1R71
Page 37
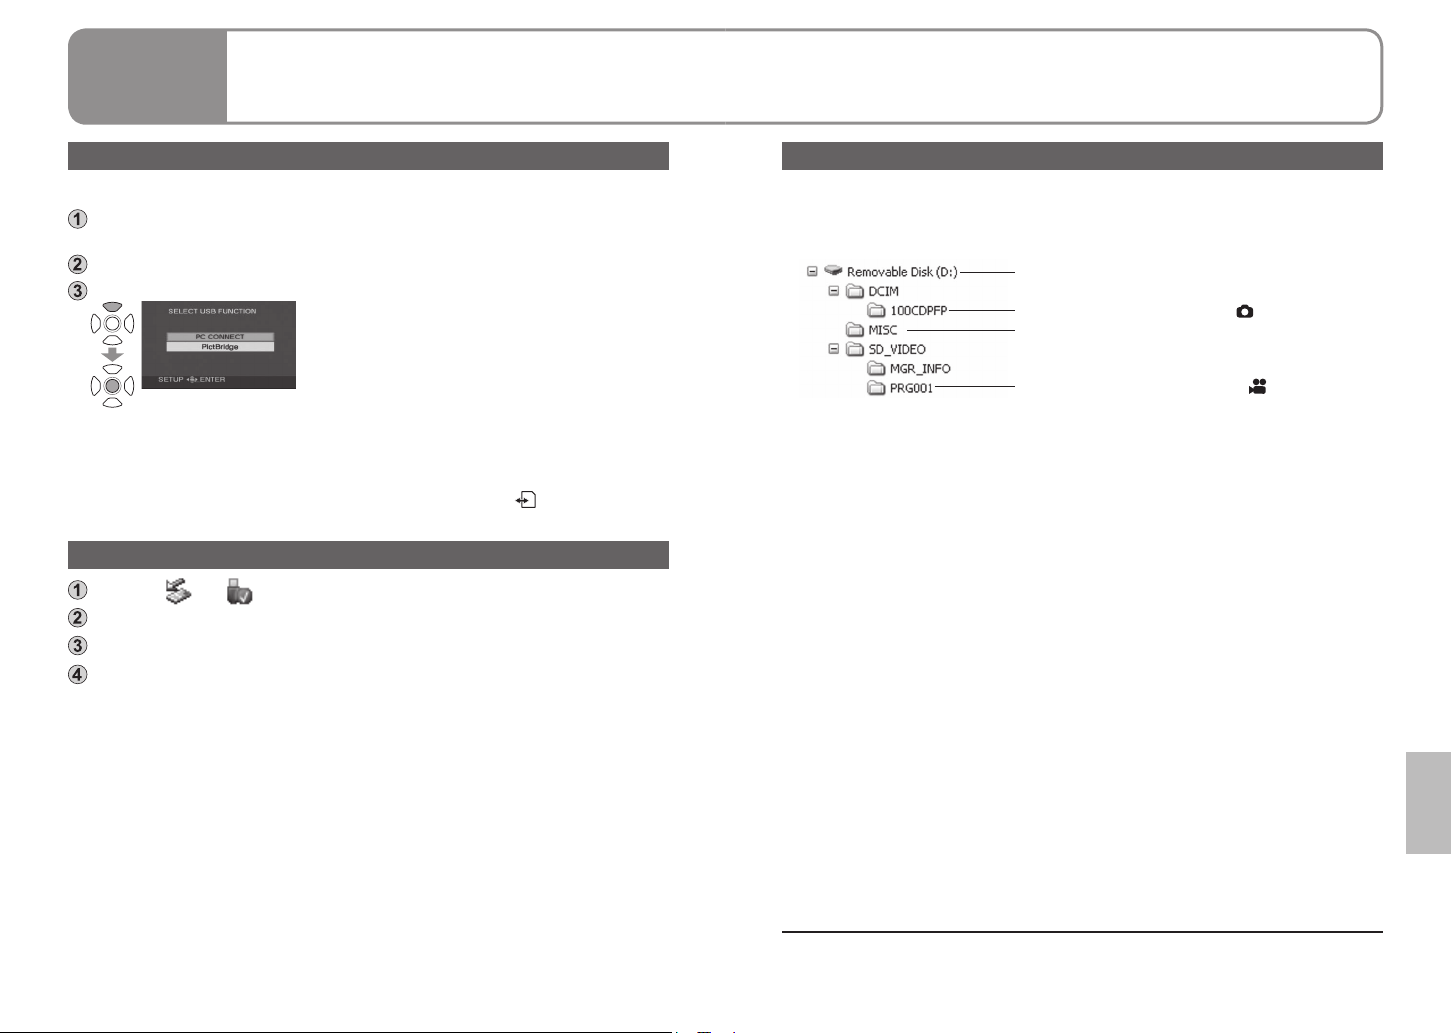
With a
computer
Using this unit as an
6
external drive (Mass storage)
This unit can be used as an external drive.
Connecting the unit to a computer
Use the AC adaptor to supply power to this unit and connected devices.
Connect the unit and AC adaptor (P.14) and set the mode dial to a position
other than [OFF].
Connect this unit and a computer with the USB cable (supplied). (P.70)
Select [PC CONNECT].
● When this unit is connected to the computer, [Removable Disk] appears in [My
Computer].
● The SD card appears as an external drive (E drive, etc.) in Windows Explorer.
● While the computer is accessing the SD card of this unit, [
bottom right of the unit’s LCD monitor.
• The SD card in the unit appears on the
computer as an external drive.
] appears at the
Disconnecting the unit
Click the [ ] or [ ] icon on the task bar.
Click “Safely remove USB Mass Storage Device.”
When the disconnection confirmation message appears, click [OK].
Disconnect the USB cable (supplied) from the computer.
SD card folder structure
The content of the SD card in the unit can be checked from the computer.
Motion pictures and still pictures recorded with the unit are saved in the folder
tree below.
SD card with data recorded on this unit
Still pictures (Max. 999) taken in [
DPOF setting information on still pictures
Motion pictures (Max. 99) taken in [
● Do not move, rename, delete, compress, format or perform other operations
to the motion pictures or folders using Windows Explorer or the Macintosh
Finder. Motion pictures will no longer play back.
● To edit motion pictures, use software capable of editing SD-Video files, such
as MotionSD STUDIO.
] mode
] mode
● Data not supported by this unit cannot be played back on this unit even if
copied onto an SD card.
72 VQT1R71 73VQT1R71
Page 38
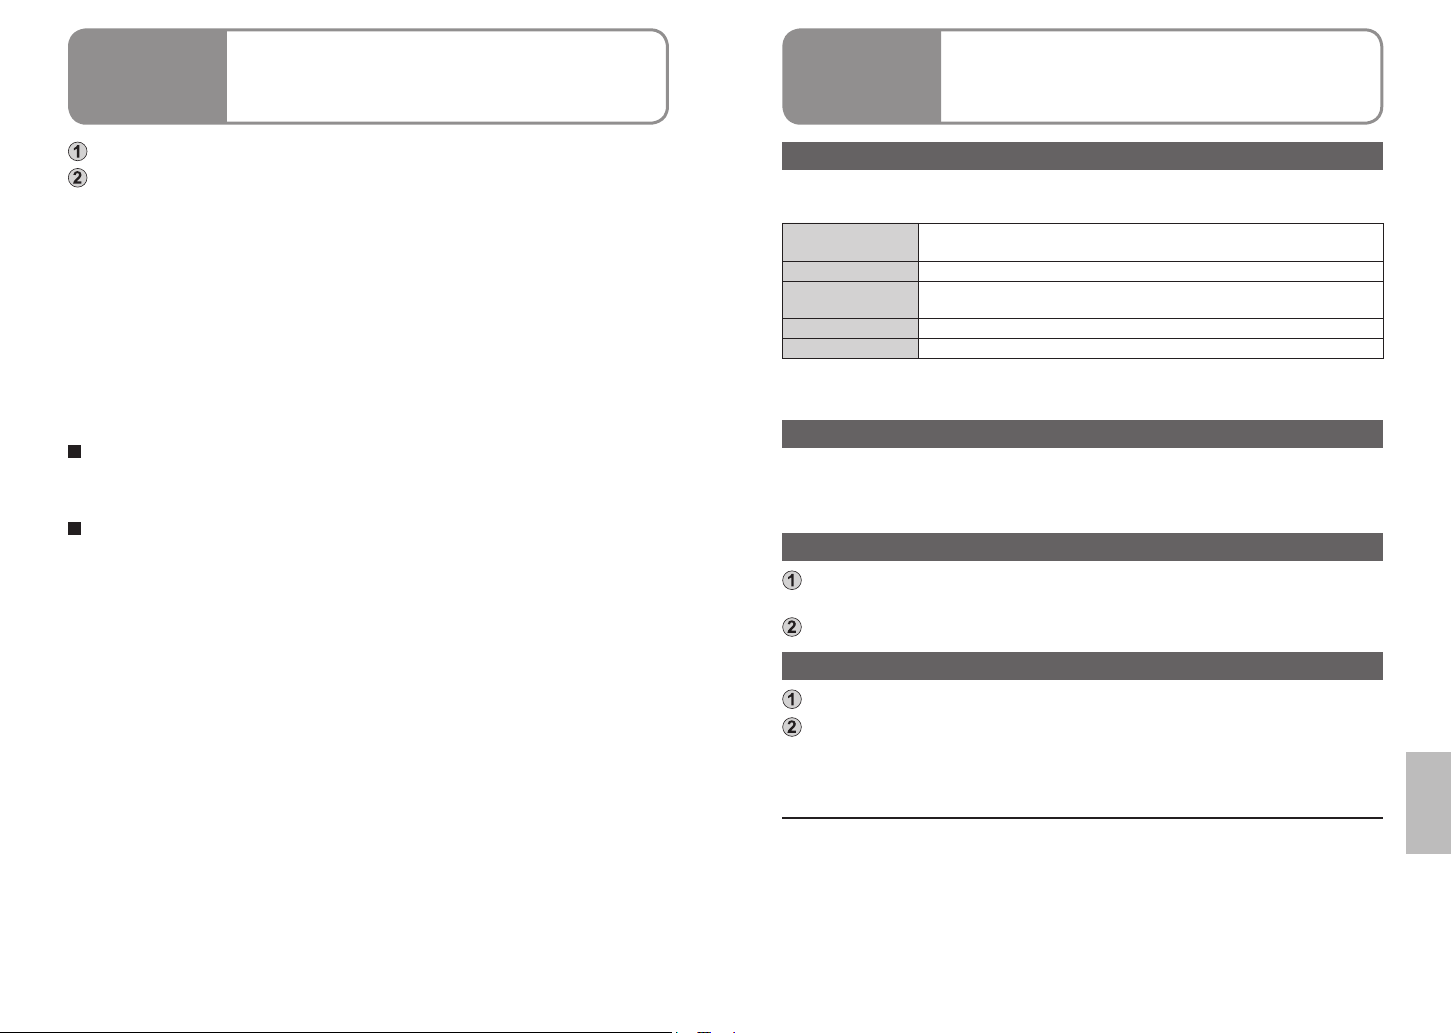
With a
computer
Checking the connections
7
With a
computer
Connecting to a Macintosh
8
computer
Connect this unit and a computer with the USB cable (supplied). (P.70)
Display the Device Manager.
● For Windows 2000
Click [Start] → [Settings] → [Control Panel] → [System] → [Hardware] tab
→ [Device Manager] button.
● For Windows XP
Click [Start] → [Control Panel] → [Performance and Maintenance] →
[System] → [Hardware] tab in the [System Properties] window → [Device
Manager] button.
● For Windows Vista
From the Start menu, select [Control Panel] → [System and Maintenance]
→ [System] → [Device Manager] (from the [Task] window).
If a confirmation window appears halfway through, click the [Continue]
button.
When the driver is recognised
[USB Mass Storage Device] appears in [Universal Serial Bus controllers].
(The display differs according to the type of computer.)
When the driver is not recognised
[!] or [Unknown device] appears in [Universal Serial Bus controllers] or [Other
devices].
Try the following.
• Method [1] : Turn off the unit and your computer once and turn on again to
reconnect.
• Method [2] : Remove the SD card from the unit and insert it back into the
unit.
• Method [3] : Connect the USB cable to another USB port on the computer.
● If the driver cannot be recognised by any of the methods above, contact the
computer manufacturer.
Operating environment required for external drives
Operating environment for the card reader function (EG/E/EP only), the card
reader/writer function (GC only) (Mass storage)
Supported
computers
OS Mac OS X 10.4 “Tiger” (Don’t have to install USB Driver.)
CPU PowerPC G5 1.8 GHz or higher
RAM 64 MB or more
Interface USB port
● Even if the system requirements mentioned in these operating instructions are
fulfilled, some personal computers cannot be used.
Macintosh
®
Core™ Duo, Intel® Core™ Solo
Intel
Connecting the unit to a computer
Connect this unit and a computer with the USB cable
(supplied). (P.70)
An icon labeled [NO_NAME] or [Untitled] appears on the desktop.
Copying still pictures to computers
Double click the [NO_NAME] or [Untitled] icon on the desktop.
The still pictures are in the [100CDPFP] folder inside the [DCIM] folder.
Drag and drop the still pictures to copy onto the computer.
Disconnecting the unit
Drag and drop the [NO_NAME] or [Untitled] icon to the Trash.
Disconnect the USB cable (supplied) from the computer.
● Apple, Mac OS is either registered trademarks or trademarks of Apple Inc. in
the United States and/or other countries.
● PowerPC
● Intel
United States and/or other countries.
● Other names of systems and products mentioned in these instructions are
usually the registered trademarks or trademarks of the manufacturers who
developed the system or product concerned.
®
is a trademark of International Business Machines Corporation.
®
Core™ is registered trademarks or trademarks of Intel Corporation in the
74 VQT1R71 75VQT1R71
Page 39
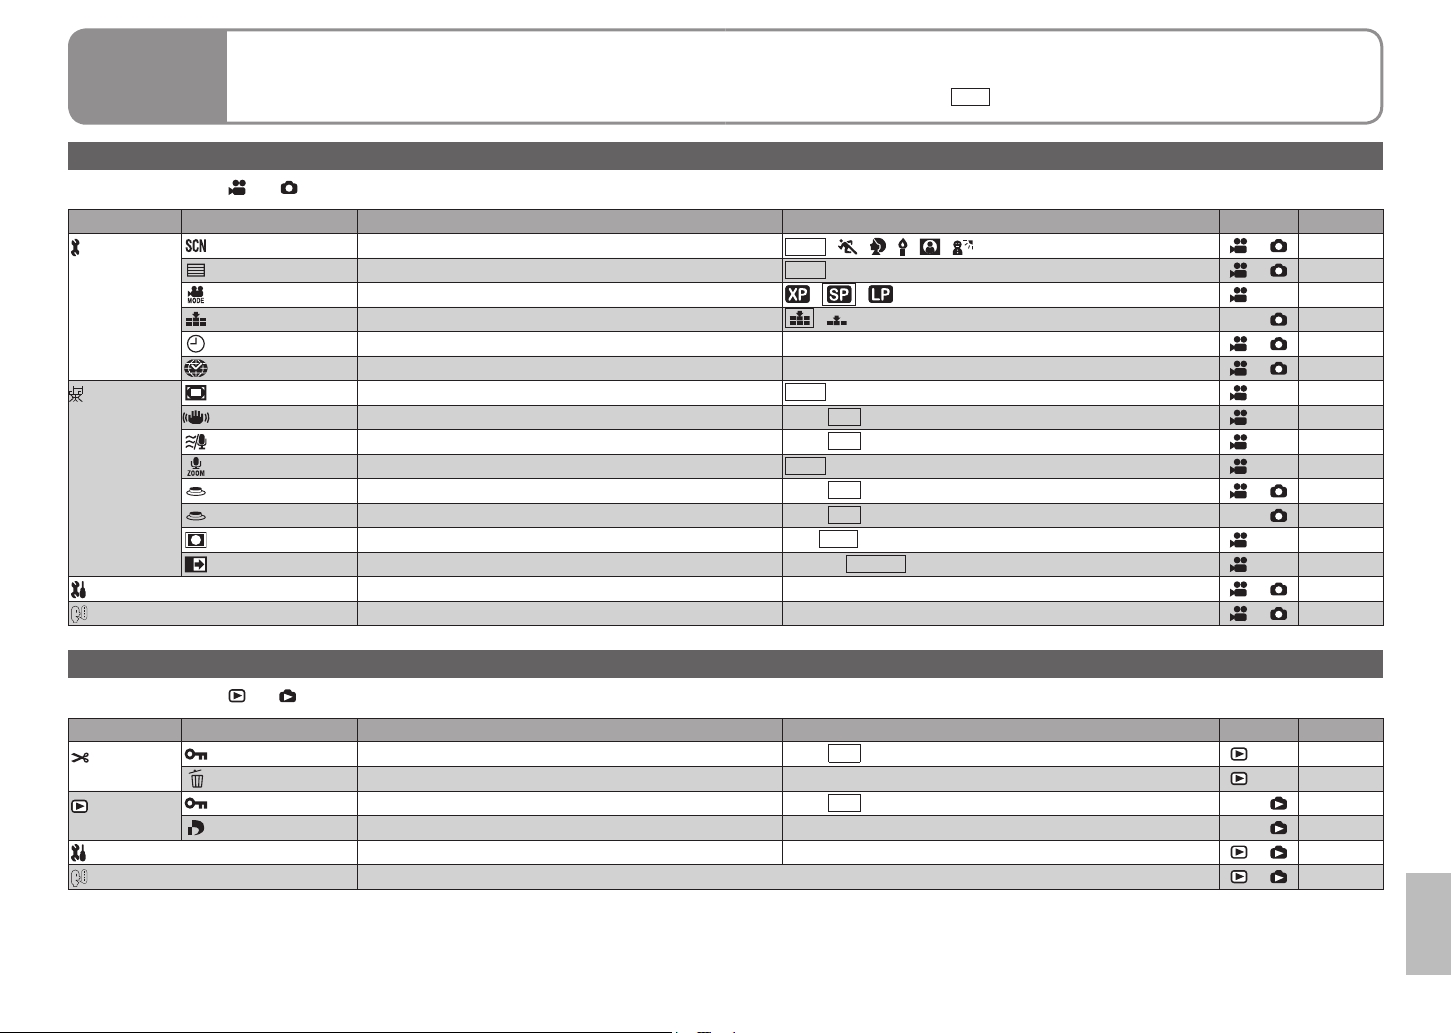
Recording and playback functions can be used and basic settings made.
Others
1
Menus
(For setting procedures, see P.20.)
● Settings enclosed in
are active at the time of purchase.
Recording menu
Set the mode dial to [ ] or [ ].
Top menu Submenus Purpose Settings/Notices Mode Page
BASIC
ADVANCED
SETUP
LANGUAGE
SCENE MODE Use settings tailored to specific scenes.
GUIDE LINES Check composition for tilting.
REC MODE Set the motion picture recording mode.
PICT.QUALITY Set still picture quality.
CLOCK SET Set the date/time. YES / NO
SET WORLD TIME Set the local date/time of travel destinations. YES / NO
D.ZOOM Use the digital zoom.
SIS Avoid jitter OFF / ON
WIND CUT Reduce the wind noise. OFF / ON
ZOOM MIC Apply zoom effect to sounds.
AUTO SLW SHTR Adjust shutter speed automatically. OFF / ON
SHTR EFFECT Cancel out shutter sound. OFF / ON
REC ASPECT Set aspect ratio for recording. 4:3 / 16:9
FADE COLOUR Change the fade colour. WHITE / BLACK
Make basic settings. For details on the SETUP menu (P.78)
Select the menu and display language. The display and menu language can be changed.
OFF / / / / /
OFF / ON
/ /
/
OFF / 25x / 700x
OFF / ON
39
45
27
29
22
44
30
31
45
31
31
28
26
33
―
21
Playback menu
Set the mode dial to [ ] or [ ].
Top menu Submenus Purpose Settings/Notices Mode Page
EDIT SCENE
PHOTO SETUP
SETUP
LANGUAGE
LOCK SET Prevent accidental deleting. YES / NO
DELETE Delete scenes. ALL / SELECT / COPIED / NO
LOCK SET Prevent accidental deleting. YES / NO
DPOF SET Write print information onto SD cards. CANCEL ALL / SET / NO
Make basic settings. For details on the SETUP menu (P.78)
Same as [LANGUAGE] above.
52
50, 63
52
53
―
21
76 VQT1R71 77VQT1R71
Page 40
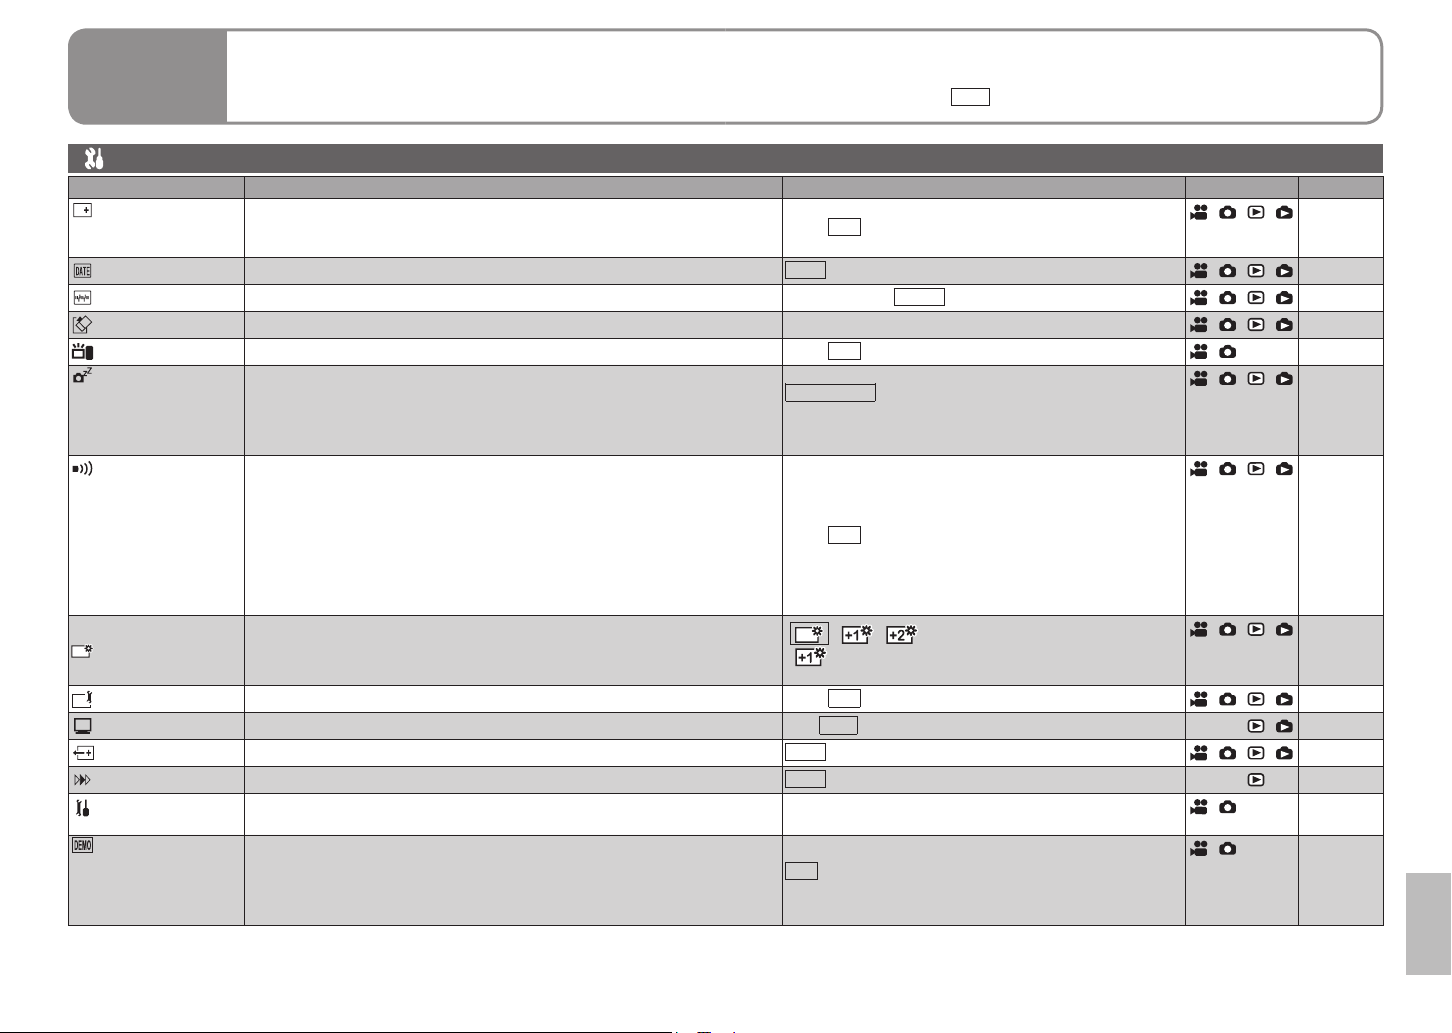
Recording and playback functions can be used and basic settings made.
Others
Menus (cont.)
1
(For setting procedures, see P.20.)
● Settings enclosed in
are active at the time of purchase.
SETUP menu
Item Purpose Settings/Notices Mode Page
DISPLAY
DATE/TIME Select the date and time display mode.
DATE FORMAT Select the date display format. Y/M/D / M/D/Y / D/M/Y
FORMAT CARD Format SD cards. YES / NO
QUICK START Start recording instantly. OFF / ON
POWER SAVE
BEEP SOUND
Display current information or settings on the LCD monitor.
• Even when this item is set to [OFF], the operating status, date
and world time will remain displayed.
Turn off the unit if the unit is not being operated.
This function does not work in the following cases.
• While using the AC adaptor
• While connected to a computer or printer via USB
Allow operations such as starting and ending recording to be
signaled by a beep.
When [ON]
Beep: • When recording starts or the unit is turned on
• When a computer or printer is recognised
Beep-Beep: • When recording stops or the unit is turned off
Beep-Beep, Beep-Beep … (4 times consecutively):
•
If an error that prevents recording occurs, etc. Check
the message (P.82) that appears on the LCD monitor.
ON
OFF /
OFF / D/T / DATE
OFF /
5 MINUTES : The unit turns off if the unit is not operated
OFF / ON
for about 5 minutes. To resume the unit use,
set the mode dial to [OFF] and then the
desired mode position.
26
22
22
52
19
―
―
POWER LCD Brighten the LCD monitor more than usual.
LCD SET Adjust brightness or colour density of the LCD monitor. YES / NO
TV ASPECT Display images at the aspect ratio of a connected TV. 4:3 / 16:9
EXT. DISPLAY Display information on a connected TV.
RESUME PLAY Continue playback from the point it was stopped.
INITIAL SET
DEMO MODE
Return all settings except for [LANGUAGE] and [CLOCK SET] to
their defaults at the time of purchase.
Display an introduction to the unit (demonstration mode).
The demonstration stops when any operation except pressing the
[AUTO] or [MANUAL AF/MF] button is performed, but it will resume
if no operations are performed for approx. 10 or more minutes.
/ /
• [ ] is automatically selected when the AC adaptor is
used.
OFF / ON
OFF / ON
YES / NO
OFF : [OFF] is normally set.
ON : When the AC adaptor is connected without an SD
card having been inserted, the demonstration starts,
and it stops when an SD card is inserted.
23
23
54
54
48
―
―
78 VQT1R71 79VQT1R71
Page 41
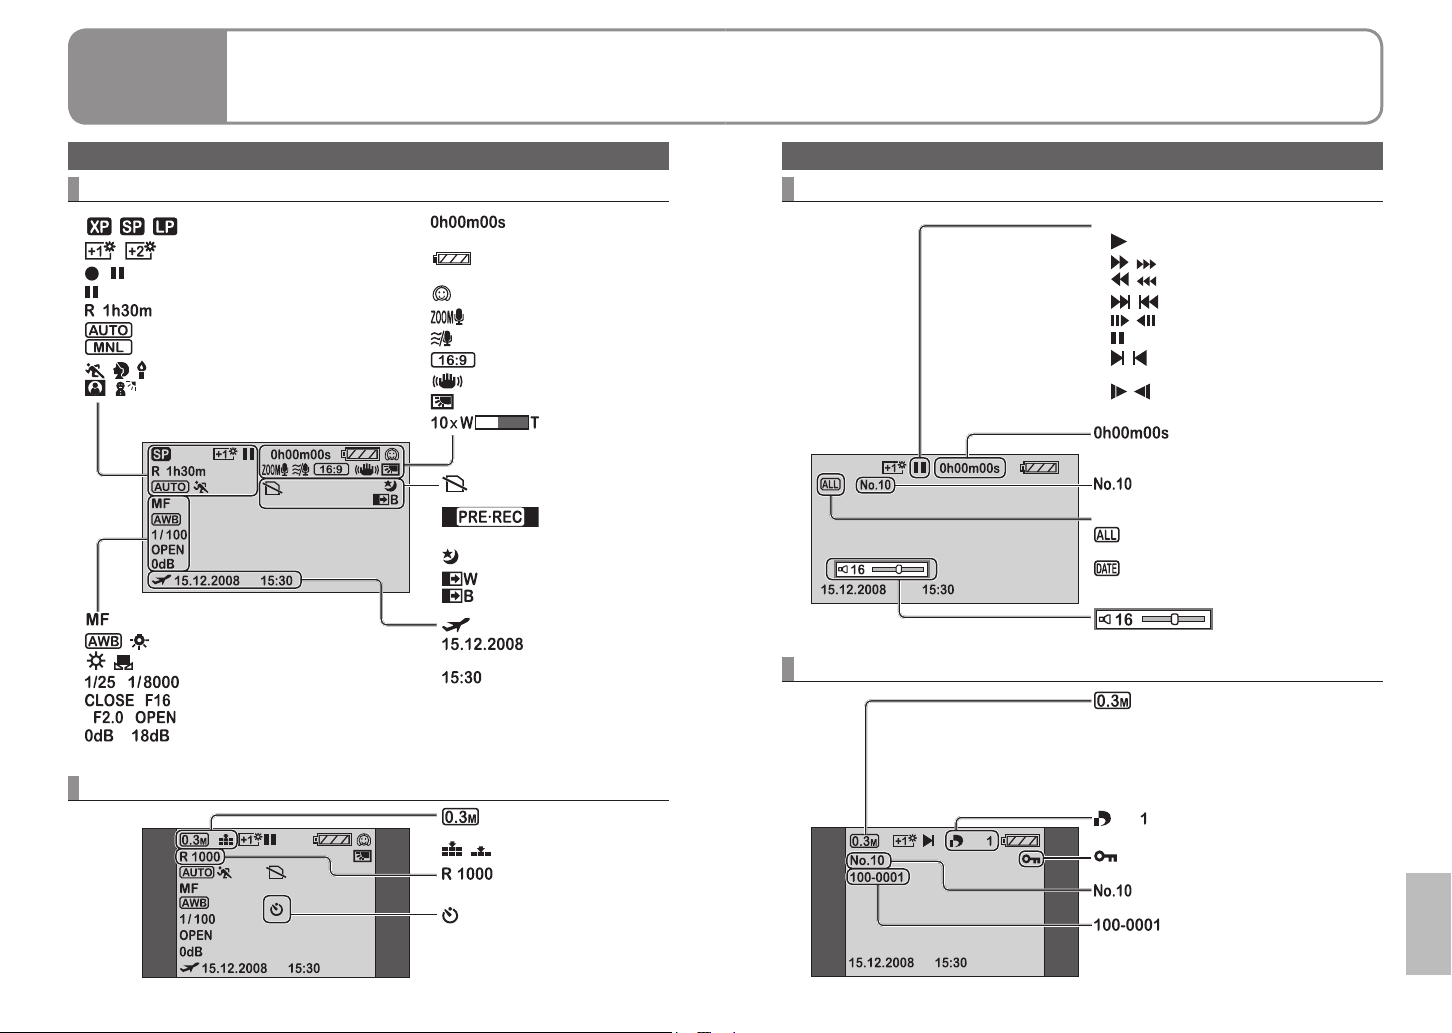
Others
LCD monitor displays
2
When recording
Motion picture recording display
Recording mode (P.27)
Power LCD (P.23)
(Red) Recording/Writing to SD card
(Green) Recording pause
Remaining time for recording (P.26)
Auto mode (P.26)/
/
Manual mode (P.38)
Scene mode (P.39)
Manual focus (P.38)
White balance (P.40)
Shutter speed (P.42)
/
F number (P.43)
Gain value (P.43)
-
/ /
/
/
/ / /
/
/ /
/
-
/
-
Still picture recording display
Elapsed recording time (P.26)
Remaining battery power
(P.16)
Soft skin mode (P.35)
Zoom microphone (P.31)
Wind noise reduction (P.45)
Aspect ratio (P.26)
Image stabilizer (P.31)
Backlight compensation (P.34)
Zoom magnification
indication (P.30)
No SD card is inserted/
unusable card
PRE-REC function (P.36)
Colour night view (P.35)
Fade colour (P.33)
/
World time (P.44)
Date (P.22)
Time (P.22)
Number of recording
pixels
Picture quality (P.29)
/
Remaining number of
still pictures (P.28)
Self-timer (P.34)
During playback
Motion picture playback display
Still picture playback display
Operating status (P.46)
Playback
Fast forward
/
Fast rewind
/
Scene shift
/
Frame-by-frame playback
/
Pause
Jump to end of last scene/
/
start of first scene
Slow motion playback
/
Playback time
Scene number (P.46)
Play mode
All scenes on the media displayed
(P.47)
Scenes recorded on the selected
date displayed (P.47)
Volume adjustment (P.46)
Number of recording pixels (640
x 480)
Size is not displayed if still
pictures recorded on other
devices that have different picture
sizes from the size shown above.
DPOF already set (P.53)
Locked (P.52)
Scene number (P.49)
Still picture folder/file number
80 VQT1R71 81VQT1R71
Page 42
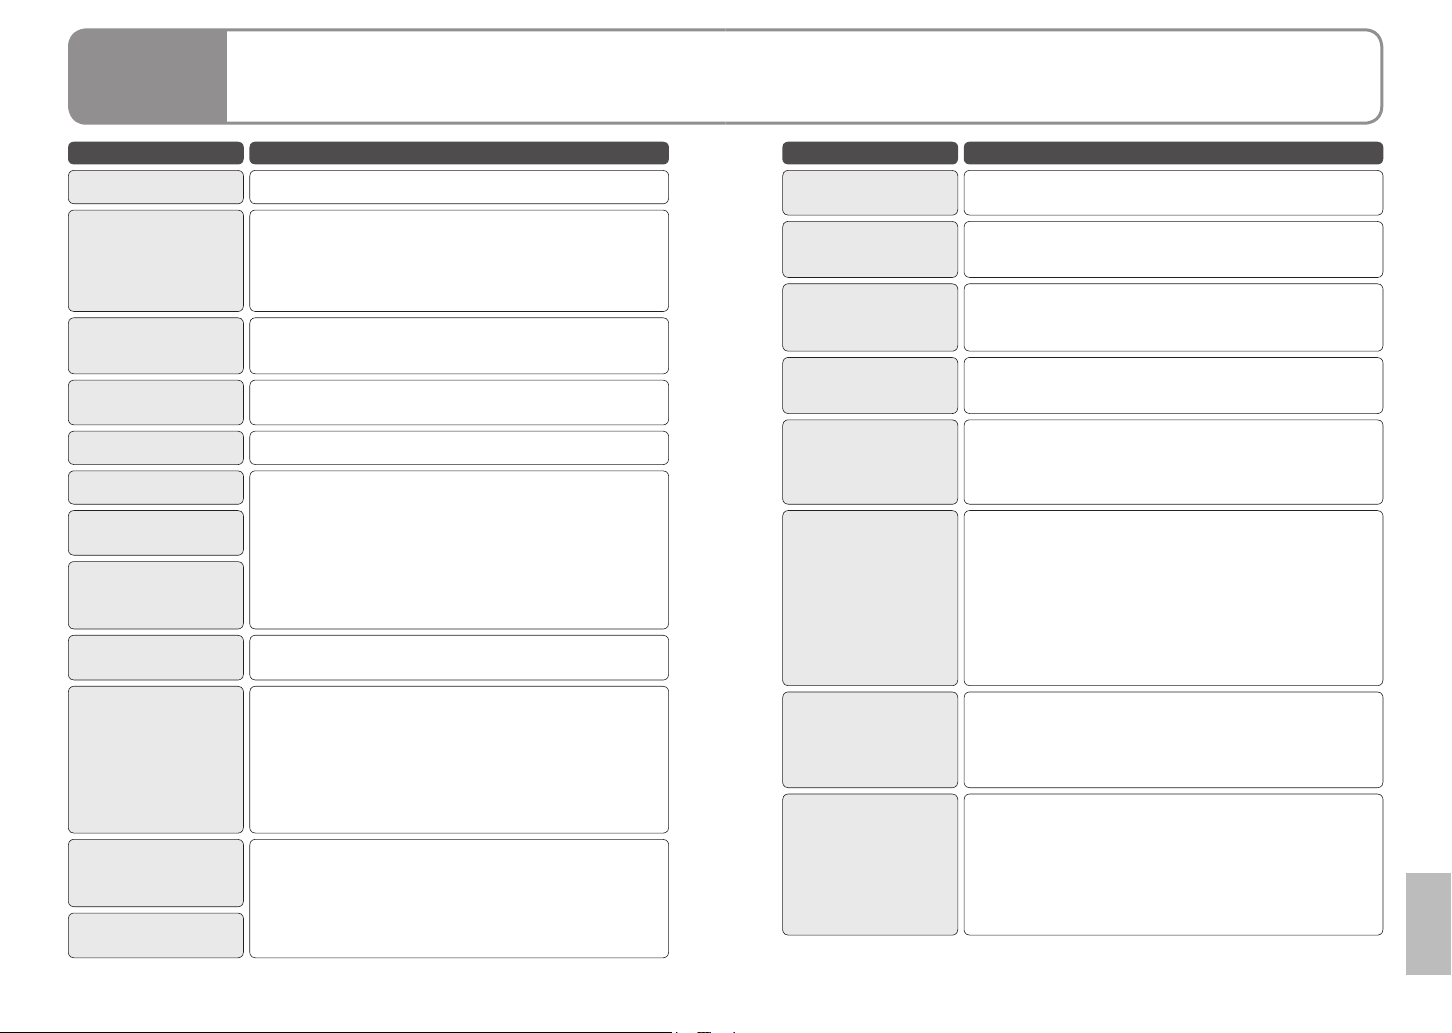
Others
Messages
3
This section explains the main messages appearing on the LCD monitor and
how to deal with them.
Message What to check
CANNOT RECORD.
Writing on the SD card failed.
Neither motion pictures nor still pictures are recorded
on the SD card.
NO DATA.
Data is recorded on the SD card, but if this message
appears, the card may be unstable.
Turn the unit off and turn back on.
THIS CARD CANNOT
RECORD IN VIDEO
MODE.
CHECK CARD.
CARD LOCKED.
CARD FULL.
SCENE NUMBER IS
FULL
An 8 MB or 16 MB SD card cannot be used in video
recording mode.
The SD card is not supported or cannot be recognised
by the unit.
The SD card is write-protected. (P.13)
The SD card cannot be recorded on because it is full
or the numbers of scenes or numbers of scenes for
the date has reached the maximum. Either delete
CANNOT RECORD.
THE NUMBER OF
PROGRAM IS FULL.
CARD DOOR OPENED.
unnecessary scenes or insert a new card. (P.50)
Close the card/battery door.
● Use a Panasonic SD card or other SD card
applicable for motion picture recording. (P.12)
ERROR OCCURRED.
RECORDING IS
STOPPED.
● If this message appears when an applicable
card is used, it is recommended to format the
card. Formatting deletes all data on the SD card.
Therefore, save data on a computer or other device
before formatting the card.
EXIT THE MENU THEN
CHANGE TO MANUAL
MODE.
Functions that cannot be used simultaneously were
selected. (P.89)
CANCEL NIGHT VIEW
MODE.
Message What to check
PLEASE CONNECT AC
ADAPTOR
ERROR OCCURRED.
PLEASE TURN UNIT OFF,
THEN TURN ON AGAIN.
DISCONNECT USB
CABLE.
CANNOT OPERATE
WHILE USB
CONNECTED.
You tried connecting the unit to a computer without
connecting the AC adaptor.
The unit detected an error. Eject the SD card and turn
off the unit and turn back on.
The unit is not properly connected to a computer or
printer.
Disconnect and reconnect the USB cable.
The unit cannot be turned off while it is connected to
a computer.
The data on the SD card contains errors.
CARD ERROR
DETECTED.
To repair the data, either use a battery of sufficient life
or connect the AC adaptor. Depending on the error, it
may take time to repair the data.
The data has been repaired.
● Depending on the situation, the data may not be
completely repaired.
If the unit is turned off without repairing data, data can
NOW REPAIRING
DATA.
●
be repaired the next time that the unit is turned on.
● If repairing fails, the data cannot be played back.
Format the SD card with this unit.
● Do not repair SD cards recorded on other devices
on this unit.
CANNOT CHECK
CONNECTED DEVICE.
DISCONNECT THE
USB CABLE FROM
THIS UNIT.
A device that cannot be used with this unit is
connected to the unit.
● Before recording, open the lens cover.
● This message may appear if you try to record in
CONDITION TOO
DARK, OR OPEN
LENS COVER.
extremely dark place
● After the power was turned on, the message
is displayed when the initial recording mode is
established, but it is not displayed when manual
recording is performed.
82 VQT1R71 83VQT1R71
Page 43
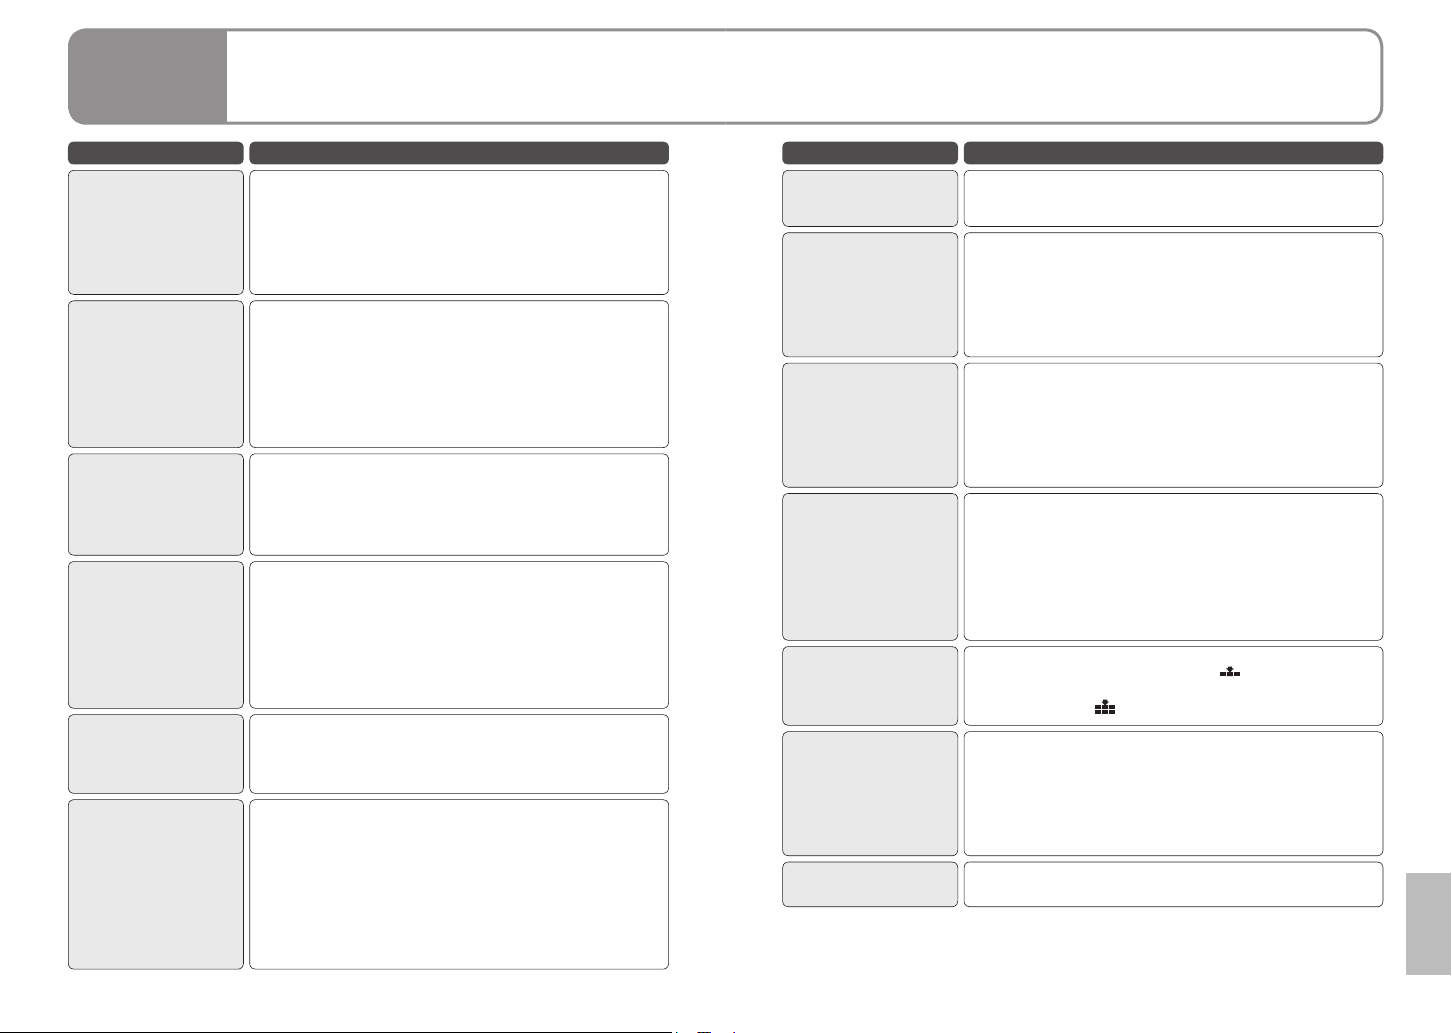
Others
Troubleshooting
4
Problem What to check
The unit does not
turn on.
The status indicator
is flashing while
using the battery.
The unit turns off
on its own.
The unit turns off as
soon as it is turned
on.
The battery runs
down quickly.
Is the battery sufficiently charged?
To conserve the battery, the unit automatically turns
off if the unit is not operated for about 5 minutes. To
resume unit use, set the mode dial to [OFF] and then
the desired mode position.
When [POWER SAVE] is set to [OFF], the unit does
not turn off automatically. (P.78)
Is the battery run down?
Charge the battery if the remaining battery life
indication is flashing or the [LOW BATTERY] message
appears on the LCD monitor. (P.16)
● Is the battery sufficiently charged?
● Is the unit being used in low temperatures?
The battery is affected by ambient temperature. In
cold places, battery availability shortens.
● Is the battery at the end of its service-life?
If the battery lasts only a short while when fully
charged, it has reached the end of its service-life.
Problem What to check
The display
changes suddenly.
Indications
(remaining pictures,
elapsed time, etc.)
do not appear on
the LCD monitor.
Pictures cannot
be recorded even
though the SD card
is properly inserted.
Motion picture
recording stops on
its own.
Still pictures come
out like mosaics.
If the demo (camera introduction) video starts, set
[DEMO MODE] to [OFF]. (P.78)
When [DISPLAY] of the [SETUP] menu is set to
[OFF], indications other than warnings and the date
do not appear.
● Is the SD card write-protected? (P.13)
● Is the SD card full? Either delete unnecessary
scenes or insert a new card. (P.50)
● Is the unit in a recording mode?
● Is the card/battery door open?
● Are you using an applicable SD card? (P.12)
● Even with applicable SD cards, recording may stop
when using an SD card on which data has been
written many times.
Copy the data to a computer, then format the SD
card on this unit. (Formatting deletes all data on the
SD card.)
When [PICT. QUALITY] is set to [
subjects are recorded, pictures come out like
mosaics. Set to [
] when recording. (P.29)
] and detailed
The battery is
swollen.
The unit cannot be
operated though it
is turned on.
The unit does not
operate normally.
The lithium ion battery used with this unit may swell if
charged/discharged often, but this is no risk to safety.
● Is the LCD monitor open?
● Check that the card access lamp is out, then eject
the SD card, remove the battery or disconnect the
AC adaptor, wait about 1 minute, then reinsert the
battery or reconnect the AC adaptor. Then about
1 minute later, turn the unit off and turn back on.
(Performing the above operation while the SD card
is being accessed can damage data.)
● Is the unit set to manual focus? Press the [AUTO]
The unit does not
focus automatically.
Audio is not output. Is the volume set low? (P.46)
button to set auto focus.
● Are you recording a scene that is hard to focus
automatically?
Focus the subject manually. (P.38)
84 VQT1R71 85VQT1R71
Page 44
Others
Troubleshooting (cont.)
4
Problem What to check
The sound of the
motor is being
recorded.
Images do not
appear on TV or
appear stretched
in the vertical
direction.
Data cannot be
deleted.
Images on the SD
card do not look
normal.
The SD card cannot
be used even after
formatting with this
unit.
The unit does not
recognise the SD
card when inserted.
This is an operating sound of the unit; there is nothing
wrong with the unit.
● Does the input mode on the TV match the connected
terminals?
Set input to the connected terminals as explained in
the TV’s operating instructions.
● Set [TV ASPECT] to match the connected TV. (P.54)
● Is the scene locked?
Unlock the scene. (P.52)
● Scenes whose thumbnails have a
deleted. If the data is unnecessary, format the SD
card (P.52). Formatting deletes all data on the SD
card.
● Is the SD card write-protected? (P.13)
The scene may be damaged. Scenes can be
damaged by static electricity and electromagnetic
waves. Save important data on a computer, etc.
This unit or the SD card may be broken. Consult the
dealer from which you purchased the unit. For SD
cards applicable with this unit (P.12)
Was the SD card formatted on the computer?
Format SD cards with the unit.
Formatting deletes all data on the SD card. Data
cannot be restored afterwards. (P.52)
cannot be
Problem What to check
● Is the unit connected to a computer?
The indication
disappears, the
display does not
work or cannot be
operated.
The SD card is not
recognised when
inserted into other
devices.
The computer does
not recognise the
unit even when
connected with USB
cable.
After disconnecting
the USB cable,
an error message
appears on the
computer.
When connected to a computer, the unit cannot be
operated from the unit itself.
● Turn the unit off. If the unit does not turn off, eject
the SD card, remove and then reinsert the battery
(disconnect and reconnect the AC adaptor), and
turn back on. If the unit still does not work right,
disconnect the power supply and consult the dealer
from which you purchased the unit.
Check the supported SD cards in the device’s
operating instructions.
● While the menu appears on the LCD monitor, the
USB function screen does not appear even if the
USB cable is connected. Close the menu, then
connect the USB cable.
● Is the AC adaptor connected?
● If the computer has multiple USB terminals, try using
another terminal.
● Check the operating environment. (P.66)
● Disconnect the USB cable, turn the unit off and turn
back on, then reconnect the cable.
● For Windows
To safely disconnect the USB cable, click the (
) icons in the task tray, and do as instructed by
or
displayed messages.
● For Macintosh
Drag the unit icon to the Trash, then disconnect the
USB cable.
86 VQT1R71 87VQT1R71
Page 45
Others
Troubleshooting (cont.)
4
Problem What to check
● The unit detected an error. To protect data, eject the
[ERROR
OCCURRED.
PLEASE TURN UNIT
OFF, THEN TURN
ON AGAIN.] appears
on the LCD monitor.
SD card and set the mode dial to [OFF]. The unit
turns off about 1 minute later.
● If the same message is displayed repeatedly after
turning the unit back on, the unit needs servicing.
Disconnect the power supply and consult the dealer
from which you purchased the unit. Do not attempt
to repair the appliance by yourself.
The PDF file of
the MotionSD
STUDIO operating
instructions does
not open.
Is Adobe Acrobat Reader 5.0 or later, or Adobe
Reader 7.0 or later installed in the computer?
Adobe Acrobat Reader 5.0 or later, or Adobe Reader
7.0 or later is required to view the PDF file of the
MotionSD STUDIO operating instructions.
[DISC IS
UNUSABLE.
CHECK DISC.]
appears on the LCD
A disc which cannot be used or a disc which cannot
be written on has been inserted into the DVD burner.
Use a new disc.
monitor.
Problem What to check
Because of specifications, this unit has functions that
cannot be used simultaneously.
Examples:
Function Condition
Digital zoom
Fade
Colour night view
A function cannot
be used or selected.
Backlight
compensation
Soft skin mode
(Set and cancel)
Help mode
Image stabilizer
Scene mode
Changes to white
balance mode
Changes to
shutter speed/
iris or gain
● When in still picture recording
mode
● When in still picture recording
mode
● While the PRE-REC function
is being set
● When in still picture recording
mode
● During recording
(Cannot set nor cancel)
● While the PRE-REC function
is being set
(Cannot set nor cancel)
● While setting iris or gain
● While using Colour night view
● During recording
● While the PRE-REC function
is being set
● When in still picture recording
mode
● While using Colour night view
● When in auto recording mode
● While using Colour night view
● When using digital zoom
● While using Colour night view
● When using scene mode
● While using Colour night view
When [INITIAL SET] is executed from the SETUP
menu, all the settings except for [LANGUAGE]
and [CLOCK SET] will be restored to the defaults
established at the time of purchase, and it will then
become possible to select functions. (P.78)
88 VQT1R71 89VQT1R71
Page 46
Others
Cautions for use
5
When using the unit
● Keep the SD Video Camera as far away as possible from electromagnetic
equipment (such as microwave ovens, TVs, video games etc.).
• If you use the SD Video Camera on top of or near a TV, the pictures and
sound on the SD Video Camera may be disrupted by electromagnetic wave
radiation.
• Do not use the SD Video Camera near cell phones because doing so may
result in noise adversely affecting the pictures and sound.
• Recorded data may be damaged, or pictures may be distorted, by strong
magnetic fields created by speakers or large motors.
• Electromagnetic wave radiation generated by microprocessors may
adversely affect the SD Video Camera, disturbing the pictures and sound.
• If the SD Video Camera is adversely affected by electromagnetic equipment
and stops functioning properly, turn the SD Video Camera off and remove
the battery or disconnect AC adaptor.
Then reinsert the battery or reconnect AC adaptor and turn the SD Video
Camera on.
● Do not use the SD Video Camera near radio transmitters or high-voltage
lines.
• If you record near radio transmitters or high-voltage lines, the recorded
pictures and sound may be adversely affected.
● Use the cord or cable supplied with the unit or other devices. Do not extend
the cords and the cables.
● Do not expose the unit to insecticide or volatile substances, or allow prolonged
contact with rubber or vinyl products. (This can cause deformation and
peeling.)
● Do not drop or impact the unit while carrying.
• Strong impacts may damage the outer casing, causing it to malfunction.
● Do not use the unit for business purposes such as surveillance.
• This unit is not of professional grade, and can build up heat internally over
extended use, resulting in trouble.
● Before long periods of disuse:
• Wipe away moisture and dirt with a soft dry cloth, dry naturally and store with
desiccant (silica gel).
SD cards
● The memory capacity indicated on the SD card label is the total of the
capacity for copyright protection and management, and that ordinarily used by
the unit, computers, etc.
● MiniSD cards require a purpose-specific adaptor. Do not insert just the miniSD
card or just the adaptor. Also, do not insert and remove a miniSD card while
keeping the adaptor inserted into the unit. (This can cause damage.)
Battery
● The rechargeable lithium ion battery used with this unit is readily affected by
temperature and humidity. In cold places, the full battery indication may not
appear and a low battery warning may appear approx. 5 minutes after starting
use. In high temperatures, a protective function may be triggered, preventing
use.
● After use, always remove and store the battery.
• If left inside the unit, the battery may over-discharge because of small
amounts of current flow, ultimately damaging the battery.
• Place the battery in a plastic bag so as to prevent metal from contacting
terminals and store in a cool (15 - 25 ˚C) dry (40 - 60 % RH) place subject to
minimal temperature changes.
• Storing the battery in extreme cold or high heat may shorten the battery’s
service-life. Moreover, places that are hot, humid or oily can rust terminals
and cause damage to the battery.
• During long-term storage, charge the battery once a year, then use it until
depleted and store it again.
• Clean battery terminals of adhering dust, etc.
● Bring a spare battery with you when going out.
• Bring 3 - 4x more battery power than you plan to use. In cold places such as
ski resorts, recording time becomes shorter.
• Do not forget the AC adaptor when traveling so that you can recharge
batteries.
● Do not use batteries if damaged or deformed (especially terminals) from
dropping, etc.
• This can cause damage to the unit.
● Do not throw batteries into fire.
• The battery may burst if heated or thrown into fire.
● If the battery does not last long immediately after charging, it has reached the
end of its service-life. Purchase a new battery.
● Notice about the rechargeable battery
• The battery is designated recyclable.
Please follow your local recycling regulations.
90 VQT1R71 91VQT1R71
Page 47
Others
Cautions for use (cont.)
5
AC adaptor
● Use the supplied AC adaptor.
● If the battery itself is too hot or too cold, it may take time to charge or may not
charge at all.
● Keep the AC adaptor at least 1 m away from the radio. (Interference may
affect the radio.)
● During use, the AC adaptor may make noises internally, however, this is
normal.
● After use, unplug the AC adaptor from its AC outlet. (Leaving it connected
consumes 0.3 W [max.] of power.)
● Keep the terminals of the AC adaptor clean.
Keep the AC adaptor near an AC outlet and yourself within arm’s reach of
a breaker (AC plug).
LCD monitor
● If the LCD monitor fogs up or becomes dirty, wipe it clean with a soft dry cloth.
● When the unit is extremely cold in cold places or in other such conditions,
although the LCD monitor may be slightly dark immediately after turning
power on, the normal brightness is restored when internal temperature rises.
The LCD monitor is made with high-precision technology, however black spots
may appear in displays or stuck lighting (red, blue or green) may occur. There
is nothing wrong with the monitor.
The LCD monitor pixels are controlled to a 99.99 % degree of accuracy;
however, dead or stuck pixels may occur in the remaining 0.01 %. These pixel
defects are not recorded in SD card images, therefore do not worry.
Condensation
● If condensation adheres to the unit, the lens may fog and the unit and SD card
may not function properly. Avoid sharp changes in temperature and humidity.
● Condensation may adhere in the following cases:
• After summer rain showers or in humid places where the air is thick with
steam
• When heaters are turned on in cold rooms
• When moving from cold places to warm places
• When the unit is directly exposed to cold drafts (i.e., air-conditioners, etc.)
● In the event of differences in temperature or humidity, place the unit in a
plastic bag, remove as much air as possible, seal and let it sit for about 1 hour
to adjust to the ambient temperature.
● If the lens fogs up, remove the battery and disconnect the AC adaptor, open
the card/battery door and let it sit for about 1 hour to adjust to the ambient
temperature.
Cleaning
● Remove the battery and disconnect the AC adaptor.
● Do not use benzene, thinner, alcohol, etc. (These substances can cause
deformation and peeling.)
● Wipe off fingerprints and dust with a soft dry cloth. For stubborn dirt, soak a
cloth in water, wring it out well, and use it to wipe the dirty surfaces. Then wipe
the surfaces with a dry cloth.
● Use chemically impregnated tissues in accordance with warnings and
indications.
92 VQT1R71 93VQT1R71
Page 48
Others
Specifications
6
SD Video Camera : Information for your safety
Power source: DC 5.0 V (When using AC adaptor), DC 3.6 V (When using
Power consumption: Recording: 2.9 W, Charging: 4.5 W
Signal system EIA Standard: 625 lines, 50 fields PAL colour signal
Image sensor
Lens
Zoom 10x optical zoom, 25/700x digital zoom
Monitor 2.7˝ wide LCD monitor (approx. 123 K pixels)
Microphone Stereo (with a zoom function)
Speaker 1 round speaker
White balance adjustment Auto tracking white balance system
Standard illumination 1,400 lx
Minimum required illumination
Video output level 1.0 Vp-p, 75 Ω
Audio output level 316 mV, 600 Ω
USB
Dimensions
(excluding the projecting parts)
Mass (Weight)
Mass (Weight) in operation
Operating temperature 0 °C to 40 °C
Operating humidity 10 % to 80 %
Battery operation time Refer to page 16.
battery)
1/6˝ CCD image sensor
Total: 800 K
Effective pixels:
Moving picture: 400 K (4:3), 350 K (16:9)
Still picture: 410 K (4:3)
Auto Iris, F1.8 to F2.4
Focal length: 2.3 mm to 23.0 mm
Macro (Full range AF)
Approx. 6 lx (Low light mode, 1/25)
[Approx. 2 lx with the Colour night view function]
Card reader function (EG/E/EP only) Card reader/
writer function (GC only) (No copyright protection
support) Hi-Speed USB (USB 2.0), USB terminal
Type miniAB, PictBridge-compliant
41.0 mm (W) x 59.0 mm (H) x 102.0 mm (D)
Approx. 160 g
without an SD card and supplied battery
Approx. 182 g
with an SD card and supplied battery
Motion pictures
SD Memory Card:
256 MB/512 MB/1 GB/2 GB
Recording media
Picture size 704 x 576
Recordable time Refer to page 27.
Compression MPEG2 (SD-Video standard compliant)
Recording mode and transfer
rate
Audio compression MPEG1-Layer2 compliant (stereo)
Still pictures
Recording media
Number of recordable pictures Refer to page 29.
Compression
Picture size 640 x 480 (4:3)
(FAT12 and FAT16 format corresponding)
SDHC Memory Card:
4 GB/8 GB/16 GB (FAT32 format corresponding)
XP: 10 Mbps (VBR), SP: 5 Mbps (VBR),
LP: 2.5 Mbps (VBR)
SD Memory Card:
8 MB/16 MB/32 MB/64 MB/128 MB/256 MB/
512 MB/1 GB/2 GB
(FAT12 and FAT16 format corresponding)
SDHC Memory Card:
4 GB/8 GB/16 GB (FAT32 format corresponding)
JPEG (Design rule for Camera File system, based
on Exif 2.2 standard), DPOF corresponding
AC adaptor : Information for your safety
Power source: AC 110 V to 240 V, 50/60 Hz
Power consumption: 12 W
DC output: DC 5.0 V, 1.6 A
Dimensions 76 mm (W) x 22 mm (H) x 46 mm (D)
Mass (Weight) Approx. 100 g
Battery pack : Information for your safety
Maximum voltage: DC 4.2 V
Nominal voltage: DC 3.6 V
Rated capacitance: 1000 mAh
Specifications may change without prior notice.
94 VQT1R71 95VQT1R71
 Loading...