

Page 1
MIN
MAX
MIC LEVEL
MIC
Operating Instructions
Advanced
progressive scan
Provides a smoother and sharper image.
page
6
Compatible with a variety of
media formats
DVD-RAM, DVD-Audio, DVD-Video, DivX and more.
page
9
High performance
sound effects
Sound field control (SFC), Dolby Pro Logic II and more.
page
22
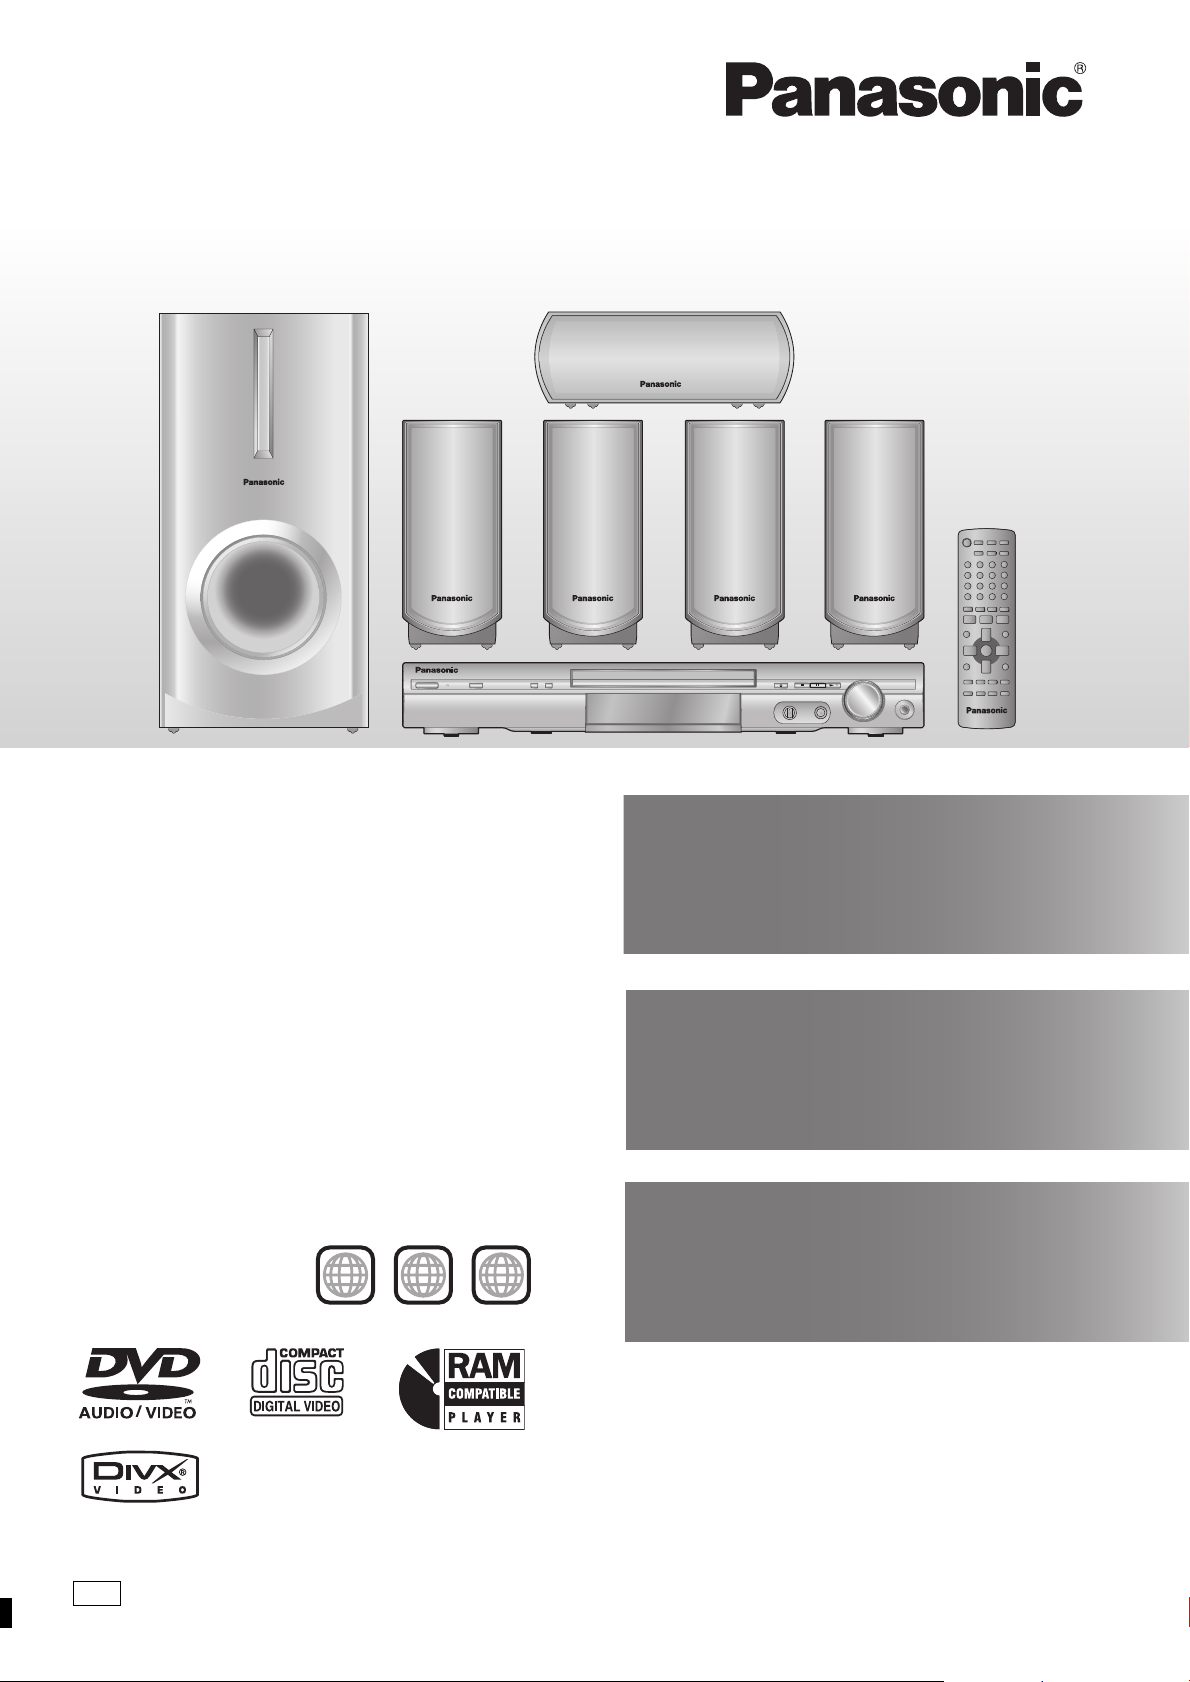
DVD Home Theater Sound System
Model No. SC-HT335
Region number
The player plays DVD-Video marked with labels containing the region
number “2” or “ALL”.
Example:
2 ALL
2
3
5
GC
Before connecting, operating or adjusting this product,
please read the instructions completely.
Please keep this manual for future reference.
RQT8291-B
Page 2
Dear customer
(Side of product)
(Inside of product)
Thank you for purchasing this product. For optimum performance
and safety, please read these instructions carefully.
Operations in these instructions are described mainly with
the remote control, but you can perform the operations on
the main unit if the controls are the same.
System SC-HT335
Main unit SA-HT335
Front speakers SB-FS335
Center speaker SB-PC335
Surround speakers SB-FS335
Subwoofer SB-W335
Safety precautions
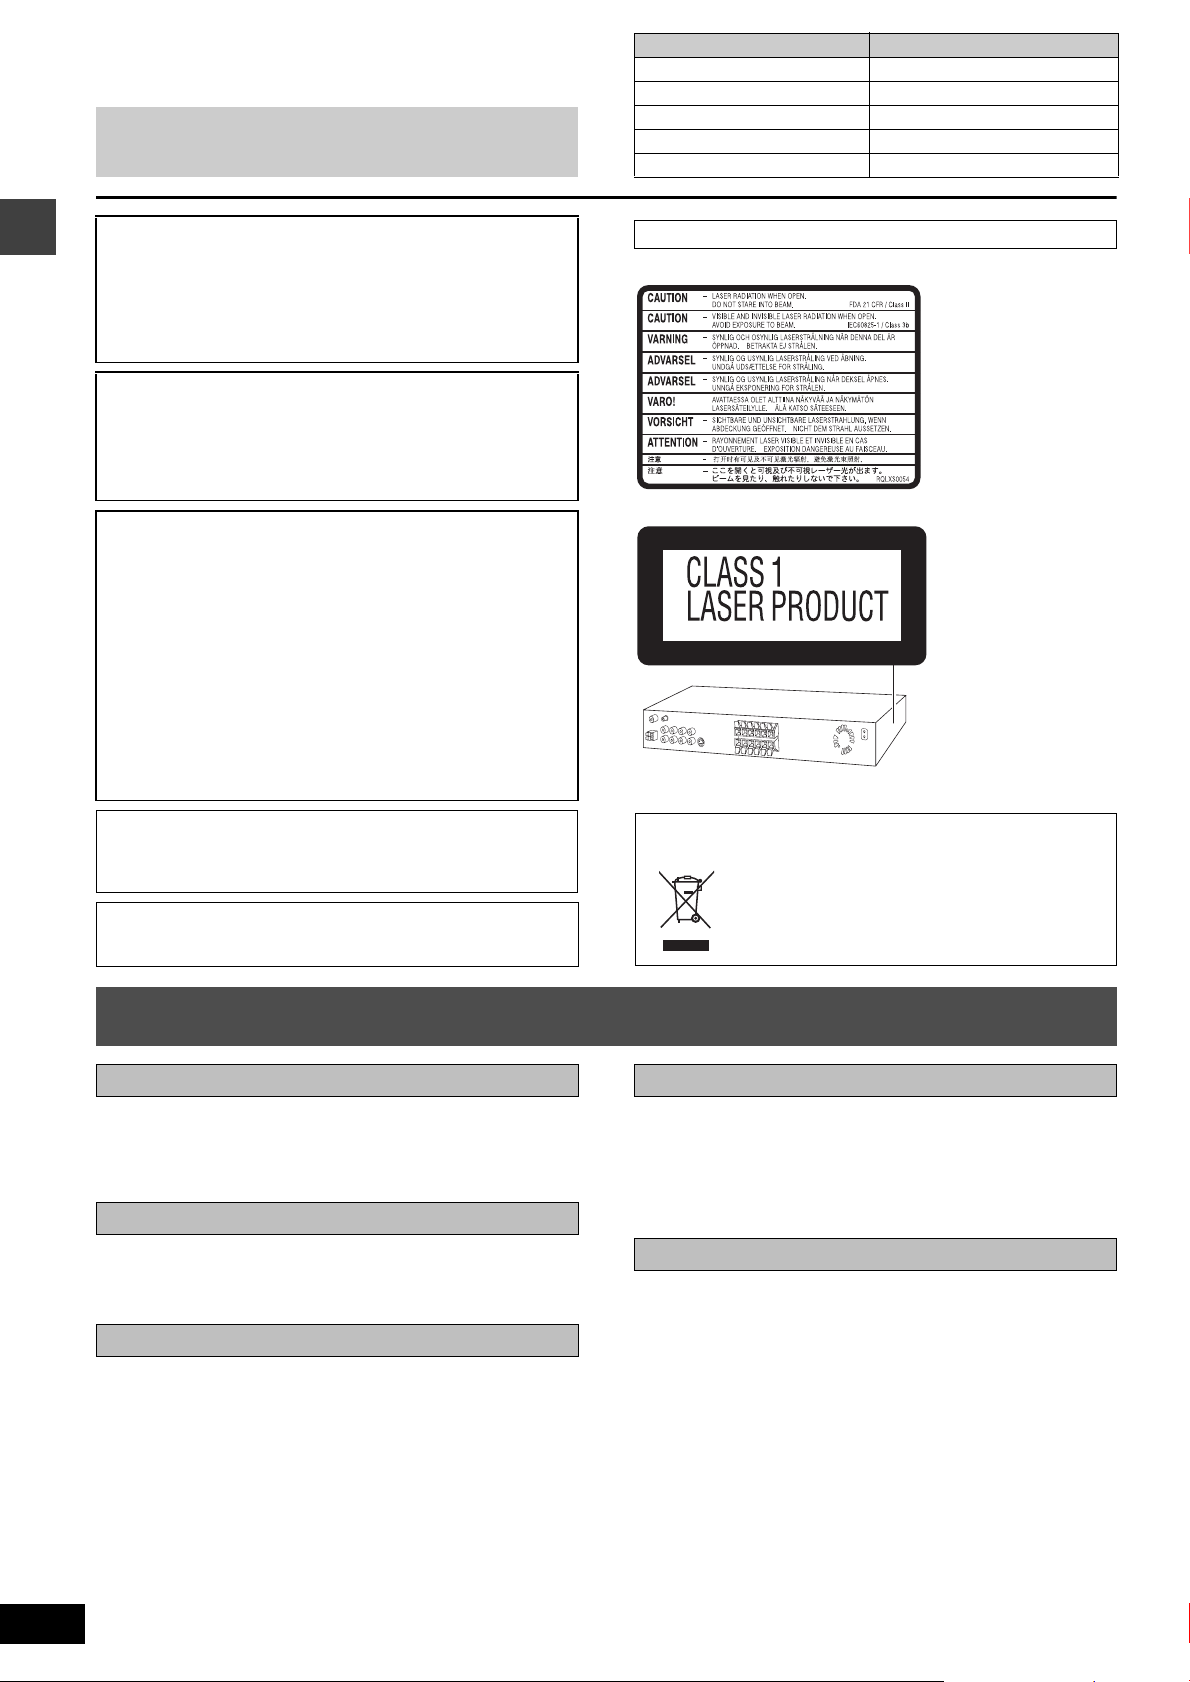
CAUTION!
THIS PRODUCT UTILIZES A LASER.
USE OF CONTROLS OR ADJUSTMENTS OR PERFORMANCE
OF PROCEDURES OTHER THAN THOSE SPECIFIED HEREIN
MAY RESULT IN HAZARDOUS RADIATION EXPOSURE.
DO NOT OPEN COVERS AND DO NOT REPAIR YOURSELF.
REFER SERVICING TO QUALIFIED PERSONNEL.
WARNING:
TO REDUCE THE RISK OF FIRE, ELECTRIC SHOCK OR
PRODUCT DAMAGE, DO NOT EXPOSE THIS APPARATUS
TO RAIN, MOISTURE, DRIPPING OR SPLASHING AND THAT
NO OBJECTS FILLED WITH LIQUIDS, SUCH AS VASES,
SHALL BE PLACED ON THE APPARATUS.
CAUTION!
≥DO NOT INSTALL OR PLACE THIS UNIT IN A BOOKCASE,
BUILT-IN CABINET OR IN ANOTHER CONFINED SPACE.
ENSURE THE UNIT IS WELL VENTILATED. TO PREVENT
RISK OF ELECTRIC SHOCK OR FIRE HAZARD DUE TO
OVERHEATING, ENSURE THAT CURTAINS AND ANY
OTHER MATERIALS DO NOT OBSTRUCT THE
VENTILATION VENTS.
≥DO NOT OBSTRUCT THE UNIT’S VENTILATION OPENINGS
WITH NEWSPAPERS, TABLECLOTHS, CURTAINS, AND
SIMILAR ITEMS.
≥DO NOT PLACE SOURCES OF NAKED FLAMES, SUCH AS
LIGHTED CANDLES, ON THE UNIT.
≥DISPOSE OF BATTERIES IN AN ENVIRONMENTALLY
FRIENDLY MANNER.
This product may receive radio interference caused by mobile
telephones during use. If such interference is apparent, please
increase separation between the product and the mobile
telephone.
The socket outlet shall be installed near the equipment and
easily accessible or the mains plug or an appliance coupler shall
remain readily operable.
THIS UNIT IS INTENDED FOR USE IN TROPICAL CLIMATES.
-If you see this symbol-
Information on Disposal in other Countries outside the
European Union
This symbol is only valid in the European Union.
If you wish to discard this product, please contact
your local authorities or dealer and ask for the
correct method of disposal.
RQT8291
2
Safety precautions
Placement
Set the unit up on an even surface away from direct sunlight, high
temperatures, high humidity, and excessive vibration. These
conditions can damage the cabinet and other components, thereby
shortening the unit’s service life.
Do not place heavy items on the unit.
Volt ag e
Do not use high voltage power sources. This can overload the unit
and cause a fire.
Do not use a DC power source. Check the source carefully when
setting the unit up on a ship or other places where DC is used.
AC mains lead protection
Ensure the AC mains lead is connected correctly and not
damaged. Poor connection and lead damage can cause fire or
electric shock. Do not pull, bend, or place heavy items on the lead.
Grasp the plug firmly when unplugging the lead. Pulling the AC
mains lead can cause electric shock.
Do not handle the plug with wet hands. This can cause electric
shock.
Foreign matter
Do not let metal objects fall inside the unit. This can cause electric
shock or malfunction.
Do not let liquids get into the unit. This can cause electric shock or
malfunction. If this occurs, immediately disconnect the unit from the
power supply and contact your dealer.
Do not spray insecticides onto or into the unit. They contain
flammable gases which can ignite if sprayed into the unit.
Service
Do not attempt to repair this unit by yourself. If sound is
interrupted, indicators fail to light, smoke appears, or any other
problem that is not covered in these instructions occurs, disconnect
the AC mains lead and contact your dealer or an authorized service
center. Electric shock or damage to the unit can occur if the unit is
repaired, disassembled or reconstructed by unqualified persons.
Extend operating life by disconnecting the unit from the power
source if it is not to be used for a long time.
Page 3

Table of contents
Getting started
Safety precautions . . . . . . . . . . . . . . . . . . . . . . . . . . . . . . .2
Glossary . . . . . . . . . . . . . . . . . . . . . . . . . . . . . . . . . . . . . . .3
Simple setup
STEP 1 Positioning . . . . . . . . . . . . . . . . . . . . . . . . . . . 4
STEP 2 Speaker connections . . . . . . . . . . . . . . . . . . 5
STEP 3 Video connections. . . . . . . . . . . . . . . . . . . . . 6
STEP 4 Antennas and AC mains lead. . . . . . . . . . . 7
STEP 5 The remote control . . . . . . . . . . . . . . . . . . . . 7
STEP 6 QUICK SETUP . . . . . . . . . . . . . . . . . . . . . . . . 8
Control reference guide . . . . . . . . . . . . . . . . . . . . . . . . . . .8
Discs that can be played . . . . . . . . . . . . . . . . . . . . . . . . . .9
Disc operations
Basic play . . . . . . . . . . . . . . . . . . . . . . . . . . . . . . . . . 10
Using the main unit/Using the remote control
Convenient functions. . . . . . . . . . . . . . . . . . . . . . . . . . . .12
Displaying current playback condition (QUICK OSD)/
Reviewing titles to play (ADVANCED DISC REVIEW)/
Quick replay/Skipping 30 seconds forward/
Changing the zoom ratio/Changing soundtracks/
Changing subtitles/Angle selection and Still picture rotation/
advance/Changing play speed/Repeat play/
All group, Program and Random play
Using navigation menus . . . . . . . . . . . . . . . . . . . . . . . . .14
Playing data discs/Playing from the selected track in the CD/
Playing HighMAT
discs
TM
discs/Playing RAM/DVD-RW (DVD-VR)
Using on-screen menus . . . . . . . . . . . . . . . . . . . . . . . . . 16
Main menu/Other Settings
Changing the player settings. . . . . . . . . . . . . . . . . . . . . 18
Changing the delay time (Speaker Settings)
Other operations
The radio . . . . . . . . . . . . . . . . . . . . . . . . . . . . . . . . . . . . . 20
Automatic presetting/Selecting the preset channels/
Manual tuning/Optional antenna connections
Sound field and sound quality. . . . . . . . . . . . . . . . . . . . 22
Sound Field Control/Center Focus/
Dolby Pro Logic II/Down-mixing/
Subwoofer level/Speaker level adjustments
Connecting other equipment. . . . . . . . . . . . . . . . . . . . . 24
Operating the television
Other useful functions . . . . . . . . . . . . . . . . . . . . . . . . . . 25
Sleep timer/Muting/Using headphones/Enjoying Karaoke
Reference
Other speaker setup options . . . . . . . . . . . . . . . . . . . . . 26
About DivX VOD content . . . . . . . . . . . . . . . . . . . . . . . . 27
Maintenance . . . . . . . . . . . . . . . . . . . . . . . . . . . . . . . . . . 27
Disc handling . . . . . . . . . . . . . . . . . . . . . . . . . . . . . . . . . 27
Language code list . . . . . . . . . . . . . . . . . . . . . . . . . . . . . 28
Specifications . . . . . . . . . . . . . . . . . . . . . . . . . . . . . . . . . 29
Troubleshooting guide. . . . . . . . . . . . . . . . . . . . . . . . . . 30
Accessories. . . . . . . . . . . . . . . . . . . . . . . . . . . . Back cover
Table of contents/Glossary
Glossary
Decoder
A decoder restores the coded audio signals on DVD’s to normal.
This is called decoding.
DivX
A video compression format developed by DivXNetworks, Inc. that
compresses video files without any considerable loss of video
quality.
Dolby Digital
This is a method of coding digital signals developed by Dolby
Laboratories. Apart from stereo (2-channel) audio, these signals can
also be multi-channel audio. A large amount of audio information can
be recorded on one disc using this method.
DTS (Digital Theater Systems)
This surround system is used in many movie theaters around the
world. There is good separation between the channels, so realistic
sound effects are possible.
Dynamic range
Dynamic range is the difference between the lowest level of sound
that can be heard above the noise of the equipment and the highest
level of sound before distortion occurs.
Frame still and field still
Frames are the still pictures that go together to make a moving
picture. There are about 30 frames shown each second.
One frame is made up of two fields. A regular television shows these
fields one after the other to create frames.
A still is shown when you pause a moving picture. A frame still is
made up of two alternating fields, so the picture may appear blurred,
but overall quality is high.
A field still is not blurred, but it has only half the information of a
frame still so picture quality is lower.
I/P/B
MPEG 2, the video compression standard adopted for use with
DVD-Video, codes frames using these 3 picture types.
I: Intra coded picture
This picture has the best quality and is the best to use when
adjusting the picture.
P: Predictive coded picture
This picture is calculated based on past I or P-pictures.
B: Bidirectionally-predictive coded picture
This picture is calculated by comparing past and future I and
P-pictures so it has the lowest volume of information.
Linear PCM (pulse code modulation)
These are uncompressed digital signals, similar to those found on
CDs.
MPEG4
A compression system for use on mobile devices or a network, that
allows highly efficient recording at a low bit rate.
Playback control (PBC)
If a Video CD has playback control, you can select scenes and
information with menus.
Sampling frequency
Sampling is the process of converting the heights of sound wave
(analog signal) samples taken at set periods into digits (digital
encoding). Sampling frequency is the number of samples taken per
second, so larger numbers mean more faithful reproduction of the
original sound.
RQT8291
3
Page 4
3
Setup example
Main unit
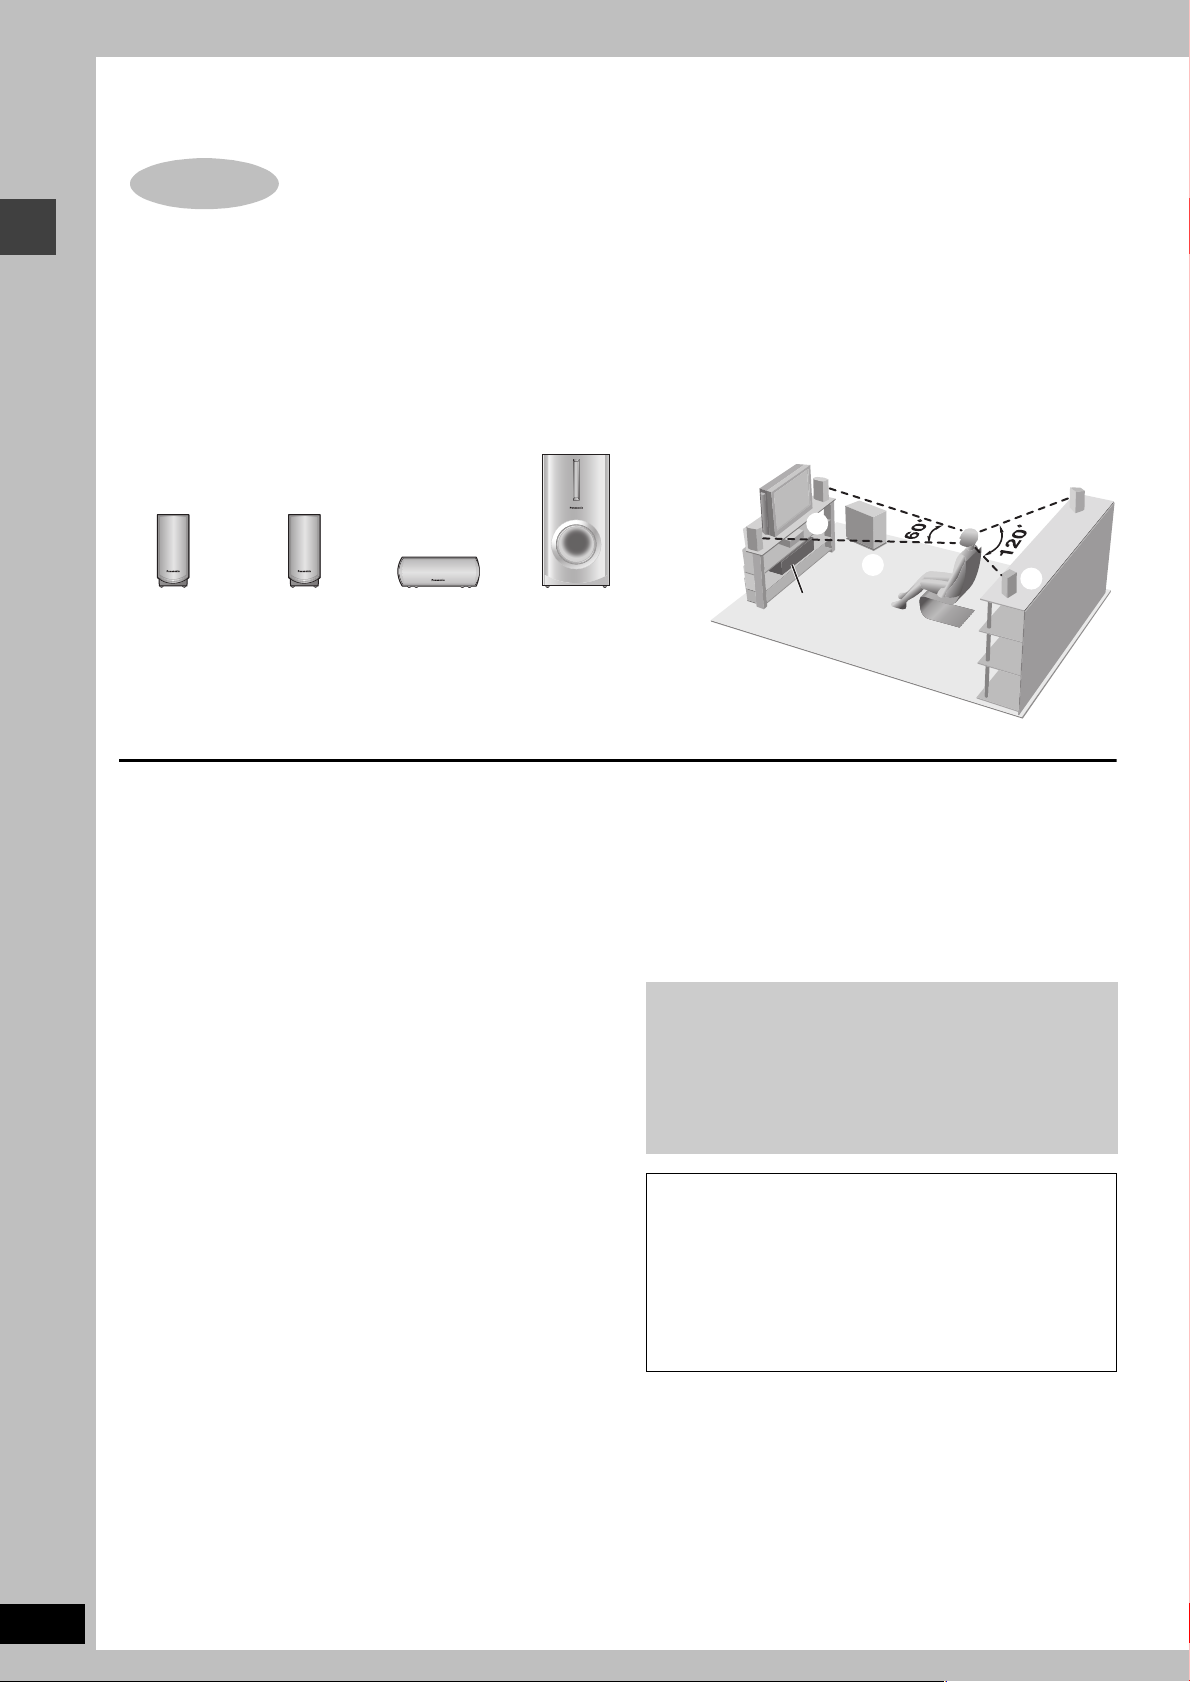
How you set up your speakers can affect the bass and the sound field. Note the following points:
≥Place speakers on flat secure bases.
≥Placing speakers too close to floors, walls, and corners can result in excessive bass. Cover walls and windows with thick curtains.
≥Place the front, center, and surround speakers at approximately the same distance from the seating position.
The angles in the diagram are approximate.
Other speaker setup options (➜ page 26)
STEP
1
Positioning
FRONT
(L, R)
SURROUND
(L, R)
CENTER
SUBWOOFER
≥The four front and surround speakers are the same.
Simple setup
Positioning
1
1
3
4
1
≥Use only supplied speakers
Using other speakers can damage the unit, and sound quality will
be negatively affected.
≥Set the speakers up on an even surface to prevent them from
falling. Take proper precautions to prevent the speakers from
falling if you cannot set them up on an even surface.
Main unit
[Note]
Keep your speakers at least 10 mm away from the system for
proper ventilation.
Center speaker
≥Vibration caused by the center speaker can disrupt the picture if it
is placed directly on the television. Put the center speaker on a
rack or shelf.
≥To prevent the speakers from falling, do not place directly on top
of the television.
Subwoofer
Place to the right or left of the television, on the floor or a sturdy
shelf so that it won’t cause vibration. Leave 10 cm at the rear for
ventilation.
2
4
Notes on speaker use
≥You can damage your speakers and shorten their useful life if you
play sound at high levels over extended periods.
≥Reduce the volume in the following cases to avoid damage:
– When playing distorted sound.
– When the speakers are reverberating due to a record player, a
microphone, noise from FM broadcasts, continuous signals
from an oscillator, test disc, or electronic instrument.
– When adjusting the sound quality.
– When turning the unit on or off.
If irregular coloring occurs on your television
The supplied speakers are designed to be used close to a
television, but the picture may be affected with some televisions
and setup combinations.
If this occurs, turn the television off for about 30 minutes.
The television’s demagnetizing function should correct the
problem. If it persists, move the speakers farther away from the
television.
Caution
≥The main unit and supplied speakers are to be used only
as indicated in this setup. Failure to do so may lead to
damage to the amplifier and/or the speakers, and may
result in the risk of fire. Consult a qualified service
person if damage has occurred or if you experience a
sudden change in performance.
≥Do not attempt to attach these speakers to walls using
methods other than those described in this manual.
2
2
RQT8291
4
Page 5
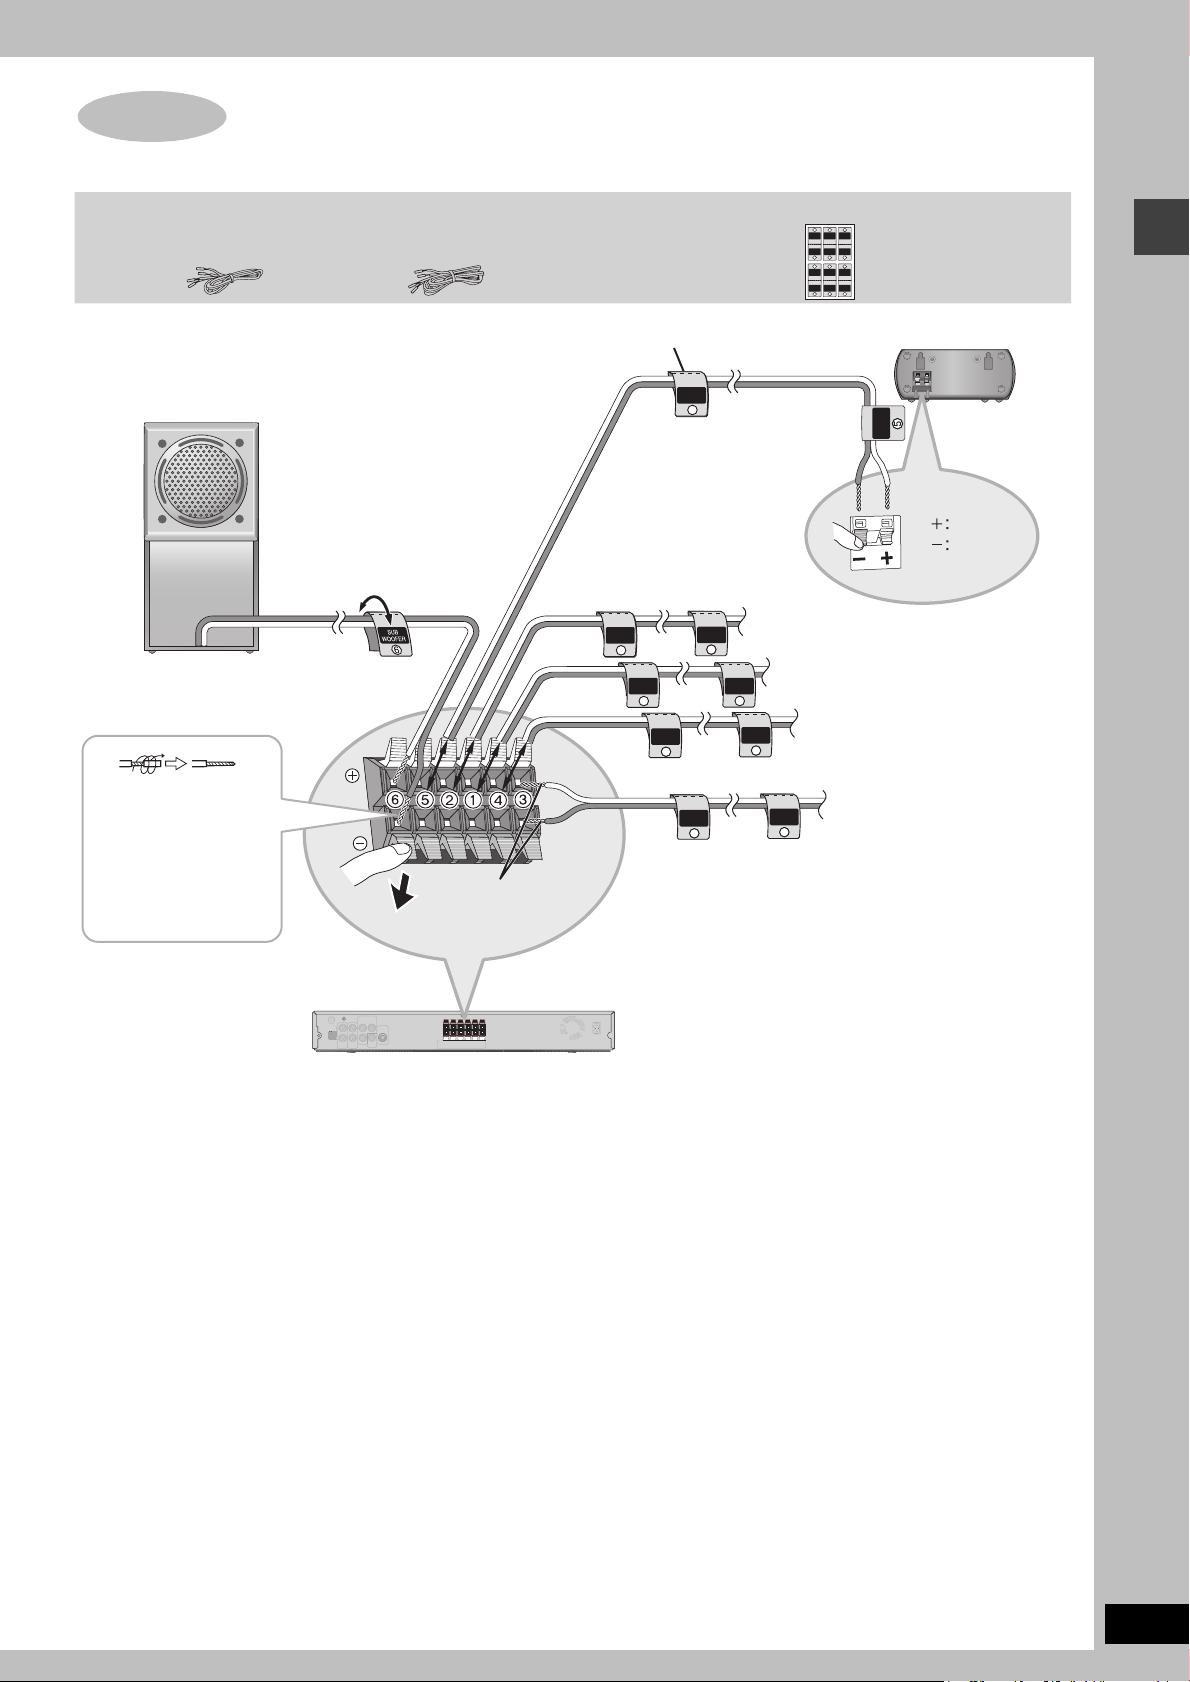
Attach the speaker-cable stickers to make connection easier.
STEP
2
Speaker connections
Click!
TV
AUDIO
IN
TVTV
AUDIUDIO
IN
IN
TV
AUDIO
IN
442
2
6
6
5
3
5
3
1
1
SURROUND
Rch
Rch
SURROUND
Rch
Rch
FRONT
WOOFER
SUB
Lch
Lch Lch
CENTER
Lch
SURROUND
SURROUND
FRONT
SUB
WOOFER
FRONT
FRONT
CENTER
FRONT
Lch
Rch
SURROUND
Rch
FRONT
2
Rch
FRONT
FRONT
Lch
Rch
SURROUND
CENTER
5
CENTER
Lch
SURROUND
Lch
SURROUND
2
1
1
4
4
3
3
2 Sheets of speaker-cable stickers
Speaker-cable sticker
2 FRONT (R)
5 CENTER
4 SURROUND (R)
3 SURROUND (L)
Main unit
White
Blue
Insert the wire fully.
[Note]
≥Never short-circuit positive (i) and negative (j) speaker wires.
≥Be sure to connect only positive (white) wires to positive (i) terminals and negative (blue) wires to negative (j) terminals. Incorrect
connection can damage the speakers.
Speaker cables
≥3kshort cables: For front and center speakers
≥2klong cables: For surround speakers
1 FRONT (L)
6 SUBWOOFER
Push!
Push!
Twist off the vinyl tips of
the speaker cables.
≥If the speaker cables
do not have vinyl tips,
directly connect them
to the terminals.
Speaker connections
RQT8291
5
Page 6
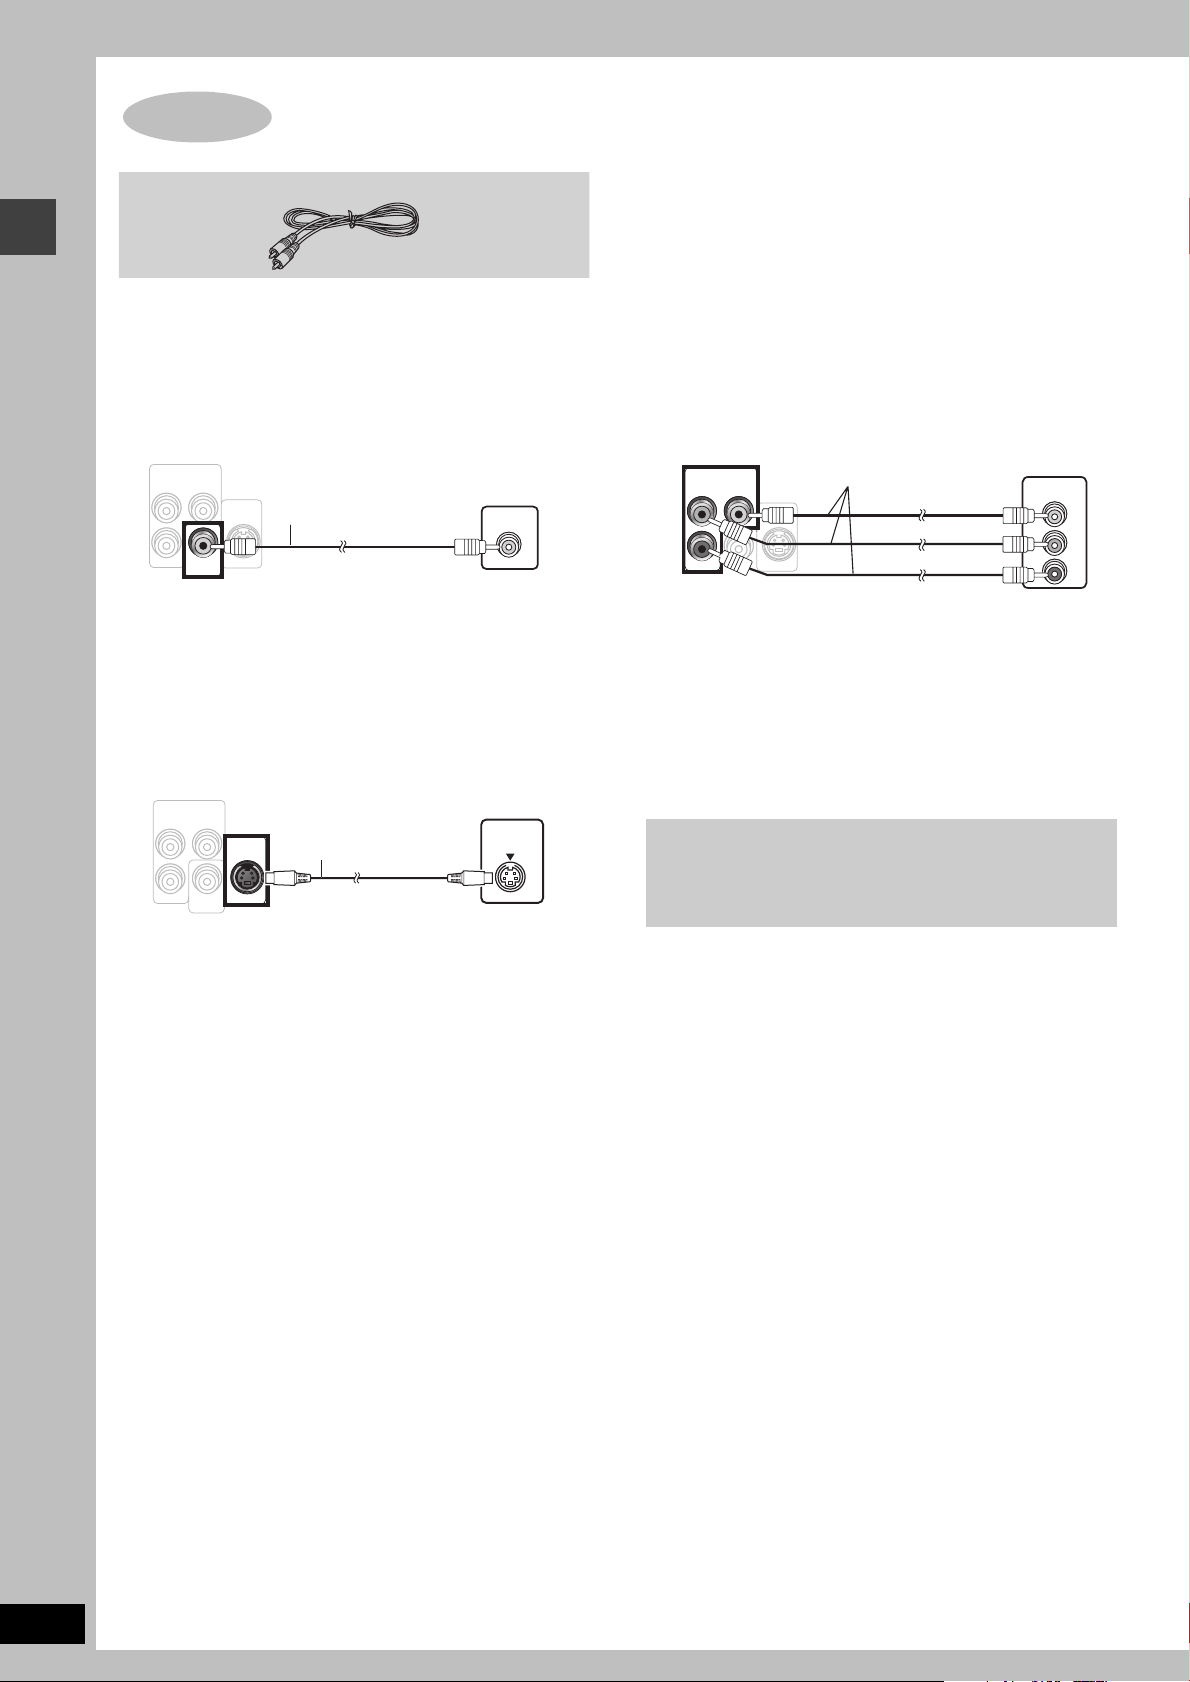
≥Do not connect through the video cassette recorder.
STEP
3
Video connections
Video cable
COMPONENT VIDEO OUT
S-V IDEO
OUT
VID EO
OUT
(NTSC: 4 80p/480i, P AL: 576p/57 6i)
Back of the
main unit
Video cable
(included)
Television
(not included)
P
B
P
R
Y
S-VIDEOS-V IDEO
OUTOUT
VIDEO
OUT
S-VIDEO
IN
COMPONENT VIDEO OUTCOMPONENT VIDEO OUT
(NTSC: 480p/480i, PAL: 576p/576i)(NTSC: 4 80p/480i, P AL: 576p/57 6i)
Television
(not included)
S-video cable
(not included)
Back of the
main unit
(NTSC: 4 80p/480i, P AL: 576p/57 6i)
Television
(not included)
Video cables
(not included)
Back of the
main unit
Due to copy guard protection, the picture may not be displayed properly.
≥Turn the television off before connecting, and refer to the television’s operating instructions.
Video connections
∫ Television with a VIDEO IN terminal
COMPONENT VIDEO OUT
(NTSC: 480p/480i, PAL: 576p/576i)
P
B
Y
S-VIDEO
OUT
P
R
VIDEO
OUT
VIDEO IN
∫ Television with an S-VIDEO IN terminal
S-VIDEO OUT terminal
The S-VIDEO OUT terminal achieves a more vivid picture than the
VIDEO OUT terminal by separating the chrominance (C) and
luminance (Y) signals. (Actual results depend on the television.)
∫
Television with COMPONENT VIDEO IN terminals
COMPONENT VIDEO OUT
(NTSC: 480p/480i, PAL: 576p/576i)
P
B
Y
S-VIDEO
OUT
P
R
VIDEO
OUT
COMPONENT
VIDEO IN
PB
PR
Y
COMPONENT VIDEO OUT terminals
These terminals can be used for either interlace or progressive
output and provide a purer picture than the S-VIDEO OUT
terminal. Connection using these terminals outputs the color
difference signals (P
B/PR) and luminance signal (Y) separately in
order to achieve high fidelity in reproducing colors.
≥The description of the component video input terminals depends
on the television or monitor (e.g. Y/P
B/PR, Y/B-Y/R-Y, Y/CB/CR).
Connect to terminals of the same color.
To enjoy progressive video
Connect to the component video input terminals on a 625p (or
576p) or 525p (or 480p) compatible television. (Video will not be
displayed correctly if connected to an incompatible television.)
RQT8291
6
Page 7
STEP
4
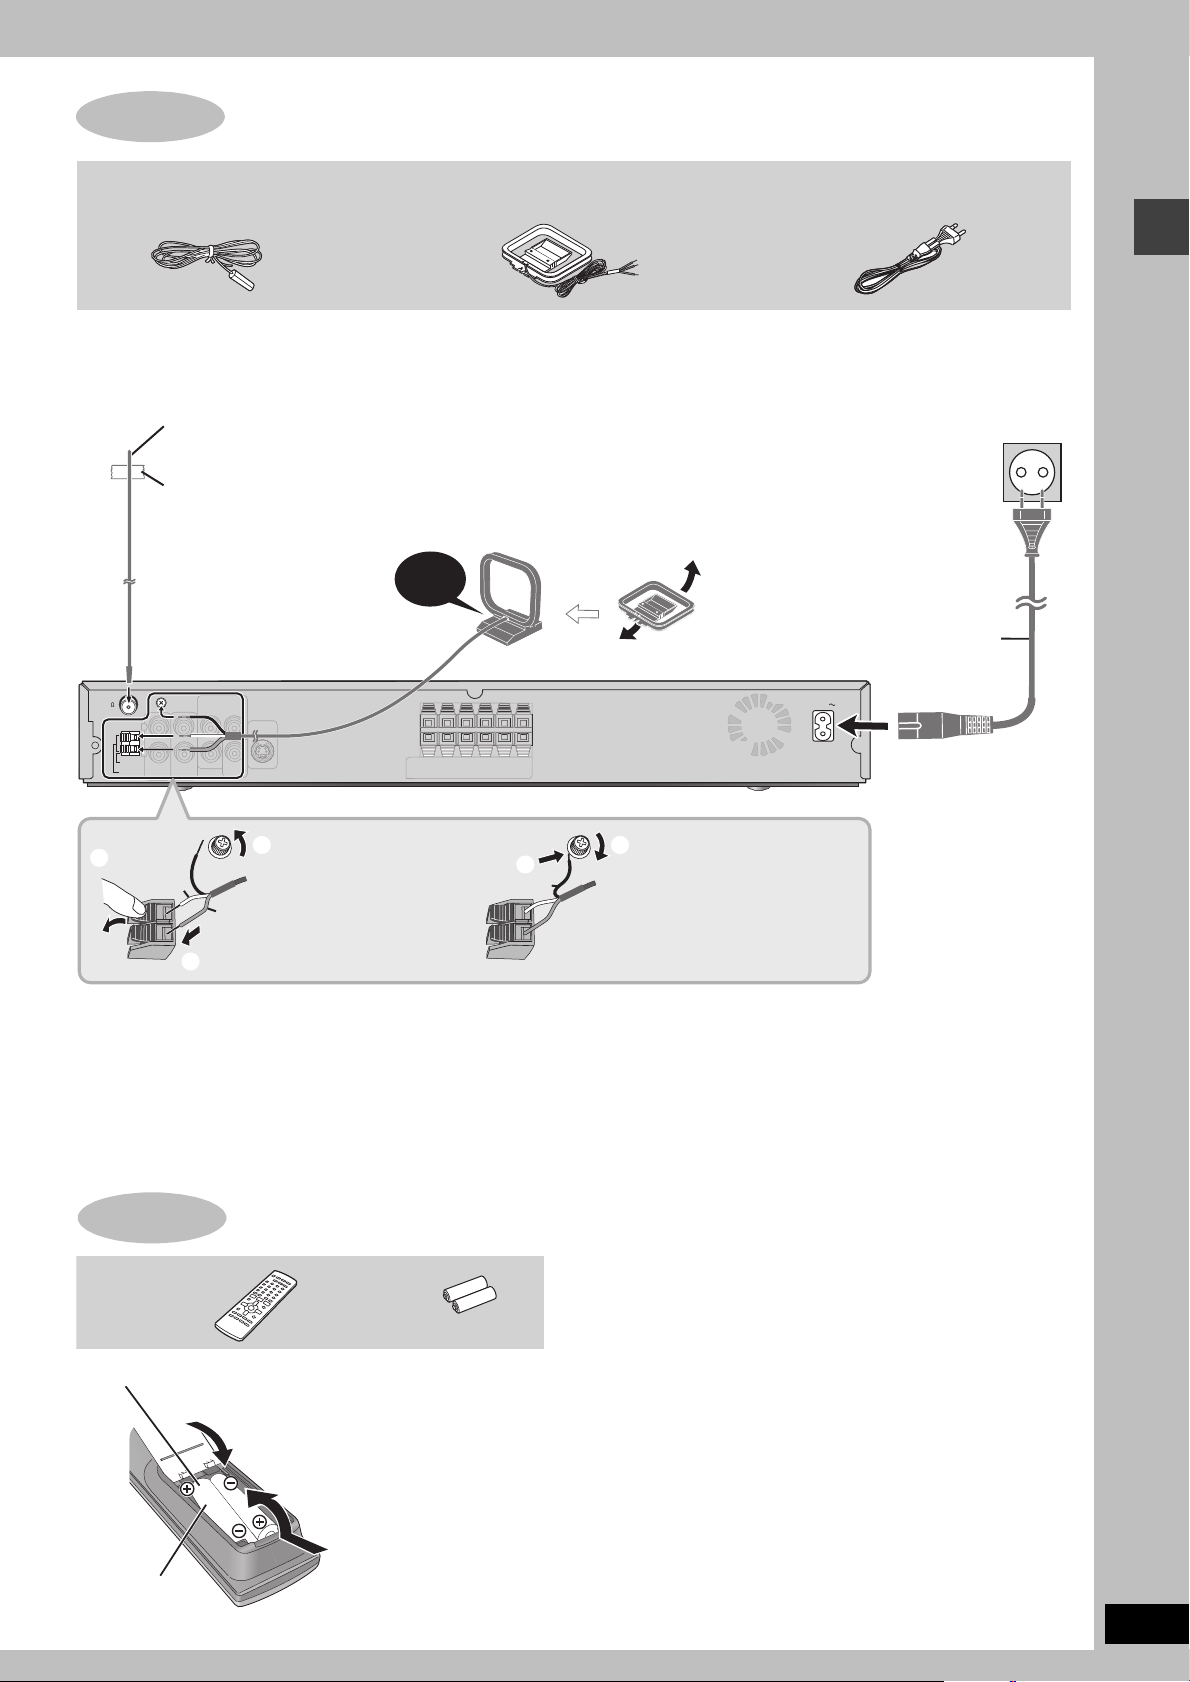
Antennas and AC mains lead
TV
AUDIO
IN
TVTV
AUDIUDIO
IN
IN
TV
AUDIO
IN
AM
ANT
LOOP
EXT
FM ANT
(75-
)
AC IN
1
2
3
4
5
Adhesive tape
AC mains lead
Main unit
≥Connect the AC mains lead after all other connections are complete.
≥Optional antenna connections (➜ page 21).
AM loop antenna
Stand the antenna up on its base.
Place the antenna where reception
is best.
Keep loose antenna cable away
from other wires and cables.
Click!
AM loop antenna
FM indoor antenna
AC mains lead
FM indoor antenna
Affix this end of the antenna where
reception is best.
Conserving power
The main unit consumes a small amount of power, even when it is turned off (approx. 0.5 W). To save power when the unit is not to be used
for a long time, unplug it from the household mains socket.
You will need to reset some memory items after plugging in the unit.
[Note]
The included AC mains lead is for use with this unit only. Do not use it with other equipment.
To household mains socket
Push.
Re-tighten the terminal screw.
Insert the wire fully.
Loosen the terminal screw
with a Phillips-head
screwdriver.
White
Red
Black
STEP
5
The remote control
R6/LR6, AA, UM-3
1
3
2
≥Do not use
rechargeable type
batteries.
Remote control Batteries
Insert so the poles (i and j) match those in the
remote control.
Antennas and AC mains lead/The remote control
Do not:
≥mix old and new batteries.
≥use different types at the same time.
≥heat or expose to flame.
≥take apart or short circuit.
≥attempt to recharge alkaline or manganese batteries.
≥use batteries if the covering has been peeled off.
Mishandling of batteries can cause electrolyte leakage which can
damage items the fluid contacts and may cause a fire.
Remove if the remote control is not going to be used for a long
period of time. Store in a cool, dark place.
∫ Use
Aim at the display (➜ page 8), avoiding obstacles, at a maximum
range of 7 m directly in front of the unit.
RQT8291
7
Page 8
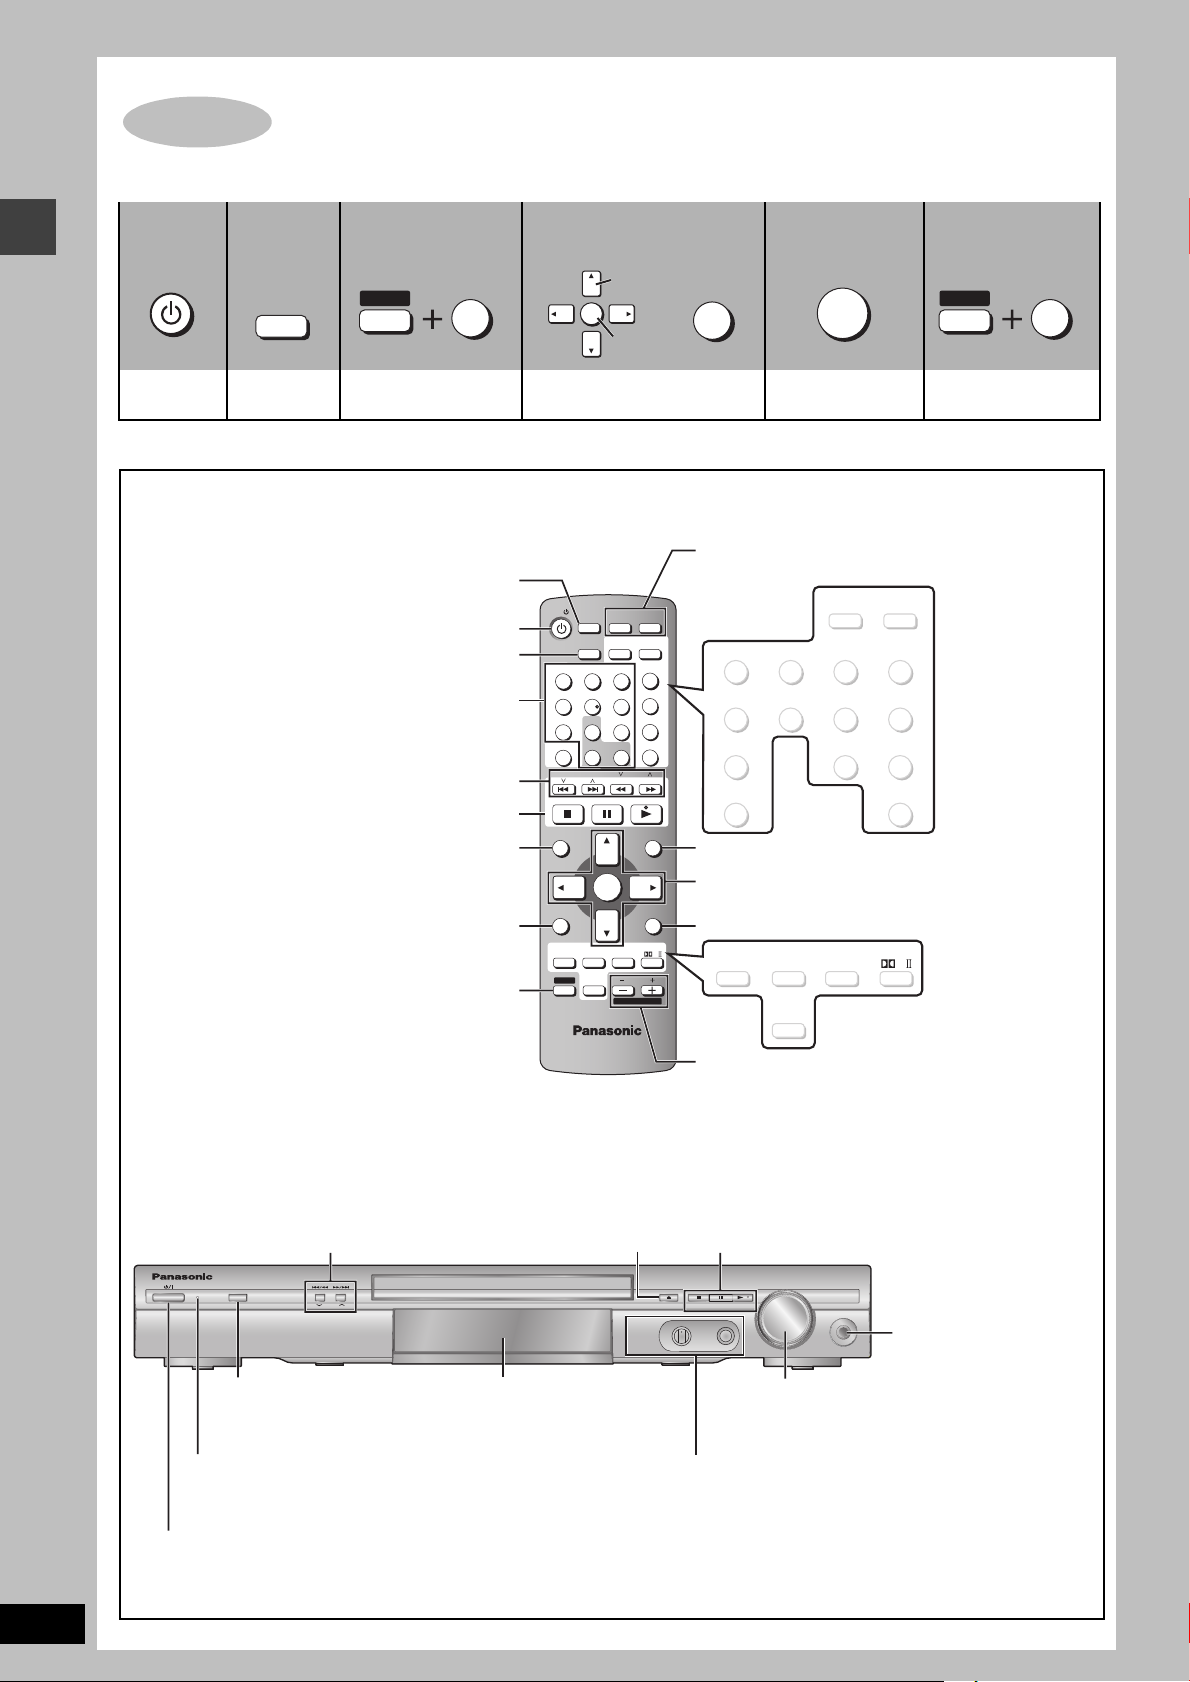
The QUICK SETUP screen assists you to make necessary settings.
STEP
6
QUICK SETUP
Register
Select
MEMORY
FM MODE
TUNE MODE
OPEN/CLOSE
DOWN
VOLUME
UP
PHONES
TUNING
INPUT SELECTOR
AC IN
MIN
MAX
MIC LEVEL
MIC
MENU
DIRECT
NAVIGATOR
TOP MENU
RETURN
SETUP
FUNCTIONS
TV/VCR
MIX 2CH
PL
SHIFT
PLAYLIST
ENTER
12
6
9
45
7
8
0
S10
3
TV
TUNER/
BAND
DVD/CD
ADVANCED
DISC REVIEW
SLEEP
TV/AV
PLAY SPEED
QUICK REPLAY
AUDIO CH SELECT TEST
FL DISPLAY
GROUP
SUBTITLE ZOOM
MANUAL SKIP
QUICK OSD
REPEAT
ANGLE/PAGE
PLAY MODE
PROGRESSIVE
CANCEL
SLOW / SEARCH
VOLUME
MUTING TV VOL
C.FOCUS
SFC
SUBWOOFER
LEVEL
CH
TV CH
(22)
MIX 2CH
PL
(22)
SFC
(22)
C.FOCUS
(23)
SUBWOOFER
LEVEL
(25)
MUTING
(12, 13)
(12)
ADVANCED
DISC REVIEW
(11)
FL DISPLAY
(23)
TEST
(23)
CH SELECT
(12)
AUDI O
(12)
MANUAL SKIP
(12)
ZOOM
(13)
SUBTITLE
(11)
GROUP
(13)
REPEAT
(13)
ANGLE/PAGE
(11)
PROGRESSIVE
(13)
PLAY MODE
(12)
QUICK OSD
PLAY SPEED
QUICK REPLAY
AC supply indicator [AC IN]
This indicator lights when the unit is connected to the
AC mains supply.
INPUT SELECTOR (20)
DVD/CD#FM#AM#TV#VCR#
Return to DVD/CD
Display
<OPEN/CLOSE
Open/Close the disc tray (10)
PHONES
Connect headphones (25)
4, 5/X TUNING W
Skipping or slow-search play (10)/
Select the radio stations (20)
Standby/on switch [Í/I]
Press to switch the unit from on to standby mode or vice versa.
In standby mode, the unit is still consuming a small amount of power. (10)
Select disc’s title numbers/Enter numbers (11)
To use functions labeled in orange:
While pressing [SHIFT],
press the corresponding button.
Select or register menu items on the television
screen, Frame-by-frame (11)
Basic operations for play (10, 11)
Show on-screen menu (16),
Adjust the AM reception condition (20) or
Show the Setup menu (18)
Channel select (20, 24)
Show a disc menu (14) or play list (15)
Return to previous screen (11)
Select the source
TUNER/BAND (20), DVD/CD (8)
Turn the unit on/off (8)
Set the sleep timer (25) or
Switch the television’s video input mode (24)
Television and Video cassette recorder
operations (24)
Control reference guide
See reference pages in brackets.
Adjust the volume of the unit (11) or the TV (24)
Show a disc top menu (14) or program list (15)
VOLUME
Turn up/down the volume (10)
∫/TUNE MODE
Stop playing (10)/Select the tuning mode (20)
;/FM MODE
Pause (10)/Adjust the FM reception condition (20)
1/MEMORY
Play discs (10)/Memorize the receiving radio stations (20)
MIC jack
Connect a microphone (25)
MIC LEVEL
Adjust microphone volume (25)
Turn on the television and select the appropriate video input on the television.
1 2 3 4 5 6
DVD/CD
Turn on
the unit.
To change these settings later
Select “QUICK SETUP” in the “Others” tab (➜ page 19).
Select
“DVD/CD”.
QUICK SETUP/Control reference guide
SETUP
SHIFT
FUNCTIONS
Show the QUICK
SETUP screen.
ENTER
Follow the messages and
make the settings.
Press to finish
QUICK SETUP.
RETURN
ENTER
SHIFT
FUNCTIONS
Press to exit.
SETUP
RQT8291
8
Page 9
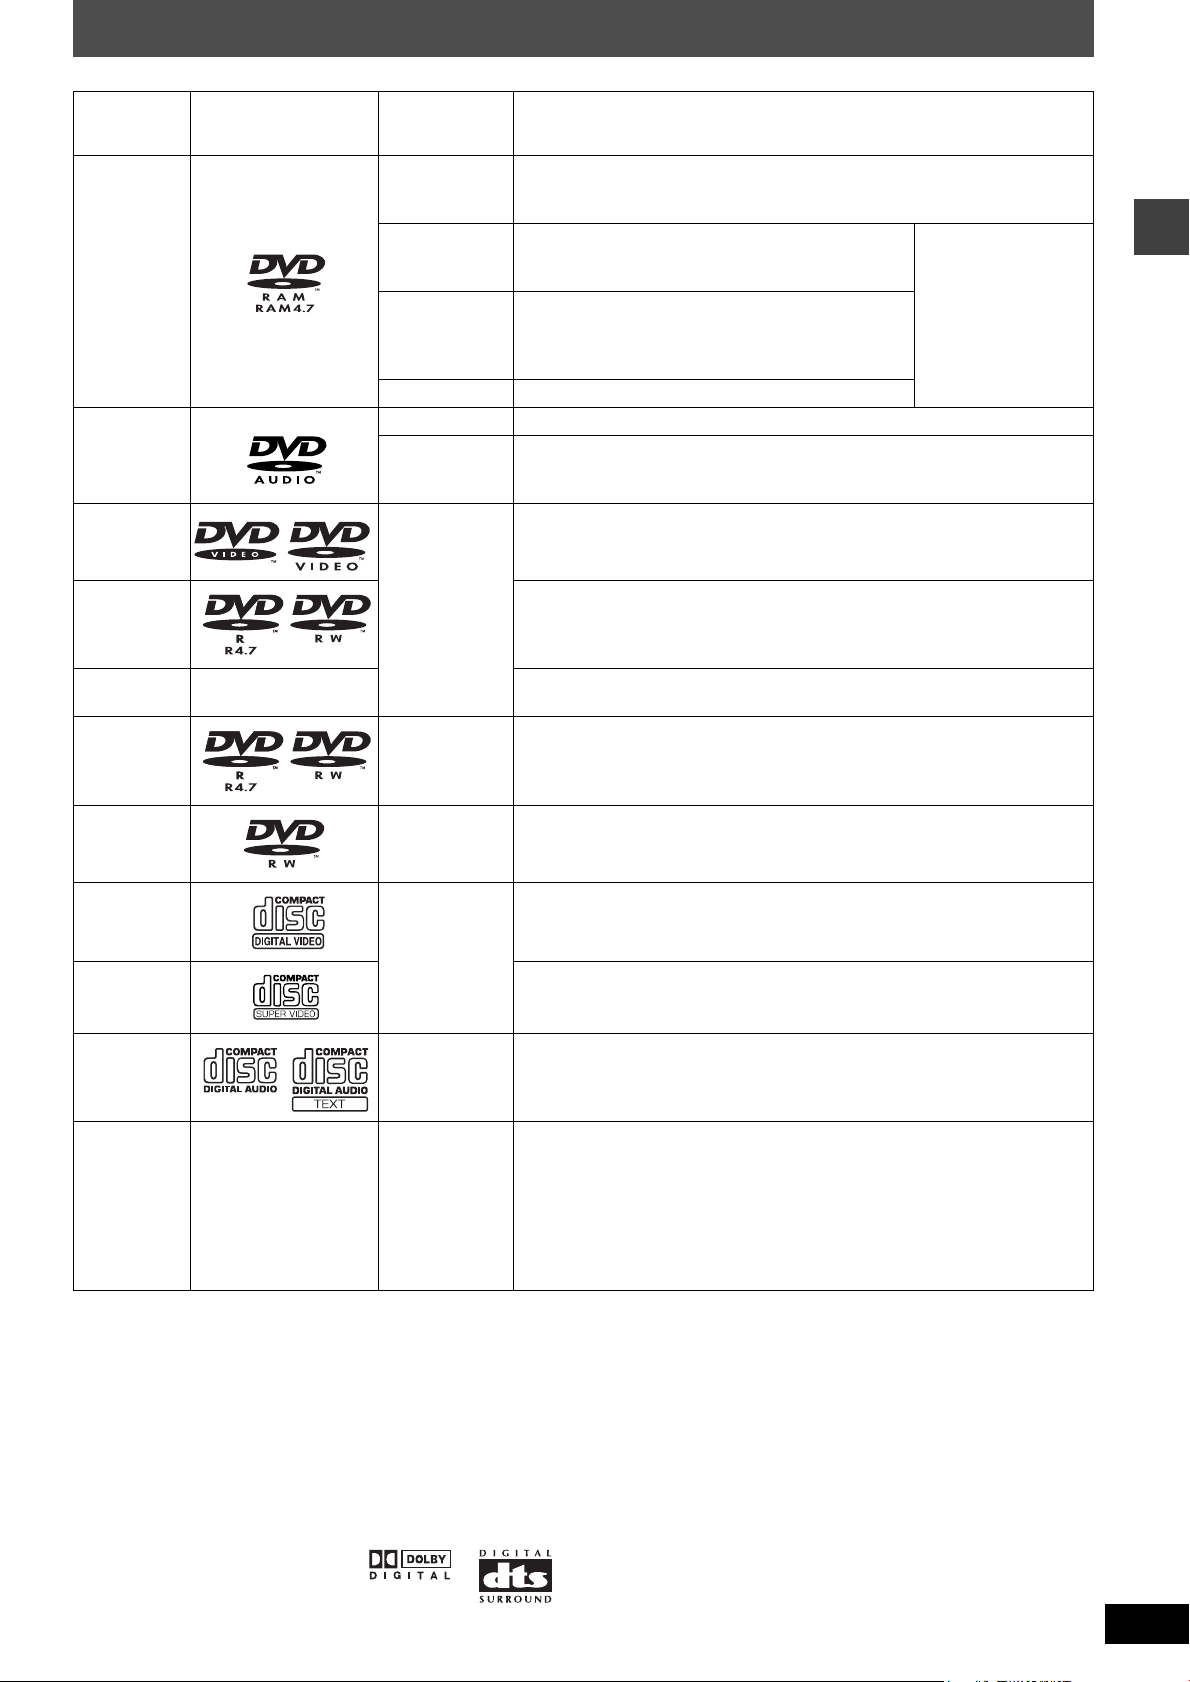
Discs that can be played
Indication in
Disc Logo
DVD-RAM
DVD-Audio
DVD-Video
these operating
instructions
[RAM]
[JPEG]
[MPEG4]
§1
[DivX]
[DVD-A] —
[DVD-V]
Remarks
Recorded with devices using Version 1.1 of the Video Recording Format (a
unified video recording standard), such as DVD video recorders, DVD video
cameras, personal computers, etc.
Recorded
video recorders
File system) Standard Version 1.0.
Recorded with the Panasonic SD multi cameras or
DVD video recorders [conforming to SD VIDEO
specifications (ASF standard)/MPEG4 (Simple Profile)
video system/G.726 audio system].
—
Some DVD-Audio discs contain DVD-Video content.
To play DVD-Video content, select “Play as DVD-Video” in Other Menu
(➜ page 17).
—
with the Panasonic SD multi cameras or DVD
using the DCF (Design rule for Camera
≥To play JPEG,
MPEG4 or DivX video
contents, select “Play
as Data Disc” in Other
Menu (➜ page 17).
Discs that can be played
DVD-R
(DVD-Video)/
[DVD-V]
Discs recorded and finalized
§2
on DVD video recorders or DVD video cameras.
DVD-RW
(DVD-Video)
iR (Video)/
iRW (Video)
DVD-R
(DivX Video)/
DVD-RW
—
§1
[DivX]
Discs recorded and finalized§2 on DVD video recorders or DVD video cameras.
§2
Finalize
the disc after recording.
(DivX Video)
DVD-RW
(DVD-VR)
[DVD-RW[‹VR›]
Discs recorded and finalized
using Version 1.1 of the Video Recording Format (a unified video recording
standard).
§2
on DVD video recorders or DVD video cameras
—
Video CD
[VCD]
Conforming to IEC62107
SVCD
This unit is compatible with HDCD, but does not support the Peak Extend
CD [CD]
function (a function which expands the dynamic range of high level signals).
HDCD-encoded CD’s sound better because they are encoded with 20 bits, as
compared with 16 bits for all other CD’s.
[WMA]
[MP3]
CD-R
CD-RW
—
[JPEG]
[CD]
[MPEG4]
[DivX]
§1
[VCD]
§1
Created using DivX ver.3.11, 4.x, 5.x [DivX video system/MP3, Dolby Digital or MPEG audio system].
§2
A process that allows play on compatible equipment.
≥This unit can play CD-R/RW (audio recording disc) recorded with the formats
on the left. Close the sessions or finalize
§2
the disc after recording.
≥HighMAT discs
WMA, MP3 or JPEG files only.
To play without using the HighMAT function, select “Play as Data Disc” in Other
Menu (➜ page 17).
≥[WMA] This unit does not support Multiple Bit Rate (MBR: a file that contains the
same content encoded at several different bit rates).
≥It may not be possible to play the above discs in all cases due to the type of discs, the condition of the recording, the recording method and how
the files were created (➜ page 15, Tips for making data discs).
∫ Discs that cannot be played
Version 1.0 of DVD-RW, DVD-ROM, CD-ROM, CDV, CD-G, SACD
and Photo CD, DVD-RAM that cannot be removed from their
cartridge, 2.6-GB and 5.2-GB DVD-RAM and “Chaoji VCD” available
on the market including CVD, DVCD and SVCD that do not conform
to IEC62107.
∫ Audio format of DVD’s
This unit automatically recognizes
and decodes discs with these
symbols.
∫ Video systems
– This unit can play PAL and NTSC, but your television must match
the system used on the disc.
– PAL discs cannot be correctly viewed on an NTSC television.
– This unit can convert NTSC signals to PAL 60 for viewing on a PAL
television (➜ page 19, “NTSC Disc Output” in “Video” tab).
RQT8291
9
Page 10
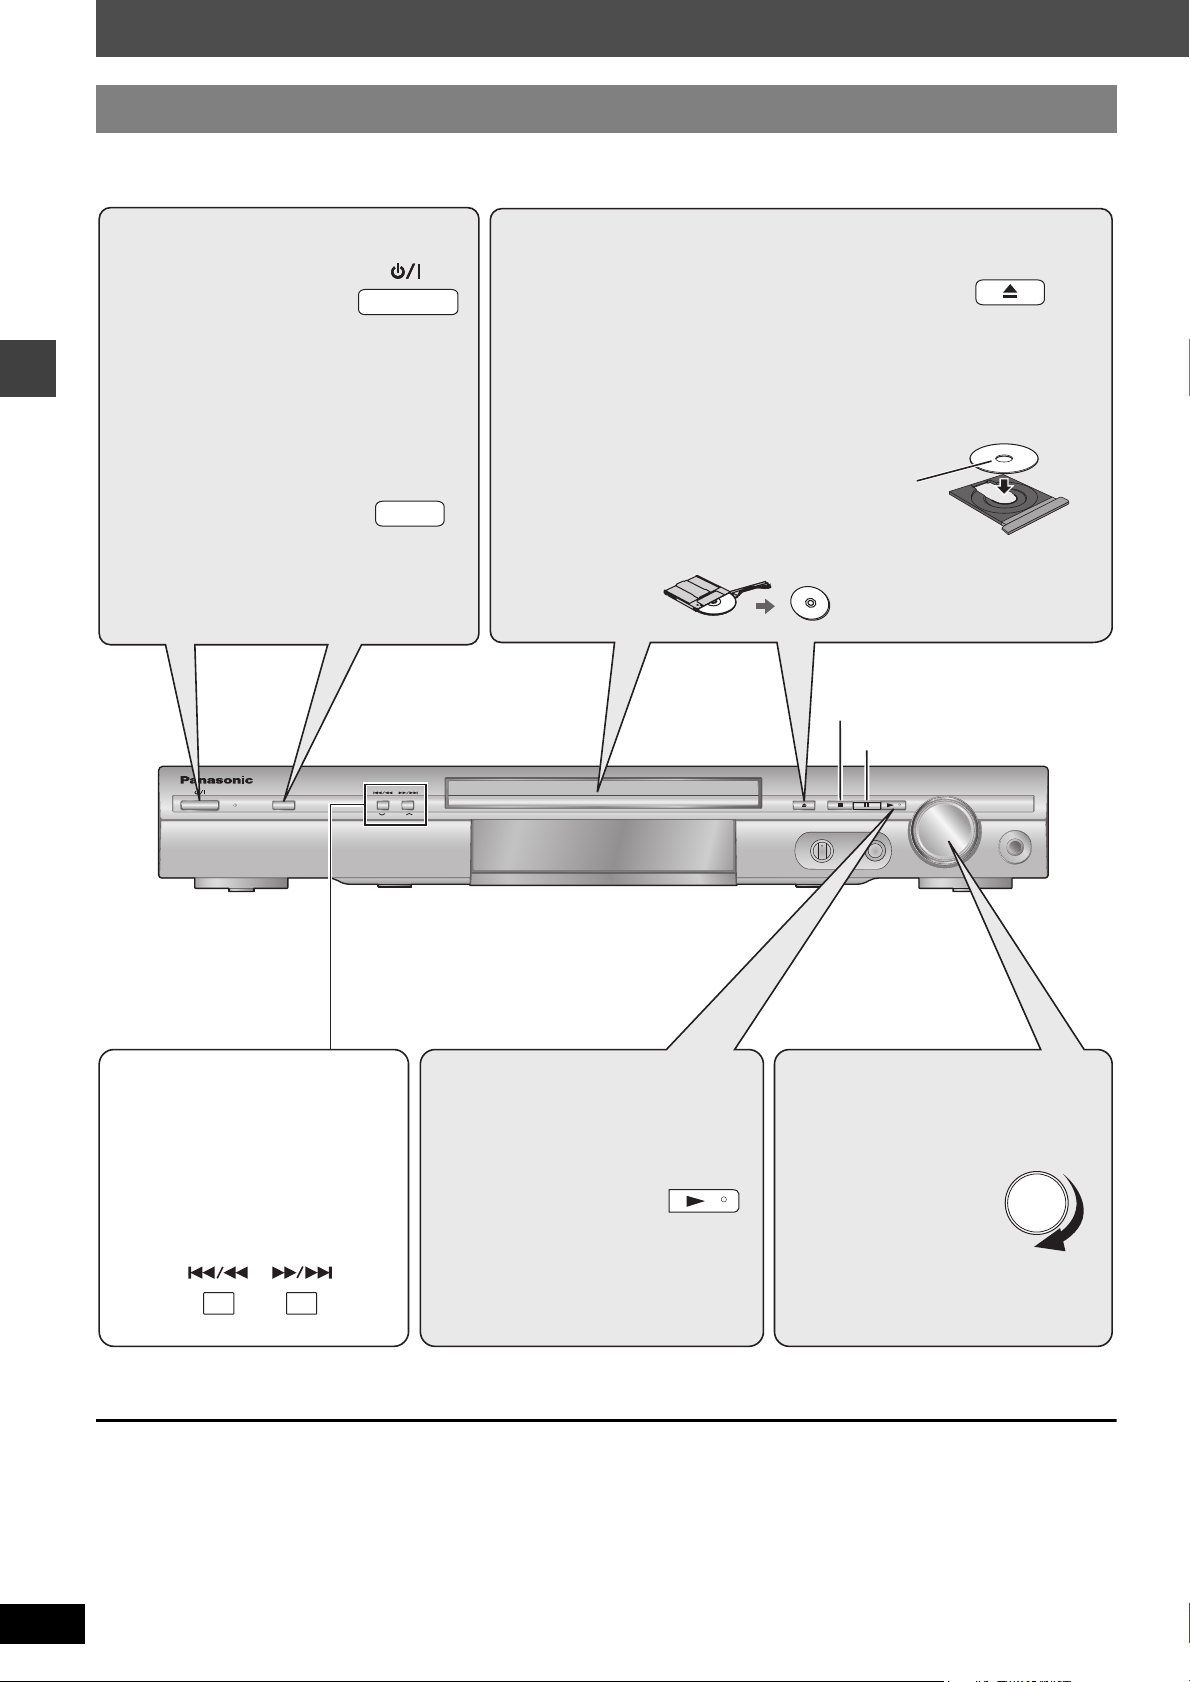
Basic play
MEMORY
FM MODE
TUNE MODE
OPEN/CLOSE
DOWN
VOLUME
UP
PHONES
TUNING
INPUT SELECTOR
AC IN
MIN
MAX
MIC LEVEL
MIC
OPEN/CLOSE
VOLUME
DOWN UP
INPUT SELECTOR
Press to skip.
Press and hold to
–search
(during play)
–slow-motion (during pause)
(Motion picture part)
≥Press [1] (play) to start normal play.
6 Adjust the volume.5 Start play.
The tray is automatically closed.
3 Open the disc tray.
∫ (Stop)
2 Select “DVD/CD”.
1 Turn the unit on.
4 Load the disc.
≥Load double-sided discs so the label for the side
you want to play is facing up.
; (Pause)
≥[RAM] Remove the disc from its cartridge before use.
Using the main unit
Basic play
RQT8291
[Note[
≥Discs continue to rotate while menus are displayed. Press [∫] when you finish to preserve the unit’s motor and your television screen.
≥Total title number may not be displayed properly on iR/iRW.
10
Page 11
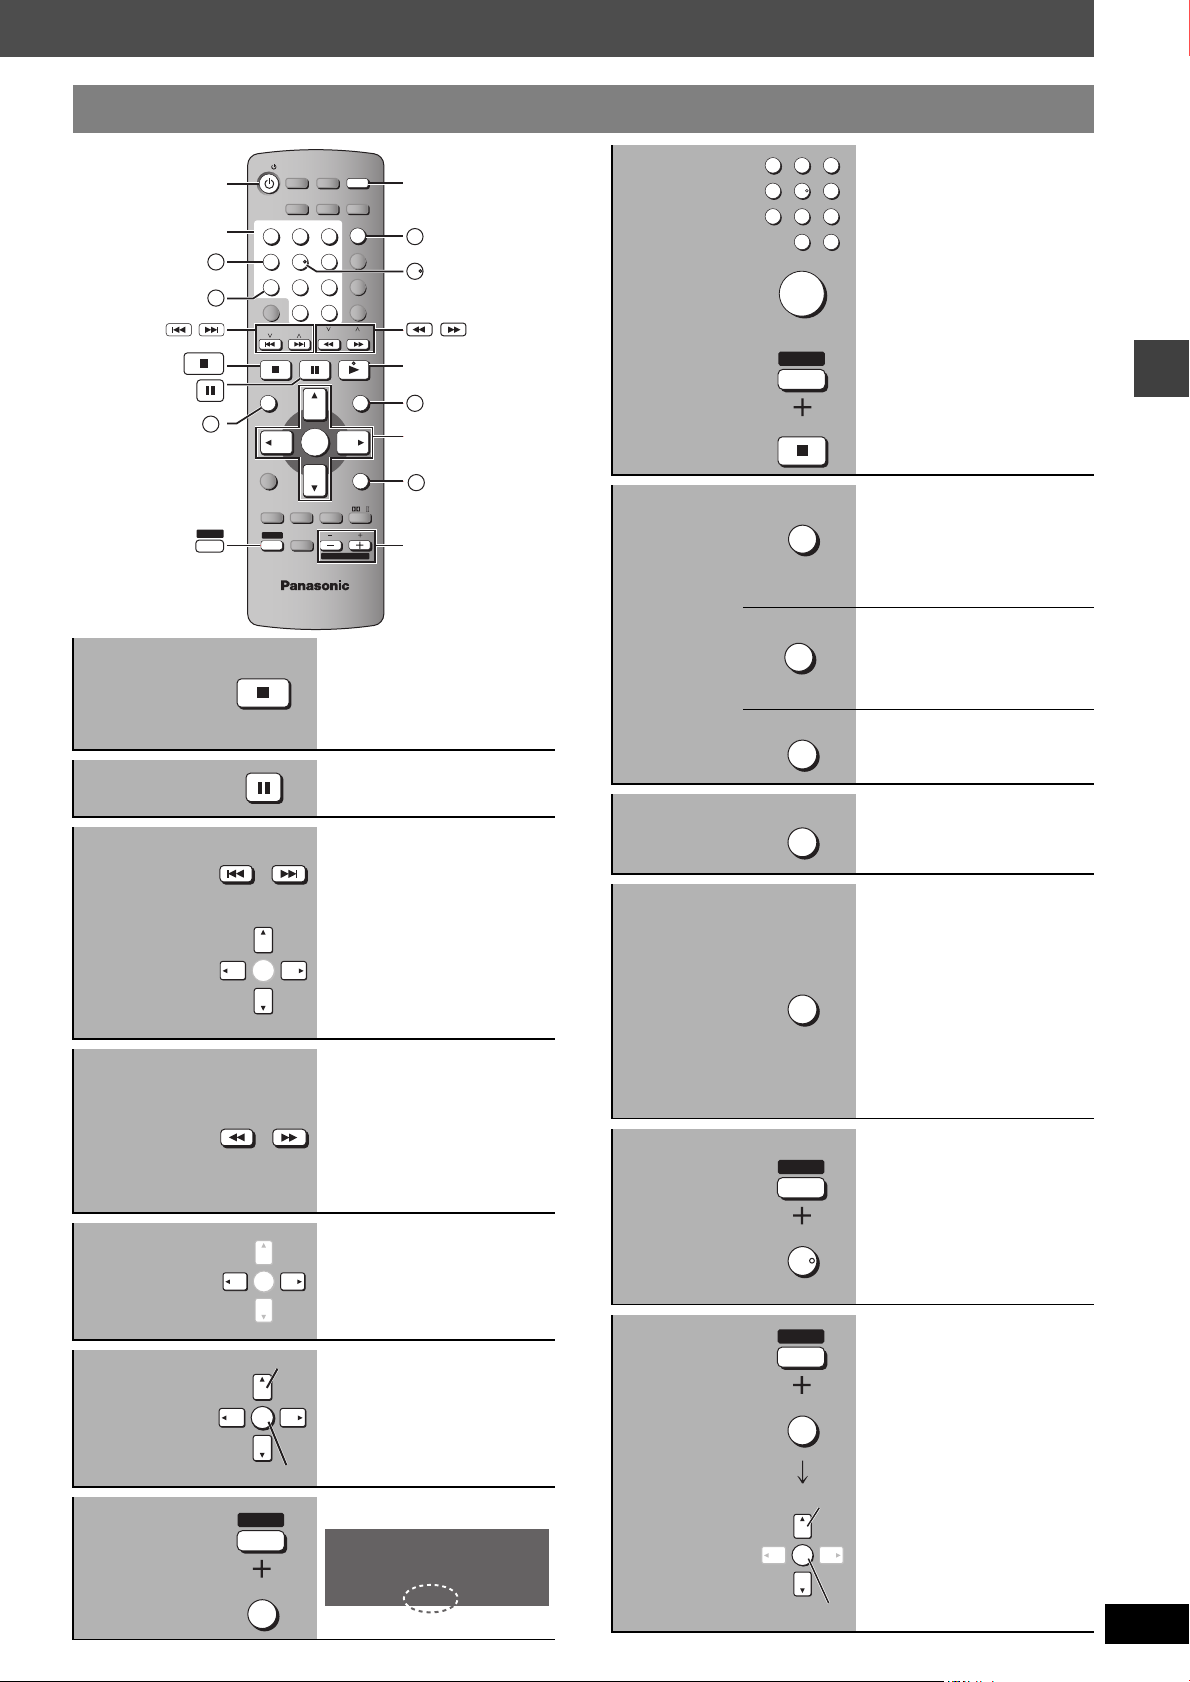
If you are experiencing problems, refer to troubleshooting (➜ page 30, 31).
Numbered
buttons
PGM
RND
PRG
RDS
PS
P
TG
MPEG4
D.MIX
SLP
M
D
X
iv
RETURN
Register
Select
Using the remote control
Stop
Pause
1
GROUP
4
PROGRESSIVE
7
CANCEL
TOP MENU
DIRECT
NAVIGATOR
SHIFT
TV
TV/VCR
SLEEP
TV/AV
AUDIO CH SELECT TEST
12
SUBTITLE ZOOM
GROUP
45
PROGRESSIVE
8
7
QUICK OSD
0
CH
CANCEL
TOP MENU
DIRECT
NAVIGATOR
SETUP
FUNCTIONS
SUBWOOFER
C.FOCUS
LEVEL
SHIFT
MUTING TV VOL
TUNER/
DVD/CD
BAND
ADVANCED
DISC REVIEW
3
6
ANGLE/PAGE
9
S10
SLOW / SEARCH
ENTER
SFC
PLAY SPEED
QUICK REPLAY
FL DISPLAY
MANUAL SKIP
PLAY MODE
TV CH
VOLUME
REPEAT
MENU
PLAYLIST
RETURN
MIX 2CH
PL
2
FL DISPLAY
SUBTITLE
5
SLOW / SEARCH
5
MENU
PLAYLIST
3, 4, 2, 1
ENTER
RETURN
6
The position is memorized while
“RESUME” is on the display.
≥Press [1] (play) to resume.
≥Press [∫] again to clear the
position.
≥Press [1] (play) to restart play.
Enter number
Disc menu
Return to
previous
screen
12
45
8
7
0
ENTER
SHIFT
CANCEL
TOP MENU
DIRECT
NAVIGATOR
MENU
PLAYLIST
RETURN
[RAM] [DVD-RW[‹VR›] [DVD-A]
3
[DVD-V] [VCD] [CD]
6
e.g. To select 12:
9
[S10] ➜ [1] ➜ [2]
S10
[VCD] with playback control
Press [∫] to cancel the PBC
function, and then press the
numbered buttons.
[WMA] [MP3] [JPEG] [MPEG4] [DivX]
e.g. To select 123:
[1] ➜ [2] ➜ [3] ➜ [ENTER]
≥Press [SHIFT]i[CANCEL] to
cancel the number(s).
[DVD-A] [DVD-V]
Shows a disc top menu
[RAM] [DVD-RW[‹VR›]
Shows the programs
(➜ page 15)
[DVD-V]
Shows a disc menu
[RAM] [DVD-RW[‹VR›]
Shows a play list (➜ page 15)
[VCD] with playback control
Shows a disc menu
Basic play
Skip
Search
(during play)
Slow-motion
(during pause)
Frame-byframe
(during pause)
On-screen
item select
Progressive
Video
ENTER
SLOW / SEARCH
ENTER
Select
ENTER
Register
SHIFT
PROGRESSIVE
7
≥[WMA] [MP3] [JPEG] [MPEG4]
[DivX]
[3,4]
: Group skip during
play
[2,1]
: Content skip during
play
≥Up to 5 steps.
≥Press [1] (play) to start
normal play.
≥[VCD] Slow-motion: forward
direction only.
≥[MPEG4] [DivX]
Slow-motion:
Does not work.
[DVD-A] (Motion picture part)
[RAM]
[DVD-RW[‹VR›] [DVD-V] [VCD]
≥[VCD] Forward direction only.
Main unit
display
Subtitles/
Information
screen
Starting play
from a
selected
group
FL DISPLAY
SHIFT
SUBTITLE
5
SHIFT
GROUP
4
ENTER
[RAM] [DVD-RW[‹VR›] [DVD-A]
[DVD-V] [WMA] [MP3] [MPEG4] [DivX]
Time display
,-. Information display
[JPEG]
When Slideshow (➜ page 16) is
on:
,-.Information display
SLIDE
When Slideshow is off:
PLAY
,-.Information display
[RAM] [DVD-RW[‹VR›]
Turns subtitle on/off (➜ page 13)
[DVD-V]
[DivX] [VCD]
Selects the subtitle languages
(➜ page 13)
[JPEG]
Date
,-. No information
[DVD-A] [WMA] [MP3] [JPEG]
[MPEG4] [DivX]
A folder on WMA/MP3, JPEG,
MPEG4 and DivX video discs is
treated as a “Group”.
(SVCD only)
RQT8291
11
Page 12
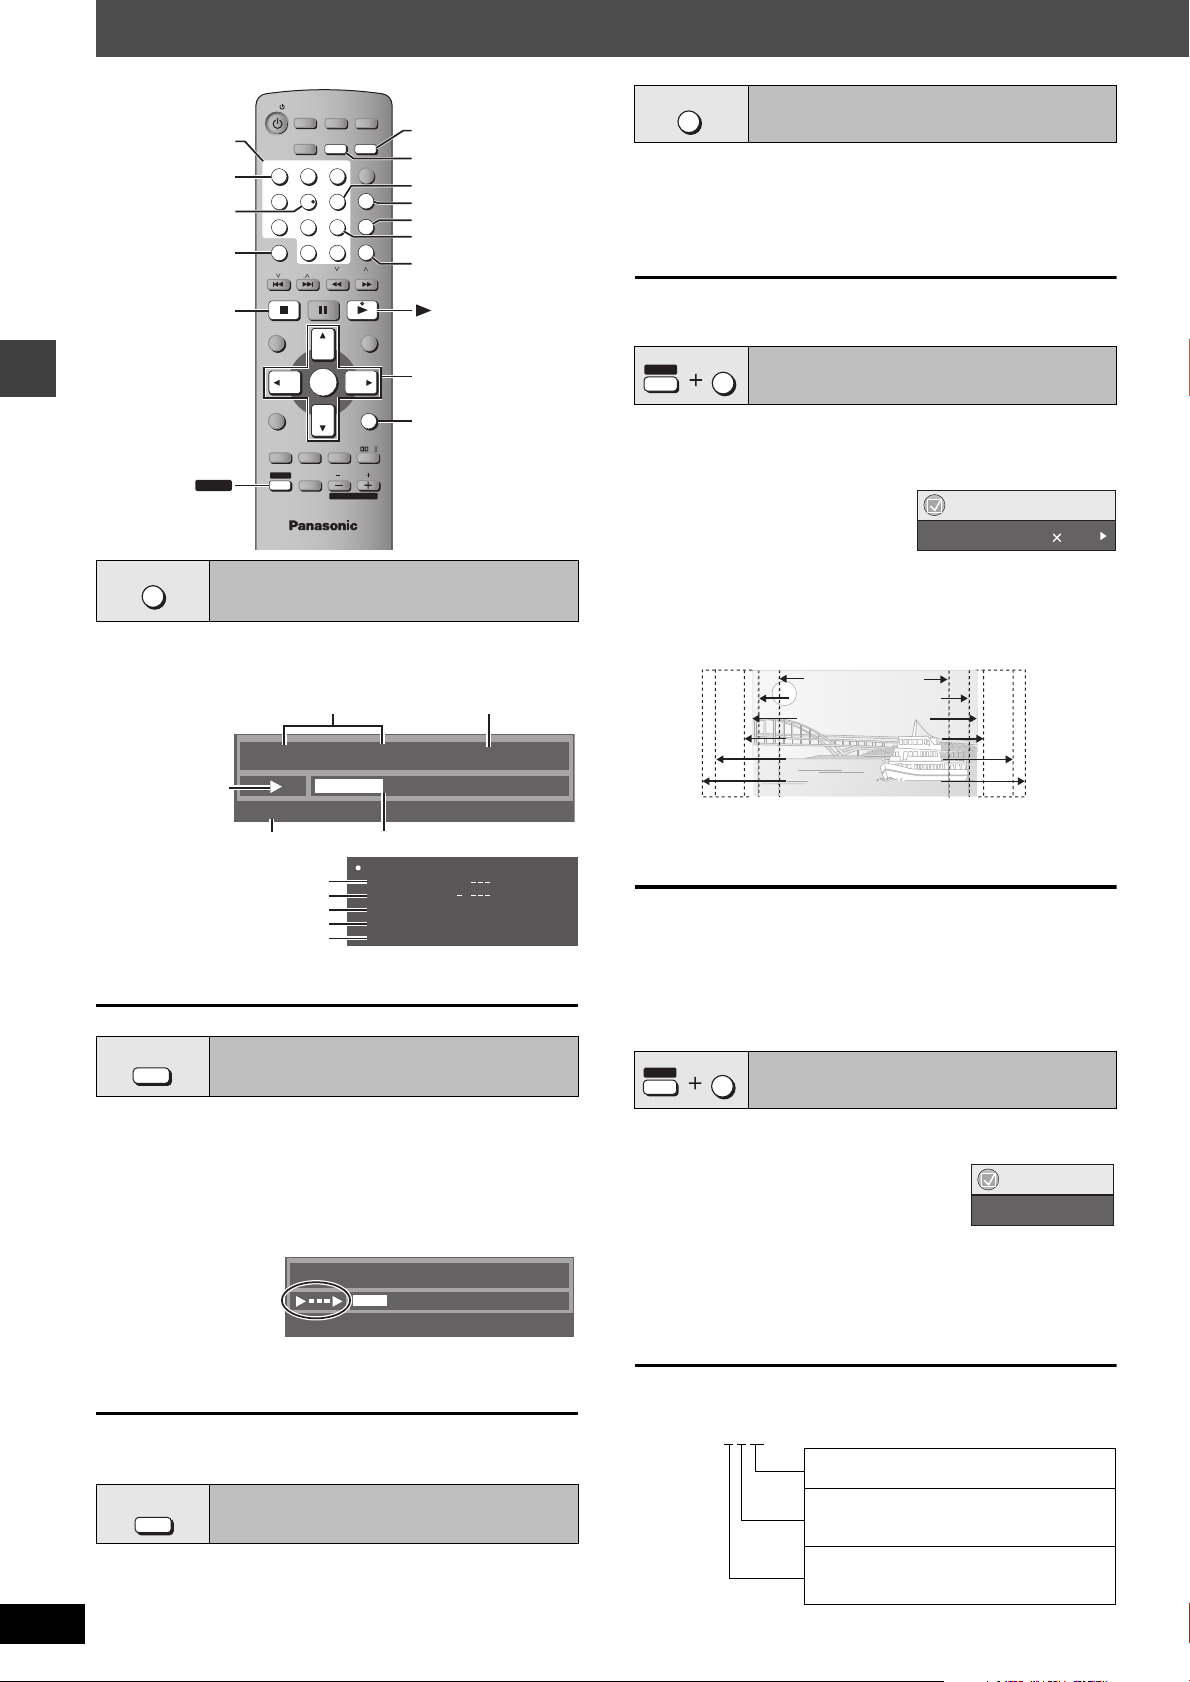
Convenient functions
MENU
DIRECT
NAVIGATOR
TOP MENU
RETURN
SETUP
FUNCTIONS
TV/VCR
MIX 2CH
PL
SHIFT
PLAYLIST
ENTER
12
6
9
45
7
8
0
S10
3
TV
TUNER/
BAND
DVD/CD
ADVANCED
DISC REVIEW
SLEEP
TV/AV
PLAY SPEED
QUICK REPLAY
AUDIO CH SELECT TEST
FL DISPLAY
GROUP
SUBTITLE ZOOM
MANUAL SKIP
QUICK OSD
REPEAT
ANGLE/PAGE
PLAY MODE
PROGRESSIVE
CANCEL
SLOW / SEARCH
VOLUME
MUTING TV VOL
C.FOCUS
SFC
SUBWOOFER
LEVEL
CH
TV CH
3, 4, 2, 1
ENTER
AUDIO
SUBTITLE
QUICK OSD
CANCEL
RETURN
PLAY MODE
SHIFT
REPEAT
MANUAL SKIP
PLAY SPEED,
QUICK REPLAY
ADVANCED DISC REVIEW
ANGLE/PAGE
ZOOM
Numbered
buttons
Chapter
Time
4
Title
1 0:41:23
Program Playback
e.g. [DVD-V]
Elapsed play timeCurrent playback number
Current position
Playback
condition
∫ Basics
Details-DVD-Video
Audio
Subtitle
Angle
Source Aspect
Title Total Time
1 DTS 3/2.1ch
1/1
4:3
0:54:28
e.g. [DVD-V]
Audio information
Subtitle information
Angle information
Aspect of current title
Total play time of current title
∫ Details
≥[MPEG4] [DivX] Video and audio information is not displayed during
search.
Play mode or
title of content
e.g. [RAM]
e.g.
e.g. [DVD-V]
Example: 3/2 .1ch
.1: Low frequency effect
.1: (not displayed if there is no signal)
.0: No surround
.1: Mono surround
.2: Stereo surround (left/right)
.1: Center
.2: Front leftiFront right
.3: Front leftiFront rightiCenter
QUICK OSD
Convenient functions
Displaying current playback
condition (QUICK OSD)
Press [QUICK OSD].
Basics ------------> Details
^-------- Off ,-------b
[CD] [MP3] [WMA] The QUICK OSD screen will appear automatically.
ADVANCED
DISC REVIEW
Reviewing titles to play
(ADVANCED DISC REVIEW)
[RAM] [DVD-RW[‹VR›] (Except still picture part)
(Except iR/iRW)
[DVD-V]
Allows you to browse the disc contents and start playing from the
selected position. You can select either “Intro Mode” or “Interval
Mode” in “Advanced Disc Review” in the “Disc” tab (➜ page 18).
1 Press [ADVANCED DISC REVIEW].
The QUICK OSD screen is displayed.
2 Press [1] (play) when you find a title/
≥This may not work depending on the disc and the play position.
≥[RAM] [DVD-RW[‹VR›]
(➜ page 15).
RQT8291
12
(Only when the elapsed play time can be displayed.)
(Except [MPEG4] [DivX], iR/iRW)
Press [QUICK REPLAY] to skip back a few
seconds.
PLAY SPEED
QUICK REPLAY
program to play.
Program
4 0:01:06
04
Time
This does not work when playing a play list
Quick replay
MANUAL SKIP
Skipping 30 seconds forward
(Only when the elapsed play time can be displayed.)
[RAM] [DVD-RW[‹VR›] [DVD-V]
(Except iR/iRW)
Play restarts from approximately 30 seconds later. Convenient when
you want to skip commercials etc.
During play
Press [MANUAL SKIP].
[RAM] [DVD-RW[‹VR›] It is not possible to skip through the current
program if the start of the next program is within about 30 seconds of
the point you are skipping from.
SHIFT
[DVD-A] (Motion picture part) [RAM] [DVD-RW[‹VR›] [DVD-V]
ZOOM
Changing the zoom ratio
6
[VCD] [MPEG4]
[DivX]
This feature expands the letterbox picture to fit the screen.
During play
Press [SHIFT]i[ZOOM]
several times to select the
preset aspect ratio (Just Fit
Functions
Just Fit Zoom 1.00
Zoom) or “Auto”.
[DVD-A] (Motion picture part) [RAM] [DVD-RW[‹VR›] [DVD-V] [VCD]
Auto --. 4:3 Standard --. European Vista --. 16:9 Standard
:;
Cinemascope2 ,------ Cinemascope1 ,------- American Vista
4:3 Standard (4:3)
European Vista (1.66:1)
16:9 Standard (16:9)
American Vista (1.85:1)
Cinemascope1 (2.35:1)
Cinemascope2 (2.55:1)
[MPEG4] [DivX]
Standard (k0.25 full-screen) -------------. Original (actual recorded size)
^--------------- Full (full-screen) ,---------------}
≥This may not work depending on the disc’s recording.
Fine adjustments (Manual Zoom)
After selecting the preset aspect ratio or “Auto”, press [2, 1].
–from “k1.00” to “k1.60” (in 0.01 units)
–from “k1.60” to “k2.00” (in 0.02 units)
–from “k2.00” to “k4.00” (in 0.05 units) ([MPEG4] [DivX] only)
≥It may not be possible to zoom up to “k4.00” depending upon the
connected television and its settings.
≥Press and hold [2, 1] to alter faster.
SHIFT
[DVD-A] [DVD-V] [DivX]
AUDI O
Changing soundtracks
1
(with multiple soundtracks)
[RAM] [DVD-RW[‹VR›] [VCD]
Press [SHIFT]i[AUDIO] several
times to select the soundtrack.
[RAM] [DVD-RW[‹VR›] [VCD]
You can use this button to select “L”, “R” or “LR”.
[DivX]
While the menu is displayed
[2,1]
Press
to select
[DVD-V] (Karaoke discs)
While the menu is displayed
Press [2, 1] to select “On” or “Off” for vocals.
Read the disc’s instructions for details.
Signal type/data
LPCM/PPCM/ÎDigital/DTS/MPEG: Signal type
kHz (Sampling frequency)/bit/ch (Number of channels)
≥[DivX] It may take some time for play to start if you change the audio
on a DivX video disc.
“L”, “R” or “LR”.
Functions
Audio 1
Page 13
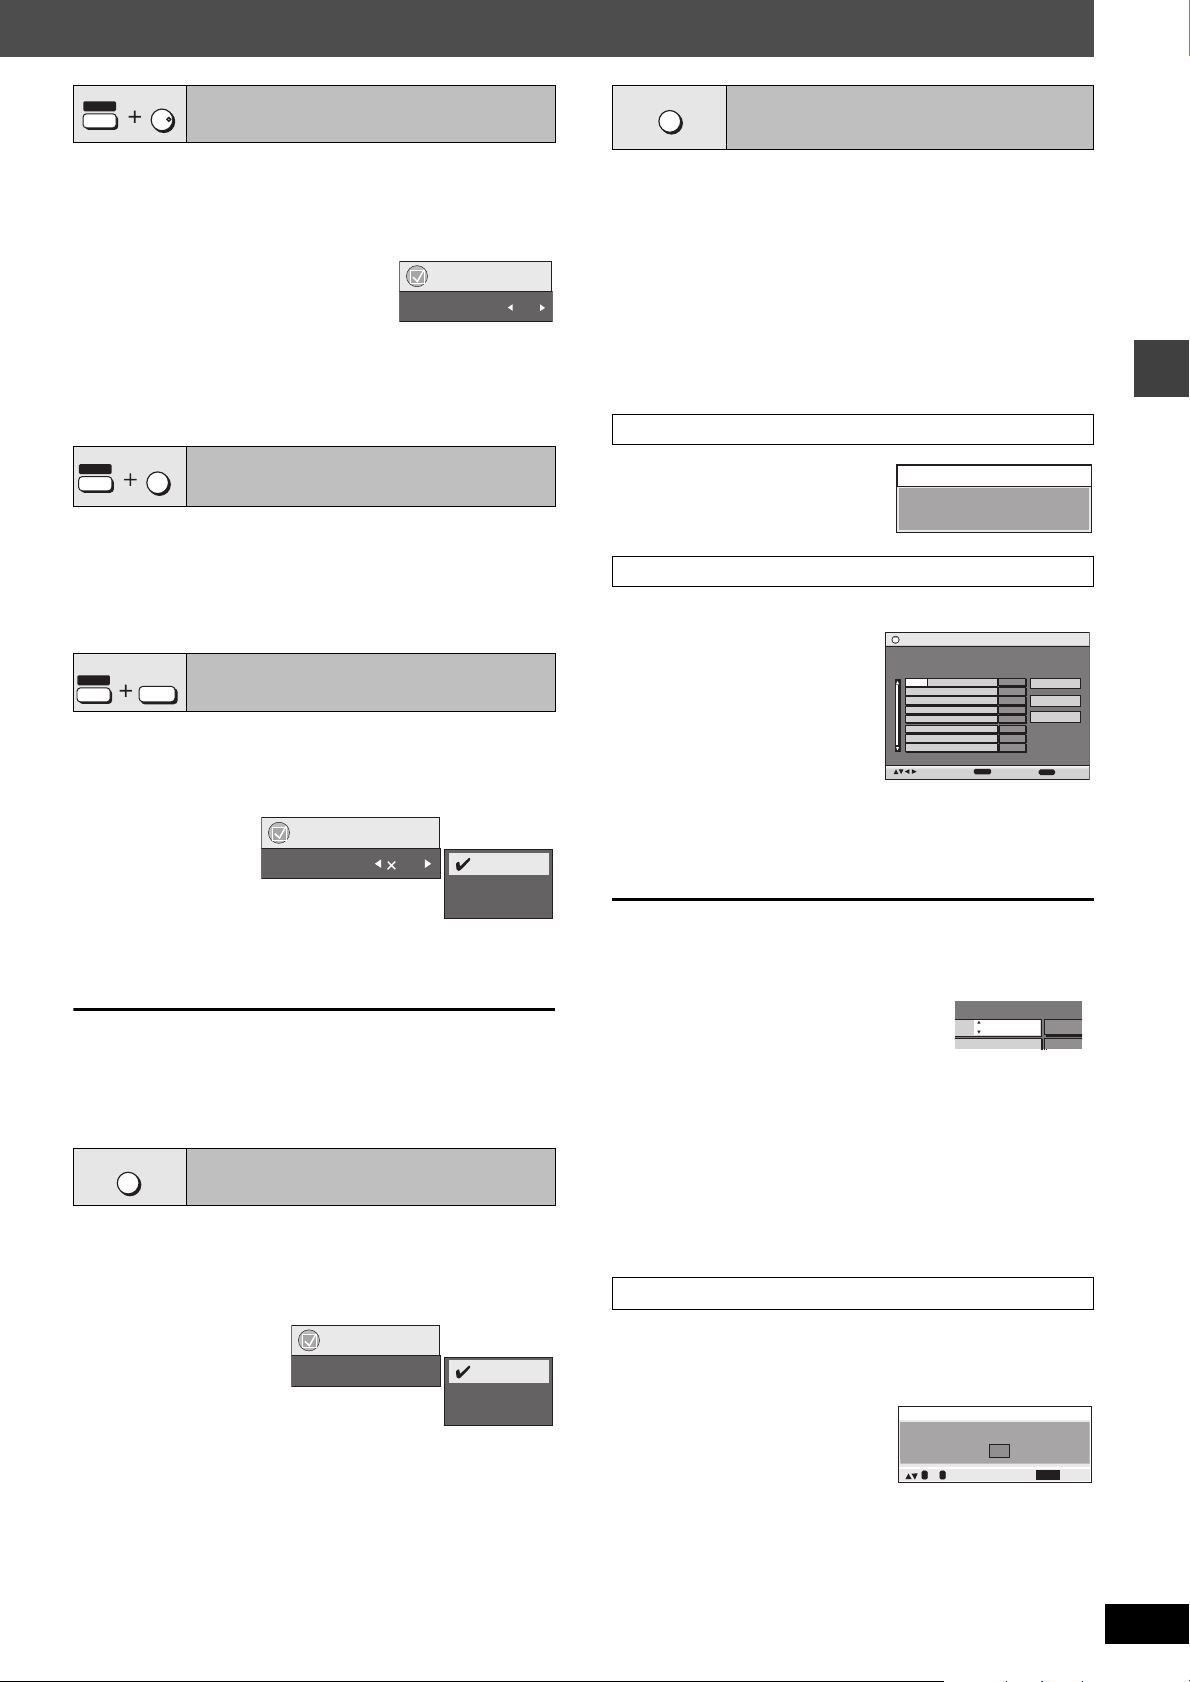
SUBTITLE
Functions
Play Speed 1.0
Fast
Slow
Normal
e.g. [DVD-V]
e.g. [DVD-V]
e.g. [DVD-V]
e.g. [DVD-V]
SHIFT
[DVD-V] [DivX] (with multiple subtitles) [VCD] (SVCD only)
Changing subtitles
5
Press [SHIFT]i[SUBTITLE] several times to
select the subtitle language.
≥On iR/iRW, a subtitle number may be shown for subtitles that
are not displayed.
To display/clear the subtitles
Press [2, 1] to select “On” or “Off”.
[RAM] [DVD-RW[‹VR›] (On/Off only with discs
that contain subtitle on/off information)
Functions
Subtitle
Off
Press [SHIFT]i[SUBTITLE] to select “On” or
“Off”.
≥Subtitle on/off information cannot be recorded using Panasonic
DVD Recorders.
PLAY MODE
All group, Program and
Random play
Except [RAM] [DVD-RW[‹VR›]
Press [PLAY MODE] while stopped.
All group, program and random playback screens appear sequentially.
All group ([DVD-A])-----------------. Program------------------------. Random
^---------------------------------- off (Normal play)
§
Sele
ct “off” condition to exit the all group, program or random mode.
≥Disable HighMAT disc play to use random and program play. Select
“Play as Data Disc” in Other Menu (➜ page 17).
≥[DVD-A] Some discs contain bonus groups. If a password screen
appears after selecting a group, enter the password with the
numbered buttons to play the bonus group. Refer also to the disc’s
jacket.
All group play
§
,---------------------------b
SHIFT
ANGLE/PAGE
Angle selection and Still
9
picture rotation/advance
Press [SHIFT]i[ANGLE/PAGE] several times
to select the angle or rotate/advance the still
picture.
[DVD-V] (with multiple angles)– Angle selection
[JPEG] –Still picture rotation
[DVD-A]
–Still picture advance (Press [RETURN] to go back to page 1.)
PLAY SPEED
QUICK REPLAY
SHIFT
[DVD-A] (Motion picture part) [RAM] [DVD-RW[‹VR›] [DVD-V]
During play
Changing play speed
Press [SHIFT]i[PLAY SPEED] several times
to select “Normal”, “Fast” or “Slow”.
Changing play speed between the range of “k0.6” to “k1.4” (in
0.1 units)
Press [2, 1]
≥Press [1] (play) to return to normal play.
≥After you change the speed
– Dolby Pro Logic II and Sound Enhancement do not work.
– Audio output switches to 2ch.
– Sampling frequency of 96 kHz is converted to 48 kHz.
≥This function may not work depending on the disc’s recording.
(Only when the elapsed play time can be displayed.
[JPEG]: Works with all JPEG content.)
During play
while the above message is displayed.
REPEAT
Repeat play
Press [REPEAT] several times to select an
item to be repeated.
[DVD-A]
Press [1] (play).
All Group Playback
Press PLAY to start
Program play (up to 32 items)
1 Press the numbered
buttons to select
the items (
[JPEG] [MPEG4] [DivX] then
press [ENTER]).
≥Repeat this step to program
other items.
≥To select a 2-digit number
e.g. To select 25: [S10] ➜ [2] ➜ [5]
[WMA] [MP3] [JPEG]
[WMA] [MP3]
[MPEG4] [DivX] [2] ➜ [5] ➜ [ENTER]
Program Playback
Choose a title and chapter.
TitleNo. Chapter Time
1
to select and press
ENTER
Play
Clear
Clear all
PLAY
to start
2 Press [1] (play).
To select an item using the cursor buttons
Press [ENTER] and [3, 4] to select an item, then press [ENTER]
again to register.
To select all the items
While the “Chapter”, “Track” or “Content” field
is highlighted, press [3, 4] to select “ALL”.
Then press [ENTER] again to register.
To change the selected program
1Press [3, 4] to select an item.
2 Repeat step 1 above.
To clear the selected program
1Press [3, 4] to select an item.
2Press [SHIFT]i[CANCEL] (or press [3, 4, 2, 1] to select
“Clear” and press [ENTER]).
To clear the whole program
Press [3, 4, 2, 1] to select “Clear all” and press [ENTER].
The whole program is also cleared when the unit is turned off, the
disc tray is opened or another source is selected.
Random play
Chapter Time
ALL
Convenient functions
[RAM] [DVD-RW[‹VR›]: Program>All>Off
≥During play list play: Scene>Playlist>Off
[DVD-A]: Track>Group
[DVD-V]: Chapter>Title
[CD]: Track>All>Off
[VCD]
[WMA]
[MP3] [MPEG4] [DivX]:
[JPEG]
: Group§>
§
“All” is displayed during all group ([DVD-A]), program and random
play.
Off
Functions
Repeat Off
§
>Off
§
>Off
Content>Group§>
Off
Off
Chapter
Title
1 [DVD-A] [DVD-V] [WMA] [MP3] [JPEG] [MPEG4] [DivX]
Press the numbered
buttons to select a
title or a group (
[MP3] [JPEG] [MPEG4] [DivX] then
[WMA]
press [ENTER]).
[DVD-A]
≥To enter all groups, press [2, 1] to select “All” and press
[ENTER].
≥To deselect a group, press the numbered buttons
corresponding to the group you want to clear.
Random Playback
Choose a title.
Title
0 ~ 9
to select
2 Press [1] (play).
1
to start
PLAY
PLAY
RQT8291
13
Page 14
Using navigation menus
MENU
DIRECT
NAVIGATOR
TOP MENU
RETURN
SETUP
FUNCTIONS
TV/VCR
MIX 2CH
PL
SHIFT
PLAYLIST
ENTER
12
6
9
45
7
8
0
S10
3
TV
TUNER/
BAND
DVD/CD
ADVANCED
DISC REVIEW
SLEEP
TV/AV
PLAY SPEED
QUICK REPLAY
AUDIO CH SELECT TEST
FL DISPLAY
GROUP
SUBTITLE ZOOM
MANUAL SKIP
QUICK OSD
REPEAT
ANGLE/PAGE
PLAY MODE
PROGRESSIVE
CANCEL
SLOW / SEARCH
VOLUME
MUTING TV VOL
C.FOCUS
SFC
SUBWOOFER
LEVEL
CH
TV CH
3, 4, 2, 1
ENTER
SHIFT
ANGLE/PAGE
,
FUNCTIONS
MENU, PLAYLIST
TOP MENU,
DIRECT NAVIGATOR
Numbered
buttons
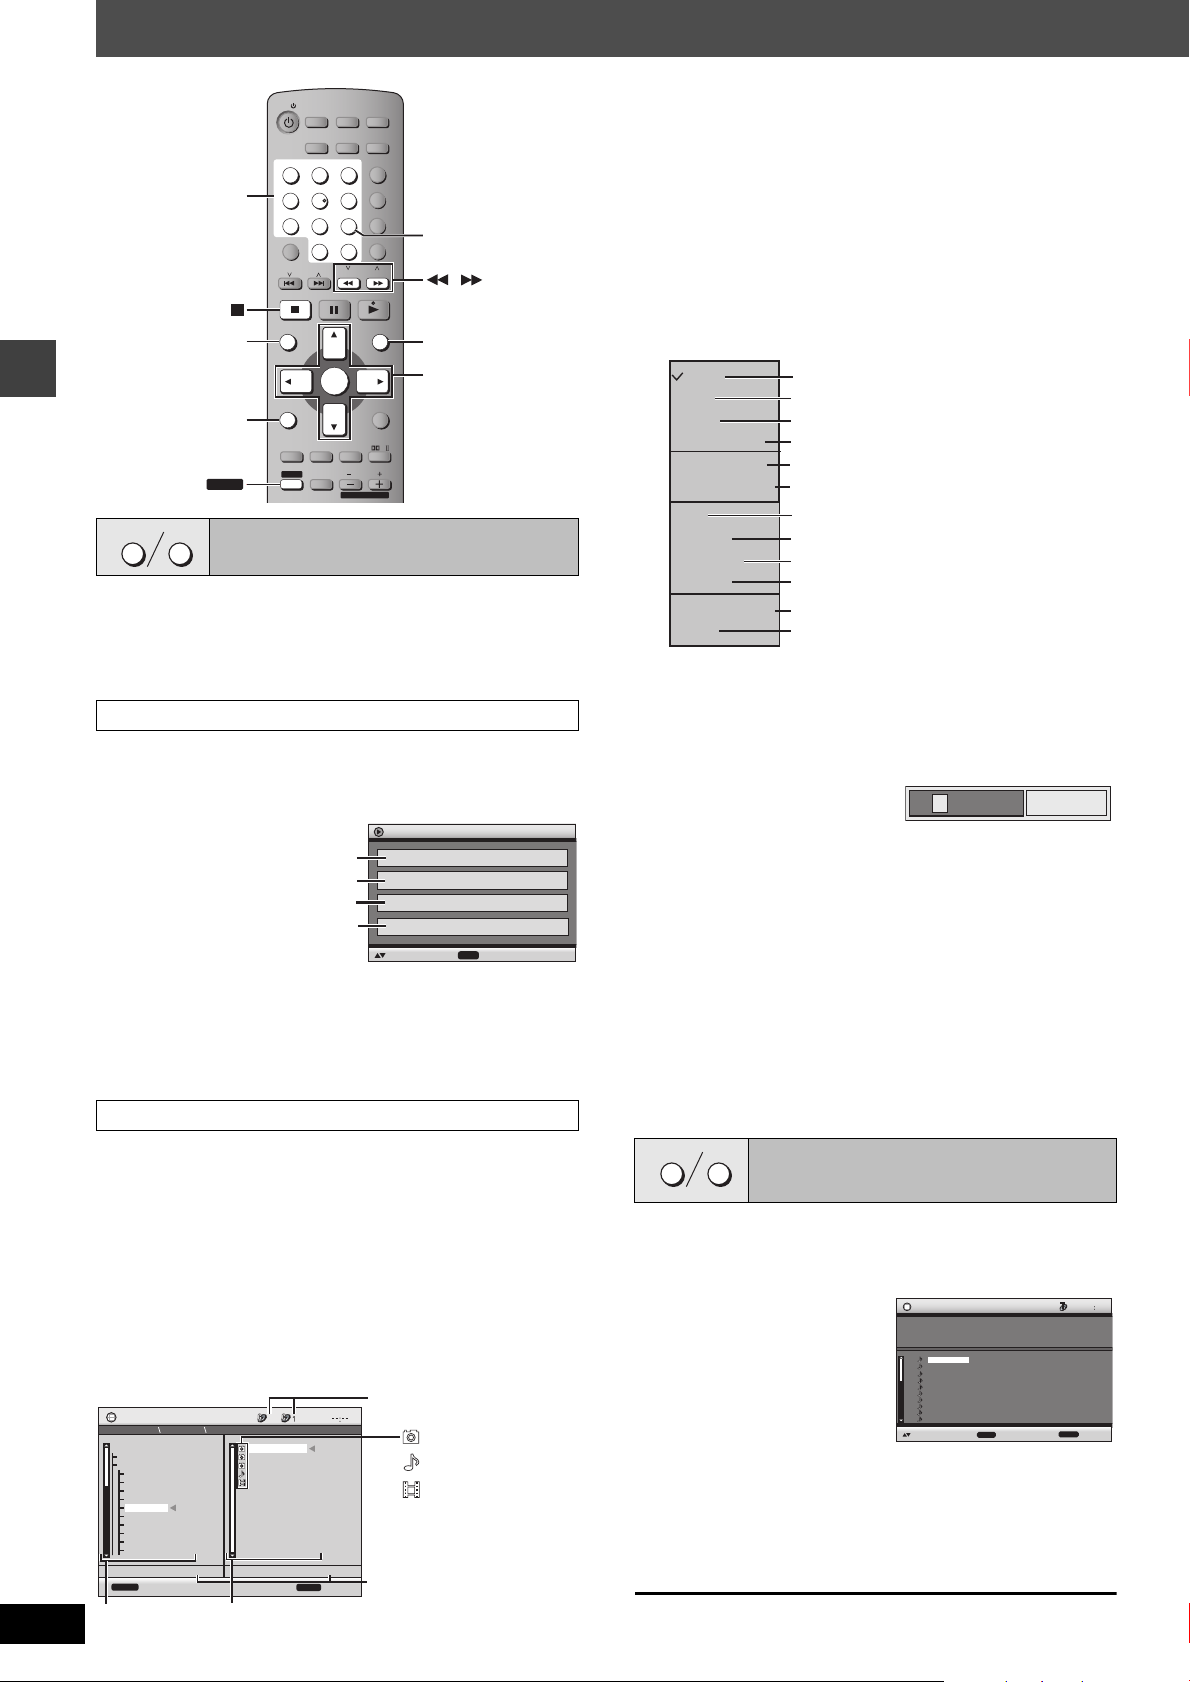
Playback Menu
ENTER
to select and press
All Total 436
Audio Total 7
Picture Total 427
Video Total 2
All contents
WMA/MP3
JPEG
≥To exit the screen
Press [TOP MENU].
MPEG4 and DivX video
e.g.
Group and content number
currently playing
: JPEG
: WMA/MP3
Number currently selected
Content
Group
e.g.
: MPEG4 and DivX
video
Contents only
Thumbnail images [JPEG]
WMA/MP3, JPEG, MPEG4 and DivX video
WMA/MP3 only
JPEG only
To switch between guide messages and the
elapsed play time indicator
To search by content or group title (➜below)
Groups and contents are displayed.
To go to next group
To go to previous group
Groups only
MPEG4 and DivX video only
e.g. CD text
MENUTOP MENU
Playing data discs
[WMA] [MP3] [JPEG] [MPEG4] [DivX]
You can play JPEG, MPEG4 and DivX video contents on DVD-RAM
or play HighMAT discs without using the HighMAT function
Using navigation menus
(➜ page 17, “Play as Data Disc” in Other Menu).
≥Playing HighMAT
TM
discs (➜ page 15)
Playing items in order (Playback Menu)
1 Press [TOP MENU].
Items shown differ depending on the type of disc.
≥Press [SHIFT]i[ANGLE/PAGE] to skip page by page in the group
or content field.
≥To enjoy listening to WMA/MP3 contents while showing a
JPEG image on the screen
Select a JPEG file first, and then select audio contents.
(The opposite order is not effective.)
≥To exit the screen
Press [MENU].
∫ Using the submenu
1 While the menu is displayed
Press [FUNCTIONS].
2 Press [3, 4] to select an item and press [ENTER].
Items shown differ depending on the disc contents.
Multi
List
Tree
Thumbnail
Next group
Previous group
All
Audio
Picture
Video
Help display
Find
∫ Searching by a content or group title
Highlight a group title to search the group, or a content title to search
its content.
1 While the submenu is displayed (➜ above)
Press [3, 4] to select “Find” and press [ENTER].
¢
A
Find
2 Press [3, 4] to select “All”, “Audio”,
Playing from the selected item (Navigation Menu)
1 Press [MENU].
2 Press [3, 4, 2, 1] to select the group
3 To play content in the group in order
N
avigation Menu
002 My favorite2
RQT8291
14
Perfume
001 My favorite1
002 My favorite2
001 Brazilian
002 Chinese
003 Czech
004 Hungarian
005 Japanese
006 Mexican
007 Philippine
008 Swedish
009 Piano
010 Vocal
FUNCTIONS
“Picture” or “Video” and press [ENTER].
and press [ENTER].
001 Lady Starfish
001 Lady Starfish
002 Metal Glue
003 Life on Jupiter
004 Starperson
005 Starperson
JPEG
5
Content 0001/0005
to exit
RETURN
Press [ENTER].
To start play from the selected content
Press [3, 4] to select and [ENTER].
005 Japanese
Group 005/023
to display the sub menu
2
Press [3,4] to select a character and press [ENTER].
≥Repeat to enter another character.
≥Lower case is also searched.
≥Press [6, 5] to skip between A, E, I, O and U.
≥Press [2] to erase a character.
≥Leave the asterisk (¢) when you search for the titles including
the character you enter.
≥Erase the asterisk (¢) to search for the titles starting with the
character you enter. To add the asterisk (¢) again, display the
submenu again and select “Find”.
3 Press [1] to select “Find” and press [ENTER].
The search result screen appears.
4 Press [3, 4] to select the content or group and
press [ENTER].
MENUTOP MENU
Playing from the selected
track in the CD
[CD]
Titles appear with CD Text disc playback.
1 Press [TOP MENU] or [MENU].
CD Text
Disc Title: All By Artist
Disc Artist: Pink Island
Track Title: Long John Platinum
Track Artist: SHIPWRECKED
1.
Ashley at Prom
2.
City Penguin
Formura one
3.
4.
Soccer
Baseball
5.
Neanderthal
6.
Cartoons
7.
Trilobites
8.
White Dwarf
9.
Discovery
10.
to select and press
ENTER
RETURN
63 00
1/23
to exit
2 Press [3, 4] to select the track and press
[ENTER].
≥Press [SHIFT]i[ANGLE/PAGE] to skip page by page.
≥Press [FUNCTIONS] to show the playback condition and
current position.
To exit the screen
Press [TOP MENU] or
[MENU].
Page 15
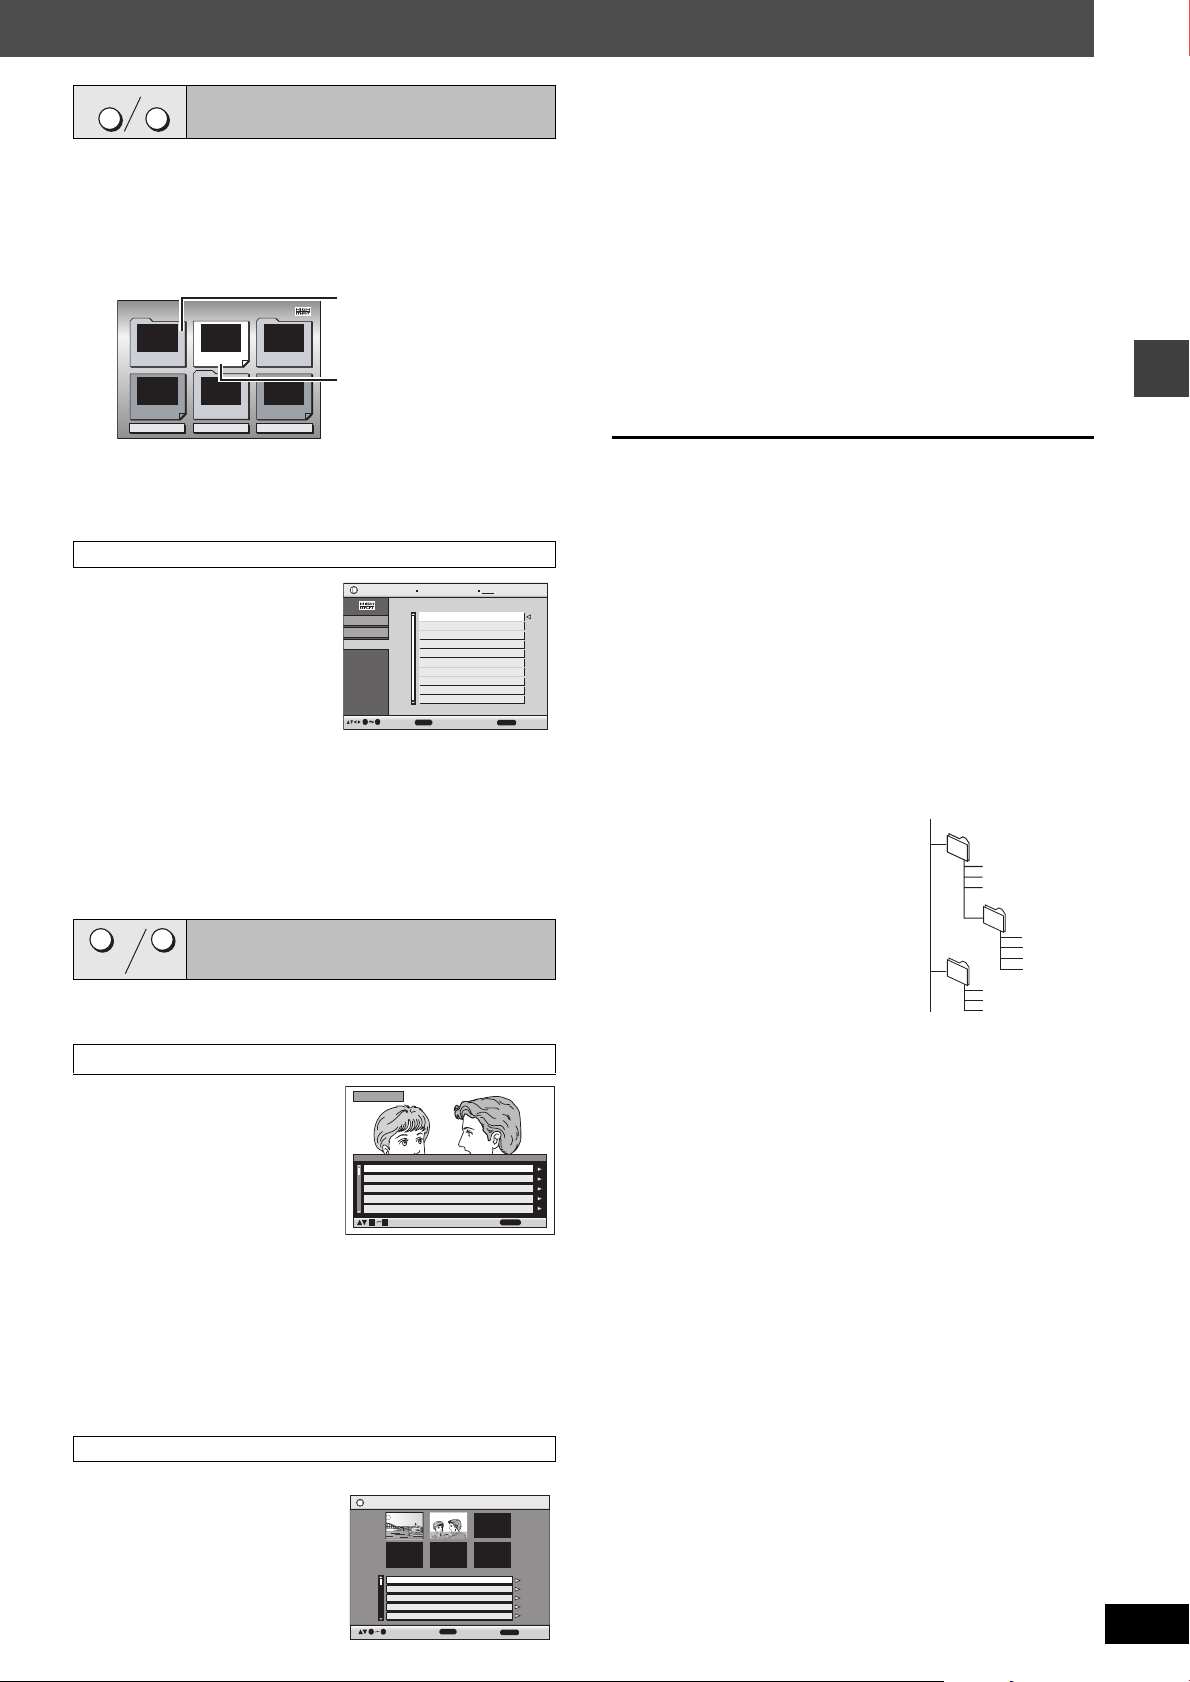
MENUTOP MENU
Menu: Takes you to the next
menu which shows
play lists or another
menu
Play list: play starts
e.g.
e.g.
e.g.
e.g.
002 group
001
001 group
001 track.mp3
002 track.mp3
003 track.mp3
003 group
001 track.mp3
002 track.mp3
003 track.mp3
001 track.mp3
002 track.mp3
003 track.mp3
004 track.mp3
e.g. [MP3]
root
Playing HighMATTM discs
[WMA] [MP3] [JPEG]
1 Press [TOP MENU].
2 Press [3, 4] or the numbered buttons to
select the play list.
≥Press [SHIFT]i[ANGLE/PAGE] to skip page by page.
≥To select a 2-digit number
e.g. 23: [S10] ➜ [2] ➜ [3]
2 Press [3, 4, 2, 1] to select the item,
then press [ENTER].
≥Repeat this step if necessary.
New Playlist Item Long Name Display Te
Menu1
Play list2
2
Prev
Play list1
Menu3
3
Return
PAGE 1/3
Play list3
Next
Menu2
1
≥To change the menu background
Press [FUNCTIONS].
The background changes to the one recorded on the disc.
≥To exit the screen
Press [∫].
Selecting from the list
1 During play
Press [MENU].
2 Press [2] then
[3, 4] to switch
Playlist
Group
Content
Playlist
09
All By Artist
No.
1
Few times in summer
2
Less and less
3
And when I was born
4
Quatre gymnopedies
5
You've made me sad
6
I can't quit him
7
Evening glory
Wheeling spin
8
Velvet Cuppermine
9
Ziggy starfish
10
to playto select
ENTER
Content title
among “Playlist”, “Group” and “Content”
lists.
3 Press [1] then [3, 4] to select an item
and press [ENTER].
≥Press [SHIFT]i[ANGLE/PAGE] to skip page by page.
≥To exit the screen
Press [MENU].
Playing RAM/DVD-RW
PLAYLISTDIRECT
NAVIGATOR
[RAM] [DVD-RW[‹VR›]
≥Titles appear only if the titles are recorded on the disc.
≥You cannot edit programs, play lists and disc titles.
Playing the programs
1 Press [DIRECT
NAVIGATOR].
≥To exit the screen
Press
NAVIGATOR]
(DVD-VR) discs
[DIRECT
.
Direct Navigator
Date
No.
11/ 1(WED) 0:05 Monday feature1
1/ 1 (MON) 1:05 Auto action2
2/ 2 (TUE) 2:21 Cinema3
3/ 3 (WED) 3:37 Music4
4/10(THU) 11:05 Baseball5
to select
09
On
Title Contents
2 Press [3, 4] or
the numbered buttons to select the
program.
≥Press [SHIFT]i[ANGLE/PAGE] to skip page by page.
≥To select a 2-digit number
e.g. 23: [S10] ➜ [2] ➜ [3]
≥Press [1] to show the contents of the program and the disc.
3 Press [ENTER].
Playing a play list
(Only when the disc contains a play list)
1 Press [PLAYLIST].
≥To exit the screen
Press [PLAYLIST].
Playlist
21
DateNo. Total Time Title Contents
11/1 0:00:01 City Penguin1
1/ 1 0:01:20 Ashley at Prom2
2/ 2 1:10:04 Formula one3
3/ 3 0:10:20 Soccer4
4/10 0:00:01 Baseball5
09
to select and press
ENTER
RETURN
RETURN
RETURN
to exit
to exit
to exit
3 Press [ENTER].
∫ Playing scenes one by one
1 While the play list menu is displayed
Press
[1].
2
Press
[3, 4]
to select
≥“Contents” shows play list information.
3
Press
[3, 4, 2, 1]
Tips for making data discs
≥When there are more than 8 groups, the eighth group onwards will
be displayed on one vertical line in the menu screen.
≥There may be differences in the display order on the menu screen
and computer screen.
≥This unit cannot play files recorded using packet write.
DVD-RAM
≥Discs must conform to UDF 2.0.
CD-R/RW
≥Discs must conform to ISO9660 level 1 or 2 (except for extended
formats).
≥This unit supports multi-session but if there are a lot of sessions it
takes more time for play to start. Keep the number of sessions to a
minimum to avoid this.
DVD-R/RW
≥Discs must conform to UDF bridge (UDF 1.02/ISO9660).
≥This unit does not support multi-session. The default session only
is played.
Naming folders and files
(Files are treated as contents and folders
are treated as groups on this unit.)
At the time of recording, prefix folder and
file names. This should be with numbers
that have an equal number of digits, and
should be done in the order you want to
play them (this may not work at times).
Files must have the extension (
[WMA] (Extension: “.WMA” or “.wma”)
≥Compatible compression rate:
between 48 kbps and 320 kbps
≥You cannot play WMA files that are copy
protected.
≥This unit does not support Multiple Bit Rate (MBR).
[MP3] (Extension: “.MP3” or “.mp3”)
≥Compatible compression rate: between 32 kbps and 320 kbps
≥This unit does not support ID3 tags.
≥Compatible sampling rates: 8, 11.02, 12, 16, 22.05, 24, 32, 44.1
and 48 kHz.
(Extension: “.JPG”, “.jpg”, “.JPEG” or “.jpeg”)
[JPEG]
≥To view JPEG files on this unit:
– Take them on a digital camera that meets the DCF Standard
(Design rule for Camera File system) Version 1.0. Some digital
cameras have functions that are not supported by the DCF
Standard Version 1.0 like automatic picture rotation which may
render a picture unviewable.
– Do not alter the files in any way or save them under a different
name.
≥This unit cannot display moving pictures, MOTION JPEG and other
such formats, still pictures other than JPEG (e.g. TIFF) or play
pictures with attached audio.
[MPEG4] (Extension: “.ASF” or “.asf”)
≥You can play MPEG4 data [conforming to SD VIDEO specifications
(ASF standard)/MPEG4 (Simple Profile) video system/G.726 audio
system] recorded with Panasonic SD multi cameras or DVD video
recorders with this unit.
≥The recording date may differ from that of the actual date.
(Extension: “.DIVX”, “.divx”, “.AVI” or “.avi”)
[DivX]
≥ You can play DivX data created using ver.3.11, 4.x, 5.x [DivX video
system/MP3, Dolby Digital or MPEG audio system].
≥GMC (Global Motion Compensation) is not supported.
≥DivX files greater than 2GB or have no index may not be played
properly on this unit.
≥This unit supports all resolutions up to maximum of 720 k480
(NTSC)/720 k576 (PAL).
≥You can select up to 8 types of audio and subtitles on this unit.
“Scene List”
and press
to select a scene and press
➜
below).
[ENTER].
[ENTER].
Using navigation menus
RQT8291
15
Page 16
Using on-screen menus
Numbered
buttons
ENTER
Go to the
next menu
Select
Register
Return to the
previous menu
Select
Register
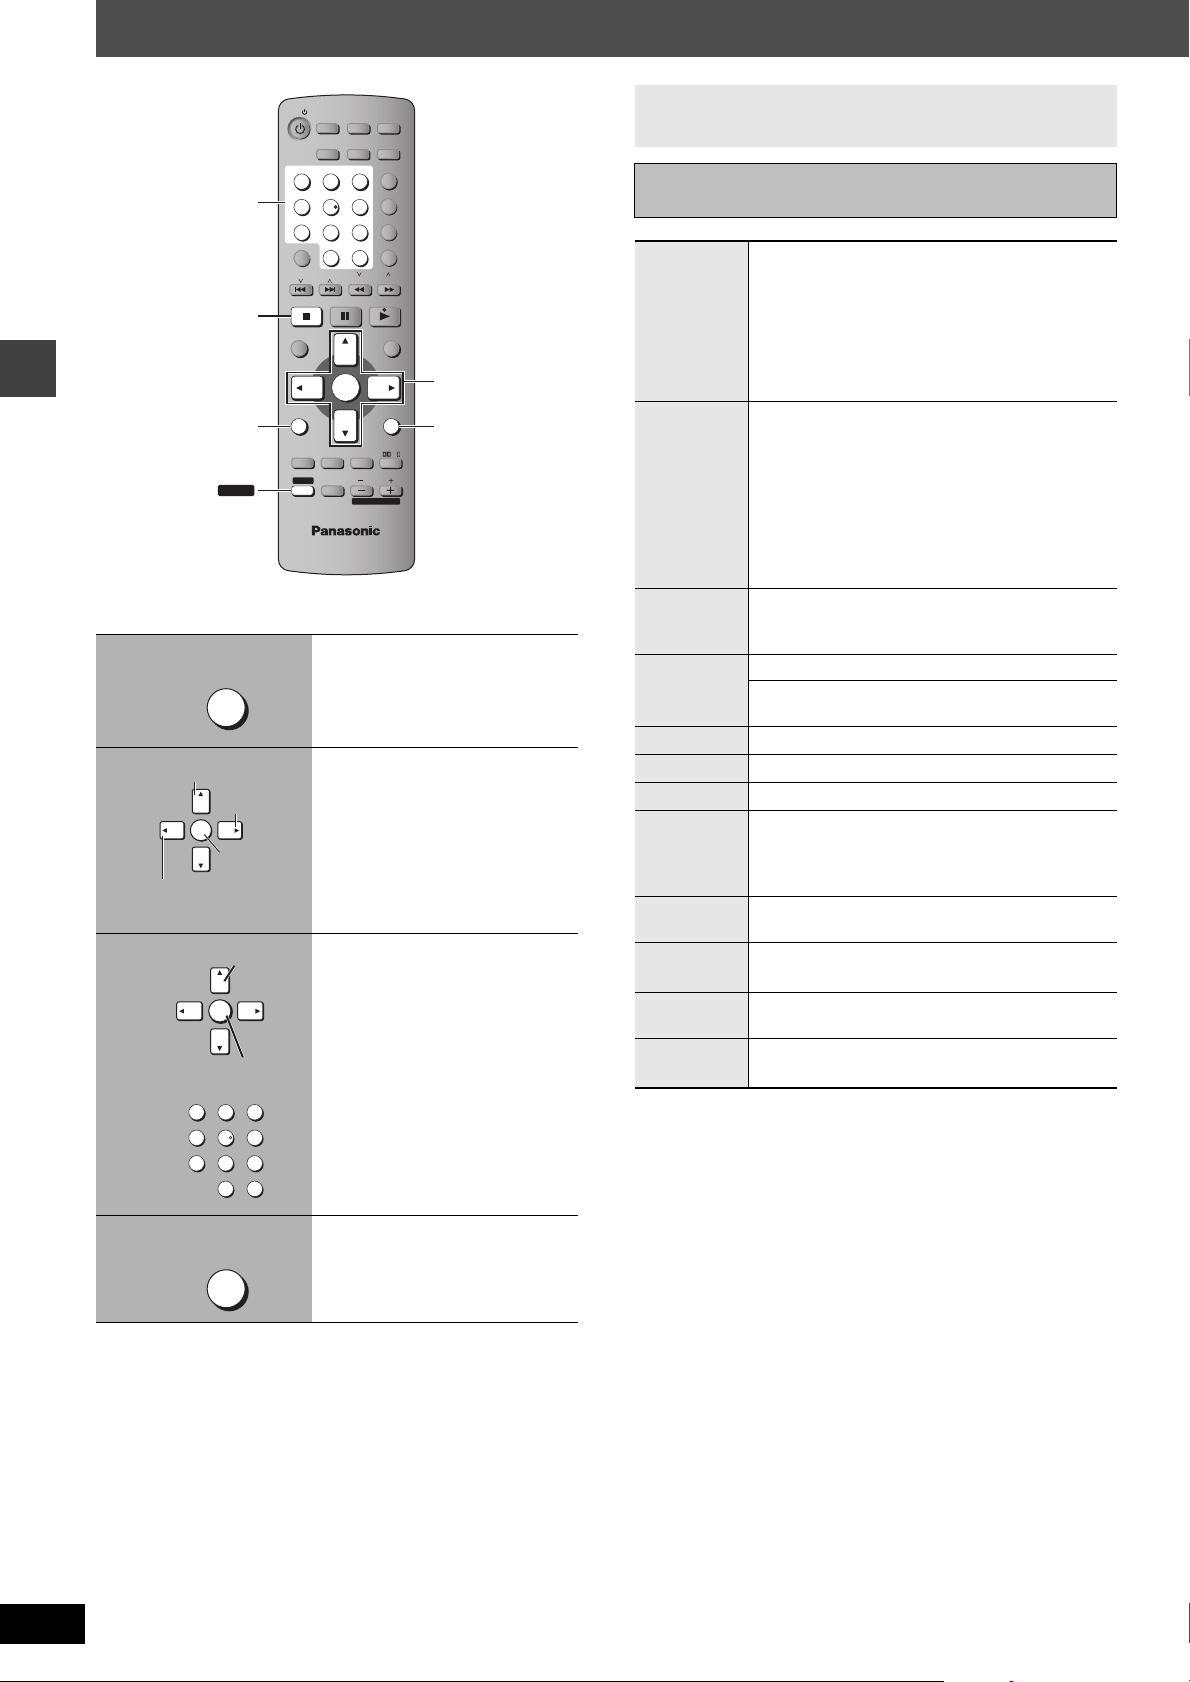
Items shown differ depending on the
type of disc.
Main menu
Program
Group
Title
Chapter
Track
Playlist
Content
Time
§
Except iR/
iRW
To start from a specific item
To skip incrementally or decrementally
Slip for play only)
1 Press [ENTER] twice to show the Time Slip
indicator.
2Press [3, 4] to select the time and press
[ENTER].
≥Press and hold [3, 4] to alter faster.
To start from a specific time
§
(Time Search)
§
(Time
CANCEL
FUNCTIONS
SHIFT
TV
TV/VCR
SLEEP
TV/AV
AUDIO CH SELECT TEST
12
SUBTITLE ZOOM
GROUP
45
PROGRESSIVE
8
7
QUICK OSD
0
CH
CANCEL
TOP MENU
DIRECT
NAVIGATOR
SETUP
FUNCTIONS
SUBWOOFER
C.FOCUS
LEVEL
SHIFT
MUTING TV VOL
TUNER/
BAND
ADVANCED
DISC REVIEW
3
6
ANGLE/PAGE
9
S10
SLOW / SEARCH
ENTER
SFC
PLAY SPEED
QUICK REPLAY
FL DISPLAY
MANUAL SKIP
PLAY MODE
TV CH
VOLUME
DVD/CD
REPEAT
MENU
PLAYLIST
RETURN
MIX 2CH
PL
3, 4, 2, 1
ENTER
RETURN
To change remaining/elapsed time display
[MPEG4] [DivX]
Using on-screen menus
1
SETUP
FUNCTIONS
Press once.
Video
Audio
To display pixel number
[DivX] fps (frame per second) is also displayed.
(➜ page 12, Changing soundtracks)
[WMA] [MP3]
To display the current disc type
To switch still pictures
To show thumbnail images
(➜ page 13, Changing subtitles)
2
Select the menu.
Still Picture
Thumbnail
Subtitle
[RAM] [DVD-RW[‹VR›]
Marker (VR)
To recall a marker recorded on DVD-Video
recorders
To recall a marker: Press [3,4] ➜ Press [ENTER]
(with multiple angles)
To select the angle
To rota t e pi c tur e
To turn on/off slideshow
To change the slideshow timing (0–30 sec)
(➜ page 17)
3
ENTER
Make the settings.
Angle
Rotate
Picture
Slideshow
Other
Settings
RQT8291
16
4
12
45
7
3
6
8
9
0
S10
SETUP
FUNCTIONS
Press to exit.
Page 17
Other Settings
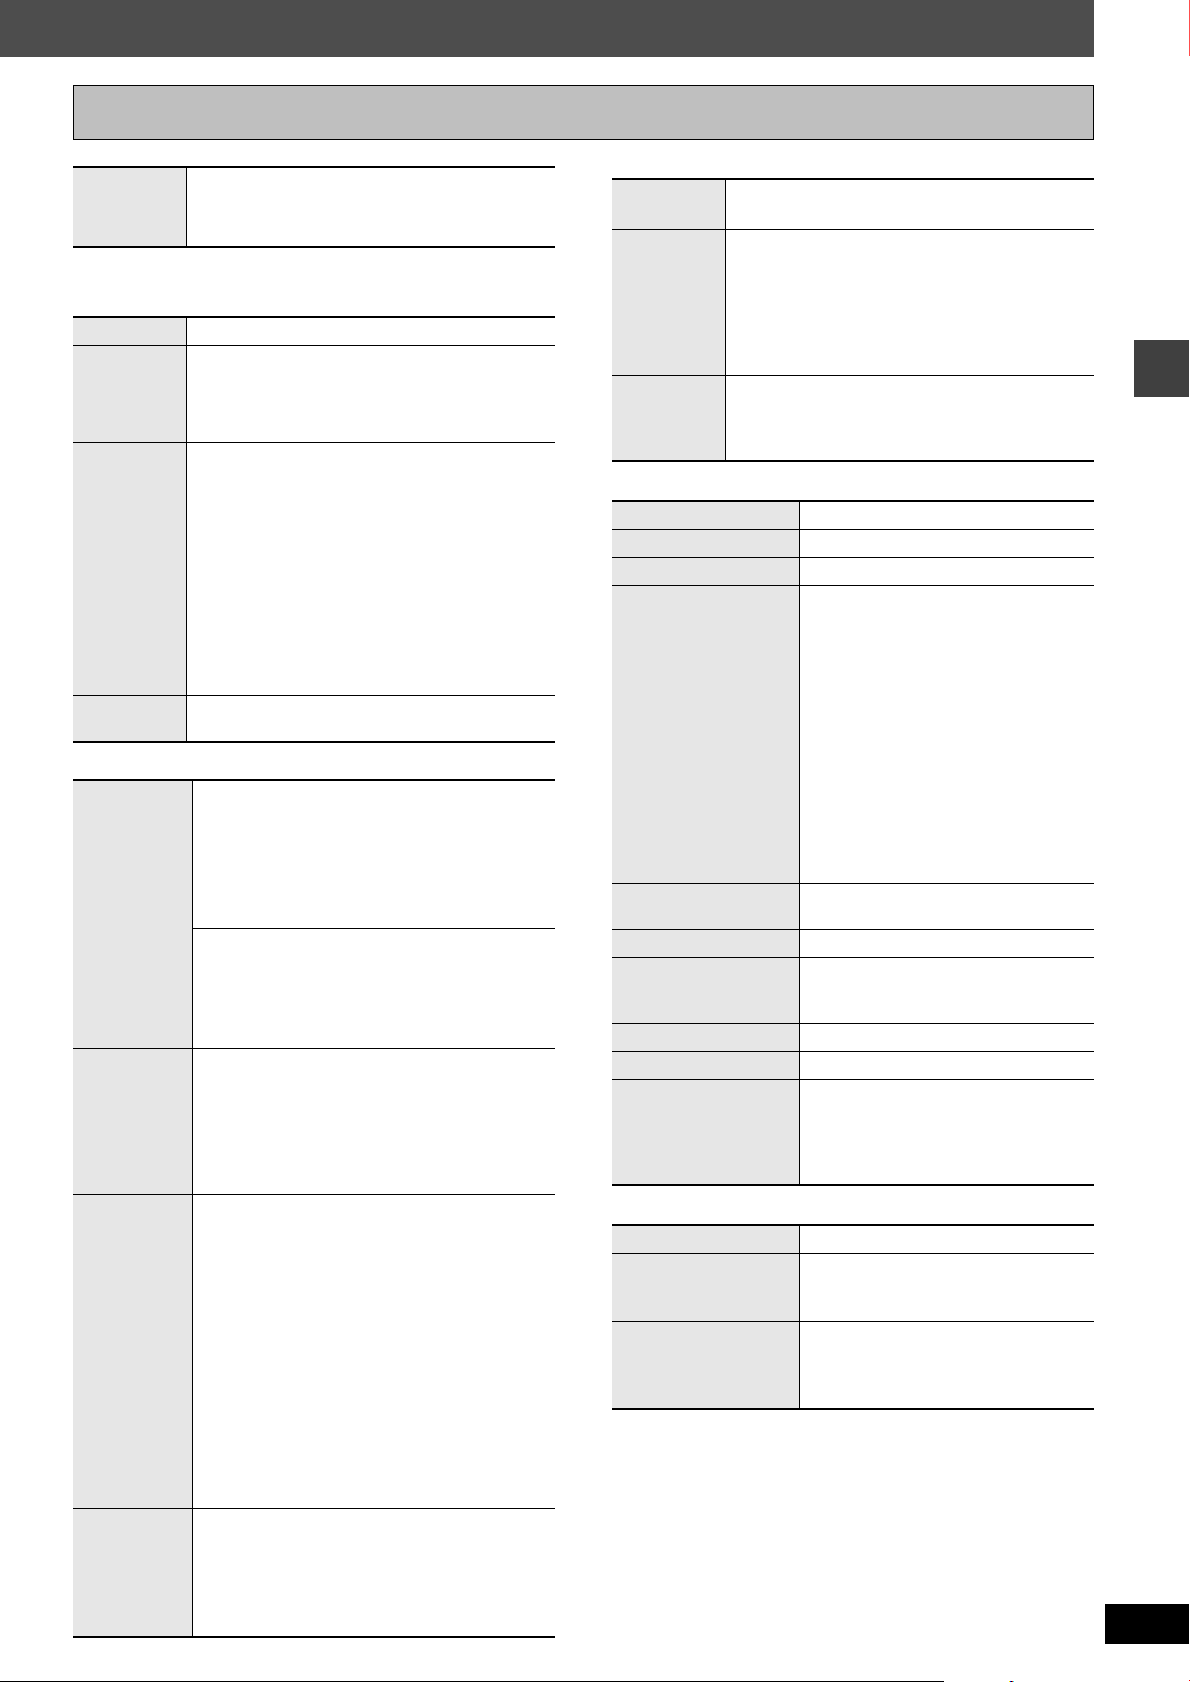
[DVD-A] (Motion picture part) [RAM] [DVD-RW[‹VR›]
Play Speed
[DVD-V]
To change play speed
–from “k0.6” to “k1.4” (in 0.1 unit steps)
∫ Play Menu
(Only when the elapsed play time can be displayed.
[JPEG]: Works with all JPEG content.)
Repeat
A-B Repeat
Marker
Advanced
Disc Review
(➜ page 13, Repeat play)
Except [JPEG] [RAM] [DVD-RW[‹VR›] (Still picture part)
[MPEG4] [DivX]
To repeat a specified section
Press [ENTER] at the starting and ending points.
Press [ENTER] again to cancel.
Except [RAM] [DVD-RW[‹VR›]
To mark up to 5 positions to play again
Press [ENTER]
To mark a position:
Press [ENTER] (at the desired point)
To mark another position:
Press [2, 1] to select “¢” ➜ Press [ENTER]
To recall a marker:
Press [2, 1] ➜ Press [ENTER]
To erase a marker:
Press [2, 1] ➜ Press [SHIFT]i[CANCEL]
≥This feature does not work during program and
random play.
[➜ page 12, Reviewing titles to play (ADVANCED
DISC REVIEW)]
(The unit is now ready to accept markers.)
∫ Picture Menu
Normal
Picture
Mode
Video
Output
Mode
Transfer
Mode
Source
Select
[DivX]
Cinema1: Mellows images and enhances detail
Cinema2: Sharpens images and enhances detail
Animation, Dynamic
User (Press [ENTER] to select “Picture
Adjustment”) (➜ below)
Picture Adjustment
Contrast, Brightness, Sharpness, Colour
Gamma: Adjusts the brightness of dark parts.
Depth Enhancer
Reduces the rough noise in the background to
give a greater feeling of depth.
625i§ (or 525i§) (Interlace)
,------. 625p
When you select “625p” or “525p”, a confirmation
screen appears. Select “Yes” only if connecting to
a progressive output compatible television.
§
The number displayed depends on the disc
being played or “Picture/Video Output” setting
(➜ page 19).
If you have chosen “625p” or “525p” (➜ above),
select the method of conversion for video output
to suit the type of material.
When you play PAL discs, MPEG4 or DivX video contents
Auto: Detects 25 frame-per-second film content
Video: Select when using Auto, and the video
When you play NTSC discs
Auto1 (normal): Detects 24 frame-per-second
Auto2:
Video: Select when using Auto1 or Auto2, and
When you select “Auto”, the constructing method
of the DivX contents is automatically
distinguished and output. If the picture is
distorted, select “I (Interlace)” or “P (Progressive)”
depending on which constructing method was
used when the contents were recorded to disc.
Auto, I (Interlace), P (Progressive)
in dark scenes.
in dark scenes.
§
(or 525p§) (Progressive)
and appropriately converts it.
content is distorted.
film content and appropriately
Compatible with 30 frame-per-second film
content in addition to 24 frame-per-second
film content.
the video content is distorted.
converts it.
∫ Audio Menu
Dolby Pro
Logic II
Dialogue
Enhancer
Sound
Enhancement
(➜ page 22, Dolby Pro Logic II)
To make the dialogue in movies easier to hear
[DVD-V] (Dolby Digital, DTS, MPEG, 3-channel or
higher, with the dialogue recorded in the center
channel)
[DivX] (Dolby Digital, 3-channel or higher, with the
dialogue recorded in the center channel)
On ,------. Off
Except [MPEG4] [DivX]
Enhances audio output to produce a warm hall-like
sound.
On ,------. Off
∫ Display Menu
Information
Subtitle Position
Subtitle Brightness
4:3 Aspect
Just Fit Zoom
Manual Zoom
Bit Rate Display
GUI See-through
GUI Brightness
Quick OSD
∫ Other Menu
Setup
Play as DVD-Video
Play as DVD-Audio
Play as DVD-VR,
Play as HighMAT
Play as Data Disc
or
or
On ,------. Off
0 to s60 (in 2 unit steps)
Auto, 0 to s7
To select how to show images made
for 4:3 aspect screens on a 16:9
aspect television
Normal: Horizontally stretches images.
Auto: Expands 4:3 letterbox images
to fill more of the screen.
Other images appear in full in
the center of the screen.
Shrink: Images appear in the center of
the screen.
Zoom: Expands all images to fill the
screen.
If your television has a similar feature,
use it instead for a better effect.
To select the appropriate screen size
to fit your TV screen
To zoom in and out manually
[DVD-A] (Motion picture part) [RAM]
[DVD-RW[‹VR›] [DVD-V] [VCD] [MPEG4] [DivX]
On ,------. Off
Off, On, Auto
s3 to r3
To display current playback condition
Off, Basics, Details
After registering the item, press
[RETURN] to show the QUICK OSD
screen (➜ page 12).
(➜ page 18)
Select “Play as DVD-Video” to play
DVD-Video contents of DVD-Audio.
Select “Play as Data Disc” to play
JPEG, MPEG4 or DivX video contents
on DVD-RAM or to play a HighMAT disc
without using the HighMAT function.
Using on-screen menus
RQT8291
17
Page 18
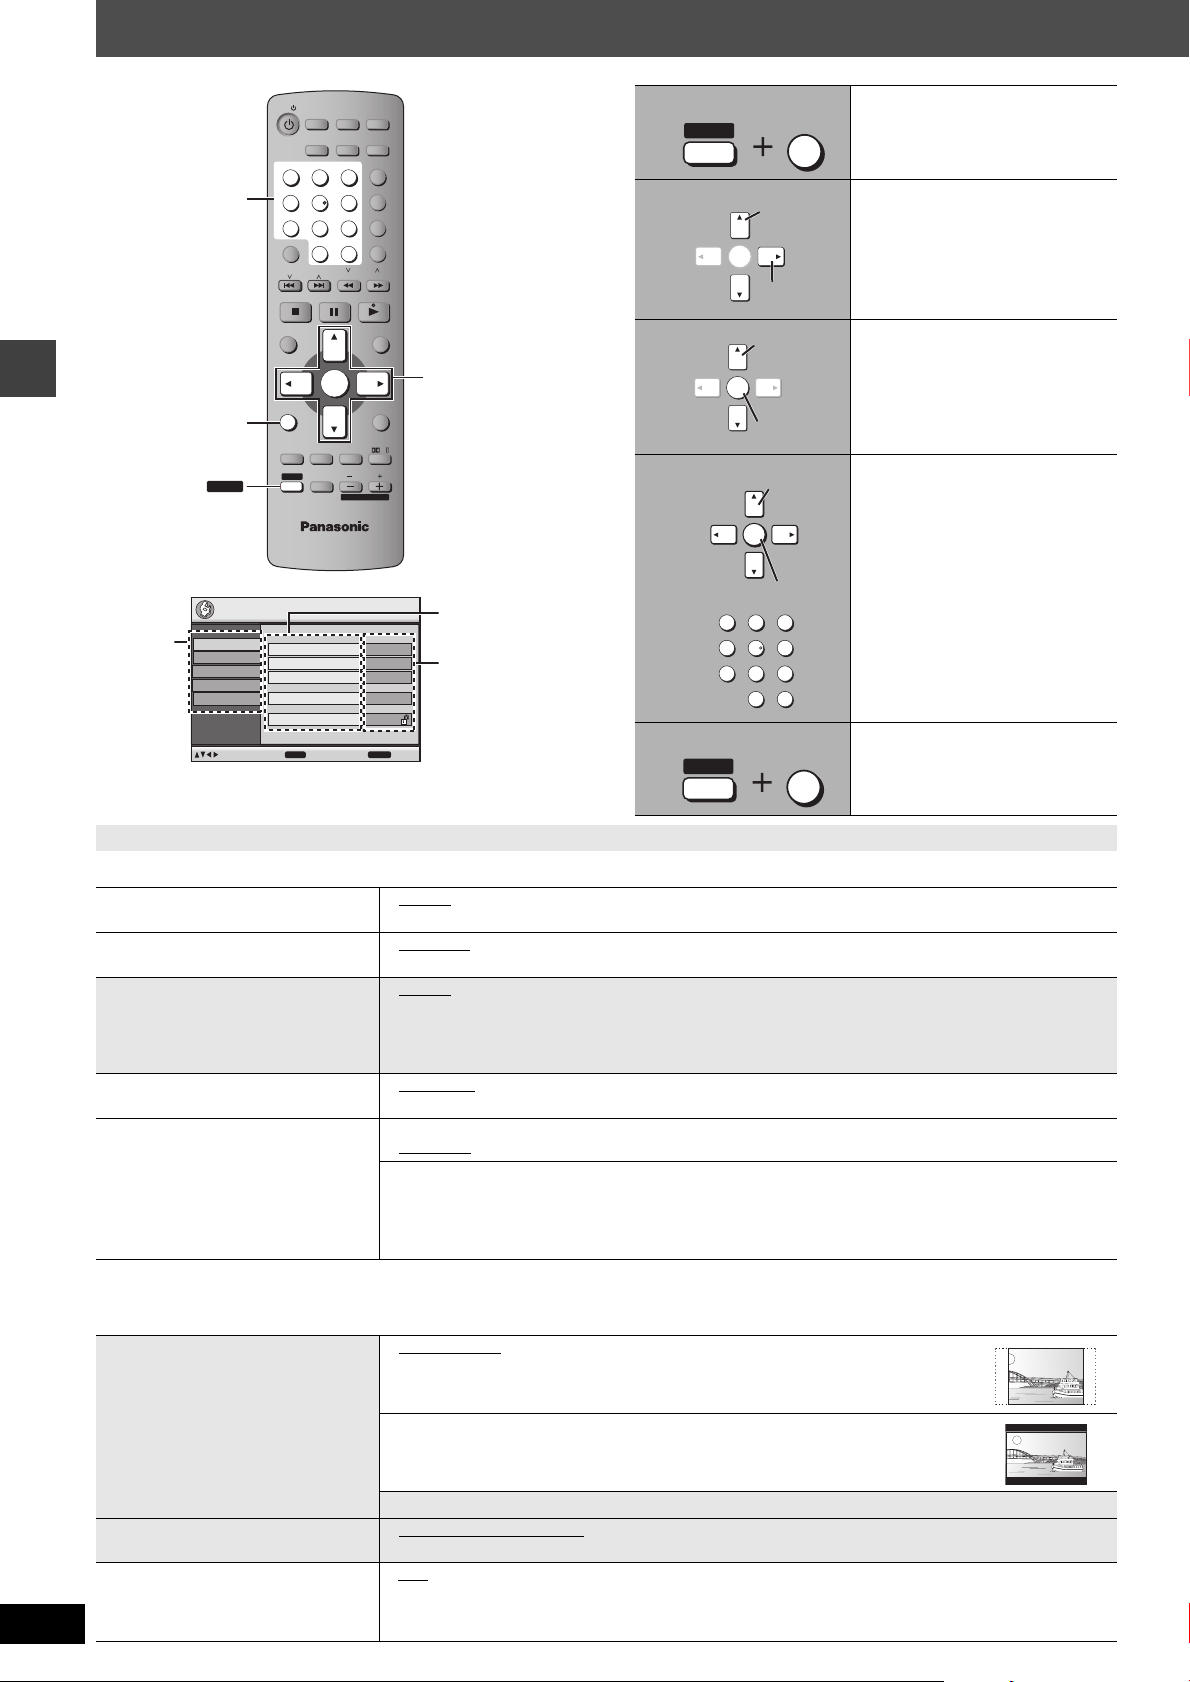
Changing the player settings
Numbered
buttons
Tab
Setting
Item
Select
Go right
Register
Select
Select
Register
TV
TUNER/
SETUP
SHIFT
TV/VCR
AUDIO CH SELECT TEST
12
SUBTITLE ZOOM
GROUP
45
PROGRESSIVE
7
QUICK OSD
CH
CANCEL
TOP MENU
DIRECT
NAVIGATOR
SETUP
FUNCTIONS
SUBWOOFER
LEVEL
SHIFT
BAND
ADVANCED
SLEEP
DISC REVIEW
TV/AV
3
6
ANGLE/PAGE
8
9
0
S10
SLOW / SEARCH
ENTER
C.FOCUS
SFC
MUTING TV VOL
VOLUME
DVD/CD
PLAY SPEED
QUICK REPLAY
FL DISPLAY
MANUAL SKIP
REPEAT
PLAY MODE
TV CH
PLAYLIST
RETURN
MENU
MIX 2CH
PL
3, 4, 2, 1
ENTER
Setup
Changing the player settings
Disc
Video
Audio
Display
Others
to select and press
Audio
Subtitle
Menus
Advanced Disc Review
Ratings
ENTER
English
Automatic
English
Intro Mode
Level 8
RETURN
to exit
≥The settings remain intact even if you switch the unit to standby.
≥Underlined items are the factory preset in the following diagram.
1
2
3
4
5
SHIFT
SHIFT
ENTER
ENTER
ENTER
12
45
8
7
0
SETUP
FUNCTIONS
3
6
9
S10
SETUP
FUNCTIONS
Show the Setup menu.
If you have not set QUICK SETUP
(➜ page 8), the QUICK SETUP
screen appears.
Select the tab.
Select the item.
Make the settings.
Press to exit.
QUICK SETUP enables successive settings of the items in the shaded area.
∫ “Disc” tab
Audio
Choose the audio language.
Subtitle
Choose the subtitle language.
Menus
Choose the language for disc menus.
Changing the menu language in
≥English
≥Russian ≥Dutch ≥ Original
≥Automatic
≥Portuguese ≥Russian ≥Dutch ≥Other¢¢¢¢
≥English ≥French ≥German ≥Italian ≥Spanish ≥Portuguese
≥Russian ≥Dutch ≥ Other¢¢¢¢
QUICK SETUP also changes this
setting.
Advanced Disc Review
(➜ page 12)
Ratings
Set a ratings level to limit DVD-Video
play.
≥Intro Mode
≥
Interval Mode: Reviews not only each title/program but also each 10 minute interval within a title/program.
Setting ratings (When level 8 is selected)
≥8 No Limit
When you select your ratings, a password screen is shown.
Follow the on-screen instructions.
Do not forget your password.
A message screen will be shown if a DVD-Video exceeding the ratings level is inserted in the unit.
Enter your password and then follow the on-screen instructions.
§1
The original language designated on the disc is selected.
§2
Input a code number referring to the table on page 28.
∫ “Video” tab
TV Aspect
Choose the setting to suit your
television and preference.
≥4:3 Pan&Scan
The sides of the widescreen picture are cut off so it fills the screen (unless
prohibited by the disc).
≥French ≥German ≥Italian ≥Spanish ≥Portuguese
§3
≥English ≥French ≥ German ≥Italian ≥ Spanish
: Reviews each title/program.
≥1 to 7 ≥0 Lock All: To prevent play of discs without ratings levels.
: Regular aspect television (4:3)
§1
≥Other¢¢¢¢
§2
§
3
If the language selected for “Audio” is not available, subtitles
§2
§2
appear in that language (if available on the disc).
RQT8291
18
TV Type
Select to suit the type of television.
Time Delay
When connected with a Plasma
display, adjust if you notice the audio
is out of sync with the video.
≥4:3 Letterbox: Regular aspect television (4:3)
Widescreen picture is shown in the letterbox style.
≥16:9: Widescreen television (16:9)
≥Standard (Direct View TV) ≥ CRT Projector ≥LCD TV/Projector
≥Projection TV ≥Plasma TV
≥0ms
≥20ms ≥40ms ≥60ms ≥80ms ≥ 100ms
Page 19
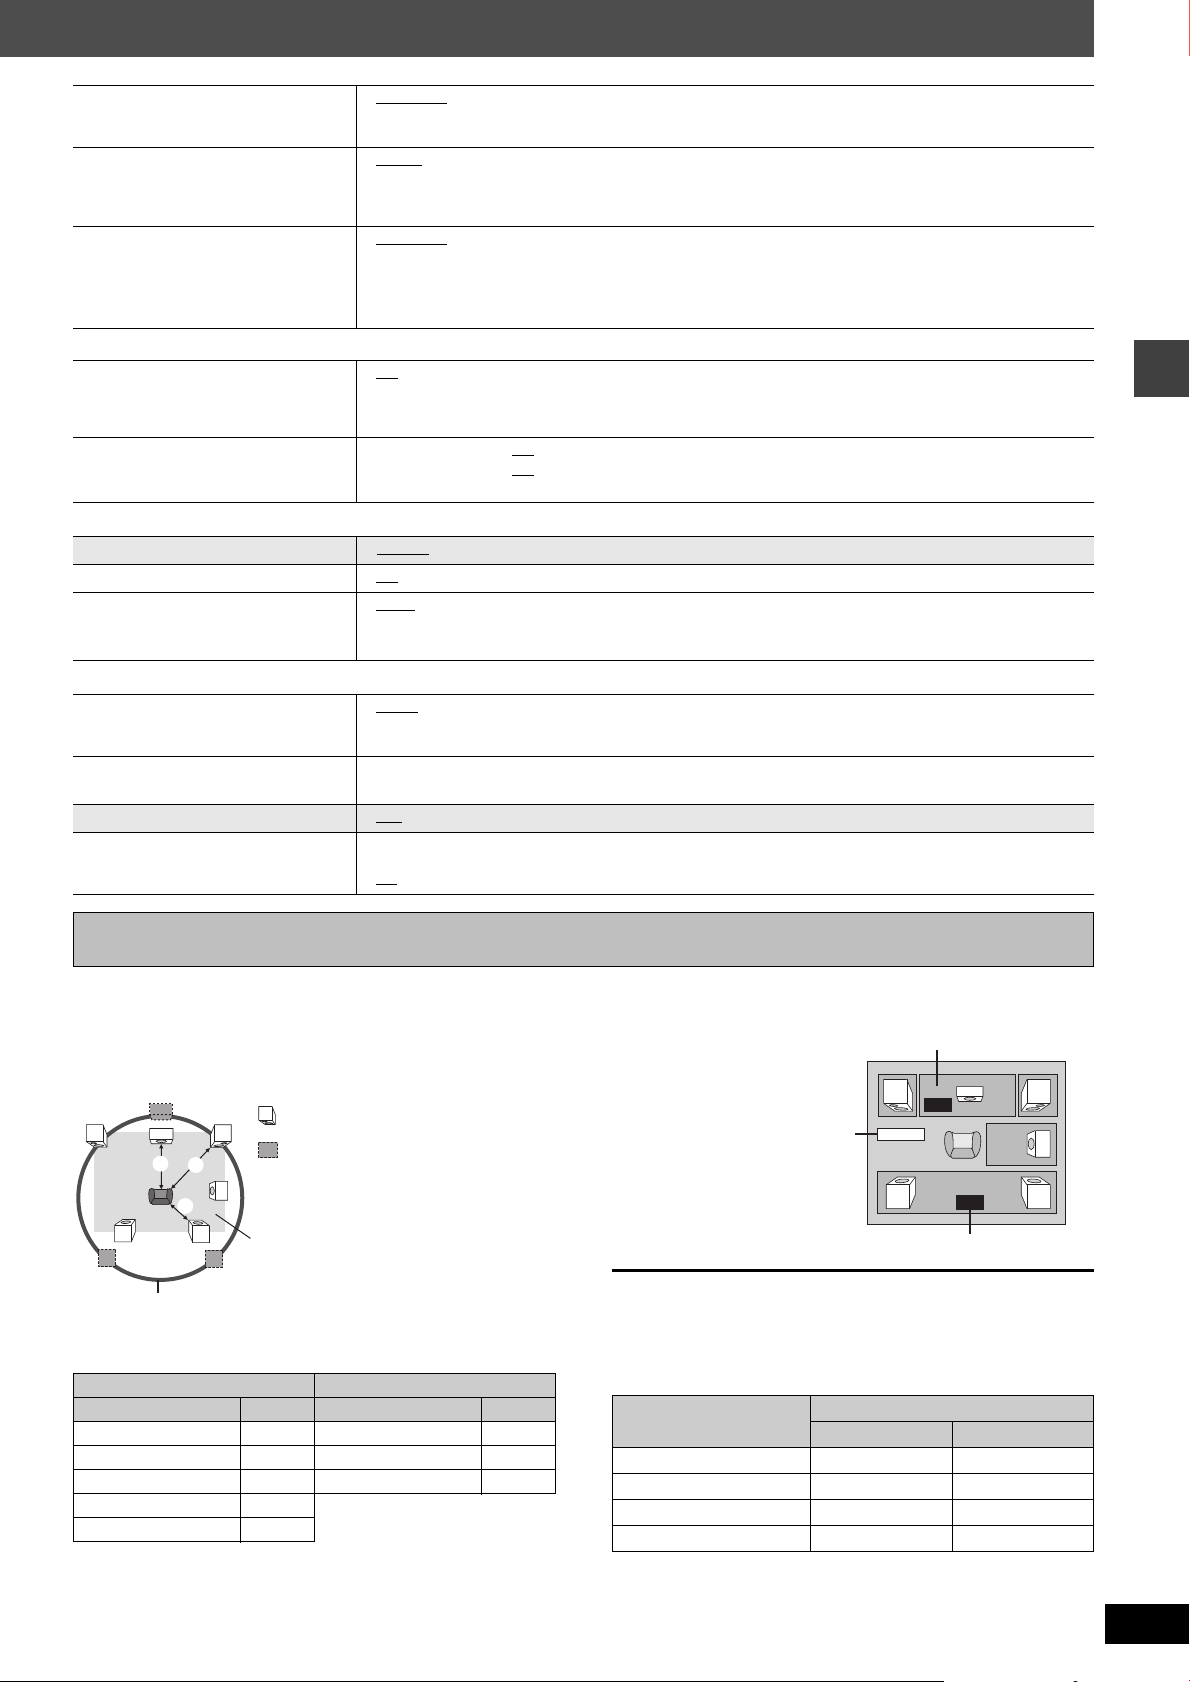
Still Mode
Approximate room dimensions
Circle of constant primary listening distance
: Actual speakers position
: Ideal speakers position
: Primary listening distance
Center delay time
Exit
Surround delay time
Specify the type of picture shown
when paused.
NTSC Disc Output
Choose PAL 60 or NTSC output when
playing NTSC discs (➜ page 9, Video
systems)
Picture/Video Output
Change the video signal format to be
output for JPEG, MPEG4 and DivX
video if picture output is not smooth
during playback.
∫ “Audio” tab
Dynamic Range Compression
Speaker Settings (➜ below)
Set the delay time for your center and
surround speakers.
∫
“
Display” tab
Menu Language
On-Screen Messages
Background during Play
Select background during JPEG,
MPEG4 and DivX video playback.
“
Others” tab
∫
FL Dimmer
Changes the brightness of the unit’s
display.
DivX Registration
Displays the unit’s registration code.
QUICK SETUP
Re-initialise Setting
This returns all values in the Setup
menus to the default settings.
≥Automatic
≥Field: The picture is not blurred, but picture quality is lower.
≥Frame:
≥PA L 6 0
Overall quality is high, but the picture may appear blurred.
: When connected to a PAL television.
≥NTSC: When connected to an NTSC television.
≥Automatic
≥PA L
≥NTSC/PAL60: Output will depend on “NTSC Disc Output” setting (➜ above).
≥Off
≥On: Adjusts for clarity even when the volume is low by compressing the range of the lowest sound
level and the highest sound level. Convenient for late night viewing. (Only works with Dolby
Digital)
≥Center: 0.0
≥Surround (L/R): 0.0
/1.0/2.0/3.0/4.0/5.0 ms
/5.0/10.0/15.0 ms
≥English ≥ Français ≥Deutsch ≥ Italiano ≥Español ≥Português ≥ PyccknØ ≥ Nederlands
≥On ≥Off
≥Black
≥Bright
≥Grey
≥Dim
≥Auto: The display is dimmed, but brightens when you perform some operations.
You need this registration code to purchase and play DivX Video-on-Demand (VOD) content.
(➜ page 27, About DivX VOD content)
≥Ye s ≥No
≥Yes: The password screen is shown if “Ratings” (➜ page 18) is set. Please enter the same password.
After “INIT” on the display disappears, turn the unit off and on again.
≥No
Changing the player settings
Changing the delay time (Speaker Settings)
(Effective when playing multi-channel audio)
(Center and surround speakers only)
For optimum listening with 5.1-channel sound, all the speakers,
except for the subwoofer, should be the same distance from the
seating position. If you have to place the center or surround
speakers closer to the seating position, adjust the delay time to
make up for the difference.
C
L
If either distance a or b is less than c, find the difference in the
table and change to the recommended setting.
Difference (Approx.) Setting Difference (Approx.) Setting
30 cm 1.0 ms 150 cm 5.0 ms
60 cm 2.0 ms 300 cm 10.0 ms
90 cm 3.0 ms 450 cm 15.0 ms
120 cm 4.0 ms
150 cm 5.0 ms
C
a
LS
LS
R
c
SW
b
RS
RS
b
ca
a Center speaker b Surround speaker
1 Press [3, 4] to select the delay time box and press
[ENTER].
2 Press [3, 4] to adjust the delay time and press [ENTER].
ms
0.0
ms
0.0
C
R
SW
RS
L
Exit
LS
To finish the speaker setting
Press [2] to select “Exit” and press [ENTER].
When you change the surround speaker setting for Dolby Digital, the
setting also changes for Dolby Pro Logic II.
e.g., the settings for MUSIC are the same as those for Dolby Digital.
Dolby Digital
Dolby Pro Logic II
MUSIC MOVIE
0ms 0ms 10ms
5ms 5ms 15ms
10 ms 10 ms 20 ms
15 ms 15 ms 25 ms
RQT8291
19
Page 20
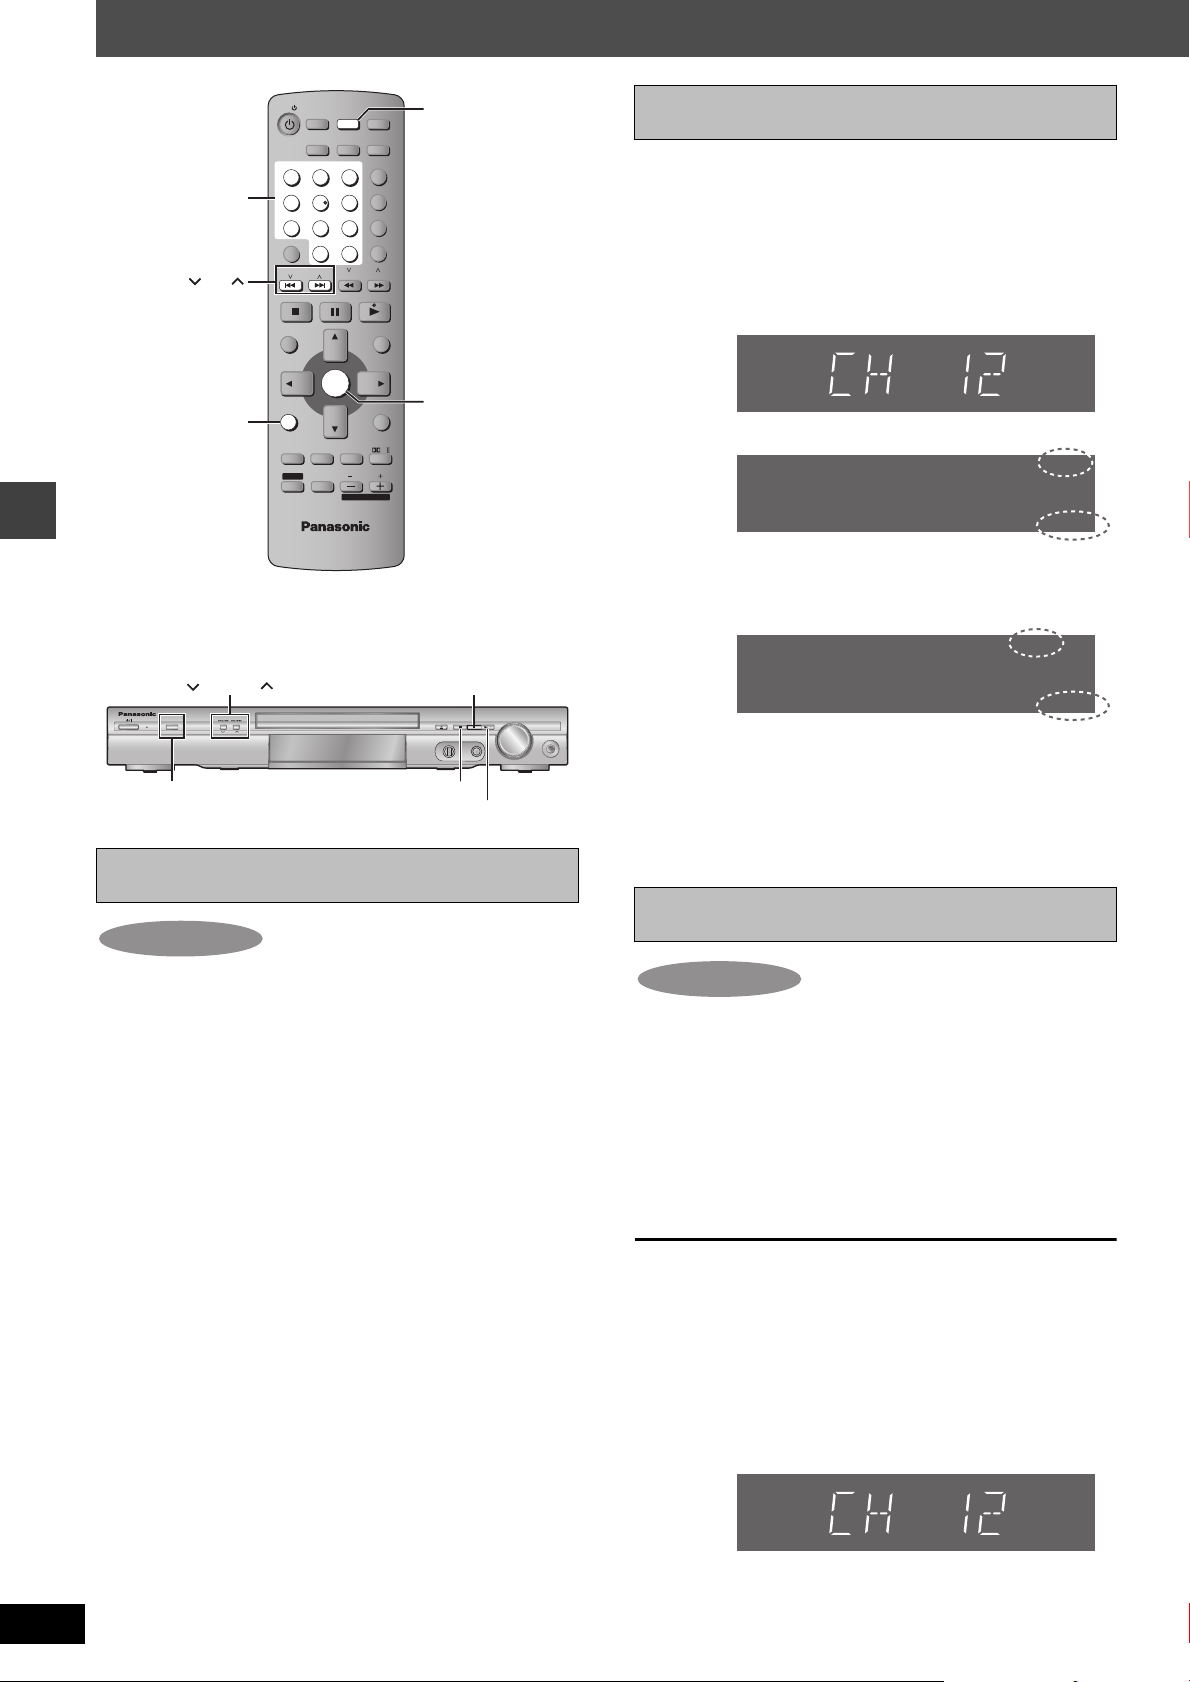
Numbered
buttons
Main unit only
e.g. FM:
Main unit only
The radio
The radio
TV
AUDIO CH SELECT TEST
12
GROUP
45
PROGRESSIVE
7
QUICK OSD
FUNCTIONS
TUNING
INPUT SELECTOR
AC IN
CH
TUNING
CANCEL
TOP MENU
DIRECT
NAVIGATOR
SETUP
FUNCTIONS
SUBWOOFER
LEVEL
SHIFT
TV/VCR
ADVANCED
SLEEP
DISC REVIEW
TV/AV
SUBTITLE ZOOM
ANGLE/PAGE
8
0
CH
ENTER
C.FOCUS
MUTING TV VOL
TUNER/
BAND
QUICK REPLAY
FL DISPLAY
3
MANUAL SKIP
6
9
PLAY MODE
S10
TV CH
SLOW / SEARCH
SFC
VOLUME
DVD/CD
PLAY SPEED
REPEAT
MENU
PLAYLIST
RETURN
MIX 2CH
PL
TUNER/BAND
ENTER
FM MODE
OPEN/CLOSE
FM MODE
TUNE MODE
MEMORY
MIC LEVEL
MIC
MAX
MIN
Selecting the preset channels
1
Press
[TUNER/BAND]
to select “FM” or “AM”.
2 Press the numbered buttons to select the
channel.
Alternatively, press [X CH W].
To select a 2-digit number
e.g. 12: [S10] ➜ [1] ➜ [2]
DTS
RAM
TG
RND
D
PL
CD
HDCD
DVD
When a stereo FM broadcast is being received.
DTS
RAM
TG
RND
D
PL
CD
HDCD
DVD
∫ If noise is excessive
When “FM” is selected
Press [FM MODE] on the main unit to display “MONO”.
DTS
RAM
TG
RND
D
PL
CD
HDCD
VOLUME
DOWN
UP
PHONES
Press [FM MODE] again to cancel the mode.
DVD
≥FM mode is also canceled when you change the frequency.
D
PGM
D
PGM
D
PGM
MPEG4
D.MIX
SLP
MONO
PTY
MONO
PTY
MONO
PTY
ST
CT
TUNED
ST
CT
TUNED
ST
CT
TUNED
X
iv
PRG
RDS
PS
MPEG4
D.MIX
RDS
D.MIX
RDS
SLP
PS
SLP
PS
X
iv
PRG
MPEG4
X
iv
PRG
Automatic presetting
Up to 15 stations can be set in each band, FM and AM.
1
2 Press [TUNE MODE] to select “MANUAL”.
3 Press [X TUNING W] to tune to the lowest
4 Press and hold [MEMORY].
RQT8291
20
INPUT SELECTOR TUNE MODE
MEMORY
Press
[INPUT SELECTOR]
AM”.
“
to select “FM” or
Each time you press the button: MANUAL()PRESET
frequency (FM: 87.50, AM: 522 or 520).
Release the button when “FM AUTO” or “AM AUTO” is
displayed.
The tuner presets all the stations it can receive into the
channels in ascending order.
≥“SET OK” is displayed when the stations are set, and the
radio tunes to the last preset station.
≥“ERROR” is displayed when automatic presetting is
unsuccessful. Preset the channels manually (➜ right).
When “AM” is selected
Press [FUNCTIONS] on the remote control.
Each time you press the button: BP 2()BP 1
≥The setting is recalled whenever “AM” is selected.
Manual tuning
1 Press [INPUT SELECTOR] to select “FM”
or “AM”.
2 Press [TUNE MODE] to select “MANUAL”.
3
Press
Press and hold [XTUNINGW] until the frequency starts scrolling
to start automatic tuning. Tuning stops when a station is found.
∫ Presetting the channel
Up to 15 stations can be set in each band, FM and AM.
1 While listening to the radio broadcast
Press [ENTER].
2
While the frequency and “PGM” are flashing on the display
Press the numbered buttons to select a channel.
Alternatively, press [X CH W], then press [ENTER].
≥To select a 2-digit number
e.g. 12: [S10] ➜ [1] ➜ [2].
The station occupying a channel is erased if another station is
preset to that channel.
[X TUNING W]
DTS
TG
RND
D
PGM
D
PL
CD
HDCD
DVD
RAM
to select the frequency.
MPEG4
D.MIX
SLP
MONO
PTY
ST
CT
TUNED
X
iv
PRG
RDS
PS
Page 21
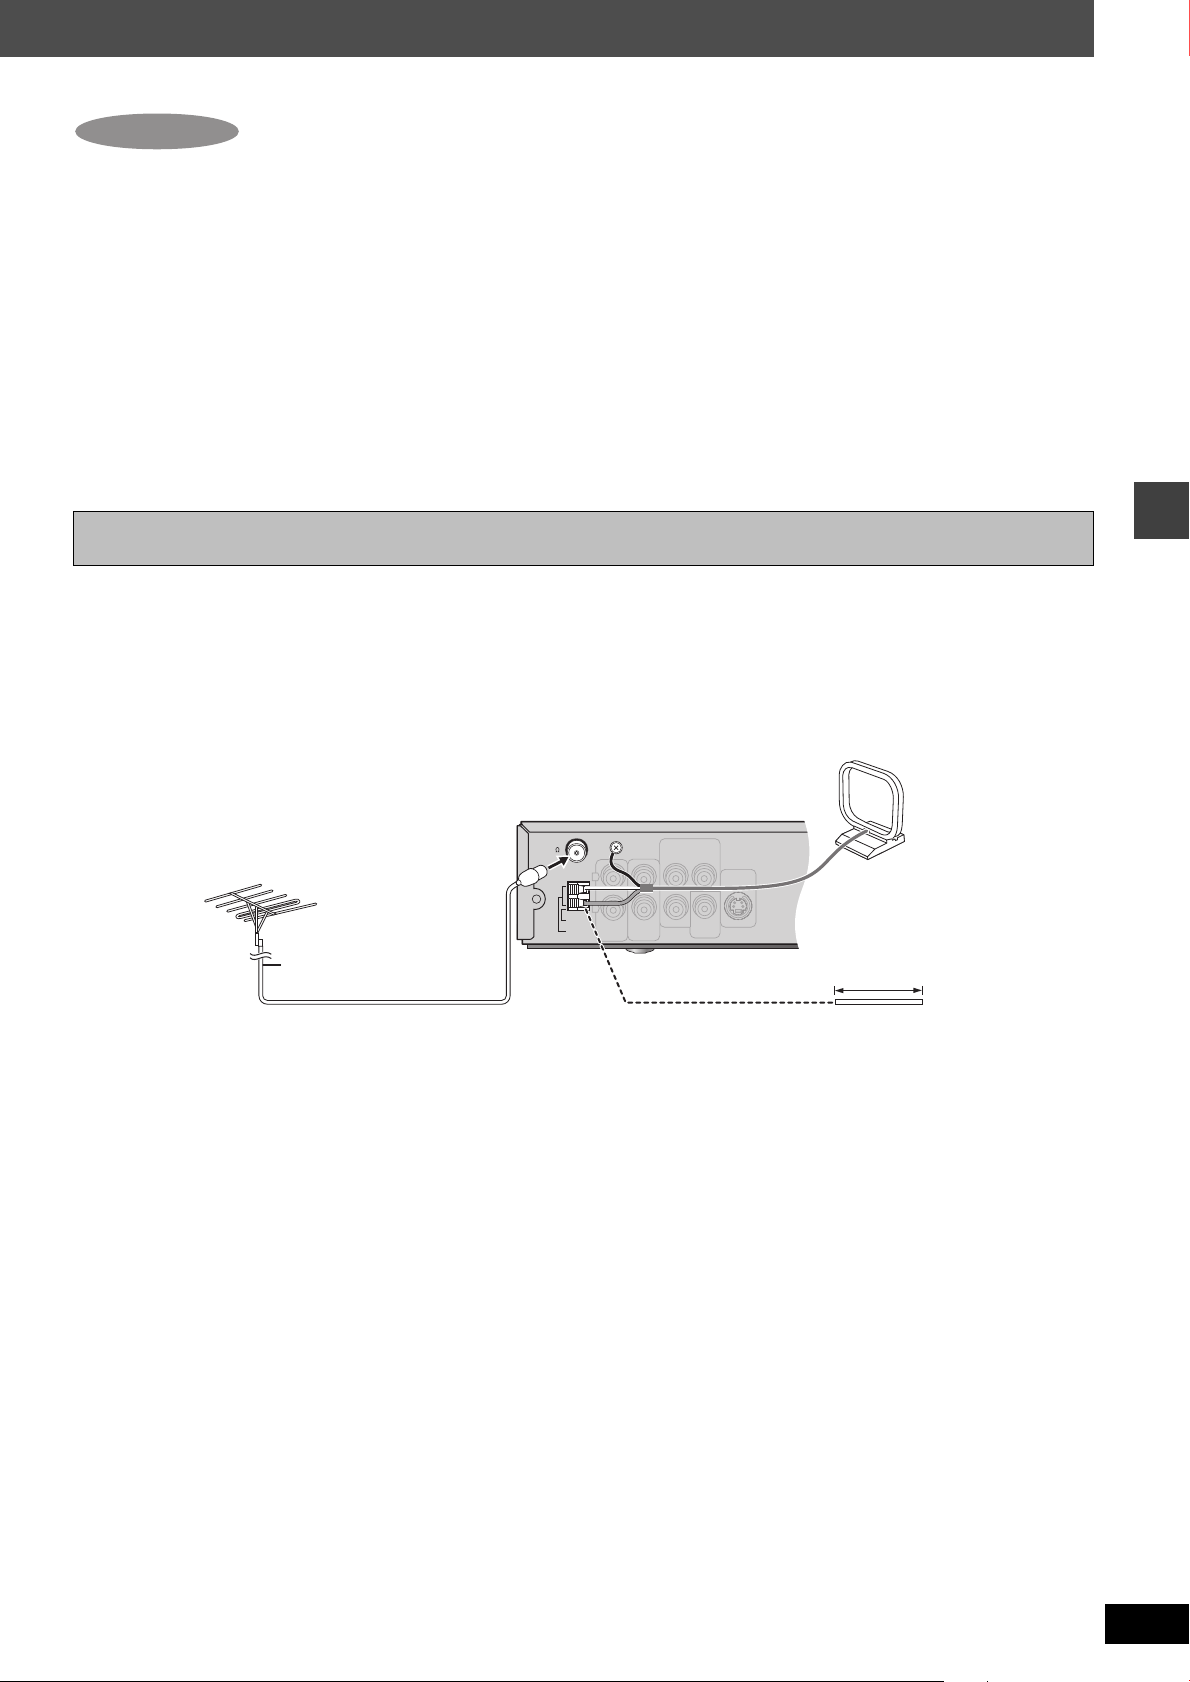
∫ AM frequency step
Main unit only
TV
AUDIO
IN
TVT V
AUDIU DIO
IN
IN
TV
AUDIO
IN
AM
ANT
LOOP
EXT
FM ANT
(75
)
AM outdoor antenna
(Using a vinyl wire)
Run a piece of vinyl wire horizontally across a
window or other convenient location.
Leave the AM loop antenna connected.
FM outdoor antenna
(Using a television antenna)
≥Disconnect the FM indoor antenna.
≥The antenna should be installed by a competent
technician.
5–12 m
75 ≠ coaxial cable
(not included)
The step is factory-set to 9 kHz, but you can change it to receive
broadcasts allocated in 10-kHz steps.
1 Press [INPUT SELECTOR]
to select “FM”.
2 Press and hold [INPUT SELECTOR].
After a few seconds, the display changes to show the current
minimum frequency. Continue to hold the button down. The
minimum frequency changes and the step is changed.
To return to the original step, repeat the above steps.
[Note]
After changing the setting, previously preset frequencies will be
cleared.
Optional antenna connections
Use outdoor antennas if radio reception is poor.
≥Disconnect the antenna when the unit is not in use.
≥Do not use the outdoor antenna during an electrical storm.
The radio
RQT8291
21
Page 22
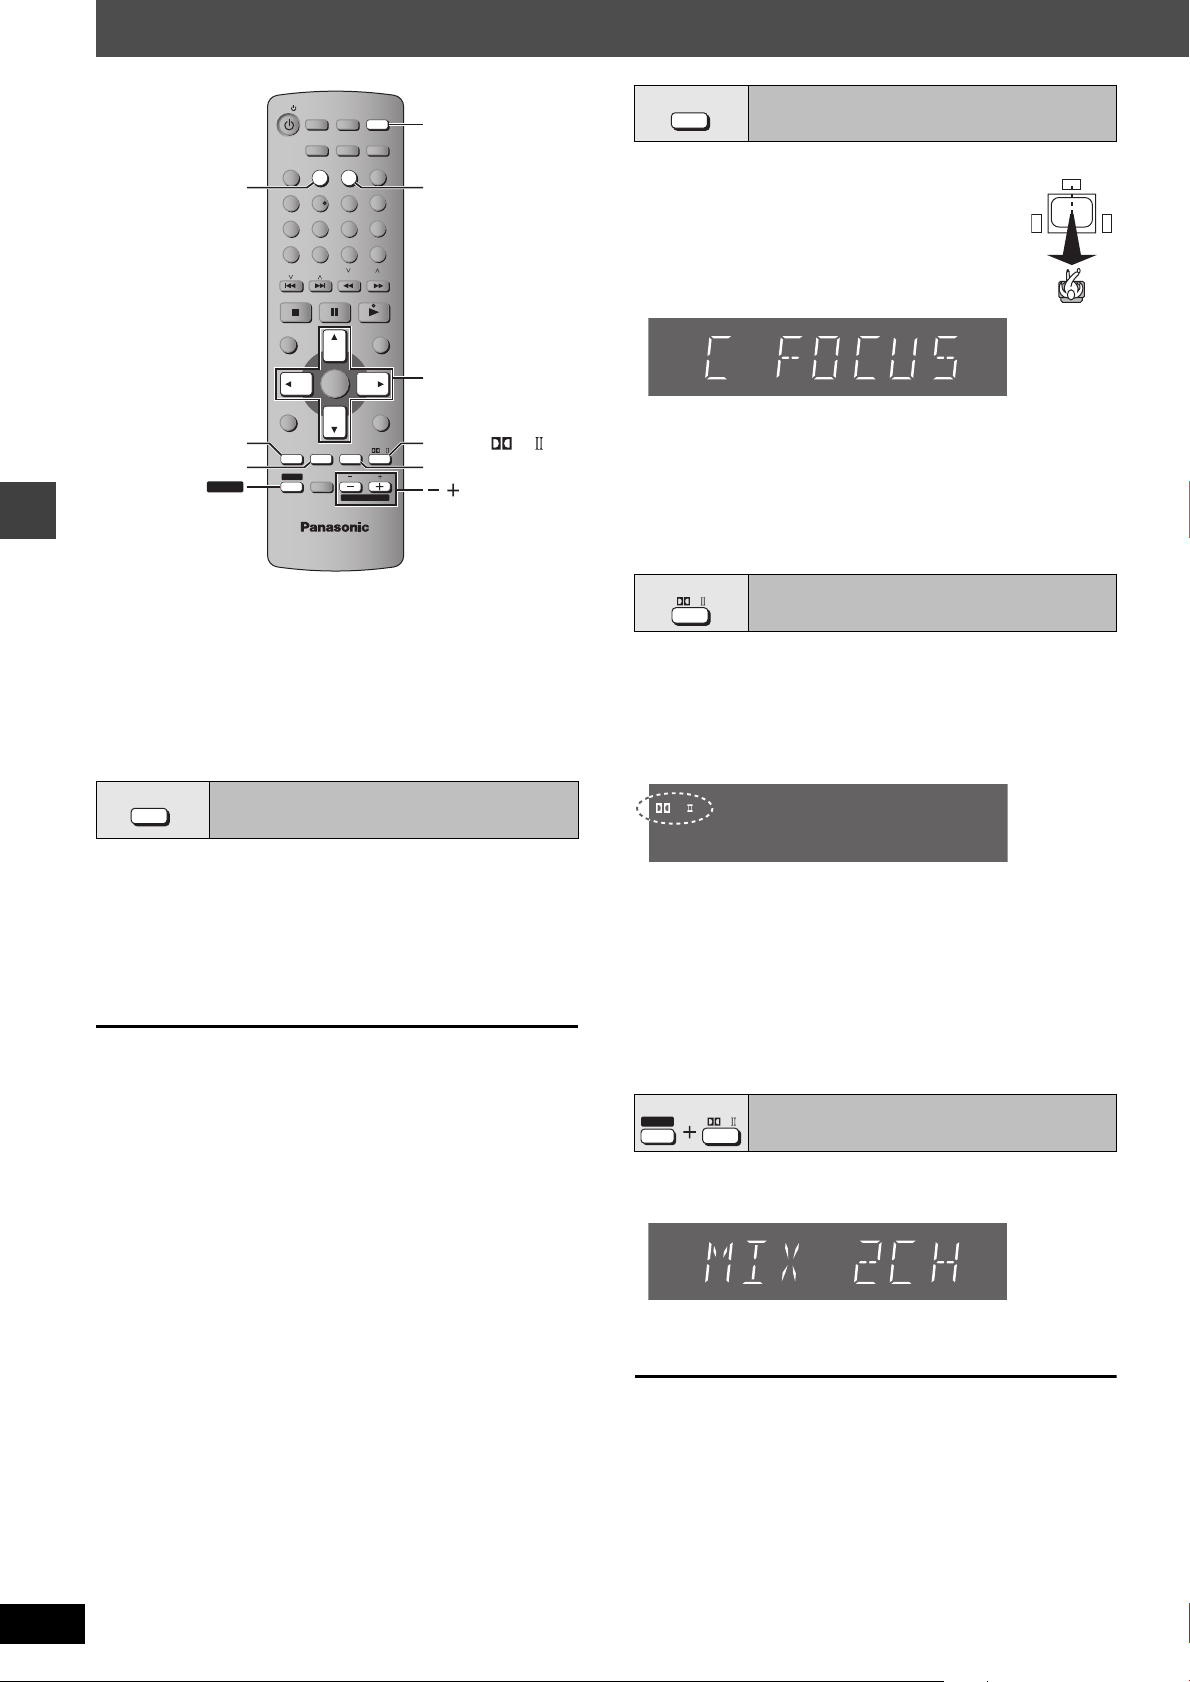
Sound field and sound quality
RAM
PGM
RND
PRG
RDS
PS
TUNED
PTY
DTS
TG
MPEG4
D.MIX
SLP
MONO
ST
D
X
iv
D
PL
CD
HDCD
DVD
CT
TV
TUNER/
CH SELECT
SUBWOOFER LEVEL
C.FOCUS
SHIFT
TV/VCR
AUDIO CH SELECT TEST
12
SUBTITLE ZOOM
GROUP
45
PROGRESSIVE
7
QUICK OSD
CH
CANCEL
TOP MENU
DIRECT
NAVIGATOR
SETUP
FUNCTIONS
SUBWOOFER
LEVEL
SHIFT
BAND
ADVANCED
SLEEP
DISC REVIEW
TV/AV
3
6
ANGLE/PAGE
8
9
0
S10
SLOW / SEARCH
ENTER
C.FOCUS
SFC
MUTING TV VOL
VOLUME
DVD/CD
PLAY SPEED
QUICK REPLAY
FL DISPLAY
MANUAL SKIP
REPEAT
PLAY MODE
TV CH
PLAYLIST
RETURN
MIX 2CH
MENU
PL
DVD/CD
TEST
3, 4, 2, 1
MIX 2CH, PL
SFC
VOLUME
[Note]
≥When connected with headphones, the following sound field
systems have no effect. (Excluding Sound Field Control)
≥You may experience a reduction in sound quality when these
sound field systems are used with some sources. If this occurs,
turn the sound field system off.
≥The following functions may not work depending on the disc’s
recording.
C.FOCUS
Center Focus
(Discs where the dialogue is recorded in the center channel)
You can make the sound of the center speaker seem
like it is coming from within the television.
Press [C.FOCUS].
DTS
D
PL
CD
HDCD
DVD
RAM
TG
RND
D
PGM
MPEG4
D.MIX
SLP
MONO
PTY
ST
CT
TUNED
X
iv
PRG
RDS
PS
Each time you press the button:
C FOCUS ON,------.C FOCUS OFF
≥This also works when Dolby Pro Logic II is turned on.
MIX2CH
PL
Dolby Pro Logic II
Except [DivX]
Dolby Pro Logic II is an advanced decoder that derives 5-channel
surround (Left and Right Front, Center, Left and Right Surround)
from any stereo program material, whether or not it has been
specifically Dolby Surround encoded.
Press [ÎPLII].
SFC
Sound Field Control
Sound field and sound quality
Changes the sound quality.
Press [SFC].
Each time you press the button:
FLAT: Cancel (no effect is added) (factory preset).
HEAVY: Adds punch to rock.
CLEAR: Clarifies higher sounds.
SOFT: For background music.
To check the current setting
Press [SFC].
Each time you press the button:
MOVIE: Movie software, recorded in Dolby Surround.
MUSIC: Stereo sources
OFF: Cancel
≥This works only in DVD/CD mode.
≥“ÎPLII” lights when there is effect.
MIX2CH
SHIFT
PL
Down-mixing
You can output the down-mixed 2 channel signals when necessary.
Press [SHIFT]i[MIX2CH].
DTS
RAM
TG
RND
D
PL
CD
HDCD
DVD
Each time you press the button:
MIX 2CH ON,------.MIX 2CH OFF
D
PGM
MPEG4
D.MIX
SLP
MONO
PTY
ST
CT
TUNED
X
iv
PRG
RDS
PS
RQT8291
22
When “D.MIX” flashes on the display, the disc contains multiplechannel signals that cannot be down-mixed. [DVD-A]
Page 23
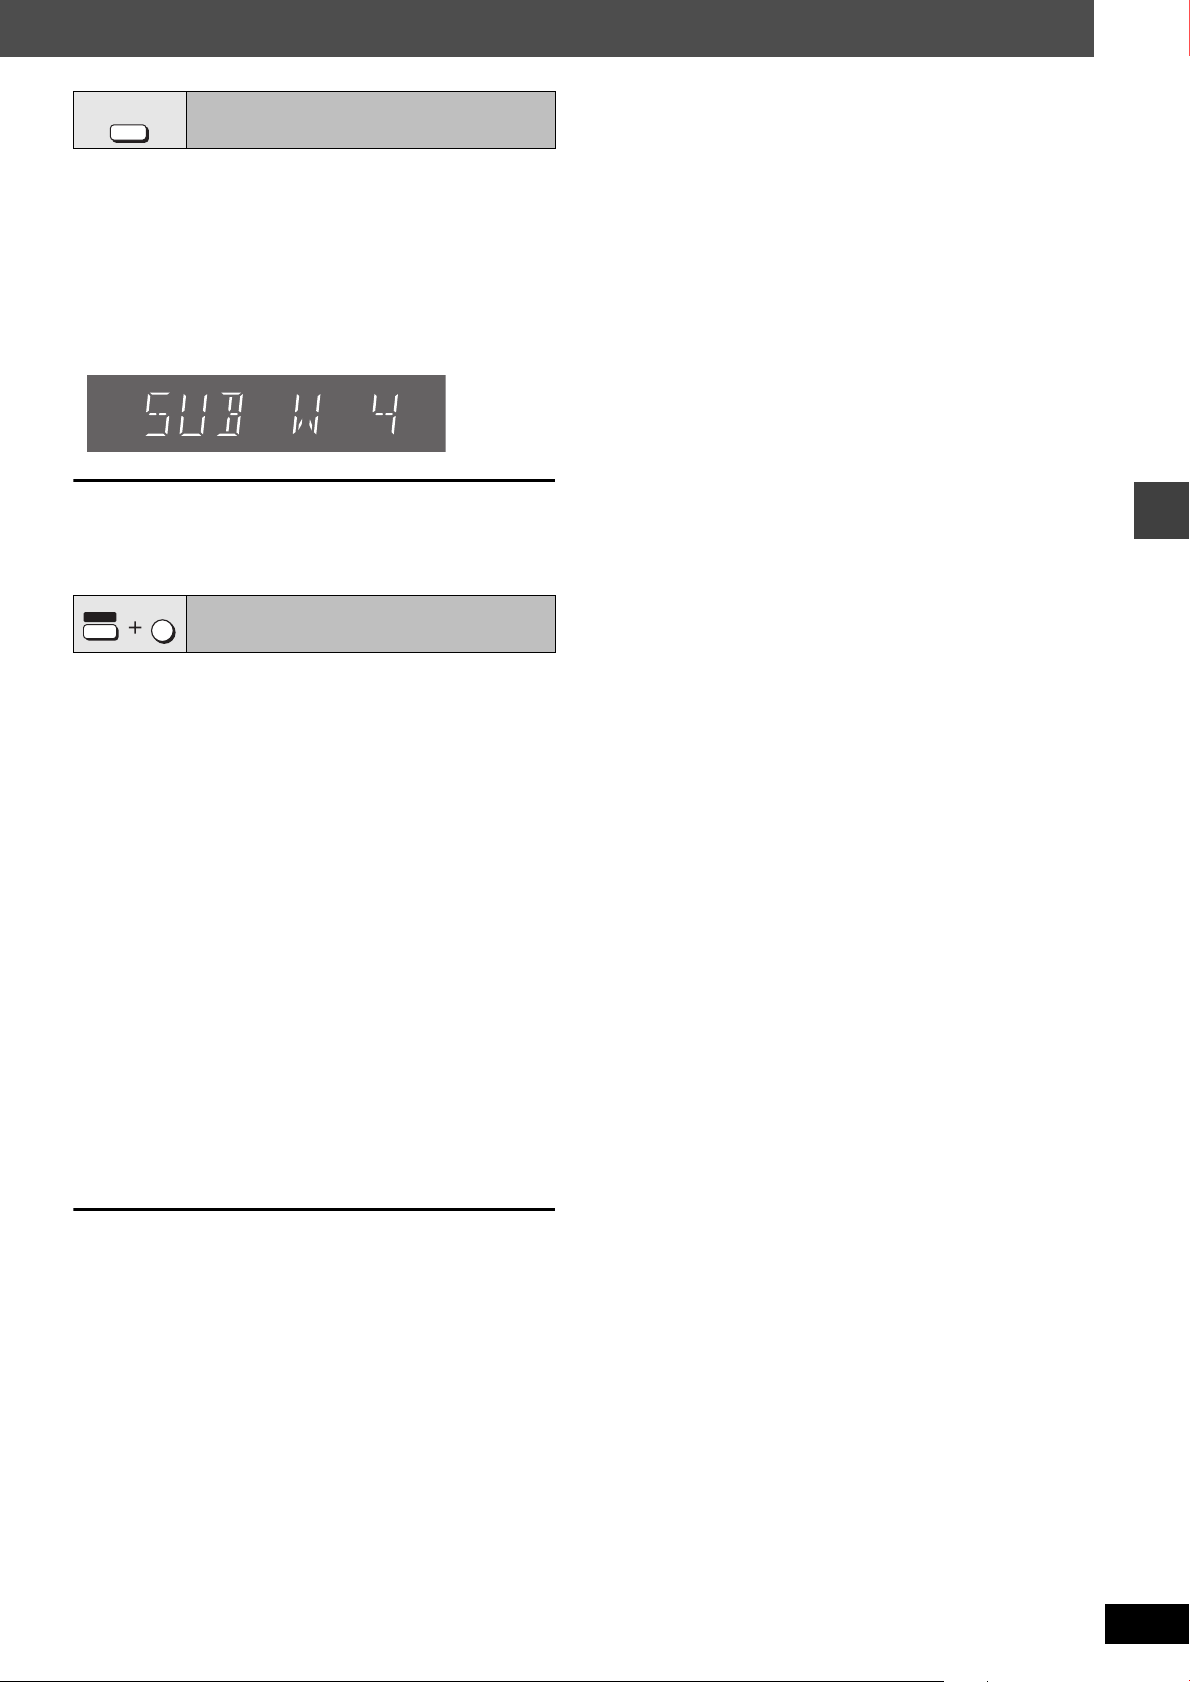
SUBWOOFER
LEVEL
You can adjust the amount of bass. The unit automatically selects
the most suitable setting according to the type of playing source.
Subwoofer level
Press [SUBWOOFER LEVEL].
≥[DVD-V] [RAM] [DVD-RW[‹VR›]
SUB W 4 (factory preset)>SUB W 1>SUB W 2>SUB W 3
^---------------------------------------------------------------------------------------}
≥When another source is selected
SUB W 2 (factory preset)>SUB W 3>SUB W 4>SUB W 1
^----------------------------------------------------------------------------------------}
DTS
RAM
TG
RND
D
PL
CD
HDCD
DVD
The setting you make is retained, and recalled every time you play
the same type of source.
D
PGM
MPEG4
D.MIX
SLP
MONO
PTY
ST
CT
TUNED
X
iv
PRG
RDS
PS
∫ To adjust speaker level during play
(Effective when playing multi-channel audio or when Dolby Pro
Logic II is on.)
1 Press [SHIFT]i[CH SELECT] to select the speaker.
L #C #R #RS #LS #SW
^--------------------------------------------------}
SW: Subwoofer
≥You can adjust SW only if the disc includes a subwoofer
channel.
≥“SW” does not appear on the display and is not adjustable
when Dolby Pro Logic II is turned on.
2 Press [3] (increase) or [4] (decrease) to adjust the
speaker level for each speaker.
C, RS, LS, SW: j6 dB to i6 dB
(L, R: Only the balance is adjustable.)
≥To adjust the balance of the front speakers
While “L” or “R” is selected, press [2, 1].
SHIFT
This is one of the ways to get appropriate surround effects.
Preparation
Press [DVD/CD].
TEST
Speaker level adjustments
3
1 While stopped and no on-screen display is shown
Press [SHIFT]i[TEST] to output a test
signal.
L: Front left C: Center R: Front right
RS: Right surround LS: Left surround
≥There is no output from SW (subwoofer) channel.
2 Press [VOLUME, r] or [s] to set the
volume level normally used for listening.
3 Press [3] (increase) or [4] (decrease) to
adjust the speaker level for each speaker.
C, RS, LS: j6 dB to i6 dB
(L, R: Only the balance is adjustable.)
≥To adjust the balance of the front speakers
While outputting the test signal, press [2, 1].
≥Adjust the speaker level to the same level as the front
speakers.
Sound field and sound quality
To stop the test signal
Press [SHIFT]i[TEST] again.
RQT8291
23
Page 24
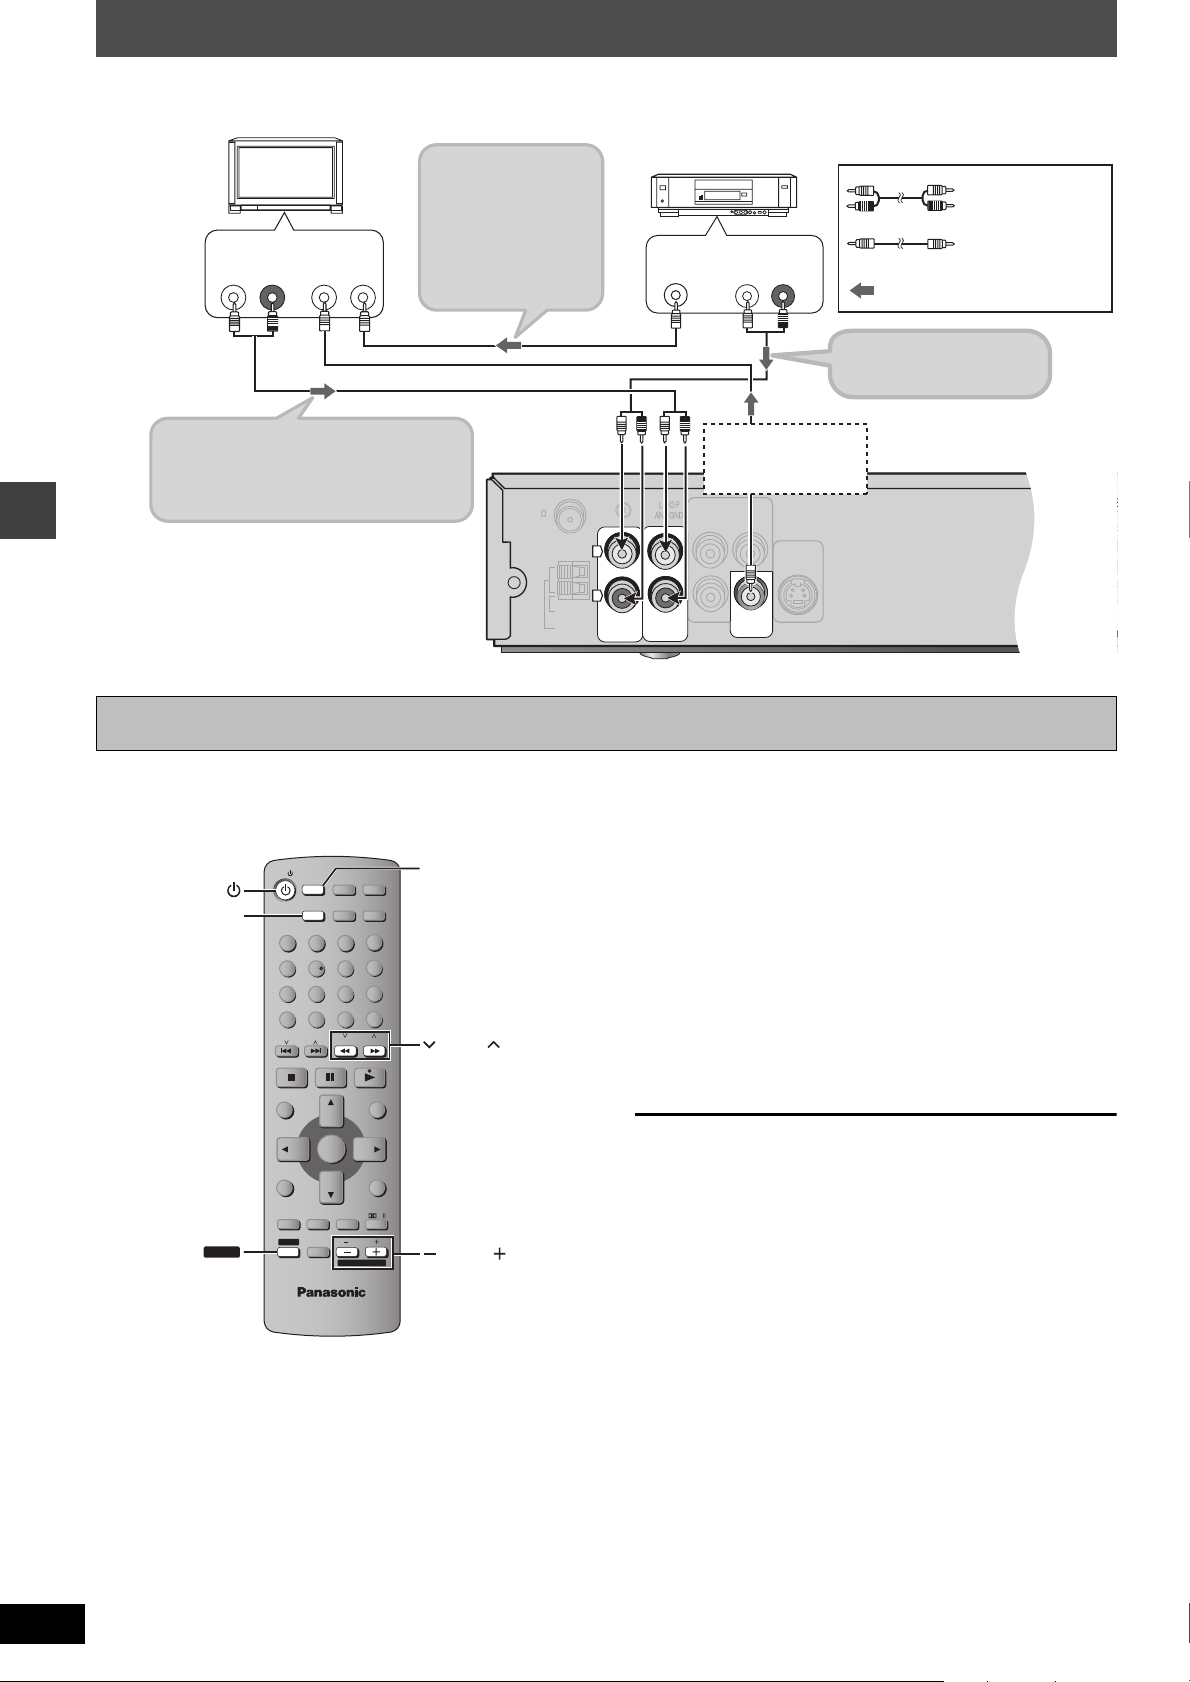
Connecting other equipment
L
R
TVTV
AUDIUDIO
IN
IN
VCRVCR
AUDIUDIO
IN
IN
AM
ANT
LOOP
EXT
P
B
Y
P
R
VIDEOVIDEO
OUTOUT
FM ANT
(75
)
SPEAKE
CE
SUBWOOFER
COMPONENT VIDEO OUTCOMPONENT VIDEO OUT
(NTSC: 480p/480i, PAL: 576p/576i)(NTSC: 480p/480i, PA L: 576p/576i)
S-VIDEOS-VI DEO
OUTOUT
AUDIO OUTRLVIDEO IN
21
VIDEO
OUT
AUDIO OUT
R
L
Television
(not included)
Video cassette recorder
(not included)
To show video from
the video cassette
recorder
Select “VIDEO 2” input
on your television in
this example.
Already connected
(➜ page 6)
To play audio from a
video cassette recorder
Audio cable
(not included)
Video cable
(not included)
: Signal flow
To play audio from the television
Reduce the volume on the television to
its minimum and control the volume on
this unit.
∫ Connection example
MENU
DIRECT
NAVIGATOR
TOP MENU
RETURN
SETUP
FUNCTIONS
TV/VCR
MIX 2CH
PL
SHIFT
PLAYLIST
ENTER
12
6
9
45
7
8
0
S10
3
TV
TUNER/
BAND
DVD/CD
ADVANCED
DISC REVIEW
SLEEP
TV/AV
PLAY SPEED
QUICK REPLAY
AUDIO CH SELECT TEST
FL DISPLAY
GROUP
SUBTITLE ZOOM
MANUAL SKIP
QUICK OSD
REPEAT
ANGLE/PAGE
PLAY MODE
PROGRESSIVE
CANCEL
SLOW / SEARCH
VOLUME
MUTING TV VOL
C.FOCUS
SFC
SUBWOOFER
LEVEL
CH
TV CH
SHIFT
TV/ VCR
TV
TV/AV
TV CH
TV VOL
Operating the television
You can use the remote control to operate a Panasonic television. Connect your equipment referring to “Connection example” (➜ above).
[Note]
Connecting other equipment
The remote control may not work properly with some models. Preparation
RQT8291
24
Aim the remote control at the unit and press [TV/VCR] once or twice
until “TV” appears in the display, and then aim it at the television for
the following operations:
Turning the television on/off
Press [SHIFT]i[TV Í].
Switching the television’s video input mode
Press [TV/AV].
Changing channels
Press [SHIFT]r[X TV CH W].
Adjusting the volume
Press [SHIFT]r[s TV VOL r].
∫ Enjoying your Home Theater Sound System with
a video cassette recorder
1
Change the video input mode on the television ("VIDEO 2" in
the example).
2 Aim the remote control at the unit and press [TV/VCR] once
or twice until “VCR” appears in the display.
3 Operate the video cassette recorder using its remote
control.
∫ Connecting a laser disc or record player
Connect instead of a video cassette recorder (➜ above) and select
“VCR” as the source.
We recommend using a record player with a built-in phono equalizer.
If your player doesn’t have a built-in equalizer, connect it first to a
separate equalizer and then to the unit.
Page 25
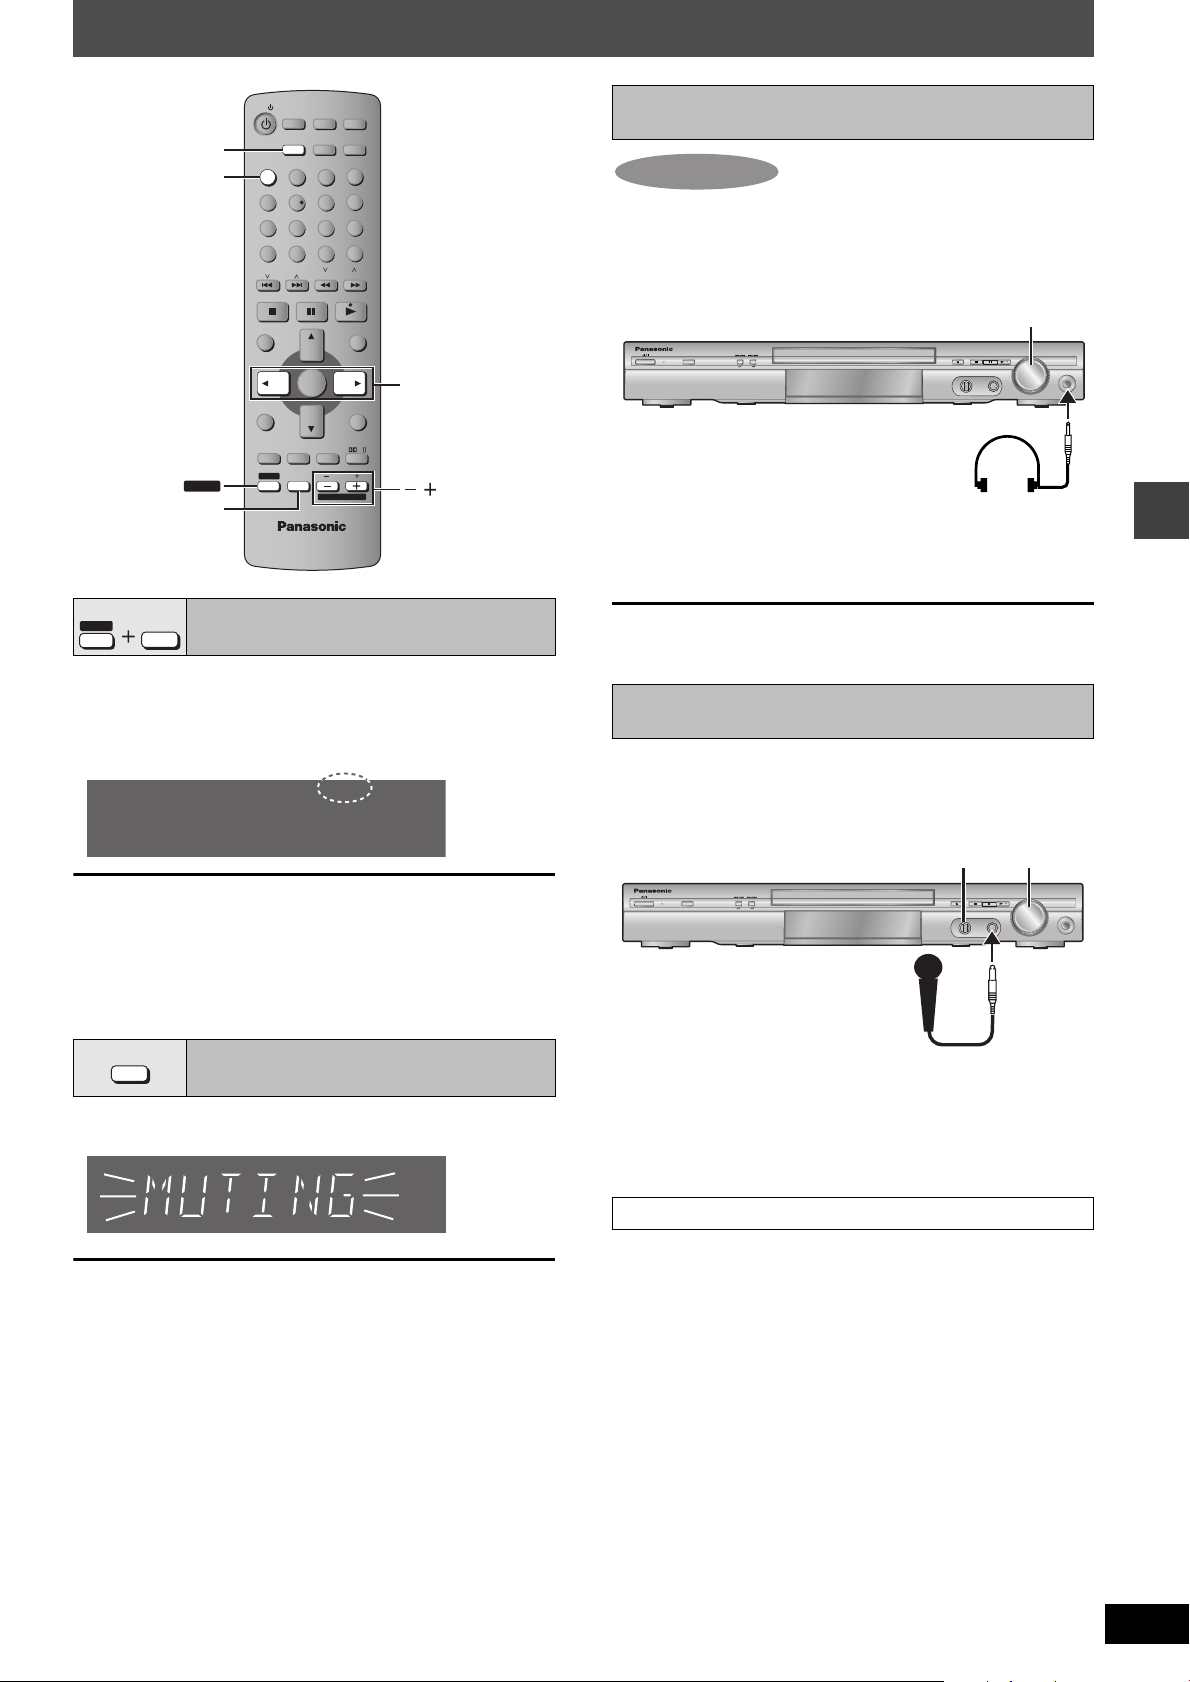
Other useful functions
RAM
PGM
RND
PRG
RDS
PS
TUNED
PTY
DTS
TG
MPEG4
D.MIX
SLP
MONO
ST
D
X
iv
D
PL
CD
HDCD
DVD
CT
Main unit only
Duet discs
Off: Vocals off
V1iV2: Both parts
V1: Part 1 only
V2: Part 2 only
Solo discs
Off:Vocals off
On: Vocals on
TV
TUNER/
SLEEP
AUDIO
SHIFT
MUTING
TV/VCR
AUDIO CH SELECT TEST
12
GROUP
45
PROGRESSIVE
7
QUICK OSD
CH
CANCEL
TOP MENU
DIRECT
NAVIGATOR
SETUP
FUNCTIONS
SUBWOOFER
LEVEL
SHIFT
BAND
ADVANCED
SLEEP
DISC REVIEW
TV/AV
3
SUBTITLE ZOOM
6
ANGLE/PAGE
8
9
0
S10
TV CH
SLOW / SEARCH
ENTER
C.FOCUS
SFC
MUTING TV VOL
VOLUME
DVD/CD
PLAY SPEED
QUICK REPLAY
FL DISPLAY
MANUAL SKIP
REPEAT
PLAY MODE
MENU
PLAYLIST
RETURN
MIX 2CH
PL
2, 1
VOLUME
Using headphones
1 Reduce the volume and connect the
headphones (not included).
Headphone plug type: 3.5 mm stereo
VOLUME
INPUT SELECTOR
AC IN
TUNING
MIC LEVEL
OPEN/CLOSE
DOWN
FM MODE
TUNE MODE
MEMORY
MIC
MAX
MIN
2 Adjust headphone volume with
[VOLUME].
≥Audio is automatically switched to stereo (2-channel).
VOLUME
UP
PHONES
SLEEP
SHIFT
TV/AV
Sleep timer
Press [SHIFT]i[SLEEP] to select the time
(in minutes).
SLEEP 30_----)SLEEP 60_----)SLEEP 90
^""""" OFF(_ SLEEP 120(__}
To cancel the timer
Press [SHIFT]i[SLEEP] to select “OFF”.
To confirm the remaining time
Press [SHIFT]i[SLEEP] again.
To change the setting
Repeat the procedure from the beginning.
MUTING
Muting
Press [MUTING].
“MUTING” flashes on the unit’s display.
DTS
RAM
TG
RND
D
PL
CD
HDCD
DVD
To cancel
≥Press [MUTING] again or reduce the volume to minimum (– – dB),
then raise it to the required level.
≥Muting is canceled when you switch the unit to standby.
D
PGM
MPEG4
D.MIX
SLP
MONO
PTY
ST
CT
TUNED
X
iv
PRG
RDS
PS
[Note]
Avoid listening for prolonged periods of time to prevent hearing
damage.
Enjoying Karaoke
1 Turn [MIC LEVEL] to “MIN” and connect
the microphone (not included).
Microphone plug type: 6.3 mm monaural
MIN
MIC LEVEL
INPUT SELECTOR
AC IN
TUNING
MIC LEVEL
OPEN/CLOSE
MIN
TUNE MODE
MAX
MAX
FM MODE
MIC
VOLUME
VOLUME
DOWN
MEMORY
UP
PHONES
2 Insert the disc and start play (➜ page 10).
3 Adjust the main volume with [VOLUME].
4 Adjust the microphone volume.
To turn the vocals on and off
[DVD-V]
1 Press [SHIFT]i[AUDIO] during play.
2 Press [2, 1] to select the mode.
Other useful functions
[VCD]
Press [SHIFT]i[AUDIO] during play.
Each time you press the button:
LR: Vocals and accompaniment
L: Accompaniment only
R: Vocals only
Select “L” for karaoke. (R and L may be reversed on some discs.)
RQT8291
25
Page 26
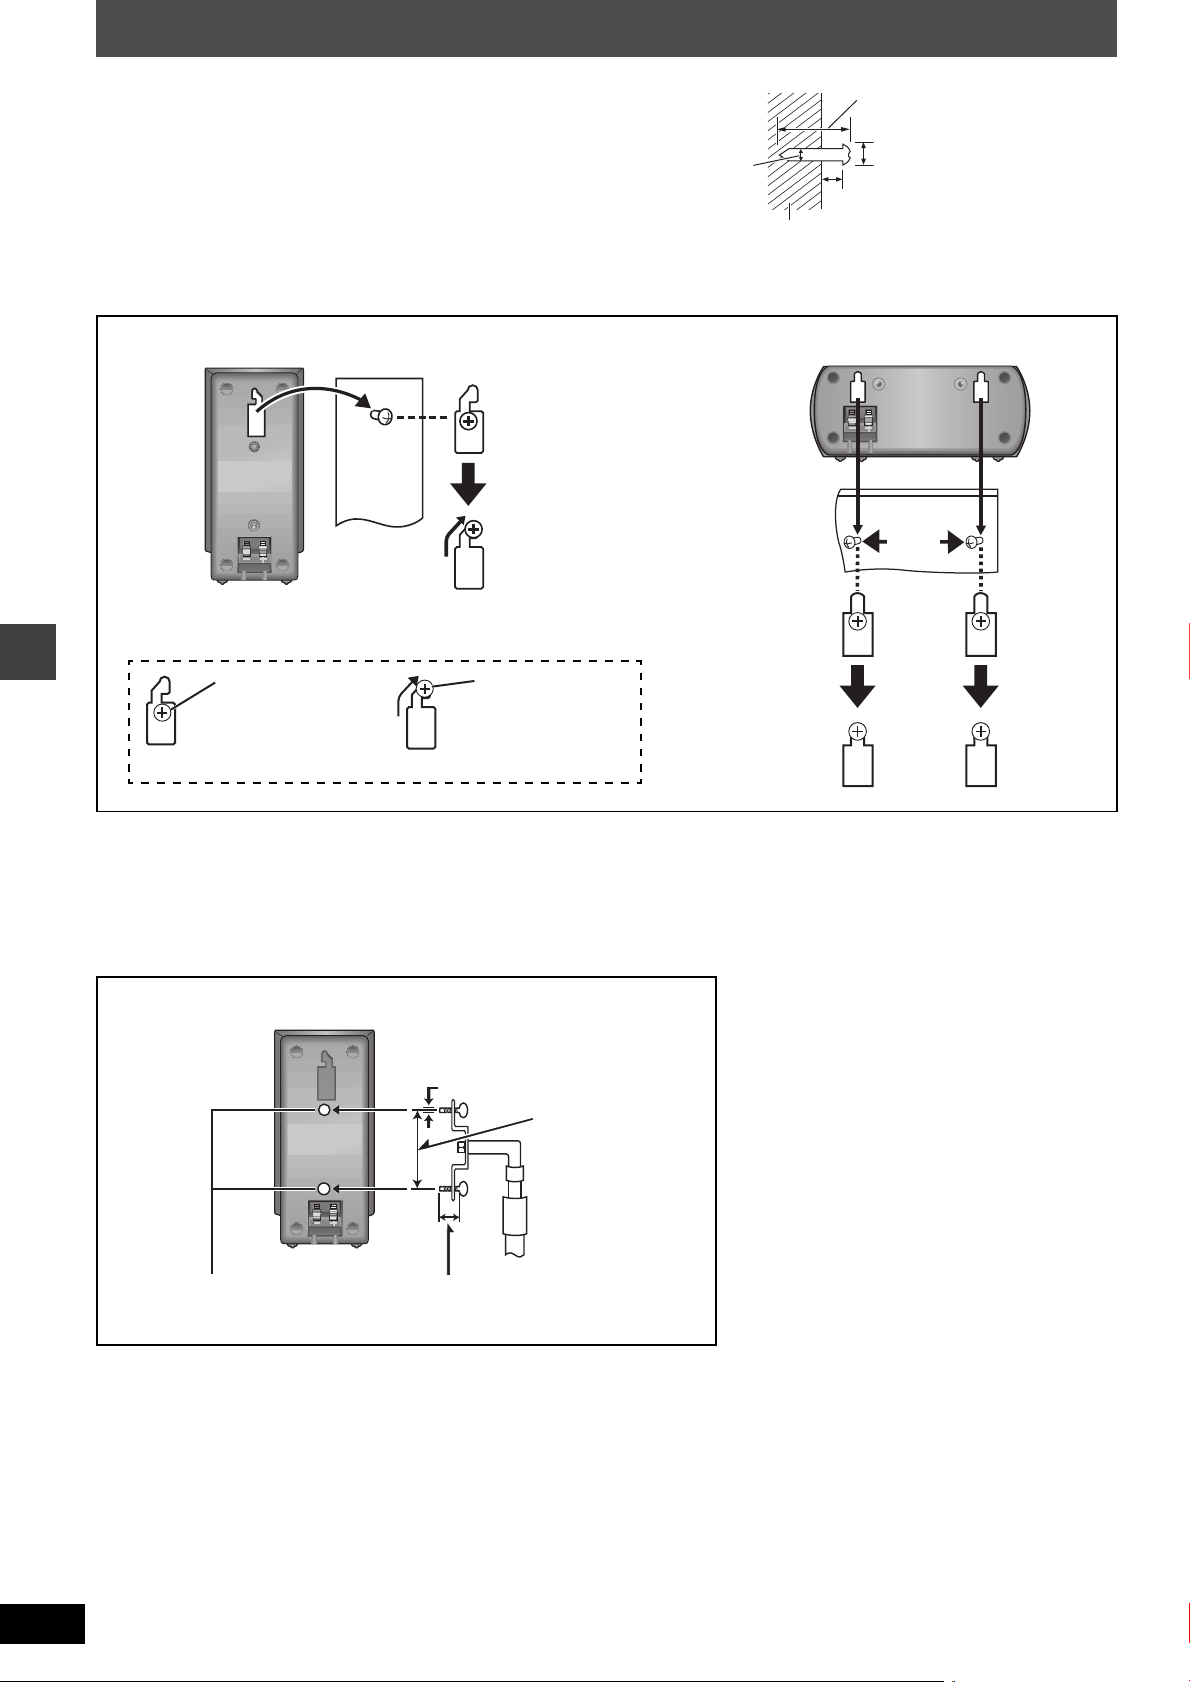
Other speaker setup options
30– 35 mm
‰7.5–9.4 mm
4.0–7.0 mm
Wall or pillar
‰3.0–4.0 mm
90 mm
Front and surround speakers
In this position, the
speaker will likely
fall if moved to the
left or right.
Move the speaker
so that the screw is
in this position.
Center speaker
Speaker stand
(not included)
Plate thickness plus 7 mm to 10 mm
Front and surround speakers
e.g.
Attach the stands to these
metal screw holes.
60 mm
5 mm, pitch 0.8 mm
∫ Attaching to a wall
You can attach all of the speakers to a wall.
1 Drive a screw (not included) into the wall.
2 Fit the speaker securely onto the screw(s) with the hole(s).
≥The wall or pillar on which the speakers are to be attached should be capable of supporting 10 kg per screw. Consult a qualified building
contractor when attaching the speakers to a wall. Improper attachment may result in damage to the wall and speakers.
∫ Fitting speaker stands (not included)
Ensure the stands meet these conditions before purchasing them.
Note the diameter and length of the screws and the distance between screws as shown in the diagram.
≥The stands must be able to support over 10 kg.
≥The stands must be stable even if the speakers are in a high position.
Other speaker setup options
RQT8291
26
Page 27
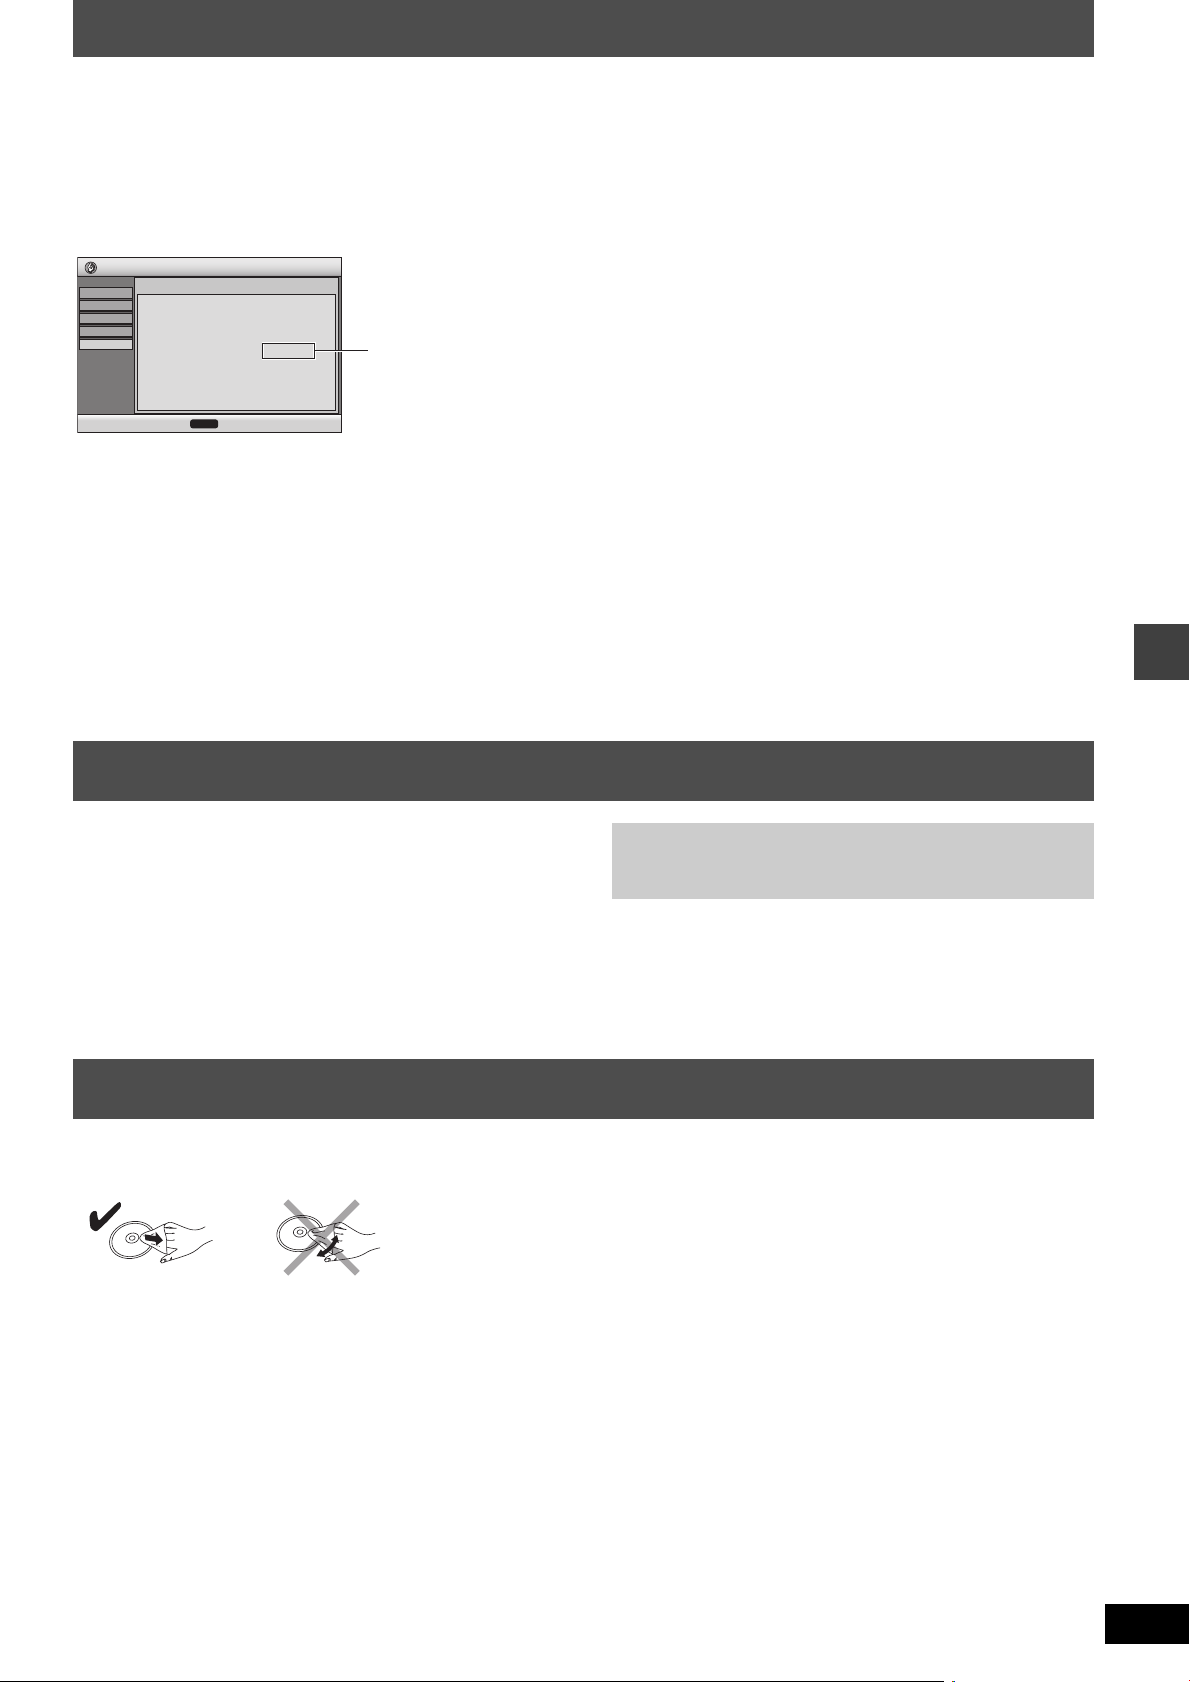
About DivX VOD content
8 alphanumeric
characters
DivX Video-on-Demand (VOD) content is encrypted for copyright protection. In order to play DivX VOD content on this unit, you first need to
register the unit.
Follow the online instructions for purchasing DivX VOD content to enter the unit’s registration code and register the unit. For more information
about DivX VOD, visit www.divx.com/vod.
Display the unit’s registration code
(➜ page 19, “DivX Registration” in “Others” tab)
Setup
Disc
Video
Audio
Display
Others
≥We recommend that you make a note of this code for future
reference.
≥After playing DivX VOD content for the first time, another
registration code is then displayed in “DivX Registration”. Do not
use this registration code to purchase DivX VOD content. If you
use this code to purchase DivX VOD content, and then play the
content on this unit, you will no longer be able to play any content
that you purchased using the previous code.
≥If you purchase DivX VOD content using a registration code
different from this unit’s code, you will not be able to play this
content. (“Authorization Error” is displayed.)
DivX Registration
DivX Video-on-Demand
Your registration code is : XXXXXXXX
To learn more visit www.divx.com/vod
ENTER
to continuePress
Regarding DivX content that can only be played a set
number of times
Some DivX VOD content can only be played a set number of times.
When you play this content, the remaining number of plays is
displayed. You cannot play this content when the number of
remaining plays is zero. (“Rented Movie Expired” is displayed.)
When playing this content
≥The number of remaining plays is reduced by one if
– you turn off the unit or press [SHIFT]i[SETUP].
– you press [∫]. (Press [;] to pause play.)
– you press [:, 9] or [6, 5] etc. and arrive at another
content or the start of the content being played.
≥Resume (➜ page 11, Stop) and Marker (➜ page 17, Play Menu)
functions do not work.
Maintenance
Clean this unit with a soft, dry cloth.
≥Never use alcohol, paint thinner or benzine to clean this unit.
≥Before using chemically treated cloth, carefully read the
instructions that came with the cloth.
Do not use commercially available lens cleaners as they may
cause malfunction. (Cleaning of the lens is generally not necessary
although this depends on the operating environment.)
Disc handling
∫ To clean discs
Wipe with a damp cloth and then wipe dry.
Before moving the unit, ensure the disc tray is empty.
Failure to do so will risk severely damaging the disc and the
unit.
∫ Disc handling precautions
≥Do not attach labels or stickers to discs (This may cause disc
warping, rendering it unusable).
≥Do not write on the label side with a ball-point pen or other writing
instrument.
≥Do not use record cleaning sprays, benzine, thinner, static
electricity prevention liquids or any other solvent.
≥Do not use scratch-proof protectors or covers.
≥Do not use the following discs:
– Discs with exposed adhesive from removed stickers or labels
(rented discs, etc.).
– Discs that are badly warped or cracked.
– Irregularly shaped discs, such as heart shapes.
About DivX VOD content/Maintenance/Disc handling
RQT8291
27
Page 28
Language code list
Abkhazian: 6566
Afar: 6565
Afrikaans: 6570
Albanian: 8381
Ameharic: 6577
Arabic: 6582
Armenian: 7289
Assamese: 6583
Aymara: 6589
Azerbaijani: 6590
Bashkir: 6665
Basque: 6985
Bengali; Bangla: 6678
Bhutani: 6890
Bihari: 6672
Breton: 6682
Bulgarian: 6671
Burmese: 7789
Byelorussian: 6669
Cambodian: 7577
Catalan: 6765
Chinese: 9072
Corsican: 6779
Croatian: 7282
Czech: 6783
Danish: 6865
Dutch: 7876
English: 6978
Esperanto: 6979
Estonian: 6984
Faroese: 7079
Fiji: 7074
Finnish: 7073
French: 7082
Frisian: 7089
Galician: 7176
Georgian: 7565
German: 6869
Greek: 6976
Greenlandic: 7576
Guarani: 7178
Gujarati: 7185
Hausa: 7265
Hebrew: 7387
Hindi: 7273
Hungarian: 7285
Icelandic: 7383
Indonesian: 7378
Interlingua: 7365
Irish: 7165
Italian: 7384
Japanese: 7465
Javanese: 7487
Kannada: 7578
Kashmiri: 7583
Kazakh: 7575
Kirghiz: 7589
Korean: 7579
Kurdish: 7585
Laotian: 7679
Latin: 7665
Latvian, Lettish: 7686
Lingala: 7678
Lithuanian: 7684
Macedonian: 7775
Malagasy: 7771
Malay: 7783
Malayalam: 7776
Maltese: 7784
Maori: 7773
Marathi: 7782
Moldavian: 7779
Mongolian: 7778
Nauru: 7865
Nepali: 7869
Norwegian: 7879
Oriya: 7982
Pashto, Pushto: 8083
Persian: 7065
Polish: 8076
Portuguese: 8084
Punjabi: 8065
Quechua: 8185
Rhaeto-Romance: 8277
Romanian: 8279
Russian: 8285
Samoan: 8377
Sanskrit: 8365
Scots Gaelic: 7168
Serbian: 8382
Serbo-Croatian: 8372
Shona: 8378
Sindhi: 8368
Singhalese: 8373
Slovak: 8375
Slovenian: 8376
Somali: 8379
Spanish: 6983
Sundanese: 8385
Swahili: 8387
Swedish: 8386
Tagalog: 8476
Tajik: 8471
Tamil: 8465
Tatar: 8484
Telugu: 8469
Thai: 8472
Tibetan: 6679
Tigrinya: 8473
Tonga: 8479
Turkish: 8482
Turkmen: 8475
Twi: 8487
Ukrainian: 8575
Urdu: 8582
Uzbek: 8590
Vietnamese: 8673
Volapük: 8679
Welsh: 6789
Wolof: 8779
Xhosa: 8872
Yiddish: 7473
Yoruba: 8979
Zulu: 9085
Language code list
Windows Media, and the Windows logo
are trademarks, or registered
trademarks of Microsoft Corporation in
the United States and/or other
countries.
WMA is a compression format
developed by Microsoft Corporation. It
achieves the same sound quality as
MP3 with a file size that is smaller than
that of MP3.
MPEG Layer-3 audio decoding technology licensed from
Fraunhofer IIS and Thomson multimedia.
Manufactured under license from Dolby Laboratories.
“Dolby”, “Pro Logic” and the double-D symbol are trademarks of
Dolby Laboratories.
“DTS” and “DTS Digital Surround” are registered trademarks of
Digital Theater Systems, Inc.
RQT8291
28
This product incorporates copyright protection technology that is
protected by method claims of certain U.S. patents and other
intellectual property rights owned by Macrovision Corporation
and other rights owners. Use of this copyright protection
technology must be authorized by Macrovision Corporation, and
is intended for home and other limited viewing uses only unless
otherwise authorized by Macrovision Corporation. Reverse
engineering or disassembly is prohibited.
HighMAT™ and the HighMAT logo are either
trademarks or registered trademarks of
Microsoft Corporation in the United States
and/or other countries.
®
, HDCD
, High Definition Compatible Digital® and
Pacific Microsonics™ are either registered
trademarks or trademarks of Pacific Microsonics, Inc. in the
United States and/or other countries.
HDCD system manufactured under license from Pacific
Microsonics, Inc. This product is covered by one or more of the
following: In the USA: 5,479,168, 5,638,074, 5,640,161,
5,808,574, 5,838,274, 5,854,600, 5,864,311, 5,872,531, and in
Australia: 669114, with other patents pending.
This product is licensed under the MPEG-4 Visual patent
portfolio license for the personal and non-commercial use of a
consumer for (i) encoding video in compliance with the MPEG-4
Visual Standard (“MPEG-4 Video”) and/or (ii) decoding MPEG-4
Video that was encoded by a consumer engaged in a personal
and non-commercial activity and/or was obtained from a video
provider licensed by MPEG LA to provide MPEG-4 Video. No
license is granted or shall be implied for any other use.
Additional information including that relating to promotional,
internal and commercial uses and licensing may be obtained
from MPEG LA, LLC. See http://www.mpegla.com
.
Official DivX Certified™
®
Plays DivX
5, DivX® 4, DivX® 3, and DivX
compliance with DivX Certified™ technical requirements).
DivX, DivX Certified, and associated logos are trademarks of
DivXNetworks, Inc. and are used under license.
product.
®
VOD video content (in
Page 29

Specifications
AMPLIFIER SECTION
RMS Output Power: Dolby Digital Mode
Front Ch 65 W per channel (6 ≠), 1 kHz, 10 % THD
Surround Ch 65 W per channel (6 ≠), 1 kHz, 10 % THD
Center Ch 65 W per channel (6 ≠), 1 kHz, 10 % THD
Subwoofer Ch 75 W per channel (4 ≠), 100 Hz, 10 % THD
Total RMS Dolby Digital mode power 400 W
PMPO output power 3500 W
DIN Output Power: Dolby Digital Mode
Front Ch 55 W per channel (6 ≠), 1 kHz, 1 % THD
Surround Ch 55 W per channel (6 ≠), 1 kHz, 1 % THD
Center Ch 55 W per channel (6 ≠), 1 kHz, 1 % THD
Subwoofer Ch 65 W per channel (4 ≠), 100 Hz, 1 % THD
Total DIN Dolby Digital mode power 340 W
FM/AM TUNER, TERMINALS SECTION
Preset station FM 15 stations
AM/MW 15 stations
Frequency Modulation (FM)
Frequency range 87.50–108.00 MHz (50-kHz step)
Sensitivity 2.5 µV (IHF)
S/N 26 dB 2.2 µV
Antenna terminals 75 ≠ (unbalance)
Amplitude Modulation (AM/MW)
Frequency range 522– 1629 kHz (9-kHz step)
520– 1630 kHz (10-kHz step)
AM Sensitivity S/N 20 dB at 999 kHz 560 µV/m
Phone jack
Terminal Stereo, 3.5 mm jack
Mic jack
Sensitivity 0.7 mV, 1.2 k
Terminal Mono, 6.3 mm jack (1 system)
DISC SECTION
Discs played (8 cm or 12 cm)
(1) DVD (DVD-Video, DVD-Audio, DivX
(2) DVD-RAM (DVD-VR, JPEG
(3) DVD-R (DVD-Video, DivX
§1, 2
(4) DVD-RW (DVD-Video, DVD-VR, DivX
(5) iR/iRW (Video)
(6) CD, CD-R/RW [CD-DA, Video-CD, SVCD
§
2, 3
JPEG
Image)]
§1
DivX 3.11, 4.x, 5.x
§2
The total combined maximum number of recognizable audio,
, MPEG4
GMC (Global Motion Compensation) is not supported.
§
2, 4
, DivX
§
picture and video contents and groups: 4000 audio, picture
and video contents and 400 groups.
§3
Exif Ver 2.1 JPEG Baseline files
Picture resolution: between 160k120 and 6144k4096 pixels
(Sub sampling is 4:2:2 or 4:2:0)
§4
MPEG4 data recorded with Panasonic SD multi cameras or
DVD video recorders
Conforming to SD VIDEO specifications (ASF standard)/
MPEG4 (Simple Profile) video system/G.726 audio system
§5
Conforming to IEC62107
§6
MPEG-1 Layer 3, MPEG-2 Layer 3
§7
Windows Media Audio Ver. 9.0 L3
Not compatible with Multiple Bit Rate (MBR)
Pick up
Wavelength CD 785 nm
Laser power CLASS 2/CLASS 3A
Audio output (Disc)
Number of channels 5.1ch (FL, FR, C, SL, SR, SW)
§1, 2
, MPEG4
§1, 2
)
§2, 4
)
§
, DivX
5
, MP3
§
§1, 2
2, 6
, WMA
§2, 3
)
1 ,2
, HighMAT Level 2 (Audio and
DVD 662 nm
)
§
2, 7
VIDEO SECTION
Video system
Signal system PAL625/50, PAL525/60, NTSC
Composite video output
Output level 1 Vp-p (75 ≠)
Terminal Pin jack (1 system)
S-video output
Y output level 1 Vp-p (75 ≠)
C output level PAL; 0.3 Vp-p (75 ≠)
NTSC; 0.286 Vp-p (75 ≠)
Terminal S terminal (1 system)
Component video output
[NTSC: 525 (480) p/525 (480) i, PAL: 625 (576) p/625 (576) i]
Y output level 1 Vp-p (75 ≠)
B output level 0.7 Vp-p (75 ≠)
P
R output level 0.7 Vp-p (75 ≠)
P
Terminal Pin jack (Y: green, P
B: blue, PR: red) (1 system)
SPEAKER SECTION
[Front/Surround\speakers\SB-FS335]
Type 1 way, 1 speaker system (Bass reflex)
Speaker unit(s) Impedance 6 ≠
Full range 6.5 cm Cone type
Input power (IEC) 70 W (Max)
Output sound pressure 80 dB/W (1.0 m)
Frequency range 88 Hz–25 kHz (j16 dB)
100 Hz–22 kHz (j10 dB)
Dimensions (WtHtD) 90 mmk193 mmk105 mm
Mass 0.74 kg
[Center\speaker\SB-PC335]
≠
Type 1 way, 1 speaker system (Bass reflex)
Speaker unit(s) Impedance 6 ≠
Full range 6.5 cm Cone type
Input power (IEC) 70 W (Max)
Output sound pressure 80 dB/W (1.0 m)
Frequency range 100 Hz–25 kHz (j16 dB)
113 Hz–22 kHz (j10 dB)
Dimensions (WtHtD) 220 mmk88 mmk96 mm
Specifications
Mass 0.72 kg
[Subwoofer\SB-W335]
,
Type 1 way, 1 speaker system (Bass reflex)
Speaker unit(s) Impedance 4 ≠
Subwoofer 16 cm Cone type
Input power (IEC) 90 W (Max)
Output sound pressure 80 dB/W (1.0 m)
Frequency range 29 Hz– 173 Hz (j16 dB)
33 Hz–148 Hz (j10 dB)
Dimensions (WtHtD) 175 mmk345 mmk295 mm
Mass 3.3 kg
GENERAL
Power supply AC 110 – 240 V, 50/60 Hz
Power consumption Main unit 80 W
Dimensions (WtHtD) 430 mmk60 mmk337 mm
Mass Main unit 3.3 kg
Operating temperature range r5 oC to r35
Operating humidity range
5 % to 90 % RH (no condensation)
Power consumption in standby mode approx.
[Note]
1. Specifications are subject to change without notice.
Mass and dimensions are approximate.
2. Total harmonic distortion is measured by the digital spectrum
analyzer.
oC
0.5 W
RQT8291
29
Page 30
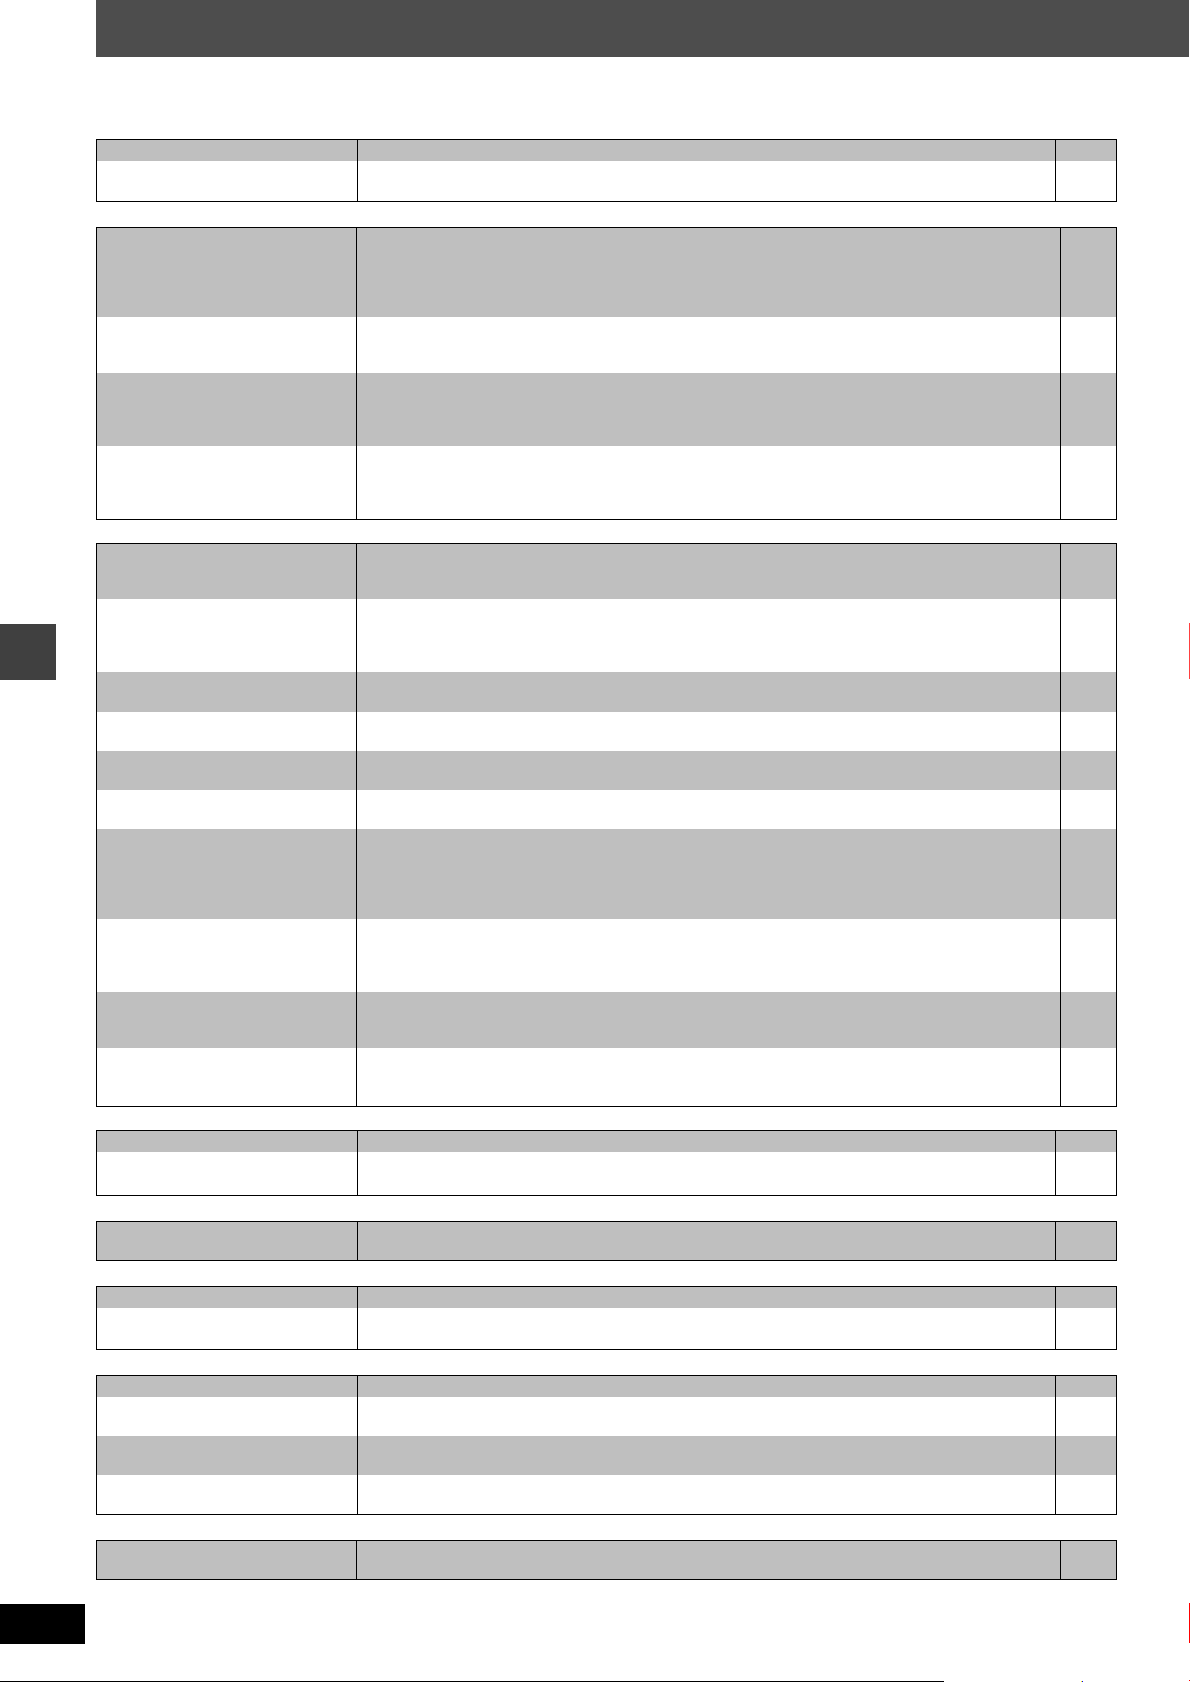
Before requesting service, make the following checks. If you are in doubt about some of the check points, or if the solutions indicated in the chart
do not solve the problem, consult your dealer for instructions.
Power Page
Unresponsive or inoperable function
Specific operation undesirable or unexpected
Troubleshooting guide
Subtitle
Marker
A-B Repeat
Sound abnormal or improper
Menus
RQT8291
30
Troubleshooting guide
No power. ≥Insert the AC mains lead securely. 7
The unit is automatically
switched to the standby mode.
No response when any buttons
are pressed.
No response when remote
control buttons are pressed.
No picture or sound. ≥Check the video or audio connection.
You have forgotten your ratings
password.
Reset all the settings to Factory
Preset.
It takes time before play starts. ≥Play may take time to begin when an MP3 track has still picture data. Even after the track starts,
Folders deeper than the eighth
layer on a data disc are not
displayed correctly.
[JPEG] [MPEG4] [DivX]
A menu screen appears during
skip or search. [VCD]
Playback control menu doesn’t
appear. [VCD]
The program and random play
functions do not work. [DVD-V]
Programmed items are not
played. [DVD-V]
The on-screen menu shows “2”
as a soundtrack option when
[SHIFT]i[AUDIO] is pressed,
but the audio does not change.
[DVD-A]
Play doesn’t start. ≥This unit may not play WMA and MPEG4 that contains still picture data.
Play restarts from the beginning
of the track when soundtrack is
changed. [DVD-A]
Scenes are skipped
intermittently. [RAM] [DVD-RW[‹VR›]
[DVD-V]
Subtitle position is wrong. ≥Adjust the position. (“Subtitle Position” in Display Menu) 17
No subtitles. ≥Display the subtitles.
Cannot add markers. ≥You cannot add markers. [RAM] [DVD-RW[‹VR›]
Point B is automatically set. ≥The end of an item becomes point B when it is reached. —
A-B Repeat is automatically
canceled.
Sound distorted. ≥Noise may occur when playing WMA. —
Effects do not work. ≥Some audio effects do not work or have less effect with some discs.
Humming is heard during play. ≥An AC mains lead or fluorescent light is near the cables. Keep other appliances and cords away
No sound ≥There may be a pause in sound when you change the play speed.
The Setup menu cannot be
accessed.
[WMA] [MP3]
with playback control
≥The Sleep timer was working and had reached the set time limit. 25
≥This unit cannot play discs other than the ones listed in these operating instructions.
The unit may not be operating properly due to lightning, static electricity or some other external
≥
Turn the unit off and then back to ON. Alternatively, turn the unit off, disconnect the AC
factor.
mains lead, and then reconnect it.
≥Condensation has formed: Wait 1 to 2 hours for it to evaporate.
≥Check that the batteries are installed correctly.
≥The batteries are depleted. Replace them with new ones.
≥Aim the remote control at the display and operate.
5, 6,
≥Check the power or input setting of the connected equipment.
≥Check that the disc has something recorded on it.
≥While stopped and “DVD/CD” is the source, press and hold [∫] on the main unit and [S10] on
the remote control until “Initialised” disappears from the television. Turn the unit off and on again.
All settings will return to the default values.
the correct play time will not be displayed. This is normal.
≥This is normal on DivX video.
≥Folders deeper than the eighth layer are displayed as the eighth layer. —
≥This is normal for Video CD’s. —
≥Press [∫] twice and then press [1] (play). —
≥These functions do not work with some DVD-Videos. —
≥Some items cannot be played even if you have programmed them. —
≥Even if a second soundtrack isn’t recorded, two numbers will normally be shown. —
≥If playing DivX VOD content, refer to the homepage where you purchased the DivX VOD
content. (Example: www.divx.com/vod) [DivX]
≥If a disc contains CD-DA and other formats, proper playback may not be possible.
≥This is normal on DVD-Audio. —
≥If you change the volume or sound field/quality setting during ADVANCED DISC REVIEW, the
function continues without the on-screen display. Press [ADVANCED DISC REVIEW] again to
cancel the function.
13
≥Subtitles may not be displayed depending on the disc. [DivX]
≥If the disc’s elapsed play time doesn’t appear on the unit’s display, you cannot add markers.
≥A-B Repeat is canceled when you press [QUICK REPLAY].
≥Dolby Pro Logic II does not work if you have changed the play speed.
from this unit’s cables.
≥Audio may not be output due to how files were created. [DivX]
≥Select “DVD/CD” as the source.
≥Cancel all group, program and random play.
—
—
—
—
—
—
—
—
15
9
—
—
7
7
8
24
—
—
—
—
—
—
—
—
12
—
13
Page 31
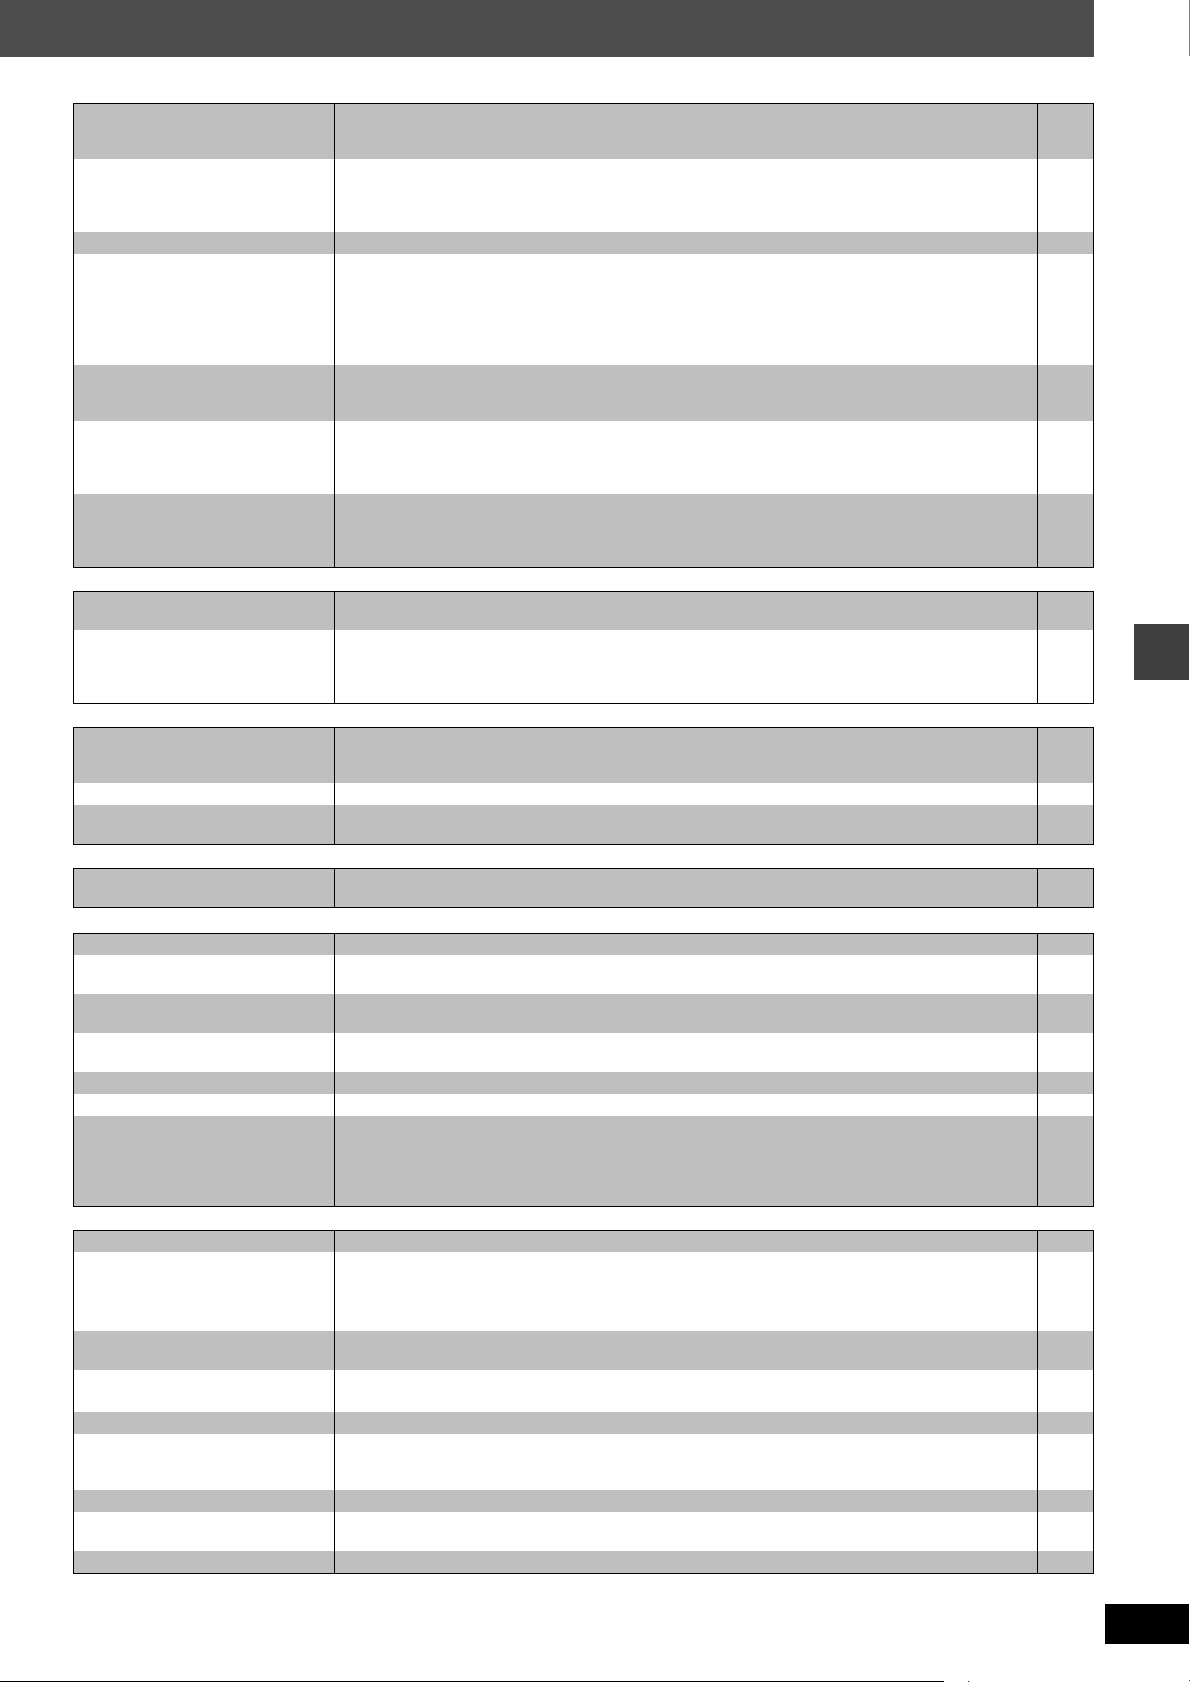
Picture abnormal or unviewable Page
Picture distorted. ≥ Ensure that the unit is connected directly to the television, and is not connected through a video
Picture size doesn’t fit the
screen.
Picture stops. [DivX] ≥Picture may stop if the DivX files are greater than 2GB. —
The television may display
incorrectly or colors appear
faded.
Menu is not displayed correctly. ≥ Restore the zoom ratio to “a1.00”.
Auto zoom function does not
work well.
The picture on the television
disappears or stripes appear on
the screen.
cassette recorder.
≥Change “Source Select” in Picture Menu. [DivX]
≥Change “TV Aspect” in the “Video” tab.
≥Use the television to change the aspect. If your television does not have that function, change
“4:3 Aspect” in Display Menu.
≥Change the Zoom setting.
≥The unit and television are using different video systems.
Use a multi-system or PAL television.
≥The system used on the disc does not match your television.
– PAL discs cannot be correctly viewed on an NTSC television.
– This unit can convert NTSC signals to PAL 60 for viewing on a PAL television (“NTSC Disc
Output” in “Video” tab).
≥Set “Subtitle Position” in Display Menu to “0”.
≥Set “4:3 Aspect” in Display Menu to “Normal”.
≥Turn off TV’s zoom function.
≥Use the other preset aspect ratios or manual adjustment.
≥Zoom function may not work well, especially in dark scenes and may not work depending on the
type of disc.
≥Mobile telephone chargers can cause some disturbance.
≥If you are using a TV indoor antenna, change to an outdoor antenna.
≥The television antenna wire is too close to the unit. Separate the antenna wire of the television
from the unit.
6
17
18
17
12
—
—
19
12
17
17
—
12
—
—
—
—
Progressive video
There is ghosting when
progressive output is on.
Pictures not in progressive
output.
≥
This problem is caused by the editing method or material used on DVD-Video, but should be
corrected if you use interlace output. Change “Video Output Mode” in Picture Menu to “625i” or “525i”.
≥Press [SHIFT]i[PROGRESSIVE] so “PRG” is displayed. Or select “625p” or “525p” in “Video
Output Mode” in Picture Menu.
≥If the unit is connected to the television through the VIDEO OUT or S-VIDEO OUT terminal,
output will be interlace even if “PRG” is displayed.
17
11,
17
6
Listening to the radio
Noise is heard.
“ST” flickers or doesn’t light.
Sound is distorted.
A beat sound is heard. ≥ Turn the television off or move it away from the unit. —
A low hum is heard during AM
broadcasts.
≥Adjust the position of the FM or AM antenna.
≥Use an outdoor antenna.
≥Separate the antenna from other cables. —
—
21
Television operation
Cannot operate the TV. ≥To use functions labeled in orange, while pressing [SHIFT], press the corresponding button. —
Unit displays
The display is dark. ≥Select “Bright” in “FL Dimmer” in the “Others” tab. 19
“NO PLAY” ≥You inserted a disc the unit cannot play; insert one it can.
“NO DISC” ≥You haven’t inserted a disc; insert one.
“F61” ≥Check and correct the speaker cord connections.
“DVD U11” ≥Disc may be dirty. Wipe it clean. 27
“ERROR” ≥ Incorrect operation performed. Read the instructions and try again. —
“DVD H∑∑”
∑∑ stands for a number.
≥You inserted a blank disc.
≥You haven’t inserted the disc correctly; insert it correctly.
If this does not fix the problem, there is a power supply problem. Consult the dealer.
≥Trouble may have occurred. The number following “H” depends on the status of the unit. Turn the
unit off and then back to ON. Alternatively, turn the unit off, disconnect the AC mains lead, and
then reconnect it.
≥If the service numbers fail to clear, note the service number and contact a qualified service
person.
9
—
—
10
5
—
—
Television displays
“/” ≥The operation is prohibited by the unit or disc. —
“Cannot play group xx, content
xx”
“Cannot display group xx,
content xx”
“Group xx, content xx is
protected”
“Cannot play audio”
“No audio”
“Check the disc” ≥This disc may be dirty. 27
“This disc may not be played in
your region”
No on-screen display. ≥ Select “On” in “On-Screen Messages” in the “Display” tab. 19
“Authorization Error” [DivX] ≥ You are trying to play the DivX VOD content that was purchased with a different registration
“Rented Movie Expired” [DivX] ≥The DivX VOD content has zero remaining plays. You cannot play it. 27
≥You are trying to play an incompatible group or content. —
≥You are trying to play a protected group or content. You cannot play it. —
≥Audio has not been recorded, or recorded in a format this unit cannot playback. Video playback
only is possible.
≥You can only play DVD-Video if their region number is the same or includes the same region
number as the unit or if the DVD-Video is marked “ALL”. Confirm the region number for the unit
on the rear panel.
code. You cannot play the content on this unit.
15
Cover
page
27
Troubleshooting guide
RQT8291
31
Page 32
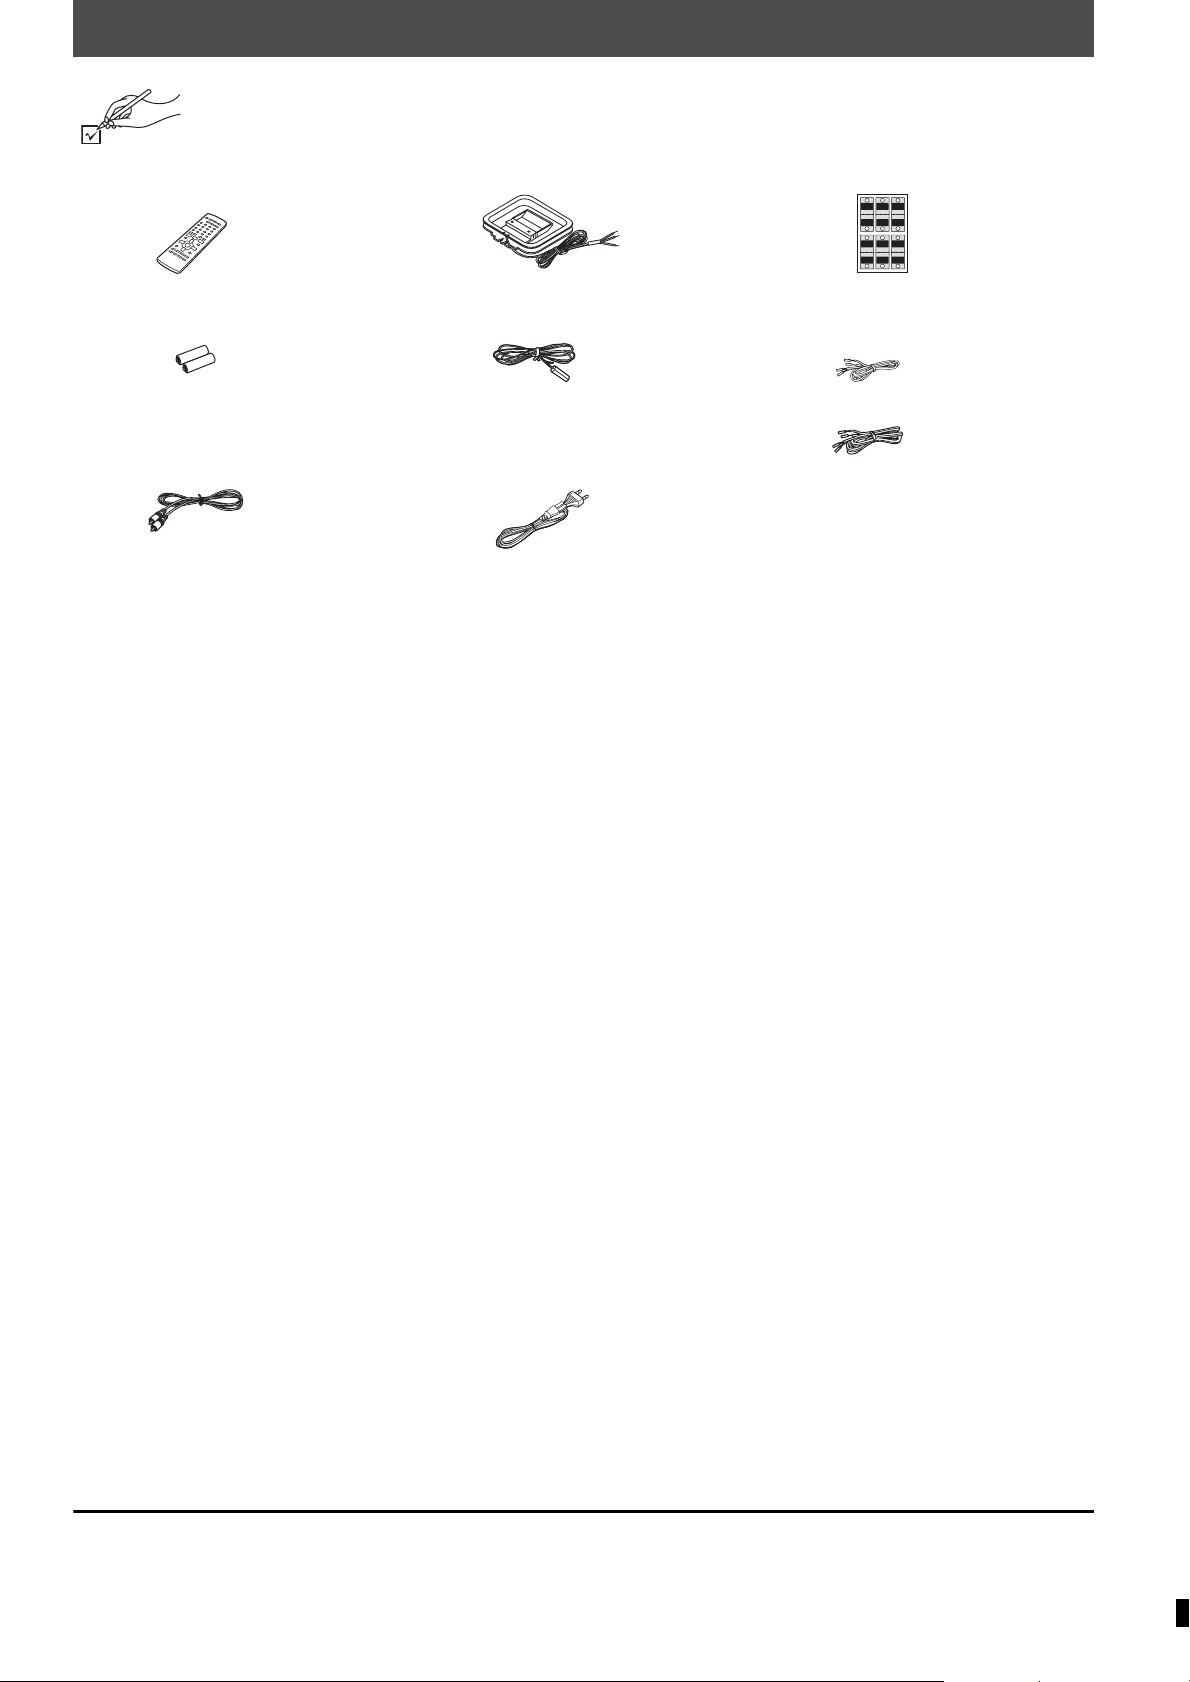
Accessories
Please check and identify the supplied accessories.
∏ 1 Remote control
(N2QAJB000147)
∏ 2 Remote control batteries
∏ 1 Video cable
∏ 1 AM loop antenna
∏ 1 FM indoor antenna
∏ 1 AC mains lead
∏ 2 Sheets of speaker-cable stickers
442
6
WOOFER
Rch
Rch
SURROUND
FRONT
SUB
SURROUND
FRONT
SUB
Rch
Rch
WOOFER
6
2
1
3
5
Lch Lch
CENTER
SURROUND
FRONT
SURROUND
FRONT
CENTER
Lch
Lch
5
3
1
∏ Speaker cables
3kshort cables
2klong cables
Matsushita Electric Industrial Co., Ltd. p
Web Site: http://www.panasonic.co.jp/global/
RQT8291-B
F0605KN0
 Loading...