

Page 1
RQTX1076-1R
EP
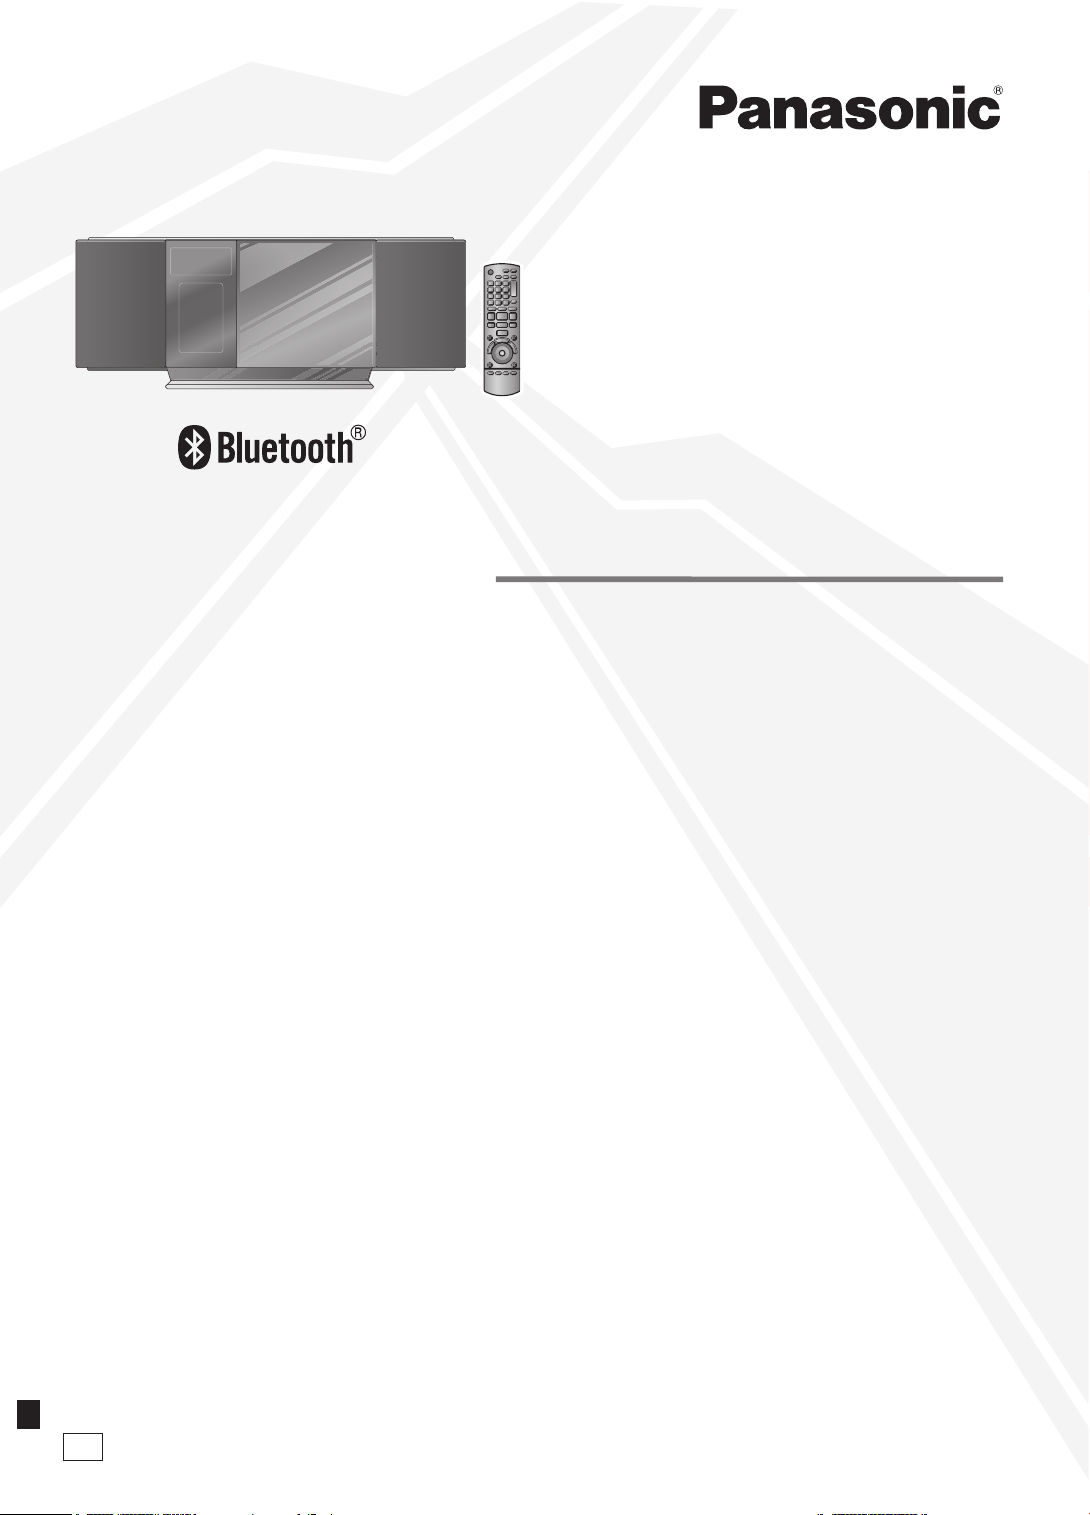
SC-HC40
Operating Instructions
Instrukcja obs³ugi
Návod k obsluze
Инструкция по эксплуатации
Інструкція з експлуатації
Compact Stereo System
Kompaktowy zestaw stereo
Kompaktní stereo systém
Компактная стереосистема
Компактна Стереосистема
Model No. / Model / Model è. /
Модель №. / Модель №
Уважаемый покупатель
Благодарим вас за покупку изделия нашей фирмы.
Прежде чем подключать, использовать или настраивать настоящий
аппарат, необходимо полностью ознакомится с настоящей
инструкцией. Инструкцию следует сохранить, она может
понадобиться в будущем.
Описание операций в настоящей инструкции дается с
использованием пульта ДУ, но можно выполнять эти же операции
на основном блоке, если используются те же органы управления.
Внешний вид аппарата может отличаться от приведенного на
рисунке.
Шановний покупець!
Дякуємо за купівлю цього продукту.
Перед підключенням, користуванням чи регулюванням апарату
уважно прочитайте усю інструкцію. Зберігайте інструкцію з
експлуатації для довідки у майбутньому.
Операції в цій інструкції описані з використанням пульту ДК, хоча їх
можна проводити, використовуючи кнопки керування на основному
апараті, якщо вони ідентичні.
Ілюстрації в інструкції можуть відрізнятися від фактичного вигляду
вашого апарату.
Dear customer
Thank you for purchasing this product.
Before connecting, operating or adjusting this product, please read the
instructions completely. Please keep this manual for future reference.
Operations in these instructions are described using remote control,
but you can do the operations with the main unit if the controls are the
same.
Your unit may not look exactly as illustrated.
Vážený zákazníku
Dìkujeme, že jste si zakoupil tento výrobek.
Døíve, než se pustíte do zapojování a zaènete výrobek používat
èi provádìt nastavování, prostudujte si prosím celý tento návod.
Uschovejte si prosím tento návod k obsluze.
Vìtšina postupù v tomto návodu je popsána s použitím dálkového
ovládání, ale mùžete je provést i pomocí ovládacích prvkù na hlavní
jednotce, pokud jsou ovládací prvky totožné.
Vzhled výrobku nemusí pøesnì odpovídat uvedeným obrázkùm.
Drogi Kliencie
Dziêkujemy za zakupienie tego produktu.
Przed pod³¹czeniem, obs³ug¹ lub regulacj¹ sprzêtu prosimy o dok³adne
zapoznanie siê z treści¹ niniejszej instrukcji. Prosimy o zachowanie
niniejszej instrukcji obs³ugi.
W niniejszej instrukcji opisano przede wszystkim sposoby
wykonywania operacji przy u¿yciu pilota, mo¿na je jednak wykonywaæ
tak¿e z poziomu urz¹dzenia g³ównego, jeśli s¹ na nim dostêpne
identyczne elementy steruj¹ce.
Urz¹dzenie mo¿e siê nieznacznie ró¿niæ od przedstawionego na
ilustracji.
Page 2
RQTX1076
2
ENGLISH
2
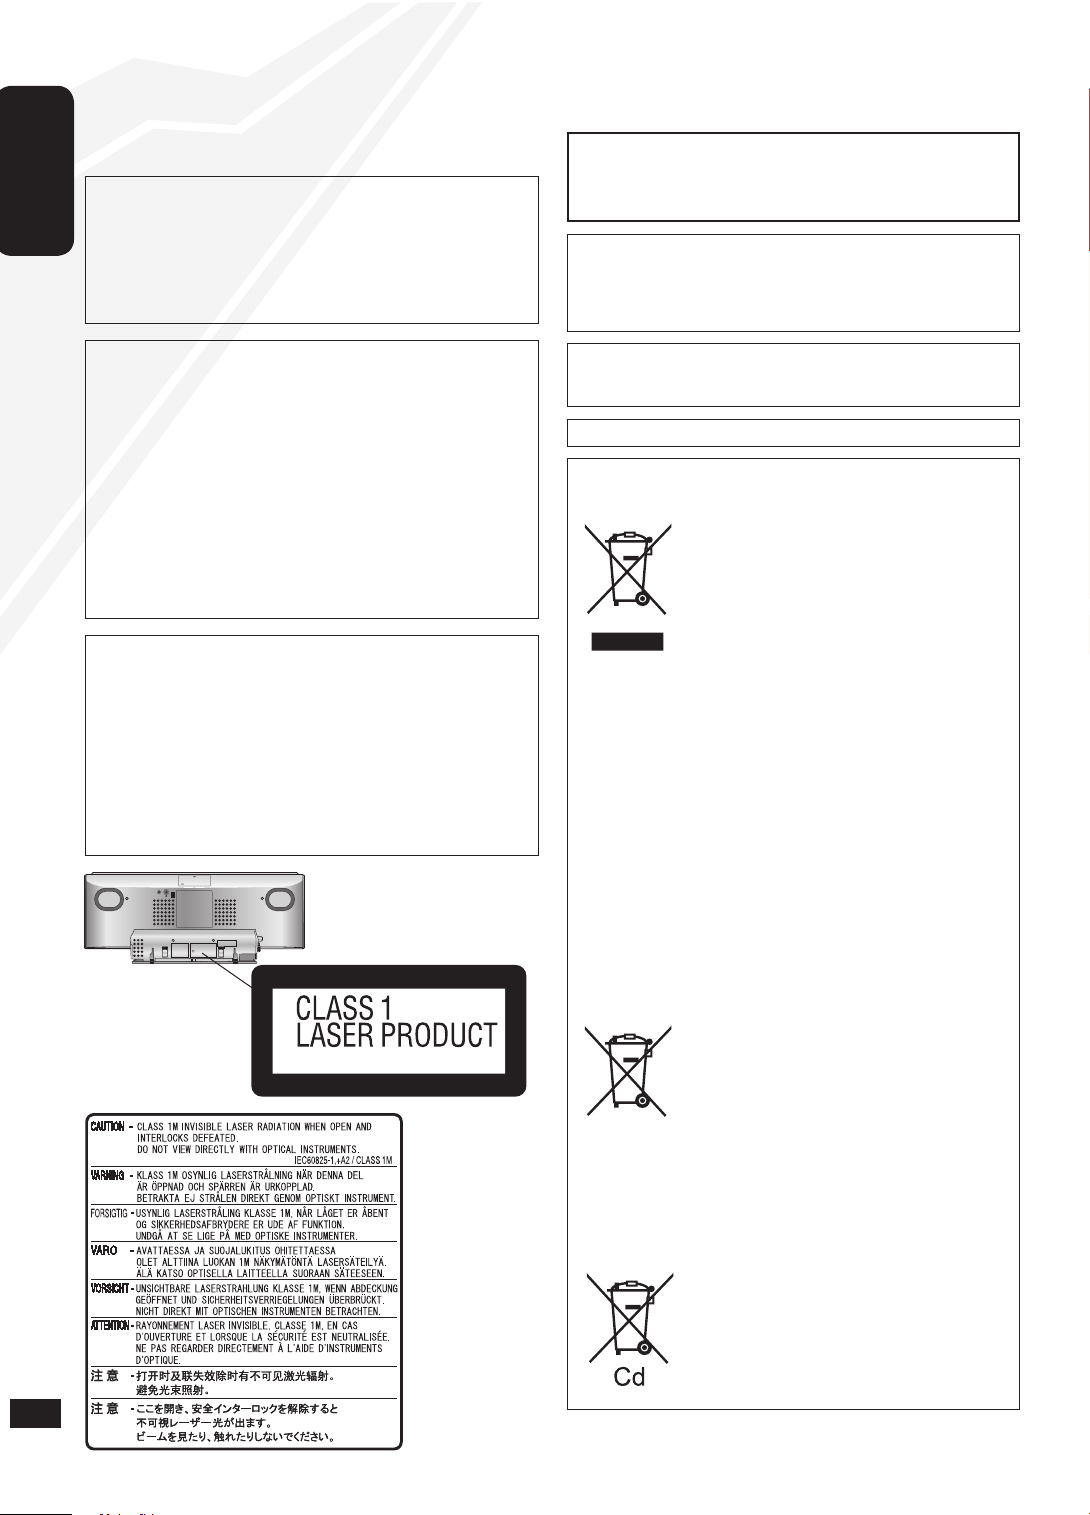
Inside of product
RQLS0418
CAUTION!
DO NOT INSTALL OR PLACE THIS UNIT IN A BOOKCASE,
BUILT-IN CABINET OR IN ANOTHER CONFINED SPACE.
ENSURE THE UNIT IS WELL VENTILATED. TO PREVENT
RISK OF ELECTRIC SHOCK OR FIRE HAZARD DUE TO
OVERHEATING, ENSURE THAT CURTAINS AND ANY OTHER
MATERIALS DO NOT OBSTRUCT THE VENTILATION VENTS.
DO NOT OBSTRUCT THE UNIT’S VENTILATION OPENINGS
WITH NEWSPAPERS, TABLECLOTHS, CURTAINS, AND
SIMILAR ITEMS.
DO NOT PLACE SOURCES OF NAKED FLAMES, SUCH AS
LIGHTED CANDLES, ON THE UNIT.
DISPOSE OF BATTERIES IN AN ENVIRONMENTALLY
FRIENDLY MANNER.
•
•
•
•
WARNING:
TO REDUCE THE RISK OF FIRE, ELECTRIC SHOCK OR
PRODUCT DAMAGE,
* DO NOT EXPOSE THIS APPARATUS TO RAIN, MOISTURE,
DRIPPING OR SPLASHING AND THAT NO OBJECTS FILLED
WITH LIQUIDS, SUCH AS VASES, SHALL BE PLACED ON THE
APPARATUS.
* USE ONLY THE RECOMMENDED ACCESSORIES.
* DO NOT REMOVE THE COVER (OR BACK); THERE ARE NO
USER SERVICEABLE PARTS INSIDE. REFER SERVICING TO
QUALIFIED SERVICE PERSONNEL.
CAUTION!
THIS PRODUCT UTILIZES A LASER.
USE OF CONTROLS OR ADJUSTMENTS OR PERFORMANCE OF
PROCEDURES OTHER THAN THOSE SPECIFIED HEREIN MAY
RESULT IN HAZARDOUS RADIATION EXPOSURE.
DO NOT OPEN COVERS AND DO NOT REPAIR YOURSELF.
REFER SERVICING TO QUALIFIED PERSONNEL.
THIS UNIT IS INTENDED FOR USE IN MODERATE CLIMATES.
The socket outlet shall be installed near the equipment and easily
accessible.
The mains plug of the power supply cord shall remain readily operable.
To completely disconnect this apparatus from the AC Mains,
disconnect the power supply cord plug from AC receptacle.
CAUTION
Danger of explosion if battery is incorrectly replaced. Replace only
with the same or equivalent type recommended by the manufacturer.
Dispose of used batteries according to the manufacturer’s instructions.
This product may receive radio interference caused by mobile
telephones during use. If such interference is apparent, please
increase separation between the product and the mobile telephone.
Information for Users on Collection and Disposal of Old
Equipment and used Batteries
These symbols on the products, packaging,
and/or accompanying documents mean that
used electrical and electronic products and
batteries should not be mixed with general
household waste.
For proper treatment, recovery and recycling
of old products and used batteries, please
take them to applicable collection points, in
accordance with your national legislation and
the Directives 2002/96/EC and 2006/66/EC.
By disposing of these products and batteries
correctly, you will help to save valuable
resources and prevent any potential
negative effects on human health and the
environment which could otherwise arise
from inappropriate waste handling.
For more information about collection and
recycling of old products and batteries,
please contact your local municipality, your
waste disposal service or the point of sale
where you purchased the items.
Penalties may be applicable for incorrect
disposal of this waste, in accordance with
national legislation.
For business users in the European
Union
If you wish to discard electrical and
electronic equipment, please contact your
dealer or supplier for further information.
[Information on Disposal in other
Countries outside the European Union]
These symbols are only valid in the
European Union. If you wish to discard these
items, please contact your local authorities
or dealer and ask for the correct method of
disposal.
Note for the battery symbol (bottom two
symbol examples):
This symbol might be used in combination
with a chemical symbol. In this case it
complies with the requirement set by the
Directive for the chemical involved.
AUX
RQT4389ZAA
Page 3
RQTX1076
3
ENGLISH
2
1
AUX
3
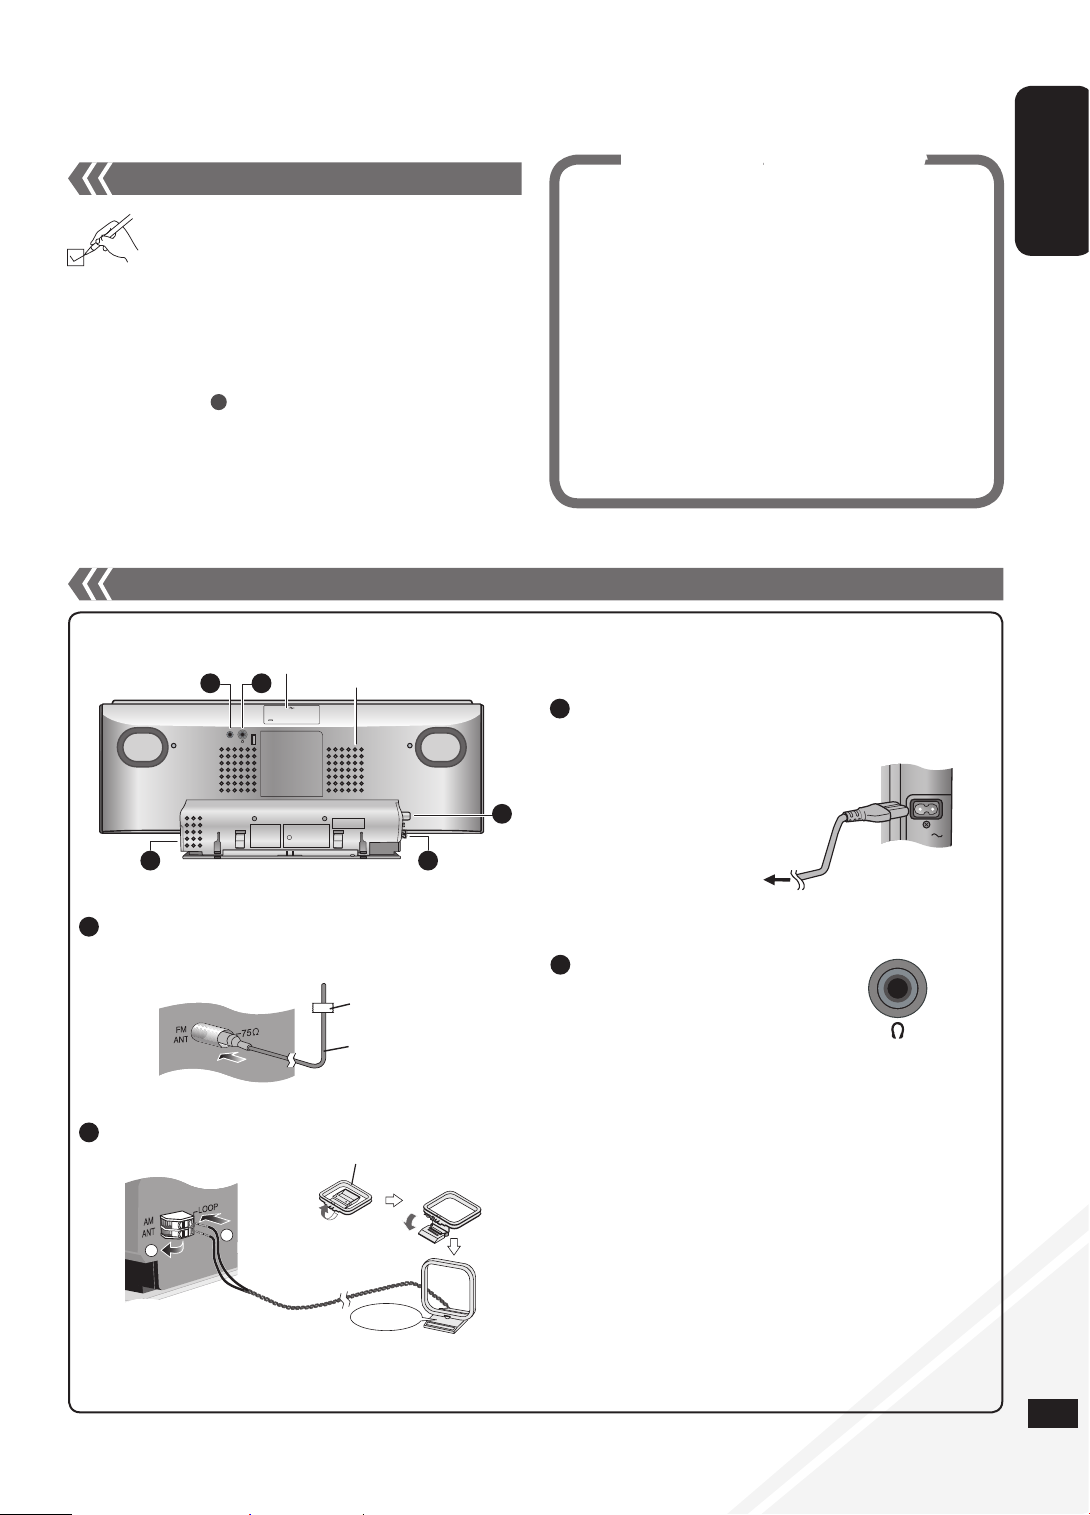
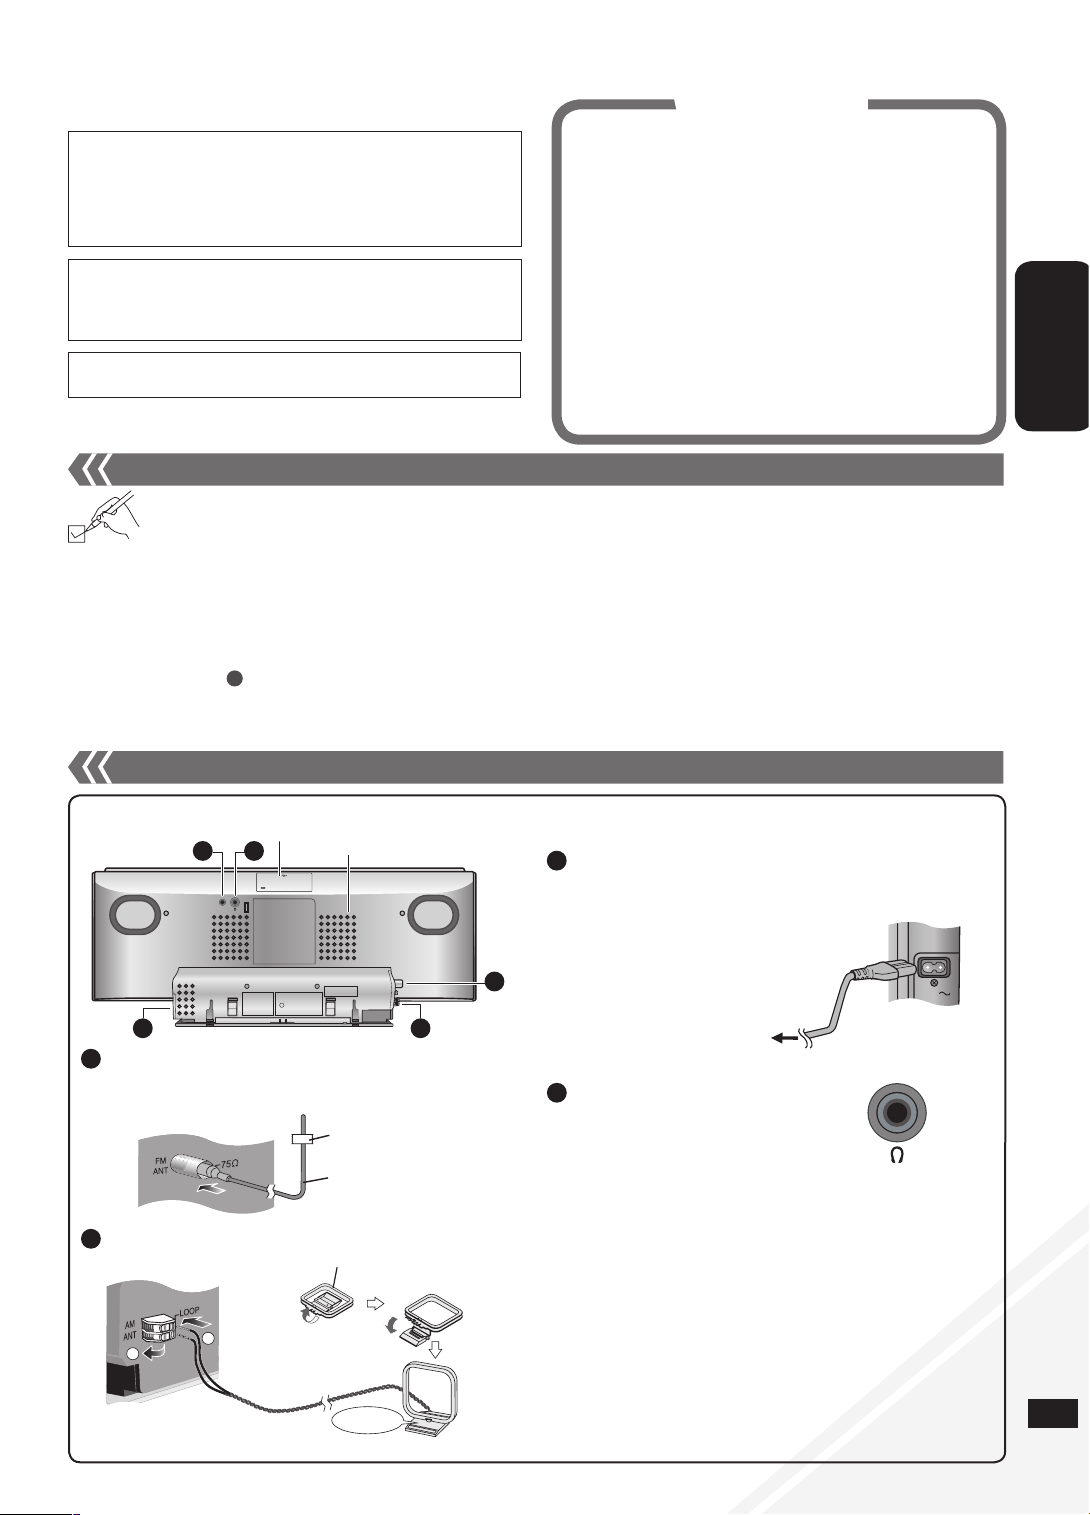
Connections
Back View
Stand the antenna
up on its base.
Click!
Connect the AM loop antenna.
2
AM loop antenna
Keep the loose antenna cord away from other wires and cords.•
Connect the AC mains lead after all other connections are
complete.
Connect the AC mains lead.
3
To household mains socket
g Notes on speakers
These speakers do not have magnetic shielding. Do not place
them near televisions, personal computers or other devices easily
influenced by magnetism.
The speaker nets cannot be removed.
•
•
Avoid listening for prolonged periods of time to prevent hearing
damage.
Excessive sound pressure from earphones and headphones
can cause hearing loss.
Listening at full volume for long periods may damage the user’s
ears.
Be sure to use the supplied or recommended headphones or
earphones.
•
•
•
Reduce the volume level and connect the
headphones.
Plug type: 3.5 mm stereo
Headphones (not included)
4
Tape the antenna to a wall or column, in a position with the
least amount of interference.
•
Connect the FM indoor antenna.
FM indoor antenna
Adhesive tape
1
AC IN
Exhaust holes
AUX (➡ page 10)
5 4
3 2
1
Please check and identify the supplied accessories.
1 AC mains lead
1 AM loop antenna
1 FM indoor antenna
2 Batteries
1 Remote control (N2QAYB000523)
Screw accessories
2 Fixing screws
1 Safety holder
Wall bracket accessories
1 Wall bracket
Four-legged cushions
The included AC mains lead is for use with this unit only. Do not use it
with other equipment.
Do not use an AC mains lead of other equipment.
•
•
B
Supplied accessories
USB cover
Supplied accessories 3
Connections 3
Attaching the unit to a wall (Optional) 4
Control guide 7
Disc operations 8
Radio operations 9
Timer 10
Sound adjustment 10
External unit 10
Memory reset (Initialization) 14
Troubleshooting guide 15
Specifications 16
Maintenance 16
Safety precautions 17
Table of contents
Page 4
RQTX1076
4
ENGLISH
4
g Commercially available accessories (not included)
2 Wall mounting screws
1 Safety holder screw
Use screws with nominal diameter of 4 mm, which are suitable to the
material of the wall (e.g. wood, steel, concrete, etc.).
•
•
g Included accessories
Screw accessories (RFAX1020)
2 Fixing screws (XYN3+J10FJ)
1 Safety holder (RMKX1015)
Wall bracket accessories (RFAX1021)
1 Wall bracket (RGQX1004)
Four-legged cushions (RKAX0028-K)
•
»
»
•
»
»
Attaching the unit to a wall (Optional)
Notes on installation
g Before installation, read the “Safety precautions” and “Wall mount instructions” for correct installation.
g For optimal performance and to prevent potential problems, do not install this unit:
at locations other than vertical walls.
near a sprinkler or a sensor.
near high-voltage lines or power sources.
near heating device.
at locations where the unit is subject to vibration or impact.
near sources of magnetism, heat, vapour, airborne grease, etc.
at locations where there may be water droplets (e.g. under an air conditioner).
g Do not install this unit under ceiling lights (e.g. spotlight, halogen light, etc.).
Failure to do so may bend the cabinet or lead to damage caused by high heat.
g Use a proper installation method that suits the structure and material of the wall.
g Use a soft blanket or cloth to prevent damage to the product or floor during installation.
g When tightening screws, make sure the screws are not loosely-tightened or overtightened.
g Secure a safe surrounding area and pay attention to safety during installation.
g Panasonic is not liable for incidental or consequential damages resulting from improper installation or operation.
•
•
•
•
•
•
•
Only a qualified building contractor shall install or uninstall this
unit.
Improper installation may cause the unit to fall, resulting in injury.
To prevent injury, the unit must be securely attached to the wall in
accordance with the installation instructions.
Do not install the unit where it cannot support the load.
If the mounting parts are not strong enough, this may cause the unit to
fall, resulting in injury.
Do not use installation methods other than instructed.
This may cause the unit to fall and be damaged, resulting in injury.
Do not install the unit at locations other than vertical walls.
This may cause the unit to fall and be damaged, resulting in injury.
Take the safety factor for mounting strength into account
(approx. 10 times the product weight).
Insufficient strength will cause the unit to fall, resulting in injury.
The wall on which the unit is to be attached to should be capable
of supporting 20 kg per screw.
Insufficient strength of the walls will cause the unit to fall in the long
run.
Do not disassemble or modify the wall-mounting hanger.
This will cause the unit to fall and be damaged, resulting in injury.
Do not install this unit at humid or dusty locations, or locations
where airborne grease or steam may come into contact with the
unit, or under an air conditioner where water may drip onto the
unit.
This may have negative impact on the unit, resulting in fire or electric
shock.
Secure enough space of more than 30 cm above the main unit
and more than 10 cm on the left and right sides respectively.
Keep space between the wall and rear of the unit clear of
obstructions.
Blocking the exhaust holes on the main unit may result in fire.
Use the designated components for installation.
Otherwise, the main unit may fall and be damaged, resulting in injury.
Prevent the mounting screws or power cord from coming into
contact with metal parts inside the wall during installation.
Failure to do so may cause electric shock.
When removing the main unit, remove the wall mounting screws
as well.
Otherwise the wall mounting screws may hit a person and lead to
injury.
Install the unit at a height where the USB port and operation
buttons can be seen for safe operation.
Operating at improper position may cause the unit to fall and be
damaged, resulting in injury.
CAUTION!
Safety precautions
WARNING!
Installation accessories
B
C
C
Keep all the intended accessories out of reach of children to
prevent swallowing.
Page 5

RQTX1076
5
ENGLISH
2. Attach the wall bracket to the back of the unit.
1. Detach the stand from the unit.
3. Drive the mounting screws into the wall.
5
Wall mount instructions
• Before installation, turn the unit off and disconnect the AC mains lead plug from the AC receptacle.
• Tighten screws firmly to prevent slack in each step.
A
Bottom of main unit
Stand
Soft blanket or cloth
Fixing screw
A
Fixing screw
B
8 mm to 9.5 mm
2.2 mm to 2.8 mm
2.5 mm to 3.5 mm
4 mm
A length which supports the
strength of 20 kg or more must
be kept for each screw.
Wall
Mounting screw
C
163 mm
C
Attaching the unit to a wall (Optional) (continued)
Measure and mark the position of the mounting screw (2 pieces) and drive them into the wall.
Use figures below for screw positions and measurements.
Please install using both wall mounting screws.
Use a level ruler to ensure both screws are level.
Use a screw which is strong enough to support the weight of at least 20 kg.
•
•
•
•
Unscrew the fixing screw (2 pieces) at the bottom of the unit.
Keep the removed screws in a safe place.
Slide the stand off the unit.
2
1
Align both tabs on the wall bracket and the main unit, then
slide it in until it clicks into place.
Secure the wall bracket with fixing screw (2 pieces).
(Tightening torque: 1.2 Nm to 1.5 Nm)
B
AUX
300 mm
Space required
Rear View
Space required
85.5 mm77.5 mm
500 mm
700 mm
74.8 mm
130 mm
Tab
Rear of main unit
Wall bracket (bottom view)
Page 6
RQTX1076
6
ENGLISH
Fix the safety holder onto the wall bracket.
Drive safety holder screw to secure the safety holder onto
the wall.
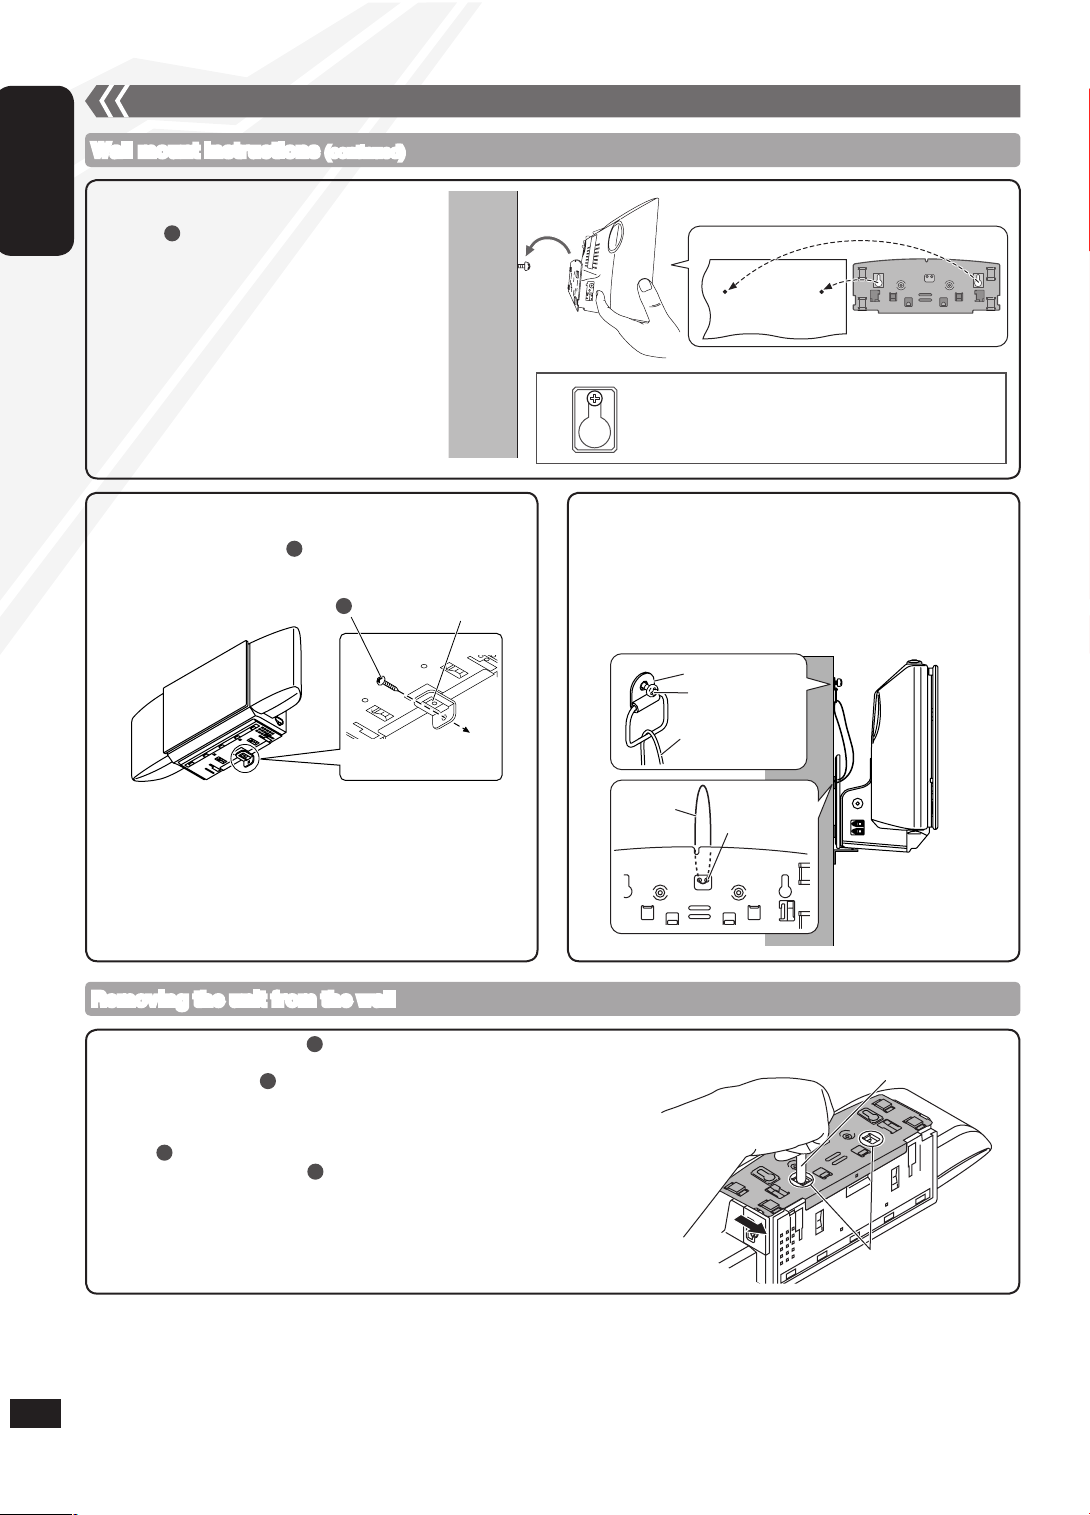
4. Hang the unit on the wall.
6
g Fall-preventive measure (Optional)
Removing the unit from the wall
Remove safety holder screw and the safety holder.
Unmount the unit from the wall.
Unscrew fixing screw (2 pieces).
Hold down both the catches and then slide the wall bracket off the unit
(➡ right).
Reattach the stand to the bottom of the unit and secure it with fixing
screw (2 pieces).
Remove the mounting screw (2 pieces) from the wall.
Remove the fall-preventive wire before step if you are using it.•
C
B
A
C
Pen or a blunt object
Catches
C
5. Install the safety holder.
Safety holder
Fixed to
the wall
Safety holder screw
C
C
Metal fitting
Screw
Wire
Wire
Slot for wire
Wall mount instructions (continued)
Attaching the unit to a wall (Optional) (continued)
Slot both screws into this position firmly.
Wall
Wall bracket
Thread a wire (commercially available) through the slot on the
wall bracket before step 4 (➡ above).
Fix the wire to the wall with a screw (commercially available)
after step 5 (➡ left).
Fix the screw to the wire so that a slack of no more than 5 cm is
kept in the upper centre part of the main unit.
•
Hook the unit securely onto the mounting
screws .
Connect the FM/AM antenna before hanging the
main unit on the wall (➡ page 3).
After hanging the unit, release your hand carefully
to confirm the unit sits securely on the wall.
•
•
Page 7
RQTX1076
7
ENGLISH
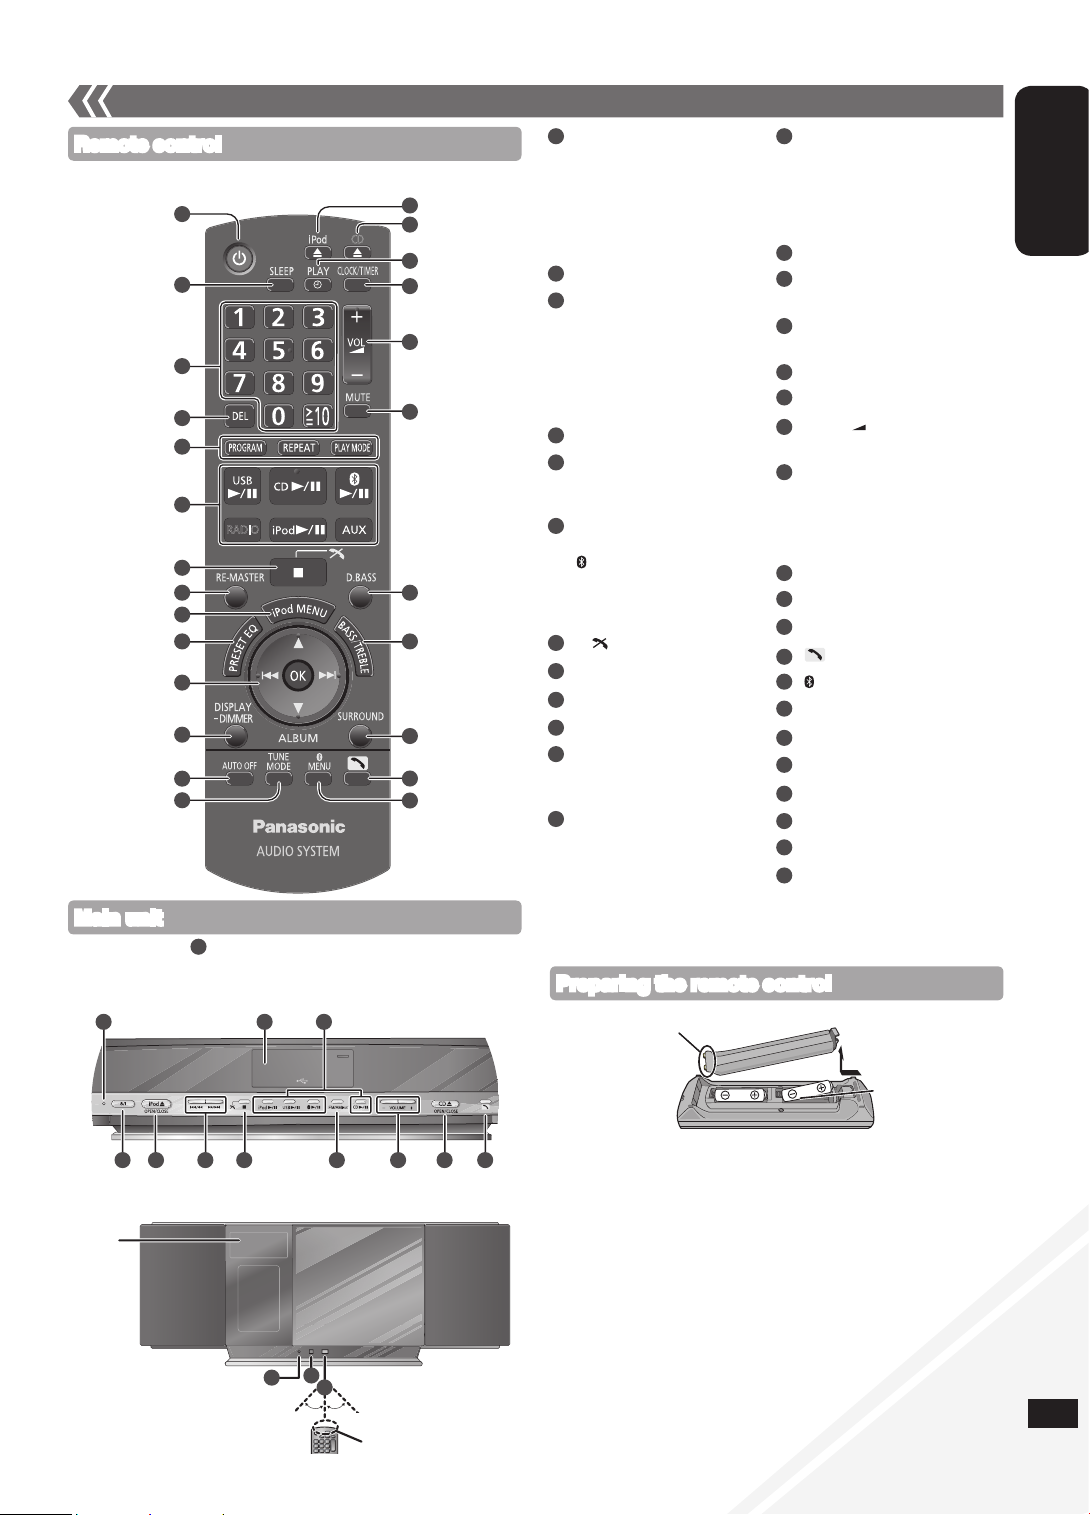
Standby/on switch [^], [8]
(8, 10, 14)
Press to switch the unit from on
to standby mode or vice versa.
In standby mode, the unit is still
consuming a small amount of
power.
[SLEEP] (10)
Numeric buttons [1-9, 0, ≧ 10]
(8, 9, 10, 14)
To select a 2-digit number
e.g. 16: [≧ 10] [1] [6]
To select a 3-digit number
e.g. 226: [
≧
10] [≧ 10] [2]
[2] [6]
[DEL] (8)
[PROGRAM] (8, 9)
[REPEAT] (9)
[PLAY MODE] (9, 10, 13)
[USB q/h] (14)
[CD q/h] (8, 9)
[ q/h] (12)
[RADIO] (9)
[iPod q/h] (11)
[AUX] (10)
[g, ] (8, 11, 12, 13, 14)
[RE-MASTER] (10)
[iPod MENU] (11)
[PRESET EQ] (10)
[e,r] (8, 9, 10, 11, 13, 14)
[u], [i] (8, 9, 11, 12, 14)
[OK] (8, 10, 11, 13)
[DISPLAY, –DIMMER]
(8, 9, 13)
Press and hold to dim the
display panel. Press and hold
again to cancel.
[AUTO OFF]
This function allows you to turn
the unit off (except in radio
mode) after the unit is left
unused for about 30 minutes.
Press twice to turn it on.
[TUNE MODE] (9)
[;, iPod],
[iPod ;, OPEN/CLOSE] (11)
[;, CD],
[CD ;, OPEN/CLOSE] (8)
[z, PLAY] (10)
[CLOCK/TIMER] (10)
[+, VOL , –],
[– VOLUME +] (13)
[MUTE] (13)
Mutes the sound. Press again to
cancel. “MUTE” is also cancelled
when the volume is adjusted or
the unit is turned off.
[D.BASS] (10)
[BASS/TREBLE] (10)
[SURROUND] (10)
[ ] (13)
[ MENU] (13)
[u/t], [y/i]
[FM/AM/AUX] (9, 10)
USB port (14)
Standby indicator
Microphone (13)
Bluetooth indicator (12)
Remote control signal sensor
Aim the remote control at the
sensor, avoiding obstacles, at a
maximum range of 7 m directly
in front of the unit.
Refer to the numbers in parentheses for page reference.•
Remote control
Main unit
Control guide
■ Batteries
Use a manganese dry battery or an alkaline dry battery.
Insert so the poles (+ and –) match those in the remote control.
Remove if the remote control is not going to be used for a long period
of time.
Store in a cool and dark place.
Do not heat or expose to flame.
Do not leave the batteries in an automobile exposed to direct sunlight
for a long period of time with doors and windows closed.
Mishandling of batteries in the remote control can cause electrolyte
leakage, which may cause a fire.
■ Do not:
mix old and new batteries.
use different types of batteries at the same time.
take apart or short-circuit the batteries.
attempt to recharge alkaline or manganese batteries.
use the batteries if the coverings have been peeled off.
•
•
•
•
•
•
•
•
•
•
•
•
R6/LR6, AA
Place this side in before the other side.
Preparing the remote control
Buttons such as function the same as the remote control. They
can be used interchangeably.
•
1
7
CD
RADIO
16
17
18
19
20
23
24
25
22
21
1
2
3
4
5
6
8
9
10
11
12
13
15
14
7
Top View
1 167
29 6
26 27
28
15 19 24
8
9
10
6
7
16
15
17
18
19
21
23
25
26
27
28
29
30
20
22
24
14
2
1
3
4
5
11
12
13
31
32
Display
Approx. 30°
Transmission window
30
Approx. 30°
Front View
31
32
Page 8
RQTX1076
8
ENGLISH
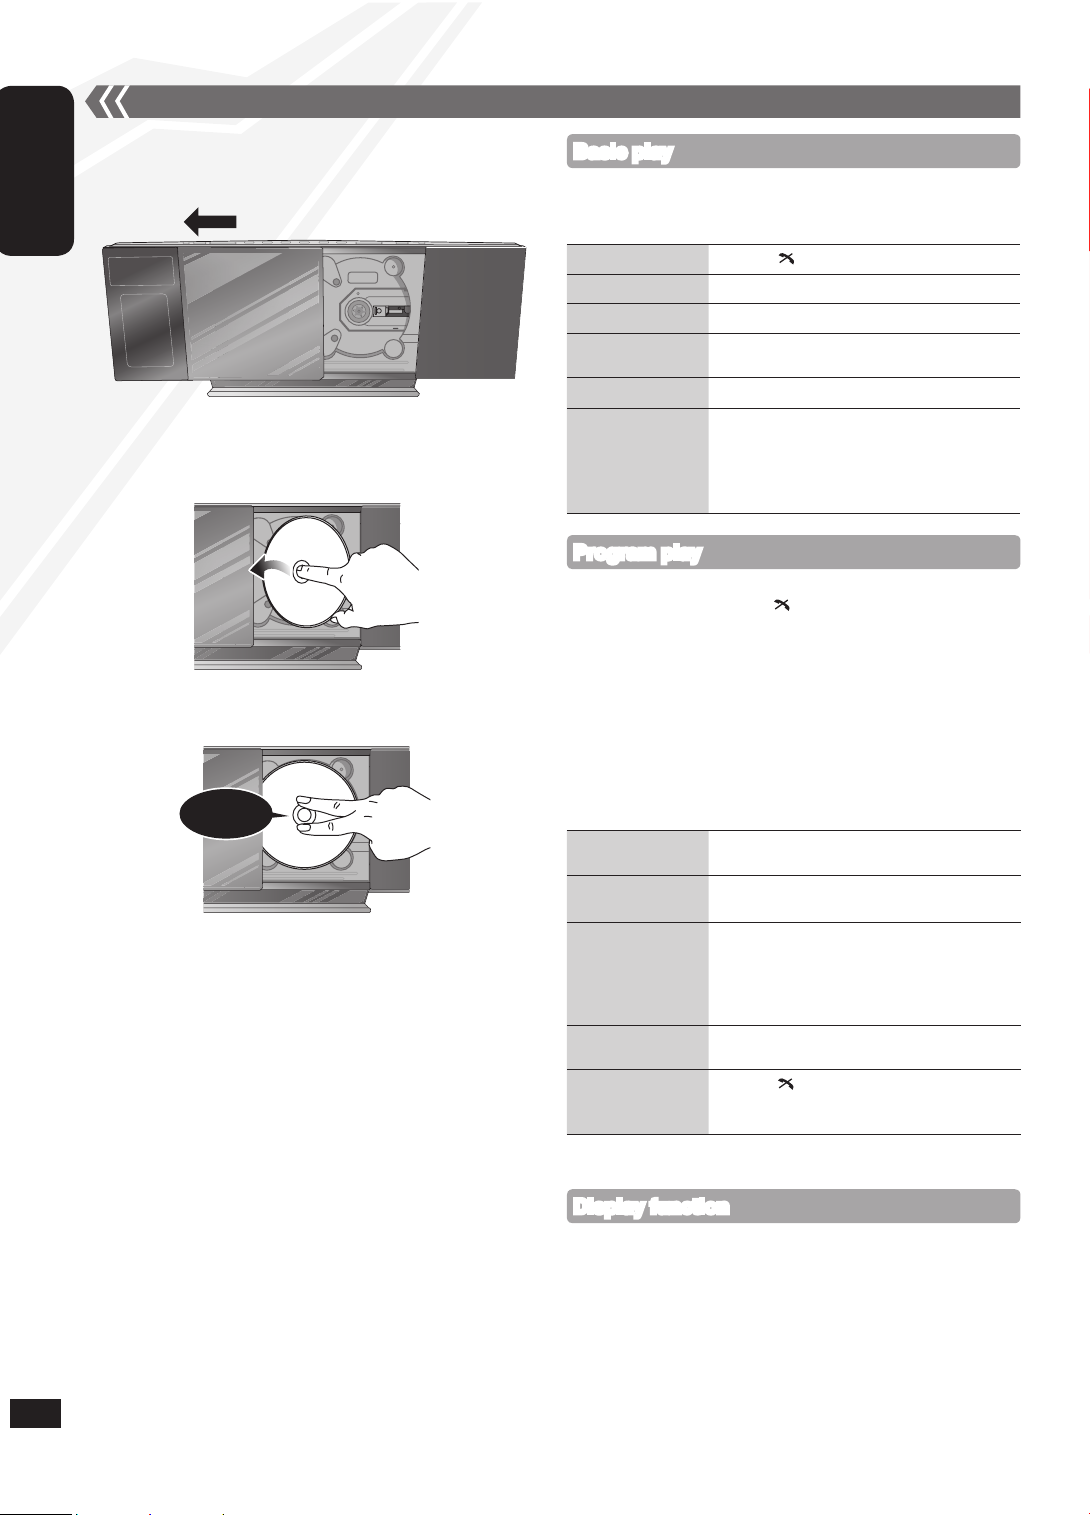
g Inserting a disc
Press [^] to turn the unit on.
Press [;, CD] to open the sliding door.
Press [DISPLAY, –DIMMER] repeatedly during play or pause to view
the current track’s information.
Maximum number of displayable characters: approximately 30
This unit supports ver. 1.0 and 1.1 ID3 tags. Text data that is not
supported will not be displayed.
•
•
Enables you to program up to 24 tracks.
Press [CD q/h] and then [g, ].
Press [PROGRAM].
CD: Press the numeric buttons to select the track.
To program more tracks, continue by pressing the numeric
buttons.
Press [OK] or [CD q/h] to start play.
MP3: Press [e,r] to select the album.
Press [i] once and then the numeric buttons to select the
track.
Press [OK].
To program more tracks, repeat step to .
Press [CD q/h] to start play.
Cancel program
mode
Press [PROGRAM] in the stop mode to clear
“PGM” indicator from the display.
Replay the program Press [PROGRAM] in the stop mode and then
[CD q/h].
Check program
contents
Press [u] or [i] when “PGM” is displayed
in the stop mode. To check while programming,
press [PROGRAM] twice after “PGM” appears
and then press [u] or [i].
Delete last
programmed track
Press [DEL] in the stop mode.
Clear all
programmed tracks
Press [g, ] in the stop mode.
“CLR ALL” is displayed. Within 5 seconds,
press the button again to clear all tracks.
The program memory is cleared when you open the sliding door.•
Program play
Stop
Press [g, ].
Pause
Press [CD q/h]. Press again to resume play.
Skip track
Press [u] or [i].
Search the current
track (CD)
Press and hold [u] or [i].
Skip album (MP3)
Press [e,r].
Direct access play
(Play starts with the
track you select.)
CD: Press the numeric buttons to select the
track.
MP3: Press [e,r] to select the album.
Press [i] once and then the numeric
buttons to select the track.
Disc operations
With the label of the disc facing towards you, tilt the disc into the
disc tray under the sliding door.
Place the disc onto the spindle in the centre and then push the
disc down until it clicks into place.
Display function
8
Press [^] to turn the unit on.
Insert the disc to be played (➡ left).
Press [CD q/h] to start play.
g Removing a disc
Press [;, CD] to open the sliding door.
Hold the centre and the top right of the disc and pull the top right
of the disc to unlock it from the spindle.
Tilt the disc so as not to touch the sliding door and remove the
disc.
Damage may occur if the sliding door is forced closed.
Be careful of CD hitting the sliding door while being removed.
•
•
Basic play
Press [;, CD] to close the sliding door.
Keep fingers away from the sliding door when it is closing to avoid
possible minor injuries.
Click!
Page 9
RQTX1076
9
ENGLISH
Notes on CD-R and CD-RW
This unit can play CD-R and CD-RW recorded with CD-DA or
MP3.
Use an audio recording disc for CD-DA and finalise* it when you
finish recording.
* A process performed after recording that enables CD-R or
CD-RW players to play audio CD-R and CD-RW.
The unit may not be able to play some discs due to the
condition of the recording.
Do not use irregularly shaped CDs.
Do not attach extra labels and stickers.
Do not use CDs with labels and stickers that are coming off or
with excessive adhesive under the labels and stickers.
Do not attach scratch-proof covers or any other kind of
accessories.
Do not write anything on the CDs.
Do not clean CDs with liquids (Wipe with a soft and dried cloth).
Creating MP3 files playable on this unit
Maximum number of tracks and albums: 999 tracks and 255
albums.
Compatible compression rate: Between 64 kbps and 320 kbps
(stereo). 128 kbps (stereo) is recommended.
Disc formats: ISO9660 level 1 and level 2 (except for extended
formats).
The time for reading TOC depends on the number of the tracks,
folders or folder structures.
Limitations on MP3
This unit is compatible with multi-sessions and it takes more
time to start playing.
This unit cannot play files recorded using packet write.
If the disc includes both MP3 and normal audio data (CD-DA),
the unit plays the type recorded in the inner part of the disc.
If the disc includes both MP3 and other types of audio data
(e.g. WMA or WAV), the unit plays only the MP3.
Depending on how you create the MP3 files, they may not play
in the order you numbered them or may not play at all.
•
•
•
•
•
•
•
•
•
•
•
•
•
•
•
•
•
Mode To play
1-TRACK
1TR
one selected track on the disc.
Press the numeric buttons to select the track.
1-ALBUM
1ALBUM (MP3)
one selected album on the disc.
Press [e,r] to select the album.
RANDOM
RND
a disc randomly.
1-ALBUM RANDOM
1ALBUM RND (MP3)
all tracks in one selected album randomly.
Press [e,r] to select the album.
During random play, you cannot skip to the previous track.
The current play mode is cleared when you open the sliding door.
To repeat program play or selected play mode, press [REPEAT].
Press again to cancel.
•
•
•
Press [CD q/h].
Press [PLAY MODE] repeatedly to select the following modes.
Play Mode function
Disc operations (continued) Radio operations
Press [RADIO] to select “FM” or “AM”.
Press [TUNE MODE] to select “MANUAL”.
Press [u] or [i] to select the frequency of the required
station.
“ST” is displayed when a stereo FM broadcast is being received.
To tune automatically
Repeat step and (➡ above).
Press and hold [u] or [i] until the frequency starts changing
rapidly.
To cancel auto tuning, press [u] or [i] once again.
Auto tuning may not function when there is excessive interference.
g To improve FM sound quality
Press and hold [PLAY MODE] to display “MONO” indicator. Press
and hold again to cancel.
“MONO” is also cancelled if the frequency is changed.
Turn “MONO” off for normal listening.
g To improve AM sound quality
Press [RADIO] to select “AM”.
Press and hold [TUNE MODE] repeatedly to change the beat
proof setting (“BP 1”, “BP 2”, “BP 3” or “BP 4”).
•
•
•
•
Manual tuning
You can preset up to 30 FM channels and 15 AM channels.
Preparation: Press [RADIO] to select “FM” or “AM”.
g Automatic presetting
Press [PLAY MODE] to switch between “LOWEST” and
“CURRENT” frequency.
Press and hold [PROGRAM] for at least 2 seconds to start
presetting.
g Manual presetting
Press [TUNE MODE] to select “MANUAL”.
Press [u] or [i] to tune to the required station.
Press [PROGRAM].
Press the numeric buttons to select a channel.
The station occupying a channel is erased if another station is preset
in that channel.
To preset more stations, repeat step to .
g Selecting a preset station
Press [TUNE MODE] to select “PRESET”.
Press [u] or [i] to select the channel.
Alternatively, press the numeric buttons to select the channel.•
Memory preset
Station Name (PS) Program Type (PTY)
Frequency display
Enables you to display the name of a broadcasting station or a program
type. “RDS” lights when RDS signal is received.
Press [DISPLAY, –DIMMER] to display.
RDS display may not be available if the reception is poor.•
RDS broadcasts
9
AM allocation setting
The unit may also receive AM broadcast allocated in 10 kHz step.
To change the step to 10 kHz (by main unit only)
Press [FM/AM/AUX] to select “AM”.
Press and hold [FM/AM/AUX].
After a few seconds the display changes to display current minimum
frequency.
Continue to hold down [FM/AM/AUX].
When the minimum frequency changes, release the button.
To return to the original step, repeat step to (➡ above).
After the setting is changed, any previously preset frequency will be
cleared.
•
•
Page 10
RQTX1076
10
ENGLISH
The sleep timer can turn the unit off after a set time.
Press [SLEEP] to turn the sleep function on or off.
Press [SLEEP] once to check the remaining time.
The play timer and sleep timer can be used together. The sleep timer
always has the priority. Be sure not to overlap the timer settings.
When AUTO OFF is ON and the unit is left unused for about 30
minutes, the unit will shut down even if the play time or sleep time has
not expired.
•
•
You can set the timer to come on at a certain time to wake you up.
This unit offers 3 optional play timers.
Preparation:
Turn the unit on and set the clock (➡ above).
Prepare the music source (disc, radio, iPod/iPhone, Bluetooth, USB or
AUX) and set the volume.
Press [CLOCK/TIMER] repeatedly to select play timer.
Within 5 seconds, press [e,r] to set the starting time.
Press [OK].
To set the finishing time, repeat step and .
To activate the timer
Press [z, PLAY] repeatedly to turn the selected play timer on.
Press [^] to turn the unit off.
•
•
This is a 24-hour clock.
Press [CLOCK/TIMER] to select “CLOCK”.
Within 5 seconds, press [e,r] to set the time. (Press and hold to
change the time faster.)
Press [OK].
To display the clock, press [CLOCK/TIMER].
Reset the clock regularly to maintain accuracy.
•
•
Setting the clock
Play timer
Change the
settings
Repeat step to (➡ above).
Change the
source or volume
Press [z, PLAY] twice to clear zPLAY
indicator from the display.
Make changes to the source or volume.
Perform step and (➡ above).
Check the settings
(When the unit is
on or in standby
mode)
Press [CLOCK/TIMER] repeatedly to select
“zPLAY 1”, “zPLAY 2” or “zPLAY 3”.
Cancel
Press [z, PLAY] twice to clear the timer indicator
from the display.
The timer will start at the preset time, with the volume increasing
gradually to the preset level.
•
Preset EQ Press [PRESET EQ] repeatedly to select
“HEAVY”, “SOFT”, “CLEAR”, “VOCAL” or “FLAT”.
Bass or Treble
Press [BASS/TREBLE] repeatedly to select
“BASS” or “TREBLE”.
Press [e,r] to adjust the level (-4 to +4).
Surround Sound Press [SURROUND] repeatedly during play to
select “ON SURROUND” or “OFF SURROUND”.
If interference in FM stereo reception increases,
cancel the surround sound effect.
D.Bass Press [D.BASS] repeatedly during play to select
“ON D.BASS” or “OFF D.BASS”.
Re-master Press [RE-MASTER] repeatedly during play to
select “ON RE-MASTER” or “OFF RE-MASTER”.
Digital remaster is effective on MP3.
Analogue remaster is effective on iPod/iPhone
and AUX.
•
•
Sleep timer
30MIN 60MIN 90MIN 120MIN
OFF (Cancelled)
Timer Sound adjustment
10
The remote control and main unit are factory-set to “REMOTE 1” mode.
If you find the remote control unintentionally also controls other
equipment, you can switch to operate in “REMOTE 2” mode.
To switch to “REMOTE 2” mode (by main unit only)
Press [FM/AM/AUX] to select “AUX”.
Press and hold [FM/AM/AUX] and then press [2] until
“REMOTE 2” is displayed.
Press and hold [OK] and [2] for at least 2 seconds.
To return to “REMOTE 1” mode
Repeat the steps above but replace [2] with [1].
(“REMOTE 1” will be displayed.)
Changing the main unit and remote control
mode
Plug the audio cord into the AUX jack.
Plug type: 3.5 mm stereo
Press [AUX] and start playback from the portable
audio source.
You can select the sound input level of the portable audio equipment.
Press [PLAY MODE] repeatedly to select “HIGH” or “NORMAL”.
Switch the equalizer off or turn the volume of the portable equipment
down to reduce the input signal. High level of input signal will distort
the sound.
For details, refer to the instruction manual of the other equipment.
Cords and equipment are not included.
•
•
•
Portable audio equipment (during AUX mode)
External unit
AUX
Page 11
RQTX1076
11
ENGLISH
11
External unit (continued)
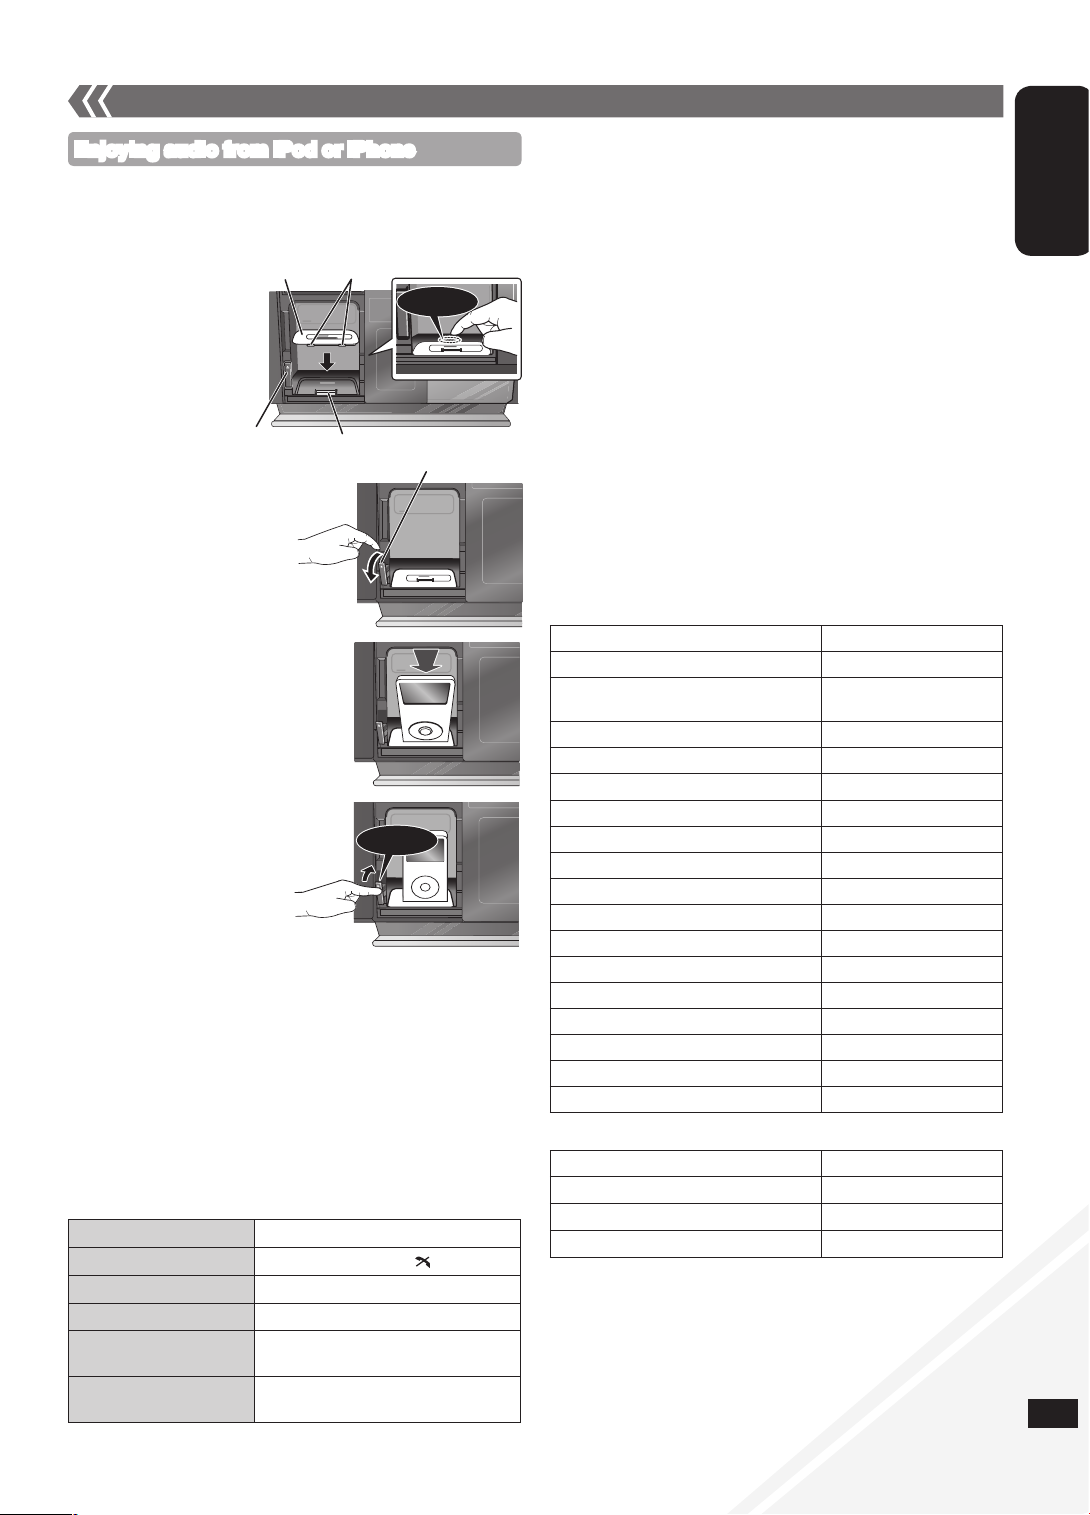
Enjoying audio from iPod or iPhone
g Inserting an iPod/iPhone
Press [;, iPod] to open the sliding door.
Insert the suitable dock adapter (not included) for the
iPod/iPhone.
g Removing an iPod/iPhone
Press [;, iPod] to close the sliding door.
Repeat step and (➡ above).
To remove, simply pull the iPod/iPhone straight out to disconnect
it.
Repeat step and (➡ above).
If the iPod/iPhone dock is not tilted when connecting or disconnecting
the iPod/iPhone, it may cause damage to the connector.
When inserting an iPod/iPhone into the unit, be sure to use the dock
adapter either supplied with the iPod/iPhone or commercially available
from Apple Inc.
Reduce the volume of the main unit to minimum before connecting or
disconnecting the iPod/iPhone.
•
•
•
■ Charging the iPod/iPhone
When iPod/iPhone is being charged in standby mode,
“IPOD CHARGING” is shown on the main unit’s display.
Check iPod/iPhone to see if the battery is fully charged. If you are
not using iPod/iPhone for an extended period of time after recharging
has completed, disconnect it from the main unit as the battery will be
depleted naturally. (Once fully recharged, additional recharging will
not occur.)
•
•
Notes on iPhone:
All phone features can only be controlled by the iPhone’s touch
screen.
The unit does not display incoming calls or the phone status (Connect
iPhone to this unit via Bluetooth (➡ page 13) to enjoy extended
capabilities).
The ringtone of incoming call can be heard from the iPhone’s speaker.
When the unit is in iPod/iPhone mode, the ringtone can also be heard
from the unit’s speakers (Connect iPhone to this unit via Bluetooth
(➡ page 13) to enjoy extended capabilities).
Connecting or disconnecting the iPhone from the unit will not cancel
a call.
There is no Apple Inc. specification that will guarantee the iPhone
responses above. iPhone responses may vary on new iPhone models
or iPhone new software updates.
•
•
•
•
•
Play
Press [iPod q/h].
Pause
Press [iPod q/h] or [g, ].
Skip track
Press [u] or [i].
Search the current track
Press and hold [u] or [i].
Display iPod/iPhone menu/
return to previous menu
Press [iPod MENU] in the play mode.
(Remote control only)
Select contents from
iPod/iPhone menu
Press [e,r] and then [OK].
(Remote control only)
Connect the iPod/iPhone
(not included) firmly.
Be sure to remove the iPod/iPhone from
its case.
■ Compatible iPod
Name Memory size
iPod nano 5th generation (video camera) 8 GB, 16 GB
iPod touch 2nd generation 8 GB, 16 GB, 32 GB,
64 GB
iPod classic 120 GB, 160 GB (2009)
iPod nano 4th generation (video) 8 GB, 16 GB
iPod classic 160 GB (2007)
iPod touch 1st generation 8 GB, 16 GB, 32 GB
iPod nano 3rd generation (video) 4 GB, 8 GB
iPod classic 80 GB
iPod nano 2nd generation (aluminum) 2 GB, 4 GB, 8 GB
iPod 5th generation (video) 60 GB, 80 GB
iPod 5th generation (video) 30 GB
iPod nano 1st generation 1 GB, 2 GB, 4 GB
iPod 4th generation (colour display) 40 GB, 60 GB
iPod 4th generation (colour display) 20 GB, 30 GB
iPod 4th generation 40 GB
iPod 4th generation 20 GB
iPod mini 4 GB, 6 GB
■ Compatible iPhone
Name Memory size
iPhone 3GS 16 GB, 32 GB
iPhone 3G 8 GB, 16 GB
iPhone 4 GB, 8 GB, 16 GB
Compatibility depends on the software version of the iPod/iPhone.•
Push the docking switch lever
back until it clicks into place.
Push!
Click!
Press [;] to unlock the
iPod/iPhone dock and then
pull the docking switch lever
to tilt the iPod/iPhone dock.
[;]
Click!
Dock adapter
Lever
Connector
Clips
Insert the side of the
iPod/iPhone dock
adapter with the clips
facing towards you
first and then push the
opposite side until it
clicks into place.
Page 12
RQTX1076
12
ENGLISH
12 13
External unit (continued)
About using Bluetooth
g Frequency band used
This unit uses the 2.4 GHz frequency band, however other devices may
use this frequency as well. To avoid interference with other wireless
devices, please follow the cautions listed below.
g Certification of this device
This unit conforms to frequency restrictions and has received certification
based on frequency laws, so a wireless permit is not necessary.
However, the following actions are punishable by law:
Taking apart/modifying the unit.
Removing specification indications from the rear part of this unit.
g Usage restrictions
Wireless transmission and/or usage with all Bluetooth equipped
devices is not guaranteed.
Compatible mobile phones capable of wireless transmission include
and comply to standards set by the Bluetooth SIG, Inc. However, if
the mobile phone is optimised to meet standard specifications, some
functions may work. Even so, depending on the specifications and
settings of the mobile phone, a connection may not be established,
nor are the methods of operation, display, or operation guaranteed.
This unit supports Bluetooth security features, however depending on
the operating environment and/or settings, this security may not be
sufficient. Use caution when transmitting data wirelessly.
Please be aware that Panasonic accepts no responsibility for data
and/or information that may be compromised during a wireless
transmission.
g Range of use
Use this device within an unobstructed 10 m range. The range of usage
or perimeter may be shortened depending on any obstructions, devices
causing interference, other people in the room, or the construction of the
building. Please note that the range mentioned above is not guaranteed.
g Effects from other devices
It is possible that this unit may not operate correctly or you may
experience other effects of instability such as “broken up” audio, etc.
when other devices are placed within close proximity. Therefore, in
order to prevent signal interference, we recommend separating this
unit from the following devices during use:
Microwave oven/Wireless LAN/Electronic devices/Audio & Video
devices/Office Assistant machines & devices/Digital cordless
telephones/Fax machines, etc.
If you live in close proximity to a broadcasting studio and the signal is
too strong, the unit may not operate correctly.
When using a notebook PC with a wireless LAN transmitter, do not
use this unit and the wireless LAN at the same time.
If you are still experiencing noise even outside of the 5 m range of a
wireless LAN device, turn the power to the wireless LAN device off.
g Intended usage limitations
This unit is intended for normal, general use. This unit is not developed
or manufactured with the intention of use in “high safety” or hazardous
occupations. Do not use this unit in these kinds of environments or
occupations.
The following examples require extreme caution, and can directly
result in loss of life, or extreme bodily harm.
e.g.)
Nuclear Engineering, and control of a nuclear reaction/automated
control of aircraft/air traffic control management/controlling
movement of heavy freight systems/control of life support or
extension systems/control of weapons systems and/or missile
launch systems, etc.
•
•
•
•
•
•
•
•
•
•
What is Bluetooth?
Bluetooth technology allows you to make a wireless connection with
another electronic device.
Bluetooth operations
Preparation:
Pair the Bluetooth device with this unit to create an audio connection.
Press [ q/h] to select Bluetooth.
When using it for the first time, it enters pairing mode automatically.
While this unit is in pairing mode, access the Bluetooth menu of
the Bluetooth device and execute a Bluetooth search to find this
unit (SC-HC40).
Please refer to the Bluetooth device user manual for further
instruction on how to connect a Bluetooth device.
If prompted for the passkey, enter “0000” (For Bluetooth
devices which version are incompatible with 2.1+EDR).
If pairing is successful, the paired device’s name will be
displayed for 2 seconds. The Bluetooth indicator lights up. The
unit is now ready to be used with the Bluetooth device.
Make sure the Bluetooth device supports A2DP (Advance Audio
Distribution Profile).
This unit supports the A2DP reception which is copyright-protected by
SCMS-T method.
A2DP enables you to stream stereo sound from an audio source
(mobile phone, PC or laptop) to this unit via Bluetooth.
Depending on the specification or setting of mobile phones,
connection may not be established, or operation and display may
vary.
You can register up to 6 devices into this unit. Disconnect the current
Bluetooth device and refer to “To register more devices” (➡ page 13).
If you register more than the maximum device number, the oldest
device in connection history will be overwritten.
If a registered device is re-registered, it will be overwritten.
•
•
•
•
•
•
•
•
•
•
Basic play
Press [ q/h] to select Bluetooth.
On the Bluetooth device, start playback of a music source. If the
device is connected, the music will be heard on this unit.
(Please refer to the Bluetooth device user manual if required.)
You can also make the following controls with the remote
control.
Play
Press [ q/h] to start play.
Stop
Press [g, ].
Pause
Press [ q/h]. Press again to resume play.
Skip track
Press [u] or [i].
To utilise these functions, the Bluetooth device must support AVRCP
(Audio Video Remote Control Profile).
This unit cannot transmit data to a Bluetooth device.
When playing iPod/iPhone by Bluetooth with the main unit, intermittent
sound may be experienced if you leave the iPod/iPhone Bluetooth
menu screen active or when making Bluetooth registration and
connection. If this occurs, please exit the iPod/iPhone Bluetooth menu
screen.
When playing music by iPod/iPhone via Bluetooth connection and the
iPod/iPhone is connected into this unit iPod/iPhone dock, the audio
will not be re-produced in Bluetooth selector. Switch the selector to
iPod to continue enjoying the music.
•
•
•
•
Page 13
RQTX1076
13
ENGLISH
External unit (continued)
or
“Made for iPod” means that an electronic accessory has been
designed to connect specifically to iPod and has been certified by the
developer to meet Apple performance standards.
“Works with iPhone” means that an electronic accessory has been
designed to connect specifically to iPhone and has been certified by
the developer to meet Apple performance standards.
Apple is not responsible for the operation of this device or its
compliance with safety and regulatory standards.
iPod is a trademark of Apple Inc., registered in the U.S. and other
countries. iPhone is a trademark of Apple Inc.
MPEG Layer-3 audio decoding technology licensed from Fraunhofer
IIS and Thomson.
The Bluetooth word mark and logos are owned by the Bluetooth
SIG, Inc. and any use of such marks by Panasonic Corporation is
under license. Other trademarks and trade names are those of their
respective owners.
Declaration of Conformity (DoC)
Hereby, “Panasonic Corporation”, declares that this product is in
compliance with the essential requirements and other relevant provisions
of Directive 1999/5/EC.
Customers can download a copy of the original DoC to our R&TTE
products from our DoC server:
http://www.doc.panasonic.de
Contact to Authorised Representative: Panasonic Marketing Europe
GmbH, Panasonic Testing Centre, Winsbergring 15, 22525 Hamburg,
Germany
This product is intended to be used in the following countries.
PL, CZ, HU, SK, BG, EE, LV, RO, SI, BO, HR, MK, RS, LT, RU, UA, KZ,
BY, O.CIS
This product is intended for general consumer. (Category 3)
OPERATING AT 2400 MHz TO 2483.5 MHz
Input level
You can select the sound input level of the Bluetooth device.
Press [PLAY MODE] repeatedly to select “LEVEL 0”, “LEVEL +1”
or “LEVEL +2”.
Select “LEVEL 0” if the sound is distorted.•
Display function
Press [DISPLAY, –DIMMER] repeatedly to view the information of
the current connected device.
BLUETOOTH Connected
device name
Connected profiles
Hands-Free Profile (HFP)
This unit works as a Bluetooth hands-free for your mobile phones.
You can answer or cancel an incoming call with the remote control.
To answer a call
(“IN CALL” blinks)
Press [ ]. “CALLING” starts blinking on the
display (Talk into the unit’s microphone).
Press [ ] again to transfer the call to the
mobile phones (“TRANSFER” blinks. You may
now converse using the mobile phone).
To cancel a call
Press [g, ].
To adjust volume Press [+, VOL , –] (Adjustable from
“TEL VOL 1” to “TEL VOL 10”).
To mute the
microphone
Press [MUTE]. Press again to cancel.
(During “MIC MUTE”, the caller is not able to
hear your voice).
This unit does not work with Headset Profile (HSP).
When the mobile phone is too close to the microphone of this unit,
noise may occur. Always keep the mobile phone away from the
microphone of this unit when making a call.
•
•
Advanced functions
Press [ MENU] to display “DISCONNECT?” and then press [OK].
A confirmation message is displayed.
Press [e,r] to select “YES” or “NO” and then press [OK].
The connection can also be stopped when you disable Bluetooth
transmission on the connected Bluetooth device.
•
Disconnecting a Bluetooth device
g To register more devices
Press [ MENU].
Press [e,r] to select “NEW DEV” and then press [OK].
The unit enters pairing mode and “PAIRING” starts blinking on the
display.
While this unit is in pairing mode, access the Bluetooth menu of
the Bluetooth device and execute a Bluetooth search to find this
unit (SC-HC40).
If prompted for the passkey, enter “0000”.
g To select communication quality
Press [ MENU].
Press [e,r] to select “LINK MODE” and then press [OK].
Press [e,r] to select the following modes and then press [OK].
“MODE 1”: Connection with emphasis on communication stability
“MODE 2”: Connection with high bit rate for good audio quality
(Communication might easily be disconnected in this
mode, select “MODE 1” if this occurs).
g To select Auto Link mode
Press [ MENU].
Press [e,r] to select “AUTO LINK” and then press [OK].
Press [e,r] to select the following modes and then press [OK].
“ON”: Automatically linked even in other than Bluetooth selector
“OFF”: Linked only in Bluetooth selector
These functions are unavailable if a device is connected. Disconnect
the Bluetooth devices to display these functions.
When “LINKING” is displayed, pressing [ MENU] is invalid.
Auto Link works only if your device support A2DP.
•
•
•
•
•
•
•
•
Page 14
RQTX1076
14
ENGLISH
External unit (continued)
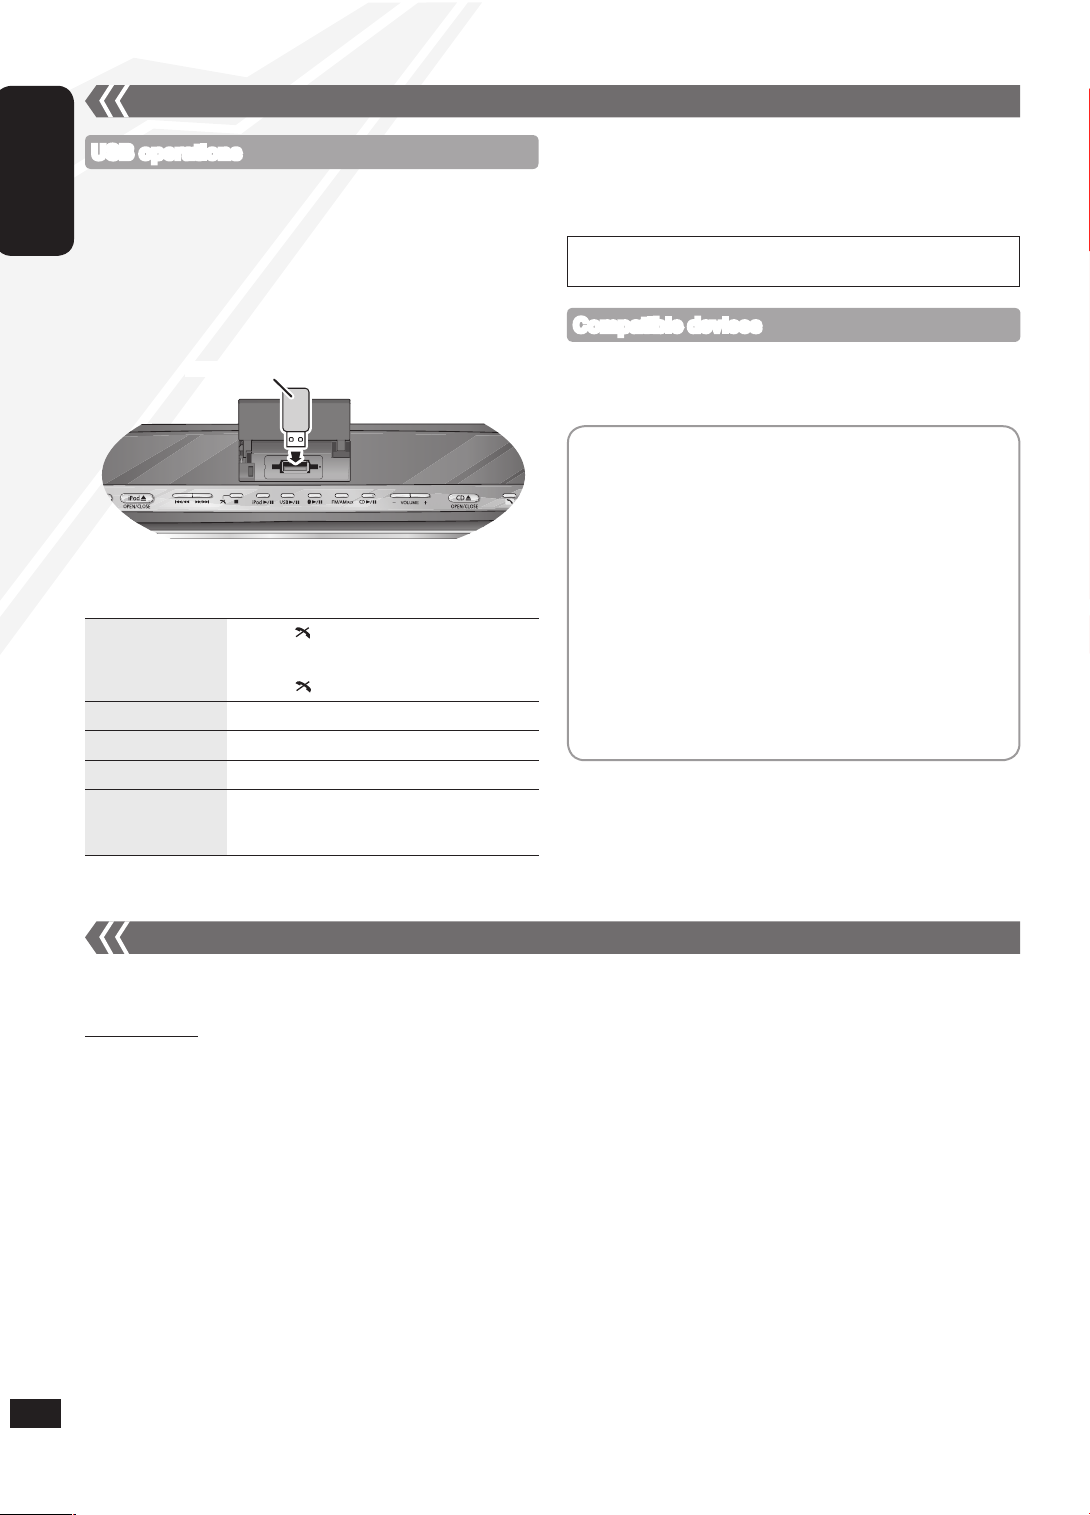
Compatible devices
The USB connectivity enables you to connect and play MP3 tracks from
USB mass storage class.
Preparation:
Before connecting any USB mass storage device to the unit, ensure
that the data stored therein has been backed up.
It is not recommended to use a USB extension cable. The device
connected via the cable will not be recognised by this unit.
Open the USB cover.
Reduce the volume and connect the USB mass storage device.
Press [USB q/h] to start play.
•
•
Stop
Press [g, ]. “RESUME” is displayed. The
position is memorised.
Press [USB q/h] to resume play.
Press [g, ] again to clear the position.
Pause
Press [USB q/h]. Press again to resume play.
Skip track
Press [u] or [i].
Skip album
Press [e,r].
Direct access play
(Play starts with the
track you select.)
Press [e,r] to select the album.
Press [i] once and then the numeric
buttons to select the track.
To remove the USB mass storage device, select a source other than
“USB”.
Removing the USB mass storage device with it selected as a source
can damage the data stored in the device.
•
Devices which are defined as USB mass storage class:
USB devices that support bulk only transfer
USB devices that support USB 2.0 full speed
•
•
For other operating functions, they are similar as those described in
“Disc operations” (➡ page 8, 9).
Notes on USB
Supported format: Files with extension “.mp3” or “.MP3”
CBI (Control/Bulk/Interrupt) is not supported.
A device using NTFS file system is not supported [Only
FAT 12/16/32 (File Allocation Table 12/16/32) file system is
supported].
Depending on the sector size, some files may not work.
This unit can access up to 255 albums and 2500 tracks.
The maximum number of tracks in a folder is 999 tracks.
Only one memory card will be selected when connecting a
multiport USB card reader, typically the first memory card
inserted.
Disconnect the USB card reader from the unit when you remove
the memory card. Failure to do so may cause malfunction to the
device.
When you connect the digital audio player to the USB port, it
charges all the time when the unit is on.
•
•
•
•
•
•
•
•
•
USB mass storage device (not included)
USB operations
When the following situations occur, reset the memory:
There is no response when buttons are pressed.
You want to clear and reset the memory contents.
To reset memory
Disconnect the AC mains lead. (Wait for at least 3 minutes before proceeding to step 2.)
While pressing and holding down [8] on the main unit, reconnect the AC mains lead.
“--------” appears on the display.
Release [8].
All the settings are returned to the factory preset. You will need to reset the memory items.
•
•
Memory reset (Initialization)
14 15
Page 15

RQTX1076
15
ENGLISH
Before requesting service, make the following checks. If you are in doubt about some of the check points, or if the remedies indicated in the
chart do not solve the problem, consult your dealer for instructions.
Troubleshooting guide
g Common problems
Incorrect display or play will not start
You have not inserted the disc properly.
Insert it correctly.
The disc is scratched or dirty (Tracks
skipped).
There is moisture on the lens. Wait for about
an hour and then try again.
MP3 cannot be read
You may not be able to play MP3 if you have
copied a multi-session disc that has no data
between sessions.
When creating a multi-session disc, it is
necessary to close the session.
The amount of data on the disc is too small.
Set the amount of data to above 5 MB.
Noise is heard or no sound
While playing MP3, noise may occur if the
recording is poor.
Keep this unit away from mobile phones if
the interference is apparent.
Turn the volume up.
Switch the unit off, check and correct the
connection and then switch the unit on.
Causes include straining of the speakers
through excessive volume or power and
using the unit in a hot environment.
Humming heard during play
An AC mains lead or fluorescent light is near
the cords. Keep other appliances and cords
away from this unit’s cables.
A beat sound or noise is heard while
receiving radio broadcast
Switch the television or other audio player off
or separate it from the unit.
Switch the portable audio player off if
connected to the AUX port.
A low hum or noise is heard during AM
broadcast
Keep the antenna away from other cables
and cords.
Keep the AM antenna away from the unit.
The picture on the television near the unit
disappears or stripes appear on the screen
The location and orientation of the antenna
are incorrect.
The television antenna wire is too close to
the unit. Separate the antenna wire of the
television from the unit.
No response when remote control buttons
are pressed
Check that the batteries are inserted
correctly (➡ page 7).
g Display
“--:--”
You plugged the AC mains lead in for
the first time or there was a power failure
recently. Set the time (➡ page 10).
“ADJUST CLOCK”
Clock is not set. Adjust the clock accordingly.
“ADJUST TIMER”
Play timer is not set. Adjust the play timer
accordingly.
•
•
•
•
•
•
•
•
•
•
•
•
•
•
•
•
•
•
•
•
•
“PGM FULL”
The number of programmed tracks is limited
to 24. No further tracks can be programmed.
“NO PLAY”
A CD-ROM disc that is not in CD-DA or MP3
format is inserted. It cannot be played.
“ERROR”
Incorrect operation is performed. Read the
instructions and try again.
“F61” or “F76”
There is a power supply problem. Consult
the dealer.
Disconnect the USB device. Turn the unit off
and on again.
“AUTO OFF”
The unit has been left unused for about
29 minutes and will shut down in a minute.
Press any button to cancel it.
“ILLEGAL OPEN”
Sliding door is not in correct position. Turn
the unit off and on again.
“NODEVICE”
The iPod/iPhone device is not inserted
correctly. Read the instructions and try again
(➡ page 11).
The USB device is not inserted. Check the
connection.
“REMOTE 1”
The main unit is in “REMOTE 1” mode.
Switch the remote control to “REMOTE 1”
mode (➡ page 10).
“REMOTE 2”
The main unit is in “REMOTE 2” mode.
Switch the remote control to “REMOTE 2”
mode (➡ page 10).
g iPod/iPhone
iPod/iPhone does not turn on
Verify that the iPod/iPhone battery is not
depleted before connecting it to the unit.
Before inserting the iPod/iPhone into the
dock, turn both the unit and the iPod/iPhone
off. Turn the power on and select the
appropriate source.
No sound is heard from the speakers
The iPod/iPhone is not inserted correctly
into the dock. Turn the iPod/iPhone off and
remove it from the dock connector. Reinsert
it and turn it on again.
Make sure that the iPod/iPhone is actually
playing something.
Adjust the volume.
Distorted sound or the sound level is too
low
Make sure the equalizer function of the
iPod/iPhone is turned off.
iPod/iPhone cannot be controlled by the
remote control or main unit
Make sure the iPod/iPhone is inserted
properly into the dock.
Check the dock connection and make sure
that iPod/iPhone is selected as the source of
music (➡ page 11).
iPod/iPhone does not charge
Check all connections (➡ page 3, 11).
•
•
•
•
•
•
•
•
•
•
•
•
•
•
•
•
•
•
•
•
g Bluetooth
The name of the connected device is shown
as “
*
”
Character that cannot be displayed will be
replaced by “ * ”.
An unknown device name is detected and
displayed as “
*****
”.
Noise is heard or broken sound
The Bluetooth communication distance has
exceeded 10 m. Bring the device closer to
the unit.
There are obstructions between the device
and the unit. Remove or avoid the obstacles.
Select “MODE 1” to improve connection
quality (➡ page 13).
Interference from mobile phones.
“F70”
Turn the unit off. Disconnect the AC mains
lead and consult your dealer.
g USB
No response when [USB q/ h] is pressed
Disconnect the USB device and then
reconnect it. Alternatively, turn the unit off
and on again.
The USB drive or its contents cannot be
read
The USB drive format or its contents is/are
not compatible with the unit (➡ page 14).
The USB host function of this product may
not work with some USB devices.
USB devices with storage capacity of more
than 8 GB may not work in some instances.
Slow operation of the USB flash drive
Large file size or high memory USB flash
drive takes longer time to read.
“NO PLAY”
Check the content.
Only MP3 format files can be played.
If there are more than 255 albums or folders
(audio and non-audio), some of the MP3 files
in these albums may not be read and played.
Transfer these music albums to another
USB. Alternatively, reformat the USB device
and save these music albums prior to saving
the other non-audio folders.
•
•
•
•
•
•
•
•
•
•
•
•
•
•
•
Page 16

RQTX1076
16
ENGLISH
g AMPLIFIER SECTION
RMS Output Power
Front Ch (both ch driven) 20 W per channel (6 Ω), 1 kHz, 10 % THD
Total RMS power 40 W
Phone jack
Terminal Stereo, 3.5 mm jack
Aux (Rear)
Terminal Stereo, 3.5 mm jack
g TUNER SECTION
Preset Memory FM 30 stations
AM 15 stations
Frequency Modulation (FM)
Frequency range 87.50 MHz to 108.00 MHz (50 kHz step)
Antenna terminals 75 Ω (unbalanced)
Amplitude Modulation (AM)
Frequency range 522 kHz to 1629 kHz (9 kHz step)
520 kHz to 1630 kHz (10 kHz step)
g DISC SECTION
Disc played [8 cm or 12 cm]
(1) CD-Audio (CD-DA)
(2) CD-R/RW (CD-DA, MP3)
(3) MP3*
* MPEG-1 Layer 3, MPEG-2 Layer 3
Pick up
Wavelength 795 nm
Laser power CLASS 1
Audio Output (Disc)
Number of channels FL, FR, 2 channel
g SPEAKER SECTION
Type 1 way, 1 speaker system (Passive Radiator)
Speaker unit(s)
Full range 6.5 cm Cone type x 1 / channel
Passive Radiator 8 cm x 2 / channel
Impedance 6 Ω
g BLUETOOTH SECTION
Bluetooth system specification V2.1 + EDR
Wireless equipment classification Class 1 (2.5 mW)
Supported profiles A2DP, AVRCP, HFP
Frequency band 2402 MHz to 2480 MHz
(Adaptive Frequency Hopping)
Driving distance 10 m Line of Sight
(iPhone 3G, at height 1 m, in MODE 1)
g USB PORT SECTION
USB Standard USB 2.0 full speed
Media file format support MP3 (*.mp3)
USB device file system FAT 12/16/32
USB port power Max 500 mA
g GENERAL
Power supply AC 220 V to 240 V, 50 Hz
Power consumption 35 W
Dimensions (W x H x D) 500 mm x 201 mm x 102 mm
(D = 69 mm minimum)
Mass Approx. 3.0 kg
Operating temperature range 0 °C to +40 °C
Operating humidity range 35 % to 80 % RH (no condensation)
Power consumption in standby mode: 0.09 W (approx.)
Specifications are subject to change without notice.
Total harmonic distortion is measured by the digital spectrum
analyser.
•
•
Specifications
16 17
g Pull out the power plug from the outlet for maintenance beforehand and then wipe it using a soft and dried cloth.
When dirt is heavy, wring the cloth moistened in water tightly to wipe the dirt, and then wipe it with a dried cloth.
Do not use solvents such as benzine, thinner, alcohol and detergent, which may deform the coating of the outer case.
When using a chemical cloth, follow the precautions.
g Care on the CD lens
Clean the lens regularly to prevent malfunctions. Use a blower to remove dust and a cotton swab if it is extremely dirty.
Do not use the lens cleaner of the CD type.
•
•
•
•
•
Maintenance
Page 17

RQTX1076
17
ENGLISH
Placement
Set the unit up on an even surface away from direct sunlight, high temperatures, high humidity, and excessive vibration. These conditions can
damage the cabinet and other components, thereby shortening the unit’s service life.
Do not place heavy items on the unit.
Voltage
Do not use high voltage power sources. This can overload the unit and cause a fire.
Do not use a DC power source. Check the source carefully when setting the unit up on a ship or other place where DC is used.
AC mains lead protection
Ensure the AC mains lead is connected correctly and not damaged. Poor connection and lead damage can cause fire or electric shock. Do not
pull, bend, or place heavy items on the lead.
Grasp the plug firmly when unplugging the lead. Pulling the AC mains lead can cause electric shock.
Do not handle the plug with wet hands. This can cause electric shock.
Foreign matter
Do not let metal objects fall inside the unit. This can cause electric shock or malfunction.
Do not let liquids get into the unit. This can cause electric shock or malfunction. If this occurs, immediately disconnect the unit from the AC mains
supply and contact your dealer.
Do not spray insecticides onto or into the unit. They contain flammable gases which can ignite if sprayed into the unit.
Service
Do not attempt to repair this unit by yourself. If sound is interrupted, indicators fail to light, smoke appears, or any other problem that is not
covered in these instructions occurs, disconnect the AC mains lead and contact your dealer or an authorized service centre. Electric shock or
damage to the unit can occur if the unit is repaired, disassembled or reconstructed by unqualified persons.
Extend operating life by disconnecting the unit from the AC mains if it is not to be used for a long time.
Safety precautions
Page 18
18
RQTX1076
POLSKI
UWAGA!
NINIEJSZEGO URZ¥DZENIA NIE NALE¯Y INSTALOWAÆ
LUB UMIESZCZAÆ W SZAFCE NA KSI¥¯KI, ZABUDOWANEJ
SZAFCE LUB INNEJ OGRANICZONEJ PRZESTRZENI, W
CELU ZAPEWNIENIA DOBREJ WENTYLACJI. NALE¯Y SIÊ
UPEWNIÆ, ¯E ZAS£ONY I INNE MATERIA£Y NIE ZAS£ANIAJ¥
OTWORÓW WENTYLACYJNYCH TAK, ABY ZAPOBIEC
RYZYKU PORA¯ENIA PR¥DEM LUB PO¯ARU W WYNIKU
PRZEGRZANIA.
NIE ZAS£ANIAJ OTWORÓW WENTYLACYJNYCH URZ¥DZENIA
GAZETAMI, OBRUSAMI, ZAS£ONAMI I PODOBNYMI
PRZEDMIOTAMI.
NIE UMIESZCZAJ NA URZ¥DZENIU ŹRÓDE£ OTWARTEGO
OGNIA, TAKICH JAK ZAPALONE ŚWIECE.
POZBYWAJ SIÊ ZU¯YTYCH BATERII W SPOSÓB NIE
ZAGRA¯AJ¥CY ŚRODOWISKU NATURALNEMU.
•
•
•
•
OSTRZE¯ENIE:
ABY ZMNIEJSZYÆ RYZYKO PO¯ARU, PORA¯ENIA PR¥DEM
ELEKTRYCZNYM LUB USZKODZENIA SPRZÊTU,
* NALE¯Y CHRONIÆ URZ¥DZENIE PRZED DESZCZEM,
WILGOCI¥, ZAMOCZENIEM LUB ZACHLAPANIEM.
PONADTO NA URZ¥DZENIU NIE WOLNO STAWIAÆ NACZYÑ
WYPE£NIONYCH SUBSTANCJAMI P£YNNYMI, NA PRZYK£AD
WAZONÓW.
* U¯YWAÆ TYLKO ZALECANYCH AKCESORIÓW.
* NIE DEMONTOWAÆ POKRYWY (TYLNEJ ŚCIANKI).
WEWN¥TRZ URZ¥DZENIA NIE MA ELEMENTÓW, KTÓRE
WYMAGAJ¥ INTERWENCJI U¯YTKOWNIKA. WSZELKIE
NAPRAWY ZLECAÆ WYKWALIFIKOWANEMU PERSONELOWI
SERWISU.
UWAGA!
W TYM URZ¥DZENIU ZNAJDUJE SIÊ LASER.
WYKONYWANIE REGULACJI INNYCH, NI¯ OPISANE, LUB
POSTÊPOWANIE W SPOSÓB NIE PRZEWIDZIANY W INSTRUKCJI
OBS£UGI GROZI NIEBEZPIECZNYM NAŚWIETLENIEM
PROMIENIAMI LASERA.
PROSIMY NIE OTWIERAÆ OBUDOWY I NIE DOKONYWAÆ
NAPRAW SAMODZIELNIE. PROSIMY POWIERZYÆ NAPRAWY
KWALIFIKOWANEMU PERSONELOWI.
Wewn¹trz
urz¹dzenia
RQLS0418
PRZESTROGA
Niew³aściwa wymiana baterii grozi ich rozerwaniem.
Do wymiany nale¿y stosowaæ wy³¹cznie baterie tego samego lub
równowa¿nego typu, zgodnie z zaleceniami producenta. Zu¿yte
baterie nale¿y zutylizowaæ zgodnie ze wskazówkami producenta.
Informacja dla u¿ytkowników o gromadzeniu i
pozbywaniu siê zu¿ytych urz¹dzeñ i baterii
Niniejsze symbole umieszczane na
produktach, opakowaniach i/ lub w
dokumentacji towarzysz¹cej oznaczaj¹,
¿e nie wolno mieszaæ zu¿ytych urz¹dzeñ
elektrycznych i elektronicznych oraz baterii z
innymi odpadami domowymi.
W celu zapewnienia w³aściwego
przetwarzania, utylizacji oraz recyklingu
zu¿ytych produktów i baterii, nale¿y
oddawaæ je do wyznaczonych punktów
gromadzenia odpadów zgodnie z przepisami
prawa krajowego oraz postanowieniami
Dyrektyw 2002/96/WE i 2006/66/WE.
Prawid³owe pozbywanie siê w/w produktów
i baterii pomaga oszczêdzaæ cenne zasoby
naturalne i zapobiegaæ potencjalnemu
negatywnemu wp³ywowi na zdrowie
cz³owieka oraz stan środowiska naturalnego,
który towarzyszy niew³aściwej gospodarce
odpadami.
Wiêcej informacji o zbiórce oraz recyklingu
zu¿ytych produktów i baterii mo¿na
otrzymaæ od w³adz lokalnych, miejscowego
przedsiêbiorstwa oczyszczania lub w
punkcie sprzeda¿y, w którym u¿ytkownik
naby³ przedmiotowe towary.
Za niew³aściwe pozbywanie siê powy¿szych
odpadów mog¹ groziæ kary przewidziane
przepisami prawa krajowego.
Dotyczy u¿ytkowników firmowych
dzia³aj¹cych na terenie Unii Europejskiej
Chc¹c w odpowiedni sposób pozbyæ siê
urz¹dzeñ elektrycznych lub elektronicznych,
nale¿y skontaktowaæ siê ze sprzedawc¹ lub
dostawc¹, który udzieli dalszych informacji.
[Informacje o pozbywaniu siê w/w
urz¹dzeñ w pañstwach trzecich]
Niniejsze symbole obowi¹zuj¹ wy³¹cznie
na terenie Unii Europejskiej. Chc¹c pozbyæ
siê w/w urz¹dzeñ elektrycznych lub
elektronicznych, nale¿y skontaktowaæ siê
z w³adzami lokalnymi lub sprzedawc¹ w
sprawie w³aściwego sposobu wyrzucania
tego rodzaju przedmiotów.
Dotyczy symbolu baterii (symbole
przyk³adowe):
Ten symbol mo¿e wystêpowaæ wraz z
symbolem pierwiastka chemicznego. W
takim przypadku spe³nia on wymagania
Dyrektywy w sprawie określonego środka
chemicznego.
2 3
AUX
RQT4389ZAA
Page 19
19
RQTX1043
POLSKI
RQTX1076
19
Dostarczone wyposa¿enie 3
Po³¹czenia 3
Mocowanie urz¹dzenia do ściany (Opcjonalne)
4
Zestawienie funkcji 7
Obs³uga p³yt 8
Obs³uga radia 9
Timer 10
Regulacja dźwiêku 10
Urz¹dzenia zewnêtrzne 10
Kasowanie pamiêci (Inicjalizacja) 14
Rozwi¹zywanie problemów 15
Dane techniczne 16
Konserwacja 16
Środki ostro¿ności 17
Spis treści
URZ¥DZENIE JEST PRZEZNACZONE DO U¯YWANIA W KLIMACIE
UMIARKOWANYM.
Gniazdo zasilania powinno znajdowaæ siê blisko urz¹dzenia i byæ
³atwo dostêpne.
Wtyczka przewodu zasilania pod³¹czona do gniazdka powinna byæ
³atwo dostêpna.
Aby ca³kowicie od³¹czyæ urz¹dzenie od zasilania, od³¹cz wtyczkê
przewodu zasilania od gniazdka.
To urz¹dzenie mo¿e odbieraæ zak³ócenia wywo³ane u¿yciem
telefonu komórkowego. Je¿eli takie zak³ócenia wyst¹pi¹, wskazane
jest zwiêkszenie odleg³ości pomiêdzy urz¹dzeniem a telefonem
komórkowym.
Dostarczone wyposa¿enie
Przewód zasilania dostarczony w zestawie mo¿na stosowaæ
wy³¹cznie z tym urz¹dzeniem. Nie wolno u¿ywaæ go do pod³¹czania
innego sprzêtu.
Do zasilania urz¹dzenia nie u¿ywaj przewodów zasilania
przeznaczonych dla urz¹dzeñ innych typów.
•
•
Zidentyfikuj poszczególne elementy dostarczonego wyposa¿enia.
Po³¹czenia
Przymocuj antenê do ściany lub s³upa w pozycji, w której
sygna³y radiowe s¹ odbierane z najmniejsz¹ ilości¹ zak³óceñ.
•
Pod³¹cz antenê pêtlow¹ AM.
2
Nie zbli¿aj przewodu antenowego do innych przewodów.•
Nale¿y unikaæ d³ugotrwa³ego s³uchania, aby zapobiec
uszkodzeniu s³uchu.
Nadmierny poziom dźwiêku przy ods³uchu przez s³uchawki
mo¿e spowodowaæ utratê s³uchu.
D³ugotrwa³y ods³uch przy pe³nej g³ośności mo¿e
spowodowaæ uszkodzenie s³uchu u¿ytkownika.
Nale¿y u¿ywaæ jedynie dostarczonych lub zalecanych
s³uchawek.
•
•
•
Zmniejsz g³ośnośæ i pod³¹cz s³uchawki.
Rodzaj wtyku: 3,5 mm stereo
S³uchawki (niedo³¹czone)
Antena wewnêtrzna FM
Pod³¹cz antenê wewnêtrzn¹ FM.
Taśma klej¹ca
1
g Informacja dot. g³ośników
G³ośniki nie maj¹ os³ony magnetycznej. Nie nale¿y ich
umieszczaæ w pobli¿u telewizorów, komputerów osobistych i
innych urz¹dzeñ podatnych na pole magnetyczne.
Siatek z g³ośników nie mo¿na ści¹gaæ.
•
•
AUX (➡ strona 10)
Widok z ty³u
AUX
Otwory wentylacyjne
5 4
3 2
1
Pokrywa USB
2
1
3
Pod³¹cz kabel sieciowy po dokonaniu wszystkich po³¹czeñ.
Pod³¹cz kabel zasilania.
Do gniazdka sieciowego
AC IN
Ustaw antenê na
podstawce.
Antena pêtlowa AM
Klik!
1 Przewód sieciowy
1 Antena pêtlowa AM
1 Antena wewnêtrzna FM
2 Baterie
1 Pilot zdalnego sterowania (N2QAYB000523)
Akcesoria - śruby
2 Śruby mocuj¹ce
1 Uchwyt zabezpieczaj¹cy
Akcesroia - wspornik ścienny
1 Wspornik ścienny
Poczwórne podk³adki
B
4
Page 20
20
RQTX1076
POLSKI
4
Mocowanie urz¹dzenia do ściany (Opcjonalne)
Uwagi dot. instalacji
g Przed instalacj¹ w celu jej prawid³owego przeprowadzenia nale¿y przeczytaæ „Środki ostro¿ności” i „Instrukcja montowania do ściany”.
g W celu prawid³owej eksploatacji urz¹dzenia i unikniêcia usterek niniejszego urz¹dzenia nie nale¿y instalowaæ:
na innych elementach ni¿ pionowe ściany,
w pobli¿u spryskiwaczy i czujników,
w pobli¿u linii wysokiego napiêcia lub źróde³ zasilania,
w pobli¿u urz¹dzeñ grzewczych,
w miejscach, gdzie urz¹dzenie mo¿e byæ nara¿ona na wibracje lub uderzenia,
w pobli¿u źróde³ pola magnetycznego, promieniowania cieplnego, pary, t³ustych oparów itp.
w miejscach, gdzie mo¿e wystêpowaæ kapanie wody (np. pod urz¹dzeniem klimatyzacyjnym).
g Urz¹dzenia nie wolno instalowaæ pod źród³ami oświetlenia sufitowego (np. pod reflektorem punktowym, lamp¹ halogenow¹ itp.).
W przypadku instalacji w takim miejscu mo¿e dojśæ do odkszta³cenia obudowy lub uszkodzenia spowodowanego przez wysok¹ temperaturê.
g Instalacjê nale¿y przeprowadziæ w sposób odpowiedni dla budowy i materia³u ściany.
g Aby unikn¹æ uszkodzenia urz¹dzenia lub pod³ogi w trakcie instalacji nale¿y wykorzystaæ miêkki koc lub tkaninê.
g Wkrêcaj¹c śruby nie nale¿y ich dokrêcaæ zbyt mocno ani zbyt s³abo.
g Nale¿y zabezpieczyæ obszar instalacji i wykonaæ j¹ przestrzegaj¹c środków ostro¿ności.
g Firma Panasonic nie ponosi odpowiedzialności za przypadkowe szkody wynik³e z nieprawid³owej instalacji lub eksploatacji.
•
•
•
•
•
•
•
Instalacjê i zdejmowanie urz¹dzenia mo¿e wykonywaæ jedynie
wykwalifikowany specjalista budowlany.
Nieprawid³owa instalacja mo¿e spowodowaæ upadek urz¹dzenia i
uszkodzenia cia³a.
W celu unikniêcia obra¿eñ urz¹dzenie musi byæ odpowiednio
przymocowane do ściany wg instrukcji instalacji.
Urz¹dzenia nie wolno instalowaæ w miejscach, które nie
wytrzymuj¹ obci¹¿enia.
W przypadku zastosowania elementów mocuj¹cych, które s¹ zbyt
s³abe mo¿e dojśæ do upadku urz¹dzenia i obra¿eñ cia³a.
Nie wolno stosowaæ metod instalacji innych ni¿ podane.
Mo¿e to spowodowaæ upadek urz¹dzenia i uszkodzenia cia³a.
Urz¹dzenia nie nale¿y instalowaæ na innych elementach ni¿
pionowe ściany.
Mo¿e to spowodowaæ upadek urz¹dzenia i uszkodzenia cia³a.
Nale¿y za³o¿yæ odpowiedni¹ wytrzyma³ośæ mocowania
(w przybli¿eniu 10 razy wiêksz¹ ni¿ masa urz¹dzenia).
Niewystarczaj¹ca wytrzyma³ośæ mo¿e spowodowaæ upadek
urz¹dzenia i obra¿enia cia³a.
Ściana, do której ma byæ zamocowane urz¹dzenie musi
wytrzymaæ obci¹¿enie 20 kg na śrubê.
Niewystarczaj¹ca wytrzyma³ośæ ściany mo¿e spowodowaæ oderwanie
siê urz¹dzenia po pewnym czasie.
Nie nale¿y rozmontowywaæ ani zmieniaæ ściennego elementu
mocuj¹cego.
Spowoduje to oderwanie siê urz¹dzenia, jego uszkodzenie i obra¿enia
cia³a.
Nie wolno instalowaæ urz¹dzenia w miejscach zawilgoconych,
zapylonych lub w miejscach, gdzie wystêpuj¹ t³uste opary
lub para ani pod urz¹dzeniami klimatyzacyjnymi, z których na
urz¹dzenie mo¿e skapywaæ woda.
Mo¿e to mieæ negatywny wp³yw na urz¹dzenie i spowodowaæ po¿ar
lub pora¿enie pr¹dem.
Nad urz¹dzeniem powinno znajdowaæ siê ponad 30 cm wolnej
przestrzeni, a po prawej i lewej stronie urz¹dzenia ponad 10 cm.
Pomiêdzy ścian¹ a ty³em urz¹dzenia nie powinny znajdowaæ siê
¿adne przeszkody.
Zablokowanie otworów wentylacyjnych mo¿e spowodowaæ po¿ar.
Do instalacji nale¿y wykorzystaæ wskazane elementy.
Zastosowanie innych elementów mo¿e spowodowaæ oderwanie siê
urz¹dzenia i obra¿enia cia³a.
Podczas instalacji nie mo¿na dopuściæ do kontaktu śrub
mocuj¹cych lub przewodu zasilania z metalowymi elementami
wewn¹trz ściany.
Mo¿e to spowodowaæ pora¿enie pr¹dem.
Po odinstalowaniu urz¹dzenia od ściany, nale¿y tak¿e usun¹æ
śruby mocuj¹ce.
W przeciwnym razie mog¹ one uderzyæ osoby i spowodowaæ
obra¿enia cia³a.
W celu bezpiecznej eksploatacji urz¹dzenie nale¿y zamontowaæ
na wysokości, na której widoczny jest port USB oraz przyciski
sterowania.
Zamontowanie urz¹dzenia w niew³aściwej pozycji mo¿e spowodowaæ
jego oderwanie siê i obra¿enia cia³a.
UWAGA!
Środki ostro¿ności
OSTRZE¯ENIE!
Akcesoria do instalacji
g Akcesoria sprzedawane osobno (niedo³¹czone)
2 Ścienne śruby mocuj¹ce
1 Śruba uchwytu zabezpieczaj¹cego
Nale¿y u¿yæ śrub o średnicy rzeczywistej 4 mm odpowiednich dla
materia³u ściennego (np. drewno, metal, beton itd.).
•
•
g Akcesoria dostarczone z urz¹dzeniem
Akcesoria - śruby (RFAX1020)
2 Śruby mocuj¹ce (XYN3+J10FJ)
1 Uchwyt zabezpieczaj¹cy (RMKX1015)
Akcesroia - wspornik ścienny (RFAX1021)
1 Wspornik ścienny (RGQX1004)
Poczwórne podk³adki (RKAX0028-K)
•
»
»
•
»
»
B
C
C
Wszystkie akcesoria nale¿y chroniæ przed dzieæmi,
zapobiegaj¹c groźbie ich po³kniêcia.
Page 21
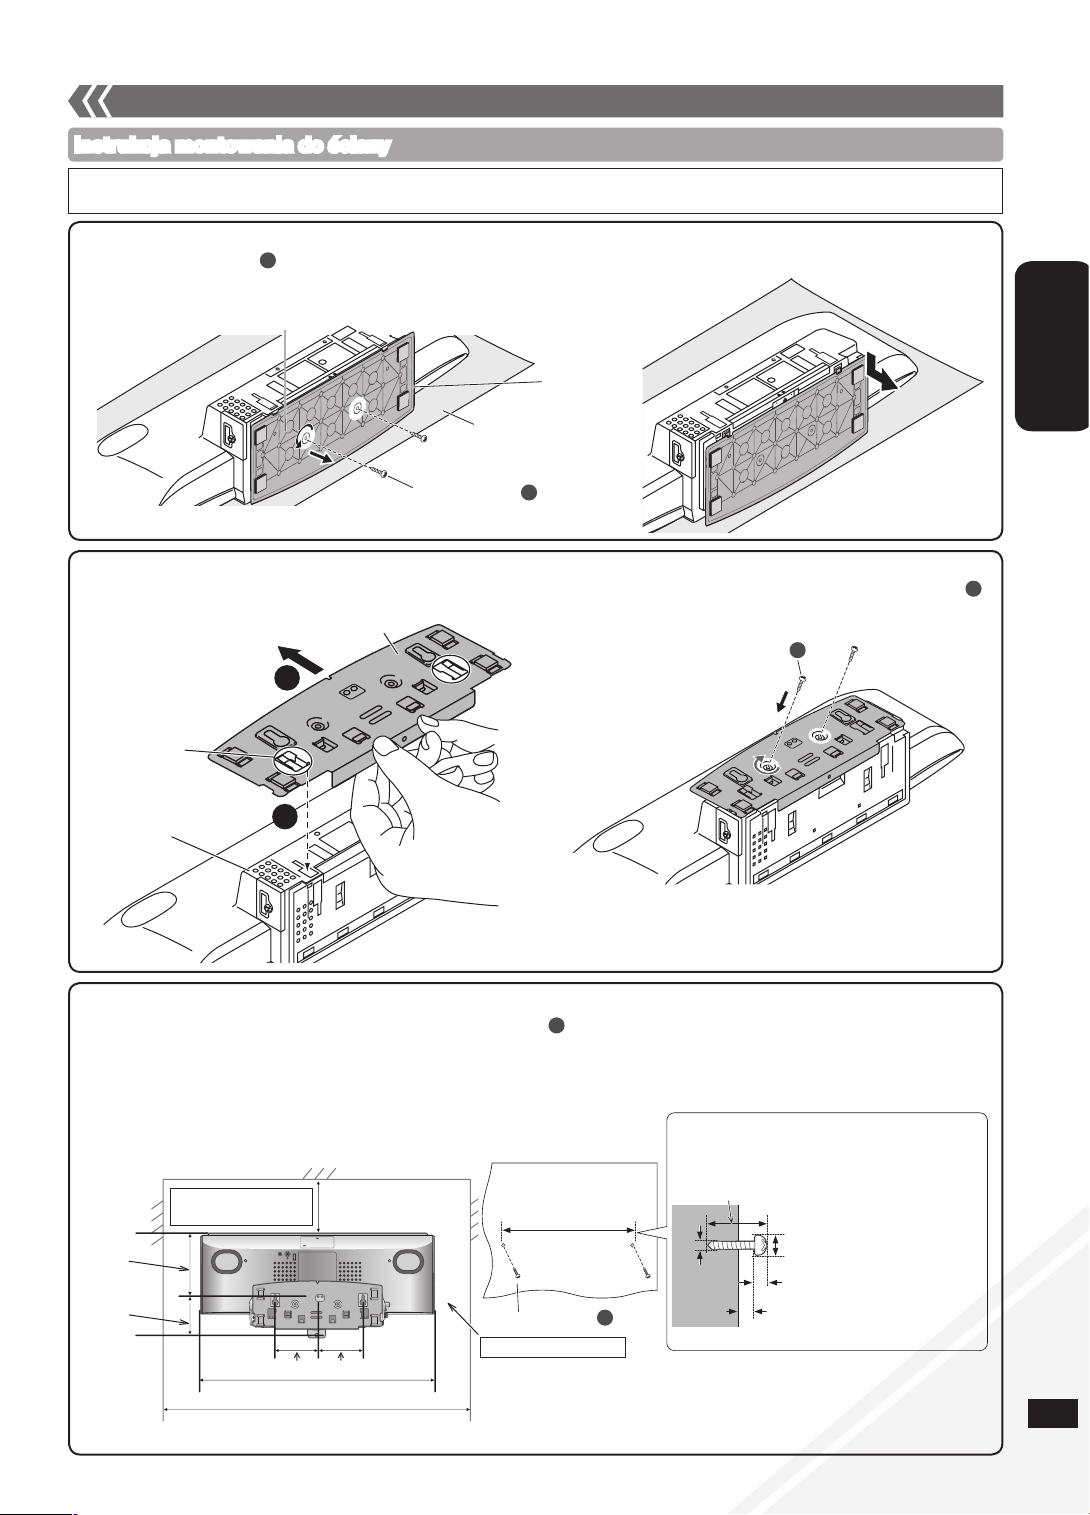
21
RQTX1043
POLSKI
RQTX1076
21
5
2. Przymocuj wspornik ścienny do tylnej czêści urz¹dzenia.
1. Zdejmij podstawê urz¹dzenia.
3. Wkrêæ śruby mocuj¹ce do ściany.
Instrukcja montowania do ściany
• Przed instalacj¹ nale¿y wy³¹czyæ urz¹dzenie i wyj¹æ przewód zasilania z gniazda elektrycznego.
• Śruby nale¿y mocno dokrêciæ, aby siê nie poluzowa³y.
Spód urz¹dzenia g³ównego
Podstawa
Miêkki koc lub tkanina
Śruba mocuj¹ca
A
Śruba mocuj¹ca
B
8 mm do 9,5 mm
2,2 mm do 2,8 mm
2,5 mm do 3,5 mm
4 mm
Obie śruby musz¹ byæ odpowiednio
d³ugie, aby wytrzymaæ obci¹¿enie co
najmniej 20 kg ka¿da.
Ściana
Śruba mocuj¹ca
C
163 mm
Mocowanie urz¹dzenia do ściany (Opcjonalne) (ci¹g dalszy)
Zdejmij podstawê urz¹dzenia.
2
1
Dopasuj obie wypustki wspornika i urz¹dzenia g³ównego i
wsuñ a¿ rozlegnie siê klikniêcie.
Przymocuj wspornik ścienny przy pomocy śruby mocuj¹cej
(2 szt.).
(Moment dokrêcania: 1,2 Nm do 1,5 Nm)
AUX
300 mm
Wymagana odleg³ośæ
Widok z ty³u
Wymagana odleg³ośæ
85,5 mm
77,5 mm
500 mm
700 mm
74,8 mm
130 mm
Wypustka
Ty³ urz¹dzenia g³ównego
Wspronik ścienny (widok od do³u)
Wykrêæ śrubê mocuj¹c¹ (2 szt.) u spodu urz¹dzenia.
Od³ó¿ wykrêcone śruby w bezpieczne miejsce.
A
B
Dokonaj pomiaru i zaznacz punkty, gdzie maj¹ byæ wkrêcone śruby (2 szt.) po czym wkrêæ śruby do ściany.
Umiejscowienie punktów i wymiary podano na ilustracji poni¿ej.
Nale¿y wkrêciæ obie śruby ścienne.
Aby odpowiednio umiejscowiæ śruby wzglêdem siebie, nale¿y pos³u¿yæ siê poziomic¹.
Nale¿y u¿yæ odpowiednio d³ugich śrub, które mog¹ wytrzymaæ obci¹¿enie co najmniej 20 kg.
•
•
•
•
C
Page 22
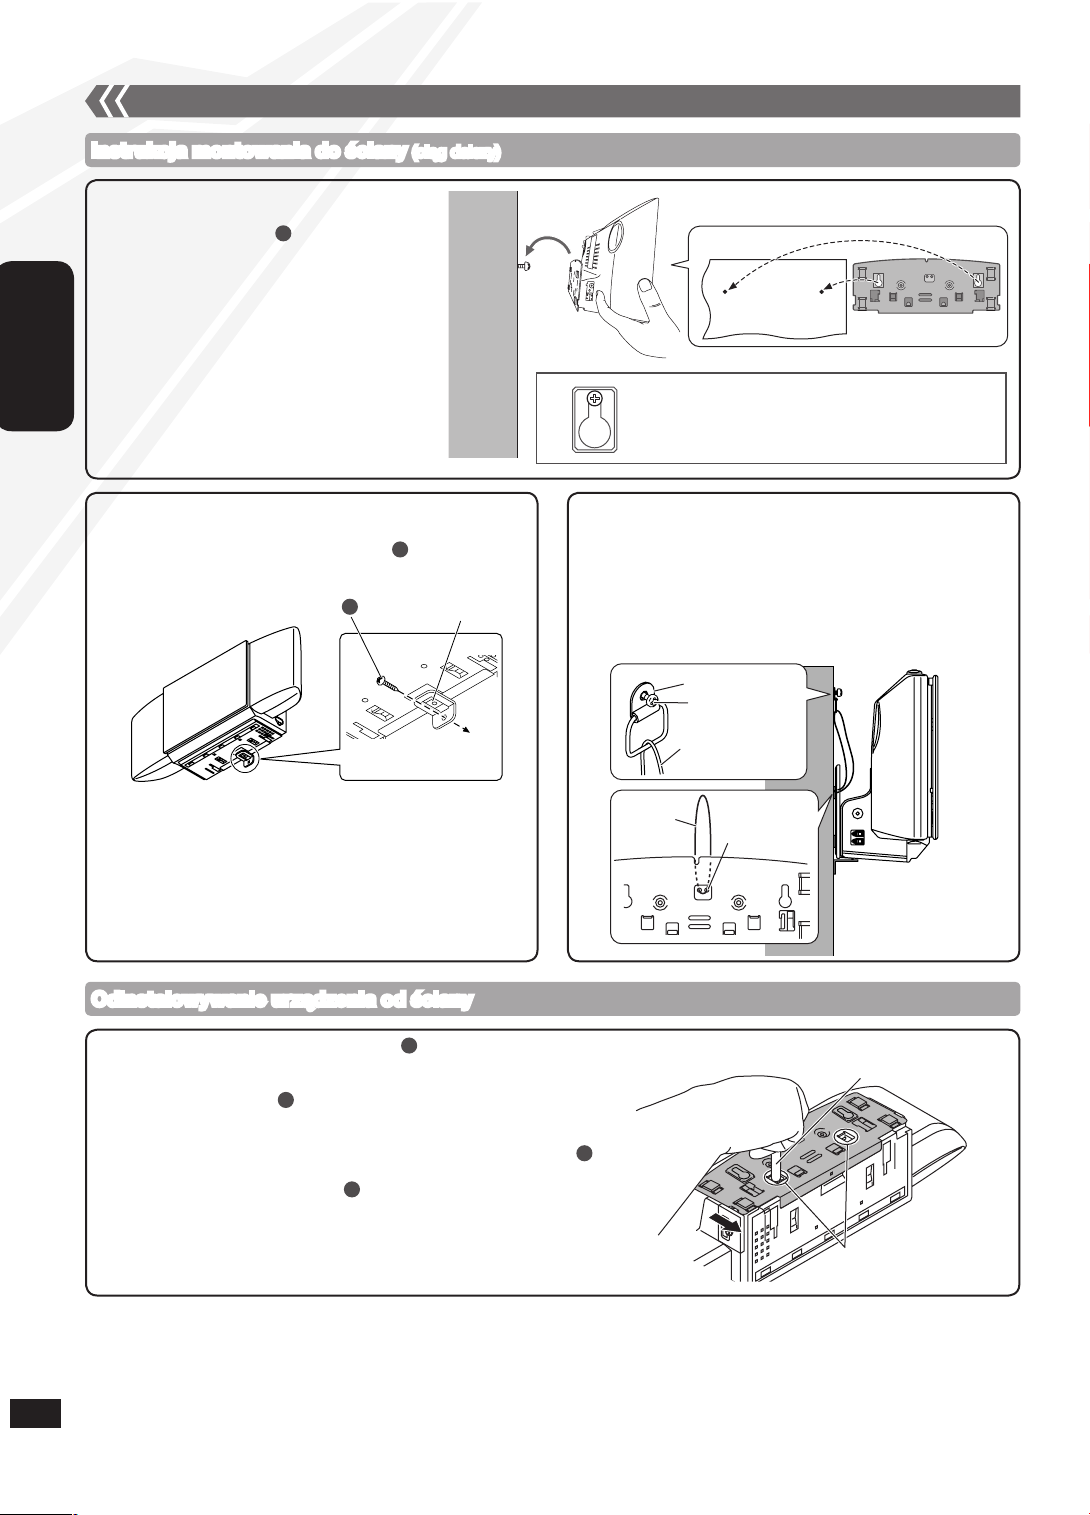
22
RQTX1076
POLSKI
6
4. Zawieś urz¹dzenie na ścianie.
g Zabezpieczenie przed oderwaniem siê
urz¹dzenia (Opcjonalne)
Odinstalowywanie urz¹dzenia od ściany
Wykrêæ śrubê uchwytu zabezpieczaj¹cego i zdejmij uchwyt
zabezpieczaj¹cy.
Zdejmij urz¹dzenie ze ściany.
Wykrêæ śruby mocuj¹ce (2 szt.).
Wciśnij oba zaciski i zdejmij wspornik ścienny z urz¹dzenia
(➡ po prawej).
Za³ó¿ ponownie podstawê urz¹dzenia i przymocuj j¹ śrub¹ mocuj¹c¹
(2 szt.).
Wykrêæ śruby mocuj¹ce ze ściany (2 szt.).
Przed wykonaniem punktu zdejmij kabel zabezpieczaj¹cy, o ile zosta³
zamontowany.
•
C
B
A
C
D³ugopis lub nieostry przedmiot
Zaciski
5. Zainstaluj uchwyt zabezpieczaj¹cy.
Uchwyt zabezpieczaj¹cy
Mocowany do
ściany
Uchwyt metalowy
Śruba
Kabel
Kabel
Otwór na kabel
Instrukcja montowania do ściany (ci¹g dalszy)
Mocowanie urz¹dzenia do ściany (Opcjonalne) (ci¹g dalszy)
Umieśæ obie śruby w otworach.
Ściana
Wspornik ścienny
Przed przejściem do punktu 4 (➡ powy¿ej) prze³ó¿ kabel przez
otwór (kabel dostêpny w sprzeda¿y).
Po wykonaniu punktu 5 (➡ po lewej) przymocuj kabel do
ściany przy pomocy śruby (dostêpna w sprzeda¿y).
Przymocuj śrubê do kabla tak, aby na wysokości górnej
środkowej czêści urz¹dzenia g³ównego luz nie wynios³ wiêcej ni¿
5 cm.
•
Zachowuj¹c ostro¿nośæ zawiesiæ urz¹dzenie
na śrubach mocuj¹cych .
Przed zawieszeniem urz¹dzenia na ścianie
pod³¹cz antenê FM/AM (➡ strona 3).
Po zawieszeniu urz¹dzenia ostro¿nie je puśæ,
upewniaj¹c siê, ¿e jest stabilnie przymocowane
do ściany.
•
•
C
Zamocuj uchwyt zabezpieczaj¹cy do wspornika ściennego.
Wkrêæ śrubê uchwytu zabezpieczaj¹cego , aby zamocowaæ
uchwyt zabezpieczaj¹cy do ściany.
C
C
Śruba uchwytu zabezpieczaj¹cego
Page 23
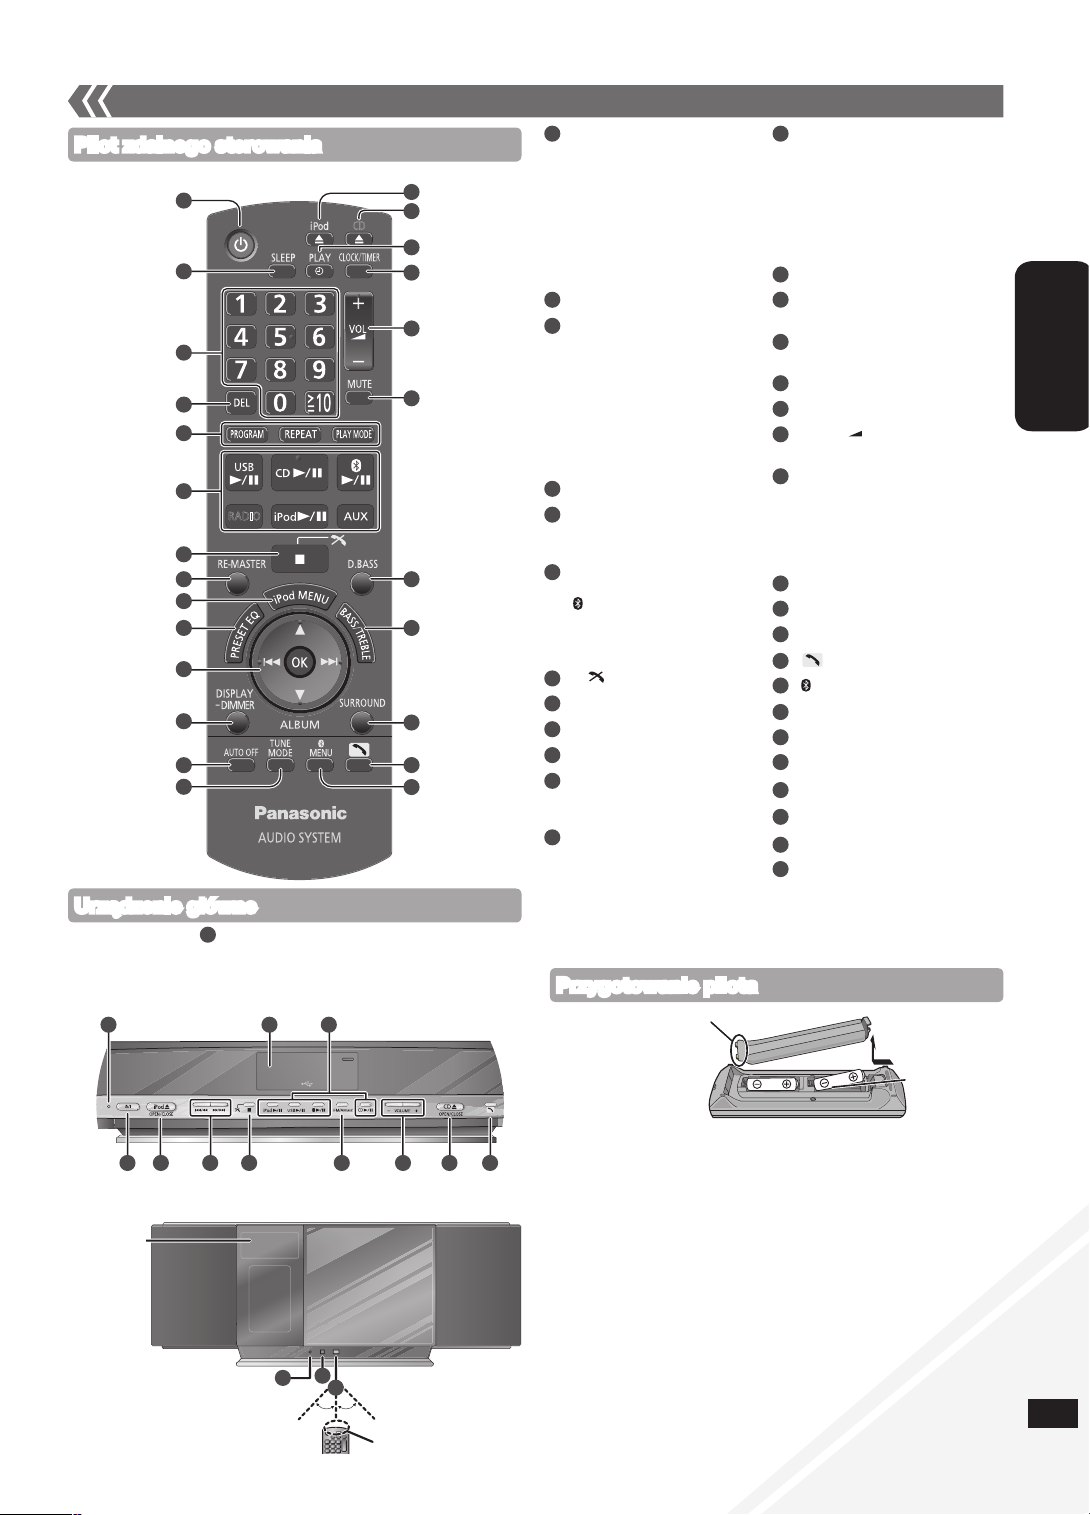
23
RQTX1043
POLSKI
RQTX1076
23
Szczegó³owy opis znajduje siê na stronie podanej w nawiasie.•
Pilot zdalnego sterowania
Urz¹dzenie g³ówne
Widok z góry
Widok od przodu
Zestawienie funkcji
■ Baterie
Nale¿y stosowaæ suche baterie manganowe lub mokre alkaliczne.
Nale¿y w³o¿yæ baterie tak, aby symbole biegunów (+ i –) odpowiada³y
oznaczeniom wewn¹trz pilota.
Baterie nale¿y wyj¹æ z pilota, jeśli nie bêdzie on u¿ywany przez
d³u¿szy czas.
Nale¿y je przechowywaæ w ch³odnym, zaciemnionym miejscu.
Nie nagrzewaæ, chroniæ przez dzia³aniem p³omieni.
Baterii nie nale¿y pozostawiaæ na d³u¿szy okres w pojeździe
z zamkniêtymi drzwiami i oknami nara¿onym na dzia³anie
bezpośredniego świat³a s³onecznego.
Niew³aściwe obchodzenie siê z bateriami w pilocie mo¿e
spowodowaæ wyciek elektrolitu, co mo¿e byæ przyczyn¹ po¿aru.
•
•
•
•
•
•
•
■ Nie nale¿y:
³¹czyæ baterii nowych i starych,
u¿ywaæ jednocześnie baterii ró¿nego typu,
rozbieraæ baterii lub powodowaæ spiêæ,
podejmowaæ prób do³adowania baterii alkalicznych lub manganowych,
u¿ywaæ baterii, z których zerwano os³onê.
•
•
•
•
•
R6/LR6, AA
Wsuñ najpierw ten koniec.
Przygotowanie pilota
30
31
32
Ok. 30°
Okienko nadajnika
Ok. 30°
Wyświetlacz
CD
RADIO
16
17
18
19
20
23
24
25
22
21
1
2
3
4
5
6
8
9
10
11
12
13
15
14
7
1 167
29 6
26 27
28
15 19 24
Prze³¹cznik trybu
gotowości/w³¹czania [^], [8]
(8, 10, 14)
Przycisk ten s³u¿y do
prze³¹czania urz¹dzenia
pomiêdzy trybem gotowości
i trybem roboczym. W trybie
gotowości urz¹dzenie nadal
pobiera niewielk¹ ilośæ energii.
[SLEEP] (10)
Przyciski numeryczne
[1-9, 0, ≧ 10] (8, 9, 10, 14)
Wybieranie numerów
2-cyfrowych
np. 16: [≧ 10] [1] [6]
Wybieranie numerów
3-cyfrowych
np. 226: [
≧
10] [≧ 10] [2]
[2] [6]
[DEL] (8)
[PROGRAM] (8, 9)
[REPEAT] (9)
[PLAY MODE] (9, 10, 13)
[USB q/h] (14)
[CD q/h] (8, 9)
[ q/h] (12)
[RADIO] (9)
[iPod q/h] (11)
[AUX] (10)
[g, ] (8, 11, 12, 13, 14)
[RE-MASTER] (10)
[iPod MENU] (11)
[PRESET EQ] (10)
[e,r] (8, 9, 10, 11, 13, 14)
[u], [i] (8, 9, 11, 12, 14)
[OK] (8, 10, 11, 13)
[DISPLAY, –DIMMER]
(8, 9, 13)
Przyciśnij i przytrzymaj, aby
przyciemniæ wyświetlacz.
Przyciśnij i przytrzymaj
ponownie, aby skasowaæ.
[AUTO OFF]
Ta funkcja umo¿liwia
automatyczne wy³¹czenie
urz¹dzenia (z wyj¹tkiem trybu
ods³uchu radia), jeśli nie by³o
u¿ywane przez 30 minut.
Aby w³¹czyæ funkcjê, naciśnij
dwukrotnie.
[TUNE MODE] (9)
[;, iPod],
[iPod ;, OPEN/CLOSE] (11)
[;, CD],
[CD ;, OPEN/CLOSE] (8)
[z, PLAY] (10)
[CLOCK/TIMER] (10)
[+, VOL , –],
[– VOLUME +] (13)
[MUTE] (13)
S³u¿y do wyciszania dźwiêku.
Aby anulowaæ naciśnij ponownie.
Funkcja „MUTE” jest tak¿e
kasowana przy regulacji g³ośności
i po wy³¹czeniu urz¹dzenia.
[D.BASS] (10)
[BASS/TREBLE] (10)
[SURROUND] (10)
[ ] (13)
[ MENU] (13)
[u/t], [y/i]
[FM/AM/AUX] (9, 10)
Port USB (14)
Wskaźnik trybu gotowości
Mikrofon (13)
Wskaźnik Bluetooth (12)
Czujnik sygna³u zdalnego
sterowania
Skierowaæ pilota bezpośrednio
w stronê czujnika urz¹dzenia
(unikaj¹c przeszkód) z
maksymalnej odleg³ości 7 metrów
8
9
10
6
7
16
15
17
18
19
21
23
25
26
27
28
29
30
20
22
24
14
2
1
3
4
5
11
12
13
31
32
Przyciski takie jak dzia³aj¹ tak samo jak przyciski urz¹dzenia
g³ównego. Mog¹ byæ u¿ywane wymiennie.
•
1
7
Page 24
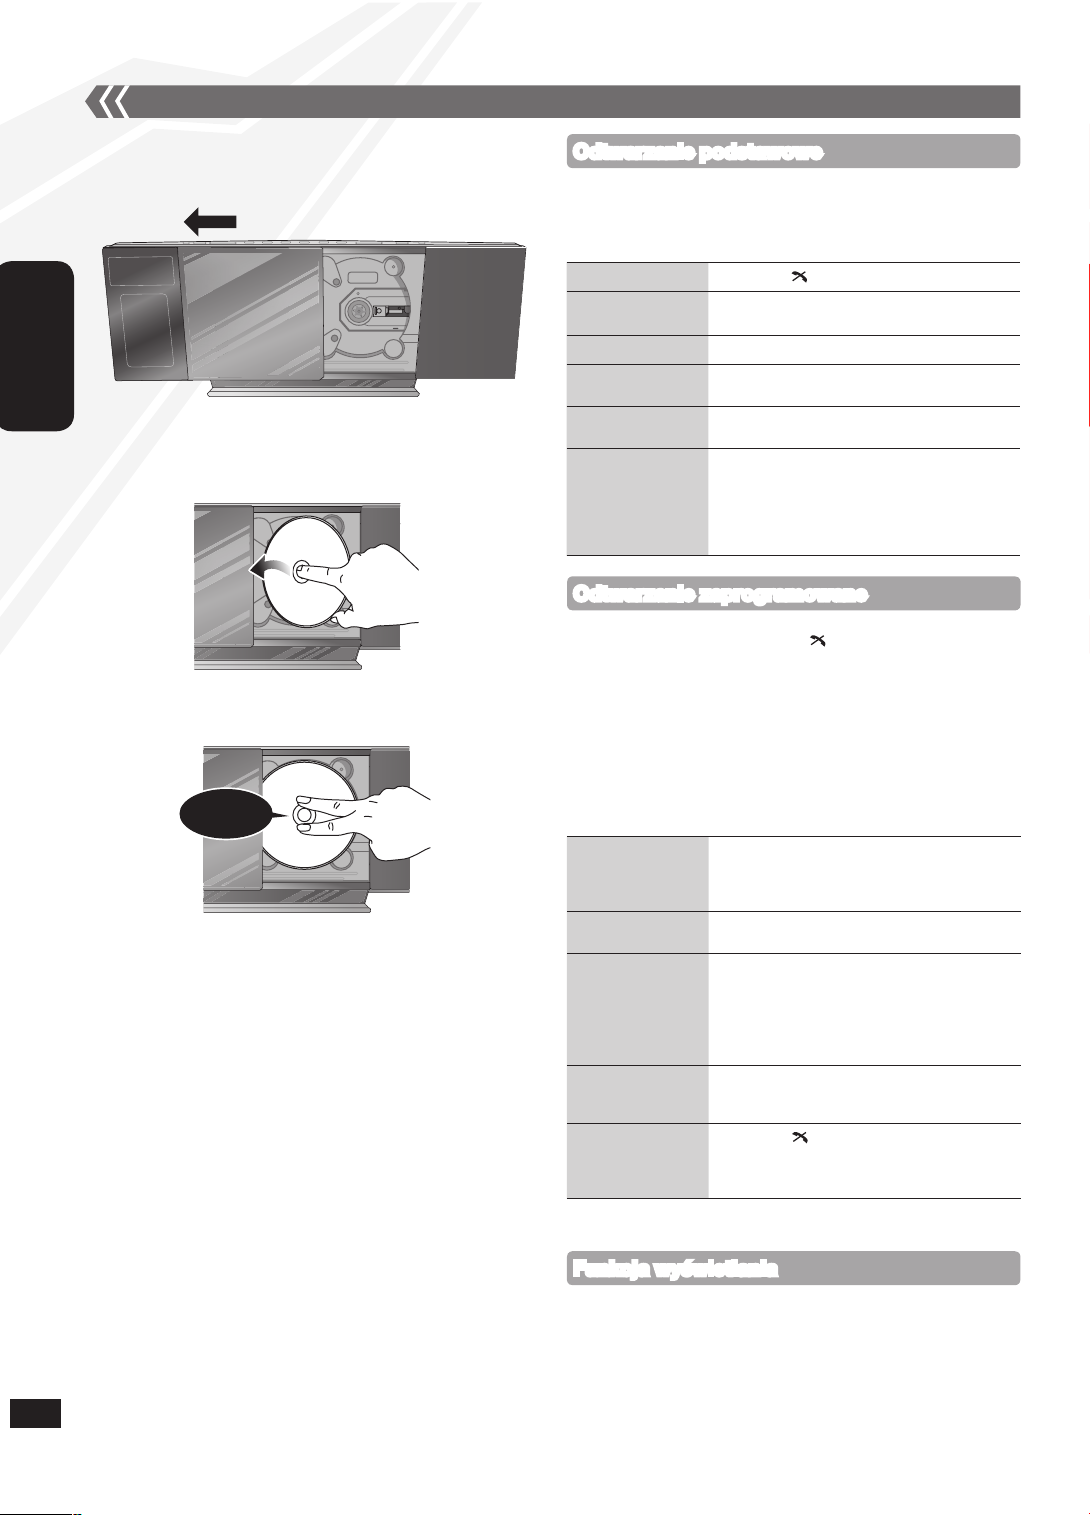
24
RQTX1076
POLSKI
Naciśnij kilkakrotnie [DISPLAY, –DIMMER] podczas odtwarzania lub
po zatrzymaniu, aby zobaczyæ informacjê o odtwarzanym utworze.
Maksymalna liczba znaków, które mo¿na wyświetliæ: ok. 30
Niniejsze urz¹dzenie obs³uguje wersje 1.0 i 1.1 znaczników ID3.
Dane tekstowe nie obs³ugiwane przez urz¹dzenie nie mog¹ byæ
wyświetlane.
•
•
Funkcja wyświetlania
Stopowanie
Naciśnij [g, ].
Pauza
Naciśnij [CD q/h]. W celu wznowienia
odtwarzania naciśnij ponownie ten przycisk.
Pomijanie utworu
Naciśnij [u] lub [i].
Przeszukiwanie
danego utworu
(CD)
Naciśnij i przytrzymaj [u] lub [i].
Pomijanie albumu
(MP3)
Naciśnij [e,r].
Odtwarzanie z
bezpośrednim
dostêpem
(Odtwarzanie od
utworu wybranego
przez u¿ytkownika.)
CD: Naciśnij odpowiednie przyciski
numeryczne, aby wybraæ utwór.
MP3: Naciśnij [e,r] aby wybraæ album.
Naciśnij [i] raz a potem
odpowiednie przyciski numeryczne,
aby wybraæ utwór.
g Wk³adanie dysku
Naciśnij [^], aby w³¹czyæ urz¹dzenie.
Naciśnij [;, CD], aby owtorzyæ pokrywê.
Obs³uga p³yt
Trzymaj¹c dysk etykietk¹ skierowan¹ do siebie, przechyliæ i
wsun¹æ dysk do kieszeni dysku pod pokryw¹.
Ustaw dysk na trzpieniu pośrodku, a nastêpnie wciśnij do
momentu, a¿ us³yszysz dźwiêk klik.
Naciśnij [^], aby w³¹czyæ urz¹dzenie.
W³ó¿ dysk, jaki ma byæ odtwarzany (➡ po lewej).
Naciśnij [CD q/h] aby rozpocz¹æ odtwarzanie.
g Wyjmowanie dysku
Naciśnij [;, CD], aby owtorzyæ pokrywê.
Przytrzymaæ środek i praw¹ górn¹ czêśæ dysku i poci¹gn¹æ z
prawej górnej strony, aby odblokowaæ dysk z trzpienia.
Przechyliæ dysk, aby nie dotyka³ pokrywy i wyj¹æ.
Zamykanie pokrywy si³¹ mo¿e spowodowaæ uszkodzenie sprzêtu.
Uwa¿aj, aby podczas wyjmowania CD p³yta nie uderzy³a przesuwanej
pokrywy.
•
•
Odtwarzanie podstawowe
Naciśnij [;, CD] aby zamkn¹æ pokrywê.
W trakcie zamykania przesuwanej pokrywy nale¿y uwa¿aæ, aby
nie zosta³y ni¹ przytrzaśniête palce, co mo¿e spowodowaæ lekkie
obra¿enia.
Umo¿liwia zaprogramowanie do 24 utworów.
Naciśnij [CD q/h] a nastêpnie [g, ].
Naciśnij [PROGRAM].
CD: Naciśnij
odpowiednie przyciski numeryczne, aby wybraæ utwór.
Aby zaprogramowaæ wiêcej utworów, naciskaj przyciski numeryczne.
Naciśnij [OK] lub [CD q/h] aby rozpocz¹æ odtwarzanie.
MP3: Naciśnij [e,r] aby wybraæ album.
Naciśnij [i] raz a potem odpowiednie przyciski
numeryczne, aby wybraæ utwór.
Naciśnij [OK].
Aby zaprogramowaæ dalsze utwory, powtórz kroki do .
Naciśnij [CD q/h], aby rozpocz¹æ odtwarzanie.
Wy³¹czanie trybu
odtwarzania
zaprogramowanych
utworów
Naciśnij [PROGRAM] w trybie zatrzymania
– na wyświetlaczu zgaśnie komunikat „PGM”.
Powtórzenie
programu
Naciśnij [PROGRAM] w trybie zatrzymania a
nastêpnie [CD q/h].
Sprawdzenie
zawartości
programu
Naciśnij [u] lub [i] kiedy w trybie
zatrzymania jest wyświeltony napis „PGM”.
Aby sprawdziæ podczas programowania,
dwukrotnie naciśnij przycisk [PROGRAM] po
wyświetlaniu komunikatu „PGM”, a nastêpnie
naciśnij [u] lub [i].
Usuwanie ostatniego
zaprogramowanego
utworu
W trybie zatrzymania naciśnij przycisk [DEL].
Usuwanie
wszystkich
zaprogramowanych
utworów
Naciśnij [g, ] w trybie zatrzymania.
Wyświetlony zostanie komunikat „CLR ALL”.
Aby skasowaæ wszystkie utwory, naciśnij
ponownie przycisk w ci¹gu 5 sekund.
Pamiêæ programów jest anulowana po otwarciu przesuwanej pokrywy.
•
Odtwarzanie zaprogramowane
Klik!
8
Page 25
25
RQTX1043
POLSKI
RQTX1076
25
Obs³uga p³yt (ci¹g dalszy)
Obs³uga radia
Naciśnij [RADIO] aby wybraæ „FM” lub „AM”.
Naciskaj¹c [TUNE MODE], wybierz tryb „MANUAL”.
Naciśnij [u] lub [i] aby wybraæ czêstotliwośæ ¿¹danej stacji.
Podczas odbioru stereofonicznego w paśmie FM wyświetlany jest
symbol „ST”.
Strojenie automatyczne
Powtórz krok i (➡ powy¿ej).
Naciśnij i przytrzymaj [u] lub [i] do momentu a¿ czêstotliwośæ
zacznie szybko siê zmieniaæ.
Aby skasowaæ stronjenie automatyczne, ponownie naciśnij [u] lub [i].
Automatyczne strojenie mo¿e nie dzia³aæ z powodu nadmiernych zak³óceñ.
g Poprawa jakości odbioru w paśmie FM
Naciśnij i przytrzymaj
[PLAY MODE] - wyświetli siê napis „MONO”.
Przyciśnij i przytrzymaj ponownie, aby skasowaæ.
Tryb „MONO” jest równie¿ anulowany po zmianie czêstotliwości.
Podczas s³uchania w normalnych warunkach tryb „MONO” powinien
by³ wy³¹czony.
g Poprawa jakości odbioru w paśmie AM
Naciśnij [RADIO] aby wybraæ „AM”.
Naciśnij i przytrzymuj [TUNE MODE], aby przechodziæ pomiêdzy
ustawieniami próby bitów („BP 1”, „BP 2”, „BP 3” lub „BP 4”).
•
•
•
•
Strojenie rêczne
Mo¿na zaprogramowaæ do 30 stacji w paśmie FM i do 15 w paśmie AM.
Przygotowanie: Naciśnij [RADIO] aby wybraæ „FM” lub „AM”.
g Automatyczne programowanie stacji
Aby prze³¹czaæ pomiêdzy czêstotliwości¹ najni¿sz¹ „LOWEST” i
obecn¹ „CURRENT” u¿yj przycisku [PLAY MODE].
Przyciśnij i przytrzymaj [PROGRAM] przez co najmniej 2 sekund,
aby rozpocz¹æ wprowadzanie ustawieñ.
g Rêczne programowanie stacji
Naciskaj¹c [TUNE MODE], wybierz tryb „MANUAL”.
Naciśnij
[u] lub [i]
aby dostroiæ ¿¹dan¹ stacjê.
Naciśnij [PROGRAM].
Naciskaj odpowiednie przyciski numeryczne, aby wybraæ utwór.
Jeśli pod tym samym numerem by³a ju¿ zaprogramowana inna stacja,
informacje o niej zostan¹ skasowane.
Aby programowaæ kolejne stacje powtarzaj kroki do .
g Wybieranie zaprogramowanej stacji
Naciskaj¹c [TUNE MODE], wybierz tryb „PRESET”.
Naciśnij
[u] lub [i]
aby wybraæ kana³.
Naciskaj odpowiednie przyciski numeryczne, aby wybraæ kana³.•
Programowanie stacji
Informacje RDS mog¹ nie byæ wyświetlane, je¿eli odbiór jest s³aby.•
Emisje RDS
Funkcja ta umo¿liwia wyświetlenie nazwy stacji lub typu audycji. Kiedy
odbierany jest sygna³ zapala siê komunikat „RDS”.
Naciśnij [DISPLAY, –DIMMER], aby wyświetliæ:
Nazwê stacji (PS) Typ programu (PTY)
Wyświetlacz czêstotliwości
Ustawienie wprowadzenia AM
Urz¹dzenie mo¿e tak¿e odbieraæ sygna³ AM ustawiony w przedzia³ach 10 kHz.
Aby zmieniæ przedzia³ na 10 kHz (tylko urz¹dzenie g³ówne)
Naciśnij [FM/AM/AUX] aby wybraæ „AM”.
Naciśnij i przytrzymaj [FM/AM/AUX].
Po kilku sekundach wyświetlacz wyświetli obecn¹ czêstotliwośæ
minimaln¹.
Przytrzymuj nadal [FM/AM/AUX].
Po zmianie czêstotliwości minimalnej zwolnij przycisk.
Aby powróciæ do poprzedniego przedzia³u, pwotórz krok do
(➡ powy¿ej).
Po zmianie ustawienia wszelkie uprzedniow wprowadzone
czêstotliwości zostan¹ skasowane.
•
•
Uwaga dot. p³yt CD-R i CD-RW
Niniejsze urz¹dzenie mo¿e odtwarzaæ p³yty CD-R i CD-RW
nagrane w formatach CD-DA i MP3.
P³yty z materia³em dźwiêkowym nagrywaj w formacie CD-DA a
po zakoñczeniu nagrywania poddaj finalizacji*.
* Proces przeprowadzany po nagraniu p³yty umo¿liwiaj¹cy
odtwarzanie p³yt audio CD-R and CD-RW w odtwarzaczach
CD-R/CD-RW.
Urz¹dzenie mo¿e nie odtwarzaæ niektórych p³yt, ze wzglêdu na
stan nagrania.
Nie u¿ywaæ p³yt o nieregularnych kszta³tach.
Nie naklejaæ dodatkowych etykiet lub naklejek.
Nie u¿ywaæ p³yt z etykietami lub naklejkami, które odklejaj¹ siê,
lub z pozosta³ościami po naklejkach lub etykietach.
Nie przymocowywaæ do p³yt os³on zapobiegaj¹cych
zadrapaniom ani innych akcesoriów.
Nie pisaæ na p³ytach.
Nie czyściæ p³yt p³ynami (Nale¿y je przetrzeæ miêkk¹, such¹
ściereczk¹).
Tworzenie plików MP3 przeznaczonych do
odtwarzania w tym urz¹dzeniu.
Maksymalna liczba utworów i albumów: 999 utworów i 255 albumów.
Obs³ugiwany stopieñ kompresji: Pomiêdzy 64 kbps i 320 kbps
(stereo). Zalecany: 128 kbps (stereo).
Formaty p³yt: ISO9660 poziom 1 i poziom 2 (z wyj¹tkiem
standardów poszerzonych).
Czas odczytu TOC jest uzale¿niony od liczby utworów,
folderów i struktury folderów.
Ograniczenia dot. MP3
Niniejsze urz¹dzenie obs³uguje materia³y wielosesyjne,
rozpocz¹cie odtwarzania trwa d³u¿ej.
Niniejsze urz¹dzenie nie odtwarza plików nagranych w formacie
„packet write”.
Jeśli na dysku zamieszczono zarówno materia³y w formacie
MP3 jak i normalnym formacie audio (CD-DA), urz¹dzenie
odtwarza materia³ nagrany na wewnêtrznej stronie dysku. Jeśli
na dysku zamieszczono zarówno materia³ w formacie MP3 jak
i w innych formatach audio (np. WMA lub WAV), urz¹dzenie
odtwarza jedynie pliki MP3.
Niekiedy pliki MP3 nie s¹ odtwarzane w kolejności nadanej
przez u¿ytkownika lub nie s¹ w ogóle odtwarzane – jest to
uzale¿nione od sposobu ich nagrywania.
•
•
•
•
•
•
•
•
•
•
•
•
•
•
•
•
•
Naciśnij
[CD q/h].
Naciśnij kilkakrotnie [PLAY MODE], aby wybraæ nastêpuj¹ce tryby.
Tryb W celu odtworzenia
1-TRACK
1TR
wybranego pojedynczego utworu na p³ycie.
Naciśnij odpowiednie przyciski numeryczne, aby
wybraæ utwór.
1-ALBUM
1ALBUM (MP3)
wybranego pojedynczego albumu na p³ycie.
Naciśnij [e,r] aby wybraæ album.
RANDOM
RND
losowego p³yty.
1-ALBUM
RANDOM
1ALBUM RND (MP3)
losowego wszystkich utworów w wybranym
albumie.
Naciśnij [e,r] aby wybraæ album.
Nie ma mo¿liwości przejścia do poprzedniego utworu w trybie
odtwarzania losowego.
Po otwarciu przesuwanej pokrywy anulowany jest obecny tryb
odtwarzania.
Aby powtórzyæ odtwarzanie programu lub wybrany tryb odtwarzania,
naciśnij [REPEAT]. Aby anulowaæ, naciśnij ponownie.
•
•
•
Funkcja trybu odtwarzania
9
Page 26
26
RQTX1076
POLSKI
Timer mo¿e w³¹czaæ odtwarzanie o określonej godzinie i s³u¿yæ jako
budzik.
Urz¹dzenie wyposa¿ono w 3 opcjonalne timery odtwarzania.
Przygotowanie:
W³¹cz urz¹dzenie i ustaw zegar (➡ powy¿ej).
Przygotuj źród³o odtwarzania (p³yta, radio, iPod/iPhone, Bluetooth,
USB lub AUX) i ustaw g³ośnośæ.
Aby wybraæ timer odtwarzania naciskaj kilkakrotnie
[CLOCK/TIMER].
W ci¹gu 5 sekund naciśnij [e,r] aby wprowadziæ czas
rozpoczêcia.
Naciśnij [OK].
Aby ustawiæ godzinê zakoñczenia, powtórz kroki i .
Aby aktywowaæ timer
Naciskaj kilkakrotnie [z, PLAY], aby w³¹czyæ ¿¹dany timer
odtwarzania.
Naciśnij [^], aby wy³¹czyæ urz¹dzenie.
•
•
Zegar 24-godzinny.
Naciśnij [CLOCK/TIMER] aby wybraæ „CLOCK”.
W ci¹gu 5 sekund naciśnij [e,r] aby ustawiæ czas. (Przyciśnij i
przytrzymaj, aby zmieniaæ godzinê szybciej.)
Naciśnij [OK].
Aby wyświetliæ zegar, naciśnij [CLOCK/TIMER].
W celu zapewnienia dok³adności wskazañ zegar nale¿y regularnie
ustawiaæ.
•
•
Ustawianie zegara
Przycisk timera odtwarzania
Zmiana ustawieñ
Powtórz krok do (➡ powy¿ej).
Wybór innego
źród³a lub regulacja
g³ośności
Naciśnij dwukrotnie [z, PLAY] aby
skasowaæ zPLAY na wyświetlaczu.
Zmieñ źród³o lub g³ośnośæ.
Wykonaj krok i (➡ powy¿ej).
Sprawdzanie
ustawieñ (Gdy
urz¹dzenie jest
w³¹czone lub w
trybie gotowości)
Naciśnij kilkakrotnie [CLOCK/TIMER]
aby wybraæ „zPLAY 1”, „zPLAY 2” lub
„zPLAY 3”.
Anulacja
Naciśnij dwukrotnie [z, PLAY] aby wygasiæ
wskaźnik timera na wyświetlaczu.
Timer w³¹czy siê o zaprogramowanej godzinie, poziom g³ośności
bêdzie stopniowo zwiêkszany do osi¹gniêcia poziomu bie¿¹cego.
•
Timer wy³¹czaj¹cy (SLEEP) mo¿e wy³¹czyæ urz¹dzenie po określonym
okresie czasu.
Naciśnij [SLEEP], aby w³¹czyæ lub wy³¹czyæ funkcjê SLEEP.
Naciśnij jednokrotnie [SLEEP] aby sprawdziæ pozosta³y czas.
Mo¿liwe jest jednoczesne u¿ycie timera odtwarzania i wy³¹czaj¹cego.
Timer wy³¹czaj¹cy zawsze ma priorytet. Nale¿y sprawdziæ, czy
ustawienia timerów nie zachodz¹ na siebie.
Po w³¹czeniu funkcji AUTO OFF kiedy urz¹dzenie nie jest
wykorzystywane przez ok. 30 minut, zostanie ono wy³¹czone nawet
jeśli nie up³yn¹³ czas wprowadzony dla wy³¹czania lub odtwarzania.
•
•
Ustawianie timera wy³¹czaj¹cego
30MIN 60MIN 90MIN 120MIN
OFF (Skasowa)
Timer
Programowanie
korektora dźwiêku
(Preset EQ)
Naciśnij kilkakrotnie [PRESET EQ] aby wybraæ
„HEAVY”, „SOFT”, „CLEAR”, „VOCAL” lub
„FLAT”.
Tony niskie lub
wysokie
Naciśnij kilkakrotnie [BASS/TREBLE] aby
wybraæ „BASS” lub „TREBLE”.
Naciśnij [e,r] aby ustawiæ poziom (-4 do +4).
Dźwiêk
przestrzenny
(Surround)
Naciśnij kilkakrotnie [SURROUND]
podczas odtwarzania „ON SURROUND” lub
„OFF SURROUND”.
Je¿eli nasilaj¹ siê zak³ócenia w odbiorze
stereofonicznym FM, nale¿y wy³¹czyæ efekt
dźwiêku przestrzennego.
D.Bass Naciśnij kilkartonie [D.BASS] podczas gry, aby
wybraæ „ON D.BASS” lub „OFF D.BASS”.
Re-master Naciśnij [RE-MASTER] kilkakrotnie, aby wybraæ
„ON RE-MASTER” lub„OFF RE-MASTER”.
Funkcja re-master jest dostêpna dla
odtwarzania z MP3.
Funkcja re-master analogowy jest dostêpna
dla odtwarzania z iPoda/iPhone i AUX.
•
•
Regulacja dźwiêku
Pilot i urz¹dzenie g³ówne posiadaj¹ ustawienie fabryczne „REMOTE 1”.
Jeśli pilot powoduje zak³ócenia pracy innego sprzêtu, mo¿na dokonaæ
prze³¹czenia na tryb „REMOTE 2”.
Aby przejśæ na tryb „REMOTE 2” (tylko urz¹dzenie g³ówne)
Naciśnij [FM/AM/AUX] aby wybraæ „AUX”.
Przyciśnij i przytrzymaj [FM/AM/AUX] a nastêpnie naciśnij [2] a¿
wyświetli siê napis „REMOTE 2”.
Przyciśnij i przytrzymaj [OK] a nastêpnie [2] przez co najmniej 2
sekundy.
Powrót do trybu „REMOTE 1”
Powtórz powy¿sze kroki, ale zamiast [2] wykonaj [1].
(Wyświetli siê napis „REMOTE 1”.)
Zmiana trybu sterowania z poziomu
urz¹dzenia i pilota
W³ó¿ przewód audio do gniazda AUX.
Rodzaj wtyku: 3,5 mm stereo
Naciśnij [AUX] aby rozpocz¹æ odtwarzanie z
przenośnego źród³a audio.
Mo¿na wyregulowaæ poziom dźwiêku wejściowego dla przenośnego
urz¹dzenia audio.
Naciśnij kilkakrotnie [PLAY MODE] aby wybraæ „HIGH” lub
„NORMAL”.
Zmniejsz poziom sygna³u wejściowego wy³¹czaj¹c korektor lub
zmniejszaj¹c g³ośnośæ sprzêtu przenośnego. Wysoki poziom sygna³u
wejściowego powoduje zak³ócenia dźwiêku.
Wiêcej informacji podano w instrukcji obs³ugi innego sprzêtu.
Kable i przewody poza zestawem.
•
•
•
Przenośne urz¹dzenie audio (w trybie AUX)
Urz¹dzenia zewnêtrzne
AUX
10
Page 27

27
RQTX1043
POLSKI
RQTX1076
27
Odtwarzanie materia³ów audio z iPoda lub iPhone
g Wk³adanie iPoda/iPhone
Naciśnij [;, iPod], aby owtorzyæ pokrywê.
W³ó¿ adapter doku odpowiedni dla danego iPoda/iPhone
(poza zestawem).
g Wyjmowanie iPoda/iPhone
Naciśnij [;, iPod] aby zamkn¹æ pokrywê.
Powtórz krok i (➡ powy¿ej).
Aby od³¹czyæ iPoda/iPhone po prostu wyjmij go ruchem
pionowym.
Powtórz krok i (➡ powy¿ej).
Jeśli dok iPoda/iPhone nie jest wychylony przy wk³adaniu lub
wyjmowaniu iPoda/iPhone, mo¿e dojśæ do uszkodzenia z³¹cza.
Aby pod³¹czyæ do urz¹dzenia iPoda/iPhone, nale¿y u¿ywaæ jedynie
adapterów doku do³¹czonych przez producenta iPoda/iPhone lub
rozprowadzanych przez firmê Apple Inc.
Zmniejsz g³ośnośæ urz¹dzenia g³ównego do poziomu minimalnego
przed pod³¹czeniem lub od³¹czeniem iPoda/iPhone.
•
•
•
■ Do³adowywanie iPoda/iPhone
Kiedy iPod/iPhone jest do³adowywany w trybie gotowości, na
wyświetlaczu urz¹dzenia g³ównego wyświetla siê komunikat
„IPOD CHARGING”.
Sprawdź, czy akumulator iPoda/iPhone zosta³ w pe³ni do³adowany.
Jeśli nie korzystasz z iPoda/iPhone przez d³u¿szy okres czasu
po do³adowaniu, od³¹cz go od urz¹dzenia g³ównego aby unikn¹æ
roz³adowania akumulatora. (Po pe³nym do³adowaniu urz¹dzenie nie
przeprowadzi do³adowywania dodatkowego.)
•
•
Uwagi dot. iPhone:
Wszystkie funkcje telefonu mog¹ byæ kontrolowane jedynie z
poziomu ekranu dotykowego iPhone.
Urz¹dzenie nie wyświetla rozmów wchodz¹cych i komunikatów
o stanie telefonu (Pod³¹cz iPhone do niniejszego urz¹dzenia za
pośrednictwem Bluetooth (➡ strona 13), aby korzystaæ z szerszej
gamy funkcji).
Dzwonek rozmów wchodz¹cych jest emitowany przez g³ośnik iPhone.
Kiedy urz¹dzenie znajduje siê w trybie iPod/iPhone, dzwonek jest
tak¿e emitowany przez g³ośniki urz¹dzenia (Pod³¹cz iPhone do
niniejszego urz¹dzenia za pośrednictwem Bluetooth (➡ strona 13),
aby korzystaæ z szerszej gamy funkcji).
Pod³¹czenie lub od³¹czenie iPhone do/od urz¹dzenia nie przerywa
rozmowy.
Firma Apple Inc. nie podaje ¿adnych specyfikacji gwarantuj¹cych
powy¿sze dzia³ania iPhone. Reakcje iPhone mog¹ byæ inne w
przypadku nowszych modeli lub aktualizacji oprogramowania iPhone.
•
•
•
•
•
Odtwarzanie
Naciśnij [iPod q/h].
Pauza
Naciśnij [iPod q/h] lub [g, ].
Pomijanie utworu
Naciśnij [u] lub [i].
Przeszukiwanie danego utworu
Naciśnij i przytrzymaj [u] lub [i].
Wyświetlanie menu
iPoda/iPhone/powrót
do poprzedniego menu
iPoda/iPhone
Naciśnij [iPod MENU] w trybie
odtwarzania.
(Tylko pilot)
Wybór pozycji z menu
iPoda/iPhone
Naciśnij [e,r] a nastêpnie [OK].
(Tylko pilot)
Pod³¹cz prawid³owo iPoda/iPhone
(poza zestawem).
Pamiêtaj o wyjêciu iPoda/iPhone z
oprawy.
■ Obs³ugiwane iPody
Nazwa Pojemnośæ pamiêci
iPod nano 5 generacji (kamera video) 8 GB, 16 GB
iPod touch 2 generacji 8 GB, 16 GB, 32 GB,
64 GB
iPod classic 120 GB, 160 GB (2009)
iPod nano 4 generacji (video) 8 GB, 16 GB
iPod classic 160 GB (2007)
iPod touch 1 generacji 8 GB, 16 GB, 32 GB
iPod nano 3 generacji (video) 4 GB, 8 GB
iPod classic 80 GB
iPod nano 2 generacji (aluminum) 2 GB, 4 GB, 8 GB
iPod 5 generacji (video) 60 GB, 80 GB
iPod 5 generacji (video) 30 GB
iPod nano 1 generacji 1 GB, 2 GB, 4 GB
iPod 4 generacji (kolorowy wyświetlacz) 40 GB, 60 GB
iPod 4 generacji (kolorowy wyświetlacz) 20 GB, 30 GB
iPod 4 generacji 40 GB
iPod 4 generacji 20 GB
iPod mini 4 GB, 6 GB
■ Obs³ugiwane iPhone
Nazwa Pojemnośæ pamiêci
iPhone 3GS 16 GB, 32 GB
iPhone 3G 8 GB, 16 GB
iPhone 4 GB, 8 GB, 16 GB
Obs³uga iPoda/iPhone przez urz¹dzenie jest uzale¿niona od
oprogramowania iPoda/iPhone.
•
Naciśnij dźwigienkê doku,
aby zaskoczy³a (powinno
rozlegn¹æ siê klikniêcie).
Naciśnij!
Naciśnij [;] aby odblokowaæ
dok iPoda/iPhone, a nastêpnie
przesuñ dźwigienkê doku, aby
go wychyliæ.
[;]
Adapter doku
Dźwigienka
Z³¹cze
Zaciski
W³ó¿ adapter doku
iPoda/iPhone zaciskami
skierowanymi ku sobie,
a nastêpnie wciśnij
z drugiej strony a¿
rozlegnie siê klikniêcie.
Urz¹dzenia zewnêtrzne (ci¹g dalszy)
Klik!
Klik!
11
Page 28

28
RQTX1076
POLSKI
Obs³uga Bluethooth
Przygotowanie:
Zsynchronizuj urz¹dzenie Bluetooth z urz¹dzeniem opisywanym, w
celu ustanowienia ³¹cza audio.
Naciśnij [ q/h], aby wybraæ opcjê Bluetooth.
Przy pierwszorazowym u¿yciu jest urz¹dzenie jest prze³¹czane na
tryb synchronizacji automatycznie.
Kiedy urz¹dzenie znajduje siê w trybie synchronizacji, wejdź
do menu Bluetooth urz¹dzenia Bluetooth i w³¹cz wyszukiwanie
niniejszego urz¹dzenia (SC-HC40).
Aby pod³¹czyæ urz¹dzenie Bluetooth, zapoznaj siê z instrukcj¹
jego obs³ugi.
Jeśli pojawi siê monit o podanie has³a, wprowadź „0000” (Dla
urz¹dzeñ Bluetooth w wersjach niezgodnych z 2.1+EDR).
Po prawid³owej synchronizacji nazwa urz¹dzenia
zsynchronizowanego zostanie wyświetlona przez 2 sekundy.
Zapala siê wskaźnik Bluetooth. Urz¹dzenie jest teraz gotowe do
u¿ytku wraz z urz¹dzeniem typu Bluetooth.
Nale¿y sprawdziæ, czy urz¹dzenie Bluetooth obs³uguje profil A2DP
(Advanced Audio Distribution Profile).
Niniejsze urz¹dzenie obs³uguje odbiór A2DP z zabezpieczeniem praw
autorskich metod¹ SCMS-T.
Profil A2DP umo¿liwia przekazywanie dźwiêku stereo ze źród³a audio
(telefon, komputer osobisty lub laptop) do niniejszego urz¹dzenia za
pośrednictwem funkcji Bluetooth.
W zale¿ności od specyfikacji lub ustawieñ telefonu komórkowego,
nawi¹zanie po³¹czenia mo¿e nie byæ mo¿liwe lub dzia³anie b¹dź tryb
wyświetlania mo¿e byæ odmienny.
Z niniejszym urz¹dzeniem mo¿na zsynchronizowaæ do 6
urz¹dzeñ. Od³¹cz urz¹dzenie Bluetooth i zapoznaj siê z sekcj¹
„Rejestracja dalszych urz¹dzeñ” (➡ strona 13).
Przy rejestracji liczby urz¹dzeñ przekraczaj¹cych maksimum,
skasowane zostanie urz¹dzenie, z którym dokonano po³¹czenia
najwcześniej.
Przy ponownej rejestracji tego samego urz¹dzenia zostanie ono
zast¹pione.
•
•
•
•
•
•
•
•
•
•
Urz¹dzenie zewnêtrzne (ci¹g dalszy)
O korzystaniu z funkcji bezprzewodowej Bluetooth
g Wykorzystywane pasmo czêstotliwości
Zestaw ten wykorzystuje pasmo 2,4 GHz, jednak mo¿e ono byæ
te¿ wykorzystywane przez inne urz¹dzenia. Aby unikn¹æ zak³óceñ
wywo³ywanych przez inne urz¹dzenia, nale¿y postêpowaæ zgodnie z
poni¿szymi wskazówkami.
g Certyfikacja urz¹dzenia
To urz¹dzenie s¹ podporz¹dkowane ograniczeniom dotycz¹cym
czêstotliwości i posiadaj¹ odpowiednie certyfikaty wydane na podstawie
odpowiednich przepisów, nie jest wiêc konieczne uzyskiwanie
zezwolenia na transmisjê bezprzewodow¹. Jednak poni¿sze dzia³ania s¹
ścigane przez prawo.
Rozk³adanie na czêści i modyfikacja urz¹dzenia.
Zdejmowanie wskazañ specyfikacyjnych z tylnej czêści urz¹dzenia.
g Ograniczenia w zastosowaniu
Nie gwarantuje siê mo¿liwości transmisji bezprzewodowej i/lub
zastosowania ze wszystkimi urz¹dzeniami z technologi¹ Bluetooth.
Kompatybilne telefony komórkowe, umo¿liwiajace transmisjê
bezprzewodow¹ s¹ zgodne ze standardami ustalonymi przez
Bluetooth SIG, Inc. Jednak jeśli telefon komórkowy jest
zoptymalizowany i zgodny ze standardowymi specyfikacjami,
niektóre funkcje mog¹ dzia³aæ. Mimo to, w zale¿ności od specyfikacji
i ustawieñ telefonu komórkowego, po³¹czenie mo¿e nie zostaæ
ustanowione, albo sposób dzia³ania, wyświetlania lub samo dzia³anie
mo¿e nie byæ pewne.
Te n zestaw obs³uguje technologiê bezpieczeñstwa Bluetooth,
jednak w zale¿ności od środowiska, w którym dzia³a i/lub ustawieñ,
zabezpieczenia te mog¹ okazaæ siê niewystarczaj¹ce. Podczas
bezprzewodowej transmisji danych nale¿y zachowaæ ostro¿nośæ.
Nale¿y mieæ na uwadze to, ¿e firma Panasonic nie ponosi
odpowiedzialności za przypadki przechwycenia danych podczas
transmisji bezprzewodowej.
g Zasiêg stosowania
Urz¹dzenie mo¿na wykorzystywaæ w odleg³ości do 10 m, jeśli obu
komunikuj¹cych siê zestawów nie oddziela ¿adna przeszkoda. Zasiêg
dzia³ania mo¿e ulec zmniejszeniu w zale¿ności od obecności przeszkód,
urz¹dzeñ powoduj¹cych zak³ócenia, obecności innych osób w
pomieszczeniu lub konstrukcji budynku. Nale¿y pamietaæ, ¿e podany
wy¿ej zasiêg nie jest gwarantowany.
g Wp³yw innych urz¹dzeñ
Urz¹dzenie i nadajnik mog¹ nie dzia³aæ w³aściwie lub mog¹ wyst¹piæ
inne objawy dzia³ania niestabilnego, np. przerwy w odtwarzaniu
dźwiêku, gdy w pobli¿u znajduj¹ siê inne urz¹dzenia. Dlatego te¿, w
celu przeciwdzia³ania interferencji sygna³u zalecamy oddzielenie tego
urz¹dzenia podczas jego stosowania od poni¿szych urz¹dzeñ.
Kuchenka mikrofalowa/Urz¹dzenie bezprzewodowe LAN/
Urz¹dzenia elektroniczne/Urz¹dzenia audio/video/Urz¹dzenia
biurowe/Cyfrowe telefony bezprzewodowe/Faksy, itp.
Jeśli u¿ytkownik mieszka zbyt blisko nadajnika i sygna³ jest zbyt silny,
urz¹dzenie mo¿e nie dzia³aæ poprawnie.
Korzystaj¹c z laptopa PC z bezprzewodowym urz¹dzeniem LAN,
nie nale¿y u¿ywaæ to urz¹dzenie i bezprzewodowego nadajnika LAN
jednocześnie.
Jeśli zak³ócenia wystêpuj¹ nawet w odleg³ości wiêkszej ni¿ 5 m od
bezprzewodowego urz¹dzenia LAN, nale¿y wy³¹czyæ urz¹dzenie LAN.
g Ograniczenia u¿ytkowania
Urz¹dzenie jest przeznaczone do u¿ytku ogólnego. Niniejsze urz¹dzenie
nie zosta³o zaprojektowane i wyprodukowane z przeznaczeniem do
wykorzystania w ramach zadañ “wysokiego ryzyka” lub wymagaj¹cych
najwy¿szego stopnia bezpieczeñstwa. Dlatego nie powinny one byæ
stosowane w takich warunkach.
Nastêpuj¹ce przyk³ady wymagaj¹ niezwyk³ej ostro¿ności i mog¹
doprowadziæ bezpośrednio do utraty ¿ycia lub powa¿nego
uszczerbku na zdrowiu.
np. In¿ynieria nuklearna oraz kontrola reakcji j¹drowych/automatyczna
kontrola ruchu lotniczego/systemy kontroli ciê¿kiego transportu/
kontrola systemów podtrzymywania ¿ycia/kontrola systemów
uzbrojenia/systemy odpalania rakiet, itp.
•
•
•
•
•
•
•
•
•
•
Czym jest Bluetooth?
Technologia Bluetooth pozwala na bezprzewodowe po³¹czenie z
innych urz¹dzeniem elektronicznym.
Odtwarzanie podstawowe
Naciśnij [ q/h], aby wybraæ opcjê Bluetooth.
Rozpocznij odtwarzanie materia³u dźwiêkowego z poziomu
urz¹dzenia Bluetooth. Jeśli urz¹dzenie jest pod³¹czone, dźwiêk
bêdzie emitowany przez opisywane urz¹dzenie.
(W razie konieczności nale¿y zapoznaæ siê z instrukcj¹ obs³ugi
urz¹dzenia Bluetooth.)
Z poziomu pilota mo¿na tak¿e dokonywaæ nast. regulacji.
Odtwarzanie
Naciśnij [ q/h] aby rozpocz¹æ odtwarzanie.
Stopowanie
Naciśnij [g, ].
Pauza
Naciśnij [ q/h]. W celu wznowienia odtwarzania
naciśnij ponownie ten przycisk.
Pomijanie
utworu
Naciśnij [u] lub [i].
Aby korzystaæ z tych funkcji, urz¹dzenie Bluetooth musi obs³ugiwaæ
profil AVRCP (Audio Video Remote Control Profile).
Niniejsze urz¹dzenie nie mo¿e przesy³aæ danych do urz¹dzenia
Bluetooth.
Podczas odtwarzania na urz¹dzeniu g³ównym materia³u z
iPoda/iPhone z wykorzystaniem ³¹czności Bluetooth dźwiêk mo¿e
zanikaæ, jeśli pozostawiono aktywny ekran z menu Bluetooth
iPoda/iPhone lub podczas rejestracji i ustanawiania po³¹czenia
Bluetooth. Jeśli ma to miejsce, wyjdź z ekranu z menu Bluetooth
iPoda/iPhone.
Podczas odtwarzania materia³u z iPoda/iPhone za pośrednictwem
³¹cza Bluetooth, kiedy urz¹dzenia te s¹ pod³¹czone do doku
iPoda/iPhone urz¹dzenia g³ównego, dźwiêk nie bêdzie emitowany
jeśli prze³¹cznik Bluetooth jest w³¹czony. Aby odtwarzaæ, prze³¹cz
prze³¹cznik na opcjê iPod.
•
•
•
•
12
Page 29

29
RQTX1043
POLSKI
RQTX1076
29
Urz¹dzenie zewnêtrzne (ci¹g dalszy)
Funkcja HFP (zestaw g³ośnomówi¹cy)
Niniejsze urz¹dzenie mo¿na wykorzystywaæ jako zestaw g³ośnomówi¹cy
Bluetooth wraz z telefonami komórkowymi.
Z poziomu pilota mo¿na odpowiedzieæ lub skasowaæ rozmowy
wchodz¹ce.
Odbieranie rozmowy
(B³yska komunikat
„IN CALL”)
Naciśnij [ ]. Na wyświetlaczu zaczyna
b³yskaæ komunikat „CALLING” (Mów do
mikrofonu niniejszego urz¹dzenia).
Ponownie naciśnij [ ], aby przekierowaæ
rozmowê do telefonu komórkowego
(B³yska komunikat „TRANSFER”. Mo¿esz
teraz prowadziæ rozmowê z telefonu
komórkowego).
Anulacja rozmowy
Naciśnij [g, ].
Regulacja poziom
g³ośności
Naciskaj [+, VOL , –] (Zakres od
„TEL VOL 1” do „TEL VOL 10”).
Wyciszanie
mikrofonu
Naciśnij [MUTE]. Aby anulowaæ, naciśnij
ponownie.
(Jeśli w³¹czona jest funkcja „MIC MUTE”,
osoba dzwoni¹ca ciê nie s³yszy ).
To urz¹dzenie nie wspó³pracuje z zestawem s³uchawkowym typu
Headset Profile (HSP).
W przypadku zbli¿enia telefonu komórkowego do mikrofonu
urz¹dzenia mog¹ wyst¹piæ zak³ócenia. Korzystaj¹c z telefonu
komórkowego zawsze nale¿y trzymaæ go z dala od mikrofonu
niniejszego urz¹dzenia.
•
•
Naciśnij [ MENU], aby wyświetliæ komunikat „DISCONNECT?” a
nastêpnie naciśnij [OK].
Wyświetlony zostanie komunikat potwierdzaj¹cy.
Naciśnij [e,r] aby wybraæ „YES” lub „NO” a nastêpnie naciśnij [OK].
£¹cze mo¿e tak¿e zostaæ przerwane po wy³¹czeniu transmisji
Bluetooth z poziomu pod³¹czonego urz¹dzenia Bluetooth.
•
Od³¹czanie urz¹dzenia BluetoothPoziom sygna³u wejściowego
Mo¿na dokonaæ wyboru poziomu sygna³u wejściowego urz¹dzenia
Bluetooth.
Naciśnij kilkakrotnie
[PLAY MODE], aby wybraæ „LEVEL 0”,
„LEVEL +1” lub „LEVEL +2”.
Wybierz „LEVEL 0”, jeśli dźwiêk jest zniekszta³cony.•
Funkcja wyświetlania
Naciśnij kilkakrotnie [DISPLAY, –DIMMER], aby wyświetliæ
informacje o aktualnie pod³¹czonym urz¹dzeniu.
BLUETOOTH Nazwa urz¹dzenia
pod³¹czonego
Pod³¹czone profile
or
Napis „Made for iPod” (Wykonano dla iPod) oznacza, ¿e akcesoria
elektroniczne zosta³o specjalnie zaprojektowane do pod³¹czenia do
iPoda, a wytwórca certyfikowa³ je pod k¹tem standardów eksploatacji
firmy Apple.
Napis „Works with iPhone” (Wspó³pracuje z iPhone) oznacza, ¿e
akcesoria elektroniczne zosta³o specjalnie zaprojektowane do
pod³¹czenia do iPhone, a wytwórca certyfikowa³ je pod k¹tem
standardów eksploatacji firmy Apple.
Firma Apple nie ponosi odpowiedzialności za funkcjonowanie
niniejszego urz¹dzenia i jego zgodnośæ ze standardami w dziedzinie
bezpieczeñstwa i z przepisami.
iPod jest znakiem towarowym firmy Apple Inc., zarejestrowanym w
USA i innych krajach. iPhone jest znakiem towarowym firmy Apple Inc.
Nazwa marki Bluetooth i logotypy s¹ w³asności¹ firmy Bluetooth
SIG, Inc. wszelkie ich u¿ycie przez firmê Panasonic Corporation jest
objête licencj¹. Pozosta³e znaki towarowe i nazwy s¹ w³asności¹ ich
posiadaczy.
Deklaracja zgodności (DoC)
Firma „Panasonic Corporation“ oświadcza niniejszym, ¿e opisywany
produkt jest zgodny z zasadniczymi wymogami i innymi stosownymi
klauzulami Dyrektywy 1999/5/EC.
Kopiê oryginalnego dokumentu DoC dotycz¹cego naszych wyrobów
objêtych dyrektyw¹ R&TTE klienci mog¹ pobraæ z naszego serwera
DoC: http://www.doc.panasonic.de
Kontakt z autoryzowanym przedstawicielem: Panasonic Marketing
Europe GmbH, Panasonic Testing Centre, Winsbergring 15, 22525
Hamburg, Niemcy
Ten produkt jest przeznaczony do eksploatacji w nastêpuj¹cych krajach.
PL, CZ, HU, SK, BG, EE, LV, RO, SI, BO, HR, MK, RS, LT, RU, UA, KZ,
BY, O.CIS
Opisywany produkt jest przeznaczony dla u¿ytkownika ogólnego.
(Kategoria 3)
DZIA£A W ZAKRESIE 2400 MHz do 2483,5 MHz
Technologia dekodowania dźwiêku MPEG Layer-3 na podstawie
licencji Fraunhofer IIS i Thomson.
13
Funkcje zaawansowane
g Rejestracja dalszych urz¹dzeñ
Naciśnij [ MENU].
Naciśnij [e,r] aby wybraæ „NEW DEV” a nastêpnie naciśnij [OK].
Urz¹dzenie jest prze³¹czane na tryb synchronizacji, a na wyświetlaczu
b³yska komunikat „PAIRING”.
Kiedy urz¹dzenie znajduje siê w trybie synchronizacji, wejdź
do menu Bluetooth urz¹dzenia Bluetooth i w³¹cz wyszukiwanie
niniejszego urz¹dzenia (SC-HC40).
Jeśli pojawi siê monit o podanie has³a, wprowadź „0000”.
g Wybór jakości komunikacji
Naciśnij [ MENU].
Naciśnij [e,r] aby wybraæ „LINK MODE” a nastêpnie naciśnij [OK].
Naciśnij [e,r] aby wybraæ jeden z nastêpuj¹cych trybów, a
nastêpnie naciśnij [OK].
„MODE 1”: Po³¹czenie z naciskiem na stabilnośæ komunikacji
„MODE 2”: Po³¹czenie o wysokiej prêdkości transmisji, a co
za tym idzie wy¿szej jakości dźwiêku (W tym trybie
mo¿e ³atwo dojśæ do przerwania transmisji, jeśli do
tego dojdzie wybierz tryb „MODE 1”).
g Wybór trybu Auto Link
Naciśnij [ MENU].
Naciśnij [e,r] aby wybraæ „AUTO LINK” a nastêpnie naciśnij [OK].
Naciśnij [e,r] aby wybraæ jeden z nastêpuj¹cych trybów, a
nastêpnie naciśnij [OK].
„ON”: Po³¹czenie automatyczne tak¿e przy innej selekcji ni¿ Bluetooth
„OFF”: Po³¹czony tylko przy selekcji Bluetooth
Funkcje te nie s¹ dostêpne, jeśli urz¹dzenie jest wy³¹czone. Od³¹cz
urz¹dzenia Bluetooth, aby wyświetliæ te funkcje.
Kiedy wyświetlony jest komunikat „LINKING” naciśniêcie [ MENU]
jest niewa¿ne.
Funkcja Auto Link dzia³a tylko jeśli urz¹dzenie obs³uguje profil A2DP.
•
•
•
•
•
•
•
•
Page 30

30
RQTX1076
POLSKI
Urz¹dzenia zewnêtrzne (ci¹g dalszy)
Obs³uga USB
Mo¿liwośæ pod³¹czenia USB pozwala na odtwarzanie utworów i plików
MP3 z pod³¹czonych urz¹dzeñ pamiêci masowej USB.
Przygotowanie:
Przed pod³¹czeniem przenośnego urz¹dzenia pamiêci masowej
USB do urz¹dzenia, nale¿y upewniæ siê, ¿e utworzono kopiê
bezpieczeñstwa zapisanych w nim danych.
Przed pod³¹czeniem przenośnego urz¹dzenia pamiêci masowej USB
do urz¹dzenia, nale¿y upewniæ siê, ¿e zapisane tam dane zapisano
w postaci kopii zapasow¹. Urz¹dzenie pod³¹czenie za pomoc¹
przewodu nie zostanie wykryte.
Otwórz pokrywê USB.
Zmniejsz g³ośnośæ i pod³¹cz urz¹dzenie pamiêci masowej USB.
Naciśnij [USB q/h] aby rozpocz¹æ odtwarzanie.
•
•
Stopowanie
Naciśnij [g, ]. Zostanie wyświetlony
komunikat „RESUME”. Po³o¿enie zostanie
zapamiêtane.
Naciśnij [USB q/h] aby wznowiæ odtwarzanie.
Naciśnij ponownie
[g, ] aby skasowaæ
pozycjê.
Pauza
Naciśnij [USB q/h]. W celu wznowienia
odtwarzania naciśnij ponownie ten przycisk.
Pomijanie utworu
Naciśnij [u] lub [i].
Pomijanie albumu
Naciśnij [e,r].
Odtwarzanie z
bezpośrednim
dostêpem
(Odtwarzanie od
utworu wybranego
przez u¿ytkownika.)
Naciśnij [e,r] aby wybraæ album.
Naciśnij [i] raz a potem odpowiednie
przyciski numeryczne, aby wybraæ utwór.
Urz¹dzenia obs³ugiwane
Aby od³¹czyæ urz¹dzenie pamiêci masowej USB wybierz inne źród³o
ni¿ „USB”.
W przypadku od³¹czenia urz¹dzenia pamiêci masowej USB podczas
gdy jest ono wybrane jako źród³o mo¿e spowodowaæ uszkodzenie
zapisanych w nim danych.
•
Urz¹dzenia określane jako pamiêci masowe USB:
Urz¹dzenia USB obs³uguj¹ce protokó³ transferu Bulk-Only
Urz¹dzenia USB obs³uguj¹ce standard USB 2.0 (pe³na prêdkośæ)
•
•
Pozosta³e funkcje obs³ugi s¹ analogiczne do opisanych w czêści
„Obs³uga p³yt” (➡ strona 8, 9).
Informacje dot USB
Obs³ugiwane formaty: Pliki z rozszerzeniem „.mp3” or „.MP3”
CBI (Control/Bulk/Interrupt) nie jest obs³ugiwany.
Urz¹dzenia korzystaj¹ce z systemu plików NTFS nie
s¹ obs³ugiwane. [Obs³ugiwany jest tylko system plików
FAT 12/16/32 (File Allocation Table 12/16/32)].
W zale¿ności od rozmiaru sektorów niektóre pliki mog¹ nie byæ
dostêpne.
Urz¹dzenie mo¿e odtwarzaæ do 255 albumów i 2500 utworów.
Maksymalna liczba utworów w folderze wynosi 999.
W przypadku po³¹czenia z czytnikiem wielu kart USB wybrana
zostanie tylko jedna karta pamiêci.
Podczas wyjmowania karty pamiêci nale¿y od³¹czyæ czytnik
kart USB od urz¹dzenia. W przeciwnym razie mo¿e nast¹piæ
uszkodzenie urz¹dzenia.
Po pod³¹czeniu cyfrowego odtwarzacza audio do portu USB jest
on stale do³adowywany, kiedy urz¹dzenie g³ówne jest w³¹czone.
•
•
•
•
•
•
•
•
•
Urz¹dzenie pamiêci masowej USB (niedo³¹czone)
Pamiêæ nale¿y skasowaæ w nast. sytuacjach:
Urz¹dzenie nie reaguje po przyciśniêciu przycisków.
U¿ytkownik pragnie skasowaæ i wprowadziæ ustawienia pamiêci.
Aby resetowaæ pamiêæ:
Od³¹cz przewód zasilania. (Odczekaj przynajmniej 3 minuty przed przejściem do punktu 2.)
Przyciśnij I przytrzymaj [8] na urz¹dzeniu g³ównym, I jednocześnie pod³¹cz ponownie przewód zasilania.
Na ekranie wyświetla siê „--------”.
Zwolnij [8].
Zostan¹ przywrócone wszystkie ustawienia fabryczne. Nale¿y ponownie wprowadziæ elementy pamiêci.
•
•
Kasowanie pamiêci (Inicjalizacja)
14
Page 31

31
RQTX1043
POLSKI
RQTX1076
31
Przed oddaniem urz¹dzenia do naprawy nale¿y sprawdziæ nastêpuj¹ce pozycje. W razie w¹tpliwości, lub jeśli środki zaradcze podane w
tabeli nie rozwi¹zuj¹ problemu, nale¿y zwróciæ siê do sprzedawcy/dystrybutora.
g Najczêstsze problemy
Niepoprawne wyświetlanie lub brak
rozpoczêcia odtwarzania
P³yta nie zsota³a w³o¿ona poprawnie. W³ó¿ j¹
poprawnie.
P³yta jest zadrapana lub zabrudzona
(Niektóre utwory s¹ pomijane).
Na soczewce osiad³a wilgoæ. Odczekaj oko³o
godziny, a¿ odparuje, i spróbuj ponownie.
Urz¹dzenie nie odczytuje plików MP3
Odtwarzanie plików MP3 mo¿e byæ
niemo¿liwe, jeśli skopiowano p³ytê
wieloseryjn¹ bez danych pomiêdzy sesjami.
Przy nagrywaniu dysku wieloseryjnego
nale¿y zamkn¹æ sesjê.
Objêtośæ danych na p³ycie jest zbyt ma³a.
Ustaw pojemnośæ danych na pow. 5 MB.
Emitowany jest ha³as lub nie ma dźwiêku
Zak³ócenia mog¹ wystêpowaæ w przypadku
odtwarzania plików MP3 z nagraniami o z³ej
jakości.
Jeśli wystêpuj¹ zak³ócenia nie zbli¿aj do
urz¹dzenia telefonów komórkowych.
Zwiêksz g³ośnośæ.
Wy³¹cz urz¹dzenie, sprawdź po³¹czenia
i skoryguj je, a nastêpnie ponownie
w³¹cz urz¹dzenie. Przyczyn¹ mo¿e byæ
przeci¹¿enie g³ośników spowodowane
nadmiern¹ g³ośności¹ lub moc¹ oraz
korzystanie z urz¹dzenia w wysokich
temperaturach.
Podczas odtwarzania s³ychaæ przydźwiêk
W pobli¿u kabli znajduje siê kabel zasilaj¹cy
lub świetlówka. Inne urz¹dzenia i przewody
powinny znajdowaæ siê z dala od kabli
urz¹dzenia.
Podczas ods³uchu radia s³ychaæ zak³ócenia
lub dudnienie
Wy³¹cz odbiornik TV lub inne odtwarzacze
audio lub oddal je od urz¹dzenia.
Wy³¹cz przenośne urz¹dzenie audio, jeśli jest
pod³¹czone do portu „AUX”.
Podczas odbioru w zakresie AM s³ychaæ
przydźwiêk o niskiej czêstotliwości
Odsuñ antenê od innych kabli i przewodów.
Odsuñ antenê AM od urz¹dzenia.
Obraz na ekranie TV w pobli¿u urz¹dzenia
zanika lub pojawiaj¹ siê pasy
Po³o¿enie i ustawienie anteny jest
niew³aściwe.
Przewód anteny telewizyjnej jest zbyt
blisko urz¹dzenia. Odsuñ przewód anteny
telewizyjnej od urz¹dzenia.
Brak odpowiedzi po przyciśniêciu
przycisków pilota
Sprawdź, czy baterie zosta³y prawid³owo
w³o¿one (➡ strona 7).
g Wyświetlacz
„--:--”
Do urz¹dzenia po raz pierwszy pod³¹czono
kabel zasilaj¹cy lub niedawno wystêpi³a
przerwa w zasilaniu. Ustaw czas
(➡ strona 10).
„ADJUST CLOCK”
Zegar nie jest ustawiony. Ustaw odpowienio
zegar.
•
•
•
•
•
•
•
•
•
•
•
•
•
•
•
•
•
•
•
•
„ADJUST TIMER”
Timer odtwarzania nie jest ustawiony. Ustaw
odpowienio timer.
„PGM FULL”
Maksymalna liczba zaprogramowanych
utworów wynosi 24. Nie mo¿na
zaprogramowaæ dalszych utworów.
„NO PLAY”
W³o¿ono dysk CD-ROM w formacie
odmiennym ni¿ CD-DA lub MP3. Dyski takie
nie mog¹ byæ odtwarzane.
„ERROR”
Zosta³a wykonana nieprawid³owa operacja.
Przeczytaj instrukcjê i spróbuj ponownie.
„F61” lub „F76”
Awaria zasilania. Nale¿y zwróciæ siê do
sprzedawcy.
Od³¹cz urz¹dzenie USB. Wy³¹cz i w³¹cz
urz¹dzenie.
„AUTO OFF”
Urz¹dzenie nie dzia³a³o przez ok. 29 minut
i zostanie zgaszone za 1 minutê. Naciśnij
dowolny przycisk, aby skasowaæ funkcjê
wy³¹czenia.
„ILLEGAL OPEN”
Przesuwana pokrywa znajduje siê w
niew³aściwej pozycji. Wy³¹cz i w³¹cz
urz¹dzenie.
„NODEVICE”
iPod/iPhone nie zosta³ prawid³owo
umieszczony. Przeczytaj instrukcjê i spróbuj
ponownie (➡ strona 11).
Nie pod³¹czono urz¹dzenia klasy USB.
Sprawdź po³¹czenia.
„REMOTE 1”
Urz¹dzenie g³ówne znajduje siê w trybie
„REMOTE 1”. Prze³¹cz pilota na tryb
„REMOTE 1” (➡ strona 10).
„REMOTE 2”
Urz¹dzenie g³ówne znajduje siê w trybie
„REMOTE 2”. Prze³¹cz pilota na tryb
„REMOTE 2” (➡ strona 10).
g iPod/iPhone
iPod/iPhone nie w³¹cza siê
Sprawdź czy akumulator iPoda/iPhone nie
jest wyczerpany przed pod³¹czeniem go do
urz¹dzenia.
Przed w³o¿eniem iPoda/iPhone do
doku wy³¹cz zarówno iPod/iPhone jak i
urz¹dzenie. W³¹cz urz¹dzenie i wybierz
odpowiednie źród³o.
G³ośniki nie emituj¹ dźwiêku
iPod/iPhone nie jest prawid³owo
umieszczony w doku. Wy³¹cz iPod/iPhone,
wyjmij go ze z³¹cza doku. Umieśæ go
ponownie w doku i w³¹cz.
Upewnij siê, ¿e w³¹czono odtwarzanie z
iPod/iPhone.
Wyreguluj poziom g³ośności.
Dźwiêk jest zniekszta³cony lub zbyt niska
g³ośnośæ
Upewnij siê, ¿e wy³¹czono funkcjê korektora
iPoda/iPhone.
•
•
•
•
•
•
•
•
•
•
•
•
•
•
•
•
•
•
Nie mo¿na sterowaæ iPodem/iPhone za
pośrednictwem pilota lub urz¹dzenia
g³ównego
Upewnij siê, czy iPod/iPhone jest prawid³owo
umieszczony w doku.
Sprawdź po³¹czenia doku i upewnij siê, ¿e
jako źród³o dźwiêku wybrano iPoda/iPhone
(➡ strona 11).
Nie dzia³a funkcja do³adowywania
iPoda/iPhone
Sprawdź wszystkie po³¹czenia
(➡ strona 3, 11).
g BLUETOOTH
Nazwa urz¹dzenia pod³¹czonego jest
wyświetlana jako „ * ”
Znaki, które nie mog¹ byæ wyświetlone s¹
zastêpowane przez „ * ”.
Nierozpoznana nazwa urz¹dzenia jest
wyświetlana jako „
*****
”.
Emitowany jest ha³as lub wystêpuj¹ przerwy
w dźwiêku
Odleg³ośæ transmisji za pośrednictwem
Bluetooth przekroczy³a 10 m. Nale¿y
przysun¹æ urz¹dzenie Bluetooth do
niniejszego urz¹dzenia.
Pomiêdzy urz¹dzeniami znajduj¹ siê
przeszkody. Nale¿y usun¹æ przeszkody.
Wybierz „MODE 1”, aby poprawiæ jakośæ
transmisji (➡ strona 13).
Zak³ócenia powodowane przez telefony
komórkowe.
„F70”
Wy³¹cz urz¹dzenie. Od³¹cz przewód zasilania
i skontaktuj siê ze sprzedawc¹.
g USB
Brak odpowiedzi po naciśniêciu przycisku
[USB q/ h]
Od³¹cz urz¹dzenie USB i pod³¹cz je
ponownie. Lub wy³¹cz urz¹dzenie, a
nastêpnie w³¹cz je ponownie.
Napêd USB lub zapisane dane nie mog¹ byæ
odczytane
Format nośnika USB lub jego zawartośæ
nie s¹ obs³ugiwane przez to urz¹dzenie
(➡ strona 14).
Funkcja USB host niniejszego urz¹dzenia
mo¿e nie dzia³aæ z niektórymi urz¹dzeniami
USB.
Urz¹dzenia USB o pojemności
przekraczaj¹cej ponad 8 GB danych, mog¹
niekiedy nie funkcjonowaæ.
Powolne dzia³anie napêdu Flash USB
Pliki o du¿ych rozmiarach lub napêd Flash
USB o du¿ej pojemności wymaga d³u¿szego
czasu wczytywania.
„NO PLAY”
Sprawdź materia³.
Odtwarzaæ mo¿na tylko pliki w formacie
MP3.
Jeśli liczba albumów lub folderów przekracza
255 (audio i inne), niektóre pliki MP3 mog¹
nie byæ odczytywane i odtwarzane. Przenieś
te albumy muzyczne do innego nośnika
USB. Mo¿esz tak¿e ponownie sformatowaæ
i zachowaj te albumy muzyczne przed
zachowaniem pozosta³ych plików.
•
•
•
•
•
•
•
•
•
•
•
•
•
•
•
•
•
•
Rozwi¹zywanie problemów
15
Page 32

32
RQTX1076
POLSKI
g SEKCJA WZMACNIACZA
Moc wyjściowa RMS
K. przednie (oba wysterowane)
20 W na kana³ (6 Ω), 1 kHz, 10 % THD
Ca³kowita moc znamionowa 40 W
Z³¹cze telefoniczne
Z³¹cze Stereo, 3,5 mm
Aux (Tylne)
Z³¹cze Stereo, 3,5 mm
g SEKCJA TUNERA
Programowanie stacji FM 30 stacji
AM 15 stacji
Modulacja czêstotliwości (FM)
Zakres czêstotliwości 87,50 MHz do 108,00 MHz (krok 50 kHz)
Zaciski anteny 75 Ω (niesymetryczne)
Modulacja (AM)
Zakres czêstotliwości 522 kHz do 1629 kHz (krok 9 kHz)
520 kHz do 1630 kHz (krok 10 kHz)
g SEEKCJA DYSKU
Odtwarzane p³yty [8 cm lub 12 cm]
(1) CD-Audio (CD-DA)
(2) CD-R/RW (CD-DA, MP3)
(3) MP3*
* MPEG-1 warstwa 3, MPEG-2 warstwa 3
Odbiór
D³ugośæ fali 795 nm
Moc lasera CLASS 1
Wyprowadzanie audio (P³yta)
Licznba kana³ów FL, FR, 2 kana³y
g SEKCJA G£OŚNIKOW
Typ 1 kolumna, 1-dro¿ne (Membrana bierna)
G³ośnik/g³ośniki
Pe³en zakres Sto¿kowy 6,5 cm x 1 / kana³
Membrana bierna 8 cm x 2 / kana³
Impedancja 6 Ω
g SEEKCJA BLUETOOTH
Dane techniczne systemu Bluetooth V2.1 + EDR
Klasa sprzêtu bezprzewodowego Klasa 1 (2,5 mW)
Obs³ugiwane profile A2DP, AVRCP, HFP
Pasmo czêstotliwości 2402 MHz do 2480 MHz
(Adaptive Frequency Hopping - adaptywna zmiana czêstotliwości)
Zasiêg 10 m po linii wzroku
(iPhone 3G, przy wysokości 1 m, w trybie MODE 1)
g SEEKCJA PORT USB
USB Standard USB 2.0 pe³na prêdkośæ
Obs³ugiwane formaty plików MP3 (*.mp3)
System plików urz¹dzenia klasy USB FAT 12/16/32
Moc portu USB Max. 500 mA
g DANE OGÓLNE
Zasilanie AC 220 V do 240 V, 50 Hz
Pobór mocy 35 W
Wymiary (Sz x W x G) 500 mm x 201 mm x 102 mm
(G = 69 mm minimum)
Masa Ok. 3,0 kg
Zakres temperatur roboczych 0 °C do +40 °C
Zakres wilgotności roboczych 35 % do 80 % RH (bez kondensacji)
g Wyjmij wtyczkê zasilania z gniazda a nastêpnie przetrzyj j¹ przy pomocy suchej, miêkkiej ściereczki.
W przypadku silnego zabrudzenia, nanieś nieco wody na ściereczkê, wykrêæ j¹ i wyczyśæ wtyczkê a nastêpnie wytrzyj such¹ ściereczk¹.
Nie u¿ywaj rozcieñczalników takich jak benzyna, rozpuszczalnik, alkohol i detergenty, gdy¿ mog¹ one spodowdowaæ deformacjê pow³oki
zewnêtrznej.
U¿ywaj¹c ściereczki chemicznej zastosuj środki ostro¿ności.
g Konserwacja soczewki CD
Aby unikn¹æ zak³óceñ w funkcjonowaniu urz¹dzenia nale¿y regularnie czyściæ soczewkê. W przypadku powa¿nego zabrudzenia nale¿y skorzystaæ
z dmuchawki lub wacika.
Nie nale¿y stosowaæ środków do czyszczenia p³yt CD.
•
•
•
•
•
Pobór mocy w trybie gotowości: 0,09 W (ok.)
Producent zastrzega sobie prawo zmiany danych technicznych bez
uprzedniego powiadomienia.
Ca³kowite zniekszta³cenia harmoniczne zmierzono cyfrowym
analizatorem widma.
•
•
Dane techniczne
Konserwacja
16
Page 33

33
RQTX1043
POLSKI
RQTX1076
33
Umieszczanie
Urz¹dzenie nale¿y ustawiæ na równej powierzchni, w miejscu nienara¿onym na bezpośrednie dzia³anie promieni s³onecznych, wysokiej
wilgotności lub nadmiernych wibracji. Mo¿e to spowodowaæ uszkodzenie obudowy i innych elementów i skrócenie okresu eksploatacji urz¹dzenia.
Na urz¹dzeniu nie nale¿y umieszczaæ ciê¿kich przedmiotów.
Zasilanie
Nie nale¿y pod³¹czaæ urz¹dzenia do źróde³ o zbyt wysokim zasilaniu. Mo¿e to spowodowaæ przeci¹¿enie urz¹dzenia i po¿ar.
Nie nale¿y pod³¹czaæ urz¹dzenia do źróde³ zasilania pr¹dem sta³ym. Przed pod³¹czeniem urz¹dzenia do zasilania na statku lub w innym miejscu,
gdzie stosowane jest zasilanie pr¹dem sta³ym, nale¿y dok³adnie sprawdziæ parametry źród³a zasilania.
Przewód zasilania pr¹dem przemiennym – środki ostro¿ności
Nale¿y sprawdziæ, czy przewód zasilania jest prawid³owo pod³¹czony i nieuszkodzony. Nieprawid³owe pod³¹czenie lub uszkodzenie przewodu
mo¿e byæ przyczyn¹ po¿aru lub pora¿enia pr¹dem elektrycznym. Nie wolno poci¹gaæ przewodu, zaginaæ go lub umieszczaæ na nim ciê¿kich
przedmiotów.
Przy od³¹czaniu przewodu nale¿y chwyciæ mocno za wtyczkê. Chwytanie za przewód grozi pora¿eniem pr¹dem.
Nie nale¿y dotykaæ wtyczki wilgotnymi d³oñmi. Mo¿e to spowodowaæ pora¿enie pr¹dem.
Cia³a obce
Nale¿y uwa¿aæ, aby do wnêtrza urz¹dzenia nie dosta³y siê metalowe przedmioty. Mo¿e to spowodowaæ pora¿enie pr¹dem lub zak³ócenia w
pracy urz¹dzenia.
Nale¿y uwa¿aæ, aby do wnêtrza urz¹dzenia nie przedosta³y siê substancje p³ynne. Mo¿e to spowodowaæ pora¿enie pr¹dem lub zak³ócenia w
pracy urz¹dzenia. Je¿eli do tego dojdzie, nale¿y natychmiast od³¹czyæ zasilanie urz¹dzenia i skontaktowaæ siê ze sprzedawc¹.
Nie wolno rozpylaæ na powierzchniê urz¹dzenia lub do jego wnêtrza środków owadobójczych. Zawieraj¹ one gazy palne, które po przedostaniu
siê do wnêtrza urz¹dzenia mog¹ ulec zap³onowi.
Us³ugi
Nie nale¿y podejmowaæ napraw urz¹dzenia na w³asn¹ rêkê. Je¿eli wyst¹pi zanik dźwiêku, zgasn¹ wskaźniki, pojawi siê dym lub wyst¹pi¹
jakikolwiek zak³ócenia nieopisane w instrukcji obs³ugi, od³¹cz przewód zasilania i skontaktuj siê z dystrybutorem lub autoryzowanym punktem
napraw. W przypadku napraw, demonta¿u lub przeróbek wykonywanych przez osoby niewykwalifikowane mo¿e dojśæ do pora¿enia pr¹dem
elektrycznym lub uszkodzenia urz¹dzenia.
Czas eksploatacji urz¹dzenia mo¿na wyd³u¿yæ od³¹czaj¹c je od zasilania na okres d³u¿szych przerw w u¿ytkowaniu.
17
Środki ostro¿ności
Page 34

ÈESKY
34
RQTX1076
POZOR!
ABYSTE ZAJISTILI DOBRÉ VENTILAÈNÍ PODMÍNKY, NIKDY
NEINSTALUJTE TENTO PØÍSTROJ V KNIHOVNÌ, VESTAVÌNÉ
SKØÍNI NEBO JINÉM UZAVØENÉM PROSTORU. ZAJISTÌTE,
ABY ZÁVÌSY A VŠECHNY OSTATNÍ MATERIÁLY NEBRÁNILY
V DOBRÉ VENTILACI, ABYSTE PØEDEŠLI NEBEZPEÈÍ ÚRAZU
ELEKTRICKÝM PROUDEM NEBO NEBEZPEÈÍ POŽÁRU, KTERÉ
BY MOHLO VZNIKNOUT PØEHØÁTÍM PØÍSTROJE.
NEBLOKUJTE VENTILAÈNÍ OTVORY PØÍSTROJE NOVINAMI,
UBRUSY, ZÁVÌSY A JINÝMI MATERIÁLY.
NEPOKLÁDEJTE ZDROJE OTEVØENÉHO OHNÌ, JAKO
NAPØÍKLAD HOØÍCÍ SVÍÈKY, NA PØÍSTROJ.
ZBAVTE SE BATERIÍ SPRÁVNÝM ZPÙSOBEM S OHLEDEM NA
ŽIVOTNÍ PROSTØEDÍ.
•
•
•
•
VAROVÁNÍ:
POKYNY K OMEZENÍ RIZIKA VZNIKU POŽÁRU, ÚRAZU
ELEKTRICKÝM PROUDEM NEBO POŠKOZENÍ PØÍSTROJE:
* NEVYSTAVUJTE TENTO PØÍSTROJ DEŠTI, VLHKOSTI NEBO
KAPAJÍCÍM ÈI STØÍKAJÍCÍM KAPALINÁM. NEPOKLÁDEJTE NA
PØÍSTROJ ŽÁDNÉ PØEDMÌTY NAPLNÌNÉ KAPALINAMI, JAKO
JSOU NAPØÍKLAD VÁZY.
* POUŽÍVEJTE POUZE DOPORUÈENÉ PØÍSLUŠENSTVÍ.
* NEDEMONTUJTE KRYT (NEBO ZADNÍ STÌNU). PØÍSTROJ
NEOBSAHUJE ŽÁDNÉ DÍLY, KTERÉ BY MOHL MÌNIT NEBO
OPRAVOVAT UŽIVATEL. SERVIS SVÌØTE KVALIFIKOVANÉMU
SERVISNÍMU PERSONÁLU.
POZOR!
TENTO VÝROBEK PRACUJE S LASEROVÝM PAPRSKEM.
PØI NESPRÁVNÉM POUŽITÍ OVLÁDACÍCH PRVKÙ, STEJNÌ
JAKO PØI PROVÁDÌNÍ JINÝCH POSTUPÙ, NEŽ JSOU POPSÁNY
V TOMTO NÁVODU, MÙŽE DOJÍT K NEBEZPEÈNÉMU
VYZAØOVÁNÍ.
NIKDY NESNÍMEJTE VNÌJŠÍ KRYT A PØÍSTROJ SAMI
NEOPRAVUJTE. SERVIS PØENECHTE POUZE KVALIFIKOVANÝM
OSOBÁM V AUTORIZOVANÝCH OPRAVNÁCH.
TENTO PØÍSTROJ JE KONSTRUOVÁN PRO POUŽITÍ V MÍRNÉM
KLIMATU.
Zásuvka by mìla být poblíž zaøízení a snadno dostupná.
Zástrèka síťového pøívodu by mìla zùstat snadno obsluhovatelná.
Abyste pøístroj zcela odpojili od sítì, odpojte zástrèku síťového proudu
ze zásuvky.
POZOR
Pøi nesprávném zpùsobu výmìny baterie hrozí riziko jejího vybuchnutí.
Baterii nahraïte pouze tím samým srovnatelným typem doporuèeným
výrobcem zaøízení. Pøi likvidaci baterie se øiïte návodem výrobce.
Tento výrobek mùže být bìhem používání rušen rádiovou interferencí,
která je zpùsobena mobilním telefonem. Jestliže k takovéto
interferenci dojde, zajistìte prosím vìtší vzdálenost mezi tímto
výrobkem a mobilním telefonem.
Uvnitø pøehrávaèe
RQLS0418
Informace pro spotøebitele o sbìru a likvidaci odpadu z
elektrických a elektronických zaøízení a použitých baterií
z domácností
Tyto symboly na výrobcích, obalech nebo v
prùvodní dokumentaci znamenají, že použitá
elektrická a elektronická zaøízení a baterie nepatøí
do bìžného domácího odpadu.
Správná likvidace, recyklace a opìtovné použití
jsou možné jen pokud odevzdáte tato zaøízení
a použité baterie na místech k tomu urèených,
za což neplatíte žádné poplatky, v souladu s
platnými národnímu pøedpisy a se Smìrnicemi
2002/96/EU a 2006/66/EU.
Správnou likvidací pøístrojù a baterií pomùžete
šetøit cenné suroviny a pøedcházet možným
negativním úèinkùm na lidské zdraví a na pøírodní
prostøedí, které jinak mohou vzniknout pøi
nesprávném zacházení s odpady.
Další informace o sbìru, likvidaci a recyklaci
starých pøístrojù a použitých baterií Vám
poskytnou místní úøady, provozovny sbìrných
dvorù nebo prodejna, ve které jste toto zboží
zakoupili.
Pøi nesprávné likvidaci odpadu vám hrozí pokuta
v souladu s národní legislativou a místními
pøedpisy.
Informace pro právnické osoby se sídlem v
zemích Evropské Unie (EU)
Pokud chcete likvidovat elektrická nebo
elektronická zaøízení, obraťte se na prodejce
nebo dodavatele s žádostí o další informace.
[Informace o likvidaci v zemích mimo
Evropskou Unii (EU)]
Tyto symboly platí jen v zemích Evropské unie.
Pokud chcete likvidovat tento produkt, obraťte
se na místní úøady nebo prodejce a informujte se
o správném zpùsobu likvidace.
Poznámka k symbolu baterie (symboly
uprostøed a dole):
Tento symbol mùže být použit v kombinaci s
chemickým symbolem. V tomto pøípadì splòuje
tento symbol legislativní požadavky, které jsou
pøedepsány pro chemickou látku obsaženou v
baterii.
AUX
RQT4389ZAA
2 3
Page 35

ÈESKY
35
RQTX1076
35
2
1
Dodávané pøíslušenství 3
Zapojení 3
Upevnìní zaøízení na zeï (Volitelné vybavení) 4
Ovládací prvky 7
Pøehrávání diskù 8
Pøehrávání rádia 9
Èasovaè 10
Nastavení zvuku 10
Externí jednotka 10
Pøedvolba pamìtí (Nastavení) 14
Návod k odstraòování závad 15
Technické údaje 16
Údržba 16
Bezpeènostní upozornìní 17
Obsah
Dodávané pøíslušenství
Zkontrolujte prosím pøíslušenství, které je souèástí
dodávky.
Zapojení
Pøilepte anténu lepicí páskou na zeï nebo sloupek v takové
poloze, která zajistí pøíjem signálu s nejmenším rušením.
•
3
Postavte anténu na
podstavec.
Rámová anténa AM
Pøipojení rámové antény AM.
2
Udržujte volný kabel antény mimo ostatní vodièe a kabely.•
Zacvaknutí!
Vyvarujte se dlouhodobého poslechu - pøedejdete tak
poškození sluchu.
Vysoká hlasitost sluchátek mùže zpùsobit poškození sluchu.
V dùsledku dlouhodobého poslechu pøi plné hlasitosti mùže
dojít k poškození sluchu.
Používejte pouze sluchátka, která jsou souèástí dodávky,
nebo jiná doporuèená sluchátka.
•
•
•
Snižte hlasitost a pøipojte sluchátka.
Typ konektoru: stereo, 3,5 mm
4
Sluchátka (nejsou souèástí dodávky)
Pokojová anténa FM
Pøipojení pokojové antény FM.
Lepicí páska
1
g Poznámky k reproduktorùm
Tyto reproduktory nemají magnetické stínìní. Neumísťujte
je blízko televizorù, osobních poèítaèù nebo jiných zaøízení
snadno ovlivnitelných magnetickým polem.
Síťky chránící reproduktory nejsou snímatelné.
•
•
Síťový kabel pøipojte až po provedení všech ostatních
zapojení.
Pøipojení síťového kabelu.
Elektrická zásuvka
Pohled zezadu
AUX
Vìtrací otvory
AUX (➡ str. 10)
5 4
3 2
1
Krytka pro USB
AC IN
1 Síťový kabel
1 Rámová anténa AM
1 Vnitøní anténa FM
2 Baterie
1 Dálkový ovladaè (N2QAYB000523)
Pøíslušenství ke šroubùm
2 Spojovací šrouby
1 Bezpeènostní držák
Pøíslušenství ke konzole na zeï
1 Konzola na zeï
Podložky se ètyøma nohama
Pøiložený síťový kabel je urèen k použití pouze s tímto zaøízením.
Nepoužívejte jej s jiným zaøízením.
Nepoužívejte síťové kabely dodávané s jiným zaøízením.
•
•
B
Page 36

ÈESKY
36
RQTX1076
Upevnìní zaøízení na zeï (Volitelné vybavení)
Poznámky k montáži
g Pøed montáží si pøeètìte oddíly „Bezpeènostní upozornìní“ a „Pokyny pro montáž na zeï“.
g Pro vìtší efektivitu a pro vyvarování se možným problémùm nesmí být toto zaøízení montováno:
jinam než na svislé zdi.
v blízkosti sprinklerù nebo èidel.
v blízkosti elektrického vedení nebo zdrojù elektrické energie.
v blízkosti zdrojù tepla.
v místech, kde by zaøízení bylo vystaveno vlivu vibrací èi mechanických šokù.
v blízkosti zdrojù magnetických polí, tepelných zdrojù, zdrojù páry, v místì proudìní vzduchu, v blízkosti zdrojù mastnoty atd.
v místech, kde by mohla odkapávat voda (napø. pod klimatizaèní jednotkou).
g Nemontujte jednotku pod stropními svítidly (napø. bodovými svìtly, záøivkovými svìtly atd.).
V pøípadì montáže v blízkosti svítidel hrozí nebezpeèí poškození zaøízení teplem.
g Montáž proveïte zpùsobem vhodným s ohledem na konstrukci a materiál zdi.
g Bìhem montáže chraòte zaøízení a podlahu textilní pøikrývkou nebo jiným vhodným zpùsobem.
g Všechny šrouby dotáhnìte s použitím odpovídající síly.
g Pøi montáži zajistìte bezpeènost svoji i svého okolí.
g Spoleènost Panasonic nenese odpovìdnost za vedlejší èi následné škody vyplývající z nesprávné montáže èi nevhodného zpùsobu
použití.
•
•
•
•
•
•
•
Montáž a demontáž zaøízení smí provádìt jen kvalifikovaný
personál.
V pøípadnì nesprávné montáže hrozí pád zaøízení a zranìní osob.
Zaøízení musí být pevnì namontováno na zeï, v souladu s pokyny
pro montáž.
Zaøízení nemontujte na konstrukce bez nezbytné nosnosti.
V pøípadì montáže na konstrukci bez požadované pevnosti hrozí pád
zaøízení a zranìní osob.
Nepoužívejte jiné než doporuèené postupy montáže.
V opaèném pøípadì hrozí pád zaøízení a zranìní osob.
Nemontujte zaøízení jinam než na svislé zdi.
V opaèném pøípadì hrozí pád zaøízení a zranìní osob.
Pøi montáži se øiïte bezpeènostním násobkem (cca 10ti násobek
hmotnosti výrobku).
V pøípadnì nedostateèné pevnosti konstrukce hrozí pád zaøízení a
zranìní osob.
Zeï, na níž bude zaøízení montováno, musí mít nosnost 20 kg na
jeden šroub.
V pøípadnì nedostateèné pevnosti konstrukce hrozí dlouhodobé riziko
pádu zaøízení.
Nedemontujte a neupravujte závìsné zaøízení.
Hrozí pád zaøízení a zranìní osob.
Zaøízení nesmí být montováno ve vlhkém èi prašném prostøedí, v
prostøedí se zvýšenou koncentrací mastnoty èi páry ve vzduchu,
ani v místech pod klimatizaèní jednotkou, kde hrozí odkapávání
vody.
Dopady tìchto vlivù na zaøízení mohou být negativní a mohou vést
mimo jiné k riziku požáru èi úrazu elektrickým proudem.
Alespoò 30 cm nad zaøízením a 10 cm po stranách nesmí být
umístìn žádný jiný pøedmìt. Prostor mezi zdí a zadní èástí
zaøízení musí být zcela volný.
V pøípadì ucpání vìtracích otvorù na hlavní jednotce hrozí nebezpeèí
požáru.
Pro instalaci použijte jen k tomu urèené souèásti.
V opaèném pøípadì hrozí pád zaøízení a zranìní osob.
Pøi instalaci nesmí dojít ke vzniku kontaktu mezi montážními
šrouby a pøívodním kabelem a kovovými èástmi uvnitø svislé
konstrukce.
V opaèném pøípadì hrozí riziko úrazu elektrickým proudem.
Pøi demontáži hlavní jednotky demontujte rovnìž montážní
šrouby.
Od vyènívajících šroubù jinak hrozí riziko poranìní.
Umístìte zaøízení v takové výšce, abyste mìli dobrý pøístup k
USB portu a ovládacím tlaèítkùm.
Budete-li zaøízení ovládat v nevhodné poloze, hrozí pád a poškození
zaøízení a zranìní osob.
UPOZORNÌNÍ!
Bezpeènostní upozornìní
VAROVÁNÍ!
Pøíslušenství pro montáž
g Komerènì dostupné pøíslušenství
(nejsou není souèástí dodávky)
2 Šrouby pro montáž na zeï
1 Šroub pro bezpeènostní držák
Použijte šrouby s prùmìrem 4 mm, vhodné s ohledem na konstrukci
zdi (napø. døevo, ocel, beton atd.).
•
•
g Dodávané pøíslušenství
Pøíslušenství ke šroubùm (RFAX1020)
2 Spojovací šrouby (XYN3+J10FJ)
1 Bezpeènostní držák (RMKX1015)
Pøíslušenství ke konzole na zeï (RFAX1021)
1 Konzola na zeï (RGQX1004)
Podložky se ètyøma nohama (RKAX0028-K)
•
»
»
•
»
»
B
C
C
Veškeré pøíslušenství uložte mimo dosah dìtí, hrozí nebezpeèí
spolknutí.
4 5
Page 37

ÈESKY
37
RQTX1076
37
3. Upevnìte šrouby do zdi.
2. Nasaïte na zadní èást zaøízení konzolu pro montáž na zeï.
1. Odmontujte stojánek od zaøízení.
Pokyny pro montáž na zeï
• Pøed montáží zaøízení vypnìte a odpojte síťový kabel.
• V každém kroku pøíslušné šrouby øádnì dotáhnìte.
Spodní strana hlavní jednotky
Adaptér
Textilní pøikrývka
Spojovací šroub
A
Spojovací šroub
B
Upevòovací šroub
C
8 mm až 9,5 mm
2,2 mm až 2,8 mm
2,5 mm až 3,5 mm
4 mm
Volte šrouby odpovídající
délky pro nosnost minimálnì
20 kg.
Zeï
163 mm
Upevnìní zaøízení na zeï (Volitelné vybavení) (pokraèování)
Vysuòte stojánek ze zaøízení.
Nasaïte konzolu podle západek na konzole a otvorù na
zaøízení a poté ji doražte tak, abyste ucítili zacvaknutí.
Zajistìte konzolu pro umístìní na zeï pomocí spojovacích
šroubù (2 ks).
(Utahovací moment: 1,2 Nm až 1,5 Nm)
B
Pohled zezadu
AUX
300 mm
Požadovaný volný
prostor
Požadovaný volný
prostor
85,5 mm
77,5 mm
500 mm
700 mm
74,8 mm
130 mm
2
1
Západka
Zadní èást hlavní jednotky
Konzola pro montáž na zeï (pohled zespodu)
Uvolnìte spojovací šroub (2 ks) ve spodní èásti zaøízení.
Odložte šrouby na bezpeèné místo.
A
Zmìøte a oznaète si umístìní upevòovacích šroubù (2 ks) a upevnìte je do zdi.
Údaje a rozmìry pro umístìní šroubù najdete níže.
Upevnìte zaøízení vždy pomocí obou šroubù.
Pro správné vyrovnání použijte vodováhu.
Šrouby musejí mít dostateènou nosnost, minimálnì 20 kg.
•
•
•
•
C
Page 38

ÈESKY
38
RQTX1076
4. Zavìste zaøízení na zeï.
g Ochrana proti pádu (Volitelné vybavení)
Sejmutí zaøízení ze zdi
Uvolnìte šroub pro bezpeènostní držák a poté bezpeènostní držák
sejmìte.
Sejmìte zaøízení ze zdi.
Uvolnìte spojovací šrouby (2 ks).
Uvolnìte obì západky a poté vysuòte konzolu pro montáž na zeï ze zaøízení
(➡ vpravo).
Znovu nasaïte stojan na spodní èást zaøízení a zajistìte jej spojovacím
šroubem (2 ks).
Odstraòte upevòovací šrouby (2 ks) ze zdi.
Pokud ho používáte, odstraòte drát chránící pøed pádem, pøed uskuteènìním
kroku .
•
C
B
A
C
Tužka nebo podobný pøedmìt
Západky
5. Nasaïte bezpeènostní držák.
Bezpeènostní držák
Pøipevnìní ke zdi
Šroub pro bezpeènostní držák
C
Kovová úchytka
Šroub
Drát
Drát
Otvor pro drát
Pokyny pro montáž na zeï (pokraèování)
Upevnìní zaøízení na zeï (Volitelné vybavení) (pokraèování)
Oba šrouby zasuòte do této pozice.
Zeï
Konzola pro
montáž na zeï
Pøed krokem 4 (➡ výše) protáhnìte otvorem na konzole pro
umístìní na zeï drát (lze zakoupit).
Po uskuteènìní kroku 5 (➡ vlevo) upevnìte drát na zeï
pomocí šroubu (lze zakoupit).
Umístìte šroub tak, aby délka drátu nad horní støední èástí hlavní
jednotky nebyla vìtší než 5 cm.
•
Zavìste zaøízení opatrnì na upevòovací
šrouby .
Pøed zavìšením zaøízení na zeï pøipojte anténu
FM/AM (➡ str. 3).
Po zavìšení zaøízení opatrnì pusťte a ujistìte se,
že je zaøízení dostateènì zajištìno.
•
•
C
Nasaïte bezpeènostní držák na konzolu pro montáž na zeï.
Pomocí šroubu pro bezpeènostní držák bezpeènostní
držák pøipevnìte ke zdi.
C
6 7
Page 39

ÈESKY
39
RQTX1076
39
Èísla v závorkách odkazují na pøíslušnou stránku.•
Dálkový ovladaè
Hlavní jednotka
Pohled shora
Pohled zepøedu
Ovládací prvky
■ Baterie
Používejte manganové nebo alkalické baterie.
Vložte baterie do dálkového ovládání podle pólù (+ a –).
Baterie vyjmìte, pokud dálkové ovládání nebude delší dobu
používáno.
Skladujte na chladném a tmavém místì.
Nevystavujte vysokým teplotám ani otevøenému ohni.
Neodkládejte baterie v automobilu vystavenému pøímému sluneènímu
záøení po delší dobu pøi zavøených dveøích a oknech.
Špatné zacházení s bateriemi v dálkovém ovládání mùže zpùsobit
vytékání elektrolytu èi požár.
•
•
•
•
•
•
•
■ Nikdy:
nepoužívejte staré baterie spoleènì s novými.
nepoužívejte rùzné typy baterií najednou.
baterie nerozebírejte ani nezkratujte.
nepokoušejte se dobíjet alkalické nebo manganové baterie.
nepoužívejte baterie s poškozeným obalem.
•
•
•
•
•
R6/LR6, AA
Pøi zavírání nasaïte nejprve tuto stranu a teprve potom zaklapnìte druhou.
Pøíprava dálkového ovladaèe
CD
RADIO
16
17
18
19
20
23
24
25
22
21
1
2
3
4
5
6
8
9
10
11
12
13
15
14
7
Nìkterá tlaèítka, napø. , fungují stejnì jako tlaèítka na dálkovém
ovladaèi. Tlaèítka a dálkový ovladaè lze používat zároveò.
•
1
1 167
29 6
26 27
28
15 19 24
30
31
32
Displej
Cca 30°
Okénko vysílaèe
Cca 30°
Pøepínaè pohotovostního
režimu/zapnutí [^], [8]
(8, 10, 14)
Stisknutím se pøístroj
pøepne mezi provozním a
pohotovostním režimem. V
pohotovostním režimu pøístroj
stále spotøebovává malé
množství energie.
[SLEEP] (10)
Èíselná tlaèítka [1-9, 0, ≧ 10]
(8, 9, 10, 14)
Pro volbu dvoumístného èísla,
napø. 16: [≧ 10] [1] [6]
Pro volbu tøímístného èísla,
napø. 226: [
≧
10] [≧ 10] [2]
[2] [6]
[DEL] (8)
[PROGRAM] (8, 9)
[REPEAT] (9)
[PLAY MODE] (9, 10, 13)
[USB q/h] (14)
[CD q/h] (8, 9)
[ q/h] (12)
[RADIO] (9)
[iPod q/h] (11)
[AUX] (10)
[g, ] (8, 11, 12, 13, 14)
[RE-MASTER] (10)
[iPod MENU] (11)
[PRESET EQ] (10)
[e,r] (8, 9, 10, 11, 13, 14)
[u], [i] (8, 9, 11, 12, 14)
[OK] (8, 10, 11, 13)
[DISPLAY, –DIMMER]
(8, 9, 13)
Pro ztlumení displeje tlaèítko
stisknìte a podržte. Pro zrušení
opìt stisknìte a pøidržte.
[AUTO OFF]
Tato funkce vám umožní
vypnout zaøízení (kromì režimu
rádia), je-li zaøízení v neèinnosti
po dobu cca 30 minut. Pro
zapnutí stisknìte dvakrát.
[TUNE MODE] (9)
[;, iPod],
[iPod ;, OPEN/CLOSE] (11)
[;, CD],
[CD ;, OPEN/CLOSE] (8)
[z, PLAY] (10)
[CLOCK/TIMER] (10)
[+, VOL , –],
[– VOLUME +] (13)
[MUTE] (13)
Ztišit zvuk. Dalším stisknutím
funkci zrušíte. Funkci „MUTE“
- ztlumení rovnìž zrušíte
stisknutím tlaèítka pro nastavení
hlasitosti nebo vypnutím zaøízení.
[D.BASS] (10)
[BASS/TREBLE] (10)
[SURROUND] (10)
[ ] (13)
[ MENU] (13)
[u/t], [y/i]
[FM/AM/AUX] (9, 10)
USB port (14)
Indikátor pohotovostního
režimu
Mikrofon (13)
Indikátor Bluetooth (12)
Èidlo signálu dálkového
ovládaèe
Nasmìrujte dálkový ovladaè
na èidlo pro dálkové ovládání
jednotky tak, aby mezi ním a
zaøízením nebyly žádné pøekážky
a v maximální vzdálenosti 7 m.
8
9
10
6
7
2
1
3
4
5
11
12
16
15
17
18
19
21
23
25
26
27
28
29
30
20
22
24
14
13
31
32
Page 40

ÈESKY
40
RQTX1076
Pro zobrazení informací o aktuálnì pøehrávané skladbì
stisknìte bìhem pøehrávání nebo po stisknutí pauzy opakovanì
[DISPLAY, –DIMMER].
Maximální poèet znakù, které lze zobrazit: pøibližnì 30
Pøehrávaè podporuje ID3 tagy ver. 1.0 & 1.1. Textová data, která
nejsou podporována, nebudou zobrazena.
•
•
Funkce zobrazení
Zastavení
pøehrávání
Stisknìte [g, ].
Pauza pøi
pøehrávání
Stisknìte [CD q/h]. Stisknìte znovu pro
obnovení pøehrávání.
Pøeskakování
skladeb
Stisknìte [u] nebo [i].
Vyhledání aktuální
skladby (CD)
Stisknìte a podržte tlaèítko [u] nebo [i].
Pøeskoèení alba
(MP3)
Stisknìte [e,r].
Pøímé pøehrávání
(Zahájení
pøehrávání vybrané
skladby.)
CD: Pomocí èíselných tlaèítek vyberte
požadovanou skladbu.
MP3: Stisknìte [e,r] pro výbìr alba.
Stisknìte jednou [i] a poté pomocí
èíselných tlaèítek vyberte požadovanou
skladbu.
Tato funkce vám umožní naprogramovat až 24 skladeb.
Stisknìte [CD q/h] a pak [g, ].
Stisknìte [PROGRAM].
CD: Stisknìte èíselná tlaèítka pro výbìr skladby.
Pro pøidání dalších skladeb pokraèujte stisknutím pøíslušných
èíselných tlaèítek.
Pro zahájení pøehrávání stisknìte [OK] nebo [CD q/h].
MP3: Stisknìte [e,r] pro výbìr alba.
Pro výbìr skladeb stisknìte jednou [i] a poté pøíslušná
èíselná tlaèítka.
Stisknìte [OK].
Pro naprogramování více skladeb opakujte kroky až .
Pro zahájení pøehrávání stisknìte [CD q/h].
Zrušení
programovacího
režimu
Stisknìte [PROGRAM] v režimu stop - z
displeje zmizí indikátor „PGM“.
Opìtovné pøehrání
programu
Stisknìte [PROGRAM] v režimu stop a poté
[CD q/h].
Kontrola obsahù
programu
Stisknìte [u] nebo [i], je-li na displeji
v režimu zastavení zobrazeno „PGM“. Pro
kontrolu bìhem programování stisknìte
dvakrát [PROGRAM] poté, co se na displeji
objeví „PGM“, pak stisknìte [u] nebo [i].
Vymazání poslední
programované
skladby
V režimu stop stisknìte [DEL].
Smazání všech
naprogramovaných
stop
V režimu stop stisknìte [g, ].
Zobrazí se „CLR ALL“. Chcete-li smazat
všechny skladby, stisknìte toto tlaèítko bìhem
5 sekund ještì jednou.
Pamìť programu se vymaže po otevøení krytu disku.•
Programované pøehrávání
g Vložení disku
Pro zapnutí zaøízení stisknìte [^].
Stisknìte [;, CD] pro otevøení posuvného krytu.
Pøehrávání diskù
Uchopte disk tak, abyste mìli etiketu disku obrácenou smìrem k
sobì, a sklopte disk do diskové pøihrádky pod posuvným krytem.
Umístìte disk na støedový kolík a zatlaète na nìj, až zapadne na
místo.
Pro zapnutí zaøízení stisknìte [^].
Vložte disk urèený k pøehrávání (➡ vlevo).
Pro zahájení pøehrávání stisknìte [CD q/h].
g Vyjmutí disku
Stisknìte [;, CD] pro otevøení posuvného krytu.
Uchopte disk ve støedu a napravo na horní stranì a zatáhnìte na
pravé horní stranì disku, abyste disk uvolnili ze støedové osy.
Vyklopte disk tak, aby se nedotýkal posuvného krytu, a vyjmìte
jej.
Zavøete-li kryt silou, mùže dojít k jeho poškození.
Pøi odebírání CD dbejte na to, aby nedošlo k poškození CD
kontaktem s krytem.
•
•
Základní pøehrávání
Pro zavøení krytu stisknìte [;, CD].
Pøi pohybu krytu se nedotýkejte krytu ani jeho okolí prsty, hrozí
nebezpeèí drobného úrazu.
Zacvaknutí!
8 9
Page 41

ÈESKY
41
RQTX1076
41
Umožní vám zobrazit název vysílací stanice nebo informace o vysílaném
programu. Bìhem pøíjmu signálu RDS svítí kontrolka „RDS“.
Pro zobrazení stisknìte [DISPLAY, –DIMMER].
Název stanice (PS) Typ programu (PTY)
Pøehrávání rádia
Pomocí tlaèítka [RADIO] vyberte „FM“ nebo „AM“.
Pomocí [TUNE MODE] vyberte „MANUAL“.
Stisknìte [u] nebo [i] pro volbu frekvence požadované
stanice.
Pøi pøíjmu stereo signálu FM vysílání se na displeji objeví „ST“.
Pro automatické ladìní
Opakujte kroky a (➡ výše).
Stisknìte a podržte [u] nebo [i], dokud se frekvence
nezaène rychle mìnit.
Pro zrušení automatického ladìní stisknìte opìt [u] nebo [i].
Automatické ladìní nemusí fungovat v pøípadì pøílišného rušení.
g Pro lepší kvalitu FM zvuku
Stisknìte a podržte tlaèítko [PLAY MODE], na displeji se zobrazí
„MONO“. Pro zrušení opìt stisknìte a pøidržte.
Pøehrávání v režimu „MONO“ se taktéž zruší pøi zmìnì frekvence.
Pro normální poslech funkci „MONO“ vypnìte.
g Pro lepší kvalitu AM zvuku
Pomocí tlaèítka [RADIO] vyberte „AM“.
Opakovanì stisknìte a podržte tlaèítko [TUNE MODE] pro zmìnu
nastavení funkce beat proof („BP 1“, „BP 2“, „BP 3“ nebo „BP 4“).
•
•
•
•
Ruèní ladìní
Mùžete pøednastavit až 30 kanálù FM a 15 kanálù AM.
Pøíprava: Pomocí tlaèítka [RADIO] vyberte „FM“ nebo „AM“.
g Automatická pøedvolba
Stisknìte [PLAY MODE] pro pøepnutí mezi „LOWEST“ (nejnižší) a
„CURRENT“ (aktuální) frekvencí.
Pro zahájení pøedvolby stisknìte tlaèítko [PROGRAM] a podržte
ho minimálnì 2 sekund.
g Manuální pøedvolba
Pomocí [TUNE MODE] vyberte „MANUAL“.
Pro naladìní požadované stanice stisknìte [u] nebo [i].
Stisknìte [PROGRAM].
Pro výbìr kanálu stisknìte pøíslušné èíselné tlaèítko.
Pøi uložení nové stanice dojde k vymazání pøedchozí uložené stanice.
Opakujte kroky až pro pøedvolbu dalších stanic.
g Výbìr pøedvolené stanice
Pomocí [TUNE MODE] vyberte „PRESET“.
Pomocí [u] nebo [i] vyberte pøíslušný kanál.
Kanál mùžete rovnìž vybrat pomocí èíselných tlaèítek.•
Pøedvolba pamìtí
RDS displej nemusí být dostupný, pokud je slabý pøíjem signálu.•
Vysílání RDS
Zobrazení frekvence
Nastavení AM
Tento systém mùže pøijímat AM vysílání v krocích po 10 kHz.
Pro zmìnu na 10 kHz (pouze na hlavním zaøízení)
Stisknìte [FM/AM/AUX] a vyberte „AM“.
Stisknìte a podržte tlaèítko [FM/AM/AUX].
Po nìkolika sekundách zaène na displeji blikat aktuální minimální
kmitoèet.
Tlaèítko [FM/AM/AUX] držte stisknuté.
Jakmile se minimální frekvence zmìní, tlaèítko uvolnìte.
Pro návrat k pùvodnímu krokování zopakujte kroky až (➡ výše).
Po zmìnì nastavení pøíslušného rozdìlení pásma se vymažou
kmitoèty, které byly døíve nastaveny v pamìti.
•
•
Poznámka k diskùm CD-R a CD-RW
Zaøízení umí pøehrávat disky CD-R a CD-RW se záznamy ve
formátu CD-DA nebo MP3.
Pro CD-DA použijte audio záznamový disk a po dokonèení
nahrávání disk uzavøete*.
* Krok uskuteènìný po dokonèení záznamu, díky nìmuž mohou
pøehrávaèe CD-R nebo CD-RW pøehrávat audio disky CD-R
a CD-RW.
Zaøízení nemusí být schopno nìkteré disky pøehrát, v závislosti
na stavu záznamu.
Nepoužívejte CD disky nepravidelných tvarù.
Nenalepujte na CD disky další štítky èi nálepky.
Nepoužívejte CD disky s odtrženými štítky èi nálepkami, nebo
se štítky èi nálepkami nalepenými na tlusté vrstvì lepidla.
Nenalepujte na CD disky obaly a jiné prostøedky jako ochranu
proti poškrábání.
Nepište nic na CD disky.
Nepoužívejte k èištìní CD diskù kapaliny (K èištìní používejte
mìkkou suchou utìrku).
Pravidla pro vytváøení MP3 souborù pro pøehrání
na tomto zaøízení
Maximální poèet skladeb a alb: 999 skladeb a 255 alb.
Kompatibilní rozsah komprimace: mezi 64 kbps a 320 kbps
(stereo). Doporuèený rozsah je 128 kbps (stereo).
Formát CD diskù: ISO9660 úroveò 1 nebo 2 (kromì rozšíøených
formátù).
Doba potøebná k naètení obsahu závisí na poètu skladeb,
adresáøù a jejich struktuøe.
Omezení pøi pøehrávání formátu MP3
Zaøízení je kompatibilní s tzv. multisession, avšak pokud je na
CD disku velké množství relací, trvá zahájení pøehrávání delší
dobu.
Zaøízení není schopno pøehrávat soubory zaznamenané pomocí
technologie „packet write“.
Jsou-li na disku uloženy soubory ve formátu MP3 spoleènì
s bìžnými audio skladbami (CD-DA), bude zaøízení pøehrávat
ten typ záznamu, který se nachází blíže støedu disku. Jsou-li
na disku uloženy soubory ve formátu MP3 a jiné druhy audio
záznamù (napø. WMA nebo WAV), bude zaøízení pøehrávat
pouze soubory typu MP3.
V závislosti na zpùsobu vytvoøení MP3 souborù se mùže stát,
že zaøízení nebude tyto soubory pøehrávat ve vámi oèíslovaném
poøadí, pøípadnì je nemusí být schopno pøehrávat vùbec.
•
•
•
•
•
•
•
•
•
•
•
•
•
•
•
•
•
Stisknìte [CD q/h].
Stisknìte [PLAY MODE] pro výbìr požadovaného režimu.
Režim Pro pøehrání
1-TRACK
1TR
jedné vybrané skladby na disku.
Stisknìte èíselná tlaèítka pro výbìr skladby.
1-ALBUM
1ALBUM (MP3)
jednoho vybraného alba na disku.
Stisknìte [e,r] pro výbìr alba.
RANDOM
RND
stop na disku v náhodném poøadí.
1-ALBUM RANDOM
1ALBUM RND (MP3)
všech skladeb z jednoho vybraného alba, v
náhodném poøadí.
Stisknìte [e,r] pro výbìr alba.
Bìhem pøehrávání v režimu náhodného pøehrávání se nelze vrátit na
pøedchozí skladbu.
Pøi otevøení krytu dojde k vymazání aktuálního režimu pøehrávání.
Pro opakování programu nebo zvoleného režimu pøehrávání stisknìte
[REPEAT]. Dalším stisknutím funkci zrušíte.
•
•
•
Funkce režimu pøehrávání
Pøehrávání diskù (pokraèování)
Page 42

ÈESKY
42
RQTX1076
Hodiny fungují v režimu zobrazení 24 hodin.
Pomocí [CLOCK/TIMER] vyberte „CLOCK“.
Pro nastavení èasu stisknìte bìhem 5 sekund [e,r]. (Pro rychlejší
posun tlaèítko stisknìte a pøidržte.)
Stisknìte [OK].
Stisknìte [CLOCK/TIMER] pro zobrazení hodin na nìkolik sekund.
Seøizujte pravidelnì èas pro vìtší pøesnost.
•
•
Nastavení hodin
Èasovaè lze nastavit na urèitý èas jako budík.
Zaøízení nabízí možnost nastavit 3 èasovaèe pøehrávání.
Pøíprava:
Zapnìte zaøízení a nastavte hodiny (➡ výše).
Pøipravte zdroj hudby (CD disk, rádio, iPod/iPhone, Bluetooth, USB
nebo AUX) a nastavte hlasitost.
Opakovanì stisknìte [CLOCK/TIMER] a vyberte èasovaè
pøehrávání.
Pro nastavení èasu spuštìní stisknìte bìhem 5 sekund [e,r].
Stisknìte [OK].
Pro nastavení èasu vypnutí opakujte kroky a .
Pro aktivaci èasovaèe
Opakovanì stisknìte [z, PLAY] a vyberte požadovaný èasovaè
pøehrávání.
Pro vypnutí zaøízení stisknìte [^].
•
•
Èasovaè pøehrávání
Zmìna nastavení
Opakujte kroky až (➡ výše).
Zmìna zdroje nebo
hlasitosti
Dvakrát stisknìte [z, PLAY] pro vymazání
indikátoru zPLAY z displeje.
Zmìna zdroje nebo hlasitosti.
Postupujte dle kroku a (➡ výše).
Kontrola nastavení
(Když je zaøízení
zapnuto nebo v
pohotovostním
režimu)
Opakovanì stisknìte [CLOCK/TIMER]
a vyberte „zPLAY 1“, „zPLAY 2“ nebo
„zPLAY 3“.
Zrušení
Dvakrát stisknìte [z, PLAY] pro vymazání
indikátoru èasovaèe z displeje.
Èasovaè se spustí v pøedem zadaném èase a zvuk se postupnì bude
zesilovat až na pøedvolenou úroveò.
•
Èasovaè spánku zaøízení po uplynutí nastavené doby vypne.
Pro zapnutí a vypnutí funkce stisknìte [SLEEP].
Pro kontrolu zbývajícího èasu stisknìte jednou [SLEEP].
Èasovaè pøehrávání a èasovaè automatického vypnutí lze použít
spoleènì. Èasovaè automatického vypnutí má vždy pøednost.
Nastavení èasovaèù se nesmìjí pøekrývat.
Pokud pøi zapnuté funkci AUTO OFF nebude zaøízení po dobu cca
30 minut používáno, zaøízení se vypne. Dojde k tomu i v pøípadì, že
ještì nevypršela doba nastavená pro pøehrávání nebo spánek.
•
•
Èasovaè spánku
30MIN 60MIN 90MIN 120MIN
OFF (Zrušení)
Èasovaè
Pøedvolba EQ Stisknìte opakovanì [PRESET EQ] pro volbu
požadovaného nastavení: „HEAVY“, „SOFT“,
„CLEAR“, „VOCAL“ nebo „FLAT“.
Basy nebo výšky
Stisknìte opakovanì
[BASS/TREBLE] vyberte
„BASS“ (basy) nebo „TREBLE“ (výšky).
Stisknìte [e,r] pro nastavení pøíslušné
úrovnì (-4 až +4).
Prostorový zvuk Bìhem pøehrávání opakovaným
stisknutím tlaèítka [SURROUND] vyberte
„ON SURROUND“ nebo „OFF SURROUND“.
Pokud je stereo pøíjem v pásmu FM rušený,
vypnìte efekt prostorového zvuku.
D.Bass Bìhem pøehrávání opakovanì stisknìte
[D.BASS] a vyberte „ON D.BASS“ nebo
„OFF D.BASS“.
Re-master Bìhem pøehrávání opakovanì stisknìte
[RE-MASTER] a vyberte „ON RE-MASTER“ nebo
„OFF RE-MASTER“.
Funkci digitálního remasteru lze použít pro
pøehrávání MP3.
Pro iPod/iPhone a AUX lze provést analogový
remaster.
•
•
Nastavení zvuku
Dálkové ovládání a zaøízení jsou z výroby nastaveny na režim
„REMOTE 1“.
Pokud dálkové ovládání nechtìnì ovlivòuje i jiná zaøízení, mùžete zmìnit
režim na „REMOTE 2“.
Pro pøepnutí do režimu „REMOTE 2“ (pouze na hlavním zaøízení)
Stisknìte [FM/AM/AUX] a vyberte „AUX“.
Stisknìte a podržte tlaèítko [FM/AM/AUX] a poté stisknìte [2],
dokud se nezobrazí „REMOTE 2“.
Na nejménì 2 sekundy stisknìte a podržte tlaèítko [OK] a poté
[2].
Pro návrat do režimu „REMOTE 1“
Opakujte výše uvedené kroky, avšak nahraïte [2] èíslem [1].
(na displeji se objeví „REMOTE 1“.)
Zmìna režimu dálkového ovládání
Pøipojte audio kabel do zdíøky pro AUX.
Typ konektoru: stereo, 3,5 mm
Stisknutím [AUX] zapnìte pøehrávání z pøenosného
audio zaøízení.
Mùžete nastavit úroveò zvukového vstupu z pøenosného audio zaøízení.
Stisknìte opakovanì [PLAY MODE] pro volbu požadovaného
nastavení „HIGH“ nebo „NORMAL“.
Pro redukci vstupního signálu vypnìte ekvalizér nebo snižte hlasitost
pøenosného zaøízení. V dùsledku vysoké úrovnì signálu mùže dojít ke
zkreslení zvuku.
Podrobnosti naleznete v návodu k použití tohoto zaøízení.
Kabely a vybavení nejsou souèástí dodávky.
•
•
•
Pøenosné audio zaøízení (v rámci režimu AUX)
AUX
Externí jednotka
10 11
Page 43

ÈESKY
43
RQTX1076
43
Externí jednotka (pokraèování)
Potìšení z pøehrávání iPodu nebo iPhonu
g Vložení zaøízení iPod/iPhone
Stisknìte [;, iPod] pro otevøení posuvného krytu.
Pøipojte vhodný adaptér pro iPod/iPhone (není souèástí dodávky).
g Vyjmutí iPod/iPhone
Pro zavøení krytu stisknìte [;, iPod].
Opakujte kroky a (➡ výše).
iPod/iPhone jednoduše odpojíte vytažením.
Opakujte kroky a (➡ výše).
Pokud adaptér iPod/iPhone pøed pøipojením nebo odpojením
iPodu/iPhonu správnì neuvolníte, mùže dojít k poškození konektoru.
iPod/iPhone mùžete k zaøízení pøipojit jen pomocí adaptéru
dodávaného s daným iPodem/iPhonem nebo komerènì nabízeného
spoleèností Apple Inc.
Pøed pøipojením nebo odpojením iPodu/iPhonu snižte hlasitost na
hlavní jednotce na minimum.
•
•
•
■ Nabíjení iPodu/iPhonu
Bìhem nabíjení iPodu/iPhonu v pohotovostním režimu se na displeji
hlavní jednotky zobrazí „IPOD CHARGING“ (nabíjení iPodu).
Stav dobití baterie mùžete zkontrolovat na iPodu/iPhonu. Nebudete-li
iPod/iPhone používat delší dobu po dobití baterie, odpojte jej od
pøístroje aby se baterie mohla pøirozenì vybíjet. (Po úplném dobití se
baterie nebude dále dobíjet.)
•
•
Poznámky k iPhonu:
Všechny funkce lze ovládat pomocí dotykové klávesnice iPhonu.
Toto zaøízení nezobrazuje pøíchozí hovory èi stav telefonu (Pøipojte
iPhone k tomuto zaøízení pøes Bluetooth (➡ str. 13), abyste mohli
využít rozšíøené možnosti).
Vyzvánìcí tón pøíchozích hovorù vychází z reproduktorù iPhonu.
Pøepnete-li zaøízení do režimu iPod/iPhone, budou vyzvánìcí tón
pøehrávat i reproduktory zaøízení (Pøipojte iPhone k tomuto zaøízení
pøes Bluetooth (➡ str. 13), abyste mohli využít rozšíøené možnosti).
Pøipojením èi odpojením iPhonu od jednotky nedojde k pøerušení
hovoru.
Spoleènost Apple Inc. neruèí za výše uvedené chování iPhonu.
Reakce iPhonu se mùže lišit v závislosti na modelu nebo aktualizaci
softwaru.
•
•
•
•
•
Pøehrávání
Stisknìte [iPod q/h].
Pauza pøi pøehrávání
Stisknìte [iPod q/h] nebo [g, ].
Pøeskakování skladeb
Stisknìte [u] nebo [i].
Vyhledání aktuální skladby
Stisknìte a podržte tlaèítko [u] nebo
[i].
Zobrazení nabídky
iPodu/iPhonu/pro návrat
do pøedchozího menu
V režimu pøehrávání stisknìte
[iPod MENU].
(Pouze na dálkovém ovládaèi)
Výbìr obsahu z nabídky
iPodu/iPhonu
Stisknìte [e,r] a poté [OK].
(Pouze na dálkovém ovládaèi)
Zaøízení iPod/iPhone (není souèástí
nabídky) pøipojte pevnì.
Nejprve vyjmìte iPod/iPhone z obalu.
■ Kompatibilní iPod
Název Kapacity pamìti
iPod nano 5. generace (videokamera) 8 GB, 16 GB
iPod touch 2. generace 8 GB, 16 GB, 32 GB,
64 GB
iPod classic 120 GB, 160 GB (2009)
iPod nano 4. generace (video) 8 GB, 16 GB
iPod classic 160 GB (2007)
iPod touch 1. generace 8 GB, 16 GB, 32 GB
iPod nano 3. generace (video) 4 GB, 8 GB
iPod classic 80 GB
iPod nano 2. generace (aluminum) 2 GB, 4 GB, 8 GB
iPod 5. generace (video) 60 GB, 80 GB
iPod 5. generace (video) 30 GB
iPod nano 1. generace 1 GB, 2 GB, 4 GB
iPod 4. generace (barevný displej) 40 GB, 60 GB
iPod 4. generace (barevný displej) 20 GB, 30 GB
iPod 4. generace 40 GB
iPod 4. generace 20 GB
iPod mini 4 GB, 6 GB
■ Kompatibilní iPhone
Název Kapacity pamìti
iPhone 3GS 16 GB, 32 GB
iPhone 3G 8 GB, 16 GB
iPhone 4 GB, 8 GB, 16 GB
Kompatibilita závisí na verzi softwaru vašeho iPodu/Phonu.•
Zatlaète na páèku adaptéru
tak, abyste uslyšeli zacvaknutí.
Stisknutím!
Stisknìte [;] pro odemknutí
adaptéru pro iPod/iPhone a
poté pomocí páèky adaptér
pro iPod/iPhone uvolnìte.
[;]
Adaptér pro pøipojení iPodu/iPhonu
Páèka
Konektor
Úchytky
Nejprve zasuòte stranu
adaptéru pøepínaèe
iPod/iPhone tak, aby
svorky byly smìrem
k Vám, a pak zasuòte
protìjší stranu, až
zapadne na místo.
Zacvaknutí!
Zacvaknutí!
Page 44

ÈESKY
44
RQTX1076
Pøehrávání pomocí zaøízení Bluetooth
Pøíprava:
Spárujte svoje zaøízení využívající technologii Bluetooth s tímto
zaøízením.
Pomocí tlaèítka [ q/h] vyberte Bluetooth.
Pøi prvním použití bude automaticky vybrán režim spárování.
Jakmile zaøízení vstoupí do režimu párování, vyhledejte toto
zaøízení pomocí vyhledávání zaøízení využívajících technologii
Bluetooth na svém mobilním telefonu (identifikace zaøízení:
SC-HC40).
Pokyny k vyhledávání zaøízení využívajících technologii
Bluetooth najdete v návodu k použití svého mobilního
telefonu.
Budete-li požádáni o zadání hesla, vložte „0000“ (Pro zaøízení
Bluetooth, která nejsou kompatibilní s 2.1+EDR).
Po úspìšné spárování se na 2 sekundy objeví název spárovaného
zaøízení. Rozsvítí se kontrolka Bluetooth. Nyní lze použít zaøízení
v kombinaci s vaším Bluetooth mobilním telefonem.
Váš mobilní telefon musí podporovat profil A2DP (Advance Audio
Distribution Profile).
Toto zaøízení podporuje pøíjem A2DP, který je chránìn autorským
právem na základì metody SCMS-T.
A2DP umožòuje pøenášet prostøednictvím technologie Bluetooth
stereo zvuk z audio zdroje (mobilní telefon, PC nebo notebook) do
tohoto zaøízení.
V závislosti na specifikaci èi nastavení mobilních telefonù nemusí
v nìkterých pøípadech dojít ke spojení, pøípadnì se mohou lišit
dostupné funkce a zobrazení.
S tímto zaøízení lze spárovat až 6 pøístrojù. Odpojte aktuálnì pøipojený
pøístroj a postupujte v souladu s pokyny „Pøiøazení více pøístrojù“
(➡ str. 13).
Zaregistrujete-li více zaøízení, než kolik je povoleno, dojde k vyøazení
nejstaršího zaøízení ze seznamu.
Pokud provedete registraci již zaregistrovaného zaøízení, bude toto
zaøízení v seznamu pøepsáno.
•
•
•
•
•
•
•
•
•
•
Externí jednotka (pokraèování)
Informace o použití bezdrátových funkcí Bluetooth
g Použité kmitoètové pásmo
Tato jednotka využívá kmitoètové pásmo 2,4 GHz, jež však mùže
být využíváno i jinými zaøízeními. Postupujte podle níže uvedených
upozornìní, abyste zabránili interferencím s jinými bezdrátovými
zaøízeními.
g Certifikace zaøízení
Tato jednotka vyhovují kmitoètovým omezením a jsou certifikovány na
základì telekomunikaèních zákonù, takže povolení k bezdrátovému
provozu není nutné. Následující kroky jsou však podle zákona trestné.
Rozebírání a pozmìòování jednotky
Odstraòování specifikaèních údajù ze zadní strany jednotky.
g Omezení používání
Bezdrátový pøenos a používání všech zaøízení vybavených technologií
Bluetooth nejsou zaruèeny.
Mezi kompatibilní mobilní telefony schopné bezdrátového pøenosu
patøí pøístroje vyhovující standardu The Bluetooth SIG, Inc. Jestliže
je však mobilní telefon optimalizován pro splnìní standardních
specifikací, mohou nìkteré funkce pracovat. Pøesto nemusí být v
závislosti na specifikacích a nastavení mobilního telefonu navázání
spojení uskuteènìno a nemusí být zaruèeny metody provozu,
zobrazování nebo èinnosti.
Tato jednotka podporuje bezpeènostní funkce Bluetooth, avšak v
závislosti na provozním prostøedí èi nastaveních nemusí být toto
zabezpeèení dostateèné. Pøi bezdrátovém pøenosu dat buïte opatrní.
Upozoròujeme, že spoleènost Panasonic nepøijímá žádnou
odpovìdnost za data a informace, jež mohou být bìhem
bezdrátového pøenosu vyzrazeny.
g Dosah použití
Zaøízení používejte v okruhu 10 m bez pøekážek. Dosah èi rozsah použití
se mùže zkrátit v závislosti na pøekážkách, zaøízeních zpùsobujících
rušení, jiných osobách v místnosti nebo konstrukci budovy. Výše
zmínìný dosah však není zaruèen.
g Úèinky jiných zaøízení
Budou-li v tìsné blízkosti umístìna jiná zaøízení, je možné, že
jednotka nebudou pracovat správnì nebo mùže docházet k jiným
jevùm nestability, mezi nìž patøí napøíklad „pøerušovaný zvuk“ atd. V
rámci zamezení rušení signálu tedy doporuèujeme jednotku bìhem
používání oddìlit od následujících zaøízení.
Mikrovlnná trouba/Bezdrátová síť LAN:/Elektronická zaøízení/Audio
a video zaøízení/Kanceláøsképøístroje a zaøízení/Digitální bezdrátové
telefony/Faxy, atd.
Bydlíte-li v blízkosti vysílacího studia s velmi silným signálem, nebude
jednotka pravdìpodobnì pracovat správnì.
Pøi používání notebooku s bezdrátovým vysílaèem LAN nepoužívejte
ne tato jednotka a bezdrátovou síť LAN souèasnì.
Jestliže nadále dochází k šumu i mimo 5 m dosah bezdrátového
zaøízení LAN, vypnìte napájení bezdrátového zaøízení LAN.
g Omezení urèeného použití
Tato jednotka a vysílaè jsou urèeny pro normální obecné použití.
Toto zaøízení není urèeno pro aplikace vyžadující „vysokou úroveò
zabezpeèení“ ani pro využití v zamìstnáních s bezpeènostním rizikem.
V tìchto prostøedích èi zamìstnáních jednotku ani vysílaè nepoužívejte.
Následující pøíklady vyžadují mimoøádnou obezøetnost, neboť mùže
dojít k pøímé ztrátì na životech nebo mimoøádnì vážným zranìním.
Napø.)
jaderné inženýrství a øízení nukleární reakce, automatizované
øízení letounù, správa letového provozu, øízení pohybu tìžkých
pøepravních systémù, ovládání pøístrojù zastupujících životní funkce,
ovládání zbraòových èi raketových systémù atd.
•
•
•
•
•
•
•
•
•
•
Co je Bluetooth?
Technologie Bluetooth umožòuje bezdrátové spojení s jiným
elektronickým zaøízením.
Základní pøehrávání
Pomocí tlaèítka [ q/h] vyberte Bluetooth.
Na zaøízení spojeném pomocí Bluetooth zaènìte pøehrávat
hudební zdroj. Je-li zaøízení spojené, bude hudba pøenášena
pomocí této jednotky.
(V pøípadì potøeby si vyhledejte potøebné informace v manuálu svého
zaøízení Bluetooth.)
Pomocí dálkového ovladaèe mùžete provést následující kroky.
Pøehrávání
Pro zahájení pøehrávání stisknìte [ q/h].
Zastavení
pøehrávání
Stisknìte [g, ].
Pauza pøi
pøehrávání
Stisknìte [ q/h]. Stisknìte znovu pro obnovení
pøehrávání.
Pøeskakování
skladeb
Stisknìte [u] nebo [i].
Abyste mohli využít tyto funkce, musí zaøízení Bluetooth podporovat
profil AVRCP (Audio Video Remote Control Profile).
Toto zaøízení neumožòuje pøenos dat ze zaøízení Bluetooth.
Pøi pøehrávání iPodu/iPhonu pøes Bluetooth na hlavním zaøízení
mohou být pøenášeny i jiné zvuky, pokud je nabídka iPodu/iPhonu
aktivní nebo v pøípadì registrace a pøipojení zaøízení Bluetooth. V tom
pøípadì ukonèete nabídku iPodu/iPhonu.
Pøi pøehrávání hudby pomocí iPodu/iPhonu pøes Bluetooth a pokud je
iPod/iPhone pøipojený do adaptéru tohoto zaøízení pro iPod/iPhone,
nebude audio signál reprodukován pøes Bluetooth. Pro další
pøehrávání hudby pøepnìte zaøízení na iPod.
•
•
•
•
12 13
Page 45

ÈESKY
45
RQTX1076
45
Externí jednotka (pokraèování)
Handsfree profil (HFP)
Toto zaøízení lze používat jako handsfree zaøízení pro váš mobilní
telefon, prostøednictvím Bluetooth.
Pomocí dálkového ovladaèe mùžete pøijímat èi odmítat pøíchozí hovory.
Pro pøijetí pøíchozího
hovoru (bliká
„IN CALL“ - pøíchozí
hovor)
Stisknìte [ ]. Na displeji zaène blikat nápis
„CALLING“ (hovor) (Hovoøte do mikrofonu na
zaøízení).
Dalším stiskem [ ] pøenesete hovor do
mobilního telefonu (Bliká „TRANSFER“. Nyní
mùžete telefonovat prostøednictvím svého
mobilního telefonu).
Pro zrušení hovoru
Stisknìte [g, ].
Nastavení hlasitosti Stisknìte [+, VOL , –] (Hlasitost lze nastavit
v rozsahu „TEL VOL 1“ až o „TEL VOL 10“).
Pro ztlumení
mikrofonu
Stisknìte [MUTE]. Dalším stisknutím funkci
zrušíte.
(Bìhem zapnutí funkce „MIC MUTE“ (ztlumení
mikrofonu) vás volající neuslyší).
Zaøízení není kompatibilní s profilem Headset (HSP).
Pokud se v blízkosti mikrofonu tohoto zaøízení nachází mobilní
telefon, mùže dojít k pøenášení rušivého zvuku. Pøi telefonování vždy
umístìte mobilní telefon dále od mikrofonu tohoto zaøízení.
•
•
Pomocí tlaèítka [ MENU] zvolte „DISCONNECT?“ (odpojit) a
poté stisknìte [OK].
Zobrazí se potvrzující hláška.
Pomocí tlaèítka [e,r] vyberte „YES“ (ano) nebo „NO“ (ne) a
stisknìte [OK].
V pøípadì zákazu funkce pøenosu Bluetooth na pøipojeném zaøízení
dojde rovnìž k ukonèení pøipojení.
•
Odpojení zaøízení Bluetooth
Pokroèilé funkce
g Pøiøazení více pøístrojù
Stisknìte [ MENU].
Pomocí [e,r] vyberte „NEW DEV“ (nové zaøízení) a poté stisknìte
[OK].
Zaøízení spustí režim párování a na displeji zaène blikat „PAIRING“.
Jakmile zaøízení vstoupí do režimu párování, vyhledejte toto
zaøízení pomocí vyhledávání zaøízení využívajících technologii
Bluetooth na svém mobilním telefonu (identifikace zaøízení:
SC-HC40).
Budete-li požádáni o zadání hesla, vložte „0000“.
g Volba kvality komunikace
Stisknìte [ MENU].
Stisknìte [e,r] pro výbìr „LINK MODE“ (režim spojení) a poté
stisknìte [OK].
Stisknìte [e,r] pro volbu režimu a poté stisknìte [OK].
„MODE 1“ (režim 1): Spojení s dùrazem na stabilitu komunikace
„MODE 2“ (režim 2):
Spojení s vyšší pøenosovou rychlostí pro vyšší
kvalitu [V tomto režimu mùže dojít k pøerušení
spojení, v tom pøípadì vyberte „MODE 1“
(režim 1).]
g Pro výbìr automatické volby režimu.
Stisknìte [ MENU].
Pomocí [e,r] vyberte „AUTO LINK“ (automatické spojení) a poté
stisknìte [OK].
Stisknìte [e,r] pro volbu režimu a poté stisknìte [OK].
„ON“: Spojeno automaticky, není tøeba ruènì zaøízení spojovat.
„OFF“: Je nutno zaøízení spojit ruènì.
Tyto funkce nejsou k dispozici, je-li zaøízení pøipojeno. Pro jejich
zobrazení je nutno zaøízení využívající technologii Bluetooth odpojit.
Je-li zobrazena hláška „LINKING“ (spojuji), není nabídka [ MENU]
dostupná.
Automatické spojování Auto Link funguje, pouze pokud váš mobilní
telefon podporuje profil A2DP.
•
•
•
•
•
•
•
•
Úroveò vstupu
Mùžete nastavit úroveò zvukového vstupu ze zaøízení pøipojeného pøes
Bluetooth.
Stisknìte opakovanì [PLAY MODE] (režim pøehrávání) pro volbu
„LEVEL 0“, „LEVEL +1“ nebo „LEVEL +2“.
Je-li zvuk zkreslený, zvolte „LEVEL 0“.•
Funkce zobrazení
Pro zobrazení informací o aktuálnì pøipojeném zaøízení stisknìte
opakovanì [DISPLAY, –DIMMER].
BLUETOOTH Název pøipojeného
zaøízení
Pøipojené profily
or
Znaèka „Made for iPod“ znamená, že toto elektronické zaøízení je
urèeno k pøipojení k iPodu a výrobce ovìøil jeho soulad s normami
spoleènosti Apple.
Znaèka „Works with iPhone“ znamená, že toto elektronické zaøízení
je urèeno k pøipojení k iPhonu a výrobce ovìøil jeho soulad s normami
spoleènosti Apple.
Spoleènost Apple nenese odpovìdnost za fungování tohoto zaøízení
ani jeho soulad s bezpeènostními a zákonnými normami.
iPod je obchodní znaèka spoleènosti Apple Inc., registrovaná v USA a
jiných zemích. iPhone je obchodní znaèka spoleènosti Apple Inc.
Technologie dekódování audio záznamù MPEG Layer-3 je použita na
základì licence spoleèností Fraunhofer IIS a Thomson.
ZAØÍZENÍ PRACUJE V ROZSAHU 2400 MHz AŽ 2483,5 MHz
Znaèka a loga Bluetooth vlastní spoleènost Bluetooth SIG, Inc. a
jejich použití spoleèností Panasonic Corporation podléhá licenèním
podmínkám. Ostatní ochranné známky a obchodní názvy náležejí
jejich pøíslušných vlastníkù.
Prohlášení o shodì (DoC)
Spoleènost „Panasonic Corporation“ tímto prohlašuje, že tento
výrobek splòuje požadavky a ostatní souvisící ustanovení smìrnice EU
1999/5/ES.
Zákazníci si mohou stáhnout kopii originálního DoC k našim produktùm
„Radiová a telekomunikaèní koncová zaøízení (R&TTE)“ z našeho serveru
DoC:
http://www.doc.panasonic.de
Kontaktujte autorizovaného pøedstavitele: Panasonic Marketing Europe
GmbH, Panasonic Testing Centre, Winsbergring 15, 22525 Hamburg,
Germany
Tento produkt je urèen pro použití v tìchto zemích.
PL, CZ, HU, SK, BG, EE, LV, RO, SI, BO, HR, MK, RS, LT, RU, UA, KZ,
BY, O.CIS
Tento produkt je urèen pro bìžného spotøebitele. (Kategorie 3)
Page 46

ÈESKY
46
RQTX1076
Externí jednotka (pokraèování)
Pøehrávání z USB
Konektivita USB vám umožòuje pøipojit velkokapacitní pamìťové zaøízení
pøes USB a pøehrávat hudební soubory MP3.
Pøíprava:
Pøed pøipojením jakéhokoli pamìťového zaøízení pøes USB k jednotce
zkontrolujte, zda jsou uložená data zálohovaná.
Nedoporuèujeme používat prodlužovací USB kabely. Zaøízení
pøipojené pøes kabel nebude rozpoznáno.
Otevøete kryt pro USB.
Snižte hlasitost a pøipojte pamìťové zaøízení USB.
Pro zahájení pøehrávání stisknìte [USB q/h].
•
•
Zastavení
pøehrávání
Stisknìte [g, ]. Na displeji se zobrazí
„RESUME“. Pozice je uložena do pamìti.
Pro pokraèování v pøehrávání stisknìte
[USB q/h].
Znovu stisknìte
[g, ] pro vymazání pozice.
Pauza pøi pøehrávání
Stisknìte [USB q/h]. Stisknìte znovu pro
obnovení pøehrávání
.
Pøeskakování
skladeb
Stisknìte [u] nebo [i].
Pøeskoèení alba
Stisknìte [e,r].
Pøímé pøehrávání
(Zahájení pøehrávání
vybrané skladby.)
Stisknìte [e,r] pro výbìr alba.
Pro výbìr skladeb stisknìte jednou [i] a
poté pøíslušná èíselná tlaèítka.
Pro odpojení velkokapacitního pamìťového zaøízení USB vyberte
jiný zdroj pøehrávání než „USB“.
Odpojíte-li velkokapacitní pamìťové zaøízení USB v dobì, kdy bude
nastaveno jako zdroj dat, mùže dojít k poškození dat uložených na
tomto zaøízení.
•
Kompatibilní zaøízení
Zaøízení, která jsou definována jako pamìťová zaøízení typu USB:
USB zaøízení, která podporují pouze hromadný pøenos
USB zaøízení, která podporují formát USB 2.0
•
•
Další ovládací funkce jsou podobné jako funkce popsané v kapitole
„Pøehrávání diskù“ (➡ str. 8, 9).
Poznámky k USB
Podporované formáty: Soubory s pøíponou „.mp3“ nebo „.MP3“
Technologie CBI (Control/Bulk/Interrupt) není podporována.
Zaøízení využívající souborový systém NTFS nejsou podporována
[Podporován je jen souborový systém FAT 12/16/32 (File
Allocation Table 12/16/32)].
V závislosti na velikosti sektoru nemusí nìkteré soubory
fungovat.
Tento pøehrávaè je schopný zpracovat až 255 alb a 2500
skladeb.
Maximální poèet skladeb v adresáøi je 999.
Pokud pøipojíte èteèku karet s rozhraním USB a podporou více
karet, zaøízení bude pracovat jen s jednou kartou; vìtšinou se
bude jednat o první vloženou pamìťovou kartu.
Pøed vyjmutím pamìťové karty odpojte USB èteèku karet od
zaøízení. V opaèném pøípadì nemusí zaøízení fungovat správnì.
Po pøipojení digitálního audio pøehrávaèe k USB portu se bude
pøehrávaè po celou dobu zapnutí zaøízení dobíjet.
•
•
•
•
•
•
•
•
•
Pøipojte velkokapacitní pamìťové zaøízení USB (nejsou souèástí dodávky)
Nastanou-li následující situace, vynulujte pamìť:
Zaøízení nereaguje na ovládání pomocí tlaèítek.
Pøejete si vymazat a vynulovat obsah pamìti.
Pro vynulování pamìti
Odpojte síťový kabel. (Pøed provedením 2. kroku poèkejte alespoò 3 minuty.)
Stisknìte a podržte [8] na hlavním zaøízení a znovu pøipojte síťový kabel.
Na displeji se objeví „--------“.
Uvolnìte [8].
Všechna nastavení budou obnovena do pùvodního stavu z výroby. Bude nutno znovu nastavit nìkteré položky uložené v pamìti.
•
•
Pøedvolba pamìtí (Nastavení)
14 15
Page 47

ÈESKY
47
RQTX1076
47
Než požádáte o servisní zásah, proveïte následující kontroly. Máte-li u nìkterých kontrolních bodù pochybnosti, nebo pokud návod
popsaný v tabulce problém nevyøeší, obraťte se s prosbou o pomoc na svého prodejce.
g Bìžné problémy
Nesprávné zobrazení nebo nemožnost
pøehrání
Nesprávnì vložený disk. Vložte disk správnì.
CD disk je poškrábaný èi zneèištìný
(Pøeskakování skladeb).
Snímací èoèka je vlhká. Poèkejte asi hodinu
a zkuste to znovu.
Nelze naèíst soubory MP3
Soubory MP3 nelze pøehrávat, pokud
zkopírujete disk s více relacemi
(multisession), kde mezi relacemi nebudou
žádná data.
Pøi vytváøení diskù s více relacemi je nutno
relace uzavøít.
Na disku je uloženo pøíliš málo dat. Objem
dat musí být vìtší než 5 MB.
Není slyšet zvuk, pøípadnì je zvuk rušen
šumem
V pøípadì nekvalitní nahrávky mùžete pøi
pøehrávání MP3 slyšet šum.
V pøípadì rušení nenechávejte v blízkostí
zaøízení mobilní telefony.
Zesilte hlasitost.
Vypnìte zaøízení, zkontrolujte a opravte
pøipojení a potom zaøízení znovu zapnìte.
Možné pøíèiny - pøetížení reproduktorù
nadmìrnou hlasitostí èi výkonem, pøípadnì
použití zaøízení v horkém prostøedí.
Bìhem pøehrávání je slyšet bzuèení
Kabely jsou vedeny v blízkosti pøívodu
síťového napìtí nebo záøivkového svítidla.
Udržujte ostatní zaøízení a pøívodní kabely ve
vzdálenosti od kabelù tohoto zaøízení.
Bìhem pøíjmu rozhlasového vysílání je slyšet
dunìní nebo rušivý hluk
Vypnìte televizi nebo jiný audio pøehrávaè
nebo je odpojte od zaøízení.
Vypnìte pøenosný audio pøehrávaè, je-li
pøipojený k portu AUX.
Bìhem pøíjmu vysílání v pásmu AM se ozývá
slabé bzuèení èi rušivý hluk
Umístìte anténu dále od ostatních kabelù
a šòùr.
Umístìte anténu AM dále od zaøízení.
Obraz na televizoru v blízkosti zaøízení mizí
nebo se na obrazovce objevují pruhy
Nesprávnì umístìná nebo nasmìrovaná
anténa.
Kabel televizní antény je pøíliš blízko zaøízení.
Posuòte kabel televizní antény dále od
zaøízení.
Zaøízení nereaguje na ovládání pomocí
tlaèítek dálkového ovládaèe
Zkontrolujte, zda jsou správnì vloženy
baterie (➡ str. 7).
g Displej
„--:--“
Poprvé jste zapojili pøívod el. proudu nebo
nedávno došlo k výpadku elektrického
proudu. Nastavte èas (➡ str. 10).
„ADJUST CLOCK“
Èas není nastaven. Nastavte èas.
„ADJUST TIMER“
Èasovaè pøehrávání není nastaven. Nastavte
èasovaè pøehrávání.
•
•
•
•
•
•
•
•
•
•
•
•
•
•
•
•
•
•
•
•
•
„PGM FULL“
Poèet naprogramovaných skladeb je
omezený na 24. Do programu nelze pøidat
další skladby.
„NO PLAY“
Vložili jste CD disk, na které nejsou uloženy
soubory ve formátu CD-DA nebo MP3.
Takový disk nelze pøehrávat.
„ERROR“
Provedli jste nesprávnou operaci. Pøeètìte si
instrukce a zopakujte postup.
„F61“ nebo „F76“
Závada v elektrickém napájení. Poraïte se s
prodejcem.
Odpojte zaøízení USB. Vypnìte zaøízení a
znovu je zapnìte.
„AUTO OFF“
Zaøízení nebylo po dobu cca 29 minut
použito a za minutu se proto vypne. Pro
zrušení stisknìte jakékoli tlaèítko.
„ILLEGAL OPEN“
Posuvný kryt není ve správné pozici. Vypnìte
zaøízení a znovu je zapnìte.
„NODEVICE“
iPod/iPhone není správnì vložen. Pøeètìte si
instrukce a zopakujte postup (➡ str. 11).
Není vloženo USB zaøízení. Zkontrolujte
pøipojení.
„REMOTE 1“
Zaøízení pracuje v režimu „REMOTE 1“.
Pøepnìte dálkové ovládání do režimu
„REMOTE 1“ (➡ str. 10).
„REMOTE 2“
Zaøízení pracuje v režimu „REMOTE 2“.
Pøepnìte dálkové ovládání do režimu
„REMOTE 2“ (➡ str. 10).
g iPod/iPhone
iPod/iPhone nelze spustit
Pøed pøipojením iPodu/iPhonu k pøístroji
zkontrolujte, zda není baterie iPodu/iPhonu
vybitá.
Pøed vložením iPodu/iPhonu do zásuvky
pøístroj i iPod/iPhone vypnìte. Pøístroj
zapnìte a vyberte pøíslušný zdroj.
Z reproduktorù není slyšet žádný zvuk
iPod/iPhone není správnì vložen do zásuvky.
Vypnìte iPod/iPhone a odpojte jej ze
zásuvky. Poté jej znovu pøipojte a zapnìte.
Zkontrolujte, zda iPod/iPhone nyní pøehrává
hudbu.
Nastavte hlasitost.
Zvuk je zkreslený nebo je úroveò hlasitosti
pøíliš nízká
Zkontrolujte, zda je na iPodu/iPhonu vypnutá
funkce ekvalizéru.
iPod/iPhone nelze ovládat pomocí dálkového
ovládaèe nebo pøístroje
Zkontrolujte, zda je iPod/iPhone správnì
vložen do zásuvky.
Zkontrolujte pøipojení zásuvky a ujistìte se,
že je iPod/iPhone vybrán jako zdroj hudby
(➡ str. 11).
iPod/iPhone se nedobíjí
Zkontrolujte pøipojení (➡ str. 3, 11).
•
•
•
•
•
•
•
•
•
•
•
•
•
•
•
•
•
•
•
•
g Bluetooth
Název pøipojeného zaøízení se zobrazí jako
„ * “
Znaky, které nelze zobrazit, budou nahrazeny
„ * “.
V pøípadì neznámého názvu zaøízení se
zobrazí „
*****
“.
Zvuk je nekvalitní nebo je rušen šumem
Vzdálenost mezi zaøízeními využívajícími
spojení Bluetooth je vyšší než 10 m. Umístìte
zaøízení blíže k sobì.
Mezi zaøízeními jsou pøekážky. Odstraòte
pøekážky nebo jinak zajistìte lepší viditelnost.
Pro lepší kvalitu zvolte „MODE 1“ (➡ str. 13).
Rušení mobilními telefony.
„F70“
Vypnìte zaøízení. Odpojte síťový kabel a
obraťte se na prodejce.
g USB
Zaøízení nereaguje na stisk tlaèítka
[USB q/h]
Odpojte USB zaøízení a znovu je pøipojte.
Pøípadnì vypnìte zaøízení a znovu je
zapnìte.
Nelze èíst USB jednotku nebo její obsah
Formát disku USB nebo obsah disku není
kompatibilní s tímto systémem (➡ str. 14).
Funkce USB tohoto výrobku nemusí být
kompatibilní s nìkterými USB zaøízeními.
Zaøízení USB s kapacitou vìtší než 8 GB
nemusí v nìkterých pøípadech fungovat.
Pomalá èinnost flash disku USB
Velké soubory nebo USB flash disky s velkou
kapacitou se mohou naèítat delší dobu.
„NO PLAY“
Zkontrolujte obsah.
Pøehrávat je možné pouze soubory ve
formátu MP3.
Pokud je na zaøízení uloženo více než
255 alb èi složek (audio nebo jiných),
nìkteré soubory MP3 nemusí být možno
èíst a pøehrávat. Pøeneste tato hudební alba
na jiné USB zaøízení. Pøípadnì je možno
pøeformátovat zaøízení USB a uložit tato
hudební alba pøed uložením jiných složek
obsahujících jiné než audio soubory.
•
•
•
•
•
•
•
•
•
•
•
•
•
•
•
Návod k odstraòování závad
Page 48

ÈESKY
48
RQTX1076
g ZESILOVAÈ
Výstupní výkon RMS
Pøední kanál (pøi fungování obou kanálù)
20 W na kanál (6 Ω), 1 kHz, 10% THD
Celkový výkon RMS 40 W
Konektor sluchátek
Konektor Stereo, 3,5 mm
Aux (Vzadu)
Konektor Stereo, 3,5 mm
g TUNER
Kapacita pamìti 30 stanic FM
15 stanic AM
Frekvenèní modulace (FM)
Frekvenèní rozsah 87,50 MHz až 108,00 MHz (krok: 50 kHz)
Anténní konektory 75 Ω (nevyvážený)
Amplitudová modulace (AM)
Frekvenèní rozsah 522 kHz až 1629 kHz (krok: 9 kHz)
520 kHz až 1630 kHz (krok: 10 kHz)
g CD DISKY
Pøehrávané disky [8 cm nebo 12 cm]
(1) CD-Audio (CD-DA)
(2) CD-R/RW (CD-DA, MP3)
(3) MP3*
* MPEG-1 Layer 3, MPEG-2 Layer 3
Ètení
Vlnová délka 795 nm
Energie laseru CLASS 1
Audio výstup (disk)
Poèet kanálù FL, FR, 2 kanály
g REPRODUKTORY
Typ 1pásmový, 1reproduktorový systém (Pasivní Radiátor)
Reproduktor(y)
Úplný rozsah 6,5 cm Kónický x 1 / kanál
Pasivní Radiátor 8 cm x 2 / kanál
Impedance 6 Ω
g BLUETOOTH
Specifikace systému Bluetooth V2.1 + EDR
Klasifikace bezdrátového zaøízení Tøída 1 (2,5 mW)
Podporované profily A2DP, AVRCP, HFP
Frekvenèní pásmo 2402 MHz až 2480 MHz
(Adaptivní støídání frekvencí)
Vzdálenost 10 m, pøímá viditelnost
(iPhone 3G, ve výšce 1 m, v režimu MODE 1)
g USB PORT
Standardní USB USB 2.0 plnìrychlostní
Podporovaný formát hudebních souborù MP3 (*.mp3)
Souborový systém USB zaøízení FAT 12/16/32
Napájení do USB portu max. 500 mA
g OBECNÉ ÚDAJE
Zdroj napájení 220 V až 240 V AC, 50 Hz
Pøíkon 35 W
Rozmìry (š x v x h) 500 mm x 201 mm x 102 mm
(h = min. 69 mm)
Hmotnost Cca 3,0 kg
Rozsah provozních teplot 0 °C až +40 °C
Provozní vlhkost r.v. 35 % až 80 % (bez kondenzace)
Spotøeba energie v pohotovostním režimu: 0,09 W (cca)
Technické údaje mohou být mìnìny bez pøedchozího upozornìní.
Celkové harmonické zkreslení se mìøí pomocí digitálního
spektrálního analyzátoru.
•
•
g Nejprve odpojte zaøízení od pøívodu el. proudu a poté otøete povrch mìkkým a suchým hadøíkem.
V pøípadì silnìjšího zneèištìní použijte vlhký hadr a poté vytøete povrch dosucha.
Nepoužívejte rozpouštìdla technický benzín, rozpouštìdla, líh èi èistící prostøedky, hrozí poškození povrchu vnìjšího krytu.
Pøi použití speciálních hadøíkù se øiïte pøíslušnými pokyny.
g Péèe o snímací èoèku CD pøehrávaèe
Pravidelnì èoèku èistìte, abyste zajistili její správnou funkci. Pro odstranìní prachu použijte ofukování, v pøípadì vìtšího zneèištìní pak vatový
tampon.
K èištìní èoèky nepoužívejte èistící CD disky.
•
•
•
•
•
Technické údaje
Údržba
16 17
Page 49

ÈESKY
49
RQTX1076
49
Umístìní
Postavte systém na rovnou plochu, mimo dosah sluneèního záøení, zdrojù vysokých teplot, vysoké vlhkosti a nadmìrných vibrací. Tyto
podmínky by mohly zpùsobit poškození krytu a dalších souèástí a zkrátit životnost jednotky.
Nepokládejte na zaøízení tìžké pøedmìty.
Napìtí
Nepoužívejte vysokonapìťové zdroje. Mùže dojít k pøetížení jednotky a vzniku požáru.
Nepoužívejte zdroje stejnosmìrného napìtí. Zkontrolujte peèlivì zdroj napìtí, používáte-li jednotku na lodi nebo na jiném místì, kde se používá
stejnosmìrné napìtí.
Ochrana síťového vedení
Ujistìte se, zda je správnì pøipojen síťový kabel a zda není poškozen. V pøípadì nesprávného pøipojení èi poškození vedení hrozí nebezpeèí
vzniku požáru èi úrazu el. proudem. Za vedení netahejte, neohýbejte je a nepokládejte na nìj tìžké pøedmìty.
Pøi odpojování ze zdi vidlici pevnì uchopte. Pøi neopatrném tahání za kabely hrozí nebezpeèí úrazu el. proudem.
Nedotýkejte se vidlice mokrýma rukama. Hrozí nebezpeèí úrazu el. proudem.
Cizí pøedmìty
Chraòte jednotku pøed vniknutím kovových pøedmìtù. Hrozí nebezpeèí úrazu el. proudem èi nefunkènosti.
Chraòte jednotku pøed vniknutím tekutin. Hrozí nebezpeèí úrazu el. proudem èi nefunkènosti. V pøípadì vylití tekutiny jednotku odpojte od
pøívodu el. proudu a obraťte se o pomoc na svého prodejce.
Nevstøikujte prostøedky k hubení hmyzu na zaøízení nebo do nìj. Tyto pøípravky obsahují hoølavé plyny, které by mohly v pøípadì vstøíknutí do
jednotky vzplanout.
Opravy
Nepokoušejte se opravit tuto jednotku vlastními silami. Dojde-li k pøerušení zvuku, pøestanou-li svítit kontrolky, objeví-li se kouø èi jakýkoli jiný
problém, který není øešen v tomto návodu, odpojte pøívod el. energie a obraťte se s žádostí o pomoc na svého prodejce èi autorizované servisní
støedisko. V pøípadì manipulace neoprávnìnou osobou hrozí nebezpeèí úrazu el. proudem èi poškození zaøízení.
Životnost mùžete prodloužit tím, že v pøípadì dlouhodobého nepoužívání jednotku odpojíte od pøívodu el. proudu.
Bezpeènostní upozornìní
Page 50

50
RQTX1076
РУССКИЙ
Внутри аппарата
ПРЕДOCTEPEЖEHИE!
HE CЛEДУET УCTAHABЛИBATЬ ИЛИ PAЗMEЩATЬ
ДAHHЬIЙ AППAPAT B КHИЖHOM ШКAФУ, BCTPOEHHOM
ШКAФУ ИЛИ ДРУГOM ОГPAHИЧEHHOM ПPOCTPAHCTBE
ДЛЯ TOГO, ЧTOБЬI COXPAHИTЬ УCЛOBИЯ XOPOШEЙ
BEHTИЛЯЦИИ. УДOCTOBEPЬTECЬ, ЧTO ШTOPЬI И ДPУГИE
ПОДОБHЬIE ПPEДMETЬI HE ПPEПЯTCTBУЮT HOPMAЛЬHOЙ
BEHTИЛЯЦИИ ДЛЯ ПPEДOTBPAЩEHИЯ PИCКA ПOPAЖEHИЯ
ЭЛЕКТРИЧЕСКИМ ТОКОМ ИЛИ ВОЗНИКНОВЕНИЯ ПОЖАРА
ИЗ-ЗА ПЕРЕГРЕВА.
НЕ ЗАКРЫВАЙТЕ ВЕНТИЛЯЦИОННЫЕ ОТВЕРСТИЯ
АППАРАТА ГАЗЕТАМИ, СКАТЕРТЯМИ, ШТОРАМИ И
ПОДОБНЫМИ ПРЕДМЕТАМИ.
НЕ РАЗМЕЩАЙТЕ НА АППАРАТ ИСТОЧНИКИ ОТКРЫТОГО
ПЛАМЕНИ, ТАКИЕ, КАК ГОРЯЩИЕ СВЕЧИ.
ВЫБРАСЫВАЙТЕ БАТАРЕИ В МУСОР, УЧИТЫВАЯ ОХРАНУ
ОКРУЖАЮЩЕЙ СРЕДЫ.
•
•
•
•
ПРЕДОСТЕРЕЖЕНИЕ:
ЧТОБЫ УМЕНЬШИТЬ ОПАСНОСТЬ ВОЗНИКНОВЕНИЯ
ПОЖАРА, ПОРАЖЕНИЯ ЭЛЕКТРИЧЕСКИМ ТОКОМ ИЛИ
ПОВРЕЖДЕНИЯ ИЗДЕЛИЯ,
* НЕ ПОДВЕРГАЙТЕ ЭТОТ АППАРАТ ВОЗДЕЙСТВИЮ ДОЖДЯ,
ВЛАГИ, КАПЕЛЬ ИЛИ БРЫЗГ, И НЕ ПОМЕЩАЙТЕ НА
АППАРАТ НИКАКИЕ ПРЕДМЕТЫ, НАПОЛНЕННЫЕ ВОДОЙ,
НАПРИМЕР, ВАЗЫ.
* ИСПОЛЬЗУЙТЕ ТОЛЬКО РЕКОМЕНДУЕМЫЕ
ПРИНАДЛЕЖНОСТИ.
* НЕ СНИМАЙТЕ КРЫШКУ (ИЛИ ЗАДНЮЮ ПАНЕЛЬ) – ВНУТРИ
АППАРАТА НЕТ ДЕТАЛЕЙ, КОТОРЫЕ ПОЛЬЗОВАТЕЛЬ
МОЖЕТ ОТРЕМОНТИРОВАТЬ САМОСТОЯТЕЛЬНО.
ОБРАЩАТЬСЯ К КВАЛИФИЦИРОВАННЫМ СПЕЦИАЛИСТАМ
СЕРВИСНЫХ ЦЕНТРОВ.
ПРЕДОСТЕРЕЖЕНИЕ!
В ЭТОМ УСТРОЙСТВЕ ИСПОЛЬЗУЕТСЯ ЛАЗЕР.
ПРИМЕНЕНИЕ РЕГУЛИРОВОК И НАСТРОЕК, ОТЛИЧНЫХ
ОТ НИЖЕОПИСАННЫХ, МОЖЕТ ПРИВЕСТИ К ОПАСНОМУ
ЛАЗЕРНОМУ ОБЛУЧЕНИЮ.
НЕ ОТКРЫВАЙТЕ КРЫШКУ И НЕ ПРОИЗВОДИТЕ РЕМОНТ
САМИ–ЛУЧШЕ ПОРУЧИТЬ ЭТО КВАЛИФИЦИРОВАННОМУ
СПЕЦИАЛИСТУ.
ЭТОТ АППАРАТ ПРЕДНАЗНАЧЕН ДЛЯ ИСПОЛЬЗОВАНИЯ В
КЛИМАТЕ СРЕДНЕЙ ПОЛОСЫ.
Сетевая розетка должна быть расположена вблизи оборудования,
и быть легко доступной.
Вилка сетевого шнура питания должна оставаться быстро
доступной.
Чтобы полностью отсоединить этот аппарат от сети переменного
тока, отсоедините вилку сетевого шнура питания от розетки
переменного тока.
ПРЕДУПРЕЖДЕНИЕ
Использование неподходящего аккумулятора сопряжено
с опасностью взрыва. Меняя аккумулятор, следуйте
рекомендациям производителя и используйте только
аккумуляторы рекомендованного или равноценного типа.
Утилизируйте отработавшие аккумуляторы согласно инструкциям
производителя.
Это изделие может принимать радио помехи, обусловленные
переносными телефонами. Если такие помежи являются
очевидными, увеличьте, пожалуйста, расстояние между изделием
и переносным телефоном.
Информация по обращению с отходами для стран,
не входящих в Европейский Союз
Действие этого символа распространяется
только на Европейский Союз.
Если Вы собираетесь выбросить данный продукт,
узнайте в местных органах власти или у дилера,
как следует поступать с отходами такого типа.
-Если Вы увидите такой символ-
Установленный производителем в порядке п. 2 ст. 5 федерального
закона РФ «О защите прав потребителей» срок службы данного
изделия равен 7 годам с даты производства при условии, что изделие
используется в строгом соответствии с настоящей инструкцией по
эксплуатации и применимыми техническими стандартами.
Информация для покупателя
Название продукции: Компактная стереосистема
Название страны
производителя:
Малайзия
Название производителя: Панасоник Корпорэйшн
Юридический адрес: 1006 Кадома, Осака, Япония
Дата производства: Вы можете уточнить год и месяц по серийному
номеру на табличке.
Пример маркировки
– Серийный номер № XX1АХХХХХХХ
(Х-любая цифра или буква)
Год: Третья цифра в серийном номере
(1 – 2001, 2 – 2002, ... 0 – 2010)
Месяц: Четвертая буква в серийном номере
(А – Январь, В – Февраль, ...L – Декабрь)
Примечание: Сентябрь может указываться как «S» вместо «I».
Дополнительная
информация:
Пожалуйста внимательно
прочитайте инструкцию по
эксплуатации.
AUX
RQT4389ZAA
RQLS0418
2 3
Page 51

51
RQTX1043
РУССКИЙ
RQTX1076
51
AUX
Прилагаемые принадлежности 3
Подключение 3
Установка аппарата на стену (Опция) 4
Руководство по органам управления 7
Операции с дисками 8
Операции с радио 9
Таймер 10
Настройка звучания 10
Внешние устройства 10
Сброс памяти (Инициализация) 14
Поиск и устранение неполадок 15
Технические характеристики 16
Уход 16
Меры предосторожности 16
Содержание
Прилагаемые принадлежности
Прилагаемый сетевой шнур предназначен для использования
только с этим аппаратом. Использование его с другой
аппаратурой запрещается.
Запрещается использовать с настоящим аппаратом сетевой шнур
от другой аппаратуры.
•
•
Ознакомьтесь с прилагаемыми принадлежностями.
Подключение
Разъем AUX
(➡ стр. 10)
Вид сзади
Выходные
вентиляционные
отверстия
5 4
3 2
1
Крышка USB
2
1
AC IN
Прикрепите лентой антенну к стене или колонне в
положении, в котором обеспечивается наименьший уровень
помех.
•
3
Установите антенну
на подставку.
Рамочная антенна AM
Подключите рамочную антенну AM.
2
Провод антенны не должен касаться других проводов и
шнуров.
•
До щелчка!
Во избежание повреждения слуха не слушайте долгое
время.
Сильное звуковое давление от наушников может вызвать
потерю слуха.
Длительное прослушивание на полной громкости может
вызвать повреждение слуха пользователя.
Используйте только прилагаемые или рекомендованные
наушники.
•
•
•
Уменьшите громкость и подключите
наушники.
Тип штекера: 3,5 мм стерео
4
Наушники (приобретаются отдельно)
Комнатная антенна FM
Подключите комнатную антенну FM.
Клейкая лента
1
g Примечания о динамиках
У прилагаемых динамиков отсутствует магнитный экран. Не
располагайте их возле телевизора, персонального компьютера
или других устройств, на работу которых влияют магнитные поля.
Снять сетки динамиков невозможно.
•
•
Подключите сетевой шнур после того, как сделаны все
другие подключения.
Подключите сетевой шнур.
К бытовой сетевой розетке
1 cетевой шнур
1 pамочная антенна AM
1 комнатная антенна FM
2 батареи пульта ДУ
1 пульт ДУ (N2QAYB000523)
Прилагаемые винты
2 крепежных винта
1 предохранительный
кронштейн
Cтеновой кронштейн – принадлежности
1 cтеновой кронштейн
4 амортизирующие ножки
B
Page 52

52
RQTX1076
РУССКИЙ
Установка аппарата на стену (Опция)
Примечания об установке
g Прежде чем приступать к установке, для обеспечения нормальной установки ознакомьтесь с содержанием разделов «Меры
предосторожности» и «Указания по установке на стене».
g Для оптимальной работы и во избежание возникновения проблем настоящий аппарат запрещается устанавливать:
где-либо, кроме вертикальных стен.
вблизи пожарного оросителя или датчика.
вблизи линий или источников питания высокого напряжения.
вблизи обогревателей.
в местах, где аппарат подвергается вибрации или ударам.
вблизи источников магнитного поля, теплоты, пара, распыленной смазки и т.д.
в местах, в которых может происходить падение капель (например, под кондиционером).
g Запрещается устанавливать настоящий аппарат под потолочными светильниками (например, точечным светильником,
галогенной лампой и т.д.).
Несоблюдение этих требований может привести к деформации корпуса или поломке из-за высокой температуры.
g Используйте способ установки, который соответствует конструкции и материалу стены.
g Во избежание повреждения изделия или пола во время установки используйте мягкое одеяло или ткань.
g При затяжке винтов убедитесь, что винты не затянуты слабо или не перетянуты.
g Не допускайте посторонних в зону установки и принимайте меры предосторожности во время установки.
g Корпорация Panasonic не несет ответственности за побочный ущерб или косвенные убытки, возникшие из-за ненормальной
установки или эксплуатации.
•
•
•
•
•
•
•
Настоящий аппарат должен устанавливаться или
демонтироваться только квалифицированным
специалистом-строителем.
При ненормальной установке аппарат может упасть и причинить
травму.
Во избежание травмы аппарат необходимо надежно
установить на стену в соответствии с указаниями по
установке.
Запрещается устанавливать аппарат там, где опорная
конструкция не выдержит нагрузку.
Если крепежные детали недостаточно прочные, аппарат может
упасть и причинить травму.
Запрещается устанавливать аппарат способом,
отличающимся от указанного в инструкции.
При несоблюдении этого требования аппарат может упасть, что
приведет к его повреждению или к травме.
Запрещается устанавливать аппарат где-либо, кроме
вертикальных стен.
При несоблюдении этого требования аппарат может упасть, что
приведет к его повреждению или к травме.
При установке нужно учесть коэффициент прочности
(примерно в 10 раз больше массы изделия).
При недостатке прочности аппарат может упасть и причинить
травму.
Стена, к которой крепится аппарат, должна выдерживать вес,
равный 20 кг на винт.
При недостаточной прочности стены аппарат все равно упадет с
течением времени.
Запрещается разбирать или изменять конструкцию подвеса
для крепления на стене.
При несоблюдении этого требования аппарат упадет, что
приведет к его повреждению или к травме.
Запрещается устанавливать настоящий аппарат во влажных
или запыленных местах, или в местах, в которых аппарат
может соприкасаться с распыленной смазкой или паром, или
под кондиционером, где на аппарат может капать вода.
Это может оказать отрицательное воздействие на аппарат и
привести к пожару или поражению электротоком.
Обеспечьте достаточное пространство: не менее 30 см
над основным блоком и не менее 10 см с левой и с правой
стороны соответственно. В пространстве между стеной и
задней частью аппарата не должно быть каких-либо преград.
Если заслонить выходные вентиляционные отверстия на
основном блоке, это может привести к пожару.
Для установки используйте предназначенные для этого
детали.
При несоблюдении этого требования основной блок может упасть,
что приведет к его повреждению или к травме.
При установке не допускайте соприкосновения крепежных
винтов или сетевого шнура с металлическими частями в
стене.
Несоблюдение этого требования может вызвать поражение
электротоком.
При снятии основного блока также извлеките из стены
крепежные винты.
Если этого не сделать, кто-нибудь может удариться о крепежные
винты в стене, что приведет к травме.
Установите аппарат на высоте при которой порт USB и кнопки
управления видны и ими легко пользоваться.
При управлении аппаратом в неудобном положении аппарат
может упасть, что приведет к его повреждению или к травме.
ВНИМАНИЕ!
Меры предосторожности
ПРЕДУПРЕЖДЕНИЕ!
Принадлежности для установки
C
g Стандартные принадлежности для установки
(приобретаются отдельно)
2 крепежных винта для крепления на стену
1 винт для предохранительного кронштейна
Используйте винты с номинальным диаметром 4 мм,
соответствующие материалу стены (например, дерево, сталь,
бетон и т.д.).
•
•
C
Необходимо беречь от детей все принадлежности во
избежание их проглатывания.
g Принадлежности, входящие в комплект
Прилагаемые винты (RFAX1020)
2 крепежных винта (XYN3+J10FJ)
1 предохранительный кронштейн (RMKX1015)
Cтеновой кронштейн – принадлежности (RFAX1021)
1 cтеновой кронштейн (RGQX1004)
4 амортизирующие ножки (RKAX0028-K)
•
»
»
•
»
»
B
4 5
Page 53

53
RQTX1043
РУССКИЙ
RQTX1076
53
3. Ввинтите крепежные винты в стену.
1. Снимите подставку с аппарата.
Измерьте и отметьте положение крепежных винтов (2 штуки) и ввинтите их в стену.
При разметке положения винтов руководствуйтесь данными и размерами, указанными ниже.
Установка на стене должна выполняться с помощью обоих крепежных винтов.
Для обеспечения горизонтальности установки воспользуйтесь строительным уровнем.
Используйте достаточно прочные винты, которые способны выдержать вес не менее 20 кг.
•
•
•
•
Вывинтите крепежные винты (2 штуки) внизу аппарата.
Храните снятые винты, чтобы они не потерялись.
2. Установите стеновой кронштейн на задней части аппарата.
Указания по установке на стене
• Перед установкой выключите аппарат и отключите вилку сетевого шнура от сетевой розетки.
• При выполнении действий каждого пункта надежно затягивайте винты во избежание ненадежного крепления.
A
Низ основного блока
Подставка
Мягкое одеяло
или ткань
Крепежный винт
A
Крепежный винт
B
от 8 мм до 9,5 мм
от 2,2 мм до 2,8 мм
от 2,5 мм до 3,5 мм
4 мм
Вылет каждого винта должен
соответствовать несущей
способности в 20 кг или более.
Стена
Крепежный винт
C
163 мм
C
Установка аппарата на стену (Опция) (продолжение)
Сдвиньте подставку и снимите ее с аппарата.
2
1
Совместите оба лепестка на стеновом кронштейне с
отверстиями на основном блоке, а затем задвиньте
кронштейн до щелчка, чтобы он стал на место.
Зафиксируйте стеновой кронштейн крепежными винтами
(2 штуки).
(Усилие затяжки: от 1,2 Н·м до 1,5 Н·м)
B
AUX
300 мм
Обязательное
пространство
Вид сзади
Обязательное
пространство
85,5 мм77,5 мм
500 мм
700 мм
74,8 мм
130 мм
Лепесток
Задняя панель
основного блока
Стеновой кронштейн (вид снизу)
Page 54

54
RQTX1076
РУССКИЙ
До выполнения действий пункта 4 (➡ выше) проденьте
провод (имеется в продаже) через прорезь в стеновом
кронштейне.
Закрепите провод к стене винтом (имеется в продаже),
выполнив действия пункта 5 (➡ слева).
Крепление провода винтом должно выполняться так, чтобы
вверху посередине основного блока оставалась слабина не
более 5 см.
•
4. Повесьте аппарат на стену.
g Средство защиты от падения (опция)
Снятие аппарата со стены
Снимите винт предохранительного кронштейна и
предохранительный кронштейн.
Снимите аппарат со стены.
Отвинтите крепежные винты (2 штуки).
Нажмите обе защелки, а затем сдвиньте стеновой
кронштейн и снимите его с аппарата (➡ справа).
Снова прикрепите подставку к нижней части аппарата и
зафиксируйте ее крепежными винтами (2 штуки).
Снимите крепежные винты (2 штуки) со стены.
Если используется, снимите провод для защиты от падения,
прежде чем выполнять действия пункта .
•
C
B
A
C
Ручка или тупой предмет
Защелки
5. Установите предохранительный кронштейн.
Предохранительный
кронштейн
Крепится
к стене
Винт предохранительного кронштейна
C
Металлическая
крепежная деталь
Винт
Провод
Провод
Прорезь для
провода
Указания по установке на стене (продолжение)
Установка аппарата на стену (Опция) (продолжение)
Оба винта должны пройти в отверстие и сдвинуться в
паз до упора.
Стена
Стеновой кронштейн
Установите предохранительный кронштейн на стеновой
кронштейн.
Ввинтите винт предохранительного кронштейна для
крепления предохранительного кронштейна к стене.
Надежно навесьте аппарат на крепежные
винты .
Прежде чем вешать основной блок на стену,
подключите антенны FM/AM (➡ стр. 3).
Повесив аппарат, отпускайте руки осторожно
и убедитесь, что аппарат надежно держится
на стене.
•
•
C
C
6 7
Page 55

55
RQTX1043
РУССКИЙ
RQTX1076
55
30
31
32
Для выбора страницы руководствуйтесь цифрами в скобках.•
Пульт ДУ
Основной блок
Руководство по органам управления
CD
RADIO
16
17
18
19
20
23
24
25
22
21
1
2
3
4
5
6
8
9
10
11
12
13
15
14
7
Вид сверху
1 167
29 6
26 27
28
15 19 24
Дисплей
Вид спереди
Примерно 30°
Передающее окно
Примерно 30°
Кнопки, аналогичные , функционируют так же, как на пульте ДУ.
Можно использовать любую из них.
•
1
■ Батарейки
Используйте сухие марганцевые батарейки или сухие щелочные
батарейки.
Вставьте в пульт ДУ, соблюдая полярность (+ и –).
Если пульт ДУ долго не будет использоваться, батарейки нужно
извлечь.
Храните в прохладном и темном месте.
Запрещается нагревать или подвергать воздействию огня.
Не оставляйте батарейки в автомобиле, долгое время стоящем
на солнце с закрытыми дверями и окнами.
Неправильное обращение с батарейками пульта ДУ может стать
причиной вытекания электролита, что может вызвать пожар.
•
•
•
•
•
•
•
■ Запрещается:
вставлять вместе старые и новые батарейки.
использовать вместе батарейки разных типов.
разбирать батарейки или замыкать полюса.
пытаться заряжать щелочные или марганцевые батарейки.
пользоваться батарейками без наружной оболочки.
•
•
•
•
•
R6/LR6, AA
Сначала вставляется эта сторона.
Подготовка пульта ДУ
Включатель питания
standby/on [^], [8] (8, 10, 14)
Нажмите включатель, чтобы
переключить aппapaт из
режима «включено» в режим
ожидания и наоборот. B
pежимe ожидания aппapaт
тем не менее потpебляет
небольшое количество
электpоэнеpгии.
[SLEEP] (10)
Кнопки с цифрами
[1-9, 0, ≧ 10] (8, 9, 10, 14)
Для выбора числа из 2 цифр,
например, 16: [≧ 10] [1] [6]
Для выбора числа из 3 цифр,
например, 226:
[≧ 10] [≧ 10] [2] [2] [6]
[DEL] (8)
[PROGRAM] (8, 9)
[REPEAT] (8)
[PLAY MODE] (8, 9, 10, 13)
[USB q/h] (14)
[CD q/h] (8)
[ q/h] (12)
[RADIO] (9)
[iPod q/h] (11)
[AUX] (10)
[g, ] (8, 11, 12, 13, 14)
[RE-MASTER] (10)
[iPod MENU] (11)
[PRESET EQ] (10)
[e,r] (8, 9, 10, 11, 13, 14)
[u], [i] (8, 9, 11, 12, 14)
[OK] (8, 10, 11, 13)
[DISPLAY, –DIMMER]
(8, 9, 13)
Длительно нажмите для
приглушения яркости панели
дисплея. Для отмены снова
длительно нажмите.
[AUTO OFF]
Данная функция позволяет
выключить аппарат (кроме
режима «радио»), если
аппарат не используется в
течение примерно 30 минут.
Для включения нажмите два
раза.
[TUNE MODE] (9)
[;, iPod],
[iPod ;, OPEN/CLOSE] (11)
[;, CD],
[CD ;, OPEN/CLOSE] (8)
[z, PLAY] (10)
[CLOCK/TIMER] (10)
[+, VOL , –],
[– VOLUME +] (13)
[MUTE] (13)
Для временного отключения
звука. Для отмены нажмите
снова. Режим отключения
звука «MUTE» отключается
при регулировке громкости или
при выключении аппарата.
[D.BASS] (10)
[BASS/TREBLE] (10)
[SURROUND] (10)
[ ] (13)
[ MENU] (13)
[u/t], [y/i]
[FM/AM/AUX] (9, 10)
USB port (14)
Индикатор режима ожидания
Микрофон (13)
Индикатор блютус (12)
Сенсор сигнала пульта ДУ
Направьте пульт ДУ на сенсор,
максимальное расстояние
– 7 метров прямо спереди
аппарата, без препятствий.
8
9
10
6
7
16
15
17
18
19
21
23
25
26
27
28
29
30
20
22
24
14
2
1
3
4
5
11
12
13
31
32
Page 56

56
RQTX1076
РУССКИЙ
Операции с дисками
Для просмотра информации о текущей дорожке нажимайте
[DISPLAY, –DIMMER] при воспроизведении или при паузе.
Максимальное отображаемых символов: примерно 30
Аппарат поддерживает версию 1.0 и 1.1 тегов ID3. Текстовые
данные, которые не поддерживаются, отображаться не будут.
•
•
Функции дисплея
Дает возможность запрограммировать до 24 дорожек.
Нажмите [CD q/h], а затем [g, ].
Нажмите [PROGRAM] (программа).
CD: Нажмите кнопки с цифрами для выбора дорожки.
Чтобы дальше программировать дорожки, продолжайте
нажимать кнопки с цифрами.
Для начала воспроизведения нажмите [OK] или
[CD q/h].
MP3: Для выбора альбома нажмите [e,r].
Нажмите [i] один раз, а затем нажимайте кнопки с
цифрами для выбора дорожки.
Нажмите [OK].
Повторите пункты с по для программирования
большего количества дорожек.
Для начала воспроизведения нажмите [CD q/h].
Отменить
программный режим
В режиме «стоп» нажмите [PROGRAM],
чтобы индикатор «PGM» на дисплее
погас.
Снова проиграть
программу
В режиме «стоп» нажмите [PROGRAM], а
затем [CD q/h].
Проверить
содержание
программы
В режиме «стоп», при горящем
индикаторе «PGM» нажмите [u] или
[i]. Для проверки при составлении
программы после появления «PGM»
дважды нажмите [PROGRAM], а затем
нажимайте [u] или [i].
Удалить последнюю
запрограммированную
дорожку
Нажмите [DEL] в режиме «стоп».
Стереть все
запрограммированные
дорожки
В режиме «стоп» нажмите [g, ].
На дисплее появится «CLR ALL» (удалить
все). Для удаления всех дорожек, пока не
прошло 5 секунд, снова нажмите кнопку.
При открытии сдвижной дверцы программная память стирается.•
Программное воспроизведение
До щелчка!
g Как вставить диск
Нажмите [^] для включения аппарата.
Нажмите [;, CD] для открытия сдвижной дверцы.
Держа диск стороной с
маркировкой к себе, под
наклоном вставьте диск в
лоток диска под сдвижной
дверцей.
Наденьте диск на ось в
центре, а затем нажмите
на диск до щелчка, чтобы
он стал на место.
g Как извлечь диск
Нажмите [;, CD] для открытия сдвижной дверцы.
Придерживая диск в центре, возьмитесь за диск справа
вверху и потяните так, чтобы он со щелчком снялся с оси.
Наклоните диск, чтобы не коснуться им сдвижной дверцы, и
извлеките диск.
Если сдвижную дверцу закрывать рукой, она может сломаться.
При извлечении диска CD следите, чтобы он не зацепился за
сдвижную дверцу.
•
•
Стоп
Нажмите [g, ].
Пауза
Нажмите [CD q/h]. Чтобы возобновить
воспроизведение, нажмите снова.
Пропуск дорожки
Нажмите [u] или [i].
Поиск в
проигрывающейся
дорожке (CD)
Длительно нажмите [u] или [i].
Пропуск альбома
(MP3)
Нажмите [e,r].
Воспроизведение
с прямым
доступом
(Воспроизведение
начинается
с выбранной
дорожки.)
CD: Нажмите кнопки с цифрами для выбора
дорожки.
MP3: Для выбора альбома нажмите [e,r].
Нажмите [i] один раз, а затем
нажимайте кнопки с цифрами для
выбора дорожки.
Нажмите [^] для включения аппарата.
Вставьте диск для воспроизведения (➡ выше).
Для начала воспроизведения нажмите [CD q/h].
Простое воспроизведение
Нажмите [;, CD] для закрытия сдвижной дверцы.
При закрытии сдвижной дверцы уберите пальцы, чтобы их не
прищемило.
Нажмите [CD q/h].
Нажимайте [PLAY MODE] (режим воспроизведения) для
выбора следующих режимов.
Режим Воспроизведение
1-TRACK
1TR
одна выбранная дорожка на диске.
Нажмите кнопки с цифрами для выбора
дорожки.
1-ALBUM
1ALBUM (MP3)
один выбранный альбом на диске.
Для выбора альбома нажмите [e,r].
RANDOM
RND
диск в произвольном порядке.
1-ALBUM RANDOM
1ALBUM RND (MP3)
все дорожки одного выбранного альбома
в произвольном порядке.
Для выбора альбома нажмите [e,r].
Во время произвольного воспроизведения невозможно выполнить
пропуск к предыдущей дорожке.
При открытии сдвижной дверцы текущий режим воспроизведения
сбрасывается.
Для повтора программного воспроизведения или выбранный
режим воспроизведения, нажмите [REPEAT] (повтор). Для
отмены нажмите снова.
•
•
•
Функции режима воспроизведения
8 9
Page 57

57
RQTX1043
РУССКИЙ
RQTX1076
57
Нажмите [RADIO] (радио) для выбора диапазона «FM» или
«AM».
Нажмите [TUNE MODE] (режим настройки) для выбора
режима «MANUAL» (ручной).
Для выбора частоты нужной станции нажмите [u] или [i].
При приеме стереофонической программы FM на дисплей
выводится индикация «ST».
Для автоматической настройки
Повторите действия пунктов и (➡ выше).
Длительно нажмите [u] или [i], пока частота не начнет
быстро изменяться.
Для отмены автоматической настройки еще раз нажмите [u]
или [i].
Автоматическая настройка может не работать в условиях
сильных помех.
g Улучшение качества звучания в диапазоне FM
Длительно нажмите [PLAY MODE] (режим FM) до появления
индикации «MONO». Для отмены снова длительно нажмите.
Режим «MONO» также отключается при изменении частоты.
Для нормального прослушивания выключите режим «МОNО».
•
•
•
•
Ручная настройка
Можно задать до 30 фиксированных настроек FM и 15
фиксированных настроек AM.
Подготовка: Нажмите [RADIO] (радио) для выбора диапазона «FM»
или «AM».
g Автоматическая запись фиксированных
настроек
Для переключения между низшей «LOWEST» и текущей
«CURRENT» частотой нажмите [PLAY MODE] (режим
воспроизведения).
Для начала записи фиксированных настроек длительно
нажмите [PROGRAM] не менее, чем на 2 секунд.
g Запись фиксированных настроек вручную
Нажмите [TUNE MODE] (режим настройки) для выбора
режима «MANUAL» (ручной).
Для настройки на нужную станцию нажмите [u] или [i].
Нажмите [PROGRAM] (программа).
Нажимайте кнопки с цифрами для выбора канала.
Станция, занимающая канал, стирается при записи в этот канал
новой станции.
Для записи в фиксированные настройки других станций
повторите действия пунктов с по .
g Выбор станции из фиксированных настроек
Нажмите [TUNE MODE] (режим настройки) для выбора
«PRESET».
Для выбора канала нажмите [u] или [i].
Для выбора канала можно также нажимать кнопки с цифрами.•
Фиксированные настройки
Данные RDS могут пропадать с дисплея при плохом приеме.•
Вещание RDS
Позволяет выдавать на дисплей название радиостанции или тип
программы. При приеме сигнала с RDS включается индикация
«RDS».
Нажмите [DISPLAY, –DIMMER] для показа:
название радиостанции (PS) тип программы (PTY)
дисплей частоты
Настройка шага частоты AM
Аппарат может также принимать радиопередачи диапазона AM на
частотах с шагом 10 кГц.
Для изменения шага настройки на 10 кГц (только на основным
блоке)
Нажмите [FM/AM/AUX] для выбора «AM».
Длительно нажмите [FM/AM/AUX].
Через несколько секунд дисплей переключится на минимальную
частоту в текущей настройке.
Продолжайте нажимать [FM/AM/AUX].
После того как минимальная частота изменится, отпустите кнопку.
Для возврата к первоначальному шагу повторите пункты по
(➡ выше).
После смены этой настройки все ранее сделанные
фиксированные настройки удаляются.
•
•
Примечания о дисках типа CD-R и CD-RW
Настоящий аппарат может воспроизводить диски CD-R и диски
CD-RW, записанные в формате записи CD-DA или MP3.
При записи в формате CD-DA используйте диск для записи
аудио, и закройте* его по окончании записи.
* Процесс, выполняемый после записи, который делает
возможным воспроизведение аудио с дисков CD-R и CD-RW
на плеере для CD-R или CD-RW.
Аппарат может не воспроизводить некоторые диски в
зависимости от состояния записи.
Не используйте диски неправильной формы.
Не наклеивайте на диск дополнительные наклейки и этикетки.
Не используйте диски с этикетками и наклейками, которые
отклеиваются, или диски с толстым слоем клея под этикеткой
или наклейкой.
Не устанавливайте покрытия для защиты от царапин или
любые другие аксессуары.
Ничего не пишите на дисках CD.
Не чистите диски CD жидкостями (Протирайте мягкой, сухой
тканью).
Запись файлов MP3 для воспроизведения на
настоящем аппарате
Максимальное количество дорожек и альбомов: 999 дорожек и
255 альбомов.
Совместимая степень сжатия: от 64 кбит/с до 320 кбит/с
(стерео). Рекомендуется 128 кбит/с (стерео).
Форматы дисков: ISO9660 уровень 1 и уровень 2 (кроме
расширенных форматов).
Время, необходимое на чтение каталога диска, зависит от
количества дорожек, папок или структуры папок.
Ограничения по MP3
Настоящий аппарат совместим с многосеансовыми дисками,
для начала воспроизведения нужно больше времени.
Настоящий аппарат не может проигрывать файлы, записанные
пакетным способом.
Если запись на диске выполнена как в формате MP3, так
и в обычном стандарте записи аудио (CD-DA), аппарат
воспроизводит данные того типа, которые записаны на
внутренней части диска. Если на диске имеются данные
формата MP3 и звуковые данных других типов (например,
WMA или WAV), аппарат воспроизводит только данные MP3.
В зависимости от того, каким образом были записаны файлы
MP3, они могут не воспроизводиться в порядке нумерации или
не воспроизводиться вообще.
•
•
•
•
•
•
•
•
•
•
•
•
•
•
•
•
•
Операции с радио
Операции с дисками
(продолжение)
Операции с радио (продолжение)
Ручная настройка
g Улучшение качества звучания в диапазоне AM
Нажмите [RADIO] (радио) для выбора диапазона «AM».
Несколько раз длительно нажмите [TUNE MODE] (режим
настройки) для изменения настройки защиты от помех
(«BP 1», «BP 2», «BP 3» или «BP 4»).
Page 58

58
RQTX1076
РУССКИЙ
Таймер автовыключения выключает аппарат по истечении
заданного времени.
Нажмите [SLEEP] (автовыключение) для включения или
выключения функции автовыключения.
Для проверки времени, остающегося до выключения, один раз
нажмите [SLEEP] (автовыключение).
Таймер воспроизведения и таймер автовыключения можно
использовать совместно. Таймер автовыключения всегда имеет
высший приоритет. Периоды настройки таймеров не должны
перекрываться.
Если включена функция автовыключения AUTO OFF и аппарат не
используется в течение примерно 30 минут, аппарат выключится,
даже если время воспроизведения или время автовыключения не
истекло.
•
•
Можно установить таймер, чтобы аппарат включился в
определенное время и разбудил вас.
Настоящий аппарат предлагает 3 независимых таймера
воспроизведения.
Подготовка:
Включите аппарат и установите часы (➡ выше).
Подготовьте источник музыки (диск, радио, iPod/iPhone, блютус,
USB или AUX) и отрегулируйте громкость.
Для выбора таймера воспроизведения нажимайте
[CLOCK/TIMER] (часы/таймер).
Для установки времени включения в течение 5 секунд
нажмите [e,r].
Нажмите [OK].
Повторите действия пунктов и для установки времени
выключения.
Включение работы таймера
Нажимайте [z, PLAY] для включения выбранного таймера
воспроизведения.
Нажмите [^] для выключения аппарата.
•
•
Часы работают в 24-часовом формате.
Нажмите [CLOCK/TIMER] (часы/таймер) для выбора режима
установки часов «CLOCK».
Для установки времени в течение 5 секунд нажмите [e,r].
(Длительно нажмите для быстрого изменения времени.)
Нажмите [OK].
Для вызова часов на дисплей нажмите [CLOCK/TIMER]
(часы/таймер).
Чтобы время всегда было точным, регулярно подводите часы.
•
•
Установка часов
Таймер воспроизведения
Чтобы изменить
настройки
Повторите действия пунктов с по
(➡ выше).
Чтобы изменить
источник или
громкость
Нажмите [z, PLAY] два раза, чтобы
индикатор zPLAY исчез с дисплея.
Смените источник или измените уровень
громкости.
Выполните действия пунктов и
(➡ выше).
Чтобы проверить
настройки (Пока
аппарат включен
или находится в
режиме ожидания)
Нажимайте [CLOCK/TIMER] (часы/таймер)
для выбора «zPLAY 1», «zPLAY 2» или
«zPLAY 3».
Для отмены
Два раза нажмите [z, PLAY], чтобы
индикатор таймера исчез с дисплея.
Таймер включится в установленное времени, громкость
постепенно увеличится до заданного уровня.
•
Стандартный
эквалайзер
Нажимайте [PRESET EQ] (стандартный
эквалайзер) для выбора «HEAVY» (тяжелый),
«SOFT» (мягкий), «CLEAR» (четкий), «VOCAL»
(вокал) или «FLAT» (без обработки).
Низкие или
высокие частоты
Нажмите [BASS/TREBLE] для выбора
«BASS» или «TREBLE».
Нажмите [e,r] для регулировки уровня
(от -4 до +4).
Объемный звук При воспроизведении нажимайте
[SURROUND] (объемный звук) для
выбора «ON SURROUND» (включен) или
«OFF SURROUND» (выключен).
Если во время приема FM-стерео
увеличиваются помехи, отключите эффект
объемного звучания.
Глубокий бас При воспроизведении нажимайте [D.BASS]
(глубокий бас) для выбора «ON D.BASS»
(включен) или «OFF D.BASS» (выключен).
Регенератор При воспроизведении нажимайте
[RE-MASTER] для выбора индикации
«ON RE-MASTER» (регенератор включен) или
«OFF RE-MASTER» (регенератор выключен).
Цифровой регенератор работает с MP3.
Аналоговый регенератор работает с
iPod/iPhone и внешним входом AUX.
•
•
Таймер автовыключения
30MIN 60MIN 90MIN 120MIN
OFF (Выключено)
Таймер Настройка звучания
Пульт ДУ и основной блок настроены на заводе-изготовителе на
режим «REMOTE 1».
Если вы заметили, что от пульта ДУ случайно срабатывает другая
аппаратура, можно переключить его в другой режим: «REMOTE 2».
Для переключения в режим «REMOTE 2» (только на основным
блоке)
Нажмите [FM/AM/AUX] для выбора «AUX».
Длительно нажмите [FM/AM/AUX], а затем нажимайте [2], пока
на дисплее не появится индикация «REMOTE 2».
Длительно нажмите [OK] и [2] не менее, чем на 2 секунды.
Возврат на режим «REMOTE 1»
Повторите действия пунктов выше, но вместо [2] нажимайте [1].
(На дисплее появится индикация «REMOTE 1».)
Изменение режима пульта ДУ и основного
блока
Подключите аудиокабель к гнезду AUX.
Тип штекера: 3,5 мм стерео
Нажмите [AUX] и начните воспроизведение на
портативном источнике аудиосигнала.
Можно выбрать входной уровень звука портативной
аудиоаппаратуры.
Нажимайте [PLAY MODE] (входной уровень) для выбора «HIGH»
(высокий) или «NORMAL» (нормальный).
Чтобы уменьшить входной сигнал, выключите эквалайзер или
убавьте громкость портативной аппаратуры. Высокий уровень
входного сигнала вызовет искажение звука.
Подробная информация содержится в инструкции по
эксплуатации другой аппаратуры.
Кабели и аппаратура приобретаются отдельно.
•
•
•
Портативная аудиоаппаратура (в режиме AUX)
Внешние устройства
AUX
10 11
Page 59

59
RQTX1043
РУССКИЙ
RQTX1076
59
Внешние устройства (продолжение)
Прослушивание аудио с iPod или iPhone
g Как вставить iPod/iPhone
Нажмите [;, iPod] для открытия сдвижной дверцы.
Вставьте стыковочный переходник (приобретается
отдельно), подходящий для вашего iPod/iPhone.
g Извлечение проигрывателя iPod/iPhone
Нажмите [;, iPod] для закрытия сдвижной дверцы.
Выполните действия пунктов и (➡ выше).
Для отключения просто достаньте iPod/iPhone из аппарата.
Выполните действия пунктов и (➡ выше).
Если стыковочный док iPod/iPhone не наклонить при подключении
или отключении iPod/iPhone, это может повредить разъем.
Для установки устройства iPod/iPhone в аппарат разрешается
использовать стыковочный переходник, или прилагаемый к
iPod/iPhone, или производства компании Apple Inc.
Прежде чем подключать или отключать iPod/iPhone, уменьшите
громкость на основном блоке до минимума.
•
•
•
■ Зарядка iPod/iPhone
Пока устройство iPod/iPhone заряжается в режиме ожидания, на
дисплее основного блока отображается индикация
«IPOD CHARGING» (зарядка iPod).
Проверьте iPod/iPhone и убедитесь, что батарея полностью
заряжена. Если вы долго не используете iPod/iPhone после
окончания зарядки, отключите его от основного блока иначе
батарея постепенно разрядится. (После полной зарядки
дополнительная подзарядка не происходит.)
•
•
Примечания об iPhone:
Всеми функциями телефона можно управлять только с помощью
сенсорного экрана iPhone.
Аппарат не отображает входящие вызовы или состояние
телефона (Для использования расширенных возможностей
подключите iPhone к настоящему аппарату через блютус
(➡ стр. 13)).
Мелодия звонка при входящем вызове воспроизводится
динамиком iPhone. Если аппарат находится в режиме iPod/iPhone,
мелодия звонка также воспроизводится динамиками аппарата
(Для использования расширенных возможностей подключите
iPhone к настоящему аппарату через блютус (➡ стр. 13)).
Подключение или отключение iPhone от аппарата не прерывает звонка.
Технические спецификации компании Apple, гарантирующие
работу iPhone, как указано выше, отсутствуют. Телефоны iPhone
новых моделей iPhone или с новыми версиями программного
обеспечения iPhone могут работать иначе.
•
•
•
•
•
Правильно подключите iPod/iPhone
(приобретается отдельно).
Обязательно достаньте iPod/iPhone
из чехла.
■ Совместимые модели iPod
Название Объем памяти
iPod nano 5-го поколения
(видеокамера)
8 Гб, 16 Гб
iPod touch 2-го поколения 8 Гб, 16 Гб, 32 Гб, 64 Гб
iPod classic 120 Гб, 160 Гб (2009)
iPod nano 4-го поколения (видео) 8 Гб, 16 Гб
iPod classic 160 Гб (2007)
iPod touch 1-го поколения 8 Гб, 16 Гб, 32 Гб
iPod nano 3-го поколения (видео) 4 Гб, 8 Гб
iPod classic 80 Гб
iPod nano 2-го поколения
(алюминиевый)
2 Гб, 4 Гб, 8 Гб
iPod 5-го поколения (видео) 60 Гб, 80 Гб
iPod 5-го поколения (видео) 30 Гб
iPod nano 1-го поколения 1 Гб, 2 Гб, 4 Гб
iPod 4-го поколения (цветной дисплей)
40 Гб, 60 Гб
iPod 4-го поколения (цветной дисплей)
20 Гб, 30 Гб
iPod 4-го поколения 40 Гб
iPod 4-го поколения 20 Гб
iPod mini 4 Гб, 6 Гб
■ Совместимые модели iPhone
Название Объем памяти
iPhone 3GS 16 Гб, 32 Гб
iPhone 3G 8 Гб, 16 Гб
iPhone 4 Гб, 8 Гб, 16 Гб
Совместимость зависит от версии программного обеспечения
iPod/iPhone.
•
Нажмите на рычаг
стыковочного выключателя,
чтобы он со щелчком
вернулся с исходное
положение.
Нажмите!
Нажмите [;], чтобы
разблокировать стыковочный
док iPod/iPhone, а затем
потяните рычаг стыковочного
выключателя, чтобы
наклонить стыковочный док
iPod/iPhone.
[;]
До щелчка!
Стыковочный переходник
Рычаг
Разъем
Защелки
Держите стыковочный
переходник iPod/iPhone
защелками к себе и
вставьте сначала эту
сторону, а затем нажмите
на другую сторону, чтобы
он со щелчком встал на
место.
До щелчка!
Воспроизведение
Нажмите [iPod q/h].
Пауза
Нажмите [iPod q/h] или [g, ].
Пропуск дорожки
Нажмите [u] или [i].
Поиск в проигрывающейся
дорожке
Длительно нажмите [u] или [i].
Вызов меню iPod/iPhone
/возврат в предыдущее
меню
Нажмите [iPod MENU] в режиме
воспроизведения.
(Только с пульта ДУ)
Выбор содержания в
меню iPod/iPhone
Нажмите [e,r] , а затем [OK].
(Только с пульта ДУ)
Page 60

60
RQTX1076
РУССКИЙ
Внешнее устройство (продолжение)
Операции с блютус
Входной уровень
Можно выбрать входной уровень звука устройства блютус.
Нажмите [PLAY MODE] (режим воспроизведения) для выбора
уровня: «LEVEL 0», «LEVEL +1» или «LEVEL +2».
Если звук искажен, выберите «LEVEL 0».•
Простое воспроизведение
Нажмите [ q/h] для выбора Bluetooth (блютус).
На устройстве блютус начните воспроизведение источника
музыки. Если устройство подключено, музыка будет слышна
из настоящего аппарата.
(При необходимости см. руководство пользователя устройства
блютус.)
Можно также выполнять следующие настройки пультом ДУ.
Подготовка:
Соедините устройство блютус с настоящим аппаратом, чтобы
создать звуковое подключение.
Нажмите [ q/h] для выбора Bluetooth (блютус).
При использовании функции в первый раз аппарат входит в
режим соединения автоматически.
Пока настоящий аппарат находится в режиме соединения,
перейдите в меню Bluetooth вашего устройства блютус
и выполните поиск устройств блютус для обнаружения
настоящего аппарата (SC-HC40).
См. руководство пользователя устройства блютус, где
имеется дальнейшая информация о порядке подключения
устройств блютус.
При выдаче запроса ввода пароля введите «0000» (Для
устройств блютус, версия которых несовместима с 2.1+EDR).
Если соединение успешно установлено, на 2 секунды
будет показано имя подключенного устройства. Загорается
индикатор блютус. Теперь аппарат готов к использованию с
устройством блютус.
Убедитесь, что устройство блютус поддерживает A2DP (профиль
дистанционного управления аудио и видео).
Настоящий аппарат поддерживает прием в режиме A2DP,
имеющем защиту авторских прав методом SCMS-T.
Профиль A2DP позволяет передавать потоковый стереозвук
от источника аудиосигнала (мобильный телефон, настольный
компьютер или ноутбук) на настоящий аппарат через блютус.
В зависимости от технических характеристик или настроек
мобильных телефонов может быть невозможно установить
подключение или работа и индикация на дисплее будут отличаться.
Можно установить соединение настоящего аппарата максимум
с 6 устройствами. Отключите текущее устройство блютус и
руководствуйтесь разделом «Регистрация дополнительных
устройств» (➡ стр. 13).
При регистрации устройства свыше максимально возможного
количества данные этого устройства будут записаны вместо
данных устройства, указанного раньше всех в хронологии
подключения.
Если зарегистрированное устройство регистрируется повторно,
его данные будут перезаписаны.
•
•
•
•
•
•
•
•
•
•
g Используемый диапазон частот
Настоящий аппарат использует диапазон частот 2,4 ГГц, однако
эта частота также может использоваться другими устройствами.
Во избежание помех со стороны других беспроводных устройства
необходимо выполнять рекомендации, указанные ниже.
g Сертификация устройства
Настоящий аппарат соответствует требованиям по частоте и прошел
сертификацию, соответствующую законодательству о диапазонах
частот, поэтому для его использования не требуется специальное
разрешение. Однако следующие действия преследуются по закону:
Разборка / изменение конструкции аппарата.
Удаление таблички с техническими данными с задней части
настоящего аппарата.
g Ограничения по использованию
Беспроводная передача и/или использование со всеми
устройствами блютус не гарантируется.
Совместимые мобильные телефоны, способные осуществлять
беспроводную передачу, включают в себя и соответствуют
стандартам, установленным корпорацией Bluetooth SIG, Inc.
Однако если мобильный телефон оптимизирован для соответствия
стандартным техническим спецификациям, некоторые функции
могут работать. Даже в этом случае, в зависимости от технических
характеристик и настроек мобильного телефона, подключение
возможно не удастся установить, а также не гарантируются режимы
работы, функционирование дисплея или работоспособность.
Настоящий аппарат поддерживает функции защиты блютус,
однако в зависимости от условий работы и/или настроек эта
защита может быть недостаточна. При передаче данных через
беспроводное соединение необходимо проявлять осторожность.
Учтите, что корпорация Panasonic не несет ответственности за
утечку данных и/или информации, которая может быть произойти
во время передачи по беспроводному соединению.
g Дальность действия
Устройство может использоваться на расстоянии до 10 м. без
препятствий. Дальность действия или периметр может сокращаться
при наличии любых преград, устройств, создающих помехи, людей
в помещении или в зависимости от конструкции здания. Просим
учесть, что дальность, указанная выше, не гарантируется.
g Воздействие других устройств
Существует вероятность, что настоящий аппарат не сможет
работать правильно или могут возникать другие следствия,
например «разрывы» звучания и т.д., если в непосредственной
близости присутствуют другие устройства. Поэтому во избежание
помех для сигнала при использовании рекомендуется удалить
настоящий аппарат от следующих устройств:
Микроволновая печь/беспроводная локальная сеть/электронные
устройства/аудио и видео аппаратура/офисная техника
и устройства/цифровые беспроводные радиотелефоны/
факсимильные аппараты и т.д.
Если вы проживаете вблизи радиостанции или телебашни и
сигнал очень сильный, аппарат может работать неправильно.
При использовании портативного компьютера с беспроводным
передатчиком локальной сети не используйте настоящий аппарат
и беспроводную локальную сеть одновременно.
Если даже при нахождении далее 5 метров от беспроводного
устройства локальной сети по-прежнему слышен шум, выключите
питание беспроводного устройства локальной сети.
g Намеренные ограничения использования
Настоящий аппарат предназначен для обычного, бытового
использования. Настоящий аппарат не разрабатывался и не
изготовлен для использования в условиях, требующих «повышенной
безопасности» или в опасных условиях. Использования настоящего
аппарата в таких условиях запрещается.
Следующие примеры указывают условия, которые требуют
крайней осторожности и могут непосредственно привести к гибели
людей или тяжким увечьям.
например) Ядерная техника и управление ядерной реакцией/
автоматизированное управление воздушным судном/
управление воздушным движением/управление
движением тяжелых грузовых систем/управление
системами жизнеобеспечения или поддержки жизненно
важных функций/управление системами вооружения
и/или системами пуска ракет и т.д.
•
•
•
•
•
•
•
•
•
•
Что такое блютус?
Технология блютус позволяет устанавливать беспроводное
соединение с другим электронным устройством.
Воспроизведение
Для начала воспроизведения нажмите [ q/h].
Стоп
Нажмите [g, ].
Пауза
Нажмите [ q/h]. Чтобы возобновить
воспроизведение, нажмите снова.
Пропуск
дорожки
Нажмите [u] или [i].
Для использования этих функций, устройство блютус должно
поддерживать AVRCP (профиль дистанционного управления
аудио-/видеоустройствами).
Настоящий аппарат не может передавать данные на устройство
блютус.
При воспроизведении iPod/iPhone через блютус и основной блок
звук может прерываться, если оставить активным экран меню
блютус iPod/iPhone или при регистрации и подключении блютус.
Если это происходит, необходимо выйти из экрана меню блютус
iPod/iPhone.
При воспроизведении музыки с iPod/iPhone через подключение
блютус с одновременным подключением iPod/iPhone к
настоящему аппарату через стыковочный док iPod/iPhone
аудиосигнал не будет воспроизводиться в положении
переключателя «Bluetooth» (блютус). Для продолжения
прослушивания музыки переключите переключатель на «iPod».
•
•
•
•
12 13
Использование блютус
Page 61

61
RQTX1043
РУССКИЙ
RQTX1076
61
Настоящий аппарат работает как устройство громкой связи с блютус
в сочетании с вашими мобильными телефонами.
При этом можно ответить на звонок или отменить входящий вызов с
помощью пульта ДУ.
Для ответа на
звонок
(мигает индикация
«IN CALL» (вызов))
Нажмите [ ]. На дисплее будет мигать
индикация «CALLING» (вызов) (Говорите в
микрофон аппарата).
Для перевода вызова на мобильный
телефон снова нажмите [ ] (мигает
индикация «TRANSFER». Теперь можно
разговаривать по мобильному телефону).
Для отмены вызова
Нажмите [g, ].
Для регулировки
громкости
Нажмите [+, VOL , –] [Регулируется с
«TEL VOL 1» по «TEL VOL 10» (уровни
громкости телефона)].
Для отключения
микрофона
Нажмите [MUTE]. Для отмены нажмите снова.
(В режиме «MIC MUTE» (микрофон
выключен) вызывающий абонент не может
слышать ваш голос)
Настоящий аппарат не работает с профилем «наушники» (HSP).
Если вблизи микрофона настоящего аппарата находится мобильный
телефон, может возникать шум. При звонке по телефону не
подносите мобильный телефон к микрофону настоящего аппарата.
•
•
Нажмите [ MENU], чтобы появилась индикация
«DISCONNECT?» (отключить?), а затем нажмите [OK].
Выдается подтверждающее сообщение.
Нажмите [e,r] для выбора «YES» (да) или «NO» (нет), а затем
нажмите [OK].
Подключение также можно прекратить, если выключить передачу
блютус на подключенном устройстве блютус.
•
Отключение устройства блютус
Расширенные функцииФункции дисплея
Для просмотра информации о текущем подключенном
устройстве нажимайте [DISPLAY, –DIMMER].
BLUETOOTH
«БЛЮТУС»
Имя подключенного
устройства
Подключенные
профили
Профиль «Громкая связь» (HFP)
Внешнее устройство (продолжение)
Торговая текстовая марка и логотипы Bluetooth (блютус)
принадлежат корпорации Bluetooth SIG, Inc. и любое
использование таких торговых текстовых марок корпорацией
Panasonic осуществляется по лицензии. Прочие товарные знаки и
фирменные названия принадлежат соответствующим владельцам.
Декларация о соответствии (DoC)
Корпорация «Panasonic Corporation» настоящим заявляет, что
настоящий продукт соответствует важнейшим требованиям и другим
уместным положениям директивы 1999/5/EC.
Клиенты могут загрузить копию оригинальной декларации о
соответствии наших изделий категории «оконечное радио- и
телекоммуникационное оборудование» с нашего сервера
документов:
http://www.doc.panasonic.de
Контактные данные авторизованного представителя: Panasonic
Marketing Europe GmbH, Panasonic Testing Centre, Winsbergring 15,
22525 Hamburg, Germany
Настоящее изделие предназначено для использования в
следующих странах.
PL, CZ, HU, SK, BG, EE, LV, RO, SI, BO, HR, MK, RS, LT, RU, UA, KZ,
BY, O.CIS
Настоящее изделие предназначено для массового потребителя.
(Категория 3)
«Made for iPod» (изготовлено для iPod) означает, что электронное
устройство было разработано специально для подключения к iPod
и имеет сертификацию разработчика в том, что оно соответствует
стандартам рабочих характеристик компании Apple.
«Works with iPhone» (работает с iPhone) означает, что
электронное устройство было разработано специально для
подключения к iPhone и имеет сертификацию разработчика в
том, что оно соответствует стандартам рабочих характеристик
компании Apple.
Компания Apple не несет ответственности за работу этого
устройства или за его соответствие стандартам безопасности и
регулятивным нормам.
iPod – это товарный знак корпорации Apple, зарегистрированной
в США и других странах. iPhone – это товарный знак корпорации
Apple.
Технология декодирования аудиосигнала MPEG (уровень 3),
лицензирована у компании Fraunhofer IIS и Thomson.
or
РАБОЧАЯ ЧАСТОТА ДО ОТ 2400 МГц ДО 2483,5 МГц
g Регистрация дополнительных устройств
Нажмите [ MENU] (меню).
Нажмите [e,r] для выбора «NEW DEV», а затем нажмите [OK].
Аппарат входит в режим соединения и на дисплее мигает
индикация «PAIRING» (соединение).
Пока настоящий аппарат находится в режиме соединения,
перейдите в меню Bluetooth вашего устройства блютус
и выполните поиск устройств блютус для обнаружения
настоящего аппарата (SC-HC40).
При выдаче запроса ввода пароля введите «0000».
g Для выбора качества связи
Нажмите [ MENU] (меню).
Нажмите [e,r] для выбора «LINK MODE» (режим соединения),
а затем нажмите [OK].
Нажмите [e,r] для выбора следующих режимов, а затем
нажмите [OK].
«MODE 1»: Соединение для высокой устойчивости связи
«MODE 2»:
Соединение с высокой скоростью передачи данных и
высоким качеством звучания (В этом режиме может
происходить отключение канала связи, если это
происходит, выберите режим «MODE 1»).
g Для выбора режима автоматического
соединения «Auto Link»
Нажмите [ MENU] (меню).
Нажмите [e,r] для выбора «AUTO LINK» (автоматическое
соединение), а затем нажмите [OK].
Нажмите [e,r] для выбора следующих режимов, а затем
нажмите [OK].
«ON» (вкл.): Автоматическое соединение даже не в режиме
«Bluetooth» (блютус) переключателя
«OFF» (выкл.): Соединение только в режиме Bluetooth (блютус)
переключателя
Эти функции недоступны, если подключено устройство. Для
отображения этих функций отключите устройства блютус.
При отображении индикации соединения «LINKING» нажатие
[ MENU] ничего не производит.
Функция автоматического соединения «Auto Link» работает,
только если ваше устройство поддерживает A2DP.
•
•
•
•
•
•
•
•
Page 62

62
RQTX1076
РУССКИЙ
Внешние устройства (продолжение)
Операции с USB
Возможность подключения устройств USB позволяет подключать
накопители USB большой емкости и воспроизводить с них дорожки
MP3.
Подготовка:
Перед подключением любого накопителя USB к аппарату
обязательно выполните резервное копирование данных,
хранящихся на нем.
Использовать удлинитель USB не рекомендуется. Устройство,
подключенное через кабель, не распознается настоящим
аппаратом.
Откройте крышку USB.
Уменьшите громкость и подключите накопитель USB.
Для начала воспроизведения нажмите [USB q/h].
•
•
Стоп
Нажмите [g, ]. На дисплее появится
«RESUME» (возобновить). Положение
запоминается.
Чтобы возобновить воспроизведение,
нажмите
[USB q/h].
Для удаления положения из памяти снова
нажмите
[g, ].
Пауза
Нажмите
[USB q/h]. Чтобы возобновить
воспроизведение, нажмите снова.
Пропуск дорожки
Нажмите
[u] или [i].
Пропуск альбома
Нажмите
[e,r].
Воспроизведение с
прямым доступом
(воспроизведение
начинается с
выбранной дорожки.)
Для выбора альбома нажмите [e,r].
Нажмите [i] один раз, а затем
нажимайте кнопки с цифрами для
выбора дорожки.
Совместимые устройства
Чтобы отключить накопитель USB, выберите другой источник
кроме «USB».
Если отключить накопитель USB, пока он выбран в качестве
источника, это может повредить данные, хранящиеся на этом
устройстве.
•
Устройства, которые определяются как накопители USB
большой емкости:
Устройства USB, которые поддерживают только поточную
передачу данных.
Устройства USB, которые поддерживают быстродействие USB 2.0.
•
•
Другие функции выполняются так же, как функции, описанные в
разделе «Операции с дисками» (➡ стр. 8, 9).
Примечания о USB
Поддерживаемый формат: Файлы с расширением «.mp3» или
«.MP3»
CBI (Control/Bulk/Interrupt) не поддерживается.
Устройства с файловой системой NTFS не поддерживаются.
[Поддерживаются только файловые системы FAT 12/16/32
(таблица размещения файлов 12/16/32).]
При некоторых размерах сектора некоторые файлы могут не
воспроизводиться.
Настоящий аппарат может осуществлять доступ к 255
альбомам и 2500 дорожкам.
Максимальное количество дорожек в папке – 999 дорожек.
При подключении многопортового USB карт-ридера будет
выбрана только одна карта памяти, обычно это первая
вставленная карта памяти.
При извлечении карты памяти отключите карт-ридер USB
от аппарата. Если этого не сделать, можно повредить
устройство.
При подключении к порту USB цифрового аудиоплеера он
заряжается все время, пока включен аппарат.
•
•
•
•
•
•
•
•
•
Накопитель USB (приобретаются отдельно)
Сброс памяти (Инициализация)
При возникновении следующих ситуаций выполните сброс памяти:
При нажатии кнопок ничего не происходит.
Вы хотите стереть и выполнить сброс содержания памяти.
Как выполнить сброс памяти
Отключите сетевой шнур. (Подождите не менее 3 минут перед переходом к пункту 2.)
Удерживая нажатой [8] на основном блоке, снова подключите сетевой шнур.
На дисплее появится «--------».
Отпустите [8].
Все настройки возвращены на заводские настройки. Вам понадобится вновь настроить данные в памяти.
•
•
14 15
Page 63

63
RQTX1043
РУССКИЙ
RQTX1076
63
Перед обращением в службу сервиса проверьте пункты, указанные ниже. Если вы сомневаетесь насчет некоторых пунктов
проверки или указанные в списке меры не помогают, обратитесь к местному дилеру.
g Обычные проблемы
Неверная индикация на дисплее или не
начинается воспроизведение
Вы не вставили диск или вставили его
неправильно. Вставьте его правильно.
Диск поцарапан или загрязнен
(Пропускаются дорожки).
На линзе осела влага. Подождите
примерно час, пока она не испарится, а
затем повторите попытку.
Невозможно прочесть файлы MP3
Иногда невозможно воспроизвести MP3,
если был скопирован многосеансовый
диск, на котором отсутствуют данные
между сеансами.
При создании многосеансового диска
необходимо закрыть сеанс.
Объем данных на диске слишком мал.
Запишите объем данных больше 5 Мбайт.
Слышен шум или нет звука
При воспроизведении MP3 при низком
качестве записи может возникать шум.
Если ясно, что помехи создает мобильный
телефон, нужно увеличить расстояние от
него до аппарата.
Прибавьте громкость.
Выключите аппарат, проверьте и
исправьте подключения, а затем
включите аппарат. Причины включают
перенапряжение динамиков из-за очень
большой громкости или мощности, а также
использование аппарата при высокой
температуре воздуха.
При воспроизведении слышно
низкочастотное гудение
Вблизи кабелей находится сетевой шнур
или лампа дневного света. Отодвиньте
другие приборы и шнуры от кабелей
настоящего аппарата.
При приеме радиопередачи слышен свист
или шум
Выключите телевизор или другой
аудиоплеер или отодвиньте его от
аппарата.
Если к входу «AUX» подключен
портативный аудиоплеер, выключите его.
При приеме передачи «AM» слышно
низкочастотное гудение или шум
Отодвиньте антенну от кабелей и шнуров.
Антенна AM должна быть на расстоянии
от аппарата.
Изображение на экране телевизора,
установленного вблизи аппарата,
пропадает или на экране появляются
полосы
Неправильное размещение и ориентация
антенны.
Кабель телевизионной антенны проходит
слишком близко к аппарату. Отодвиньте
кабель телевизионной антенны от
аппарата.
Ничего не происходит при нажатии кнопок
пульта ДУ
Убедитесь, что батарейки вставлены
правильно (➡ стр. 7).
g Дисплей
«--:--»
Это возможно при первом подключении
сетевого шнура или после отключения
электропитания. Установите время
(➡ стр. 10).
•
•
•
•
•
•
•
•
•
•
•
•
•
•
•
•
•
•
•
«ADJUST CLOCK» (установите часы)
Не установлены часы. Правильно
установите часы.
«ADJUST TIMER» (установите таймер)
Не установлен таймер воспроизведения.
Правильно установите таймер
воспроизведения.
«PGM FULL» (программа заполнена)
Можно запрограммировать не
более 24 дорожек. Больше дорожек
запрограммировать невозможно.
«NO PLAY» (невозможно воспроизвести)
Вставлен диск CD-ROM не в формате
записи CD-DA или MP3. Его невозможно
воспроизвести.
«ERROR» (ошибка)
Выполнена недопустимая операция.
Прочитайте инструкцию и повторите
попытку.
«F61» или «F76»
Неисправность блока питания. Обратитесь
к дилеру.
Отключите устройство USB. Выключите и
включите аппарат.
«AUTO OFF» (автовыключение)
Аппарат не используется уже примерно
29 минут, через одну минуту он
отключится. Чтобы отменить выключение,
нажмите любую кнопку.
«ILLEGAL OPEN» (ошибка открытия)
Сдвижная дверца в неправильном
положении. Выключите и включите
аппарат.
«NODEVICE» (нет устройства)
Плеер iPod/iPhone установлен
неправильно. Прочитайте инструкцию и
повторите попытку (➡ стр. 11).
Устройство USB не подключено.
Проверьте подключение.
«REMOTE 1» (режим ПДУ 1)
Основной блок находится в режиме
«REMOTE 1». Переключите пульт ДУ в
режим «REMOTE 1» (➡ стр. 10).
«REMOTE 2» (режим ПДУ 2)
Основной блок находится в режиме
«REMOTE 2». Переключите пульт ДУ в
режим «REMOTE 2» (➡ стр. 10).
g Плеер iPod/iPhone
iPod/iPhone не включается
Перед подключением к аппарату
убедитесь, что батарея iPod/iPhone не
разряжена.
Перед тем как вставлять свой iPod/iPhone
в стыковочный док, выключите как
аппарат, так и iPod/iPhone. Снова
включите аппарат и выберите
соответствующий источник.
Нет звука из динамиков
iPod/iPhone неправильно установлен в
стыковочный док. Выключите iPod/iPhone,
достаньте его из разъема стыковочного
дока. Снова вставьте его и включите.
Убедитесь, что iPod/iPhone что-нибудь
воспроизводит.
Отрегулируйте громкость.
Звук искажен или слишком тихое
звучание
Убедитесь, что функция эквалайзера
iPod/iPhone выключена.
•
•
•
•
•
•
•
•
•
•
•
•
•
•
•
•
•
•
•
Не удается управлять плеером
iPod/iPhone при помощи пульта ДУ или с
основного блока
Убедитесь, что iPod/iPhone нормально
установлен в стыковочный док.
Проверьте подключение стыковочного
дока и убедитесь, что в качестве
источника выбран iPod/iPhone (➡ стр. 11).
iPod/iPhone не заряжается
Проверьте все подключения (➡ стр. 3, 11).
g Блютус
Имя подключенного устройства
показывается как « * »
Символ, который невозможно отобразить,
будет заменен на « * ».
Имя неизвестного устройства
обнаруживается и отображается как
«
*****
».
Слышен шум или прерывается звук
Расстояние связи блютус превысило 10 м.
Поднесите устройство ближе к аппарату.
Между устройством и аппаратом есть
препятствия. Устраните препятствия или
смените положение устройства.
Выберите режим «MODE 1», чтобы
улучшить качество подключения
(➡ стр. 13).
Помехи от мобильных телефонов.
«F70»
Выключите аппарат. Отключите сетевой
шнур и обратитесь к местному дилеру.
g Устройства USB
При нажатии кнопки
[USB q/ h]
ничего не
происходит
Отключите устройство USB, а затем
снова подключите его. Или выключите и
включите аппарат.
Нет доступа к носителю USB или
невозможно прочитать его содержание
Формат носителя USB или его содержимое
несовместимо с аппаратом (➡ стр. 14).
Функция хоста USB настоящего аппарата
может не работать с некоторыми
устройствами USB.
Устройства USB емкостью более 8 Гб в
некоторых случаях могут не работать.
Медленная работа носителя USB флэш
При больших размерах файлов или с
носителями USB большой емкости для
чтения требуется больше времени.
«NO PLAY» (невозможно воспроизвести)
Проверьте содержание.
Воспроизводятся только файлы формата
MP3.
Если имеется более 255 альбомов или
папок (аудио и другие данные), некоторые
из файлов MP3 в этих альбомах могут
не читаться и не воспроизводится.
Перепишите эти альбомы с музыкой
на другое устройство USB. Или
отформатируйте устройство USB и
сохраните на нем музыкальные альбомы
прежде чем сохранять папки с другими
данными.
•
•
•
•
•
•
•
•
•
•
•
•
•
•
•
•
•
•
Поиск и устранение неполадок
Page 64

64
RQTX1076
РУССКИЙ
Технические характеристики
g СЕКЦИЯ УСИЛИТЕЛЯ
Эффективная выходная мощность (RMS)
Передний канал (при работе обоих каналов)
20 Вт на канал (6 Ω), 1 кГц, 10 % СКГ
Полная эффективная мощность 40 Вт
Гнездо наушников
Разъем Стерео, гнездо 3,5 мм
Линейный вход (задняя панель)
Разъем Стерео, гнездо 3,5 мм
g СЕКЦИЯ ТЮНЕРА
Фиксированные настройки FM – 30 станций
AM – 15 станций
Частотная модуляция (FM)
Частотный диапазон от 87,50 МГц до 108,00 МГц (шаг 50 кГц)
Антенные входы 75 Ω (несимметричный)
Амплитудная модуляция (AM)
Частотный диапазон от 522 кГц до 1629 кГц (шаг 9 кГц)
от 520 кГц до 1630 кГц (шаг 10 кГц)
g СЕКЦИЯ ДИСКА
Воспроизводимые диски [8 см или 12 см]
(1) Формат CD-Audio (CD-DA)
(2) Носители CD-R/RW (формат CD-DA, MP3)
(3) Формат MP3*
* MPEG-1 уровень 3, MPEG-2 уровень 3
Считывающее устройство
Длина волны 795 нм
Мощность лазера CLASS 1
Аудио выход (диск)
Количество каналов
2 канала: передний левый, передний правый
g СЕКЦИЯ ДИНАМИКОВ
Тип Акустическая система – 1 полоса, 1 головка
(Пассивный излучатель)
Динамические головки
Широкополосные 6,5 см, с коническим диффузором x 1 /
канал
Широкополосные 8 см x 2 /
канал
Сопротивление 6 Ω
g СЕКЦИЯ БЛЮТУС
Технические характеристики системы блютус V2.1 + EDR
Класс беспроводного оборудования Класс 1 (2,5 мВт)
Поддерживаемые профили A2DP, AVRCP, HFP
Диапазон частот от 2402 МГц до 2480 МГц
(адаптивная скачкообразная перестройка частоты)
Рабочая дальность 10 м. в прямой видимости
(iPhone 3G, на высоте 1 м., в режиме «MODE 1»)
g СЕКЦИЯ ПОРТ USB
Стандарт USB Полная поддержка быстродействия USB 2.0
Поддерживаемые форматы файлов мультимедиа Формат MP3 (*.mp3)
Файловая система устройства USB FAT 12/16/32
Питание порта USB Макс. 500 мА
g ОБЩИЕ ДАННЫЕ
Электропитание Переменного тока, 220 В до 240 В, 50 Гц
Потребляемая мощность 35 Вт
Габариты (Ш x В x Г) 500 мм x 201 мм x 102 мм
(Г = минимум 69 мм)
Масса Примерно 3,0 кГ
Допустимая рабочая температура окружающего воздуха
от 0 °C до +40 °C
Допустимая влажность окружающего воздуха
от 35 % до 80 % относительной влажности (без конденсации)
Потребляемая мощность в режиме ожидания: 0,09 Вт (примерно)
Технические характеристики могут изменяться без уведомления.
Суммарный коэффициент гармоник измерялся с помощью
цифрового анализатора спектра.
•
•
Меры предосторожности
Установка
Установите аппарат на горизонтальной поверхности вдали
от прямого солнечного света, высоких температур, высокой
влажности и сильной вибрации. Эти условия могут повредить
корпус и прочие компоненты, тем самым сократив срок службы
аппарата.
Не ставьте на аппарат тяжелые предметы.
Напряжение
Запрещается использовать высоковольтные источники
питания. Это может вызвать перегрузку аппарата и пожар.
Запрещается использовать источники питания постоянного
тока. При установке аппарата на судне или в другом месте, где
используется постоянный ток, необходимо тщательно проверить
источник питания.
Обращение с сетевым шнуром
Убедитесь, что сетевой шнур подключен правильно и не
поврежден. Ненадежное подключение и повреждение шнура
могут привести к пожару или поражению электротоком.
Запрещается натягивать, перегибать шнур или ставить на него
тяжелые предметы.
При отключении шнура нужно крепко взяться за вилку. Если
тянуть сам сетевой шнур, это может привести к поражению
электротоком.
Запрещается прикасаться к вилке шнура влажными руками.
Это может привести к поражению электротоком.
Посторонние предметы
Не допускайте попадания металлических предметов внутрь
аппарата. Это может привести к поражению электротоком или к
неисправности.
Не допускайте попадания жидкости внутрь аппарата. Это
может привести к поражению электротоком или к неисправности.
Если это произошло, немедленно отключите аппарат от сети и
свяжитесь с местным дилером.
Не распыляйте инсектициды на аппарат или внутрь него.
Они содержат легковоспламеняющиеся газы, которые могут
загореться при попадании в аппарат.
Обслуживание
Не пытайтесь самостоятельно ремонтировать аппарат.
Если прерывается звук, не загораются индикаторы, появился
дым или возникла другая проблема, которая не описана в
настоящем руководстве, отключите сетевой шнур и обратитесь
к дилеру или в авторизованный сервисный центр. Если аппарат
ремонтируется, разбирается или собирается лицами, не
имеющими соответствующей квалификации, это может привести
к поражению электротоком или повреждению аппарата.
Для продления срока службы аппарата отключайте его от сети,
если он долго не будет использоваться.
g Осуществляя уход за аппаратом, заранее отключите его от
сети, достав вилку из розетки, а затем протрите мягкой и
сухой тканью.
Если аппарат сильно загрязнился, намочите и тщательно
отожмите ткань, сотрите загрязнения, а затем протрите аппарат
сухой тканью.
Запрещается использовать растворители, например, бензин,
разбавитель, спирт и моющие средства, потому что они могут
вызвать отслоение покрытий корпуса.
При использовании салфетки с пропиткой строго соблюдайте
меры предосторожности.
g Обращение с линзой CD
Для гарантии нормальной работы регулярно чистите линзу.
Сдувайте пыль грушей, при сильном загрязнении очистите
хлопковым тампоном.
Не используйте очиститель линзы в виде диска CD.
•
•
•
•
•
Уход
16 17
Page 65

65
RQTX1043
РУССКИЙ
RQTX1076
65
Page 66

66
RQTX1076
УКРАЇНСЬКА
-За наявності цього знакуІнформація щодо утилізації в країнах, які не входять в
Європейський Союз
Даний символ дійсний тільки на території
Європейського Союзу.
При потребі утилізації даного виробу зверніться
до місцевого керівництва або дилера щодо
правильного методу її здійснення.
Встановлений виробником згідно п. 2 ст. 5 Федерального
Закону РФ “Про захист прав споживачів” термін служби
виробу становить 7 років з дати виготовлення за умови,
що виріб використовується в суворій відповідності до
даної інструкції з експлуатції та застосовуваних технічних
стандартів.
Інформація для покупця
Назва виробу: Компактна Стереосистема
Країна виробника: Малайзії
Назва виробника: Панасонік Корпорейшн
Зареєстрований офіс: 1006 Кадома, Осака, Японія
Дата виробництва: ви можете знайти рік і місяць
виробництва у серійному номері, вказаному на табличці.
Приклад позначення – Серійний № XX1AXXXXXXX
(X-будь-яка цифра або літера)
Рік: третя цифра у серійному номері (1 – 2001, 2 – 2002,
... 0 – 2010)
Місяць: четверта літера у серійному номері (A – січень,
B – лютий, ...L – грудень)
Примітка. Вересень може вказуватись як “S” замість “I”.
Додаткова інформація: Просимо уважно прочитати
інструкцію з експлуатації.
УВАГА!
НЕ ВСТАНОВЛЮЙТЕ І НЕ РОЗМІЩУЙТЕ ЦЕЙ АПАРАТ У
КНИЖКОВІЙ ШАФІ, ВБУДОВАНИХ МЕБЛЯХ АБО В ІНШОМУ
ОБМЕЖЕНОМУ ПРОСТОРІ. ПЕРЕКОНАЙТЕСЬ, ЩО АПАРАТ
ДОБРЕ ВЕНТИЛЮЄТЬСЯ. ДЛЯ ЗАПОБІГАННЯ НЕБЕЗПЕКИ
УРАЖЕННЯ ЕЛЕКТРИЧНИМ СТРУМОМ АБО ВИНИКНЕННЯ
ПОЖЕЖІ ВНАСЛІДОК ПЕРЕГРІВУ, ПЕРЕКОНАЙТЕСЬ, ЩО
ЗАВІСКИ ЧИ БУДЬ-ЯКІ ІНШІ МАТЕРІАЛИ НЕ ЗАГОРОДЖУЮТЬ
ВЕНТИЛЯЦІЙНІ ОТВОРИ.
НЕ ЗАГОРОДЖУЙТЕ ВЕНТИЛЯЦІЙНІ ОТВОРИ ГАЗЕТАМИ,
СКАТЕРТИНАМИ, ЗАВІСКАМИ ТА ПОДІБНИМИ
ПРЕДМЕТАМИ.
НЕ СТАВТЕ ДЖЕРЕЛА ВІДКРИТОГО ПОЛУМ’Я, НАПРИКЛАД,
ЗАПАЛЕНІ СВІЧКИ, НА АПАРАТ.
ЛIКВIДУЙТЕ БАТАРЕЙКИ ЕКОЛОГІЧНО ПРИЙНЯТИМ
СПОСОБОМ.
•
•
•
•
ПОПЕРЕДЖЕННЯ:
ЗАРАДИ УНИКНЕННЯ РИЗИКУ ВИНИКНЕННЯ ПОЖЕЖІ,
УРАЖЕННЯ ЕЛЕКТРИЧНИМ СТРУМОМ АБО ПОШКОДЖЕННЯ
ВИРОБУ:
*
ЗАПОБІГАЙТЕ ПОТРАПЛЯННЮ НА ПРИСТРІЙ ДОЩОВИХ
КРАПЕЛЬ, ВОЛОГИ АБО БРИЗОК ТА НЕ СТАВТЕ НА ПРИСТРІЙ
ПРЕДМЕТИ, НАПОВНЕНІ ВОДОЮ, НАПРИКЛАД, ВАЗИ.
* ВИКОРИСТОВУЙТЕ ЛИШЕ РЕКОМЕНДОВАНЕ ПРИЛАДДЯ.
* НЕ ЗНІМАЙТЕ КРИШКУ (АБО ЗАДНЮ ПАНЕЛЬ); ВСЕРЕДИНІ
НЕМАЄ ДЕТАЛЕЙ, ЩО ПОТРЕБУЮТЬ ОБСЛУГОВУВАННЯ
КОРИСТУВАЧЕМ. ДЛЯ ПРОВЕДЕННЯ ОБСЛУГОВУВАННЯ
ЗВЕРНІТЬСЯ ДО КВАЛІФІКОВАНОГО ОБСЛУГОВУЮЧОГО
ПЕРСОНАЛУ.
УВАГА!
У ЦЬОМУ ВИРОБІ ЗАСТОСОВАНО ЛАЗЕР.
ВИКОРИСТАННЯ ОРГАНІВ КЕРУВАННЯ АБО РЕГУЛЮВАННЯ
ЧИ ВИКОНАННЯ ПРОЦЕДУР ІНШИХ, НІЖ ЗАЗНАЧЕНО ТУТ,
МОЖЕ ПРИЗВЕСТИ ДО НЕБЕЗПЕЧНОГО РАДІОАКТИВНОГО
ВИПРОМІНЮВАННЯ.
НЕ ВІДКРИВАЙТЕ КРИШОК І НЕ ВИКОНУЙТЕ РЕМОНТ
САМОСТІЙНО. ЗВЕРТАЙТЕСЬ ЗА ОБСЛУГОВУВАННЯМ ДО
КВАЛІФІКОВАНОГО ПЕРСОНАЛУ.
ЦЕЙ АПАРАТ ПРИЗНАЧЕНИЙ ДЛЯ ВИКОРИСТАННЯ У
ПОМІРНИХ КЛІМАТИЧНИХ УМОВАХ.
Штепсельну розетку потрібно встановити біля обладнання та
забезпечити вільний доступ до неї.
Штепсельна вилка шнура живлення повинна бути готова до
використання.
Щоб повністю відключити цей пристрій від мережі живлення
змінного струму, вийміть штепсельну вилку зі штепсельної
розетки.
УВАГА
Якщо батарейка встановлена неправильно, існує небезпека
вибуху. Замінюйте ії тільки на аналогічну батарейку або
батарейку подібного типу, відповідно до рекомендацій виробника
обладнання. Використані батарейки утилізуйте згідно з
інструкціями компанії-виробника.
Цей виріб може приймати радіоперешкоди, що створюються
мобільними телефонами під час їх використання. Якщо такі
перешкоди є помітними, будь ласка, збiльшiть відстань між
виробом та мобільним телефоном.
Усереденi виробу
RQLS0418
AUX
RQT4389ZAA
2 3
Page 67

67
RQTX1076
УКРАЇНСЬКА
67
Комплект постачання 3
Підключення 3
Кріплення приладу до стіни (Додатково) 4
Елементи керування 7
Операції з дисками 8
Операції з радіоприймачем 9
Таймер 10
Регулювання гучності 10
Зовнішній апарат 10
Скидання пам’яті (Ініціалізація) 14
Усунення несправностей 15
Технічні характеристики 16
Технічне обслуговування 16
Заходи безпеки 17
Зміст
Комплект постачання
Включений у комплект шнур живлення призначений тільки для
використання з даним пристроєм. Не використовуйте його з
будь-яким іншим обладнанням.
Не використовуйте шнур живлення від іншого обладнання.
•
•
Перевірте наявність усіх аксесуарів комплекту.
AUX
Підключення
2
1
Встановіть антену
вертикально на
підставці.
Рамкова антена АМ
Підключіть рамкову антену АМ.
2
Не плутайте кабель антени з іншими кабелями та шнурами.•
Клац!
4
Не використовуйте навушники упродовж тривалого часу,
оскільки це може призвести до пошкодження слуху.
Надлишковий звуковий тиск у навушниках може
спричинити втрату слуху.
Прослуховування при повній гучності протягом тривалого
часу може завдати шкоди слухові користувача.
Використовуйте лише рекомендовані навушники.
•
•
•
Знизьте гучність і підключіть навушники.
Тип штекера: 3,5 мм стерео
Навушники (не входить у комплект)
g Зауваження щодо динаміків
Ці динаміки на мають магнітного екранування. Не ставте їх
поблизу телевізорів, персональних комп’ютерів або інших
пристроїв, на які діють магнітні поля.
З’єднання динаміків не можна від’єднати.
•
•
3
Підключіть силовий кабель після завершення всіх інших
підключень.
Підключіть шнур живлення.
До побутової розетки
AUX (➡ стор. 10)
Вигляд ззаду
Прикріпіть антену клейкою стрічкою до стіни чи колони у
місці з найменшою інтерференцією.
•
Кімнатна антена FM
Підключіть кімнатну антену FM.
Клейка стрічка
1
AC IN
Отвори для
відкачування Повітря
5 4
3 2
1
Кришка USB порту
1 Шнур живлення змінного
струму
1 Рамкова антена АМ
1 Кімнатна антена FM
2 Батарейки
1 Пульт ДК (N2QAYB000523)
Комплект гвинтів
2 Кріпильних гвинта
1 Захисний тримач
Комплект стінного кронштейна
1 Стінний кронштейн
Чотириопорна прокладка
B
Page 68

68
RQTX1076
УКРАЇНСЬКА
Кріплення приладу до стіни (Додатково)
Зауваження щодо встановлення
g Для правильного встановлення перед початком роботи прочитайте розділи “Заходи безпеки” та “Інструкції щодо настінного
встановлення”.
g Для оптимальної роботи та запобігання потенційним проблемам не встановлюйте прилад:
в місцях інших, ніж вертикальні стіни.
біля розбризкувача протипожежної системи або датчика.
біля ліній високої напруги або джерел живлення.
біля нагрівального приладу.
в місцях, де прилад зазнає вібрації або коливання.
біля джерел магнітного поля, тепла, вологи, жирного бруду в повітрі тощо.
в місцях, де на нього можуть падати крапельки води (наприклад, під кондиціонером).
g Не встановлюйте прилад під стельовими освітлювачами (наприклад, точковим освітлювачем, галогенною лампою тощо).
Інакше це може пожолобити корпус або привести до пошкодження від високої температури.
g Використовуйте відповідний спосіб встановлення, що підходить до структури та матеріалу стіни.
g Для запобігання пошкодженню пристрою чи підлоги під час встановлення використовуйте м’яку ковдру або тканину.
g Під час затягування гвинтів перевірте, щоб гвинти не були ані недостатньо, ані надмірно затягнуті.
g Під час встановлення забезпечте навкруги безпечну зону та зверніть увагу на техніку безпеки.
g Panasonic не несе відповідальності за випадкові або непрямі збитки, що виникли в результаті неналежного встановлення або
експлуатації.
•
•
•
•
•
•
•
Не встановлюйте прилад у вологих та запилених місцях, або
у місцях, де прилад може увійти в контакт з жирним брудом у
повітрі або парою, або під кондиціонером, де на прилад може
капати вода.
Це може негативно вплинути на прилад та привести до займання
або ураження електричним струмом.
Забезпечте достатньо вільного простору - не менше 30 см
над основним приладом і не менше 10 см з лівого та правого
боків відповідно. Між задньою стороною приладу та стіною
не повинно бути сторонніх предметів.
Загороджування отворів для відкачування повітря на приладі може
викликати займання.
Для встановлення використовуйте позначені компоненти.
Інакше основний прилад може впасти та спричинити травмування.
Запобігайте контакту монтажних гвинтів чи шнура живлення
з металевими предметами всередині стіни під час
встановлення.
Якщо цього не зробити, ви можете бути вражені електричним
струмом.
Під час зняття основного приладу також знімайте стінні
монтажні гвинти.
Інакше стінні монтажні гвинти можуть уразити людину та
спричинити травмування.
Для безпечної роботи встановлюйте прилад на такій висоті,
щоб можна було бачити USB-порт та кнопки керування.
Керування в неналежному положенні може привести до падіння та
пошкодження приладу та спричинити травмування.
УВАГА!
Заходи безпеки
Роботи з встановлення або демонтажу приладу повинні
виконуватися тільки кваліфікованими будівельними
підрядчиками.
Неналежне встановлення може привести до падіння приладу та
спричинити травмування.
Щоб запобігти травмуванню, прилад повинен бути
надійно прикріпленим до стіни відповідно до інструкцій з
встановлення.
Не встановлюйте прилад у місцях, де він не зможе витримати
навантаження.
Якщо кріпильні деталі недостатньо міцні, це може привести до
падіння приладу та спричинити травмування.
Не використовуйте способи встановлення інші, ніж наведені
в інструкції.
Це може привести до падіння приладу та спричинити травмування.
Не встановлюйте прилад в місцях інших, ніж вертикальні
стіни.
Це може привести до падіння приладу та спричинити травмування.
Під час встановлення враховуйте коефіцієнт запасу міцності
(прибл. в 10 разів більше ваги виробу).
Недостатня міцність може привести до падіння приладу та
спричинити травмування.
Стеля, до якої прикріплюється прилад, повинна витримувати
навантаження 20 кг на гвинт.
Недостатня міцність стін згодом може привести до падіння
приладу.
Не розбирайте та не переробляйте кронштейн для настінного
кріплення.
Це приведе до падіння і пошкодження приладу та спричинить
травмування.
ПОПЕРЕДЖЕННЯ!
Комплект для встановлення
g Комплект, доступний у продажу (не входить у
комплект)
2 Стінні монтажні гвинти
1 Гвинт захисного тримача
Використовуйте гвинти з номінальним діаметром 4 мм, що
відповідають матеріалу стіни (наприклад, деревина, сталь, бетон
тощо).
•
•
g Комплект поставки
Комплект гвинтів (RFAX1020)
2 Кріпильних гвинта (XYN3+J10FJ)
1 Захисний тримач (RMKX1015)
Комплект стінного кронштейна (RFAX1021)
1 Стінний кронштейн (RGQX1004)
Чотириопорна прокладка (RKAX0028-K)
•
»
»
•
»
»
B
C
C
Зберігайте комплект у недоступному місці, щоб запобігти
випадковому проковтуванню дрібних деталей дітьми.
4 5
Page 69

69
RQTX1076
УКРАЇНСЬКА
69
Відгвинтіть кріпильний гвинт (2 штуки) знизу приладу.
Зберігайте зняті гвинти в безпечному місці.
2. Прикріпіть стінний кронштейн до задньої частини приладу.
1. Відділіть підставку від приладу.
3. Закріпіть монтажні гвинти в стіні.
Інструкції щодо настінного встановлення
• Перед встановленням вимкніть прилад та від’єднайте штепсель змінного струму від штепсельної розетки змінного струму.
• Міцно затягніть гвинти, щоб запобігти розкручуванню під час кожного кроку.
A
Нижня частина основного приладу
Підставка
М’яка ковдра
або тканина
Кріпильний гвинт
A
Кріпильний гвинт
B
8 мм до 9,5 мм
2,2 мм до 2,8 мм
2.5 мм до 3,5 мм
4 мм
Кожний гвинт повинен мати
достатню довжину, щоб утримувати
опір 20 кг або більше.
Стіна
Монтажний гвинт
C
163 мм
Кріплення приладу до стіни (Додатково) (продовження)
Висуньте підставку із приладу.
2
1
Вирівняйте обидва язички на стінному кронштейні
та основному приладі, потім вставляйте, доки він не
зафіксується на місці.
Закріпіть стінний кронштейн кріпильним гвинтом
(2 штуки).
(Момент затягування: 1,2 Нм до 1,5 Нм)
B
AUX
300 мм
Потрібний простір
Вид ззаду
Потрібний простір
85,5 мм
77,5 мм
500 мм
700 мм
74,8 мм
130 мм
Язичок
Задня частина
основного приладу
Стінний кронштейн (вид знизу)
Замірте та помітьте положення монтажних гвинтів (2 штуки) та закріпіть їх в стіні.
Для вимірювань та визначення положення гвинтів користуйтеся малюнками нижче.
Встановлюйте, користуючись обома стінними монтажними гвинтами.
Використовуйте лінійку з рівнем, щоб упевнитися в тому, що обидва гвинти знаходяться на одному рівні.
Використовуйте достатньо міцний гвинт, який утримуватиме вагу принаймні 20 кг.
•
•
•
•
C
Page 70

70
RQTX1076
УКРАЇНСЬКА
4. Повішайте прилад на стіну.
Надійно причепіть прилад на монтажні
гвинти .
Перед тим, як вішати основний прилад на
стіну, під’єднайте антену FM/AM (➡ стор. 3).
Після того, як ви повісили прилад, обережно
відпустіть руку, щоб упевнитися в тому, що
пристрій надійно встановлено на стіні.
•
•
Зняття приладу зі стіни
g Захист від падіння (додатково)
Вийміть гвинт захисного тримача та захисний тримач.
Зніміть прилад зі стіни.
Відгвинтіть кріпильні гвинти (2 штуки).
Утримуйте обидва фіксатори і потім висуньте стінний
кронштейн із приладу (➡ справа).
Знову приєднайте нижню частину приладу та закріпіть її
кріпильними гвинтами (2 штуки).
Зніміть монтажні гвинти (2 штуки) зі стіни.
Зніміть дріт захисту від падіння перед кроком , якщо ви його
використовуєте.
•
C
B
A
C
Ручка або тупий предмет
Фіксатори
C
5. Встановіть захисний тримач.
Захисний тримач
Фіксація
до стіни
Гвинт захисного тримача
C
Металева арматура
Гвинт
Дріт
Дріт
Проріз для
дроту
Інструкції щодо настінного встановлення (продовження)
Кріплення приладу до стіни (Додатково) (продовження)
Вставте обидва гвинти в посадкові
місця до упору.
Стіна
Стінний кронштейн
Протягніть дріт (доступний у продажу) через проріз на
стінному кронштейні перед кроком 4 (➡ вище).
Зафіксуйте дріт на стіні за допомогою гвинта (доступний у
продажу) після кроку 5 (➡ зліва).
Зафіксуйте гвинт з дротом таким чином, щоб у верхній
центральній частині основного приладу провисання було не
більше 5 см.
•
Зафіксуйте захисний тримач на стінному кронштейні.
Затягніть гвинт захисного тримача , щоб закріпити
захисний тримач на стіні.
C
6 7
Page 71

71
RQTX1076
УКРАЇНСЬКА
71
■ Батарейки
Використовуйте марганцеву або лужну суху батарею.
Вставте згідно з полярністю (+ та –) на пульті ДК.
Якщо пульт дистанційного керування не використовується
упродовж тривалого часу, виймайте з нього батарейки.
Зберігайте їх у прохолодному і темному місці.
Не нагрівайте і не піддавайте вогню.
Не залишайте батарейки у закритому автомобілі під прямим
сонячним промінням упродовж тривалого часу.
Неправильне поводження з батареєю пульту ДК може призвести
до протікання електроліту, що може стати причиною пожежі.
•
•
•
•
•
•
•
■ Не рекомендується:
одночасно використовувати старі та нові батарейки.
одночасно використовувати різні типи батарейок.
розбирати або замикати батарейки.
намагатися перезарядити лужні або марганцеві батарейки.
використовувати батарейки, якщо покриття зняте.
•
•
•
•
•
R6/LR6, AA
Вставляти спочатку цим кінцем.
Підготовка пульту дистанційного керування
Перемикач режимiв роботи
standby/on (очiкування/
ввiмкнено) [^], [8] (8, 10, 14)
Натисніть вимикач, щоб
переключити апарат з режиму
“ввімкнено” до режиму
очікування і навпаки. Навiть
у режимi очікування апарат
споживає невелику кількість
електроенергії.
[SLEEP] (10)
Цифрові кнопки [1-9, 0, ≧ 10]
(8, 9, 10, 14)
Для вибору двоцифрового
номера
напр., 16: [≧ 10] [1] [6]
Для вибору трицифрового
номера
напр., 226: [
≧
10] [≧ 10] [2]
[2] [6]
[DEL] (8)
[PROGRAM] (8, 9)
[REPEAT] (9)
[PLAY MODE] (9, 10, 13)
[USB q/h] (14)
[CD q/h] (8, 9)
[ q/h] (12)
[RADIO] (9)
[iPod q/h] (11)
[AUX] (10)
[g, ] (8, 11, 12, 13, 14)
[RE-MASTER] (10)
[iPod MENU] (11)
[PRESET EQ] (10)
[e,r] (8, 9, 10, 11, 13, 14)
[u], [i] (8, 9, 11, 12, 14)
[OK] (8, 10, 11, 13)
[DISPLAY, –DIMMER]
(8, 9, 13)
Натисніть та утримуйте
для затемнення дисплея.
Натисніть та утримуйте знову,
щоб скасувати.
[AUTO OFF]
Ця функція дає змогу
вимикати апарат (крім режиму
радіо) після того, як ним не
користувалися протягом
прибл. 30 хв. Натисніть двічі
для увімкнення.
[TUNE MODE] (9)
[;, iPod],
[iPod ;, OPEN/CLOSE] (11)
[;, CD],
[CD ;, OPEN/CLOSE] (8)
[z, PLAY] (10)
[CLOCK/TIMER] (10)
[+, VOL , –],
[– VOLUME +] (13)
[MUTE] (13)
Приглушення звучання.
Натисніть знову, щоб
скасувати. “MUTE”
(ВИМКНЕННЯ ЗВУКУ)
також скасовується, коли
ви налаштовуєте звук або
пристрій вимикається.
[D.BASS] (10)
[BASS/TREBLE] (10)
[SURROUND] (10)
[ ] (13)
[ MENU] (13)
[u/t], [y/i]
[FM/AM/AUX] (9, 10)
USB port (14)
Індикатор режиму очікування
Мікрофон (13)
Індикатор Bluetooth (12)
Сенсор сигналу
дистанційного керування
Спрямуйте пульт
дистанційного керування на
сенсор з віддалі до 7 метрів на
передню панель апарата.
Цифри в дужках означають номер сторінки.•
Пульт ДК
Основний апарат
Елементи керування
Такі кнопки як виконують ті ж самі функції, що й на пульті ДК.
Їх можна використовувати рівнозначно.
•
1
CD
RADIO
16
17
18
19
20
23
24
25
22
21
1
2
3
4
5
6
8
9
10
11
12
13
15
14
7
Вигляд зверху
1 167
29 6
26 27
28
15 19 24
8
9
10
6
7
16
15
17
18
19
21
23
25
26
27
28
29
30
20
22
24
14
2
1
3
4
5
11
12
13
31
32
30
Вигляд спереду
31
32
Дисплей
Прибл. 30°
Вікно передачі
Прибл. 30°
Page 72

72
RQTX1076
УКРАЇНСЬКА
Кілька разів натисніть [DISPLAY, –DIMMER] під час відтворення
або паузи, щоб переглянути інформацію про поточний запис.
Максимальна кількість знаків: приблизно 30
Даний апарат підтримує теги вер. 1.0 і 1.1 ID3. Текстові дані,
формат яких не підтримується цим апаратом, на екран не
виводяться.
•
•
Функція показу
Cтоп
Натисніть [g, ].
Пауза
Натисніть [CD q/h]. Натисніть знову, щоб
продовжити відтворення.
Пропуск запису
Натисніть [u] або [i].
Пошук поточного
запису (CD)
Натисніть і утримуйте [u] або [i].
Пропуск альбому
(MP3)
Натисніть [e,r].
Відтворення з
безпосереднім
доступом
(Відтворення
починається з
вибраного запису.)
CD: Цифровими кнопками виберіть запис.
MP3: Натисніть [e,r], щоб вибрати альбом.
Натисніть [i] один раз, а тоді
цифровими кнопками виберіть
потрібний запис.
Дозволяє програмувати до 24 записів.
Натисніть [CD q/h], а потім [g, ].
Натисніть [PROGRAM].
CD: Цифровими кнопками виберіть запис.
Щоб запрограмувати більше записів, продовжуйте натискати
цифрові кнопки.
Натисніть [OK] або [CD q/h] щоб почати відтворення.
MP3: Натисніть [e,r] для вибору альбому.
Один раз натисніть [i], а потім цифрові кнопки, щоб
вибрати запис.
Натисніть [OK].
Для програмування інших записів повторіть кроки до .
Натисніть [CD q/h], щоб почати відтворення.
Скасувати режим
програмування
Натисніть [PROGRAM] у режимі зупинки,
індикатор “PGM” на дисплеї зникне.
Повторно
відтворити
програму
Натисніть [PROGRAM] у режимі зупинки, а
потім [CD q/h].
Перевірити вміст
програми
Натисніть [u] або [i], коли на екрані
горить індикатор “PGM” у режимі зупинки.
Для перевірки під час програмування двічі
натисніть [PROGRAM] після появи значка
“PGM”, а потім натисніть [u] або [i].
Видалити останній
запрограмований
запис
Натисніть [DEL] у режимі зупинки.
Очистити усі
запрограмовані
записи
Натисніть [g, ] у режимі зупинки.
Виводиться повідомлення “CLR ALL”.
Протягом 5 секунд ще раз натисніть цю
кнопку, щоб стерти усі записи.
При відкриванні розсувних дверцят пам’ять програми стирається.•
Програмне відтворення
Клац!
g Як вставити диск
Натисніть [^], щоб увімкнути апарат.
Натисніть [;, CD], щоб відкрити розсувні дверцята.
Операції з дисками
Утримуючи диск етикеткою до себе, встановіть його в
дисковий лоток за розсувними дверцятами.
Щоб вийняти диск, візьміть його за краї, і, акуратно
натискуючи на шпиндель, рухом вгору зніміть його.
Натисніть [^], щоб увімкнути апарат.
Вставте диск, що буде програватися (➡ зліва).
Натисніть [CD q/h], щоб почати відтворення.
g Як вийняти диск
Натисніть [;, CD], щоб відкрити розсувні дверцята.
Утримуючи диск по центру і за верхній правий край, потягніть
за його верхній правий край, щоб зняти зі шпинделя.
Нахиліть диск так, щоб він не стикався з розсувними
дверцятами, і вийміть його.
Якщо розсувні дверцята закривати із надмірним зусиллям, вони
можуть пошкодитися.
Слідкуйте, щоб компакт-диск не вдарявся об розсувні дверцята,
коли виймаєте його.
•
•
Основи користування
Натисніть [;, CD] щоб закрити розсувні дверцята.
Пильнуйте, щоб кришка відділення компакт-дисків при закриванні
не прищемила пальці.
8 9
Page 73

73
RQTX1076
УКРАЇНСЬКА
73
Дає змогу відображати назву радіостанції чи тип програми. При
прийомі RDS-сигналів світиться “RDS”.
Натисніть клавішу [DISPLAY, –DIMMER], щоб вивести на екран.
Назву станції (PS) Тип програми (PTY)
Зауваження щодо CD-R та CD-RW
На апараті відтворюються диски CD-R і CD-RW, записані у
форматі CD-DA або MP3.
Для CD-DA використовуйте диски аудіо запису і фіналізуйте* їх
після завершення процедури записування.
*
Процес, який виконується після записування, що дає змогу
відтворювати аудіодиски CD-R або CD-RW на плеєрах CD-R і CD-RW.
Деякі диски на апараті не відтворюватимуться через низьку
якість запису.
Не використовувати компакт-диски незвичайної форми.
Не наклеювати на них додаткові ярлики.
Не використовувати диски з наклейками, які відриваються або
з-під яких виступає зайва клейка речовина.
Не покривати захисним покриттям та не прикріпляти інші аксесуари.
Не писати на компакт-дисках.
Не чистити диски рідиною (Тільки протирати м’якою сухою ганчіркою).
Створення файлів МР3, призначених для
відтворення на цьому апараті
Максимальна кількість записів і альбомів: 999 записів і 255 альбомів.
Сумісні коефіцієнти стиснення: між 64 кбіт/с та 320 кбіт/с
(стерео). Рекомендується 128 кбіт/с (стерео).
Формати дисків: ISO9660 рівень 1 і рівень 2 (крім розширених форматів)
Час зчитування змісту залежить від кількості записів, папок та
структури папок.
Обмеження стосовно МР3
Даний апарат підтримує диски з багатьма сеансами запису,
однак для початку відтворення може бути потрібний певний час.
Даний апарат не відтворює файли, записані пакетним способом.
Якщо на диску є дані формату МР3 та звичайні аудіо записи
(CD-DA), апарат відтворює той тип, який записаний у внутрішній
частині диску. Якщо на диску є дані формату МР3 та інші аудіо
записи (напр., WMA чи WAV), апарат відтворює тільки МР3.
Залежно від процедури створення файлів МР3 вони можуть
відтворюватися у іншому порядку, ніж пронумеровано, або й
зовсім не відтворюватися.
•
•
•
•
•
•
•
•
•
•
•
•
•
•
•
•
•
Натисніть [CD q/h].
Натисніть [PLAY MODE], щоб вибрати наступні режими.
Режим Відтворення
1-TRACK
1TR
один вибраний запис на диску.
Цифровими кнопками виберіть запис.
1-ALBUM
1ALBUM (MP3)
oдин вибраний альбом на диску.
Натисніть [e,r] для вибору альбому.
RANDOM
RND
відтворення диску у довільному порядку.
1-ALBUM
RANDOM
1ALBUM RND (MP3)
усі записи на одному вибраному альбомі у
довільному порядку.
Натисніть [e,r] для вибору альбому.
Під час відтворення у довільному порядку попередній запис
пропустити неможливо.
При відкриванні розсувних дверцят настройки поточного режиму
відтворення стираються.
Щоб повторити програмне відтворення або вибраний режим
відтворення натисніть [REPEAT]. Натисніть знову, щоб скасувати.
•
•
•
Функція режиму відтворення
g Для поліпшення якості звучання FM
Натисніть і утримуйте [PLAY MODE] для виводу індикатора
“MONO”. Натисніть та утримуйте знову, щоб скасувати.
Режим “MONO” скасовується також при зміні частоти.
Для звичайного прослуховування вимкніть режим “MONO”.
g Щоб удосконалити якість звучання AM
Натисніть [RADIO], щоб вибрати “AM”.
Натискайте та притримуйте [TUNE MODE] повторно, щоб змінити
настройку гетеродинного звуку (“BP 1”, “BP 2”, “BP 3” або “BP 4”).
•
•
Ручна настройка (продовження)
У пам’ять можна занести до 30 каналів FM та 15 каналів AM.
Підготовка: Натисніть [RADIO], щоб вибрати “FM” або “AM”.
g Автоматичне програмування станцій
Натисніть [PLAY MODE], щоб перейти від частоти “LOWEST” і
“CURRENT” чи навпаки.
Натисніть і притримайте [PROGRAM] не менше 2 секунд, щоб
почати програмування.
g Ручне програмування
Натисніть [TUNE MODE], щоб вибрати “MANUAL”.
Натисніть [u] або [i], щоб вибрати потрібну станцію.
Натисніть [PROGRAM].
Цифровими кнопками виберіть канал.
Радіостанція, яка займає канал, буде стерта при програмуванні
іншої радіостанції на цей канал.
Для програмування інших станцій повторіть кроки до .
g Вибір запрограмованої радіостанції
Натисніть [TUNE MODE], щоб вибрати “PRESET”.
Натисніть [u] або [i], щоб вибрати канал.
Або натискуйте цифрові кнопки для вибору каналу.•
Попередня настройка пам’яті
Текстові дані RDS можуть не відображатись при слабкому сигналі
прийому.
•
RDS-трансляція
Показ частоти
Настроювання розподілення AM
Пристрій може також приймати АМ-трансляції, що розподілені
кроком 10 кГц.
Для зміни кроку до 10 кГц (тільки на основному пристрої)
Натисніть [FM/AM/AUX], щоб вибрати “AM”.
Натисніть і утримуйте [FM/AM/AUX].
Після кількох секунд дисплей зміниться на поточну мінімальну
частоту.
Продовжуйте утримувати [FM/AM/AUX].
Коли мінімальна частота зміниться, відпустіть кнопку.
Для повернення до початкового кроку повторіть кроки до
(➡ вище).
Після зміни настройки будь-яку попередньо встановлену частоту
буде видалено.
•
•
Операції з радіоприймачем
Натисніть [RADIO], щоб вибрати “FM” або “AM”.
Натисніть [TUNE MODE], щоб вибрати “MANUAL”.
Натисніть [u] або [i], щоб вибрати частоту потрібної станції.
Під час приймання стереопередач FM на дисплеї відображається
значок “ST”.
Для автоматичної настройки на станцію
Повторіть кроки і (➡ вище).
Натисніть і утримуйте [u] або [i], поки не почнеться
швидка зміна частоти.
Щоб скасувати автоматичну настройку, натисніть [u] або [i] знову.
При надмірних перешкодах авто настройка може не працювати.
•
•
Ручна настройка
Операції з радіоприймачем
(продовження)
Операції з дисками (продовження)
Page 74

74
RQTX1076
УКРАЇНСЬКА
Натисніть EQ Натисніть кілька разів [PRESET EQ], щоб
обрати “HEAVY”, “SOFT”, “CLEAR”, “VOCAL”
або “FLAT”.
Низькі або високі
частоти
Натисніть кілька разів [BASS/TREBLE], щоб
обрати “BASS” або “TREBLE”.
Натисніть [e,r] для настройки рівня
(від -4 до +4).
Об’ємне
звучання
Натисніть [SURROUND] кілька разів під час
відтворення для вибору “ON SURROUND” або
“OFF SURROUND”.
Якщо перешкоди при прийомі радіохвиль
FM посилюються, скасуйте ефект об’ємного
звучання.
D.Bass Натисніть [D.BASS] кілька разів під час
відтворення для вибору “ON D.BASS” або
“OFF D.BASS”.
Функція
Re-master
Натисніть [RE-MASTER] кілька разів під час
відтворення для вибору “ON RE-MASTER”
або
“OFF RE-MASTER”.
Цифровий ремастер ефективний на MP3.
Аналоговий ремастер ефективний на
iPod/iPhone і AUX.
•
•
Таймер режиму очікування вимикає апарат через заданий проміжок
часу.
Натисніть [SLEEP], щоб увімкнути або вимкнути цю функцію.
Натисніть один раз [SLEEP], щоб перевірити залишок часу.
Таймери відтворення та режиму очікування можуть
використовуватися одночасно. Таймер режиму очікування завжди
має пріоритет. Уникайте перекривання настройок таймера.
Коли функція AUTO OFF увімкнена і пристрій не використовується
протягом прибл. 30 хвилин, він зупиниться, навіть якщо час
відтворення чи час очікування не закінчився.
•
•
Можна виставити таймер так, щоб він будив вас о певній годині.
В апараті є три варіанти таймерів відтворення.
Підготовка:
Увімкніть апарат та встановіть годинник (➡ вище).
Підготуйте джерело музики (диск, радіо, iPod/iPhone, Bluetooth,
USB або AUX) і встановіть гучність.
Натисніть [CLOCK/TIMER] кілька разів, щоб увімкнути
потрібний таймер.
Впродовж 5 секунд натисніть [e,r], щоб виставити час
початку.
Натисніть [OK].
Щоб налаштувати час закінчення, повторіть кроки і .
Щоб увімкнути таймер
Натисніть [z, PLAY] кілька разів, щоб увімкнути потрібний
таймер.
Натисніть [^], щоб вимкнути апарат.
•
•
Даний годинник має 24-годинний формат.
Натисніть [CLOCK/TIMER], щоб вибрати “CLOCK”.
Впродовж 5 секунд натисніть [e,r] для установки часу.
(Натисніть та притримайте для швидкої зміни.)
Натисніть [OK].
Щоб відобразити годинник натисніть [CLOCK/TIMER].
Регулярно наставляйте годинник, щоб його покази були точними.
•
•
Налаштування годинника
Таймер відтворення
Зміна настройок
Повторіть кроки до (➡ вище).
Зміна джерела чи
гучності
Натисніть [z, PLAY] двічі для видалення
індикатора zPLAY з дисплея.
Змініть джерело або гучність.
Виконайте кроки і (➡ вище).
Перевірте
настройки (Коли
апарат увімкнено
або він у режимі
очікування)
Натисніть кілька разів [CLOCK/TIMER],
щоб вибрати “zPLAY 1”, “zPLAY 2” або
“zPLAY 3”.
Відміна
Натисніть [z, PLAY] для видалення
індикатора таймера з дисплея.
Таймер спрацює в установлений час із гучністю, поступово
зростаючою до установленого рівня.
•
Таймер режиму очікування
30MIN 60MIN 90MIN 120MIN
OFF (Скасовано)
Регулювання гучності
Таймер
Пульт ДК та основний апарат виставлені виробником у режим
“REMOTE 1”.
Якщо виявиться, що пульт ДК мимоволі керує іншим обладнанням,
можна перемкнути його у режим “REMOTE 2”.
Для переходу в режим “REMOTE 2” (тільки на основному
пристрої)
Натисніть [FM/AM/AUX], щоб вибрати “AUX’’.
Натисніть і утримуйте [FM/AM/AUX], а потім натисніть [2], доки
на дисплеї не відображатиметься “REMOTE 2”.
Натисніть і утримуйте [OK] і [2] принаймні 2 секунди.
Для повернення в режим “REMOTE 1”
Повторіть кроки вище, але замініть [2] на [1].
(відображається “REMOTE 1”.)
Зміна режиму основного апарата та пульта ДК
Вставте аудіошнур в роз’єм AUX.
Тип штекера: 3,5 мм стерео
Натисніть [AUX] і почніть відтворення з
переносного аудіоджерела.
Можна вибрати рівень вхідного звукового сигнал на портативному
аудіообладнанні.
Натисніть [PLAY MODE] кілька разів, щоб вибрати “HIGH” або
“NORMAL”.
Вимкніть еквалайзер або приглушіть звук портативного
аудіообладнання, щоб зменшити вхідний сигнал. При високому
рівні вхідного сигналу звук буде спотворений.
Подробиці подано у інструкції до іншого обладнання.
Шнури і обладнання в комплект не входять.
•
•
•
Переносне аудіообладнання (у режимі AUX)
Зовнішній апарат
AUX
74
RQTX1076
УКРАЇНСЬКА
10 11
Page 75

75
RQTX1076
УКРАЇНСЬКА
75
Зовнішній апарат (продовження)
Прослуховування аудаозаписів на iPod або iPhone
g Як вставити iPod/iPhone
Натисніть [;, iPod], щоб відкрити розсувні дверцята.
Вставте відповідний адаптер (не входить до комплекту) до
свого iPod/iPhone.
g Виймання програвача iPod/iPhone
Натисніть [;, iPod], щоб закрити розсувні дверцята.
Повторіть кроки і (➡ вище).
Для зняття просто прямо потягніть за iPod/iPhone, щоб
від‘єднати його.
Повторіть кроки і (➡ вище).
Якщо відділення для iPod/iPhone не нахилене під час під’єднання
або від’єднання iPod/iPhone, це може призвести до пошкодження
штекера.
Вставляючи iPod/iPhone у пристрій використовуйте лише адаптер,
що додається до вашого iPod/iPhone або такий, що можна
придбати у Apple Inc.
Зменшіть гучність на головному апараті до мінімуму перед
підключенням або відключенням від iPod/iPhone.
•
•
•
■ Заряджання iPod/iPhone
Під час заряджання iPod/iPhone у режимі очікування на екрані
основного апарату відображається “IPOD CHARGING”.
Перевірте iPod/iPhone, чи повністю зарядилася батарея. Якщо
iPod/iPhone не використовується тривалий час після заряджання,
відключіть його від апарату оскільки батарея буде розряджатися.
(Після одного повного заряджання додаткового заряджання не
буде).
•
•
Зауваження щодо iPhone:
Усіма функціями можна керувати тільки з сенсорного екрана
iPhone.
Пристрій не відображає вхідні виклики чи статус телефону
(Під’єднайте iPhone до пристрою через Bluetooth (➡ стор. 13), щоб
скористатися розширеними функціями).
Мелодію вхідного виклику можна почути із динаміка iPhone. Коли
пристрій працює в режимі iPod/iPhone, мелодію також можна
почути із динаміків пристрою (Під’єднайте iPhone до пристрою
через Bluetooth (➡ стор. 13), щоб скористатися розширеними
функціями).
Під час під’єднання або від’єнання iPhone виклик не скасовується.
Немає технічних характеристик Apple Inc., що гарантуватимуть
відгуки iPhone, що описані вище. Відгуки iPhone можуть
відрізнятися на нових моделях iPhone або в оновленому
програмному забезпеченні iPhone.
•
•
•
•
•
Програвання
Натисніть [iPod q/h].
Пауза
Натисніть [iPod q/h] або [g, ].
Пропуск запису
Натисніть [u] або [i].
Пошук поточного запису
Натисніть і утримуйте [u] або [i].
Показ меню iPod/iPhone/
повернення до
попереднього меню
Натисніть [iPod MENU] в режимі
відтворення. (Тільки пульт ДК)
Вибір елементів меню
iPod/iPhone
Натисніть [e,r], а потім [OK].
(Тільки пульт ДК)
Правильно пiдключiть iPod/iPhone
(не входить до комплекту
постачання).
Витягніть iPod/iPhone з чохла.
■ Сумісний iPod
Назва Обсяг пам’яті
iPod nano 5 покоління (відеокамера) 8 Гбайт, 16 Гбайт
iPod touch 2 покоління 8 Гбайт, 16 Гбайт,
32 Гбайт, 64 Гбайт
iPod classic 120 Гбайт, 160 Гбайт
(2009)
iPod nano 4 покоління (відео) 8 Гбайт, 16 Гбайт
iPod classic 160 Гбайт (2007)
iPod touch 1 покоління
8 Гбайт, 16 Гбайт, 32 Гбайт
iPod nano 3 покоління (відео) 4 Гбайт, 8 Гбайт
iPod classic 80 Гбайт
iPod nano 2 покоління (алюміній) 2 Гбайт, 4 Гбайт, 8 Гбайт
iPod 5 покоління (відео) 60 Гбайт, 80 Гбайт
iPod 5 покоління (відео) 30 Гбайт
iPod nano 1 покоління 1 Гбайт, 2 Гбайт, 4 Гбайт
iPod 4 покоління (кольоровий дисплей)
40 Гбайт, 60 Гбайт
iPod 4 покоління (кольоровий дисплей)
20 Гбайт, 30 Гбайт
iPod 4 покоління 40 Гбайт
iPod 4 покоління 20 Гбайт
iPod mini 4 Гбайт, 6 Гбайт
■ Сумісний iPhone
Назва Обсяг пам’яті
iPhone 3GS 16 Гбайт, 32 Гбайт
iPhone 3G 8 Гбайт, 16 Гбайт
iPhone 4 Гбайт, 8 Гбайт,
16 Гбайт
Сумісність залежить від версії програмного забезпечення
iPod/iPhone.
•
Натисніть на важіль замка
відділення, доки він не
зафіксується на місці.
Натисніть!
Натисніть [;], щоб відкрити
відділення для iPod/iPhone,
а після цього потягніть
важіль замка відділення,
щоб нахилити відділення
для iPod/iPhone.
[;]
Адаптер
Важіль
Штекер
ФіксаториСпочатку вставте
док-адаптер
iPod/iPhone боком з
кліпсою до себе, потім
проштовхніть його з
протилежного боку в
гніздо до защіпання.
Клац!
Клац!
Page 76

76
RQTX1076
УКРАЇНСЬКА
Операції з Bluetooth
Основи користування
Натисніть [ q/h] для вибору Bluetooth.
Почніть відтворення джерела музики на пристрої Bluetooth.
Якщо пристрій підключений, на приладі буде чутна музика.
(У разі необхідності дивіться посібник користувача до пристрою
Bluetooth.)
За допомогою дистанційного керування ви також можете
здійснювати такі функції.
Програвання
Натисніть [ q/h], щоб почати відтворення.
Стоп
Натисніть [g, ].
Пауза
Натисніть [ q/h]. Натисніть знову, щоб
продовжити відтворення.
Пропуск
запису
Натисніть [u] або [i].
Щоб користуватися цими функціями, пристрій Bluetooth повинен
підтримувати профіль AVRCP (Audio Video Remote Control Profile).
Цей прилад не може передавати дані на пристрій Bluetooth.
Під час програвання iPod/iPhone через Bluetooth на основному
апараті звук може стати переривчастим, якщо ви залишите
активним екран меню Bluetooth на iPod/iPhone; це також може
статися під час реєстрації чи підключення Bluetooth. У цьому
випадку вийдіть з екрана меню Bluetooth на iPod/iPhone.
Під час програвання музики на iPod/iPhone через з’єднання
Bluetooth і коли iPod/iPhone приєднаний до пристрою через
відділення для iPod/iPhone, звук в селекторі Bluetooth
відтворюватися не буде. Перемкніть селектор в позицію iPod та
продовжуйте насолоджуватися музикою.
•
•
•
•
Підготовка:
Спарюйте Bluetooth з цим приладом, щоб створити аудіо-зв’язок.
Натисніть [ q/h] для вибору Bluetooth.
При використанні його вперше автоматично здійснюється вхід до
режиму спарювання.
Під час роботи приладу в режимі спарювання увійдіть у меню
Bluetooth пристрою Bluetooth та виконайте пошук Bluetooth,
щоб знайти цей прилад (SC-HC40).
Додаткові інструкції щодо підключення пристрою Bluetooth
дивіться у посібнику користувача до пристрою Bluetooth.
Якщо з’явиться запитання про ключ для доступу, введіть
“0000” (Для пристроїв Bluetooth, версії яких не сумісні з
версією 2.1+EDR).
Якщо спарювання було здійснено успішно, на дисплеї
протягом 2 секунд буде відображатися ім’я спареного
пристрою. Висвітлюється індикатор Bluetooth. Тепер прилад
готовий до використання з Bluetooth.
Переконайтеся, що Bluetooth підтримує профіль A2DP (Advance
Audio Distribution Profile).
Цей прилад підтримує прийом за профілем A2DP, що захищено
авторським правом за методом SCMS-T.
A2DP надає вам можливість направляти стереофонічний звук від
джерела звуку (телефону, ПК або портативного комп’ютера) до
цього приладу через Bluetooth.
У залежності від технічних характеристик або налаштування
мобільних телефонів зв’язок може не встановитися, або можуть
відрізнятися функції чи дисплей.
На цьому приладі можна спарювати до 6 пристроїв.
Від’єднайте поточний пристрій Bluetooth та див. «Реєстрація
декількох пристроїв» (➡ стор. 13).
Якщо ви реєструєте більше максимальної кількості пристроїв, дані
про перший пристрій в історії з’єднань будуть перезаписані.
Якщо зареєстрований пристрій реєструється повторно, дані
будуть перезаписані.
•
•
•
•
•
•
•
•
•
•
Про використання Bluetooth
g Смуга частот
Цей прилад використовує смугу частот 2,4 ГГц, однак інші пристрої
також можуть використовувати цю частоту. Щоб уникнути перешкод
від інших бездротових пристроїв, дотримуйтесь застережень, що
надані нижче.
g Сертифікація пристрою
Цей прилад відповідає вимогам щодо обмеження частот та
отримав сертифікацію на основі законів при використання частот,
отже потреби у отриманні дозволу на використання бездротового
пристрою немає. Однак закон передбачає відповідальність за такі дії:
Розбирання/перероблення приладу.
Видалення позначень технічних характеристик з задньої частини
приладу.
g Обмеження щодо використання
Бездротова передача даних та/або використання разом з
пристроями Bluetooth не гарантується.
Сумісні мобільні телефони, придатні до бездротової передачі,
відповідають стандартам, що встановлені компанією Bluetooth
SIG, Inc. Однак деякі функції можуть працювати, якщо мобільний
телефон відповідає технічним нормативам. Навіть в такому
випадку, залежно від технічних характеристик та налаштувань,
з’вязок може не бути встановлений, і також не гарантуються
методи експлуатації, відображення або функції.
Цей прилад підтримує функції безпеки пристрою Bluetooth, однак,
залежно від операційного середовища та/але налаштувань,
захист може бути недостатнім. Проявляйте обережність під час
бездротової передачі даних.
Необхідно усвідомлювати, що компанія Panasonic не бере на себе
відповідальність за витік або розголошення конфіденційних даних
та/але інформації під час бездротової передачі.
g Дальність дії
Дальність дії пристрою складає 10 м при відсутності перешкод.
Дальність дії або периметр може бути зменшений у залежності
від фізичних перешкод, наявності пристроїв, що спричиняють
перешкоди, інших людей у кімнаті або конструкції будівлі. Зверніть
увагу на те, що дальність дії, яку вказано вище, не гарантується.
g Вплив інших пристроїв
Пристрій може працювати неналежним чином або можуть
виникнути інші ефекти нестабільної роботи, такі як “переривчастий”
звук, якщо у безпосередній близькості розташовані інші пристрої.
Тому, щоб запобігти перешкодам сигналу, під час використання
приладу рекомендується відокремити його від таких пристроїв:
Мікрохвильова піч/Бездротова локальна комп’ютерна мережа/
Електронні пристрої/Аудіо- та відео пристрої/Офісне обладнання
та пристрої/Цифрові бездротові телефони/Факсові апарати тощо.
Якщо ви живете у безпосередній близькості до радіомовної студії і
сигнал занадто сильний, прилад може працювати неналежним чином.
Якщо ви користуєтеся ноутбуком з бездротовою локальною
комп’ютерною мережею, не користуйтеся приладом одночасно з
бездротовою локальною комп’ютерною мережею.
Якщо шум виникає навіть тоді, коли пристрій бездротової
локальної комп’ютерної мережі знаходиться на відстані більше
5 м, вимкніть живлення пристрою бездротової локальної
комп’ютерної мережі.
g Встановлені обмеження використання
Цей прилад призначений для звичайного масового споживача.
Цей прилад розроблений або виготовлений не для використання
в умовах “суворого дотримання правил техніки безпеки” або
небезпечних умовах експлуатації. Не використовуйте цей прилад в
таких оточеннях або умовах.
Нижче наведені приклади оточення, де використання приладу
вимагає надзвичайної обережності і може привести до втрати
життя або спричинити серйозне тілесне ушкодження.
приклади
:
Ядерна техніка та контроль ядерного реактора/автоматичний
контроль літального апарату/керування повітряним рухом/
системи керування переміщенням важких вантажів/керування
системами життєзабезпечення/керування системами озброєння
та/або ракетних пускових систем тощо.
•
•
•
•
•
•
•
•
•
•
Що таке Bluetooth?
Технологія Bluetooth дозволяє встановити бездротовий з’вязок з
іншим електронним пристроєм.
Зовнішній апарат (продовження)
12 13
Page 77

77
RQTX1076
УКРАЇНСЬКА
77
BLUETOOTH Ім’я
підключеного пристрою
Зовнішній апарат (продовження)
Рівень вхідного сигналу
Можна вибрати рівень вхідного звукового сигналу пристрою
Bluetooth.
Натисніть [PLAY MODE] кілька разів, щоб обрати “LEVEL 0”,
“LEVEL +1” або “LEVEL +2”.
Оберіть “LEVEL 0”, якщо звук спотворений.•
Профіль голосного зв’язку HFP (Hands-Free
Profile)
Цей прилад працює, як Bluetooth hands-free для мобільних
телефонів.
Ви можете відповідати або скасовувати вхідний виклик за допомогою
дистанційного керування.
Щоб отримати
виклик
(“IN CALL” блимає)
Натисніть [ ]. На дисплеї починає
блимати напис “CALLING” (Говоріть у
мікрофон пристрою).
Натисніть [ ] знову, щоб передати виклик
до мобільних телефонів (“TRANSFER”
блимає. Тепер ви можете спілкуватися по
мобільному телефону).
Щоб скасувати
виклик
Натисніть [g, ].
Щоб відрегулювати
гучність
Натисніть [+, VOL , –] (Регулюється від
“TEL VOL 1” до “TEL VOL 10”).
Щоб вимкнути
мікрофон
Натисніть [MUTE]. Натисніть знову,
щоб скасувати (Під час “MIC MUTE”
співрозмовник не може чути ваш голос).
Цей прилад не працює з профілем гарнітури HSP (Headset Profile).
Коли мобільний телефон знаходиться занадто близько до
мікрофона пристрою, може виникати шум. Під час виклику завжди
тримайте мобільний телефон подалі від мікрофону пристрою.
•
•
Натисніть [ MENU], доки не з’явиться напис “DISCONNECT?”,
і потім натисніть [OK].
З’являється повідомлення з підтвердженням.
Натисніть [e,r], щоб обрати “YES” або “NO”, і потім знову
натисніть [OK].
З’єднання також може перерватися, коли ви виключаєте передачу
через Bluetooth на підключеному пристрої Bluetooth.
•
Відключення пристрою Bluetooth
Додаткові функції
Функція показу
Натисніть [DISPLAY, –DIMMER] кілька разів, щоб переглянути
інформацію про поточний підключений пристрій.
Підключені профілі
Словесний товарний знак та логотип Bluetooth є власністю
Bluetooth SIG, Inc. і будь-яке використання таких знаків фірмою
Panasonic Corporation здійснюється за ліцензією. Інші торговельні
марки та фірмові назви належать їхнім відповідним власникам.
Заява про відповідність (DoC)
Цим “Panasonic Corporation” заявляє, що цей виріб відповідає
істотним вимогам та іншим відповідним вимогам Директиви ЄС
1999/5/EC.
Споживачі можуть завантажити копію оригіналу Заяви про
відповідність до нашого радіо- та телекомунікаційного обладнання з
нашого сервера Заяви про відповідність:
http://www.doc.panasonic.de
Контакт з нашим уповноваженим представником: Panasonic
Marketing Europe GmbH, Panasonic Testing Centre, Winsbergring 15,
22525 Hamburg, Germany
Цей виріб призначений для використання у наступних країнах.
PL, CZ, HU, SK, BG, EE, LV, RO, SI, BO, HR, MK, RS, LT, RU, UA, KZ,
BY, O.CIS
Цей виріб призначений для масового споживача. (Категорія 3)
“Made for iPod” (Зроблено для iPod) означає, що електронне
приладдя призначено для підключення спеціально до iPod і
було сертифіковане розробником відповідно до експлуатаційних
показників фірми Apple.
“Works with iPhone” (Працює з iPhone) означає, що електронне
приладдя призначено для підключення спеціально до iPhone і
було сертифіковане розробником відповідно до експлуатаційних
показників фірми Apple.
Apple не несе відповідальності за роботу пристрою або його
відповідність до стандартів безпеки та регулятивних норм.
iPod є торгівельною маркою Apple Inc., що зареєстрована у США
та інших країнах. iPhone є торгівельною маркою Apple Inc.
or
Дозвіл на використання технології декодування звуку MPEG
Layer-3 отриманий від Fraunhofer IIS and Thomson.
ПРАЦЮЄ В ДІАПАЗОНІ ВІД 2400 МГц ДО 2483,5 МГц
g Реєстрація декількох пристроїв
Натисніть [ MENU].
Натисніть [e,r], щоб обрати “NEW DEV”, і потім натисніть
[OK].
Прилад входить до режиму спарювання, і на на дисплеї починає
блимати напис “PAIRING”.
Під час роботи приладу в режимі спарювання увійдіть у меню
Bluetooth пристрою Bluetooth та виконайте пошук Bluetooth,
щоб знайти цей прилад (SC-HC40).
Якщо з’явиться запитання про ключ для доступу, введіть “0000”
g Щоб обрати якість зв’язку
Натисніть [ MENU].
Натисніть
[e,r]
, щоб обрати
“LINK MODE”, і потім натисніть
[OK].
Натисніть [e,r], щоб обрати наступні режими, і потім
натисніть [OK].
“MODE 1”
(РЕЖИМ 1):
З‘єднання с наголосом на стабільність зв’язку
“MODE 2”
(РЕЖИМ 2): З’єднання з високою швидкістю передачі
бітів, отже якість звуку висока (В цьому
режимі зв’язок може легко перерватися;
у цьому випадку оберіть “MODE 1”).
g Щоб обрати режим Auto Link
Натисніть [ MENU].
Натисніть [e,r], щоб обрати “AUTO LINK”, і потім натисніть
[OK].
Натисніть [e,r], щоб обрати наступні режими, і потім
натисніть [OK].
“ON”: Автоматично з’єднаний, навіть коли селектор інший, ніж
Bluetooth
“OFF”: З’єднаний тільки в селекторі Bluetooth
Ці функції недоступні, якщо пристрій підключений. Щоб
відобразити ці функції, відключіть пристрої Bluetooth.
Коли відображається напис “LINKING”, кнопка [ MENU] не
працює.
Режим Auto Link працює тільки тоді, коли ваш пристрій підтримує
профіль A2DP.
•
•
•
•
•
•
•
•
Page 78

78
RQTX1076
УКРАЇНСЬКА
Зовнішній апарат (продовження)
Операції з USB
USB-підключення дозволяє вам підключати та відтворювати музику
або файли з USB-накопичувачів.
Підготовка:
Перед підключенням будь-якого USB-накопичувача до даного
апарата обов’язково зробіть резервне копіювання даних.
Не рекомендується використовувати USB-подовжувач. При
підключенні USB-пристрою за допомогою подовжувача, даний
апарат не розпізнає його.
Відкрийте кришку USB.
Знизьте гучність і підключіть USB-накопичувач.
Натисніть [USB q/h], щоб почати відтворення.
•
•
Стоп
Натисніть [g, ].
З’явиться напис
“RESUME”.
Позиція зупинки запам’ятовується.
Натисніть
[USB q/h], щоб продовжити
відтворення.
Натисніть
[g, ] знову, щоб стерти позицію.
Пауза
Натисніть
[USB q/h]. Натисніть знову, щоб
продовжити відтворення.
Пропуск запису
Натисніть
[u] або [i].
Пропуск альбому
Натисніть
[e,r].
Відтворення з
безпосереднім
доступом
(Відтворення
починається
з вибраного
запису.)
Натисніть [e,r] для вибору альбому.
Один раз натисніть [i], а потім цифрові
кнопки, щоб вибрати запис.
Сумісні пристрої
Для відключення USB-накопичувача оберіть джерело інше, ніж
“USB”.
Якщо відключити накопичувач USB в той час, як джерелом
вибрано USB, дані на накопичувачі можуть пошкодитися.
•
Пристрої, що включаються в клас USB-накопичувачів:
USB-пристрої, що підтримують тільки групове пересилання даних
USB-пристрої, що підтримують USB 2.0 (швидкісний)
•
•
Інші функції подібні до тих, що описані в “Операції з дисками”
(➡ стор. 8, 9).
Зауваження щодо USB
Підтримка формату: Файли з розширеннями “.mp3” або “.MP3”
CBI (Control/Bulk/Interrupt) не підтримується.
Не підтримується пристрій з файловою системою NTFS
[Підтримується лише файлова система FAT 12/16/32 (File
Allocation Table 12/16/32)].
Залежно від розміру сектора деякі файли можуть не
працювати.
Апарат дає доступ до 255 альбомів та 2500 записів.
Максимальна кількість записів у папці 999.
При підключенні зчитувача карт USB з декількома портами
буде вибрана тільки одна карта пам’яті, зазвичай це перша
вставлена карта пам’яті.
Відключіть зчитувач карт USB від апарату, коли виймаєте
карту пам’яті. Якщо цього не зробити, апарат може працювати
некоректно.
При підключенні вашого цифрового аудіо програвача до
USB-порту він буде заряджатись увесь час, доки апарат
увімкнений.
•
•
•
•
•
•
•
•
•
USB-накопичувач (не входить у комплект)
Скидання пам’яті (Ініціалізація)
Виконайте скидання пам’яті при виникненні наступних ситуацій:
Немає відгуку при натисканні кнопок.
Ви бажаєте очистити та скинути вміст пам’яті.
Для ініціалізації пам’яті
Відключіть шнур живлення. (Зачекайте щонайменше 3 хвилини перед переходом до кроку 2.)
Натиснувши та притримуючи [8] на основному апараті, підключіть шнур живлення.
На дисплеї з’явиться “--------”.
Відпустіть клавішу [8].
Всі настройки повертаються до заводських. Вам потрібно буде скинути елементи пам’яті.
•
•
14 15
Page 79

79
RQTX1076
УКРАЇНСЬКА
79
Перед зверненням до служби технічного обслуговування виконайте нижченаведену перевірку. Якщо ви маєте якісь сумніви
стосовно порад у цьому списку або запропоновані в таблиці заходи не вирішують проблеми, зверніться до магазину, в якому ви
придбали товар.
g Звичайні проблеми
Неправильне виведення на екран чи
відтворення не починається
Ви невірно вставили диск. Вставте його
правильно.
Диск забруднений або подряпаний (записи
пропускаються).
Волога на лінзах. Почекайте годину і
спробуйте знову.
МР3 не читається
Файли МР3 можуть не відтворюватися,
якщо скопійовано багатосесійний диск без
даних між сесіями.
При створенні багатосесійного диску
необхідно закривати сесію.
Об’єм даних на диску надто малий. Об’єм
даних має бути більшим 5 Мбайт.
Чути шум або звуку немає
При відтворенні файлів МР3 може
виникати шум внаслідок низької якості
запису.
Тримайте апарат подалі від мобільних
телефонів, якщо перешкоди є помітними.
Підвищіть гучність.
Вимкніть апарат, перевірте підключення
і знову увімкніть апарат. Серед причин
можуть бути перевантаження колонок
через надмірну гучність і потужність
або використання апарату при високій
температурі довкілля.
Під час відтворення чути гудіння
Кабель живлення або флуоресцентна
лампа знаходяться поблизу кабелів.
Розташовуйте інші прилади або кабелі на
віддалі від кабелів даного апарата.
При радіоприйомі чути биття або шум
Вимкніть телевізор чи інший аудіоплеєр
або відключіть їх від апарату.
Вимкніть портативний аудіоплеєр, якщо він
підключений до порта AUX.
Під час прослуховування АМ-трансляцій
чути низьке гудіння або шум
Відокремте антену від інших кабелів або
шнурів.
АМ-антена має бути далеко від апарату.
Біля пристрою зображення зникло
з екрана телевізора або на ньому
з’являються смуги
Неправильне розташування та орієнтація
антени.
Кабель телевізійної антени знаходиться
надто близько до апарата. Відокремте
кабель антени від апарата.
Апарат не реагує на натискання кнопок на
пульті ДК
Перевірте правильність встановлення
батарейок (➡ стор. 7).
g Дисплей
“--:--”
Шнур живлення вставлено вперше, або
до того було відключення електроенергії.
Установіть годинник (➡ стор. 10).
“ADJUST CLOCK”
Годинник не встановлено. Налаштуйте
правильно годинник.
•
•
•
•
•
•
•
•
•
•
•
•
•
•
•
•
•
•
•
•
“ADJUST TIMER”
Таймер відтворення не виставлено.
Зробіть необхідні настройки.
“PGM FULL”
Кількість програмованих записів не
може перевищувати 24. Більше записів
програмувати неможливо.
“NO PLAY”
Вставлено компакт-диск іншого формату,
ніж CD-DA чи MP3. Він не підлягає
відтворенню.
“ERROR”
Виконується неправильна операція.
Ознайомтесь із інструкцією та спробуйте
знову.
“F61” або “F76”
Виникла проблема з подачею живлення.
Зверніться до дилера.
Відключіть USB-пристрій. Вимкніть і знову
увімкніть апарат.
“AUTO OFF”
Пристрій не використовувався протягом
прибл. 29 хвилин і вимкнеться за хвилину.
Натисніть двічі, щоб скасувати.
“ILLEGAL OPEN”
Розсувні дверцята у невірному положенні.
Вимкніть і знову увімкніть апарат.
“NODEVICE”
Прилад iPod/iPhone вставлено невірно.
Ознайомтесь із інструкцією та спробуйте
знову (➡ стор. 11).
Приcтрій USB не вставлений. Перевірте
підключення.
“REMOTE 1”
Основний апарат в режимі “REMOTE 1”.
Перемкніть пульт ДК в режим “REMOTE 1”
(➡ стор. 10).
“REMOTE 2”
Основний апарат в режимі “REMOTE 2”.
Перемкніть пульт ДК в режим “REMOTE 2”
(➡ стор. 10).
g iPod/iPhone
iPod/iPhone не вмикається
Перед підключенням iPod/iPhone до
апарату, перевірте, чи не розрядився його
акумулятор.
Перед тим, як вставити iPod/iPhone у
відділення, вимкніть і апарат, і iPod/iPhone.
Знову увімкніть живлення і виберіть
відповідне джерело.
Не чутно звуку з динаміків
iPod/iPhone вставлено неправильно.
Вимкніть iPod/iPhone і вийміть його
з відділення. Вставте ще раз і знову
увімкніть.
Перетворюється, чи iPod/iPhone дійсно
відтворює якийсь запис.
Відрегулюйте гучність.
Звук спотворено або гучність надто
низька
Перевірте, щоб функція еквалайзера на
iPod/iPhone була вимкнена.
Прилад iPod/iPhone не реагує на
натискання кнопок на пульті ДК
Перевірте, чи правильно вставлено
iPod/iPhone у відділення.
Перевірте підключення і переконайтеся,
що джерелом музики вибрано саме
iPod/iPhone (➡ стор. 11).
•
•
•
•
•
•
•
•
•
•
•
•
•
•
•
•
•
•
•
•
iPod/iPhone не заряджається
Перевірте усі підключення (➡ стор. 3, 11).
g Bluetooth
Ім’я підключеного пристрою
відображається як “ * ”
Знаки, які не можуть бути відображені,
будуть замінені на “ * ”.
Ім’я невідомого пристрою розпізнається і
відображається, як “
*****
”.
Чути шум або переривчастий звук
Відстань зв’язку з пристроєм bluetooth
більше 10 м. Перенесіть пристрій ближче
до приладу.
Між пристроєм та приладом знаходяться
сторонні предмети. Відсуньте сторонні
предмети або приберіть їх.
Оберіть “MODE 1”, щоб покращити якість
зв’язку (➡ стор. 13).
Перешкоди від мобільного телефону.
“F70”
Вимкніть прилад. Відключіть від розетки
змінного струму та зверніться до дилера.
g USB
Апарат не реагує, коли кнопку
[USB q/ h]
натиснуто
Відключіть та знову підключіть пристрій
USB або вимкніть і знову увімкніть апарат.
USB-пристрій або його вміст не
зчитується
Формат або вміст USB-пристрою не
підтримуються пристроєм (➡ стор. 14).
Функція USB-хосту даного виробу може не
працювати з деякими USB-пристроями.
USB-пристрої з ємністю більш ніж 8 Гбайт
можуть не працювати в деяких випадках.
Повільна робота флеш-пам’яті USB
Якщо розмір файлу або флеш-пам’яті
великий, зчитування займає більше часу.
“NO PLAY”
Перевірте вміст.
Відтворюються тільки файли формату
МР3.
Якщо є більше 255 альбомів або папок
(аудіо або не аудіо), деякі файли MP3 у
цих альбомах можуть не зчитуватися чи не
відтворюватися. Передайте ці альбоми на
інший USB-пристрій. Або переформуйте
USB-пристрій та збережіть ці музикальні
альбоми перед зберіганням інших папок з
не-аудіо файлами.
•
•
•
•
•
•
•
•
•
•
•
•
•
•
•
•
Усунення несправностей
Page 80

80
RQTX1076
УКРАЇНСЬКА
g СЕКЦІЯ BLUETOOTH
Системна специфікація Bluetooth V2.1 + EDR
Класифікація апаратури бездротового зв’язку Клас 1 (2,5 мВт)
Формати, що підтримуються A2DP, AVRCP, HFP
Смуга частот 2402 MГц до 2480 MГц
(Адаптивна стрибкоподібна перебудова частоти)
Відстань приведення в дію 10 м на віддалі прямої видимості
(iPhone 3G, на висоті 1 м, в режимі MODE 1)
g СЕКЦІЯ USB-ПОРТ
USB Стандарт USB 2.0 (швидкісний)
Підтримка формату медіафайлів MP3 (*.mp3)
Файлова система пристрою USB FAT 12/16/32
Потужність USB-порта Макс. 500 мА
g ЗАГАЛЬНІ ХАРАКТЕРИСТИКИ
Живлення Змінний струм 220 В до 240 В, 50 Гц
Енергоспоживання 35 Вт
Розміри (Ш x В x Г) 500 мм x 201 мм x 102 мм
(
Г = 69 мм мінімум)
Вага Прибл. 3,0 кг
Робоча температура 0 °C до +40 °C
Відносна вологість 35 % до 80 % RH (без утворення конденсату)
g СЕКЦІЯ ПІДСИЛЮВАЧА
Вихідна потужність RMS
Передній кн (обидва кн. працюють)
20 Вт на канал (6 Ω), 1 кГц, 10 % THD
Загальна вихідна потужність RMS 40 Вт
Гніздо навушників
Гніздо Стерео, гніздо 3,5 мм
Aux (Задній)
Гніздо Стерео, гніздо 3,5 мм
g СЕКЦІЯ ТЮНЕРА
Програмована пам’ять FM 30 станцій
AM 15 станцій
Частотна модуляція (FM)
Діапазон частот 87,50 МГц до 108,00 МГц (кроком 50 кГц)
Виходи антени 75 Ω (несиметрич.)
Амплітудна модуляція (AM)
Діапазон частот 522 кГц до 1629 кГц (кроком 9 кГц)
520 кГц до 1630 кГц (кроком 10 кГц)
g СЕКЦІЯ ДИСКІВ
Диски, придатні для відтворення [8 см або 12 см]
(1) Аудіо компакт-диски (CD-DA)
(2) CD-R/RW (CD-DA, MP3)
(3) MP3*
* MPEG-1 Layer 3, MPEG-2 Layer 3
Пікап
Довжина хвилі 795 нм
Потужність лазера CLASS 1
Аудіовихід (Диск)
Кількість каналів Передній лівий, передній правий, 2 канали
g СЕКЦІЯ КОЛОНОК
Тип 1-полосна, акустична система з 1 динаміком
(Пасивний випромінювач)
Колонка(и)
Повний діапазон 6,5 cм Конусного типу x 1 / канал
Пасивний випромінювач 8 cм x 2 / канал
Імпеданс 6 Ω
Споживання енергії в режимі очікування: 0,09 Вт (прибл.)
Технічні характеристики можуть бути змінені без попередження.
Загальне гармонічне спотворення визначається за допомогою
цифрового спектрального аналізатора.
•
•
g Від’єднайте шнур електроживлення від штепсельної розетки змінного струму до обслуговування і витріть його м’якою та сухою
ганчіркою.
Якщо система дуже брудна, ретельно викрутіть ганчірку, змочену водою, витріть бруд, і сухою ганчіркою витріть вологу.
Не користуйтесь такими розчинами, як бензин, розчинник для фарби, спиртові розчини або миючі засоби, тому що вони можуть спричинити
деформування корпусу.
При використанні хімічної тканини дотримуйтеся заходів безпеки.
g Догляд за лінзами CD
Регулярно очищайте лінзи, щоб запобігти порушенням роботи. Усувайте пил струменем повітря та ватою, якщо вони надто забруднилися.
Не використовуйте засоби чищення лінз типу CD.
•
•
•
•
•
Технічні характеристики
Технічне обслуговування
16 17
Page 81

81
RQTX1076
УКРАЇНСЬКА
81
Розташування
Установіть апарат на рівній поверхні подалі від прямих сонячних променів, високих температур, високої вологості й надлишкової вібрації.
Ці умови можуть спричинити пошкодження корпуса та інших компонентів, тим самим скоротивши термін його служби.
Не кладіть на пристрій важкі предмети.
Напруга
Не використовуйте джерела живлення високої напруги. Це може призвести до перенапруги апарата і загоряння.
Не використовуйте джерела живлення постійного струму. Ретельно перевірте джерело живлення перш, ніж установити апарат на
кораблі або в іншому місці, де використовуються джерела постійного струму.
Захист мережного шнура
Переконайтеся в тому, що шнур живлення змінним струмом підключений правильно і не пошкоджений. Нещільне приєднання й
ушкодження шнура можуть призвести до загоряння або ураження електричним струмом. Не смикайте, не згинайте мережний шнур і не
кладіть на нього важкі предмети.
Під час від’єднання від розетки міцно утримуйте штепсельну вилку. Смикаючи за мережний шнур, ви можете бути вражені електричним
струмом.
Не доторкайтеся штепсельної вилки вологими руками. Це може спричинити ураження електричним струмом.
Зовнішні предмети та речовини
Не дозволяйте металевим предметам потрапляти усередину апарата. Це може спричинити ураження електричним струмом або
призвести до несправності.
Не дозволяйте рідинам потрапляти усередину апарата. Це може спричинити ураження електричним струмом або призвести до
несправності. Якщо це станеться, негайно від’єднайте апарат від мережі електроживлення і зверніться до вашого дилера.
Не розпорошуйте інсектициди на апарат або усередину нього. Вони містять легкозаймисті гази, що можуть зайнятися від розпилення на
апарат.
Обслуговування
Не намагайтеся самі ремонтувати цей апарат. Якщо звук переривається, індикатори не горять, з’явився дим або сталося будь-що
інше, не згадане в цій інструкції, від’єднайте апарат від мережі живлення і зв’яжіться з вашим дилером або уповноваженим центром з
обслуговування. Якщо апарат ремонтується, розбирається або відновлюється неуповноваженими особами, може відбутися ураження
електричним струмом або пошкодження апарата.
Термін служби апарата можна збільшити, від’єднавши його від джерела живлення, якщо він не буде використовуватися протягом
тривалого періоду часу.
Заходи безпеки
Page 82

82
RQTX1076
УКРАЇНСЬКА
18 19
Page 83

83
RQTX1076
УКРАЇНСЬКА
83
Page 84

EU
EU
Pursuant to at the directive 2004/108/EC, article 9(2)
Panasonic Testing Centre
Panasonic Marketing Europe GmbH
Winsbergring 15, 22525 Hamburg, Germany
RQTX1076-1R
H0210HU1050
Ur
Panasonic Corporation
Web Site: http://panasonic.net
RuCzPoEn
© Panasonic Corporation 2010
 Loading...