

Page 1
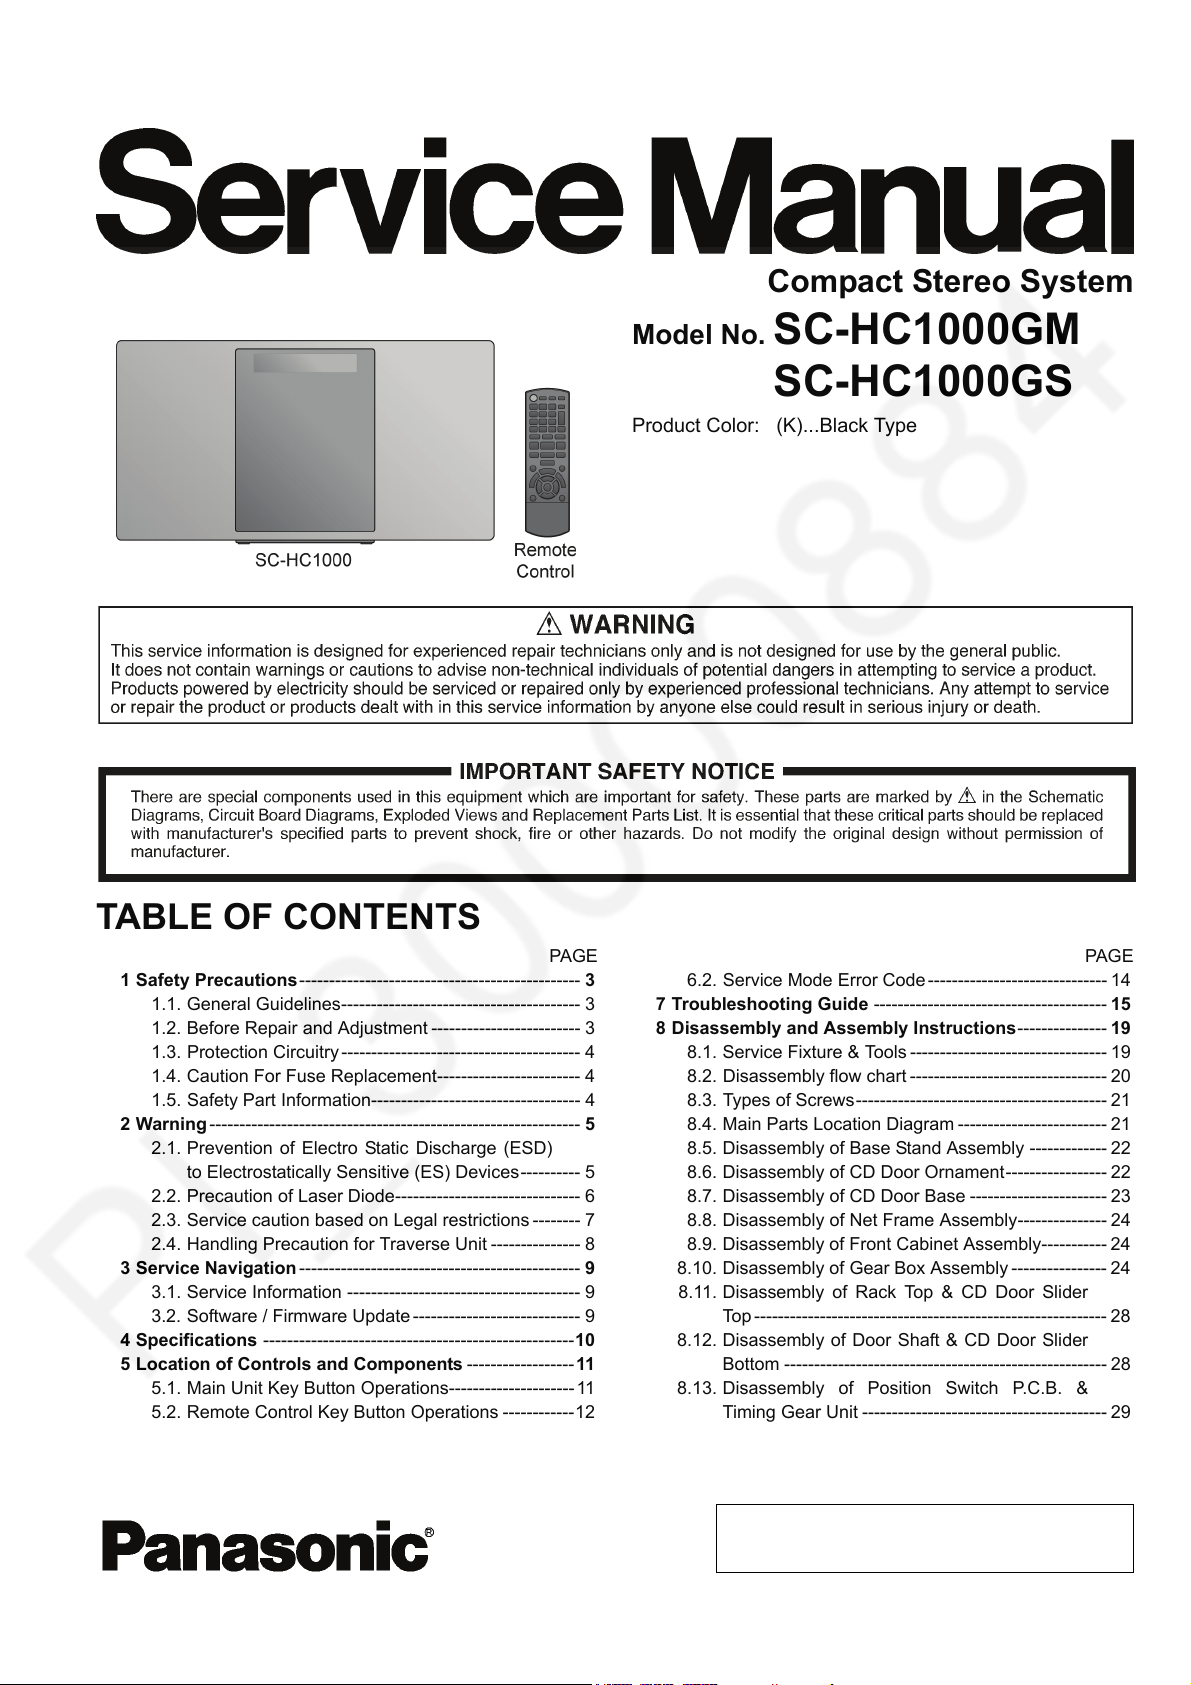
PSG1703008CE
Compact Stereo System
Model No. SC-HC1000GM
SC-HC1000GS
Product Color: (K)...Black Type
TABLE OF CONTENTS
1 Safety Precautions ----------------------------------------------- 3
1.1. General Guidelines---------------------------------------- 3
1.2. Before Repair and Adjustment ------------------------- 3
1.3. Protection Circuitry ---------------------------------------- 4
1.4. Caution For Fuse Replacement------------------------ 4
1.5. Safety Part Information----------------------------------- 4
2 Warning-------------------------------------------------------------- 5
2.1. Prevention of Electro Static Discharge (ESD)
to Electrostatically Sensitive (ES) Devices---------- 5
2.2. Precaution of Laser Diode------------------------------- 6
2.3. Service caution based on Legal restrictions -------- 7
2.4. Handling Precaution for Traverse Unit --------------- 8
3 Service Navigation ----------------------------------------------- 9
3.1. Service Information --------------------------------------- 9
3.2. Software / Firmware Update ---------------------------- 9
4 Specifications ----------------------------------------------------10
5 Location of Controls and Components ------------------11
5.1. Main Unit Key Button Operations--------------------- 11
5.2. Remote Control Key Button Operations ------------12
6 Service Mode -----------------------------------------------------13
6.1. Service Mode Table--------------------------------------13
PAG E PAG E
6.2. Service Mode Error Code ------------------------------ 14
7 Troubleshooting Guide --------------------------------------- 15
8 Disassembly and Assembly Instructions--------------- 19
8.1. Service Fixture & Tools --------------------------------- 19
8.2. Disassembly flow chart --------------------------------- 20
8.3. Types of Screws------------------------------------------ 21
8.4. Main Parts Location Diagram ------------------------- 21
8.5. Disassembly of Base Stand Assembly ------------- 22
8.6. Disassembly of CD Door Ornament----------------- 22
8.7. Disassembly of CD Door Base ----------------------- 23
8.8. Disassembly of Net Frame Assembly--------------- 24
8.9. Disassembly of Front Cabinet Assembly----------- 24
8.10. Disassembly of Gear Box Assembly ---------------- 24
8.11. Disassembly of Rack Top & CD Door Slider
Top----------------------------------------------------------- 28
8.12. Disassembly of Door Shaft & CD Door Slider
Bottom ------------------------------------------------------ 28
8.13. Disassembly of Position Switch P.C.B. &
Timing Gear Unit ----------------------------------------- 29
8.14. Disassembly of Panel P.C.B.-------------------------- 29
8.15. Disassembly of Tact Switch P.C.B. ------------------ 30
© Panasonic Corporation 2017. All rights reserved.
Unauthorized copying and distribution is a violation of
law.
Page 2
8.16. Disassembly of ALLPLAY Module with Data &
ALLPLAY Antenna P.C.B.------------------------------31
8.17. Disassembly of Ethernet P.C.B. ---------------------- 32
8.18. Disassembly of CD Mechanism ---------------------- 32
8.19. Disassembly of CD Interface P.C.B. ----------------- 33
8.20. Disassembly of Tuner P.C.B. -------------------------- 34
8.21. Disassembly of Main P.C.B. -------------------------- 35
8.22. Disassembly of Speaker Unit (SP1) ----------------- 35
8.23. Disassembly of Speaker Unit (SP2) ----------------- 36
9 Service Position ------------------------------------------------- 37
9.1. Checking of Tact Switch, Panel, Ethernet,
ALLPLAY Antenna, ALLPLAY Module with
Data, Main and CD Interface P.C.B.----------------- 37
10 Block Diagram --------------------------------------------------- 39
10.1. SERVO & SYSTEM CONTROL (1/2) BLOCK
DIAGRAM--------------------------------------------------39
10.2. SERVO & SYSTEM CONTROL (2/2) BLOCK
DIAGRAM--------------------------------------------------40
10.3. AUDIO BLOCK DIAGRAM ---------------------------- 41
10.4. POWER SUPPLY BLOCK DIAGRAM -------------- 42
11 Wiring Connection Diagram --------------------------------- 43
12 Schematic Diagram--------------------------------------------- 45
12.1. Schematic Diagram Notes ----------------------------- 45
12.2. CD INTERFACE CIRCUIT-----------------------------47
12.3. MAIN (SMPS) CIRCUIT -------------------------------- 48
12.4. MAIN (SUPPLY) CIRCUIT----------------------------- 49
12.5. MAIN (CD) CIRCUIT ------------------------------------ 50
12.6. MAIN (USB) CIRCUIT ---------------------------------- 51
12.7. MAIN (AUX) CIRCUIT ---------------------------------- 52
12.8. MAIN (SOC) CIRCUIT ---------------------------------- 53
12.9. MAIN (DAMP) CIRCUIT -------------------------------- 54
12.10. MAIN (ALLPLAY) CIRCUIT---------------------------- 55
12.11. POSITION SWITCH, MOTOR, ETHERNET &
TACT SWITCH CIRCUIT------------------------------- 56
12.12. PANEL CIRCUIT ----------------------------------------- 57
12.13. TUNER CIRCUIT----------------------------------------- 58
13 Printed Circuit Board ------------------------------------------ 59
13.1. CD INTERFACE, POSITION SWITCH,
MOTOR & ETHERNET P.C.B.------------------------59
13.2. MAIN P.C.B. (Side A)------------------------------------ 60
13.3. MAIN P.C.B. (Side B)------------------------------------ 61
13.4. PANEL, TACT SWITCH & TUNER P.C.B. --------- 62
14 Appendix Information of Schematic Diagram--------- 63
14.1. Voltage Measurement----------------------------------- 63
15 Exploded View and Replacement Parts List -----------65
15.1. Exploded View and Mechanical replacement
Parts List --------------------------------------------------- 65
15.2. Electrical Replacement Parts List -------------------- 71
2
Page 3
1 Safety Precautions
1.1. General Guidelines
1. IMPORTANT SAFETY NOTICE
There are special components used in this equipment which are important for safety. These parts are marked by in the
Schematic Diagrams, Circuit Board Layout, Exploded Views and Replacement Parts List. It is essential that these critical parts
should be replaced with manufacturer’s specified parts to prevent X-RADIATION, shock, fire, or other hazards. Do not modify
the original design without permission of manufacturer.
2. An Isolation Transformer should always be used during the servicing of AC Adaptor whose chassis is not isolated from the AC
power line. Use a transformer of adequate power rating as this protects the technician from accidents resulting in personal
injury from electrical shocks. It will also protect AC Adaptor from being damaged by accidental shorting that may occur during
servicing.
3. When servicing, observe the original lead dress. If a short circuit is found, replace all parts which have been overheated or
damaged by the short circuit.
4. After servicing, see to it that all the protective devices such as insulation barriers, insulation papers shields are properly
installed.
5. After servicing, make the following leakage current checks to prevent the customer from being exposed to shock hazards.
1.1.1. Leakage Current Cold Check
1. Unplug the AC cord and connect a jumper between the two prongs on the plug.
2. measure the resistance value, with an ohmmeter between the jumpered AC plug and each exposed metallic cabinet part on
the equipment such as screwheads, connectors, control shafts, etc. When the exposed metallic part has a return path to the
chassis, the reading should be between 1MΩ and 5.2MΩ. When the exposed metal does not have a return path to the chas-
sis, the reading must be
1.1.2. Leakage Current Hot Check
1. Plug the AC cord directly into the AC outlet. Do not use an isolation transformer for this check.
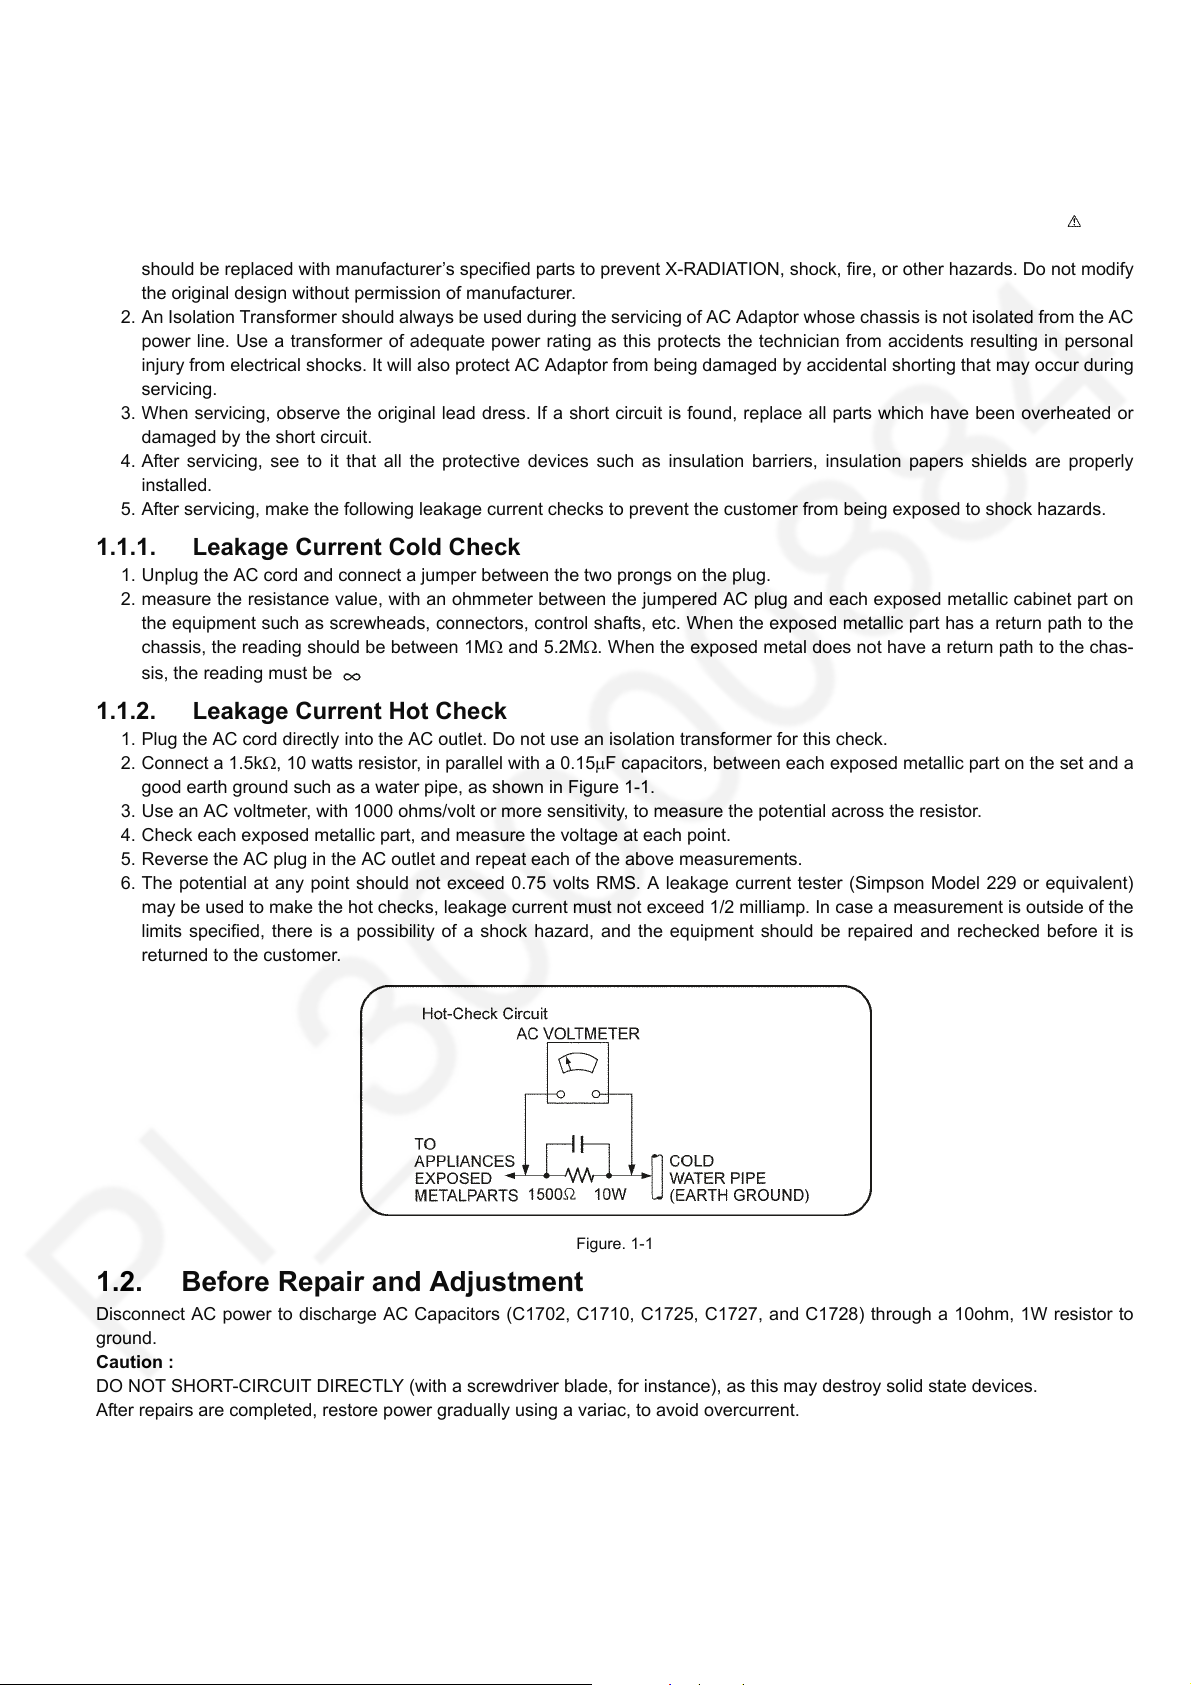
2. Connect a 1.5kΩ, 10 watts resistor, in parallel with a 0.15μF capacitors, between each exposed metallic part on the set and a
good earth ground such as a water pipe, as shown in Figure 1-1.
3. Use an AC voltmeter, with 1000 ohms/volt or more sensitivity, to measure the potential across the resistor.
4. Check each exposed metallic part, and measure the voltage at each point.
5. Reverse the AC plug in the AC outlet and repeat each of the above measurements.
6. The potential at any point should not exceed 0.75 volts RMS. A leakage current tester (Simpson Model 229 or equivalent)
may be used to make the hot checks, leakage current must not exceed 1/2 milliamp. In case a measurement is outside of the
limits specified, there is a possibility of a shock hazard, and the equipment should be repaired and rechecked before it is
returned to the customer.
Figure. 1-1
1.2. Before Repair and Adjustment
Disconnect AC power to discharge AC Capacitors (C1702, C1710, C1725, C1727, and C1728) through a 10ohm, 1W resistor to
ground.
Caution :
DO NOT SHORT-CIRCUIT DIRECTLY (with a screwdriver blade, for instance), as this may destroy solid state devices.
After repairs are completed, restore power gradually using a variac, to avoid overcurrent.
• Current consumption at AC 110V to 240V, at 50/60Hz in NO SIGNAL mode (at volume minimum in FM Tuner mode) should be
~200 mA.
3
Page 4
1.3. Protection Circuitry
The protection circuitry may have operated if either of the following conditions are noticed:
• No sound is heard when the power is turned on.
• Sound stops during a performance.
The function of this circuitry is to prevent circuitry damage if, for example, the positive and negative speaker connection wires are
"shorted", or if speaker systems with an impedance less than the indicated rated impedance of the amplifier are used.
If this occurs, follow the procedure outlines below:
1. Turn off the power.
2. Determine the cause of the problem and correct it.
3. Turn on the power once again after one minute.
Note:
When the protection circuitry functions, the unit will not operate unless the power is first turned off and then on again.
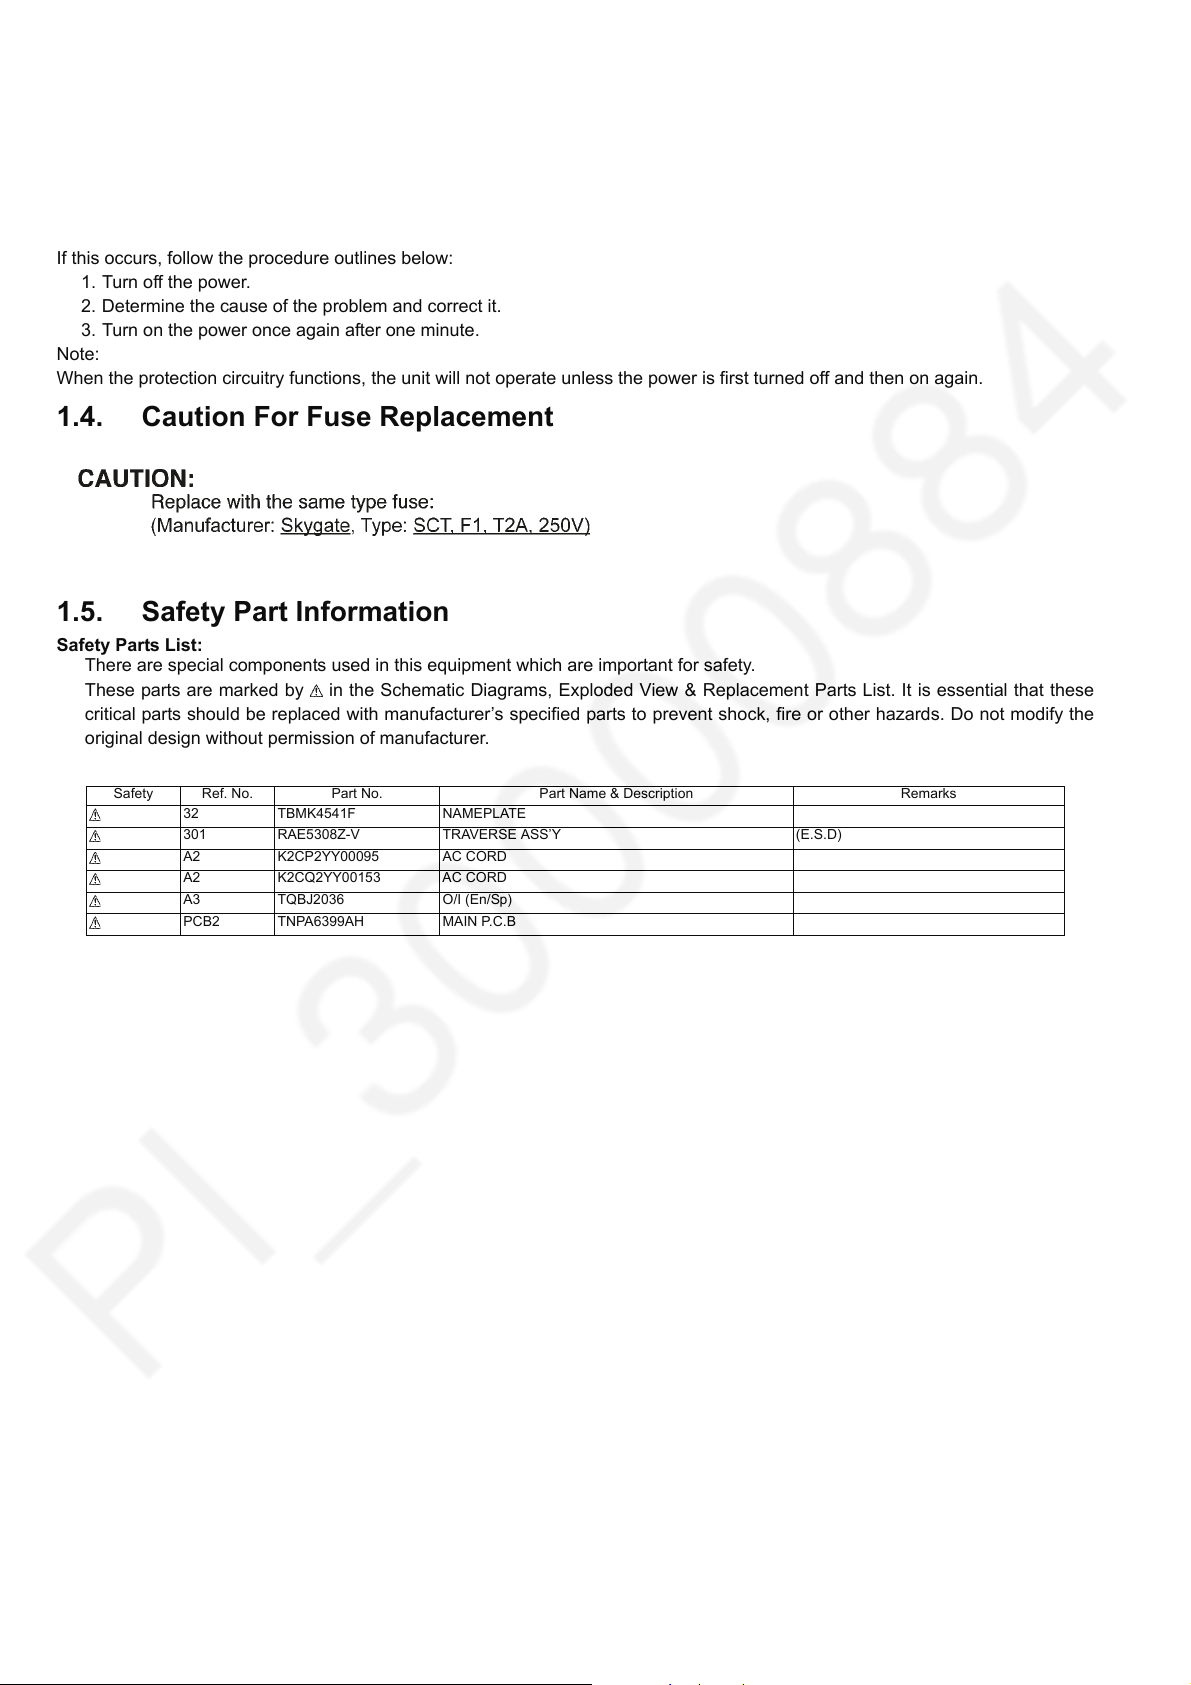
1.4. Caution For Fuse Replacement
1.5. Safety Part Information
Safety Parts List:
There are special components used in this equipment which are important for safety.
These parts are marked by in the Schematic Diagrams, Exploded View & Replacement Parts List. It is essential that these
critical parts should be replaced with manufacturer’s specified parts to prevent shock, fire or other hazards. Do not modify the
original design without permission of manufacturer.
Safety Ref. No. Part No. Part Name & Description Remarks
32 TBMK4541F NAMEPLATE
301 RAE5308Z-V TRAVERSE ASS’Y (E.S.D)
A2 K2CP2YY00095 AC CORD
A2 K2CQ2YY00153 AC CORD
A3 TQBJ2036 O/I (En/Sp)
PCB2 TNPA6399AH MAIN P.C.B
4
Page 5
2Warning
2.1. Prevention of Electro Static Discharge (ESD) to Electrostatically Sensitive (ES) Devices
Some semiconductor (solid state) devices can be damaged easily by static electricity. Such components commonly are called Electrostatically Sensitive (ES) Devices.
The following techniques should be used to help reduce the incidence of component damage caused by electrostatic discharge
(ESD).
1. Immediately before handling any semiconductor component or semiconductor-equipped assembly, drain off any ESD on your
body by touching a known earth ground. Alternatively, obtain and wear a commercially available discharging ESD wrist strap,
which should be removed for potential shock reasons prior to applying power to the unit under test.
2. After removing an electrical assembly equipped with ES devices, place the assembly on a conductive surface such as alumi-
num foil, to prevent electrostatic charge buildup or exposure of the assembly.
3. Use only a grounded-tip soldering iron to solder or unsolder ES devices.
4. Use only an anti-static solder removal device. Some solder removal devices not classified as “anti-static (ESD protected)” can
generate electrical charge sufficient to damage ES devices.
5. Do not use freon-propelled chemicals. These can generate electrical charges sufficient to damage ES devices.
6. Do not remove a replacement ES device from its protective package until immediately before you are ready to install it. (Most
replacement ES devices are packaged with leads electrically shorted together by conductive foam, aluminum foil or compara-
ble conductive material).
7. Immediately before removing the protective material from the leads of a replacement ES device, touch the protective material
to the chassis or circuit assembly into which the device will be installed.
CAUTION:
Be sure no power is applied to the chassis or circuit, and observe all other safety precautions.
8. Minimize bodily motions when handling unpackaged replacement ES devices. (Otherwise harmless motion such as the
brushing together of your clothes fabric or the lifting of your foot from a carpeted floor can generate static electricity (ESD) suf-
ficient to damage an ES device).
5
Page 6
2.2. Precaution of Laser Diode
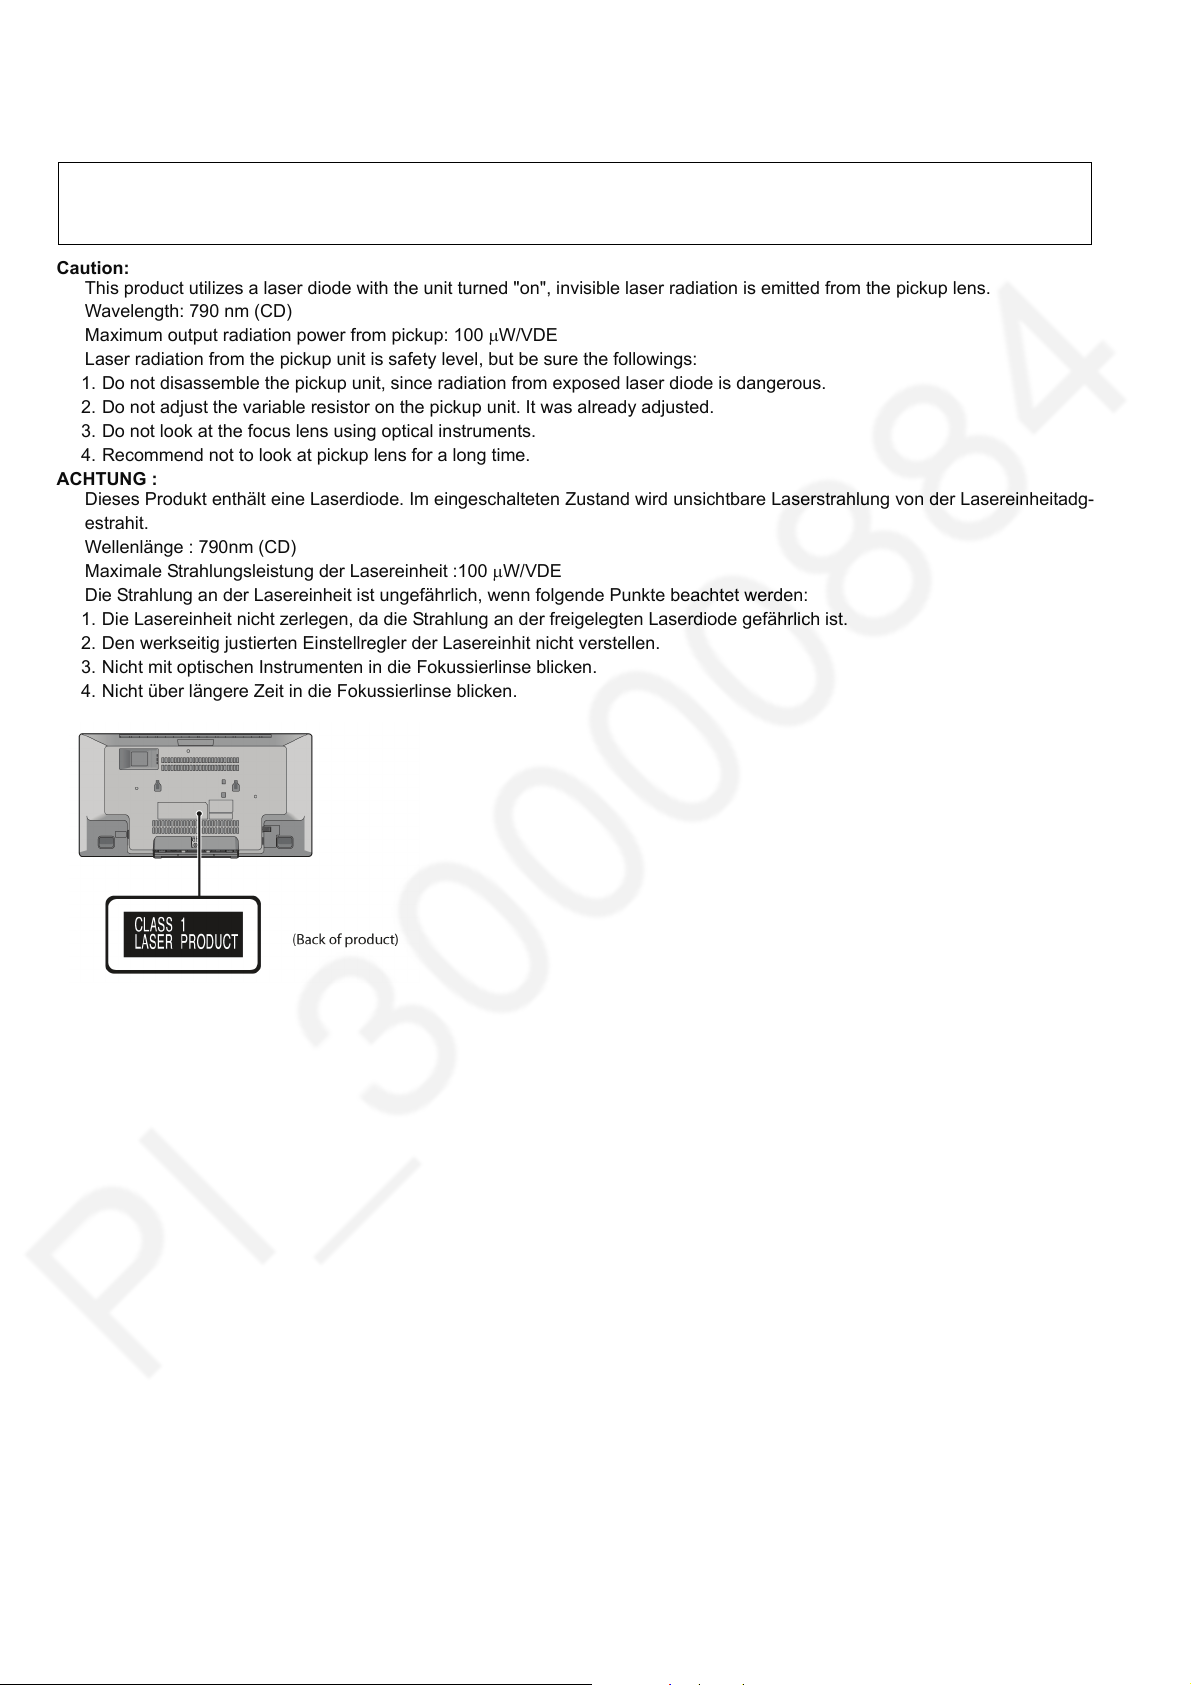
CAUTION!
THIS PRODUCT UTILIZES A LASER.
USE OF CONTROLS OR ADJUSTMENTS OR PERFORMANCE OF PROCEDURES OTHER THAN THOSE SPECIFIED HEREIN MAY RESULT
IN HAZARDOUS RADIATION EXPOSURE.
Caution:
This product utilizes a laser diode with the unit turned "on", invisible laser radiation is emitted from the pickup lens.
Wavelength: 790 nm (CD)
Maximum output radiation power from pickup: 100 μW/VDE
Laser radiation from the pickup unit is safety level, but be sure the followings:
1. Do not disassemble the pickup unit, since radiation from exposed laser diode is dangerous.
2. Do not adjust the variable resistor on the pickup unit. It was already adjusted.
3. Do not look at the focus lens using optical instruments.
4. Recommend not to look at pickup lens for a long time.
ACHTUNG :
Dieses Produkt enthält eine Laserdiode. Im eingeschalteten Zustand wird unsichtbare Laserstrahlung von der Lasereinheitadg-
estrahit.
Wellenlänge : 790nm (CD)
Maximale Strahlungsleistung der Lasereinheit :100 μW/VDE
Die Strahlung an der Lasereinheit ist ungefährlich, wenn folgende Punkte beachtet werden:
1. Die Lasereinheit nicht zerlegen, da die Strahlung an der freigelegten Laserdiode gefährlich ist.
2. Den werkseitig justierten Einstellregler der Lasereinhit nicht verstellen.
3. Nicht mit optischen Instrumenten in die Fokussierlinse blicken.
4. Nicht über längere Zeit in die Fokussierlinse blicken.
6
Page 7
2.3. Service caution based on Legal restrictions
2.3.1. General description about Lead Free Solder (PbF)
The lead free solder has been used in the mounting process of all electrical components on the printed circuit boards used for this
equipment in considering the globally environmental conservation.
The normal solder is the alloy of tin (Sn) and lead (Pb). On the other hand, the lead free solder is the alloy mainly consists of tin
(Sn), silver (Ag) and Copper (Cu), and the melting point of the lead free solder is higher approx.30 degrees C (86°F) more than that
of the normal solder.
Definition of PCB Lead Free Solder being used
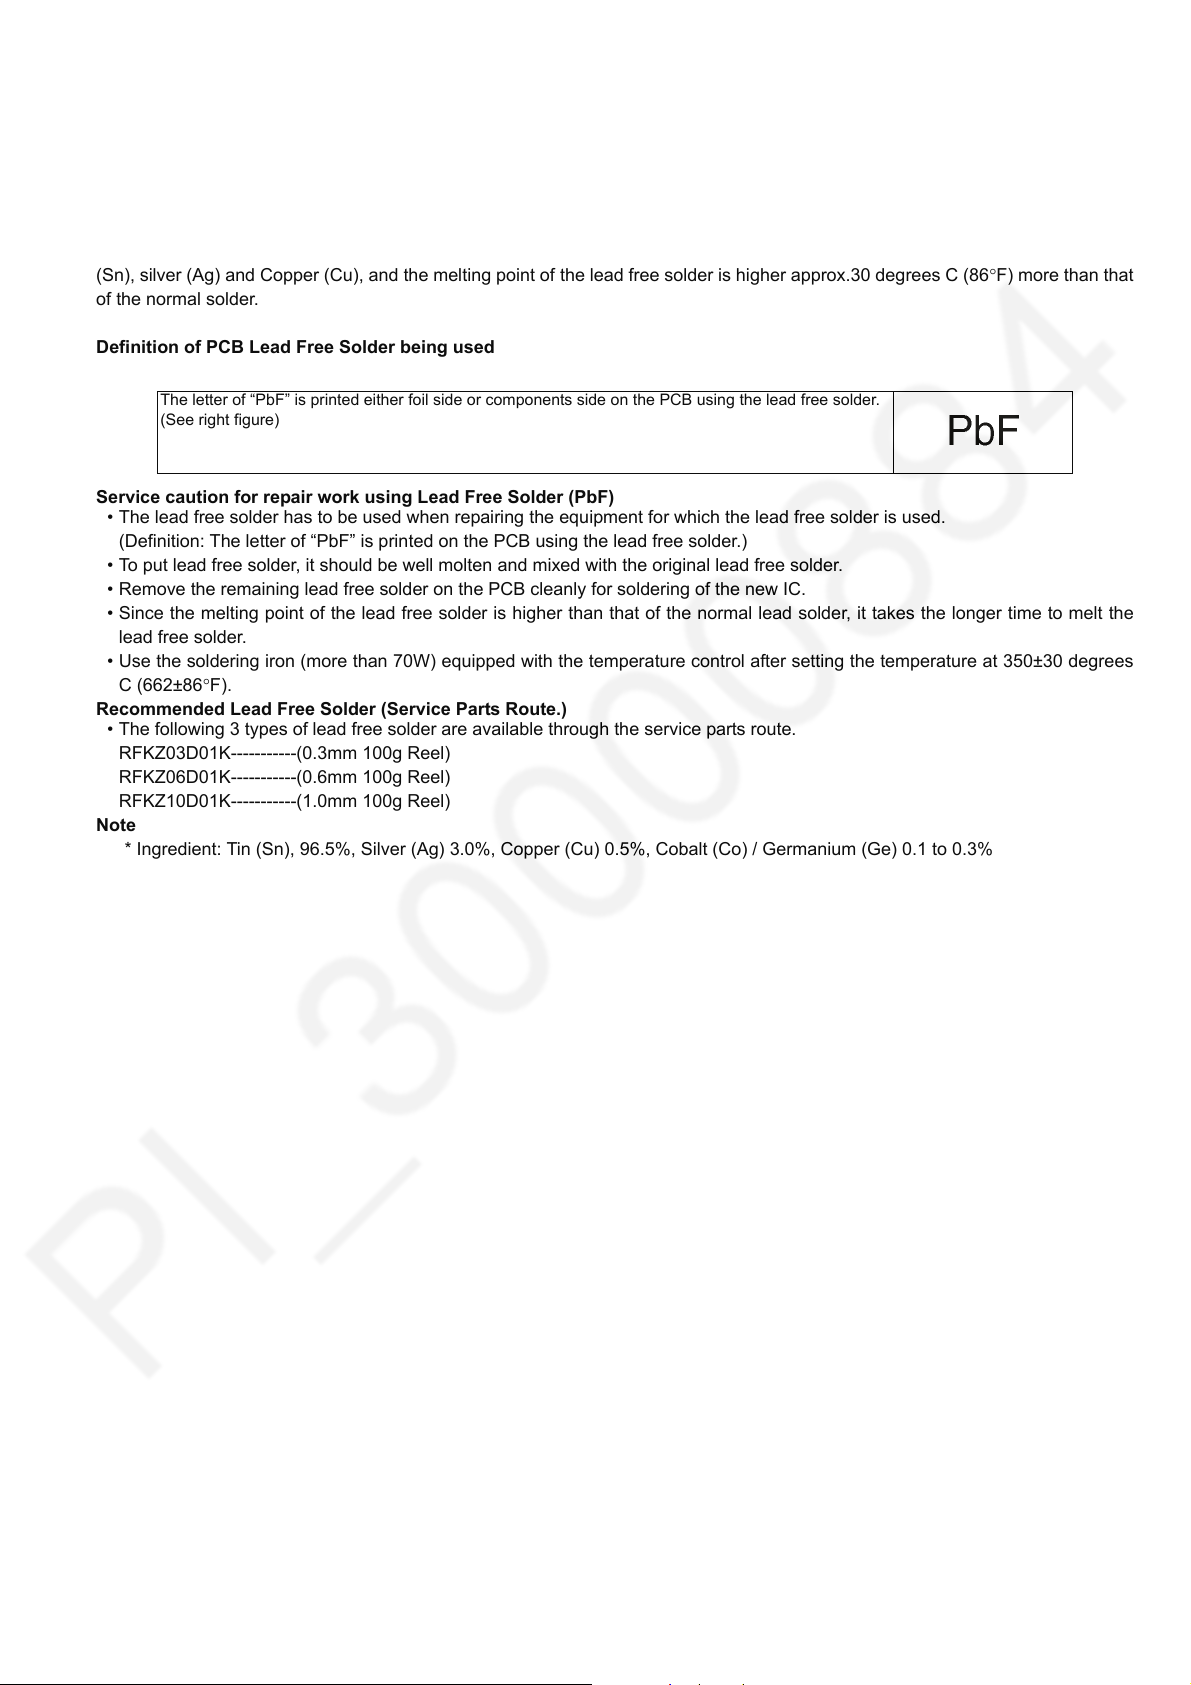
The letter of “PbF” is printed either foil side or components side on the PCB using the lead free solder.
(See right figure)
Service caution for repair work using Lead Free Solder (PbF)
• The lead free solder has to be used when repairing the equipment for which the lead free solder is used.
(Definition: The letter of “PbF” is printed on the PCB using the lead free solder.)
• To put lead free solder, it should be well molten and mixed with the original lead free solder.
• Remove the remaining lead free solder on the PCB cleanly for soldering of the new IC.
• Since the melting point of the lead free solder is higher than that of the normal lead solder, it takes the longer time to melt the
lead free solder.
• Use the soldering iron (more than 70W) equipped with the temperature control after setting the temperature at 350±30 degrees
C (662±86°F).
Recommended Lead Free Solder (Service Parts Route.)
• The following 3 types of lead free solder are available through the service parts route.
RFKZ03D01K-----------(0.3mm 100g Reel)
RFKZ06D01K-----------(0.6mm 100g Reel)
RFKZ10D01K-----------(1.0mm 100g Reel)
Note
* Ingredient: Tin (Sn), 96.5%, Silver (Ag) 3.0%, Copper (Cu) 0.5%, Cobalt (Co) / Germanium (Ge) 0.1 to 0.3%
7
Page 8
2.4. Handling Precaution for Traverse Unit
The laser diode in the optical pickup unit may break down due to static electricity of clothes or human body. Special care must be
taken avoid caution to electrostatic breakdown when servicing and handling the laser diode in the Traverse Unit.
2.4.1. Cautions to Be Taken in Handling the Optical Pickup Unit
The laser diode in the optical pickup unit may be damaged due to electrostatic discharge generating from clothes or human body.
Special care must be taken avoid caution to electrostatic discharge damage when servicing the laser diode.
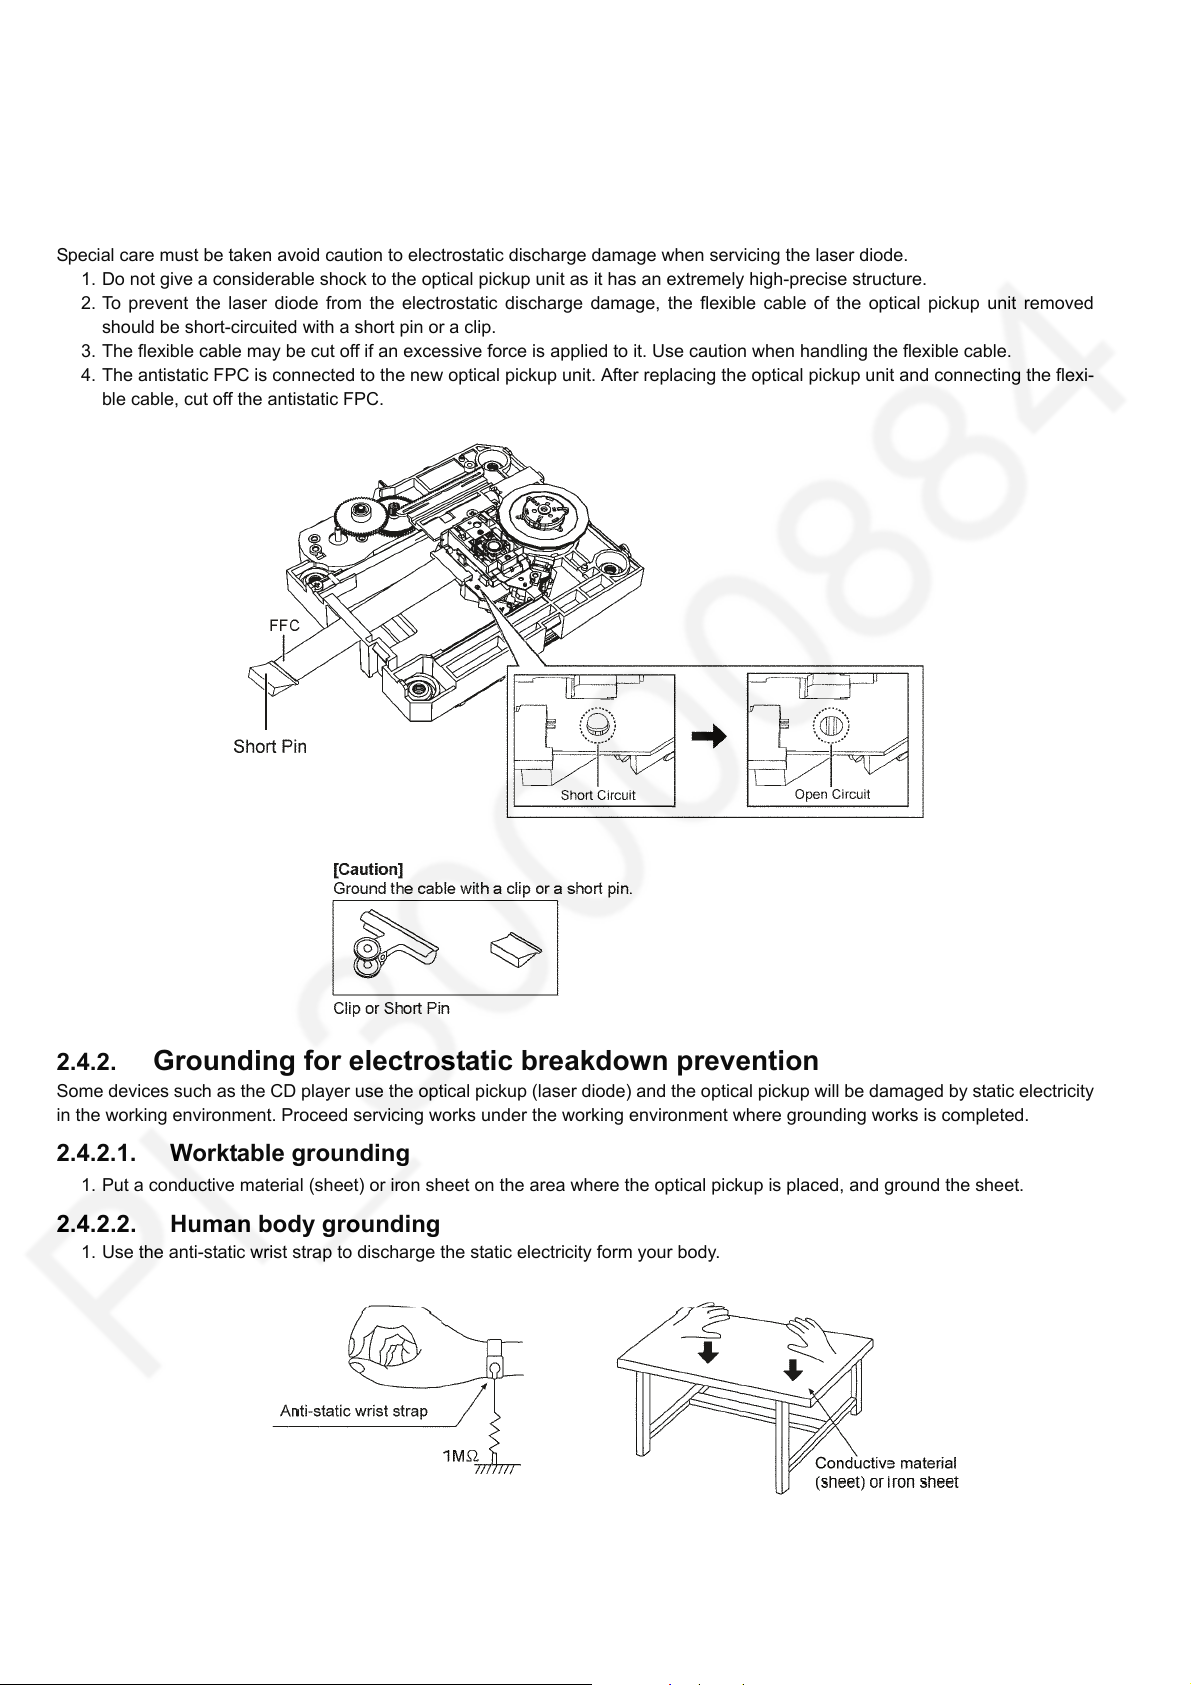
1. Do not give a considerable shock to the optical pickup unit as it has an extremely high-precise structure.
2. To prevent the laser diode from the electrostatic discharge damage, the flexible cable of the optical pickup unit removed
should be short-circuited with a short pin or a clip.
3. The flexible cable may be cut off if an excessive force is applied to it. Use caution when handling the flexible cable.
4. The antistatic FPC is connected to the new optical pickup unit. After replacing the optical pickup unit and connecting the flexi-
ble cable, cut off the antistatic FPC.
2.4.2. Grounding for electrostatic breakdown prevention
Some devices such as the CD player use the optical pickup (laser diode) and the optical pickup will be damaged by static electricity
in the working environment. Proceed servicing works under the working environment where grounding works is completed.
2.4.2.1. Worktable grounding
1. Put a conductive material (sheet) or iron sheet on the area where the optical pickup is placed, and ground the sheet.
2.4.2.2. Human body grounding
1. Use the anti-static wrist strap to discharge the static electricity form your body.
8
Page 9
3 Service Navigation
3.1. Service Information
This service manual contains technical information which will allow service personnel’s to understand and service this model.
Please place orders using the parts list and not the drawing reference numbers.
If the circuit is changed or modified, this information will be followed by supplement service manual to be filed with original service
manual.
3.1.1. P.C.B. repair method
In case of P.C.B. repair, please refer as follow :
Detective P.C.B. / Parts Repair method Remarks
1) CD INTERFACE P.C.B. Change by component
2) MAIN P.C.B. Change by P.C.B. exchange
3) POSITION SWITCH P.C.B. Change by component
4) MOTOR P.C.B. Change by component
5) ETHERNET P.C.B. Change by component
6) PANEL P.C.B. Change by component
7) TACT SWITCH P.C.B. Change by component
8) TUNER P.C.B. Change by component
9) BLUETOOTH MODULE Change by P.C.B. exchange
10) ALLPLAY MODULE with Data Change by P.C.B. exchange
11) ALLPLAY ANTENNA P.C.B. Change by P.C.B. exchange
Table 3-1
3.1.2. Individual Part repair method (For Main P.C.B.)
Main P.C.B is replaced by PCB exchange. Additionally, below are list of ICs that can be replaced individually. Please see Table 3-2.
For the location of the respective ICs, please refer to P.C.B. section.
Detective P.C.B. / Parts Repair method Remarks
1) IC1700 Change by component Main P.C.B. (Side B)
2) IC1701 Change by component Main P.C.B. (Side A)
3) IC1101 Change by component Main P.C.B. (Side B)
4) IC1104 Change by component Main P.C.B. (Side B)
5) IC1110 Change by component Main P.C.B. (Side B)
6) IC1105 Change by component Main P.C.B. (Side B)
7) IC1109 Change by component Main P.C.B. (Side B)
8) IC1111 Change by component Main P.C.B. (Side B)
9) IC1106 Change by component Main P.C.B. (Side B)
10) IC1103 Change by component Main P.C.B. (Side B)
11) IC6000 Change by component Main P.C.B. (Side B)
12) IC2004 Change by component Main P.C.B. (Side B)
13) IC8001 Change by component Main P.C.B. (Side B)
14) IC400 Change by component Main P.C.B. (Side B)
Table 3-2
3.2. Software / Firmware Update
9
Page 10
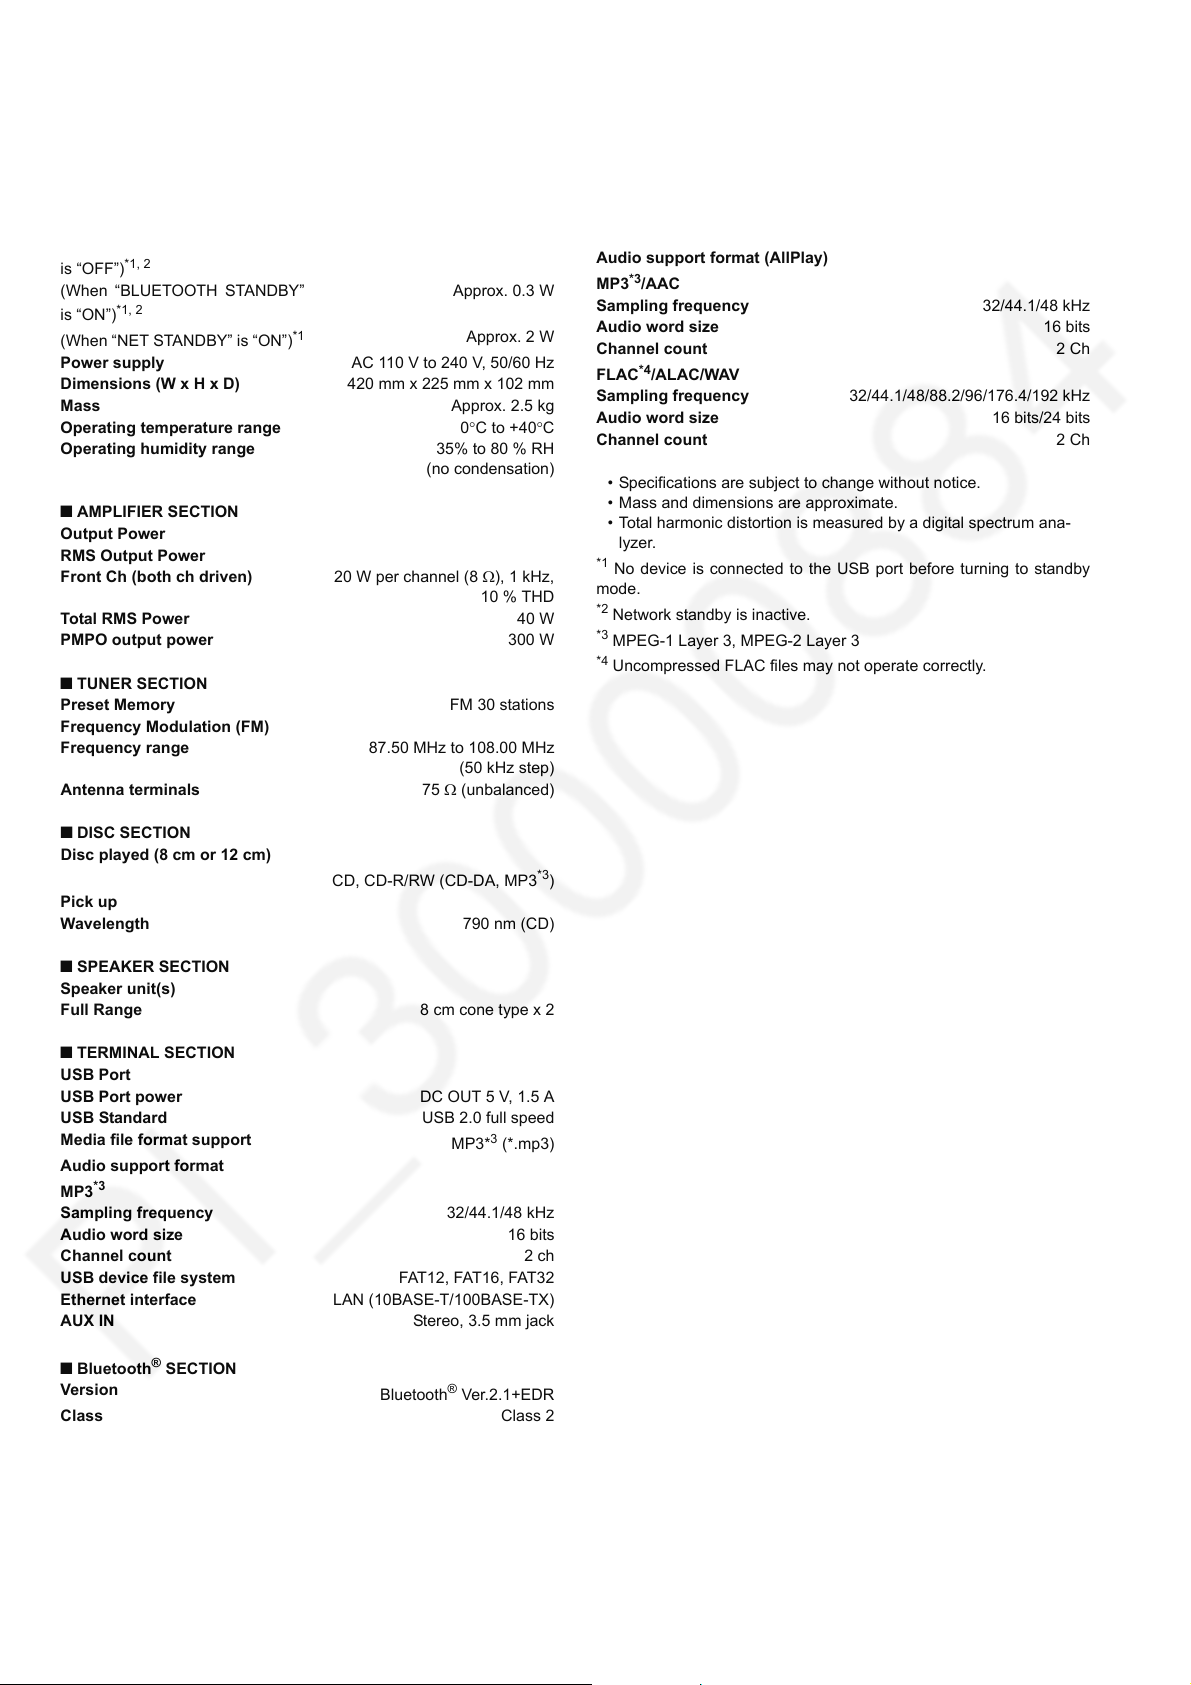
4 Specifications
Q GENERAL
Power consumption 25 W
Power consumption in standby mode
(When “BLUETOOTH STANDBY”
is “OFF”)
*1, 2
(When “BLUETOOTH STANDBY”
*1, 2
is “ON”)
(When “NET STANDBY” is “ON”)
*1
Power supply AC 110 V to 240 V, 50/60 Hz
Dimensions (W x H x D) 420 mm x 225 mm x 102 mm
Mass Approx. 2.5 kg
Operating temperature range 0°C to +40°C
Operating humidity range 35% to 80 % RH
Q AMPLIFIER SECTION
Output Power
RMS Output Power
Front Ch (both ch driven) 20 W per channel (8 Ω), 1 kHz,
Total RMS Power 40 W
PMPO output power 300 W
Q TUNER SECTION
Preset Memory FM 30 stations
Frequency Modulation (FM)
Frequency range 87.50 MHz to 108.00 MHz
Antenna terminals 75 Ω (unbalanced)
Approx. 0.2 W
Approx. 0.3 W
Approx. 2 W
(no condensation)
10 % THD
(50 kHz step)
Wi-Fi
WLAN Standard IEEE802.11a/b/g/n
Frequency range 2.4 GHz band/5 GHz band
Security WPA2™
WPS version Version 2.0
Audio support format (AllPlay)
*3
MP3
/AAC
Sampling frequency 32/44.1/48 kHz
Audio word size 16 bits
Channel count 2 Ch
*4
FLAC
/ALAC/WAV
Sampling frequency 32/44.1/48/88.2/96/176.4/192 kHz
Audio word size 16 bits/24 bits
Channel count 2 Ch
• Specifications are subject to change without notice.
• Mass and dimensions are approximate.
• Total harmonic distortion is measured by a digital spectrum ana-
lyzer.
*1
No device is connected to the USB port before turning to standby
mode.
*2
Network standby is inactive.
*3
MPEG-1 Layer 3, MPEG-2 Layer 3
*4
Uncompressed FLAC files may not operate correctly.
Q DISC SECTION
Disc played (8 cm or 12 cm)
CD, CD-R/RW (CD-DA, MP3
*3
Pick up
Wavelength 790 nm (CD)
Q SPEAKER SECTION
Speaker unit(s)
Full Range 8 cm cone type x 2
Q TERMINAL SECTION
USB Port
USB Port power DC OUT 5 V, 1.5 A
USB Standard USB 2.0 full speed
Media file format support
MP3*
3
(*.mp3)
Audio support format
*3
MP3
Sampling frequency 32/44.1/48 kHz
Audio word size 16 bits
Channel count 2 ch
USB device file system FAT12, FAT16, FAT32
Ethernet interface LAN (10BASE-T/100BASE-TX)
AUX IN Stereo, 3.5 mm jack
Q Bluetooth
Version
®
SECTION
Bluetooth
®
Ver.2.1+EDR
Class Class 2
Supported Profiles A2DP, AVRCP
Frequency band 2.4 GHz band FH-SS
Operation Distance 10 m Line of sight
Supported Codec SBC
)
Q Wi-Fi SECTION
10
Page 11
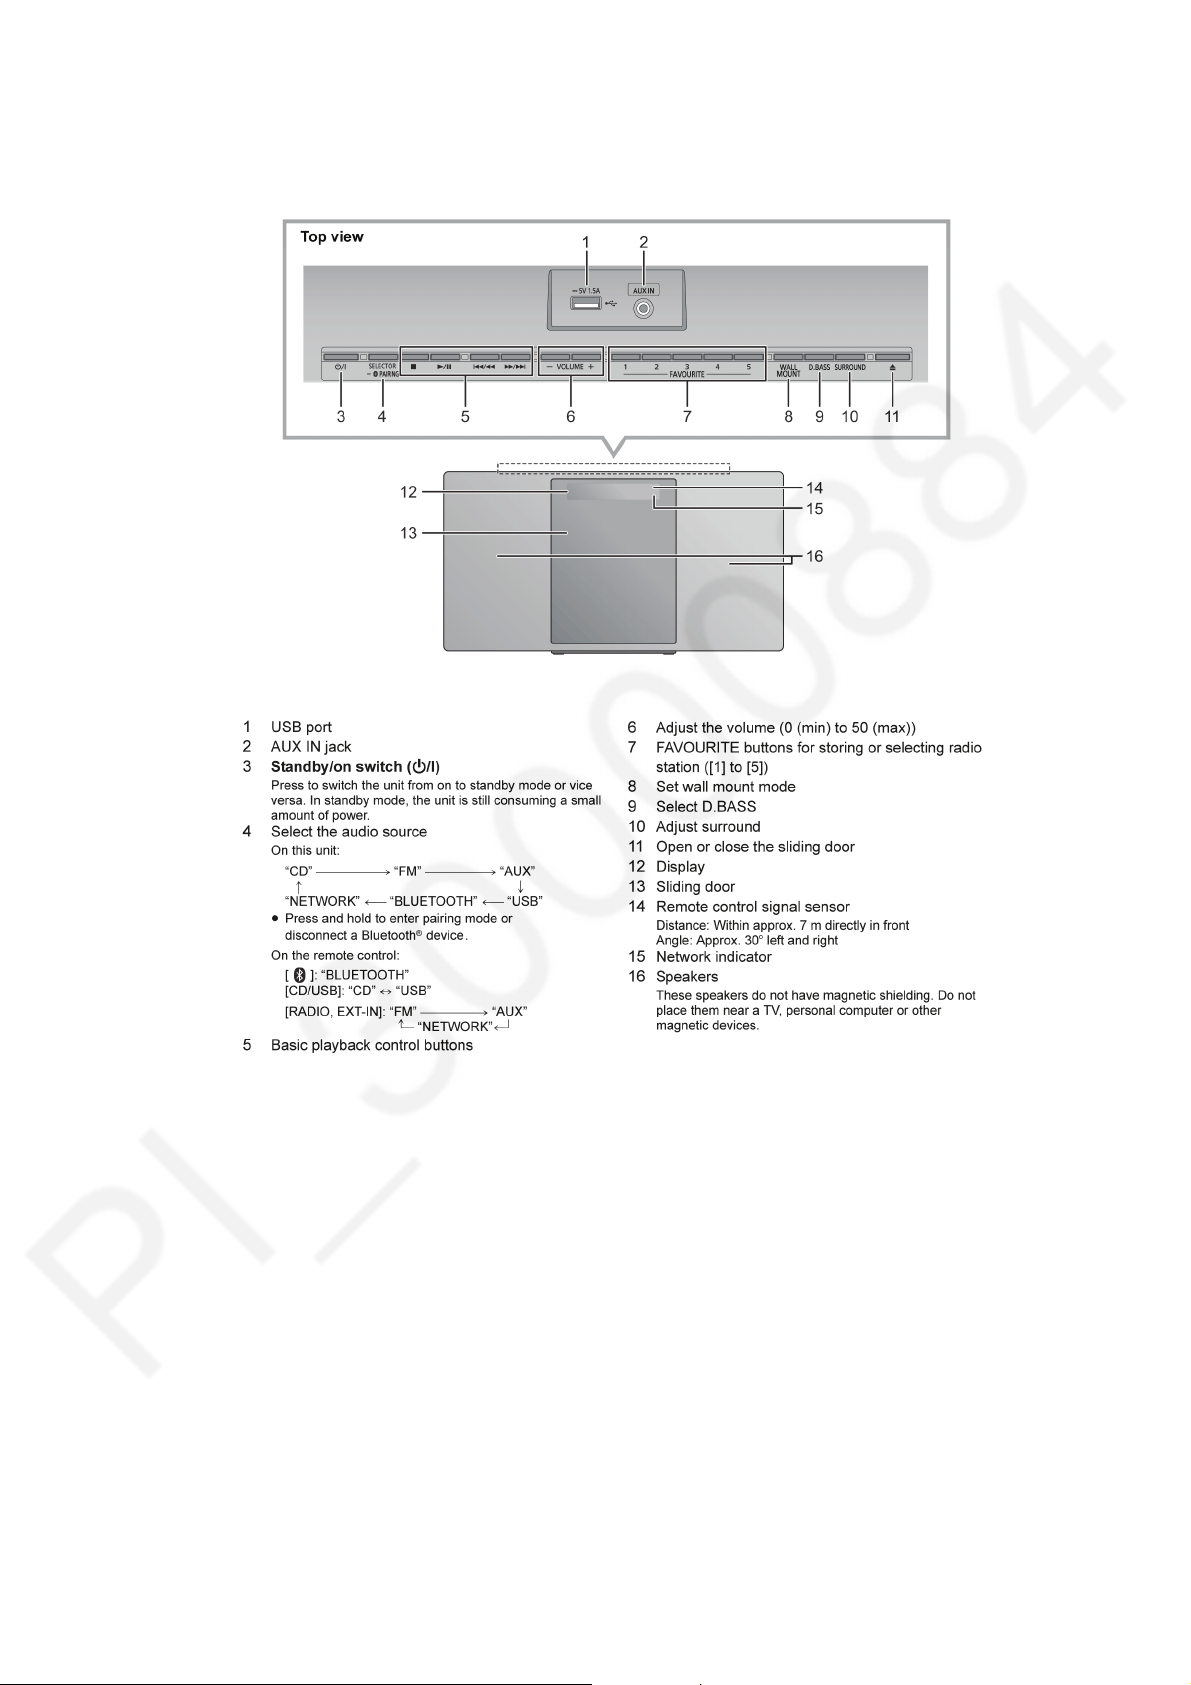
5 Location of Controls and Components
5.1. Main Unit Key Button Operations
11
Page 12
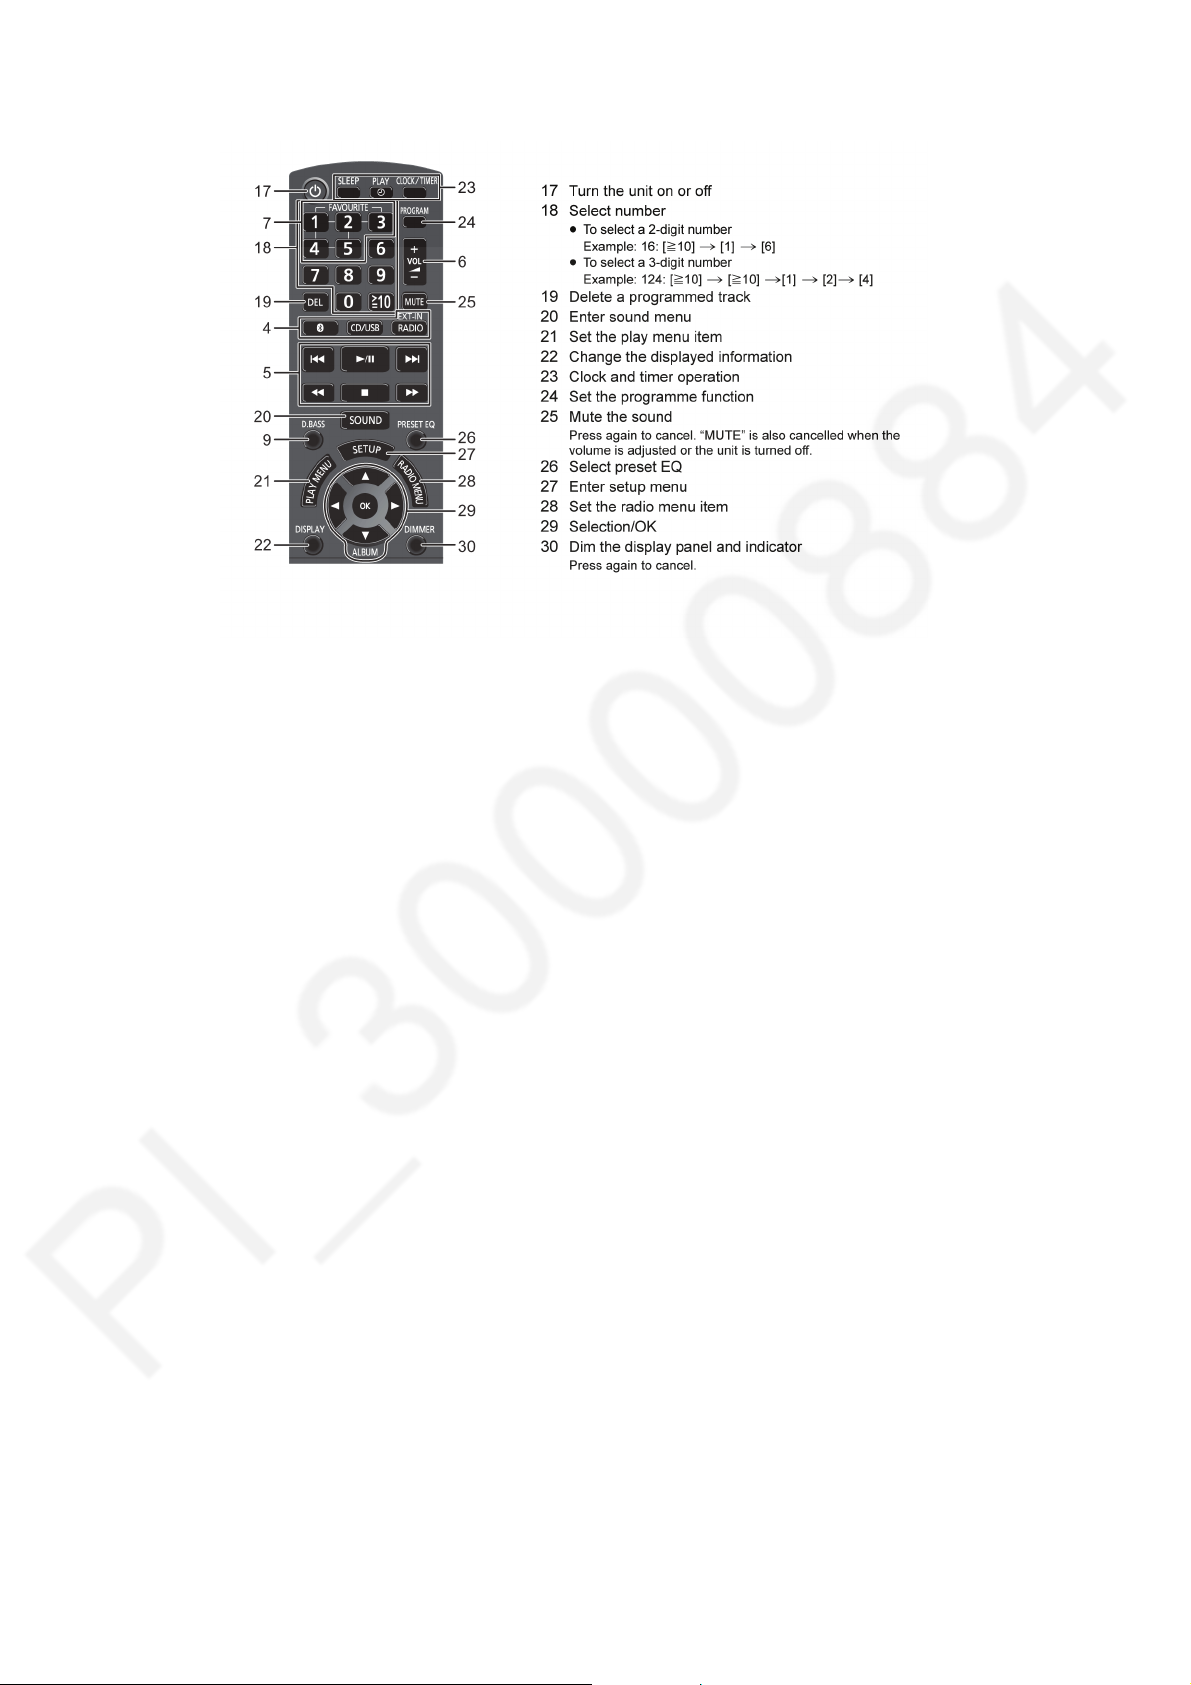
5.2. Remote Control Key Button Operations
12
Page 13
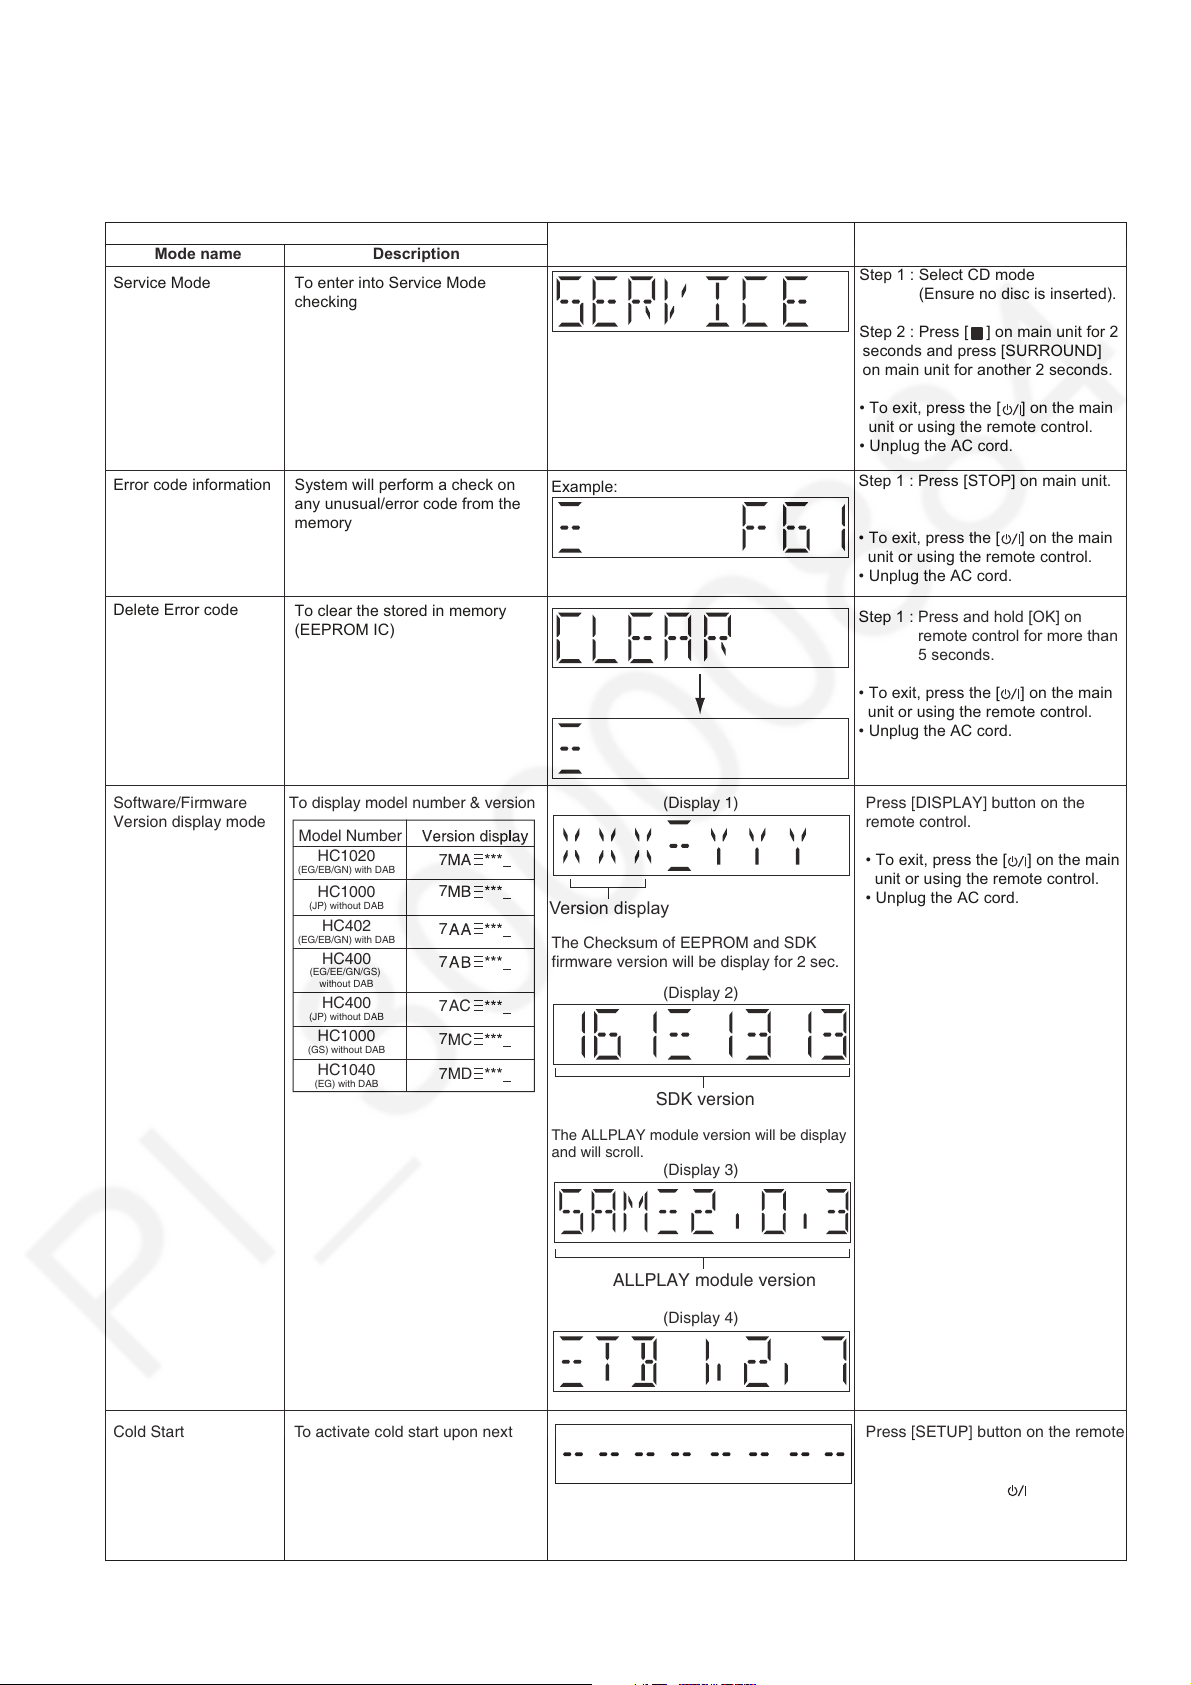
6 Service Mode
Service Mode To enter into Service Mode
checking
Item
FL display Key operation
Mode name Description
Error code information
Delete Error code
Example:
System will perform a check on
any unusual/error code from the
memory
To clear the stored in memory
(EEPROM IC)
Software/Firmware
Version display mode
Cold Start
To display model number & version
Step 1 : Select CD mode
(Ensure no disc is inserted).
Step 2 : Press [ ] on main unit for 2
seconds and press [SURROUND]
on main unit for another 2 seconds.
• To exit, press the [TA] on the main
unit or using the remote control.
• Unplug the AC cord.
Step 1 : Press [STOP] on main unit.
• To exit, press the [TA] on the main
unit or using the remote control.
• Unplug the AC cord.
Step 1 : Press and hold [OK] on
remote control for more than
5 seconds.
• To exit, press the [TA] on the main
unit or using the remote control.
• Unplug the AC cord.
Version display
Press [DISPLAY] button on the
remote control.
• To exit, press the [TA] on the main
unit or using the remote control.
• Unplug the AC cord.
Press [SETUP] button on the remote
control.
• To exit, press the [TA] on the main
unit or using the remote control.
• Unplug the AC cord.
To activate cold start upon next
power up.
All setting is set to default value
after AC out and in again.
(Backup data are initialized)
(Display 1)
(Display 2)
The ALLPLAY module version will be display
and will scroll.
(Display 3)
The Checksum of EEPROM and SDK
firmware version will be display for 2 sec.
(Display 4)
SDK version
ALLPLAY module version
Model Number
HC1020
(EG/EB/GN) with DAB
HC1000
(JP) without DAB
7
HC402
(EG/EB/GN) with DAB
7
HC400
(JP) without DAB
7
HC400
(EG/EE/GN/GS)
without DAB
7
7
AC
HC1000
(GS) without DAB
7
MC
HC1040
(EG) with DAB
7
MD
This unit is equipped with features of self diagnostic & service mode setting for checking the functions & reliability.
6.1. Service Mode Table
13
Page 14
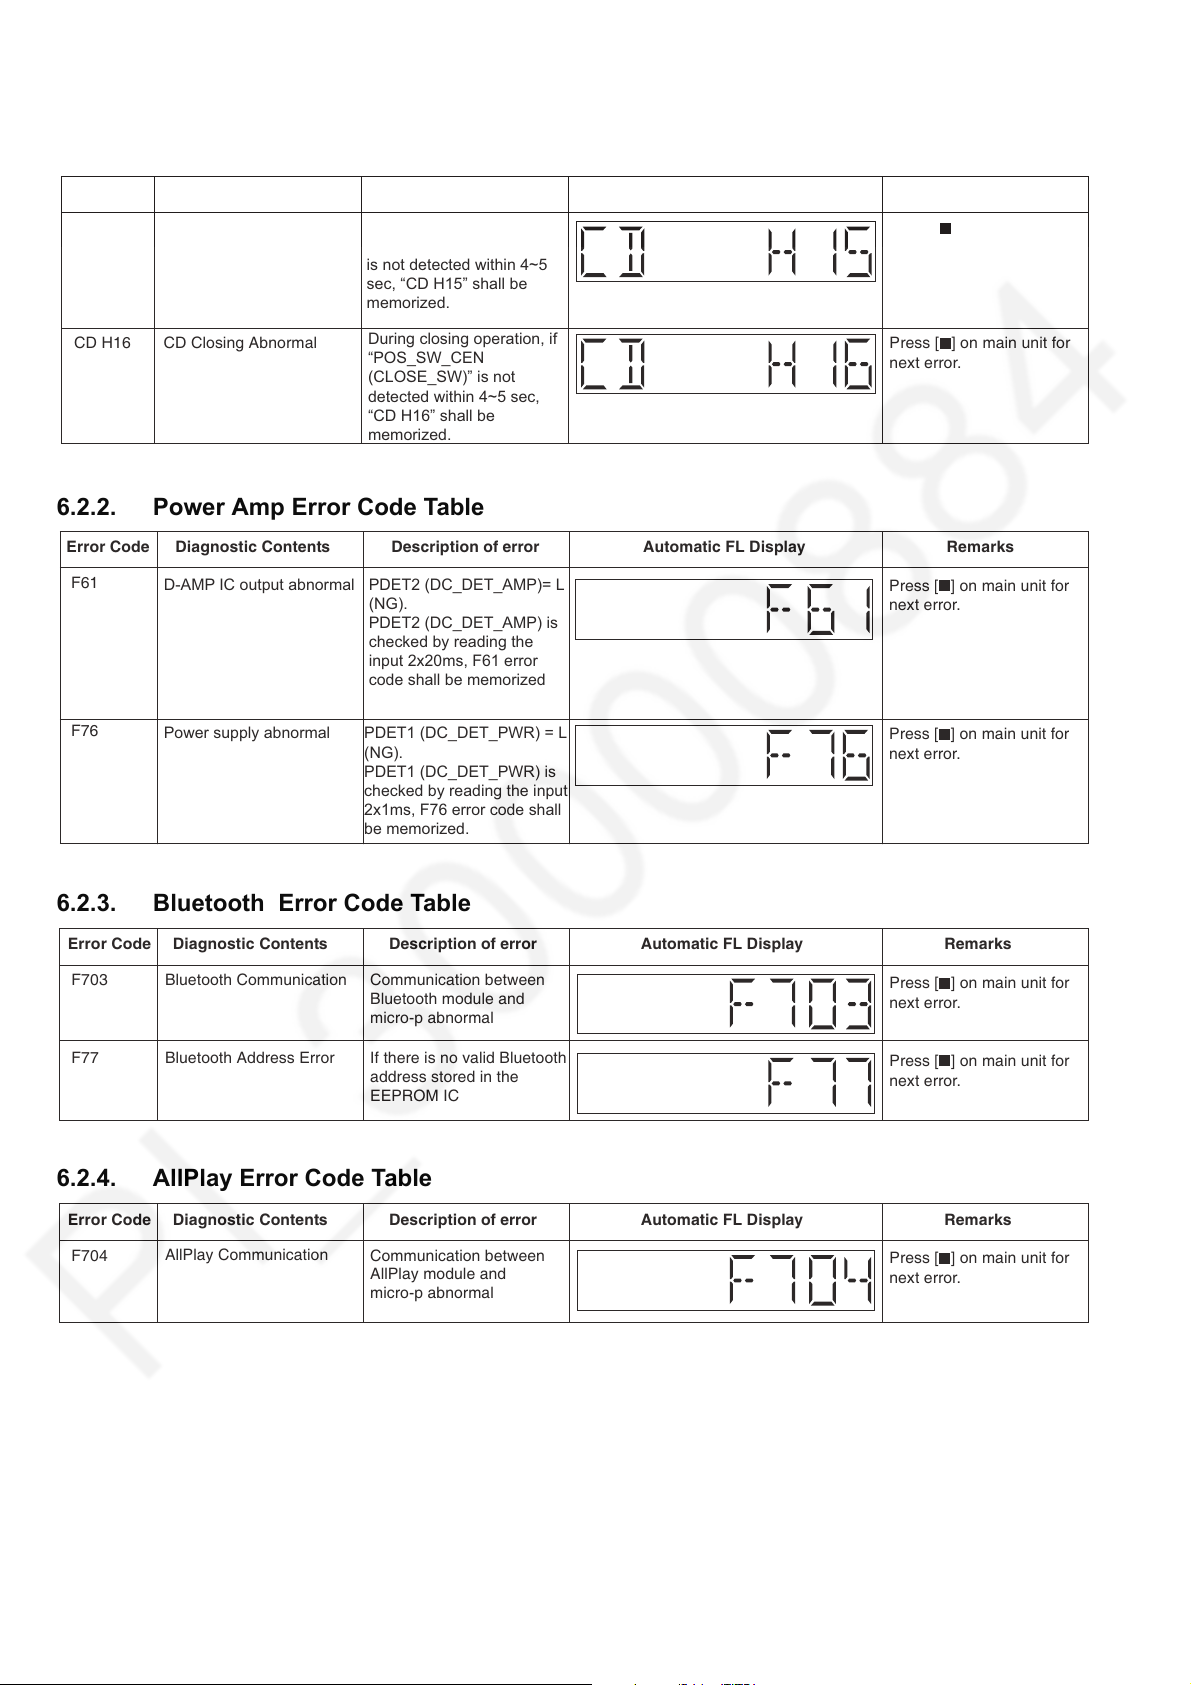
6.2. Service Mode Error Code
CD Open Abnormal
Press [
] on main unit for
next error.
CD Closing Abnormal
Press [
] on main unit for
next error.
CD H15
Error Code Diagnostic Contents Description of error Automatic FL Display Remarks
CD H16
During normal operation, if
“POS_SW_R (OPEN_SW)”
is not detected within 4~5
sec, “CD H15” shall be
memorized.
During closing operation, if
“POS_SW_CEN
(CLOSE_SW)” is not
detected within 4~5 sec,
“CD H16” shall be
memorized.
F61
Automatic FL Display RemarksError Code Diagnostic Contents Description of error
Press [
] on main unit for
next error.
Press [
] on main unit for
next error.
D-AMP IC output abnormal PDET2 (DC_DET_AMP)= L
(NG).
PDET2 (DC_DET_AMP) is
checked by reading the
input 2x20ms, F61 error
code shall be memorized
F76
Power supply abnormal PDET1 (DC_DET_PWR) = L
(NG).
PDET1 (DC_DET_PWR) is
checked by reading the input
2x1ms, F76 error code shall
be memorized.
Automatic FL Display RemarksError Code Diagnostic Contents
F703
Bluetooth Communication
Communication between
Bluetooth module and
micro-p abnormal
Press [
] on main unit for
next error.
F77
Bluetooth Address Error
If there is no valid Bluetooth
address stored in the
EEPROM IC
Press [
] on main unit for
next error.
Description of error
Automatic FL Display RemarksError Code Diagnostic Contents
F704
AllPlay Communication
Communication between
AllPlay module and
micro-p abnormal
Press [
] on main unit for
next error.
Description of error
6.2.1. CD Mechanism Error Code Table
6.2.2. Power Amp Error Code Table
6.2.3. Bluetooth Error Code Table
6.2.4. AllPlay Error Code Table
14
Page 15
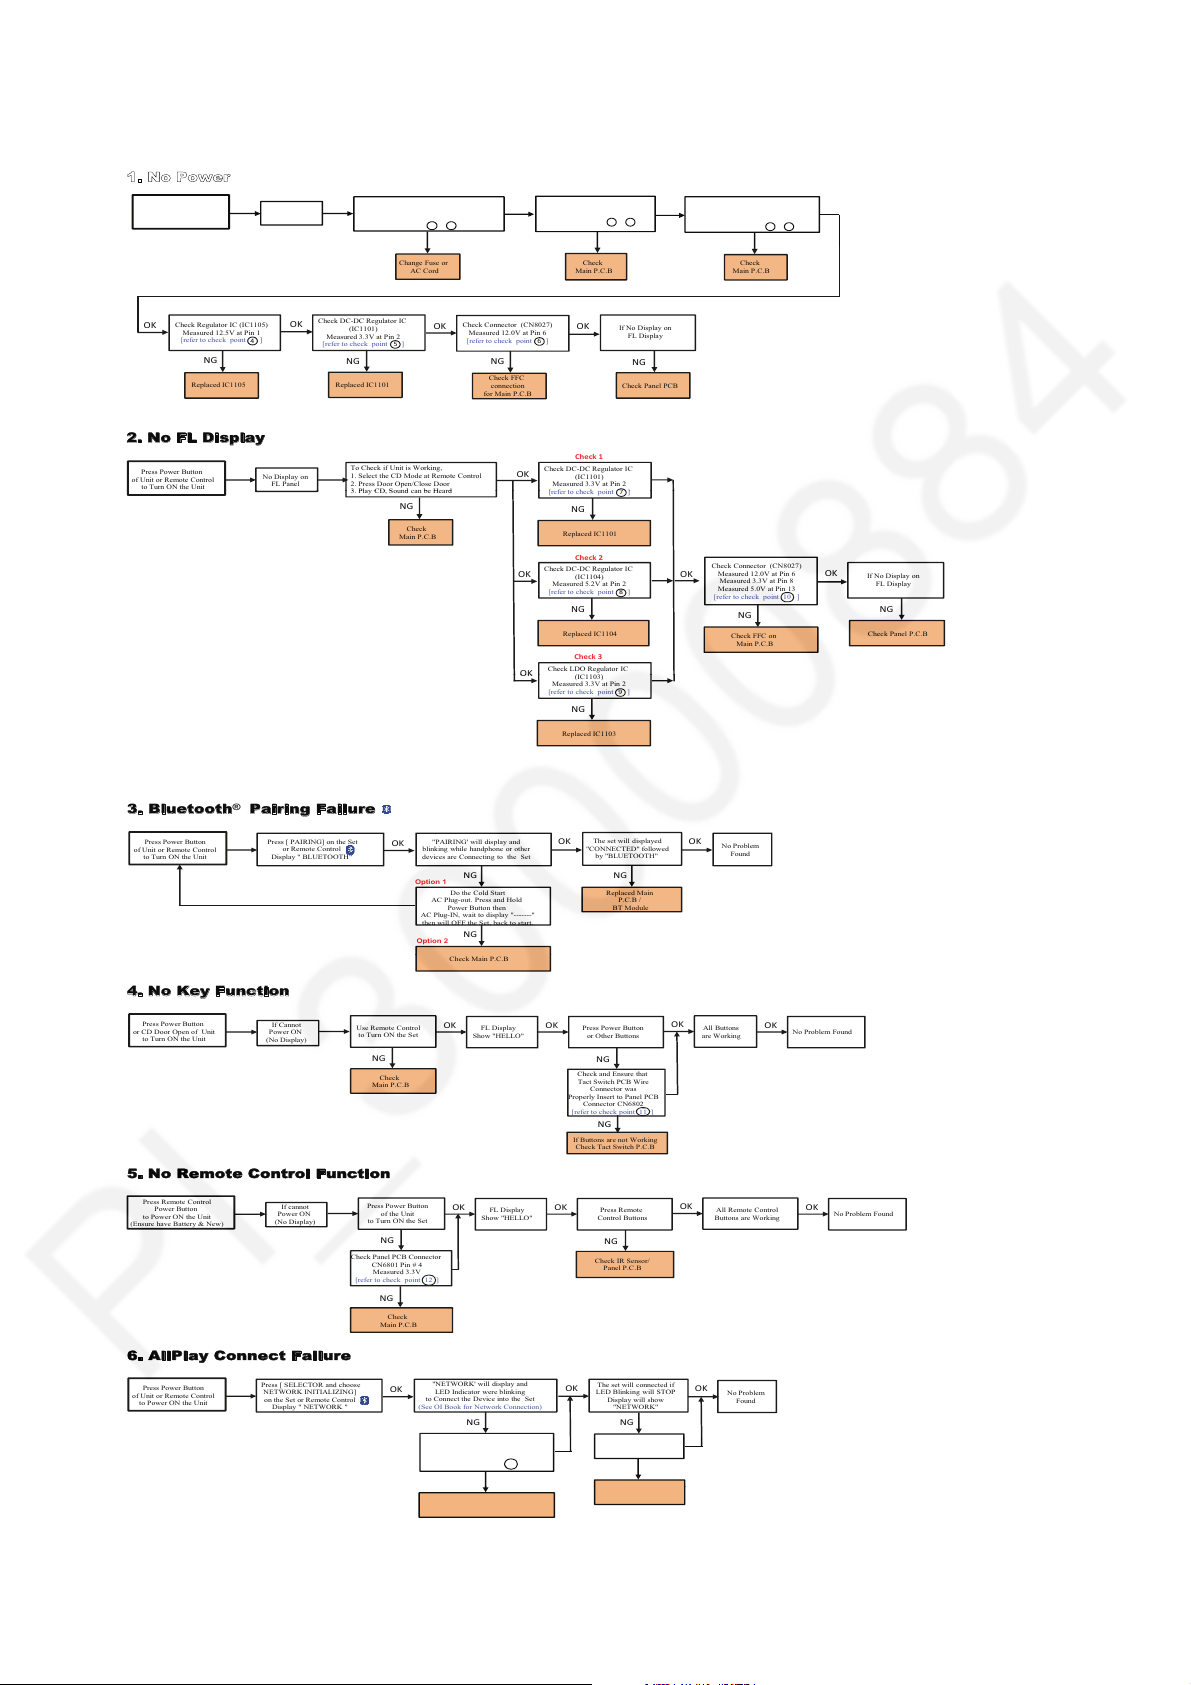
7 Troubleshooting Guide
1. NoPower
Press Power Button
of Unit or Remote Control
to Turn ON the Unit
No Display on
FL Display
Caution:
1. Disconnect AC Cord
2. Check Fuse(F1) = 0 ohm (Pin to Pin)
[ refer tocheck point - ]
Change Fuse or
AC Cord
Check Primary E-Cap (C1706)
Measured 300V or more
[refer to check point - ]
1
1
2 2
Check
Main P.C.B
Check Secondary Cap.(C1703)
or Secondary Rect.Diode (D1700)
Measured 8.5V or 19.5V
[refer to check point - ]
3 3
Check
Main P.C.B
OK
OK
NG
NG
NG
2.NoFLDisplay
Check Regulator IC(IC1105)
Measured12.5V at Pin 1
[refer to check point ]
4
Check DC-DC RegulatorIC
(IC1101)
Measured3.3V at Pin 2
[refer to check point ]
5
Check Connector (CN8027)
Measured12.0V at Pin 6
[refer to check point ]
6
If No Display on
FL Display
Check PanelPCB
OK
OK
OK OK
NG
NG
NG
NG
Replaced IC1105
Replaced IC1101
Check FFC
connection
for MainP.C.B
Press Power Button
of Unit or Remote Control
to Turn ON the Uni
t
No Display on
FL Panel
To Check if Unit is Working,
1. Select the CDMode at Remote Control
2. Press Door Open/Close Door
Check DC-DC RegulatorIC
(IC1101)
Measured3.3V at Pin 2
OK
Check 1
Check LDORegulator IC
3.PlayCD,S
oun
d
canbe
H
ear
d
Check
Main P.C.B
NG
[refert
ochec
kpoint ]
NG
Check DC-DC RegulatorIC
(IC1104)
Measured5.2V at Pin 2
[refer to check point ]
OK
NG
Replaced IC1101
Replaced IC1104
Check Connector (CN8027)
Measured12.0V at Pin 6
Measured3.3V at Pin 8
Measured5.0V at Pin 13
[refer to check point 10 ]
If No Display on
FL Display
Check PanelP.C.B
OK
OK
NG
NG
Check FFC on
Main P.C.B
Check 2
Check 3
(
IC1103
)
Measured3.3V at Pin 2
[refer to check point ]
OK
NG
Replaced IC1103
7
8
9
3
. Bluetooth®PairingFa
ilure
Press Power Button
of Unit or Remote Control
to Turn ON the Unit
Press [ PAIRING] on the Set
or Remote Control
Display " BLUETOOTH"
NG
"PAIRING' will display and
blinking while handphone or other
devicesare Connecting to the Set
Do the Cold Start
AC Plug-out. Press and Hold
Power Button then
AC Plug-IN, wait to display "-------"
then will OFF the Set, back tos tart.
NG
NG
Option 1
Option 2
The set will displaye d
"CONNECTED" followed
by "BLUETOOTH"
No Problem
Found
OK
KOKO
ReplacedMain
P.C.B /
BT Module
4. No KeyFunction
Press PowerButton
or CD Door Open of Unit
to Turn ON the Unit
If Cannot
Power ON
(No Display)
OK
NG
Use Remote Control
to Turn ON the Set
FL Display
Show "HELLO"
OK
Press Power Button
or Other Buttons
Check andEnsure that
Tact Switch PCB Wire
Connector was
Properly Insertto Panel PCB
Connector CN6802
[refer to check point 11 ]
NG
OK
All Buttons
are Working
NG
OK
No Problem Found
Check MainP.C.B
Check
Main P.C.B
5. No RemoteControl Functio
n
If Buttons are not Working
Check Tact Switch P.C.B
Press Remote Control
Power Button
to Power ON the Unit
(Ensure have Battery& New)
If cannot
Power ON
(No Display)
OK
NG
Press Power Button
of the Unit
to Turn ON the Set
FL Display
Show "HELLO"
OK
PressRemote
Control Buttons
Check IR Sensor/
PanelP.C.B
NG
OK
All Remote Control
Buttons are Working
NG
OK
No Problem Found
Check PanelPCB Connector
CN6801 Pin # 4
Measured3.3V
[refer to check point 12 ]
6
. AllPlayConnectFa
ilu
re
Press PowerButton
of Unit or Remote Control
to Power ON the Unit
Press [ SELECTOR and choose
NETWORK INITIALIZING]
on the Set or Remote Control
Display " NETWORK"
If cannot CONNECT
Ensure FFC C onnection
NG
"NETWORK' will displa y and
LED Indicator wereblinking
to Connectthe Device into the Set
(See OI Book for Network Connection)
Check the 3.3VDC-DC Regulator IC
(IC1110)
Measure3.3V @ Pin 2
[ refer to checkpoint 13 ]
NG
NG
The set willconnected if
LED Blinking will S TOP
Display will show
"NETWORK"
No Problem
Found
OK
KOKO
NG
Check
Main P.C.B
CheckAllPla
y
Module
ReplacedIC1110
15
Page 16
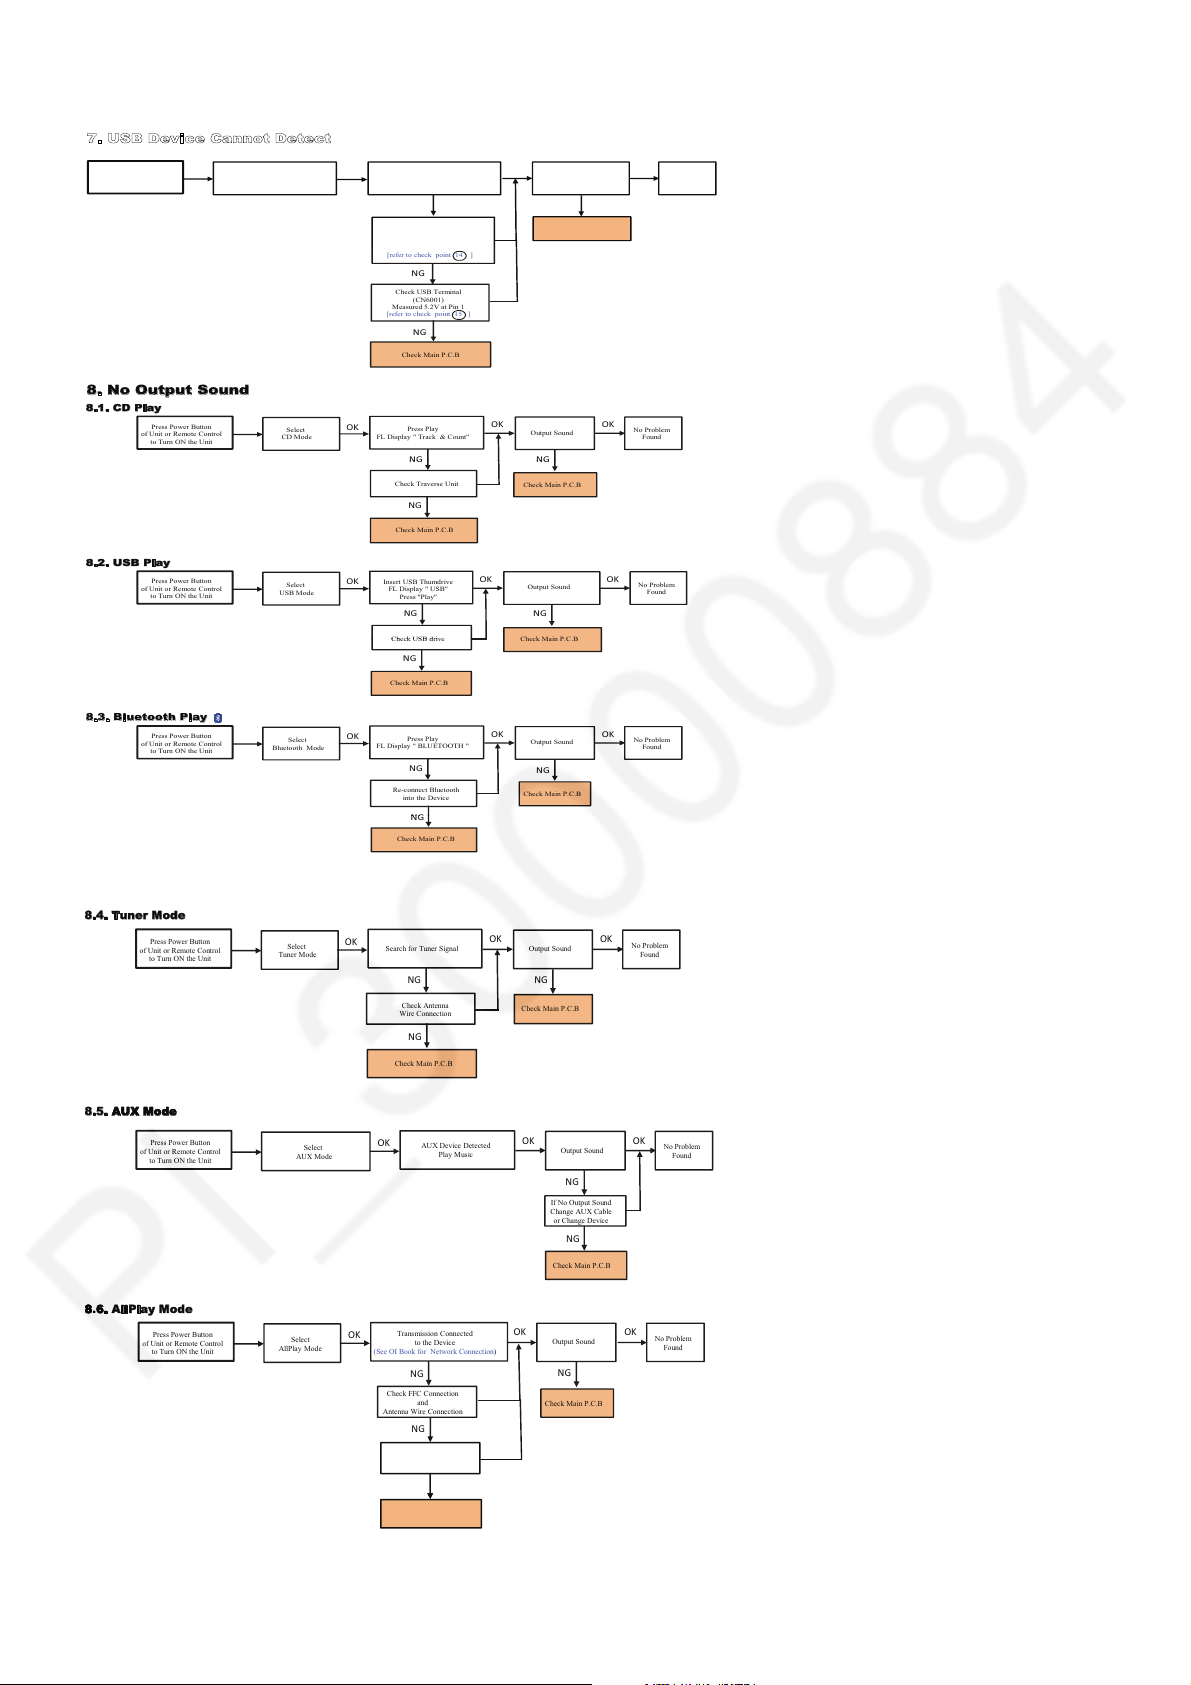
7.USB DeviceCannotDetect
Press Power Button
of Unit or Remote Control
to Turn ON the Unit
NG
Plug-in USB D evice
FL Display " USB"
NG
Press Play
FL Display
"Music Name or Title"
No Problem
Found
OK
OK
Press [ SELECTOR] and
choose [USB mode] on the Set
or Use RemoteC ontrol
Display " USBand NO DEVICE"
If display show "NO DEVICE"
Check DC-DCRegulator IC
(IC1104)
Measured5.2V at Pin 2
[refer to check point 14 ]
OK
Check MainP.C.B
NG
8. No Output Sound
8.1
. CD P
lay
NG
Check USB Terminal
(CN6001)
Measured5.2V at Pin 1
[refer to check point 15 ]
Press Power Button
of Unit or Remote Control
to Turn ON the Unit
Press Play
FL Display " Track & Count "
Output Sound
No Problem
Found
OK
OK OK
Select
CD Mode
Check MainP.C.B
8.2. US
B Play
Check MainP.C.B
NG
NG
Check TraverseUnit
Press Power Button
of Unit or Remote Control
to Turn ON the Unit
NG
Insert USB Thumdrive
FL Display " USB"
Press"Play"
NG
Output Sound
No Problem
Found
OK
KOKO
Select
USB Mode
Check MainP.C.B
NG
8.3.Bluetoot
h Play
CheckMainP.C.B
Ch
ec
kUSBdri
ve
Press Power Button
of Unit or Remote Control
to Turn ON the Unit
Check MainP.C.B
NG
Press Play
FL Display " BLUETOOTH "
NG
Output Sound
No Problem
Found
OK
OK OK
Select
Bluetooth Mode
Re-connect Bluetooth
into the Device
Check MainP.C.B
NG
Check MainP.C.B
NG
8.4. Tuner Mode
Press Power Button
of Unit or Remote Control
to Turn ON the Unit
Check Main P.C.B
NG
Search for Tuner Signa l
NG
Output Sound
No Problem
Found
OK
OK OK
Select
Tuner Mode
Check Antenna
Wire Connection
Check Main P.C.B
NG
8.5.
8
AUXM
o
de
8 6..
AUX Mode
Press Power Button
of Unit or Remote Control
to Turn ON the Unit
AUX Device Detected
Play Music
NG
Output Sound
No Problem
Found
OK
OK OK
Select
AUX Mode
If No Output Sound
Change AUX C able
or Change De vice
Check Main P.C.B
NG
AllPlay Mode
Press Power Button
of Unit or Remote Control
to Turn ON the Unit
Check Main P.C.B
NG
TransmissionConnected
to the Device
(See OI Book for Network Connection)
NG
Output Sound
No Problem
Found
OK
OK OK
Select
AllPlay Mod e
Check FFC Connection
and
Antenna Wire Conne ction
NG
Replaced
AllPlay Mod ule
Check Main P.C.B
NG
16
Page 17
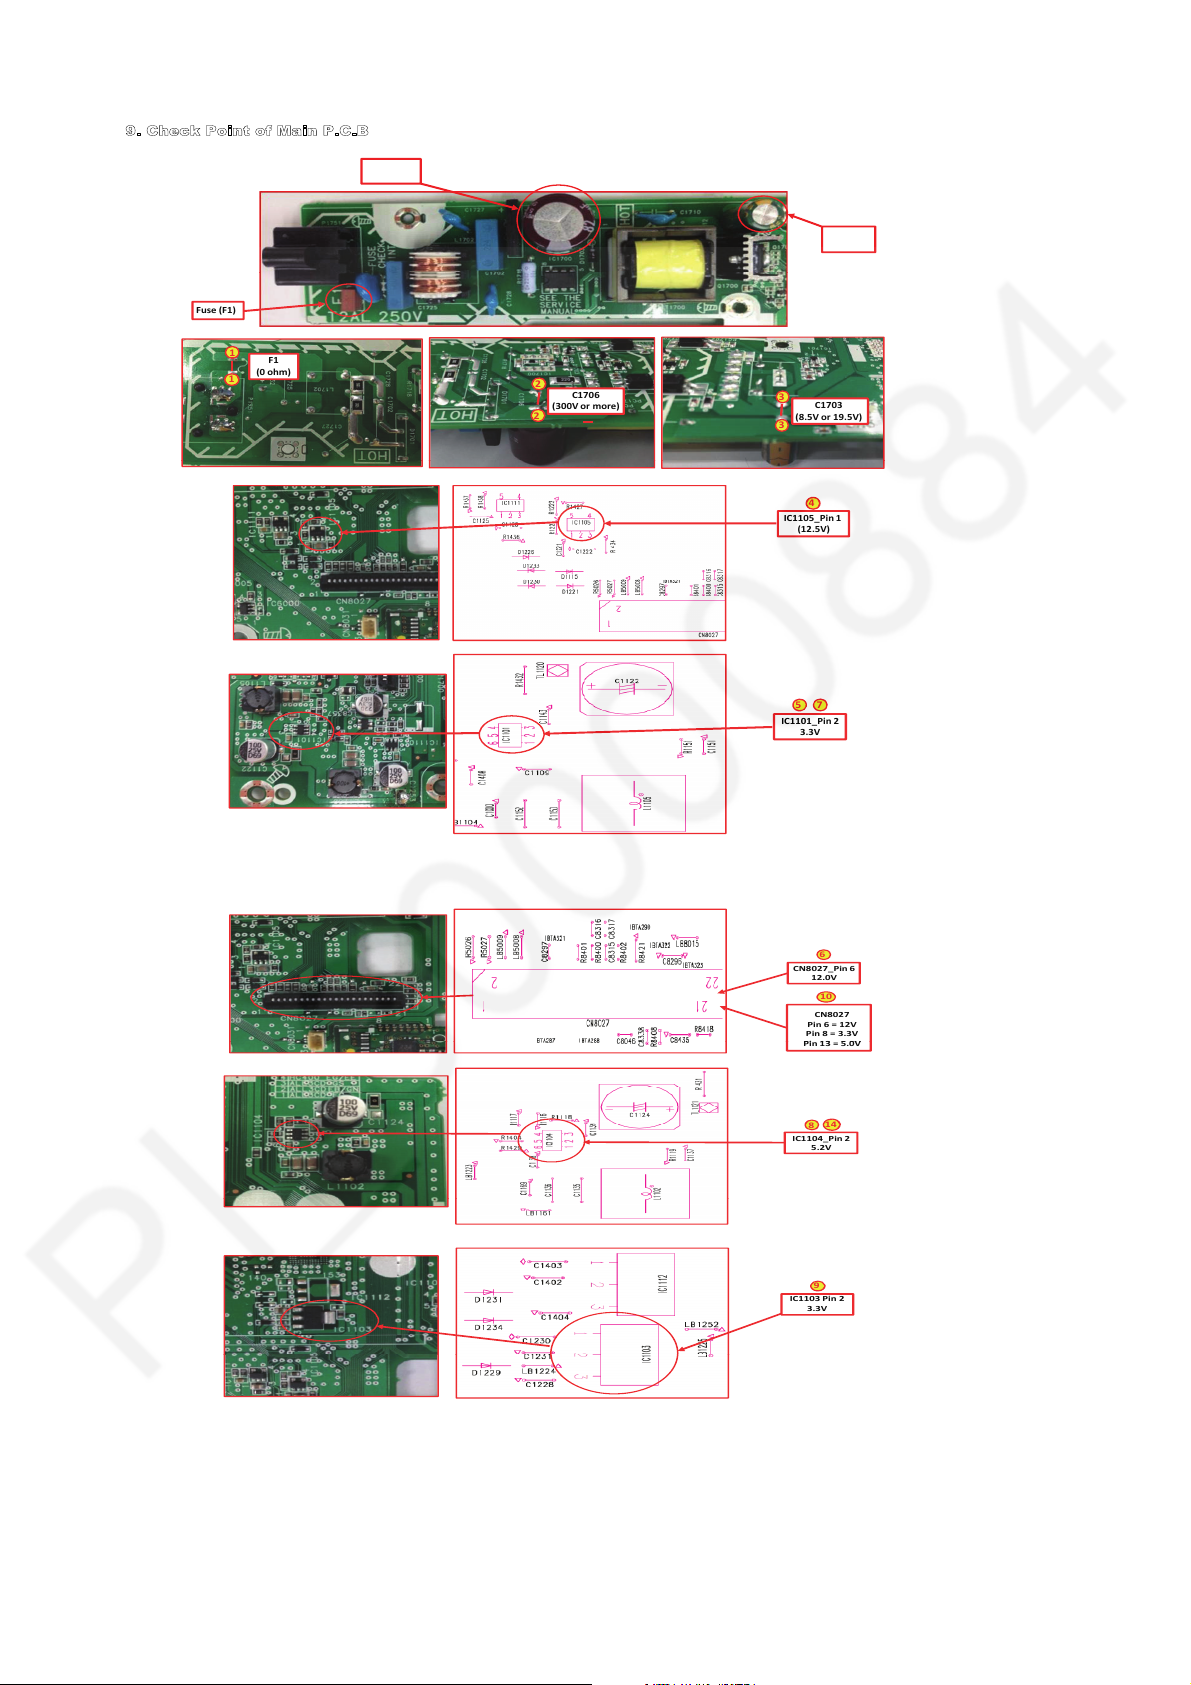
9. Che
c
k PointofMainP.C.B
Pri. Cap
(C1706)
Sec. Cap.
(C1703)
Fuse (F1)
1
1
2
2
3
3
C1703
(8.5V or 19.5V)
C1706
(300V or more)
F1
(0 ohm)
4
IC1105_Pin 1
(12.5V)
5
IC1101_Pin 2
3.3V
7
6
CN8027_Pin6
12.0V
10
CN8027
Pin 6= 12V
Pin 8= 3.3V
8
IC1104_Pin2
5.2V
Pi
n13=5.
0V
14
9
IC1103 Pin 2
3.3V
17
Page 18
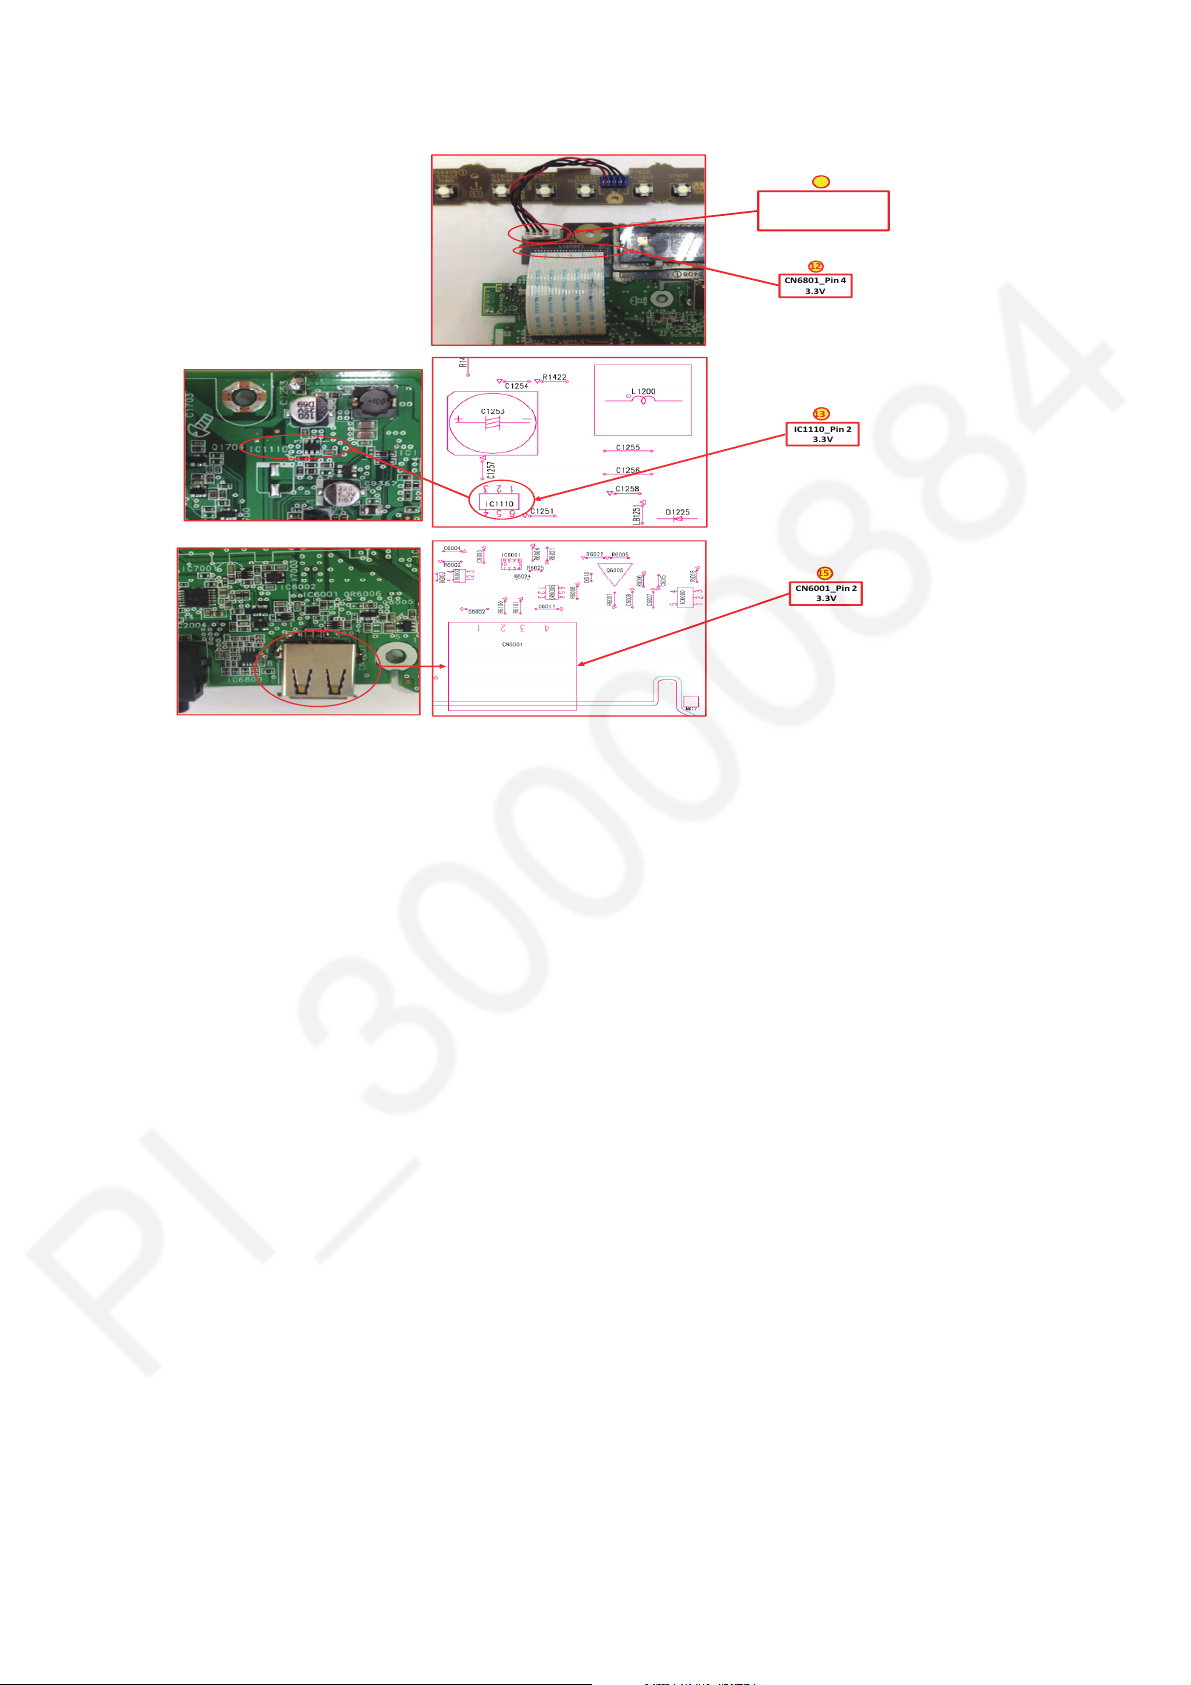
18
11
Check Wire Connectror
is Properly
Inserted toCN6903
12
CN6801_Pin4
3.3V
13
IC1110_Pin2
3.3V
15
CN6001_Pin2
3.3V
Page 19
8 Disassembly and Assembly Instructions
Caution Note:
• This section describes the disassembly and/or assembly procedures for all major printed circuit boards & main components for the unit. (You may refer to the section of “Main components and P.C.B Locations” as described in this service
manual)
• Before carrying out the disassembly process, please ensure all the safety precautions & procedures are followed.
• During the disassembly and/or assembly process, please handle with care as there may be chassis components with
sharp edges.
• Avoid touching heatsinks due to its high temperature after prolong use.
• Be sure to use proper service tools , equipments or jigs during repair.
• Select items from the following indexes when disassembly or replacement are required.
• Disassembly of Base Stand Assembly
• Disassembly of CD Door Ornament
• Disassembly of CD Door Base
• Disassembly of Net Frame Assembly
• Disassembly of Front Cabinet Assembly
• Disassembly of Gear Box Assembly
• Disassembly of Rack Top & CD Door Slider Top
• Disassembly of Door Shaft & CD Door Slider Bottom
• Disassembly of Position Switch P.C.B. & Timing Gear Unit
• Disassembly of Panel P.C.B.
• Disassembly of Tact Switch P.C.B.
• Disassembly of ALLPLAY Module with Data & ALLPLAY Antenna P.C.B.
• Disassembly of Ethernet P.C.B.
• Disassembly of CD Mechanism
• Disassembly of CD Interface P.C.B.
• Disassembly of Tuner P.C.B.
• Disassembly of Main P.C.B.
• Disassembly of Speaker Unit (SP1)
• Disassembly of Speaker Unit (SP2)
8.1. Service Fixture & Tools
Prepare service tools before process service position.
Ref. No. Service Tools Remarks
SFT1 Main P.C.B. (P5003) - CD Interface P.C.B. (CN7002) REE1978 (24P FFC)
19
Page 20
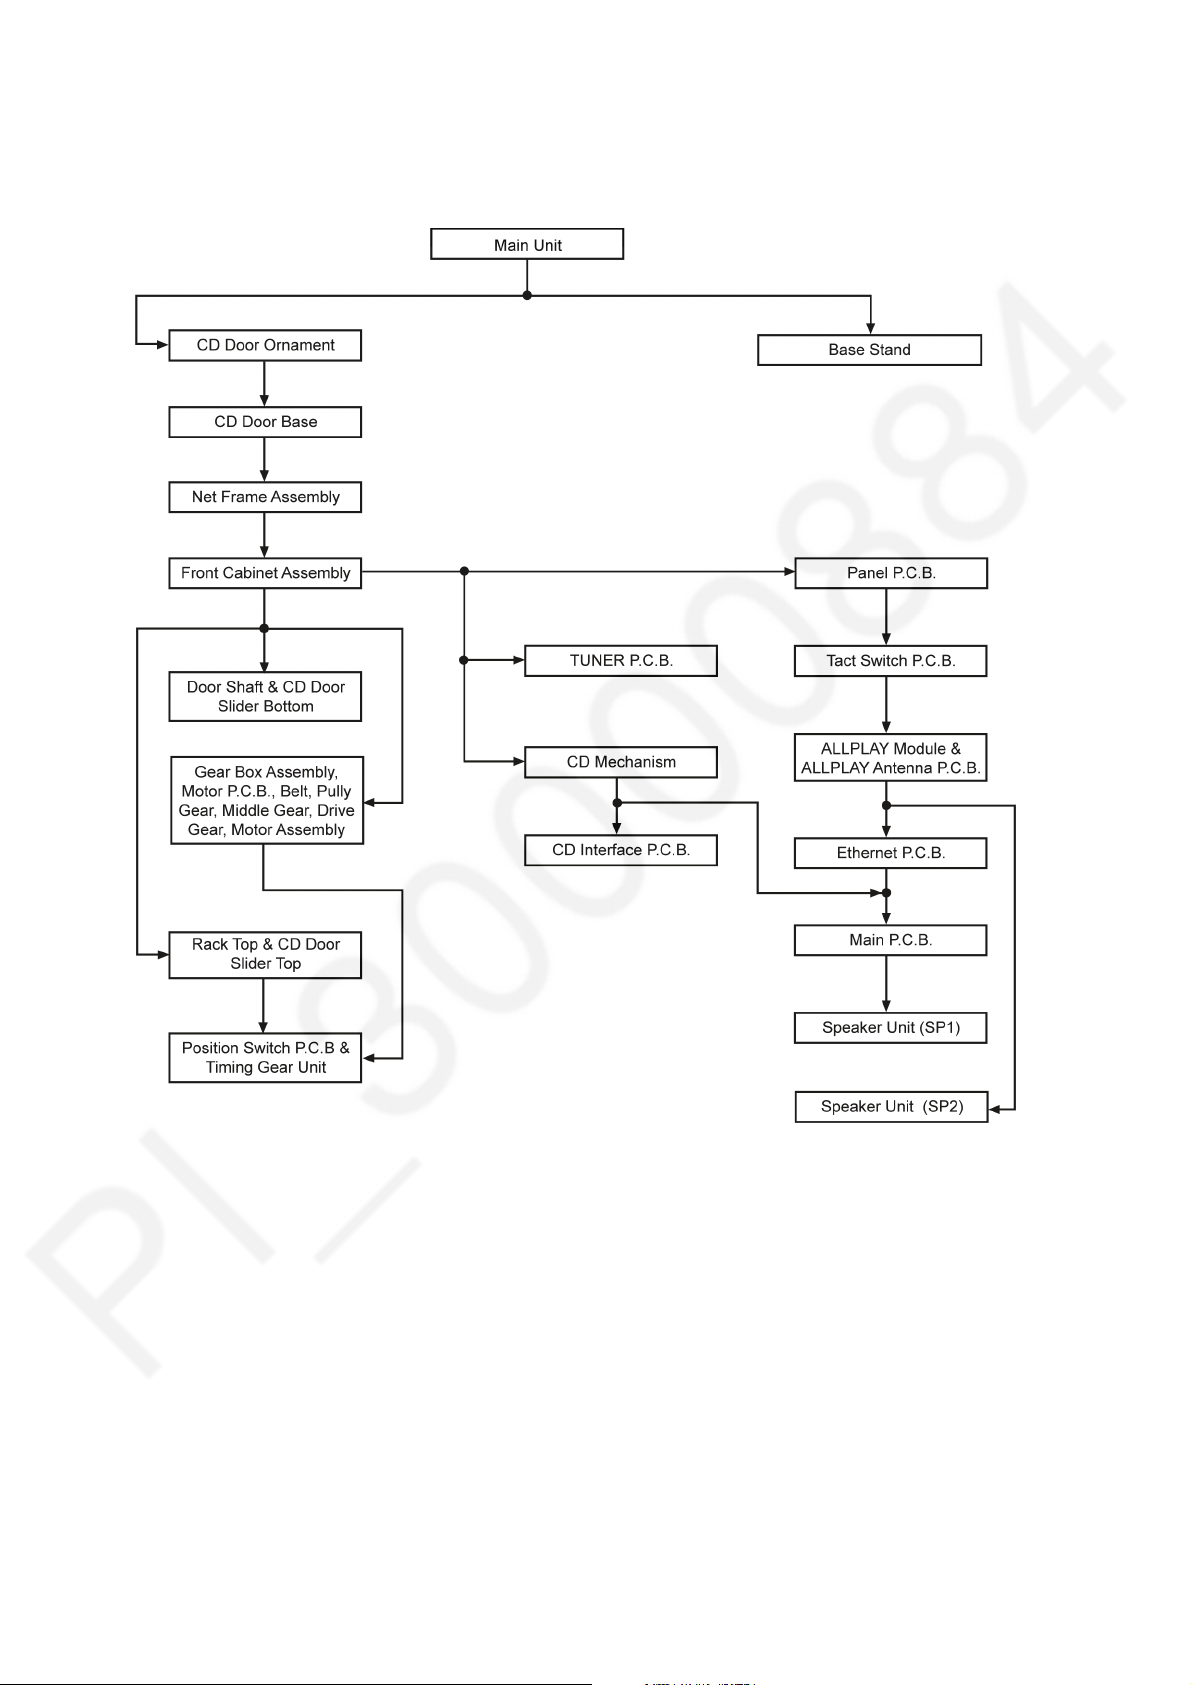
8.2. Disassembly flow chart
The following chart is the procedure for disassembling the casing and inside parts for internal inspection when carrying out the servicing.
To assemble the unit, reverse the steps shown in the chart below.
20
Page 21
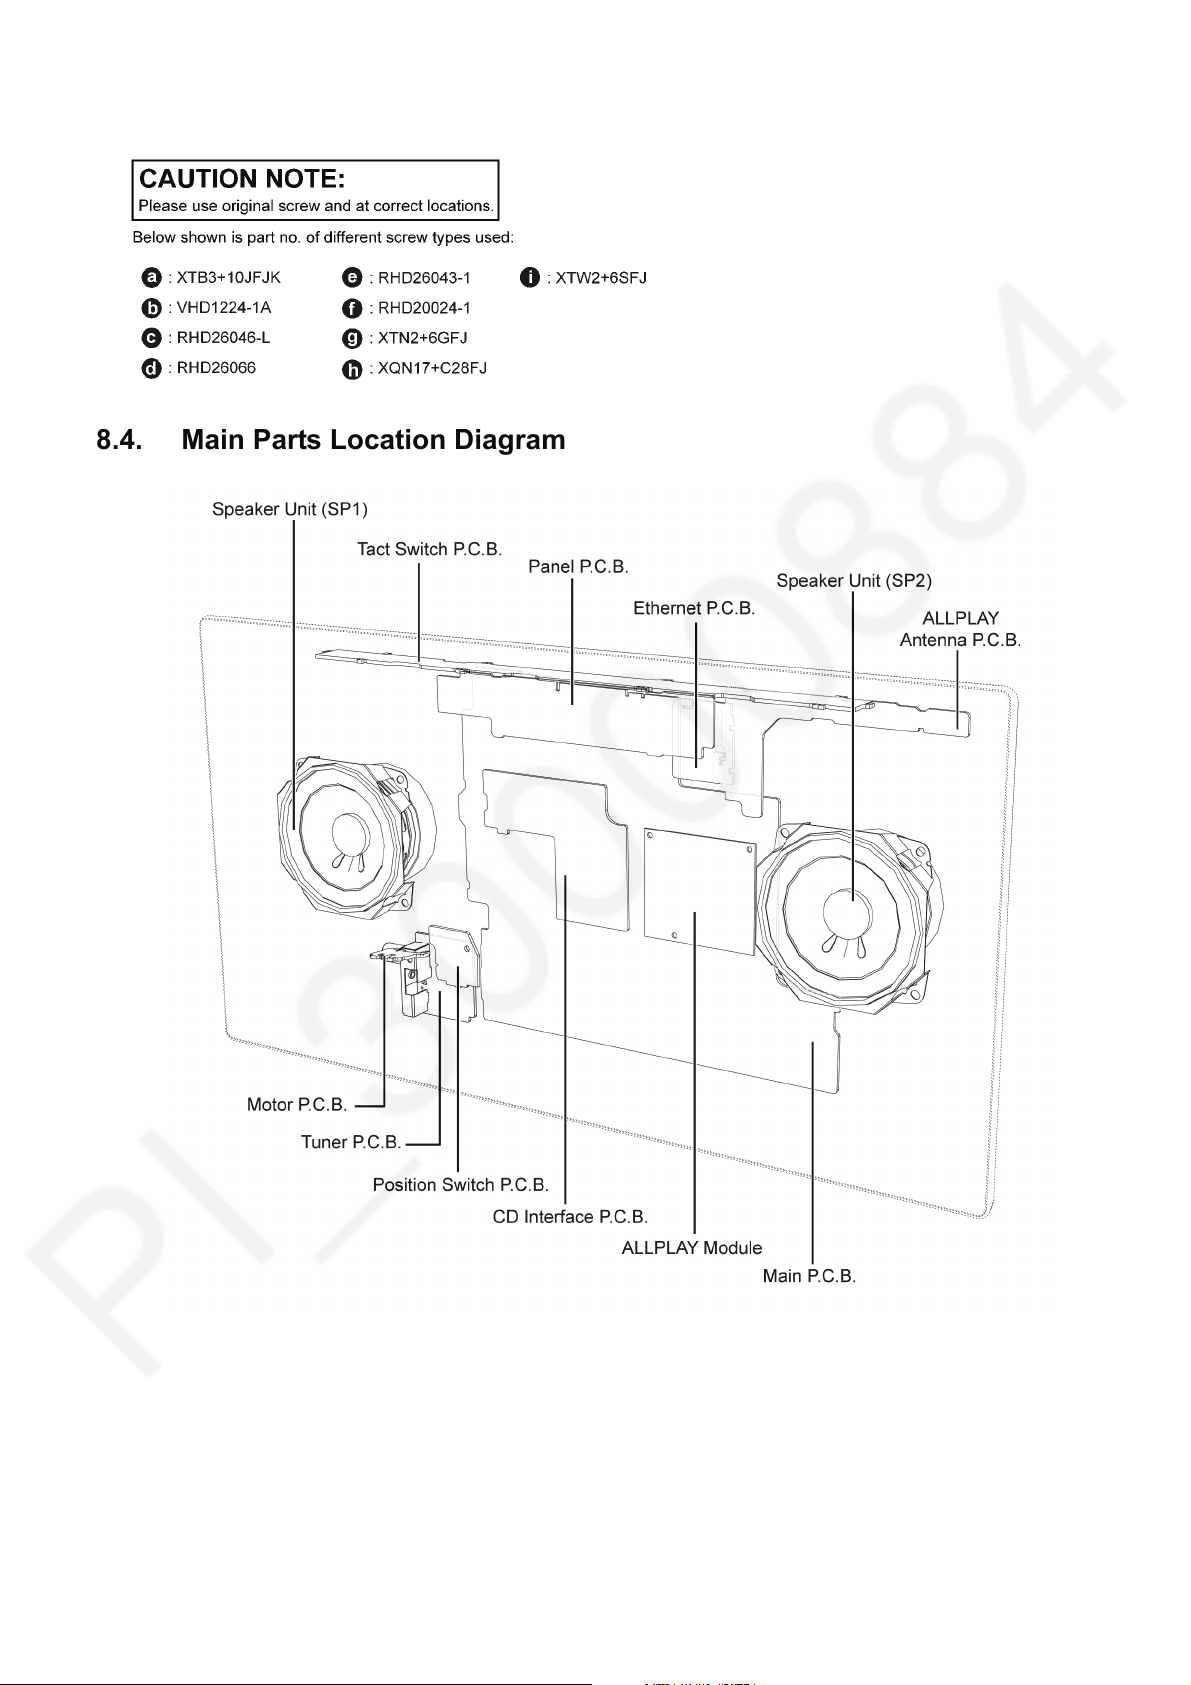
8.3. Types of Screws
8.4. Main Parts Location Diagram
21
Page 22
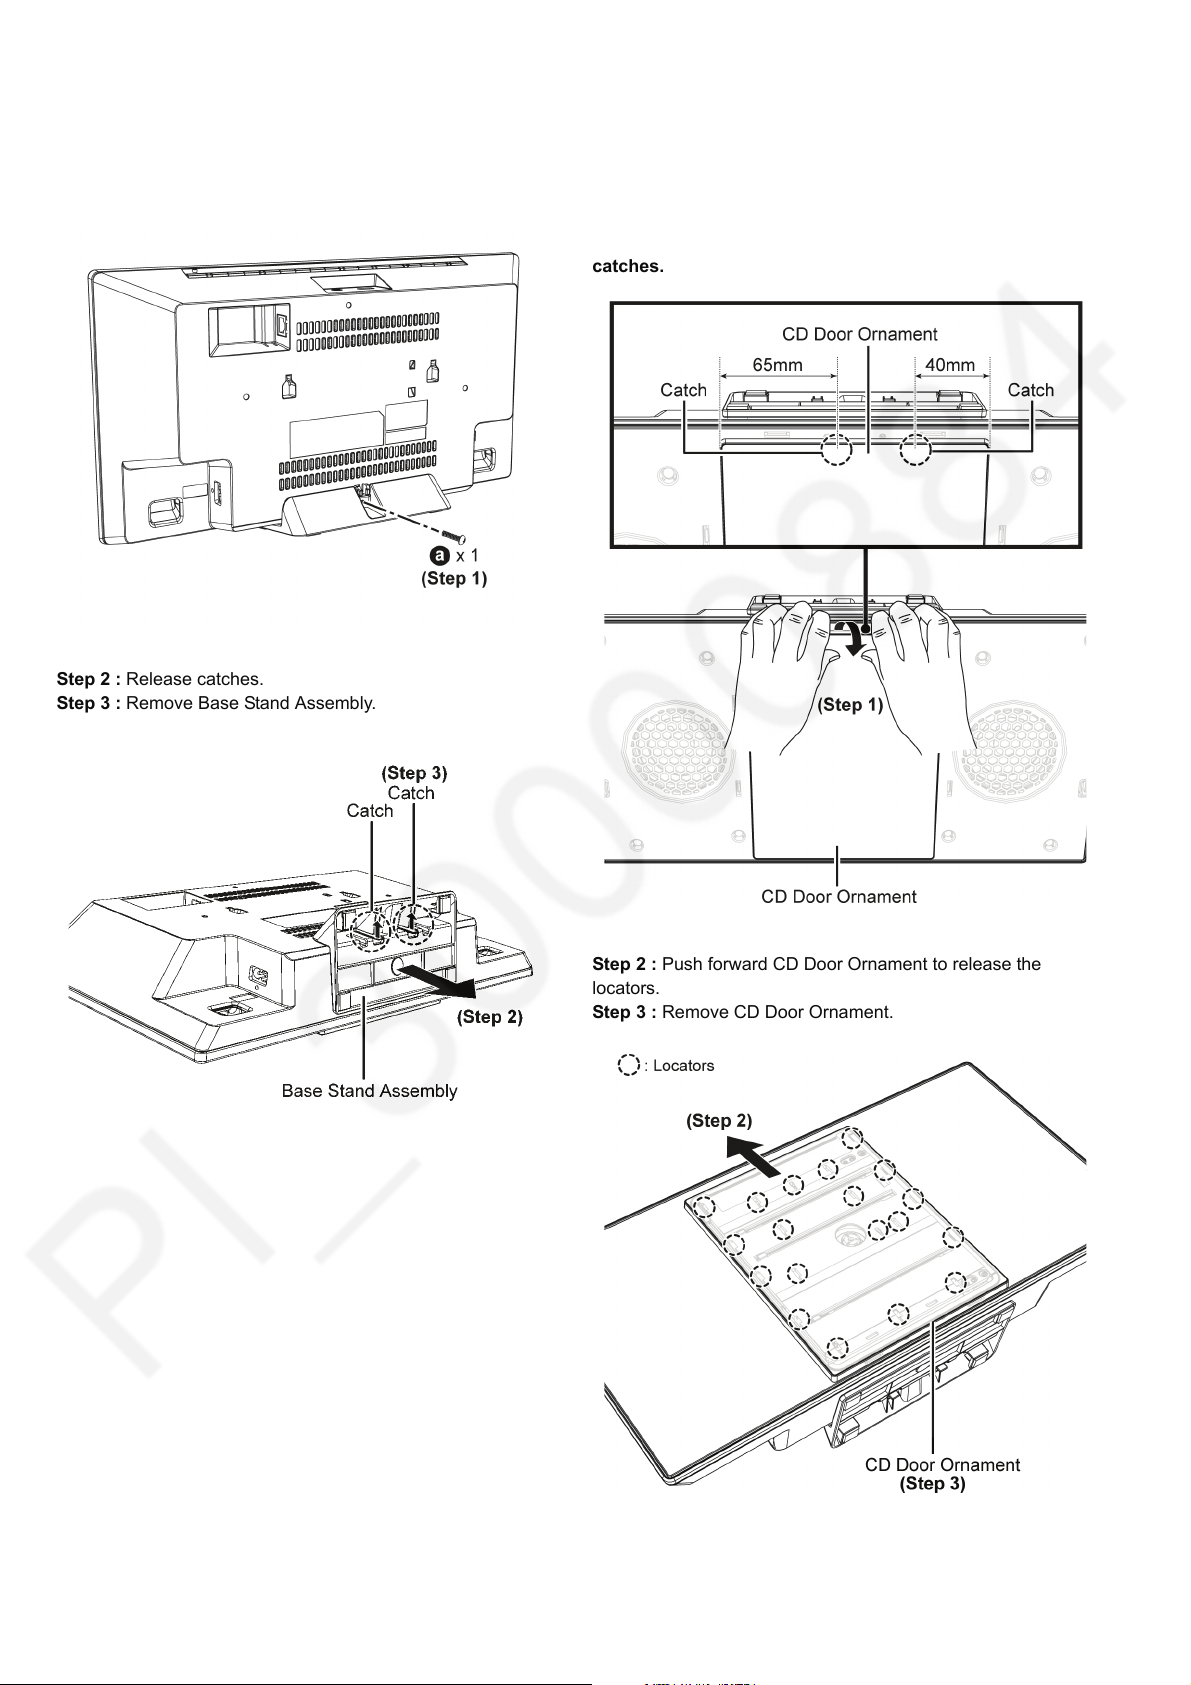
8.5. Disassembly of Base Stand
8.6. Disassembly of CD Door
Assembly
Step 1 : Remove screw.
Step 2 : Release catches.
Step 3 : Remove Base Stand Assembly.
Ornament
Step 1 : Slightly lift up the CD Door Ornament to release
catches.
Caution : Do not use strong force as it may damage the
catches.
Step 2 : Push forward CD Door Ornament to release the
locators.
Step 3 : Remove CD Door Ornament.
22
Page 23
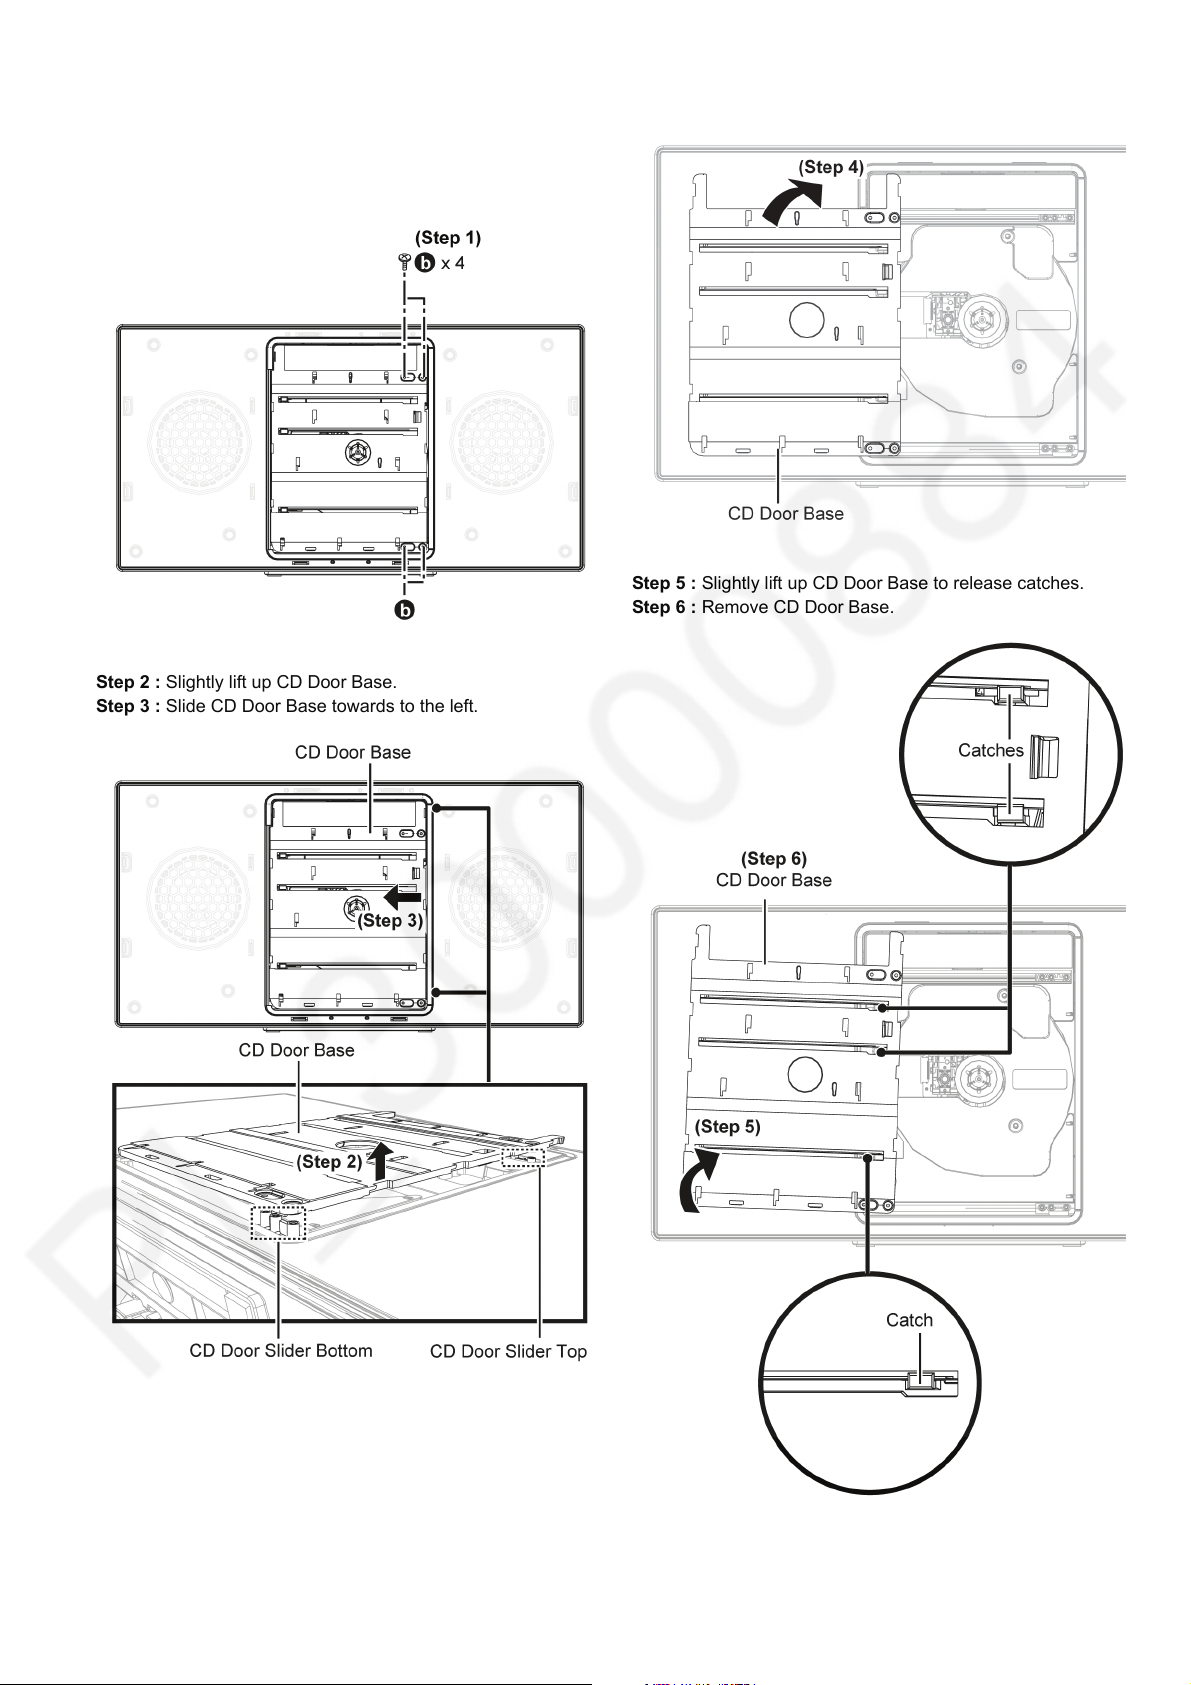
8.7. Disassembly of CD Door Base
• Refer to “Disassembly of CD Door Ornament”
Step 1 : Remove 4 screws.
Step 2 : Slightly lift up CD Door Base.
Step 3 : Slide CD Door Base towards to the left.
Step 4 : Push CD Door Base as shown.
Step 5 : Slightly lift up CD Door Base to release catches.
Step 6 : Remove CD Door Base.
23
Page 24
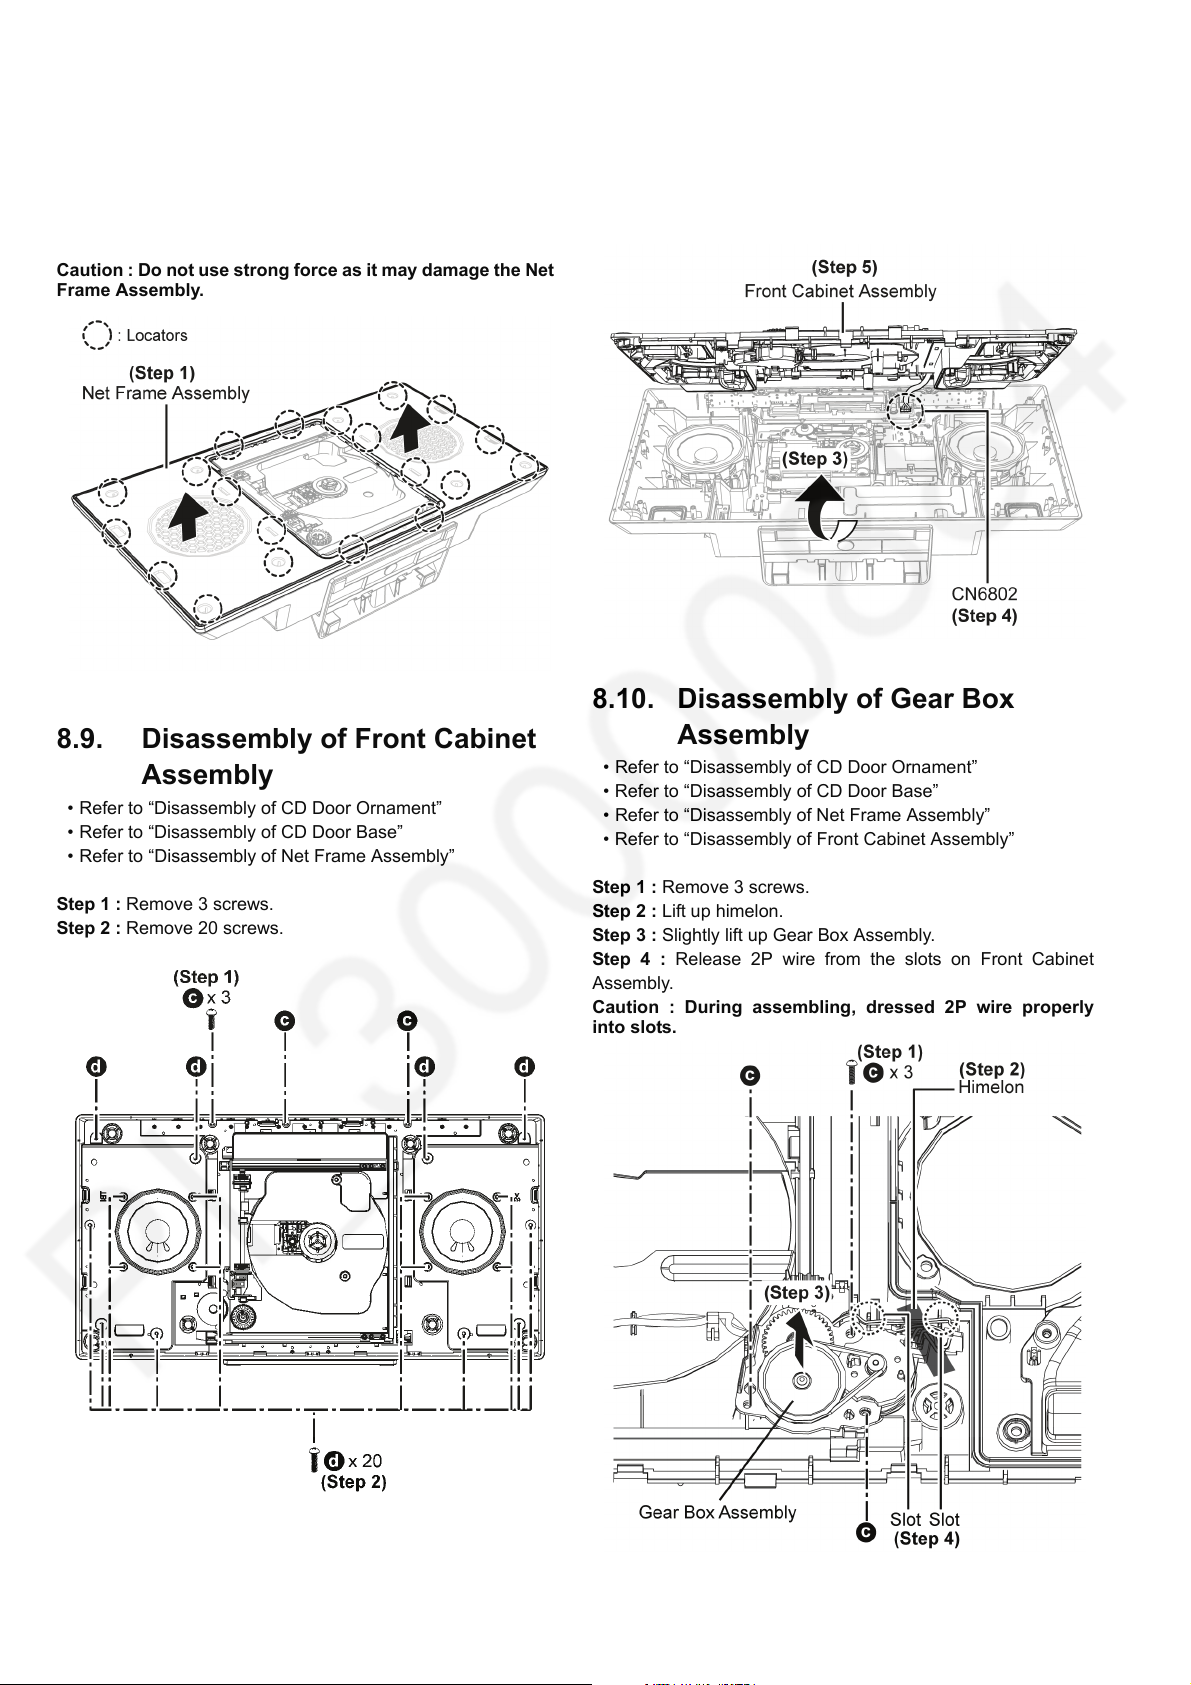
8.8. Disassembly of Net Frame Assembly
• Refer to “Disassembly of CD Door Ornament”
• Refer to “Disassembly of CD Door Base”
Step 1 : Release catches and remove Net Frame Assembly.
Caution : Do not use strong force as it may damage the Net
Frame Assembly.
Step 3 : Slightly lift up the Front Cabinet Assembly as shown.
Caution : Do not use strong force during lifting up of the
Front Cabinet Assembly.
Step 4 : Detach 5P Wires at the connector (CN6802) on Panel
P. C .B .
Step 5 : Remove Front Cabinet Assembly.
8.9. Disassembly of Front Cabinet Assembly
• Refer to “Disassembly of CD Door Ornament”
• Refer to “Disassembly of CD Door Base”
• Refer to “Disassembly of Net Frame Assembly”
Step 1 : Remove 3 screws.
Step 2 : Remove 20 screws.
8.10. Disassembly of Gear Box Assembly
• Refer to “Disassembly of CD Door Ornament”
• Refer to “Disassembly of CD Door Base”
• Refer to “Disassembly of Net Frame Assembly”
• Refer to “Disassembly of Front Cabinet Assembly”
Step 1 : Remove 3 screws.
Step 2 : Lift up himelon.
Step 3 : Slightly lift up Gear Box Assembly.
Step 4 : Release 2P wire from the slots on Front Cabinet
Assembly.
Caution : During assembling, dressed 2P wire properly
into slots.
24
Page 25
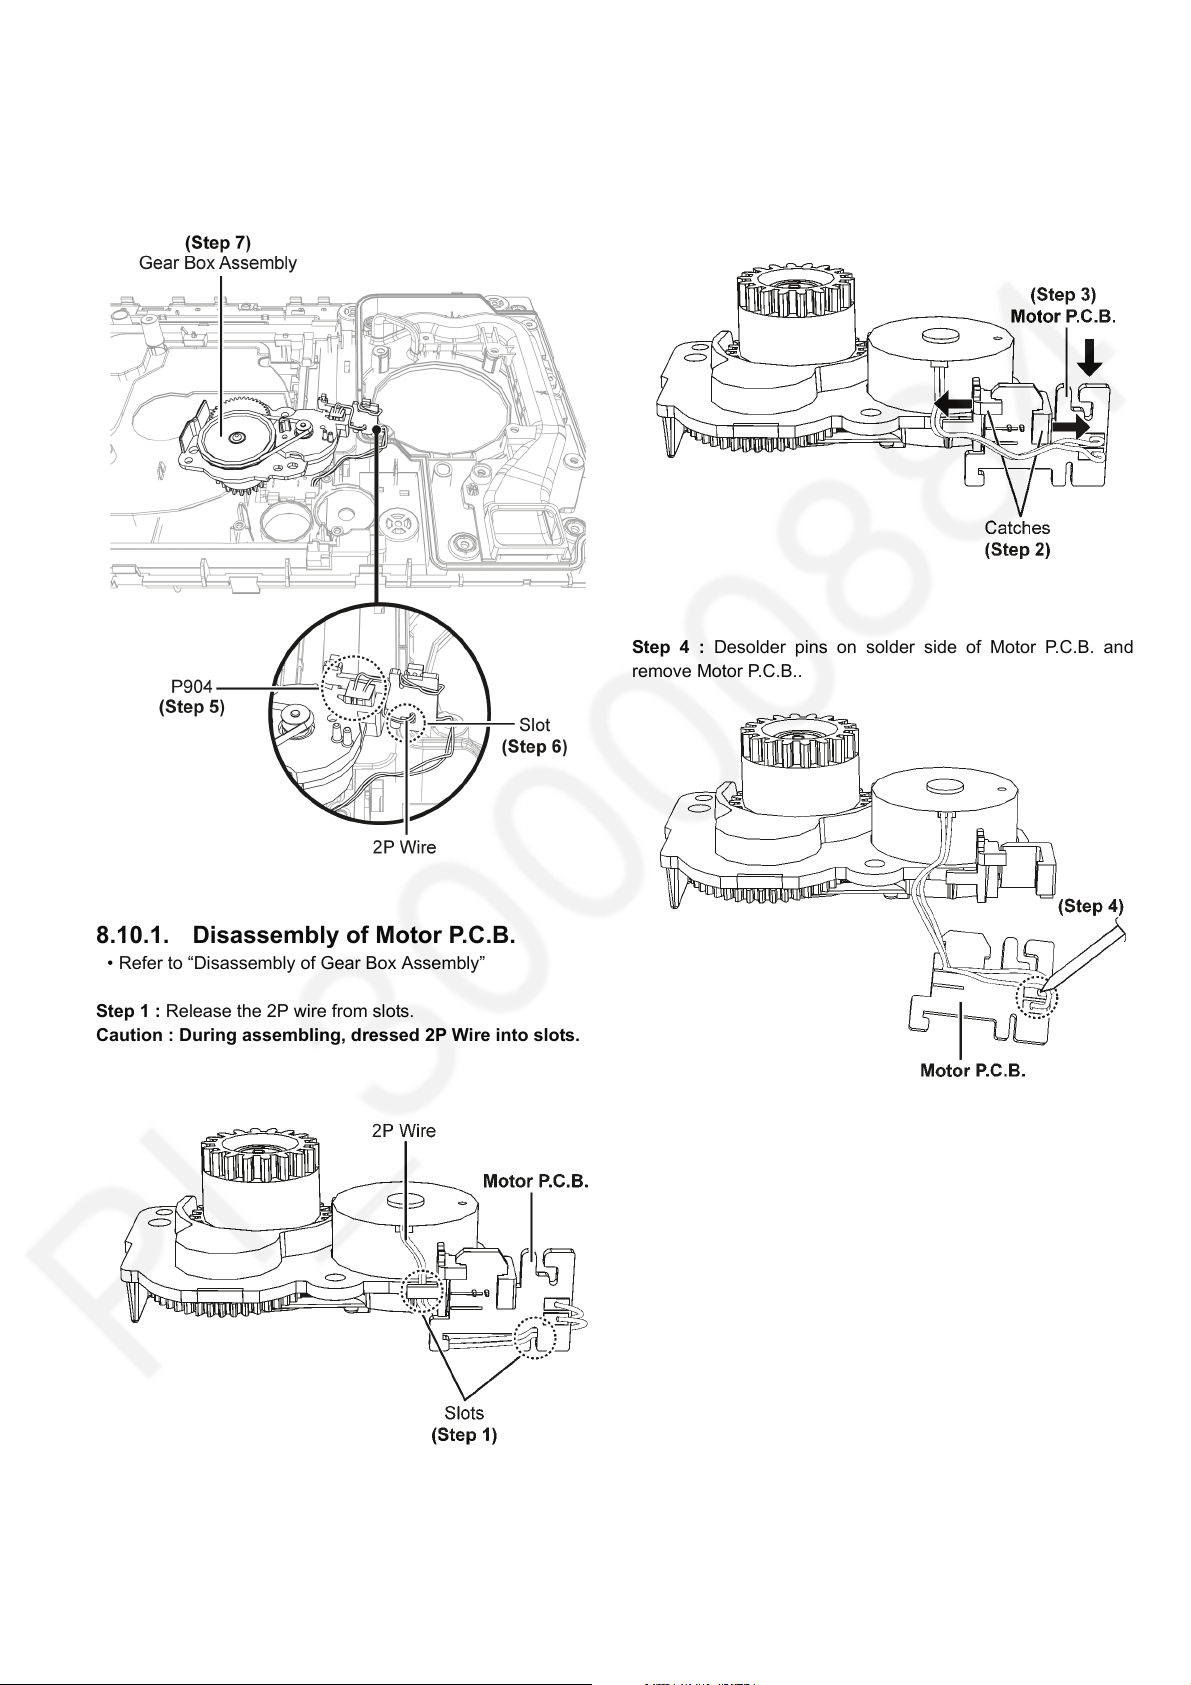
Step 5 : Detach 2P wire at connector (P904) on Motor P.C.B..
Step 6 : Release 2P wire from slot.
Caution : During assembling, dressed 2P wire properly
into slots.
Step 7 : Remove Gear Box Assembly.
Step 2 : Release 2 catches.
Step 3 : Remove Motor P.C.B..
Caution : During assembling, insert Motor P.C.B.
properly & ensure it is fully catched.
Step 4 : Desolder pins on solder side of Motor P.C.B. and
remove Motor P.C.B..
8.10.1. Disassembly of Motor P.C.B.
• Refer to “Disassembly of Gear Box Assembly”
Step 1 : Release the 2P wire from slots.
Caution : During assembling, dressed 2P Wire into slots.
25
Page 26
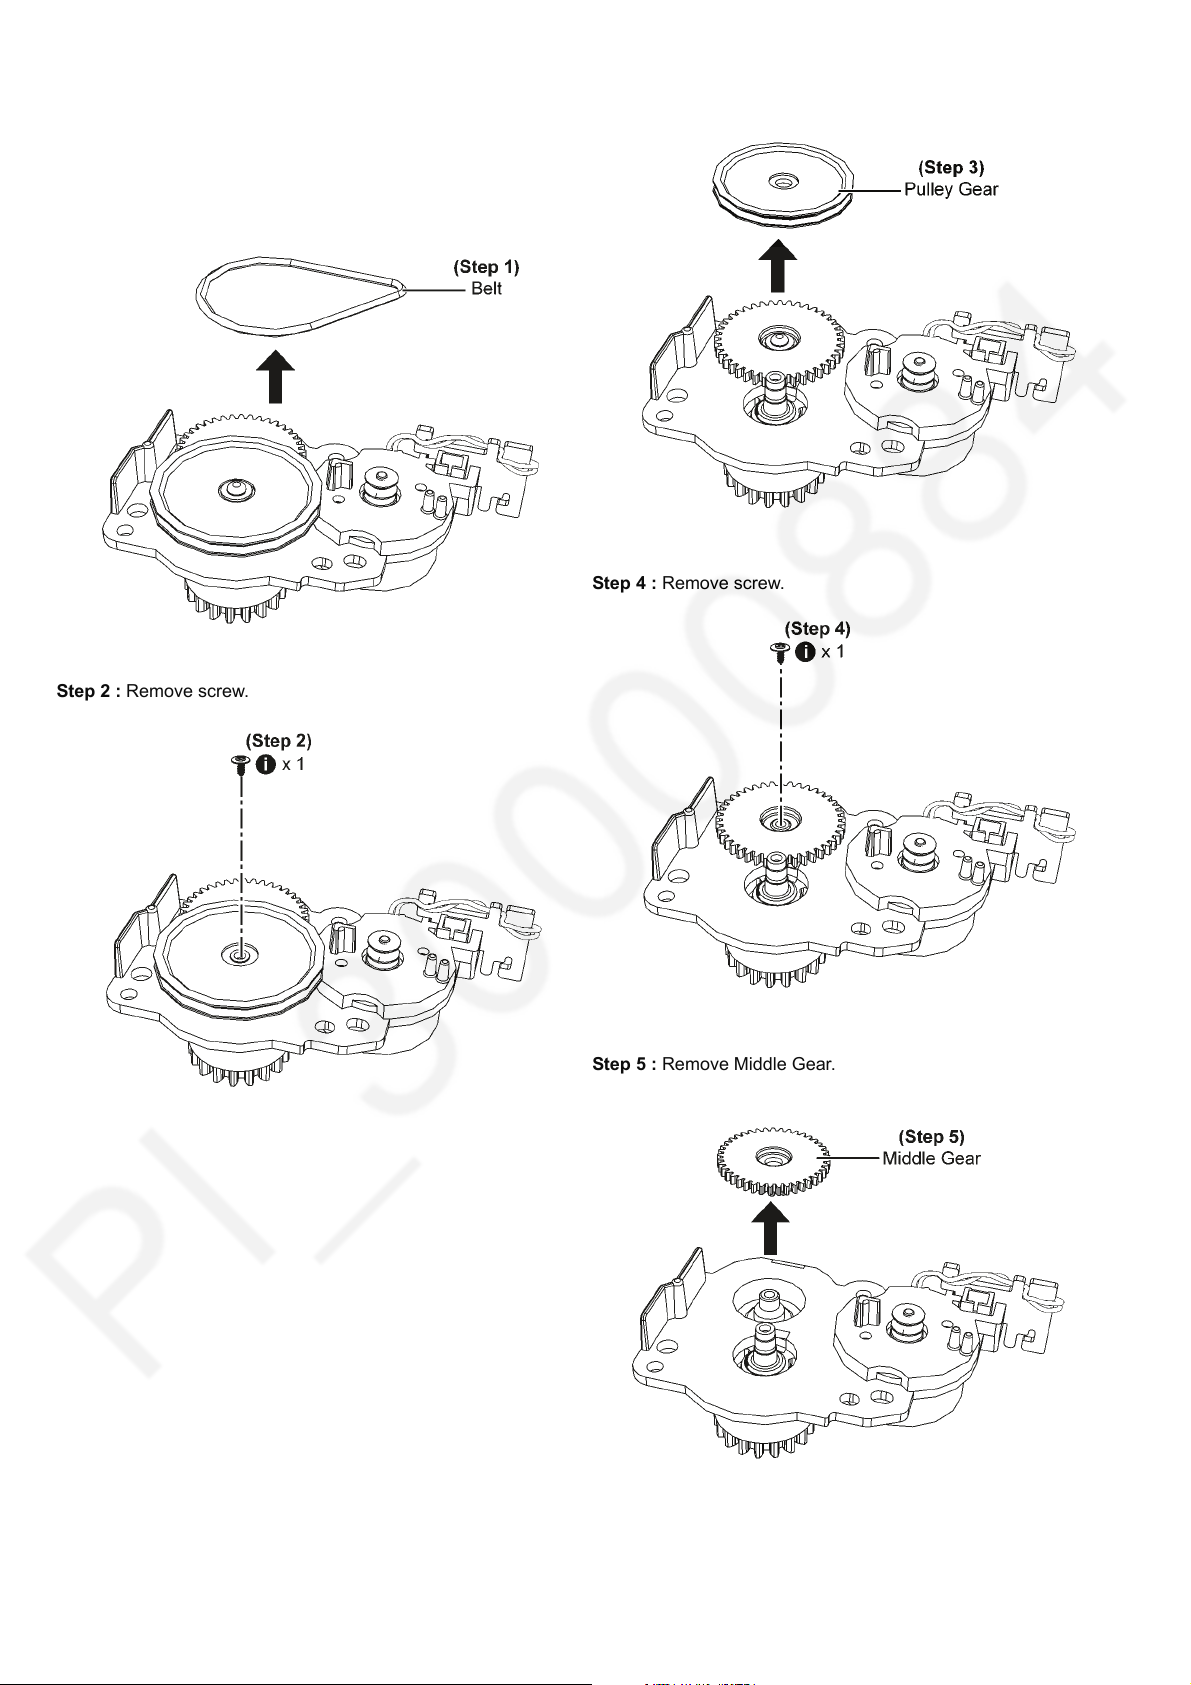
8.10.2. Disassembly of Belt, Pulley Gear, Middle Gear and Drive Gear
• Refer to “Disassembly of Gear Box Assembly”
Step 1 : Remove Belt.
Step 3 : Remove Pulley Gear.
Step 4 : Remove screw.
Step 2 : Remove screw.
Step 5 : Remove Middle Gear.
26
Page 27
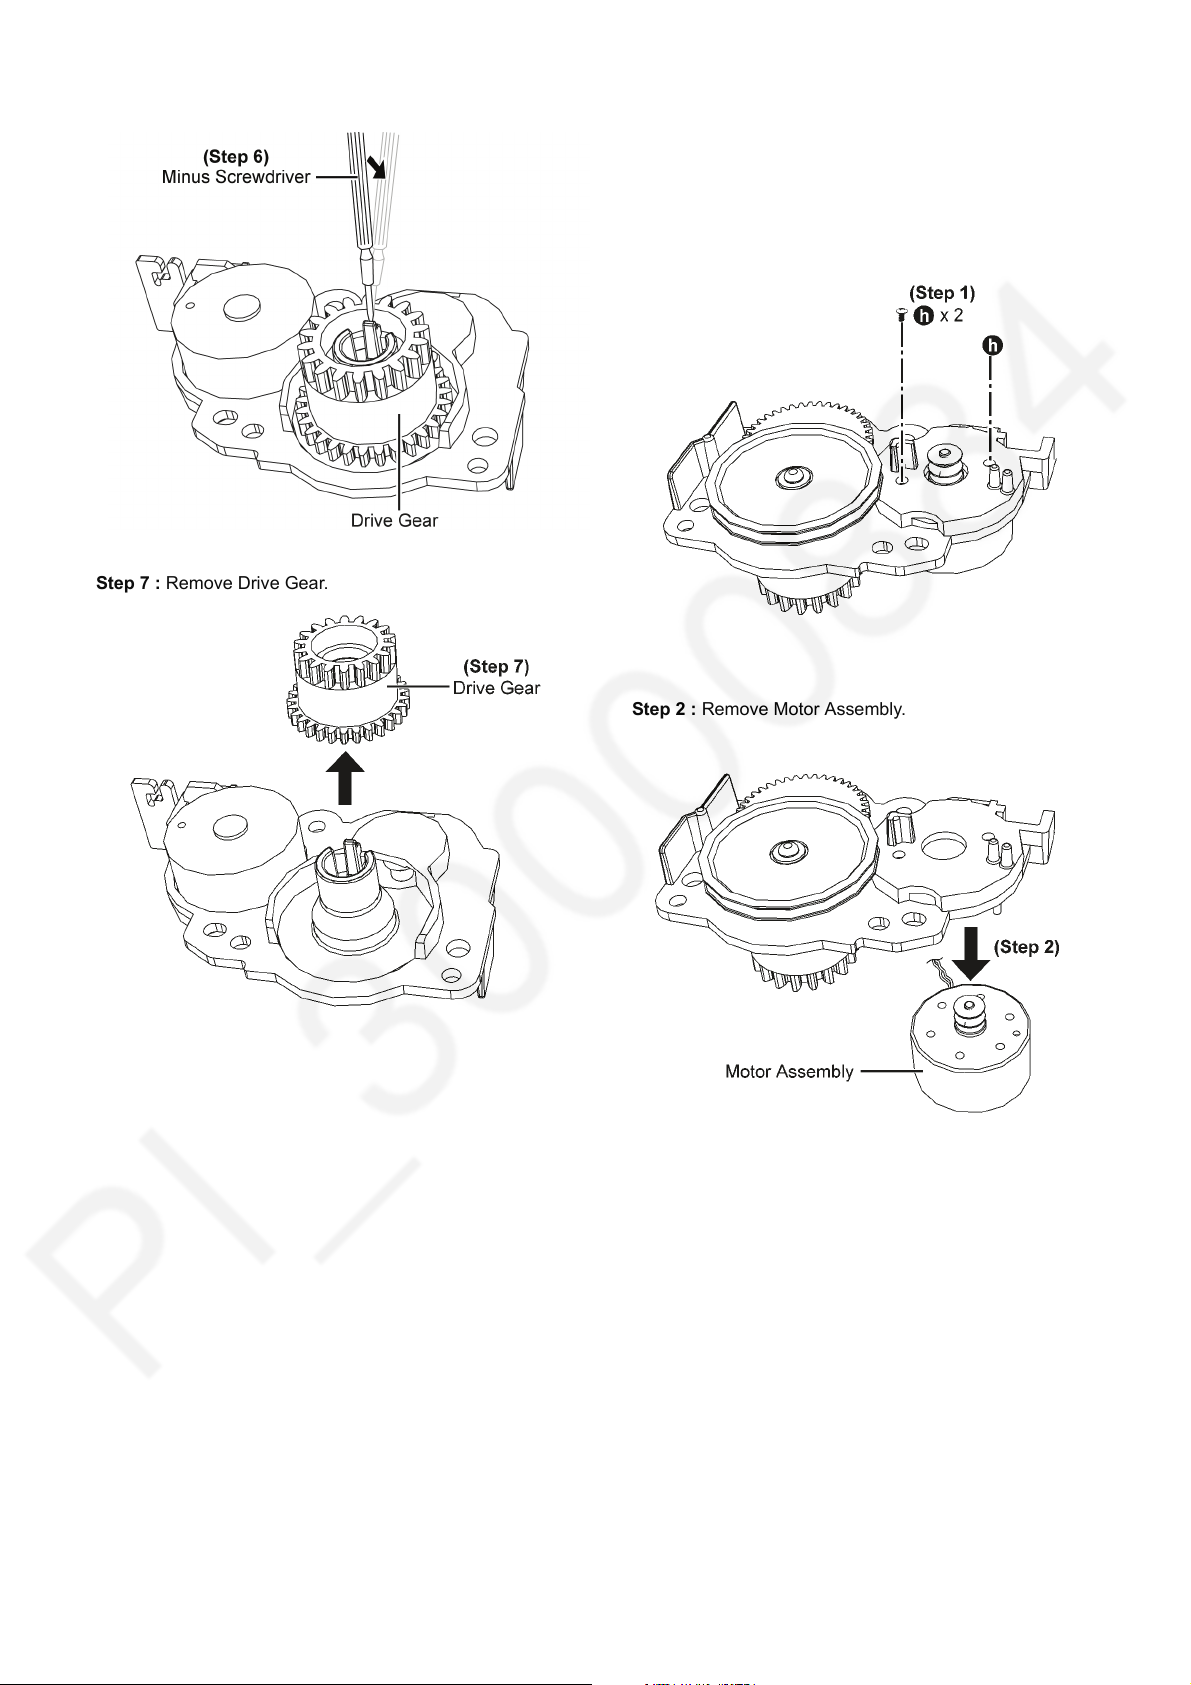
Step 6 : Use minus screwdriver to release catch as shown.
Step 7 : Remove Drive Gear.
8.10.3. Disassembly of Motor Assembly
• Refer to “Disassembly of Gear Box Assembly”
• Refer to “Disassembly of Motor P.C.B.”
• Refer to (Step 1) of item 8.10.2.
Step 1 : Remove 2 screws.
Step 2 : Remove Motor Assembly.
27
Page 28
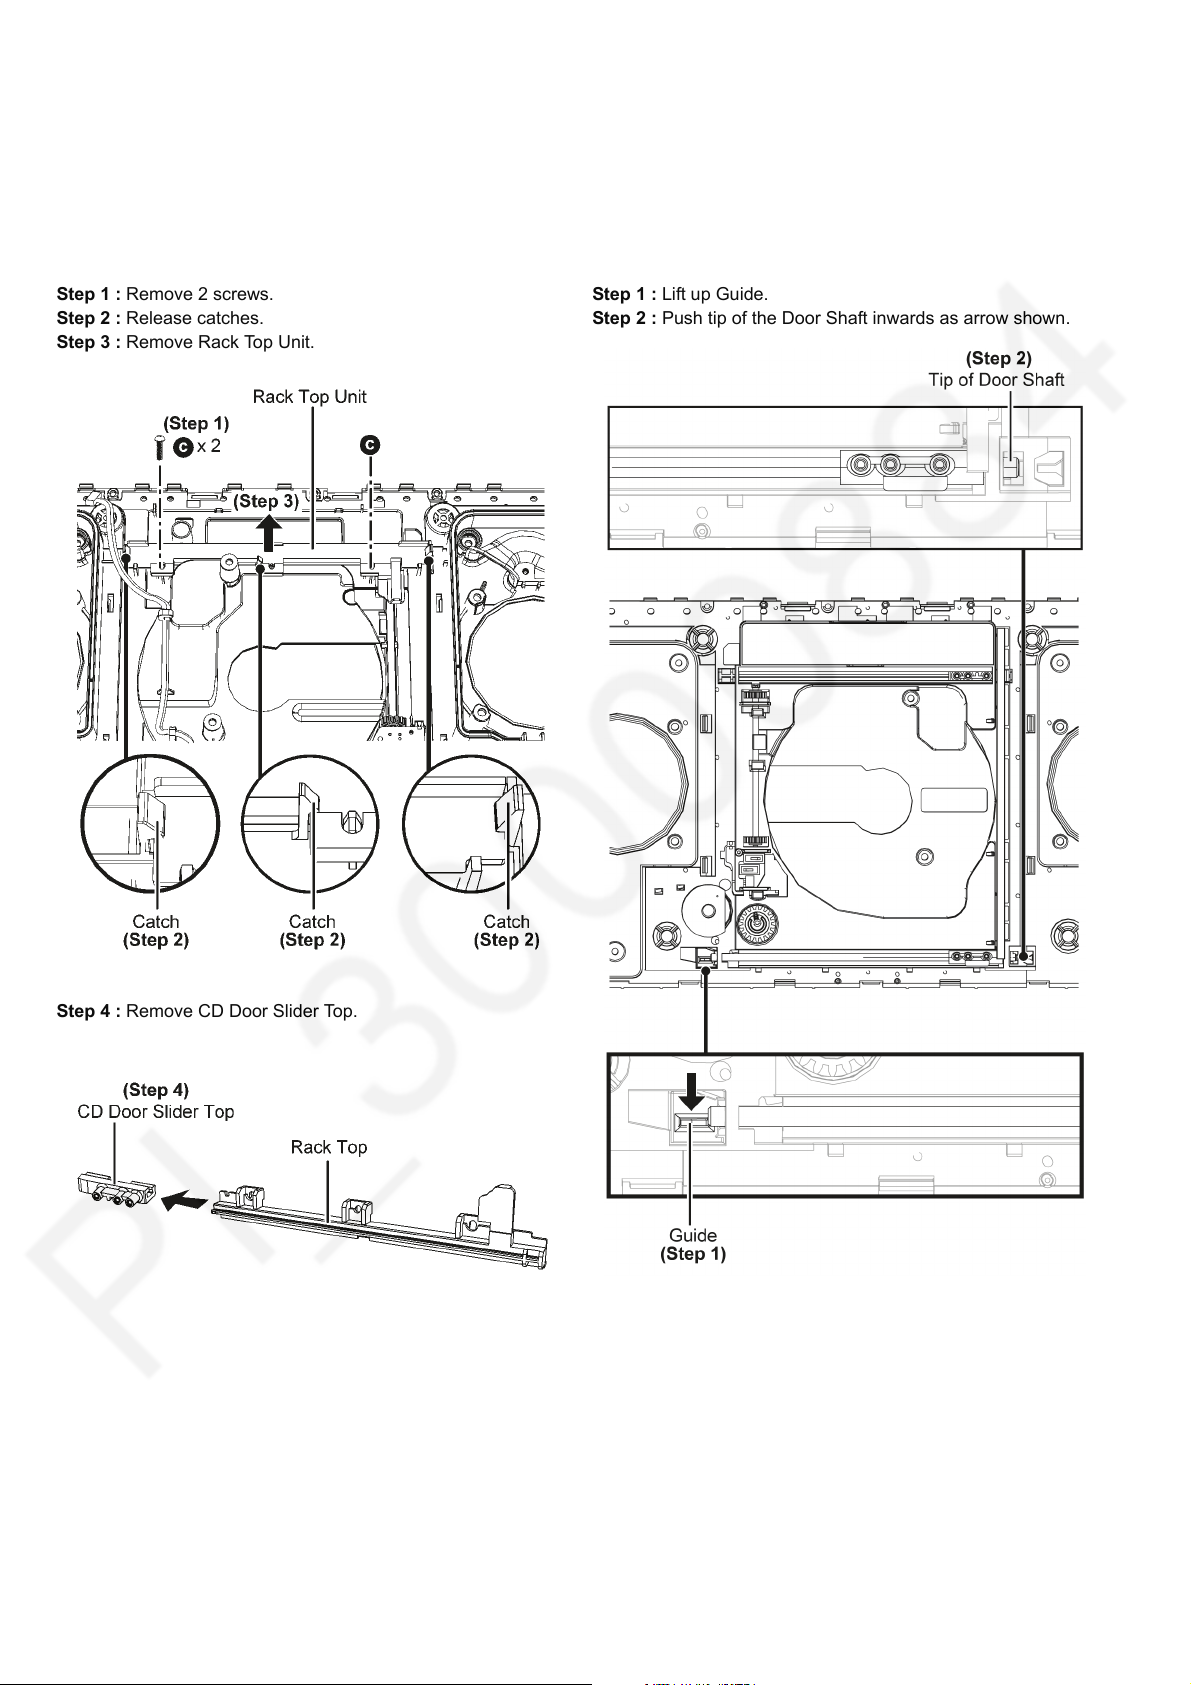
8.11. Disassembly of Rack Top & CD
8.12. Disassembly of Door Shaft &
Door Slider Top
• Refer to “Disassembly of CD Door Ornament”
• Refer to “Disassembly of CD Door Base”
• Refer to “Disassembly of Net Frame Assembly”
• Refer to “Disassembly of Front Cabinet Assembly”
Step 1 : Remove 2 screws.
Step 2 : Release catches.
Step 3 : Remove Rack Top Unit.
CD Door Slider Bottom
• Refer to “Disassembly of CD Door Ornament”
• Refer to “Disassembly of CD Door Base”
• Refer to “Disassembly of Net Frame Assembly”
• Refer to “Disassembly of Front Cabinet Assembly”
Step 1 : Lift up Guide.
Step 2 : Push tip of the Door Shaft inwards as arrow shown.
Step 4 : Remove CD Door Slider Top.
28
Page 29
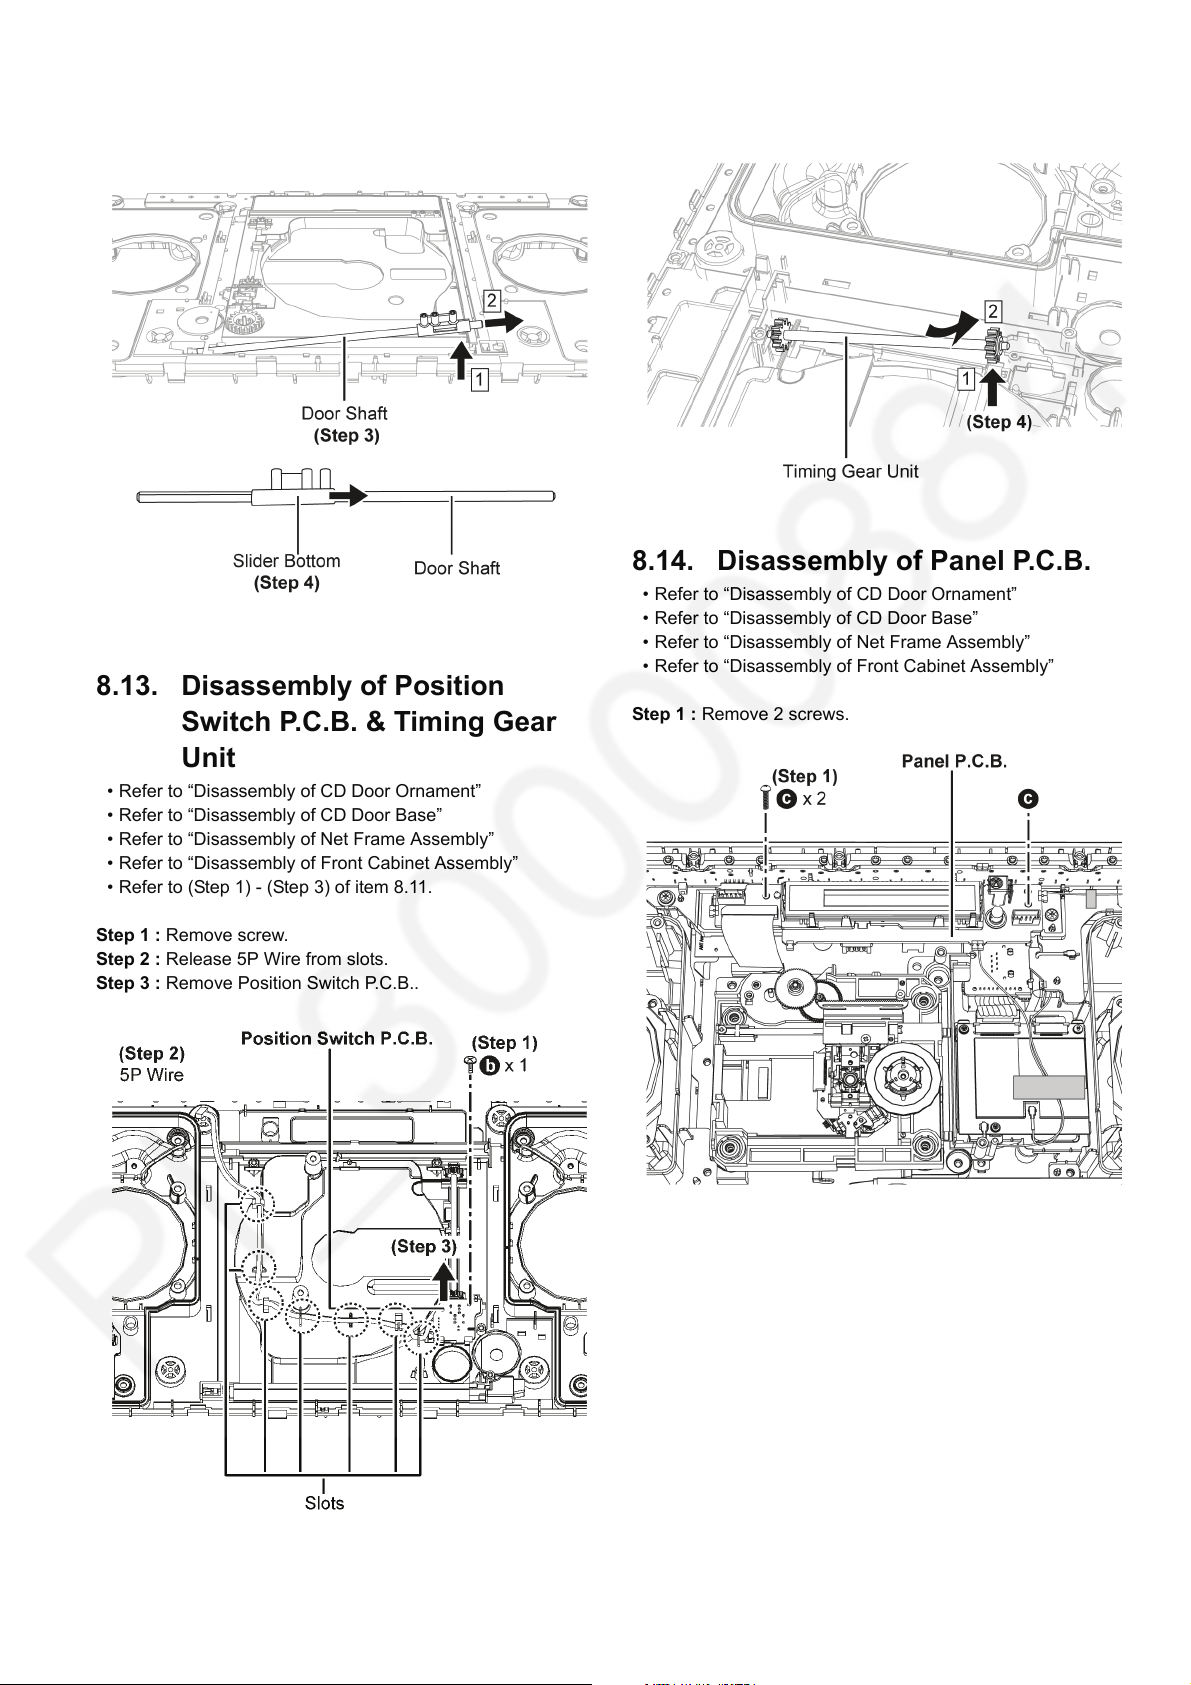
Step 3 : Lift up and remove Door Shaft in order of sequences
(1) to (2).
Step 4 : Remove Slider Bottom.
8.13. Disassembly of Position
Switch P.C.B. & Timing Gear
Step 4 : Remove Timing Gear Unit in order of sequences (1) to
(2) as shown.
8.14. Disassembly of Panel P.C.B.
• Refer to “Disassembly of CD Door Ornament”
• Refer to “Disassembly of CD Door Base”
• Refer to “Disassembly of Net Frame Assembly”
• Refer to “Disassembly of Front Cabinet Assembly”
Step 1 : Remove 2 screws.
Unit
• Refer to “Disassembly of CD Door Ornament”
• Refer to “Disassembly of CD Door Base”
• Refer to “Disassembly of Net Frame Assembly”
• Refer to “Disassembly of Front Cabinet Assembly”
• Refer to (Step 1) - (Step 3) of item 8.11.
Step 1 : Remove screw.
Step 2 : Release 5P Wire from slots.
Step 3 : Remove Position Switch P.C.B..
29
Page 30
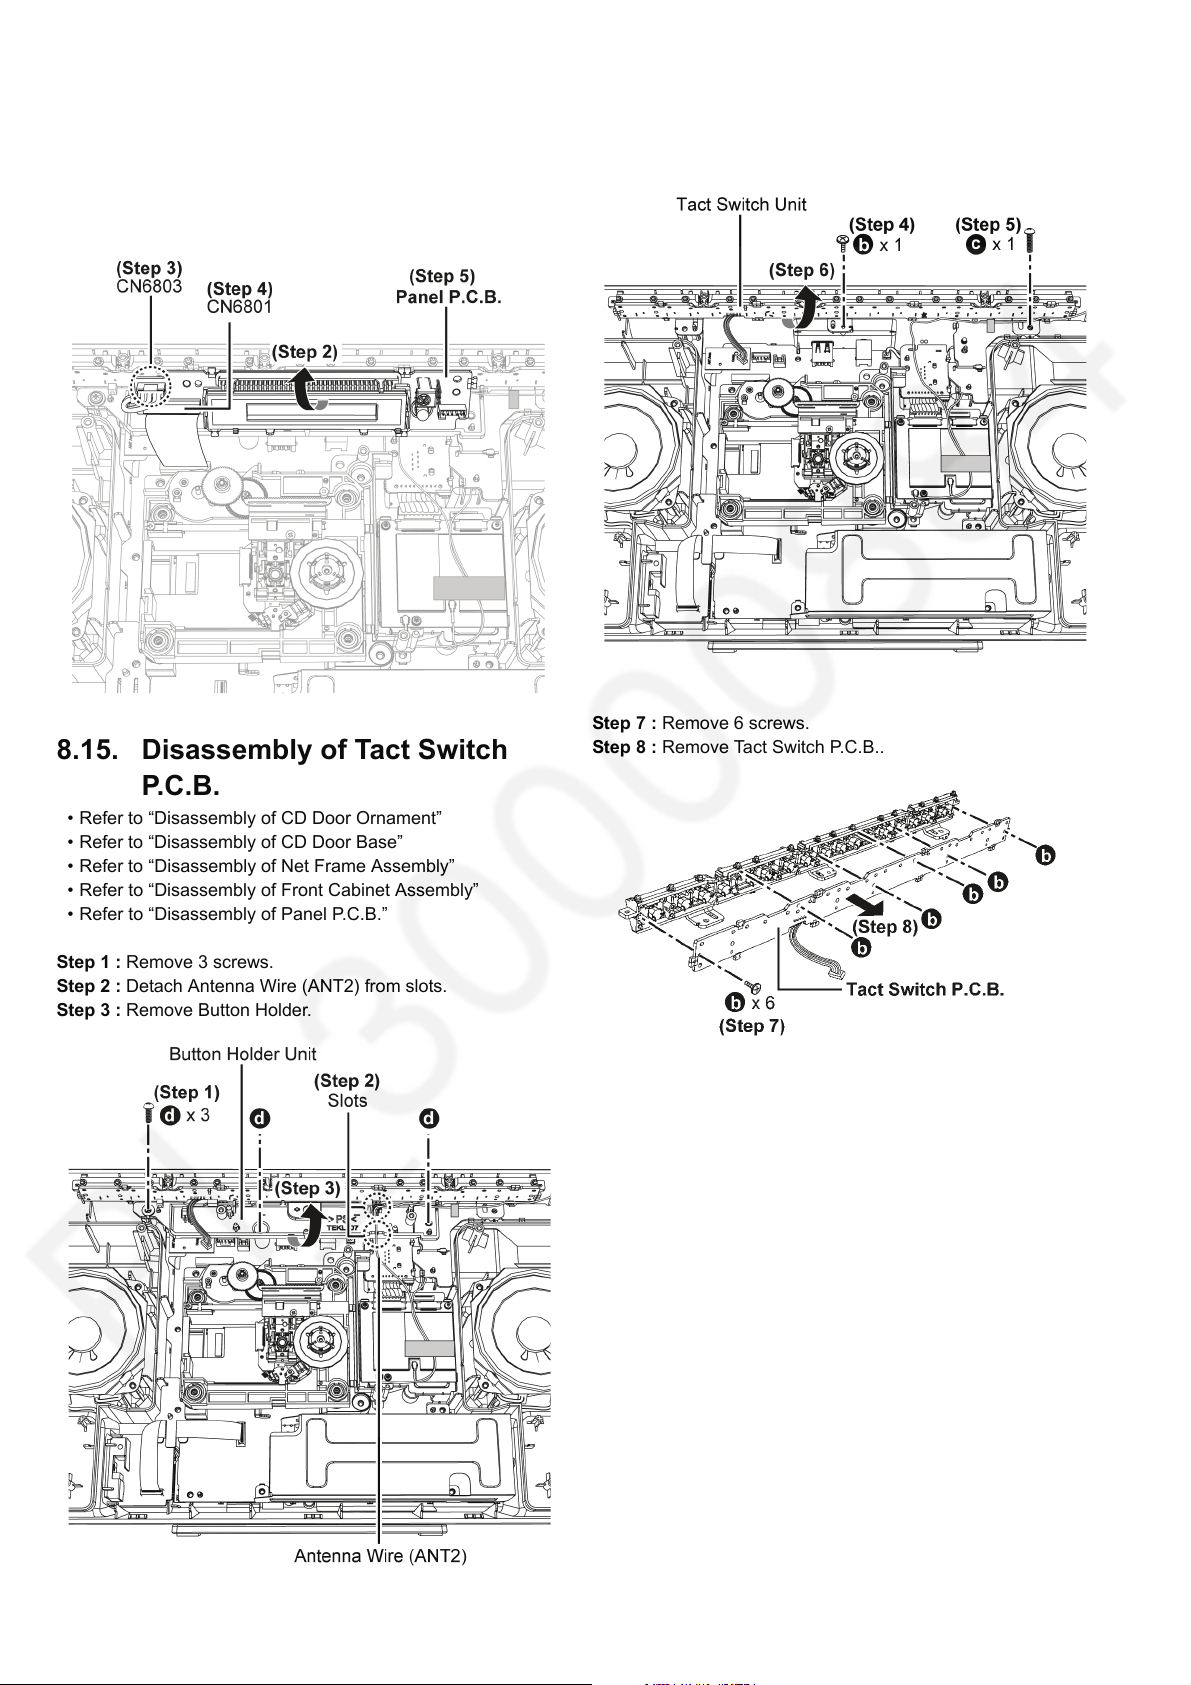
Step 2 : Lift up Panel P.C.B..
Step 3 : Detach 5P wire at the connector (CN6803) on the
Panel P.C.B..
Step 4 : Detach 22P FFC at the connector (CN6801) on the
Panel P.C.B..
Step 5 : Remove Panel P.C.B..
Step 4 : Remove screw.
Step 5 : Remove screw.
Step 6 : Remove Tact Switch Unit.
8.15. Disassembly of Tact Switch P.C.B.
• Refer to “Disassembly of CD Door Ornament”
• Refer to “Disassembly of CD Door Base”
• Refer to “Disassembly of Net Frame Assembly”
• Refer to “Disassembly of Front Cabinet Assembly”
• Refer to “Disassembly of Panel P.C.B.”
Step 1 : Remove 3 screws.
Step 2 : Detach Antenna Wire (ANT2) from slots.
Step 3 : Remove Button Holder.
Step 7 : Remove 6 screws.
Step 8 : Remove Tact Switch P.C.B..
30
Page 31
8.16. Disassembly of ALLPLAY Module with Data & ALLPLAY Antenna P.C.B.
• Refer to “Disassembly of CD Door Ornament”
• Refer to “Disassembly of CD Door Base”
• Refer to “Disassembly of Net Frame Assembly”
• Refer to “Disassembly of Front Cabinet Assembly”
• Refer to “Disassembly of Panel P.C.B.”
• Refer to (Step 1) - (Step 6) of item 8.15.
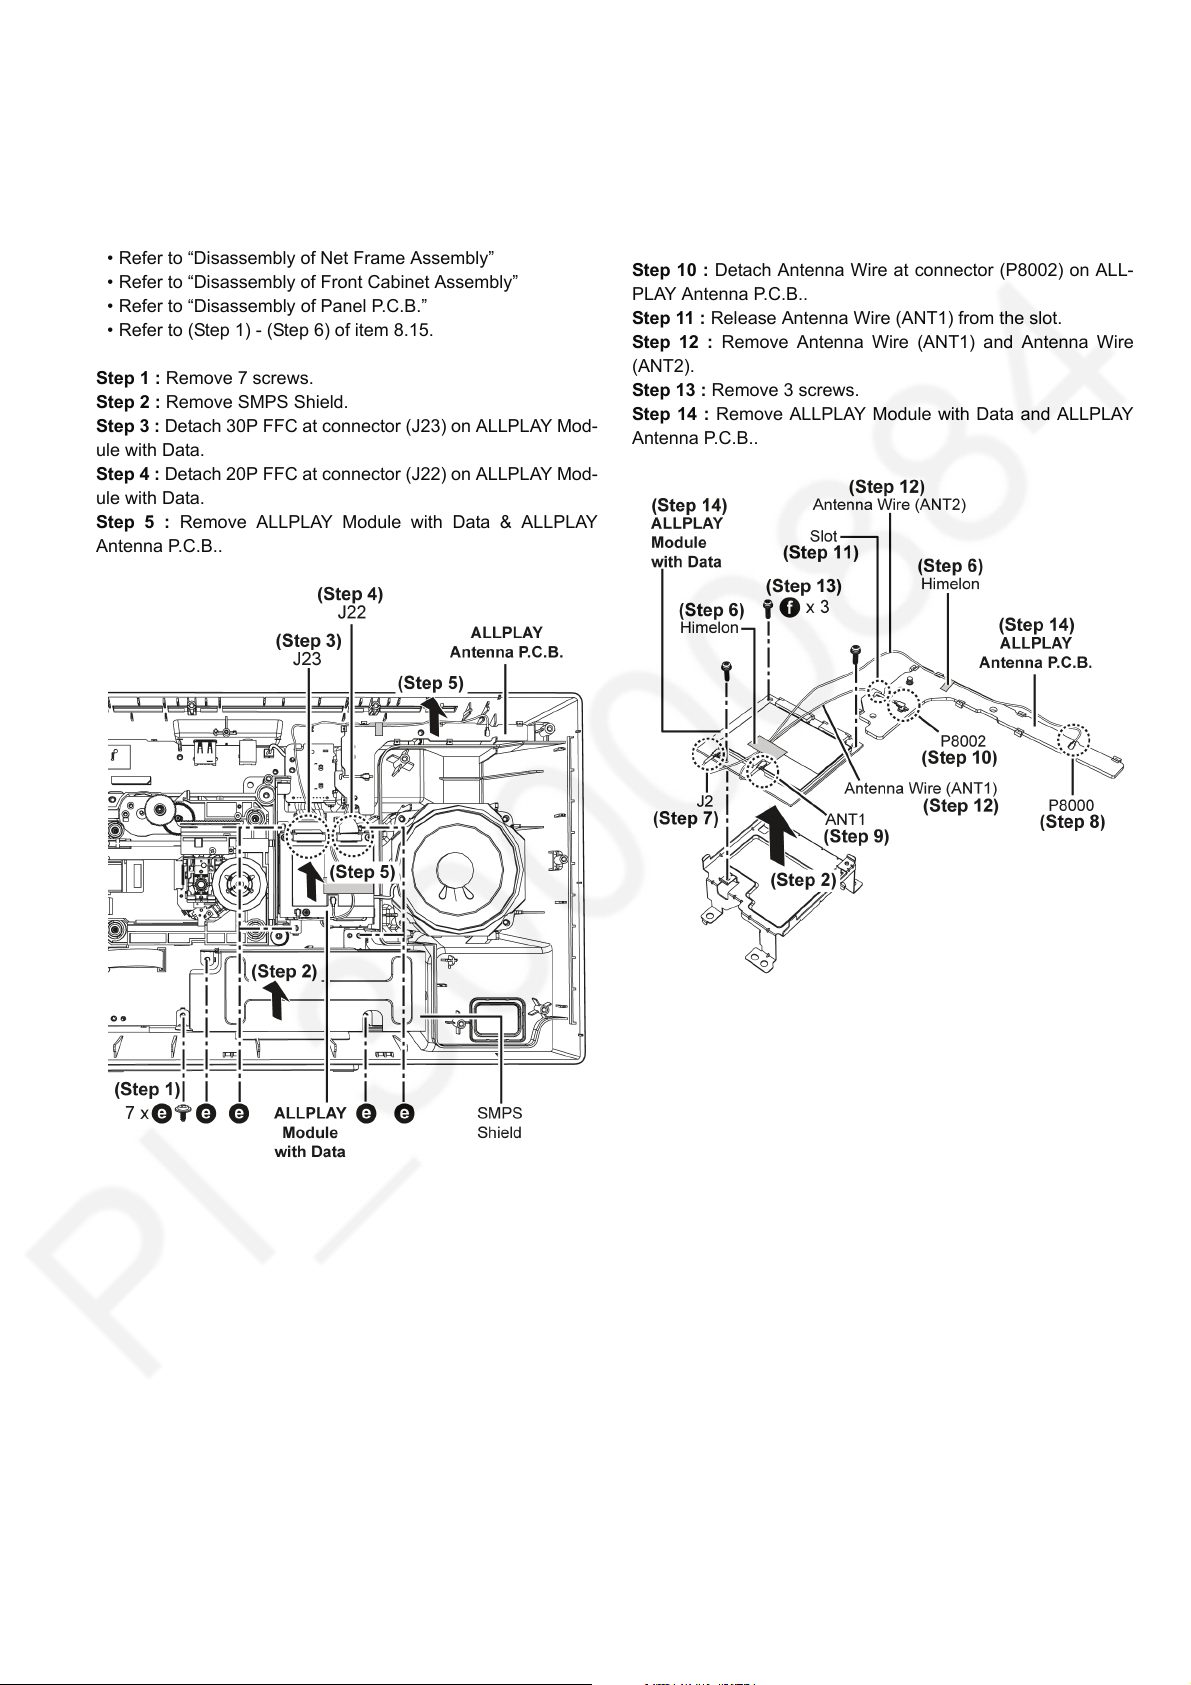
Step 1 : Remove 7 screws.
Step 2 : Remove SMPS Shield.
Step 3 : Detach 30P FFC at connector (J23) on ALLPLAY Mod-
ule with Data.
Step 4 : Detach 20P FFC at connector (J22) on ALLPLAY Mod-
ule with Data.
Step 5 : Remove ALLPLAY Module with Data & ALLPLAY
Antenna P.C.B..
Step 6 : Lift up the himelons.
Step 7 : Detach Antenna Wire at connector (J2) on ALLPLAY
Module with Data.
Step 8 : Detach Antenna Wire at connector (P8000) on ALLPLAY Antenna P.C.B..
Step 9 : Detach Antenna Wire at connector (ANT1) on ALLPLAY Module with Data.
Step 10 : Detach Antenna Wire at connector (P8002) on ALL-
PLAY Antenna P.C.B..
Step 11 : Release Antenna Wire (ANT1) from the slot.
Step 12 : Remove Antenna Wire (ANT1) and Antenna Wire
(ANT2).
Step 13 : Remove 3 screws.
Step 14 : Remove ALLPLAY Module with Data and ALLPLAY
Antenna P.C.B..
31
Page 32
8.17. Disassembly of Ethernet P.C.B.
• Refer to “Disassembly of CD Door Ornament”
• Refer to “Disassembly of CD Door Base”
• Refer to “Disassembly of Net Frame Assembly”
• Refer to “Disassembly of Front Cabinet Assembly”
• Refer to “Disassembly of Panel P.C.B.”
• Refer to (Step 1) - (Step 6) of item 8.15.
• Refer to (Step 1) - (Step 5) of item 8.16.
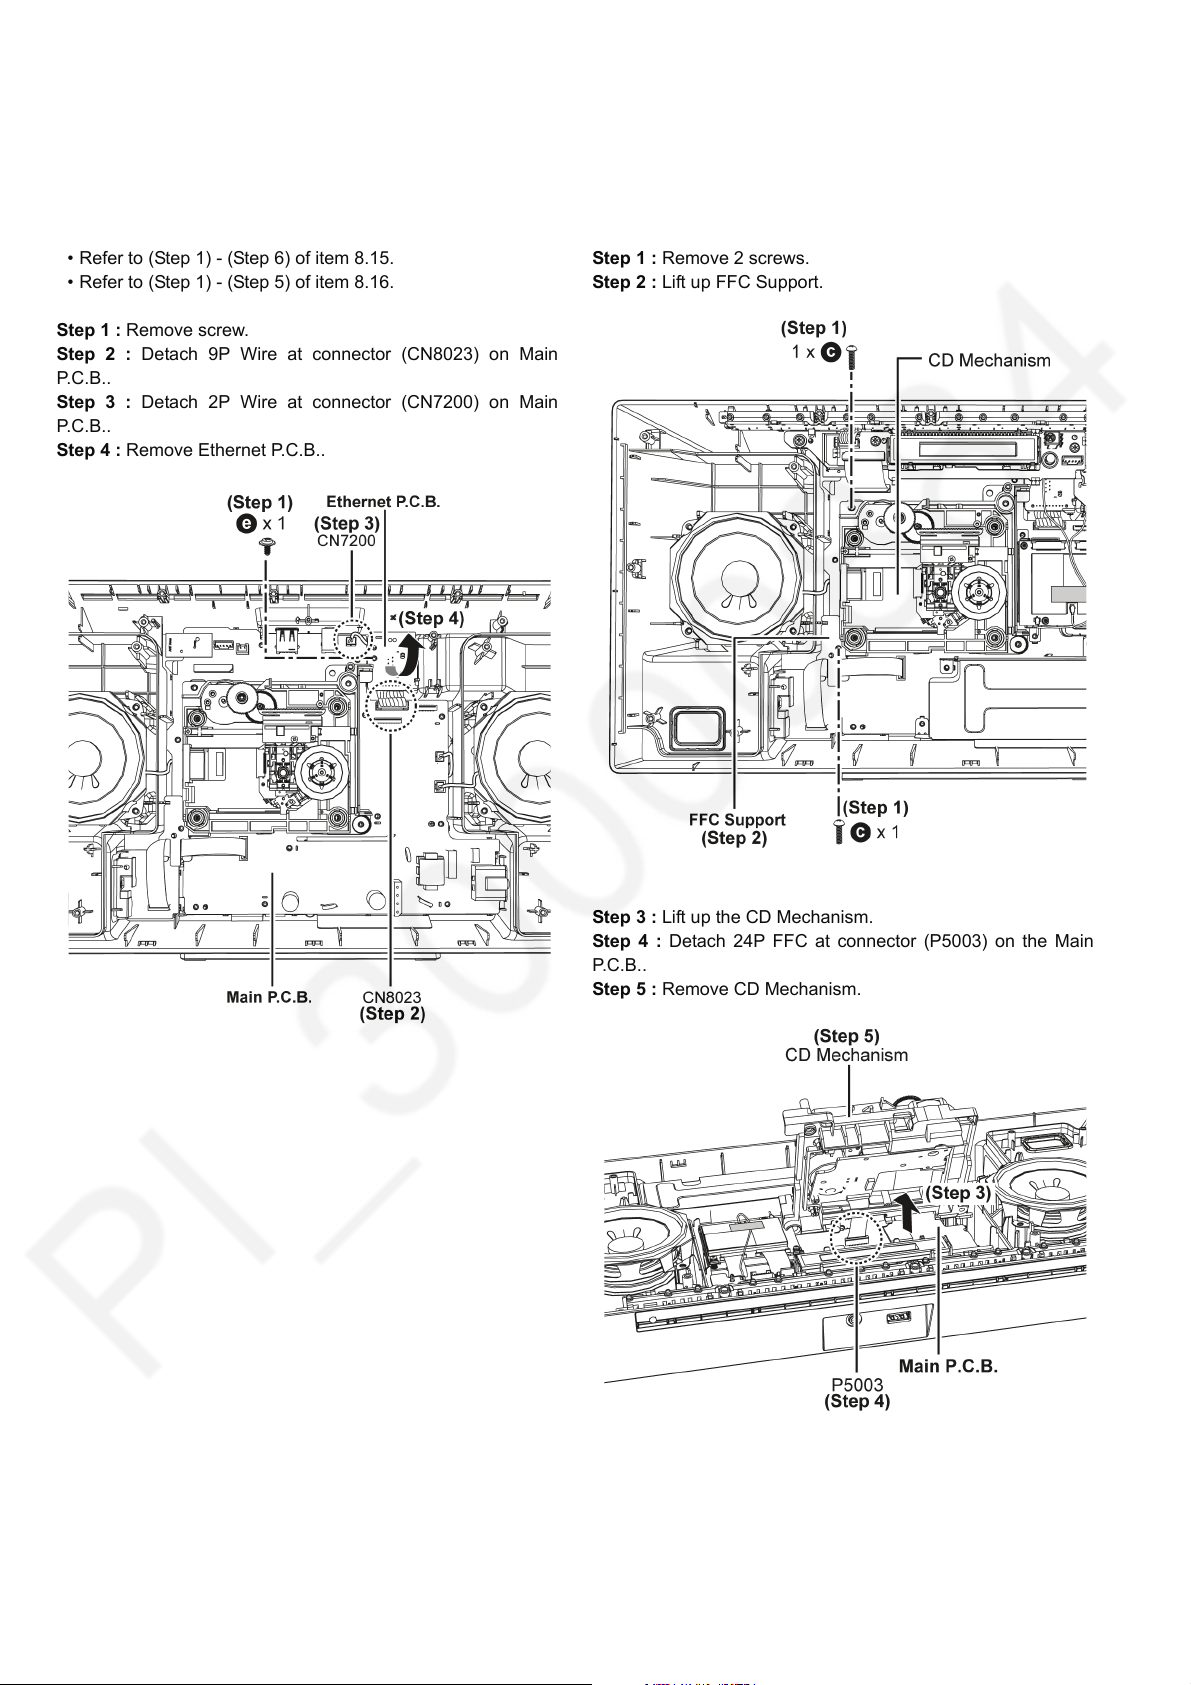
Step 1 : Remove screw.
Step 2 : Detach 9P Wire at connector (CN8023) on Main
P. C .B . .
Step 3 : Detach 2P Wire at connector (CN7200) on Main
P. C .B . .
Step 4 : Remove Ethernet P.C.B..
8.18. Disassembly of CD Mechanism
• Refer to “Disassembly of CD Door Ornament”
• Refer to “Disassembly of CD Door Base”
• Refer to “Disassembly of Net Frame Assembly”
• Refer to “Disassembly of Front Cabinet Assembly”
Step 1 : Remove 2 screws.
Step 2 : Lift up FFC Support.
Step 3 : Lift up the CD Mechanism.
Step 4 : Detach 24P FFC at connector (P5003) on the Main
P. C .B . .
Step 5 : Remove CD Mechanism.
32
Page 33
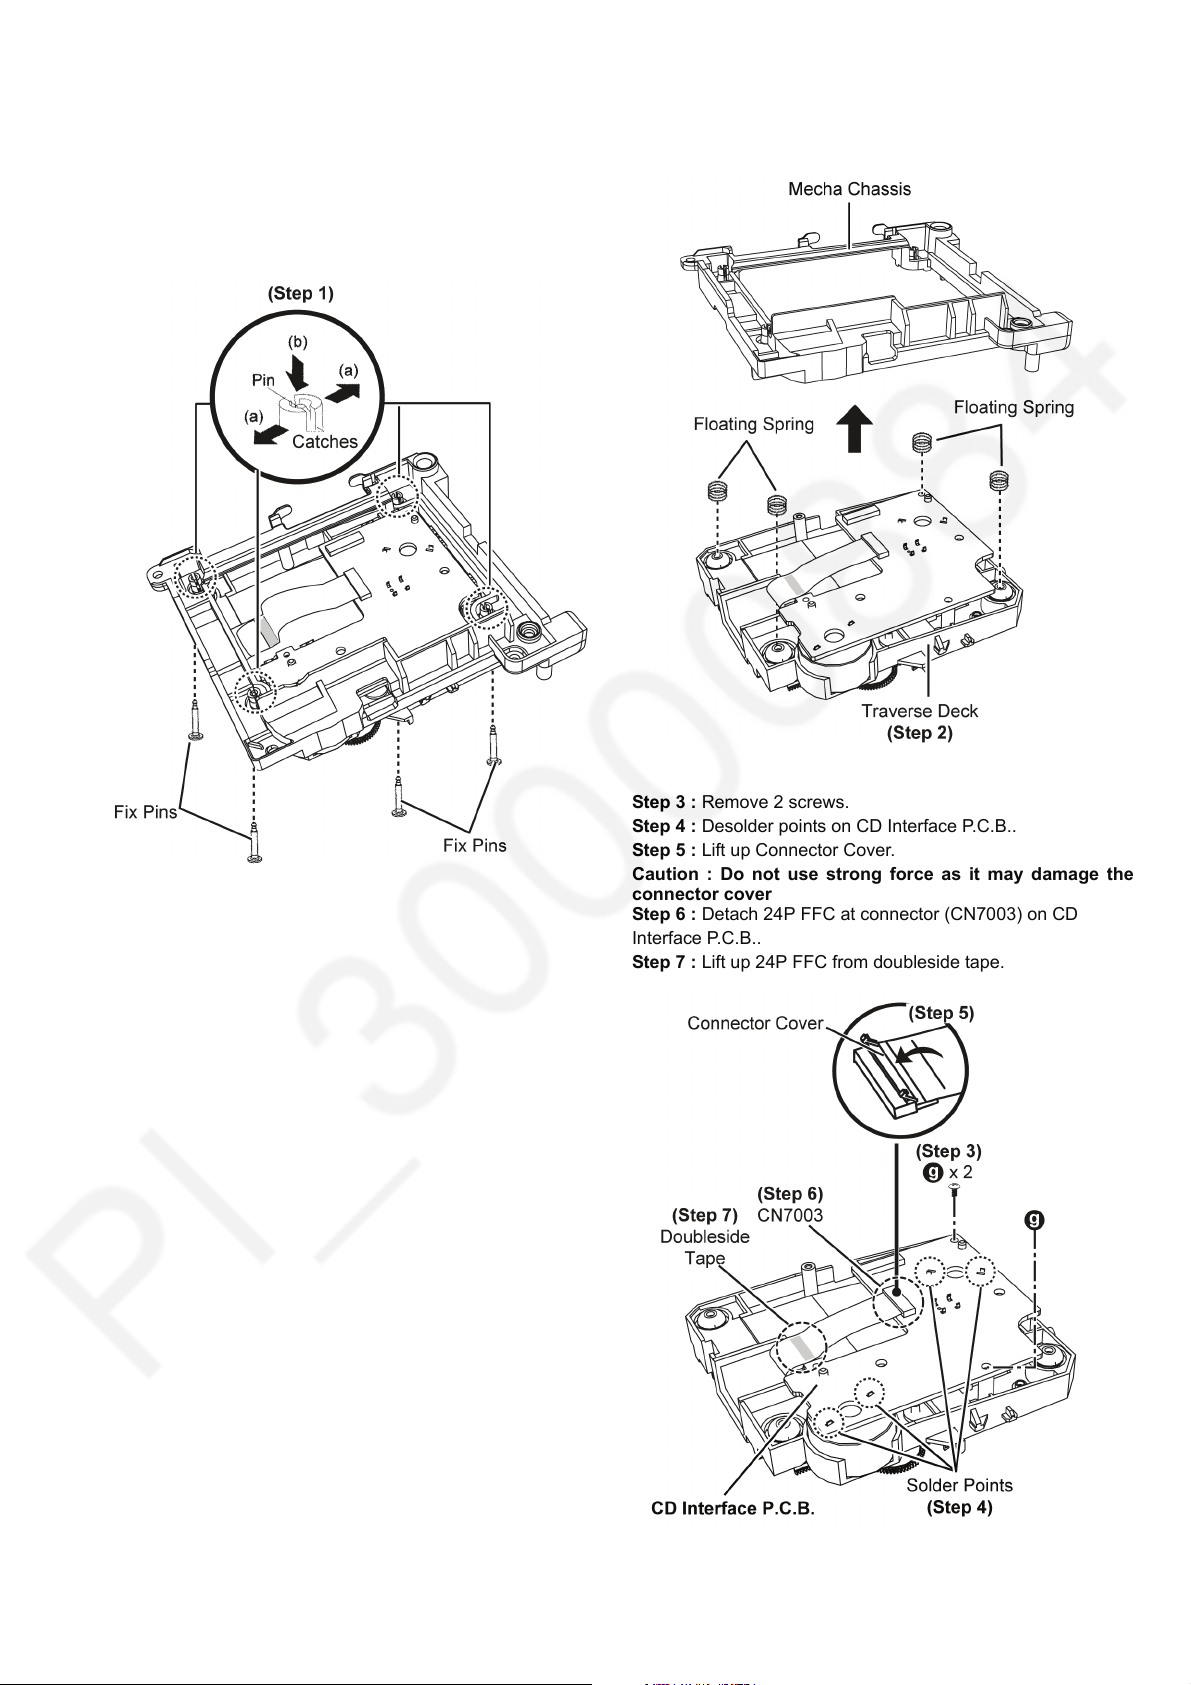
8.19. Disassembly of CD Interface P. C .B .
• Refer to “Disassembly of CD Mechanism”
Step 1 : Release catches and push down fixed pins as arrow
shown.
Step 2 : Lift up Mecha Chassis & remove Floating Springs.
Caution : Keep Floating Springs in safe place and place
them back during assembling
Step 3 : Remove 2 screws.
Step 4 : Desolder points on CD Interface P.C.B..
Step 5 : Lift up Connector Cover.
Caution : Do not use strong force as it may damage the
connector cover
Step 6 : Detach 24P FFC at connector (CN7003) on CD
Interface P.C.B..
Step 7 : Lift up 24P FFC from doubleside tape.
33
Page 34
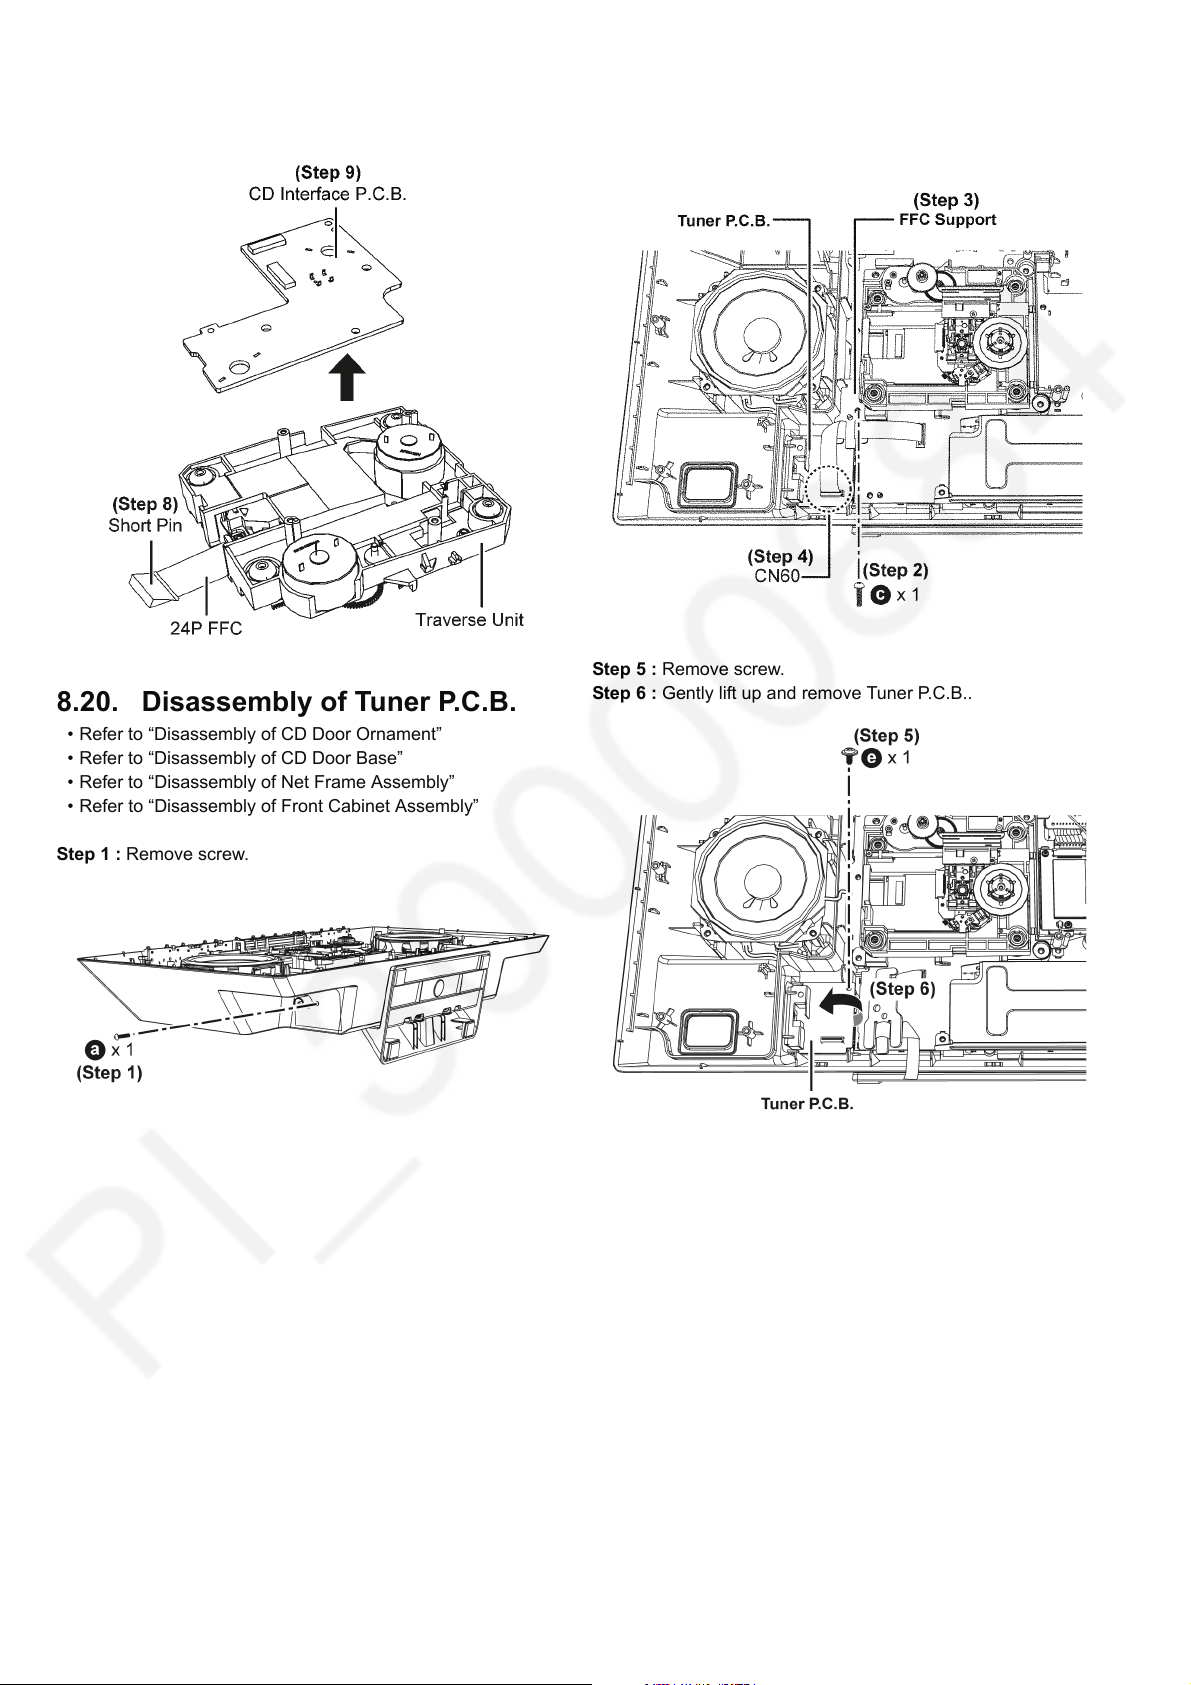
Step 8 : Attach short pin to 24P FFC of Traverse Unit.
Step 9 : Remove CD Interface P.C.B..
8.20. Disassembly of Tuner P.C.B.
• Refer to “Disassembly of CD Door Ornament”
• Refer to “Disassembly of CD Door Base”
• Refer to “Disassembly of Net Frame Assembly”
• Refer to “Disassembly of Front Cabinet Assembly”
Step 2 : Remove screw.
Step 3 : Lift up FFC Support.
Step 4 : Detach 10P FFC at connector (CN60) on Tuner P.C.B..
Step 5 : Remove screw.
Step 6 : Gently lift up and remove Tuner P.C.B..
Step 1 : Remove screw.
34
Page 35
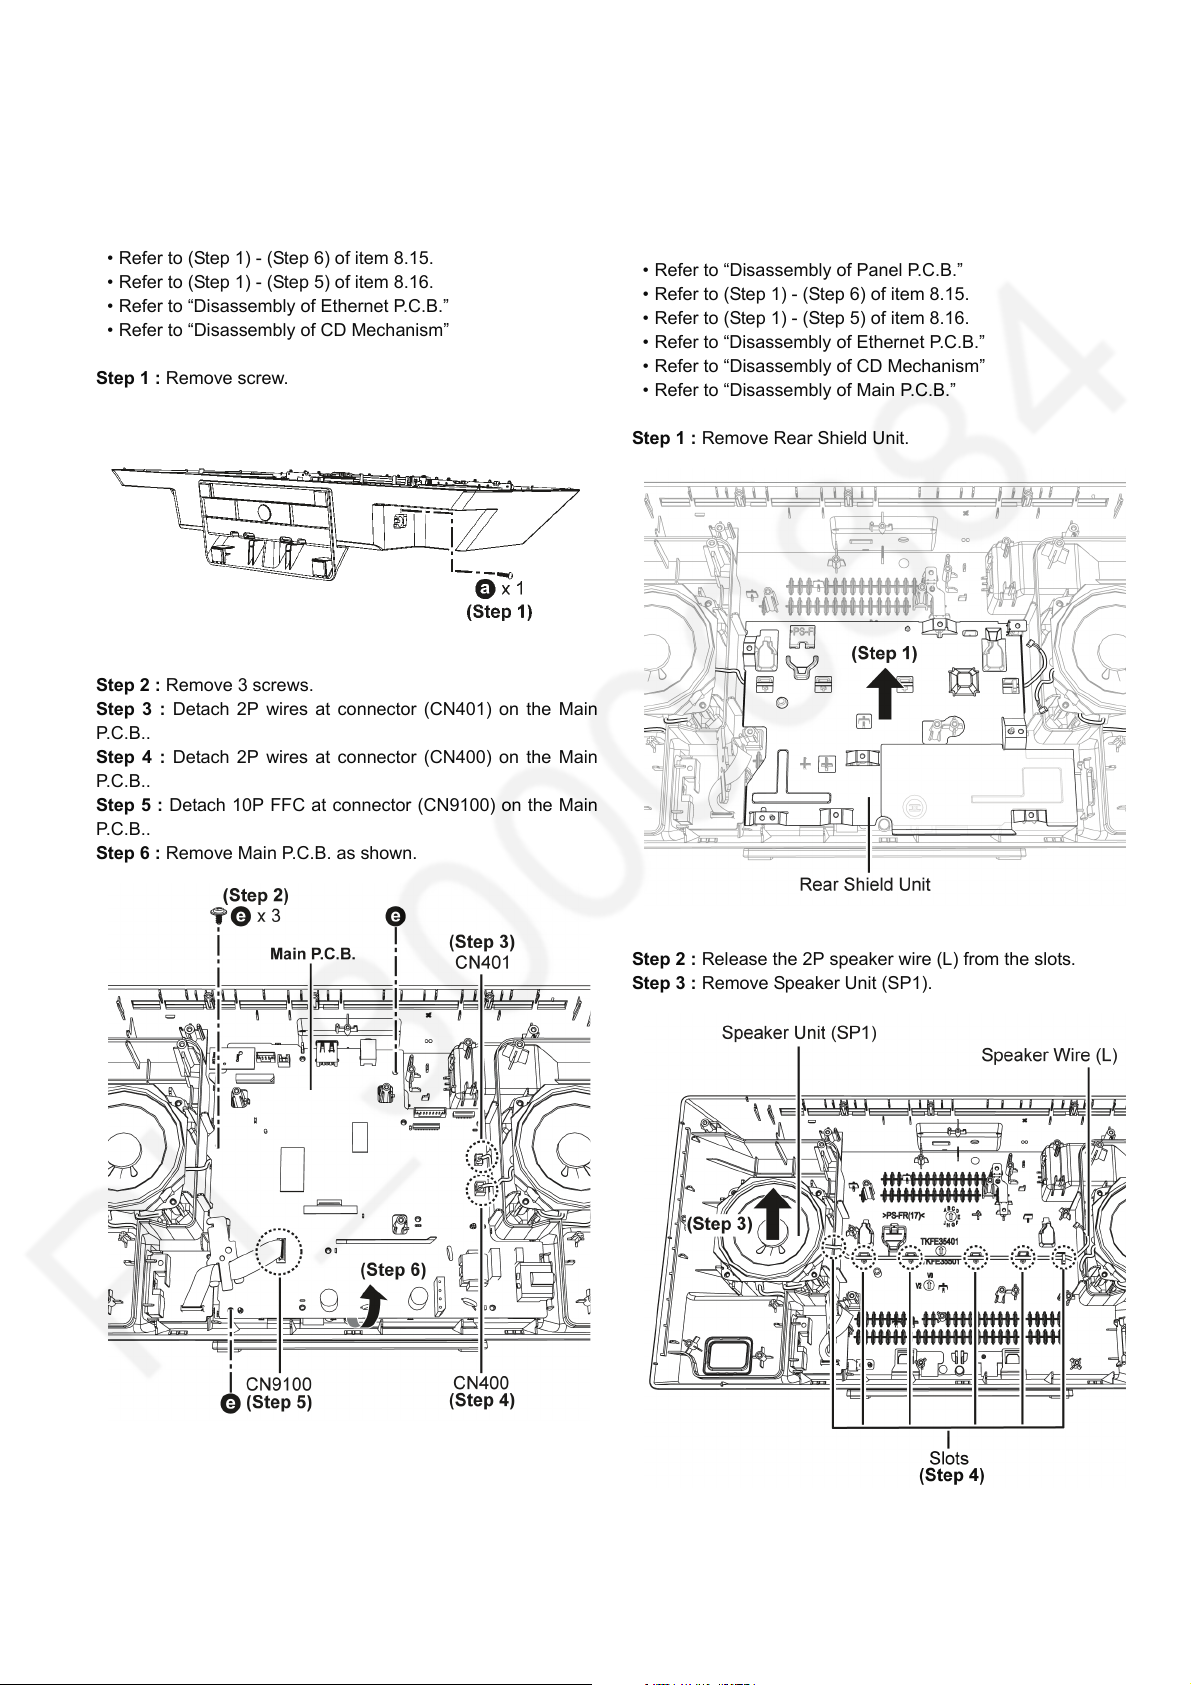
8.21. Disassembly of Main P.C.B.
• Refer to “Disassembly of CD Door Ornament”
• Refer to “Disassembly of CD Door Base”
• Refer to “Disassembly of Net Frame Assembly”
• Refer to “Disassembly of Front Cabinet Assembly”
• Refer to “Disassembly of Panel P.C.B.”
• Refer to (Step 1) - (Step 6) of item 8.15.
• Refer to (Step 1) - (Step 5) of item 8.16.
• Refer to “Disassembly of Ethernet P.C.B.”
• Refer to “Disassembly of CD Mechanism”
Step 1 : Remove screw.
Step 2 : Remove 3 screws.
Step 3 : Detach 2P wires at connector (CN401) on the Main
P. C .B . .
Step 4 : Detach 2P wires at connector (CN400) on the Main
P. C .B . .
Step 5 : Detach 10P FFC at connector (CN9100) on the Main
P. C .B . .
Step 6 : Remove Main P.C.B. as shown.
8.22. Disassembly of Speaker Unit (SP1)
• Refer to “Disassembly of CD Door Ornament”
• Refer to “Disassembly of CD Door Base”
• Refer to “Disassembly of Net Frame Assembly”
• Refer to “Disassembly of Front Cabinet Assembly”
• Refer to “Disassembly of Panel P.C.B.”
• Refer to (Step 1) - (Step 6) of item 8.15.
• Refer to (Step 1) - (Step 5) of item 8.16.
• Refer to “Disassembly of Ethernet P.C.B.”
• Refer to “Disassembly of CD Mechanism”
• Refer to “Disassembly of Main P.C.B.”
Step 1 : Remove Rear Shield Unit.
Step 2 : Release the 2P speaker wire (L) from the slots.
Step 3 : Remove Speaker Unit (SP1).
35
Page 36
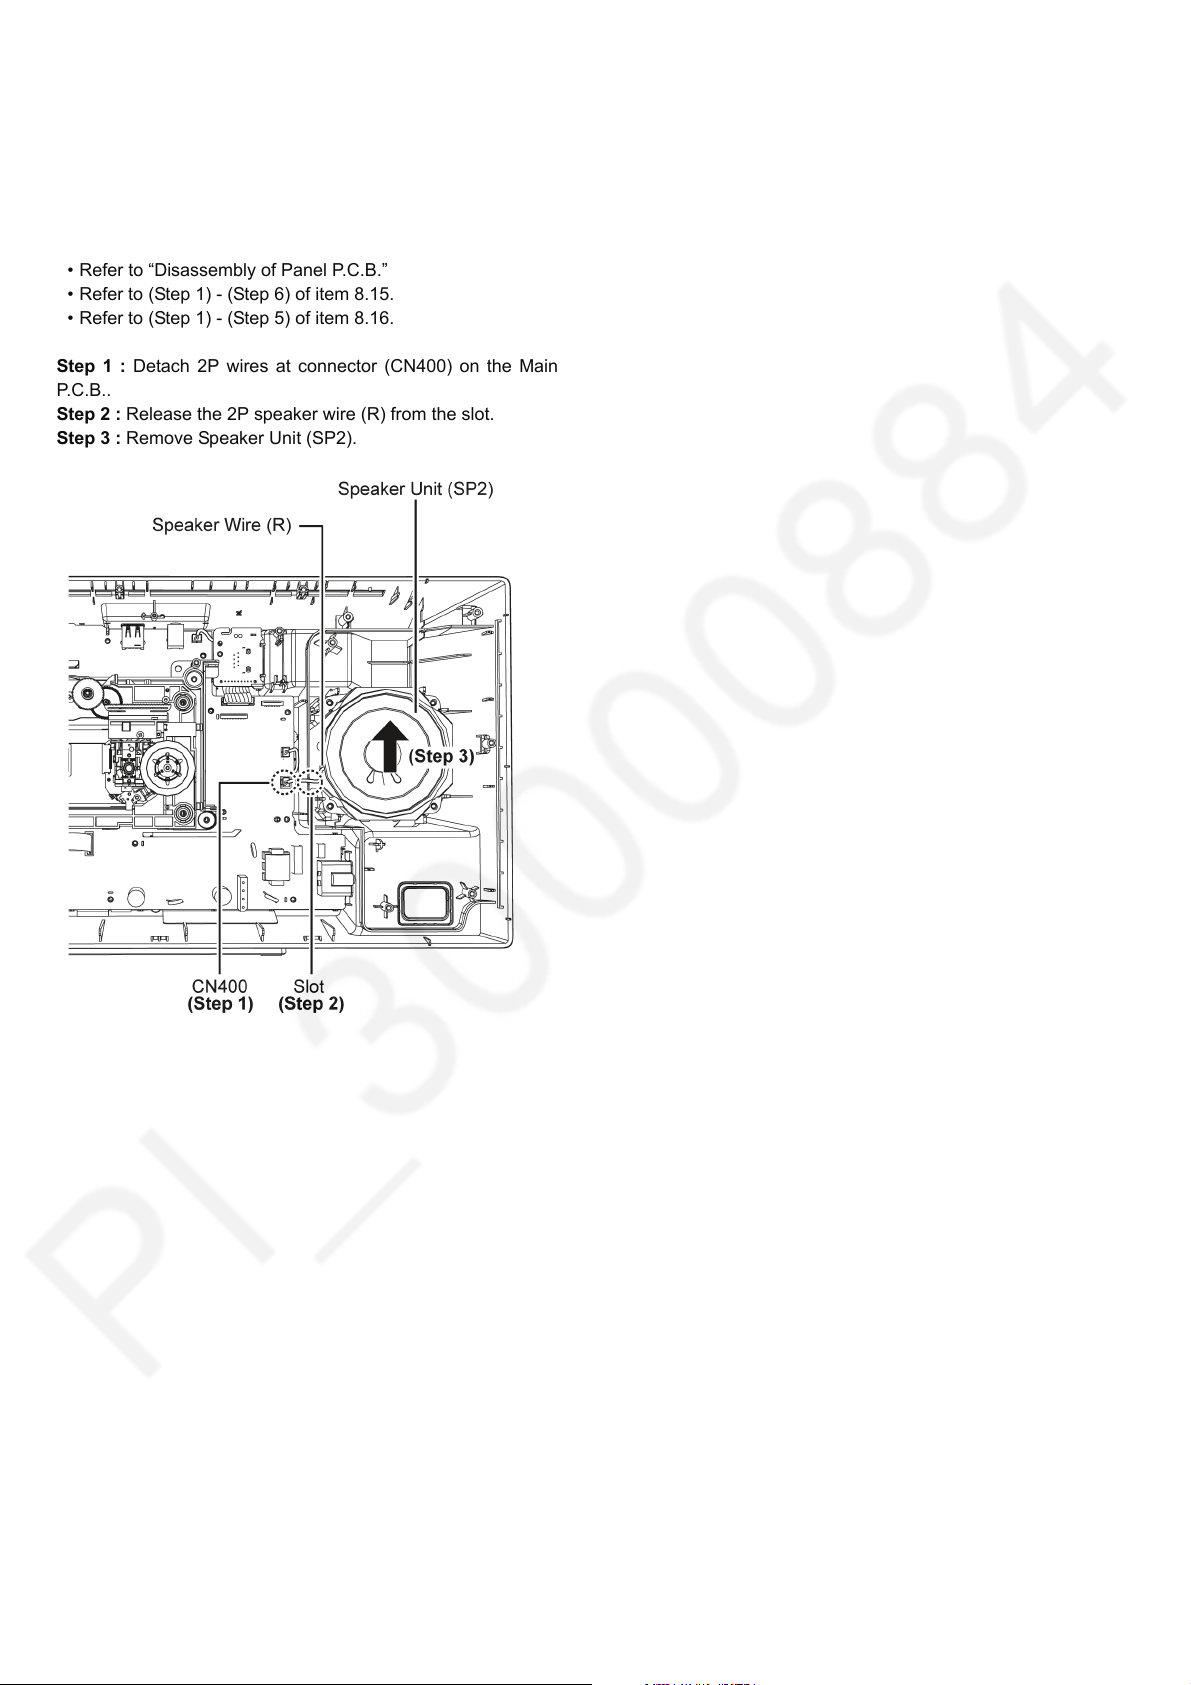
8.23. Disassembly of Speaker Unit (SP2)
• Refer to “Disassembly of CD Door Ornament”
• Refer to “Disassembly of CD Door Base”
• Refer to “Disassembly of Net Frame Assembly”
• Refer to “Disassembly of Front Cabinet Assembly”
• Refer to “Disassembly of Panel P.C.B.”
• Refer to (Step 1) - (Step 6) of item 8.15.
• Refer to (Step 1) - (Step 5) of item 8.16.
Step 1 : Detach 2P wires at connector (CN400) on the Main
P. C .B . .
Step 2 : Release the 2P speaker wire (R) from the slot.
Step 3 : Remove Speaker Unit (SP2).
36
Page 37
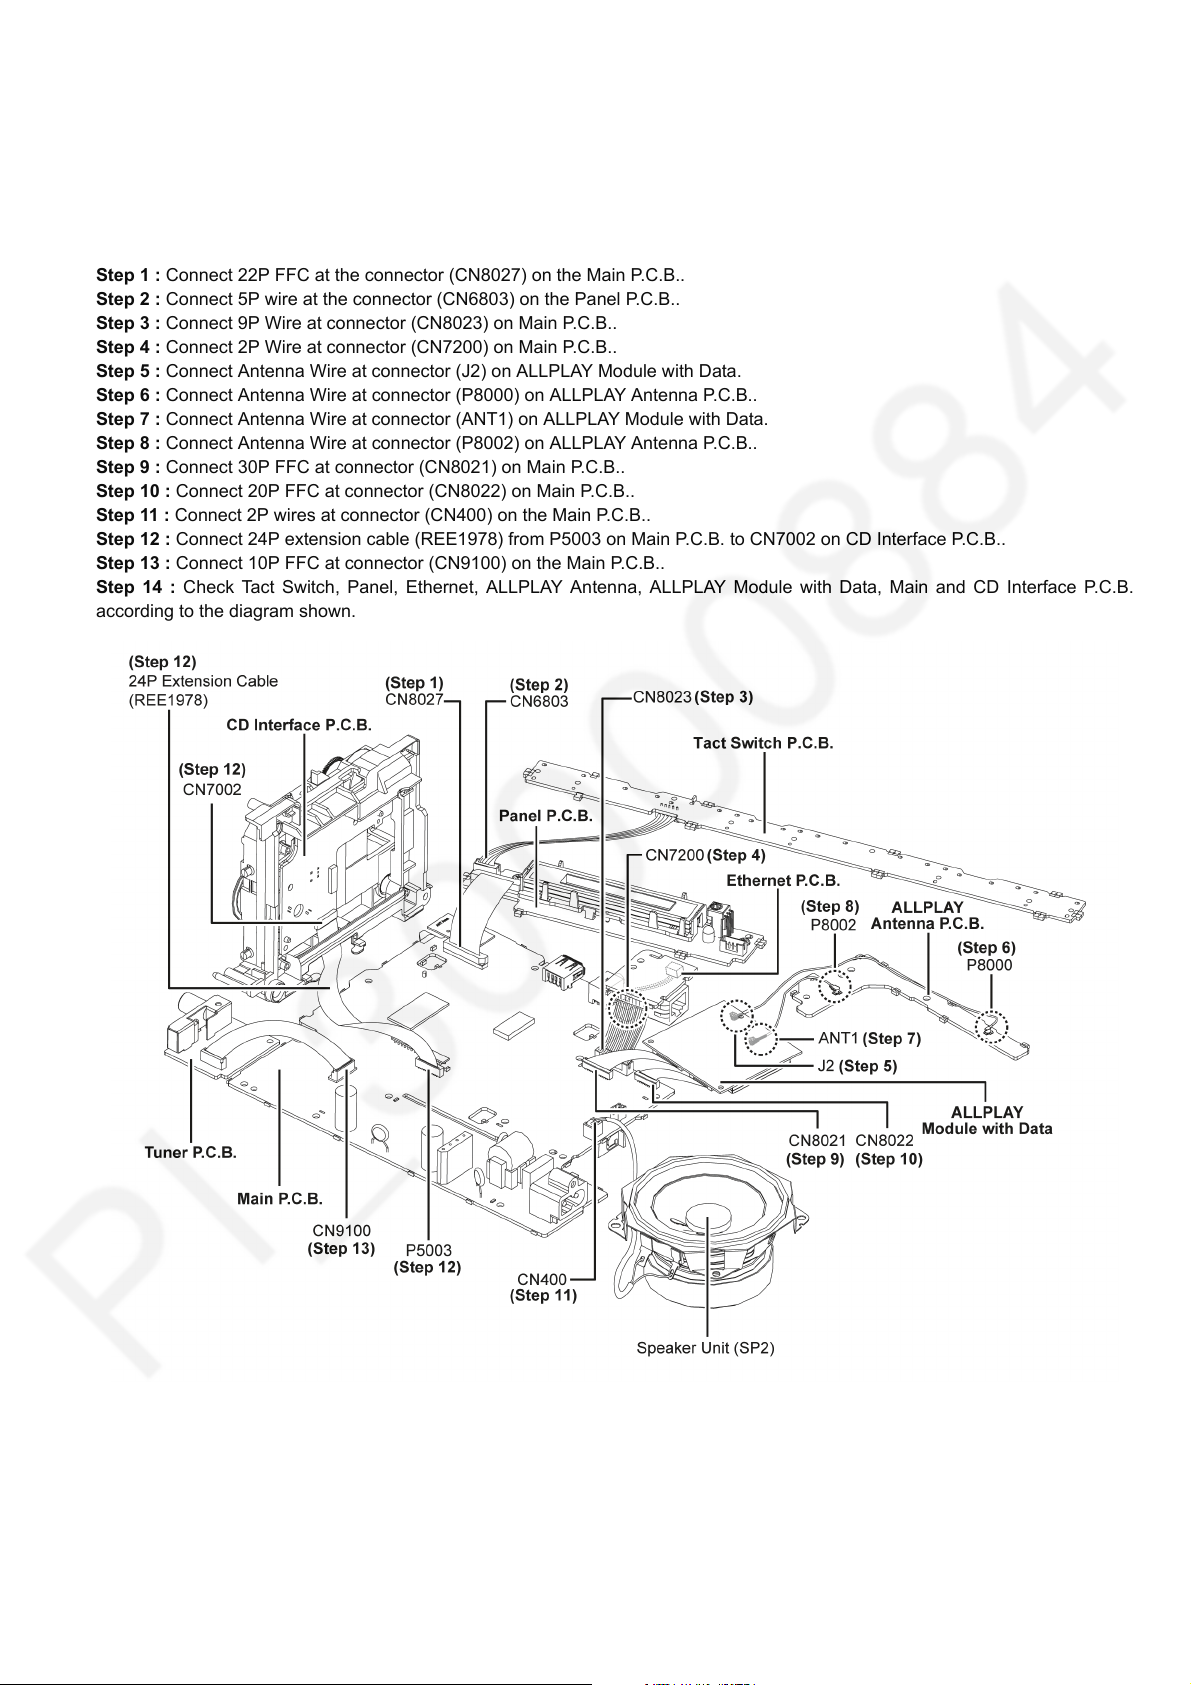
9 Service Position
Note: For description of the disassembly procedures, see the Section 8
9.1. Checking of Tact Switch, Panel, Ethernet, ALLPLAY Antenna, ALLPLAY Module with Data, Main and CD Interface P.C.B.
Step 1 : Connect 22P FFC at the connector (CN8027) on the Main P.C.B..
Step 2 : Connect 5P wire at the connector (CN6803) on the Panel P.C.B..
Step 3 : Connect 9P Wire at connector (CN8023) on Main P.C.B..
Step 4 : Connect 2P Wire at connector (CN7200) on Main P.C.B..
Step 5 : Connect Antenna Wire at connector (J2) on ALLPLAY Module with Data.
Step 6 : Connect Antenna Wire at connector (P8000) on ALLPLAY Antenna P.C.B..
Step 7 : Connect Antenna Wire at connector (ANT1) on ALLPLAY Module with Data.
Step 8 : Connect Antenna Wire at connector (P8002) on ALLPLAY Antenna P.C.B..
Step 9 : Connect 30P FFC at connector (CN8021) on Main P.C.B..
Step 10 : Connect 20P FFC at connector (CN8022) on Main P.C.B..
Step 11 : Connect 2P wires at connector (CN400) on the Main P.C.B..
Step 12 : Connect 24P extension cable (REE1978) from P5003 on Main P.C.B. to CN7002 on CD Interface P.C.B..
Step 13 : Connect 10P FFC at connector (CN9100) on the Main P.C.B..
Step 14 : Check Tact Switch, Panel, Ethernet, ALLPLAY Antenna, ALLPLAY Module with Data, Main and CD Interface P.C.B.
according to the diagram shown.
37
Page 38

38
Page 39
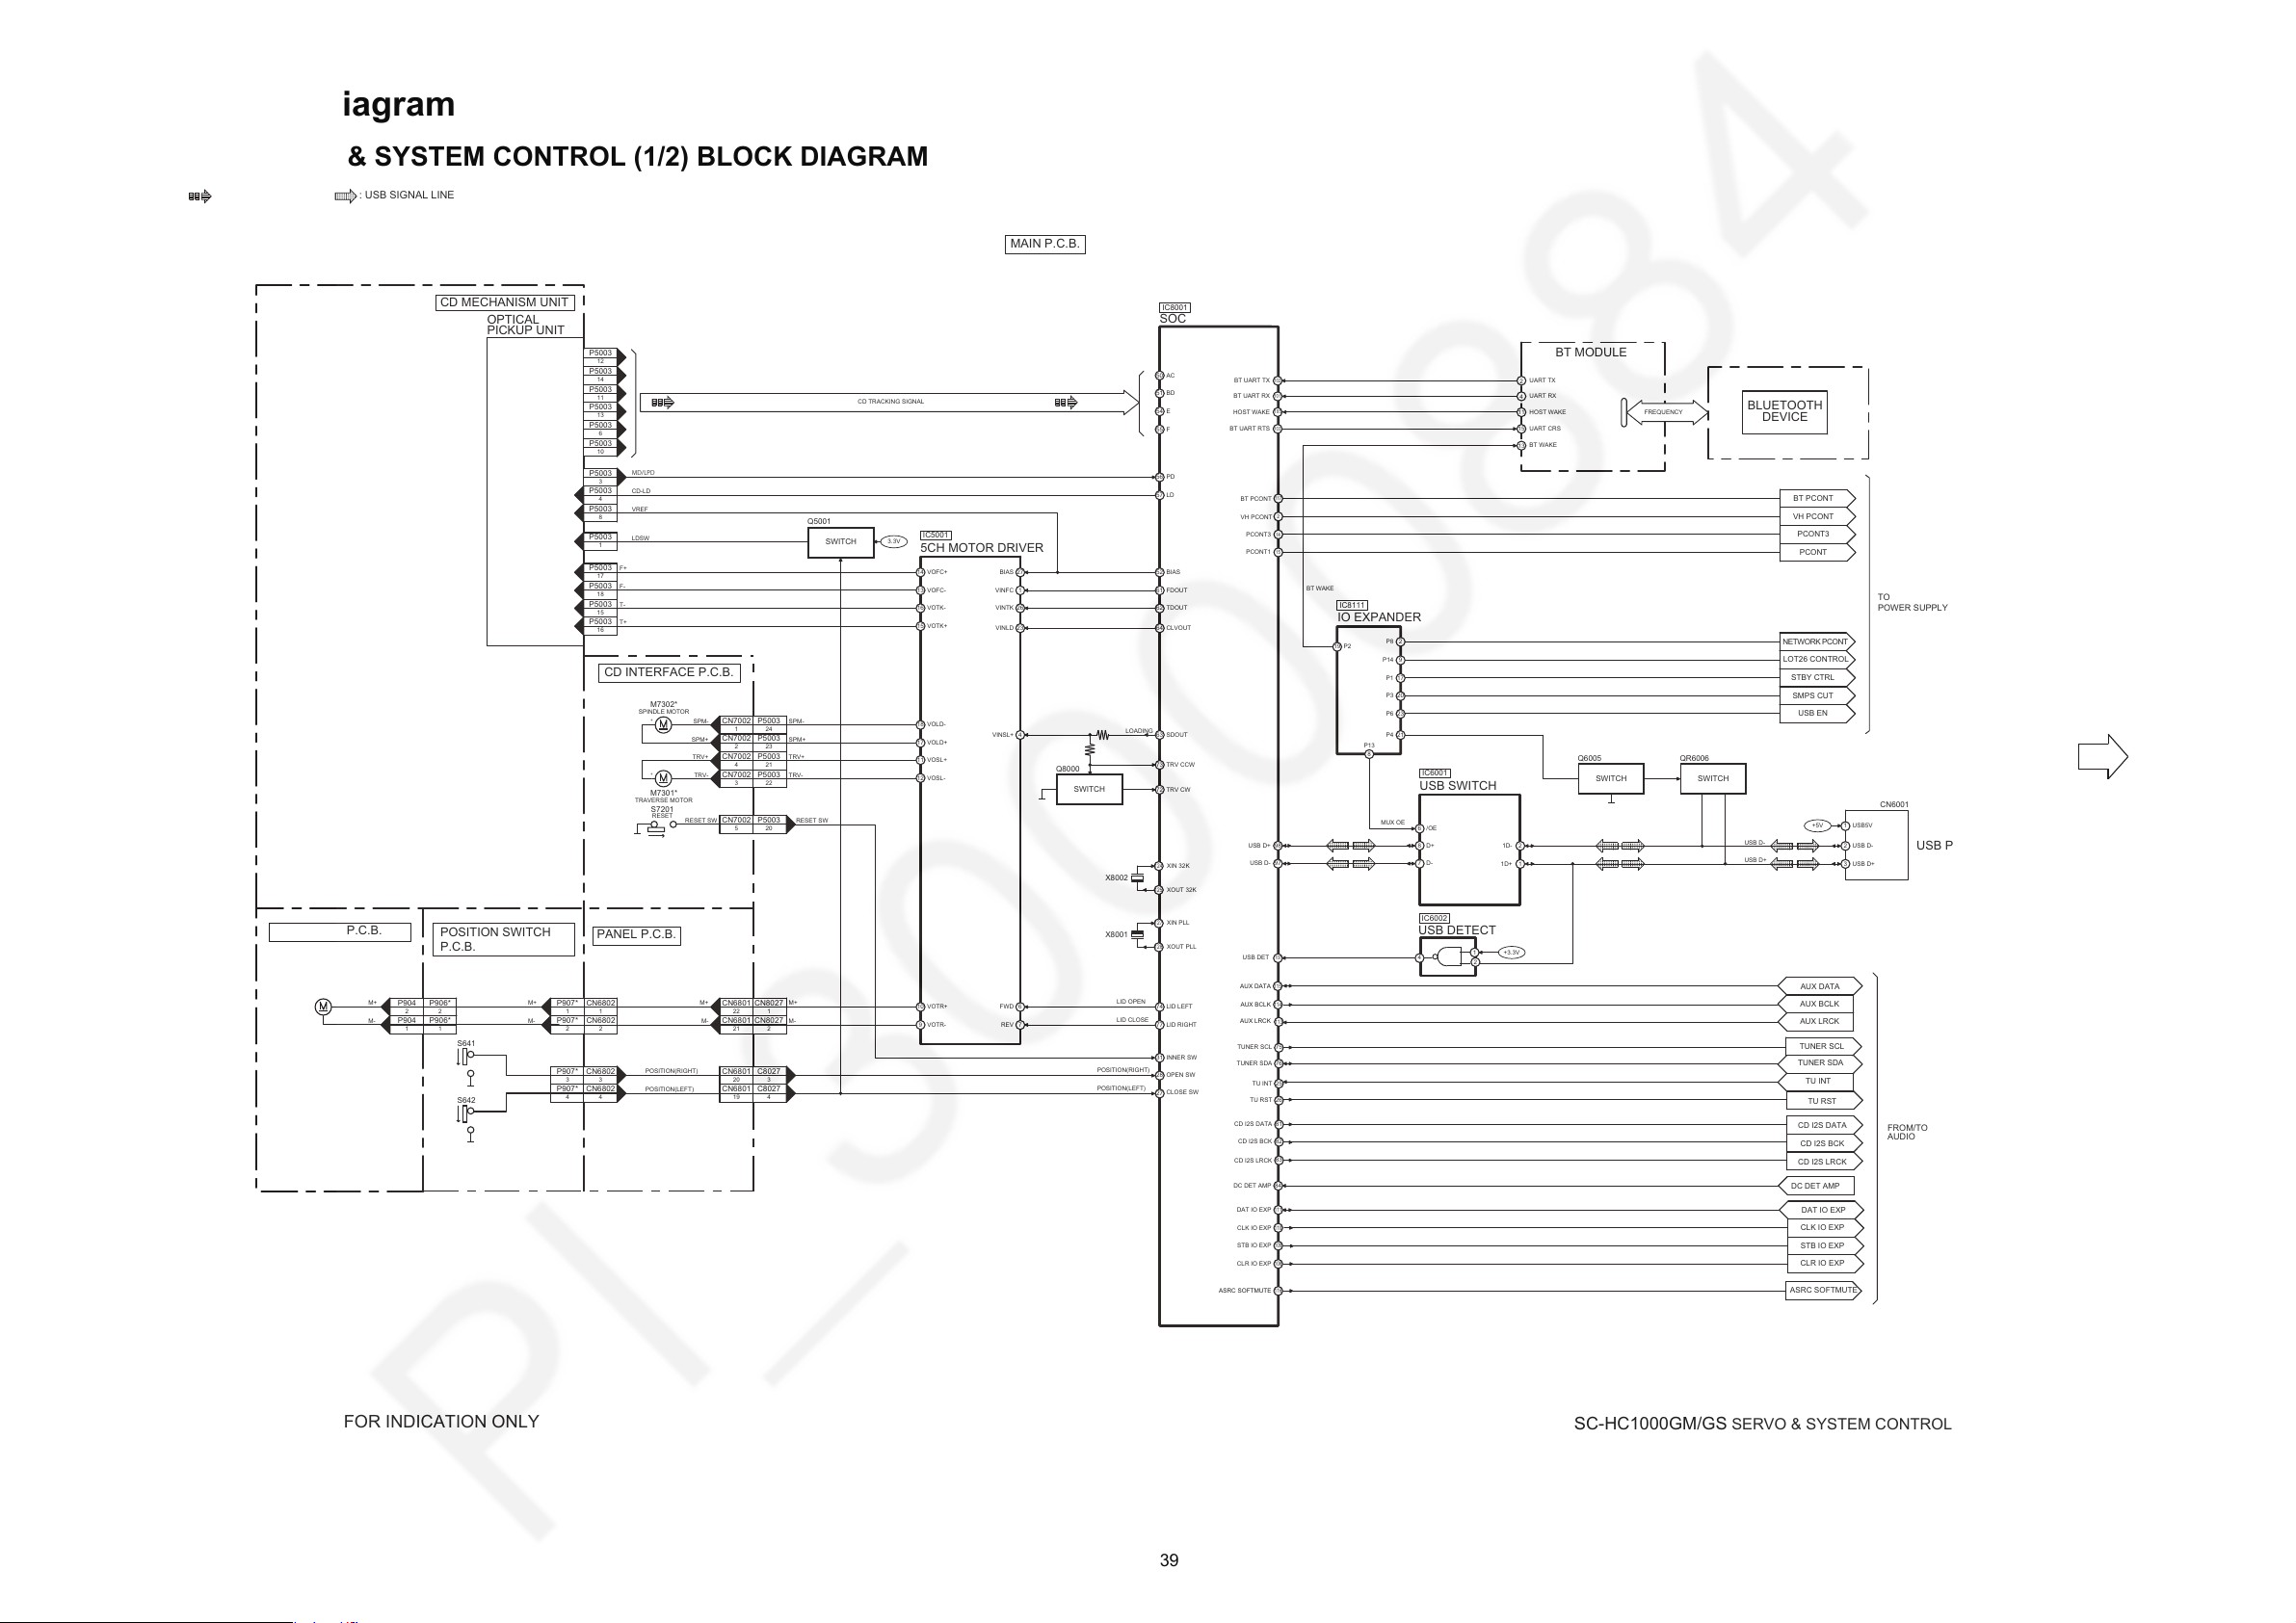
10 Block Diagram
TO SERVO &
SYSTEM CONTROL
BLOCK (2/2)
NOTE: “ * ” REF IS FOR INDICATION ONLY
SC-HC1000GM/GS
SERVO & SYSTEM CONTROL (1/2) BLOCK DIAGRAM
: CD SIGNAL LINE
: USB SIGNAL LINE
FROM/TO
AUDIO
ASRC SOFTMUTE
116
ASRC SOFTMUTE
DC DET AMP
84
111
109
108
DAT IO EXP
110
CLK IO EXP
STB IO EXP
CLR IO EXP
DC DET AMP
DAT IO EXP
CLK IO EXP
STB IO EXP
CLR IO EXP
83
82
81
CD I2S LRCK
CD I2S BCK
CD I2S DATA
CD I2S DATA
CD I2S BCK
CD I2S LRCK
+
X8002
X8001
XIN 32K
XOUT 32K
124
125
XIN PLL
XOUT PLL
127
128
+5V
1USB5V
USB D-
USB D+
USB PORT
CN6001
2 USB D-
3USB D+
USB D+ 98
USB D- 97
SOC
IC8001
+
+
AC50
BD51
E54
F55
PD56
LD57
TDOUT62
CLVOUT64
SDOUT63
TRV CCW73
TRV CW72
INNER SW31
CLOSE SW
28
OPEN SW
27
LID LEFT74
LID RIGHT
LID OPEN
LID CLOSE
77
FDOUT61
203
CN6801 C8027
19 4
CN6801 C8027
SPM-
1 24
CN7002 P5003
SPM+
223
CN7002 P5003
TRV+
4 21
CN7002 P5003
TRV-
3 22
CN7002 P5003
M+
22 1
CN6801 CN8027
M-
M+
M-
21 2
CN6801 CN8027
SPINDLE MOTOR
M7302*
TRAVERSE MOTOR
M7301*
PANEL P.C.B.
CD INTERFACE P.C.B.
POSITION SWITCH
P.C.B.
MOTOR P.C.B.
23VINLD
5CH MOTOR DRIVER
IC5001
VOLD+17
VOLD-18
VOSL+11
VOSL-12
VOFC+14
VOFC-13
VOTK-16
VOTK+
F+
F-
T-
T+
CD-LD
MD/LPD
LDSW
VREF
15
VOTR+10
VOTR-9
26VINTK
6FWD
7REV
17
P5003
18
P5003
15
P5003
8
P5003
1
P5003
16
P5003
4
P5003
3
P5003
POSITION(RIGHT)
3
CN6802
POSITION(LEFT)
434
CN6802
P907*
S641
S642
P907*
1VINFC
BIAS5227BIAS
12
P5003
14
P5003
11
P5003
13
P5003
6
P5003
10
P5003
4VINSL+
OPTICAL
PICKUP UNIT
5 20
CN7002 P5003
RESET SWRESET SW
1
CN6802
M+
2
CN6802
1
P907*
2
P907*
M+
M-
2
P906*
1
P906*
2
P904
1
P904
M-
SPM-
SPM+
TRV+
LOADING
POSITION(LEFT)
POSITION(RIGHT)
TRV-
CD MECHANISM UNIT
CD TRACKING SIGNAL
RESET
S7201
USB SWITCH
IC6001
USB DETECT
IC6002
1D+ 1
1D- 2
D+8
/OE6
D-7
MAIN P.C.B.
3.3V
+3.3V
USB DET
MUX OE
107
IO EXPANDER
IC8111
117
P4 21
P623
P1 17
P3 20
P13
8
4
1
2
Q5001
SWITCH
Q8000
SWITCH
STBY CTRL
USB EN
SMPS CUT
BT PCONT
2
VH PCONT
14
PCONT3
TO
POWER SUPPLY
Q6005
SWITCH
QR6006
SWITCH
UART TX
BT UART TX
UART RX
BT UART RX
HOST WAKE
HOST WAKE
BT WAKE
UART CRS
BT UART RTS
BLUETOOTH
DEVICE
FREQUENCY
2
102
4
101
11
13
15
103
BT WAKE
BT PCONT
VH PCONT
PCONT3
PCONT1
105
BT MODULE
15
PCONT
P219
AUX DATA
115
AUX DATA
AUX LRCK
AUX BCLK
AUX BCLK
AUX LRCK
113
114
26
25
TU RST
TU INT
76
TUNER SDA
TUNER SCL
75
TUNER SDA
TU INT
TU RST
TUNER SCL
P8 2
P14 9
NETWORK PCONT
LOT26 CONTROL
10.1. SERVO & SYSTEM CONTROL (1/2) BLOCK DIAGRAM
39
Page 40
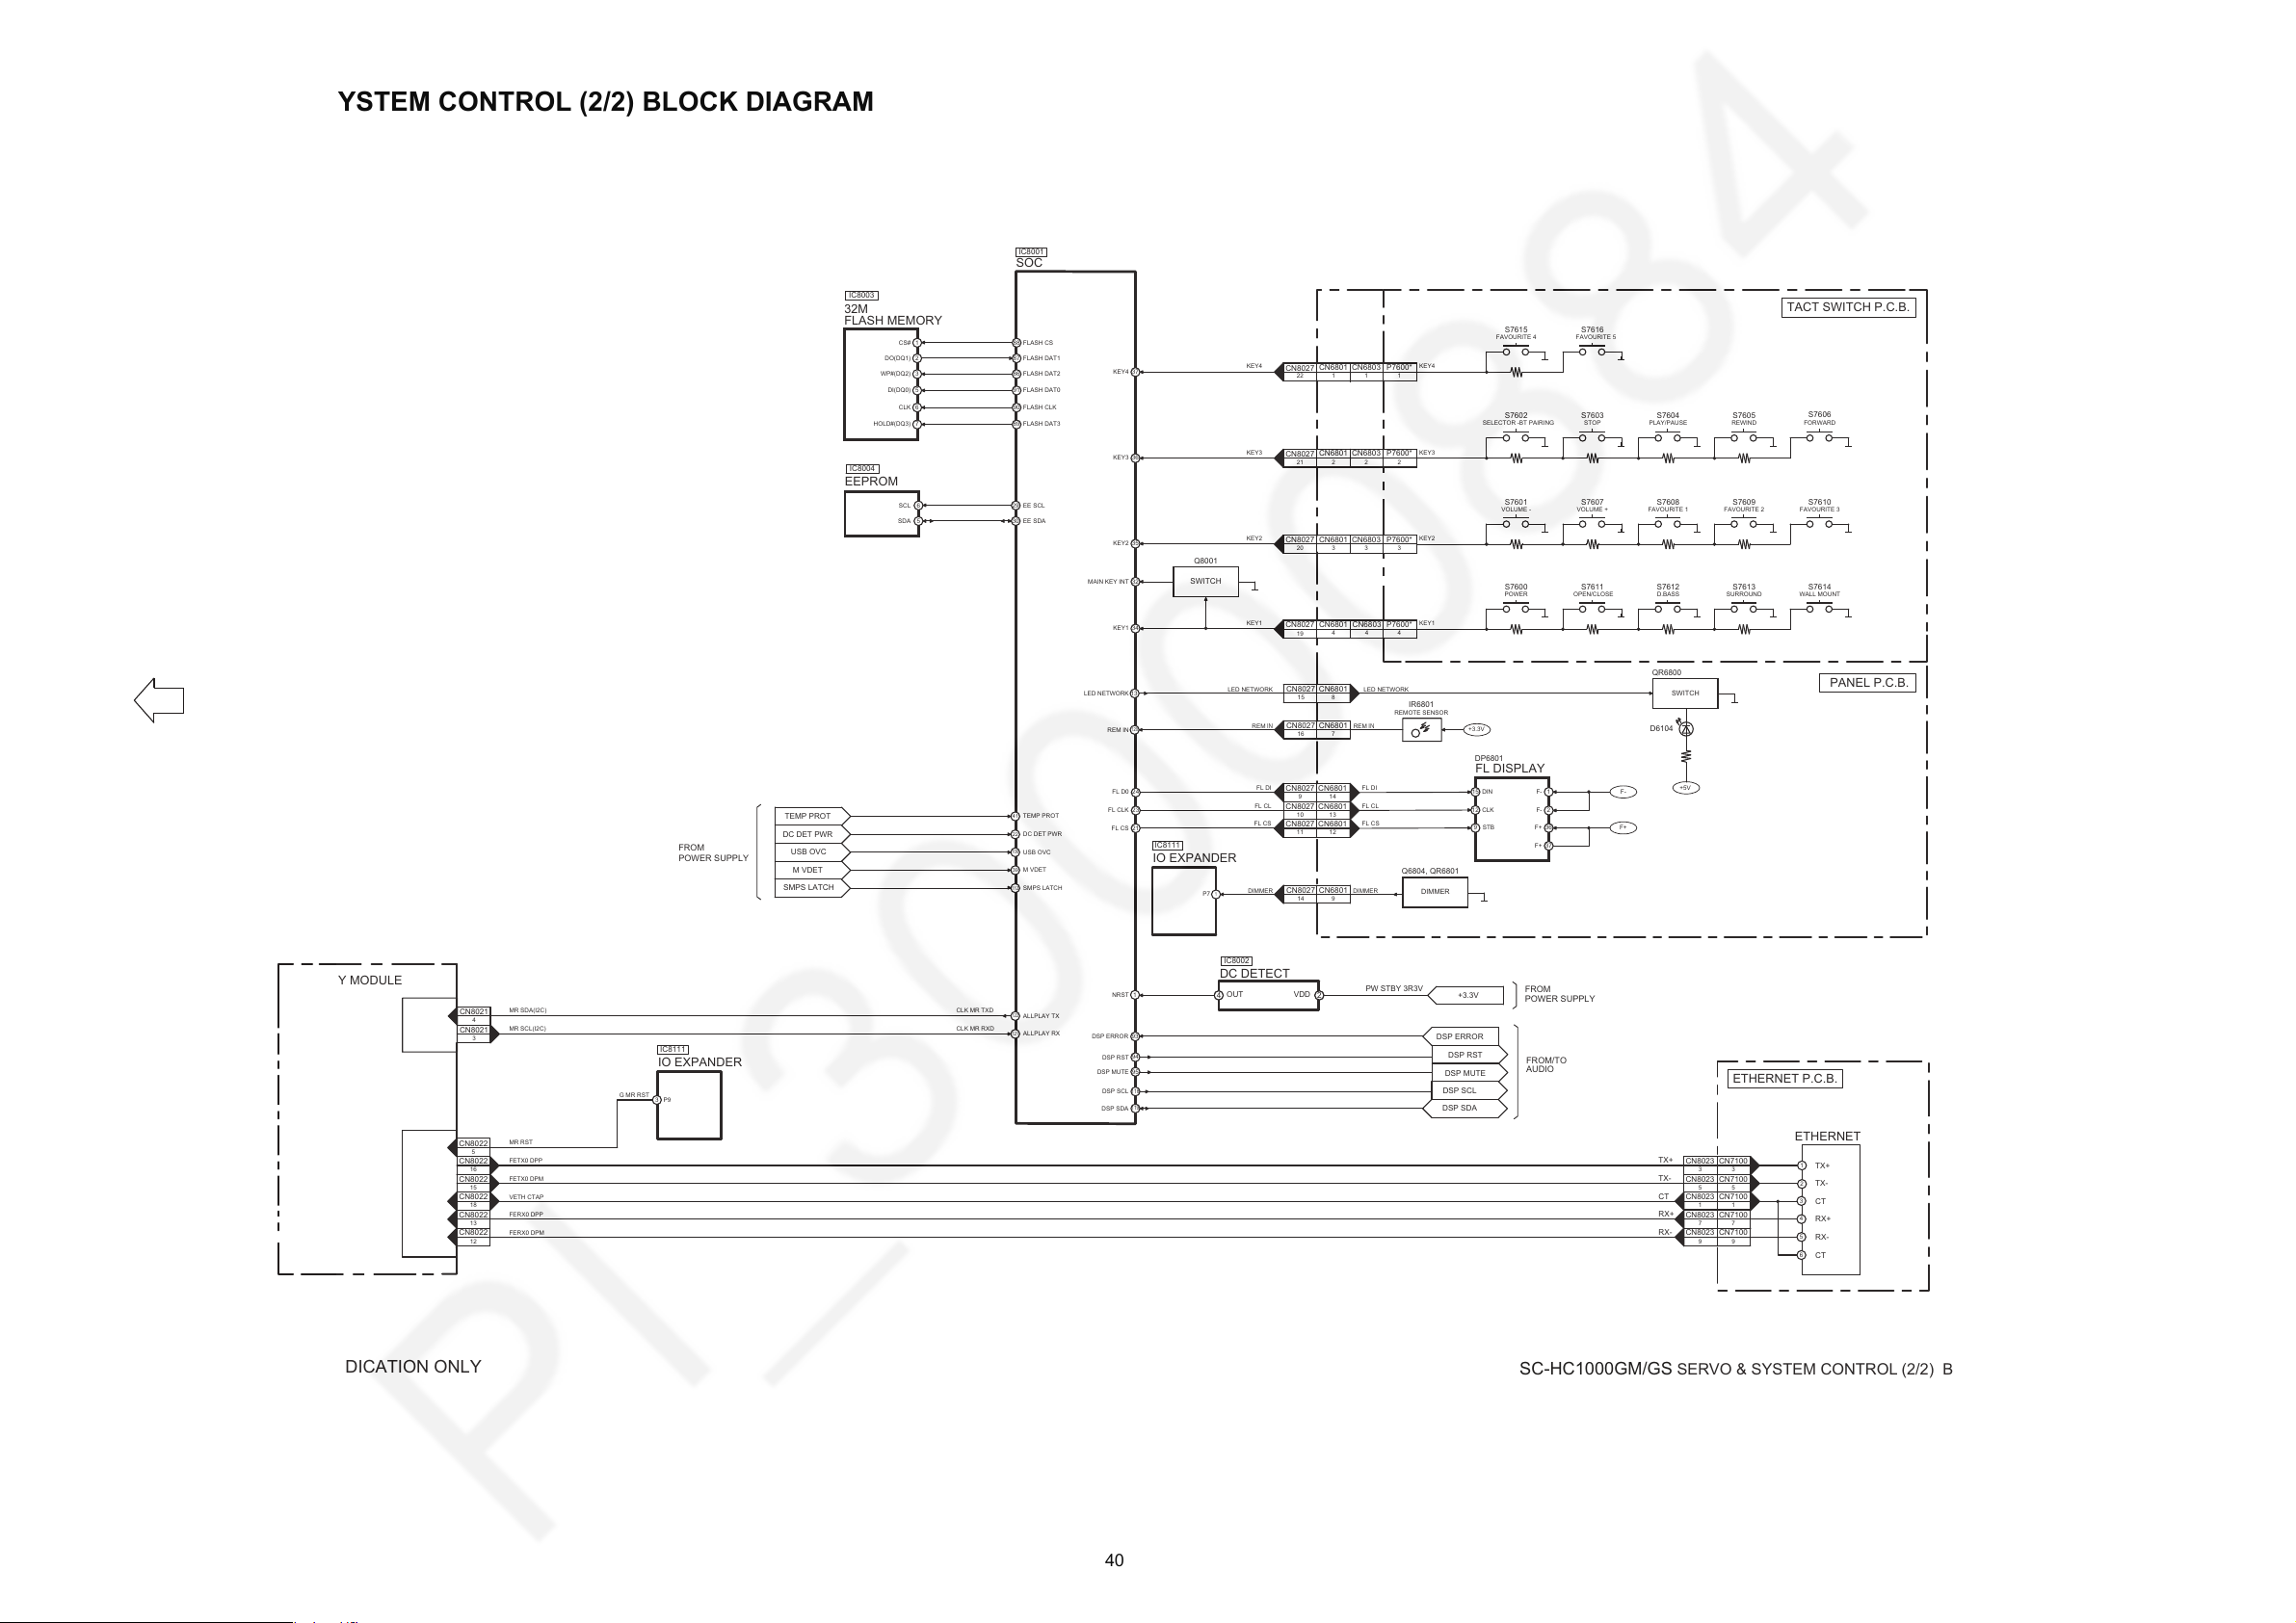
10.2. SERVO & SYSTEM CONTROL (2/2) BLOCK DIAGRAM
TO SERVO &
SYSTEM CONTROL
BLOCK (1/2)
NOTE: “ * ” REF IS FOR INDICATION ONLY
SC-HC1000GM/GS
SERVO & SYSTEM CONTROL (2/2) BLOCK DIAGRAM
TACT SWITCH P.C.B.
PANEL P.C.B.
22
CN6803 P7600*
KEY3
33
CN6803 P7600*
KEY1
KEY2
KEY3
KEY4
KEY2
S7602
STOP
S7603
PLAY/PAUSE
S7604
REWIND FORWARD
S7605
SELECTOR -BT PAIRING
S7606
VOLUME -
S7601
44
CN68014CN6803 P7600*
KEY1
POWER
S7600
VOLUME +
S7607
FAVOURITE 1
S7608
FAVOURITE 2
S7609
FAVOURITE 3
S7610
OPEN/CLOSE
S7611
D.BASS
S7612
SURROUND
S7613
WALL MOUNT
S7614
11
CN6803
2
CN6801
3
CN6801
1
CN6801 P7600*
KEY4
FAVOURITE 4
S7615
FAVOURITE 5
S7616
CN8027
CN8027
22
21
CN8027
20
CN8027
19
NRST
118
DSP SCL
93
DSP ERROR
DSP SDA
119
DSP SCL
DSP SDA
DSP ERROR
DSP MUTE
95
DSP RST
94
DSP MUTE
DSP RST
FROM/TO
AUDIO
MAIN KEY INT 32
Q8001
SWITCH
KEY1 34
KEY2 35
KEY3 36
KEY4 37
USB OVC
M VDET
USB OVC
106
M VDET
39
DC DET PWR
DC DET PWR
22
TEMP PROT
TEMP PROT
41
FROM
POWER SUPPLY
1
REM IN
120
SOC
IC8001
VDDOUT
DC DETECT
IC8002
716
CN6801CN8027
+3.3V
REMOTE SENSOR
IR6801
REMIN REMIN
LED NETWORK
13
8
15
CN6801CN8027
LED NETWORK LED NETWORK
4 2
+3.3V
PW STBY 3R3V
FROM
POWER SUPPLY
FL DISPLAY
F-
F-
F+
F+
115
36
2
37
STB
9
DIN
CLK
12
DP6801
FL DI
FL CL
FL CS
914
CN8027 CN6801
10 13
CN8027 CN6801
11 12
CN8027 CN6801
FL CS
21
FL D0
FL CLK
FL CS
FL DI
FL CL
24
23
F-
F+
32M
FLASH MEMORY
1
WP#(DQ2)
DI(DQ0)
3
5
CLK
6
HOLD#(DQ3)
7
CS#
DO(DQ1)
2
88
FLASH DAT2
FLASH DAT0
86
91
FLASH CLK
90
FLASH DAT3
89
FLASH CS
FLASH DAT1
87
IC8003
EEPROM
6
SCL
SDA
5
29
EE SCL
EE SDA
30
IC8004
SMPS LATCH
112
SMPS LATCH
+5V
QR6800
D6104
SWITCH
16
CN8022
15
CN8022
18
CN8022
13
CN8022
12
CN8022
5
CN8022
FETX0 DPP
MR RST
MR SDA(I2C)
MR SCL(I2C)
FETX0 DPM
VETH CTAP
FERX0 DPP
FERX0 DPM
ALLPLAY MODULE
4
CN8021
3
CN8021
G MR RST
P93
IO EXPANDER
IC8111
ALLPLAY TX
ALLPLAY RX
CLK MR TXD
CLK MR RXD
122
121
TX+
TX-
3
CN7100
5
CN7100
1
CN7100
7
CN7100
9
CN7100
3
CN8023
5
CN8023
1
CN8023
7
CN8023
9
CN8023
CT
RX+
RX-
CT
TX+
TX-
CT
RX+
RX-
ETHERNET P.C.B.
ETHERNET
1
2
3
4
5
6
914
CN6801CN8027
DIMMER DIMMER
P7
1
IO EXPANDER
IC8111
Q6804, QR6801
DIMMER
40
Page 41
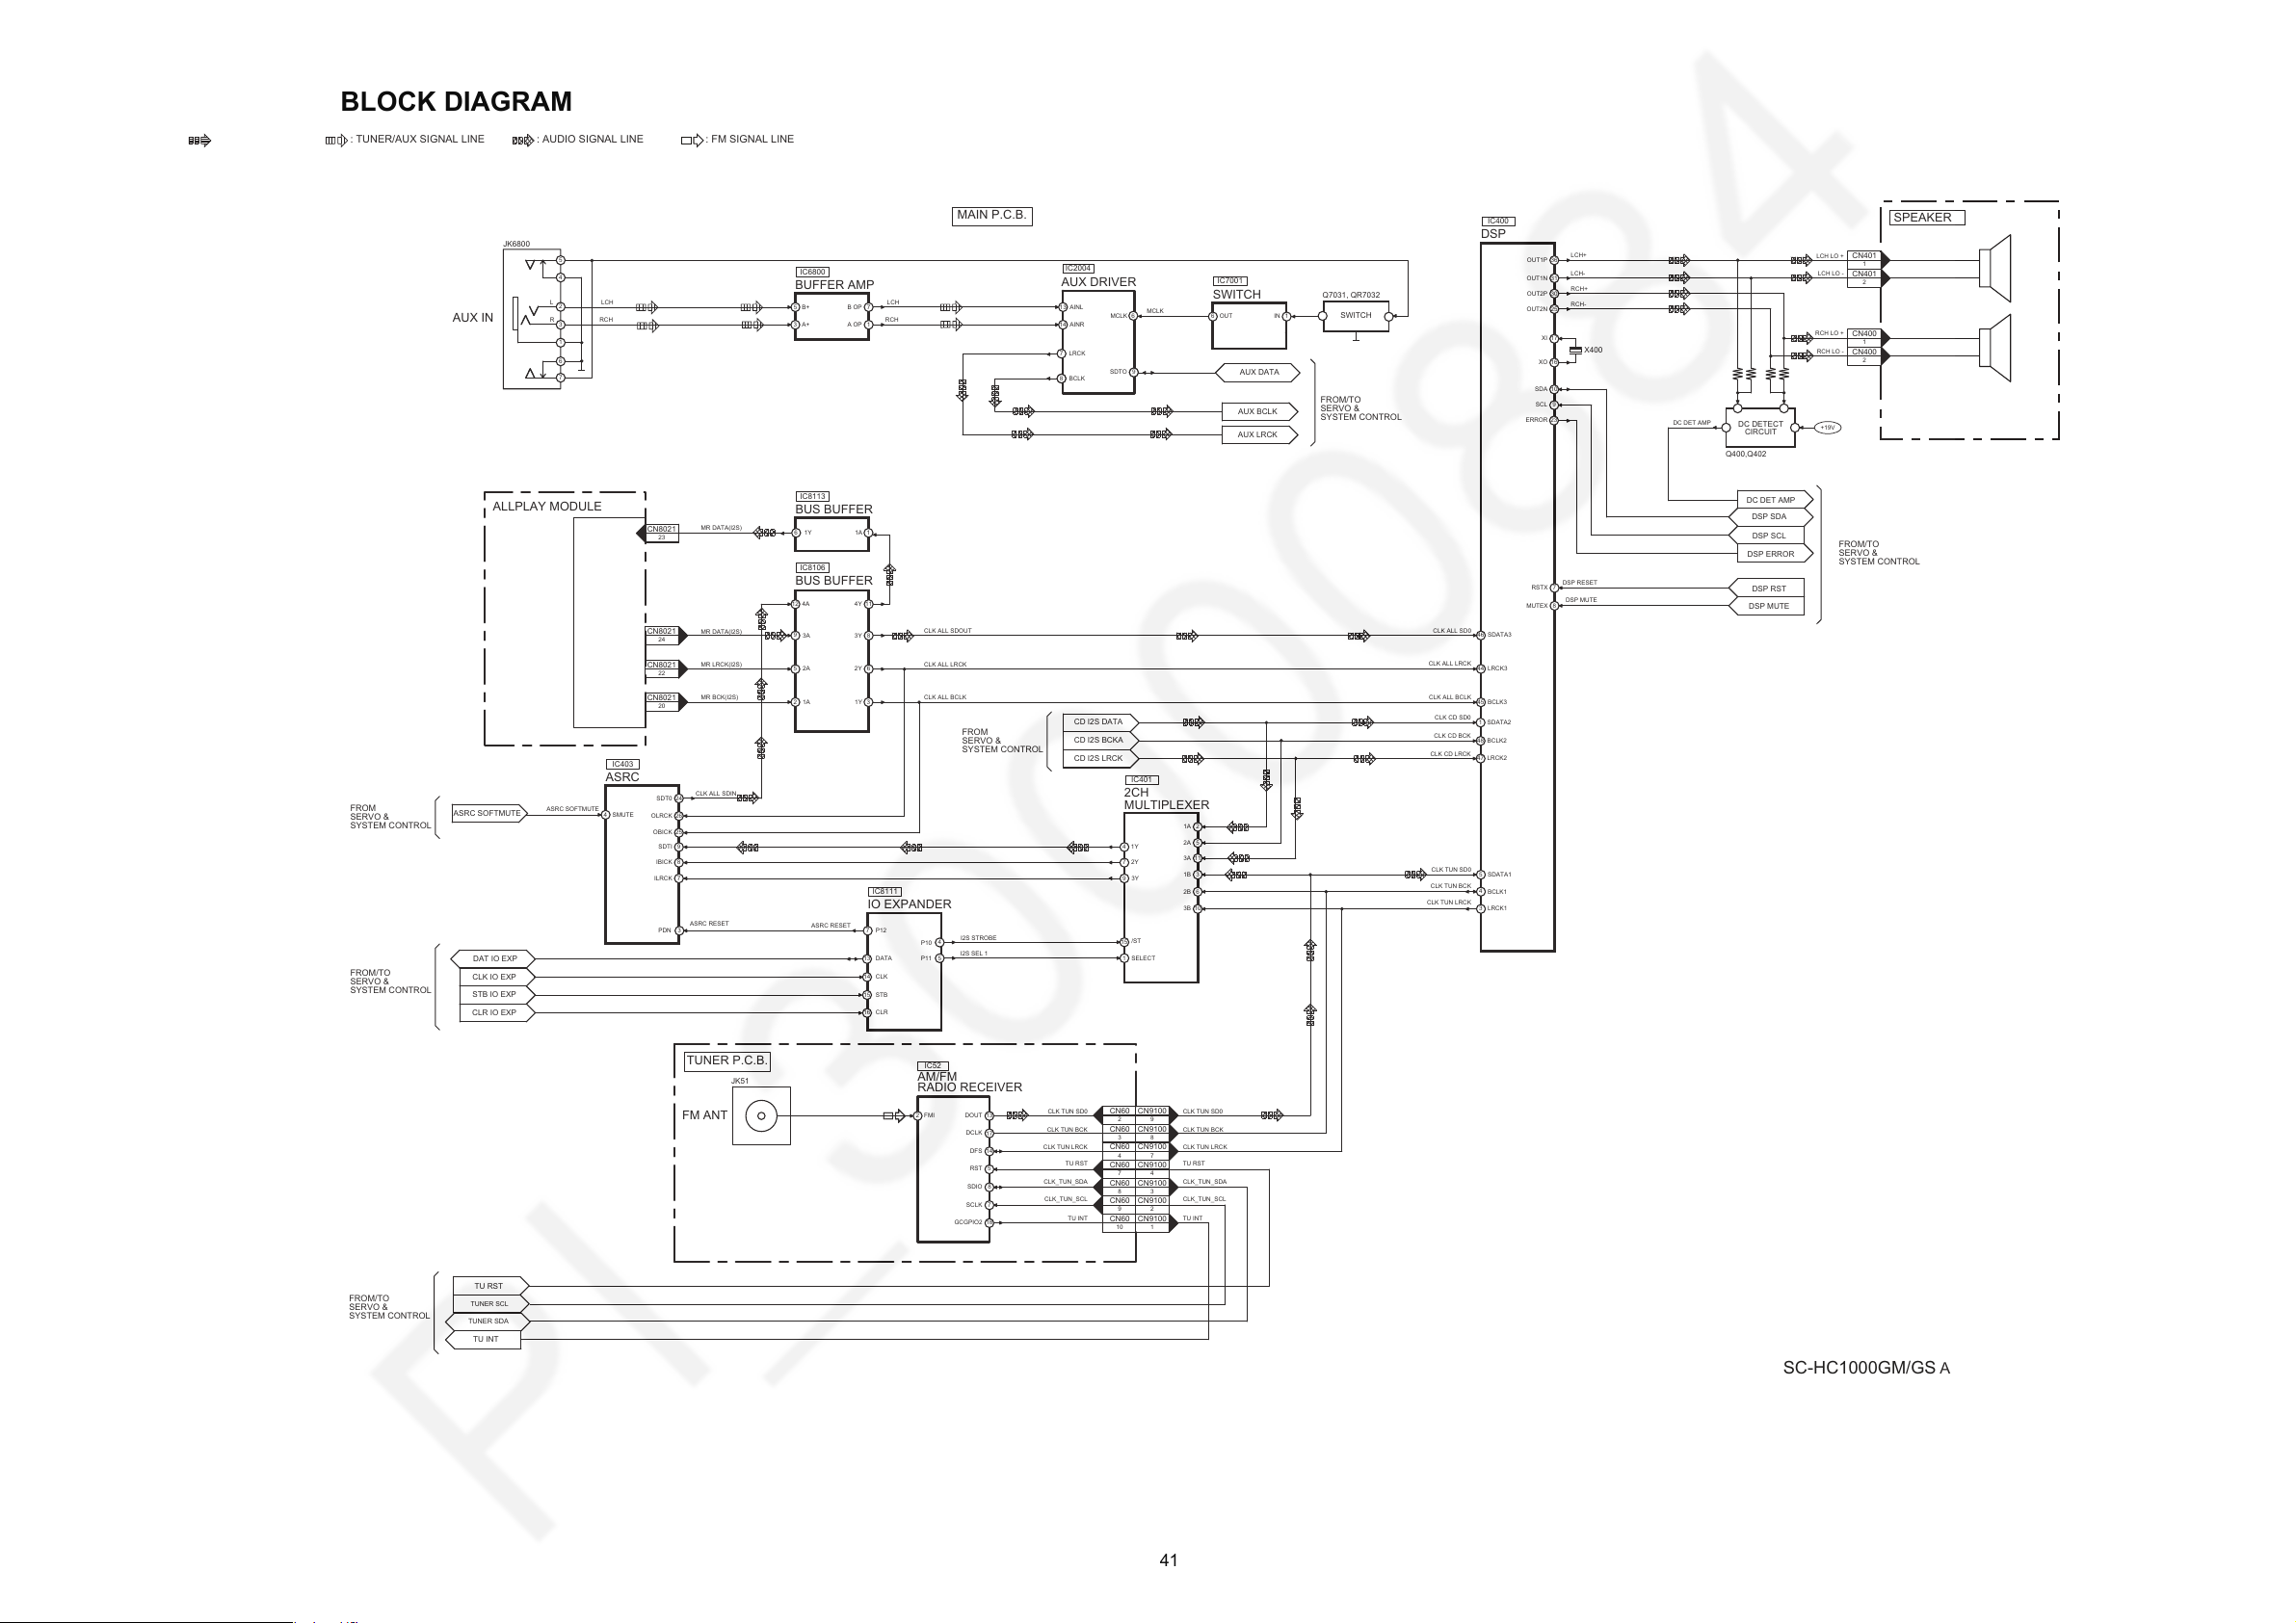
10.3. AUDIO BLOCK DIAGRAM
SC-HC1000GM/GS
AUDIO BLOCK DIAGRAM
: TUNER/AUX SIGNAL LINE : AUDIO SIGNAL LINE : FM SIGNAL LINE: CD SIGNAL LINE
1
X400
1
CN401
2
CN401
1
CN400
2
CN400
MR DATA(I2S)
MR LRCK(I2S)
MR BCK(I2S)
MR DATA(I2S)
24
CN8021
22
CN8021
20
CN8021
23
CN8021
ALLPLAY MODULE
SPEAKERS
FRONT
LEFT
FRONT
RIGHT
MAIN P.C.B.
ASRC
SDTI
IBICK
ILRCK
OBICK
OLRCK
9
3
8
7
25
SDT0
24
CLK ALL SDIN
ASRC RESET
LCH
RCH
L
R
CLK ALL SDOUT
DSP MUTE
DSP RESET
CLK CD SD0
LCH LO +
LCH LO -
RCH LO +
DC DET AMP
DC DET AMP
RCH LO -
LCH+
LCH-
RCH+
RCH-
CLK CD BCK
CLK CD LRCK
CLK ALL BCLK
CLK ALL LRCK
CLK ALL SD0
I2S STROBE
I2S SEL 1
ASRC RESET
CLK ALL LRCK
CLK ALL BCLK
PDN
4
ASRC SOFTMUTE
SMUTE
26
IC403
BUS BUFFER
4Y
3Y
2Y
1112
8
6
4A
3A
2A
5
1A
2
1Y
3
9
IC8106
BUS BUFFER
IC8113
2CH
MULTIPLEXER
1A
3A
1B
2
4
11
2A
5
3
2B
6
3Y
SELECT
9
15
/ST
1
3B
10
1Y
2Y
7
IC401
IO EXPANDER
DATA
STB
CLR
13
15
CLK
P11
P12
P10
14
16
5
7
4
IC8111
DSP
SDA
10
SCL
9
4
BCLK1
3
LRCK1
SDATA1
ERROR
23
5
48
BCLK2
47
LRCK2
SDATA2
1
OUT2N
XI
XO
25
17
16
31
OUT1N
30
OUT2P
OUT1P
36
44
LRCK3
45
BCLK3
8MUTEX
7
RSTX
SDATA3
46
IC400
JK6800
2
3
1
6
7
5
4
+
-
+
-
Q400,Q402
DC DETECT
CIRCUIT
+19V
1A
1
1Y
6
DSP ERROR
DSP SDA
DSP SCL
DSP MUTE
DSP RST
FROM/TO
SERVO &
SYSTEM CONTROL
DAT IO EXP
CLK IO EXP
STB IO EXP
CLR IO EXP
ASRC SOFTMUTE
FROM/TO
SERVO &
SYSTEM CONTROL
FROM
SERVO &
SYSTEM CONTROL
CD I2S DATA
CD I2S BCKA
CD I2S LRCK
FROM
SERVO &
SYSTEM CONTROL
AUX IN
AUX LRCK
BUFFER AMP
B OP
7
5
A OP
1
A+
B+
3
IC6800
SWITCH
7
6
1
OUT
1
IN
IC7001
LCH
RCH
AUX DRIVER
IC2004
13
AINL
AINR
14
7
LRCK
6
MCLK
BCLK
8
8
89
SDTO
AUX DATA
MCLK
Q7031, QR7032
SWITCH
FROM/TO
SERVO &
SYSTEM CONTROL
AUX BCLK
AM/FM
RADIO RECEIVER
IC52
TUNER P.C.B.
FM ANT
JK51
74
CN9100CN60
47
CN9100CN60
92
CN9100CN60
83
CN9100CN60
CLK TUN SD0
CLK TUN BCK
CLK TUN LRCK
DOUT
17
DCLK
13
29
CN9100CN60
CLK_TUN_SDA
CLK_TUN_SCL
110
CN9100CN60
TU INT
SCLK 7
DFS 14
SDIO 8
38
CN9100CN60
TU RST
CLK TUN SD0
CLK TUN SD0
CLK TUN BCK
CLK TUN LRCK
CLK TUN BCK
CLK TUN LRCK
CLK_TUN_SDA
CLK_TUN_SCL
TU INT
TU RST
RST5
2 FMI
GCGPIO2 18
TU INT
FROM/TO
SERVO &
SYSTEM CONTROL
TUNER SDA
TU RST
TUNER SCL
41
Page 42
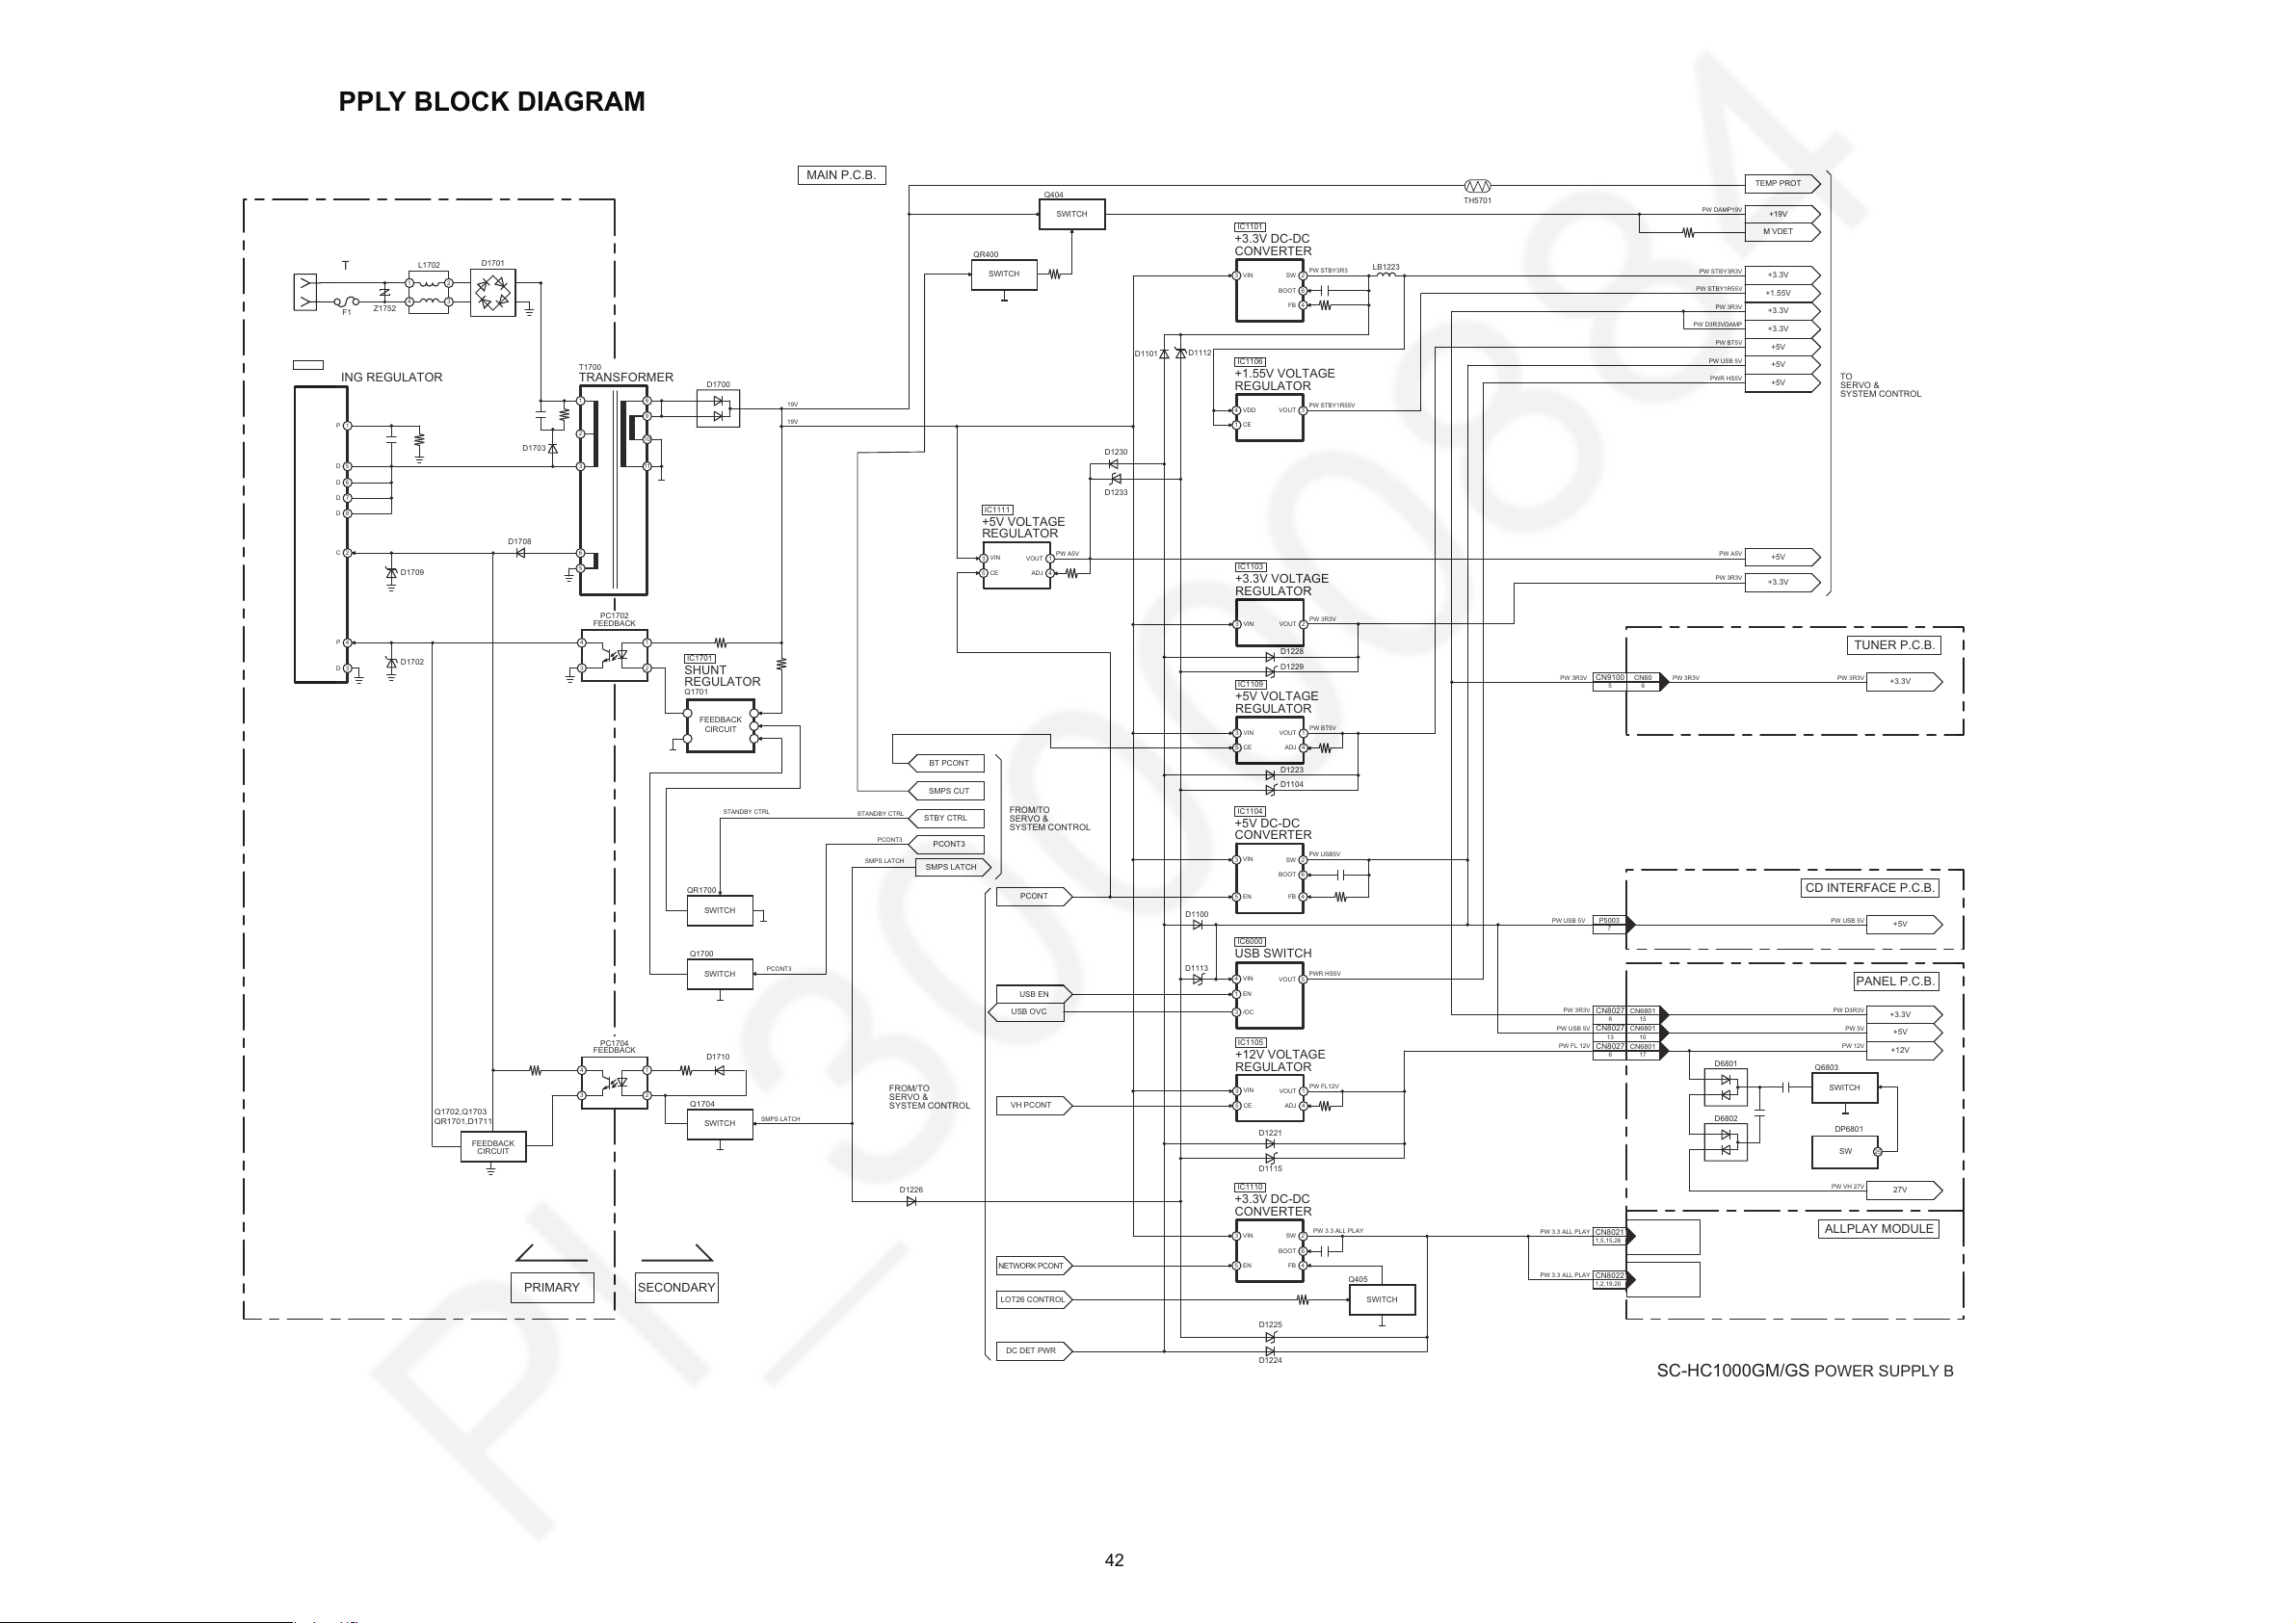
10.4. POWER SUPPLY BLOCK DIAGRAM
SC-HC1000GM/GS
POWER SUPPLY BLOCK DIAGRAM
TO
SERVO &
SYSTEM CONTROL
AC INLET
P1751
Z1752
SWITCHING REGULATOR
IC1700
TRANSFORMER
T1700
D1701
D1703
LB1223
TH5701
D1101
D1112
D1223
D1104
D1221
D1115
D1100
D1113
D1708
FEEDBACK
CIRCUIT
Q1700
SWITCH
Q404
SWITCH
QR400
SWITCH
Q6803
SWITCH
QR1700
SWITCH
3
4
2
1
PC1702
FEEDBACK
3
4
2
1
PC1704
FEEDBACK
L1702
142
3
MAIN P.C.B.
FB/OLP 4
GND 3
D5
D 6
D 7
D8
VCC 2
S/OCP 1
5
6
3
1
2
9
8
10
11
SHUNT
REGULATOR
IC1701
Q1701
F1
19V
19V
STANDBY CTRL
PCONT3
Q1704
SWITCH
SMPS LATCH
D1709
D1702
STANDBY CTRL
PCONT3
BT PCONT
SMPS CUT
PCONT3
SMPS LATCH
SMPS LATCH
USB OVC
STBY CTRL
PCONT
USB EN
VH PCONT
DC DET PWR
SW
DP6801
PW DAMP19V
+19V
TEMP PROT
PW STBY3R3V
+3.3V
PW 3R3V
+3.3V
+5V
M VDET
PW STBY1R55V
+1.55V
PW 3R3V
+3.3V
PW BT5V
+5V
PW USB 5V
+5V
PWR HS5V
+5V
PW 3R3V
158
CN6801
CN8027
7
P5003
CD INTERFACE P.C.B.
PANEL P.C.B.
PW USB 5VPW USB 5V
+5V
PW VH 27V
27V
PW D3R3V
+3.3V
PW USB 5V
1013
CN6801
CN8027
PW 5V
+5V
PW FL 12V
176
CN6801
CN8027
PW 12V
+12V
PW D3R3VDAMP
+3.3V
D1700
D6801
D6802
SECONDARYPRIMARY
PW STBY3R3
IC1101
+3.3V DC-DC
CONVERTER
SW 2
FB 4
BOOT 6
3
VIN
PW USB5V
IC1104
+5V DC-DC
CONVERTER
5EN
SW 2
FB 4
25
BOOT 6
3
VIN
PWR HS5V
IC6000
USB SWITCH
3/OC
EN
VOUT 5
1
4
VIN
PW STBY1R55V
IC1106
+1.55V VOLTAGE
REGULATOR
1CE
VOUT 3
4
VDD
PW BT5V
IC1109
+5V VOLTAGE
REGULATOR
5CE
VOUT 1
ADJ 4
3
VIN
PW A5V PW A5V
IC1111
+5V VOLTAGE
REGULATOR
5CE
VOUT 1
ADJ 4
3
VIN
PW 3R3V
IC1103
+3.3V VOLTAGE
REGULATOR
5
VOUT 2
3
VIN
PW FL12V
IC1105
+12V VOLTAGE
REGULATOR
5CE
VOUT 1
ADJ 4
3
VIN
FROM/TO
SERVO &
SYSTEM CONTROL
FROM/TO
SERVO &
SYSTEM CONTROL
D1226
D1710
Q1702,Q1703
QR1701,D1711
FEEDBACK
CIRCUIT
D1228
D1229
D1230
D1233
PW 3.3 ALL PLAY
PW 3.3 ALL PLAY
1,5,15,26
CN8021
1,2,19,20
CN8022
ALLPLAY MODULE
D1224
D1225
PW 3.3 ALL PLAY
+3.3V DC-DC
CONVERTER
5EN
SW 2
FB 4
BOOT 6
3
VIN
Q405
SWITCH
IC1110
LOT26 CONTROL
NETWORK PCONT
5
CN9100
TUNER P.C.B.
PW 3R3V
+3.3V
6
CN60
PW 3R3VPW 3R3V
42
Page 43
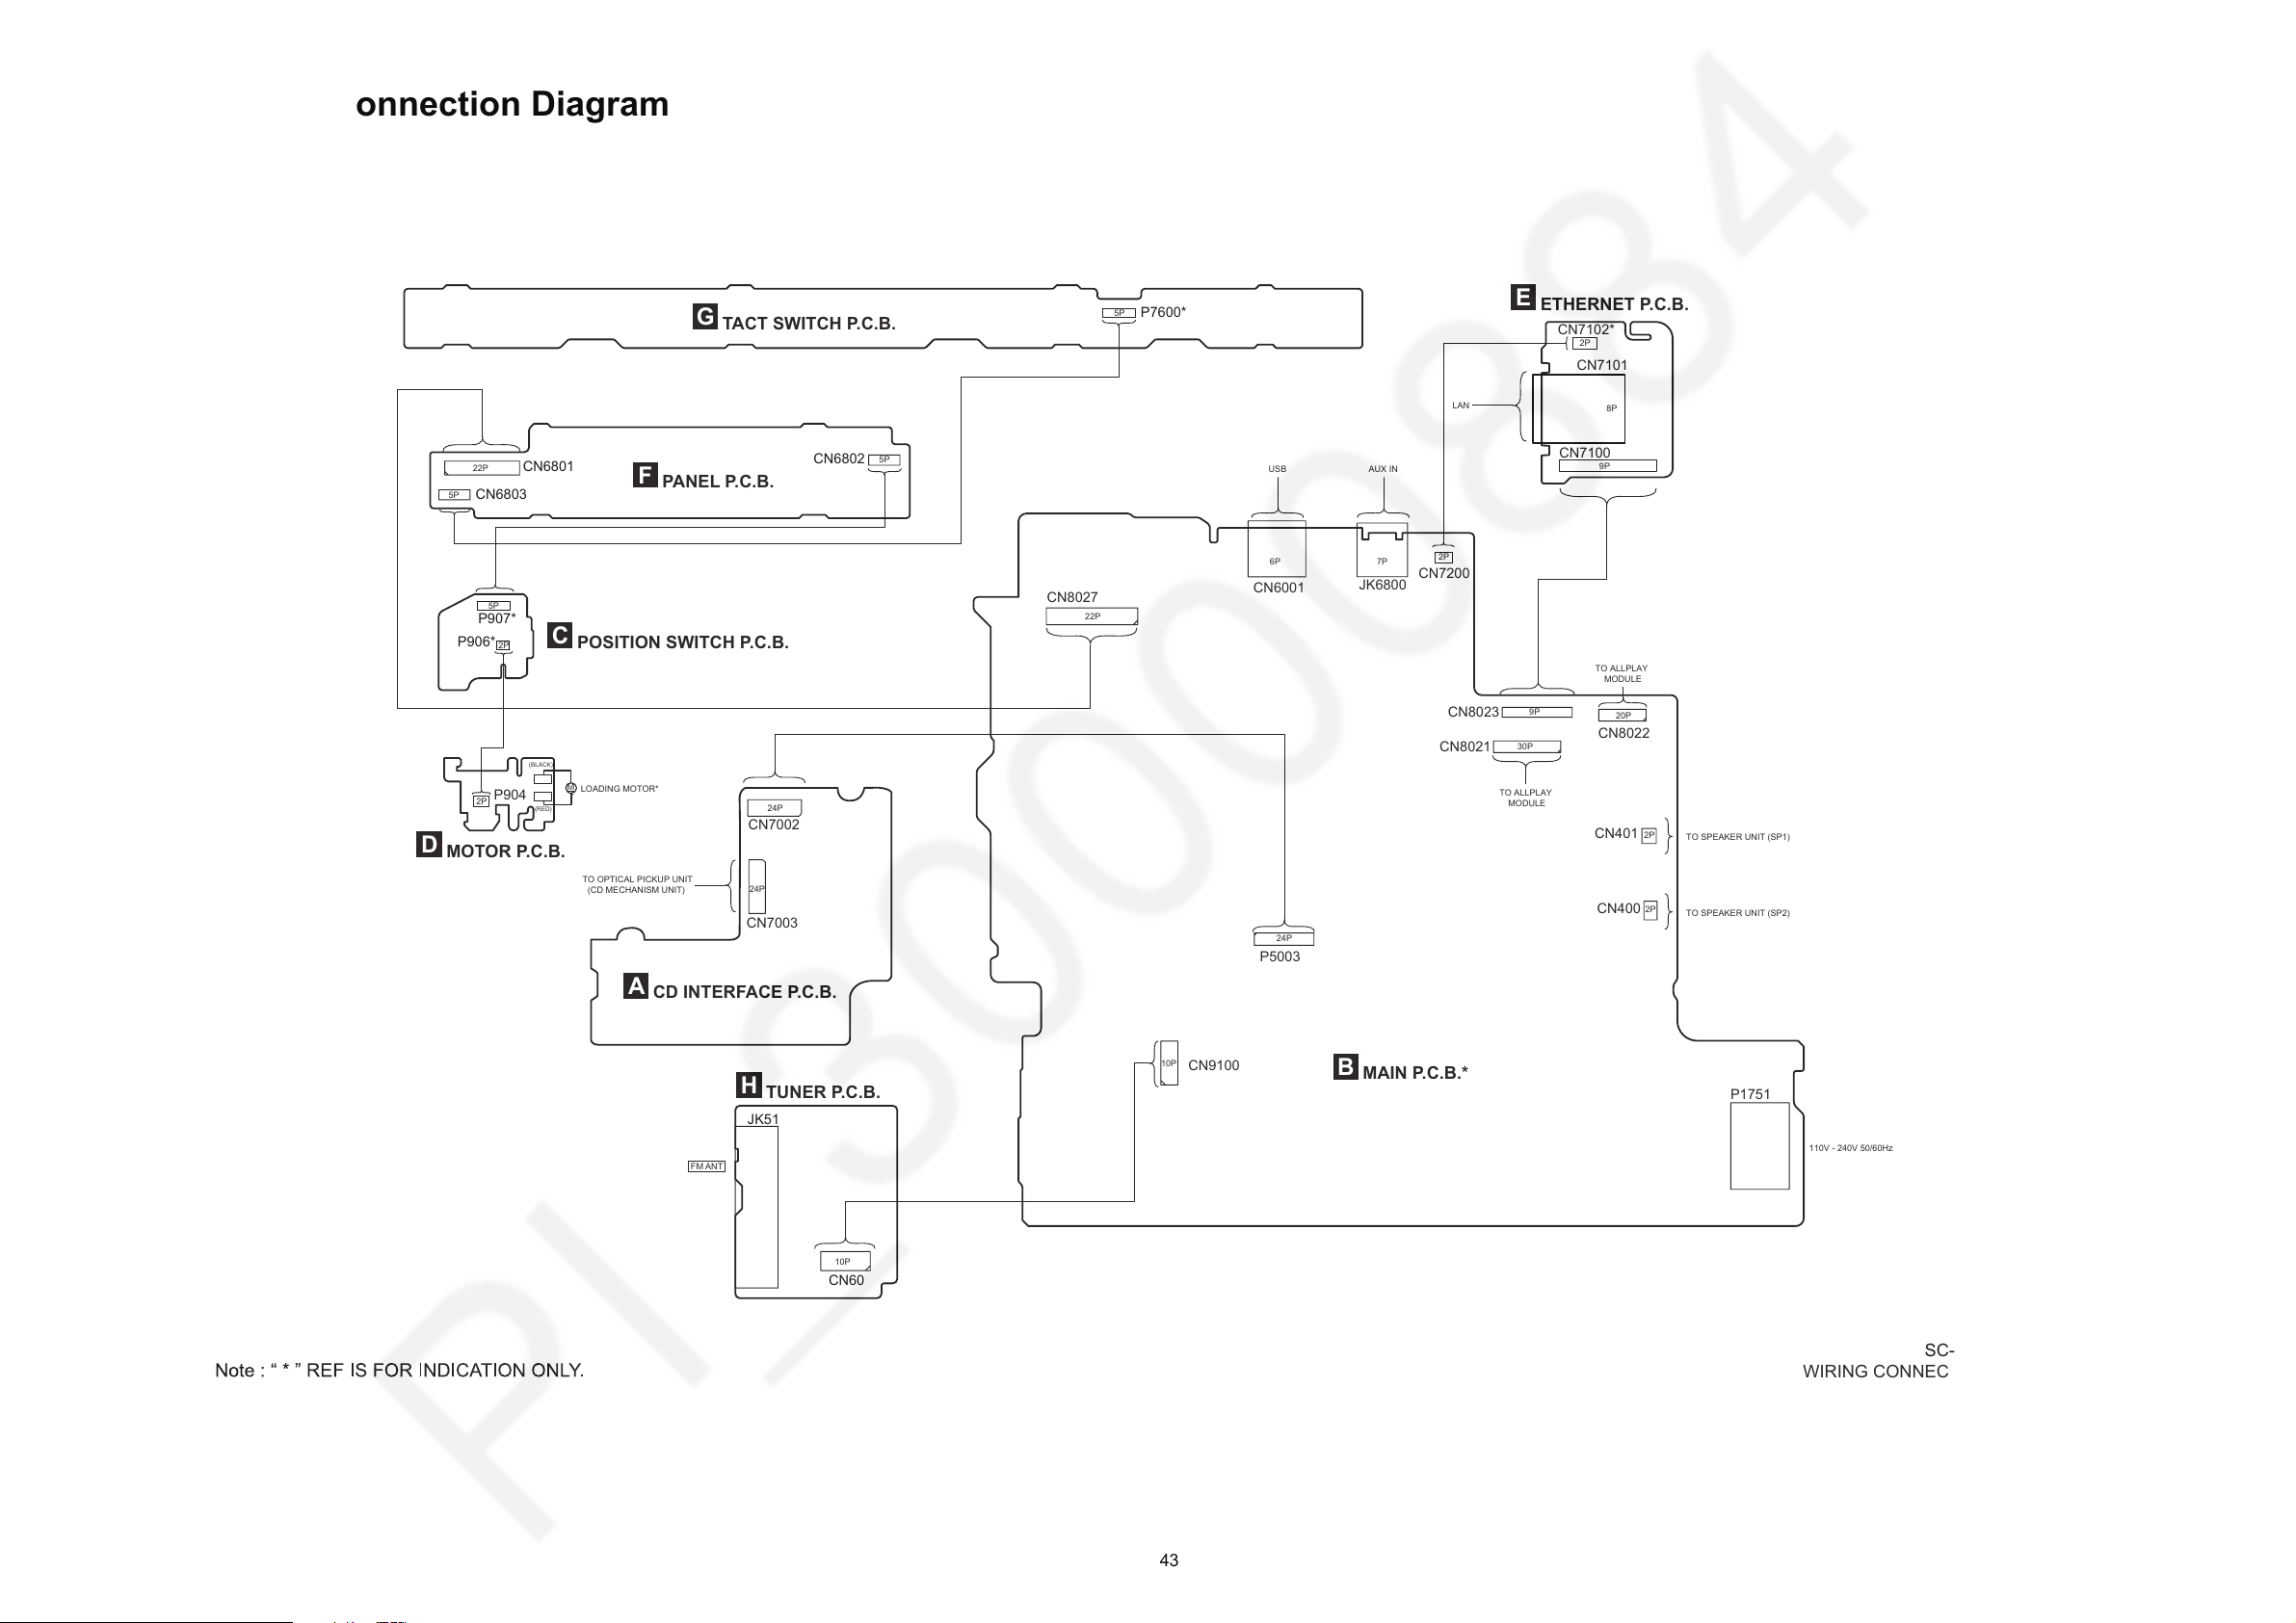
11 Wiring Connection Diagram
SC-HC1000GM/GS
WIRING CONNECTION DIAGRAM
A
CD INTERFACE P.C.B.
TO OPTICAL PICKUP UNIT
(CD MECHANISM UNIT)
B
MAIN P.C.B.*
E
ETHERNET P.C.B.
G
TACT SWITCH P.C.B.
F
PANEL P.C.B.
C
POSITION SWITCH P.C.B.
AUX IN
TO ALLPLAY
MODULE
TO ALLPLAY
MODULE
LAN
USB
22P
5P
9P
7P6P
9P
8P
30P
20P
110V - 240V 50/60Hz
CN7100
CN7101
CN6801
CN6802
CN6803
P7600*
5P
22P
5P
5P
P907*
P906*
D
MOTOR P.C.B.
LOADING MOTOR*
M
+
(BLACK)
(RED)
P904
TO SPEAKER UNIT (SP1)
TO SPEAKER UNIT (SP2)
P1751
CN400
CN401
JK6800
CN6001
CN8021
CN8022
CN8023
CN8027
CN9100
P5003
2P
2P
24P
24P
2P
2P
24P
10P
CN7002
CN7003
H
TUNER P.C.B.
CN60
JK51
FM ANT
10P
2P
2P
CN7102*
CN7200
43
Page 44

44
Page 45
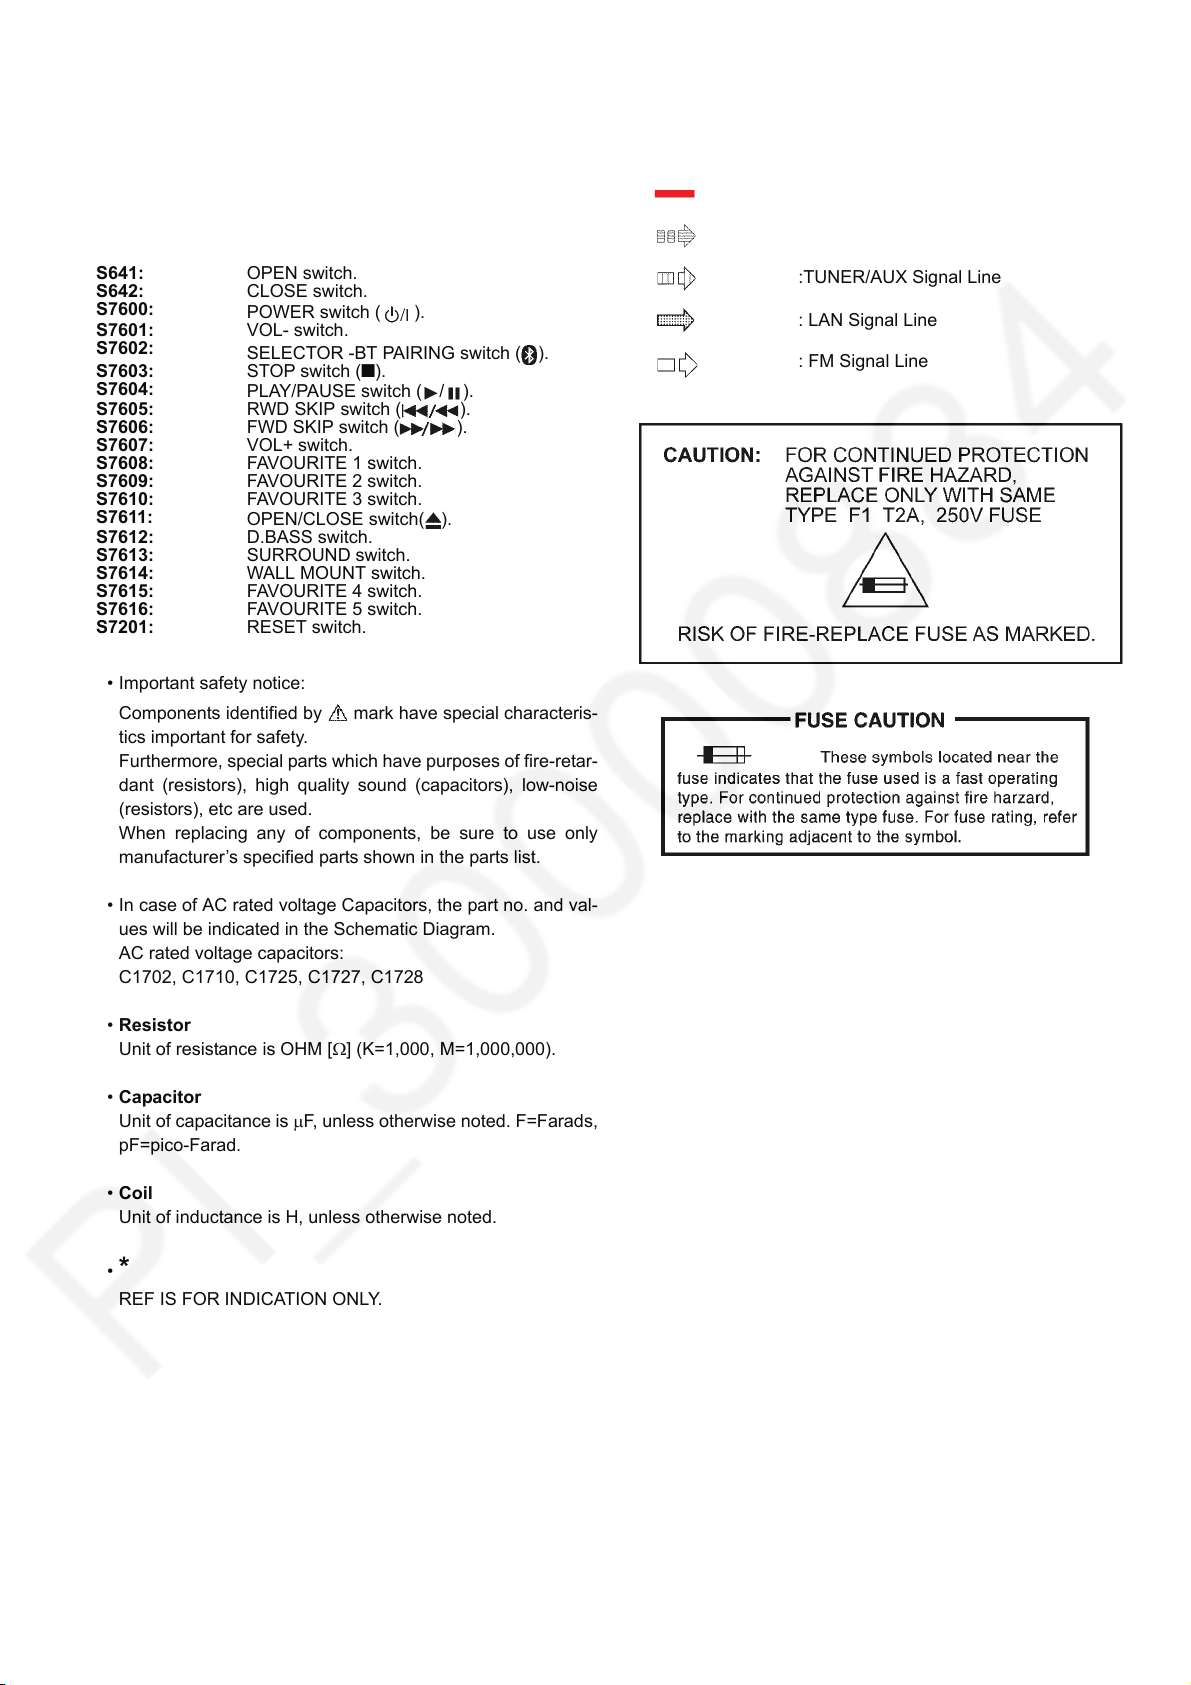
12 Schematic Diagram
12.1. Schematic Diagram Notes
(All schematic diagrams may be modified at any time with
the development of new technology)
Notes:
S641: OPEN switch.
S642: CLOSE switch.
S7600:
S7601: VOL- switch.
S7602:
S7603: STOP switch (Q).
S7604:
S7605: RWD SKIP switch ( ).
S7606: FWD SKIP switch ( ).
S7607: VOL+ switch.
S7608: FAVOURITE 1 switch.
S7609: FAVOURITE 2 switch.
S7610: FAVOURITE 3 switch.
S7611:
S7612: D.BASS switch.
S7613: SURROUND switch.
S7614: WALL MOUNT switch.
S7615: FAVOURITE 4 switch.
S7616: FAVOURITE 5 switch.
S7201: RESET switch.
• Important safety notice:
Components identified by mark have special characteris-
tics important for safety.
Furthermore, special parts which have purposes of fire-retar-
dant (resistors), high quality sound (capacitors), low-noise
(resistors), etc are used.
When replacing any of components, be sure to use only
manufacturer’s specified parts shown in the parts list.
• In case of AC rated voltage Capacitors, the part no. and val-
ues will be indicated in the Schematic Diagram.
AC rated voltage capacitors:
C1702, C1710, C1725, C1727, C1728
• Resistor
Unit of resistance is OHM [Ω] (K=1,000, M=1,000,000).
• Capacitor
Unit of capacitance is μF, unless otherwise noted. F=Farads,
pF=pico-Farad.
• Coil
Unit of inductance is H, unless otherwise noted.
•
*
REF IS FOR INDICATION ONLY.
POWER switch ( ).
SELECTOR -BT PAIRING switch ( ).
PLAY/PAUSE switch ( / ).
OPEN/CLOSE switch( ).
• Voltage and signal line
: +B Signal Line
: CD Signal Line
:TUNER/AUX Signal Line
: LAN Signal Line
: FM Signal Line
45
Page 46

46
Page 47
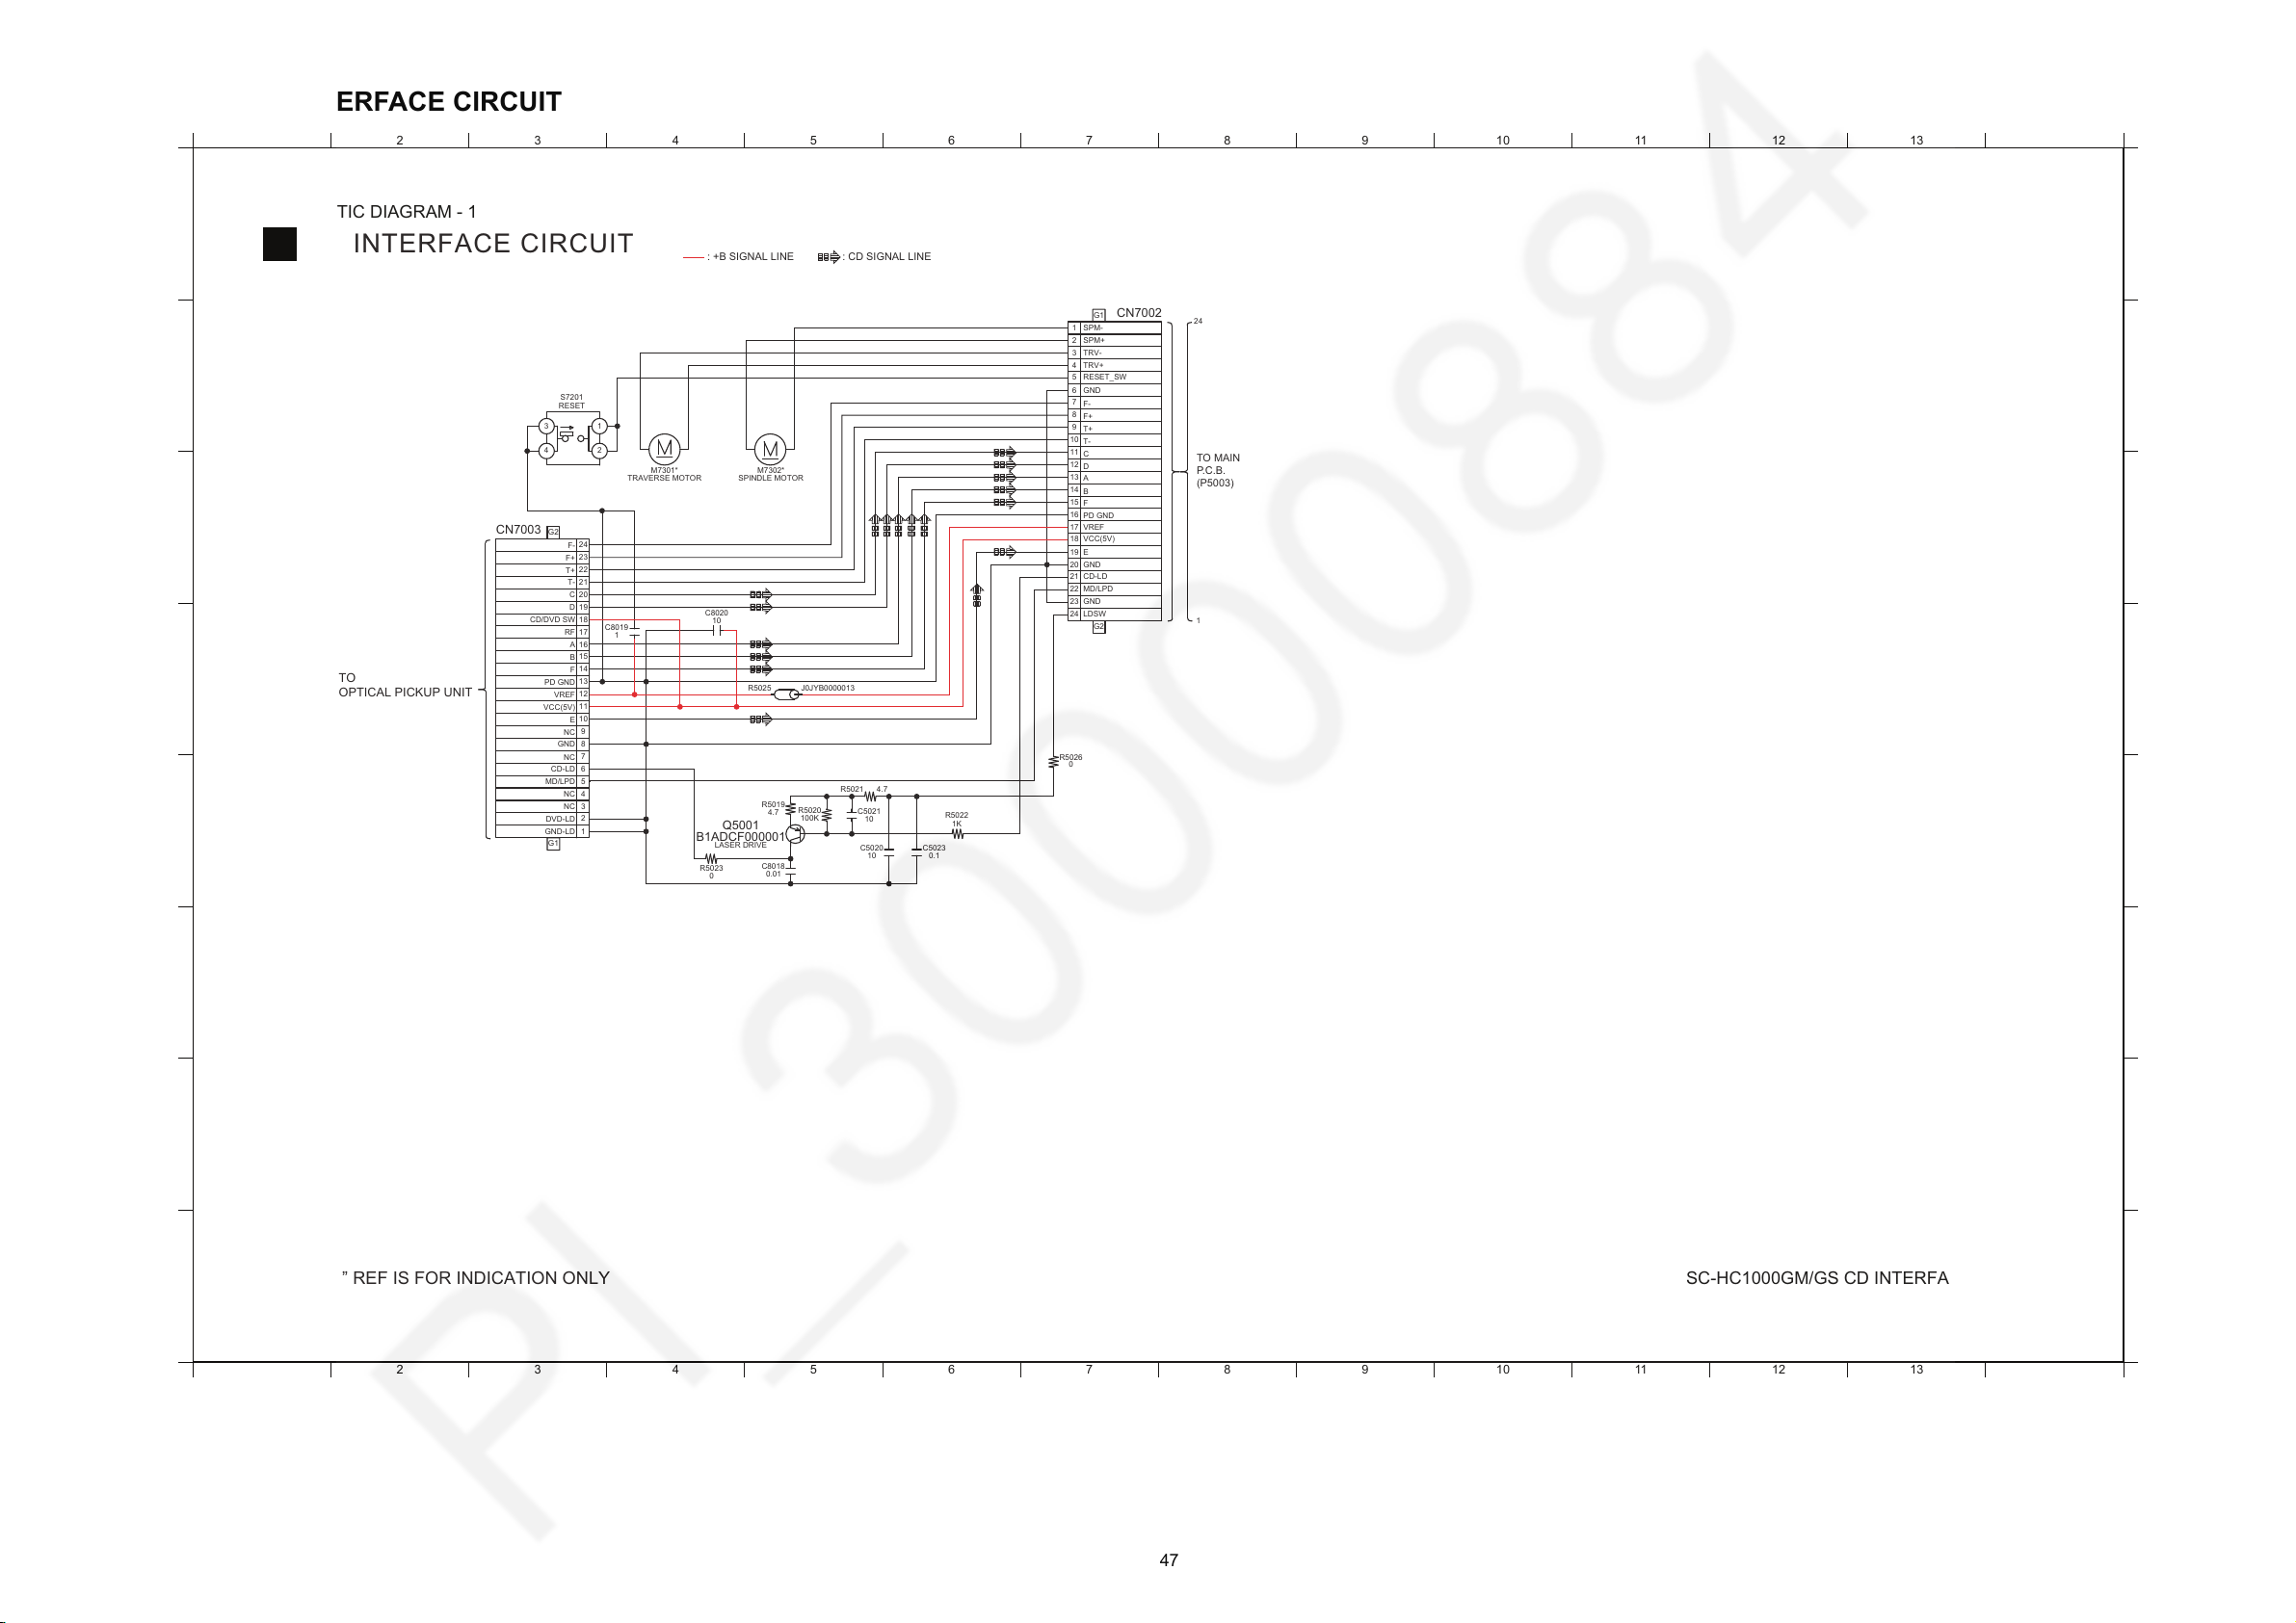
12.2. CD INTERFACE CIRCUIT
A
1
2 3 4 5 6 7 8 9 10 11 12 13 14
1 2 3 4 5 6 7 8 9 10 11 12 13 14
C
D
B
E
G
H
F
A
C
D
B
E
G
H
F
A
TO
OPTICAL PICKUP UNIT
CD INTERFACE CIRCUIT
SCHEMATIC DIAGRAM - 1
SC-HC1000GM/GS CD INTERFACE CIRCUIT
: +B SIGNAL LINE
NOTE: “ * ” REF IS FOR INDICATION ONLY
: CD SIGNAL LINE
TO MAIN
P.C.B.
(P5003)
R5023
0
1K
R5022
C8018
0.01
C5020
10
C5023
0.1
Q5001
B1ADCF000001
LASER DRIVE
R5026
0
G1
G2
6
7
5
9
13
15
14
11
10
12
21
22
18
16
17
20
19
8
1
1
3
4
2
24
24
23
CN7002
4.7R5021
R5025 J0JYB0000013
M7302*
R5019
4.7
C5021
10
100K
R5020
G1
G2
6
7
5
9
13
15
14
11
10
12
21
22
18
16
17
20
19
8
1
3
4
2
24
23
CN7003
4
31
2
S7201
C8020
10
C8019
1
M7301*
F-
F+
TRV+
GND
SPM+
SPM-
TRV-
RESET_SW
SPINDLE MOTOR
GND
E
CD-LD
GND
LDSW
MD/LPD
VCC(5V)
F
D
C
B
A
T-
T+
VREF
PD GND
TRAVERSE MOTOR
B
A
E
F
RF
VREF
VCC(5V)
PD GND
F+
F-
C
D
T-
T+
CD/DVD SW
RESET
NC
GND
NC
NC
CD-LD
MD/LPD
GND-LD
DVD-LD
NC
47
Page 48
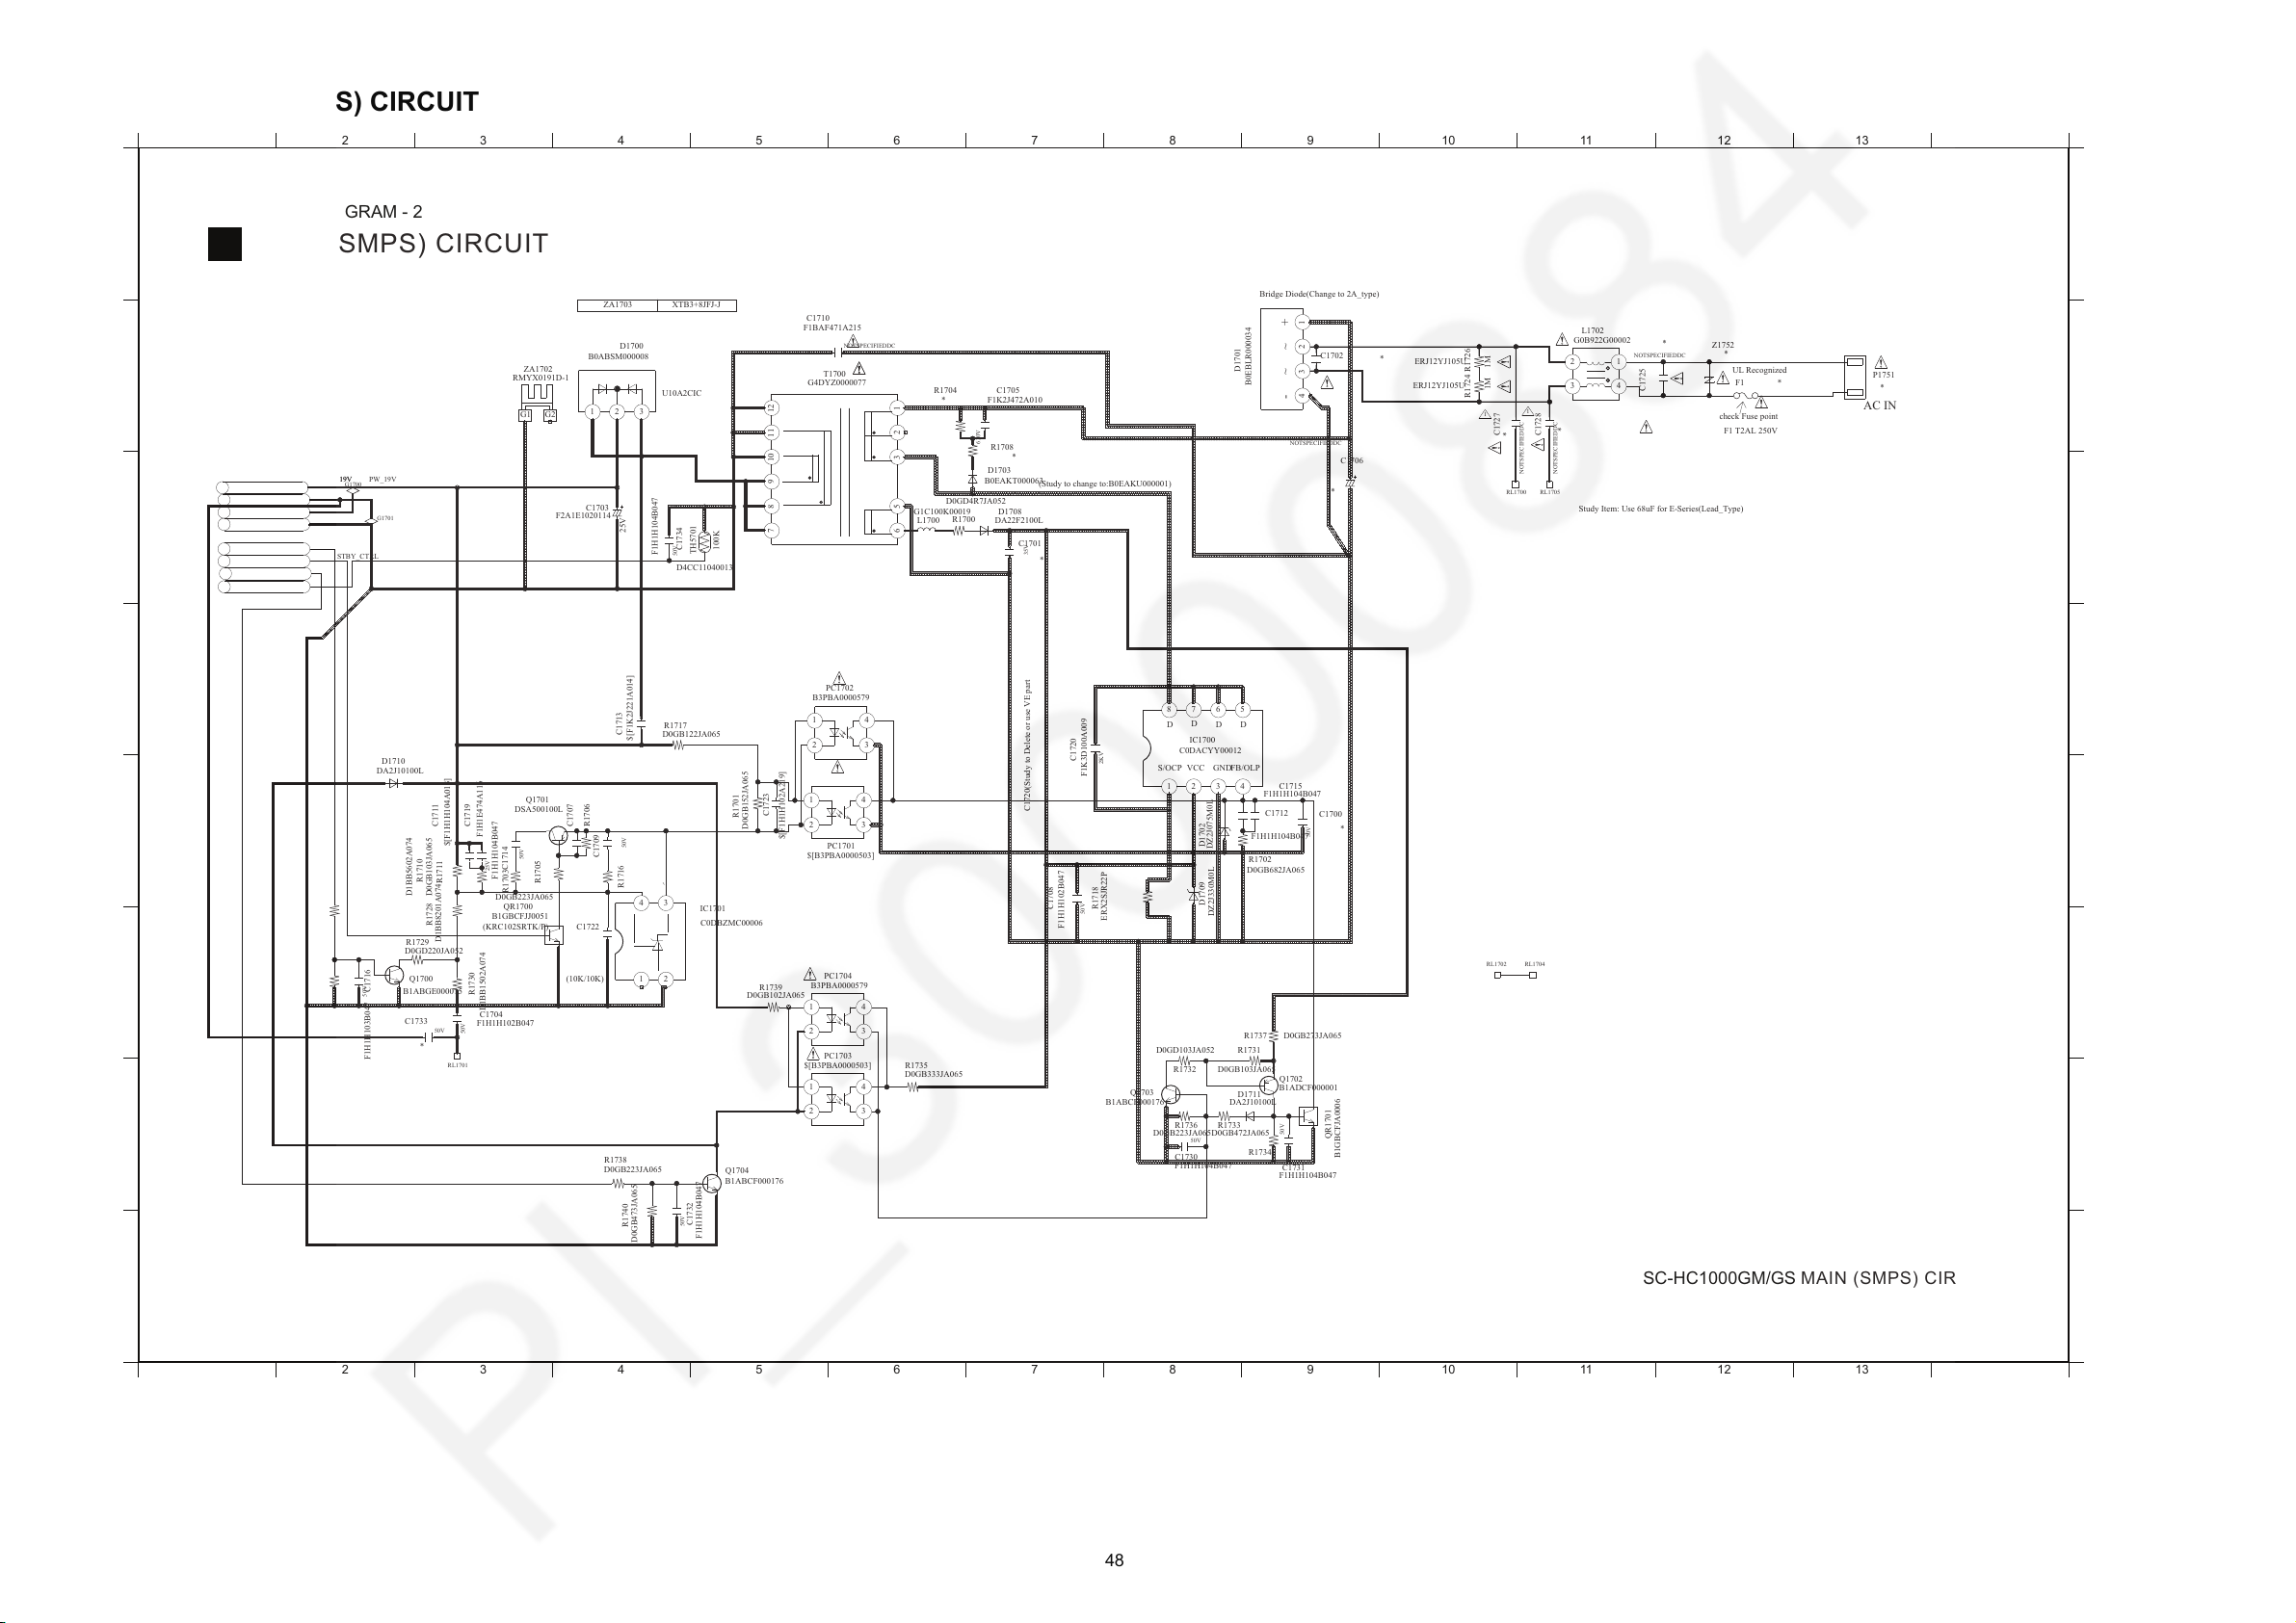
12.3. MAIN (SMPS) CIRCUIT
A
1
2 3 4 5 6 7 8 9 10 11 12 13 14
1 2 3 4 5 6 7 8 9 10 11 12 13 14
C
D
B
E
G
H
F
A
C
D
B
E
G
H
F
B
SC-HC1000GM/GS MAIN (SMPS) CIRCUIT
MAIN (SMPS) CIRCUIT
SCHEMATIC DIAGRAM - 2
R1708
*
*
C1728
NOTSPECIFIEDDC
*F1
Z1752
*
P1751
*
C1725
NOTSPECIFIEDDC
*
3
2
4
1
G0B922G00002
L1702
R1726
ERJ12YJ105U
*
R1704
C1705
F1K2J472A010
630V
NOTSPECIFIEDDC
C1702
*
~- ~
324
+
1
D1701
B0EBLR000034
*
C1727
NOTSPECIFIEDDC
R1724
ERJ12YJ105U
L1700
G1C100K00019
R1700
D0GD4R7JA052
RL1702 RL1704
D0GD103JA052
R1732
B1ADCF000001
Q1702
D0GB103JA065
R1731
R1733
D0GB472JA065
QR1701
B1GBCFJA0006
DA2J10100L
D1711
B1ABCF000176
Q1703
R1736
D0GB223JA065
D0GB273JA065R1737
C1730
F1H1H104B047
50V
R1734
F1H1H104B047
C1731
50V
RL1700
*
C1706
RL1705
D1702
DZ2J075M0L
DZ2J330M0L
D1709
D0GB682JA065
R1702
F1K3D100A009
C1720
2KV
67
5
2
43
8
1
C0DACYY00012
IC1700
R1718
ERX2SJR22P
C1708
F1H1H102B047
50V
C1700
*
50V
C1712
F1H1H104B047
C1715
F1H1H104B047
B0EAKT000063
D1703
35V
C1701
*
DA22F2100L
D1708
PW_19VPW_19VPW_19V
PW_19V
G2
G1
ZA1702
RMYX0191D-1
31 2
B0ABSM000008
D1700
C1710
F1BAF471A215
NOTSPECIFIEDDC
R1701
D0GB152JA065
C1723
$[F1H1H102A219]
R1739
D0GB102JA065
D1BB8201A074
R1728
R1729
D0GD220JA052
Q1700
B1ABGE000015
DA2J10100L
D1710
R1725
D0GB223JA065
R1710
D1BB5602A074
$[F1H1H104A013]
C1711
D0GB122JA065
R1717
$[F1K2J221A014]
C1713
C1722
R1716
C1709
50V
1
423
IC1701
C0DBZMC00006
C1714
F1H1H104B047
50V
C1707
DSA500100L
Q1701
R1706
D1BB1502A074
R1730
F1H1E474A116
C1719
25V
R1703
D0GB223JA065
D0GB103JA065
R1711
QR1700
B1GBCFJJ0051
(KRC102SRTK/P)
R1705
*
C1733
50V
RL1701
R1727
D0GB104JA065
C1716F1H1H103B047
50V
D0GB473JA065
R1740
B1ABCF000176
Q1704
C1704
F1H1H102B047
50V
R1738
D0GB223JA065
F1H1H104B047
C1732
50V
TH5701
100K
D4CC11040013
F1H1H104B047
C1734
50V
PGND
G1700
PCONT3
TEMP_PROT
STBY_CTRL
SMPS_LATCH1
PW_DAMP19V
DAMPGND
STBY_CTRL
G1701
C1703
F2A1E1020114
25V
R1735
D0GB333JA065
4
3
1
2
PC1701
$[B3PBA0000503]
4
3
1
2
PC1702
B3PBA0000579
4
3
1
2
$[B3PBA0000503]
PC1703
4
3
1
2
B3PBA0000579
PC1704
132
1110 12
6 5
87 9
T1700
G4DYZ0000077
F1 T2AL 250V
check Fuse point
UL Recognized
AC IN
1M
(Study to change to:B0EAKU000001)
VCC
D
D
FB/OLPGND
DD
S/OCP
C1720(Study to Delete or use VE part
U10A2CIC
1
1M
XTB3+8JFJ-JZA1703
Bridge Diode(Change to 2A_type)
1
Study Item: Use 68uF for E-Series(Lead_Type)
(10K/10K)
48
Page 49
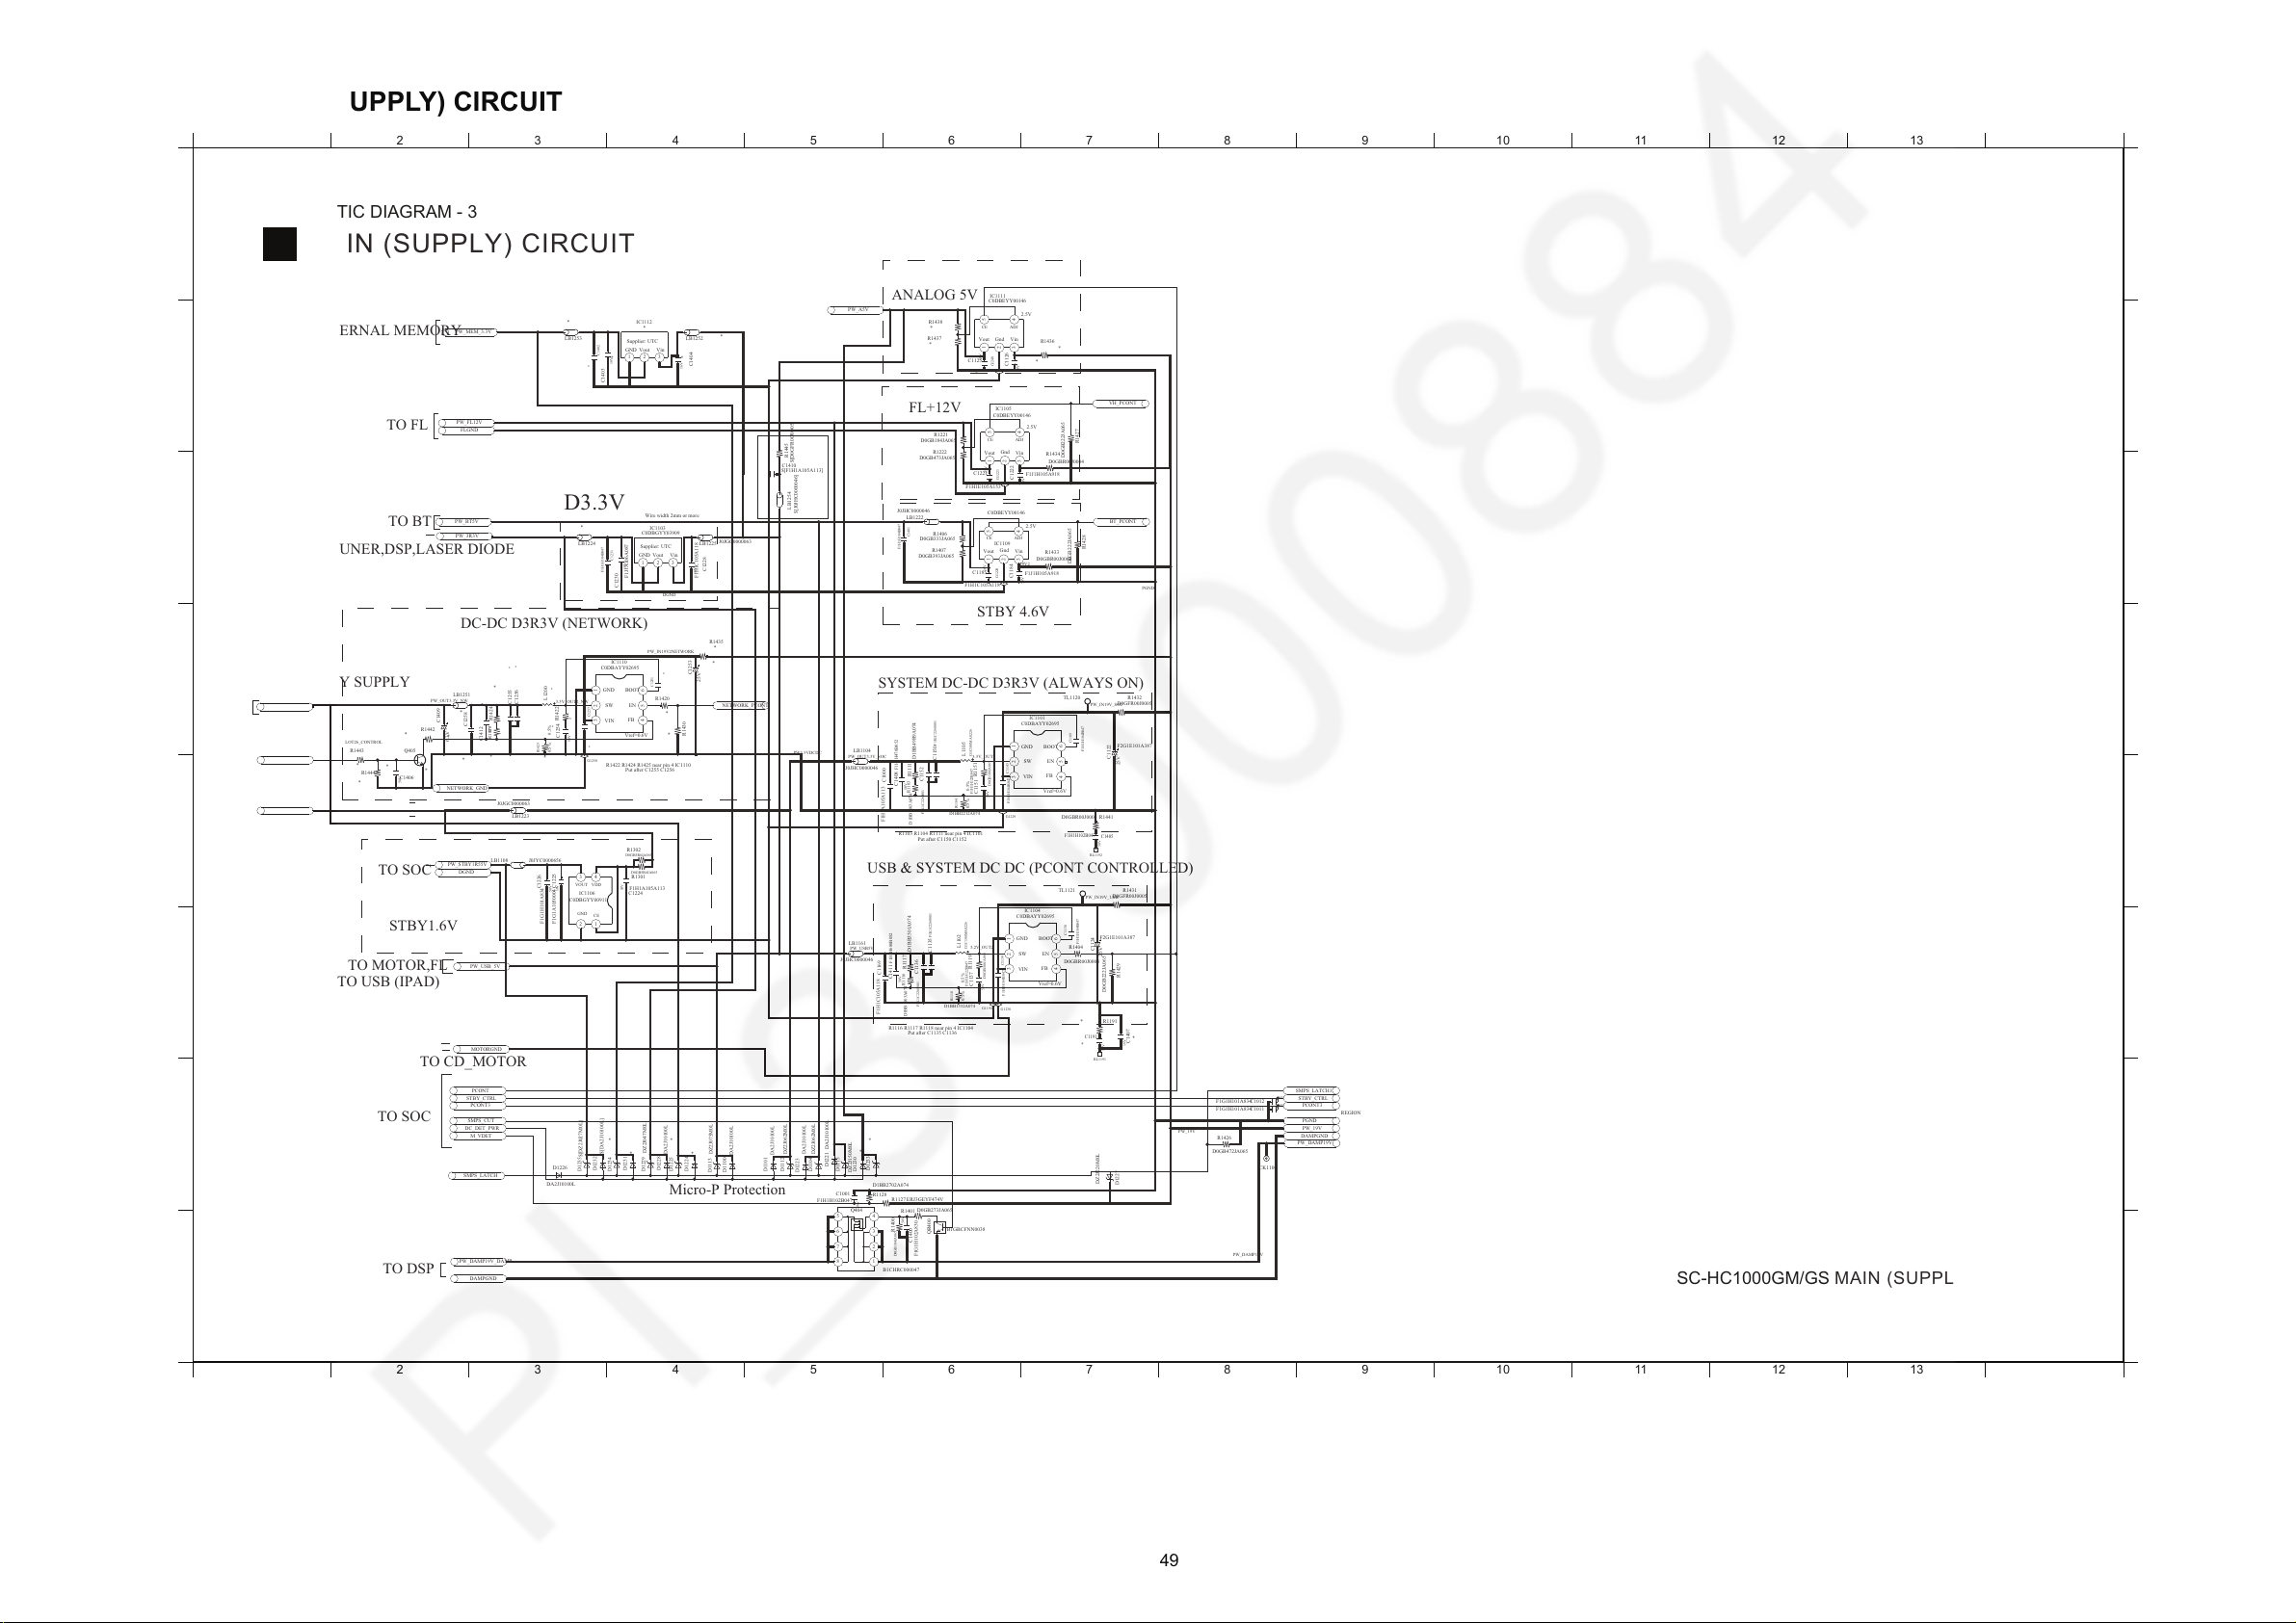
12.4. MAIN (SUPPLY) CIRCUIT
A
1
2 3 4 5 6 7 8 9 10 11 12 13 14
1 2 3 4 5 6 7 8 9 10 11 12 13 14
C
D
B
E
G
H
F
A
C
D
B
E
G
H
F
B
SC-HC1000GM/GS MAIN (SUPPLY) CIRCUIT
MAIN (SUPPLY) CIRCUIT
SCHEMATIC DIAGRAM - 3
F1H1H104B047
C1231
F1J1A106A087
C1230
10V
12
5 6
3
4
IC1110
C0DBAYY02695
LB1224
*
*
C1402
*
C1403
10V
NETWORK_PCONT
TL1120
PW_IN19V_SOC
R1433
D0GBR00J0004
19V2
G1228
F1J1H105A918
C1184
50V
BT_PCONT
D0GB222JA065
R1428
LB1222
J0JHC0000046
F1H1C105A118
C1185
16V
D0GB393JA065
R1407
R1406
D0GB333JA065
F1H1H104B047
C1401
312
4
5
C0DBEYY00146
IC1109
R1432
D0GFR00J0005
DGND
F1H1C105A118
C1228
16V
21 3
C0DBGYY03909
IC1103
R1435
*
LB1225
J0JGC0000063
C1251
*
*
R1420
*
R1430
C1253
*
25V
PW_IN19V2NETWORK
*
C1125
16V
PW_A5V
*
C1404
16V
LB1252
*
*
R1437
R1438
*
VH_PCONT
G1240
*
R1436
312
4
5
IC1111
C0DBEYY00146
*
C1126
50V
G1221
19V
F1J1H105A918
C1222
50V
F1H1E105A153
C1221
25V
R1221
D0GB184JA065
LB1254
$[J0JHC0000046]
C1410
$[F1H1A105A113]
R1445
$[D0GFR00J0005]
D0GB473JA065
R1222
312
4
5
IC1105
C0DBEYY00146
D0GBR00J0004
R1434
PGND
D0GB222JA065
R1427
21 3
*
IC1112
D1235
$[DZ2J027M0L]
D1232
$[DA2J10100L]
G1250
*
C1257
J0JHC0000046
LB1161
PW_USB5V
C1169
F1H1C105A118
L1102
G1C100MA0226
D0GB222JA065
R1429
D0GBR00J0004
R1404
R1119
D0GB100JA065
R1118
D1BB1332A074
C1137
F1H1H122B047
50V
F1H1H104B047
C1139
C1411
F1H1H680B052
50V
D1BB1003A074
R1116
C1136
F1K1C2260001
5.2V_OUT2
C1138
F1H1H104B047
TL1121
PW_IN19V_USB
C1124
F2G1E101A387
25V
R1431
D0GFR00J0005
12
5 6
3
4
IC1104
C0DBAYY02695
R1117
D1BB3301A074
C1135
F1K1C2260001
R1401
D0GB273JA065
PW_DAMP19V
QR400
B1GBCFNN0038
R1128
D1BB2702A074
ERJ3GEYF474VR1127
7
8
6
5
2
1
3
4
Q404
B1CHRC000047
R1400
D0GB104JA065
C1400
F1G1H102A830
50V
G1190
G1230
RL1191
C1407
*
16V
R1191*
*
C1191
50V
C1012F1G1H101A834
50V
PGND
STBY_CTRL
SMPS_LATCH1
PCONT3
D0GB472JA065
R1426
D1227
DZ2J220M0L
DAMPGND
PW_DAMP19V
PW_19V
CK1100
PW_19V
C1011F1G1H101A834
50V
*
D1225
D1228
DA2J10100L
D1115
DZ2J150M0L
*
D1233
D1224
*
D1221
DA2J10100L
D1113
DZ2J075M0L
D1101
DA2J10100L
D1223
DA2J10100L
D1230
*
C1001
F1H1H102B047
50V
D1100
DA2J10100L
DZ2J062M0L
D1104
DZ2J062M0L
D1112
C1224
F1H1A105A113
10V
D0GB5R6JA065
R1301
D1231
*
D1234*D1229
DZ2J047M0L
C1152
F1K1C2260001
J0JHC0000046
LB1104
PW_OUT3.3V_SOC
C1000
F1H1A105A113
C1408
F1H1H470B052
50V
C1150
F1K1C2260001
R1111
D1BB49R9A074
C1151
F1H1H122B047
50V
C1109
F1H1H104B047
12
5 6
3
4
IC1101
C0DBAYY02695
3.3V_OUT2
C1122
F2G1E101A387
25V
F1H1H104B047
C1143
R1151
D0GB100JA065
L1105
G1C100MA0226
PW3.3VDCDC
R1441D0GBR00J0004
RL1192
C1405
F1H1H102B047
50V
R1104
D1BB2212A074
G1229
D1BB1003A074
R1103
R1302
D0GB5R6JA065
PW_3.3ALLPLAY
PW_OUT3.3V_NW
C1412
*
50V
*
LB1251
R1424
*
*
C1255
PW_FL12V
PW_MEM_3.3V
PW_3R3V
PW_BT5V
FLGND
L1200
*
R1422
*
3.3V_OUT2_NW
C1256
*
LB1253
*
D1226
DA2J10100L
PCONT3
STBY_CTRL
M_VDET
SMPS_LATCH
SMPS_CUT
DC_DET_PWR
DGND
PW_STBY1R55V
PCONT
PW_DAMP19V_DAMP
J0JYC0000656LB1108
F1G1H101A834
C1226
50V
PW_USB_5V
MOTORGND
DAMPGND
*
C1409
6.3V
R1442
*
LOT26_CONTROL
C1258
*
*
R1425
LOT26_CONTROL
R1443
*
R1444
*
Q405
*
R1423
*
C1254
*
50V
*
C1406
50V
PW_STBY3R3V
J0JGC0000063
LB1223
NETWORK_GND
1
423
IC1106
C0DBGYY00911
C1225F1G1A1050004
10V
FB
VIN
SW EN
VDD
0.5% 0.5%
TO SOC
VOUT
R1422 R1424 R1425 near pin 4 IC1110
Put after C1255 C1256
Vref=0.6V
TO SOC
STBY1.6V
CE
TO CD_MOTOR
GND
TO SOC
TO MOTOR,FL
TO USB (IPAD)
GND Vout
DC-DC D3R3V (NETWORK)
Supplier: UTC
Vout Vin
GND
D3.3V
Vin
Supplier: UTC
Wire width 2mm or more
GND BOOT
TO INTERNAL MEMORY
TO FL
TO ALLPLAY SUPPLY
TO BT
TO FL,TUNER,DSP,LASER DIODE
0.5% 0.5%
Vref=0.6V
ENFBSW
VIN
R1116 R1117 R1118 near pin 4 IC1104
Put after C1135 C1136
REGION
Micro-P Protection
0.5%
R1103 R1104 R1111 near pin 4 IC1101
Put after C1150 C1152
SW
2.5V
2.5V
FB
EN
BOOT
Vref=0.6V
VIN
GND
Gnd
Vin
2.5V
ADJ
ADJ
Vin
Gnd
ADJ
Vin
CE
Vout
CE
Vout
Gnd
ANALOG 5V
FL+12V
CE
Vout
STBY 4.6V
0.5%
USB & SYSTEM DC DC (PCONT CONTROLLED)
SYSTEM DC-DC D3R3V (ALWAYS ON)
BOOTGND
TO DSP
49
Page 50
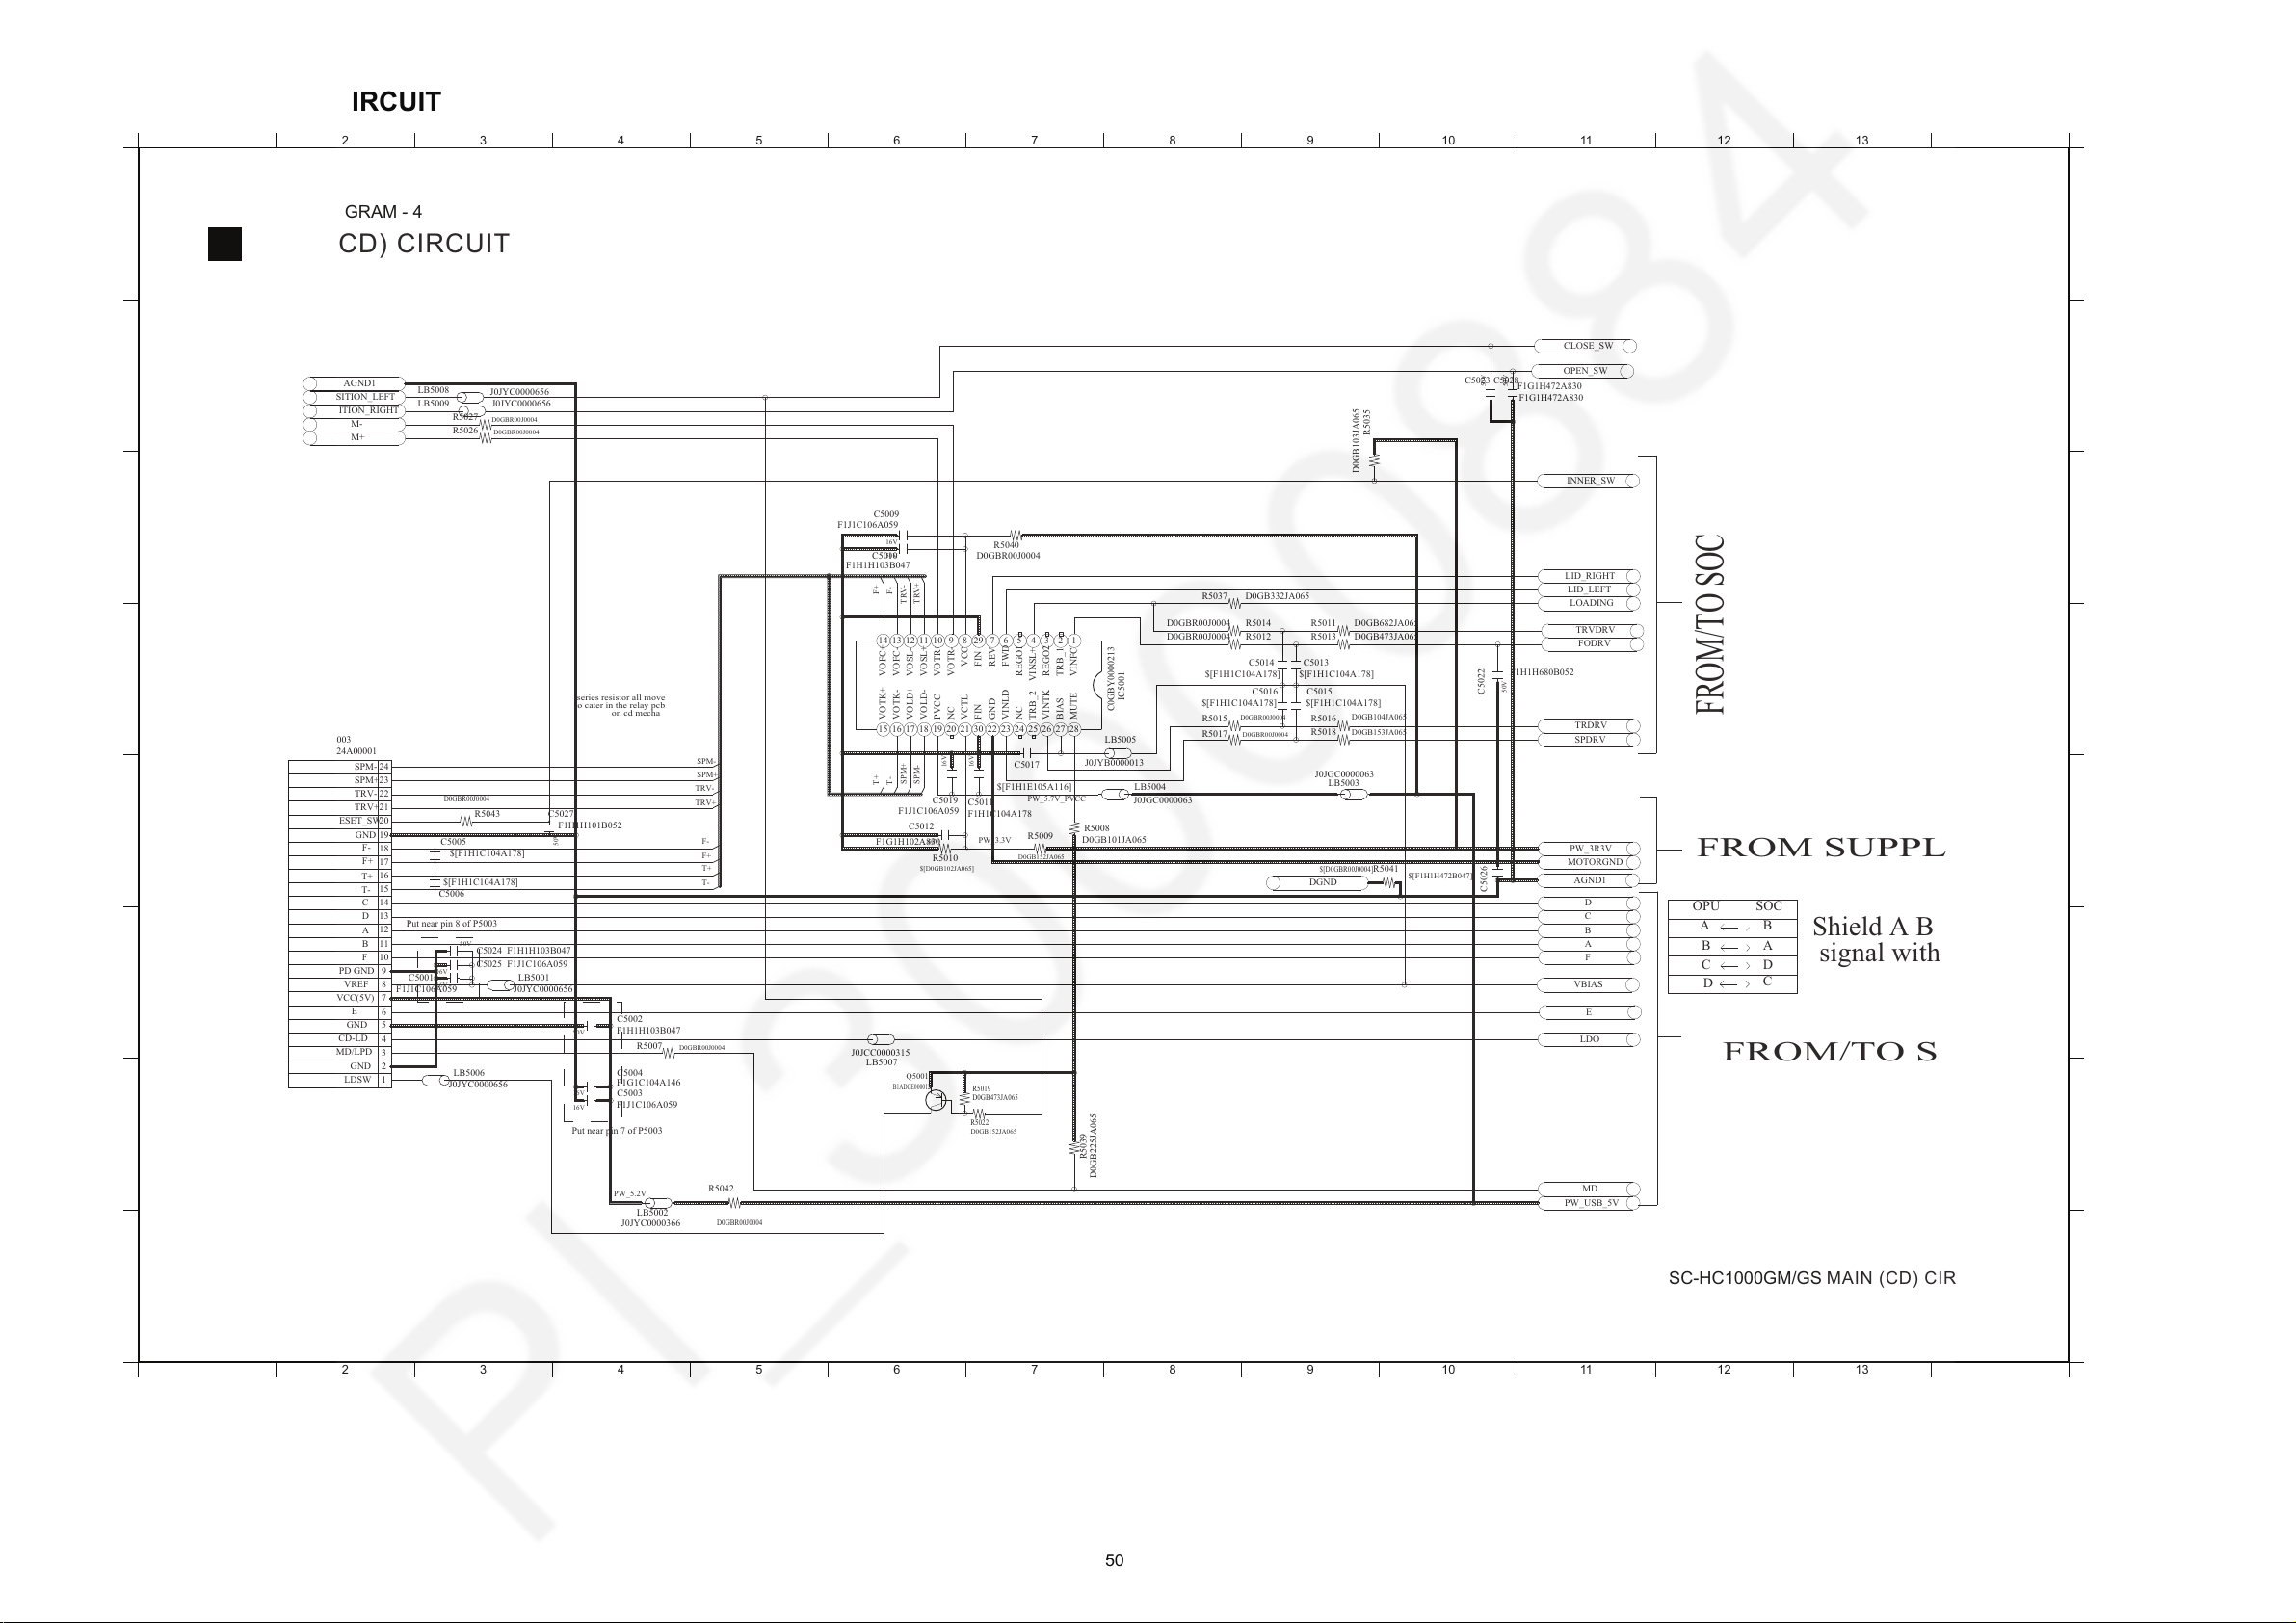
12.5. MAIN (CD) CIRCUIT
A
1
2 3 4 5 6 7 8 9 10 11 12 13 14
1 2 3 4 5 6 7 8 9 10 11 12 13 14
C
D
B
E
G
H
F
A
C
D
B
E
G
H
F
B
SC-HC1000GM/GS MAIN (CD) CIRCUIT
MAIN (CD) CIRCUIT
SCHEMATIC DIAGRAM - 4
SPDRV
PW_3R3V
TRVDRV
FODRV
LOADING
LID_RIGHT
LID_LEFT
TRDRV
MD
MOTORGND
E
C
F
A
LDO
B
D
TRV-
SPM-
SPM+
TRV+
R5027
D0GBR00J0004
R5026
D0GBR00J0004
M-
POSITION_LEFT
AGND1
POSITION_RIGHT
J0JYC0000656
LB5008
M+
J0JYC0000656LB5009
R5008
D0GB101JA065
D0GBR00J0004
R5040
D0GBR00J0004 R5014
R5037 D0GB332JA065
R5011 D0GB682JA065
D0GBR00J0004 R5012 R5013 D0GB473JA065
$[F1H1C104A178]
C5014
OPEN_SW
F1G1H472A830
C5028
50V
F1G1H472A830
C5023
50V
CLOSE_SW
INNER_SW
R5035
D0GB103JA065
PW_5.7V_PVCC
J0JYB0000013
LB5005
C5017
$[F1H1E105A116]
J0JGC0000063
LB5004
F1H1C104A178
C5011
16V
LB5003
J0JGC0000063
$[F1H1C104A178]
C5013
C5022
F1H1H680B052
50V
R5018
D0GB153JA065
R5016
D0GB104JA065
$[F1H1C104A178]
C5015
R5015
D0GBR00J0004
$[F1H1C104A178]
C5016
R5017
D0GBR00J0004
SPM-T+SPM+
T- F-
TRV-F+TRV+
C5010
F1H1H103B047
50V
F1J1C106A059
C5009
16V
21
27
54
24 25
2217 191815 16 3020 21
711 101314 12 8 299
23
6 3
26
28
C0GBY0000213
IC5001
C5019
F1J1C106A059
16V
LB5001
J0JYC0000656
LB5002
J0JYC0000366
PW_5.2V
D0GBR00J0004
R5042
D0GBR00J0004
R5007
LB5007
J0JCC0000315
R5022
D0GB152JA065
D0GB473JA065
R5019
B1ADCE000012
Q5001
F1H1H103B047
C5002
50V
F1J1C106A059
C5003
16V
C5004
F1G1C104A146
16V
LB5006
J0JYC0000656
F1J1C106A059C5025
16V
F1H1H103B047C5024
50V
F1J1C106A059
C5001
16V
R5010
$[D0GB102JA065]
$[F1H1C104A178]
C5006
D0GBR00J0004
R5043
$[F1H1C104A178]
C5005
F1G1H102A830
C5012
50V
F+
F-
T-
T+
F1H1H101B052
C5027
50V
6
7
5
9
13
15
14
11
10
12
21
22
18
16
17
20
19
8
1
3
4
2
24
23
K1MY24A00001
P5003
PW_USB_5V
R5039
D0GB225JA065
DGND
R5041
$[D0GBR00J0004]
AGND1
C5026
$[F1H1H472B047]
VBIAS
PW_3.3V
R5009
D0GB152JA065
VOTK- VOFC-
PVCC
VOSL+
VOTR+
VOLD-
FIN
NC
FIN
VOTR-
VCCVCTL
VOSL-VOLD+
CD MOTOR
GO TO FL CONN
VOFC+
SPM+
GND
F-
B
D
C
A
F
T-
T+
Put near pin 8 of P5003
F+
TRV+
GND
LDSW
GND
CD-LD
MD/LPD
E
VREF
PD GND
VCC(5V)
RESET_SW
TRV-
SPM-
FROM/TO CD INTERFACE
VOTK+
Put near pin 7 of P5003
series resistor all move
to cater in the relay pcb
on cd mecha
BIAS
OPU SOC
FROM SUPPLY
D
A
C
FROM/TO SOC
Shield A B C D E F
signal with AGND1
BA
C
B
D
MUTE
GND
NC
REGO2
VINFC
TRB_1
VINTK
FROM/TO SOC
VINLD FWD
REV
TRB_2 VINSL+
REGO1
50
Page 51
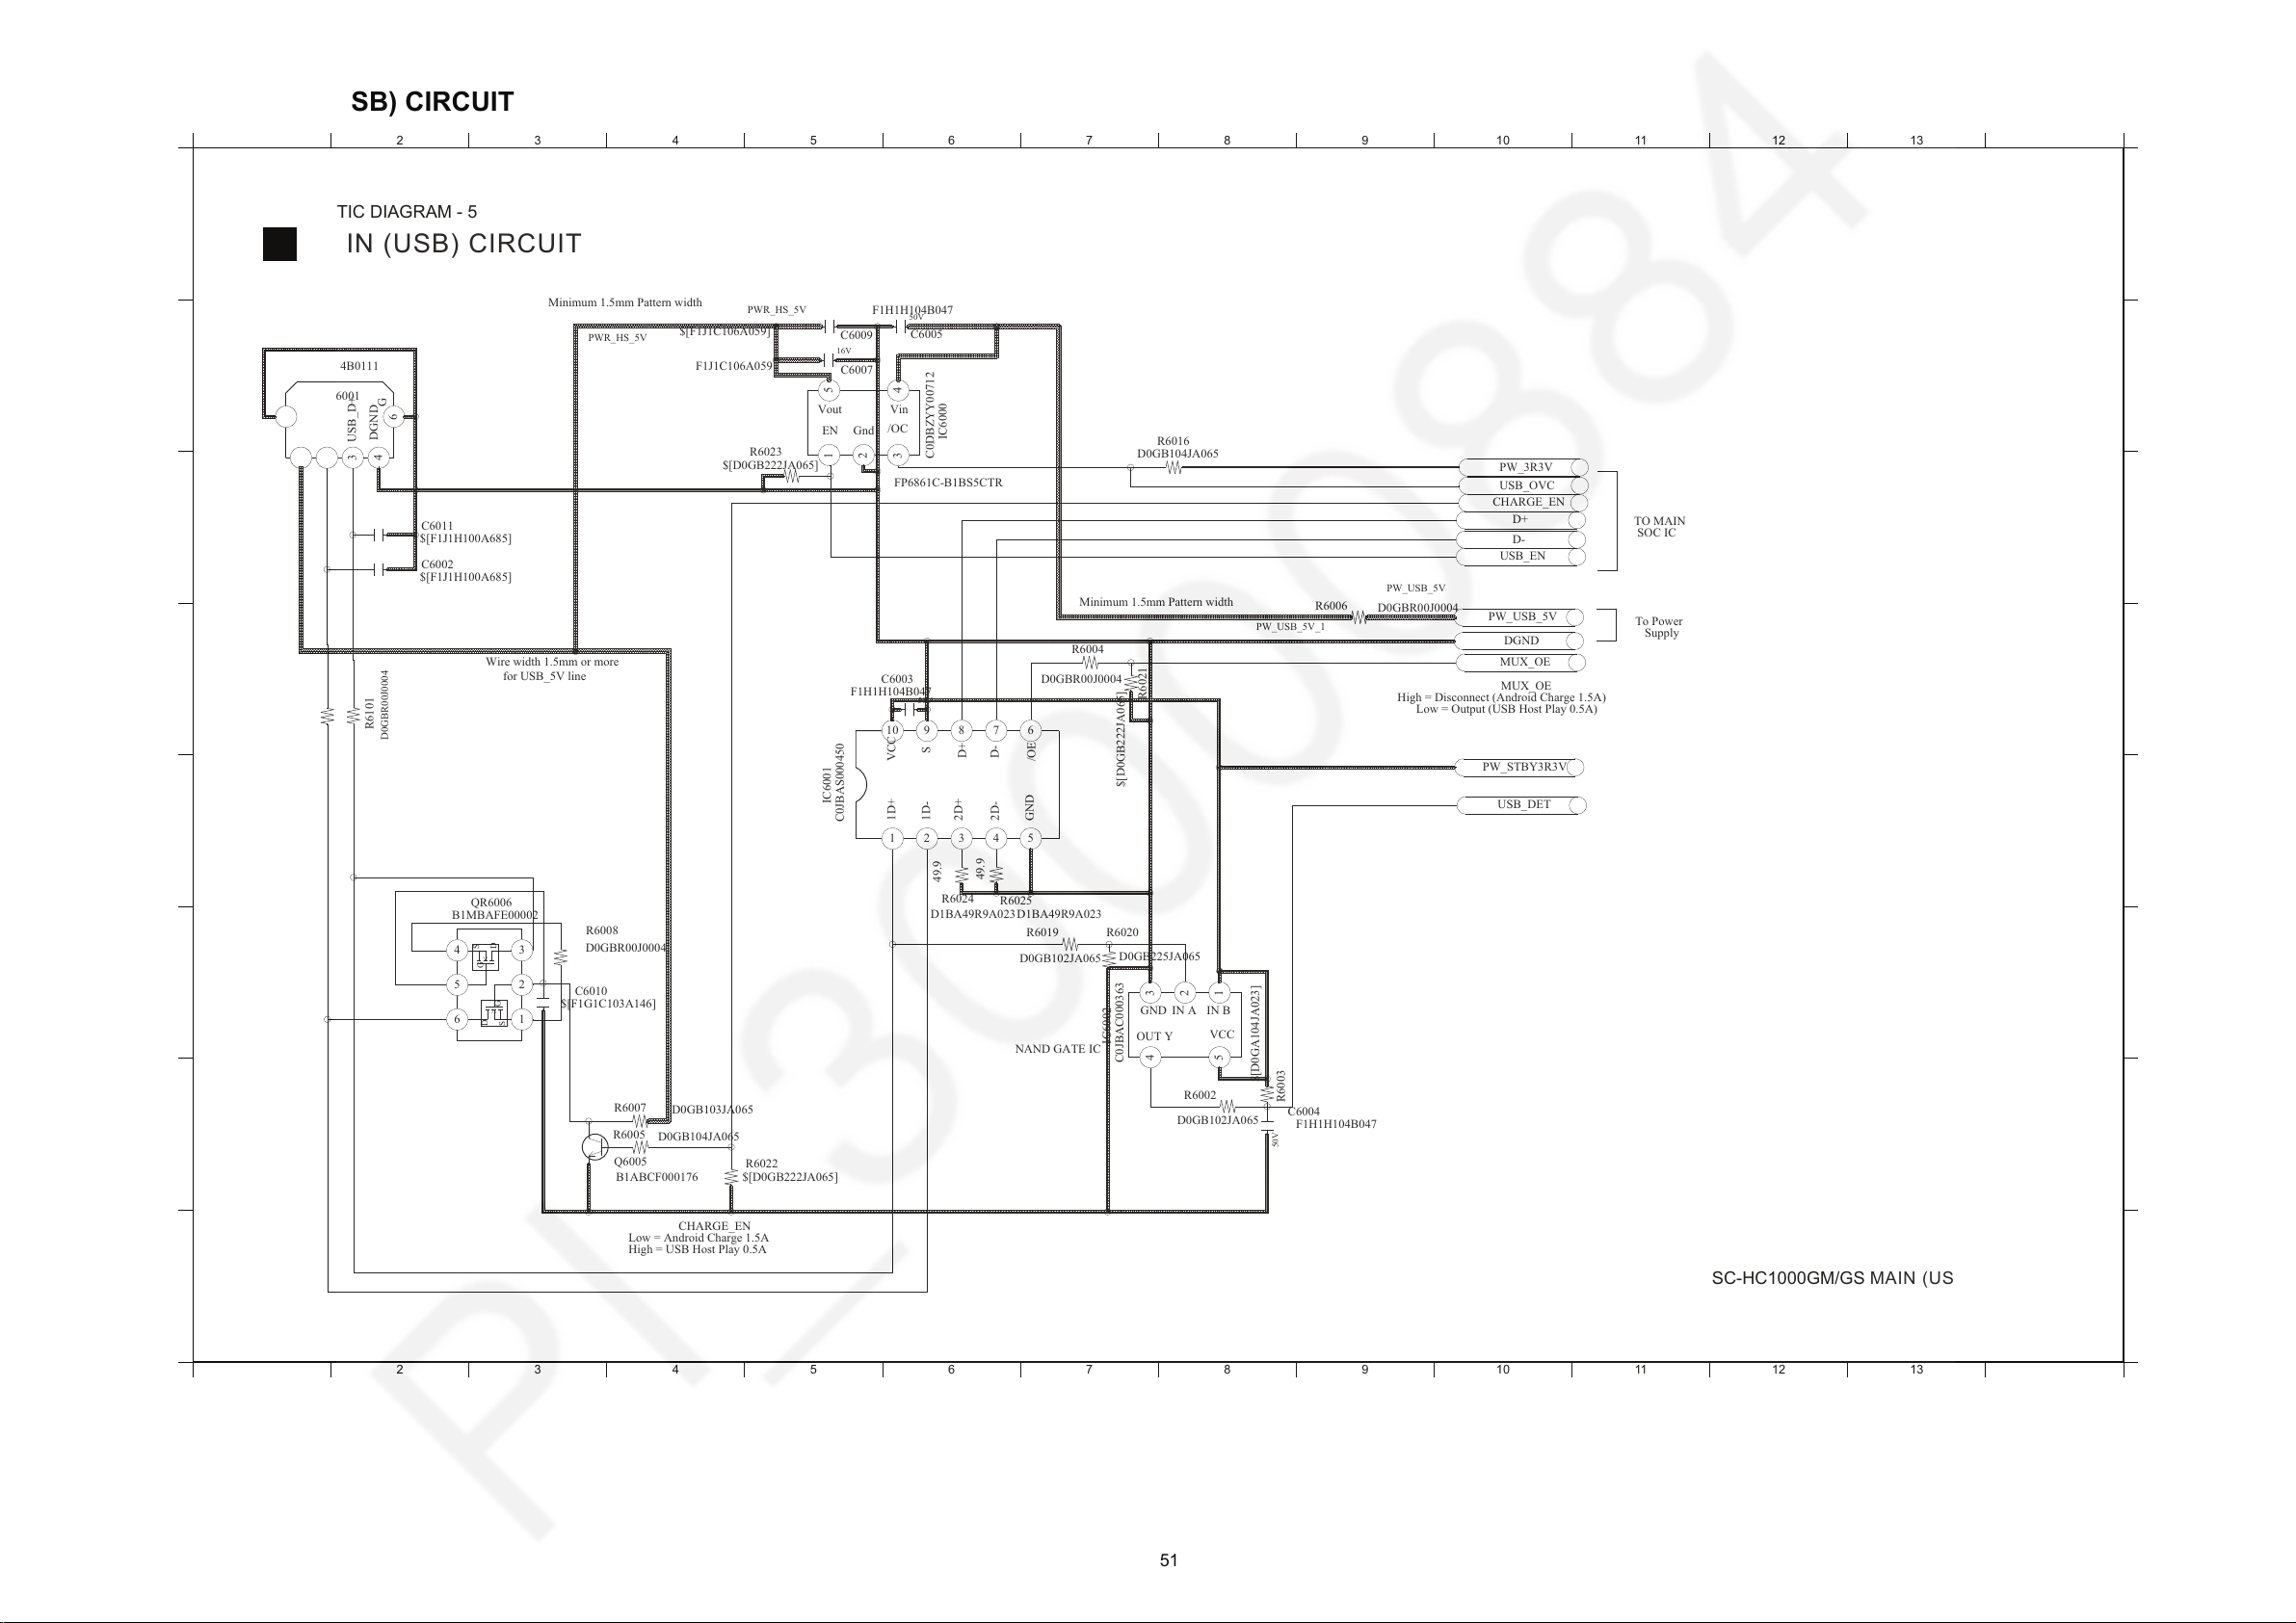
12.6. MAIN (USB) CIRCUIT
A
1
2 3 4 5 6 7 8 9 10 11 12 13 14
1 2 3 4 5 6 7 8 9 10 11 12 13 14
C
D
B
E
G
H
F
A
C
D
B
E
G
H
F
B
SC-HC1000GM/GS MAIN (USB) CIRCUIT
MAIN (USB) CIRCUIT
SCHEMATIC DIAGRAM - 5
PW_3R3V
USB_OVC
D0GB104JA065
R6016
$[D0GB222JA065]
R6023
C6011
$[F1J1H100A685]
C6002
$[F1J1H100A685]
D0GBR00J0004
R6100
R6101
D0GBR00J0004
D0GBR00J0004
R6004
$[D0GB222JA065]
R6021
C6003
F1H1H104B047
50V
C6005
F1H1H104B047
50V
3
1
2
4
5
IC6000
C0DBZYY00712
PWR_HS_5V
PWR_HS_5V
2
5
G
1
4
6
G
3
K1FY104B0111
CN6001
F1J1C106A059
C6007
16V
$[F1J1C106A059]
C6009
PW_USB_5V
PW_USB_5V
DGND
D0GBR00J0004
R6006
MUX_OE
D+
CHARGE_EN
PW_USB_5V_1
USB_EN
D-
Q6005
B1ABCF000176
$[F1G1C103A146]
C6010
R6008
D0GBR00J0004
2
3
S
1
G
5
4
S
D
D
6
G
B1MBAFE00002
QR6006
R6022
$[D0GB222JA065]
49.9
D1BA49R9A023
R6025
R6020
D0GB225JA065
USB_DET
PW_STBY3R3V
R6019
D0GB102JA065
R6002
D0GB102JA065
R6003
$[D0GA104JA023]
F1H1H104B047
C6004
50V
312
4
5
C0JBAC000363
IC6002
D0GB103JA065
R6007
49.9
R6024
D1BA49R9A023
6
51
10
3 42
897
IC6001
C0JBAS000450
D0GB104JA065
R6005
To Power
Supply
MUX_OE
High = Disconnect (Android Charge 1.5A)
Low = Output (USB Host Play 0.5A)
TO MAIN
SOC IC
OUT Y
GND
Vout
EN
DGND
USB_5V
USB_D+
for USB_5V line
Wire width 1.5mm or more
USB_D-
Minimum 1.5mm Pattern width
FP6861C-B1BS5CTR
Gnd
Vin
/OC
USBD-
USBD+
S
VCC
D-
D+
/OE
1D+
2D-
GND
1D-
2D+
VCC
IN B
Minimum 1.5mm Pattern width
IN A
CHARGE_EN
Low = Android Charge 1.5A
High = USB Host Play 0.5A
NAND GATE IC
51
Page 52
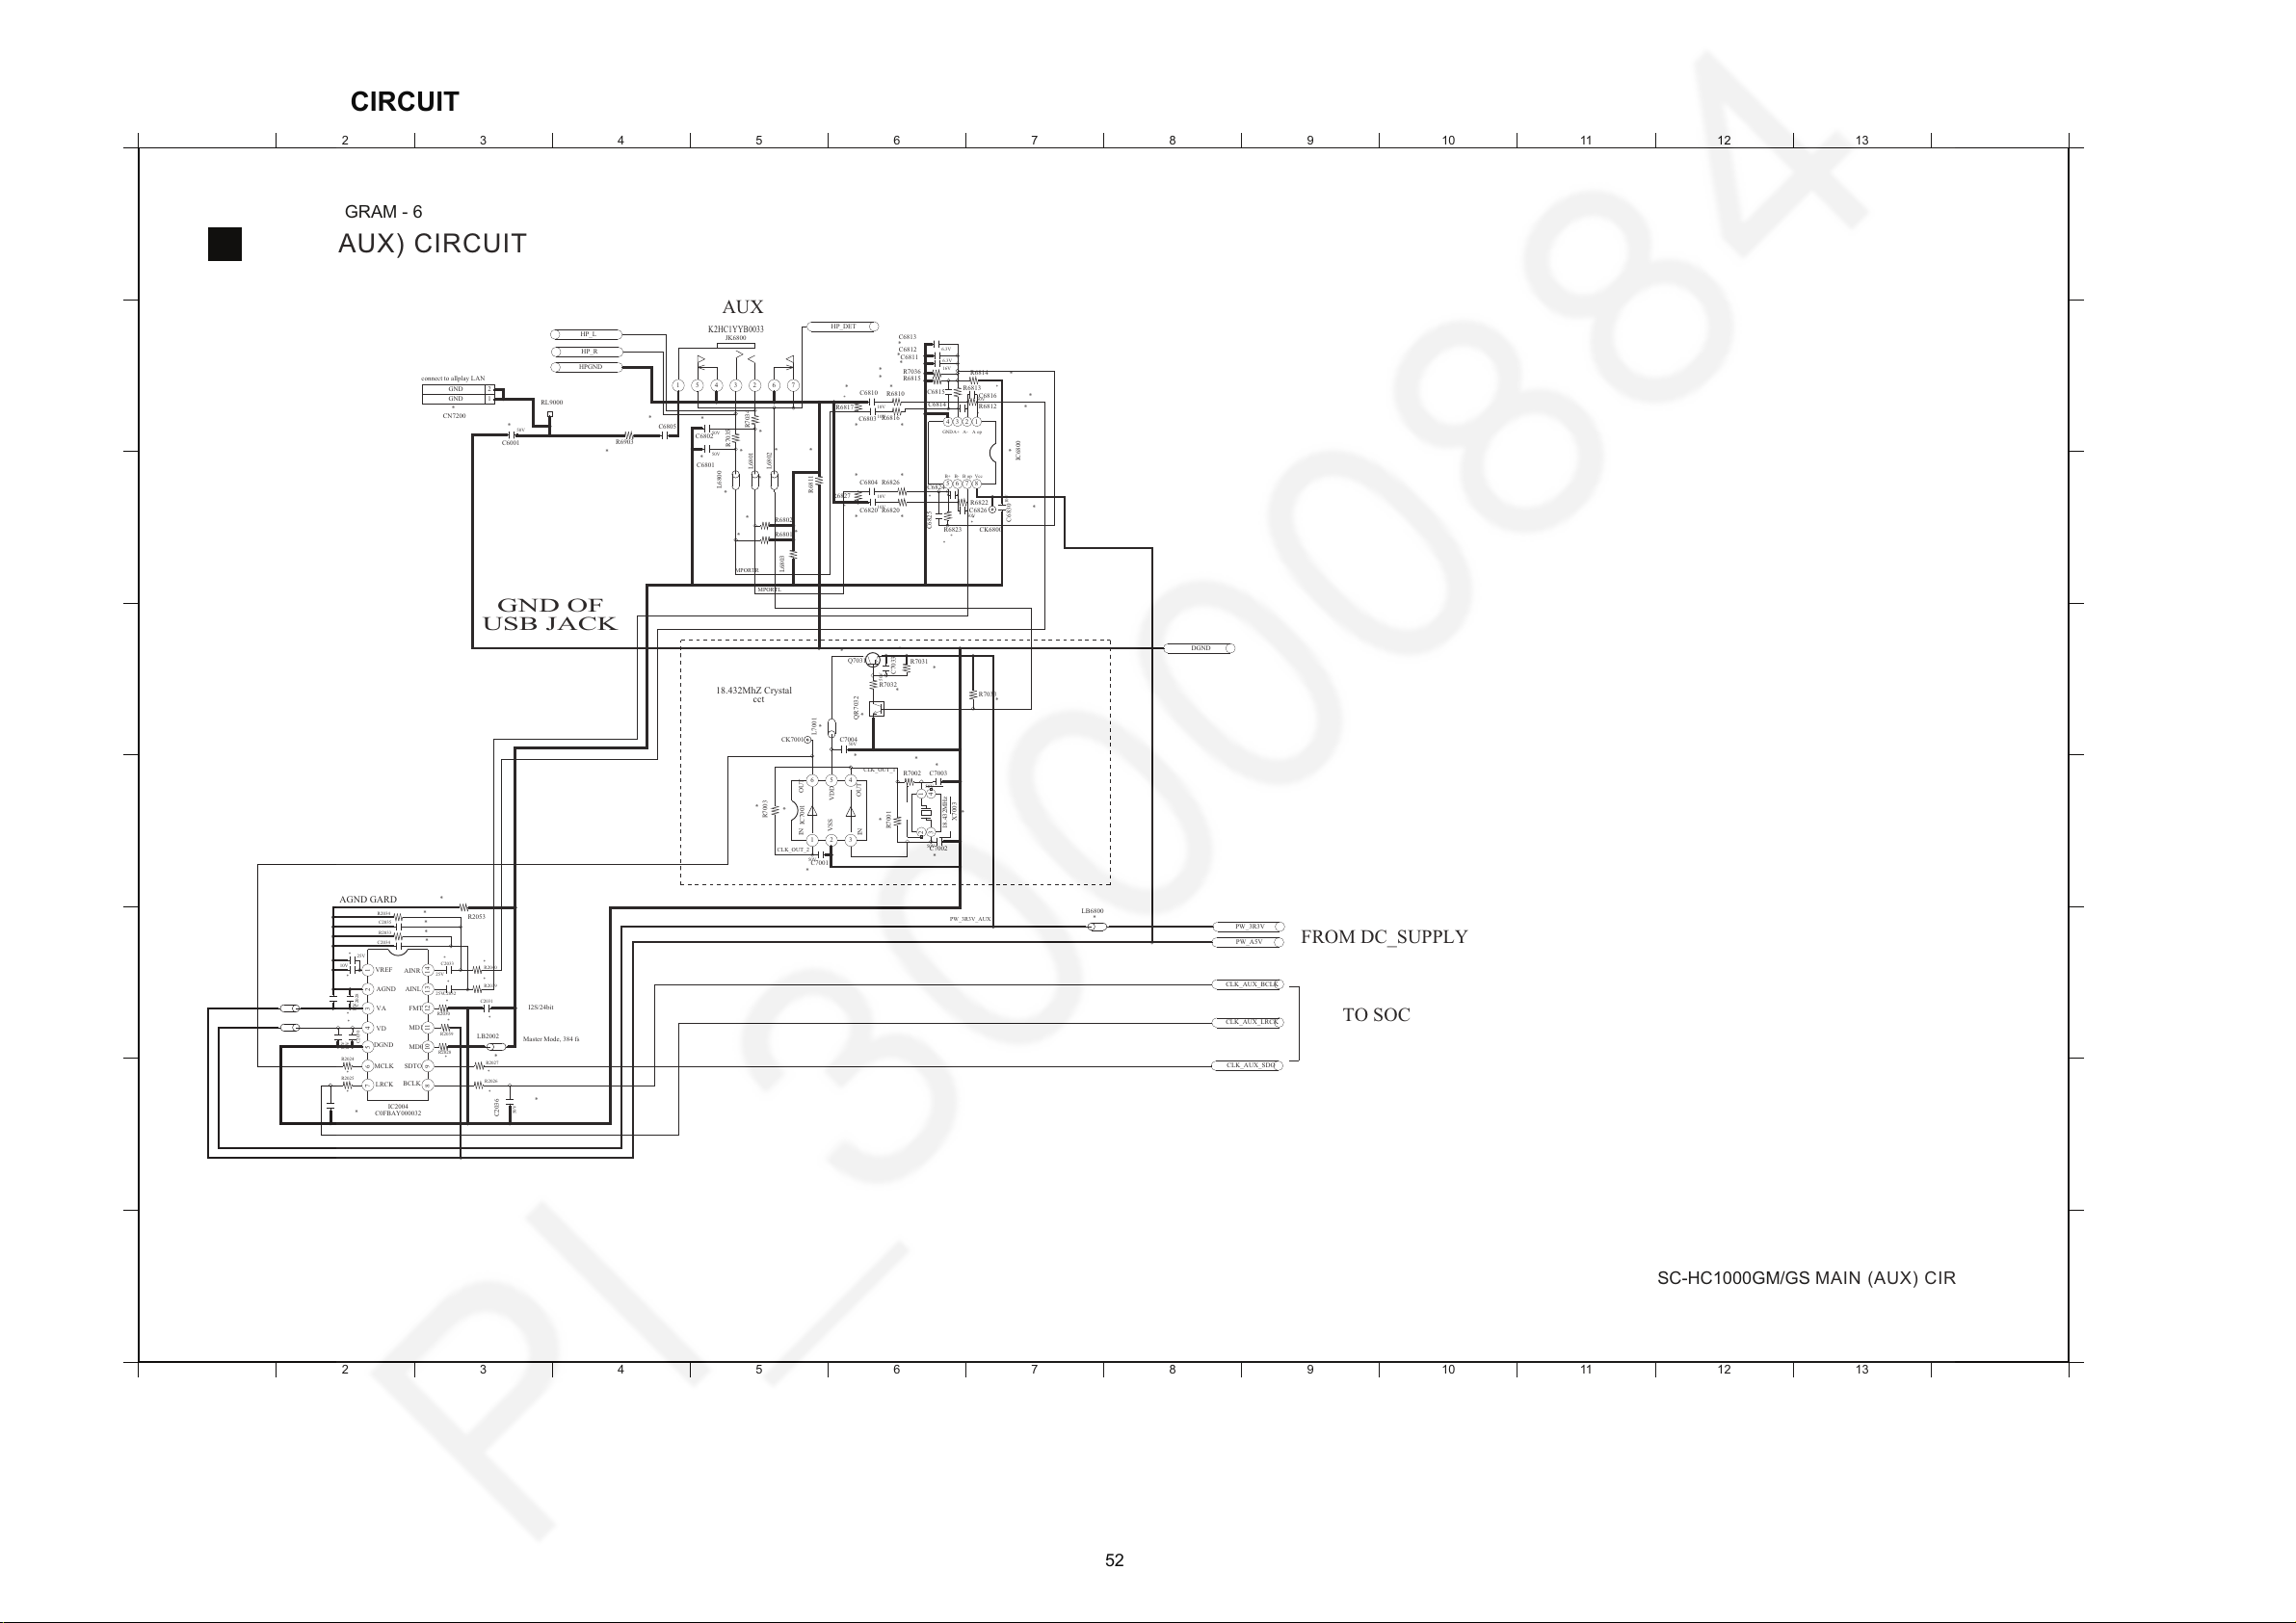
12.7. MAIN (AUX) CIRCUIT
A
1
2 3 4 5 6 7 8 9 10 11 12 13 14
1 2 3 4 5 6 7 8 9 10 11 12 13 14
C
D
B
E
G
H
F
A
C
D
B
E
G
H
F
B
SC-HC1000GM/GS MAIN (AUX) CIRCUIT
MAIN (AUX) CIRCUIT
SCHEMATIC DIAGRAM - 6
HP_R
HPGND
HP_L
R6903
*
*
L6800
L6801
*
*
R7034
C6805
*
R7035
*
*
C6802
50V
*
C6801
50V
*
C6001
50V
RL9000
*
L6802
R6802
*
763 2145
K2HC1YYB0033
JK6800
R7003
*
R6801
*
CK7001
*
L7001
DGND
*
R7032
*
QR7032
*
Q7031
*
R7033
R7031
*
*
C7033
50V
R7001
*
C7002
*
50V
C7001
*
50V
R7002
*
2
3
1
4
X7003
*
C7003
*
50V
C7004
*
50V
CLK_OUT_1
CLK_OUT_2
1 2
5
634
*
IC7001
C6813
*
6.3V
C6811
*
16V
C6812
*
6.3V
R6814
*
R6812
*
R6813
*
C6816 *
50V
C6815
C6814
*
R6815
*
R7036
*
*
R6817
*
R6816
R6810
*
C6810
*
10V
*
C6803
10V
R6823
*
R6827
*
C6804
*
10V
21
7
85
4
3
6
*
IC6800
C6824
*
*
R6826
C6825
*
*
C6820
10V
R6820
*
CK6800
C6830
*
10V
R6822
*
C6826
*
50V
HP_DET
L6803
*
R6811
*
MPORTL
MPORTR
LB2002
*
R2027
*
*
C2036
50V
R2026
*
R2059
*
R2028
*
R2040
*
R2039
*
C2031
*
C2033
*
25V
R2053
*
*
R2030
C2032*25V
CLK_AUX_LRCK
CLK_AUX_SDO
*
LB6800
PW_A5V
PW_3R3V_AUX
PW_3R3V
CLK_AUX_BCLK
1
2
CN7200
*
*
LB2005
*
LB2000
R2025
*
*
R2024
*
50V
C2037
*
C2030
10V
C2025
*
10V
C2028
*
16V
*
C2029
16V
R2034
*
R2033
*
C2035
*
C2034
*
C2027
*
10V
*
C2026
25V
56 4 123
9 11 13 141210
7
8
C0FBAY000032
IC2004
VSS
IN
AGND
VA
VREF
AGND GARD
I2S/24bit
FMT
AINL
AINR
OUT
18.432MhZ Crystal
cct
AUX
VDD
GND
GND
connect to allplay LAN
GND OF
USB JACK
FROM DC_SUPPLY
OUT
IN
A+B-GND
B+ VccB op
A opA-
TO SOC
Master Mode, 384 fs
DGND
MD0
MD1
VD
BCLK
LRCK
MCLK SDTO
52
Page 53
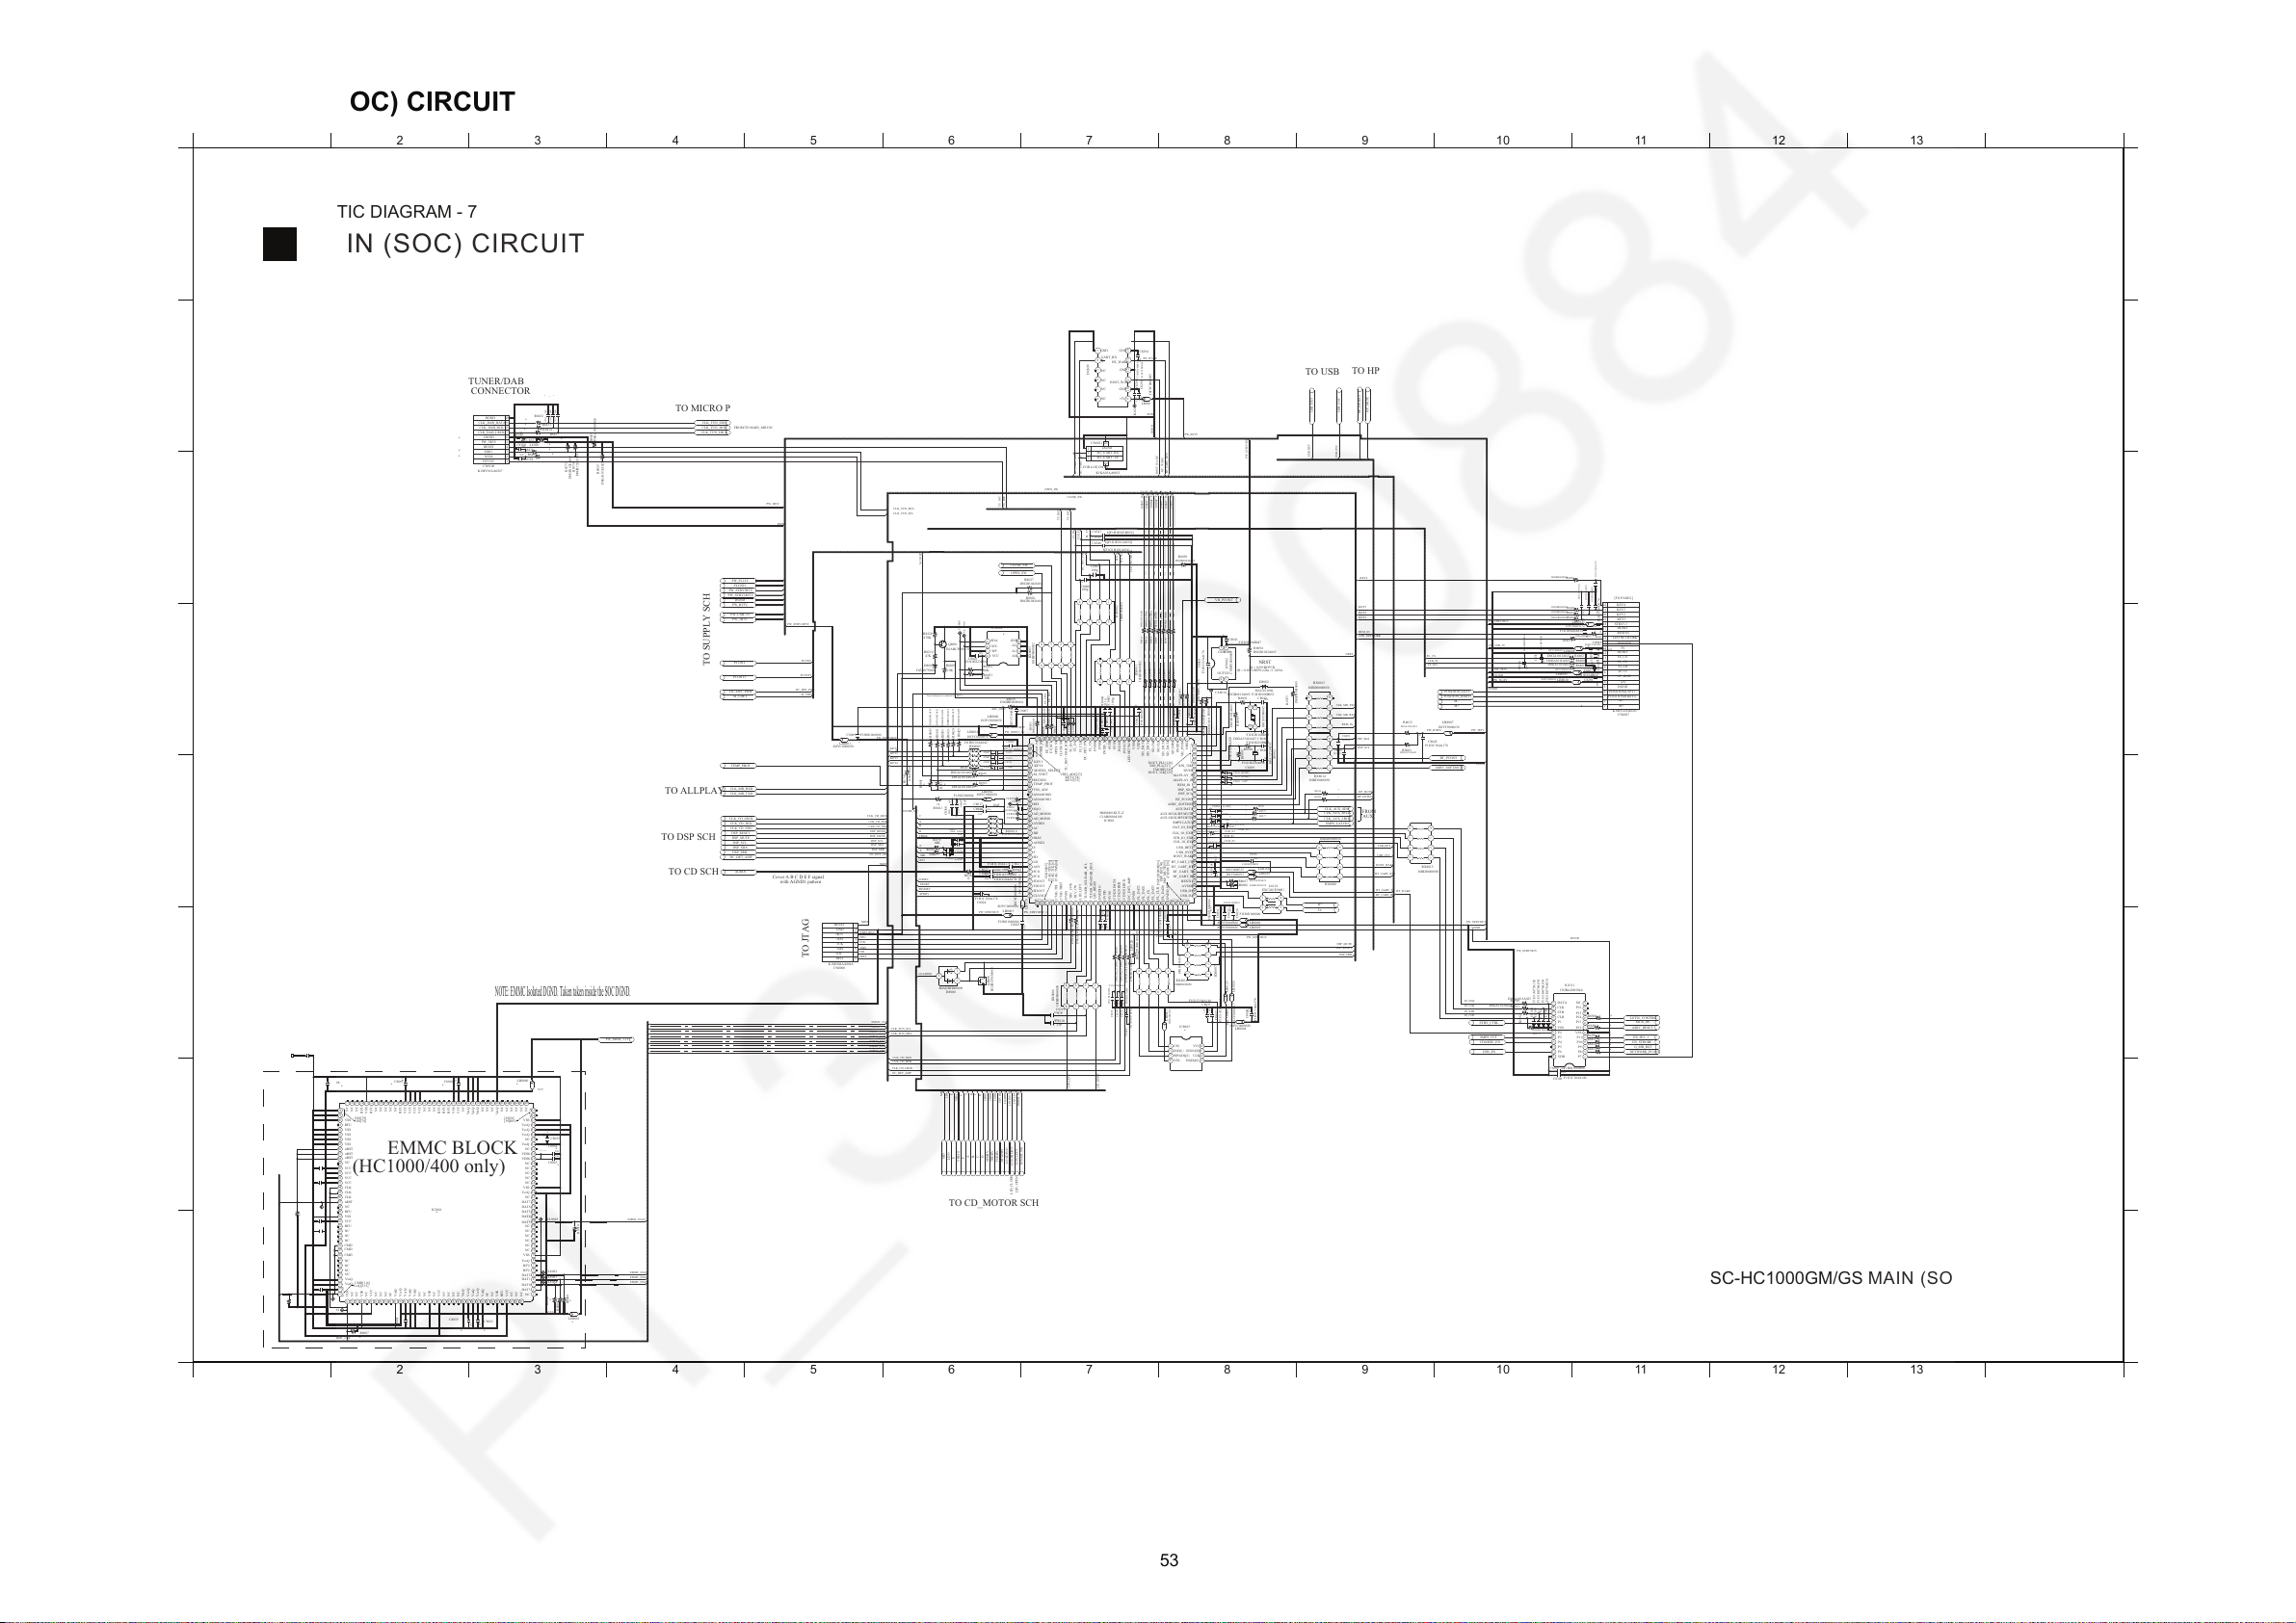
12.8. MAIN (SOC) CIRCUIT
A
1
2 3 4 5 6 7 8 9 10 11 12 13 14
1 2 3 4 5 6 7 8 9 10 11 12 13 14
C
D
B
E
G
H
F
A
C
D
B
E
G
H
F
B
SC-HC1000GM/GS MAIN (SOC) CIRCUIT
MAIN (SOC) CIRCUIT
SCHEMATIC DIAGRAM - 7
LB7173
J0JYC0000656
LB8003
J0JYC0000656
LB8006J0JYC0000656
PW_STBY3R3V_1
431
2
L8101
EXC24CE900U
R8067
ERJ3GEYF683V
R8066
D1BB1502A074
C8030
50V
C8033
F1H0J1060006
6.3V
R8047D0GA101JA023
R8046D0GA101JA023
F1H0J1060006
C8025
6.3V
C8029
50V
C8035
F1H1H101B052
50V
C8034
F1H0J1060006
6.3V
C8036
F1H0J1060006
6.3V
LB8005J0JYC0000656
R8361
0
FODRV
TRDRV
C8023
F1H1C224A178
16V
SPDRV
F1H1C104A178
C8024
16V
TRVDRV
CL8013
CL8012
C8016
F1G1H681A571
50V
CL8010
CL8011
R8376
*
R8377
*
R8375
*
D0GA272JA023
R8359
$[F1G1H101A834]
C8443
C8444
$[100P]
*
C8441
50V
C8442
*
50V
R8075D0GA101JA023
C8038 100P
50V
R8045
D0GB471JA065
C8021
F1H1C104A178
16V
F1H1H101B052
C8336
50V
LB8169
J0JCC0000315
J0JCC0000315
LB8168
C8445
$[F1H1H101B052]
F1G1H101A834
C8337
50V
F
VBIAS
E
0.1u
C8360
16V
R8021
10
*
R8110
R8041
*
R8380
68K
R8379
68K
MD
J0JYC0000656
LB8002
C8018
0.1u
16V
C8017
10uF
10V
8 6
57
42
13
RX8010
D1H81034A042
C8047
22uF
F1J0J2260004
6.3V
C
A
R8430
100
D0GA101JA023
R8501
100
D0GA101JA023
C8020
0.1u
16V
D
C8019
10uF
10V
B
2200P
C8288
50V
NRST
NRST
C8289
2200P
50V
C8022
F1H1A335A083
10V
LDO
B1GBCFNN0038
Q8000
C8318
33P
50V
LID_RIGHT
INNER_SW
LID_LEFT
C
TRVDRV
D
SPDRV
FODRV
LOADING
TRDRV
LID_LEFT
C8319
47P
50V
LOADING
LDO
EMDA
B
F
VBIAS
PW_STBY3R3V
TDO
TCK
TMS
TDI
TRST
3
1
2
B0ADDH000009
D8000
R8036D0GA221JA023
R8022
D0GB104JA065
D0GB101JA065
LB8120
LB8013
J0JHC0000118
$[F1H1H101B052]
C8446
C8335
F1G1H101A834
50V
6 58 7
3412
J0JBD0000050
RX8016
R8035D0GA221JA023
21
7
85
4 3
6
IC8003
*
C8044
F1H1C104A178
16V
LB8004
J0JYC0000656
LB8126
J0JCC0000317
C8032
F1G1A1050004
10V
C8031
F1G1C104A146
16V
LB8125
J0JCC0000317
R8037D0GA221JA023
F1G1H101A834
C8333
50V
LID_RIGHT
CLK_TUN_SCL
CLK_TUN_SDA
6 58 7
34 12
RX8006
J0JBD0000050
CLK_CD_SDO
DC_DET_AMP
C8334
F1G1H101A834
50V
CLK_CD_BCK
CLK_CD_LRCK
PW_STBY3R3V
PW_STBY3R3V
C8060
F1G1C104A146
16V
65 87
3 41 2
RX8007
J0JBD0000050
CLK_CD_BCK
CLK_CD_BCK
CLK_CD_SDO
CLK_CD_SDO
CLK_CD_LRCK
CLK_CD_LRCK
CLK_MR_RXD
CLK_MR_TXD
DSP_SDA
DSP_ERR
C8074
*
50V
RL8060
C8067
*
16V
C8066
*
10V
C8068
*
6.3V
LB8060
*
PW_MEM_3.3V
VCC
DC_DET_AMP
DSP_MUTE
DSP_SCL
5
6
1
3
4
2
8
7
K1MN08AA0046
CN8000
EMMC_CLK
EMMC_DAT0
EMMC_DAT2
EMMC_NRST
EMMC_DAT3
EMMC_DAT1
EMMC_CMD
DSP_RESET
DSP_SCL
DSP_RESET
DSP_MUTE
DC_DET_AMP
DSP_ERR
DSP_SDA
AGND1
PW_STBY1R6V
LB8001
J0JYC0000656
C8026
F1H1H223B047
50V
R8052
10K
R8051
10K
47K
R8210
D8001
DZ2J075M0L
R8209
10K
D0GB104JA065
R8026
CLOSE_SW
OPEN_SW
R8027
D0GB104JA065
21
7
85
43
6
IC8004
*
CL8000
CL8006
R8221
470K
B1ABCF000176
Q8001
J0JYC0000656
LB8000
J0JYC0000656
LB8014
C8007
F1H1C104A178
16V
R8029
D0GBR00J0004
ADC_GND
C8009 F1H0J1060006
6.3V
F1H1C224A178
16V
C8054
D8002
DA2J10100L
D0GFR00J0005
R8553
CL8014
R8090
D0GB105JA065
R8091
D0GB681JA065
R8093
$[D0GB103JA065]
R8092
D0GB103JA065
C8041
F1H1H100B051
50V
C8042
F1H1H100B051
50V
2
3
1
4
X8001
H0J169500045
CL8004
F1H1C104A178
C8001
16V
CL8005
C8052
F1H1C104A178
16V
F1H0J1060006
C8053
6.3V
R8423
D0GA101JA023
C8051
50V
D0GA101JA023
R8448
PW_STBY1_5V
D0GA101JA023
R8447
CL8073
CL8072
CL8071
D0GB101JA065
R8001
EE_SCL
EE_SDA
CL8070
CL8068
CL8067
6 58 7
34 12
RX8011
J0JBD0000052
CL8069
C8003
100p
50V
0.1u
C8004
16V
F1H1H101B052
C8002
50V
F1H1C104A178
C8000
16V
D0GB101JA065
R8000
STANDBY_3R3V
USB_DET
USB_DET
1
4
2
3
C0EBY0000664
IC8002
D0GB104JA065
R8050
EMMC_DAT1
EMMC_NRST
VH_PCONT
R8094
D0GB102JA065
PW_STBY3R3V
C8043
F1H1H104B047
50V
C8290
F1H0J1060006
6.3V
7 56 4 3
10 12 141311
8
9
L8000
J0JYC0000305
C8291
F1G1C104A146
16V
C8294
16V
PCONT3
LED_NETWORK
FL_DO
TU_RST
OPEN_SW
TU_INT
CLOSE_SW
$[F1G1H101A834]
C8345
$[F1H1H101B052]
C8347
C8005
100p
50V
PCONT
$[F1G1H101A834]
C8346
FL_CS
CLK_FL
6 58 7
34 12
RX8003
J0JBD0000052
6 587
34 1
2
RX8002
J0JBD0000050
DC_DET_PWR
C8006
100p
50V
G1
G2
1
3
2
K1KA03AA0051
CN8031
BT_UART_TX
BT_UART_RX
DGND
DGND
D0GA330JA023R8015
EMMC_CMD
EMMC_CLK
EMMC_DAT0
EMMC_DAT3
D0GA330JA023R8014
D0GA330JA023R8017
D0GA330JA023R8016
D0GA330JA023R8011
EMMC_DAT2
D0GA330JA023R8018
D0GA330JA023R8012
HOST_WAKE
BT_WAKE
BT_WAKE
PW_BT5V
BT_UART_RTS
CK8261
86
5 7
42
1 3
RX8005
D1H81014A042
KEY2
KEY1
D1BB1002A074
R1741
KEY4
R8442
D0GA101JA023
100
KEY3
R8425
D1BB1002A074
R8503
D1BB1002A074
R8431
D1BB1002A074
R8424
D1BB1002A074
D1BB1002A074
R8043
D1BA1002A022
R8441
M_VDET
F1G1H220A834
C8039
50V
H0A327200191
X8002
C8447
4700P
50V
C83554700P
50V
C8354
4700P
50V
C8356
4700P
50V
C8330 $[100P]
$[100P]C8329
D0GA106JA023
R8095
R8088
D0GA334JA023
C8040
F1H1H220B052
50V
PW_STBY1R5V
PW_STBY3R3V_2
127
125
123
117
116
118
115
120
121
119
98
97
99
105
104
106
102
100
101
103
113
111
109
108
110
112
114
107
122
124
126
63 5052 51 4547 46 4142 38 343637 3540 3944 4349 48606261 5657 5355 54595864
959293888984858081
7267656671696870767879777375748382878691909496
9107
8
1215161314
11
14236
5
128
31292326272425181917222021
283032
33
IC8001
C1AB00004188
C8008
F1G1C104A146
16V
INNER_SW
PW_STBY3R3V
FLGND
CLK_TUN_BCK
*
C8433
50V
*
C8434
50V
*C8432
50V
R8432
*
R8433*
CLK_TUN_LRCK
CLK_TUN_SDO
6
8
9
7
2
1
4
5
3
10
CN9100
K1MY10AA0267
D0GA103JA023
R8025
50V
*
C8358
R8435
*
*
R8437
*L8100
D0GB152JA065
R8374
D0GB152JA065
R8373
R8024
D0GA103JA023
R8434*
*
C8359
50V
R8436
*
C8152 *
50V
*
C8357
6.3V
PW_FL12V
TU_INT
PW_3R3V
TU_RST
CLK_TUN_SCL
CLK_TUN_SDA
DGND
PW_STBY1R55V
PW_BT5V
PCONT
M_VDET
PCONT3
DC_DET_PWR
PW_3R3V
TEMP_PROT
M_VDET
PCONT3
PCONT
DC_DET_PWR
PW_USB_5V
PW_STBY1R55V
DGND
I2S_SEL_1
ASRC_RESET
I2S_STROBE
LOT26_CONTROL
MUX_OE
G_MR_RST
NETWORK_PCONT
STBY_CTRL
R8391
D0GA101JA023
R8390
D0GA101JA023
R8392
D-
USB_OVC
HOST_WAKE
USB_DET
65 87
3 41 2
RX8008
J0JBD0000050
BT_UART_RTS
BT_UART_TX
BT_UART_RX
STB_IO
CLR_IO
D+
PW_STBY3R3V
DSP_MUTE
DSP_ERR
DSP_RESET
DGND
IO_CLR
IO_CLK
IO_STB
CHARGE_EN
USB_EN
SMPS_CUT
D0GB222JA065
R8372
C8303
F1G1H470A834
50V
C8304
F1H1A475A102
10V
*
R8451
*
R8450
*R8500
*R8449
*
R8453
*
R8452
C8306
F1H0J1060006
6.3V
C8305
F1G1C104A146
16V
C8302
F1G1H470A834
50V
21
23
67
18
20 1921
45
13
121089
17 1516
11
14
3
22
24
C0JBAZ003040
IC8111
BT_WAKE
C8301
F1G1H470A834
50V
DGND
PW_STBY3R3V
HP_DETECT
R8013
D0GA152JA023
D0GA152JA023
R8003
HP_MUTE
PW_D3R3V PW_3R3V
M+
ASRC_SOFTMUTE
LB8007
J0JYC0000656
IO_DAT
BT_PCONT
F1H1C104A178
C8045
16V
65 87
3 41 2
RX8015
J0JBD0000050
R8401
D0GA101JA023
D0GAR00J0005
R8418
R8420
D0GBR00J0004
R8502
D0GBR00J0004
D0GBR00J0004
R8419
R8402
D0GA101JA023
C8317
F1G1H470A834
50V
R8400
D0GA101JA023
J0JYC0000656
LB8009
F1G1C104A146
C8046
16V
C8296
F1H1C104A178
16V
C8437
$[F1H1H101B052]
C8448
$[F1H1H101B052]
C8297
F1G1C104A146
16V
R8421
*
LB8008
J0JYC0000656
C8435
$[F1H1H101B052]
C8436
$[F1H1H101B052]
R8408
D0GAR00J0005
LB8015
J0JYC0000656
C8338
F1G1H820A834
50V
C8315
F1G1H470A834
50V
LB8010
J0JYC0000656
C8295
F1H1H104B047
50V
6
5
8
9
11
12
10
18
15
17
16
20
19
13
14
7
2
1
4
3
22
21
K1MY22AA0267
CN8027
POSITION_RIGHT
C8316
F1G1H470A834
50V
POSITION_LEFT
PW_USB_5V
PW_FL12V
PW_3R3V
DGND
FLGND
REM_IN
FL_DO
CLK_FL
FL_CS
LED_NETWORK
PW_STBY3R3V
KEY4
KEY3
KEY1
KEY2
M-
USB_OVC
CLK_MR_RXD
DSP_SDA
REM_IN
CLK_MR_TXD
NRST
USB_OVC
*
R8414
R8429
*
65 87
3 41 2
J0JBD0000050
RX8014
65 87
3 41 2
RX8013
J0JBD0000050
CLK_AUX_BCLK
HP_DETECT
HP_MUTE
SMPS_LATCH
CLK_AUX_LRCK
CLK_AUX_SDO
CLK_IO
DAT_IO
DSP_SCL
C8439
$[100P]
C8440
$[100P]
DGND
A
VBIAS
SPDRV
D
TRVDRV
FODRV
LID_RIGHT
INNER_SW
LID_LEFT
LOADING
TRDRV
B
C
F
C8063
*
16V
MD
PW_1R8V_VDDI
C8064
*
50V
LDO
CL8064
R8009
*
R8004
*
EMMC_DAT0
R8006
*
EMMC_DAT1
EMMC_DAT2
VCCQ
LB8061
*
*
C8062
10V
*
C8059
16V
EMMC_CMD
R8005
*
C8072
*
10V
CL8066
EMMC_CLK
CL8061
*
R8007
C8061
*
16V
CL8062
R8008
*
*
C8070
16V
C8071
*
10V
EMMC_NRST
C8073
*
10V
C8069
*
16V
CL8060
EMMC_DAT3
R8010
*
CL8065
CL8063
E
*
C8065
50V
3780
2
3
1
8
9
5
4
7
6
3582
18
22
21
24
26
25
23
20
30
32
33
31
27
29
28
19
11
12
10
17
14
15
13
16
84
86
88
90
93
95
97
99
100
101
102
98
96
94
92
112
111
114
116
115
136
132
133
129
124
125
120
122
121
118
117
119
123
127
128
126
131
130
135
134
150
152
153
151
146
147
142
143
139
137
138
141
140
145
144
149
148
113
105
106
103
104
108
110
109
107
91
89
87
85
3483
36
81
39
38
78
6970
61452636
55 51 50
53 52
57 14658
5
43 42 404645
49 47
48 4460 5967 6668 6465
72
75 74
77 76
73 71
79
*
IC2001
NC
NC
NC
DAT2
RFU
RFU
DAT0
DAT1
NC
VssQ
VssQ
NC
CMD
NC
CMD
CMD
VccQ
VSS
VCCNCNCNCNC
NC
CMD[116]
VccQ[115]
NC
CLKNCVSS
NC
VssQ
VssQ
VccQ
VccQ
DAT3
NCNCVssQ
VssQ
VssQ
VccQ
VccQNCNC
NC
NC
NC
VSSNCVCC
RFU
NCNCVCCNCVSSNCVssQ
P4
P2
P1
P3
P6
P5
CLR
VSS
STB
VDD
DATA
CLK
TO HP
AUX
FROM
P16
P14
VSS
P12
P13
P15
P7
P9
P10
P11
P8
KEY3
KEY4
[TO PANEL]
KEY1
M-
M+
DGND
DGND
5V
DGND
12V
KEY2
REM IN
FL_DI
D3.3V
FL_CL
VP_GND
FL_CS
DIMMER
LED NETWORK
POSITION(LEFT)
POSITION(RIGHT)
STBY3.3
SO
ASY
EQO
RFI
AD_MONI1
AD_MONI0
BD
AC
AVDD1
EE_SDA
EE_SCL
OPEN SW
MAIN KEY INT
VSS_ADC
ANAMONI0
INNER_SW
KEY4
KEY3
MODEL_SELECT
REGION
TEMP_PROT
M_VDET
ANAMONI1
FL_DO
FL_CS
DVSS
SVDD
DVDD_M1
DVSSQ
FL_CLK
DC_DET_PWR
CLOSE SW
TU_INT
TU_RST / DAB_RST
VDD_ADC[33]
KEY1[34]
KEY2[35]
DGND
DGND
FOR LOG DATA
NC
NC
NC
NC
UART_RX
GND
LD
E
F
PD
AGND1
BIAS
TO SUPPLY SCH
DGND
TO MICRO P
SDIO
RESET
SCLK
PW_3R3V
INT/NC
DGND
CLK_DAB_BCK
CLK_DAB_DATA
TUNER/DAB
CONNECTOR
CLK_DAB_LRCK
A2
GND
VCC
A0
A1
SDA
SCL
WP
FROM/TO MAIN_MICON
TO DSP SCH
TO ALLPLAY
Eject and power connected to KEY1
BT_UART_RTS
NRST
DVDDIO
VH_PCONT
XIN_32K
DVSS
ALLPLAY_TX
OUT
GND
tD = 0.69*RD*CD
tD = 0.69*10M*0.224u =1.5456s
CD
TO USB
VDD
NRST
DSP_SCL
AUX DATA
BT_PCONT
HOST_WAKE
USB_DET
USB_OVC
CLK_IO_EXP
DAT_IO_EXP
SMPS LATCH
DSP_SDA
REM_IN
STB_IO_EXP
CLR_IO_EXP
ALLPLAY_RX
BT_UART_TX
BT_UART_RX
GND
GND
GND
+5V
BT_WAKE
HOST_WAKE
BM94801KUT-Z
SD_CMD
SD_DATA3
SD_CLK
SD_NRST
SD_DATA0
SD_DATA1
XOUT_PLL[128]
XIN_PLL[127]
TMODE[126]
XOUT_32K[125]
VSSQ
PCONT3
LED NETWORK
SVSS
PCONT
VDDQ
SD_DATA2
BT_UART_CTS
AUX BCLK/HP MUTE
ASRC_SOFTMUTE
AUX LRCK/HP DETECT
JTAG TDI
SDOUT
CLVOUT
FCO
FDOUT
TDOUT
Cover A B C D E F signal
with AGND1 pattern
TDO
3R3V
NC
NC
VSS
NC
NC
NC
NC
NC
NC
NC
NC
VSS
NC
NC
NC
VSS
VSS
nRST
nRST
NCNCNC
VssQ
RFU
RFU
RFU
VCC
VSS
NC
VssQ
VssQ
[38]NC
[39]RFU
NC
NC
VssQ
NC
VSS
NC
NC
VSS
RFU
VSS[79]
VSS[78]
NC
NC
VCC
VCC
VCC
NC
NCNCNCNCNC
NC
RFU
RFU
RFU
VSS
VCC
VSS
VDDi
VccQ
NC
NC
VccQ
VccQ
VssQ
CLK
NC
NC
NC
NC
CLK
CLK
RFU
VSS
RFU
nRST
VCC
NC
VCC
nRST
VCC
VCC
VCC
DAT6
VccQ
DAT7
DAT3
DAT5
DAT4
VDDi
EMMC BLOCK
(HC1000/400 only)
TDI
NOTE: EMMC Isolated DGND. Taken taken inside the SOC DGND.
TMS
TRST
TCK
RESET
GND
TO JTAG
LID_OPEN
LID_CLOSE
TO CD_MOTOR SCH
CLK88[65]
JTAG TDO[66]
JTAG TCK[67]
JTAG TMS[68]
PCO
TO CD SCH
TRV_CW
USB_D-
USB_D+
SVSS
SVDD
DVDDIO
LID_LEFT
FL_CLK
FL_CS
FL_DAT3
VCC
CLK
DO(DQ1)
WP#(DQ2)
CS#
HOLD#(DQ3)
VSS DI(DQ0)
DVDD_M2
FL_DAT0
DVSS
FL_DAT2
FL_DAT1
TRV_CCW
DVSS
REXTI
AVSSC
BT_UART_RX
BT_UART_TX
DSP_ERROR[93]
DSP_RST[94]
DSP_MUTE[95]
AVDDC[96]
DC_DET_AMP
CD I2S BCK
CD I2S LRCK
JTAG TRST
TUNER_SCL/DAB_SCL
LID_RIGHT
CD I2S DATA
TUNER_SDA/DAB_SDA
53
Page 54
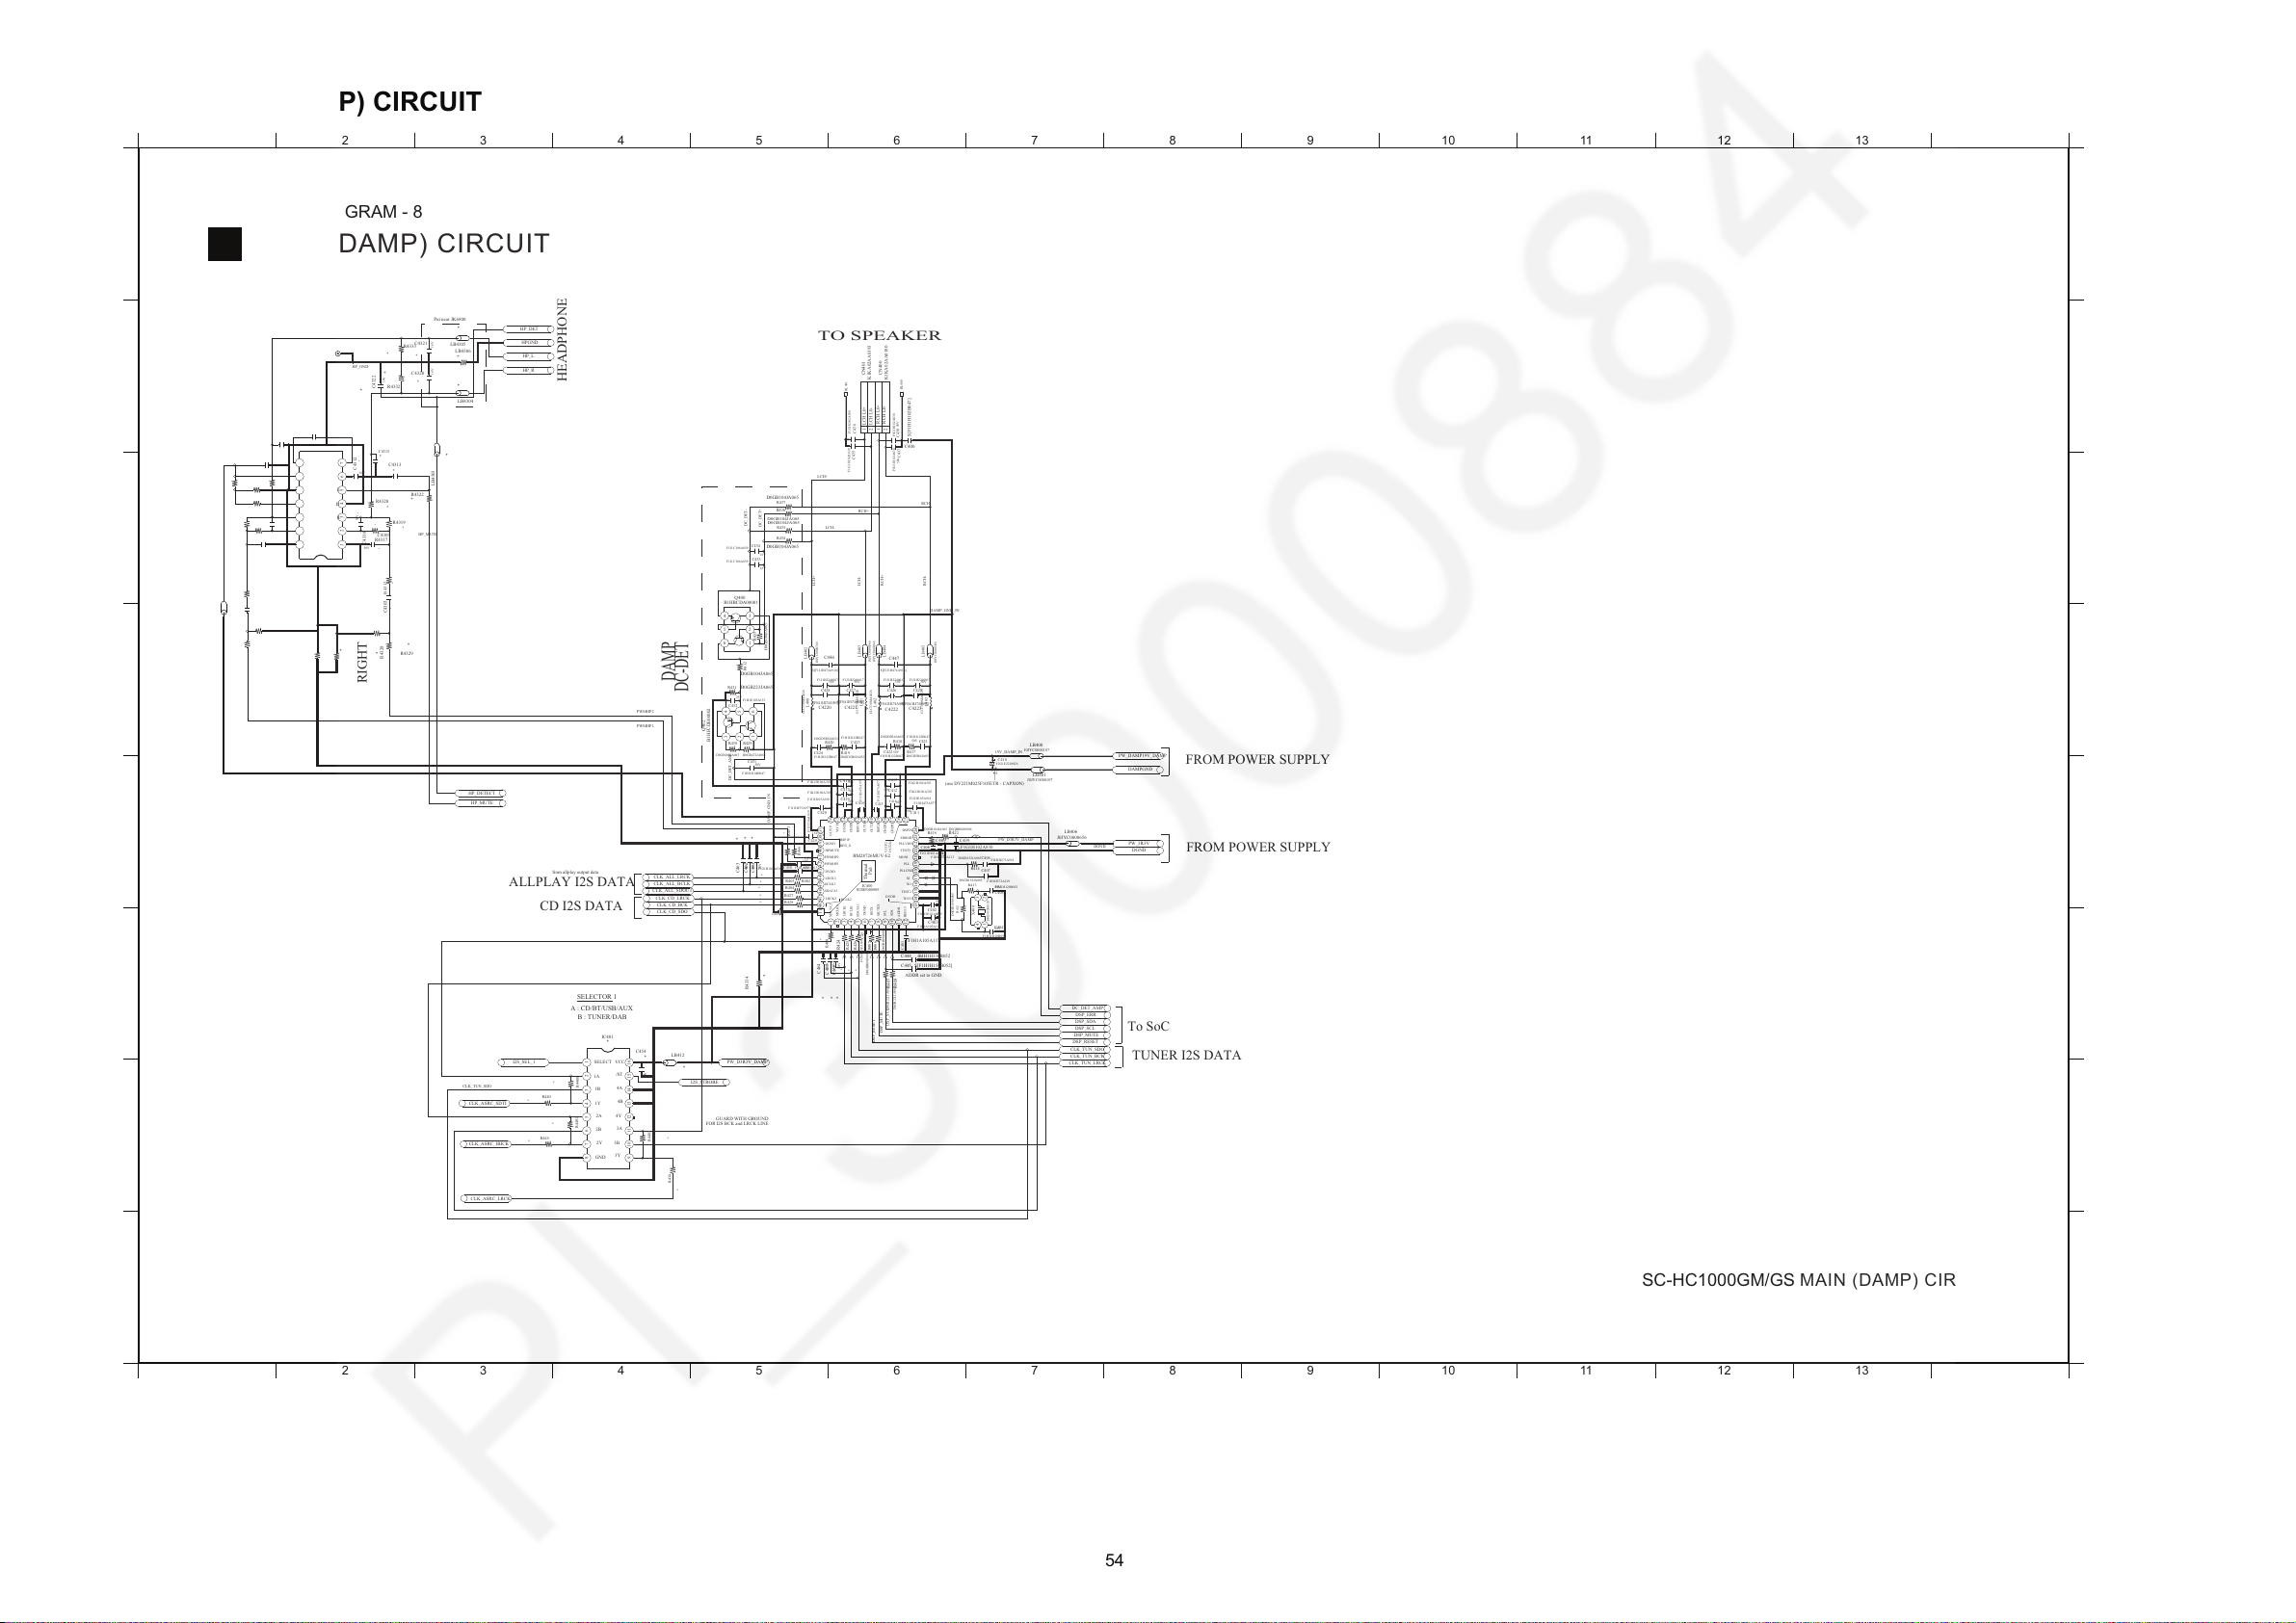
12.9. MAIN (DAMP) CIRCUIT
A
1
2 3 4 5 6 7 8 9 10 11 12 13 14
1 2 3 4 5 6 7 8 9 10 11 12 13 14
C
D
B
E
G
H
F
A
C
D
B
E
G
H
F
B
SC-HC1000GM/GS MAIN (DAMP) CIRCUIT
MAIN (DAMP) CIRCUIT
SCHEMATIC DIAGRAM - 8
I2S_STROBE
R406
D0GBR00J0004
G400
*
R4334
R402
*
*
R466
*C463
50V
*
C462
50V
*
C461
50V
*
R453
F1H1A105A113
C430
10V
C453
F1G1H102A830
R426
*
R424
*
R425
*
R405
D0GBR00J0004
R400
*
R404
*
R403
*
F1G1H101A834
C450
50V
R428
*
R427
*
16V
F1J1C106A059
C429
J0JYC0000366
LB404
C447
$[F1J1H474A918]
RL400
C4222
$[F0A1H474A095]
C426
F1J1H2240017
50V
R418
D0GD5R6JA052
C422
50V
F1H1H122B047
C413
F1K1H106A303
50V
D0GD5R6JA052
R417
C438
F1G1H102A830
50V
C437
F1G1H102A830
50V
C414
F1J1H105A918
50V
R420
D0GD5R6JA052
R429
D0GB472JA065
C424
F1H1H122B047
R430
D0GB104JA065
C431
F1H1H104B047
50V
RL401
R419
D0GD5R6JA052
C428
F1J1H2240017
50V
R435
D0GB104JA065
R434
D0GB104JA065
R437
D0GB104JA065
R436
D0GB104JA065
LCH+
LB402
J0JYC0000366
R433
D0GB104JA065
DC_DET-
DC_DET+
C434
F1J1C106A059
16V
C433
F1J1C106A059
16V
2
3
1
5
4
6
B1HBCDA00001
Q400
R432
D0GB104JA065
C446
$[F1J1H474A918]
DC_DET_AMP
R431
D0GB223JA065
L400
G1C330MA0226
C4220
$[F0A1H474A095]
1
2
K1KA02AA0180
CN400
J0JYC0000366
LB403
L402
G1C330MA0226
RCH+
RCH+
C427
F1J1H2240017
50V
LCH+
L401
G1C330MA0226
1
2
CN401
K1KA02AA0193
F1G1H102A830
C435
LCH-
C436
F1G1H102A830
C4221
$[F0A1H474A095]
LCH-
C423
F1H1H122B047
C419
F1J1H105A918
50V
C418
F1K1H106A303 50V
C417
F1K1H106A303
50V
C420
F1J1H475A977
DAMP_GND_IN
C415
F1J1H475A977
C416
F1J1H475A977
R416
D0GB104JA065
C401
F1H1A105A113
C444 F1H1H330B052
50V
C445 $[F1H1H150B052]
4
5
T1 4546 4448 47
213
32
34
363533
42 404143
3739 38
8
15 171613 14
967
27
25
22 232019 21 24
2618303128
29
Thermal
Pad
111210
SUBF000009
IC400
C4223
$[F0A1H474A095]
C400
$[F1H1H102B047]
L403
G1C330MA0226
C425
F1J1H2240017
50V
C411
F1J1H475A977
50V
RCH-
RCH-
C412
F1K1H106A303
PW_D3R3V_DAMP
D0GB221JA065
R408
C464
*
50V
C465
*
50V
C466
*
50V
R407
D0GB221JA065
CLK_CD_BCK
CLK_CD_SDO
CLK_CD_LRCK
CLK_ALL_LRCK
CLK_ALL_BCLK
CLK_ALL_SDOUT
F1H1E105A153
C432
25V
231
546
Q402
B1HFCDE00002
LB412
*
*
C454
50V
CLK_TUN_LRCK
DC_DET_AMP
DSP_ERR
CLK_TUN_SDO
J0JYC0000656
LB406
PW_3R3V
DGND
PW_DAMP19V_DAMP
DAMPGND
CLK_TUN_BCK
C408
F1G1H101A834
C406
F1H1H273A918
R414
D0GB152JA065
R412
D0GB105JA065
R413
D0GB152JA065
C404
F1H1H120B052
50V
2
3
1
4
H0J245500110
X400
C405
F1H1H120B052
50V
C407
F1H1H272A219
F1G1H101A834
C402
50V
C403
F1H1A105A113
10V
J0JYC0000366
LB405
R421
D0GBR00J0004
F1H1A105A113
C409
10V
C439
F1G1H102A830
50V
F2G1E2210026
C410
25V
F1H1H122B047
C421
50V
DAMP_GND_IN
DSP_SCL
DSP_SCL
DSP_SDA
DSP_MUTE
DSP_MUTE
J0JYC0000107
LB401
19V_DAMP_IN
PW_D3R3V_DAMP
J0JYC0000107
LB400
DGND
DSP_RESET
DSP_RESET
7 56 124 3
10 12 14 15 161311
8
9
IC401
*
R438
*
R4402
*
R4316
*
*
C4319
R4318
*
*
C4308
*
C4317
C4316
*
*
R4324
*
R4323
*
R4321
*
R4325
*
C4314
HP_L
LB4303
*
*
LB4306
*
LB4304
C4320
*
16V
HP_R
HP_GND
C4322
*
16V
*
R4332
*
R4319
R4320
*
R4317
*
*
C4318
50V
C4309
*
50V
*
C4313
R4322
*
*
C4312
10V
C4315
*
HP_DET
C4321
*
16V
LB4305
*
HPGND
CK4304
R4333
*
*
R4327
*
R4329
R4312
*
C4303
*
*
R4328
*
R4308
*
R4326
*
LB4301
*
C4300
*
R4331
*
R4330
564123
9111314 12 10
7
8
IC4300
*
CLK_ASRC_SDTI
R440
*
R4400
*
I2S_SEL_1
CLK_ASRC_IBICK
CLK_ASRC_LRCK
R4401
*
*
R445
HP_MUTE
CLK_TUN_SDO
HP_DETECT
HP_MUTE
PWMHP1
PWMHP2
PLLVDD
SCL
DGND
RSTX
MUTEX
VCCP2
PLLGND
PLL
MONI
DVDD
TEST1
XO
TEST2
SDA
ADDR
REG15
XI
TEST3
OUT2N
DGND
3Y
2Y
GND
3B
VCC
3A
4Y
4A
4B
/ST
1B
1A
SELECT
SELECTOR 1
B : TUNER/DAB
A : CD/BT/USB/AUX
from allplay output data
CD I2S DATA
ALLPLAY I2S DATA
1Y
2B
2A
GUARD WITH GROUND
FOR I2S BCK and LRCK LINE
REG_G
BCLK1
SDATA1
MCLK0
LRCK1
BCLK2
BM28726MUV-E2
DVDD
PWMHP2
PWMHP1
HPMUTE
SDATA2
BCLK3
SDATA3
LRCK2
LRCK3
BSP2P
RCH L0-
GNDP2
GNDP2
GND1
LCH L0+
OUT1N
GNDP1
BSP1N
OUT2P
RCH L0+
LCH L0-
ERROR
BSP2N
BSP1P
VSS
/MUTE
GND
-INR
+INR
OUTR
GND
UVP
VDD
-INL
+INL
OUTL
CNCP
HEADPHONE
Put near JK6800
LEFT
RIGHT
DAMP
DC-DET
VCCP1
TO SPEAKER
OUT1P
To SoC
FROM POWER SUPPLY
TUNER I2S DATA
ADDR set to GND
FROM POWER SUPPLY
(use DV221M025F105ETR - CAPXON)
54
Page 55
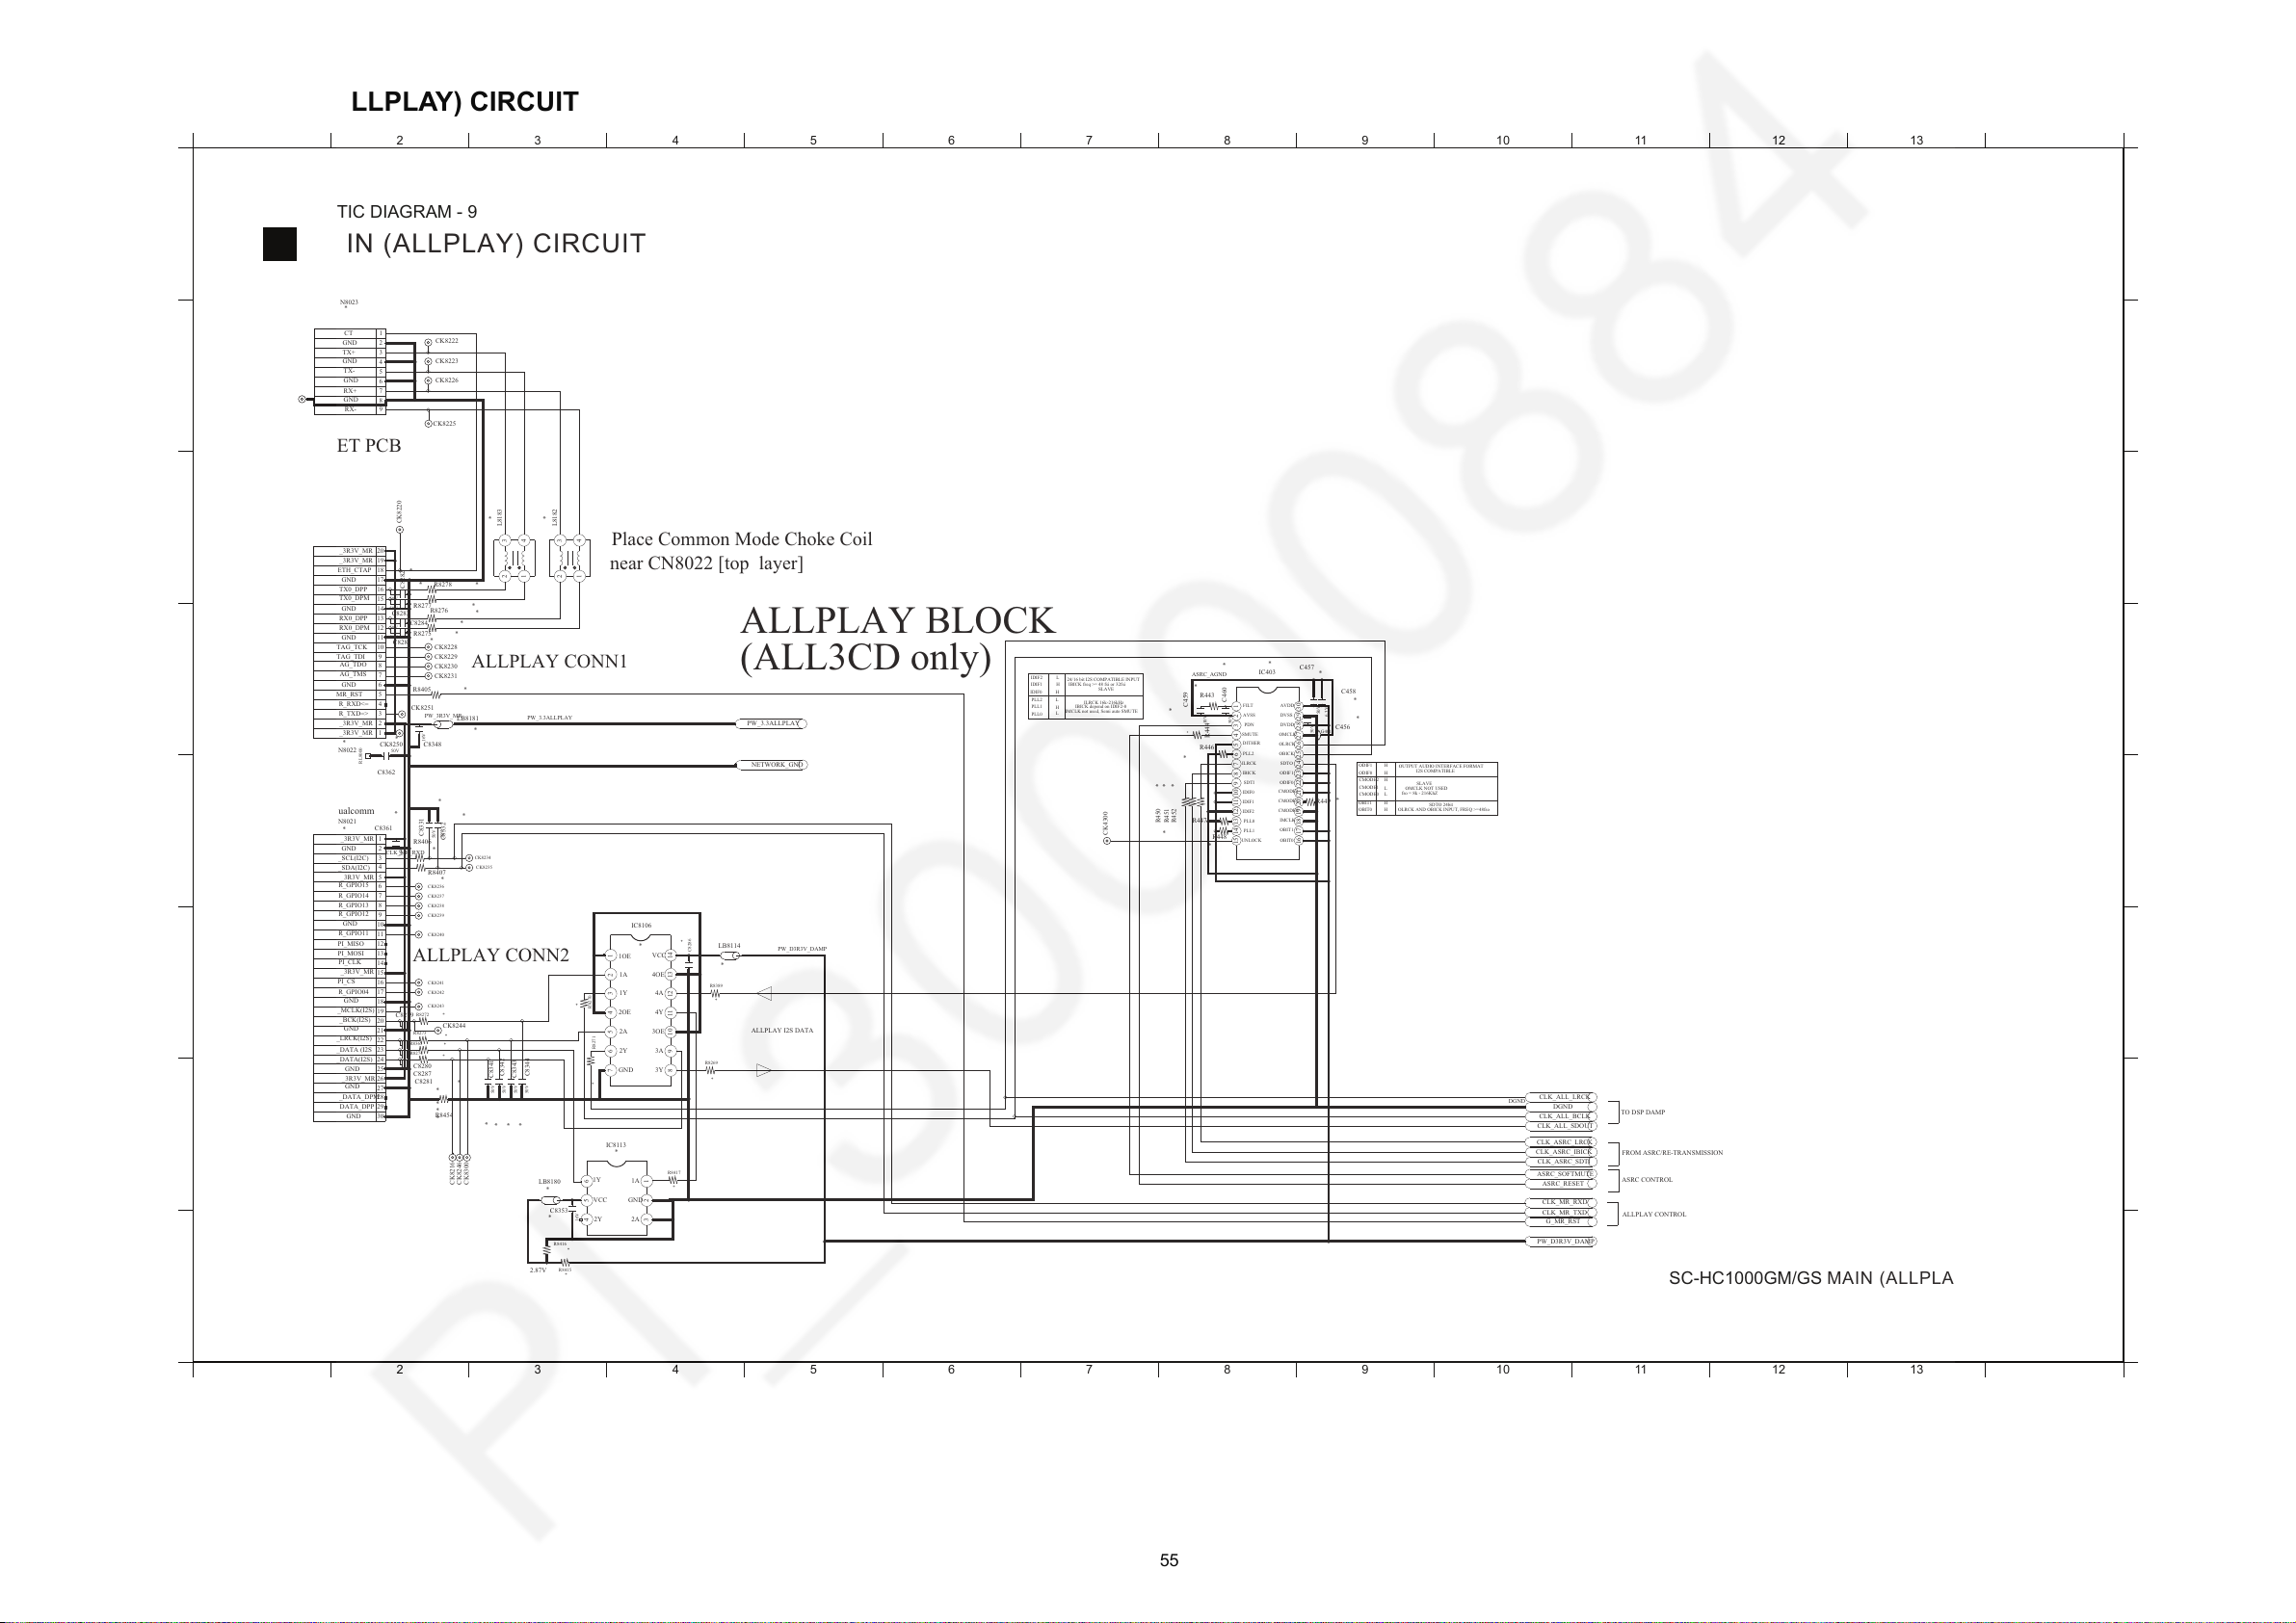
12.10. MAIN (ALLPLAY) CIRCUIT
A
1
2 3 4 5 6 7 8 9 10 11 12 13 14
1 2 3 4 5 6 7 8 9 10 11 12 13 14
C
D
B
E
G
H
F
A
C
D
B
E
G
H
F
B
SC-HC1000GM/GS MAIN (ALLPLAY) CIRCUIT
MAIN (ALLPLAY) CIRCUIT
SCHEMATIC DIAGRAM - 9
CLK_ALL_LRCK
CLK_ALL_SDOUT
CLK_ASRC_IBICK
CLK_ASRC_LRCK
DGND
CLK_ALL_BCLK
R8269
*
PW_3.3ALLPLAY
G401
*
R444
C457
*
50V
R443
*
*
C459
10V
ASRC_AGND
*
C460
50V
*
C456
50V
*
C458
6.3V
CK4300
R8389
*
LB8114
*
*
C8286
NETWORK_GND
*R450
*R452
*
R451
R449
*
R448
*
R447
*
R446
*
21
29
7
24
8
23
54
26
27
6
25
16
15 13 11 91012
19
2018 2221
14
17
3
28
30
*
IC403
56 4 123
9 11 13 141210
7
8
*
IC8106
R8417
*
12
5 6
3
4
IC8113
*
CLK_MR_TXD
G_MR_RST
PW_D3R3V_DAMP
ASRC_SOFTMUTE
CLK_ASRC_SDTI
CLK_MR_RXD
ASRC_RESET
DGND
PW_D3R3V_DAMP
RL8000
3
2
6
7
4
5
1
9
8
*
CN8023
6
7
5
9
14
11
10
13
12
17
18
15
16
8
1
3
4
2
20
19
*
CN8022
CK8256
CK8241
CK8242
CK8220
PW_3.3ALLPLAY
LB8181
*
*
R8405
4
3
1
2
L8182
*
R8278 *
4
3
1
2
L8183
*
*
R8275
R8277 *
*
R8276
CK8250
*
C8348
16V
CK8251
CK8228
CK8230
CK8231
CK8229
PW_3R3V_MR
CK8225
CK8223
CK8222
CK8226
*
R8406
CK8240
CK8236
*
R8407
CK8234
CK8235
C8331
*
50V
CLK_MR_RXD
C8332
*
50V
CK8239
CK8237
CK8238
*
C8283
50V
*
C8285
50V
*
C8282
50V
C8284
*
50V
*
C8361
16V
50V
C8362
CK8243
*
R8274
R8365
*
R8272
*
R8273
*
C8281
*
C8280
*
C8287
*
C8279
*
6
7
5
9
25
24
26
21
20
22
17
18
13
10
12
11
16
14
15
19
23
28
27
8
1
3
4
2
29
30
*
CN8021
*
C8342
50V
R8416
*
R8415
*
R8271
*
LB8180
*
*
C8353
16V
*
C8343
50V
*
C8344
50V
CK8300
CK8216
CK8246
*
C8341
50V
*
R8454
R8270
*
CK8244
2A
2Y
ILRCK 16k-216kHz
IBICK depend on IDIF2-0
IMCLK not used, Semi auto SMUTE
H
L
L
H
24/16 bit I2S COMPATIBLE INPUT
IBICK freq >= 48 fsi or 32fsi
SLAVE
H
L
DVSS
AVDD
CMODE1
H
H
H
CMODE2
ODIF1
ODIF0
CMODE0
L
L
OBICK
ODIF0
CMODE2
SDTO
ODIF1
DVDD
OMCLK
OLRCK
SLAVE
OMCLK NOT USED
fso = 8k - 216KhZ
OUTPUT AUDIO INTERFACE FORMAT
I2S COMPATIBLE
AVSS
FILT
PDN
SDTI
PLL2
IDIF0
IBICK
ILRCK
DITHER
SMUTE
OBIT1
H
OBIT0
H
SDTO 24bit
OLRCK AND OBICK INPUT, FREQ >=48fso
IDIF1
CMODE0
CMODE1
PLL1
PLL0
IMCLK
OBIT1
OBIT0
UNLOCK
IDIF2
JTAG_TCK
GND
GND
CT
GND
TX-
RX+
GND
RX-
GND
GND
TX+
GND
FERX0_DPM
Place Common Mode Choke Coil
FERX0_DPP
FETX0_DPP
FETX0_DPM
near CN8022 [top layer]
PW_3R3V_MR
TO
ETHERNET PCB
V_ETH_CTAP
PW_3R3V_MR
GND
GND
MR_RST
GND
GND
GND
GND
SPI_CLK
GND
MR_RXD<=
SPI_CS
MR_TXD=>
JTAG_TDO
GND
JTAG_TMS
ALLPLAY CONN1
IDIF1
IDIF0
IDIF2
PLL2
PLL0
ALLPLAY I2S DATA
PLL1
2Y
1Y
1A
2A
ALLPLAY CONN2
4Y
4A
3A
3OE
2OE
VCC
4OE
1OE
VCC
1Y
1A
GND
3YGND
JTAG_TDI
PW_3R3V_MR
PW_3R3V_MR
MR_BCK(I2S)
PW_3R3V_MR
MR_DATA (I2S
MR_DATA(I2S)
MR_LRCK(I2S)
USBDATA_DPP
USB_DATA_DPM
MR_GPIO12
SPI_MOSI
SPI_MISO
MR_GPIO11
MR_GPIO15
MR_GPIO13
MR_GPIO14
PW_3R3V_MR
PW_3R3V_MR
PW_3R3V_MR
MR_GPIO04
MR_SDA(I2C)
MR_SCL(I2C)
MR_MCLK(I2S)
To Qualcomm
ALLPLAY BLOCK
(ALL3CD only)
ALLPLAY CONTROL
ASRC CONTROL
FROM ASRC/RE-TRANSMISSION
TO DSP DAMP
2.87V
55
Page 56
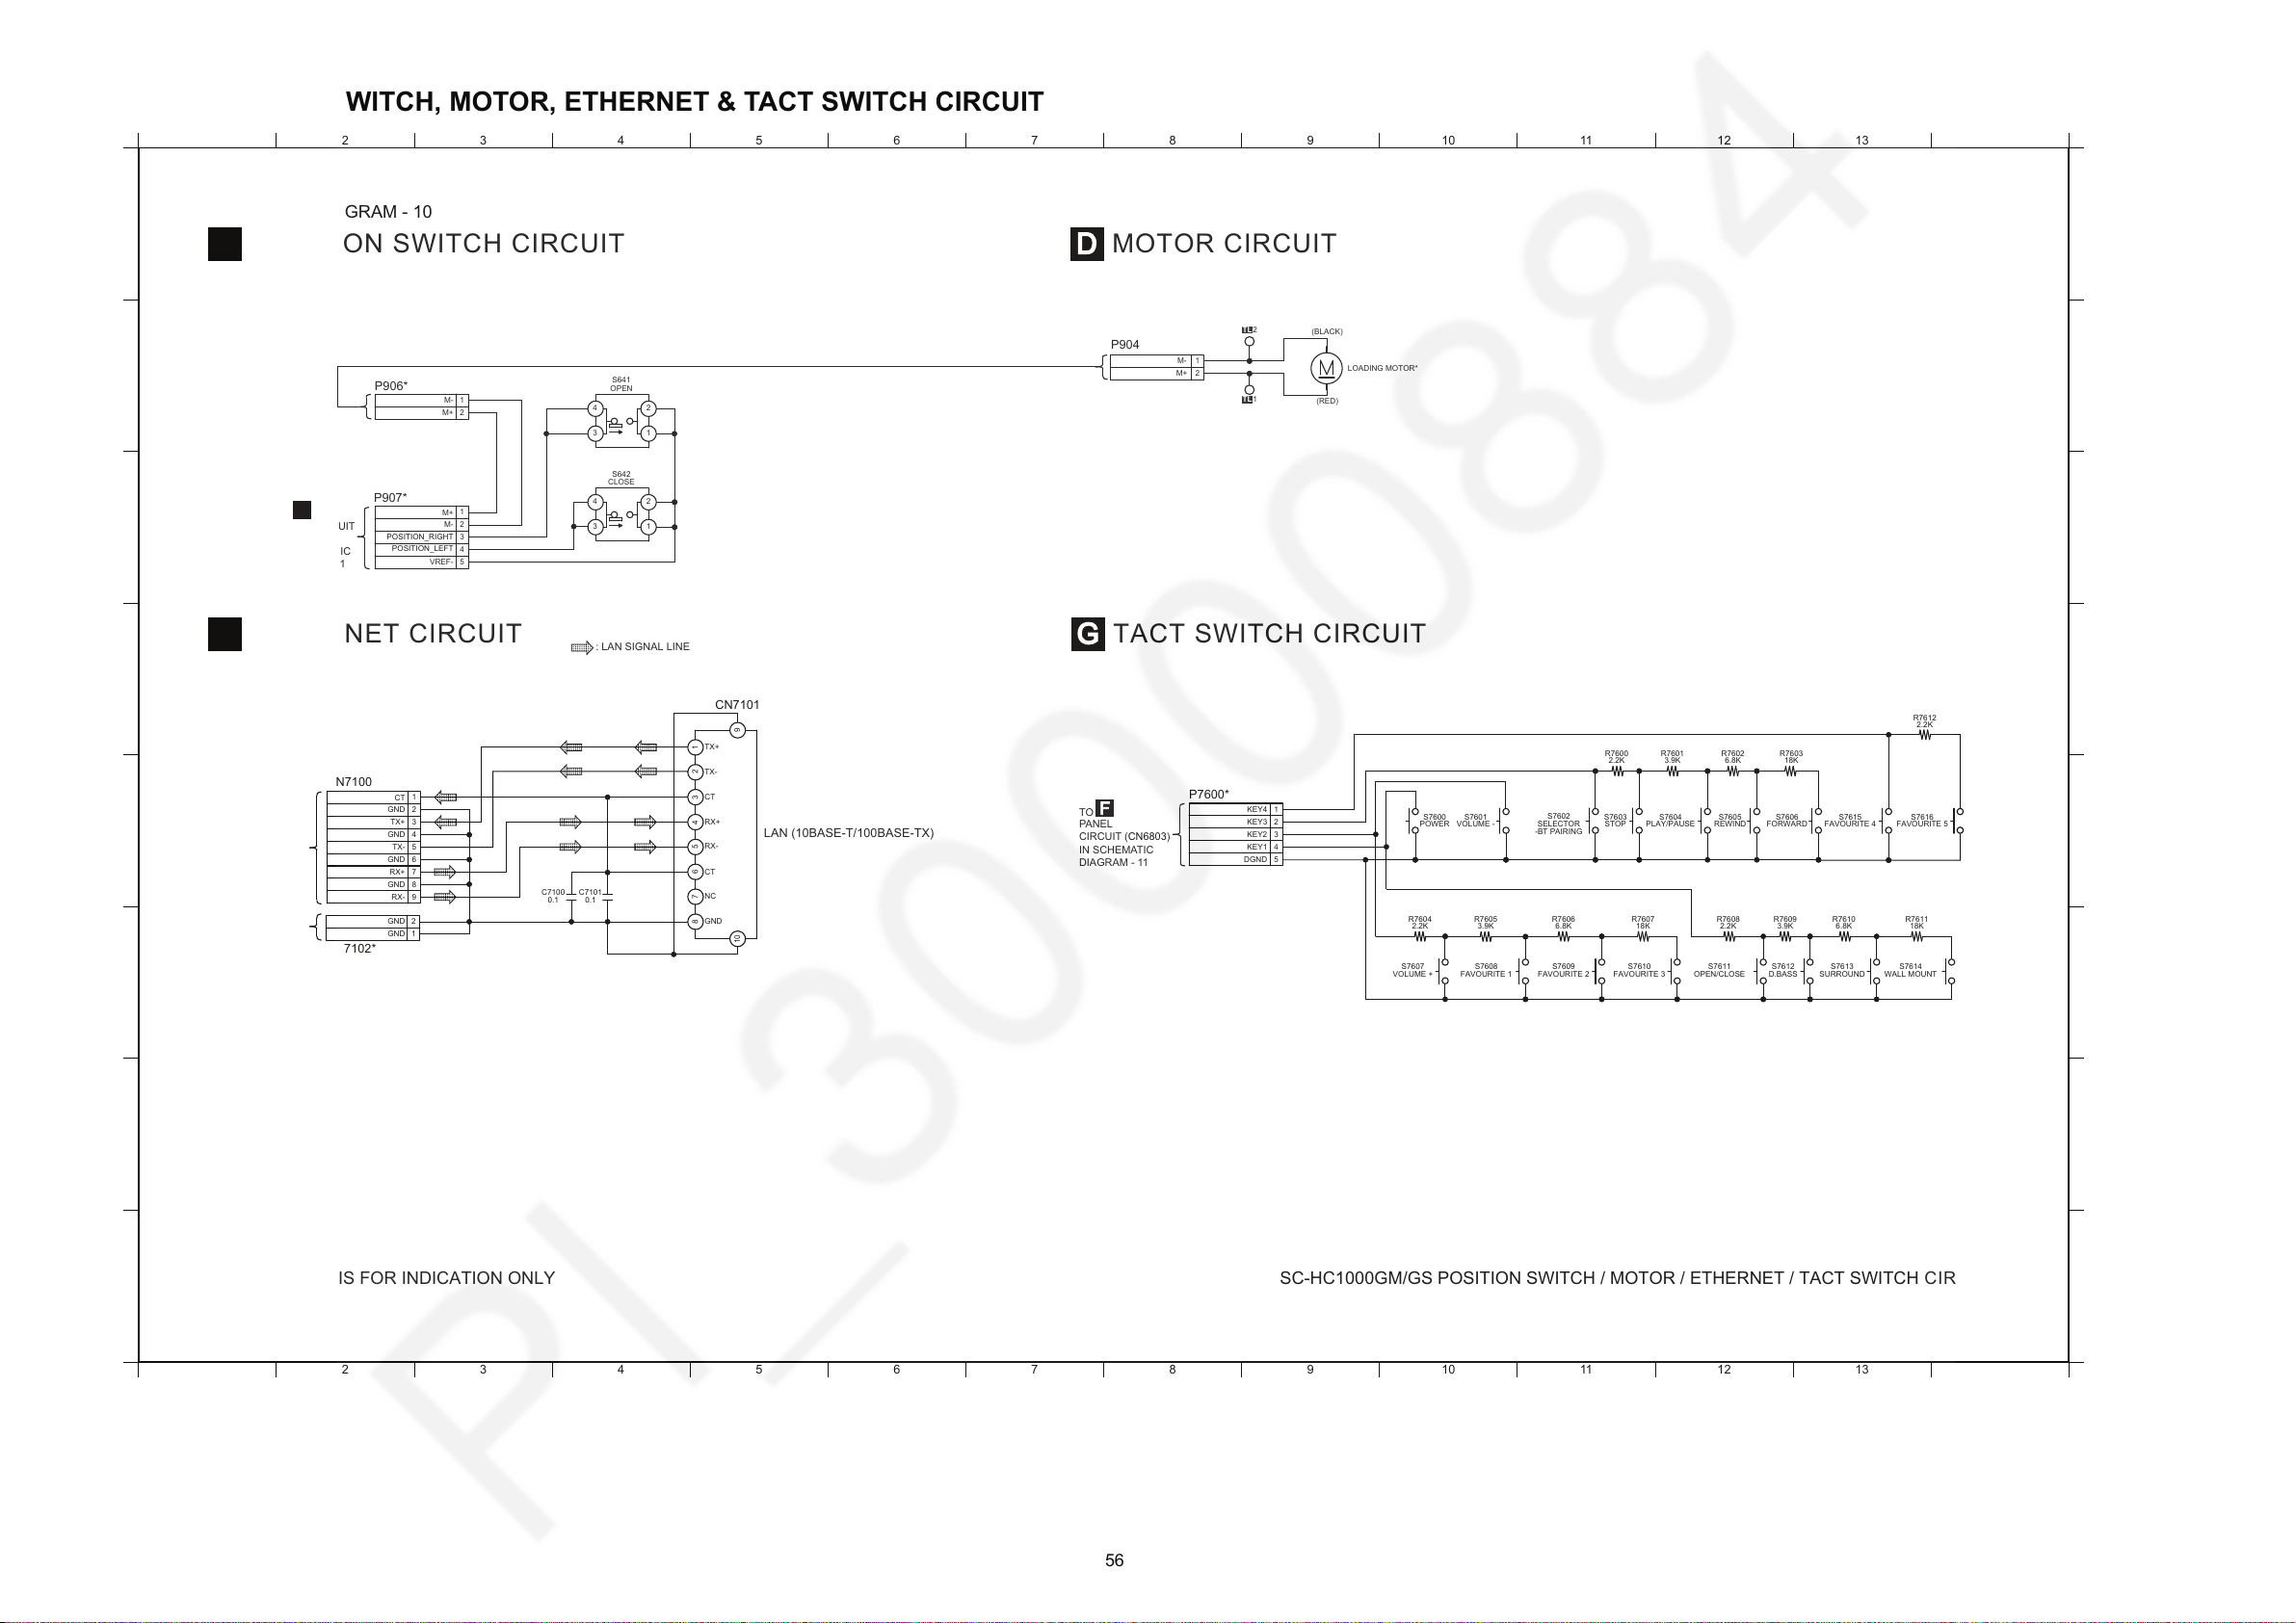
12.11. POSITION SWITCH, MOTOR, ETHERNET & TACT SWITCH CIRCUIT
A
1
2 3 4 5 6 7 8 9 10 11 12 13 14
1 2 3 4 5 6 7 8 9 10 11 12 13 14
C
D
B
E
G
H
F
A
C
D
B
E
G
H
F
C
E
D
G
LAN (10BASE-T/100BASE-TX)
: LAN SIGNAL LINE
TO MAIN
P.C.B.
(CN8023)
TO MAIN
P.C.B.
(CN7200)
POSITION SWITCH CIRCUIT
ETHERNET CIRCUIT
MOTOR CIRCUIT
SCHEMATIC DIAGRAM - 10
SC-HC1000GM/GS POSITION SWITCH / MOTOR / ETHERNET / TACT SWITCH CIRCUIT
NOTE: “ * ” REF IS FOR INDICATION ONLY
F
TO
PANEL CIRCUIT
(CN6802)
IN SCHEMATIC
DIAGRAM - 11
TACT SWITCH CIRCUIT
F
TO
PANEL
CIRCUIT (CN6803)
IN SCHEMATIC
DIAGRAM - 11
1
2
P904
M-
M+
1
2
P906*
4
31
2
S642
2
3
1
5
4
P907*
4
31
2
S641
OPEN
CLOSE
VREF-
POSITION_LEFT
M+
M-
M+
M-
POSITION_RIGHT
2
TL
1
TL
LOADING MOTOR*
(BLACK)
(RED)
S7604
R7601
3.9K 6.8K
R7602
S7603
R7600
2.2K
S7602
S7615 S7616S7606
18K
R7603
2.2K
R7612
S7605S7601S7600
2
3
1
5
4
P7600*
REWIND
FORWARD
FAVOURITE 5FAVOURITE 4
DGND
KEY3
KEY4
KEY1
KEY2
PLAY/PAUSE
VOLUME - STOP
SELECTOR
-BT PAIRING
POWER
3.9K
R7605 R7609
3.9K 18K
R7611R7606
6.8K
R7607
18K 6.8K
R7610R7608
2.2K
S7608
S7607 S7611 S7613 S7614S7612S7609 S7610
R7604
2.2K
SURROUND WALL MOUNT
D.BASS
VOLUME + FAVOURITE 3FAVOURITE 2FAVOURITE 1 OPEN/CLOSE
3
2
6
7
4
5
1
9
8
CN7100
0.1
C7101
0.1
C7100
10
7342658
9
1
CN7101
NC
CT
CT
TX+
RX+
RX-
GND
TX-
CT
TX+
GND
RX+
RX-
TX-
GND
GND
GND
1
2
CN7102*
GND
GND
56
Page 57
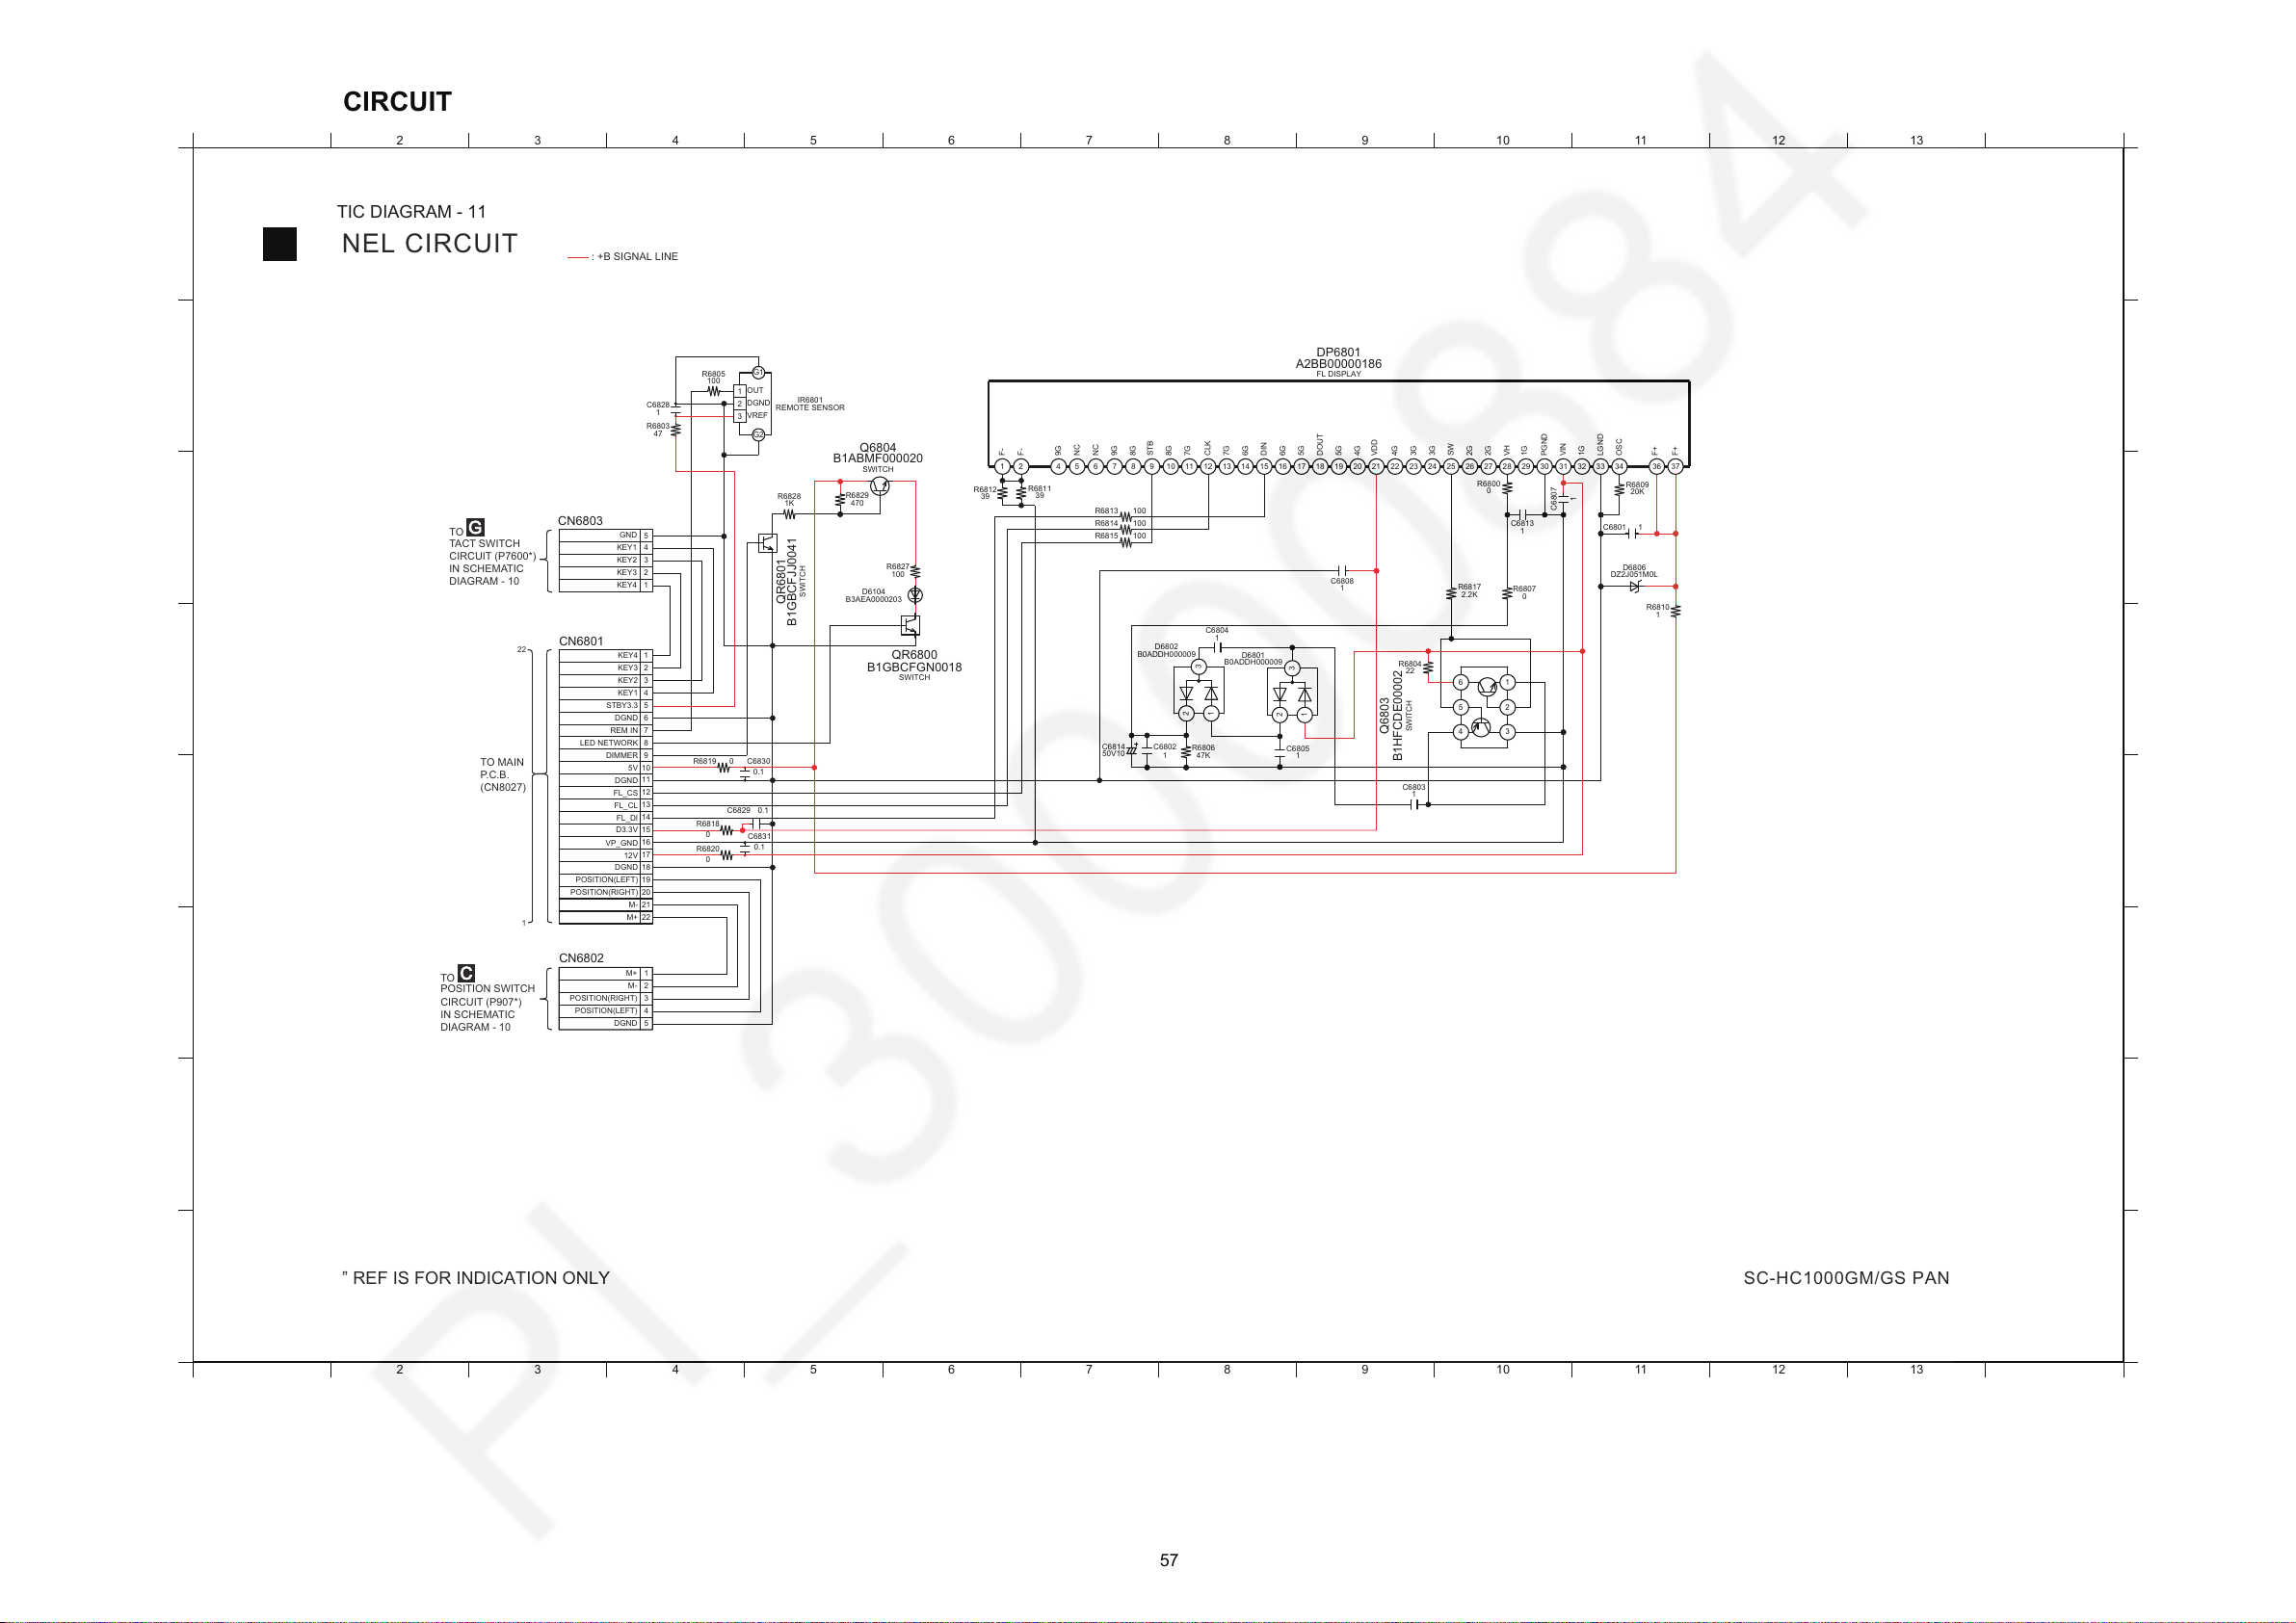
12.12. PANEL CIRCUIT
A
1
2 3 4 5 6 7 8 9 10 11 12 13 14
1 2 3 4 5 6 7 8 9 10 11 12 13 14
C
D
B
E
G
H
F
A
C
D
B
E
G
H
F
F
PANEL CIRCUIT
SCHEMATIC DIAGRAM - 11
SC-HC1000GM/GS PANEL CIRCUIT
TO MAIN
P.C.B.
(CN8027)
G
TO
TACT SWITCH
CIRCUIT (P7600*)
IN SCHEMATIC
DIAGRAM - 10
C
TO
POSITION SWITCH
CIRCUIT (P907*)
IN SCHEMATIC
DIAGRAM - 10
: +B SIGNAL LINE
NOTE: “ * ” REF IS FOR INDICATION ONLY
1
22
R6811
39
R6800
0
C6808
1
20K
R6809
C6807
1
32307 10845 1261621 20 2322 289181 27 292524 26171191513 1412 31 34 373633
A2BB00000186
FL DISPLAY
DP6801
1
C6813
R6814 100
R6813 100
R6815 100
R6810
1
2.2K
R6817
0
R6807
22
R6804
1
C6804
3
1
2
D6802
B0ADDH000009
3
1
2
D6801
B0ADDH000009
C6805
1
2
3
1
5
4
6
Q6803
B1HFCDE00002
SWITCH
SWITCH
SWITCH
SWITCH
1
C6803
C6814
50V10
R6806
47K
C6802
1
D6806
DZ2J051M0L
C6801 1
G2
2
1
3
G1
IR6801
REMOTE SENSOR
R6805
100
R6803
47
C6828
1
R6820
0
R6818
0
C6829 0.1
C6831
0.1
R6829
470
B1ABMF000020
Q6804
QR6801
B1GBCFJJ0041
C6830
0.1
R6819 0
6
5
8
9
11
12
10
18
15
17
16
20
19
13
14
7
2
1
4
3
22
21
CN6801
1K
R6828
R6827
100
B3AEA0000203
D6104
B1GBCFGN0018
QR6800
R6812
39
5G
DOUT
3G4GSW
1G1GVH
3G
4G
PGND
OSC
LGND
VDD
2G
F+
F+
2G
VIN
6G6GDIN
DGND
VREF
OUT
5G
M-
M+
POSITION(RIGHT)
FL_CS
FL_CL
DGND
FL_DI
12V
DGND
D3.3V
VP_GND
POSITION(LEFT)
2
3
1
5
4
CN6802
DGND
M+
M-
POSITION(LEFT)
POSITION(RIGHT)
F-
REM IN
5V
DIMMER
LED NETWORK
KEY2
KEY4
KEY3
DGND
KEY1
STBY3.3
2
3
1
5
4
CN6803
KEY2
KEY4
KEY3
KEY1
GND
7G8G7G
F-
NC
9G
9G
NC
8G
CLK
STB
57
Page 58
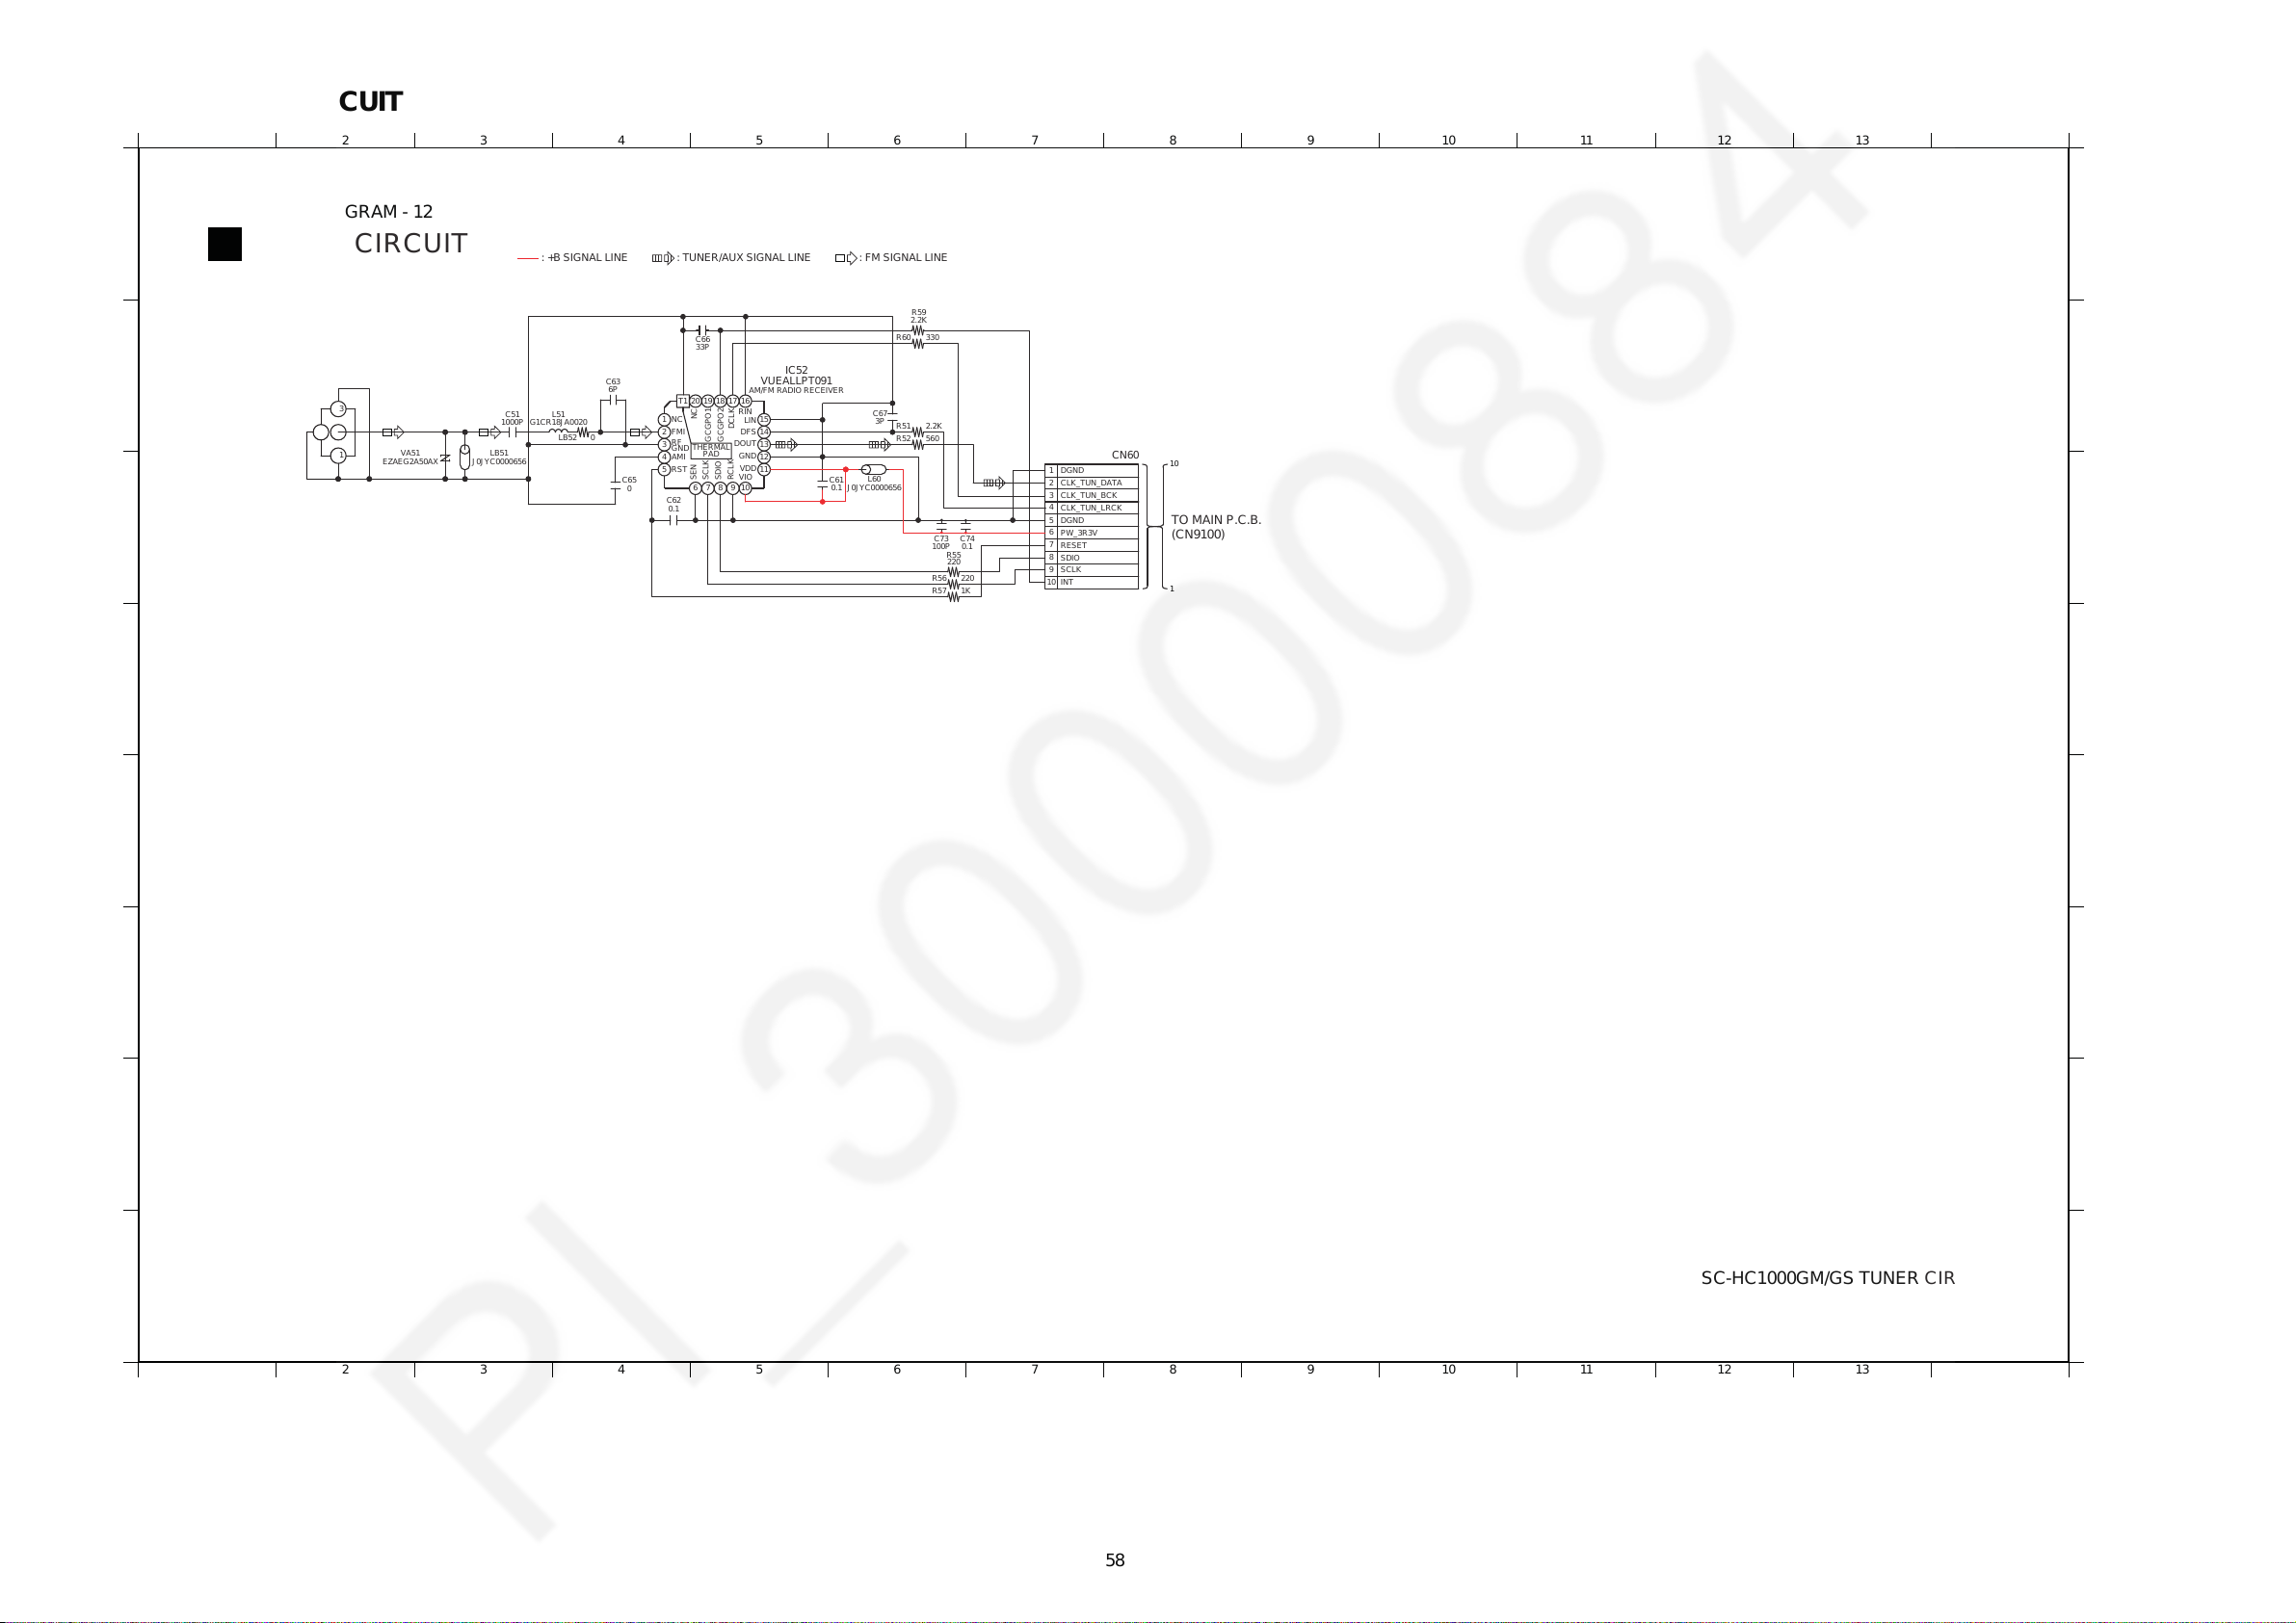
12.13. TUNER CIRCUIT
A
1
2 3 4 5 6 7 8 9 10 11 12 13 14
1 2 3 4 5 6 7 8 9 10 11 12 13 14
C
D
B
E
G
H
F
A
C
D
B
E
G
H
F
H
10
1
TO MAIN P.C.B.
(CN9100)
TUNER CIRCUIT
SCHEMATIC DIAGRAM - 12
58
Page 59
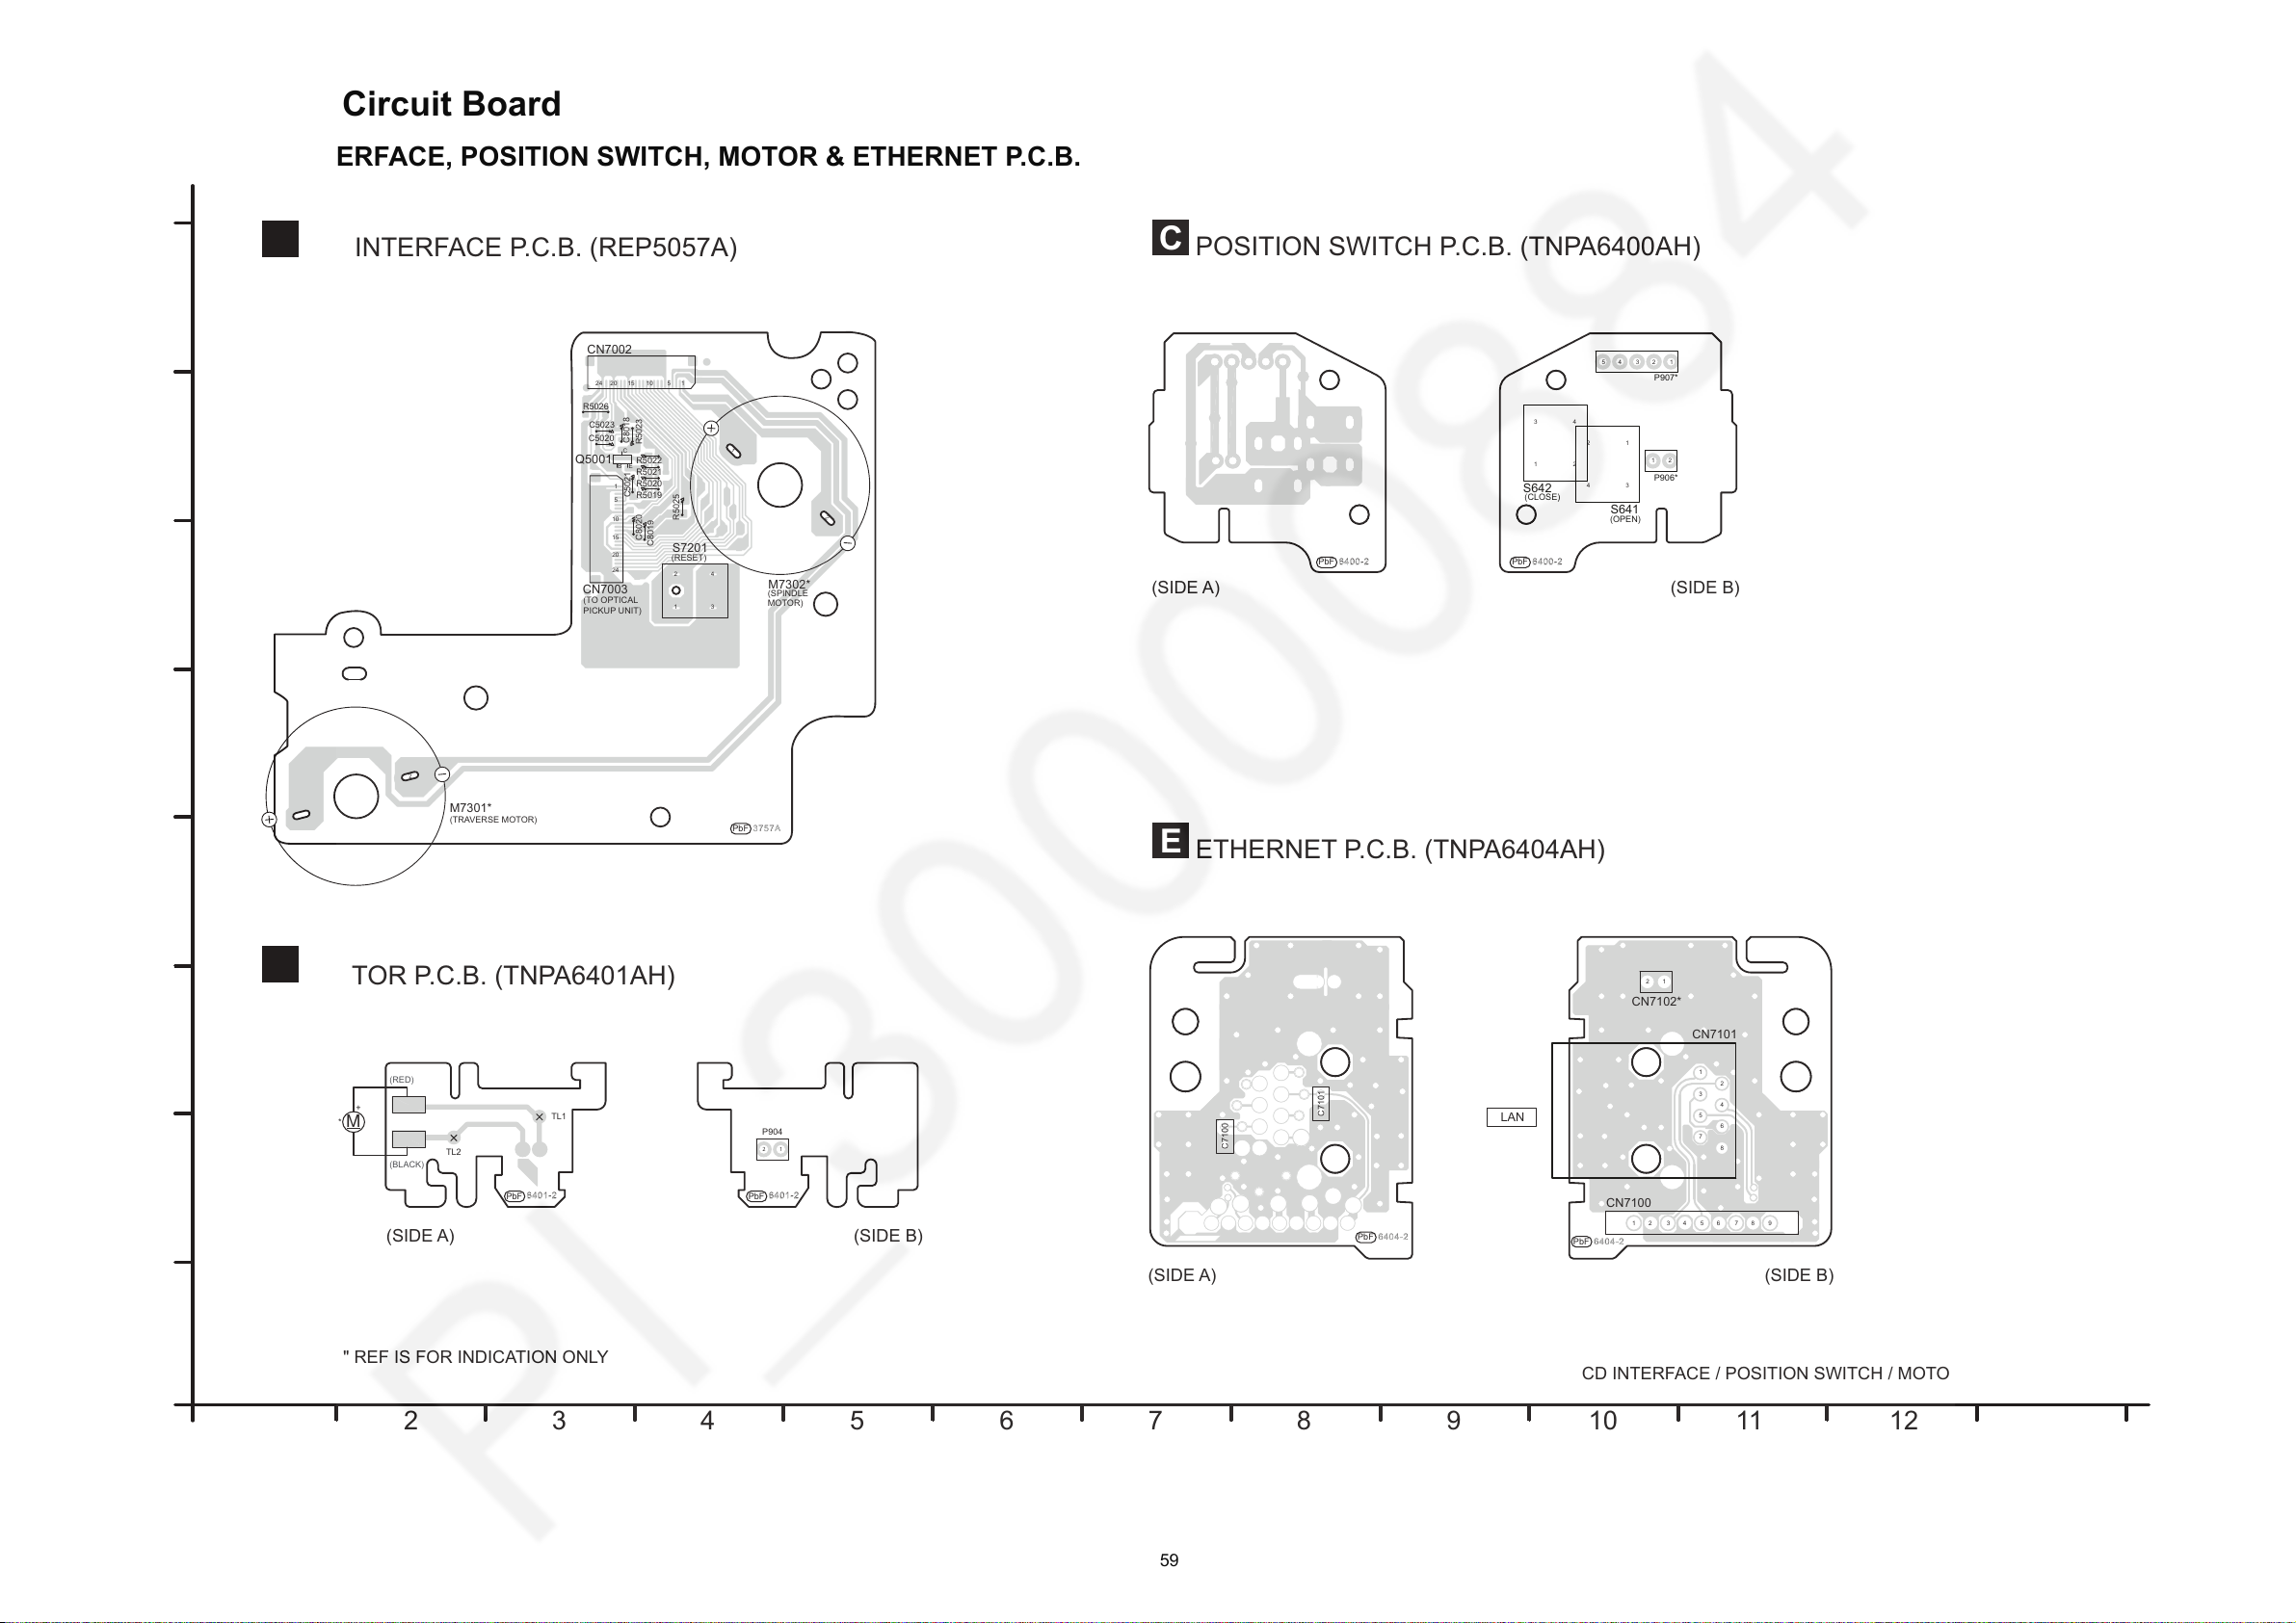
13 Printed Circuit Board
1
1
2
3
4
5
6
7
8
9
A
B
C
D
E
F
G
H
10 1 12 13
A
C
CD INTERFACE P.C.B. (REP5057A)
POSITION SWITCH P.C.B. (TNPA6400AH)
D
E
MOTOR P.C.B. (TNPA6401AH)
ETHERNET P.C.B. (TNPA6404AH)
(SIDE A) (SIDE B)
(SIDE A) (SIDE B)
(SIDE A) (SIDE B)
6404-2
PbF
6404-2
PbF
6401-2
PbF
6401-2
PbF
6400-2
6400-2
375 7A
PbF
PbF PbF
M
LOADING MOTOR*
+
LAN
CN7002
CN7003
R5022
C5023
C5020
C8018
R5023
R5021
C5021
R5020
R5019
Q5001
R5025
C8020
C8019
R5026
S7201
TL1
TL2
P904
P907*
S641
S642
P906*
(OPEN)
(CLOSE)
C7100
C7101
CN7100
CN7101
CN7102*
2 4
31
1510152024
1
5
10
15
20
24
B
C
E
1
2
1
2
12
5432 1
112
2
3
132
4
4
1 2 34 56789
8
7
2
1
4
3
6
5
2
1
SC-HC1000GM/GS
CD INTERFACE / POSITION SWITCH / MOTOR / ETHERNET P.C.B.
NOTE: " * " REF IS FOR INDICATION ONLY
13.1. CD INTERFACE, POSITION SWITCH, MOTOR & ETHERNET P.C.B.
59
Page 60
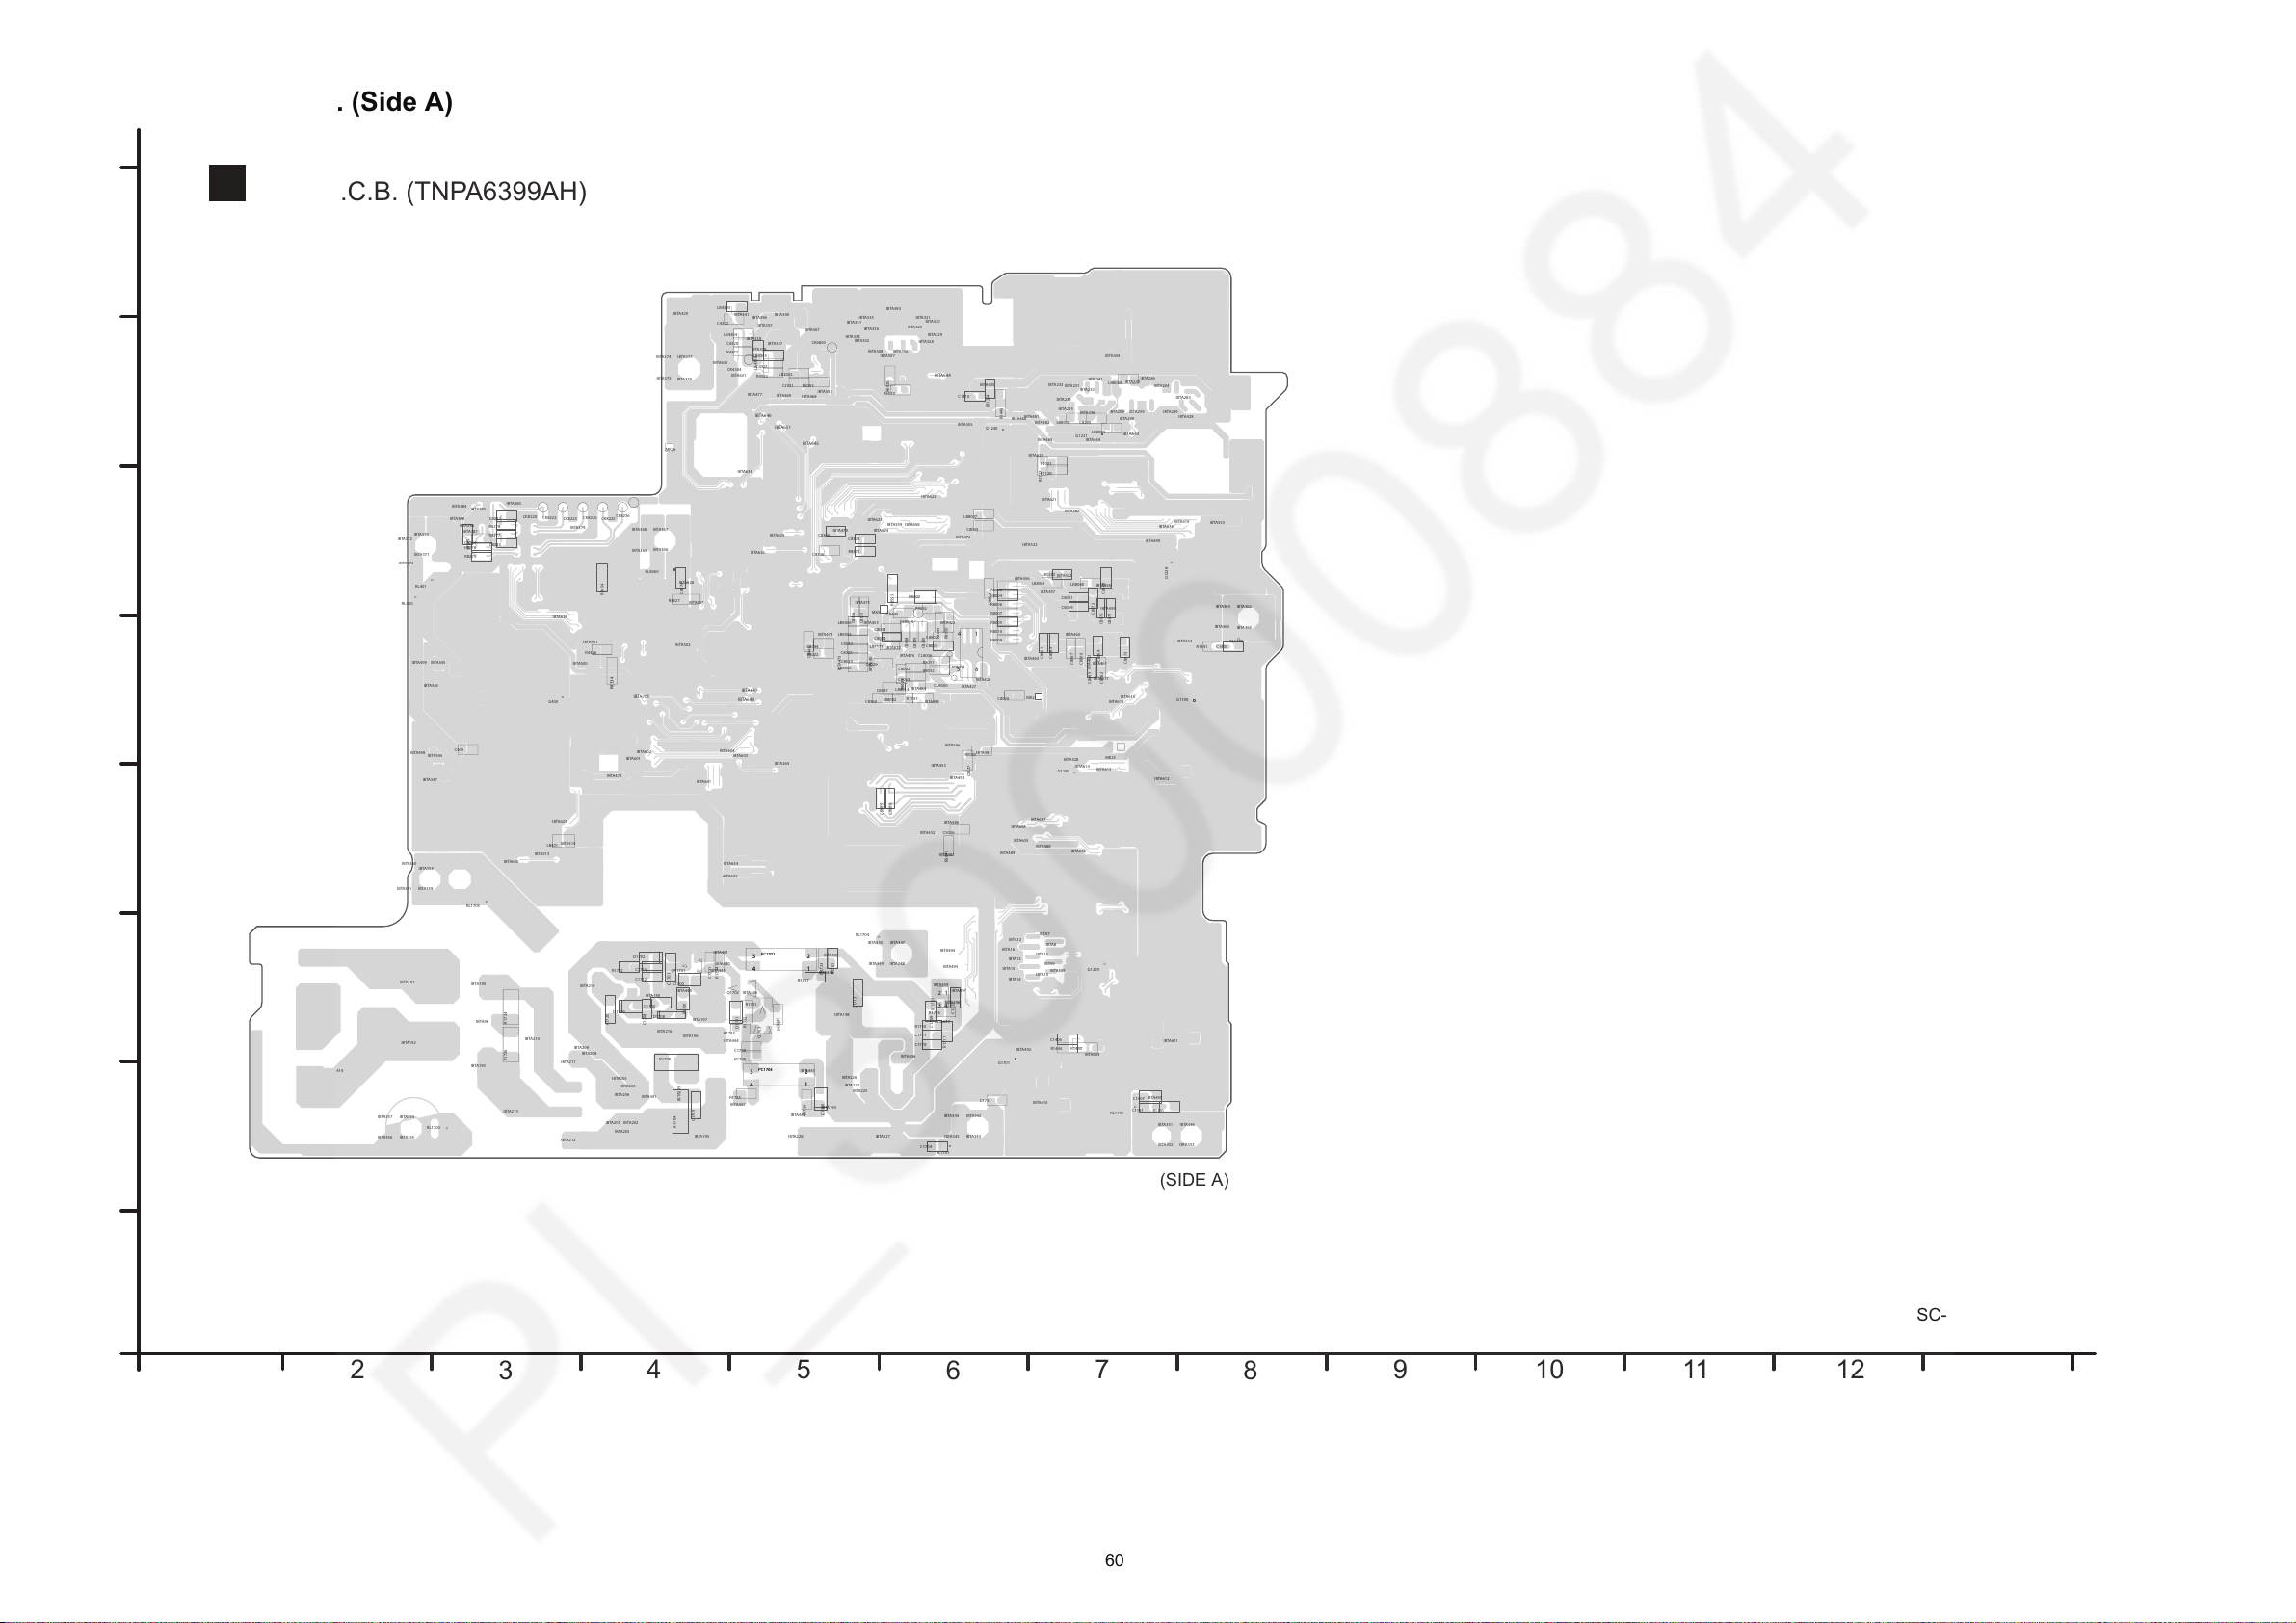
1
2
3
4
5
6
7
8
9
A
B
C
D
E
F
G
H
10 11 12 13
(SIDE A)
MAIN P.C.B. (TNPA6399AH)
B
SC-HC1000GM/GS
MAIN
P.C.B.
324
1
4
3
2
14
3
2
1
4
3
2
14
3
2
1
14
58
R8007
R1724
C4320
R8010
R8008
C4321
R8009
R1127
R1726
G1228
C4322
G1230
R1128
R8092
G1229
C1730
R8093
C1731
R6020
C2031
R1731
R6019
C8295
R1732
C1733
R4326
R1733
C5026
R4327
R1734
C5027
R1735
R8021
R1736
G1240
R8022
R4332
R1737
R4333
R1441
C8025
R4334
R1741
R1739
C8026
IC1701
PC1701PC1702
PC1703PC1704
R1443
LB401
R5035
R1444
C8030
C8330
R1445
C8029
C8329
C8033
R5041
LB2002
C8034
C8035
LB8002
LB8003
LB8005
LB8006
C8036
LB8007
LB8010
LB8008
LB8009
LB8014
C8336
IC8004
MK25
R2053
C8038
LB8060
LB8061
C8044
C8045
C8445
C8446
C8047
MK26
RL1700
RL1701
R8050
RL1704
RL1705
R8051
C8052
RL400
R8052
C8053
RL401
C8054
LB7173
R8553
R8454
CK6800
CL8000
C8360
LB1253
C8061
C8059
LB1254
CL8006
C8062
CL8014
C1001
C8063
MK2
C1700
L1700
MK5
C8064
R1700
C1701
G1701
LB4303
QR1701
LB4304
LB4305
R1701
C8065
LB4306
D1702
Q1702
C8066
R1702
Q1703
C8067
C1704
C1405
RL8060
C8070
C8068
R1704
C1705
C1406
C8071
C8069
C1407
C8072
C1410
G1190
C8073
C1708
D1708
D1710
C1191
R8372
R1710
C8074
R1708
C1711
C1709
D1709
D1711
R1191
R1711
C1712
C1713
C5005
R8275
C5006
R8276
C1715
R8277
CK8220
CK8222
RL1191
CK8223
RL1192
CK8225
C8002
D8002
R8278
CK8226
R1716
C8003
C8282
R1717
C1720
G1221
C8004
C8283
C8304
C1719
R8004
CK8256
C8284
C1722
R8005
C8285
C8306
C1723
CK4304
R8006
C400
G400
IBTA462
IBTA472
IBTA482
IBTA502
IBTA492
IBTA522
IBTA562
IBTA203
IBTA602
IBTA213
IBTA193
IBTA612
IBTA223
IBTA622
IBTA632
IBTA233
IBTA283
IBTA333
IBTA343
IBTA353
IBTA363
IBTA373
IBTA383
IBTA423
IBTA443
IBTA453
IBTA463
IBTA473
IBTA483
IBTA493
IBTA523
IBTA553
IBTA603
IBTA204
IBTA214
IBTA194
IBTA613
IBTA224
IBTA623
IBTA234
IBTA633
IBTA643
IBTA264
IBTA284
IBTA334
IBTA344
IBTA354
IBTA364
IBTA374
IBTA384
IBTA414
IBTA434
IBTA444
IBTA454
IBTA464
IBTA474
IBTA484
IBTA514
IBTA494
IBTA544
IBTA554
IBTA604
IBTA205
IBTA215
IBTA195
IBTA614
IBTA225
IBTA624
IBTA235
IBTA634
IBTA644
IBTA335
IBTA345
IBTA355
IBTA365
IBTA375
IBTA385
IBTA415
IBTA435
IBTA445
IBTA455
IBTA465
IBTA475
IBTA485
IBTA505
IBTA515
IBTA495
IBTA545
IBTA555
IBTA206
IBTA605
IBTA216
IBTA196
IBTA615
IBTA226
IBTA625
IBTA236
IBTA635
IBTA645
IBTA286
IBTA705
IBTA336
IBTA346
IBTA356
IBTA366
IBTA376
IBTA386
IBTA396
IBTA426
IBTA436
IBTA446
IBTA456
IBTA476
IBTA486
IBTA506
IBTA496
IBTA546
IBTA556
IBTA606
IBTA197
IBTA616
IBTA227
IBTA626
IBTA636
IBTA646
IBTA337
IBTA347
IBTA357
IBTA367
IBTA377
IBTA387
IBTA397
IBTA427
IBTA437
IBTA447
IBTA457
IBTA467
IBTA477
IBTA487
IBTA507
IBTA497
IBTA547
IBTA208
IBTA607
IBTA198
IBTA617
IBTA228
IBTA627
IBTA238
IBTA647
IBTA328
IBTA338
IBTA348
IBTA358
IBTA368
IBTA388
IBTA428
IBTA448
IBTA458
IBTA468
IBTA478
IBTA488
IBTA508
IBTA498
IBTA528
IBTA558
IBTA209
IBTA608
IBTA219
IBTA618
IBTA229
IBTA628
IBTA239
IBTA638
IBTA249
IBTA648
IBTA289
IBTA329
IBTA339
IBTA349
IBTA359
IBTA369
IBTA379
IBTA429
IBTA439
IBTA449
IBTA459
IBTA469
IBTA479
IBTA509
IBTA489
IBTA499
IBTA559
IBTA609
IBTA619
IBTA629
IBTA639
IBTA10
IBTA7
IBTA11
IBTA12
IBTA13
IBTA14
IBTA15
IBTA16
IBTA8
IBTA9
IBTA100
IBTA210
IBTA190
IBTA220
IBTA240
IBTA330
IBTA340
IBTA350
IBTA360
IBTA370
IBTA380
IBTA440
IBTA450
IBTA460
IBTA480
IBTA500
IBTA490
IBTA201
IBTA191
IBTA610
IBTA211
IBTA221
IBTA620
IBTA231
IBTA630
IBTA241
IBTA640
IBTA331
IBTA341
IBTA351
IBTA96
IBTA361
IBTA97
IBTA371
IBTA98
IBTA99
IBTA441
IBTA461
IBTA481
IBTA501
IBTA491
IBTA202
IBTA601
IBTA212
IBTA192
IBTA611
IBTA222
IBTA621
IBTA232
IBTA631
IBTA641
IBTA651
IBTA332
IBTA342
IBTA352
IBTA362
IBTA372
IBTA422
IBTA442
IBTA452
13.2. MAIN P.C.B. (Side A)
60
Page 61
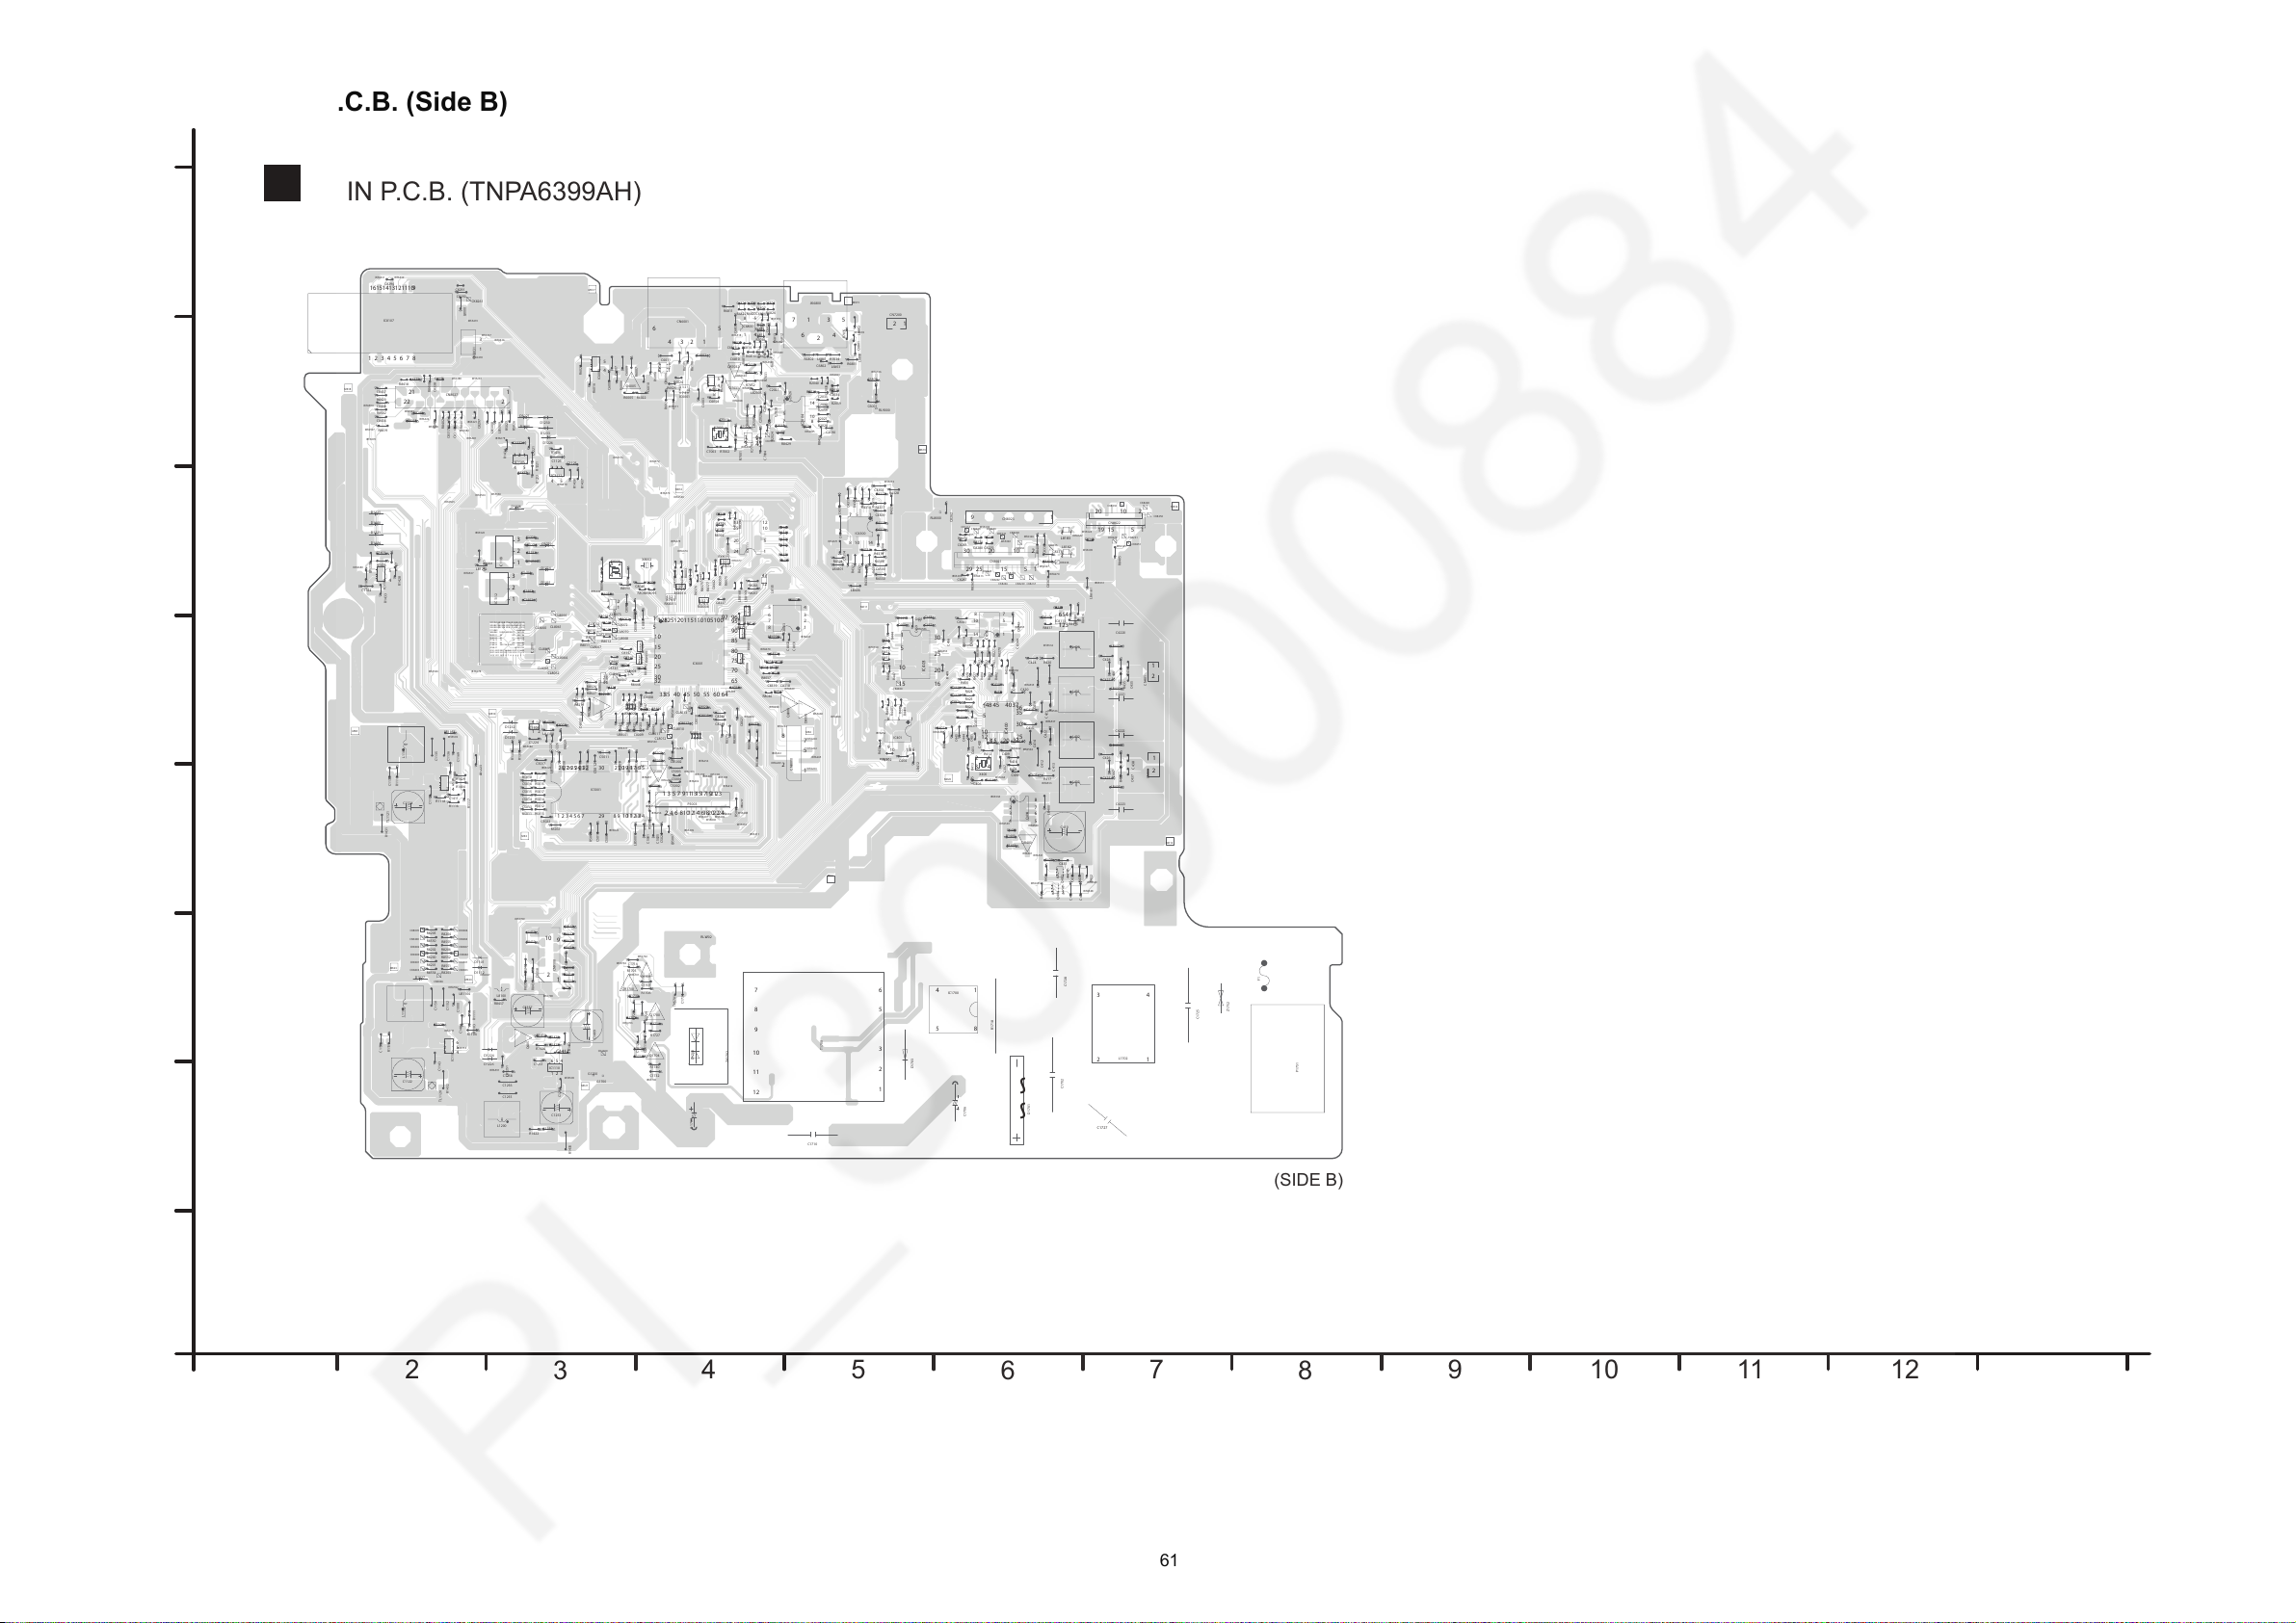
1
2
3
4
5
6
7
8
9
A
B
C
D
E
F
G
H
10 11 12 13
(SIDE B)
B
SC-HC1000GM/GS
MAIN
P.C.B.
MAIN P.C.B. (TNPA6399AH)
3
2
1
4
5
6
43
21
8
7
6
5
4
3
2
1
8
7
6
5
4
3
2
1
8
7
6
5
4
3
2
1
8
7
6
5
4
3
2
1
8765
4321
8
7
6
5
4
3
2
1
8765
4321
8765
4321
8765
4321
8
7
6
5
4
3
2
1
14
58
4845 4037
36
35
30
25
24201513
12
10
5
1
3
2
1
4
5
6
161510
9
85 1
1
5
10
15 16
20
25
30
153152151150149148147146145144143142141140
139138137136135134133132131130129128127126
125124123122121120119118117116115114113112
111110109 108107106
105104103 102101100
999897 969594
939291 90 89 888786
858483 82 81 807978
777675 74 73 727170
696867 66 65 646362
616059 58575655 5453 525150
494847 46454443
42414039 38373635343332 313029
28272625 24232221201918 171615
14131211 10
987654321
1
5
78
10
14
28272625242322 21201918171615
1413121110987654321
30
29
541
2
3
10
9876
5
4321
1
2
34
5
6
43
215
1
5
10
15
20
25
30
32
3335 40 45 50 55 60 64
65
70
75
80
85
90
95
96
97
100105110115120125128
14
58
1
2
3
4
1
2
3
45
6
7
8
3
2
1
4
5
6
3
2
1
3
2
1
4
5
6
54
1
2
3
12
34
321
456
541
2
3
54
1
2
3
3
2
1
1
5
78
10
14
910111213141516
87654321
1
5
10
1213
15
20
24
4
3
2
1
8
7
6
5
64
321
5
1
2
2
1
7
654
321
~~
12
1
2
11
3
10
9
58
67
4321
56
1
5
7
2
8
2
1
43
157
810 14
15
10 2302520
1529
15
10 220
1519
91
1
2
21
22
1
3
1
2
9
10
2423222120
19181716151413121110987654321
3
2
1
4
5
6
43
21
43
21
4321
4
3
2
1
4
3
2
1
21
R4316
C4317
C420
L400
R5015
R8406
R6811
R1424
C408
C5016
C8008
C6812
C430
Q400
C8287
R400
C418
C1126
C4220
C428
C1226
C450
D1226
X400
R4317
R420
C438
C4318
C1725
C460
R408
R5016
R8407
R2024
R6812
R1425
R430
C5017
C2025
C8009
C6813
C8290
R418
C8288
R8110
C458
R440
R428
R8210
C4221
R450
D1227
R8090
R8088
R1725
R4320
R4318
R438
C4319
R448
R5017
R8011
R8408
R2025
R1426
R6813
C2026
C6814
C8291
C8289
R8390
R8209
C4222
C1230
C1228
D1230
D1228
RX8002
R8091
R4321
R4319
RX8003
C1727
R5018
R8012
R2026
RX8005
R6016
R6814
R1427
C5019
C2027
C6815
RX8006
RX8007
RX8010
RX8008
R8389
R8391
RX8011
C1231
C4223
D1229
D1231
R1727
R4322
RX8013
C1728
RX8014
R1428
R5019
R2027
R8013
RX8015
R6815
R1430
C5022
C2030
C2028
C6816
RX8016
R8392
D1232
R1730
R1728
R4323
R5022
R8014
R2030
R2028
R6816
R1431
R1429
C2029
C5023
C8294
D1233
R8094
R1729
R4324
C8315
C1732
R1432
R8015
R6021
R8414
R6817
C5024
C2032
C8016
C6820
D1234
R8095
R4325
C8316
R8016
R6022
R6820
R8415
R1433
C5025
C2033
C8017
C8296
C1135
C401
CK8400
CK8401
C411
G401
D1235
CK8402
C1734
C8317
CK8403
C421
MK23
L401
CK8404
R8416
R8017
R6023
R2033
R1434
C8018
C409
C2034
C8020
C431
C8297
C419
C1136
C429
R421
C439
C8318
C461
R8417
R8018
R6024
R2034
R5026
R6822
R1435
R431
C2035
C8021
C8019
R419
C459
C1137
R429
R451
R4330
R4328
C8319
R6025
R5027
R6823
R449
R1436
R8420
R8418
C2036
C8022
C5028
C6824
C1138
R8221
R4329
R4331
R1437
R8421
R8419
C2037
C8023
C6825
C1139
ZA1702
R1438
C8024
C6826
R1740
R1738
R8024
R2040
R8423
R6826
C1143
R8025
R2039
R8424
R6827
R1442
IC1700
C6830
LB400
R8425
R8026
C402
C412
MK14
C422
MK24
Q7031
L402
R7031
R8027
C432
IC400
Q402
R402
LB402
R412
C462
R7032
C7033
R432
C8031
IC401
LB403
R452
C8331
R7033
R5037
R8430
R8029
C8032
C1150
LB404
C8332
G1250
R5040
R8431
R8429
R7034
C8432
IC403
C1151
LB405
C1251
LB2000
C8333
R8432
R5039
R7035
C8433
R1151
C1152
LB406
LB2005
LB5001
LB5002
C8334
LB5003
R8433
R5042
R7036
C8434
LB5004
LB5005
LB5006
LB8000
LB5007
LB8001
LB6800
LB5008
C1253
P1751
LB5009
IC2001
LB8004
C8335
R8434
R5043
R8035
C8435
IC2004
IC5001
C1254
IC6000
LB8013
IC6001
IC6002
LB8015
IC7001
R8435
R8036
C8436
IC8001
Z1752
IC6800
C403
IC8002
IC8003
C1255
C413
MK15
C8337
C423
L403
R8436
R8037
C8437
C8040
C433
R403
LB412
R413
C1256
C453
C8338
C463
R8437
R433
C8440
C8041
C8039
R443
R453
C1257
C8341
TH5701
R8041
C8439
C8042
C8441
C1258
C8342
R8441
C8043
C8442
C8343
R8442
R8043
LB1104
C8443
LB1108
C8344
C8444
IC1101
IC1103
C8345
IC1104
R2059
R8045
IC1105
C8046
IC1106
IC1110
IC1109
IC1111
IC1112
LB8114
C8346
R8046
LB8120
C404
C414
MK16
C8347
IC8106
C424
LB8125
IC8107
R8047
LB8126
C8447
C434
IC8111
Q404
R404
C444
IC8113
R414
C454
C8348
R424
C464
RL1702
R8447
R434
C8448
C8051
R444
LB1161
R8448
R8450
R8550
C8152
R8451
R8449
R8551
C1169
C8353
R8452
R8552
LB8168
LB8169
C8354
R8453
LB8180
LB8181
CN400
LB1222
C8355
LB1223
LB1224
LB1225
R8554
CK7001
CN401
CK8000
C8356
CK8001
CK8002
CK8003
R8555
CK8004
C405
JK6800
CK8005
CK8006
C415
CK8007
MK17
C8357
C425
C8060
C435
Q405
R405
C445
LB1251
F1
R425
C8358
LB1252
C465
R435
CL8004
R445
C1000
CL8005
RL8000
D1100
CL8010
C8361
C8359
CL8011
RL9000
CL8012
CL8013
C1400
L1200
D1101
R8361
R8359
C8362
MK1
D1700
R1400
MK3
C1401
G1700
MK4
Q1700
R1301
MK6
D1701
T1700
L1102
R1401
C1402
CN6001
LB4301
QR1700
CN8000
Q1701
CK1100
R1302
C1702
C1403
R1103
D1104
L1702
C1703
IC4300
D1703
C1184
C1404
R1104
QR400
CL8060
R8365
CL8061
CN8021
MK10
R8066
CL8062
CN8022
R1703
CN8023
CL8063
L1105
MK20
CL8064
C1185
R1404
C406
CL8065
CL8066
C416
CL8067
CN8027
MK18
CL8070
CL8068
CN8031
C426
CL8071
CL8069
CL8072
R8067
Q1704
C436
C4300
CL8073
R406
C446
R416
C456
R426
C466
R1705
R436
C1706
R1406
R446
R4400
R8270
R466
TL1120
R1706
C1707
TL1121
R1407
R4401
C5001
C1408
C1011
R8271
R8269
C1109
C4303
C1710
Q5001
R4402
C5002
C1409
C1411
C1012
R8272
R1111
D1112
C5003
C6001
C1412
R8273
R6100
D1113
R8373
CN9100
P5003
C5004
C6002
R8274
R6101
R8374
QR6006
L6800
R8075
R6002
C7001
C6003
C6801
D1115
R8375
L7001
L6801
MK11
C1714
MK21
R7001
R6003
R6801
C7002
C407
C8000
C6004
C6802
D8000
C417
MK19
R8376
C427
L8000
L6802
C437
C4308
L8100
Q8000
R7002
R407
R8000
R6004
R6802
C7003
C447
C8001
C6005
C6803
D8001
CK8216
R417
C8280
R1116
QR7032
C457
R8377
R427
R8200
L6803
R437
R4308
C8301
C1716
C4309
L8101
Q6005
Q8001
R6005
R7003
R447
R5007
R8400
R8001
C7004
C5010
C6804
C8281
C8279
R6903
R1117
R8500
X7003
X8001
CK8230
CK8228
R8380
R8201
CK8231
CK8229
C8302
C4312
CK8234
R5010
R5008
R8401
R6006
C5011
C5009
CK8235
C6007
C6805
CK8236
R8501
R1118
CK8237
X8002
CK8240
CK8238
R8379
R8202
CK8239
L8182
CK8241
C1221
D1221
CK8242
R4312
C8303
C4313
CK8243
CK8244
R6007
R5011
R5009
R8402
R8003
R1420
C5012
C6010
CK8246
R8502
R1119
C1122
CK8250
R8203
R1221
L8183
CK8251
C1222
R1718
C4314
R5012
R6008
C5013
C8005
C6011
C6009
CN7200
R8503
R8204
R1222
CK8261
D1223
C8305
C4315
R5013
R1422
C5014
C8006
C6810
C1124
CK4300
R8205
C1224
D1224
C4316
R5014
R8405
R6810
R1423
C5015
C8007
C6811
C8286
C1125
CK8300
R8206
C1225
C410
D1225
MK12
IBTA532
IBTA572
IBTA592
IBTA642
IBTA253
IBTA263
IBTA662
IBTA672
IBTA702
IBTA682
IBTA692
IBTA712
IBTA323
IBTA403
IBTA413
IBTA393
IBTA533
IBTA573
IBTA593
IBTA653
IBTA673
IBTA703
IBTA683
IBTA693
IBTA324
IBTA404
IBTA394
IBTA534
IBTA564
IBTA574
IBTA594
IBTA654
IBTA255
IBTA265
IBTA664
IBTA674
IBTA704
IBTA684
IBTA694
IBTA325
IBTA405
IBTA395
IBTA535
IBTA565
IBTA595
IBTA655
IBTA256
IBTA266
IBTA665
IBTA675
IBTA685
IBTA695
IBTA326
IBTA406
IBTA416
IBTA526
IBTA536
IBTA566
IBTA586
IBTA596
IBTA656
IBTA257
IBTA666
IBTA676
IBTA706
IBTA686
IBTA287
IBTA696
IBTA327
IBTA407
IBTA417
IBTA527
IBTA537
IBTA567
IBTA597
IBTA637
IBTA268
IBTA667
IBTA677
IBTA707
IBTA687
IBTA288
IBTA697
IBTA408
IBTA418
IBTA398
IBTA518
IBTA538
IBTA548
IBTA658
IBTA269
IBTA668
IBTA678
IBTA708
IBTA688
IBTA698
IBTA409
IBTA419
IBTA399
IBTA519
IBTA529
IBTA539
IBTA549
IBTA569
IBTA649
IBTA659
IBTA669
IBTA679
IBTA709
IBTA689
IBTA699
IBTA250
IBTA260
IBTA270
IBTA290
IBTA400
IBTA410
IBTA390
IBTA430
IBTA520
IBTA530
IBTA540
IBTA550
IBTA570
IBTA590
IBTA650
IBTA251
IBTA261
IBTA670
IBTA680
IBTA700
IBTA710
IBTA321
IBTA401
IBTA411
IBTA431
IBTA521
IBTA531
IBTA541
IBTA571
IBTA591
IBTA252 IBTA262
IBTA661
IBTA671
IBTA701
IBTA681
IBTA711
IBTA322
IBTA402
IBTA412
IBTA392
13.3. MAIN P.C.B. (Side B)
61
Page 62
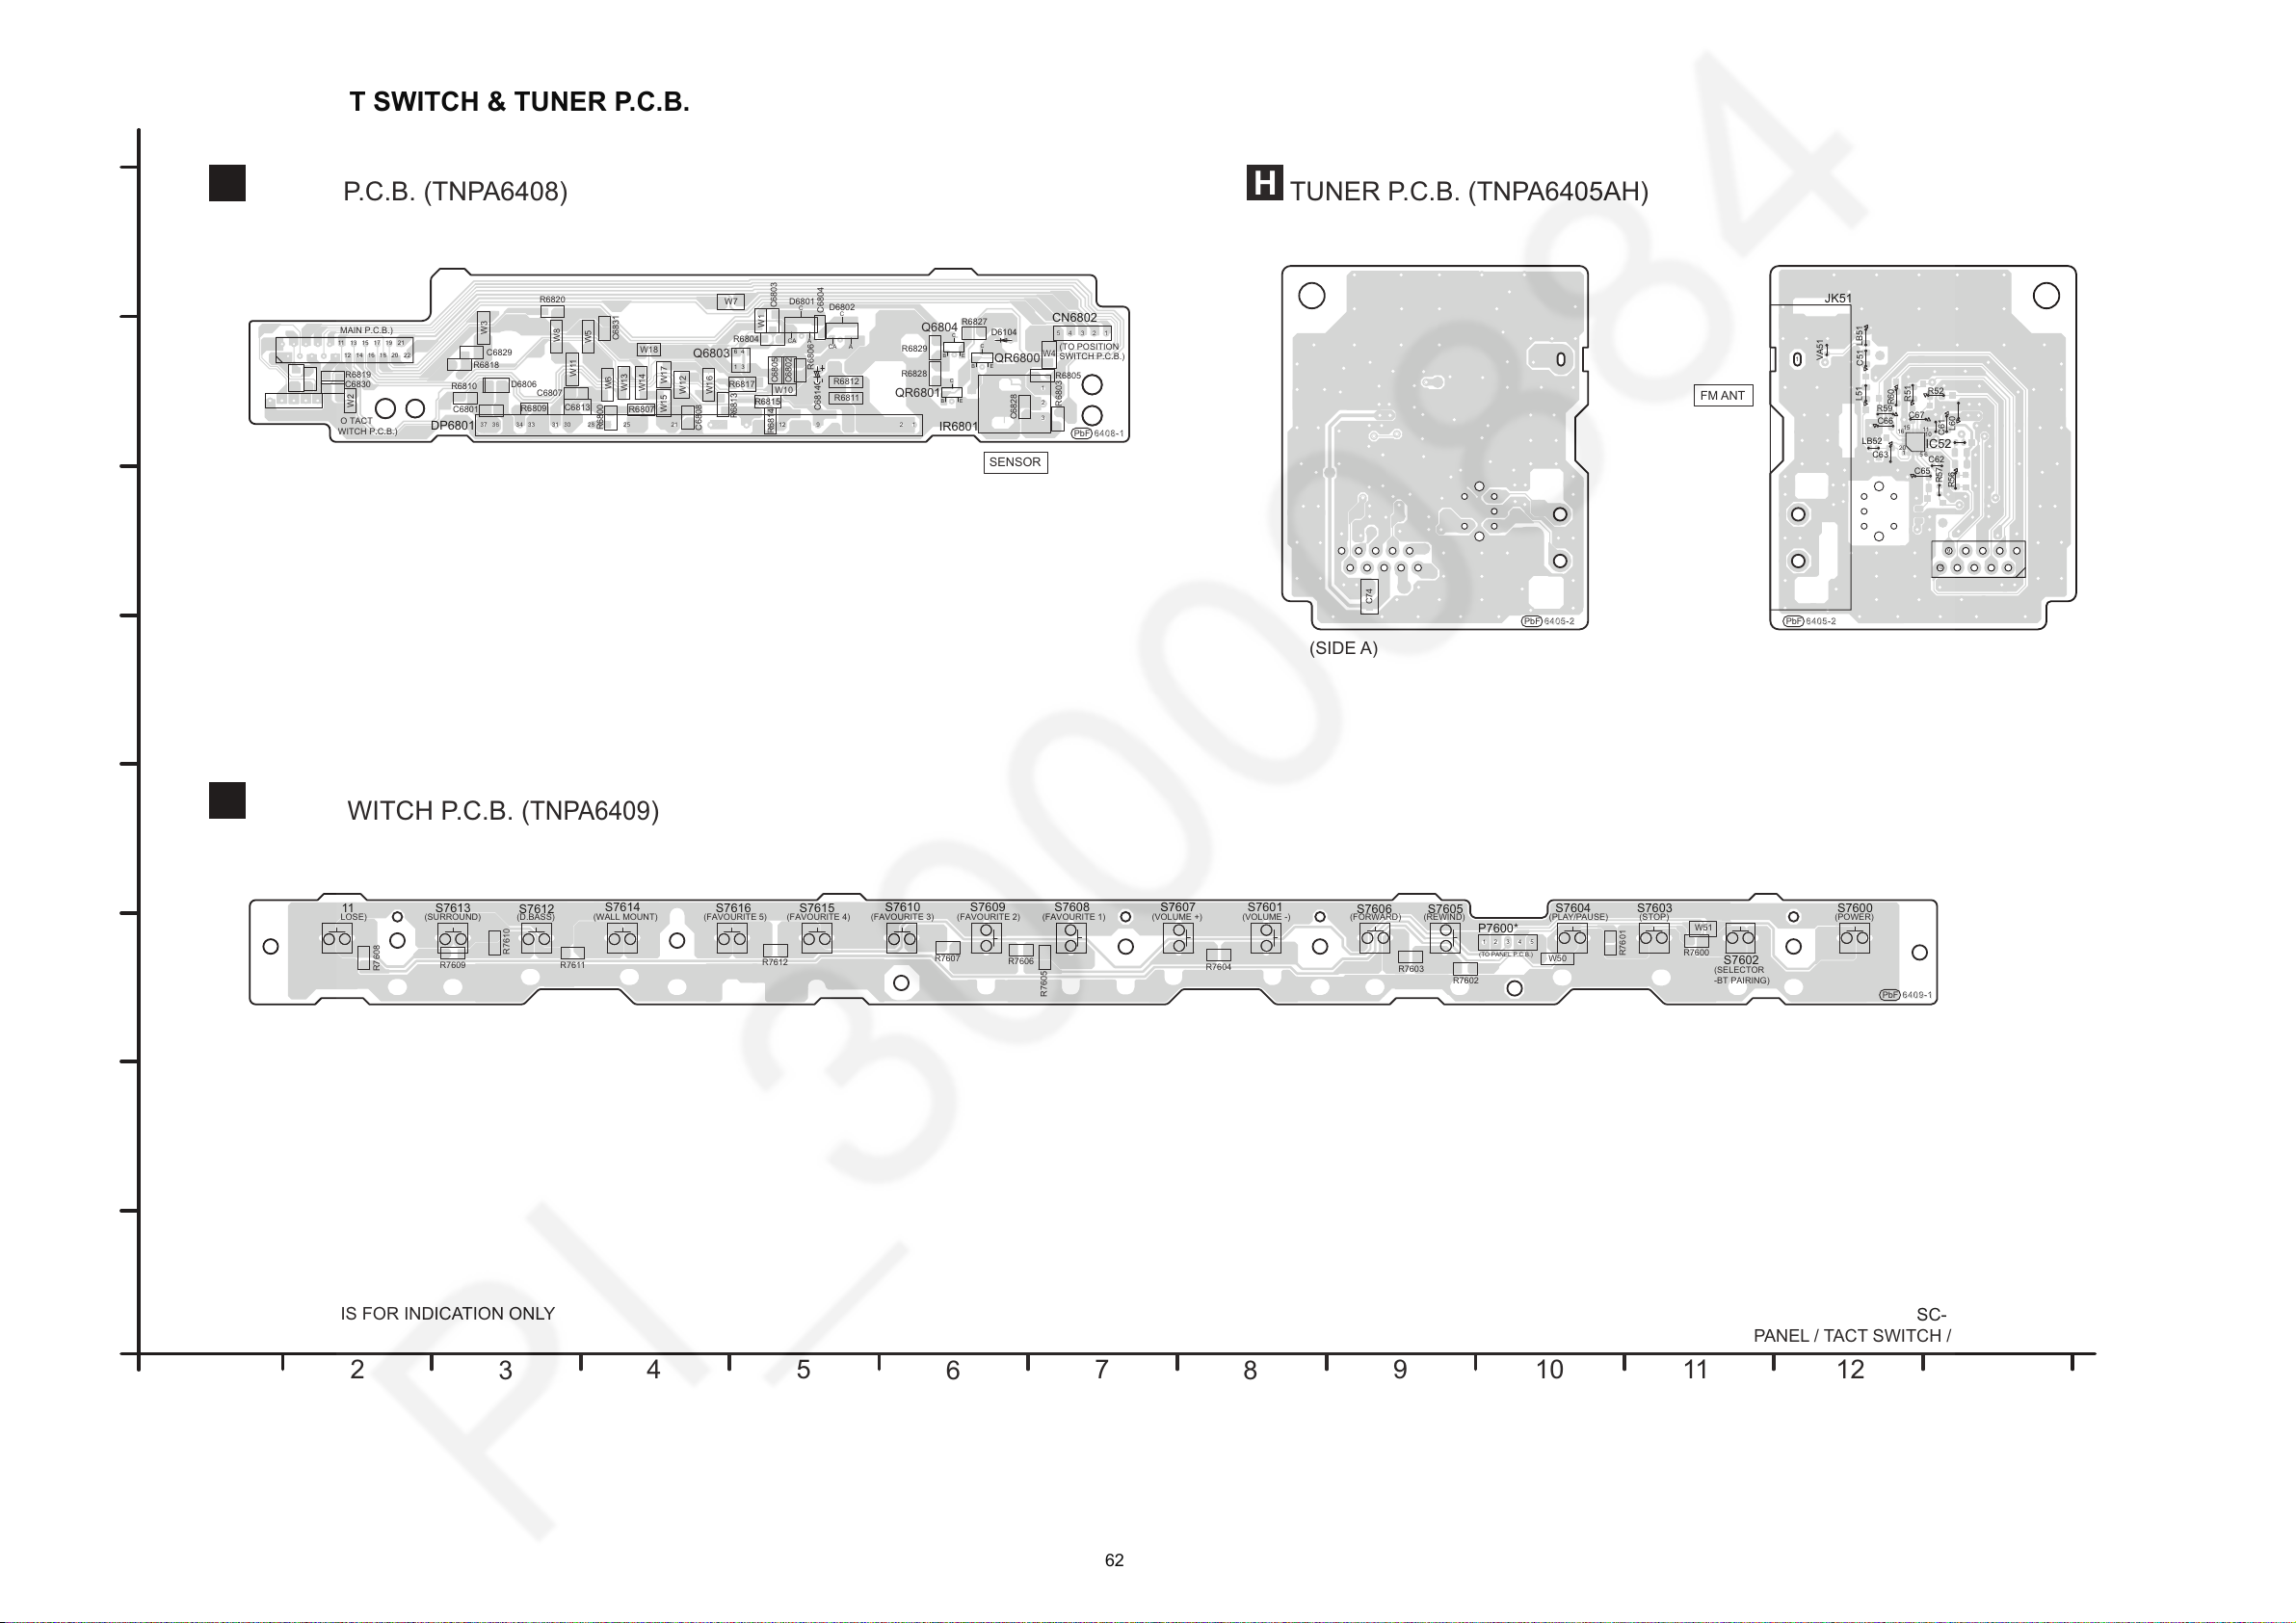
13.4. PANEL, TACT SWITCH & TUNER P.C.B.
1
2
3
4
5
6
7
8
9
A
B
C
D
E
F
G
H
10 11 12 13
PANEL P.C.B. (TNPA6408)
F
G
TACT SWITCH P.C.B. (
TNPA6409
)
SC-HC1000GM/GS
PANEL / TACT SWITCH / TUNER
P.C.B.
NOTE: " * " REF IS FOR INDICATION ONLY
PbF
TUNER P.C.B. (TNPA6405AH)
H
(SIDE A) (SIDE B)
PbF
6405-2
PbF
6405-2
PbF
6409-1
6408-1
SENSOR
R6811
R6809
R6812
C6813
R6813
R6814
R6815
R6817
R6820
R6818
R6819
R6827
C6830
C6828
R6828
C6831
C6829
R6829
W1
W2
W3
W4
W5
W6
W10
W7
QR6800
QR6801
W11
W12
R6800
C6801
D6801
W13
W14
W15
W16
C6802
D6802
W17
W18
W8
W19
C6803
Q6803
R6803
C6804
W9
Q6804
R6804
C6805
R6805
D6806
R6806
C6807
R6807
C6808
R6810
C6814
CN6801
CN6802
CN6803
DP6801
IR6801
D6104
(TO MAIN P.C.B.)
143
6
A
CA
C
A
CA
C
R7610
R7608
R7611
R7609
R7612
R7600
R7601
R7602
R7603
R7604
R7605
R7606
W50
W51
R7607
S7610
S7608
S7611
S7609
S7612
S7613
S7614
S7615S7616
P7600*
S7600
S7601
S7602
S7603
S7604
S7605S7606
S7607
(POWER)(STOP)(PLAY/PAUSE)(REWIND)(FORWARD)(VOLUME -)(VOLUME +)
(FAVOURITE 1)(FAVOURITE 2)(FAVOURITE 3)(FAVOURITE 4)(FAVOURITE 5)(WALL MOUNT)(SURROUND)(OPEN/CLOSE) (D.BASS)
(SELECTOR
-BT PAIRING)
(TO PANEL P.C.B.)
(TO POSITION
SWITCH P.C.B.)
(TO TACT
SWITCH P.C.B.)
R56
C62
L60
R57
C63
R60
R59
C65
C66
C67
C73
VA51
LB51
LB52
IC52
CN60
JK51
C51
L51
R51
R52
R55
C61
C74
FM ANT
1
1
234
5
5432
678910111213141516171819202122
154 32
1
2 1
3
2
25
9
37 3034 313336
12
2128
51 2 34
20
16
15
11
10
65
1
123456789
10
1
62
Page 63
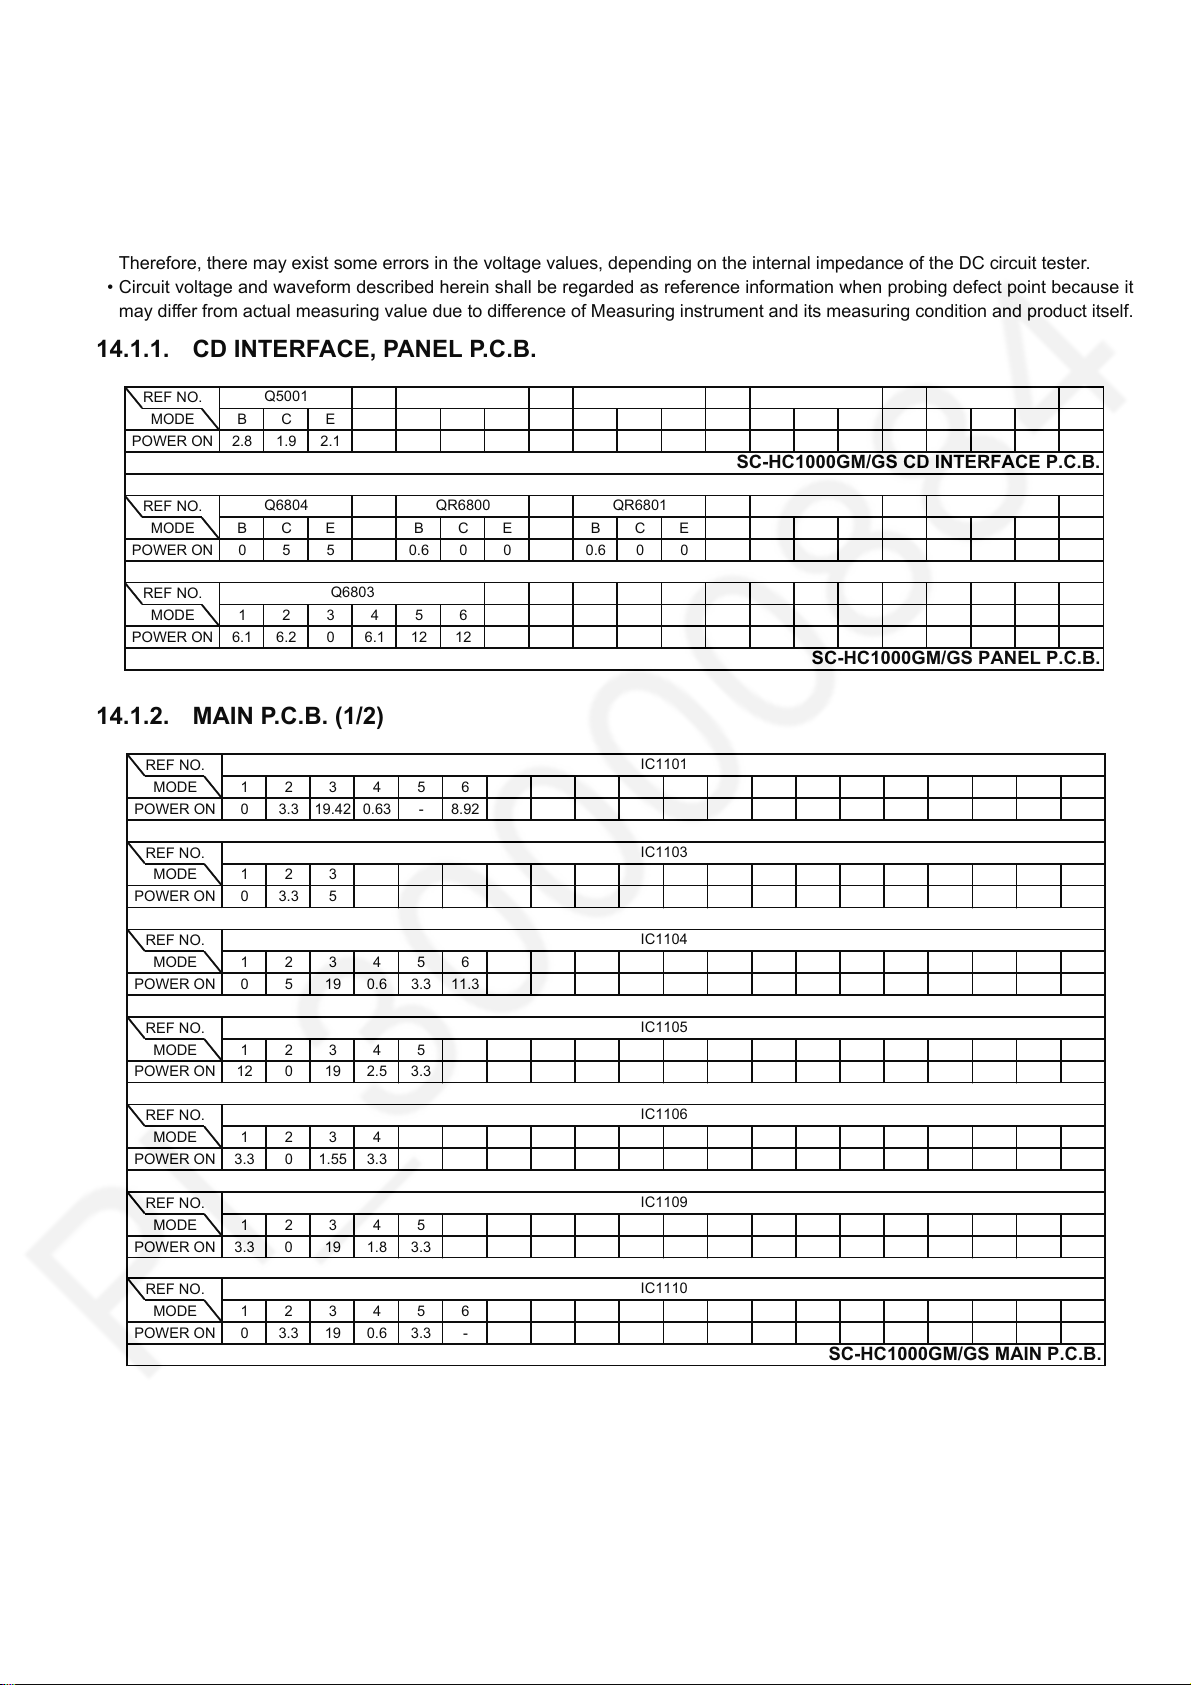
14 Appendix Information of Schematic Diagram
REF NO.
MODE B C E
POWER ON 2.8 1.9 2.1
REF NO.
MODE B C E B C E B C E
POWER ON 0 5 5 0.6 00 0.6 00
REF NO.
MODE 1 2 3456
POWER ON 6.1 6.2 0 6.1 12 12
QR6801
Q6803
SC-HC1000GM/GS PANEL P.C.B.
Q5001
SC-HC1000GM/GS CD INTERFACE P.C.B.
Q6804 QR6800
REF NO.
MODE 1 2 3456
POWER ON 0 3.3 19.42 0.63 - 8.92
REF NO.
MODE 1 2 3
POWER ON 0 3.3 5
REF NO.
MODE 1 2 3456
POWER ON 0 5 19 0.6 3.3 11.3
REF NO.
MODE 1 2 345
POWER ON 12 0192.5 3.3
REF NO.
MODE 1 2 34
POWER ON 3.3 0 1.55 3.3
REF NO.
MODE 1 2 345
POWER ON 3.3 0 19 1.8 3.3
REF NO.
MODE 1 2 3456
POWER ON 0 3.3 19 0.6 3.3 -
SC-HC1000GM/GS MAIN P.C.B.
IC1101
IC1104
IC1110
IC1105
IC1109
IC1103
IC1106
14.1. Voltage Measurement
Note:
• Indicated voltage values are the standard values for the unit measured by the DC electronic circuit tester (high-impedance) with
the chassis taken as standard.
Therefore, there may exist some errors in the voltage values, depending on the internal impedance of the DC circuit tester.
• Circuit voltage and waveform described herein shall be regarded as reference information when probing defect point because it
may differ from actual measuring value due to difference of Measuring instrument and its measuring condition and product itself.
14.1.1. CD INTERFACE, PANEL P.C.B.
14.1.2. MAIN P.C.B. (1/2)
63
Page 64
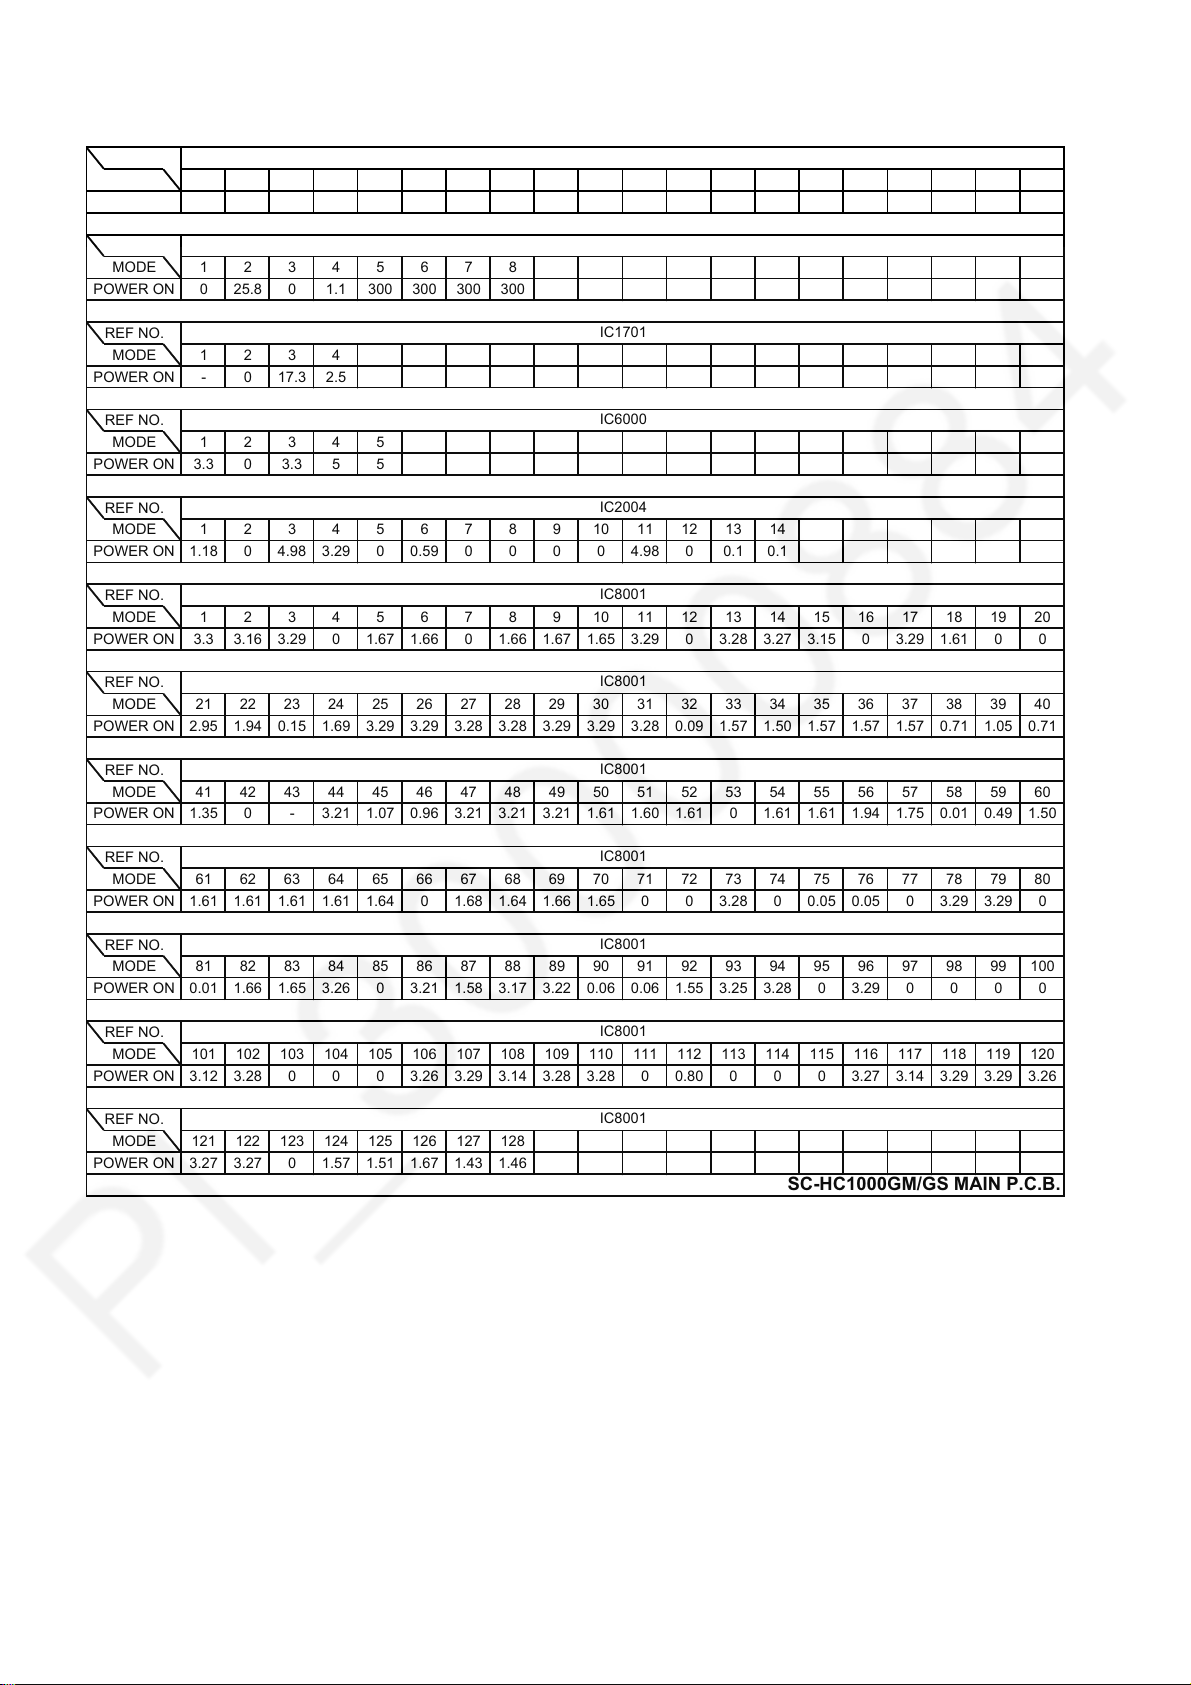
14.1.3. MAIN P.C.B. (2/2)
REF NO.
MODE 1 2 345
POWER ON 5 0 19 2.5 3.3
REF NO.
MODE 1 2 345678
POWER ON 0 25.8 0 1.1 300 300 300 300
REF NO.
MODE 1 2 34
POWER ON - 0 17.3 2.5
REF NO.
MODE 1 2 345
POWER ON 3.3 0 3.3 5 5
REF NO.
MODE 1 2 345678 9 10 11 12 13 14
POWER ON 1.18 0 4.98 3.29 0 0.59 00004.98 0 0.1 0.1
REF NO.
MODE 1 2 345678 9 10 11 12 13 14 15 16 17 18 19 20
POWER ON 3.3 3.16 3.2901.67 1.66 01.66 1.67 1.653.2903.283.27 3.15 0 3.291.610 0
REF NO.
MODE 21 22 23 24 25 26 27 28 29303132 33 34 35 36 37 38 39 40
POWER ON 2.95
1.94
0.15 1.693.293.293.283.283.293.293.28 0.09 1.57 1.50 1.57 1.57 1.57 0.71 1.05 0.71
REF NO.
MODE 41 42 43 44 45 46 47 48 49 50 51 52 53 54 55 56 57 58 59 60
POWER ON 1.35 0 - 3.21 1.07 0.96 3.213.213.211.611.601.6101.611.61 1.94 1.75 0.01 0.49 1.50
REF NO.
MODE 61 62 63 64 65 66 67 68 69 70 71 72 73 74 75 76 77 78 7980
POWER ON 1.611
.6
11.611.611.6401.681.641.66 1.650 03.28 0 0.05 0.05 0 3.293.290
REF NO.
MODE 81 82 83 84 85 86 87 88 89 90 91 92 93 94 95 96 97 98 99 100
POWER ON 0.01 1.66 1.653.26 03.21 1.58 3.17 3.22 0.06 0.06 1.55 3.253.2803.290000
REF NO.
MODE 101 102 103 104 105 106 107 108 109 110 111 112 113 114 115 116 117 118 119 120
POWER ON 3.12 3.280003.26 3.29 3.14 3.283.28 0 0.80 0 0 0 3.27 3.14 3.293.293.26
REF NO.
MODE 121122 123124125126 127 128
POWER ON
3.
27 3.27 0 1.57 1.51 1.67 1.43 1.46
IC8001
IC8001
IC8001
IC1111
IC1700
SC-HC1000GM/GS MAIN P.C.B.
IC6000
IC1701
IC2004
IC8001
IC8001
IC8001
IC8001
64
Page 65
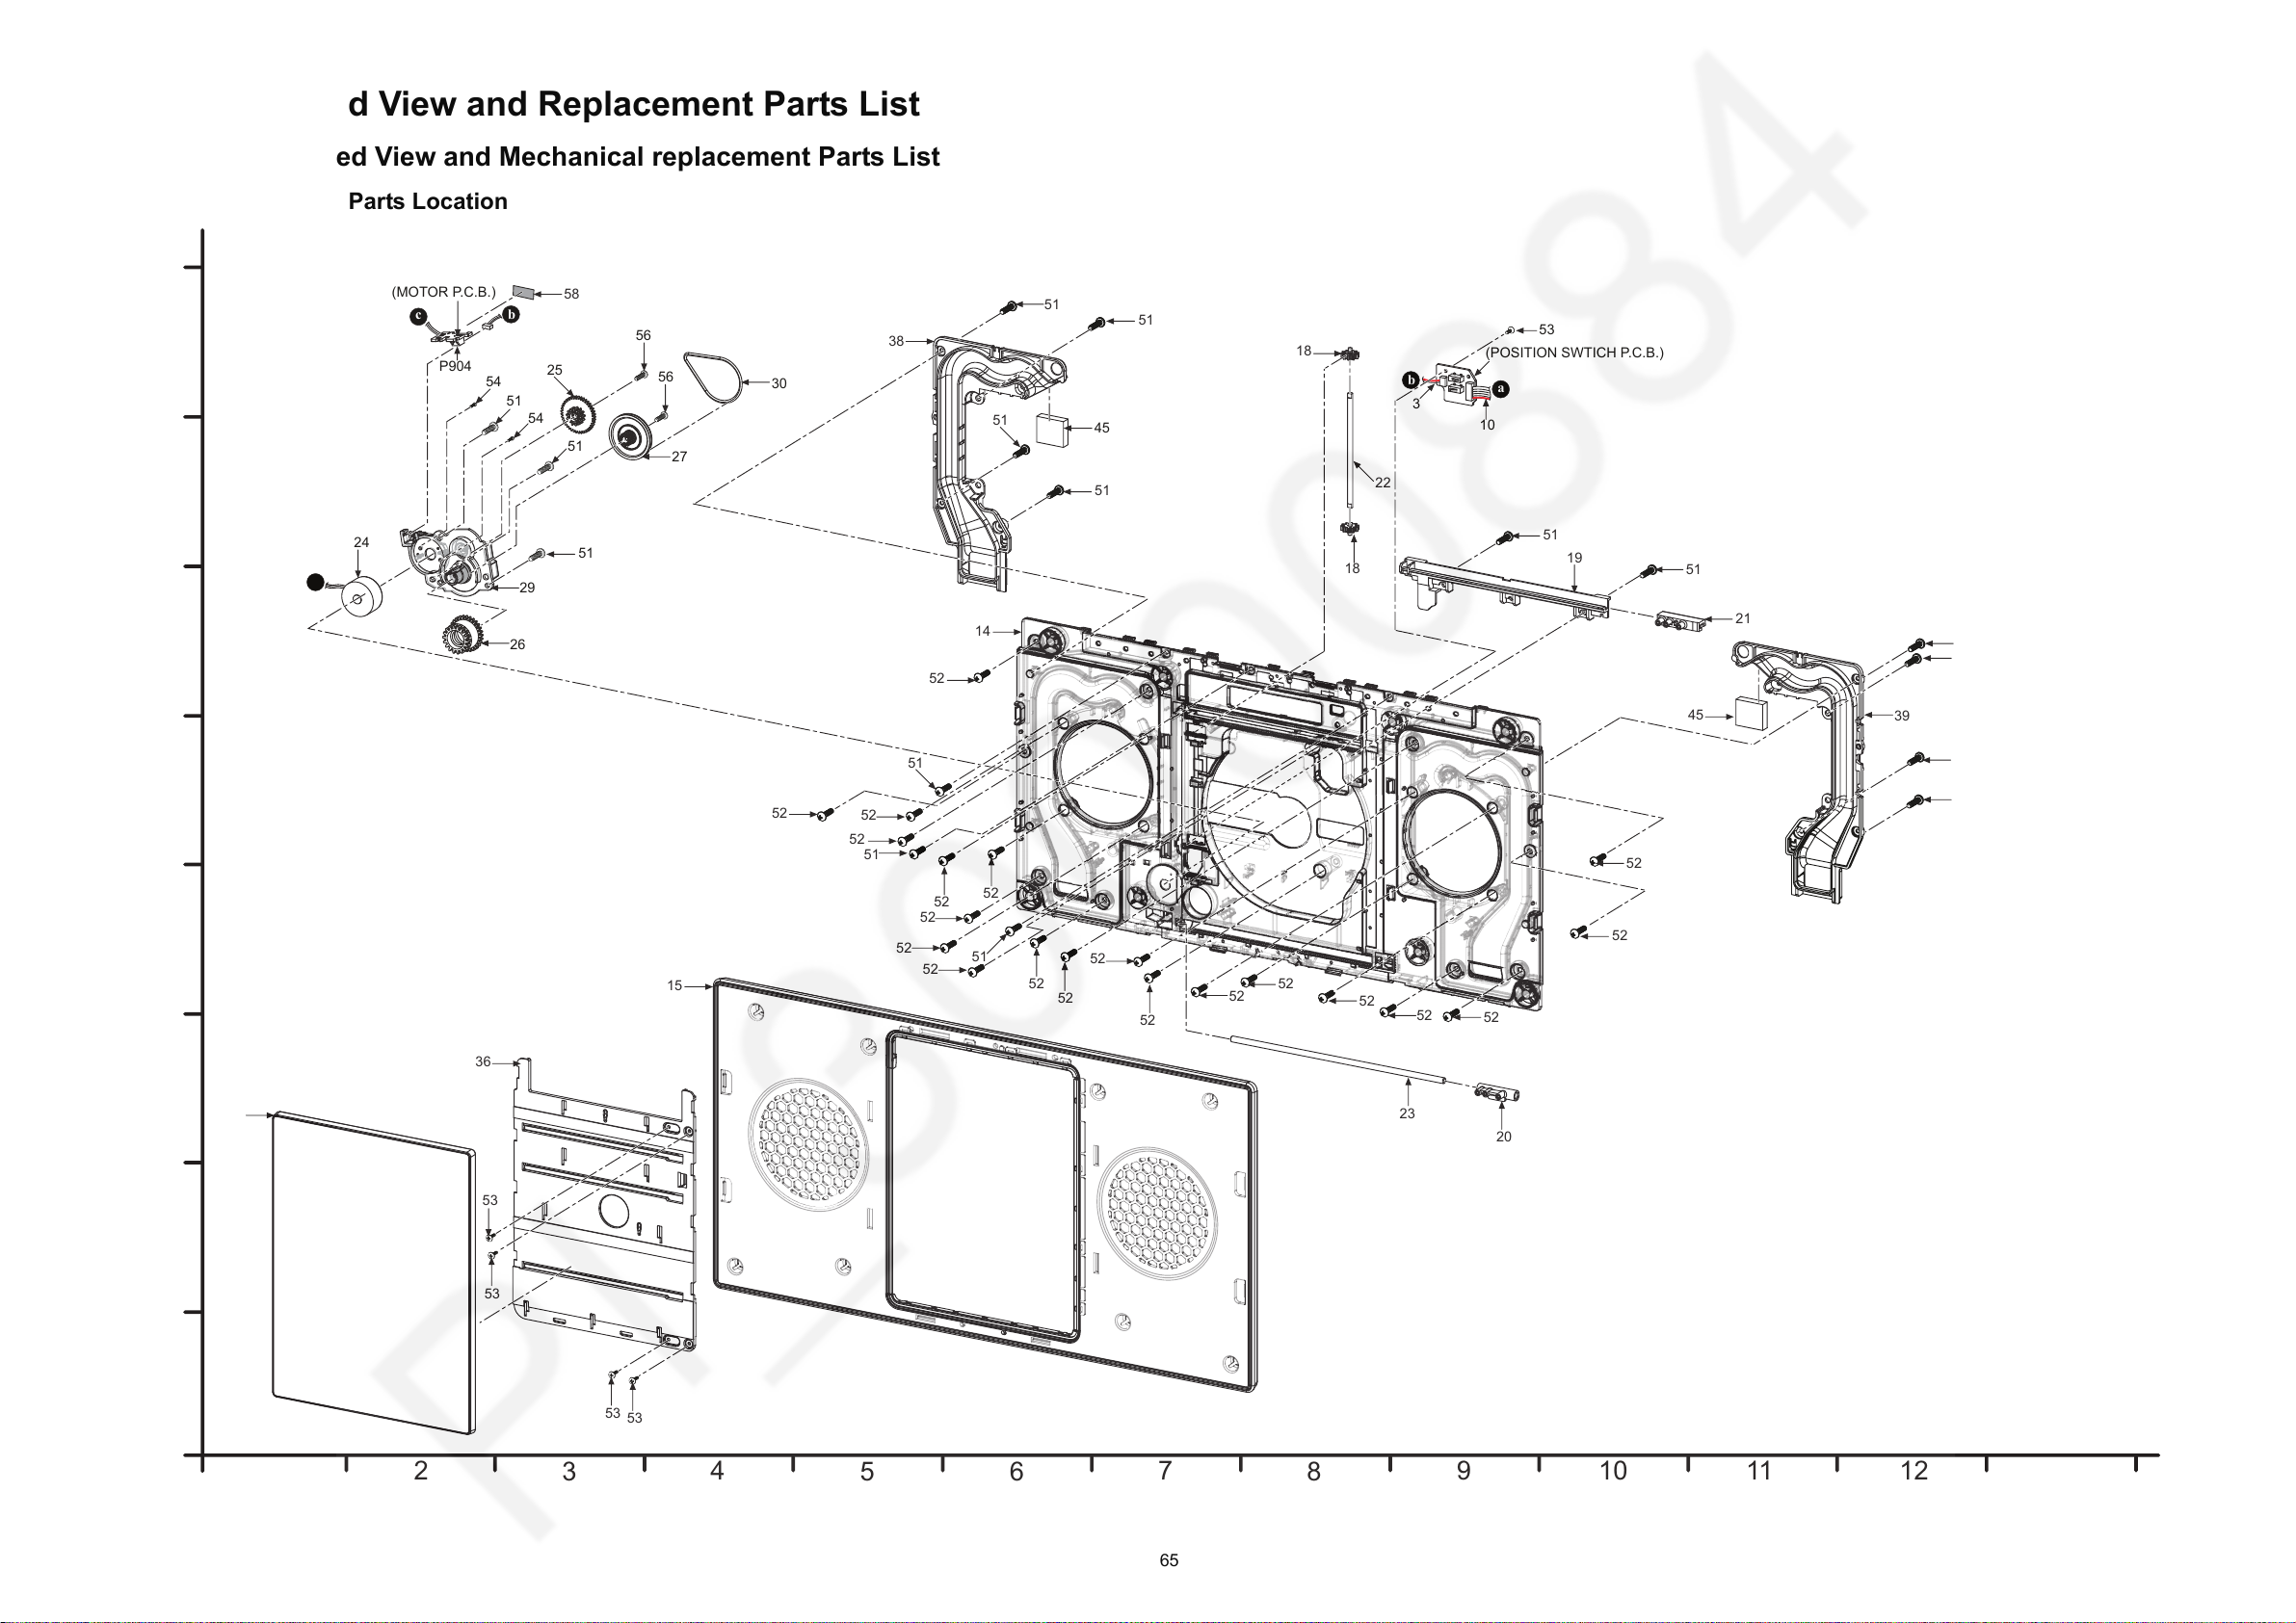
15 Exploded View and Replacement Parts List
c
c
b
b
a
15.1. Exploded View and Mechanical replacement Parts List
15.1.1. Cabinet Parts Location
65
Page 66
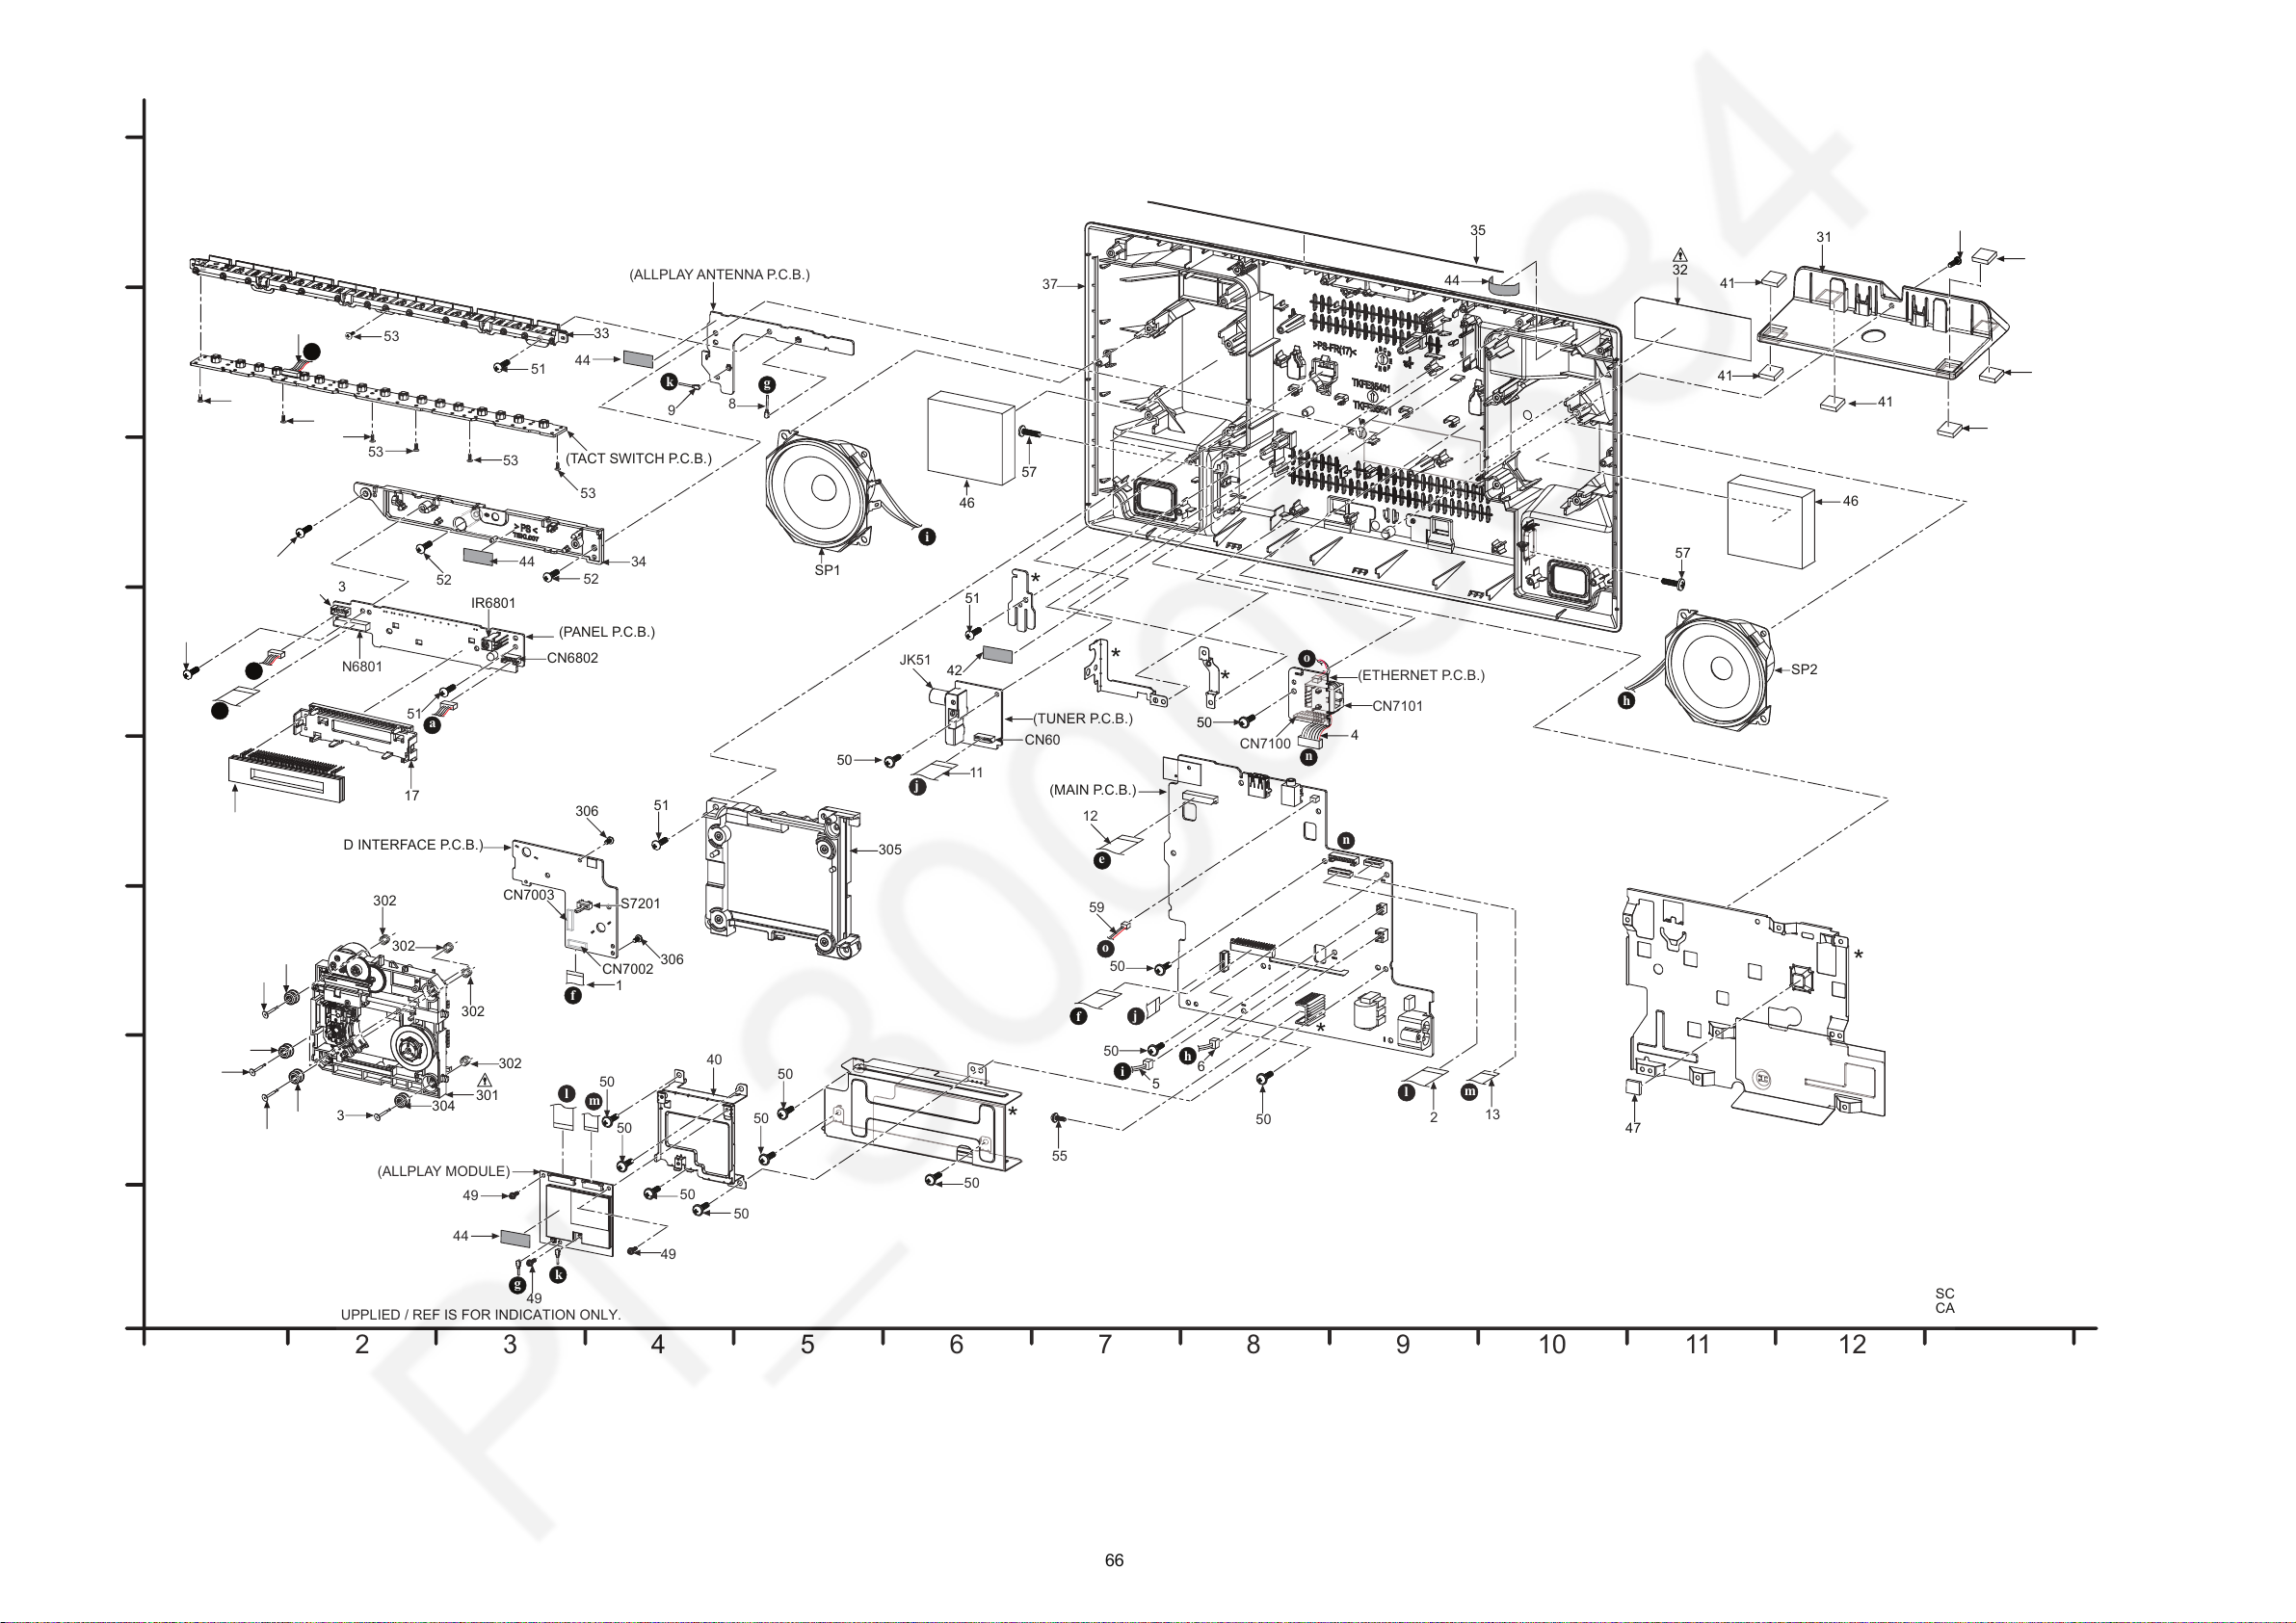
i
i
h
h
f
f
e
d
d
e
a
j
n
n
j
o
o
k
g
l
m
l
m
k
g
66
Page 67
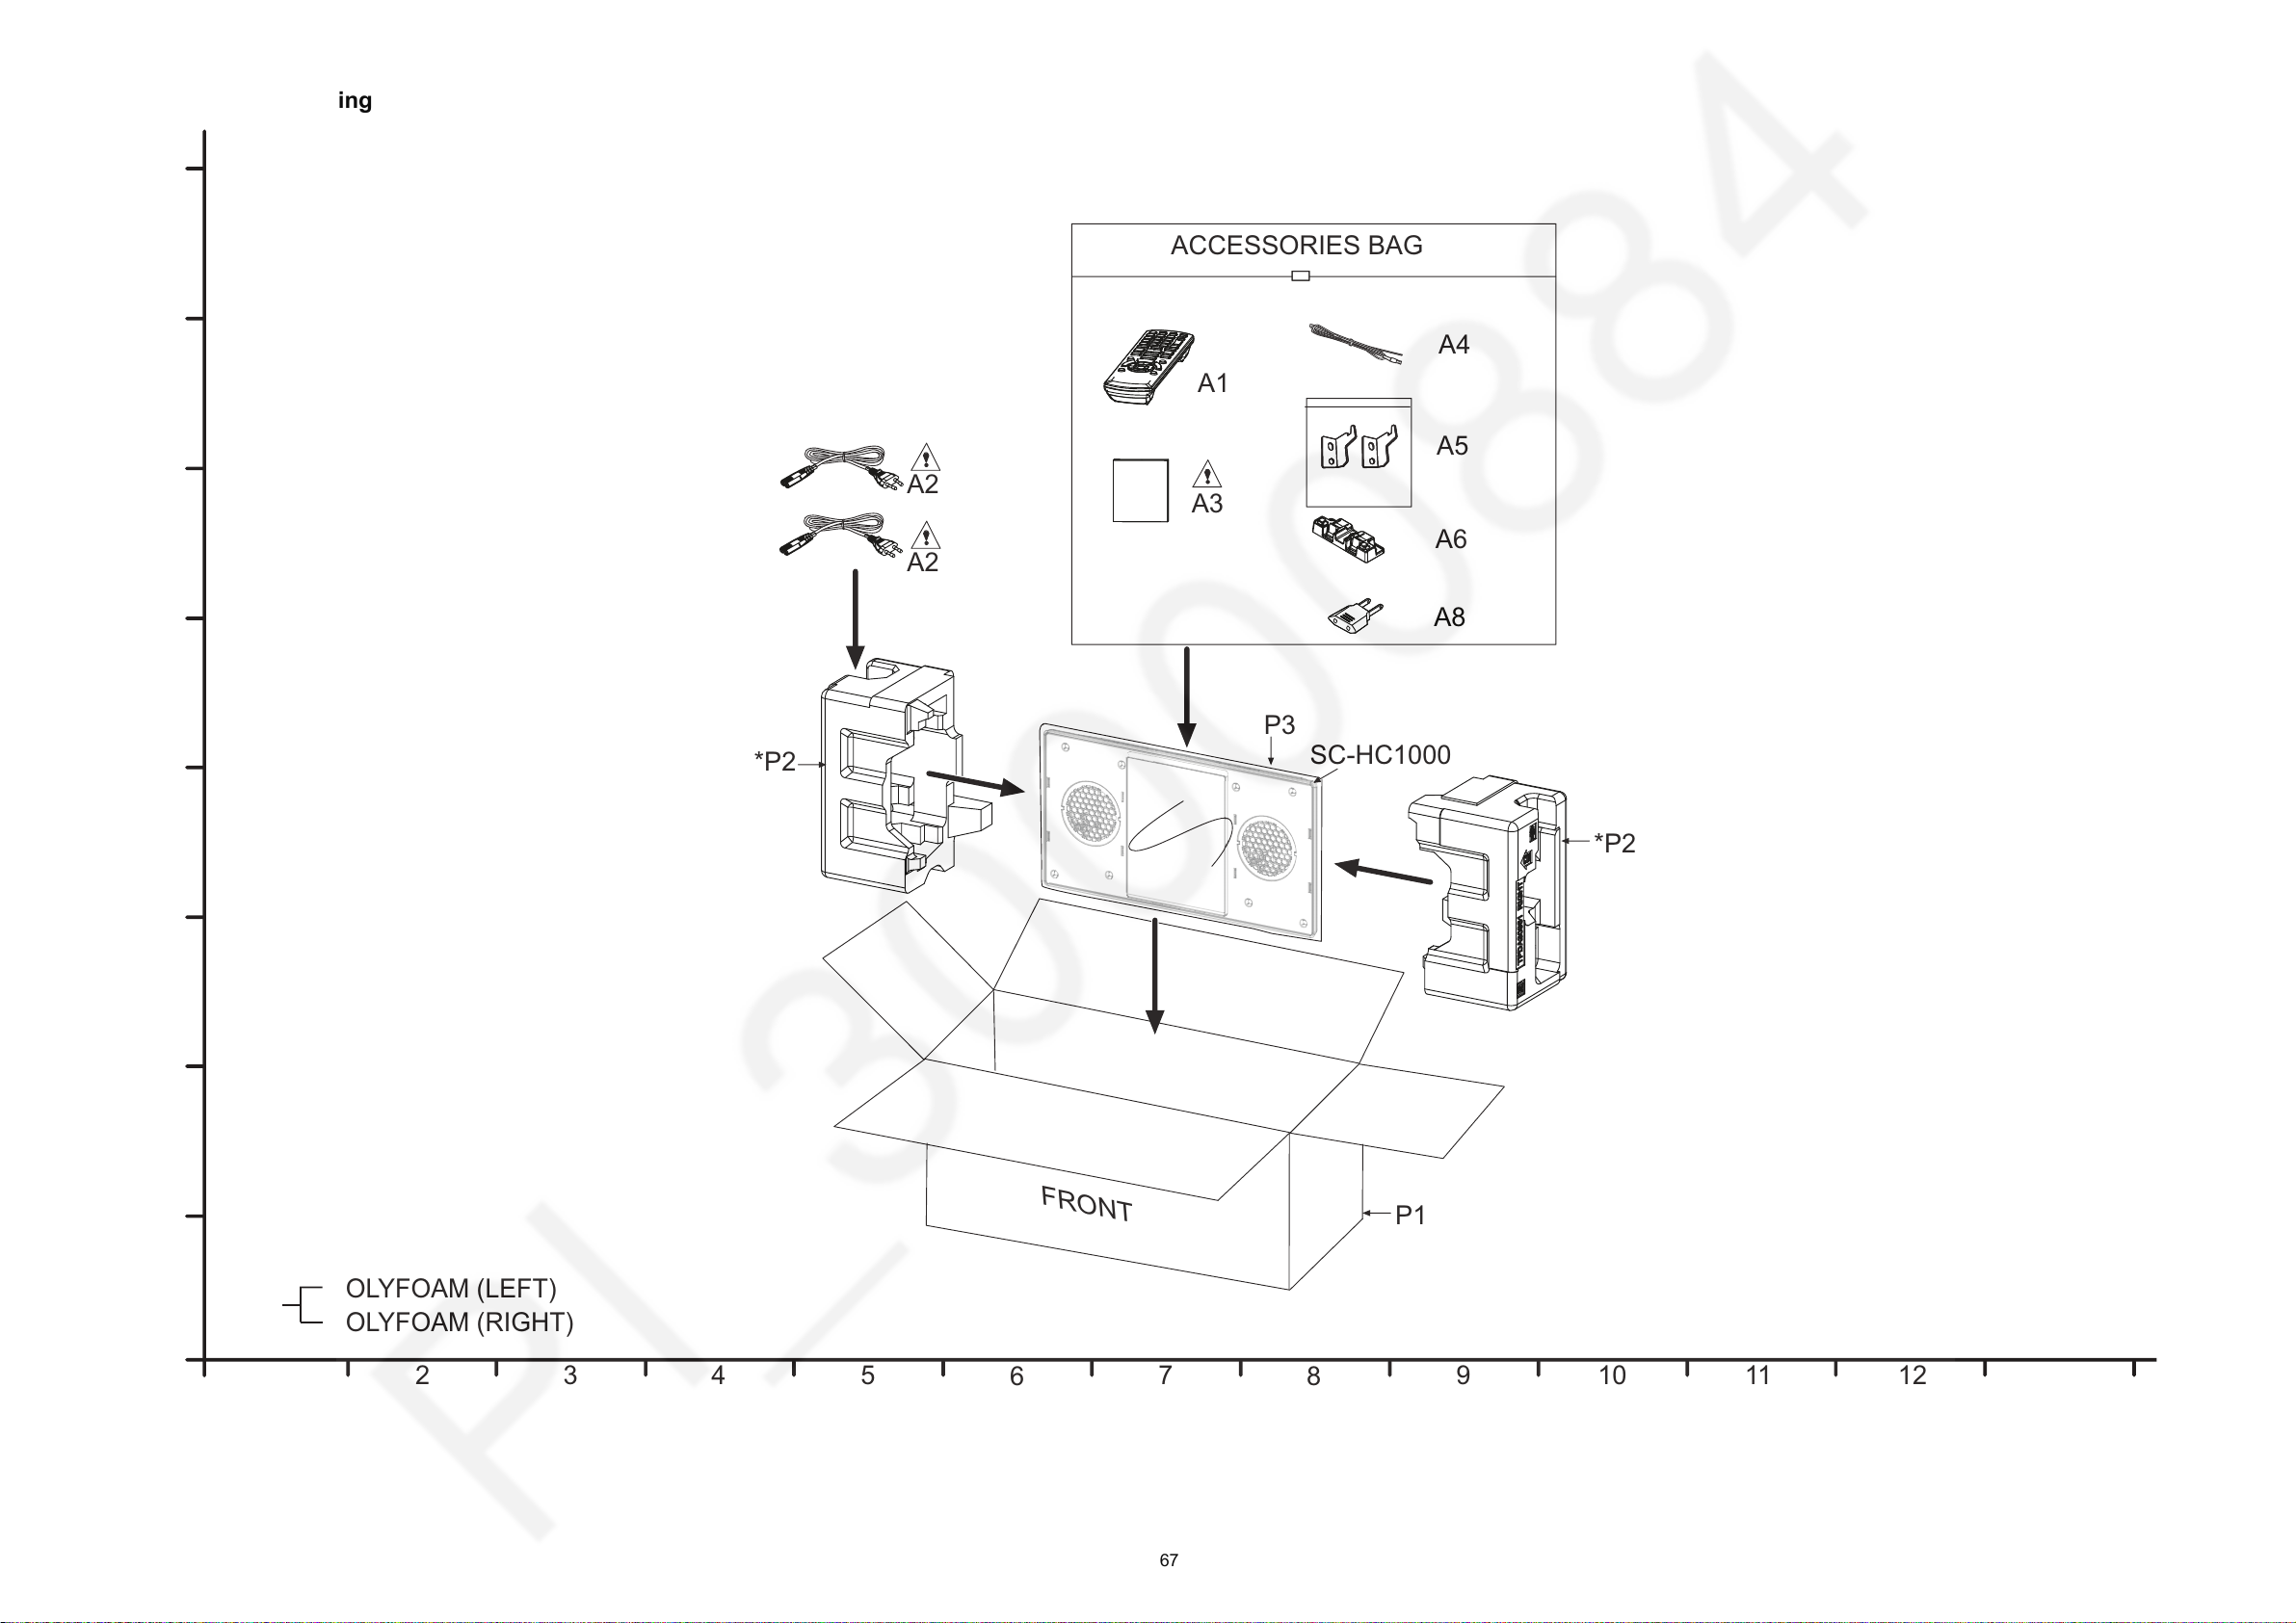
15.1.2. Packaging
SC-HC1000
ACCESSORIES BAG
P3
*P2
*P2
FRONT
P1
A6
A5
A4
A3
A2
A2
A1
1
2
3
4
5
6
7
8
9
A
B
C
D
E
F
G
H
10 11 12 13
P2*
POLYFOAM (LEFT)
POLYFOAM (RIGHT)
67
Page 68

68
Page 69
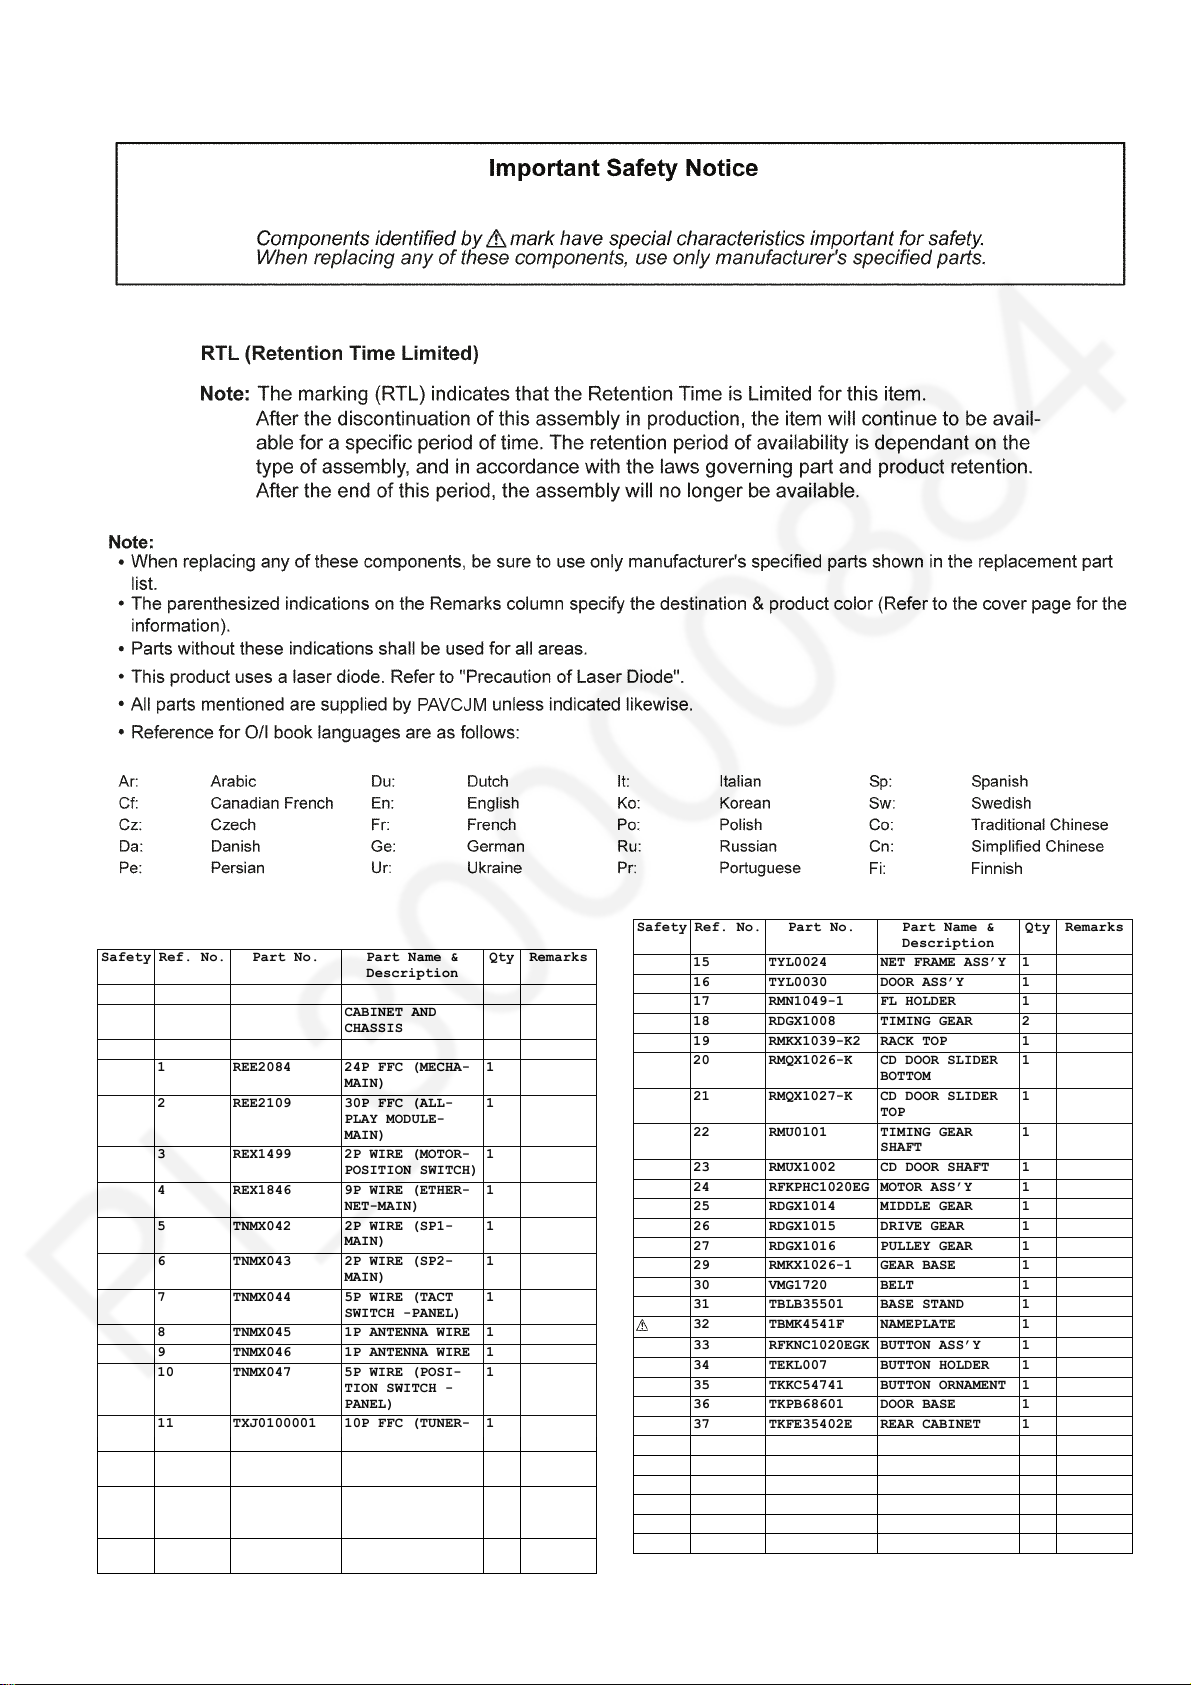
15.1.3. Mechanical Replacement Parts List
Safety Ref. No. Part No. Part Name &
1 REE2084 24P FFC (MECHA-
2 REE2109 30P FFC (ALL-
3 REX1499 2P WIRE (MOTOR-
4 REX1846 9P WIRE (ETHER-
5 TNMX042 2P WIRE (SP1-
6 TNMX043 2P WIRE (SP2-
7 TNMX044 5P WIRE (TACT
8 TNMX045 1P ANTENNA WIRE 1
9 TNMX046 1P ANTENNA WIRE 1
10 TNMX047 5P WIRE (POSI-
11 TXJ0100001 10P FFC (TUNER-
12 TXJ0220001 22P FFC (PANEL-
13 TZH3QKZ014 20P FFC (ALL-
14 RFKGHC1020EG FRONT PANEL
Description
CABINET AND
CHASSIS
MAIN)
PLAY MODULE-
MAIN)
POSITION SWITCH)
NET-MAIN)
MAIN)
MAIN)
SWITCH -PANEL)
TION SWITCH -
PANEL)
MAIN)
MAIN)
PLAY MODULEMAIN)
ASS’Y
Qty Remarks
1
1
1
1
1
1
1
1
1
1
1
1
Safety Ref. No. Part No. Part Name &
15 TYL0024 NET FRAME ASS’Y 1
16 TYL0030 DOOR ASS’Y 1
17 RMN1049-1 FL HOLDER 1
18 RDGX1008 TIMING GEAR 2
19 RMKX1039-K2 RACK TOP 1
20 RMQX1026-K CD DOOR SLIDER
21 RMQX1027-K CD DOOR SLIDER
22 RMU0101 TIMING GEAR
23 RMUX1002 CD DOOR SHAFT 1
24 RFKPHC1020EG MOTOR ASS’Y 1
25 RDGX1014 MIDDLE GEAR 1
26 RDGX1015 DRIVE GEAR 1
27 RDGX1016 PULLEY GEAR 1
29 RMKX1026-1 GEAR BASE 1
30 VMG1720 BELT 1
31 TBLB35501 BASE STAND 1
32 TBMK4541F NAMEPLATE 1
33 RFKNC1020EGK BUTTON ASS’Y 1
34 TEKL007 BUTTON HOLDER 1
35 TKKC54741 BUTTON ORNAMENT 1
36 TKPB68601 DOOR BASE 1
37 TKFE35402E REAR CABINET 1
38 TBB002K PORT COVER L 1
39 TBB003K PORT COVER R 1
40 TEKK002 ALL BRACKET 1
41 RKAX0028-K LEG CUSHION 6
42 RMF0794 HIMELON 1
44 RMFX1037 HIMELON 4
Description
BOTTOM
TOP
SHAFT
Qty Remarks
1
1
1
69
Page 70
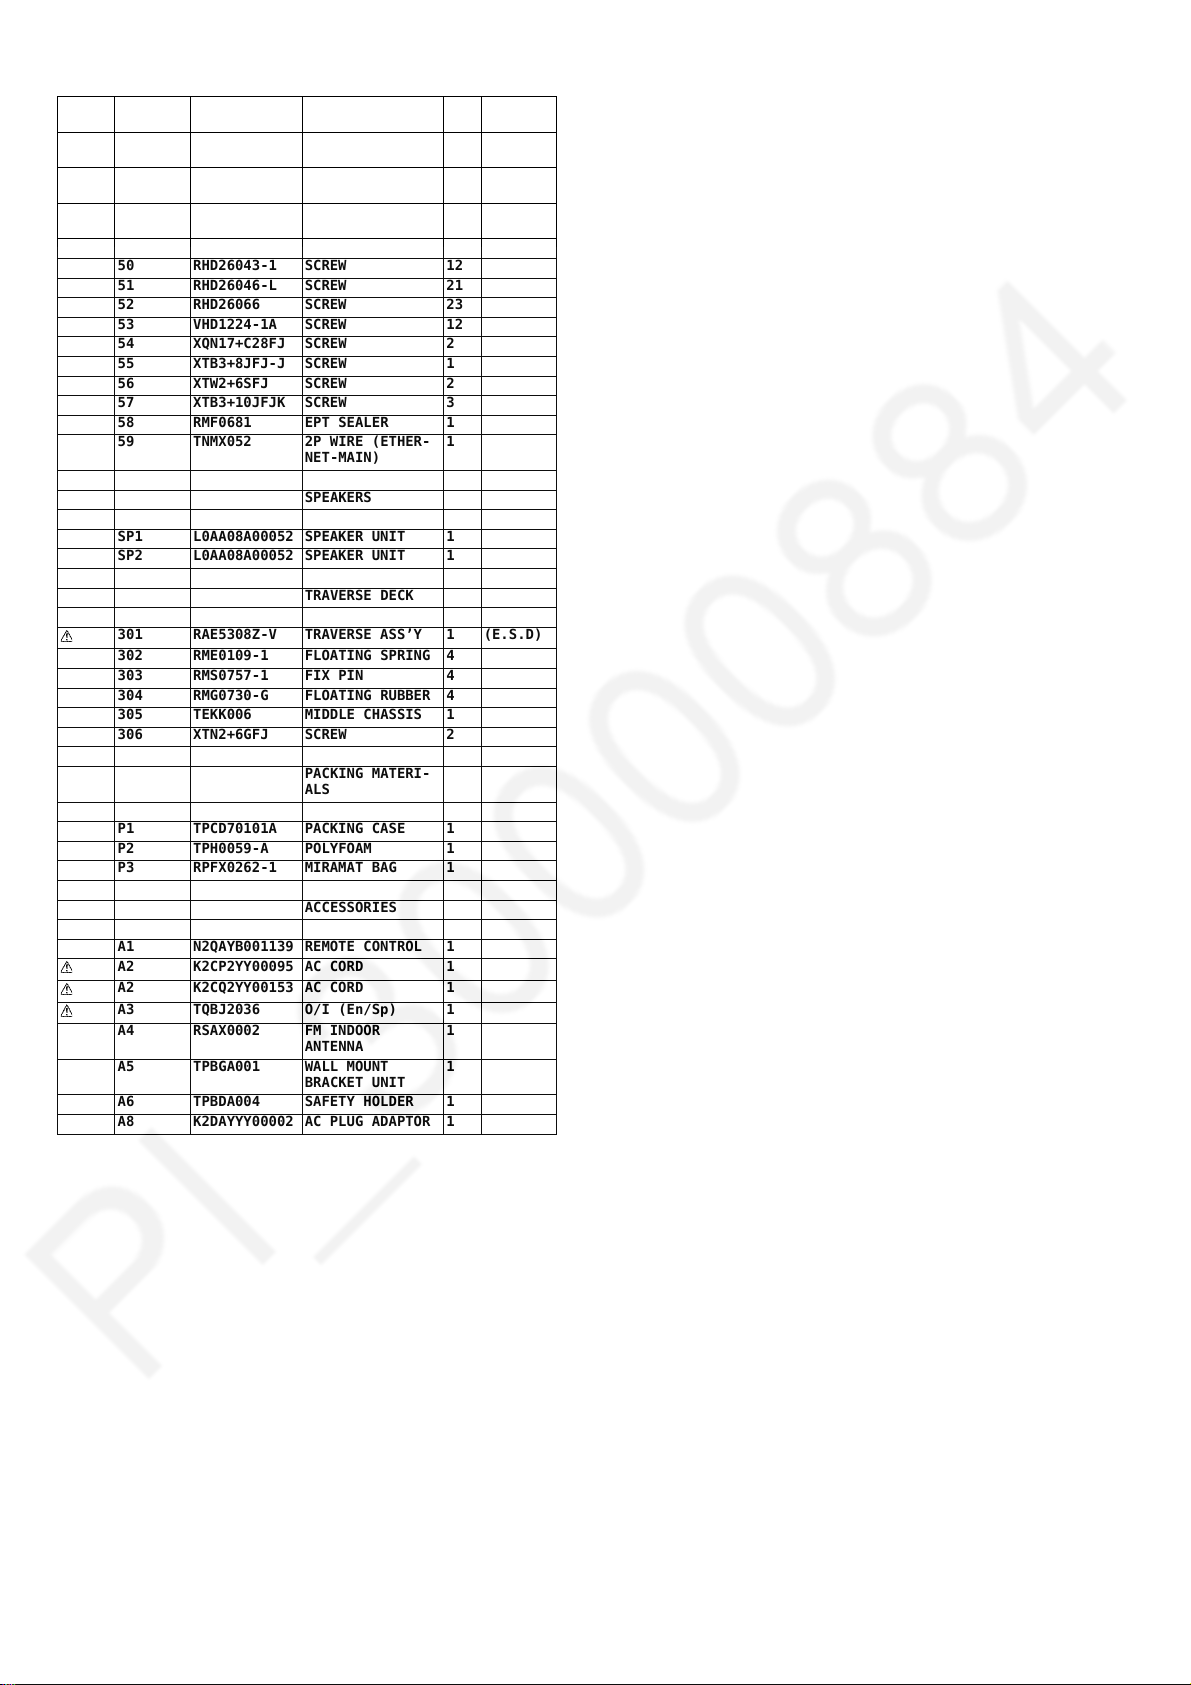
Safety Ref. No. Part No. Part Name &
45 TMKJ019 ACOUSTIC
46 RMFX0091 ACOUSTIC
47 RSC1097 D-AMP HEAT
49 RHD20024-1 SCREW 3
50 RHD26043-1 SCREW 12
51 RHD26046-L SCREW 21
52 RHD26066 SCREW 23
53 VHD1224-1A SCREW 12
54 XQN17+C28FJ SCREW 2
55 XTB3+8JFJ-J SCREW 1
56 XTW2+6SFJ SCREW 2
57 XTB3+10JFJK SCREW 3
58 RMF0681 EPT SEALER 1
59 TNMX052 2P WIRE (ETHER-
SP1 L0AA08A00052 SPEAKER UNIT 1
SP2 L0AA08A00052 SPEAKER UNIT 1
301 RAE5308Z-V TRAVERSE ASS’Y 1 (E.S.D)
302 RME0109-1 FLOATING SPRING 4
303 RMS0757-1 FIX PIN 4
304 RMG0730-G FLOATING RUBBER 4
305 TEKK006 MIDDLE CHASSIS 1
306 XTN2+6GFJ SCREW 2
Description
ABSORBER
ABSORBER
ABSORBER
NET-MAIN)
SPEAKERS
TRAVERSE DECK
Qty Remarks
2
2
1
1
PACKING MATERI-
ALS
P1 TPCD70101A PACKING CASE 1
P2 TPH0059-A POLYFOAM 1
P3 RPFX0262-1 MIRAMAT BAG 1
ACCESSORIES
A1 N2QAYB001139 REMOTE CONTROL 1
A2 K2CP2YY00095 AC CORD 1
A2 K2CQ2YY00153 AC CORD 1
A3 TQBJ2036 O/I (En/Sp) 1
A4 RSAX0002 FM INDOOR
A5 TPBGA001 WALL MOUNT
A6 TPBDA004 SAFETY HOLDER 1
A8 K2DAYYY00002 AC PLUG ADAPTOR 1
ANTENNA
BRACKET UNIT
1
1
70
Page 71
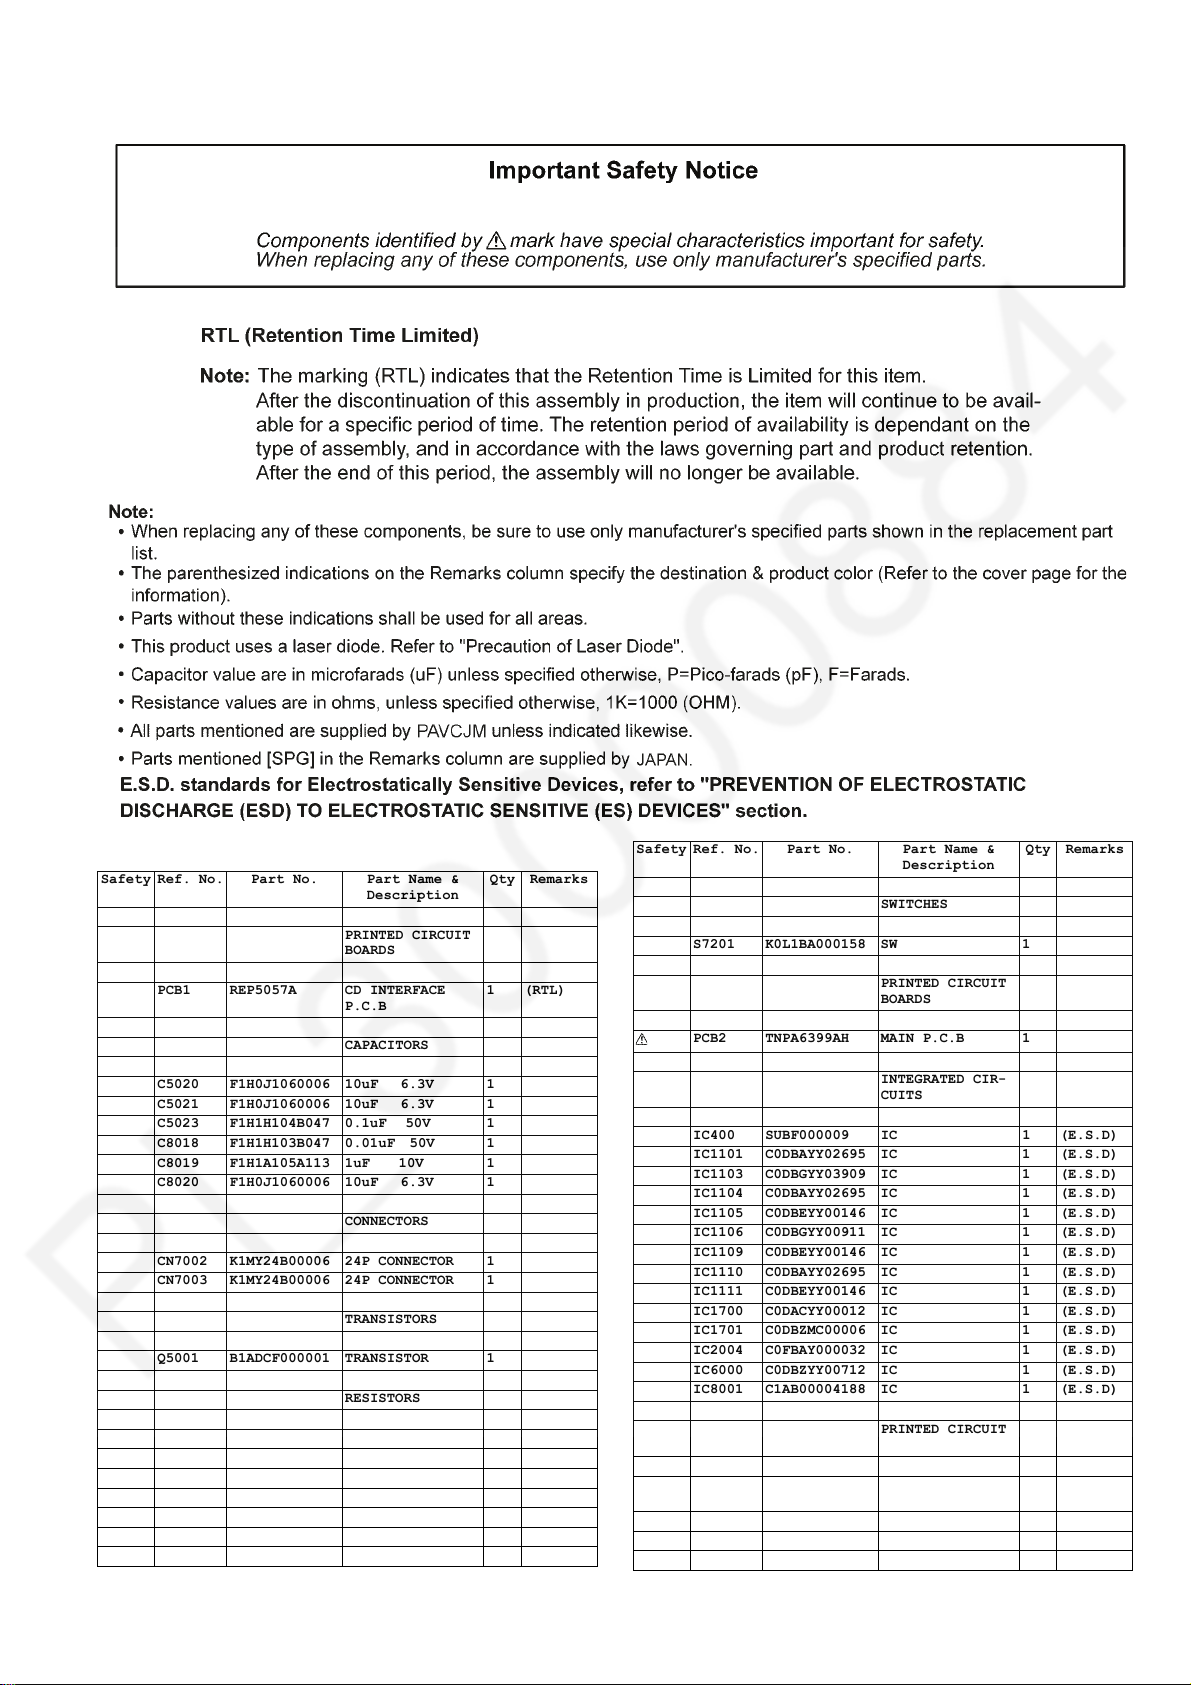
15.2. Electrical Replacement Parts List
Safety Ref. No. Part No. Part Name &
PCB1 REP5057A CD INTERFACE
C5020 F1H0J1060006 10uF 6.3V 1
C5021 F1H0J1060006 10uF 6.3V 1
C5023 F1H1H104B047 0.1uF 50V 1
C8018 F1H1H103B047 0.01uF 50V 1
C8019 F1H1A105A113 1uF 10V 1
C8
CN7002 K1MY24B00006 24P CONNECTOR 1
CN7003 K1MY24B00006 24P CONNECTOR 1
Q5001 B1ADCF000001 TRANSISTOR 1
R5019 D0GB4R7JA065 4.7 1/10W 1
R5020 D0GB104JA065 100K 1/10W 1
R5021 D0GB4R7JA065 4.7 1/10W 1
R5
R5023 D0GBR00J0004 0 1/10W 1
R5025 J0JYB0000013 INDUCTOR 1
R5026 D0GFR00J0005 0 1/4W 1
F1H0J1060006 10uF 6.3V 1
020
D0GB102JA065 1K 1/10W 1
022
Description
PRINTED CIRCUIT
BOARDS
CAPACITORS
CONNECTORS
TRANSISTORS
RESISTORS
Qty Remarks
1 (RTL)
Safety Ref. No. Part No. Part Name &
S7201 K0L1BA000158 SW 1
PCB2 TNPA6399AH MAIN P.C.B 1
IC400 SUBF000009 IC 1 (E.S.D)
IC1101 C0DBAYY02695 IC 1 (E.S.D)
IC1103 C0DBGYY03909 IC 1 (E.S.D)
IC1104 C0DBAYY02695 IC 1 (E.S.D)
IC1105 C0DBEYY00146 IC 1 (E.S.D)
IC1106 C0DBGYY00911 IC 1 (E.S.D)
IC1109 C0DBEYY00146 IC 1 (E.S.D)
IC1110 C0DBAYY02695 IC 1 (E.S.D)
IC1111 C0DBEYY00146 IC 1 (E.S.D)
IC1700 C0DACYY00012 IC 1 (E.S.D)
IC1701 C0DBZMC00006 IC 1 (E.S.D)
IC2004 C0FBAY000032 IC 1 (E.S.D)
IC6000 C0DBZYY00712 IC 1 (E.S.D)
IC8001 C1AB00004188 IC 1 (E.S.D)
PCB3 TNPA6400AH POSITION SWITCH
Description
SWITCHES
PRINTED CIRCUIT
BOARDS
INTEGRATED CIR-
CUITS
PRINTED CIRCUIT
BOARDS
P.C.B
SWITCHES
Qty Remarks
1 (RTL)
71
Page 72
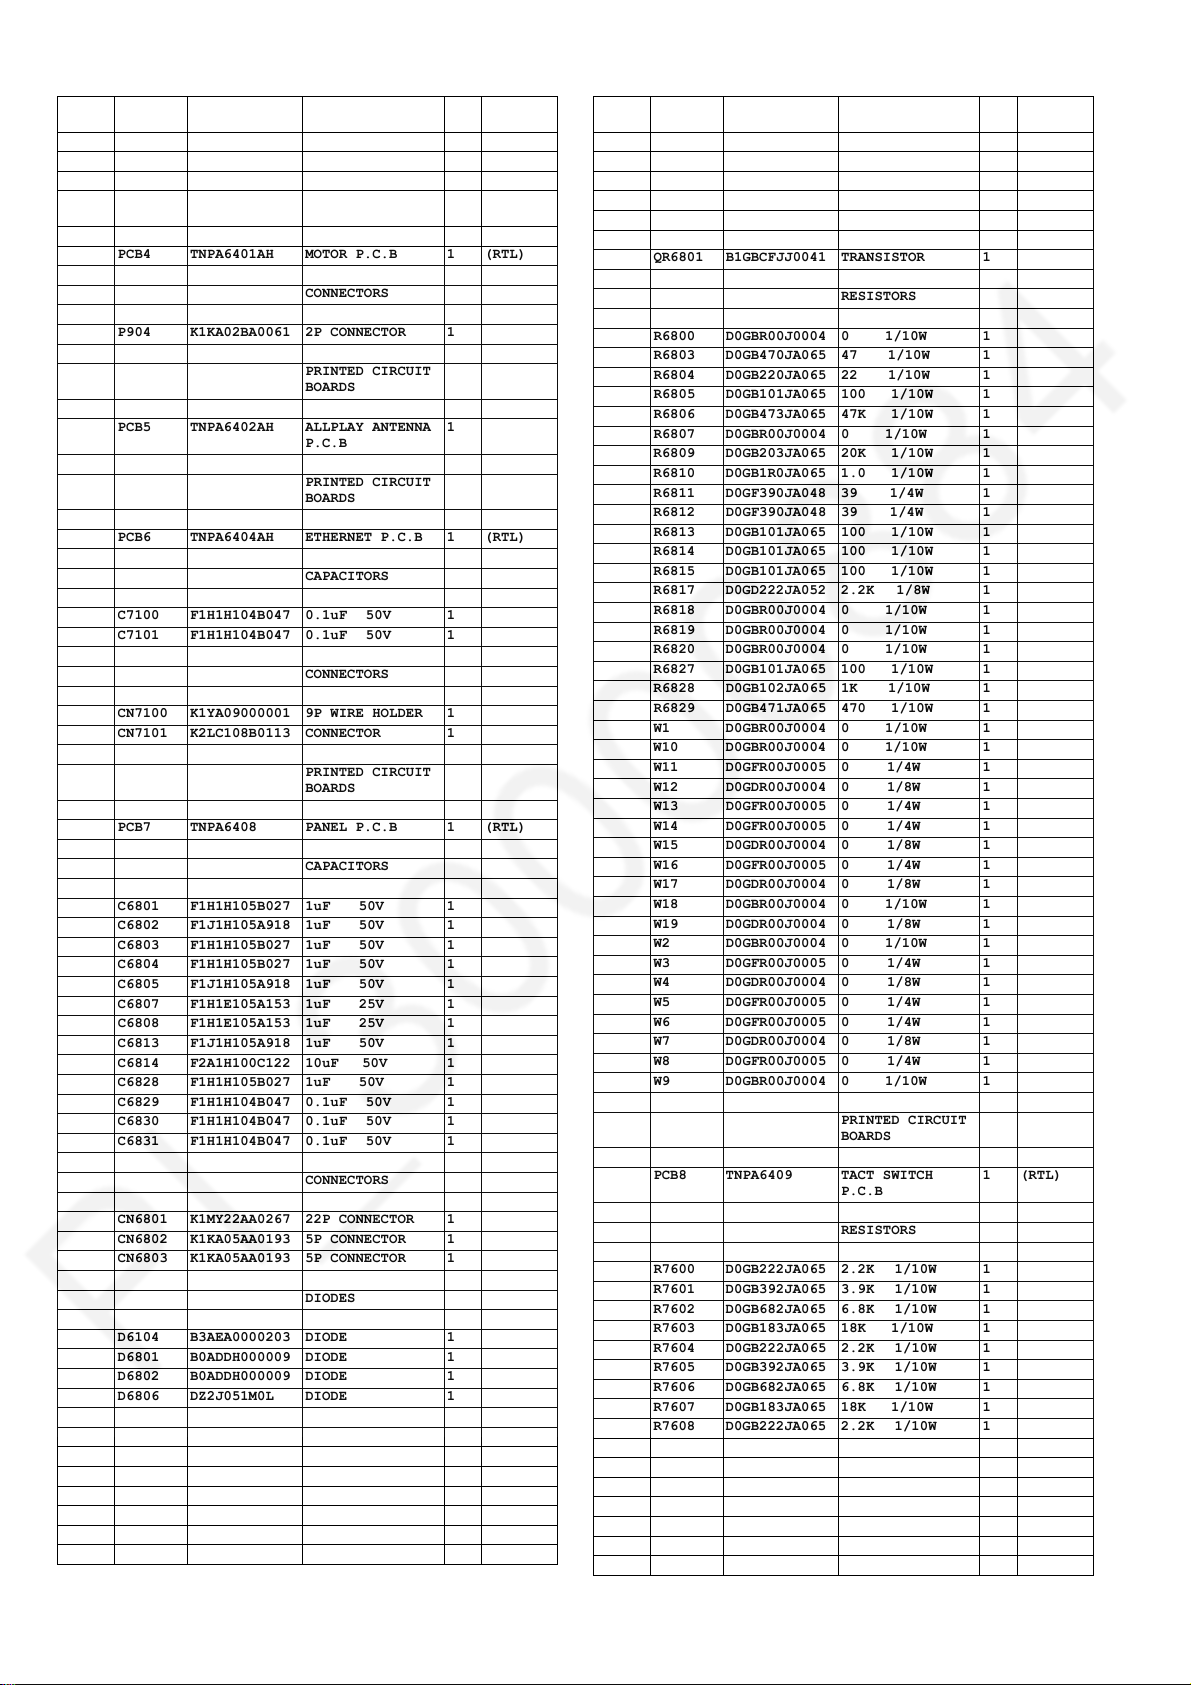
Safety Ref. No. Part No. Part Name &
S641 K0L1BA000166 SW 1
S642 K0L1BA000166 SW 1
Description
Qty Remarks
Safety Ref. No. Part No. Part Name &
Description
TRANSISTORS
Qty Remarks
PRINTED CIRCUIT
BOARDS
PCB4 TNPA6401AH MOTOR P.C.B 1 (RTL)
CONNECTORS
P904 K1KA02BA0061 2P CONNECTOR 1
PRINTED CIRCUIT
BOARDS
PCB5 TNPA6402AH ALLPLAY ANTENNA
PCB6 TNPA6404AH ETHERNET P.C.B 1 (RTL)
C7100 F1H1H104B047 0.1uF 50V 1
C7101 F1H1H104B047 0.1uF 50V 1
CN7100 K1YA09000001 9P WIRE HOLDER 1
CN7101 K2LC108B0113 CONNECTOR 1
PCB7 TNPA6408 PANEL P.C.B 1 (RTL)
C6801 F1H1H105B027 1uF 50V 1
C6802 F1J1H105A918 1uF 50V 1
C6803
C6804 F1H1H105B027 1uF 50V 1
C6805 F1J1H105A918 1uF 50V 1
C6807 F1H1E105A153 1uF 25V 1
C6808
C6813 F1J1H105A918 1uF 50V 1
C6814 F2A1H100C122 10uF 50V 1
C6828 F1H1H105B027 1uF 50V 1
C6829
C6830 F1H1H104B047 0.1uF 50V 1
C6831 F1H1H104B047 0.1uF 50V 1
F1H1H105B027 1uF 50V 1
F1H1E105A153 1uF 25V 1
F1H1H104B047 0.1uF 50V 1
P.C.B
PRINTED CIRCUIT
BOARDS
CAPACITORS
CONNECTORS
PRINTED CIRCUIT
BOARDS
CAPACITORS
CONNECTORS
1
Q6803 B1HFCDE00002 TRANSISTOR 1
Q6804 B1ABMF000020 TRANSISTOR 1
QR6800 B1GBCFGN0018 TRANSISTOR 1
QR6801 B1GBCFJJ0041 TRANSISTOR 1
RESISTORS
R6800 D0GBR00J0004 0 1/10W 1
R6803 D0GB470JA065 47 1/10W 1
R6804 D0GB220JA065 22 1/10W 1
R6805 D0GB101JA065 100 1/10W 1
R6806 D0GB473JA065 47K 1/10W
R6807 D0GBR00J0004 0 1/10W 1
R6809 D0GB203JA065 20K 1/10W 1
R6810 D0GB1R0JA065 1.0 1/10W 1
R6811 D0GF390JA048 39 1/4W 1
R6812
R6813 D0GB101JA065 100 1/10W 1
R6814 D0GB101JA065 100 1/10W 1
R6815 D0GB101JA065 100 1/10W 1
R6817 D0GD222JA052 2.2K 1/8W
R6818 D0GBR00J0004 0 1/10W 1
R6819 D0GBR00J0004 0 1/10W 1
R6820 D0GBR00J0004 0 1/10W 1
R6827 D0GB101JA065 100 1/10W 1
R6828
R6829 D0GB471JA065 470 1/10W 1
W1 D0GBR00J0004 0 1/10W 1
W10 D0GBR00J0004 0 1/10W 1
W11
W12 D0GDR00J0004 0 1/8W 1
W13 D0GFR00J0005 0 1/4W 1
W14 D0GFR00J0005 0 1/4W 1
W15
W16 D0GFR00J0005 0 1/4W 1
W17 D0GDR00J0004 0 1/8W 1
W18 D0GBR00J0004 0 1/10W 1
W19
W2 D0GBR00J0004 0 1/10W 1
W3 D0GFR00J0005 0 1/4W 1
W4 D0GDR00J0004 0 1/8W 1
W5 D0GFR00J0005 0 1/4W
W6 D0GFR00J0005 0 1/4W 1
W7 D0GDR00J0004 0 1/8W 1
W8 D0GFR00J0005 0 1/4W 1
W9 D0GBR00J0004 0 1/10W
PCB8 TNPA6409 TACT SWITCH
D0GF390JA048 39 1/4W 1
D0GB102JA065 1K 1/10W 1
D0GFR00J0005 0 1/4W 1
D0GDR00J0004 0 1/8W 1
D0GDR00J0004 0 1/8W 1
PRINTED CIRCUIT
BOARDS
1
1
1
1
1 (RTL)
CN6801 K1MY22AA0267 22P CONNECTOR 1
CN6802 K1KA05AA0193 5P CONNECTOR 1
CN6803 K1KA05AA0193 5P CONNECTOR 1
DIODES
D6104 B3AEA0000203 DIODE 1
D6801 B0ADDH000009 DIODE 1
D6802 B0ADDH000009 DIODE 1
D6806 DZ2J051M0L DIODE 1
FL DISPLAY
DP6801 A2BB00000186 FL DISPLAY 1
REMOTE SENSOR
IR6801 B3RAD0000226 REMOTE SENSOR 1
72
RESISTORS
R7600 D0GB222JA065 2.2K 1/10W 1
R7601 D0GB392JA065 3.9K 1/10W 1
R7602 D0GB682JA065 6.8K 1/10W 1
R7603 D0GB183JA065 18K 1/10W 1
R7604
R7605 D0GB392JA065 3.9K 1/10W 1
R7606 D0GB682JA065 6.8K 1/10W 1
R7607 D0GB183JA065 18K 1/10W 1
R7608 D0GB222JA065 2.2K 1/10W 1
R7609
R7610 D0GB682JA065 6.8K 1/10W 1
R7611 D0GB183JA065 18K 1/10W 1
R7612 D0GB222JA065 2.2K 1/10W 1
W50
W51 D0GDR00J0004 0 1/8W 1
D0GB222JA065 2.2K 1/10W 1
D0GB392JA065 3.9K 1/10W 1
D0GFR00J0005 0 1/4W 1
Page 73
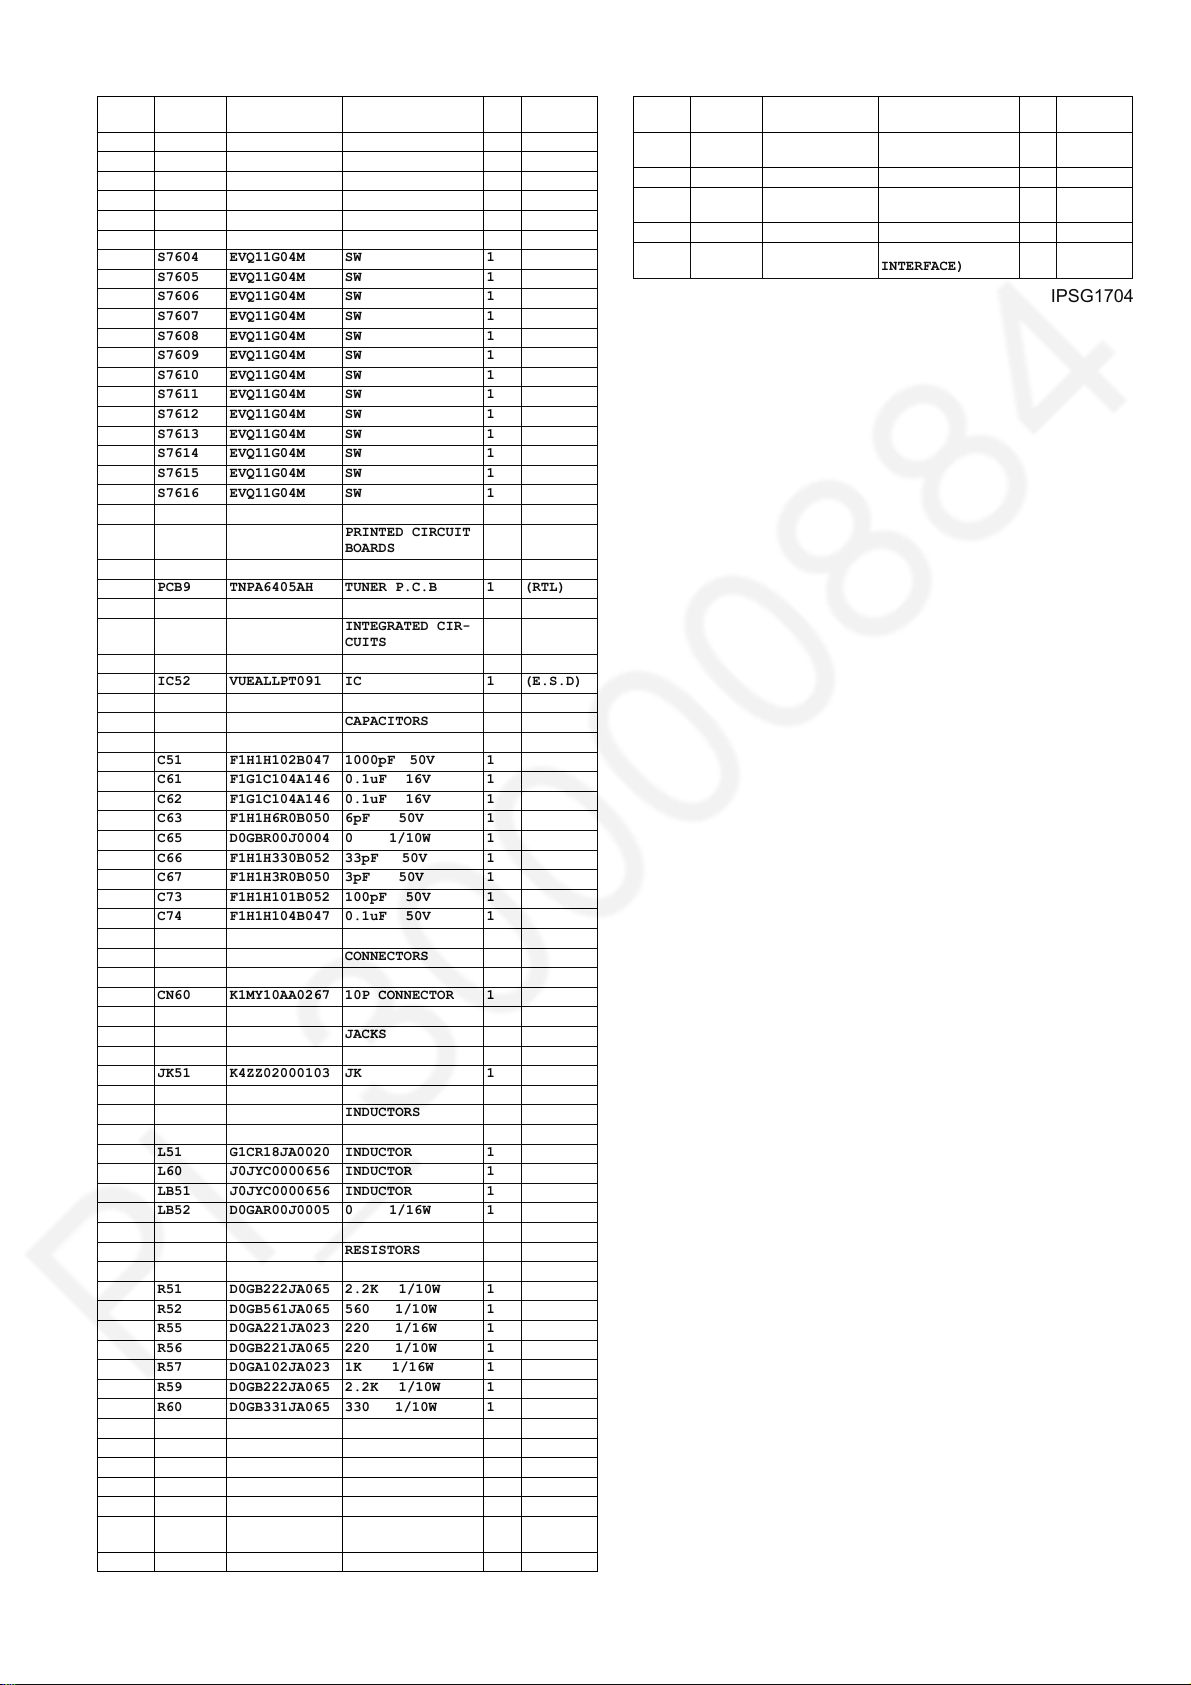
Safety Ref. No. Part No. Part Name &
S7600 EVQ11G04M SW 1
S7601 EVQ11G04M SW 1
S7602 EVQ11G04M SW 1
S7603 EVQ11G04M SW 1
S7604 EVQ11G04M SW 1
S7605 EVQ11G04M SW 1
S7606 EVQ11G04M SW 1
S7607 EVQ11G04M SW 1
S7608 EVQ11G04M SW 1
S7609 EVQ11G04M SW 1
S7610 EVQ11G04M SW 1
S7611 EVQ11G04M SW 1
S7612 EVQ11G04M SW 1
S7613 EVQ11G04M SW 1
S7614 EVQ11G04M SW 1
S7615 EVQ11G04M SW 1
S7616 EVQ11G04M SW 1
PCB9 TNPA6405AH TUNER P.C.B 1 (RTL)
IC52 VUEALLPT091 IC 1 (E.S.D)
Description
SWITCHES
PRINTED CIRCUIT
BOARDS
INTEGRATED CIR-
Qty Remarks
Safety Ref. No. Part No. Part Name &
PCB10 RFKZHC1000GS ALLPLAY MODULE
SFT1 REE1978 24P FFC (MAIN-CD
Description
WITH DATA
SERVICE FIXTURE
AND TOOLS
INTERFACE)
Qty Remarks
1
1
IPSG1704
CAPACITORS
C51 F1H1H102B047 1000pF 50V 1
C61 F1G1C104A146 0.1uF 16V 1
C62 F1G1C104A146 0.1uF 16V 1
C63 F1H1H6R0B050 6pF 50V 1
C6
5
C66 F1H1H330B052 33pF 50V 1
C67 F1H1H3R0B050 3pF 50V 1
C73 F1H1H101B052 100pF 50V 1
C74
CN60 K1MY10AA0267 10P CONNECTOR 1
JK51 K4ZZ02000103 JK 1
L51 G1CR18JA0020 INDUCTOR 1
L60 J0JYC0000656 INDUCTOR 1
LB51 J0JYC0000656 INDUCTOR 1
LB52 D0GAR00J0005 0 1/16W 1
R51 D0GB222JA065 2.2K 1/10W 1
R52 D0GB561JA065 560 1/10W 1
R55 D0GA221JA023 220 1/16W
R56 D0GB221JA065 220 1/10W 1
R57 D0GA102JA023 1K 1/16W 1
R59 D0GB222JA065 2.2K 1/10W 1
R60 D0GB331JA065 330 1/10W 1
D0GBR00J0004 0 1/10W 1
F1H1H104B047 0.1uF 50V 1
CONNECTORS
INDUCTORS
RESISTORS
1
ESD SUPRESS
VA51 EZAEG2A50AX ESD SUPRESSOR 1
PRINTED CIRCUIT
BOARDS
OR
73
 Loading...