

Page 1
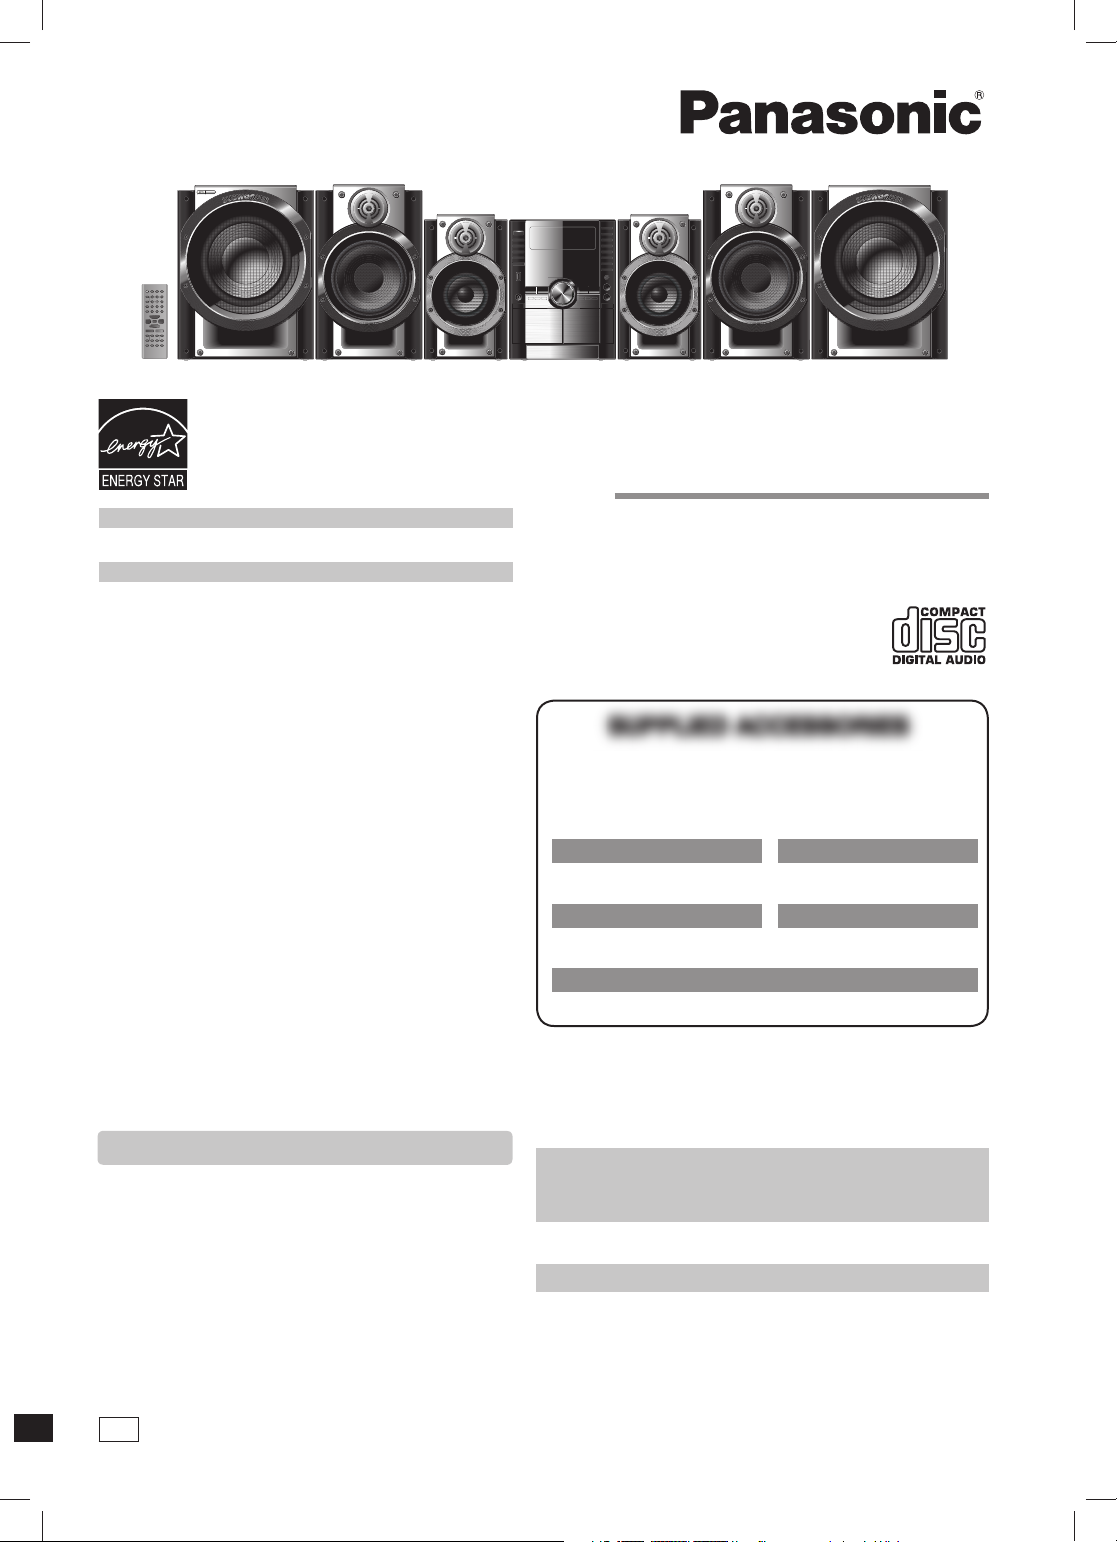
SUPPLIED ACCESSORIES
As an ENERGY STAR® Partner, Panasonic has
Español
determined that this product meets the ENERGY
®
guidelines for energy effi ciency.
STAR
Operating Instructions
CD Stereo System
Table of contents
IMPORTANT SAFETY INSTRUCTIONS ...............3
Product Service ....................................................3
Listening caution ..................................................3
Handling of the disc trays and discs .................. 4
Placement of speakers .........................................4
Getting started ...................................................... 5
Preparing the remote control ..............................6
DEMO function ......................................................6
Overview of controls ............................................ 7
Discs ...................................................................... 8
Cassette tape – Play and record .......................11
FM/AM radio ........................................................ 12
Microphone mixing .............................................13
Timer .................................................................... 13
Sound adjustment .............................................14
External unit ........................................................15
Troubleshooting guide ....................................... 17
Maintenance ........................................................ 18
When moving the unit ........................................ 18
Specifi cations .....................................................19
Limited Warranty .................................................20
Model No. SC-AK960
SUPPLIED ACCESSORIES
Please check and identify the supplied accessories.
Use numbers indicated in parentheses when asking for replacement
parts. (As of July 2008)
To order accessories, refer to “Accessory Purchases” on
page 20.
1 x AC power supply cord
(K2CB2CB00021)
1 x Remote Control
(N2QAYB000189)
2 x Remote control batteries
Before connecting, operating or adjusting this product, please read the
instructions completely.
Please keep this manual for future reference.
1 x AM loop antenna
(N1DAAAA00001)
1 x FM indoor antenna
(RSA0007-L1)
Español
Preparativos iniciales .........................................21
Colocación de los altavoces..............................22
Operations in these instructions are described mainly using remote
control, but you can perform the operations on the main unit if the
controls are the same.
Your unit may not look exactly the same as illustrated.
Controles .............................................................23
Discos .................................................................. 24
Cintas de casete – reproducción y
La guía rápida en español se encuentra en la página 21 - 28.
grabación ........................................................ 25
Radio FM/AM .......................................................26
Temporizador ......................................................27
Equipo externo .............................................BACK
P
RQTX0169-P.indd 1RQTX0169-P.indd 1 7/18/08 9:23:55 AM7/18/08 9:23:55 AM
If you have any questions contact
In the U.S.A.: 1-800-211-PANA (7262)
RQTX0169-P
Page 2
LANG - 5
LANG - 4
FRANÇAIS
DANSK
ENGLISH
Dear customer
Thank you for purchasing this product.
For optimum performance and safety, please read these instructions
carefully.
These operating instructions are applicable to the following system.
ENGLISH
DANSK
FRANÇAIS
LANG - 4
LANG - 5
2
RQT8043
System
Main unit
Front speakers
Surround speakers
Subwoofer 1 (with buttons) SB-WAK860
Subwoofer 2 (without buttons) SB-WAK960
The model number and serial number of this product can be
found on either the back or the bottom of the unit.
Please note them in the space provided below and keep for future
reference.
MODEL NUMBER
SERIAL NUMBER
User memo:
DATE OF PURCHASE
DEALER NAME
DEALER ADDRESS
TELEPHONE NUMBER
SC-AK960
SC-AK960
SA-AK960
SB-PF960
SB-PS960
WARNING:
TO REDUCE THE RISK OF FIRE, ELECTRIC SHOCK
OR PRODUCT DAMAGE,
• DO NOT EXPOSE THIS APPARATUS TO RAIN,
MOISTURE, DRIPPING OR SPLASHING AND
THAT NO OBJECTS FILLED WITH LIQUIDS,
SUCH AS VASES, SHALL BE PLACED ON THE
APPARATUS.
• USE ONLY THE RECOMMENDED ACCESSORIES.
• DO NOT REMOVE THE COVER (OR BACK);
THERE ARE NO USER SERVICEABLE PARTS
INSIDE. REFER SERVICING TO QUALIFIED
SERVICE PERSONNEL.
CAUTION!
THIS PRODUCT UTILIZES A LASER.
USE OF CONTROLS OR ADJUSTMENTS OR
PERFORMANCE OF PROCEDURES OTHER THAN
THOSE SPECIFIED HEREIN MAY RESULT IN
HAZARDOUS RADIATION EXPOSURE.
DO NOT OPEN COVERS AND DO NOT REPAIR
YOURSELF. REFER SERVICING TO QUALIFIED
PERSONNEL.
CAUTION!
DO NOT INSTALL OR PLACE THIS UNIT IN A
BOOKCASE, BUILT-IN CABINET OR IN ANOTHER
CONFINED SPACE. ENSURE THE UNIT IS
WELL VENTILATED. TO PREVENT RISK OF
ELECTRIC SHOCK OR FIRE HAZARD DUE TO
OVERHEATING, ENSURE THAT CURTAINS AND
ANY OTHER MATERIALS DO NOT OBSTRUCT THE
VENTILATION VENTS.
The socket outlet shall be installed near the equipment and easily
accessible. The mains plug of the power supply cord shall remain
readily operable.
RQTX0169
To completely disconnect this apparatus from the AC Mains,
disconnect the power supply cord plug from AC receptacle.
CAUTION: TO REDUCE THE RISK OF ELECTRIC
SHOCK, DO NOT REMOVE SCREWS.
NO USER-SERVICEABLE PARTS
INSIDE.
REFER SERVICING TO QUALIFIED
SERVICE PERSONNEL.
The lightning flash with arrowhead symbol,
within an equilateral triangle, is intended to
alert the user to the presence of uninsulated
dangerous voltage within the product s
enclosure that may be of sufficient
magnitude to constitute a risk of electric
shock to persons.
The exclamation point within an equilateral
triangle is intended to alert the user to the
presence of important operating and
maintenance (servicing) instructions in the
literature accompanying the appliance.
FCC Note:
This equipment has been tested and found to comply
with the limits for a Class B digital device, pursuant to
Part 15 of the FCC Rules.
These limits are designed to provide reasonable
protection against harmful interference in a residential
installation. This equipment generates, uses and can
radiate radio frequency energy and, if not installed and
used in accordance with the instructions, may cause
harmful interference to radio communications. However,
there is no guarantee that interference will not occur in
a particular installation. If this equipment does cause
harmful interference to radio or television reception,
which can be determined by turning the equipment off
and on, the user is encouraged to try to correct the
interference by one or more of the following measures:
• Reorient or relocate the receiving antenna.
• Increase the separation between the equipment and
receiver.
• Connect the equipment into an outlet on a circuit
different from that to which the receiver is connected.
• Consult the dealer or an experienced radio/TV
technician for help.
Any unauthorized changes or modifications to this
equipment would void the user’s authority to operate this
device.
This device complies with Part 15 of the FCC Rules.
Operation is subject to the following two conditions:
(1) This device may not cause harmful interference, and
(2) this device must accept any interference received,
including interference that may cause undesired
operation.
Declaration of conformity
Trade Name: Panasonic
Model No: SC-AK960
Responsible Party:
Panasonic Corporation of North America
One Panasonic Way
Secaucus, NJ 07094
Support Contact:
Panasonic Consumer Electronic Company
Telephone No: 1-800-211-7262
RQTX0169-P.indd 2RQTX0169-P.indd 2 7/18/08 9:24:12 AM7/18/08 9:24:12 AM
Page 3
LANG - 5
LANG - 4
FRANÇAIS
DANSK
IMPORTANT SAFETY INSTRUCTIONS
Read these operating instructions carefully before using the unit. Follow the safety instructions on the unit and the applicable safety instructions
listed below. Keep these operating instructions handy for future reference.
1) Read these instructions.
2) Keep these instructions.
3) Heed all warnings.
4) Follow all instructions.
5) Do not use this apparatus near water.
6) Clean only with dry cloth.
7) Do not block any ventilation openings. Install in accordance with
the manufacturer’s instructions.
8) Do not install near any heat sources such as radiators, heat
registers, stoves, or other apparatus (including amplifiers) that
produce heat.
9) Do not defeat the safety purpose of the polarized or groundingtype plug. A polarized plug has two blades with one wider than
the other. A grounding-type plug has two blades and a third
grounding prong. The wide blade or the third prong are provided
for your safety. If the provided plug does not fit into your outlet,
consult an electrician for replacement of the obsolete outlet.
10) Protect the power cord from being walked on or pinched
particularly at plugs, convenience receptacles, and the point
where they exit from the apparatus.
11) Only use attachments/accessories specified by the
manufacturer.
12) Use only with the cart, stand, tripod, bracket, or
table specified by the manufacturer, or sold with
the apparatus. When a cart is used, use caution
when moving the cart/apparatus combination to
avoid injury from tip-over.
13) Unplug this apparatus during lightning storms or when unused
for long periods of time.
14) Refer all servicing to qualified service personnel. Servicing is
required when the apparatus has been damaged in any way,
such as power-supply cord or plug is damaged, liquid has been
spilled or objects have fallen into the apparatus, the apparatus
has been exposed to rain or moisture, does not operate
normally, or has been dropped.
DANSK ENGLISH
Product Service
1. Damage requiring service − The unit should be serviced by
qualifi ed service personnel if:
(a) The AC power supply cord or the plug has been damaged; or
(b) Objects or liquids have gotten into the unit; or
(c) The unit has been exposed to rain; or
(d) The unit does not operate normally or exhibits a marked change
in performance; or
(e) The unit has been dropped or the cabinet damaged.
2. Servicing − Do not attempt to service the unit beyond that described
in these operating instructions. Refer all other servicing to authorized
servicing personnel.
3. Replacement parts − When parts need replacing ensure the
servicer uses parts specifi ed by the manufacturer or parts that
have the same characteristics as the original parts. Unauthorized
substitutes may result in fi re, electric shock, or other hazards.
4. Safety check − After repairs or service, ask the servicer to
perform safety checks to confi rm that the unit is in proper working
condition.
The servicer will require all components to service your system.
Therefore, should service ever be necessary, be sure to bring the
entire system.
Product information
For product information or assistance with product operation:
Refer to “Customer Services Directory” on page 20.
Listening caution
%34
Selecting fi ne audio equipment such as the unit you’ve just purchased is only the start of your musical enjoyment. Now it’s time
to consider how you can maximize the fun and excitement your
equipment offers. This manufacturer and the Electronic Industries
Association’s Consumer Electronics Group want you to get the most
out of your equipment by playing it at a safe level. One that lets the
sound come through loud and clear without annoying blaring or
distortion—and, most importantly, without affecting your sensitive
hearing.
We recommend that you avoid prolonged exposure to excessive
noise.
Sound can be deceiving. Over time your hearing “comfort level”
adapts to higher volumes of sound. So what sounds “normal” can
actually be loud and harmful to your hearing.
Guard against this by setting your equipment at a safe level BEFORE
your hearing adapts.
To establish a safe level:
• Start your volume control at a low setting.
• Slowly increase the sound until you can hear it comfortably and clearly,
and without distortion.
Once you have established a comfortable sound level:
• Set the dial and leave it there.
Taking a minute to do this now will help to prevent hearing damage or
loss in the future. After all, we want you listening for a lifetime.
FRANÇAIS
LANG - 4
-If you see this symbol-
Information on Disposal in other Countries outside the European Union
This symbol is only valid in the European Union.
If you wish to discard this product, please contact your
local authorities or dealer and ask for the correct method
of disposal.
RQTX0169
LANG - 5
3
RQT8043
RQTX0169-P.indd 3RQTX0169-P.indd 3 7/18/08 9:24:13 AM7/18/08 9:24:13 AM
Page 4
LANG - 5
LANG - 4
FRANÇAIS
DANSK
ENGLISH
Handling of the disc trays and discs
Not doing the following will cause damage to the unit.
Removing the power plug
• Press [y/I, POWER] to turn off the unit and remove the power plug
only after all the displays have disappeared.
Tray caution
ENGLISH
• Always press [0, OPEN/CLOSE] to insert or remove a disc.
• Do not push or pull out the tray by hand as this will cause an accident.
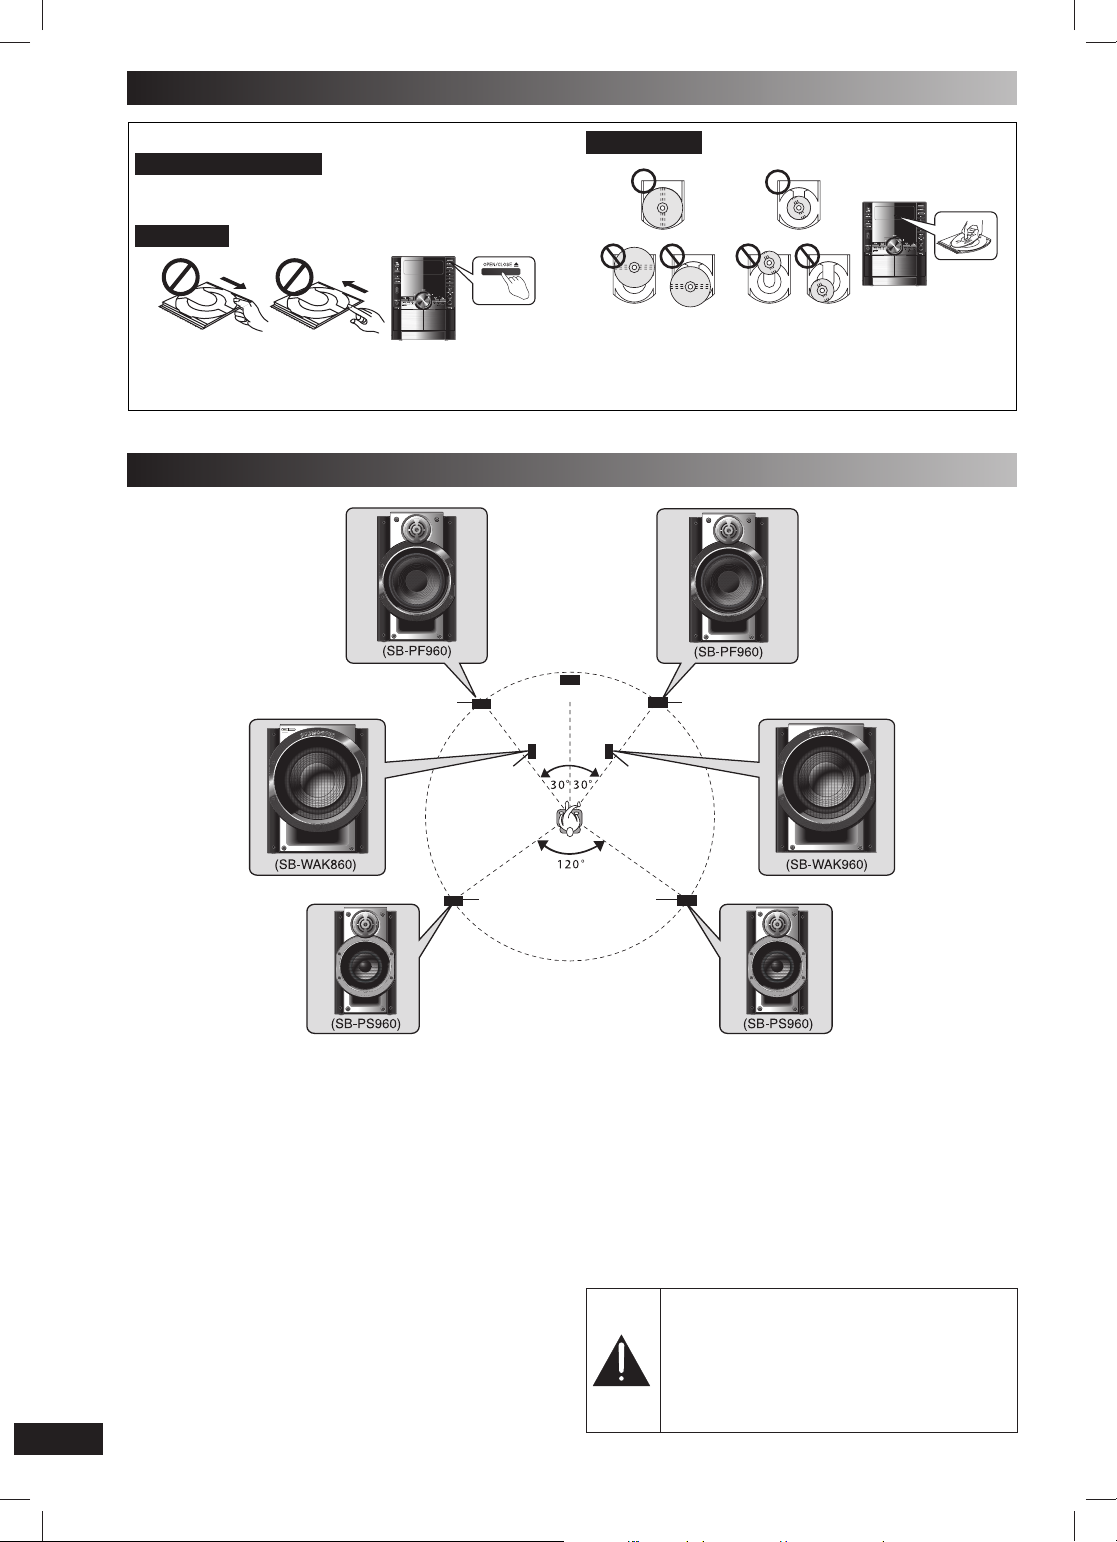
Placement of speakers
DANSK
Front speaker (left)
Inserting a disc
• Place the disc correctly label-up as shown in the diagram.
• Insert one disc into the tray.
Main unit
Front speaker (right)
FRANÇAIS
LANG - 4
LANG - 5
4
RQT8043
Subwoofer
(left)
Surround
speaker
Front speakers
Speakers are designed identically so that no left or right channel
orientation is necessary.
Surround speakers
Place on the side of or slightly behind the seating area, higher than
ear level.
Subwoofer(s)
Place on the fl oor or a sturdy shelf to reduce vibration.
Leave 10 cm (3
Use only the supplied speakers
• Using other speakers can damage the unit and sound quality will be
negatively affected.
• Set the speakers up on an even surface to prevent them from falling. Take proper precautions to prevent the speakers from falling if
you cannot set them up on an even surface.
RQTX0169
15
/16˝) at the rear for ventilation.
(left)
Subwoofer
(right)
Surround
speaker
(right)
Note:
• Keep your speakers at least 10mm (13/32˝)away from the system
for proper ventilation.
• You cannot take the front net off the speakers.
• These speakers do not have magnetic shielding. Do not place
them near televisions, personal computers or other devices easily
infl uenced by magnetism.
• You can damage your speakers and shorten their useful life if you
play sound at high levels over extended periods.
• Reduce the volume in the following cases to avoid damage.
– When playing distorted sound.
– When adjusting the sound quality.
– When turning the unit on or off.
Caution
• Use the speakers only with the recommended
system. Failure to do so can damage the amplifi er and speakers, and can cause fi re. Consult a
qualifi ed service person if damage occurs or if a
sudden change in performance is apparent.
• Do not attach these speakers to walls or ceilings.
RQTX0169-P.indd 4RQTX0169-P.indd 4 7/18/08 9:24:13 AM7/18/08 9:24:13 AM
Page 5
LANG - 5
LANG - 4
FRANÇAIS
DANSK
Getting started
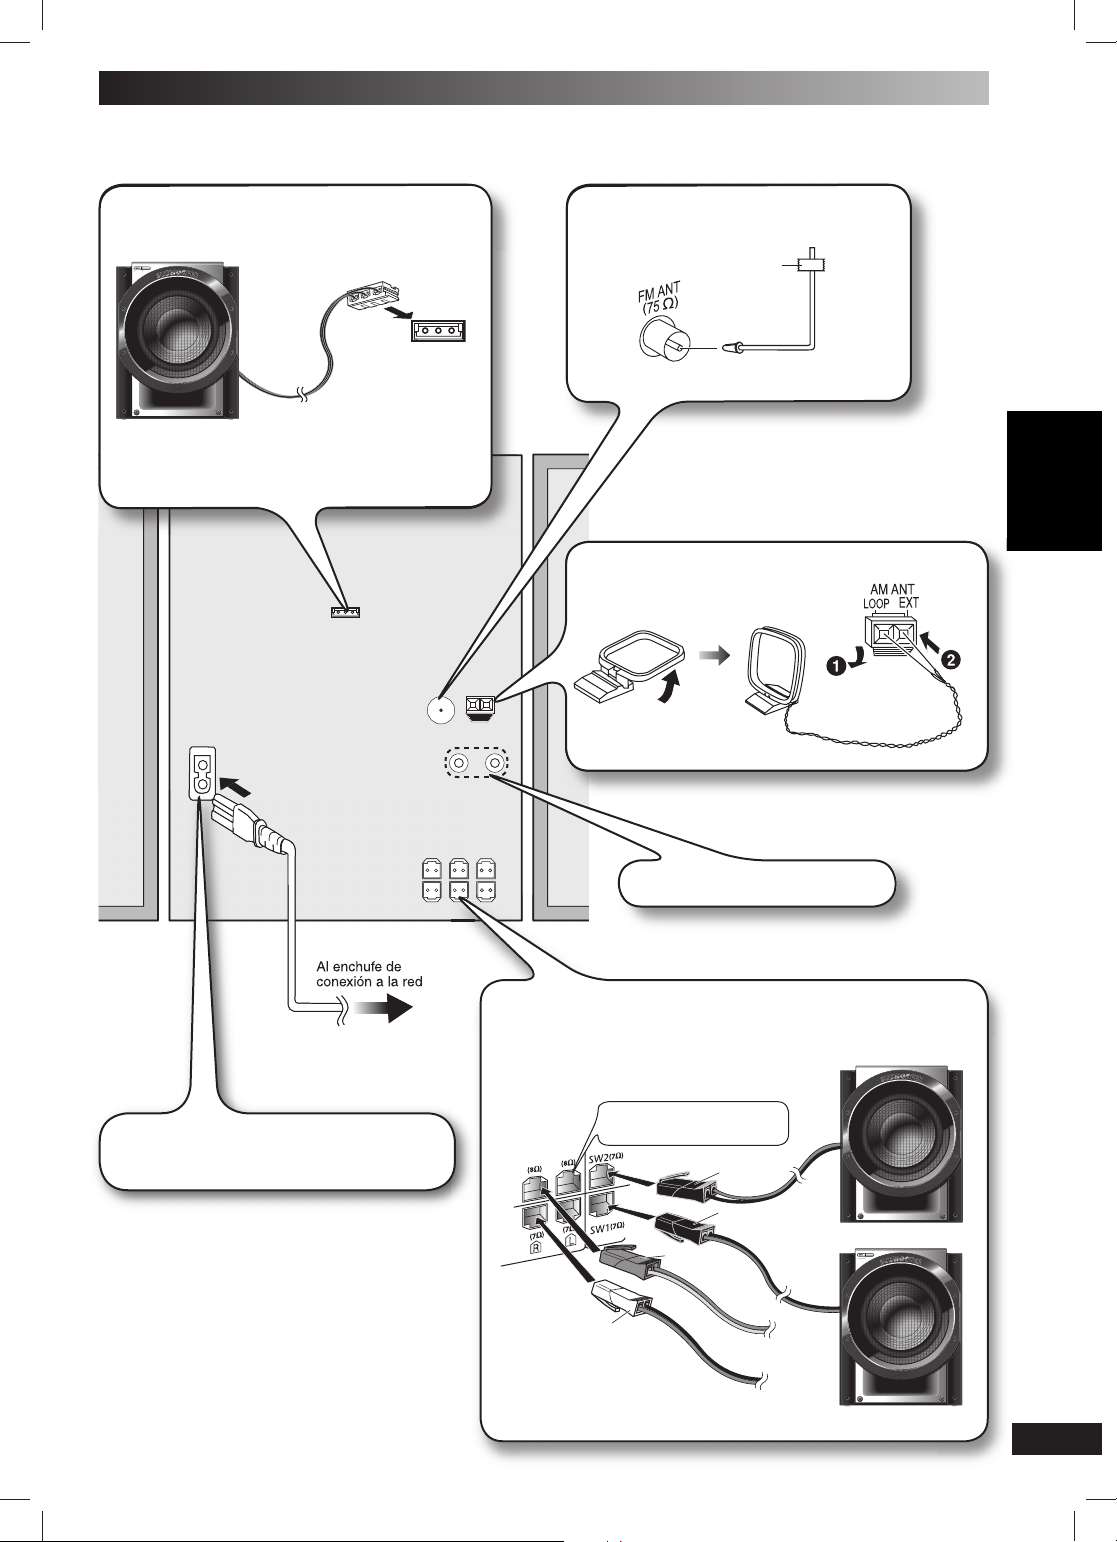
!
PORTANT
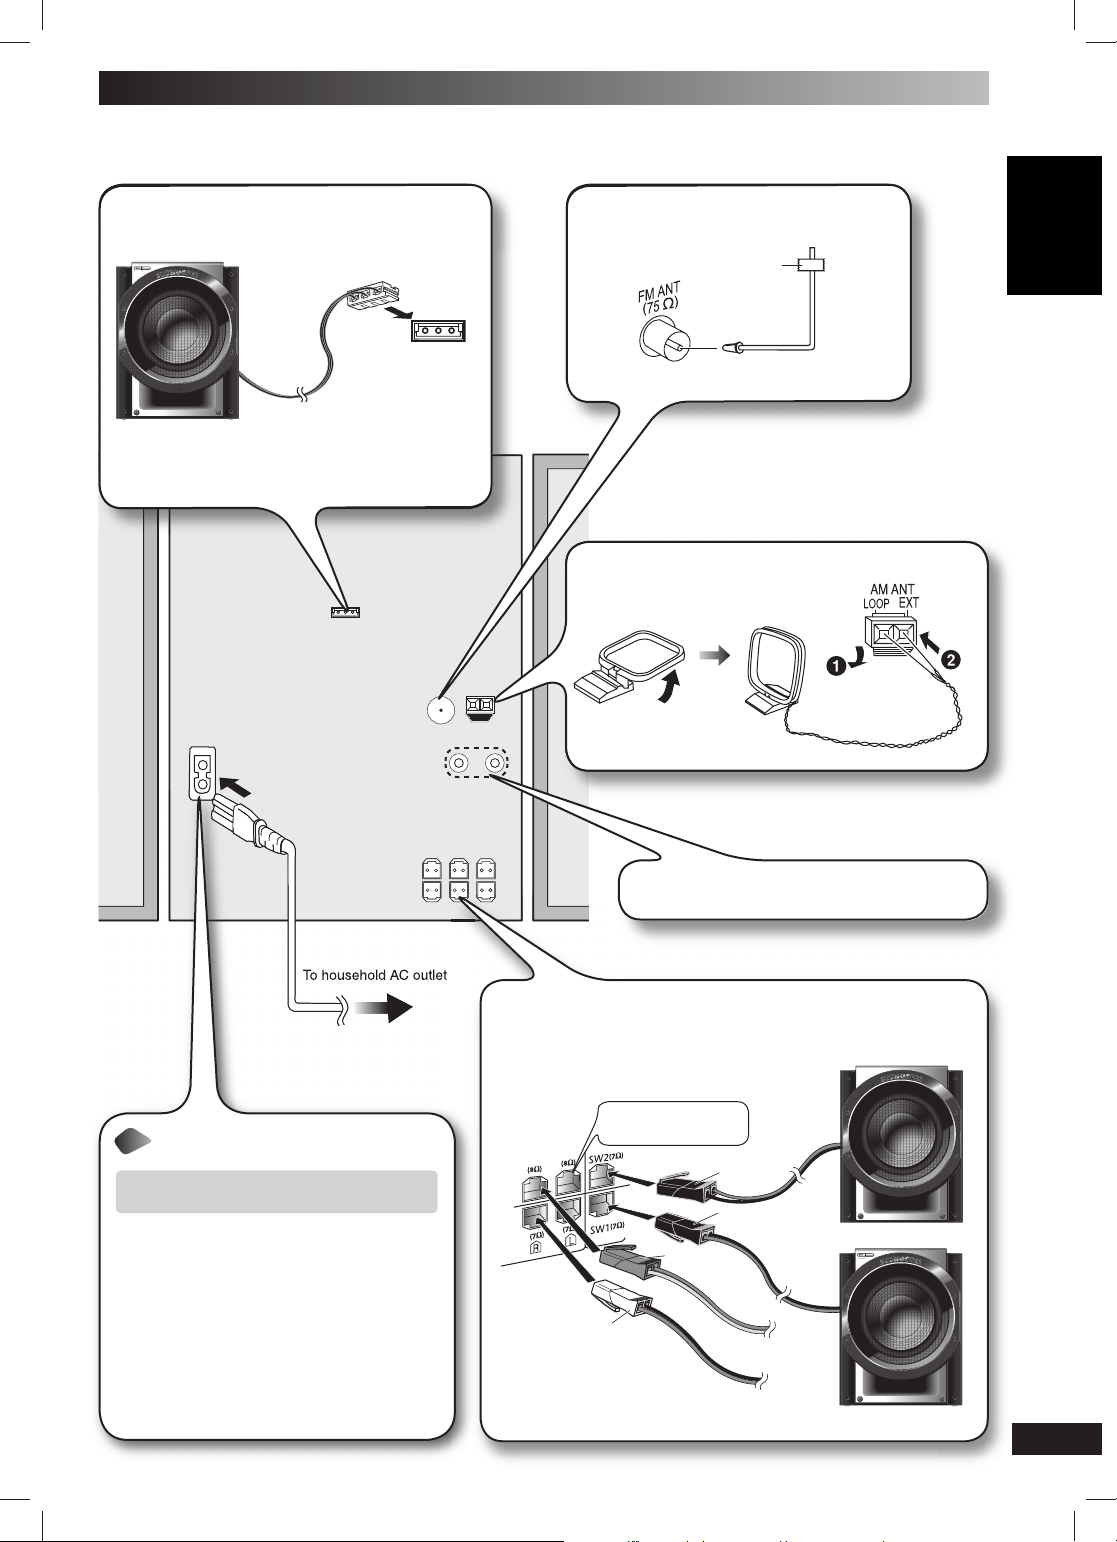
Making the connections
Connect the subwoofer to the
main unit.
(SB-WAK860)
Please refer to “Boosting the subwoofer” on page
15 for more information on subwoofer operation.
Connect the FM indoor antenna.
Adhesive
tape
Tape the antenna where reception is best.
Connect the AM loop antenna.
Stand the antenna
up on its base.
DANSK ENGLISH
FRANÇAIS
To household AC outlet
IMIM
PORTANT
Connect the AC power supply cord only after
all other connections have been made.
Connect the AC power supply
cord.
The included AC power supply cord is for use with
this unit only. Do not use it with other equipment.
Conserving power
The unit consumes approx. 0.2 W even when it is
turned off with [y/I, POWER]. To save power when
the unit is not to be used for a long time, unplug it
from the household AC outlet. Remember to reset
the radio stations and any other memory items
before using the unit again.
Please refer to “Connecting to other external unit” on
page 15 for more information on AUX connection.
Connect the speaker cords.
Connect the left (L)
side in the same way
Black
Black
Blue
Transparent
Surround
speaker
(right)
Front
speaker
(right)
Subwoofer
(SB-WAK960)
(SB-WAK860)
RQTX0169
5
RQT8043
LANG - 4
LANG - 5
RQTX0169-P.indd 5RQTX0169-P.indd 5 7/18/08 9:24:29 AM7/18/08 9:24:29 AM
Page 6
LANG - 5
LANG - 4
FRANÇAIS
DANSK
ENGLISH
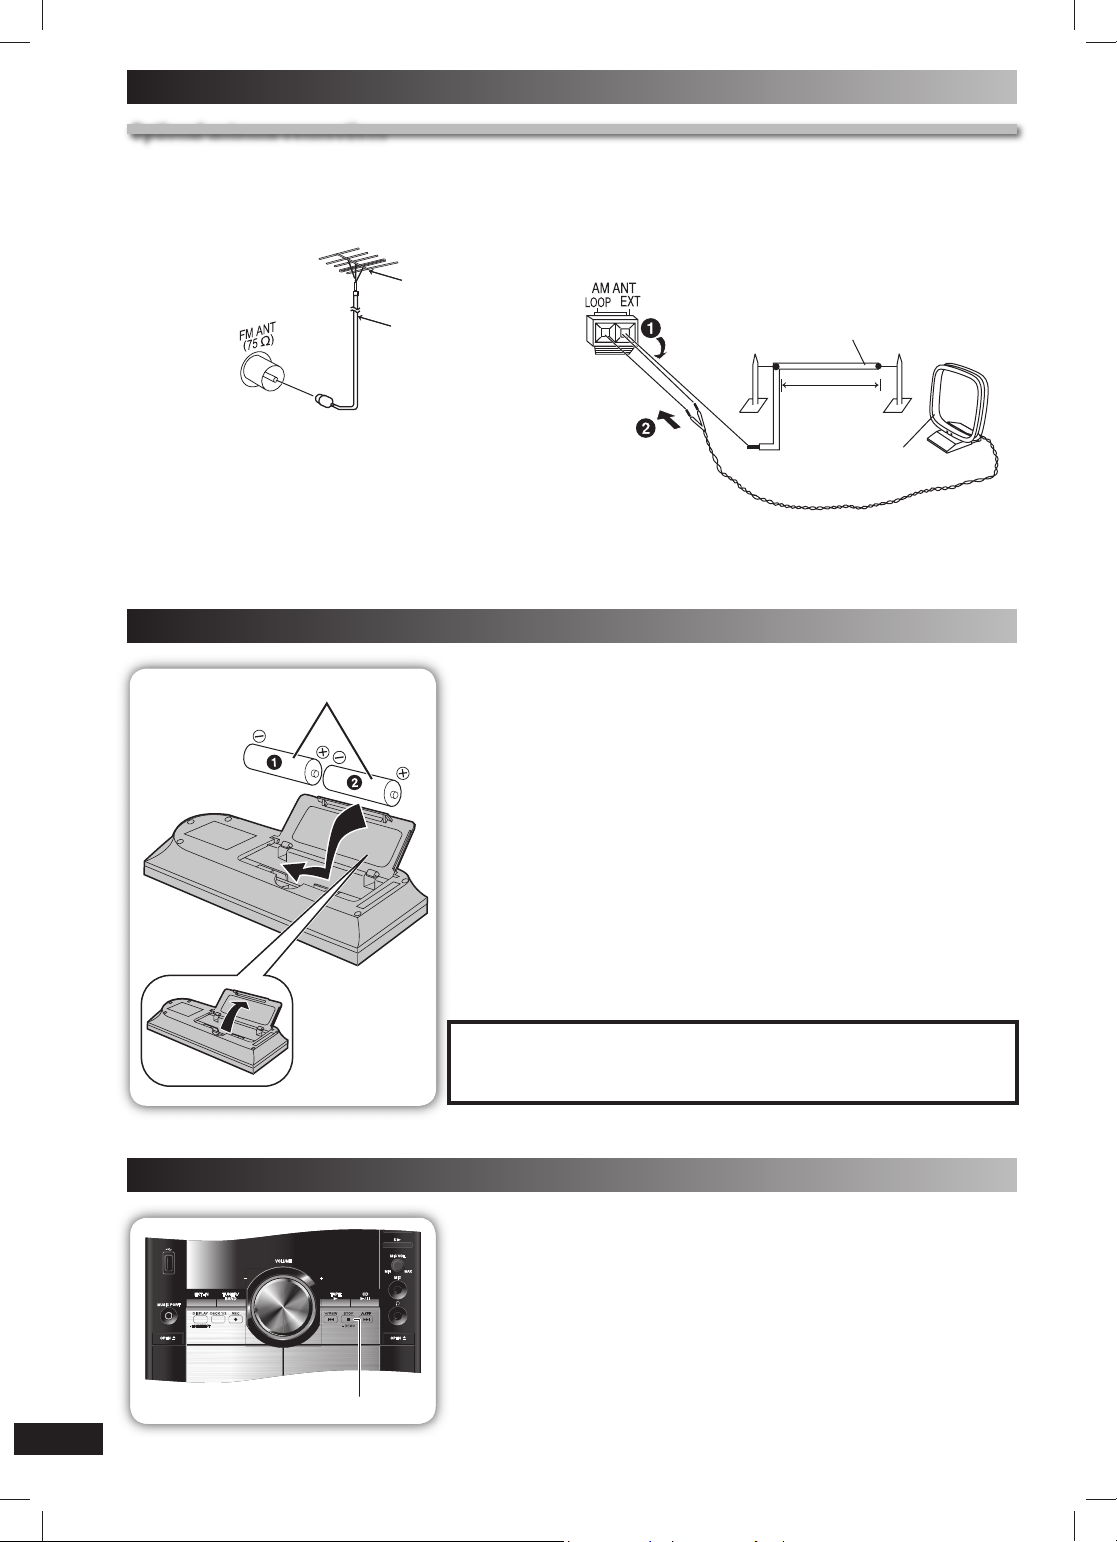
Optional antenna connections
Getting started (continued)
Optional antenna connections
Use outdoor antenna if radio reception is poor.
Note:
Disconnect the outdoor antenna when the unit is not in use. Do not use the outdoor antenna during a lightning storm.
FM outdoor antenna AM outdoor antenna
ENGLISH
75 Ω coaxial cable
Rear panel
of this unit
DANSK
• Disconnect the FM indoor antenna.
• The antenna should be installed by a competent technician.
(not included)
FM outdoor antenna
(not included)
Rear panel
of this unit
• Run a piece of vinyl wire horizontally across a window or other convenient location.
• Leave the loop antenna connected.
Preparing the remote control
AM outdoor antenna
(not included)
5-12 m
(16-40 ft)
AM loop antenna
(included)
FRANÇAIS
LANG - 4
DEMO function
LANG - 5
AA/R6/LR6
■ Batteries
• Insert so the poles (+ and –) match those in the remote control.
• Remove if the remote control is not going to be used for a long period of time. Store in a
cool, dark place.
• Do not use rechargeable type batteries.
• Do not heat or expose to fl ame.
• Do not leave the battery(ies) in an automobile exposed to direct sunlight for a long period
of time with doors and windows closed.
• Mishandling of batteries in the remote control can cause electrolyte leakage, which may
cause a fi re.
Do not:
• mix old and new batteries.
• use different types of batteries at the same time.
• take apart or short circuit;
• attempt to recharge alkaline or manganese batteries.
• use batteries if the covering has been peeled off.
■ Use
Aim at the remote control sensor, avoiding obstacles, at a maximum range of 7 m
(23 feet) directly in front of the unit.
Refer to page 7 for the remote control sensor position.
CAUTION
Danger of explosion if battery is incorrectly replaced. Replace only with the same or
equivalent type recommended by the manufacturer. Dispose of used batteries according
to the manufacturer’s instructions.
When the unit is fi rst plugged in, a demonstration of its functions may be shown on the
display.
If the demo setting is off, you can show a demonstration by selecting “DEMO ON”.
Press and hold [7, STOP, – DEMO].
The display changes each time the button is held down.
NO DEMO (off) Ô DEMO ON (on)
While in standby mode, select “NO DEMO” to reduce power consumption.
Note:
DEMO function cannot be turned on when DIMMER is on.
RQTX0169
7, STOP, –DEMO
6
RQT8043
RQTX0169-P.indd 6RQTX0169-P.indd 6 7/18/08 9:24:39 AM7/18/08 9:24:39 AM
Page 7
LANG - 5
LANG - 4
FRANÇAIS
DANSK
Overview of controls
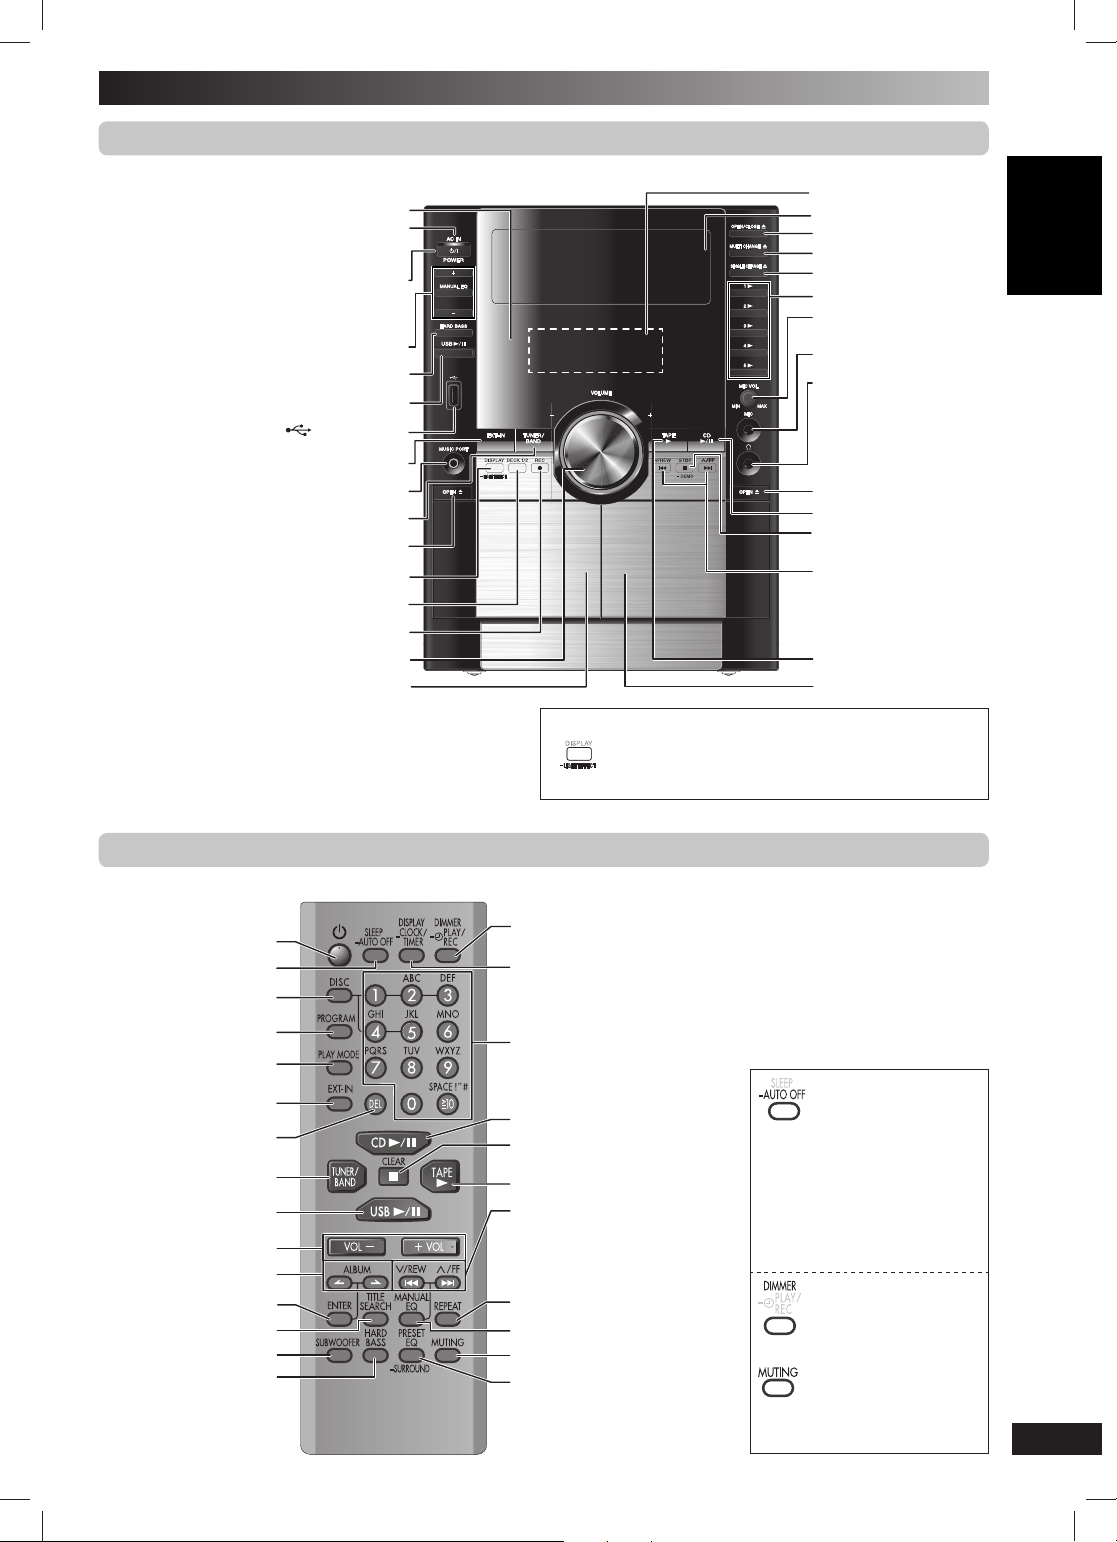
Main unit
Remote control
Main unit
Refer to the numbers in parentheses for page reference.
Remote control signal sensor
This indicator lights when the unit is connected
1 Standby/on switch [y/l, POWER] (4, 18)
Press to switch the unit from on to standby mode
or vice versa. In standby mode, the unit is still
AC supply indicator [AC IN]
to the AC power supply.
consuming a small amount of power.
Manual EQ adjustment (14)
2 HARD BASS (14)
3 USB play/pause (16)
USB port (16)
4 EXT-IN selection (15)
Music port jack (15)
5 Tuner/Band selection (12)
Deck 1 open (11)
Display (9), light effect
Deck selection (11)
Record (11, 13, 15 ~ 16)
6 Volume control (13)
Deck 1 cassette holder (11)
Display panel
Disc trays
Disc tray open/close (4, 8)
Multiple discs change (8)
Single disc change (9)
Disc direct play (8
Microphone volume
control (13)
Microphone jack (13)
A
Headphone jack
Avoid listening for prolonged
periods of time to prevent
hearing damage.
Plug type: Ø 3.5 mm (1/8˝)
stereo (not included)
Deck 2 open (11)
Disc play/pause (8 ~ 10)
7
Demonstration, stop
(6, 11)
Track skip/search, tape
fast-forward/rewind, tune/
preset channel selection,
time adjustment
(8 ~ 14, 16)
8 Tape play (11)
Deck 2 cassette holder (11)
~ 9
)
DANSK ENGLISH
Remote control
Buttons such as 1 function the same as the controls on the main unit.
1
Sleep timer (14),
Auto off
Disc (8 ~ 9)
Program (9, 12)
Play mode (8, 12)
4
Delete (9 ~ 10)
5
3
6
Disc album selection (8)
Enter (9 ~ 10)
Title search (10)
Subwoofer (15)
2
Dimmer,
Play timer/record timer (13 ~ 14)
Display,
Clock/timer (9, 13 ~ 14)
Numeric, characters
(8, 10, 12)
7
Stop/program clear
(8 ~ 10, 16)
8
Track skip/search, tape fastforward/rewind, tune/preset
channel selection, time
adjustment, manual EQ
adjustment (8 ~14, 16)
Repeat (10)
Manual EQ (14)
Muting
Preset EQ, Surround (14 ~ 15)
This function allows you to have light animation during
disc, tape or USB play mode or when using MIC.
• Press and hold [−LIGHT EFFECT] to activate the function.
• Press and hold [−LIGHT EFFECT] again to cancel.
This auto off function allows
you to turn off the unit in disc, tape
or USB mode only after left unused
for 10 minutes.
• Press and hold [–AUTO OFF] to
activate the function.
• Press and hold [–AUTO OFF]
again to cancel.
• The setting is maintained even if
the unit is turned off.
To dim the display panel.
To mute the sound.
• Press the button to activate.
• Press again or adjust the volume
to cancel.
FRANÇAIS
LANG - 4
LANG - 5
RQTX0169
7
RQT8043
RQTX0169-P.indd 7RQTX0169-P.indd 7 7/18/08 9:24:42 AM7/18/08 9:24:42 AM
Page 8
LANG - 5
LANG - 4
FRANÇAIS
DANSK
ENGLISH
Discs
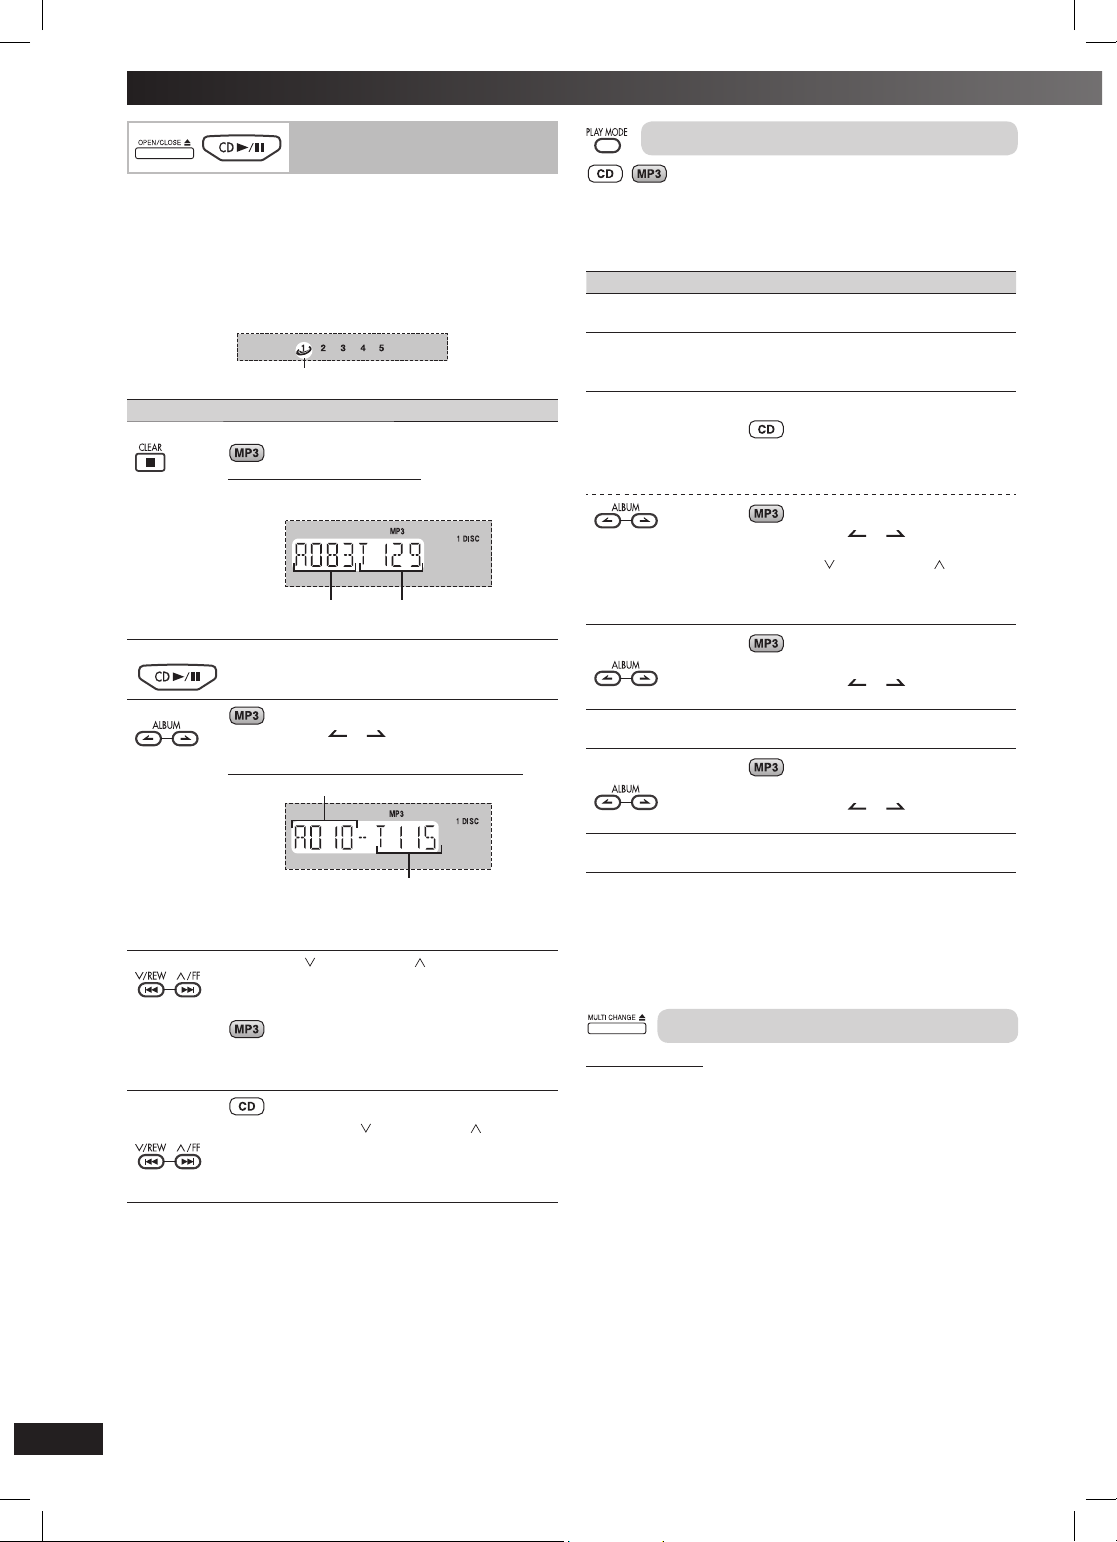
Basic play
Basic play
1 Press [0, OPEN/CLOSE] on the main unit to open the tray.
The unit turns on, load a disc in the current tray with the label
facing up.
Press [0, OPEN/CLOSE] to close the tray.
ENGLISH
2 Press [ 6 , CD] to start play.
You can also press [DISC] and then [1] ~ [5] to select and play the
other loaded discs.
Current disc indicator
To Action
stop play
DANSK
pause play
skip album
FRANÇAIS
skip tracks
LANG - 4
search
through
tracks
Press [7, CLEAR] during play.
Display when in the stop mode:
Example: “MP3” indicates the disc contains MP3
Press [6, CD] during play.
Press again to resume play.
Press [ALBUM ( or )] to select the desired
album during play or when in stop mode.
Display when selecting in stop mode (example):
• This function does not work during 1-DISC RAN-
Press [4, /REW ] or [¢, / FF ].
• During random play (\ see right, “Play Mode
During 1-ALBUM and 1-ALBUM RANDOM mode,
track skipping can only be done within the current
album.
Press and hold [4, /REW ] or [¢, / FF ] during play or pause to search.
• During program play (\ page 9), or random play
fi les.
Total number
of albums
Current album
DOM and ALL-DISC RANDOM mode.
function”), you cannot skip to tracks which have
been played.
(\ see right, “Play Mode function”), you can
search only within the track.
Total number
of tracks
Number of tracks
in current album
Play Mode function
You can listen to specifi c discs and tracks.
Preparation
Select and play your desired disc.
Press [PLAY MODE] to select the desired mode.
Mode To play
1-DISC
1 DISC
ALL-DISC
ALL DISC
1-TRACK
1-TR
1-ALBUM
1-ALB
1-DISC RANDOM
1 DISC RND
1-ALBUM RANDOM
1-ALB RND
ALL-DISC RANDOM
ALL DISC RND
When playback ends
The current play mode will be retained in memory until it is changed
even if the unit is turned off.
Note:
You cannot use program mode together with “Play Mode function”.
one selected disc.
all loaded discs in succession from the
selected disc to the fi nal disc.
Example: 4→5→1→2→3.
one selected track on the selected disc.
Press the numeric buttons to select the
track in the current disc.
Play starts from the selected track.
Press [ALBUM ( or )] to select the
album.
Press [4,
then the numeric buttons to select the
track in the current album.
Play starts from the selected track.
one selected album on the selected disc.
Press [ALBUM (
album.
one selected disc randomly.
all tracks in one selected album randomly.
Press [ALBUM (
album.
all loaded discs randomly.
/REW ] or [¢, / FF ],
or )] to select the
or )] to select the
Changing multiple discs
By main unit only
1 Press [0, MULTI CHANGE] to open the trays.
2 Press the button repeatedly to check and change multiple
discs.
Note:
• The tray with a disc being played will not open.
• If the player is stopped, all trays will open. To close the remaining
trays simultaneously, press [0, OPEN/CLOSE].
LANG - 5
RQTX0169
8
RQT8043
RQTX0169-P.indd 8RQTX0169-P.indd 8 7/18/08 9:24:45 AM7/18/08 9:24:45 AM
Page 9
LANG - 5
LANG - 4
FRANÇAIS
DANSK
Changing a single disc (SINGLE CHANGE)
Advanced play
By main unit only
While one disc is playing, you can change the discs in other trays.
1 Press [0, SINGLE CHANGE].
2 Press [3, 1] ~ [3, 5] to select the desired tray.
3 Change the disc.
4 Press [0, SINGLE CHANGE] again to close the tray.
Checking the track information
You can select a desired disc display mode.
Press [DISPLAY] during play or pause.
Elapsed play time Remaining play time
Note:
Elapsed
play time
Remaining
play time
Tag (Artist)
Album Name
Tag (Track) Tag (Album)
Track Name
1 Press [DISC] and then [1] ~ [5] to select the disc.
2 Press [7, CLEAR].
3 Press [PROGRAM].
4 Press [ALBUM ( or )] to select your desired album.
To select an album directly, press the numeric buttons after
pressing [ALBUM (
or )].
5 Press [4, / REW ] or [¢, / FF ] to select the track.
To select a track directly, press the numeric buttons after
pressing [4,
/ REW ] or [¢, / FF ].
6 Press [ENTER].
Repeat steps 4 to 6 to program other tracks.
7 Press [6, CD] to start play.
For two-digit track, press [h10] once then the two digits.
For three-digit track, press [
To Action
cancel program
mode
replay the
program
add to the
program
h
10] twice then the three digits.
Press [PROGRAM] in the stop mode.
Press [PROGRAM] then [6, CD] in the stop
mode.
Repeat steps 3 to 4 in the stop mode.
DANSK ENGLISH
• When track number 25 or greater is playing, remaining play time
display shows “– –:– –”.
• When a title is longer than 9 characters, it will scroll across the
display. The scrolling will start after every 3 seconds.
• “NO TAG” is displayed if titles with tags have not been entered.
• Maximum number of displayable characters: approximately 32
• This unit can display album, track and artist name with MP3 ID3
tags (version 1.0 and 1.1).
• Titles containing text data that the unit does not support cannot be
displayed.
• ID3 is a tag embedded in MP3 track to provide information about
the track.
• Titles entered with 2-byte code cannot be displayed correctly on
this unit.
Advanced play
Program play
This function allows you to program up to 24 tracks.
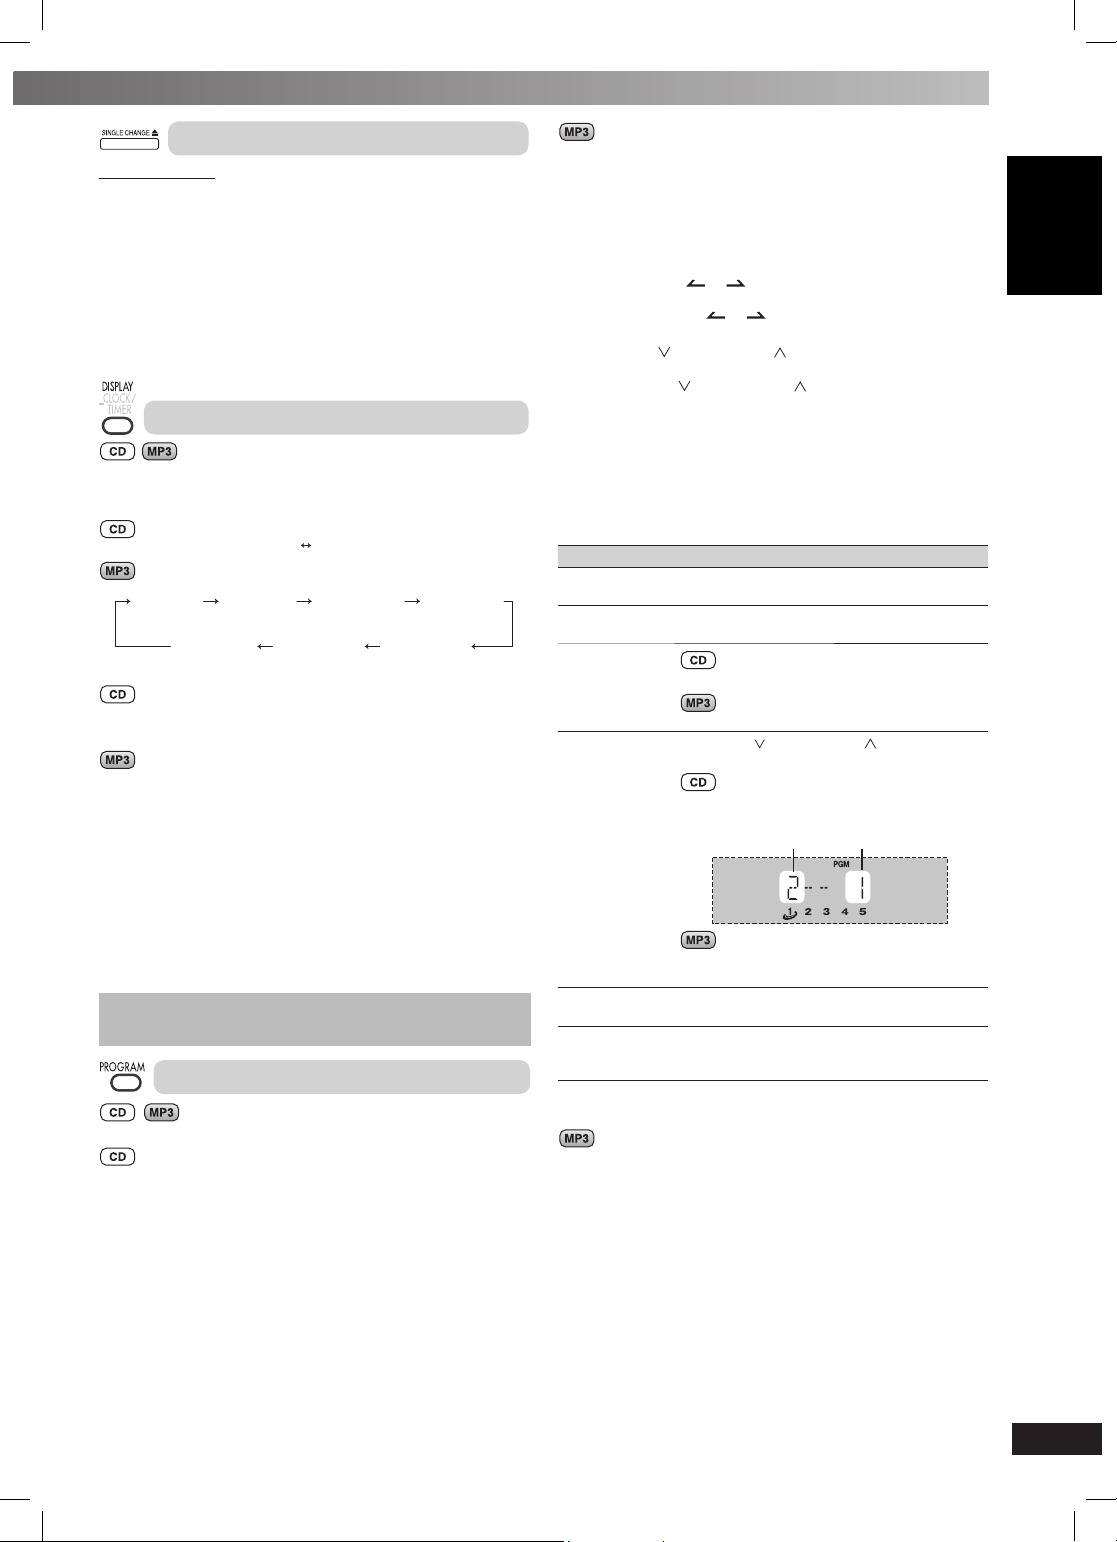
1 Press [6, CD] and then [7, CLEAR].
2 Press [PROGRAM].
“PGM” appears.
3 Press [DISC] and then [1] ~ [5] to select the disc.
4
Press the numeric buttons to select your desired track.
Repeat steps 3 to 4 to program other tracks.
Repeat steps 4 to 6 in the stop mode.
check program
contents
clear the last
track
clear all programmed tracks
Note:
• You cannot program CD-DA together with MP3 tracks.
• The program memory is cleared when you change a disc or open
the disc tray.
• You cannot program more than one disc.
Press [4,
“PGM” is displayed in the stop mode.
The track number, program order and disc
number are displayed:
The program order is displayed followed by the
album number and track number.
Press [DEL] in the stop mode.
Press [7, CLEAR] in the stop mode. “CLEAR
ALL” is displayed. Within 5 seconds, press the
button again to clear all tracks.
/ REW] or [¢, / FF] when
Program orderTrack number
FRANÇAIS
LANG - 4
LANG - 5
5 Press [6, CD] to start play.
RQTX0169
9
RQT8043
RQTX0169-P.indd 9RQTX0169-P.indd 9 7/18/08 9:24:49 AM7/18/08 9:24:49 AM
Page 10
LANG - 5
LANG - 4
FRANÇAIS
DANSK
ENGLISH
Advanced play (
only)
Discs (continued)
Repeat play
You can repeat program play or other selected play mode.
Press [REPEAT].
” is displayed.
“
To cancel
ENGLISH
Press [REPEAT] again.
” is cleared.
“
Note:
You can use repeat mode with “Program play” (\ page 9) and “Play
Mode function” ( \ page 8).
Advanced play (
only)
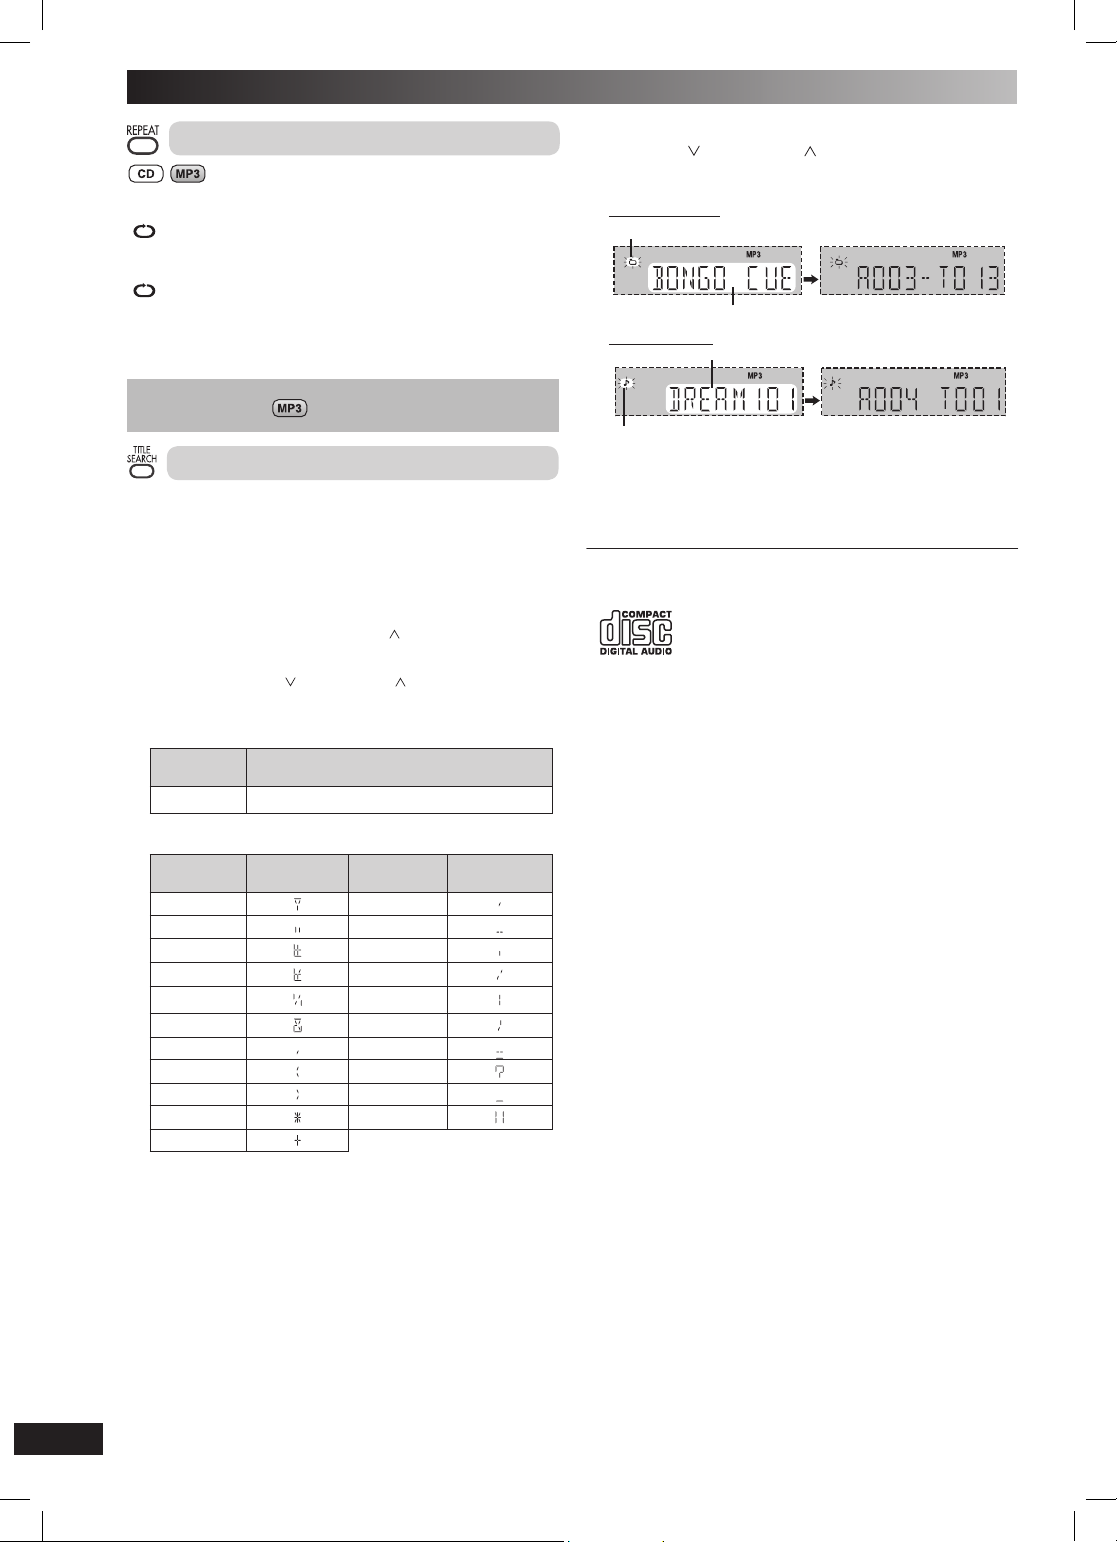
Album /Track title search
This function enables you to search your desired album or track.
DANSK
1 Press [6, CD] and then [7, CLEAR].
2 For album title search, press [TITLE SEARCH] once.
For track title search, press [TITLE SEARCH] twice.
3 Press the numeric buttons repeatedly to select your
desired character then press [¢,
character.
• You can enter up to 8 characters.
• To edit, press [4,
• To delete, move the cursor over the character and then press
FRANÇAIS
• You can search for “<” or “>” by entering “(” or “)”.
• The special characters will be displayed as below:
LANG - 4
• Some characters may not be displayed correctly due to the
acters.
[DEL].
Numbered
Button
h
10
Characters Main unit
! ,
” –
# .
$ /
% :
& ;
’ =
( ?
) _
✽
+
recording format/software used.
/ REW] or [¢, / FF] to revise any char-
Characters
space ! ” # $ % & ’ ( ) ✽ + , – . / : ; = ? _
display
/ FF] to key in the next
Characters Main unit
`
display
4 Press [ENTER].
Press [4,
or next match.
The matched title is displayed.
Album title search
Blinks to indicate album title search mode
Track title search
Blinks to indicate track title search mode
/ REW] or [ ¢, / FF] to search for previous
Matched album title
Matched track title
5 Press [6, CD] to start play from the album/track found.
Note:
This function does not work during any random/program mode.
NOTE on CDs
• This unit can access up to 99 tracks.
• Choose disc with this mark.
• This unit can play MP3 fi les and CD-DA format audio
CD-R/RW that have been fi nalized.
• It may not be able to play some CD-R/RW due to the condition of
the recording.
• Do not use irregularly shaped disc.
• Do not use disc with labels and stickers that are coming off or with
adhesive exuding from under labels and stickers.
• Do not attach extra labels or stickers on the disc.
`
• Do not write anything on the disc.
Using DualDiscs
The “CD” sides of DualDiscs do not meet the CD-DA standard so it
may not be possible to play them on this unit.
NOTE on MP3
• Files are treated as tracks and folders are treated as albums.
• This unit can access up to 999 tracks, 255 albums and 20 sessions.
• Disc must conform to ISO9660 level 1 or 2 (except for extended
formats).
To play in a certain order, prefi x the folder and fi le names with
•
3-digits numbers in the order you want to play them.
When “NOT MP3/ERROR1” appears on the display, an unsupported
MP3 format is being played. The unit will skip that track and play the
next one.
Limitations on MP3 play
• If you have recorded MP3 on the same disc as CD-DA, only the
format recorded in the fi rst session can be played.
• Some MP3s may not be played due to the condition of the disc or
recording.
• Recordings will not necessarily be played in the order you recorded
them.
LANG - 5
RQTX0169
10
RQT8043
RQTX0169-P.indd 10RQTX0169-P.indd 10 7/18/08 9:24:52 AM7/18/08 9:24:52 AM
Page 11
LANG - 5
LANG - 4
FRANÇAIS
DANSK
Cassette tape – Play and record
Basic play
Recording
The buttons described for “Cassette tape - Play and record” are
mainly for the main unit unless indicated otherwise.
You can use either DECK 1 or DECK 2 for tape playback.
Use normal position tapes.
High position and metal position tapes can be played, but the unit will
not be able to do full justice to the characteristics of these tapes.
Basic play
1 Press [ 3, TAPE].
The unit turns on.
If a cassette was loaded, play starts automatically (One touch
play).
2 Press [0, OPEN ] for DECK 1 or [0, OPEN] for DECK 2 and
insert the cassette.
Insert with the side to be played facing towards you and the
exposed tape facing down. Close the holder by hand.
3 Press [ 3, TAPE] to start play.
To Action
stop tape playback
fast-forward and
rewind
select between
loaded decks
Press [7, STOP].
Press [4, / REW ] or [¢, / FF].
Press [DECK 1/2] (remote control :
[PLAY MODE]).
To Action
record
programmed
tracks
By remote control only
record
specifi c
discs/tracks
Tape-to tape recording:
1 Press [3, TAPE] and then [7, STOP].
2 Press [0, OPEN] for DECK 1 and insert the cassette to
record.
Perform steps 2 to 4 in “Program play”
(\ page 9).
Perform steps 3 to 6 in “Program play”
(\ page 9).
1) Press [DISC] and then [1] ~ [5] to select
the disc.
Ensure disc is stopped.
2) Press [PLAY MODE] to select the desired
mode (\ page 8).
3)
For 1-ALBUM mode and 1-TRACK mode:
Press [ALBUM (
album.
For 1-TRACK mode:
Press [4,
select the track.
or )] to select the
/ REW] or [¢, / FF ] to
3 Press [¶, REC] to start recording.
Other basic operations
To Action
stop recording
Press [7, STOP].
DANSK ENGLISH
Note:
• Tape playback is momentarily interrupted if you open the other
deck.
• Tapes exceeding 100 minutes are thin and can break or get caught
in the mechanism.
• Tape slack can get caught up in the mechanism and should be
wound up before the tape is played.
• Endless tapes can get caught up in the deck’s moving parts if used
incorrectly.
Recording
Selection of tapes for recording
Use normal position tapes.
High position and metal position tapes can be used, but this unit will
not be able to record or erase them correctly.
Preparation
Wind up the leader tape so recording can begin immediately.
1 Press [0, OPEN] for DECK 2 and insert the cassette to be
recorded.
Insert with the side to be recorded facing towards you and the
exposed tape facing down.
2 Select the source to be recorded.
Radio recording:
Tune in the station (\ page 12).
Disc recording:
1
Insert the disc(s) you want to record.
Press [6, CD] and then [7, STOP].
2
Prepare the desired disc recording mode.
record on the other
side of the tape
erase a recorded
sound
Note:
• Changes to volume and sound adjustments do not affect recording.
• You can only use DECK 2 for tape recording.
• You cannot open DECK 1 while recording.
• You cannot fast-forward or rewind one deck while recording with the
other.
Turn the cassette over and press [¶, REC].
1) Press [3, TAPE] and then [7, STOP].
2) Insert the recorded tape into DECK 2.
Ensure there is no tape in DECK 1.
3) Press [¶, REC].
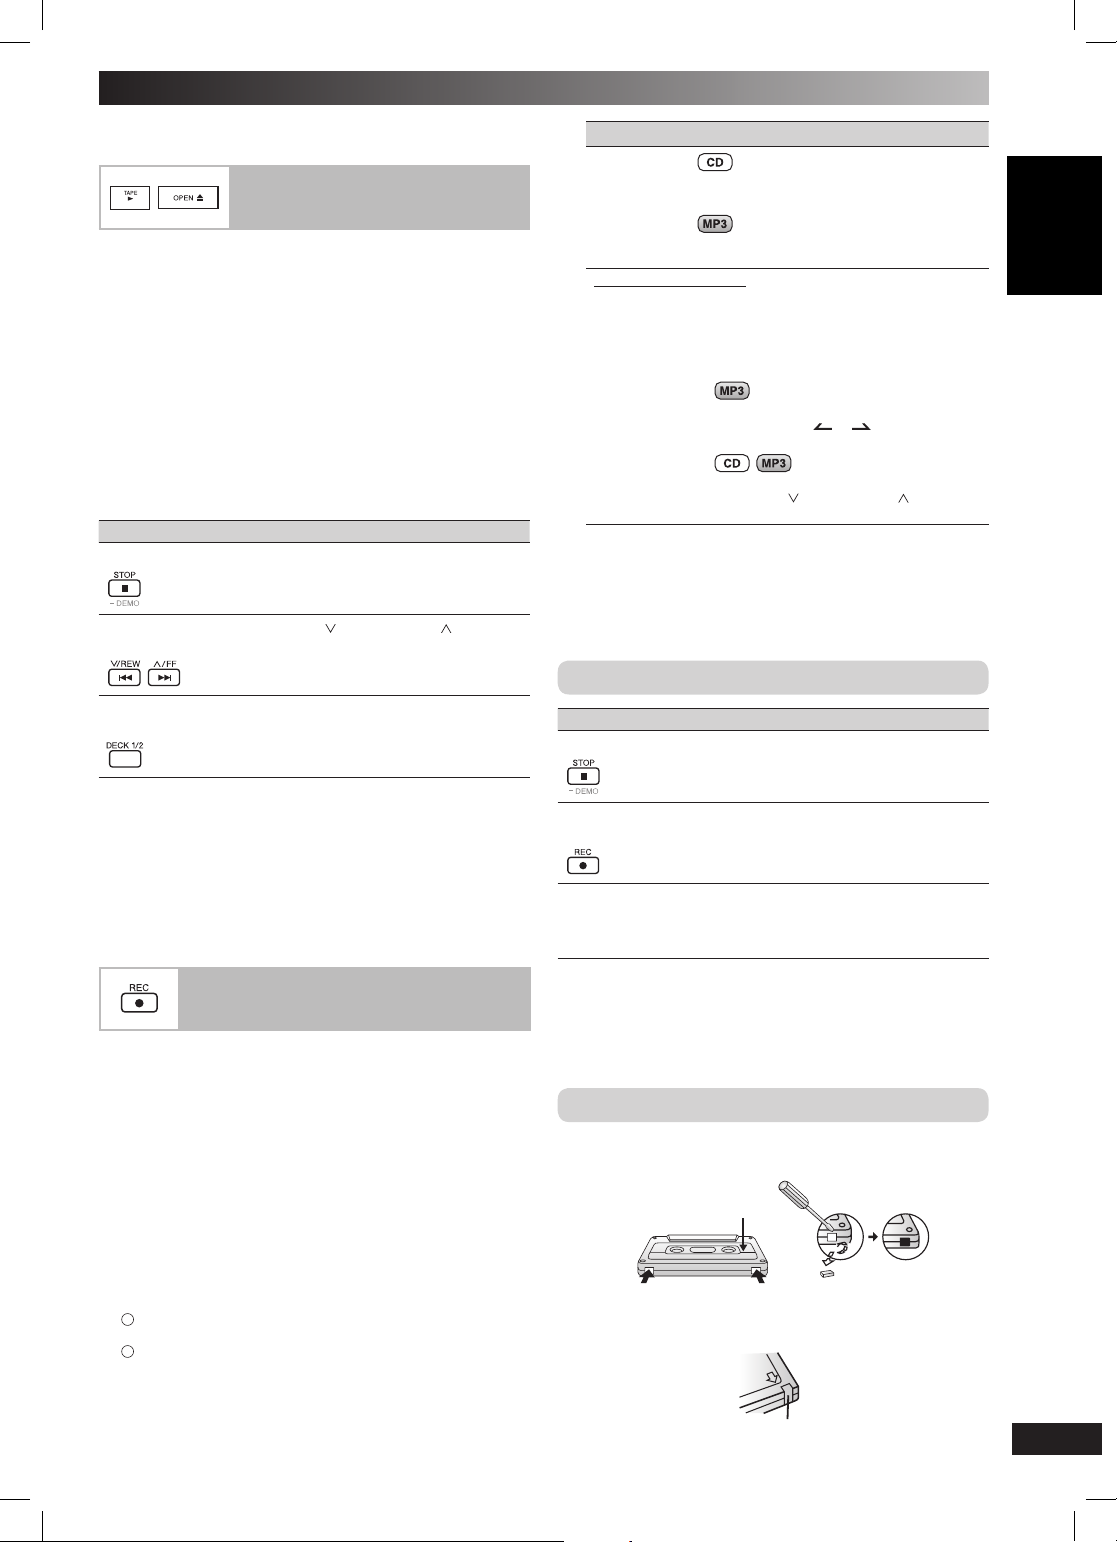
Erasure prevention
The illustration shows how to remove the tabs to prevent recording.
To record on the tape again, cover as shown.
Side A
Tab for side ATab for side B
To re-record
Normal cassette
FRANÇAIS
LANG - 4
LANG - 5
Adhesive tape
RQTX0169
11
RQT8043
RQTX0169-P.indd 11RQTX0169-P.indd 11 7/18/08 9:24:56 AM7/18/08 9:24:56 AM
Page 12
LANG - 5
LANG - 4
FRANÇAIS
DANSK
ENGLISH
FM/AM radio
Manual tuning
Memory preset
Manual tuning
1 Press [TUNER / BAND] to select “FM” or “AM”.
2 Press [PLAY MODE] to select “MANUAL”.
ENGLISH
3 Press [ 4 , / REW] o r [¢ , / FF ] to select the frequency
of the required station.
ST
” is displayed when a stereo FM broadcast is being received.
“
To tune automatically
Press and hold [4,
starts changing rapidly. The unit begins auto tuning, stopping when it
fi nds a station.
• Auto tuning may be interrupted when there is excessive interference.
• To cancel auto tuning, press [4,
[¢, / FF ] once again.
DANSK
FRANÇAIS
To improve the sound quality
Press and hold [PLAY MODE] to display “MONO”.
To cancel
Press and hold [PLAY MODE] again until “MONO” disappears.
• MONO is also canceled if the frequency is changed.
• Turn off “MONO” for normal listening.
FM allocation setting
By main unit only
This system can also receive FM broadcasts allocated in 0.1 MHz
steps.
To change the step to 0.1 MHz
1 Press and hold [TUNER /BAND].
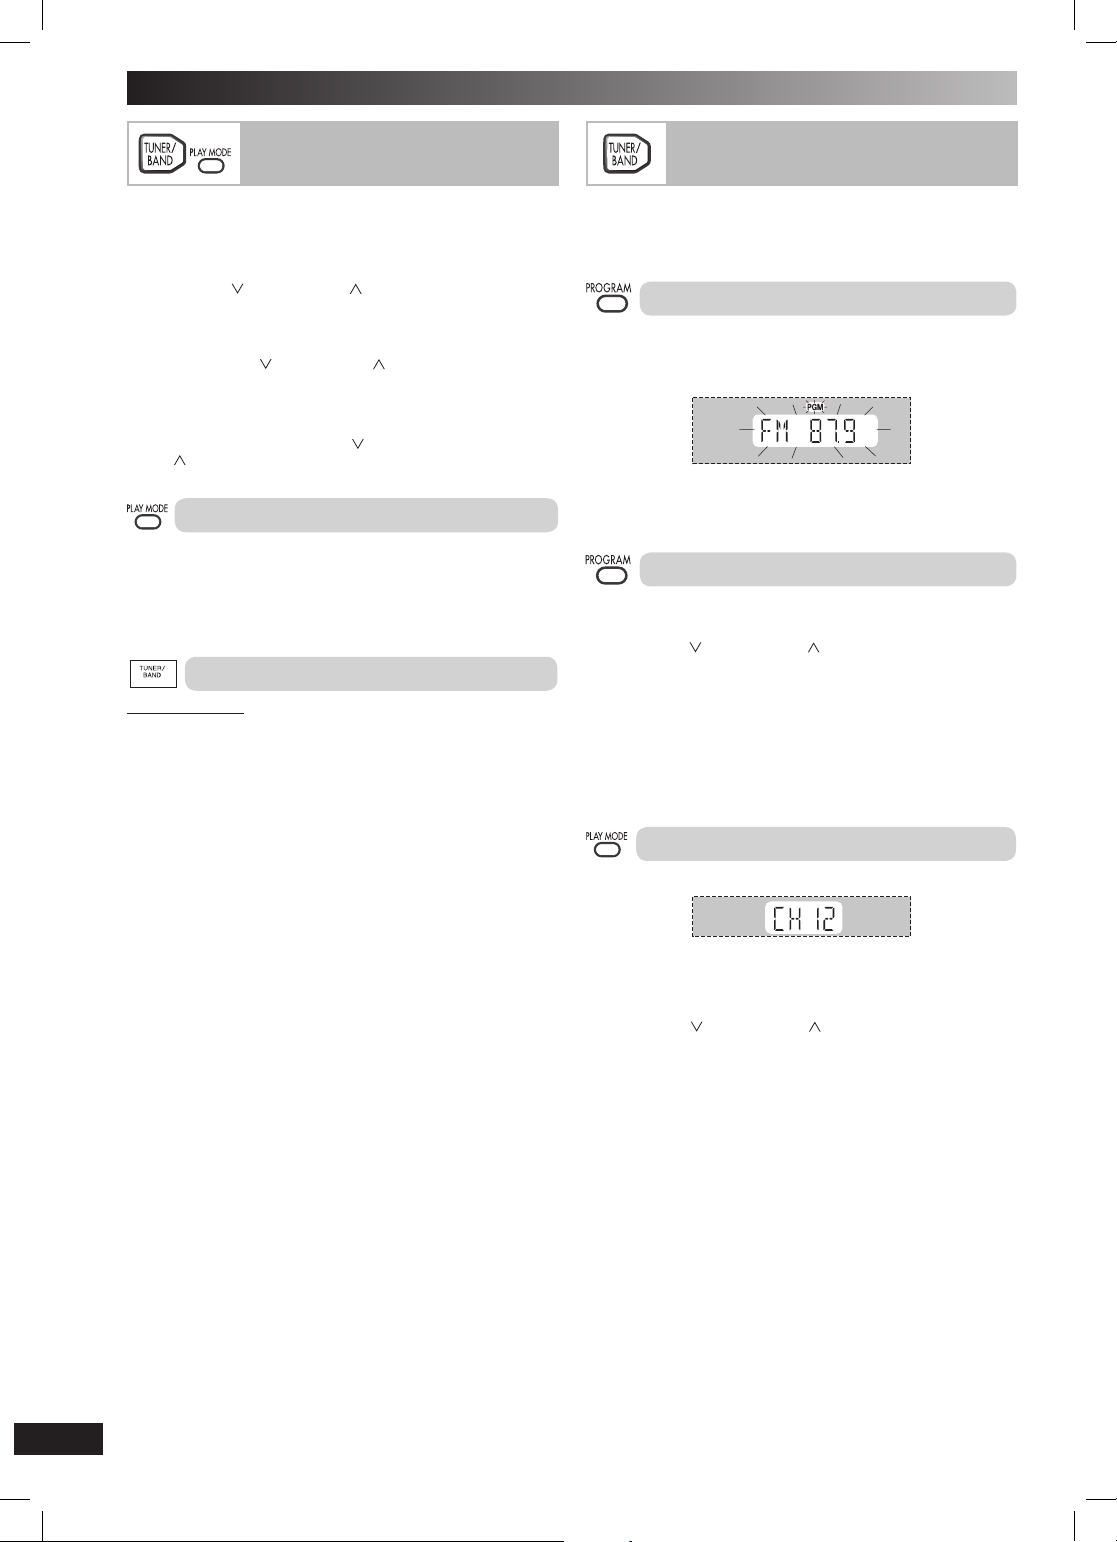
After a few seconds the display changes to a fl ashing display of
the current minimum frequency.
/ REW ] or [¢, / FF ] until the frequency
/ REW ] or
2 Continue to hold down [TUNER/BAND].
• When the minimum frequency changes, release the button. To
return to the original step, repeat the above steps.
• After changing the setting, previously preset frequency will be
cleared.
Memory preset
20 FM and 15 AM stations can be preset.
Preparation
Press [TUNER / BAND] to select “FM” or “AM”.
Automatic presetting
1 Tune to the frequency where presetting is to begin.
2
Press and hold [PROGRAM] to start presetting.
The tuner presets all the stations it can receive into the channels in
ascending order. When fi nished, the last station memorized is tuned
in.
Manual presetting
1 Press [PLAY MODE] to select “MANUAL”.
2 Press
[4 , / REW ] or [ ¢, / FF]
station.
to tune to the required
3 Press [PROGRAM].
4 Press the numeric buttons to select a channel.
h
For channels 10 to 20 press [
The station occupying a channel is erased if another station is
preset to that channel.
Selecting a preset station
Press the numeric buttons to select the channel.
OR
10], then the two digits.
1 Press [PLAY MODE] to select “PRESET”.
LANG - 4
LANG - 5
RQTX0169
2 Press
[4 , / REW ] or [ ¢, / FF] to select the channel.
12
RQT8043
RQTX0169-P.indd 12RQTX0169-P.indd 12 7/18/08 9:24:59 AM7/18/08 9:24:59 AM
Page 13
LANG - 5
LANG - 4
FRANÇAIS
DANSK
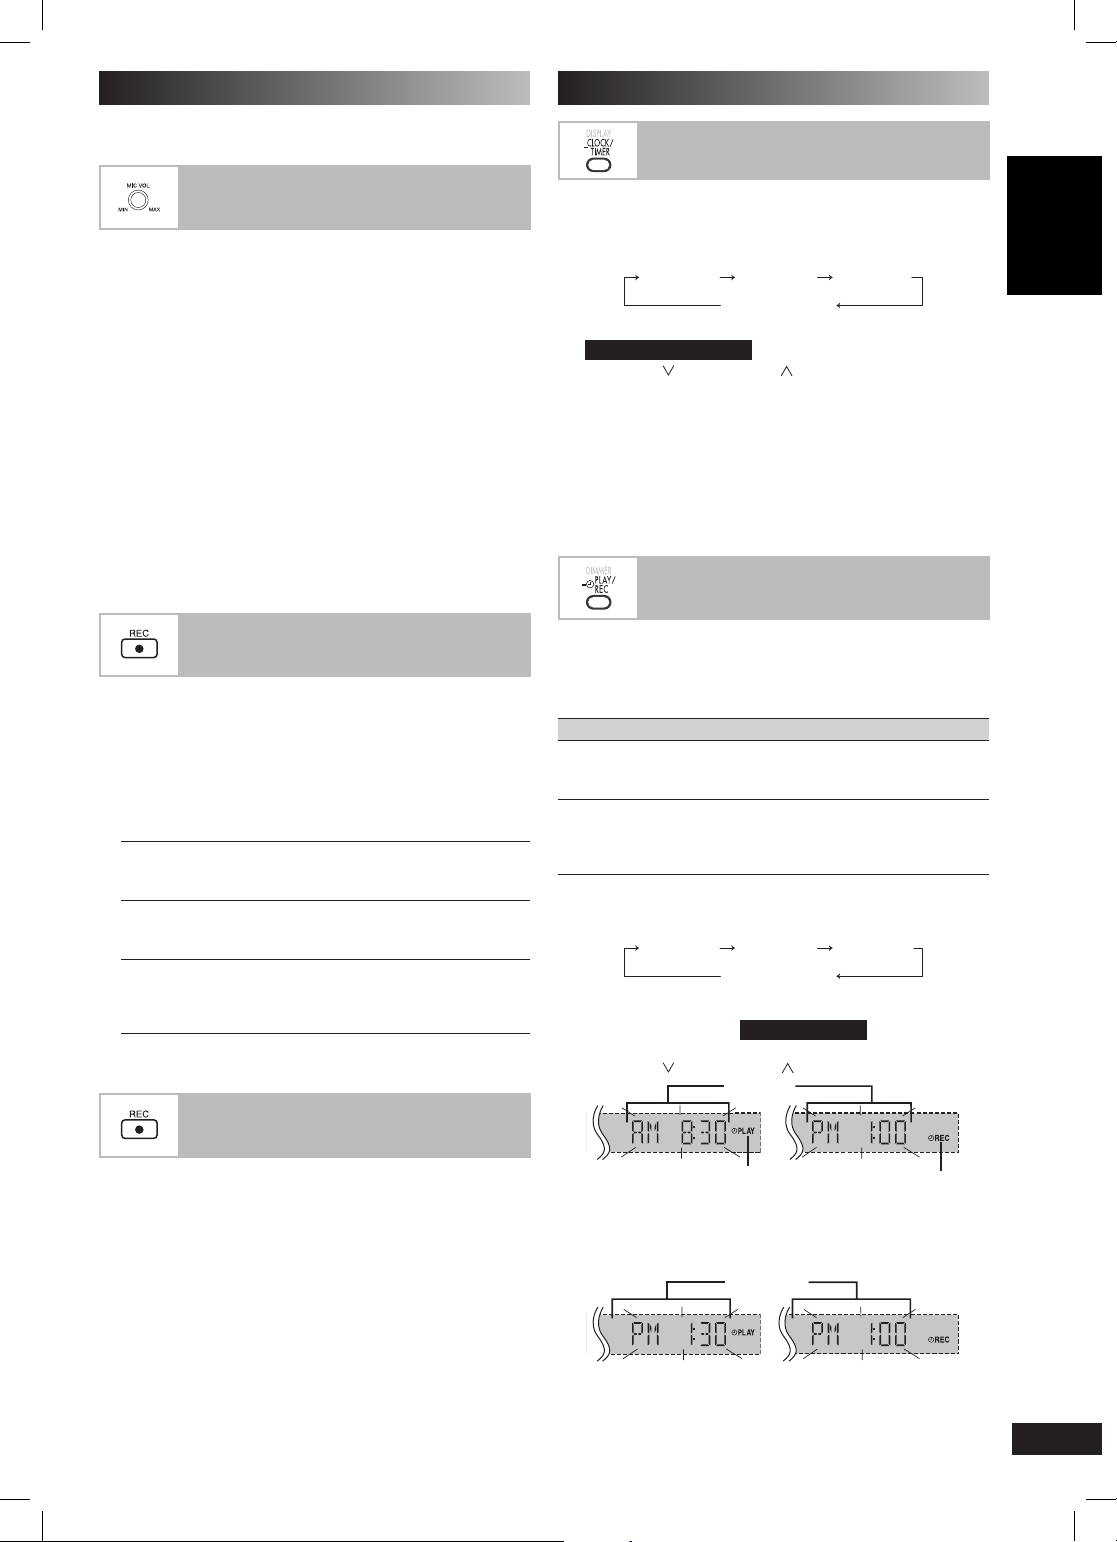
Enjoying the microphone mixing
Record microphone mixing
To record your voice
Microphone mixing
Setting the clock
Using the play or record timer
The buttons described for “Microphone mixing” are mainly for
the main unit unless indicated otherwise.
Enjoying the microphone mixing
You can enjoy microphone mixing from various music sources (cassette, disc, radio or other external equipments).
1 Firstly, lower the volume with [MIC VOL, MIN], connect the
microphone.
Plug type : Ø 3.5 mm (1/8˝) monaural
2 Start playing the music source.
3
Adjust the volume with [VOLUME − ] or [VOLUME + ] and
[MIC VOL, MIN] or [MIC VOL, MAX] and sing along.
Note:
• If a strange noise (howling) is emitted during use, move the
microphone away from the speakers, or turn down the microphone
volume.
• When you are not using the microphone, disconnect it from the
microphone jack, and turn down the microphone volume level to
“MIN”.
• Sound adjustments can be made using microphone mixing but
recording will not be affected.
Record microphone mixing
1 Press [0, OPEN] and insert the cassette to be recorded.
Insert with the side to be recorded facing towards you and the
exposed tape facing down.
2 Lower the volume with [MIC VOL, MIN], then connect the
microphone.
3 Select the music source:
When singing
along with
discs
When singing
along with
radio
When singing
along from
other external
equipments
Insert the desired disc (
Select your desired station (
Connect and prepare the external equipment
\ page 15).
(
\ page 8).
\ page 12).
4 Press [¶, REC] and start microphone mixing.
Timer
Setting the clock
This is a 12-hour clock.
1 Press and hold [
Each time you press and hold the button:
2 (
Within 8 seconds or so
–
CLOCK / TIMER] to select “CLOCK”.
CLOCK
˚ PLAY
Original display
)
˚ REC
Press [4, / REW ] or [ ¢, / FF] to set the time.
3 Press and hold [
Displaying the clock
Press and hold [– CLOCK / TIMER] once when the unit is on or in
standby mode.
The time is displayed for a few seconds.
Note:
Reset the clock regularly to maintain accuracy.
You can set the timer to come on at a certain time to wake you up
(play timer) or to record from the radio or the external equipment
(record timer).
Play timer and record timer cannot be used together.
Turn the unit on and set the clock.
Timer Action
Play timer Prepare the music source you want to listen to;
Record
timer
–
CLOCK / TIMER] to finish setting the time.
Using the play or record timer
cassette, disc number (1 ~ 5), radio or other external
equipments, and set the volume.
Check the cassette’s erasure prevention tabs
\ page 11), insert the cassette and tune to the
(
radio station (
equipment (
\ page 12) or select the external
\ page 15).
1 Press and hold [ – CLOCK /TIMER] to select the timer function.
Every time you press and hold the button:
CLOCK
˚PLAY : to set the play timer
˚REC : to set the record timer
(Proceed to the next step
2 Press [4, / REW ] or [ ¢ , / FF] to set the starting time.
˚ PLAY
Original display
within 8 seconds
Start time
˚ REC
)
DANSK ENGLISH
FRANÇAIS
LANG - 4
To record your voice
1 Press [0, OPEN] for DECK 2 and insert the cassette to be
recorded.
Play timer indicator
3 Press and hold [
–
CLOCK / TIMER] to confirm.
Record timer indicator
2 Lower the volume with [MIC VOL, MIN], then connect the
microphone.
3 Press [¶, REC] to start recording.
4 Repeat steps 2 to 3 to set the fi nishing time.
Finish time
LANG - 5
4 Speak through the microphone and adjust the volume with
[VOLUME − ] or [VOLUME + ]
[MIC VOL, MAX].
RQTX0169-P.indd 13RQTX0169-P.indd 13 7/18/08 9:25:00 AM7/18/08 9:25:00 AM
and [MIC VOL, MIN] or
(Continued on next page)
RQTX0169
13
RQT8043
Page 14
LANG - 5
LANG - 4
FRANÇAIS
DANSK
ENGLISH
Timer (continued)
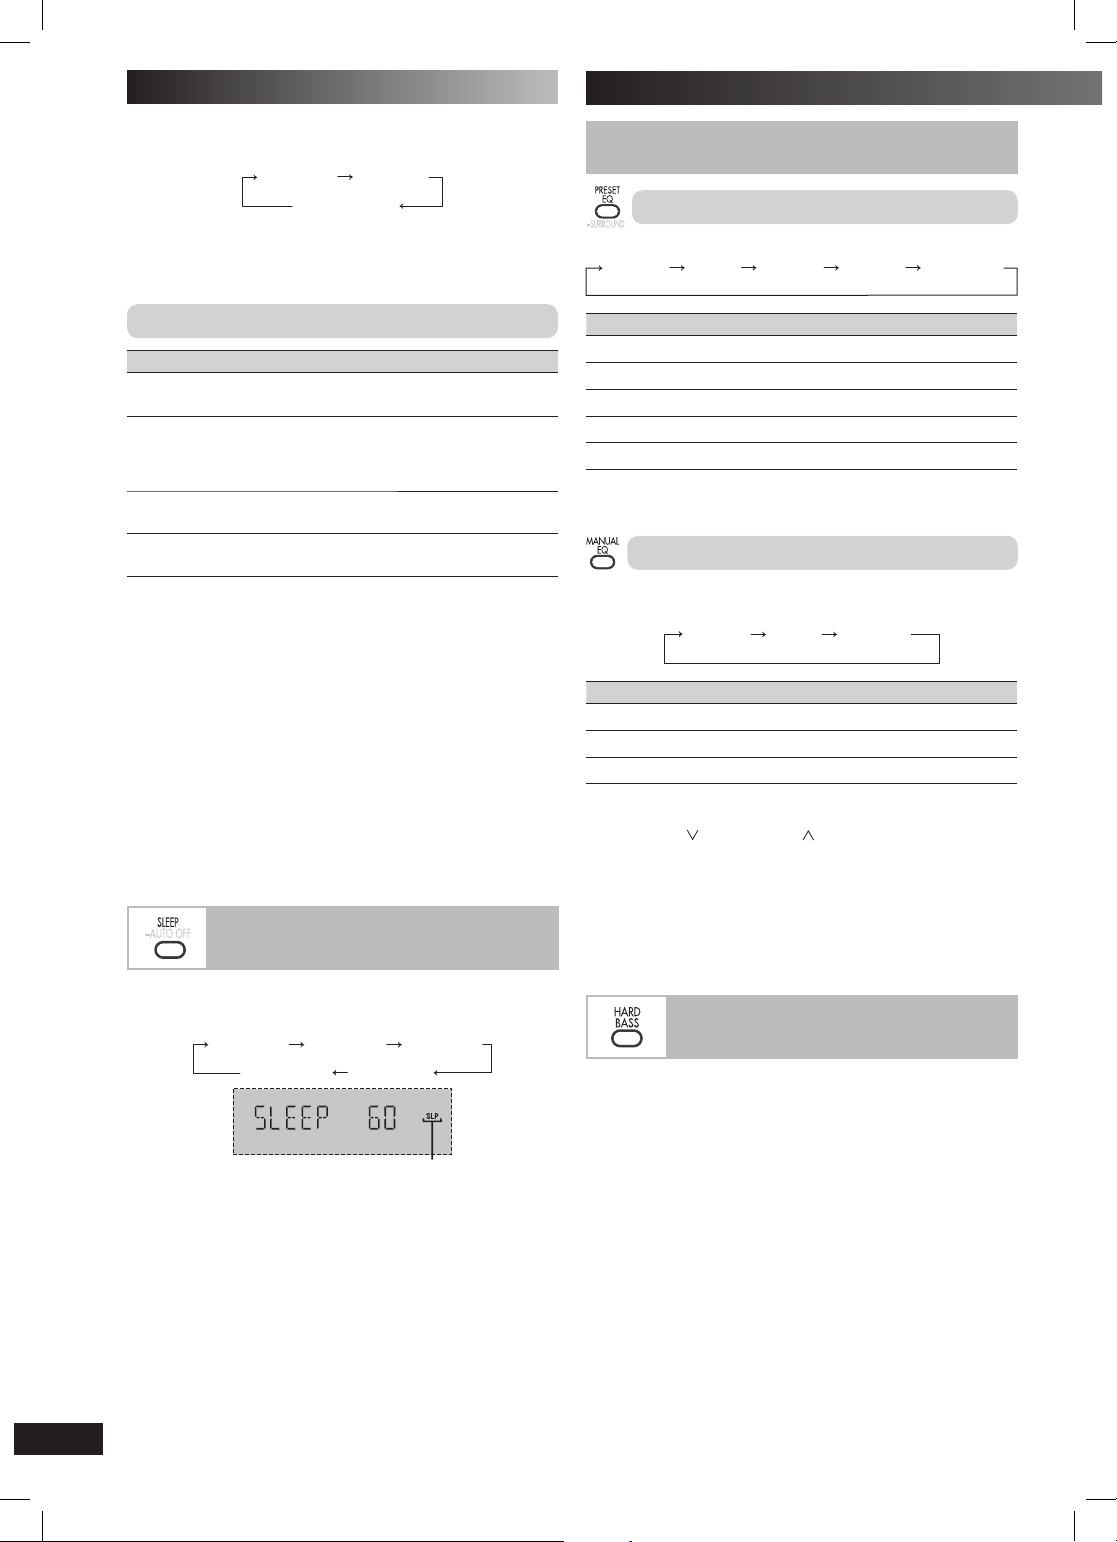
Using the sleep timer
Selecting sound effects
Enhancing the bass sound
To activate the timer
5
Press and hold [– ˚ PLAY/REC] to turn on your desired timer.
˚ PLAY
no display (off)
˚ REC
Sound adjustment
Selecting sound effects
Preset EQ
6 Press [y] to turn off the unit.
ENGLISH
The unit must be off for the timers to operate.
Other basic operations
To Action
change the
settings
change the
source or
volume
check the set-
DANSK
tings
cancel Press and hold [– ˚PLAY/REC] to clear the timer
If you use the unit after the timers are set
After using, check that the correct tape/disc are loaded before turning
the unit off.
Note:
• The play timer will start at the preset time with volume increasing
gradually to preset level.
• The record timer will start 30 seconds before the set time with the
volume muted.
• The timer comes on at the set time everyday if the timer is on.
• The unit must be in the standby mode for the timer to function.
• If you turn the unit off and on again while a timer is functioning, the
FRANÇAIS
fi nish time setting will not be activated.
• If MUSIC PORT is selected as the source when the timer comes
on, the system turns on and engages MUSIC PORT as the source.
If you wish to playback or record from the portable audio equipment, just activate the equipment’s play mode and increase the
volume. (See the portable audio equipment’s instruction manual.)
This function enables you to turn off the unit automatically after the
set time.
Press [SLEEP] to select your desired time.
LANG - 4
To cancel
Press [SLEEP] to select “SLEEP OFF”.
Changing the remaining time
Press [SLEEP] to show the remaining time and press [SLEEP] again
to select your desired time.
LANG - 5
Note:
• The play and sleep timer or the record and sleep timer can be used
together.
• The sleep timer always has priority. Be sure not to overlap timer settings.
• The sleep timer turns off when you perform the record function.
RQTX0169
Repeat steps 1 to 4 and 6 (\ see page 13 and
above).
1) Press and hold [– ˚PLAY/REC] to clear the
timer indicator from the display.
2) Make changes to the source or volume.
3) Perform steps 5 to 6 (
Press and hold [– CLOCK/TIMER] repeatedly to
select ˚PLAY or ˚REC.
indicators from the display.
Using the sleep timer
SLEEP 30 SLEEP 60
SLEEP OFF
Sleep timer indicator
\ see above).
SLEEP 90
SLEEP 120
Press [PRESET EQ] repeatedly to select your desired setting.
HEAVY
Setting Effect
HEAVY Adds punch to rock
SOFT For background music
CLEAR Clarifi es higher frequencies
VOCAL Adds gloss to vocal
FLAT No effect
SOFT CLEAR VOCAL FLAT (off)
Manual EQ
1 Press [MANUAL EQ] repeatedly to select your desired
setting.
BASS MID
Setting Effect
BASS For lower pitch sound
MID For middle pitch sound
TREBLE For higher pitch sound
TREBLE
2 Press [4, / REW ] or [¢, / FF] to adjust the level.
OR
Press [+] or [–] on the main unit to adjust the level.
Note:
• The level of the pitch is between -3 to +3.
• The changes you make are stored and automatically recalled the
next time you select “MANUAL EQ”.
Enhancing the bass sound
You can enhance low-frequency sound so that heavy bass sound can
be heard clearly, even if the acoustics of your room are not optimal.
To activate
Press [HARD BASS].
To cancel
Press [HARD BASS] again.
Note:
The actual effect depends on the disc.
14
RQT8043
RQTX0169-P.indd 14RQTX0169-P.indd 14 7/18/08 9:25:01 AM7/18/08 9:25:01 AM
Page 15
LANG - 5
LANG - 4
FRANÇAIS
DANSK
Connecting to a portable audio equipment
Playing or recording from a
portable audio equipment
Connecting to other external unit
Playing or recording from an
external unit
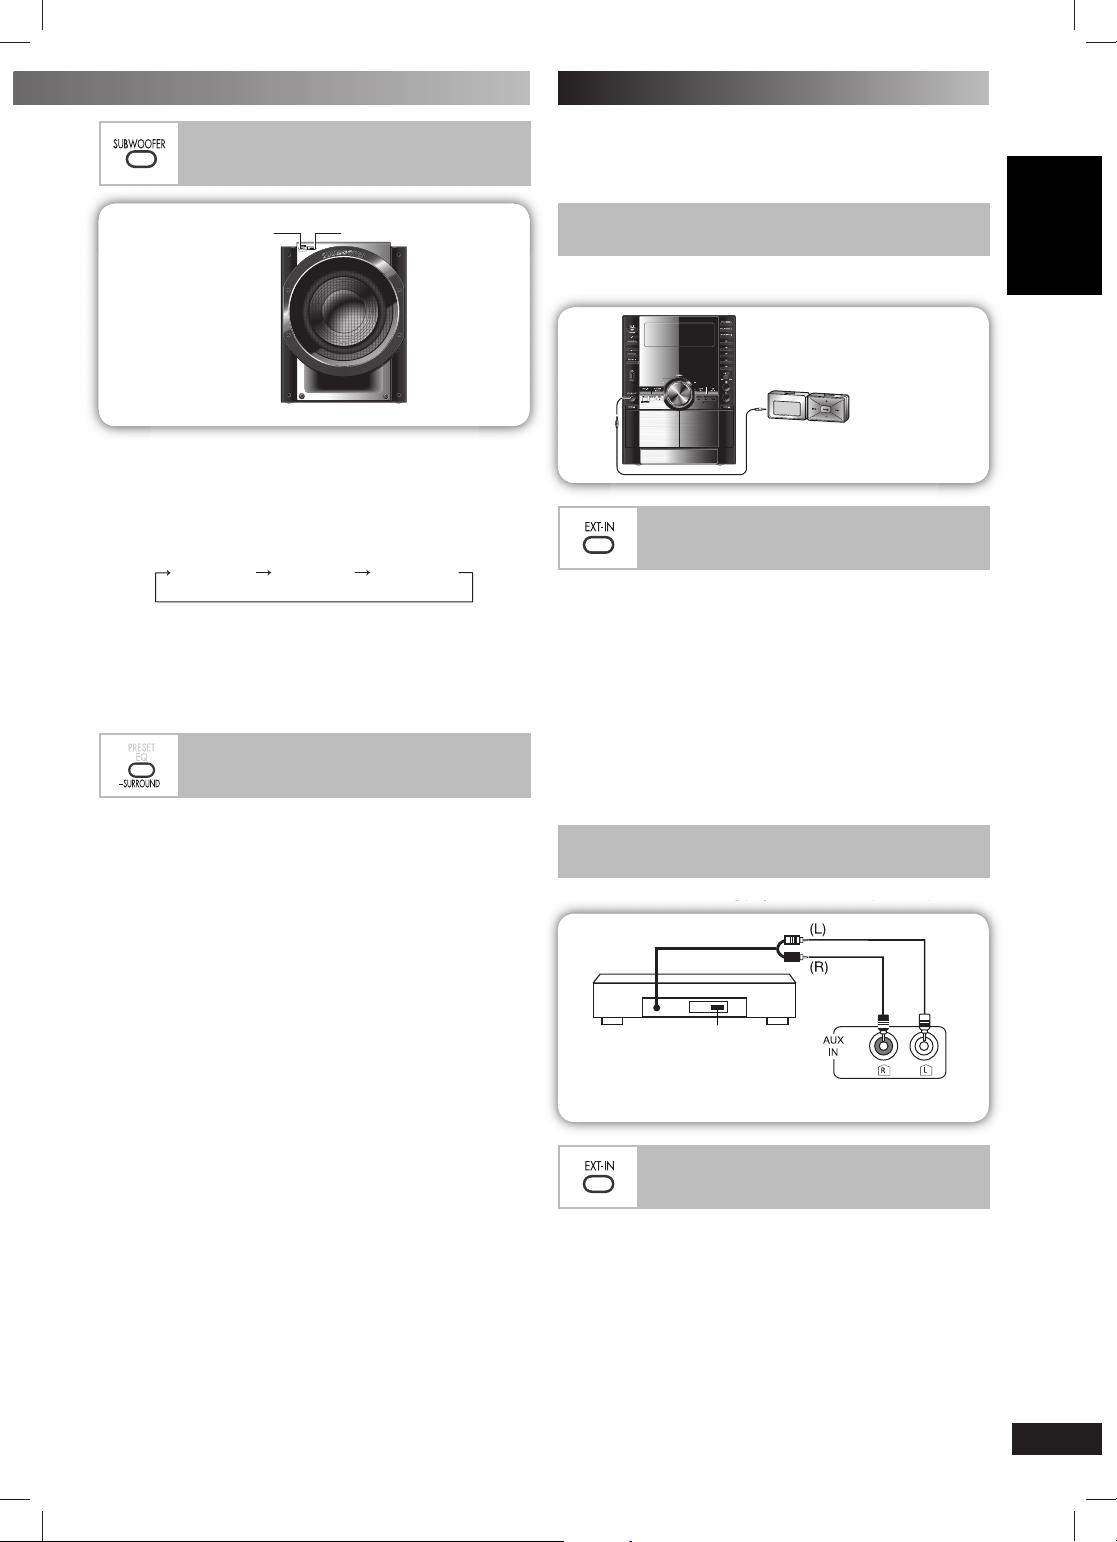
Boosting the subwoofer
Boosting the subwoofer
Enjoying surround sound
External unit
Preparation
All peripheral components and cables are sold separately.
•
• Turn off all equipment and read the appropriate operating instructions.
LEVELON/OFF
1 Press [ON/OFF] on the subwoofer (remote control:
[SUBWOOFER]) to activate the subwoofer function.
2 Press [LEVEL] on the subwoofer to select your desired
setting.
Each time you press the button:
SUB W MIN SUB W MID SUB W MAX
To turn off the subwoofer function
Press [ON/OFF] on the subwoofer (remote control: [SUBWOOFER]) to select “SUB W OFF”.
Note:
This function is not applicable when a headphone is connected.
Enjoying surround sound
Enable you to add natural width and depth to the stereo sound.
To activate
Press and hold [−SURROUND] to select “SURROUND ON”.
To cancel
Press and hold [−SURROUND] again to select “SURROUND
OFF”.
Note:
• Surround sound is less discernible when listening through headphones.
• If interference in FM stereo reception increases, cancel the surround sound effect.
Connecting to a portable audio equipment
This feature enables you to enjoy music from a portable audio equipment.
Portable audio equipment
(not included)
Audio cord
(not included)
Playing or recording from a
portable audio equipment
Switch off the equalizer function (if there is any) of the portable audio
equipment before you plug into the MUSIC PORT jack. Otherwise,
sound from the speaker may be distorted.
1 Plug the audio cord into the MUSIC PORT jack.
2 Press [EXT-IN] repeatedly until “MUSIC PORT” is displayed.
3 For listening : Proceed to step 4.
For recording : Press [¶, REC] on the main unit to start
recording.
4 Play the portable audio equipment.
Connecting to other external unit
You can connect to an analog player with a built-in phone equalizer.
“LINE OUT”
position
Analog player
(not included)
Rear panel of this unit
DANSK ENGLISH
FRANÇAIS
LANG - 4
Playing or recording from an
external unit
1 Press [EXT-IN] repeatedly until “AUX” is displayed.
2 For listening : Proceed to step 3.
For recording : Press [¶, REC] on the main unit to start
recording.
LANG - 5
3 Start playback from the external source.
Note:
• When units other than those described above are to be connected,
please consult your audio dealer.
• Sound distortion may occur when you use an adaptor other than
the one supplied.
RQTX0169-P.indd 15RQTX0169-P.indd 15 7/18/08 9:25:02 AM7/18/08 9:25:02 AM
RQTX0169
15
RQT8043
Page 16
LANG - 5
LANG - 4
FRANÇAIS
DANSK
ENGLISH
External unit (continued)
Recording from a USB mass
storage class device
Avoid interfering with other Panasonic
equipment
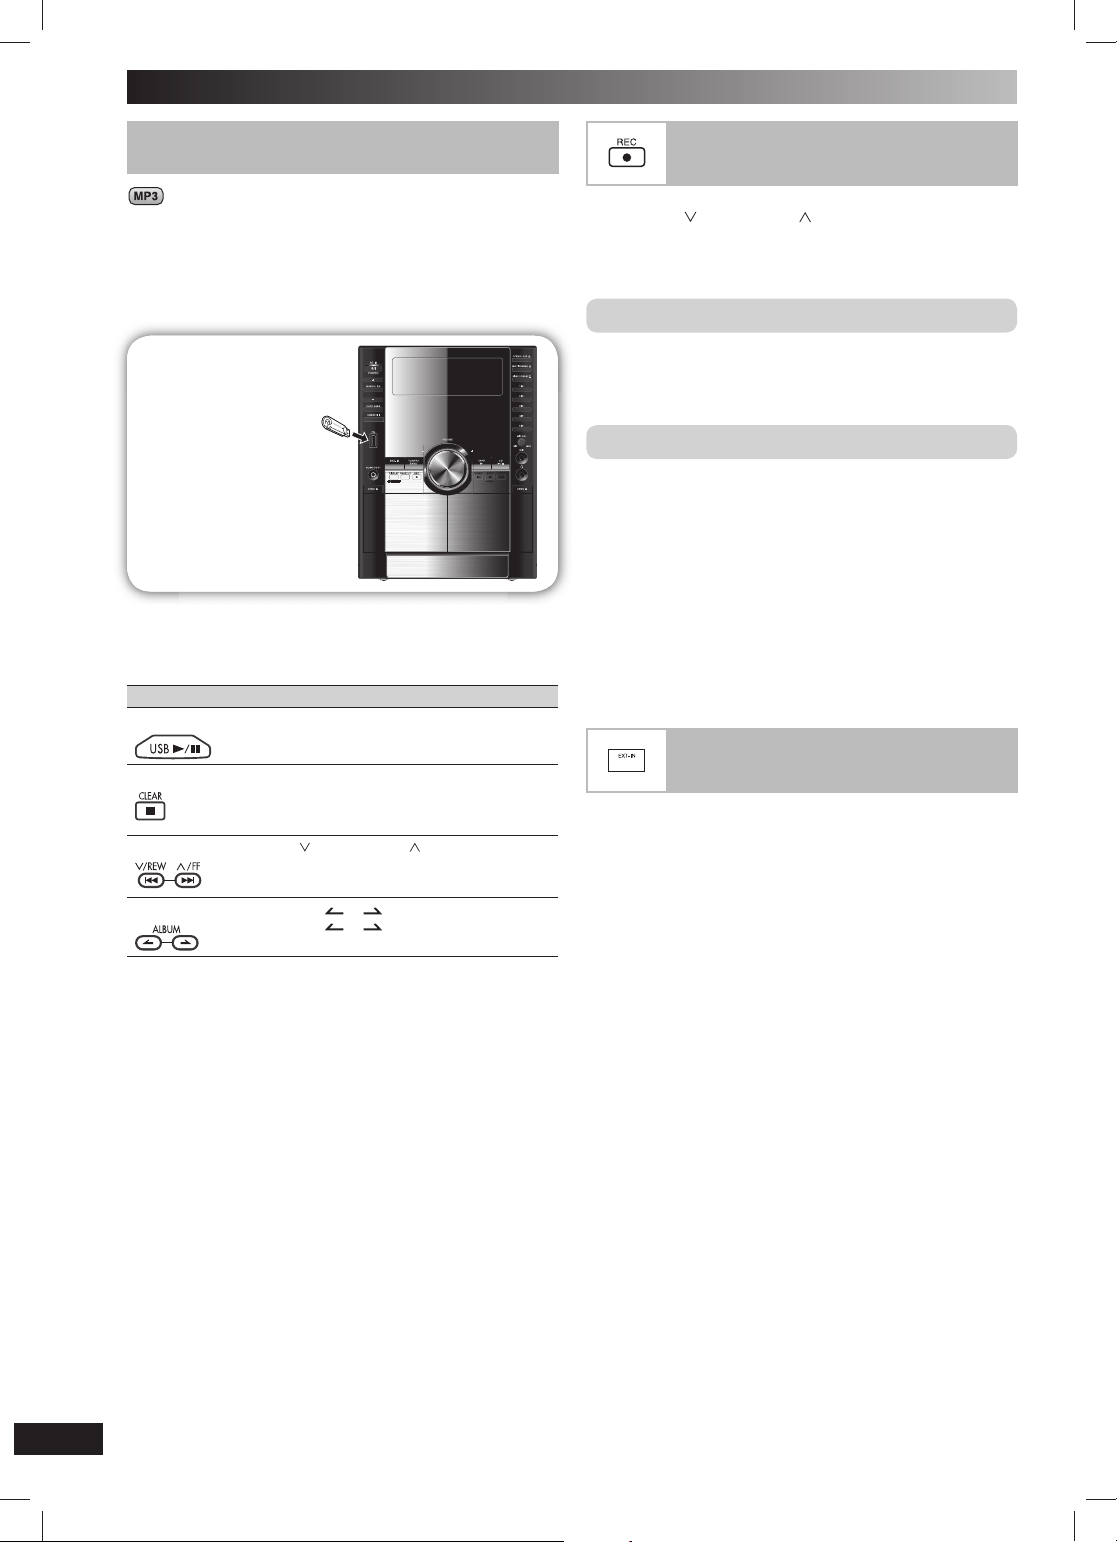
Connecting and playing a USB mass storage
class device
Connecting and playing a USB mass storage
class device
The USB connectivity enables you to connect and play MP3 tracks
from USB mass storage class. Typically, USB memory devices. (Bulk
only transfer)
ENGLISH
Preparation
Before connecting any USB mass storage device to the unit, ensure
that the data stored therein has been backed up.
USB enabled device
(not included)
It is not recommended
to use a USB extension
cable. The device
connected via the cable
will not be recognised by
DANSK
this unit.
1 Reduce the volume and connect the USB mass storage
device.
2 Press [ 6 , USB] to start play.
To Action
pause play
stop play
FRANÇAIS
skip tracks
skip album
Press [6, USB].
Press again to resume play.
Press [7, CLEAR].
“RESUME” is displayed. The position is memorized.
Press [6, USB] to resume.
Press [7, CLEAR] again to clear the position.
Press [4, / REW] or [¢, / FF].
Press [ALBUM ( or )] in the play mode.
Press [ALBUM (
the numeric buttons in the stop mode.
or )] once and then
Recording from a USB mass
storage class device
1
Press
[4, / REW ]
for recording.
or
[¢, / FF]
to select the desired track
2 Press [¶, REC] on the main unit to start recording.
Compatible devices
Devices which are defi ned as USB mass storage class:
• USB devices that support bulk only transfer.
• USB devices that support USB 2.0 full speed.
Supported format
Files must have the extension “.mp3” or “.MP3”.
Note:
• CBI (Control/Bulk/Interrupt) is not supported.
• A device using NTFS fi le system is not supported [Only FAT
12/16/32 (File Allocation Table 12/16/32) fi le system is supported].
• Depending on the sector size, some fi les may not work.
• This unit can access up to 255 albums (including blank folders) and
2500 tracks.
• The maximum number of tracks in a folder are 999 tracks.
• Only one memory card will be selected when connecting a multiport
USB card reader. Typically the fi rst memory card inserted.
• Disconnect the USB card reader from the unit when you remove the
memory card. Failure to do so may cause malfunction to the device.
• Compatible audio device will be charged when in USB mode.
Avoid interfering with other Panasonic
equipment
Other Panasonic audio or video equipment may start functioning
when you operate the unit using the supplied remote control.
You can operate this unit in another mode by setting the remote
control operating mode to “REMOTE 2”.
The main unit and remote control must be set to the same mode.
1 Press and hold [EXT-IN] on the main unit. Then press [2]
on the remote control until “REMOTE 2” is displayed.
For other operating functions, they are similar as those described in
“Discs” (\ page 8 ~ 10).
LANG - 4
LANG - 5
RQTX0169
2 Press and hold [ENTER] on the remote control followed by
numeric button [2].
To change the mode back to “REMOTE 1”, repeat the steps above by
replacing [2] with [1].
16
RQT8043
RQTX0169-P.indd 16RQTX0169-P.indd 16 7/18/08 9:25:08 AM7/18/08 9:25:08 AM
Page 17
LANG - 5
LANG - 4
FRANÇAIS
DANSK
Troubleshooting guide
Common problems
Listening to the radio
When there is a television set nearby
Using the cassette deck
Playing discs
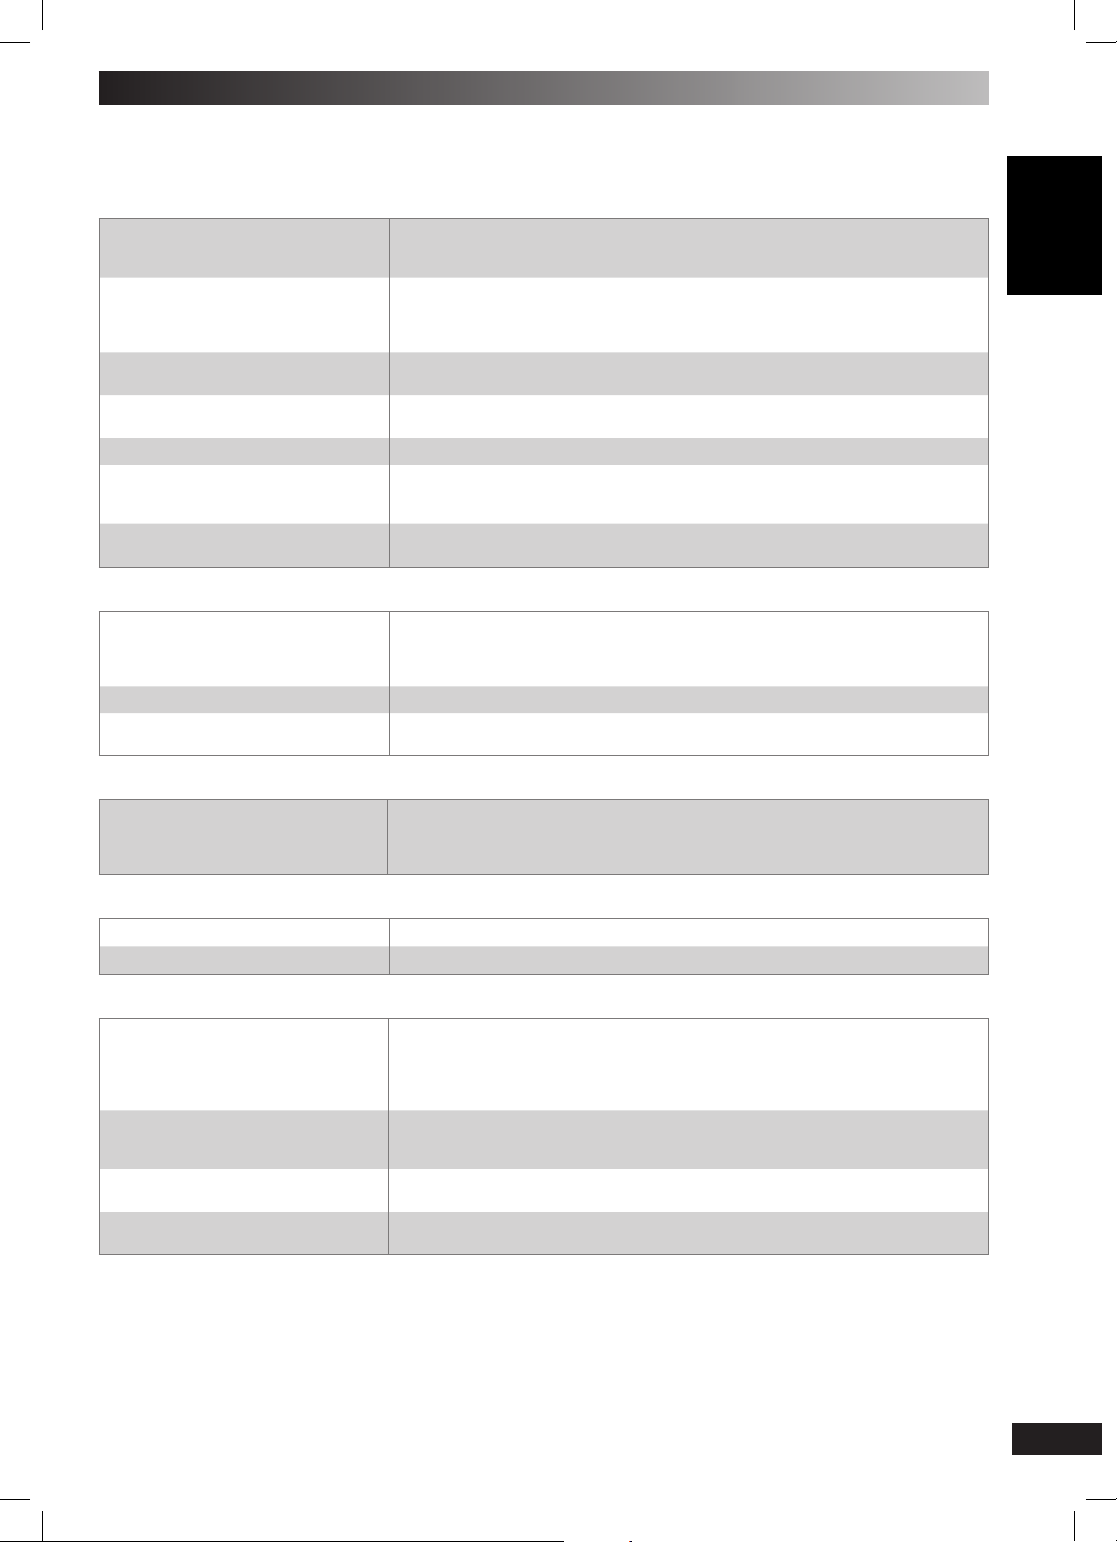
Before requesting service, make the following checks. If you can’t fi x the system as described below, or if something not listed here
occurs, refer to the enclosed directory to locate an Authorized Service Center convenient to you or contact your dealer.
Reference pages are shown as black circled numbers 4.
Common problems
Although the unit is in standby mode,
the display lights up and changes continuously.
No sound.
Sound stops.
Sound is unfi xed, reversed or comes
from one speaker only.
Humming heard during play.
“ERROR” is displayed.
“– –:– –” appears on the display at
standby mode.
“F61” is displayed.
Listening to the radio
Noise is heard.
The stereo indicator fl ickers or doesn’t
light.
Sound is distorted.
A beat sound is heard.
A low hum is heard during AM broadcast.
Turn off the demo function. 6
If you set the clock, demo function will be turned off automatically. $
Turn the volume up.
Switch off the unit, determine and correct the cause, then switch the unit on. Causes include
straining of the speakers through excessive volume or power and using the unit in a hot
environment.
Check the speaker connections. 4 5
An AC power supply cord or fl uorescent light is near the cables. Keep other appliances and
cords away from this unit’s cables.
Incorrect operation performed. Read the instructions and try again.
You plugged the AC power supply cord in for the fi rst time or there was a power failure
recently.
Set the time. $
Check and correct the speaker cords connection. 4 5
If this does not fi x the problem, there is a power supply problem. Consult the dealer.
Use an outdoor antenna. 6
Turn the TV off or separate it from the unit.
Separate the antenna from other cables and cords.
DANSK ENGLISH
When there is a television set nearby
The picture on the TV disappears or
stripes appear on the screen.
Using the cassette deck
Poor sound quality.
Recording is not possible.
Playing discs
The display is wrong or play won’t start.
The total number of tracks displayed differs each time the same disc is inserted.
Unusual sound is heard.
CD-RW cannot be read.
“VBR–” is displayed instead of the
remaining play time.
The location and orientation of the antenna are incorrect. If you are using an indoor antenna,
change to an outdoor antenna.
The TV antenna wire is too close to the unit. Separate the antenna wire of the TV set from the
unit.
Clean the heads. ~
If the erasure prevention tabs have been removed, cover the holes with adhesive tape. "
The disc may be upside down. 4
Wipe the disc.
Replace the disc if it is scratched, warped, or non-standard.
Condensation may have formed inside the unit due to a sudden change in temperature. Wait
for about an hour for it to clear and try again.
The disc may be scratched, or its data may be defective. Replace the disc.
The disc was incompletely formatted. Use the recording equipment to fully format the disc
before recording.
The unit cannot display the remaining play time for variable bit rate (VBR) tracks.
FRANÇAIS
LANG - 4
LANG - 5
RQTX0169
17
RQT8043
RQTX0169-P.indd 17RQTX0169-P.indd 17 7/18/08 9:25:12 AM7/18/08 9:25:12 AM
Page 18
LANG - 5
LANG - 4
FRANÇAIS
DANSK
ENGLISH
Troubleshooting guide (continued)
Disc trays
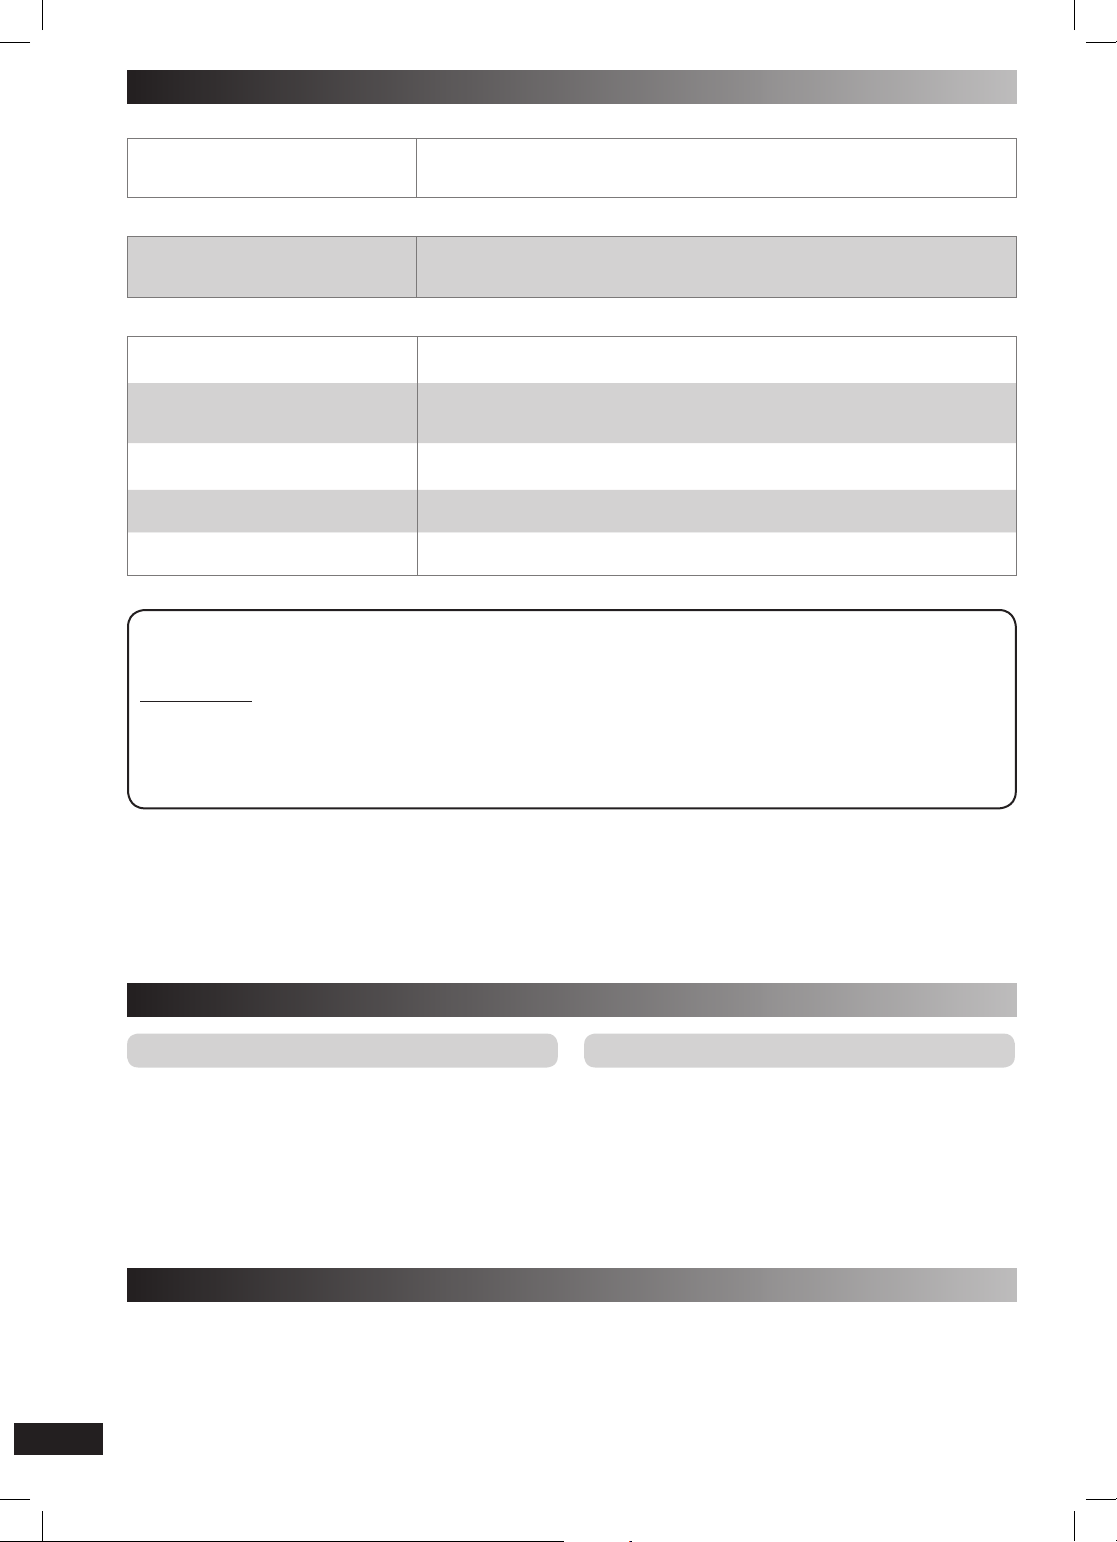
Disc tray(s) cannot open.
“CHGR ERR ” is displayed.
Remote control
Remote control doesn’t work.
ENGLISH
USB
No response when [¶, REC] button is
pressed.
The USB drive or its contents cannot be
read.
Slow operation of the USB fl ash drive.
Press [y/I, POWER] to release the jammed tray(s) as the unit will switch off. Switch it on again
and the tray(s) will initialize to the previous tray(s) condition.
If this still does not fi x the problem, please consult the dealer.
Check that the batteries are inserted correctly. 6
Replace the batteries if they are worn.
Change the remote control mode to match the main unit mode. (
Disconnect the USB device and then reconnect it back. Alternatively, turn the unit off and then
back on.
The USB drive format or its contents is/are not campatible with the system. (
The USB host function of this product may not work with some USB devices.
USB devices with storage capacity of more than 8 gigabytes may not work in some instances.
Large fi le size or high memory USB fl ash drive takes longer time to read.
“USB OVER CURRENT ERROR”
DANSK
“NO PLAY”
Memory reset (Initialization)
When the following situations occur, refer to the instructions below to reset the memory:
• There is no response when buttons are pressed.
• You want to clear and reset the memory contents.
To reset memory
1 Disconnect the AC power supply cord. (Wait at least 3 minutes before proceeding to step 2)
2 While pressing and holding down [y/I, POWER] on the main unit, reconnect the AC power supply cord.
“– – – – – – – – –” appears on the display.
3 Release [y/I, POWER].
All the settings are returned to the factory preset.
FRANÇAIS
You will need to reset the memory items.
Maintenance
LANG - 4
If the surfaces are dirty
To clean this unit, wipe with a soft, dry cloth.
• Never use alcohol, paint thinner or benzine to clean this unit.
• Before using chemically treated cloth, read the instructions that
came with the cloth carefully.
The USB mass storage device rating exceeds 500mA. Disconnect the USB device. Turn the
unit off and then back on.
Check the content.
Only MP3 format fi les can be played.
For a cleaner crisper sound (cassette deck)
Clean the heads regularly to assure good quality playback and
recording. Use a cleaning tape (not included).
LANG - 5
When moving the unit
1 Remove all discs.
2 Press [y/ I, POWER] to turn the unit off.
3 Disconnect the AC power supply cord.
RQTX0169
18
RQT8043
RQTX0169-P.indd 18RQTX0169-P.indd 18 7/18/08 9:25:12 AM7/18/08 9:25:12 AM
Page 19
LANG - 5
LANG - 4
FRANÇAIS
DANSK
Specifi cations
AMPLIFIER SECTION
RMS output power
Front Ch 200 W per channel (7 Ω), 1 kHz, 10% THD
Subwoofer Ch 240 W per channel (7 Ω), 100 Hz, 10% THD
Total RMS Dolby Digital mode power 880 W
FTC Output Power Stereo Mode
Front Ch (both ch driven)
190 W per channel (7Ω), 100 to 12 kHz. 10% THD
Subwoofer Ch 220 W per channel (7Ω), 40 to 100 Hz, 10% THD
Total FTC Stereo mode power 820 W
FM/AM TUNER, TERMINALS SECTION
Preset station FM 20 stations
AM 15 stations
Frequency Modulation (FM)
Frequency range 87.9 to 107.9 MHz (200 kHz step)
87.5 to 108.0 MHz (100 kHz step)
Sensitivity 4.0 µV (IHF)
S/N 26 dB 2.2 µV
Antenna terminal(s) 75 Ω (unbalanced)
Amplitude Modulation (AM)
Frequency range 520 to 1710 kHz (10 kHz step)
Phone jack
Terminal Stereo, 3.5 mm (1/8˝) jack
MIC jack
Sensitivity 0.7 mV, 1.2
Terminal Mono, 3.5 mm (1/8˝) jack (1 system)
Music Port (Front)
Sensitivity 100 mV, 4.7
Terminal Stereo, 3.5 mm (1/8˝) jack
kΩ
kΩ
USB Port
USB standard USB 2.0 full speed
Media fi le format support MP3 (
USB device fi le system FAT12, FAT16, FAT32
*
.mp3)
USB port power 500 mA (Max)
CASSETTE DECK SECTION
Track system 4 track, 2 channel
Heads
Record/playback Solid permalloy head
Erasure Double gap ferrite head
Motor DC servo motor
Recording system AC bias 100
Erase system AC erase 100
Tape speed 4.8
cm/s (1-7/8 ips)
kHz
kHz
Overall frequency response (+3 dB, –6 dB) at DECK OUT
Normal 35 Hz to 14 kHz
S/N Ratio 50 dB (A-WTD)
Wow and fl utter 0.18% (WRMS)
Fast forward and rewind time Approx. 120 seconds with
C-60 cassette tape
DISC SECTION
Disc played [8 cm (3˝ ) or 12 cm (5˝ )]
(1) CD-Audio (CD-DA)
(2) CD-R/RW (CD-DA, MP3
*
(3) MP3
*
MPEG-1 Layer 3, MPEG-2 Layer 3
Pick up
Wavelength 785 nm
Laser power CLASS 1
Audio output (Disc)
Number of channels (FL, FR, SL, SR, SW) 4.2 ch
Audio performance (measurement at: CD out terminal)
Frequency response (CD-Audio) 4 Hz to 20 kHz
S/N ratio (CD-Audio) 95 dB
Dynamic range (CD-Audio) 93 dB
Total harmonic dist. (CD-Audio) 0.005%
*
formatted disc)
SPEAKER SECTION
Front speakers (SB-PF960
*
Rating with low-cut fi lter equipped amplifi er
)
Type 2 way, 2 speaker system (Bass refl ex)
Speaker unit(s) Impedance 7 Ω
1. Woofer 20 cm (7
2. Tweeter 6 cm (2
7
/8˝) cone type
3
/8˝) cone type
Input power (IEC) 220 W (Max)
Output sound pressure 88 dB/W (1.0 m)
Cross over frequency 4 kHz
Frequency range 60 Hz to 24 kHz (–16 dB)
69 Hz to 23 kHz (–10 dB)
Dimensions (WxHxD) 250 x 411 x 338 mm (9
Mass 5.8 kg (12.8 lb)
Surround speakers (SB-PS960
*
Rating with low-cut fi lter equipped amplifi er
)
7
/8˝ x 163/6˝ x 135/16˝)
Type 2 way, 2 speakers system (Bass refl ex)
Speaker unit(s) Impedance 8
1. Woofer 12 cm (4
2. Tweeter 6 cm (2
Input power (IEC) 125
3
/4˝) cone type
3
/8˝) cone type
W* (Max)
Output sound pressure 85 dB/W (1.0 m)
Cross over frequency 4 kHz
Frequency range 60 Hz to 26 kHz (–16 dB)
71 Hz to 23 kHz (–10 dB)
3
Dimensions (WxHxD) 196 x 341 x 226 mm (7
Mass 2.8 kg (6.2 lb)
Subwoofer 1 (SB-WAK860
Subwoofer 2 (SB-WAK960
)
)
/4˝ x 137/16˝ x 815/16˝)
Type 1 way, 1 speaker system (Bass refl ex)
Speaker unit(s) Impedance 7
1. Woofer 25 cm (10˝) cone type
Input power (IEC) 250
Output sound pressure 82 dB/W (1.0 m)
W (Max)
Frequency range 48 Hz to 250 Hz (–16 dB)
50 Hz to 200 Hz (–10 dB)
Dimensions (WxHxD) 320 x 411 x 330 mm (12
Mass
SB-WAK860
SB-WAK960
7.4 kg (16.3 lb)
7.3 kg (16.1 lb)
5
/8˝ x 163/16˝ x 13˝)
GENERAL
Power supply AC 120 V, 60 Hz
Power consumption 240 W
Dimensions (WxHxD) 250 x 331.5 x 358 mm (9
Mass 8.3 kg (18.3 lb)
Operating temperature range 0°C to +40°C (+32°F to +104°F)
Operating humidity range 35% to 80% RH (no condensation)
Power consumption in standby mode: 0.2 W (Approx.)
Note:
1. Specifi cations are subject to change without notice.
Weight and dimensions are approximate.
2. Total harmonic distortion is measured by the digital spectrum
analyzer.
7
/8˝ x 131/16˝ x 141/8˝)
Ω
DANSK ENGLISH
Ω
FRANÇAIS
LANG - 4
LANG - 5
RQTX0169
19
RQT8043
RQTX0169-P.indd 19RQTX0169-P.indd 19 7/18/08 9:25:13 AM7/18/08 9:25:13 AM
Page 20
LANG - 5
LANG - 4
FRANÇAIS
DANSK
ENGLISH
Limited Warranty
Customer Services Directory
Accessory Purchases
Service in Puerto Rico
Panasonic Consumer Electronics Company,
Division of Panasonic Corporation of North America
One Panasonic Way Secaucus, New Jersey 07094
Panasonic Audio Products
Limited Warranty Coverage
ENGLISH
If your product does not work properly because of a defect in materials or
workmanship, Panasonic Consumer Electronics Company or Panasonic
Puerto Rico, Inc. (collectively referred to as “the warrantor”) will, for the length
of the period indicated on the chart below, which starts with the date of original
purchase (“warranty period”), at its option either (a) repair your product with
new or refurbished parts, or (b) replace it with a new or a refurbished product.
The decision to repair or replace will be made by the warrantor.
Product or Part Name Parts Labor
Audio Products (except items listed
below)
USB Reader-Writer, Personal Computer Card Adapters
(in exchange for defective item)
DANSK
Accessories: Headphones, Cartridges, Microphones, Adapters
Rechargeable Batteries,
DVD-R/-RAM Discs (in exchange for
defective item)
SD Memory Cards, Rechargeable
Battery Packs (in exchange for
defective item)
During the “Labor” warranty period there will be no charge for labor. During the
“Parts” warranty period, there will be no charge for parts. You must carry-in or
mail-in your product during the warranty period. If non-rechargeable batteries
are included, they are not warranted. This warranty only applies to products
purchased and serviced in the United States or Puerto Rico. This warranty
is extended only to the original purchaser of a new product which was not
sold “as is”. A purchase receipt or other proof of the original purchase date
FRANÇAIS
is required for warranty service.
One (1) year One (1) year
One (1) year Not Applicable
Ninety (90)
days
Ten (10) days Not Applicable
Ninety (90)
days
Panasonic Puerto Rico, Inc.
Ave. 65 de Infantería, Km. 9.5
San Gabriel Industrial Park, Carolina, Puerto Rico 00985
Limited Warranty
Carry-In or Mail-In Service
For Carry-In or Mail-In Service in the United States call 1-800-211-PANA (1800-211-7262) or visit Panasonic web site: http://www.panasonic.com
For assistance in Puerto Rico call Panasonic Puerto Rico, Inc. (787)-7504300 or fax (787)-768-2910.
Limited Warranty Limits And Exclusions
This warranty ONLY COVERS failures due to defects in materials or
workmanship, and DOES NOT COVER normal wear and tear or cosmetic
damage. The warranty ALSO DOES NOT COVER damages which occurred
in shipment, or failures which are caused by products not supplied by the
warrantor, or failures which result from accidents, misuse, abuse, neglect,
mishandling, misapplication, alteration, faulty installation, set-up adjustments,
misadjustment of consumer controls, improper maintenance, power line surge,
lightning damage, modifi cation, or commercial use (such as in a hotel, offi ce,
restaurant, or other business), rental use of the product, service by anyone
other than a Factory Servicenter or other Authorized Servicer, or damage
that is attributable to acts of God.
Ninety (90)
days
Not Applicable
THERE ARE NO EXPRESS WARRANTIES EXCEPT AS LISTED UNDER
“LIMITED WARRANTY COVERAGE”. THE WARRANTOR IS NOT LIABLE
FOR INCIDENTAL OR CONSEQUENTIAL DAMAGES RESULTING FROM
THE USE OF THIS PRODUCT, OR ARISING OUT OF ANY BREACH OF
THIS WARRANTY. (As examples, this excludes damages for lost time, travel
to and from the servicer, loss of media or images, data or other memory
content. The items listed are not exclusive, but are for illustration only.) ALL
EXPRESS AND IMPLIED WARRANTIES, INCLUDING THE WARRANTY
OF MERCHANTABILITY, ARE LIMITED TO THE PERIOD OF THE LIMITED
WARRANTY.
Some states do not allow the exclusion or limitation of incidental or consequential
damages, or limitations on how long an implied warranty lasts, so the exclusions
may not apply to you.
This warranty gives you specifi c legal rights and you may also have other rights
which vary from state to state. If a problem with this product develops during
or after the warranty period, you may contact your dealer or Servicenter. If
the problem is not handled to your satisfaction, then write to the warrantor’s
Consumer Affairs Department at the addresses listed for the warrantor.
PARTS AND SERVICE WHICH ARE NOT COVERED BY THIS LIMITED
WARRANTY ARE YOUR RESPONSIBILITY.
20
RQT8043
Customer Services Directory
Obtain Product Information and Operating Assistance; locate your nearest Dealer or Servicenter; purchase Parts and Accessories;
or make Customer Service and Literature requests by visiting our Web Site at:
http://www.panasonic.com/consumersupport
or, contact us via the web at:
http://www.panasonic.com/contactinfo
You may also contact us directly at:
1-800-211-PANA (7262),
Monday-Friday 9 am-9 pm; Saturday-Sunday 10 am-7 pm, EST.
LANG - 4
For hearing or speech impaired TTY users, TTY: 1-877-833-8855
Accessory Purchases
Purchase Parts, Accessories and Instruction Books online for all Panasonic Products by visiting our Web Site at:
http://www.pstc.panasonic.com
or, send your request by E-mail to:
You may also contact us directly at:
1-800-332-5368 (Phone) 1-800-237-9080 (Fax Only) (Monday-Friday 9 am to 8 pm, EST.)
Panasonic Service and Technology Company
20421 84th Avenue South, Kent, WA 98032
LANG - 5
(We Accept Visa, MasterCard, Discover Card, American Express, and Personal Checks)
For hearing or speech impaired TTY users, TTY: 1-866-605-1277
Service in Puerto Rico
Panasonic Puerto Rico, Inc.
RQTX0169
Ave. 65 de Infantería, Km. 9.5, San Gabriel Industrial Park, Carolina, Puerto Rico 00985
Phone (787)750-4300, Fax (787)768-2910
RQTX0169-P.indd 20RQTX0169-P.indd 20 7/18/08 9:25:13 AM7/18/08 9:25:13 AM
Page 21
LANG - 5
LANG - 4
FRANÇAIS
Preparativos iniciales
Conexiones
Conecte el altavoz de subgraves
a la unidad principal.
(SB-WAK860)
Por favor consulte “Refuerzo de subgraves” en la página 15 para más información sobre el funcionamiento
de los altavoces de subgraves.
Conecte la antena interior de FM.
Adhesive
tape
Fije la antena donde la recepción sea mejor.
Conecte la antena de cuadro de AM.
Ponga la antena
en posición vertical
sobre su base.
FRANÇAIS ESPAÑOL ENGLISH
Al enchufe de
conexión a la red
Conecte el cable de alimentación
de CA.
Conectar a otra unidad externa
Conecte los cables de los altavoces.
Conecte de la misma forma
en el lado izquierdo (L)
Negro
Negro
Azul
Transparente
Altavoz
envolvente
(derecha)
Altavoz
delantero
(derecha)
Subwoofer
(SB-WAK960)
(SB-WAK860)
LANG - 4
LANG - 5
RQTX0169
21
RQT8043
RQTX0169-P.indd 21RQTX0169-P.indd 21 7/18/08 9:25:14 AM7/18/08 9:25:14 AM
Page 22
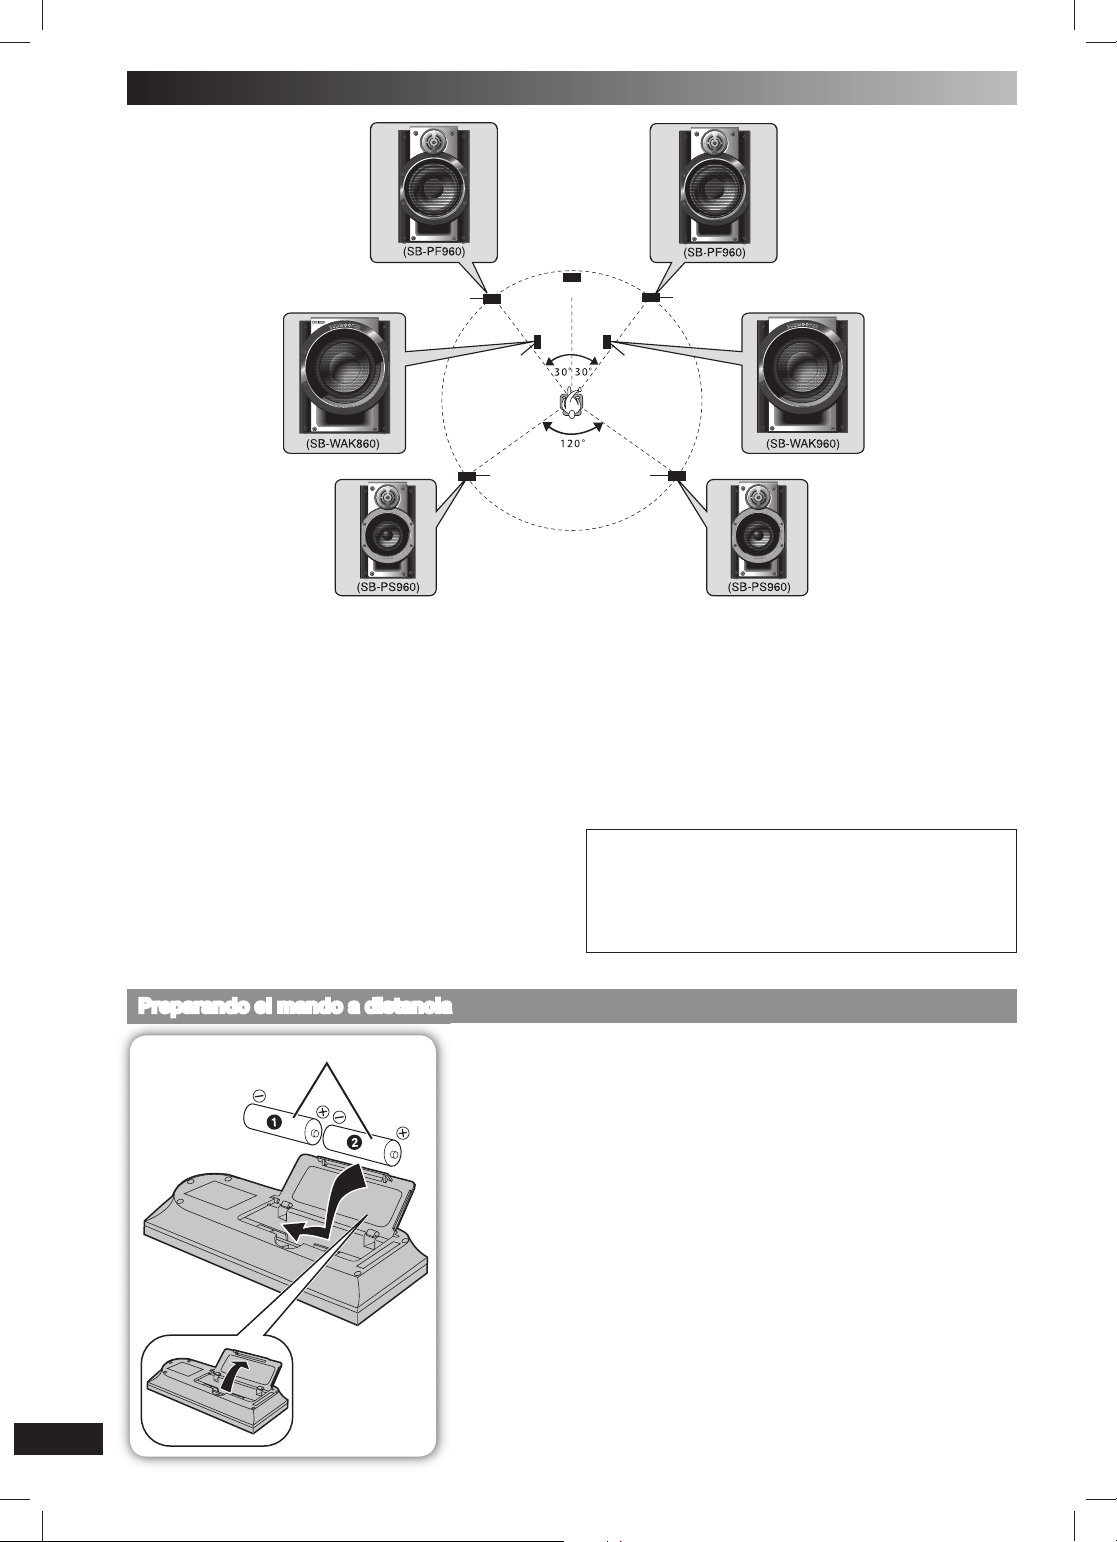
LANG - 5
LANG - 4
FRANÇAIS
DANSK
ENGLISH
ENGLISH
Colocación de los altavoces
Altavoz delantero (izquierdo)
Aparato principal
Altavoz delantero (derecha)
DANSK
Altavoces delanteros
Los altavoces han sido diseñados identicamente por lo que no es
necesario orientar el canal derecho o izquiedo.
Altavoces envolvente
Colóquelos a los lados o ligeramente detrás del sitio donde se sentará, a una altura superior a la de sus oídos.
Altavoz(ces) de subgraves
Colóquelos en el suelo o sobre un estante fuerte para reducir la
vibración.
FRANÇAIS
Deje libres 10 cm en la parte posterior, para ventilación.
Utilice solamente los altavoces suministrados
• La utilización de otros altavoces puede dañar el aparato y la calidad del sonido se verá afectada negativamente.
• Coloque los altavoces sobre una superfi cie plana para evitar que
se caigan. Tome las medidas de precaución adecuadas para evitar
que los altavoces se caigan si no puede colocarlos sobre una
superfi cie plana.
Altavoz de
subgraves
(izquierdo)
Altavoz
envolvente
(izquierdo)
Altavoz de
subgraves
(derecha)
Altavoz
envolvente
(derecha)
Nota:
• Mantenga sus altavoces alejados un mínimo de 10mm del sistema
para disponer de una ventilación apropiada.
• No quite la red frontal de los altavoces.
• Estos altavoces no disponen de blindaje magnético. No los ponga
cerca de televisores, ordenadores personales y otros dispositivos a
los que afecte fácilmente el magnetismo.
• Si reproduce el sonido con niveles altos durante largos periodos de
tiempo podrá dañar los altavoces y reducir su duración.
• Reduzca el volumen para evitar daños en los casos siguientes.
– Cuando reproduzca sonido distorsionado.
– Cuando ajuste la calidad del sonido.
– Al encender o apagar la unidad.
Precaución
• Use los altavoces sólo con el sistema recomendado. De lo
contrario, se podrían dañar el amplifi cador y los altavoces,
y se podría ocasionar un incendio. Consulte a un técnico de
servicio especializado si se ha producido algún daño o si se
ha producido un cambio repentino en su funcionamiento.
• No instale estos altavoces en paredes ni techos.
Preparando el mando a distancia
LANG - 4
LANG - 5
RQTX0169
AA/R6/LR6
22
RQT8043
RQTX0169-P.indd 22RQTX0169-P.indd 22 7/18/08 9:25:24 AM7/18/08 9:25:24 AM
■ Pilas
• Inserte los polos (+ y –) de la forma que se indica en el mando a distancia.
• Retire las pilas si no va a utilizar el mando a distancia durante un periodo de tiempo
prolongado. Guárdelas en un lugar fresco y oscuro.
• Reemplace las pilas si el aparato no responde al mando a distancia a pesar de utilizarlo
cerca del panel delantero.
• No utilice baterías recargables.
• Un mal manejo de pilas en el mando a distancia puede provocar fugas electrolíticas, que
pueden provocar fuego.
• Si las pilas tienen fugas de electrólito, consulte a su distribuidor.
Si el electrólito entra en contacto con cualquier parte de su cuerpo, lave la parte
afectada con agua abundante.
No:
• mezcle nunca pilas viejas y nuevas.
• utilice tipos diferentes de baterías al mismo tiempo.
• calentar o exponer pilas a las llamas.
• destruir o cortocircuitar las pilas.
• intente nunca recargar pilas alcalinas o de manganeso.
• utilice nunca pilas cuya cubierta protectora esté levantada.
• ponga nunca objetos pesados encima del mando a distancia.
• derrame nunca líquidos sobre el mando a distancia.
■ Utilización
Diríjalo al sensor del mando a distancia, evitando los obstáculos, desde una distancia
máxima de 7 m directamente frente al aparato.
Consulte la página 7 para ver la posición del sensor de la señal del mando a distancia.
Page 23
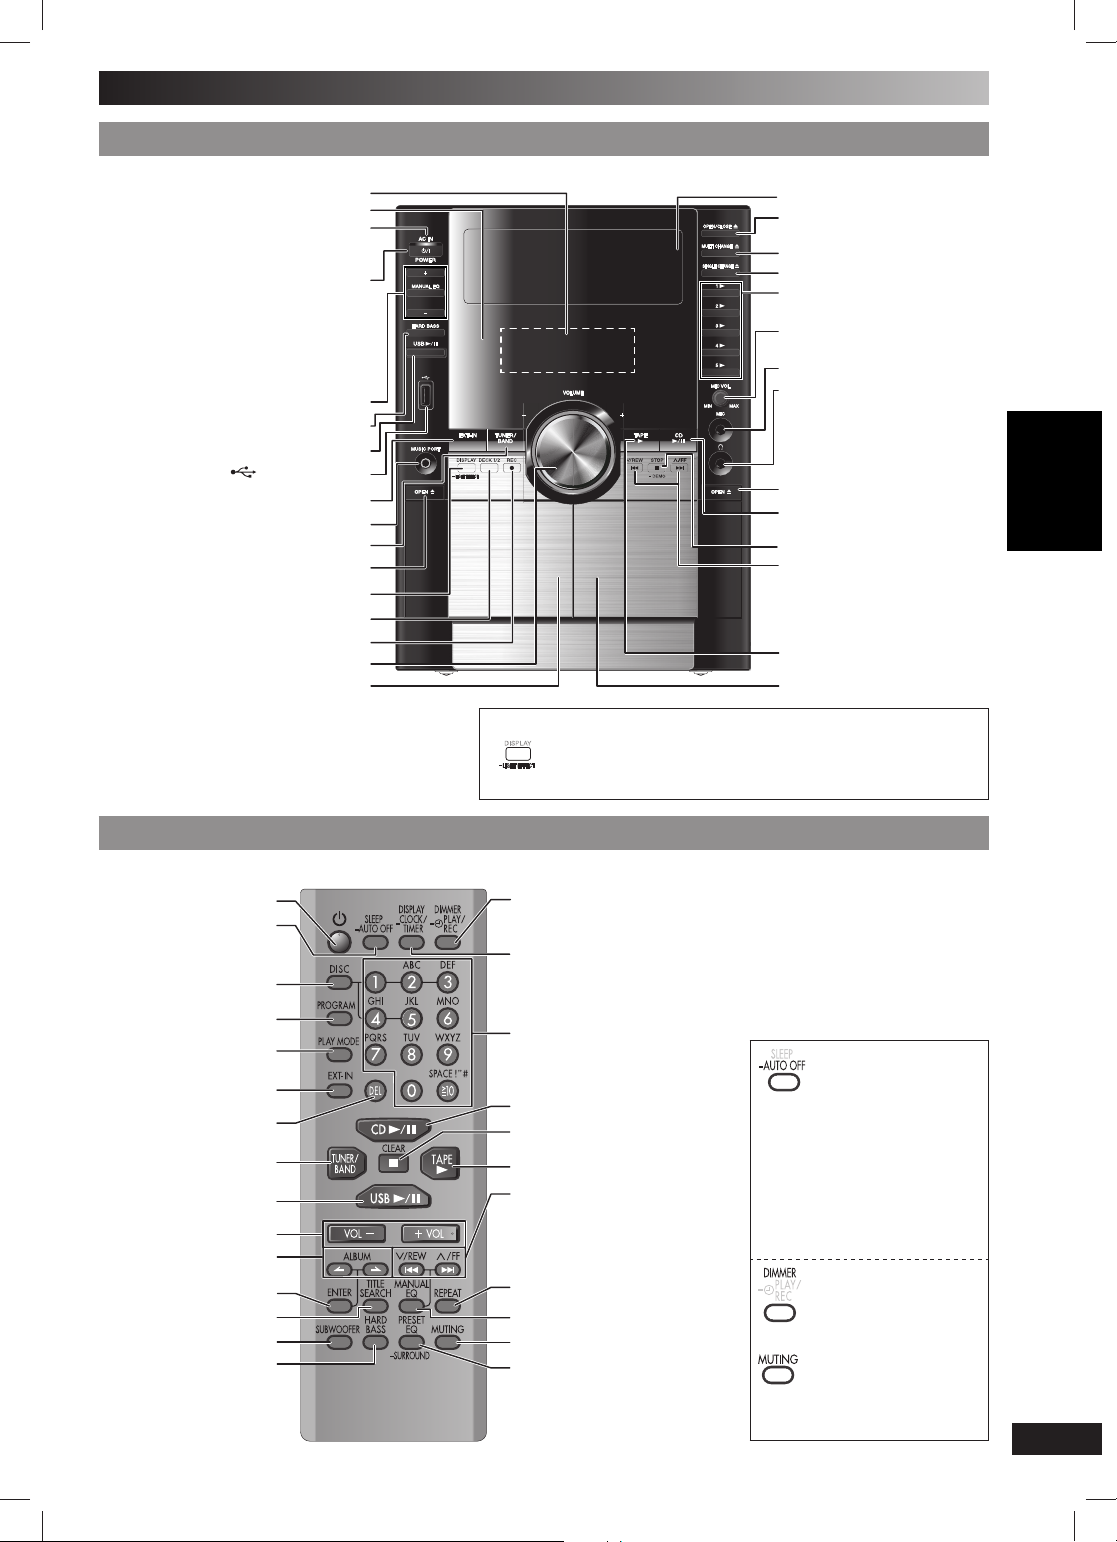
LANG - 5
LANG - 4
FRANÇAIS
Controles
Aparato principal
Mando a distancia
Aparato principal
Los números entre paréntesis indican la página de referencia.
Sensor de señal del mando a distancia
Indicador de alimentación de CA [AC IN]
Este indicador se encenderá cuando la
unidad esté conectada a la red de CA.
1 Interruptor de alimentación en es-
pera/conectada [y/l, POWER] (4, 18)
Pulse este interruptor para cambiar del
modo de alimentación conectada al modo
de alimentación en espera o viceversa.
En el modo de alimentación en espera, el
aparato consume una pequeña cantidad
Ajuste manual EQ
3 Reproducir/pausa USB (28)
4 Selección EXT-IN (15)
Conector de puerto de música (15)
5 Selector de sintonizador/banda (26)
Apertura de la platina 1 (25)
Visualización (9), Efecto de luz
Grabación (15 ~ 16, 25)
6 Control de volumen
Portacinta de la platina 1
Visualizador
de corriente.
(14)
2 Bajo potente (14)
Puerto USB (28)
Selección de platina
(25)
Bandeja de discos
Abrir/cerrar bandeja
de disco (3 ~ 8)
Cambiar múltiples discos (8)
Cambiar un sólo disco (9)
Reproducción directa de
disco (24)
Control de volumen del
micrófono
Toma de micrófono (13)
A
Procure evitar utilizarlos mucho
rato con el fi n de evitar lesiones
auditivas.
Tipo de clavija: estéreo de
Ø 3,5 mm (no suministrado)
Apertura de la platina 2 (25)
7 Reproducción/pausa
de disco (8 ~ 10, 25)
Demostración, parar (6, 25)
Omitir/buscar disco pista,
avance rápido de cinta/rebobinar, sintonizar/selección de
canal presintonizado, ajuste de
tiempo (8 ~ 14, 16, 24
8 Reproducción de
la cinta (25)
Portacinta de la platina 2 (25)
(13)
Toma de auriculares
~ 28
)
Esta función le permite tener el efecto de luz en la unidad principal
durante el modo de reproducción de disco, cinta o USB o cuando
use MIC.
• Mantenga pulsado [−LIGHT EFFECT] para activar esta función.
• Mantenga pulsado [−LIGHT EFFECT] de nuevo para cancelar.
Mando a distancia
Los botones como el 1 funcionan del mismo modo que los botones del aparato principal.
Temporizador para
Apagado automático
Selector del modo de
reproducción (8, 12, 24)
Búsqueda de títulos (10)
Altavoz de subgraves
dormir (26),
Disco (8 ~ 9, 24)
Programas (9, 12)
Borrado (9 ~ 10)
Selección de disco
de album (8)
Introducir (9 ~ 10)
(15)
1
4
5
3
6
2
Reducción de la iluminación del
visualizador, Temporizador de
reproducción/grabación (27)
Visualizador,
Reloj/temporizador
(9, 27)
Numerados, caracteres
(10, 24, 26)
7
Parada/cancelación de programas (24, 25, 28)
8
Omitir/buscar disco pista,
avance rápido de cinta/rebobinar,
sintonizar/selección de canal
presintonizado, ajuste de tiempo,
ajuste manual EQ (8 ~14, 16)
Repetición (10)
Ecualización manual (14)
Silenciamiento
Ecualizador preajustado
Envolvente (14 ~ 15)
,
Esta función de apagado
automático le permite apagar el
aparato en modo disco, cinta o
USB, sólo después de 10 minutos
sin utilizarlo.
• Mantenga pulsado [–AUTO OFF]
para activar esta función.
• Mantenga pulsado [–AUTO OFF]
de nuevo para cancelar.
• El ajuste se mantiene aunque el
aparato esté apagado.
Para reducir la iluminación
del visualizador.
Para silenciar el sonido.
• Pulse el botón para activarlo.
• Vuélvalo a pulsar para cancelar o
ajuste el volumen.
RQTX0169
23
RQT8043
FRANÇAIS ESPAÑOL ENGLISH
LANG - 4
LANG - 5
RQTX0169-P.indd 23RQTX0169-P.indd 23 7/18/08 9:25:37 AM7/18/08 9:25:37 AM
Page 24
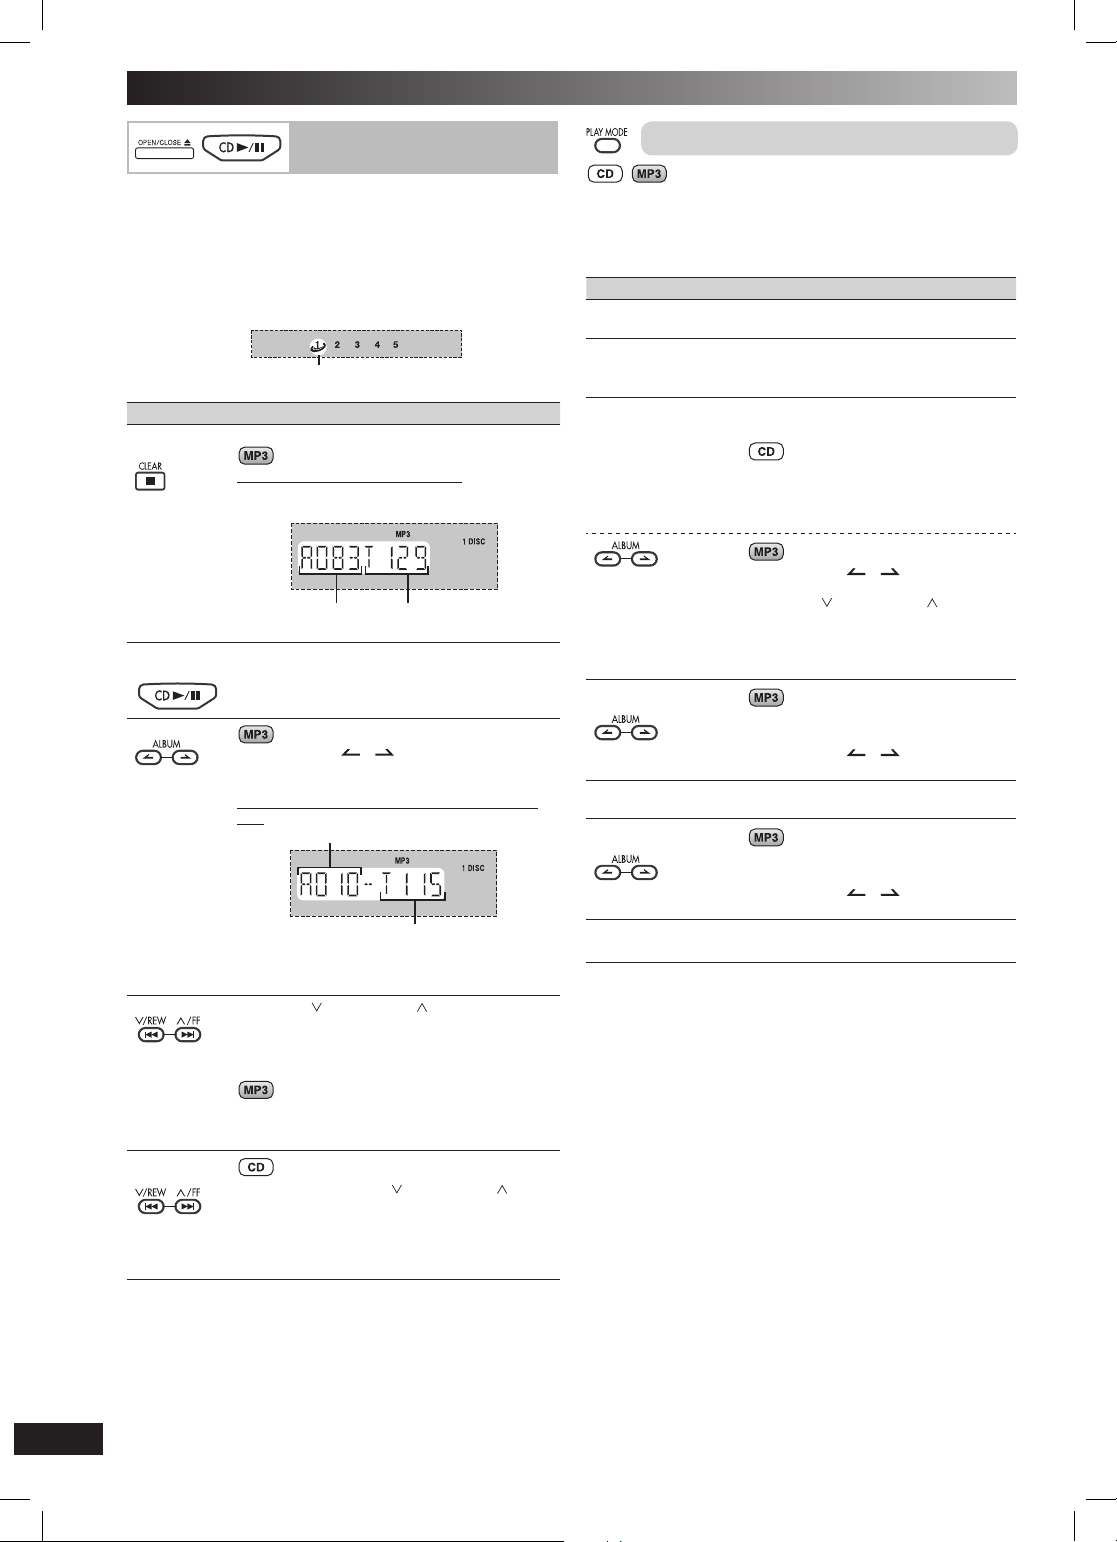
LANG - 5
LANG - 4
FRANÇAIS
DANSK
ENGLISH
Discos
Reproducción básica
1
ENGLISH
2
Para Acción
parar reproducción
DANSK
interrumpir la
reproducción
saltar álbum
FRANÇAIS
saltar pistas
LANG - 4
Pulse [0, OPEN/CLOSE] en la unidad principal para abrir la
bandeja.
El aparato se enciende, carga un disco en la bandeja actual con
la etiqueta hacia arriba.
Pulse [0, OPEN/CLOSE] para cerrar la bandeja.
Pulse [6, CD] para iniciar la reproducción.
También puede pulsar [DISC] y a continuación
[1] ~ [5] para seleccionar y reproducir los otros discos cargados.
Reproducción básica
Indicador del disco actual
Pulse [7, CLEAR] durante la reproducción.
Visualización en el modo de parada:
Ejemplo: “MP3” indica que el disco contiene
Pulse [6, CD] durante la reproducción.
Vuelva a pulsar para reanudar la reproducción.
Pulsar [ALBUM ( o )] para seleccionar el
album deseado durante la reproducción o en el
modo de paro.
Mostrar al seleccionarlo en modo de paro (ejemplo):
• Esta función no funciona en modo 1-DISC RAN-
Pulse [4, / REW] o [¢, / FF].
• Durante la reproducción aleatoria (\ ver dere-
archivos MP3.
Número total
de álbumes
Álbum actual
DOM y ALL-DISC RANDOM.
cha, “Función de modo de reproducción”), no se
puede saltar a pistas que ya han sido reproducidas.
Número total
de pistas
Número de pistas
del álbum actual
Función de modo de reproducción
Puede escuchar discos específi cos y pistas.
Preparación
Seleccione y reproduzca sus discos deseados.
Pulse [PLAY MODE] para seleccionar el modo deseado.
Modo Para reproducir
1-DISC
1 DISC
ALL-DISC
ALL DISC
1-TRACK
1-TR
1-ALBUM
1-ALB
1-DISC RANDOM
1 DISC RND
1- ALBUM RANDOM
1-ALB RND
ALL-DISC RANDOM
ALL DISC RND
Cuando termine la reproducción
El modo de reproducción actual se retendrá en la memoria, aunque
se apague el aparato, hasta que se cambie.
Nota:
Usted no puede utilizar el modo de programa con la “Función de
modo de reproducción”.
un disco seleccionado.
todos los discos cargados en sucesión
del disco seleccionado al último disco.
Ejemplo: 4→5→1→2→3.
una melodía seleccionada del disco
seleccionado.
Pulse los botones numéricos para seleccionar la pista en el disco actual.
La reproducción empieza desde la pista
seleccionada.
Pulse [ALBUM ( o )] para seleccionar el álbum.
Pulse [4,
continuación los botones numéricos para
seleccionar la pista en el álbum actual.
La reproducción empieza desde la pista
seleccionada.
un álbum seleccionado del disco seleccionado.
Pulse [ALBUM (
cionar el álbum.
un disco seleccionado aleatoriamente.
todas las pistas de un álbum seleccionado aleatoriamente.
Pulse [ALBUM (
cionar el álbum.
todos los discos cargados en orden
aleatorio.
/ REW] o [¢, / FF], a
o )] para selec-
o )] para selec-
Durante el modo 1-ALBUM y 1-ALBUM RANDOM,
el salto de pista sólo puede realizarse dentro del
álbum actual.
buscar por
LANG - 5
RQTX0169
pistas
Mantenga pulsado [4, / REW] o [¢, / FF]
durante la reproducción o la pausa para buscar.
• Durante la reproducción programada (\ página 9), o la reproducción aleatoria (\ ver
derecha, “Función de modo de reproducción”),
usted sólo puede buscar dentro de la pista.
24
RQT8043
RQTX0169-P.indd 24RQTX0169-P.indd 24 7/18/08 9:25:40 AM7/18/08 9:25:40 AM
Page 25
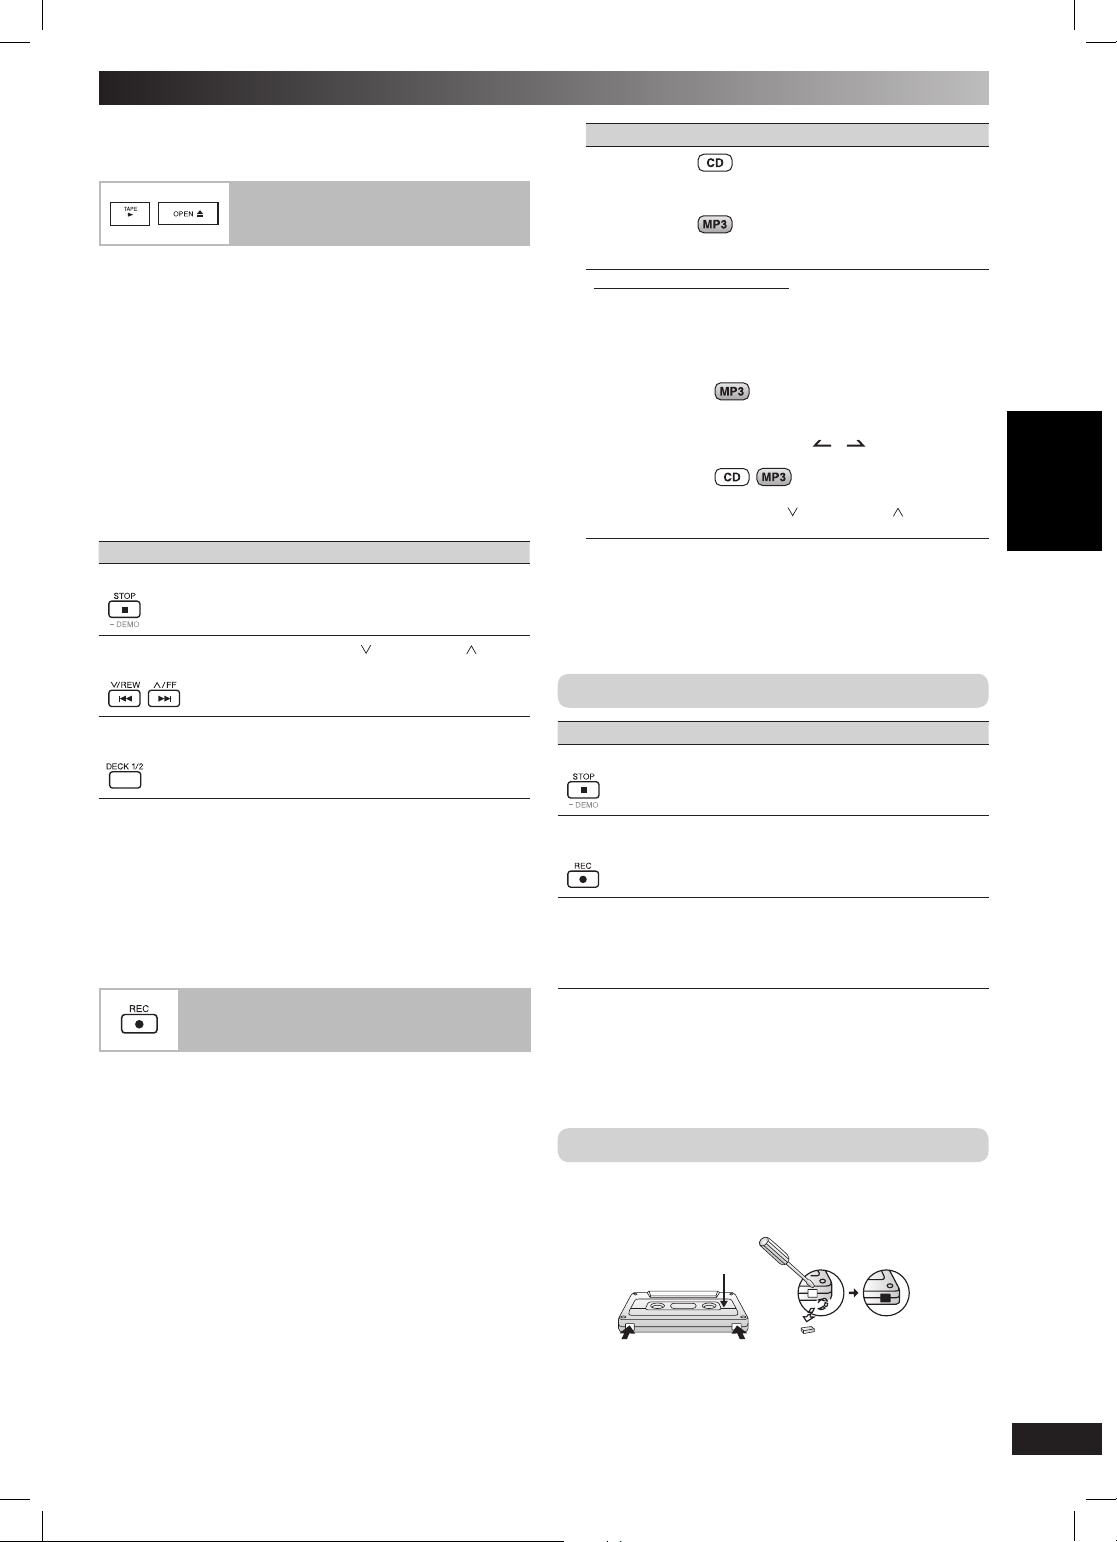
LANG - 5
LANG - 4
FRANÇAIS
Cintas de casete – reproducción y grabación
Reproducción básica
Grabación
Los botones descritos para “Cintas de casete –
reproducción y grabación” son principalmente para la unidad a
no ser que se indique lo contrario.
Puede utilizar la platina 1 (DECK 1) o platina 2 (DECK 2) para
reproducir cintas.
Use cintas de posición normal.
Las cintas de posición alta y de posición metal pueden reproducirse,
pero el aparato no podrá reproducir perfectamente las características
de estas cintas.
Pulse [3, TAP E].
1
El aparato se enciende.
Si ya se introdujo una cinta de casete, la reproducción empezará
automáticamente (Reproducción de un toque).
Pulse [0, OPEN] para la platina 1 (DECK 1) o
2
[0, OPEN] para la platina 2 (DECK 2) e insertar la cinta.
Inserte con el lado que va a reproducirse hacia usted y con la
cinta expuesta hacia abajo. Cierre el portacasete con la mano.
Pulse [3, TAPE] para iniciar la reproducción.
3
Para Acción
detener la reproducción
avanzar rápidamente o
rebobinar
Reproducción básica
Pulse [7, STOP].
Pulse [4, / REW] o [¢, / FF].
Para Acción
grabar las
pistas programadas
Mando a distancia solamente
grabar
discos/pistas
específi cas
Grabación de cinta a cinta:
1 Pulse [3, TAPE] y luego [7, STOP].
2 Pulse [0, OPEN] para la platina 1 (DECK 1) e inserte el
casete a grabar.
Pulse [¶, REC] para iniciar la grabación.
3
Ejecutar los pasos de 2 a 4 en “Reproducción
programada” (\ página 9).
Ejecutar los pasos de 3 a 6 en “Reproducción
programada” (\ página 9).
1) Pulse [DISC] y luego [1] ~ [5] para seleccionar el disco.
Asegúrese de que el disco esté parado.
2) Pulse [PLAY MODE] para seleccionar el
modo deseado (\ página 8).
3)
Para el modo 1-ALBUM y el modo
1-TRACK:
Pulse [ALBUM (
el álbum.
Para el modo 1-TRACK:
Pulse [4,
seleccionar la pista.
o )] para seleccionar
/ REW] o [¢, / FF] para
Otras operaciones básicas
seleccionar entre las
platinas cargadas
Nota:
• La reproducción de la cinta se interrumpe momentáneamente si
usted abre la otra platina.
• Las cintas de más de 100 minutos son fi nas y pueden romperse o
atascarse en el mecanismo.
• Las cintas fl ojas pueden quedar atrapadas en el mecanismo, por lo
que deberán tensarse antes de ser reproducidas.
• Las cintas sin fi n pueden quedar atrapadas en las partes móviles
de la platina si no se utilizan correctamente.
Grabación
Selección de cintas para la grabación
Use cintas de posición normal.
Pueden usarse cintas de posición alta y de metal, pero el aparato no
las grabará ni las borrará correctamente.
Preparación
Rebobine la cinta original para que la grabación pueda comenzar de
inmediato.
Pulse [0, OPEN] para la platina 2 (DECK 2) e inserte la cinta
1
que hay que grabar.
Inserte con el lado que va a grabar hacia usted y con la cinta
expuesta hacia abajo.
Seleccione la fuente que va a grabar.
2
Grabación de la radio:
Sintonice la emisora (\ página 12).
Grabación de disco:
➀ Inserte el(los) disco(s) que desee grabar.
Pulse [DECK 1/2] (mando a distancia:
[PLAY MODE]).
Pulse [6, CD] y luego [7, STOP].
➁ Prepare el modo de grabación del disco deseado.
Para Acción
detener la grabación
grabar en la otra
cara de la cinta
borrar un sonido
grabado
Nota:
• Los cambios en el volumen o en los ajustes de volumen no afectan
a la grabación.
• Utilizar la platina 2 (DECK 2) para la grabación.
• No podrá abrir la platina 1 (DECK 1) durante la grabación.
• No podrá avanzar rápidamente ni rebobinar en una platina mientras
graba con la otra.
Pulse [7, STOP].
Dé vuelta a la cinta de casete y pulse
[¶, REC].
1) Pulse [3, TAPE] y luego [7, STOP].
2) Inserte la cinta grabada en la platina 2
(DECK 2). Asegúrese de que no haya
una cinta en la platina 1 (DECK 1).
3) Pulse [¶, REC].
Protección contra borrado
La ilustración muestra cómo retirar las lengüetas para evitar el borrado por regrabación. Para volver a grabar en la cinta, tape el agujero
como se muestra.
Lado A
Lengüeta del lado ALengüeta del lado B
FRANÇAIS ESPAÑOL ENGLISH
LANG - 4
LANG - 5
RQTX0169
25
RQT8043
RQTX0169-P.indd 25RQTX0169-P.indd 25 7/18/08 9:25:43 AM7/18/08 9:25:43 AM
Page 26
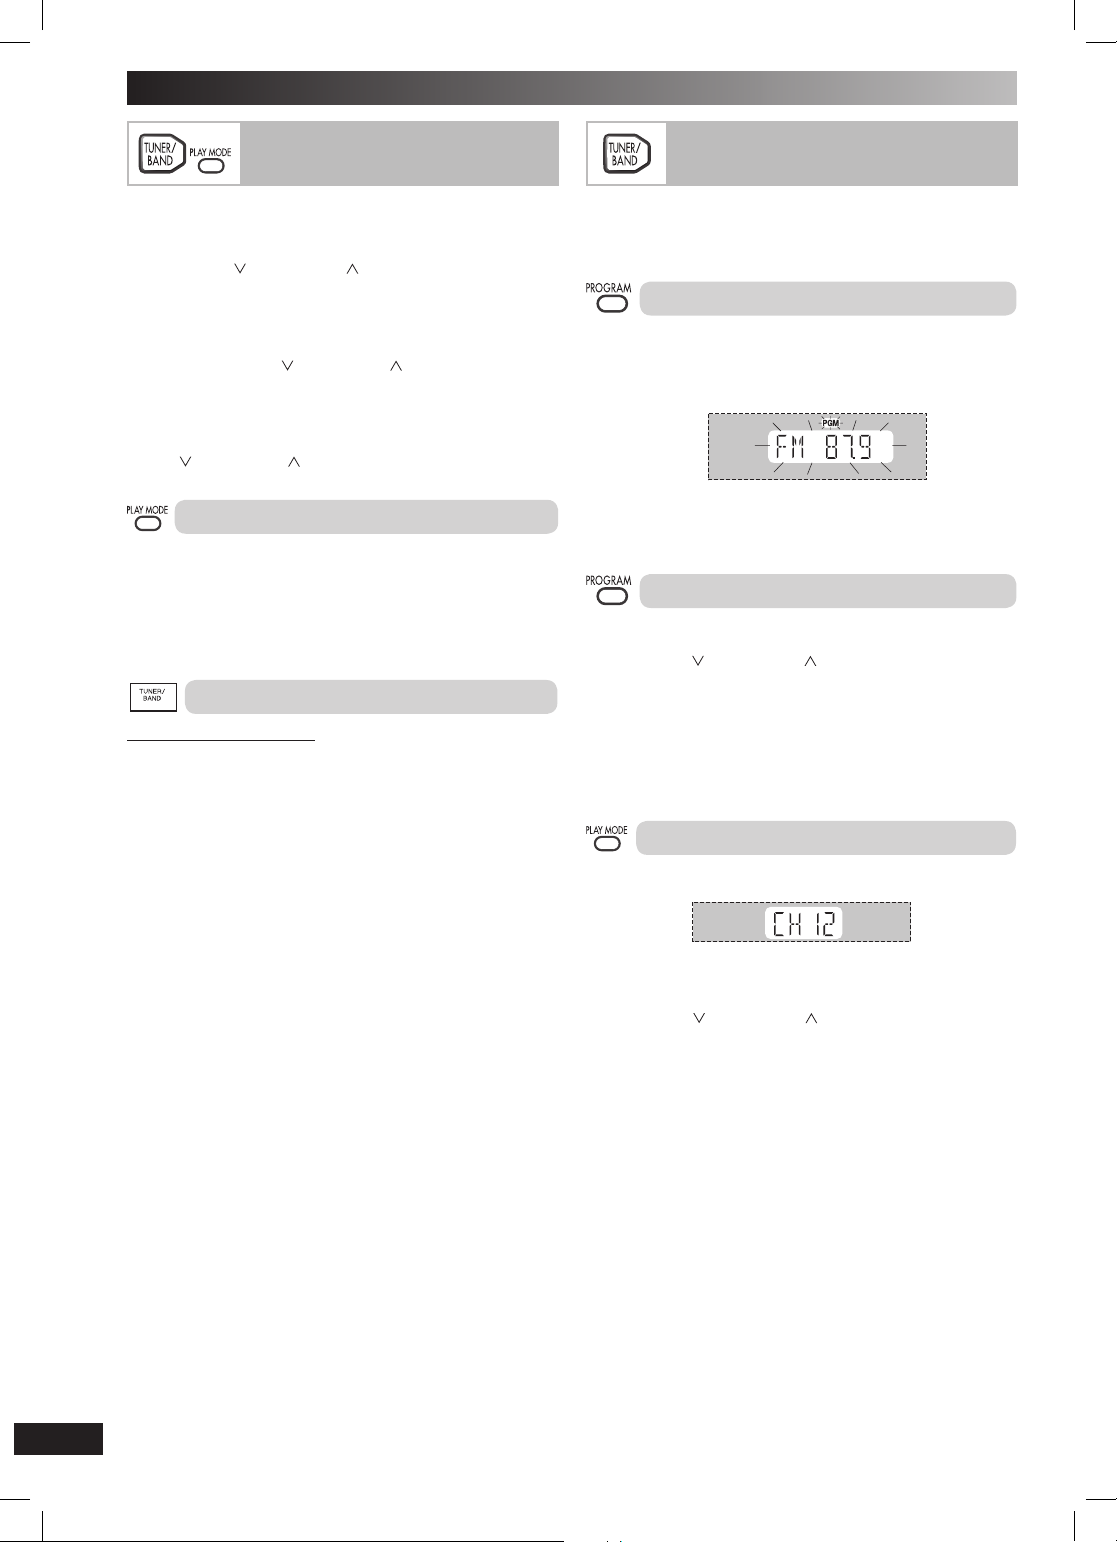
LANG - 5
LANG - 4
FRANÇAIS
DANSK
ENGLISH
Radio FM/AM
Sintonización manual
Grabación de emisoras en memoria
Pulse [TUNER / BAND] para seleccionar “FM” o “AM”.
1
Pulse [PLAY MODE] para seleccionar “MANUAL”.
2
ENGLISH
DANSK
FRANÇAIS
LANG - 4
Pulse [4, / RE W] o [ ¢ , / F F] para seleccionar la
3
frecuencia de la emisora requerida.
Se visualizará “
estéreo por FM.
Para sintonizar automáticamente
Mantenga pulsado [4,
la frecuencia empiece a cambiar rápidamente. El aparato inicia la sintonización automática y se detendrá cuando encuentre una emisora.
• La sintonización automática tal vez se interrumpa cuando las
interferencias sean excesivas.
• Para cancelar la sintonización automática, pulse una vez más
[4,
Para mejorar la calidad del sonido de FM
Mantenga pulsado [PLAY MODE] para visualizar “MONO”.
Para cancelar
Mantenga pulsado [PLAY MODE] otra vez hasta que “MONO”
desaparezca.
• MONO también se cancelará si se cambia la frecuencia.
• Deje “MONO” apagado para la escucha normal.
Aparato principal solamente
Este sistema también puede recibir emisiones de AM asignadas en
pasos de 10 kHz.
Para cambiar el paso de a 0.1 MHz
Mantenga pulsado [TUNER/BAND].
1
Después de unos segundos, la visualización cambiará a una
visualización parpadeante de la frecuencia mínima actual.
Continúe pulsando [TUNER/BAND].
2
• Si la frecuencia mínima cambia, suelte el botón. Para volver al
paso original, repita los pasos anteriores.
• Después de cambiar el ajuste de “asignación”, las frecuencias
previamente preajustadas en la memoria se borrarán.
Sintonización manual
ST
” cuando esté siendo recibida una emisora
/ REW ] o [¢, / FF] hasta que
/ REW ] o [¢, / FF].
Ajuste de asignación de AM
Grabación de emisoras en memoria
Se pueden presintonizar 20 emisoras FM y 15 AM.
Preparación
Pulse [TUNER / BAND] para seleccionar “FM” o “AM”.
Presintonización automática
Sintonice la frecuencia desde la que quiere comenzar a
1
presintonizar.
Mantenga pulsado [PROGRAM] para iniciar la presintoniza-
2
ción.
El sintonizador presintonizará en los canales, en orden ascendente,
todas las emisoras que pueda recibir. Cuando termine, se sintonizará
la última emisora memorizada.
Presintonización manual
Pulse [PLAY MODE] para seleccionar “MANUAL”.
1
Pulse
2
3
4
Pulse los botones numéricos para seleccionar el canal.
O
1
2
[4, / RE W] o [ ¢ , / FF] para seleccionar la
emisora deseada.
Pulse [PROGRAM].
Pulse los botones numéricos para seleccionar el canal.
Para los canales 10 a 20 pulse [
La emisora que ocupa un canal se borrará si se presintoniza otra
emisora en ese canal.
Selección de una emisora presintonizada
Pulse [PLAY MODE] para seleccionar “PRESET”.
Pulse [4, / RE W] o [ ¢ , / FF] para seleccionar el canal.
h
10] y luego los dos dígitos.
LANG - 5
RQTX0169
26
RQT8043
RQTX0169-P.indd 26RQTX0169-P.indd 26 7/18/08 9:25:46 AM7/18/08 9:25:46 AM
Page 27
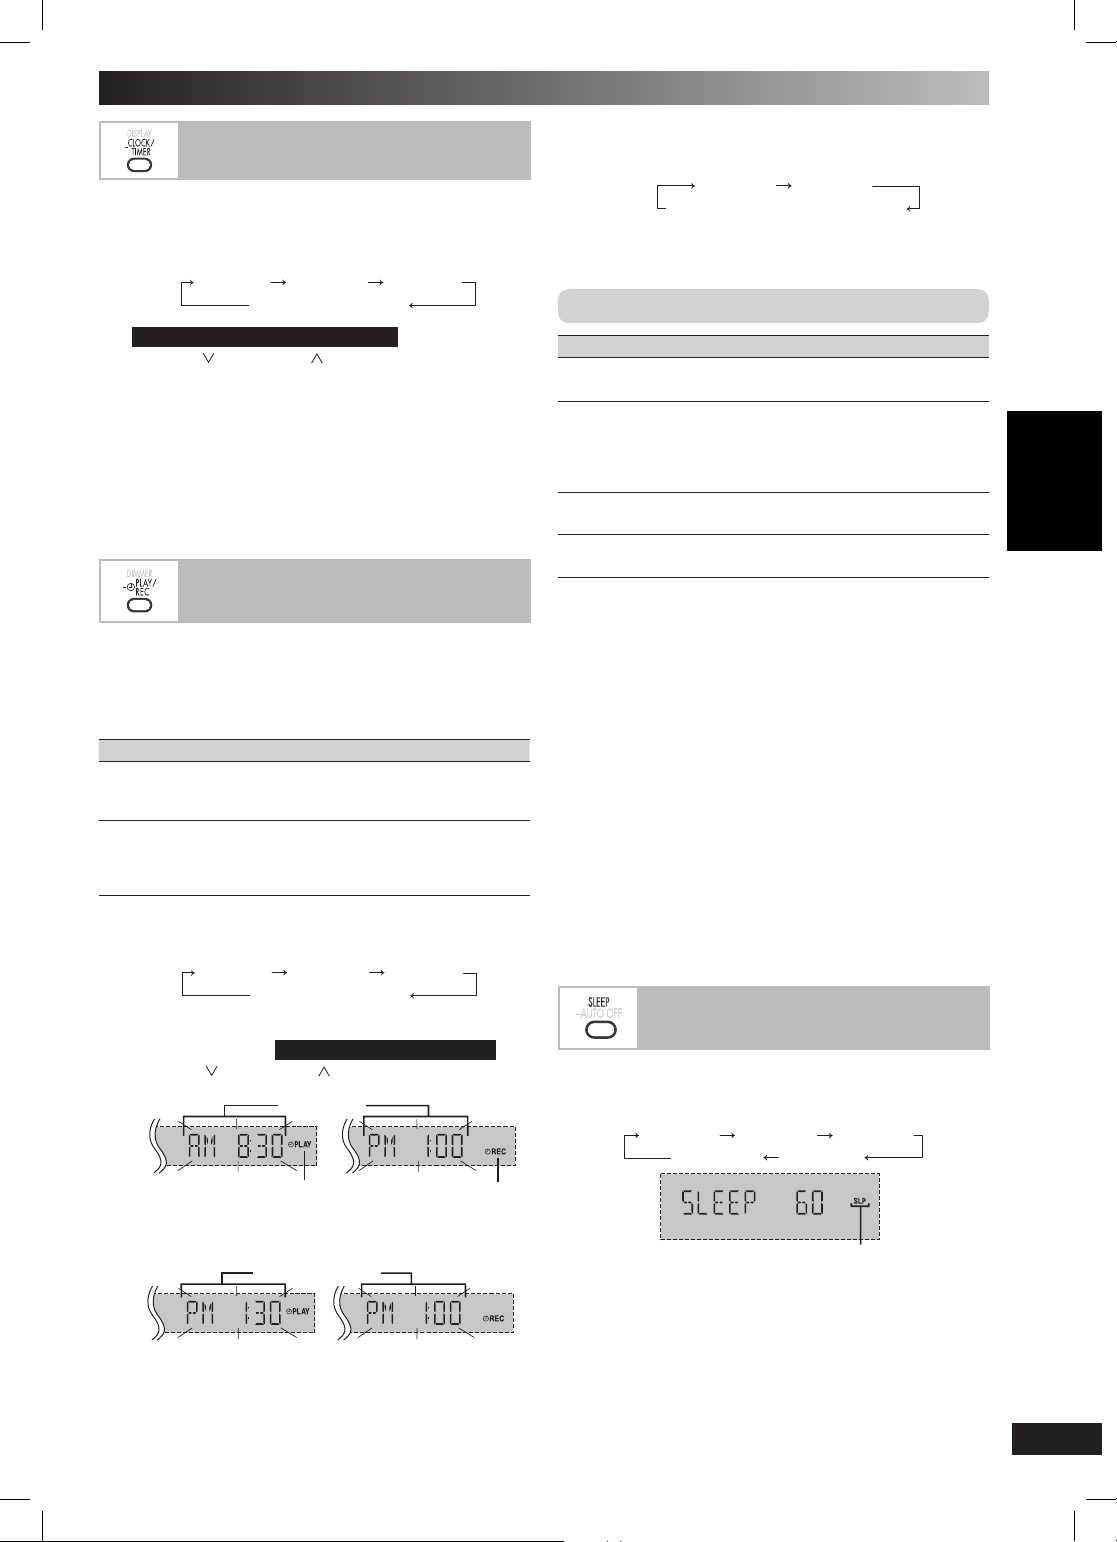
LANG - 5
LANG - 4
FRANÇAIS
Puesta en hora
Utilización del temporizador de
reproducción/grabación
Temporizador
Utilización del temporizador para
dormir
Puesta en hora
Éste es un reloj de sistema de 24 horas.
Mantenga pulsado [– CLOCK/TIMER] para seleccionar
1
“CLOCK”.
Cada vez que mantenga pulsado el botón:
CLOCK
(
Antes de que pasen unos 8 segundos
2
Pulse [4, / R EW] o [¢, / FF] para ajustar la hora.
Mantenga pulsado [–
3
la hora.
Visualización del reloj
Mantenga pulsado una vez [
encendido o en el modo de espera.
La hora se muestra durante unos pocos segundos.
Nota:
Vuelva a poner en hora el reloj con frecuencia para mantener su
precisión.
Utilización del temporizador de
reproducción/grabación
Puede ajustar el temporizador para que se encienda a una hora
determinada para despertarle (temporizador de reproducción) o para
grabar la radio o equipo externo (temporizador de grabación).
El temporizador de reproducción no puede utilizarse en combinación
con el temporizador de grabación.
Encienda el aparato y ponga en hora el reloj.
Temporizador Acción
Temporizador
de reproducción
Temporizador
de grabación
1
2
3
4
Prepare la fuente de música que desea escuchar
otros equipos externos y ajuste el volumen.
Compruebe las lengüetas de prevención de borrado del casete (
y sintonice la emisora de radio (
seleccione el equipo externo (
Mantenga pulsado [–
temporizador deseado.
Cada vez que mantenga pulsado el botón:
CLOCK ˚ PLAY
˚PLAY : para ajustar el temporizador de reproducción
˚REC : para ajustar el temporizador de grabación
(Vaya al paso siguiente
Pulse [4, / RE W] o [ ¢ , / FF] para ajustar la hora de
inicio.
Indicador del temporizador
Mantenga pulsado [–
Repita los pasos 2 a 3 para ajustar la hora de finalización.
de reproducción
˚ PLAY
Visualización original
CLOCK/TIMER] para terminar de poner
–
CLOCK/TIMER] cuando el aparato esté
; casete,
número de disco (1~5), radio u
˚ REC
)
\ página 11), inserte el casete
\ página 12) o
\ página 15).
CLOCK/TIMER]
Visualización original
antes de que pasen 8 segundos
Hora de inicio
CLOCK/TIMER]
Hora de fi nalización
para seleccionar el
˚ REC
Indicador del temporizador
para confirmar.
de grabación
)
Para activar el temporizador
Mantenga pulsado [– ˚PLAY/REC] para encender el tempori-
5
zador deseado.
Pulse [y] para apagar el aparato.
6
El aparato debe estar apagado para que funcionen los temporizadores.
˚ PLAY
Ninguna visualización (desactivado)
˚ REC
Otras operaciones básicas
Para Acción
cambiar la
confi guración
cambiar la
fuente o el
volumen
compruebe la
confi guración
cancelar
Si utiliza el aparato después de haber ajustado los temporizadores
Tras la utilización del aparato, compruebe que la cinta/disco correcto
esté introducido antes de apagar el aparato.
Nota:
• El temporizador de reproducción se pondrá en marcha a la hora
programada y el volumen aumentará gradualmente hasta el nivel
seleccionado.
•
El temporizador de grabación de registro comenzará 30 segundos
antes del tiempo del sistema con el volumen silenciado.
• Si el temporizador está activo, se encenderá todos los días a la
hora fi jada.
• El aparato debe estar en modo de espera para que el temporizador
funcione.
• Si apaga el aparato y lo vuelve a encender mientras esté funcionando un temporizador, no se activará el ajuste de tiempo de
fi nalización.
• Si se selecciona el puerto música (MUSIC PORT) como fuente
cuando el temporizador avance, el sistema se enciende y utiliza el
puerto de música (MUSIC PORT) como fuente. Si desea reproducir
o grabar desde el equipo reproductor portátil de audio, solo ha de
activar el modo reproducir del equipo reproductor y aumentar el
volumen. (Ver el manual de instrucciones del reproductor portátil de
audio.)
Esta función le permite apagar el aparato automáticamente después
de la hora fi jada.
Pulse [SLEEP] para seleccionar la hora deseada.
Para cancelar
Pulse [SLEEP] para seleccionar “SLEEP OFF”.
Modifi cación del tiempo restante
Vuelva a pulsar [SLEEP] para mostrar la hora y luego pulse [SLEEP]
para seleccionar el tiempo deseado.
Nota:
El temporizador para reproducción y para dormir o el temporizador
•
para grabación y para dormir pueden usarse al mismo tiempo.
• El temporizador para dormir siempre tiene prioridad. Asegúrese de
no superponer los ajustes de temporizador.
• El temporizador de dormir se desconecta cuando ejecuta la función
de grabar.
Repita los pasos 1 a 4 y 6 (
y arriba).
1) Mantenga pulsado [– ˚PLAY/REC] para can-
celar el temporizador indicador del visualizador.
2) Cambie la fuente o el volumen.
3) Ejecute los pasos 5 a 6 (
Mantenga pulsado
mente seleccione ˚PLAY o ˚REC.
Mantenga pulsado [– ˚PLAY/REC] para cancelar
los indicadores del temporizador del visualizador.
Utilización del temporizador para
dormir
SLEEP 30 SLEEP 60
SLEEP OFF
Indicador del temporizador de dormir
\ mirar la página 13
\ ver arriba).
[– CLOCK/TIMER]
SLEEP 90
SLEEP 120
repetida-
RQTX0169
27
RQT8043
FRANÇAIS ESPAÑOL ENGLISH
LANG - 4
LANG - 5
RQTX0169-P.indd 27RQTX0169-P.indd 27 7/18/08 9:25:47 AM7/18/08 9:25:47 AM
Page 28
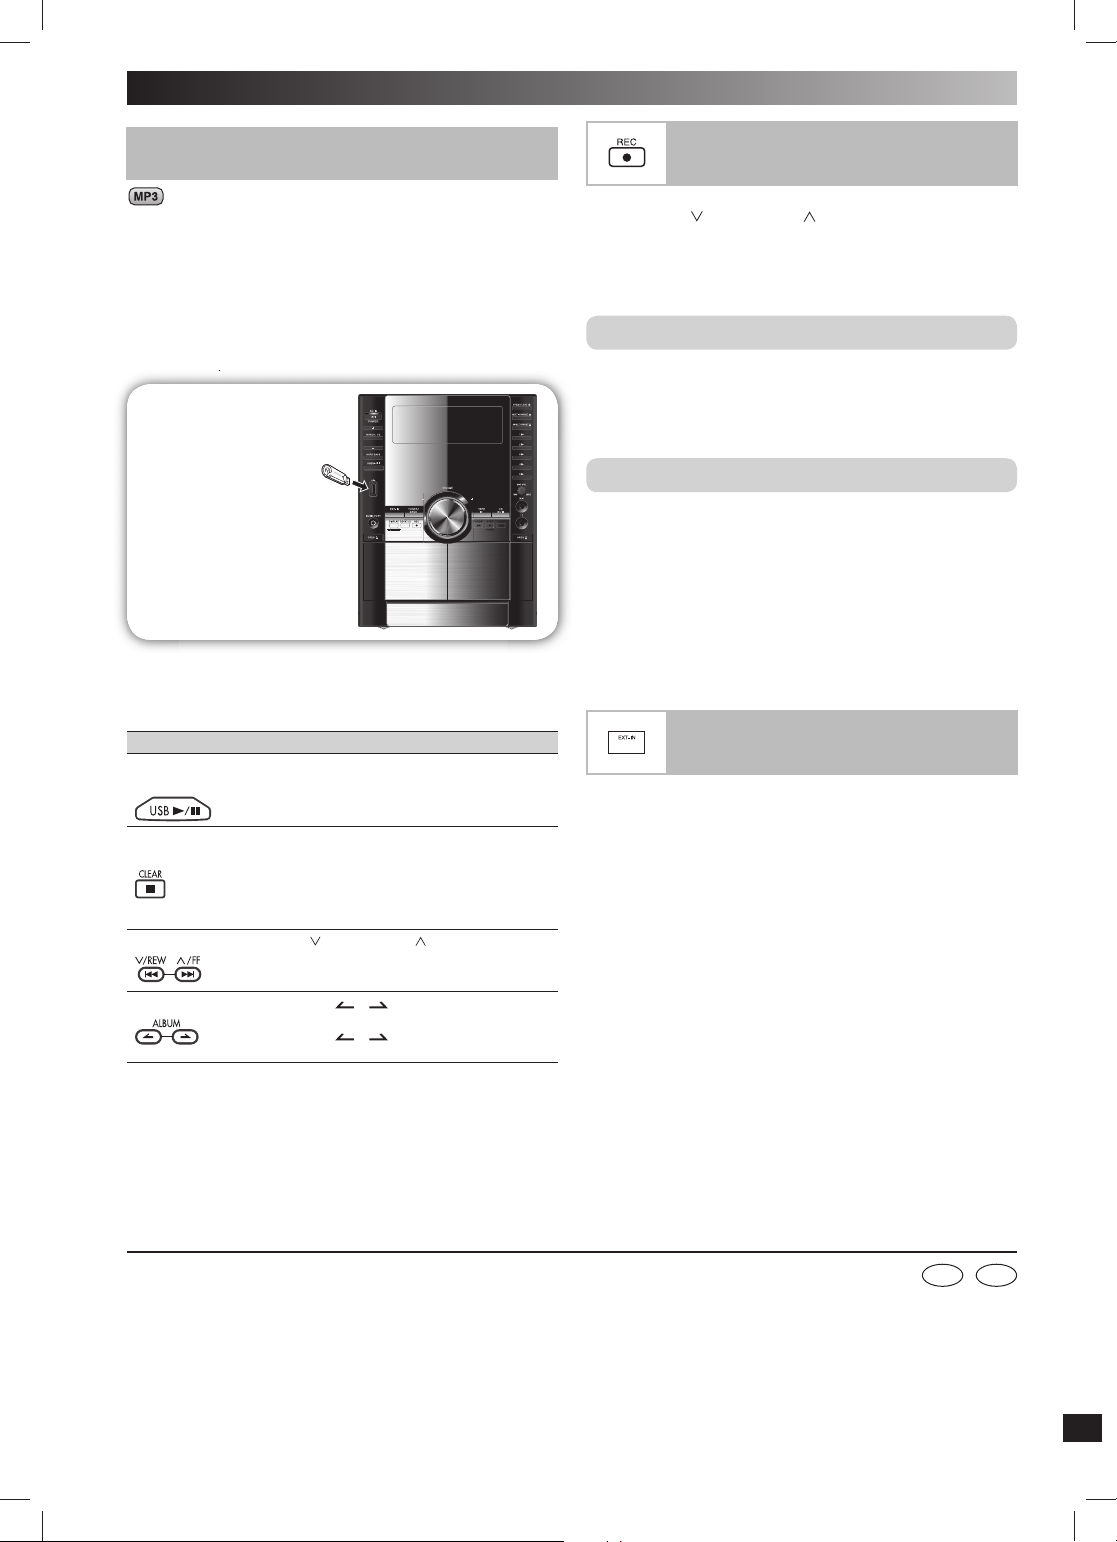
Equipo externo
Grabación desde un dispositivo de
tipo de almacenamiento masivo USB
Combiando la unidad principal y el
mando a distancia
Conexión y reproducción un dispositivo de tipo
de almacenamiento masivo USB
Conexión y reproducción un dispositivo de tipo
de almacenamiento masivo USB
La conectividad USB le permite conectar y reproducir pistas MP3 de
dispositivos de tipo de almacenamiento masivo USB. Normalmente,
dispositivos de memoria USB. (transferencia solo en masa)
Preparación
Antes de conectar cualquier dispositivo de almacenamiento masivo
USB a la unidad, asegúrese de que se ha hecho una copia de seguridad de los datos almacenados.
Se recomienda no utilizar un alargador USB. El dispositivo USB no
es reconocido por esta unidad.
Dispositivo USB permitido
(no suministrado)
Se recomienda no utilizar
un alargador USB. El
dispositivo conectado
a través del cable no
será reconocido por esta
unidad.
Reduzca el volumen y conecte el dispositivo de almacenami-
1
ento masivo USB.
Pulse [6, USB] para iniciar la reproducción.
2
Para Acción
interrumpir la
reproducción
parar reproducción
saltar pistas
saltar álbum
Para otras funciones de operación, son similares a aquellos descritos
en “Discos” (\ página 8 ~ 10).
Pulse [6, USB].
Vuelva a pulsar para reanudar la reproducción.
Pulse [7, CLEAR].
Se muestra “RESUME”. Se memorizará la
posición.
Pulse [6, USB] para reanudar.
Pulse [7, CLEAR] de nuevo para borrar la posición.
Pulse [4, / REW] o [¢, / FF].
Pulse [ALBUM ( o )] en el modo reproducción.
Pulse [ALBUM (
uación los botones numéricos en el modo paro.
o )] una vez y a contin-
Grabación desde un dispositivo de
tipo de almacenamiento masivo USB
Pulse
1
2
[4, / RE W ]
que desea grabar.
Pulse
[¶, REC] en la unidad principal para iniciar la
grabación.
o
[¢ , / FF]
para seleccionar la pista
Dispositivos compatibles
Dispositivos defi nidos como tipo de almacenamiento masivo
USB:
• Dispositivos USB que soportan sólo transferencia en masa.
• Dispositivos USB que soportan velocidad total USB 2.0.
Formatos admitidos
Los archivos han de tener la extensión “.mp3” o “.MP3”.
Nota:
• CBI (en inglés, Control/Bulk/Interrumpt) no es soportado.
• Un dispositivo que utilice el sistema de archivos NTFS no es
admitido. [Sólo los archivos de sistema FAT 12/16/32 (Cuadro de
asignación de archivo 12/16/32) son soportados].
• Dependiendo del tamaño del sector, algunos archivos no funcionarán.
• Esta unidad puede acceder hasta en 255 (incluidas carpetas
vacías) álbumes y 2500 pistas.
• El número máximo de pistas en una carpeta son 999.
Combiando la unidad principal y el
mando a distancia
El mando a distancia y la unidad principal vienen con el preajuste de
fábrica en el modo “REMOTE 1”.
Si su mando a distancia afecta a otro equipo durante su funcionamiento, puede cambiar para que funcione en el modo “REMOTE 2”.
Para cambiar al modo “REMOTE 2”
Mientras mantiene pulsado [EXT-IN] en la principal unidad
1
Mantenga pulsado [2] hasta que aparezca “REMOTE 2” en la
pantalla de la unidad principal.
Mantenga pulsado [ENTER] y [2] durante por lo menos 2
2
segundos.
La unidad principal y el mando a distancia están ajustados ahora
para funcionar en modo “REMOTE 2”.
Para volver al modo “REMOTE 1”
Realice los pasos 1 y 2 de arriba, pero use [1] en vez de [2] para
ambos pasos. (“REMOTE 1” aparece en la unidad principal durante
el paso 1.)
Panasonic Consumer Electronics
Company, Division of Panasonic
Corporation of North America
One Panasonic Way Secaucus,
New Jersey 07094
http://www.panasonic.com
Panasonic Puerto Rico, Inc.
Ave. 65 de Infantería, Km. 9.5
San Gabriel Industrial Park, Carolina,
Puerto Rico 00985
En Sp
© 2008 Panasonic Corporation
Printed in Malaysia
RQTX0169-P
L0708CS0
RQTX0169-P.indd 28RQTX0169-P.indd 28 7/18/08 9:25:48 AM7/18/08 9:25:48 AM
 Loading...