

Panasonic SBZT1 User Manual [en, de, es, fr, it, cs, pl]
Operating Instructions
Bedienungsanleitung
Istruzioni per l’uso
Mode d’emploi
ENGLISHDEUTSCHITALIANOFRANÇAISESPAÑOL
Speaker System
Heimkino-Audiosystem
Sistema audio Home Theather
Système audio pour Home Cinéma
Sistema de Cine en Casa
Home Theater Audiosysteem
Hjemmebiograf-lydsystem
Hommabiosystem
Zestaw audio do kina domowego
Sestava pro domácí kino
ᡀໄ఼㋏㒳
This speaker system is exclusively used for SC-ZT1. This unit is not stand-alone
equipment. (As of April, 2009)
Dear customer
Thank you for purchasing this product.
Before connecting, operating or adjusting this product, please read the
instructions completely.
Please keep this manual for future reference.
Dieses Lautsprechersystem ist nur in Verbindung mit dem SC-ZT1 verwendbar.
Dieses Produkt kann nicht als Einzelgerät betrieben werden. (Stand per April
2009)
Sehr geehrter Kunde,
wir danken Ihnen, dass Sie sich für dieses Produkt unseres Hauses entschieden
haben.
Bitte lesen Sie die Bedienungsanleitung vollständig durch, bevor Sie das Gerät
anschließen, in Betrieb setzen oder einstellen.
Bewahren Sie diese Bedienungsanleitung für spätere Bezugnahme griffbereit
auf.
Questo sistema diffusori è destinato esclusivamente all’utilizzo con l’unità SCZT1. Questa unità non è un apparecchio autonomo. (Aprile 2009)
Gentile cliente,
grazie per aver acquistato questo prodotto.
Prima di collegare, utilizzare o regolare il prodotto, leggere completamente le
istruzioni.
Conservare il presente manuale per un riferimento futuro.
Ce système d’enceintes est utilisé exclusivement avec le SC-ZT1. Cette unité
ne fonctionne pas de manière autonome. (Informations en vigueur en avril 2009)
Cher client
Merci d’avoir porté votre choix sur cet appareil.
Avant de brancher, d’utiliser ou de régler cet appareil, veuillez lire l’ensemble
des présentes instructions.
Conservez ce manuel pour pouvoir vous y référer ultérieurement.
Este sistema de altavoces es de uso exclusivo para SC-ZT1. Esta unidad no es
un equipo de uso individual. (A fecha de abril de 2009)
Estimado cliente:
Muchísimas gracias por haber adquirido este producto.
Antes de conectar, utilizar o ajustar este producto, lea con detenimiento y por
completo estas instrucciones.
Guarde este manual para consultarlo en el futuro.
Dit luidsprekersysteem wordt uitsluitend gebruikt voor de SC-ZT1. Dit apparaat
is een afzonderlijke installatie. (Vanaf april 2009)
Geachte klant
Wij danken u voor de aankoop van dit product.
Lees deze gebruiksaanwijzing volledig door alvorens u dit product aansluit,
bedient of afstelt.
Bewaar deze gebruiksaanwijzing voor latere naslag.
Note
“E”, “GN” and “GS” are indicated on the packaging box.
“E”, “GN” y “GS” se indican en la caja de embalaje.
Instrucciones de funcionamiento
Gebruiksaanwijzing
Betjeningsvejledning
Bruksanvisning
Instrukcja obs³ugi
Návod k obsluze
Փ⫼䇈ᯢк
Model No. SB-ZT1
Dette højtaleranlæg er udelukkende beregnet til brug med SC-ZT1. Dette anlæg
er ikke udstyr, som kan stå alene. (fra april 2009)
Kære kunde
Tak fordi du har købt dette produkt.
Læs venligst denne vejledning i hele sin udstrækning, før du tilslutter, indstiller
og anvender dette produkt.
Gem venligst denne brugsvejledning til senere konsultation.
Detta högtalarsystem används exklusivt för SC-ZT1. Denna enhet är ingen
självständig utrustning. (Från och med april 2009)
Bäste kund
Tack för ditt val av denna produkt.
Läs denna bruksanvisning helt innan du ansluter, använder eller justerar denna
produkt.
Spara denna bruksanvisning för kommande referens.
Niniejszy zestaw g³ośników mo¿e byæ eksploatowany ³¹cznie z urz¹dzeniem
SC-ZT1. Nie stanowi on osobnego sprzêtu. (Stan na kwiecieñ 2009 r.)
Szanowny Kliencie
Dziêkujemy za zakup niniejszego urz¹dzenia.
Przed pod³¹czeniem, obs³ug¹ lub regulacj¹ urz¹dzenia, prosimy zapoznaæ siê z
ca³¹ instrukcj¹.
Instrukcjê nale¿y zachowaæ do u¿ytku w przysz³ości.
Niniejsza instrukcja zosta³a opracowana na podstawie oryginalnej publikacji
firmy Panasonic Corporation.
Tento systém reproduktorù je používán výhradnì pro SC-ZT1. Nejedná se o
samostatné zaøízení. (stav: duben 2009)
Vážený zákazníku
Dìkujeme, že jste si zakoupil tento výrobek.
Døíve, než se pustíte do zapojování a zaènete výrobek používat èi provádìt
nastavování, prostudujte si prosím celý tento návod.
Uschovejte si prosím tento návod k obsluze.
ᴀᡀໄ఼㋏㒳ᰃ 6&=7 ϧ⫼ⱘᡀໄ఼㋏㒳DŽᴀ㺙㕂ϡሲѢ⣀ゟ䆒DŽ˄㟇
ᑈ᳜˅
ᇞᭀⱘᅶ᠋
ᛳ䇶ᙼ䌁фᴀѻકDŽ
䖲ǃ᪡䇗ᭈᴀѻકПࠡˈ䇋䆺ሑ䯙䇏Փ⫼䇈ᯢDŽ
䇋ཹֱᄬᴀݠҹ᮹ৢᶹ䯙DŽ
(2009 ŌóĿàƈ Ŏð ƫIJóƌĽà) .ŏáƌľà ƫİĦĤöûð ƫƌƗİĩã ijûĪï ƎĽäŐïƌ Ƨľòƨ .SC-ZT1 Ōãƈ Ŏð ƫİóĿĝä ƌľò ƏŐĝïƌ Ŀõĥð ƥİĠñ ƥĽúöûƯó
.Ōðİĥïİà ƏİħĪĦġöïƌ ƎƆƌĿí ƆİãĿà ŸŏğõŖ ƨƈ ŏĦĪĢĜá ƨƈ ĵöĨħïƌ ƌľò ŌĪřŐá Ōõí
(2009 ŌǟƖƨƇ Ɨƌ) .ijûŗñ ŌĤöûð Ǟáƌŀŗĩøá ƧİŘöæƔ Ŏǟƌ .ijæƌ ƧĽç ǞäƌĿè SC-ZT1 ǐƌĿà ƫƌĿĝùĨð ŐŞĽĨĦà ōöûŗæ Ŏǟƌ
.ĽŗǟİðĿì ŏġïİğð ijíƔ ŏà ƌƖ İò ŌħġïƌƖŐöæƔ ƫİģğï ŸƤŐĝùð Ŏǟƌ ōŗĠĨá İǟ ǐƗƌĽñƌ ƧƌƖ ŸƤİĝáƌ Ɨƌ Ōõí
.ŌõĤöûħïƌ Œì ŏĪïƊ ƞŐãĿĦï ŌĪïĽïƌ ƌľĩà Ɲİģöäİïƌ őãĿƯóƨ
.ōǟĿǥĜöð ƤŐĝùð Ŏǟƌ ĽǟĿå ƨ İħç ƍİúöñƌ Ŏûä Ɨƌ
.ĽǟƖƌƔ ŏŘñ ǐĽġà ƏİġãƌĿð ǐƌĿà ƌƖ İħĨòƌƖ ŏśĿöìƔ Ŏǟƌ ƫİģğï
ĹìĹĚèƅ ĩġģğĠã
.ĵöĨħïƌ ƌľò ƆƌĿç őĦê ŋï ƫƌĿĥç
ǵéƅĸŗ Ǫĸïĕé
NEDERLANDS
DANSKSVENSKAPOLSKI
ÈESKY
EGNGS
RQT9462-1E
-If you see this symbol-
Information on Disposal for Users of Waste Electrical &
Electronic Equipment (private households)
This symbol on the products and/or accompanying
documents means that used electrical and
electronic products should not be mixed with
general household waste.
For proper treatment, recovery and recycling,
please take these products to designated collection points, where
they will be accepted on a free of charge basis. Alternatively, in
some countries you may be able to return your products to your
local retailer upon the purchase of an equivalent new product.
Disposing of this product correctly will help to save valuable
resources and prevent any potential negative effects on human
health and the environment which could otherwise arise from
inappropriate waste handling. Please contact your local authority
for further details of your nearest designated collection point.
Penalties may be applicable for incorrect disposal of this waste, in
accordance with national legislation.
For business users in the European Union
If you wish to discard electrical and electronic equipment, please
contact your dealer or supplier for further information.
Information on Disposal in other Countries outside the
European Union
This symbol is only valid in the European Union.
If you wish to discard this product, please contact your local
authorities or dealer and ask for the correct method of disposal.
NORSK
ADVARSEL!
APPARATET MÅ IKKE PLASSERES I EN BOKHYLLE, ET
•
INNEBYGGET KABINETT ELLER ET ANNET LUKKET STED
HVOR VENTILASJONSFORHOLDENE ER UTILSTREKKELIGE.
SØRG FOR AT GARDINER ELLER LIGNENDE IKKE FORVERRER
VENTILASJONSFORHOLDENE, SÅ RISIKO FOR ELEKTRISK
SJOKK ELLER BRANN FORÅRSAKET AV OVERHETING UNNGÅS.
• APPARATETS VENTILASJONSÅPNINGER MÅ IKKE DEKKES
TIL MED AVISER, BORDDUKER, GARDINER OG LIGNENDE.
•
PLASSER IKKE ÅPEN ILD, SLIK SOM LEVENDE LYS, OPPÅ APPARATET.
•
BRUKTE BATTERIER MÅ KASSERES UTEN FARE FOR MILJØET.
Strømuttaket må befi nne seg i nærheten av utstyret og være lett tilgjengelig.
Støpslet på strømkabelen må være klart til bruk.
Når dette apparatet skal kobles helt fra strømnettet (AC), må
støpslet på strømkabelen trekkes ut av stikkontakten.
ADVARSEL:
FØLG NEDENSTÅENDE INSTRUKSER FOR Å REDUSERE RISIKOEN
FOR BRANN, ELEKTRISK STØT OG SKADE PÅ PRODUKTET:
DETTE APPARATET MÅ IKKE UTSETTES FOR REGN,
•
FUKTIGHET, DRYPP ELLER SPRUT, OG INGEN
VÆSKEFYLTE GJENSTANDER, SOM F.EKS. VASER, MÅ
PLASSERES PÅ APPARATET.
BRUK KUN ANBEFALT TILBEHØR.
•
IKKE FJERN DEKSELET (ELLER BAKSIDEN); APPARATET
•
INNEHOLDER INGEN DELER SOM KAN SKIFTES ELLER
REPARERES AV BRUKEREN. OVERLAT TIL KVALIFISERTE
SERVICETEKNIKERE Å UTFØRE SERVICE.
CAUTION!
DO NOT INSTALL OR PLACE THIS UNIT IN A BOOKCASE,
•
BUILT-IN CABINET OR IN ANOTHER CONFINED SPACE.
ENSURE THE UNIT IS WELL VENTILATED. TO PREVENT
RISK OF ELECTRIC SHOCK OR FIRE HAZARD DUE TO
OVERHEATING, ENSURE THAT CURTAINS AND ANY OTHER
MATERIALS DO NOT OBSTRUCT THE VENTILATION VENTS.
DO NOT OBSTRUCT THE UNIT’S VENTILATION OPENINGS WITH
•
NEWSPAPERS, TABLECLOTHS, CURTAINS, AND SIMILAR ITEMS.
DO NOT PLACE SOURCES OF NAKED FLAMES, SUCH AS
•
LIGHTED CANDLES, ON THE UNIT.
DISPOSE OF BATTERIES IN AN ENVIRONMENTALLY
•
FRIENDLY MANNER.
The socket outlet shall be installed near the equipment and easily
accessible.The mains plug of the power supply cord shall remain
readily operable.
To completely disconnect this apparatus from the AC Mains,
disconnect the power supply cord plug from AC receptacle.
WARNING:
TO REDUCE THE RISK OF FIRE, ELECTRIC SHOCK OR
PRODUCT DAMAGE,
DO NOT EXPOSE THIS APPARATUS TO RAIN, MOISTURE, DRIPPING
•
OR SPLASHING AND THAT NO OBJECTS FILLED WITH LIQUIDS,
SUCH AS VASES, SHALL BE PLACED ON THE APPARATUS.
USE ONLY THE RECOMMENDED ACCESSORIES.
•
DO NOT REMOVE THE COVER (OR BACK); THERE ARE NO
•
USER SERVICEABLE PARTS INSIDE. REFER SERVICING TO
QUALIFIED SERVICE PERSONNEL.
This product may receive radio interference caused by mobile
telephones during use. If such interference is apparent, please
increase separation between the product and the mobile telephone.
SUOMI
VAROITUS!
•
ÄLÄ ASENNA TAI LAITA TÄTÄ LAITETTA KABINETTITYYPPISEEN
KIRJAKAAPPIIN TAI MUUHUN SULJETTUUN TILAAN, JOTTA
TUULETUS ONNISTUISI. VARMISTA, ETTÄ VERHO TAI MIKÄÄN
MUU MATERIAALI EI HUONONNA TUULETUSTA, JOTTA
VÄLTETTÄISIIN YLIKUUMENEMISESTA JOHTUVA SÄHKÖISKUTAI TULIPALOVAARA.
• ÄLÄ PEITÄ LAITTEEN TUULETUSAUKKOJA
SANOMALEHDELLÄ, PÖYTÄLIINALLA, VERHOLLA TAI
MUULLA VASTAAVALLA ESINEELLÄ.
• ÄLÄ ASETA PALAVAA KYNTTILÄÄ TAI MUUTA AVOTULEN
LÄHDETTÄ LAITTEEN PÄÄLLE.
• HÄVITÄ PARISTOT LUONTOA VAHINGOITTAMATTOMALLA
TAVALLA.
Pistorasia tulee asentaa laitteen lähelle helppopääsyiseen paikkaan.
Verkkojohdon pistokkeen on oltava aina helposti käytettävissä.
Tämä laite voidaan kytkeä kokonaan irti verkkovirrasta irrottamalla
pistoke pistorasiasta.
VAROITUS:
VÄHENNÄ TULIPALON, SÄHKÖISKUN TAI LAITTEISTON
VAHINGOITTUMISEN VAARAA
TÄTÄ LAITETTA EI SAA ALTISTAA SATEELLE, KOSTEUDELLE,
•
ROISKEILLE TAI TIPPUVILLE NESTEILLE. LAITTEEN
PÄÄLLE EI SAA MYÖSKÄÄN ASETTAA MITÄÄN NESTEELLÄ
TÄYTETTYÄ ESINETTÄ, KUTEN MALJAKKOA.
KÄYTÄ VAIN SUOSITELTUJA LISÄVARUSTEITA.
•
ÄLÄ IRROTA KANTTA (TAI TAUSTAA). SISÄLLÄ EI OLE
•
KÄYTTÄJÄN HUOLLETTAVISSA OLEVIA OSIA. HUOLLON
SAA SUORITTAA VAIN AMMATTITAITOINEN HENKILÖKUNTA.
For E, GN
For Singapore
Complies with
IDA Standards
RQT9462
2
2
THIS UNIT IS INTENDED FOR USE IN MODERATE CLIMATES.
SUOMI
DB01017
TÄMÄ LAITE ON TARKOITETTU KÄYTETTÄVÄKSI LEUDOSSA
ILMASTOSSA.
NORSK
DETTE APPARATET ER BEREGNET TIL BRUK UNDER
MODERATE KLIMAFORHOLD.
For GS
THIS UNIT IS INTENDED FOR USE IN TROPICAL CLIMATES.
ENGLISH
Declaration of Conformity (DoC)
Hereby, “Panasonic Corporation”, declares that this product is in
compliance with the essential requirements and other relevant
provisions of Directive 1999/5/EC.
Customers can download a copy of the original DoC to our R&TTE
products from our DoC server:
http://www.doc.panasonic.de
Contact to Authorised Representative: Panasonic Marketing Europe
GmbH, Panasonic Testing Centre, Winsbergring 15, 22525 Hamburg,
Germany
This product is intended to be used in the following countries.
AT, BE, BG, CY, CZ, DK, EE, FI, FR, DE, GR, HU, IS, IE, IT, LV, LI, LT,
LU, MT, NL, NO, PL, PT, RO, SK, SI, ES, SE, CH, GB
This product is intended for general consumer. (Category 3)
NORSK
Samsvarserklæring
“Panasonic Corporation” erklærer herved at dette produktet samsvarer
med de vesentlige krav og andre relevante bestemmelser i direktiv
1999/5/EF.
Kundene kan laste ned en kopi av den originale samsvarserklæringen
til vårt radio- og teleterminalutstyr (R&TTE) fra serveren (DoCserveren)
vår:
http://www.doc.panasonic.de
Kontakt vår autoriserte representant: Panasonic Marketing Europe
GmbH, Panasonic Testing Centre, Winsbergring 15, 22525 Hamburg,
Tyskland
Dette produktet er beregnet på bruk i følgende land:
AT, BE, BG, CY, CZ, DK, EE, FI, FR, DE, GR, HU, IS, IE, IT, LV, LI, LT,
LU, MT, NL, NO, PL, PT, RO, SK, SI, ES, SE, CH, GB
Dette produktet er tiltenkt vanlige forbrukere. (Kategori 3)
SUOMI
Caution for AC Mains Lead
(For the United Kingdom, Republic of Ireland, Saudi Arabia, Kuwait,
Malaysia and Hong Kong)
For your safety, please read the following text carefully.
This appliance is supplied with a moulded three pin mains plug for
your safety and convenience.
A 5-ampere fuse is fitted in this plug.
Should the fuse need to be replaced please ensure that the replacement fuse
has a rating of 5-ampere and that it is approved by ASTA or BSI to BS1362.
Check for the ASTA mark or the BSI mark on the body of the fuse.
If the plug contains a removable fuse cover you must ensure that it is
refitted when the fuse is replaced.
If you lose the fuse cover the plug must not be used until a
replacement cover is obtained.
A replacement fuse cover can be purchased from your local dealer.
CAUTION!
IF THE FITTED MOULDED PLUG IS UNSUITABLE FOR THE SOCKET
OUTLET IN YOUR HOME THEN THE FUSE SHOULD BE REMOVED
AND THE PLUG CUT OFF AND DISPOSED OF SAFELY.
THERE IS A DANGER OF SEVERE ELECTRICAL SHOCK IF THE
CUT OFF PLUG IS INSERTED INTO ANY 13-AMPERE SOCKET.
If a new plug is to be fitted please observe the wiring code as stated below.
If in any doubt please consult a qualified electrician.
IMPORTANT
The wires in this mains lead are coloured in accordance with the following code:
Blue: Neutral, Brown: Live.
As these colours may not correspond with the coloured markings
identifying the terminals in your plug, proceed as follows:
The wire which is coloured Blue must be connected to the terminal
which is marked with the letter N or coloured Black or Blue.
The wire which is coloured Brown must be connected to the terminal
which is marked with the letter L or coloured Brown or Red.
WARNING: DO NOT CONNECT EITHER WIRE TO THE EARTH
TERMINAL WHICH IS MARKED WITH THE LETTER E, BY THE
EARTH SYMBOL OR COLOURED GREEN OR GREEN/YELLOW.
THIS PLUG IS NOT WATERPROOF–KEEP DRY.
Before use
Remove the connector cover.
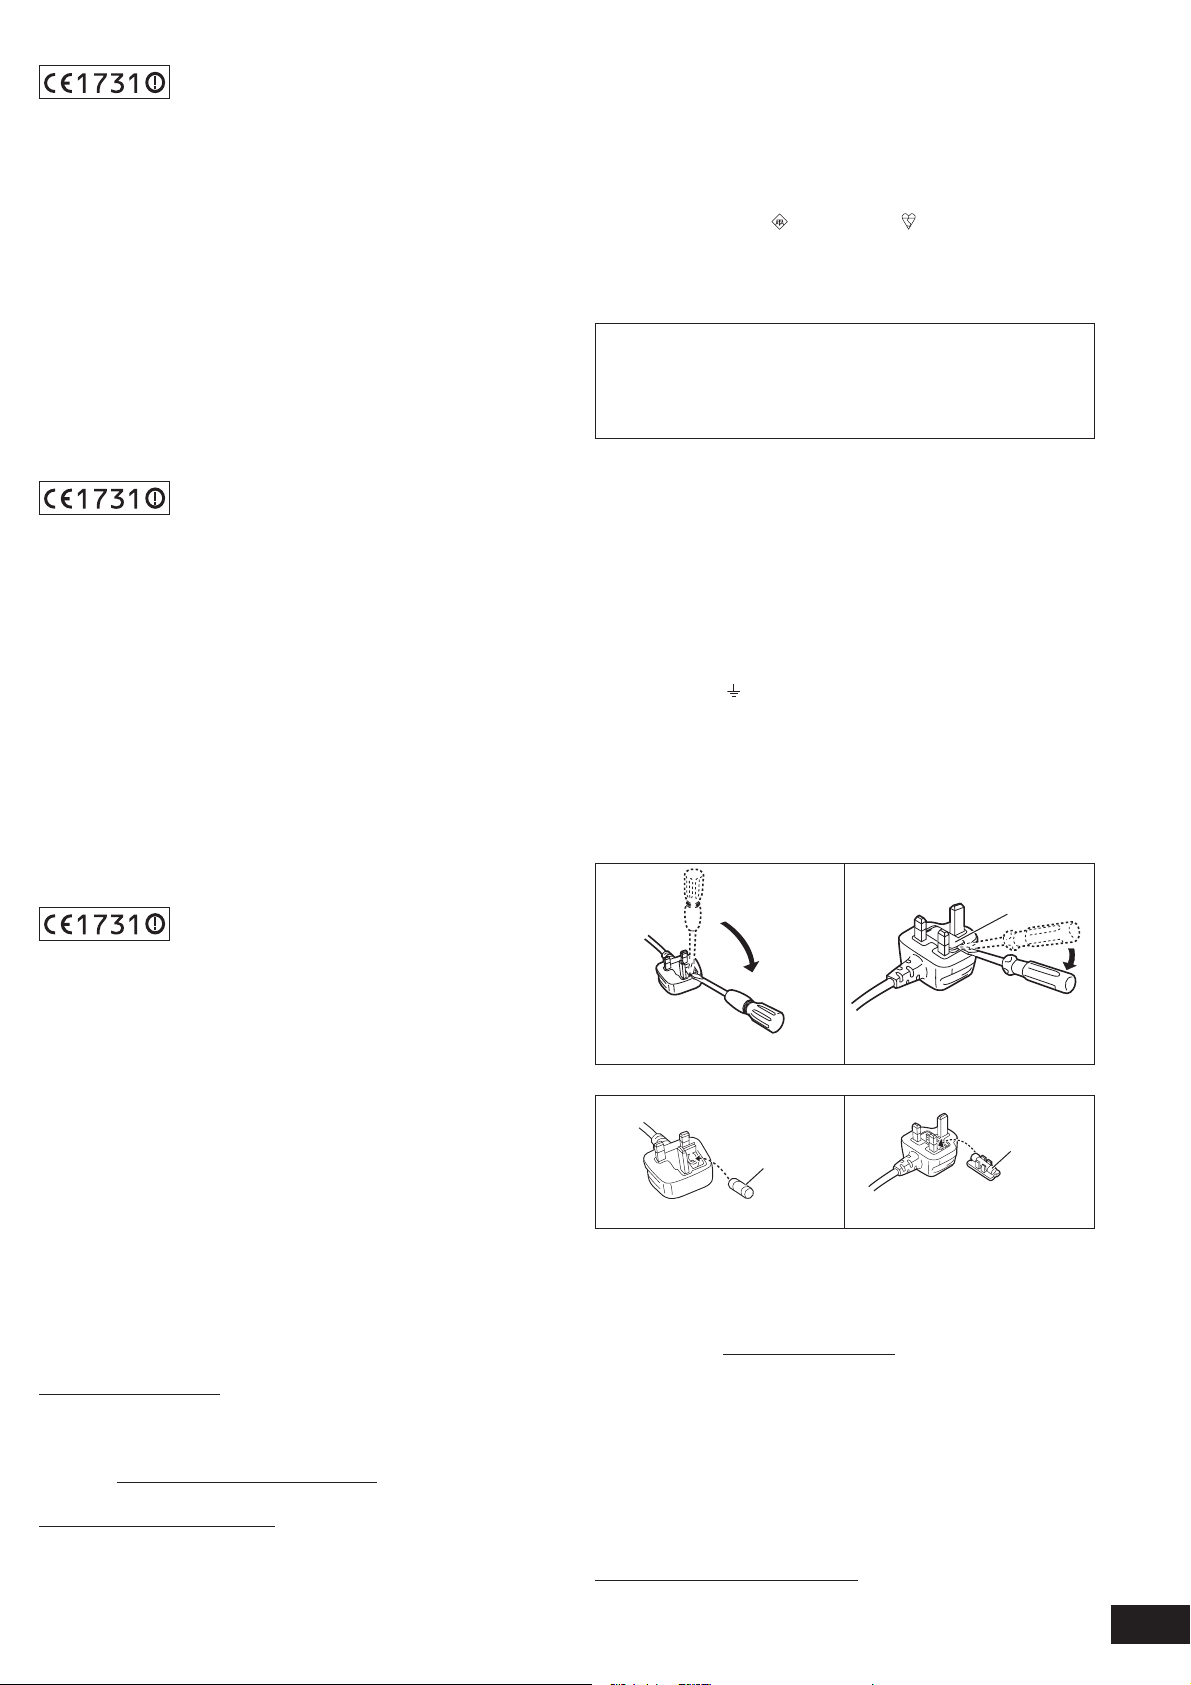
How to replace the fuse
The location of the fuse differ according to the type of AC mains plug
(figures A and B). Confirm the AC mains plug fitted and follow the
instructions below. Illustrations may differ from actual AC mains plug.
1. Open the fuse cover with a screwdriver.
Figure A Figure B
Fuse cover
Vaatimustenmukaisuusvakuutus
“Panasonic Corporation” ilmoittaa, että tämä tuote täyttää direktiivin
1999/5/EY olennaiset vaatimukset ja muut asiaankuuluvat ehdot.
Asiakkaat voivat ladata kopion R&TTE-tuotteiden alkuperäisestä
vaatimustenmukaisuusvakuutukse sta DoC-palvelimeltamme:
http://www.doc.panasonic.de
Valtuutetun edustajan yhteystiedot: Panasonic Marketing Europe
GmbH, Panasonic Testing Centre, Winsbergring 15, 22525 Hamburg,
Saksa
Tämä tuote on tarkoitettu käytettäväksi seuraavissa maissa.
AT, BE, BG, CY, CZ, DK, EE, FI, FR, DE, GR, HU, IS, IE, IT, LV, LI, LT,
LU, MT, NL, NO, PL, PT, RO, SK, SI, ES, SE, CH, GB
Tämä tuote on tarkoitettu kuluttajakäyttöön. (Luokka 3)
Sales and Support Information
(For the United Kingdom and Republic of Ireland)
Customer Care Centre
• For customers within the UK: 0844 844 3852
• For customers within the Republic of Ireland: 01 289 8333
• Visit our website for product information
• E-mail: customer.care@panasonic.co.uk
Direct Sales at Panasonic UK
• For customers: 0844 844 3856
• Order accessory and consumable items for your product
with ease and confidence by phoning our Customer Care
Centre Monday-Thursday 9:00am-5:30pm, Friday 9:30am5:30pm (Excluding public holidays).
2. Replace the fuse and close or attach the fuse cover.
Figure A Figure B
Fuse
(5 ampere)
Fuse
(5 ampere)
• Or go on line through our Internet Accessory ordering
application at www.panasonic.co.uk.
• Most major credit and debit cards accepted.
• All enquiries transactions and distribution facilities are
provided directly by Panasonic UK Ltd.
• It couldn’t be simpler!
• Also available through our Internet is direct shopping for
a wide range of finished products, take a browse on our
website for further details.
Interested in purchasing an extended guarantee?
Please call 0870 240 6284 or visit our website
www.panasonic.co.uk/guarantee.
RQT9462
3
3
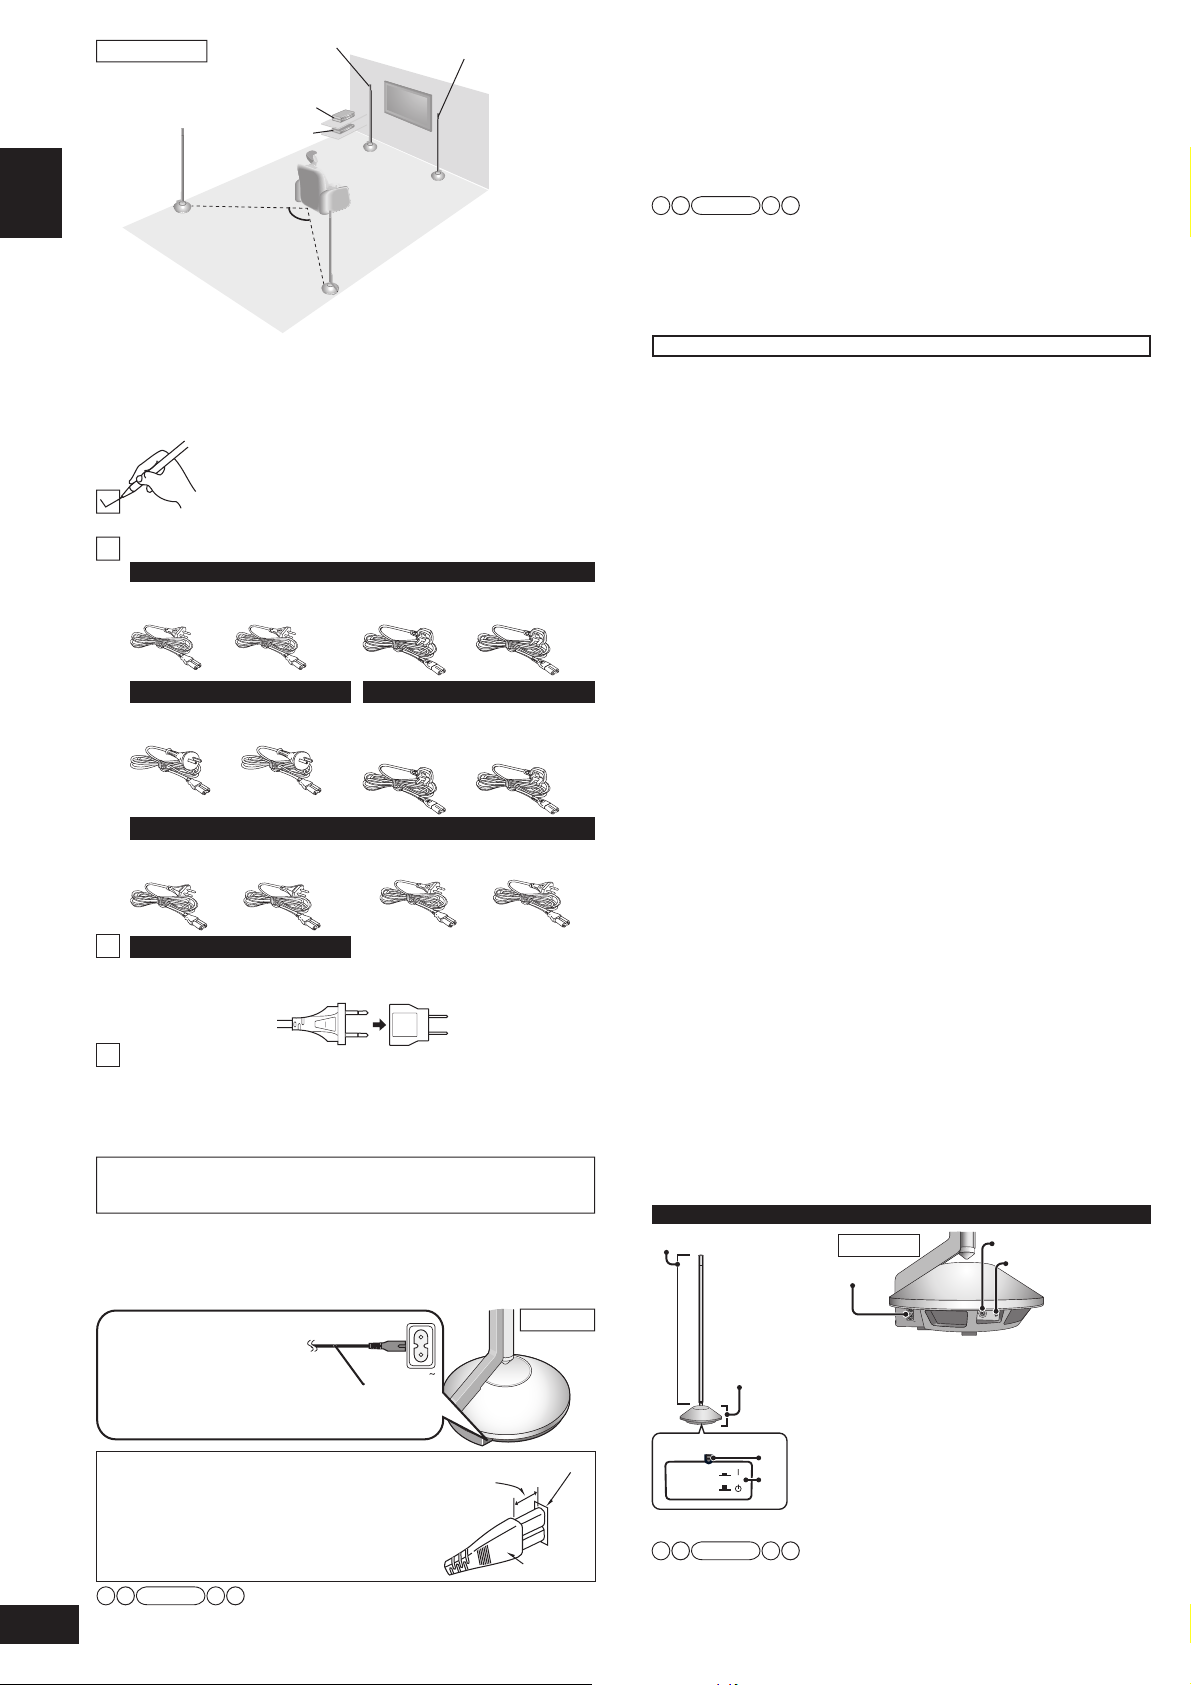
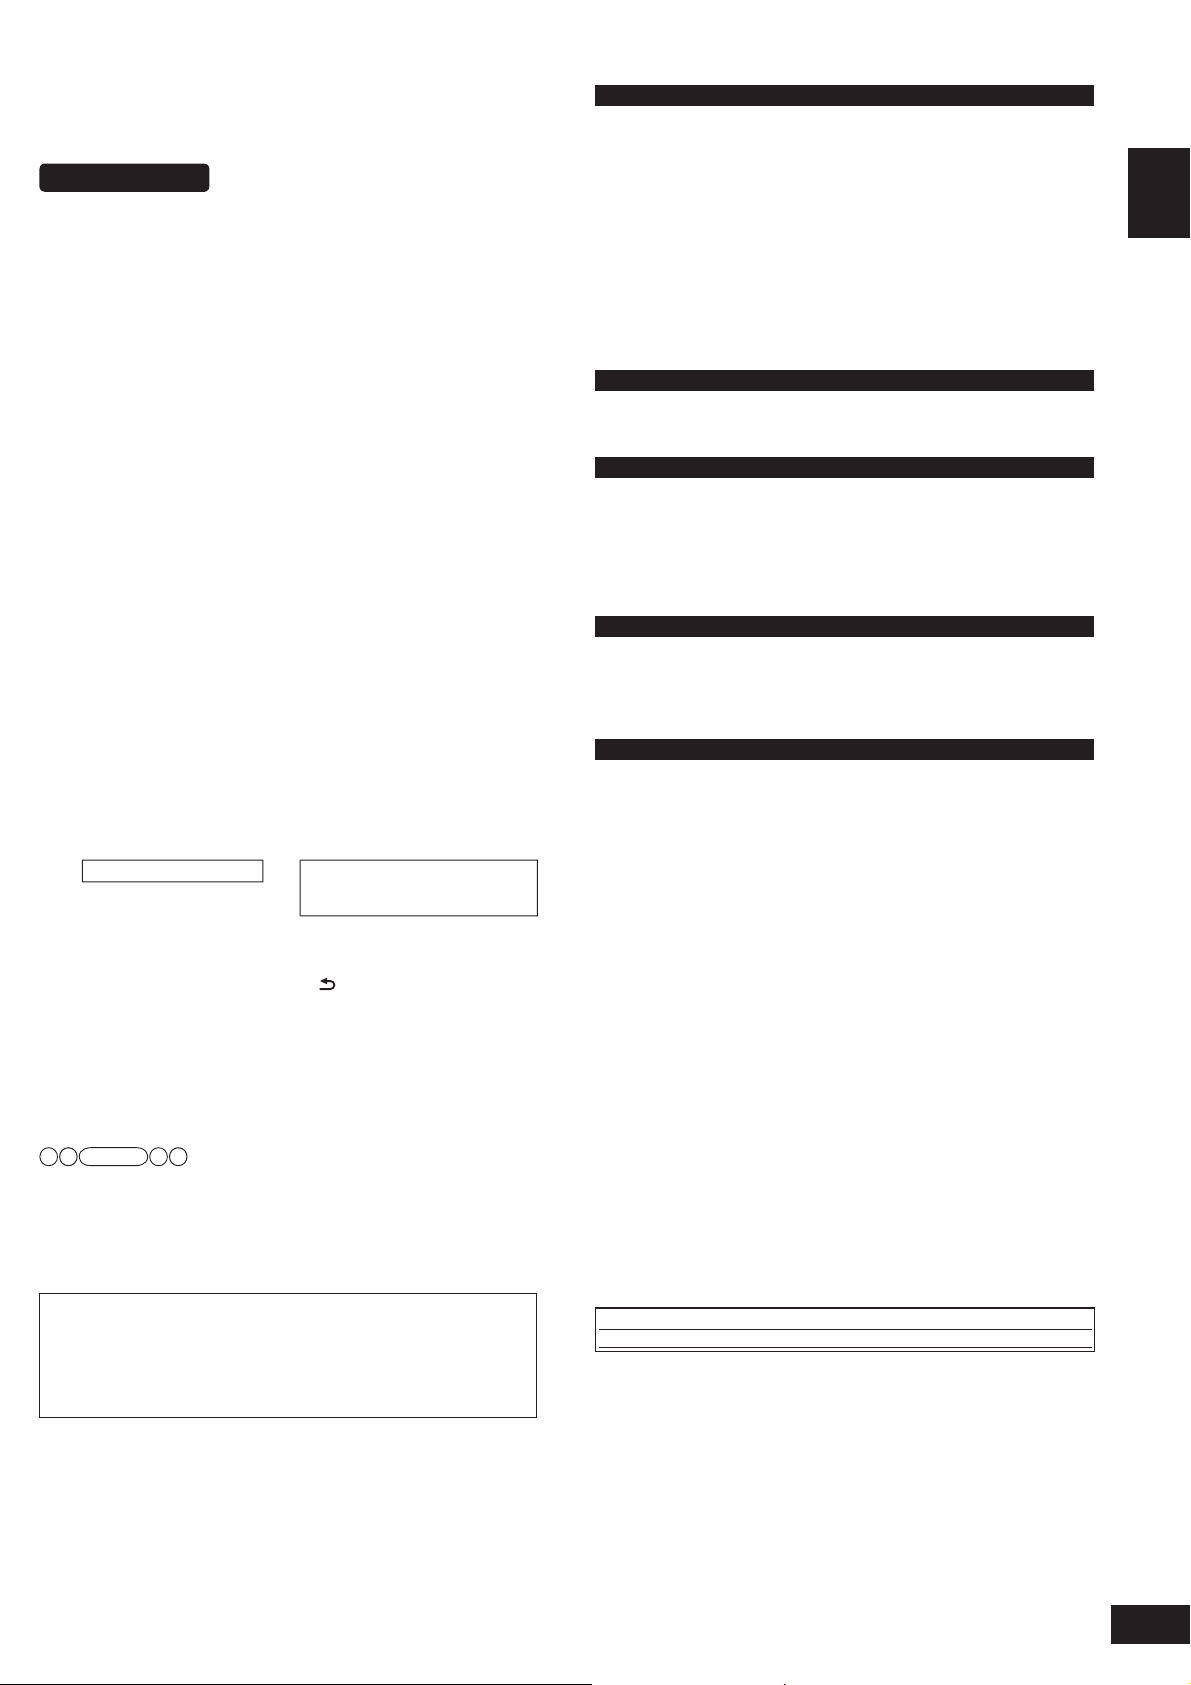
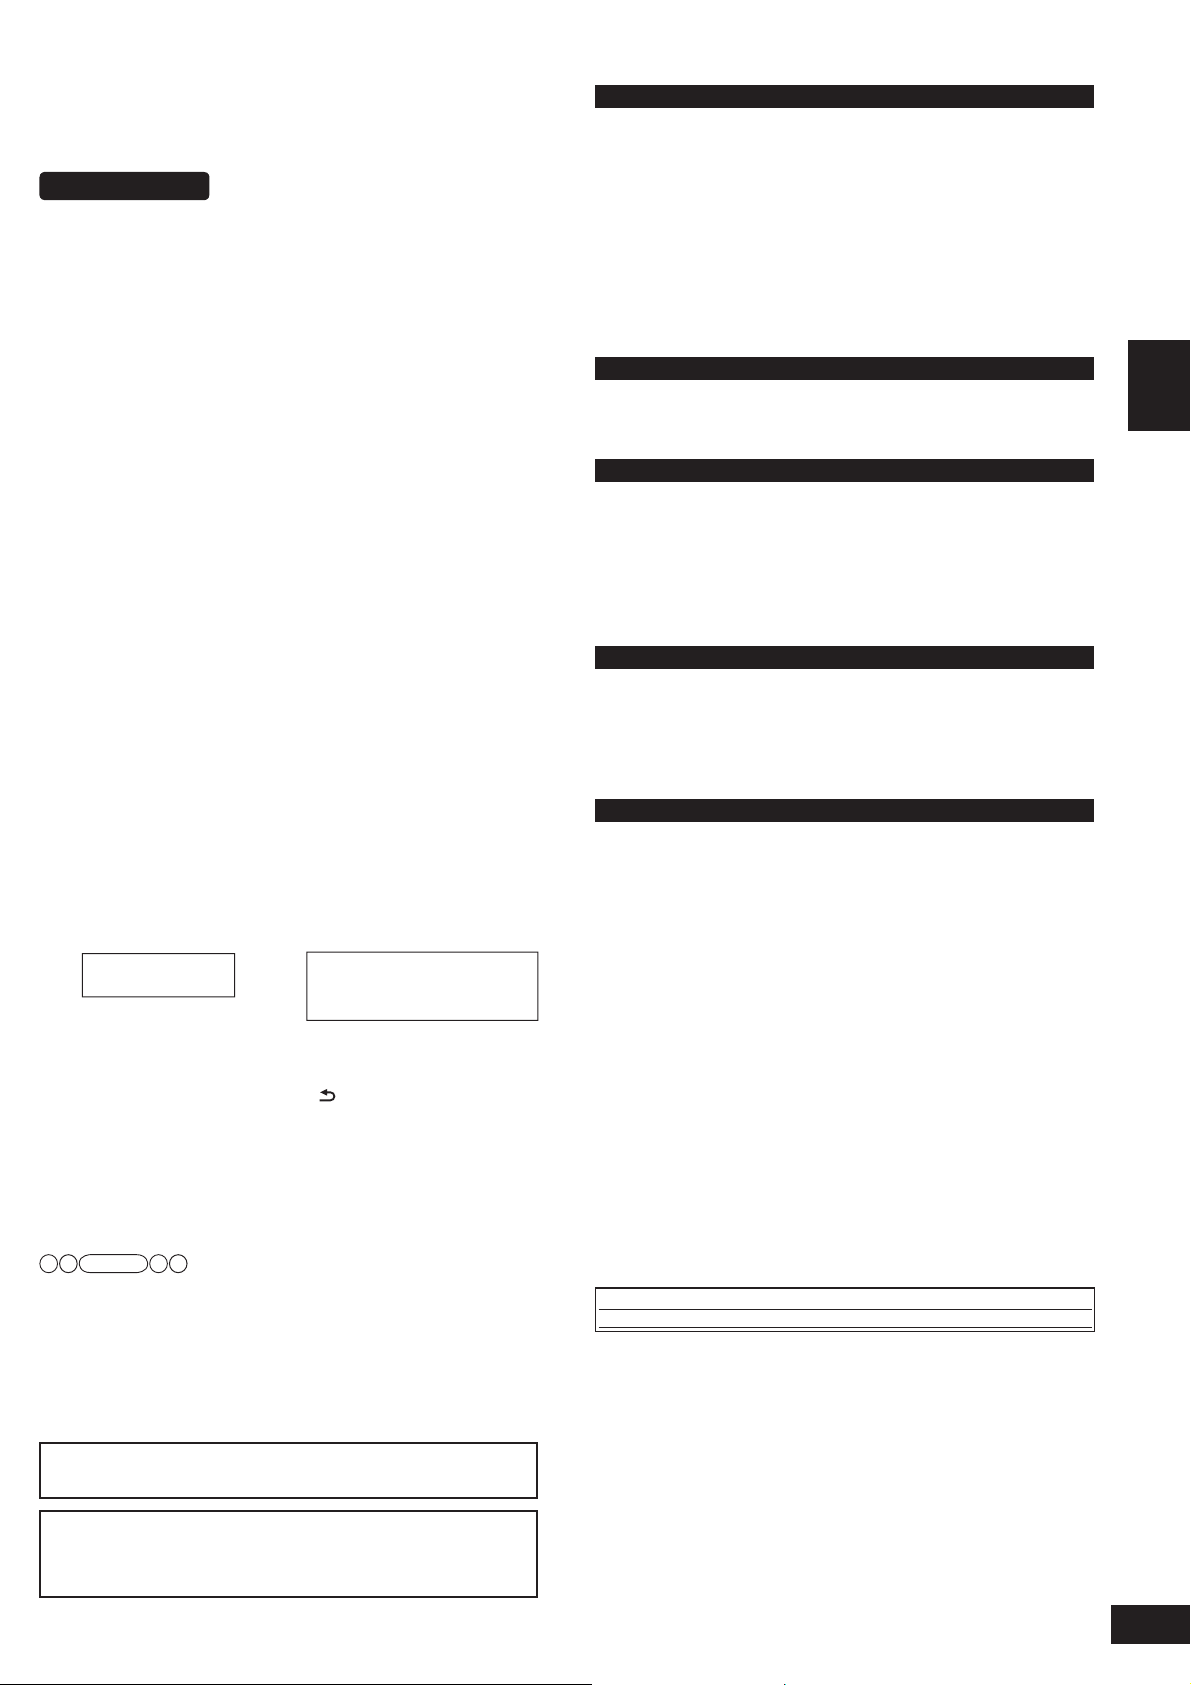
Setup example
Connected equipment
Surround
speaker
(left)
ENGLISH
• Aim the front face (with Panasonic logo) of each speaker at the
listening-viewing position for setting.
•
Place the surround speakers slightly at the back right and left of the listening-viewing position.
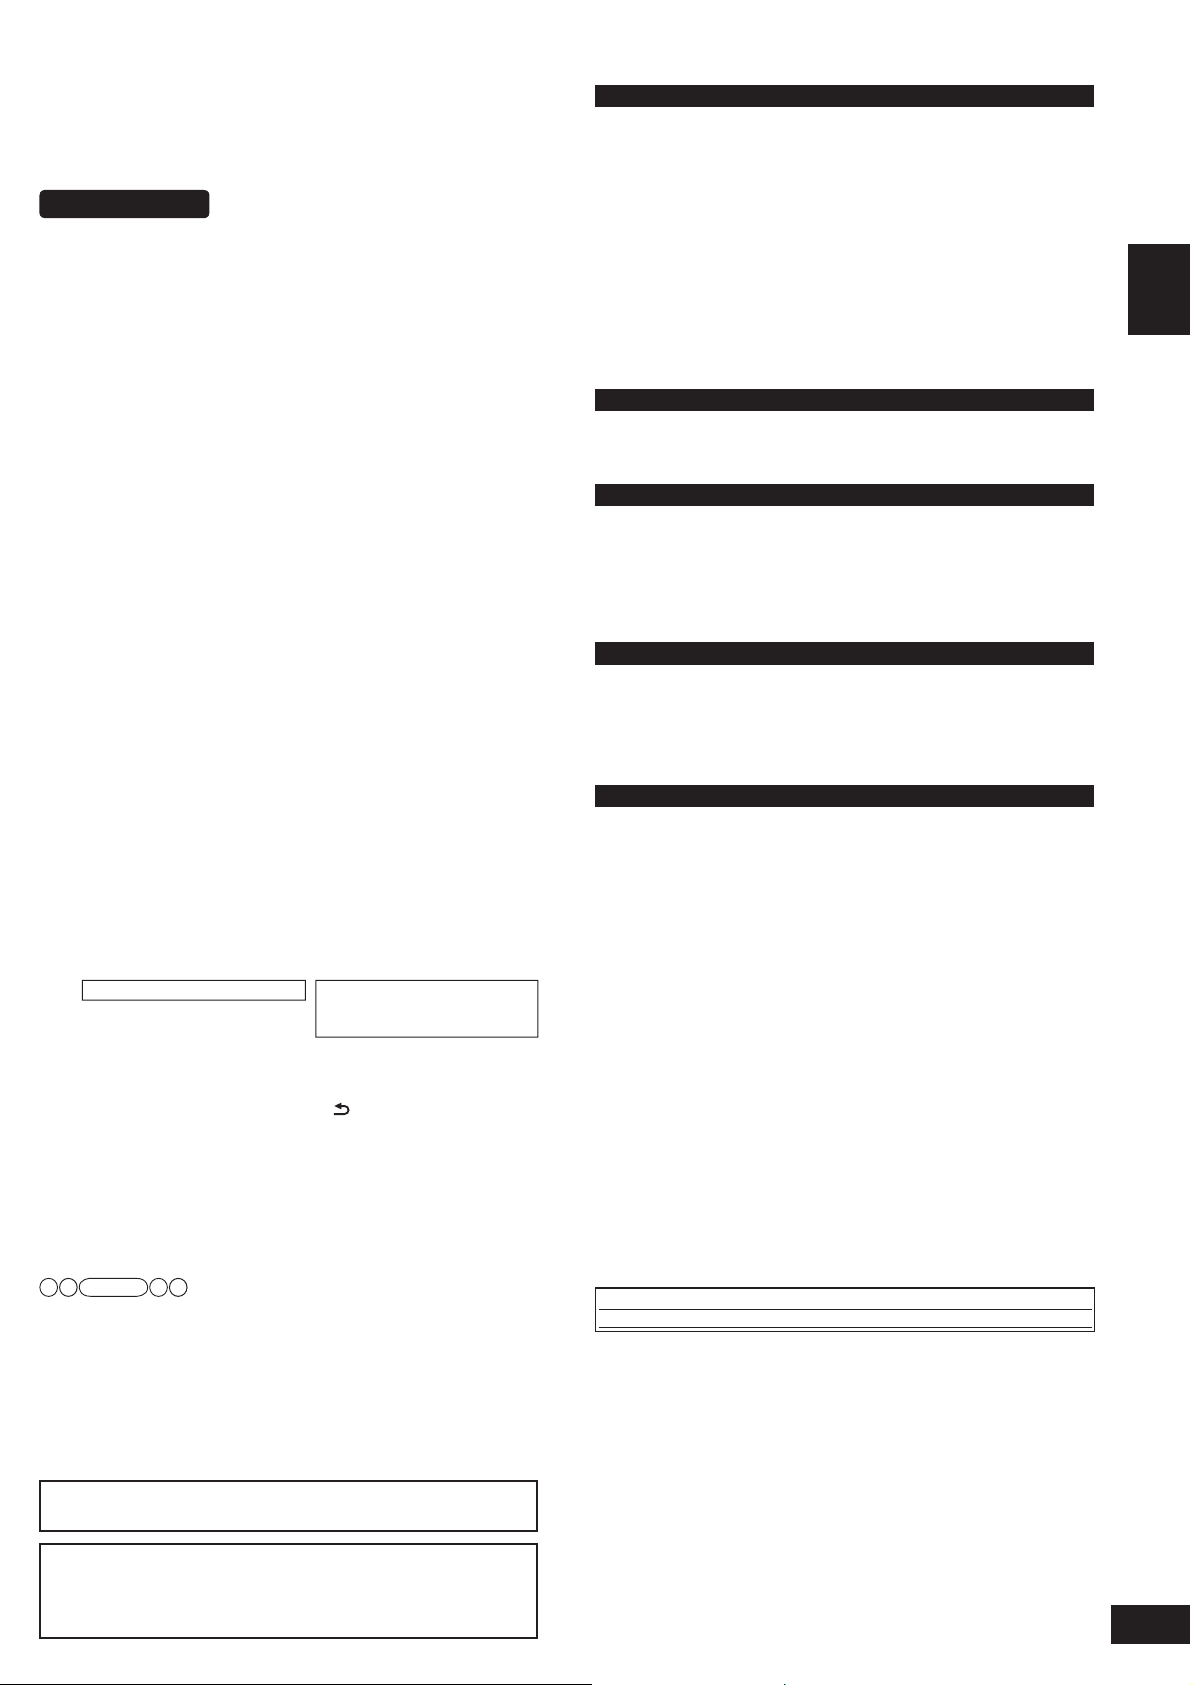
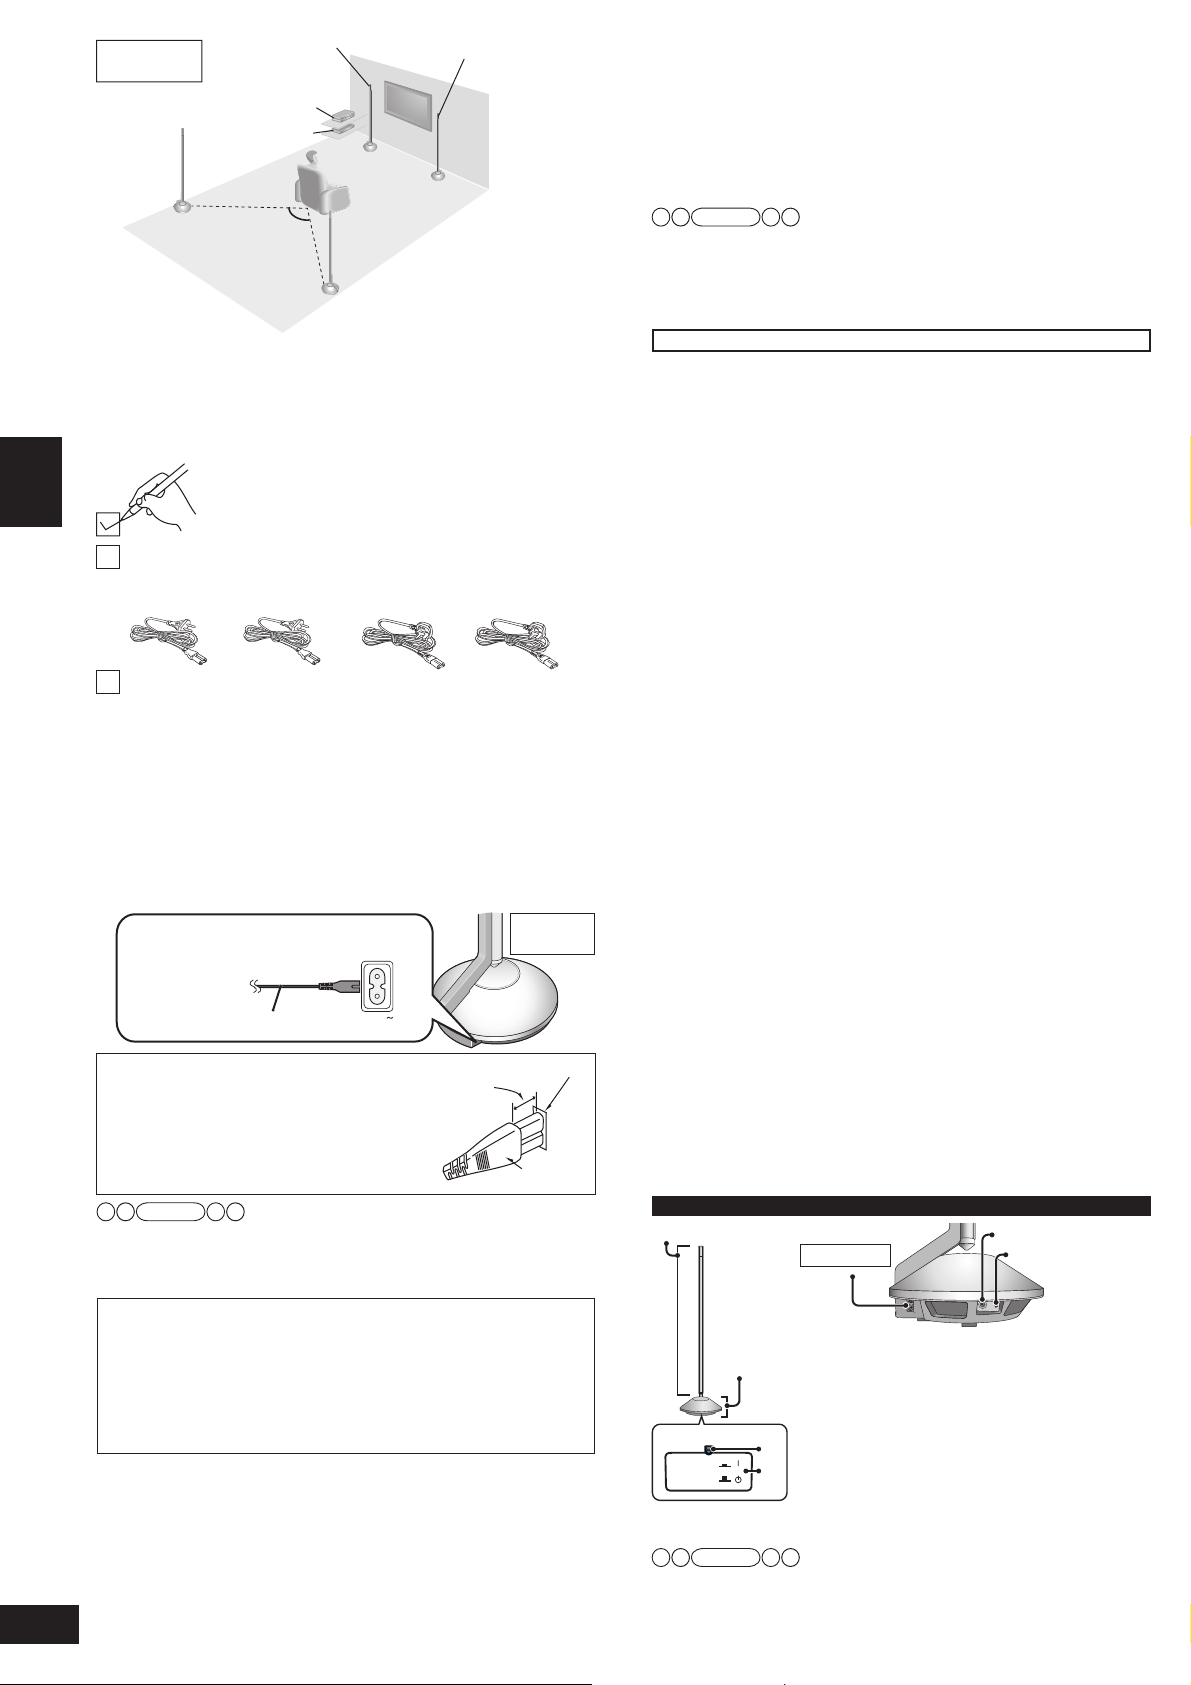
Supplied accessories
2 AC mains leads
For E
(For continental Europe)
(K2CQ2CA00007)
For GN
(For Australia and New Zealand)
(K2CJ2DA00010)
For GS
(For Thailand)
(K2CP2CA00001)
For GS
2 AC mains lead adapters (K2DAYYY00002)
I
f AC mains leads will not fit your socket, use AC mains lead adapters.
Supplied accessories/AC mains lead connection/Installation/Control guide
Leg cushions (1 sheet: 8 pieces) (RFA3045)
Keep the leg cushion out of reach of children to prevent swallowing.
Refer to page 3 for Sales and Support Information (for the United Kingdom and Republic of lreland).
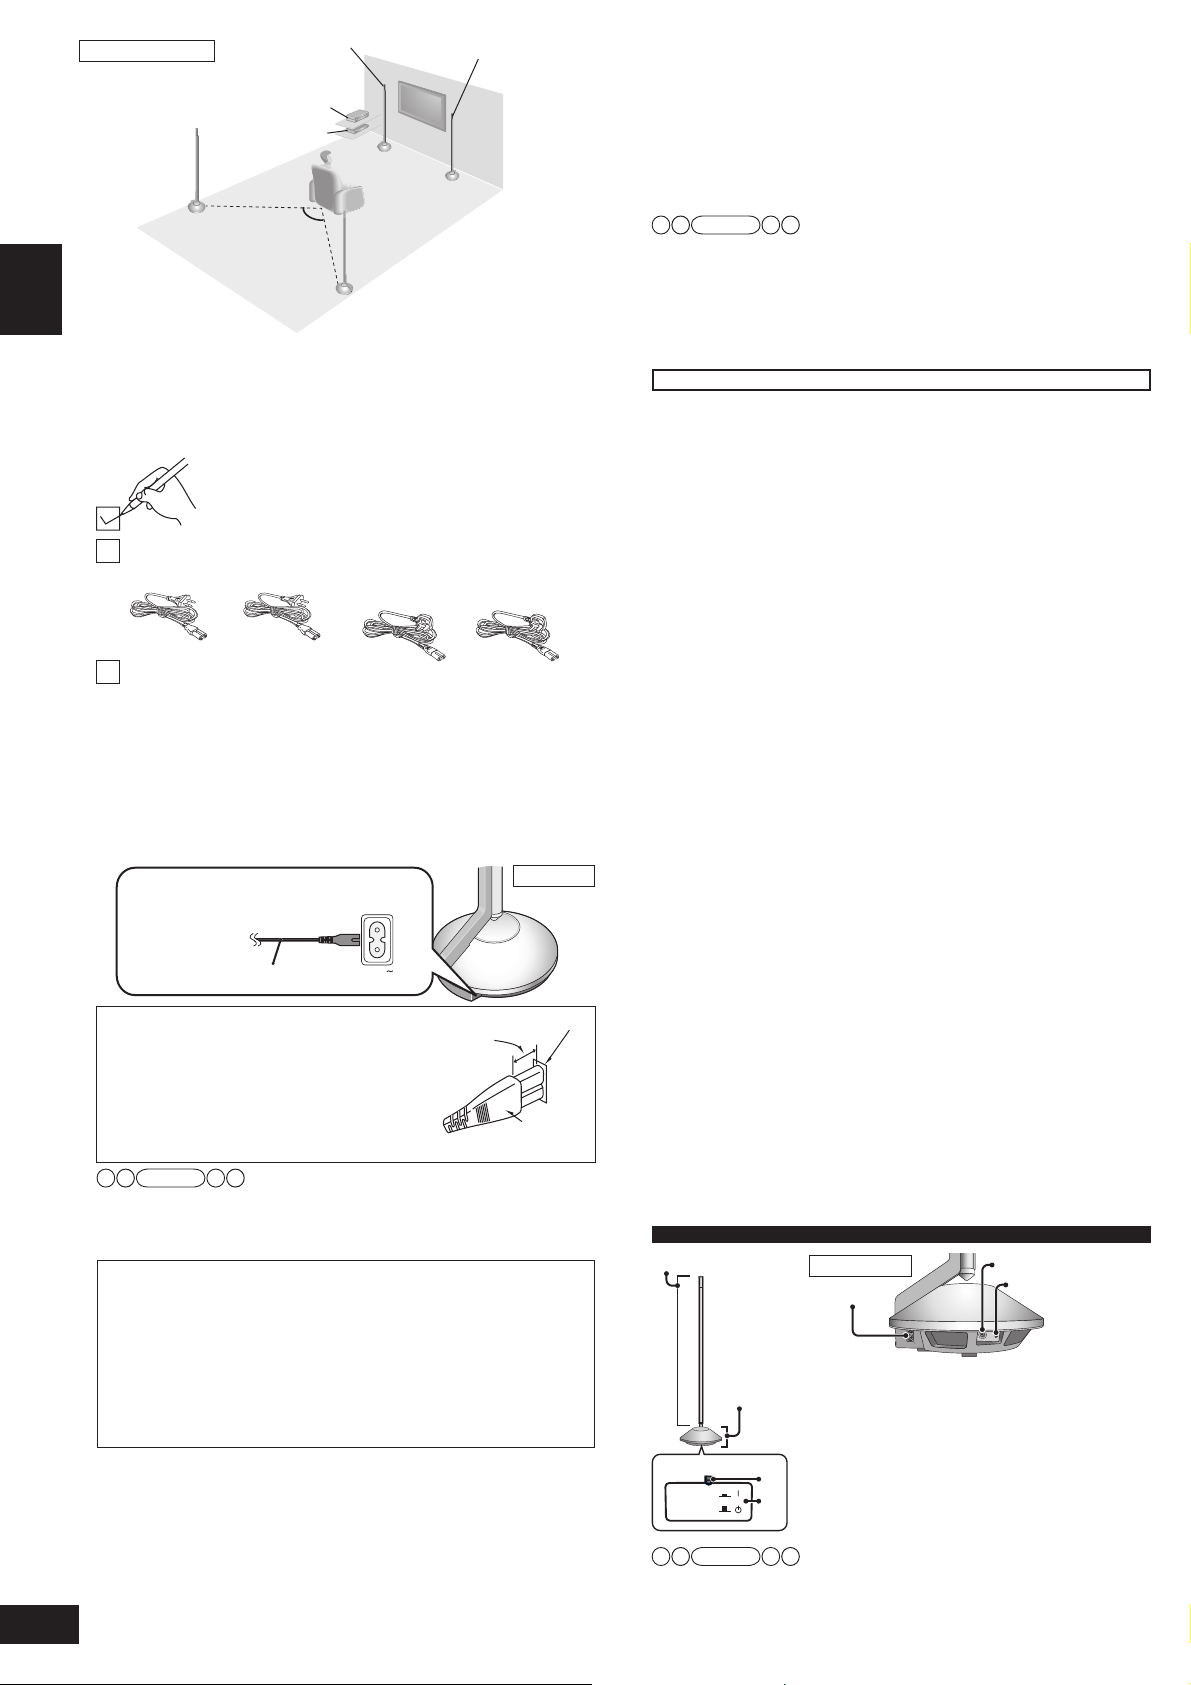
AC mains lead connection
FOR THE UNITED KINGDOM, REPUBLIC OF IRELAND, SAUDI ARABIA,
KUWAIT, MALAYSIA AND HONG KONG ONLY READ THE CAUTION
FOR THE AC MAINS LEAD ON PAGE 3 BEFORE CONNECTION.
To save power when the system is not to be used for a long time,
unplug it from the household mains socket.
Make sure to turn this system off before unplugging the AC mains lead.
For power consumption of speakers in standby, see right.
Power supply differ depending on the symbols (E, GN, GS) indicated on the packaging box.
Household mains socket
For E, GN
(AC 220 to 240 V, 50 Hz)
For GS
(AC 110 to 240 V, 50/60 Hz)
Insertion of connector
Even when the connector is perfectly
inserted, depending on the type of inlet used,
the front part of the connector may jut out as
shown in the drawing.
However there is no problem using the system.
RQT9462
4
4
Note
The included AC mains leads are for use with this system only. Do not use them with
other equipment. Also, do not use AC mains lead for other equipment with this system.
Front speaker
(left)
Main unit
Approx.120°
Surround
speaker (right)
Please check and identify the supplied accessories.
Use numbers indicated in parentheses when asking for replacement parts.
(Product numbers correct as of April 2009. These may be subject to change.)
Supplied accessories differ depending on the symbols
(E, GN, GS) indicated on the packaging box.
Use correct accessories according to the region for use.
(For the United Kingdom and Republic of Ireland)
(K2CZ3YY00005)
For GS
(For Saudi Arabia, Kuwait,
Malaysia and Hong Kong)
(K2CZ3YY00005)
(For others)
(K2CQ2CA00007)
Front speaker
(right)
Installation
There is no positional distinction for each speaker before setting.
Make sure to place the speakers on a flat, stable surface so
there is no danger of them falling over.
When carrying speakers, hold the pole and base parts. (➜ below)
The speakers of this system are not magnetically shielded. Do
not install this system near a CRT-based television.
Make sure the base parts are not covered by cloth such as a curtain.
•
• Before attaching the leg cushion (included) on the base parts to
prevent tilt or rattle on the floor, make sure there are no people in
the surrounding area.
• Set the distance from each speaker to the listening-viewing position.
(➜ page 24 of SC-ZT1 Operating Instructions)
Wireless functions
As this system uses a frequency band of 2.4 GHz, the radio waves
may be interrupted by an obstacle. Depending on the surrounding
environment (i.e. radio wave interruption from outside, etc.) or the
building structure where this system is used (i.e. wall that easily
reflects radio waves, etc.), sounds may be cut or noise may occur.
Install this system properly paying attention to the following descriptions.
Equipment certification
As this system received Technical Conditions compliance certifi cation
based on the Radio Law, the wireless station license is not required.
However, if you do the following actions to this system, you may be
punished by law.
• Disassemble or refurbish
Restrictions for use
• Domestic use only.
• Use this system in the same room.
Do not place an obstacle between the main unit (SC-ZT1) and
speakers.
Radio
waves from this system reach maximum range of 15 m in the
same room. If there is an obstacle between the main unit (SC-ZT1) and
speakers or the main unit (SC-ZT1) is placed at the height of 50 cm or
below from the floor, the
Keep this system away from equipment that generates radio
wave interference.
If the following equipment is located near the system, install this
system away from such equipment.
• Bluetooth, OA devices, telephone, etc.: approx. 3 m or more
• Microwave oven, wireless LAN compatible devices: approx. 3 m
or more
This system is designed to automatically avoid radio wave interference
with such household equipment. If radio wave interference occurs, the
Wireless Link display (➜ page 16 of SC-ZT1 Operating Instructions)
may blink, the sounds from speakers may be interrupted or noise may
occur.
These phenomena occur when this system selects a proper
frequency. These are not malfunctions.
Keep this system away from metal objects that tend to reflect
radio waves.
If there are metal objects or furniture in the room where this system is
installed,
viewing position, sounds may be interrupted or noise may occur. These
symptoms may be remedied by slightly moving this system’s position.
Note that radio waves tend to be reflected also when this system is
installed in rooms with a lot of activity.
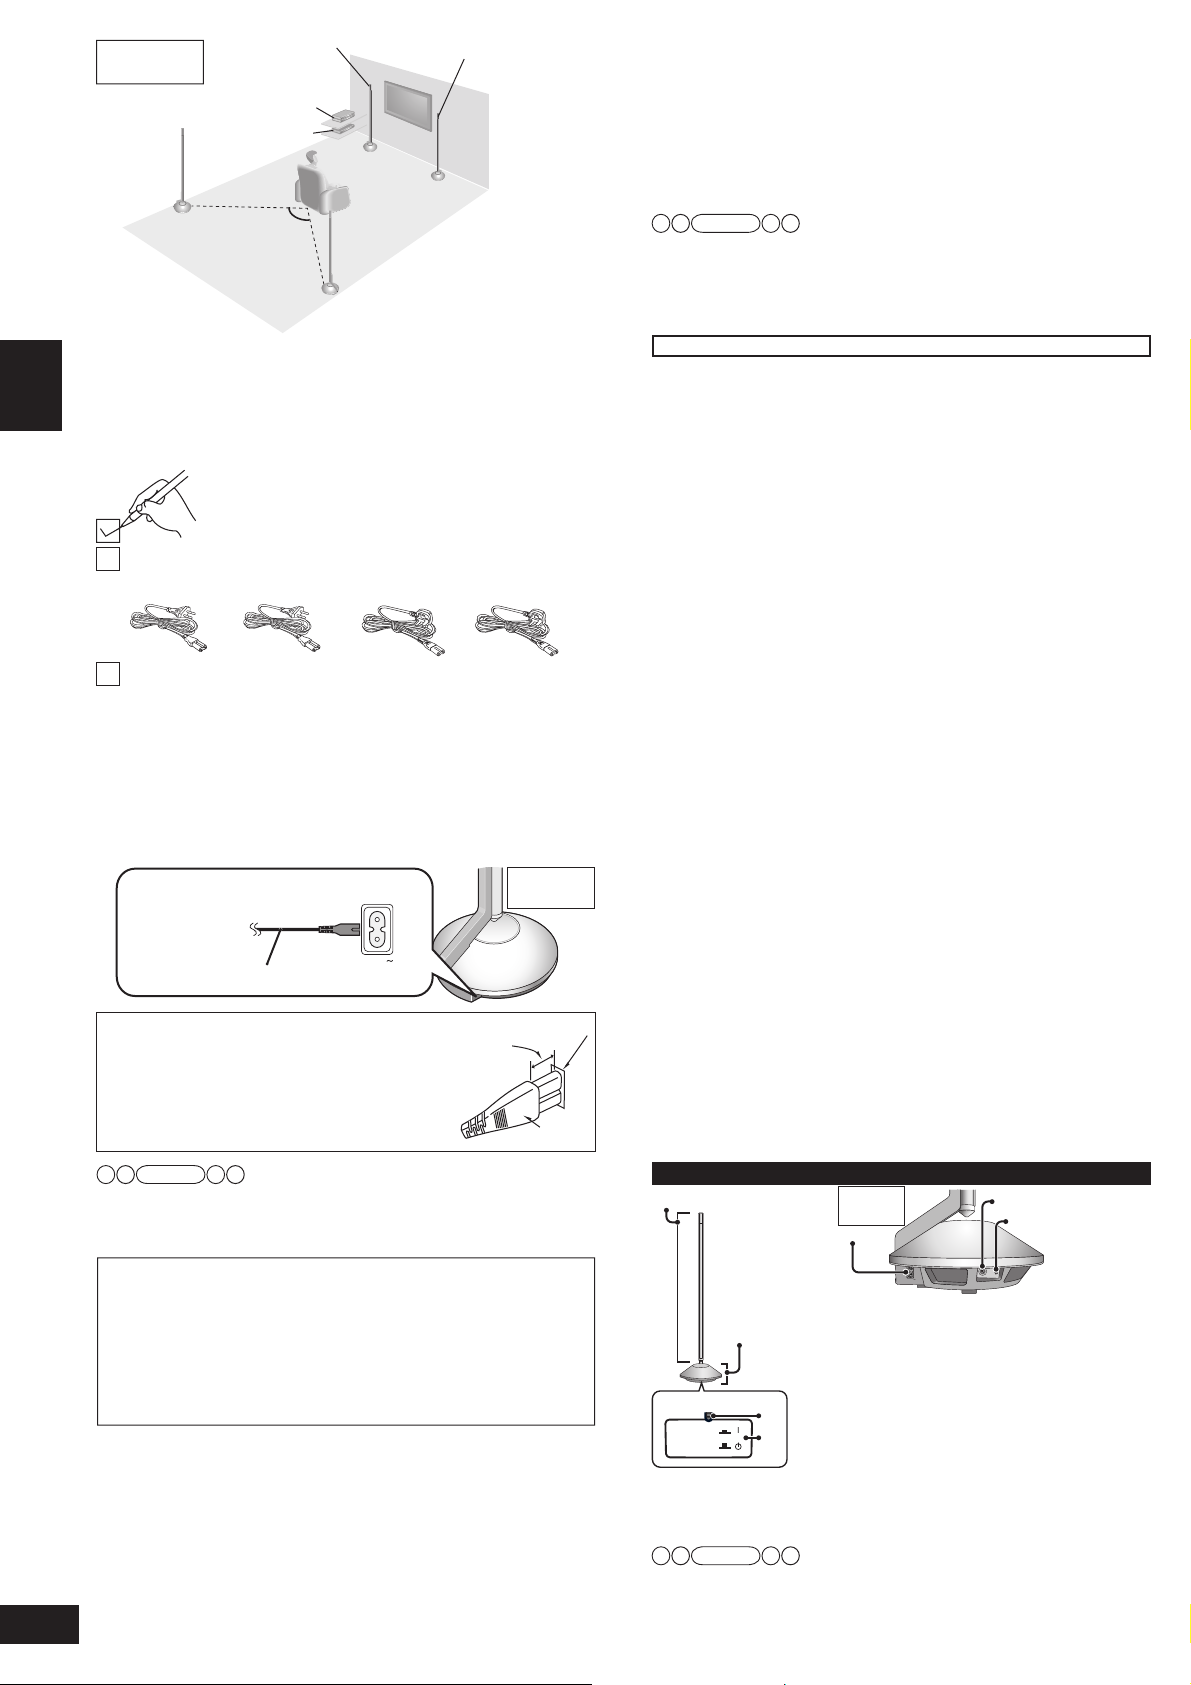
Control guide
Speaker (with built-in amplifier)
Pole (mid-high part)
Side view
AC IN
AC mains lead
(included)
WIRELESS LINK
Appliance inlet
Approx.
6 mm
Connector
TEST terminal: This is used to check the product operation status.
Only used in factory. Do not insert a foreign object.
ID switch: This is used to check the product operation status and not
used regularly.
Note
radio
waves tend to be reflected. Depending on the listening-
AC inlet (➜ left)
Base
(woofer
part)
1
2
1
2
Note
radio
waves reach smaller range.
Side view
AC IN
[WIRELESS LINK] indicator (➜ right
page)
When the unit is connected to the AC mains
supply, this indicator lights red in standby mode
and lights green when the unit is turned on.
Unit on/off button (l ^ k I) (➜ right page)
Use this button to turn the unit on and off.
l (off): The unit is in standby mode.
k (on): The unit is on.
The unit is still using a small amount of power in
the standby. Standby uses less power.
TEST terminal
ID switch
ID
TEST
Speaker setting
Make sure to make this setting when using for the first time after purchase.
Link the front speakers (SC-ZT1) wirelessly first and then
make the settings for the surround speakers.
Preparations
• Make sure that all equipment has been turned off.
(When the VIERA Link “HDAVI Control” compatible Panasonic
TV (VIERA) and Blu-ray Disc player/DVD recorder (DIGA) are
connected, do not turn on TV (VIERA) and Blu-ray Disc player/DVD
recorder (DIGA) until the setting is complete.)
• Connect AC mains leads of main unit (SC-ZT1) and 4 speakers
to household mains sockets. (➜ page 14 of SC-ZT1 Operating
Instructions and left page of this manual)
•
Make sure that the main unit (SC-ZT1) and speakers have been turned off.
• Prepare the remote control (SC-ZT1). (➜ page 8 of SC-ZT1
Operating Instructions)
1. Turn the main unit (SC-ZT1) on.
2. Turn on the front speakers (SC-ZT1).
• The colour of [WIRELESS LINK] indicator of front speaker
changes from red to green.
• Do not turn on the surround speakers yet at this point. The colour
of [WIRELESS LINK] indicator does not change from red to green
even if the power is turned on.
3.
Set “4CH ” at the setting operation of “Changing the number of
speakers to 4”. (➜ page 17 of SC-ZT1 Operating Instructions)
4. Turn the main unit (SC-ZT1) off once.
5. Turn the main unit (SC-ZT1) on again.
• “4CH SEARCH ” appears on the display. (This is displayed only
at the first-time setting.)
6. Turn on the surround speakers.
• The colour of [WIRELESS LINK] indicator of surround speaker
changes from red to green.
• When the [WIRELESS LINK] indicator of each speaker lights
green, “4CH SEARCH ” display disappears.
7.
Press and hold [CH] on the remote control (SC-ZT1) about 3 seconds
until “4 SPKR SET ” is displayed on the main unit’s display.
• Always aim the remote control at the main unit for operation.
8. Press the remote control (SC-ZT1) button corresponding to
the speaker outputting the confi rmation sound.
Speaker (➜ left page)
Front speaker (left) : [GAME]
Front speaker (right) : [MUTE]
Surround speaker (left) : [–SETUP, OFF]
Surround speaker (right) : [
• Sound is output from either of the speakers.
• When you press the button corresponding to the confirmation
sound of speaker, another speaker outputs confirmation sound.
Press the corresponding button in the same way and complete
settings for all 4 speakers.
• When “COMPLETE ” disappears on the main unit’s display, the
speaker setting is complete.
Note
• Check if the speakers are properly set after setting the speakers.
(➜ page 16 of SC-ZT1 Operating Instructions)
• If the speakers are set incorrectly in step 8, turn the main unit (SC-
ZT1) off then on again and perform steps 7 and 8.
•
If [WIRELESS LINK] indicator does not change from red to green, see
page 29 of SC-ZT1 Operating Instructions, “Troubleshooting guide”.
•
When you turn the main unit (SC-ZT1) off with the speakers on, the speakers automatically
enter standby (Wireless link standby). The colour of [WIRELESS LINK] indicator turns to red.
•
To reduce more of the power consumption of speakers in standby, turn
the speakers off. The speakers enter standby (In standby condition).
<Power consumption of speakers in standby>
Wireless link standby: approx. 0.8 W (per 1 speaker)
In standby condition: approx. 0.15 W (per 1 speaker)
Corresponding buttons (➜
page 17 of SC-ZT1 Operating
Instructions)
RETURN]
Maintenance
Unplug the AC mains lead from the household mains socket and wipe
the system using a soft and dry cloth.
• When the system is very dirty, wring the cloth soaked in water
thoroughly, wipe the dirt and wipe moisture off with a dry cloth.
• Do not use solvents such as benzine, thinner, alcohol, etc. because
they may cause casing to deform and coating to come off.
• Before using chemically treated cloth, read the instructions that
come with the cloth carefully.
Safety precautions
Placement
Set the system up on an even surface away from direct sunlight, high temperatures,
high humidity, and excessive vibration. These conditions can damage the system
and other components, thereby shortening the system’s service life.
Do not hang from or climb on the system. This may result in serious injury.
Do not use this device in hospitals and other places where electric
medical devices are installed.
Do not use this device near automatic doors, fire alarms and other
automatically controlled apparatuses.
Do not hold the speaker with one hand.
Before attaching the leg cushion on the base parts to prevent tilt or rattle
on the floor, make sure there are no people in the surrounding area.
Do not insert your hand or foot into the opening of side surface of base part.
Do not turn on the speakers with foot or vacuum cleaner carelessly.
Do not use this device as a plaything.
Voltage
Do not use high voltage power sources. This can overload the system and cause a fire.
Do not use a DC power source. Check the source carefully when
setting the system up on a ship or other place where DC is used.
AC mains lead protection
Ensure the AC mains lead is connected correctly and not damaged.
Poor connection and lead damage can cause fire or electric shock. Do
not pull, bend, or place the system on the lead.
Grasp the plug firmly when unplugging the lead. Do not move the system if AC mains lead is
still connected to socket outlet. Pulling the AC mains lead can cause electric shock.
Do not handle the plug with wet hands. This can cause electric shock.
Remove AC mains plug from socket outlet when not using for a long period.
Foreign matter
Do not let metal objects fall inside the system. This can cause electric shock or malfunction.
Do not let liquids get into the system. This can cause electric shock or malfunction. If this
occurs, immediately disconnect the system from the AC mains lead and contact your dealer.
Do not spray insecticides onto or into the system. They contain
flammable gases which can ignite if sprayed into the system.
Service
Do not attempt to repair this unit by yourself. If sound is interrupted, indicators fail to light, smoke
appears, or any other problem that is not covered in these instructions occurs, disconnect the AC
mains lead and contact your dealer or an authorized service centre. Electric shock or damage to the
system can occur if the system is repaired, disassembled or reconstructed by unqualified persons.
Extend operating life by disconnecting the system from the AC mains
if it is not to be used for a long time.
Specifi cations
Power supply differ depending on the symbols (E, GN, GS) indicated
on the packaging box.
g POWER AMPLIFIER SECTION
RMS output power (at AC 220 to 240 V)
10 % total harmonic distortion
Woofer Speaker ch 60 W (100 Hz, 3 Ω)
Mid High Speaker ch 20 W (1 kHz, 8 Ω)
System Total Power
DIN output power (at AC 220 to 240 V)
1.0 % total harmonic distortion
100 Hz Woofer Speaker ch 40 W (3 Ω)
1 kHz Mid High Speaker ch 15 W (8 Ω)
System Total Power
g SPEAKER SECTION
2 way 5 speakers system (Bass reflex type)
Woofer part 12 cm cone type x 1
Mid High part 2.4 x 10 cm flat type x 4
g SPEAKER GENERAL
Power supply For E, GN AC 220 to 240 V, 50 Hz
For GS AC 110 to 240 V, 50/60 Hz
Power consumption 20 W
Wireless link standby 0.8 W
In standby condition 0.15 W
Dimensions ( W × H × D ) 290 mm × 1231 mm × 290 mm
Mass Approx. 3.9 kg
Operating temperature range 0 °C to 40 °C
Operating humidity range 20 % to 80 % RH (no condensation)
g WIRELESS SECTION
Frequency of the using band 2.4000 GHz to 2.4835 GHz
Number of using channels 3
The reaching distance 15 m
∗1: per 1 speaker
∗2: use 2 speakers
∗3: It is under the condition as follows.
At same room indoor, there is not an obstacle between the main unit and the speaker.
And installing a main unit in the position with equal to or more than 50 cm height.
Note: 1. Specifications are subject to change without notice.
2.
Total harmonic distortion is measured by the digital spectrum analyser.
3.
Total harmonic distortion is measured by using AES17 filter.
2
∗
160 W (80 W + 80 W)
2
∗
110 W (55 W + 55 W)
1
∗
1
∗
1
∗
3
∗
ENGLISH
Speaker setting/Maintenance/Safety precautions/Specifi cations
RQT9462
5
5
Anordnungsbeispiel
Angeschlossenes Gerät
Surround lautsprecher
(links)
DEUTSCH
• Richten Sie zum Einstellen die Vorderseite (mit dem Panasonic
Logo) jedes Lautsprechers zur Hör-/Betrachtungsposition.
• Platzieren Sie die Lautsprecher links und rechts, schräg hinter der
Hör-/Betrachtungsposition.
Mitgeliefertes Zubehör
2 Netzkabel
(Für Kontinentaleuropa)
Unterlegpolster (1 Blatt: 8 Teile)
Bewahren Sie das Unterlegpolster außerhalb der Reichweite von
Kindern auf, um ein Verschlucken zu verhindern.
Netzkabelanschluss
Um Energie zu sparen, während das System für längere Zeit nicht in
Betrieb ist, stecken Sie das Netzkabel aus.
Schalten Sie dieses System unbedingt aus, bevor Sie es vom Stromnetz trennen.
Den Energieverbrauch der Lautsprecher im Standby-Modus, sehen
Sie nachfolgend.
Wandsteckdose
(AC 220 bis 240 V, 50 Hz)
Netzkabel (im
Lieferumfang enthalten)
Anschließen des Netzkabelsteckers
Auch nach einwandfreiem Anschluss des
Netzkabelsteckers kann es je nach Ausführung der
Netzeingangsbuchse vorkommen, dass der vordere
Teil des Steckverbinders geringfügig aus der
Buchse hervorsteht, wie in der Abbildung gezeigt.
Die einwandfreie Gerätefunktion wird
dadurch jedoch nicht beeinträchtigt.
Hinweis
Das mitgelieferte Netzkabel ist nur für den Gebrauch mit diesem
System vorgesehen. Verwenden Sie es nicht mit anderen Geräten.
Verwenden Sie auch keine Netzkabel von anderen Geräten in
Verbindung mit diesem System.
Wenn Sie bei eingeschalteten Lautsprechern das Hauptgerät (SC-ZT1)
•
ausschalten, schalten der Lautsprecher automatisch in den
Standby-Modus (Wireless-Link-Standby). Die Farbe des [WIRELESS
LINK] Indikators wechselt auf Rot.
•
Um sicherzustellen, dass die Lautsprecher im Standby-Betrieb weniger
Strom verbrauchen, schalten Sie diese aus. Die
Lautsprecher schalten in den Standby-Modus (Im Standby-Modus).
<Energieverbrauch der Lautsprecher im Standby-Modus>
Wireless-Link-Standby: ca. 0,8 W (je Lautsprecher)
Im Standby-Modus: ca. 0,15 W (je Lautsprecher)
Pfl ege und Instandhaltung
Trennen Sie das Netzkabel von der Wandsteckdose und reinigen Sie
das System mit einem trockenen weichen Tuch.
•
Wenn das System stark verschmutzt ist, wischen Sie den Schmutz mit einem gründlich
ausgewrungenen Lappen ab und trocknen es mit einem trockenen Tuch nach.
Mitgeliefertes Zubehör/Netzkabelanschluss/Pfl ege und Instandhaltung/Aufstellen/Übersicht über die Bedienelemente
•
Verwenden Sie keine Lösungsmittel wie Benzin, Farbverdünner, Alkohol usw. Denn
RQT9462
dadurch kann das Gehäuse deformiert werden und die Beschichtung beschädigt werden.
•
Lesen Sie vor der Verwendung eines chemisch behandelten Reinigungstuchs,
2
die dem Tuch beiliegende Gebrauchsanweisung aufmerksam durch.
6
Frontlautsprecher
(links)
Hauptgerät
ca.120°
Surroundlautsprecher
(rechts)
Überprüfen Sie das mitgelieferte Zubehör auf seine
Vollständigkeit.
(Für Großbritannien und die
Republik Irland)
AC IN
Frontlautsprecher
(rechts)
Seitenansicht
Netzeingangsbuchse
ca. 6 mm
Netzkabelstecker
Aufstellen
Vor der Einstellung sind die Lautsprecher in Hinsicht ihrer Position gleich.
Vergewissern Sie sich, dass die Lautsprecher auf einer flachen, stabilen
Oberfläche aufgestellt werden, damit diese nicht umfallen können.
Halten Sie beim Transport die Lautsprecher an Stange und
Basis fest. (➜ siehe Unten)
Die Lautsprecher dieses Systems sind nicht magnetisch abgeschirmt. Installieren
Sie dieses System nicht in der Nähe eines Fernsehgerätes mit Bildröhre.
Hinweis
• Vergewissern Sie sich, dass die Teile der Basis nicht durch Textilien
wie z.B. Vorhänge verdeckt werden.
Bevor Sie das Unterlegpolster (mitgeliefert) an der Basis anbringen, um ein
•
Klappern am Fußboden oder einen unebenen Stand zu verhindern, vergewissern
Sie sich, dass sich keine Personen in unmittelbarer Nähe befi nden.
•
Stellen Sie den Abstand von jedem Lautsprecher zur Hör-/Betrachtungsposition
ein. (➜ Seite 24 der Bedienungsanleitung des SC-ZT1)
Kabellose Funktion
Da dieses System in einem Frequenzbereich von 2,4 GHz arbeitet, können die Radiowellen
u. U. durch ein Hindernis unterbrochen werden. Abhängig von der unmittelbaren Umgebung
(d.h. Unterbrechung der elektromagnetischen Wellen von außen usw.) oder durch die
Bauweise des Gebäudes, in dem das Gerät betrieben wird (d.h. Mauern, die Radiowellen
stark refl ektieren usw.), kann der Ton unterbrochen werden oder ein Rauschen auftreten.
Wenden Sie bei der Installation dieses Systems größte Sorgfalt unter Berücksichtigung
folgender Angaben an.
Gerätezertifizierung
Da dieses System den technischen Anforderungen in Hinsicht des Telekommunikationsgesetzes
entspricht, ist eine Lizensierung des kabellosen Systems nicht erforderlich. Wenn Sie jedoch
folgende Handlungen an diesem System durchführen, machen Sie sich strafbar.
• Zerlegen oder umbauen
Betriebseinschränkungen
• Nur für den privaten Gebrauch.
• Verwenden Sie dieses System im selben Raum.
Stellen Sie zwischen das Hauptgerät (SC-ZT1) und den
Lautsprechern kein Hindernis.
Die Radiowellen aus diesem System haben eine Reichweite von maximal 15 m, im
selben Raum. Falls sich ein Hindernis zwischen dem Hauptgerät (SC-ZT1) und den
Lautsprechern befindet bzw. das Hauptgerät in (SC-ZT1) einer Höhe von 50 cm (oder
näher) zum Fußboden aufgestellt ist, haben die Radiowellen eine geringere Reichweite.
Halten Sie dieses System von Geräten fern, die Interferenzen
durch Radiowellen hervorrufen.
Wenn sich folgende Geräte in der Nähe des Systems befinden, stellen
Sie dieses System mit Abstand zu diesen Geräten auf.
•
Bluetooth, Bürokommunikationsgeräte, Telefone usw.: mind. 3 m (ca.)
• Mikrowellengeräte, W-LAN kompatible Geräte: mind. 3 m (ca.)
Dieses System wurde so konzipiert, dass es Radiowellen-Interferenzen mit solchen
Haushaltsgeräten automatisch vermeidet. Falls Störungen durch Radiowellen auftreten,
blinkt u. U. die Wireless-Link-Anzeige (➜ Seite 15 der Bedienungsanleitung des SC-ZT1),
der Ton aus den Lautsprechern kann unterbrochen werden oder Rauschen auftreten.
Dieses Phänomen ist festzustellen, wenn dieses System eine
geeignete Frequenz wählt. Dies stellt keine Fehlfunktion dar.
Halten Sie dieses System von Metallgegenständen entfernt, die
Radiowellen leicht refl ektieren.
Falls sich im Raum, wo dieses System aufgestellt ist, Metallgegenstände oder Möbel
befinden, kann es zur Refl ektion der Radiowellen kommen. Abhängig von der Hör/Betrachtungsposition, kann der Ton unterbrochen werden oder ein Rauschen auftreten.
Diese Symptome können behoben werden, indem dieses System etwas verschoben wird.
Beachten Sie bitte, dass Radiowellen ebenfalls leicht refl ektiert werden, wenn
dieses System in Räumen aufgestellt ist, wo viele Aktivitäten stattfi nden.
Übersicht über die Bedienelemente
Lautsprecher (mit eingebautem Verstärker)
Stange (Mittel-/Hochtöner)
Netzanschlussbuchse
(➜ siehe links)
Basis
(Woofer)
WIRELESS LINK
Hinweis
TEST-Buchse: Diese Buchse dient zur Überprüfung des Betriebsstatus des
Produktes. Verwendung nur im Werk. Stecken Sie keinen Fremdkörper hinein.
ID-Schalter: Dieser Schalter dient zur Überprüfung des Betriebsstatus
des Produktes und wird beim normalen Betrieb nicht verwendet.
1
2
Seitenansicht
AC IN
[WIRELESS LINK] Indikator (➜ rechte Seite)
1
Wenn das Gerät an eine Netzsteckdose angeschlossen
ist, leuchtet diese Anzeige im Standby-Modus rot und
grün bei eingeschaltenem Gerät.
Geräte-Ein/Ausschalttaste (l ^ k I) (➜ rechte Seite)
2
Betätigen Sie diese Taste, um das Gerät ein- und auszuschalten.
l
(OFF): Das Gerät befindet sich im Standby-Modus.
k (ON): Das Gerät ist eingeschaltet.
Das Gerät verbraucht auch im Bereitschaftszustand
eine geringe Menge Strom. Im Bereitschaftszustand
(Standby) ist der Energieverbrauch reduziert.
TEST-Buchse
ID-Schalter
ID
TEST
Lautsprechereinstellung Sicherheitsvorkehrungen
Führen Sie diese Einstellung unbedingt vor der ersten
Inbetriebnahme nach dem Kauf durch.
Stellen Sie zuerst zwischen den Frontlautsprechern (SC-
ZT1) eine kabellose Verbindung her, führen Sie danach die
Einstellungen an den Surroundlautsprechern durch.
Vorbereitungen
•
Vergewissern Sie sich, dass sämtliche Geräte ausgeschaltet sind.
(Wenn der VIERA Link „HDAVI Control“ kompatible Panasonic
Fernseher (VIERA) und Blu-ray Disc-Player/DVD-Recorder (DIGA)
angeschlossen sind, schalten Sie weder das Fernsehgerät (VIERA)
noch den Blu-ray Disc-Player/DVD-Recorder (DIGA) ein, bevor die
Einstellung abgeschlossen ist.)
• Die Netzkabel der 4 Lautsprecher und des Hauptgerätes
an die Wandsteckdose (SC-ZT1). (➜ siehe Seite 13 der
Bedienungsanleitung des SC-ZT1 und linke Seite dieser
Anleitung.)
•
Vergewissern Sie sich, dass das Hauptgerät (SC-ZT1) und die
Lautsprecher ausgeschaltet sind.
• Bereiten Sie die Fernbedienung (SC-ZT1) vor. (➜ Seite 7 der
Bedienungsanleitung des SC-ZT1)
1. Schalten Sie das Hauptgerät (SC-ZT1) ein.
2. Schalten Sie die beiden Lautsprecher (SC-ZT1) ein.
Die Farbe des [WIRELESS LINK] Indikators wechselt von Rot auf Grün.
•
•
Schalten Sie zu diesem Zeitpunkt die Surroundlautsprecher noch
nicht ein. Die Farbe des [WIRELESS LINK] Indikators wechselt
nicht von Rot auf Grün, auch wenn die Einschalttaste betätigt wird.
3. Stellen Sie unter „Anzahl der Lautsprecher auf 4 ändern” auf
die Einstellung „4CH ”. (➜ Seite 17 der Bedienungsanleitung
des SC-ZT1)
4. Schalten Sie das Hauptgerät (SC-ZT1) einmal aus.
5. Schalten Sie das Hauptgerät (SC-ZT1) erneut ein.
• „4CH SEARCH ” erscheint am Display. (Dies wird nur bei der
ersten Einstellung angezeigt.)
6. Schalten Sie die Surroundlautsprecher ein.
• Die Farbe des [WIRELESS LINK] Indikators des
Surroundlautsprechers wechselt von Rot auf Grün.
• Wenn der [WIRELESS LINK] Indikator bei jedem Lautsprecher
grün leuchtet, erlischt „4CH SEARCH ” am Display.
7. Halten Sie die Taste [CH] auf der Fernbedienung (SC-ZT1)
ca. 3 Sekunden gedrückt, bis „4 SPKR SET ” am Display des
Hauptgerätes erscheint.
• Richten Sie die Fernbedienung für die Steuerung stets Richtung
Hauptgerät.
8. Drücken Sie die Fernbedienungstaste (SC-ZT1) entsprechend
des Lautsprechers, der das Bestätigungssignal ausgibt.
Lautsprecher (➜ linke Seite)
Frontlautsprecher (links) : [GAME]
Frontlautsprecher (rechts) : [MUTE]
Surroundlautsprecher (links) : [–SETUP, OFF]
Surroundlautsprecher (rechts) : [
• Es erfolgt von einem der Lautsprecher eine Tonausgabe.
• Wenn Sie die Taste entsprechend des Bestätigungssignals
des Lautsprechers drücken, gibt ein anderer Lautsprecher das
Bestätigungssignal aus. Betätigen Sie die entsprechende Taste
auf dieselbe Weise und führen Sie die Einstellungen für alle 4
Lautsprecher aus.
• Wenn „COMPLETE ” am Display des Hauptgerätes erlischt, ist
die Lautsprechereinstellung abgeschlossen.
Hinweis
• Überprüfen Sie nach der Lautsprechereinstellung, ob
die Lautsprecher korrekt eingestellt sind. (➜ Seite 15 der
Bedienungsanleitung des SC-ZT1)
• Falls die Lautsprecher bei Schritt 8 falsch eingestellt wurden,
schalten Sie das Hauptgerät (SC-ZT1) aus und erneut ein und
wiederholen Sie die Schritte 7 und 8.
• Wenn der [WIRELESS LINK] Indikator nicht von Rot auf Grün
wechselt, siehe Seite 29 der Bedienungsanleitung des SC-ZT1
unter „Störungsbeseitigung“.
DIESES GERÄT IST FÜR DEN BETRIEB IN LÄNDERN MIT
GEMÄSSIGTEM KLIMA BESTIMMT.
Dieses Gerät kann beim Betrieb Hochfrequenzstörungen auffangen,
die von einem in der Nähe verwendeten Handy verursacht werden.
Falls eine solche Störbeeinfl ussung festgestellt wird, sollte das
Handy in größerer Entfernung von diesem Gerät betrieben werden.
Entsprechende Tasten (➜ Seite
16 der Bedienungsanleitung
des SC-ZT1)
RETURN]
Aufstellung
Stellen Sie das System auf einer ebenen Fläche auf, die nicht direktem Sonnenlicht,
hohen Temperaturen, hoher Luftfeuchtigkeit und starken Vibrationen ausgesetzt ist.
Derartige Umgebungsbedingungen können eine Beschädigung des Systems und
anderer Bauteile des Systems verursachen, wodurch seine Lebensdauer verkürzt wird.
Hängen Sie sich nicht an bzw. klettern Sie nicht auf das System, weil
Sie sich dadurch schwer verletzen können.
Betreiben Sie dieses Gerät nicht in Krankenhäusern oder anderen
Orten, wo elektrische medizinische Geräte eingesetzt werden.
Verwenden Sie dieses Gerät nicht in der Nähe von elektrischen Türen,
Feuermeldern und anderen automatisch gesteuerten Vorrichtungen.
Halten Sie den Lautsprecher nicht nur mit einer Hand.
Bevor Sie das Unterlegpolster an der Basis anbringen, um ein Klappern
am Fußboden oder einen unebenen Stand zu verhindern, vergewissern
Sie sich, dass sich keine Personen in unmittelbarer Nähe befinden.
Bringen Sie Ihre Hand oder Ihren Fuß nicht in die Öffnung an der Seite der Basis.
Schalten Sie die Lautsprecher nicht mit dem Fuß oder versehentlich beim
Reinigen mit dem Staubsauger ein. Dieses Gerät ist kein Spielzeug.
Spannung
Verwenden Sie keine Hochspannungs-Stromquellen. Diese können das
System überlasten und einen Brand verursachen.
Verwenden Sie keine Gleichstromquelle. Überprüfen Sie die Stromquelle sorgfältig, wenn Sie das
System auf einem Schiff oder an einem anderen Ort benutzen, an dem Gleichstrom verwendet wird.
Schutz des Netzkabels
Vergewissern Sie sich, dass das Netzkabel richtig angeschlossen und unbeschädigt ist.
Ein unzureichender Anschluss und eine Beschädigung des Kabels können einen Brand
oder elektrischen Schlag verursachen. Vermeiden Sie Ziehen, Knicken oder Belasten
des Kabels mit schweren Gegenständen. Stellen Sie das System nicht auf das Kabel.
Fassen Sie den Stecker beim Abziehen des Kabels fest an. Bewegen Sie das System nicht, wenn das Netzkabel
noch mit der Steckdose verbunden ist. Ziehen am Kabel kann einen elektrischen Schlag verursachen.
Fassen Sie den Stecker nicht mit nassen Händen an. Es kann sonst zu einem elektrischen Schlag kommen.
Trennen Sie das Netzkabel von der Steckdose, wenn das System für längere Zeit nicht in Betrieb genommen wird.
Fremdkörper
Achten Sie darauf, dass keine Metallgegenstände in das System gelangen, weil
dadurch elektrische Schläge oder Fehlfunktionen verursacht werden können.
Achten Sie darauf, dass keine Flüssigkeiten in das System gelangen, weil dadurch elektrische
Schläge oder Fehlfunktionen verursacht werden können. Sollte dies geschehen, trennen Sie
das System unverzüglich vom Stromnetz und wenden Sie sich an Ihren Fachhändler.
Sprühen Sie keine Insektensprays auf oder in das System. Diese enthalten
brennbare Gase, die sich beim Sprühen in das System entzünden können.
Wartung
Versuchen Sie nicht, das Gerät selbst zu reparieren. Falls Unterbrechungen im Ton auftreten,
Anzeigen nicht mehr leuchten, Rauch aus dem Gerät entweicht oder andere Probleme auftreten,
die nicht in dieser Bedienungsanleitung behandelt werden, ziehen Sie unverzüglich den
Netzstecker und wenden Sie sich an Ihren Fachhändler oder eine autorisierte Kundendienststelle.
Wenn das System von unqualifizierten Personen repariert, zerlegt oder wieder zusammengebaut
wird, können elektrische Schläge oder Beschädigungen des Systems verursacht werden.
Verlängern Sie die Lebensdauer des Geräts, indem Sie es von der
Stromquelle trennen, wenn es längere Zeit nicht benutzt werden soll.
Technische Daten
1
g LEISTUNG VERSTÄRKERBEREICH
RMS Ausgangsleistung (bei AC 220 bis 240 V)
10 % Gesamtklirrfaktor
Woofer-Lautsprecherkanal 60 W (100 Hz, 3 Ω)
Mittel-/Hochtönerkanal 20 W (1 kHz, 8 Ω)
Gesamte Systemleistung
DIN Ausgangsleistung (bei AC 220 bis 240 V)
1,0 % Gesamtklirrfaktor
100 Hz Woofer-Lautsprecherkana 40 W (3 Ω)
1 kHz Mittel-/Hochtönerkanal 15 W (8 Ω)
Gesamte Systemleistung
g LAUTSPRECHER-BEREICH
2-Wege, 5 Lautsprecher-System (Bassreflexion)
Woofer-Teil 12 cm Konus × 1
Mittel-/Hochtoner 2,4 × 10 cm Flach × 4
g LAUTSPRECHER ALLGEMEIN
Spannungsversorgung AC 220 bis 240 V, 50 Hz
Leistungsaufnahme 20 W
Wireless-Link-Standby 0,8 W
Im Standby-Modus 0,15 W
Abmessungen (B x H x T) 290 mm × 1231 mm × 290 mm
Masse Ca.3,9 kg
Betriebstemperaturbereich 0°C bis 40 °C
Betriebsfeuchtigkeitsbereich 20 % bis 80 % RH (Keine Kondensbildung)
g KABELLOSER TEIL
Frequenz des verwendeten Bands 2,4000 GHz bis 2,4835 GHz
Anzahl der verwendeten Kanäle 3
Reichweite 15 m
∗1 : pro 1 Lautsprecher
∗2 : Verwendung von 2 Lautsprechern
∗3 : Gilt unter folgenden Bedingungen:
Betrieb im selben Innenraum, es befindet sich kein Hindernis
zwischen dem Hauptgerät und dem Lautsprecher und es wird
ein Hauptgerät 50 cm oder höher positioniert.
Hinweis: 1. Änderung der technischen Daten bleibt ohne
2. Der Gesamtklirrfaktor wurde mit einem Digital-
3.
vorherige Ankündigung vorbehalten.
Spektralanalysator gemessen.
Der Gesamtklirrfaktor wurde unter Verwendung eines AES17-Filters gemessen.
2
∗
160 W (80 W + 80 W)
2
∗
110 W (55 W + 55 W)
∗
1
∗
2
∗
DEUTSCH
Lautsprechereinstellung/Sicherheitsvorkehrungen/Technische Daten
∗3
RQT9462
3
7
Esempio di
installazione
Diffusore
surround
(sinistro)
•
Puntare la parte anteriore (con il logo Panasonic) di ciascun diffusore
verso la posizione di visione-ascolto per l’impostazione.
• Posizionarli leggermente a destra e a sinistra dietro alla posizione di
visione-ascolto.
ITALIANO
Accessori in dotazione
2 cavi di alimentazione CA
(Per l’Europa continentale) (Per il Regno Unito e l’Irlanda)
Feltrini (1 foglio: 8 pezzi)
Tenere i feltrini fuori della portata dei bambini per impedirne
l’ingestione.
Collegamento del cavo di alimentazione CA
Per risparmiare energia elettrica quando si prevede di non utilizzare il
sistema per un periodo di tempo prolungato, scollegarlo dalla presa di
alimentazione per uso domestico.
Spegnere il sistema prima di scollegare il cavo di alimentazione CA.
Per il consumo di corrente dei diffusori in standby vedere sotto.
Presa di alimentazione per uso domestico
(CA da 220 a 240 V, 50 Hz)
Cavo di alimentazione CA (incluso)
Inserimento del connettore
Anche se il connettore è inserito
perfettamente, a seconda del tipo di presa
utilizzato, la parte anteriore del connettore
potrebbe sporgere come mostrato nella figura.
Non sussiste tuttavia alcun problema per
l’utilizzo del sistema.
Nota
Il cavo di alimentazione CA incluso è destinato soltanto all’utilizzo
con questo sistema. Non utilizzarlo con altri apparecchi. Inoltre, non
utilizzare il cavo di alimentazione CA di altri apparecchi con questo
sistema.
• Quando si spegne l’unità principale (SC-ZT1) con i diffusori
accesi, i diffusori entrano automaticamente in standby (Standby
Wireless Link). Il colore dell’indicatore [WIRELESS LINK] diventa
rosso.
• Per ridurre il consumo di corrente dei diffusori in modalità
Standby, spegnere i diffusori. I diffusori entrano in standby (In
condizione di standby).
<Consumo di corrente dei diffusori in standby>
Accessori in dotazione/Collegamento del cavo di alimentazione CA/Manutenzione/Installazione/Guida ai comandi
Standby Wireless Link: circa 0,8 W (per 1 diffusore)
In condizione di standby: circa 0,15 W (per 1 diffusore)
Manutenzione
Scollegare il cavo di alimentazione CA dalla presa di alimentazione per
uso domestico e pulire il sistema con un panno morbido e asciutto.
•
Quando il sistema è molto sporco, strizzare accuratamente il panno immerso
nell’acqua ed eliminare la sporcizia e l’umidità con un panno asciutto.
• Non utilizzare solventi come benzina, diluenti, alcol o altri prodotti
perché potrebbero provocare la deformazione dell’alloggiamento e
RQT9462
la perdita del rivestimento.
• Prima di utilizzare un panno trattato chimicamente, leggerne
attentamente le istruzioni.
2
8
Diffusore anteriore
(sinistro)
Apparecchi collegati
Unità principale
Circa 120°
Diffusore
surround (destro)
Controllare e individuare gli accessori in dotazione.
AC IN
Diffusore anteriore
(destro)
Presa dell’apparecchio
Circa 6 mm
Vista
laterale
Connettore
Installazione
Prima dell’impostazione non esiste alcuna distinzione di
posizione per ciascun diffusore.
Assicurarsi di posizionare i diffusori su una superficie piana e
stabile in modo che non sussista alcun pericolo di caduta.
Quando si trasportano i diffusori, afferrarne la base e l’asta. (➜ sotto)
I diffusori del sistema non sono schermati magneticamente.
Non installare il sistema vicino a un televisore CRT.
Nota
•
Assicurarsi che le basi non siano coperte da un tessuto, ad esempio una tenda.
•
Prima di applicare i feltrini (inclusi) alle basi per impedire la caduta a
terra, assicurarsi che non vi siano persone nell’area circostante.
•
Impostare la distanza da ciascun diffusore in base alla posizione di visione-ascolto.
(➜ pagina 24 delle Istruzioni per l’uso del sistema SC-ZT1)
Funzioni wireless
Poiché il sistema utilizza una banda di frequenza di 2,4 GHz, le onde radio
potrebbero essere interrotte da un ostacolo. A seconda dell’ambiente circostante
(ossia, interruzione delle onde radio per cause esterne, ecc.) o della struttura
dell’edifi cio in cui si utilizza il sistema (ossia, pareti che riflettono facilmente le onde
radio, ecc.), i suoni potrebbero essere interrotti o si potrebbero verificare disturbi.
Installare correttamente il sistema prestando attenzione alle seguenti descrizioni.
Certificazione degli apparecchi
Poiché il sistema ha ottenuto la certificazione di conformità alle Condizioni
tecniche previste dalla Legge sulle apparecchiature radio, non è necessaria
una licenza per le stazioni wireless. Tuttavia, qualora si effettuassero le
seguenti operazioni sul sistema, si è perseguibili per legge.
• Smontaggio o rinnovo
Restrizioni per l’uso
• Solo per uso domestico.
• Utilizzare il sistema nella stessa stanza.
Non collocare un ostacolo tra unità principale (SC-ZT1) e diffusori.
Le onde radio emesse dal sistema hanno un campo di azione massimo di 15 m
nella stessa stanza. Se vi è un ostacolo tra unità principale (SC-ZT1) e diffusori
o se l’unità principale (SC-ZT1) è installata a un’altezza di 50 cm o inferiore dal
pavimento, le onde radio hanno un campo di azione inferiore.
Tenere il sistema lontano da apparecchi che generano
interferenze delle onde elettriche.
Se i seguenti apparecchi sono installati vicino al sistema, collocare il
sistema lontano da essi.
• Bluetooth, dispositivi OA, telefoni, ecc.: circa 3 m o più
•
Forno a microonde, dispositivi compatibili con LAN wireless: circa 3 m o più
Il sistema è studiato per evitare automaticamente l’interferenza delle onde
radio emesse da tali apparecchi domestici. Se si verifi cano interferenze
delle onde radio, è possibile che l’indicatore Wireless Link (➜ pagina 15 delle
Istruzioni per l’uso del sistema SC-ZT1) lampeggi, che il suono emesso dai
diffusori si interrompa e che si verifi chino disturbi.
Questi fenomeni si verificano quando il sistema seleziona una
frequenza corretta. Non si tratta di guasti.
Tenere il sistema lontano da oggetti metallici che tendono a rifl
ettere le onde radio.
Se vi sono oggetti o arredi metallici nella stanza in cui è installato il sistema,
le onde radio tendono a essere rifl esse. A seconda della posizione di
visione-ascolto è possibile che i suoni si interrompano o che si verifi chino
disturbi. Questi problemi si possono risolvere spostando leggermente la
posizione del sistema.
Si noti che le onde radio tendono a essere rifl esse anche quando il sistema
è installato in stanze con molta attività.
Guida ai comandi
Diffusore (con amplificatore integrato)
Asta (parte medio-alta)
Presa di corrente
CA (➜ sinistra)
Base
(parte woofer)
WIRELESS LINK
1
2
Nota
Terminale TEST: Si utilizza per controllare lo stato di funzionamento
del prodotto. Utilizzato solo in fabbrica. Non inserire oggetti estranei.
Interruttore ID: Si utilizza per controllare lo stato di funzionamento del
prodotto e in genere non si utilizza.
Vista
laterale
AC IN
Indicatore [WIRELESS LINK]
1
(➜ pagina destra)
Quando l’unità è collegata all’alimentazione
CA, questa spia si accende di colore rosso
in modalità Standby e di colore verde
all’accensione dell’unità.
Pulsante di accensione/spegnimento
2
dell’unità (l ^ k I) (➜ pagina destra)
Utilizzare questo pulsante per accendere e
spegnere l’unità.
l (off): L’unità è in modalità standby.
k (on): L’unità è accesa.
In modalità Standby l’unità consuma comunque una
minima quantità di corrente. La modalità Standby
richiede una quantità di corrente ridotta.
Terminale TEST
Interruttore ID
ID
TEST
Impostazione dei diffusori Precauzioni di sicurezza
Assicurarsi di effettuare l’impostazione quando si utilizza il sistema
per la prima volta dopo l’acquisto.
Collegare i diffusori anteriori (SC-ZT1) in modo wireless, quindi
effettuare le impostazioni per i diffusori surround.
Preparativi
• Assicurarsi che tutti gli apparecchi siano spenti.
(Quando si collega un televisore (VIERA) e un lettore di dischi Blu-Ray/
registratore DVD (DIGA) Panasonic compatibili con la funzione VIERA Link
“HDAVI Control”, non accendere il televisore (VIERA) e il lettore di dischi
Blu-Ray/registratore DVD (DIGA) finché l’impostazione non è completa.)
• Collegare il cavo di alimentazione CA di 4 diffusori all’unità
principale (SC-ZT1). (➜ pagina 13 delle Istruzioni per l’uso del
sistema SC-ZT1 e pagina sinistra del presente manuale)
•
Assicurarsi che l’unità principale (SC-ZT1) e i diffusori siano stati
spenti.
• Preparare il telecomando (SC-ZT1). (➜ pagina 7 delle Istruzioni
per l’uso del sistema SC-ZT1)
1. Accendere l’unità principale (SC-ZT1).
2. Accendere i diffusori anteriori (SC-ZT1).
• Il colore dell’indicatore [WIRELESS LINK] del diffusore anteriore
passa da rosso a verde.
• Non accendere i diffusori surround. Il colore dell’indicatore
[WIRELESS LINK] non passa da rosso a verde, anche se si
accende l’unità.
3. Impostare “4CH ” all’operazione di “Impostazione di 4
diffusori”. (➜ pagina 17 delle Istruzioni per l’uso del sistema
SC-ZT1)
4. Spegnere l’unità principale (SC-ZT1).
5. Accendere nuovamente l’unità principale (SC-ZT1).
• “4CH SEARCH” viene visualizzato sul display. (Questa
impostazione viene visualizzata solo alla prima impostazione.)
6. Accendere i diffusori surround.
• Il colore dell’indicatore [WIRELESS LINK] del diffusore surround
passa da rosso a verde.
• Quando l’indicatore [WIRELESS LINK] di ciascun diffusore
diventa verde, “4CH SEARCH ” scompare dal display.
7. Tenere premuto [CH] sul telecomando (SC-ZT1) per circa 3
secondi fi nché “4 SPKR SET” viene visualizzato sul display
dell’unità principale.
• Puntare sempre il telecomando verso l’unità principale per il
funzionamento.
8. Premere il pulsante del telecomando (SC-ZT1) corrispondente
al diffusore che sta emettendo il suono di conferma.
Diffusore
(➜ pagina sinistra)
Diffusore anteriore (sinistro) : [GAME]
Diffusore anteriore (destro) : [MUTE]
Diffusore surround (sinistro) : [–SETUP, OFF]
Diffusore surround (destro) : [
• Il suono viene emesso da entrambi i diffusori.
• Quando si preme il pulsante corrispondente al suono di conferma
del diffusore, un altro diffusore emette un suono di conferma.
Premere il pulsante corrispondente nello stesso modo e
completare le impostazioni di tutti e 4 i diffusori.
• Quando “COMPLETE” scompare dal display dell’unità principale,
l’impostazione dei diffusori è completata.
Nota
• Dopo aver impostato i diffusori controllare se l’impostazione è
corretta. (➜ pagina 15 delle Istruzioni per l’uso del sistema SC-ZT1)
• Se i diffusori sono stati impostati in modo scorretto nel punto 8,
spegnere e riaccendere l’unità principale (SC-ZT1) ed eseguire i
punti 7 e 8.
• Se l’indicatore [WIRELESS LINK] non passa da rosso a verde,
vedere pagina 29 delle Istruzioni per l’uso del sistema SC-ZT1,
“Guida alla risoluzione dei problemi”.
QUESTA UNITÀ È PROGETTATA PER L’USO NEI PAESI CON
CLIMA MITE.
Durante l’uso questo prodotto potrebbe essere soggetto
all’interferenza radio causata dal cellulare. Se si dovesse verifi care
tale interferenza, aumentare la distanza tra questo prodotto e il
cellulare.
Pulsanti corrispondenti (➜
pagina 16 delle Istruzioni per
l’uso del sistema SC-ZT1)
RETURN]
Posizionamento
Collocare il sistema su una superficie piana, lontana dalla luce diretta del sole, dalle alte
temperature, dall’umidità elevata e da vibrazioni eccessive. Queste condizioni possono
danneggiare il sistema e altri componenti, riducendo la durata di esercizio del sistema.
Non attaccarsi e non arrampicarsi sul sistema. Altrimenti si possono provocare gravi lesioni.
Non utilizzare il dispositivo in ospedali e altri luoghi in cui sono
installate apparecchiature medicali elettriche.
Non utilizzare il dispositivo vicino a porte automatiche, allarmi
antincendio e altri apparati controllati automaticamente.
Non tenere il diffusore con una sola mano.
Prima di applicare i feltrini alle basi per impedire la caduta a terra,
assicurarsi che non vi siano persone nell’area circostante.
Non inserire una mano o un piede nell’apertura della superfi cie laterale della base.
Non accendere i diffusori con un piede o con l’aspirapolvere senza
prestare attenzione. Questo dispositivo non è un giocattolo.
Tensione
Non utilizzare sorgenti di alimentazione ad alta tensione, che possono
sovraccaricare il sistema e provocare un incendio.
Non utilizzare una sorgente di alimentazione CC. Controllare attentamente la sorgente
se si utilizza il sistema su una nave o in altro luogo in cui si impieghi corrente continua.
Protezione del cavo di alimentazione CA
Assicurarsi che il cavo di alimentazione CA sia collegato correttamente e che non sia
danneggiato. Se il cavo non è collegato correttamente ed è danneggiato, può causare
incendi e scosse elettriche. Non tirare e non piegare il cavo e non collocarvi sopra il sistema.
Per scollegare il cavo afferrare saldamente la spina. Non spostare il sistema
se il cavo di alimentazione CA è ancora collegato alla presa di corrente. Se
si tira il cavo di alimentazione CA si possono provocare scosse elettriche.
Non toccare la spina con le mani bagnate. Altrimenti si possono provocare scosse elettriche.
Scollegare la spina di alimentazione CA dalla presa di corrente quando non
si utilizza il sistema per un periodo di tempo prolungato.
Oggetti estranei
Prestare attenzione a non far cadere oggetti metallici all’interno del
sistema. Altrimenti si possono provocare scosse elettriche o guasti.
Prestare attenzione a non far entrare liquidi all’interno del sistema. Altrimenti si
possono provocare scosse elettriche o guasti. Se ciò si dovesse verificare, scollegare
immediatamente il cavo di alimentazione del sistema e contattare il rivenditore.
Non spruzzare insetticidi sopra o all’interno del sistema, perché
contengono gas infiammabili che altrimenti potrebbero prendere fuoco.
Riparazioni
Non cercare di riparare l’unità da soli. Se il suono si interrompe, le spie non si accendono, esce fumo
o si verifica qualsiasi altro problema non contemplato nelle presenti istruzioni, scollegare il cavo di
alimentazione CA e rivolgersi al rivenditore o a un centro di assistenza autorizzato. Se il sistema viene
riparato, smontato o rimontato da personale non qualificato si possono verificare scosse elettriche o danni.
Per prolungare la durata di esercizio scollegare il sistema dall’alimentazione
CA se non si intende utilizzarlo per un periodo di tempo prolungato.
Specifi che tecniche
1
g SEZIONE AMPLIFICATORE DI CORRENTE
Corrente di uscita RMS (CA da 220 a 240 V)
Distorsione armonica totale 10 %
Canale diffusore woofer 60 W (100 Hz, 3 Ω)
Canale diffusore centrale alto 20 W (1 kHz, 8 Ω)
Corrente totale del sistema
Corrente di uscita DIN (CA da 220 a 240 V)
Distorsione armonica totale 1,0 %
100 Hz Canale diffusore woofer 40 W (3 Ω)
1 kHz Canale diffusore centrale alto 15 W (8 Ω)
Corrente totale del sistema
g SEZIONE DIFFUSORI
Sistema a 5 diffusori a 2 vie (tipo bass-reflex)
Parte woofer A corno da 12 cm × 1
Parte centrale alta Tipo piatto da 2,4 × 10 cm × 4
g DIFFUSORI GENERALI
Alimentazione CA da 220 V a 240 V, 50 Hz
Consumo di corrente 20 W
Standby Wireless Link 0,8 W
In condizione di standby 0,15 W
Dimensioni (L × A × P) 290 mm × 1231 mm × 290 mm
Peso Circa.3,9 kg
Intervallo di temperature di esercizio Da 0 °C a 40 °C
Intervallo di umidità di esercizio UR dal 20 % all’80 % (senza condensa)
g SEZIONE WIRELESS
Frequenza alla banda di utilizzo Da 2,4000 GHz a 2,4835 GHz
Numero di canali utilizzati 3
Distanza del campo di azione 15 m
∗1: per 1 diffusore
∗2: utilizzare 2 diffusori
∗3: Conforme alla specifica nelle seguenti condizioni.
Alla stessa temperatura ambiente, in assenza di ostacoli
tra unità principale e diffusore. Con installazione dell’unità
principale a un’altezza uguale o superiore a 50 cm.
Note: 1.
2. La distorsione armonica totale viene misurata con
3.
le specifiche tecniche sono soggette a modifiche senza preavviso.
l’analizzatore di spettro digitale.
La distorsione armonica totale viene misurata con il filtro AES17.
2
∗
160 W (80 W + 80 W)
2
∗
110 W (55 W + 55 W)
1
∗
1
∗
∗
ITALIANO
/Specifi che tecniche
Impostazione dei diffusori/Precauzioni di sicurezza
∗3
RQT9462
3
9
Exemple
d’installation
Enceinte
d’ambiance
(gauche)
•
Orientez les faces avant (comportant le logo Panasonic) de chaque
enceinte vers l’aire d’écoute/de visionnage afin d’effectuer les réglages.
• Placez-les légèrement à l’arrière gauche/droite de l’aire d’écoute/de
visionnage.
Accessoires fournis
FRANÇAIS
2 Cordons d’alimentation
(Pour l’Europe continentale) (Pour le Royaume-Uni et la
Patins adhésifs (1 feuille : 8 pièces)
Conservez les patins adhésifs hors de la portée des enfants pour
éviter tout risque d’ingestion.
Raccordement du cordon d’alimentation
Pour faire des économies d’énergie, si vous prévoyez de ne pas
utiliser le système pendant une période assez longue, débranchez-le
de la prise d’alimentation secteur.
Assurez-vous de mettre ce système hors tension avant de débrancher
le cordon d’alimentation.
Pour en savoir plus sur la consommation électrique des enceintes en
mode veille, voir ci-dessous.
Prise d’alimentation secteur
(CA 220 à 240 V, 50 Hz)
Cordon d’alimentation (inclus)
Insertion du connecteur
Même si le connecteur est parfaitement
inséré, la partie avant de la fiche peut
éventuellement dépasser selon le type de
prise utilisé, comme le montre l’illustration.
Cela ne pose toutefois aucun problème pour
utiliser le système.
Remarque
Le cordon d’alimentation fourni ne doit être utilisé qu’avec ce système.
Ne l’utilisez avec aucun autre appareil.
De même, n’utilisez pas de cordon d’alimentation provenant d’un autre
appareil avec ce système.
•
Lorsque vous mettez hors tension l’appareil principal (SC-ZT1) et que
les enceintes sont sous tension, celles-ci se mettent automatiquement
en veille (Mode veille de la liaison sans fil). La couleur du témoin de
liaison sans fil [WIRELESS LINK] passe au rouge.
•
Pour réduire davantage la consommation électrique des enceintes en mode veille,
mettez-les hors tension. Les enceintes se mettent en veille (En mode veille).
<Consommation électrique des enceintes en mode veille>
Mode veille de la liaison sans fil : environ 0,8 W (pour 1 enceinte)
En mode veille : environ 0,15 W (pour 1 enceinte)
Maintenance
Débranchez le cordon d’alimentation de la prise de courant et essuyez
le système à l’aide d’un chiffon doux et sec.
•
Si le système est très sale, essorez vigoureusement le chiffon imbibé
d’eau, essuyez la poussière et ôtez l’humidité à l’aide d’un chiffon sec.
Accessoires fournis/Raccordement du cordon d’alimentation/Maintenance/Installation/Guide des commandes
•
N’utilisez pas de solvants tels que de la benzine, des diluants, de l’alcool,
RQT9462
etc. car ils risquent de déformer le boîtier et de détériorer le revêtement.
• Avant d’utiliser un chiffon imprégné chimiquement, lisez
attentivement les instructions qui l’accompagnent.
2
10
Enceinte avant
(gauche)
Appareil raccordé
Appareil principal
Environ 120°
Enceinte d’ambiance
(droite)
Vérifiez que vous disposez bien de tous les
accessoires fournis en cochant les cases
correspondantes.
République d’Irlande)
AC IN
Environ
6 mm
Enceinte
avant (droite)
Vue
latérale
Prise de l’appareil
Connecteur
Installation
Chaque enceinte peut être positionnée indifféremment avant la configuration.
Assurez-vous de placer les enceintes sur une surface plane et
stable afin d’éviter tout risque de basculement.
Lorsque vous portez les enceintes, maintenez la base et les
tiges métalliques. (➜ Ci-dessous)
Les enceintes de ce système ne disposent pas d’un blindage magnétique.
N’installez pas ce système à proximité d’un téléviseur à tube cathodique.
Remarque
•
Assurez-vous que la base n’est pas couverte par un tissu tel qu’un rideau.
• Avant de fixer les patins adhésifs (inclus) sur les bases pour
empêcher les vibrations au sol ou que l’appareil ne penche,
assurez-vous qu’il n’y a personne dans les environs.
• Définissez la distance entre chaque enceinte et l’aire d’écoute/de
visionnage. (➜ page 24 du Mode d’emploi du SC-ZT1)
Fonctions sans fil
Ce système utilisant une bande de fréquence de 2,4 GHz, les ondes radio peuvent être
interrompues si elles sont entravées par un obstacle. En fonction de l’environnement
(interruption des ondes radio depuis l’extérieur, etc.) ou de la structure du bâtiment
dans lequel ce système est utilisé (mur réfl échissant facilement les ondes électriques,
etc.), il est possible que des sons soient coupés ou que des bruits se produisent.
Installez ce système correctement en vous conformant à la description ci-après.
Certification de l’appareil
Ce système ayant reçu la certification de conformité aux Conditions
Techniques d’après la législation sur la radio, la licence de station
sans fil n’est pas nécessaire. Cependant, le fait d’effectuer les actions
suivantes sur l’appareil est répréhensible par la loi :
• Démonter ou remettre à neuf
Restrictions d’utilisation
• Usage domestique uniquement.
• Utilisez ce système dans une même pièce.
Ne placez pas d’obstacle entre l’appareil principal (SC-ZT1) et les enceintes.
Les ondes radio émanant de ce système ont une portée maximale de
15 m dans une même pièce. S’il y a un obstacle entre l’appareil principal
(SC-ZT1) et les enceintes ou si celui-ci est placé à une hauteur de
50 cm ou moins du sol, la portée des ondes radio sera réduite.
Maintenez ce système à l’écart des équipements générant des
interférences avec les ondes radio.
Si les appareils suivants sont situés à proximité du système, installez
ce dernier loin de ces appareils.
• Périphériques Bluetooth, équipements de bureautique,
téléphones, etc. : environ 3 m ou plus
•
Four micro-ondes, appareils sans fil compatibles LAN : environ 3 m ou plus
Ce système est conçu pour éviter automatiquement les interférences avec
les ondes radio émanant de tels appareils ménagers. Si des interférences
avec les ondes radio se produisent, il est possible que le témoin de liaison
sans fil (➜ page 15 du Mode d’emploi du SC-ZT1) clignote, que le son
des enceintes soit interrompu ou que du bruit se produise.
Ces phénomènes se produisent lorsque le système sélectionne une
fréquence adaptée. Il ne s’agit pas de dysfonctionnements.
Maintenez ce système à l’écart des objets métalliques
susceptibles de réfl échir les ondes radio.
Si des objets ou des meubles en métal se trouvent dans la pièce où
est installé le système, les ondes radio ont tendance à se réfléchir.
Selon l’aire d’écoute/de visionnage, il est possible que le son soit
interrompu ou que du bruit se produise. Pour tenter de remédier à ces
symptômes, déplacez légèrement ce système.
Notez que les ondes radio ont tendance à se réfl échir également lorsque ce
système est installé dans des pièces où il y a beaucoup d’allées et venues.
Guide des commandes
Enceinte (avec amplificateur intégré)
Tige métallique (partie mi-hauteur)
Vue
latérale
Entrée CA
(➜ gauche)
Témoin de liaison sans fil [WIRELESS LINK] (➜ page de droite)
Base
(partie woofer)
WIRELESS LINK
Remarque
Borne de TEST : sert à vérifier l’état de fonctionnement du produit.
Utilisé uniquement en usine. N’insérez pas d’objet étranger.
Commutateur ID : sert à vérifier l’état de fonctionnement du produit et
ne doit habituellement pas être utilisé.
1
Lorsque l’appareil est branché sur secteur, le
témoin s’allume en rouge en mode veille et en
vert lorsque l’appareil est mis en marche.
Bouton marche/arrêt de l’appareil (l ^
2
k I) (➜ page de droite)
1
2
Utilisez ce bouton pour mettre en marche
ou arrêter l’appareil.
l (arrêt) : L’appareil est en mode veille.
k (marche) : L’appareil est en marche.
L’appareil consomme une petite quantité d’énergie en
mode veille. Le mode veille est plus économique.
AC IN
Borne de TEST
Commutateur ID
ID
TEST
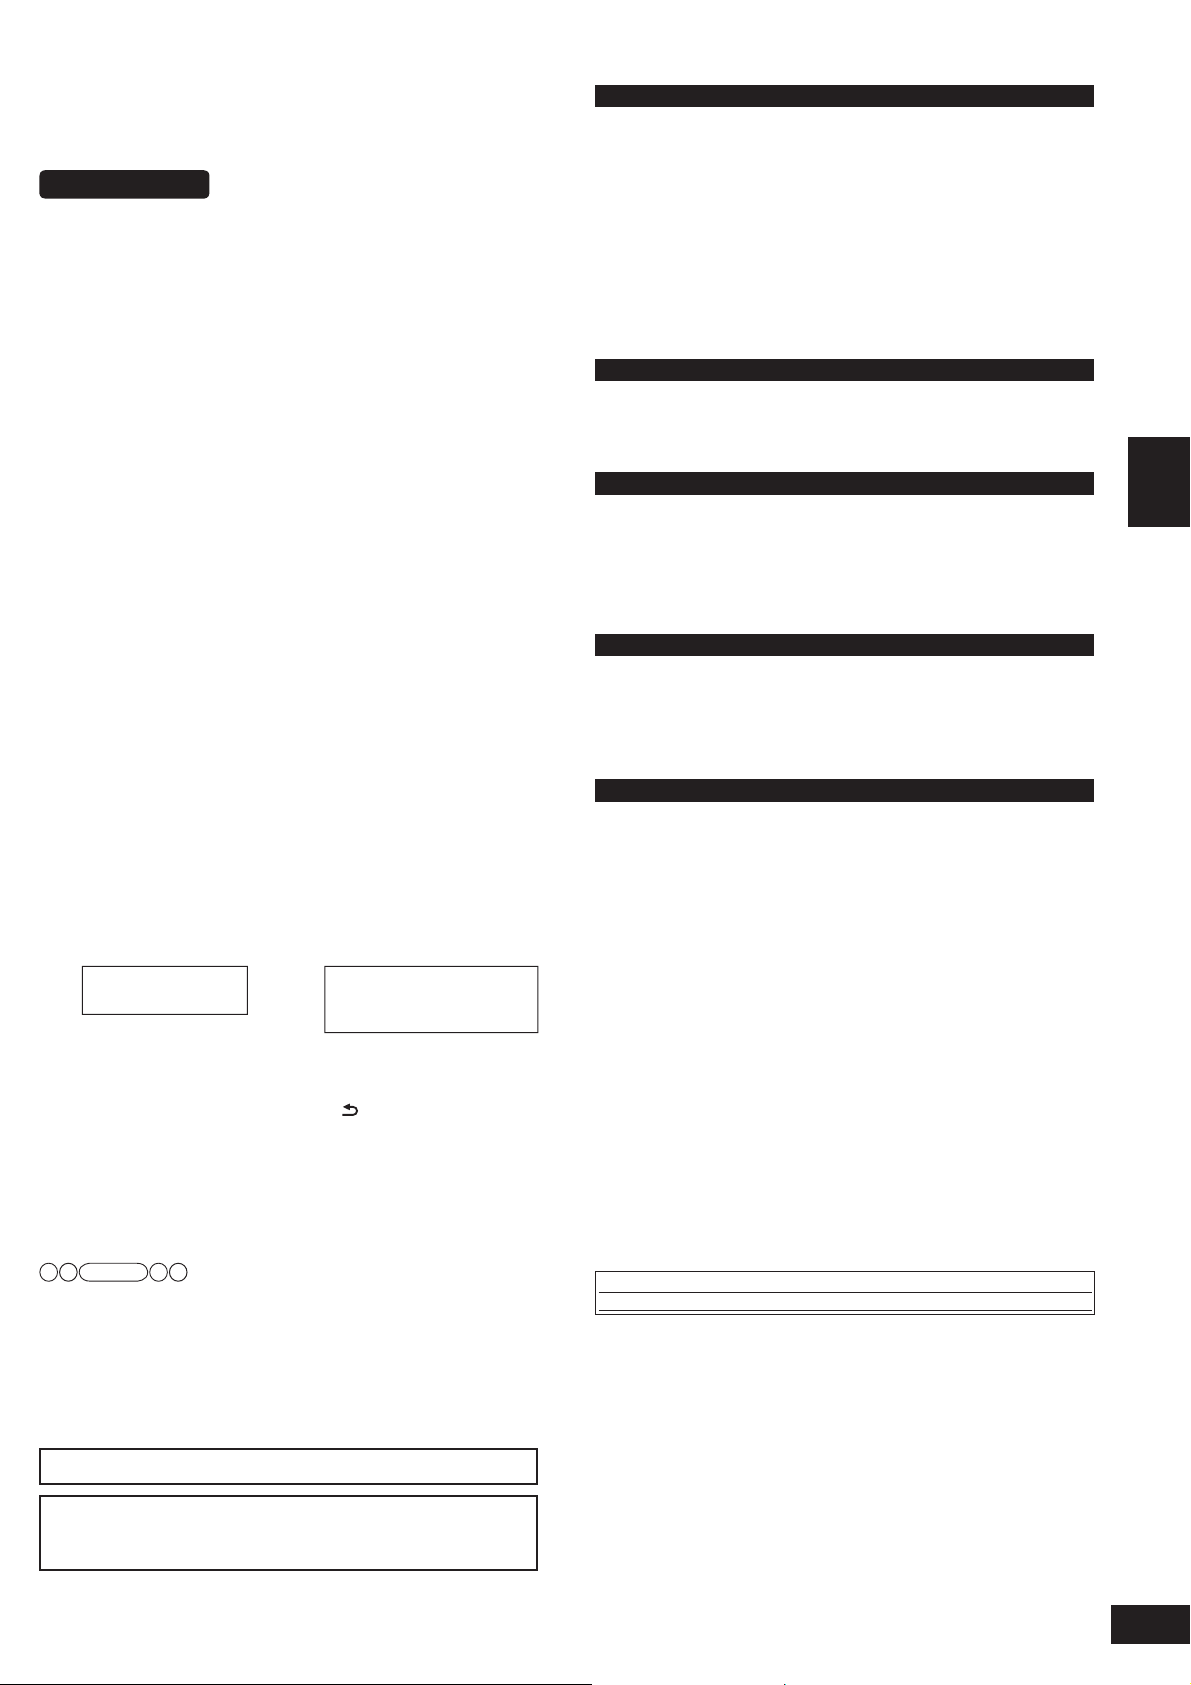
Réglage des enceintes Précautions de sécurité
Assurez-vous d’effectuer cette confi guration lors de la première
utilisation.
Effectuez d’abord la liaison sans fi l avec les enceintes avant
(SC-ZT1), puis confi gurez ensuite les enceintes d’ambiance.
Préparation
• Assurez-vous que tous les appareils ont été mis hors tension.
(Wenn der VIERA Link „HDAVI Control“ kompatible Panasonic
Fernseher (VIERA) und Blu-ray Disc-Player/DVD-Recorder (DIGA)
angeschlossen sind, schalten Sie weder das Fernsehgerät (VIERA)
noch den Blu-ray Disc-Player/DVD-Recorder (DIGA) ein, bevor die
Einstellung abgeschlossen ist.)
• Branchez le cordon d’alimentation de 4 enceintes sur l’appareil
principal (SC-ZT1). (➜ page 13 du Mode d’emploi du SC-ZT1 et
page de gauche du présent manuel)
Assurez-vous d’avoir mis hors tension l’appareil principal (SC-ZT1) et
•
les enceintes.
• Préparez la télécommande (SC-ZT1). (➜ page 7 du Mode
d’emploi du SC-ZT1)
1. Mettez sous tension l’appareil principal (SC-ZT1).
2. Allumez les enceintes avant (SC-ZT1).
• La couleur du témoin de liaison sans fil [WIRELESS LINK] passe
du rouge au vert.
•
Ne mettez pas encore en marche les enceintes d’ambiance à ce
stade. La couleur du témoin de liaison sans fil [WIRELESS LINK]
ne passe pas du rouge au vert même si l’appareil est sous tension.
3. Choisissez « 4CH » lors de la confi guration de « Changer le
nombre des enceintes pour passer à 4 ». (➜ page 17 du Mode
d’emploi du SC-ZT1)
4. Mettez hors tension l’appareil principal (SC-ZT1).
5. Remettez-le ensuite en marche (SC-ZT1).
• «4CH SEARCH » apparaît sur l’afficheur. (Cette indication
n’apparaît que lors de la configuration initiale.)
6. Mettez en marche les enceintes d’ambiance.
• La couleur du témoin de liaison sans fil [WIRELESS LINK] des
enceintes d’ambiance passe du rouge au vert.
• Lorsque le témoin de liaison sans fil [WIRELESS LINK] de
chaque enceinte s’allume en vert, «4CH SEARCH » disparaît.
7. Maintenez enfoncée la touche [CH] sur la télécommande (SCZT1) pendant environ 3 secondes jusqu’à ce que «4 SPKR
SET » soit indiqué sur l’affi cheur de l’appareil principal.
• Orientez toujours la télécommande en direction de l’appareil
principal pour qu’elle fonctionne correctement.
8. Appuyez sur la touche de la télécommande (SC-ZT1)
correspondant à l’enceinte qui émet le son de confi rmation.
Enceinte
(➜ page de gauche)
Enceinte avant (gauche) : [GAME]
Enceinte avant (droite) : [MUTE]
Enceinte d’ambiance (gauche) : [–SETUP, OFF]
Enceinte d’ambiance (droite) : [
• Le son est émis depuis l’une ou l’autre des enceintes.
• Lorsque vous appuyez sur la touche correspondant au son de
confirmation de l’enceinte, une autre enceinte émet un son de
confirmation. Appuyez sur la touche correspondante de la même
manière et achevez la configuration pour les 4 enceintes.
• Lorsque l’indication «COMPLETE » disparaît de l’afficheur de
l’appareil principal, la configuration de l’enceinte est terminée.
Remarque
• Vérifiez que la configuration des enceintes a été correctement
effectuée. (➜ page 15 du Mode d’emploi du SC-ZT1)
• Si la configuration des enceintes est incorrecte à l’étape 8,
éteignez puis remettez en marche l’appareil principal (SC-ZT1) et
recommencez les étapes 7 et 8.
• Si le témoin de liaison sans fi l [WIRELESS LINK] ne passe pas du
rouge au vert, consultez la section « Guide de dépannage » page
29 du Mode d’emploi du SC-ZT1.
CET APPAREIL EST DESTINÉ AUX CLIMATS TEMPÉRÉS.
Ce produit peut être perturbé par les ondes des téléphones mobiles
pendant l’utilisation. Si vous constatez une telle interférence,
éloignez le téléphone mobile du produit.
Boutons correspondant
(➜ page 16 du Mode
d’emploi du SC-ZT1)
RETURN]
Emplacement
Placez le système sur une surface plane, ne l’exposez pas aux rayons du
soleil ou aux températures élevées, et préservez-le d’une humidité élevée et
de vibrations excessives. Ces facteurs peuvent endommager le boîtier et les
autres composants du système, diminuant ainsi sa durée de service.
Ne vous suspendez pas au système et ne grimpez pas dessus. Vous
risqueriez de vous blesser gravement.
Ne pas utiliser cet appareil dans les hôpitaux et autres lieux équipés de dispositifs médicaux électriques.
Ne pas utiliser cet appareil près de portes automatiques, d’alarmes
incendie et autres appareils contrôlés automatiquement.
Ne tenez pas l’enceinte d’une seule main.
Avant de fi xer les patins adhésifs sur les bases pour empêcher les vibrations au
sol ou que l’appareil ne penche, assurez-vous qu’il n’y a personne dans les environs.
N’insérez pas votre main ou votre pied dans l’ouverture de la surface latérale de la base.
Ne mettez pas en marche les enceintes négligemment avec le pied ou avec
un aspirateur. Cet appareil n’est pas un jouet, ne l’utilisez pas en tant que tel.
Tension
N’utilisez aucune source d’alimentation à haute tension. Cela risquerait de
surcharger le système et de causer un incendie.
N’utilisez aucune source d’alimentation en courant continu (« CC »).
Vérifiez attentivement la source utilisée si vous installez le système
sur un navire ou en tout autre endroit où du courant continu est utilisé.
Protection du cordon d’alimentation
Assurez-vous que le cordon d’alimentation est bien branché et qu’il n’est pas endommagé.
Il y a risque d’incendie ou de choc électrique si le cordon est mal branché ou endommagé.
Évitez de tirer sur le cordon ou de le plier, et ne placez pas le système dessus.
Pour débrancher le cordon, saisissez-le fermement par sa fiche. Ne déplacez pas
le système si le cordon d’alimentation est toujours branché à la prise de courant.
Il y a risque de choc électrique si vous tirez sur le cordon d’alimentation lui-même.
Ne manipulez pas la fiche avec les mains mouillées. Cela peut provoquer un choc électrique.
Débranchez la fiche d’alimentation de la prise de courant si vous ne l’utilisez pas pendant une longue période.
Corps étrangers
Prenez garde de ne pas laisser tomber d’objets métalliques dans le système.
Cela peut provoquer un choc électrique ou un dysfonctionnement.
Prenez garde de ne pas renverser de liquide dans le système. Cela peut provoquer
un choc électrique ou un dysfonctionnement. Si cela se produit, débranchez
immédiatement le système de la prise secteur et contactez votre revendeur.
Ne vaporisez aucun insecticide sur le système ou à l’intérieur de celui-ci. Ces produits
contiennent des gaz inflammables qui peuvent prendre feu s’ils sont vaporisés dans le système.
Réparation
N’essayez pas de réparer cet appareil vous-même. Si le son est interrompu, les témoins ne
s’allument pas, de la fumée apparaît ou tout autre problème non mentionné dans ce mode
d’emploi survient, débranchez le cordon d’alimentation et contactez votre revendeur ou un
centre de service agréé. Il y a risque de choc électrique ou d’endommagement du système
si une personne non qualifiée tente de le réparer, de le démonter ou de le remonter.
Pour augmenter la durée de vie du système, débranchez-le de sa source
d’alimentation si vous ne l’utilisez pas pendant une longue période.
Spécifi cations
1
g SECTION AMPLIFICATEUR DE PUISSANCE
Puissance de sortie RMS (pour une tension comprise entre 220 et 240 V CA)
Distorsion harmonique totale 10%
Canal d’enceinte du caisson de basse (woofer) 60 W (100 Hz, 3 Ω)
Canal d’enceinte moyenne fréquence 20 W (1 kHz, 8 Ω)
Puissance totale du système
Puissance de sortie DIN (pour une tension comprise entre 220 et 240 V CA)
Distorsion harmonique totale 1,0%
100 Hz Canal d’enceinte du caisson de basse (woofer) 40 W (3 Ω)
1 kHz Canal d’enceinte moyenne fréquence 15 W (8 Ω)
Puissance totale du système
g SECTION ENCEINTES
Système à 5 enceintes 2 voies (Bass reflex)
Partie caisson de basse (woofer) 12 cm type conique × 1
Partie moyenne fréquence 2,4 × 10 cm type plat × 4
g ENCEINTES, GÉNÉRALITÉS
Alimentation électrique CA 220 à 240 V, 50 Hz
Consommation électrique 20 W
Mode veille de la liaison sans fil 0,8 W
En mode veille 0,15 W
Dimensions ( L × H × P ) 290 mm × 1231 mm × 290 mm
Poids Approx. 3,9 kg
Plage de températures en fonctionnement 0 °C to 40 °C
Plage d’humidité de fonctionnement 20 % à 80 % de HR (pas de condensation)
g SECTION SANS FIL
Fréquence de la bande d’utilisation 2,4000 GHz à 2,4835 GHz
Nombre de canaux d’utilisation 3
Distance de portée 15 m
∗1: pour 1 enceinte
∗2: utilisez 2 enceintes
∗3: Les conditions suivantes doivent être observées.
Dans une même pièce en intérieur, aucun obstacle ne doit se
trouver entre l’appareil principal et l’enceinte.
L’appareil principal est installé à une hauteur égale ou
supérieure à 50 cm.
Remarques : 1.
2. La distorsion harmonique totale est mesurée au
3. La distorsion harmonique totale est mesurée à
Les spécifications peuvent être modifiées sans préavis.
moyen d’un analyseur de spectre numérique.
l’aide d’un filtre AES17.
2
∗
160 W (80 W + 80 W)
2
∗
110 W (55 W + 55 W)
1
∗
1
∗
∗
FRANÇAIS
Réglage des enceintes/Précautions de sécurité/Spécifi cations
3
∗
RQT9462
3
11
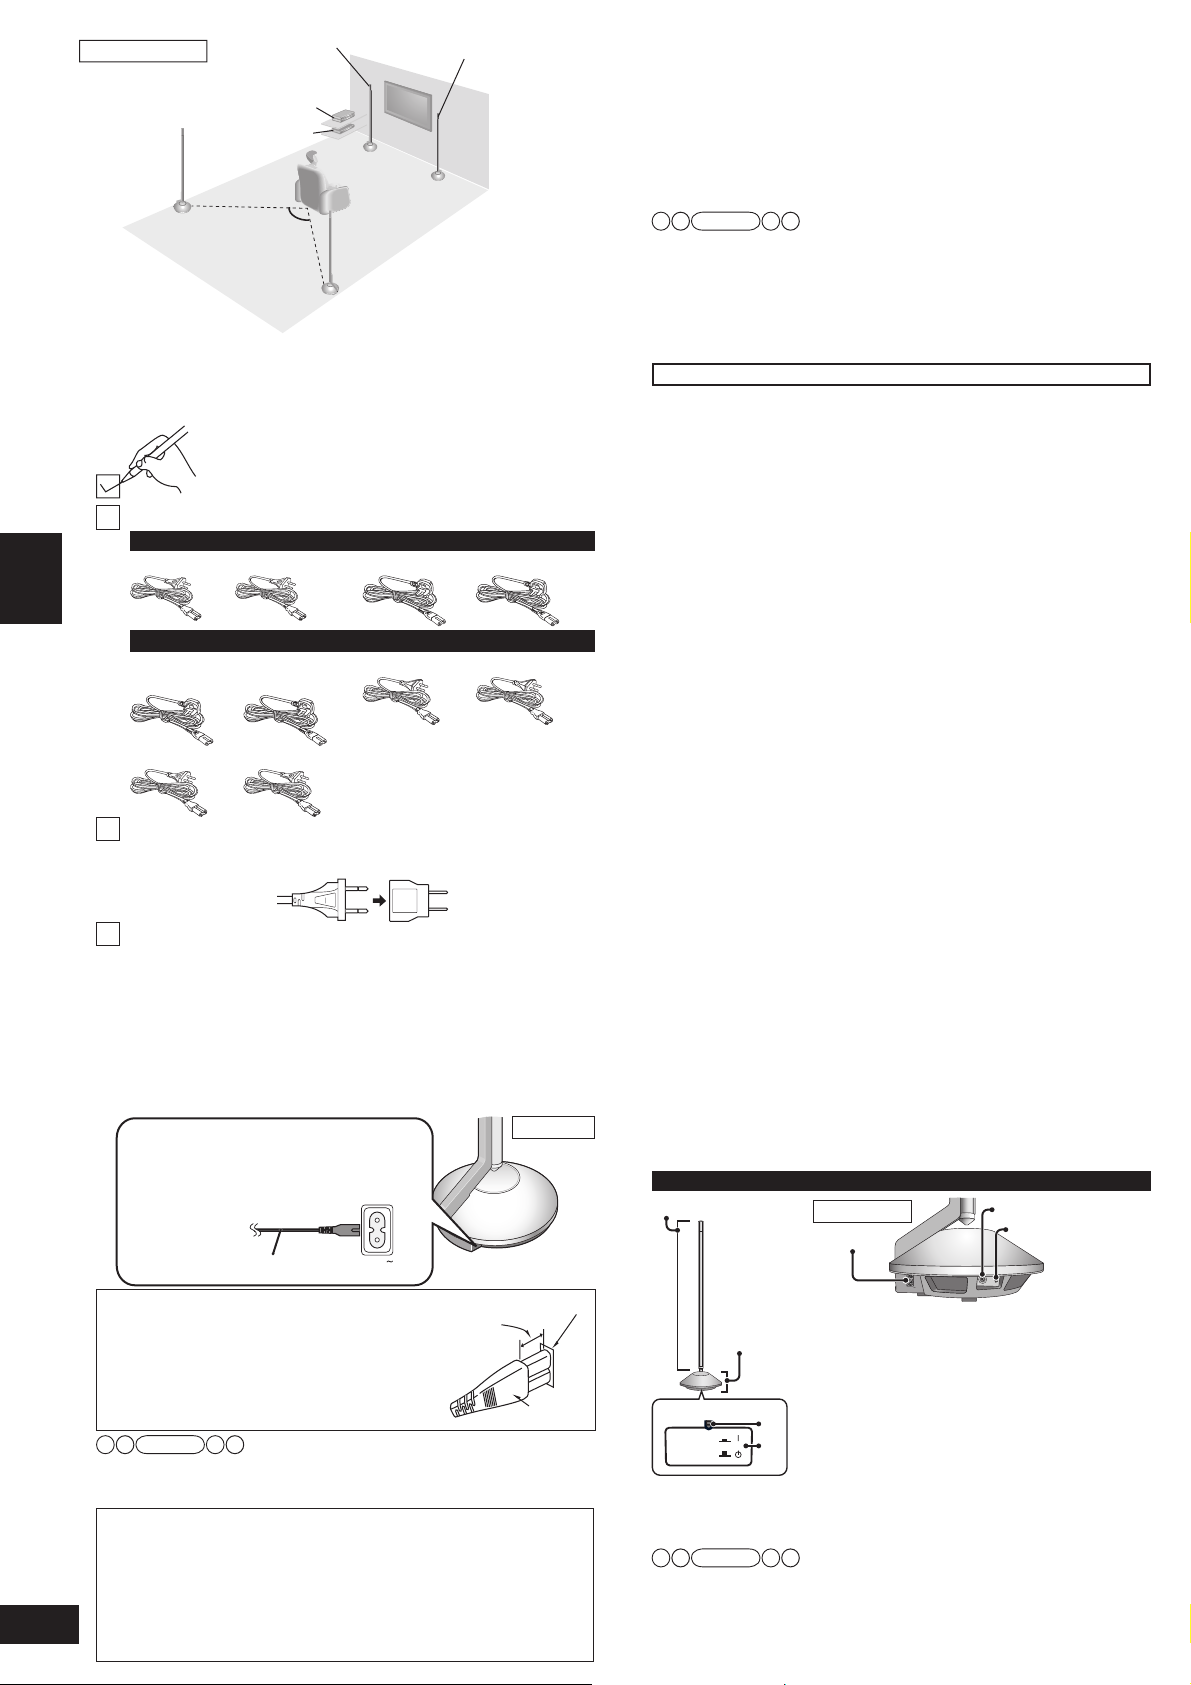
Ejemplo de montaje
Altavoz
de sonido
envolvente
(izquierda)
• Oriente la superficie frontal (con el logo de Panasonic) de cada
altavoz en la posición de escucha-visualización para el ajuste.
•
Sitúelos ligeramente hacia atrás, a la derecha e izquierda de la posición de escucha-visualización.
Accesorios suministrados
2 Cables de alimentación de CA
Para E
(Para Europa continental)
ESPAÑOL
Para GS
(Para Arabia Saudita, Kuwait,
Malasia y Hong Kong)
(Para otros)
2 adaptadores para cables de alimentación de CA
Si los cables de alimentación de CA no se pueden conectar en su toma
de corriente, utilice los adaptadores para cables de alimentación de CA.
Almohadillas para las patas (1 plancha: 8 piezas)
Mantenga el almohadillado para las patas fuera del alcance de
los niños para evitar su ingestión.
Conexión del cable de alimentación de CA
Para ahorrar energía cuando no se vaya a utilizar la unidad durante un
periodo largo de tiempo, desenchúfela de la toma de corriente doméstica.
Asegúrese de apagar este sistema antes de desenchufar el cable de alimentación.
Para informarse sobre el consumo de energía de los altavoces en modo En espera, véase a continuación.
Las fuentes de alimentación son diferentes dependiendo de los
símbolos (E, GN, GS) indicados en la caja de embalaje.
Toma de corriente doméstica
Para E
(CA, 220 a 240 V, 50 Hz)
Para GS
(CA, 110 a 240 V, 50/60 Hz)
Cable de alimentación de CA (incluido)
Inserción del conector
Aunque el conector se introduzca perfectamente, la
parte delantera del conector puede sobresalir como
se muestra en la ilustración, dependiendo del tipo de
entrada utilizado.
Esto, sin embargo, no supone ningún problema para
utilizar el sistema.
Accesorios suministrados/Conexión del cable de alimentación de CA/Instalación/Guía de control
El cable de alimentación de CA suministrado está diseñado únicamente para
su uso con este sistema. No lo utilice con ningún otro equipo.
Además, no utilice el cable de alimentación de CA para otros equipos con este sistema.
•
Cuando apaga la unidad principal (SC-ZT1) con los altavoces encendidos,
los altavoces entran automáticamente en modo En espera (Modo En espera
de Wireless Link). El color del indicador [WIRELESS LINK] cambia a verde.
• Para reducir más el consumo de energía de los altavoces en el
modo En espera, apague los altavoces.
RQT9462
Los altavoces entran en modo En espera (En modo En espera).
<Consumo de energía de los altavoces en el modo En espera>
2
Modo En espera de Wireless Link: aprox. 0,8 W (por 1 altavoz)
En modo En espera: aprox. 0,15 W (por 1 altavoz)
12
Altavoz delantero
(izquierdo)
Equipo conectado
Unidad principal
Aprox. 120°
Altavoz de sonido
envolvente (derecha)
Marque e identifique los accesorios suministrados.
Los accesorios suministrados son diferentes dependiendo de
los símbolos (E, GS) indicados en la caja de embalaje.
Utilice los accesorios correctos según la región de utilización.
(Para el Reino Unido y la República de Irlanda
(Para Tailandia)
AC IN
Nota
Altavoz delantero
(derecho)
Entrada en el equipo
6 mm
aprox.
Conector
)
Vista lateral
Instalación
Antes del ajuste cada altavoz puede colocarse indistintamente.
Asegúrese de colocar los altavoces sobre una superficie plana
y estable para evitar que se caigan.
Cuando transporte los altavoces, sostenga los componentes
de la base y la varilla. (➜ Abajo)
Los altavoces de este sistema no cuentan con protección
magnética. No instale este sistema cerca de una televisión CRT.
Nota
• Asegúrese de que los componentes de la base no estén cubiertos
por ninguna tela, como por ejemplo una cortina.
•
Antes de fijar el almohadillado de la pata (incluido) en los componentes de
la base para evitar que se incline o el traqueteo en el suelo, asegúrese de
que no haya gente en el área circundante.
•
Fije la distancia entre cada altavoz en la posición de escucha-visualización.
(➜ página 14 de las Instrucciones de funcionamiento de SC-ZT1)
Funciones inalámbricas
Dado que este sistema utiliza una banda de frecuencia de 2,4 GHz,
las ondas de radio podrían verse interrumpidas por un obstáculo.
Dependiendo del entorno circundante (es decir, interrupción de las ondas de radio desde
el exterior, etc.) o la estructura del edificio donde se usa este sistema (es decir, pared que
refleja con facilidad las ondas de radio, etc.), podrían producirse cortes de sonido o ruidos.
Instale este sistema correctamente prestando atención a las siguientes descripciones.
Certificación del equipo
Dado que este sistema ha recibido la certificación de cumplimiento de las Condiciones Técnicas
basada en la Ley de la Radio, no se necesita una licencia para la estación inalámbrica. No
obstante, si realiza las siguientes acciones en este sistema, podría ser castigado por la ley.
• Lo desmonta o restaura
Restricciones de uso
• Para uso doméstico solamente.
• Utilice este sistema en la misma habitación.
No coloque ningún obstáculo entre la unidad principal (SC-ZT1) y los altavoces.
Las ondas de radio de este sistema alcanzan un rango máximo de 15 m en la
misma habitación. Si hay un obstáculo entre la unidad principal (SC-ZT1) y los
altavoces o se sitúa la unidad principal (SC-ZT1) a una altura de 50 cm o por
debajo respecto al suelo, las ondas de radio alcanzan un rango más corto.
Mantenga este sistema alejado de equipos que generen
interferencias de ondas de radio.
Si se coloca el siguiente equipo cerca del sistema, instale este sistema lejos de dicho equipo.
• Bluetooth, dispositivos para la automatización de oficinas (OA,
por sus siglas en inglés), teléfono, etc.: aprox. 3 m o más
• Horno microondas, dispositivos compatibles con LAN
inalámbrica: aprox. 3 m o más
Este sistema ha sido diseñado para evitar de forma automática interferencias de
ondas de radio con dichos equipos para el hogar. Si se producen interferencias
de ondas de radio, la visualización Wireless Link (➜ página 9 de las
Instrucciones de funcionamiento de SC-ZT1) podría parpadear, los sonidos de
los altavoces podrían interrumpirse o podrían oírse ruidos.
Este fenómeno se produce cuando este sistema selecciona una
frecuencia adecuada. No se trata de una avería.
Mantenga este sistema alejado de objetos metálicos que
tiendan a reflejar las ondas de radio.
Si hay objetos metálicos o mobiliario en la habitación donde está instalado el
sistema, las ondas de radio tienden a reflejarse.
Dependiendo de la posición de escucha-visualización, podrían producirse cortes
de sonido o ruidos. Estos síntomas pueden solucionarse moviendo ligeramente de
posición este sistema. Tenga en cuenta que las ondas de radio tienden a reflejarse
también cuando se instala este sistema en habitaciones con mucha actividad.
Guía de control
Altavoz (con amplificador incorporado)
Varilla (parte media-alta)
Toma CA (➜ izquierda)
Base
(parte del
woofer)
WIRELESS LINK
Nota
Terminal de PRUEBA: Esto se utiliza para comprobar el estatus de funcionamiento
del producto. Sólo se utiliza en fábrica. No inserte ningún objeto extraño.
Interruptor de ID: Esto se utiliza para comprobar el estatus de
funcionamiento del producto y no se utiliza normalmente.
1
2
Vista lateral
AC IN
Indicador [WIRELESS LINK] (➜ página derecha)
1
Cuando la unidad está conectada a una toma
de CA, este indicador se enciende de color
rojo en el modo En espera y se enciende de
color verde cuando la unidad está encendida.
Botón de encendido/apagado de la
2
unidad (l ^ k I) (➜ página derecha)
Utilice este botón para encender y apagar la unidad.
l (apagado):
k (encendido): La unidad está encendida.
La unidad sigue utilizando una pequeña
cantidad de energía en el modo En espera. El
modo En espera utiliza menos energía.
La unidad está en modo En espera.
Terminal de PRUEBA
Interruptor de ID
ID
TEST
 Loading...