How it Works
Log In / Sign Up
Buy Points
How it Works
FAQ
Contact Us
Questions and Suggestions
Users
Panasonic
Loading...
S
SB24C50GAU6
SB30C50GAU6
SB35C65GAU6
SB43C75GAU6
SB43C77RAU6
SB48C90RAU6
SB51C90RAU6
SBAK-250-PL
SBAK-320-GC
SBAK-450-P
SBAK-450-PC
SBAK-450-PL
SBAK-750-P
SBAK-750-PC
SBAK-77
2
SBAS100
2
SBAS35
SBAS-40
SBC700A
SBC700E
SBDV-170
SBFC-1000-LE
SBFC-1000-LP
SBFC-1000-RE
SBFC-1000-RP
SBFS-1000-E
SBFS-1000-P
SBFS996GC
SBFX-85-P
2
SBFX-85-PC
2
SBHC-550-G
SBHC-750-P
2
SBHC-950-P
SBHF-550-G
SBHF-650-P
SBHF-750-P
2
SBHF-850-G
SBHFX-5-E
SBHS-1000-E
SBHS-1000-P
SBHS100A
2
SBHS100A - SPEAKER SYSTEM - MULTI LANGUAGE
SBHS-550-G
SBHS-650-P
SBHS-750-P
2
SBHS-851-G
SBHSX70
SBHW-550-G
SB-W540
SB-W640
SB-W80
2
SB-W95
SB-W995GC
SB-WA100
2
SB-WA100K
SB-WA101
SB-WA101EB
SB-WA102
SB-WA1050
SB-WA110
SB-WA15E
SB-WA15EB
SB-WA17EB
SB-WA330
2
SB-WA330E
SB-WA330EB
SB-WA340
3
SB-WA342
SB-WA350
SB-WA50
SB-WA520EG
2
SB-WA54
SB-WA55
SB-WA623
SB-WA70
2
SB-WA730PP
SB-WA800
4
SB-WA833
SB-WA883YP
SB-WA885
SB-WA888
SB-WA930
SB-WAK520
2
SB-WAK610
SB-WAK630
4
SB-WAK640
SB-WAK750
2
SB-WAK770
2
SB-WAK780
2
SB-WAK980
2
SB-WAK981
2
SB-WAKX105
SB-WAKX70
SB-WAKX95
SB-WNC9
SB-WVK650
SB-WVK870
SB-WVK91
SB-ZT1
4
SB-ZT2
2
Loading...
Loading...
Nothing found
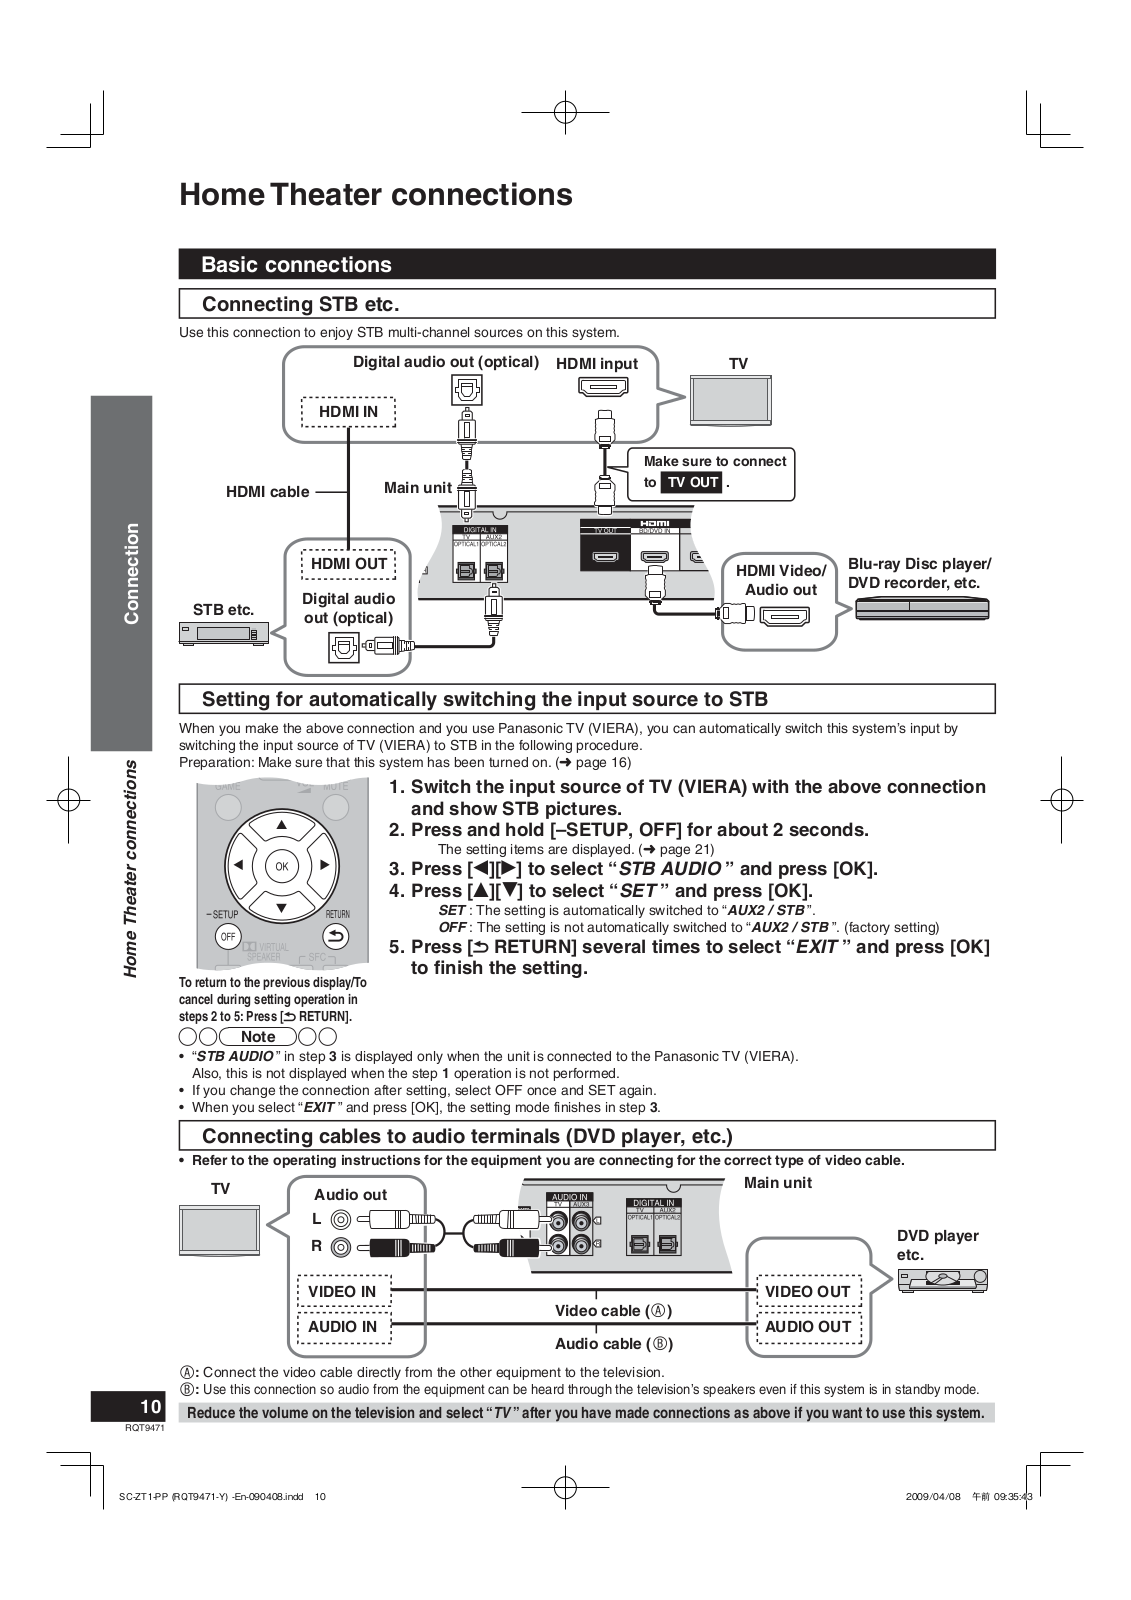
SB-ZT1
User Manual
8 pgs
463.73 Kb
0
User Manual
32 pgs
1.47 Mb
0
User Manual [en, de, es, fr, it, cs, pl]
40 pgs
4.17 Mb
0
User Manual [sk]
4 pgs
671.47 Kb
0
Table of contents
Loading...
Panasonic SB ZT1, SU ZT1 User Manual
...
Panasonic User Manual
Download
Specifications and Main Features
Frequently Asked Questions
User Manual
Download
Loading...
+
22
hidden pages
Unhide
You need points to download manuals.
1 point = 1 manual.
You can buy points or you can get point for every manual you upload.
Buy points
Upload your manuals
 Loading...