

Page 1
For U.S.A.
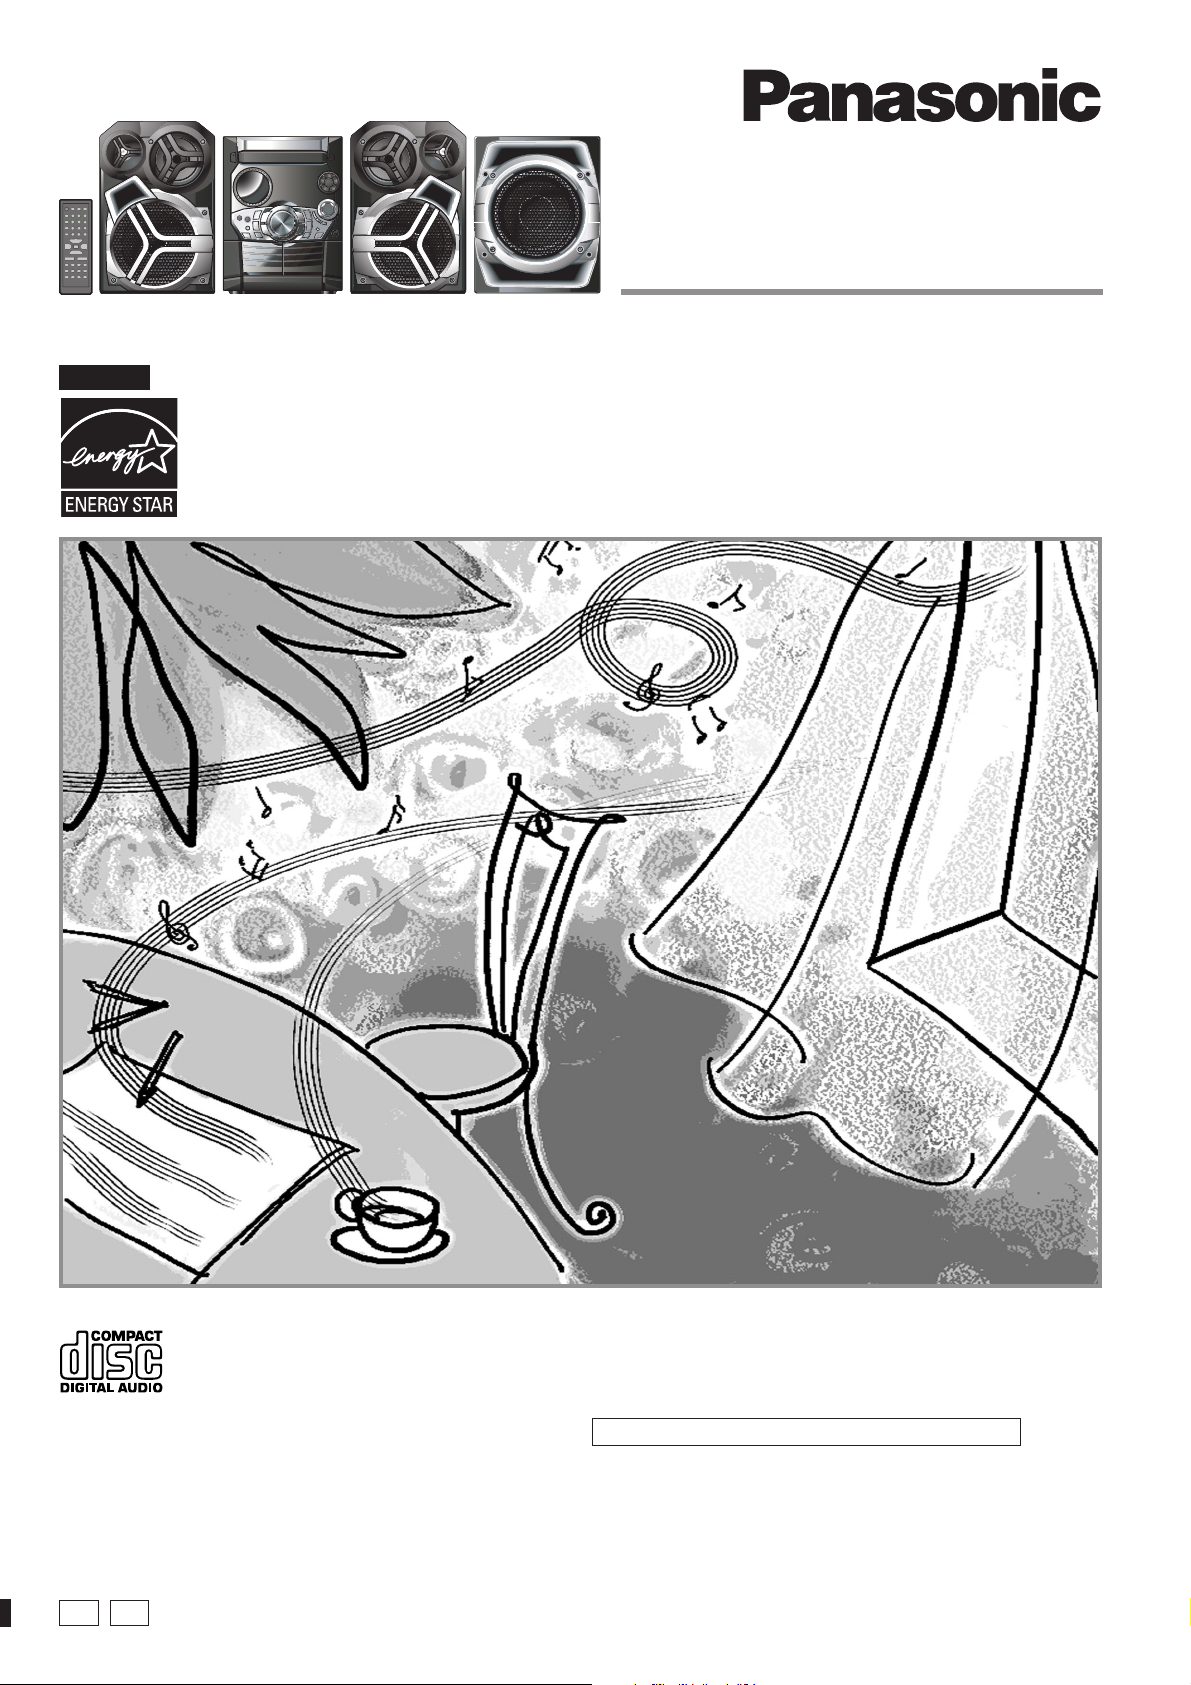
The illustrations show SC-AK520.
As an ENERGY STAR® Partner, Panasonic has determined
that this product meets the ENERGY STAR® guidelines for
energy efficiency.
CD Stereo System
Operating Instructions
Model No. SC-AK520
SC-AK523
SC-AK320
SC-AK323
P PC
Before connecting, operating or adjusting this product, please read these
instructions completely.
Please keep this manual for future reference.
SC-AK523 and SC-AK323 are available in the U.S.A. only.
RQT7330-5P
Page 2
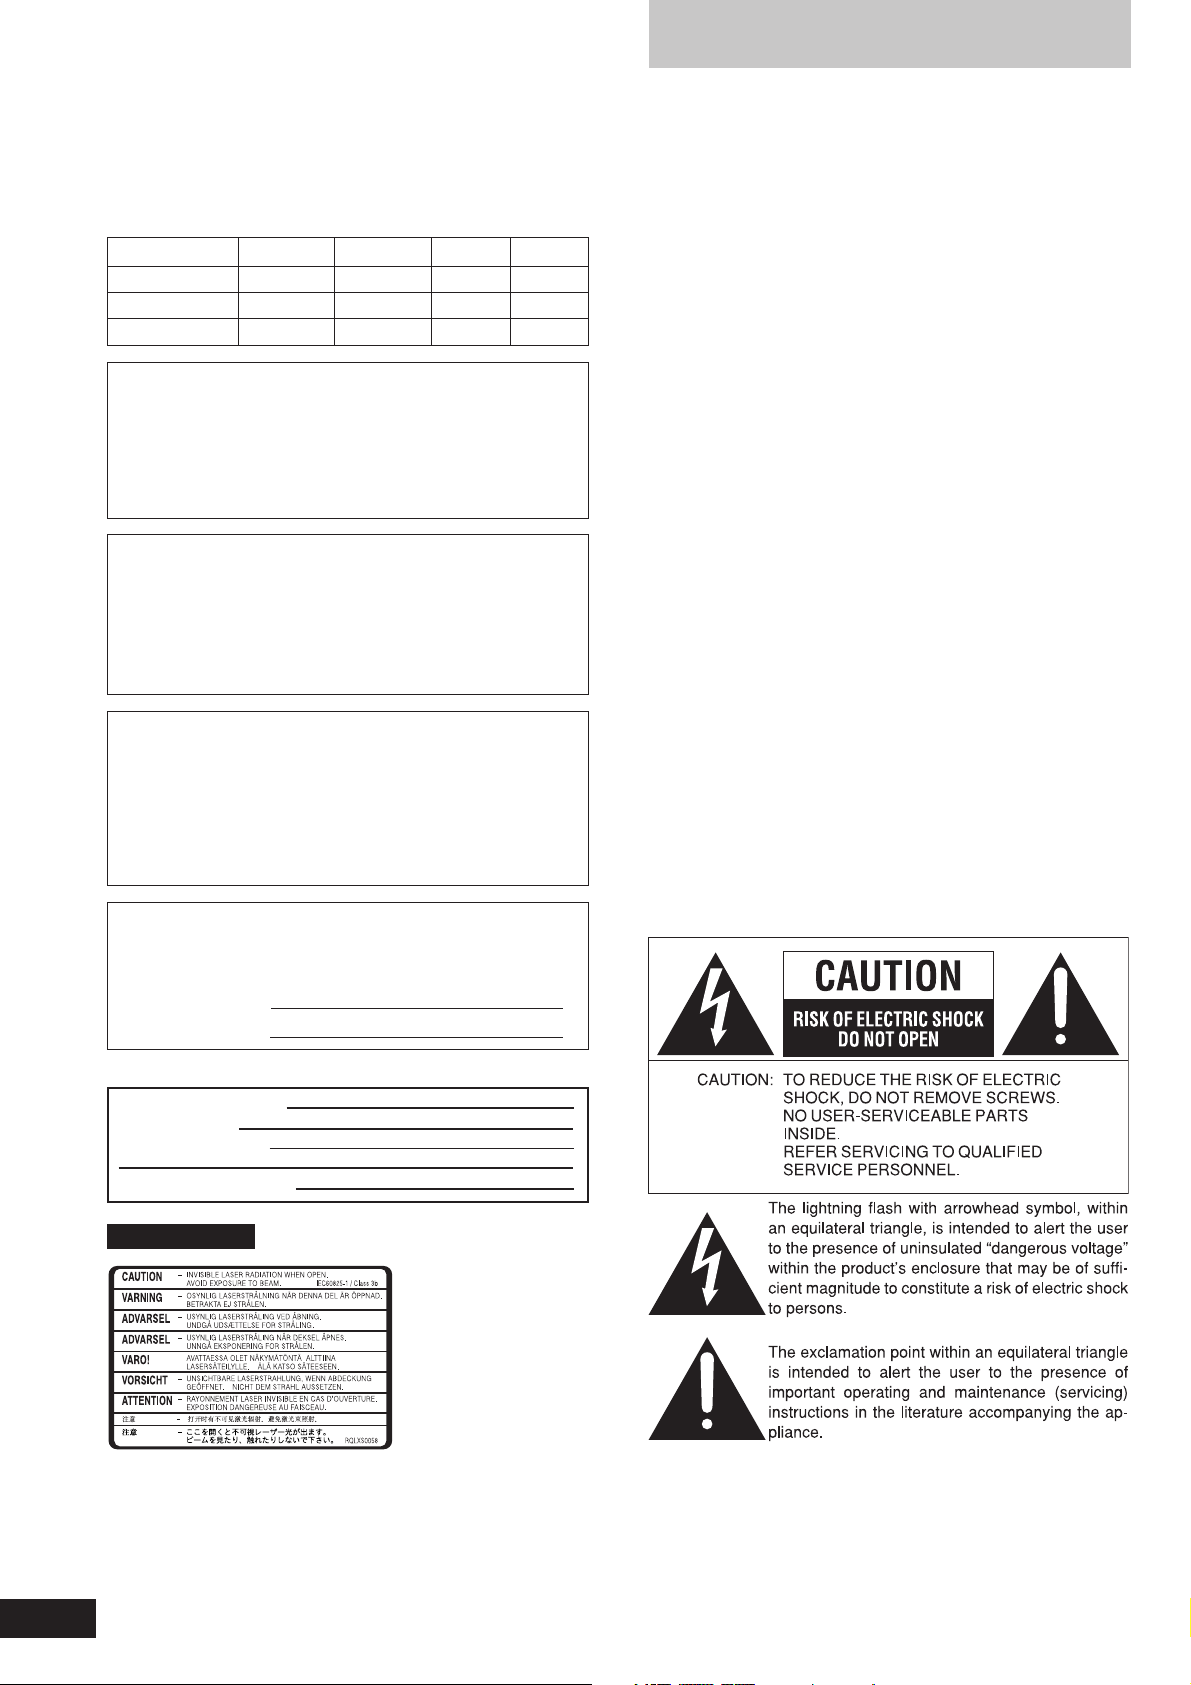
Table of contents
Dear customer
Thank you for purchasing this product.
For optimum performance and safety, please read these instructions
carefully.
These operating instructions are applicable to the following systems.
Unless otherwise indicated, illustrations in these operating instructions
are of SC-AK520.
System SC-AK520 SC-AK523 SC-AK320 SC-AK323
Main unit SA-AK520 SA-AK523 SA-AK320 SA-AK323
Front speakers SB-AK520 SB-AK520 SB-AK320 SB-AK320
Subwoofer SB-WAK520 SB-WAK520 – –
CAUTION!
THIS PRODUCT UTILIZES A LASER.
USE OF CONTROLS OR ADJUSTMENTS OR PERFORMANCE
OF PROCEDURES OTHER THAN THOSE SPECIFIED HEREIN
MAY RESULT IN HAZARDOUS RADIATION EXPOSURE.
DO NOT OPEN COVERS AND DO NOT REPAIR YOURSELF.
REFER SERVICING TO QUALIFIED PERSONNEL.
WARNING:
TO REDUCE THE RISK OF FIRE, ELECTRIC SHOCK
OR PRODUCT DAMAGE, DO NOT EXPOSE THIS
APPARATUS TO RAIN, MOISTURE, DRIPPING OR
SPLASHING AND THAT NO OBJECTS FILLED WITH
LIQUIDS, SUCH AS VASES, SHALL BE PLACED
ON THE APPARATUS.
CAUTION!
DO NOT INSTALL OR PLACE THIS UNIT IN A BOOKCASE,
BUILT-IN CABINET OR IN ANOTHER CONFINED SPACE.
ENSURE THE UNIT IS WELL VENTILATED. TO PREVENT
RISK OF ELECTRIC SHOCK OR FIRE HAZARD DUE TO
OVERHEATING, ENSURE THAT CURTAINS AND ANY OTHER
MATERIALS DO NOT OBSTRUCT THE VENTILATION VENTS.
IMPORTANT SAFETY INSTRUCTIONS ............................. 3
Listening caution ............................................................... 3
Product Service ................................................................. 3
Supplied accessories ........................................................ 4
Placement of speakers ...................................................... 4
The remote control ............................................................ 4
Disc information ................................................................ 5
Set-up ................................................................................. 6
Front panel controls .......................................................... 7
CDs ..................................................................................... 8
How discs with MP3 differ from CDs ............................... 9
CD Play Mode function for MP3 ....................................... 9
Album skip play .............................................................. 10
Track skip play ............................................................... 10
INTRO function (Album scan) ........................................ 10
Program play for MP3 .................................................... 10
Starting play from a desired track in a desired album .... 11
Title search function ....................................................... 11
CD display for MP3 ........................................................ 12
Marking a track .............................................................. 13
Radio ................................................................................ 13
Cassettes .......................................................................... 14
Sound quality/sound field ............................................... 15
Other functions ................................................................ 15
Optional antenna connections ........................................ 15
External unit connections ............................................... 15
Using an external unit .................................................... 15
Using headphones (not included) ................................... 15
Turning the demo function on/off .................................... 15
Convenient functions ...................................................... 16
Auto-off function ............................................................. 16
Setting the time .............................................................. 16
Timers............................................................................... 17
Troubleshooting guide .................................................... 18
Maintenance ..................................................................... 18
Specifications .................................................................. 19
Limited Warranty (ONLY FOR U.S.A.) ............. Back cover
The model number and serial number of this product can be
found on either the back or the bottom of the unit.
Please note them in the space provided below and keep for
future reference.
MODEL NUMBER
SERIAL NUMBER
User memo:
DATE OF PURCHASE
DEALER NAME
DEALER ADDRESS
TELEPHONE NUMBER
Except for U.S.A.
Inside of product
2
RQT7330
Page 3
IMPORTANT SAFETY INSTRUCTIONS
Read these operating instructions carefully before using the unit. Follow the safety instructions on the unit and the applicable safety instructions
listed below. Keep these operating instructions handy for future reference.
1) Read these instructions.
2) Keep these instructions.
3) Heed all warnings.
4) Follow all instructions.
5) Do not use this apparatus near water.
6) Clean only with dry cloth.
7) Do not block any ventilation openings. Install in accordance with
the manufacturer’s instructions.
8) Do not install near any heat sources such as radiators, heat
registers, stoves, or other apparatus (including amplifiers) that
produce heat.
9) Do not defeat the safety purpose of the polarized or groundingtype plug. A polarized plug has two blades with one wider than
the other. A grounding-type plug has two blades and a third
grounding prong. The wide blade or the third prong are provided
for your safety. If the provided plug does not fit into your outlet,
consult an electrician for replacement of the obsolete outlet.
Listening caution
Selecting fine audio equipment such as the unit you’ve just purchased is only the start of your musical enjoyment. Now it’s time to
consider how you can maximize the fun and excitement your equipment offers. This manufacturer and the Electronic Industries Association’s Consumer Electronics Group want you to get the most out of
your equipment by playing it at a safe level. One that lets the sound
come through loud and clear without annoying blaring or
distortion—and, most importantly, without affecting your sensitive
hearing.
We recommend that you avoid prolonged exposure to excessive
noise.
Sound can be deceiving. Over time your hearing “comfort level”
adapts to higher volumes of sound. So what sounds “normal” can
actually be loud and harmful to your hearing.
Guard against this by setting your equipment at a safe level BEFORE
your hearing adapts.
To establish a safe level:
Start your volume control at a low setting.
•
Slowly increase the sound until you can hear it comfortably and
•
clearly, and without distortion.
Once you have established a comfortable sound level:
Set the dial and leave it there.
•
Taking a minute to do this now will help to prevent hearing damage
or loss in the future. After all, we want you listening for a lifetime.
10) Protect the power cord from being walked on or pinched
particularly at plugs, convenience receptacles, and the point
where they exit from the apparatus.
11) Only use attachments/accessories specified by the manufacturer.
12) Use only with the cart, stand, tripod, bracket, or
table specified by the manufacturer, or sold with
the apparatus. When a cart is used, use caution
when moving the cart/apparatus combination to
avoid injury from tip-over.
13) Unplug this apparatus during lightning storms or when unused
for long periods of time.
14) Refer all servicing to qualified service personnel. Servicing is
required when the apparatus has been damaged in any way,
such as power-supply cord or plug is damaged, liquid has been
spilled or objects have fallen into the apparatus, the apparatus
has been exposed to rain or moisture, does not operate normally,
or has been dropped.
THE FOLLOWING APPLIES ONLY IN THE U.S.A.:
CAUTION:
This equipment has been tested and found to comply with
the limits for a Class B digital device, pursuant to Part 15 of
the FCC Rules.
These limits are designed to provide reasonable protection
against harmful interference in a residential installation. This
equipment generates, uses and can radiate radio frequency
energy and, if not installed and used in accordance with the
instructions, may cause harmful interference to radio
communications. However, there is no guarantee that interference will not occur in a particular installation. If this equipment does cause harmful interference to radio or television
reception, which can be determined by turning the equipment off and on, the user is encouraged to try to correct the
interference by one or more of the following measures:
Reorient or relocate the receiving antenna.
•
Increase the separation between the equipment and re-
•
ceiver.
Connect the equipment into an outlet on a circuit different
•
from that to which the receiver is connected.
Consult the dealer or an experienced radio/ TV technician
•
for help.
Any unauthorized changes or modifications to this equipment
would void the user’s authority to operate this device.
This device complies with Part 15 of the FCC Rules. Operation is subject to the following two conditions: (1) This device
may not cause harmful interference, and (2) this device must
accept any interference received, including interference that
may cause undesired operation.
Product Service
1. Damage requiring service —The unit should be serviced by
qualified service personnel if:
(a) The AC power supply cord or AC adaptor has been damaged; or
(b)Objects or liquids have gotten into the unit; or
(c)The unit has been exposed to rain; or
(d)The unit does not operate normally or exhibits a marked change
in performance; or
(e)The unit has been dropped or the cabinet damaged.
2. Servicing —Do not attempt to service the unit beyond that
described in these operating instructions. Refer all other servicing
to authorized servicing personnel.
3. Replacement parts —When parts need replacing ensure the
servicer uses parts specified by the manufacturer or parts that
have the same characteristics as the original parts. Unauthorized
substitutes may result in fire, electric shock, or other hazards.
4. Safety check —After repairs or service, ask the servicer to
perform safety checks to confirm that the unit is in proper working
condition.
Product information
For product information or assistance with product operation:
In the U.S.A., refer to “Customer Services Directory” on the back
cover.
In Canada, contact the Panasonic Canada Inc. Customer Care Centre
at 905-624-5505, or visit the website (www.panasonic.ca), or an
authorized Servicentre closest to you.
3
RQT7330
Page 4
Supplied accessories
Please check and identify the supplied accessories.
Use numbers indicated in parentheses when asking
for replacement parts.
In U.S.A. to order accessories, refer to
“Accessory Purchases” on the back cover.
The remote control
Batteries
R6/LR6, AA, UM-3
AC power supply cord .. 1 pc.
(RJA0065-A)
Remote control
transmitter ..................... 1 pc.
AK520
(EUR7710050)
AK320
• Black: (N2QAHB000045)
• For U.S.A. only:
Silver: (EUR7710020)
AK323
(N2QAHB000045)
AK523
FM indoor antenna .. 1pc.
(RSA0006-J)
AM loop antenna .. 1 pc.
(N1DADYY00002)
Batteries ............. 2 pcs.
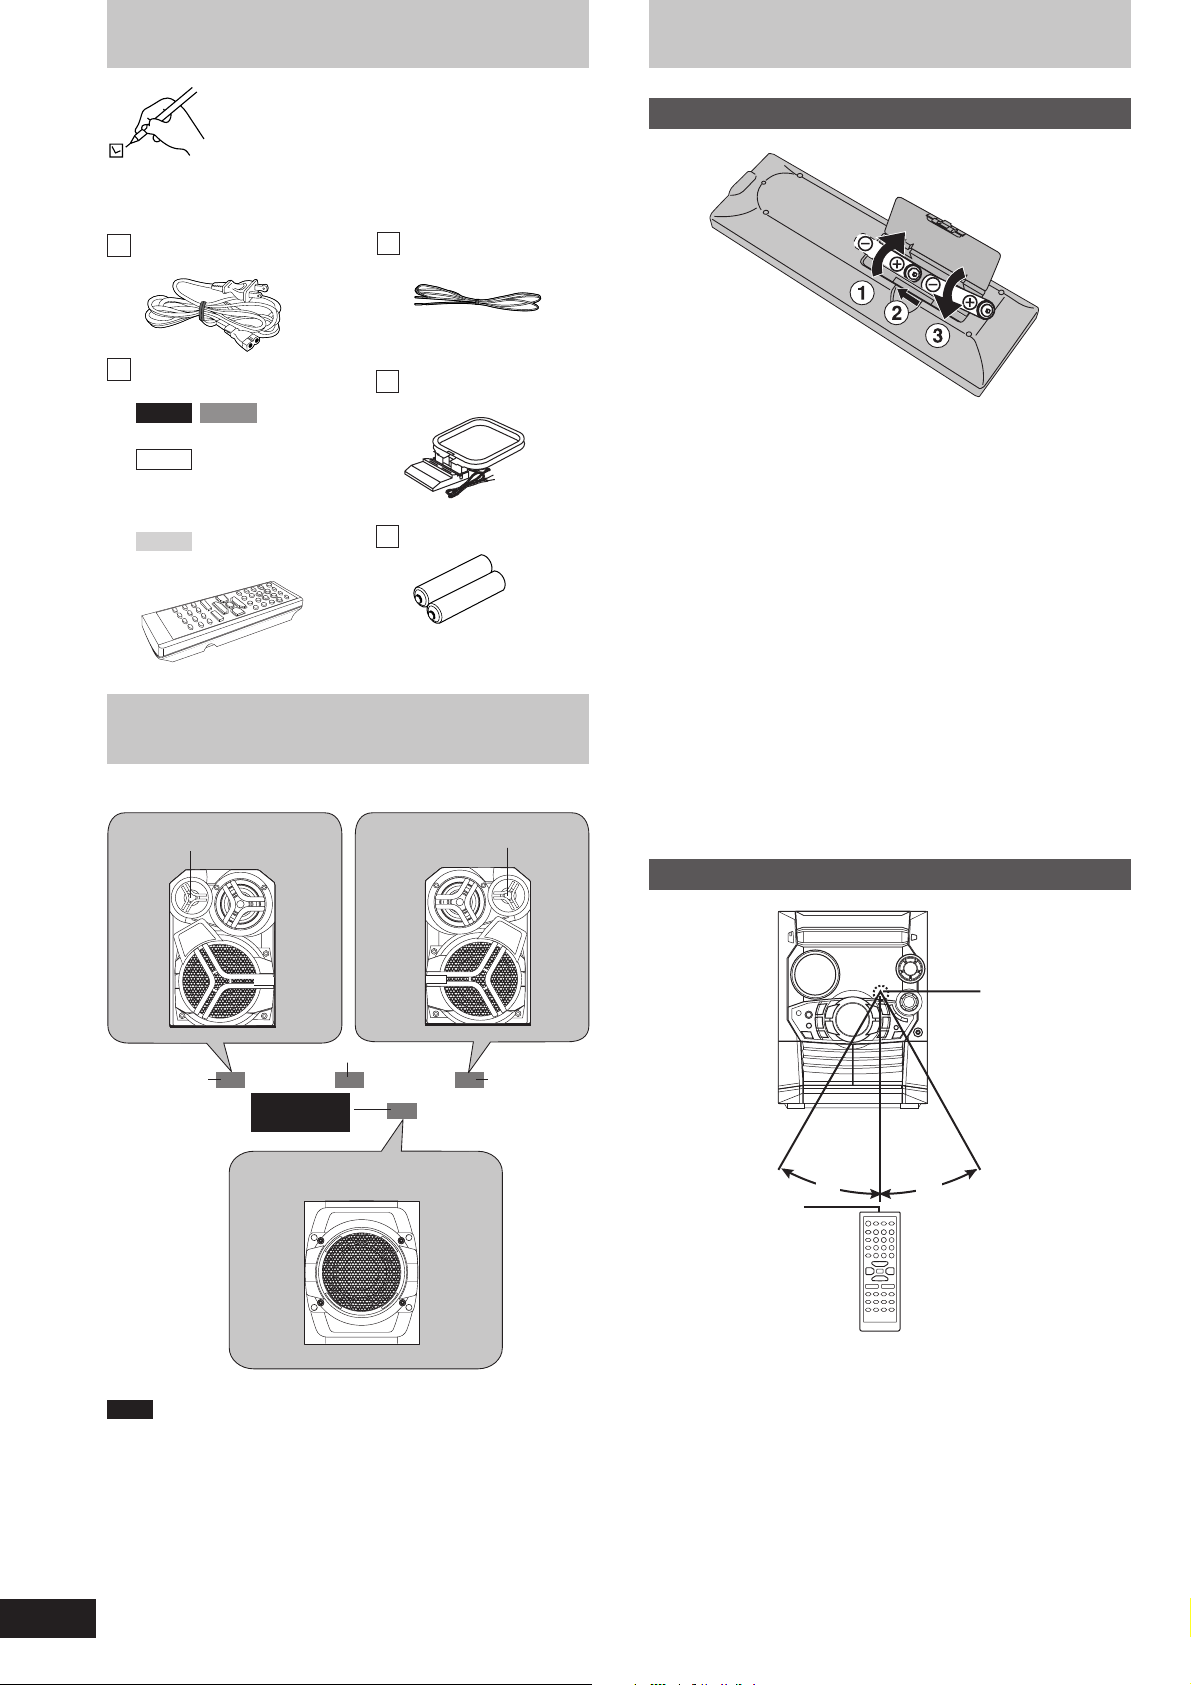
Placement of speakers
Place the front speakers so that the super tweeter is on the outside.
Super tweeter
Super tweeter
Insert so the poles (+ and –) match those in the remote control.
•
Do not use rechargeable type batteries.
•
Do not:
mix old and new batteries.
•
use different types at the same time.
•
heat or expose to flame.
•
take apart or short-circuit.
•
attempt to recharge alkaline or manganese batteries.
•
use batteries if the covering has been peeled off.
•
keep together with metallic objects such as necklaces.
•
Mishandling of batteries can cause electrolyte leakage which can
damage items the fluid contacts and may cause a fire.
If electrolyte leaks from the batteries, consult your dealer.
Wash thoroughly with water if electrolyte comes in contact with any
part of your body.
Remove if the remote control is not going to be used for a long
period of time. Store in a cool, dark place.
Replace if the unit does not respond to the remote control even
when held close to the front panel.
Main unit
Front speaker
(left)
Note
AK520 and
AK523 only
Subwoofer
Place on the floor or a sturdy shelf
so that it won’t cause vibration.
(SB-WAK520)
• Keep your speakers at least 10 mm (
for proper ventilation.
13
/32˝) away from the system
Front speaker
(right)
• These speakers do not have magnetic shielding. Do not place them
near televisions, personal computers or other devices easily
influenced by magnetism.
• You cannot take the front net off the speakers.
Use
Y
R
O
M
E
M
30
Transmission
window
Aim at the sensor, avoiding obstacles, at a maximum range of 7
meters directly in front of the unit.
Keep the transmission window and the unit’s sensor free from dust.
•
Operation can be affected by strong light sources, such as direct
•
sunlight, and the glass doors on cabinets.
˚
30
About 7 meters in front of
the signal sensor
Do not:
put heavy objects on the remote control.
•
take the remote control apart.
•
spill liquids onto the remote control.
•
Remote control
signal sensor
˚
4
RQT7330
Page 5
Disc information
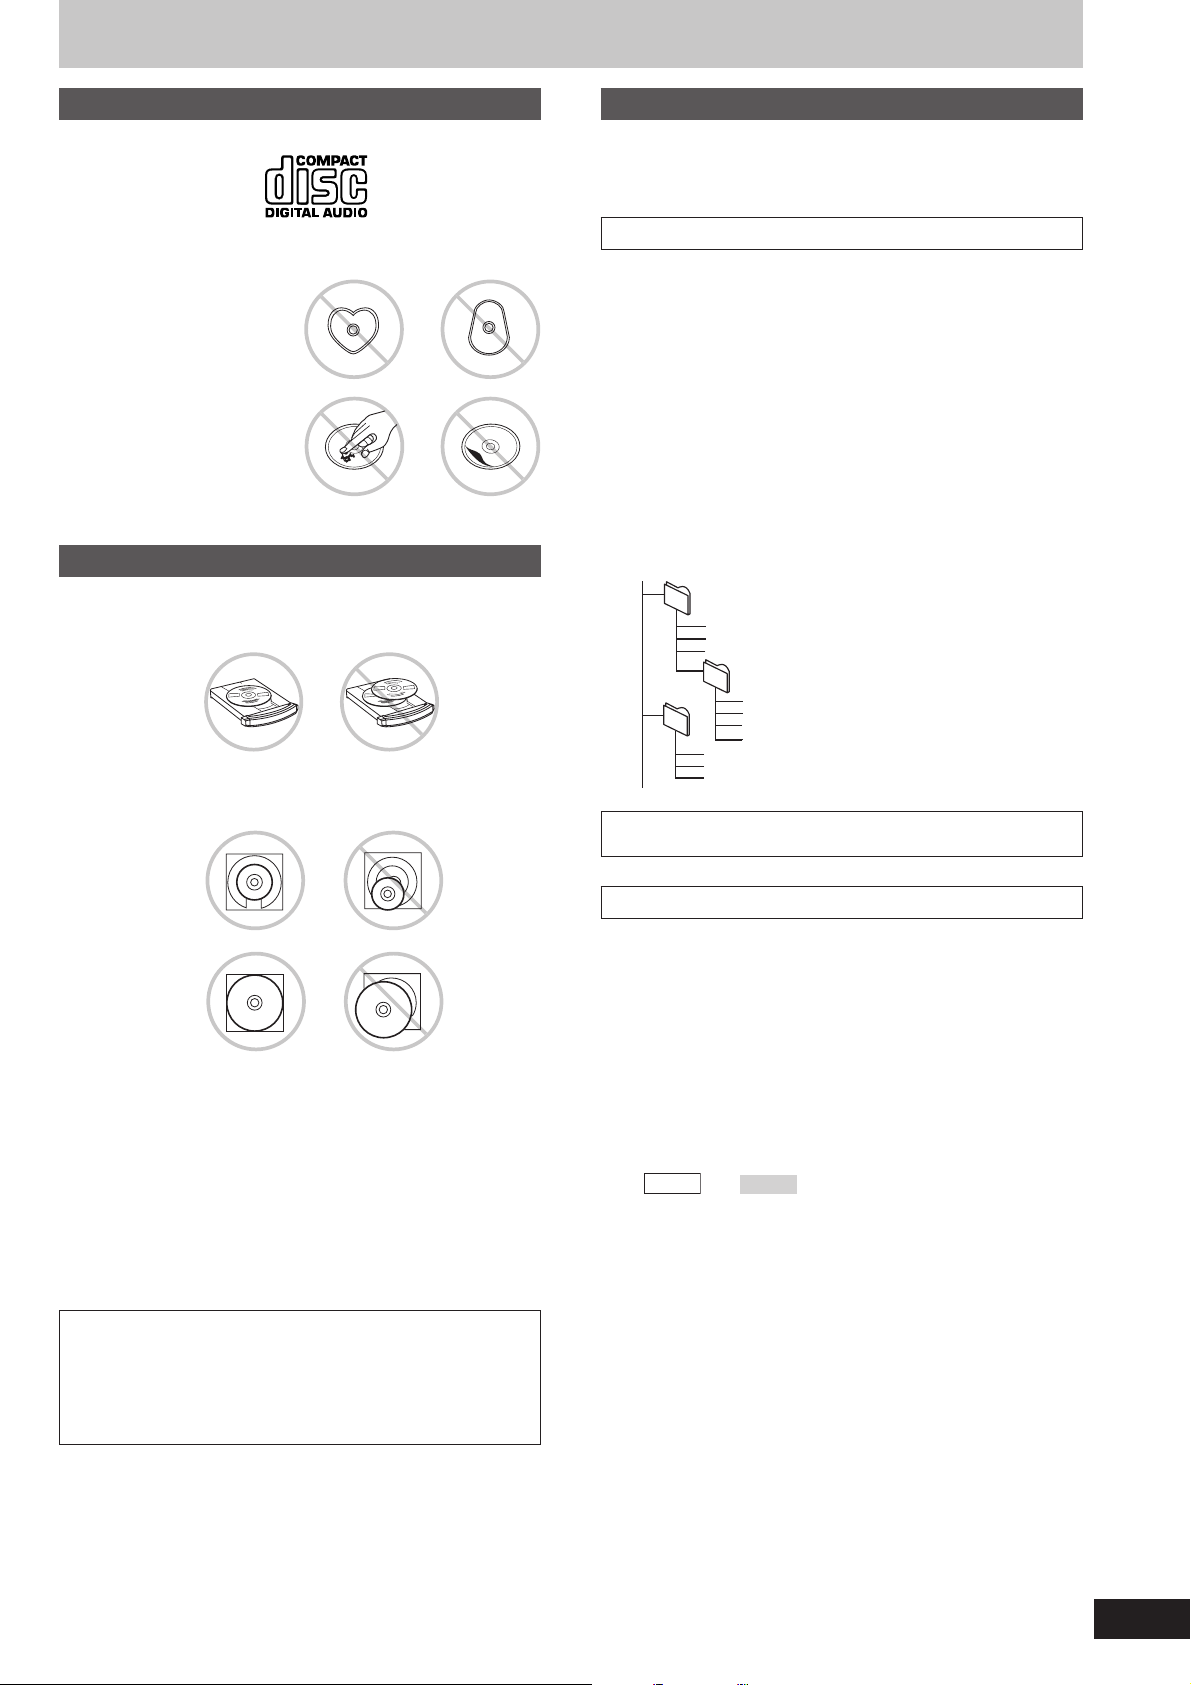
CD selection
Choose CDs with this mark:
Do not:
use irregularly shaped CDs.
•
attach extra labels and stickers.
•
use CDs with labels and stickers
•
that are coming off or with
adhesive exuding from under
labels and stickers.
attach scratch proof covers or
•
any other kind of accessory.
write anything on the CD.
•
clean CDs with liquids. (Wipe
•
with a soft, dry cloth.)
use CDs printed with label
•
printers available on the market.
XXXX XXXX XXXXX XXXX XX
XXXX XXXX XXXXX
XXXX XXXX XXXXX
XXXX XXXX
x
x
x
x
x
x
x
x
x
x
x
x
x
x
x
x
x
x
x
x
x
x
x
x
x
x
x
x
To prevent damage
Always observe the following points:
Load only 1 CD on the tray.
•
Load CDs as shown in the figure.
•
An adaptor is not needed with 8 cm CDs (singles).
X
X
X
X
X
X
X
X
X
X
X
X
X
X
X
X
X
X
X
X
X
XXXX XX XXXXX
XXXX XXXX XXXXX
X
XXXXXXXX XXXX
XXX XXX XXXXX
XX
XXXXXX XXX XXXXXXX
XXXX XX XXXXX
X
X
X
X
X
X
X
X
X
X
X
XXXX XX XXXXX
XXXX XXXX XXXXX
XXXX
X
X
XXXX
X
XXX
X
X
X
X
X
X
X
X
X
X
X
X
X
X
X
X
X
X
X
X
X
X
X
X
X
X
X
X
X
X
X
X
XXXX
X
XXXX
XXX
XXXXXX
XXX XXXXXXX
XXXX XX
X
XXX
X
XXXX X
X
XXXXX
XXXX XX
XXXXX
XX
XX
XXXX XXXXX
XXXX XX
XX
XXXXX
8 cm CD
12 cm CD
Set the system on a flat, level surface.
•
Always unload all CDs before moving the unit.
•
Do not:
set the unit on top of magazines, inclined surfaces, etc.
•
move the unit while a tray is opening/closing, or when loaded.
•
put anything except a CD in the tray.
•
use cleaning CDs or CDs which are badly warped or cracked.
•
disconnect the AC power supply cord from the household AC outlet
•
during disc changing operation.
MP3 information
This unit can play MP3 files recorded on CD-R/RW with a computer.
Files are treated as tracks and folders are treated as albums.
This unit can access up to 999 tracks, 255 albums and 20 sessions.
When making MP3 files to play on this unit
Disc format
Discs must conform to ISO9660 level 1 or 2 (except for extended
formats).
x
x
x
x
x
x
x
x
x
x
x
x
x
x
x
x
x
x
x
x
x
x
x
x
x
x
File format
MP3 files must have the extension “.MP3” or “.mp3”.
To play in a certain order
Prefix the folder and file names with 3-digit numbers in the order you
want to play them.
Files may not be recorded in numbered order if the prefixes have
different numbers of digits. For example: 1????.mp3, 2????.mp3,
10????.mp3.
However, some writing software may also cause recording to occur in
a different order.
root
001
001.mp3
002.mp3
003.mp3
002
001.mp3
001.mp3
002.mp3
003.mp3
002.mp3
003.mp3
004.mp3
003
MPEG Layer-3 audio decoding technology licensed from Fraunhofer
IIS and Thomson multimedia.
Limitations on MP3 play
This unit is not compatible with packet-write format.
•
When both MP3 and CD-DA data is recorded on the disc over a
•
number of sessions:
If the first session contains MP3 recordings, the unit will play from
•
the MP3 made in that session till the session before the first CD-DA
recordings.
If the first session contains CD-DA recordings, the unit will play only
•
the recordings made in that session. The subsequent sessions will
be ignored.
Some MP3 may not be played due to the condition of the disc or
•
recording.
Recordings will not necessarily be played in the order you recorded
•
them.
For
•
upper case.
AK320
and
, lower case letters will be displayed as
AK323
This unit can play MP3 and CD-DA (digital audio) format audio
CD-R and CD-RW that have been finalized (a process that enables
CD-R/CD-RW players to play audio CD-R and CD-RW) upon
completion of recording.
It may not be able to play some CD-R or CD-RW due to the
condition of the recording.
5
RQT7330
Page 6
Set-up
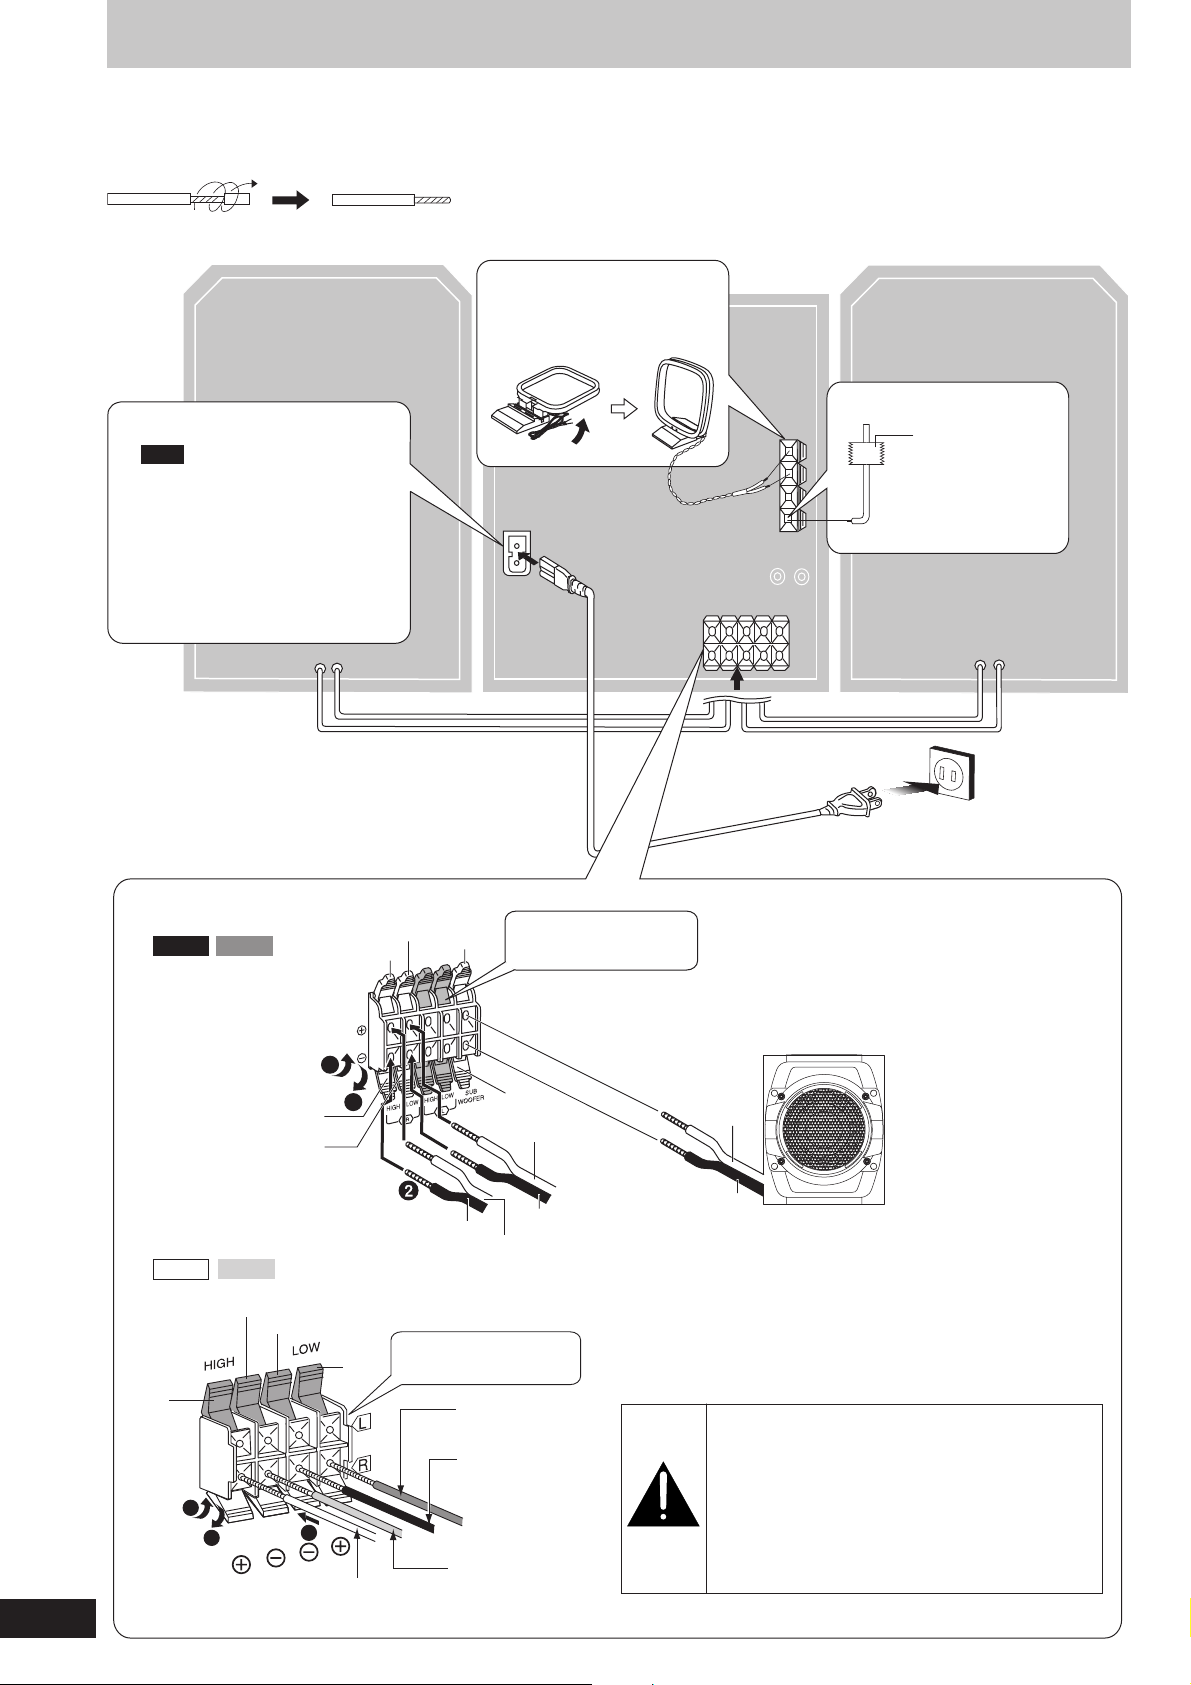
Connect the AC power supply cord only after all other connections have been made.
Preparation
Twist and pull off the vinyl tip of the antenna wires and speaker cords.
2 AM loop antenna
Stand the antenna up
(R)
on its base.
4 AC power supply cord
Note
The included AC power supply cord
is for use with this unit only.
Do not use it with other equipment.
For your reference
To save power when the unit is not
to be used for a long time, unplug it
from the household AC outlet.
You will need to reset some memory
items after plugging in the unit.
The illustrations show SC-AK520.
(L)
1 FM indoor antenna
Adhesive tape
Affix where
reception is best.
3 Speaker cords
AK520 AK523
AK320
Gray
AK323
Blue
Black
3
1
Blue
Black
3
2
Gray (+)
Red
Gray
1
Blue (–)
Connect the left (L) side
Red
in the same way.
Red
-
Red (+)
Black (–)
Blue (–)
Connect the left (L) side
in the same way.
Black
Red (+)
Black (–)
Gray (+)
Subwoofer
Red (+)
Black (–)
Use only the supplied speakers.
The combination of the main unit and speakers provide the best sound.
Using other speakers can damage the unit and sound quality will be
negatively affected.
Caution
•
•
(SB-WAK520)
Use the speakers only with the recommended
system. Failure to do so may lead to damage
to the amplifier and/or the speakers, and may
result in the risk of fire. Consult a qualified
service person if damage has occurred or if
you experience a sudden change in
performance.
Do not attach these speakers to walls or
ceilings.
6
RQT7330
Page 7
Front panel controls
Main unit
SUPER
SUBWOOFER
SOUND EQ
PRESET EQ
DECK 1
DISP
DEMO
TUNER
BAND
AUX
REC
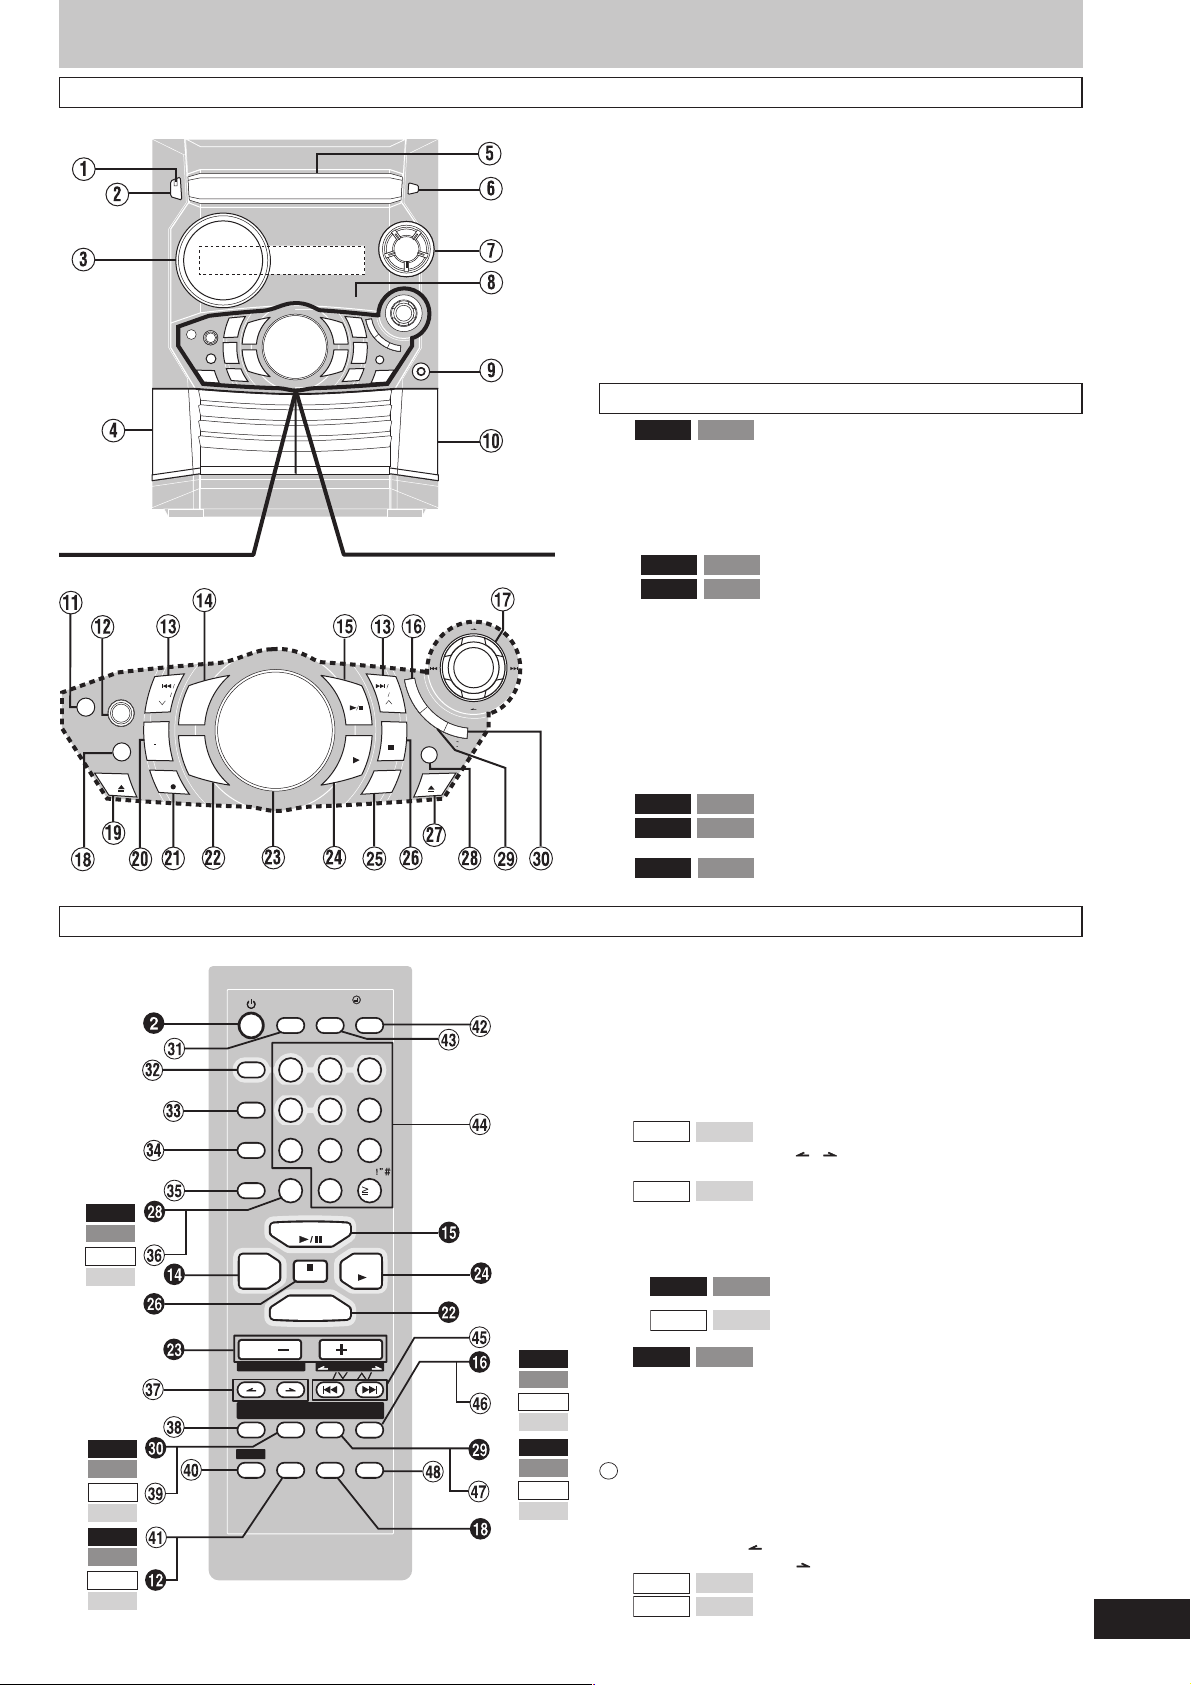
1 AC supply indicator [AC IN]
This indicator lights when the unit is connected to the AC power
supply.
2 Standby/on switch [
ff
f/I, POWER]
ff
Press to switch the unit from on to standby mode or vice versa. In
standby mode, the unit is still consuming a small amount of power.
3 Display
4 Deck 1 cassette holder .........................................................14
5 Disc tray
6 CD tray open/close button [c, OPEN/CLOSE] .................... 8
7 CD direct play buttons [1 ~ 5] ............................................... 8
8 Remote control signal sensor ............................................... 4
9 Headphones jack [PHONES] ................................................15
! Deck 2 cassette holder .........................................................14
Center console
AK520 AK523
!
Subwoofer button [SUBWOOFER] ......... 15
# Super sound EQ button [SUPER SOUND EQ] ................... 15
$ CD skip/search, tape fast-forward/rewind,
tune/preset channel select, time adjust buttons
[g/REW/3, f/FF/4] ........................ 8-11, 13, 14, 16, 17
% Tuner/band select button [TUNER, BAND] ........................ 13
& CD play/pause button [ :/J, CD] .......................................... 8
(
)
AK520
AK520
Enter button [ENTER] ....................... 10, 11
AK523
Joystick .............................................. 10, 11
AK523
~ Preset EQ select button [PRESET EQ] ............................... 15
/
C
M
H
U
B
A
L
R
A
A
C
R
O
S
R
U
C
E
N
T
E
R
FFREW
CD
TAP E
DECK
1/2
T
I
T
L
E
S
E
A
R
C
H
DELETE
STOP
DECK 2
U
R
S
O
R
A
A
L
R
B
A
U
H
M
C
/
M
A
R
K
E
R
M
E
M
O
R
Y
R
E
C
A
L
L
+ Deck 1 open button [c, DECK 1] ....................................... 14
, Display, demonstration button [DISP, –DEMO] .... 8, 12, 15, 16
- Record button [a, REC] ....................................................... 14
. AUX button [AUX] ................................................................ 15
/ Volume control [VOLUME DOWN, UP] ............................... 16
: Tape play button [ :, TAPE] ................................................ 14
; Deck select button [DECK 1/2] ............................................ 14
< Stop/program clear button [L, STOP] ....................... 8-11, 14
= Deck 2 open button [c, DECK 2] ....................................... 14
>
AK520 AK523
?
AK520 AK523
[TITLE SEARCH] .................................................................. 11
@
AK520 AK523
[MARKER, –MEMORY, -RECALL] ....................................... 13
Delete button [DELETE] ................ 9, 10, 12
Title search mode select button
Marker memory/recall button
Remote control
(For
AK520
and )
AK523
(For
AK320
and )
AK323
(For
AK520
and )
AK523
(For
AK320
and )
AK323
(For
AK520
and )
AK523
(For
AK320
and )
AK323
AU TO OFF
DISC
PROG
R AM
PL AY MODE
REP
E AT
TUNER
BAND
VOL
AL BUM
INTRO
MARKER
S.WOOFER
SHI
FT
S.SOUND EQ
SL EEP
/
PL
AY
CLOCK
/
REC
TIMER
CD DISP
DIMMER
DEF
ABC
2
1
GHI
4
JKL
5
TUV
3
MNO
6
WXY
ZPQRS
789
0
CD
CLEAR
AUX
CURSOR
RE W FF
TITLE
SEARCH
PRE
SET EQ
SPACE
TAP E
VOL
ENTER
MUT
10
ING
DEL
(For
AK520
and )
AK523
(For
AK320
and )
AK323
(For
AK520
and )
AK523
(For
AK320
and )
AK323
Buttons such as 2 function in exactly the same way as the
buttons on the main unit.
[ Sleep timer + Auto off button [SLEEP, AUTO OFF] .....16, 17
\ Disc button [DISC] ................................................................. 8
] Program button [PROGRAM] .................................... 9, 10, 13
^ Play mode select button [PLAY MODE] .................. 8, 9, 13, 14
Use this for selecting CD play mode, tune mode, FM mode, AM
beat proof and deck select.
_ Repeat button [REPEAT] ....................................................... 8
{
AK320
Delete button [DEL] ....................... 9, 10, 12
AK323
| Album skip buttons [ , , ALBUM] ............................... 10
} Intro button [INTRO] ............................................................. 10
AK320
V
[MARKER] ............................................................................. 13
AK323
Marker memory/recall button
0 Shift button [SHIFT]
To use functions labeled in orange \:
While pressing [SHIFT], press the corresponding button.
\
AK520 AK523
: For buttons [AUTO OFF], [CLOCK/TIMER],
[rPLAY/REC] and [S.WOOFER]
AK320
: For buttons [AUTO OFF], [CLOCK/TIMER]
AK323
and [rPLAY/REC]
AK520 AK523
1
Super sound EQ + Subwoofer button
[S.SOUND EQ, S.WOOFER] ................................................ 15
2 Dimmer + Play timer/record timer button
[DIMMER, rPLAY/REC] .................................................. 16, 17
3 CD display + Clock/timer button
[CD DISP, CLOCK/TIMER] ................................... 8, 12, 16, 17
44
Numbered, character buttons
>>
[
>10, 1–9, 0, A-Z, SPACE!”#] ...................................... 8-11, 13
>>
5 CD skip/search, tape fast-forward/rewind,
tune/preset channel select, time adjust, cursor buttons
[g, REW/3, CURSOR,
f, 4/FF, CURSOR ] ..................................... 8-14, 16, 17
6
7
AK320
AK320
AK323
AK323
Enter button [ENTER] ......................... 10, 11
Title search mode select button
[TITLE SEARCH] .................................................................... 11
8 Muting button [MUTING] ..................................................... 16
7
RQT7330
Page 8
CDs
Note
During 1-RANDOM or A-RANDOM play (A see below), you cannot
•
skip to tracks already played.
During program play (A page 9), 1-RANDOM or A-RANDOM play,
•
you can search only within the track.
You cannot use search function for MP3 files.
•
Always stop the changer before loading or changing CDs. You
•
cannot change CDs while a disc is playing.
CD display
You can display the remaining play time of the current track.
On the remote control
Press [CD DISP] during play or pause.
On the main unit
AK320
AK323
Press [DISP, –DEMO] during play or pause.
Every time you press the button:
Elapsed play time ↔ Remaining play time
Note
When track number 25 or greater is playing, remaining play time
display shows “– –:– –”.
Repeat play
Remote control only
Press [REPEAT] during play.
“ ” is displayed.
8
RQT7330
Basic play
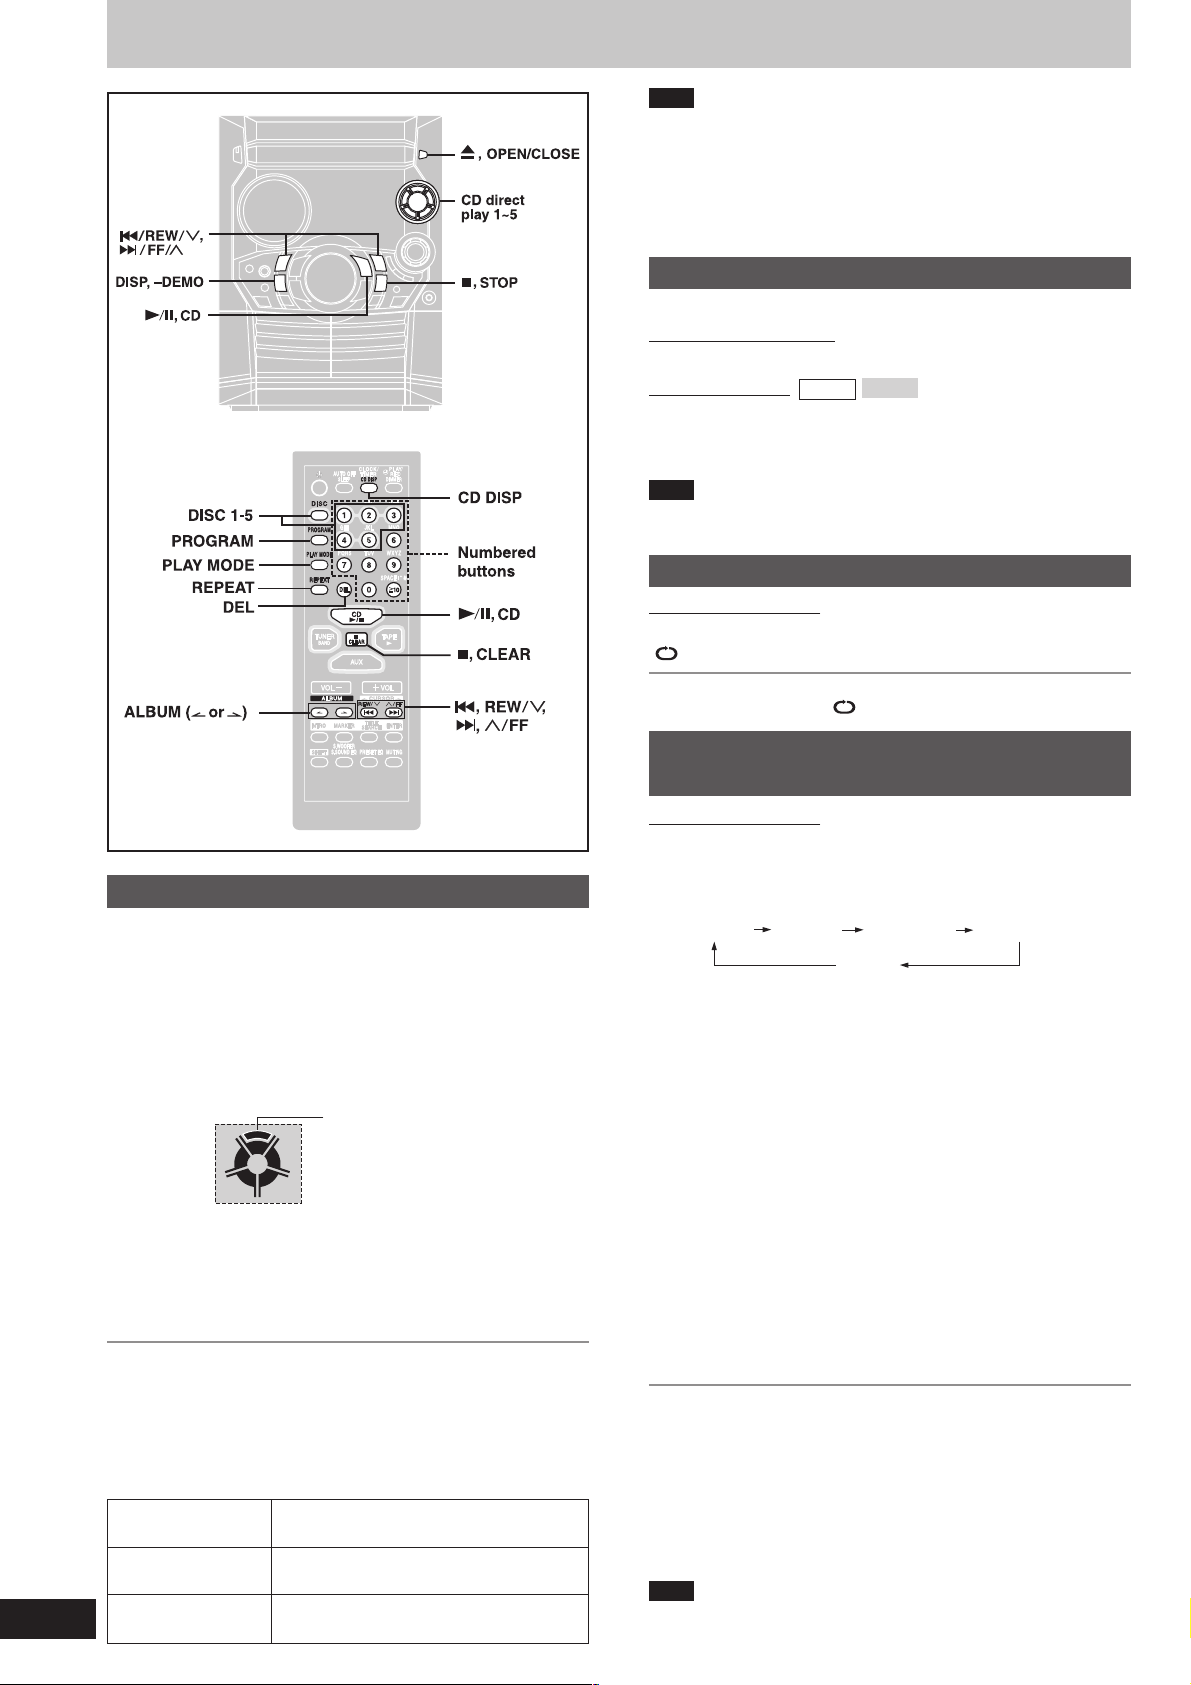
1 Press [c, OPEN/CLOSE] to open the tray.
The unit comes on.
2 Set a CD in the tray. (Label must face upward.)
To continue loading CDs in the other trays
Press [1]–[5] to select the required tray and press [c, OPEN/
CLOSE] to open the tray.
Press [c, OPEN/CLOSE] to close the tray.
3 Press [1]–[5] to play your desired disc.
Current disc indicator
1
2
5
3
4
(Alternatively, you can press [:/J, CD] if the current disc is your
desired CD.)
The track number and its elapsed playing time are shown.
Use the CD Play Mode function’s ALL-DISC mode to play CDs in
succession. (A see right)
To stop the disc play
Press [L, STOP].
The total number of tracks and total playing time are shown.
One touch play
During standby mode and when a CD is loaded, press [:/J, CD] or
[1]–[5].
The unit comes on and play starts.
To pause Press [:/J, CD] during play.
To search forward/ Hold down [g/REW/3] (backward)
backward or [f/FF/4] (forward) during play or pause.
To skip forward/ Press [ g/REW/3] (backward) or
backward [f/FF/4] (forward) during play or pause.
Press again to resume play.
To cancel repeat play
Press [REPEAT] to clear “ ” .
To listen to specific CDs and tracks
(CD Play Mode function)
Remote control only
Preparation: Press [:/J, CD] and then [L, CLEAR].
1 Press [PLAY MODE] to select the desired mode.
Every time you press the button:
ALL-DISC 1-RANDOM1-SONG
1-DISC
ALL-DISC: Plays all loaded discs in succession from the
1-SONG: Plays one selected track on the selected disc.
1-RANDOM: Plays one selected disc in random order.
A-RANDOM: Plays all loaded discs in random order.
1-DISC: Plays one selected disc.
(The original display is restored in about 2 seconds.)
Proceed to step 4 when you selected A-RANDOM in step 1.
selected disc to the final disc\.
2 Press [DISC] and (within 10 seconds) [1]–[5] to select the
disc.
The CD starts.
3 Only when you selected “1-SONG” in step 1
Select the track with the numbered buttons.
To select a track 10 or over, press [>10] then the two digits.
Play starts from the selected track.
4 Only when you selected “A-RANDOM” in step 1
Press [:/J, CD] to start play.
To stop play
Press [L, CLEAR].
When playback ends
The current play mode will be retained in memory until it is changed
even if the unit is turned off.
\
Final disc
For example, if play starts from disc 4, disc 3 will be the “final disc”.
Order of progression: Disc 4z5z1z2z3
Note
You can use repeat mode with CD Play Mode function.
•
You cannot use program mode together with CD Play Mode function.
•
A-RANDOM
Page 9
CDs
How discs with MP3 differ from CDs
Starting play from a specific track
Remote control only
1 Press [DISC] and (within 10 seconds) [1] –[5] to select the
disc.
2 Select the track with the numbered buttons.
To select track 10 or over, press [>10] then the two digits.
Play starts from the selected track.
Note
You cannot use this function with 1-RANDOM or A-RANDOM mode.
Program play
You can program up to 24 tracks.
Remote control only
::
Preparation: Press [
1
Press [PROGRAM].
“PGM” appears.
2
Press [DISC] and (within 10 seconds) [1]–[5] to select the
disc.
3
Select the tracks with the numbered buttons.
To select track 10 or over, press [>10] then the two digits.
Repeat steps 2 and 3 to program other tracks.
4
Press [:/J, CD] to start play.
JJ
:/
J, CD] and then [L, CLEAR].
::
JJ
CD Play Mode function for MP3
Remote control only
Preparation: Press [:/J, CD] and then [ L, CLEAR].
1 Press [PLAY MODE] to select the desired mode.
Every time you press the button:
ALL-DISC 1-ALBUM1-SONG
ALL-DISC: Plays all loaded discs in succession from the
1-SONG: Plays one selected track on the selected disc.
1-ALBUM: Plays one selected album on the selected disc.
1-DISC: Plays one selected disc.
(The original display is restored in about 2 seconds.)
2 Press [DISC] and (within 10 seconds) [1]–[5] to select the
disc.
The CD starts.
3 When you selected “1-ALBUM” or “1-SONG” in step 1
Press [ALBUM ( or )] to select the album.
Play starts from the first track of the selected album.
4 When you selected “1-SONG” in step 1
Press the numbered buttons to select the track in the
current album.
To select track 10 or over, press [X10] once then the two digits.
To select track 100 or over, press [X10] twice then the three digits.
Play starts from the selected track.
→→
↑
1-DISC
selected disc to the final disc \.
←
To exit program mode
Press [PROGRAM] in the stop mode. (You can replay your program
by pressing [PROGRAM] then [:/J, CD].)
You can do the following
while “P” is displayed
To check program contents
•
Press [g, REW/3] or [f, 4/FF].
Every time you press the button, the track number and program
order are displayed.
Track number Program order
To add to the program
•
Do steps 2 and 3.
To clear the last track
•
Press [DEL].
To clear all tracks
•
Press [L, CLEAR].
While “CLEAR ALL” is blinking, press the button again to clear all tracks.
Note
You can use repeat mode with program play.
•
You cannot program CD-DA together with MP3 tracks.
•
To mark a track
See page 13.
To stop play
Press [L, CLEAR].
L Display when in the stop mode (example)
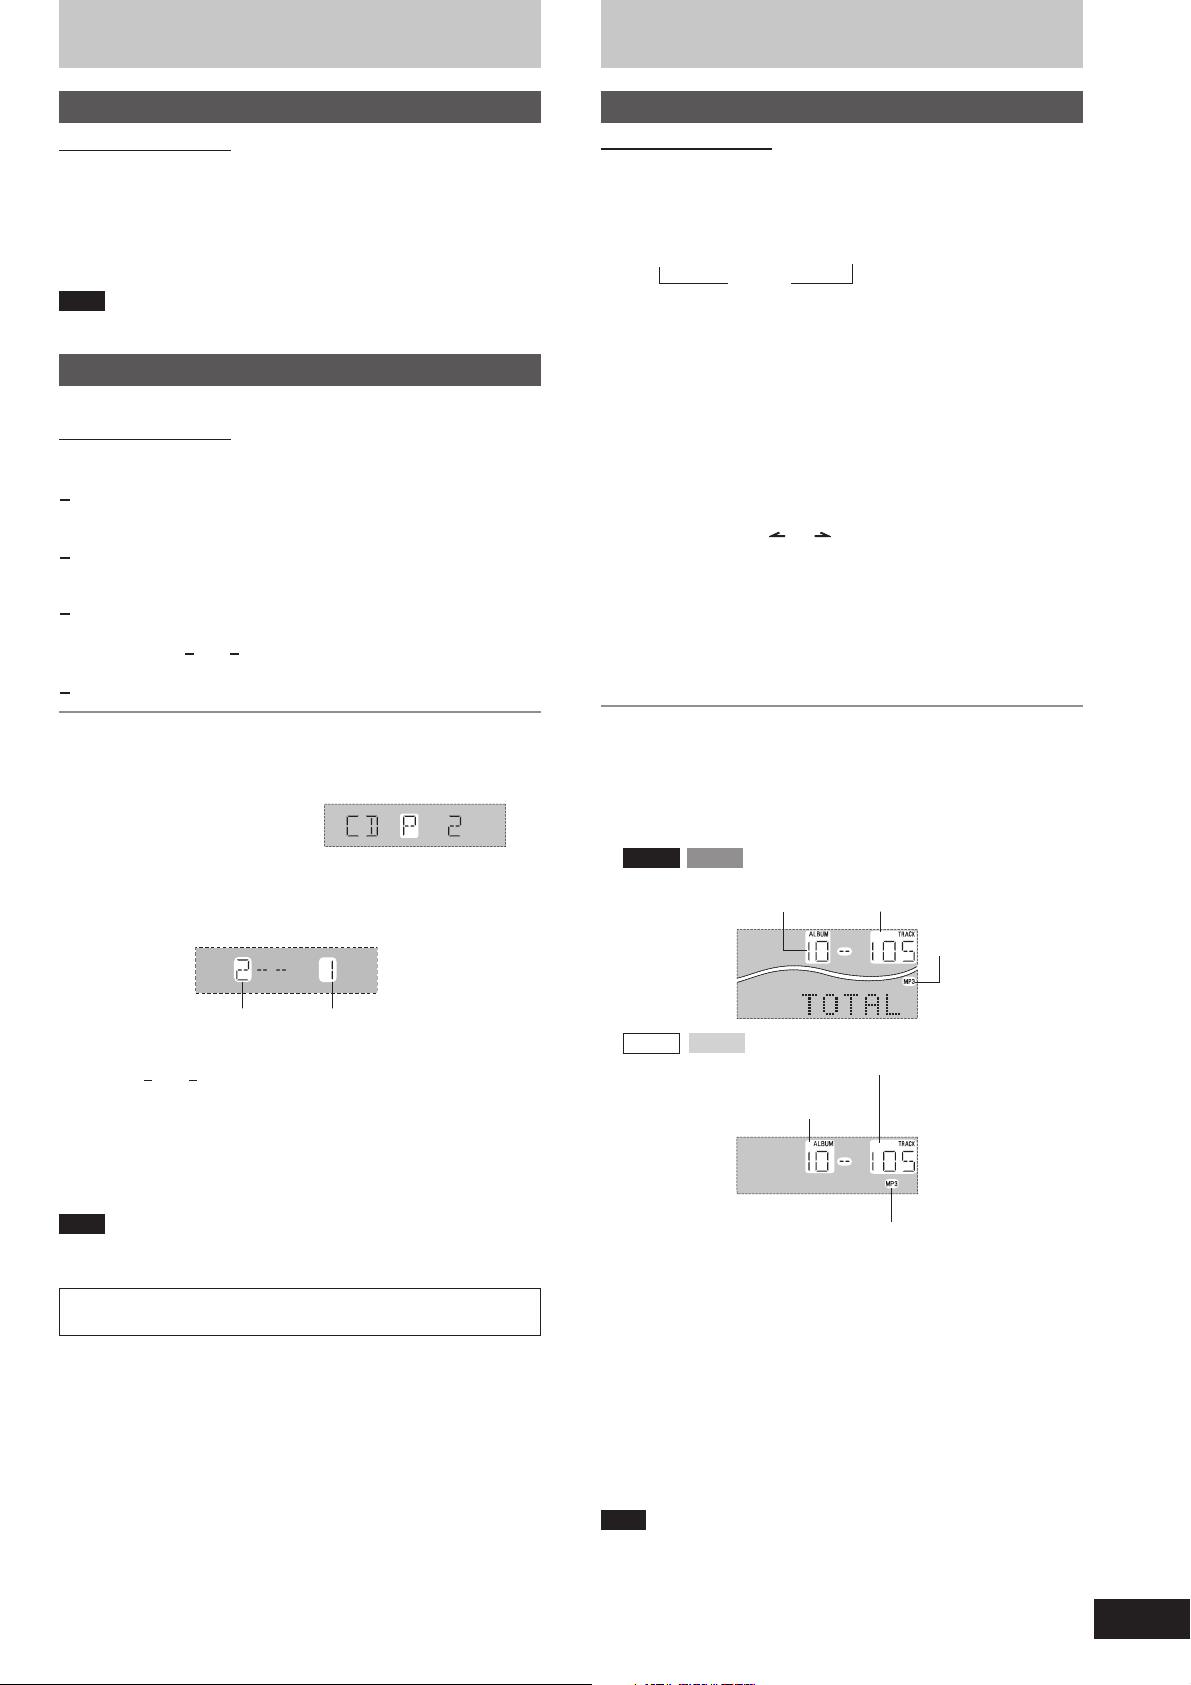
File format indicator
“MP3”: Indicates the disc contains MP3 files
AK520 AK523
Total number of albums
(on the current disc)
AK320
When playback ends
The current play mode will be retained in memory until it is changed
even if the unit is turned off.
AK323
Total number of albums
(on the current disc)
Total number of tracks
(on the current disc)
File format indicator
Total number of tracks
(on the current disc)
File format indicator
\
Final disc
For example, if play starts from disc 4, disc 3 will be the “final disc”.
Order of progression: Disc 4z5z1z2z3
L When “NOT MP3/ERROR1” appears on the display
An unsupported MP3 format is being played. The unit will skip that
track and play the next one.
Note
You can use repeat mode (A page 8) with CD Play Mode function.
•
You cannot use program mode together with CD Play Mode function.
•
9
RQT7330
Page 10
How discs with MP3 differ from CDs
Note
During 1-ALBUM mode, track skipping can only be done within the
current album.
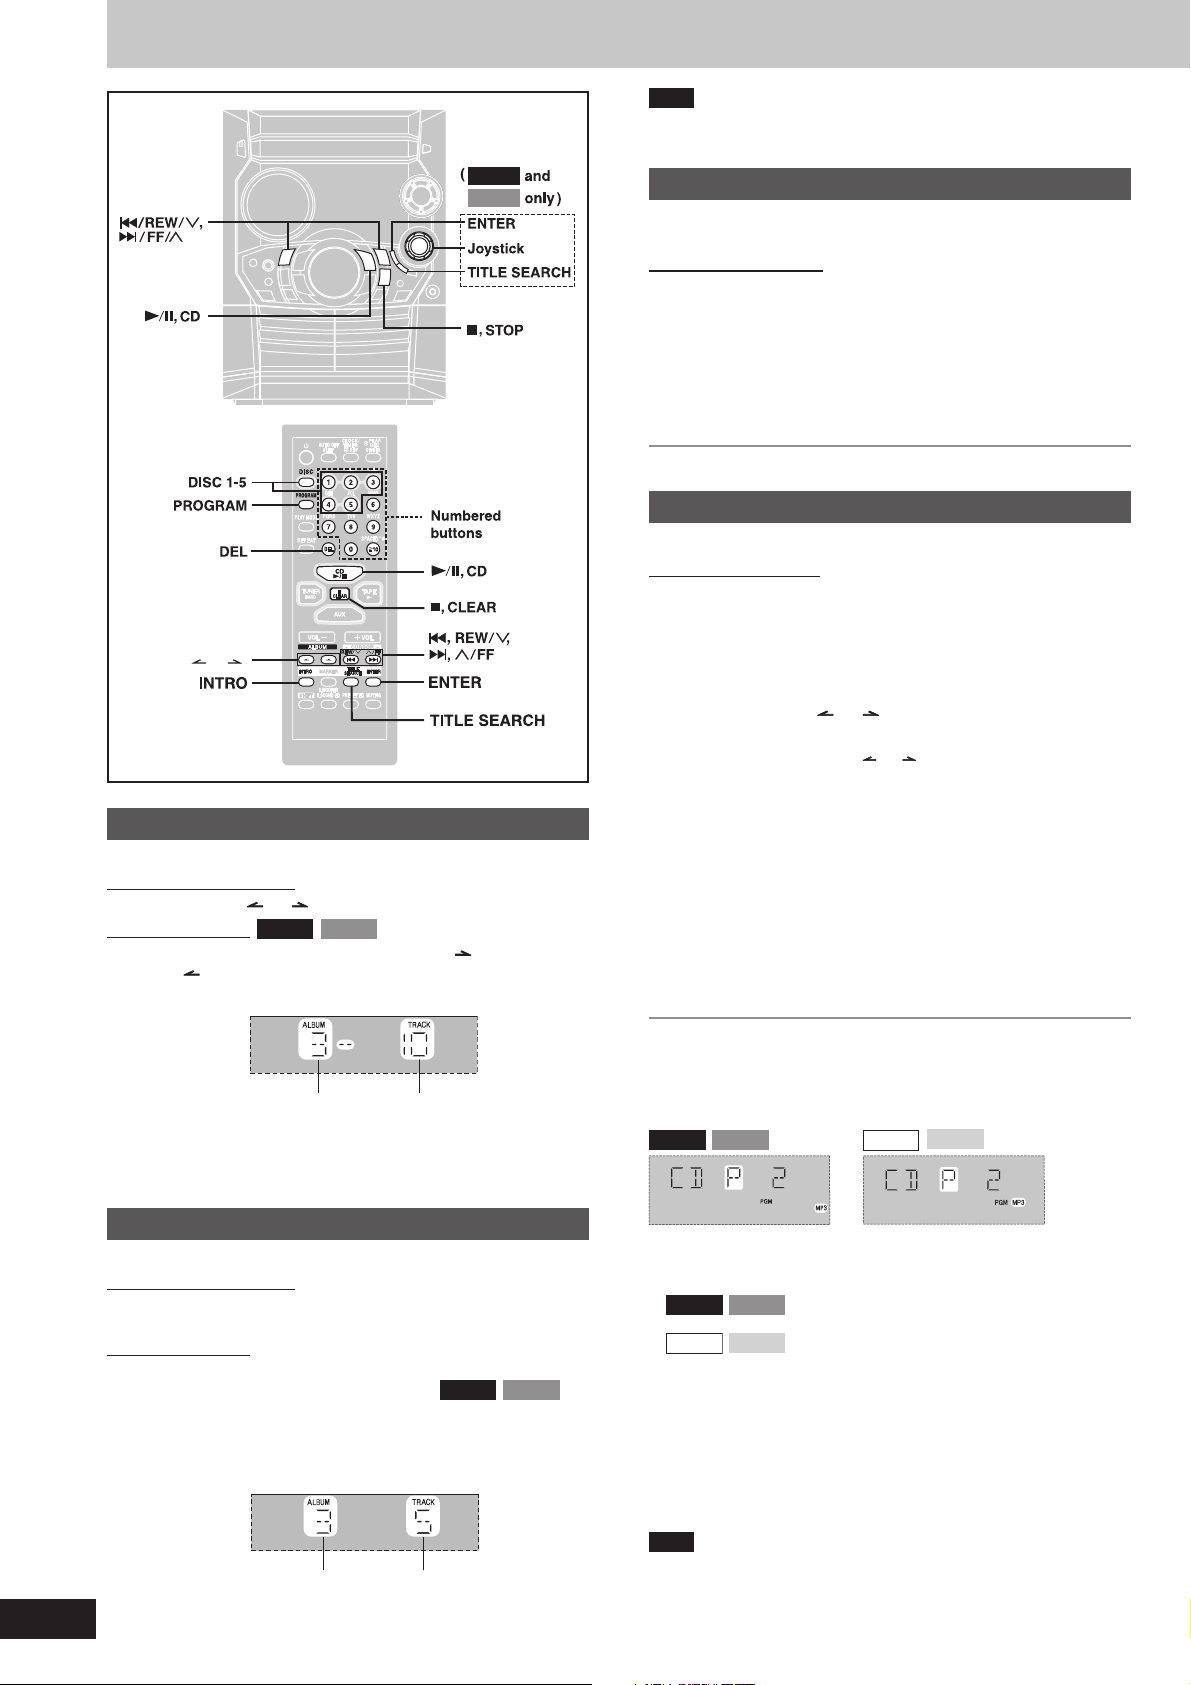
ALBUM ( or )
Album skip play
During play or stop
On the remote control
Press [ALBUM (
On the main unit
Push the joystick up/down ([ALBUM
[ALBUM
When selecting in the stop mode:
/CHARA]) to select the desired album.
or )] to select the desired album.
AK523AK520
AK520
AK523
/CHARA)] or
INTRO function (Album scan)
You can find an album by listening to the first track of all albums in the
current disc for 10 seconds each.
Remote control only
Preparation: Press [:/J, CD] and then [L, CLEAR].
1 Press [INTRO].
INTRO function starts.
(INTRO function is cancelled after playing the first track in the
last album on the current disc.)
2 While your desired album is playing, press [
Play continues from the first track of the album.
To stop during the process, press [INTRO] or [L, CLEAR].
::
:/J, CD].
::
Program play for MP3
You can program up to 24 tracks.
Remote control only
Preparation:
1. Press [DISC] and (within 10 seconds) [1]– [5] to select the disc.
2. Press [L, CLEAR].
1 Press [PROGRAM].
“PGM” appears.
2 Press [ALBUM ( or )] to select the album.
To select an album directly, press the numbered buttons
after pressing [ALBUM ( or )].
To select album 10 or over, press [>10] once then the two digits.
To select album 100 or over, press [>10] twice then the three digits.
3 Press [
4 Press [ENTER].
5 Press [:/J, CD] to start play.
g, REW/3] or [f, 4/FF] to select the track.
To select a track directly, press the numbered buttons after
pressing [ g, REW/3] or [f, 4/FF].
To select track 10 or over, press [>10] once then the two digits.
To select track 100 or over, press [>10] twice then the three digits.
Repeat steps 2~4 to program other tracks.
10
RQT7330
Current album
Press [:/J, CD] to start play.
Play starts from the first track of the selected album.
To play from another track, refer to “Track skip play” below.
Number of tracks
in current album
Track skip play
During play or stop
On the remote control
g, REW/3]
Press [
track.
On the main unit
Push the joystick left/right ([
CURSOR]) to select the desired track ( ).
Press [g/REW/3] or [f/FF/4] to select the desired
track.
When selecting in the stop mode:
Current album Current track
Press [:/J, CD] to start play.
Play starts from the selected track.
To play from another album, refer to “Album skip play” above.
[f, 4/FF] to select the desired
or
g, CURSOR] or [f,
OR
AK520
AK523
To exit program mode
Press [PROGRAM] in the stop mode. (You can replay your program
by pressing [PROGRAM] then [:/J, CD].)
You can do the following while “P” is displayed
AK520 AK523
To check program contents
•
Press [g, REW/3] or [f, 4/FF].
Every time you press the button:
AK520 AK523
AK320
To add to the program
•
Do steps 2~4.
To clear the last track
•
Press [DEL].
To clear all tracks
•
Press [L, CLEAR].
While “CLEAR ALL” is blinking, press the button again to clear all
tracks.
Note
You can use repeat mode (A page 8) with program play.
•
You cannot program more than one CD for MP3.
•
You cannot program CD-DA together with MP3 tracks.
•
The program memory is cleared when you change a disc or open
•
the CD tray.
: Album number, track number and program order
are displayed.
: Program order is displayed, then album number
AK323
and track number.
AK320
AK323
Page 11
Starting play from a desired track in a desired album
Remote control only
Preparation: Press [:/J, CD] and then [L, CLEAR].
1 Press [ALBUM ( or )] and then the numbered
buttons to select the album.
To select album 10 or over, press [>10] once then the two digits.
To select album 100 or over, press [>10] twice then the three digits.
Play starts from the first track of the selected album.
2 Press the numbered buttons to select the track in the
current album.
To select track 10 or over, press [>10] once then the two digits.
To select track 100 or over, press [>10] twice then the three digits.
Play starts from the selected track.
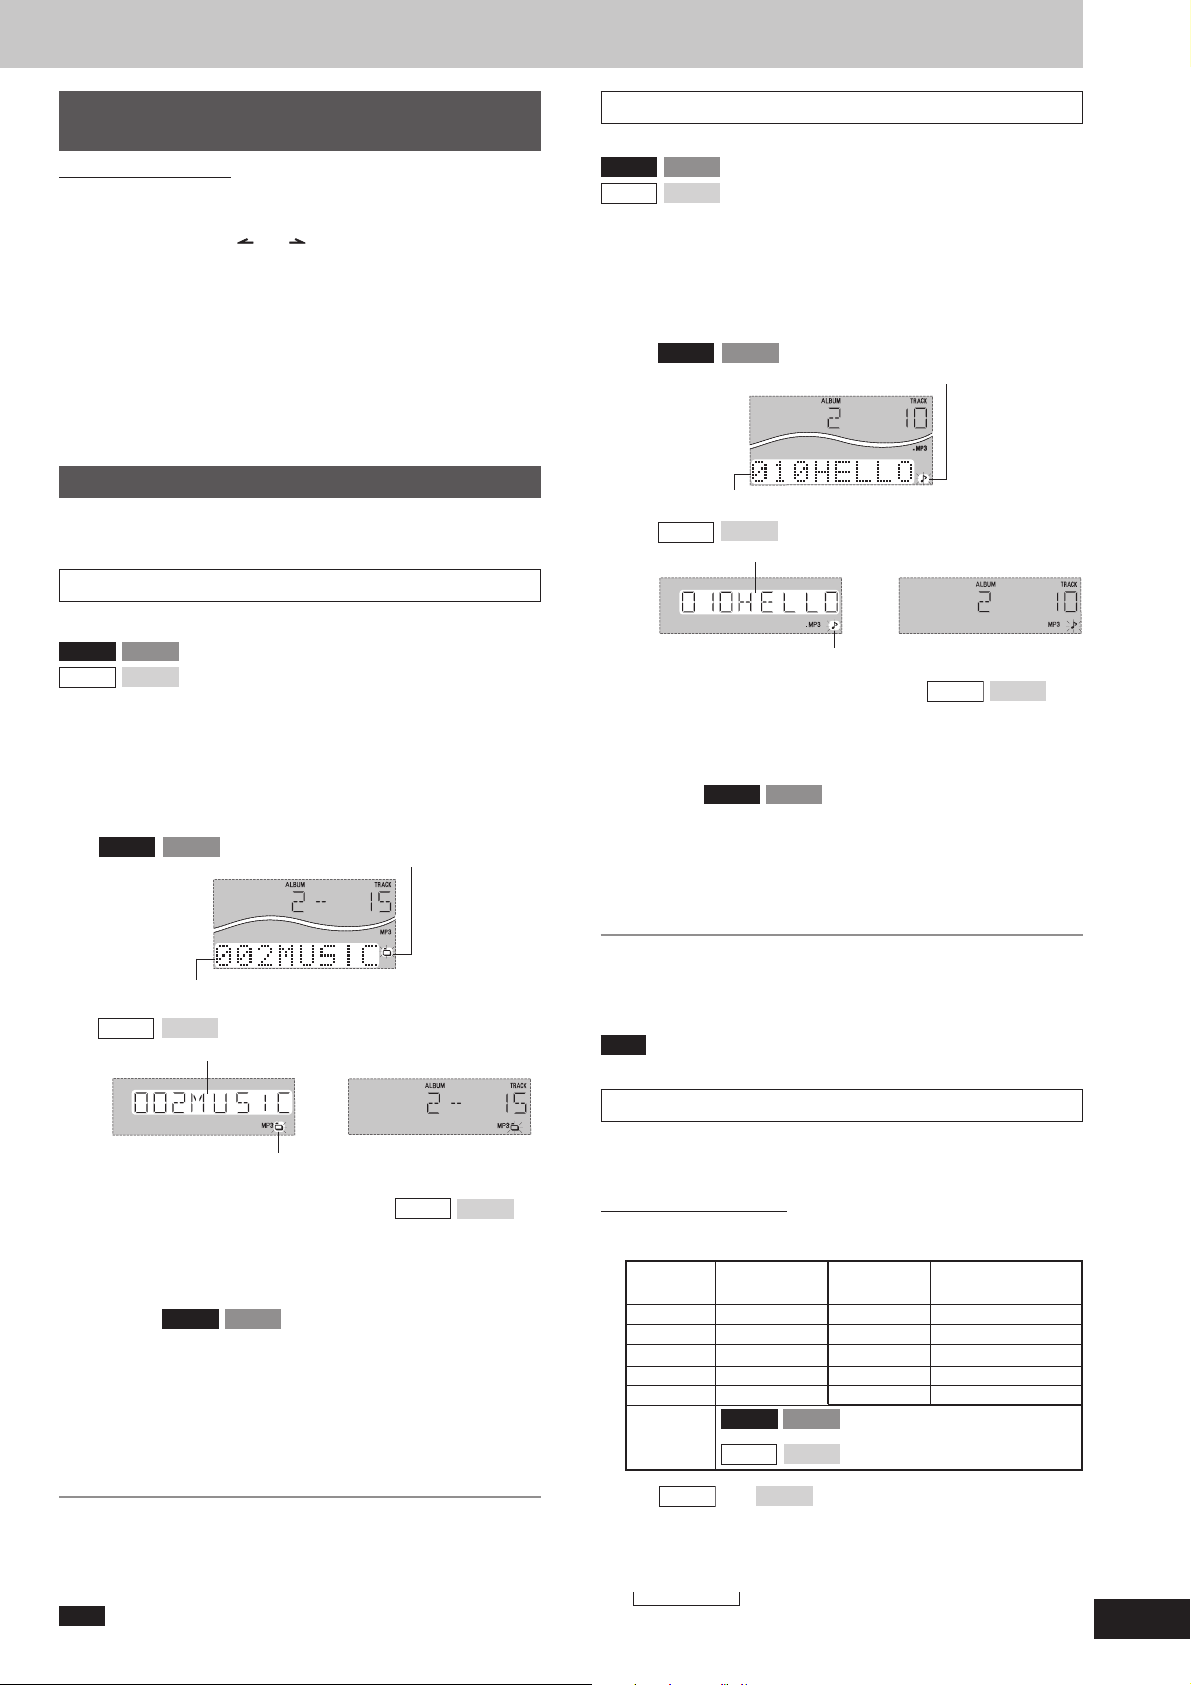
rack title search
T
Preparation: Press [:/J, CD] and then [L, STOP].
AK520 AK523
AK320
1 Press [TITLE SEARCH]
: Main unit and remote control
AK323
: Remote control only
twice.
2 Enter the characters of the keyword for the track title.
(A see below: “Entering characters”)
3 Press [ENTER].
Track title search starts.
AK520
AK523
Blinks to indicate track title search mode
Title search function
You can search for your desired album/track with its keyword (part of
the title).
Album title search
Preparation: Press [:/J, CD] and then [L, STOP].
AK520 AK523
AK320
1 Press [TITLE SEARCH]
2 Enter the characters of the keyword for the album
title. (A see right: “Entering characters”)
3 Press [ENTER].
Album title search starts.
AK520 AK523
AK320
: Main unit and remote control
: Remote control only
AK323
once.
Blinks to indicate album title search mode
Matched album title
AK323
Matched album title
Matched track title
AK320
AK323
Matched track title
=
Blinks to indicate track title search mode
To show the matched track title again (
Press [ENTER].
To show the next/previous track title search result
Press [f, 4/FF] (next) or [ g, REW/3]
remote control.
(Main unit
Press [
(Title search mode is cancelled.)
To cancel partway through
Press [L, STOP].
When there is no match for the searched keyword, the display shows
“NOT FOUND”.
Note
You cannot use title search function in program mode.
AK520 AK523
:/J, CD
] to start play from the track found.
: Push the joystick right ([f,
CURSOR]) (next) or left ([g,
CURSOR]) (previous). (You can
also press [ g/REW/3] or [f/
FF/4].))
AK320
(previous)
AK323
)
on the
=
Blinks to indicate album title search mode
To show the matched album title again (
Press [ENTER].
To show the next/previous album title search result
Press [f, 4/FF] (next) or [ g, REW/3]
remote control.
(Main unit
Press [
Play starts from the first track of the album.
(Title search mode is cancelled.)
To cancel partway through
Press [L, STOP].
When there is no match for the searched keyword, the display shows
“NOT FOUND”.
Note
You cannot use title search function in program mode.
AK520 AK523
:/J, CD
] to start play from the album found.
: Push the joystick right ([f,
CURSOR]) (next) or left ([g,
CURSOR]) (previous). (You can
also press [ g/REW/3] or [f/
FF/4].))
AK320
(previous)
AK323
)
on the
Entering characters
You can enter keyword of up to 8 characters for album/track title
search. You can only enter upper case letters but the unit also searches
for lower case.
On the remote control
11
1 Press the numbered button to select the required character.
11
Characters allocated to the numbered buttons:
Numbered Characters
buttons
11
2 A B C 2
3 D E F 3
4G H I 4
5 J K L 5
>10
For
AK320
entering “ ( ” or “ ) ”.
The characters change each time a numbered button is pressed.
For example, every time you press [2]:
A → B → C → 2
∧
(Continued on next page)
AK520
AK320
and
AK323
Numbered Characters
buttons
6 M N O 6
7 P Q R S 7
8 T U V 8
9 W X Y Z 9
00
: space
AK523
: space
AK323
, you can search for “ < ” or “ > ” by
!” #$ %&’()∗+,– ./:;
<= > ?_ `
!”#$ %&’()∗+,– ./:; = ?_ `
11
RQT7330
Page 12
How discs with MP3 differ from CDs
AK520
AK523
Deleting a character
1. Move the cursor over the character to be deleted.
2. On the remote control: Press [DEL].
On the main unit:
Editing a character
1. Move the cursor over the character to be edited.
2. Enter the correct character.
AK520 AK523
Press [DELETE].
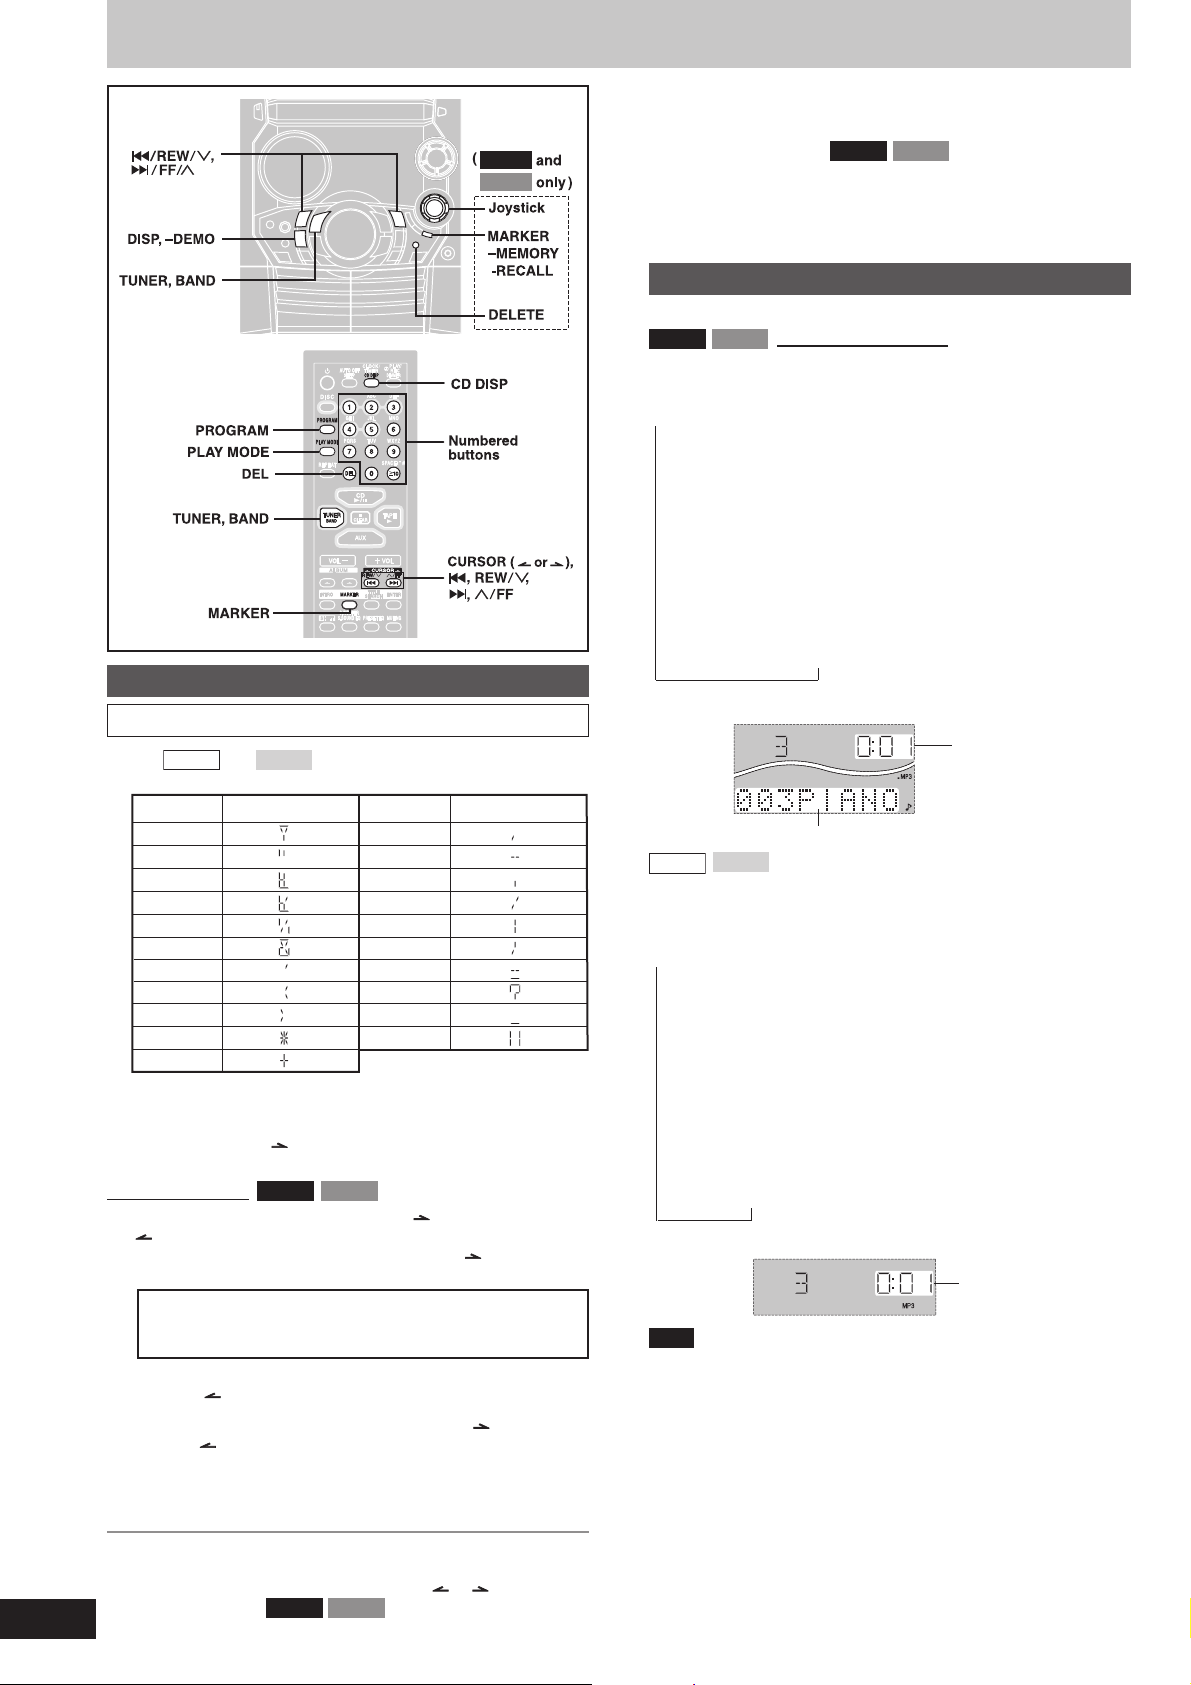
CD display for MP3
During play or pause
AK520 AK523
Press [CD DISP] to select a desired CD display mode.
Every time you press the button:
→
a Remaining play time, Original display
b Elapsed play time, Album title
c Elapsed play time, Track title
d Elapsed play time, ID3 album name
e Elapsed play time, ID3 title name
f Elapsed play time, ID3 artist name
Remote control only
→
→→→→→
12
RQT7330
Title search function
Entering characters
For
as below:
Characters Main unit display Characters Main unit display
Some characters may not be displayed correctly due to the recording
format/software used.
22
2 Press [CURSOR ] to enter the character.
22
Repeat steps 1~2 to complete the keyword.
On the main unit
11
1 Push the joystick up/down ([ALBUM /CHARA] or [ALBUM
11
/CHARA]) to select the required character.
Each time you push the joystick up ([ALBUM /CHARA]), the
characters change in the following order.
ABCDEFGHIJKLMNOPQRSTUVWXYZ
1234567890
space
The sequence is reversed if you push the joystick down
([ALBUM /CHARA]).
If you hold the joystick up/down ([ALBUM /CHARA] or
[ALBUM /CHARA]), the characters change faster.
22
2 Push the joystick right ([f, CURSOR])
22
character.
Repeat steps 1~2 to complete the keyword.
L Editing keywords
To move the cursor
On the remote control: Press [CURSOR ( or )].
On the main unit:
and
AK320
!
”–
#.
$/
%:
&;
’
(
)
∗
+
! ”#$ %&’()∗ +,– ./:;<= > ?_ `
, the special characters will be displayed
AK323
,
=
?
_
`
AK520 AK523
to enter the
AK520 AK523
Push the joystick left/right ([g, CURSOR]
or [f, CURSOR]).
g Elapsed play time, Original display
Example:
c
AK320
Track title
AK323
Elapsed play time
Press [DISP, –DEMO] (remote control: Press [CD DISP]) to
select a desired CD display mode.
Every time you press the button:
→
a Remaining play time
b Album title
c Track title
d ID3 album name
e ID3 title name
f ID3 artist name
g Elapsed play time
Example:
g
Note
When a title is longer than 8 characters, it will scroll across the
•
display. If you selected a mode from b - f (see above), the
scrolling will start again after every 3 seconds.
“NO ID3” is displayed if titles with ID3 tags haven’t been entered.
•
Maximum number of displayable characters:
•
Album/track title: 31
ID3 album/title/artist name: 30
(ID3 is a tag embedded in MP3 track to provide information about
the track.)
This unit can display album and track titles with ID3 tags (version
•
1.0 and 1.1). Titles containing text data that the unit doesn’t support
cannot be displayed.
Titles entered with 2-byte code cannot be displayed correctly on this
•
unit.
→
→→→→→
Elapsed play time
Page 13
How discs with MP3 differ from CDs
Radio
Marking a track
You can mark one track each on the discs loaded so that you can
start play from them later.
To mark a track number
1 During play or stop
Select your desired track.
(For MP3, refer to “Track skip play” on page 10.
For CD-DA, press the numbered buttons on the remote control.
To select track 10 or over, press [
X
10] then the two digits.)
2 On the remote control
Hold down [MARKER] until “STORING” blinks on the
display.
On the main unit
Hold down [MARKER, –MEMORY] until “STORING”
blinks on the display.
The selected track is stored in the marker of the current disc.
Note
If a track is already stored in the marker, it will be replaced next time
you store a new track in the same marker.
To recall a marked track number in the current disc
During play or stop
On the remote control
Press [MARKER] to recall a marker.
On the main unit
Press [MARKER, -RECALL] to recall a marker.
Play starts from the track recalled.
Note
“NO MARKER” indicates that the marker in the current disc is empty.
•
The marker memory is cleared when you open the CD tray.
•
For CD-DA, you cannot use this function during 1-RANDOM play
•
and A-RANDOM play.
You cannot use this function during program mode.
•
AK520
AK520
AK523
AK523
Radio
Manual tuning
1 Press [TUNER, BAND] to select band.
The unit comes on.
Every time you press the button:
FM ↔ AM
2 Press [PLAY MODE] on the remote control to select
“MANUAL”.
Every time you press the button:
MANUAL ↔ PRESET
To receive FM broadcasts allocated in 0.1 MHz steps
Main unit only
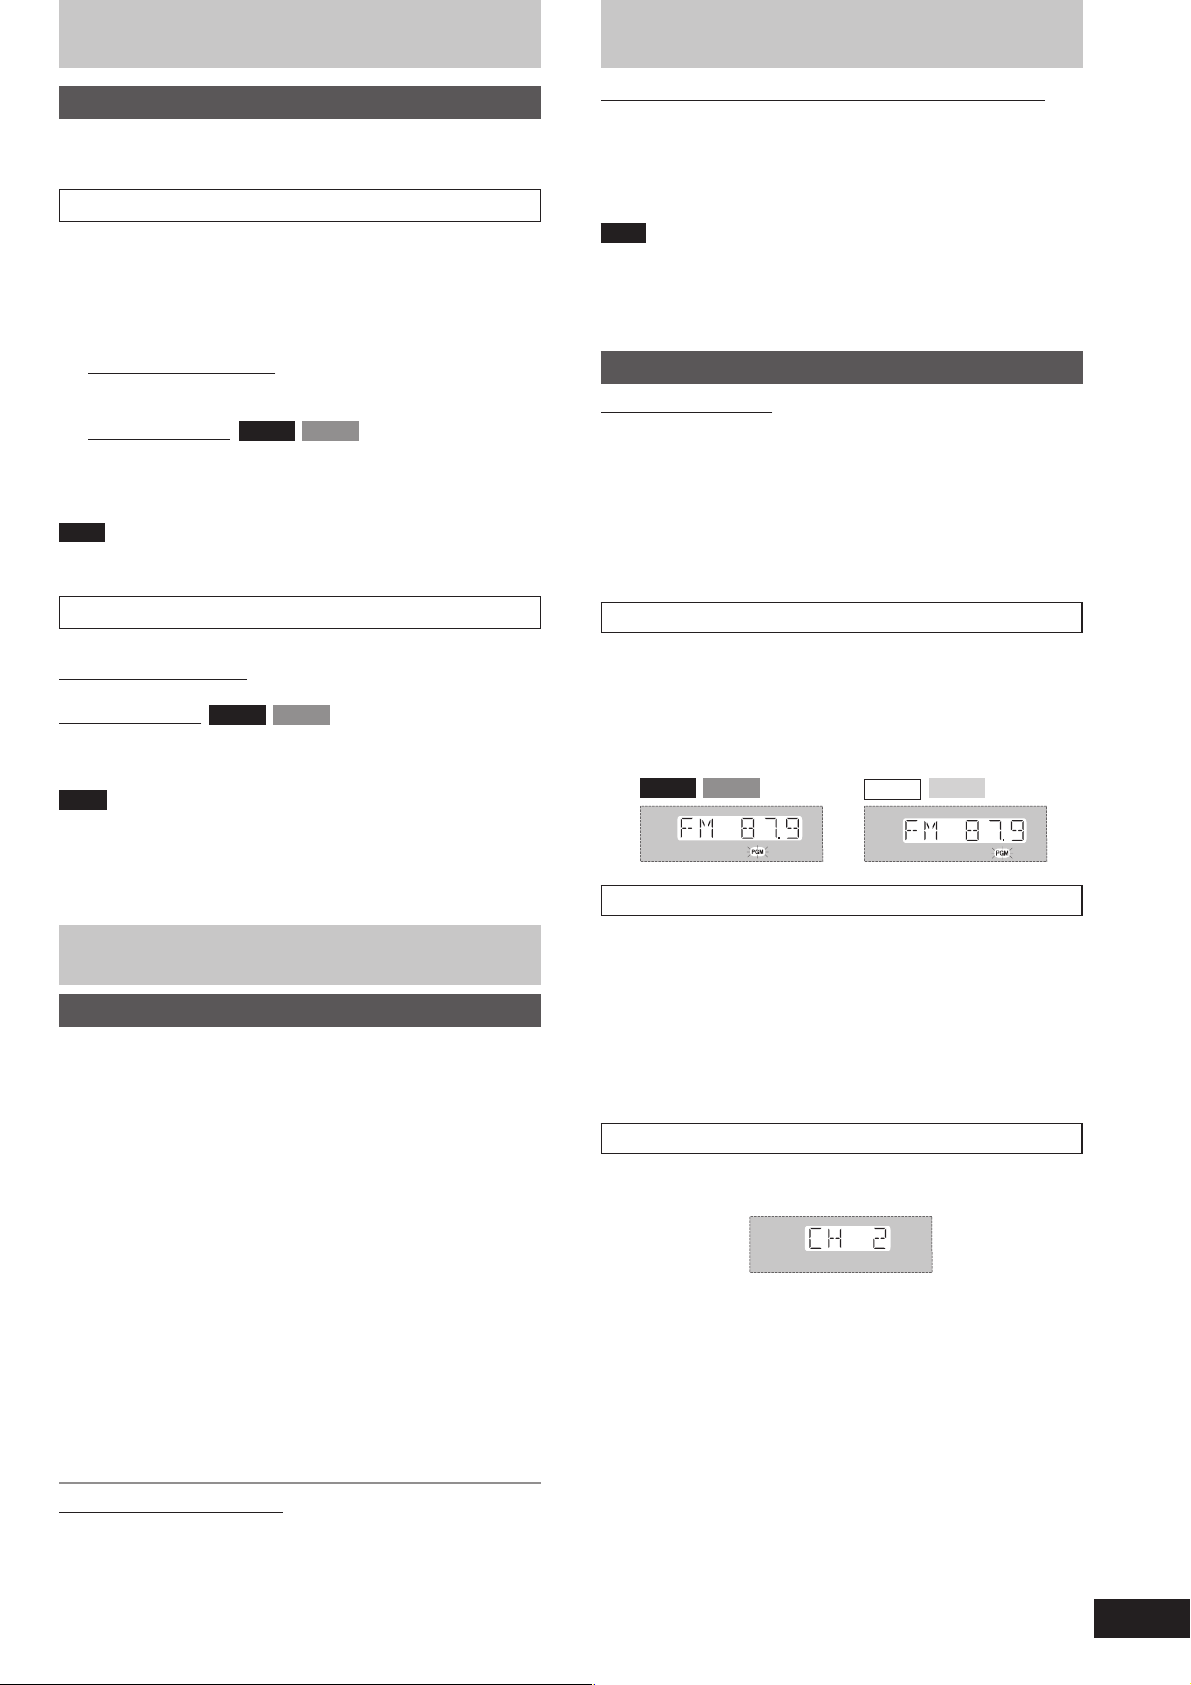
Hold down [TUNER, BAND]. The display changes in a few seconds to
show the current minimum FM frequency. Continue to hold down the
button until the minimum frequency changes. The step is changed.
Repeat the above to change the step back.
Note
After changing the “allocation” setting, the frequencies you previously
•
preset in the memory will be cleared.
Sound is momentarily interrupted if you load/unload tapes while
•
listening to an AM broadcast.
Preset tuning
Remote control only
There are two methods of pre-setting stations.
Automatic presetting : All the stations the tuner can receive are
Manual presetting : You can select the stations to preset and the
Up to 15 stations each can be set in the FM and AM bands.
Preparation:
Press [TUNER, BAND] to select “FM” or “AM”.
Automatic presetting
Do the following once each for FM and AM.
Preparation: Tune to the frequency where pre-setting is to begin.
Hold down [PROGRAM] until the frequency changes.
The tuner presets all the stations it can receive into the channels in
ascending order. When finished, the last station memorized is tuned in.
AK520
AK523
Manual presetting
Pre-set the stations one at a time.
1 Press [PROGRAM] then press [g, REW/3 ] or
[f, 4/FF] to tune to the desired station.
2 Press [PROGRAM] then press [g, REW/3 ] or
[f, 4/FF] to select a channel.
3 Press [PROGRAM].
The station occupying a channel is erased if another station is preset
in that channel.
Selecting channels
Press the numbered buttons to select the channel.
To enter channel 10 or over, press [>10], then the two digits.
preset.
order they are preset in.
AK320
AK323
3 Hold down [g/REW/3] or [f/FF/4] for a moment
to search for a station.
The frequency stops when it finds a clear station.
To stop during the process, press [g/REW/3] or [f/FF/4].
Under excessive interference, a station may not be found.
Press [g/REW/3] or [f/FF/4] repeatedly to tune step-by-
step.
“TUNED” is displayed when a radio station is tuned.
“ST” is displayed when a stereo FM broadcast is being
received.
If noise is excessive in FM
Remote control only
Hold down [PLAY MODE] to display “MONO”.
Monaural sound is selected and noise reduces when reception is
weak.
Hold down [PLAY MODE] again to cancel the mode.
“MONO” is also cancelled if the frequency is changed.
OR
1 Press [PLAY MODE] to select “PRESET”.
2 Press [g, REW/3] or [f, 4/FF] to select the
channel.
13
RQT7330
Page 14
Cassettes
( and
AK520
only)
AK523
SUBWOOFER
DISP, –DEMO
PRESET EQ
DECK 1
, REC
AUX
/
PL
AY
CLOCK
/
AU TO OFF
REC
TIMER
SLEEP
CD DISP
DIMMER
DEF
ABC
DISC
2
1
3
GHI
JKL
4
7 8 9
DEL
CD
CLEAR
AUX
REW FF
MARKER
S.WOOFER
S.SOUND EQ
5
TUV
0
CURSOR
TITLE
SEARCH
PRE
SET EQ
SPACE
TAPE
VOL
MNO
6
WXY
10
ENTER
MUT
ZPQRS
ING
PLAY MODE
ALBUM ( or )
SHIFT
PROG
PL AY MOD E
REP
TUNER
BAND
INTRO
SHI
RAM
EAT
VOL
ALBUM
FT
S.SOUND EQ
( and
AK520
only)
AK523
S.WOOFER
Playback
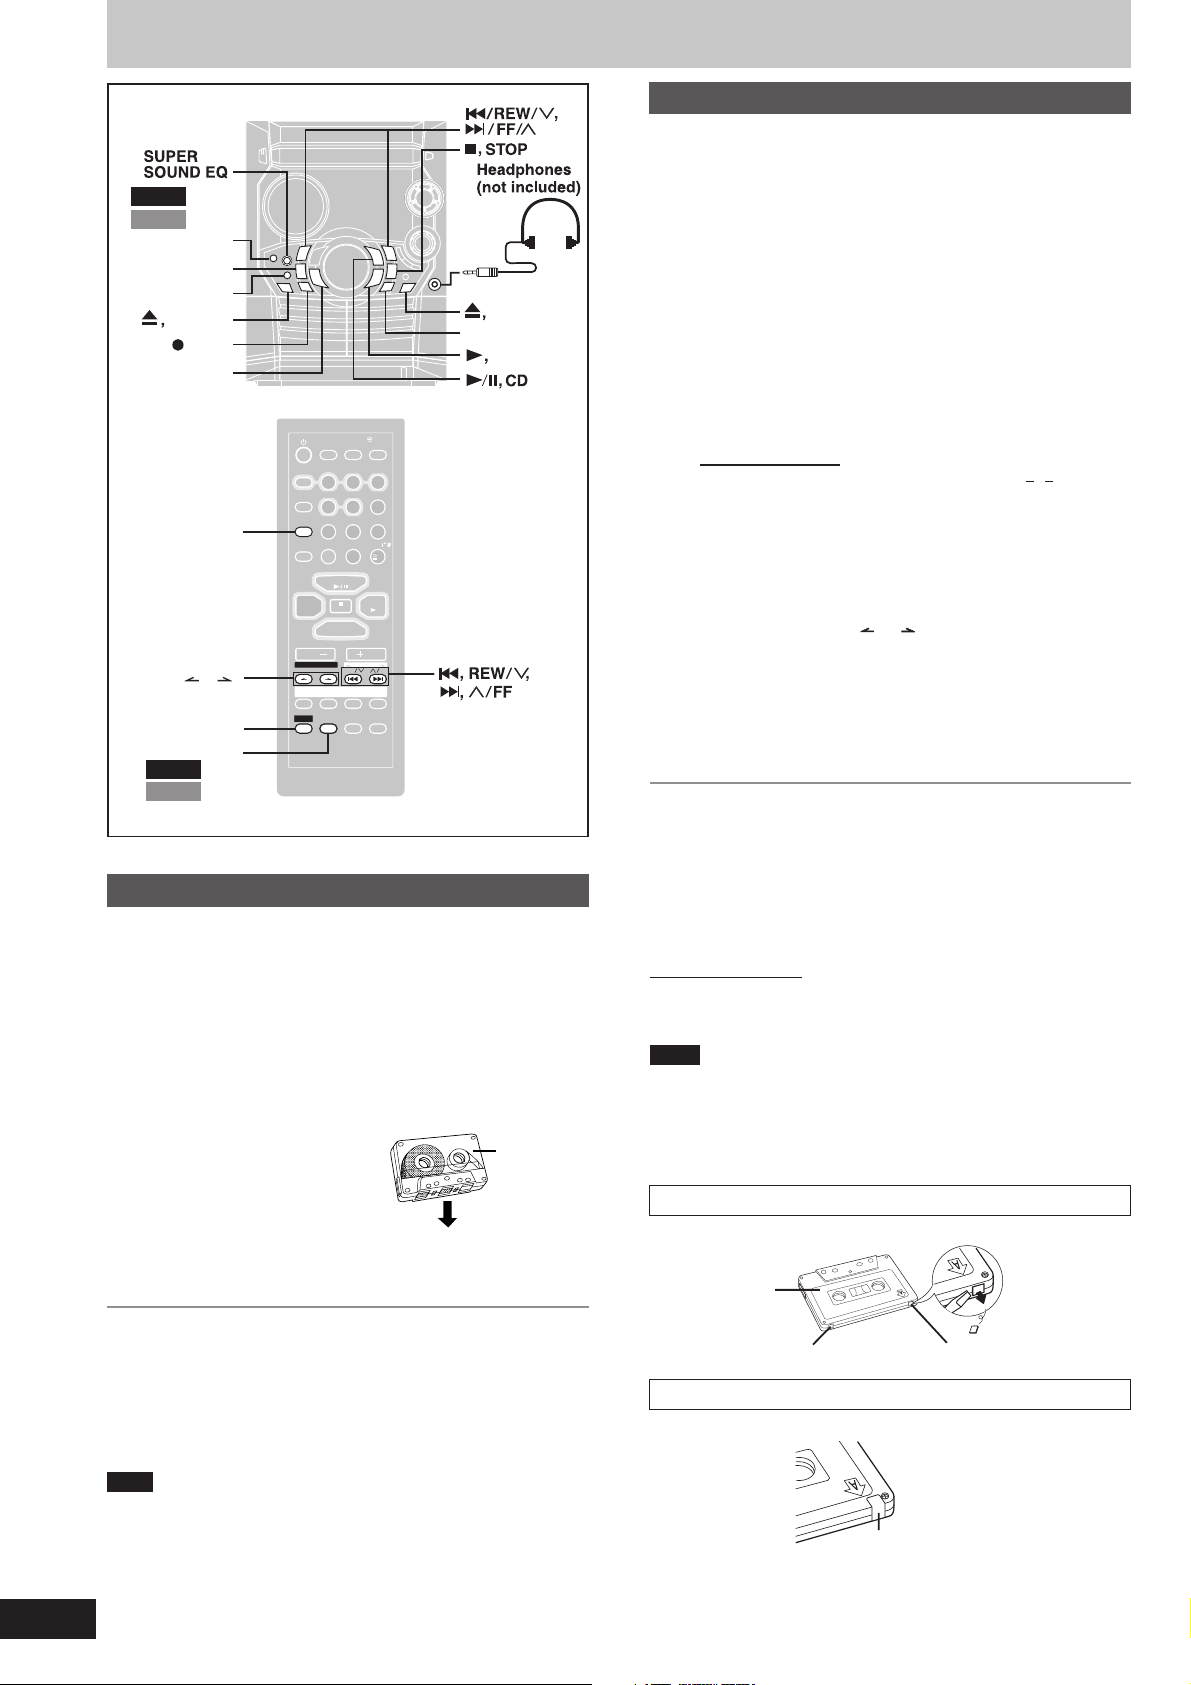
You can use either deck 1 or deck 2 for tape playback.
Use normal position tapes.
High position and metal position tapes can be played, but the unit will
not be able to do full justice to the characteristics of these tapes.
1 Press [:, TAPE].
The unit comes on.
If a cassette was loaded, play starts automatically (One touch play).
2 Press [c, DECK 1] or [c, DECK 2] and insert the
cassette.
Insert with the side to be played
facing towards you and the
exposed tape facing down.
Close the holder by hand.
3 Press [:, TAPE] to start playback.
To play on the other side of the tape, turn the tape over and press
[:, TAPE].
PHONES
DECK 2
DECK 1/2
TAPE
Front side
Recording
Selection of tapes for recording
Use normal position tapes.
High position and metal position tapes can be used, but this unit will
not be able to record or erase them correctly.
Preparation:
Wind up the leader tape so recording can begin immediately.
1 Press [c, DECK 2] and insert the cassette to be
recorded.
Insert with the side to be recorded facing towards you and the
exposed tape facing down.
2 Select the source to be recorded.
Radio recording:
Tune in the station. (A page 13)
CD recording:
1 Insert the CD(s) you want to record.
Press [:/J, CD] and then [L, STOP].
2 Prepare the desired CD recording mode.
Remote control only
To record programmed tracks (A do steps 1–3 on page 9
•
for CD-DA or steps 1–4 on page 10 for MP3).
To record specific CDs/tracks
•
1. For CD-DA, do steps 1 to 2 on page 8: “To listen to
specific CDs and tracks (CD Play Mode function)”.
For MP3, do steps 1 to 2 on page 9: “CD Play Mode
function for MP3”.
Ensure CD is stopped.
2. (MP3 only) For 1-ALBUM mode and 1-SONG mode:
Press [ALBUM ( or )] to select the album.
3. For 1-SONG mode: Press [g, REW/3] or [f,
4/FF] to select the track.
Tape-to-tape recording:
1 Press [:, TAPE] and then [L, STOP].
2 Press [c, DECK 1] and insert the cassette you want to record.
3 Press [a, REC] to start recording.
To stop recording
Press [L, STOP].
If the tape finishes before the CD
The CD continues playing. Press [L, STOP] to stop it.
To record on the other side of the tape
Turn the tape over and press [a, REC].
Reducing noise when recording AM
Remote control only
Hold down [PLAY MODE] while recording.
Every time you hold down the button: BP1 ↔ BP2
Choose the setting with the least noise.
Note
Changes to volume and sound/field quality do not affect recording.
•
You cannot open deck 1 while recording.
•
You cannot fast-forward or rewind one deck while recording with
•
the other.
When recording an AM broadcast, sound is momentarily interrupted
•
when you start and stop the recording.
Erasure prevention
Use a screwdriver or similar object to break out the tab.
Side A
14
RQT7330
To stop tape playback
Press [L, STOP].
To fast-forward or rewind
Press [g/REW/3] (rewind) or [f/FF/4] (fast-forward).
To select between loaded decks
Press [DECK 1/2] (remote control: [PLAY MODE]).
Note
Tape playback is momentarily interrupted if you open the other deck.
•
Tapes exceeding 100 minutes are thin and can break or get caught
•
in the mechanism.
Tape slack can get caught up in the mechanism and should be
•
taken up before the tape is played.
Endless tapes can get caught up in the deck’s moving parts if used
•
incorrectly.
Tab for side B
To re-record on a protected cassette
Cover the hole with adhesive tape.
Adhesive tape
To erase a tape
1. Press [:, TAPE] and then [L, STOP].
2. Insert the recorded tape into deck 2.
Ensure there is no tape in deck 1.
3. Press [a, REC].
Tab for side A
Page 15
Sound quality/sound field
Other functions
Using the built-in sound quality/sound
field settings
Press [PRESET EQ] to select a setting.
Every time you press the button:
HEAVY SOFT CLEAR
(cancelled)
HEAVY (sound quality) : Adds punch to rock
SOFT (sound quality) : For background music
CLEAR (sound quality): Clarifies higher sounds
DISCO (sound field) : Produces sound with the same kind of
LIVE (sound field) : Makes vocals more alive
HALL (sound field) : Adds an expansiveness to the sound to
Note
You cannot use PRESET EQ and SUPER SOUND EQ together.
DISCO LIVE HALL
EQ-OFF
lengthy reverberations heard at a disco
produce the atmosphere of a great concert
hall
Enhancing the sound quality
You can enhance the bass and treble effect of the sound.
Press [SUPER SOUND EQ].
Remote control: Press [S.SOUND EQ].
The button light comes on.
Press the button again to cancel.
The button light goes out.
Adjusting the bass (AK520 and
AK523 only)
Press [SUBWOOFER].
Remote control: Press [SHIFT] + [S.WOOFER].
The button light comes on.
Each time you press the button:
MID (medium) → MAX (high) → Light off (off)
→
To cancel
Press [SUBWOOFER] to turn the light off.
Remote control: Press [SHIFT] + [S.WOOFER].
Note
You cannot use this function when headphones are connected.
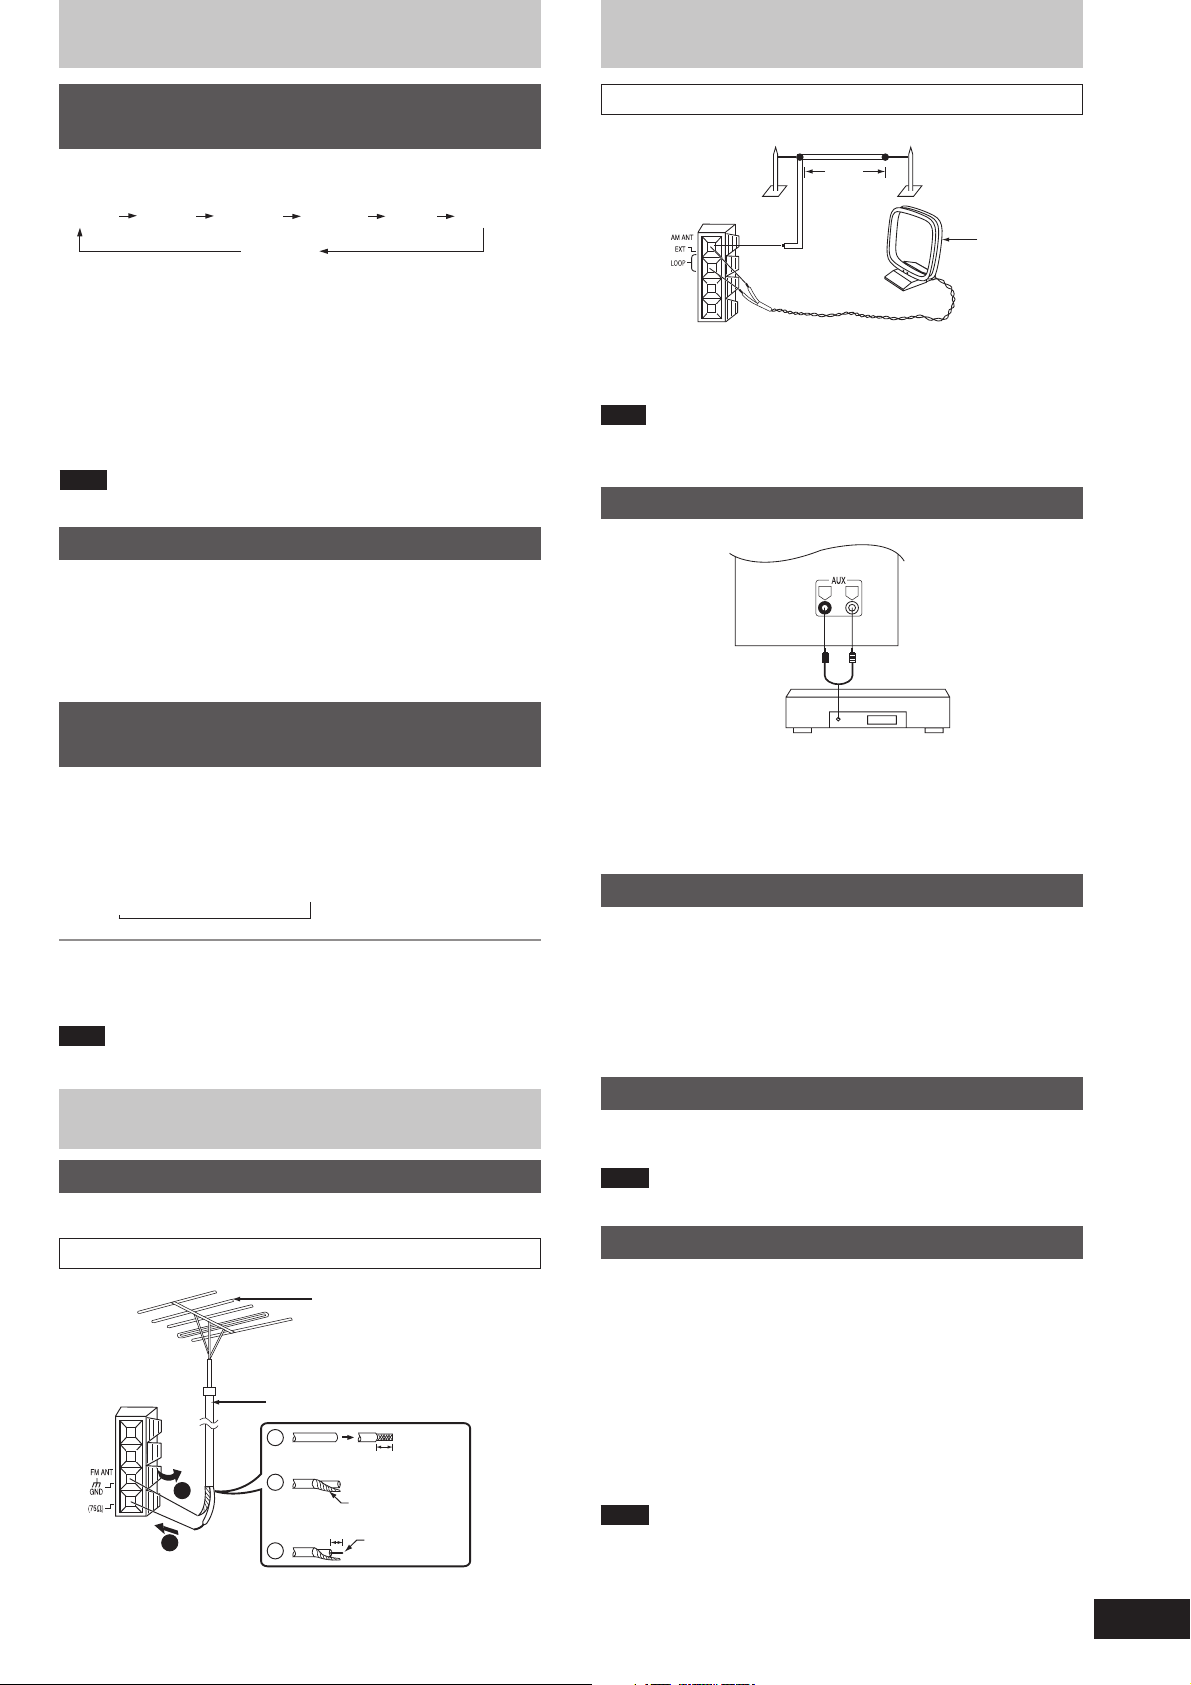
AM outdoor antenna
AM outdoor antenna (not included)
5 -12 m
(
16 – 40 ft.)
AM loop
antenna
(included)
Run a piece of vinyl wire horizontally across a window or other
convenient location.
Leave the loop antenna connected.
Note
Disconnect the outdoor antenna when the unit is not in use.
Do not use the outdoor antenna during an electrical storm.
External unit connections
Rear panel of
this unit
An analog player with a built-in phono equalizer can be connected.
•
For details, refer to the instruction manual of the units which are to
•
be connected.
When units other than those described above are to be connected,
•
please consult your audio dealer.
RL
(R)
(L)
Analog player
(not included)
Using an external unit
(See above for external unit connection.)
1. Press [AUX].
The unit comes on.
2. For listening: Proceed to step 3.
For recording: Press [a, REC] (recording starts).
3. Start playback from the external source. (For details, refer to the
external unit’s instruction manual.)
Other functions
Optional antenna connections
Use outdoor antenna if radio reception is poor.
FM outdoor antenna
FM outdoor antenna
(not included)
75 Ω coaxial cable (not included)
1
1
2
Disconnect the FM indoor antenna.
•
The antenna should be installed by a competent technician.
•
2
3
Shield braid
15 mm
19
”
(
/
)
32
30 mm
”
3/
)
(1
16
Shield braid
Core wire
Core wire
Using headphones (not included)
Reduce the volume level and connect the headphones.
Plug type: 3.5 mm (1/8˝) stereo
Note
Avoid listening for prolonged periods of time to prevent hearing damage.
Turning the demo function on/off
When the unit is first plugged in, a demonstration of its functions may
be shown on the display.
If the demo setting is off, you can show a demonstration by selecting
“DEMO ON”.
Press and hold [DISP, –DEMO].
The display changes each time the button is held down.
NO DEMO (off) ↔ DEMO ON (on)
While in the standby mode, select “NO DEMO” to reduce power
consumption.
Note
DEMO function cannot be turned on when Dimmer is on.
15
RQT7330
Page 16
Other functions
Auto-off function
Remote control only
When CD or tape is selected as the source
To save power, the unit turns off if it is left unused for ten minutes.
This function does not work if the source is tuner or AUX.
Press [SHIFT] + [AUTO OFF].
“AUTO OFF” is shown on the display.
The setting is maintained even if the unit is turned off.
If you select tuner or AUX as the source, “AUTO OFF” goes out. It
comes on again when you select CD or tape.
To cancel
Press [SHIFT] + [AUTO OFF] again.
Setting the time
Remote control only
This is a 12-hour clock.
1 Switch on the power.
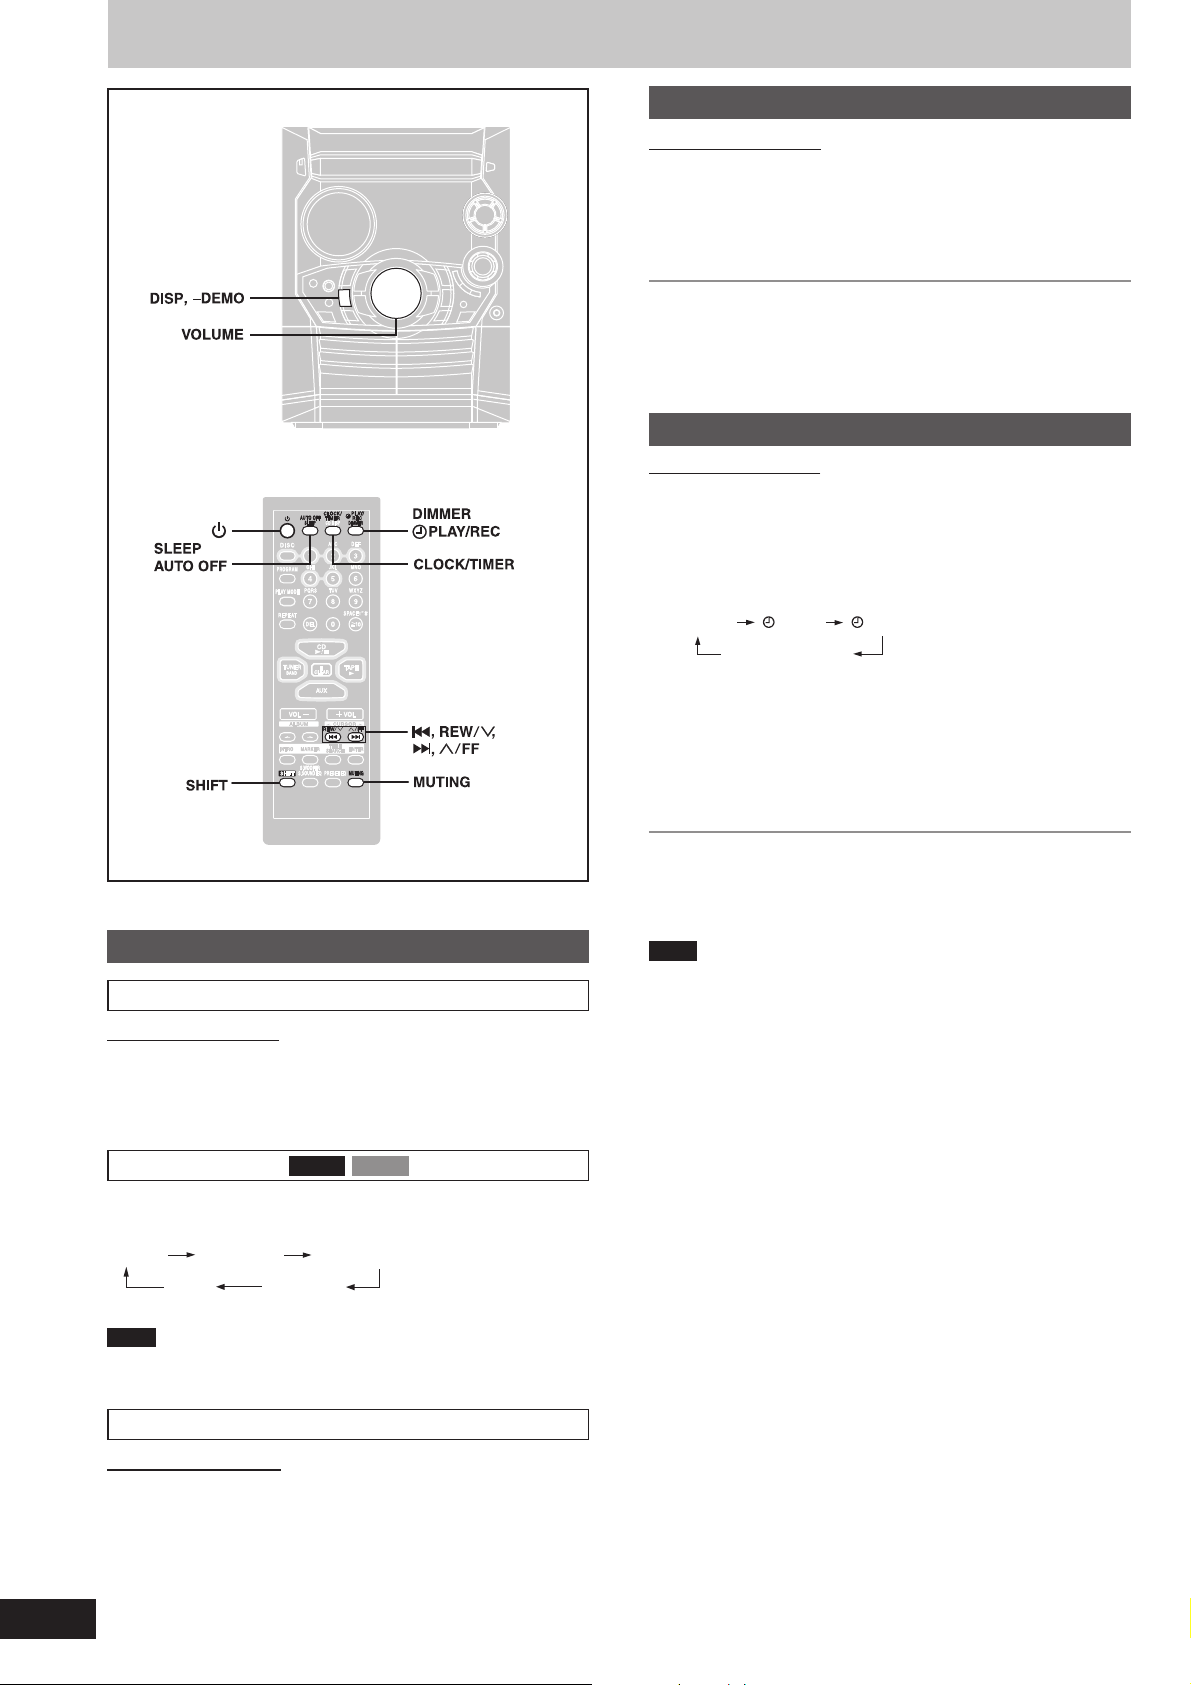
2 Press [SHIFT] + [CLOCK/TIMER] to select “CLOCK”.
Every time you press the button:
CLOCK RECPLAY
Previous display
3 (Within 7 seconds or so)
Press [g, REW/3] or [f, 4/FF] to set the time.
Convenient functions
To dim the display panel
Remote control only
Press [DIMMER].
The display is dimmed and the indicators are turned off.
(The AC supply indicator remains on.)
Press [DIMMER] again to restore the display.
Switching displays
Press [DISP, –DEMO] to select the desired display mode.
Every time you press the button:
Normal
Peak hold
(OFF)
AK520 AK523
Reflection
Animation
("Race")
4 Press [SHIFT] + [CLOCK/TIMER] to finish setting the
time.
The display will return to whatever was displayed before you set
the time.
To display the time
Press [SHIFT] + [CLOCK/TIMER] once when the unit is on or at
standby mode.
The time is shown for about 5 seconds.
Note
Reset the clock regularly to maintain accuracy.
16
RQT7330
Note
If you selected a display mode from b – f (A page 12), the animation
(“Race”) will not be displayed.
To mute the volume
Remote control only
Press [MUTING].
Press the button again to cancel.
“MUTING” goes out.
To cancel from the unit, turn [VOLUME] to minimum (--dB), then raise
it to the required level.
Muting is also cancelled when the unit is turned off.
Page 17
Timers
Using the play/record timer
Remote control only
You can set the timer to come on at a certain time to wake you up
(play timer) or to record a radio station or from the aux source (record
timer).
The play and record timers cannot be used together.
Preparations:
Turn the unit on and set the clock (A page 16).
•
For the play timer, prepare the desired music source (tape/CD/
•
radio/aux), and set the volume.
For the record timer, check the cassette’s erasure prevention tabs
•
(A page 14) and insert the tape in deck 2 (A page 14). Tune to
the radio station (A page 13) or select the aux source (A page
15).
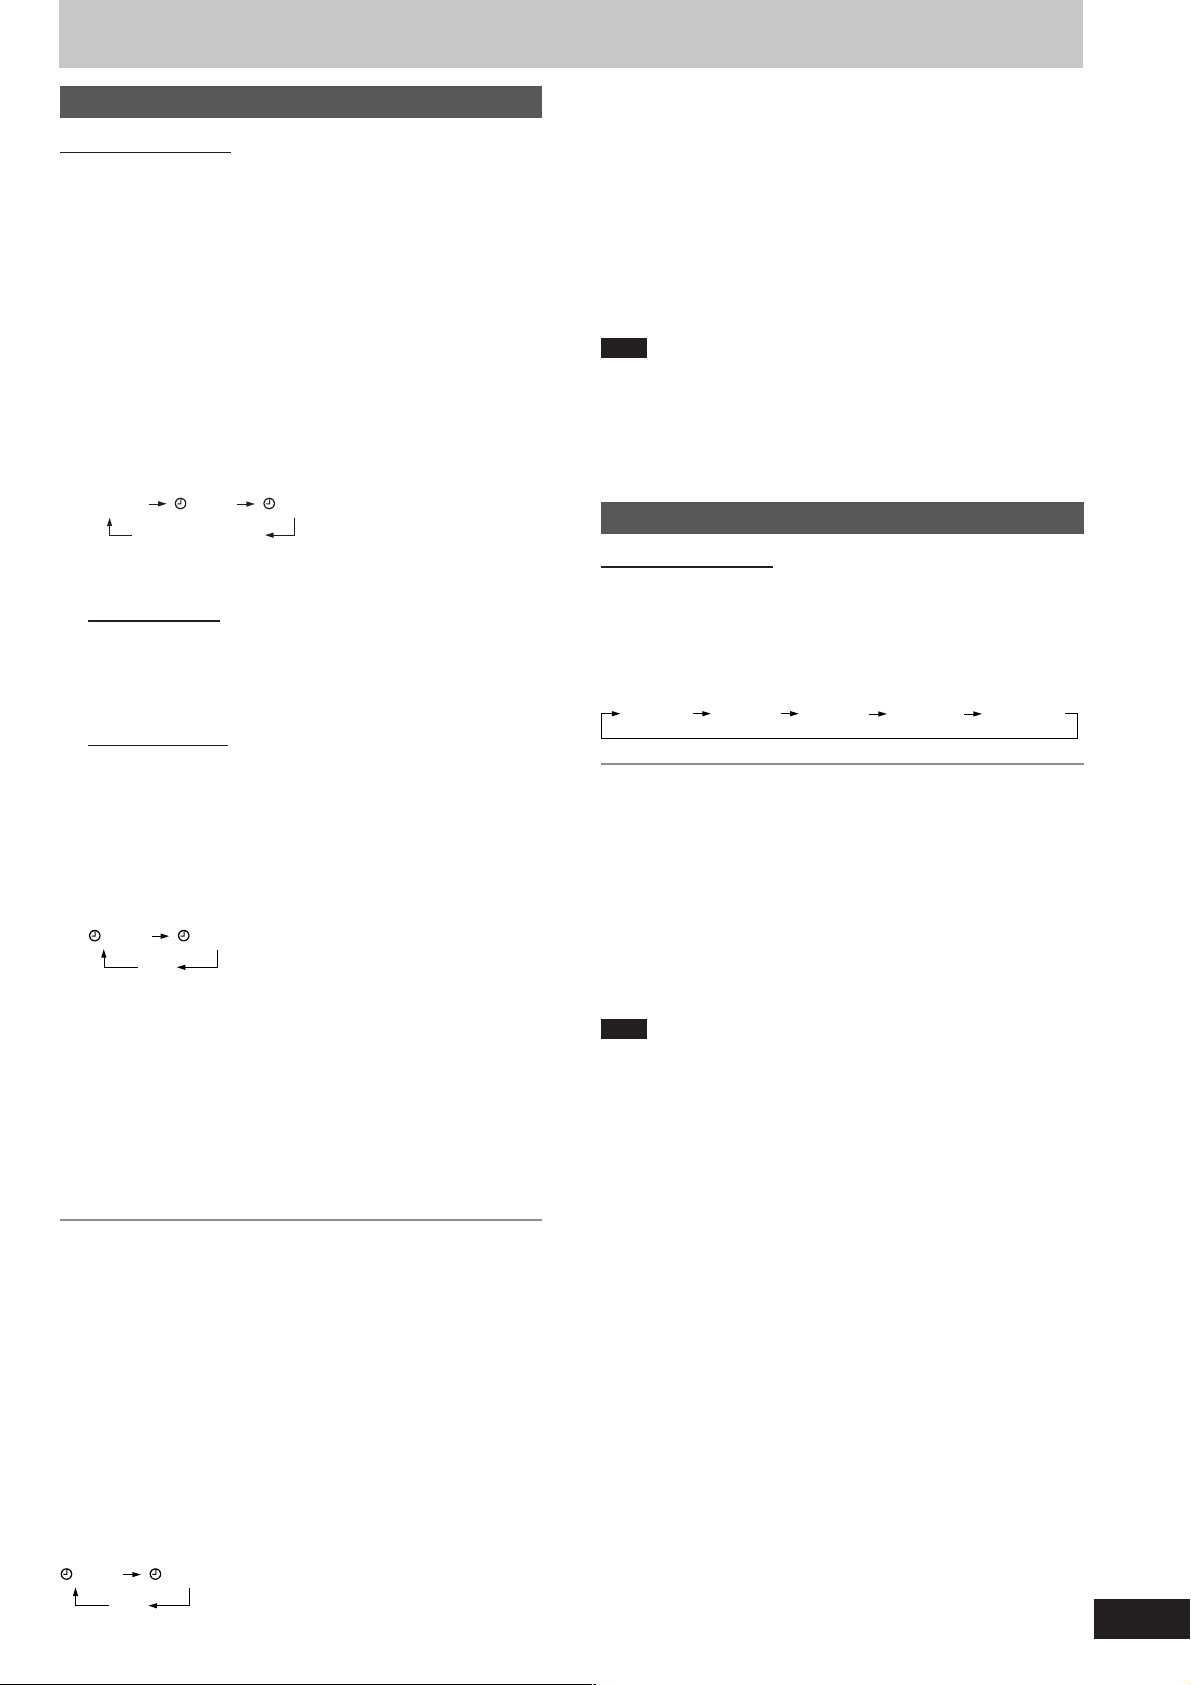
1 Press [SHIFT] + [CLOCK/TIMER] to select the timer
function.
Every time you press the button:
CLOCK RECPLAY
Previous display
rPLAY: to set the play timer
rREC: to set the record timer
2 ON time setting
1
(Within 8 seconds or so)
Press [g, REW/3] or [f, 4/FF] to set the
start time.
2 Press [SHIFT] + [CLOCK/TIMER].
3 OFF time setting
1 Press [g, REW/3] or [f, 4/FF] to set the
finish time.
2 Press [SHIFT] + [CLOCK/TIMER].
The start and finish times are now set.
4 Press [SHIFT] + [rPLAY/REC] to display the timer
indicator.
Every time you press the button:
RECPLAY
(off)
rPLAY: to turn the play timer on
rREC: to turn the record timer on
(The indicator doesn’t appear if the start and finish times or the
clock hasn’t been set.)
To check the settings
Press [SHIFT] + [CLOCK/TIMER] while the unit is on to select “rPLAY”
or “rREC”.
The settings are shown in the following order:
Play timer: start time→finish time→source→volume
Record timer: start time→finish time→source
To check the settings while the unit is off, press [SHIFT] + [CLOCK/
TIMER] twice.
If you use the unit after the timers are set
After using, check that the correct tape/CD are loaded before turning
the unit off.
Note
If you turn the unit off and on again while a timer is functioning, the
•
finish time setting will not be activated.
If you selected AUX as the source, when the timer comes on, the
•
unit turns on and engages “AUX” as the source. If you want to
playback or record from a connected unit, set that unit’s timer to the
same time. (See the connected unit’s instruction manual.)
Using the sleep timer
Remote control only
This timer turns the unit off after a set time.
While enjoying the desired source:
Press [SLEEP] to select the time (minutes).
Every time you press the button:
SLEEP 90 SLEEP 120SLEEP 60SLEEP 30
To cancel the sleep timer
Press [SLEEP] to select “SLEEP OFF”.
To confirm the remaining time
Press [SLEEP] once.
The remaining time is shown for about 5 seconds.
To change the setting
Press [SLEEP] to select the new setting.
You can use the sleep timer in combination with the play/record timer.
Make sure the unit is off before the play/record timer’s start time.
Note
The sleep timer will be turned off when you start recording from a CD.
SLEEP OFF
5 Press [
The unit must be off for the timers to operate.
•
•
To cancel the timer
Press [SHIFT] + [rPLAY/REC] to clear the timer indicator from the
display.
(The timer comes on at the set time everyday if the timer is on.)
ff
f] to turn the unit off.
ff
Play timer: Play will start in the set condition at the set time
Record timer: The unit comes on 30 seconds before the set
with volume increasing gradually to the set level.
time with the volume muted.
To change the settings (when the unit is on)
To change the play/record times
Do steps 1, 2, 3 and 5.
To change the source or volume
1. Press [SHIFT] + [rPLAY/REC] to clear the timer indicator from the
display.
2. Make changes to the source or volume.
3. Do steps 4 to 5.
To change the timer
Press [SHIFT] + [rPLAY/REC] to select the desired timer.
Every time the button is pressed:
RECPLAY
(off)
17
RQT7330
Page 18
Troubleshooting guide
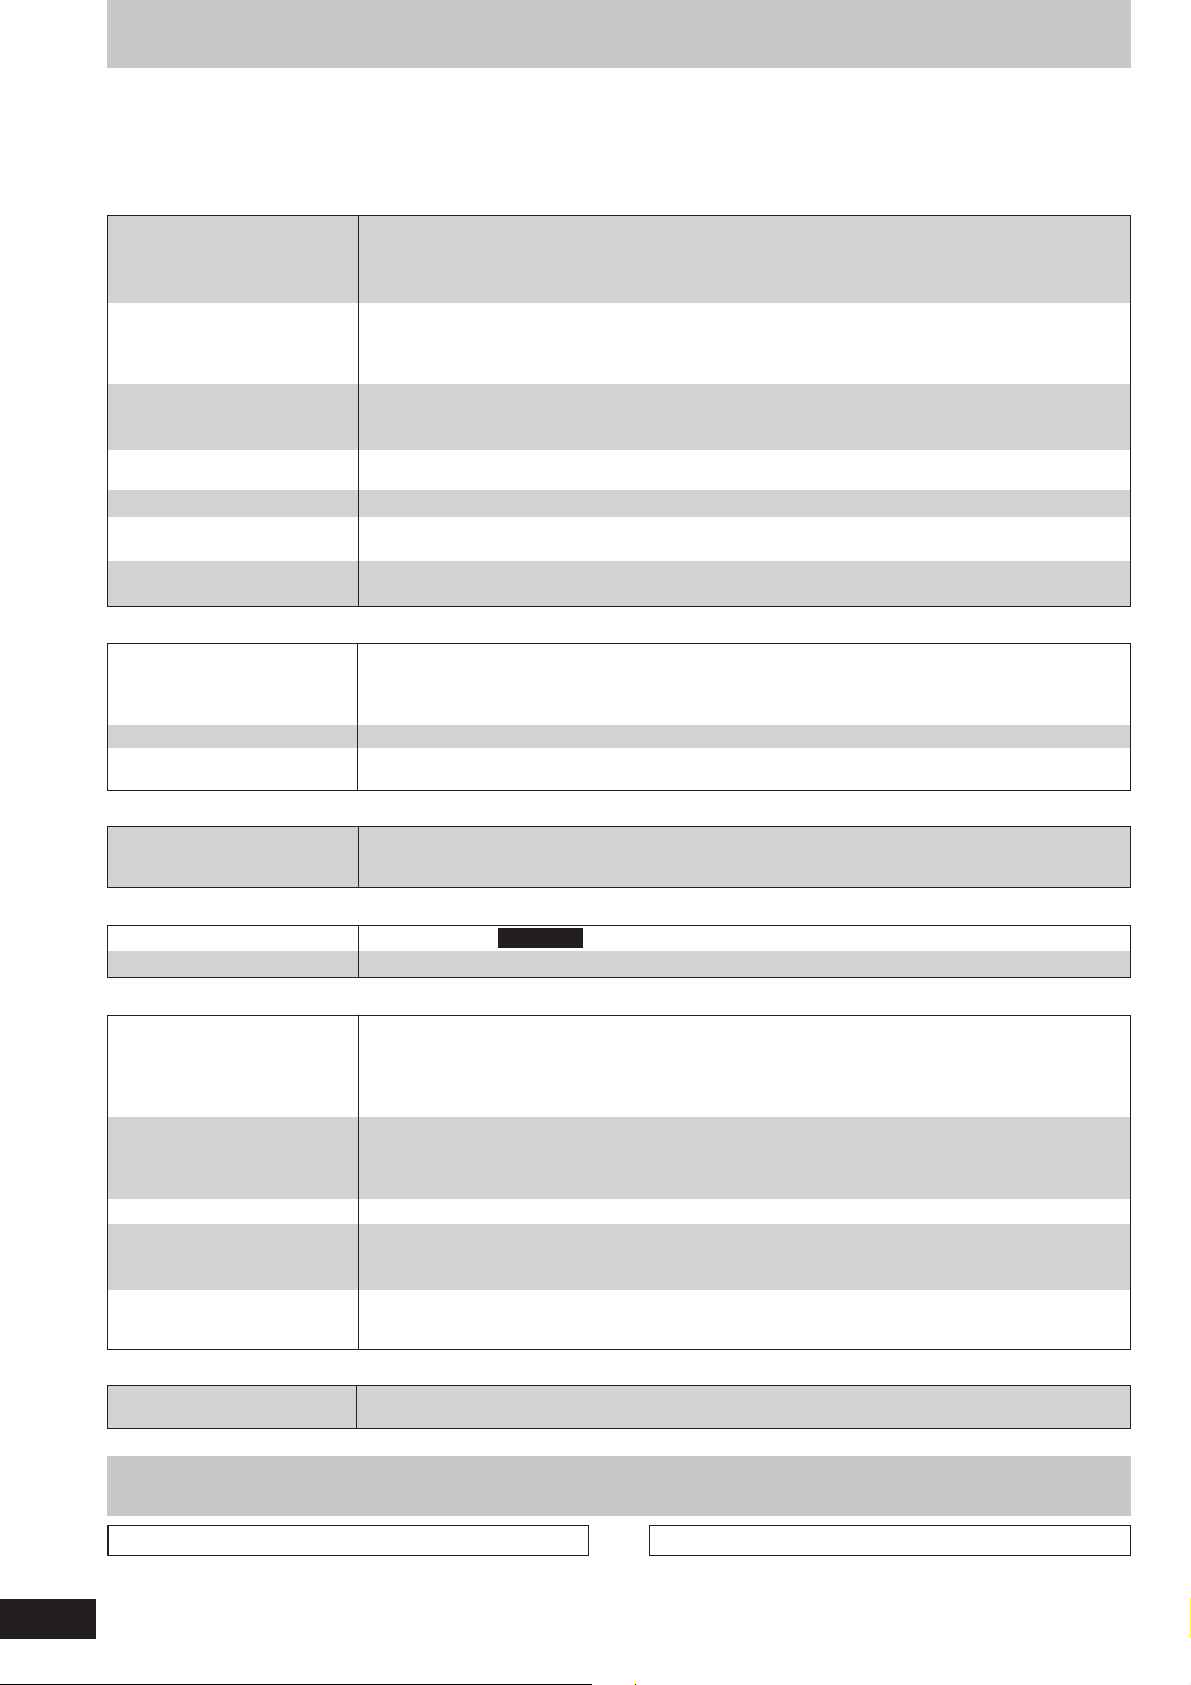
Before requesting service, make the below checks. If you are in doubt about some of the check points, or if the remedies indicated in the
chart do not solve the problem, refer to the “Customer Services Directory” on the back cover if you reside in the U.S.A., or refer to the
“Product information” on page 3 if you reside in Canada.
Reference pages are shown as black circled numbers
Common Problems
Although the unit is in
standby mode, the display
lights up and changes
continuously.
No sound.
Sound stops.
Sound is unfixed, reversed or
comes from one speaker
only.
Humming heard during play.
“ERROR” is displayed.
“– –:– –” appears on the
display at standby mode.
“F61” is displayed.
Turn off the demo function. %
If you set the clock, demo function will be turned off automatically. ^
Turn the volume up.
Switch off the unit, determine and correct the cause, then switch the unit on. Causes include shorting of
the positive and negative speaker wires, straining of the speakers through excessive volume or power,
and using the unit in a hot environment.
Check the speaker connections. 6
An AC power supply cord or fluorescent light is near the cables. Keep other appliances and cords away
from this unit’s cables.
Incorrect operation performed. Read the instructions and try again.
You plugged the AC power supply cord in for the first time or there was a power failure recently. Set the
time. ^
Check and correct the speaker cords connection. 6
If this does not fix the problem, there is a power supply problem. Consult the dealer.
Listening to the radio
Noise is heard.
The stereo indicator flickers
or doesn’t light.
Sound is distorted.
A beat sound is heard.
A low hum is heard during
AM broadcasts.
Use an outdoor antenna. %
Turn the TV off or separate it from the unit.
Separate the antenna from other cables and cords.
%%
%.
%%
When there is a television set nearby
The picture on the TV
disappears or stripes
appear on the screen.
The location and orientation of the antenna are incorrect. If you are using an indoor antenna, change to
an outdoor antenna.
The TV antenna wire is too close to the unit. Separate the antenna wire of the TV set from the unit.
Using the cassette deck
Poor quality sound.
Recording is not possible.
Clean the heads. See below
If the erasure prevention tabs have been removed, cover the holes with adhesive tape. $
Playing discs
The display is wrong or
play won’t start.
The total number of tracks
displayed differs each time
the same disc is inserted.
Unusual sound is heard.
CD-RW cannot be read.
“VBR–” is displayed
instead of the remaining
play time.
“TAKE OUT/DISC” appears
on the display.
The disc may be upside down. 8
Wipe the disc.
Replace the disc if it is scratched, warped, or non-standard.
Condensation may have formed inside the unit due to a sudden change in temperature. Wait for about an
hour for it to clear and try again.
The disc may be scratched, or its data may be defective. Replace the disc.
The disc was incompletely formatted. Use the recording equipment to fully format the disc before recording.
The unit cannot display the remaining play time for variable bit rate (VBR) tracks.
There is a problem with the disc mechanism. (A power failure may have occurred.)
The tray will open automatically. Remove the disc from the tray, and after ensuring there is no disc in the tray,
close it. The unit will make the disc changing noises for a few moments and then it should operate normally.
Remote control
Remote control doesn’t
work.
Check that the batteries are inserted correctly. 4
Replace the batteries if they are worn.
18
RQT7330
Maintenance
If the surfaces are dirty
To clean this unit, wipe with a soft, dry cloth.
• Never use alcohol, paint thinner or benzene to clean this unit.
• Before using a chemically treated cloth, read the instructions that
came with the cloth carefully.
For a cleaner, crisper sound
Clean the heads regularly to assure good quality playback and
recording.
Use a cleaning tape (not included).
Page 19
Specifications
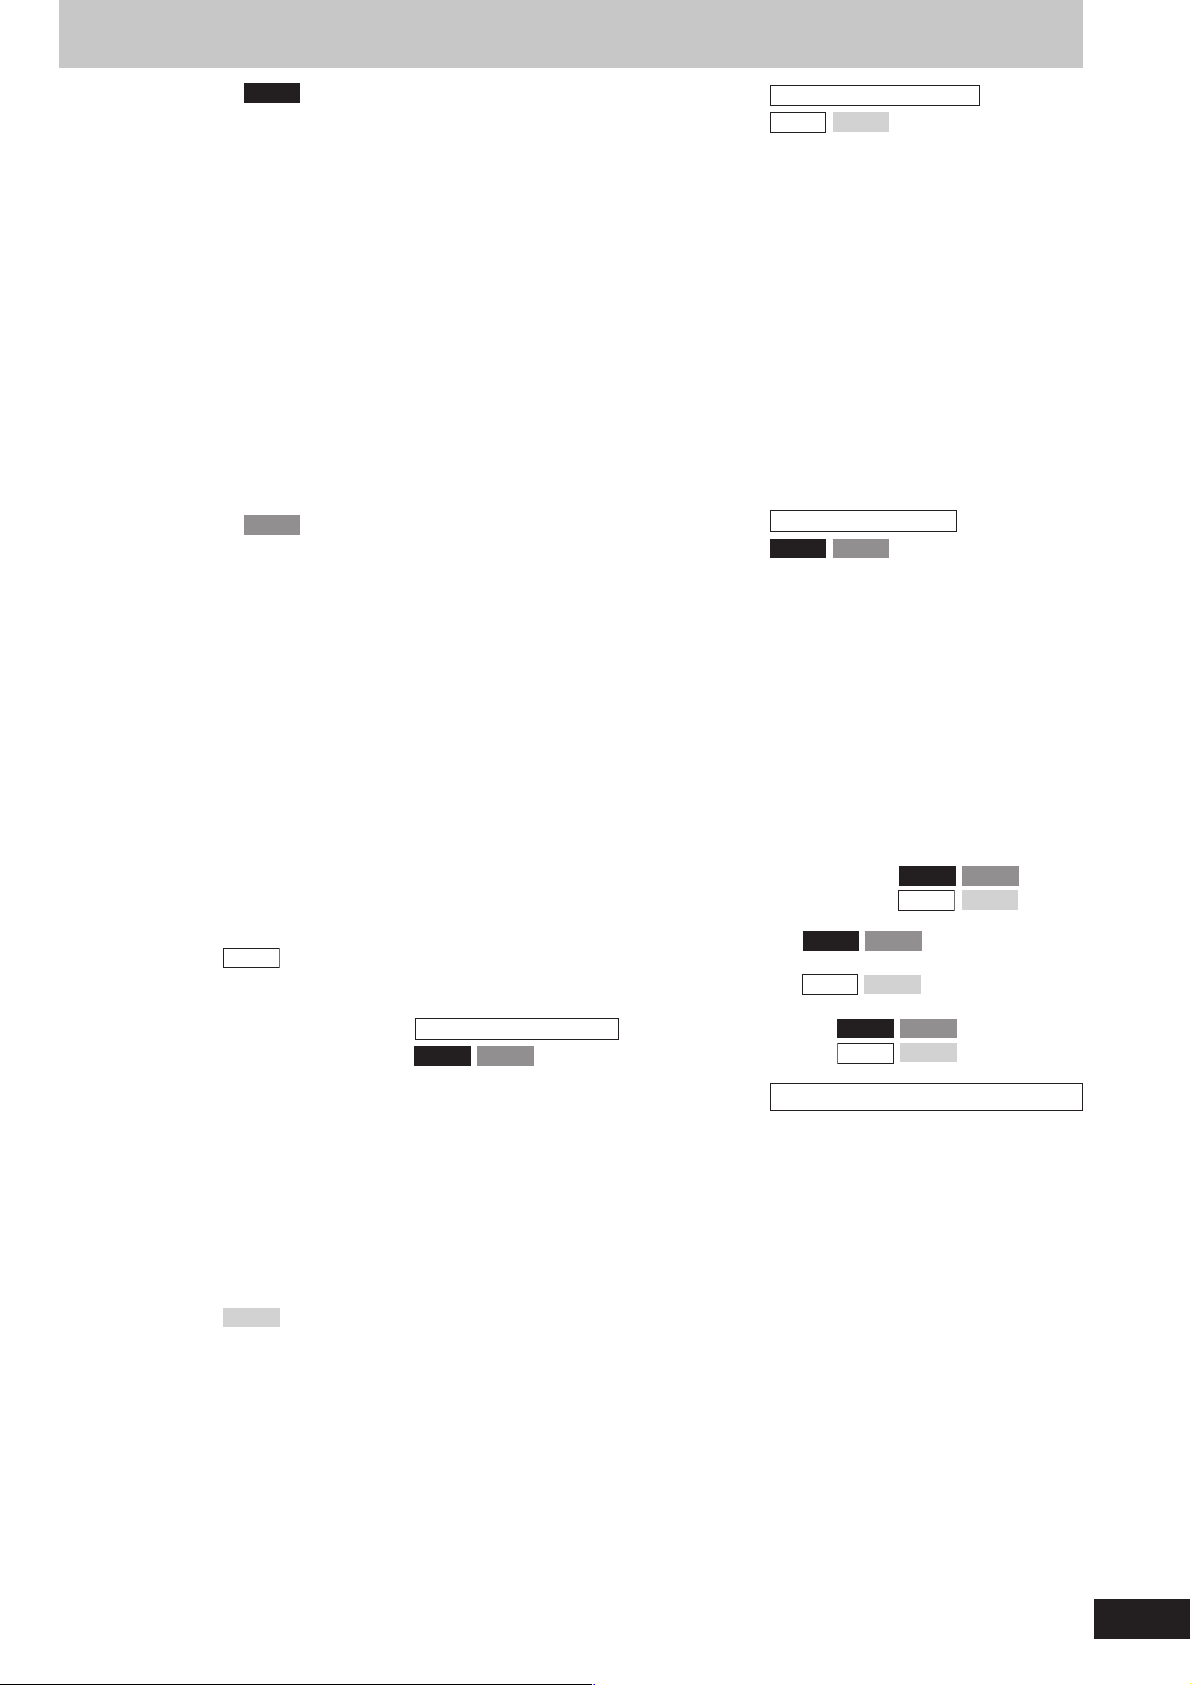
AMPLIFIER SECTION
Power output
THD 10%, both channels driven
60 Hz–3 kHz
(Low channel) 55 W per channel (6 Ω)
3 kHz–16 kHz
(High channel) 55 W per channel (6 Ω)
40 Hz–100 Hz
(Subwoofer channel) 140 W (8 Ω)
Total power 360 W (Total)
Power output
THD 10%, both channels driven
1 kHz
(Low channel) 65 W per channel (6 Ω)
10 kHz
(High channel) 65 W per channel (6 Ω)
80 Hz
(Subwoofer channel) 160 W (8 Ω)
Total power 420 W (Total)
Input sensitivity
AUX 250 mV
Input Impedance
AUX 13.3 kΩ
AMPLIFIER SECTION
Power output
THD 10%, both channels driven
60 Hz–3 kHz
(Low channel) 50 W per channel (6 Ω)
3 kHz–16 kHz
(High channel) 50 W per channel (6 Ω)
40 Hz–100 Hz
(Subwoofer channel) 140 W (8 Ω)
Total power 340 W (Total)
Power output
THD 10%, both channels driven
1 kHz
(Low channel) 60 W per channel (6 Ω)
10 kHz
(High channel) 60 W per channel (6 Ω)
80 Hz
(Subwoofer channel) 160 W (8 Ω)
Total power 400 W (Total)
Input sensitivity
AUX 250 mV
Input Impedance
AUX 13.3 kΩ
AMPLIFIER SECTION
Power output
THD 10%, both channels driven
60 Hz–3 kHz
(Low channel) 58 W per channel (6 Ω)
3 kHz–16 kHz
(High channel) 58 W per channel (6 Ω)
Total Bi-Amp power 116 W per channel
Power output
THD 10%, both channels driven
1 kHz
(Low channel) 75 W per channel (6 Ω)
10 kHz
(High channel) 75 W per channel (6 Ω)
Total Bi-Amp power 150 W per channel
Input sensitivity
AUX 250 mV
Input Impedance
AUX 13.3 kΩ
AMPLIFIER SECTION
Power output
THD 10%, both channels driven
60 Hz–3 kHz
(Low channel) 54 W per channel (6 Ω)
3 kHz–16 kHz
(High channel) 54 W per channel (6 Ω)
Total Bi-Amp power 108 W per channel
Power output
THD 10%, both channels driven
1 kHz
(Low channel) 70 W per channel (6 Ω)
10 kHz
(High channel) 70 W per channel (6 Ω)
Total Bi-Amp power 140 W per channel
Input sensitivity
AUX 250 mV
Input Impedance
AUX 13.3 kΩ
AK520
AK523
AK320
AK323
FM TUNER SECTION
Frequency range
Sensitivity 2.5 ØV (IHF)
S/N 26 dB 2.2 ØV
Antenna terminal(s) 75
87.9–107.9 MHz (200 kHz steps)
87.5–108.0 MHz (100 kHz steps)
Ω (unbalanced)
AM TUNER SECTION
Frequency range
Sensitivity
S/N 20
520–1710 kHz (10 kHz steps)
dB (at 1000 kHz) 560 ØV/m
CASSETTE DECK SECTION
Track system 4 track, 2 channel
Heads
Record/playback Solid permalloy head
Erasure Double gap ferrite head
Motor DC servo motor
Recording system AC bias 100 kHz
Erasing system AC erase 100 kHz
Tape speed 4.8 cm/s (17/8 ips)
Overall frequency response
(+3 dB, –6 dB at DECK OUT)
NORMAL (TYPE I) 35 Hz–14 kHz
S/N 50 dB (A weighted)
Wow and flutter 0.18% (WRMS)
Fast forward and rewind time
Approx. 120 seconds with
C-60 cassette tape
CD SECTION
Sampling frequency 44.1 kHz
Decoding 16 bit linear
Beam source/wavelength
Number of channels Stereo
Frequency response
Wow and flutter Below measurable limit
Digital filter 8 fs
D/A converter MASH (1 bit DAC)
MP3
Bit rate 32 kbps–320 kbps
Sampling frequency
Semiconductor laser/780 nm
20 Hz–20 kHz (+1, –2 dB)
32 kHz, 44.1 kHz, 48 kHz
SPEAKER SECTION
Front speakers SB-AK520
AK520 AK523
Type 3 way, 3 speaker system
Speaker(s)
Woofer 16 cm (61/2˝) cone type
Tweeter 6 cm (23/8˝) cone type
Super tweeter 2.5 cm (1˝) Piezo type
Impedance
HIGH 6 Ω
LOW 6 Ω
Input power (IEC)
HIGH 65 W (Max)
LOW 65 W (Max)
Output sound pressure level
Cross over frequency 2.6 kHz, 10 kHz
Frequency range 37 Hz–23 kHz (–16 dB)
Dimensions (WxHxD) 241 x 360 x 239 mm
Mass 3.8 kg (8.4 lb.)
83 dB/W (1.0 m)
44 Hz–22 kHz (–10 dB)
(91/2˝ x 143/16˝ x 913/32˝)
Front speakers SB-AK320
AK320
Type 3 way, 3 speaker system
Speaker(s)
Impedance
Input power (IEC)
Output sound pressure level
Cross over frequency 2.6 kHz, 10 kHz
Frequency range 37 Hz–23 kHz (–16 dB)
Dimensions (WxHxD) 241 x 360 x 239 mm
Mass 3.8 kg (8.4 lb.)
Subwoofer SB-WAK520
AK520 AK523
Type 1 way, 1 speaker system
Speaker(s)
Impedance 8 Ω
Input power (IEC) 160 W (Max)
Output sound pressure level
Frequency range 40 Hz–220 Hz (–16 dB)
Dimensions (WxHxD) 266 x 331 x 264 mm
Mass 4.1 kg (9 lb.)
AK323
Woofer 16
Tweeter 6
Super tweeter 2.5 cm (1˝) Piezo type
HIGH 6 Ω
LOW 6 Ω
HIGH 75 W (Max)
LOW 75 W (Max)
Subwoofer 16 cm (61/2˝) cone type
cm (61/2˝) cone type
cm (23/8˝) cone type
83 dB/W (1.0 m)
44 Hz–22 kHz (–10 dB)
(91/2˝ x 143/16˝ x 913/32˝)
80 dB/W (1.0 m)
45 Hz–180 Hz (–10 dB)
(1015/32˝ x 131/32˝ x 1013/32˝)
GENERAL
Power supply AC 120 V, 60 Hz
Power consumption
AK520 AK523
Dimensions (WxHxD)
AK520 AK523
AK320
Mass
Power consumption in standby mode: 0.34 W
Note:
1. Specifications are subject to change
without notice.
Mass and dimensions are approximate.
2. Total harmonic distortion is measured by
the digital spectrum analyzer.
3. The labels “HIGH” and “LOW” on the rear
of the speakers refer to High frequency
and Low frequency.
AK320
: 250 x 330 x 369 mm
AK520 AK523
AK320
(927/32˝ x 13˝ x 1417/32˝)
AK323
: 250 x 330 x 366 mm
(927/32˝ x 13˝ x 1413/32˝)
AK323
: 267 W
AK323
: 8.2 kg (18.0 lb.)
: 7.5 kg (16.5 lb.)
: 225 W
19
RQT7330
Page 20
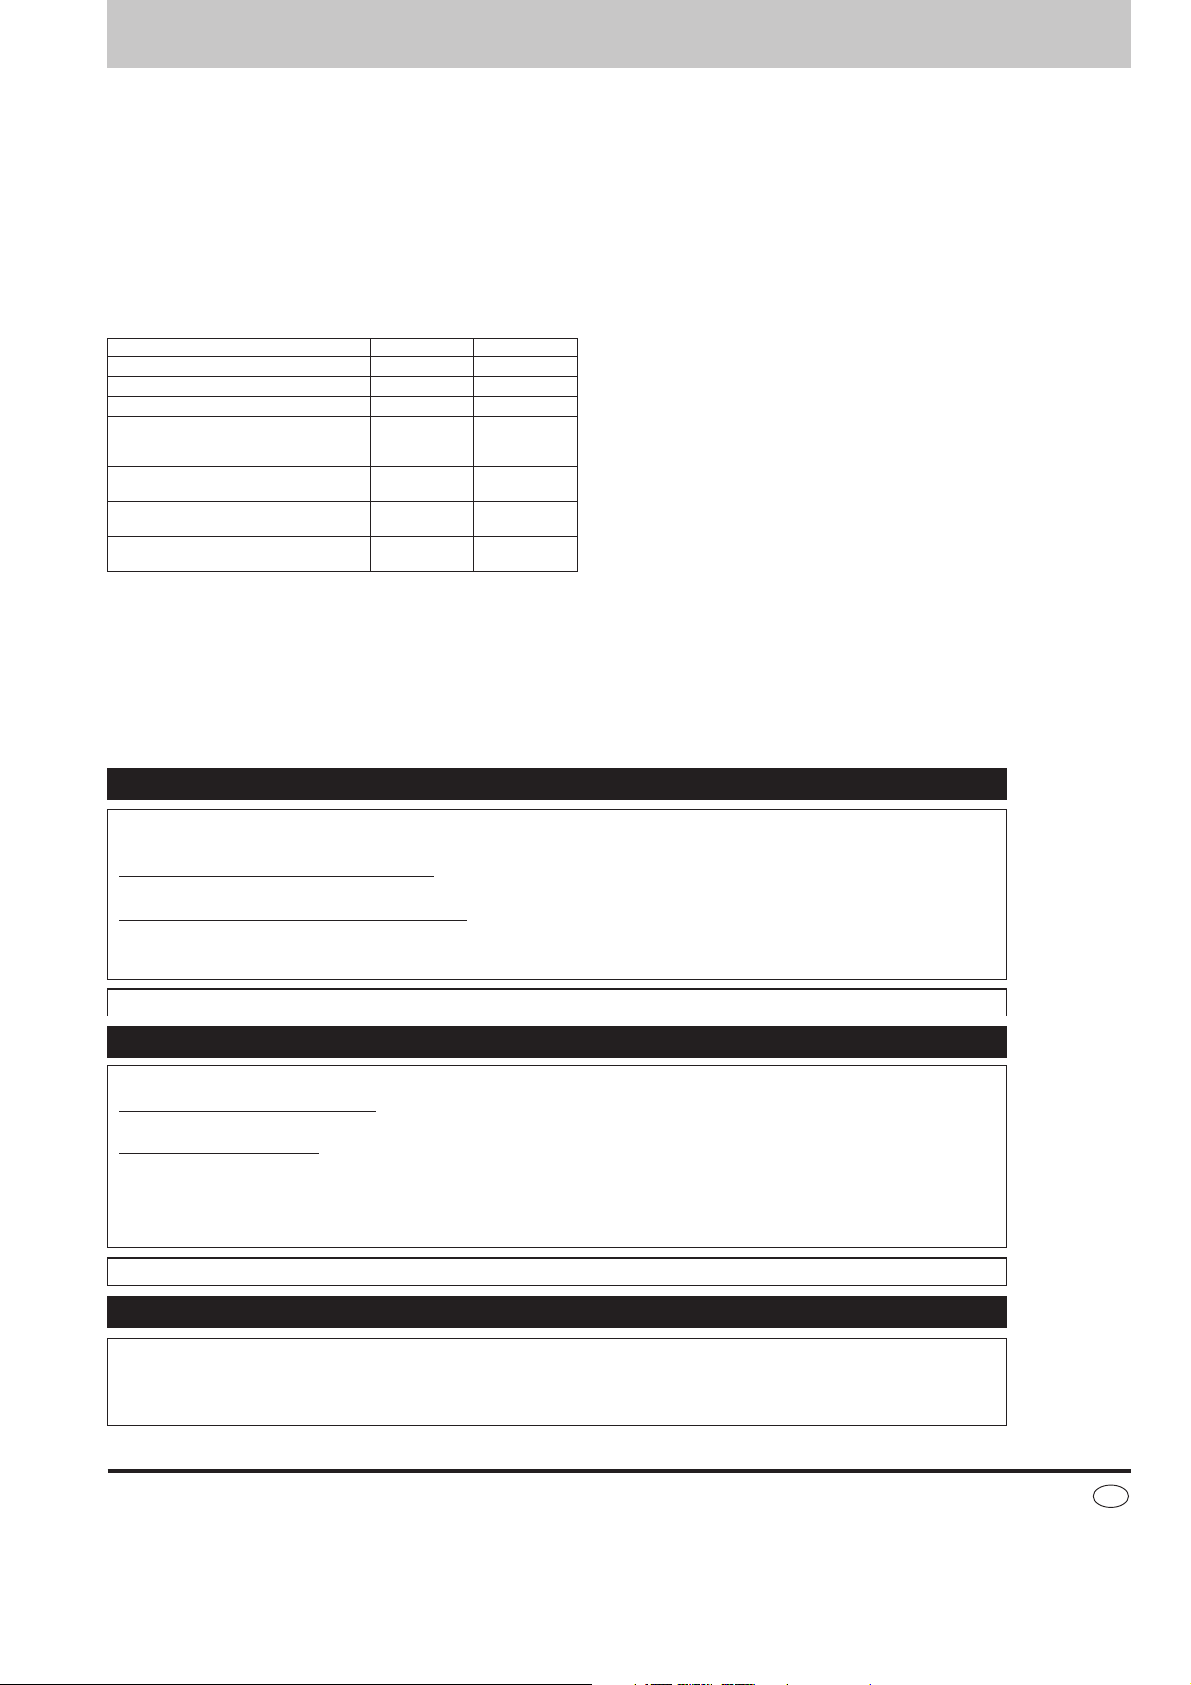
Limited Warranty (ONLY FOR U.S.A.)
Panasonic Consumer Electronics Company,
Division of Matsushita Electric Corporation of America
One Panasonic Way Secaucus, New Jersey 07094
Panasonic Audio Products
Limited Warranty
Limited Warranty Coverage
If your product does not work properly because of a defect in materials or workmanship,
Panasonic Consumer Electronics Company or Panasonic Sales Company (collectively
referred to as “the warrantor”) will, for the length of the period indicated on the chart below,
which starts with the date of original purchase (“warranty period”), at its option either (a)
repair your product with new or refurbished parts, or (b) replace it with a new or a refurbished product. The decision to repair or replace will be made by the warrantor.
Product or Part Name
Audio Products (except items listed below)
All Audio Racks (cabinets)
Stand Alone Speakers, Subwoofer Speakers
USB Reader-Writer, Personal Computer
Card Adapters
(in exchange for defective item)
Accessories: Headphones, Cartridges,
Microphones, Adapters
Rechargeable Batteries, DVD-R/-RAM Discs
(in exchange for defective item)
SD Memory Cards, Rechargeable Battery
Packs (in exchange for defective item)
During the “Labor” warranty period there will be no charge for labor. During the “Parts”
warranty period, there will be no charge for parts. You must carry-in or mail-in your product during the warranty period. If non-rechargeable batteries are included, they are not
warranted. This warranty only applies to products purchased and serviced in the United
States or Puerto Rico. This warranty is extended only to the original purchaser of a new
product which was not sold “as is”. A purchase receipt or other proof of the original purchase date is required for warranty service.
Parts
One (1) year
Thirty (30) days
Three (3) years
One (1) year
Ninety (90) days
Ten (10) days
Ninety (90) days
Labor
One (1) year
Not Applicable
Three (3) years
Not Applicable
Ninety (90) days
Not Applicable
Not Applicable
Panasonic Sales Company, Division of Matsushita Electric
of Puerto Rico, Inc.,
Ave. 65 de Infantería, Km. 9.5
San Gabriel Industrial Park, Carolina, Puerto Rico 00985
Carry-In or Mail-In Service
For Carry-In or Mail-In Service in the United States call 1-800-211-PANA (1-800-211-
7262) or visit Panasonic web site: http://www.panasonic.com
For assistance in Puerto Rico call Panasonic Sales Company (787)-750-4300 or fax
(787)-768-2910.
Limited Warranty Limits And Exclusions
This warranty ONLY COVERS failures due to defects in materials or workmanship, and
DOES NOT COVER normal wear and tear or cosmetic damage. The warranty ALSO
DOES NOT COVER damages which occurred in shipment, or failures which are caused
by products not supplied by the warrantor, or failures which result from accidents, misuse,
abuse, neglect, mishandling, misapplication, alteration, faulty installation, set-up adjustments, misadjustment of consumer controls, improper maintenance, power line surge,
lightning damage, modification, or commercial use (such as in a hotel, office, restaurant,
or other business), rental use of the product, service by anyone other than a Factory
Servicenter or other Authorized Servicer, or damage that is attributable to acts of God.
THERE ARE NO EXPRESS WARRANTIES EXCEPT AS LISTED UNDER “LIMITED
WARRANTY COVERAGE”. THE WARRANTOR IS NOT LIABLE FOR INCIDENTAL
OR CONSEQUENTIAL DAMAGES RESULTING FROM THE USE OF THIS PRODUCT,
OR ARISING OUT OF ANY BREACH OF THIS WARRANTY. (As examples, this ex-
cludes damages for lost time, travel to and from the servicer, loss of media or images,
data or other memory content. The items listed are not exclusive, but are for illustration
only.) ALL EXPRESS AND IMPLIED WARRANTIES, INCLUDING THE WARRANTY OF
MERCHANTABILITY, ARE LIMITED TO THE PERIOD OF THE LIMITED WARRANTY.
Some states do not allow the exclusion or limitation of incidental or consequential damages,
or limitations on how long an implied warranty lasts, so the exclusions may not apply to you.
This warranty gives you specific legal rights and you may also have other rights which
vary from state to state. If a problem with this product develops during or after the warranty period, you may contact your dealer or Servicenter. If the problem is not handled to your
satisfaction, then write to the warrantor’s Consumer Affairs Department at the addresses
listed for the warrantor.
PARTS AND SERVICE WHICH ARE NOT COVERED BY THIS LIMITED WARRANTY
ARE YOUR RESPONSIBILITY.
Customer Services Directory
Obtain Product Information and Operating Assistance; locate your nearest Dealer or Servicenter; purchase Parts and
Accessories; or make Customer Service and Literature requests by visiting our Web Site at:
http://www.panasonic.com/support
or, contact us via the web at:
http://www.panasonic.com/contactinfo
You may also contact us directly at:
1-800-211-PANA (7262),
Monday-Friday 9 am-9 pm; Saturday-Sunday 10 am-7 pm, EST.
For hearing or speech impaired TTY users, TTY: 1-877-833-8855
Accessory Purchases
Purchase Parts, Accessories and Instruction Books online for all Panasonic Products by visiting our Web Site at:
http://www.pasc.panasonic.comm
or, send your request by E-mail to:
You may also contact us directly at:
1-800-332-5368 (Phone) 1-800-237-9080 (Fax Only) (Monday – Friday 9 am to 8 pm, EST.)
Panasonic Services Company
20421 84th Avenue South, Kent, WA 98032
(We Accept Visa, MasterCard, Discover Card, American Express, and Personal Checks)
For hearing or speech impaired TTY users, TTY: 1-866-605-1277
Service in Puerto Rico
Matsushita Electric of Puerto Rico, Inc. Panasonic Sales Company
Factory Servicenter:
Ave. 65 de Infantería, Km. 9.5, San Gabriel Industrial Park, Carolina, Puerto Rico 00985
Phone (787)750-4300, Fax (787)768-2910
Panasonic Consumer Electronics
Company, Division of Matsushita
Electric Corporation of America
One Panasonic Way Secaucus,
New Jersey 07094
http://www.panasonic.com
© 2004 Matsushita Electric Industrial Co., Ltd.
Printed in Singapore
Panasonic Sales Company,
Division of Matsushita Electric of
Puerto Rico, Inc. (“PSC”)
Ave. 65 de Infantería, Km. 9.5
San Gabriel Industrial Park, Carolina,
Puerto Rico 00985
Panasonic Canada Inc.
5770 Ambler Drive
Mississauga, Ontario
L4W 2T3
www.panasonic.ca
RQT7330-5P
En
G1003CP5044
Page 21

documentation manual, user maintenance, brochure, user reference, pdf manual
This file has been downloaded from:
User Manual and User Guide for many equipments like mobile phones, photo cameras, monther board, monitors, software, tv, dvd, and othes..
Manual users, user manuals, user guide manual, owners manual, instruction manual, manual owner, manual owner's, manual guide,
manual operation, operating manual, user's manual, operating instructions, manual operators, manual operator, manual product,
 Loading...