

Page 1
Operating Instructions
IC Recorder
The illustration shows
RR-US591.
Dear customer
Thank you for purchasing this product.
For optimum performance and safety, please read
these instructions carefully.
Before connecting, operating or adjusting this
product, please read the instructions completely.
Please keep this manual for future reference.
En Cf
PP
Model No.
RR-US591
RR-US571
RR-US551
If you have any questions contact
In the U.S.A. and Puerto Rico: 1-800-211-PANA (7262)
In Canada: 1-800-561-5505
For Canada only
The warranty can be found on pages 40 and 41.
For U.S.A. and Puerto Rico only
The warranty can be found on pages 42 and 43.
Please return the product registration card (if included), or register via
the Internet at:
www.panasonic.com/register
VQT2M17
H1209TY0
Page 2
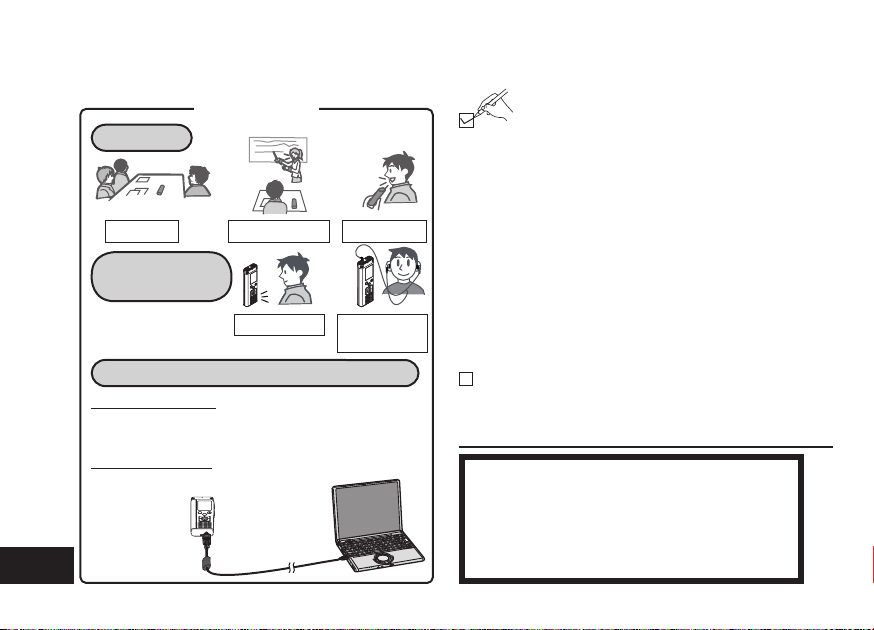
Features
Recording
Meeting
Playing back
to listen
• Recorded file
• MP3 music file
Connecting this unit to a computer
Using a computer
• Copy/Organize (Delete) recorded files/
Play back to listen
From a computer
• Transfer MP3 music files
VQT2M17
2
Lesson/Lecture
with speaker
Dictation
or earphones
(not included)
Supplied accessories
Please check and identify the supplied
accessories.
Use numbers indicated in parentheses
when asking for replacement parts.
(Product numbers correct as of December
2009. These may be subject to change.)
Only for the U.S.A. and Puerto Rico:
To order accessories, refer to
“Accessory Purchases (United
States and Puerto Rico)” on
page 43.
Only for Canada: To order accessories, call the
dealer from whom you have
made your purchase.
1 USB cable [K2KZ4CB00012]
CAUTION
Danger of explosion if battery is incorrectly
replaced. Replace only with the same
or equivalent type recommended by the
manufacturer. Dispose of used batteries
according to the manufacturer’s instructions.
Page 3

Table of contents
Preparation
Features ...........................................................................2
Supplied accessories ....................................................... 2
Part names ....................................................................... 4
Inserting the batteries .......................................................5
Turning ON/OFF the Power ..............................................6
Hold function ..................................................................... 6
Setting the time ................................................................. 7
Basic Operations
Recording settings ............................................................ 8
Switching recording position ........................................8
Recording ......................................................................... 9
Playing ............................................................................ 10
Listening to the audio using earphones .......................... 11
Deleting recorded fi les ....................................................12
Locking recorded fi les (File protection) ........................... 13
Advanced Operations
Changing recording settings
(Monaural/Stereo, Microphone sensitivity) ..................... 14
Changing recording settings
(Zoom microphone/Recording mode (XP/LP/SLP)) .......15
Preventing unnecessary recording (VAS) ....................... 16
Confi rming possible (remaining) recording time .............16
Setting the playback speed control function ...................17
Reducing noise (EQ setting) ........................................... 18
Slight return playback .....................................................18
Repeat play/Successive play .......................................... 19
A-B Repeat play .............................................................19
Security functions ........................................................... 20
Recording using an external microphone .......................22
Recording from other devices ......................................... 22
Recording to other devices ............................................. 23
Canceling the operation beep ......................................... 23
Using with a computer
Connecting this unit to a computer .................................24
Opening the folder of this unit using a computer ............25
Importing the recorded fi les in this unit to a
computer/Organizing fi les ...............................................26
Returning the fi les imported to the computer to this unit
Listening to music on this unit (Transferring MP3 music fi les to this unit)
Listening to music on this unit (Playing MP3 music fi les on this unit)
Creating MP3 music fi les ................................................30
.... 27
... 28
....... 29
Other
System requirements ...................................................... 31
Q & A (Frequently Asked Questions) ..............................32
Troubleshooting guide ....................................................33
Care and use ..................................................................36
Maintenance ................................................................... 37
Product Service .............................................................. 38
Specifi cations ................................................................. 39
Limited Warranty (ONLY FOR CANADA) ........................ 40
Limited Warranty
(ONLY FOR U.S.A. AND PUERTO RICO) ...................... 42
Preparation
VQT2M17
3
Page 4
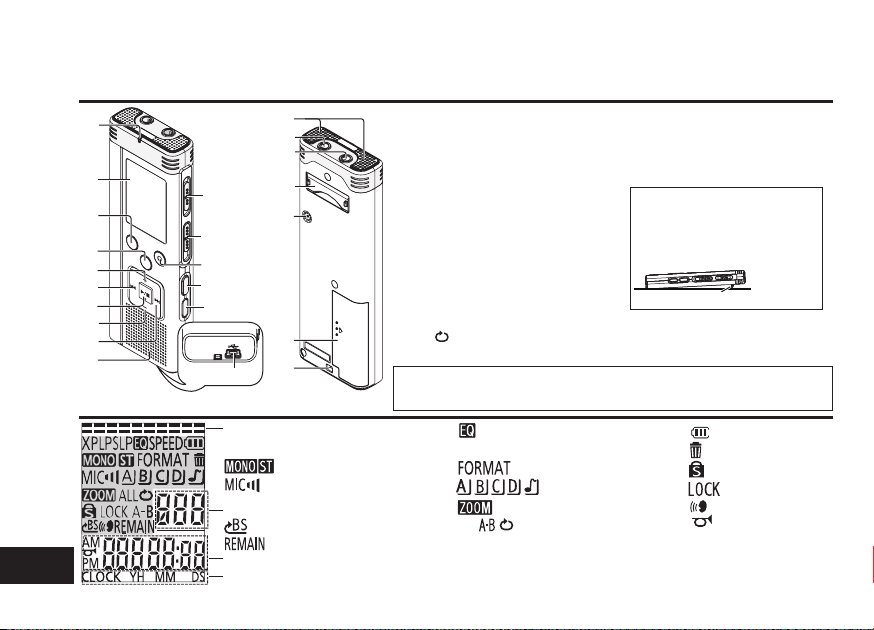
Part names
Main unit
„
‟
†
‡
•
‣
․
‥
ӹ
Ӻ
Display
VQT2M17
4
ԁ
Ԃ
ԃ
ӻ
Ԅ
′
Ӽ
ӽ
Ӿ
ӿ
″
‴
Ԁ
„ Recording indicator (red)
‟ LCD display
† FOLDER/SPEED
‡ STOP
• + (Volume)
‣ u (Fast backward)
․ q/g (Play/Stop/Enter)
‥ – (Volume)
… i (Fast forward)
‧ Built-in speaker
OPR/HOLD
Recording position switch
(ZOOM/WIDE/MANUAL)
REC/PAUSE
A-B (A-B repeat/Repeat)/−MENU
•
ERASE
The enclosed Canadian French label sheet corresponds to
USB jack
Built-in microphone
External microphone jack (MIC)
Ԃ
‰ Headphone/earphone jack (W)
‱ Stand
When you perform zoom
recording with the unit placed
on a surface, stable zoom
effect can be obtained by
using the stand.
stand
′ Zoom microphone
″ġBattery cover
‴ġHand strap hole
English display on the unit.
Remaining memory/Recording level
: Recording mode
XPLPSLP
: Monaural/Stereo
: Microphone sensitivity
File number
Slight return playback
:
: Possible remaining recording time
Recording (Playback) elapsed time/Possible remaining recording time/Remaining playback time/Current time etc.
Clock/Recording (Playback) time/Recording date
: Noise reduction
: Playback speed control
SPEED
: Formatting
: Zoom recording
: Successive/Repeat play
ALL
: Folder
: Battery indicator
: Delete
: Security
: File protection
: VAS recording
: Operation beep
Page 5
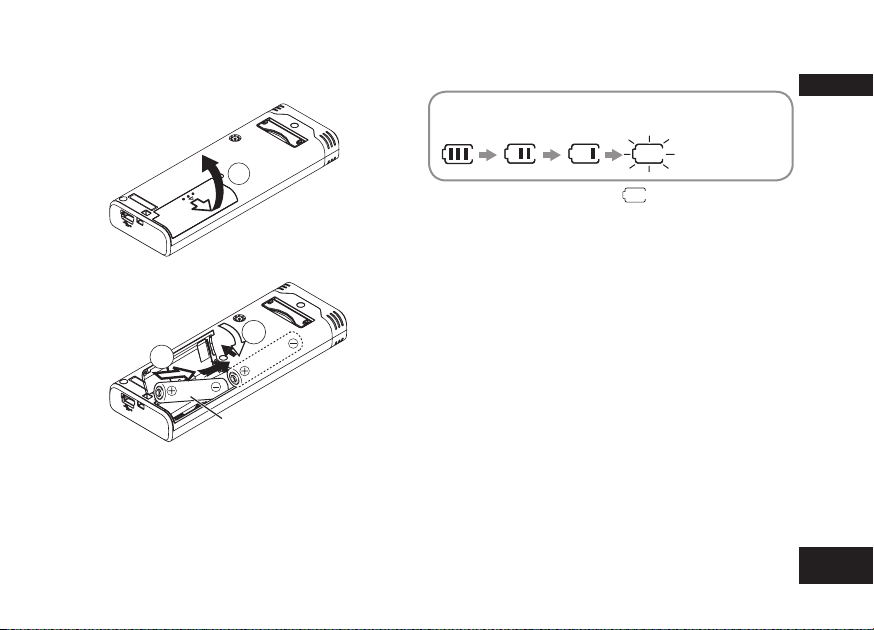
Inserting the batteries
1
The remaining battery display shown below is
displayed while recording or playing.
Blinking
* If the batteries run out, “
batteries as soon as possible.
* Remove the batteries from the unit if you will not
use it f
or a long period of time.
* Please replace batteries within approx. 30
seconds for preservation of the clock data.
” blinks. Replace the
Preparation
3
2
2 AAA LR03 batteries
(not included)
Make sure the batteries face the right direction.
* Use alkaline batteries.
Make sure to turn the power off before
removing the batteries.
• If the batteries are removed while recording,
deleting, etc., all data on this unit may be lost or
this unit may be destroyed.
VQT2M17
5
Page 6
Turning ON/OFF the Power
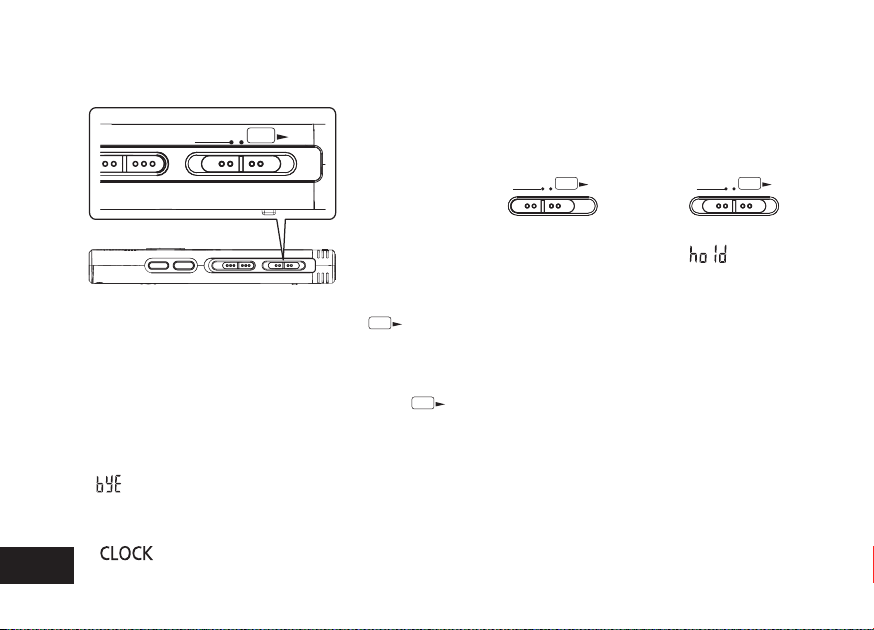
OPERATION/HOLD Switch
HOLD
OPR
Turning the power ON
• Slide OPERATION/HOLD switch to
then the power turns on and the display lights on.
OPR: operation
OPR
side,
Hold function
Button operations are ignored when you set Hold
on.
Switching Hold on/off
Hold on
HOLD
OPR
• When the Hold function is on, button operation is
ignored even if the unit is on (“ ” is displayed).
Accordingly, operation mistakes (i.e. Recording or
playback stopping midway) can be prevented.
Hold off
HOLD
OPR
Turning the power OFF
• Slide and hold OPERATION/HOLD switch to
side for 2 seconds.
Also, when you do not operate the unit for more
than approx. 15 minutes while the unit is stopped,
“ ” is displayed and the power automatically
turns off.
* When batteries are inserted for the first time,
VQT2M17
“ ”
6
time (➜ page 7).
blinks on the display. Please set the
OPR
Page 7
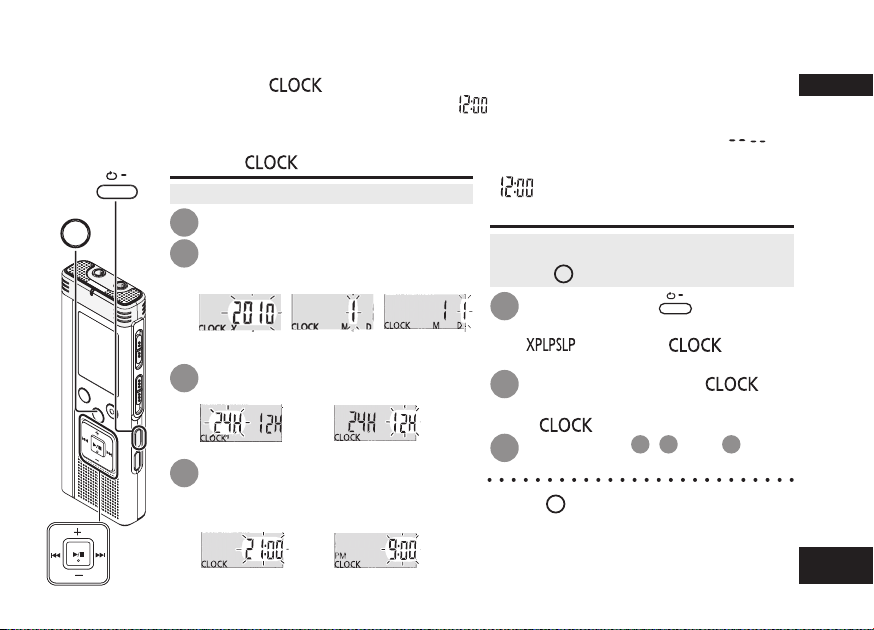
Setting the time
When the power is turned on, “ ” blinks on the display when the time is not set (e.g. at the time of
purchase). (In power-on condition, the display changes to “ ” (blinking) in approx. 1 minute.)
The clock is used for preserving recording date. Please set the time first.
Recording is possible even if the clock is not set. However, the Recording date, Recording start time will be displayed as “ ”.
•
A-B / MENU
STOP
When “ ” is blinking
• Turn the power on (➜ page 6).
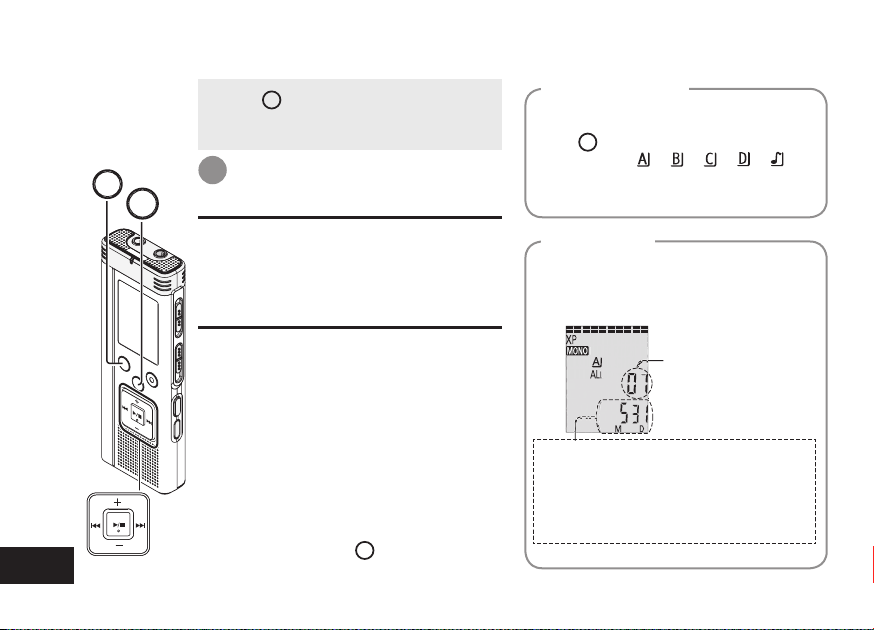
Press q/g .
1
Press +, – to set the year and
2
press q/g to enter.
Set month and day in the same way.
Ye a r Month Day
The above illustration is a display example.
Press u, i to select the time
3
display and press q/g to enter.
Press +, – to set the time and
4
press q/g to enter.
You can adjust the time quickly by
pressing and holding +, –.
12-hour display24-hour display
12-hour display24-hour display
When the time display is
” (blinking) or you change
“
the time
• Turn the power on (➜ page 6).
STOP
• Press
1
Press +, – to select “ ”
2
If “ ” blinks, press q/g to enter.
Follow step 2, 3 and
3
*
Press
*
The clock operates with the monthly loss/gain
of approx. 60 seconds at normal temperature.
*
The time setting is cleared, if the battery has
been consumed completely.
to stop the unit.
•
A-B / MENU
Press and hold
second or longer
“ ” (blinking) or “ ” (blinking)
is displayed.
for 1
.
and press q/g to enter.
4
shown at left.
STOP
to stop the setting process midway.
Preparation
VQT2M17
7
Page 8
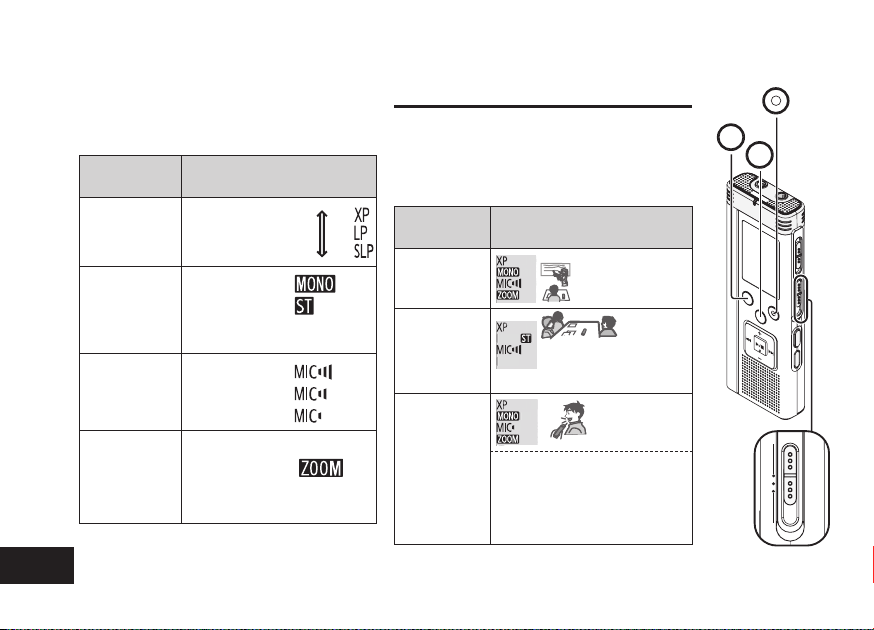
Recording settings
MANUAL WIDE ZOOM
This unit has 4 recording setting items related to
recording quality. Using different combinations of
recording settings, you can adjust audio quality
according to recording situations.
Recording
setting item
Recording
mode
(➜ page 15)
Switching
Monaural/
Stereo
(➜ page 14)
Microphone
sensitivity
(➜ page 14)
Zoom
microphone
(➜ page 15)
The total possible recording time (➜ page
VQT2M17
39) changes according to the combination
8
of the recording mode and Stereo/Monaural.
Switching recording position
This unit is equipped with 3 recording positions: [ZOOM],
[WIDE] and [MANUAL]. The [ZOOM] and [WIDE] content
Setting contents and
display
High-quality :
:
Long recording :
Monaural :
Stereo :
High :
Normal :
Low :
Zoom microphone ON
:
Zoom microphone OFF
: No display
settings are fixed while [MANUAL] content settings can
be changed according to your preference. You can switch
among the positions using Recording position switch.
Recording
position
ZOOM
WIDE
MANUAL
You can change the recording mode (XP,
LP, SLP) in all positions (➜ page 15).
Setting contents (display)
and situations
For lessons, lectures,
etc. (Recording the
aimed person’s voice).
For meetings, etc. (Recording
offering a sense of being in
the actual situation).
For
✽
dictation,
etc.
✽
[MANUAL] position has been set to
be suitable for dictation at the time
of purchase. You can change the
setting according to your preference
(➜ pages 14, 15).
REC/PAUSE
FOLDER/SPEED
STOP
MANUAL WIDE ZOOM
MANUALWIDEZOOM
Recording
position switch
Page 9
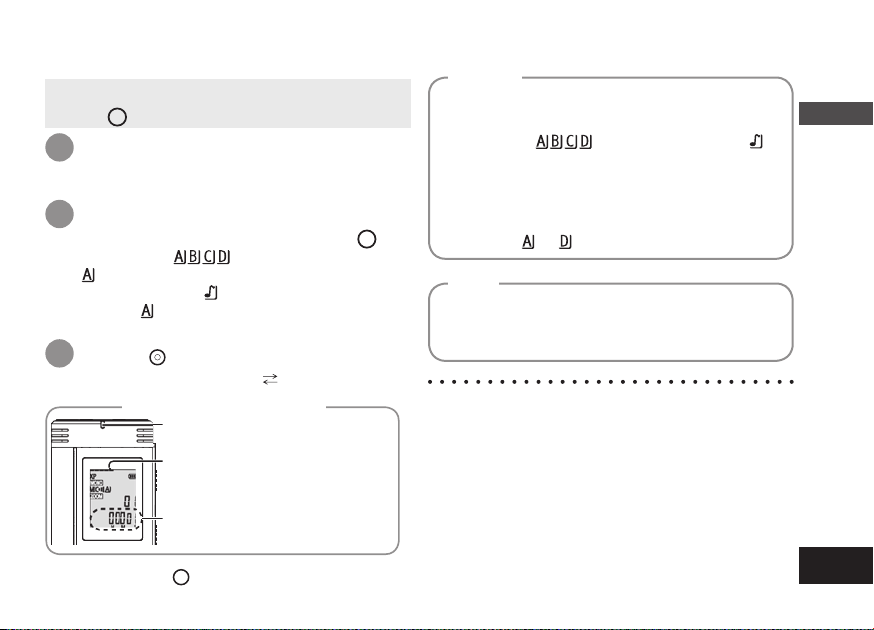
Recording
• Turn the power on (➜ page 6).
STOP
• Press
1
2
3
To stop:
to stop the unit.
Slide recording position switch to
select a position.
Switch modes according to situations (➜ page 8).
Select a folder for recording.
The folder is switched each time you press
Select among “
“ ”).
When you select “ ”, recording is automatically
saved in “ ” (If the folder already contains 99 files,
the next folder with recordable space is used).
REC/PAUSE
Press
Each time you press Pause Recording resumes
(Recording starts).
Display during recording
Light stays on. (Blinks while paused.)
The display changes depending on
recording levels.
In stereo Top side: ch-L/Bottom side:
ch-R
Recording elapsed time
(Blinks while paused.)
Press
” (The factory setting is
STOP
.
FOLDER/SPEED
.
Folder
[Folder] for this unit means locations in which
recording (music) files are stored. There are 4
audio folders “
this unit.
Using each folder according to the purposes of
recording enables you to search files easily later.
A maximum of 99 files can be saved into each
audio folder
” and 1 music folder “ ” in
to .
File
Recorded audio data from the starting point to the
ending point is saved as a file.
The saved data is called a file.
Even if you change the position of Recording
*
position switch during recording, the setting will
not be changed until the recording is complete.
*
Change the recording mode as necessary
(➜ page 15).
*
Do not block the holes of the zoom microphone and
built-in microphone during recording (➜ page 4).
*
Note if your finger or an object touches this unit
during recording, the noise will be recorded
through the microphone.
Basic Operations
VQT2M17
9
Page 10
Playing
FOLDER/SPEED
VQT2M17
10
STOP
STOP
• Press
• Select a folder (➜ right).
• Select a file (➜ right).
1
to stop the unit.
Press q/g (Playback starts).
Adjusting the volume
Turn up the volume: Press +.
Turn down the volume: Press –.
Volume range is 0 to 20.
(The factory setting is 13.)
Operations during playback
Jump (Skip):
Press u, i.
Press u midway while playing a
file and the playback jumps to the
beginning of the file. To return to the
previous file, press u again within 1
second.
Fast backward/Fast forward
(Search):
Press and hold u, i.
Stop:
Press q/g or
STOP
.
Select a folder
The folder is switched each time you
FOLDER/SPEED
press
Select among “
Select the folder that contains the file to
play.
.
”, “ ”, “ ”, “ ”, “ ”.
Select a fi le
Press u, i to select.
Each time you press, the file number
changes.
File number
When a file is selected, the recording
information below is displayed.
Recording date → Recording start time →
Recording time → Total number of files in the
folder
Page 11
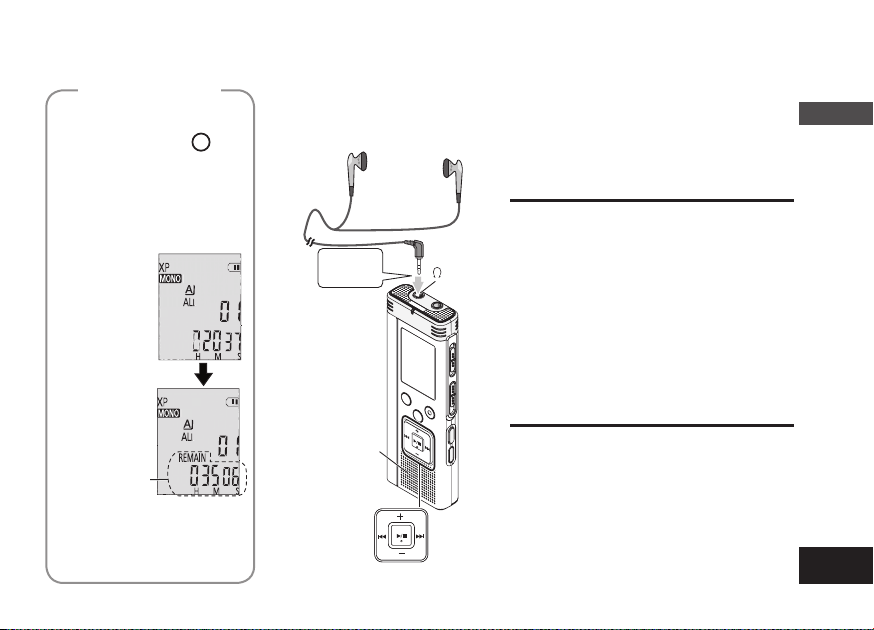
Confi rming the
remaining time
Press and hold
FOLDER/SPEED
for 1 second or longer
during playback.
The remaining time of the file
being played is displayed for
approx. 3 seconds.
Remaining
playback time
The remaining playback time
*
for the last approx. 3 seconds
of file is not displayed.
Listening to the audio using earphones
Connect stereo earphones (not included).
Plug type: ø 3.5 mm (1/8") stereo mini plug
Monitoring the recording
progress
Adjusting the volume:
Insert
securely.
Built-in
speaker
You can adjust the volume by pressing
+, –, but the recording level is not
affected.
Listening to the audio
during playback
The audio during playback comes from
the speaker. Listening may be difficult in
noisy places due to the speaker output.
In that case, connect stereo earphones
(not included).
*
The built-in speaker is turned off when
earphones are connected.
Basic Operations
VQT2M17
11
Page 12
Deleting recorded files
12
VQT2M17
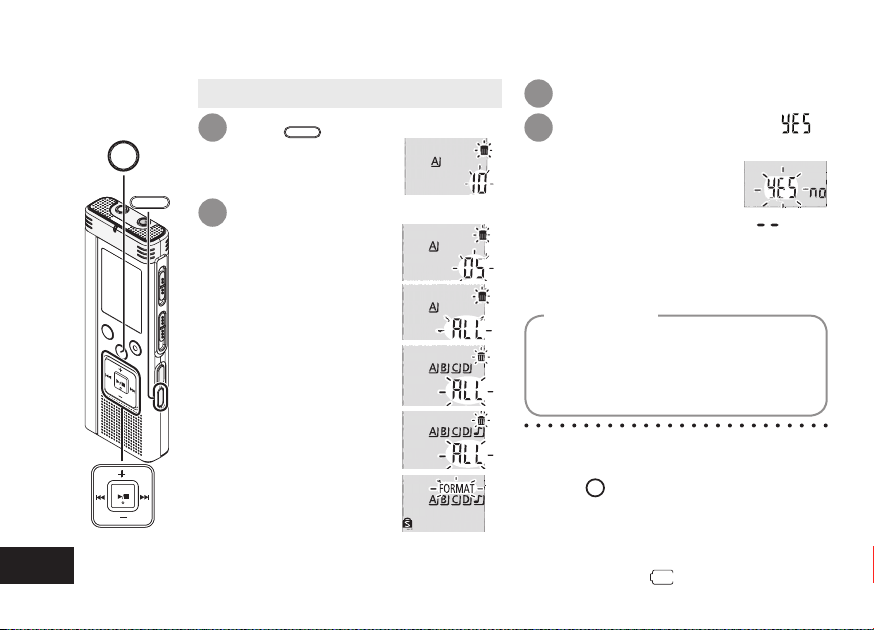
STOP
ERASE
• Select a folder (➜ page 10).
1 4
Press
playing or the unit
is stopped.
Press u, i to select the file.
2
ӱ Deleting one file
Ӳ Deleting all files in
one folder
ӳ Deleting all files in
folder A through D
Ӵ Deleting all files in
all folders
ӵ Formatting this unit
ӱ to Ӵ : Protected files and files which
ERASE
while
cannot be played back on this
unit cannot be deleted.
Press q/g to enter.
3
Press u, i to select “ ”
and press q/g to enter.
When deleting is complete, “ ” is
displayed.
It may take dozens of seconds until
deleting is complete.
Formatting
If the unit is formatted, all existing files
including protected files, music files,
data files transferred from PCs, etc. are
deleted.
* Deleted files cannot be recovered.
* You cannot delete a portion of a file.
* Press
* The file numbers displayed on this unit
* Both deleting and formatting data are
STOP
to stop the operation midway.
are moved forward after deleting files.
not available when the remaining battery
display shows “ ” (blinking).
Page 13
Locking recorded files (File protection)
Locked files cannot be deleted on this unit (except when formatting).
Use this function to protect files.
•
A-B / MENU
STOP
• Select a folder (➜ page 10).
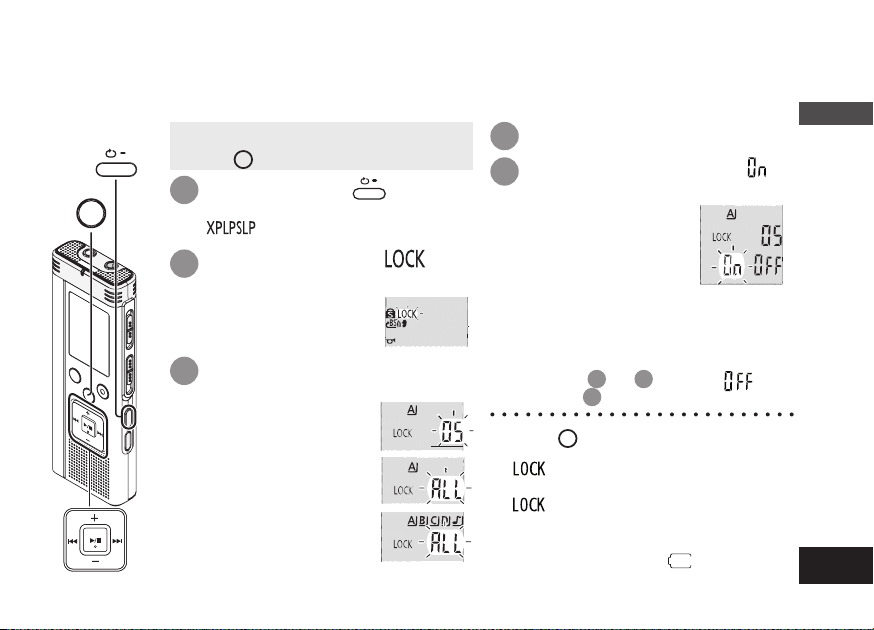
STOP
• Press
1
2
3
to stop the unit.
•
Press and hold
A-B / MENU
for 1
second or longer.
“ ” (blinking) is displayed.
Press +, – to select “ ” and
press q/g to enter.
Press u, i to select the
file.
ӱ Selecting one file
Ӳ Selecting all files in
one folder
ӳ Selecting all files in all
folders
Press q/g to enter.
4
Press u, i to select “ ”
5
and press q/g to enter.
Lock is performed.
It may take dozens of seconds until
locking is complete.
To cancel lock:
Follow step
enter in step
* Press
* “
* “ ” is not displayed when there is no
* You cannot lock files when the remaining
STOP
midway.
” is displayed for the locked files
when the file is selected.
file in the selected folder.
battery display shows “ ” (blinking).
1
to 4, select “
5
.
to stop the setting process
” and
Basic Operations
VQT2M17
13
Page 14
STO
MANUAL WIDE ZOOM
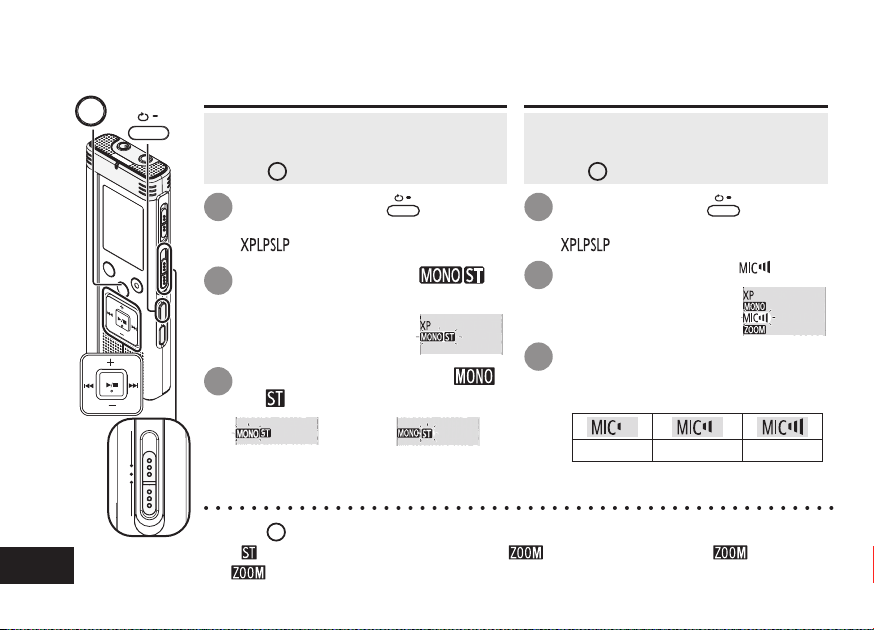
Changing recording settings (Monaural/Stereo, Microphone sensitivity)
P
•
A-B / MENU
Switching Monaural/Stereo
• Set the Recording position switch to
[MANUAL] (➜ page 8).
STOP
• Press
1
2
3
to stop the unit.
•
Press and hold
A-B / MENU
for 1
second or longer.
“ ” (blinking) is displayed.
Press +, – to select “ ”
and press q/g to enter.
Press
u, i
” and press q/g to enter.
or “
to select “ ”
Changing microphone sensitivity
• Set the Recording position switch to
[MANUAL] (➜ page 8).
STOP
• Press
1
2
3
to stop the unit.
•
Press and hold
A-B / MENU
for 1
second or longer.
“ ” (blinking) is displayed.
Press +, – to select “ ” and
press q/g to enter.
Press u, i to select
microphone sensitivity and
press q/g to enter.
VQT2M17
Recording
position switch
14
Monaural
* Press
* If “
STOP
to stop the setting process midway.
” is selected and entered while “ ” is on (➜ page 15), “ ” turns off.
(“ ” disappears.)
Stereo
Low Normal High
Page 15

Changing recording settings (Zoom microphone/Recording mode (XP/LP/SLP))
MANUAL WIDE ZOOM
Changing Zoom microphone setting
When the zoom is set to “ ”, the surrounding sound volume
is lowered, and the sound in front is clearly recorded.
When recording with zoom microphone, the audio becomes monaural.
STOP
•
A-B / MENU
•
Set the Recording position switch to [MANUAL] (➜ page 8).
• Set to “ ” (Monaural) (➜ page 14).
STOP
• Press
1
2
3
to stop the unit.
•
A-B / MENU
Press and hold
“ ” (blinking) is displayed.
Press
+, –
to select “ ” and press q/g
for 1 second or longer.
to enter.
Press u, i to select “ ” o r “ ” and
press q/g to enter.
Zoom ON Zoom OFF
STOP
to stop the setting process midway.
When “ ” is set (➜ page 14), you cannot set the zoom
microphone and “ ” is not displayed on the menu screen.
The zoom function does not work as long as a device is connected to the
external microphone jack even if the zoom is set to ON on this unit.
desk, etc., we recommend putting up the stand (➜ page 4).
Recording
position switch
* Press
*
*
* When you perform zoom recording with the unit placed on a
How to set the
recording mode
(XP/LP/SLP)
STOP
• Press
1
“ ” (blinking) is
2
3
* If noise bothers you when
recording/pla
mode, use XP or LP mode.
to stop the unit.
•
Press and hold
A-B / MENU
for 1 second or longer.
displayed.
Press
q/g
to enter.
Press u, i to
select among “XP”, “LP”
and “SLP” and press
to enter.
q/g
ying in SLP
Advanced Operations
VQT2M17
15
Page 16

Preventing unnecessary recording (VAS)/Confirming possible (remaining) recording time
Recording indicator
FOLDER/SPEED
VQT2M17
•
A-B / MENU
STOP
16
VAS (Voice Activated System) function
Recording stops automatically when silence
continues for about 3 seconds. If the unit
detects sound, the recording resumes.
Start recording to activate this function.
When the VAS function is active and the
recording is paused during recording, “ ”
and the recording indicator blink.
Canceling VAS function:
Select “ ” and enter in step
* T
*
STOP
• Press
1
2
3
important matters.
Press
to stop the unit.
•
A-B / MENU
Press and hold
for 1 second
or longer.
“ ” (blinking) is displayed.
Press +, –
press q/
to select “ ” and
to enter.
g
Press u, i to select “ ” and
press
Then “ ” is displayed.
urn the function off when recording
to enter.
q/g
3
STOP
to stop the setting process midway.
.
Confirming possible
(remaining) recording time
Press and hold
1
FOLDER/SPEED
for 1 second or
longer while
recording or stopped.
Possible recording time is
displayed for approx. 3 seconds.
When there is only a little∗ remaining memory
left while recording, the display is automatically
changed to the remaining recording time
display.
*
When the possible recording time is 1000 hours or
longer, “ ” is displayed. (RR-US591 only)
The “ ” display while
stopped shows approximate
remaining memory.
“ ” lights up in response to
the remaining time.
When there is only a little∗ remaining
memory left, “ ” blinks.
∗ When the remaining recording time falls
below approx. 1 hour.
Possible
recording time
hour minute
second
Page 17

Setting the playback speed control function
Playback speed can be adjusted at 21 different steps (50% to 200%).
1
FOLDER/SPEED
STOP
2
3
*
Press
* When playing with speed other than 100% speed, the bar at the top blinks and
“
SPEED
e.g. When playing back with 75% speed
FOLDER/SPEED
Press
Playback speed adjustment display appears. (screen at right)
The figure of 2 digits represents a speed step.
(
The figure returns to the file number after playback speed adjustment display finishes.)
during playback.
e.g. for 100% speed
Press u, i to select playback speed.
When pressing i, the playback speed becomes faster and “ ”
(blinking) moves to the right.
When pressing u, the playback speed becomes slower and “ ”
(blinking) moves to the left.
50% 100% 200%
adjustable
in 10 steps
(at 5% intervals)
adjustable
in 10 steps
(at 10% intervals)
Press q/g to enter.
STOP
to stop the setting process midway.
” lights up.
Advanced Operations
VQT2M17
17
Page 18

Reducing noise (EQ setting)/Slight return playback
•
A-B / MENU
STOP
Reducing noise (EQ setting)
This function makes it easier to hear sounds during playback.
You cannot make this setting when “ ” is selected.
Press and hold
1
longer
during playback.
EQ setting display appears.
Press
2
u, i
or “
” “ ”and press
•
A-B / MENU
for 1 second or
to select “ ” “ ”
to enter.
q/g
Setting Slight Return Playback
Slight Return Playback function: When u is pressed
during playback, the play point reverses about 5
seconds, and playback resumes from the point.
• Press
STOP
to stop the unit.
•
Press and hold
1
A-B / MENU
or longer.
“ ” (blinking) is displayed.
Press
+, –
2
press q/g to enter.
to select “ ” and
for 1 second
18
VQT2M17
When
“ ”
is selected, high range noise is reduced.
When
“ ”
is selected, both high range noise and
low range noise are reduced.
After setting, “ ” is displayed while playing.
Canceling Noise reduction (EQ setting):
Select “ ” and enter in step 2.
STOP
Press
*
* When EQ is set to On, human voice can be heard more easily. However, components
of other sound ranges are reduced.
* Slight return playback cannot be done during A-B Repeat play (➜ page 19).
to stop the setting process midway.
Press u, i to select “ ”
3
and press q/g to enter.
Then “ ” is displayed.
Canceling Slight return playback:
Select “ ” and enter in step
.
3
Page 19

Repeat play/Successive play, A-B Repeat play
•
A-B / MENU
STOP
Repeat play/Successive play
•
Each time you press
while stopped, the playback
style is switched as follows.
ALL → ALL → No display →
“ALL” display
The selected file until
the last file in the selected folder are
played successively. The unit stops
when the playback finishes.
(The factory setting is “ALL”.)
“ALL ” display
Plays all files in the
folder repeatedly.
No display
When the playback for
one file finishes, the unit stops.
“ ” display
Plays one file repeatedly.
* Select one of the above settings
and, press q/g to star
A-B / MENU
t playback.
A-B Repeat play
Playback repeats between the start point (A)
and finish point (B) if those points are set.
1
The start point (A) is set and
“ ” (blinking) and “ ”
(lighting) are displayed.
2
The display changes to “ ”
(lighting) and repeat play starts.
Canceling A-B Repeat:
Press
press
You cannot set A-B Repeat in the following cases;
*
•
Within approx. 1 second from the beginning of
the file and within approx. 2 seconds from the
end of the file
•
Less than approx. 2 seconds between the start
point (A) and finish point (B)
*
When only the start point (A) is set and playback
continues until the end of the file, the end becomes
the finish point (B) and A-B Repeat begins.
*
During A-B Repeat playback, the Slight Return
Playback (➜ page 18) is not available.
Press
Press
•
A-B / MENU
STOP
.
•
A-B / MENU
while playing.
•
A-B / MENU
at the finish point (B).
or u, i while playing. Or
Advanced Operations
VQT2M17
19
Page 20

Security functions
If you set a password, password authentication is necessary when playing back this unit or connecting to
a computer. When the unit is lost or stolen, the recorded data stored in this unit cannot be played or the
computer does not recognize this unit as long as the password does not match.
20
STOP
VQT2M17
•
A-B / MENU
If you forget the password, you cannot
play files in folder A to D. Please write
it down in MEMO section (➜ right) for
reference.
Setting the password
(4-digit number)
STOP
• Press
1
2
3
to stop the unit.
•
Press and hold
A-B / MENU
for 1
second or longer.
“ ” (blinking) is displayed.
Press +, – to select “ ” and
press q/g to enter.
Press u, i to select “
and press q/g to enter.
Enters the password entry display.
”
Press +, – to select a number
4
and press q/g to enter.
Move to the next digit and select a
number. Repeat this until the 4th digit.
(You can select a digit with u, i.)
The password is determined when
you finish entering the 4th digit.
Then “
MEMO
Password
If the password has been set and you
press q/g to play a file, the password
entry display appears (➜ page 21).
” is displayed.
Canceling the security lock:
„ Select “ ” and enter in step
‟ P
erform step
* Press
*
STOP
midway.
To change the password, cancel the
security lock and set a password again
from step
. (Enter the password.)
4
to stop the setting process
.
1
.
3
Page 21

Authenticating the password
Perform step 4 on page 20.
(Enter the password.)
g When the password matches
* The security lock is temporarily released and
the audio file can be played. (“
temporarily canceling.)
* In the condition
, the security lock is set again.
A
• When you do not operate for more than
approx. 15 minutes and the power turns off
while the unit is stopped (➜ page 6)
• When the unit is off for more than approx. 15
minutes
g When the password is wrong
* The unit beeps and “ ” is displayed,
then the password entry display reappears.
When wrong passwords are entered 5 times in
succession, the unit stops accepting password
entry. In that case, reenter the password in
condition (➜ above).
” blinks while
g When you have forgotten the password
To initialize the password, delete all files.
ӱ Release all locks set on files in folder A through
D (➜ page 13).
Ӳ Delete all files in folder A through D
(➜ page 12).
ӳ Select “
(4-digit number)” and press q/g to enter
(➜ page 20).
* If this unit is connected to a computer when the
secur
not recognize this unit. After connecting the USB
cable, the password entry display appears. Then,
authenticate the password.
* Even if the security lock is not canceled,
recording and playing music are still available.
This security function is only to limit a playback
function for files by password, not by encryption.
Panasonic does not guarantee any kind of loss in
case your password gets discovered.
” in step 3 of “Setting the password
ity lock is not canceled, the computer does
Advanced Operations
VQT2M17
21
Page 22

Recording using an external microphone/Recording from other devices
Recording using an external
microphone
• Change the setting to monaural/stereo on this
unit according to the microphone’s monaural/
stereo (➜ page 14).
Insert
securely.
Plug type:
ø 3.5 mm
(1/8")
stereo mini
plug
ӱ Record the audio (➜ page 9).
* If the recording level is too low or high, adjust the
microphone sensitivity (➜ page 14).
VQT2M17
* Read the operating instructions for the connected device.
22
*
The microphone function of this unit does not work if another device is connected to the external microphone jack.
MIC
External
microphone
(not included)
Recording from other devices
• Set monaural/stereo to stereo (➜ page 14).
Head phone
jack
(Stereo
device)
(Monaural
device)
ӱ On the source, play audio you want to copy.
Ӳ On this unit, record the audio (➜ page 9).
*
Use the connection cable that matches monaural/stereo of the connected device.
Wrong connection may cause recording trouble (i.e. Only 1 channel is recorded.).
*
The recorded sound may differ from the original recording sound.
*
Adjust the recording volume on the source to the desired level.
Audio Cable with resistor (not included)
Stereo
mini plug
Monaural
mini plug
Insert
Playing
securely.
Plug type:
ø 3.5 mm (1/8")
stereo mini plug
Stereo
mini plug
Stereo
mini plug
MIC
Page 23

Recording to other devices
Insert
securely.
Plug type:
ø 3.5 mm (1/8")
stereo mini plug
Mini microphone
jack
(Stereo
device)
(Monaural
device)
Monaural
mini plug
Stereo
mini plug
Stereo
mini plug
Stereo
mini plug
Audio Cable with resistor (not included)
Recording
•
Cancel the operation beep while copying (➜ right).
ӱ
On this unit, play the file you want to copy (➜ page 10).
Ӳ Record using recording equipment.
* Read the operating instructions for the
connected device.
*
Use the connection cable that matches monaural/stereo
of the connected device. Wrong connection may cause
recording trouble (i.e. Only 1 channel is recorded.).
* The recorded sound quality may differ from the
sound quality of this unit.
* Adjust the recording volume on this unit to the
desired level.
Canceling the operation beep
STOP
•
A-B / MENU
STOP
* Press
• Press
1
2
3
Setting the operation beep ON:
Select “ ” and enter in step
STOP
to stop the setting process midway.
to stop the unit.
•
A-B / MENU
Press and hold
for 1
second or longer.
“ ” (blinking) is displayed.
Press +, – to select “
and press q/g to enter.
Press u, i to select
” and press q/g to
“
enter.
3
”
Advanced Operations
.
VQT2M17
23
Page 24

Connecting this unit to a computer
You can copy files recorded on this unit to the
computer.
• Star t the computer beforehand.
• Press
STOP
to stop the unit.
1. Insert the USB cable into this unit.
2. Insert the USB cable into the computer.
This unit
•
Do not use any other USB connection cables except the supplied one.
“ ” is displayed on the unit’s screen when the computer recognizes this unit.
Use the supplied USB cable.
Do not use the supplied cable with other devices.
Caution: Use only the included USB cable with a
ferrite core when connecting to computer.
When the computer does not recognize this unit
” is displayed, enter the password (➜ page 21).
If “
VQT2M17
If “ ” is displayed, disconnect this unit from the computer
24
once, replace the batteries and reconnect the unit to the computer.
Insert the USB
cable straight in
the same direction
as that of the
terminal.
USB cable (included)
Computer
*
Even if you connect this unit to the computer without the battery
or with a depleted battery, the computer cannot recognize this unit
(➜ page 33).
g
System requirements (OS)
Windows 2000 (SP4), Windows XP and SP2, SP3,
Windows Vista and SP1, Windows 7 (As of December 2009)
*
Please see page 31 for details of system requirements.
g Removing the USB cable
Double-click the icon (Windows 2000/Windows XP: [ ], Windows
Vista/Windows 7: [ ]) on the task tray at the bottom of the
computer screen and follow the on-screen instructions to remove the
USB cable. (The icon may not be displayed depending on the OS
settings.)
After the cable is removed, this unit turns off.
g USB mass storage function
This unit functions as a USB memory and is recognized as a
computer’s external storage device.
Data files in the computer can be transferred and saved in this unit.
*
When the unit is connected to the computer, the computer may
not start (restart). It is recommended that the USB cable is
removed from this unit when starting (restarting) the computer.
* When the unit is connected to the computer, if you start (restart) the
computer or the computer enters standby mode, the computer may not
recognize the unit. Disconnect the unit and reconnect to the computer
or reconnect the unit after the computer is restarted.
* Operation is not guaranteed when 2 or more USB devices are
connected to 1 computer, or a USB hub or extension cable are used.
*
Please see the Operating Instructions for the computer.
Page 25

Opening the folder of this unit using a computer
The illustrations show Windows XP (OS). The
display may differ depending on the OS.
• Connect this unit to a Computer beforehand
(➜ page 24).
1. Click [start] → [My Computer].
This unit is displayed as a removable disk.
ユーザー名
2. Right-click to open the removable disk
(this unit).
The folders (A to D, MUSIC) in this unit appear.
(They are displayed as
screen.)
on this unit’s
3. Right-click to open the folder.
Recorded files in this unit appear.
A removable disk is an external storage device (SD
memory card, USB memory etc.) connected to the
computer.
The components of the computer and the external
storage device illustrated here is an example.
The display may differ depending on the computer
you are using.
“H” indicated in Removable Disk (H:) is not a fixed
character.
Using with a computer
VQT2M17
25
Page 26

Importing the recorded files in this unit to a computer/Organizing files
• Open the removable disk (this unit) displayed on
the computer screen and open the audio folder
(A to D) beforehand (➜ page 25).
Importing recorded files to a computer
1. Select the recorded file in this unit,
right-click and select [Copy].
Select a folder in the computer, right-click and
2.
select [Paste] to import to the computer.
Folder in this unit Folder in the computer
Playing recorded files on the computer:
Select the recorded file in this unit, right-click and
select [Play].
Delete unnecessary files using the
computer:
VQT2M17
Select the recorded file in this unit, right-click,
26
select [Delete] and [Yes] to enter.
Do not change the folder names
If you change the names of folders (A, B, C,
D, MUSIC) of this unit, new A, B, C, D and
MUSIC folders are generated when this unit is
disconnected from the computer. The files in the
folders with changed names cannot be played on
this unit.
* Using [drag and drop], you can import the files to
the computer as well.
* If the file is deleted, file numbers displayed on
this unit are moved forward.
* “ ” (blinking) is displayed during the data
transmission. Never remove the USB cable
while “ ” is blinking. File data or this unit may be
destroyed, or all the data in this unit may be lost.
* When this unit is removed from the computer
or the power is turned on afterwards, “
displayed for a moment while updating the file
data.
*
Do not format this unit using a computer.
” is
Page 27

Returning the files imported to the computer to this unit
• Open the audio folder (A to D) of this unit
beforehand (➜ page 25).
Returning recorded files to this
unit from the computer
1.
Select the recorded file imported to the computer
(➜ page 26), right-click and select [Copy].
2.
Select the original folder in this unit, right-click
and select [Paste] to return the recorded file.
Reload the files to the original folder that the files
were imported from. When you reload the files to other
folders, those files cannot be played on this unit.
(Confirm the first character (A to D) of the file name
matches the folder name (A to D).)
Do not change the file names
If you change file names, those files cannot be
played on this unit. Return the file name to the
original one or move the file to the MUSIC folder.
* MP3 music files which were not recorded on
this unit can be played only in MUSIC folder.
If the file is returned to folder A to D, it cannot
be played on this unit. (The file number is not
displayed on the screen of this unit.)
* Up to 99 files in folder A to D respectively can
be
played on this unit. Files over 99 cannot be
played on this unit.
* If you create folders in folder A to D, and put
recorded
cannot be played on this unit.
* The files that are returned to this unit are played
back in the order the files are received. For
example, even if the file is recorded first, the
playback order becomes 5th if the file is the 5th
file reloaded from the computer.
The file name consists of [Folder name (1 byte,
1 character (A to D)) + File number (1 byte, 3
characters + Recording date (1 byte, 4 numbers)].
e.g.
files in the new folder, those files
File naming rules
(for recorded files on this unit)
if the file is recorded as the first file in folder A on
July 20, the name is “A0010720.mp3”. The second
file on the same day is named as “A0020720.mp3”.
Using with a computer
VQT2M17
27
Page 28

Listening to music on this unit (Transferring MP3 music files to this unit)
You can enjoy music by transferring MP3 music files stored in the computer to this unit.
Transferring MP3 music files to
this unit from the computer
• Open MUSIC folder
(➜ page 25).
1. Select an MP3 music file or folder which
has MP3 music files in the computer,
right-click and select [Copy].
2. Select MUSIC folder of this unit, right-click
and select [Paste] to transfer to this unit.
*
The files in the folder that was created into the MUSIC folder
are playable. However, note that playable folders are the
ones on the 1st hierarchy and 2nd hierarchy only. Folders on
the 3rd hierarchy and after are not playable.
*
The audio files and folders that are loaded to this unit are played
back in the order the files and folders are received. But in case of
the structure at right, files in M2 are played after all files in M1 are
played since the loaded order of 1st hierarchy takes priority. Even
if M1-2 is loaded after M2-1, the files in M1-2 are played first.
* Files just under the folder are played first; e.g., even if
A.mp3 was loaded last, A.mp3 is played first.
VQT2M17
*
In the case of the structure shown at right, the order
of successive playback on this unit is
28
A.mp3 → B.mp3 → C.mp3 → D.mp3 → E.mp3 → F.mp3 → G.mp3.
( )
of this unit beforehand
Folder/file structure in MUSIC folder (example)
This is an example when M1 was loaded before M2 for M1
and M2, M1-1 was loaded before M1-2 for M1-1 and M1-2,
C.mp3 was loaded before D.mp3 for C.mp3 and D.mp3.
MUSIC
A
M1
A
M2
A
F.mp3
A.mp3
(M1, etc. represent a folder and A.mp3, etc. represent a file.)
* “ ” (blinking) is displayed during data transmission.
Never remove the USB cable while “ ” is blinking.
File data or this unit may be destroyed.
When two or more files are
loaded at a time, those are
loaded in an order decided
by the computer.
M1-1
A
C.mp3
D.mp3
M1-2
A
B.mp3
M2-1
A
E.mp3
G.mp3
This is not playable
because this is on the 3rd
hierarchy.
M2-1A
H.mp3
Page 29

Listening to music on this unit (Playing MP3 music files on this unit)
* See pages 10 and 11 for playback
operations.
* In “
” folder, you can play a maximum
of 999 files. Files over 999 cannot be
played on this unit.
* The file name or folder name cannot
be displayed. Successive numbers,
starting from “
displayed according to the order of
playback.
* Files other than files with MP3 format,
such as WMA, AAC format files cannot
be played. (The number is not displayed
on screen.)
* Copyright-protected MP3 music files
cannot be played.
* MP3 music files with variable bit rate
may be played, but the playback
elapsed time display may differ from the
actual time.
* When the length of one music file is
1000 hours or longer, time after
“ ” is displayed as “ ”,
“ ” ... (RR-US591 only)
” (file number) are
VQT2M17
29
FOLDER/SPEED
STOP
• Remove the USB cable (➜ page 24).
• Turn the power on (➜ page 6).
STOP
• Press
1
Press
to stop the unit.
FOLDER/SPEED
to select “ ”
(MUSIC folder).
Press u, i to select the
2
file you want to listen to.
File number
After selection, the length of the music
and the total number of files in MUSIC
folder are displayed.
Press q/g (Playback starts).
3
Stop:
Press q/g or
STOP
.
Using with a computer
Page 30

Creating MP3 music files
This unit is not equipped with the function or computer software to create MP3 file from music CD. You
can create MP3 music files using separately sold computer software, etc.
Windows XP or Windows Vista users can create MP3 music files using Windows Media Player 11 (using
Windows Media Player 12 for Windows 7 users).
Following is the example of operating instructions when using Windows XP and Windows Media Player
11. See [Help] section of Windows Media Player for more details. (The display and operations may differ
depending on the OS.)
• Star t the computer beforehand.
1. Select [start] - [All Programs] and start
[Windows Media Player] on the computer.
2. Select [Rip] → [Format] → [mp3].
3. Select [Rip] → [Bit Rate] and select among
[128 Kbps (Smallest Size)] , [192 Kbps],
[256 Kbps] and [320 Kbps (Best Quality)].
If you select low Bit Rate for ripping, more songs
will be ripped.
4. Select [Rip] → [Rip CD Automatically
When Inserted] and select [Never].
5. Set music CD into the computer.
6. In “
If there are songs you do not want to rip, remove
VQT2M17
7. Click [Start Rip] to begin ripping.
” for the album, add the check mark
as “
”.
the check mark “ ”.
30
Music files ripped (encoded) into the
computer using Windows Media Player
are saved in [My Music] folder of
[My Document] if the destination to save
has not been changed.
* Windows Media Player 9 and older versions
cannot create MP3 music file.
* Please see the homepage of the Microsoft
company for details of download/update of
Windows Media Player etc.
http://www.microsoft.com/windows/
windowsmedia/player/11/default.aspx
* If you cannot create MP3 music files successfully
or do not know how to operate the computer,
please consult the computer manufacturer.
• See page 28 for transferring MP3 music files to
this unit and page 29 for playback.
Page 31

System requirements
Computer IBM PC/AT compatible machines
• Windows
OS
Interface
Even if the system requirements mentioned in this document are fulfilled, some personal computers cannot be used.
✽
Operation is guaranteed only on compliant OSes.
✽
Operation is not guaranteed on an upgraded OS.
✽
Operation is not guaranteed on home-made computers.
✽
When using Windows Media® Player, your computer must fulfill the system requirements of Windows
✽
Media® Player. Please consult Microsoft Corporation for details of Windows Media® Player.
Microsoft, Windows, Windows Media and Windows Vista are registered trademarks or trademarks of
✽
Microsoft Corporation of the U.S. and other countries.
MPEG Layer-3 audio coding technology licensed from Fraunhofer IIS and Thomson.
✽
IBM and PC/AT are registered trademarks of International Business Machines Corporation of the U.S.
✽
Other system names and product names appearing in this document are in general the registered trademarks or
✽
trademarks of the respective developer companies. Note that the ™ mark and ® mark do not appear in this document.
Depending on the computer environment, malfunctions may occur (e.g. Audio data recorded on this unit cannot be
✽
used. etc.). Panasonic and Panasonic dealers cannot be held liable for any lost audio data or other direct or indirect
damage except in cases of intentional of gross negligence.
This model is not compatible with TRC/ADPCM format IC recorders made by Panasonic. Also, files recorded on this unit
✽
cannot be played on those IC recorders and/or cannot be read using Voice Editing software supplied with those IC recorders.
You can transfer contents recorded on this unit to your PC without using the dedicated software. The
✽
computer software (Voice Editing) is not supplied with this unit.
• Windows® XP Home Edition/Professional and SP2, SP3
• Windows Vista® Home Basic/Home Premium/Business/Ultimate and SP1
• Windows® 7 Starter/Home Premium/Professional/Ultimate
Pre-installed version
USB port
(Operation cannot be guaranteed if you use a USB hub or extension cable.)
®
2000 Professional SP4
Using with a computer/Other
VQT2M17
31
Page 32

Q & A (Frequently Asked Questions)
Question Answer
Can I play files recorded on other
Panasonic IC recorders?
Can I use audio editing software
(Voice Editing) included in other
Panasonic IC Recorder?
Is the security lock set on all
folders if a password is set?
What kind of files can be played? •
What kind of computers can be
connected with this unit?
Can I do timer recording? • No, you cannot.
Can I divide a file or delete a
portion of a file?
VQT2M17
32
• You can play files recorded on IC recorders using MP3 format
by transferring them to MUSIC folder (➜ page 27). But cannot
play files with other formats (i.e. ADPCM and TRC formats)
because the recording format is different.
• The Voice Editing cannot be used for this product because
the recording format differs from the format used for other
Panasonic IC recorders. The recording format used for this
product is MP3 format. This product is not compatible with the
voice editing software (Voice Editing) supplied with Panasonic
IC recorders using ADPCM and TRC format.
• When you play back on this unit, the security lock is set on
folders A through D only, but not on MUSIC folder. However,
password authentication is necessary when you use this unit
connected to a PC with the security lock set (➜ page 21).
Only MP3 file can be played. WMA, AAC and other files cannot be
played.
• Windows 2000 (SP4), Windows XP, Windows Vista, Windows 7
only. Please refer to “System requirements” (➜ page 31).
• No, you cannot.
Page 33

Troubleshooting guide
Before requesting service, make the following checks. If you are in doubt about some of the check points, or if the remedies
indicated in the chart do not solve the problem, refer to “Customer Services Directory (United States and Puerto Rico)” on
page 43 if you reside in the U.S.A. or Puerto Rico, or refer to “Product information” on page 38 if you reside in Canada.
Symptom Checkpoints
Battery
Cannot use a battery that can be still
used on other equipment.
Operations
No operation.
Cannot operate when “
Display
“ ”, “ ” blinks.
” appears.
“
“ ” appears. • If the batteries are extremely exhausted, “ ” is displayed even if the unit is connected to the
“ ” is not displayed on menu screen.• “ ” has been set. When set to “ ”, “ ” is displayed on menu screen (➜ page 15).
” appears.
“
Normal display appears during setting
operation
“
” appears.
” appears.
•
This unit considers the battery as empty even if there is actually power left in it. This is to
preserve the clock setting.
•
Make sure the batteries are correctly inserted.
•
You cannot operate on this unit when the unit is connected to a computer.
•
The Hold function is on. Switch Hold off (➜ page 6).
•
Please set the time (➜ page 7).
•
There are 99 files in folder A, B, C, D.
•
There is no remaining memory (➜ page 39). Delete unnecessary recording files, files and
data other than MP3 files (➜ pages 12, 26).
computer and the computer does not recognize this unit. Disconnect this unit from the computer once,
replace the batteries (If batteries are not inserted, insert batteries.) (➜ page 5) and reconnect it.
•
This appears when updating data in this unit (e.g. after disconnecting this unit from the
computer, when turning the power on, etc.).
•
When you do not operate for 60 seconds during setting operation, the setting in process is
canceled and normal display appears.
•
Formatting was performed on a computer, etc., or the file system is damaged. Perform
formatting on this unit (All data is erased after formatting is complete.) (➜ page 12).
33
Other
VQT2M17
Page 34

Troubleshooting guide
Symptom Checkpoints
Display
“
“
Record
The memory is used completely
earlier than expected.
(“
expected.)
Recording stops halfway.
Howling occurs when listening
to the recording in progress with
earphones.
Recording ended halfway.
“
recording date.
“
Playing
Cannot play the recorded file though
VQT2M17
it was recorded on this unit.
Playback speed is too fast or slow.
34
” appears.
” appears.
” is displayed earlier than
” appears instead of the
” is not displayed.
•
The operation program is damaged. Consult your dealer.
•
You tried to play an MP3 file that cannot be played on this unit, or the MP3 file is damaged. Delete
the MP3 file that cannot be played. If the problem persists, the file system is damaged. Perform
formatting on this unit (All data is erased after formatting is complete.) (➜ page 12).
•
Available recording time differs approx. 16 times, comparing Stereo/XP mode with Monaural/SLP
mode (➜ page 39).
You can record longer if recording in Monaural/SLP mode (➜ pages 14, 15).
•
If you lower the Bit Rate for ripping music CDs, more songs will be saved (➜ page 30).
•
Is much data other than MP3 stored? Delete unnecessary data (➜ page 26).
•
VAS is functioning (➜ page 16).
•
Turn down the volume (➜ page 10).
•
Keep earphones and this unit separate.
•
When you are using an external microphone, keep earphones and external microphone separate.
•
The data may not be updated if the unit receives a shock (e.g. it is dropped), or the batteries
come off during recording.
•
Set the time (➜ page 7).
•
You are using the external microphone (➜ page 15).
•
The file name was changed. Only files named according to the file naming rules (➜ page 27) can
be played in folder A through D.
•
You changed the playback speed (➜ page 17).
Page 35

Symptom Checkpoints
Playing
The order of playing changed after
reloading files that were once imported
to the computer to this unit.
There is no sound from the earphones
or it is difficult to hear or noisy.
The sound is distorted. There is a
noise at the beginning of sound.
No sound from the speaker. • There is no sound when you have connected earphones.
I hear noises. •
Recorded sounds contain noise that
makes it difficult to hear sounds.
Others
The power cannot be turned on.• The batteries may have run out. Replace the batteries with the new ones (➜ page 5).
The power automatically
turns off.
Cannot delete a file or folder. • The file is protected (➜ page 13).
This unit is not recognized by
a computer.
• This occurs because files imported from the computer are placed at
the end in the folder.
• Ensure the plug is inser ted firmly.
• Wipe the plug clean.
• Please lower the microphone sensitivity (➜ page 14) or keep more
distance from the recording sound source.
Move a mobile telephone away from this unit when you use the two in the same area.
• Reduce noise (➜ page 18). Noise is reduced and listening may
become easier.
• When you do not operate for more than approx. 15 minutes, the
power automatically turns off. When you slide the OPERATION/
HOLD switch to “
• The folder is already empty.
• “
” (blinking) is displayed (➜ page12).
•
The OS on the computer may not be compliant with this unit (➜ page 31).
• The password has been set (➜ page 21).
• Are the batteries in this unit? If they are not, insert batteries.
• When the voltage of the batteries are too low, “
and the computer cannot recognize this unit (➜ page 33).
OPR
” side, the power is turned on (➜ page 6).
” is displayed
Other
VQT2M17
35
Page 36

Care and use
To reduce risk of radio interference caused by headphone-, earphone- or microphone cables, only use
adequate accessories with a cable length of less than 3 m (9.8 ft.).
g Unit
• Avoid using or placing this unit near sources of heat.
• To avoid product damage, do not expose this product to rain, water or other liquids.
• The unit’s speaker does not have magnetic shielding. Do not place the unit near televisions, personal
computers, magnetized cards (bank cards, commuter passes) or other devices easily influenced by a magnet.
g Batteries
• Do not peel off the covering on batteries and do not use the batteries if the covering has been peeled off.
• Align the poles ( and ) correctly when inserting the batteries.
• Do not mix different types of batteries or old and new batteries.
• Remove the batteries if you do not intend to use the unit for a long time.
• Do not heat or expose to flame.
• Do not leave the batteries in an automobile exposed to direct sunlight for a long period of time with
doors and windows closed.
• Do not attempt to recharge dry cell batteries.
• Battery mishandling can cause electrolyte leakage which can damage items the fluid contacts and may
cause a fire. If electrolyte leaks from the batteries, consult your dealer. Wash thoroughly with water if
electrolyte comes in contact with any part of your body.
• Keep the AAA, LR03 batteries out of reach of children to prevent swallowing. Accidental swallowing of
batteries can result in stomach and intestinal damage.
When carrying batteries in a pocket or bag, ensure no metal objects such as necklaces are placed
•
together with them. Contact with metal may cause short-circuiting which can cause a fire. For safety,
carry the batteries in the battery carrying case.
g Allergies
VQT2M17
• Discontinue use if you experience discomfort with the earphones or any other parts that directly
contact your skin.
36
• Continued use may cause rashes or other allergic reactions.
Page 37

g Listening caution
Do not play your headphones or earphones at a high volume. Hearing
experts advise against continuous extended play.
You should use extreme caution or temporarily discontinue use in potentially hazardous situations.
Even if your headphones or earphones are the open-air type designed to let you hear outside sounds,
don’t turn up the volume so high that you can’t hear what’s around you.
Sound can be deceiving. Over time your hearing “comfort level” adapts to higher volumes of sound. So
what sounds “normal” can actually be loud and harmful to your hearing.
Guard against this by setting your equipment at a safe level BEFORE your hearing adapts.
To establish a safe level:
• Start your volume control at a low setting.
• Slowly increase the sound until you can hear it comfortably and clearly, and without distortion.
Once you have established a comfortable sound level:
• Leave it there.
Maintenance
Clean this unit with a dry and soft cloth.
• If the unit becomes too dirty, wring a cloth moistened
in water, wipe the dirt with it and clean with a dry
cloth.
• Do not use solvents including benzine, thinner,
alcohol, kitchen detergent, a chemical wiper, etc.
This might cause the exterior case to be deformed or
the coating to come off.
If you experience a ringing in your ears, reduce volume or discontinue use.
Do not use while operating a motorized vehicle. It may create a traffic
hazard and is illegal in many areas.
-If you see this symbol-
Information on Disposal in other Countries
outside the European Union
This symbol is only valid in the
European Union.
If you wish to discard this product,
please contact your local
authorities or dealer and ask for
the correct method of disposal.
Other
VQT2M17
37
Page 38

Product Service
1. Damage requiring service – The unit should be serviced by qualified service personnel if:
(a) Objects or liquids have gotten into the unit; or
(b) The unit has been exposed to rain; or
(c) The unit does not operate normally or exhibits a marked change in performance; or
(d) The unit has been dropped or the cabinet damaged.
2. Servicing – Do not attempt to service the unit beyond that described in these operating instructions.
Refer all other servicing to authorized servicing personnel.
3. Replacement parts – When parts need replacing ensure the servicer uses parts specified by the
manufacturer or parts that have the same characteristics as the original parts. Unauthorized substitutes
may result in fire, electric shock, or other hazards.
4. Safety check – After repairs or service, ask the servicer to perform safety checks to confirm that the
unit is in proper working condition.
Product information
For product information or assistance with product operation:
In the U.S.A. and Puerto Rico, refer to “Customer Services Directory (United States and Puerto Rico)” on
page 43.
In Canada, contact the Panasonic Canada Inc. Customer Care Centre at 1-800-561-5505, or visit the
website (www.panasonic.ca), or an authorized Servicentre closest to you.
VQT2M17
38
Page 39

Specifications
Power
Batteries DC 3.0 V (2 AAA LR03 batteries)
Audio
Sampling Frequency
(Stereo/Monaural)
Recording Format MP3
Playable Bit Rate (MUSIC
folder)
Playable Sampling
Frequency (MUSIC folder)
Frequency Response
(-10 dB, Rec-Play,
Monaural)
Built-in Microphone S/N Ratio
USB USB2.0 (Hi-Speed)
Audio
Earphone ø 3.5 mm (1/8"), 16 Ω, Max. 3 mW
Output
Speaker output ø 20 mm (25/32"), 8 Ω, Max. 330 mW
Audio
External
Input
Microphone
Built-in Memory
Operating Temperature
Operating Humidity
1 GB means one billion bytes. Usable capacity will be less.
∗
XP: 44.1 kHz/44.1 kHz
LP: 22.05 kHz/16 kHz
SLP: 8 kHz/8 kHz
8 kbps to 320 kbps
8 kHz to 48 kHz
XP: 180 Hz to 15,100 Hz
LP: 180 Hz to 6,700 Hz
SLP: 180 Hz to 2,900 Hz
40.5 dB (XP) Filter (JIS A)
DC 5 V / 150 mA
ø 3.5 mm (
1/8"
);
0.80 mV plug in power
RR-US591
1
∗
4 GB
RR-US571
2 GB
1
∗
RR-US551
1 GB
0°C to 40°C (32°F to 104°F)
20% to 80% (non-condensing)
Battery life (may be less depending on the operating conditions.)
Battery
(AAA LR03)
Recording
mode
Rec
3
∗
XP approx. 23 h. approx. 35 h.
Stereo
LP approx. 29 h. approx. 35 h.
Alkaline
battery
2
∗
Monaural
SLP approx. 32 h. approx. 35 h.
XP approx. 32 h. approx. 35 h.
LP approx. 42 h. approx. 35 h.
SLP approx. 45 h. approx. 35 h.
2 Using Panasonic Alkaline batteries.
∗
3 When zoom microphone is off.
∗
4 When audio is output from speaker (Volume: 13,
∗
EQ: off, Playback speed control : 100%).
Standard recordable time
Recording mode RR-US591 RR-US571 RR-US551
XP 68 h. 30 min. 34 h. 00 min. 16 h. 30 min. 128 kbps
Stereo
LP 137 h. 00 min. 68 h. 00 min. 33 h. 10 min. 64 kbps
SLP 548 h. 20 min. 272 h. 10 min. 133 h. 10 min. 16 kbps
XP 137 h. 00 min. 68 h. 00 min. 33 h. 10 min. 64 kbps
Monaural
LP 274 h. 10 min. 136 h. 00 min. 66 h 30 min. 32 kbps
SLP 1096 h. 50 min. 544 h. 20 min. 266 h. 30 min. 8 kbps
Max. Dimensions (W × H × D)
40.4 mm × 110.6 mm × 16.8 mm (1-19/32" × 4-11/32" × 21/32")
Cabinet dimensions (W × H × D)
1
∗
39.0 mm × 110.6 mm × 15.1 mm (1-17/32" × 4-11/32" × 19/32")
Mass (Weight)
Approx. 65 g (2.30 oz.) with battery
Approx. 43 g (1.52 oz.) without battery
*
Specifications are subject to change without notice.
Play
4
∗
Bit rate
Other
VQT2M17
39
Page 40

Limited Warranty (ONLY FOR CANADA)
5770 Ambler Drive, Mississauga, Ontario L4W 2T3
PANASONIC PRODUCT – LIMITED WARRANTY
Panasonic Canada Inc. warrants this product to be free from defects in material and workmanship and agrees to
replace the product for a period as stated below from the date of original purchase.
Panasonic Portable / Clock Radio (without Tape, CD, MD) One (1) year
Panasonic Audio Product One (1) year
Panasonic DVD Product One (1) year
Accessories including rechargeable batteries Ninety (90) days
LIMITATIONS AND EXCLUSIONS
This warranty does not apply to products purchased outside Canada or to any product which has been improperly
installed, subjected to usage for which the product was not designed, misused or abused, damaged during shipping,
or which has been altered or repaired in any way that affects the reliability or detracts from the performance, nor
does it cover any product which is used commercially. Dry cell batteries are also excluded from coverage under this
warranty.
This warranty is extended to the original end user purchaser only. A purchase receipt or other proof of date of
original purchase is required before warranty service is performed.
THIS EXPRESS, LIMITED WARRANTY IS IN LIEU OF ALL OTHER WARRANTIES, EXPRESS OR IMPLIED,
INCLUDING ANY IMPLIED WARRANTIES OF MERCHANTABILITY AND FITNESS FOR A PARTICULAR
VQT2M17
PURPOSE.
IN NO EVENT WILL PANASONIC CANADA INC. BE LIABLE FOR ANY SPECIAL, INDIRECT OR
40
CONSEQUENTIAL DAMAGES.
Panasonic Canada Inc.
EXCHANGE PROGRAM
Page 41

In certain instances, some jurisdictions do not allow the exclusion or limitation of incidental or consequential
damages, or the exclusion of implied warranties, so the above limitations and exclusions may not be applicable.
CONTACT INFORMATION
For product information and operation assistance, please contact:
Our Customer Care Centre: Telephone #: (905) 624-5505
1-800 #: 1-800-561-5505
Fax #: (905) 238-2360
Email link: “customer support” on www.panasonic.ca
For defective product exchange within the warranty period, please contact the original dealer or our Customer Care
Centre.
Other
The serial number of this product can be found
on either the back or the bottom of the unit.
Please note it in the space provided below and
keep for future reference.
MODEL NUMBER
SERIAL NUMBER
User memo:
DATE OF PURCHASE
DEALER NAME
DEALER ADDRESS
TELEPHONE NUMBER
Product Identification Marking is located on
the bottom of unit.
VQT2M17
41
Page 42

Limited Warranty (ONLY FOR U.S.A. AND PUERTO RICO)
Panasonic Consumer Electronics Company,
Division of Panasonic Corporation of North America
One Panasonic Way, Secaucus, New Jersey 07094
Limited Warranty Coverage (For USA and Puerto Rico
Only)
If your product does not work properly because of a defect in
materials or workmanship, Panasonic Consumer Electronics
Company (referred to as “the warrantor”) will, for the length of the
period indicated on the chart below, which starts with the date of
original purchase (“warranty period”), at its option either (a) repair
your product with new or refurbished parts, (b) replace it with a new
or a refurbished equivalent value product, or (c) refund your
purchase price. The decision to repair, replace or refund will be made
by the warrantor.
All Portable Audio Products except items listed
below
Multimedia & Compact Audio System 1 Year
Rechargeable batteries (in exchange for
defective item)
SD Memory Card (in exchange for
defective item)
During the “Labor” warranty period there will be no charge for labor.
During the “Parts” warranty period, there will be no charge for parts.
This Limited Warranty excludes both parts and labor for
non-rechargeable batteries, antennas, and cosmetic parts (cabinet).
This warranty only applies to products purchased and serviced in the
United States or Puerto Rico. This warranty is extended only to the
original purchaser of a new product which was not sold “as is”.
VQT2M17
42
Panasonic Portable Audio Products Limited Warranty
Mail-In Service
For assistance in the U.S.A. and Puerto Rico in obtaining repairs,
please ship the product prepaid to:
Panasonic Exchange Center
4900 George McVay Drive Suite B
Product or Part Name Parts Labor
1 Year 1 Year
1 Year
10 Days
90 Days
Not
Applicable
Not
Applicable
McAllen, TX 78503
When shipping the unit, carefully pack, include all accessories, and
send it prepaid, adequately insured and preferably in the original
carton. If Lithium Ion batteries are shipped by air the package
must be labeled “Contains Lithium Ion Battery (No lithium metal)”.
Damaged batteries are prohibited from shipment by US Mail.
Batteries must be securely packed in a manner to prevent
short-circuiting and a package cannot contain more than 3 Lithium
Ion batteries. Include a letter detailing the complaint, a return
address and provide a daytime phone number where you can be
reached. A valid registered receipt is required under the Limited
Warranty.
IF REPAIR IS NEEDED DURING THE WARRANTY PERIOD, THE
PURCHASER WILL BE REQUIRED TO FURNISH A SALES
RECEIPT/PROOF OF PURCHASE INDICATING DATE OF
PURCHASE, AMOUNT PAID AND PLACE OF PURCHASE.
CUSTOMER WILL BE CHARGED FOR THE REPAIR OF ANY UNIT
RECEIVED WITHOUT SUCH PROOF OF PURCHASE.
Limited Warranty Limits And Exclusions
This warranty ONLY COVERS failures due to defects in materials or
workmanship, and DOES NOT COVER normal wear and tear
or cosmetic damage. The warranty ALSO DOES NOT COVER
damages which occurred in shipment, or failures which are caused
by products not supplied by the warrantor, or failures which result
from accidents, misuse, abuse, neglect, mishandling, misapplication,
panacare@us.panasonic.com
Page 43

alteration, faulty installation, set-up adjustments, misadjustment
of consumer controls, improper maintenance, power line surge,
lightning damage, modification, introduction of sand, humidity or
liquids, commercial use such as hotel, office, restaurant, or other
business or rental use of the product, or service by anyone other
than a Factory Service Center or other Authorized Servicer, or
damage that is attributable to acts of God.
THERE ARE NO EXPRESS WARRANTIES EXCEPT AS LISTED
UNDER “LIMITED WARRANTY COVERAGE”.
THE WARRANTOR IS NOT LIABLE FOR INCIDENTAL OR
CONSEQUENTIAL DAMAGES RESULTING FROM THE USE OF
THIS PRODUCT, OR ARISING OUT OF ANY BREACH OF THIS
WARRANTY.
(As examples, this excludes damages for lost time, travel to and from
the servicer, loss of or damage to media or images, data or other
memory or recorded content. The items listed are not exclusive, but
for illustration only.)
ALL EXPRESS AND IMPLIED WARRANTIES, INCLUDING THE
WARRANTY OF MERCHANTABILITY , ARE LIMITED TO THE
PERIOD OF THE LIMITED WARRANTY.
Some states do not allow the exclusion or limitation of incidental
or consequential damages, or limitations on how long an implied
warranty lasts, so the exclusions may not apply to you.
This warranty gives you specific legal rights and you may also
have other rights which vary from state to state. If a problem with
this product develops during or after the warranty period, you may
contact your dealer or Service Center. If the problem is not handled
to your satisfaction, then write to the warrantor’s Consumer Affairs
Department at the addresses listed for the warrantor.
PARTS AND SERVICE, WHICH ARE NOT COVERED BY THIS
LIMITED WARRANTY, ARE YOUR RESPONSIBILITY.
Customer Services Directory (United States and Puerto Rico)
Obtain Product Information and Operating Assistance;
locate your nearest Dealer or Service Center; purchase
Parts and Accessories; or make Customer Service and
Literature requests by visiting our Web Site at:
http://www.panasonic.com/help
or, contact us via the web at:
http://www.panasonic.com/contactinfo
You may also contact us directly at:
1-800-211-PANA (7262)
Monday-Friday 9am-9pm, Saturday-Sunday 10am-7pm EST
For hearing or speech impaired TTY users, TTY: 1-877-833-8855
Accessory Purchases (United States and Puerto Rico)
Purchase Parts, Accessories and Instruction Books online for all
Panasonic Products by visiting our Web Site at:
http://www.pstc.panasonic.com
Or, send your request by E-mail to:
npcparts@us.panasonic.com
You may also contact us directly at:
1-800-332-5368 (Phone) 1-800-237-9080 (Fax Only)
(Monday-Friday 9am-9pm EST)
Panasonic Service and Technology Company
20421 84th Avenue South, Kent, WA 98032
(We accept Visa, MasterCard, Discover Card, American Express, and
Personal Checks)
For hearing or speech impaired TTY users, TTY: 1-866-605-1277
As of November 2009
Other
VQT2M17
43
Page 44

THE FOLLOWING APPLIES ONLY IN THE U.S.A.
FCC Note:
This equipment has been tested and found to comply with the limits
for a Class B digital device, pursuant to Part 15 of the FCC Rules.
These limits are designed to provide reasonable protection against
harmful interference in a residential installation. This equipment
generates, uses, and can radiate radio frequency energy and, if not
installed and used in accordance with the instructions, may cause
harmful interference to radio communications. However, there is no
guarantee that interference will not occur in a particular installation. If
this equipment does cause harmful interference to radio or television
reception, which can be determined by turning the equipment off and
on, the user is encouraged to try to correct the interference by one or
more of the following measures:
•
Reorient or relocate the receiving antenna.
•
Increase the separation between the equipment and receiver.
•
Connect the equipment into an outlet on a circuit different from that
to which the receiver is connected.
•
Consult the dealer or an experienced radio/TV technician for help.
FCC Caution: To assure continued compliance, follow the
attached installation instructions and use only
shielded interface cables with ferrite core when
connecting to computer or peripheral devices.
Any changes or modifi cations not expressly approved by
the party responsible for compliance could void the user’s
authority to operate this equipment.
Declaration of Conformity
Trade Name: Panasonic
Model no.: RR-US591/RR-US571/
RR-US551
Responsible party: Panasonic Corporation of North
America
One Panasonic Way, Secaucus,
NJ 07094
Support Contact: Panasonic Consumer Electronics
Company 1-800-211-PANA (7262)
This device complies with Part 15 of the FCC Rules.
Operation is subject to the following two conditions: (1) This
device may not cause harmful interference, and (2) this
device must accept any interference received, including
interference that may cause undesired operation.
THE FOLLOWING APPLIES ONLY IN CANADA.
This Class B digital apparatus complies with
Canadian ICES-003.
Panasonic Consumer Electronics Company, Division of Panasonic Corporation of North America
One Panasonic Way, Secaucus, New Jersey 07094 http://www.panasonic.com
Panasonic Canada Inc.
VQT2M17
5770 Ambler Drive, Mississauga, Ontario L4W 2T3 www.panasonic.ca
© Panasonic Corporation 2009
44
Printed in Malaysia
 Loading...