

Page 1
Operating Instructions
Direct Drive Digital Turntable
Model No.
SL-DZ1200
PP
Before connecting, operating or adjusting this product, please read the
instructions completely.
Please keep this manual for future reference.
RQT7114-2Y
Page 2
Dear customer
Parts and supplied accessories
Thank you for purchasing this product.
For optimum performance and safety, please read these instructions
carefully.
Parts and supplied accessories ................................................. 2
Product service ............................................................................. 2
Listening caution .......................................................................... 3
IMPORTANT SAFETY INSTRUCTIONS ....................................... 4
Main features ................................................................................ 5
Component part names ............................................................... 6
Platter setup .................................................................................. 7
Before use
Setup .............................................................................................. 7
Connections .................................................................................. 8
Inserting-removing a disc or SD Memory Card ...................... 10
Display indicator ......................................................................... 11
Playing a CD or SD Memory Card (basic play) ....................... 12
Basic function settings .............................................................. 14
Platter operations ....................................................................... 15
Changing tempo and direction of play .................................... 16
Playing from memory ................................................................. 17
Changing the sound ................................................................... 20
Saving to a SD Memory Card, Recalling .................................. 21
Using with other equipment ...................................................... 23
Unit’s initialize memory function .............................................. 24
Glossary ...................................................................................... 24
Handling SD Memory Cards ...................................................... 25
Concerning CDs ......................................................................... 25
Q&A (Frequently asked questions) .......................................... 26
Troubleshooting guide............................................................... 26
Error messages .......................................................................... 27
Maintenance ................................................................................ 27
Specifications ............................................................................. 27
Warranty (U.S.A.) ......................................................... Back cover
2
RQT7114
Table of contents
Before use
Connecting with the DJ mixer .................................................... 8
Connecting the control terminals for relay play ......................... 9
Connecting with the stereo amplifier (Not using the DJ mixer) ...........
Connecting to equipment with digital input terminals ................ 9
Basic operations
Selecting TURNTABLE mode or CD PLAYER mode .............. 14
Instant play (INSTANT CHANGE) ........................................... 14
Using the FREE WHEEL mode ............................................... 14
Adjusting the platter brake ....................................................... 14
Adjusting the auto cue level ..................................................... 14
Advanced operations
Changing play with your hand ................................................. 15
Basic play for DJs .................................................................... 15
Changing tempo ....................................................................... 16
Locking the pitch ...................................................................... 16
Reverse play (Reversing the platter) ....................................... 16
Setting the auto cue point ........................................................ 17
Setting the cue point at any point ............................................ 17
Play from the stored point ........................................................ 17
Storing to the CUE PADS and playing .................................... 18
Store desired points to memory and play (loop play) ............. 18
Recording to the SAMPLE PADS and playing ........................ 19
Erasing cue pad, sample pad, loop play data ......................... 19
Changing sound to simulate analog ........................................ 20
Change sound with combined performance ............................ 20
Editing the SAMPLE PADS...................................................... 20
Other functions
Saving to a SD Memory Card .................................................. 21
Formatting the SD Memory Card ............................................. 22
Recalling (loading) data saved on a SD Memory Card ........... 22
Regarding MP3 albums and SD audio .................................... 22
Start play using the mixer’s fader ............................................ 23
Using two units for relay play ................................................... 23
Using the amplifier and other equipment ................................ 23
Linking different tracks ............................................................. 24
Initializing this unit’s memory ................................................... 24
Reference
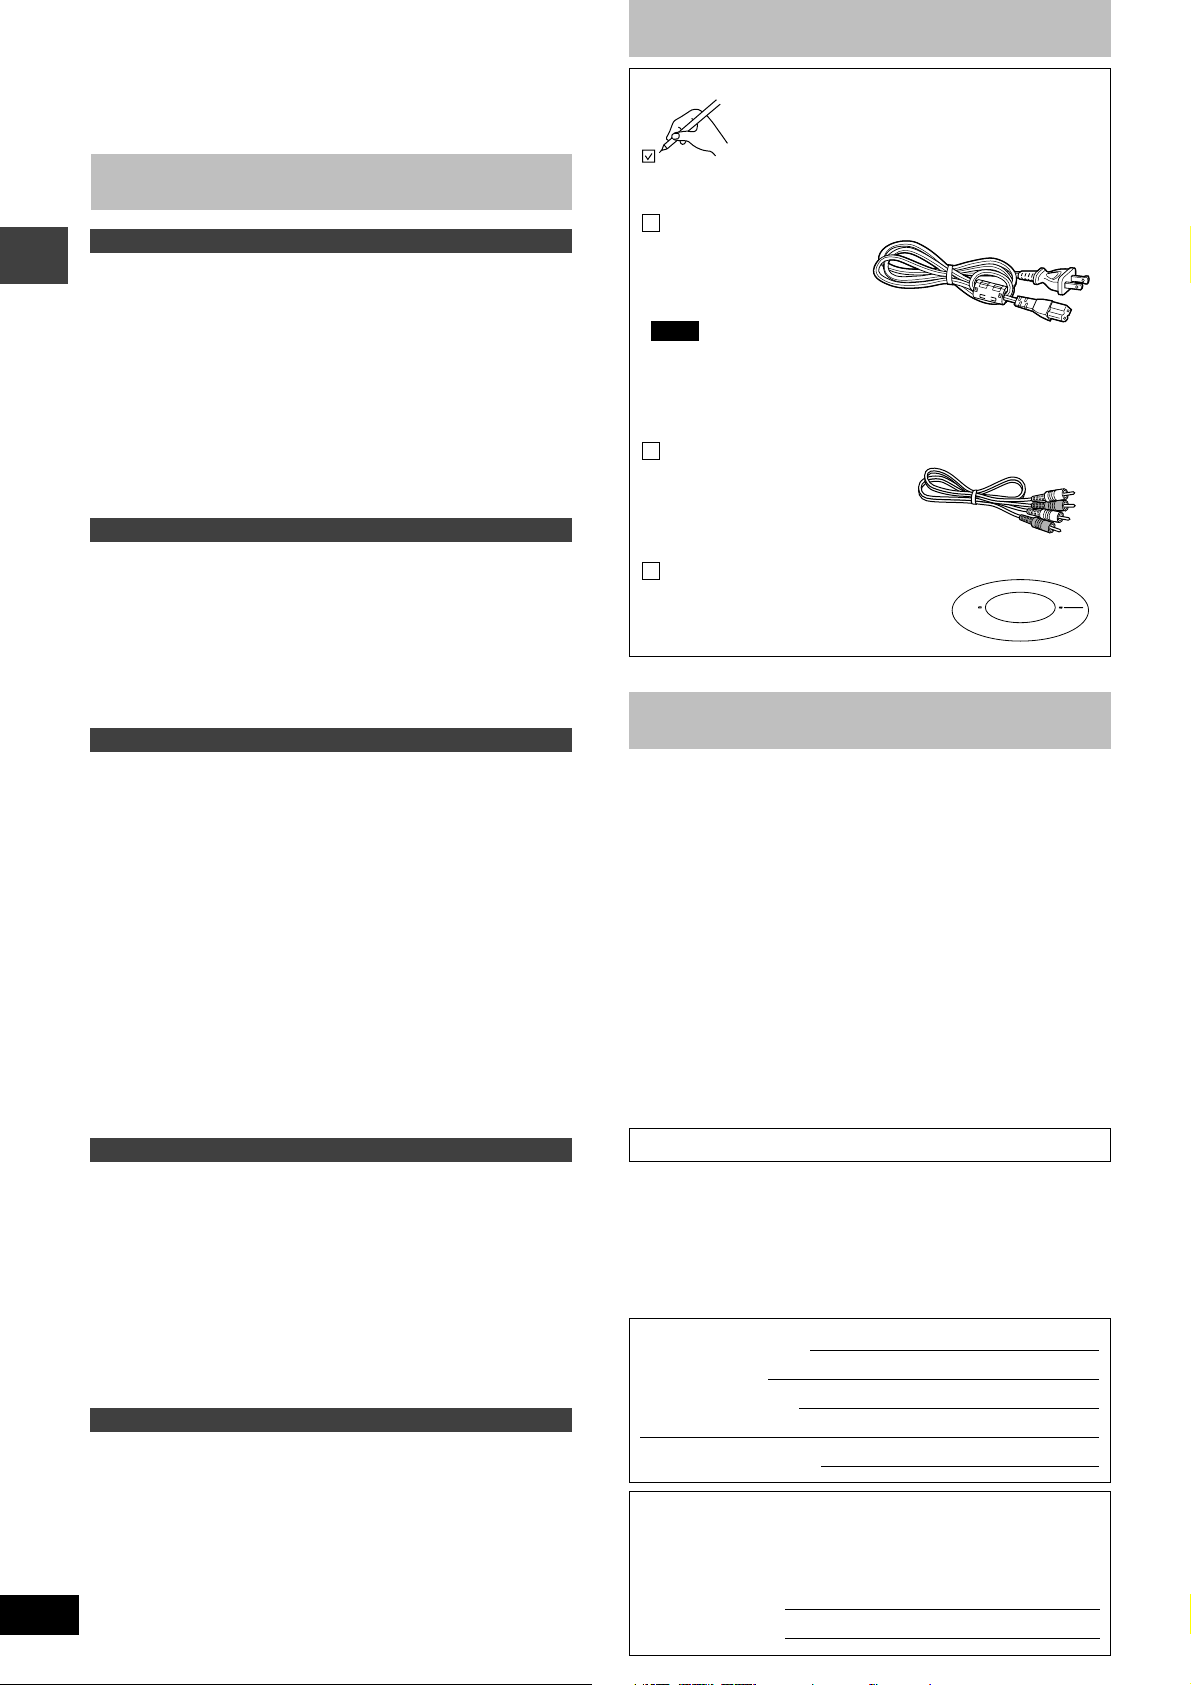
Please check and identify the parts and supplied accessories.
Use numbers indicated in parentheses when
asking for replacements parts.
In U.S.A. to order accessories, refer to “Accessory Purchases” on back cover.
AC power supply cord (REZ1619) ................................. 1
Note
The included AC power supply cord is for use with this unit only.
Do not use it with other equipment.
Do not use an AC power supply cord from any other type of
equipment with this unit.
Stereo connection cable (SFDHBD2N01) ..................... 1
9
Slip surface (RGK1704-S2) ............................................ 1
Product service
1. Damage requiring service—The unit should be serviced by
qualified service personnel if:
(a) The AC power supply cord or AC adaptor has been
damaged; or
(b) Objects or liquids have gotten into the unit; or
(c) The unit has been exposed to rain; or
(d) The unit does not operate normally or exhibits a marked
change in performance; or
(e) The unit has been dropped or the cabinet damaged.
2. Servicing— Do not attempt to service the unit beyond that
described in these operating instructions. Refer all other servicing to authorized servicing personnel.
3. Replacement parts—When parts need replacing ensure the
servicer uses parts specified by the manufacturer or parts that
have the same characteristics as the original parts. Unauthorized
substitutes may result in fire, electric shock, or other hazards.
4. Safety check—After repairs or service, ask the servicer to
perform safety checks to confirm that the unit is in proper
working condition.
Product information
For product information or assistance with product operation:
In the U.S.A., refer to “Customer Services Directory” on back cover.
In Canada, contact the Panasonic Canada Inc. Customer Care Centre at 905-624-5505, or visit the website (www.panasonic.ca), or an
authorized Servicentre closest to you.
User memo:
DATE OF PURCHASE
DEALER NAME
DEALER ADDRESS
TELEPHONE NUMBER
The model number and serial number of this product can be found
on either the back or the bottom of the unit.
Please note them in the space provided below and keep for future
reference.
MODEL NUMBER
SERIAL NUMBER
SL-DZ1200
Page 3
CLASS 1
E
L
E
C
T
R
O
N
I
C
I
N
D
U
S
T
R
I
E
S
•
A
S
S
O
C
I
A
T
I
O
N
•
EST. 1924
LASER PRODUCT
(Back of product)
Listening caution
Selecting fine audio equipment such as the unit you’ve just purchased is only the start of your musical enjoyment. Now it’s time
to consider how you can maximize the fun and excitement your
equipment offers. This manufacturer and the Electronic Industries
Association’s Consumer Electronics Group want you to get the
most out of your equipment by playing it at a safe level. One that
lets the sound come through loud and clear without annoying
blaring or distortion—and, most importantly, without affecting your
sensitive hearing.
(Inside of product)
CAUTION!
THIS PRODUCT UTILIZES A LASER.
USE OF CONTROLS OR ADJUSTMENTS OR
PERFORMANCE OF PROCEDURES OTHER
THAN THOSE SPECIFIED HEREIN MAY
RESULT IN HAZARDOUS RADIATION
EXPOSURE.
DO NOT OPEN COVERS AND DO NOT REPAIR
YOURSELF. REFER SERVICING TO QUALIFIED
PERSONNEL.
WARNING:
TO REDUCE THE RISK OF FIRE, ELECTRIC
SHOCK OR PRODUCT DAMAGE, DO NOT
EXPOSE THIS APPARATUS TO RAIN,
MOISTURE, DRIPPING OR SPLASHING AND
THAT NO OBJECTS FILLED WITH LIQUIDS,
SUCH AS VASES, SHALL BE PLACED ON THE
APPARATUS.
We recommend you to avoid prolonged exposure to excessive
noise.
Sound can be deceiving. Over time your hearing “comfort level”
adapts to higher volumes of sound. So what sounds “normal” can
actually be loud and harmful to your hearing.
Guard against this by setting your equipment at a safe level
BEFORE your hearing adapts.
To establish a safe level:
チStart your volume control at a low setting.
チSlowly increase the sound until you can hear it comfortably and
clearly, and without distortion.
Once you have established a comfortable sound level:
チSet the dial and leave it there.
Taking a minute to do this now will help to prevent hearing
damage or loss in the future. After all, we want you listening for a
lifetime.
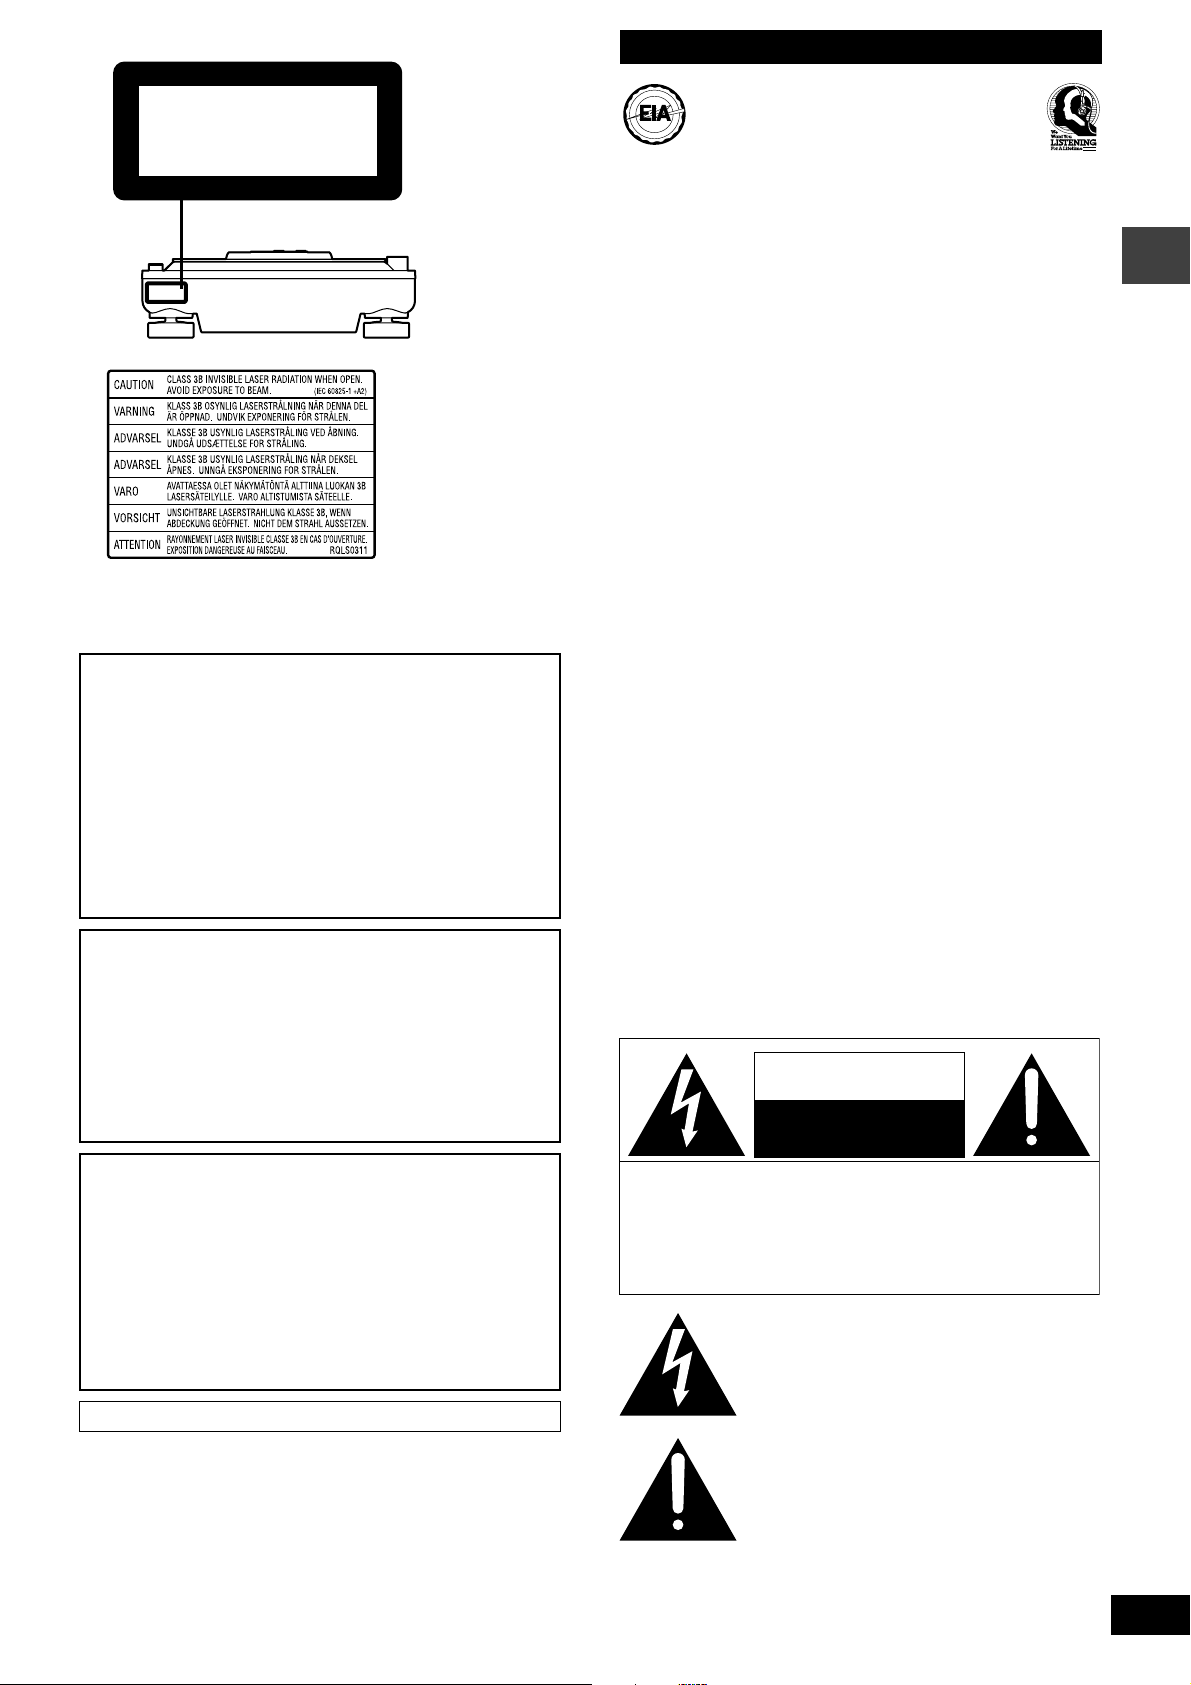
The following mark and symbols are located on bottom of the unit.
CAUTION
RISK OF ELECTRIC SHOCK
DO NOT OPEN
Before use
CAUTION!
DO NOT INSTALL OR PLACE THIS UNIT IN A
BOOKCASE, BUILT-IN CABINET OR IN
ANOTHER CONFINED SPACE. ENSURE THE
UNIT IS WELL VENTILATED. TO PREVENT
RISK OF ELECTRIC SHOCK OR FIRE HAZARD
DUE TO OVERHEATING, ENSURE THAT
CURTAINS AND ANY OTHER MATERIALS DO
NOT OBSTRUCT THE VENTILATION VENTS.
CAUTION: TO REDUCE THE RISK OF ELECTRIC
SHOCK, DO NOT REMOVE SCREWS.
NO USER-SERVICEABLE PARTS
INSIDE.
REFER SERVICING TO QUALIFIED
SERVICE PERSONNEL.
The lightning flash with arrowhead symbol, within
an equilateral triangle, is intended to alert the user
to the presence of uninsulated “dangerous voltage”
within the product’s enclosure that may be of sufficient magnitude to constitute a risk of electric shock
Marking sign is located on bottom of the unit.
to persons.
The exclamation point within an equilateral triangle
is intended to alert the user to the presence of
important operating and maintenance (servicing)
instructions in the literature accompanying the
appliance.
3
RQT7114
Page 4

IMPORTANT SAFETY INSTRUCTIONS
Read these operating instructions carefully before using the unit. Follow the safety instructions on the unit and the applicable safety instructions
listed below. Keep these operating instructions handy for future reference.
1) Read these instructions.
2) Keep these instructions.
3) Heed all warnings.
4) Follow all instructions.
5) Do not use this apparatus near water.
6) Clean only with dry cloth.
7) Do not block any ventilation openings. Install in accordance with
Before use
the manufacturer’s instructions.
8) Do not install near any heat sources such as radiators, heat registers, stoves, or other apparatus (including amplifiers) that produce heat.
9) Do not defeat the safety purpose of the polarized or groundingtype plug. A polarized plug has two blades with one wider than
the other. A grounding-type plug has two blades and a third
grounding prong. The wide blade or the third prong are provided
for your safety. If the provided plug does not fit into your outlet,
consult an electrician for replacement of the obsolete outlet.
10) Protect the power cord from being walked on or pinched particularly at plugs, convenience receptacles, and the point where
they exit from the apparatus.
11) Only use attachments/accessories specified by the manufacturer.
12) Use only with the cart, stand, tripod, bracket, or
table specified by the manufacturer, or sold with
the apparatus. When a cart is used, use caution
when moving the cart/apparatus combination to
avoid injury from tip-over.
13) Unplug this apparatus during lightning storms or when unused
for long periods of time.
14) Refer all servicing to qualified service personnel. Servicing is
required when the apparatus has been damaged in any way,
such as power-supply cord or plug is damaged, liquid has been
spilled or objects have fallen into the apparatus, the apparatus
has been exposed to rain or moisture, does not operate normally, or has been dropped.
THE FOLLOWING APPLIES ONLY IN THE U.S.A.
CAUTION:
This equipment has been tested and found to comply with
the limits for a Class B digital device, pursuant to Part 15 of
the FCC Rules.
These limits are designed to provide reasonable protection
against harmful interference in a residential installation.
This equipment generates, uses and can radiate radio
frequency energy and, if not installed and used in
accordance with the instructions, may cause harmful
interference to radio communications. However, there is no
guarantee that interference will not occur in a particular
installation. If this equipment does cause harmful
interference to radio or television reception, which can be
determined by turning the equipment off and on, the user is
encouraged to try to correct the interference by one or more
of the following measures:
チReorient or relocate the receiving antenna.
チIncrease the separation between the equipment and re-
ceiver.
チConnect the equipment into an outlet on a circuit different
from that to which the receiver is connected.
チConsult the dealer or an experienced radio/TV technician
for help.
Any unauthorized changes or modifications to this
equipment would void the user’s authority to operate this
device.
4
RQT7114
This device complies with Part 15 of the FCC Rules.
Operation is subject to the following two conditions: (1) This
device may not cause harmful interference, and (2) this
device must accept any interference received, including
interference that may cause undesired operation.
Page 5
Main features
This direct drive digital turntable is designed for DJs to play digital media (CDs and SD audio) giving an analog-like feeling. Having the feeling of an
analog turntable, this unit delivers digitally robust functions and performance realizing a new style of play.
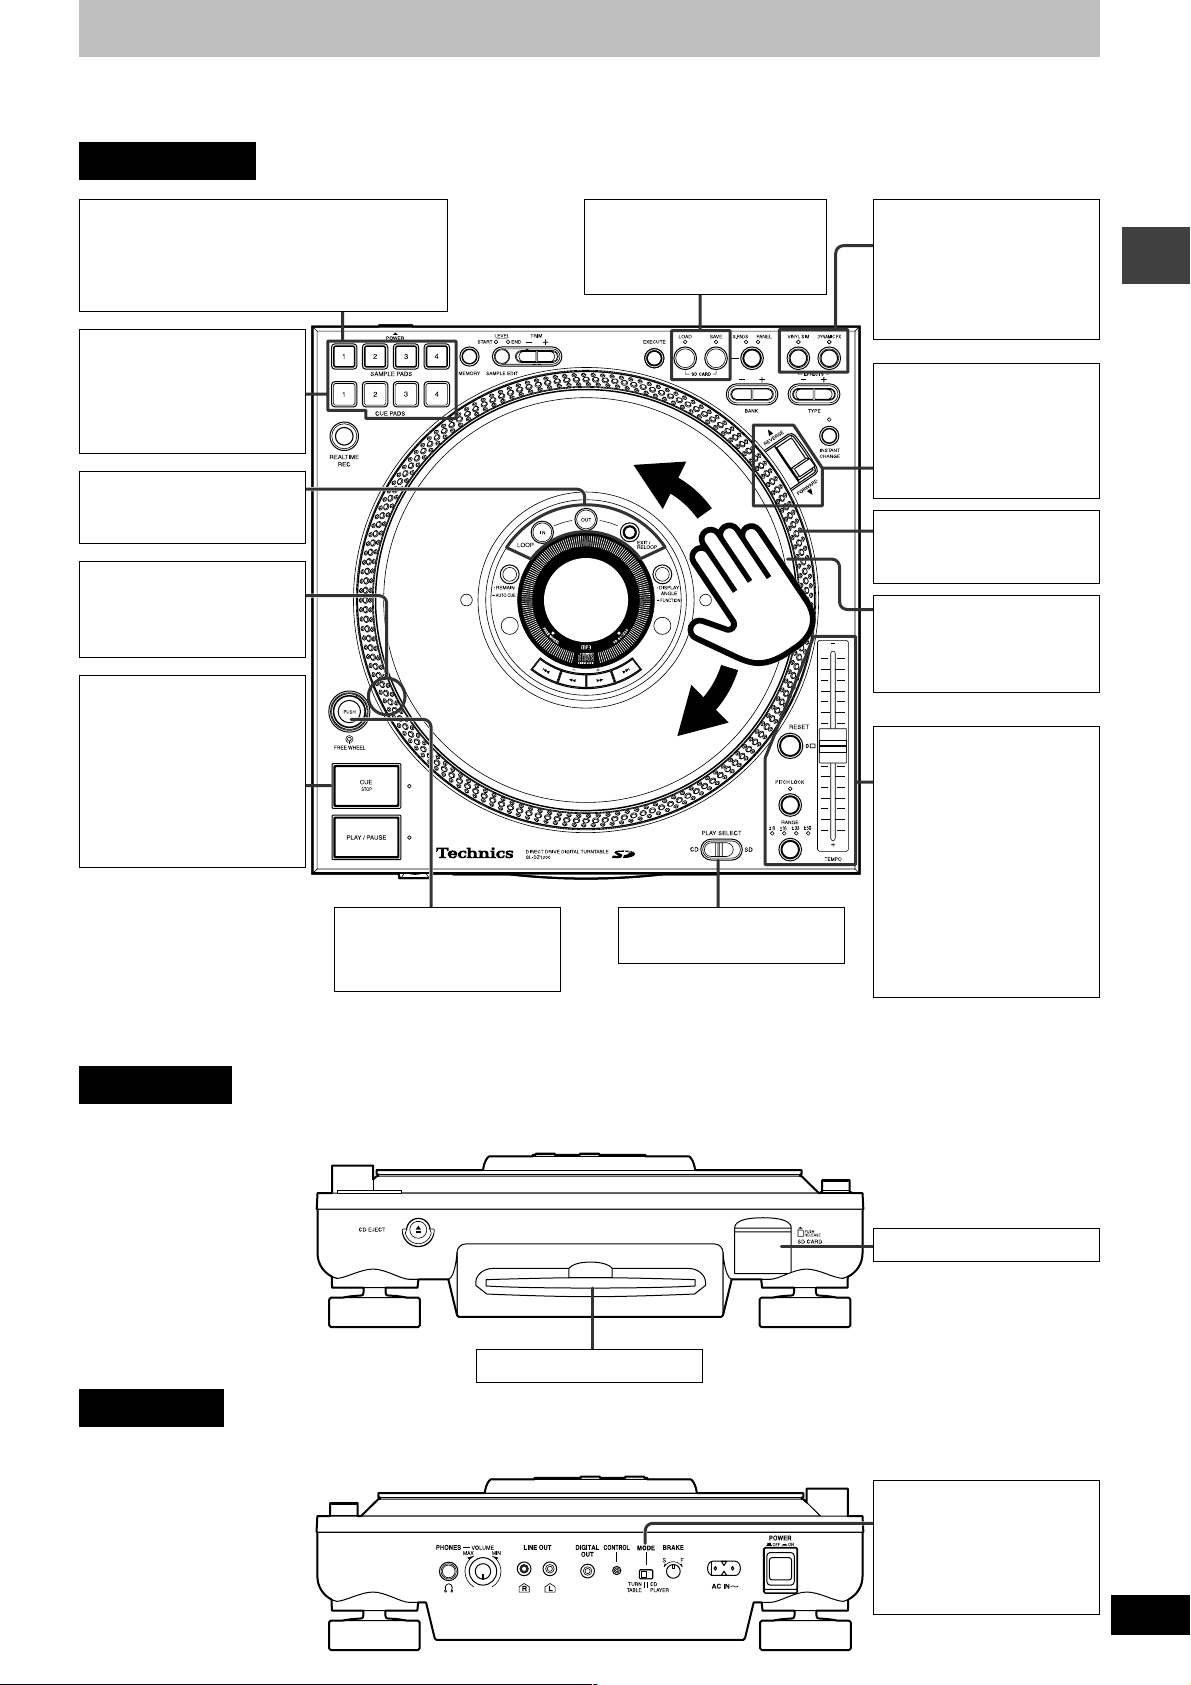
Control panel
SAMPLE PADS
•You can store up to 4 audio segments to memory.
•You can use for dual play for up to 2 sample pads,
and use for switching between one shot and loop
play.
CUE PADS
You can store 4 cue points to
memory. Play can be started instantly from one of those cue
points.
LOOP play
You can set the IN and OUT
points and play as a loop.
Strobo Dot Reflectors
You can use the red strobo illuminator to check changes in
tempo.
CUE
•Setting the cue point
Store the cue point to
memory.
•Back cue
During play you can instantly
return to the set cue point
and the unit waits in the
pause state.
FREE WHEEL
You can switch the platter to
freewheel.
SD CARD LOAD and SAVE
You can SAVE and LOAD sample
pad, cue point panel data etc. to
the SD Memory Card.
PLAY SELECT
Selects CD or SD play.
VINYL SIM
You can simulate sound similar to an analog player.
DYNAMIC FX
You can transform sound by
using the platter.
FORWARD and REVERSE
The rotation direction of the
platter can be reversed by
switching the play direction
switch to REVERSE or FORWARD.
Platter
Play media is synchronized
with platter movement.
Platter slip surface
Use your hand to turn the platter slip surface for scratch,
brake and spin DJ play.
TEMPO
•You can control the play speed
(tempo).
•You can adjust the tempo to
4 levels of settings between
± 8 and ± 50 using the
RANGE button.
•You can instantly return to
normal playing speed using
the RESET button.
•By using the PITCH LOCK
button the pitch is held even
if the tempo is changed.
Before use
Front panel
Rear panel
SD Memory Card slot
CD slot (Slot in type)
TURNTABLE
Mode for DJ play.
CD PLAYER
Mode for use as an audio
player.
5
RQT7114
Page 6
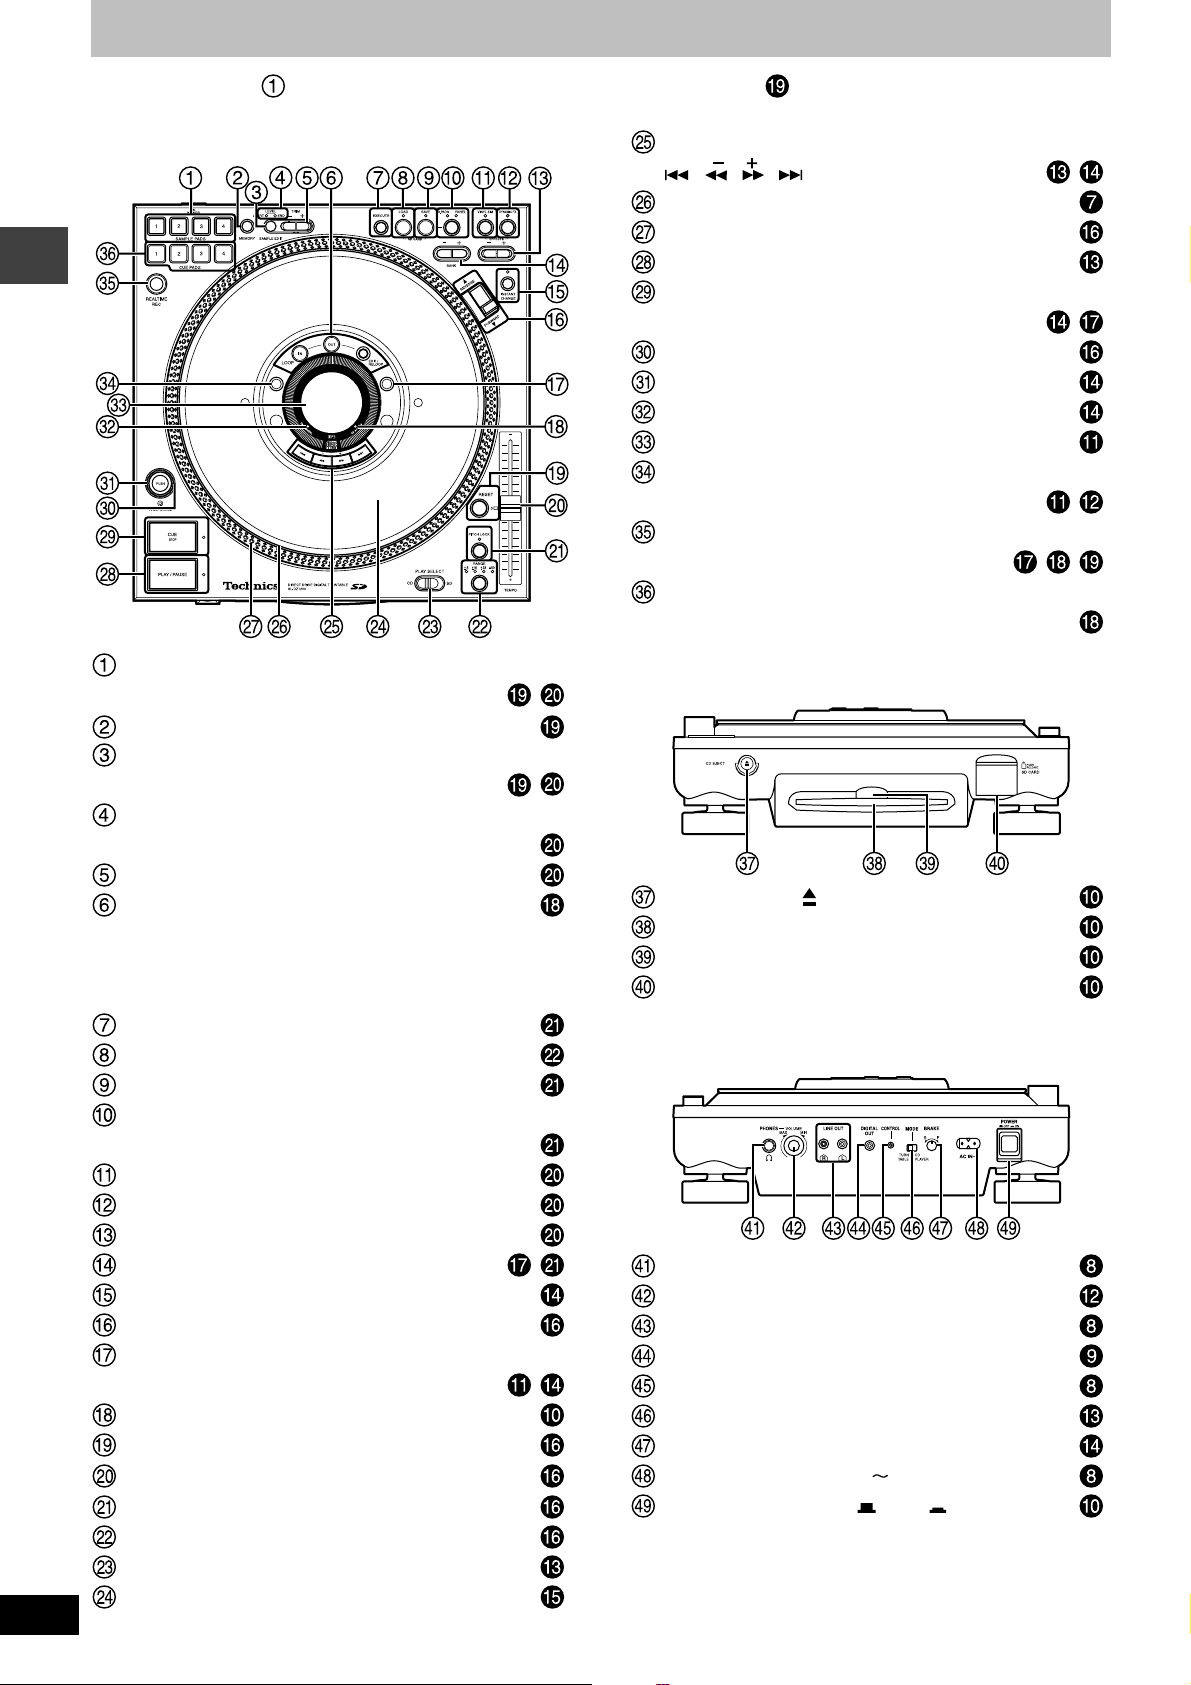
Component part names
The unshaded numbers etc, correspond to the numbered illustrations. The shaded numbers etc, are reference pages.
Control panel
Before use
6
RQT7114
Sampling data record, play, and erase button, lamp
(1-4 SAMPLE PADS) .........................................
Sample pad play mode, edit memory button (MEMORY)
Play mode and edit item select button (SAMPLE EDIT)
...........................................................................
Start point (START) lamp, end point (END) lamp,
level (LEVEL) lamp ..................................................
Modify data button (– + TRIM) ................................
Loop play button (LOOP) ........................................
Start of loop play point setting, erase button, lamp (IN)
End of loop play point setting, erase button, lamp (OUT)
Play or cancel loop play button (EXIT/RELOOP)
Execute button (EXECUTE) ...................................
Load SD Memory Card data button, lamp (LOAD)
Save SD Memory Card data button, lamp (SAVE)
SD Memory Card save mode select button, lamp
(S.PADS, PANEL) .....................................................
Analog player simulation button, lamp (VINYL SIM)
Special effects button, lamp (DYNAMIC FX) .........
Simulation, effect type select button (– + TYPE) ....
Cue bank, file number select button (
Instant play select button, lamp (INSTANT CHANGE)
Play direction switch (REVERSE, FORWARD)......
Display angle setting, function setting button
(•DISPLAY ANGLE –FUNCTION)......................
SD Memory Card access indicator (SD ACCESS)
Normal tempo button, lamp (RESET) ....................
Tempo, pitch control slider (TEMPO) ....................
Fixed pitch play button, lamp (PITCH LOCK) .......
Tempo variation range button, lamp (RANGE) .....
Media play select switch (PLAY SELECT).............
Platter slip surface ..................................................
– +
BANK)
,
,
,
,
Track skip, search, setting buttons
, , , ) ............................................. ,
(
Platter .......................................................................
Strobo dot reflectors ...............................................
Play pause button, lamp (PLAY/PAUSE) ...............
Cue setting, load and stop button, lamp (CUE STOP)
...........................................................................
Strobo illuminator ...................................................
Platter free wheel setting button (PUSH) ..............
Platter free wheel indicator (FREE WHEEL) .........
Display ......................................................................
Remaining time display, auto cue setting button
(•REMAIN –AUTO CUE) ....................................
Cue point, pad memory button (REALTIME REC)
.....................................................................
Cue memory, play and erase button, lamp
(1-4 CUE PADS)........................................................
, ,
Front panel
CD eject button ( CD EJECT) ..............................
CD slot ......................................................................
Power lamp ..............................................................
SD Memory Card slot (SD CARD) ..........................
Rear panel
Headphone terminal (PHONES) .............................
Headphone volume control knob (VOLUME) ........
Output terminal (LINE OUT) ...................................
Digital output terminal (DIGITAL OUT) ..................
Digital turntable control terminal (CONTROL) ......
Turntable, CD player select switch (MODE) ..........
Platter brake control (BRAKE) ...............................
AC input terminal (AC IN ) ...................................
Power button (POWER OFF ON) .................
,
,
Page 7
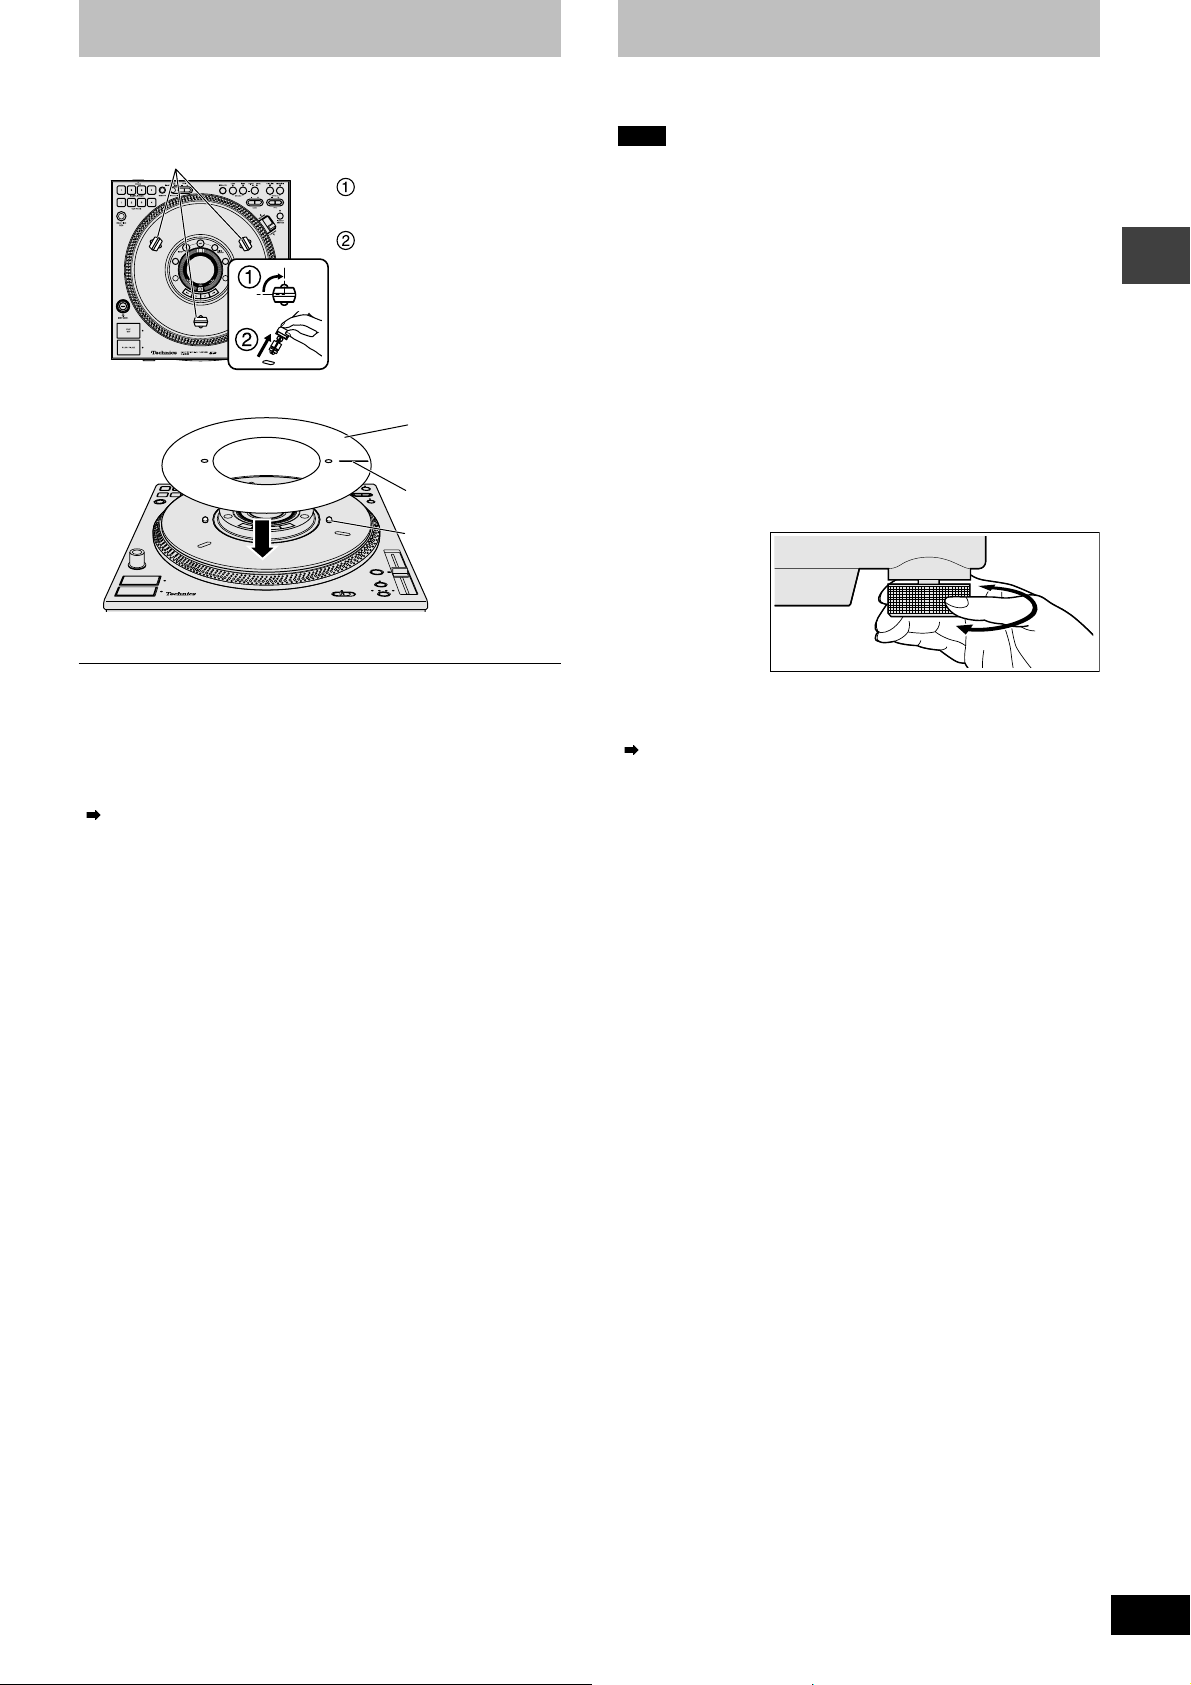
Platter setup
Setup
The stoppers are used to lock the platter, protecting the unit from
shock during shipping.
1. Remove the 3 platter lock stoppers from the platter
Platter lock stoppers
Turn the platter lock stop-
pers approximately 90°
Pull the platter lock stop-
pers out
•Pull out the platter lock stoppers
once they are aligned with the
release hole.
2. Attach the slip surface (included)
Slip surface
Marker
Mounting pin
•With the marker on the slip surface facing up, attach onto the 2
mounting pins.
Store the 3 platter lock stoppers in a safe place after removal.
Adjusting the platter brake
You can adjust the platter brake speed using the BRAKE control on
the rear of the unit. After connecting, adjust to the desired brake speed.
( page 14)
Place the unit on a flat and stable surface that is not subject to
vibrations or movement.
Note
•Do not place this unit on top of amplifiers emitting hot air or place
near spot lights and use for any long duration. This may affect the
unit or disc causing problems.
•Create space around this unit in order to assist heat release.
•Place the unit away from televisions and tuners to avoid interfer-
ence. Interference will affect picture and sound quality.
•Placing the unit near speakers may result in undesired sound in an
environment that requires elevated volume. In this case move the
unit further away from the speaker(s) or turn the volume down.
•Place stereo connection cables, AC power supply cord and panel
in a location that will not be affected by movement or vibration
during play.
Undesirable sounds may result if there are movements or vibrations affecting the unit with exception of the legs.
Adjusting the height of the main unit
After placing the unit in the desired location for use, adjust the insulator so the main unit is flat and secure.
Changing the display angle
Change display angle corresponding to position of the main unit.
( page 11)
Before use
When transporting the unit
Make sure to re-attach the 3 platter lock stoppers.
1. Remove the slip surface
•Pack in a way to avoid bending the slip surface.
2. Insert the 3 platter lock stoppers
1. Align the platter holes with the chassis holes inside at the same
position used to remove the stoppers above in step 1.
2. Insert the platter lock stoppers into the holes
•Move the platter to fully insert the stoppers.
3. Turn the platter lock stoppers approximately 90° to lock
7
RQT7114
Page 8
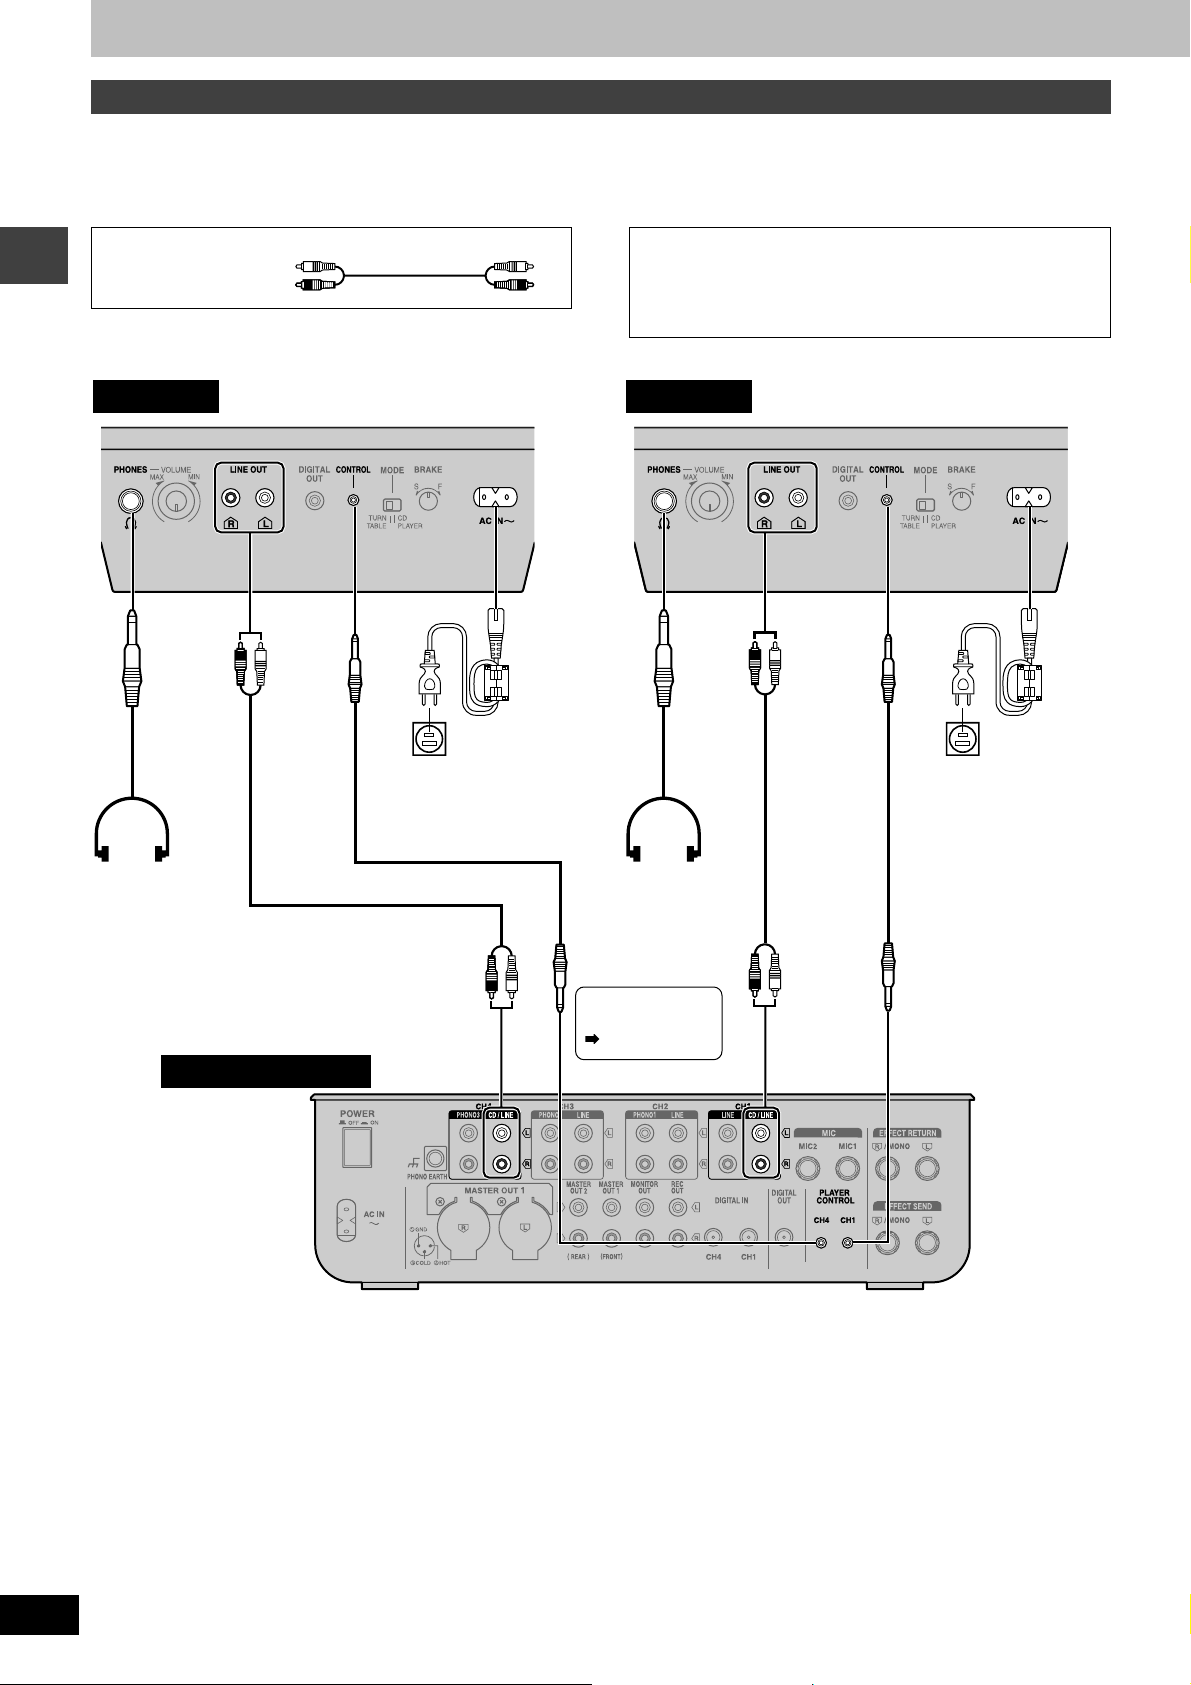
Connections
When connecting for
fader start play
(
page 23)
Connecting with the DJ mixer
This example indicates a connection with the SH-MZ1200 DJ mixer (not included) and two digital turntables. Use the stereo connection cable
(supplied accessories) and control cable (not included) to connect the main unit with the DJ mixer. Turn off all power when connecting component
equipment.
Connect the AC power supply cord after all other connections have been connected.
Stereo connection cable
White (L)
Red (R)
Before use
Rear panel
Type: 6.3 mm
(1/4 in.) stereo
Direct drive digital turntable 2
Connects to DJ mixer CH4.
Household
AC outlet
AC power supply
cord (supplied
accessories)
Connection to the SL-DZ1200 rear panel CONTROL terminal
Only the direct drive digital turntable or the separately sold
DJ Mixer can be operated.
Connecting to control terminals of other manufacturer’s products
may result in incorrect operation or other equipment problems.
Rear panel
Type: 6.3 mm
(1/4 in.) stereo
Direct drive digital turntable 1
Connects to DJ mixer CH1.
Household
AC outlet
AC power
supply cord
(supplied
accessories)
Headphone
(not included)
Headphone
(not included)
Control cable
(not included)
Type:
3.5 mm (1/8 in.) stereo
Control cable
(not included)
Type:
3.5 mm (1/8 in.) stereo
DJ mixer rear panel
Connecting with other mixers
Do not connect with the PHONO terminal. Connecting will result in excessive sound being generated and may result in serious damage
to your equipment.
Connect the main unit’s LINE OUT terminal with the mixers LINE input terminal or AUX input terminal.
Listening with the headphones
•When connecting the headphones, reduce the volume using the phones VOLUME control.
•Avoid listening for prolonged periods of time to prevent hearing damage.
8
RQT7114
Page 9
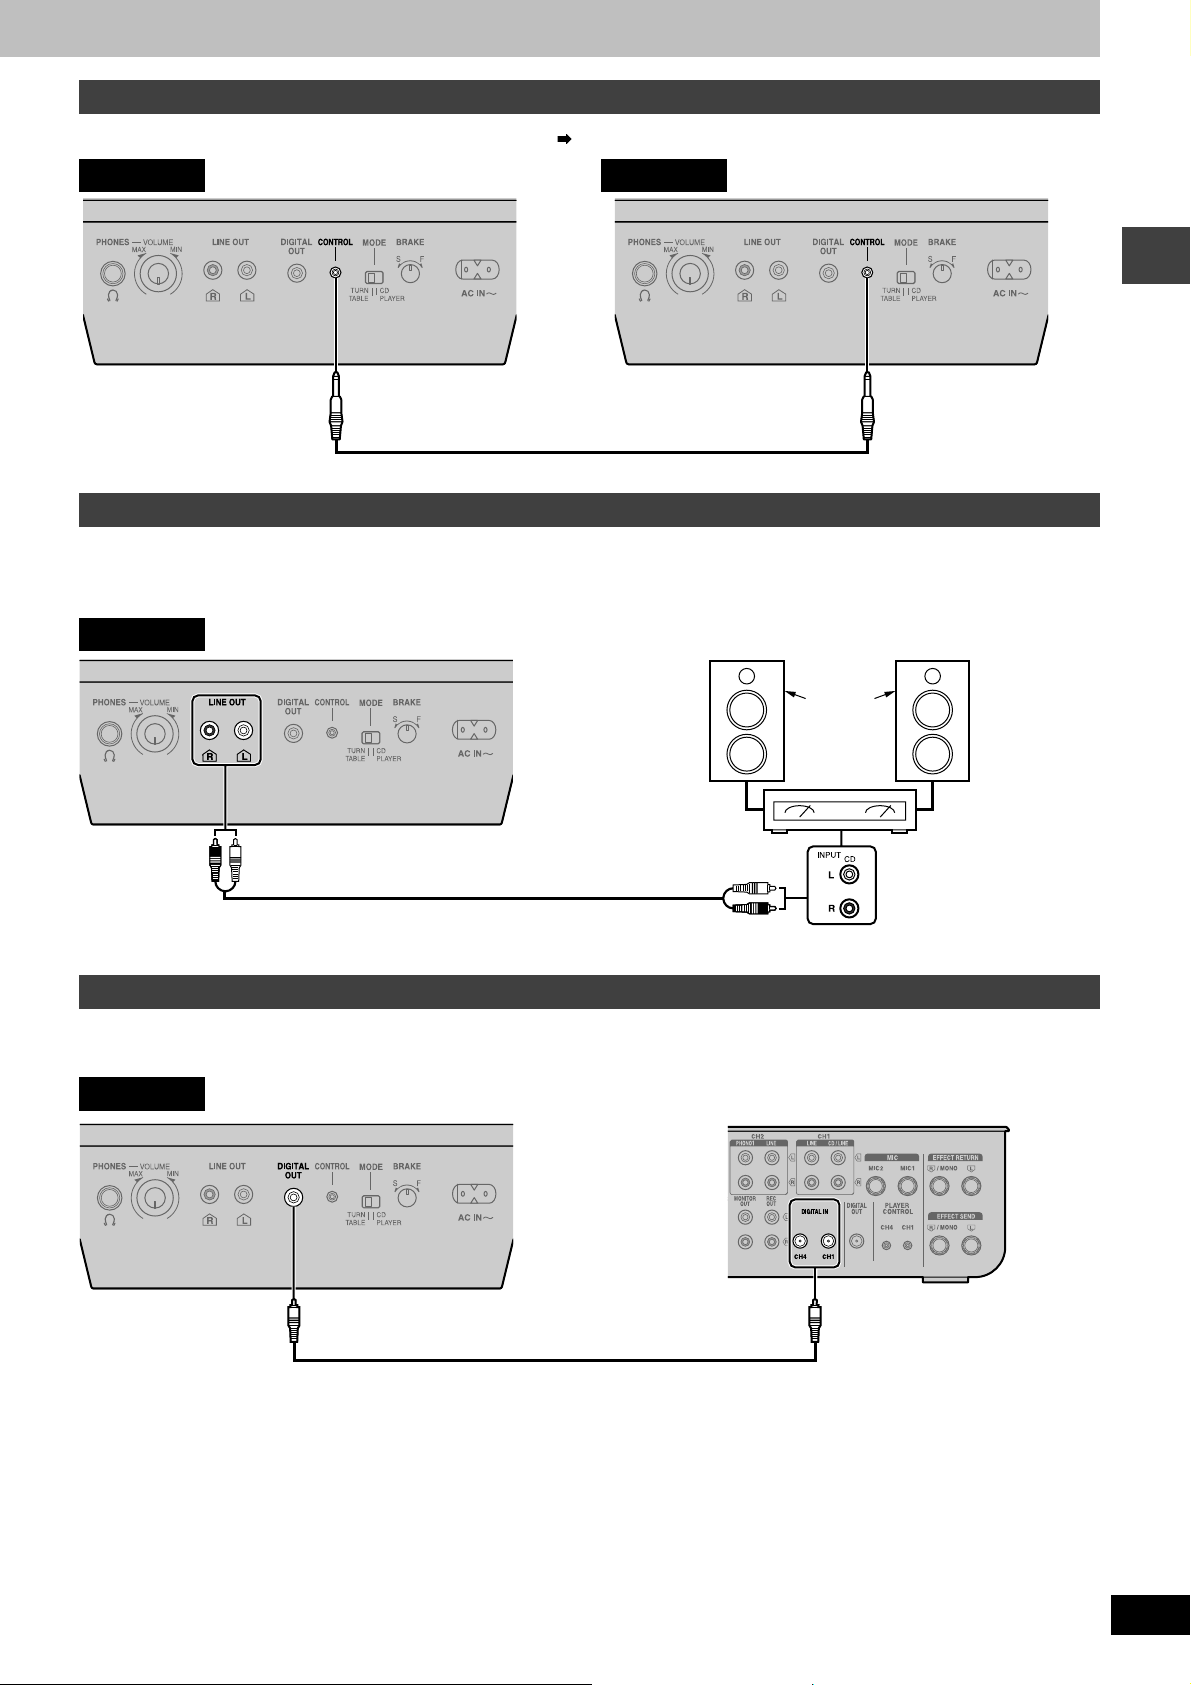
Connecting the control terminals for relay play
Use the control terminals of the two units to connect for relay play. ( page 23)
Rear panel
Direct drive digital turntable 2
Control cable (not included)
Type: 3.5 mm (1/8 in.) stereo
Rear panel
Direct drive digital turntable 1
Connecting with the stereo amplifier (Not using the DJ mixer)
Do not connect with the PHONO terminal. Connecting will result in excessive sound being generated and may result in serious damage
to your equipment.
Connect with the amplifier's CD or AUX input terminal.
Rear panel
Speaker
(not included)
Amplifier
(not included)
Before use
Stereo connection cable (Supplied accessories)
Connecting to equipment with digital input terminals
Connect to the digital input terminal on the DJ mixer or amplifier with digital input terminals using the connection cables (not included).
•SD Audio cannot be output from this unit's digital out terminals.
Rear panel
Connection cable (not included)
Type: RCA coaxial
DJ mixer etc. (not included)
9
RQT7114
Page 10

Inserting-removing a disc or SD Memory Card
Rear panel
Front panel
Power lamp
With the label
face up
Inserting a disc
1. Press [POWER OFF ON] on the rear of unit
The unit power is on. The display comes on and the power lamp
Basic operations
lights.
2. Insert a disc
•Insert the disc flat and parallel into the CD slot, with the label up.
The unit will automatically load the disc.
•You cannot use an 8 cm disc.
Note
•Do not insert a disc when the power is off.
•Do not insert 2 or more discs.
•Do not try to insert the disc using unnecessary force that may bend
the disc. When the unit is loading or ejecting a disc, do not apply
opposing force to the disc. Not following the above steps may result in damage to the disc or unit.
Removing a disc
While stopped or while paused
1. Press [ CD EJECT]
•Press the button and the disc will come out.
•If you press while playing in TURNTABLE mode, a message ap-
pears in the display and play continues. Make sure to press after pausing play.
•If you do not remove the disc within approximately 10 seconds
the unit will automatically re-load the disc.
To remove
2. Press again
•Remove as indicated in the illustration
without touching the playing surface.
Front panel
SD ACCESS
indicator
With the label
face up
SD Memory Card
Inserting a SD Memory Card
1. Open the SD Memory Card slot lid
2. With the label on the card facing up and the notched
edge facing the unit, insert the card
3. Insert until the card locks into place
4. Close the lid
Removing a SD Memory Card
After confirming the SD ACCESS indicator is not flashing, open the lid and press on the center of the SD
Memory Card to release the lock and pull the ejected
card out carefully, then close the lid.
•The SD ACCESS indicator flashes when the SD Memory Card
is being accessed. Do not turn off the power or try to open the lid
and remove the card while the indicator is flashing. (Doing so
may result in a loss of saved data.)
Note
•Make sure to always close the SD card slot lid.
If you try using when the lid is open, “NO SD CARD” or “SD LID
OPEN” will appear in the display and operation will not be possible.
•You can use SD Memory Cards with capacities between 8 MB
and 1 GB on this unit. ( page 25)
Reference
Page
25
12, 22
22
CD
SD Memory Card
(SD audio)
Playable media
CD-DA audio that is finalized on a
CD-R or CD-RW
MP3 files
(WMA is not supported)
Secure AAC
Secure MP3
(WMA is not supported)
10
RQT7114
Forced disc eject
You can forcefully eject a disc when the disc does not eject even after
pressing [ CD EJECT].
1. Press [POWER OFF ON] to turn the power off
2. Press [POWER
[
CD EJECT] to turn the power on, and then release
[
CD EJECT] after “DZ1200” appears in the display
OFF ON] again holding down
Page 11

Display indicator
Displaying the remaining time
While playing a CD, SD Memory Card
Press [•REMAIN –AUTO CUE]
•“REMAIN” appears and the remaining play time of the track is
displayed.
•Pressing again will return the time display to its original state.
•When you are playing a MP3 file from a CD-R or CD-RW the
remaining play time will not be displayed if you press [•REMAIN
–AUTO CUE].
•When there is less than 30 seconds of time remaining, you are
notified by the flashing time display. With a MP3 file from a CDR or CD-RW, the time display flashes if there is less than 7 seconds of time remaining. However, depending on the operation,
the flashing indicator in the display may not appear.
Changing the display angle
You can rotate the display angle corresponding to the way the unit is
setup.
Press [•DISPLAY ANGLE –FUNCTION] to select the display angle
•The angle of the display rotates 90 degrees clockwise each time
the button is pressed.
•The setting remains in memory even when the power is turned
off.
Adjusting the display contrast
1. Press and hold [•DISPLAY ANGLE –FUNCTION] for
about 2 or more seconds until the display changes
•“CONTRAST” is selected in the display.
2. Press [– ], [+ ] to adjust the display contrast
•Press [– ], [+ ] to change the display to the desired con-
trast (adjustable range: 1-100).
•If no buttons are pressed for more than 5 seconds, the time dis-
play returns to its original state.
•The setting remains in memory even when the power is turned
off.
Displayed when using CD, SD audio
Displayed when using MP3 files on CD-R and CD-RW
Selected play media indicator
: Indicates CD is selected
: Indicates SD is selected
Track number indicator
When using CD, SD Audio: Total number of tracks and the track
being played is displayed
When using CD-R, CD-RW MP3 files:
Total number of tracks and the track
being played within the album is displayed
Current track position indicator
Change in tempo rate indicator
Auto Cue indicator
: Indicates Auto Cue is on
Cue bank indicator
REALTIME REC indicator
:
Indicates the sample pad is in REALTIME REC operation
Beats per minute (BPM) indicator
Number of beats per minute, indicating track speed
Depending on the music, the BPM may not be detectable, or
may take time to be displayed.
Play time (Minutes, seconds, frames), remaining time
(CD, SD audio) indicator
Remaining time (REMAIN) indicator
Displayed only for CD, SD audio
MP3 album number indicator
Indicated when using MP3 files
CD-MP3 (CD-R, CD-RW MP3 file) indicator
Basic operations
11
RQT7114
Page 12

Playing a CD or SD Memory Card (basic play)
Rear panel
Adjusting volume when
using the headphones
Turn [VOLUME]
1
2
Basic operations
5
Front panel
With the label
face up
Auto Cue function (TURNTABLE mode only)
When one of the media has been set, or when a track has been
skipped, or when advancing to the next song while playing, the auto
cue point automatically sets and pauses at the point just before audio
begins, skipping the null sound area at the beginning of the track.
Auto Cue is set to off as default.
Auto Cue indicator
Auto cue point setting indicator
3
4
Front panel
SD ACCESS
indicator
With the label
face up
Playing CD-R and CD-RW discs
This unit can play CD-DA formatted CD-R and CD-RW discs.
CD-DA formatted discs must be finalized at the final point of recording using a CD designed for music recording. CD-R and CD-RW discs
containing MP3 files can also be played. However, play may not be
possible on some discs depending on the state of recording.
Finalizing makes audio recordings compatible for play on equipment that supports play of CD-R and CD-RW discs that are designed for music recording.
SD Memory Card
12
RQT7114
Turning on Auto Cue
Press [•REMAIN –AUTO CUE] for more than 2 seconds
•The display indicator changes from “ ” to “ ”
•Each time you press and hold the button:
(Auto Cue is on) (Auto Cue is off).
•The segment without sound that is skipped is a maximum of 15
seconds from the beginning of the track.
•The on or off setting remains in memory even when the power is
turned off. Additionally, the setting stored to memory for each
CD or SD Memory Card is restored once the set media is reinserted.
Page 13

1 Press [POWER OFF ON]
•The unit display will come on once the power is turned on.
2 Switch [MODE] to TURNTABLE
•Functions are limited when using the CD PLAYER mode.
( page 14)
3 Switch [PLAY SELECT] to select the me-
dia to be used
•When there is no media inserted, "NO DISC" or "NO SD
CARD" appears in the display.
•You can control platter movement and adjust tempo once
the media is inserted.
4 Insert a disc or SD Memory Card
( page 10)
•Make sure to close the SD card slot lid as it will not work if
left open.
•It takes several seconds for the disc to be loaded.
•When Auto Cue is on, the unit switches to standby at the
first track's auto cue point. The CUE lamp flashes when the
settings are being read and after reading is finished it
changes to a stationary light.
When Auto Cue is off, the unit switches to standby at the
beginning of the first track.
•The PLAY/PAUSE lamp begins flashing.
When no disc is inserted
When no SD Memory Card is inserted
5 Press [PLAY/PAUSE]
When Auto Cue is on
•The platter begins rotating and synchronized with the plat-
ter, the first track begins playing.
•The PLAY/PAUSE lamp and the CUE lamp light.
•Once play of the first track has ended, play is paused at the
second track’s auto cue point. The platter stops at this point.
When Auto Cue is off
•The platter begins rotating, synchronized with the platter,
the first track begins playing and the PLAY/PAUSE lamp
lights.
•Play continues again from the first track once the last track
is reached. (All track repeat)
Pausing
Press [PLAY/PAUSE] (to restart, press once more)
•PLAY/PAUSE lamp flashes and the platter stops.
Skipping forward or backward
Press [ ], [ ]
•Skips each time the button is pressed or while being pressed.
•When Auto cue is on, the unit skips to the auto cue point just
before where the selected track's audio begins.
Searching forward or backward
During play or while paused
Press and hold [– ], [+ ]
•Hold the button to search.
•You cannot search beyond a track with MP3 files on CD-R, CD-
RW.
•Sounds heard when searching become cut with MP3 files and
SD Audio.
Regarding display indicators when the inserted
media is not recognized
Re-insert correctly.
NO CD AUDIO TRACK: The CD type is not supported. ( page
25), or was inserted upside down.
NO SD AUDIO TRACK: The SD Memory Card is unrecognizable
because of damage or an error, or there is
no track data.
During CD play
Track number
Play time
Play position
Selecting MP3 albums, selecting SD audio tracks
Select the SD audio track stored on the SD Memory Card or the
MP3 album on the CD-R, CD-RW. ( page 22, Regarding MP3
albums and SD audio)
1. Switch [PLAY SELECT] to select the media to be used
2. Press [
•The album number of the CD-R, CD-RW MP3 album appears in
the display.
•The memorized track name etc. that is selected appears in the
display when played. (Up to 32 alphanumeric characters.)
•When using SD audio on a SD Memory Card, a track only from
the default playlist can be selected or played.
], [ ] to select the track
Removing the CD
While paused
Press [ CD EJECT]
•The eject indicator appears in the display and the disc is ejected.
•When you press during play, the CD does not eject, a message
appears in the display and play continues.
Removing the SD Memory Card ( page 10)
•Remove after play has ended.
•The SD ACCESS indicator flashes when the SD Memory Card
is being accessed. Do not turn off the power or try to open the lid
and remove the card from the SD Memory Card slot while the
indicator is flashing. (Doing so may result in a loss of saved
data.)
Basic operations
13
RQT7114
Page 14

Basic function settings
Selecting TURNTABLE mode or
CD PLAYER mode
You can select to use the unit as a turntable, or as a CD player.
Basic operations
On the rear panel, switch [MODE] to either TURNTABLE
or CD PLAYER
TURNTABLE : A mode for DJ play, all functions are useable.
•Panel data ( page 19) set on this unit is memorized on this
unit.
•When using CD-R, CD-RW MP3 files, the total number of tracks
and total album number are not displayed. Confirm by switching to the CD PLAYER mode.
CD PLAYER:
The mode best suited for play as an audio player.
You can use DJ play functions excluding the following limited functions.
Limited functions
•Panel data cannot be automatically stored or read.
•The platter does not rotate. The platter slip surface cannot be
operated.
•The auto cue and cue bank functions do not work.
•The instant change function does not work.
Automatic settings immediately after switching modes
•The RESET lamp comes on and returns to normal play speed.
•DJ play functions like dynamic effect and so on are automati-
cally switched off.
Basic play operation ( page 12-13) changes
•In step 2, switch to the CD PLAYER side.
•In step 5, press [PLAY/PAUSE]
and play of the first track begins,
and once the end of track is
reached the PLAY/PAUSE lamp
goes out and play stops.
Display indicator when stopped
When using CD, SD Audio:
Total play time is displayed.
When using CD-R, CD-RW MP3 files:
The total number of tracks and
total number of albums are displayed.
•To start play
Press [PLAY/PAUSE].
•To stop play
Press [CUE STOP].
•To eject the CD
During play, you can also press the CD eject button to eject the
disc.
Total play time
(Hours, Minutes, Seconds)
Total number
of tracks
Total number
of albums
Instant play (INSTANT CHANGE)
When in the TURNTABLE mode and Instant Change is off, the sound
when starting and pausing is synchronized with the starting and stopping of the platter. When Instant Change is on, just like pressing [PLAY/
PAUSE] on a normal CD player, play is paused or starts instantly.
This is a feature specific to digital turntables.
Press [INSTANT CHANGE]
•The INSTANT CHANGE lamp lights.
•Pressing [INSTANT CHANGE] again will cancel the setting.
•The Instant Change on or off setting for each CD or SD Memory
Card is stored to memory, and the setting is restored once the set
media is re-inserted.
Using the FREE WHEEL mode
While in TURNTABLE mode
Press [PUSH]
•The platter drive motor stops. When play-
ing, the platter comes to a gradual stop,
and the sound playing is synchronized to
the platters movement.
•The strobo illuminator light goes out, and
the FREE WHEEL indicator flashes in the
display.
•You can press [PUSH] again to release.
•Turning the power off will erase the settings.
FREE WHEEL indicator
Adjusting the platter brake
While in TURNTABLE mode, you can adjust the brake speed for the
platter to come to a stop by pressing [PLAY/PAUSE] during play.
On the rear panel, turn [BRAKE]
S (Slow) direction : Slow stop
F (Fast) direction : Fast stop
Adjusting the auto cue level
When the Auto Cue function is on ( page 12), depending on the
track, the auto cue point may not be set at the point just before where
the audio begins. In this situation you can adjust the auto cue level.
1. Press and hold [•DISPLAY ANGLE –FUNCTION] for
more than 2 seconds until the display changes
2. Press [
LEVEL”
•“LEVEL –60 dB” appears in the display (initial settings example).
3. Press [– ], [+ ] and select the level:
•Select from –36 dB, –42dB, –48 dB, –54 dB, –60 dB, –66 dB,
–72 dB, –78 dB
•Sound that is lower than the set level is skipped as null sound.
4. Press [•DISPLAY ANGLE –FUNCTION]
•The selection is automatically set if you do not press [•DISPLAY
ANGLE –FUNCTION] within 5 seconds.
•The set auto cue level for each CD or SD Memory Card is stored
to memory, and the setting is restored once the set media is reinserted.
] and from the display select “AUTO CUE
14
RQT7114
Page 15

Platter operations
Platter slip
surface
Before use
•Switch [PLAY SELECT] to select the media to be used
•Turn [MODE] on the rear panel to TURNTABLE
•Insert the SD Memory Card or CD to be used
Changing play with your hand
Play on this unit is synchronized with the platter when Instant Change
is off. You can change the tempo using the platter slip surface.
Instant play
When Instant Change is off
1. While the platter slip surface is stopped, press [PLAY/
PAUSE]
2. Spin the platter slip surface when you want to start play
When Instant Change is on
Press [PLAY/PAUSE]
•For several seconds after the start of play the INSTANT CHANGE
lamp flashes and the tempo or audio play cannot be changed
even by operating the platter slip surface.
•You can also use the cue pad for instant play ( page 18)
Instant stop
When Instant Change is off
During play, hold and stop the platter slip surface, then
press [PLAY/PAUSE]
When Instant Change is on
During play, press [PLAY/PAUSE]
Use your hand to vary the platter slip surface
rotation speed
During play use your hand on the platter slip surface to
increase or decrease tempo.
•Increasing or decreasing the rotation speed of the platter slip
surface changes the tempo.
•The time display flashes and play sound does not change if the
platter slip surface is operated immediately after the disc is
loaded, or immediately after auto cueing.
•Sound may not be output if you turn the platter slip surface im-
mediately after pressing [ ], [ ] to skip a track.
•You cannot use the platter slip surface to move from the 1st track
back to the last track.
•When using CD-R, CD-RW MP3 files you cannot use the platter slip
surface to move backward to the previous track.
•You can also use [TEMPO] to change the tempo. ( page 16)
Basic play for DJs
Using the platter slip surface, you can improvise play with the platter
slip surface speed and direction of play using your hand.
Braking
Stop the platter slip surface with your hand during play
•The audio being played will stop corresponding to the speed of
the platter slip surface.
•Once you release the platter slip surface after you have stopped
play, the audio will begin to play corresponding to the speed of
the platter slip surface.
Spinning
Forcefully spin the platter slip surface faster than the
platter slip surface speed during play
•Play is controlled by the platter slip surface rotation speed.
•If you spin the platter slip surface too fast, the sound and the time
display will not keep pace.
Scratch playing
1. Press and stop the platter slip surface during play
•Play stops.
2. Turn the platter slip surface in the direction and speed
you want to play
•Play corresponds to the direction and speed of the platter slip
surface.
3. Release your hand from the platter slip surface
•Play returns to its original state.
•When pitch lock ( page 16) is on, the pitch does not change
even if you move the platter slip surface with your hand.
Advanced operations
Note
•In order to begin play from any state on this unit right away, the CD
is always rotating. Because of this there may be some noise that
occurs due to rotation, however this is not a malfunction.
•Switching [PLAY SELECT] during play or while paused, instantly
stops play, a “PLEASE WAIT !” message appears in the display,
and the unit returns to the beginning of the CD or SD Memory
Card.
•The time display flashes and [PLAY/PAUSE] does not function immediately after the media is loaded, or immediately after skipping,
searching or auto cueing.
15
RQT7114
Page 16

Changing tempo and direction of play
Tempo reset
Checking tempo
Press [RESET]
•The RESET lamp lights and play instantly returns to normal play
when playing.
•Tempo reset automatically turns off when the power is turned
off.
•The change in tempo
rate appears in the display.
•You can check the relative change in tempo when the strobo
light reflects on the three rows of strobo dots on the peripheral
edge of the platter when rotating.
Change in
tempo rate
Before use
•Switch [PLAY SELECT] to select the media to be used
•Turn [MODE] on the rear panel to TURNTABLE
•Insert the SD Memory Card or CD to be used
Changing tempo
You can change the tempo and pitch of the media being played.
1 When the RESET lamp is lit
Press [RESET] and the RESET lamp
goes out
Advanced operations
RESET lamp
2 Press [RANGE] to select the tempo
variation range
•Each time the button is pressed:
±8% ±16% ±33% ±50%
Strobo dots
a
b
c
When the dots appear to be stationary, the tempo setting
has changed about +3.5%.
When the dots appear to be stationary, the tempo is at
normal setting.
When the dots appear to be stationary, the tempo setting
has changed about –3.5%.
Note
The strobo dot illuminator is a synchronized and precise frequency
quartz illuminator (Red LED). Be sure to use this red LED as the basis
when checking tempo.
Strobo illuminator
Locking the pitch
You can change the tempo without affecting the pitch.
Press [PITCH LOCK]
•The PITCH LOCK lamp lights.
•Sound quality will change due to digital processing.
•Making a big adjustment to the rate of change in tempo may
cause the occurrence of digital noise.
•By rotating the platter slip surface with the pitch lock set to on,
you can play using the platter slip surface without changing the
original pitch.
•Pitch lock automatically turns off when the power is turned off.
16
RQT7114
•When playing CD-R, CD-RW MP3 files or SD audio, only
the ±8%, ±16% range can be selected.
•The larger the range number, the larger the change in tempo
when using [TEMPO].
•The selected tempo variation range lamp lights.
3 During play, use [TEMPO] to make ad-
justments
•Use the scale on the panel for making approximate adjust-
ments.
•The pitch will change with the tempo.
•When the power is turned off the range returns to ±8%.
Reverse play (Reversing the platter)
You can reverse play a track.
Set the play direction switch to REVERSE side
•The platter spins in reverse, and reverse play starts.
•Reverse play is synchronized with the platter, therefore it may
take time for it to come up to the normal rated speed. Use Instant Change to make quicker changes.
•The direction you increase or decrease tempo with your hand
on the platter slip surface is also reversed.
•You cannot reverse play from the 1st track back to the last track.
•You cannot perform reverse play beyond a track with MP3 files on
CD-R and CD-RW.
•When using reverse play, the start of play for cue pad play or loop
play that is longer than 15 seconds may be delayed ( page 18).
Page 17

Playing from memory
Before use
•Switch [PLAY SELECT] to select the media to be used
•Turn [MODE] on the rear panel to TURNTABLE
•Insert the SD Memory Card or CD to be used
Setting the cue point at any point
You can set a cue point at any point of a track and easily recall any
desired cue point.
You can save up to 10 cue points from one CD or one SD Memory
Card to cue bank memory.
1. Press [– + BANK] to select the
cue bank
•Once a point has been stored to a cue
bank (1-10), the cue bank number indicator in the display reverses display.
2. During play or while paused, press [REALTIME REC]
•All the SAMPLE PADS, CUE PADS 1-4 pad lamps and the CUE
lamp flash.
•Press [REALTIME REC] again to cancel.
3. Turn the platter slip surface to position play to start
just before the beginning of audio
•If the cue point is set at an audible point, the point immediately
following becomes the cue point.
•Make certain the platter slip surface is completely stopped.
4. Press [CUE STOP]
•The CUE lamp lights, the selected cue bank number reverses
display and is stored in memory.
•When the reverse displayed cue bank number is selected, it is
overwritten.
5. Repeat the above steps to store additional cue points
•The cue bank for each CD or SD Memory Card is stored to memory,
and the setting is restored once the set media is re-inserted.
(e.g.) cue point is stored
in memory
Setting the auto cue point
You can automatically set the auto cue point and pause just before
the beginning of the audio you want to play.
1 When Auto Cue is off
Press [•REMAIN -AUTO CUE] for more
than 2 seconds until “ ” appears
in the display
2 Perform track skip or play to move to
the beginning of the track you want to
set
•The unit pauses just before the
beginning of the track’s audio,
the CUE lamp lights and the auto
cue point is set.
•“ ” is displayed in the cue bank
display.
•After returning to the set point, the play point is moved in synchro-
nization with the platter slip surface. When you reverse the platter
slip surface with your hand and when the platter slip surface has
moved back to the previous track because of the brake setting,
pressing [PLAY/PAUSE] to begin play stops play again at the auto
cue point.
•The CUE lamp flashes several seconds immediately after setting
and platter slip surface operation may not be possible.
•Setting again erases previous auto cue points.
Storing the auto cue point to cue bank memory
1. Set the auto cue point ( indicated above)
•“ ” appears in the cue bank indicator display.
2. Perform step 1, 2, 4 in the Setting the cue point at
any point section (
•The selected cue bank number reverses display and is stored in
memory.
•If you do not select the cue bank, a “CUE BANK ERROR” mes-
sage appears in the display. Select the cue bank and re-set.
right side of page)
Play from the stored point
Before use:
•When using the auto cue point
When “ ” does not appear in the cue bank number display
Set the auto cue point ( left side of page)
•When using the cue point
Press [– + BANK] and select the desired cue bank
•Select the cue bank of the number indicator that has reversed in
the display.
•You cannot select “ ” by pressing [– + BANK].
Returning to the auto cue point, cue point
(Back cue)
When Instant Change is off
During play or while paused, stop the platter slip surface and press [CUE STOP]
•The unit returns to the set point, the PLAY/PAUSE lamp flashes
and play pauses.
•You cannot operate the platter slip surface for several seconds
immediately after back cueing.
•During play, pressing [CUE STOP] without stopping the platter
slip surface, will move the play point in synchronization with the
platter slip surface after having returned to the set point.
When Instant Change is on
During play or while paused, press [CUE STOP]
•During play, without stopping the platter slip surface the unit re-
turns to the set point.
•
Immediately following platter slip surface operation the INSTANT
CHANGE lamp flashes and after several seconds sound is output.
Advanced operations
17
RQT7114
Page 18

Playing from memory
Before use
•Switch [PLAY SELECT] to select the media to be used
•Turn [MODE] on the rear panel to TURNTABLE
•Insert the SD Memory Card or CD to be used
Play from the stored point
Play after back cueing
After performing back cue, press [PLAY/PAUSE]
•Play begins from the set point.
Advanced operations
Correcting the cue point
1. Perform back cue
2. Perform steps 2-4 in the Setting the cue point at any
point section again. (
•A new cue point is stored to memory.
page 17)
Storing to the CUE PADS and playing
You can store cue points to CUE PADS and immediately replay one
of those points by inserting the media and simply pressing the appropriate pad.
Playing from the CUE PADS
Press one of the lit [CUE PADS 1-4]
•Even if you are playing, play immediately begins from the point
stored to the CUE PADS .
When paused in the TURNTABLE mode, the platter begins to
turn and play.
•During play of the CUE PADS, if you press the same pad again,
play will repeat from the beginning of the memorized point.
•During play of the CUE PADS, if you press a different pad, play
will switch to the selected pad.
Stopping cue pad play
Press [PLAY/PAUSE]
•The PLAY/PAUSE lamp flashes and play pauses.
Store desired points to memory and
play (loop play)
During media play you can set any 2 desired points to loop play.
Creating a loop
1. During play, press LOOP [IN] at the desired point
•LOOP IN lamp lights.
•Press LOOP [IN] again to set again.
•After pressing LOOP [IN] you can cancel settings by pressing
[EXIT/RELOOP].
To set in real time
Press LOOP [IN] to set the desired point
To set manually
1. Stop the platter slip surface at the desired point
2. Press LOOP [IN]
To set using the cue point transferred from memory
1. Select the cue bank and back cue
2. Press LOOP [IN]
2. During play press LOOP [OUT]
Repeat step 1 above to set.
•The LOOP OUT and IN lamp flashes, and play begins looping
between the loop in point and the loop out point.
•Turn off Auto Cue before setting or playing a loop beyond a track.
•When setting the loop setting again, perform the above steps after
canceling loop play by pressing [EXIT/RELOOP].
•You can also control the platter slip surface and make tempo ad-
justments etc. during loop play.
•During loop play, looping is released when you have exceeded the
loop range using the skip or search button.
•The loop points for each CD or SD Memory Card are stored to
memory, and the settings are restored once the set media is reinserted.
18
RQT7114
Storing to the CUE PADS in real-time
1. During play or while paused, press [REALTIME REC]
•All SAMPLE PADS, CUE PADS 1-4 pad lamps and CUE lamp
flash.
•Press [REALTIME REC] again to cancel.
2. At the desired point, press one of the [CUE PADS 1-4]
•The play point selected is stored in memory. The previously stored
data is erased if it exists.
•The selected pad lamp lights.
•The CUE PADS data for each CD or SD Memory Card is stored to
memory, and the setting is restored once the set media is re-inserted.
Loop release (Cancel)
During loop play, press [EXIT/RELOOP]
•Play continues without returning to loop play even when the loop
out point is reached.
•The LOOP IN, OUT lamps change to stationary lights.
Re-loop (Returns to a loop)
After releasing a loop, press [EXIT/RELOOP] during play
•Returns to the loop in point previously set and begins loop play
again.
When using CD-R, CD-RW MP3 files
•When you reverse play while using cue point, cue pad or re-loop,
reverse play is not effective beyond the set starting point.
Page 19

Note
Storing panel data to this unit (TURNTABLE mode only)
•The unit stores following panel data for each CD or SD Memory
Card. It can store data for up to 50 CDs or SD Memory Cards.
•Auto Cue on, off and auto cue level
•Cue bank •Instant change
•Loop in, Loop out •Cue pad 1-4
•Dynamic effect •Vinyl simulator
•If the unit’s memory exceeds 50 CDs or SD Memory Cards worth
of data items, a message indicating replacement appears in the
display and data items will be overwritten and replaced in the order of the oldest used first.
•You can save this panel data for each CD or SD Memory Card to
a SD Memory Card. ( page 21, Saving to a SD Memory Card)
•In CD player mode, panel data cannot be automatically stored or
read.
Automatic read when media inserted (TURNTABLE mode only)
•When media with recorded data is inserted into the unit, the set-
tings are automatically read.
While the unit is reading the media, each of the lamps for the cue
pad 1 to 4, CUE, LOOP IN, and OUT flash rapidly, and are set in
order. Pushing the cue pad, or the CUE or loop play buttons while
the lamp is flashing rapidly will give that pad or button priority to be
set, and then played. The start of play may be delayed.
When reading has completed, the lamps stop flashing, and remains
lit.
MP3 files on CD-R and CD-RW, or SD audio take more time to
read than CD audio. Use only once the lamp has stopped flashing
and remains lit after pressing the cue pad, or the CUE or loop play
buttons.
•The lamps may flash rapidly while the media is being read even
when carrying out other operations.
•Removing the media, or switching [PLAY SELECT] erases the set-
tings, however re-inserting the media restores the settings.
Recording to the SAMPLE PADS and
playing
You can record audio to the sample pads for replay.
You can record up to a maximum total of 32 seconds using SAMPLE
PADS 1-4.
Recording to the SAMPLE PADS in real-time
1. Press [REALTIME REC] while media is being played
•All SAMPLE PADS, CUE PADS 1-4 pad lamps and CUE lamp
flash.
•Press [REALTIME REC] again to cancel.
2. Press one of the [SAMPLE PADS 1-4] and recording
starts
•The selected SAMPLE PADS lamp flashes.
• indicator changes to in the display.
•Previous pad data is erased at the start of recording if it exists.
•Recording automatically ends when the pads total recording time
reaches 32 seconds.
3. At the end point press the same sample pad again
•The SAMPLE PADS lamp changes to a stationary light and re-
cording ends.
• indicator reverts back to in the display.
•You can also control the platter slip surface and adjust the tempo
during recording.
•You can also edit sample pad data. ( page 20)
•Recorded sample pad data is erased when the power is turned off.
To avoid losing data you can save to the SD Memory Card. (
page 21, Saving to a SD Memory Card)
Playing from the SAMPLE PADS
Press one of the lit [SAMPLE PADS 1-4]
•The lamp of the pad you pressed begins to flash and play begins.
•During play, if you press one of the lit sample pads, dual play
begins and mixed sound is output. You can perform dual play
using up to 2 sample pads.
•Once the end of the play is reached the SAMPLE PADS lamp
changes to a stationary light. Play ends if you press the pad
again during play.
•When playing only the sample pad, the platter slip surface does
not rotate even in the TURNTABLE mode.
•When playing media, you can mix sound by also playing the sample
pad. Sound may become distorted depending on the audio level.
You can adjust the sample pad level. ( page 20, Editing the
SAMPLE PADS)
Select play mode and play
1. Press [SAMPLE EDIT] and select “PLAY MODE SELECT”
•Play mode selection is not possible when nothing has been re-
corded to the sample pad.
Each time you press the button:
START END
START : (Edit the data starting point)
END : (Edit the data ending point)
LEVEL : (Edit the volume level)
PLAY MODE SELECT : Selects the play mode
EDIT WRITING OK? : (Select to store to memory or not)
LEVEL
PLAY MODE SELECT
EDIT WRITING
OK?
2. Press one of the recorded sample pads
•The selected sample pad flashes and play begins.
3. Press [– ], [+ ] to select the play mode
•The play mode indicated in the display changes each time you
press the button.
ONE SHOT & REPLAY ONE SHOT & STOP LOOP
ONE SHOT & REPLAY :
Plays from the start and ends once the end of play is reached.
During play, press again and play begins from the start.
ONE SHOT & STOP :
Plays from the start and ends once the end of play is reached.
During play, press again and play stops.
LOOP :
Plays from the start, and after reaching the end of play, play
continues from the beginning again. Press again and play
stops.
•Repeat steps 2-3 above to set other pads.
4. Press [MEMORY]
•“COMPLETED” appears in the display and the play mode is saved
on the main unit.
•The sample pad lamp light comes back on.
5. Press the same sample pad to play
•Play starts with the selected play mode.
•If you don’t want to store to the main unit’s memory, press
[SAMPLE EDIT] and select “EDIT WRITING OK?” and press [+ ]
to select “NO” from the display.
Erasing cue pad, sample pad, loop
play data
1. Until “DATA ERASE OK?” appears, press one of the
lit pads or buttons (longer than 2 sec.) cue pads 1-4,
sample pads 1-4, LOOP [IN] or [OUT].
2. Press [–
•During play, audio play stops.
•“COMPLETED” appears in the display and the data of the but-
ton you selected is erased.
•The selected button lamp goes out.
•Pressing [+ ] to select “NO” cancels the operation and re-
turns to the original display.
] and select “YES” from the display
Advanced operations
19
RQT7114
Page 20

Changing the sound
Before use
•Switch [PLAY SELECT] to select the media to be used
•Turn [MODE] on the rear panel to TURNTABLE
•Insert the SD Memory Card or CD to be used
Changing sound to simulate analog
You can change CD or SD Memory Card audio to simulate an analog
turntable.
1 Press [VINYL SIM]
•The VINYL SIM lamp lights.
•During play, the sound changes to the type that has been
set.
2 To select the type
Press [– + TYPE] to select the type
Advanced operations
•Analog simulation type: TYPE 1 to TYPE 8
1 SL1200: Like using a SL1200 analog turntable
2 MAKE UP: Like using a cartridge that emphasizes high
3 WIDE RANGE: Like using a cartridge with wide range char-
4 VIVID: Like using a cartridge with vivid characteristics
5 LOW RANGE: Only low range sound is output producing
6 HIGH RANGE: Only high range sound is output producing
7 OLD RADIO: Like listening to an old radio
8 TELEPHONE: Like speaking on an analog telephone
•If no buttons are pressed for more than 5 seconds, the dis-
play returns to its original state.
•This feature simulates the fine acoustic characteristics of an ana-
log turntable’s cartridge. Depending on the external equipment
connected, the difference between analog simulation types may
be difficult to notice.
•You can use together with DYNAMIC FX.
•Press [VINYL SIM] again to cancel.
•The set type for each CD or SD Memory Card is stored to memory,
and the setting is restored once the set media is re-inserted.
Change sound with combined performance
You can change the sound when using the platter slip surface.
1 Press [DYNAMIC FX]
•The DYNAMIC FX lamp lights.
20
RQT7114
•During play, the sound changes to the type that has been
set.
and low range sounds
acteristics
a muffled sound
a crisp sound
2 To select the type
Press [– + TYPE] to select the type
•Special effect types: TYPE 1 to TYPE 8
1 ONE WAY: Generates sound only when the platter slip
surface is operated in the forward direction.
2 TT DIST: Distorts the sound. The depth of the distortion
can be changed using the platter slip surface.
3 TT WAH: Introduces a Wah Wah effect.
4 AIR HAMMER: Changes the sound intermittently
5 TT PAN: Changes the sound image from left or right by
use of the platter slip surface.
6 AUTO PAN: Automatically rolls the sound image from left
or right and back.
7 CRUSH RING:
8 RING STORM: Sound simulates ringing of the wind.
•If no buttons are pressed for more than 5 seconds, the dis-
play returns to its original state.
•Effects are different in the CD PLAYER mode, and there are also
some effect types that are not output unless the platter slip surface
is being rotated.
•You can use together with VINYL SIM.
•Press [DYNAMIC FX] again to cancel.
•The set type for each CD or SD Memory Card is stored to memory,
and the setting is restored once the set media is re-inserted.
Distorts the sound. The speed of distortion can
be changed by using the platter slip surface.
Editing the SAMPLE PADS
You can edit the start point or end point and volume of data recorded
to SAMPLE PADS.
1 Press [SAMPLE EDIT] and select the
item to be edited
Each time you press the button:
START END
START : Beginning of data segment (START lamp indicator lights)
END : Ending of data segment (END lamp indicator lights)
LEVEL : Volume (START and END lamp indicators light)
PLAY MODE SELECT : (When selecting the play mode)
EDIT WRITING OK? : (Select to store to memory or not)
LEVEL
PLAY MODE SELECT
EDIT WRITING
OK?
2 Press one of the recorded [SAMPLE
PADS 1-4]
•The selected sample pad plays and the sample pad lamp
flashes.
3 Press [– + TRIM] to change the data
•Time or level appears in the display.
•Smallest unit of adjustment
START, END : 1 frame (1 sec. per 75 frames)
LEVEL : 1 dB (–24dB to + 24 dB)
•Pressing selected sample pads while editing confirms
changes.
•Sound may be distorted if the LEVEL is too high.
•If data is trimmed and stored, you cannot restore to the origi-
nal length.
4 Modifying other data
•Perform steps 1-3 indicated above.
5 Storing to memory
Press [MEMORY]
•“COMPLETED” appears in the display and all sample pad
data is stored.
•The selected sample pad lamp lights and the lamp of the
edit item goes out.
Not storing to memory
Press [SAMPLE EDIT] to select “EDIT
WRITING OK?”,
And press [+ ] to select “NO” from
the display
•The lamp of the selected sample pad changes to a station-
ary light, and the original data is returned.
•Pressing [– ] to select “YES” from the display will store
to memory.
Page 21

Saving to a SD Memory Card, Recalling
Before use
•Switch [PLAY SELECT] to select the media to be used
•Insert the SD Memory Card or CD to be used
Saving to a SD Memory Card
You can save sample pad 1-4. You can also save panel data for each
CD or SD Memory Card from this unit to a SD Memory Card.
1 Insert a SD Memory Card ( page 10)
•You will not be able to save to the SD Memory Card if the
write lock switch is set to LOCK on the SD Memory Card.
Release the lock and re-insert.
2 Save the data
1. Press SD CARD [SAVE]
•The SAVE lamp lights. “SD SAVE” screen appears in the
display.
2. Press [S.PADS, PANEL] to select the mode
Each time you press the button:
S.PADS PANEL
S.PADS : Sample pad 1-4 data (S.PADS lamp lights)
PANEL : Can only select in TURNTABLE mode
Panel data such as cue pad data etc.
(PANEL lamp lights)
3. The PANEL mode file name is automatically assigned by the unit.
When only using S.PADS mode
Press [– + BANK] to select the file
•Press and hold [– + BANK] to load in high speed.
•Display of the selected file is reversed.
(File example) 001ABCDE, 002FGHIJ...
•You can give a name to a file.
( right side of page, Giving a name to the sample pad file)
•Press [SAVE] again to cancel.
4. Press [EXECUTE] to begin
•If “REPLACE OK?” appears in the display ( bottom
of page)
•Saving of data begins, “NOW SD SAVING” appears in the
display. Saving sample pad data to a SD Memory Card
may take up to 50 seconds.
•The SAVE lamp goes out once saving has finished and
“COMPLETED” appears in the display.
When “REPLACE OK?” appears in the display while saving
The selected sample pad file already has data.
To overwrite, select “YES” by pressing [– ] from the display.
To not save, select “NO” by pressing [+ ] from the display.
Note
•You can only save panel data when you have inserted the CD or
SD Memory Card for which that data has been stored.
•Pressing [SAVE] during play displays a warning message and play
continues.
•The panel data file name is automatically assigned by this unit.
Automatic loading on this unit ( page 22) may not work if you
use a computer to change the panel data file name saved on a SD
Memory Card.
•If you save the panel data for the same media previously set to a
SD Memory Card, the previously saved data is overwritten. If you
save CD panel data and don’t want to overwrite, you can use a
new SD Memory card to save.
Sample pad file names
•(Example) 001ABCDE
First 3 digits: Can be numbers between 001-999 (Un-changeable)
(The maximum number of files is 999 files.)
Last 5 digits: File name (Changeable)
•File names will become blank if there is no data in the file.
•Files without names will be saved as “_” (underbars).
Giving a name to the sample pad file
You can give a name to the sample pad file when saving to the SD
Memory Card.
After selecting the file in step 3 on the left, Save the data
1. Press [+ ] to select “NAME” from the display
•The “NAMING” screen appears in the display.
2. Press [ ], [ ] and select the character to change
•The selected characters (only last 5 digits) become reverse dis-
played.
3. Press [– ], [+ ] to select the input characters
•Press and hold [– ], [+ ] for high speed search.
•Characters that can be input
_
A B C D E F G H I J K L M N O P Q R S
T U V W X Y Z 0 1 2 3 4 5 6 7 8 9
•Press [SAVE] again to cancel.
4. Repeat steps 2-3 to give the file a name (only last 5
digits)
5. Press [EXECUTE] to save
Deleting sample pad files
You can delete sample pad files saved on a SD Memory Card.
After selecting the file in step 3 on the left, Save the data
1. Press [– ] to select “DEL” from the display
•“SD DELETE” screen appears in the display.
2. Press [EXECUTE] to perform deletion
•Files with no data cannot be deleted. Trying to delete them will
result in a “FILE SELECT ERROR” message being displayed.
Deleting panel data saved on a SD Memory Card
If the SD Memory Card has become full and you can no longer save
panel data, you can delete the panel data on the SD Memory Card
corresponding to the inserted media.
After selecting “PANEL” in step 2 on the left, Save the data
Press [– ] to select “DEL” from the display
•The panel data on the SD Memory Card is deleted.
•If the panel data corresponding to the currently inserted media
does not exist on the SD Memory Card, “DEL” is not displayed
and the panel data cannot be deleted.
Data saved to a SD Memory Card
S.PADS mode (1 Bank: MAX. 5.4 MB)
MB means one million bytes.
•Maximum of 32 seconds data from SAMPLE PADS 1-4
PANEL mode
•Auto Cue on, off and auto cue level
•Cue bank •Instant change
•Loop in, Loop out •Cue pad 1-4
•Dynamic effect •Vinyl simulator
Other functions
21
RQT7114
Page 22

Saving to a SD Memory Card, Recalling
Formatting the SD Memory Card
All data is erased and the SD Memory Card is formatted. Useable
capacity will be less. Useable capacity may differ from that indicated
on the media.
Use only when you want to erase all files or when there is data
on the card that cannot be read.
1 Insert the SD Memory Card ( page 10)
2 Hold down SD CARD [SAVE] for more
than 5 seconds until “FORMAT OK?”
appears in the display
•Press [SAVE] again to cancel.
3 Press [EXECUTE] to proceed
•“COMPLETED” will appear on the display. All data is erased
and the card is formatted.
•If “FORMAT ERROR” appears in the display, this SD Memory
Card cannot be formatted.
Recalling (loading) data saved on a
SD Memory Card
Panel data automatic loading (TURNTABLE mode only)
The unit automatically loads panel data for each CD or SD Memory
Card to its memory from the SD Memory Card.
1. Switch [PLAY SELECT] to select the media to be used
and turn the MODE switch on the rear panel to TURNTABLE side
2. Insert the SD Memory Card containing saved panel
data
3. If the media corresponding to the saved panel data is
a CD, insert the CD
•If the same media data exists on the SD Memory Card and in
the unit’s memory, the SD Memory Card takes precedence and
the unit’s memory is overwritten.
If you do not want to replace data in the unit’s memory, save to a
SD Memory Card in advance.
Regarding MP3 albums and SD audio
Selection and play order of tracks within an MP3
album
•For MP3 tracks on CD-R and CD-RW, play proceeds folder by
folder in the sequence of folder number order.
Play order
Naming folders and files
Root
001
002
003
At the time of recording, give folders
and file names with 3-digit prefixes
in the order you want to play them.
001ABCDE.mp3
002FGHIJ.mp3
003KLMNO.mp3
004PQRST.mp3
001A_123.mp3
002FG_12.mp3
003KLM_1.mp3
001VWXYZ.mp3
1st track
2nd track
3rd track
4th track
5th track
6th track
7th track
8th track
Loading sample pad data
You can recall sample pad 1-4 data saved on a SD Memory Card.
1 Insert the SD Memory Card containing
Other functions
saved data ( page 10)
2 Load the file
1. Press SD CARD [LOAD]
•The LOAD lamp lights. “SD LOAD” screen appears in the
display.
•The S.PADS lamp lights.
2. Press [– + BANK] to select the file
•Press and hold [– + BANK] to load in high speed.
•Display of the selected file is reversed.
(File example) 001ABCDE, 002FGHIJ...
•Press [LOAD] again to cancel.
3. Press [EXECUTE]
•The media begins to load, “NOW SD LOADING” appears
in the display. Loading may take up to 25 seconds.
•The LOAD lamp goes out once loading has finished and
“COMPLETED” appears in the display.
•Pressing [LOAD] during play, displays a warning message and play
continues.
•Previous sample pad data is erased from memory on this unit once
loaded.
Folders can be created within folders, however
the play may not proceed in the correct order.
•Only MP3 files are playable when there are files other than MP3
files on the CD-R, CD-RW containing the MP3 files.
However, when there is normal audio data (CD-DA) and MP3
files mixed on the same disc, only audio data can be played.
Folders that do not contain MP3 files are skipped.
Creating MP3 files for play on this unit
•The format used for CD-R, CD-RW is ISO9660 level 1, or level 2.
•When creating on a computer etc, give folders and files names
using numeric and alphabetic characters.
•Read the operating instruction manual if using MP3 file creation
software on your computer. Depending on the type of recording,
some MP3 files may not be playable.
•Only ID3 tag track titles are displayable on this unit.
V1, V1.1 (Up to 32 alphanumeric characters.)
•This unit is compatible with multi-sessions. When there are many
sessions, it may take some time for play to begin, therefore we
recommend reducing the number of sessions to a minimum.
•You cannot play a file that was recorded with packet write.
•This unit is not compatible with HighMATTM.
Creating SD audio for play on this unit
Record tracks to a SD Memory Card using only the “SD JUKEBOX” application for recording SD audio for your PC, and a USB
reader-writer (all sold separately).
•This unit is not compatible with the WMA format.
22
RQT7114
Page 23

Using with other equipment
Before use
•Switch [PLAY SELECT] to select the media to be used
•Turn [MODE] on the rear panel to TURNTABLE
•Insert the SD Memory Card or CD to be used
Start play using the mixer’s fader
You can instantly start play from the auto cue point or cue point on this
unit using the mixer’s fader by connecting this unit to the control terminal of a DJ mixer using a control cable connection. ( page 8)
Before use :
•Adjust buttons and control knobs of CH1 and CH4 on the DJ mixer
so mixed sound is output from the master output.
•Turn the DJ mixer’s FADER START CH1 and CH4 to on.
•On unit 1 or 2, set the auto cue point or set the cue point and select
the cue bank.
Starting with the channel fader
(e.g.)
When the fader operation switch on the DJ mixer is set to NORMAL
1. On the DJ Mixer, change the C.FADER ASSIGN A
switch to other than 1 and change the C.FADER ASSIGN B switch to other than 4
Push the CH1, CH4 channel fader all the way to the bottom
2.
3. During play or while paused on unit 1 or 2, press
[CUE STOP] (Back cue)
•Returns to the set point and pauses.
4. When you want to start play, push the CH1 or CH4
channel fader up
•At the same time, play begins from the set point on unit 1 or 2.
•
After you return the channel fader to its original position, unit back cues,
and pauses after returning to the set point.
Starting with the cross fader
(e.g.) When the cross fader operation switch on the DJ mixer is set to
NORMAL and to start play on CH1
1. On the DJ Mixer, change the C.FADER ASSIGN A
switch to 1 and change the C.FADER ASSIGN B
switch to 4
2. Push the cross fader all the way toward CH4 (
3. During play or while paused on unit 1, press [CUE
STOP] (Back cue)
4. When you want to start play, push the cross fader in
the opposite direction indicated in step 2, towards
CH1 ( )
•At the same time, play begins from the set point on unit 1.
)
•You can alternate play by back cueing unit 2 connected to
CH4.
Push the cross fader all the way toward CH4 Play CH4
CH1 Back cue
Push the cross fader all the way toward CH1 Play CH1
CH4 Back cue
Using two units for relay play
You can relay play by connecting the control terminals of the two units.
( page 9)
Before use:
•Turn Auto Cue on for both units, set the auto cue point for the track
to be played and back cue.
Press [PLAY/PAUSE] on the unit to be
played first
•Once track play finishes on the unit being played, play auto-
matically begins from the unit on standby.
•The unit that was played first pauses and cues at the next track’s
auto cue point.
•You can automatically alternate play between both units by repeat-
ing this method.
•You can listen to many different tracks by changing the media and
selecting the track of the unit in the standby position.
•Set the cue point, select the cue bank and back cue on the standby
unit to begin relay play from the desired point of the desired track.
Note
•During play, if power on one of the units is cut or turned off, play
may begin on the other standby unit.
•You cannot use fader start and relay play at the same time.
Using the amplifier and other equipment
Connect with the matching input terminals on the equipment (not included). ( page 9)
•When using this unit’s DIGITAL OUT terminal, SD Audio is not out-
put.
1 Put the equipment on standby
2 Press [PLAY/PAUSE] to play
•Audio played from the connected equipment is output.
Other functions
23
RQT7114
Page 24

Using with other equipment
4 On unit 2 (track B),
Stop the platter slip surface and press
[CUE STOP] to return to the cue point
5
Match with track A again, on unit 2 (track B)
Press [PLAY/PAUSE] and play track B
6 Checking the audio through the moni-
tor (headphones), gradually slide the
mixer’s cross fader towards the CH4
side
•Track B audio is mixed with track A audio from the speaker
and output.
•When the cross fader has been completely moved to the
CH4 side, the transition from track A to track B is complete.
Unit’s initialize memory function
Before use
•Switch [PLAY SELECT] to select the media to be used
•Turn [MODE] on the rear panel to TURNTABLE
•Insert the SD Memory Card or CD to be used
Linking different tracks
(e.g.) Using the DJ Mixer, link track A that is currently being played
with track B that will be played next.
Before use:
•Connect main unit 1 (track A) with DJ mixer CH1 and main unit 2
(track B) with CH4. ( page 8)
•Adjust buttons and control knobs of CH1 and CH4 on the DJ mixer
so mixed sound is output from the master output.
(Refer to the DJ mixer’s operating instructions.)
•Push the cross fader to the CH1 side to play track A.
(Only track A audio is output from the master output (speaker).)
1 Cue track B using the DJ mixer moni-
tor (headphone)
(Refer to the DJ mixer’s operating instructions.)
•Search for the track’s cue point (first beat) and set the cue
point.
Other functions
Initializing this unit’s memory
You can re-initialize all memory content on this unit, restoring it to
factory settings.
Re-initializing will erase the following memory.
•Cue bank, cue pad, loop play
•Vinyl simulator, dynamic effect settings
•Auto Cue on, off settings and auto cue level settings
•Instant change settings
50 CDs or SD Memory Cards worth of data items of the above indicated media data.
•Display angle, display contrast settings
When the power is off
While holding down [SAMPLE PADS 1] and [SAMPLE
PADS 4], press [POWER
on, and release [SAMPLE PADS 1] and [SAMPLE PADS
4] after “INITIALIZED” appears in the display
•All memory content is re-initialized.
•The display returns to its original state and you can begin operat-
ing.
OFF ON] to turn the power
Glossary
24
RQT7114
2 Match with track A being played on the
speaker, on unit 2 (track B)
Press [PLAY/PAUSE] to play track B
•Track A is only output on the speaker, track B is output from
the monitor headphones.
3 Adjust [TEMPO] on unit 2 (track B) and
match the BPM (beats per minute) on
track A and track B by listening
•Use [TEMPO] on unit 2 (track B)
to adjust track B’s BPM value to
approximately match the BPM
value of track A indicated in the
display.
BPM
•SD Audio
An audio standard for SD Memory Cards. An encryption technology is
used in order to protect copyrights and the legal rights of the consumer as well as help develop a healthy music culture. There are
restrictions upon the copying of data etc. Use an application like SDJukebox etc. for creating data.
•Cue
Used to begin play. On this unit the cue point is used to store the
beginning of a track or an arbitrary point of a track to memory and
then to instantly begin play from this point.
•Platter slip surface
The rotatable surface on an analog turntable which you place a record.
Although this unit is a digital turntable, play functionality is the same
as when operating a platter slip surface on an analog turntable.
•MP3 album
When creating multiple MP3 files on a computer and writing to a CDROM, you can organize the files using folders. These folders are called
albums on this unit. When you want to play tracks in sequential order
on this unit, use numbers like 001 and 002 etc. for naming the albums. ( Page 22)
Page 25

•AAC
A compression standard that makes recording and play of high quality audio possible including MPEG2 (an international standard). Used
in SD Audio and broadcast satellite digital signals.
•MP3
MP3 is the abbreviated form of the international standard MPEG1/
Audio Layer3. MP3 allows you to achieve approximately ten to one
compression rates with bit rates of 128 kbps. MP3 is used widely with
SD Audio, CDs, and computers.
•Sampling frequency
The number of samples taken approximately each second when an
audio signal is digitally converted and stored in memory. The higher
the value the wider the frequency range can be used for digital conversion thus providing near original audio quality reproduction, however the resulting size of the audio data does become quite large.
•Bit rate
A value that indicates the audio signal compression rate. Indicates
the number of bits sampled approximately each second, the larger
the bit value the more information is contained resulting in better audio quality, however the size of the audio data does become quite
large.
Concerning CDs
With this system, you can only play CDs having this
mark.
•Do not use irregularly shaped CDs. (May
result in damage to your equipment.)
•Use discs that display the logo mark indi-
cated above, or conform to the Compact
disc digital audio standard. The disc may
not play properly if you are using a nonstandard conforming disc.
•For CDs with greater than 80 minutes total play time, the portion
beyond 80 minutes cannot be played on this unit.
•Depending on the CD, there may be apparent noise or the total
number of tracks may not be read properly. In either case, try reinserting the CD.
•Recorded music CDs that are partially or fully translucent may not
be usable with this unit.
•Do not use CDs that are dirty.
Note about using a DualDisc
•The digital audio content side of a DualDisc does not meet the
technical specifications of the Compact Disc Digital Audio (CDDA) format so play may not be possible.
•Do not use a DualDisc in this unit as it may get scratched or scraped.
Handling SD Memory Cards
When handling SD Memory Cards
Avoid the following:
•Altering or disassembling the SD Memory Card
•Striking, bending, dropping, or getting water on the SD Memory
Card
•Touching the metal connectors with your fingers or with metal objects
•Peeling off attached labels
•Attaching new labels or stickers
Storage
•Always put the SD Memory Card back in its case.
•Do not store in potentially high temperature locations such as within
cars, or in areas open to direct sunlight.
•Do not place in locations subject to high humidity or dust.
•Do not place in areas subject to caustic gases.
Protecting important data
•Set the write protect switch to the
LOCK position. Release the lock when
storing new data.
•If there is a space for writing a note on
the SD Memory Card, use a felt pen
(oil based) for writing. Do not use a pencil or ball point pen. Loss of
data may result if the SD Memory Card is damaged.
•Do not remove the AC power supply cord while the unit power is
on (When the units display is on) or loss of data may result.
•Do not remove the SD Memory Card from the unit during play.
Loss of data may result.
Rear
side
Write Protect
Switch
Handling precautions
•If you are taking the CD from a cold to a warm environment, mois-
ture may form on the CD. Wipe this off with a soft, dry, lint-free
cloth before using the CD.
•Do not write on the label side with a ball-point pen or other writing
instrument.
•Do not use record cleaning sprays, benzine, thinner, static elec-
tricity prevention liquids or any other solvent.
•Do not attach labels or stickers to CDs. (Do not use CDs with ex-
posed adhesive from tape or left over peeled off stickers.)
•Do not use scratch-proof protectors etc.
•Do not use CDs printed with label printers available on the market.
How to hold CDs
Do not touch the
recorded surface.
Suitable SD Memory Cards
You can use SD Memory Cards with the following capacities (from
8 MB to 1 GB).
8 MB, 16 MB, 32 MB, 64 MB
128 MB, 256 MB, 512 MB, 1 GB (Maximum)
Please confirm the latest information on the following website.
http://panasonic.co.jp/pavc/global/cs
(This site is in English only.)
•If the SD Memory Card is formatted on other equipment, the time
spent for recording may become longer. Also if the SD Memory Card
is formatted on a PC, you may not be able to use it on this unit.
In these cases, format the card on this unit.
•This unit supports SD Memory Cards formatted in FAT12 system
and FAT16 system based on SD Memory Card Specifications.
•SD logo is a trademark.
•MPEG Layer-3 audio decoding technology licensed from
Fraunhofer IIS and Thomson multimedia.
How to clean CDs
The recorded surface
Wipe from inside outward.
Storage precautions
Be sure to store CDs in their cases to protect them from dust, scratches,
and warping.
Do not place or store CDs in the following places
•Locations exposed to direct sunlight
•Humid or dusty locations
•Locations directly exposed to a heat vent or heating appliance
•In the glove compartment or on the rear deck of an automobile
Reference
25
RQT7114
Page 26

Q&A (Frequently asked questions)
Connecting
Other
Devices
CD
Question
How do I connect an analog player?
How do I connect speakers?
How do I record through an optical digital connection?
Can I use a multimedia card (MMC) or a memory
stick?
Can I play DVD-Video or a CD video?
Can I play CD-R and CD-RW which contains MP3
data?
An analog player cannot be connected directly. It must be connected through a DJ mixer.
Speakers cannot be connected directly. Speakers must be
connected through DJ Mixer or amplifier.
There is no optical digital output terminal on the unit. A connection cable can be used to connect to the DIGITAL OUT
terminal on the unit.
No. Use a SD Memory Card only.
No.
Yes. However, play may not be possible on some discs depending on the state of recording.
Some functions are not operational.
Answer
Troubleshooting guide
Before requesting service, make the below checks. If you are in doubt about some of the check points, or if the remedies indicated
in the chart do not solve the problem,
refer to the “Customer Services Directory” on back cover if you reside in the U.S.A., or refer to the “Product information” on page 2 if
you reside in Canada.
Problem
General
CD
SD audio
Operation
Reference
•Sometimes the BPM value and the CD memory value differ. This is because the method for measuring the BPM value is different, and
it is not due to a defective or malfunctioning unit.
Left and right audio is reversed.
A “Humming” sound is
heard during play.
No sound comes out of
one speaker.
Sound is distorted and or
noise is being emitted.
There is interference to
TV or FM reception.
“NO CD AUDIO TRACK”
appears on the display
when a CD is inserted.
The unit does not play
when the Play button is
pushed.
There is noise or certain
points on the disc cannot
be played properly.
CD does not eject after
pressing the CD EJECT
button.
“NO SD AUDIO TRACK”
appears on the display
when a SD Memory Card
is inserted.
The platter does not rotate.
Back cue does not work
when the CUE button is
pressed during play.
Loop play does not work
when the LOOP OUT button is pressed.
The last panel data set on
this unit is replaced when
you insert the corresponding media.
Are the left and right stereo cables reversed?
Are connection cables too close to the AC
power supply cord or a fluorescent light?
Is the stereo connection cable not connected?
Are the output cables properly connected?
Is the unit is causing the TV or FM interference?
Is the CD is inserted upside down?
Are you using a non-standard CD?
Is the CD dirty?
Has the unit been suddenly moved from
a cold to a warm or hot location, resulting
in an abrupt change in temperature?
Is the CD dirty?
When in the TURNTABLE mode you cannot eject the disc during play.
Is the music file you inserted not SD audio?
Are you using the FREE WHEEL mode?
Is the CD PLAYER mode selected?
Is the cue point set?
Is the loop in point (start point) set?
Have you inserted a SD Memory Card
that already has the panel data for the
corresponding media? In this case the SD
Memory Card takes precedence and the
panel data stored to the unit’s memory is
replaced with the setting on the SD
Memory Card.
Cause
Connect the stereo cables properly, left to
left, right to right.
Move the unit away from the other electrical
equipment.
Connect the stereo connection cable properly.
Connect with the DJ mixer’s LINE input terminals. Do not connect to the PHONO terminal.
Turn the unit power off or distance the unit
from the TV or FM tuner.
Insert the CD with the label-side facing up.
Replace with a standard conforming CD.
Wipe the CD clean with a soft cloth.
Moisture may form on the lens.
Wait about an hour and try playing again.
Wipe the CD clean with a soft cloth.
Eject the disc after stopping or pausing.
If forced disc ejection does not work, contact your nearest dealer.
Record tracks using the SD audio recording
application for the PC (sold separately).
Press the PUSH button to release.
Switch the MODE switch on the rear panel
to the TURNTABLE side.
Set the cue point.
Set the loop in point and loop out point to
create the loop.
When updating the unit’s memory etc., and
when panel data is necessary, save to the
SD Memory Card in advance.
Solution
Reference
page
8
9
9
10, 12-13
25
12
Reference Page
8 - 9
—
8 - 9
8 - 9
—
10
25
—
25
10
22
14
14
17
18
22
26
RQT7114
Page 27

Error messages
Message
CAN NOT EJECT
CUE BANK ERROR
DATA ERROR
FAILED
FILE SELECT ERROR
FORMAT ERROR
NO CD AUDIO TRACK
NO DATA
NO DISC
NO PANEL MODE
NO REMAIN
NO SD AUDIO TRACK
NO SD CARD
REPLACED OLD PANEL DATA
SD CARD FULL
SD CARD PROTECTED
SD LID OPEN
TRACK ERROR
Description
Cannot eject the CD.
After setting the auto cue point, you tried to set
the cue setting without selecting the cue bank.
There is a problem with the data.
A save, load or format error occurred and the operation did not complete.
The wrong file was selected.
You cannot format this SD Memory Card.
The inserted disc is unrecognizable.
The disc has been inserted upside down.
You tried to save to a SD Memory Card, but there
is no sample pad data.
CD is not inserted.
You cannot save panel data when using the CD
PLAYER mode.
You cannot display the current remaining time with
MP3 files.
There are no audio tracks on this SD Memory Card.
The inserted SD Memory Card is unrecognizable
because of damage or an error.
SD Memory Card is not inserted.
The oldest used media panel data was replaced.
You cannot store more than 50 CDs or SD Memory
Cards worth of data items.
You cannot save any more data to the SD Memory
Card.
The SD Memory Card is write protected.
The lid of the SD Memory Card slot is open.
You cannot play this track.
This track data cannot be read.
Action
Pause the unit and eject the CD.
Select the cue bank first.
Use a SD Memory Card that was recorded
properly.
Try saving or loading again. Or try saving to a
new SD Memory Card.
Select the correct file.
Use a new SD Memory Card.
Re-insert the CD properly.
Re-insert the CD properly.
Save using the TURNTABLE mode.
Use a SD Memory Card that was recorded
properly.
Re-insert the SD Memory Card properly.
Save it to a SD Memory Card or initialize the
unit’s memory.
Use a new SD Memory Card.
Release the SD Memory Card write-protect
switch.
Make sure to close the lid.
Select another track or replace with properly
recorded media.
Maintenance
To clean this unit, wipe with a soft, dry cloth.
•Never use alcohol, paint thinner, or benzine to clean this unit.
•Before using chemically treated cloth, read the instructions that came with the cloth carefully.
Specifications
•Playable media
CD (12 cm) (5˝) CD-Audio (CD-DA)
CD-R/CD-RW (CD-DA, MP3)
SD Memory Card
•CD-MP3 play format
Compatible compression rate between 32 kbps and 192 kbps
(Recommended: 128 kbps)
Compatible sampling rate 48 kHz/44.1 kHz/32 kHz
•SD Audio play format
Audio extension format MPEG2-AAC/MP3
Compatible sampling rate 48 kHz/44.1 kHz/32 kHz
•Audio
No. of channels 2 (stereo)
Frequency response 4 Hz-20 kHz
Output voltage 2 Vrms (0 dB) (JEITA)
Output terminal Pin jack
•Digital audio output
Coaxial digital output Pin jack
•Headphone
Output level 20 mW max. 32 Ω (adjustable)
•Pickup
Wave length 790 nm
Laser Power No hazardous radiation is emitted
•General
Power supply AC 120 V, 60 Hz
Power consumption 20 W
Dimensions (W X H X D) 320 x 111 x 330 mm
Mass 5.8 kg
Note
Specifications are subject to change without notice.
Mass and dimensions are approximate.
Specifications are the values when playing CD audio in the CD
PLAYER mode with tempo reset.
Reference
(1239/64˝ x 43/8˝ x 13˝)
(12.8 lb.)
27
RQT7114
Page 28

Limited warranty (ONLY FOR U.S.A.)
Panasonic Consumer Electronics Company,
Division of Panasonic Corporation of North America
One Panasonic Way Secaucus, New Jersey 07094
Panasonic/Technics DJ Products
Limited Warranty
Limited Warranty Coverage
If your product does not work properly because of a defect in materials or workmanship,
Panasonic Consumer Electronics Company or Panasonic Puerto Rico, Inc. (collectively
referred to as “the warrantor”) will, for the length of the period indicated on the chart below,
which starts with the date of original purchase (“warranty period”), at its option either (a)
repair your product with new or refurbished parts, or (b) replace it with a new or a
refurbished product. The decision to repair or replace will be made by the warrantor.
Product
DJ Turntables (analog), DJ Mixers,
DJ Direct Drive Digital Turntables
Accessories:
(Repaired or exchanged)
DJ Headphones, Cartridges,
Microphones
Accessories:
(Exchanged)
SD Memory Cards, Platter
Mats, Adaptors, Cables
During the “Labor” warranty period there will be no charge for labor. During the “Parts”
warranty period, there will be no charge for parts. You must carry-in or mail-in your
product or arrange for in-home service, as applicable, during the warranty period. If nonrechargeable batteries are included, they are not warranted. This warranty only applies to
products purchased and serviced in the United States or Puerto Rico. This warranty is
extended only to the original purchaser of a new product which was not sold “as is”.
purchase receipt or other proof of the original purchase date is required for warranty service.
Carry-In, Mail-in or In-Home Service
For Carry-In, Mail-in or In-Home Service (as applicable) in the United States call 1-800211-PANA(7262) or visit Panasonic Web Site: http://www.panasonic.com
For assistance in Puerto Rico call Panasonic Puerto Rico, Inc. (787)-750-4300 or fax
(787)-768-2910.
In-Home service, if applicable, requires clear, complete and easy access to the product by
the authorized servicer and does not include removal or re-installation of an installed
product. It is possible that certain in-home repairs will not be completed in-home, but will
require that the product, or parts of the product, be removed for shop diagnosis and/or
repair and then returned.
Parts
One (1) Year
Ninety (90) Days
Ninety (90) Days
Labor
One (1) Year
Ninety (90) Days
(when applicable)
Not Applicable
(in exchange for
defective item)
Service
Carry-In or Mail-In
Carry In or Mail In
Carry In or Mail In
A
Panasonic Puerto Rico, Inc.
Ave. 65 de Infantería, Km. 9.5
San Gabriel Industrial Park, Carolina, Puerto Rico 00985
Limited Warranty Limits And Exclusions
This warranty ONLY COVERS failures due to defects in materials or workmanship, and
DOES NOT COVER normal wear and tear or cosmetic damage. The warranty ALSO
DOES NOT COVER damages which occurred in shipment, or failures which are caused
by products not supplied by the warrantor, or failures which result from accidents, misuse,
abuse, neglect, mishandling, misapplication, alteration, faulty installation, set-up
adjustments, misadjustment of consumer controls, improper maintenance, power line
surge, lightning damage, modification, rental use of the product, service by anyone other
than a Factory ServiCenter or other Authorized Servicer, or damage that is attributable to
acts of God.
THERE ARE NO EXPRESS WARRANTIES EXCEPT AS LISTED UNDER “LIMITED
WARRANTY COVERAGE”. THE WARRANTOR IS NOT LIABLE FOR INCIDENTAL
OR CONSEQUENTIAL DAMAGES RESULTING FROM THE USE OF THIS PRODUCT,
OR ARISING OUT OF ANY BREACH OF THIS WARRANTY, INCLUDING WITHOUT
LIMITATION, LOSS OF GOODWILL, PROFITS OR REVENUE, LOSS OF USE OF THIS
PRODUCT OR ANY ASSOCIATED EQUIPMENT, COST OF SUBSTITUTE
EQUIPMENT, DOWNTIME COSTS, OR CLAIMS OF ANY PARTY DEALING WITH
BUYER FOR SUCH DAMAGES. (As examples, this excludes damages for lost time, cost
of having someone remove or re-install an installed unit if applicable, travel to and from
the servicer, loss of media, data or other memory content. The items listed are not
exclusive, but are for illustration only.) ALL EXPRESS AND IMPLIED WARRANTIES,
INCLUDING THE WARRANTY OF MERCHANTABILITY, ARE LIMITED TO THE
PERIOD OF THE LIMITED WARRANTY.
Some states do not allow the exclusion or limitation of incidental or consequential
damages, or limitations on how long an implied warranty lasts, so the exclusions may not
apply to you.
This warranty gives you specific legal rights and you may also have others rights which
vary from state to state. If a problem with this product develops during or after the
warranty period, you may contact your dealer or ServiCenter. If the problem is not handled
to your satisfaction, then write to the warrantor's Consumer Affairs Department at the
addresses listed for the warrantor.
PARTS AND SERVICE (INCLUDING COST OF AN IN-HOME SERVICE CALL IF
APPLICABLE) WHICH ARE NOT COVERED BY THIS LIMITED WARRANTY ARE
YOUR RESPONSIBILITY.
(ONLY FOR U.S.A.)
Customer Services Directory
Obtain Product Information and Operating Assistance; locate your nearest Dealer or Servicenter; purchase Parts and
Accessories; or make Customer Service and Literature requests by visiting our Web Site at:
http://www.panasonic.com/consumersupport
or, contact us via the web at:
http://www.panasonic.com/contactinfo
You may also contact us directly at:
1-800-211-PANA (7262),
Monday-Friday 9 am-9 pm; Saturday-Sunday 10 am-7 pm, EST.
For hearing or speech impaired TTY users, TTY: 1-877-833-8855
Accessory Purchases
Purchase Parts, Accessories and Instruction Books online for all Panasonic Products by visiting our Web Site at:
http://www.pasc.panasonic.comm
or, send your request by E-mail to:
npcparts@us.panasonic.com
You may also contact us directly at:
1-800-332-5368 (Phone) 1-800-237-9080 (Fax Only) (Monday – Friday 9 am to 8 pm, EST.)
Panasonic Services Company
20421 84th Avenue South, Kent, WA 98032
(We Accept Visa, MasterCard, Discover Card, American Express, and Personal Checks)
For hearing or speech impaired TTY users, TTY: 1-866-605-1277
Service in Puerto Rico
Panasonic Puerto Rico, Inc.
Ave. 65 de Infantería, Km. 9.5, San Gabriel Industrial Park, Carolina, Puerto Rico 00985
Phone (787)750-4300, Fax (787)768-2910
Panasonic Consumer Electronics
Company, Division of Panasonic
Corporation of North America
One Panasonic Way Secaucus,
New Jersey 07094
http://www.panasonic.com
2004 Matsushita Electric Industrial Co., Ltd.
Printed in Japan
Panasonic Puerto Rico, Inc.
Ave. 65 de Infantería, Km. 9.5
San Gabriel Industrial Park, Carolina,
Puerto Rico 00985
Panasonic Canada Inc.
5770 Ambler Drive
Mississauga, Ontario L4W 2T3
www.panasonic.ca
RQT7114-2Y
En
M0304TK4035
 Loading...