

Before connecting, operating or adjusting this product,
please read the instructions completely. Please keep
this manual for future reference.
Dear customer
Thank you for purchasing this product.
For optimum performance and safety, please read the
instructions carefully.
Avant de raccorder, régler ou utiliser l’appareil, il est
recommandé de lire attentivement le manuel d’utilisation.
Conserver ce manuel.
Cher client
Nous vous remercions d’avoir arrêté votre choix sur
cet appareil.
Pour en tirer un rendement optimal, lire attentivement
le présent manuel.
Antes de conectar, operar o ajustar este producto,
sírvase leer estas instrucciones completamente. Guarde
este manual.
Estimado cliente
Mu c h ísim a s g r acia s por haber adqu i r ido este
producto.
Lea con atención estas instrucciones para obtener
las máximas prestaciones y seguridad.
Antes de ligar, utilizar ou regular este produto, leia com
cuidado estas instruções até ao fim. Guarde o manual
para consultas futuras.
Caro cliente
Obrigado por ter adquirido este produto.
Para melhor desempenho e segurança, leia estas
instruções com cuidado.
Operating Instructions
Manuel d’utilisation
Instrucciones de funcionamiento
Manual de instruções
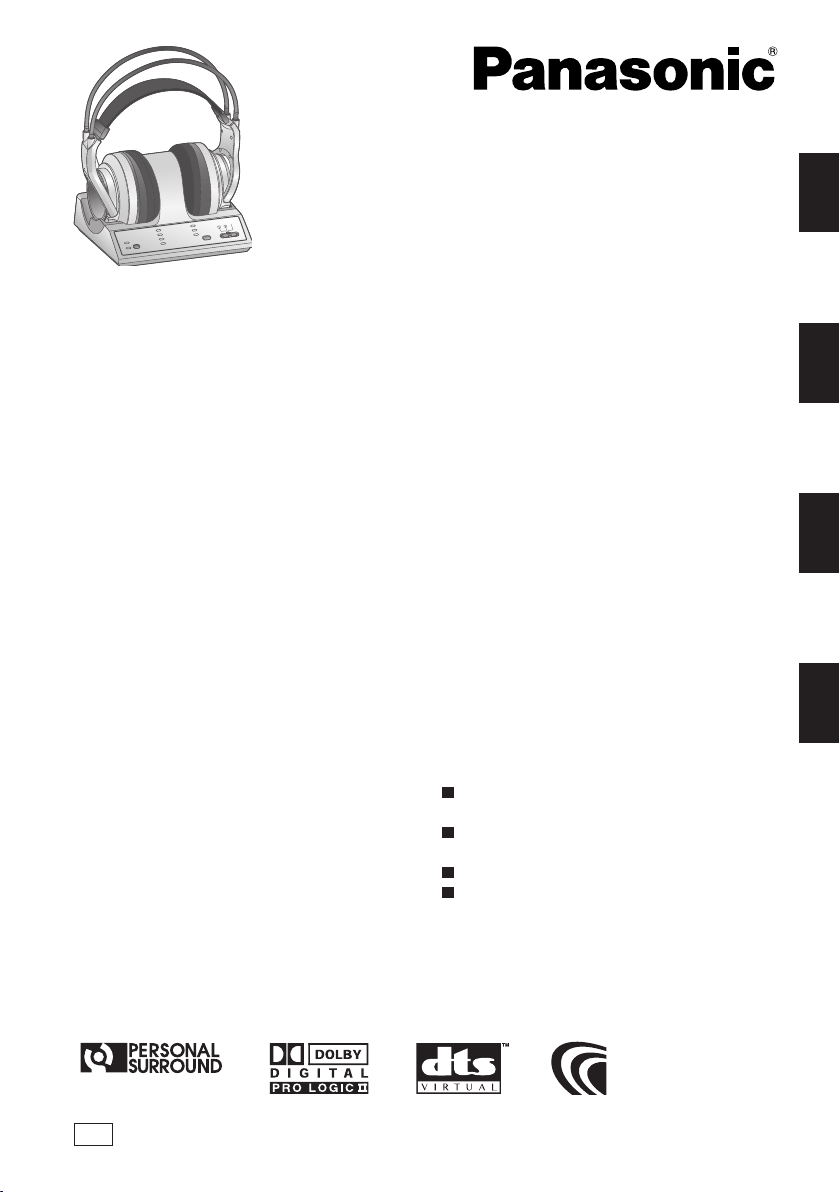
Digital Wireless Surround Headphones
Casque d’écoute ambiophonique sans
fil numérique
Auriculares inalámbricos digitales de
sonido ambiental
Fones de ouvido surround digital
sem fio
Model No. / N° de modèle /
No Modelo. / No Modelo.
ENGLISH
........................... See pages 2-17,
66-67 and back cover
FRANÇAIS ............. Voir les pages 18 à 33,
67 et la couverture arrière
ESPAÑOL
..........
PORTUGUÊS .......... Veja as páginas 50-65
RP-WF6000
Consulte las páginas
34-49
ENGLISHFRANÇAISESPAÑOL
PORTUGUÊS
PP
RQT8948-Y
RQT8948
2
00
3
RQT8948
ENGLISH
Features
Table of contents
Features ................................................................... 2
IMPORTANT SAFETY INSTRUCTIONS ..................
3
Precautions ............................................................. 4
Control reference guide ......................................... 4
Transmitter’s front panel ........................................
4
Transmitter’s rear panel .........................................
5
Headphones ..........................................................
5
Power supply preparations: Headphones ............ 6
Using the rechargeable battery (supplied) ..............
6
Using alkaline dry cell batteries (not included) ......
8
Connections ............................................................ 9
Connecting digital equipment ................................
9
Connecting analog equipment .............................
10
Placement of transmitter and headphones .........11
Listening caution ....................................................11
Listening to audio from equipment connected to
the transmitter ....................................................... 12
Selecting the surround field ................................
14
Maintenance .......................................................... 14
Troubleshooting guide .........................................
15
Specifications .......................................................
17
The model number and serial number of this product
can be found on either the back or the bottom of the
unit.
Please note them in the space provided below and
keep for future reference.
MODEL NUMBER
RP-WF6000
SERIAL NUMBER
User memo:
DATE OF PURCHASE
DEALER NAME
DEALER ADDRESS
TELEPHONE NUMBER
Product service
Do not attempt to remove the cover(s) or repair the unit
yourself. Refer servicing to qualified personnel only.
Product information
For product service, product information or assistance
wi t h pro d uct op era t ion , refe r to the ser v ice n ter
directory. ( pages 66 to 67)
Manufactured under license from Digital Theater
Sys tems , I n c. U. S. Pa t . No's. 5, 4 51,942;
5,956,674; 5,974,380; 5,978,762; 6,487,535 and
other U.S. and world-wide patents issued and
pending. “DTS” and “DTS Virtual” are trademarks
of Digital Theater Systems, Inc. Copyright 1996,
2003 Digital Theater Systems, Inc. All Rights
Reserved.
Man u f a c tu r e d un de r li ce n s e fr om Do l by
Laboratories.
Dolby, Pro Logic and the double-D symbol are
trademarks of Dolby Laboratories.
Supplied Accessories
Please check and identify the supplied
accessories.
Use numbers indicated in parentheses when asking
for replacement parts. “As of December 2006”
(Only for U.S.A.)
To order accessories contact 1-800-332-5368 or
the website (http://www.pasc.panasonic.com).
AC adaptor ......................1
(RFX5726)
AC adaptor cord ..............1
(K2CB2CB00018)
Dedicated nickel-metal hydride
rechargeable battery .......
1
(RP-BP6000)
Optical digital cable .........1
(Approximately 2 meters (6.6 ft.))
(K7CXJFA00001)
The shape of replacement parts may differ.
Th e RP-W F 600 0 is a digita l wire l ess surrou nd
hea dpho nes sy s t em us ing th e 2.4 GH z radio
frequency band for digital transmission.
You can enjoy multi-channel surround sound when
you listen with the headphones.
● The headphones are compatible with Dolby Digital,
Dolby Pro Logic II, DTS, Dolby Digital Surround EX
and DTS- ES.
● The headphones are compatible with the MPEG-2
AAC audio format.
● The headpho nes use non-compr ess ed dig ita l
wireless transmission that provides sound quality
equal to a CD and is resistant to external noise.
● The “Personal Surround” technology developed by
Panasonic and the large diameter, high quality
Φ50
mm (1-15/16 in.) driver unit mean you can enjoy the
powerful presence of surround audio from these
headphones.
● The headphones have a rece pt io n range of up
to approximately 30 meters (98.4 ft.). This range
differs depending on the conditions under which the
headphones are used.
● The headphones are charged by simply placing
them on the transmitter. ( 3 hours quick charge)
● The headphones can be placed on the transmitter
in 2 different ways. (The battery can be charged in
both positions).
● This unit has 2 OPTICAL DIGITAL IN terminals and
1 OPTICAL DIGITAL OUT (pass-through) terminal.
● If n o au d i o si g n al i s in p u t fo r mo r e t h an
approximately 5 minutes, the radio waves being
emitted from the transmitter automatically stop to
save power consumption.
● The headband has a free adjusting mechanism
eliminating the need for headband adjustment.
● The headphones have an AUTO POWER ON/OFF
function which automatically turns on the power
when the headphones are put on and turns it off
when the headphones are removed.
● A single volume control adjusts both the right and
left volume of the headphones.
● The he a dphone s are po w e r ed by either the
su ppli ed ni c k el-meta l h ydride re c hargeab le
battery or “LR6, AA” alkaline dry cell batteries (not
included).
● The MUTING function cuts noise if the headphones
are used outside their effective range.
● The headphones are comfortable to wear as they
use a velvety material that is soft and breathes well.
This transmitter has a DTS decoder, Dolby Digital
decoder, a Dolby Pro Logic II decoder and a MPEG-2
AAC decoder.
3
WARNING:
TO REDUCE THE RISK OF FIRE, ELECTRIC
SHOCK OR PRODUCT DAMAGE, DO NOT
EXPOSE THIS APPARATUS TO RAIN,
MOISTURE, DRIPPING OR SPLASHING
AND THAT NO OBJECTS FILLED WITH
LIQUIDS, SUCH AS VASES, SHALL BE
PLACED ON THE APPARATUS.
CAUTION!
DO NOT INSTALL OR PLACE THIS UNIT IN A BOOKCASE,
BUILT-IN CABINET OR IN ANOTHER CONFINED SPACE.
ENSURE THE UNIT IS WELL VENTILATED. TO PREVENT
RISK OF ELECTRIC SHOCK OR FIRE HAZARD DUE
TO OVERHEATING, ENSURE THAT CURTAINS AND
ANY OTHER MATERIALS DO NOT OBSTRUCT THE
VENTILATION VENTS.
The socket outlet shall be installed near the equipment
and easily accessible. The mains plug of the power
supply cord shall remain readily operable. To completely
disconnect this apparatus from the AC Mains, disconnect
the power supply cord plug from AC receptacle.
Marking sign is located on bottom of the unit.
THE FOLLOWING APPLIES ONLY IN THE U.S.A. AND CANADA
A nickel metal hydride battery that is
recyclable powers the product you have
purchased.
Please call 1-800-8-BATTERY for
information on how to recycle this
battery.
2
IMPORTANT SAFETY INSTRUCTIONS
1) Read these instructions.
2) Keep these instructions.
3) Heed all warnings.
4) Follow all instructions.
5) Do not use this apparatus near water.
6) Clean only with dry cloth.
7) Do not block any ventilation openings. Install in
accordance with the manufacturer’s instructions.
8) Do not install near any heat sources such as
radiators, heat registers, stoves, or other apparatus
(including amplifiers) that produce heat.
9) Do not defeat the safety purpose of the polarized
or grounding-type plug. A polarized plug has two
blades with one wider than the other. A groundingtype plug has two blades and a third grounding
prong. The wide blade or the third prong are
provided for your safety. If the provided plug does
not fit into your outlet, consult an electrician for
replacement of the obsolete outlet.
10) Protect the power cord from being walked on
or pinched particularly at plugs, convenience
receptacles, and the point where they exit from the
apparatus.
11) Only use attachments/accessories specified by the
manufacturer.
12) Use only with the cart, stand,
tripod, bracket, or table specified
by the manufacturer, or sold with
the apparatus. When a cart is
used, use caution when moving
the cart/apparatus combination
to avoid injury from tip-over.
13) Unplug this apparatus during
lightning storms or when unused for long periods
of time.
14) Refer all servicing to qualified service personnel.
Servicing is required when the apparatus has been
damaged in any way, such as power-supply cord or
plug is damaged, liquid has been spilled or objects
have fallen into the apparatus, the apparatus has
been exposed to rain or moisture, does not operate
normally, or has been dropped.
Read these operating instructions carefully before using the unit. Follow the safety instructions on the unit and the
applicable safety instructions listed below. Keep these operating instructions handy for future reference.
AC adaptor
This AC adaptor operates on AC between 100 V and
240 V.
BUT
● In the U.S.A. and Canada, the AC
adaptor must be
connected to a 120 V AC power supply only.
● When connecting to an AC supply outside of the
U.S.A. or Canada, use a plug adaptor to suit the AC
outlet configuration.
● When connecting to a supply of greater than AC 125 V,
ensure the cord you use is suited to the voltage of the
AC supply and the rated current of the AC adaptor.
● Contact an electrical parts distributor for assistance in
selecting a suitable AC plug adaptor or AC cord set.
CAUTION
Danger of explosion if battery is incorrectly replaced.
Replace only with the same or equivalent type
recommended by the manufacturer.
Dispose of used batteries according to the manufacturer’s
instructions.
-If you see this symbol-
Information on Disposal in other Countries outside the
European Union
This symbol is only valid in the European Union.
If you wish to discard this product, please contact
your local authorities or dealer and ask for the
correct method of disposal.
RQT8948
4
00
5
RQT8948
ENGLISH
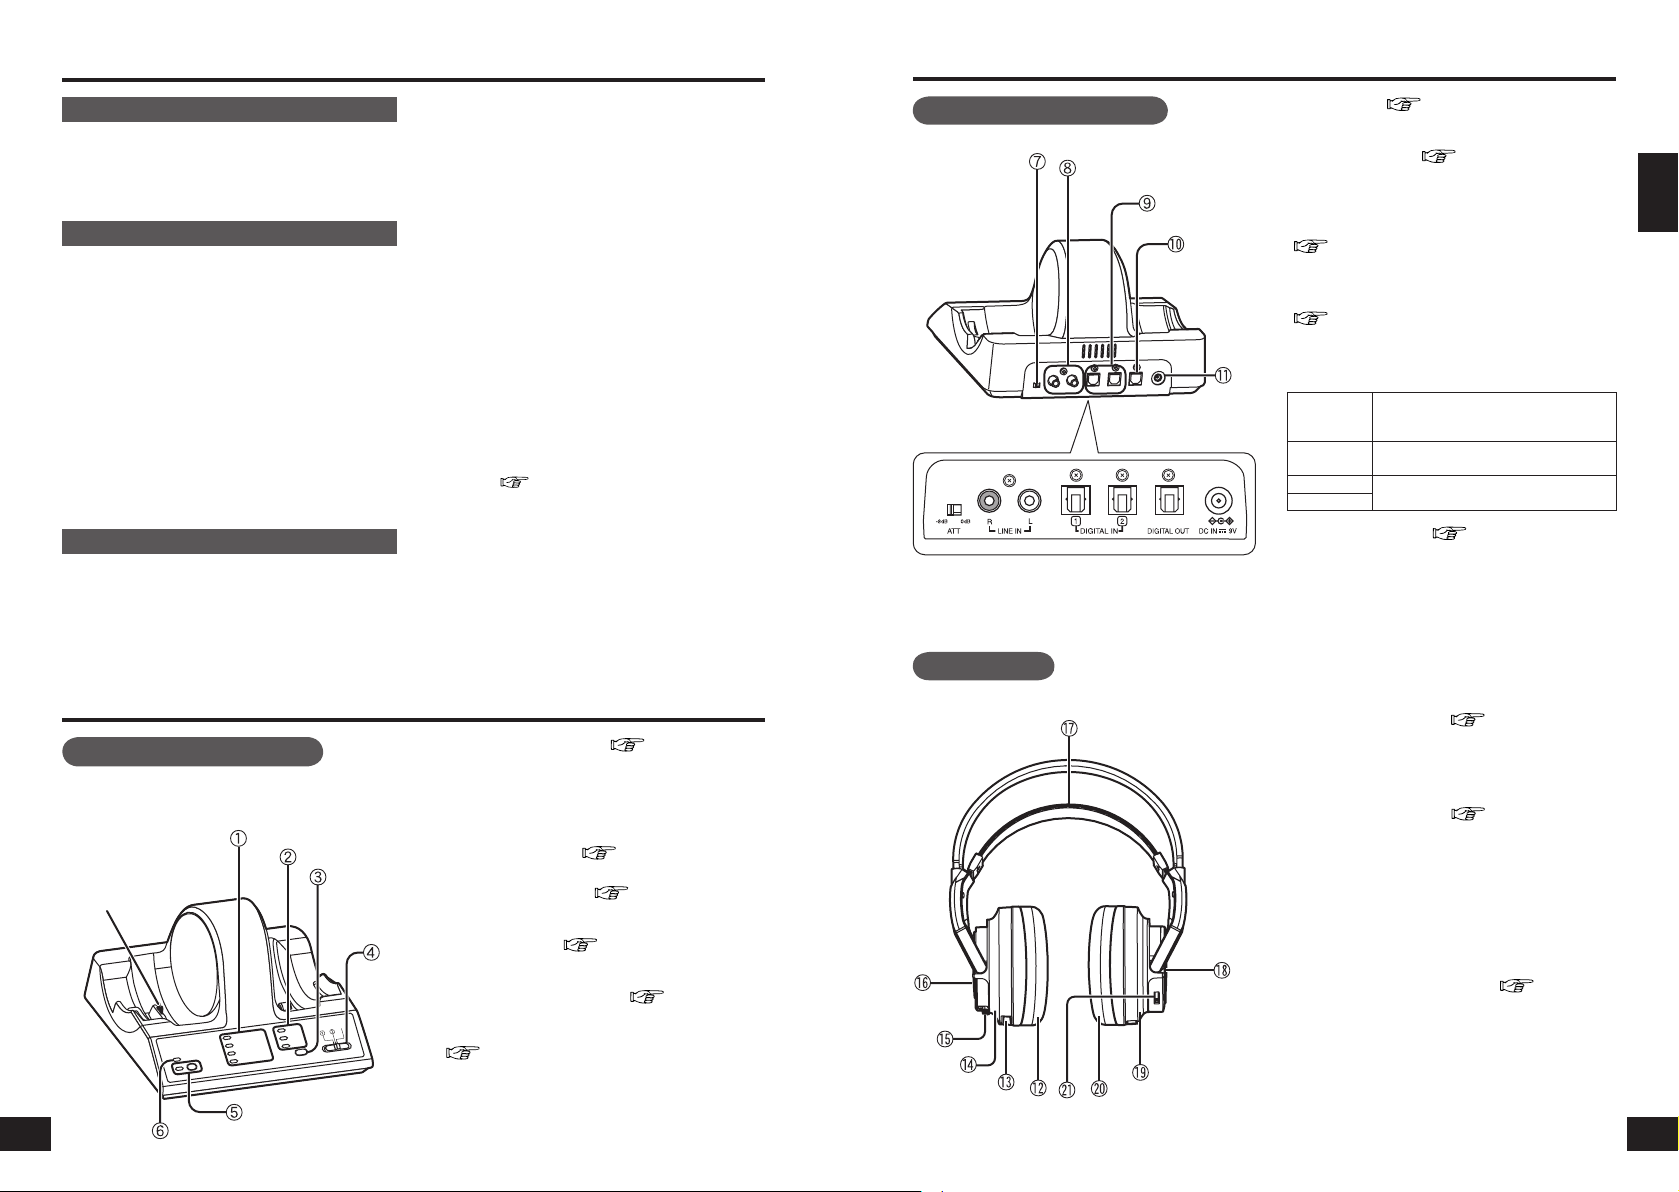
Transmitter’s rear panel
Headphones
g
ATT control ( page 10)
Switch to [0 dB] when sound from an analog input is
low. The standard setting is [-8 dB].
h
LINE IN terminal ( page 10)
To connect to the audio out terminals of AV equipment
such as a video cassette recorder or television (not
included).
i
DIGITAL IN 1, 2 terminal (optical digital input)
( page 9)
To connect to digital equipment such as a DVD player
or a television (not included).
j
DIGITAL OUT terminal (optical digital output)
( page 9)
The same digital signal as the input signal selected
with the INPUT SELECT control is output.
● When ANALOG is selected, the same digital signal
as the input signal to DIGITAL IN 2 is output.
INPUT
SELECT
control
DIGITAL OUT
DIGITAL 1
The same signal as the signal input
to DIGITAL 1
DIGITAL 2
The same signal as the signal input
to DIGITAL 2
ANALOG
k
DC IN 9V terminal ( page 6)
To connect to the supplied AC adaptor.
(Use only the supplied AC adaptor. Use of other AC
adaptors with, for example, a different plug polarity is
dangerous and can damage the unit.)
l
Ear pad (left)
m
Charging terminal
n
Left housing
o
BATT (battery) knob ( page 6)
p
Battery compartment lid
Press BATT to open the battery compartment lid.
Use the supplied rechargeable battery or “LR6, AA”
alkaline dry cell batteries (not included).
q
Free-adjusting band ( page 8)
The power turns on automatically and the OPR lamp
lights when you put on the free-adjusting band.
r
OPR (operation) lamp
Pull up the free-adjusting band and check that the OPR
lamp glows red. You can now use the headphones.
s
Right housing
t
Ear pad (right)
u
ID button, VOL control
VOL: When adjusting the volume ( page 12)
Control reference guide
5
Transmitter’s front panel
a
DECODE MODE lamp ( pages 12 to 13)
(DOLBY DIGITAL, DOLBY PRO LOGIC II,
DTS, MPEG-2 AAC)
The transmitter automatically distinguishes the recording
method of the input signal and the DECODE MODE lamp
lights.
b
SURROUND lamp ( page 14)
(MUSIC, CINEMA, VOICE)
c
SURROUND button ( page 14)
Switch between MUSIC, CINEMA, VOICE and OFF
in SURROUND MODE.
d
INPUT SELECT ( page 12)
Switch between DIGITAL 1, DIGITAL 2 and ANALOG
input.
e
ID/TUNING button, lamp ( page 14)
Use when the radio waves are weak.
f
OPR/CHARGE (operation/charge) lamp
( page 7)
● It glows red when the headphones are being
charged.
● It glows green when the transmitter is in operation.
● It goes out when the charging finishes or when
there are no audio signals input for approximately 5
minutes.
Charging terminal
AC adaptor
Handle the AC adaptor carefully. Improper handling is
dangerous.
● Do not touch it with wet hands.
● Do not place heavy objects on top of it.
Be sure to use the supplied AC adaptor.
Batteries
● The rechargeable battery can be recharged about
300 times. If it’s operating time becomes extremely
short, you should replace it.
● Do not mix old and new batteries or different types of
batteries.
●
Do not heat the batteries or expose them to flames.
● Do not recharge ordinary dry cell batteries.
● Remove the battery if the unit is not to be used for a
long time.
● Carry and store the rechargeable batteries in the
battery carrying case to prevent contact with metal
objects.
● Do not peel off the covering on batteries and do not
use if the covering has been peeled off.
Mishandling of batteries can cause electrolyte leakage
which can damage items the fluid contacts and may
cause a fire.
The unit
This unit uses the 2.4 GHz radio frequency band.
However other wireless equipment may use the
same frequency. Be sure to take note of the following
to prevent radio wave interference from other
equipment.
Precautions
Control reference guide
n Restriction of use
For use only in your country.
n Range of use
The range of use is up to approximately 30 m (98.4 ft.)
.
The range may be less depending on the structure
of the building, the environment and any obstacles
between the headphones and the transmitter.
Such obstacles as reinforced concrete walls and
metal doors, in particular, obstruct the transmitter’s
signals.
n Interference from other equipment
Due to radio interference, malfunctions such as
sound distortion may occur if the unit is placed too
close to other equipment. We recommend keeping
the unit as far away as possible from the following
devices.
Bluetooth devices, wireless LAN, microwaves,
office automation devices, digital cordless
telephones and other electronic devices
The unit is designed to automatically avoid radio
interference from these household devices. However
the sound will be broken when radio interference
occurs. In this case reset the most appropriate
frequency (
page 14 [Setting the most appropriate
frequency]).
n Using the unit
● Do not drop, hit or otherwise subject the transmitter
or headphones to strong shocks of any kind. This
may damage them.
● Do not expose the unit to water or other liquids as it
may damage it.
4
RQT8948
6
7
RQT8948
ENGLISH
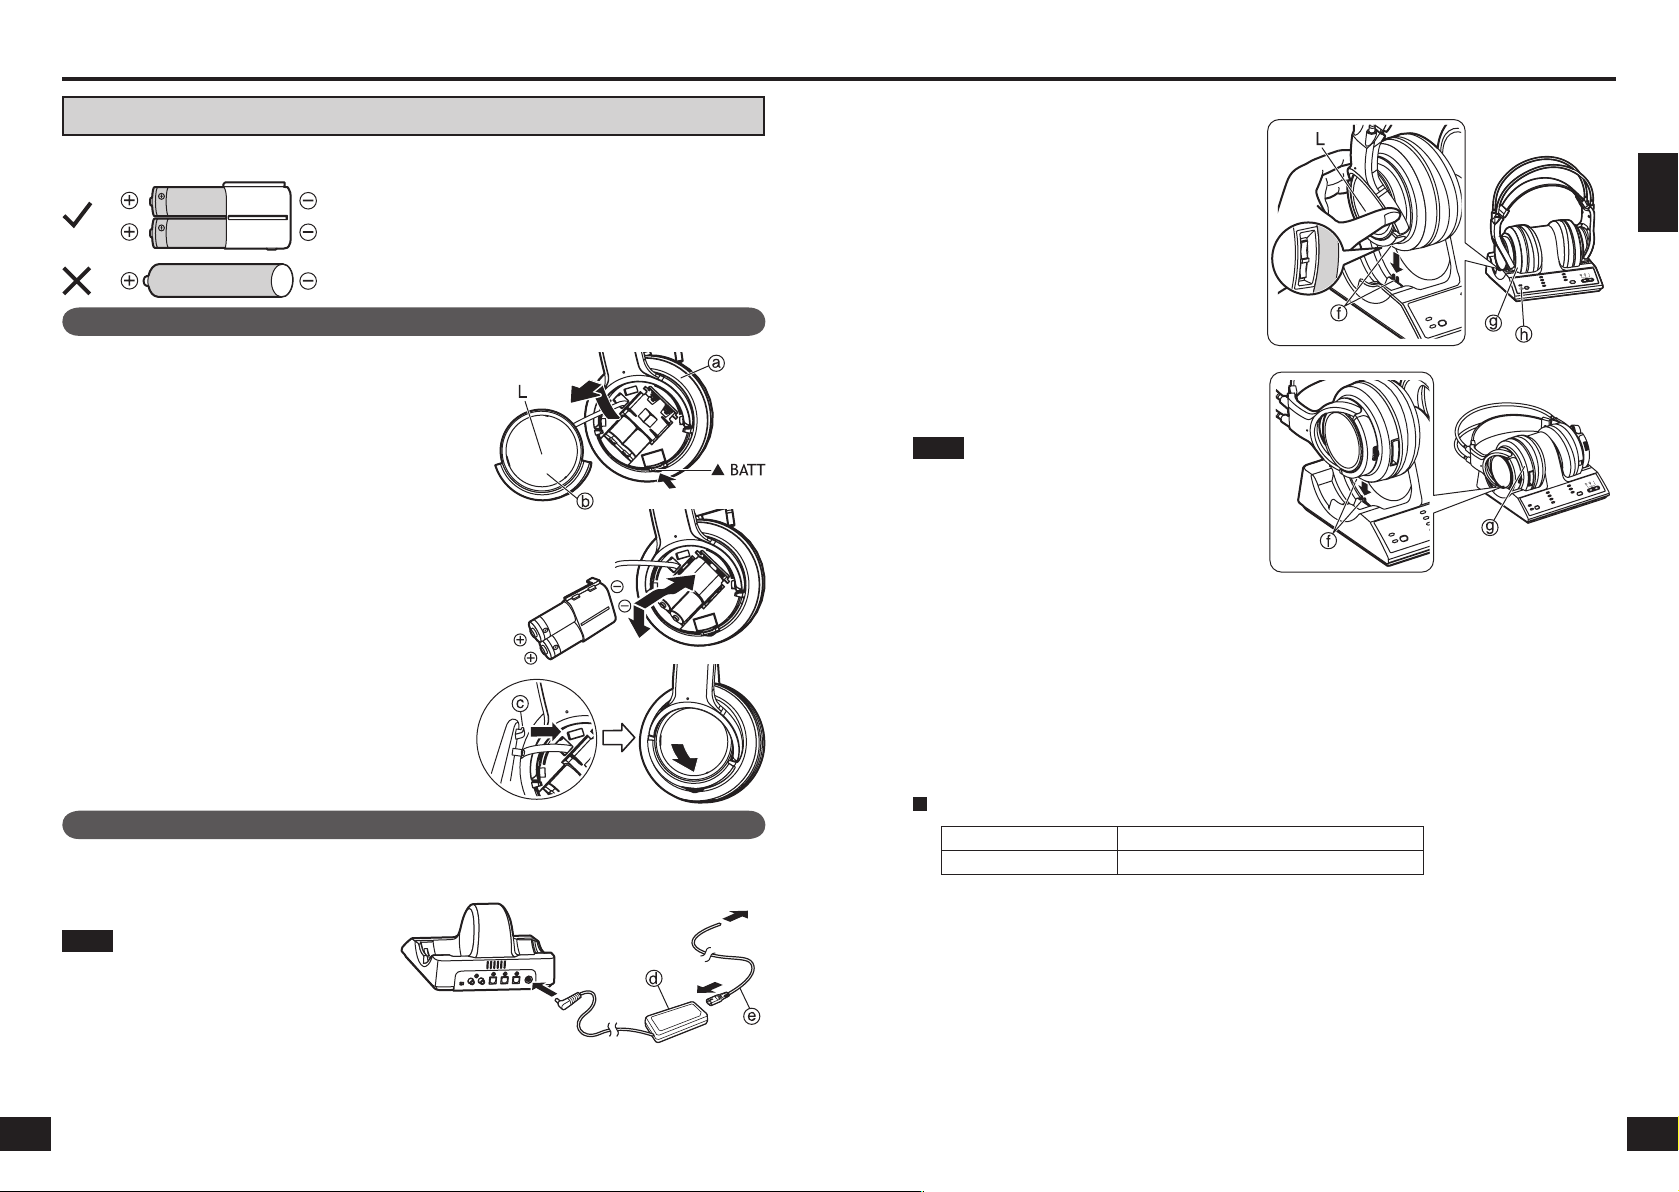
Using the rechargeable battery (supplied)
The supplied rechargeable battery must be charged before using this unit.
Inserting the supplied nickel-metal hydride rechargeable battery
1
Press the [BATT] knob on the left housing
a to open the battery compartment lid b
and then take it off.
2
Insert the supplied nickel-metal hydride
rechargeable battery.
● Align the poles + and - correctly when inserting.
● Push down on the
- pole spring when inserting.
Remove the +
poles first when removing.
3
Insert the rib c on the battery compartment
lid into the hole on the left housing and then
close the battery compartment lid.
Push the battery compartment lid until it locks.
Charging
1
Connect the AC adaptor (supplied)
d to the transmitter.
2
Put the headphones on the
transmitter making sure that the
charging terminals
f are in contact
with each other.
g Left housing
The battery can be charged with the headphones
placed vertically or horizontally.
● The OPR/CHARGE lamp
h on the transmitter
glows red.
● The OPR/CHARGE lamp
h goes out when the
battery is fully charged.
● When putting the headphones on the
transmitter, hold the left and right housings in
each hand and put the headphones straight
down onto the transmitter.
● Radio wave emission automatically stops when the headphones are placed onto the transmitter.
● The headphones can be used even if the battery is not fully charged.
● Disconnect the AC adaptor from the household AC outlet if the unit is not going to be used for a long time. This
unit consumes a small amount of power (approximately 1.8 W) if the AC adaptor is connected, even when it is
turned off.
The unit is in the standby condition when the AC adaptor is connected. The primary circuit is always “live” as long
as the AC adaptor is connected to an electrical outlet.
● Charge the battery in an environment with an ambient temperature between 0 °C and 40 °C or it may not be fully
charged.
Nickel-metal hydride rechargeable battery
Use the supplied battery or a dedicated replacement battery
RP-BP6000 (optional).
Commercially available rechargeable batteries
You cannot charge commercially available rechargeable
batteries.
Note
● The AC adaptor power cord (supplied) e is for use
with this unit only. Do not use it with other equipment.
Do not use cords from other equipment with this
unit.
● Be sure to use the supplied AC adaptor.
Note
The headphones are recharged if they are put back
onto the transmitter after being fully charged.
Do not keep recharging the battery if it is not used
between recharges.
The battery will be overcharged causing overheating
and electrolyte leakage.
Charging and operating times
※1
At 1 kHz, 1 mW + 1 mW output.
※2
Time required to fully charge from empty.
※3
Operating times may differ depending on the temperature of the surrounding environment and operating
conditions.
Power supply preparations: Headphones
Transmitter
To DC-IN 9V terminal
To household AC outlet
6
Placing the headphones vertically
Placing the headphones horizontally
Charging time
Operating time
※1
Approx. 3 hours
※2
Approx. 8 hours
※3
7
For your reference
RQT8948
8
9
RQT8948
ENGLISH
To check the remaining battery power
Pull the free-adjusting band i and check if the OPR lamp j on the right housing
k is dim or off. This means that the battery has run down and should be charged
or replaced.
If the sound is distorted, intermittent or there is excessive background noise while
using the headphones, the battery should be charged or replaced.
The service life for the supplied rechargeable battery
The supplied nickel-metal hydride rechargeable battery can be recharged
approximately 300 times. If the operation time of the battery becomes extremely
short after charging, the battery’s service life has reached the end. Be sure to
replace it with the dedicated rechargeable battery RP-BP6000 (optional).
The power turns off automatically when you remove
the headphones.
(Auto power on/off function)
Do not pull up the free-adjusting band i when not using the headphones. This may
cause the auto power on/off function to switch the headphones back on and battery
power to run down.
Optical digital cable (optical mini plug) (not included)
When connecting the optical DIGITAL AUDIO OUT terminal of, for example, a portable DVD player or portable CD
player to the transmitter’s DIGITAL IN 1 or 2 terminal, use the optional digital cable (mini plug to angular plug) or
similar.
For your reference
※1
Operation is not guaranteed when connecting to a computer’s optical DIGITAL AUDIO OUT terminal.
※2
When the connected equipment supports PCM output only, the surround sound will become DOLBY PRO LOGIC II.
Using alkaline dry cell batteries (not included)
Use “LR6, AA” alkaline dry cell batteries. Put the 2 alkaline dry cell batteries into the headphones in the same way
as described in [Inserting the supplied nickel-metal hydride rechargeable battery] ( page 6).
You cannot charge dry cell batteries even if you put the headphones on the transmitter.
Operating time for the dry cell battery
● Before connecting, turn off the digital or analog equipment.
● After connecting the digital or analog equipment to the transmitter, connect the AC adaptor (supplied)
(
page 6 [Charging] step 1)
● Refer/Read to the operating instructions of the connected equipment.
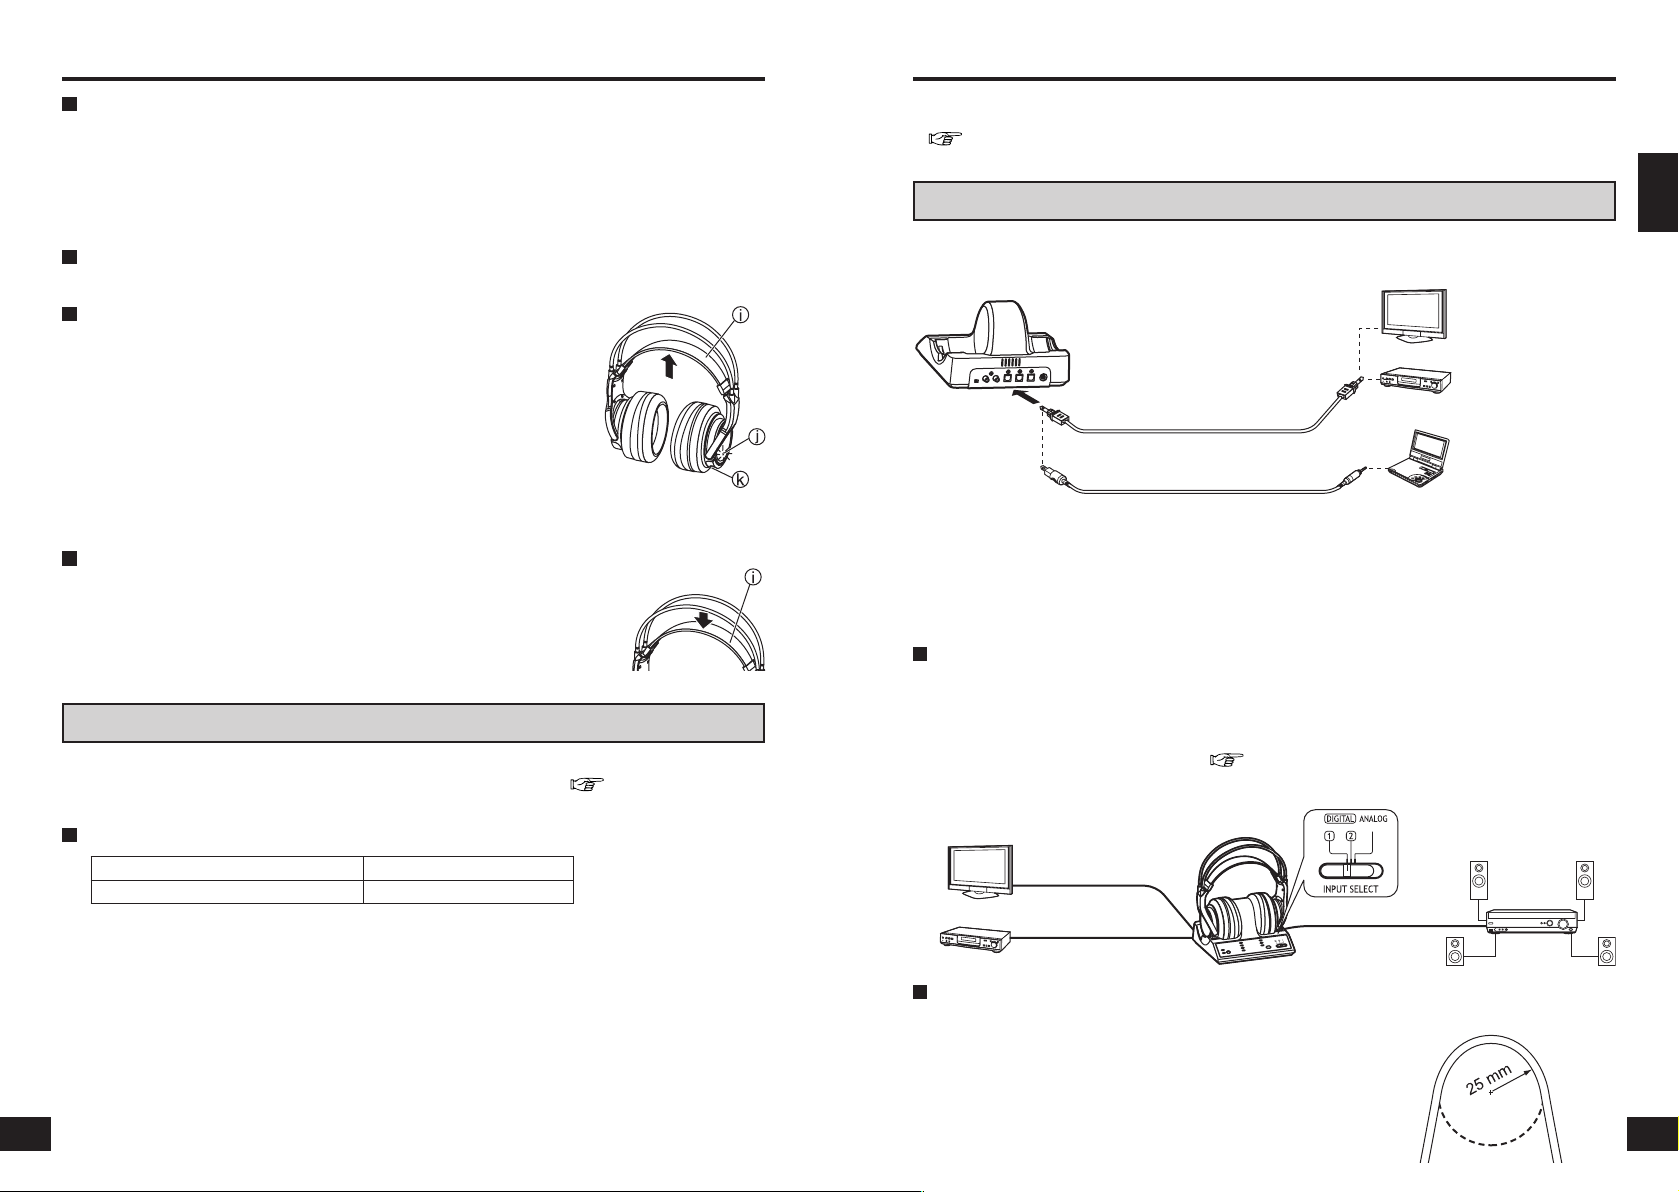
Connecting digital equipment
Use the supplied optical digital cable to connect a television or DVD player’s※1 optical DIGITAL AUDIO OUT
terminal※2 to the transmitter’s DIGITAL IN 1 or 2 terminal.
Connecting an amplifier etc.
If you connect optical digital output equipment to the DIGITAL IN 1 and DIGITAL IN 2 terminals and an AV
amplifier (not included) to the DIGITAL OUT terminal, you can switch the input without changing the optical
digital cable.
● You can select the signal input to this unit and the signal output to the connected equipment at the same time
with the INPUT SELECT control. When ANALOG is selected, the signal input to DIGITAL 2 is output to the
connected equipment (AV amplifier, etc.). (
page 4)
● The input signal cannot be switched if the AC adaptor is not connected to the transmitter. Likewise, no signal
will come out to the DIGITAL OUT terminal.
If the OPR/CHARGE lamp does not glow red
Check that the left and right sides of the headphones are correctly placed on the left and right sides of the
transmitter.
Check that the charging terminals on the headphones and transmitter are touching each other. Adjust them if
they are not touching.
● When there is dirt on the charging terminals of the headphones or the transmitter, remove it gently with a
cotton bud, etc.
To charge the battery after using the headphones
Put the headphones back on the transmitter. The OPR/CHARGE lamp glows red and charging begins.
Power supply preparations: Headphones
※1
At 1 kHz, 1 mW + 1 mW output.
※2
Operating times may differ depending on the temperature of the surrounding environment and operating
conditions.
Battery type
Operating time
※1
Panasonic Alkaline batteries
Approx. 6 hours
※2
8
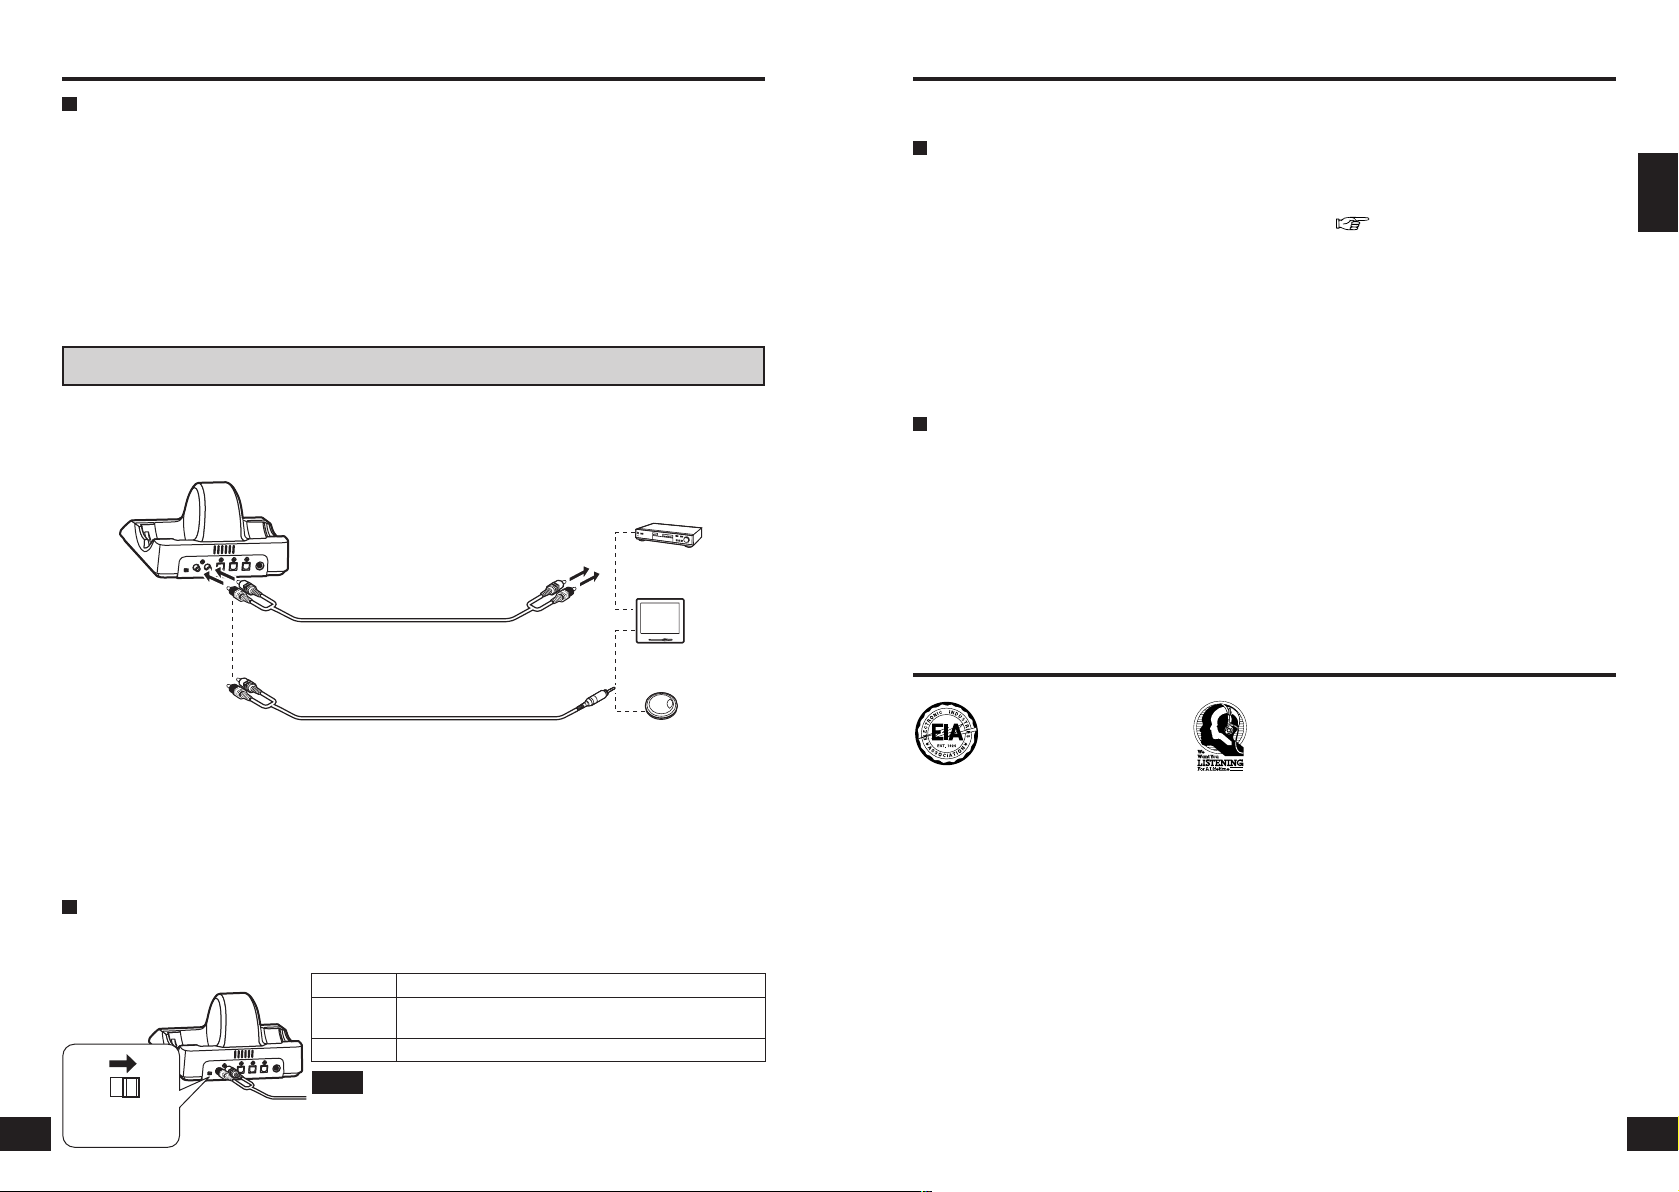
Connections
Transmitter
To DIGITAL IN 1
or DIGITAL IN 2
terminal
Optical digital cable (supplied)
Remove the plug caps and insert the
cable firmly into the correct terminals.
Optical digital cable (optical mini
plug) (not included)
Television with an
optical DIGITAL AUDIO
OUT terminal
Equipment with an
optical DIGITAL AUDIO
OUT terminal e.g. a DVD
player
Equipment with an
optical mini DIGITAL
AUDIO OUT terminal e.g.
a portable DVD player
9
To DIGITAL IN 1
terminal
To DIGITAL IN 2
terminal
To DIGITAL OUT
terminal
AV amplifier
Optical digital
output terminal
Optical digital
input terminal
Using an optical digital cable
● Do not let falling objects subject the optical digital cable to vibration or
shock.
● Hold the plugs in your hands and carefully connect or disconnect the
optical digital cable.
● If the ends of the optical digital cable become dirty or dusty, efficiency will
decrease. Keep them clean.
● For safety reasons, attach plug caps and do not bend the optical digital
cable too much.
The optical digital cable’s
minimum bending radius is 25
mm (1 in.).
RQT8948
00
10
00
11
RQT8948
ENGLISH
Placement of transmitter and headphones
Playing DTS signals
Select the DTS audio signal on the connected equipment.
● A DTS compatible DVD player is necessary to play DVD discs recorded in DTS. (Refer to your DVD player’s
operating instructions for further details.)
● If
“OFF” has been selected for the DVD player’s DTS digital setting, sound may not be output even when DTS
output is selected in the DVD menu.
● When connecting a DVD player and this unit with an analog connection, sound may not be output. Change to
a digital connection if this happens.
● There may be some noise emitted during functions such as rewinding and fast forwarding with a DTS format
DVD. This does not indicate a problem with the unit.
Audio cable (mini pin plug) (not included)
Use the audio cable (stereo mini plug to 2-pin plug) or similar to connect the transmitter’s LINE IN terminal to a
stereo mini headphone jack on the television or portable AV equipment. If the output level from the television
or portable AV equipment is set to low, there may be unwanted noise. Set the volume so the sound is not
distorted.
Connecting analog equipment
Use an audio cable when connecting the AUDIO OUT terminals of a video cassette player, television etc. to the
transmitter’s LINE IN (L/R) terminal.
ATT Control
When the sound is low with an analog connection, switch the ATT (attenuator) control on the Transmitter’s rear
panel to [0 dB].
The range of the radio waves
The radio waves have a maximum range of 30 m (98.4 ft.) from the transmitter.
The most appropriate frequency is automatically set when the headphones are taken off the transmitter. When
the headphones are used outside the range of the radio waves or the radio waves weaken, the sound is
broken. Move nearer to the transmitter or reset the frequency (
page 14 [Setting the most appropriate
frequency]).
● Since this unit is using the 2.4 GHz radio frequency band, obstacles (such as reinforced concrete walls
and metal doors) may cause the sound to be broken. This is a characteristic of radio waves and not a
malfunction.
● The sound heard from the headphones will differ depending on where the transmitter is placed and the kind
of location in which it is used. We recommend placing the transmitter where the sound is received best.
● The sound may be broken when the unit is used at the same time as other equipment that uses the 2.4 GHz
radio frequency band such as wireless equipment or microwaves.
Locations
Avoid placing the unit in the following locations
- Places with high temperatures such as near heating appliances or places directly exposed to sunlight
- Places with a lot of dust
- On top of unstable carts or inclined surfaces
- Places with excessive vibration
- Bathrooms and other moisture-prone places
ATT
0dB
–8dB
This unit uses radio waves to transmit the signals so it is recommended to use the headphones within the range
of the radio waves.
Note
● Reduce the volume before switching the ATT control.
● If the analog sound input is distorted (there may also be noise), switch
the ATT control to [-8 dB].
Connections
Transmitter
To LINE IN
terminal
AUDIO-L
(L, white)
AUDIO-R
(R, red)
Audio cable (not included)
Audio cable (mini pin plug)
(not included)
To the AUDIO OUT
terminals
Headphone terminal etc.
AUDIO-L
(L, white)
AUDIO-R
(R, red)
Video cassette
player
Television
Portable AV
equipment
10
Position Source
0 dB
Equipment with a low output level such as televisions and
portable equipment
-8 dB Other equipment (setting at shipment)
11
Listening caution
Selecting fine audio equipment such as the unit
you’ve just purchased is only the start of your musical
enjoyment. Now it’s time to consider how you can
maximize the fun and excitement your equipment
offers. This manufacturer and the Electronic Industries
Association’s Consumer Electronics Group want you
to get the most out of your equipment by playing it at
a safe level. One that lets the sound come through
loud and clear without annoying blaring or distortion
and, most importantly, without affecting your sensitive
hearing.
We recommend that you avoid prolonged exposure to
excessive noise.
Sound can be deceiving. Over time your hearing
“comfort level” adapts to higher volumes of sound. So
what sounds
“normal” can actually be loud and harmful
to your hearing.
Guard against this by setting your equipment at a safe
level BEFORE your hearing adapts.
To establish a safe level:
● Start your volume control at a low setting.
● Slowly increase the sound until you can hear it
comfortably and clearly, and without distortion.
Once you have established a comfortable sound
level:
● Set the dial and leave it there.
Taking a minute to do this now will help to prevent
hearing damage or loss in the future. After all, we want
you listening for a lifetime.
 Loading...