

Page 1

Page 2
COUNTER
RESET
TAPE
POSITION
PAUSE/SLOW
ACTION
SEARCH
TRACKING
EJECT
VCR/TV
INPUT
DISPLAY
CM/ZERO
VOL CH
REC
POWER
1
2
3
4
5
6
7
8
9
100
0
ADD/DLT
REW
PLAY
STOP
FF
VCR TV
SELECT
SPEED
SAP/Hi-Fi
PROG
DAILY
7
21
31
68 9
SELECT / Selection Order
WEEKLY
(SAT)
WEEKLY
(MON)
WEEKLY
(SUN)
TIMER PROG.
L I
ST
CANC
EL : ADD /
DLT
SELECT :
SET :
EXIT
: PROG
DT
START
STOP CH
SPD
7 9 : 00A 12 : 00A 08
SP
8
10 : 00P
12 : 00P 02 SP
10
8 : 00P
9 : 00P 10
SP
S
U
9 : 00P 10 : 00P
L1
LP
TIMER
PROG.
LIST
SELECT START DATE
DATE START
ST
O
P
C
H
SP
TODA
Y
7 SUN 9:
00A 12:00A
08
SELECT :
END : PROG
SET:
TIMER PROG.
L I
ST
DT
START
STOP CH
SPD
13 2 : 00 P
3 : 20P 02
SLP
-- -- : --
-- : -- --
--
--
-- : -- -- : -- --
--
--
-- : -- -- : -- --
--
CANC
EL : ADD /
DLT
SELECT :
SET :
EXIT
: PROG
SELECT :
END : PROG
DATE START
ST
O
P
C
H
SLP
SET:
SELECT START DATE
T
ODAY
13 SAT --:-- --:-- --
TIMER
PROG.
LIST
TIMER PROG.
L I
ST
CANC
EL : ADD /
DLT
SELECT :
SET :
EXIT
: PROG
DT
START
STOP CH
SPD
-- -- : --
-- : -- --
--
8
10 : 00P
12 : 00P 02 SP
10
8 : 00P
9 : 00P 10
SP
S
U
9 : 00P 10 : 00P
L1
LP
VCR CLOCK CHANNEL
6 /08 / 20 0 3
SUN 2 : 20P
M
DST :
ON
SETT I NG
: CH
10
AUTO CLOCK SET
C
OMPLETED
VCR CLOCK CHANNEL
SELECT MONTH
DST:ON
1 / /
:
SELECT :
SET :
EXIT
:
ACT I ON
VCR CLOCK CHANNEL
SET COMPLETED
DST:ON
6 /08 / 20 0 3
SUN
2 : 20P
M
START :
ACT I ON
SET
:
IN FROM ANT.
TV
VCR
VHF/UHF
OUT
TO
TV
IN from
ANT./CABLE
IN FROM ANT.
TV
VCR
VHF/UHF
OUT
TO
TV
IN from
ANT./CABLE
Cable TV
Converter Box
Before Using
COUNTER
RESET
TAPE
POSITION
PAUSE/SLOW
ACTION
SEARCH
TRACKING
EJECT
VCR/TV
INPUT
DISPLAY
CM/ZERO
VOL CH
REC
POWER
1
2
3
4
5
6
7
8
9
100
0
ADD/DLT
REW
PLAY
STOP
FF
VCR TV
SELECT
SPEED
SAP/Hi-Fi
PROG
V I D
EO HEADS MAY
N
EED
CLEAN I NG
PLEASE I NSERT HEAD
CLEAN I NG CASSETTE
OR REFER
TO
MANUAL
END
: PL
AY
R
R
R
R
• Important Safeguards • Accessories • Head Cleaning • Loading Batteries • Prevent Tape Erasure • Specifications • Record/Playback Time
Congratulations
on your new purchase! With proper use, this
dependable product will provide years of
enjoyment. Please fill in the information below.
(Serial number is on tag on back of VCR.)
• Date of Purchase
• Dealer Purchased From
• Dealer Address
• Dealer Phone No.
• Model No.
• Serial No.
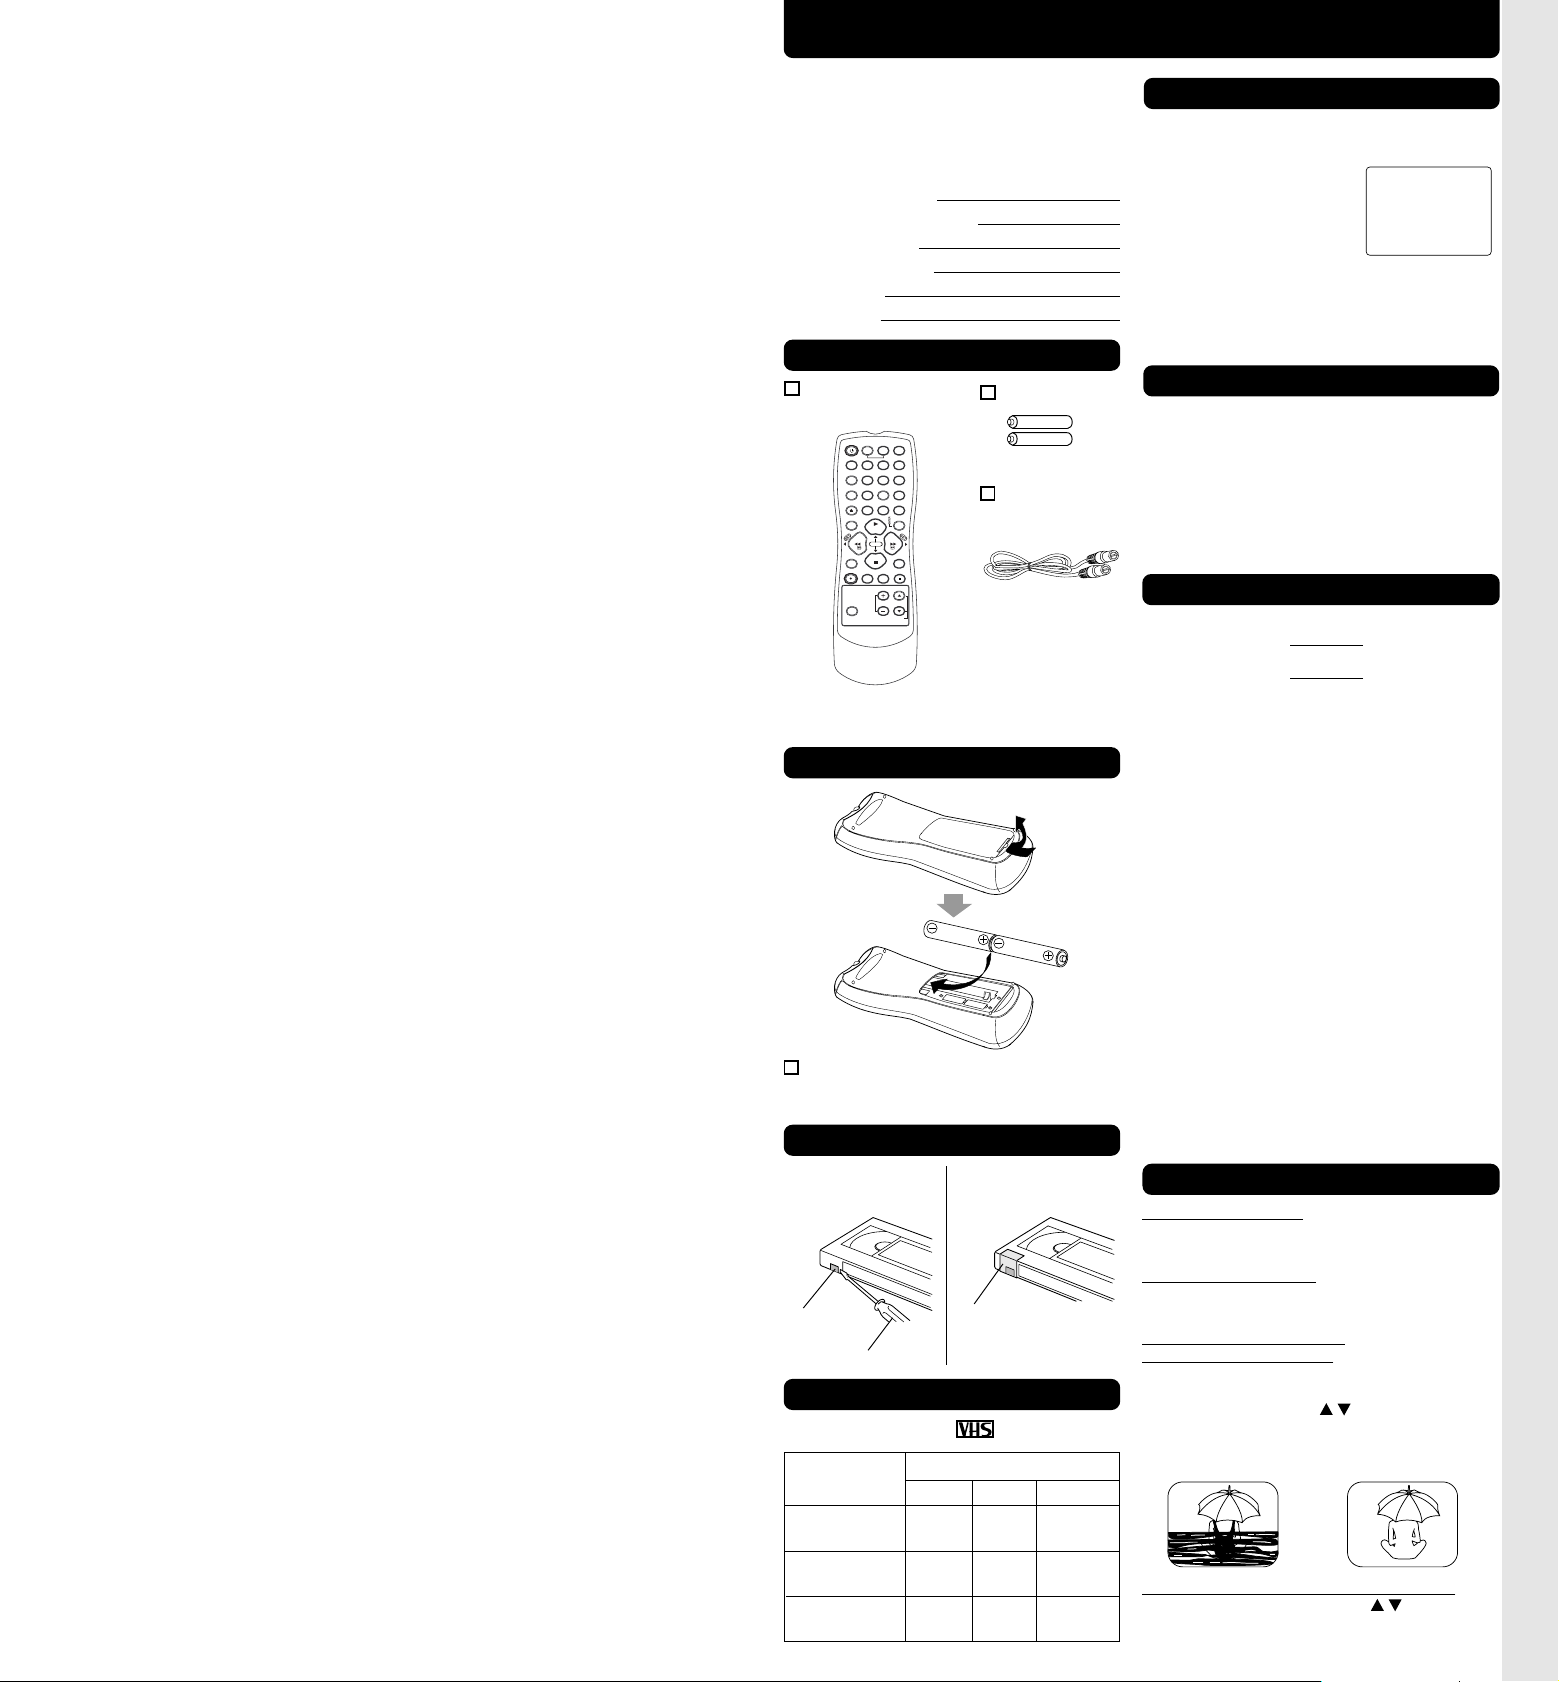
Accessories
Remote Control
LSSQ0389
To order accessories, call toll free
1-800-332-5368.
Loading the Batteries
Battery replacement caution
• Do not mix old and new batteries.
• Do not mix alkaline with manganese batteries.
Prevent Accidental Tape Erasure
Break off the tab to
prevent recording.
Record Tab
Screw driver
Record/Playback Time
Only use tapes with the mark in this unit.
Tape Speed
Setting
SP
(Standard Play)
LP
(Long Play)
SLP
(Super Long Play)
PV-V4523S
Batteries 2 “AA”
RF Coaxial
Cable
LSJA0372
To record again
Cover the hole
with cellophane
tape.
Type of Video Cassette
T160T120T60
1 Hour 2 Hours
2 Hours
3 Hours
4 Hours
6 Hours 8 Hours
2 Hours
40 Minutes
5 Hours
20 Minutes
Head Cleaning
Old or damaged tapes may clog heads.
Video Head Clog Sensor
Screen-right appears during
play if clogging is detected.
To remove screen, press
PLAY.
• Use “ dry” type head
cleaning cassette only.
(Part No. NV-TCL30PT is recommended.)
• Follow cleaning tape instructions carefully.
Excessive use of tape can shorten head life.
Cleaning the VCR
Use soft, dry cloth or dusting attachment of a
vacuum to remove dust from all cabinet vent
holes. You may moisten cloth with nonabrasive,
antistatic cleaner/ polisher.
Caution:
Alcohol and various solvents could damage
finish.
Specifications
Power Source: 120 V AC, 60 Hz
Power Consumption:
Video Signal: EIA Standard NTSC color
Video Recording 4 rotary heads helical
System: scanning system
Audio Track: 1 track (Normal)
Tuner:
Broadcast Channels: VHF 2 ~ 13, UHF 14 ~ 69
CABLE Channels: Midband A ~ I (14 ~ 22)
Operating
Temperature: 5 °C ~ 40 °C (41 °F ~ 104 °F)
Operating Humidity: 10 % ~ 75 %
Weight: 2.5 kg (5.5 lbs).
Dimensions: 360 (W) x 93 (H) x 242 (D) mm
Note: Designs and specifications are subject
to change without notice.
Power On
Approx. 23 W
Power Off
Approx. 3.0 W
2 channel (Hi-Fi Audio Sound)
Superband J ~ W (23 ~ 36)
Hyperband AA ~ EEE
(37 ~ 64)
Lowband A-5 ~ A-1 (95 ~ 99)
Special CABLE channel 5A
(01)
Ultraband 65 ~ 94, 100 ~ 125
14-3/16” (W) x 3-11/16” (H) x
9-9/16” (D) inch
Features for a Quality Picture
Digital Auto Picture
Automatically controls the video output signal for
less noise depending on the tape condition.
Digital Auto Tracking
Continuously analyzes the signal and adjusts for
optimum picture quality.
Manual Tracking Control
(to reduce picture noise)
Use during Playback and Slow Motion mode to
reduce picture noise.
Press CH (TRACKING)
/ on the remote
control or on the VCR until the picture clears up.
To return to Auto Tracking, press POWER off,
then on again a few seconds later.
V-Lock Control (to reduce picture jitter)
In Still mode, CH (TRACKING)
/ operate as a
V-Lock control.
- 3 -
Page 3
COUNTER
RESET
TAPE
POSITION
PAUSE/SLOW
ACTION
SEARCH
TRACKING
EJECT
VCR/TV
INPUT
DISPLAY
CM/ZERO
VOL CH
REC
POWER
1
2
3
4
5
6
7
8
9
100
0
ADD/DLT
REW
PLAY
STOP
FF
VCR TV
SELECT
SPEED
SAP/Hi-Fi
PROG
DAILY
7
21
31
68 9
SELECT / Selection Order
WEEKLY
(SAT)
WEEKLY
(MON)
WEEKLY
(SUN)
TIMER PROG.
L I
ST
CANC
EL : ADD /
DLT
SELECT :
SET :
EXIT
: PROG
DT
START
STOP CH
SPD
7 9 : 00A 12 : 00A 08
SP
8
10 : 00P
12 : 00P 02 SP
10
8 : 00P
9 : 00P 10
SP
S
U
9 : 00P 10 : 00P
L1
LP
TIMER
PROG.
LIST
SELECT START DATE
DATE START
ST
O
P
C
H
SP
TODA
Y
7 SUN 9:
00A 12:00A
08
SELECT :
END : PROG
SET:
TIMER PROG.
L I
ST
DT
START
STOP CH
SPD
13 2 : 00 P
3 : 20P 02
SLP
-- -- : --
-- : -- --
--
--
-- : -- -- : -- --
--
--
-- : -- -- : -- --
--
CANC
EL : ADD /
DLT
SELECT :
SET :
EXIT
: PROG
SELECT :
END : PROG
DATE START
ST
O
P
C
H
SLP
SET:
SELECT START DATE
T
ODAY
13 SAT --:-- --:-- --
TIMER
PROG.
LIST
TIMER PROG.
L I
ST
CANC
EL : ADD /
DLT
SELECT :
SET :
EXIT
: PROG
DT
START
STOP CH
SPD
-- -- : --
-- : -- --
--
8
10 : 00P
12 : 00P 02 SP
10
8 : 00P
9 : 00P 10
SP
S
U
9 : 00P 10 : 00P
L1
LP
Connections / Initial Setup (Ready to Play)
VCR CLOCK CHANNEL
6 /08 / 20 0 3
SUN 2 : 20P
M
DST :
ON
SETT I NG
: CH
10
AUTO CLOCK SET
C
OMPLETED
VCR CLOCK CHANNEL
SELECT MONTH
DST:ON
1 / /
:
SELECT :
SET :
EXIT
:
ACT I ON
VCR CLOCK CHANNEL
SET COMPLETED
DST:ON
6 /08 / 20 0 3
SUN
2 : 20P
M
START :
ACT I ON
SET
:
IN FROM ANT.
TV
VCR
VHF/UHF
OUT
TO
TV
IN from
ANT./CABLE
IN FROM ANT.
TV
VCR
VHF/UHF
OUT
TO
TV
IN from
ANT./CABLE
Cable TV
Converter Box
Playback / Record on a Tape
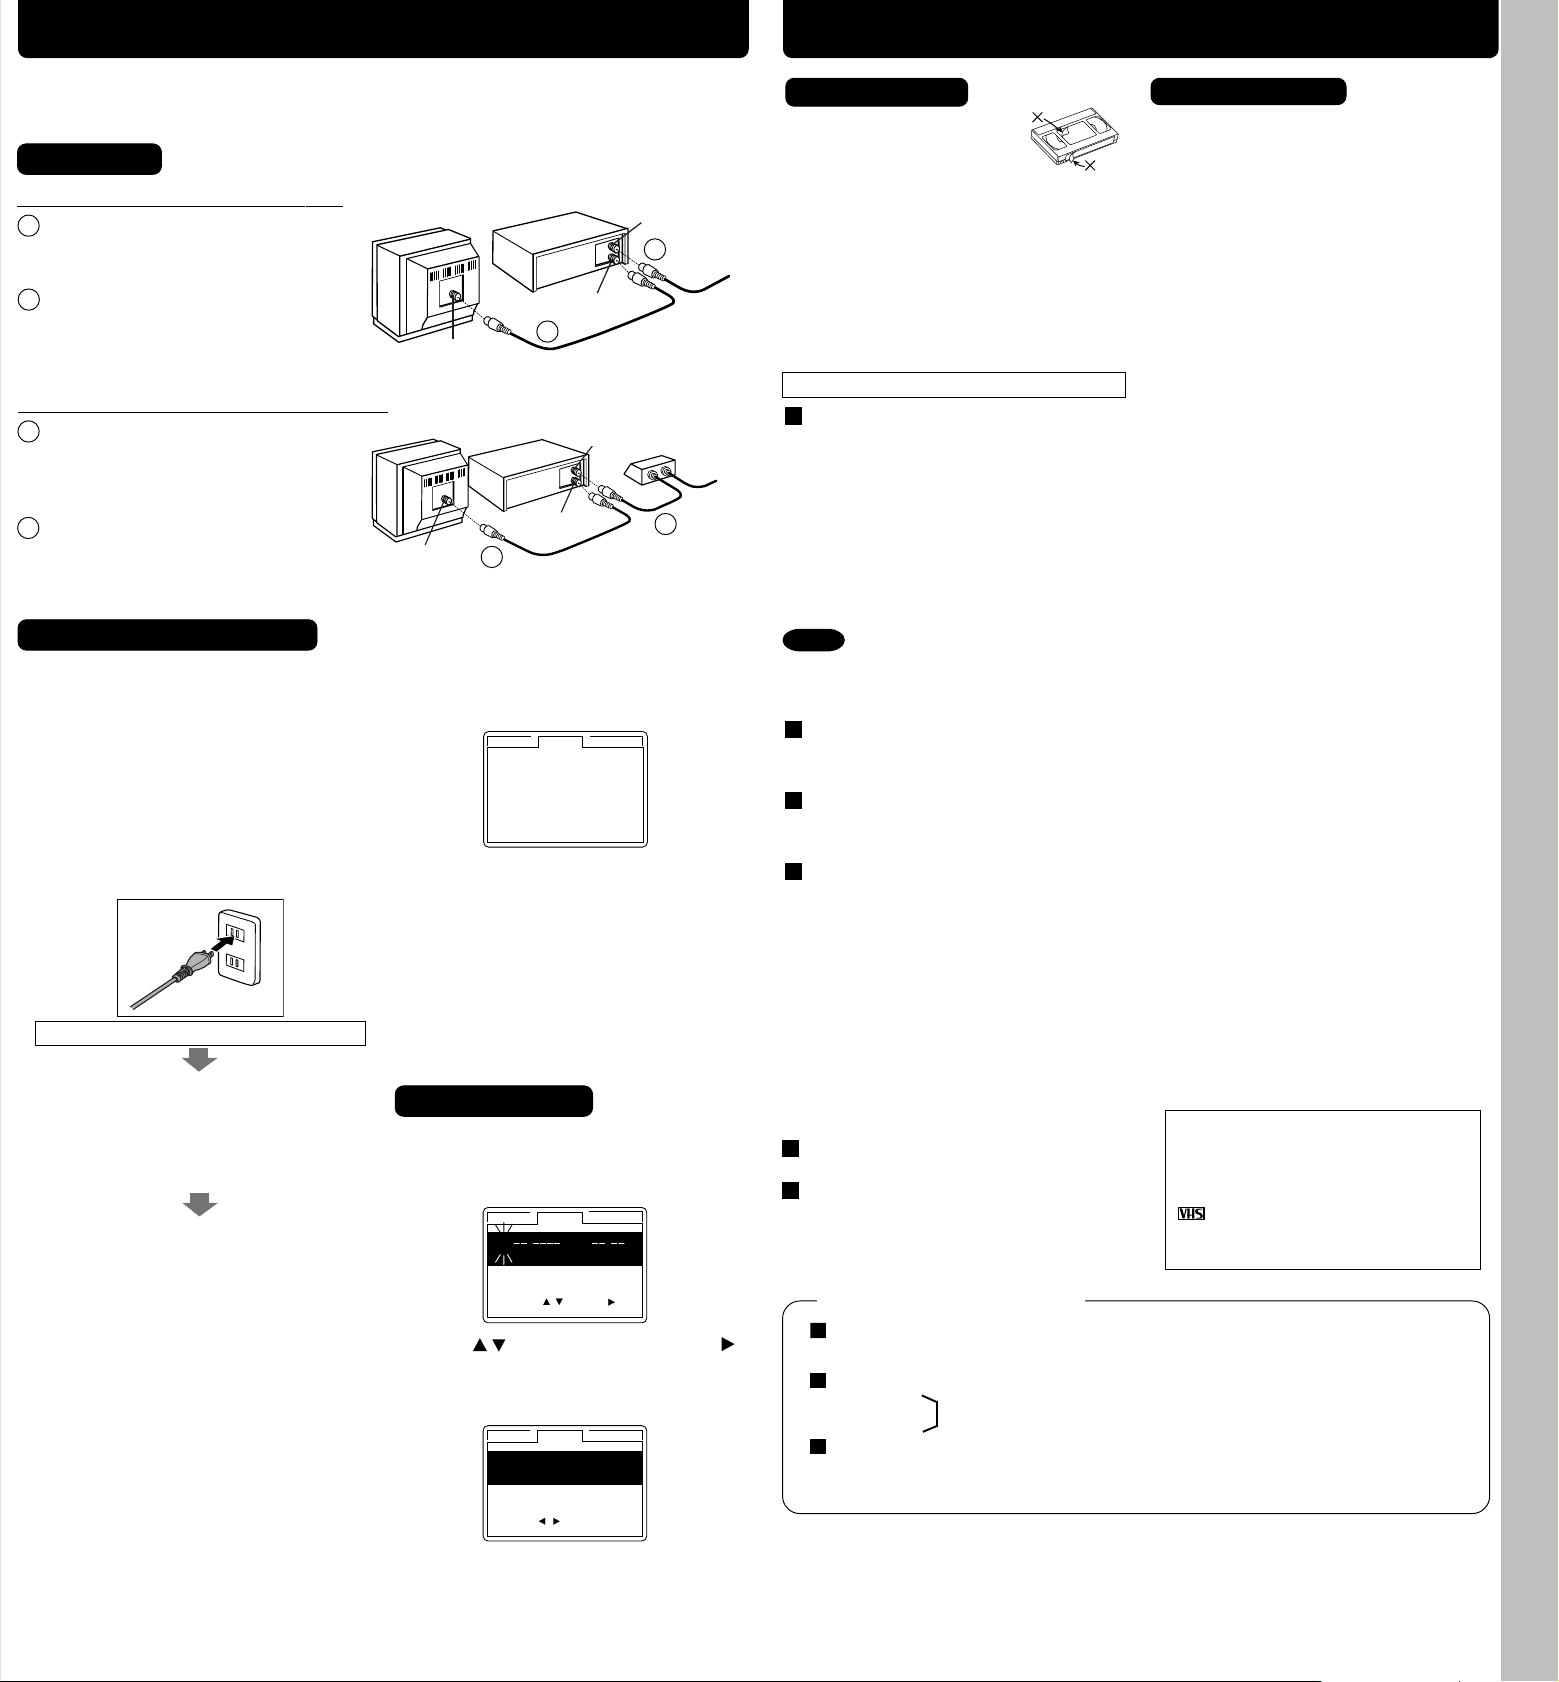
• Connections • Initial Setup • Clock Set • Select Channel • Playback • Record • Auto Operation
Please make all cable or antenna connections before plugging into the AC
outlet.
Plugging the VCR Power Cord into an AC wall outlet starts auto channel and clock set.
Connecting
➛➛
For ANT./Cable
1
Connect cable from
➛
➛➛
VCR
Antenna/Cable to VCR’s IN
➛➛
➛
➛➛
TV
1
FROM ANT. jack.
2
Connect VCR’s OUT TO TV
jack to TV’s ANT. IN jack
2
with included RF Cable
accessory.
➛➛
For DSS/Cable Box
Connect your cable box’s
1
➛
VCR
➛➛
➛➛
➛
➛➛
TV
OUT jack to the VCR’s IN
FROM ANT. jack with an RF
cable.
2
Connect VCR’s OUT TO TV
jack to TV’s ANT. IN jack
2
1
with included RF Cable
accessory.
Initial Setup (Ready to Play)
1 Turn TV on and tune to channel 3.
2 Plug VCR Power Cord into AC wall
outlet. VCR comes on and auto
channel and clock set starts.
• If screen below does not appear, check
VCR - TV connection and, if TV is
tuned to channel 3, try switching it to
channel 4.
• To change VCR’s output channel,
please refer to “VCR’s Output Channel”
in Advanced Operations book (p. 12).
Plugging the AC Power Plug into an AC outlet
If you use a cable box, turn it on and set it
to the Public Broadcasting Station (PBS)
channel in your time zone. If you use a
DSS receiver, it must be turned off.
3 Settings are made automatically.
When setup is done, this screen
appears.
If “ AUTO CLOCK SET IS INCOMPLETE”
appears, manually set clock.
See below.
Manual Clock Set
If Auto Clock Set was incomplete.
1 Press ACTION* on remote to display
CLOCK menu.
2 Press to select the month and
to set. In the same manner, select and
set the date, year, time, and DST
(Daylight Saving Time).
3 Press ACTION to start clock and exit.
- 4 -
Playback a Tape
1 Insert a tape.
Record on a Tape
1
Insert a tape with a record tab (p. 3).
• Loose or peeling labels
may cause tape jam.
• VCR power comes on. “ VCR” lights
on Multi Function Display.
If Auto VCR/TV (see p. 10 of
Advanced Operations book) is set to
“ OFF,” press VCR/TV until “ VCR”
lights on the Multi Function Display.
2
Press PLAY to play tape.
• If tape has no rec. tab (p. 3), auto play begins.
Special Features During Play
Forward/Reverse Scene Search
➛ Press FF or REW.
➛ Press PLAY to release.
After search has begun, each additional
press of FF or REW changes speed as
shown below.
[SLP] : Approx. 21X
[LP] : Approx. 9X
[SP] : Approx. 7X
↔ Approx. 9X
↔ Approx. 7X
↔ Approx. 3X
If at 21X, 9X, or 7X speed the picture is
interrupted, change speed to 9X, 7X, or 3X.
Notes
• Picture interruption may occur with some TVs.
• FF and REW search speed may vary
depending on current tape position.
Still (Freeze) Picture
➛ Press PAUSE/SLOW.
➛ Press PLAY to release.
Frame by Frame Picture
➛ Press PAUSE/SLOW in Still mode.
➛ Press PLAY to release.
Slow Motion Picture
➛ Hold down PAUSE/SLOW in Still mode.
➛ Press PLAY to release.
Notes
• These features work best in SP or SLP mode.
• The sound will be muted.
• To reduce picture noise, see “Manual
Tracking Control” on p. 3.
• After VCR is in Still or Slow mode 3 minutes, it
auto switches to Stop mode to protect the tape
and the video heads.
3 Press STOP to stop tape.
Press REW or FF in Stop mode to
Rewind or Fast Forward tape.
Press EJECT on remote,
or STOP/EJECT on VCR to eject tape.
This video recorder, equipped with
HQ (High Quality) system, is
compatible with existing VHS
equipment. Only use tapes with the
mark. Only tapes tested and
inspected for use in 2, 4, 6, and 8
hour machines are recommended.
Auto Operation Functions
Auto Play
Insert a tape ➛ Power comes on ➛ Play starts if there is no record tab (see p. 3).
Auto Rewind
Play
Fast Forward
➛ Tape end ➛ Rewind
Play Auto Eject
(Repeat Play must be off)
Play ➛ Tape end ➛ Rewind ➛ Tape ejects if there is no record tab
*Important: If a remote control button does not work when pressed,
press the VCR button on the remote and try the button again.
- 5 -
Page 4
COUNTER
RESET
TAPE
POSITION
PAUSE/SLOW
ACTION
SEARCH
TRACKING
EJECT
VCR/TV
INPUT
DISPLAY
CM/ZERO
VOL CH
REC
POWER
1
2
3
4
5
6
7
8
9
100
0
ADD/DLT
REW
PLAY
STOP
FF
VCR TV
SELECT
SPEED
SAP/Hi-Fi
PROG
Timer Recording
DAILY
7
21
31
68 9
SELECT / Selection Order
WEEKLY
(SAT)
WEEKLY
(MON)
WEEKLY
(SUN)
TIMER PROG.
L I
ST
CANC
EL : ADD /
DLT
SELECT :
SET :
EXIT
: PROG
DT
START
STOP CH
SPD
7 9 : 00A 12 : 00A 08
SP
8
10 : 00P
12 : 00P 02 SP
10
8 : 00P
9 : 00P 10
SP
S
U
9 : 00P 10 : 00P
L1
LP
TIMER
PROG.
LIST
SELECT START DATE
DATE START
ST
O
P
C
H
SP
TODA
Y
7 SUN 9:
00A 12:00A
08
SELECT :
END : PROG
SET:
TIMER PROG.
L I
ST
DT
START
STOP CH
SPD
13 2 : 00 P
3 : 20P 02
SLP
-- -- : --
-- : -- --
--
--
-- : -- -- : -- --
--
--
-- : -- -- : -- --
--
CANC
EL : ADD /
DLT
SELECT :
SET :
EXIT
: PROG
SELECT :
END : PROG
DATE START
ST
O
P
C
H
SLP
SET:
SELECT START DATE
T
ODAY
13 SAT --:-- --:-- --
TIMER
PROG.
LIST
TIMER PROG.
L I
ST
CANC
EL : ADD /
DLT
SELECT :
SET :
EXIT
: PROG
DT
START
STOP CH
SPD
-- -- : --
-- : -- --
--
8
10 : 00P
12 : 00P 02 SP
10
8 : 00P
9 : 00P 10
SP
S
U
9 : 00P 10 : 00P
L1
LP
Location of Controls
• Timer Recording • Location of Controls (Remote Control Buttons, Front View of the VCR)
Timer Recording
1 1) Press PROG*.
2) Press
2
3
4
Press POWER off to set the timer recording. (“TIMER” lights on Multi Function Display.)
Review, Replace, or Clear Program
(Recording is not in progress)
a 1) Press PROG.
2) Press
b
c
To Replace program...
to display program screen.
1) Set record DATE,
press
to select:
1~31= one time,
or DAILY= MON~ FRI,
or WEEKLY= same time
each week and press
2) Set remaining items,
press
press
to select and
to set START/ STOP times, CH (channel) or
LINE input (p. 9 of Advanced Operations book), and
tape speed (p. 3).
Press PROG to end programming.
To Enter More Programs
Press
press
to select and
to set an unused program.
Then repeat step 2.
Or, press PROG to exit.
to select LIST.
Press to select
desired program.
1) Press to display.
2) Repeat Step 2
(above) to set new
programs.
Example
Today
.
Cancel a Timer Recording
(Recording is in progress)
Press POWER and then STOP within 10
seconds to cancel the Timer Recording.
(The TIMER indicator goes out on Multi
Function Display.)
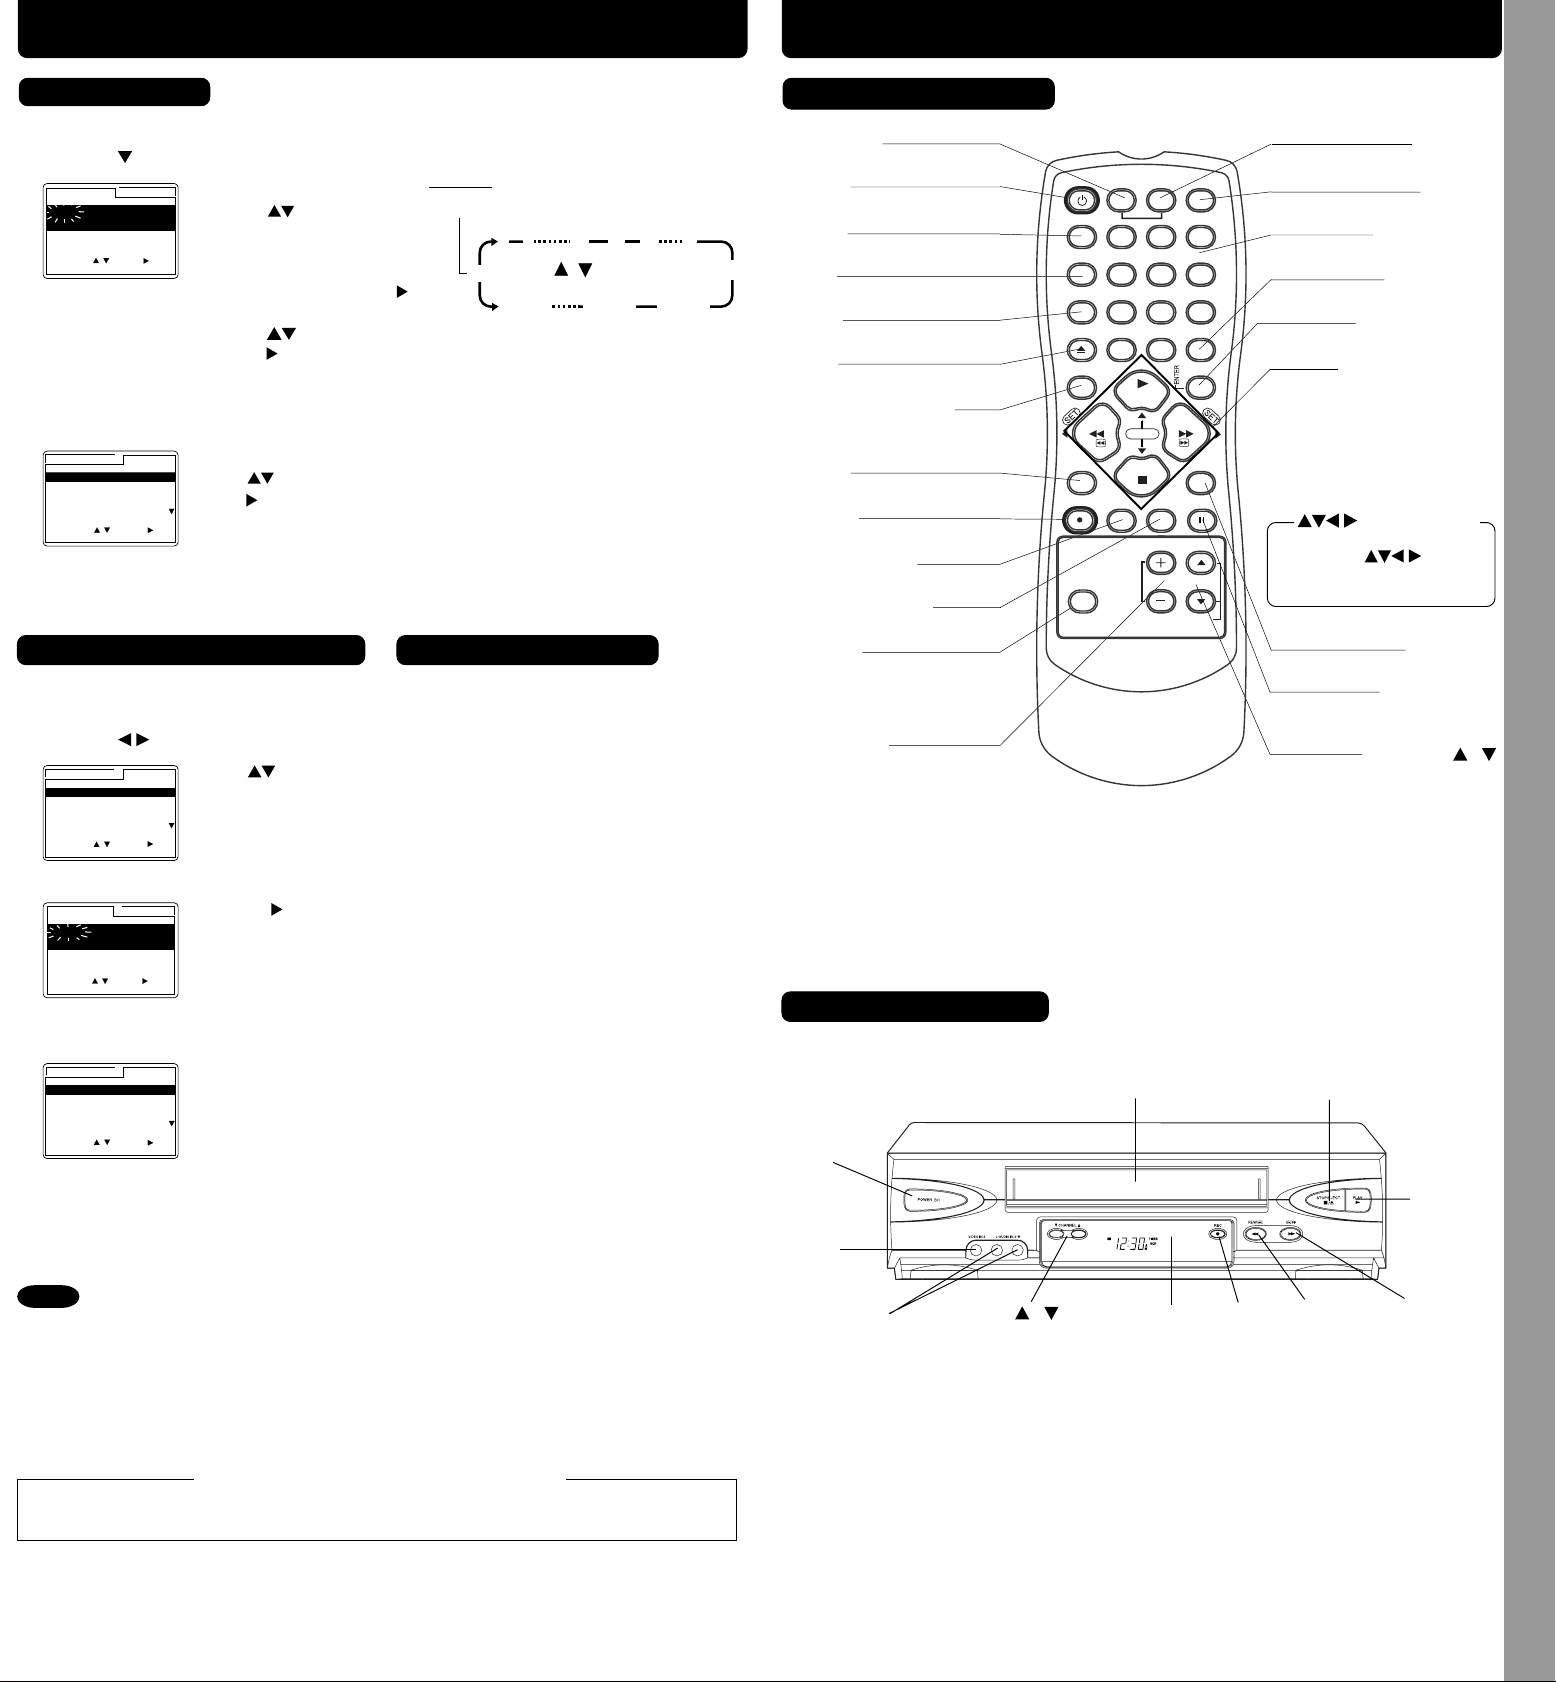
Remote Control Buttons
VCR (mode)
(Enables VCR functions)
POWER
(Turns VCR off/on)
VCR/TV
(For TV or VCR mode)
INPUT
(For LINE or channel)
SPEED
(Changes tape speed)
EJECT
(Ejects tape)
COMMERCIAL SKIP/
ZERO SEARCH
(
Starts COMMERCIAL SKIP/ Zero Search
ACTION
(Displays menu)
RECORD
(Records a program, etc.)
TAPE POSITION
(Locates tape position)
COUNTER RESET
(Resets counter to zero)
SAP/Hi-Fi
(Selects audio mode for play
or record)
VOLUME +/
-
(Adjusts TV volume)
Remote Control
EJECT button:
Press to eject tape. EJECT is not available during recording.
(Enables TV functions)
TV (mode)
DISPLAY
(Displays VCR status)
(Selects channel directly)
NUMBER Keys
ADD/DELETE
(Adds or deletes a channel)
SEARCH/ ENTER
(Set search system /Tunes TV channel)
PLAY (Plays a tape)/
FAST FORWARD/SEARCH
(Fast forwards tape/ forward visual
search)
)
REWIND/SEARCH
(Rewinds tape/ reverse visual
search)
STOP (Stops tape)
Remote keys
PLAY, STOP, REW, and FF
function as
operation keys when menus
are displayed.
(Displays Timer Program screen)
PROGRAM
PAUSE/SLOW
(Displays still, frame by frame,
or slow motion picture)
CHANNEL /
TRACKING/ V-LOCK
(Selects channel/ reduces
picture noise during Play and
Slow mode)
or
To Clear program...
d Press PROG to end the programming.
Notes
• If you are using a Cable Box, VCR Timer Programming Channel (Step 2 above) must
be set to the Cable Box output channel and your Cable Box must be manually set to
the desired channel. The Cable Box must be left on.
• If a power interruption occurs while programming the timer, the timer program(s) may be
canceled. If “TIMER PROGRAMS WERE LOST DUE TO POWER INTERRUPTION” appears
on-screen, please re-enter the timer programs.
• When recording programs via DSS receiver, DSS receiver must be left on.
• When recording programs via an antenna or cable, DSS receiver must be turned off.
Press ADD/DLT.
Important notes when using DSS receiver
- 6 -
Front View of the VCR
Cassette Compartment
POWER
Video
Input
Connector
Audio Input
Connector
(L/R)
CHANNEL
/
TRACKING/ V-LOCK
Remote
Sensor
RECORD
*Important: If a remote control button does not work when pressed,
press the VCR button on the remote and try the button again.
- 7 -
STOP/EJECT
REWIND/
SEARCH
PLAY
FAST
FORWARD/
SEARCH
Page 5

Page 6

Page 7

Reset Language, Channels, Clock, VCR’s Output Channel
SELECT :
EXIT
:
ACT I ON
REPEAT PLAY : OFF
REMOTE WARNING :ON
AUTO SHUT
- OFF : OFF
AUTO VCR/TV : ON
IDIOMA/LANGUE : ENGLISH
VCR’ S OUTPUT CH :3
VCR CLOCK CHANNEL
SEL. : REGLER:
QUITTER
: ACT I ON
MAGNETO. HORL. CANAL
REPRISE LECTURE
:NON
MESSAGE D’ ERREUR
:OUI
COUPURE AUTO
:NON
MAGNETO. /TELE AUTO : OUI
LANGUAGE/IDIOMA : FRANÇAIS
CA SORTIE : 3
ELEGIR
: FIJAR :
SAL
I R
:
ACT I ON
VCR RELOJ CANAL
REPETICION :INACT
AVISO/CONT.REMOTO :ACT
APAGADO AUTOMATICO:INACT
VCR/TV AUTO :ACT
LANGUE/LANGUAGE:ESPAÑOL
CANAL DE SALIDA :3
VCR CLOCK CHANNEL
SELECT
:
SET :
EXIT
:
ACT I ON
REPEAT PLAY : OFF
REMOTE WARNING :ON
AUTO SHUT
- OFF : OFF
AUTO VCR/TV : ON
IDIOMA/LANGUE : ENGLISH
VCR’ S OUTPUT CH :3
VCR CLOCK CHANNEL
SELECT
:
SET :
EXIT
:
ACT I ON
REPEAT PLAY : OFF
REMOTE WARNING :ON
AUTO SHUT
- OFF : OFF
AUTO VCR/TV : ON
IDIOMA/LANGUE : ENGLISH
VCR’ S OUTPUT CH :3
SELECT :
EXIT
:
ACT I ON
ANTENNA : CABLE
AUTO SET
WEAK
SIGNAL DISPLAY : OFF
VCR CLOCK CHANNEL
VCR CLOCK CHANNEL
ANTENNA : CABLE
AUTO SET
WEAK
SIGNAL DISPLAY : OFF
SELE
CT :
SET :
EXIT
:
ACT I ON
VCR CLOCK CHANNEL
AUTO CLOCK SET
MANUAL
TIME
ZONE ADJUST : 0
SELECT :
EXIT
:
ACT I ON
VCR CLOCK CHANNEL
SELECT HOUR
DST:ON
6 /08 /
2020 0 3
SUN SUN
2 2 : --PM
SELECT
:
SET :
EXIT
:
ACT I ON
VCR CLOCK CHANNEL
AUTO CLOCK SET
MANUAL
TIME
ZONE ADJUST : 0
SELE
CT :
SET :
EXIT
:
ACT I ON
VCR CLOCK CHANNEL
AUTO CLOCK SET
MANUAL
TIME
ZONE ADJUST : 0
SELE
CT :
SET :
EXIT
:
ACT I ON
VCR CLOCK CHANNEL
SELECT
:
SET :
EXIT
:
ACT I ON
REPEAT PLAY : OFF
REMOTE WARNING :ON
AUTO SHUT
- OFF : OFF
AUTO VCR/TV : ON
IDIOMA/LANGUE : ENGLISH
VCR’ S OUTPUT CH :3
VCR CLOCK CHANNEL
SELECT
:
SET :
EXIT
:
ACT I ON
REPEAT PLAY : OFF
REMOTE WARNING :ON
AUTO SHUT
- OFF : OFF
AUTO VCR/TV : ON
IDIOMA/LANGUE : ENGLISH
VCR’ S OUTPUT CH :4
VCR CLOCK CHANNEL
IF YOU PRESS ACTION
KEY, VCR ’ S OUTPUT CH
SWITCHES TO CH 4.
VCR CLOCK CHANNEL
PLEASE TUNE YOUR TV TO
CH 4.
C
HANNEL
08 ADDED
C
HANNEL
08 DELE T
ED
VCR CLOCK CHANNEL
AUTO CLOCK SET
MANUAL
TIME
ZONE ADJUST : 0
SELECT :
EXIT
:
ACT I ON
VCR CLOCK CHANNEL
CH AUTO SET PROCEEDING
CANCEL :
STOP
VCR CLOCK CHANNEL
CH AUTO SET PROCEEDING
CANCEL :
STOP
Press ACTION
to display MENU.
Language
1) Press to select
language item.
Channels
1) Press
CHANNEL.
to select
Clock
1) Press to select
CLOCK.
Time Zone
Adjust
(Only when Auto Clock
is set.)
1) Press to select
CLOCK.
• Reset Language, Channels, Clock, Time Zone Adjust, VCR’s Output Channel • DST • On-Screen Displays (OSD)
Video Cassette Recorder
Operating Instructions
(Advanced Operations)
For Basic operations, see the separate
“Basic Operations” instruction book.
2) Press repeatedly.
For English
For Spanish
For French
3) Press ACTION to exit.
2) Press to select
“ANTENNA,” then
press
to set
your antenna system
(“TV” or “CABLE.”)
3) Press
to select
“AUTO SET,” then
press
.
• If you use Cable
Box, set it to the
PBS channel in your
time zone.
• After Channel Auto
Set is finished, Auto
Clock Set will be
performed.
2) Press to select
“MANUAL,” and press
. (For Auto Clock Set,
select “AUTO CLOCK
SET.”)
(“TIME ZONE ADJUST”
appears only when
auto clock is set.)
3) Press and
to select and set
the date, time, and
DST (Daylight
Saving Time).
4) Press ACTION to
start the Clock and
exit this mode.
2) Press
to select
“TIME ZONE
ADJUST”
and press
to
subtract or add
hour(s) as necessary.
3) Press ACTION.
•“TIME ZONE
ADJUST” returns to
“0” if clock is set
manually.
Models No. PV-V4523S
VCR’s Output Channel
1) Press to select
“VCR’S OUTPUT CH.”
.
2) Press
3) Press ACTION.
After 3 seconds
• To Make Corrections,
repeat steps 1) ~ 3).
Add or Delete a Channel
To add channel:
Select channel with NUMBER keys and
press ADD/DLT.
To delete channel:
Select channel with CH
/ or NUMBER
keys and press ADD/DLT.
DST (Daylight Saving Time)
VCR auto adjusts clock for DST.
Spring (First Sunday in April)
DST:ON ➛ Sets clock ahead one hour.
Autumn (Last Sunday in October)
DST:ON ➛ Turns clock back one hour.
• If your area does not observe Daylight
Saving Time, select DST:OFF.
• Keep these time changes in mind when
programming VCR for timer recordings.
- 12 -
Table of Contents
Multi-Brand Control Feature ..................................... 2
Advanced Connections (Cable/DSS) ....................... 3
MTS Broadcast......................................................... 4
VHS Hi-Fi Stereo System ......................................... 5
Tape Operation .................................................... 6, 7
Before Requesting Service ...................................... 8
Copying Your Tapes (Dubbing) ............................... 9
Special VCR Features ........................................... 10
On-Screen Displays (OSD) .................................... 11
Reset Language, Channels, Clock, VCR’s Output Channel ... 12
As an ENERGY STAR ® Partner,
Matsushita Electric Corporation of America
has determined that this product or product
E
model meets the
NERGY STAR
guidelines for energy efficiency.
Please read these instructions carefully before attempting to connect,
operate or adjust this product. Please save this manual.
For assistance, please call : 1-800-211-PANA(7262) or send e-mail to : consumerproducts@panasonic.com
®
LSQT0632A
Page 8

PLAY
1st Press
2nd Press
3rd Press
1 min Skip
2 min Skip
3 min Skip
6157
2
34
17534 6
2
Program 2
Program 1
the current tape position
Press SEARCH button
BLANK
INDEX
FF
Program 2 or BLANK
Program 1
the current tape position
Press SEARCH button
FF
INDEX
Program 2
Program 1
the current tape position
Press SEARCH button
INDEX
INDEX
BLANK
BLANK
FF
SEARCH
INDEX
PROGRAM END
ENTER INDEX NUMBER :1
USING 1- 9 KEYS
FORWARD SEARCH :FF
REVERSE SEARCH :REW
NEXT :SEARCH
EXIT :STOP
INDEX SEARCH
FORWARD SEARCH :FF
REVERSE SEARCH :REW
SEARCH
INDEX
PROGRAM END
SEARCH START :FF
EXIT :SEARCH
STER
EO
SAP
M
ONO
H I F I
: L / R
H I F I
: L
H I F I
:
R
N
ORM
AL
®
®®®
Stereo Amplifier
AUDIO IN
R
L
VCR
R
L
R
OUT TO TV
VHF/UHF
TV
R
L
AUDIO OUT
STOP 1 2 : 0 0A
M
CH 02
0 : 0 0 : 0 0
SP
STER
EO
SAP
M
ONO
STOP 1 2 : 0 0A
M
CH 02
0 : 0 0 : 0 0
SP
STER
EO
SAP
M
ONO
STOP 1 2 : 0 0A
M
CH 02
0 : 0 0 : 0 0
SP
STER
EO
SAP
M
ONO
STOP 1 2 : 0 0A
M
CH 02
0 : 0 0 : 0 0
SP
STER
EO
SAP
M
ONO
TV
VCR
IN FROM ANT.
OUT TO TV
VHF/UHF
VIDEO IN
R
L
AUDIO IN
L
R
VIDEO OUT
AUDIO OUT
R
Multi-Brand Control Feature
PLAY
1 2 : 0 0A
M
0 : 0 0 : 0 0
SP
REW
1 2 : 3 0A
M CH 02
0 : 30 : 30
SP
STOP
1 2 : 3 1AM CH 02
0 : 0 0 : 0 0
SP
VCR CLOCK CHANNEL
SELECT
:
SET :
EXIT
:
ACT I ON
REPEAT PLAY :OFF
REMOTE WARNING :ON
AUTO SHUT
- OFF :OFF
AUTO VCR/TV :ON
IDIOMA/LANGUE : ENGLISH
VCR’ S OUTPUT CH :3
Advanced Connections
• Advanced Connections • Multi-Brand Control Feature
Multi-Brand Control Setup
The Remote Control can be set to control some TV functions.
1 Find your TV Brand Code Number from those shown below.
2 Set up for TV control,
➛ hold down TV button,
➛ enter code with NUMBER keys.
3 Confirm code entry,
➛ press POWER to turn your TV on or off.
• See table below for controllable functions in each mode.
Notes
Using Multi-Brand Control
After remote is set up, you can select VCR or TV for the desired function.
Press VCR or TV on the remote.
(Table below shows available unit buttons for each mode.)
Mode
VCR
• Repeat setup after remote battery replacement.
• Remote will not control every TV made by the manufacturer listed. If you get no
response, your particular unit cannot be controlled. There are NO additional codes for
the products listed. If your product is not listed, then the remote is not compatible with
that product.
Unit
VCR TV
All
VCR/TV, PLAY, STOP, EJECT, SAP/Hi-Fi, DISPLAY,
FF, REW, PAUSE/SLOW, REC,
TV
SPEED, CM/ZERO, RESET COUNTER, TAPE POSITION
POWER, INPUT, ENTER,
NUMBER keys, CH UP/DOWN,
VOL UP/DOWN
VOL UP/DOWN
Audio/Video connection
If your TV has AUDIO IN and VIDEO IN terminals, you can connect your VCR
to them to receive higher quality picture and sound.
Connect the VCR’s VIDEO OUT jack to the TV’s VIDEO IN jack.
1
Connect VCR’s L/R AUDIO OUT jacks to the TV’s L/R AUDIO IN jacks.
2
Set the VIDEO/TV selector of your TV (Monitor/Receiver) to “VIDEO.”
3
Notes
• Not all functions listed may be controllable.
• In TV mode, it may be necessary to press ENTER after pressing NUMBER keys for channel
selection.
TV Brand Code Numbers
Panasonic ....................... 01, 02
Quasar ............................ 01, 02
RCA ...................................... 03
GE ......................................... 03
Zenith .................................... 04
Magnavox .............................. 05
Important Notes
• Some manufacturers use several codes for one brand. If the first code entered fails, try the next one
listed.
• Some TV brands require you to turn on the power manually.
Sylvania ................................. 05
Sharp ............................... 06, 07
Sony ...................................... 08
Toshiba ................................. 09
Sanyo .................................... 10
Fisher .................................... 10
- 2 -
JVC ....................................... 11
Hitachi ................................... 12
Mitsubishi ........................ 07, 13
Samsung ............................... 14
Gold Star ................... 15, 16, 17
■ ■
■ With a Cable Box (VCR
■ ■
ANT
or
CATV
IN 1
AUDIO
VIDEO
IN FROM ANT.
R
L
OUT
VHF/UHF
OUT TO TV
CABLE BOX
VCR
■■
■
Connect With Two Cable Boxes
■■
CABLE BOX
IN
ANT
or
2-Way Splitter
CATV
OUT 1
OUT
OUT 2
AUDIO
VIDEO
IN 1
OUT
CABLE BOX
OUTIN
R
L
Cable Box)
TV
OUTIN
VCR
IN FROM ANT.
VHF/UHF
OUT TO TV
A/B Switch
IN 2IN 1
IN
R
IN
- 3 -
OUT
L
VHF/UHF
OUT
R
L
AUDIO
VIDEO
TV
AUDIO
VIDEO
VHF/UHF
• view any
(including
scrambled)
channel.
• use VCR
Remote
Control to
select
channels
without using
Multi-brand
control feature.
You Can
• record and
view both
scrambled and
unscrambled
channels if
additional
equipment is
added. This
connection
requires: two
converter
boxes, an A/B
switch, and a
2-way splitter.
You CannotYou Can
• record
scrambled
channels.
You Cannot
• view a
channel
other than
the one
selected for
any type of
recording.
• do a Timer
recording of
a channel
unless you
select it at
the cable
box.
Page 9

PLAY
1st Press
2nd Press
3rd Press
1 min Skip
2 min Skip
3 min Skip
6157
2
34
17534 6
2
Program 2
Program 1
the current tape position
Press SEARCH button
BLANK
INDEX
FF
Program 2 or BLANK
Program 1
the current tape position
Press SEARCH button
FF
INDEX
Program 2
Program 1
the current tape position
Press SEARCH button
INDEX
INDEX
BLANK
BLANK
FF
SEARCH
INDEX
PROGRAM END
ENTER INDEX NUMBER :1
USING 1- 9 KEYS
FORWARD SEARCH :FF
REVERSE SEARCH :REW
NEXT :SEARCH
EXIT :STOP
INDEX SEARCH
FORWARD SEARCH :FF
REVERSE SEARCH :REW
SEARCH
INDEX
PROGRAM END
SEARCH START :FF
EXIT :SEARCH
STER
EO
SAP
M
ONO
H I F I
: L / R
H I F I
: L
H I F I
:
R
N
ORM
AL
MTS Broadcast
®
®
®
Stereo Amplifier
AUDIO IN
R
L
VCR
R
L
R
OUT TO TV
VHF/UHF
TV
R
L
AUDIO OUT
STOP 1 2 : 0 0A
M
CH 02
0 : 0 0 : 0 0
SP
STER
EO
SAP
M
ONO
STOP 1 2 : 0 0A
M
CH 02
0 : 0 0 : 0 0
SP
STER
EO
SAP
M
ONO
STOP 1 2 : 0 0A
M
CH 02
0 : 0 0 : 0 0
SP
STER
EO
SAP
M
ONO
STOP 1 2 : 0 0A
M
CH 02
0 : 0 0 : 0 0
SP
STER
EO
SAP
M
ONO
PLAY
1 2 : 0 0A
M
0 : 0 0 : 0 0
SP
REW
1 2 : 3 0A
M CH 02
0 : 30 : 30
SP
STOP
1 2 : 3 1AM CH 02
0 : 0 0 : 0 0
SP
VCR CLOCK CHANNEL
SELECT
:
SET :
EXIT
:
ACT I ON
REPEAT PLAY :OFF
REMOTE WARNING :ON
AUTO SHUT
- OFF :OFF
AUTO VCR/TV :ON
IDIOMA/LANGUE : ENGLISH
VCR’ S OUTPUT CH :3
VHS Hi-Fi Stereo System
• MTS Broadcast • VHS Hi-Fi Stereo System
Connection
Make the Audio/Video Connection as shown on page 3.
• You can use a TV connected to Stereo amp and speakers instead of a Stereo TV.
Receivable Broadcast Types
The following are possible audio broadcast types and on-screen displays.
The signal being received is indicated with an “
indicated with an arrow.
To display the broadcast signal being received,
➛➛
➛ press DISPLAY*.
➛➛
MTS Stereo and SAP broadcast
Multi-channel Television Sound Stereo (main language)
and Secondary Audio Program (sub language)
broadcasts are being received simultaneously.
Select STEREO or SAP audio mode.
” mark while the selected audio mode is
Audio Mode for Recording
1
Press SAP/ Hi-Fi to display audio mode.
(Display disappears after 5 seconds.)
2
Press SAP/ Hi-Fi repeatedly
to select desired mode.
• Refer to “Receivable
Broadcast Types” on page 4.
• Arrow indicates selection.
Make a recording.
3
See p. 5 of “Basic Operations” Instruction book.
Audio Mode for Playback
1
Start playback.
See p. 5 of “Basic Operations” Instruction book.
2
Press SAP/ Hi-Fi to display audio mode.
(Display disappears after 5 seconds.)
3
• Arrow indicates
selection.
Press SAP/ Hi-Fi repeatedly
to select desired mode.
• Select “HIFI(L/R)” or
“HIFI(L)” or “HIFI(R)” to
listen to stereo recordings in
stereo sound.
Select “NORMAL” for
monaural sound.
MTS Stereo broadcast
Multi-channel Television Sound Stereo broadcast.
Select STEREO audio mode.
• If stereo broadcast is weak and display flickers,
select MONO audio mode for possible better results.
SAP broadcast
Secondary Audio Program (sub language) broadcast.
Select SAP audio mode for the sub language.
MONO broadcast
Normal monaural sound broadcast.
Equipped with ®-TV Noise Reduction for true
MTS reproduction.
required for good stereo separation and audio
fidelity.
licensed by
is a registered trademark, and is
Technology Licensing.
-TV Noise Reduction is
- 4 -
Notes
• Only tapes recorded in Hi-Fi stereo will playback with true stereo sound.
Standard stereo tapes will playback in monaural sound.
• To listen to Hi-Fi stereo playback, the VCR AUDIO (L/R) jacks must be connected to
a stereo TV or an external stereo amp and speakers. (See page 4.)
• If tracking is adjusted during playback, Hi-Fi audio may revert to normal audio.
• Hi-Fi and normal audio playback volume level may differ.
*Important: If a remote control button does not work when pressed,
press the VCR button on the remote and try the button again.
- 5 -
Page 10

PLAY
1st Press
2nd Press
3rd Press
1 min Skip
2 min Skip
3 min Skip
Tape Operation
6157
2
34
17534 6
2
Program 2
Program 1
the current tape position
Press SEARCH button
BLANK
INDEX
FF
Program 2 or BLANK
Program 1
the current tape position
Press SEARCH button
FF
INDEX
Program 2
Program 1
the current tape position
Press SEARCH button
INDEX
INDEX
BLANK
BLANK
FF
SEARCH
INDEX
PROGRAM END
ENTER INDEX NUMBER :1
USING 1- 9 KEYS
FORWARD SEARCH :FF
REVERSE SEARCH :REW
NEXT :SEARCH
EXIT :STOP
INDEX SEARCH
FORWARD SEARCH :FF
REVERSE SEARCH :REW
SEARCH
INDEX
PROGRAM END
SEARCH START :FF
EXIT :SEARCH
PLAY
1 2 : 0 0A
M
0 : 0 0 : 0 0
SP
REW
1 2 : 3 0A
M CH 02
0 : 30 : 30
SP
STOP
1 2 : 3 1AM CH 02
0 : 0 0 : 0 0
SP
VCR CLOCK CHANNEL
SELECT
:
SET :
EXIT
:
ACT I ON
REPEAT PLAY :OFF
REMOTE WARNING :ON
AUTO SHUT
- OFF :OFF
AUTO VCR/TV :ON
IDIOMA/LANGUE : ENGLISH
VCR’ S OUTPUT CH :3
Tape Operation
• Tape Operation
Search System
For each recording, an invisible index mark is placed on the tape. A program index and
information are also included for timer recordings. These marks are used to access or
scan recordings.
Index Search
1
2
Press SEARCH* to
display SEARCH in Stop
or Play mode, and then
press NUMBER keys to
select recording
number.
• To calculate number,
see below.
Press FF or REW to
start search.
Play begins at search
end. To search forward
or back 1 index, press
FF or REW while
screen left is displayed
(10 sec.).
• To cancel, press
PLAY or STOP.
To Calculate Index Number
Example 1:
To go to rec. 2 from rec. 4, enter 3 and press
REW.
Example 2:
To go to rec. 6 from rec. 2, enter 4 and press
FF.
NOTE:
indicates start points of each recording.
Program End Search
Locates end point of recording for continuity.
1
Press SEARCH twice to display SEARCH
in Stop or Play mode.
2
Examples of Program End Search.
Fig. 1
Fig. 2
Fig. 3
End Point
Upon locating end point,
➛ search continues 7 sec. past end point,
➛ tape rewinds to 10 sec. before end point,
➛ tape plays to end point and stops.
Notes
• If Program End Search is started very
close to an index mark, that mark may be
skipped over.
• To cancel, press PLAY or STOP.
Press FF to start
PROGRAM END
SEARCH.
• To cancel, press
PLAY or STOP.
End Point
End Point
If search
exceeds a few
seconds in
BLANK area.
Repeat Play
Set to playback a recording over and over.
1 Press ACTION to display menu.
2
Press to select
REPEAT PLAY and
press
to set ON or
OFF.
ON :Play repeats at tape end
or if unrecorded portion
over 30 sec. is detected.
3 Press ACTION to return to normal screen.
Zero Search
To quickly return to a specified tape location.
1
Press DISPLAY during play
to display Counter.
2
Continue to record, playback, etc.
3
4
Press STOP.
5
Press RESET
COUNTER at desired
position to reset to
“0:00:00”.
Press CM/ZERO in Stop
mode to start ZERO
SEARCH.
• Unit will go into FF or
REW mode and stop at
the last point the
Counter was set to
0:00:00.
Commercial Skip
VCR fast forwards (skips) over 1~3 minutes
of recorded tape.
1
Press CM/ZERO in Play mode.
• Press CM/ZERO repeatedly to change
skip time as shown below.
• No indication appears.
Note
• If Index Search is started very close to an
index mark, that index mark may not be
counted in the search.
- 6 -
*Important: If a remote control button does not work when pressed,
press the VCR button on the remote and try the button again.
- 7 -
Page 11

SELECT :
EXIT
:
ACT I ON
REPEAT PLAY : OFF
REMOTE WARNING :ON
AUTO SHUT
- OFF : OFF
AUTO VCR/TV : ON
IDIOMA/LANGUE : ENGLISH
VCR’ S OUTPUT CH :3
VCR CLOCK CHANNEL
SEL. : REGLER:
QUITTER
: ACT I ON
MAGNETO. HORL. CANAL
REPRISE LECTURE
:NON
MESSAGE D’ ERREUR
:OUI
COUPURE AUTO
:NON
MAGNETO. /TELE AUTO : OUI
LANGUAGE/IDIOMA : FRANÇAIS
CA SORTIE : 3
ELEGIR
: FIJAR :
SAL
I R
:
ACT I ON
VCR RELOJ CANAL
REPETICION :INACT
AVISO/CONT.REMOTO :ACT
APAGADO AUTOMATICO:INACT
VCR/TV AUTO :ACT
LANGUE/LANGUAGE:ESPAÑOL
CANAL DE SALIDA :3
VCR CLOCK CHANNEL
SELECT
:
SET :
EXIT
:
ACT I ON
REPEAT PLAY : OFF
REMOTE WARNING :ON
AUTO SHUT
- OFF : OFF
AUTO VCR/TV : ON
IDIOMA/LANGUE : ENGLISH
VCR’ S OUTPUT CH :3
VCR CLOCK CHANNEL
SELECT
:
SET :
EXIT
:
ACT I ON
REPEAT PLAY : OFF
REMOTE WARNING :ON
AUTO SHUT
- OFF : OFF
AUTO VCR/TV : ON
IDIOMA/LANGUE : ENGLISH
VCR’ S OUTPUT CH :3
SELECT :
EXIT
:
ACT I ON
ANTENNA : CABLE
AUTO SET
WEAK
SIGNAL DISPLAY : OFF
VCR CLOCK CHANNEL
VCR CLOCK CHANNEL
ANTENNA : CABLE
AUTO SET
WEAK
SIGNAL DISPLAY : OFF
SELE
CT :
SET :
EXIT
:
ACT I ON
VCR CLOCK CHANNEL
AUTO CLOCK SET
MANUAL
TIME
ZONE ADJUST : 0
SELECT :
EXIT
:
ACT I ON
VCR CLOCK CHANNEL
SELECT HOUR
DST:ON
6 /08 /
2020 0 3
SUN SUN
2 2 : --PM
SELECT
:
SET :
EXIT
:
ACT I ON
VCR CLOCK CHANNEL
AUTO CLOCK SET
MANUAL
TIME
ZONE ADJUST : 0
SELE
CT :
SET :
EXIT
:
ACT I ON
VCR CLOCK CHANNEL
AUTO CLOCK SET
MANUAL
TIME
ZONE ADJUST : 0
SELE
CT :
SET :
EXIT
:
ACT I ON
VCR CLOCK CHANNEL
SELECT
:
SET :
EXIT
:
ACT I ON
REPEAT PLAY : OFF
REMOTE WARNING :ON
AUTO SHUT
- OFF : OFF
AUTO VCR/TV : ON
IDIOMA/LANGUE : ENGLISH
VCR’ S OUTPUT CH :3
VCR CLOCK CHANNEL
SELECT
:
SET :
EXIT
:
ACT I ON
REPEAT PLAY : OFF
REMOTE WARNING :ON
AUTO SHUT
- OFF : OFF
AUTO VCR/TV : ON
IDIOMA/LANGUE : ENGLISH
VCR’ S OUTPUT CH :4
VCR CLOCK CHANNEL
IF YOU PRESS ACTION
KEY, VCR ’ S OUTPUT CH
SWITCHES TO CH 4.
VCR CLOCK CHANNEL
PLEASE TUNE YOUR TV TO
CH 4.
C
HANNEL
08 ADDED
C
HANNEL
08 DELE T
ED
VCR CLOCK CHANNEL
AUTO CLOCK SET
MANUAL
TIME
ZONE ADJUST : 0
SELECT :
EXIT
:
ACT I ON
REC
1 2 : 0 0A
M
0 : 25
CH 02
-0 : 1 2 : 3 4
SP
STER
EO
SAP
M
ONO
CH 0 8
1
2
3
125
LINE1
(CABLE)
69
(TV)
or
LINE2
Before Requesting Service
VCR CLOCK CHANNEL
CH AUTO SET PROCEEDING
CANCEL :
STOP
VCR CLOCK CHANNEL
CH AUTO SET PROCEEDING
CANCEL :
STOP
BEG I
N END
VCR LOCK ACT I VA
TED
VCR LOCK OFF
VCR CLOCK CHANNEL
ANTENNA : CABLE
AUTO SET
WEAK
SIGNAL DISPLAY : OFF
SELE
CT :
SET :
EXIT
:
ACT I ON
VCR CLOCK CHANNEL
SELECT
:
SET :
EXIT
:
ACT I ON
REPEAT PLAY : OFF
REMOTE WARNING :ON
AUTO SHUT
- OFF : OFF
AUTO VCR/TV : ON
IDIOMA/LANGUE : ENGLISH
VCR’ S OUTPUT CH :3
VCR CLOCK CHANNEL
SELECT
:
SET :
EXIT
:
ACT I ON
REPEAT PLAY : OFF
REMOTE WARNING :ON
AUTO SHUT
- OFF : OFF
AUTO VCR/TV : ON
IDIOMA/LANGUE : ENGLISH
VCR’ S OUTPUT CH :3
VCR CLOCK CHANNEL
SELECT
:
SET :
EXIT
:
ACT I ON
REPEAT PLAY : OFF
REMOTE WARNING :ON
AUTO SHUT
- OFF : OFF
AUTO VCR/TV : ON
IDIOMA/LANGUE : ENGLISH
VCR’ S OUTPUT CH :3
Copying Your Tapes (Dubbing)
Check the following points once again if you are having trouble with your VCR.
(BO : refers to “Basic Operations” Instruction book.)
(AO : refers to “Advanced Operations” Instruction book.)
Power
No power…
Correction
• Completely insert Power Plug into an AC outlet.
• Set POWER button to on.
• Make sure power source is active.
Recording & Playback
TV program cannot be recorded...
Correction
• Check connections between VCR, external antenna, and
TV.
• Check connections selection. (BO p. 4, AO p. 3)
• Make sure your antenna system (CABLE or TV) is
correctly set. (Channels [AO p. 12])
• Make sure cassette record tab is intact. (BO p. 3)
Timer recording cannot be
performed…
• Confirm that clock is set to current time and date.
• Make sure Cable/DSS box (if used) is left on and tuned to
channel to be recorded.
• Set recording start/stop times correctly. (BO p. 6)
• Make sure VCR POWER button is pressed off. (BO p. 6)
• Timer recording may not be performed or continued if a
power interruption occurs before or during a Timer
Recording, even after power is restored.
There is no playback picture, or the
playback picture is noisy or contains
streaks...
• Select channel 3 or 4 on TV to match VCR output channel
(3 or 4) (BO p. 4) or select LINE.
• Set VCR/TV selector to “VCR.”
• Adjust TRACKING control in either direction. (BO p. 3)
• Try Head Cleaning. (BO p. 3)
Special effects playback, picture may
contain some vertical jitter when using
• Set TV’s Vertical Hold Control to MANUAL, then adjust.
a TV with an Automatic Vertical Hold
Control...
VCR cannot be controlled...
• Make sure VCR power is on.
• Check Remote batteries.
• Make sure VCR LOCK is set to off. (AO p. 10)
• Make sure Timer Record is not in progress.
Remote Control
VCR cannot be remote controlled...
Correction
• Make sure VCR power is on.
• Make sure Remote is in VCR mode.
• Aim Remote Control directly at remote sensor on VCR.
(BO p. 7)
• Avoid any object blocking signal path.
• Check Remote batteries. (BO p. 3)
• Make sure VCR LOCK is set to off. (AO p. 10)
• Exposing VCR remote sensor to direct fluorescent or
outdoor light may cause signal interference.
ACTION and PROG buttons do not
respond...
• Check connections between VCR, external antenna, and
TV.
• Press VCR button for VCR mode. (AO p. 2)
• Check Remote batteries. (BO p. 3)
Miscellaneous
Programs cannot be viewed on TV...
Correction
• Make sure TV power is on.
• Make sure TV is set to output of VCR.
• Check connections between VCR, external antenna, and
TV.
• Set VCR/TV selector to “TV.” (BO p. 5, AO p.10)
• Make sure proper signal source is selected.
Video cassette cannot be inserted...
• Insert the cassette with window side up; record tab facing
you.
• Check if a tape is already in the unit.
Video cassette cannot be removed...
Video cassette ejects when a
recording is started or the power is
• Confirm Power Plug is fully inserted into an AC outlet.
• Make sure cassette record tab is intact. (BO p. 3)
turned off for timer recording...
In Stop mode, the motor (CYLINDER)
continues to rotate...
• To enable Quick play mechanism, the cylinder will rotate
for about 3 minutes. This reduces response time from
Stop to Play mode and from Play to Rewind Search
mode.
If you cannot resolve the problem, please call the Customer Call Center for product
assistance at 1-800-211-PANA (7262).
To locate an authorized servicenter, please call toll free 1-800-211-PANA (7262).
or send e-mail to : consumerproducts@panasonic.com
Connection
(Rear connection shown.)
Playing (Source) VCR Recording (Editing) VCR
1
Insert pre-recorded tape. Insert blank tape with record tab.
2
Press PLAY, then PAUSE/SLOW
3
immediately to enter PLAY/PAUSE mode.
The operation of steps 4 and 5 must be done on both playing
and recording VCRs at the same time.
Press PLAY to start dubbing.
4
Playing VCR starts playback.
5
Press STOP to stop dubbing.
To Monitor Dubbing on Your TV
1 Turn your TV on and tune to the
Recording VCR channel (CH3 or CH4).
2 Set the VCR/ TV Selector on the
Recording VCR to “VCR.”
Note
• Dubbing tapes protected with Copy
Guard will have poor quality results.
Press INPUT* to set VCR Input mode to LINE1
for Video Input (Rear) or to LINE2 for Video
Input (Front). (See “Selecting the Input Mode”
below.)
Press REC, then PAUSE/SLOW
immediately to enter REC/PAUSE mode.
Press PAUSE/SLOW to start dubbing.
Recording VCR starts recording.
Press STOP to stop dubbing.
Selecting the Input Mode
Method 1:
Press INPUT repeatedly.
Channel Number
Method 2:
Press CH
Display will change as below.
•“L1” or “L2” lights on Multi-Function Display
(about 4 sec.) when LINE1 or LINE2 is
selected.
• LINE1: For rear audio/video connection.
LINE2: For front audio/video connection.
/ .
↔↔
↔ LINE1
↔↔
↔↔
↔ LINE2
↔↔
Panasonic Consumer Electronics Company,
Division of Matsushita Electric Corporation of America
One Panasonic Way Secaucus, New Jersey 07094
Panasonic Sales Company (“ PSC” ),
Division of Matsushita Electric of Puerto Rico, Inc.
Ave. 65 de Infantería. Km. 9.5 San Gabriel Industrial Park,
Carolina, Puerto Rico 00985
- 8 -
P
Printed in Indonesia
LSQT0632A
S0203-0
Caution : Unauthorized exchanging and/or copying of copyrighted recordings may be
copyright infringement.
*Important: If a remote control button does not work when pressed,
press the VCR button on the remote and try the button again.
- 9 -
Page 12

SELECT :
EXIT
:
ACT I ON
REPEAT PLAY : OFF
REMOTE WARNING :ON
AUTO SHUT
- OFF : OFF
AUTO VCR/TV : ON
IDIOMA/LANGUE : ENGLISH
VCR’ S OUTPUT CH :3
VCR CLOCK CHANNEL
SEL. : REGLER:
QUITTER
: ACT I ON
MAGNETO. HORL. CANAL
REPRISE LECTURE
:NON
MESSAGE D’ ERREUR
:OUI
COUPURE AUTO
:NON
MAGNETO. /TELE AUTO : OUI
LANGUAGE/IDIOMA : FRANÇAIS
CA SORTIE : 3
ELEGIR
: FIJAR :
SAL
I R
:
ACT I ON
VCR RELOJ CANAL
REPETICION :INACT
AVISO/CONT.REMOTO :ACT
APAGADO AUTOMATICO:INACT
VCR/TV AUTO :ACT
LANGUE/LANGUAGE:ESPAÑOL
CANAL DE SALIDA :3
VCR CLOCK CHANNEL
SELECT
:
SET :
EXIT
:
ACT I ON
REPEAT PLAY : OFF
REMOTE WARNING :ON
AUTO SHUT
- OFF : OFF
AUTO VCR/TV : ON
IDIOMA/LANGUE : ENGLISH
VCR’ S OUTPUT CH :3
VCR CLOCK CHANNEL
SELECT
:
SET :
EXIT
:
ACT I ON
REPEAT PLAY : OFF
REMOTE WARNING :ON
AUTO SHUT
- OFF : OFF
AUTO VCR/TV : ON
IDIOMA/LANGUE : ENGLISH
VCR’ S OUTPUT CH :3
SELECT :
EXIT
:
ACT I ON
ANTENNA : CABLE
AUTO SET
WEAK
SIGNAL DISPLAY : OFF
VCR CLOCK CHANNEL
VCR CLOCK CHANNEL
ANTENNA : CABLE
AUTO SET
WEAK
SIGNAL DISPLAY : OFF
SELE
CT :
SET :
EXIT
:
ACT I ON
VCR CLOCK CHANNEL
AUTO CLOCK SET
MANUAL
TIME
ZONE ADJUST : 0
SELECT :
EXIT
:
ACT I ON
VCR CLOCK CHANNEL
SELECT HOUR
DST:ON
6 /08 /
2020 0 3
SUN SUN
2 2 : --PM
SELECT
:
SET :
EXIT
:
ACT I ON
VCR CLOCK CHANNEL
AUTO CLOCK SET
MANUAL
TIME
ZONE ADJUST : 0
SELE
CT :
SET :
EXIT
:
ACT I ON
VCR CLOCK CHANNEL
AUTO CLOCK SET
MANUAL
TIME
ZONE ADJUST : 0
SELE
CT :
SET :
EXIT
:
ACT I ON
VCR CLOCK CHANNEL
SELECT
:
SET :
EXIT
:
ACT I ON
REPEAT PLAY : OFF
REMOTE WARNING :ON
AUTO SHUT
- OFF : OFF
AUTO VCR/TV : ON
IDIOMA/LANGUE : ENGLISH
VCR’ S OUTPUT CH :3
VCR CLOCK CHANNEL
SELECT
:
SET :
EXIT
:
ACT I ON
REPEAT PLAY : OFF
REMOTE WARNING :ON
AUTO SHUT
- OFF : OFF
AUTO VCR/TV : ON
IDIOMA/LANGUE : ENGLISH
VCR’ S OUTPUT CH :4
VCR CLOCK CHANNEL
IF YOU PRESS ACTION
KEY, VCR ’ S OUTPUT CH
SWITCHES TO CH 4.
VCR CLOCK CHANNEL
PLEASE TUNE YOUR TV TO
CH 4.
C
HANNEL
08 ADDED
C
HANNEL
08 DELE T
ED
VCR CLOCK CHANNEL
AUTO CLOCK SET
MANUAL
TIME
ZONE ADJUST : 0
SELECT :
EXIT
:
ACT I ON
REC
1 2 : 0 0A
M
0 : 25
CH 02
-0 : 1 2 : 3 4
SP
STER
EO
SAP
M
ONO
CH 0 8
Special VCR Features
VCR CLOCK CHANNEL
CH AUTO SET PROCEEDING
CANCEL :
STOP
VCR CLOCK CHANNEL
CH AUTO SET PROCEEDING
CANCEL :
STOP
BEG I
N END
VCR LOCK ACT I VA
TED
VCR LOCK OFF
VCR CLOCK CHANNEL
ANTENNA : CABLE
AUTO SET
WEAK
SIGNAL DISPLAY : OFF
SELE
CT :
SET :
EXIT
:
ACT I ON
VCR CLOCK CHANNEL
SELECT
:
SET :
EXIT
:
ACT I ON
REPEAT PLAY : OFF
REMOTE WARNING :ON
AUTO SHUT
- OFF : OFF
AUTO VCR/TV : ON
IDIOMA/LANGUE : ENGLISH
VCR’ S OUTPUT CH :3
VCR CLOCK CHANNEL
SELECT
:
SET :
EXIT
:
ACT I ON
REPEAT PLAY : OFF
REMOTE WARNING :ON
AUTO SHUT
- OFF : OFF
AUTO VCR/TV : ON
IDIOMA/LANGUE : ENGLISH
VCR’ S OUTPUT CH :3
VCR CLOCK CHANNEL
SELECT
:
SET :
EXIT
:
ACT I ON
REPEAT PLAY : OFF
REMOTE WARNING :ON
AUTO SHUT
- OFF : OFF
AUTO VCR/TV : ON
IDIOMA/LANGUE : ENGLISH
VCR’ S OUTPUT CH :3
• Special VCR Features • Copy Your Tapes (Dubbing) • Before Requesting Service
On-Screen Displays (OSD)
Remote Warning ON/OFF Feature
If Multi-brand feature is used (page 2), and this
feature is set to on, a warning appears
whenever an invalid key is pressed in TV mode.
1
Press ACTION to display menu.
2
Press to select
REMOTE WARNING
and press
to set ON
or OFF.
• If “OFF,” remote
warning will not appear
if invalid key is pressed.
Press ACTION to return to normal screen.
3
Auto Shut-Off Feature
The power shuts off at a preset time.
1 Press ACTION to display menu.
2
3
Press ACTION to return to normal screen.
Note
• The shut-off countdown will not
function during Play or Record.
VCR/TV Selector Feature
The VCR/TV selection can be set to auto or
manual.
1
Press ACTION to display menu.
2
• OFF(Manual): You select “VCR” or “TV”
• ON(Auto): “VCR” mode is automatically
Press ACTION to return to normal screen.
3
Note
• For more on VCR/TV selection, see “Record
one station, watch another” and “Select
channels on VCR” sections (see p. 5 of Basic
Operations book).
Press to select
AUTO SHUT-OFF.
Press
repeatedly to
change shutoff time as
shown below.
Press
to select
AUTO VCR/TV,
and press
to set ON
or OFF.
mode using the VCR/TV
button on the unit or remote.
set when VCR is turned on,
or in Play mode.
Tape Position Display Feature
To find out the present tape position.
Tape position is displayed for VHS-C
Cassettes type, tapes under 30 minutes, and
some other tapes, but the position is not
correct.
1 Press TAPE POSITION
to detect tape position.
DETECTING TAPE POSITION
2
Press TAPE POSITION
to return to normal screen.
Weak Signal Display ON/OFF Feature
When set to “ON,” picture is displayed
regardless of signal strength.
1
Press ACTION to display menu.
2
• ON: Picture is displayed even if signal
is very weak but quality may be
poor.
OFF: Screen turns solid blue when signal
is weak or non-existent.
• Selecting ON has no effect on connected
equipment with blue back feature.
3
Press ACTION to return to normal screen.
VCR Lock Feature
When set to ON, all operations except for timer
record and tape eject are prohibited. Useful for
households with small children.
• VCR Lock cancels in 24 hours if clock is set.
•“DETECTING TAPE
POSITION” only
appears the first time
a cassette is inserted
and it takes several
seconds for correct
indication to appear.
• The present tape
position indication is
displayed.
Press
to select
and display CHANNEL.
Press
to select
WEAK SIGNAL
DISPLAY, and press
to set ON or OFF.
To turn on, hold down
REC on the VCR in Stop
mode with no tape
inserted for 7 sec.
(Please ignore the NO
CASSETTE warning.)
To turn off, repeat above.
On-Screen Displays (OSD)
Function & Channel Displays
When a function button
is pressed, e.g. PLAY, or
you change channels,
a 5 second display
appears.
VCR Status & Clock Displays
To display or remove
overlay at right,
➛ press DISPLAY*.
Function Status
Rec Time Remaining
(OTR mode only.
See p. 5 of Basic
Operations book.)
Broadcast Audio
Being Received
Warning and Instruction Displays
OSD
PLEASE SET CLOCK BY
PRESSING ACTION KEY
TURN VCR OFF
FOR TIMER RECORDING
CHECK CASSETTE
RECORD TAB
NO CASSETTE
TO CANCEL TIMER REC
PRESS POWER THEN
STOP KEY
VIDEO HEADS MAY
NEED CLEANING
PLEASE INSERT HEAD
CLEANING CASSETTE
OR REFER TO MANUAL
END :PLAY
VCR LOCK ACTIVATED
If you attempt to set or review a Timer
Recording and the Clock is not set...
After a Timer Program has been set...
If you press REC on the remote
control or VCR, and a cassette is
inserted with no record tab...
If you press PLAY, FF, REW, or REC
on the remote control or VCR without
a cassette inserted...
If you press POWER or STOP during
a Timer Recording...
(visible in VCR mode only)
If head cleaning becomes necessary
while playing back a tape...
If you press a function button other
than STOP/EJECT or POWER while
the VCR is in VCR Lock mode...
Blank Tape/
No Video Signal Indications
When blank tape is detected during play,
or the current channel has no signal (with
Weak Signal Display feature (p. 10) set to
OFF), the TV screen will turn solid blue.
Current Time
Tape Speed
(See p. 3 of Basic
Operations book.)
These displays will alert you to a missed
operation or provide further instructions.
Caution
Page
See page 6 of
Basic Operations
book
See page 6 of
Basic Operations
book
See page 3 of
Basic Operations
book
See page 5 of
Basic Operations
book
See page 6 of
Basic Operations
book
See page 3 of
Basic Operations
book
See page 10
Channel
Counter
REMOTE CONTROL IS SET
TO TV MODE
If you press an invalid key on the
remote while in TV mode...
See pages 2, 10
USE VCR : VCR KEY
- 10 -
*Important: If a remote control button does not work when pressed,
press the VCR button on the remote and try the button again.
- 11 -
 Loading...