

Page 1
Panasonic
Video Cassette Recorder
Onnivtnícin )m Operati ng Instructions
Models No. PV-V4021/PV-V4521
5- "
Connections and Initial Setup Procedures are on
pages 8 to 9.
As an Energy Star^ Parmer,
Matsushita Efectnc Corporatior) a<
America has dctorminod that this product / ^
or product modef meets the ENERGY
StaR^ guideimes for ene/py efficiency.
Please read these instructions carefully before attempting to connect,
operate or adjust this product. Please save this manual.
Spanish Quick Use Guide is included. (Guía para rápida consulta en
español está incluida.) lsqto329a
For assistane«, please call : 1-800-211-PANA(72^) or send e-mail to : consumerproducts<3pianasonic.com
Page 2
Important Safeguards and Precautions
FOR YOUR SAFETY, READ AND RETAIN
ALL SAFETY AND OPERATING IN
STRUCTIONS. HEED ALL WARNINGS IN
THE MANUAL AND ON THE UNIT
1 POWERSOURCECAUnON
Operate only from a power source indicated on
the unit or in this manual. If necessary, have
your Electric Utility Service Company or Video
Products Dealer verify the power source in your
home.
2 POLARIZEDORGROUNDINGPLUG
As a safety feature, this Video product comes
with either a polarized power cord plug (one
blade is wider than the other), or a three-wire
grounding type plug.
POLARIZED PLUG CAUTION:
This plug will only lit into an outlet one way. If you
cannot Tully insert the plug, tty reversing it. If it
still will not fit, have an electrician install the
proper wall outlet. Do not defeat the safety
feature by tampering with the plug.
GROUNDING PLUG CAUTION:
This plug will only fit into a three-hole grounding
outlet, ft necessary, have an electrician Install the
proper outlet. Do not defeat the safety feature by
tampering with the plug.
3 POWER CORD
Make sure power cords are routed so that they
are not likely to have anything rest on them, roll
over them, or be in the way of walking traffic. If
an extension cord is used, make sure it also
has either a polarized or grounded plug and that
the cords can be securely connected. Frayed
cords, damaged plugs, and damaged or cracked
wire insulation are hazardous and should be
replaced by a qualified service technician.
Overloaded outlets and extension cords are fire
hazards and should be avoided.
4 DO NOT BLOCK VENTILATION HOLES
Ventilation openings in the cabinet release heat
generated during operation. If they are blocked,
neat build-up inside the unit can cause failures
that may result in a fire hazard or heat damage
to cassettes. For protection, follow these rules:
a. Never cover ventilation slots or the unit
while in use, or operate the unit when placed
on a bed, sofa, rug, or other soft surface.
b. Avoid built-in installation, such as a book case
or rack, unless proper ventilation is provided.
5 AVOIDEXTREMELYHOTLOCATIONSOR
SUDDEN TEMPERATURE CHANGES
Do not place the unit over or near any kind of
heater or regulator, in direct sunlight, inside a
closed vehicle, etc.. Do not move the unit
suddenly between areas of extreme temperature
variation. If the unit is suddenly moved from a
cold place to a warm place, moisture may
condense in the unit and on the tape,
6 TOAVOIDPERSONALINJURY
• Do not place unsecured equipment on a
sloping surface,
• Do not place this unit on any support
that is not firm, level, and adequately
strong. The unit could fall causing
serious injury to a child or adult
and damage to the unit
• An appliance and cart combination I
should be moved with care.
Quick stops, excessive force, and
uneven surfaces may cause the
appliance and cart corntrination to overturn.
• Carefully follow all operating instructions and
use the manufacturer's recommended
accessories when operating this unit or
connecting it lo any other equipment.
INSTALUVnON
For assistance, please call : 1-800-211-PANA(7262) or send e-mail to : consumerproducts@panasonic.com
SAFE ANTENNA AND CABLE CONNECTION
If an outside antenna or саЫе system is connected to the
equiprryent, be sure the antenna or cable system is grounded so as
to provide some protection against built up static cKarges
and voltage surges. Section
810 of the National Electrical
Code, ANSI/NFPA 70 (in Canada,
part 1 of the Canadian Electrical
Code) provides informatior
vrith respect to proper grounding
of the mast and supporting
structure, grourxing of the lead-in wire
to an antenna discharge unit, size of grounding conductors,
location of antenna discharge unit, connection to grounding ,
electrodes and requirements for the grounding electrode,
KEEPANTENNACLEAROFHIGHVOLTAGEPOWERLiNESORCIRCUnS
An outside antenna system should bo located well away from
power lines, electric light or power drcuits агк1 where it will rtever
come into contact with these power sources if it should happen to
fall. When installing an outside antenna, extreme care should be
taken to avoid touching power lines, circuits or other power
sources as this could be fatal. Because of the hazards involved,
antenna installation should be left to a professional.
_______________USING THE VIDEO UNIT |
f the unit has been in stor^e or moved to a new location,
refer first to the INSTALLATION section of these safeguards.
1 KEEPTHISVIDEOUNITAWAYFROMWATEROR
MOISTURE OF ANY KIND.
2 IFEQUIPMENTISEXPOSEDTORAIN, MOISTURE.OR
STRONG IMPACT, unplug the unit and have it inspected by
a qualified service technician before use.
3 DURINQANELECTRICALSTORM
During a lightning storm, whether indoors or outdoors, or
before leaving the unit unused for extended periods of time,
disconnect all equipment from the power source as well as
the antenna and cable system.
4 WHENTHEUNITISPLUGGEDIN
• Never expose the unit to rain or water. DO NOT OPERATE
• Never drop or push any object through openings in the unit.
• Avoid placing the unit directly above or below your TV set
5 USING ACCESSORIES
Use only accessories recommended by the manufacturer to
avoid risk of fire, shock, or other hazards.
6 CLEANING THE UNIT
Unplug the unit. Then, use a dean, diy, chemically untreated doth
to gently remove dust or debris. DO NOT USE cfeaning fluids,
aerosols, or forced air that could over-spray, or seep into the unit
and cause electrical shock. Any substance such as wax, adiesive
tape, etc. may mar the cabinet surface. Exposure to greasy, humid,
or dusty areas may adversely affect internal parts.
1 DO NOT SERVICE THIS PRODUCT YOURSELF
If, after carefully following the detailed operating instruc
tions, this Video product does not operate properly, do not
attempt to open or remove covers, or make any adjust
ments not described in the manual. Unplug the unit and
contact a qualified service technician.
2 IF REPLACEMENT PARTS ARE REQUIRED
Make sure the service techniqjan uses only parts spedtied by
the manufacturer, or those having the same safety charactenstics as the original parts. The use of unauthorized substitutes
may result in fire, electric shock, or other hazards.
3 HAVETHESERVICETECHNICIAN PERFORMASAFETYCHECK
After any service or repairs to the unit, request the service
technician to conduct a through safety check as described
in the manufacture's service literature to insure that the
video unit is in safe operating condition.
OUTDOOR ANTENNA INSTALLATION
_____
if liquid has been spilled into the unit. Immediately unplug
the unit, and have it inspected by a service technician.
Fire and shock hazards can result from electrical shorts
caused by liquid contact inside.
Some internal parts carry hazardous voltages and contact
can cause electric shock or fire hazard.
as this may cause electrical interference. Keep all magnets
away from electronic equipment.
SERVICE
Page 3
Safety Precautions
Warning: To prevent fire or shock hazard, do not expose this equipment
to rain or moisture.
CAUTION: To prevent electric shock, match wide blade of plug to wide
slot, fully insert.
Avertissement: Afin de prévenir tout risque d’incendie ou de chocs
électriques, ne pas exposer cet appareil à la pluie ou à une
humidité excessive.
Attention: Pour éviter les chocs électriques, introduire la lame la plus
large de la fiche dans la borne correspondante de la prise et
pousser jusqu’au fond.
CAUTION
RISK OF ELECTRIC SHOCK
A
CAUTION: TO REDUCE THE RISK OF ELECTRIC SHOCK,
DO NOT REMOVE COVER (OR BACK)
NO USER-SERVICEABLE PARTS INSIDE
REFER SERVICING TO QUALIFIED SERVICE PERSONNEL
DO NOT OPEN
This symbol warns the user that uninsulated
voltage within the unit may have sufficient
magnitude to cause electric shock. Therefore,
it is dangerous to make any kind of contact
with any inside part of this unit.
A
This symbol alerts the user that important
literature concerning the operation and
maintenance of this unit has been included.
Therefore, it should be read carefully in order
to avoid any problems.
Note to CABLE system installer:
This reminder is provided to call the CABLE system installer’s attention to
Article 820-40 of the NEC in USA (and to the Canadian Electrical Code in
Canada) that provides guidelines for proper grounding and, in particular,
specifies that the cable ground shall be connected to the grounding system
of the building, as close to the point of cable entry as practical.
FCC Warning: Any unauthorized changes or modifications to this
equipment would void the user’s authority to operate.
Page 4
Before Using
Congratulations
on your purchase of one of the most
sophisticated and reliable products on the market
today. Used properly, it will bring you years of
enjoyment. Please fill in the information below.
The serial number is on the tag located on the
back of your VCR.
• Date of Purchase
Dealer Purchased From
Dealer Address___________
Dealer Phone No.
Model No.
Serial No.
______________________
_____
___________
___________
Accessories
□ Remote Control
LSSQ0263 {PV-V4021)
LSSQ0264 (PV-V4521)
Model PV-V4521
remote shown.
Prevent Accidental Tape Erasure
Break off the tab to
prevent recording.
Record Tab
Screw driver
Record/PlaybackTime
To order accessories, call toll free
1 -800-332-5368.
Loading the Batteries
□ Battery replacement caution
• Do not mix old and new batteries.
• Do not mix alkaline with manganese
batteries.
For assistance, please call : 1-800-211-PANA(7262) or send e-mail to : consumerproducts@panasoric.com
Only use tapes with the IVrt*g| mark in this unit.
Tape Speed
Setting
SP
(Standard Play)
LP
(Long Play)
SLP
(SuperLongPlay)
Type of Video Cassette
T60 T120
1 Hour 2 Hours
2 Hours 4 Hours
3 Hours 6 Hours 8 Hours
T160
2 Hours
40 Minutes
5 Hours
20 Minutes
Page 5

able of Contents
Important Safeguards and Precautions
Accessories..............................................................................4
Loading the Batteries..............................................................4
Prevent Accidental Tape Erasure..........................................4
Record/Ptayback Time............................................................4
Location of Controls
Connections and Initial Setup.............................................8,9
Reset Language, Channels, Clock, VCR’s Output Channel.... 10,11
Playback a Tape
Record On a Tape..................................................................13
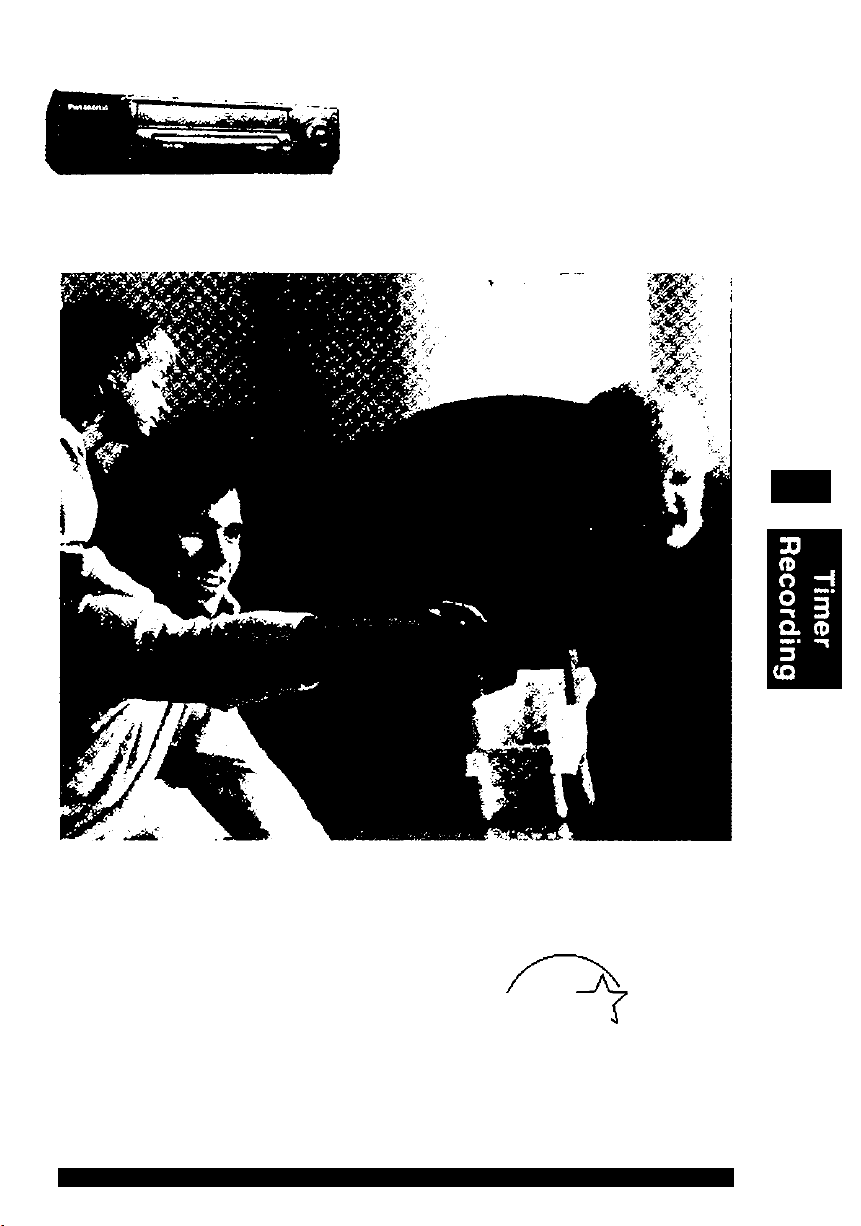
Timer Recording...............................................................14,15
Multi-Brand Control Feature
Advanced Connections (Cable/DSS)
MTS Broadcast/ VHS Hi-Fi Stereo System
(For model PV-V4521 only)
Tape Operation (Search System)
Special VCR Features
Copying Your Tapes (Dubbing)
............................................................
....................................................................
................................................
.....................................
......................................................
............................................
.............................
...................................
....................
18,19
20-22
22,23
2,3
6,7
12
16
17
24
O 3
§ 5
5 "
o c
3 -o
A Q>
Q) (/>
O
0) 3
VCR 8t Cassette Information.................................................25
On-Screen Displays (OSD)
Before Requesting Service...................................................27
Service Center List................................................................28
Warranty.................................................................................29
Spanish (Español) Quick Use Guide..............................30,31
Index
........................................................................
...................................................
Back Cover
26
Page 6
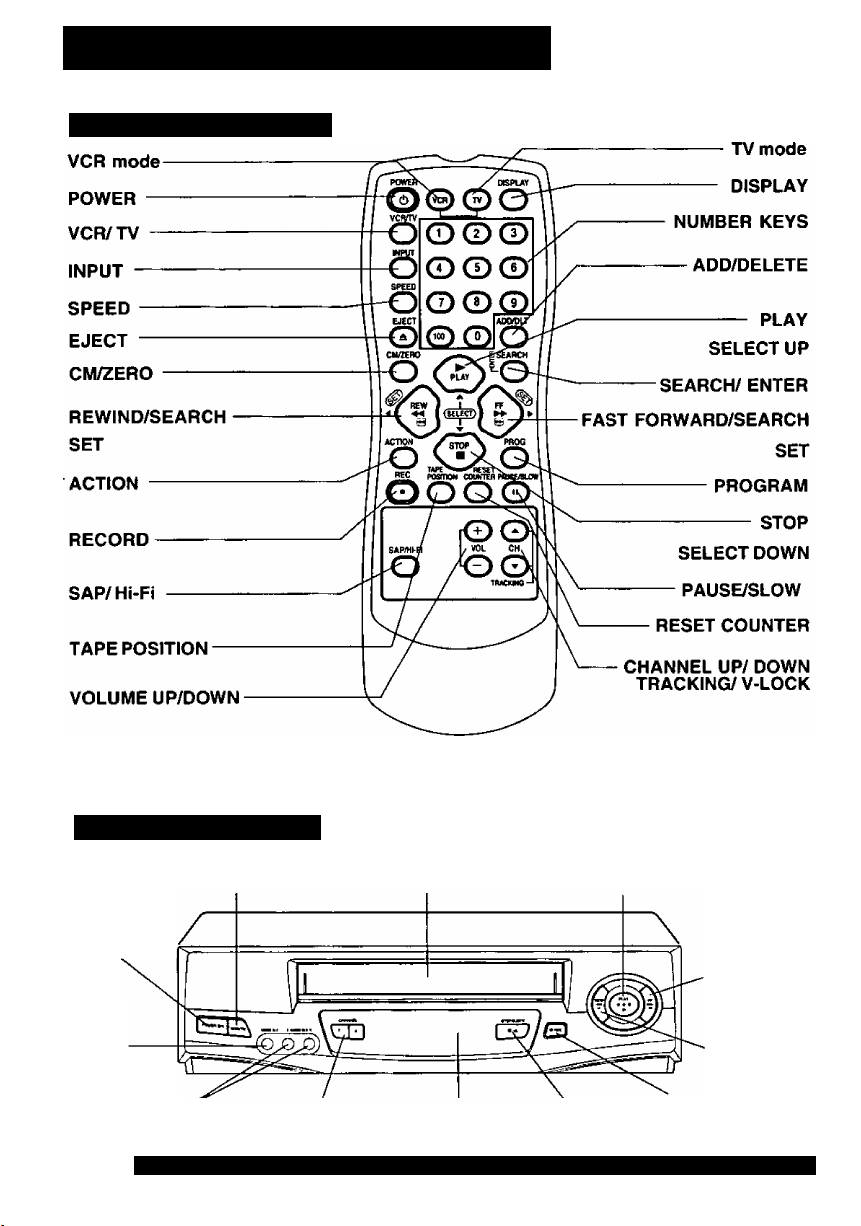
Location of Controls
Remote control Buttons
Model PV-V4521 remote shown.
EJECT button: Press to eject tape from VCR. If EJECT is pressed during record,
Front View of the VCR
VCR/TV selector Cassette Compartment
POWER
Video
Input
Connector
Connector '^CHANNEL UP/ DOWN Remote STOP/EJECT
(L/R) TRACKING/ V-LOCK Sensor
6
For assistance, please call : 1-800-211-PANA{7262) or send e-mail to : consumerproducts@panasonic.com
VCR will not respond.
Model PV-V4521 VCR shown.
PLAY
FAST
FORWARD/
SEARCH
REWIND/
SEARCH
Page 7
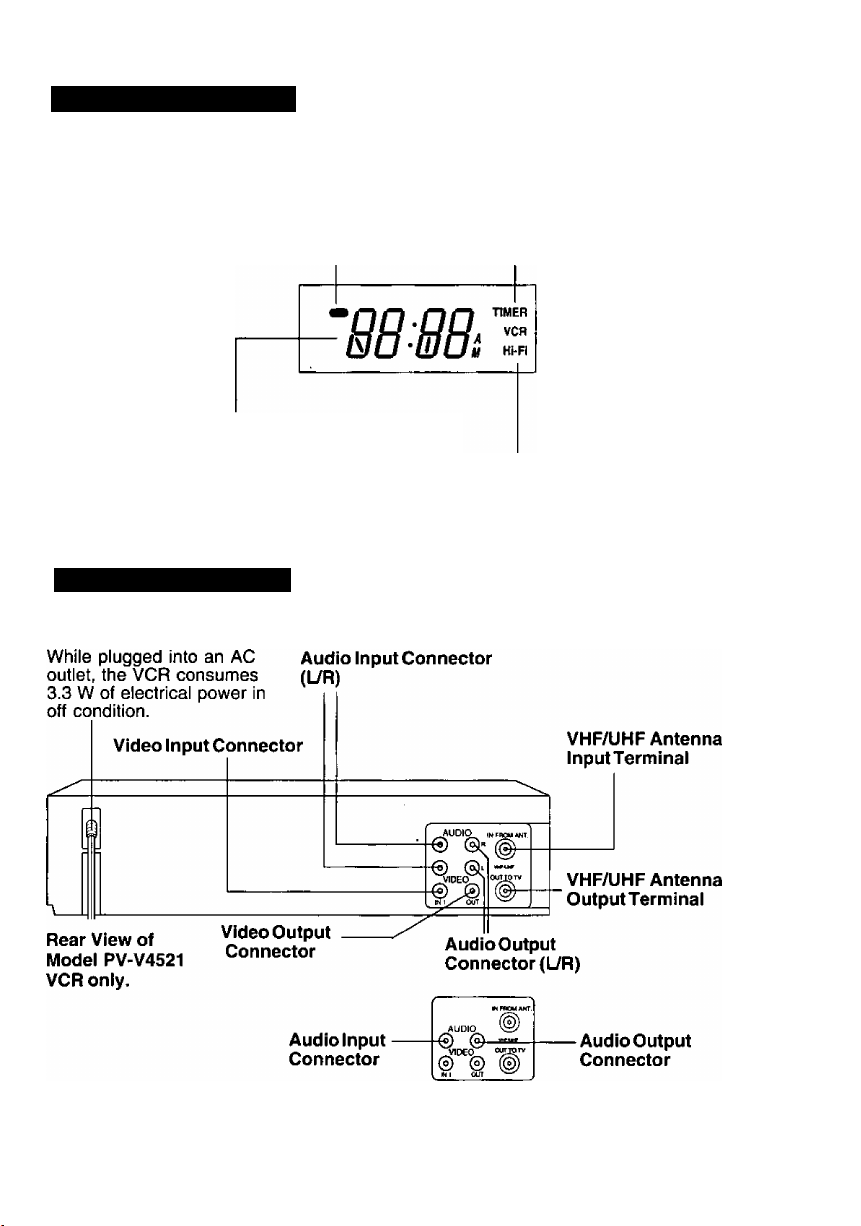
Multi Function Display
Timer Indicator
Lights when the VCR is set for a Timer
Power Indicator
Lights when power
is on.
Recording, or when One Touch Recording
(OTR) is used. Flashes when a Timer
Recording is set, but a tape has not been
inserted into the VCR and when a power
interruption occurs during Timer Programming.
Clock/ Status/ Channel/ Speed Display
Displays the current time. Briefly displays VCR
status when a function button is pressed. Briefly
displays the channel number, or “LI” or “L2” when
a channel or line input is selected. Briefly displays
the recording speed when SPEED is pressed.
Rear View of the VCR
AC Power Plug
VCR indicator
Lights when the
VCR/TV selector is
set to VCR.
Hi-Fi Indicator (For Model
PV-V4521 only)
Lights when Hi-Fi audio is
monitored in Playback
Mode.
Rear View of Model
PV-V4021 VCR only.
Page 8
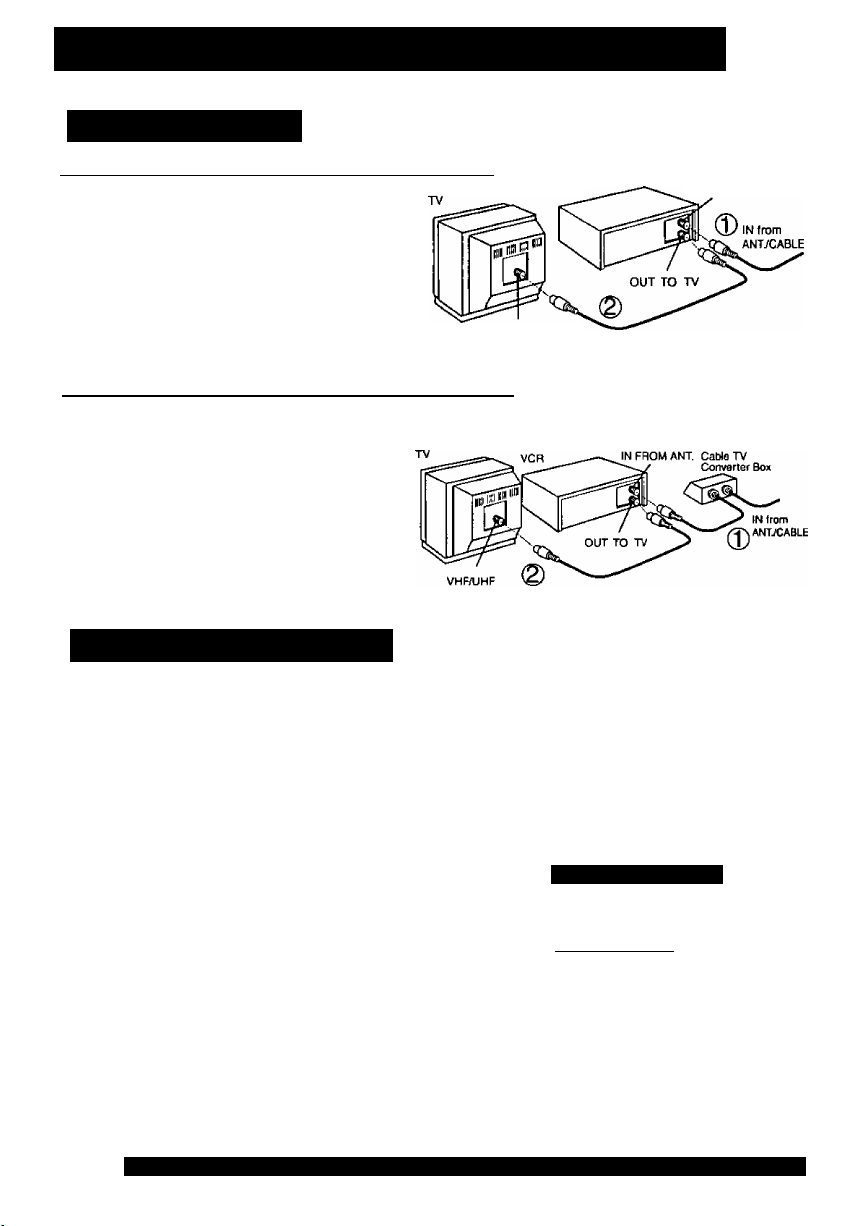
Connections and Initial Setup
How to Connect
Initial Setup for ANT./Cable - VCR - TV
(J) Connect the Cable from
Antenna/Cable to the IN
FROM ANT. terminal on VCR.
0 Connect the OUT TO TV
terminal on the rear of VCR
to the ANT. IN terminal on
TV using the RF Cable
(included accessory).
Initial Setup for DSS/Cable Box-VCR-TV
® Connect the OUT Jack on
your cable box to the IN
FROM ANT. terminal on the
VCR with an RF cable.
© Connect the OUT TO TV
terminal on the rear of VCR
to the ANT. IN terminal on
TV using the RF Cable
(included accessory).
VHF/UHF
VCH
IN FROM ANT.
How to do Initial Setup
Press VCR* for VCR mode. Turn
the TV on and set it to channel 3.
1
Turn VCR on.
When VCR is turned on the first
2
time, SELECT LANGUAGE screen
appears.
SELECT LANGUAGE
PRESS CH A t ENGLISH
OPRIMIR CH ▼ ; ESPAÑOL
APP. VCR/TV : FRANÇAIS
TO CHANGE VCR' S OUTPUT
CH. PRESS ACTION KEY.
If screen does not appear, check
connection between VCR and TV
and, if TV is tuned to channel 3, try
switching it to channel 4.
When you want to change the output
channel of VCR, please refer to VCR’s
Output Channel on page 11.
If wrong language is set, do “Reset All
VCR Memory Functions” steps on
page 9.
8
For assistance, please call : 1-80[>-211-PANA(7262) or send e-mail to : consumerproducts@panasonic.com
Press CHA to select English,
or
3
Press CHV to select Spanish,
or
Press VCR/TV key to select French.
When one of above keys is pressed,
CHANNEUCLOCK AUTO SET screen
appears.
VCfl fCLOCK fCHANNEL
«EL/CL0CK .iiUTO SET
CONNECT ANTENNA CABLE
AND IF YOU USE A CABLE
BOX. TUNE IT TO YOUR
LOCAL PBS CH THEN, . .
PLEASE PRESS CH UP KEY
If you use a cable box, turn it on and set it to
the Public Broadcasting Station (PBS)
channel in your time zone. If you use DSS
receiver, it must be turned off.
r WARNING-----------------------------------------------
When using “Nut type" RF coaxial cables,
tighten with fingers only. Overtightening
may damage terminals.
Page 9
Important: If a remote control button does not work when pressed, press
Press CHA Key to start Channel/Clock
Auto Set operation. Settings are
performed automatically. If the setup is
4
completed, the following screen is
displayed.
r VCR
571372001 SUN 2:20PH|
If “Auto Clock Set is Incomplete"
screen appears, set the clock using
MANUAL CLOCK SET procedure shown
below.
rCLOCtTI Shaknel
: CH UP KEY
the VCR button on the remote and try the button again.
DST:ON
CH 10
S CD © ©
SPEED
CO
© ©
®o
O <©^0
-M Jp
oSHo.
QOO0
o©
AOMUT
POWER
VCR
VCRATV
SELECT/
SET
A iPLAY
T :STOP
◄ :REW
► :FF
ACTION
rvCR I CLOCK I channel
PLEASE SET CLOCK BY
PRESSING ACTION KEY
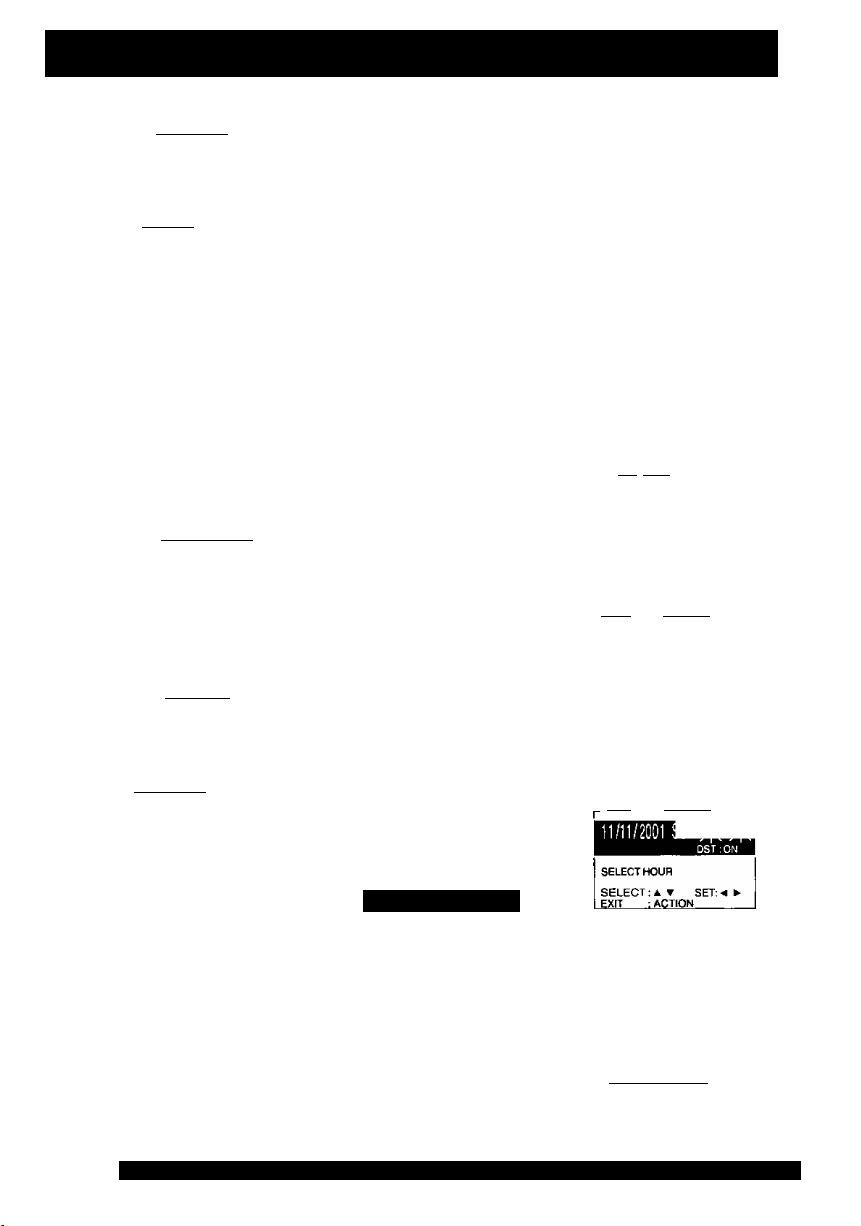
Manual ClockSet
If Auto Clock Set was incomplete, manually
set the clock as follows.
Press ACTION Key on the Remote to
display CLOCK Menu screen.
1
rVCR r CLOCK 1 CHANNEL;|
SELECT MONTH
SELECT:A » SET:
EXIT ..INACTION________
Press A T to select the month and ► to
set. In the same manner, select and set
2
the date, year, time, and DST (daylight
saving time).
I VCR
fCLOCin CHANNET|
liKIliJiIiIUlklHI
SET COMPLETED
SET '.■* ►
START ■ACTION
Press ACTION Key twice to start CLOCK
3
and exit.
CH A/T
Model PV-V4521 remote shown.
Reset All VCR Memory Functions
Use when moving VCR to new
location, or if a mistake was made in
the Initial Setup section.
• Make sure a tape is not inserted in
the VCR.
Press and hold both
PLAY and CHANNEL
A on the VCR for
more than 5 seconds.
• The power shuts off.
3 Do “Initial Setup” on page 8.
Page 10
Reset Language, Channels, Clock,
1
2
fVCR I ~CngKl~eHANNEL
REPEAT PtAY :OFF
REMOTE WARNING :ON
AUTO SHUT-OFF :ON
tOIOMA/LANGUE : ENGLISH
VCR' S OUTPUT CH :3
SELECT
EXIT : ACT ION
■ Language
1) Press AW to select
language item.
v5n”
REPEAT PLAY :OFF
REMOTE WARNING :ON
VCR'S OUTPUT CH :3
SELECT:a t SET:^
EXIT :ACTION
2) Press ► repeatedly.
VCR 1 "CLOCK I CHANNEL
REPEAT PLAY OFF
REMOTE WARNING :ON
VCR’S OUTPUT CH ;3
SELECTia t SET:»EXIT : ACT I ON
For English
VCR I SECQTI CANgn
IE RETICI ON :INACT
AVISO(CONT.REMOTO) :ACT
■ -■ JATICtLACT
:ANAL de SALIDA :3
ELEG1R:ay FUAR;P
SALIR : ACT I ON
rMAGNETO:]_;
hEPflISE LEC
CA SORTIE ;3
SEL, :a ▼ REGLER:»
■PmTTER.;ACT I ON . jj
3) Press ACTION to exit.
______________
For Spanish
hOrD "CanaTTI
LECTURE :NON
MESSAGE O'ERREUR : OUI
For French
Press ACTION*
to display menu.
■ Channels
1 ) Press ► to select
CHANNEL.
AUTO SET
WEAK SIGNAL DISPLAY:OFF
SELECT : A T A ►
EXIT : ACTI ON
2) Press AW to select
“ANTENNA," then
press ► to set your
antenna system
(TV or CABLE).
AUTO SET
WEAK SIGNAL DISPLAY : OFF
SELECT:A ▼ SET:
EXIT : ACT I ON
3) Press AT to select
“AUTO SET,” then
press ►.
• If you use a cable box,
set it to the PBS channel
in your time zone.
rvCH I CLOCK rCHANNEL T
CHAIEL/CLOCK AUTO SET
CONNECT ANTENNA CABLE
AND IF YOU USE A CABLE
BOX, TUNE IT TO YOUR
LOCAL PBS CH THEN. , ,
PLEASE PRESS CH UP KEY
{This screen appears only
when auto clock is set.)
4) Press CH A.
• After Channel Auto Set is
finished. Clock Auto Set
will be performed.
■ Clock
1 ) Press ^ ► to select
CLOCK.
VCR [»CLOCK I CHANNEL
■StlTi5Ta;oCK SET
nio
MANUAL
TIME ZONE ADJUST
SELECT ; A T
EXIT : ACT I ON
2) Press AT to select
MANUAL and press ►.
(For Auto Clock Set,
select “AUTO CLOCK
SET," then press CH A.)
PVCH [ CLOCif] CHANNgn^
FAUTO CLOCK SET ^
I TIME ZONE ADJUST
SELECTIA T SET:»
EXIT : ACT I ON
_____________
(“TIME ZONE ADJUST
appears only when auto
clock is set.)
VCR rCL'OCKl CHANNEL
m
3) Press AT and ► to
select and set the date,
time, and DST (Daylight
Saving Time).
4) Press ACTION twice to
start the clock and exit
this mode.
10
For assistance, please call : 1-800-211-PANA(7262) or send e-mail to : consumerproducts@panasonlc.com
Page 11

s Output Channel
‘'Important: If a remote control button does not
work when pressed, press the VCR
button on the remote and try the
button again.
■Time Zone Adjust
(Only when Auto Clock is set.)
1) Press 4 ► to select
CLOCK.
PvCH »CLOCK I CHANNEL
AUTO“CLOCK SET
MANUAL
TIME ZONE ADJUST : 0
SELECT
EXIT :ACTIQN
2) Press AT to select
TIME ZONE ADJUST
1 VCR 1 CLOCK 1 CHANNEL 1
fAUrO CLOCK SET
1 MANUAL 1
fcJLI,IJj.lflJJ.IIII.4J1.1
SELECT:* ▼ SET;-« ►
EXIT : ACTION 1
and press or ► to
subtract or add hour(s)
as necessary.
3) Press ACTION.
4) Press POWER off to
perform AUTO
CLOCK SET.
• TIME ZONE ADJUST
returns to “0" if clock is
set manually.
■ VCR’s Output
Channel
1) Press AW to select
VCR'S OUTPUT CH.
vcRH_:ei:ocin channeo,
REPEAT PLAY :OFF
REMOTE WARNING ON
AUTO SHUT-OFF ON
SELECT:* » SeT:^
EXIT : ACT I ON
2) Press ►.
VCR
IF YOU PRESS ACTION
KEY, VCR'S OUTPLTTCH
SWITCHES TO CH 4,
3) Press ACTION.
VCR I CLOCK I CHANNEL|
PLEASE TUNE YOUR TV TO
CH 4.
After 3 seconds
VCR lckselchannei^
repeat play :0FF
REMOTE WARNING :ON
AUTO SHOT- OFF :ON
IDIOMAAANGUE : ENGLISH
SELECT:* Y SET:*
EXIT : ACT I ON
To Make Corrections,
repeat step 1) - 3).
_________
1
CLOCK t CHANNEL|
lOQi
____________
POWER
■VCR
NUMBER
keys
SELECT/
SET
A:PLAY
T :STOP
◄ :REW
► :FF
.ADD/
DELETE
■CH A/T
ACTION
Model PV-V4521 remote shown.
Add or Delete a Channel
To add channel:
Select channel with number
keys and press ADD/DLT.
1 CHANNEL 08 ADDED |
To delete channel:
Select channel with CH A / T or
number keys and press ADD/DLT.
1 CHANNEL 08 DELETED
DST (Daylight Saving Time)
VCR auto adjusts clock for DST.
(Page 9.)
Spring (First Sunday in April)
DST :ON --> Sets clock ahead one hour,
Autumn (Last Sunday In October)
DST:ON --> Turns clock back one
hour.
• If your area does not observe
Daylight Saving Time, select
DST:OFF.
• Keep these time changes in mind
when programming the VCR for
timer recordings.
11
Page 12

Playback a Tape
cnwjw
©© CE) O
esooo
Sooo
SWTP
O O © CD
EJECT
REW-
Playback using VCR controls
EJECT WWXT
-© © © o
O <g)ÌO
^ /sraT\ "22
0isi40.
Hmurn cow^PrnmmOK
QOOGlV
Model PV-V4521 remote shown.
*| Insert a cassette.
2 Press P
1
........
1
PLAY
FF
STOP
PAUSE/
SLOW
LAY
1
w\
Ready Check List
□ All connections are made (pg. 8,17).
□ TV and VCR are plugged in.
□ TV is on and tuned to CH3, 4, or VIDEO.
□ Remote is in VCR mode. (Press VCR)
Insert a tape,
1
• VCR power comes on.
"VCR” lights on Multi Function Display.
Press PLAY*
to play tape.
* if tape has no ree. tab (pg. 4), auto play begins.
Special Features During Play
Forward/ Reverse scene search
--> Press FF or REW.
-> Press again or PLAY to release.
Still (Freeze) picture
-*> Press PAUSE/SLOW.
-*> Press PLAY to release.
Frame by Frame picture
-> Press PAUSE/SLOW in Still mode.
--> Press PLAY to release.
Slow Motion picture
Hold down PAUSE/SLOW in Still mode.
-> Press PLAY to release.
These features work best in SP or SLP
mode.
• The sound will be muted.
• To reduce picture noise, see “Manual
Tracking Control" on page 25.
• After the VCR is in Still or Slow mode for 3
minutes, it will switch to Stop mode
_________
Press STOP
to stop tape.
Press REW or FF In Stop mode
to Rewind/ Fast Forward tape.
Press EJECT on remote,
or STOP/EJECT on VCR to eject tape.
automatically to protect the tape and the
video head.
Remove loose or peeling
labels from tapes
to prevent tape jam.
________________________
Multi Function Display
Press STOP/EJECT to stop
and/ or eject tape.
12
For assistance, please call : 1-800-211-PANA(7262) or send e-mail to : consumerproducts@panasonic.com
Page 13

Record On a Tape
o© © o
VCR/
TV
VCIVTV _
-ooo©
So©©
OO© ©
/ UfiCT _ _ ADCffiLT
SPEED
O © © O
CtnEUD IKARCM
REC
Model PV-V4521 remote shown.
DOnM
Important: It a remote control button does not work
when pressed, press the VCR button on
the remote and try the button again.
Ready Check List
Q All connections are made (pg. 8, 17).
□ TV and VCR are plugged in.
Q TV is on and tuned to CH3, 4, or VIDEO.
□ Remote is in VCR mode. (Press VCR)
Insert tape with rec. tab (pg. 4).
1
• VCR power comes on.
“VCR" lights on Multi Function Display.
Press CH AT, or number keys
to select channel.
• For “LINE" input, see pg. 24.
• For channels over 100, press 100 key then
press the remaining 2 digits.
Press SPEED
to select record speed (pg. 4).
SP = Standard Play LP = Long Play
SLP = Super Long Play
• Speedappearson-screenandonMultiFunctionDisplay.
Press REC
to start record.
• To edit out unwanted scenes, press PAUSE/
SLOW to pause, and again to resume recording.
Press STOP
to stop record.
Record using VCR controls
2 Select 1 Insert 4 Press REC
Channel, a cassette. to start
Recording.
VCR/TV
Multi Function
Display
This video recorder, equipped with HQ
(High Quality) system, is compatible
with existing VHS equipment. Only use
tapes with the mark. Only tapes
tested and inspected for use in 2, 4, 6,
and 8 hour machines are
recommended.
5 Press STOP/
EJECT to stop.
One Touch Recording (record in progress),
• VCR shuts off after preset record length.
"> each press of REC adds 30 min. to
record length up to 4 hours.
Record one station, watch another,
--> press VCR/TV (“VCR" goes out on Multi
Function Display),
"> select channels at TV (recording
continues).
Watching one channel and
recording another is NOT
possible when using a Cable
Box or a Satellite Receiver.
Select channels at VCR,
• Other channels cannot be viewed during
recording.
-> press VCR/TV (“VCR” lights on Multi
Function Display),
-> select channels at VCR.
• After 5 min. in Pause mode, VCR stops to
protect tape and video head.
13
Page 14

Timer Recording
POWER
VCR/
TV
«CDOO
So0O
5o
SELECT/
SET
A: PLAY
TiSTOP
◄:REW
► :FF
[^1
Ready Check List
All connections made (pg. 8, 17).
□
TV and VCR plugged in and turned on.
□
VCR/TV selector set to “VCR.”
□
Clock set correctly.
n
Tape has rec. tab {pg. 4),
□
Remote in VCR mode. (Press VCR)
n
Press PROG*
1
to display PROGRAM.
REC
m Hjm wE5
^oo
----
Model PV-V4521 remote shown.
Example
Today
If you are using a Cable Box, VCR
Timer Programming
Channel(Step 3) must be set to
the Cable Box output channel
AND your Cable Box must be
manually set to the desired
channel. The Cable Box power
left on.
If a power interruption occurs
while programming the timer, the
timer program(s) may be canceled.
If “TIMER PROGRAMS WERE LOST
DUE TO POWER INTERRUPTION”
appears on-screen, please reenter
the timer programs.
14
For assistance, please call : 1-800-211-PANA(7262) or send e-mail to : consuirerproducts® panasonic.com
PROG
(SAT)
■31— 1—2"
WEEKLY
■ (MON)
Ptimer prog. rCiiP
^8-9
7 selecta / T Selection Order
^WEEKLY
L
Press ▼
to display Program
screen.
1) To set record DATE,
press AT to select:
1-31= one time, or
DAILY= MON- FRI, or
WEEKLY= same time
each week and
press ► to set.
• See selection order
below left.
2) To set remaining
items, press AT to
select and press ^ to
set START/STOP
times, CH(channel) or
LINE input (pg.24),
and tape speed (SP,
LP, SLP).
___WEEKLY _J
(SUN)
DAILY
Press PROG
to end program.
To Enter More Programs,
press AT to select and
press ^ to set an unused
CANCEL lAOD/DLT
SELECT :* T SET:
EXIT : PROG
_____
program number and
repeat step 3.
Or
Press PROG again
to exit-
press POWER off
to set the timer.
(“TIMER” lights on Multi Function Display.)
Page 15

important: It a remote control button does not work when pressed, press
the VCR button on the remote and try the button again.
Review, Replace or Clear Program Contents:
(Recording is not in progress)
1
TtIMER PROG. I^UST
P OT START STOP CH
9:00*12:00*
1 7
S 8
10:OOP12;OOP
8:OOP 9;00P 10
3 10
9:OOP 10:OOP LI
4 SU
SELECT:A T 4 ►
EXIT
:PROG
_____
fTIMER PROG. I LIST
i^T START STOP CH
BKffiSIIBCSIKIl
2
B 1O:O0P12:O0P 02
3 10 8:OOP 9:OOP 10
4 SU 9:00P10:O0P LI
CANCEL -.ADO/DLT
SELECT ;A ▼ SET:*
EXIT : PROG
______________
02
1) Press PROG.
SPO
06 SP
2) Press
SP
SP
LP
T
Press
to select number.
to select LIST.
AW
To cancel a Timer
Recording in progress...
Press POWER and then STOP
within 10 seconds to cancel the
Timer recording. (The TIMER
indicator goes out on Multi
Function Display.)
3 To Replace program...
1) Press ►
7 SUN 9:00A 12:00A 08
TODAY
SELECT START DATE
SELECT: AT SET;t ►
END :PROG
_________________
to display.
2) Repeat Step 3
(pg.14) to set
new programs.
or
To Clear program...
TIMER PROG. J LIST
8 10;00f 12:OOP 02
10 8:00f> 9:00P 10
SU 9;OOP10:OOP Li
CANCEL ;ADD/DLT
SELECT ;a T SET;»EXIT :PROG
STOP CH SPDl
Press ADD/DLT.
Press PROG
to end the program. .
• If there are set programs, press
POWER off to set timer.
- Important notes when using a DSS receiver —
When recording programs via a DSS receiver, the DSS
receiver must be left on.
When recording programs via an antenna or cable, the DSS
receiver must be turned off.
SELECT/
o
S5o©©
5 of
SET
A :PLAY
T :STOP
◄ :REW
► :FF
ADD/DLT
PROG
Model PV-V4521 remote shown.
15
Page 16

Multi-Brand Control Feature
Multi-Brand Control Setup
The Remote Control can be set to control some TV functions.
^ Find your TV Brand Code Number shown below.
I Setup for TV control,
-->hold down TV button,
-->enter code with number keys.
• if code number istOO or greater,
-->press too key, then other digits.
E.g., press 100 - 0 - 2 for 102.
Confirm code entry,
">press POWER to turn selected unit on or off.
• See table below for controllable functions in each mode.
Repeat setup after remote battery replacement.
Remote will not control every TV made by the
manufacturer listed. If you get no response, your
particular unit cannot be controlled. There are NO
additional codes for the products listed. If your
product is not listed, then the remote is not
compatible with that product.
Using Multi-Brand Control
After remote is set up, you can select VCR or TV for the
desired function.
Press VCR or TV on the remote.
(Table below shows available unit buttons for each mode.)
"\Unit
Mode\^
VCR
TV
VCR/TV, PLAY, STOP EJECT, SAP/ Hi-Fi (PV-V4521
only), DISPLAY, FF, REW, PAUSE/SLOW, REC, SPEED,
CM/ZERO, RESET COUNTER, TAPE POSITION
VCR
All
О © © О
Model PV-V4521 remote shown.
TSW
^OQ©
So©©'
O©©©
UfCT _ AooraJ
'5S* /|тсГ\ "M
oSZLo
^ гаагпм сошли piMenj»
OOO0
TV
VOL UP/DOWN
POWER, INPUT, number
keys, ENTER, CH UP/
DOWN, VOL UP/DOWN
NUMBER
keys
ENTER
Not all functions listed may be controllable.
In TV mode, it may be necessary to press ENTER after pressing number keys for channel
selection.
TV Brand Code Numbers
............
Panasonic
Quasar
FCA......................................... 03
GE
Zenith
Magnavox
............
.................
.........................
..................
...........
01,02
...........
01,02
..................
..................
..................
Sylvania
..............
Sharp
..................
Sony
03
04
05
....................
Toshiba
...............
Sanyo .................................... 10
Rsher
..................
...................05
............
06, 07
...................08
...................09
................... 10
JVC
...................
Hitachi...............
Mitsubishi
Samsung
Gold Star
.........
.........
..........
.....................
..................... 12
..............
..................... 14
........
15, 16, 17
Due to changes in infra-red commands used by manufacturers, some brands have several
codes. If your unit does not respond to the first code, please try the next one.
Some TV brands require you to turn on the power manually.
16
For assistance, please call : 1-800-211-PANA{7262) or send e-mail to : consumerproducts@panasonic.com
11
07, 13
Page 17

Advanced Connections
AudioA^ideo connection
If your TV has AUDIO IN and VIDEO IN terminals, you can connect your VCR to
them to recive higher quality picture and sound.
Connect the VIDEO OUT terminal on the VCR to the VIDEO IN terminal
of your TV.
Connect the “L” and “R” AUDIO OUT terminals on the VCR to the “L” and
“R” AUDIO IN terminals of your TV. {PV-V4521 Rear)
Connect the AUDIO OUT terminal on the VCR to the AUDIO IN terminal
ofyourTV. (PV-V4021 Rear)
Set the VIDEO/TV selector of your TV (Monitor/Receiver) to “VIDEO.”
With a Cable Box (VCR -^Cable Box)
rÀNfi
I - I
■CATV
AUDIO INFUOMANT^
; O OR “
OL
^VIDEO
o o
INI our
VHF/UHF
OUT TO TV,
CABLE BOX: AUDIO ,
IN OUT' ' O OviDEp,
' ® ® ■ ■■' @VHF/UHF '
J
VCR
Connect With Two Cable Boxes
CABLE BOX
,IN OUT
r®
HinT'
2-Way Splitter CABLE BOX
I I
'' AUDIO IN FROM |
; O OR
pL VHF/UHF
VIDE(
o
our
INI
OUT TO TV
|CAT^
OUT 1 OUT2
2 ! "in* out
L
VCR
TV
IN on''
IN OUT
ORO,
'AUDIO
OlO
O_OviDE0|
VHF/UHF
TV
You Can
view any
(including
scrambled)
channel.
use VCR Remote
Control to select
channels without
using Multi-brand
control feature.
You Can
record and view
both scrambled
and unscrambled
channels if
additional
equipment is
added. This
connection
requires: two
converter boxes,
an A/8 switch,
and a 2-way
splitter.
You Cannot
record
scrambled
channels.
You Cannot
view channel
other than the
one selected
for any type of
recording.
do a Timer
recording of a
channel unless
you select it at
the cable box.
17
Page 18

iTilfcì
Broadcast/VHS Hi-Fi Stereo System
Connection For Model PV-V4521
Make the AudioA/ideo Connection as shown on page 17.
• You can use a TV connected to Stereo amp and speakers
instead of a Stereo TV.
Receivable Broadcast Types
The following are possible audio broadcast types and on
screen displays.
The signal being received is indicated with an “[((” mark while
the selected audio mode is indicated with an arrow.
To display the broadcast signal being received,
-> press DISPLAY.
©(^
esooo
S O O ©
5o® ®
|j£T MRmu
O ® ® O
o <2)^0
MTS stereo and SAP broadcast
Multi-channel Television Sound Stereo
(main language) and Secondary Audio
Program (sub language) broadcasts
are being received simultaneously.
Select STEREO or SAP audio mode.
STOP 12:00AM
fr STEREO
►SAP
MONO
ABC
:00:00
0
SP
5<:Slo
HMnOH COUHIMHiVIMLAr
QOO®
only
DISPLAY
MTS Stereo broadcast
Multi-channel Television Sound Stereo
broadcast. Select STEREO audio
mode.
• If stereo broadcast is weak and
display flickers, select MONO audio
mode for possibly better results.
SAP broadcast
Secondary Audio Program (sub
language) broadcast. Select SAP
audio mode for the sub language.
MONO broadcast
Normal monaural sound broadcast.
18
For assistance, please call : 1-800-2H-PANA(7262) or send e-mail to ; consumerproducts@panasonic.com
STOP
»STEREO ^
SAP
MONO
STOP
STEREO
»SAP
MONO
STOP
STEREO
SAP
MONO
12:00AM
12:00AM
4
12:00AM
SAP/
ABC
0:00:00
SP
Hi-Fi
Equipped with dbx*-TV
ABC
:00:00
0
SP
Noise Reduction for
true MTS reproduction.
dbx*-TV Noise
Reduction is required
for good stereo
separation and audio
ABC
;00:00
0
SP
fidelity, dbx* is a
registered trademark,
and is licensed by dbx*
Technology Licensing.
Page 19

Audio Mode for Recording
Press SAP/ Hi-Fi
to display audio mode.
1
(Display disappears after 5 seconds.)
»STEREO
»SAP <
MONO
2
Arrow indicates
selection.
Do a recording.
See page 13.
3
Press SAP/ Hi-Fi
repeatedly to select
desired mode.
Refer to “Receivable
Broadcast Types”
on page 18.
Audio Mode for Playback
Start playback.
1
See page 12.
Press SAP/Hi-Fi
to display audio mode.
2
(Display disappears after 5 seconds.)
Press SAP/ Hi-Fi
3
HIFI(L/H)^
HIFI (L)
HIFI(R)
NORMAL
Arrow indicates
selection.
repeatedly to select
desired mode.
•Select “HIFI(L/R)”or
“HIFI(D” or “HIFI(R)” to
listen to stereo
recordings in stereo
sound. Select
“NORMAL” for
monaural sound.
o
ÔOOCD
ÔOOCD
So®©
uccf um.T
OCE)® O
mmo tfUMCM
O
QOO®
SAP/
Hi-Fi
Only tapes recorded in Hi-Fi stereo will playback with true stereo sound.
Standard stereo tapes will playback in monaural sound.
To listen to Hi-Fi stereo playback, the VCR AUDIO (L/R) jacks must be connected
to a stereo TV or an external stereo amp and speakers. (See page 18.)
If tracking is adjusted during playback, Hi-Fi audio may revert to normal audio.
Hi-Fi and normal audio playback volume level may differ.
19
Page 20

Tape Operation
Search System
For each recording, an invisible index marit is placed
on the tape. A program index and information are also
included for timer recordings. These marks are used to
access or scan recordings.
Index Search
INDEX IPRQGRAMENQ
1
FORWARD SEARCH :FF
REVERSE SEARCH :REW
NEXT ^SEARCH
EXrr :STOP
Press SEARCH*
to display SEARCH
in Stop or Play
mode.
Program End Search
Locates end point of recording for
continuity.
1
Press SEARCH twice
to display SEARCH in Stop or
Play mode.
INDEX SEARCH 3
Press number keys
to select recording
number.
• To calculate
number, see below.
Press FF or REW
to start search.
INDEX SEARCH
Play begins at
search end. To
search fonward or
back 1 index,
press FF or REW
while screen left
is displayed (10
sec.).
m To Calculate Index Number
Example 1:
To go to rec. 2 from rec. 4, enter 3 and press REW.
6
Example 2:
To go to rec. 6 from rec. 2, enter 4 and press FF.
NOTE: i indicates start points of each recording.
SEARCH
INDEX
1
PROGRAM END
SEARCH START: FF
EXIT : SEARCH
Press FF
to start
PROGRAM
END SEARCH.
Examples ol Program End Search.
Fiq.1
Program 1
pE
Program 2 or BLANK
End Point
ЕШ
ISII Program 1 11 1 BLANK ||g| Program 2
current tap* poiftwn
Pf M SEARCH button
BLANK II
V
End Point
Fiq.3
End Point
rh« currenl Hum po«rti
Pr*H SEARCH butto
a/
II search exceeds
a few seconds in
5
BLANKarea.
Pnogtam
2
Upon locating end point,
-->search continues 7 sec. past end point,
-->tape rewinds to 10 sec. before end point,
-->tape plays to end point and stops.
If Index Search is started very close to
an index mark, that index mark may not
be counted in the search.
20
For assistance, please call ; 1-800-211-PANA(7262) or send e-mail to : consumerproducts@panasonic.com
• If Program End Search is started very
close to an index mark, that mark may be
skipped over.
• To cancel, press PLAY or STOP.
Page 21

'Important: If a remote control button does not work when pressed, press
the VCR button on the remote and try the button again.
Auto Operation Functions
■ Auto Play
Insert tape --> Power comes on,
NUMBER
keys
CM/ZERO
-->Play starts if no record tab
(see pg. 4).
■ Auto Rewind
Play
Manual Record
Fast Forward
■ Play Auto Eject
> Tape end,
--> Rewind
3-
(Repeat Play must be off)
Play, -->Tapeend,-->Rewind,
-->Tape ejects if no record tab
Commercial Skip
VCR fast forwards (skips) over 1 -3
minutes of recorded tape.
Model PV-V4521 remote shown.
*1 Press CM/ZERO in Play mode.
• The skip time can be changed by
pressing CM/ZERO button
repeatedly as shown by the
figure below.
PLAY
1st Press—►I min Skip
I
2nd Press —^2 min Skip
I
3rd J^ress—-3 min Skip
No indication appears.
21
Page 22

ape Operation Special VCR Features
Repeat Play
Set to playback a recording over and over.
Press ACTION*
to display menu.
1
REMOTE WARNING ON
AUTO SHLfT ' OFF ;ON
IDIOMAiLANQUE : ENGUSH
VCR'S OUTPUT CH :3
Press ACTION
to return to normal screen.
Press AV
to select REPEAT
PLAY and press ► to
set ON or OFF.
• Play repeats at tape
end or if unrecorded
portion over 30 sec.
is detected.
Zero Search
To quickly return to a specified tape location.
Press DISPLAY during play
1
to display Counter.
Press RESET
COUNTER at
desired position
to reset to “0:00:00”
^ Continue to record, playback, etc.
Tape Position Display Feature
To find out the present tape position.
Tape position cannot be detected for VHS-C
Cassette type and tapes less than 60 minutes
in length.
Press TAPE POSITION
1
to detect tape position.
DETECTING TAPE POSmO^ J
Press TAPE POSITION
to return to normal screen.
‘‘DETECTING TAPE
POSITION” only
appears the first time
a cassette is inserted
and it takes several
seconds for correct
indication to appear.
The present tape
position indication is
displayed.
Remote Warning ON/OFF Feature
If Multi-brand feature is used {page 16), and this
feature is set to on, a warning appears whenever
an invalid key is pressed in TV mode.
Press ACTION
1
to display menu.
Press Stop.
Press CIWZERO
In Stop mode
to start ZERO
SEARCH.
• Unit will go into FF
or REW mode and
stop at the last point
the Counter was set
to 0:00:00.
If a blank portion exists on the
tape, and depending on the position
of the V mark, the V mark display
position may not be accurate.
22
For assistance, please call ; 1-800-211-PANA(7262) or send e-mail to ; consumerproducts@panasonic.com
VCR~1 "CLOCRI ümÑNEL
tEPEAI PLAT _ OFF^
AL/TO SHUT-OFF ON
IDIOMAAANGUE: ENGLISH
VCR’S OUTPUT CH :3
Press ACTION
to return to normal screen.
Press AT
to select REMOTE
WARNING and press ►
to set ON or OFF.
• If "OFF," remote
warning will not
appear if invalid
key is pressed.
Page 23

'Important: If a remote control button does not work when pressed, press
the VCR button on the remote and try the button again.
fnn GOTUT
O'
So©©
S©©®
5ooo
uecT _ _ I
O ©
DISPLAY
SELECT/
SET
ArPLAY
▼ :STOP
► :FF
^:REW
SEARCH
ACTION
RESET
COUNTER
TAPE
POSITION
Model PV-V4521 remote shown.
Weak Signal Display ON/OFF Feature
When “ON," picture is displayed regardless of signal
strength.
"CLQCKI CHANNëT
REPEAT flAY <JFF
REMOTE WAftNtNO
1
AUTO SHUT-OFF ON
IDIÛMAAANOUE ; ENGLISH
VCfrS OUTPUTCH rZ
I VCR raBCiff
PWTCH}'
ON:
Picture is displayed regardless of signal
condition, and may not always be clearly
visible.
OFF: Screen turns solid blue when signal is weak
or non-existant.
Selecting ON has no effect on connected
equipment with blue back feature. ■
Press ACTION
to return to normal screen.
3
Press ACTION
to display menu.
Press -4 ^
to select and display
CHANNEL,
press AT
to select WEAK
SIGNAL DISPLAY,
and press P to set
ON or OFF.
VCR Lock Feature
When set to ON, all operations except
for timer record and tape eject are
prohibited. Useful for households with
small children.
To turn on,
VCR LOCK activated
VO) LOCK OFF
VCR Lock cancels in 24' hours if
clock is set.
hold down REC on
the VCR in Stop
mode with no tape
inserted for 7 sec.
(Please ignore the
NO CASSETTE
warning.)
To turn off,
repeat above.
REC
Auto Shut-Off Feature
When set to ON, VCR shuts off if blank tape is
played or no signal is detected for 5 min.
Press ACTION
1
to display menu.
Press AT
to select AUTO SHUT
OFF and press ►
to set ON or OFF.
Press ACTION
to return to normal screen.
23
Page 24

opying Your Tapes (Dubbing)
Connection
L-AlOlO IN2-n
Front of VCR
Connect VIDEO OUT terminal on Playing VCR to VIDEO IN terminal on Recording VCR. To
monitor the dubbing, also connect a TV as shown.
Connect “L” and "R" AUDIO OUT terminals on Playing VCR to “L" and “R” AUDIO IN
terminals on Recording VCR. (PV-V4521 Rear)
Connect AUDIO OUT terminal on Playing VCR to AUDIO IN terminal on Recording VCR.
(PV-V4021 Rear)
VDEOIN!
o
o o
(Video In Terminal on the
front of VCR is available)
VIDEOIN 2
o o
In place of a Playing VCR, you can use other equipment, such as a Camcoder.
Simply connect the unit’s AudioA/ideo outputs to the Recording VCR.
Playing (Source) VCR
Insert pre-recorded tape.
1
Press PLAY, then PAUSE/SLOW Press REC, then PAUSE/SLOW
immediately to enter PLAY/PAUSE mode, immediately to enter REC/PAUSE mode.
The operation of steps 4 and 5 must be done on both
playing and recording VCRs at the same time.
Press PLAY to start dubbing.
Playing VCR starts playback.
Press STOP to stop dubbing.
Recording (Editing) VCR
Insert blank tape with record tab.
Press INPUT to set VCR Input mode to LINE1 for
Video Input (Rear) or to LINE2 for Video Input
(Front). (See “Selecting the Input Mode” below.)
Press PAUSE/SLOW to start dubbing.
Recording VCR starts recording.
Press STOP to stop dubbing.
AUHOINi
Front of VCR
To Monitor Dubbing on Your TV
1
Turn your TV on and tune to the Recording
VCR channel (CH3orCH4).
2
Set the VCR/TV Selector on the Recording
VCRto“VCR."
Dubbing tapes protected with Copy Guard will
have poor quality results.
^Caution: unauthorized exchanging and/or copying of copyrighted recordings may ba copyright Infringement.^
24
For assislance, please call : 1-800-211-PANA(7262) or send e-mail to : consumerproducts@panasontc.com
Selecting the Input Mode
Method 1:
Method 2:
Press INPUT repeatedly.
Channel Number<->LINE1 <->LINE2
Press CHA/Y, Display will change as below.
1 **'2**3'*—
(CABLE) (TV) )
^UNE2-«
“LI" or “L2" lights on Multi-Function Display
(about 4 sec.) when LINEI or LINE2 is selected.
LINEI: For rear audio/video connection.
LINE2: For front audio/video connection.
i-LINE1*-»-125 or 69
Page 25

VCR & Cassette Information
Head Cleaning
Playing older or damaged tapes may
eventually cause video heads to
become clogged,
Video Head Clog Sensor
During playback, this
screen appears if
clogging is detected.
To remove screen,
press PLAY on the
remote or VCR.
^QlJ^^^^leaning_Tap^
Use “dry” type head cleaning
cassette only. (Part No. NV-
TCL30PT is recommended.)
Follow cleaning tape instructions
carefully. Excessive use of tape
can shorten head life.
If head clog symptoms persist,
contact your nearest Factory
Service Center or authorized
Service Center. (See page 28.)
Cleaning the VCR
Use a soft cloth or dusting
attachment of a vacuum cleaner to
remove dust from the ventilation
holes on the back sides and bottom
of the cabinet.
Plastic surfaces are easily
scratched and can be marred by
alcohol and various solvents. Avoid
excessive use of oil-based furniture
polishes since the materials used in
the cabinet will accumulate more
dust. We recommend using a
nonabrasive, antistatic cleaner and
polisher.
______________
VIDEO HEADS MAY
NEED CLEANING
PtEASE INSERT HEAD
cleaning cassette
on REFER TO MANUAL
Specifications
Power Source; 120VAC,60Hz
Power Consumption: PowerOn
Video Signal; EIA Standard NTSC color
Video Recording System: 4rotaryheadshelical
Audio Track: 1 track (Normal)
Tuner:
Broadcast Channels: VHF2-13,UHF14~69
CABLE Channels; MidbandAthroughl(14~22)
Operating Temperature:
Operating Humidity:
Weight:
Dimensions:
Note: Designs and specifications are
subject to change without notice.
Approx. 18 watts (PV-V4021)
Approx. 23 watts (PV-V4521)
Power Off
Approx. 3.0 watts
scanning system
2channel (Hi-Fi Audio Sound)
(PV-V4521)
Superband J through \W (23-36)
Hyperband AA-EEE (37-64)
LowbandA-5-A-1 (95-99)
Special CABLE channel 5 A (01)
Ultraband65-94,100-125
5°C-40 “C (41“F-104"F)
10%-75%
2.5 kg (5.5 lbs).
360 (W) x 93 (H) X 242 (D) mm
14-3/16” (W)x3-11/16"(H)x
9-9/16” (D)
Features for a Quality Picture
Digital Auto Picture
Automatically controls the video output signal for
less noise depending on the tape condition.
Digital Auto Tracking
Continuously analyzes the signal and adjusts for
optimum picture quality.
Manual Tracking Control to reduce picture noised
Use during Playback and Slow Motion mode to
reduce picture noise. Press CH (TRACKING) A
/ ▼ buttons on the remote control or on the VCR
until the picture clears up. To return to Auto
Tracking, press POWER off, then on again a few
seconds later.
r
V-Lock Control (to reduce oicturejitterl
In Still mode, CH (TRACKING) ▲ / T buttons
operate as a V-Lock control.
25
Page 26

On-Screen Displays (OSD)
Function & Channel Display
Blank Tape/ No Video Signal Indication
When a function
button is pressed, e.g.
PLAY, or you change
channels, a 4 second
display appears first
in large and then
small characters.
Function Status Current Time
Whenever a blank section of a tape
comes up in Play mode, or when the
selected channel has no broadcast
signal with the Weak Signal Display
Feature (page 23) set to OFF, the TV
screen will turn solid blue.
VCR Status &
Clock Display
To display or
Rec Time Remaining
(OTR mode only,
see page 13.)
-
0:25
»STEREO 4
»SAP
MONO
remove overlay
at right,
--> press DISPLAY.
Broadcast Audio
Being Received
(For Model PV-V4521 only)
Warning and Instruction Displays operation or provide furt^ii
OSD
NO CH FOUND
PLEASE CHECK ANTENNA
CABLE CONNECTION THEN
PRESS CH UP KEY AGAIN
PLEASE SET CLOCK BV
PRESSING ACTION KEY
TURN VCR OFF
FOR TIMER RECORDING
CHECK CASSETTE
RECORD TAB
NO CASSETTE
PLEASE INSERT A CASSETTE
Caution
If no active channels
are found for
CHANNEL
MEMORY...
If you attempt to set
or review a Timer
Recording and the
Clock is not set...
After a Timer
Program has
been set...
If you press REC on
the remote control or
VCR, and a cassette
is inserted with no
record tab...
If you press PLAY,
FF, REW, or REC on
the remote control or
VCR without a
cassette inserted...
РЯ
8
14
14
4
OSD Caution
TO CANCEL TIMER REC
PRESS POWER THEN
STOP KEY
VIDEO HEADS MAY
NEED CLEANING
PLEASE INSERT HEAD
CLEANING CASSETTE
OR REFER TO MANUAL
END :PLAY
VCR LOCK ACTIVATED
REMOTE CONTROL IS SET
TO TV MODE
USE VCR ; VCR KEY
12
13
Channel
Counter
Tape Speed
(See page 4.)
ou to a missed
er instructions.
If you press POWER
or STOP during a
Timer Recording...
(visible in VCR
mode only)
If head cleaning
becomes
necessary while
playing back a
tape...
If you press a
function button
other than STOP/
EJECT or POWER
while the VCR is in
VCR Lock mode...
If you press an
invalid key on the
remote while in
TV mode...
РЯ
14
25
23
16
22
26
For assistance, please call : 1-800-211-PANA(7262) or send e-mail to : consumerproducts@panasonic.corn
Page 27

Before Requesting Service
Check the following points once again if you are having trouble with your VCR.
Power
No power...
Recording & Playback Correction
TV program cannot be recorded...
Timer recording cannot be performed...
There is no playback picture, or the playback
picture is noisy or contains streaks...
Special effects playback, picture may
contain some vertical jitter when using a TV
with an Automatic Vertical Hold Control...
VCR cannot be controlled,.,
Remote Control
VCR cannot be remote controlled...
ACTION and PROG buttons do not respond...
Miscellaneous
Programs cannot be viewed on TV...
Video cassette cannot be inserted...
Video cassette cannot be removed...
Video cassette ejects when a recording is started
or the power is turned off for tirrrer recording...
In Stop mode, the motor (CYLINDER)
continues to rotate...
Correction
• Conpletely insert Power Plug into an AC outlet.
• Set POWER button to on.
• Make sure power source is active.
• Check connections between VCR, external antenna, and TV.
• Check connections selection. (P.8, 17)
• Make sure your antenna system (CABLE or TV) is correctly
set. (Channels (P.IO])
• Make sure cassette record tab is intact. (P.4)
• Confirm that clock is set to current time and date.
• Make sure Cable/DSS box (if used) is left on and tuned to
channel to be recorded.
• Set recording start/stop times correctly. (P,14)
• Make sure VCR POWER button is pressed off. (P.14)
• Timer recording may not be performed or continued if a power
interruption occurs before or during a Timer Recording, even
after power is restored.
• Select channel 3 or 4 on TV to match VCR output channel (3
or 4) (P.8) or select LINE.
• Set VCR/TV selector to "VCR
• Adjust TRACKING control in either direction. (P.25)
• Try Head Cleaning. (P.25)
• Set TV's Vertical Hold Control to MANUAL, then adjust.
• Make sure VCR power is on.
• Check Remote batteries.
• Make sure VCR LOCK is set to off. (P.23)
• Make sure Remote is in proper mode.(P.16)
• Make sure Timer Record is not in progress.
Correction
• Make sure VCR power is on.
• Make sure Remote is in VCR mode.
• Aim Remote Control directly at remote sensor on VCR. (P.6)
• Avoid any object blocking signal path.
• Check Remote batteries. (P.4)
• Make sure VCR LOCK is set to off, (P.23)
• Exposing VCR remote sensor to direct fluorescent or outdoor
light may cause signal interference.
• Check connections between VCR, external antenna, and TV,
• Press VCR button for VCR mode. (P.16)
• Check Remote batteries. (P.4)
Correction
• Make sure TV power is on.
• Make sure TV is set to output of VCR.
• Check connections between VCR, external antenna, and TV.
• Set VCR/TV selector to TV." (P.13)
• Make sure proper signal source is selected.
• Insert the cassette with window skfe up; record tab facing you.
• Check if a tape is already in the unit.
• Completely insert Power Plug into an AC outlet.
• Make sure cassette record tab is intact. (P.4)
• To enable Quick play mechanism, the cylinder will rotate for
about 3 minutes. This reduces response time from Stop to
Play mode and from Play to Rewind Search mode.
If you cannot resolve the problem, please call the Customer Call Center for product
assistance at 1-800-211-PANA (7262).
To locate an authorized servicenter, piease cali toii free 1-800-211-PANA (7262).
or send e-maii to :
consumerproducts@panasonic.com
27
Page 28

ervice Center List
For Product Information, Operating Assistance, Literature Request, Dealer Locations,
and all Customer Service inquiries please contact:
1-800-211-PAN A (7262), Mon day-Friday 9am-9pm Saturday-Sunday 9am-7pm,
EST. or send e-mail to :
Web Site: http://www/.Panasonic.com
You can purchase parts, accessories or
locate your nearest servicenter by visiting
our Web Site.
Accessory Purchases:
Customer Orders Only 800-332-5368 (Customer Orders Only)
Panasonic Services Company 20421 84th Avenue South, Kent, WA 98032
(6 am to 5 pm Monday - Friday; 6 am to 10:30 am Saturday; PST)
(Visa, MasterCard, Discover Card, American Express, Check)
Factory Servicenters Locations
CALIFORNIA
6550 Katella Avenue
Cypress, CA 90630
800 Dubuque Avenue
S. San Francisco,
CA 94080
20201 Sherman Way
Suite 102
Canoga Park, CA
91306
3878 Ruffin Road
Suite A
San Diego, CA 92123
COLORADO
1640 South Abilene
Street Suite D
Aurora, CO 80012
FLORIDA
3700 North 29th
Avenue
Suite 102
Hollywood, FL
33020
consumerproducts@panasonic.com
GEORGIA
8655 Roswell Road
Suite 100
Atlanta, GA 30350
ILLINOIS
9060 Golf Road
Niles, IL 60714
1703 North Randall
Road
Elgin, IL 60123
(Pick-up/ Drop-off only)
MARYLAND
62 Mountain Road
Glen Burnie, MD
21061
MASSACHUSETTS
60 Glacier Drive
Suite G
Westwood, MA
02090
MICHIGAN
37048 Van Dyke
Avenue Suite 101
Sterling Heights, Ml
48312
MINNESOTA
7850-12th Avenue
South
Airport Business Center
Bloomington, MN 55425
OHIO
2236 Waycross Road
Civic Center Plaza
Forest Park, OH 45240
PENNSYLVANIA
2221 Cabot Blvd. West
Suite B
Langhorne, PA 19047
TEXAS
13615 Welch Road
Farmers Branch,
TX 75244
WASHINGTON
20425-84th Avenue
South
Kent, WA 98032
HAWAII
99-859 Iwaiwa
Street
Aiea, Hawaii 96701
Phone (808)488-
1996
Fax (808)486-4369
Service in Puerto Rico
Matsushita Electric of Puerto rico, Inc. Panasonic Sales Company/ Factory Servicenter:
Ave. 65 de Infanterie, Km. 9.5, San Gabriel Industrial Park, Carolina, Puerto Rico 00985
28
For assistance, please call ; 1-800-211-PANA(7262) or send e-mail to : consumerproducts@panasonlc.com
Phone (787)750-4300 Fax (787)768-2910
As of January 2000
Page 29

Warranty
Panasonic Consumer Electronics Company,
Division of Matsushita Electric Corporation of
America,
One Panasonic Way
Secaucus, New Jersey 07094
Panasonic Sales Company,
Division of Matsushita Electric of Puerto
Rico, Inc.
AVE. 65 de Infantería, Km. 9.5
San Gabriel Industrial Park
Carolina, Puerto Rico 00985
PANASONIC Video Products
Panasonic Consumer Elecironics Company or Panasonic Sales Company (colleciivdy referred lo as “the Warranior”) will
repair this priniuct with new or refurbished parts, free of charge, in the USA (>r Puerto Rico, in the event of a defect in
materials or workmanship as follows (all time periods commence from the date of the original purchase):
FBOPUCT PARTS
CAMCORDER ONE(l)YEAR,EXCEPTCCDlMAGESENSOR
VCR ONE(l)YEAR NINETY(90)DAYS
/WMIXER ONE(l)YEAR NINETY (90) DAYS
MONHOR-VCR ONE(l) YEAR, EXCEPTCR F
Monitor-VCR In-home or carry-in Service: 22” (dia!>onal) CRT / LCD and Larger
Monitor-VCR Carry-in Service: 21” (diagonal) CRT ! LCD and smaller
Batteries (if included) - New rechargeable batteries in exchange for defective rechargeable batteries for ten ( 10) days.
Non-rcchargeable batteries are not warranted.
Tape tif included) - New video cassette tape in exchange for a defective video cassette tape for five (5) days.
In-home, canry-in or mail-in service, as applicable, in the USA can be obtained during the warranty period by contacting a
Panasonic Services Company (PASC) Factory Servicentcr listed in the Service Directory. Or call toll free 1-800-211-PANA
(7262), to locate an authorized PASC Scrvicenier. Carry-in or niai 1-in service in Puerto Rico can be obtained during the
warranty period by calling the Panasonic Sales Company telephone number listed in the ScA'icenier Directory.
This warranty is extended only to the original purchaser, A purchase receipt or other proof of the date of the original
purchase is required before warranty service is rendered.
This warranty only covers failures due to defects in materials and workmanship which tx:cur during normal use and does
not cover normal maintenance, including, but not limited to, video and audio head cleaning. The warranty does not cover
damage which occurs in shipment, or failures whieh arc eaused by products not supplied by the warrantor, or failures
which result from accident, misuse, abuse, neglect, mishandling, misapplication, alteration, modification, faulty
installation, set-up adjustments, improper antenna, inadequate signal pickup, maladjustment of consumer controls,
improper operation, power line surge, improper voltage supply, lightning damage, commercial use such as hotel, office,
restaurant, or other bu.siness or rental u.sc of the product, or service by anyone other than a PASC Factory Scrvicenier or a
PASC authorized Scrvicenier, or damage that is aitributahle to acts of God.
LIMITS AND EXCLUSIONS
'ITiere are no expre.ss warranties except as listed above.
THE WARRANTOR SHAIX NOT BE LIABLE FOR I NaDENTAL OR CONSEQUENT! AL DAMAGF:S(1NCLUDING. WITHOUT
LIMITATION,DAMAGETOTAPF:S)RESULTINGFROMTHEUSEOrTHlSPRODUCrS.ORARISlNGOUTOFANY
BREACHOFTHEWARRANTY,ALLEXPRESSANDlMPLIEDWARRANTIES.INCLUDlNGTHEWARRAbmESOF
MERCHANTABILITYANDnTNh:SS FORPARTICULAR PURPOSE, ARELIMfTEDTOTHEAPPLICABLEWARRANTY
PERIOD SET FORTH ABOVE. Some states do not allow the exclusion or limitation of incidental or consequential
damage.s, or limitations on how long an implied warranty la.sts, so the above exclusions or limitations may not apply to
you.
This warranty gives you specific legal rights and you may also have other rights which vary from state to state.
If a problem with this pnxlucl develops during or after the warranty period, you may eoniaci your dealer or Servicentcr. If
the problem is not handled to your satisfaction, then write to the Customer Satisfaction Center at the Panasonic
Consumer Electronics Company address above.
SERVICECALLS WHICH DO NCrriNVOLVEDEJ^l-CTIVEMATERIAXSOR WORKMANSHIP AS DETHRMINEDBYTHE
WARRANTOR, IN ITSSOLEDISCRETION.ARENOTCOVERED.COSTSOFSUCHSERVICECALI.SARETHE
REÎSTONS1BILITYOFTHEPURCHASER.
warvid 10/20/99
Limited Warranty
CCD IMAGESENSOR-SIX (6)MONTHS
CRT-TWO (2) YEARS
LABOR
NINETY (90) DAYS
NINETY (90) DAYS
NlNirTY(90)DAYS
CRT-NINETY (90)DAYSCUSTOMER
PAYS ALLLABORCH A RGES AFTER
90 DAYS
29
Page 30

Spanish QuickUseGuide/Guía para rápida consulta
Como realizar la Configuración Inicial
1 Encienda el TV y ajústeto en el canal 3.
2 ^ SILtCT lamSÜwe
PRESS CH i : ES01.ISH
OPRIMIR CH T : ESPRÑO.
RPP. VCWTV : FRANÇAIS
Si la pantalla no aparece, verifique las
conexiones entre el VCR y el TV, y si el TV está
sintonizado en el canal 3, intente cambiándolo al
canal 4.
Cuando desee cambiar el canal de salida del
VCR, por favor remítase Canal de Salida del
VCR en la página 11.
SI ajusta el idioma equivocado, realice los pasos
de “Reajuste de Todas las Funciones de
Memoria del VCR" en la página 9.
rvcñ rRECoj ríÁí«(;“i
greKffiWMtHWii
ONECTE A SU ANTENA V SI
9A UNA CAJA DE Ti POR
C
CA6LE SlNTOMCC Ai. CANAL
DE SU LOCAL LUEGO.
lYQFLQEElMIfìXH 1¿PJ
Encienda el VCR. Al
encender el VCR por
primera vez, en la pantalla
aparecerá SELECT
LANGUAGE.
Pulse CH A para
seleccionar Inglés.
O
Pulse CH T para
seleccionar Español.
O
Pulse la tecla VCR/TV para
seleccionar Francés.
Cuando se pulsa una de las
teclas anteriores, aparece la
pantalla FIJACION AUTO.
(CA/RELOJ).
Encienda la caja de cable y
ajuste su canal de Estación
Pública de Radiodifusión
(PBS) en su huso horario.
Si utiliza un receptor DSS,
este tiene que estar
apagado.
Ajuste Manual del Reloj
Si el ajuste automático del reloj no se ha
completado, ajuste el reloj manualmente de la
siguiente manera:
1) Pulse la tecla ACTION en el control remoto
para visualizar la pantalla del menú RELOJ.
2) Pulse AT para seleccionar el mes y ► para
ajustar. De la misma forma, seleccione y
ajuste la fecha, año, hora y DST (Hora de
Verano).
3) Pulse dos veces la tecla ACTION para
poner el RELOJ en marcha y salir.
Ajustar de nuevo el reloj
1 Pulse ACTION para exhiba el menú.
"víR ' r FfiEiaJl
ETÎÆÎON «ÍTOIMTICÁ
rvenjj” RELOJ 1 ^Canati
ÍFTÍACToN AUTOMATICA ' I
AJUSTE ZONA HORA
rvCR'i tetan
11/11/2001 suN;ií;-í)r
ELEGIR MORA
Pulse para
seleccionar “RELOJ"
Pulse AT para
seleccionar “MANUAL"
y luego pulse ►.
Pulse AT y O para
seleccionar y ajustar la
hora y la fecha.
ven" pRELOJ I ~CaÑAL
mm ooM 2:fflpu
FIJACION AUTOMATICA
TERMIM№,№ UP
“ftggFI "“CauaT"
POA favor fue El RELO.
OÛN LA TECLA ACTION
Por ayuda llame al 1-800-211-PANA{7262) o envie e-mail a : consumerproducts@panasonic.com
30
Pulse la tecla CH A para
comenzar la operación de
Ajuste Automático Canal/
Reloj. El ajuste Canal/Reloj
se lleva a cabo
automáticamente.
Si la configuración se
termina, aparece la pantalla
siguiente.
Si aparece la pantalla
“Fijación Automatica Del
Reloj Incompleto", ajuste el
reloj utilizando los
procedimientos de “AJUSTE
MANUAL DEL RELOJ".
Pulse ACTION dos veces para que el reloj comience
a funcionar y salir desde este modo.
Page 31

Operaciones básicas para la reproducción
1 Inserte una cinta,
• la alimentación del VCR se activa.
En la Pantalla de Visualízación Multi
Función se ilumina “VCR".
2 Pulse PLAY para reproducir la cinta.
• Si la cinta no tiene lengüeta de
prevención de grabación (página 4), se
inicia la reproducción automática.
__________________
I Detalles especíales durante la grabación
■ Pulse FF o REW para búsqueda de
escenas Hacia delante/ Hacia atrás. Pulse
nuevamente o pulse PLAY para liberar.
■ Pulse PAUSE/SLOW para imagen Fija
(Congelada). Pulse PLAY para liberar.
■ Pulse PAUSE/SLOW en el modo de
Imagen fija para imágenes Cuadro a
Cuadro. Pulse PLAY para liberar.
■ Mantenga pulsado PAUSE/SLOW en el
modo de Imagen fija para imágenes en
cámara lenta. Pulse PLAY para liberar.
Pulse STOP para detener la cinta.
Pulse REW o FF en el modo de parada
para Rebobinado/Avanee Rápido de la cinta.
Pulse EJECT en el control remoto, o STOP/
EJECT en el VCR para expulsar la cinta.
Operaciones básicas para la
grabación
1 Inserte la cinta con lengüeta de
protección de grabación (pág. 4).
• La alimentación del VCR se activa.
En la pantalla Multi Función se ilumina
“VCR”.
__________________________________
2 Pulse CH AT, o las teclas de números
para seleccionar el canal.
3 Pulse SPEEO para seleccionar la
velocidad de grabación (pág.4)
• SP = Reproducción estándar,
• LP = Larga duración,
■ SLP = Superlarga duración.
4 Pulse REC para comenzar a grabar.
• Para eliminar escenas indeseadas, pulse
PAUSE/SLOW para pausar, y al pulsar
nuevamente se reanuda la grabación.
5 Pulse STOP para detener la grabación,
■ Grabación de Un Toque (grabar en
marcha),
• El VCR se apaga después de preajustar la
extensión de la grabación.
--> Cada vez que se pulsa REC se
adicionan 30 min. a la extensión de
grabación hasta un máximo de 4 horas.
_________________
* •
Programación fácil para la grabación con temporizador
► PTOO“
=ECHA INICIO PARADA CA
i3SAB-:-‘ «:«
MOV
Ejemplo
“Fecha de hoy
&■■■■■'* 31— 1 " 2 ■■■"
A/T OrtpepweHifr OUAC
y líSTÁ“ 1
WC PARADA CA VFLÍ
F FF t
B —
:: ::
tR:ADD/0LT
CANCEU
ELEGtn
:a 9 FUAR>
1 SAPIR
:PROO 1
4 Pulse POWER off para ajustar el
temporizador.
(Se ilumina “TIMER" en el panel delantero)
Pulse PROG
para visualizar la
pantalla de Programa.
1) Para ajustar la FECHA
de grabación, pulse AT
para seleccionar:
1-31 = una vez, o DIARIO
= a la misma hora de
lunes a viernes, o
SEMANA = a la misma
hora cada semana y
pulse P- para ajustar.
• Vea el orden de
selección abajo a la
izquierda.
2) Para ajustar los ítems
que quedan, pulse AT
para seleccionar y pulse
► para ajustar los tiempos
de START/STOP,
CANAL, o entrada de
LÍNEA (pág. 20), y
velocidad de la cinta ( SP,
Lp SLP).
Pulse PROG para
finalizar el programa.
Pulse AT para
seleccionar un número
sin usar para ingresar
V
mas programas y pulse
^ para ajustar. Luego
repita el paso 2.
Pulse nuevamente
PROG para salir.
31
Page 32

Index
Accessories.............................4
AC Power Plug........................7
Add or Delete a Channel
Audio Input Connector(LVR)
........
....
11
7
Audio Output Connector(L/R) ..7
Auto Operation Functions
Auto Shut-Off
........................
......
21
23
Before Requesting Service ...27
Blank Tape/ No Video Signal
Indication............................26
Cable Box Setup
Cassete Compartment
.....................
.............
8
6
Channel Up/Down Tracking/
V-Lock Button.......................6
Cleaning the VCR
.................
25
Clock/Status/Channel/Speed
Display
Commercial Skip
Connections
Copying Your Tapes
..................................
..................
............................
..............
7
21
8
24
DST (Daylight Saving Time) . 11
Fast Forward/Search Button.... 6
Features for a Quality
Picture
...............................
25
Function & Channel Display .26
Head Cleaning
......................
25
Hi-Fi Indicator..........................7
Index Search.........................20
Initial Setup
MTS Broadcast
Multi-Brand Control
On-Screen Display
Playback
........................
.....................
...............
................
...............................
8,17
18
16
26
12
Play Button..............................6
Power Button
Power Indicator
..........................
.......................
6
7
Program End Search
Record
Record Button
..................................
........................
Remote Control Buttons
Remote Sensor
Remote Warning ON/OFF
.............
..........
......................
.....
20
13
6
6
6
22
Repeat Play..........................22
Review, Replace or Clear
Program Contents..............15
Rewind/Search Button.............6
Select Audio Mode
Service Center List
...............
...............
19
28
Spanish Quick
Use Guide.......
Specifications
.............
30,31
.......................
25
Stereo/SAP/Mono Broadcast 18
Stop/Eject Button
Tape Position Display
Timer Indicator
Timer Recording
VCR Indicator
....................
............
........................
...................
.........................
6
22
7
14
7
VCR Lock..............................23
VCR Status & Clock Display .26
VCR/TV Selector
....................
6
VHF/UHF Antenna
Input Terminal......................7
VHF/UHF Antenna
Output Terminal
Video Input Connector(L/R)
...................
.....
7
7
Video Output Connector(LVR).. 7
Warning and Instruction
Displays.............................26
Warranty
...............................
29
Weak Signal Display ON/OFF . 23
Zero Search
..........................
22
Panasonic Consumer Electronics
Company, Division of Matsushita
Electric Corporation of America
One Panasonic Way Secaucus,
New Jersey 07094
Panasonic Sates Company (“PSC”),
Division of Matsushita Electric of Puerto Rico, Inc.
Av0,65 de Infanteria. Km, 9.5
San Gabriel Industrial Park, Carolina,
Puerto Rico 00985
Printed in Indonesia
LSQT0329A
S1100-0
 Loading...