

Page 1
Digital Camera
Operating Instructions
Model No. PV-SD5000
R
®
For assistance, please call : 1-800-272-7033.
Before attempting to connect, operate or adjust this product, please read these
instructions thoroughly, and keep them for future reference.
SD5000. p 1-5.p65 80/01/04, 11:361
LSQT0287A
Page 2
Things You Should Know
Things You Should Know
Attach your purchase receipt here
Thank you and congratulations
on your purchase of this state of the art
Panasonic Digital Camera. This product
has been manufactured and tested to
Panasonic’s highest standards to give you
the best in performance and reliability.
Save this operating instruction manual
as an operating and information guide.
Date of Purchase
Dealer Purchased From
Dealer Address
Dealer Phone No.
Model No.
Serial No.
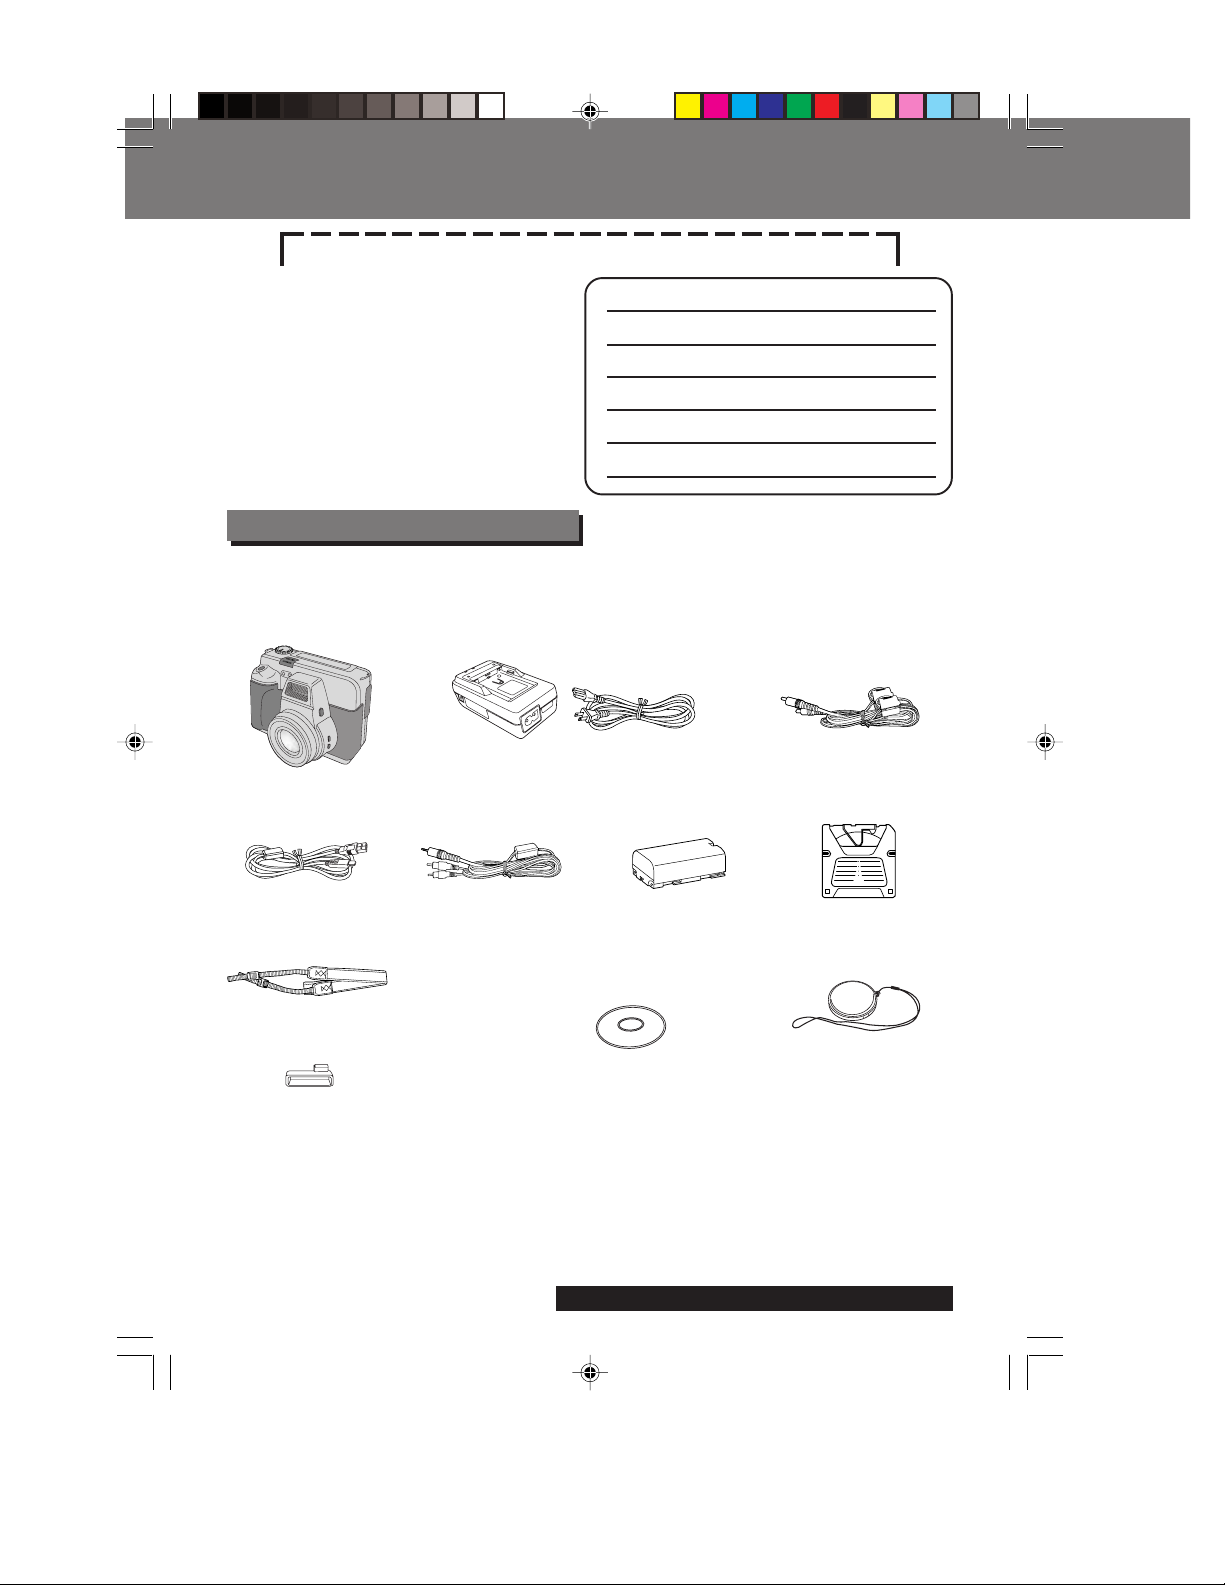
Unpack your Digital Camera
Please confirm that the following items are packed in the Digital Camera box.
They are provided to help you use or set up your Digital Camera.
1pc. Digital Camera
(PV-SD5000)
1 pc. USB Cable
(LSJA0265-1)
1 pc. AC Adaptor (LSSQ0239)
with AC Cable (VJAW0044)
1pc. A/V Cable
(LSJA0278)
1pc. Lithium Ion
Battery Pack
(PV-DBP5)
1pc. DC POWER
Cable (LSJA0277-1)
1pc. SuperDisk
Diskette (LSFT0188)
1pc. Camera Strap
(LSFC0013)
1pc. Lens Cap
Holder (VGQW0075)
SuperDisk and the SuperDisk logo are trademarks of Imation Corporation.
Microsoft and Windows are registered trademarks of Microsoft in the United States and
other countries.
Macintosh and iMac are registered trademarks of Apple Computer Inc.
QuickTime and the QuickTime logo are trademarks used under license. QuickTime is
registered in the US and other countries.
Adobe, the Adobe logo & PhotoDeluxe are trademarks of Adobe Systems Inc.
All product/brand names are trademarks or registered trademarks of the respective holders.
2
SD5000. p 1-5.p65 80/01/04, 11:362
1pc. CD-ROM of USB Driver Software for
Windows 98 and Macintosh / File Converter
for Windows 98/2000 / QuickTime™
Software / Adobe
for Windows 95/98 and Macintosh
(LSFT0222)
®
PhotoDeluxe® Software
For assistance, please call : 1-800-272-7033.
1pc. Lens Cap
(LSFB0011)
Page 3

Safety Precautions
Safety Precautions
WARNING: TO PREVENT FIRE OR SHOCK HAZARD,
DO NOT EXPOSE THIS EQUIPMENT TO RAIN OR MOISTURE.
Note: This equipment has been tested and found to comply with Part 15 of the FCC
rules. These limits are designed to provide reasonable protection against harmful interference when operated in a residential environment.
If this equipment does cause interference to radio or television reception, which can be
determined by turning the equipment off and on, use the equipment in another location
and/or utilize an electrical outlet different from that used by the receiver.
If necessary, consult the dealer or an experienced radio/TV technician for help. You may
find the booklet, ‘Something About Interference’ available from FCC local regional offices
helpful.
FCC Warning:
To assure continued FCC compliance, use only the provided shielded interface cable
with ferrite core when connecting digital camera to computer in accordance with instruction herein. Also, any unauthorized changes or modifications to this equipment could void
the user’s authority to operate.
Declaration of Conformity
Model Number : PV-SD5000
Trade Name : Panasonic
Responsibility Party : Matsushita Electric Corporation of America
Address : One Panasonic Way Secaucus New Jersey 07094
Telephone Number : 1-800-211-PANA (7262)
This device complies with Part 15 of the FCC Rules. Operation is subject to the
following two conditions: (1) This device may not cause harmful interference, and
(2) this device must accept any interference received, including interference that
may cause undesired operation.
G
G
e
e
t
t
t
t
i
i
n
n
g
g
S
S
t
t
a
a
r
r
t
t
e
e
d
d
CAUTION:
UNIT IS A CLASS I LASER PRODUCT.
HOWEVER THIS UNIT USES A VISIBLE LASER
BEAM WHICH COULD CAUSE HAZARDOUS
RADIATION EXPOSURE IF DIRECTED. BE SURE
TO OPERATE THE UNIT CORRECTLY AS
INSTRUCTED.
WHEN THIS UNIT IS PLUGGED TO THE WALL
OUTLET. DO NOT PLACE YOUR EYES CLOSE TO
THE OPENING OF THE DISC TRAY AND OTHER
OPENINGS TO LOOK INTO THE INSIDE OF THIS
UNIT.
USE OF CONTROLS OR ADJUSTMENTS OR
PERFORMANCE OF PROCEDURES OTHER THAN
THOSE SPECIFIED. HEREIN MAY RESULT IN
HAZARDOUS RADIATION EXPOSURE.
DO NOT OPEN COVERS AND DO NOT REPAIR
YOURSELF. REFER SERVICING TO QUALIFIED
PERSONNEL.
SD5000. p 1-5.p65 80/01/04, 11:363
CAUTION:
LASER RADIATION WHEN OPEN.
DO NOT STARE INTO BEAM.
ATTENTION:
RAYONNEMENT LASER EN CAS
D’OUVERTURE.
NE PAS REGARDER DANS LE
FAISCEAU.
(inside of product)
3
Page 4

Important Safeguards
Important Safeguards
1. Read Instructions — All the safety and
operating instructions should be read before
the unit is operated.
2. Retain Instructions — The safety and
operating instructions should be retained for
future reference.
3. Heed Warnings — All warnings on the unit
and in the operating instructions should be
adhered to.
4. Follow Instructions — All operating and
maintenance instructions should be followed.
5. Cleaning — Unplug this video unit from the
wall outlet before cleaning. Do not use liquid
or aerosol cleaners. Use a dry cloth for
cleaning.
6. Attachments — Do not use attachments not
recommended by the video product
manufacturer as they may be hazardous.
7. Water and Moisture — Do not use this video
unit near water — for example near a bath
tub, wash bowl, kitchen sink, or laundry tub,
in a wet basement, or near a swimming pool,
and the like.
8. Accessories — Do not place this video unit
on an unstable cart, stand, tripod, bracket, or
table. The video unit may fall, causing
serious injury to a child or adult, and serious
damage to the unit. Use only with a cart,
stand, tripod, bracket, or table
recommended by the
manufacturer, or sold with the
video unit. Any mounting of
the unit should follow the
manufacturer’s instructions
and should use a mounting
accessory recommended by
the manufacturer. An appliance and cart
combination should be moved with care.
Quick stops, excessive force, and uneven
surfaces may cause the appliance and cart
combination to overturn.
9. Ventilation — Slots and openings in the
cabinet are provided for ventilation and to
ensure reliable operation of the video unit and
to protect it from overheating. These
openings must not be blocked or covered.
Never place the video unit on a bed, sofa,
rug, or other similar surface, or near or over
a radiator or heat register. This video unit
should not be placed in a built-in installation
such as a bookcase or rack unless proper
ventilation is provided or the manufacturer’s
instructions have been adhered to.
10.Power Sources — This video unit should be
operated only from the type of power source
indicated on the marking label. If you are not
sure of the type of power supply to your
home, consult your appliance dealer or local
power company. For video units intended to
be operated from battery power, or other
sources, refer to the operating instructions.
11.Grounding or Polarization — This video unit
may be equipped with either a polarized 2wire AC (Alternating Current) line plug (a
plug having one blade wider than the other)
or 3-wire grounding type plug, a plug having
a third (grounding) pin.
The 2-wire polarized plug will fit into the
power outlet only one way. This is a safety
feature. If you are unable to insert the plug
fully into the outlet, try reversing the plug. If
the plug still fails to fit, contact your
electrician to replace your obsolete outlet.
Do not defeat the safety purpose of the
polarized plug.
The 3-wire grounding type plug will fit into a
grounding type power outlet. This is a safety
feature. If you are unable to insert the plug
into the outlet, contact your electrician to
replace your obsolete outlet. Do not defeat
the safety purpose of the grounding type
plug.
12.Power-Cord Protection — Power-supply
cords should be routed so that they are not
likely to be walked on or pinched by items
placed upon or against them, paying
particular attention to cords of plugs,
convenience receptacles, and the point
where they exit from the unit.
13.Lightning — For added protection of this
video unit receiver during a lightning storm,
or when it is left unattended and unused for
long periods of time, unplug it from the wall
outlet and disconnect the antenna or cable
system. This will prevent damage to the
video unit due to lightning and power-line
surges.
14.Overloading — Do not overload wall outlets
and extension cords as this can result in a
risk of fire or electric shock.
15.Objects and Liquids — Never push objects
of any kind into this video unit through
openings as they may touch dangerous
voltage points or short out parts that could
result in a fire or electric shock. Never spill
liquid of any kind onto the video unit.
16.Servicing — Do not attempt to service this
video unit yourself as opening or removing
covers may expose you to dangerous
voltage or other hazards. Refer all servicing
to qualified service personnel.
4
SD5000. p 1-5.p65 80/01/04, 11:364
For assistance, please call : 1-800-272-7033.
Page 5

Important Safeguards
Important Safeguards
17.Damage Requiring Service — Unplug this
video unit from the wall outlet and refer
servicing to qualified service personnel under
the following conditions:
a. When the power-supply cord or plug is
damaged.
b. If any liquid has been spilled onto, or
objects have fallen into the video unit.
c. If the video unit has been exposed to rain
or water.
d. If the video unit does not operate normally
by following the operating instructions.
Adjust only those controls that are covered
by the operating instructions, as an
improper adjustment of other controls may
result in damage and will often require
extensive work by a qualified technician to
restore the video unit to its normal
operation.
e. If the video unit has been dropped or the
cabinet has been damaged.
f. When the video unit exhibits a distinct
change in performance — this indicates a
need for service.
USE & LOCATION
• TO AVOID SHOCK HAZARD ... Your Digital Camera and power supply should not be exposed to
rain or moisture. Do not connect the power supply or operate your Digital Camera if it gets wet.
Your Digital Camera has been designed for outdoor use, however it is not designed to sustain
direct exposure to water, rain, sleet, snow, sand, dust, or a direct splashing from a pool or even a
cup of coffee. This action could permanently damage the internal parts of your Digital Camera. Do
not attempt to disassemble this unit. There are no user serviceable parts inside. Unplug your
Digital Camera from the power supply and have it serviced.
• DO NOT AIM YOUR DIGITAL CAMERA AT THE SUN OR OTHER BRIGHT OBJECTS.
• DO NOT EXPOSE YOUR DIGITAL CAMERA TO EXTENDED HIGH TEMPERATURE ... Such
as, in direct sunlight, inside a closed car, next to a heater, etc... This action could permanently
damage the internal parts of your Digital Camera.
• AVOID SUDDEN CHANGES IN TEMPERATURE ... If the unit is suddenly moved from a cold
place to a warm place, moisture may form inside the unit.
• DO NOT LEAVE YOUR DIGITAL CAMERA OR THE POWER SUPPLY TURNED ON WHEN
NOT IN USE.
• STORAGE OF YOUR DIGITAL CAMERA ... Store and handle your Digital Camera in a manner
that will not subject it to unnecessary movement (avoid shaking and striking). Your Digital Camera
contains a sensitive pick-up device which could be damaged by improper handling or storage.
CARE
• TO CLEAN YOUR DIGITAL CAMERA ... Do not use strong or abrasive detergents when
cleaning your Digital Camera body.
• TO PROTECT THE LENS ... Do not touch the surface of the lens with your hand. Use a
commercial Digital Camera lens solution and lens paper when cleaning the lens. Improper cleaning
can scratch the lens coating.
• TO PROTECT THE FINISH OF YOUR DIGITAL CAMERA ... Before handling your Digital
Camera, make sure your hands and face are free from any chemical products, such as suntan
lotion, as it may damage the finish.
18.Replacement Parts — When replacement
parts are required, be sure the service
technician has used replacement parts
specified by the manufacturer or have the
same characteristics as the original part.
Unauthorized substitutions may result in fire,
electric shock or other hazards.
19.Safety Check— Upon completion of any
service or repairs to this video unit, ask the
service technician to perform safety checks
to determine that the video unit is in safe
operating order.
Precautions
Precautions
5
G
G
e
e
t
t
t
t
i
i
n
n
g
g
S
S
t
t
a
a
r
r
t
t
e
e
d
d
SD5000. p 1-5.p65 80/01/04, 11:365
Page 6

Table of Contents
Table of Contents
Getting Started
Things You Should Know.................................................................................................. 2
Safety Precautions ...........................................................................................................3
Important Safeguards .......................................................................................................4
Precautions....................................................................................................................... 5
Index of Controls .............................................................................................................. 7
On Screen Display (OSD) ................................................................................................ 9
LCD Monitor Indication...................................................................................................10
Power Supply ..................................................................................................................12
Removing the Lens Cap and Attaching the Camera Strap ...........................................15
Inserting the SuperDisk™ Diskette or Floppy Disk ........................................................16
Operating the MENU Screen..........................................................................................18
Setting the Clock ............................................................................................................20
Basic Operation
Capturing Images (REC or MANUAL REC mode, AUDIO, Motion Image Rec Mode, Burst
Adjusting LCD Viewfinder Brightness ............................................................................31
Playing Back Captured Images .....................................................................................32
Viewing Images on a TV Screen and Transferring Images to a VCR.............................35
Rec Mode, Beep, RapidFire™, Quick Rec (FD), Manual Mode)................ 21
Special Features
Using the Built-in Flash ..................................................................................................36
White Balance ................................................................................................................37
Light Metering .................................................................................................................38
Self Timer Recording ...................................................................................................... 39
Time Lapse Recording ...................................................................................................40
T o Delete Specific Images..............................................................................................41
Multi Delete.....................................................................................................................42
Formatting the Disk Media .............................................................................................43
Multi Copy.......................................................................................................................44
T o Copy All Images.........................................................................................................45
Slide Show .....................................................................................................................46
T ransferring Y our Images (Windows).............................................................................. 47
T ransferring Y our Images (Macintosh) ............................................................................55
SuperDisk Drive .............................................................................................................62
Using the SuperDisk Drive (Windows)........................................................................... 63
Using the SuperDisk Drive (Macintosh) .........................................................................65
Using the SuperDisk Drive .............................................................................................66
Print Mark........................................................................................................................67
For Your Information
Digital Camera Accessory.............................................................................................. 68
Digital Camera Accessory Order Form ..........................................................................69
Before Requesting Service ............................................................................................70
Warning Indications ........................................................................................................71
Specifications .................................................................................................................73
Warranty .........................................................................................................................74
Service Center Directory ................................................................................................75
Index ...............................................................................................................................76
Caution
• Do not subject unit to strong impact during record or playback. Unit may not function
normally.
• Do not use in extreme heat (104° F and above). This may damage the disk. Also, in
extremely hot places (104° F and above), remove the disk from the camera and store
to avoid damaging disk.
• Be sure to make a backup copy of important data.
6
SD5000. p 6-8.p65 80/01/04, 11:366
For assistance, please call : 1-800-272-7033.
Page 7
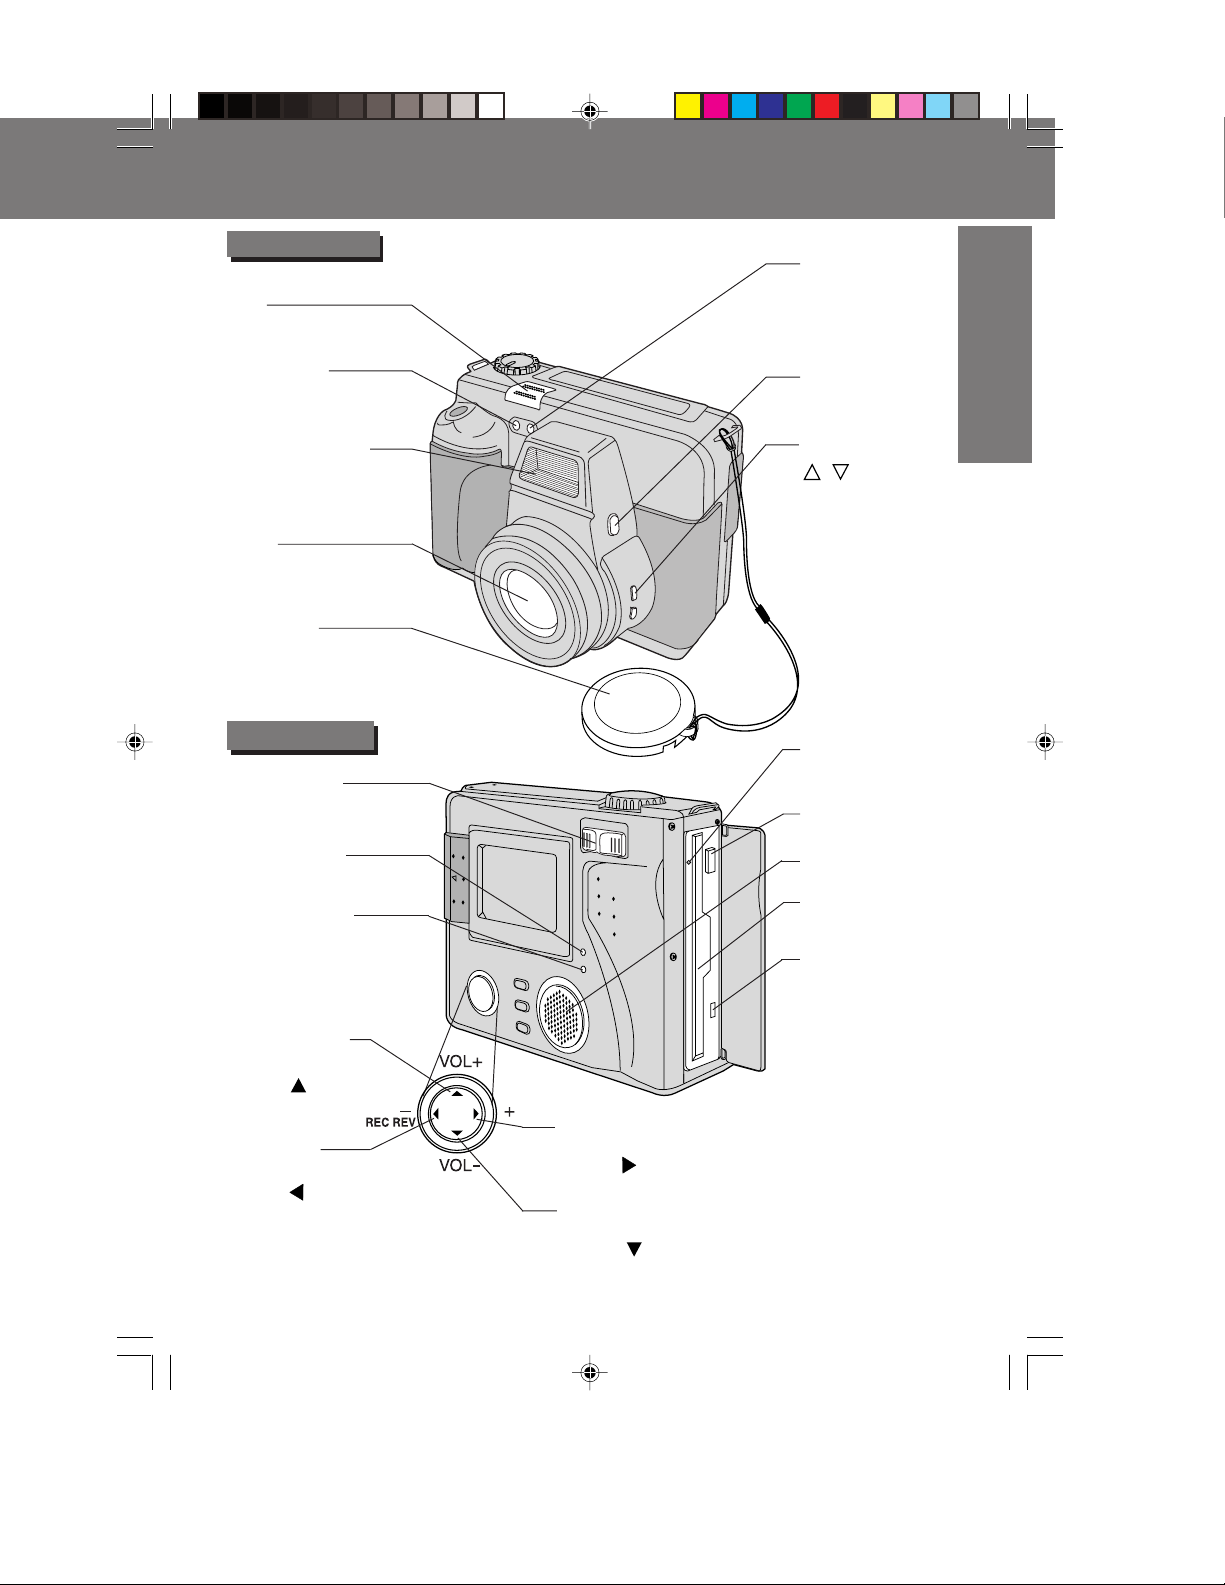
Front View
MIC
See page 24.
Self-Timer
Indicator
See page 39.
FLASH Emitter
See page 36.
Lens
Lens Cap
See page 15.
Index of Controls
Index of Controls
Light Sensor
See page 36.
MANUAL Button
See pages 29, 30.
MANUAL Select
/ Buttons
See page 29.
G
G
e
e
t
t
t
t
i
i
n
n
g
g
S
S
t
t
a
a
r
r
t
t
e
e
d
d
Rear View
ZOOM (T/W)
See pages 21, 22, 24.
POWER LED
See page 18.
ACCESS LED
See page 17.
VOL+ Button
See pages 32, 33.
Select Button
See pages 18, 19.
-
Button
See pages 31, 32, 34.
Select Button
See pages 18, 19.
REC REV Button
See page 28.
+ Button
See pages 27, 31, 32, 33.
Select Button
See pages 18, 19.
VOL- Button
See pages 32, 33.
Select Button
See pages 18, 19.
Emergency Eject
hole
See page 16.
EJECT Button
See page 16.
Speaker
SuperDisk Slot
See pages 16, 50,
57.
ACCESS LED
See page 17.
7
SD5000. p 6-8.p65 80/01/04, 11:367
Page 8
Index of Controls
Index of Controls
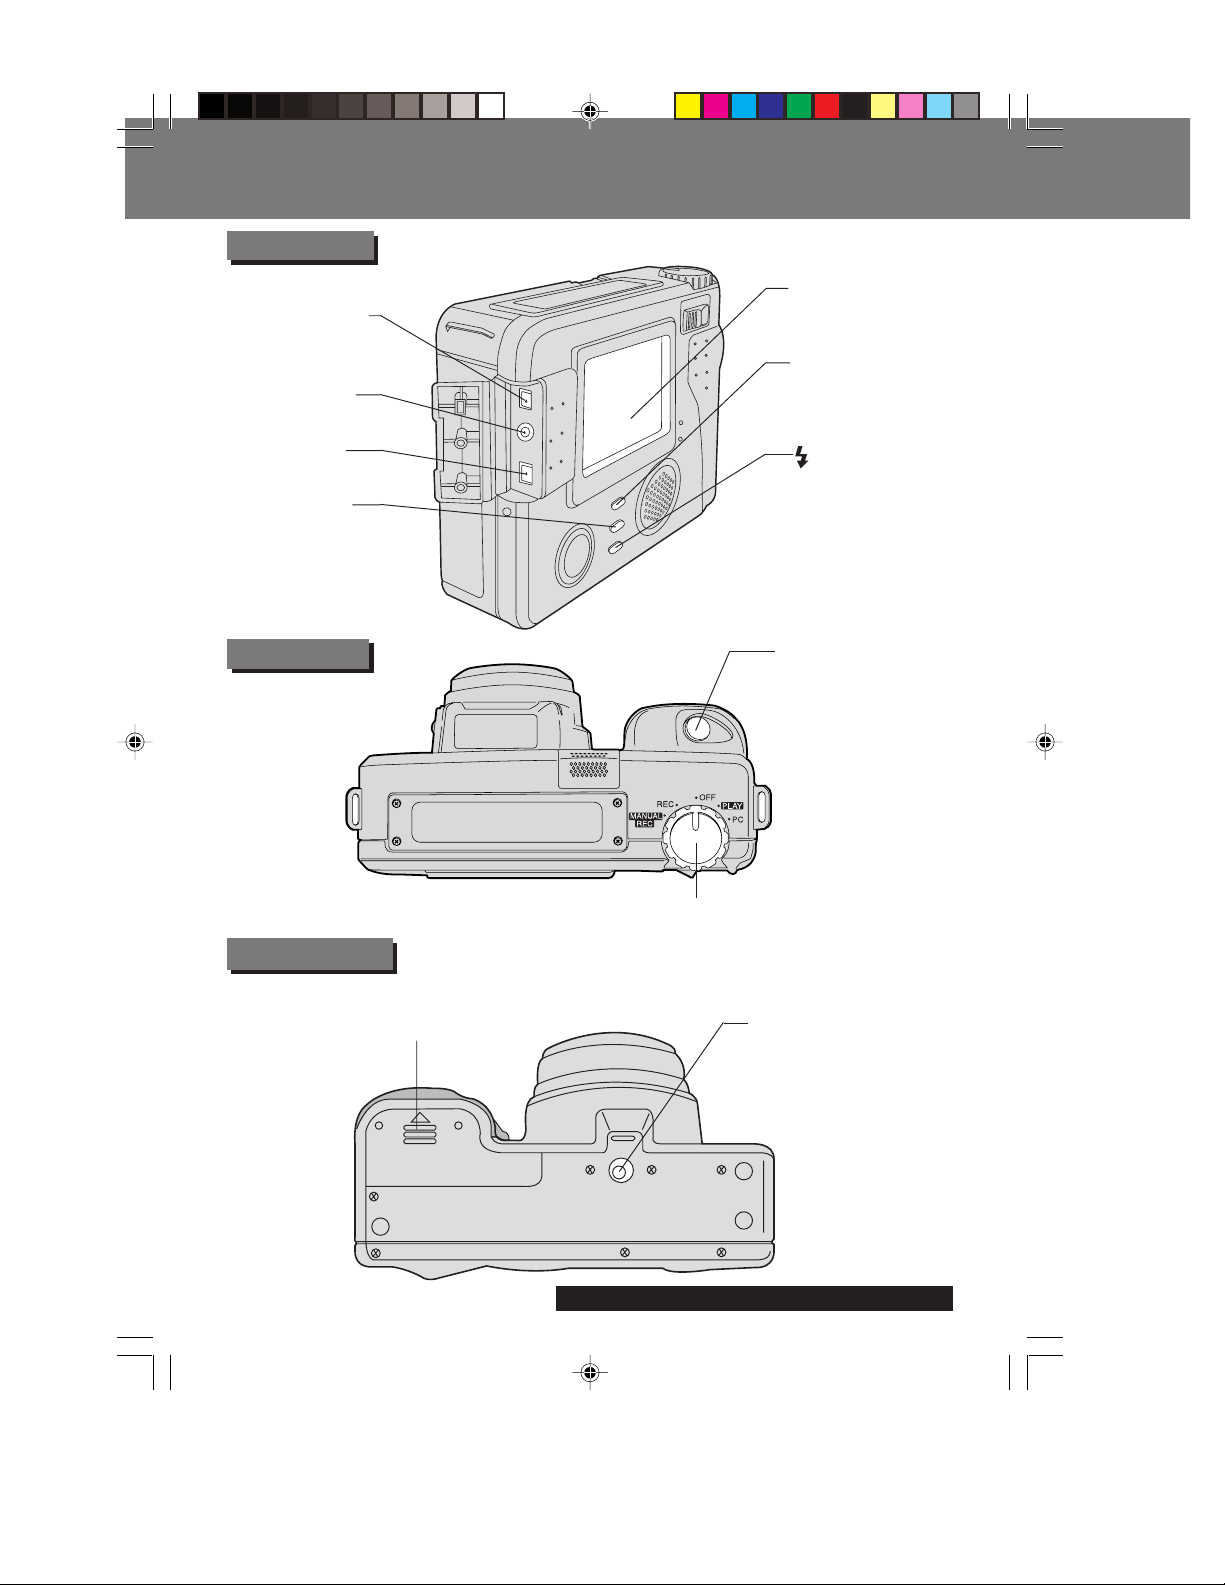
Rear View
To PC Terminal
See pages 49,
50, 56, 57.
A/V OUT Jack
See page 35.
DC IN Jack
See page 14.
MENU Button
See pages 18, 19.
LCD Viewfinder
See pages 21, 22,
24, 31, 32.
REC MODE
Button
See pages 21, 22,
24, 25, 27, 29.
FLASH Button
See pages 36, 42,
44.
Top View
Bottom View
Battery Compartment
See page 13.
SHTR (SHUTTER)
See pages 21, 34,
39, 40, 41~45.
POWER Switch
(PC•PLAY•OFF•REC•MANUAL REC)
See pages 18, 19.
T ripod Receptacle
Used when securing
the camera to a tripod.
8
SD5000. p 6-8.p65 80/01/04, 11:368
For assistance, please call : 1-800-272-7033.
Page 9
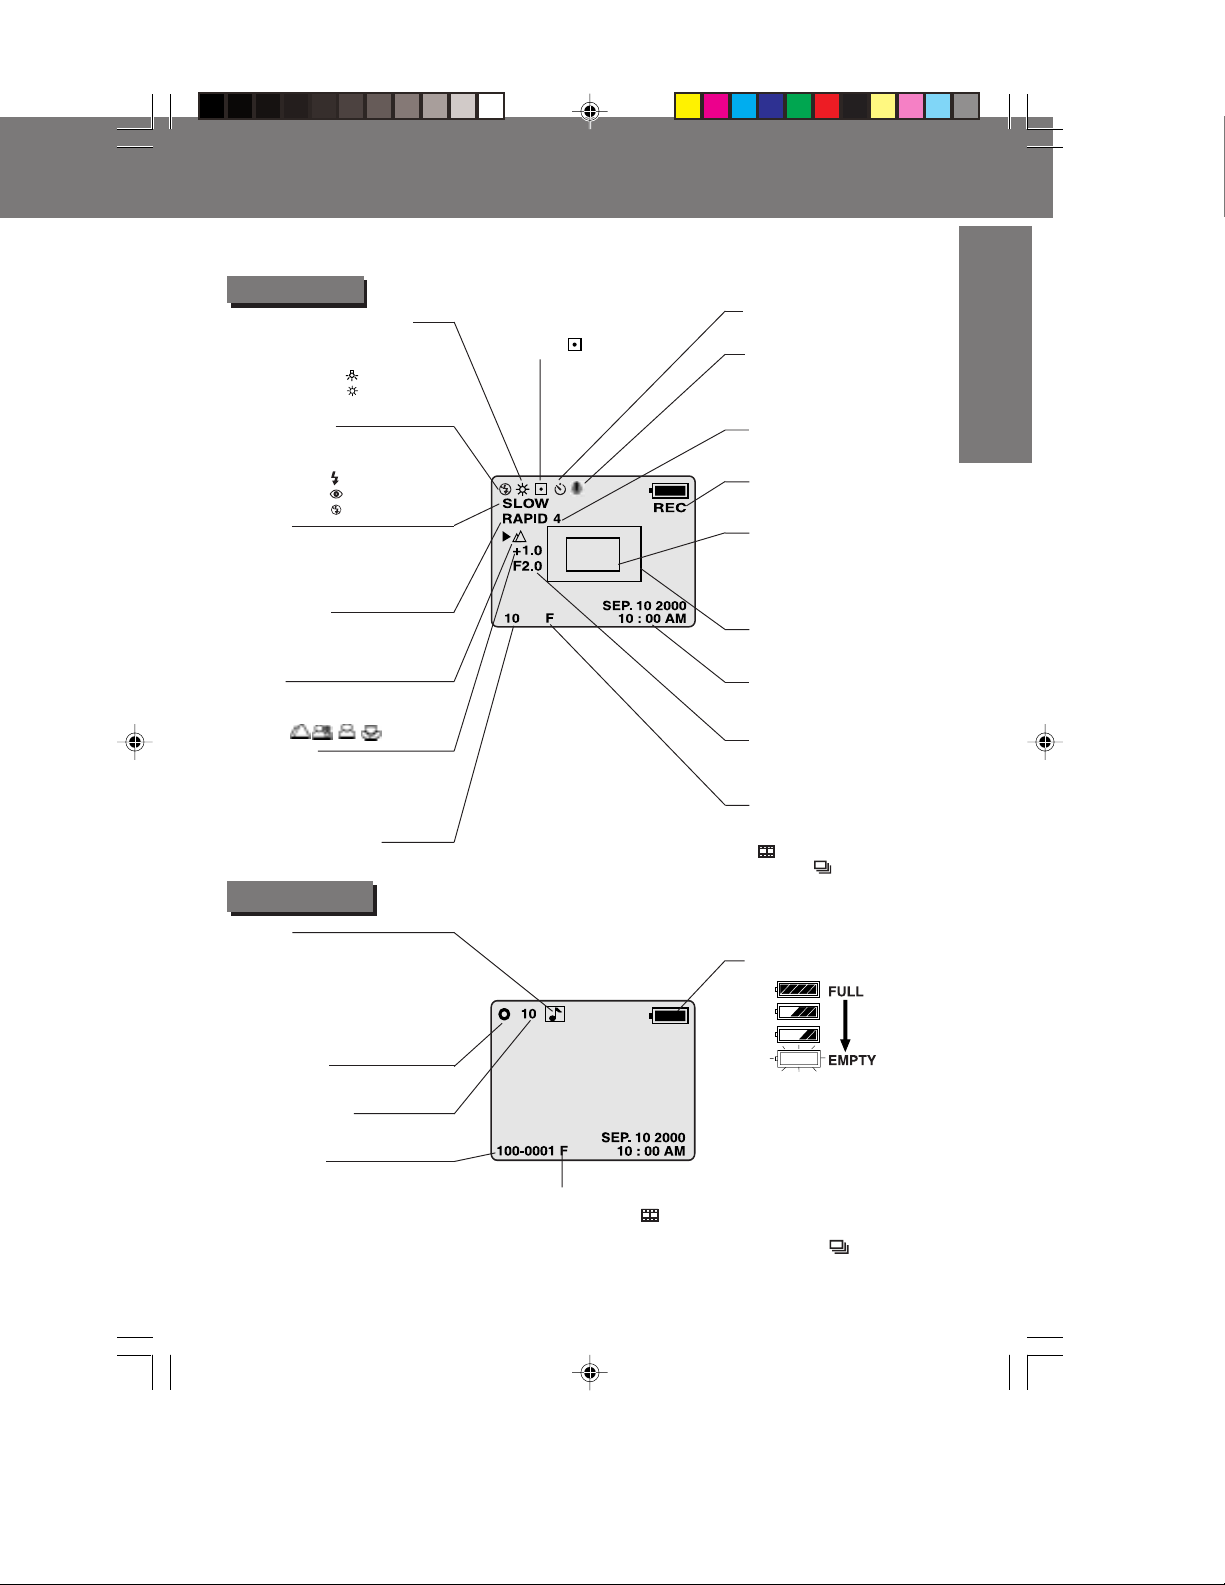
On Screen Display (OSD)
On Screen Display (OSD)
The indication displayed on the LCD screen will tell you the operation status of the
Digital Camera.
REC OSD
White Balance Mode
(See page 37.)
AU T O : No Indication
INDOOR :
OUTDOOR :
WHITE SET : WS
Flash Mode
(See page 36.)
AU T O : No Indication
ON :
RED EYE :
OFF :
SLOW
(See pages 21, 22.)
Displayed if SLOW SHUTTER
is set to ON in the MENU
screen.
RapidFire™
(See page 27.)
OFF : No Indication
ON : RAPID
Focus
(See pages 29, 30.)
AUTO : AF
ZONE :
Exposure
(See pages 29, 30.)
-1.5, -1.0, -0.5, 0, +0.5,
+1.0, +1.5
Image Pages left
in memory
PLAY OSD
Audio
Displayed when image with
AUDIO is played. Not
displayed when movie is
played. (See page 32.)
Light Metering Mode
(See page 38.)
AU T O : No Indication
SPOT :
Self-Timer Mode
(See page 39.)
Audio
Displayed when image with
AUDIO is recorded.
(See pages 22, 24.)
RapidFire™ Page
Remain
REC
Displayed when image is
recorded.
Zoom 3X Area
(See page 25.)
Zoom 2X Area
(See page 25.)
Date/Time Indication
(See page 20.)
Program AE
(See pages 29, 30.)
1/500, 1/125, AE, F2.0, F8.0
Recording Mode :
SF(Super Fine), F(Fine),
N(Normal), 2X, 3X(Zoom),
Mode), (Burst Rec
Mode), TIFF (Tagged
Image File Format).
(See page 25.)
Battery Condition
(See page 27.)
(Motion Image Rec
G
G
e
e
t
t
t
t
i
i
n
n
g
g
S
S
t
t
a
a
r
r
t
t
e
e
d
d
Print Mark
(See page 67.)
Print Number
(See page 67.)
Directory/
Image Number
SD5000. p 9-11.p65 80/01/04, 11:369
As the Battery is depleted,
the indication changes.
POWER LED will flash
when battery is empty.
Displayed Image Page and its captured mode, SF(Super Fine),
F(Fine), N(Normal), (Motion Image Rec Mode), or TIFF
(Tagged Image File Format).
• If the image is captured in 2X, 3X (Zoom) or (Burst Rec
Mode), the displayed image mode will be N(Normal).
9
Page 10
LCD Monitor Indication
LCD Monitor Indication
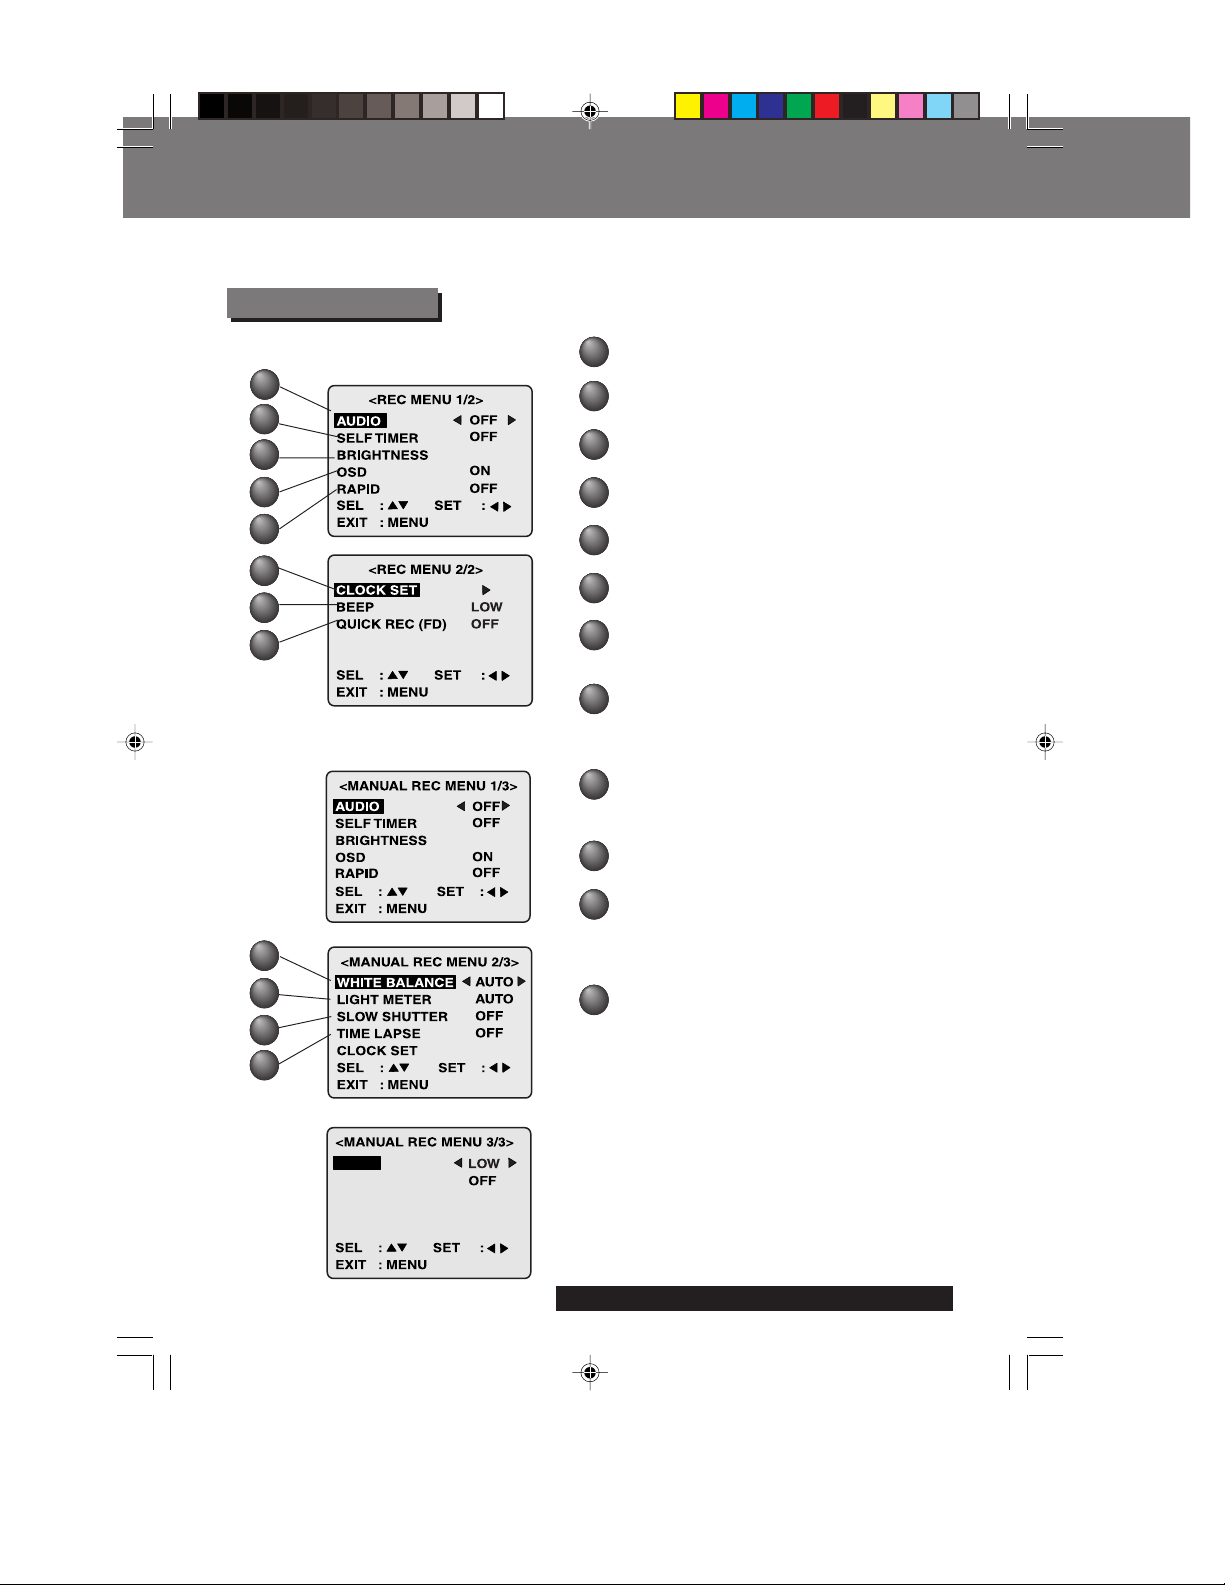
Recording Menu
[ REC Mode ]
1
2
3
4
5
6
7
8
[ MANUAL REC Mode ]
9
10
11
AUDIO (See pages 22, 24.)
1
To select audio recording ON/OFF.
SELF TIMER (See page 39.)
2
To set Self Timer.
BRIGHTNESS (See page 31.)
3
To adjust LCD Viewfinder brightness.
OSD (See pages 9, 10, 11.)
4
To select OSD display ON/OFF.
RAPID (See page 27.)
5
To select RapidFire™ mode ON/OFF.
CLOCK SET (See page 20.)
6
To set clock.
BEEP (See page 26.)
7
To select beep mode when capturing
images.
QUICK REC (FD) (See page 28.)
8
To select Quick Rec (FD) mode ON/OFF
when capturing images to a Floppy
Disk.
WHITE BALANCE (See page 37.)
9
To change to one of the 4 White Balance
modes.
LIGHT METER (See page 38.)
10
To change to AUTO or SPOT.
SLOW SHUTTER (See pages 21, 22.)
11
To select slow shutter. By selecting “ON”,
you can capture more beautiful images
in comparatively dark places.
TIME LAPSE (See page 40.)
12
To set time lapse recording.
12
BEEP
QUICK REC (FD)
10
SD5000. p 9-11.p65 80/01/04, 11:3610
For assistance, please call : 1-800-272-7033.
Page 11
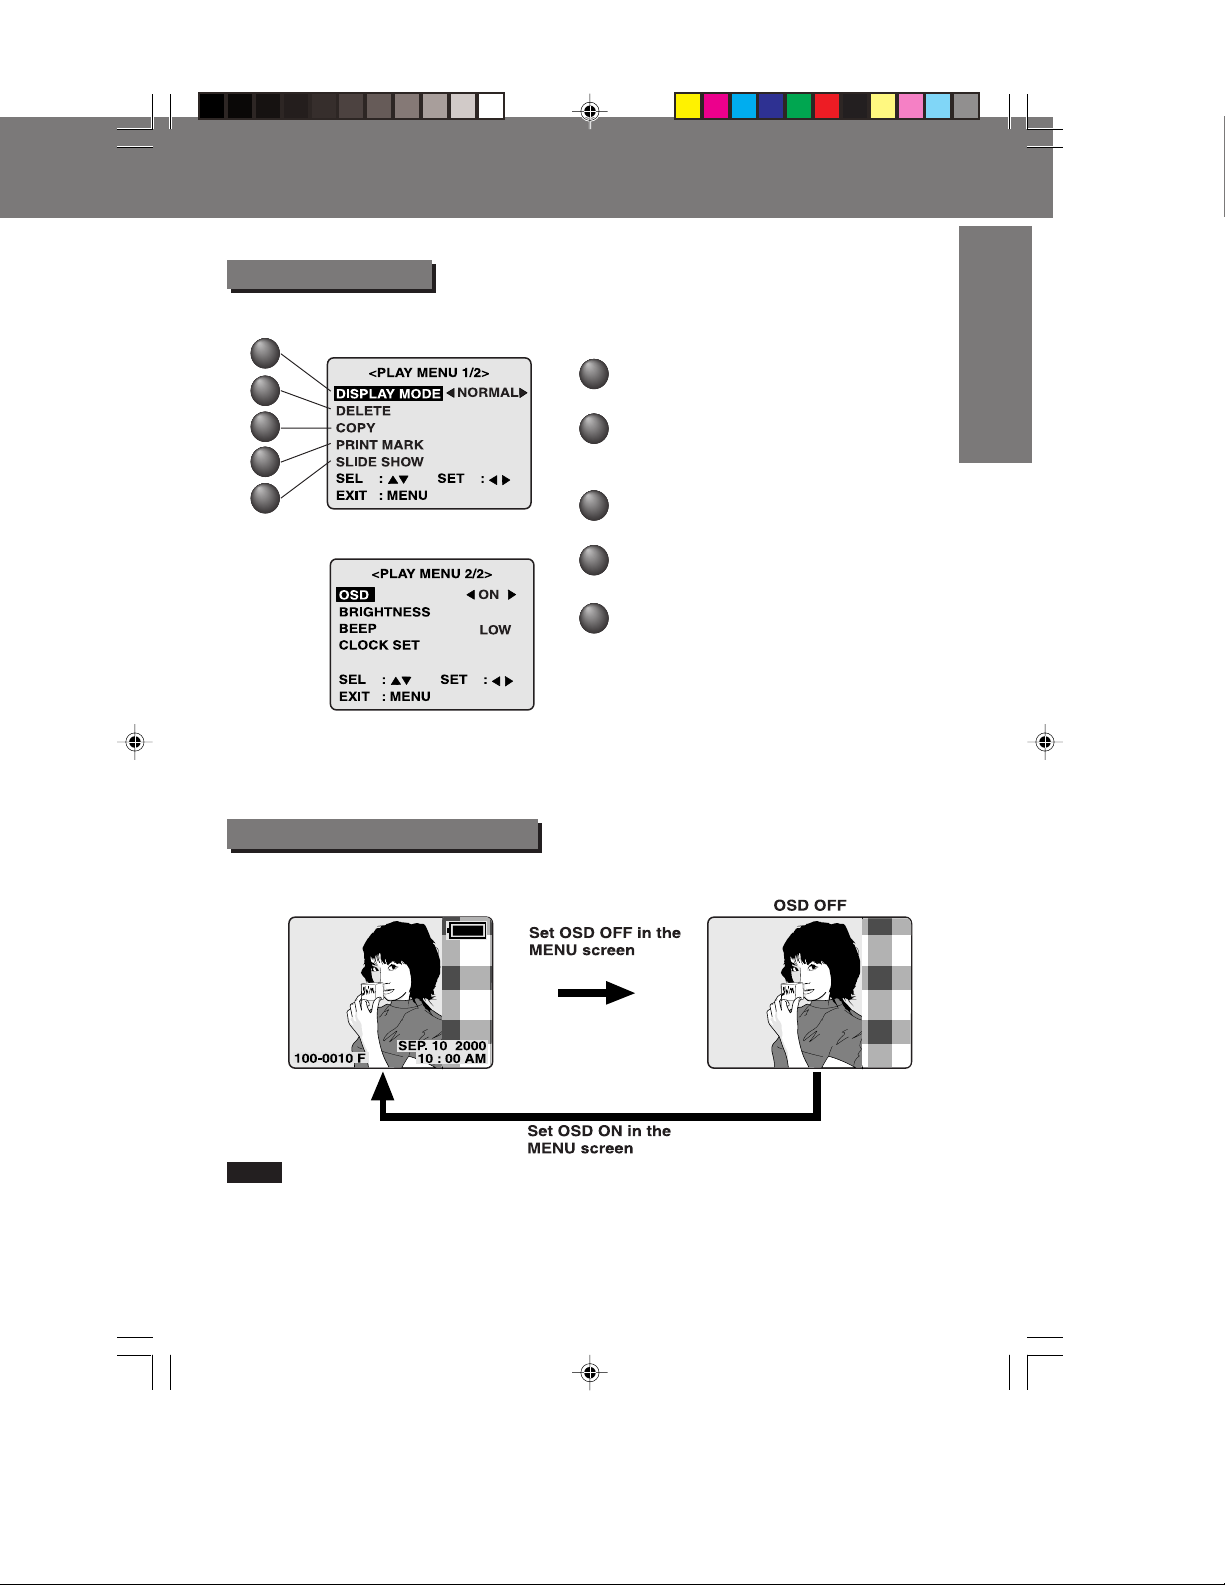
Playback Menu
1
2
3
4
5
LCD Monitor Indication
LCD Monitor Indication
DISPLAY MODE (See pages 32, 33, 34.)
1
Select playback mode.
DELETE (See pages 41, 42, 43.)
2
Delete image from SuperDisk Diskette or
Floppy Disk.
COPY (See pages 44, 45.)
3
To set copy.
PRINT MARK (See page 67.)
4
To set print mark.
SLIDE SHOW (See page 46.)
5
Playback images as slide show.
G
G
e
e
t
t
t
t
i
i
n
n
g
g
S
S
t
t
a
a
r
r
t
t
e
e
d
d
On Screen Display Order
Note
• Press MENU to display MENU screen, then select OSD: ON.
• If you select OFF, OSDs will not be displayed.
SD5000. p 9-11.p65 80/01/04, 11:3611
11
Page 12
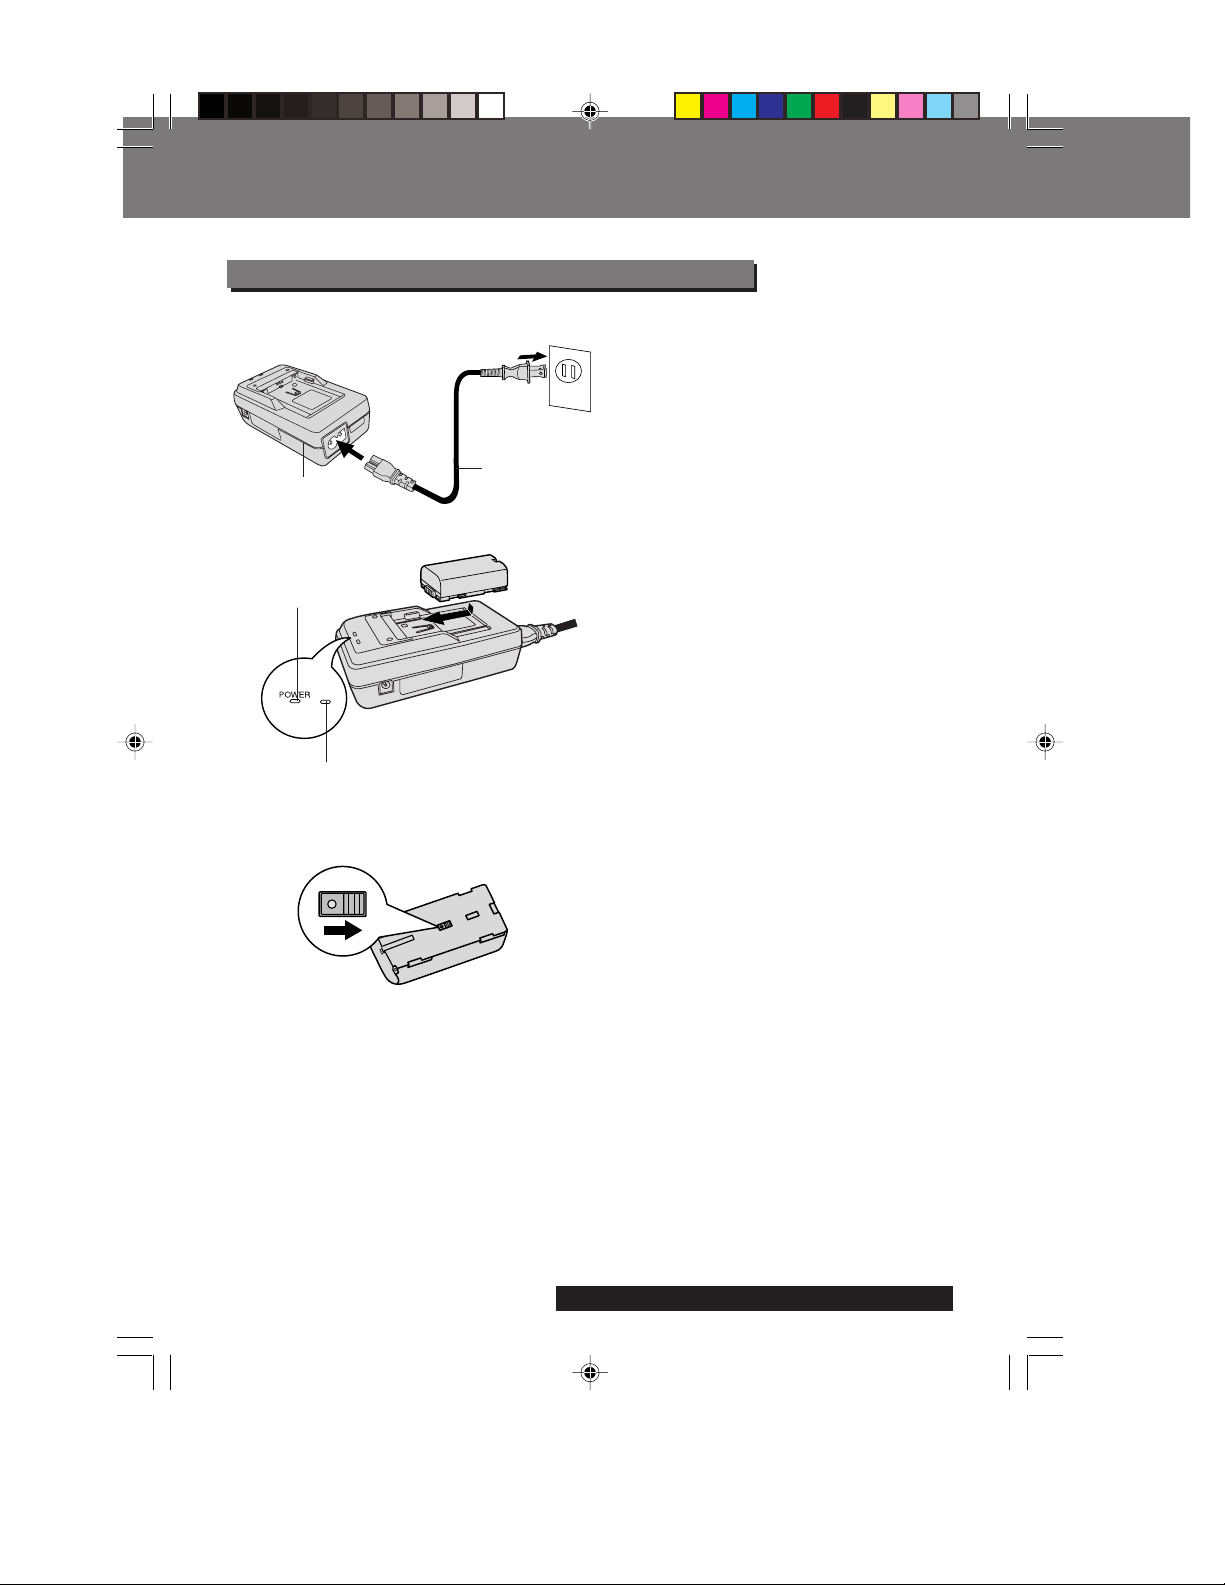
Power Supply
P o wer Supply
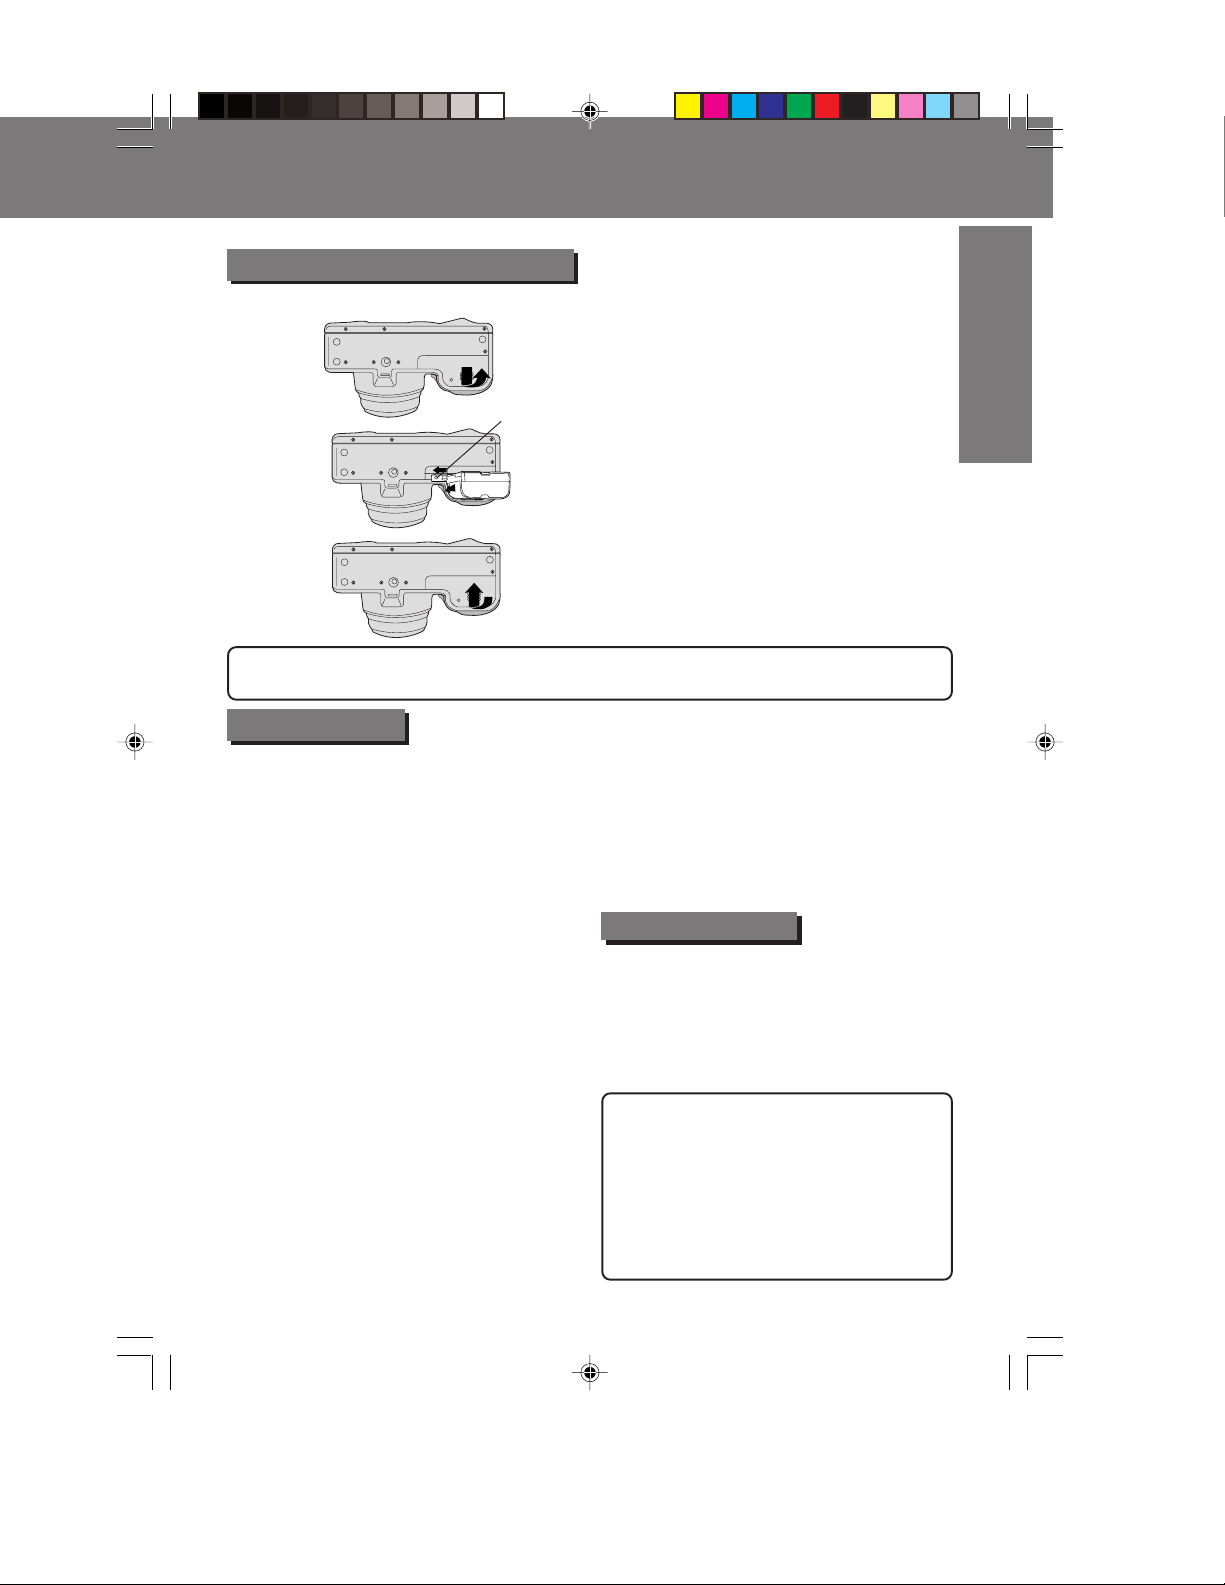
Charge the Battery Pack on the AC Adaptor
1Connect AC Cable (supplied) to AC
IN on the AC Adaptor and plug the
AC Adaptor into an AC outlet.
• POWER Lamp lights red.
AC Adaptor
AC Cable
• Disconnect DC Cable if it is
connected to AC Adaptor.
2Attach the Battery as shown to
charge.
POWER Lamp
• Charge Lamp on the AC Adaptor
flashes green. When lamp stops
flashing, the Battery is fully charged.
(T akes approx. 1 hour 40 minutes.)
3Remove the Battery.
Slide the Battery out and then lift up.
12
Charge Lamp
Battery Charging Confirmation Marker
Use this marker as a reminder to yourself
when the Battery is fully charged or in need
of a charge. This marker performs no
function and is for your reference only.
• The Battery is no longer serviceable if the
operation time is very short, even after a
sufficient charge.
For assistance, please call : 1-800-272-7033.
SD5000. p12-14.p65 80/01/04, 11:3712
Page 13
Loading the Lithium Battery
[ Bottom View ]
Latch
Power Supply
P o wer Supply
1Slide the Battery Compartment lid in
the direction of the arrow and swing it
open.
2While sliding Latch, insert the Lithium
Ion Battery until it locks into place.
• Be sure to use a Lithium Ion Battery.
Be sure that the direction of the arrow
on the battery is facing down when
inserting it into the camera.
3Swing the Battery Compartment lid
down and slide it shut.
G
G
e
e
t
t
t
t
i
i
n
n
g
g
S
S
t
t
a
a
r
r
t
t
e
e
d
d
WARNING! Do not dispose of Battery in fire, put in backwards, disassemble, or short
circuit; otherwise it may leak or burst, causing possible personal injury.
Battery Notes
Caution:
• Charge only with specified charger.
• The Battery can be charged within a
temperature range of 32° F (0° C) and 104° F
(40° C).
• The Battery may be warm after charging or
just a fter us e. This is normal.
• Do not use an insuffic iently charged or worn
out Battery.
• In extreme cold surroundings, Battery
charging time will increase.
Safety precautions:
• Do not get the Battery near, or dispose of in
fire.
• Do not directly connect (short circuit) the
positive (+) and negative (–) terminals.
• Never attempt to disassemble or reassemble
the Battery.
To avoid damage to the Battery:
• Do not drop or jar the Battery.
• Use the Battery with specified models only.
• If the Battery is used in extremely high
temperatures, a safety device will
automatically prevent operation.
To insure longer battery life:
• While not in use, remove Battery from the
Digital Camera and AC Adaptor and store
in a cool, dark, dry place. If you leave the
Battery in the Digital Camera or on the AC
Adaptor for a long time, the Battery will no
longer be rechargeable.
• Keep the Battery terminals clean.
Operation Time
When using the supplied Panasonic Lithium Ion
Batteries, you may get a maximum of about 200
images (at an ambient temperature of 25° C
under the following conditions).
• Capturing an image every 30 seconds.
• Using Flash once for every other capture.
• Recording mode is Fine.
CA UTION
Replace with Panasonic PV-DBP5 or CGR-B/
202A1B only. Use of another battery may
present a risk of fire or explosion. Cautionbattery may explode if mistreated.
Do not disassemble or dispose of in fire. Keep
battery out of reach of children.
Danger of explosion if battery is incorrectly
inserted. Dispose of used battery promptly.
13
SD5000. p12-14.p65 80/01/04, 11:3713
Page 14
Power Supply
P o wer Supply
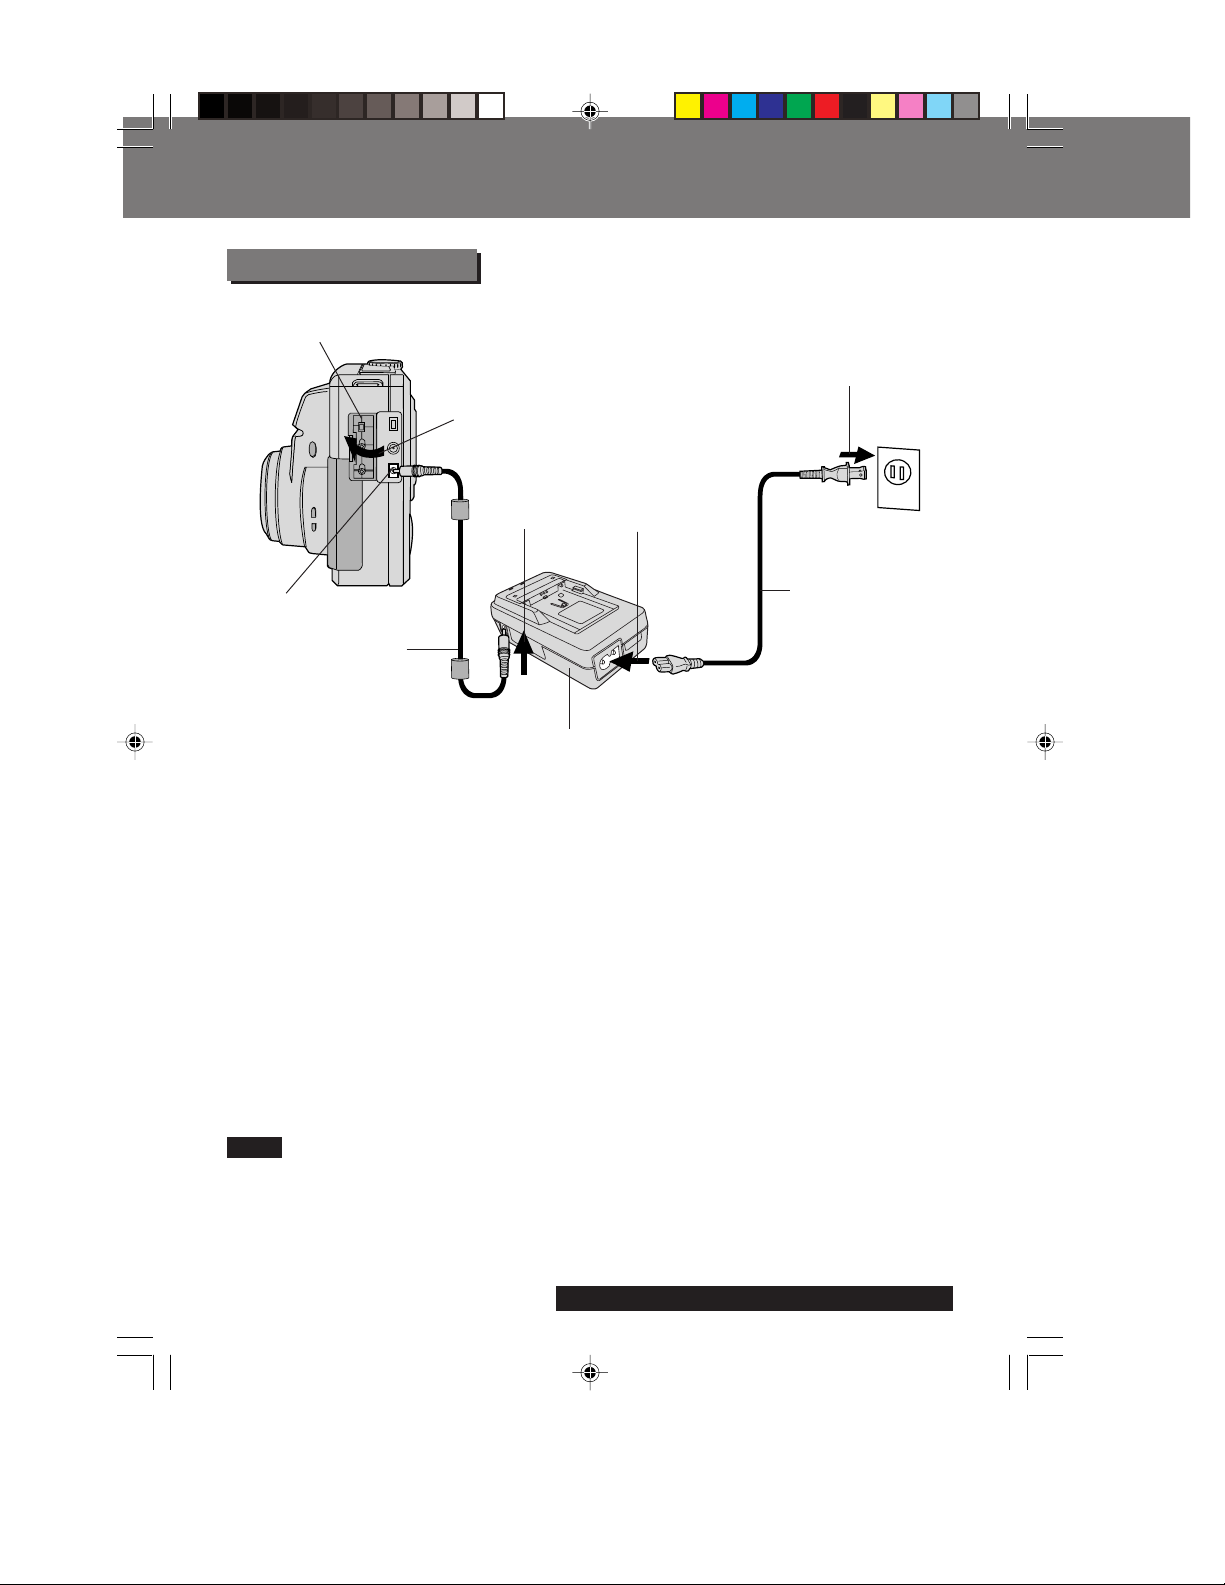
Using AC Adaptor
Jack Cover
1
4
2
2DC IN
DC POWER Cable
(supplied)
AC Adaptor
(supplied)
3
AC Cable
(supplied)
1Pull up the Jack Cover.
2Connect DC POWER Cable (supplied) to DC OUT on the AC Adaptor and DC
IN on the Digital Camera.
3Connect AC Cable (supplied) to AC IN on the AC Adaptor.
4Plug the AC Adaptor into an AC outlet.
Note
• While not in use, unplug the AC Adaptor from the AC outlet.
• Use the supplied Panasonic AC Adaptor.
• Do not connect AC Adaptor after turning POWER on.
• When the DC Cable is connected during charging, the power supply is given priority
and charging will not be possible.
14
SD5000. p12-14.p65 80/01/04, 11:3714
For assistance, please call : 1-800-272-7033.
Page 15
Removing the Lens Cap and Attaching the Camera Strap
Removing the Lens Cap and Attaching the Camera Strap
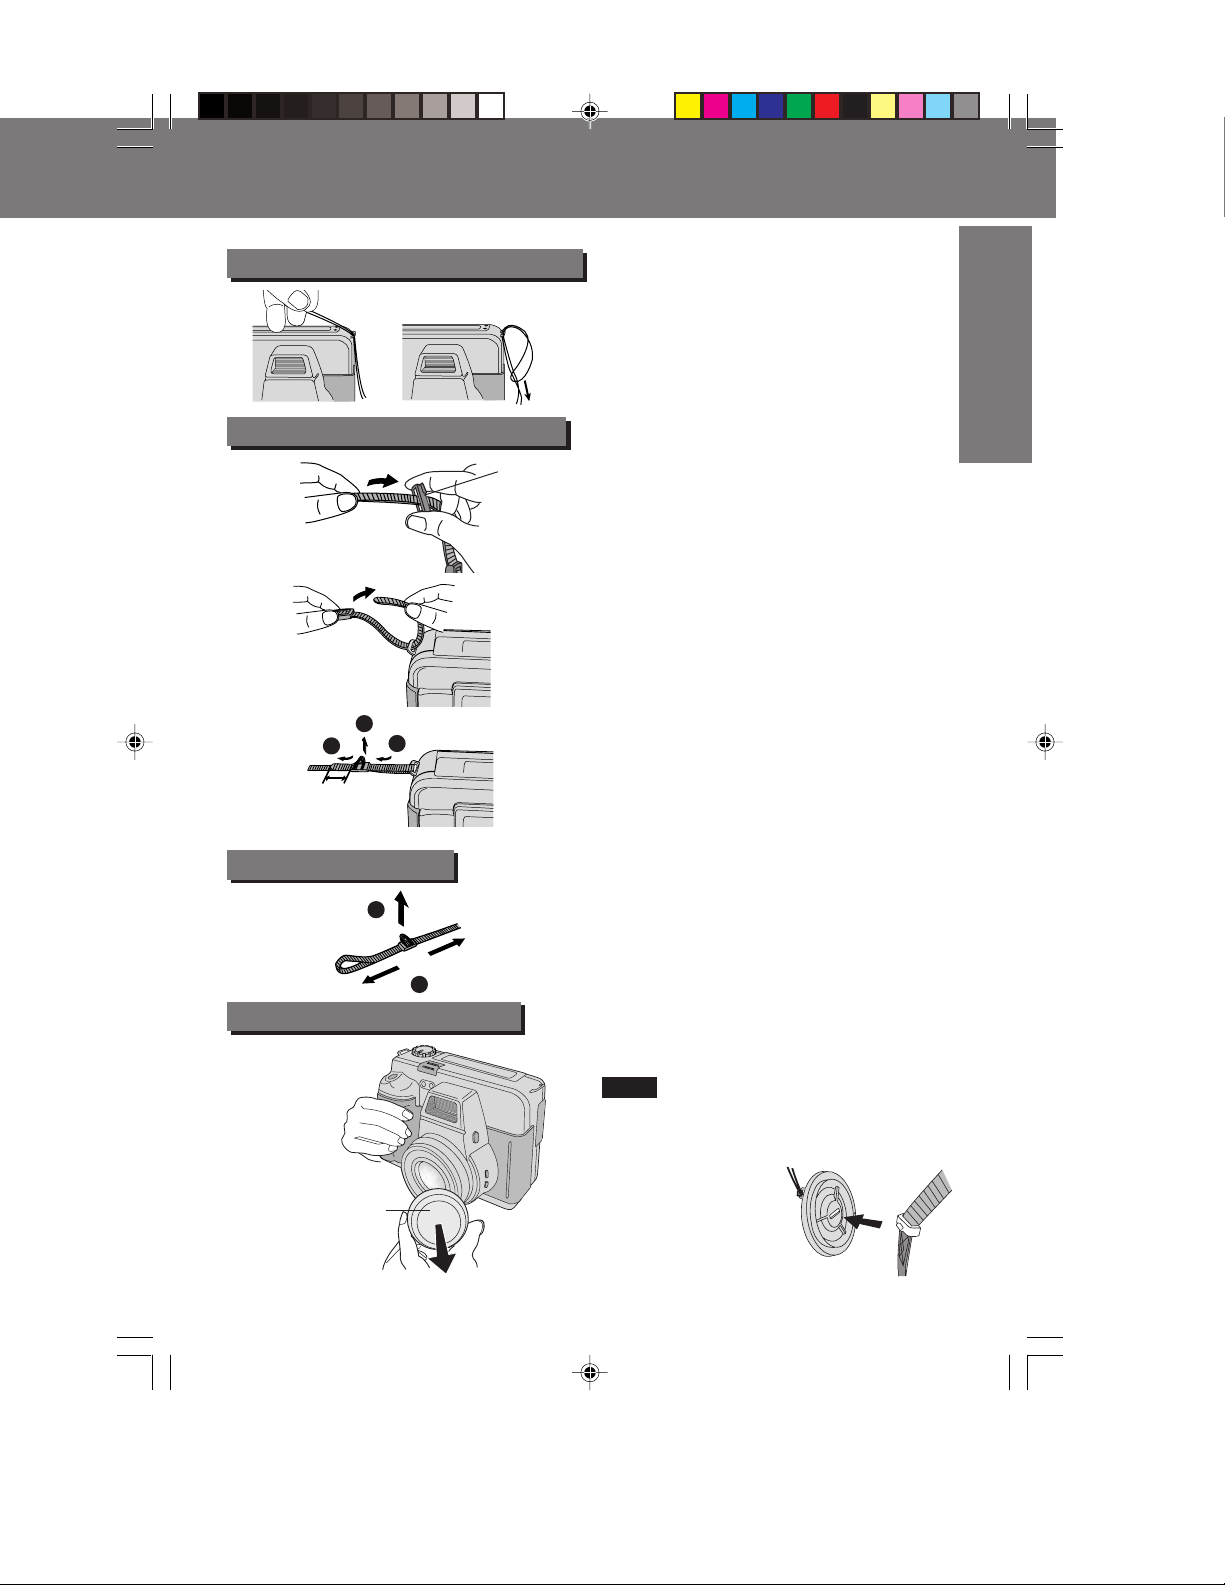
Attaching the Lens Cap Cord
1Thread the Lens Cap cord through
the Strap Attachment Ring.
2Run the Lens Cap through the cord
loop and pull tight.
Attaching the Camera Strap
Lens Cap
Holder
1Thread the Lens Cap Holder onto the
strap.
2Thread the strap ends through the
Strap Attachment Rings.
G
G
e
e
t
t
t
t
i
i
n
n
g
g
S
S
t
t
a
a
r
r
t
t
e
e
d
d
2
3
Min. 1 inch
(25.4 mm)
Adjust the Length
Removing the Lens Cap
Lens Cap
1
1
R
O
2
3Reinsert the strap ends through
their buckles.
• Make sure the straps are not twisted.
1Loosen the strap from the Buckle and
create a loop.
2Pull the strap firmly through the Buckle
to shorten or lengthen the strap.
While pinching the sides of the Lens
Cap, pull the Lens Cap off.
Note
• Always remove the Lens Cap before use.
• When using the camera, insert the Lens
Cap into the Lens Cap Holder.
15
SD5000. p15-17.p65 80/01/04, 11:3715
Page 16
Inserting the SuperDisk™ Diskette or Floppy Disk
Inserting the SuperDisk™ Diskette or Floppy Disk
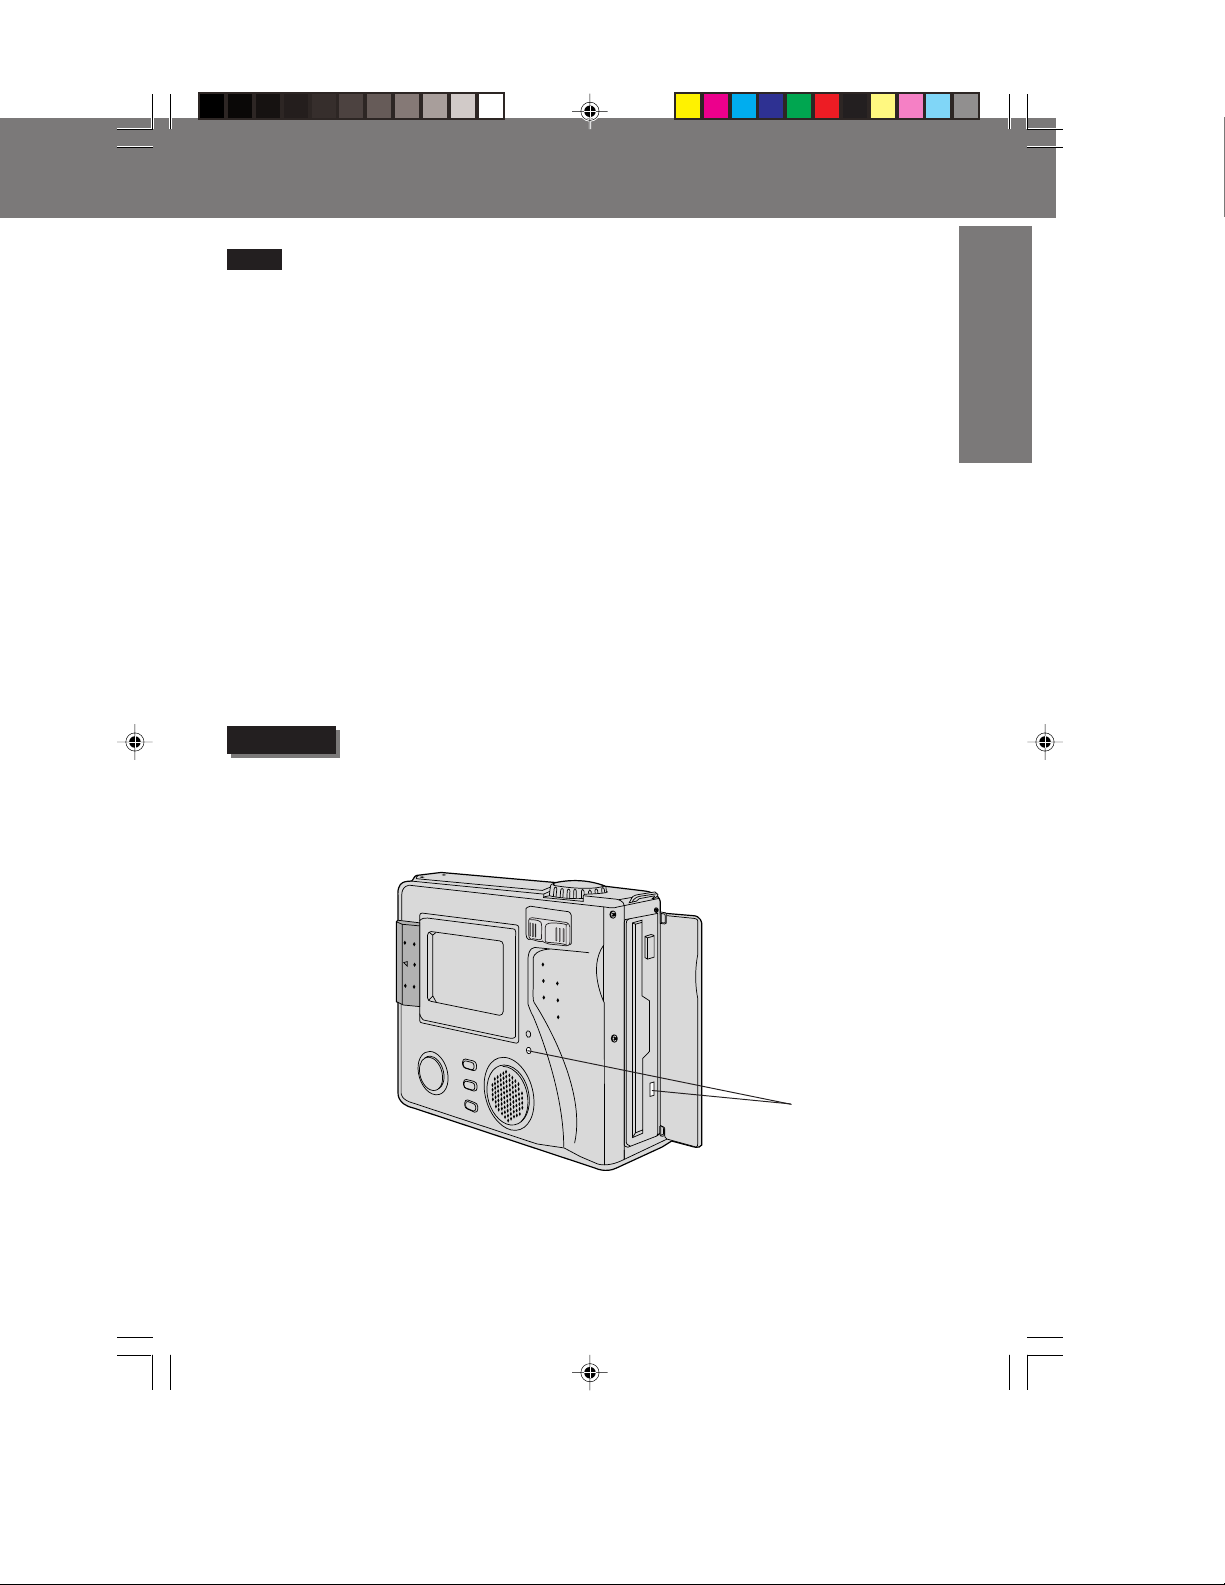
Inserting the Disk Media:
• The captured images will be stored on
the Disk Media.
• Be sure to insert the Disk Media before
using the camera.
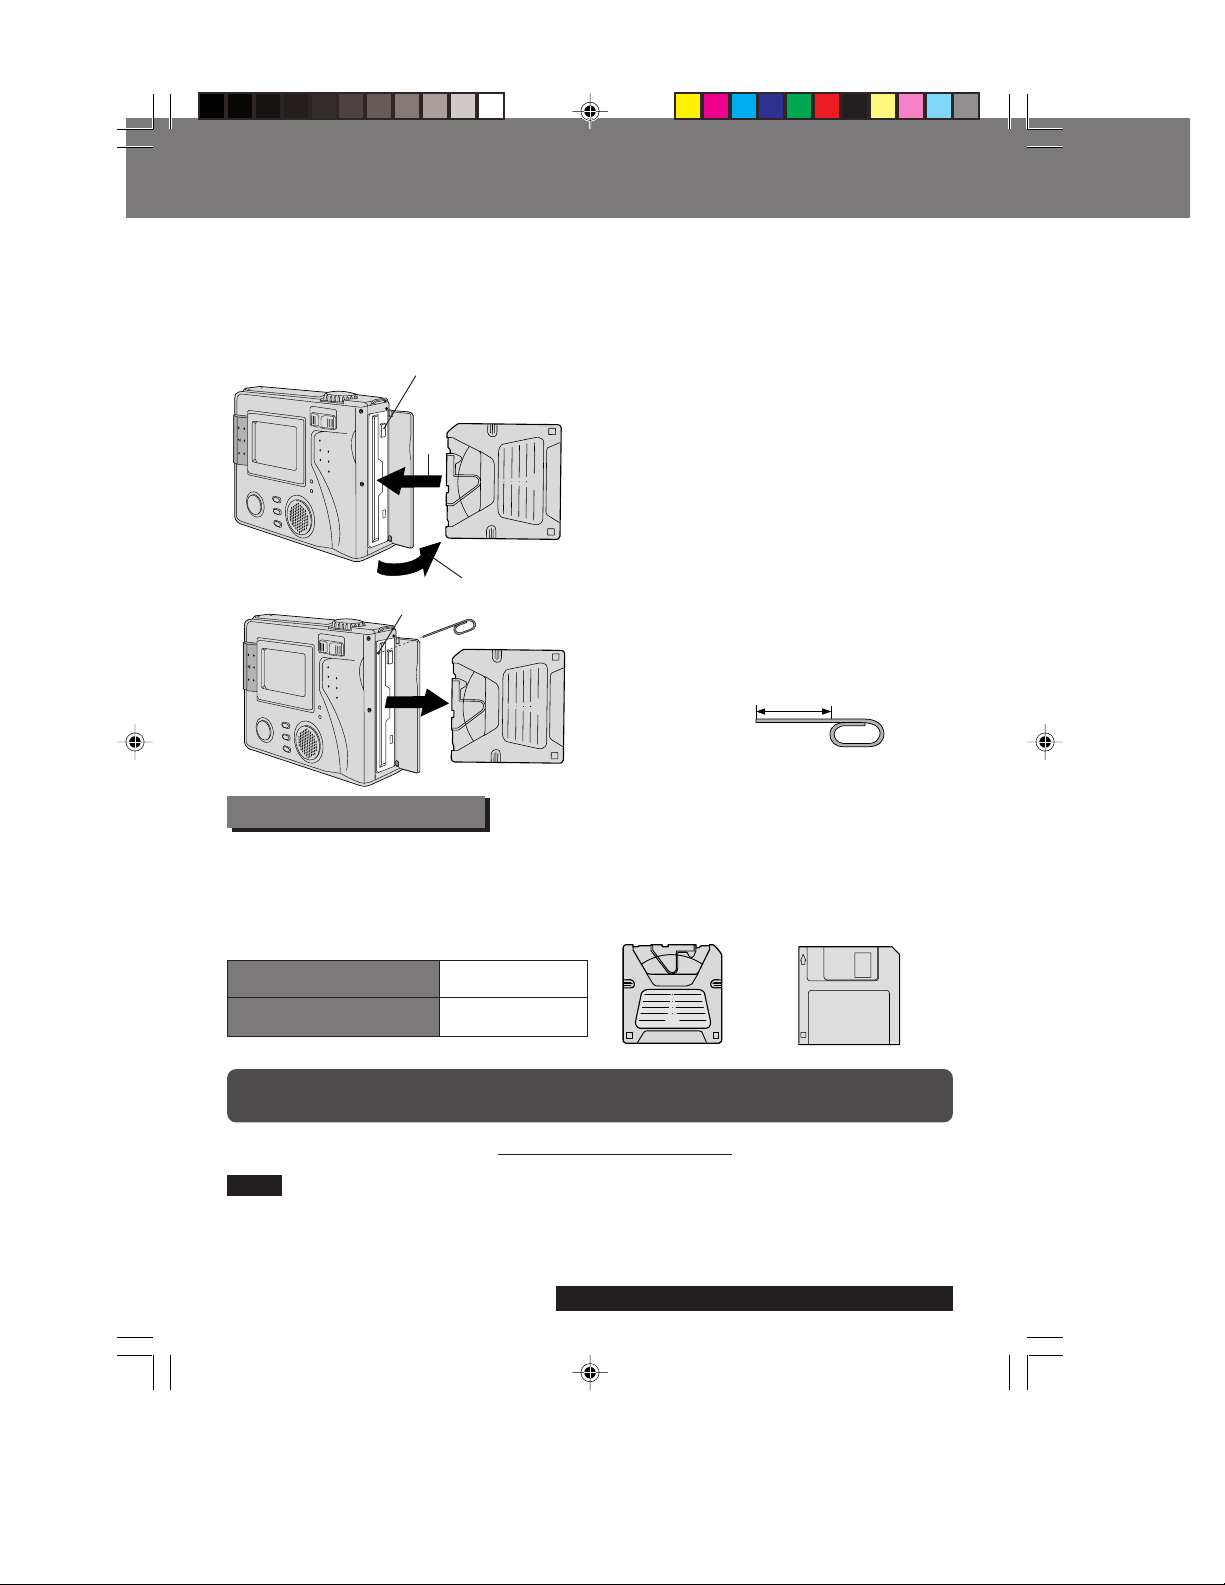
EJECT Button
2
1
Emergency Eject hole
1Turn the Power ON, open the cover
and insert the Disk Media.
2Push the Disk Media fully into the
SuperDisk Drive.
Removing the Disk Media:
Set the POWER Switch to REC, PLAY or
PC. Push the EJECT button so the Disk
Media pops out. (Be careful not to drop
the Disk Media.)
Emergency Ejection of the Disk Media:
If, for some reason, the Disk Media does
not eject automatically, you can eject
manually. (Turn P OWER OFF before
proceeding.) Insert a straightened paper
clip, etc., (diameter = 1 mm~1.5 mm, min.
length = 30 mm) into the Emergency
Eject hole.
Min. 30 mm
Paper Clip
Using a Floppy Disk
A Floppy Disk (not supplied) which has been formatted to Windows on your Floppy Disk
Drive can be used in the SuperDisk Drive. (See pages 62, 65.)
When using a new Floppy Disk, it is recommended that the Disk be inserted into the
Digital Camera and formatted (Quick Format).
If a read error occurs in the PC Floppy Disk Drive, use the Digital Camera to read the data.
SuperDisk Diskette
Floppy Disk (2HD)
*Data transfer using USB cable is applicable only for Microsoft® Windows® 98 preinstalled
PC with USB port, Windows® 2000 PC, iMac®, iBook®, Power Macintosh® G3 with USB port or
Power Mac™ G4 and Mac OS version 8.1 or later.
• The USB Driver software for Windows 2000 is currently not available, but will be available
in the future on our website at www.panasonic.com/palmcam or by calling 1-800272-7033.
Note
• Only DOS formatted floppy disks can be used with this Camera. Macintosh OS formatted floppy
disks must be re-formatted to DOS with this camera.
• You can use this unit as a SuperDisk Drive. (See pages 49, 56.)
• The SuperDisk Diskette is only used for SuperDisk Drive.
• T o format the Disk Media, see pages 62, 65.
16
SD5000. p15-17.p65 80/01/04, 11:3716
120 MB Format
1.44 MB Format
*SuperDisk Diskette *Floppy Disk (2HD)
For assistance, please call : 1-800-272-7033.
Page 17
Inserting the SuperDisk™ Diskette or Floppy Disk
Inserting the SuperDisk™ Diskette or Floppy Disk
Note
• Do not bend, drop, apply high pressure
or subject the Disk Media to strong
shocks.
• Do not store it in places with high
temperature, high humidity, a lot of dust,
or static electricity and strong
electromagnetic waves.
• Keep the Disk Media’s contacts free from
dust, water or other foreign substances.
Do not touch them with your fingers, etc.
• Do not disassemble or deform the Disk
Media.
• Be sure to make a backup copy of
important data.
• Make sure that you do not insert the
Disk Media in the wrong direction.
• Do not, under any circumstances, eject
the Disk Media immediately after
pressing the SHUTTER Button (during
recording of an image) or while deleting
(when “PLEASE WAIT” is displayed).
This could damage the format of the Disk
Media and make them unusable.
• When the Disk Media does not eject after
pressing the EJECT Button, push the
Disk Media fully into the slot again and
then press the EJECT Button firmly.
• “NO DISK” will appear on the LCD
Viewfinder when the Disk Media is not
inserted.
• “DISK ERROR” will appear on the LCD
Viewfinder if the Disk Media is defective.
Caution
• The ACCESS LED lamp will flash when the Digital Camera is accessing the Disk Media.
Never expose this unit to strong vibrations or impacts while ACCESS LED lamp is
flashing. And, do not turn off the Power, take out a Disk Media, or remove the Battery
when ACCESS LED lamp is flashing.
G
G
e
e
t
t
t
t
i
i
n
n
g
g
S
S
t
t
a
a
r
r
t
t
e
e
d
d
For additional information regarding Imation SuperDisk products,
please call 1-888-466-3456.
SD5000. p15-17.p65 80/01/04, 11:3717
ACCESS LED
17
Page 18
Operating the MENU Screen
Operating the MENU Screen
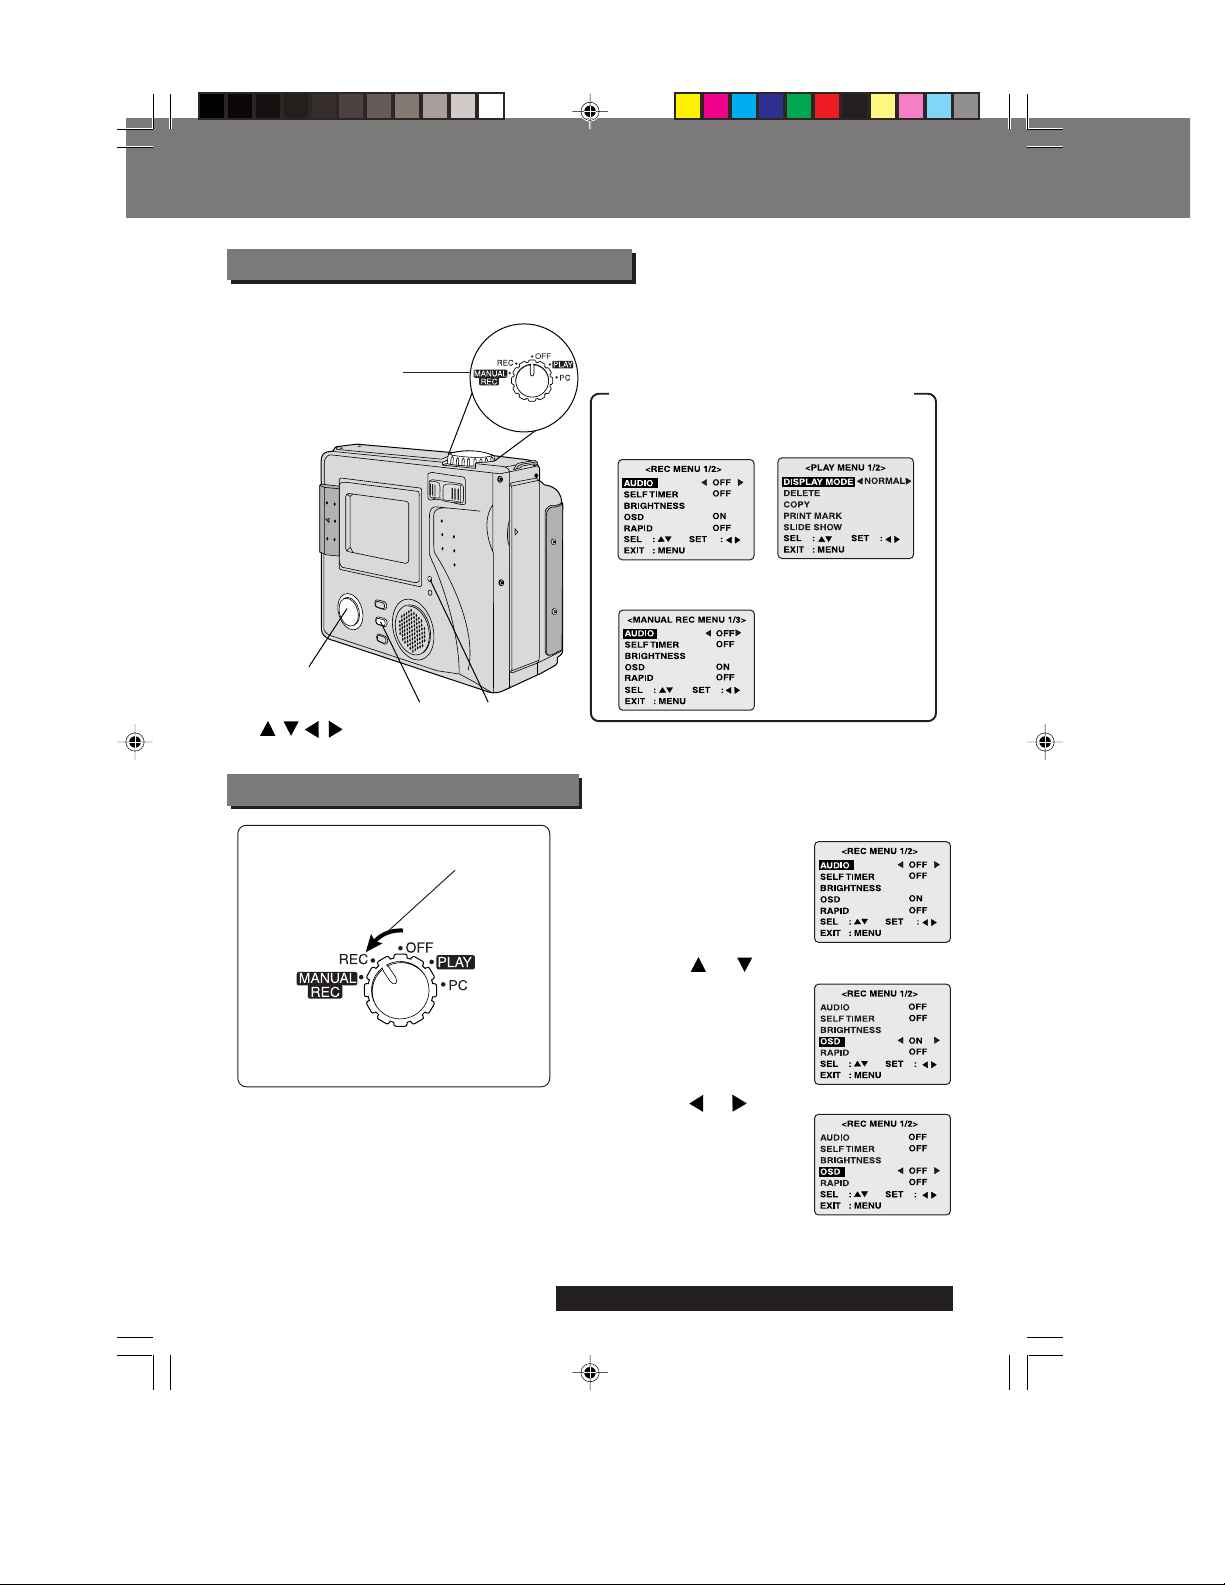
How to operate the MENU screen
Please refer to pages 10~11 for explanation of each menu item.
1POWER Switch
Example of Menu Screens
3, 4
Select Button
/ / /
When selecting REC mode
2, 5
MENU Button
POWER LED
1
[ REC mode ]
[ MANUAL REC mode ]
[ PLAY mode ]
2Press MENU to display MENU screen.
3Press or to select the item.
1Remove the Lens Cap. Set POWER
Switch to REC.
• Turn the dial so that it clicks into
position.
• The POWER LED lamp lights up.
18
SD5000. p18-20.p65 80/01/04, 11:3818
4Press or to set it.
5Press MENU to exit.
For assistance, please call : 1-800-272-7033.
Page 19
Operating the MENU Screen
Operating the MENU Screen
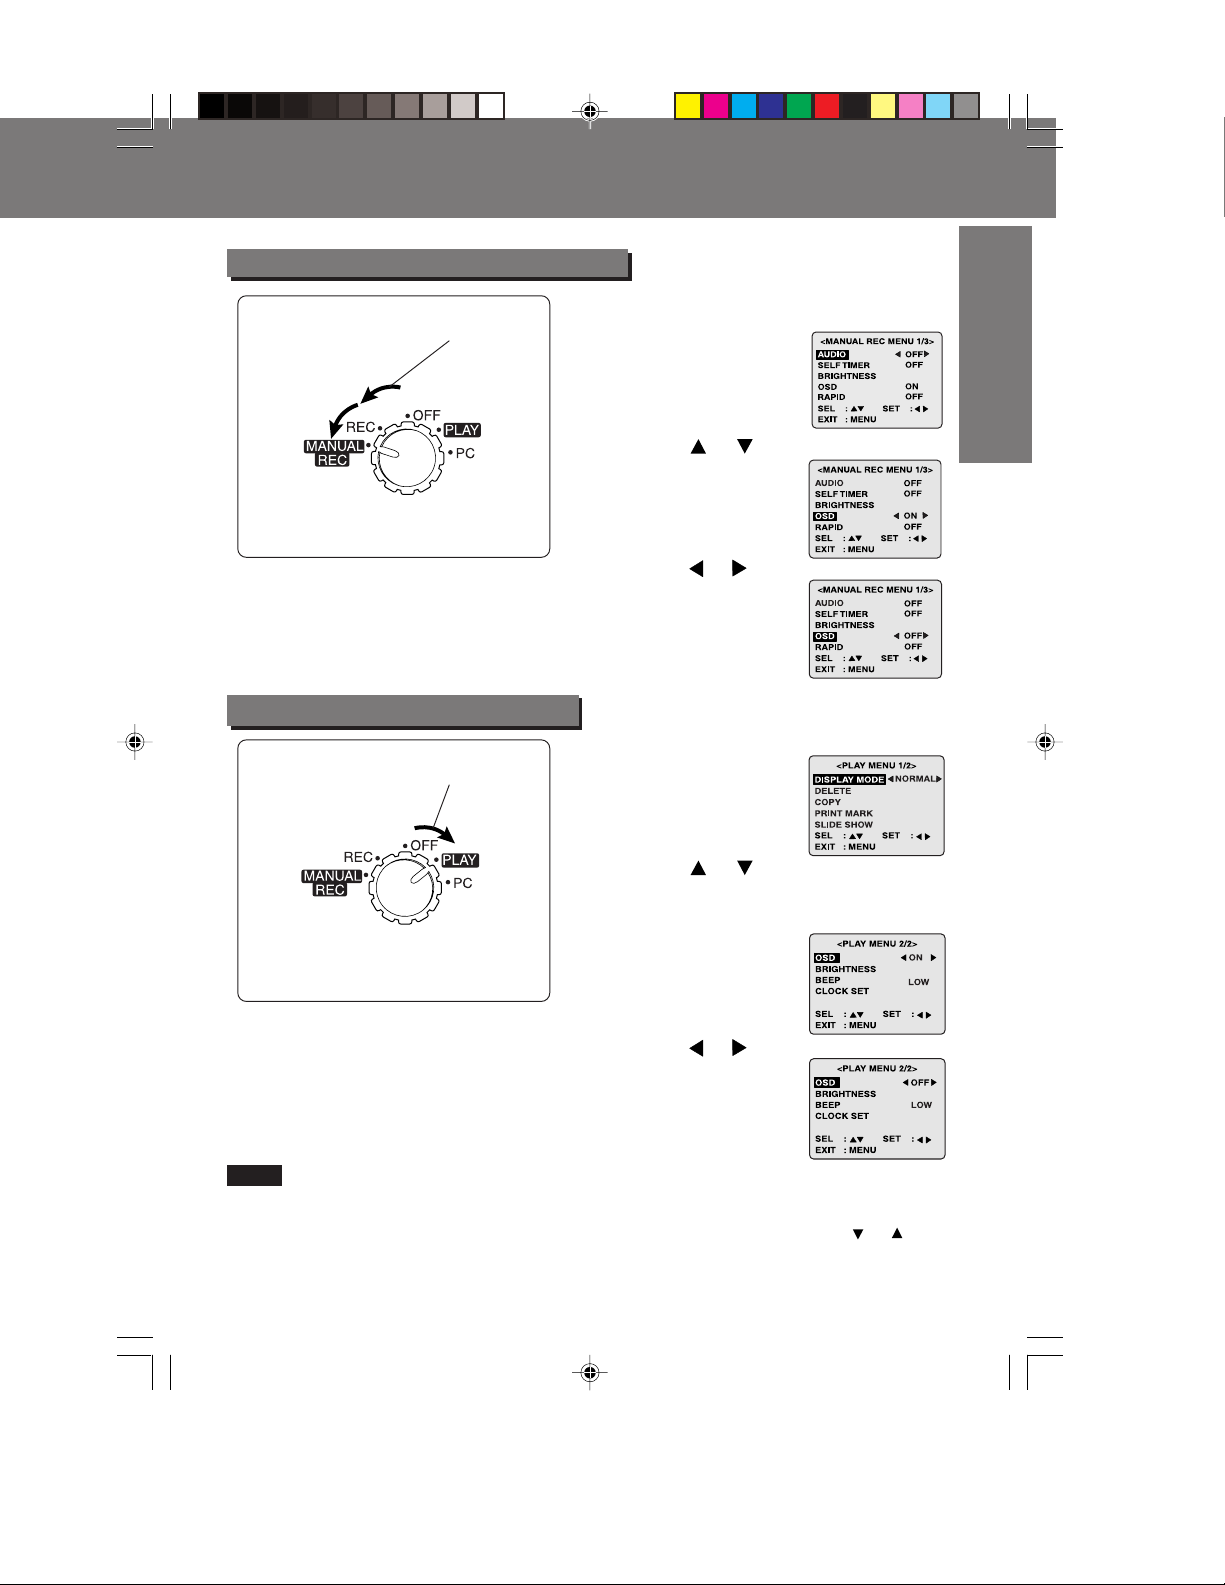
When selecting MANUAL REC mode
1
1Remove the Lens Cap. Set POWER
Switch to MANUAL REC.
• Turn the dial so that it clicks into
position.
• The POWER LED lamp lights up.
When selecting PLAY mode
1
2Press MENU to display MENU screen.
3Press or to select the item.
4Press or to set it.
5Press MENU to exit.
2Press MENU to display the MENU
screen.
G
G
e
e
t
t
t
t
i
i
n
n
g
g
S
S
t
t
a
a
r
r
t
t
e
e
d
d
3Press or to select the item.
• When there is no image in Play
mode, OSD, BRIGHTNESS, BEEP,
and CLOCK SET functions are not
available.
1Set POWER Switch to PLAY.
• Turn the dial so that it clicks into
position.
• The POWER LED lamp lights up.
Note
• While REC is sufficient for normal recording, select MANUAL REC when you want to
make more precise settings.
• The REC, MANUAL REC, and PLAY menus consist of multiple pages. Press or
repeatedly to scroll to the next or previous menu page.
• REC and PLAY functions cannot be operated while MENU screen is displayed.
SD5000. p18-20.p65 80/01/04, 11:3819
4Press or to set it.
5Press MENU to exit.
19
Page 20
Setting the Clock
Setting the Clock
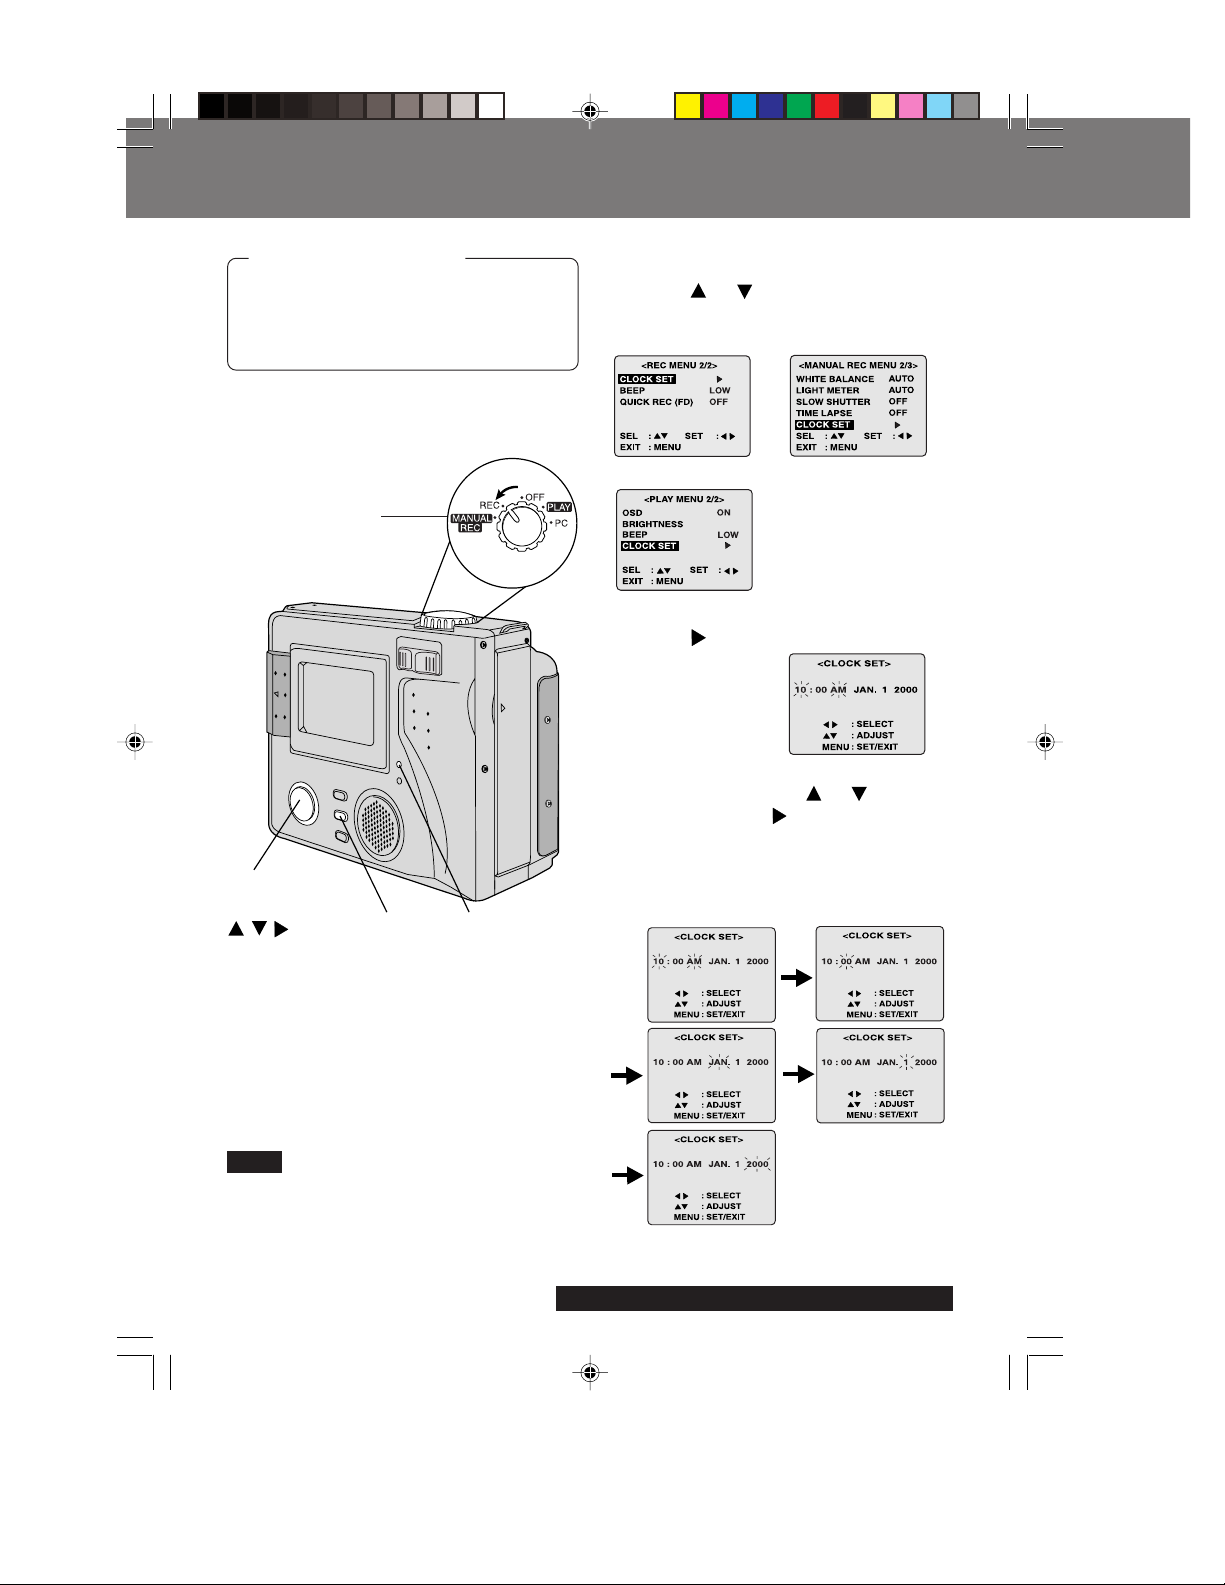
Before you begin
Remove the Lens Cap. Set the POWER
Switch to REC, MANUAL REC or PLAY.
(See pages 18, 19.) Press MENU to
display the MENU screen.
POWER Switch
1Press or to select CLOCK SET
in the MENU screen.
[ REC mode ] [ MANUAL REC mode ]
[ PLAY mode ]
2Press to display CLOCK SET menu.
1, 2, 3
Select Button
/ /
Note
• To make corrections, repeat steps 1~3.
• The clock will continue to operate
about 8 hours after the battery has
been removed. If you need to set clock
again, repeat these steps.
4
MENU Button
20
SD5000. p18-20.p65 80/01/04, 11:3820
POWER LED
3Press or hold down or to select
hour, then press
• Repeat for minute, month, day and
year.
• Double check all items before exiting
the menu.
to set.
4Press MENU twice to exit.
Clock starts when menu is exited.
For assistance, please call : 1-800-272-7033.
Page 21
Super Fine Mode, Fine Mode,
Normal Mode, Zoom (2X, 3X)
Mode, TIFF Mode
Before you begin
Remove the Lens Cap. Set the PO WER
Switch to REC or MANUAL REC.
(See pages 18, 19.)
POWER Switch
Capturing Images
Capturing Images
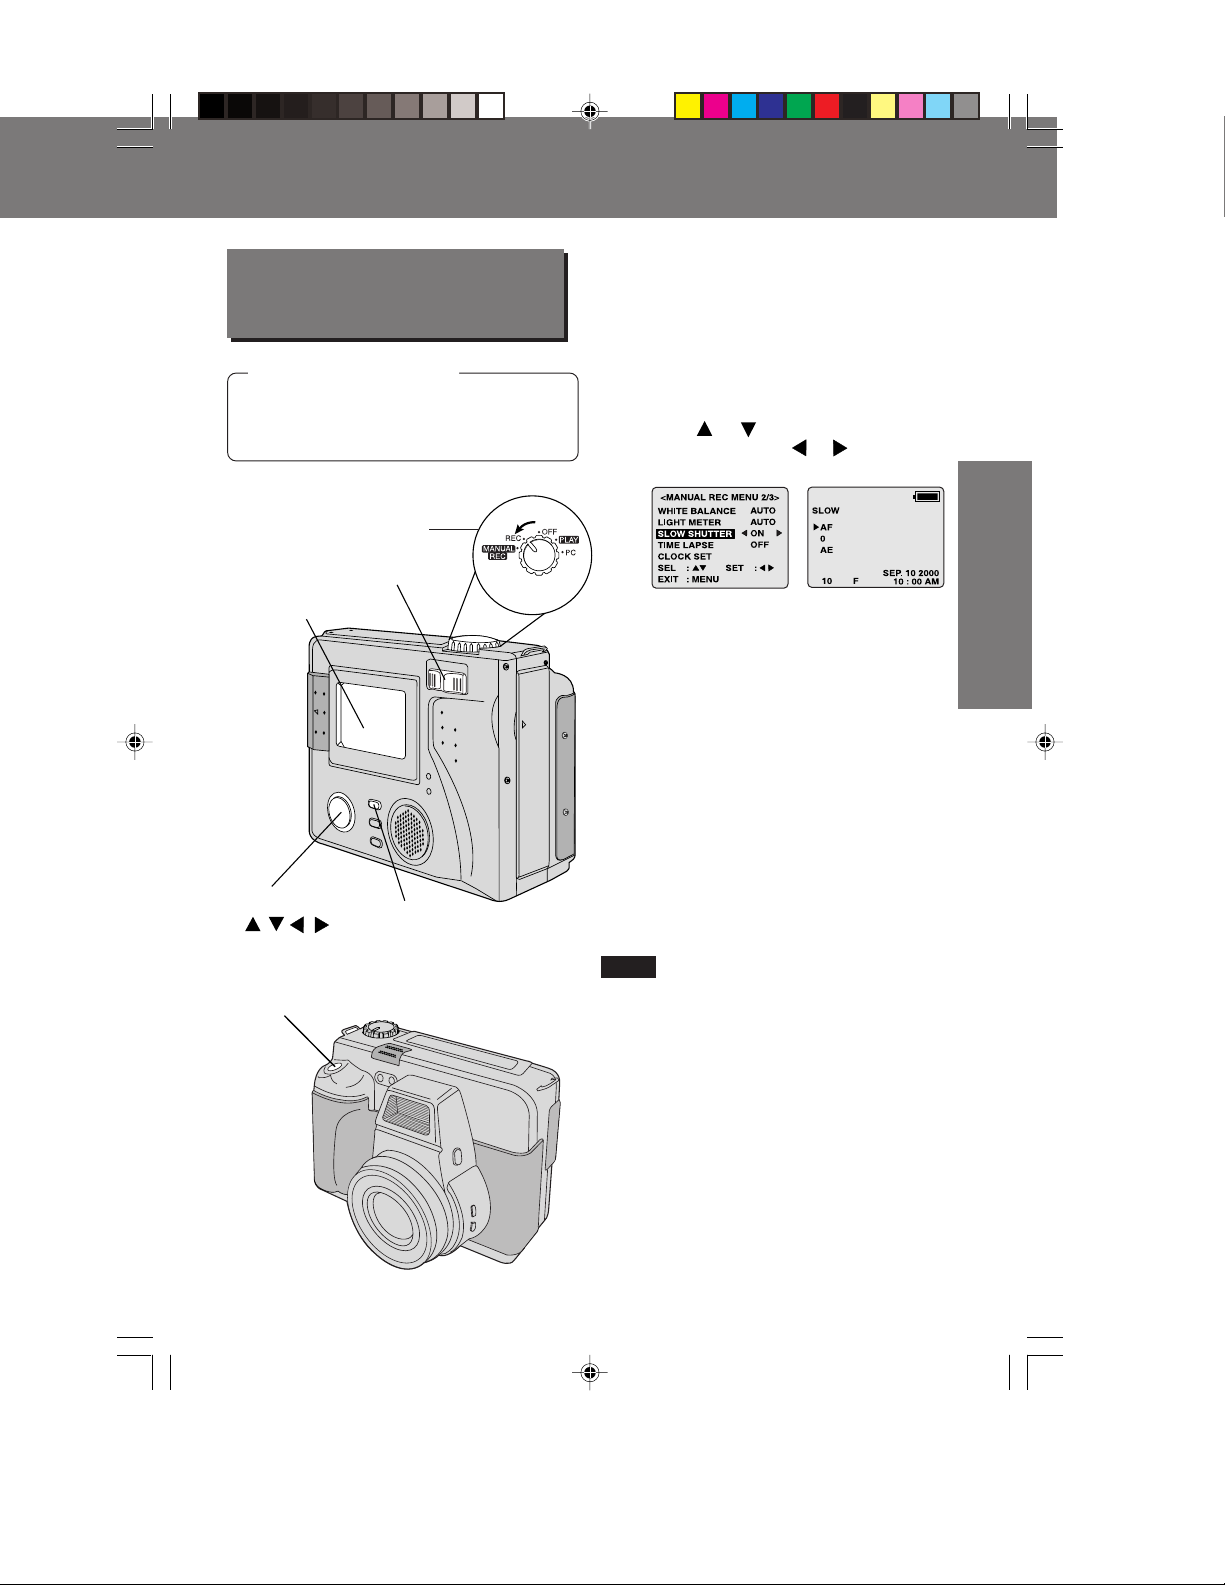
1Press REC MODE repeatedly to select
recording mode (SF, F, N, ZOOM (2X,
3X), TIFF). (See page 25.)
• If you want to use SLOW SHUTTER:
In Manual Rec mode, press MENU to
display the MENU screen, and then
press
SHUTTER. Press
(MANUAL REC only). (See page 10.)
or to select SLOW
or to select ON.
Basic Operation
Basic Operation
LCD
Viewfinder
2ZOOM Switch
1Select Button
/ / /
3, 4SHTR (SHUTTER)
1REC MODE Button
2Press ZOOM T or W to zoom I n and
Out.
• Zoom magnification level is up to 3X.
3Press SHTR down halfway to lock Auto
Focus.
• Beep sounds twice. (See page 26.)
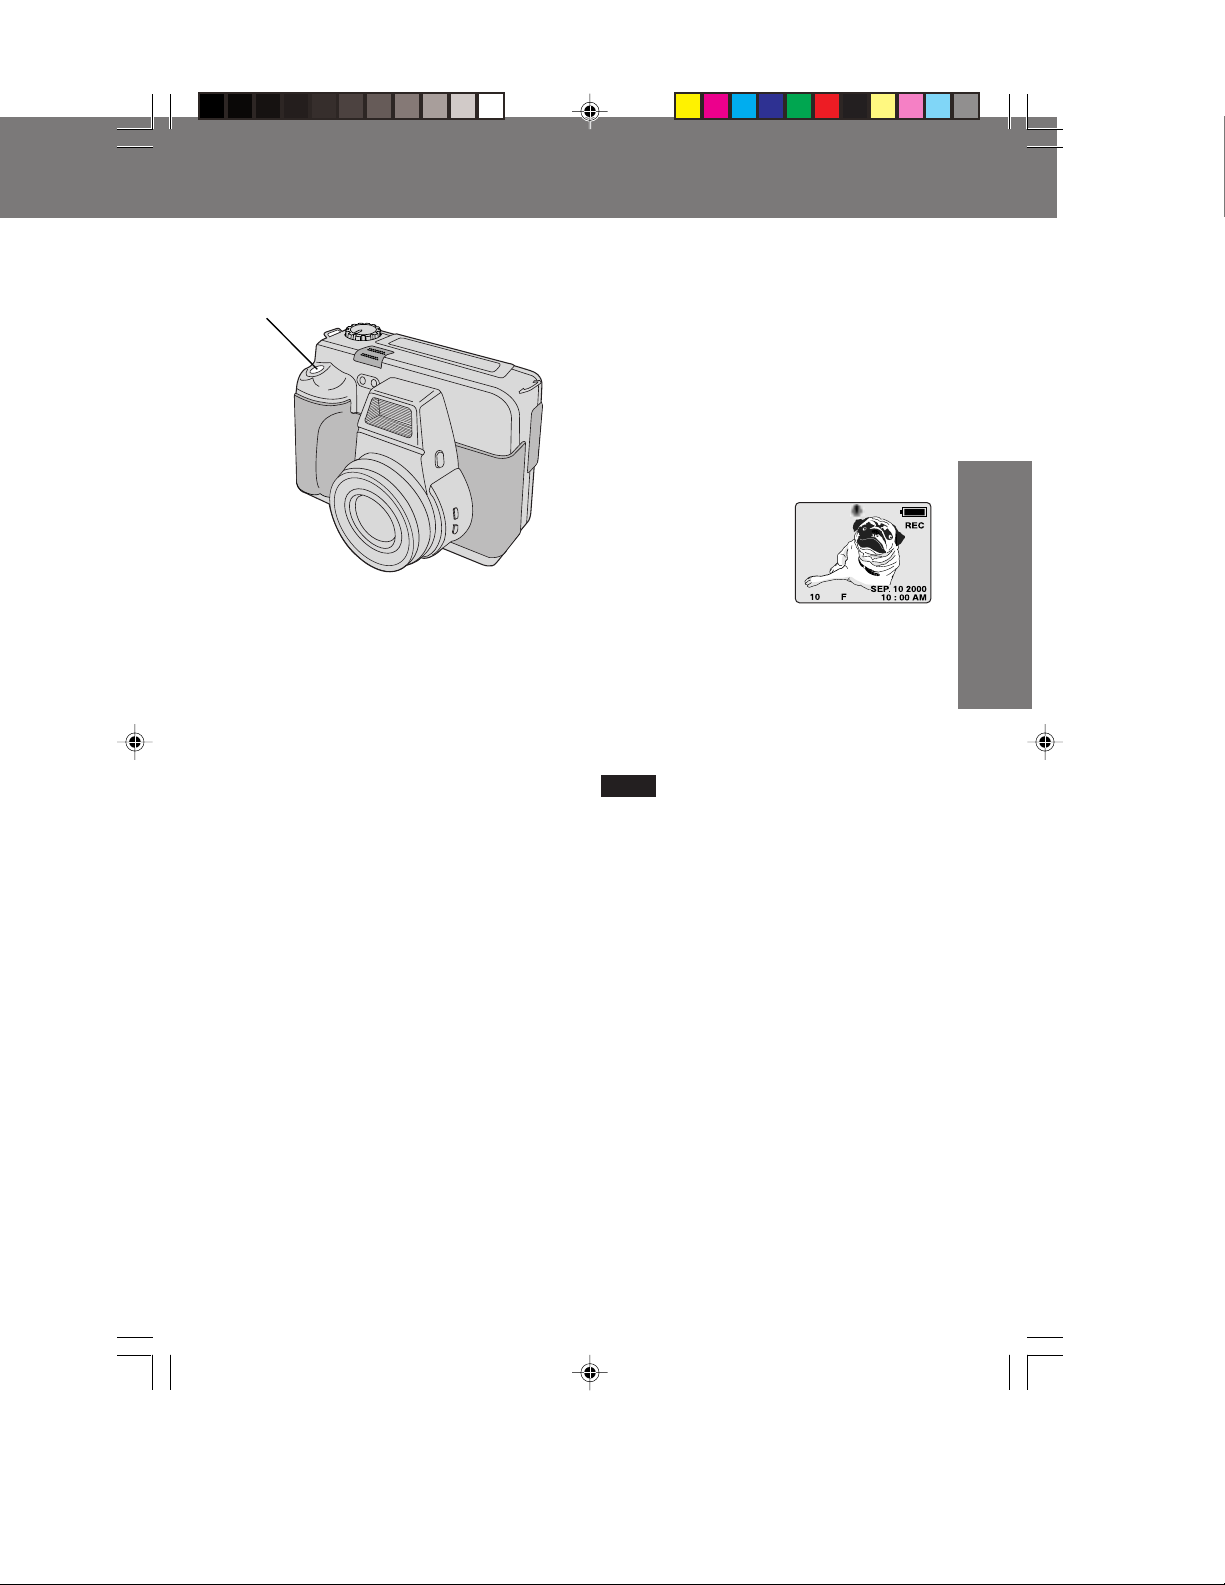
4Press SHTR down the rest of the way
to actually capture the image.
• Shutter sounds once. (See page 26.)
• While the Digital Camera processes
the image, REC will flash on the LCD
Viewfinder and the captured image
will be displayed on the LCD
Viewfinder for a few seconds. Images
cannot be captured while REC
flashes.
Note
• The next image cannot be captured until
the previously captured image is no
longer displayed on the LCD Viewfinder.
• Power shuts off if there is no activity over
1 minute with Battery as a power source
to conserve power. Press SHTR to turn
power back on.
• Do not subject unit to a strong impact
during record or playback. Unit may not
function normally.
• Do not use in extreme heat (104° F and
above). This may damage the disk. Also,
in extremely hot places (104° F and
above), remove the disk from the camera
and store to avoid damaging disk.
SD5000. p21-24.p65 80/01/04, 11:3921
21
Page 22
Capturing Images
Capturing Images
Capturing images (AUDIO ON)
You can record audio with a still image.
The still image and audio can then be
played back in the PLAY mode. (See
page 32.)
Note
• AUDIO is set to ON, the RAPIDFIRE™ is
automatically disabled and can not be
set to ON. (See page 27.)
Before you begin
Remove the Lens Cap. Set the POWER
Switch to REC or MANUAL REC.
(See pages 18, 19.)
POWER Switch
3ZOOM Switch
LCD
Viewfinder
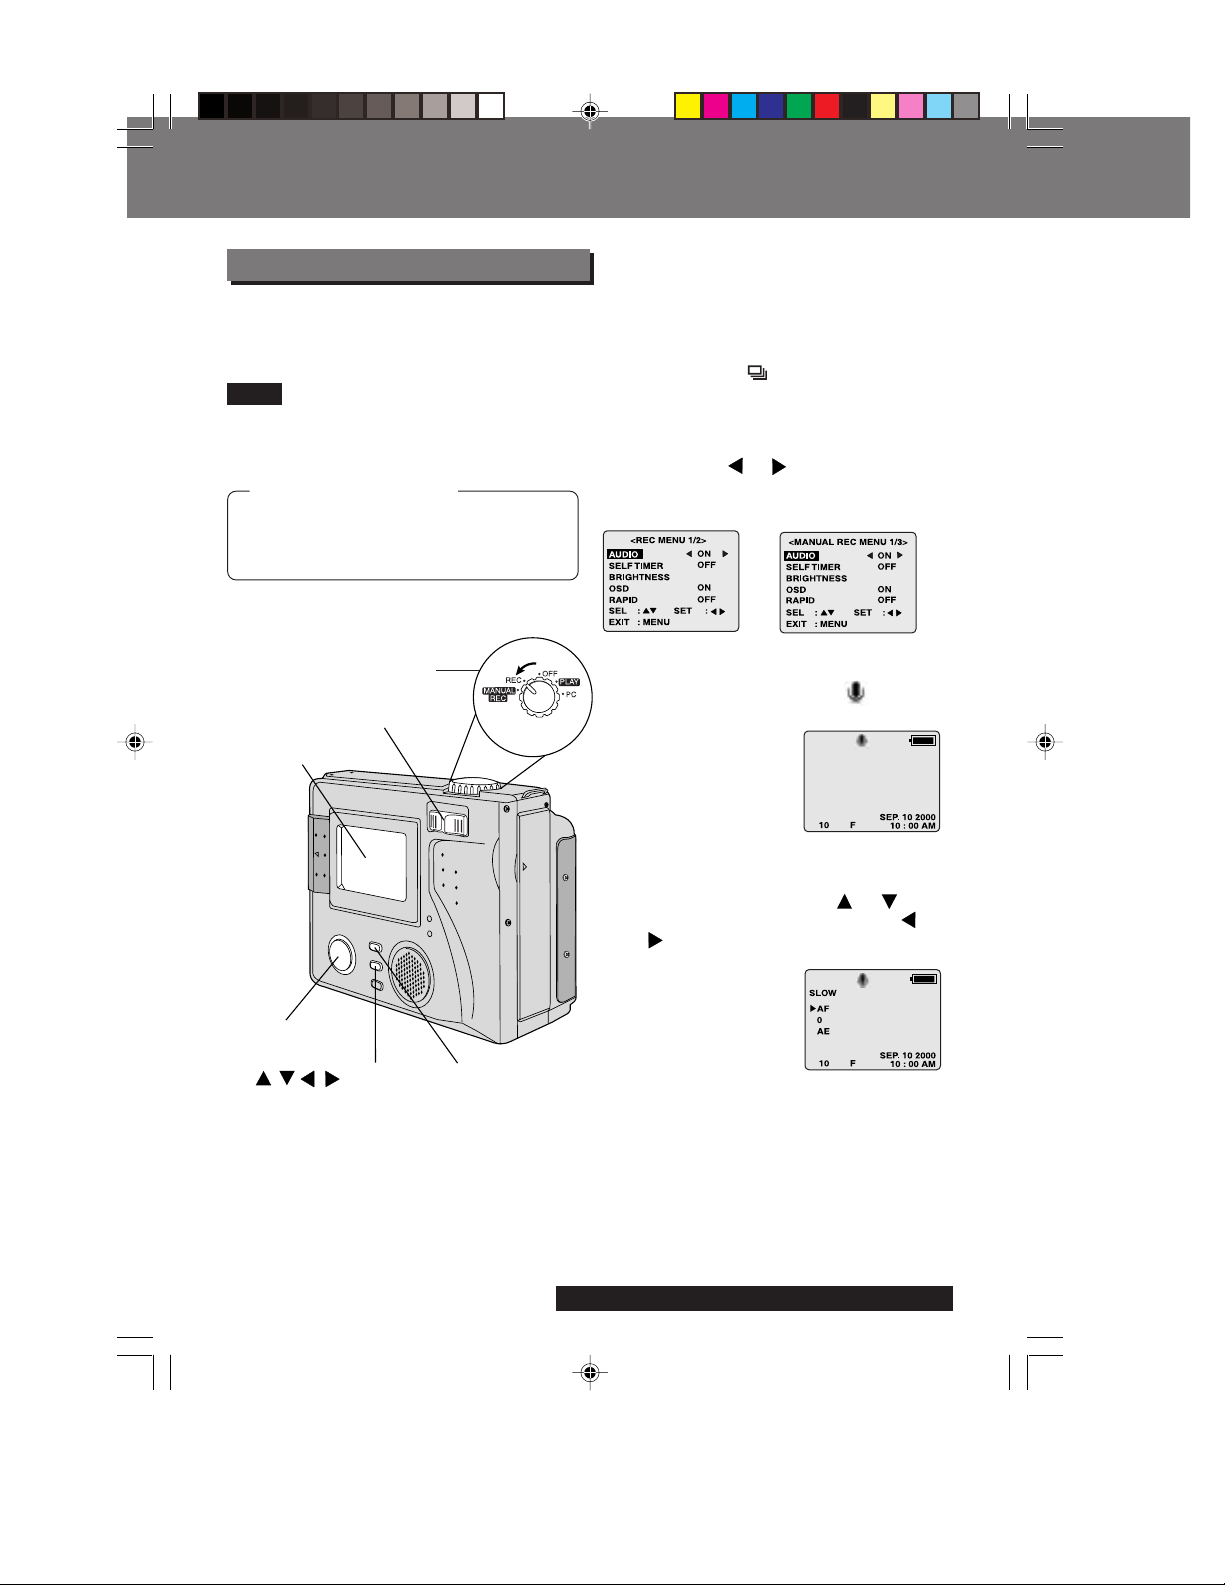
1Press REC MODE repeatedly to select
recording mode (SF, F, N, ZOOM (2X,
3X)). (See page 25.)
• If you select and TIFF mode, you
can not record audio.
2Press MENU to select AUDIO, and
then press
ON .
[ REC mode ]
• Press MENU to exit.
• When AUDIO is ON, the
displayed on the screen.
• If you want to use SLOW SHUTTER:
Press MENU to display the MENU
screen, and then press
select SLOW SHUTTER. Press or
to select ON (MANUAL REC only).
(See page 10.)
or to select AUDIO
[ MANUAL REC mode ]
is
or to
2Select
Button
/ / /
22
SD5000. p21-24.p65 80/01/04, 11:3922
2MENU
Button
1REC MODE
Button
3Press ZOOM T or W to zoom In and
Out.
• Zoom magnification level is up to 3X.
For assistance, please call : 1-800-272-7033.
Page 23
Capturing Images
Capturing Images
4, 5SHTR (SHUTTER)
4Press SHTR down halfway to lock
Auto Focus.
• Beep sounds twice. (See page 26.)
5Press SHTR down the rest of the way
to actually capture the image.
• Shutter sounds once. (See page 26.)
• You can record audio for 5 seconds
by pressing the SHTR button.
• While the Digital Camera processes
the image, REC will flash on the LCD
Viewfinder and the captured image
will be displayed on the LCD
Viewfinder for a few seconds. Images
cannot be captured while REC
flashes.
Note
• The next image cannot be captured until
the previously captured image is no
longer displayed on the LCD Viewfinder.
• Power shuts off if there is no activity over
1 minute with Battery as a power source
to conserve power. Press SHTR to turn
power back on.
• Do not subject unit to a strong impact
during record or playback. Unit may not
function normally.
• Do not use in extreme heat (104° F and
above). This may damage the disk. Also,
in extremely hot places (104° F and
above), remove the disk from the camera
and store to avoid damaging disk.
Basic Operation
Basic Operation
SD5000. p21-24.p65 80/01/04, 11:3923
23
Page 24

Capturing Images
Capturing Images
Motion Image Rec Mode,
Burst Rec Mode
You can select
or Burst Image capture as the REC
MODE.
Motion Image capture
Before you begin
Remove the Lens Cap. Set the POWER
to REC or MANUAL REC.
(See pages 18, 19.)
POWER Switch
LCD
Viewfinder
2ZOOM Switch
1REC MODE Button
3, 4SHTR
(SHUTTER)
MIC
1Press REC MODE repeatedly to select
Motion ( ) or Burst ( ) recording
mode.
2Press ZOOM T or W to zoom I n and
Out.
• Zoom magnification level is up to 3X.
3Press SHTR down halfway to lock
Auto Focus.
• Beep sounds twice. (See page 26.)
4Hold down the SHTR button the rest of
the way to actually capture the image.
If you select AUDIO ON, audio will be
recorded through the MIC. (See page
22.)
REC MODE
• A Motion Image with audio can be
captured for up to 12 seconds.
REC MODE
• A burst of up to 5 images with no
audio (one frame every 0.9 seconds)
can be captured while SHTR is
pressed.
• While the Digital Camera processes
the image, REC will flash on the LCD
Viewfinder and the captured image
will be displayed on the LCD
Viewfinder for a few seconds.
24
SD5000. p21-24.p65 80/01/04, 11:3924
Note
• If you select , you can not record
audio.
• The next image cannot be captured until
the previously captured image is no
longer displayed on the LCD Viewfinder.
• Power shuts off if there is no activity over
1 minute with Battery as a power source
to conserve power. Press SHTR to turn
power back on.
For assistance, please call : 1-800-272-7033.
Page 25

Recording Mode
Capturing Images
Capturing Images
SF : Super Fine Mode (with audio)
(Low compression)
Select for higher quality resolution
with lowest compression (e.g., for
printing)
F : Fine Mode (with audio)
(High compression)
Select for high resolution
(e.g., for printing or archiving an
image).
N : Normal Mode (with audio)
Select for lower resolution
(e.g., for e-mail or posting on the
Internet).
ZOO M: Zoom Mode (with audio)
Use to magnify image to twice its
normal size.
Image size at 2X Zoom is 1 024 x
768 and 3X Zoom is 640 x 480.
: Motion Image Rec Mode (with
audio)
Create a short motion picture (one
frame captured every 0.1 second):
SuperDisk : for 12 seconds
Floppy Disk : for 10 seconds
• REC will flash on the LCD
Viewfinder while processing a
motion image.
: Burst Rec Mode
Capture burst of up to 5 images
(one image every 0.9 second)
while SHTR is held down.
• If the number of remaining pages
is less than 5, only the number
of images equal to the remaining
memory will be captured.
TIFF* : Tagged Image File Format
(SuperDisk Diskette only)
(No compression)
Select for highest quality
resolution with no compression.
Image Resolution and Capacity
(SuperDisk Diskette)
REC Mode
SF
F
N
ZOOM 2X
ZOOM 3X
TIFF*
Image
Resolution
2 048 × 1 536
2 048 × 1 536
1 024 × 768
1 024 × 768
640 × 480
320 × 240
1 024 × 768
2 048 × 1 536
Capacity
(w/supplied Super Disk)
Approx. 240 images
Approx. 340 images
Approx. 1 000 images
Approx. 1 000 images
Approx. 1 500 images
12 seconds × Approx.
70 sets
Approx. 1 400 images
Approx. 12 images
Image Resolution and Capacity
(Floppy Disk)
REC Mode
SF
F
N
ZOOM 2X
ZOOM 3X
Image
Resolution
2 048 × 1 536
2 048 × 1 536
1 024 × 768
1 024 × 768
640 × 480
320 × 240
1 024 × 768
Capacity
(w/Floppy Disk)
Approx. 2 images
Approx. 4 images
Approx. 12 images
Approx. 12 images
Approx. 17 images
10 seconds × 1 set
Approx. 15 images
• The number of images given for each
mode applies when all images are taken
in same mode.
• You can change recording modes at
any time before capturing an image.
• The number of images that can be
captured may differ depending on the
subject. After capturing an image, the
number may not decrease, or it may
decrease by two. This is normal.
*TIFF (RGB)
• TIFF (RGB) images may not be viewable
on all computers.
• It takes approx. 2~3 minutes to save
image data to the SuperDisk.
Basic Operation
Basic Operation
SD5000. p25-28.p65 80/01/04, 11:3925
25
Page 26

Capturing Images
BEEP
QUICK REC (FD)
Capturing Images
Beep
Set Digital Camera to beep (low or high
volume), when an image is captured, or
set to OFF.
Before you begin
Set the POWER Switch to REC, MANUAL
REC or PLAY. (See pages 18, 19.)
Press MENU to display the MENU screen.
POWER Switch
1Press or to select BEEP and
press
settings shown below.
[ REC mode ] [ MANUAL REC mode ]
[ PLAY mode ]
OFF : Select to turn OFF the beep sound.
LOW : Select to hear a low beep sound.
HIGH : Select to hear a loud beep sound.
or to select one of the three
2Press MENU to exit.
1Select Button
/ / /
2MENU Button
Note
• You can select BEEP mode in the REC,
MANUAL REC and PLAY mode.
• To change settings, repeat these steps.
26
SD5000. p25-28.p65 80/01/04, 11:3926
Digital Camera will beep:
• When BEEP is set to LOW or HIGH,
camera will beep as follows.
Once when you press REC MODE,
MENU, MANUAL, MANUAL SELECT or
FLASH Buttons.
Once when an item is selected in Menu.
• Twice when you press SHTR half way to
adjust focus.
For assistance, please call : 1-800-272-7033.
Page 27

Capturing Images
Capturing Images
RapidFire™ Picture Taking
With this feature, captured images are first
stored in Camera memory. This speeds up
the processing time and allows you to
capture the next image right away.
Note
• AUDIO, SELF TIMER and TIME LAPSE
functions are automatically disabled when
RAPIDFIRE™ is set to ON.
Before you begin
Set the PO WER Switch to REC or
MANUAL REC. (See pages 18, 19.)
POWER Switch
2Select
Button
/ / /
1REC
Note
• The Disk Media cannot be ejected until after the
memory data has been written. Press (+)
button to write the memory data to the Disk
Media, then eject the Disk Media.
• Camera memory capacity is: 3 frames in SF
mode, 4 frames in FINE mode, and 12 frames
in NORMAL mode. While the Digital Camera
processes the images “REC” will flash on the
LCD Viewfinder, no further images can be
captured while REC is flashing.
• If there are images left in Camera memory
when the power is turned off, the images are
saved to the Disk Media and then power
goes off.
• To save images in Camera memory to the Disk
Media at any time, press the (+) button.
• Images stored in Camera memory cannot be
deleted. Save the images to the Disk Media,
then refer to page 41 (To Delete Specific
Images).
MODE Button
3MENU Button
1Press REC MODE repeatedly to
select recording mode (SF, F, N).
(See page 25.)
• If the REC mode is set to ZOOM (2X,
3X),
REC mode. (See page 25.)
, or TIFF mode, change
2Press MENU to display the MENU
screen. Press
in the MENU screen, and press
to select ON.
[ REC mode ] [ MANUAL REC mode ]
or to select RAPID
3Press MENU to exit.
• If you select ON, “RAPID” is displayed
on the screen.
• RapidFire™ Page Remaining is
displayed on the screen.
RapidFire™
Page Remain
4Press SHTR to capture the image.
• When page remaining becomes zero,
or when you change modes (e.g.
REC-->MANUAL REC), images are
automatically saved to the Disk
Media.
Caution
• If the Battery becomes depleted with
image data not saved to the Disk Media,
the image data will be lost. Always
confirm the Battery condition before
capturing images.
or
27
Basic Operation
Basic Operation
SD5000. p25-28.p65 80/01/04, 11:3927
Page 28

Capturing Images
BEEP
QUICK REC (FD)
Capturing Images
Quick Rec (FD)
This function works only for Floppy Disk.
This feature allows quick recording on a
floppy disk which is readable on this unit,
however it may not be readable on
another floppy drive.
Before you begin
Set the PO WER Switch to REC or
MANUAL REC. (See pages 18, 19.) Press
MENU to display the MENU screen.
POWER Switch
1Press or to select QUICK REC
(FD) in the MENU screen and press
or to select ON.
[ REC mode ] [ MANUAL REC mode ]
2Press MENU to exit.
Note
• If a floppy disk recorded with QUICK
REC (FD) “ON” is used on another
floppy drive, normal operation may fail.
In this case, record again with QUICK
REC (FD) “OFF” or copy the recording.
• REC flashes on the LCD Viewfinder
while the Digital Camera is processing
images. Images cannot be captured
while REC flashes.
1Select Button
/ / /
2MENU Button
Rec Review
When in REC or MANUAL REC mode, you can confirm the last captured image by
holding the
removed, this feature will not work.
• If Rapid Fire is set to “ON”, this feature cannot be used.
28
SD5000. p25-28.p65 80/01/04, 11:3928
(-) button down. However, if the camera is turned off or if the disk was
For assistance, please call : 1-800-272-7033.
Page 29

Manual Mode
Capturing Images
Capturing Images
With this feature you can select the
desired settings for various recording
modes.
Before you begin
Set the POWER Switch to MANUAL REC.
(See page 19.)
POWER Switch
1REC MODE
Button
4SHTR (SHUTTER)
2MANUAL
Button
3MANUAL
Select Button
1Press REC MODE repeatedly to select
recording mode (SF, F, N, ZOOM (2X,
, , TIFF). (See page 25.)
3X),
2Press MANUAL to enter Manual
mode.
• The current settings appear on the
left side of the screen.
• Each additional press of MANUAL
selects “Focus”, “Exposure”, and
“Program AE” mode.
selection.
mark shows
3Press MANUAL Select or to
select the desired setting in the current
mode.
• Please refer to the chart below.
• The current setting is displayed on
the LCD Viewfinder.
4Press SHTR to capture the images.
IRIS + 1.5 EV
IRIS + 1.0 EV
Iris priority (F8.0)
Basic Operation
Basic Operation
Macro (50 cm [19-11/16 inch] ~ 6 cm [2-6/16 inch])
AF (infinity ~ 30 cm [11-13/16 inch])
Zone AF (2.0 m [78-3/4 inch] ~ 1.0 m [39-3/8 inch])
Zone AF (3.5 m [137-13/16 inch] ~ 2.5 m [98-7/16 inch])
Zone AF (Near infinity)
Focus Exposure Program AE
SD5000. p29-32.p65 80/01/04, 11:3929
IRIS + 0.5 EV
IRIS ± 0 EV
IRIS - 0.5 EV
IRIS - 1.0 EV
IRIS - 1.5 EV
Iris priority (F2.0)
Program AE
Shutter priority (1/125)
Shutter priority (1/500)
Press MANUAL Button
Press MANUAL Select
Button
(Continued on next page.)
29
Page 30

Capturing Images
Capturing Images
[ Recording Modes ]
Mode
FOCUS
EXPOSURE
PROGRAM AE
Note
• All set items return to factory settings when power is turned off. However, settings are
maintained if auto power shut off occurs after one minute with no activity, or if camera is
put back in MANUAL REC mode after being in AUTO REC, PLAY, or PC mode.
• Selectable Exposure values and program Auto Exposure (AE) settings are included to
enhance creative photography and improve picture quality of specific subject matter.
Please feel free to experiment with the different available settings.
• When Preferred Shutter Speed mode is selected, Slow Shutter cannot be used.
• While the menu is displayed, Lens Mode operation is not available. In this case, exit the
menu screen before pressing MANUAL button.
• When FOCUS is set to Macro mode, zoom reverts to wide end and PROGRAM AE is
fixed to AE.
Display
AF
0 EV
+1.5 ~ -1.5 EV
AE
F8.0
F2.0
1/125
1/500
Explanation
Use AUTO FOCUS for normal recording. Focus is
adjusted automatically from 30 cm ~ ∞.
Focus will be fixed between approx. 1.0 m~2.0 m.
Focus will be fixed between approx. 2.5 m~3.5 m.
Focus will be fixed at infinity (for distant objects).
Macro mode is entered. Focus is adjusted within a 6.5
cm ~ 50 cm range.
0 EV is the standard (center) value.
You can select one of 7 exposure levels (+1.5 ~
-1.5 EV).
Program AE (auto exposure) mode. Use for normal
recording.
Fixed at F8.0 in the Preferred Iris mode.
Fixed at F2.0 in the Preferred Iris mode.
Fixed at 1/125 seconds in the Preferred Shutter Speed
mode.
Fixed at 1/500 seconds in the Preferred Shutter Speed
mode.
30
SD5000. p29-32.p65 80/01/04, 11:3930
For assistance, please call : 1-800-272-7033.
Page 31

Adjusting LCD Viewfinder Brightness
Adjusting LCD Viewfinder Brightness
You may want to brighten or darken the
LCD (Liquid Crystal Display) Viewfinder for
easier viewing. This adjustment will not
affect the captured image brightness.
1Press or to select BRIGHTNESS
in the MENU screen.
Before you begin
Set POWER Switch to REC, MANUAL
REC, or PLAY. (See pages 18, 19.) Press
MENU to display the MENU screen.
POWER Switch
LCD
Viewfinder
1, 2, 3
Select Button
/ / /
4MENU Button
[ REC mode ]
[ PLAY mode ]
[ MANUAL REC mode ]
2Press to display LCD BRIGHTNESS
screen.
3Press (-) or (+) to change the
brightness of the LCD Viewfinder;
(+) for brighter, (-) for darker.
4Press MENU twice to exit.
Basic Operation
Basic Operation
SD5000. p29-32.p65 80/01/04, 11:3931
Note
• The original BRIGHTNESS will be
restored when the Digital Camera is
turned off.
• The brightness level set in this menu is
not related to the brightness of the
captured image.
31
Page 32

Pla ying Back Captured Images
Playing Back Captured Images
Manual Playback
You can playback recorded images on the
LCD Viewfinder.
• For images recorded with audio, a
mark is displayed on the screen and
audio is played back when SHTR is
pressed.
1Press MENU to display PLAY MENU
and press
NORMAL.
to set DISPLAY MODE to
Before you begin
Set the POWER Switch to PLA Y .
(See page 19.)
• Press MENU to exit.
POWER Switch
LCD
Viewfinder
VOL Button
(+) / (-)
1, 2, 3
Select Button /
Note
• A still image with audio will be played. The
audio volume can be adjusted by
pressing VOL (+) / (-).
• Do not subject unit to a strong impact
during record or playback. Unit may not
function normally.
• Do not use in extreme heat (104° F and
above). This may damage the disk. Also,
in extremely hot places (104° F and
above), remove the disk from the camera
and store to avoid damaging disk.
• Power shuts off if there is no activity over
2 minutes with Battery as a power source
to conserve power. Press SHTR to turn
POWER back.
32
1MENU Button
2Press (+) or (-) repeatedly,
(+) for ascending order, and (-) for
[
descending order] to change the
displayed image on the LCD
Viewfinder.
• The image page number and
recording mode are displayed at the
bottom of the screen.
[ With AUDIO ]
• If there are no images in memory,
a blue back screen will be displayed.
• The image with audio is played back
when SHTR is pressed.
[ Without AUDIO ]
3Hold down (+) or (-), [ (+) for
ascending order, and (-) for
descending order] to quickly advance
the images on the LCD Viewfinder.
• Page number is changed
continuously while (+) or (-) is
held down.
• Selected page is displayed when
button is released.
For assistance, please call : 1-800-272-7033.
SD5000. p29-32.p65 80/01/04, 11:3932
Page 33

Pla ying Back Captured Images
Playing Back Captured Images
Motion Image Playback
When an image captured in
Image Rec mode (see page 25) is
displayed, a message like the one at right
appears.
Motion
1SHTR (SHUTTER)
• To adjust volume, press VOL
(+)/ (-).
1Press SHTR to start playback of
Motion image.
2While Motion Image data is being
read, “NOW LOADING” is displayed on
the LCD.
Basic Operation
Basic Operation
Multi Playback
If you select in the PLAY MENU, you
will be able to see Thumbnail images on
the LCD Viewfinder (each Thumbnail
page will contain 9 images).
Before you begin
Set the PO WER Switch to PLA Y .
(See page 19.) Press MENU to display
the MENU screen.
POWER Switch
NOW LOADING
1Press or to select DISPLAY
MODE in the MENU screen. And,
press or to select .
2Press MENU. A Multi Image Playback
screen will appear.
• When many images are stored in the
Disk Media, it may take a while for the
Multi Image screen to playback.
3Press (+) repeatedly to scroll
forward through Multi Image pages
(each page contains 9 images).
• All images will be displayed as
still images.
1, 3
Select Button
/ / /
SD5000. p33-35.p65 80/01/04, 11:4033
2MENU Button
(Continued on next page)
33
Page 34

Playing Bac k Captured Images
Pla ying Back Captured Images
POWER Switch
4, 5, A, C
Select Button
/ / /
A, B, EMENU Button
6, DSHTR (SHUTTER)
4Press (-) to move back through the
images on the page until the number
of the desired image is highlighted.
5Press or to go directly to the next
or previous page of images.
6Press SHTR to playback the selected
image, and to return to Manual
Playback.
Zoom Playback
Before you begin
Set the PO WER Switch to PLA Y .
(See page 19.)
A Press MENU to display PLAY MENU
and press or to select ZOOM.
B Press MENU to set display mode to
ZOOM.
34
SD5000. p33-35.p65 80/01/04, 11:4034
C Press , , , or repeatedly to
change the zooming area.
D Press SHTR to zoom in on the
selected area.
E Press MENU to restore the image to
its normal size.
Note
• The zoom area cannot be selected for
(Motion Image Rec) (QVGA).
For assistance, please call : 1-800-272-7033.
Page 35

Viewing Images on a TV Screen and Transferring Images to a VCR
VIDEO IN
AUDIO IN
POWER
VOLCHCH
Viewing Images on a TV Screen and Transferring Images to a VCR
A/V OUT
TV Monitor
A/V Cable
(supplied)
3POWER
Switch
1
1Connect the Digital Camera to your
TV or VCR using the A/V Cable
(supplied) as shown.
2Turn on your TV and select its video
input mode. If using a VCR, set it to
LINE input. (See TV/VCR manual.)
3Set the Digital Camera POWER to
PLAY. To view playback on a TV
Monitor, perform playback as
described on pages 32~34.
• The POWER LED lamp lights up.
4If using a VCR, you can record the
desired images. (See VCR manual.)
Note
• For extended periods of use, it is
recommended to use the AC Adaptor
(supplied) as a power source.
• On screen displays will appear in black
and white on the TV monitor.
• You can view REC or MANUAL REC
mode, however picture quality is best in
PLAY mode.
VCR
Basic Operation
Basic Operation
2, 4
2
1
POWER
VOL
VIDEO IN
AUDIO IN
A/V Cable
1
A/V Cable
(supplied)
SD5000. p33-35.p65 80/01/04, 11:4035
Connect the A/V OUT Terminal on the
Camera and the AUDIO IN/VIDEO IN on
the VCR or TV using the A/V Cable
(supplied).
(supplied)
35
Page 36

Using the Built-in Flash
Using the Built-in Flash
This camera features a Built-in Flash which
can be used to capture images in dimly lit
conditions.
Before you begin
Set the PO WER Switch to REC or
MANUAL REC. (See pages 18, 19.)
POWER Switch
LCD Viewfinder
1 FLASH Button
Light Sensor
FLASH Emitter
1Press (FLASH) repeatedly to select
flash mode.
The mode that is selected will be
displayed on the LCD Viewfinder.
AUTO (No indication) :
The flash automatically lights
depending on lighting conditions.
: The flash will light whenever you
capture an image (flash twice).
: This setting reduces the red
reflections in the eye when the
flash lights. The flash will light
three times, once before capturing
and then twice during capturing.
(The flash will light whenever you
capture an image.)
• The effective range of the flash is roughly
• Do not use the flash close to a person’s
• When the recording mode is set to
• Do not cover the FLASH Emitter and Light
: The flash will not light even when
you capture an image.
(MANUAL REC mode only.)
Note
7.8 inches (20 cm) to 9.8 feet (3 m).
If you are using the flash in very bright
areas, the image background may
become dark.
face as it may be harmful to the eyes.
Especially when capturing images of
infants or small children, keep at least
3.3 feet (1 m) away.
(Motion Image Rec) or (Burst Rec),
the flash mode will go to
Sensor with your finger or other object.
(OFF).
36
SD5000. p36-40.p65 80/01/04, 11:4036
For assistance, please call : 1-800-272-7033.
Page 37

During normal use, Auto White Balance
automatically maintains optimum color
balance. If this is not the case, set
manually.
Before you begin
Set the PO WER Switch to MANUAL
REC. (See page 19.) Press MENU to
display the MENU screen.
POWER Switch
1Select Button
/ / /
White Balance
White Balance
1Press or to select WHITE
BALANCE and press
one of the four settings shown below.
• Default setting is AUTO.
AUTO (No indication) :
Automatically maintains
optimum color balance in
most lighting conditions.
: When the source illumination
is a halogen lamp.
: When shooting outdoors on a
sunny day.
WS (SET) : Manually sets the color
balance to a fixed position
based on the current lighting
environment.
• Aim the camera at white
object (important: white
object must fill entire LCD
viewfinder).
• Press SHTR button.
or to select
Special Features
Special Features
2MENU Button
SD5000. p36-40.p65 80/01/04, 11:4037
2Press MENU to exit.
• Selected mode will appear on the
LCD Viewfinder. (See page 9.)
Note
• When the Camera is set to POWER OFF,
the white balance setting will be stored in
Camera memory. When the Camera is
set to POWER ON, the white balance
setting will default to the previous setting.
37
Page 38

Light Metering
Light Metering
According to the recording condition and
purpose, set light metering to measure
exposure time.
Before you begin
Set the PO WER Switch to MANUAL
REC. (See page 19.) Press MENU to
display the MENU screen.
1Press or to select LIGHT METER
and press
two settings shown below.
• Default setting is AUTO.
or to select one of the
POWER Switch
1Select Button
/ / /
AUTO (No indication) :
Ideal for normal capturing, the
focus is set to the center portion
of the finder and the entire image
is metered.
: A small sphere in the center
portion of the finder is metered.
This mode is useful for capturing
back lit conditions, such as when
the subject is brightly lit.
2Press MENU to exit.
• Selected mode will appear on
the LCD Viewfinder. (See page 9.)
2MENU Button
38
SD5000. p36-40.p65 80/01/04, 11:4038
For assistance, please call : 1-800-272-7033.
Page 39

The Self-Timer allows you to capture an
image about 10 seconds after pressing
the shutter.
Note
• SELF TIMER is set to ON, the
RAPIDFIRE™ and TIME LAPSE functions
are automatically disabled and can not be
set to ON.
Before you begin
Set the PO WER Switch to REC or
MANUAL REC. (See pages 18, 19.)
Press MENU to display the MENU
screen.
POWER Switch
Self Timer Recording
Self Timer Recording
1Press or to select SELF TIMER
and press
This puts the camera in self-timer
mode.
[ REC Mode ] [ MANUAL REC Mode ]
• After ON is selected and MENU is
pressed,
LCD Viewfinder (see page 9).
or to select ON.
mark will appear on the
1Select Button
/ / /
3SHTR
(SHUTTER)
2MENU Button
Self-Timer Indicator
2Press MENU to exit.
3Press SHTR.
• The Self-Timer Indicator lights up.
The indicator starts flashing rapidly
after about 8 seconds and the image
is captured about 2 seconds later.
• The Self-Timer setting returns to
OFF mode each time an image is
captured. Repeat these steps each
time Self-Timer is used.
Special Features
Special Features
39
SD5000. p36-40.p65 80/01/04, 11:4039
Page 40

Time Lapse Recording
Time Lapse Recording
Time Lapse enables you to set the camera
to automatically capture an image from
once every minute to once every 24 hours.
Note
• TIME LAPSE is set to ON, the
RAPIDFIRE™ and SELF TIMER functions
are automatically disabled and can not be
set to ON.
Before you begin
Set the PO WER Switch to MANUAL
REC. (See page 19.) Press MENU to
display the MENU screen.
POWER Switch
1Press or to select TIME LAPSE
and press
interval.
You can select a capture rate of
approx. 1MIN, 5MIN, 10MIN, 30MIN,
1HOUR, 6HOUR, 12HOUR, or
24HOUR.
• Time Lapse feature is available with
Super Fine (SF), Fine (F), Normal (N) and
Zoom (2X, 3X) mode.
If the REC mode is set to
mode, change REC mode. (See page
25.)
2Press MENU to set time lapse mode.
or to select time
, or TIFF
1Select Button
/ / /
2MENU Button
3SHTR (SHUTTER)
40
SD5000. p36-40.p65 80/01/04, 11:4040
3Press SHTR to start time lapse mode
recording.
• REC will flash on the LCD Viewfinder
while image is being processed.
• Press MENU to exit this mode.
Note
• During time lapse recording (even
during non-recording intervals), the
battery may become depleted. Therefore,
using an AC Adaptor (supplied) is
recommended.
• During time lapse, the ZOOM area is not
displayed.
For assistance, please call : 1-800-272-7033.
Page 41

To Delete Specific Images
To Delete Specific Images
You can delete unwanted images and
increase the remaining image memory.
Warning: Once deleted, images cannot be
restored.
Before you begin
Set the POWER Switch to PLA Y.
(See page 19.) Press MENU to display
the MENU screen.
POWER Switch
1Press or to select DELETE and
press
to display DELETE menu.
2Press to display DELETE PAGE
menu.
3Press or to select the image page
to be deleted.
4Press SHTR to delete an image.
• To delete other specific image pages,
repeat steps 3~4.
• Press MENU three times to exit.
Special Features
Special Features
1, 2, 3
Select Button
/ / /
4MENU Button
4SHTR (SHUTTER)
SD5000. p41-43.p65 80/01/04, 11:4141
Note
• To delete all image data, refer to
“Formatting the Disk Media” on page 43.
Important:
• While deleting images, do not turn off
the Digital Camera or unplug the AC
Adaptor (supplied) because this will
cause irreversible damage to the
memory, resulting in reduced image
storage capacity.
41
Page 42

Multi Delete
Multi Delete
You can delete selected images on the
Multi playback screen from memory easily
with this operation.
Warning: Once deleted, images cannot be
restored.
Before you begin
Set the POWER Switch to PLA Y.
(See page 19.) Press MENU to display
the MENU screen.
POWER Switch
1, 2, 3
Select Button
/ / /
4 FLASH
Button
MENU Button
1Press or to select DELETE and
press to display DELETE menu.
2Press or to select MULTI
DELETE and press to display
MULTI DELETE menu.
• The multi playback screen is
displayed.
3Press , , , or to select the
images you want to delete (up to 100
images), then press SHTR to set the
selection.
• The file number of the selected image
is displayed in red.
• To cancel a selection, select the
image and press SHTR again.
3SHTR (SHUTTER)
42
SD5000. p41-43.p65 80/01/04, 11:4142
• Press MENU three times to exit this
menu.
4Press (FLASH) to delete the
selected images.
• “DELETE COMPLETE” is displayed
on the LCD Viewfinder.
Important:
• While “PLEASE WAIT” is displayed, do
not turn off the Digital Camera or
unplug the AC Adaptor (supplied)
because this will cause irreversible
damage to the memory, resulting in
reduced image storage capacity.
For assistance, please call : 1-800-272-7033.
Page 43

Formatting the Disk Media
Formatting the Disk Media
You can easily format your Disk Media
using this operation. Quick formatting will
be done.
Warning: Formatting permanently removes
all image data as well as any
other files on the Disk.
Before you begin
Set the POWER Switch to PLA Y.
(See page 19.) Press MENU to display
the MENU screen.
POWER Switch
1Press or to select DELETE and
press to display DELETE menu.
2Press or to select FORMAT and
press to display FORMAT menu.
3Press or to select YES.
• To exit this menu, press or to
select NO and press SHTR.
Special Features
Special Features
1, 2, 3
Select Button
/ /
4SHTR (SHUTTER)
SD5000. p41-43.p65 80/01/04, 11:4143
4Press SHTR to format.
• “PLEASE WAIT” will be displayed on
screen as all images are deleted from
memory. Deletion is complete when
“NO IMAGE” is displayed.
Important:
• While “PLEASE WAIT” is displayed, do
not turn off the Digital Camera or
unplug the AC Adaptor (supplied)
because this will cause irreversible
damage to the memory, resulting in
reduced image storage capacity.
• When a Floppy Disk formatted with
Macintosh is inserted, DISK ERROR
is displayed and formatting cannot be
done.
43
Page 44

Multi Copy
Multi Copy
You can copy specific images from one
Disk Media to another Disk Media using
this operation.
Before you begin
Set the PO WER Switch to PLA Y .
(See page 19.) Press MENU to display
the MENU screen.
POWER Switch
1Press or to select COPY.
2Press to display COPY menu and
press
or to select MULTI COPY.
3Press to display the multi playback
screen.
1, 2, 3, 4
Select Button
/ / /
5
FLASH
Button
MENU Button
4SHTR
(SHUTTER)
Important:
• While “PLEASE WAIT” is displayed, do
not turn off the Digital Camera or
unplug the AC Adaptor (supplied)
because this will cause irreversible
damage to the memory, resulting in
reduced image storage capacity.
Note
• If the memory capacity of the Disk Media that
you want to copy to is not sufficient, the
following message will appear.
• You can copy images from a SuperDisk
Diskette to another SuperDisk Diskette
providing the TARGET disk has enough
space. You can copy images from a Floppy
Disk to another Floppy Disk or to a SuperDisk
Diskette providing the TARGET disk has
enough space.
44
4Press , , , or to select the
image you want to copy, and then
press SHTR to set the selection.
• The file number of the selected image
is displayed in green.
• To cancel a selection, select the
image and press SHTR again.
• Press MENU to exit this menu.
5Press
For assistance, please call : 1-800-272-7033.
• “PLEASE WAIT”, then “PLEASE
• Press MENU twice to exit.
(FLASH) to copy.
CHANGE DISK” is displayed. After
Disk is changed, “PLEASE WAIT” is
displayed as images are copied.
When copying is complete, the
screen below will be displayed.
SD5000. p44-46.p65 80/01/04, 11:4144
Page 45

You can copy all of the images stored on a
Disk Media to another Disk Media using
this operation.
Before you begin
Set the PO WER Switch to PLA Y .
(See page 19.) Press MENU to display
the MENU screen.
POWER Switch
1, 2, 3
Select Button
/ /
MENU Button
4SHTR (SHUTTER)
To Copy All Images
To Copy All Images
1Press or to select COPY.
2Press to display COPY menu and
press
or to select COPY ALL.
3Press to display COPY ALL menu
and press or to select YES.
• Select NO to return to the COPY
MENU.
4Press SHTR to copy.
Special Features
Special Features
Note
• When copying images from one disk to
another, the images are temporarily stored in
camera memory before being copied to the
target disk. As the camera memory is only
equal to about one Floppy Disk, all the
SuperDisk Diskette images cannot be stored
and COPY ALL cannot be used. If COPY ALL
is selected when SuperDisk is the source,
“CANNOT COPY ALL THE SUPERDISK” will
be displayed.
• If the memory capacity of the target SuperDisk
Diskette or Floppy Disk is insufficient, the
following message will appear.
• You can copy images from a Floppy Disk to
another Floppy Disk or a to SuperDisk
Diskette providing the TARGET disk has
enough space.
SD5000. p44-46.p65 80/01/04, 11:4145
• “PLEASE WAIT”, then “PLEASE
CHANGE DISK” is displayed. After
Disk is changed, “PLEASE WAIT” is
displayed as all of the images are
copied. When copying is complete,
the screen below will be displayed.
• Press MENU twice to exit.
Important:
• While “PLEASE WAIT” is displayed, do
not turn off the Digital Camera or
unplug the AC Adaptor (supplied)
because this will cause irreversible
damage to the memory, resulting in
reduced image storage capacity.
45
Page 46

Slide Show
Slide Show
You can playback captured images as a
slide show.
Before you begin
Set the POWER Switch to PLA Y .
(See page 19.) Press MENU to display
the MENU screen.
POWER Switch
1, 2
Select Button
/ /
MENU Button
1Press or to select SLIDE SHOW.
2Press to start slide show.
• Press MENU to exit this mode.
Note
• SLIDE SHOW automatically stops after
approx. 20 minutes when SuperDisk is
inserted.
• SLIDE SHOW continues endlessly when
Floppy Disk is inserted. However, if Super
Fine mode images are included, SLIDE
SHOW may stop after approx. 20 minutes.
Important:
• While SLIDE SHOW is proceeding, do
not turn off the Digital Camera or
unplug the AC Adaptor (supplied)
because this will cause irreversible
damage to the memory, resulting in
reduced image storage capacity.
46
SD5000. p44-46.p65 80/01/04, 11:4146
For assistance, please call : 1-800-272-7033.
Page 47

Transferring Your Images (Windows)
Transferring Your Images (Windows)
System Requirements:
• IBM PC/AT or compatible
• Windows 98/2000 preinstalled PC with
USB port
• 486 CPU or higher (Pentium
recommended)
• 32 MB on-board memory
• 10 MB available hard disk space
• 256 Color Monitor or Full Color Monitor
recommended (24 bits per pixel or
16.7 million colors)
• CD-ROM drive (for installation)
• USB Port
• Mouse or other pointing device
Driver & File Converter Installation
Note
• If Windows 2000 USB Device Driver is installed, please refer to page 48.
1Turn on the PC (Personal Computer) and start up Windows 98.
2Insert supplied Software CD-ROM into the CD-ROM Drive.
3Select and click the icon you want to install.
USB Device Driver : Click
PalmCam File Converter : Click
Adobe PhotoDeluxe : Click
QuickTime™ : Click
4Follow the instructions as they appear on your PC screen.
PalmCam File Converter
•When transferring non-Design rule for
Camera File system format images from
your PC to the Digital Camera, you will
need to convert the image data to
Design rule for Camera File system format
so that the Camera can read it.
Note
• The Design rule for Camera File system
was standardized by the Japan Electronic
Industry Development Association (JEIDA)
with the main purpose of developing an
environment in which image files such as
those from Digital Still Cameras can easily be
exchanged with other related devices.
QuickTime and the QuickTime logo are trademarks used under license.
QuickTime is registered in the U.S, and other countries.
QuickTime™ Installation
• QuickTime, when installed, allows your
Digital Camera to transfer Motion Image
Recording files to your PC.
Note
• For information on Apple QuickTime,
visit their website at :
http://www.apple.com/support/
Special Features
Special Features
SD5000. p47-51.p65 80/01/04, 11:4147
47
Page 48

Transferring Your Images (Windows)
Transferring Your Images (Windows)
• If installation cannot be done with steps on page 47, please follow the steps
below.
To install software
1Insert supplied Software CD into the CD-ROM drive. A window may appear letting
you choose the software you want to install.
Note
• If a window does not appear automatically, click the “Start” button on your desktop
and then click “Run”. When the Run box is open, type in “D:\Instmenu.exe” where
“D:” is the drive letter of your CD; then click “OK”.
2Follow the instructions that appear on-screen.
Note
• Exit from all applications and disable any virus-protection applications.
USB Driver Installation (Windows 2000)
The USB Driver software for Windows 2000 is currently not available, but will be
available in the future on our website at www.panasonic.com/palmcam or by calling
1-800-272-7033.
48 For assistance, please call : 1-800-272-7033.
SD5000. p47-51.p65 80/01/04, 11:4148
Page 49

Transferring Your Images (Windows)
Transferring Your Images (Windows)
By using the included USB cable to
connect to a PC, you can use your
SuperDisk camera as an external storage
device.
2
TO PC Terminal
POWER Switch
3
USB Cable (supplied)
*Data transfer using USB cable is applicable
only for Microsoft® Windows® 98
preinstalled PC with USB port, Windows
2000 PC, iMac®, iBook®, Power Macintosh
G3 with USB port or Power Mac™ G4 and
Mac OS version 8.1 or later.
• The USB Driver software for Windows 2000
is currently not available, but will be
available in the future on our website at
www.panasonic.com/palmcam or by
calling 1-800- 272-7033.
Personal Computer
®
®
1
USB Terminal
Special Features
Special Features
Connection
1Turn on your PC.
2Set the POWER Switch to PC on the Digital Camera.
• The POWER LED lamp lights up.
• LCD Viewfinder is off in PC mode.
3Connect the Digital Camera to your PC (Windows) using the USB Cable (supplied).
• You can use this Digital Camera as a SuperDisk Drive. (See pages 62, 63, 64, 66.)
Note
• For extended periods of use, it is recommended to use the AC Adaptor (supplied) as a
power source.
• Once the USB driver is installed, the Digital Camera can be connected even after the
PC has been started. The USB Cable (supplied) must be connected as described in
the above steps.
SD5000. p47-51.p65 80/01/04, 11:4149
49
Page 50

Transferring Your Images (Windows)
Transferring Your Images (Windows)
Reading and Writing the Disk Media
To read or write to the Disk Media using
Windows follow the instructions below.
USB Cable (supplied)
Personal Computer
Before you begin
Set the POWER Switch to PC.
Connect the Digital Camera to the PC
using the supplied USB Cable. Refer to
page 49 for additional details.
To PC Terminal
Reading the Disk Media
1Insert the Disk Media into the SuperDisk Slot.
2Click “Start”, “Programs”, and the Image Viewing Software. For example, for
PHOTODELUXE, click “Adobe”, “PhotoDeluxe Home Edition 4.0”, and
“Adobe PhotoDeluxe Home Edition 4.0”.
The initial screen of the Image Viewing Software is displayed.
Note
• When playing back Motion images, start QuickTime.
50 For assistance, please call : 1-800-272-7033.
SD5000. p47-51.p65 80/01/04, 11:4150
Page 51

Transferring Your Images (Windows)
Transferring Your Images (Windows)
3Click on the “File” Menu and “Open File”.
The File Open MENU is displayed.
Select the 3.5
Digital Camera.
• When the Digital Camera POWER Switch is set to PC, the Digital Camera Drive is
recognized as the 3.5″ FD Drive with the latest drive letter, for example, (H:).
• The Camera Disk consists of DCIM and MISC Folders.
• The DCIM Folder is used to store image data, and the MISC Folder is used to store Print
Mark data.
• Image data is stored in the “100_PANA” folder with the file number starting from
“P1000001”. When the 1000th image data is written, the “101_PANA” folder is created and the
file number starts from “P1010001”.
• File numbers once deleted cannot be used.
• If the file number is changed, the Digital Camera cannot read the file.
″″
″ FD Drive for the Digital Camera and find the image data file in the
″″
4Open the image to view it.
Note
• End all applications, if, after playing back a Motion image, etc.
with “QuickTime”, you want to change from PC mode to another
mode. Only change from PC mode while a message, such as the
one shown at right is displayed.
Writing to the Disk Media
1Insert the Disk Media into the
SuperDisk Slot.
2Click “Start”, “Programs”, and
“Windows Explorer”.
3You can write to the Disk Media by
simply dragging and dropping a file or
folder from the Digital Camera Drive
to another Drive. You can also drag
and drop a file or folder from another
Drive to the Drive of the Digital
Camera.
Special Features
Special Features
SD5000. p47-51.p65 80/01/04, 11:4151
51
Page 52

Transferring Your Images (Windows)
Transferring Your Images (Windows)
PalmCam File Converter
When the Digital Camera cannot playback image data which is transferred from another
Drive to the Drive of the Digital Camera, even if the data is JPEG, PalmCam File
Converter is necessary.
Before you begin
Set the POWER Switch to PC.
Connect the Digital Camera to the PC
using the supplied USB Cable. Refer to
page 49 for additional details.
1Insert the Disk Media into the
SuperDisk Slot. (See page 16.)
2Click “Start”, “Programs”,
“PalmCam File Converter 2.0” and
“PalmCam File Converter 2.0”.
3Select and click “To resize the
image” or “To convert format for
camera playback”.
• To resize the image:
The size of images captured with the
PalmCam can be increased or decreased
to make them suitable for Internet and
E-mail use.
To convert format for camera playback:
Images can be converted to JPEG format
and to file names that can be played back
on the PalmCam.
[When selecting “To resize the image”]
4Select the size for the image you want to change. And then, click on “File select”
and select the file to be converted.
Note
• When User Select is selected, you can specify a size within a range of 2 048 x
1 536 ~ 64 x 48 pixels.
52 For assistance, please call : 1-800-272-7033.
SD5000. p52-57.p65 80/01/04, 11:4252
Page 53

Transferring Your Images (Windows)
Transferring Your Images (Windows)
5Select the folder in which the converted file is to be saved.
• The Conversion results screen is displayed.
6Use “Help” of “PalmCam File Converter 2.0” for detailed instructions.
[When selecting “To convert format for camera playback”]
4Select the file to be converted.
Special Features
Special Features
5Select the drive in which the converted file is to be saved.
• The Conversion results screen is displayed.
6Use “Help” of “PalmCam File Converter 2.0” for detailed instructions.
SD5000. p52-57.p65 80/01/04, 11:4253
53
Page 54

Transferring Your Images (Windows)
Transferring Your Images (Windows)
Deleting a File (Folder) from the SuperDisk Drive
To delete a file (folder) from the Digital Camera.
• Click on the file or folder you want to delete. Then, from the “File” menu, click on
“Delete” to delete the file.
Disconnection
1End all applications and close all windows. (i.e. QuickTime, PhotoDeluxe, etc.)
2Eject the Disk Media from the SuperDisk Slot. (See page 16.)
• You can also remove the Disk Media by right clicking on the
SuperDisk Drive icon in “Windows Explorer” and “My Computer”
and then clicking on “Eject”.
3Disconnect the USB Cable (supplied) from your PC and change
the POWER Switch on the Digital Camera setting from PC mode
to another selection. Make sure that all of the applications and all
of the windows are closed. Then press the SHTR button.
Note
• If the USB Cable (supplied) is connected before the AC Adaptor is connected, or, if the
AC Adaptor is disconnected before the USB Cable is disconnected, it is possible that
Windows will abort the operation.
• The USB Cable (supplied) must be disconnected as described in the above steps.
54 For assistance, please call : 1-800-272-7033.
SD5000. p52-57.p65 80/01/04, 11:4254
Page 55

Transferring Your Images (Macintosh)
Transferring Your Images (Macintosh)
System Requirements:
• Mac OS 8.1, 8.5, 8.5.1, 8.6
• iMac, iBook or Power Macintosh
USB port or Power Mac™ G4
• 32 MB of RAM
• 10 MB available hard disk space
USB Driver Installation
®
G3 with
• 256 Color Monitor or Full Color Monitor
recommended (24 bits per pixel or
16.7 million colors)
• CD-ROM drive (for installation)
• USB Port
• Mouse or other pointing device
1Turn on the Macintosh.
2Insert the supplied Software CD-ROM into the CD-ROM Drive.
3Double click the “PHOTODELUXE” icon.
4Double click on “Panasonic”, “Driver” and
“DSC&SuperDisk Driver”.
5Follow the instructions as they appear on your Macintosh section screen.
When the USB Driver is installed, the following changes will occur.
• The Mac OS ROM in the Mac OS 8.1 system folder is changed from 1.1 to 1.1.2.
• The USB Driver of the SuperDisk Drive is installed in the function expansion folder of
the System folder.
• Inquire about Mac OS and Firmware updates at the Apple Computer Inc. web site
http://www.apple.com/).
(
Special Features
Special Features
QuickTimeTM Installation
• QuickTime, when installed, allows your Digital Camera to transfer Motion
Image Recording files to your PC.
Note
• For information on Apple QuickTime,
visit their website at : http://www.apple.com/support/
1Repeat steps 1~3 above.
2Double click on “QT” and “QuickTime Installer”.
3Follow the instructions as they appear on your
Macintosh section screen.
PalmCam File Converter Installation
1Repeat steps 1~3 above.
2Double click on “Panasonic” and “FileConverter”.
3Drag and Drop the FileConverter file into the hard
disk.
SD5000. p52-57.p65 80/01/04, 11:4255
55
Page 56

Transferring Your Images (Macintosh)
Transferring Your Images (Macintosh)
By using the included USB cable to
connect to a PC, you can use your
SuperDisk camera as an external storage
device.
TO PC Terminal
POWER Switch
3
USB Cable (supplied)
*Data transfer using USB cable is applicable
only for Microsoft® Windows® 98
preinstalled PC with USB port, Windows
2000 PC, iMac®, iBook®, Power Macintosh
G3 with USB port or Power Mac™ G4 and
Mac OS version 8.1 or later .
• The USB Driver software for Windows 2000
is currently not available, but will be
2
available in the future on our website at
www.panasonic.com/palmcam or by
calling 1-800- 272-7033.
USB Terminal
1
®
®
Connection
1Turn on your PC.
2Set POWER Switch to PC on the Digital Camera.
• The POWER LED lamp lights up.
• LCD Viewfinder is off in PC mode.
3Connect the Digital Camera to your PC using the USB Cable (supplied).
• You can use this Digital Camera as a SuperDisk Drive. (See pages 62, 65, 66.)
Note
• For extended periods of use, it is recommended to use the AC Adaptor (supplied) as a
power source.
• Once the USB driver is installed, the Digital Camera can be connected even after the
PC has been started. The USB Cable (supplied) must be connected as described in
the above steps.
56 For assistance, please call : 1-800-272-7033.
SD5000. p52-57.p65 80/01/04, 11:4256
Page 57

Transferring Your Images (Macintosh)
Transferring Your Images (Macintosh)
R
Reading and Writing the Disk Media
To read or write to the Disk Media using
Macintosh, follow the instructions below.
USB Cable (supplied)
iMac
Before you begin
Set the POWER Switch to PC.
Connect the Digital Camera to the PC using
the supplied USB Cable. Refer to page 56
for additional details.
Reading the Disk Media
To PC Terminal
1Insert the Disk Media into the SuperDisk Slot.
2Click “Apple Menu”, “Macintosh HD”, “Adobe PhotoDeluxe™ 2.0” and
“Adobe PhotoDeluxe™”.
The initial screen of the Image Viewing Software is displayed.
Special Features
Special Features
Note
• When playing back Motion images, start QuickTime.
SD5000. p52-57.p65 80/01/04, 11:4257
57
Page 58

Transferring Your Images (Macintosh)
Transferring Your Images (Macintosh)
3Click on the “File” Menu and “Open File”.
The File Open MENU is displayed.
Select the 3.5
Digital Camera.
• When the Digital Camera POWER Switch is set to PC, the Digital Camera Drive is
recognized as the 3.5″ FD Drive.
• The Camera Disk consists of DCIM and MISC Folders.
• The DCIM Folder is used to store image data, and the MISC Folder is used to store
Print Mark data.
• Image data is stored in the “100_PANA” folder with the file number starting from
“P1000001”. When the 1000th image data is written, the “101_PANA” folder is
created and the file number starts from “P1010001”.
• File numbers once deleted cannot be used.
• If the file number is changed, the Digital Camera cannot read the file.
″″
″ FD Drive for the Digital Camera and find the image data file in the
″″
4Open the image to view it.
Note
• End all applications, if, after playing back a Motion image,
etc. with “QuickTime”, you want to change from PC mode to
another mode. Only change from PC mode while a
message, such as the one shown at right is displayed.
Writing to the Disk Media
1Insert the Disk Media into the
SuperDisk Slot.
2Click the icon displayed on the
desktop.
3You can write to the Disk Media by
simply dragging and dropping a file
or folder from the Digital Camera
Drive to another Drive.
58 For assistance, please call : 1-800-272-7033.
SD5000. p58-60.p65 80/01/04, 11:4258
Page 59

Transferring Your Images (Macintosh)
Transferring Your Images (Macintosh)
PalmCam File Converter
When the Digital Camera cannot playback image data which is transferred from another
Drive to the Drive of the Digital Camera, even if the data is JPEG, PalmCam File
Converter is necessary.
Before you begin
Set the POWER Switch to PC.
Connect the Digital Camera to the
Macintosh using the supplied USB Cable.
Refer to page 56 for additional details.
1Insert the Disk Media into the SuperDisk Slot. (See page 16.)
2Double click on “FileConverter”.
3Select and click “To resize the image” or “To convert format for camera
playback” from Conversion mode.
• To resize the image : Resize the JPEG image for use with the
• To convert format for
camera playback : Convert to JPEG image format for
Internet, e-mail, etc.
camera playback.
4Select “File Selection” to register a file from the file select dialog box.
Note
• Only JPEG format file can be selected.
• A maximum of 1 000 files can be
selected at one time.
Special Features
Special Features
[When selecting “To resize the image”]
5Specify the save location.
Select “Option” and select the desired size from the following 3 options.
Then, Select the “Folder” and select the store folder.
SD5000. p58-60.p65 80/01/04, 11:4259
Note
• VGA (640 X 480) pixels
• QVGA (320 X 240) pixels
• Custom select : Custom select allows you
to freely set the image height and width
from 64 X 48 to 2 048 X 1 536 pixels.
(Continued on next page)
59
Page 60

Transferring Your Images (Macintosh)
Transferring Your Images (Macintosh)
6Click “Convert” to convert the selected file.
7Use “Help” of “File Converter” for detailed instructions.
[When selecting “To convert format for camera playback”]
5Select the store volume for converted files from the “Volume” list box.
6Click “Convert” to convert the selected file.
7Use “Help” of “File Converter” for detailed instructions.
60 For assistance, please call : 1-800-272-7033.
SD5000. p58-60.p65 80/01/04, 11:4260
Page 61

Transferring Your Images (Macintosh)
Transferring Your Images (Macintosh)
Deleting a File (Folder) from the SuperDisk Drive
To delete a file (folder) from the Digital Camera.
• Drag and Drop the selected file or folder into the “Trash” icon.
Disconnection
1End all applications and close all windows. (i.e. QuickTime, PhotoDeluxe, etc.)
2Eject the Disk Media from the SuperDisk Slot. (See page 16.)
3Disconnect the USB Cable (supplied) from your PC and change the POWER
Switch on the Digital Camera setting from PC mode to another selection.
Make sure that all of the applications and all of the windows are closed. Then
press the SHTR button.
Note
• If the USB Cable (Supplied) is connected before the AC Adaptor is connected, or, if the
AC Adaptor is disconnected before the USB Cable is disconnected, it is possible that
Macintosh will abort the operation.
• The USB Cable (supplied) must be disconnected as described in the above steps.
Removing the Disk Media
• When the PC recognizes the Disk Media, an icon, like the one
shown right, is displayed on the desktop.
• You can remove Disk Media from the Digital Camera by
dragging and dropping the Disk Media icon on the desktop into
the “Trash” icon.
• While the PC is starting up, the Disk Media cannot be removed,
even if the EJECT button on the Digital Camera is pressed.
• When a damaged Disk Media is inserted in the Digital Camera,
the Disk Media icon will not appear on the PC desktop. In this
case, the Disk Media can be removed by pressing the EJECT
button on the Digital Camera.
61
Special Features
Special Features
SD5000. p61-64.p65 80/01/04, 11:4261
Page 62

SuperDisk Drive
SuperDisk Drive
You can use this Digital Camera as an
external SuperDisk storage drive. You can
only use SuperDisk Diskette media or 2HD
Floppy Disks in this camera.
Note
• When a DOS formatted Floppy Disk is read by a Macintosh, the PC/File Exchange
function will be necessary.
Media Format Type & Explanation
Type
SuperDisk
Diskette
Floppy Disk
(2HD)
Note
Adverse conditions, such as those described below, are confirmed in PC
Exchange Ver. 2.2.1 and also File Exchange Ver. 3.0.
• Do not format a SuperDisk Diskette that is in the DOS format on a Macintosh.
If you use the DOS format with a Macintosh, the SuperDisk Diskette will not be
able to be read or written to.
Format Style
DOS Format
(120 MB)
DOS Format
(1.44 MB)
Explanation
This format is usable with DOS
and Windows.
This format is usable with DOS
and Windows.
Note
This format is usable with
Windows and Macintosh.
This format is usable with
Windows and Macintosh.
WRITE Protecting the Disk Media
You can prohibit the writing to or deletion of data from the Disk Media by using the
PROTECT switch as shown below.
SuperDisk Diskette
Floppy Disk (2HD)
PROTECT
Switch
: Set
: Cancel
PROTECT
Switch
62 For assistance, please call : 1-800-272-7033.
SD5000. p61-64.p65 80/01/04, 11:4262
Page 63

Using the SuperDisk Drive (Windows)
Using the SuperDisk Drive (Windows)
Before Formatting
Before formatting the Disk Media, close all applications and all windows. If you format
the Disk Media while any of the disk’s files are open, an error may occur on the display.
Formatting the Disk Media
1Insert the Disk Media into the SuperDisk Slot.
Special Features
Special Features
2Click “My Computer”. Click right mouse button on the 3 1/2 Floppy icon.
3Click “FormatUtility for SuperDisk”.
4Follow the instructions as they appear on your PC screen.
SD5000. p61-64.p65 80/01/04, 11:4263
63
Page 64

Using the SuperDisk Drive (Windows)
Using the SuperDisk Drive (Windows)
Copying the Disk Media
• The DISKCOPY command at the DOS prompt cannot be used.
SuperDisk Diskette/
Floppy Disk (2HD)
Floppy Disk (2HD)
SuperDisk Drive
Floppy Disk Drive
• Disk copy cannot be performed with SuperDisk Diskette.
SuperDisk Diskette
SuperDisk Drive
SuperDisk Diskette
SuperDisk Drive
• Explorer CopyDisk is only possible with 2HD Floppy Disk.
SuperDisk Drive
and
Floppy Disk Drive
Floppy Disk (2HD)
Floppy Disk (2HD)
SuperDisk Drive
and
Floppy Disk Drive
When using Windows Explorer, etc., if you attempt to copy a previously used 2HD
Floppy Disk from the Floppy Disk Drive to the Digital Camera with the CopyDisk utility,
please note the following.
After PC start up, when CopyDisk is attempted the first time, a Windows error message
box may be displayed and CopyDisk may fail.
In this case, switch the source Floppy Disk and the target Floppy Disk so that CopyDisk is
performed from the Digital Camera to the Floppy Disk Drive. By doing this, CopyDisk will
function properly.
64 For assistance, please call : 1-800-272-7033.
SD5000. p61-64.p65 80/01/04, 11:4264
Page 65

Using the SuperDisk Drive (Macintosh)
Using the SuperDisk Drive (Macintosh)
Formatting the Disk Media
Note
• Do not format the Disk Media under DOS format with Macintosh.
1Insert the SuperDisk Diskette or Floppy Disk into the SuperDisk Slot.
2Click the SuperDisk Diskette or Floppy Disk icon
displayed on the desktop.
3Select “Erase Disk” in the “Special” MENU.
4Select format style. Then, click “Erase”.
Special Features
Special Features
Note
• When using the Disk Media that was formatted to Mac OS standard format or Mac OS
expanded format in the Digital Camera, format again in the Digital Camera.
• When “File Sharing” is used, formatting may be impossible. In this case, either quit “File
Sharing” or turn AppleTalk off in the control panel.
• In Camera mode (REC, MANUAL REC, PLAY), only PC Exchange Ver. 2.2.1 in DOS
format can be used.
SD5000. p65-67.p65 80/01/04, 11:4265
65
Page 66

Using the SuperDisk Drive
Using the SuperDisk Drive
Important Operating Notes
• FORMAT command cannot be used.
The FORMAT command at the DOS prompt cannot be used for the Digital Camera.
• DISKCOPY command cannot be used.
The DISKCOPY command at the DOS prompt cannot be used for the Digital Camera.
• You cannot boot your PC from this Digital Camera.
• When using the Digital Camera, never remove the Disk Media
while data is being written to it.
If the Disk Media is removed while it is being written, it may become completely
unusable.
• When a Defective Disk is inserted into the Digital Camera, it will
take a longer than usual time for the drive to recognize the disk.
This is normal, so please wait for a while.
• If the Disk Media is not inserted into the SuperDisk Drive,
“FormatUtility for SuperDisk” will not be displayed.
Insert the Disk Media. After the busy light goes out, right click on the SuperDisk icon.
• According to the use limitations of “QuickTime for Windows”,
files stored in the SuperDisk Drive may not play back normally.
• Unable to place in Suspend/ Resume mode.
While the SuperDisk Drive is reading/writing to the Disk Media, please do not place
in Suspend/ Resume mode.
• This Digital Camera is not compatible with F lash Pass.
• Using a head cleaner caution.
When using a head cleaner, please use the product described below and limit cleaning
to about 7 seconds.
Name of article : Imation 3.5″ Dry Head Cleaning Disk
Article No.
: 74040183035
66 For assistance, please call : 1-800-272-7033.
SD5000. p65-67.p65 80/01/04, 11:4266
Page 67

Print Mark
Print Mark
Use this feature when a laboratory service
that supports DPOF (Digital Print Order
Format) is used.
Before you begin
Set the PO WER Switch to PLA Y .
(See page 19.) Press MENU to display
the MENU screen.
POWER Switch
1, 2
Select Button
/ / /
3MENU Button
Stamp Print Marker
1Press or to select PRINT MARK
and press
menu.
• Select “SET/CANCEL PAGE” to
select image, “CANCEL ALL” to
cancel all image print marks, and
“INDEX” to set or clear index print
mark on all pages.
to display PRINT MARK
2Press or to select the image page
you want to mark for printing and
press SHTR to stamp print mark.
” mark will appear on the image.
A “
Press
copies to print. (up to 99)
or to select number of
Special Features
Special Features
2SHTR (SHUTTER)
Print mark is based on DPOF (Digital Print Order Format).
SD5000. p65-67.p65 80/01/04, 11:4267
• Repeat step 2 to stamp other images.
• Press SHTR again to cancel print
mark.
3Press MENU to exit this menu.
67
Page 68

Digital Camera Accessory
Digital Camera Accessory
For ordering instructions, see the Accessory Order Form page.
Accessory #
CGR-B/
202A1B
PV-FA52
PV-H150
Figure
Description
Lithium Ion Battery
Lens Adaptor & Protective
Filter Kit
System Carrying Case
Price
$100.00
$69.95
$49.95
68
SD5000. p68-72.p65 80/01/04, 11:4368
For assistance, please call : 1-800-272-7033.
Page 69

Digital Camera Accessory Order Form
Digital Camera Accessory Order Form
Please photocopy this form when placing an order.
1. Model #
2. Items Ordered
QuantityAccessory # Price EachDescription
Subtotal
Your State & Local Sales Tax
Shipping & Handling
Total Enclosed
3. Method of payment (check one)
Check of Money Order enclosed (NO C.O.D.SHIPMENTS)
VISA Credit Card #
MasterCard Expiration Date
Discover Customer Signature
Make Check or Money Order to: MATSUSHITA ACCESSORIES
(Please do not send cash)
Total Price
5.00
4. Shipping information (UPS delivery requires complete street address)
Ship To:
Mr.
Mrs.
Ms.
First Last
Street Address
City State Zip
TO OBTAIN ANY OF OUR DIGITAL CAMERA ACCESSORIES YOU CAN DO ANY OF THE
FOLLOWING:
VISIT YOUR LOCAL PANASONIC DEALER
OR
CALL PANASONIC’S ACCESSORY ORDER LINE AT 1-800-272-7033 [8:30 AM-8 PM M-F, EST]
OR
MAIL THIS ORDER TO: PANASONIC SERVICES COMPANY ACCESSORY ORDER OFFICE
20421 84th Avenue South Kent, WA. 98032
SD5000. p68-72.p65 80/01/04, 11:4369
Phone #:
Day ( )
Night ( )
For Your Information
For Your Information
69
Page 70

Before Requesting Service
Before Requesting Service
If you have a problem with your Digital Camera, it may be something you can correct
yourself.
Check the list below for symptoms and corrections.
Symptom
Cannot charge the Battery
Pack.
No power.
Power shuts off automatically.
Cannot capture the image.
No Picture on the LCD
Viewfinder.
LCD Viewfinder image is too
bright or dark.
Flash will not light.
Cannot playback.
No picture on the TV
(if connected).
Cannot transfer images on the
PC Connection.
Possible Solution
• Make sure the rechargeable Lithium Ion Battery
Pack is attached. (p. 12)
• Make sure all necessary connections are correct
and tight. (p. 12)
• Lithium Ion Battery is depleted. (p. 13)
• Make sure polarities are aligned properly. (p. 13)
• When the unit is moved from a cold place to a
warm place, it may not function. In this case,
please wait one hour before using the unit.
• Auto shut off feature is on. Press SHTR, or set
POWER Switch to OFF, and then set to REC or
MANUAL REC. (pp. 18, 19, 21)
• SuperDisk Diskette/(FD) is not inserted. (p. 16)
• Make sure the POWER switch is set to REC or
MANUAL REC. (pp. 18, 19)
• No memory. Delete some images before
capturing images. (p. 41)
• Auto shut off feature is on. Set the POWER to
OFF and then set to REC or MANUAL REC.
(pp. 18, 19, 21)
• Make sure the LCD Viewfinder brightness
setting is adjusted properly. (p. 31)
• The flash mode is set to
Change the flash mode. (p. 36)
• SuperDisk Diskette/(FD) is not inserted. (p. 16)
• There are no images on the SuperDisk
Diskette/(FD). (pp. 21~24)
• Set the POWER switch to PLAY.
(p. 19)
• Do PalmCam File Conversion.
(pp. 52, 53, 59, 60)
• Make sure all necessary connections are correct
and tight. (p. 35)
• Make sure the TV is set to video input mode.
(p. 35)
• Make sure all necessary connections are correct
and tight. (pp. 49, 56)
• Make sure the SuperDisk Driver is installed.
• Set Camera to PC mode. (pp. 49, 56)
(OFF).
70
SD5000. p68-72.p65 80/01/04, 11:4370
For assistance, please call : 1-800-272-7033.
Page 71

Warning Indications
Warning Indications
These displays will alert you of a missed operation or provide further instructions.
Indication
DRIVE ERROR
READ ERROR
WRITE ERROR
ERROR
DISK
(PUSH
SHTR TO FORMAT)
DELETE
ERROR
Phenomenon
Failed to initialize the
drive.
Failed to read.
Failed to write.
Unsuitable disk.
Failed to delete the
file.
Solution
If, after Power Switch is set to
OFF, then REC or PLAY again,
DRIVE ERROR is still
displayed, the camera may be
broken and needs repair.
The camera cannot read this
image. Press + or - button to
play the next image. A READ
ERROR file cannot be delete in
DELETE menu. Please format
the disk, or delete with the PC.
If the problem occurred while
capturing, please capture
again. If WRITE ERROR is still
displayed, the disk may be
defective, or could not be read.
Please reinsert the disk or
change disks. If the problem
occurred while setting a COPY
or PRINT MARK, please try
again. If still WRITE ERROR,
repeat this procedure.
If PUSH SHTR TO FORMAT is
displayed, you may format the
disk. If PUSH SHTR TO
FORMAT is not displayed, the
disk cannot be formatted. (Disks
that can be formatted were
once formatted under DOS or
Mac.)
If after second attempt to delete
again, DELETE ERROR is
displayed, the disk may be
defective. Change disks.
For Your Information
For Your Information
SD5000. p68-72.p65 80/01/04, 11:4371
71
Page 72

Warning Indications
Warning Indications
Indication
FORMAT ERROR
THIS
DISK IS PROTECTED
NOT
ENOUGH MEMORY
PUSH
MENU TO EXIT
NOT
ENOUGH DISK SPACE
CONTINUE : SHTR
EXIT : MENU
NOT AVAILABLE DISK SPACE
CONTINUE : SHTR
EXIT : MENU
CANNOT
THE
PLEASE REMOVE THE
LENS
LIGHT
COPY ALL
SUPERDISK
CAP
Phenomenon
Failed to format the
disk.
The disk is protected.
Insufficient disk
memory. (1.44 MB)
Copy capacity was
exceeded.
Insufficient space on
target disk compared
to source disk.
The disk cannot be
copied.
Cannot copy all the
images.
Lens Cover is closed.
The light level is
inadequate.
Solution
If after second attempt to format
again, FORMAT ERROR is
displayed, the disk may be
defective. Change disks.
If THIS DISK IS PROTECTED is
displayed, change disks or
disengage protect.
If NOT ENOUGH MEMORY is
displayed, delete unnecessary
images. Or, decrease or change
the images to be copied.
After pressing SHTR to
CONTINUE, switch to a disk
with enough space, or press
MENU to EXIT.
The disk is unusable or
protected. After pressing SHTR
to CONTINUE, switch to a disk
with enough space, or press
MENU to EXIT.
It is impossible to select ALL
COPY when SuperDisk is the
source. Please select COPY
PAGE to copy.
Please open the Lens Cover.
More light should be provided
or use flash to achieve better
picture quality and color.
72
SD5000. p68-72.p65 80/01/04, 11:4372
For assistance, please call : 1-800-272-7033.
Page 73

Specifications
Specifications
CCD 1/1.8 inch 3 340 k Pixels
Lens f=7.0-21.0 mm (equivalent to a 35-105 mm lens on a 35 mm
Focus Auto / Preset (Zone)
Focusing Area 30 cm ~ ∞ (AF)/6 cm ~ 50 cm (Macro)
Iris (Shutter Speed) F2.0 ~ F8.0 (wide)
Shutter Speed 1/30-1/1 000 seconds (Auto), 1/4-1/1 000 seconds (Slow
White Balance Auto/Indoor/Outdoor/White Set
LCD Viewfinder 2.5 inch (63.4 mm) TFT Color LCD with 112 k pixels
Flash Built-in
Microphone Built-in (Mono)
Speaker Built-in (Mono)
Memory Floppy Disk (1.44 MB)/SuperDisk Diskette(120 MB)
Image Size 2 048 × 1 536 pixels (Super Fine, Fine, TIFF mode)
Image Storage Approx. 2 images (Super Fine mode)
(Floppy Disk) Approx. 4 images (Fine mode)
(SuperDisk Diskette) Approx. 240 images (Super Fine mode)
Image Format JPEG (Design Rule for Camera File System)
(Still Image With Audio) JPEG, QuickTime
(Motion Image) QuickTime (320 pixel × 240 pixel Still image with Audio)
Digital lnterface USB
Video Signal NTSC Composite
Power Supply Lithium Ion Battery (1 250 mAh, 7.2 V)/AC Adaptor
Power Consumption Digital Camera : 7.2 V DC, 0.7 A
Operating Temperature 32 °F – 104 °F/0 °C – 40 °C
Operating Humidity 10 % – 75 %
Weight Digital Camera 1.53 lbs approx./695 g approx.
Dimensions Digital Camera 5-11/16 (W) × 4-3/ 8 (H) × 3-1/4 (D) inch
Weight and dimensions shown are approximate.
Design and specifications are subject to change without notice.
still camera.)/F2.0-2.5
Shutter mode)
1 024 × 768 pixels (Normal, Zoom 2X, mode)
640 × 480 pixels (Zoom 3X mode)
320 × 240 pixels ( mode)
Approx. 12 images (Normal, Zoom 2X mode)
Approx. 15 images ( mode)
Approx. 17 images (Zoom 3X mode)
10 seconds × 1 set ( mode)
Approx. 340 images (Fine mode)
Approx. 1 000 images (Normal, Zoom 2X)
Approx. 1 400 images ( mode)
Approx. 1 500 images (Zoom 3X mode)
12 seconds × Approx. 70 sets ( mode)
Approx. 12 images (TIFF mode)
(input 110 V -240 V AC)
AC Adaptor (supplied)
input : USA&CANADA 120 V~60 Hz 0.3 A
FOREIGN 110 V-240 V~50 Hz-60 Hz 0.3 A
output : 7.2 V 1.0 A
7.2 V 0.9 A (CHARGE)
AC Adaptor (supplied) 0.308 lbs approx./140 g approx.
144 (W) × 112 (H) × 84 (D) mm
AC Adaptor (supplied) 2-5/16 (W) × 1-7/16 (H) × 4-5/ 16 (D) i nch
59 (W) × 37 (H) × 110 (D) mm
73
For Your Information
For Your Information
SD5000. p73-76.p65 80/01/04, 11:4373
Page 74

Warranty
Warranty
Panasonic Consumer Electronics
Company, Division of Matsushita
Electric Corporation of America
One Panasonic Way Secaucus,
New Jersey 07094
Panasonic Sales Company, Division of
Matsushita Electric of Puerto Rico, Inc.
Ave. 65 de Infanteria. Km. 9.5
San Gabriel Industrial Park, Carolina, Puerto
Rico 00985
PANASONIC/QUASAR Video Products
Limited Warranty
Panasonic Consumer Electronics Company or Panasonic Sales Company (collectively referred to
as “the Warrantor”) will repair this product with new or refurbished parts, free of charge, in the USA
or Puerto Rico, in the event of a defect in materials or workmanship as follows (all time periods
commence from the date of the original purchase):
PRODUCT PARTS LABOR
CAMCORDER ONE (1) YEAR, EXCEPT CCD IMAGE SENSOR NINETY (90) DAYS
DIGITAL CAMERA CCD IMAGE SENSOR - SIX (6) MONTHS NINETY (90) DAYS
VCR ONE (1) YEAR NINETY (90) DAYS
A/V MIXER ONE (1) YEAR NINETY (90) DAYS
MONITOR-VCR ONE (1) YEAR, EXCEPT CRT NINETY (90) DAYS
Monitor-VCR In-home or carry-in Service: 22” (diagonal) CRT / LCD and Larger
Batteries (if included) - New rechargeable batteries in exchange for defective rechargeable
batteries for ten (10) days. Non-rechargeable batteries are not warranted.
Tape (if included) - New video cassette tape in exchange for a defective video cassette tape for
five (5) days.
In-home, carry-in or mail-in service, as applicable, in the USA can be obtained during the warranty
period by contacting a Panasonic Services Company (PASC) Factory Servicenter listed in the
Service Directory. Or call toll free 1-800-272-7033, to locate an authorized PASC Servicenter.
Carry-in or mail-in service in Puerto Rico can be obtained during the warranty period by calling the
Panasonic Sales Company telephone number listed in the Servicenter Directory.
This warranty is extended only to the original purchaser. A purchase receipt or other proof of the
date of the original purchase is requires before warranty service is rendered.
This warranty only covers failures due to defects in materials and workmanship which occur
during normal use and does not cover normal maintenance, including, but not limited to, video and
audio head cleaning. The warranty does not cover damage which occurs in shipment, or failures
which are caused products not supplied by the warrantor, or failures which result from accident,
misuse, abuse, neglect, mishandling, misapplication, alteration, modification, faulty installation, setup adjustments, improper antenna, inadequate signal pickup, maladjustment of consumer controls,
improper operation, power line surge, improper voltage supply, lightning damage, commercial use
such as hotel, office, restaurant, or other business or rental use of the product, or service by
anyone other than a PASC Factory Servicenter or a PASC authorized Servicenter, or damage that
is attributable to acts of God.
LIMITS AND EXCLUSIONS
There are no express warranties except as listed above. THE WARRANTOR SHALL NOT BE
LIABLE FOR INCIDENTAL OR CONSEQUENTIAL DAMAGES (INCLUDING, WITHOUT
LIMITATION, DAMAGE TO TAPES) RESULTING FROM THE USE OF THIS PRODUCTS, OR
ARISING OUT OF ANY BREACH OF THE WARRANTY. ALL EXPRESS AND IMPLIED
WARRANTIES, INCLUDING THE WARRANTIES OF MERCHANTABILITY AND FITNESS FOR
PARTICULAR PURPOSE, ARE LIMITED TO THE APPLICABLE WARRANTY PERIOD SET
FORTH ABOVE. Some states do not allow the exclusion or limitation of incidental or consequential
damages, or limitations on how long an implied warranty lasts, so the above exclusions or
limitations may not apply to you.
This warranty gives you specific legal rights and you may also have other rights which vary from
state to state.
If a problem with this product develops during or after the warranty period, you may contact your
dealer or Servicenter. If the problem is not handled to your satisfaction, then write to the Customer
Satisfaction Center at the Panasonic Consumer Electronics Company address above.
SERVICE CALLS WHICH DO NOT INVOLVE DEFECTIVE MATERIALS OR WORKMANSHIP AS
DETERMINED BY THE WARRANTOR, IN ITS SOLE DISCRETION, ARE NOT COVERED.
COSTS OF SUCH SERVICE CALLS ARE THE RESPONSIBILITY OF THE PURCHASER.
warvid 10/20/99
Monitor-VCR Carry-in Service: 21” (diagonal) CRT / LCD and smaller
CRT - TWO (2) YEARS CRT- NINETY (90) DAYS
CUSTOMER PAYS ALL
LABOR CHARGES
AFTER 90 DAYS
74
SD5000. p73-76.p65 80/01/04, 11:4374
For assistance, please call : 1-800-272-7033.
Page 75

Service Center Directory
Service Center Directory
For Product Information, Operating Assistance, Literature Request, Dealer Locations, and
all Customer Service inquiries please contact:
1-800-272-7033, Monday-Friday 8:30am-8pm EST.
Web Site: http://WWW.Panasonic.com
You can purchase parts, accessories or locate your
nearest servicenter by visiting our Web Site.
Product Repairs
MAIL TO :
Please carefully pack and ship, prepaid and insured, to the Elgin centralized repair Factory
Servicenter. While there will be added handling delays, you may bring your unit to one of the
following locations who will then forward the unit to Elgin for repair.
Customer’s in Puerto Rico, please ship or carry in to location below (“Service in Puerto Rico”).
Centralized Factory Servicenter
Panasonic Services Company
1705 N. Randall Road,
Elgin, IL 60123-7847
Attention: Digital Camera Repair
Factory Servicenters Locations
CALIFORNIA
6550 Katella Avenue
Cypress, CA 90630
800 Dubuque Avenue
S. San Francisco,
CA 94080
20201 Sherman Way
Suite 102
Canoga Park, CA 91306
3878 Ruffin Road
Suite A
San Diego, CA 92123
COLORADO
1640 South Abilene
Street Suite D
Aurora, CO 80012
FLORIDA
3700 North 29th Avenue
Suite 102
Hollywood, FL 33020
GEORGIA
8655 Roswell Road
Suite 100
Atlanta, GA 30350
ILLINOIS
1703 North Randall Road
Elgin, IL 60123
(Pick-up / Drop-off only)
9060 Golf Road
Niles, IL 60714
MARYLAND
62 Mountain Road
Glen Burnie MD 21061
MASSACHUSETTS
60 Glacier Drive,
Suite G
Westwood, MA 02090
MICHIGAN
37048 Van Dyke Avenue
Sterling Heights, MI
48312
MINNESOTA
7850-12th Avenue South
Airport Business Center
Bloomington, MN 55425
OHIO
2236 Waycross Road
Civic Center Plaza
Forest Park, OH 45240
PENNSYLVANIA
2221 Cabot Blvd. West
Suite B
Langhorne, PA 19047
TEXAS
13615 Welch Road
Suite 101
Farmers Branch,
TX 75244
WASHINGTON
20425-84th Avenue
South
Kent, WA 98032
HAWAII
99-859 Iwaiwa Street
Aiea, Hawaii 96701
Phone (808) 488-1996
Fax (808) 486-4369
For Your Information
For Your Information
Matsushita Electric of Puerto Rico, Inc. Panasonic Sales Company/ Factory Servicenter:
Ave. 65 de Infanteria. Km. 9.5 San Gabriel Industrial Park Carolina, Puerto Rico 00985
Phone (787) 750-4300 Fax (787) 768-2910
Accessory Purchases:
Customer Orders Only 1-800-272-7033
SD5000. p73-76.p65 80/01/04, 11:4375
Service in Puerto Rico
As of January 2000
75
Page 76

Index
Index
A
AC Adaptor (Supplied) 2, 12, 14
AC Cable (Supplied) 2, 12, 14
Accessory (optional) 68
Accessory (Supplied) 2
A/V Cable 2, 35
B
Battery Remaining Indication 9
Before Requesting Service 70
Beep 26
Brightness (LCD Viewfinder) 31
Built-in Flash 36
C
Camera Strap 2, 15
Capturing Images 21~30
Copy Image 44, 45
D
DC POWER Cable 2, 14
Delete Image 41, 42
Digital Camera Accessory Order Form 69
F
Formatting the Disk Media 43
I
Index of Controls 7, 8
L
LCD Viewfinder 21~24, 31, 32
Lens Cap 2, 15
Low Light Warning 72
Light Metering 38
Lithium Ion Battery 2, 12, 13, 68
M
Manual Mode 29, 30
Manual Playback 32
MENU Screen 18, 19
Multi Playback 33, 34
Motion Image Playback 33
O
On Screen Display (OSD) 9
P
Playback 32, 33, 34
Playback Menu 11
POWER Supply 12, 13, 14
Print Mark (DPOF) 67
Q
Quick Rec (FD) 28
R
RapidFire™ 9, 27
Rec Review 28
Recording Menu 10
Recording Mode 25
S
Self Timer 10, 39
Setting the Clock 20
Service Center Directory 75
Slide Show 46
Slow Shutter 10, 21, 22
Specifications 73
SuperDisk 2, 16
SuperDisk Drive 62, 63, 64, 65, 66
T
T ransferring Images 35, 47~61
Time Lapse 40
W
Warning Indications 71, 72
Warranty 74
White Balance 37
Z
Zoom Playback 34
Panasonic Consumer
Electronics Company, Division
of Matsushita Electric
Corporation of America
One Panasonic Way Secaucus,
New Jersey 07094
76
SD5000. p73-76.p65 80/01/04, 11:4376
Panasonic Sales Company (“PSC”),
Division of Matsushita Electric
of Puerto Rico, Inc.
Ave. 65 de Infanteria, Km. 9.5
San Gabriel Industrial Park
Carolina, Puerto Rico 00985
For assistance, please call : 1-800-272-7033.
Printed in Japan
LSQT0287A
S0800A0
 Loading...