

Page 1
Panasonic
oigMjpHtoo Printer
PV-PD2000
OpaMting instructions
f» * • ^ »
Video Input
14-
PC Card Input
26-
For assistar^, call 1-800-272-7033.
rMd tiMe instructions thorough»^ before operafeng tis product
Advanced
Operations
40
Precautions,
etc.
47
B
Index
Back Cover
LSOT0071
Page 2

Dear Customer,
We would like to take this opportunity to thank you for purchasing this Panasonic Digital Photo Printer.
Please read these Operating Instructions carefully and keep them handy for future reference.
■IMPORTANT
Please respect all copyrights.
Whatever you have recorded and created can be
used for your personal entertainment only. Under
copyright laws, it cannot be used without obtaining
permission from the holders of the copyrights.
»“Microsoft Windows" is a trademark of Microsoft Corporation in the United States.
►The name “Apple”, Macintosh and System are either registered trademarks or trademarks of Apple
Computer Inc.
►Other model names, company names, product names, etc. mentioned in this manual are either the
trademarks or registered trademarks of the companies concerned.
Page 3

Information for Your Safety
WARNING
TO REDUCE THE RISK OF FIRE OR
SHOCK HAZARD AND ANNOYING
INTERFERENCE. USE ONLY THE
RECOMMENDED ACCESSORIES AND DO
NOT EXPOSE THIS EQUIPMENT TO RAIN
OR MOISTURE.
DO NOT REMOVE THE COVER (OR
BACK);THERE ARE NOT USER
SERVICEABLE PARTS INSIDE. REFER
SERVICING TO QUALIFIED SERVICE
PERSONNEL.
•As this equipment gets hot during use,
operate it in well ventilated place; do not
install this equipment in a confined space
such as a book case or similar unit.
(U.S. only)
This device complies with Part 15 of the FCC
Rules. OPERATION IS SUBJECT TO THE
FOLLOWING TWO CONDITIONS :
(1 )THIS DEVICE MAY NOT CAUSE
HARMFUL INTERFERENCE. AND
(2)THIS DEVICE MUST ACCEPT ANY
INTERFERENCE RECEIVED.
INCLUDING INTERFERENCE THAT
MAY CAUSE UNDESIRED OPERATION.
(Canada Only)
COMPLIES WITH CLASS B LIMITS OF
ICES-003 OF INDUSTRY CANADA.
CONFORME AUX LIMITES PRESCRITES
POUR APPAREILS DE CLASSE B DE LA
NORME NMB-003 D’INDUSTRIE CANADA.
FCC NOTE: (u .S. only)
This equipment has been tested and found
to comply with the limits for a Class B digital
device, pursuant to Part 15 of the FCC
Rules. These limits are designed to provide
reasonable protection against harmful
interference in a residential installation. This
equipment generates, uses, and can radiate
radio frequency energy and, if not installed
and used in accordance with the instructions,
may cause harmful interference to radio
communications. However, there is no
guarantee that interference will not occur in a
particular installation. If this equipment does
cause harmful interference to radio or
television reception, which can be
determined by turning the equipment off and
on, the user is encouraged to try to correct
the interference by one or more of the
following measures:
• Reorient or relocate the receiving antenna.
• Increase the separation between the
equipment and receiver.
•Connect the equipment into an outlet on a
circuit different from that to which the
receiver is connected.
•Consult the dealer or an experienced
radioATV technician for help.
FCC Caution : To assure continued
compliance, follow the attached installation
instructions and use only shielded cables
when connecting to computer or other
devices. Also, any changes or modifications
not expressly approved by the party
respossible for compliance could void the
user’s authority to operate this equipment.
Page 4
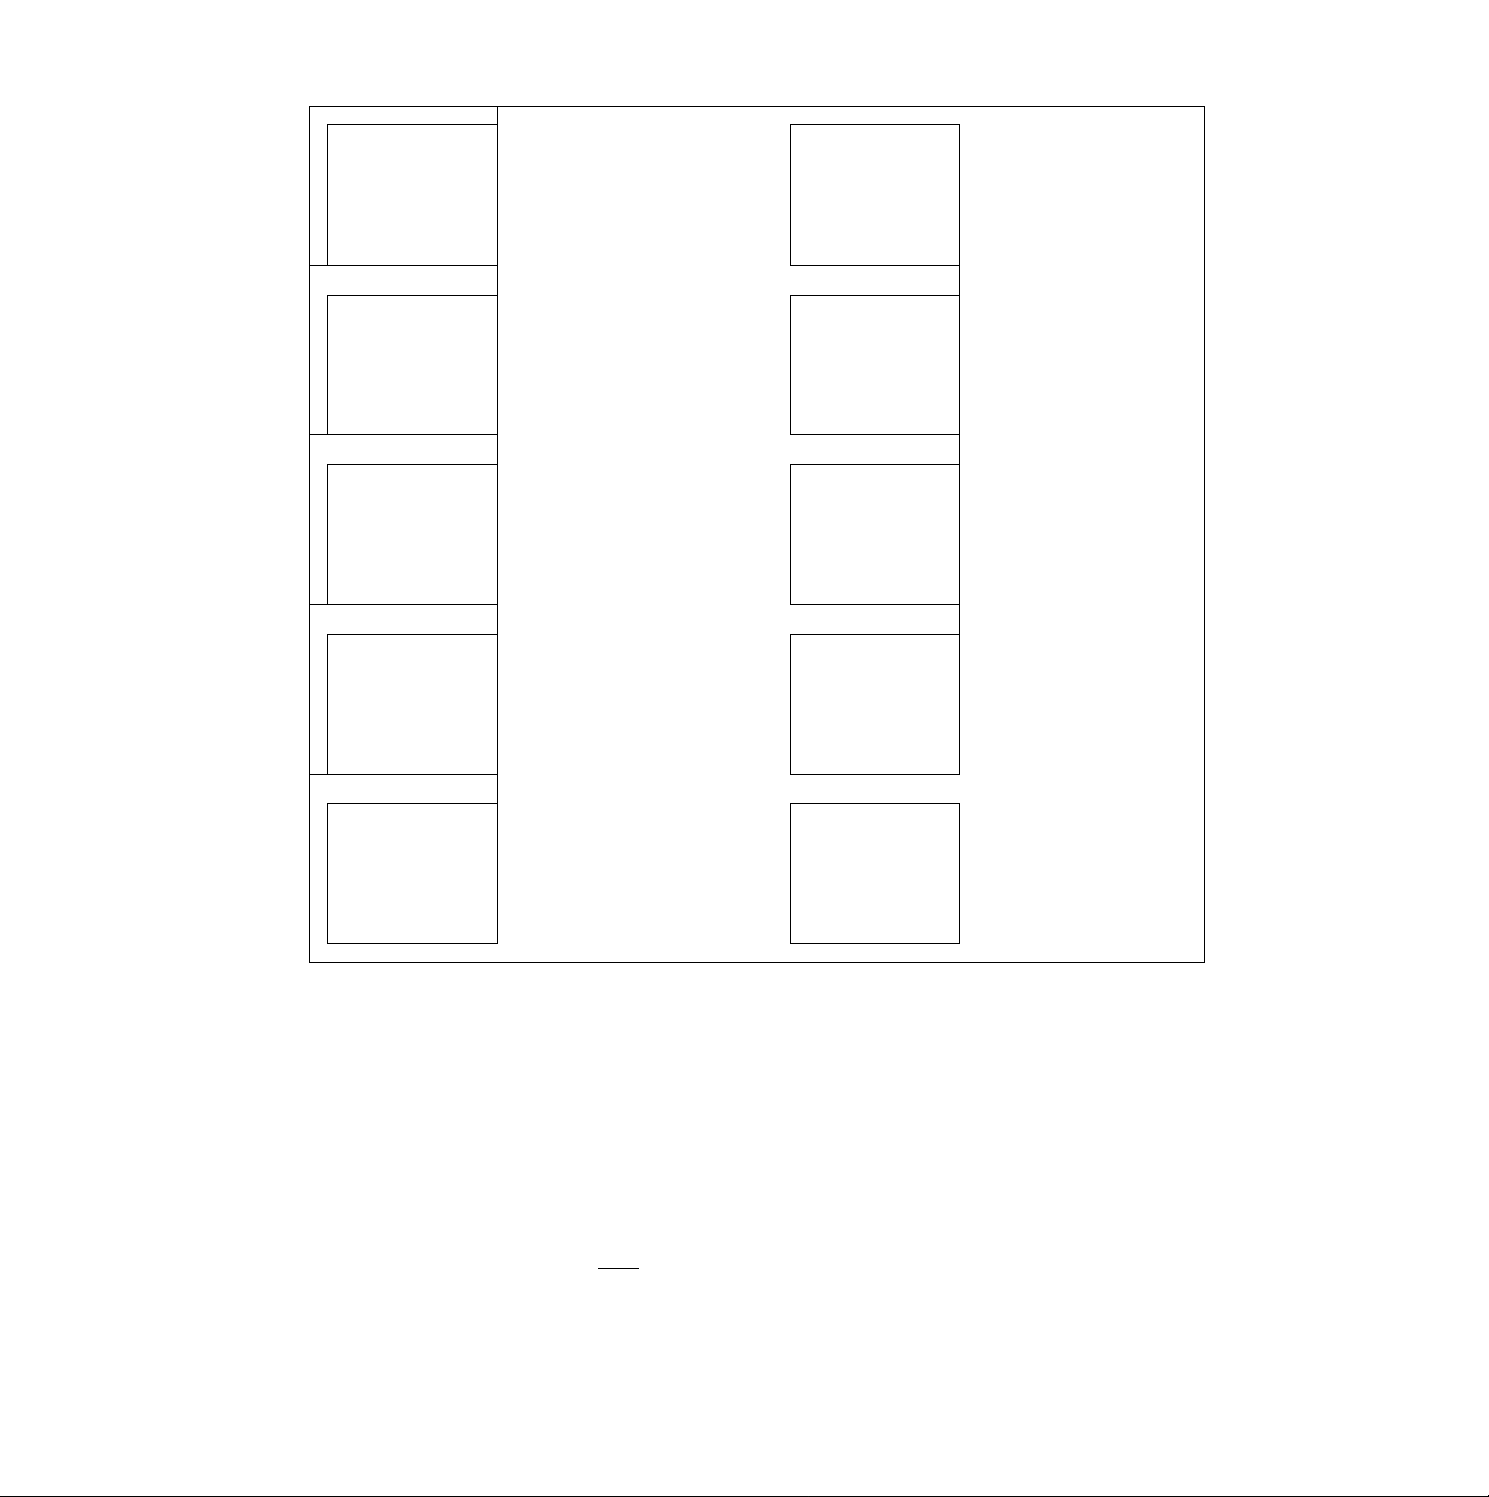
Standard Accessories
Power Cable
(p.9)
Video Cable
(p.9)
PC Connection Cable for
Windows
(P-46)
PC Connection Cable for
Macintosh
(P-46)
PC Card Adapter
(P-26)
Printer Driver Software for
Windows 95
Printer Driver Software for
Windows 3.1
Printer Driver Software for
Macintosh
^ ^ N
"Q
Paper Cassette
(p.12)
V.
Usable Paper for Printing
/--------------------------------------------------------------------------------------------------------- \
Use Print Sets that either bear the Ih^PI mark or have been designated by Panasonic as suitable for this
Digital Photo Printer.
Printer Driver Manual
■Standard paper
The Print Set (PV-MPS50; 50 sheets) is required (sold separately).
This paper can be used as a postcard if you affix the proper postage.
V.
Page 5

Contents
Preparations
Controls and Components....................................................................6
Connections..........................................................................................9
Automatic Printing for Panasonic Digital Video Camera
Paper That Can Be Used for Printing
Inserting the Printing Paper..................................................................12 o
Inserting the Ink Cassette.....................................................................12 2
..................................................
....................
10
11 w
Video Input
Printing from Video Input....................................................................14
Using MENU Mode.............................................................................16
For Optimum Printing Results
Printing a Series of Different Pictures on the Same Print.....................20 c
Printing the Same Picture Repeatedly on the Same Print
Printing a Sequence of Pictures on the Same Print
..............................................................
...................
.............................
18 "S
22 g
24 2
PC Card Input
CD
a
0)
Inserting a PC Card............................................................................26
Printing from a PC Card.......................................................................28 q.
Printing Multiple Images at Once from a PC Card
Using MENU Mode...............................................................................32 "g
Printing a Series of Different Pictures on the Same Print
Printing the Same Picture Repeatedly on the Same Print
Erasing the Images on the PC Card
Recording the Video Input Image on the PC Card..............................38
...................................................
...............................
..................
..................
30 —
34 O
36 ^
38
Advanced Operations
Printing with Title or Trimming Frame
Printing with Trimming Frame
Printing with a Title..............................................................................44
Connections When Using as Personal Computer Printer
.................................................
.............................................................
...................
40 ^
42 O
46
Precautions, etc.
Precautions............................................................................................47 3
Questions and Answers.........................................................................50 g
Before Requesting Service....................................................................54 £
Error Messages
Specifications
Warranty.............................................................................................58
Servicenter Directory..........................................................................59
..................................................................................
.....................................................................................
56
56
Index...........................................................................Back Cover
CD CD
>
Page 6

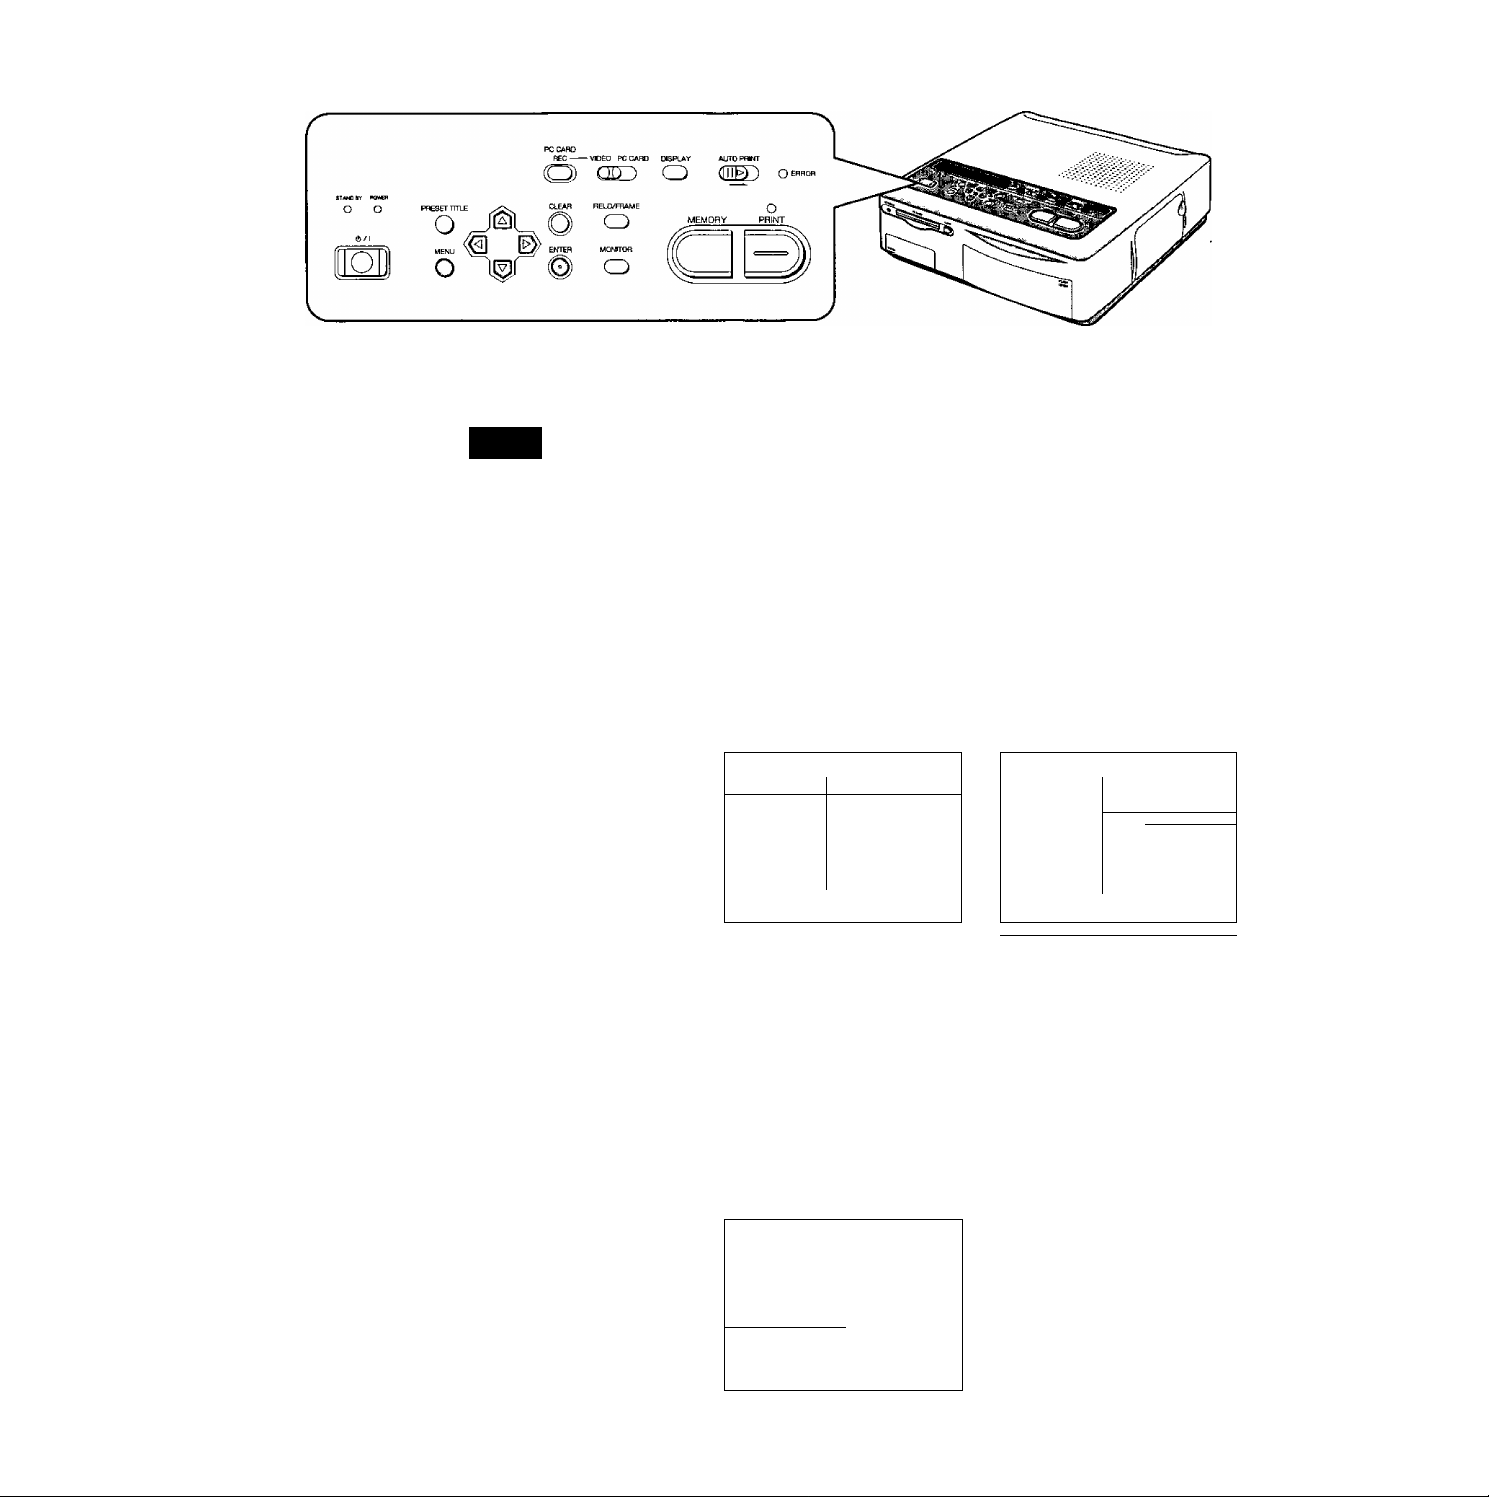
Controls and Components
Front
8TV«BY PG iicn
AHD
PC(
R
:c
-------
c
S a
VIDEO
PC CARD DIS
ZD C
=>LAY ALTTC
D m
PHNT
5D ^
^ ERROR
Page 7

o STAND BY Lamp (p.15, 29) ®
This lamp lights up when the Printer is plugged
into the outlet and the c!) /1 (Power) Button is
set to off.
© POWER Lamp (p.14, 28) ©
This lamp lights up when the c!) /1 (Power)
Button is pressed and the Printer is turned on.
When the power is turned off, the Printer goes
into STAND BY Mode and the STAND BY ©
Lamp lights up.
© PRESET TITLE Button (p.40)
Use this button to insert one of the included
trimming frames or titles for printing. ©
o Button (p.16, 29)
Use these buttons to select the menu contents
or select the PC Card image. ©
0 PC CARD REC Button (p.39)
Use this button to record the image from the
VIDEO IN (or S-VIDEO IN) Socket to the PC ©
Card.
© INPUT SELECT (VIDEO / PC CARD) Switch
(p.14, 28)
Use this switch to select either VIDEO IN (or ©
S-VIDEO IN) Socket or PC CARD for input of
the image to be printed. Either setting can be
used when printing from a computer. ©
O DISPLAY Button (p.28)
Use this button to switch between the Single- ©
image and Index Screen when displaying the
images stored in the PC Card. ®
© AUTO PRINT Lever (p.31)
Use this lever to batch print the images stored ©
in the PC Card.
© ERROR Lamp (p.56) ©
This lamp flashes when a problem that
prevents normal printing has occurred, such as ©
paper jamming or running out of printing paper
or ink. A corresponding error message also
appears on the television screen.
© (!) /1 (Power) Button (p.14, 28)
Use this button to turn the Printer on and off.
When the Printer is turned off, all data stored
in the memory is lost.
© MENU Button (p.16, 32) ©
Use this button to display the MENU Screen.
Various printer functions can be selected at
the MENU Screen. The Buttons,
ENTER Button, INPUT SELECT Switch, and
the (!) /1 (Power) Button are the only buttons
and switches that function while the MENU
Screen is displayed.
© ENTER Button (p.17, 33)
Use this button to execute the items selected ©
in MENU Mode.
CLEAR Button (p.14)
Use this button to erase the image stored in
memory, cancel printing of multiple prints,
cancel batch printing, or cancel the settings.
MONITOR Button (p.14)
During video input, this button switches
between the image from the video source and
the image stored in memory.
FIELD/FRAME Button (p.14)
Use this button when storing a fast-moving
image in memory or when the image stored in
memory is blurred.
MEMORY Button (p.15, 31)
Use this button to store the image currently
displayed on the television screen in memory.
PRINT Button (p.15, 28)
Use this button to print pictures. No buttons
function while printing is in progress.
PRINT Lamp (p.15, 28)
This lamp lights up when the MEMORY Button
is pressed. This lamp flashes while printing is
in progress.
ACCESS Lamp (p.27)
This lamp lights up when image data from an
inserted PC Card is being read or stored.
PC Card Slot (p.27)
The PC Card is inserted here.
PC Card EJECT Button (p.27)
Use this button to eject the PC Card.
Paper Cassette Slot (p.13)
The Paper Cassette is loaded here.
Ink Cassette EJECT Lever (p.13)
Raise this lever to eject the Ink Cassette.
Ink Cassette Slot (p.13)
The Ink Cassette is inserted here.
EDIT Socket (p.10)
Connecting this Printer to the Panasonic
Digital Video Camera using the System Cable
(sold separately) lets you automatically search
for and print still images that were recorded
with the digital photo-shot function. For details,
refer to the Operating Instructions for the
Digital Video Camera.
S-VIDEO IN Socket (p.9)
Use an S-VIDEO Cable to connect this socket
to the S-VIDEO OUT Socket on video
equipment.
High-quality images are obtained from the SVIDEO IN Socket.
If the device you are using has an S-VIDEO
OUT Socket, it is recommended that you use
this socket.
VIDEO IN Socket (p.9)
Use a VIDEO Cable to connect this socket to
the VIDEO OUT Socket on video equipment.
Page 8
Controls and Components (Coni)
—
8
0
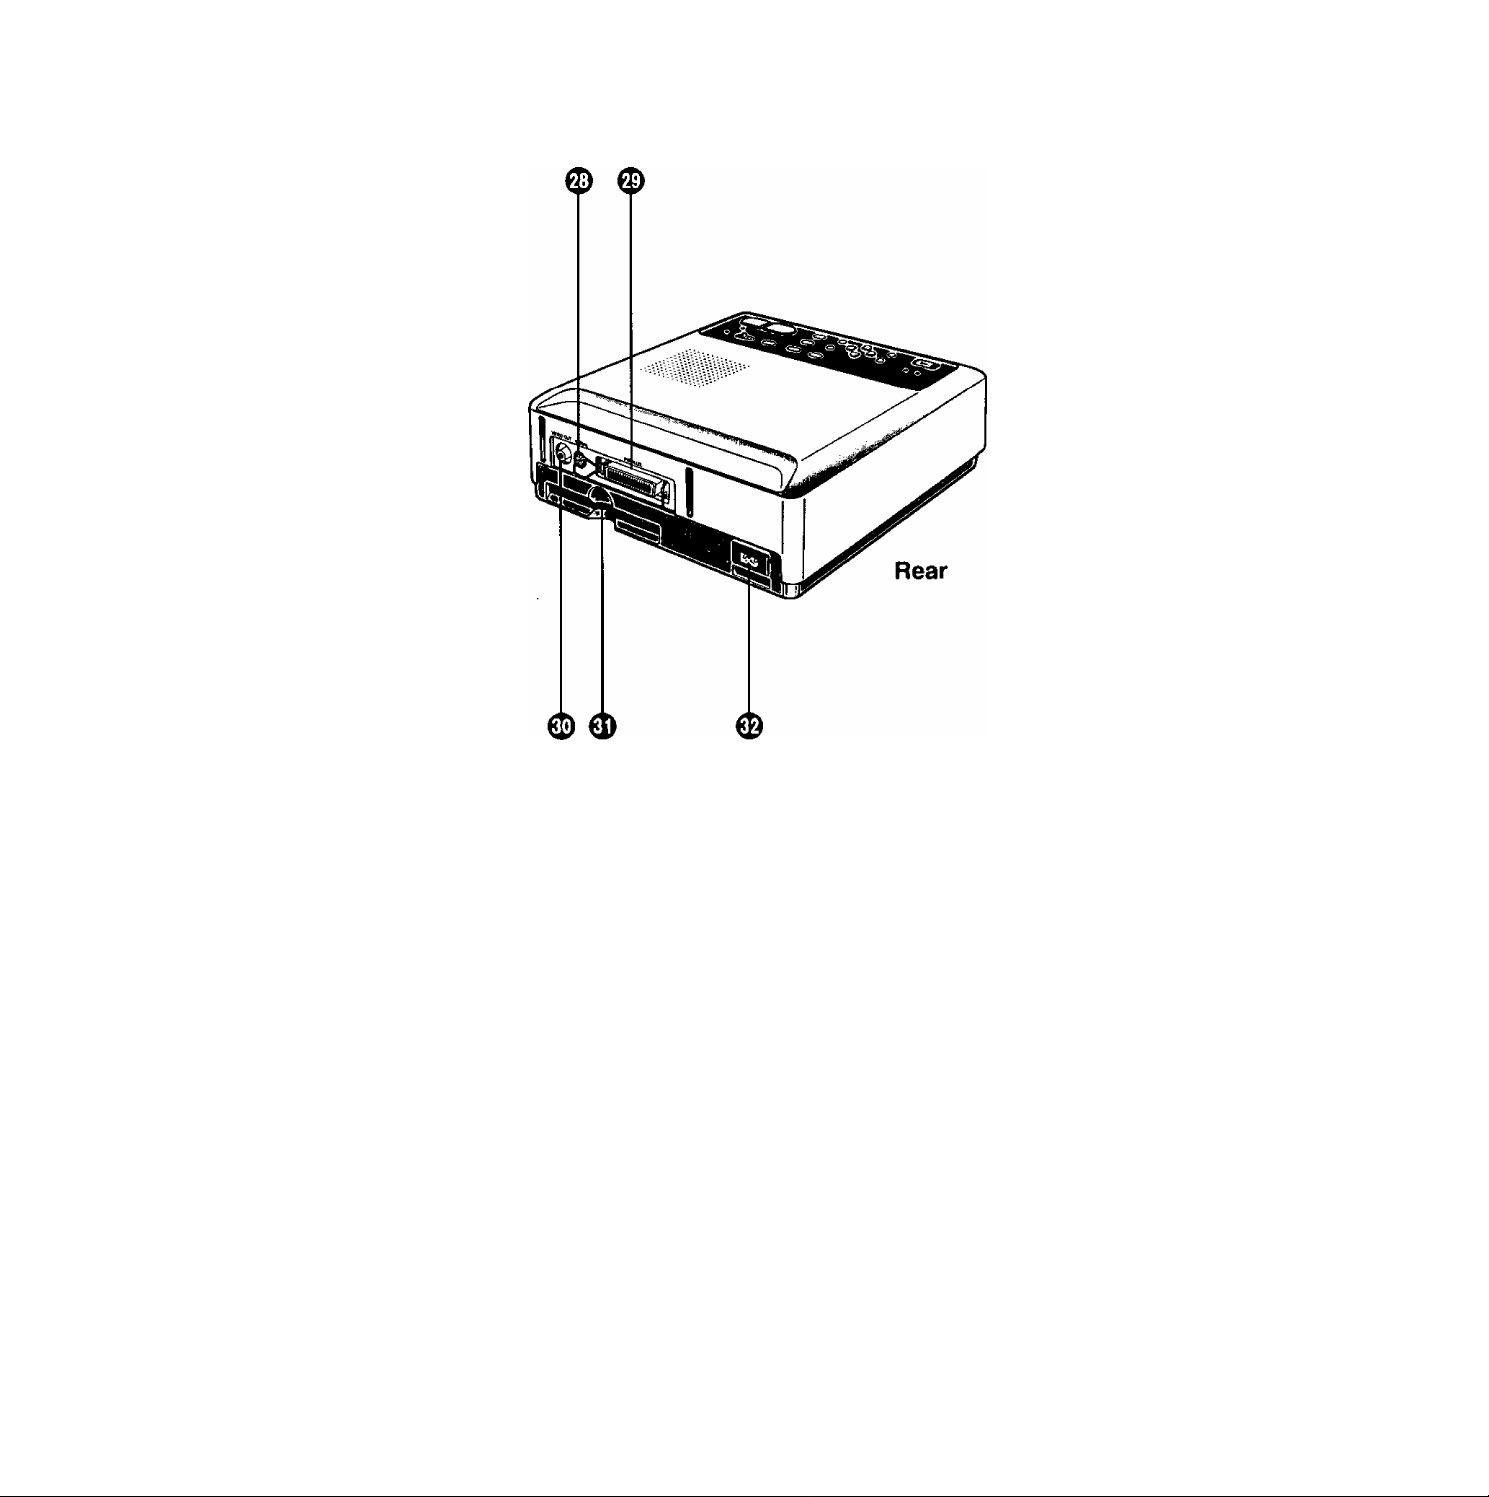
SERIAL Socket (p.46)
Use this socket to connect the printer cable for
Macintosh computers (available at computer
stores).
PARALLEL Socket (p.46)
Use this socket to connect the printer cable
(available at computer stores). The PC should
have a bidirectional parallel socket conforming
to Centronics standards.
VIDEO OUT Socket (p.9)
Use this socket to connect the cable from the
VIDEO Socket (VIDEO IN Socket) on the
television.
Paper Removal Port (p.15)
0»
Remove paper from here if a paper jam
occurs.
0
Power Socket (p.9)
Connect the supplied Power Cable here.
Page 9
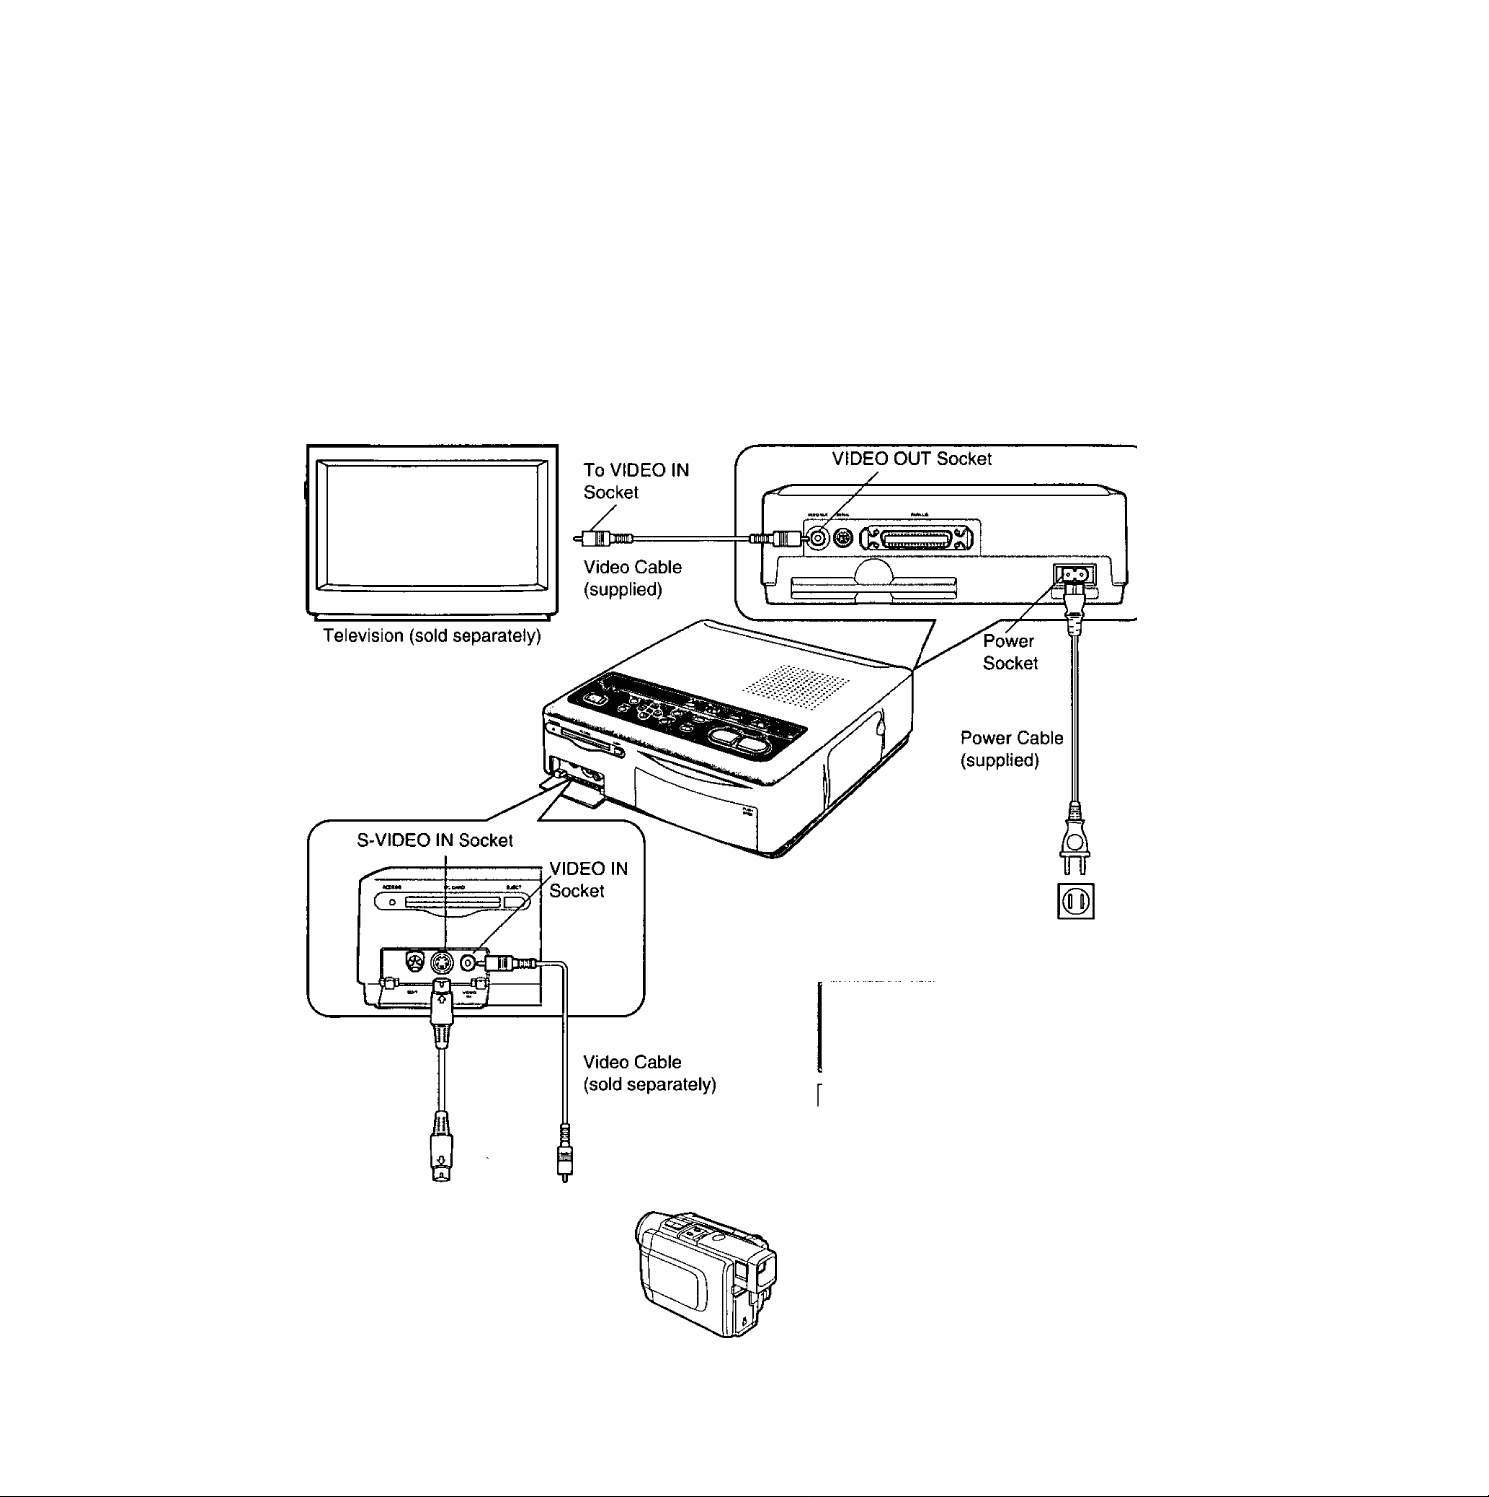
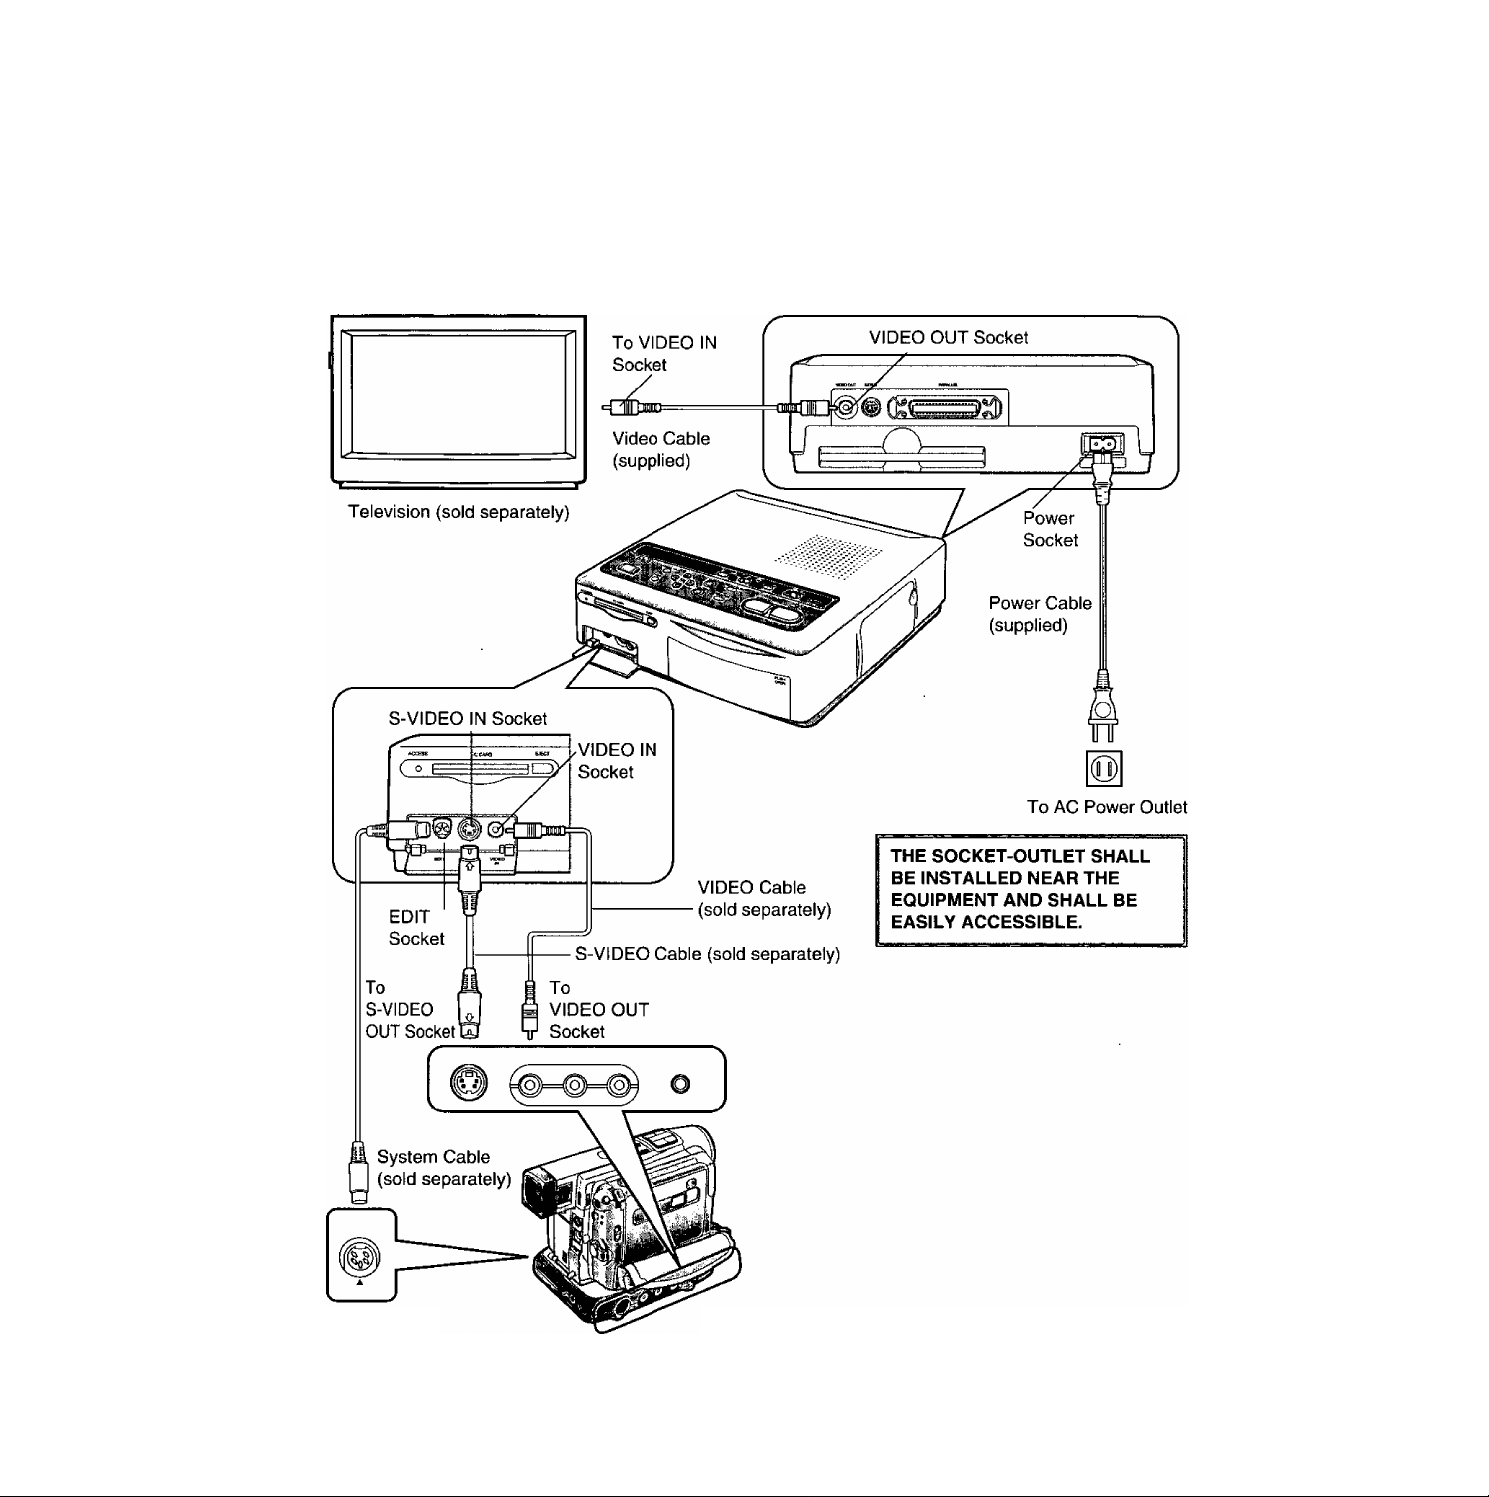
Connections (Connecting to the VCR or Camera)
■Connect with the S-Video Cable if
the VCR or Camera has an SVIDEO OUT socket.
•Connecting to a VCR with an S-VIDEO OUT
socket will allow wide-screen images to be
automatically printed out in wide dimensions.
(When “AUTO" is set for “WIDE” in MENU Mode)
(p.17)
•Connect using a Video Cable if the VCR or
Camera has no S-VIDEO OUT socket.
•To listen to sound from the VCR or Video
Camera, connect the audio output from the VCR
or Video Camera directly to the television AUDIO
IN socket.
• If different video sources are connected
simultaneously to the S-VIDEO IN Socket and the
VIDEO IN Socket, the video for the S-VIDEO IN
Socket takes precedence.
S-Video Cable
(sold separately)
To S-VIDEO
OUT Socket
Video Camera or other video
equipment (sold separately)
To VIDEO OUT
Socket
To AC Power Outlet
THE SOCKET-OUTLET SHALL BE
INSTALLED NEAR THE EQUIPMENT
AND SHALL BE EASILY ACCESSIBLE.
Installation Notes:
The temperature inside this printer can
become extremely hot due to the
thermal sublimation transfer printing
system. For this reason, the printer
should be used in a well-ventilated
location. Also, objects should not be
placed on top of the printer.
Be sure to leave at least 10 cm behind
the printer so that paper can be
removed from the Paper Removal Port
if a paper jam occurs.
Page 10
Automatic Printing for Panasonic Digitai Video Camera
(Automatic printing requires a Digital Video Camera (soid separately) with a System (EDiT) Socket.)
Using a Video Cable (sold separately) or an S-Video Cable (sold separately), connect the Digital Video
Camera to the Digital Photo Printer.
If the System Cable (sold separately) is also used to connect the System (EDIT) Socket on the Digital
Video Camera to the EDIT Socket on the Digital Photo Printer, you can automatically search for and print
still images that were recorded with the digital photo-shot function.
Important Caution : This Automatic Printing feature is not available for models PV-DV1000, PV-DV710, and
PV-DV700.
10
System EDIT
Socket
Digital Video Camera
(sold separately)
Page 11

Procedure
Digital Photo Printer:
1. Turn the Digital Photo Printer on.
2. Make the necessary settings on the Digital
Photo Printer according to the input signal.
Digital Video Camera:
3. Set the POWER Switch to [ON] to turn the
Digital Video Camera on.
4. Press the [VCR / CAMERA] Button so that the
[VCR] Lamp lights.
5. Search for the first still picture from which you
want to start printing with the Auto Print
Function.
• If you want to print all still pictures recorded on
the cassette, rewind the tape to its beginning.
6. Press the [MENU]Button.
7. Set [AUTOPRINT] on the Menu to [ON].
•Automatic Printing starts.
• If you want to stop the Automatic Printing in the
middle, press the ■ (STOP) Button on the Digital
Video Camera.
■Notes
•Auto Print may stop if the Digital Photo Printer’s
speed is slowed down due to its cooling
mechanisms. In this event, perform the Auto Print
operation through the Digital Video Camera again.
• If several photo-shots were recorded
consecutively, some prints may be skipped
during Auto Print.
•If the ink or paper is replaced while Auto Print is
in progress, one image may be inadvertently
printed twice.
•The Auto Print Function cannot be used to print
multiple copies of the same image in succession.
•To stop Auto Print while it is in progress, press the
■ (STOP) Button on the Digital Video Camera.
Pressing the CLEAR Button on the Digital Photo
Printer will not stop Automatic Printing.
Paper That Can Be Used for Printing
The Digital Photo Printer can use the following three types of paper.
(Use Print Sets that either bear the mark or have been designated by Panasonic as suitable
for this Digital Photo Printer)
■Standard paper
The Print Set PV-MPS50 is required.
(Sold separately: Ink Cassette and paper [50
sheets])
•This paper can be used as a postcard if a
postage stamp is affixed.
•Do not affix stamps or adhesive paper to the
paper or print on it with a word processor before
printing. The paper may become curled, or the
stamp may come off, resulting in a paper jam or
malfunction in the Photo Printer.
•Do not write on the paper before printing on it
with the Photo Printer,
•When writing on a printed surface, use a
permanent marker (oil-based). In this case, do
not allow printed surfaces to come into contact
with each other.
• Permanent markers, washable markers, pencils,
and ballpoint pens can all be used to write on the
back of the printed images. However, be careful
not to apply too much pressure when writing on
the back since this will leave marks on the printed
surface.
■Adhesive paper
The Print Set PV-MPAS25 is required.
(Sold separately: Ink Cassette and adhesive paper
[25 sheets])
•Do not peel off the adhesive before printing. This
can cause a paper jam or malfunction in the
Photo Printer.
•When affixing the adhesive paper to another
surface (paper, glass, plastic, metal, etc.),
carefully clean the surface of all dirt and foreign
matter.
•When cutting off adhesive paper after printing,
use a “one-sheet cutter" (available at stores) to
cut the adhesive paper with the backing paper
still in place.
■16 Pre-Cut Adhesive paper
The Print Set PV-MPAS16 is required.
(Sold separately: Ink Cassette and 16 Pre-Cut
Adhesive paper [25 sheets])
•Do not peel off the adhesive before printing.
This can cause a paper jam or malfunction in the
Photo Printer.
•When affixing the adhesive paper to another
surface (paper, glass, plastic, metal, etc.),
carefully clean the surface of all dirt and foreign
matter.
•This paper cannot be used for wide-mode
printing.
11
Page 12
Inserting the Printing Paper / Inserting the Ink Cassette
Ink Cassette
Compartment Door
Paper Cassette Slot
Title
Inserting the Printing Paper
Inserting the Ink Cassette
Ink Cassette Slot
Open the cover of the Paper
Cassette (supplied).
O Slide the switch, and
@ Raise the cover.
Place the paper in the Paper
Cassette with the blank side
to be printed facing up.
The Paper Cassette can hold
up to 25 sheets.Tuck the paper
under the two tabs.
Close the cover.
Ink Cassette
Film
12
Ink Cassette
Compartment Door
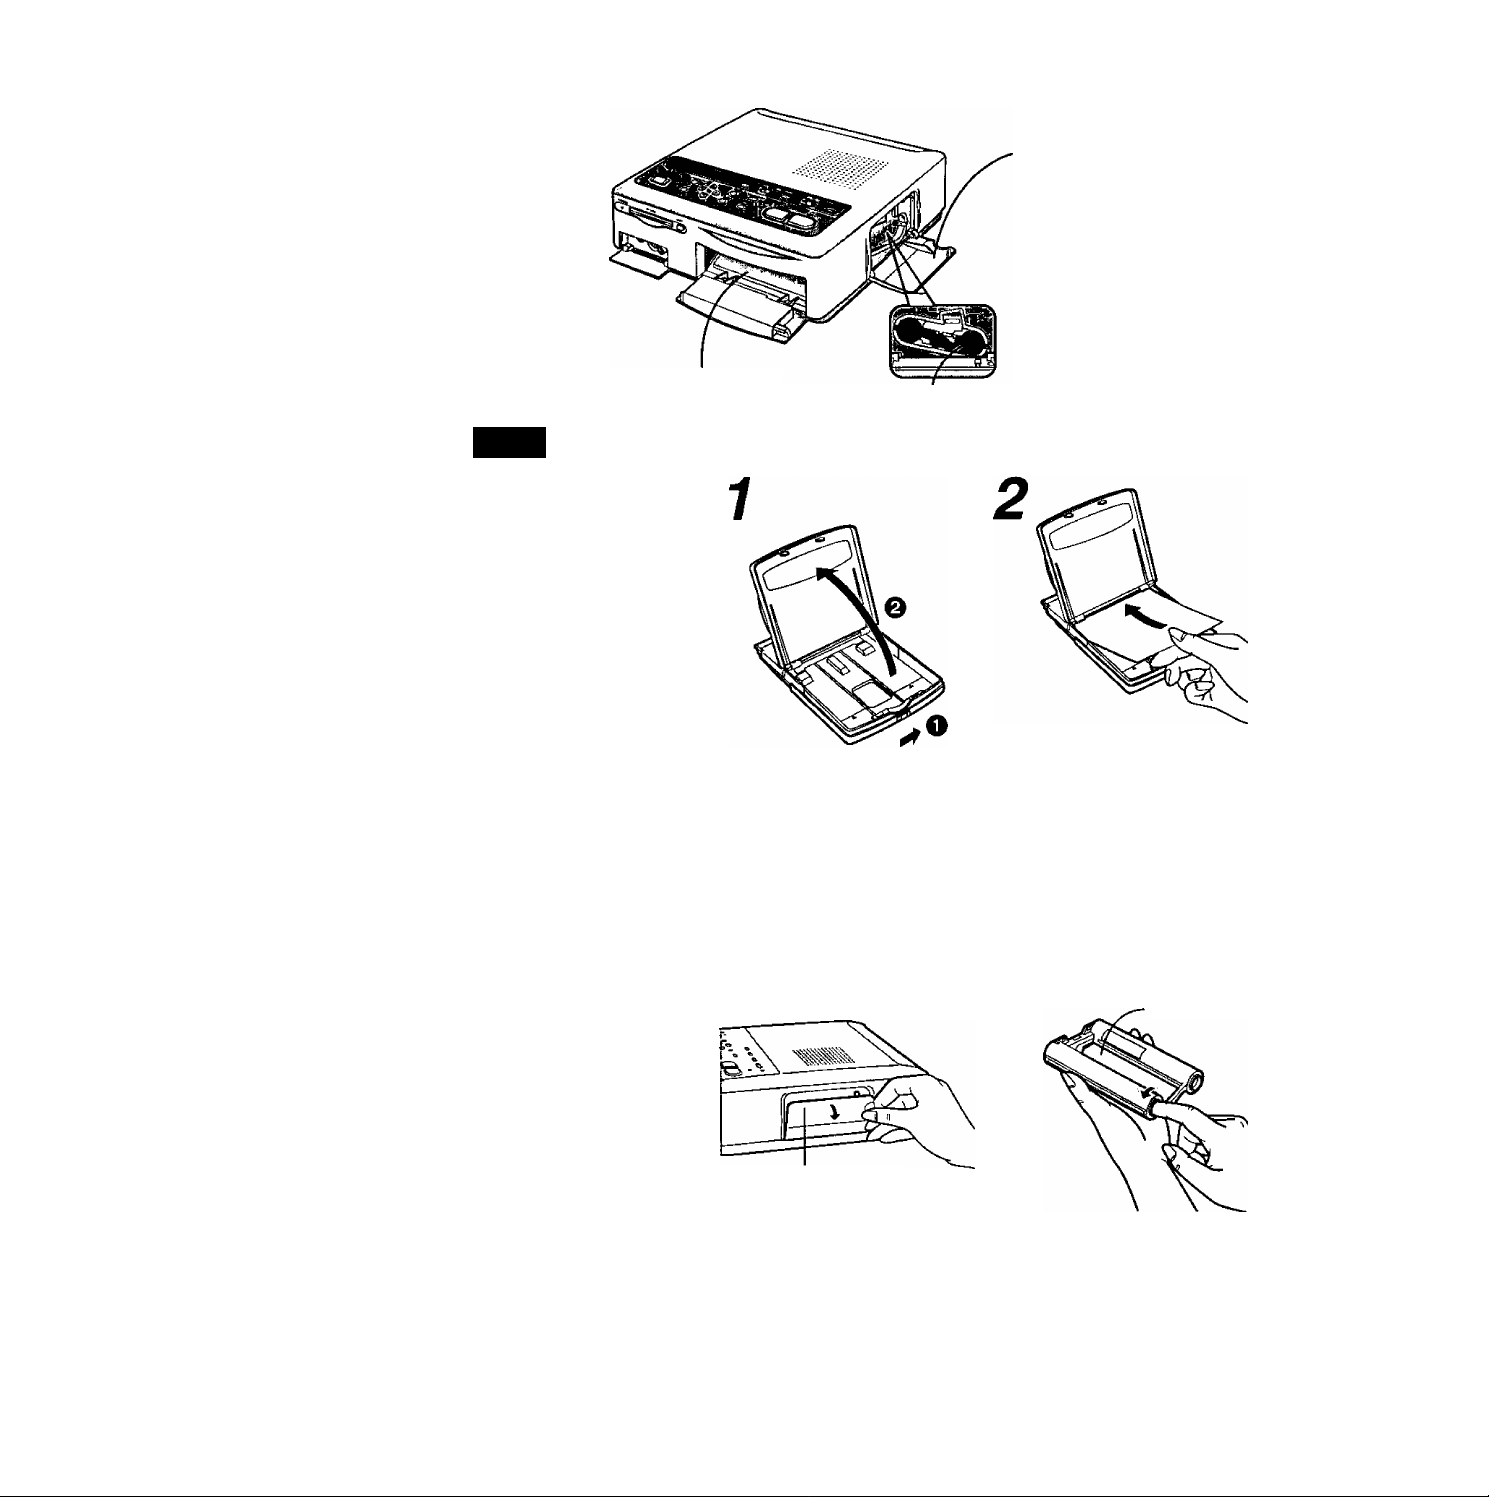
Open the Ink Cassette
Compartment Door.
Take up any slack in the Ink
Cassette Film.
• Insert a finger in a spool and
turn it in the direction
indicated by the arrow,
•Ink Cassettes are included in
the Print Sets {sold separately).
(p.ii)
Page 13
Open the cover of the Paper
Slot.
To open, press “PUSH
OPEN” at the top right of the
cover.
Push the Paper Cassette into
the Photo Printer as far as it
will go.
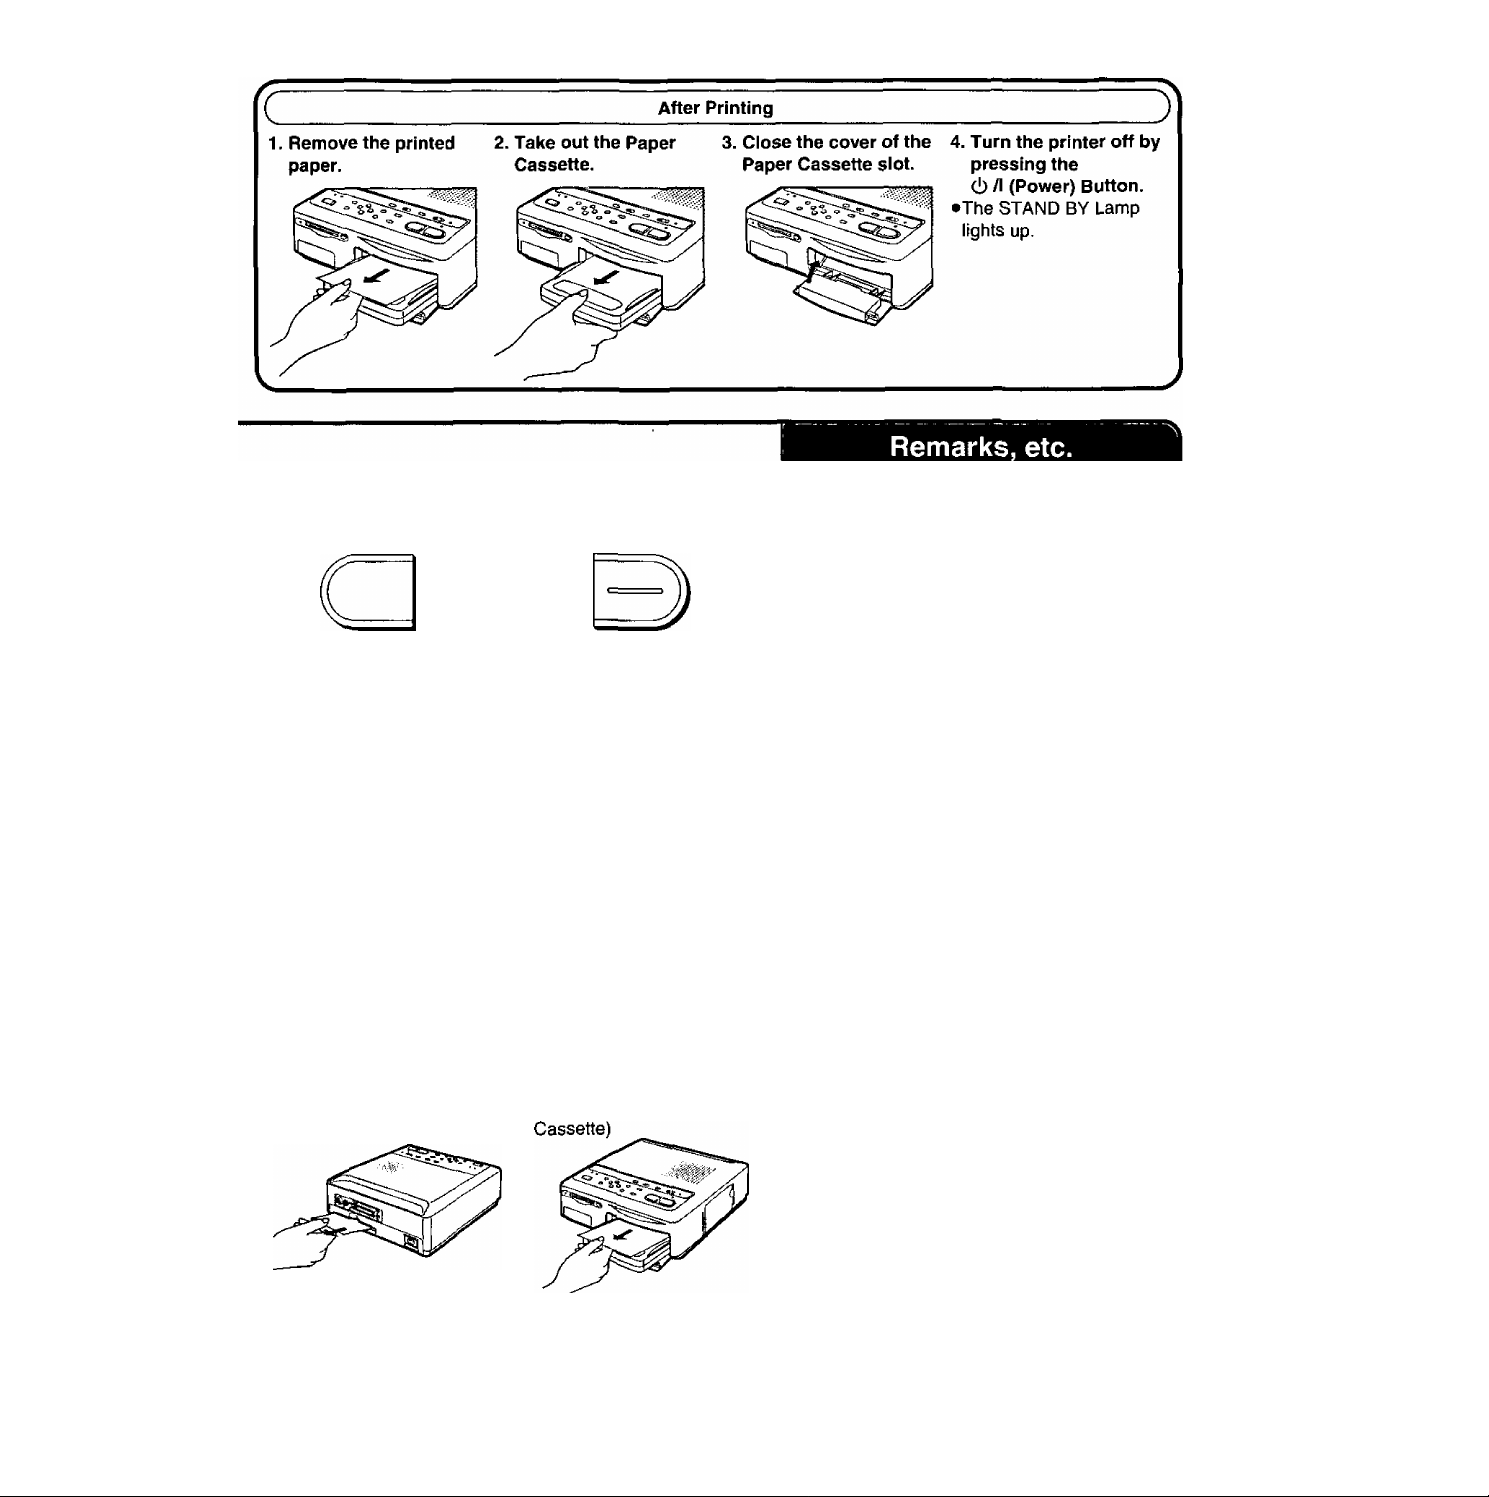
Remarks, etc.
•Do not bend or foid the paper or piace it
in the cassette with the wrong side facing
upward.
•Do not soil the printing side (blank side) of
the paper.
•Fan the paper before placing it in the Paper
Cassette.
•The front end of the Paper Cassette Slot
becomes the left side of the image to be
printed.
•Do not remove the Paper Cassette while
printing is in progress.
•After printing, remove the Paper Cassette
and cióse the cover of the Paper Cassette
Slot.
CO
a
o>
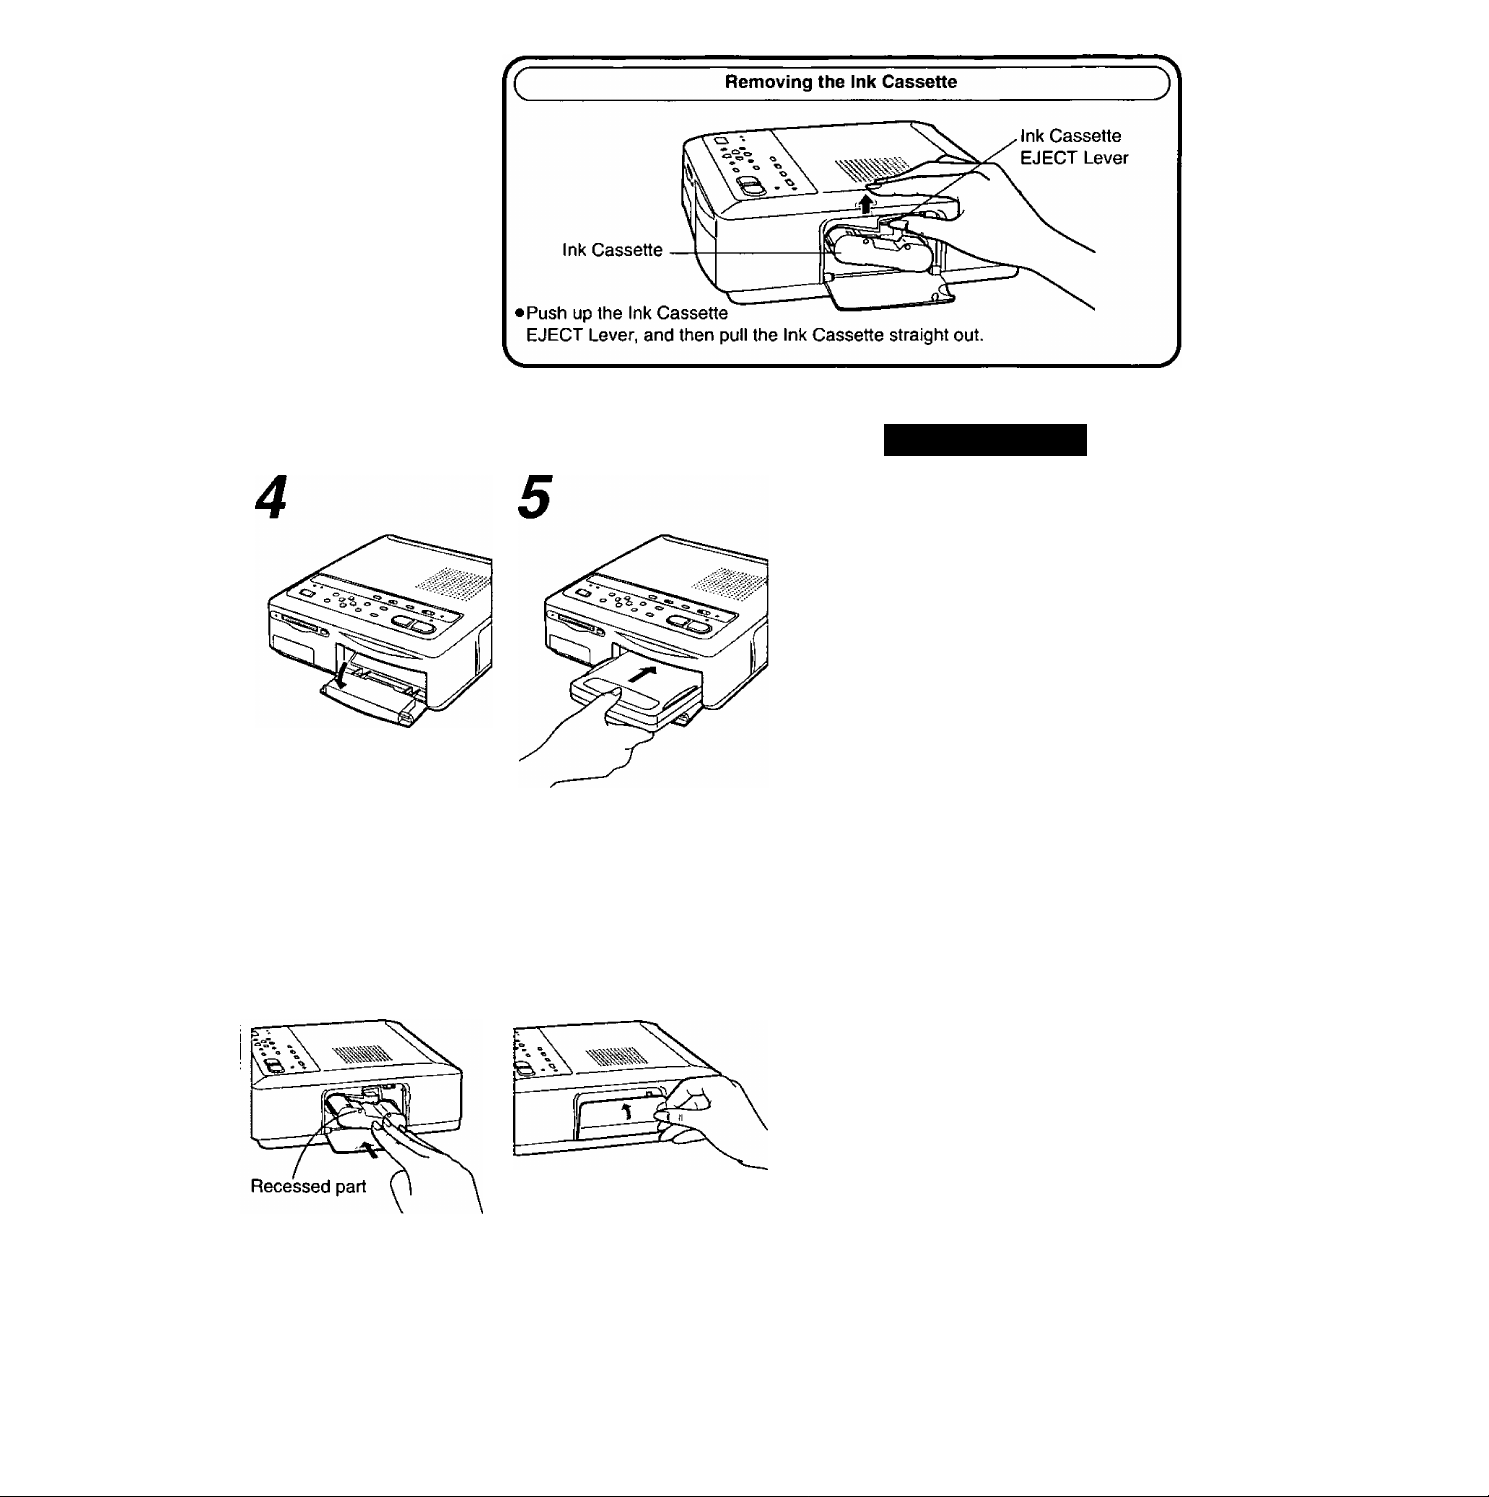
With the recessed part
facing upward, push the Ink
Cassette into the Photo
Printer as far as it will go.
• Do not touch the ink film in the Ink
Cassette, and do not try to pull it out of
the cassette.
• Do not peel off the label on the Ink Cassette.
•The “ink film” refers to the wide tape that is
inside the Ink Cassette.
•When all of the ink film in an Ink Cassette
has been used up, replace the Ink Cassette
with a new one. Used Ink Cassettes cannot
be reused.
• For best printing results, use only the printing
paper and Ink Cassette packaged together
as a Print Set.
Close the Ink Cassette
Compartment Door.
Check that the Ink Cassette
has been inserted all the way
before closing the
Compartment Door.
13
Page 14

Printing from Video input
Title
Printing from Video Input
(Printing an image from the VÌDEO iN or
S-ViDEO IN Socket)
•Before printing, check that an Ink Cassette
has been inserted in the Ink Cassette
Compartment.
•Check that paper has been placed in the
Paper Cassette, and then start the printing
procedure.
1
(i) /1
O
Press the cl) /1 (Power)
Button to turn the printer on.
•The POWER Lamp lights up.
Ink Cassette Slot
VIDEO PC CARD
Set the INPUT SELECT
(VIDEO / PC CARD) Switch to
“VIDEO”.
While printing is in progress, the only
button on the Photo Printer that
functions is the CLEAR Button for
canceiing the printing of muitiple sheets.
14
■Blur Reduction
Use this button when the picture stored in
memory is blurred because the subject is
moving. “FIELD” appears on the screen when
the FIELD/FRAME Button is pressed.
•The television may make the picture stored in memory appear
slightly blurry. However, this does not affect the printing.
■To Print the Same Image Again
After printing is finished, press the MONITOR Button again so that the
image displayed on the television screen is stored in the memory.
Then, press the PRINT Button to print the same image again.
■Printing Multiple Copies of the Same Image
Set the number of prints on the MENU Screen (up to 10 sheets).
(p.16)
•The remaining sheets to be printed are shown at the top right of
the television screen. This number includes the sheet being
printed.
•To cancel continuous printing when two or more sheets remain,
press the CLEAR Button.
FIELD/FRAME
O
Page 15
MEMORY
Check that the PRINT Ump
While watching the
television screen, press the
MEMORY Button at the
scene that you want to print.
•The PRINT Lamp lights up.
•To store a new scene in
memory, press the
MONITOR Button so that the
PRINT Lamp turns off. Then,
press the MEMORY Button
again to store a new image in
memory.
■If a Paper Jam Occurs
A “REMOVE JAMMED PAPER” error message is displayed,
and the ERROR Lamp flashes. When this happens, remove the
paper where it has jammed (Q or Q in the figure above).
If the paper cannot be removed, turn off the printer. Then, turn
the printer on again and remove the paper from either O or ©■
0
Rear Paper Removal Port Q Print Exit (above the Paper
on the Photo Printer is lit, and
then press the PRINT Button.
• Printing starts.
• During printing, the picture
that is being input from the
memory appears on the
television screen.
•When printing is finished, the
picture that is being input
from the video source
appears on the television
screen again.
PRINT
•When printing starts, the “
shown at the top right of the screen changes
to “☆ —
“☆
------
Printing in progress
Printing in progress
Printing is completed when the ☆
mark flashes and then lights up.
(The ☆ mark indicates the printing progress.)
• Do not putt the paper while it is moving
during the printing operation.
• Do not remove the Paper Cassette white
printing is in progress.
• Do not take out the Ink Cassette while
printing is in progress.
• If there is no paper in the Paper Cassette or
if the paper is not inserted properly, the “SET
PAPER AND PUSH [PRINT]’’ message may
appear after the PRINT Button is pressed
(after approx. 25 seconds). When this
happens, reinsert the paper correctly.
• Printing may take more time for continuous
printing of two or more sheets or when
printing at high or low temperatures. Also, if
the Photo Printer becomes hot, the edges of
the printed images may be slightly
discolored.
•Please note that if the paper is bent or
folded, the prints may fall from the Print Exit
(above the Paper Cassette).
•To prevent paper jams, do not allow more
than 10 sheets of paper to accumulate at the
Print Exit.
---------
"display
3
a
c
o
V
■O
>
• If the Paper Cassette is removed while printing is in progress,
paper wiil become jammed in the Print Exit (above the Paper
Cassette) and be unable to be pulled out. Insert the Paper
Cassette and turn the printer on again to discharge the paper.
15
Page 16

Using MENU Mode
Title
Using MENU Mode
The settings for the functions in the Photo
Printer are made at the MENU Screen.
MENU
IMenu Description
О
Press the MENU Button.
•The MENU Screen is
displayed on the television
screen.
О PRINT:
О FORMAT;
О PICTURE:
О FRAME:
0 TITLE;
О OSD (On Screen Display):
Use the ◄ and ► Buttons to set the number of
prints (from 1 to 10) desired.
If [SET] is selected, use the A and T Buttons
to select each print function. (p.20 - 25)
If [SET] is selected, you can adjust the picture
quality. (p.18)
If [SET] is selected, you can make your own
trimming frame, (p.42)
If [SET] is selected, you can make your own
titles, (p.44)
Use the M and ► Buttons to select [ON] or
[OFF] for the screen display.
• Error messages, menus, and the preset title
menu are still displayed even when [OFF] is
selected for OSD.
(The setting for OSD is still stored even when
the INPUT SELECT Switch is set to “PC
CARD”).
^ or ^
Use the A and T Buttons to select the desired menu.
•The mark indicates the
selected item.
16
Page 17
MENU
-IC^PRINT
- FORMAT [STD] SET
- PICTURE [STD] SET
- FRAME
- TITLE [OFR SET
- OSD [ON]
- WIDE [AUTO] ON OFF
[◄►jCHANGE
[^ jSELECT [ENTER] END
1 i
[OFF] SET
OFF
Remarks, etc.
ENTER
or
Use the M and ^ Buttons to select the desired setting.
•The selected setting is
indicated by brackets [ ].
OWIDE; [AUTO] The wide video signal from the S-
[ON] All pictures are printed in wide
[OFF] All images, including wide images,
Press the ENTER Button to complete the setting.
•The MENU Screen
disappears from the television
screen.
VIDEO IN socket is automatically
identified and printed in wide
dimensions (62x 107 mm).
dimensions.
are printed in normal dimensions.
•The M A T ^ Buttons, ENTER Button,
and cl)/1 (Power) Button are the only
buttons that function while the MENU
Screen is displayed.
•Once you set “PICTURE,” [ADJ] is displayed
on the MENU Screen. The previous settings
are maintained in memory until you select
[SET] to implement the new settings.
•Once you set “FRAME" or ‘TITLE,” [ON] is
displayed on the MENU Screen. The previous
settings are maintained in memory until you
select [SET] to implement the new settings.
•The stored settings are erased when the
power cable is unplugged.
• If the letters are blurred and difficult to read
when the MENU Screen is displayed, go to
the MEMORY Screen and then return to the
MENU Screen to make the settings.
•When normal-sized images are printed as
wide images, the printed picture is stretched
horizontally.
o
a>
■o
>
►When wide images are printed as normal
sized images, the printed picture is stretched
vertically ,
•Wide images can be automatically identified
only when the Photo Printer and the video
device are connected with an S-Video cable.
17
Page 18
For Optimum Printing Resuits (picture)
Title
For Optimum Printing
Resuits
(PiCTURE)
Although the picture quality of an image that
you want to print can be adjusted before
storing the image in memory, for optimum
results we recommend that you adjust the
picture quality of the image after you have
stored it in memory.
Press the MENU Button.
MENU
o
Use the ▼ Button to select
“PICTURE”.
MENU
K^pniMT
----------FORMAT
PICTURE [STD] SET
FRAME [OFF] SET
TIUE [OFF] SET
OSD [ON] OFF
WIDE [AUTO] ON OFF
[-«►ICHANGE
[ t ] SELECT
------
1
[STD] SET
[ENTER] END
^ or
Use the ^ and ^ Buttons to
adjust the level.
COLOR +2
_
+
MENU
PRINT
FORMAT1[STD] SET
[^PICTURE '[STD]“ SET“n
FRAME [OFF]
TITLE [OFF] SET
OSD [ON] OFF
WIDE [AUTO] ON OFF
[< ^ ►]SELECT [ENTER]END
ENTER
e
Press the ENTER Button.
SET
18
[^►]ADJUST
[^ ]SELECT [ENTER]END
Page 19

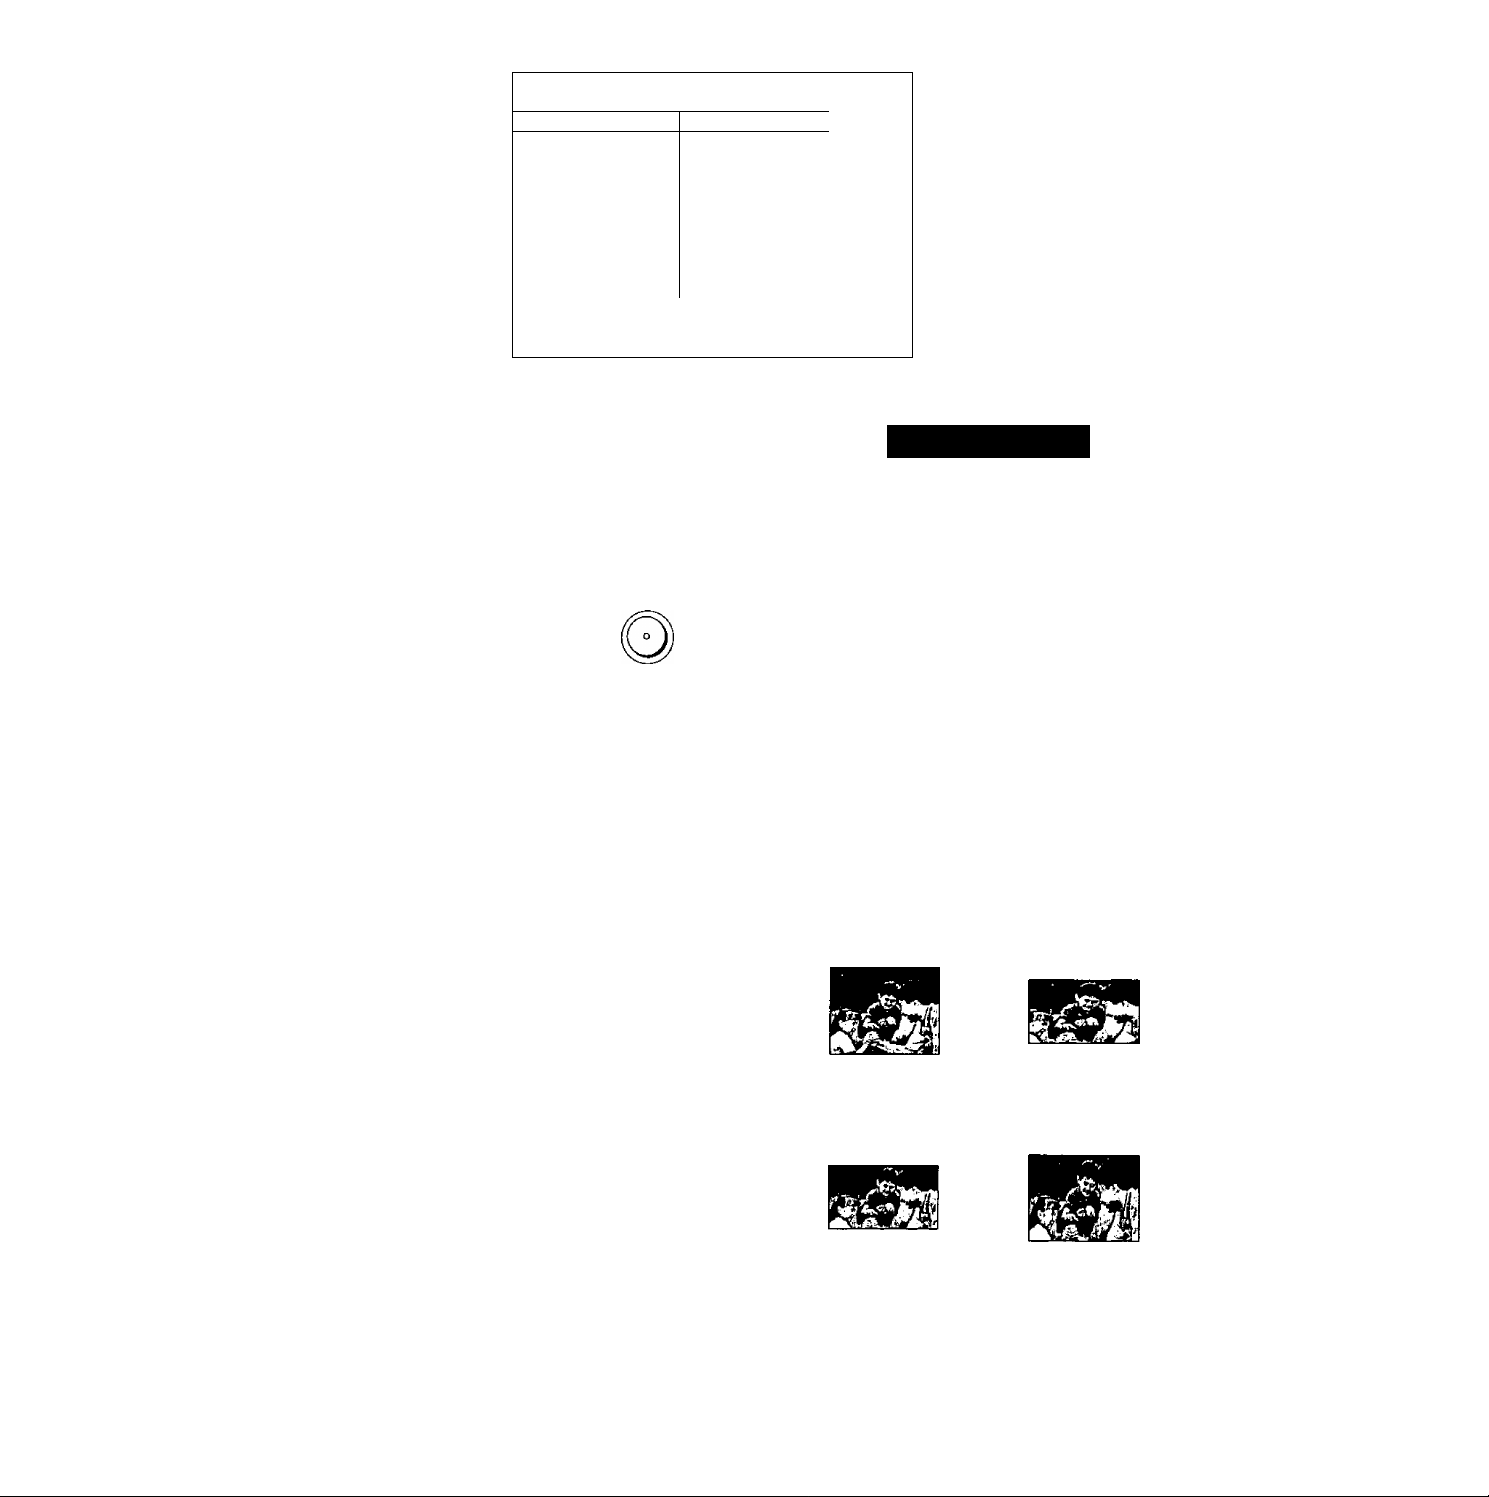
c
1. Set “PICTURE” to [STD] in MENU mode, and then print
2. In television picture quality adjustment, adjust the
television screen to nearly the same color as the printed
3. At “PICTURE” in MENU mode, adjust the television
screen to the desired color balance.
print with almost exactly the same colors as the screen.
Picture Quality Adjustment Procedure
an image with contrasting bright and dark areas.
picture.
Printing after making these adjustments will produce a
Remarks, etc.
3
(a] or
Use the ^ Button to select [SET].
MENU
PRIMT
FORMAT
[^PICTURE
FRAME :[0FF]
TITLE :[0FF] SET
OSD
WIDE
[■< 4 ►ISELECT [ENTERJEND
: 1
:[STD] SET
: STD
-m
:[ALTT0] ON OFF
[SET] 13
SET
OF
Use the A and ▼ Buttons to
select the picture quality
item that you want to adjust.
•See the adjustment items
below.
COLOR 0
[-<►] ADJUST
[ ^ ISELECT [ENTERIEND
Picture Quality Adjustment Items
COLOR <
------> SHARPNESS <
The adjustments shown below change in the following order.
COLOR: This setting lets you adjust to the desired colour
TINT: This setting lets you reproduce colors with the
BRIGHTNESS: This setting lets dark parts become more visible.
CONTRAST: This setting lets you adjust the difference
SHARPNESS: This setting lets you adjust the contours.
•The COLOR, TINT, BRIGHTNESS, and CONTRAST settings
can be adjusted from —9 to 4-9 using the ◄ and ► Buttons.
•The level of SHARPNESS can be set to L (Low), M (Medium),
or H (High) using the ◄ and ► Buttons.
--------
> TINT <
intensity.
correct balance.
between the light and dark parts of the picture.
---------
---------
> BRIGHTNESS i
> CONTRAST
------------
• For PC Card input, follow the same
procedure shown above.
• If it is necessary to re-adjust the picture
quality, start over from Step 1.
•The picture will not be displayed in black and
white even if COLOR is set to —9.
•Adjusting SHARPNESS has no effect on
television picture quality.
• Images are stored in the PC Card without the
setting adjustments made to the picture
quality.
When using video input, one of the most
important factors in printing images of high
quality is skillful video camera work. When
printing, it is recommended that you use an SVIDEO IN Socket for best results. When
shooting a scene from a Video Camera, keep
the following points in mind.
•If at all possible, shoot with the light source at
your back.
•When shooting a scene outdoors that
includes motion, either put the Video Camera
into “sports mode” or, if the camera is
equipped with an electronic shutter function,
set it to about 1/500. Doing so will allow you
to print images without blurring,
•When shooting indoors, make sure that there
is enough illumination.
o
0)
■a
>
19
Page 20

Printing a Series of Different Pictures on the Same Print (album)
o CED O (OM) O
Title
Printing a Series of Different Pictures on the Same Print (ALBUM)
• This printing function allows you to divide the
screen into 4, 9, or 16 mini-frannes
containing different pictures, and then print
them all together on the same print.
• This feature is useful for printing a variety of
scenes from a vacation on a single print.
• When using the 16 Pre-Cut Adhesive paper
PV-MPAS16 (sold separately), select
ALBUM: [16] in Step 4.
[?ii®®32]QDDtS
MENU
o ^
Press the MENU Button, and
then use the T Button to
select “FORMAT”.
i^ENU
PRIMT
[^FORMAT
PICTURE
FRAME
TITLE
OSD
WIDE
[< $ »-ISELE
1
:iSTO] SUZ3
tSTD] SET
[OFF] SET
[OFF] SET
[ON] OFF
[AUTO] ON OFF
:T [ENTER] end
ENTER
Use the P* Button to select [SET].
F
/ENU
PRINT
|C3?* FORMAT STD [SET]~1
PICTURE
FRAME
TITLE
OSD
WIDE
[< ^ ►]SELE
1
[STD] SET
[OFR SET
[OFR SET
[ON] OFF
[AUTO] ON OFF
:T [ENTER] END
MEMORY
20
Press the ENTER Button.
Press the MEMORY Button.
•After the image stored in
memory is displayed for about
one second, the display
returns to the input screen.
Page 21

Printing for 16 Mini-frame Pictures
16 mini-frame pictures are printed separated by white lines.
(These lines are also displayed on the television screen.)
Remarks, etc.
■To Erase Stored Pictures
Press the CLEAR Button when the PRINT
Lamp is lit. One frame is erased each time the
CLEAR Button is pressed.
(To store new pictures to replace the erased
or
pictures, press the MONITOR Button so that
the PRINT Lamp turns off, and then press the
MEMORY Button.)
J
a
c
o
o
■a
Use the ▼ Button to select “ALBUM”.
FORMAT
STD
MULTI
___
STROBE
l< ^ ►] SELECT [ENTER] END
Check that the PRINT Lamp is lit up.
• If the entire ALBUM Screen is
not stored in memory, press
the MONITOR Button to light
up the PRINT Lamp.
16ZU
Use the < and ^ Buttons to
select the desired number of
mini-frames.
FORMAT
STD
[^'ALBUMI
MULTI
-----
STROBE-
[< ^ ►JSELECT [ENTERIEND
8
Then press the PRINT Button.
• Printing starts.
RÌ 9 16 I
PRINT
■Storing Pictures Again after All the Pictures Are Stored
Press the MONITOR Button so that the PRINT
Lamp turns off, and then press the MEMORY
Button. (See Step 6 on the previous page.)
■To Abort the Setting Process
Press the CLEAR Button twice when the
PRINT Lamp is turned off.
Hints for Use
•The PRINT Lamp lights up and turns off each
time the MONITOR Button is pressed.
• If you press the MONITOR Button again after
printing is complete, the display returns to the
MEMORY Screen, allowing you to print the
same pictures again.
•To allow printing without the entire ALBUM
Screen stored in memory, press the
MONITOR Button to light up the PRINT
Lamp. The ALBUM Screen will be printed
with white spaces where no image was
saved. (In this case, the pictures are still
stored in memory starting from the upper left
corner. There is no editing operation that
makes it possible to print images
interspersed with blank (white) images.)
21
Page 22

Printing the Same Picture Repeatedly on the Same Pr/nf (multi frame)
Title
Printing the Same Picture Repeatedly on the Same Print (MULTI FRAME)
1
MENU
o ^
•This feature allows you to divide the paper
into 4. 9, or 16 mini-frames, and then print
the same stored image, reduced in size, in
each mini-frame.
•This feature is useful for printing head
portraits for business cards when using the
Print Set for adhesive paper.
•When using the 16 Pre-Cut Adhesive paper
PV-MPAS16 {sold separately), select MULTI:
[16] in Step 4.
Press the MENU Button, and
then use the T Button to
select “FORMAT”.
MENU
PRINT
INFORMATI MSTD]_
PICTURE ;[STD] SET
FRAME
TITLE
OSD
WIDE
^ ►ISELECT
: I
:[0FF] SET
:[OFR
■ m
: [AUTO] ON OFF
[ENTER] END
ENTER
SET
OFF
SET“I
Press the ENTER Button.
MULTI
FRAME
Use the
^ Button to select
[SET].
MENU
PRINT I
l®° FORMAT
PICTURE [STD]
FRAME [OFF] SET
TITLE [OFF]
OSD [ON] OFF
WIDE [AUTO] ON OFF
STD
[^ ^ ►]SEL£CT [ENTERIEND
MEMORY
-[SETlZl
SET
SET
Press the MEMORY Button.
22
Page 23

Use the ▼ Button to select “MULTI”.
FOR
VIAT
STD
ALBUM
MULTI :[<?
RTRnflF
[M ^ ►ISELECT
1
-----9------16-----
PRINT
[ENTER] END
FOR
or
\AAT
[ENTER] END
<3
Use the ^ and ^ Buttons to
select the desired number of
mini-frames.
STD
1
ALBUM
l^MULTl LW
STBCRF
C’i t ►ISELECT
Remarks, etc.
■To Erase Stored Pictures
Press the MONiTOR Button when the PRiNT
Lamp is iit.
(To store new pictures to repiace the erased
pictures, press the MONiTOR Button so that
the PRiNT Lamp turns off, and then press the
MEMORY Button.)
■To Abort the Setting Process
Press the CLEAR Button once when the
PRINT Lamp is turned off.
•The PRiNT Lamp lights up and turns off each
time the MONITOR Button is pressed.
• If you press the MONITOR Button again after
printing is complete, the display returns to the
MEMORY Screen, allowing you to print the
same pictures again.
•It is also possible to store the image that you
want to print in memory first, and then select
the “MULTI” printing settings on the MENU
Screen.
a
c
o
0)
■o
B
Press the PRINT Button,
•Printing starts.
23
Page 24

Printing a Sequence of Pictures on the Same Print (strobe)
№C VCCO PCCAAO OlS^Y AUTDFmT
OUJ O Qi^~) 0“«>"
C1£AR FCm^mAME /q.
o
MEMORY
O
Title
Printing a Sequence of Pictures on the Same Print (STROBE)
1
MENU
This feature allows the screen to be divided
into 4, 9, or 16 mini-frames, allowing you to
print a series of freeze-frames on a single
sheet.
This feature is useful when studying, for
instance, a golfer’s swing or a tennis player’s
shot.
•One of three strobe speeds can be selected.
The memory storage time is determined by
the MODE and SPEED settings.
Normal Swing
L 3 seconds
M 2 seconds
H 1 second
2 seconds
1.8 seconds
1.4 seconds
o ^
Press the MENU Button, and
then use the ▼ Button to
select “FORMAT”.
PRINT
l^raRMAT
PICTURE [STD] SET
FRAME
TITLE
OSD [ON] OFF
WIDE
^ \E>
Use the ▼ Button to select
“SPEED”, and then use the
< and ^ Button to select the
speed.
STD
ALBUM
MULD
STROBE : [4] 9 16
[^SPEED^L—[MIZIH:
MENU
1
[STDl SET 1
[OFF]
[OFF]
[AUTO] ON
[4 ^ ►ISELECT [ENTERIEND
SET
SET
OFF
SWING
E>
Use the Button to select [SET].
PRINT
[^FORMAT _STD
PICTURE [STD] SET
FRAME
TITLE [OFF] SET
OSD
WIDE
[4 t ►]SELECT [ENTER]END
Press the ENTER Button.
STROBE
MENU
1
[OFF]
[ON]
[AUTO] ON
ENTER
-iSETlZ]
SET
OFF
OFF
24
[< ± ►ISELECT [ENTERJEND
Page 25

Printing for 16 Mini-frame Pictures
16 mini-frame pictures are printed separated by white lines.
{These lines are also displayed on the television screen.)
^ ^
Use the ▼ Button to select
“STROBE”, and then use
the ◄ and ► Button to
select the number of mini-
frames.
STD
ALBUM
MULTI
_____
[^STROBE
___
LI41_9
__
-MeBE-
-!-[N0RM]
SPEED
: L [M]
[< ^ ►JSELECT [ENTERJEND
16 I
SWING
H
^ ^
Use the ▼ Button to select
“MODE”, and then use the M
and ^ Button to select the
mode.
8
PRINT
Remarks, etc.
■To Erase Stored Pictures
Press the CLEAR Button when the PRINT
Lamp is lit. One frame is erased each time the
CLEAR Button is pressed.
(To store new pictures to replace the erased
pictures, press the MONITOR Button so that
the PRINT Lamp turns off, and then press the
MEMORY Button.)
■To Resume Storing Pictures Again
Press the MONITOR Button so that the PRINT
Lamp turns off, and then press the MEMORY
Button. (See Step 7 on the previous page.)
■To Abort the Setting Process
Press the CLEAR Button twice when the
PRINT Lamp is turned off.
•The PRINT Lamp lights up and turns off each
time the MONITOR Button is pressed.
•If you press the MONITOR Button again after
printing is complete, the display returns to the
MEMORY Screen, allowing you to print the
same pictures again.
3
CL
C
o
(U
■D
Press the MEMORY Button
where you want the desired
freeze-frames to start.
•The screen goes blank while
these frames are being
stored in memory.
Press the PRINT Button.
•Printing starts.
■When to Use the Two Strobe Modes
NORM (Normal);
Use this mode to store the screen in memory
at uniform intervals.
SWING:
Use this mode to store the screen in memory
at long intervals during the first part of the
sampling period, then at shorter intervals
during the middle part of the sampling period,
and then at longer intervals again.
This mode is suitable for printing tennis and
golf swings.
25
Page 26

Inserting a PC Card
r- ^ ■
Title
(fteaegtaai©
Inserting a PC Card
•This feature allows you to insert a PC Card,
CF Card, or Smart Media into the PC Card
Slot, and then print images from the card.
•The PC Card can be inserted into the PC
Card Slot without any adaptors.
CF Cards and Smart Media require adaptors.
■Using a CF Card
1
Attach the CF Card containing image data to a PC Card
Adapter (supplied).
Insert the CF Card in the direction of the A
mark as shown in the figure. Insert the CF
Card all the way into the PC Card Adapter.
■Using Smart Media
7
Attach the Smart Media containing image data to a PC Card
Adapter (avaiiable at stores).
______________________________________________
26
Follow the adapter instructions for attaching
the Smart Media.
Page 27

mark as shown in the figure.
Insert the card all the way into the PC Card
Slot.
Never pull out or insert the card while the ACCESS Lamp
on the front of the Photo Printer is lit up. This could
damage the format of the card and make it unusabie.
Remark^S;etc.
• Be careful not to insert the card in the wrong
direction.
• PC Card Adaptors include a CF Card type
(supplied) and Smart Media type (available at
stores). Choose the proper one for the card
you are using.
•The Smart Media is removed from the
adapter by pressing the button on the
adapter.
• Do not remove the Smart Media while it is
still inserted into the PC Card Slot.
■Compatibility of Cards from Dlgital Stitl
Cameras with this Digital Photo Printer
Cards with recorded images from the following
Digital Still Cameras (in no particular order)
can be printed with this Digital Photo Printer.
(As of December 1997)
.Q.
o
u
0.
3
CD
• NV-DCF1, PV-DC1080 (Panasonic) ;
J
27
Page 28

Printing from a PC Card
O CT) O o
CLEAR FIB-D/FHAME
E>fTER MDMTOR
Title
Printing from a PC Card
(Printing images from a PC Card)
LD/FHAfi
o
MEMORY PRINT
O OB
•The images stored in the PC Card are
displayed as an Index {16 images per
screen). This makes it easy to select the
image to be printed.
•Insert the PC Card into the Digital Photo
Printer before starting the procedure.
•Before printing, check that an Ink Cassette
has been inserted into the Ink Cassette
Compartment,
•Check that paper has been placed in the
Paper Cassette, and then start the printing
procedure.
<!)/1
O
Press the (!) / i (Power)
Button to turn the printer on.
•The POWER Lamp lights up.
PRINT
Press the PRINT Button.
•The PRINT Lamp flashes
when printing starts.
•When printing is finished, a
Single-image Display is
shown on the screen.
VIDEO PC CARD
Set the INPUT SELECT
(VIDEO / PC CARD) Switch to
“PC CARD”.
•The ACCESS Lamp lights up,
and the data in the card is
read.
•The images stored in the card
are shown on an Index
Display (16 images per screen)
DISPLAY
o
Press the DISPLAY Button to return to the Index.
28
None of the buttons on the Photo Printer
function while printing is in progress.
Page 29

B □ □ □
□ □□ □
□ □ □ □
rt^-^-HSELECT IMAGE-1 i
4MEM0RY1SET--CANCeJ i
Use the M, A, and T Buttons to select the image to be
printed.
•The green frame moves each time one of these buttons is
pressed.
•When more than 16 images are recorded, you can go to the
next index Display by pressing the ▼ and ► Buttons several
times.
•The printer does not function while the images are being
displayed.
■Switching the Television Picture from Index Display to
Single-image Display and Printing
1. Press the DISPLAY Button.
•The DISPLAY Button switches
C J between Single-image Display and
Index Display.
2. Use the M and ^ Buttons to select the image to be
printed.
----------------
---------
<ll - •The PRINT Lamp lights up.
•Some images stored in the PC Card may be
output to the television screen at a slow rate
depending on the image.
One image takes about 5 to 30 seconds to
be output to the screen. (An Index Display
takes about 5 to 30 seconds X 16 images.)
Also, when the screen switching button is
used to change between the Single-image
Display and the Index Display, about 5 to 30
1
1
seconds are required for each image to be
output.
The menu operations do not function when
the picture image is being output.
•If the image is not displayed properly,
remove the card and insert it, and then try to
display the image again.
•When printing starts, the “
shown at the top right of the screen changes
to “☆
------
”.
“☆
------
Printing in progress
Printing in progress
Printing is completed when the ☆
mark flashes and then lights up.
(The ☆ mark indicates the printing progress.)
• Do not pull the paper while it is moving
during the printing operation.
• Do not remove the Paper Cassette while
printing is in progress.
•Do not take out the Ink Cassette while
printing is in progress.
•To prevent paper jams, do not allow more
than 10 sheets of paper to accumulate at the
Print Exit.
---------
” display
ra
O
u
a
3. Press the PRINT Button.
• Printing starts.
29
Page 30

Printing Muitiple images at Once from a PC Card (Batch print)
Title
Printing Muitipie images at Once from a PC Card (Batch print)
This feature allows multiple images selected
from the PC Card to be automatically printed.
1
DISPLAY
o
If a Single-image Display is
shown, press the Display
Button to display the Index.
E □ □ □
□ □ □ n
□ □ □ □
^►]SEtECTIMAGE-| i--------------1
,MEMORY]SET-’ CANCEL-
Use the M, A, and ▼
Buttons to select the image
to be printed.
•When more than 16 images
are recorded, you can go to
the next Index Display by
pressing the ▼ and ►
Buttons several times.
•You can return to the
previous Index Display by
pressing the A and ◄
Buttons several times.
H □ □ □
□ □ □ □
□ □ □ □
rt-<'^'|HSELECT IMAGE"! j
4MEM0RYISET-J CANCEL-! '
----------------
-----
j
1
30
Page 31

MEMORY
AUTO PRINT
Remarks,etc.
•The images are printed in the order they
were seiected in Steps 2 and 3,
•When printing is finished, the O mark is
erased, and the memory is reset.
•After storing the images in memory, setting
the INPUT SELECT Switch to “VIDEO” or
turning the power off will reset the memory.
Press the MEMORY Button.
•The image is marked with a
O mark.
•Pressing the MEMORY
Button again wiil erase the
O mark.
• Repeat Steps 2 and 3 to
select a number of images.
Slide the AUTO PRINT Lever.
•The PRINT Lamp flashes
when printing starts.
■To Print All the Images Recorded in the
Card
Slide the AUTO PRINT Lever.
(Steps 1,2, and 3 are not necessary.)
■To Abort Printing
Press the CLEAR Button.
Although the image being printed will not stop,
the following printing images wiil be canceled.
3
Q.
(D
o
o
Q.
31
Page 32

Using MENU Mode
fp ■- ^ -- ^
Title
Using MENU Mode
The settings for the functions in the Photo
Printer are made at the MENU Screen.
■Menu Description
1
MENU
2
^ or ^
o
Press the MENU Button.
The MENU Screen is displayed
on the television screen.
O PRINT: Use the ◄ and ► Buttons to set the number of
prints (from 1 to 10) desired.
© FORMAT: If [SET] is selected, use the ▲ and ▼ Buttons
to select each print function, {p.34 - 37)
0 PICTURE: If [SET] is selected, you can adjust the picture
quality.
•The setting procedure is identical to the
procedure for video input, (p. 18)
Use the A and ▼ Buttons to
select the desired menu.
•The mark indicates the
selected item.
<______________________________________
32
O FRAME; If [SET] is selected, you can make your own
trimming frame, (p.42)
0 TITLE: If [SET] is selected, you can make your own
titles, (p.44)
Page 33

-i®=PRINT
- FORMAT [STD]
- PICTURE
- FRAME
- TITLE
- OSD
©
- DELETE
[◄►JCHANGE
[$ ] SELECT
CARD MENU
1 1
[STD]
[OFF]
[OFF]
[ON]
[NO]
[ENTER] END
SET
SET
SET
SET
OFF
YES
©
-li^PRINT :
- FORMAT
- OSD
- DELETE
[◄►]CHANGE
[$]S ELE CT
CARD MENU
1^
[STD]
[ON]
[NO]
[ENTER] END
SET
OFF
YES
Single-image Screen
^ or
Use the M and 1^ Buttons
to select the desired
setting.
•The selected setting is
indicated by brackets [ ].
O OSD (On Screen Display):
Use the ◄ and ► Buttons to select [ON] or
[OFF] for the screen display.
•Error messages, menus, and the preset title
menu are still displayed even when [OFF] is
selected for OSD.
(The setting for OSD is still stored even
when the INPUT SELECT Switch is set to
“VIDEO”.)
ENTER
Press the ENTER Button to
complete the setting.
•The MENU Screen
disappears from the television
screen.
Index Display
Remarks,etc.
•The ► A ▼ Buttons, ENTER Button, and
C!) /1 (Power) Button are the only buttons that
function while the MENU Screen is displayed.
•The menu operations do not function when
the picture image is being output. Operation
can be performed once the complete picture
appears.
•Once you set “PICTURE,” [ADJ] is displayed
on the MENU Screen. The previous settings
are maintained in memory until you select
[SET! to implement the new settings.
•Once you set “FRAME" or “TITLE,” [ON] is
displayed on the MENU Screen. The
previous settings are maintained in memory
until you select [SET] to implement the new
settings.
•The stored settings are erased when the
power cable is unplugged.
• During Index Display, only Q> 0> ^nd O
are shown. (PICTURE, FRAME, and TITLE
are not shown.)
Q.
C
<0
o
o
Q.
O DELETE: Use the ◄ and ► Buttons to select [YES] or
[NO] for allowing images in the PC Card to be
erased (p.38).
33
Page 34

Printing a Series of Different Pictures on the Same Print (album)
Title
Printing a Series of Different Pictures on the Same Print (ALBUM)
•This printing function allows you to divide the
screen into 4, 9, or 16 mini-frames containing
different pictures, and then print them all
together on the same print.
•This feature is useful for printing a variety of
scenes from a vacation on a single print.
•When using the 16 Pre-Cut Adhesive paper
PV-MPAS16 (sold separately), select
ALBUM: [16] in Step 3.
(íte@@é)QDD©
MENU
o ^
Press the MENU Button, and
then use the ▼ Button to
select “FORMAT”.
CARD MENU
PRINT 1
[^FORMAT [S7D1 SET”1
PICTURE [STD] SET
FRAME [OFF] SET
TITLE [OFF] SET
OSD [ON] OFF
OBJETE [NO] YES
[<* ^ HSELECT [ENTER] END
MEMORY
<<l
Use the M and ^ Buttons to
select the desired image to
be printed, and then press
the MEMORY Button.
PRINT 1
Use the Button to seiect [SET].
CAF
ID MENU
PRINT
^FORMAT“
PICTURE
FRAME
TITLE
OSD
DELETE
[4 ^ ^]SELE
1
STD [SETT
[STD] SET
[OFF] SET
[OFF] SET
[ON] OFF
[NO] YES
:T [ENTER] end
PRINT
B
Repeat Step 5, and after
storing the number of
images which fiii up the
screen, press the PRiNT
Button.
•Printing starts.
1
34
IMAGE NO, 0001
[•«►JSELECT IMAGE
[MEMORYIOK
Page 35

Use the ▼ Button to select
“ALBUM”, and then use the
M and ^ Buttons to select
the desired number of mini
frames.
MAT
EOF
STD
^’ALBUM T[^
MULT)
[-4 ^ ►] SELECT [ENTERjEND
r 9 16 1
or ^
Press the ENTER Button.
ALBUM
IMAGE NO. 0001
[-«►ISELECT IMAGE
[MEMORY] OK
Printing for 16 Mini-frame Pictures
16 mini-frame pictures are printed separated by white lines.
{The horizontal lines are displayed on the television screen, but
the vertical lines are not displayed.)
Remarks,etc.
■To Erase Stored Pictures
Press the CLEAR Button when the PRINT
Lamp is lit.
ENTER
■To Abort the Setting Process
Press the CLEAR Button several times to
completely clear the memory screen. Pressing
the MENU Button when the Index Display is
displayed will return you to the CARD MENU.
■To Print Various ALBUM Prints from Different Screens at the Same Time
1. Use the ◄, ►, A, and ▼ Buttons and
MEMORY Button to select the various
different types of images.
2. Slide the AUTO PRINT Lever.
AUTO PRINT
o
u
0.
3
Q.
C
(D
■To Select the Desired Image Displayed on the Index Display
1. After Step 4, press the DISPLAY Button.
2. Use the M, fe**, ▲, ▼ Buttons
to select desired image to be
printed, and then press the
MEMORY Button.
□ Q □ Q
DISPLAY
o
n CZr"'Q
□ a □ □
•The image is mar1<ed with a O mark.
•This operation can be performed
only for the number of images on
the screen.
3. Press the DISPLAY Button to confirm the print images. (Please be careful when pressing the DISPLAY Button since
pressing it twice wili ciear the memory.)
4. Press the PRINT Button.
• Example; If ALBUM:[4] is selected when
printing 8 selected images, then the first print
will have the first to the fourth selected
images, and the second print will have the
fifth to the eighth selected images.
•The ALBUM Screen shows white spaces
where no image was saved. There is no
editing operation that makes it possible to
print images interspersed with blank (white)
images.
□
35
Page 36

Printing the Same Picture Repeatediy on the Same Print (multi
r
C3 c UD O
CLEAA FtLO/FRAME
CNT04 liOMTCn
ip>
Title
Printing the Same Picture Repeatediy on the Same Print (MULTi FRAME)
MENU
frame)
•This feature allows you to divide the paper
into 4, 9, or 16 mini-frames, and then print
the same stored image, reduced in size, in
each mini-frame.
•This feature is useful for printing head
portraits for business cards when using the
Print Set for adhesive paper.
•When using the 16 Pre-Cut Adhesive paper
PV-MPAS16 (sold separately), select MULTI:
[16] in Step 3.
o ©
Press the MENU Button, and
then use the ▼ Button to
select “FORMAT”.
CAP
ID MENU
PRIWT
^'FORMAT
PICTURE
FRAME
TTTLE
OSD
DELETE
H ^ ►ISELE
Use the M and ^ Buttons to
select the desired image to
be printed.
1
rSTDl SET 1
[STD] SET
(OPR SET
(Off) SET
[ON] Off
[NO] YES
:T [ENTER] end
or
©
Use the ^ Button to select [SET].
CARD MENU
PRINT 1
i^F0RMAT__ STD
PICTURE
FRAME [OFF]
Tm£
OSD
DELETE [NO]
[r< ^ ►]SEl£CT
[STD]
[OFF]
[ON]
PRINT
Press the PRINT Button.
•Printing starts.
[SETlZ!
SET
SET
SET
Off
YES
[ENTER] END
36
Page 37

3
” E>
Use the ▼ Button to select
“MULTI”, and then use the
•4 and ^ Buttons to select
the desired number of miniframes.
yiAT
FOR
STD
ALBUM
[^MULTI :
$ ►] SELECT [ENTER] END
1 9 16 1
ENTER
Press the ENTER Button.
Remarks,etc.
■To Print Various Types of Different MULTI
FRAME Prints from the Same Screen at
the Same Time
1. After Step 4 on the previous page, press the
DISPLAY Button so that the Index Display is
shown.
2. Use the ◄, ►, A, and ▼ Buttons and
MEMORY Button to select the various
different types of images.
□ □ □
□ ra □□
□ a □ □
IMAGE-1 I
--------------
j
4f№M0R¥}BETJcANGEfcrJ '
3. Slide the AUTO PRINT Lever.
AUTO PRINT
---------
'
o
u
Q.
Q.
C
(8
iTo Select the Desired Image Displayed on the index
Dispiay
1. After Step 4, press the DISPLAY
Button.
again will erase the O mark.
3. Press the DISPLAY Button to confirm the print images.
4. Press the PRINT Button.
DISPLAY
o
№3
37
Page 38

Erasing the Images on the PC Card/
Recording the Video Input Image on the PC Card
Title
Erasing the Images on the
PC Card
(Erasing card images)
MENU
The images stored on the PC Card can be
erased one at a time.
Recording the Video Input
Image on the PC Card
(Recording images on the
PC Card)
•This function allows Images from the VIDEO
IN Socket or the S-VIDEO IN Socket to be
recorded on the PC Card as still images.
•The images are recorded as still images.
•Approximately 40 images can be recorded on
a 4-M8 capacity PC Card. However, this may
vary depending on the stored image.
O
Press the MENU Button, and
then use the ▼ Button to
select “DELETE”.
CARD MENU
PRINT
FORMAT
PICTURE
FRAME
TITLE
OSD
^OaETE ’[N01 —1
l< ^ ►ISELECT [ENTER]END
1
[STD] SET
[STD] SET
[OFF] SET
[OFF] SET
[ON] OFF
1
Connect the necessary
devices, and then prepare
the desired image to be
recorded on the PC Card.
•Connections (p.9)
Use the P- Button to select [YES].
CARD MENU
PRINT : 1
FORMAT : [STD] SET
PICTURE : [STD] SET
FRAME : [OFF] SET
TITLE : [OFF] SET
f^^DaETE :"N0 [YES]"1
Set the INPUT SELECT
(VIDEO / PC CARD) Switch to
“VIDEO”.
OSD : [ON] OFF
[^ ^ ►]SELECT
VIDEO PC CARD
[ENTER] END
38
Page 39

ITo Select the Desired Image to be Erased from the Index Display Screen
1. Press the DISPLAY
Button so that the Index
Display is shown. then select [YES].
2. At the MENU Screen,
select “DELETE”, and
3. Use the A, and ▼ Buttons to select the
image to be erased, and then press the ENTER
Button. ^
DISPLAY
o
or
Use the -4 and ^ Buttons
to select the desired image
to be erased.
CARD MENU
PRINT : )
FORMAT : (STD) SET
OSD : [ON] OFF
fS= DELETE :'N0 lYESl—1
[<«»']CHANGE
[ * jSELECT [ENTER]END
ENTER
Press the ENTER Button.
•When the image is erased, the
screen returns to the CARD
MENU. To continue erasing
images, repeat Steps 2 and 3.
□ □ □ □
1 DEI-ETE'JHjS~IM.^GE |
ENTER
iTErmijoecETs i—i i—i
^rCLEA’RjCANCEL '-----------'
Remarks,etc.
•Once an image has been erased, it cannot
be restored. Check carefully before
erasing any images.
•Never remove the PC Card or press the
c!) /1 (Power) Button to turn off the Photo
Printer while the image is being erased
(when the ACCESS Lamp is lit up). This
could damage the format of the card and
make it unusable.
• Images can be erased either from the Single
image Display and Index Display.
-----------
O
O
Q.
3
Q.
m
MEMORY
Start playback of the video
equipment, and then while
viewing the television
screen, press the MEMORY
Button at the scene to be
recorded on the card.
•The scene is stored in the
Photo Printer memory.
NOW DELETING
[•«► JSELECT IMAGE
[ENTER] DELETE
[CLEAR] CANCEL
PC CARD
REC
Press the
PC CARD REC Button.
•The scene is stored in the PC
Card from the Photo Printer
memory.
•The ACCESS Lamp lights up
while the image is being
recorded.
o
•Never remove the PC Card or turn off the
Photo Printer while the image is being
recorded (when the ACCESS Lamp is lit
up). This could damage the format of the
card and make it unusable.
•images cannot be recorded on the PC Card
with MULTI FRAME Mode.
• Data stored in the PC Card undergoes image
compression. In some cases, this can
deteriorate the image when it is stored on the
card.
• Images are stored in the PC Card without the
setting adjustments made to the picture
quality.
•Blurred images are stored without any
adjustments.
•Titles are not stored.
•Wide images cannot be stored in wide format
in the PC Card.
39
Page 40

Printing with Titie or Trimniing Frame (Preset title)
Title
Printing with Titie or
Trimming Frame
(Preset titie)
Press the PRESET TITLE Button.
• If the Index Display Screen is
shown when using the PC
Card, press the PRESET
TITLE Button after switching
to Single-image Display.
HTHANKYOlfll MISS YOU
PRESET TITLE
o
TITLE
HOW ARE
BOY HAUOWEEN
GIRL
MOTHERS GREETINGS
FATHERS XMAS
CONGRATS
ILLUSTRATION
[PRESET] CANCEL
[< ^ ► ] SELECT
MARRIED
BIRTHDAY
HOUDAYS
[ENTER]OK
ENTER
Use the <4, A, and ▼
Buttons to make a selection,
and then press the ENTER
Button.
IITHANKYOUj!
HOW ARE
BOY HALLOWEEN
GIRL BIRTHDAY
MOTHERS GREETINGS
FATHERS XMAS
CONGRATS HOLIDAYS
ILLUSTRATION
[PRESEDCANCa
[< ^ ► ISELECT
TITLE
MISS YOU
MARRIED
[ENTER]OK
This feature uses preset tities to add titles or
trimming frames to the image.
•The Photo Printer includes 14 examples of
preset titles and 8 illustrations. {See next
page.)
•Some of the greeting examples are colored.
Colors
Black
Red
Cyan, Blue 0, 0
Pink
Green
Example Number
O, 0,0
O, o. o. 0.0
0.0
0.0
40
ENTER
Use the A and ▼ Buttons to
select the “MONTH”, and then
press the ENTER Button.
•You can change to the
desired month using the ◄
and ► Buttons.
[MONTHÌ.PAN]]
OFF
[PRESET] CANCEL
[^► jCHANGE
t ^ jSELECT [ENTEFjOK
6
Print the title and image.
Page 41

I,Mission
0
Juit Married f
©
ffifUippMi
] O
©
f^pctr Blrthdby
0
ILLUSTRATION
Use the A and ▼ Buttons
to select the “TEXT”, and
then press the ENTER
Button.
•Text cannot be selected for
examples 0, O, ©, O,
Q, and 0.
rTEXT:~iFOn'ALL' YOUHZ] ]
OF
Mothar^ cm/
ENTER
(D
m/mmmomimMm
©
HaiTpy F 'atf wr'i ()air
ENTER
Use the A and T Buttons to
select the “YEAR”, and then
press the ENTER Button.
•You can change to the
desired year using the ◄ and
► Buttons.
1YEAR:~[1 99811
OF
0
i^/rrcfmsmti
0
COMOfUtVlLATIOHS !
0
c 1
Remarks,etc.
•Although a portion of the title display is not
shown on the television screen, this has no
effect on the printing.
•The year can be set from 1997 to 2028.
•All data stored in the memory is erased when
the Photo Printer is turned off.
•To turn off a trimming frame or title on the
television screen, press the PRESET TITLE
Button.
•To turn off either the trimming frame or title
only, set FRAME or TITLE in MENU Mode to
[OFF].
{Switching this setting to [ON] again will
display the trimming frame or title again.)
■To Abort the Setting Process
Press the PRESET TITLE Button.
[PRESET] CANCEL
[ ^ jSELECT (ENTERjOK
ILLUSTRATION 1
[PRESET] CANCa
[-4 ► ] CHANGE' [ENTERJOK
rn
[PRESET] CANCa
[<4k>]CHANGE
[ ^ JSELECT [ENTERJOK
0 Selecting “ILLUSTRATION"
allows you to choose from the
eight illustrations 1 to 8.
Use the ◄ and ► Buttons to
select one of the illustrations 1
to 8, and then press the ENTER
Button.
•When an ©Illustration is inserted into an
image from a PC Card, the right and left
sides of the illustration will become slightly
shortened.
T3
0)
u
41
o
o.
O
Page 42

Printing with Trimming Frame
Title
Printing with Trimming
Frame
A trimming frame can be made in one of two
possible ways.
Press the MENU Button.
Example.Video Input
[QFPRIMT
FORMAT [STD] SET
PICTURE
FRAME [OFF] SET
TITIE
OSD
WIDE [AUTO] ON OFF
[^►ICHANGE
[ ^ ISELECT
MENU
------
[STD] SET
[OFF] SET
[ON] OFF
1
[ENTER] END
Use the ▼ Button to select “FRAME”.
MENU
PRINT : 1
FORMAT :[STD]
PICTURE :fSTD)
FRAME i'lOFFl
TITLE :[OFF]
OSD :[0N)
WIDE
[< ^ ►]SELECT
: [AUTO]
SET
SET
SET
OFF
ON OFF
[ENTER]END
SET 1
O Selecting from one of the preset
trimming frames: SQUARE, OVAL,
FROST, or HEART
(The size of the SQUARE trimming frame
can be adjusted.)
•Trimming can be used to cover black
bands appearing at the top, bottom or
around the image (such as for movie
scenes).
0 Capturing with your Video Camera a
trimming frame that you created
O When “SELECT” is
chosen
Select one of the four trimming
frames: SQUARE, QVAL,
FROST, and HEART.
Then, select [YES].
•The size of the SQUARE
trimming can be adjusted by
using the ◄, ►, A, and ▼
Buttons.
If “OVERLAY” was selected in Step 4, press the ENTER Button.
FRAME
SELECT
OVERLAY
To perform inside-outside
reversal, use the ▼ Button to
select “IN-OUT”. Next, use the ^
Button to select [YES], and then
select “INSIDE” or “OUTSIDE”.
r№TI№UT : MO'
* ►ISELECT [ENTERJEND
:[YES1ZI
42
Page 43

Digital Video Camera
(sold separately)
Remarks,etc.
Use the ^ Sutton to select
[SET].
MENU
PRirJT
FORMAT1[STD]
PICTURE [STD] SET
[®= FRAME
TFHE
OSD
WIDE [AUTO] ON OFF
^ ► ISELECT [ENTERJEND
o When “OVERLAY” is
chosen
A trimming frame that you
created is captured with your
Video Camera, and the
trimming frame is adjusted for
optimum appearance.
•The value can be adjusted
over a range from —9 to 4-
9. Positive values make the
trimming frame lighter, and
negative values make the
trimming frame darker.
OFF ■ "
(OFF) SET
ION] OFF
SET
IISEDID
Use the ▼ Button to
select one of the two
methods, and then use
the ^ Button to select
[YES].
FRAME
OVERLAY
”:'N0
[^SELECT“
[< ^ ► ]SEUCT tENTERlEND
:[YES]Z1
•When a trimming frame is stored in memory,
[ON] appears on the MENU Screen.
•A trimming frame stored in memory is lost
when the Digital Photo Printer is turned off.
•When a new trimming frame is stored in
memory, the previous trimming frame is
erased.
•When a preset title is used, the previous
trimming frame is lost.
•When capturing the title or trimming frame
with a Video Camera, shine the lighting at a
45-degree angle to prevent reflection.
•To temporarily turn off a trimming frame
stored in memory displayed on the screen,
set “FRAME" in MENU Mode to [OFF].
(When the setting is switched back to [ON],
the stored trimming frame reappears on the
screen.)
•When creating your own frame, use a black
marker on white paper.
■INSIDE, OUTSIDE
INSIDE :The image is inserted inside the
stored frame.
OUTSIDE :The image is inserted outside the
stored frame.
■D cn
0» C
u o
E
n <0
fl)
a
O
Press the EffTER Button.
(If the menu is
displayed, hold down
this button until the
menu disappears.)
8
Print the trimming frame.
43
Page 44

Printing with a Titie (Inserting your own titles)
Title
Printing with a Title (Inserting your own titles)
With this function, you can use your Video
Camera to capture titles that you created,
aliowing you to add an original title to the
image.
Press the MENU Button.
1(5?" PRINT :"1 1
FORMAT [STD] SET
PICTURE [STD] SET
FRAME
TITLE [OFF] SET
OSD [ON] OFF
WIDE
[-«►ICHANGE
[^ ISELECT
Example:Video Input
MENU
[OFF] SET
[AUTO] ON OFF
[ENTER] END
Use the ▼ Button to
select “TITLE”.
MENU
PRINT
FORMAT
PICTURE ;[STD] SET
FRAME :[0FF]
f(5‘*Tm£ ;[0FF] "SET—1
OSD
WIDE :[AUTD] ON OFF
[-< ^ ►ISELECT [ENTERIEND
: 1
:[STD] SET
SET
:[0N]
OFF
press the ENTER Button.
•The value can be adjusted
over a range from —9 to +9.
Positive values make the title
darker, and negative values
make the title lighter.
Print the title with the
image.
3Ii
■Changing the Color of the
Title
1. Select “COLOR CHANGE :
WHOLE”, and then select
[YES].
TITLE
OVERLAY
COLOR CANGE
[QT
-----
WHOLE;‘NO— [YES];
PART
[■4 ^ ►] SELECT [ENTERJEND
--------
2. Use the A and ▼ Buttons to
select the color, and then
press the ENTER Button.
[GrCYANl
RED
MAGENTA
YELLOW
WHITE
BLACK
BLUE
GREEN
[ ^ ]SELECT [ENTER] OK
1
44
[ ^ JMUUST [ENTERJOK
Page 45

Use the ^ Button to
select [SET].
MENU
PRINT
FORMAT
PICTURE [STD] SET
FRAME
ItiT’ HILL
OSD [ON] OFF
WIDE [Ain'O] ON OFF
1
[STD] SET
[OFF]
"OFF
..........
.[SETIZ]
^ ►JSELECT [EMTERJEND
[Or OVERLAY
SET
■Changing the Color of Part of the Title
1. Select “PART’, and then select
[YES].
\Gr PAHT'~TNQ iYESr
2. Use the ◄, A, ▼, and ►
Buttons to select the upper left
limit for the color, and then
press the ENTER Button.
Upper Left Corner'
Use the < and ^
Buttons to select [YES].
TITLE
:[YKO
[^►JSELECT [ETiTERJEND
TITLE
OVERLAY
CaOR CANGE
WHOLE
[< ^ ►^SELECT
^ ►ISET START
[ENTER]0K
[ENTERIEND
Remarks,etc.
•A title stored in memory is lost when the
Digital Photo Printer is turned off.
•When a new title is stored in memory, the
previous title is erased.
•To temporarily erase a title stored in memory
from the screen, set ‘TITLE’’ in MENU Mode
to [OFF]-
(When the setting is switched back to [ON],
the stored title reappears on the screen.)
•When creating your own title, use a black
marker on white paper.
•The MACRO function on the Video Camera
is useful for capturing titles.
Be sure to also read the Operating
Instructions for the Video Camera.
T3
Q>
u
ca (0
> i;
3. Use the ◄, A, T, and ►
Buttons to select the size for
the color, and then press the
ENTER Button.
4. Use the A and ▼ Buttons to
select the color, and then press
the ENTER Button.
i ►ISETSIZE
[ENTERIOK
45
Page 46

Connections When Using as Personal Computer Printer
When Connecting to a Windows
(PC/AT) Computer;
A PC Connection Cable for Windows (supplied) is
required to connect the Photo Printer.
■When Connecting to a Macintosh
Computer:
A PC Connection Cable for Macintosh (supplied) is
required to connect the Photo Printer.
After connecting the computer to the Video
Printer, the settings (Setup) are performed at
the Windows PC or the Macintosh computer.
Refer to the separate Printer Driver Manual
for more information.
46
Installation Notes :
The temperature inside this printer can
become extremely hot due to the
thermal sublimation transfer printing
system. For this reason, the printer
should be used in a well-ventilated
location. Also, objects should not be
placed on top of the printer.
Be sure to leave at least 10 cm behind
the printer so that paper can be
removed from the paper removal port if
a paper jam occurs.
Page 47

Precautions
■Precautions when using the Digital Photo
Printer
•If the Photo Printer emits smoke, becomes
unusually hot, or gives off an unusual smell, turn
off the printer and unplug it.
• If water or other foreign matter gets inside the
printer, turn off the printer and unplug it.
• If the surface of the printer becomes broken or
cracked, turn off the printer and unplug it.
• If the power cable is damaged (such as the core
wires being exposed), turn off the printer and
unplug it.
• Do not use the Photo Printer in any way which
overloads the electric outlet or wiring. Also, only
AC 120 V should be used as the power supply for
the Photo Printer.
• Make sure the plug is properly plugged in when
using the Photo Printer.
• Do not damage the power cable or plug.
• Remove dust or other foreign matter adhering to
the power plug.
•Do not place the Photo Printer on unsteady,
inclined, or other unstable surfaces.
• Do not place flower vases, containers with water,
or small metal objects on the Photo Printer.
• Do not drop or insert metal or flammable objects
inside the Photo Printer.
•Do not splash or wet the Photo Printer.
• Do not disassemble or remodel the Photo Printer.
• Do not touch the metal parts on the Photo Printer
or the plug during a thunderstorm.
•Do not unplug with wet hands.
•Do not place the Photo Printer in locations with
smoke, steam, high humidity, large amounts of
dust, or severe vibrations.
• Do not install the Photo Printer in such a way that
the power cable is forcibly bent.
• Do not cover the ventilation holes on the Photo
Printer.
•Do not place heavy objects on the Photo Printer.
•Do not move the Photo Printer with the power
cable plugged in.
• Do not unplug by pulling on the power cable.
• Remove the plug from the outlet as a safety
measure when cleaning the Photo Printer or
when the Photo Printer will not be used for a long
period of time.
• Do not touch any internal components other than
those specified.
•Do not remove the Paper Cassette while printing
is in progress.
During printing, the paper moves forward and
backward three times. You can be cut if you
touch the paper during this operation.
■Notes on Handling the Ink Cassettes, Ink
Cassette Film, Paper Cassette, and Paper
To ensure high-quality, precise printing, always
observe the following points.
Failure to observe these points can not only result
in poor-quality prints, but also paper jams or
breakdown of the Photo Printer.
• Use only the specified paper.
Use Print Sets that carry the MP| mark or that
have been specified for use with this Photo
Printer by Panasonic.
• Use the Ink Cassette with the paper provided in
the same box.
One Ink Cassette is designed to provide enough
ink film to print the number of sheets provided in
that Print Set.
•Do not remove the label from the Ink Cassette.
Doing so could lead to mistaken operation.
•Before loading an Ink Cassette, take up any slack
in the ink film (wide tape inside the Ink Cassette).
The slack can be taken up by turning the spool in
the direction of the arrow.
•Make sure that the Ink Cassette is oriented
properly and insert it all of the way in.
•Do not touch or pull on the ink film.
• Do not get fingerprints or dust on the ink film or
on the paper.
• Do not get the ink film or the paper wet.
• Do not touch the Ink Cassette or the Paper
Cassette while printing is in progress.
The Ink Cassette cannot be taken out white
printing is in progress.
Forcibly pulling out the Ink Cassette, loading too
much paper, or applying strong pressure or
vibrations to the Paper Cassette could result in a
paper jam or other malfunction,
(Do not take out the Paper Cassette and add
paper while printing is in progress.)
•Do not attempt to reuse an empty Ink Cassette or
paper which has already been printed on.
Doing so could result in malfunction or
breakdown of the Photo Printer.
(0 u
I “
3
(Q
U
4>
47
Page 48

Precautions (Cont)
• Fan the paper thoroughly before placing it in the
Paper Cassette.
Sheets that adhere to other sheets can cause a
paper jam.
•Do not fold or bend the paper.
If a postcard is curled, remove the curl before
attempting to use the postcard in the printer.
•Do not load the paper upside-down.
The glossy side of the paper with no markings on
it is the printing side. The paper should be loaded
with this side facing up.
• Do not write on the paper before printing on it.
This could lead to mistaken operation.
•Do not load too much paper in the Paper
Cassette.
No more than 25 sheets should be loaded.
•Allow the Print Set to adjust to the ambient
temperature before using it.
If the Print Set has been stored at a low
temperature, condensation could form on the
paper when brought into a warmer room. Do not
open the Print Set package until it has reached
the room temperature.
• Do not leave printed paper above the Paper
Cassette (in the Print Exit).
Do not allow more than 10 sheets to accumulate
above the Paper Cassette.
• Do not place foreign objects above the Paper
Cassette (in the Print Exit).
■Notes on Print Set Storage
•Do not store the Ink Cassettes or paper under
high temperatures or high humidity.
Doing so could result in a deterioration of printing
quality.
• Do not store the paper on end.
Store the paper fiat in its original silver bag.
•Do not store Ink Cassettes or paper in a location
exposed to direct sunlight.
Doing so will result in a deterioration of printing
quality. The Ink Cassette and paper could even
become unusable.
•After using the Photo Printer, remove the Ink
Cassette and paper and put them back in
storage.
If the Ink Cassette is left in the Photo Printer,
slack will develop in the ink film and dust will
collect, which may make high-quality printing
impossible.
In order to keep leftover paper in optimum
condition for as long as possible, remove the
V»
paper from the Photo Printer, and then place it in
the original silver bag for storage.
■Notes on Handling Finished Prints
In order to preserve finished prints in the best
condition, always observe the following points.
Failure to observe these points could result in a
deterioration of print quality or a slight injury.
• Do not affix cellophane tape to the printed
surface.
•Do not touch the printed surface with your
fingers.
• Do not let the printed surface come into contact
with other objects.
Do not let the following materials in particular
come into contact with the printed surface:
- Desk pads or business card cases made of vinyl
- Erasers made of plastic
• Do not spill or apply volatile solvents such as
alcohol to the printed surface.
Doing so could result in discoloration or fading.
•Do not leave printed surfaces in contact with one
another.
Doing so could cause color transfer between the
two images. Color transfer could also occur if a
printed surface is left in contact with any other
type of paper under pressure for an extended
period of time.
•Do not store prints under conditions of high
temperature or high humidity.
Leaving prints under such conditions for an
extended period of time could cause a
deterioration in print quality. Do not leave prints
exposed to direct sunlight.
•When prints are to be stored in an album, select
an album that has nylon pockets.
Other materials could cause color transfer or
discoloration.
(Polypropylene and cellophane are also
acceptable materials.)
■Notes on Handling the Digital Photo Printer
•Do not spray insecticides or other volatile
materials on the printer.
If such materials come into contact with the
printer, they can damage the surface of the
printer or cause the finish to peel. Also, do not
leave rubber or vinyl materials in contact with the
printer for an extended period of time.
•When the printer will not be used for an extended
period of time:
To conserve electric power, turn off the printer
48
Page 49

and unplug it.
Leaving the printer idle for long periods can
impair its functionality. Be sure to turn the power
on and operate the printer once every six months.
•When transporting the printer by car or truck:
Pack the printer carefully in its original packing
materials. If you did not retain the packing
materials, wrap the printer carefully in a blanket
or other cushioning material to protect it.
{Before transporting the Photo Printer, be sure to
first remove the Paper Cassette and Ink
Cassette, and then close the cover.)
■Maintenance Notes
• Do not use benzene, paint thinner, or other
solvents to clean the printer.
Most of the printer surface is plastic. Do not use
solvents such as benzene and paint thinner to
wipe the printer since they can damage the
surface of the printer and cause the surface to
peel.
To clean the printer surface, wipe up any dust
with a soft, dry cloth.
If the Photo Printer is particularly dirty, soak the
cloth in kitchen detergent (neutral) diluted with
water and wring out thoroughly. Then, wipe off
the dust with the cloth, and wipe again with a dry
cloth.
When using a synthetic cloth, follow the
precautions in the usage instructions.
•When dust accumulates around the ventilation
holes on top of the printer:
After removing the Ink Cassette, use a vacuum
cleaner to clean the dust from the ventilation
holes. Dust that enters the printer through the
ventilation holes can adhere to the ink film,
making high-quality printing impossible. In this
event, remove the Ink Cassette, and then clean
the dust off the ink film.
■Installation Notes
• Install the Photo Printer away from devices that
generate magnetic fields
The magnetic fields generated by stereo
speakers or large monitors will distort the image
produced by the Photo Printer.
Electromagnetic waves produced in this Photo
Printer and in televisions, video game machines,
and other devices can cause mutual interference,
disrupting both the display on the television
screen and the print image.
■Internal Temperature
•Although it varies with the ambient temperature, if
the internal temperature of the Photo Printer rises
above a certain level, the ERROR Lamp will flash
and the error message “WAIT: COOLING” will
appear on the television screen. In this situation,
the printing operation will halt temporarily. This is
not a malfunction. After waiting for a few minutes
for the temperature to drop (four or five minutes
at the most), the Photo Printer will automatically
resume printing.
•The printing operation may be halted temporarily
in any of the following cases, which will result in a
longer than normal printing time:
- When printing images continuously
- When the ambient temperature is high
- When the internal temperature of the printer
rises quickly because the ventilation holes or
other parts are blocked.
•Note that if two or more of these conditions exist,
printing will take even longer. Therefore, make
every effort to find a well-ventilated location for
installing this printer.
■Condensation
•When a bottle is taken out from a refrigerator in
summer and left to stand for a while for instance,
droplets of water will form on it. This
phenomenon is known as condensation.
•Conditions for condensation
Condensation will form if the printer or Print Set is
moved to a location with a considerable
difference in temperature or humidity, such as:
- A high-humidity location, such as one filled with
steam
- When suddenly moved from an air-conditioned
environment to one with high temperatures and
high humidity
- A room that has just been heated
In this event, turn the power on and wait for two
hours.
If the paper or rollers are damp with
condensation, the printed surface that is
produced may be dirty.
(0 u
49
Page 50

Questions and Answers
■About Functions
Q1: When printing, what are the differences
between “Photo Shot” and normal video?
A1: When an image is shot using the “Photo
Shot” function of a Digital Video Camera, the
result wiil be a high-quality image with little
noise or distortion. Therefore, a print of this
image wiil be of higher quality than a print of
a normal video image.
Q2: What kinds of Video Cameras can be
connected to the Digital Photo Printer?
A2: Any type of Video Camera that is equipped
with either an S-VIDEO OUT Socket or a
VIDEO OUT Socket can be used, (p.9)
Q3: Can a title or trimming frame be input
from a camera?
A3: You can input your own titles or trimming
frames by shooting them with a Video
Camera, (p.42 - 45)
Q4: How should I adjust the level settings
when storing the trimming frame?
A4: The level adjustments are similar to the
darkness adjustment on a copy machine.
Under normal conditions, you do not need to
adjust the settings. However, if the trimming
frame which you created shows unwanted
tines, then reduce the level of the trimming
frame for the best appearance, (p.43)
Q8: Is it possible to insert a title for each
ALBUM Mode screen?
A8: No, it is not possible in ALBUM Mode. It is
possible in MULTI FRAME Mode, but it is not
possible to insert a different title for each
mini-frame.
Q9: Which should I use, the S-VIDEO IN
Socket or the VIDEO IN Socket?
A9: When connecting a device that has an S-
VIDEO OUT Socket, it is best to use the SVIDEO IN Socket. Doing so will provide the
best print quality.
If devices are connected to both the SVIDEO IN Socket and the VIDEO IN Socket,
the S-VIDEO IN Socket takes precedence.
(p.9)
Q10: What should I do if a paper jam occurs?
A10: Remove the paper from either the O Rear
Paper Removal Port or the 0 Print Exit
(above the Paper Cassette). If the paper
cannot be removed, turn off the printer. Then,
turn the printer on again and remove the
paper from either O or Q- If paper still
cannot be removed, please contact your
nearest Panasonic Dealer. (p.15)
Q5: Can the Digital Photo Printer print images
from HDTV broadcasts?
A5: No, because the video signals are different.
Q6: What should I do about poor coloring?
A6: The most important factor is the coloring of
the original shot of the image. The color and
other parameters can be adjusted by
selecting “PICTURE” on the MENU Screen.
(P-18)
Q7: When I adjust the coloring and other
aspects of picture quality, can I check the
results on the television screen?
A7: Yes, this can be done for all the adjustments
except SHARPNESS. The quality of the
picture on the television monitor will differ
slightly from the quality of the printed image.
Test print the image, adjust the television so
that the quality of the picture on the screen is
close as possible to that of the printed image,
and then adjust the Digital Photo Printer.
(P-19)
50
Page 51

■About the Digital Photo Printer in General
■About the Paper and ln^< Cassettes
Q11 : How should I store my prints?
A11 : We recommend keeping them in an album.
When doing so, make sure that the pockets
are made of nylon, polypropylene, or
cellophane. Using other materials may result
in color transfer or discoloration, (p.48)
Q12: What is the “thermal sublimation transfer
printing system”?
A12: This is a type of printing method offering
excellent image quality. Other methods exist
such as the direct thermal printing method.
Q13; What does the number of dots in a printed
picture mean?
A13; A printed picture is made up of many dots.
This printer prints 464 dots (vertical) X 672
dots (horizontal) during VIDEO Input Mode,
and prints 478 dots (vertical) X 700 dots
(horizontal) during PC Card Input Mode.
The print size for PC Card input is slightly
larger than the print size for Video input.
014: What does “256 color gradations” mean?
A14: It means that the Digital Photo Printer can
express 256 gradations of color between
white and the darkest color formed by the
three primary colors. Because each of the
three colors can be expressed in 256
gradations, the total number of colors is
256X256X256 (full color).
015: How do the Init Cassettes and paper
work?
A15: The Ink Cassettes contain three colors in one
unit: cyan, magenta, and yellow. The printing
paper has a special coating that improves the
adhesion of the ink.
016: How should I store the Ink Cassettes and
paper after having opened them?
A16: Do not leave the Ink Cassettes or paper in a
location exposed to direct sunlight, or in a
location subjected to high temperature or
high humidity. Place the cassette or paper
back in its original silver bag, and then store
them flat, (p.48)
These supplies should be used as soon as
possible after they are opened.
017; What kind of paper can the Digital Photo
Printer print on?
A17: The Digital Photo Printer can print on
standard paper and adhesive paper
(including 16 Pre-Cut Adhesive paper).
Do not use other types of paper, since doing
so could cause paper jams or other
malfunctions. Use the special Print Set and
Video Print Ink Cassette when printing, (p.11)
018: Can the Digital Photo Printer print images
continuously?
A18: If “PRINT’ is set in MENU Mode, up to 10
sheets can be printed continuously.
(P-16, 32)
019: How many sheets can be printed with a
single ink Cassette?
A19: An Ink Cassette can print the number of
sheets that are included in the same Print
Set. For example, the Print Set PV-MPS50 is
intended for 50 sheets, and so the Ink
Cassette can print 50 sheets. Ink Cassettes
cannot be rewound and used again.
020: What kinds of Ink Cassettes and printing
paper can I use with the Digital Photo
Printer?
A20: Use Print Sets that bear either the
MPI mark or have been designated by
Panasonic as suitable for this Digital Photo
Printer.
51
Page 52

Questions and Answers (Cont)
■About Computers
•Windows and Macintosh
Q21: What is an OS?
A21: OS is an abbreviation for Operating System,
and it is also sometimes called “basic
software”. The OS is the basic software
provided for allowing the computer to be
used easily. For example, operations such as
reading data or displaying text cannot be
performed only with other software.
The OS performs these operations through
commands from the software.
The OS for PC/AT computers is Windows 3.1
or Windows 95, and the OS for Macintosh
computers is the Mac OS (System).
Q22: What are applications (software)?
A22: This is software for performing specific tasks
in a computer. Applications include, for
instance, word-processing and spreadsheet
software.
Q23: What is an interface?
A23: An interface is a means of connecting two or
more different devices. Interfaces are used in
a variety of contexts, including between
computers and external devices, and
computers and humans. For example,
interfaces include connection cables,
connection sockets, and keyboards.
Q24: What is resolution?
A24: The resolution indicates how many dots can
be displayed on a screen. The resolution is
shown in dots per inch, and the higher the
resolution, the better the printing quality.
Q25: What is dpi?
A25: The dpi is a unit of resolution which indicates
the number of dots per inch that can be
printed. Higher dpi allows more detailed
printing.
Q26: What is a printer port?
A26: A printer port is a socket for connecting a
printer to other devices. It is provided at the
rear of the computer.
Printer ports are classified into the following
two types based on the transmission system.
•Serial port
A serial port is an input/output socket for
connecting peripheral devices which allow
only one bit of data to be sent at a time,
such as a mouse or modem.
•Parallel port
A parallel port is an input/output socket for
connecting peripheral devices which
transfer data by simultaneously sending a
number of bits over separate lines.
Although the parallel port allows data
transfer at a higher speed than the serial
port, transfer cannot be performed over
long distances since interference will result
between the data lines.
This port is usually used to connect a
printer to a computer. In general, printing
with a Windows computer uses a parallel
port, while printing with a Macintosh
computer uses a serial port.
Q27: What is memory?
A27: The memory is a temporary storage location
for data when the computer performs
operations. Memory can be broadly divided
into RAM and ROM. RAM is an acronym for
random-access memory, a type of memory
which allows data to be read and stored
freely. Software programs and entered data
are stored in RAM. ROM, on the other hand,
stands for read-only memory, a special type
of memory which only allows data to be read.
The ROM contains fixed data for programs of
the particular computer.
Q28: What is a bitmap?
A28: A bitmap is a type of standard used for
storing graphics created by the computer as
a file. The graphics file is stored as a
collection of extremely small dots.
Q29: What is a dialogue box?
A29: A dialogue box is a specialized window on
Windows and Macintosh screens for
displaying specific information and soliciting
a needed response.
Q30: What is a printer driver?
A30: A printer driver is a program used to control
how the computer and printer interact. The
printer driver provides the printer interface
and font designation, functions of the
installed printer, and other necessary
information to Windows and Macintosh
systems.
52
Page 53

Q31: Can the Digital Photo Printer print text
created with word-processing software so
that titles can be added to photographs
and other images in the computer?
A31: Text created with image-handling software
(graphics software: painting software,
drawing software, photograph retouching
software) can also be printed with the image.
Q32: Can the Digital Photo Printer print video
scenes shot with a Video Camera?
A32: You can print video scenes if your computer
includes a video capture board (device which
digitalizes video signals before sending them
to the computer).
Also, when images shot with a Digital Video
Camera are sent to the computer, they can
be printed with the Digital Photo Printer.
For Panasonic Digital Video Cameras, a
Personal Computer Connection Kit (sold
separately).
This kit allows data to be sent to the
computer. (However, this kit can only be
used for Digital Video Cameras equipped
with a Digital Still-Frame Socket.)
• Macintosh
Q33: What is AppleTalk?
A33: AppleTalk is the name of the LAN (local area
network; an in-house computer network
connecting a number of computers, printers,
and other devices together) system
standards and the network software for
Macintosh computers.
Q34: What is LocalTalk?
A34: LocalTalk is a LAN standard for Appletalk
that allows a computer network to be formed
by simply connecting Macintosh computers
together with a special cable.
You cannot connect to a printer port when
using a LocalTalk network. In this case, the
modem port must be used. However, by
setting “AppleTalk” to “Not Used”, you can
cut off the LocalTalk network connections
and then use the printer port.
Q35: What is PICT?
A35: PICT is the standard format for Apple’s
graphics files.
Q36: What are the major computers capable of
supporting high-resolution printing?
A36 :The following computers are compatible with
this Digital Photo Printer.
Macintosh series computers with a 68030 or
faster CPU
However, PPC603, 603eCPU, and 68030
CPU systems can also be used for highresolution printing by setting the
transmission method to “Customize".
<0 u
53
Page 54

Before Requesting Service
f
Symptom
The power cannot be
switched on.
No picture appears on the
television screen.
(video input)
The printer does not print.
Printing is not of the
expected quality.
The printed colors are not
right.
The printed pictures are
distorted.
Pressing the MEMORY
Button does not store the
picture in memory.
The printer does not
respond when a button is
pressed.
Paper jams occur
frequently.
Cause
•The power plug is not plugged in
correctly.
•The external video source is not
connected properly.
•A device is connected to an SVIDEO IN Socket, but you are
attempting to use a VIDEO IN
Socket.
•The INPUT SELECT {VIDEO / PC
CARD) Switch is set to “PC CARD”.
•The Ink Cassette is not oriented
properly, or was not pushed all of
the way in.
•There is slack In the ink film.
•The Paper Cassette Is not oriented
properly, or was not pushed all of
the way in.
•The paper was loaded upside-down.
•The internal temperature of the
printer is too high.
•The paper being used is not of the
specified type.
•The paper was not loaded correctly.
•The ink film or paper is dirty.
•Condensation has formed.
•The print image has not been
adjusted correctly.
•The printer is located near a television,
video game machine or other source
of electromagnetic waves.
•The printer is located near a stereo
speaker, large motor, or other
source of a strong magnetic field.
•The MENU Screen is displayed.
•A picture stored in memory is
displayed on the television screen
due to the MONITOR Button
settings.
•The interna! temperature of the
printer is toohigh.
•Printing is in progress.
•More than 25 sheets of paper have
been loaded in the Paper Cassette.
•More than 10 sheets of paper have
accumulated in the Print Exit.
•The paper is creased or curled.
\
Remedy
• Insert the power plug all the way into
a wall outlet.
•Connect the external video source
correctly, (p.9)
• Unplug the S-Video Cable
connected to the S-VIDEO IN
Socket.
•Set to “VIDEO”. (p.14)
• Insert the Ink Cassette correctly.
(P-13)
•Take up the slack in the ink film.
(P-12)
• Insert the Paper Cassette correctly.
(P-13)
• Load the paper correctly. (p.12)
•Wait.
•Use the specified paper.
(P-11)
•Load the paper correctly. (p.12)
•Use clean supplies.
•Wait.
•Adjust the print image correctly.
(P-18)
•Move the printer so that it is at least
one meter away from the television,
video game machine, etc.
•Move the printer away from the
device generating the magnetic field.
•Press the ENTER Button. (p.17)
•Press the MONITOR Button to
display the video source picture on
the screen. (p.15)
•Wait.
•Wait until printing is complete.
•Do not place more than'25 sheets of
paper in the Paper Cassette.
• Do not allow more than 10 sheets to
accumulate in the Print Exit.
• Do not use creased or curled paper.
54
Page 55

Symptom Cause
The MENU Screen does
not appear.
No picture appears on the
television screen.
(PC Card input)
it takes time for the image
to appear.
Muitipie images from the
PC Card cannot be aii
printed at once.
images in the PC Card
cannot be erased, or
cannot be aii erased at
once.
Video images cannot be
recorded in the PC Card.
The video image was
stored in the PC Card, but
the image is not clear.
The printer cannot be
used as a computer
printer.
Remedy
•The Photo Printer is not connected
properly to the teievision.
• Printing is in progress. •Wait until printing is complete.
•The CF Card or Smart Media is not
correctiy inserted in the adapter.
•The PC Card is not correctiy
inserted in the printer.
•The iNPUT SELECT {ViDEO / PC
CARD) Switch is set to “ViDEO”.
•A card with an incompatibie format is
being used.
• Depending on the image system for
storing the images in the PC Card
and its capacity, it can take 20 to 30
seconds to dispiay the image.
•Muitipie images are not stored in the
PC Card.
•There are no images stored in the
PC Card.
•The image is set to write-protect in
the camera or computer.
• images can only be erased one at a
time.
•The iNPUT SELECT {ViDEO / PC
CARD) Switch is set to “PC CARD”.
•The PC Card is set to write-protect. •Set the PC Card to write-enable.
•The PC Card is fuli. • Either erase unneeded images
• in some cases, image compression
may deteriorate the quality of image
when storing.
•The printer and computer are not
connected correctly.
•You are not using the proper PC
Connection Cable for your computer.
•Connect the printer to the television
correctly, (p.9)
• Insert correctly, (p.26)
• Insert correctly, (p.27)
• Set to “PC CARD", (p.28)
•This card cannot be used with this
printer.
•This is not a malfunction.
• Use a PC Card with multiple images
stored.
•You cannot erase.
•Change the write-protect setting in
the camera or computer, and then
erase.
-
•Set to “VIDEO”, (p.38)
(p.38) or use another PC Card with
sufficient capacity.
•This is not a malfunction.
•Connect the printer and computer
correctly, (p.46)
• Use the PC Connection Cable
(supplied) for your computer, (p.46)
s
___________________________
•The printer driver software is not
installed or is not installed correctly.
• Refer to the separate Printer Driver
Manual.
55
Page 56

Error Messages
When an error occurs, an error message appears in the center of the television screen to notify you. The
ERROR Lamp also flashes.
r
SET PAPER AND PUSH [PRINT]
SET PAPER (when using as a computer printer)
CHECK PAPER TYPE
REMOVE JAMMED PAPER
CHECK PAPER TYPE
SET PAPER PROPERLY AND PUSH [PRINT]
NO PAPER CASSETTE
REMOVE JAMMED PAPER
NO INK
CHECK INK TYPE
NO INK CASSETTE
WAIT
WAIT:COOLING
NO CARD
CAN NOT USE THIS CARD
CAN NOT RECORD
CAN NOT DELETE
^N0 IMAGE IN THIS CARD
Error Message
Remedy
Insert the printing paper correctly. (p.12,13)
Insert the printing paper correctly. (p.12,13)
Remove the jammed paper (p. 15) and insert the
specified printing paper (p.11).
Insert the specified printing paper (p.11) correctly.
(P-12, 13)
Insert the Paper Cassette. (p.13)
Remove the jammed paper, (p. 15)
Replace the Ink Cassette with a new one. (p.13)
Use the specified Ink Cassette, (p.11)
Insert the Ink Cassette, (p.13)
Wait for a moment.
Internal temperature (p.49)
Insert the card, (p.27)
Insert a card which can be used, (p.26)
Either the card is full or an incompatible card is being
used. Either erase unneeded images (p.38), or use
another card.
No images are recorded on the card.
Use a card with images recorded on it. ^
>lf FOO or other error message appears, contact your nearest Panasonic dealer.
Specifications
Power Supply
Power Consumption
Printing System
Printing Speed Approx. 95 sec./ sheet (Video Mode)
Picture Memory
Print Media
•Ink Film
•Printing Paper Cut sheets 100 x 148 mm (postcard size)
Paper Feeding System
Picture Quaiity
AC 120 V 50/60 Hz
During printing: Approx. 0.9 A
Thermal sublimation transfer printing system
8-bit, 1 frame
Cassette type (exclusive),
3 color field successive printing (yellow, magenta, cyan)
Screen dimensions: Video mode: 82X108 mm
Card mode: 85 x 112 mm
Computer mode: 85 x 113 mm
Automatic paper feed (holds 25 sheets of standard paper or adhesive
paper)
256 color gradations
Information for Your Safety
56
Page 57

Number of Printing Pixeis
Number of Copies
Functions
Print Head
input Socket
•S-ViDEO IN Socket
•VIDEO IN Socket
• EDIT Socket
•PARALLEL Socket
•SERIAL Socket
• PC Card
•Input Switch
Output Socket
• VIDEO OUT Socket
Compatible Computers
•Windows
• Macintosh
Compatible PC Cards
•Standards
•Format
• Number of Pixels
•Recorded Image
•Number of Recorded Images
•Decompression Time
Allowable Operating
Temperature
Allowable Operating Humidity
External Dimensions
Weight
Video mode: 464 x 672 dots (frame and field), 144 x 158/dpi
Card mode: 478 x 700 dots, 144 x 1 58/dpi
Computer mode: 480X640 dots (standard and high-speed), 144Xl44/dpi
480 XI280 dots (high resolution), 144X288/dpi
Video/Card mode: Max, 10 sheets
Computer mode: Max. 99 sheets
Video mode: Single Screen, Album Print, Strobe Print, Multi Frame Print,
Title, Wide, Card Storage
Card mode: Single Screen, Album Print, Multi Frame Print, Title, Card
Erase, Auto Print
Computer mode: Single Screen, Multi Frame Print
Film Thermal Head 5.65 dots/mm
Y (luminance signal) 1 Vp-p, 75 ohm, C (color signal) 0.3 Vp-p, 75 ohm
(front: 1)
RCA pin socket 1 Vp-p, 75 ohm (front: 1)
(front: 1)
Centronics standard 36 pin (rear: 1)
Macintosh serial port 8 pin (rear: 1)
PC Card type II (CF card and Smart Media are compatible with the
adapter.) (front: 1)
Video mode: S-VlDEO takes precedence when both S-ViDEO and VIDEO
are connected.
Computer mode: When both the SERIAL Socket and PARALLEL Socket
are connected, you can switch to the side to be used.
RCA pin socket 1 Vp-p, 75 ohm (rear: 1)
PC/AT compatible system with i486SX or faster CPU
OS: Windows 95, Windows 3.1
Memory: 16 MB or more (Windows 95)
8 MB or more (Windows 3.1)
Macintosh series with 68030 or faster CPU
OS: System 7 or later
Memory: 8 MB or more
PCMCIA2.1 / JEIDA4.2 and PCMCIA ATA 1.02 standard
JPEG baseline system (JFIF, EXIF, SISRIF)
320 X 240 (QVGA) to 1536 X1024 (4BASE)
Sampling ratio 4:4:4, 4:2:2, 4:2:0, 4:1:1
JPEG baseline system JFIF 4:2:2
Approx. 20 images (2-MB card)
Approx. 40 images (4-MB card)
Approx. 10 seconds (VGA image)
5 “C - 35 “C (41 “F - 95 "F)
35% - 60%
Approx. 9 7e" (W) X 3 ^/16" (H) X10 %" (D)
[Approx. 250 (W) X 89.5 (H) X 269.5 (D) mm]
Approx. 5.28 lbs (2.4 kg)
(0 u
.1«
3
CO
u
0>
57
Page 58

Warranty
Panasonic Consumer Electronics
Company, Division of Matsushita
Electric Corporation of America
One Panasonic Way Secaucus,
New Jersey 07094
Panasonic Sales Company, Division of
Matsushita Electric of Puerto Rico, Inc,
Ave. 65 de infantería. Km. 9.5
San Gabriei Industriai Park, Carolina, Puerto
Rico 00985
PANASONIC / QUASAR Video Products
Limited Warranty
Panasonic Consumer Electronics Company of Panasonic Saies Company (coiiectiveiy referred to as “the
Warrantor”) wiil repair this product with new or refurbished parts, free of charge, in the USA or Puerto Rico, in
the event of a defect in materiais or workmanship as foliows (ali time periods commence from the date of the
original purchase):
PRODUCT
DIGITAL PHOTO PRINTER
Batteries (if included) - New rechargeable batteries in exchange for defective rechargeable batteries for ten
(10) days. Non-rechargeable batteries are not warranted.
Tape (if included) - New video cassette tape in exchange for a defective video cassette tape for five (5) days.
In-home, carry-in or mail-in sen/ice, as applicable, in the USA can be obtained during the warranty period by
contacting a Panasonic Services Company (PASC) Factory Servicenter listed in the Service Directory.
Or call toll free 1-800-272-7033, to locate an authorized PASC Servicenter. Carry-in or mail-in service in
Puerto Rico can be obtained during the warranty period by calling the Panasonic Sales Company telephone
number listed in the Servicenter Directory. This warranty is extended only to the original purchaser.
A purchase receipt or other proof of the date of the original purchase is requires before warranty service is
rendered.
This warranty only covers failures due to defects in materials and workmanship which occur during normal
use and does not cover normal maintenance, including, but not limited to, video and audio head cleaning,
and does not cover consumable materials such as printing paper and ink cassette. The warranty does not
cover damage which occurs in shipment, or failures which are caused products not supplied by the
warrantor, or failures which result from accident, misuse, abuse, neglect, mishandling, misapplication,
alteration, modification, faulty installation, set-up adjustments, improper antenna, inadequate signal pickup,
maladjustment of consumer controls, improper operation, power line surge, improper voltage supply,
lightning damage, commercial use such as hotel, office, restaurant, or other business or rental use of the
product, or service by anyone other than a PASC Factory Servicenter or a PASC authorized Servicenter, or
damage that is attributable to acts of God.
PARTS
ONE (1) YEAR
LABOR
NINETY (90) DAYS
LIMITS AND EXCLUSIONS
There are no express warranties except as listed above. THE WARRANTOR SHALL NOT BE LIABLE FOR
INCIDENTAL OR CONSEQUENTIAL DAMAGES (INCLUDING, WITHOUT LIMITATION, DAMAGE TO
TAPES) RESULTING FROM THE USE OF THIS PRODUCTS, OR ARISING OUT OF ANY BREACH OF
THE WARRANTY. ALL EXPRESS AND IMPLIED WARRANTIES, INCLUDING THE WARRANTIES OF
MERCHANTABILITY AND FITNESS FOR PARTICULAR PURPOSE, ARE LIMITED TO THE APPLICABLE
WARRANTY PERIOD SET FORTH ABOVE. Some states do not allow the exclusion or limitation of
incidental or consequential damages, or limitations on how long an implied warranty lasts, so the above
exclusions or limitations may not apply to you.
This warranty gives you specific legal rights and you may also have other rights which vary from state to
state.
If a problem with this product develops during or after the warranty period, you may contact your dealer or
Servicenter. If the problem is not handled to your satisfaction, then write to the Customer Satisfaction Center
at the Panasonic Consumer Electronics Company address above.
SERVICE CALLS WHICH DO NOT INVOLVE DEFECTIVE MATERIALS OR WORKMANSHIP AS
DETERMINED BY THE WARRANTOR, IN ITS SOLE DISCRETION, ARE NOT COVERED.
COSTS OF SUCH SERVICE CALLS ARE THE RESPONSIBILITY OF .THE PURCHASER,
warvid 10/24/97
58
Page 59

Servicenter Directory
For Product Information, Operating Assistance, Literature Request, Dealer Locations, and all
Customer Service inquires please contact:
1-800-272-7033, Monday-Friday 9am-8pm EST.
Web Site: http;//WWW.Panasonic.com
You can purchase parts, accessories or locate your
nearest servicenter by visiting our Web Site.
Product Repairs
1 Fantorv Rf^rvin^ntf>r
Panasonic Services Company
MAIL TO: 6550 Katella Avenue
Cypress, CA 90630
Attention: Digital Photo Printer
Please carefully pack and ship, prepaid and insured, to the Cypress centralized repair Factory Servicenter.
While there will be added handling delays, you may bring your unit to one of the following locations who will
then forward the unit to Cypress for repair.
Customer’s in Puerto Rico, please ship or carry in to location below (“Service in Puerto Rico”).
Factory Servicenter Locations
CALIFORNIA
800 Dubuque Avenue 8655 Roswell Road
S. San Francisco,
CA 94080
20201 Sherman Way
Suite 102
Canoga Park, CA 91306
3878 Ruffin Road OHIO
Suite A
San Diego, CA 92123
COLORADO
1640 South Abilene Street
Suite D
Aurora, CO 80012
FLORIDA
3700 North 29th Avenue Suite G
Suite 102
Hollywood, FL 33020
GEORGIA MICHIGAN TENNESSEE
37048 Van Dyke Avenue
Suite 100
Sterling Heights, Ml 48312
919-8th Avenue South
Nashville, TN 37203
Atlanta, GA 30350
MINNESOTA
ILLINOIS 7850-12th Avenue South
1703 North Randall Road Airport Business Center
Elgin, IL 60123
Bloomington, MN 55425
(Pick-up / Drop-off only)
TEXAS
7482 Harwin Drive
Houston, TX 77036
13615 Welch Road
Suite 101
9060 Golf Road 2236 Waycross Road
Niles, IL 60714 Civic Center Plaza
Farmers Branch,
TX 75244
Forest Park, OH 45240
MARYLAND
62 Mountain Road
Glen Burnie MD 21061
PENNSYLVANIA 20425-84th Avenue South
2221 Cabot Blvd. West
WASHINGTON
Kent, WA 98032
Suite B
MASSACHUSETTS
60 Glacier Drive,
Westwood, MA 02090
Langhorne, PA 19047
HAWAII
Chartiers Valley
99-859 Iwaiwa Street
Shopping Center Aiea, Hawaii 96701
1025 Washington Pike
Bridgeville, PA 15017
Phone (808) 488-1996
Fax (808) 486-4369
Matsushita Electric of Puerto Rico, Inc. Panasonic Sales Company / Factory Servicenter:
Ave. 65 de Infantería. Km. 9.5 San Gabriel Industrial Park Carolina, Puerto Rico 00985
Phone (787) 750-4300 Fax (787) 768-2910
Accessory Purchases:
Customer orders Only 1 -800-272-7033
Service in Puerto Rico
As of October ’97
59
Page 60

Index
ACCESS lamp (p.27)
Adhesive paper (p. 11)
ALBUM (p.20, 34}
Blur Reduction (p.14)
BRIGHTNESS (p.19)
CF Card (p.26)
COLOR (p.19)
CONTRAST (p.19)
Error Messages (p.56)
FRAME (p.42)
Ink Cassette (p.12)
INPUT SELECT (VIDEO / PC CARD) Switch
(P-14, 28)
INSIDE (p.43)
Paper Cassette (p.l2)
Paper Jam (p.15)
PARALLEL Socket (p,46)
PC Card Adapter {p.26)
PICTURE (p.18)
Preset title (p.40)
Print Set (p.11)
SERIAL Socket (p.46)
SHARPNESS (p.19)
Smart Media (p.26)
Standard Paper (p.11)
STROBE (p.24)
TINT (p.19)
TITLE (p.44)
WIDE (p.17)
Windows (p.46)
Macintosh (p.46)
MENU Mode (p.16, 32)
MULTI FRAME (p.22, 36)
OSD (p.16, 33)
OUTSIDE (p.43)
Panasonic Consumer Electronics
Company, Division of Matsushita
Electric Corporation of America
One Panasonic Way Secaucus,
New Jersey 07094
Printed in Japan
LSQT0071
F1297YO(500®)
0
 Loading...