

Panasonic PV-M1379W, PV-M1369, PV-M1359W, PV-M1349 Owner’s Manual
Panasonic
Omnlvi8ion_H_Jl
Combination VCR
Operating Instructions
Models
PV-M1349/PV-M 1359W/
PV-M1369/PV-M 1379W
As an ENERGY STAFf' Partner, Matsushita f _
ElectricCorporation of America has determined
that thisproduct or product model meets the
ENERGY STAR_ guidelines for energy efficiency.
Please read these instructionscarefullybefore attemptingto connect, operate or adjust thisproduct.
Please save this manual.
Spanish Quick Use Guide is included. (Guia para r&pida consulta en espahol esta incluida.)
Important Safeguards and Precautions
READ AND RETAIN ALL SAFETY AND
OPERATING INSTRUCTIONS. HEED ALL
I
WARNINGS IN MANUAL AND ON UNIT
t INSTALLATION
1 POWER SOURCE CAUTION
Operateonlyfrompowersourceindicatedonunit
orinthismanual,If uncertain,haveanElectric
UitgtySaUceCompanyor V'_o ProductsDealer
verifyyourhomepowersource.
2 POWER CORD PLUG
Fors_fety, this unitcomes witha polarized
type plug (one wide blade),ora three-wirs
groundingtypeplug.
:- _ : I_ :% ] •
;e plugfits intooutletone way. If it cannot be
RYinserted,try reversingit. If it stillwill not fit,
we an electri_ installtheproperwall outlet.
Dnottempor with the plug.
_nding outlet.
nenesr_nj, have an elentdcten Install the
_nar outlet, Do_ot tamper withthe plug.
orbein the wayef
reston
d have
OUTDOOR ANTENNA INSTALLATION I
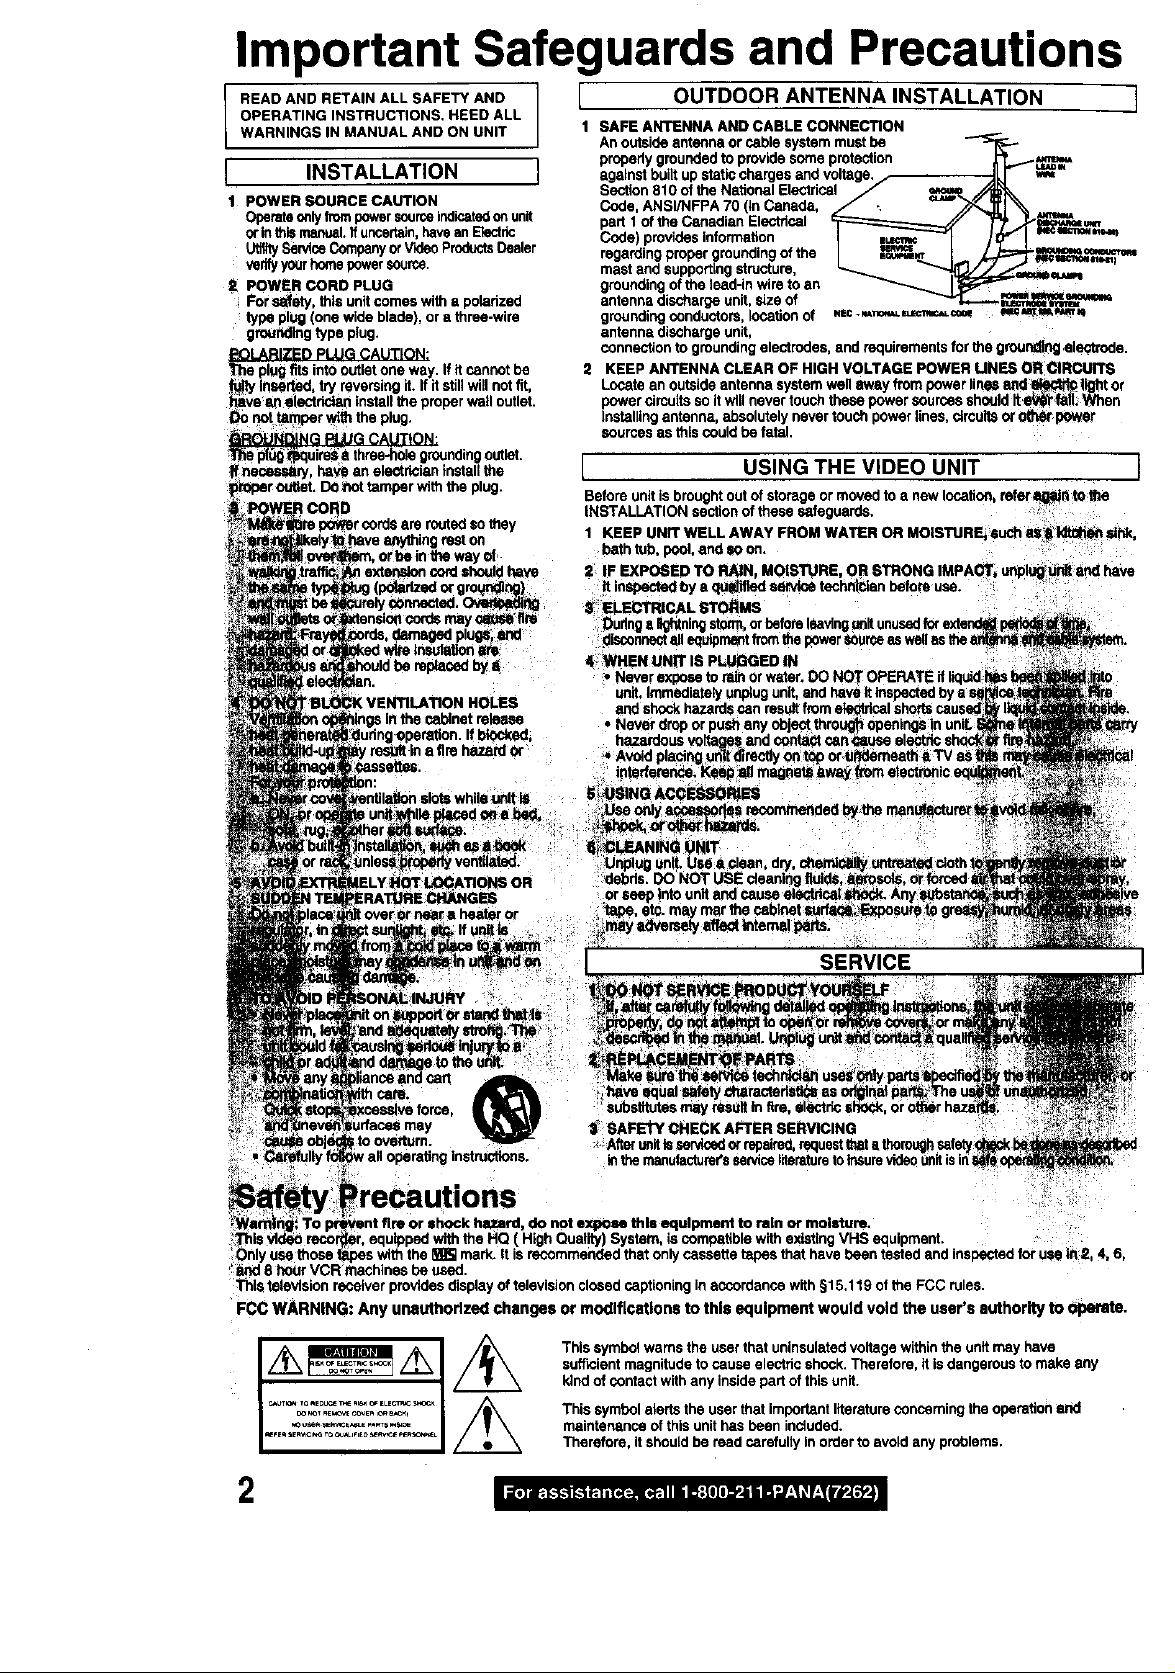
1 SAFE ANTENNA AND CABLE CONNECTION
An outside antenna or cable systemmust be _ _-
properlygrouodedto providesome protection .....__
against builtup staticchargesand voltage,_- _m=
Section810 of the National Electrical
Code, ANSI/NFPA 70 (InCanada, d/_ _ %
part 1of the Canadian Electrical _/ J_-_,._
Code) providesinformation I !_ '/I ms==m_oN=_
regardingpropergroundingofthe I _.T I :=._=e_,
mastand supportingstructure, _ _ IJ_=_ "*'_'
groundingofthe lead-in wire to an _ I_ "
antennadischargeunit,size of _"'J_ _m/m_fm, a'_'mm
groundingconductors, locationof _.c.._,,_m_,.=_e== _*_t_**_
antenna dischargeunit,
connectiontogroundingelectrodes,and requirementsfor the groundingelectrode.
2 KEEP ANTENNA CLEAR OF HIGH VOLTAGE POWER UNES OR CIRCUITS
Locate an outside antenna systemwell awayfrom power linesand_ tightor
powercimultsso itwill never touchthese power sourcesshouldIte_/_ fall. When
installing antenna, absolutelynevertouchpowerlines,circuitsorO0te_power
sourcesas thiscouldha fatal.
[ USING THE VIDEO UNIT I
Before unitisbroughtoutofstorage ormovedto a newlocation refer_NpJ_tothe
INSTALLATION sectionof these sefeguaros.
1 KEEP UNff WELL AWAY FROM WATER OR MOISTURE, such ascii_ slhk,
bath tub, pool. ano en on.
2 IF EXPO6ED TO RAIN, MOISTURE, OR STRONG IMPAOT_unpl_ur_ and have
It inspectedby a quldtfladservice technicianbefore use.
8" ELECTRICAL STORMS
Dudnga _ghtnlngstorm,orbefore
disconnectall equtpn_ntfromthe
• Never expose to rai
|utions
_ti m 'H,< '
Only Usethose tj _ mark.It isrecommendedthatonlycassettetapesthat havebeen testedand inspectedforUSelit2. 4,6,
I_ 8 hour VCR thachinsebe used.
This televisionreceiverprovidesdisplayoftelevisionclosedcaptioningin accordancewith §15.119 of the FCC rules.
FCC WARNING: Any unauthorized changes or modifications to this equipment would void the user's authority to _.
This symbolwarnsthe userthat uninsulatedvoltagewithinthe unitmay have
sufficientmagnitudeto causeelectricshock. Therefore, itisdangerousto makeany
kindof contact withany insidepartofthis unit.
This symbolaterts the user that importantliteratureconcerning the operationand
maintenanceof this unithas been included.
Therefore, it shouldbe read carefully in orderto avoidany problems.
2
Table of Contents
Important Safeguards and Precautions ................................ 2
Before Using ............................................................................ 4
• Accessories ................................ 4 • Loading the Batteries .................. 4
• Record/Playback Time .............. 4 • Prevent Accidental Tape Erasure ..4
Connections (OutdoorAntennaConnections,OSS/Cable Box Connections) .......... 5
One Time Setup (Language,Channel,Clock).................................... 6, 7
TV Operation
(NITE mode, Using the 100 key, RapidTune, Audio Mute, Phones,SELF-DEMO mode) ...... 8
Picture Adjustment .................................................................. 9
Playback a Tape (slowMotion,StillPicture,FramebyFrame,FeaturesforQuality) ..1 0
Record On a Tape .................................................................. 11
• One Touch Recording ............ 11 • Selecting Input Mode ................ 11
Timer Recording .............................................................. 12, 13
• Timer Recording Using • Review, Replace or Clear
Combination VCR Buttons ...... 12 Program Contents ...................... 13
TV Timer Features .......................................................... 14, 15
• ON-TIMER with Alarm ............ 14 • INSTANT ALARM ...................... 15
• SLEEP TIMER ........................ 14
Closed Caption System .................................................. 16, 17
• ClosedCaption Mode • Captionon Mute Feature ..........17
Feature.................................... 16
FM Radio .......................................................................... 18, 19
Tape Operation .............................................................. 20~ 23
• Tape Position Display .............. 20 •Auto Operation Functions .......... 21
• Zero Search ............................ 20 • One Minute Skip ........................ 21
• Repeat Play ............................ 21 • VHS Index Search System ..22, 23
Special VCR Features .................................................. 24 ~ 28
• Channel Caption ................ 24, 25 • Weak Signal Display ON/OFF ..28
•Time Stamp ...................... 26, 27 • VCR Lock .................................. 28
Copying Your Tapes (Dubbing) ............................................ 29
V-Chip Control Feature .................................................. 30 ~ 33
• Enter or Change Secret Code....30 • Setup TV PARENTAL Ratings ..32
• Setup MOTION PICT. Ratings _31 • Blocking Message ...................... 33
Reset Language, Channels, Clock ........................................ 34
On-Screen Display (OSD) ...................................................... 35
• VCR Status & Clock Display....35 • Warning and Instruction
• Channel & Function Display ....35 Displays .................................... 35
Unit Information ...................................................................... 36
• Reset all Combination VCR • Head Cleaning .......................... 36
Memory Functions .................. 36 • Specifications ............................ 36
• DST (Daylight Saving Time) ,,,,36
Before Requesting Service .................................................... 37
Service Center List ................................................................ 38
Spanish (Espabol) Quick Use Guide ............................ 39- 41
Location of Controls ........................................................ 42, 43
Warranty .................................................................. Back Cover
3
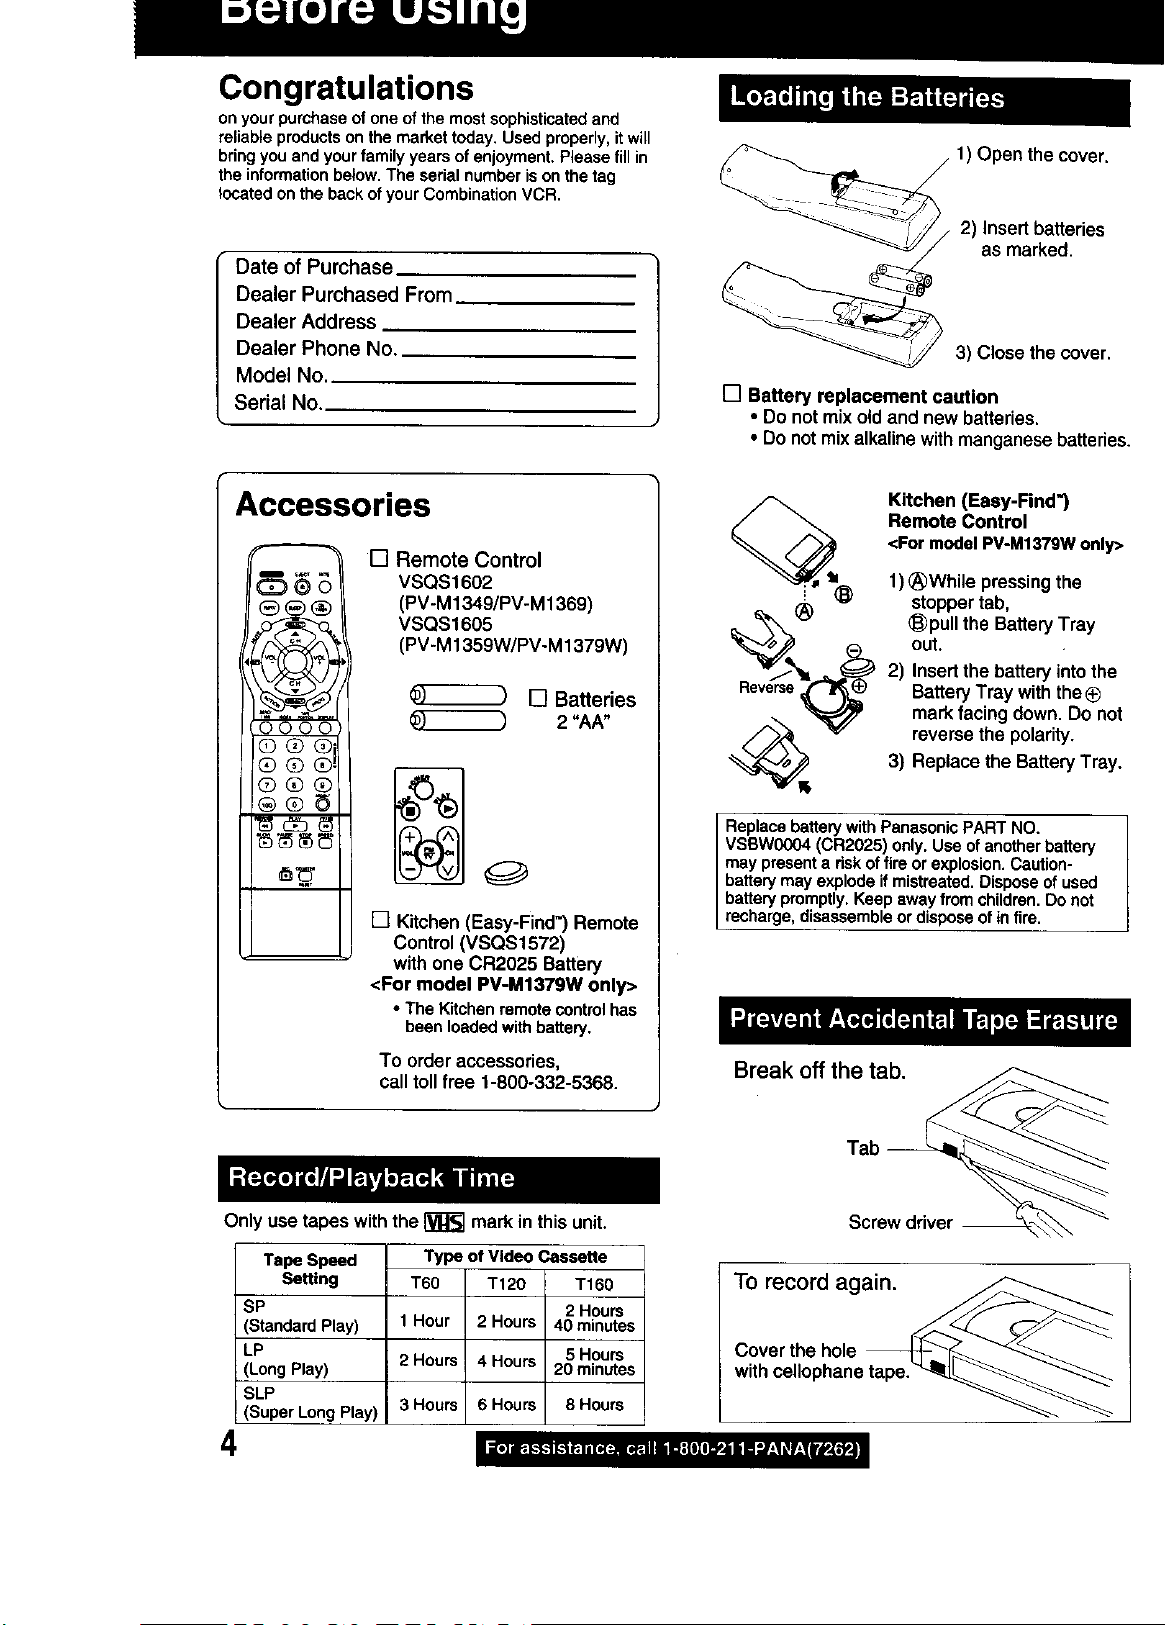
Congratulations
onyour purchaseof one ofthe mostsophisticated and
reliableproductson the market today. Usedproperly,itwill
bringyou and yourfamily years of enjoyment, Please fill in
the informationbelow.The serial numberis onthe tag
located on the backofyour CombinationVCR.
Date of Purchase
Dealer Purchased From
Dealer Address
Dealer Phone No.
Model No.
Serial No.
1) Open the cover.
2) Insert batteries
as marked.
3) Close thecover.
[] Battery replacement caution
• Do notmix oldand new batteries.
• Do notmixalkalinewithmanganesebatteries.
Accessories
[] Remote Control
,P'9_.7o.
,4_1( ))71"4
@®®
N'_ NS_
[] Kitchen(Easy-Find') Remote
Control (VSQS1572)
with one CR2025 Battery
<For model PV-M1379W only>
• TheKitchenremotecontrolhas
To order accessories,
calltollfree 1-800-332-5368.
VSQS1602
(PV-M1349/PV-M 1369)
VSQS1605
(PV-M1359W/PV-M1379W)
[] Batteries
2 "AA"
beenloadedwithbattery.
Remote Control
<FormodalPV-M1379Wonly>
__ Kitchen (Easy-Find')
1) _)While pressingthe
stoppertab,
out.
Rev_e_e,__ (_pull the BatteryTray
2) Insertthe battery intothe
BatteryTray withthe®
markfacing down. Do not
'_ reversethe polarity.
Replacebattery withPanasonicPART NO.
VSBW0004 (CR2025) only. Use of anotherbattery
may present a risk of fire or explosion. Caution-
battery may explode if mistreated. Dispose of used
battery promptly. Keep away from children.Do not
recharge, disassemble or dispose of in fire.
3) Replace the Battery Tray.
Break off the tab.
Only use tapes withthe _ mark inthis unit.
Tape Speed
Setting I T60 T120 T160
SP 2 Hours
(StandardPlay) i 1 Hour 2 Hours 40 minutes
LP i 5 Hours
(LongPlay) 2 Hours 4 Hours 20 minutes
SLP
(Super
LongPlay)
I Type of Video Cassette
I
I 3 Hours 6 Hours 8 Hours
I
4
Tab
Screw driver
To record again.
Cover the hole --
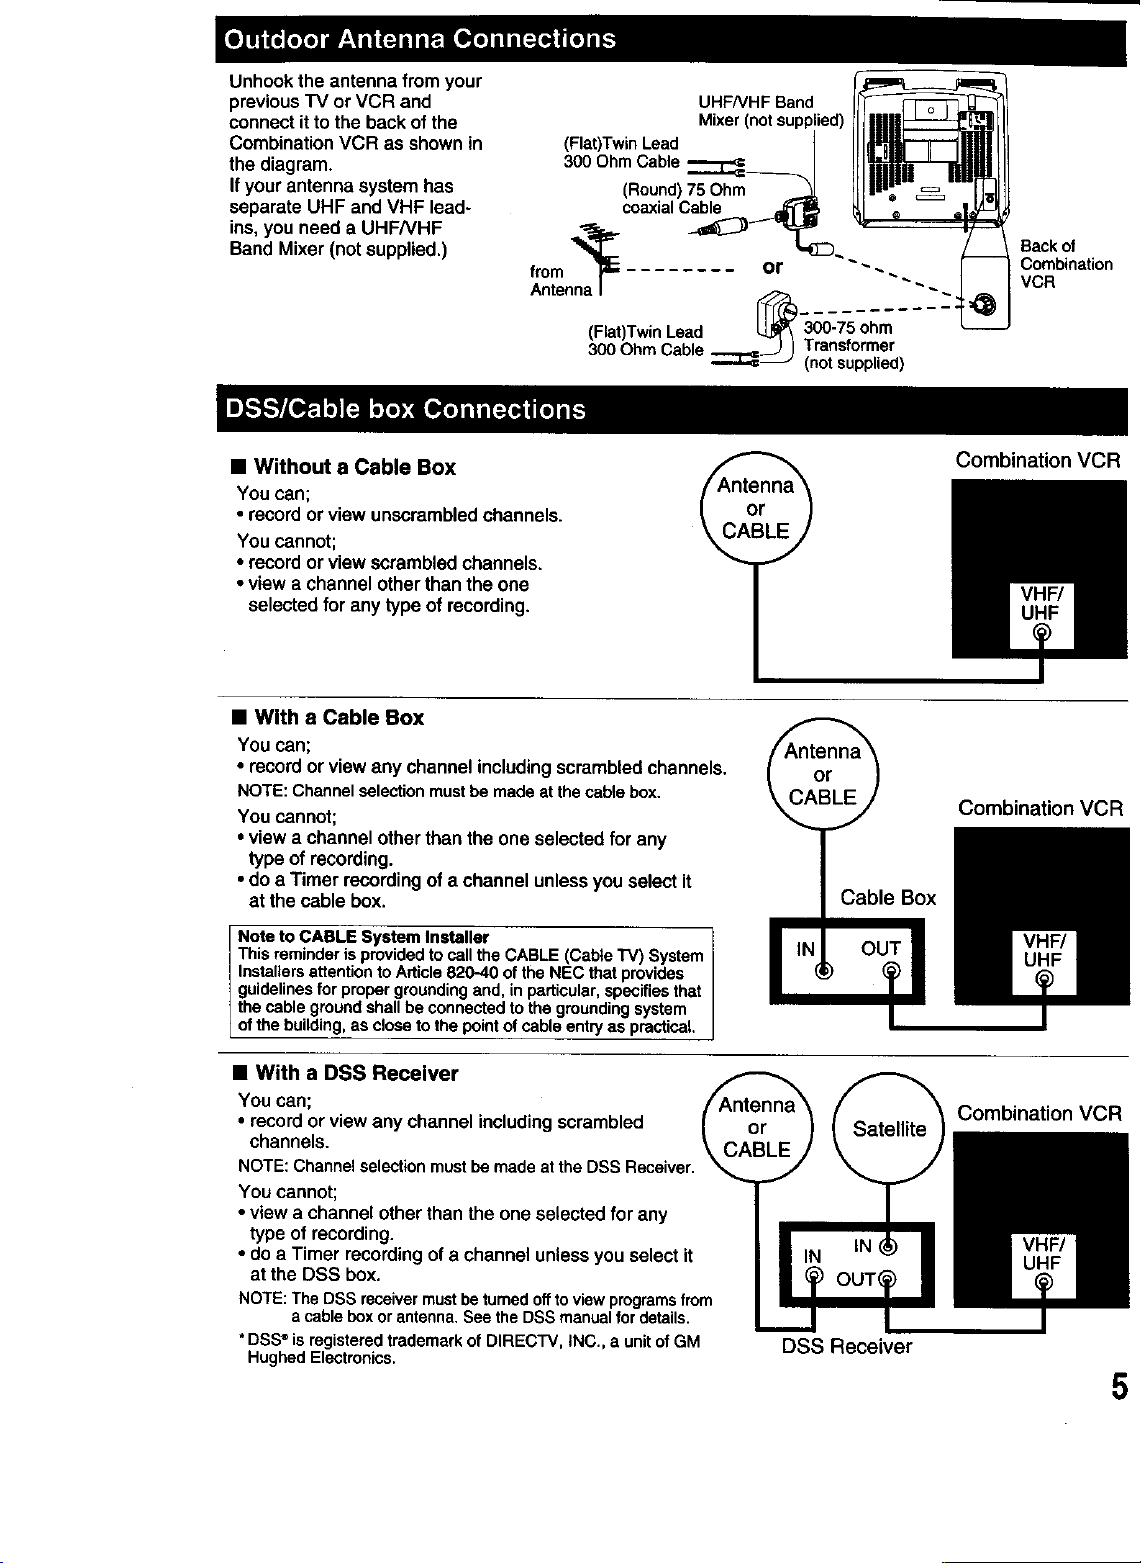
Unhookthe antenna from your
previous TV or VCR and
connect itto the back of the
Combination VCR as shown in
the diagram.
If your antenna system has
separate UHF and VHF lead-
ins, you need a UHFNHF
Band Mixer (not supplied.)
UHFNHF Band
Mixer (not supplied)
(Flat)Twin Lead
300 Ohm Cable
(Round)75 Ohm
coaxialCabl,
from '_ or ""--..
AntennaI ""
(Flat)TwinLead [_ _0-750 hm
300OhmCable _J Transformer
(not supplied)
Back of
Combination
VCR
• Without a Cable Box
You can;
• recordor view unscrambledchannels.
You cannot;
• recordor view scrambledchannels,
• viewa channel otherthanthe one
selectedfor anytype of recording,
• With a Cable Box
You can;
• recordor view any channel includingscrambledchannels.
NOTE:Channelselectionmustbemadeatthecablebox.
You cannot;
• viewa channel otherthanthe one selectedforany
type of recording.
• do a Timer recordingofa channel unlessyouselect it
at thecable box.
Note to CABLE System Installer 7
This reminderis providedto call the CABLE (CabteTV) System|
Instaflersattentionto Article820-40 of the NEC that provides |
guidelinesforpropergroundingand, inparticular,specifiesthat |
thecable groundshallbe connectedto the groundingsystem |
ofthe buUding,as closeto the pointof cable entryas practical |
Combination VCR
Combination VCR
• With a DSS Receiver
You can;
• recordorview anychannel includingscrambled
channels.
NOTE:Channelselectionmustbe madeattheDSSReceiver.
You cannot;
•view a channelotherthan the one selectedforany
type ofrecording.
• do a Timer recordingofa channel unlessyou selectit
at the DSS box.
NOTE:TheDSSreceivermustbeturnedofftoviewprogramsfrom
a cableboxorantenna.SeetheDSSmanualfordetails.
*DSS_isregisteredtrademarkof DIRECTV,INC.,a unitofGM
HughedElectronics.
Combination VCR
DSS Receiver
5
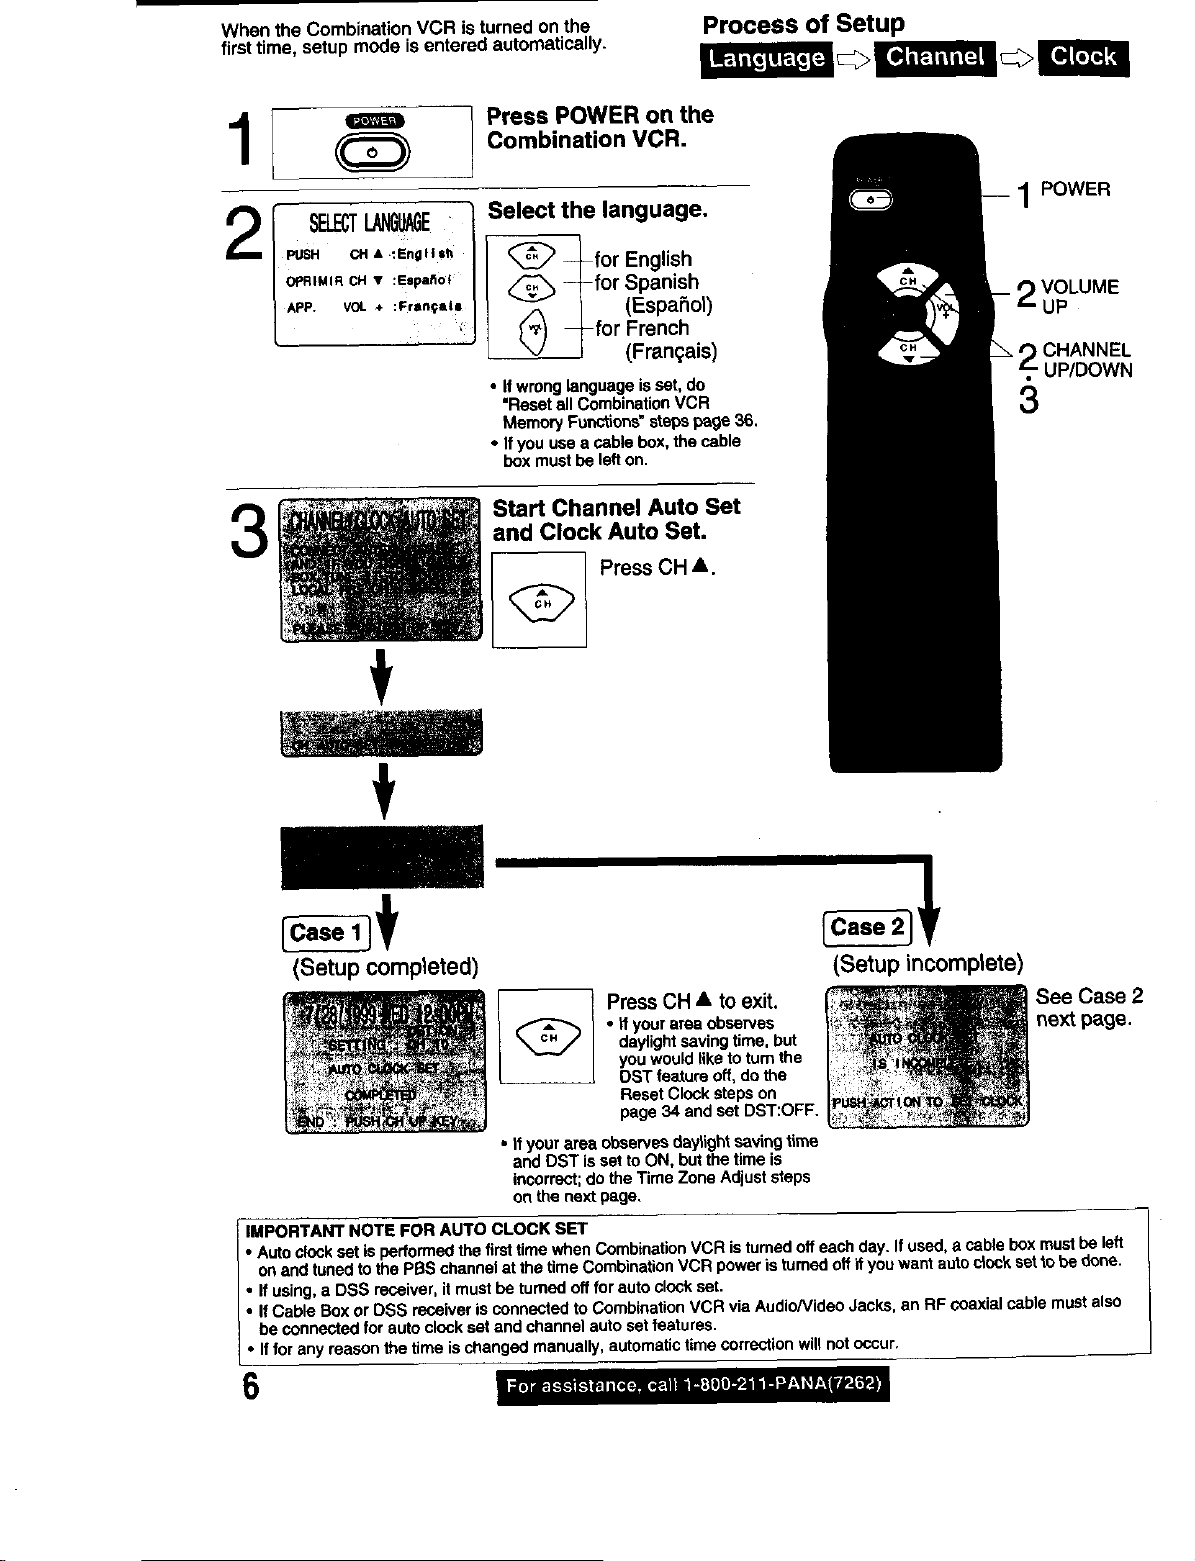
When the Combination VCR is turned on the
first time, setup mode is entered automatically.
Press POWER on the
Combination VCR.
Process of Setup
3
Select the language.
<_ _-for English
_-for Spanish
_ (EspaFiol)
_'_) _-for French
_-/_ (Fran_ais)
• If wronglanguageis set, do
"Resetall CombinationVCR
MemoryFunctions"stepsp_ge 36.
• If you use a cablebox, the cable
box must be left on.
Start Channel Auto Set
and Clock Auto Set.
Press CH A.
1 POWER
VOLUME
2CHANNEL
UP/DOWN
3
(Setup completed)
Press CH • to exit.
• if yourarea observes
daylightsaving time,but
youwouldlike to turnthe
DST featureoff, dothe
Reset Clock steps on
page 34 and set DST:OFF.
• if yourarea observesdaylight savingtime
and DST is set to ON, butthe time is
incorrect;do the Time Zone Adjuststeps
on the nextpage.
IMPORTANT NOTE FOR AUTO CLOCK SET
• Auto clockset is performedthe firsttimewhen CombinationVCR isturnedoffeach day. If used, a cable boxmustbeleft
onand tunedto the P_S channelat the timeCombinationVCR poweristurnedoffifyou want autoclock setto be done.
• If using,a DSS receiver,itmust be turnedoff forauto clockset.
• If Cable Boxor DSS receiver isconnectedto CombinationVCR via Audio/VideoJacks, an RF soaxial cable mustalso
be connected for auto clockset and channelauto set features.
• Iffor any reasonthe time ischanged manually,automatic time correctionwill notoccur.
(Setup incomplete)
See Case 2
next page.
6
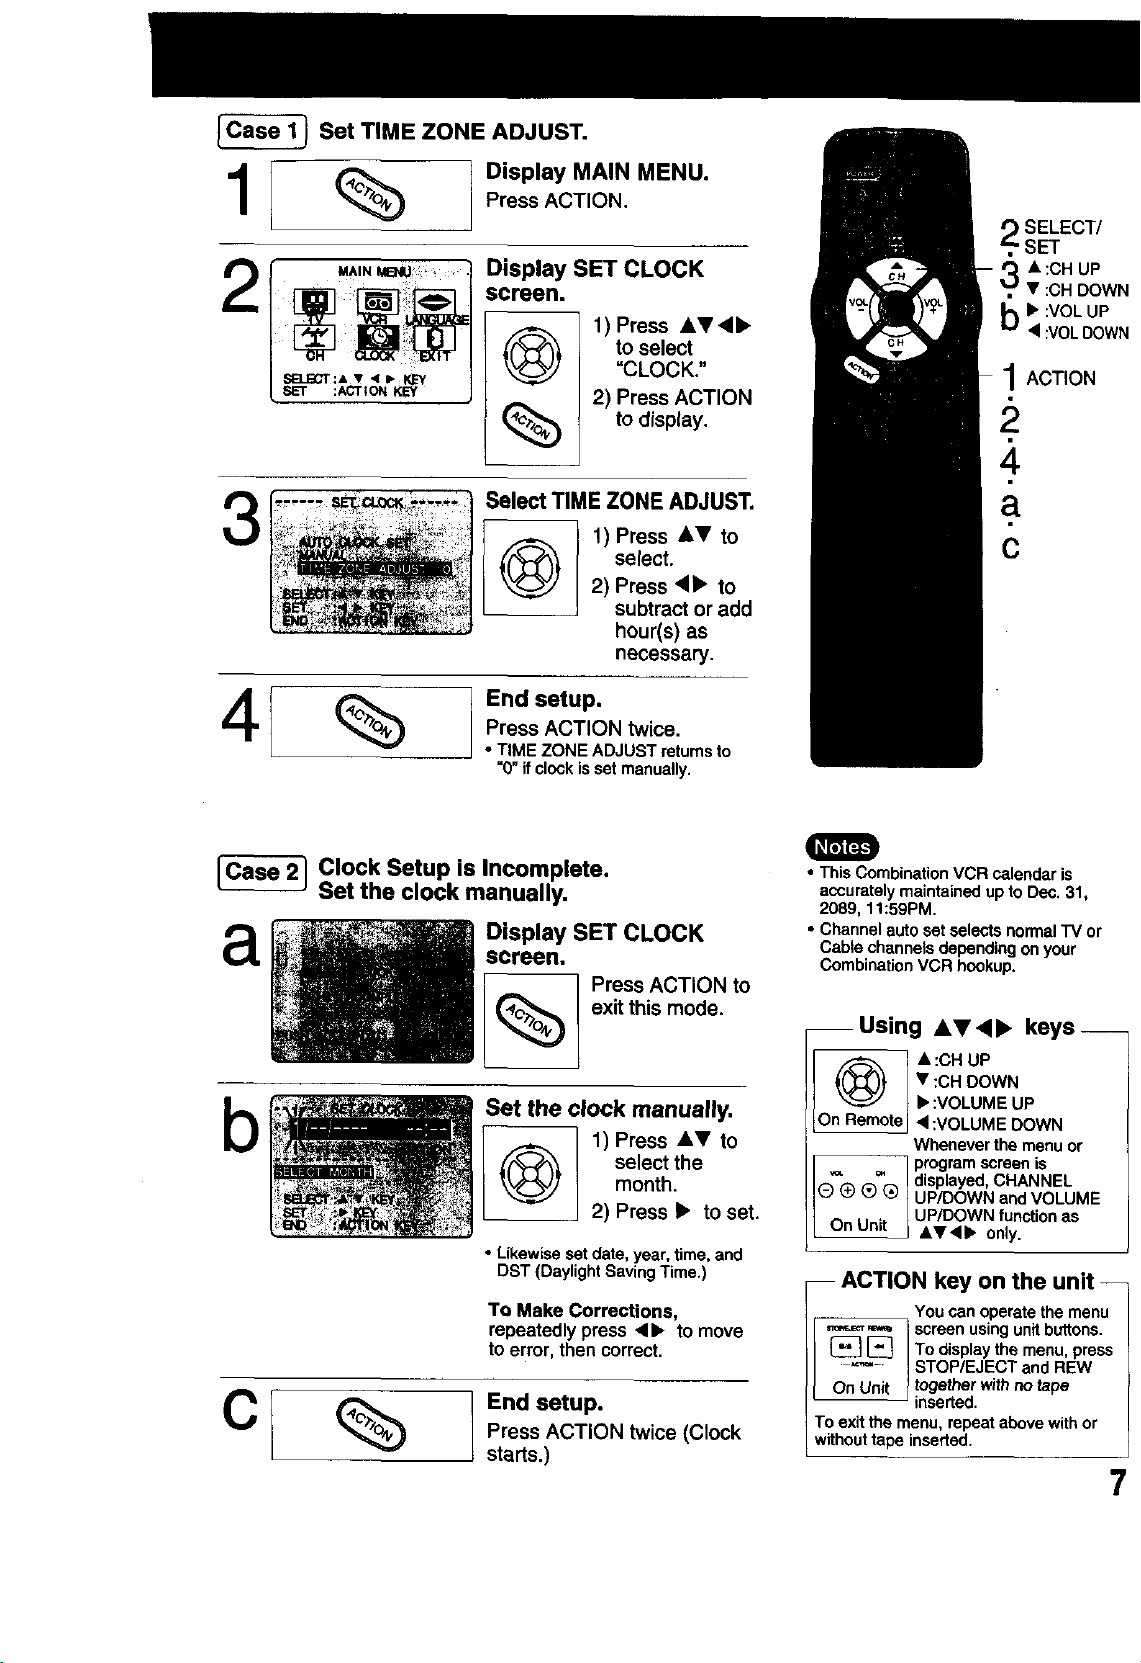
_Set TIME ZONE ADJUST.
1I %
Display SET CLOCK
2
screen.
@
%
Select TIME ZONE ADJUST. a
1) Press AT<I•
to select
"CLOCK."
2) Press ACTION
to display.
1) Press AV to
SELECT/
SET
• :CHUP
• :CHDOWN
b• :VOLUP
• :VOLDOWN
1ACTION
Q select. C
End setup.
Press ACTION twice.
• TIME ZONE ADJUST returns to
"0" ifclock isset manually.
_ Clock Setup is Incomplete.
a
Set the clock manually.
Display SET CLOCK
screen.
Set the clock manually,
b
O select the
• Likewiseset date,year, time, and
DST (Daylight Saving Time.)
To Make Corrections,
repeatedly press <11_to move
toerror, then correct.
C
%
End setup.
Press ACTION twice (Clock
starts,)
2) Press 4• to
subtract or add
hour(s) as
necessary.
Press ACTION to
exit this mode.
1) Press AT to
month.
2) Press • to set.
• ThisCombinationVCR calendar is
accuratelymaintainedupto Dec. 31,
2089, 11:59PM.
• Channel autoset selectsnormalTV or
Cable channelsdependingon your
Combination VCR hookup.
-- Using AV41_ keys--
• :CHDOWN
Q ] •:CH UP
On Remote •:VOLUME DOWN
Q (_ ® _ ] UP/DOWN andVOLUME
A - , [ UP/DOWN functionas
unumt_ •V•• only.
ACTION key on the unit --
'_='_"_'_ 1screen usingunitbuttons.
..... | STOP/EJECT and REW
On Unit _togetherwithno tape
To exit the menu, repeat abovewithor
withouttape inserted.
• :VOLUME UP
Whenever the menu or
1programscreenis
= _displayed,CHANNEL
You can operate the menu
[_] | To displaythe menu,press
inserted.
7
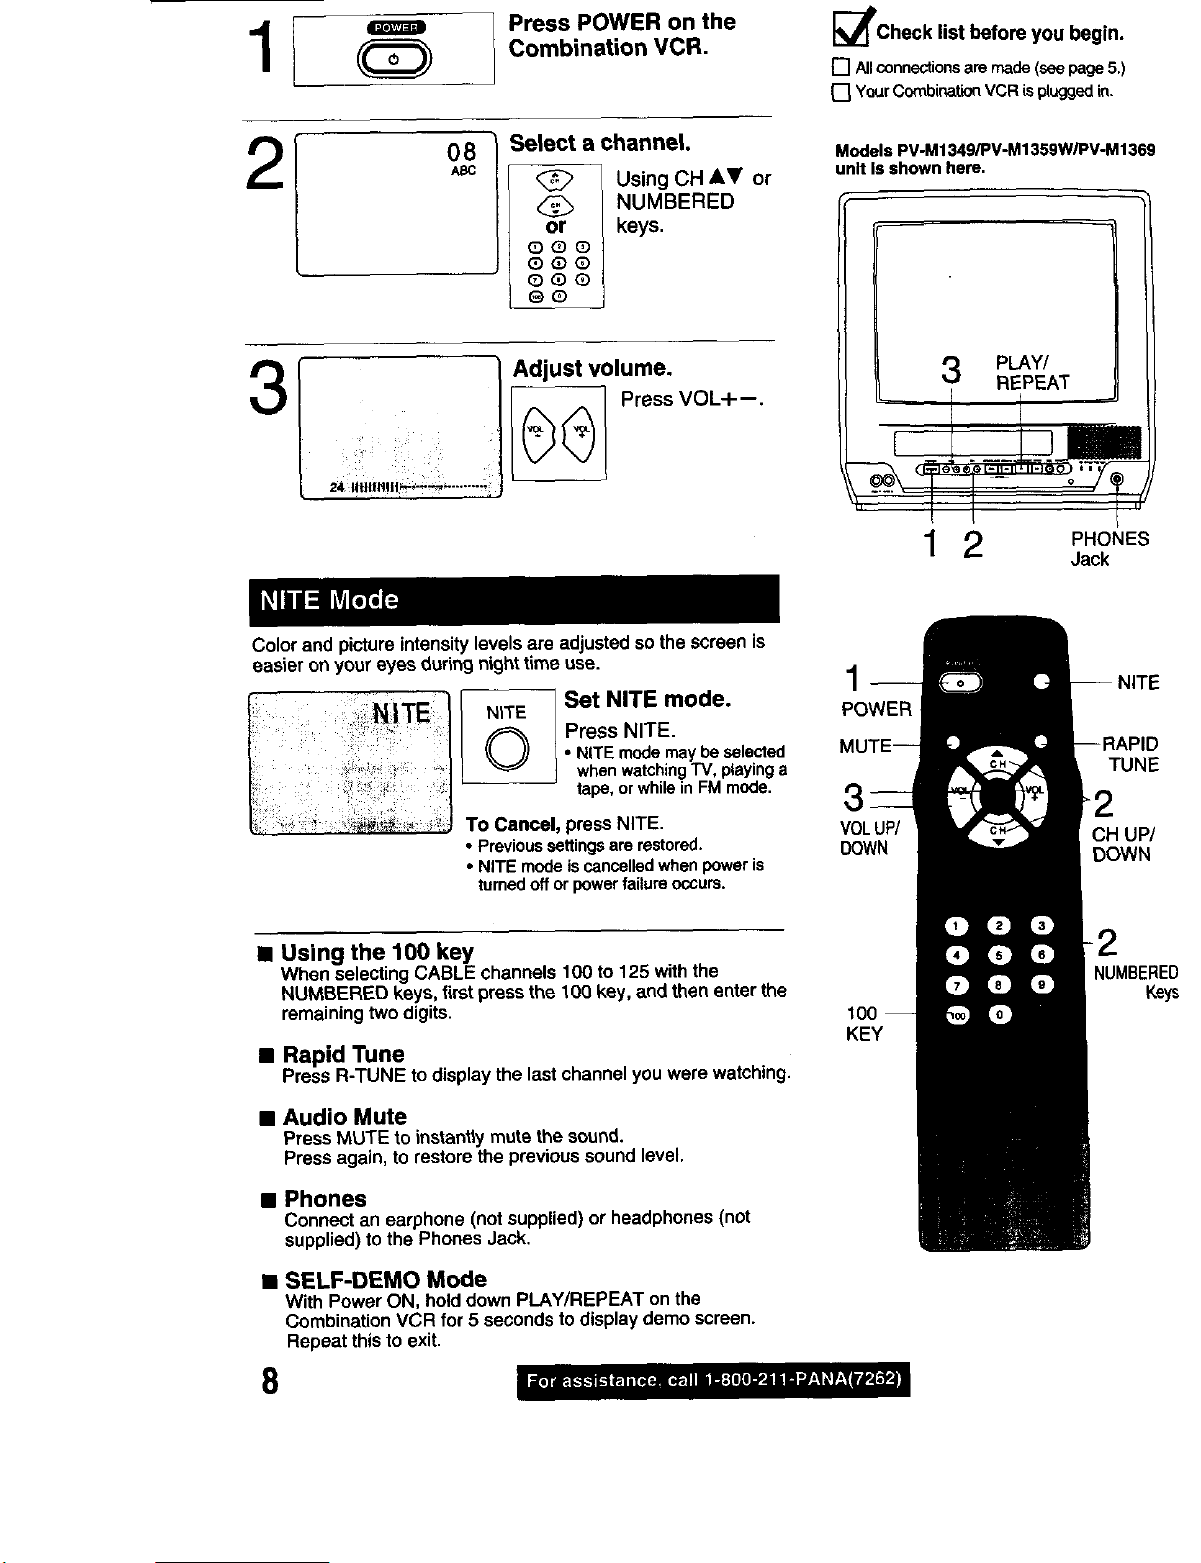
Press POWER on the_eITLTJ 1 =|
(_ CombinationVCR.
_l_check list before you begin.
[] Allconnectionsaremade(see page5.)
[] YourCombinationVCR ispluggedin.
Select a channel.
<_> Using CH &V or
,_, NUMBERED
or keys.
oo(_
QoO
QQ(_
GO
Adjust volume.
3
t _- Press VOL+--.
Color and picture intensitylevels are adjustedso thescreen is
easier on your eyes duringnight time use.
NITE
©
To Cancel, press NITE.
• Previoussettingsare restored.
• NITE mode is cancelk3c_when power is
turnedoff or powerfailureoccurs.
Set NITE mode.
Press NITE.
• NITEmodemaybe selected
whenwatchingTV, playinga
tape,orwhilein FMmode.
Models PV-M1349/PV-M1359W/PV-M1369
unit Is shown here.
3 PLAY/
REPEAT
1 2 PHONES
__
POWER
Jack
TUNE
3
VOLUP/ CH UP/
DOWN DOWN
• Using the 100 key
When selectingCABLEchannels 100 to 125 withthe
NUMBERED keys, firstpressthe 10(3key, and then enter the
remainingtwodigits,
• Rapid Tune
PressR-TUNE todisplaythe last channelyou were watching.
• Audio Mute
PressMUTE to instantlymute the sound.
Pressagain, to restore theprevioussound level.
• Phones
Connectan earphone(notsupplied)or headphones(not
supplied)to the Phones Jack,
• SELF-DEMO Mode
With Power ON, holddown PLAY/REPEAT on the
CombinationVCR for5 secondsto displaydemo screen.
Repeat thisto exit.
8
NUMBERED
Keys
100
KEY
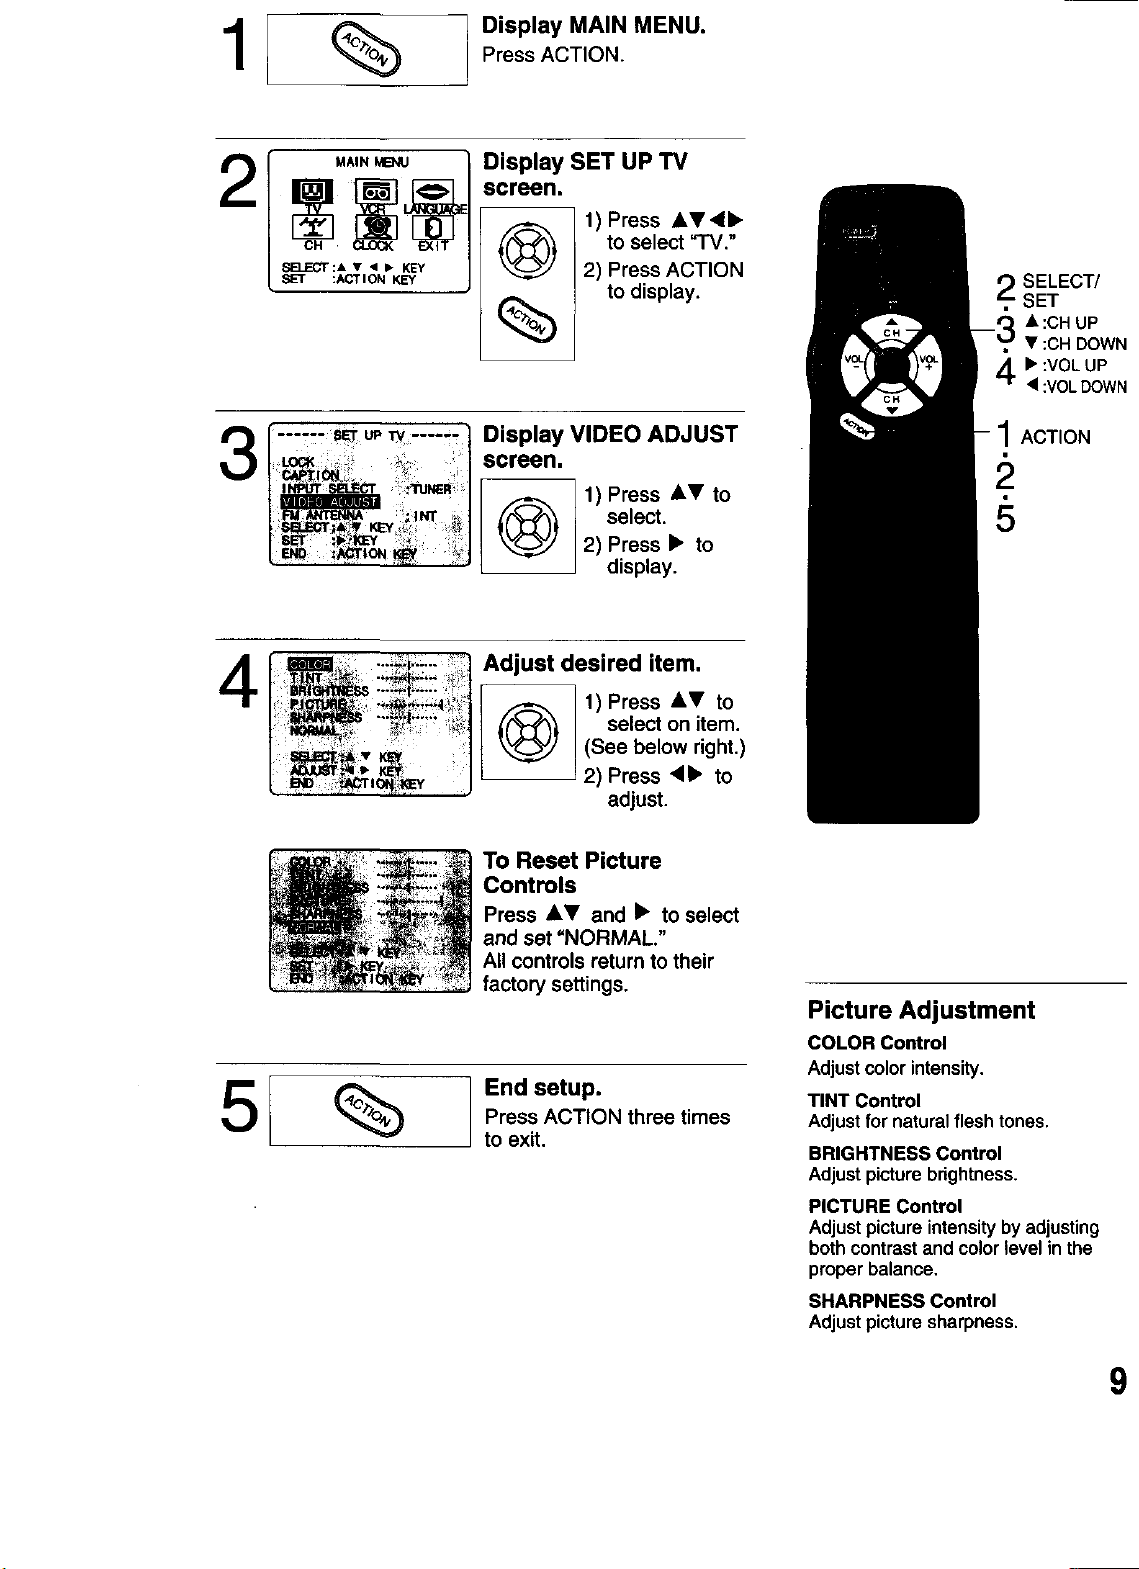
Display MAIN MENU.
Press ACTION.
Display SET UP TV
screen.
1) Press AT_I•
SET :ACTION KEY
3
4 t _=,,m_,,_ .-_.,:i.i_:---._. '.i Adjust desired item.
l '_ _ _!'_ t @ ,)Press,, to
V, Ib KEY
(_) to display.
Display VIDEO ADJUST
screen.
_:, select on item.
t J 2) Press '<• to
to select "TV."
2) Press ACTION
1) Press AV to
select.
2) Press • to
display.
(See below right.)
adjust.
2 SELECT/
SET
_A :CH UP
• :CH DOWN
b":VOL UP
• :VOLDOWN
1ACTION
5
%
To Reset Picture
Controls
Press AT and • to select
and set "NORMAL."
All controls return to their
factory settings.
End setup.
Press ACTION three times
to exit.
Picture Adjustment
COLOR Control
Adjustcolorintensity.
TINT Control
Adjust for natural flesh tones.
BRIGHTNESS Control
Adjustpicturebrightness.
PICTURE Control
Adjustpictureintensityby adjusting
bothcontrastand colorlevel in the
properbalance,
SHARPNESS Control
Adjustpicturesharpness.
9
Models PV-M1349/PV-M1359W/PV-M 1369
unlt Is shown here.
V-LOCK
_f'Check list before you begin,
[] Allconnectionsaremade(seepage5.)
[] YourCombinationVCRispluggedin,
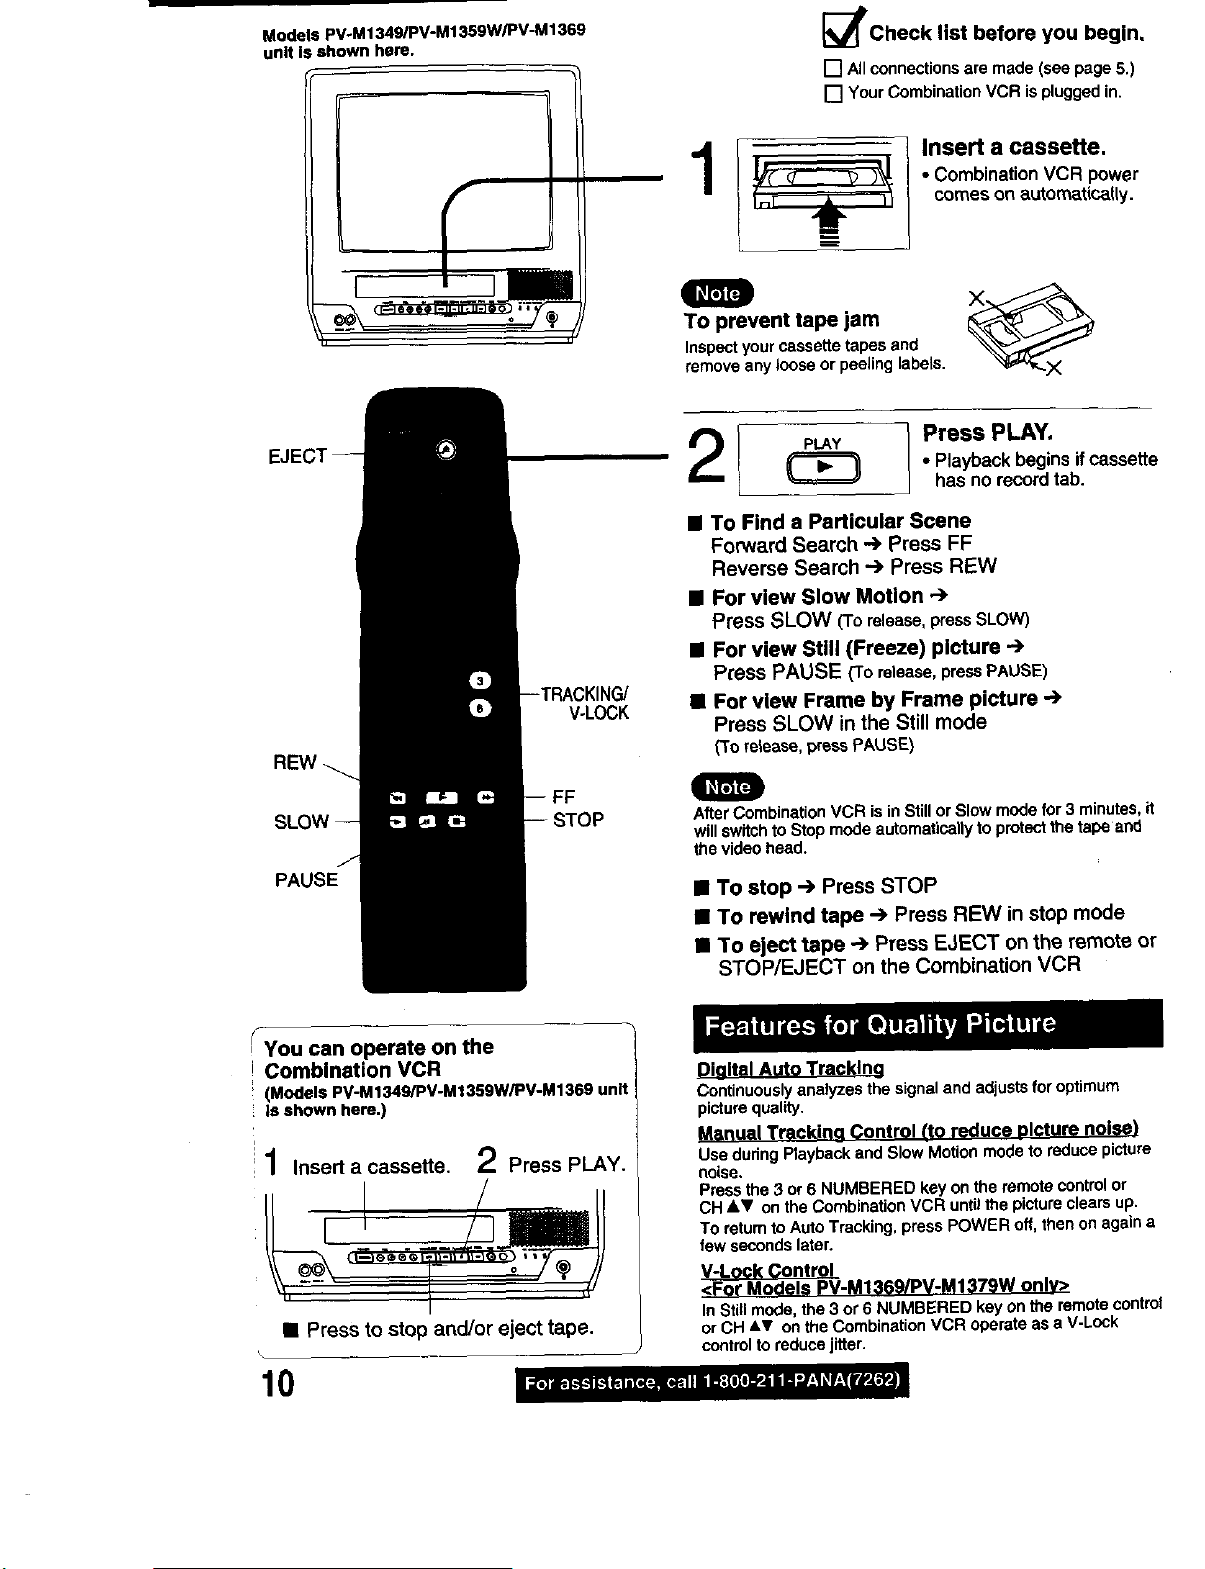
Insert a cassette.
• Combination VCR power
comes on autom_t(ca((y.
Q
To prevent tape jam L_..-_ _-_
Inspectyourcassettetapes and
removeany loose or peelinglabels.
Press PLAY.
21
• To Find a Particular Scene
Forward Search --) Press FF
Reverse Search "-')Press REW
• For view Slow Motion
Press SLOW (To release, pressSLOW)
• For view Still (Freeze) picture -'.)
Press PAUSE _ro release,pressPAUSE)
• For view Frame by Frame picture -')
Press SLOW in the Still mode
(Torelease, press PAUSE)
• Playback begins if cassette
has no record tab.
PAUSE
_ou can operate on the
JCombination VCR
(Models PV-M1349/PV-M1359WiPV-M1369 unit
Is shown here.)
i
11Insert a cassette. 2 Press PLAY.
• Press to stop and/or eject tape.
10
AfterCombinationVCR isin Stillor Slow mode for 3 minutes,it
will switchto Stopmode automatically to protect the tape and
the video head.
• To stop ") Press STOP
• To rewind tape -.) Press REW in stop mode
• To eject tape -') Press EJECT on the remote or
STOP/EJECT on the Combination VCR
Dialtal Auto Tracklna
Continuouslyanalyzes the signaland adjustsforoptimum
picturequality.
M_r_ua{ TrackJng Control Lto reduce DIcturo noise)
UseduringPlaybackand Slow Motionmodeto reduce picture
noise.
Pressthe 3 or 6 NUMBERED keyon the remotecontrolor
CH&.V onthe CombinationVCR untilthe pictureclears up.
To returnto AutoTracking, press POWER off, thenon againa
few secondslater.
V-Lock Control
<For •odels PV-M1369/PV-M1379W onlY>
In Stillmode, the 3 or 6 NUMBERED key onthe remotecontrol
orCH &V onthe CombinationVCR operateas a V-Lock
controltoreduce jitter.
ModelsPV-M1349/PV-M1359W/PV-M1369
unitisshownhere.
1
3I
• :CHUP
• :CHDOWN
• :VOL UP
• :VOLDOWN
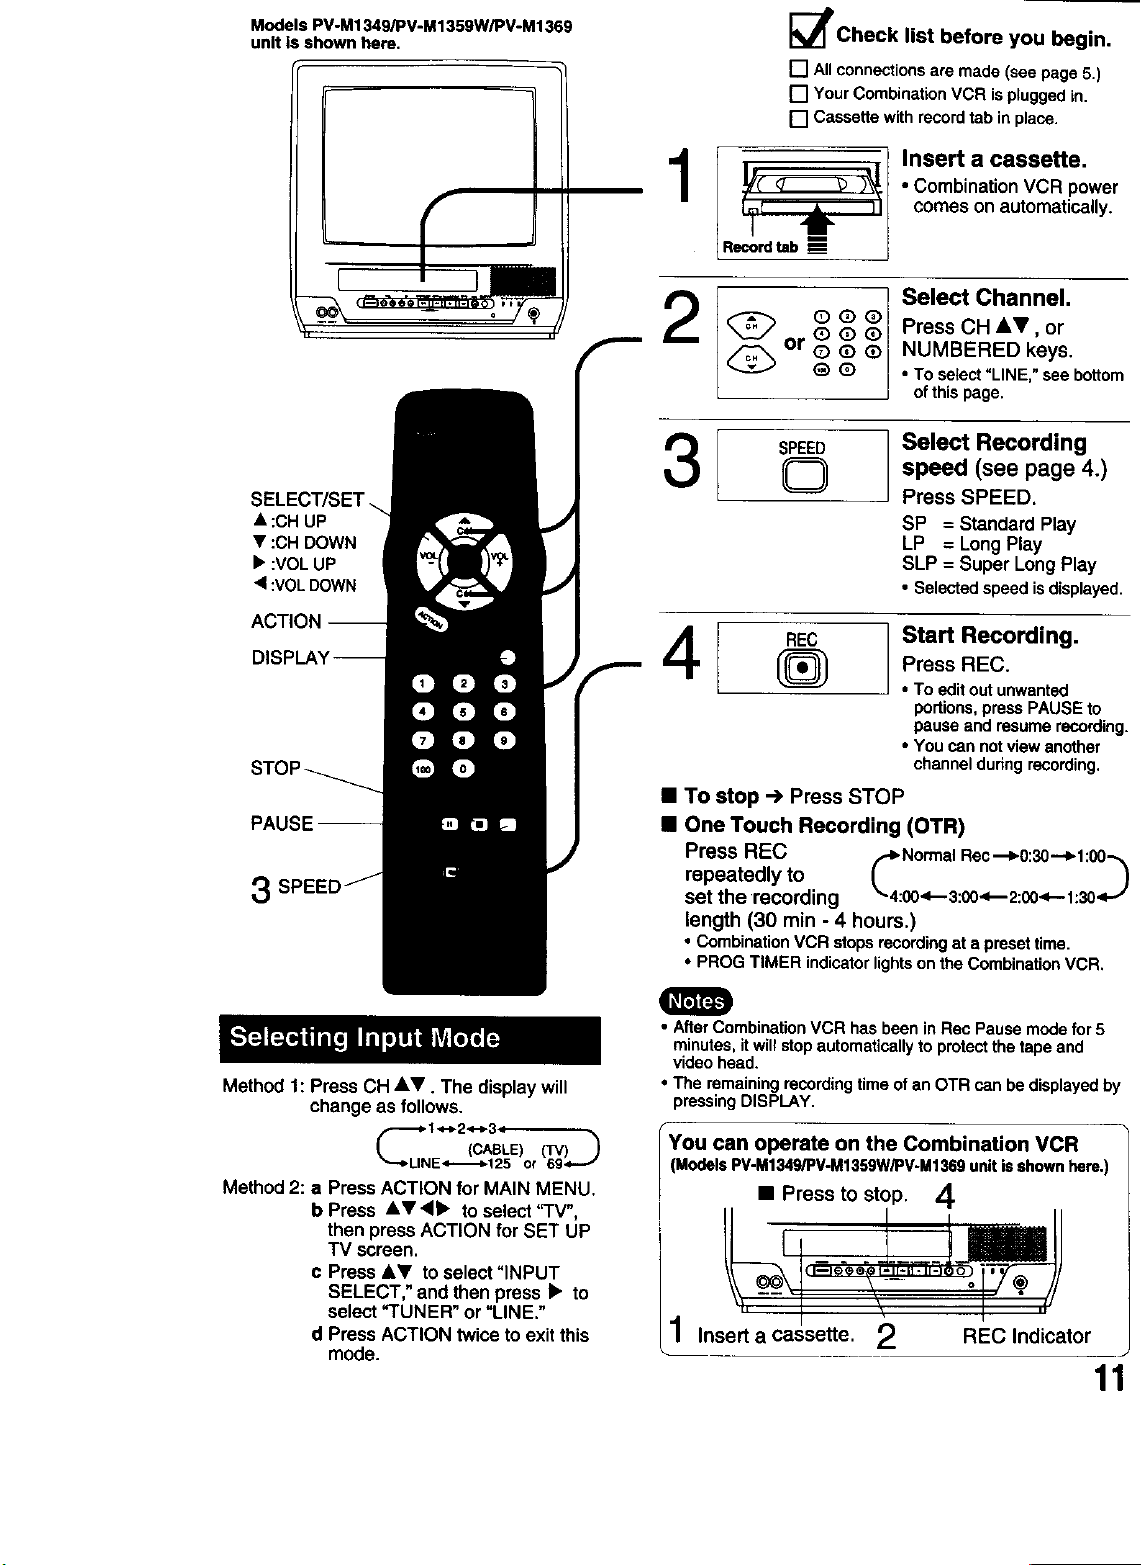
Recordtab
_t_l_check list before you begin.
[] Allconnectionsare made (see page 5.)
[] YourCombinationVCR ispluggedin.
[] Cassette withrecordtab inplace.
Insert a cassette.
• Combination VCR power
comeson automatically.
Select Channel.
Press CH iT, or
or©Q
NUMBERED keys.
• To select"LINE," see bottom
ofthis page.
Select Recording
speed (see page 4.)
Press SPEED.
SP = Standard Play
LP = Long Play
SLP = Super Long Play
• Selected speed is displayed.
3
Method 1: Press CH AV. The displaywill
changeas follows.
Method 2: a Press ACTION for MAIN MENU.
b Press &V<l• to select 'q'V",
then press ACTION for SET UP
TV screen.
c Press &Y to select "INPUT
SELECT," and then press • to
select "TUNER" or "LINE."
d Press ACTION twice to exit this
mode.
Start Recording.
4
• To stop -.) Press STOP
• One Touch Recording (OTR)
Press REC c_Normal Rec.--1_0:30-.-_l:00-_
repeatedly to
set the recording _-4:00<---3:0o_2:00<--1:3o<.-_
length (30 rain - 4 hours.)
• CombinationVCR stopsrecordingat a presettime.
• PROG TIMER indicatorlightson the Combination VCR.
Press REC.
• To editoutunwanted
portions,pressPAUSE to
pause and resume recording.
• You can notviewanother
channelduringrecording.
Q
• After CombinationVCR has been inRec Pause mode for 5
minutes,itwillstopautomaticallyto protectthe tapeand
video head.
• The remainingrecordingtime of an OTR can be displayedby
pressingDISPLAY.
You can operate on the Combination VCR
(ModelsPV-M1349/PV-M1359W/PV-M1369unitisshownhere.)
• Press to stop.
i
l_lllnsert a cassette. 2
4
REC Indicator
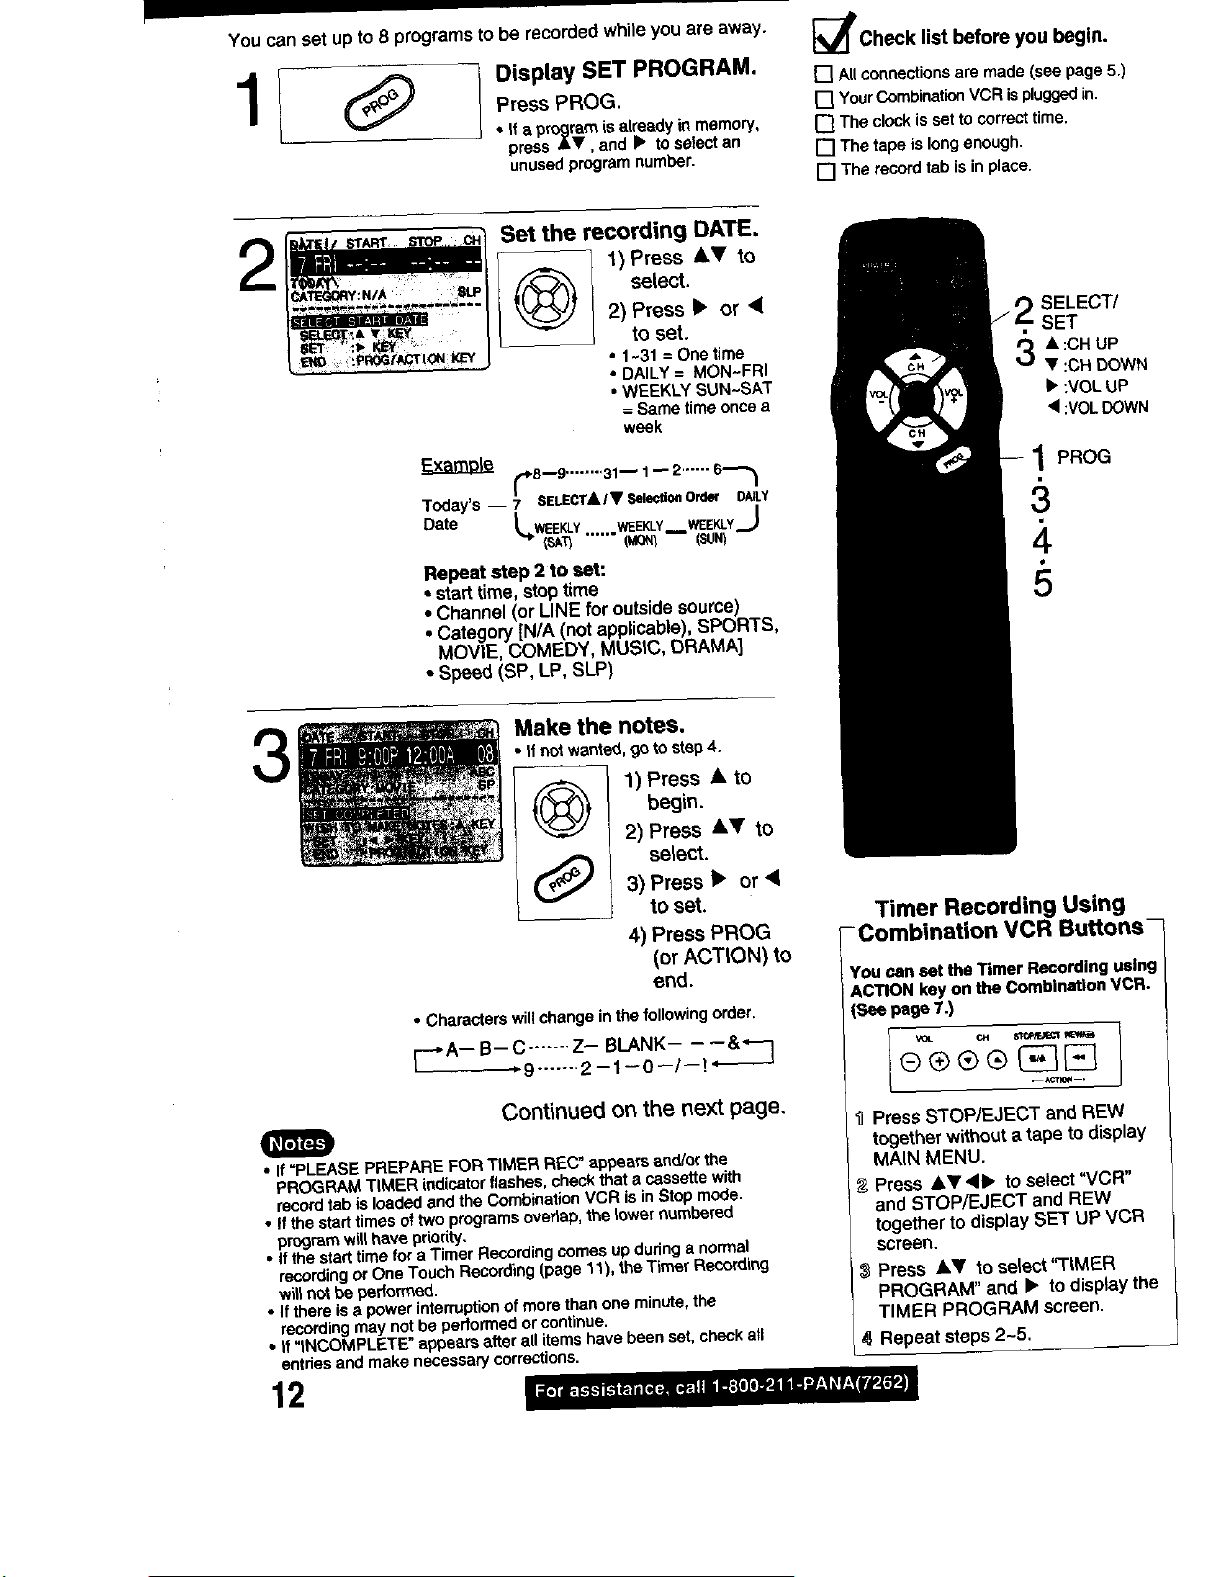
You canset upto 8 programs tobe recorded whileyou are away.
Display SET PROGRAM.
Press PROG,
• if aprogram isalreadym memory,
press •V, and • to select an
unusedprogramnumber.
Set the recording DATE.
2
1) Press AT to
_;_ll'Check list before you begin.
[] All connectionsare made (see page 5.)
[] YourCombinationVCR ispluggedin.
[] The clockis set tocorrecttime.
[] The tape is longenough.
[] The recordtab is inplace.
O select.
t,._B--9 ........
Today's -- 7 SELECTA/V SelectionOrder DAILY
Date _._E_-Y WEEKLY WEEKLY_.J
Repeat step 2 to sat:
• start time, steptime
• Channel(or LINE for outsidesource)
• Category[N/A (not applicable),SPORTS,
MOVIE, COMEDY, MUStC, DRAMA]
• Speed (SP, LP, SLP)
/
(SAT) ..... (MON_ (SUN)
2) Press • or •
to set.
• 1-31 = One time
• DAILY = MON~FRI
• WEEKLY SUN-SAT
= Same time once a
week
Make the notes.
• tfnot wanted, go to step 4.
O 1) Press • to
(_ select.3) Press • or •
• Characters will change inthe followingorder.
begin.
2) Press •V to
to set.
4) Press PROG
(or ACTION) to
end.
SELECT/
SET
• :CHUP
V :CH DOWN
• :VOL UP
< :VOLDOWN
1 PROG
4
Timer Recording Using
- Combination VCR Buttons-
You can set the Timer Recording using
ACTION key on the Combination VCR.
(See page 7.)
_-_C9 .......Z- BLANK- - --&
....... 2--1--0--I--!"- "_
Continued on the next page.
• If=PLEASE PREPARE FOR TIMER REC" appears end/or the
PROGRAM TIMER indicatorflashes,checkthata cassettewith
record tab isloaded and the CombinationVCR is inStop mode.
• Ifthe start times ottwo pmgremsoverlap, the lower numbered
program will have priority.
• If the start time for a Timer Recordingcomes up dudnga normal
recordingorOne Touch Recording(page 11), the TimerRecording
willnotbe performed.
• If there is a power interruptionofmore than one minute,the
recordingmay not be pedormed orcontinue.
• If "INCOMPLETE" appears after all items have been set,check all
entriesand make necessarycorrections.
12
*-I
'DPress STOP]EJECT and REW
together withouta tape to display
MAIN MENU.
Press AY4• to select "VCR"
and STOP/EJECT and REW
together to display SET UP VCR
screen.
Press J,Y to setsct"T|MER
PROGRAM" and • to display the
TIMER PROGRAM screen.
I_, Repeat steps2-5,
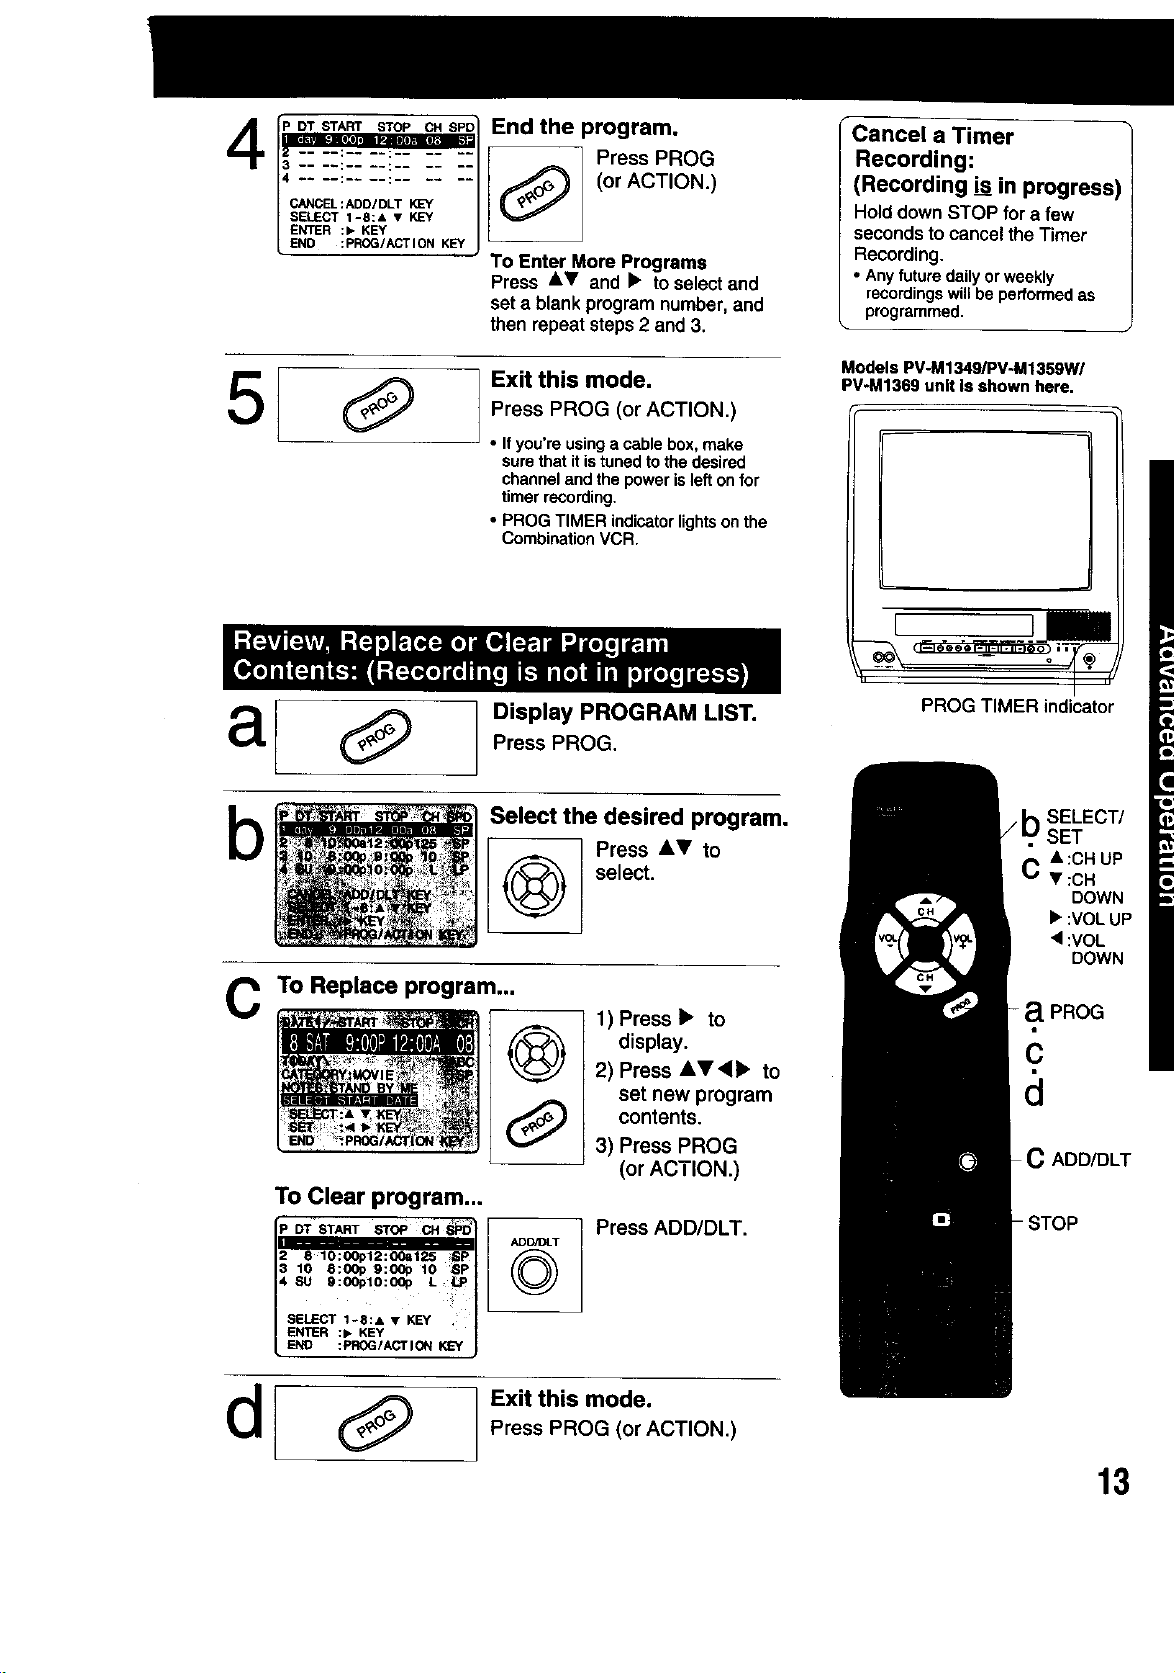
.oT.s:rA_.sT.o_c. sPoI End the program.
r .... :'_-:-_ ..... / _ Press PROG
_ --" ---::-- ---i--- --_ "--/[ _==_ t (or ACTION.)
=,EY/
LENO :PROG/ACTION "J To Enter More Programs
Press &V and • to selectand
set a blankprogramnumber,and
then repeat steps2 and 3.
Exit this mode.
Press PROG (or ACTION.)
5/
• ifyou'reusin9 a cabk-=box, make
surethatit istuned to thedesired
channeland the powerisleft onfor
timerrecording.
• PROG TIMER indicatorlightsonthe
CombinationVCR.
Display PROGRAM LIST.
al
Press PROG.
Cancel a Timer
Recording:
(Recording is in progress)
Hold down STOP for a few
seconds to cancel the Timer
Recording.
• Any future daily orweekly
recordingswillbe performedas
programmed.
Models PV-M1349/PV-M1359W/
PV-M1369 unit Is shown here.
-- I
PROG TIMER indicator
b
C To Replace program...
To Clear program...
Select the desired program.
Press A_' to
select.
1) Press • to
display.
@
0
2) Press &T,d• to
set new program
contents.
3) Press PROG
(or ACTION.)
Press ADD/DLT.
SELECT/
SET
CA :OH UP
• :CH
DOWN
• :VOLUP
• :VOL
DOWN
-aPROG
c
d
C ADD/DLT
Exit this mode.
PressPROG (orACTION.)
13
 Loading...