

Panasonic PT-JX200 Operating Instructions Manual
Operating Instructions
Content Manager Manual
DLP™ Projector
Model No.
Commercial Use
PT-JX200 series
Thank you for purchasing this Panasonic product.
■This manual explains the signage playback function (Content Manager).
For information other than the signage playback function, see “Operating Instructions Functional Manual”.
ENGLISH
DPQP1111ZC

Contents
Introduction 4
Notation in this manual 4
Functions of the Content Manager 5
Denitions of the Content Manager terms 5
Files compatible with signage playback 6
Preparation 8
Conrm the computer in use 8
Computers for the signage setting 8
Computer environment required for connection 8
Accessing from the web browser 9
Logging in to the Content Manager 9
Logging out from the Content Manager 11
Changing the login information 11
Basic ow of the schedule operation 13
Logging in to the Content Manager 13
Registering the content 14
Creating a timetable 16
Registering timetable to the schedule 18
Starting the playback of schedule 20
Basic ow of the slideshow 21
Logging in to the Content Manager 21
Registering the content to use in slideshow 22
Creating a slideshow 24
Starting a slideshow 25
Basic ow of the multiple direct play 26
Logging in to the Content Manager 26
Registering the content used for direct playback
27
Creating a playlist for direct playback 29
Assigning a playlist to remote control ID 30
Delivering the registered playlist 31
Operating the remote control to start playing 32
Operation method of the schedule 33
Various screens of the schedule 3 3
Top menu screen 33
Schedule screen 34
[Content registration] screen/[Content edit]
screen 40
Calendar screen 42
Registering the content 42
Registering the still image/movie/music content 42
Registering the power supply content 44
Editing the content 45
Deleting the content 46
Creating a playlist 47
Editing the playlist 49
Deleting the content registered in the playlist 50
Changing the setting of content registered in a
playlist 51
Duplicating the playlist 52
Displaying the preview of playlist contents 53
Editing the timetable 5 6
Editing the timetable 56
Creating a new timetable 57
Deleting the image content registered in the
timetable 57
Deleting the music content registered in the
timetable 58
Deleting the brightness content registered in the
timetable 59
Deleting the power supply content registered in
the timetable 61
Duplicating the timetable 62
Deleting the timetable 62
Changing the setting of the content registered in
the timetable 63
Displaying the preview of timetable details 63
Editing the schedule 66
Registering a schedule 66
Deleting the schedule 67
Checking the contents of a timetable registered
in a schedule 68
Checking the content of the created schedule 69
Checking the schedule. 69
Setting a schedule 70
Perform system setting 70
Obtaining the backup of a schedule 71
Uploading a schedule 72
Playing the schedule simultaneously on
multiple projectors 74
Setting schedules for simultaneous playback 74
Duplicating a schedule 74
Setting synchronization for the NTP server 76
Enabling [Fixed loading time] 77
Operation method of the slideshow 78
Various screens of the slideshow 78
Top menu screen 78
Slideshow screen 79
Slideshow setting screen 80
- 2 -

Registering the content used in the slideshow 8 1
Adding content to be used in slideshow 81
Deleting the content used in slideshow 82
Editing the slideshow 84
Changing the playback order of the content
registered in slideshow 84
Deleting the content registered in the slideshow 84
Changing the content setting of still image
registered in slideshow 85
Operation method of the multiple direct
play 87
Various screens of the multiple direct play 87
Top menu screen 87
[Remote control ID assignment] screen 88
[Direct play] screen 89
Editing the playlist to direct play 90
Edit the playlist to direct play 90
Deleting the content registered in the playlist of
direct play 90
Change the setting of the contents registered in
the playlist of direct play 91
Duplicating the playlist of direct play 91
Deleting the playlist of direct play 92
Editing the remote control ID assignment 9 3
Assigning the playlist to the remote control ID 93
Deleting the playlist from the remote control ID
assignment 94
Check the playlist assigned to the remote
control ID assignment 95
Delivering the registered playlist 96
Starting the direct playback 97
Setting up the conditions and starting the direct
playback 97
Stop the direct playback being played 99
Trademark 111
Operation method of the interruption
playback 100
Logging in to the Content Manager 100
Various screens of the interruption playback 102
Top menu screen 102
[Interrupt play] screen 103
Setting the interruption playback 105
Setting the interruption playback using the
existing registered content 105
Setting interruption playback with newly
registered content 106
Deleting the scheduled interruption playback 108
Canceling the currently played interruption
schedule 109
FAQ 110
- 3 -

Introduction
Notation in this manual
rDescription in this manual
f Description in this manual is assumed that a desktop computer is used and operated with a mouse.
The actual size or indication of the screen may differ from that of this manual depending on the OS or the
computer used.
rReference pages
f Reference pages in this manual are indicated as (x page 00).
References to the PDF manual on the supplied CD-ROM are indicated as “XXXX” (→ Operating Instructions –
Functional Manual).
rTerms
f The part that is described as “device” in this manual and the software refers to the projector (Model No.:
PT-JX200 series).
f In this manual, the SD memory card and the SDHC memory card are referred to as “SD card”.
- 4 -
Functions of the Content Manager
Content Manager has the following functions.
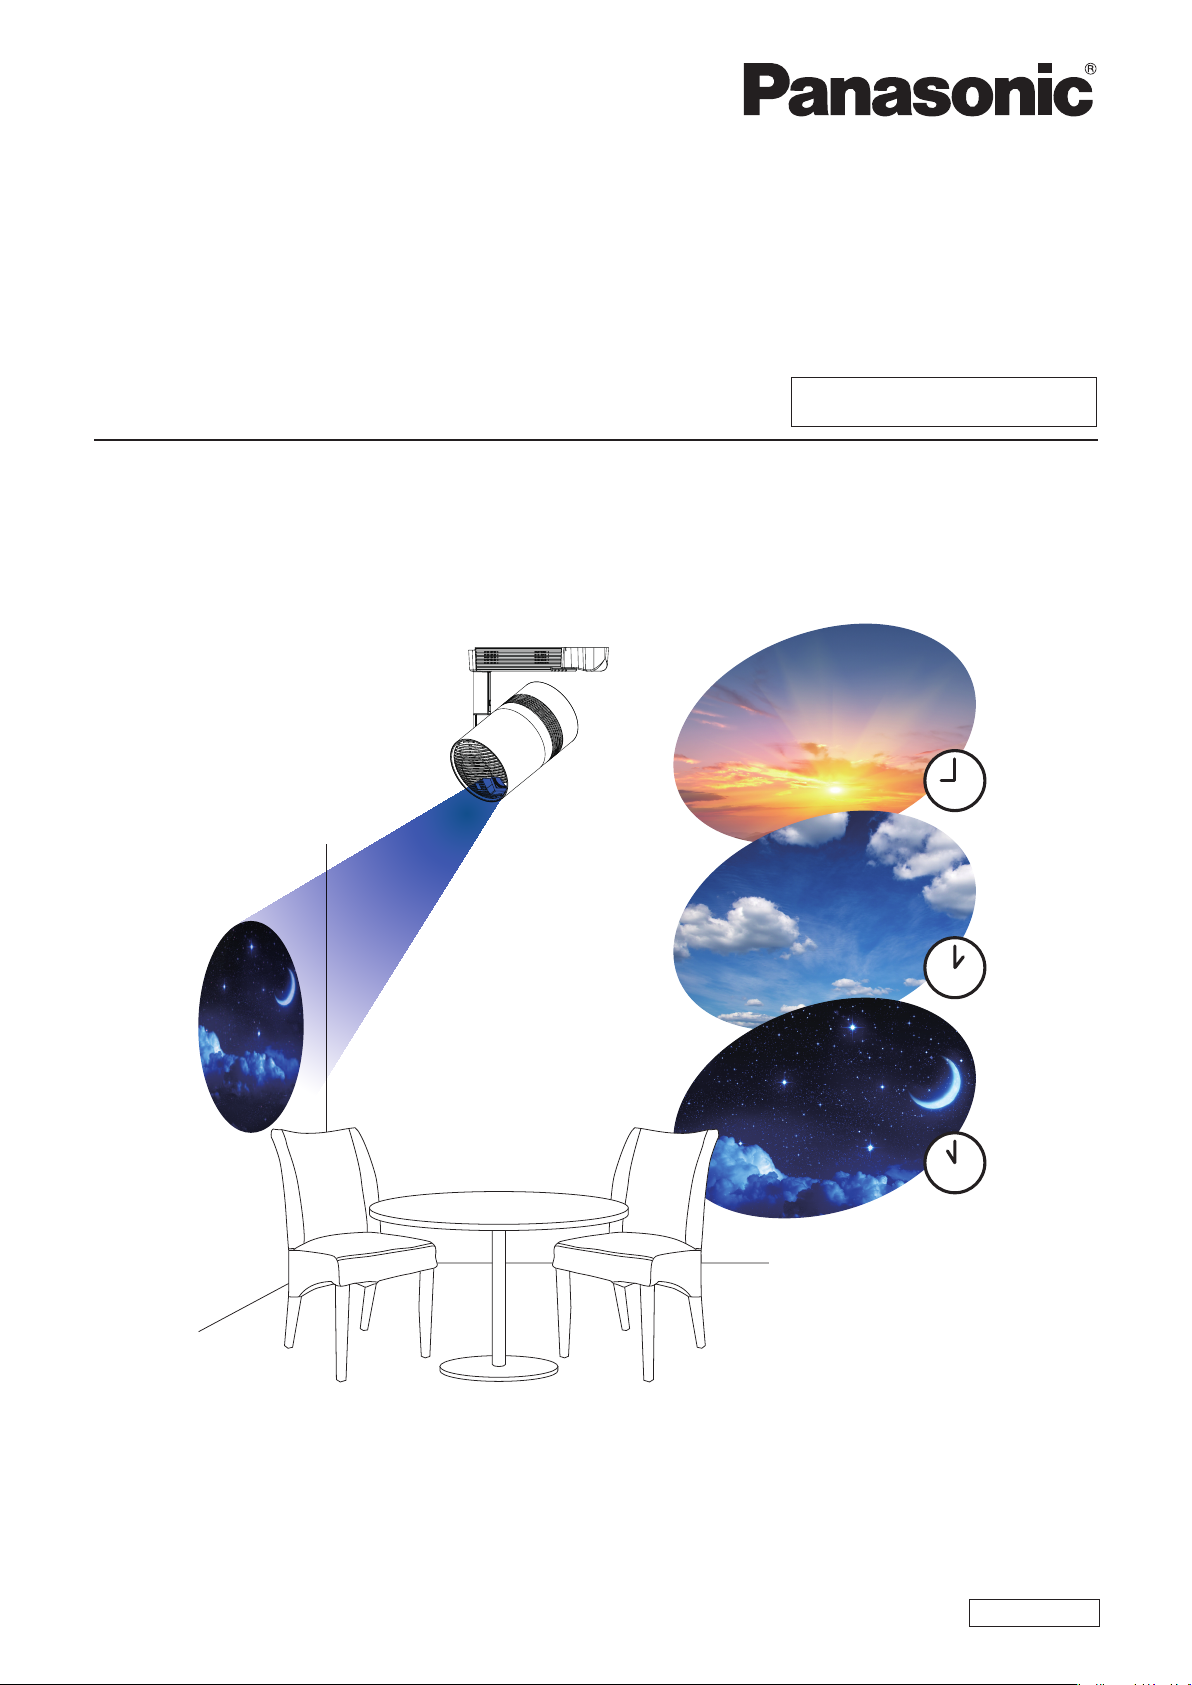
f The signage playback function
g Plays still image/movie/music les in the SD card, changes brightness of the light source, and turns off/on the
power according to the registered schedule.
g Plays still image/movie les in the SD card according to the slideshow setting.
f The signage setting function
g Sets a schedule.
g Sets a slideshow.
Denitions of the Content Manager terms
Denitions of the main terms used in this manual are as follows.
Term Description
This is the inclusive term summarizing the set of data necessary to perform the signage playback on a
Schedule
Content
Image content Indicates the inclusive term of three playback contents of still image/movie/external input.
External input content
Brightness content Indicates the material to change the brightness of the light source of the device.
Power supply content Indicates the material to perform power on/off operation of the device.
Playlist
Timetable Indicates the settings of playback contents, playback time, playback order, etc. in a day.
device with the Content Manager installed.
This includes content such as still image and movie, the calendar including the setting for each day, and
the timetable dening what to play back within the day.
Indicates the material to be used in the Content Manager. There are four playback contents of still image/
movie/external input/music, and two device control contents of brightness/power supply.
Contents of still image/movie/music are registered in the Content Manager using still image/movie/music
les.
Indicates the content of the signal input to the HDMI input of the device, to be registered in the Content
Manager as a single material.
Indicates the multiple contents of still image/movie/external input content registered in the Content
Manager as a single material.
- 5 -
Files compatible with signage playback
The signage playback function (schedule/slideshow) can use the following still image/movie/music les.
Extension Format Restriction
Number of pixels: Maximum 8 000 x 8 000
jpg/jpeg JPEG
Still
image
bmp Windows Bitmap
(For progressive JPEG, maximum 4 096 x 4 096)
YUV format: Only YUV444, YUV422, and YUV411 supported
Color mode: Only RGB supported
Number of pixels: Maximum 2 000 x 2 000
(1-bit, 4-bit, 8-bit, 16-bit, 24-bit, and 32-bit supported)
Following formats are not supported.
Run-length encoding, Bit elds, Top to bottom, Transparent data
Extension
mov
*1
Movie
*1 To play back a schedule simultaneously on multiple devices, use the following movie le as a movie content. If you use the movie les other than
the following, simultaneous playback function may not work properly.
For details on simultaneous playback, refer to “Playing the schedule simultaneously on multiple projectors” (x page 74).
f Extension: mp4, Video codec: H.264/MPEG-4 AVC, Audio codec: AAC
f Extension: mpg/mpeg, Video codec: MPEG-2, Audio codec: MPEG-1/2 Audio Layer-2
*2 Following movie les are not supported.
f Files with the video codec of WMV7, WMV8, DivX, or Xvid
f Uncompressed video
f Multi-angle video
f Files with the prole of Advanced Simple Prole @ Level 0 or Advanced Simple Prole @ Level 1
Music
avi
mp4
mpg/mpeg MPEG-2 MPEG-1/2 Audio Layer-2
wmv WMV9 WMA
Extension Audio codec Audio format
aac AAC
mp3
wma WMA
MPEG-1/2 Audio Layer-3
Video Audio Video Audio
H.264/MPEG-4 AVC
Motion JPEG
H.264/MPEG-4 AVC
Motion JPEG
MPEG-4
H.264/MPEG-4 AVC
MPEG-4
(MP3)
Codec Restriction
AAC
Linear PCM
MPEG-1/2 Audio Layer-3
(MP3)
AAC
Linear PCM
AAC
MPEG-4 AAC-LC
Sample rate: Maximum 48 kHz
Channel: Maximum 2 ch
Bit rate: Maximum 384 kbps
Resolution:
Maximum 1 920 x 1 080
Minimum 240 x 180
Frame rate:
Maximum 30 fps
Bit rate:
Maximum 40 Mbps
*2
Sample rate:
Maximum 48 kHz
(For Linear PCM,
maximum 16 kHz)
Channel:
Maximum 2 ch
Bit rate:
Maximum 384 kbps
Note
f Some information for still image/movie/music les can be viewed with a computer where relevant les are accessible.
Operation example
g For Windows computer
1. Right-click a le, and click [Properties].
2. Click the [Details] tab.
g For Mac
1. Click a le while holding down the “Control” key, and click [Get Info].
2. Click [More Info].
f The movie/music le with playback time less than ten seconds cannot be used.
f The maximum le size that can be used is 2 GB.
The following table shows the playback time when a 2 GB movie le is used. However, the following playback time is an estimate and may
differ depending on the compression method such as encoding and codec.
Resolution Bit rate Estimate of playback time
720 x 240 Approx. 2 Mbps Approx. 120 minutes
720 x 480 Approx. 5 Mbps Approx. 50 minutes
- 6 -

f Files protected by DRM (Digital Rights Management) cannot be used.
f Some les listed as compatible formats may still not be able to be used.
f Use the SD card with high data transfer speed. If the data transfer speed is slow, movie or music recorded in the SD card may not be played
back properly or it may take time to display a still image. (Speed class: Class 10 recommended)
f For the SD card compatible with the device, refer to “Using SD cards” (Operating Instructions - Functional Manual).
- 7 -
Preparation
Conrm the computer in use
Computers for the signage setting
The signage setting is performed by connecting a client computer (including iPad/iPhone/iPod touch or Android
terminal) to the projector.
A web browser is required for the setting. Prepare a computer which satises the following conditions beforehand.
OS (Operating System) Web browser
Windows 7/Windows 8.1/Windows 10 Internet Explorer 11.0
f Except for Internet Explorer 11 for Windows 8.1 Modern UI
Microsoft Edge
Google Chrome
Mac OS X v10.8/Mac OS X v10.9/Mac OS X v10.10/Mac OS X v10.11 Safari 6.0/7.0/8.0/9.0
Computer environment required for connection
Android 4.1/4.2/4.3/4.4/5.0/5.1/6.0 Google Chrome
iOS 8/9 Safari 8.0/9.0
Make sure to conrm the following settings before connecting the device to a computer.
rLAN setting
f Computer with a built-in LAN function
g Is the LAN function enabled?
f Computer without a built-in LAN function
g Is the LAN adaptor correctly recognized?
g Is the LAN adaptor enabled?
g Install the driver for the LAN adaptor in advance. For the installation method of the driver, refer to the
operating instructions of the LAN adaptor.
Note
f It may not be possible to connect to the device when a security (rewall) software or utility software for LAN adaptor is installed.
f This does not guarantee the operation with all the LAN adaptors and LAN adaptors built-in the computer.
- 8 -
Accessing from the web browser
Connect the client computer (including iPad/iPhone/iPod touch or Android terminal) and the projector on one-toone correspondence.
Attention
f If the web browser is closed while the Content Manager is used, the login state is retained. For details, refer to “Network connection”
(Operating Instructions - Functional Manual).
f If the user takes the computer and moves out of the radio wave area while the Content Manager is used via wireless LAN and
communication is interrupted, the login state is retained. Therefore, login is not possible with the same rights for a while (up to 20 minutes).
Perform operations in the area where stable communication is possible while the Content Manager is used.
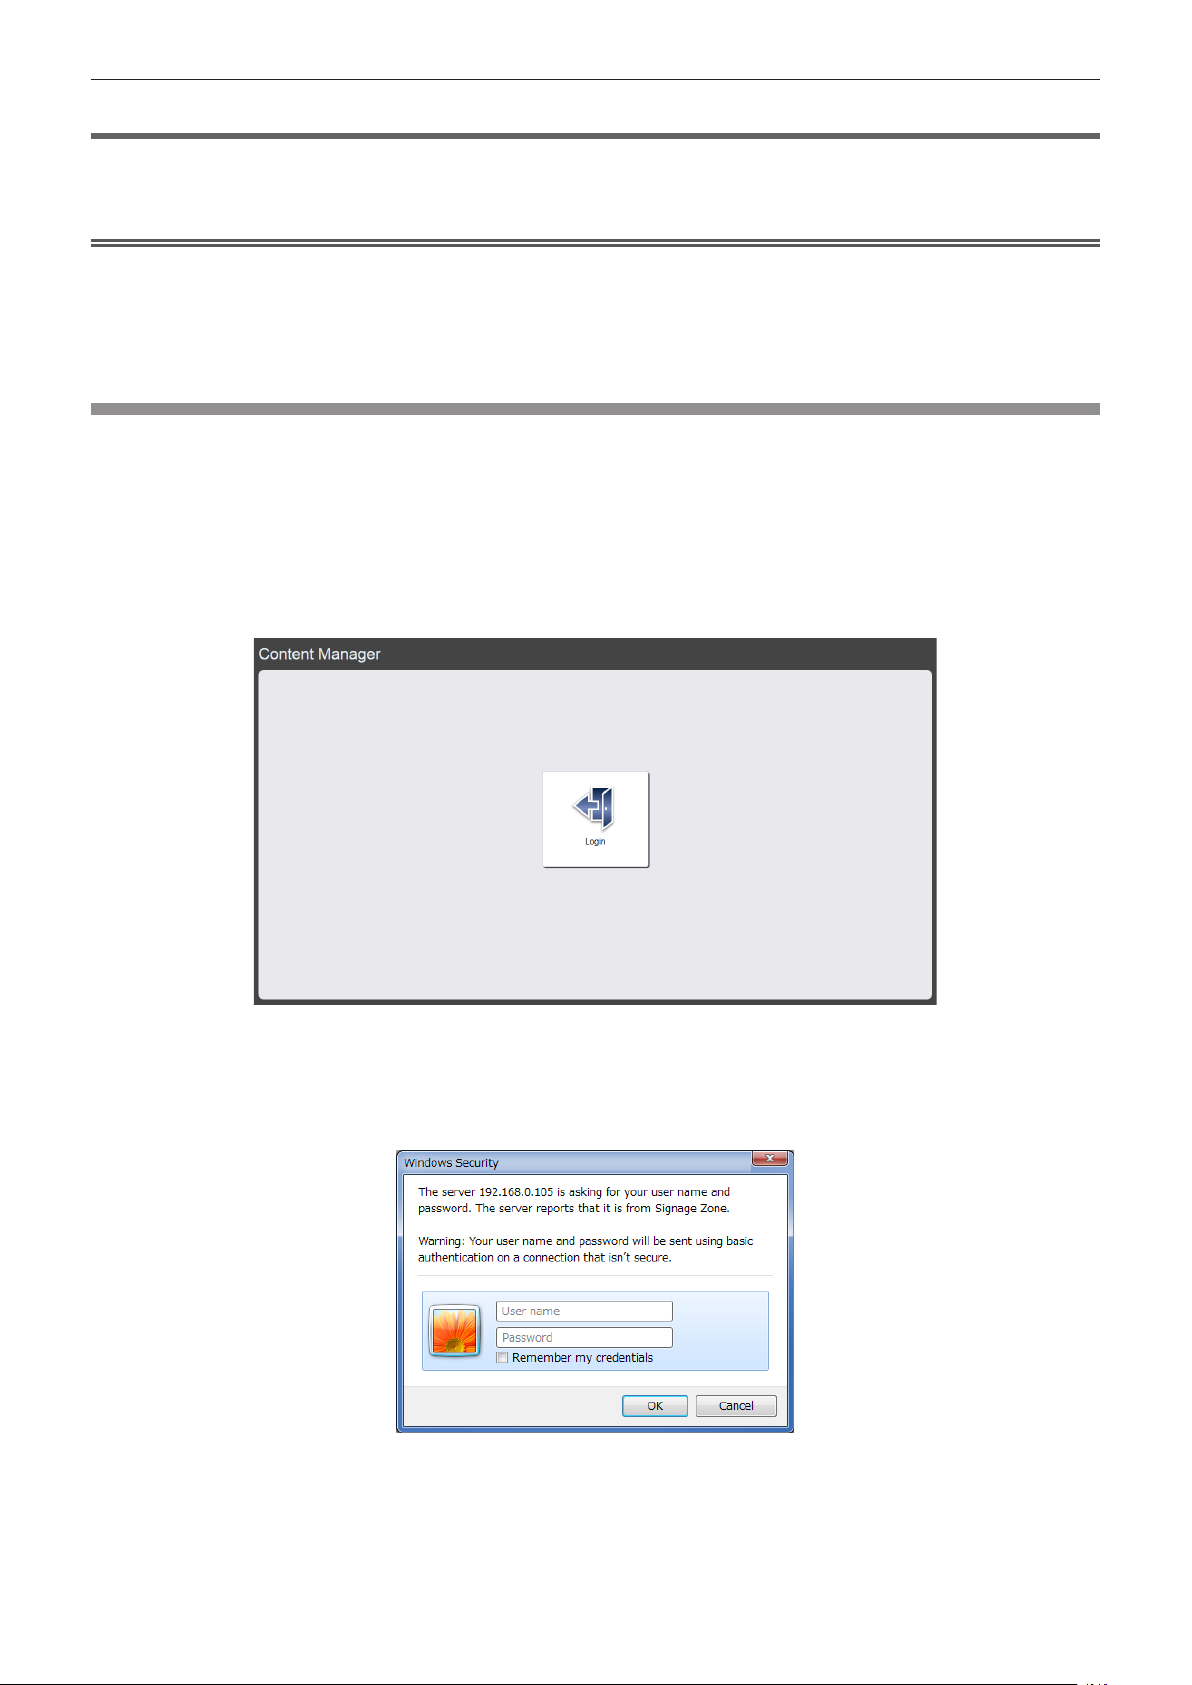
Logging in to the Content Manager
Start up the web browser and log in to the Content Manager.
1
Start up the web browser on the computer.
2
Enter “http://xxx.xxx.xxx.xxx/signage/” in the URL entry field of the web
browser.
f xxx.xxx.xxx.xxx is the IP address set in the projector.
f The login screen is displayed.
3
Click [Login].
4
Enter the user name and the password.
f The factory default setting of the user name is “user1” (user rights)/“admin1” (administrator rights) and the
password is “panasonic” (lower case).
5
Click the [OK] button.
f When logging in with administrator rights, you can use the user name and password set at factory. The
screen of prompting to change password is displayed. Follow the screen to change the password and log in
again with the new password. The password should be 4 to 16 single-byte alphanumeric characters.
- 9 -
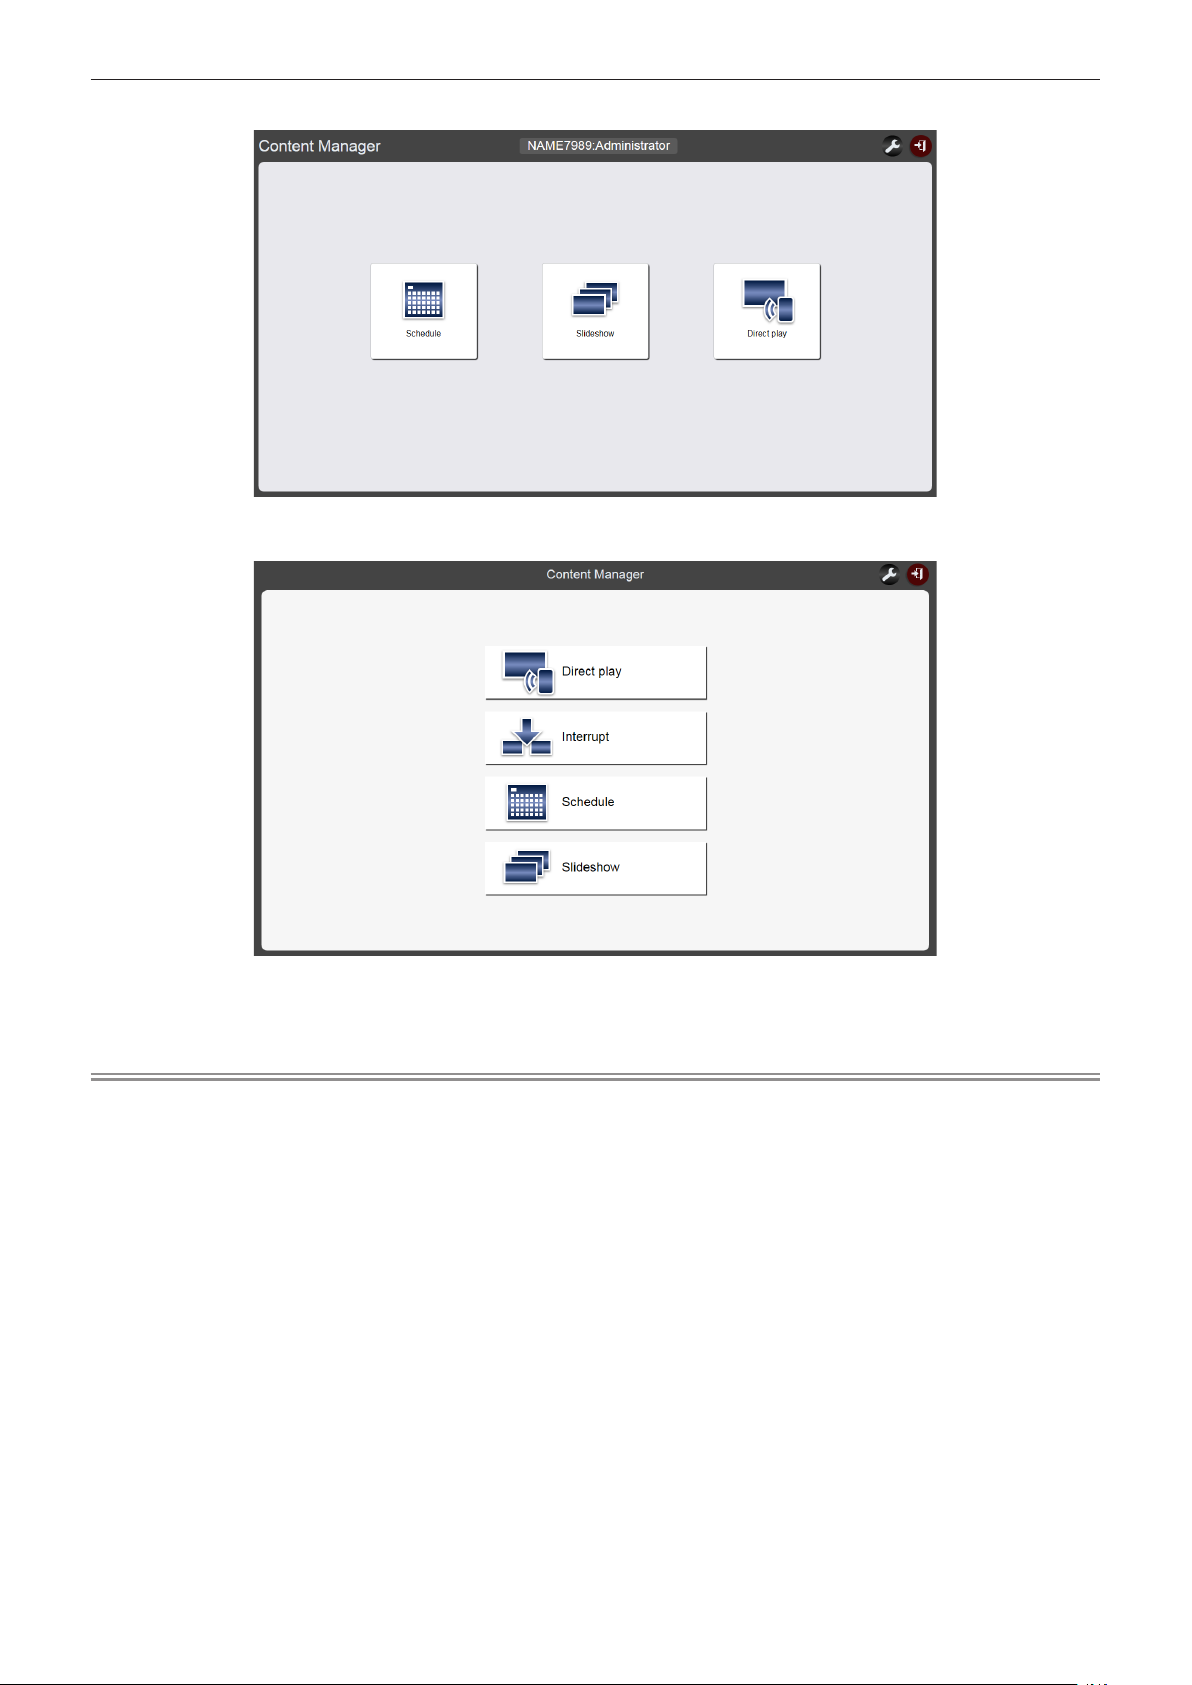
f The top menu screen is displayed.
f When connected from smartphone, the [Direct play] menu/[Interrupt] menu/[Schedule] menu/[Slideshow]
menu are displayed on the top menu screen.
6
Click any of [Schedule] menu/[Slideshow] menu/[Direct play] menu.
f The schedule screen/slideshow screen/multiple direct play screen is displayed.
Note
f Log in with the administrator rights rst and then change the password.
f The user name/password of the Content Manager are managed separately from the user name/password of the web control function.
f One person each can log in with administrator rights and with user rights. Two people cannot log in with the same rights, or more than
three people cannot log in at the same time. When logging with administrator rights from other devices, the previously logged person with
administrator rights is forced to log out.
f If you log in with the administrator rights, you can use all Content Manager functions. If you log in with the user rights, you can check
registered schedules or timetables, and the content of preset slideshow, but cannot register, edit, or play them.
f Access will be locked for few minutes when an incorrect password is entered three times consecutively.
f When no SD card is inserted in the SD card slot, or the projector cannot recognize the SD card, the logout screen is displayed.
f If the Content Manager screen is not displayed, consult your network administrator.
f The Content Manager of the projector can also be started from “Wireless Manager ME6.3” which is image transfer application software
compatible with Windows computers and Mac, Panasonic image transfer application software compatible with iPad/iPhone/iPod touch and
Android terminals, and “Multi Monitoring & Control Software” which is software to monitor and control multiple projectors connected via LAN.
For details of “Wireless Manager ME6.3” and “Multi Monitoring & Control Software”, refer to the respective operating instructions on the
supplied CD-ROM. For the image transfer application software compatible with iPad/iPhone/iPod touch, and Android terminals, refer to the
following URL.
http://panasonic.net/avc/projector/
f Screen illustration of the computer
Descriptions in this manual assume “Windows 7” as the OS and “Internet Explorer 11” as the web browser. Depending on the type of the
OS, web browser or computer you use, the screen size or display may differ from the ones shown in this manual. In addition, the “le
selection screen” in the following operation procedures uses the OS standard functions.
f When using the Content Manager on a tablet, turn its screen to landscape orientation.
- 10 -
Logging out from the Content Manager
Terminate signage setting (schedule/slideshow/multiple direct play) and log out from the Content Manager.
1
Click the [logout] button at the top right of the screen.
f After Logging out from the Content Manager, the login screen is displayed.
2
Click the close button of the web browser to exit.
f To use the Content Manager again, access the projector from the web browser. (“Logging in to the Content
Manager” (x page 9))
Note
f In addition to the top menu screen, you can also log out from schedule screen or slideshow screen.
Changing the login information
Set the user name and password with administrator rights/users rights respectively for logging in to the Content
Manager.
1
Click on the top menu screen.
f The login setting screen is displayed.
2
Enter the current user name and password.
3
Enter the desired new user name and password.
f The password should be 4 to 16 single-byte alphanumeric characters.
- 11 -

4
Enter the desired new password again.
f Clicking the [Undo] button will clear the already entered information.
5
Click the [Save] button.
6
When the confirmation screen is displayed, click the [OK] button.
f The set contents are registered in the SD card.
- 12 -

Basic ow of the schedule operation
Content Manager requires the registration of the content to be used in advance for performing the signage
playback. The registered content is used in the timetable that determines the playback order for the day. Once the
timetable is created, the data and schedule necessary for signage playback on the device can be completed by
setting the timetable to the date to perform signage playback using the calendar. The schedule can be registered
in the SD card.
The basic operation procedure from logging into the Content Manager to operating the schedule is described
here. For details of each operation method, refer to “Operation method of the schedule” (x page 33).
Logging in to the Content Manager
Start up the web browser and log in to the Content Manager.
1
Start up the web browser on the computer.
2
Enter “http://xxx.xxx.xxx.xxx/signage/” in the URL entry field of the web
browser.
f xxx.xxx.xxx.xxx is the IP address set in the projector.
f The login screen is displayed.
3
Click [Login].
4
Enter the user name and the password.
f The factory default setting of the user name is “user1” (user rights)/“admin1” (administrator rights) and the
password is “panasonic” (lower case).
5
Click the [OK] button.
f When logging in with administrator rights, you can use the user name and password set at factory. The
screen of prompting to change password is displayed. Follow the screen to change the password and log in
again with the new password.
The password should be 4 to 16 single-byte alphanumeric characters.
f The top menu screen is displayed.
Next is the procedure for “Registering the content”.
- 13 -
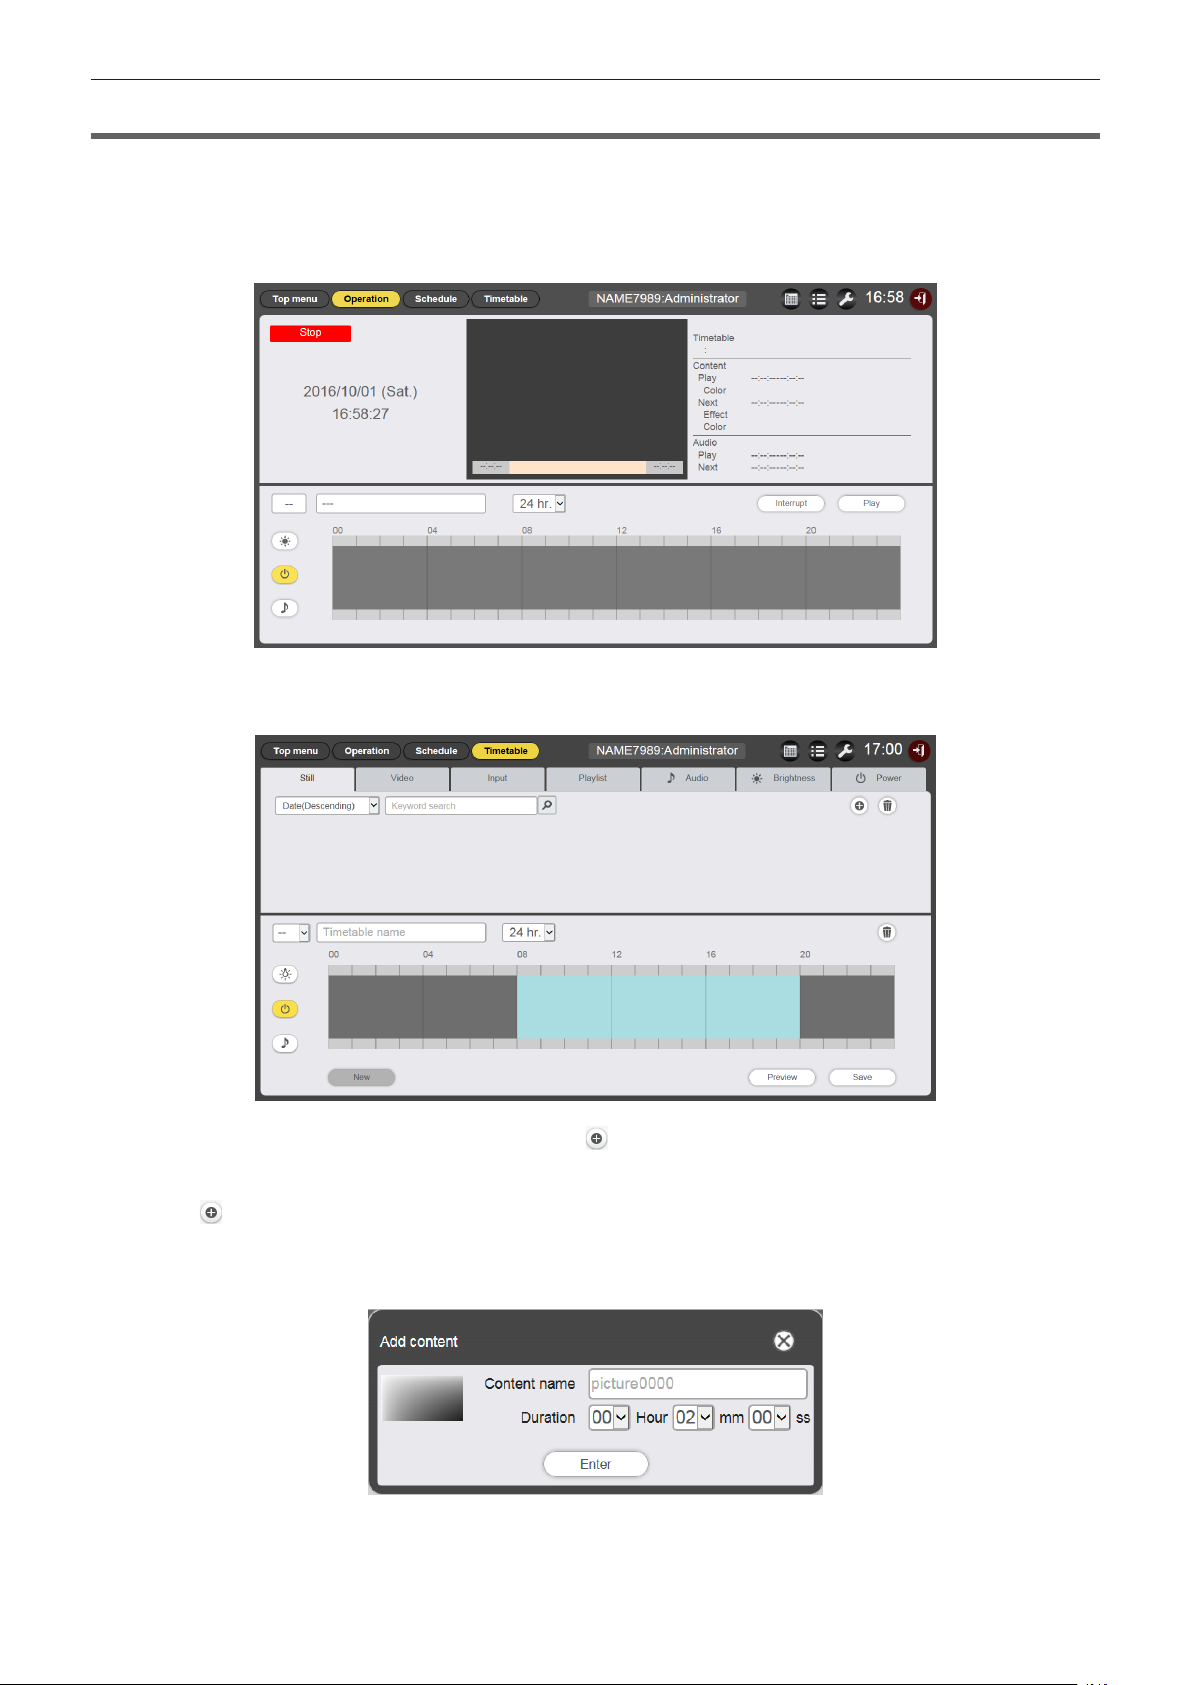
Registering the content
To create a schedule with the Content Manager, rst register still image/movie/music le as a content. The still
image content registration is used as an example here.
1
Click the [Schedule] menu on the top menu screen.
f The schedule screen is displayed.
2
Click the [Timetable] button.
f The [Timetable] page is displayed.
3
When the [Still] tab is selected, click at the top right of the screen.
f The [Add content] screen is displayed.
4
Click on the [Add content] screen.
f The le selection screen is displayed.
5
Select the still image file to register and click the [Open] button.
- 14 -
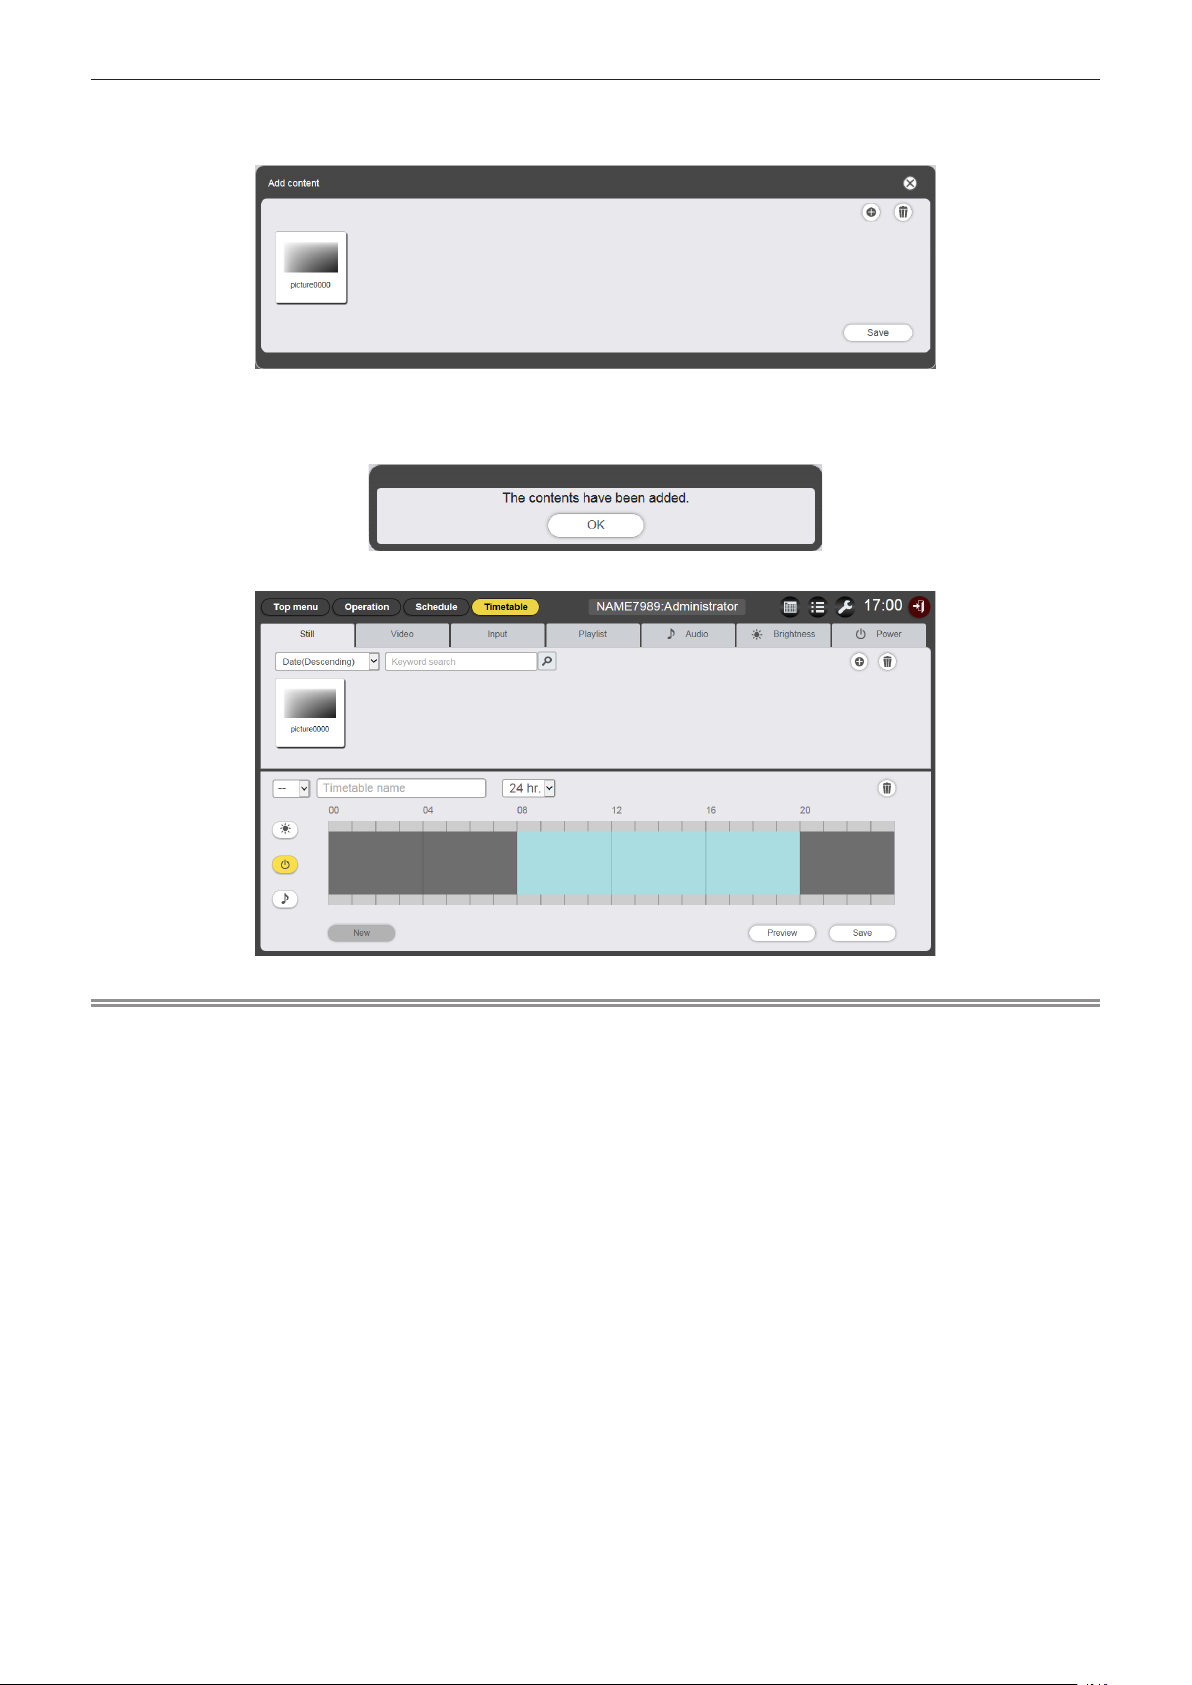
6
Enter the [Content name] and [Duration], and click the [Enter] button.
f The content is registered in the [Add content] screen.
7
When the addition of the content is completed, click the [Save] button.
8
When the confirmation screen is displayed, click the [OK] button.
f The selected still image le is registered in the SD card as a content.
Note
f To register a movie le as a content, select the [Video] tab in Step 3, and to register a music le as a content, select the [Audio] tab in Step
3.
f It is convenient to create a playlist when multiple contents are to be used repeatedly for multiple times in a specied order. For details on
creating the playlist, refer to “Creating a playlist” (x page 47).
Next is the procedure for “Creating a timetable”.
- 15 -
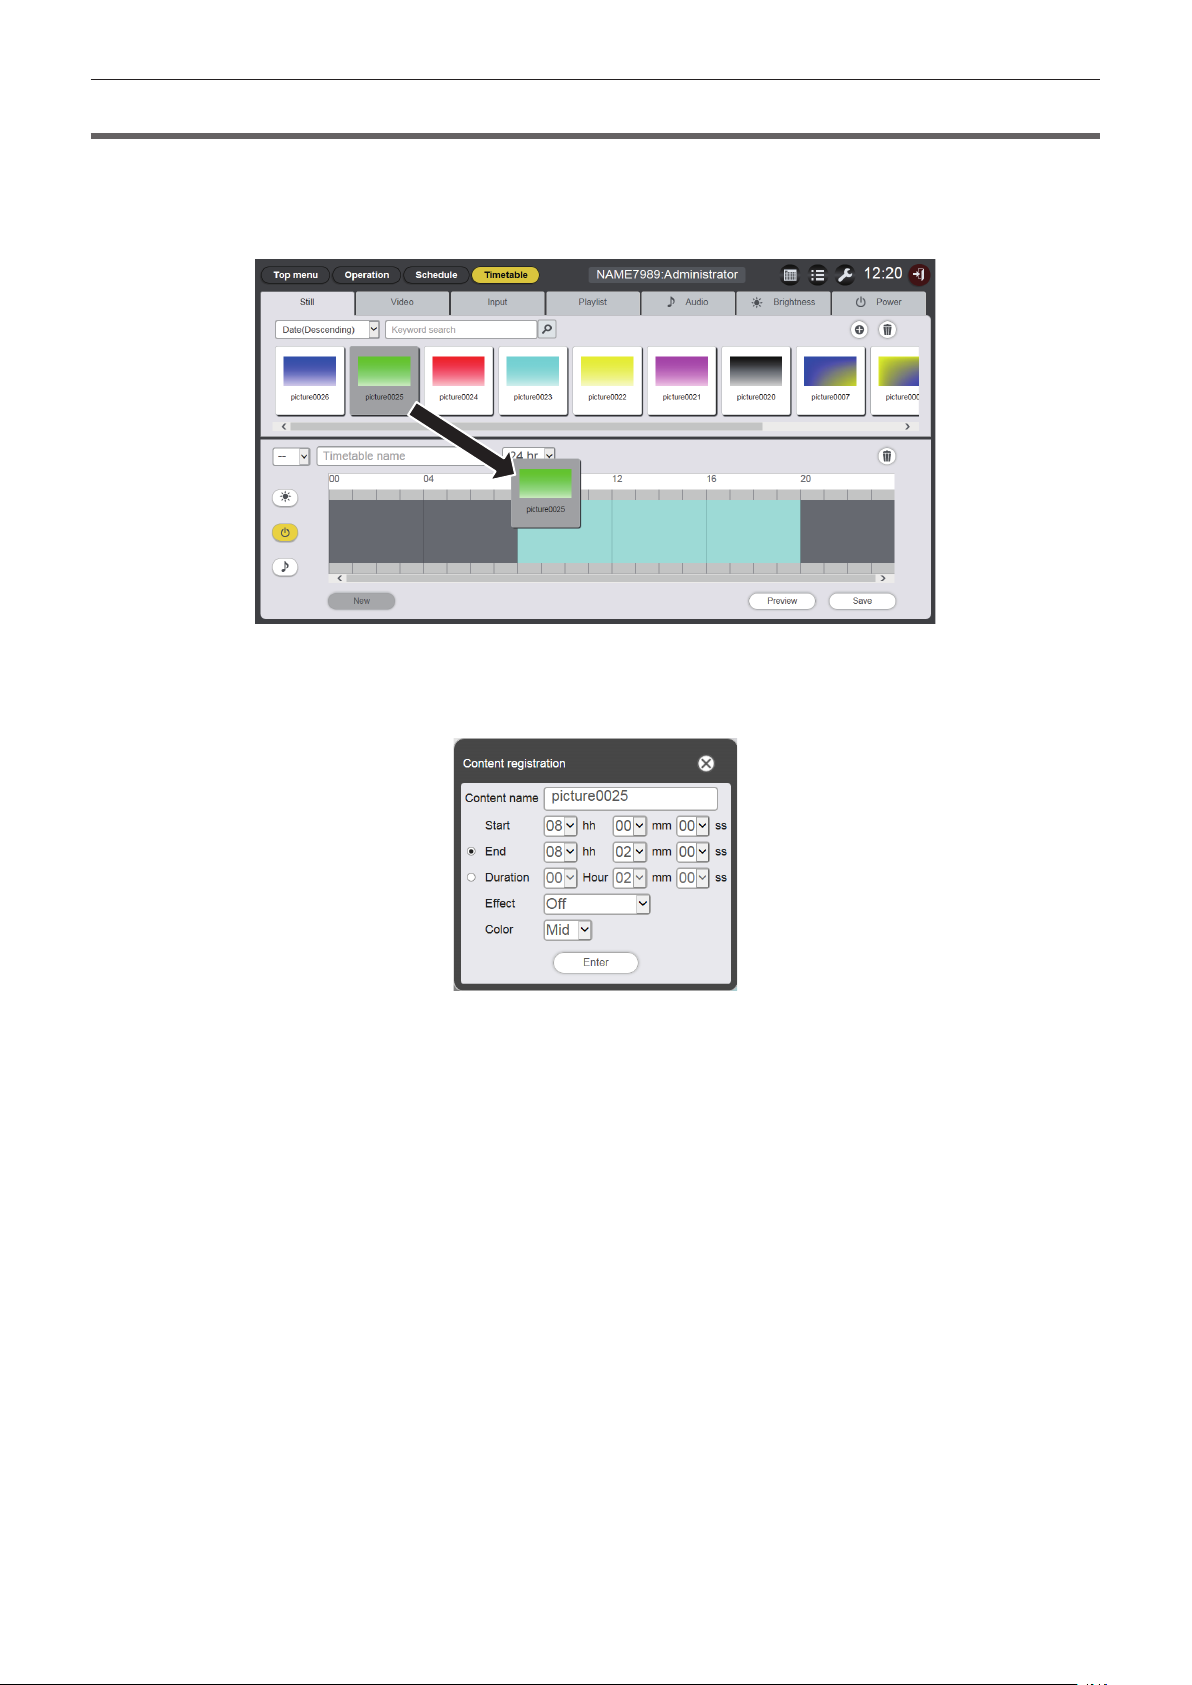
Creating a timetable
Set the content details, playback time, and playback order to be played in one day as a timetable.
1
Register the content in the timetable.
f Drag and drop the registered still image content to the timetable at the bottom of the screen.
f The [Content registration] screen is displayed.
2
Perform various settings, and click the [Enter] button.
f Enter [Start], [End] or [Duration] on the [Content registration] screen.
3
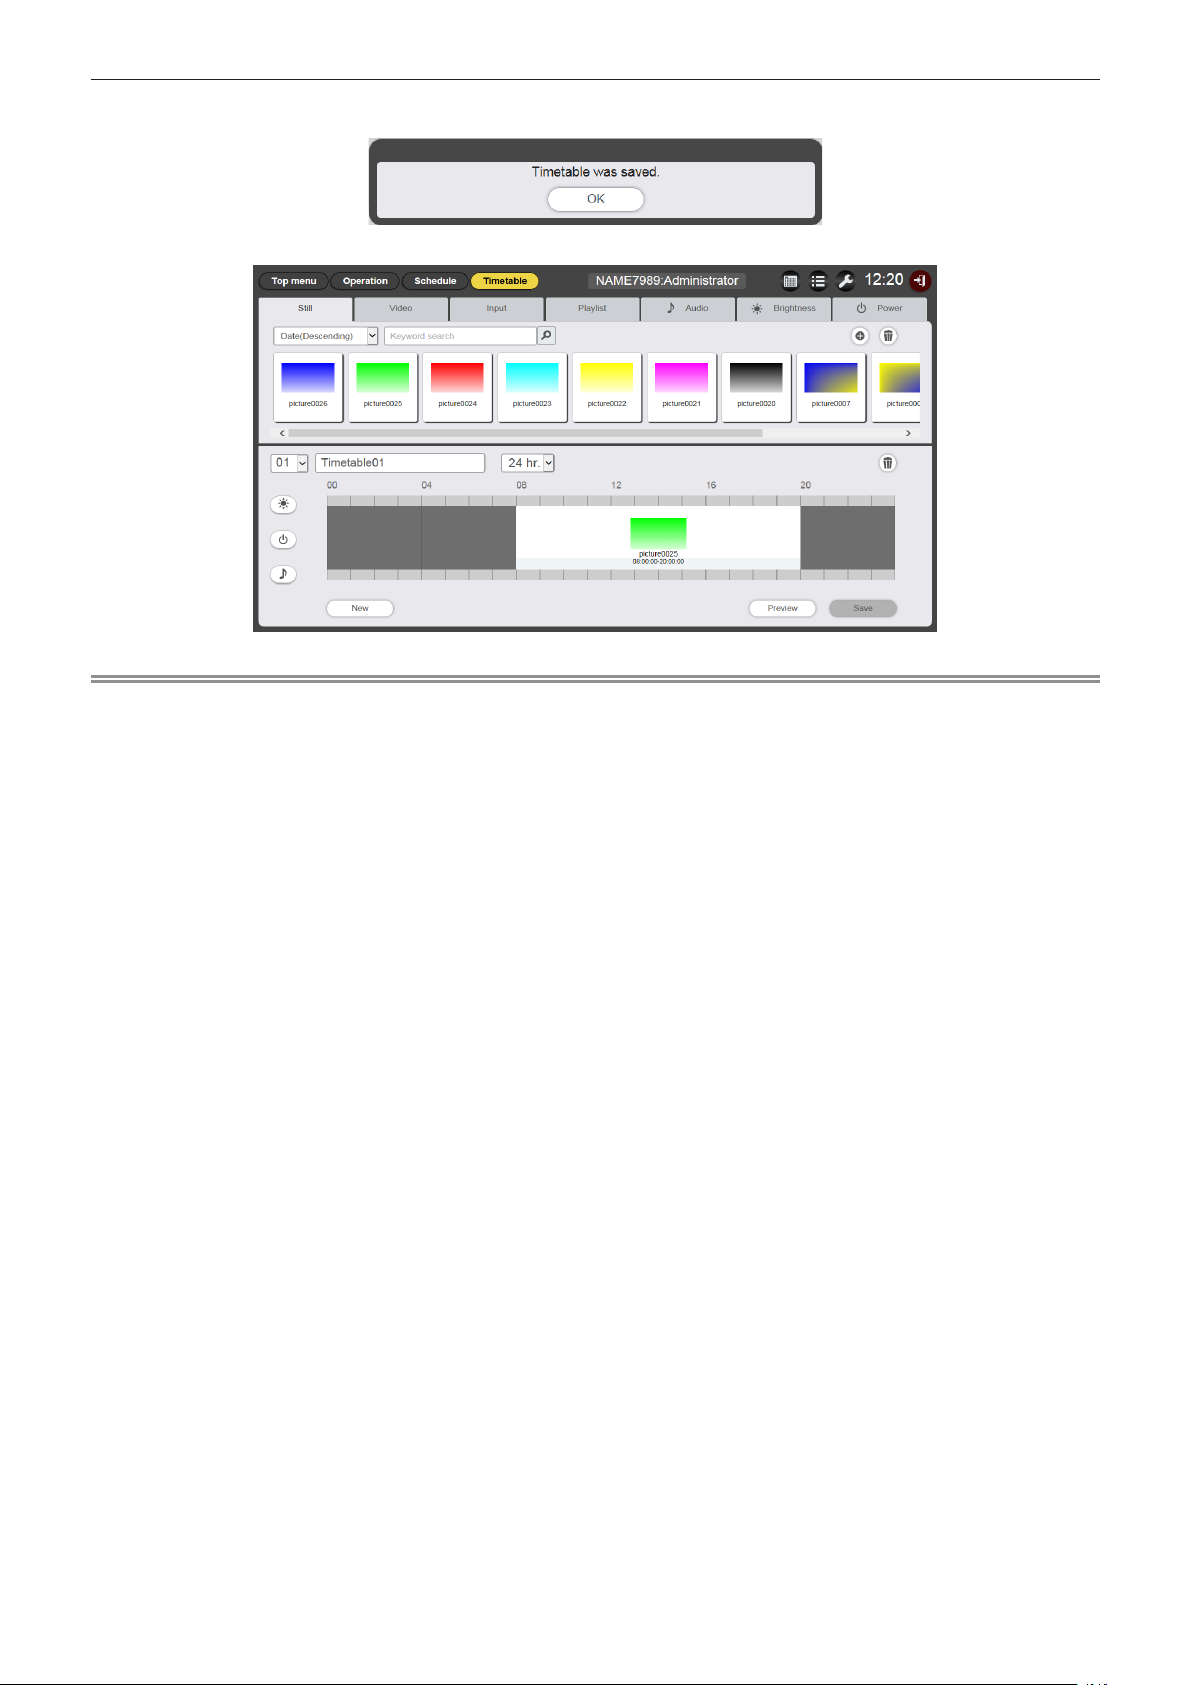
Save the timetable.
f Enter the timetable name in the [Timetable name] eld and click the [Save] button.
- 16 -
4
When the confirmation screen is displayed, click the [OK] button.
f The created timetable is registered in the SD card.
Note
f To register contents other than still image, select the desired content tab before performing step 1.
Next is the procedure for “Registering timetable to the schedule”.
- 17 -
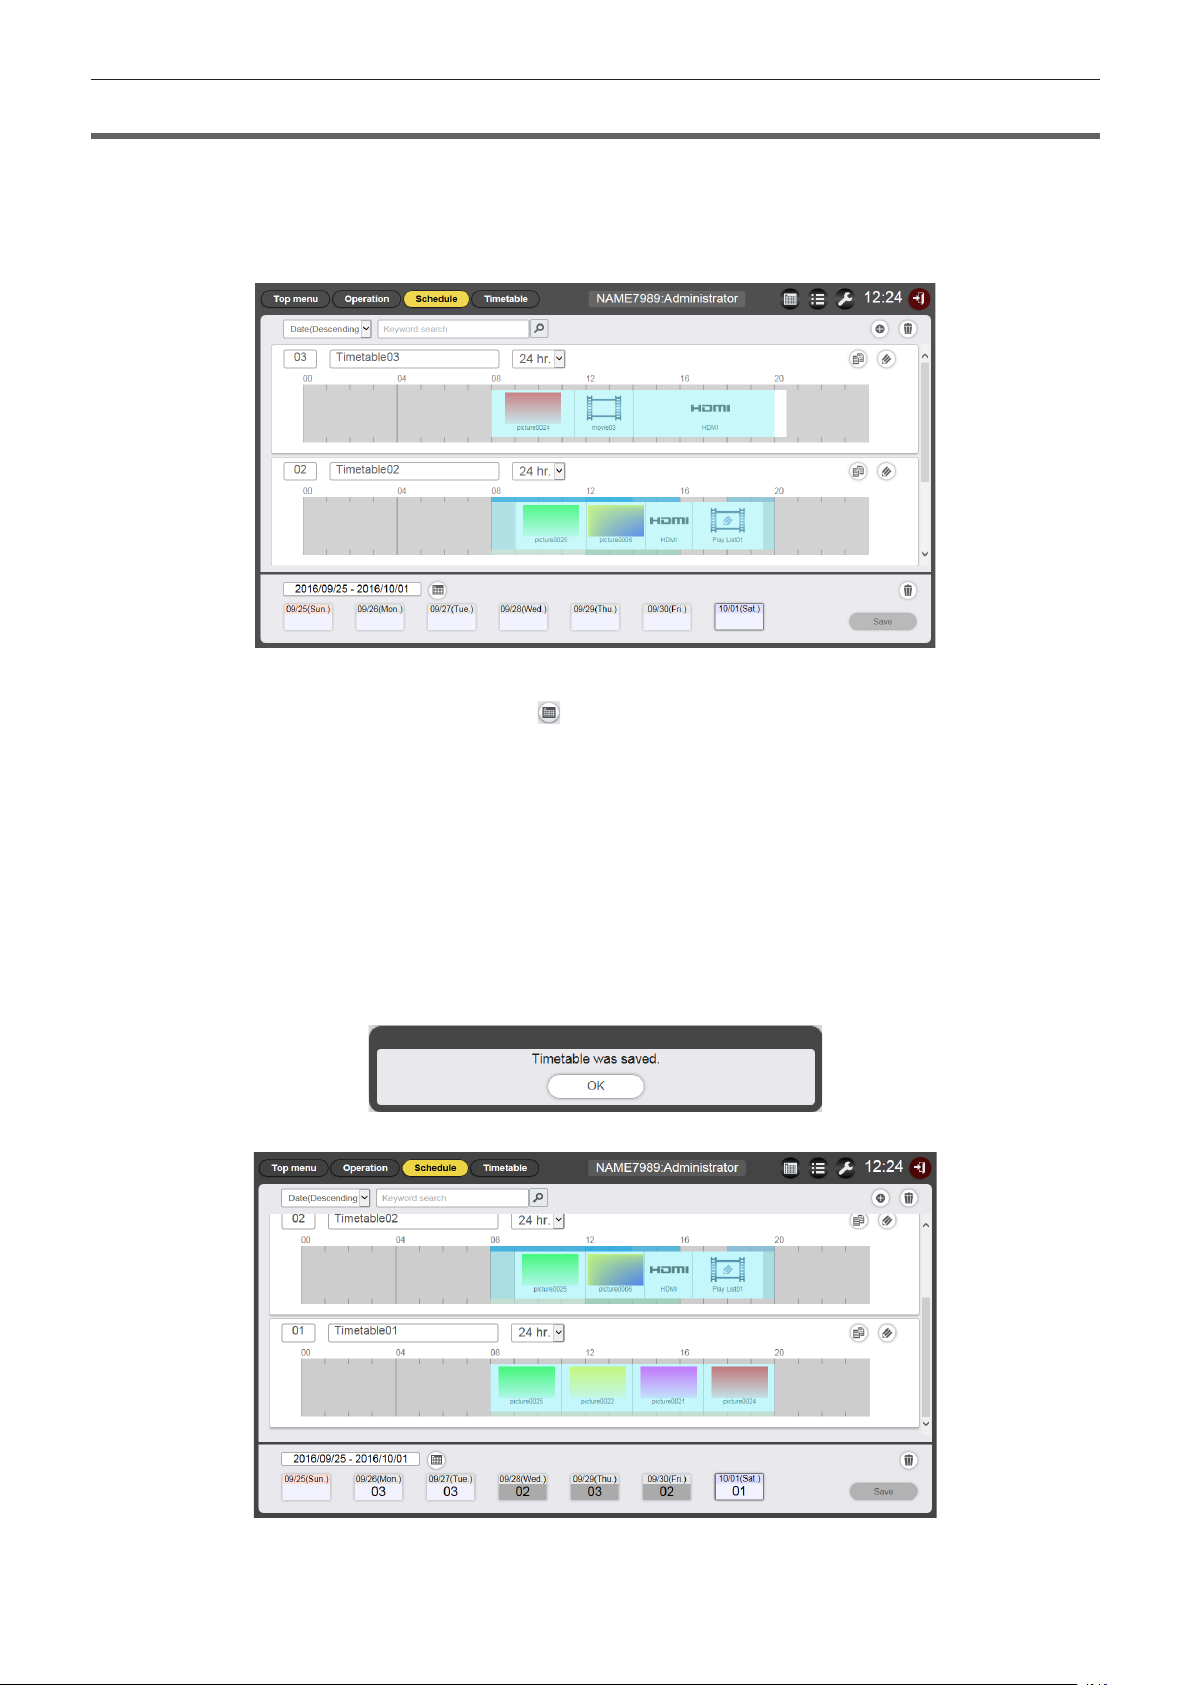
Registering timetable to the schedule
Set the created timetable to a specic day using the calendar.
1
Click the [Schedule] button at the schedule screen
f The [Schedule] page is displayed.
The picture below is an example of setting the schedule for the rst time.
2
Select the day or the day of week to register the timetable.
f The calendar will be displayed after clicking . You can select the date by clicking the registration day of
the timetable on the schedule.
f The timetable, which species the date for daily varying playback content or species the day of week for
the same content repeatedly played each week, can be registered to the schedule. For details, refer to
“Registering a schedule” (x page 66).
3
Register the timetable in the schedule.
f Select the timetable to register to the schedule on the specied day or the day of week. For details, refer to
“Registering a schedule” (x page 66).
4
When the timetable registration is completed, click the [Save] button.
5
When the confirmation screen is displayed, click the [OK] button.
f The schedule is registered in the SD card.
- 18 -

Note
f From now to the twelve weeks ahead, the daily varying timetables can be set in schedule. Besides, the same content for each week can
also be set.
Next is the procedure for “Starting the playback of schedule”.
- 19 -
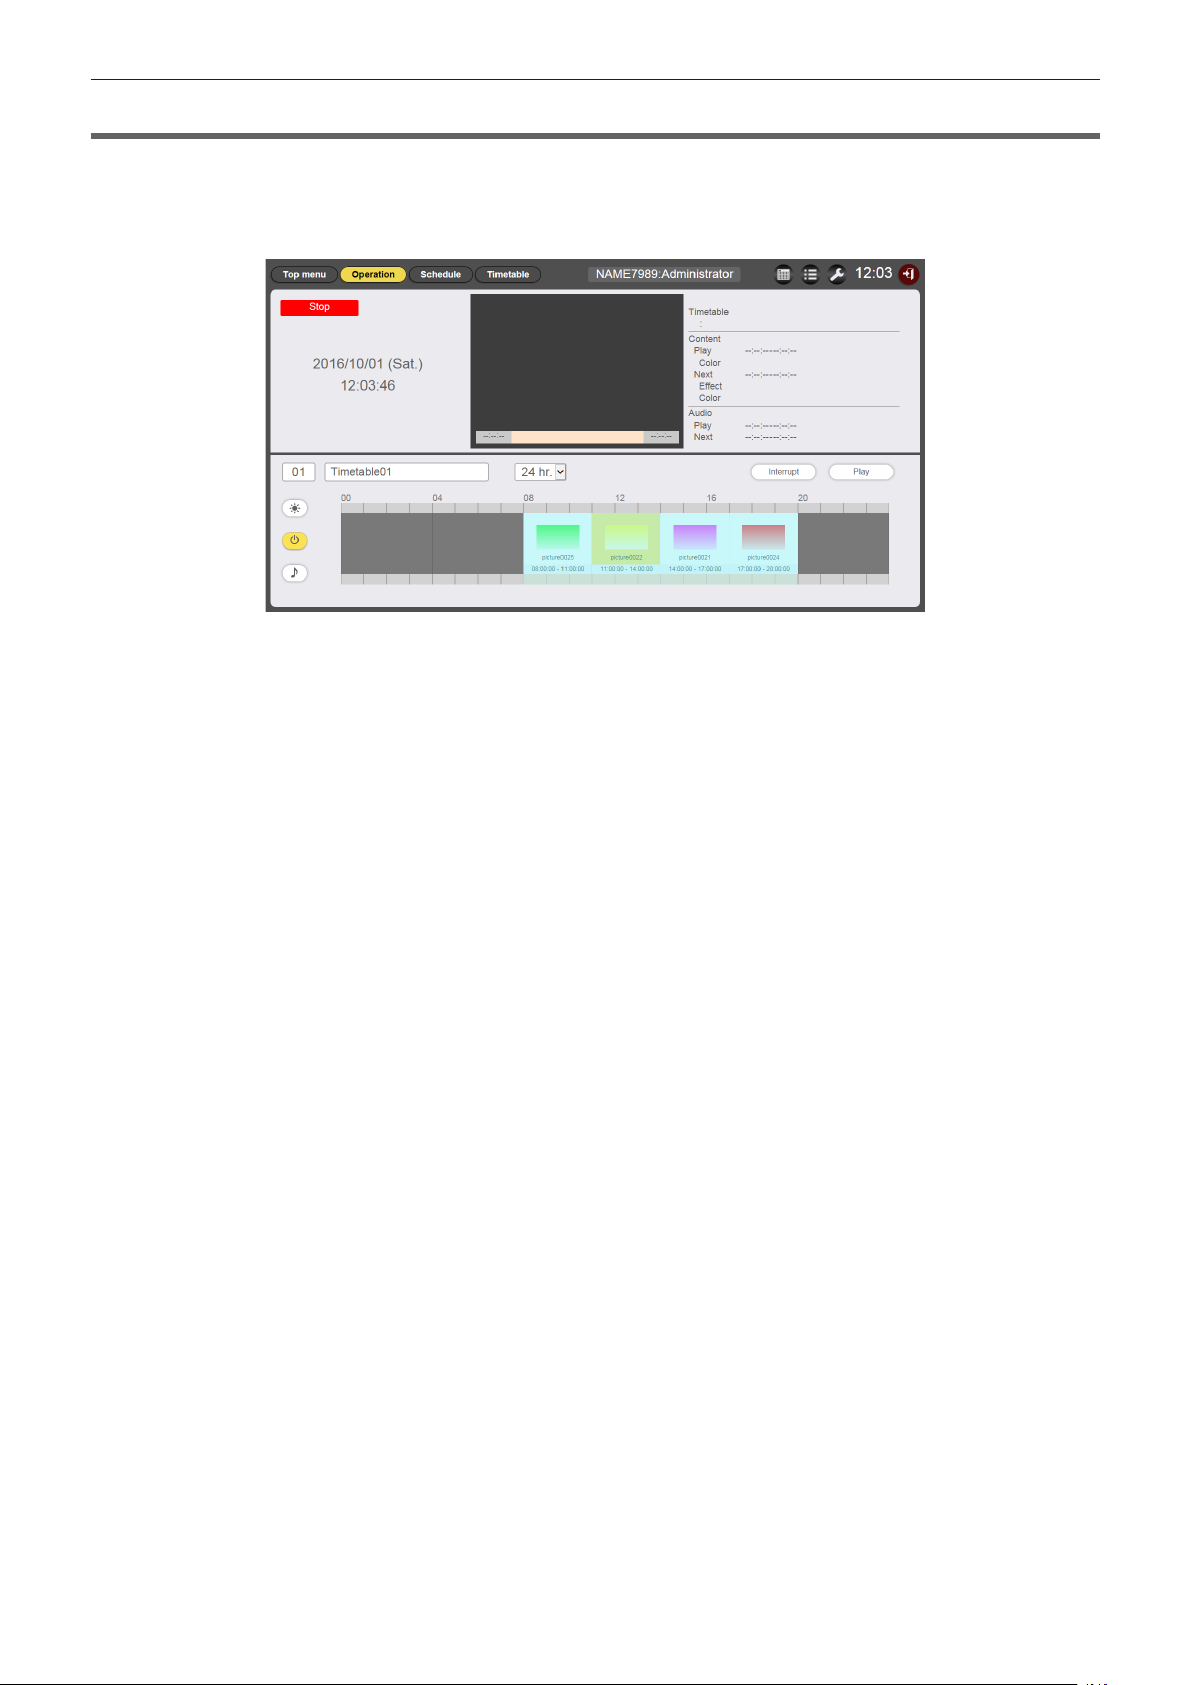
Starting the playback of schedule
Perform the playback of a schedule on the [Operation] page.
1
Click the [Operation] button on the schedule screen.
f The [Operation] page is displayed.
2
Click the [Play] button.
f The input of the projector automatically switches to signage, and playback starts according to the registered
schedule.
f The [Play] button changes to the [Stop] button.
f To stop the playback of the schedule, click the [Stop] button.
- 20 -

Basic ow of the slideshow
The basic operation steps from logging in the Content Manager to playing the slideshow is describe here. For
details of various operation methods, refer to the “Operation method of the slideshow” (x page 78).
Logging in to the Content Manager
Start up the web browser and log in to the Content Manager.
1
Start up the web browser on the computer.
2
Enter “http://xxx.xxx.xxx.xxx/signage/” at the URL entry field of the web
browser.
f xxx.xxx.xxx.xxx is the IP address set for the projector.
f The login screen is displayed.
3
Click [Login].
4
Enter the user name and the password.
f The factory default setting of the user name is “user1” (user rights)/“admin1” (administrator rights) and the
password is “panasonic” (lower case).
5
Click the [OK] button.
f When logging in with administrator rights, you can use the user name and password set at factory. The
screen of prompting to change password is displayed. Follow the screen to change the password and then
log in again with the new password.
The password should be 4 to 16 single-byte alphanumeric characters.
f The top menu screen is displayed.
- 21 -

Registering the content to use in slideshow
To create a slideshow in Content Manager, rst register the still image/movie as content. The still image content
registration is used as an example here.
1
Click the [Slideshow] menu on the top menu screen.
f The slideshow screen is displayed.
2
When the [Still] tab is selected, click at the top right of the screen.
f The [Add content] screen is displayed.
3
Click in the [Add content] screen.
f The le selection screen is displayed.
4
Select the still image file to register, and click the [Open] button.
5
Enter the [Content name] and click the [Enter] button.
f The still image le is registered in the [Add content] screen.
6
Click the [Save] button when the content addition is completed.
- 22 -
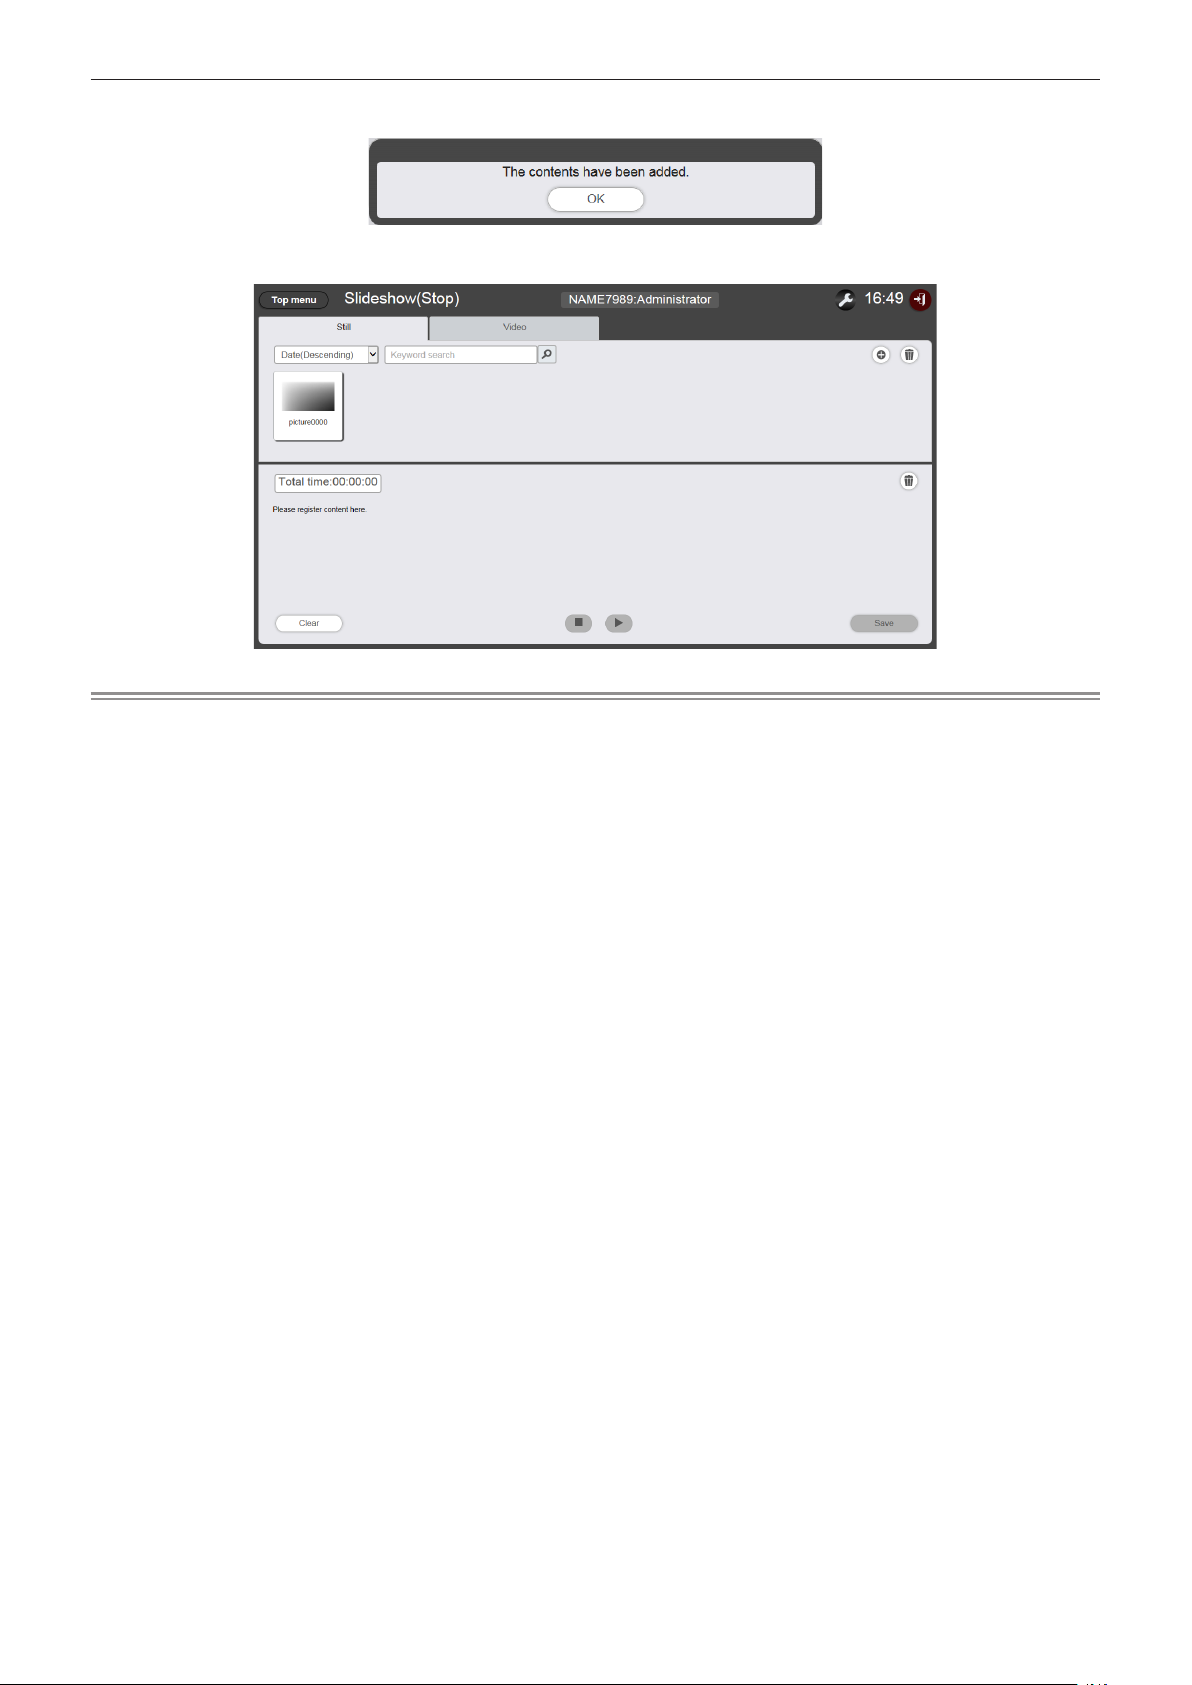
7
When the confirmation screen is displayed, click the [OK] button.
f The selected still image le is registered as content to the SD card.
Note
f To register a movie le as a content, select the [Video] tab in Step 2.
Next is the procedure for “Creating a slideshow”.
- 23 -
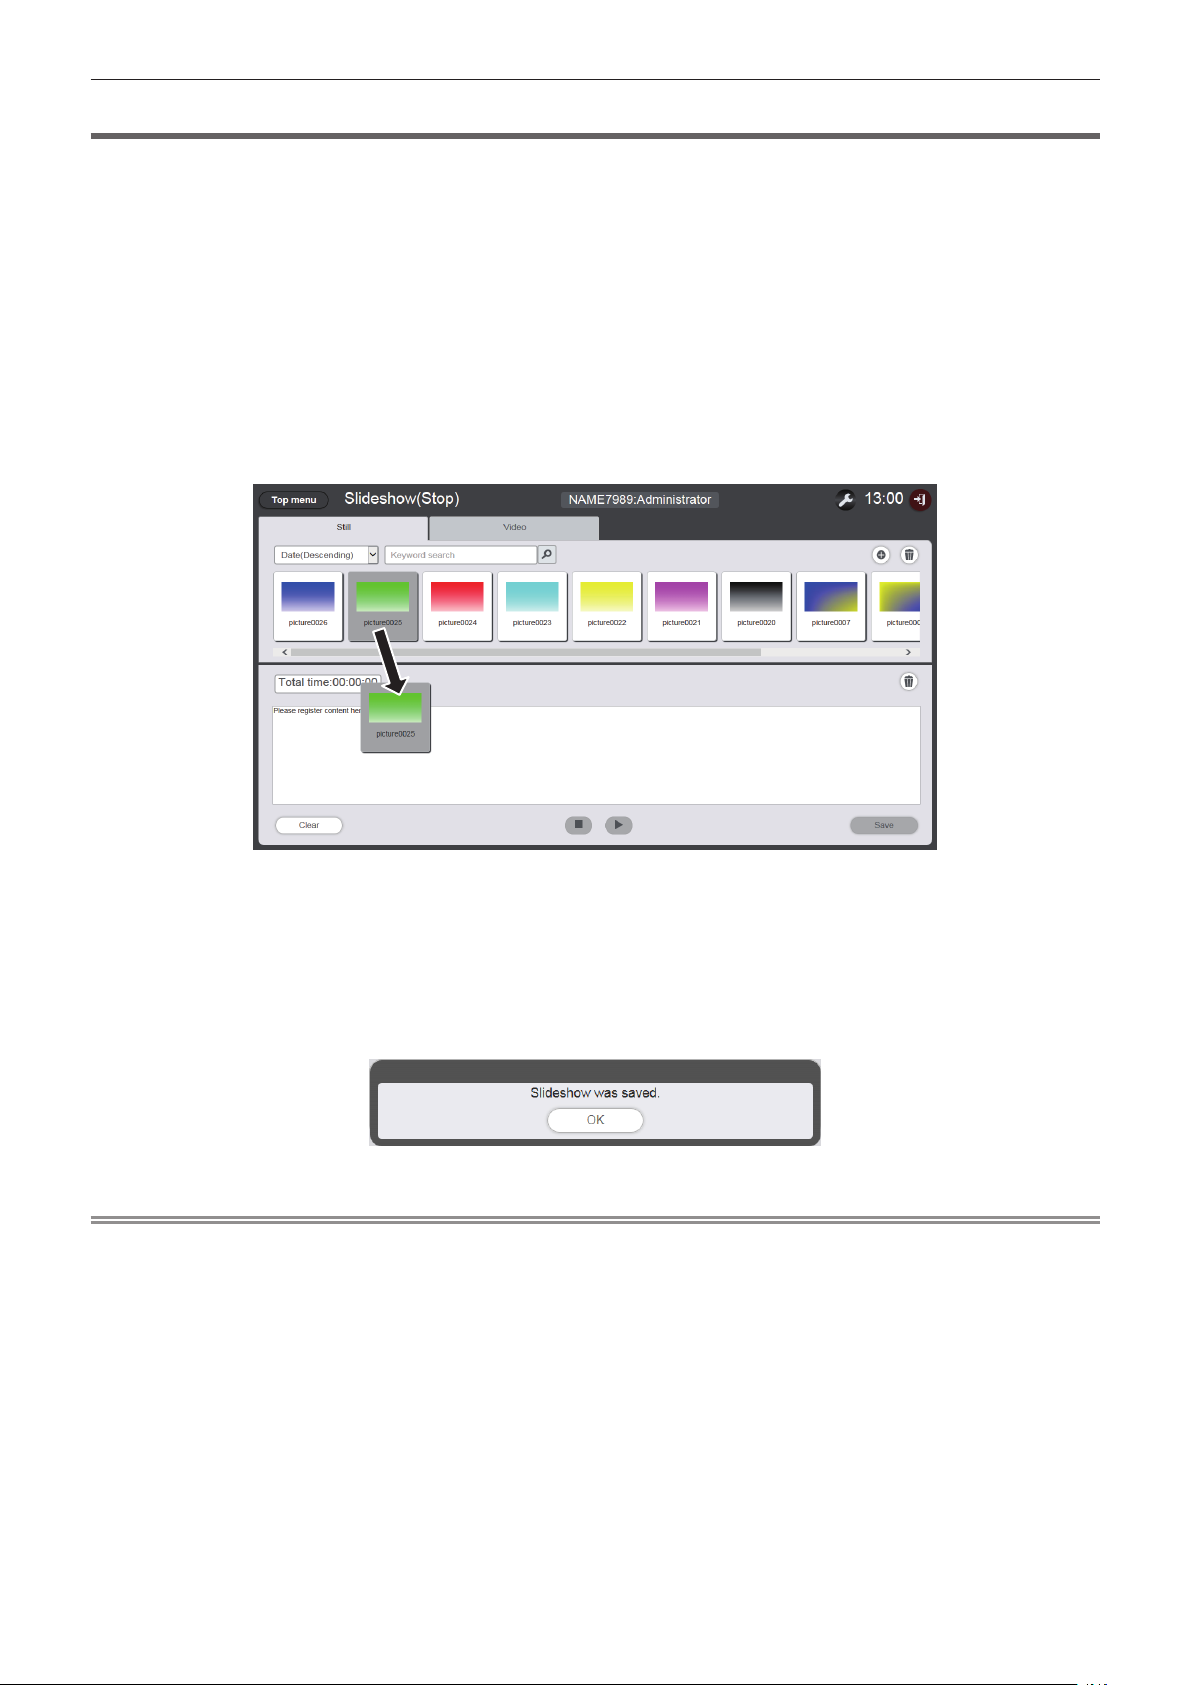
Creating a slideshow
Register the content in slideshow.
1
Click the tab of content to register in slideshow from the content selection tab
( [Still] or [Video]).
f The content list screen switches between still images and movies when clicked.
2
Register the content to content list.
f To register still image/movie content in slideshow, it is required to register the still image/movie les into
the content list. For details about the registration steps, see “Adding content to be used in slideshow”
(x page 81).
3
Register the content to slideshow.
f Drag and drop the registered still image on the slideshow to the bottom of the screen.
f Multiple contents cannot be registered at a time.
f When registering the content to a slideshow, the content inserting location cannot be specied. After
registering to the slideshow, operate according to “Changing the playback order of the content registered in
slideshow” (x page 84).
4
Click the [Save] button.
5
When the confirmation screen is displayed, click the [OK] button.
f The setting of the slideshow is registered in the SD card.
Note
f Only one slideshow setting can be registered in one SD card.
f Up to 100 contents (still image/movie les) can be registered in a slideshow.
f You cannot register contents other than still image/movie.
Next is the procedure for “Starting a slideshow”.
- 24 -
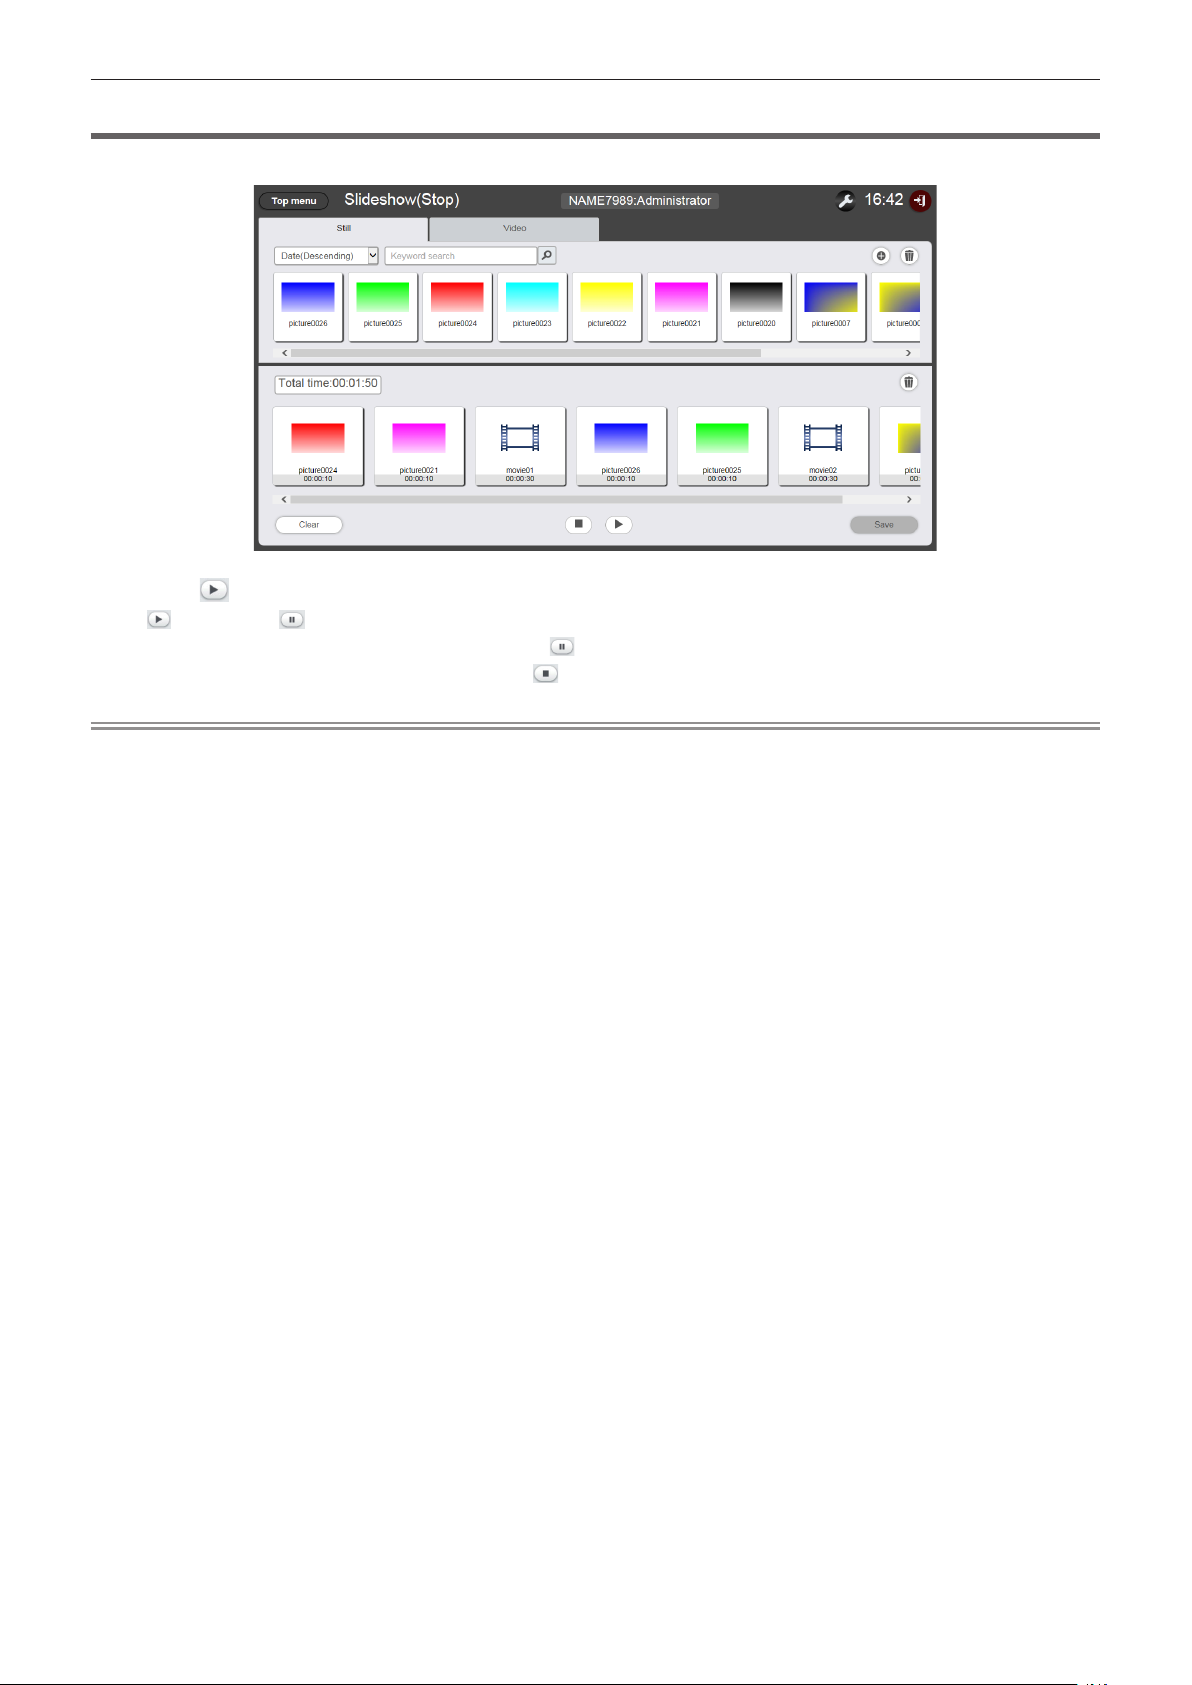
Starting a slideshow
Start the playback of a slideshow.
1
Click .
f changes to .
f To pause the playback of the slideshow, click .
f To stop the playback of the slideshow, click .
Note
f When you pause playing still image content, the playback time of the paused content is reset when it is resumed and played from the
beginning. In the case of movie content, the playback resumes from the paused part.
f If the content that rst registered to the slideshow is still image content, the initial play time of that still image content shortens compared
with the set time.
- 25 -

Basic ow of the multiple direct play
The basic operation procedure from logging in to the Content Manager to directly playing the playlist on multiple
projectors is described here.
It is necessary to prepare the direct playlist in advance on client computers other than the smartphones. Playlist
is shared by all schedules. If the playlist used on the timetable of the schedule is edited, note that the modication
will be reected on the schedule.
The multiple direct play function can be used with the supplied remote control or the smartphone. The basic
operation ow of using remote control is described here.
For details of the operation methods, see “Operation method of the multiple direct play” (x page 87).
To perform direct playback on multiple projectors, it is necessary to refer to the shared playlist in all SD cards. For
details, refer to “Delivering the registered playlist” (x page 31).
Logging in to the Content Manager
Start up the web browser and log in to the Content Manager.
1
Starting up the web browser on computers other than the smartphones.
2
Enter “http://xxx.xxx.xxx.xxx/signage/” in the URL entry field of the web
browser.
f “xxx.xxx.xxx.xxx” is the IP address set in the projector.
f The login screen is displayed.
3
Click [Login].
4
Enter the user name and the password.
f The factory default setting of the user name is “user1” (user rights)/“admin1” (administrator rights) and the
password is “panasonic” (lower case).
5
Click the [OK] button.
f If you log in with administrator rights, after logging in using the user name and password set at factory, the
screen of prompting to change password is displayed. Follow the screen to change the password and log in
again with the new password.
The password should be 4 to 16 single-byte alphanumeric characters.
f The top menu screen is displayed
Next is the procedure for “Registering the content used for direct playback”.
- 26 -
Registering the content used for direct playback
To create a playlist for direct play in Content Manager, rst register the image content (still image/movie). The still
image content registration is used as an example here.
1
Click the [Direct play] menu on the top menu screen.
f The [Remote control ID assignment] screen is displayed.
2
Click .
f The [Playlist edit] screen is displayed.
3
When the [Still] tab is selected, click at the top right of the screen.
f The [Add content] screen is displayed.
4
Click on the [Add content] screen
f The le selection screen is displayed.
5
Select the registered still image file and click the [Open] button.
- 27 -
6
Enter the [Content name] and [Duration], and click the [Enter] button.
f The content is registered in the [Add content] screen.
f To continue adding content, click on the [Add content] screen and register the content.
7
When the content addition is completed, click the [Save] button.
8
When the confirmation screen is displayed, Click the [OK] button.
f The selected still image le is registered in the SD card.
Note
f To register the movie le as content, select the [Video] tab in step 3.
Next is the procedure for “Creating a playlist for direct playback”.
- 28 -
Creating a playlist for direct playback
1
Register the content to playlist in [Playlist edit] screen.
f Drag and drop the registered still image content to the playlist at the bottom of the screen.
2
When various settings are completed, click the [Enter] button.
f Set the [Duration] and [Effect] in [Add content] screen, and click the [Enter] button.
3
Enter the playlist name and click the [Save] button.
4
When the confirmation screen is displayed, click the [OK] button.
f The created playlist is registered in the SD card.
Next is the procedure for “Assigning a playlist to remote control ID”.
- 29 -
Assigning a playlist to remote control ID
1
Assign a playlist to remote control ID in [Remote control assignment] screen.
f Drag and drop the created playlist ID to the remote control ID assignment list at the bottom of the screen.
2
When the remote control ID assignment is completed, click the [Save] button.
3
When the confirmation screen is displayed, click the [OK] button.
f The remote control ID is registered in the SD card.
f The assigned playlist ID is displayed in the remote control ID assignment list.
Next is the procedure for “Delivering the registered playlist”.
- 30 -
 Loading...