


LTIP/TY-LA1000
REPLACEMENT LAMP FOR PANASONIC LCD REAR PROJECTION TELEVISION
CAUTION:
.
Do not attempt to remove the lamp immediately after use; doing so can cause serious burns. Prior to removing lamp, switch off the
power supply to the television and wait approximately 60 minutes or more to allow for complete lamp cooling.
.
Avoid touching the glass portion(s) of the lamp with bare hands; fingerprints, dirt and dust may cause early lamp failure and/or
image obscurity. It is recommended that gloves be worn when replacing the lamp.
.
When transporting the replacement lamp, use the box that is provided to avoid breakage.
WARNING:
.
To avoid overheating and/or fire, ensure that the replacement lamp is mounted securely.
.
The lamp contains mercury. Dispose of it in accordance with local environmental regulations. For disposal or recycling
information, contact your local authorities or see www.lamprecycle.org.
R
EPLACING THELAMP
MODELS PT-50LC13/PT-60LC13/PT-50LCX63/PT-60LCX63/PT-43LCX64/
PT-50LCX64/PT-60LCX64/PT-43LC14/PT-50LC14/PT-60LC14
®
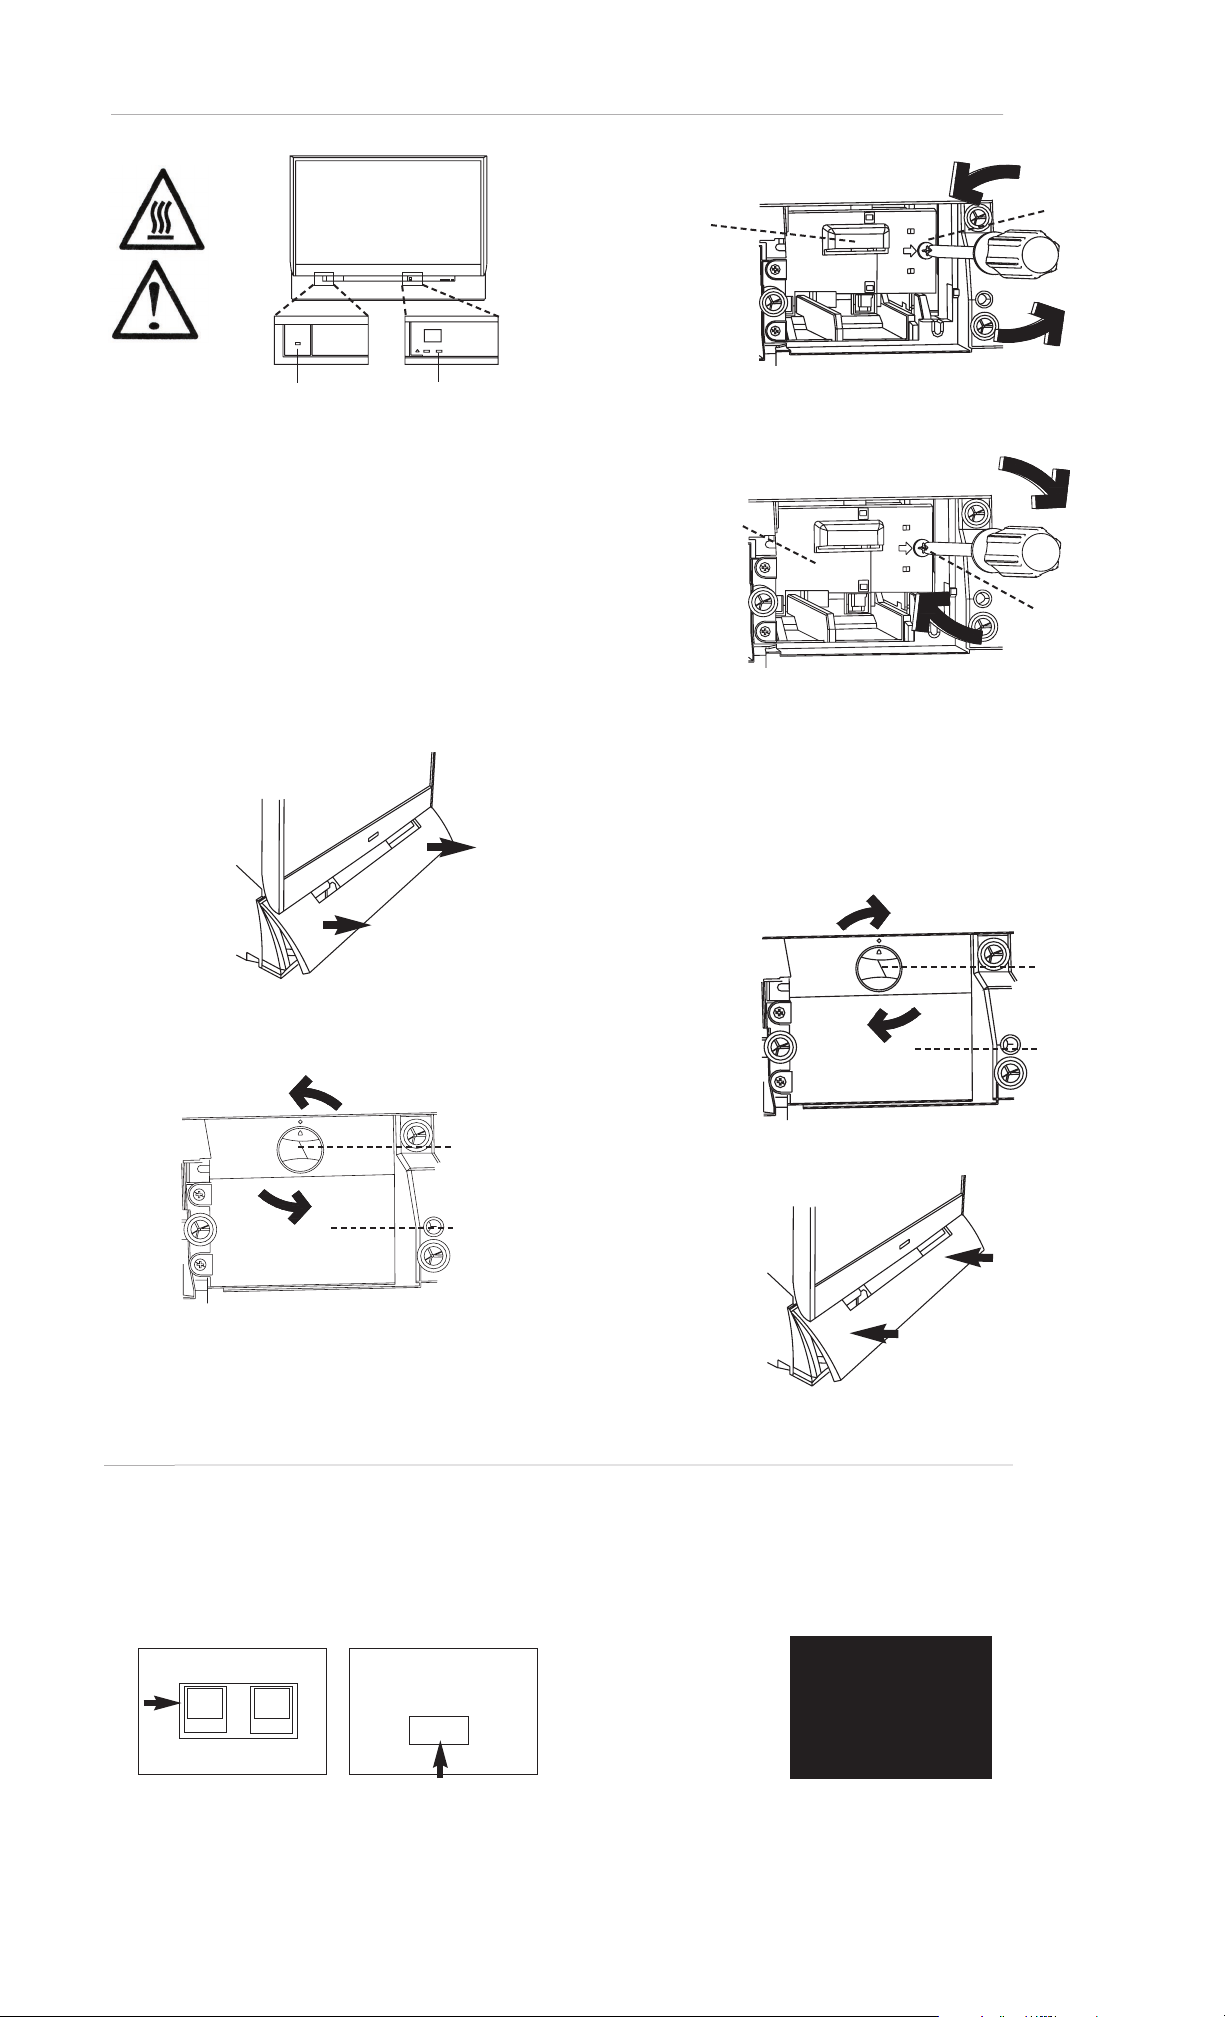
3. Loosen the lamp cover screw.
After reading the caution and warning labels on the lamp cover,
loosen the lamp cover screw using a screwdriver.
POWER
POWER button/
+
_
LAMP indicator
1. Switch off power to the television, wait until the power
indicator stops blinking red, then unplug the power cord from
the wall outlet. Allow the television to cool for at least 1 hour.
[If the lamp must be replaced more urgently:]
The projection display has a feature for forced cooling. During
the first minute of the normal cooling fan operation after the
POWER button is turned OFF, press the VOL+ button on the
projection display and the ▲ button on the remote control
simultaneously for more than 5 seconds. The cooling fan will
operate for approximately 10 minutes. The LAMP indicator
will flash red 5 times every 5 seconds.
Front cover
2. Remove the front cover.
Place your fingertips under the front cover and pull it from the
projection display.
v
POWER indicator
VOL
v
CH
Lamp Unit
Handle
Lamp Unit
Screw
4. Loosen the lamp unit screw.
Using a screwdriver, loosen the lamp unit screw. Grasp the
lamp unit handle and slowly pull the lamp unit from the
projection display.
5. Insert the new lamp unit, paying attention to the direction
of insertion. Press on the lamp unit handle, ensuring that the
insertion is done correctly. Dispose of the old lamp in
accordance with local environmental regulations. Tighten the
lamp unit screw and the lamp cover screw using a screwdriver.
Replace front cover.
[Note: Ensure that the lamp unit and lamp unit housing doors
are attached securely. If not, the protective circuit will be
activated and the power will not turn on.]
R
ESETTING THELAMPTIMER
PT-50LC13/PT-60LC13/PT-50LCX63/PT-60LCX63/PT-43LCX64/PT-50LCX64/PT-60LCX64/PT-43LC14/PT-50LC14/PT-60LC14
WARNING: Only reset the lamp timer when the lamp has been replaced.
1. Plug the power cord back into a properly grounded wall outlet. Then press the POWER button on the projection display or the
remote control to turn the power on.
UNIT
+
VOL
_
2. While pressing the VOL- button on the projection display,
hold down the PIP or SPLIT button on the remote control
simultaneously for more than 5 seconds.
REMOTE CONTROL
For models PT-50LC13/
PT-60LC13/PT-50LCX63/
PT-60LCX63/PT-43LCX64/
PT-50LCX64/PT-60LCX54
PIP
For models PT-43LC14/
PT-50LC14/PT-60LC14
SPLIT
PLAY
▲
LAMP TIME WAS
RESET TO 0.
3. When the lamp time reset procedure is complete, the
above screen will appear. (This screen may be different from
the actual screen.)
Note: When the lamp time reset is complete, the LAMP
indicator goes out.
®
p. 1
Panasonic is a registered trademark of Panasonic Corporation.
EPLACING THELAMP
R
MODELS PT-44LCX65 / PT-52LCX65 / PT-61LCX65 / PT-52LCX15
POWER button/
POWER indicator
1. Switch off power to the television, wait until the
power indicator stops blinking red, then unplug the
power cord from the wall outlet. Allow the television to
cool for at least 1 hour.
[If the lamp must be replaced more urgently:]
The Projection display has a feature for forced cooling.
During the first minute of the normal cooling fan
operation after the POWER button is turned OFF, press
the VOL+ button on the projection display and the ▲
button on the remote control simultaneously for more
than 5 seconds. The cooling fan will operate for
approximately 10 minutes. The LAMP indicator will
flash red 5 times every 5 seconds.
LAMP indicator
Lamp Unit
Handle
4. Using a screwdriver, loosen the lamp unit screw.
Grasp the lamp unit handle and slowly pull the lamp unit
from the projection display.
Lamp Unit
5. Insert the new lamp unit, paying attention to the
direction of insertion. Press on the lamp unit handle,
ensuring that the insertion is done correctly. Dispose of
lamp in accordance with local environmental regulations.
Tighten the lamp unit screw with using a screwdriver.
[Note: Ensure that the lamp unit and lamp unit housing
doors are attached securely. If not, the protective circuit
will be activated and the power will not turn on.]
Lamp Unit
Screw
Lamp Unit
Screw
2. Grasp both sides of the front cover with your
fingertips and pull it from the projection display for
removal.
Lock/Open
Knob
Lamp Cover
3. Turn the Lock/Open knob to the left
(counterclockwise). Pull the lamp cover out and down to
open it.
R
ESETTING THELAMPTIMER
MODELS PT-44LCX65 / PT-52LCX65 / PT-61LCX65 / PT-52LCX15
WARNING: Only reset the lamp timer when the lamp has been replaced.
6. Close the lamp cover. Turn the Lock/Open knob to
the right (clockwise).
7. Replace the front cover.
Lock/Open
Knob
Lamp Cover
1. Plug the power cord back into a properly grounded wall outlet. Then press the POWER button on the projection display
or the remote control to turn the power on.
UNIT
▲
▲
- VOL+
2. While pressing the VOL- button on the projection
display, hold down the SPLIT button on the remote
control at the same time for more than 5 seconds.
REMOTE CONTROL
SPLIT
DVD/VCR CH
v
LAMP TIME WAS
RESET TO 0.
3. When the lamp time reset procedure is complete, the
above screen will appear. (This screen may be different
from the actual screen.)
Note: When the lamp time reset is complete, the LAMP
indicator goes out.
p. 2
 Loading...