

Panasonic PanaVOICE system Technician Manual

Integrated Voice
System
TM.0199B -Cam-lndusbialcalp.dAmarica
Version 2.0
Technician’s Guide
Panasonic@
---TM
---
mIImm
Digital Business System
SM-PANA20-TECH
www.voicesonic.com
Phone: 877-289-2829
3DQDVRQLF7HOHSKRQH6\VWHPV

Technician’s Guide
. . .
LII
Using the Technician’s Guide
The
Technician’s Guide
is designed to take you through the process of installing and
setting up a voice messaging system. The guide is divided into three main sections:
This section of the
Technician’s Guide
explains how to install a new PanaVOICETM
system at a customer site and how to update an existing voice messaging system.
Setting Up the Application. The chapters in this section take you through the
process of planning and configuring a new voice messaging system so that it will
meet the specific requirements of the people using it.
Installing and using Remote Maintenance. This section describes how to set up
and use the Remote Maintenance program so you can maintain and troubleshoot
a voice messaging system using a remote computer.
Additional sections and appendices provide information about specific hardware.
What is new in ihis version?
PanaVOICE 2.0 introduces a digital voice board, as well as other system enhancements.
Digital voice board support
PanaVOICE 2.0 supports a new digital voice board. The new board allows digital lines
to connect to the voice messaging system.
On-site key reprogramming
When you need to add voice ports to PanaVOICE 2.0, Panasonic@ will send you instructions for reprogramming your system key. You do not need to install a new key
Auto-apply
This feature safeguards changes you make at the console. When you make changes,
auto-apply automatically saves them when you move to another screen, even if you
forget to choose the Save button. If you do not want to save changes, you can press the
Reset button to restore the original information before you move to another screen.
Technician’s Guide
V
Contents
InsdIbg the PanaVOICE system
............................................................................................
1
Install the system key
............................................................................................................................... 4
Test thesystem
..........................................................................................................................................
5
Make a boot disk
.......................................................................................................................................
6
Connect the telephone system
...............................................................................................................
7
Voice mail integration features ...................................................................................................
7
Program the teiephone system
....................................................................................................
7
Special Telephone System Programming for Non-Integrated Systems
....................................
8
Connect the telephone leads .......................................................................................................
9
Test the PanaVOICE system
.........................................................................................................
9
Configure the application ......................................................................................................................
10
Backup the system
.................................................................................................................................
11
Updating the voice messaging software
.................................................................................
12
Check the system requirements
............................................................................................................
13
Prepare for the update
...........................................................................................................................
14
Update the software
...............................................................................................................................
1.5
Installation notes
.........................................................................................................................
16
Troubleshoot the hardware
...................................................................................................................
17
Troubleshooting PanaVOICE
.....................................................................................................
17
If you beiieve the hardware is defective ...................................................................................
17
Moving the system
..................................................................................................................................
18
Moving the software
....................................................................................................................
18
Moving the computer..
................................................................................................................
18
InstaGng
PanaVOICE with au OAI Integration
....................................................................
19
About OAI Integration
................................................................................................................
21
Integration Overview
..................................................................................................................
22
How the Integration Works
....................................................................................................................
23
Integration Features for Telephones
....................................................................................... 24
Constant Message Count ........................................................................................................................
25
Examples of Constant Message Count
......................................................................................
35
-
Other Displays .............................................................................................................................
26
Display of Touchtone Entry
.......................................................................................................
26
Large LCD Display Phones &Constant Message Count
...........................................................
26
Visua,I
Menus
...........................................................................................................................................
27
Using Keys on the Large Display Telephone
............................................................................
28
Tip for Subscribers
......................................................................................................................
29
The IMessage List..
........................................................................................................................
29
Message Waiting Indicators
.......................................................................................................
30
The System Conversation and Visual Menus..
.....................................................................................
31
How a Subscriber Uses Visual Menus
........................................................................................
31
Voice Mail Call Handling Features
........................................................................................................
36
Avoiding Call Forwarding Conflicts
......................................................................................................
37
Setting Rings to Wait
................................................................................................................... 37
Installation Summary
.................................................................................................................
38
vi Technician S Guide
PanaVOICE2.0
Preinstallation Checklist
.......................................................................................................................
39
Telephone System
39
.......................................................................................................................
For
both Panasonic DBS and DBS
824 you will need: ..............................................................
39
Voice Messaging System
............................................................................................................. 39
Additional Items
..........................................................................................................................
39
Preparing the
Panasonic DBS
...................................................................................................
40
Installing
Additional Telephone System
Hardware ............................................................................
41
Panasonic DBS System Programming
...................................................................................................
42
Station Information
.....................................................................................................................
42
Special
Telephone System Programming
..................................................................................
43
Direct-Inward-Dial
(DID) .............................................................................................................
46
Resetting the Panasonic DBS Telephone System
.....................................................................
46
Preparing the Voice Messaging
System
..................................................................................
47
Connecting the Voice
Messaging and
Telephone Systems
...............................................................
48
Connecting the
Station Lines
to the Voice Messaging System
..............................................
48
Installing
the Serial Link between
the Systems .......................................................................
48
New
Fully-Assembled PanaVOICE
System
................................................................................
48
Upgrading an Existing Voice Messaging System
......................................................................
49
Testing the system
..................................................................................................................................
50
If the
System Starts as a Demonstration
Copy .........................................................................
50
Checking
the COM Port and Voice Boards
Using SYSCHK
.................................................................
5
1
Using
the COMl Port
...................................................................................................................
51
Running
SYSCHK
.........................................................................................................................
51
Configuring the Voice Messaging System
............................................................................................
53
Application
Setup .......................................................................................................................
53
Default
Subscriber
.......................................................................................................................
55
Subscribers and Guests
..............................................................................................................
56
Telephone System Setup
............................................................................................................
58
How to Turn Visual Menus On or Off
....................................................................................................
61
Mailbox Builder
...........................................................................................................................
62
How Mailbox
Builder Works
...................................................................................................................
63
Using Mailbox Builder to Update the Voice Messaging System
.............................................
63
Before Using Mailbox Builder
.....................................................................................................
64
After
Using Mailbox Builder
.......................................................................................................
64
Mailbox Builder Uses Telephone System Information
............................................................
64
Starting Mailbox Builder
.............................................................................................................
66
Mailbox Builder Reports
........................................................................................................................
68
The
Mailbox Builder Report
.......................................................................................................
68
Sample Mailbox Builder Report
.................................................................................................
69
Mailbox
Builder Log Report Data
..............................................................................................
70
Mailbox
Information
...................................................................................................................
i’ 1
The
Call Log Report .....................................................................................................................
72
Sample
..........................................................................................................................................
72
Call
Log Report Data.. ..................................................................................................................
73
Reviewing the
Mailbox Builder Report
or Call Log Report
.....................................................
75
Testing the Integration
...............................................................................................................
76
Training Subscribers
..................................................................................................................
77
How to Train for Upgrade Installations
................................................................................................
78
What 1s the Same
.........................................................................................................................
78
Technician’s Guide
vii
How to
Train for New Features
..............................................................................................................
79
Tips
for Subscriber
Training .......................................................................................................
79
One Week After Training
.............................................................................................................
79
Troubleshooting
..........................................................................................................................
80
Refresh Interval for Constant Message Count
..........................................................................
82
LCD Display Reference ...............................................................................................................
84
Prompts Included with OAI Integration Package ................................................................... 86
Integration Package Prompts
.....................................................................................................
86
!%ting
Up the Appiication ..................................................................................................... 87
Using the application worksheets to set up the system .......................................................
89
Planning the system
....................................................................................................................
90
Identify a System Manager
.....................................................................................................................
91
Determine the primary users of the system
.........................................................................................
92
Visualize the system
...............................................................................................................................
93
Determine which system features you want to use
............................................................................
94
Determine
how PanaVOICE
ports will be used
....................................................................................
95
Plan the
organization of System
IDS .....................................................................................................
96
Decide
who owns a group
or box.. ........................................................................................................
97
Plan opening
greeting strategies
..........................................................................................................
98
Set schedules
...........................................................................................................................................
99
Plan message groups
............................................................................................................................
100
Plan how the system will provide directory assistance
...................................................................
101
Design transaction boxes ....................................................................................................................
102
Plan interview boxes ............................................................................................................................
103
Setting up the basic system .....................................................................................................
104
Set up the telephone system
hardware parameters ............................................................................................................................
105
Assemble the site information
............................................................................................................
106
Define
the port settings
........................................................................................................................
108
Set up the operator box: System IDS and transfer options
..............................................................
110
Set up the operator box: greetings and messages
.............................................................................
112
Specify
public settings and
public fax box
settings .........................................................................
114
Specify the
system schedules
..............................................................................................................
117
Specify
general system-wide
settings
.................................................................................................
119
Adding subscribers, guests, and groups
...............................................................................
122
Specify the default subscriber Personal ID information
..................................................................
123
Specify the
default subscriber
call transfer
settings
........................................................................
125
Specify the
default subscriber
action settings
..................................................................................
127
Specify
default subscriber
notification settings
...............................................................................
129
Specify the default subscriber conversation settings
......................................................................
131
Specify default subscriber access options settings
............................................................
133
List the system subscribers
..................................................................................................................
135
List the
system guests
..........................................................................................................................
137
Set up
message groups
.........................................................................................................................
139
Set up
a System Manager..
....................................................................................................................
141
Setting up advanced features
.................................................................................................
142
Map transaction box menus and call transfer actions
.....................................................................
144
Set up transaction boxes, part
1 (General settings and Call Transfer options)
............................. 145
Set up transaction boxes, part 2 (Greeting and Action After Greeting options)
........................... 147
Set up
interview boxes
................................................. ........................................................................
149
viii
Technician’s Guide
PanaVOKE2.0
balling and using Remote Maintenance
.........................................................................
151
Remote Maintenance overview
..............................................................................................
153
The
host and remote computers
.............................................................................................
153
Two
disks for Remote Maintenance
........................................................................................
153
Storing
phone numbers, names,
and modem settings ..........................................................
154
What
you need for each computer
..........................................................................................
154
Where
to Start
............................................................................................................................
154
Set up the host software
......................................................................................................................
155
Checking
that the host software
is loading correctly ...........................................................
157
Solving
host software problems
..............................................................................................
157
Install the
remote computer’s software
..............................................................................................
158
Set up the
remote software ..................................................................................................................
159
Setting
the defaul’i phone book
entry..
...................................................................................
159
Adding a phone book entry for each host computer
............................................................
161
Solving
problems after installation
.........................................................................................
163
Using Remote Maintenance
....................................................................................................
164
Understand
the basics of a Remote Maintenance
session ...............................................................
165
Starting
the remote version
.....................................................................................................
165
Accessing
Remote Maintenance
menus
.................................................................................
165
Returning
to DOS
.......................................................................................................................
166
Calling a host computer
...........................................................................................................
166
Accessing menus during a connection
...................................................................................
167
Restarting a host computer
......................................................................................................
167
Ending a connection
.................................................................................................................
167
Unloading
Remote Maintenance
from memory
.....................................................................
168
Recommended operating system configurations for the remote computer..
................................
169
Prepare for
file transfers
.......................................................................................................................
170
Set
file transfer options
............................................................................................................
170
The
file menu screen
.................................................................................................................
170
File
Lists ......................................................................................................................................
171
Status Box
...................................................................................................................................
171
Phone Book ID
...........................................................................................................................
171
Local/(Arrow)/Host
...................................................................................................................
172
Scroll Bars
...................................................................................................................................
172
Highlight Bar
..............................................................................................................................
172
Message
Line
..............................................................................................................................
172
Functions
Line
...........................................................................................................................
172
Transfer files
between host and remote
computers .........................................................................
173
During
the file transfer
..............................................................................................................
174
If the file transfer fails
...............................................................................................................
174
Other
file menu functions
........................................................................................................
174
REPLOG files
...............................................................................................................................
175
CaIl other computers
............................................................................................................................
176
Checking
TOPTIONS settings
...................................................................................................
176
Setting up a phone book entry
................................................................................................
177
Making a caI1 using TOPTIONS
.................................................................................................
178
Using
TOPTIONS functions
......................................................................................................
178
Remote Maintenance
advanced features
...........................................................................................
180
Suspending and resuming a session
.......................................................................................
180
Using the billing log
..................................................................................................................
181
Technician’s Guide
ix
Using a mouse
............................................................................................................................
182
Editing files during a Remote Maintenance session
.............................................................
182
Troubleshoot Remote Maintenance
...................................................................................................
184
Problems with the remote version
..........................................................................................
184
Problems with the host version
...............................................................................................
185
Checking the default phone book entry
.................................................................................
185
Problems with either version
...................................................................................................
186
Still having probiems?
..............................................................................................................
186
Appendix A: Hardware documentation
.............................................................................
187
Appendix B: Application worksheets
.................................................................................
193
Appendix C: Resolving tone detection problems
..............................................................
217
Appendix D:
Special
considerations for dialing
outside
telephone numbers
................ 221
Glossary
................................................................................................................................
225
index
......................................................................................................................................
239

Installing the PanaVOlCE system

Technician 3 Guide
Installing the PanaVOiCEsystem I-3
Install the PanaVOICE system
This chapter will lead you stepby-step through the process of installing PanaVOICE at
the installation site.
The six steps involved in completing the installation for a voice messaging system are
covered in the following topics:
Install the
system key
Test the system
Make a boot disk
Connect the telephone system
Configure the application
Back up the system
Note
TM If you are installing the Panasonic DBS
OAI Integration package as part of
your voice messaging system, read the OAI Integration section of the
Technician’s Guide
before you
begin this installation.
Note
Throughout this section, the term Panasonic DBS refers to both the
Panasonic DBS and DBS 824 unless explicitly stated otherwise.

I-4 Installing the PanaVOICEsystem
PanaVOICE2.0
hsfall
fhe sysfem
key
The system key must be properly installed before PanaVOICE can answer calls. The
system will only operate as a demonstration unit without the system key.
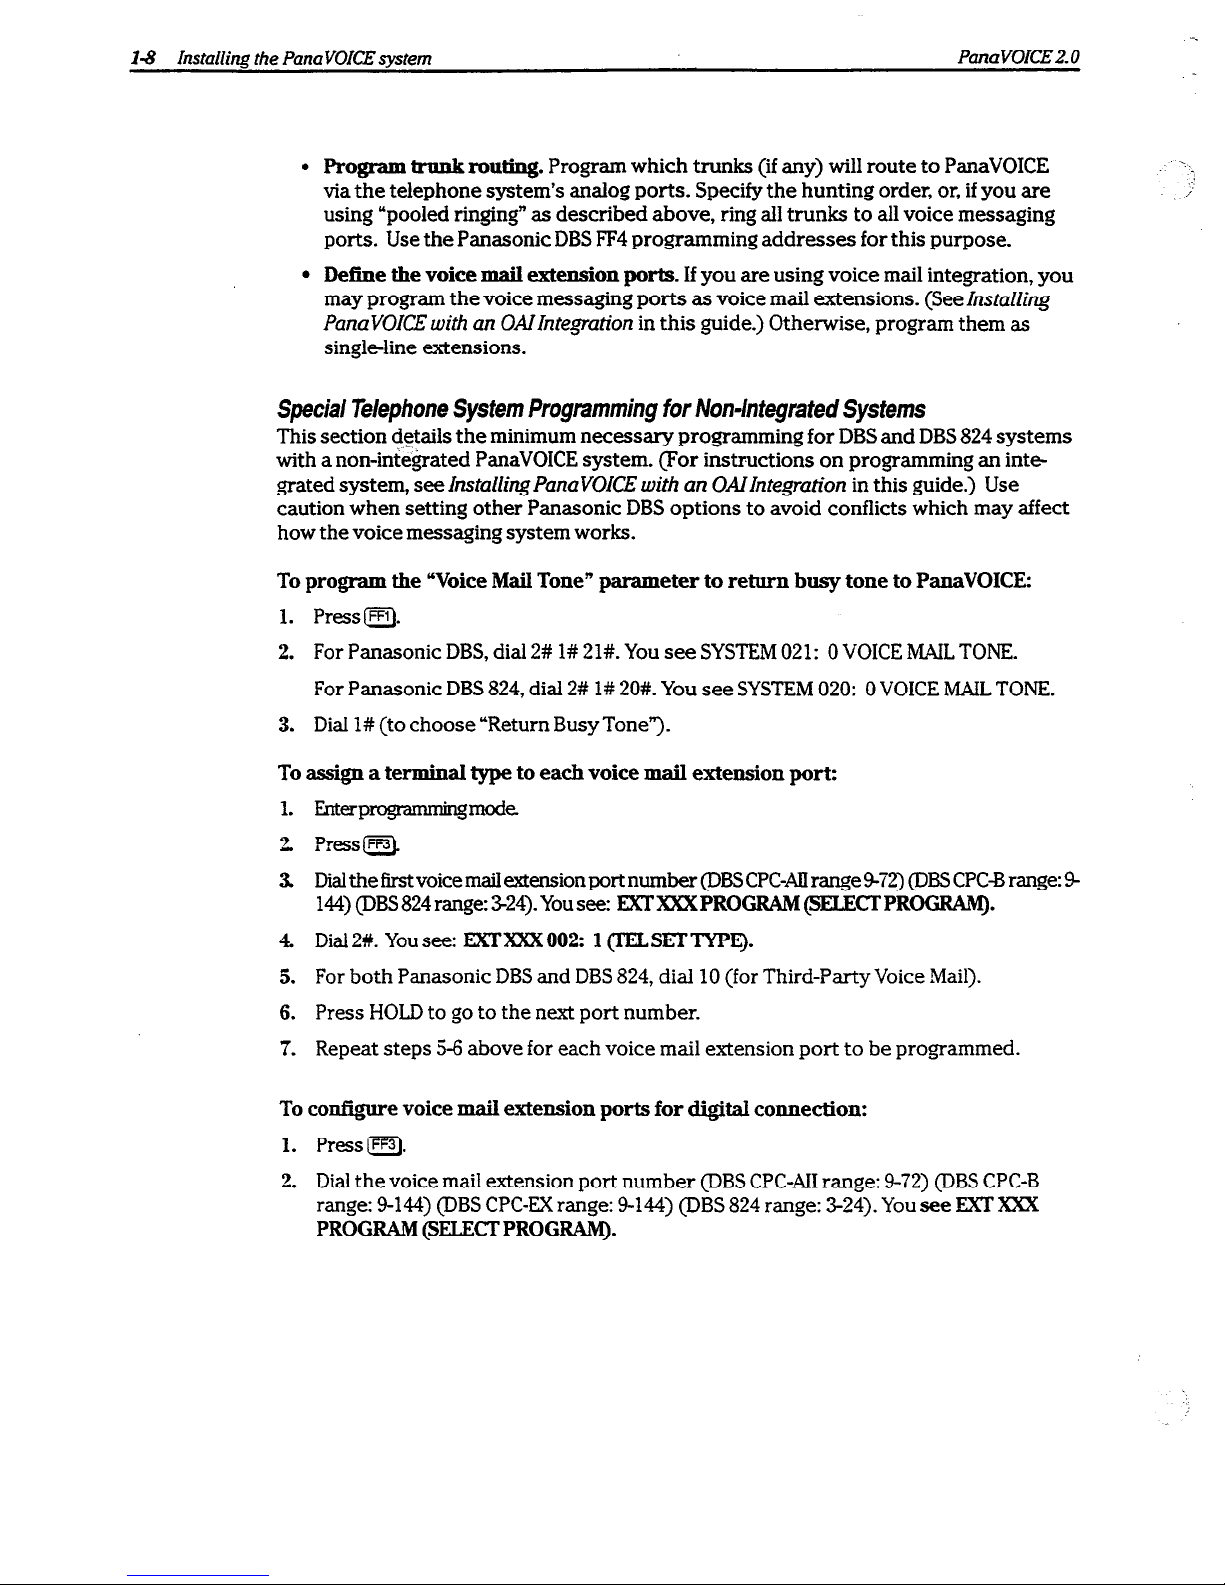
System Key
The system key connects to the parallel port of your computer. Any device that also
plugs into the parallel port (for example, a printer) must be plugged into the key. The
computer’s parallel port, also called the printer port, is a 25pin, female, D-shaped
connector on the back of the computer.
Parallel Port
i -
.-
Fgure 1 Parallel port for system key
To
connect
the
system
key:
1.
2.
3.
Locate the system’s parallel port.
Plug the male end of the system key (the end with 25 pins) into the female socket of
the parallel port. Tighten the screws to firmly attach the key to the socket.
If applicable, plug any cable that also plugs into the parallel port (such as a printer
cable) into the female end of the system key. The system key will not interfere with
the normal operation of a printer or other peripheral plugged into the parallel port.
Technician’s Guide
Installing
the PanaVOXE system
15
Tesf
the
system
You should test the system to ensure the system key is installed on the correct port and
the system starts properly.
To test the system:
1. Turn on the system. Watch as several messages display on-screen and the voice
messaging software starts.
2. Check that the key is properly installed:
If the words DEMONSTRATION COPY, SYSTEM KEY NOT FOUND appear on the
system’s Banner screen, the system key is not properly installed.
If the
system starts as a demonstration copy
1.
2.
3.
4.
Check that the label on your system key matches the number of ports (if any)
installed on your system.
Check that the system key is fully plugged into the parallel port.
Exit to DOS by choosing Shut Down on the Banner screen. Press [CMHXHK) to restart
the system. If the system starts as a regular (non-demo) unit, then continue with the
next step in the installation.
If the system still starts as a demonstration copy, look for another parallel port on
the voice messaging computer. If there is more than one parallel port, put the
system key on that port and start the system again. If PanaVOICE now starts
without
the DEMONSTRATION COPY, SYSTEM KEY NOT FOUND message, the key is installed
correctly
If the system still starts as a demonstration copy, contact Technical Support.
. .
I-S Installing the PanaVOICE system PanaVOICE 2.0
Make a boot disk
If your hard disk should fail, it is important to have a way to start the computer without
using the hard disk. You can do this with a disk that contains essential MS-DOS system
software copied from the hard disk. This disk is called a boot disk because it can be
used to restart (or “reboot”) your computer. This procedure also copies other system
utilities.
Tomakeabootdidc
1.
2.
3.
4.
5.
6.
i.
Insert a blank, high-density disk in the AI\ drive.
If neces&&, exit the voice messaging software and type Y when asked if you would
like to access the Toolkit Menu. If you are already at a DOS prompt, type
C:\AVUTIIS\MENU[-Enter).
At the Toolkit Main Menu, select Maintenance Tools.
At the Maintenance Tools Menu, select Make a System (Boot) Disk.
Press C-j to begin making the boot disk. Wait until the system finishes. The
Toolkit Main Menu automatically reappears.
Exit to DOS.
Test the boot disk as described below.
To test the boot disk
1.
With the boot disk in the AI:\ drive, press Q&GKJ-@ to restart the computer. The
computer should restart normally, without running the voice messaging software.
You will see the DOS prompt (for example, A:\>).
2. If the computer does not restart normally, remove the boot disk from the AI:\ drive.
Again press ~~HXl-iDelj to restart the computer from the hard disk. Repeat the steps
to create a boot disk.
3. When you are satisfied that the boot disk works properly, remove it from the A:\
drive. Press aXHDel] to restart the voice messaging software.
‘\
‘!
,’
Always keep the MSDOS disk set and the boot disk close to the computer. If you cannot
guarantee this, take a copy of these disks with you to use for future maintenance and
recovery.
Technician’s Guide
Installing the Pana VOICE system
1-7
Conned
the telephone system
Inorderto instaIlPanaVOICE,thePanasonicDBStelephonesystemmust beconfiguredwith a
CPC-AU ,
CPC-B card (Version 8.1 or higher), or CPC-EX (version 1 .I or higher) and a DEC card.
TheDBS824systemrequiresVersion2.1orhiiherfortheCPCcard(CPC-Monly). Inboth
systems, theAPI card is required
for
the
OAI Integration. CPCS is not supported.
Voice mail integration features
PanaVOICE offers several voice mail features that take advantage of special capabilities
found on yozx Panasonic DBS telephone system:
l
Message Waiting Indication via message waiting lamps or special dialtones
l
Automatic Call Forwarding to your personal greeting
l
Easy Message Access via programmable keys at each extension
Program the telephone system
Program the telephone system before you connect it to PanaVOICE.
l
Define the
hardware. You
must tell the DBS software which boards and other
special telephone system hardware you have added or enabled (such as a DEC or
API card).
l
Assign the extension numbers and hunt groups.
Program which extension
numbers will ring PanaVOICE through the digital ports.
When programming the hunt group, we recommend a terminal hunt rather than a
circular or call distribution hunt group. This is because voice mail ports are
typically set up so that the first ports handle incoming calls while the last port
handles tasks which require the voice mail to dial out (for example, lighting lamps
and delivering messages). With this setup, a terminal group assists the ports in
performing their jobs effectively and efficiently, because incoming calls will
usually go to the first few ports, leaving the last port open to handle outdialing
tasks.
When programming, you must also assign a “hunt group access code” or “group
hunting code” for PanaVOICE. This code is the number, dialed in-house, that rings
PanaVOICE.
Program what you want to happen to calls when all voice messaging ports are
busy. Incoming calls may be forwarded to an attendant or operator, or may get a
busy signal or ringback until one of the ports becomes available.
PanaVOICE can also use pooled ringing. To activate pooled ringing, set the Rings
to answer field for all ports to 0 on the Application Setup: Port Settings page. Then,
program all lines that PanaVOICE will answer to ring aII of PanaVOICE ports. That
way, when a call comes in, PanaVOICE answers, which signals the DBS to stop
sending ring voltage to the other ports.
l-8 Installing the
Pana
VOICE
system
PanaVOICE2_0
l
Program &nnk routing. Program which trunks (if any) will route to PanaVOICE
-
via the telephone system’s analog ports. Specify the hunting order, or, if you are
i
using “pooled ringing” as described above, ring all trunks to all voice messaging
ports. Use the Panasonic DBS FF4 programming addresses for this purpose.
l
Define the
voice mail extension ports. If
you are using voice mail integration, you
may program the voice messaging ports as voice mail extensions. (See
Installing
PamVOICE with an OAZIntegration
in this guide.) Otherwise, program them as
single-line extensions.
Special Telephone System Programming for Non-Integrated Systems
This section details the minimum necessary programming for DBS and DBS 824 systems
with a non-integrated PanaVOICE system. (For instructions on programming an integrated system, see
Instdling PanaVOKE with an OAI Integration
in this guide.) Use
caution when setting other Panasonic DBS options to avoid conflicts which may affect
how the voice messaging system works.
To program the “Voice MaiI Tone” parameter to return busy tone to PanaVOICE:
1.
Press a.
2. For Panasonic DBS, dial 2# l# 21#. You see SYSTEM 021: 0 VOICE MAIL TONE.
For Panasonic DBS 824, dial 2# l# 20#. You see SYSTEM 020: 0 VOICE MAIL TONE.
3. Dial l# (to choose “Return Busy Tone”).
To assign a terminal type to each voice mail extension port:
1.
2
3.
4.
5.
6.
7.
Dial the
first
voice
mail extension port number (DBS CPC-AlI range 9-72) (DBS CPC-B range: 9
144) (DBS 824 range: 324). You see:
EXTXXXPROGRAM @F3ECXPROGFUM).
Dial 2#. You see: EXTXXX 002:
1 (IELSEITYPEJ
For both Panasonic DBS and DBS 824, dial 10
(for Third-Party Voice Mail).
Press HOLD to go to the next port number.
Repeat steps 5-6 above for each voice mail extension port to be programmed.
To configure
voice maiI extension ports for digital connection:
1.
Press[FF3).
2.
Dial the voice mail extension port number (DBS CPC-AI1 range: 9-72) (DBS CPC-B
range: 9-144) (DBS CPC-EX range: 9-144) (DBS 824 range: 3-24). You see EXT XXX
PROGRAM @ELEmPROGRAM).
Technician’s Guide
Installing the Pana VOICE system l-9
3.
For the DBS, dial 47#. You see EXT Xxx 647: 0
VAU/VM Port
For the DBS 824, dial 46f#. You see EXT XXX 046: 0
VAU/VM Port.
4.
Dial 1 to enable the voice mail port confirmation.
5. Press
HOLD
to go to the next port number
S. Repeat steps 4 & 5 for each extension.
To set call forward ID codes for individual extensions
I.
At any extension, dial: ON/OFF
PROG AUTO *
2.
Dial the extension number to be forwarded.
3. Dial the voice mailbox ID code. These are the digits required by PanaVOICE to
identify the DBS extension and allow it to retrieve messages. The lD code can be up
to 16 digits long. Press the REDIAL key to insert a pause between digits.
4. Press
HOLD.
5. Repeat for each extension to be programmed with Call Forward ID codes.
Connect
the
telephone
leads
The telephone leads are plugged into the jacks at the back of the voice boards. For
details, see the
Voice Board Note
in Appendix
A:
Hardware Documentation.
For Remote IMaintenance. connect an additional extension to PanaVOICE’s modem.
Test
the
Pana
VOICE
system
Using a telephone near the PanaVOICE console, call each extension connected to
PanaVOICE. Go to the Banner screen (Figure 2) and watch the port status indicator to
verify which voice messaging system port answers your calls.
- -----..
Paw&i~i~
Figure 2 Banner screen

I-IO Instailing the PanaVOICEsystem
PanaVOKE2.0
Configure fhe application
You have now installed the hardware and software for PanaVOICE and are ready to
configure the system application. This includes:
l
Configuring PanaVOICE for the DBS
l
Selecting features, adding special greetings, adding subscribers, and programming
any special call routing applications for this installation
The Setting up the application
section of this guide contains easy, step-by-step proce
dures for configuring your application, along with worksheets you can fill out and use
to enter data on-screen.
To continue the hstallation process, see Setting
up the
appkation now.
After you have finished setting up your application, continue the installation by
backing up PanaVOICE. For details, see
Back
up the system
on page l-l 1.
?‘.
-.::

Technician k Guide
hxtalling the
Pana
VOICE
system
I-l I
Back
up
the system
Once you have completed configuring the application, you must back
up the system. A
backup is a copy of the system configuration stored on a separate set of disks or tapes.
We recommend using tapes. The system backup contains a copy of all the greetings,
custom voice prompts, and system database information installed on your system. This
includes all the subscriber’s message box names and options, as well as any transaction
boxes or interview boxes you have created for this application.
If for some reason your computer or hard disk fails, a system backup can save you hours
of work reconstructing the application, including reentering all the names of subscribers, setting up all the directories, and setting system parameters. For details, see the
System Manager’s Guide.
We strongly recommend that you establish a regular backup schedule-monthly,
weekly, etc. This will preserve any of the system updates made by a System Manager
since the previous backup, such as the addition of new subscribers. All backups should
be kept in a safe place separate from the system computer. PanaVOICE’s Toolkit Main
Menu makes it easy to do backups and to schedule unattended backups. The Toolkit
Main Menu is available when you exit the voice messaging software.
Wamfng You must exit the voice messaging software to perform a backup.

I-12 Installing the Pana VOICE system
PanaVOICEZ.0
Updating the voice messaging software
This chapter explains how to upgrade an existing voice messaging system to
PanaVOICE 2.0. This chapter also provides an overview of the changes that occur to the
voice mail computer’s configuration during an update.
Ch&thesystemrequirements
Prepare for the update
Update the software
I-
.-
z’s Guide
Installing the PanaVOKEsystem
I-13
%k &ne system requirements
Updating your system to this software version requires the following:
MS-DOS 6.22 or higher
DF’I DX4/100 computer with at least 4ME3 of memory on the mother board
Serf
al
ports as needed with 16550 or higher UART support
Remote Maintenance diskversion S.lj or higher
The system must
not
be using the MS-DOS DoubleSpace or DriveSpace utilities
PanaVOICE requires a mouse. Panasonic supports the following mouse devices for use
on PanaVOICE systems:
9 PanaVOICE 1 .O requires a bus mouse
l
PanaVOICE 2.0 requires a serial PS/2 mouse
_
_
2 I
:. ;
..;’ --. __
.’ ‘::I.
:
_.-’ :
Note
AlI required mouse device drivers are already installed on the PanaVOICE
system. Do not install any other mouse device drivers onto the system.
I-14 Installing the Pana VOICE system
PanaVOKE2.0
Prepare for fhe update
” ~
After you have verified that your current system meets all the requirements for a
successful update, prepare the system by following these steps:
1. Check that your system has at least 70 minutes (approximately 12MB) of free
recording time. The available recording time is displayed in the upper-right comer
of the Banner screen. You need at least 70 minutes of recording time for the software update, plus enough free recording time to store messages, boxes, names, and
greetings. If there is not enough space available on the hard disk, the install program will not let you update the voice mail software.
‘7%
Note
If you want to free up disk storage space, follow the procedure on the next
page to delete old messages from the system.
2.
3.
4.
Fxit to the DOS prompt by pressing@ then a at the Banner screen. If prompted,
type a System Manager ID (cl-).
Make a complete backup of the system, including any system prompts you have
created for your unique situation. For information explaining how to back up your
system, see the documentation which came with the earlier version of the software
Optimize the system’s hard disk, if necessary. This can significantly speed the
system’s performance and speed up installation. If the system is currently using the
Toolkit, select Hard
Disk Tools
from the Toolkit Main Menu, then select
Optimize Hard
Disk
NOW. Otherwise, supply your own optimization utility and run it before you
perform the update.
Technician’s Guide
Installing the Pana VOICE system I-15
Update the software
To
update
the
software:
1. Insert the disk labeled Install Disk- Update in the A\ drive.
2. Check that you are in the voice mail system directory (typically C:\VMAIL). Type
AANSTALL [=I. (You must install the software from the &\ drive.)
3. Choose to update an existing system.
4. Follow the on-screen instructions and insert disks as prompted.
5. Once the process is complete, choose the option to restart the voice mail software.
After updating the software, verify that PanaVOICE is still detecting hangup
supervision (GTD) and call progress signals accurately. If the system is not
detecting these signals correctly, refer to
Appendix C Resolving tone detection
problems.

I-16 Installing the PanaVOICE system
PanaVOICE2.0
installation notes
Troubleshooting steps as well as tips for moving a voice messaging computer or the
software are covered in the following topics of this chapter:
Troubleshoot
the
hardware
Moving the system
i!
,j
Technician’s Guide
Instailing the PanaVOICE system
l-l 7
Troubleshoot the hardware
Troubleshooting PanaVOlCE
If
you
experience trouble while installing a PanaVOICE system, check the following:
l
Check that you received all the hardware on the bill of materials.
l
Check that all cables are correctly connected.
l
Check all installation steps, starting with Test the system on page l-5.
:
If you believe the hardware is defective
All requests for returned material authorization @MA) should be made from the site
where the system is being installed. When you call Technical Support from on-site, we
can check what has failed and what may need
to
be replaced. ln addition, the techni-
cian can suggest additional tests for you to try.
Technical Support needs the following information before issuing an RMA on any
hardware which you purchased from Panasonic:
l
The serial numbers of the part needing to be replaced. On the PanaVOICE system,
look at the tag attached to the fan on the back of the computer to determine a
part’s PCL number.
l
The date the system was installed.
l
A description of the problem and what troubleshooting has already been attempted.
l-18 Installing the PanaVOICEsystem
PanaVOICE2.0
Moving the system
Moving the software
if
you are moving PanaVOICE from one computer
to install it on another computer, you
can take these approaches:
l
Remove all voice boards, the system key, modem and any other required hardware
from the current computer and install them on the new computer. Remove the
hard disk from the current computer and install it on the new computer.
l
Remove all voice boards, the system key, and any other required hardware from
the cutiZnt computer and install them on the new computer. Use the MS-DOS
Interlnk utility and an Interhxk cable to transfer PanaVOICE software to the new
computer For details, see MSDOS Online Help.
Whether or not you are moving the hard disk, you
should back up the current applica-
tion before moving it to a new computer. Use the backup
to restore the current appli-
cation on the new computer.
Moving the computer
If
you are moving the voice messaging computer to a new location, it is possible to
leave the software, voice boards, and any other required hardware installed in the
computer during the moving process.
Before moving the computer, back up the current application. Use the backup to
restore the current application
in case the computer’s hard disk becomes damaged in
transit.
Note
Always exit PanaVOICE before turning off the computer.
To
exit
PanaVOICE:
1. From the Banner Screen, choose the Shut Down button.
:-
Installing PanaVOlCE with an
OAl Integration

Technician 3 Guide
Installing PanaVOKE with an OAI Integration
Z-21
About OAI Integration
The Panasonic
DBS OAI (Open Application Interface) Integration Package may be used
with two Panasonic telephone systems:
l
Panasonic Digital Business System (DBS), equipped with a CPC-AII, CPC-B card
Version 8.1 or higher, or a CPC-EXVersion 1.1 or higher, an DEC card, and an API
card
l
Panasonic Digital Business System 824 (DBS 824), equipped with a CPC-M card
Version 2.1 or higher; and an API card
Most of the installation procedures for the OAI Integration Package are identical for
both telephone systems. Only steps described in
Preparing the Panasonic DBSare
significantly different for each type of telephone system. The differences are clearly
noted.
Note
Throughout this section of the
Technician’s Guide,
the term Panasonic DBS
will refer to both telephone systems unless explicitly stated otherwise.
This section of the
Technician’s Guide
describes how to install the OAI Integration
Package. It is designed to be used with thesystem
Manager’s Guide
and other sections in
the
Technician’s Guide.
The material in this section assumes you are familiar with the
Panasonic DBS telephone system’s features and configuration.
Integration Overview
describes the integration, the steps to take before installa-
tion, and the hardware required.
Preparing the Panasonic DBS
guides you through installing telephone hardware
and programming the telephone system.
Preparing the Voice
Messaging
System
details the steps for configuring the voice
mail software.
Muiibox Builder
describes how to use the feature that adds subscriber mailboxes
based on information programmed in the telephone system.
Testing the integration
covers how to test the integration.
Training Subscribers
describes what subscribers should know about using the
integrated systems.
Troubleshooting
gives advice on locating and solving problems that may occur in
the integration.
2-22 Instailing Pana VOICE with an OAI Integration
PanaVOKE2.0
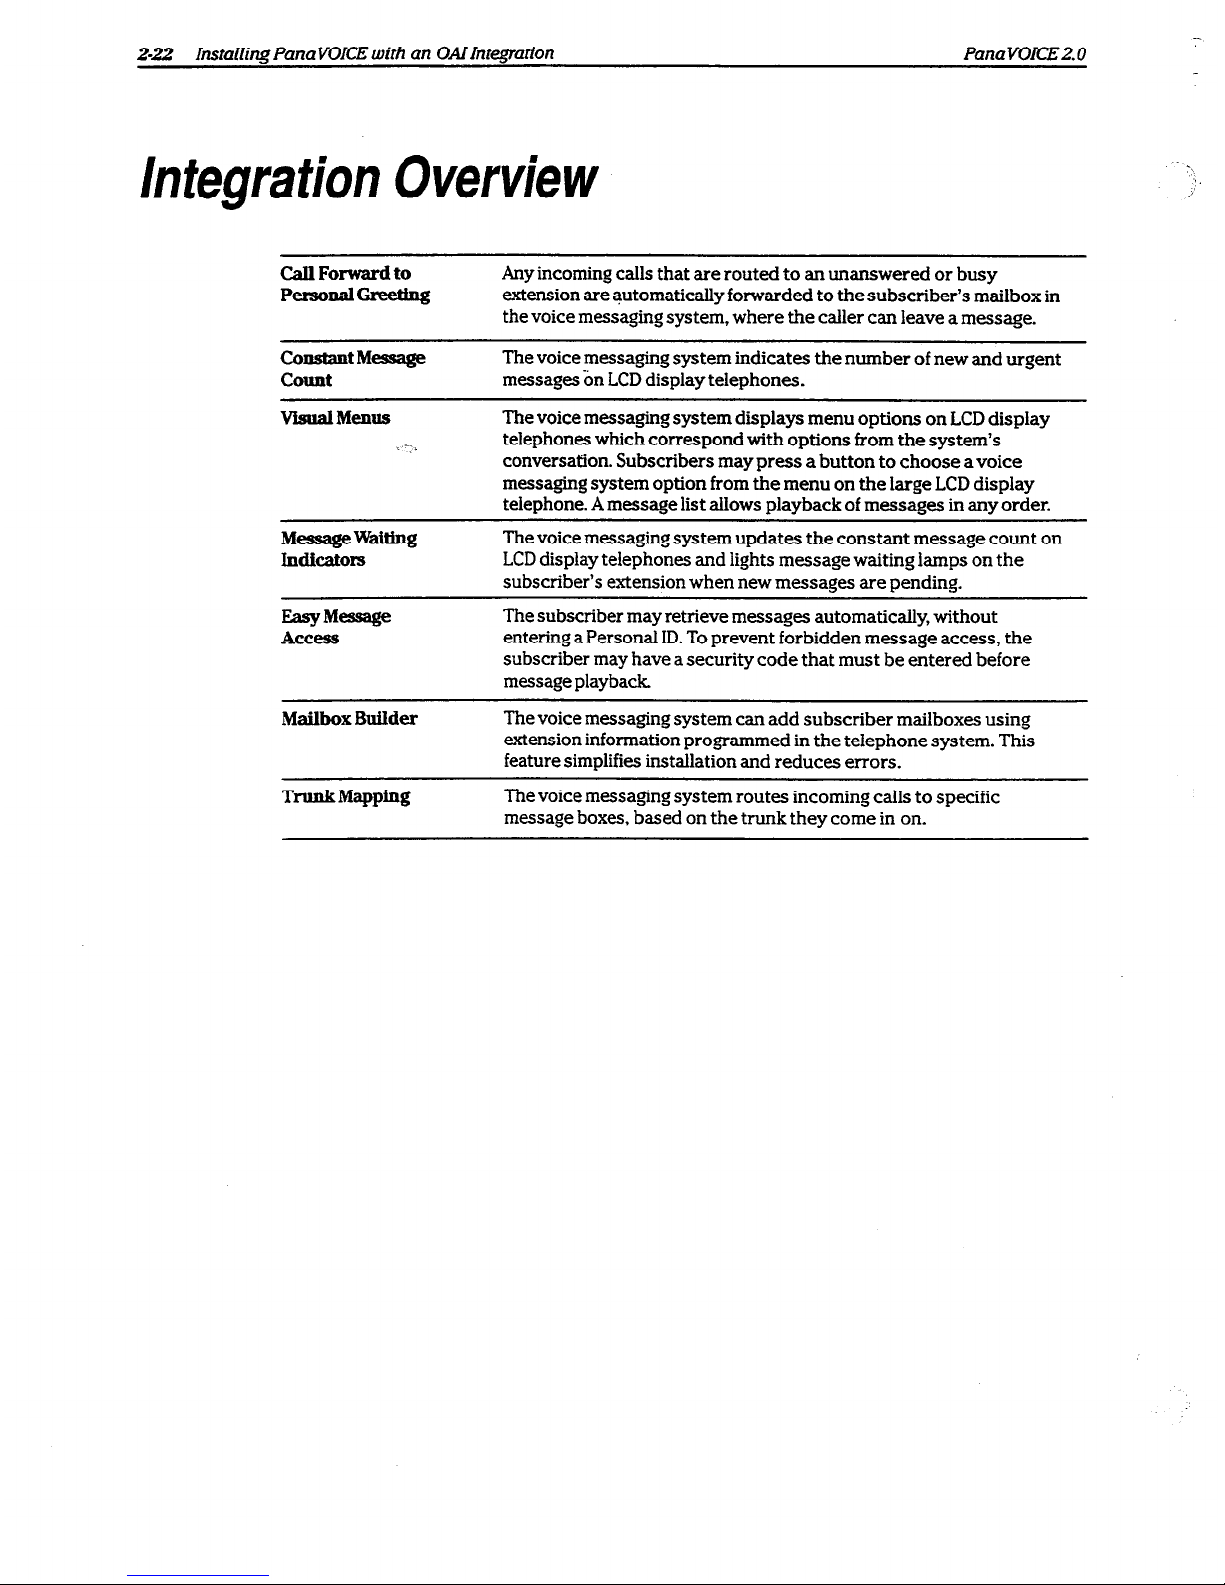
Integration Overview
Call
Forward
to
PersonalciRemg
Any incoming calls that are routed to an unanswered or busy
extension are automatically forwarded to the subscriber’s mailbox in
the voice messaging system, where the caller can leave a message.
ConstantMessage
count
ViSUlMeIlUS
The voice messaging system indicates the number of new and urgent
messages on LCD display telephones.
The
voice messaging system displays menu options on LCD display
telephones which correspond with options from the system’s
conversation. Subscribers may press a button to choose a voice
messaging system option from the menu on the large LCD display
telephone. A message list allows playback of messages in any order.
Messagewaiting
IlldiC.&OlS
The voice messaging system updates the constant message count on
LCD display telephones and lights message waiting lamps on the
subscriber’s extension when new messages are pending.
-+YMessage
Access
The subscriber may retrieve messages automatically, without
entering a Personal ID. To prevent forbidden message access, the
subscriber may have a security code that must be entered before
message playback.
MailboxBuilder
The
voice messaging system can add subscriber mailboxes using
extension information programmed in the telephone system. This
feature simplifies installation and reduces errors.
T-Mapping
The
voice
messaging system routes incoming calls to specific
message boxes, based on the trunk they come in on.
khnician ‘s Guide
..-
Installing Pana VOICE with an OAI Integration
2-23
LN fhe lnfegrafion
Works
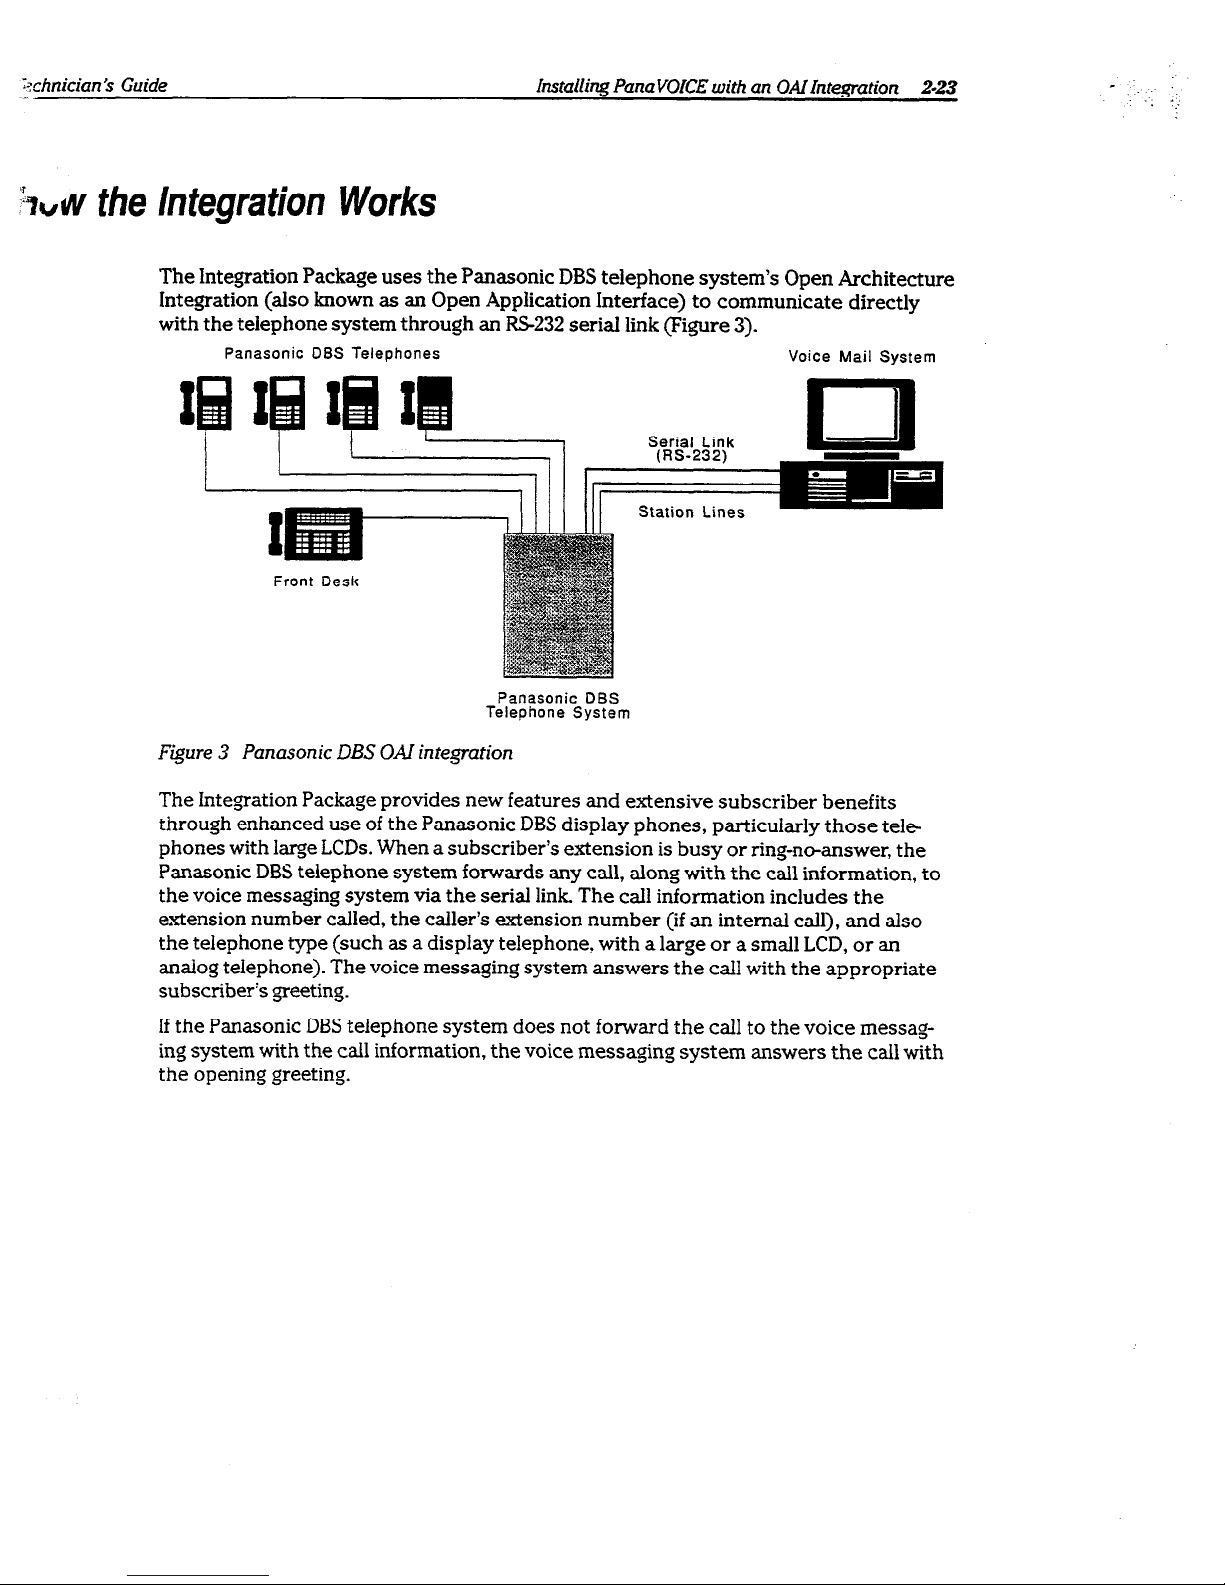
The Integration Package uses the Panasonic DBS telephone system’s Open Architecture
Integration (also known as an Open Application Interface) to communicate directly
with the telephone system through an RS-232 serial link (Figure 3).
Panasonic DBS Telephones
Voice Mail System
Panasonic DBS
Telephone System
Figure 3 Panasonic DBS 0A.l integration
The Integration Package provides new features and extensive subscriber benefits
through enhanced use of the Panasonic DBS display phones, particularly those telephones with large LCDs. When a subscriber’s extension is busy or ring-no-answer, the
Panasonic DBS telephone system forwards any call, along with the call information,
to
the voice messaging system via the serial link The call information includes the
extension number called, the caller’s extension number (if an internal call), and also
the telephone type (such as a display telephone. with a large or a small LCD, or an
analog telephone). The voice messaging system answers the call with the appropriate
subscriber’s greeting.
If the Panasonic DBS telephone system does not forward the call to the voice messaging system with the call information, the voice messaging system answers the call with
the opening greeting.
2-24
Installing PanaVOiCE with an OAI Integration PanaVOKE2_0
lnfegration
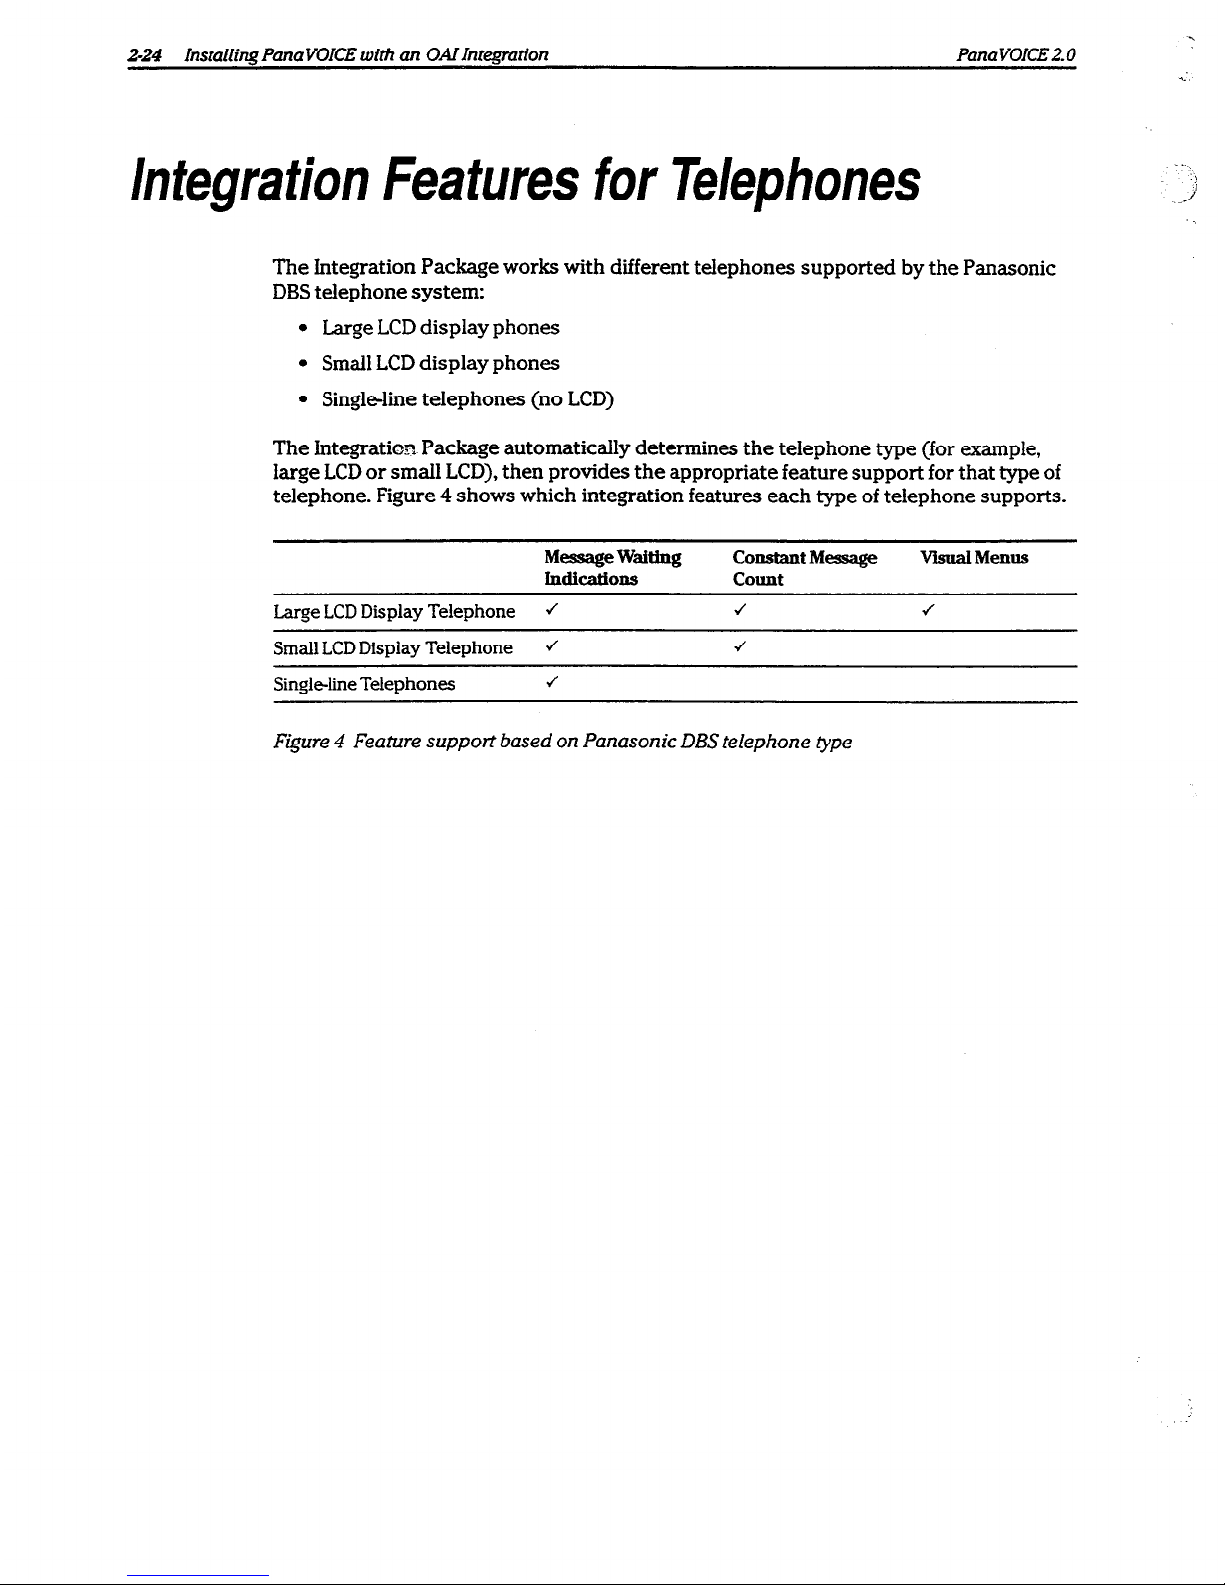
Features for Telephones
The Integration Package works with different telephones supported
by
the Panasonic
DBS telephone system:
l
Large LCD display phones
l
Small LCD display phones
l
Single-line telephones (no LCD)
The Integration Package automatically determines the telephone type (for example,
large LCD or small LCD), then provides the appropriate feature support for that type of
telephone. Figure 4 shows which integration features each type of telephone supports.
MessageWaitIng
Constant Message VisualMenus
hdiCatiOlSS
count
Large
LCD Display Telephone J
J
J
Small LCD Display Telephone J
J
Single-line Telephones
4
Figure 4
Feature support based on Panasonic DBS telephone type
Technician’s Guide
Installing PanaVOICE with an OAI Integration Z-25
Constant Message Count
The voice messaging system displays the number of new and urgent messages on both
small and large LCD Panasonic DBS display phones using a feature called
constant
message count.
With constant message count, the subscriber simply looks at the display telephone’s
LCD to determine how many new and urgent messages, if any, there are to check.
The voice messaging system updates constant message count regardless of whether the
telephone is off-hook or on-hook The refresh interval is configurable on the voice
messaging system. Note that the message waiting indication works as usual with
constant message count.
Examples of Constant Message Count
The constant message count appears on the
second
line of the LCD. The first line
displays the time, day, and date as programmed on the telephone system. For a display
telephone with a large LCD, these examples represent the top two lines only. For a
display telephone with a small LCD, these examples represent what would appear on
the entire display.
New
Messages, inchding Urgent Messages
08~30
Tue MAY 09
7MSGS 1URG
.
The voice messaging system displays the total number of new messages (7 MSGS), and
how many of these are urgent (1 URG). The voice messaging system also activates the
message waiting indication.
New
Messages, No Urgent Messages
08130.Tue. MN 09
7NEwhEG.s
The voice messaging system displays new message information, and activates the
message waiting indication.
No New
Messages
08:30
Tue Mw 09
Yale, Hugh
101
The Panasonic DBS telephone system, not the voice messaging system, controls the
display. The state of the telephone determines what appears on the second line of the
LCD.
 Loading...