

Panasonic Palmcoder PV-L557, Palmcoder VM-L457 Service Manual
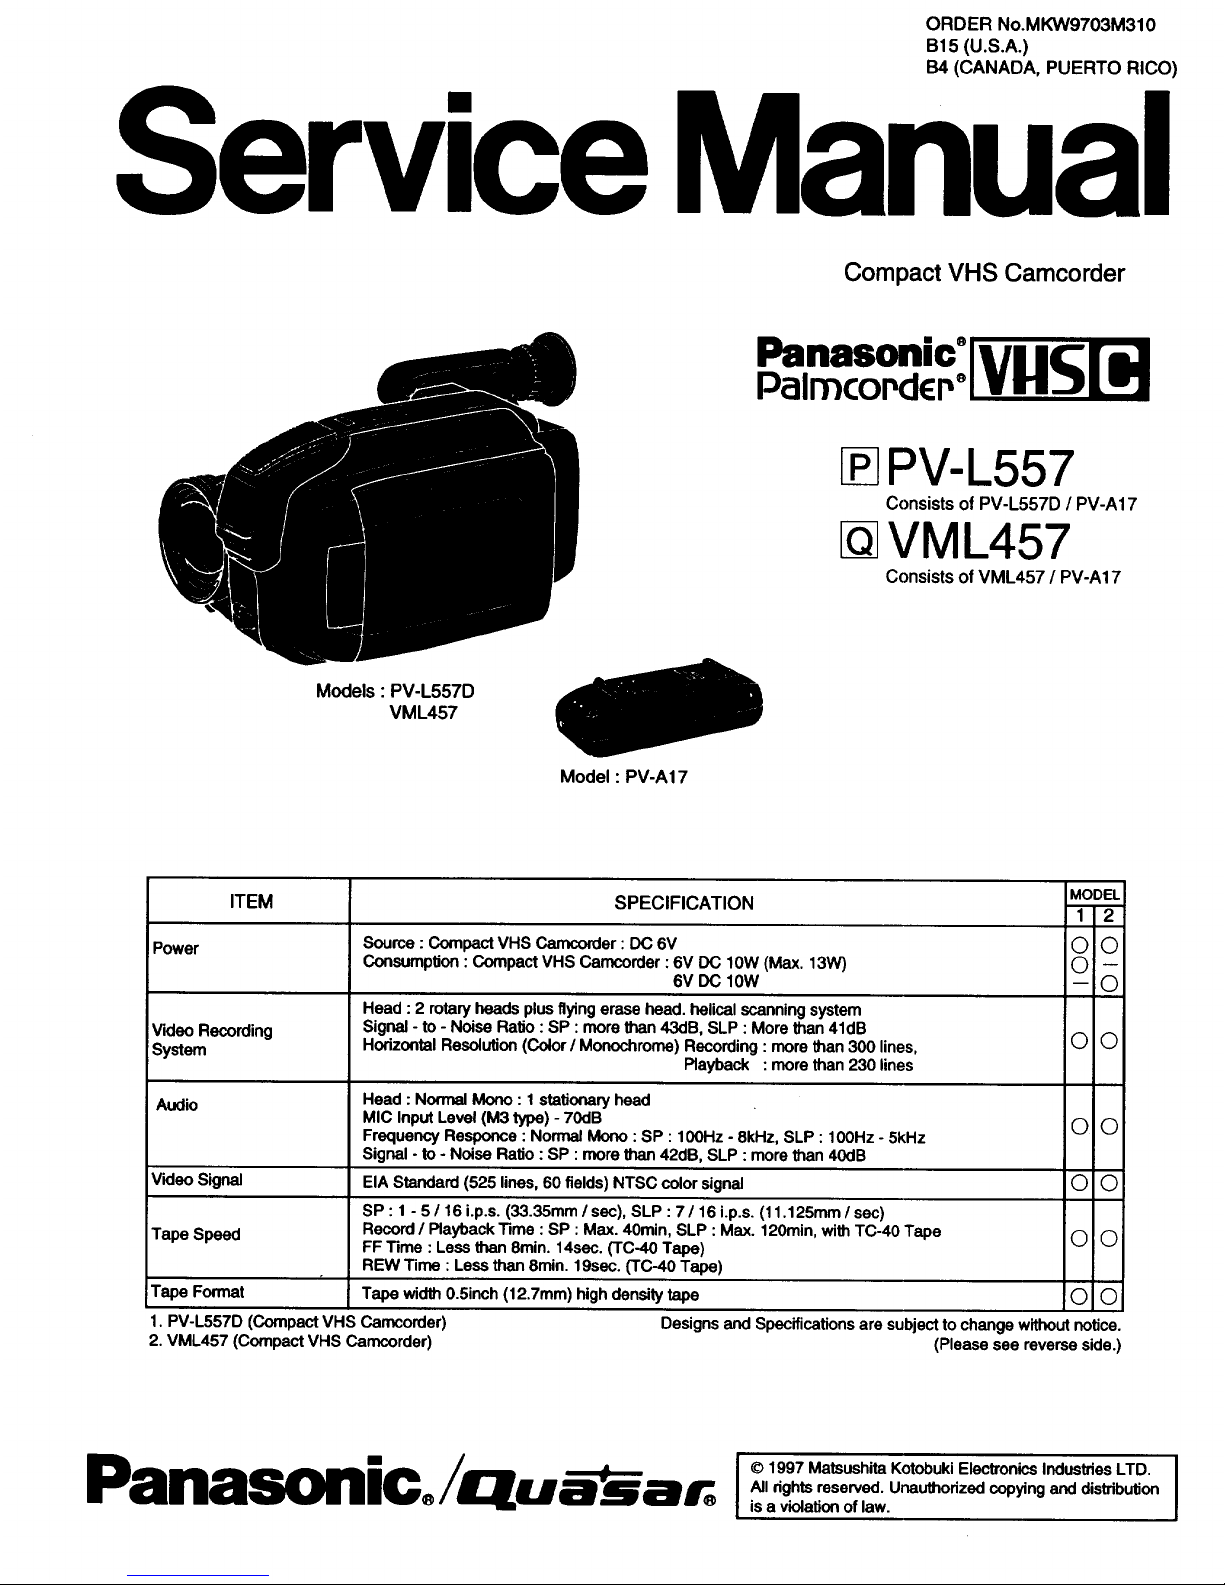
ORDER No.MKW9703M310
B15 (U.S.A.)
B4 (CANADA, PUERTO RICO)
ServiceManual
Compact VHS Camcorder
Panasonic°[ [ T
Palmcor,dcp°!1
I PV-L557
Consists of PV-L557D / PV-A17
VML457
Consists of VML457 / PV-A17
Models : PV-L557D
VML457
Model: PV-A17
ITEM SPECIFICATION MODEL
1 2
Power Source : Compact VHS Camcorder : DC 6V O (_
Consumption : Compact VHS Camcorder : 6V DC 10W (Max. 13W) O --
6V DC lOW -- (_
Head : 2 rotary heads plus flying erase head. helical scanning system
VkJeo Recording Signal - to - Noise Ratio : SP : more than 43dR, SLP : More than 41dB
System Horizontal Resolution (Color / Monochrome) Recording : more than 300 lines, O O
Playback : more than 230 lines
Audio Head : Normal Mono : 1 stationary head
MIC Input Level (M3 type) - 70dB (_) O
Frequency Responce : Normal Mono : SP : 100Hz - 8kHz, SLP : 100Hz - 5kHz
Signal -to - Noise Ratio : SP : more than 42dB, SLP : more than 40dB
EIA Standard (525 lines, 60 fields) NTSC color signal O (_)
SP : 1 - 5 / 16 i.p.s. (33.35mm / sec), SLP : 7 / 16 i.p.s. (11.125mm / sec)
Record / Playback Time : SP : Max. 40min, SLP : Max. 120min, with TC-40 Tape (_) O
FF Time : Less than 8min. 14sec. (TC-40 Tape)
REW Time : Less than 8min. 19sec. (TC-40 Tape)
r
Tape width 0.5inch (12.7mm) high density tape !O
Designs and Specifications are subject to change without notice.
(Please see reverse side.)
VideoSignal
Tape Speed
Tape Format
1. PV-L557D (CompactVHS Camcorder)
2. VML457 (CompactVHS Camcorder)
Panasonic/Uu ar. [©l"'--" '--""° I
All rights reserved. Unauthodzed copying and distribution
® is a violation of law.
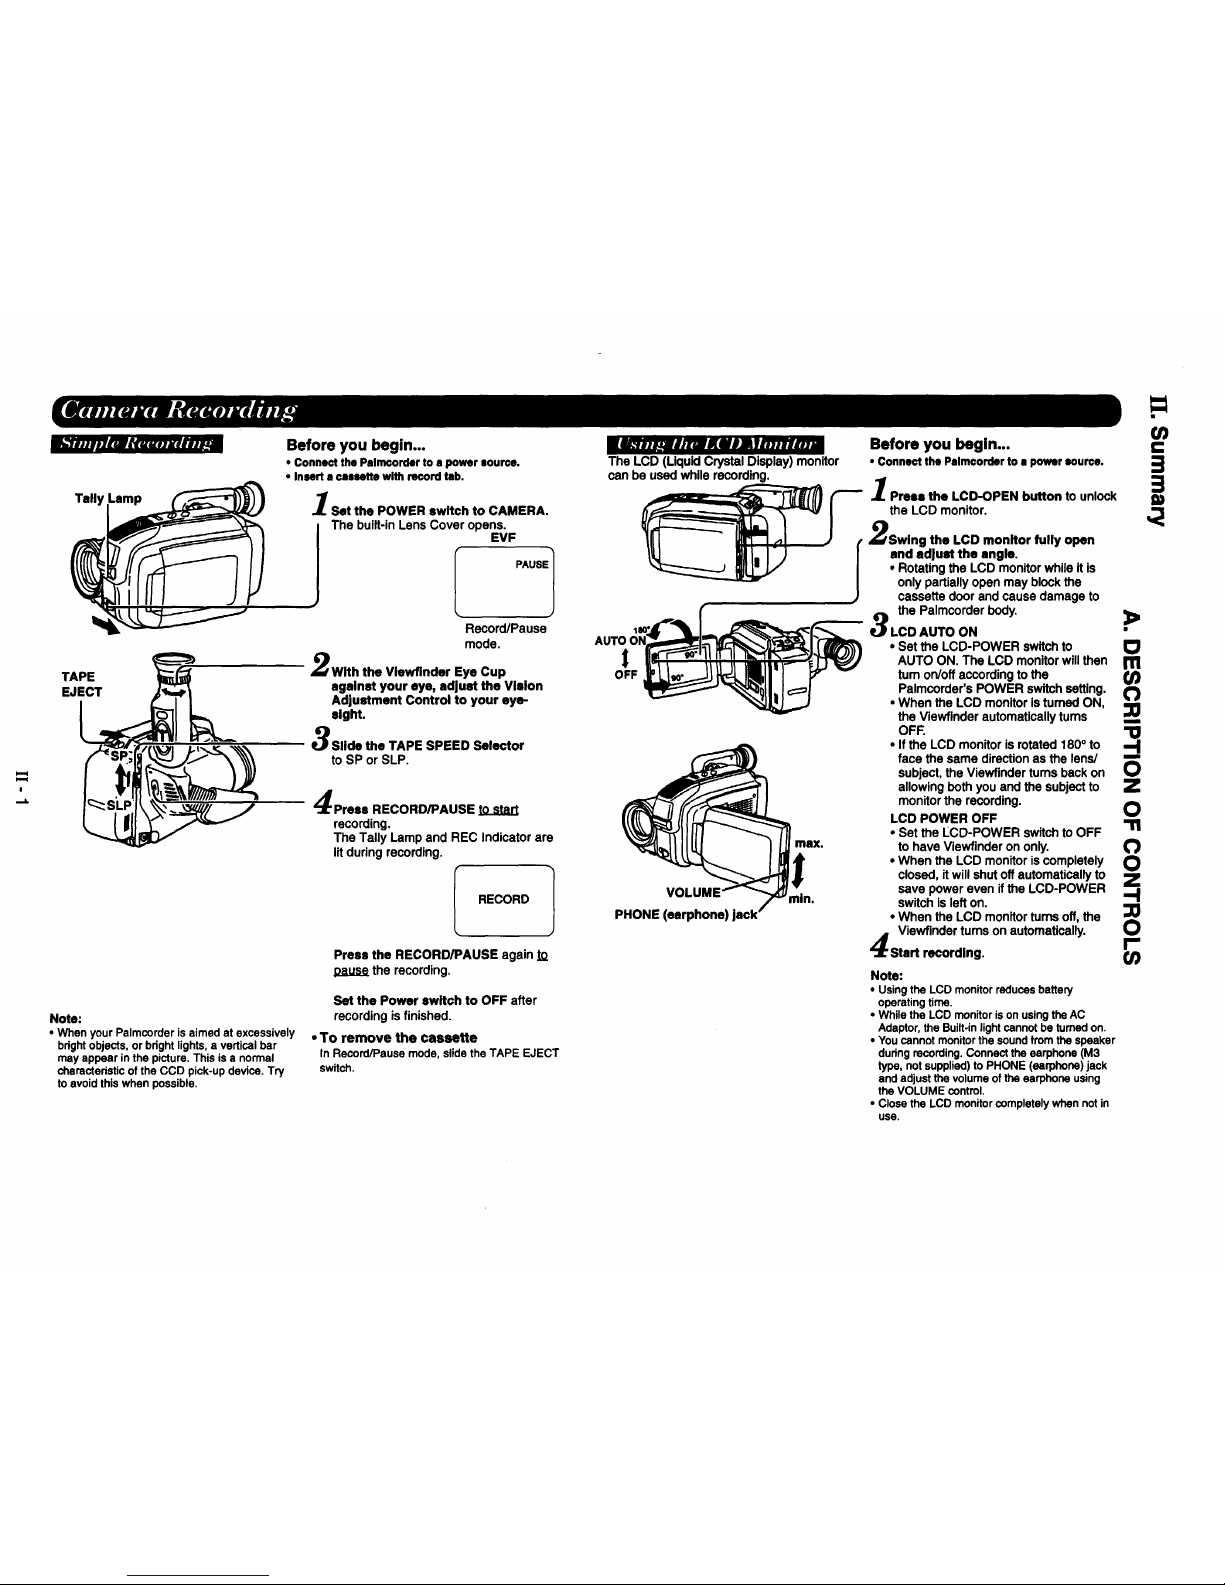
Tally
TAPE
EJECT
Before you begin...
• Connect the Palmcorder to • power aoun:e.
• Insert a cassette with record tab.
Set the POWER switch to CAMERA.
The built-in Lens Cover opens.
EVF
PAUSE1
Record/Pause
mode.
With the Vlewflnder Eye Cup
against your eye, adjust the Vision
Ad|ustment Control to your eye-
eight.
Slide the TAPE SPEED Selector
to SP or SLP.
Press RECORD/PAUSE to start
recording,
The Tally Lamp and REC Indicator are
litduringrecording.
RECORD 1
Press the RECORD/PAUSE again to
the recording.
Note:
• When yourPatmcorderis aimed at excessively
bdghtobjects, or bdghtlights,a verticalbar
may appear inthe picture. This is a normal
charactedsticofthe CCD pick-updevice. Try
to avoid this when possible.
Set the Power switch to OFF after
recording is finished.
• To remove the cassette
In Record/Pause mode, slide the TAPE EJECT
switch.
l_.a ._ajnz_KiOlYma.u.m
The LCD (LiquidCrystalDisplay) monitor
can be used whilerecording.
OFF
max.
VOI
PHONE (earphone)
min.
Before you begin...
• Connect the Palmcorder to a power source.
Press the LCD-OPEN button to unlock
the LCD monitor.
,_Swing the LCD monitor fully open
I andadjust the angle.
• Rotating the LCD monitor while It is
only partially open may block the
cassette door and cause damage to
the Palmcorderbody.
LCDAUTO ON
>
Note:
• Usingthe LCD monitor reducesbattery
operatingtime.
• While the LCD monitor is on usingthe AC
Adaptor,the Built.inlightcannot be turned on,
• Youcannot monitorthe sound kom thespeaker
dudng recording.Connectthe earphone (M3
type, not supplied) to PHONE (earphone) jack
and adjust thevolume of the earphone using
the VOLUME control.
• Close the LCD monitorcompletelywhennot in
use.
.=
O_
3=
• Set the LCD-POWER switch to
AUTO ON. The LCD monitor will then r_
tum on/off according to the Or)
Palmcorcler's POWER switch setting.
• When the LCD monitor is turned ON,
the Viewflnder automatically tums
OFF.• If the LCD monitor is rotated 180° to
face the same direction as the lens/
subject, the Viewfinder turns back on
allowing both you and the subject to
monitor the recording.
LCD POWER OFF
• Set the LCD-POWER switch to OFF
to have Viewfinder on only. (")
• When the LCD monitor is completely O
closed, itwill shut off automatically to Z
save power even if the LCD-POWER -'1
switch is left on.
• When the LCD monitor turns off, the
Viewfinder turns on automatically. 0
Start recording, r-

rk, L_wAwll'lJ _E*m*RJ,J_
Whenever the Pslmcorder Is leftIn RECORD/PAUSE mode for 5 minutes, It will automatl-
cally switch to Stand-by mode to conserve energy. Actlvatlng the Stand-by Quick
Release feature allows you to release the Stand-by mode and resume recording by
slmply pressing the RECORD/PAUSE button. If this feature is not activated, it Is necas-
sary to turn the Palmcorder OFF and back on to CAMERA to start recording again. The
default setting from the factory Is set to the_mode.
Before you begin...
• Connect the Palm€order to a power source.
• Insert • cassette with record tab.
DISPLAY
B[e]lll_J=
RECORD/PAUSE
Continue holding down the UP •
button before and after turning the
POWER switch to CAMERA until the
STAND-BY RELEASE menu screen is
displayed.
Prses UP • or DOWN • to select
_]_ or I__ I .
PUSH VI& KEY
: Pt_H DlSlq.Ay tq_.
You can resume recording from Stand-
by mode by pressing the RECORD/
PAUSE button.
You must set the POWER switchto
OFF, and then to CAMERA to release
the Stand-by mode.
Press DISPLAY to set your selection
and exit this screen.
If you stop recording but plan to resume within 24 hours, use the Edit Standby feature to
make a smooth transition between scenes,
Proel RECORD/PAUSE while
recording.
Set the POWER switch to OFF and
leave the cassette In the Palmcordsr.
When ready to resume recording, set
the POWER switch to CAMERA and
press RECORD/PAUSE.
Note:
• If it is goingtobe longerthen24 hoursbefore
youresumerecording,youwillneedtousethe
POWER Switch manualEasyEditfeaturedescribedbelow.
For proper continuity when taping from the Stop mode, or after changing the Battery
Pack.
"-- I Set the POWER ewltch to VCR.
2_) Press REWIND/SEARCH to go
back a few seconds on the tape.
_) Press PLAY to review the picture
on the Viewfinder.
(_ Press STILL at the location you
wish to continue your recording.
Set the POWER switch to CAMERA.
Prsee RECORD/PAUSE to continue
recording.
 Loading...