

Page 1

Install Manual/Manuel d’installation
安装手册 / インストールマニュアル
DEUTSCH
ITALIANO
ESPAÑOL
한국어
P2 Software/Logiciel P2
P2 软件 /P2 ソフトウェア
Für Erlauterungen in Deutsch, konsultieren
Sie bitte die mitgelieferte CD-ROM.
Per le istruzioni in italiano, vedere il CDROM in dotazione.
Para la explicación en español, consulte
el CD-ROM suministrado.
한국어 설명은 부속품
.
십시오
CD-ROM을
참조하여 주
ENGLISH
FRANÇAIS
中
文
日
本
語
F0604T9028 -F
Printed in Japan 在日本印制 发行:2008 年 2 月
D
VQT0L24-8
Page 2

Contents
Operating Precautions
When Using Windows
1. Before Installing . . . . . . . . . . . . . . . . . . . . . . . . . . . . . . . . . . . . . . . . . . . . 2
2. Precautions in Handling the P2 Card in the Personal Computer . . . . . . . 3
3. Software to be Installed . . . . . . . . . . . . . . . . . . . . . . . . . . . . . . . . . . . . . . . 3
4. Installation of the P2 Software . . . . . . . . . . . . . . . . . . . . . . . . . . . . . . . . . 4
5. Adding a New P2 Device . . . . . . . . . . . . . . . . . . . . . . . . . . . . . . . . . . . . 10
6. Uninstallation of the P2 Software . . . . . . . . . . . . . . . . . . . . . . . . . . . . . . 10
7. Checking the Installed Devices . . . . . . . . . . . . . . . . . . . . . . . . . . . . . . . . 11
8. Setting the internal P2 drive . . . . . . . . . . . . . . . . . . . . . . . . . . . . . . . . . . 12
9. Checking the Installation Status of the P2 Driver . . . . . . . . . . . . . . . . . . 13
10. Checking the Version of the P2 Driver . . . . . . . . . . . . . . . . . . . . . . . . . . 17
11. P2 Card Manager . . . . . . . . . . . . . . . . . . . . . . . . . . . . . . . . . . . . . . . . . . 17
12. Software for each P2 device . . . . . . . . . . . . . . . . . . . . . . . . . . . . . . . . . . 18
When Using Macintosh
PC card slot driver for Macintosh PowerBook . . . . . . . . . . . . . . . . . . . . . 19
P2 card formatter for the Macintosh . . . . . . . . . . . . . . . . . . . . . . . . . . . . 20
Operating Precautions
It is prohibited to redistribute the software included with this supplied CD-ROM, regardless
of whether or not compensation is received. Use of the software stored on the supplied
CD-ROM without permission for the purposes of manufacturing and/or selling any kinds of
software and hardware shall be also prohibited. Furthermore, we will not be responsible
for any losses and/or damage that may arise from using or not being able to use this
system. This shall apply even if we have already been notified of the possibility of such
damage.
Windows, Windows 2000, Windows XP and Windows Vista are trademarks of Microsoft
Corporation of the United States.
Macnintosh and Mac OS X are trademarks of Apple Computer, Inc. of the United States.
Other names of companies and products are trademarks or registered trademarks of the
respective companies.
zIn these instructions, Microsoft
Professional and Windows
“Windows XP Professional,” and “Windows Vista Business,” respectively.
zSimilarly, in these instructions, Macintosh
as “Macintosh,” “Mac OS X” and “PowerBook,” respectively.
®
®
Windows®, Windows® 2000, Windows® XP
Vista Business are given as “Windows,” “Windows 2000,”
®
, Mac OS® X and PowerBook® are given
E-1
Page 3

When Using Windows
1. Before Installing
This supplied CD-ROM installs the software
for P2, used to reference on a personal
computer the content of Panasonic P2
cards.
A personal computer on which this software
will be installed needs to meet the following
conditions:
z OS Windows 2000 SP4 or later
Windows XP Professional
SP2 or later
Windows Vista Business or
higher
z RAM 512MB or greater recommended
1GB or greater recommended
for Windows Vista Business
z CPU Pentium
recommended
®
4 1.5GHz or greater
z The personal computer is equipped with
a drive in which CD-ROM can be read.
z If the OS is Windows 2000 SP4, SP4
patches must be installed.
SP4 patches are included on the supplied
CD-ROM, in a folder named
\Win2000SP4Patch.
The personal computer further needs to
meet the following conditions when actually
using the software or when connecting the
personal computer to the P2 card or P2
devices (P2 drive, P2 deck etc.).
When connecting the P2 devices to the
personal computer via USB2.0:
z A USB2.0 port is provided, and the
USB2.0 driver used is that supplied by
Microsoft.
If said OS is preinstalled in the personal
computer, the driver is already present in
the computer, so you do not need to
check it.
When using the software with the P2
card directly inserted into the card bus
of the personal computer:
z A Type 2 card bus slot is installed.
<Notes>
z Depending on the condition of the
personal computer, phenomena such as
dropping image frames and
disconnecting sound may occur when
playing back material.
z When connecting the P2 devices, be sure
to reserve more free drives than the
number of drives necessary for each P2
device which can be used by the
personal computer. (The number of
drives necessary for a P2 device should
include those necessary for the P2 card
slots and hard disks built into P2 device.)
z The following 3 types of cards only can
be used with the cardbus driver for
Windows 2000. Other types of cards
cannot be used.
AJ-P2C002SG
AJ-P2C004HG
AJ-P2C008HG
z If the OS is Windows Vista Business, the
“User Account Control” dialogue box may
appear when installing, formatting etc. In
this case, click “Continue” and continue
the operation.
z For versions of 64-bit Windows later than
64-bit Windows Vista, the installer is
stored in the folder \Win64 on the CDROM.
ENGLISH
E-2
Page 4

2. Precautions in Handling the P2 Card in the
Personal Computer
When using the software with the P2 card or P2 devices connected to the
personal computer, be sure to install the P2 driver on the personal
computer from the supplied CD-ROM.
If these devices are connected to a personal computer on which the P2 driver is not
installed, these devices may not operate properly.
Do not remove the P2 card from the slot during reading from or writing to
the P2 card. Also, do not insert or remove the USB cable or change the
setting of USB connector.
Otherwise, abnormal operation of the personal computer may result.
Also, perform the following operation before removing the P2 card from the card slot:
z If the P2 card is inserted directly into the card bus in the personal computer, execute
“Safely Remove Hardware” from the system tray on the Windows taskbar.
z If the P2 devices are connected to the personal computer via USB2.0, open My
Computer, then right-click on the particular hardware item into which the P2 card is
inserted, and select “Take Out”.
z Ensure that the personal computer system is set up in such a way that it will not go
into standby mode or hibernation mode during use of the P2 card. If the system is set
up to go into standby mode or hibernation mode while a P2 card is being accessed,
destruction of the files and/or data being executed may result.
3. Software to be Installed
The supplied CD-ROM installs the following
programs:
z P2 driver
z P2 card manager
z Software for each P2 device
When the programs are installed using the
supplied CD-ROM, you are able to format
the P2 card. The P2 card can be formatted
in either of two ways:
E-3
z In Windows Explorer, right-click on the P2
card drive. Select “Format” from the
displayed menu.
z In Windows Explorer, select the P2 card
drive.
From the displayed menu, select “File”,
“Removable Disk” and “Format” in that
order.
The supplied CD-ROM also contains a set
of instruction manuals. Refer to the folder
named \Manuals.
To browse instruction manuals, you need
Adobe
currently installed in the personal computer,
you will need to download this program
from the Adobe Web site.
®
Reader. If Adobe Reader is not
Page 5
4. Installation of the P2 Software
<Notes>
z Install the P2 software after logging into
the personal computer under a user
name that has administrator status.
z We recommend that installation of the
software be started with the P2 devices
to be used, connected to the personal
computer.
When the P2 devices are connected to
the personal computer, Windows
Explorer will additionally display the same
number of drives as device card slots for
these devices.
When no drive is displayed in Windows
Explorer, check that the USB2.0 driver
provided by Microsoft is installed in the
personal computer.
z The P2 card driver needs to be installed
for each card bus slots. If you are using a
personal computer that has two or more
card bus slots, insert the P2 card into
every slot.
The driver may not be installed for any
slot into which the P2 card is not inserted,
causing the P2 card to operate
improperly. If the PC does not recognize
the inserted P2 card, then try re-inserting
it.
z If the OS is Windows 2000/Windows XP
Professional, installation of the software
may fail when the driver signature option
in Windows is set to “Block”.
If the installation fails, select the
Hardware tab in the “System Properties”
window in Control Panel and check that
the driver signature option for the driver is
not set to “Block”.
z If a dialogue box not described in this
manual appears during installation of
the software, click “Cancel” to close
the box.
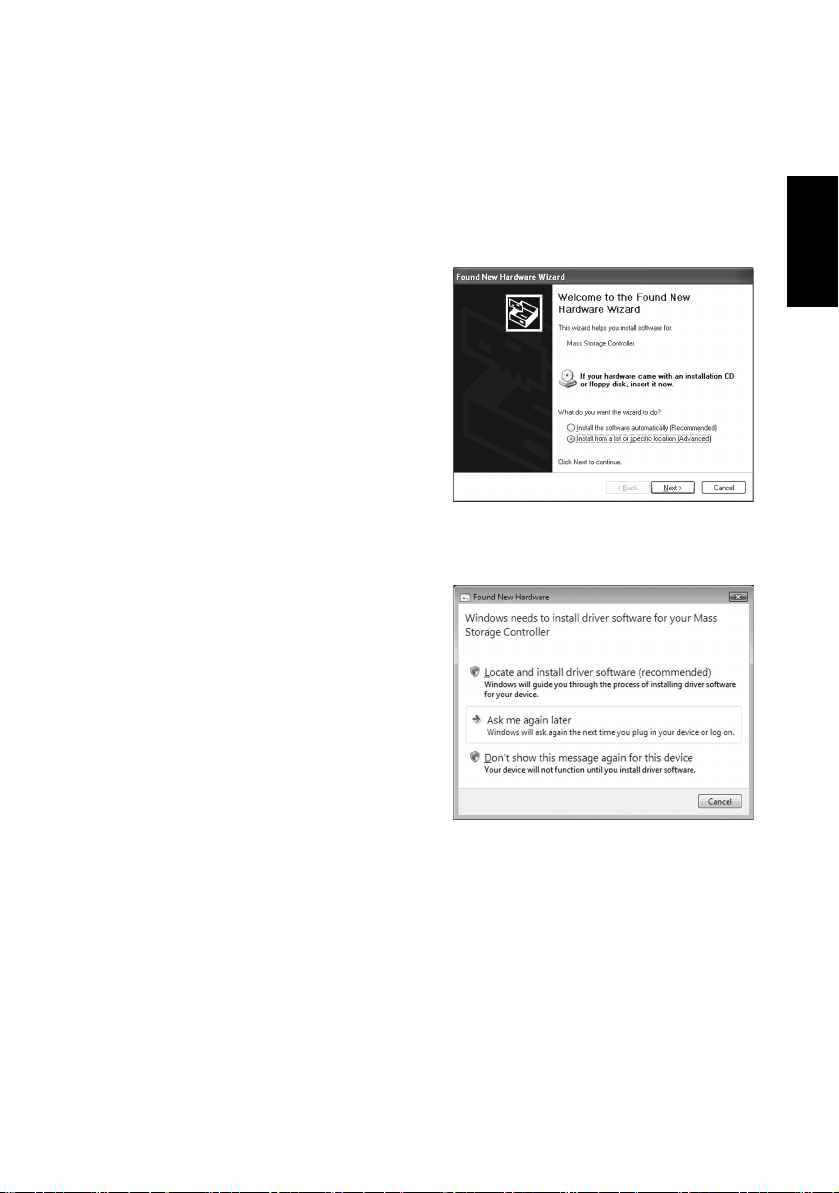
z When a device such as the P2 card is
connected to the personal computer
before the driver is installed, the
following dialogue box appears. Be
sure to click “Cancel” to close the box.
( Fo r Wi n d ow s 20 0 0/
Windows XP Professional)
(For Windows Vista Business)
ENGLISH
Figure 1
Figure 2
E-4
Page 6
z
Users with a P2 driver version prior to
1.07.0048 already installed in Windows
2000/Windows XP Professional
Refer to “10. Checking the Version of the
P2 Driver” for the procedure to check the
version.
To install the new driver, you need to
uninstall the currently installed driver. If
you uninstall this driver, all the
information installed until now will be
deleted. Refer to “6. Uninstallation of the
P2 Software” for the uninstallation
procedure and notes.
Also, you can uninstall the old version of
the P2 driver during the procedure to
upgrade the P2 driver. For both
procedures, you may need to restart
Windows.
z If the OS of the personal computer is
Windows Vista Business, the dialogue
box shown in Figure 3 may appear when
you upgrade the P2 driver. In this case,
click the “OK” button.
After checking each item in “1. Before
Installing”, use the following procedure to
install the P2 software in the personal
computer:
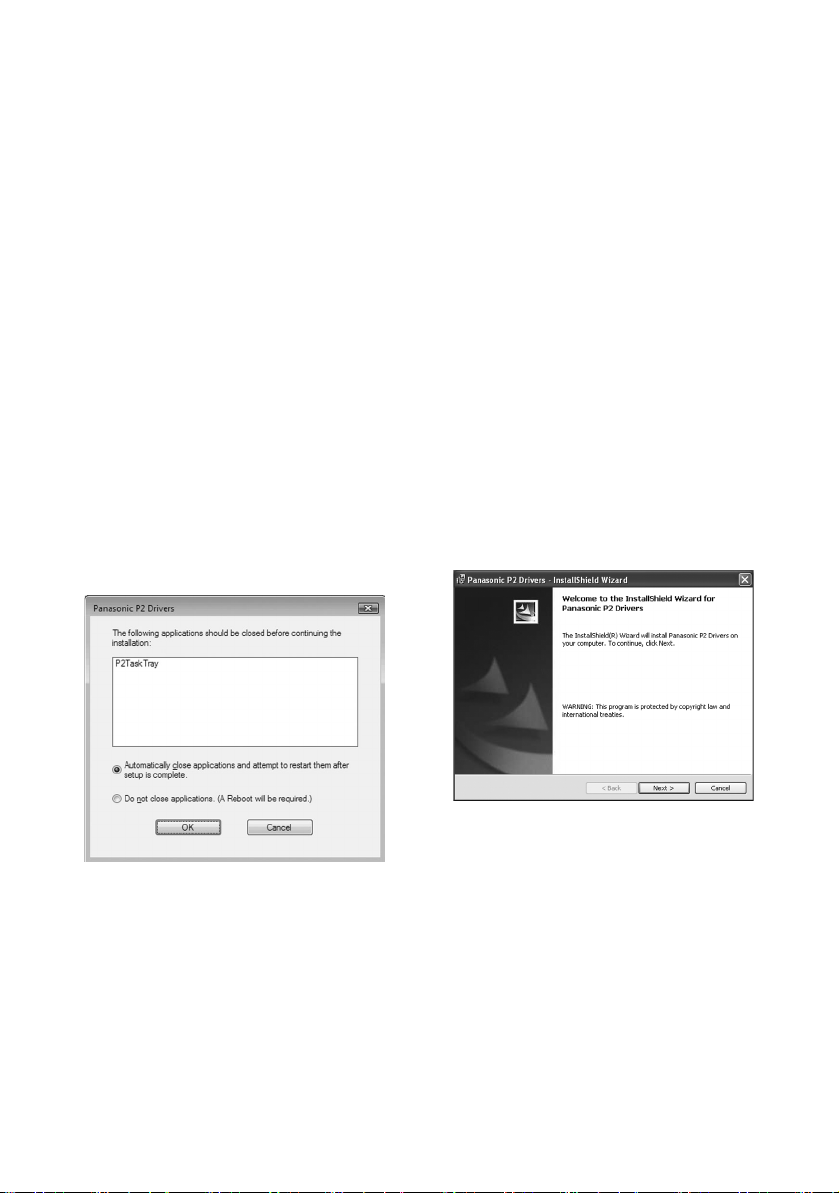
1 Close all applications, then connect
the P2 card or P2 devices to be used
to the personal computer.
When the devices are connected to
the personal computer, the Found
New Hardware Wizard box will
appear automatically, but click
“Cancel” to close the box.
2 Insert the supplied CD-ROM.
3 From “MY COMPUTER”, access the
drive containing the supplied CD-ROM
and execute setup.exe.
The window shown in Figure 4
appears, starting the setup process.
Click “Next”.
E-5
Figure 4
Figure 3
Page 7

4 (Users with a P2 driver version prior
to 1.07.0048 already installed in
Windows 2000/Windows XP
Professional)
The box shown in Figure 5 is
displayed. To install the new driver,
you need to uninstall the currently
installed driver.
If you wish to continue with the
uninstallation, click the “OK” button.
If you wish to uninstall manually, click
“Cancel”. Refer to “6. Uninstallation of
the P2 Software” for information on
manual uninstallation.
Figure 5
5 As shown in Figure 6, the License
Agreement box appears. If you agree
to the terms of the License
Agreement, click “I accept the terms of
the license agreement”, then click
“Next”.
6 As shown in Figure 7, the installation
destination folder setting window
appears. To change the installation
destination folder, click “Change”, and
then create a new folder. Once the
new installation destination folder is
set, click “Next”.
ENGLISH
Figure 7
7 As shown in Figure 8, the installation
start window appears. Click “Install”.
Figure 6
Figure 8
E-6
Page 8

8 As shown in Figure 9, the status
display window appears, indicating
that installation is in progress.
Figure 9
9 As shown in Figure 10, the driver
installation selection window appears
with each device displayed. Select the
device to be installed and check the
appropriate box.
zInstallation of drivers for the
installed devices is not necessary.
For monitoring the installation
status, see Page 13.
10 After pressing the OK button, a
dialogue box appears to prompt for
connection with the P2 card or P2
device as shown in Figure 11. If you
need to install them, connect them,
then click “Install”. If you do not wish to
use them, just click “Cancel”.
If at some future time you want to add
a device that was skipped in the initial
setup, execute the installer again to
perform an overwrite installation of the
device. Please refer to “5. Adding a
New P2 Device” for more information.
<Note>
When the focus shifts to another
window during installation, this box
may be hidden behind that window. If
the box shown in Figure 9 remains
displayed and its status display does
not change, check whether the box
shown in Figure 11 is hidden behind
another window.
E-7
Figure 11
Figure 10
Page 9

11 For Windows 2000/Windows XP
Professional,
The message window shown in Figure
12 may appear. Click “Continue
Anyway”. The message window may
appear several times.
Figure 12
For Windows Vista Business,
The message window shown in Figure
13 may appear. Click “Install this driver
software anyway”. The message
window may apppear several times.
12 (Users with a P2 driver version prior to
1.07.0048 already installed in
Windows 2000/Windows XP
Professional)
The message window shown in
Figure 14 may appear. In this case,
uninstallation of the old version of
the P2 driver is completed, however
the new version of the driver is not
installed.
Click the “OK” button to close the
installer, restart Windows and then
start the installation operation
again from Step
13
As shown in Figure 15, the installation
completion window appears, signifying
completion of the installation.
1.
Figure 14
ENGLISH
Figure 13
Figure 15
E-8
Page 10

14 As shown in Figure 16, a dialogue box
appears, prompting you to restart the
personal computer. Click “Yes” to
restart.
Figure 16
When connecting two P2 drives to the
personal computer, install the P2 software
by following the steps below. (It is
assumed here that portA and portB are
used as the two USB2.0 ports.)
Use two USB2.0 ports exclusively for the
P2 drives.
1 With the personal computer running,
connect one of the P2 drives to portA
and then the other one to portB.
2 Install the P2 software. (See pages 4
to 8)
3 When the installation is completed
and the panel requesting that the
system be restarted (Figure 16 on
Page 9) has appeared, click “No”,
and disconnect each of the P2 drives
from the USB2.0 ports.
4 The P2 drives are now connected
again, but this time one of them is
connected to portB and then the
other one to portA.
E-9
5 After starting the installer again and
click the “Next” button (Page 5),
Figure 17 (on Page 10) appears.
Check the “Repair” check box, and
click the “Next” button.
6 After following the instructions
displayed on the screen, restart the
personal computer.
z Be sure to connect at least one P2
device to the personal computer. Up to
two P2 drives can be connected.
Page 11

5. Adding a New P2
6. Uninstallation of
Device
To connect a new P2 card or P2 device to a
personal computer in which P2 software is
already installed, use the procedure
described in “4. Installation of the P2
Software” to perform an overwrite
installation of the P2 software.
During the overwrite installation, the
window shown in Figure 17 appears, but
the License Agreement box shown in
Figure 6 does not reappear.
In this window, check “Repair”, then click
“Next”.
After following the instructions displayed on
the screen, restart the personal computer.
the P2 Software
To uninstall the P2 software, use the
following procedure:
For Windows Vista Business,
in the “Programs and Features” window in
the “Programs” window in Control Panel,
select “Panasonic P2 Drivers”, then click
“Uninstall”.
For Windows XP Professional,
in the “Add or Remove Programs” window
in Control Panel, select “Panasonic P2
Drivers”, then click “Remove”.
For Windows 2000,
in the “Add/Delete Applications” window in
Control Panel, select “Panasonic P2
Drivers”, then click “Remove”.
After following the instructions displayed on
the screen to complete the uninstallation,
follow the on-screen instructions to restart
the personal computer.
ENGLISH
Figure 17
<Note>
The above screen will be displayed when
the installed P2 software and the installer
have the same version.
E-10
Page 12

<Notes>
z If you uninstall the software, all the
information installed until now will be
deleted so, if you install the software
again, you will need to install the drivers
for all the devices that you will use. We
recommend checking the current
information before uninstallation. Refer to
“7. Checking the Installed Devices” for
the procedure for checking.
z If the OS of the personal computer is
Windows Vista Business, the dialogue
box shown in Figure 18 may appear
when you uninstall the P2 driver. In this
case, click the “OK” button.
7. Checking the
Installed Devices
To check which devices have a driver
installed, use an installer that is the same
version as the P2 software currently
installed and follow the procedure
described in “4. Installation of the P2
Software” to perform an overwrite
installation.
If you start the installation, then click “Next”,
the window shown in Figure 17 (on Page
10) appears. In this window, check “Repair”,
then click “Next”. If you follow the
instructions displayed on the screen, the
window shown in Figure 19 appears.
In this window, you can check which
devices have a driver installed by checking
if “Installed” is displayed.
After checking, click “Cancel” to close the
window.
E-11
Figure 18
Figure 19
Page 13

8. Setting the internal
P2 drive
To use a personal computer in which the P2
drive is incorporated in the 5-inch bay,
install the P2 card software, connect the P2
drive to the personal computer, then
perform the following setting:
1 For Windows Vista Business/
Windows XP Professional,
select the following: “Start” > “All
Programs” > “Panasonic P2” > “Set
P2 Drive Settings” > “Enable Internal
Drive”.
For Windows 2000,
select the following: “Start” >
“Program” > “Panasonic P2” > “Set
P2 Drive Settings” > “Enable Internal
Drive”.
2 The box shown in Figure 20 appears.
Click “OK”.
ENGLISH
Figure 20
E-12
Page 14

9. Checking the Installation Status of the P2
Driver
When the standard driver is installed via the
Found New Hardware Wizard box (Figure
1), or when the P2 driver is uninstalled for
some reason, the P2 device does not
operate properly.
If any of the following events occurs, check
that the P2 driver is properly installed; if it is
not, reinstall it.
z P2 card or P2 device is not recognized.
z Reading from the P2 card or P2 device
cannot be performed.
z Writing to the P2 card or P2 device
cannot be performed.
z Image frame dropping occurs frequently
during playback from the P2 card or P2
device, indicating that there is a
performance problem.
How to check the P2 driver
<Note>
When checking that the P2 driver is
properly installed, be sure to connect the
appropriate device to the personal
computer. Devices not connected to the
personal computer cannot be checked
using the following method:
For Windows Vista Business,
select: “Start” > “Control Panel” >
“System and Maintenance”. Click on Device
Manager.
For Windows XP Professional,
select: “Start” > “Control Panel” >
“System”. The System Properties window
appears. Select the Hardware tab, then
click on Device Manager.
For Windows 2000,
select: “Start” > “Settings” > “Control
Panel” > “System”. The System Properties
window appears. Select the Hardware tab,
then click on Device Manager.
E-13
Page 15

1 Check the P2 device driver display.
Checking the P2 card driver
“IDE ATA/ATAPI controllers” “Panasonic P2 Card” is set.
“P2 Disk Drive” - “P2Card Series
Cached Disk” is set.
Checking the P2 USB devices drivers
“Universal Serial Bus controllers” “Panasonic P2 Series USB Device” is
set.
ENGLISH
P2 card driver
P2 devices drivers
Figure 21
E-14
Page 16

Checking the P2 card 1394b driver
For Windows XP Professional,
Click “MATSHITA AJ-PCD20 #1 IEEE 1394 SBP2 Device” listed under “Disk drives,”
then click on the “Driver” tab in the “MATSHITA AJ-PCD20 #5 IEEE 1394 SBP2
Device” property panel. “Provider” - “Panasonic” is set.
P2 devices 1394b
drivers
E-15
Figure 22
Page 17

For Windows Vista Business,
Click “P2 SBP2 Device”. There are 5 items displayed from “MATSHITA AJ-PCD20 #1
IEEE 1394 SBP2 Device” to “MATSHITA AJ-PCD20 #5 IEEE 1394 SBP2 Device”.
P2 devices 1394b
drivers
Figure 23
ENGLISH
E-16
Page 18

10. Checking the
11. P2 Card Manager
Version of the P2
Driver
For Windows Vista Business,
select: “Control Panel” > “Programs” >
“Programs and Features“ > “View” >
“Details”. Press the “Alt” key to display the
menu, select “Display settings“ in the “View”
menu, check the “Version” check box and
click the “OK” button to display the version.
For Windows XP Professional,
in the “Add or Remove Programs” window
in Control Panel, select “Panasonic P2
Drivers”, then refer to the support
information.
For Windows 2000,
in the “Add/Delete Applications” window in
Control Panel, select “Panasonic P2
Drivers”, then refer to the support
information.
After P2 software installation, the “P2 Card
Manager” icon will be added to the control
panel and task bar.
Card names and passwords can be set for
the P2 cards by using the “P2 Card
Manager”.
Start the “P2 Card Manager” and select the
desired P2 card from the recognized P2
cards, the “Change Card Name” and
“Change Password” buttons will be
enabled. After clicking the “Refresh” button,
the latest information on the P2 card will be
determined and displayed.
(Card names and passwords for unused P2
cards are not set.)
<Note>
If the P2 card cannot be written to because
the write protect switch is set to
“PROTECT” etc, the card name and
password cannot be set.
<Change Card Name>
Card names can be changed from this
screen. A password is required for the
change.
No password is set when a new P2 card is
inserted. Be sure to use the required
password for P2 cards that are inserted and
use a password.
E-17
1) Click the “Change Card Name” button,
and enter the password and the card
name.
2) After clicking the “OK” button, the card
name can be changed. Pressing the
“Cancel” button returns the user to the
“P2 Card Manager” screen without
changing the card name.
Page 19

<Change Password>
Passwords for protecting card names can
be controlled from this screen.
12. Software for each
P2 device
1) Click the “Change Password” button, and
enter the old and new passwords.
Enter the current password in the “Old
Password” column.
Enter a new password in the “New
Password” column, and enter the same
new password in the “New Password
Confirm” column.
2) Click the “OK” button to confirm the
change. Click the “OK” button when the
“Successfully changed. When you eject,
..... information may be shown.” message
is displayed.
3) Pressing the “Cancel” button returns the
user to the “P2 Card Manager” screen.
4) After the password change, the P2 card
information whose password has been
changed will disappear from the “P2
Card Manager” screen. Remove the P2
card.
After installation of the P2 software,
software for each P2 device will be installed
simultaneously. For software for each
device, refer to the instruction manual of the
respective software.
ENGLISH
E-18
Page 20

Panasonic Broadcast & Television Systems Company
Unit Company of Panasonic Corporation of North America
Executive Office:
One Panasonic Way 4E-7, Secaucus, NJ 07094 (201) 348-7000
EASTERN ZONE:
One Panasonic Way 4E-7, Secaucus, NJ 07094 (201) 348-7196
Southeast Region: (201) 348-7162
WESTERN ZONE:
3330 Cahuenga Blvd W., Los Angeles, CA 90068 (323) 436-3500
Government Marketing Department:
One Panasonic Way 2E-10, Secaucus, NJ 07094 (201) 348-7587
Broadcast PARTS INFORMATION & ORDERING:
9:00 a.m. – 5:00 p.m. (EST) (800) 334-4881/24 Hr. Fax (800) 334-4880
Emergency after hour parts orders (800) 334-4881
TECHNICAL SUPPORT:
Emergency 24 Hour Service (800) 222-0741
Panasonic Canada Inc.
5770 Ambler Drive, Mississauga, Ontario L4W 2T3 (905) 624-5010
Panasonic de Mexico S.A. de C.V.
Av angel Urraza Num. 1209 Col. de Valle 03100 Mexico, D.F. (52) 1 951 2127
Panasonic Puerto Rico Inc.
San Gabriel Industrial Park, 65th Infantry Ave., Km. 9.5, Carolina, Puerto Rico 00630 (787) 750-4300
Professional & Broadcast IT Systems Business Unit Europe
Panasonic AVC Systems Europe a Division of Panasonic Marketing Europe GmbH
Hagenauer Str. 43, 65203 Wiesbaden-Biebrich Deutschland Tel: 49-611-235-481
制造商:松下电器产业株式会社
日本大阪府门真市大字门真 1006 番地
Web Site: http://panasonic.net
进口商:松下电器(中国)有限公司
北京市朝阳区光华路甲 8 号和乔大厦 C 座
松下電器産業株式会社 システム事業グループ
〒 571-8503 大阪府門真市松葉町 2 番 15 号 i(06)6901ー 1161
C 2004 Matsushita Electric Industrial Co., Ltd. All Rights Reserved.
 Loading...