

Panasonic Omnivision VHS PV-C2061, Omnivision PV-C2081 Operating Instructions Manual
Ornnlvi81on {_
Panasonic
Combination VCR
Operating Instructions
Model No. PV-C2061/PV-C2081
i-
/
. Initial Setup and Connection Procedures are on pages 8 to 13
• SELF-DEMO Procedure is on page 4
3
_ s an ENERGY STAFP Partner,
Matsushita Electric Corporation
of America has determined that
this product or product model
meets the ENERGY STAFP
guidelines for energy efficiency.
Please read these instructions carefully before attempting to connect,
operate, or adjust this product. Please save this manual.
Spanish Quick Use Guide is included.
(Gufa para rapida consulta en espafiol est,_ incluida.)
LSQT0332A
_1 lJ,I _ " t.- I- .el I,.ell
ImportantSafeguardsandPrecautions
I READAND RETAIN ALL SAFETY AND
OPERATINGINSTRUCTIONS. HEED ALL
WARNINGS IN THE MANUAL AND ON UNIT
I INSTALLATION
1 POWER SOURCE CAUTION
Operate onlyfrom power source indicatedon unit
or in this manual. If uncertain, have your Electdc
Utility Service Company or Video Products Dealer
verity your home power source.
2 POWER CORD PLUG
For safety, this unit has a polarized type plug (one
wide blade), or a three-wire grounding type plug.
Always hold the plugfirmly and make sure your
hands are dry when plugging in or unplugging the
AC power cord. Regularly remove dust, dirt, etc.
on the plug.
POLARIZED PLUG CAUTION:
The plug fits into outlet one way. If it cannot be fully
inserted, tryreversing it. If it still will not fit, have an
electdcian install the properwall outlet. Do not
tamper with the plug.
GROUNDING PLUG CAUTION:
The plugrequires a three-hole grounding outlet.
If necessary, have an electrician install the proper
outlet. Do not tamper with the plug.
3 POWER CORD
To avoid unit malfunction,and to protectagainst
electricalshock,fireor personalinjury:
- Keeppowercordaway from heatingappliances
and walkingtraffic.Do not restheavyobjectson,
or rollsuchobjectsover the power cord.
- Do nottamperwiththe cord inanyway.
- An extensioncordshouldhave the sametype
plug(polarizedorgrounding)and mustbe
securelyconnected.
- Overloaded walloutletsor extensioncordsisa
fire hazard.
- Frayedcords,damaged plugs,and damaged or
crackedwireinsulationare hazardousand should
be replacedby a qualifiedelectrician.
4 DO NOT BLOCK VENTILATION HOLES
Ventilation openings in the cabinet release heat
generated dudng operation. If blocked, heat
build-up may result in a fire hazard or heat
damageto cassettes.
Foryour protection:
a. Never cover ventilation slots while unit is ON,
or operate unit while placed on a bed, sofa,
rug, or other soft surface.
b. Avoid built-in installation, such as a book case
or rack, unless properly ventilated,
5 AVOID EXTREMELY HOT LOCATIONS OR
SUDDEN TEMPERATURE CHANGES
Do not place unit overor near a heater or
regulator, in direct sunlight, etc. If unit is suddenly
moved from a cold place to a warm place,
moisture may condense in unit and on the tape
causing damage.
6 TO AVOID PERSONAL INJURY
• Never place unit on support or stand that is not
firm, level, and adequately strong.
The unit could fall causing sadous ,_1=.__.
injury to a child or adult and
damageto the unit.
• Move any appliance and cart
combination with care.
Quick stops, excessive force, and
unevensurfaces may cause objects to overturn.
• Carefully follow all operating instructions.
2
I OUTDOOR ANTENNA INSTALLATION I
1 SAFE ANTENNA AND CABLE CONNECTION
Anoutside antenna orcable system must be properly
grounded to provide some protection
against built up static charges =_._
and voltage. Section 810 _ _-%_ -.
of the National Electdcal _ _ "_._==_
Code, ANSI/NFPA 70 (in I _'] J_-_=_=--,_
Canada, part 1 of the I.._._.:-."=:,.. ....
Canadan Electdcal Code) -_L:]_,,t,_._=_:..._.-.
provides information ..............
regarding proper grounding of the mast and supporting
structure, grounding of the lead-in wire to an antenna
discharge unit, size of grounding conductors, location of
antenna discharge unit, connection to grounding
electrodes, and requirements for the grounding electrode.
2 KEEP ANTENNA CLEAR OF HIGH VOLTAGE
POWER LINES OR CIRCUITS
Locate an outside antenna system well away from power
lines and electric light or power circuits so it will never
touch these power sources should it ever fall. When
installing antenna, absolutely never touch power lines,
circuits or other power sources asthis could be fatal.
I USING THE UNIT I
Beforeunitisbrought outof storageormovedtoa newlocation,
referagaintotheINSTALLATIONsectionofthesesafeguards.
1 KEEP UNIT WELL AWAY FROM WATER OR
MOISTURE, suchas vases, sinks,tubs,etc.
2 IF EXPOSED TO RAIN, MOISTURE, OR
STRONG IMPACT, unplugunit andhave it inspected
bya qualifiedservicetechnicianbeforeuse.
3 ELECTRICAL STORMS
Dudnga lightningstorm,or beforeleaving unitunusedfor
extendedperiodsoftime,disconnectall equipmentfrom
thepowersource as wellas the antennaandcablesystem.
4 WHEN UNIT IS PLUGGED IN
• DO NOT OPERATE IF:
- liquidhasspilledinto unit.
- unitwas droppedor otherwisedamaged.
- unitemitssmoke, malodors, ornoises.
Immediatelyunplugunit,and have it inspectedby a
servicetechniciantoavoidpotentialfire andshockhazards.
• Neverdroporpushanyobjectthroughopeningsinunit.
Touchinginternalpartsmaycauseelectricshockor timhazard.
• Keep magnetic objects, such as speakers, away from
unit to avoid electdcal interference.
5 USING ACCESSORIES
Use only accessories recommended by the manufacturer
to avoid risk of fire, shock, or other hazards.
6 CLEANING UNIT
Unplugunit.Use aclean,dry,chemicallyuntreatedclothto
genT removedustor debris.DO NOTUSEcleaningfluids,
aerosols,or forcedairthatcouldover-spray,orseep intounitand
causeelectricalshock.Anysubstance,suchas wax,adhesive
tape,etc.may marthecabinetsurface.Exposuretogreasy,
humid,or dustyareasmayadverselyaffectintemalparts.
I SERVICE I
1 DO NOT SERVICE PRODUCT YOURSELF
If,aftercarefullyfollowingdetailedoperatinginstructions,the
unitdoes notoperate properly,do not attempttoopen or
removecovers, or makeany adjustmentsnotdescribed in the
manual.Unplugunitand contacta qualifiedservicetechnician.
2 REPLACEMENT OF PARTS
Make surethe service technicianusesonlyparts specified
bythemanufacturer,or haveequal safetycharacteristics
as originalparts. The useof unauthorizedsubstitutesmay
resultinfire, electricshock,or otherhazards.
3 SAFETY CHECK AFTER SERVICING
Afterunitisserviced or repaired,requestthat athrough safety
checkbe done asdescribed in themanufacturer'sservice
literaturetoinsurevideounitis insafeoperatingcondition.
Safety Precautions/Mesures de s curitd
Warning : To prevent fire or shock hazard, do not expose this equipment to rain or moisture.
Caution : To prevent electric shock, match wide blade of plug to wide slot, fully insert.
Avertissement :Afin de pr_venir tout risque d'incendie ou de chocs electriques, ne pas
exposer cet appareil b la pluie ou b une humidit_ excessive.
Attention : Pour dviter les chocs dlectriques, introduire la lame la plus large de la fiche dans
la borne correspondante de la prise et pousser jusqu'au fond.
This video recorder, equipped with the HQ (High Quality) System, is compatible with
existing VHS equipment.
Only use those tapes with the _ mark. It is recommended that only cassette tapes that
have been tested and inspected for use in 2, 4, 6, and 8 hour VCR machines be used.
This television receiver provides display of television closed captioning in accordance with
§15.119 of the FCC rules.
FCC WARNING : Any unauthorized changes or modifications to this equipment
would void the user's authority to operate.
CAUTION: TO REDUCE THE RISK
OF ELECTRIC SHOCK, DO NOT
REMOVE COVER (OR BACK)
NO USER-SERVICEABLE PARTS
INSIDE REFER SERVICING TO
QUALIFIED SERVICE PERSONNEL
This symbol warns the user that uninsulated
voltage within the unit may have sufficient
magnitude to cause electric shock.
Therefore, it is dangerous to make any kind
of contact with any inside part of this unit.
This symbol alerts the user that important
literature concerning the operation and
maintenance of this unit has been included.
Therefore, it should be read carefully in order
to avoid any problems.
3
Congratulations
on your purchase of one of the most
sophisticated and reliable products on the market
today. Used properly, it will bring you and your
family years of enjoyment. Please fill in the
information below. The serial number is on the
tag located on the back of your unit.
r Date of Purchase
Dealer Purchased From
Dealer Address
Dealer Phone No.
Model No.
Serial No.
f
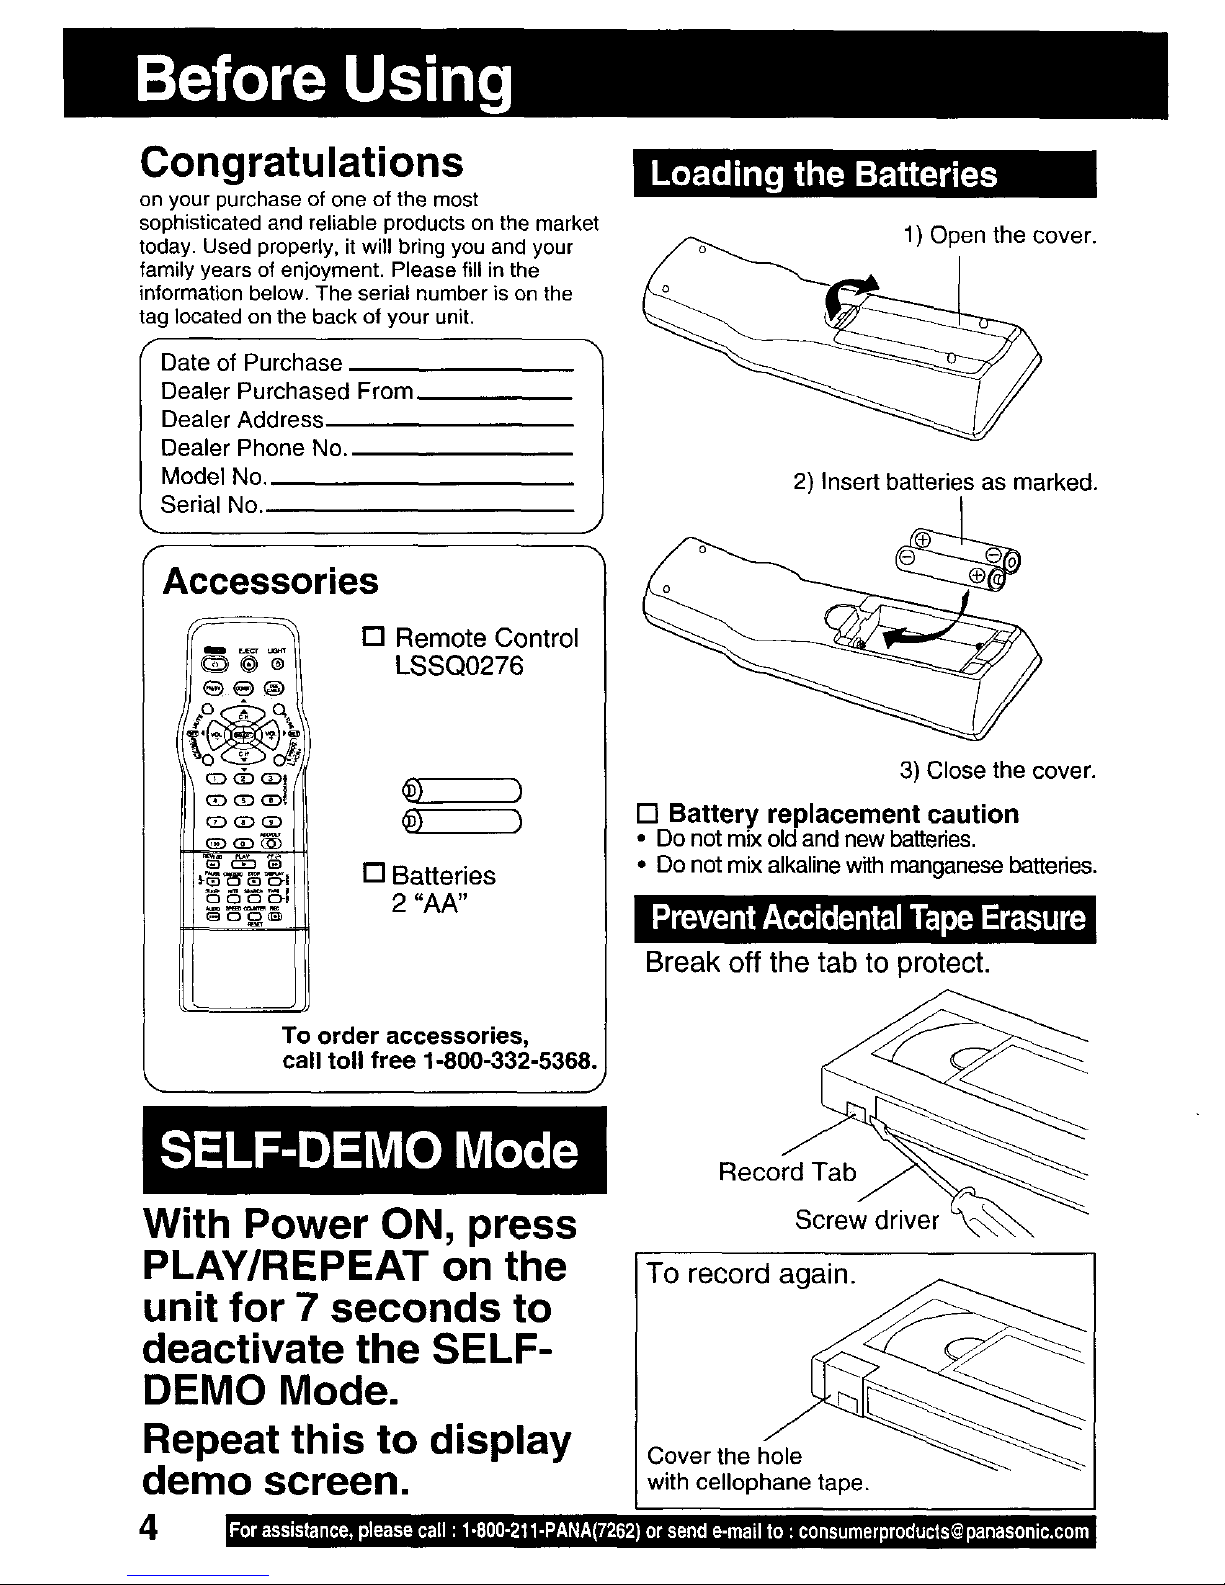
Accessories
(3D CD (DI
c3D(3D (3D
O O O CTI
[] Remote Control
LSSQ0276
[] Batteries
2 "AA"
To order accessories,
call toll free 1-800-332-5368.
J
1) Open the cover.
2) Insert batteries as marked.
3) Close the cover.
[] Battery replacement caution
• Do not mix old and new batteries.
• Do not mix alkaline with manganese batteries.
Break off the tab to protect.
Record Tab
With Power ON, press
PLAY/REPEAT on the
unit for 7 seconds to
deactivate the SELF-
DEMO Mode.
Repeat this to display
demo screen.
Screw driver
To record again.
Cover the hole
with cellophane tape.
Important Safeguards and Precautions / Safety Precautions ......... 2
Before Using ......................................................................................... 4
Table of Contents ................................................................................. 5
Location of Controls ............................................................................ 6
Initial Setup for ANT. / Cable Connection .......................................... 8
Initial Setup for DSS / Cable box Connection ................................. 10
m
Reset Language, Channels, Clock, Time Zone Adjust ................... 12
Playback a Tape ................................................................................. 14
m
Record On a Tape .............................................................................. 14
Copy Your Tapes (Dubbing) ............................................................. 15
TV Operation ...................................................................................... 16
MTS Broadcast / TV Stereo System ................................................. 17
TV Timer Features .............................................................................. 18
Closed Caption System ..................................................................... 20
Picture Adjustment ............................................................................ 21
FM Radio / FM Transmitter ................................................................ 22
(Model PV-C2081 only)
Timer Recording ................................................................................. 24
Timer Programming using
VCR Plus+®System ............................................................................ 26
Cable Box Universal Remote Control Feature ................................ 28
Tape Operation ................................................................................... 30
Special VCR Features ........................................................................ 33
V-Chip Control Feature ...................................................................... 37
Audio Features (Model PV-C2081 only) ........................................... 40
On-Screen Display (OSD) .................................................................. 41
Unit Information ................................................................................. 42
Before Requesting Service ............................................................... 43
Service Center List ............................................................................ 44
Limited Warranty ................................................................................ 45
Spanish Quick Use Guide / Gufa para rbpida consulta .................. 46
Index .................................................................................................... 48
5

Light Tower "MIlluminated Remote Control
LIGHT button:
When LIGHT is pressed, available buttons in the selected mode light up and the selected mode
button (COMBO or DSS CABLE) flashes for 5 seconds. If no button is pressed, light goes out in 5
seconds to conserve batteries. Also, by holding down a button, you can confirm the selected mode
(mode button will flash) in the dark.
EJECT button:
When EJECT is pressed, the tape is ejected from Cassette Compartment.
If EJECT is pressed during recording, the unit will net respond to the command.
EJECT
Page 6
POWER
Page 8
FM/TV
Page 22
MUTE
Page 16
CHANNEL UP/DOWN Pg. 16
SELECT UP/DOWN Pg. 13
ACTION
Page 12
NUMBER KEYS
Page 16
REWIND/SEARCH
Page 14
PAUSE/SLOW
Page 14
CM/ZERO
Page 32
SLEEP
Page 19
AUDIO
Page 17
NITE
Page 16
SPEED
Page 14
pAtI,_E CMIZ_qO STO P DlelelelelelelelelelSPLAy
COMBO
Page 28
LIGHT
Page 6
DSS CABLE
Page 28
RAPID TUNE
/ Page 16
VOLUME UP/DOWN Pg. 16
/SET/BACKSPACE Pg, 13
S PROGRAM Page 24
VCR Plus+ Page 26
TRACKING UP/DOWN
V-Lock Page 42
ADD/DELETE
Page 13
PLAY
Page 14
FAST FORWARD/SEARCH
Page 14
ENTER Page 28
DISPLAY Page 41
STOP
Page 14
TAPE POSITION
Page 31
REC
Page14
SEARCH
Page 30
COUNTER RESET
Page 32
I lie] I_-k"}-'] 1-'__ll [_[ _11 *if ;_-_-"[;I ff;-I_ ii I_:[l[l_-_i li [] _J.*__r_._'_,[ I'_j l,] il.-_ _ it, • :_ iiP.ii 1(01414,11 _.1111i[:1 di]1{*[* iTr_J(_']L_Ji_]l _ _.-[i] iI (*_ hi,] tim
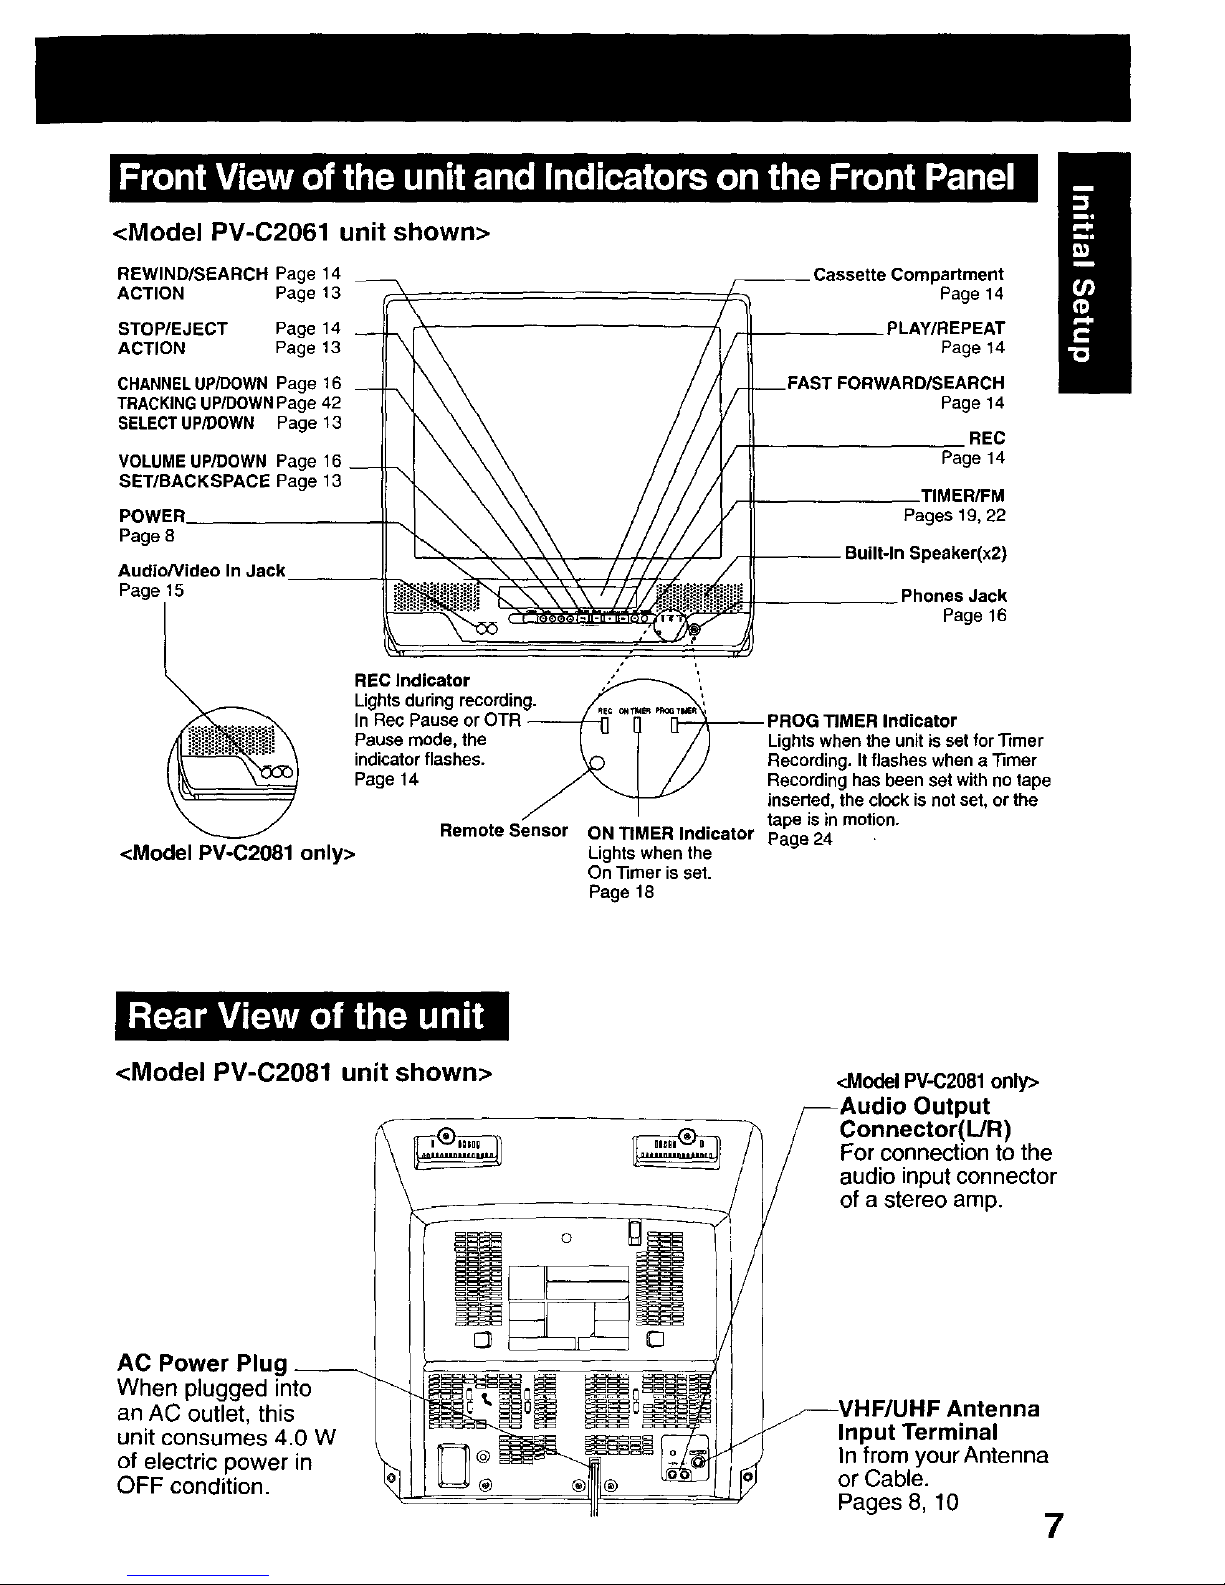
<Model PV-C2061 unit shown>
REWIND/SEARCH Page 14
ACTION Page 13
partment
Page 14
STOP/EJECT Page 14
ACTION Page 13
PLAY/REPEAT
Page 14
CHANNELUP/DOWN Page 16
TRACKINGUP/DOWNPage 42
SELECTUP/DOWN Page 13
VOLUME UP/DOWN Page
SET/BACKSPACE Page 13
POWER
Page 8
Audio/Video In Jack
Page 15
<Model PV-C2081 only>
Page14
REC
Page 14
TIMER/FM
Pages19,22
Built-In Speaker(x2)
Phones Jack
Page 16
,I IL
REC Indicator ," ,
Lights during recording. /_'_i_:
In Rec Pause or OTR _ n _ PROG TIMER Indicator
Pause mode, the I - ] / I Lights when the unit is set forlimer
indicatorflashes. _) I J /_ Recording. It flashes when a _mer
Page 14 /" _. [ FJ Recording has been set with no tape
J _ inserted, the clock is not set, or the
tape is in motion.
Remote Sensor ON TIMER Indicator Page 24
Lights when the
On llrner isset.
Page 18
<Model PV-C2081 unit shown>
0
<ModelPV-C2081only>
Output
Connector(L/R)
For connection to the
audio input connector
of a stereo amp.
AC Power Plug
When plugged into
an AC outlet, this
unit consumes 4.0 W
of electric power in
OFF condition.
_VHF/UHF Antenna
Input Terminal
In from your Antenna
or Cable.
Pages 8, 10
7
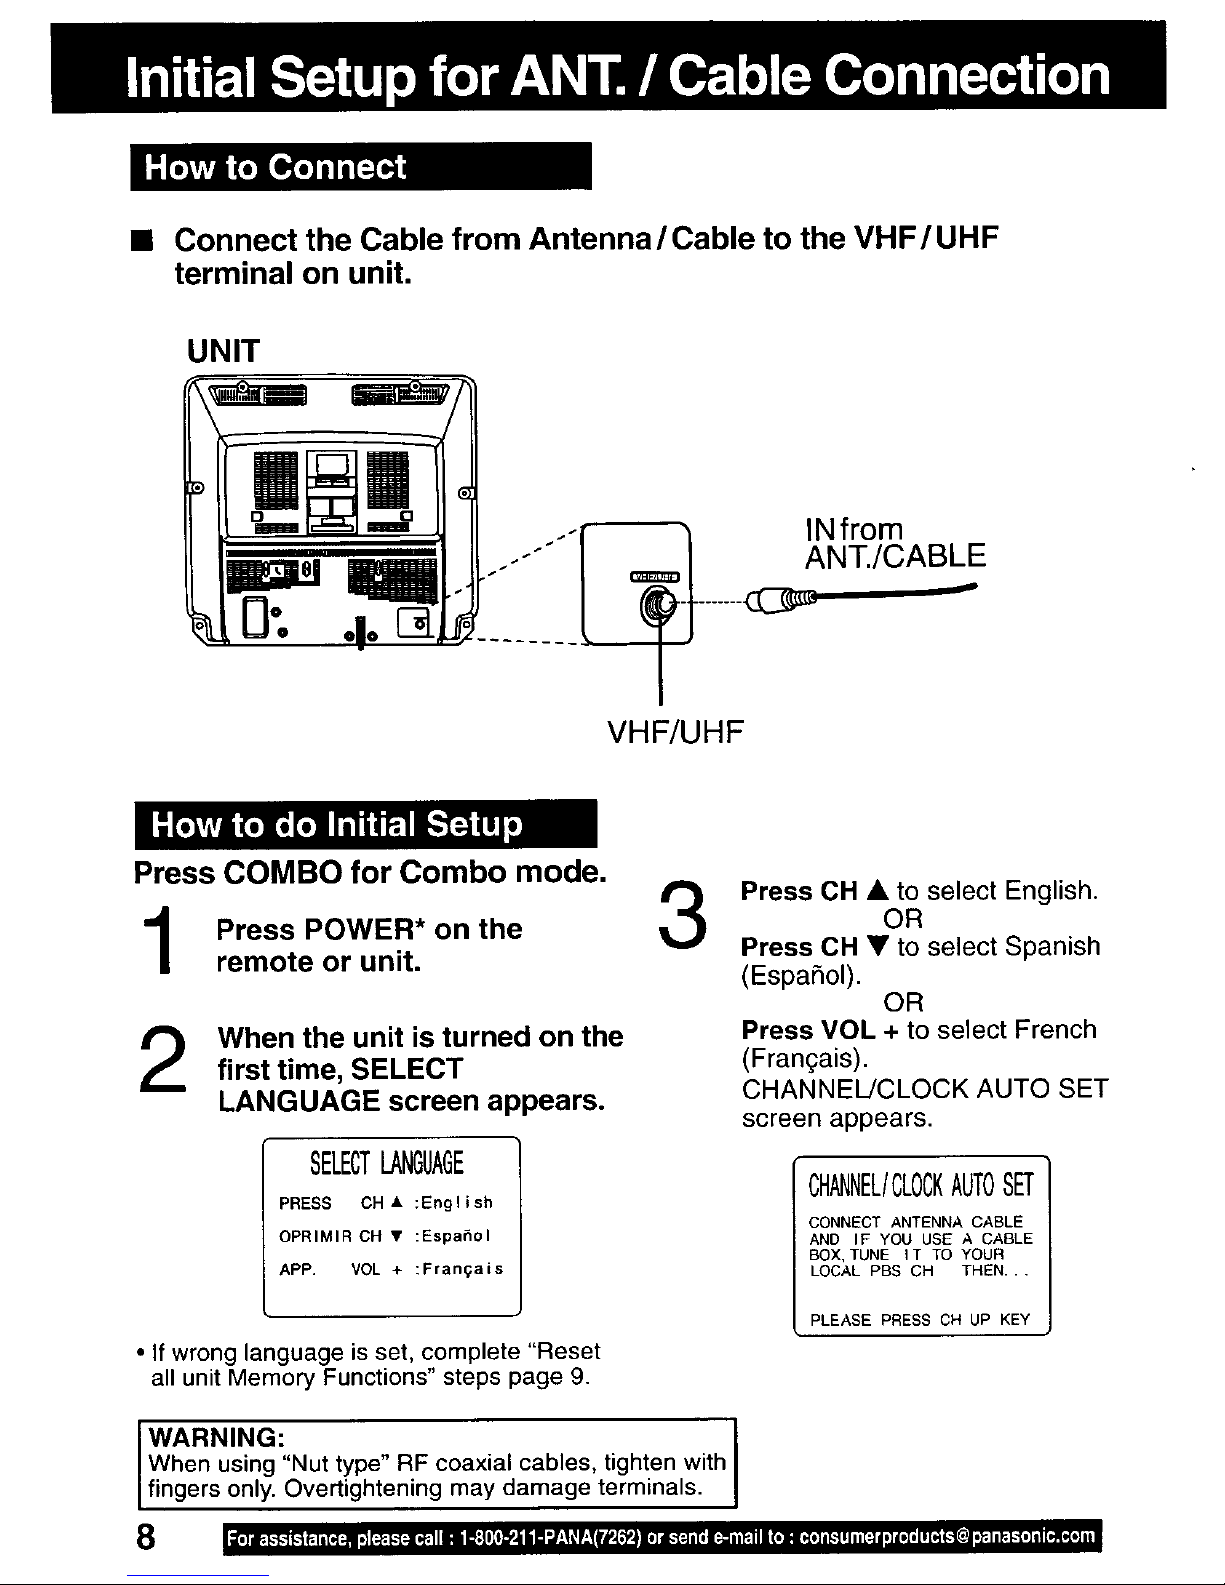
• Connect the Cable from Antenna/Cable to the VHF/UHF
terminal on unit.
UNIT
INfrom
ANT./CABLE
VHF/UHF
Press COMBO for Combo mode.
Press POWER* on the
remote or unit.
When the unit is turned on the
first time, SELECT
LANGUAGE screen appears.
3
Press OH • to select English.
OR
Press OH • to select Spanish
(Espahol).
OR
Press VOL + to select French
(Frangais).
CHANNEL/CLOCK AUTO SET
screen appears.
SELECTLANGUAGE
PRESS CH • :English
OPRIMIR CH • :Espahol
APP. MOL + :Frangais
• If wrong language is set, complete "Reset
all unit Memory Functions" steps page 9.
CHANNEL/CL0CKAUTOSET
CONNECT ANTENNA CABLE
AND IF YOU USE A CABLE
BOX, TUNE IT TO YOUR
LOCAL PBS CH THEN...
PLEASE PRESS CH UP KEY
WARNING:
When using "Nut type" RF coaxial cables, tighten with
fingers only. Overtightening may damage term na s.
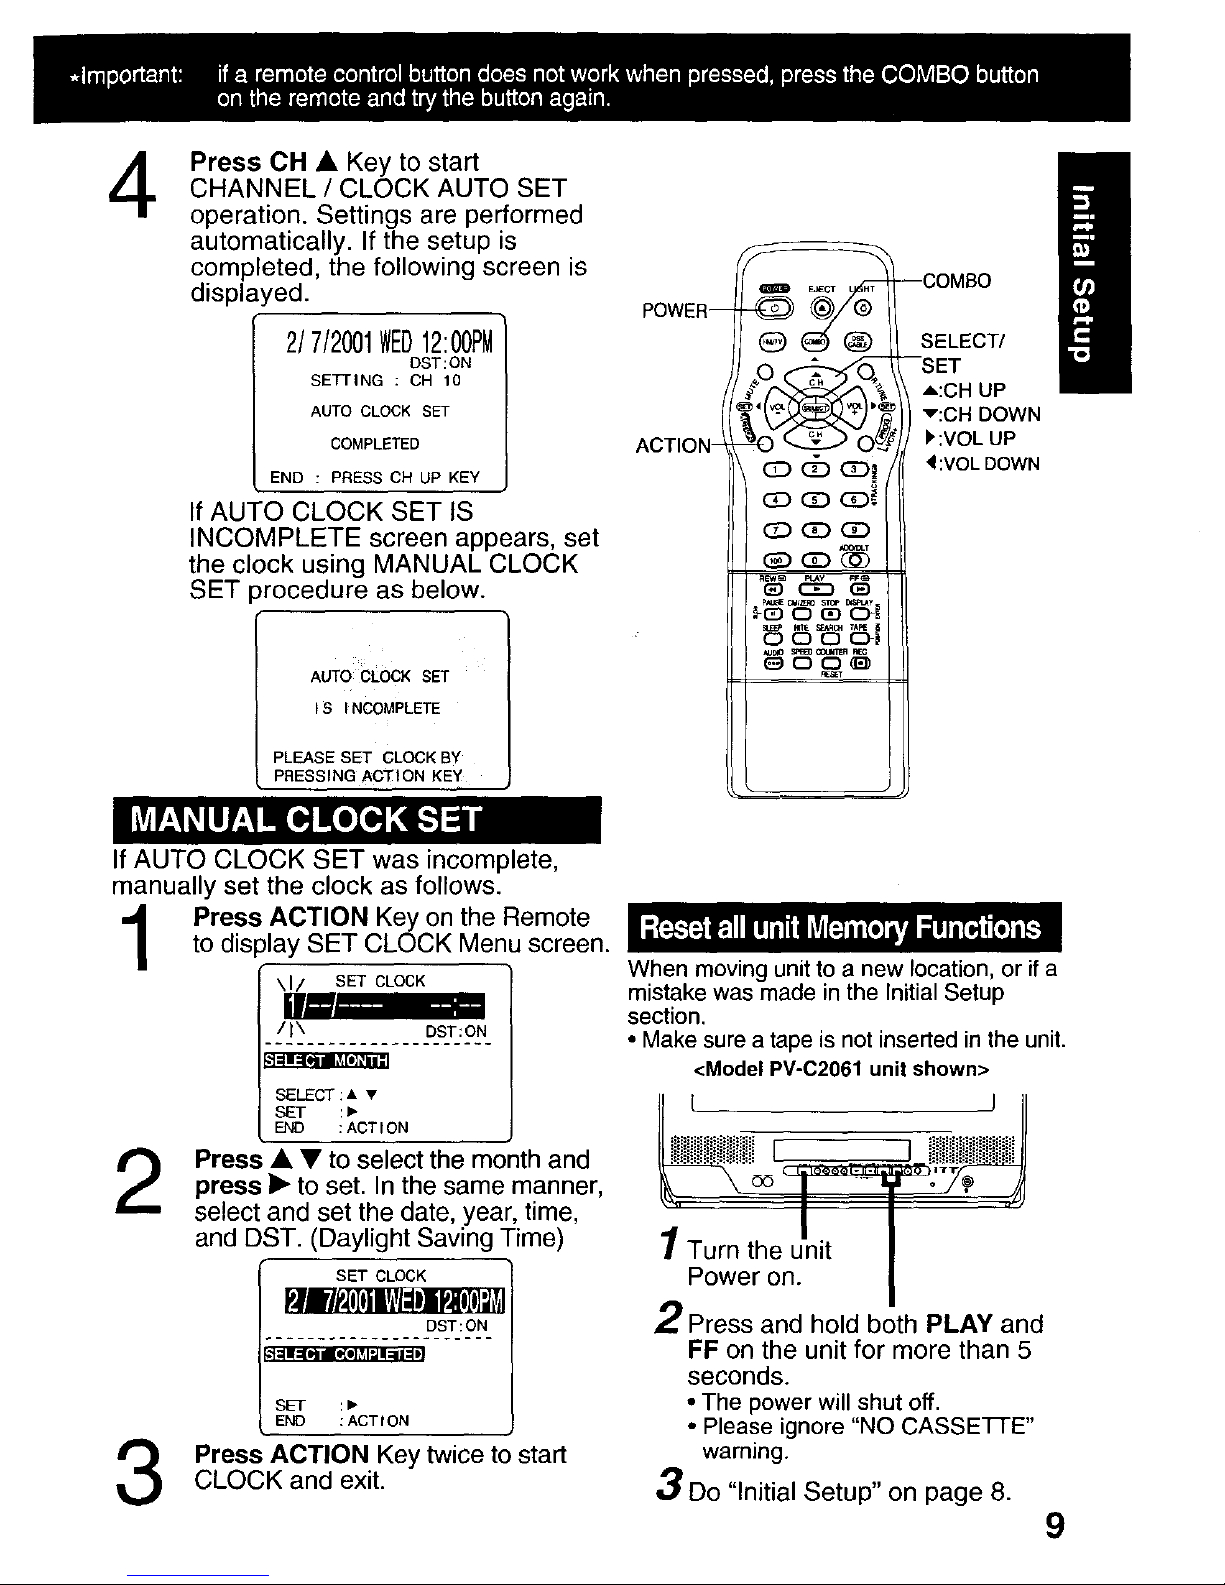
4
Press CH • Key to start
CHANNEL / CLOCK AUTO SET
operation. Settings are performed
automatically. If the setup is
completed, the following screen is
displayed.
2/7/2001WED12:00PM
DST:ON
SETTING : CH 10
AUTO CLOCK SET
COMPLETED
END : PRESS CH UP KEY
If AUTO CLOCK SET tS
INCOMPLETE screen appears, set
the clock using MANUAL CLOCK
SET _rocedure as below.
AUTO CLOCK SET
IS INCOMPLETE
PLEASE SET CLOCK BY
PRESSING ACTION KEY
POWER--
ACTION-
cb
C_ (Z) (:Z:)._
czz)(]D (3D
_OO_tT
_SWea _ea
e) (_3 e)
P_ ct_l_qo STOr* #,_tay
_-c!_O (3DOl
Auolo P_ OOetWTI__te_
--COMBO
SELECT/
--SET
A:CH UP
v:CH DOWN
I'+:VOL UP
:VOL DOWN
If AUTO CLOCK SET was incomplete,
manually set the clock as follows.
Press ACTION Key on the Remote
to display SET CLOCK Menu screen.
SET CLOCK
/IX DST:ON
SELECT:A •
SET :_
:ACTION
Press • • to select the month and
press II_ to set. In the same manner,
select and set the date, year, time,
and DST. (Daylight Saving Time)
3
SET CLOCK
DST :ON
END :ACTION
Press ACTION Key twice to ;tart
CLOCK and exit.
When moving unit to a new location, or if a
mistake was made in the Initial Setup
section.
• Make sure a tape is not inserted in the unit.
<Model PV-02061 unit shown>
[ I
! Turn the unit
Power on.
2 Press and hold both PLAY and
FF on the unit for more than 5
seconds.
• The power will shut off.
• Please ignore "NO CASSE-I-FE"
warning.
Do "Initial Setup" on page 8.
9
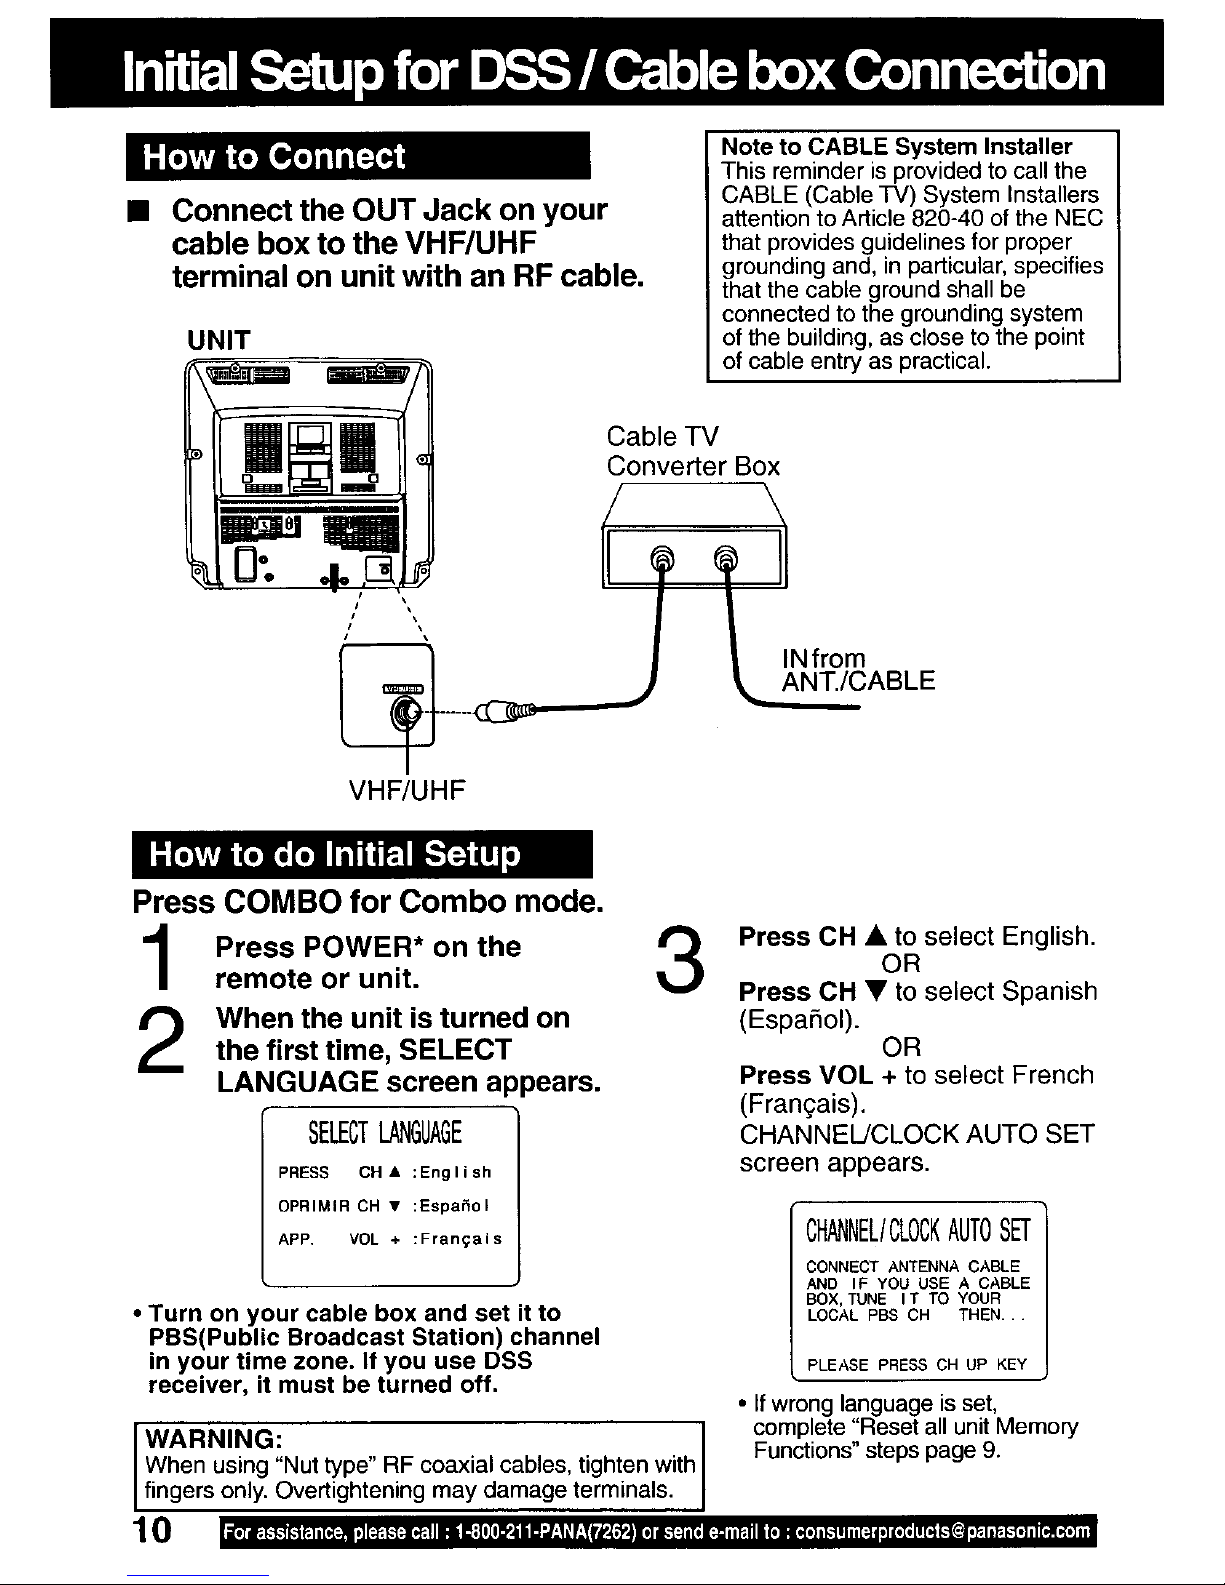
cable box to the VHF/UHF
Connect the OUT Jack on your
terminal on unit with an RF cable.
UNIT
Note to CABLE System Installer
This reminder is provided to call the
CABLE (Cable TV) System Installers
attention to Article 820-40 of the NEC
that provides guidelines for proper
grounding and, in particular, specifies
that the cable ground shall be
connected to the grounding system
of the building, as close to the point
of cable entry as practical.
Cable TV
Converter Box
i I \\
INfrom
ANT./CABLE
VHF/UHF
Press COMBO for Combo mode.
Press POWER* on the
remote or unit.
When the unit is turned on
the first time, SELECT
LANGUAGE screen appears.
SELECTLANGUAGE
PRESS CH • :English
OPRIMIR CH • :Espa_ol
APP, VOL + :Franqais
3
• Turn on your cable box and set it to
PBS(Public Broadcast Station) channel
in your time zone. If you use DSS
receiver, it must be turned off.
WARNING:
When using "Nut type" RF coaxial cables, tighten with
fingers only. Overt ghten ng may damage term nas.
10
Press CH • to select English.
OR
Press CH • to select Spanish
(Espa5ol).
OR
Press VOL + to select French
(Frangais).
CHANNEL/CLOCK AUTO SET
screen appears.
CHANNEL/CLOCKAUTOSET
CONNECT ANTENNA CABLE
AND IF YOU USE A CABLE
BOX, TUNE IT TO YOUR
LOCAL PBS CH THEN...
PLEASE PRESS CH UP KEY
• If wrong language is set,
complete "Reset all unit Memory
Functions" steps page 9.
| i[o]dl;._-'_'][_'tP.II [_ _ e][_. _.__[ _. I li_ _; [I!0B',iliB:/:I_f:YIr#',T."P_• o] di.'_:_a[, • _ i if;.IIIs(e]HI _e | iF."I!III [_ d•](oli [Tr__.-l(_,jo_ll _ I_-f•] iI [H! _ o]i i•
4
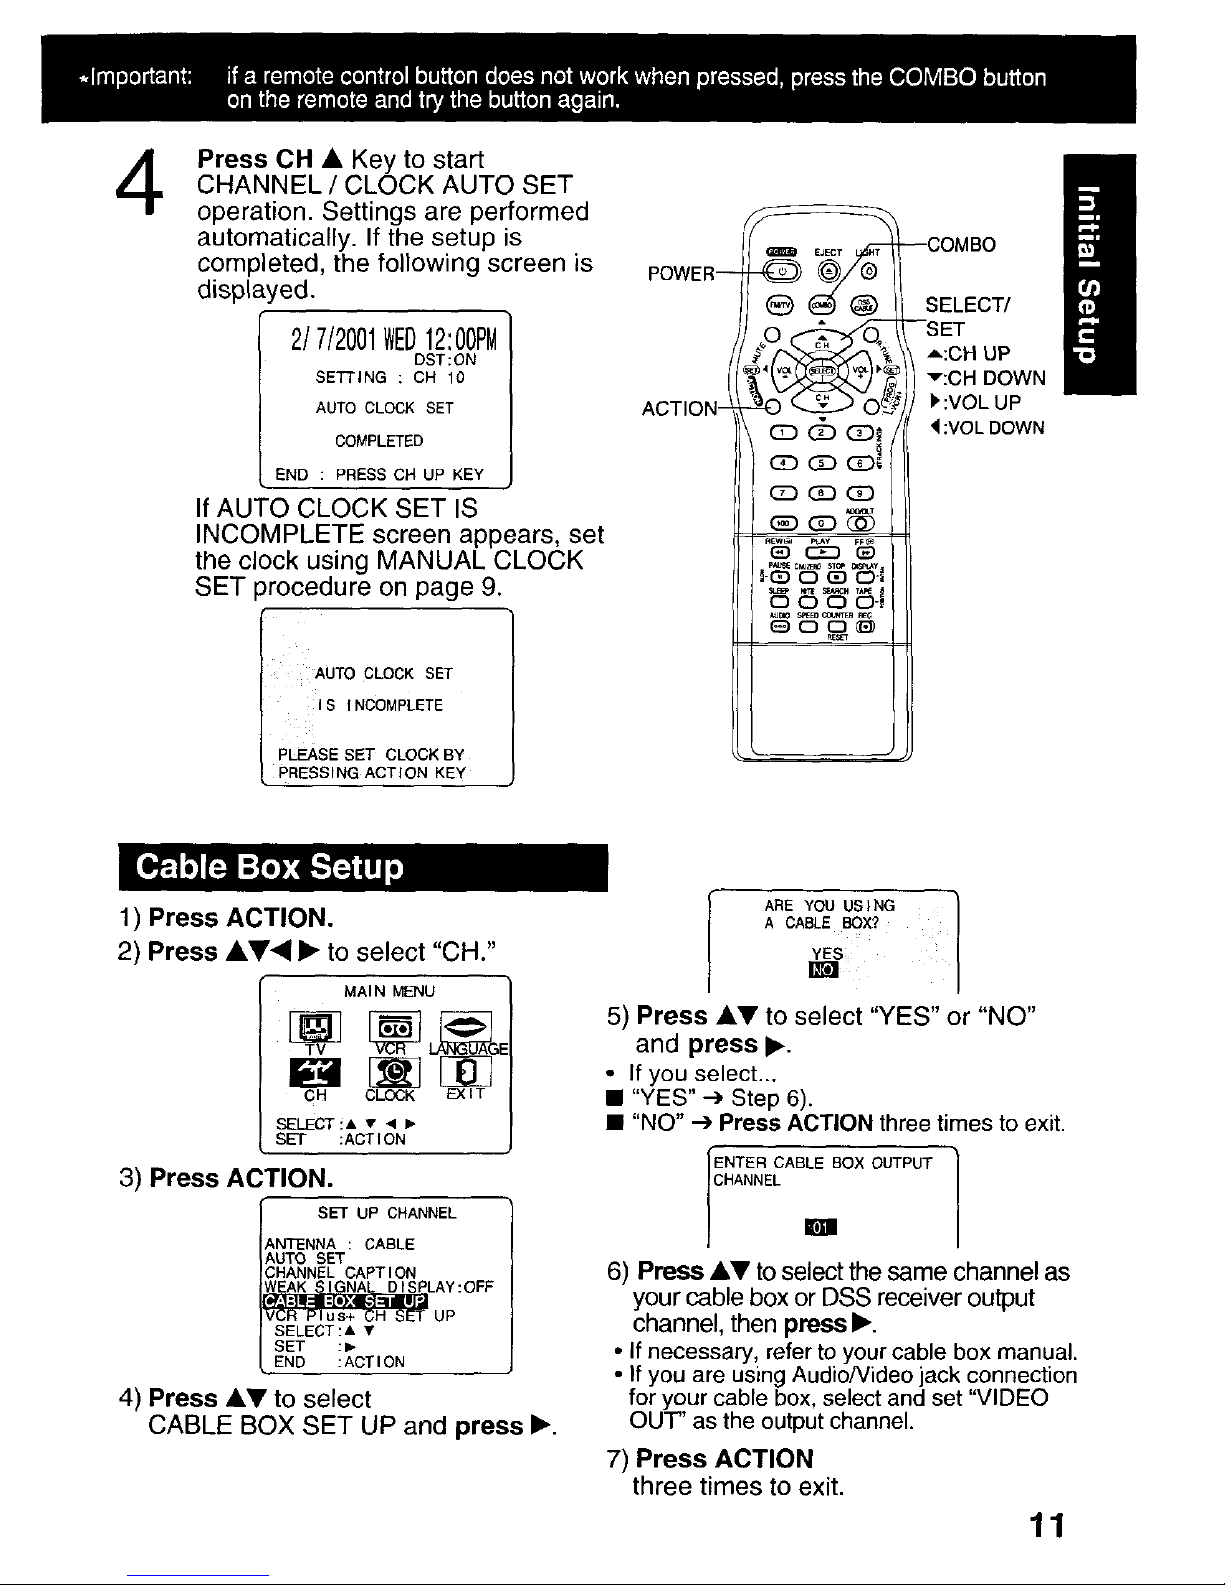
Press CH • Key to start
CHANNEL / CLOCK AUTO SET
operation. Settings are performed
automatically. If the setup is
completed, the following screen is
displayed.
2/7/2001WED12:00PM
DST:ON
SETTING : CH 10
AUTO CLOCK SET
COMPLETED
END : PRESS CH UP KEY
If AUTO CLOCK SET IS
INCOMPLETE screen appears, set
the clock using MANUAL CLOCK
SET )rocedure on page 9.
AUTO CLOCK SET
I S INCOMPLETE
PLEASE SET CLOCK BY
PRESSING ACTION KEY
1) Press ACTION.
2) Press AY, I_ to select "CH."
POWER--
ACTION-
f
m(_l.T
I-(_0
--COMBO
SELECT/
--SET
A:CH UP
v:CH DOWN
I, :VOL UP
:VOL DOWN
MAIN MENU
CH CLOCK EXIT
SELECT !A • •
SET :ACTION
3) Press ACTION.
SET UP CHANNEL
ANTENNA : CABLE
AUTO SET
CHANNEL CAPTION
LAY:OFF
UP
BELECT:A T
SET :_
END :ACTION
4) Press &Y to select
CABLE BOX SET UP and press I_.
ARE YOU US ING I
A CABLEyEsBOX?
/
5) Press •Y to select "YES" or "NO"
and press I_.
• If you select...
• "YES" --) Step 6).
• "NO" -_ Press ACTION three times to exit.
6) Press _I,V to select the same channel as
your cable box or DSS receiver output
channel, then press I_.
• If necessary, refer to your cable box manual.
• If you are using Audio/Video jack connection
for your cable box, select and set "VIDEO
OU-r as the output channel.
7) Press ACTION
three times to exit.
11

1
MAIN MENU
CH _ EXIT
SELECT:& • • P"
SET :ACT fON
Press ACTION*
to display MAIN MENU.
=" Language
1) Press AY4 • to
select language
icon.
MAIN MENU
CH
SELECT:A • 4 •
SET :ACTION
2) Press ACTION
repeatedly.
MENU PRINCIPAL
F_LA
ELEGIR:, • < •
FIJAR :ACTION
For Spanish
MENU
CANALNORkOGE
SEL. :, • < •
REGLER : ACT I ON
For French
MAIN MENU
HELLO
CH CLOCK
SELECT:A • • •
SET : ACT I ON
For English
3) Press AY_I • to
select "EXIT."
Press ACTION to
exit.
• Channels
1) Press A_'4 • to
select "CH."
MAIN MENU
SELECT:& • • •
SET :ACTION
2) Press ACTION,
SET UP CHANNEL
CHANNEL CAPTION
WEAK SIGNAL DISPLAY:OFF
CABLE BOX SET UP
VCR Plus+ CH SET UP
SELECT:A •
SET _
END ;ACTION
3) Press A_r to select
"ANTENNA," then
press • to set your
antenna system
("TV" or "CABLE").
4) Press 4,y to select
"AUTO SET," then
press I_.
• After Channel Auto Set
is finished, Clock Auto
Set willbe performed.
• Clock
1) Press A_I'< • to
select "CLOCK."
2) Press ACTION.
SET CLOCK
AUTO CLOCK SET
TIME ZONE ADJUST :0
SELECT:, •
SET :•
END :ACTION
'TIME ZONE ADJUST"
appears only when
autoclock isset.)
3) Press kY to select
"MANUAL" or
"AUTO CLOCK
SET" and press I_.
• ForAuto Clock Set,
select"AUTO CLOCK
SET,"ltBn pressOHA.
\_/ SET CLOCK
/J\ DST:ON
E
SELECT:, •
SET :•
END :ACTION
4) Press AV and
press _11_ to
select and set the
month, date, year,
time, and DST
(Daylight Saving
Time).
5) Press ACTION
twice to start the
clock and exit this
mode.
12
E,lil;i.'_.'Jl¢_.ll[i_;mH[:._._.."[:li.F;Ill_ il_;_l]l_.liO'I/!_-_ tj_'_l[oli L`T;_[_;_ii_o_i4s]_i``_[;_}_[oI_T_k``_o]_[I_A_j_I
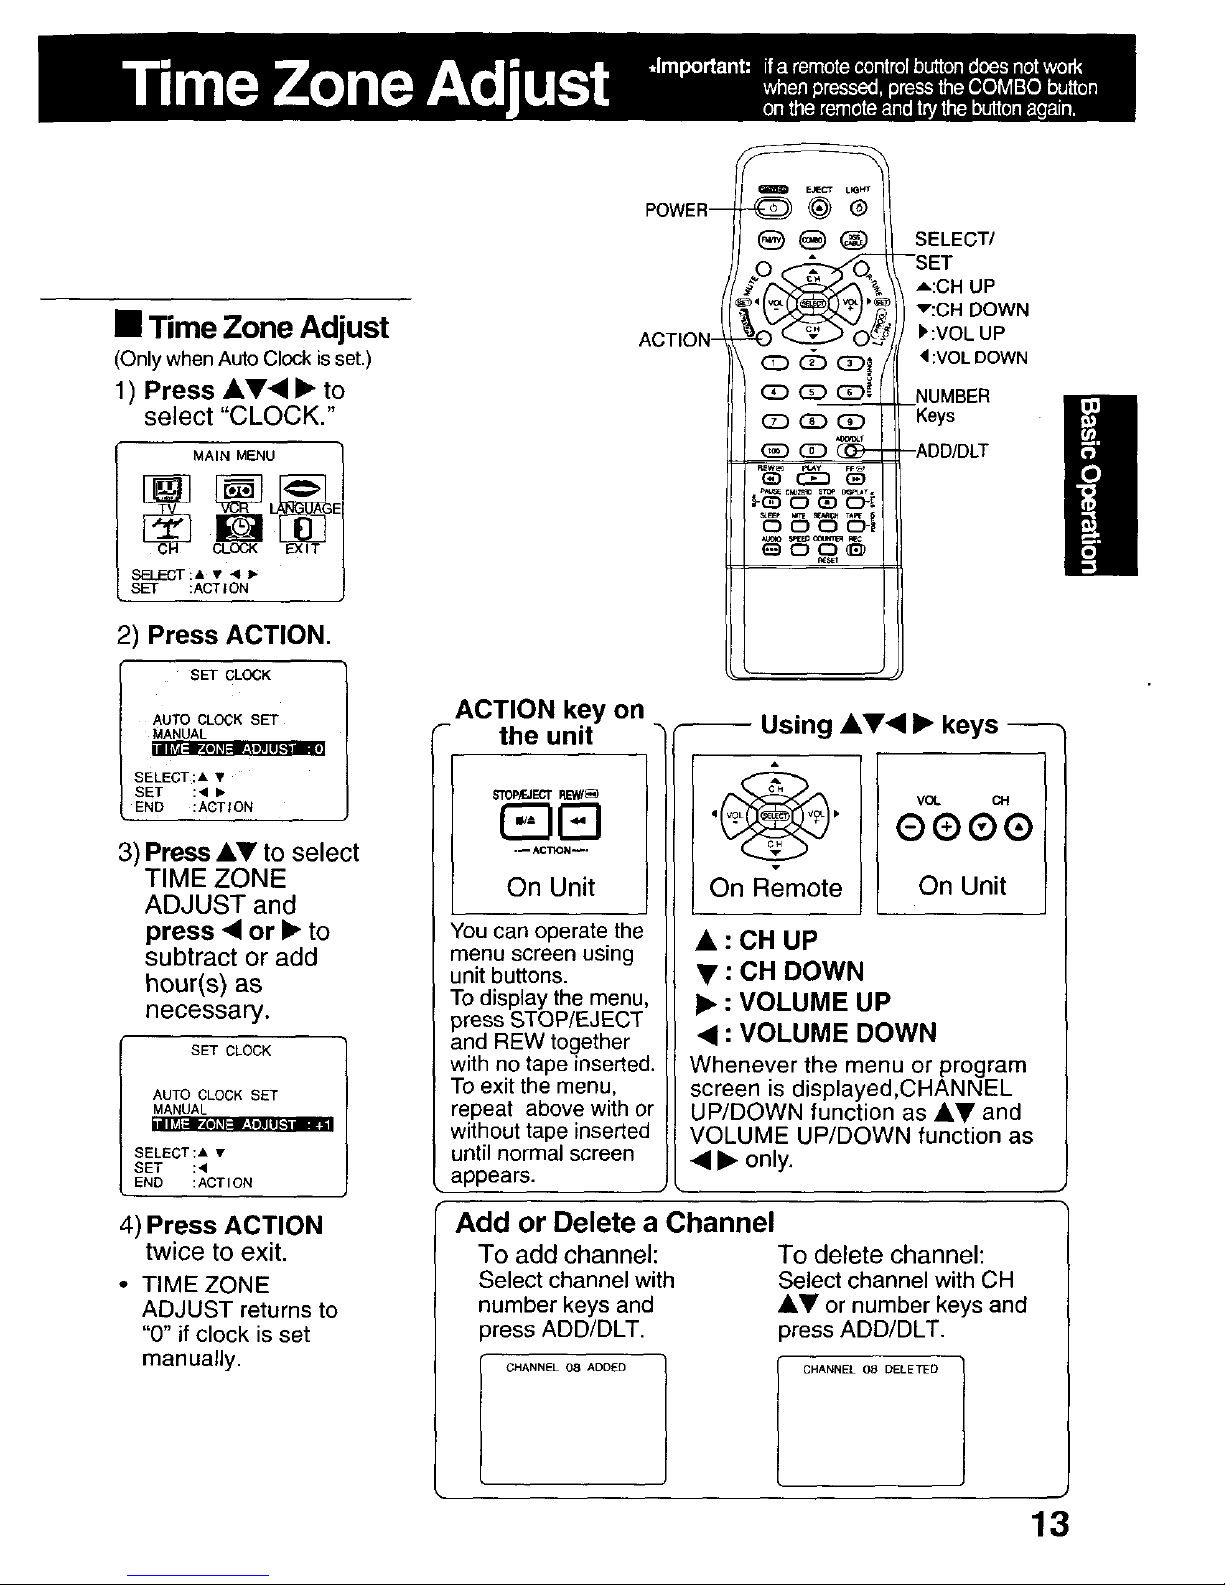
• Time Zone Adjust
(Only when Auto Clock isset.)
1) Press AV, • to
select "CLOCK."
MAIN MENU
CLOCK EXIT
SET :AGTtON
2) Press ACTION.
SET CLOCK
AUTO CLOCK SET
MANUAL
SELECT:& •
SET :_
END :ACTION
3) Press AY to select
TIME ZONE
ADJUST and
press _1or • to
subtract or add
hour(s) as
necessary.
SET CLOCK
AUTO CLOCK SET
MANUAL
• ,B
SELECT:A •
SET :,
END :ACTION
4) Press ACTION
twice to exit.
• TIME ZONE
ADJUST returns to
"0" if clock is set
manually.
POWER--
ACTION-
EJECT LIG_
0@®
eG_
SELECT/
--SET
A:CH UP
v:CH DOWN
I' :VOL UP
4:VOL DOWN
NUMBER
Keys
--ADDIDLT
ACTION key on
the unit
_O_/F_IECTREW/(_B
(E]E]
-_ ACTION_-
On Unit
You can operate the
menu screen using
unit buttons.
To display the menu,
press STOP/EJECT
and REW together
with no tape inserted.
To exit the menu,
repeat above with or
without tape inserted
until normal screen
appears.
Using A•, • keys --_
On Remote
VOL CH
QQQQ
On Unit
• : CH UP
• : CH DOWN
• : VOLUME UP
_1 : VOLUME DOWN
Whenever the menu or program
screen is displayed,CHANNEL
UP/DOWN function as AV and
VOLUME UP/DOWN function as
_I • only.
Add or Delete a Channel
To add channel:
Select channel with
number keys and
_ress ADD/DLT.
To delete channel:
Select channel with CH
AY or number keys and
press ADD/DLT.
CHANNEL OSAOOED
CHANNEL 08 DELETED
13
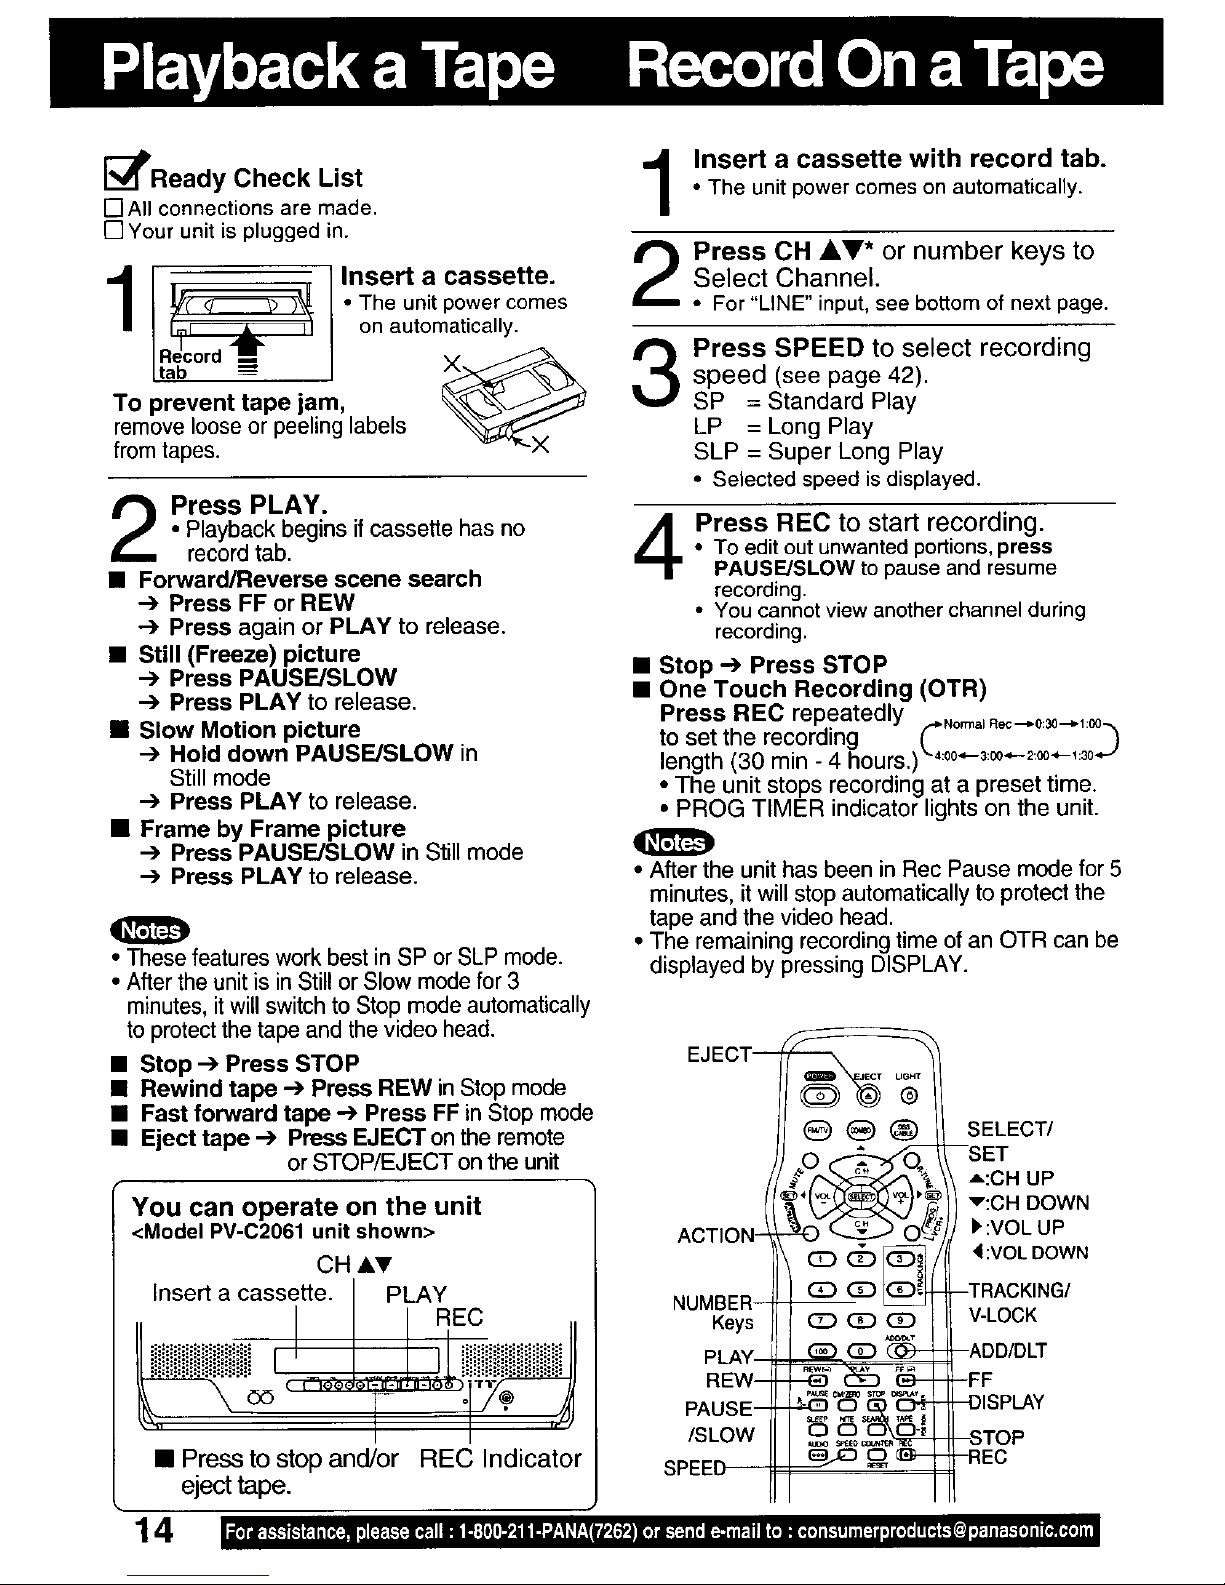
I_'Ready Check List
[] All connections are made.
[] Your unit is plugged in.
1 '°se acassette.
• The unit power comes
on automatically.
To prevent tape jam, _j,_
remove loose or peeling labels
from tapes.
Press PLAY.
Playback begins if cassette has no
recordtab.
• Forward/Reverse scene search
--) Press FF or REW
•--) Press again or PLAY to release.
• Still (Freeze) picture
--) Press PAUSE/SLOW
--) Press PLAY to release.
• Slow Motion picture
--) Hold down PAUSE/SLOW in
Still mode
--) Press PLAY to release.
• Frame by Frame picture
--) Press PAUSE/SLOW in Still mode
---)Press PLAY to release.
• These features work best in SP or SLP mode.
• After the unit is in Still or Slow mode for 3
minutes, it will switch to Stop mode automatically
to protect the tape and the video head.
Insert a cassette with record tab.
• The unitpower comeson automatically.
Press CH AV* or number keys to
Select Channel.
• For "LINE" input, see bottom of next page.
3
Press SPEED to select recording
speed (see page 42).
SP = Standard Play
LP = Long Play
SLP = Super Long Play
• Selected speed is displayed.
Press REC to start recording.
• To edit out unwanted portions, press
PAUSE/SLOW to pause and resume
recording.
• You cannot view another channel during
recording.
• Stop --) Press STOP
• One Touch Recording (OTR)
Press REC repeatedly -No._a_R_---030--,:o0
to set the recording _, __
length (30 min - 4 hours.) ,:00_-3:0o.,-2:®*-::30-,--
• The unit stops recording at a preset time.
• PROG TIMER indicator lights on the unit.
• After the unit has been in Rec Pause mode for 5
minutes, it will stop automatically to protect the
tape and the video head.
• The remaining recording time of an OTR can be
displayed by pressing DISPLAY.
• Stop --) Press STOP
• Rewind tape ---)Press REW inStop mode
• Fast forward tape ---) Press FF in Stop mode
• Eject tape --) Press EJECT on the remote
or STOP/EJECT on the unit
You can operate on the unit
<Model PV-C2061 unit shown>
CH AV
Insert a cassette. I PLAYEc
,,' .......°T:,JA
• Pressto stop and/or REC Indicator
eject tape.
Keys
/SLOW
SELECT/
A:CH UP
v:CH DOWN
l, :VOL UP
4 :VOLDOWN
V-LOCK
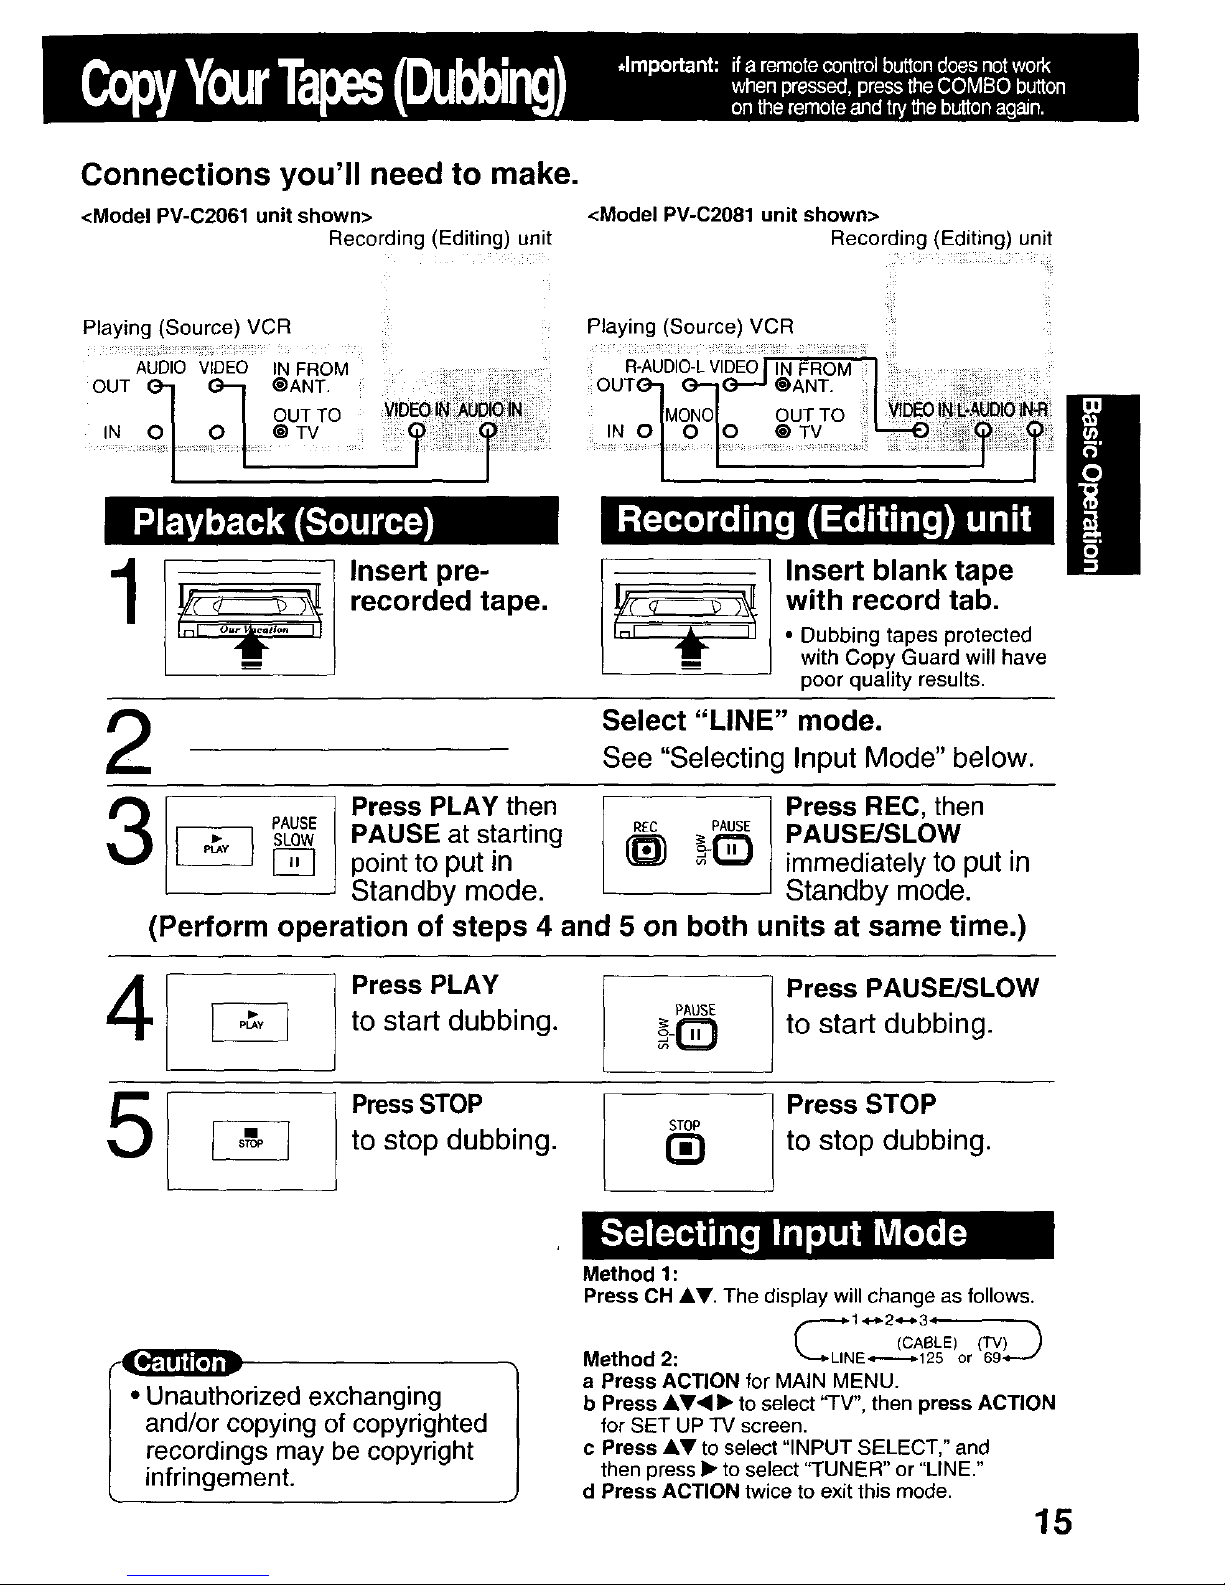
Connections you'll need to make.
<Model PV-C2061 unit shown>
Recording (Editing) unit
Playing (Source) VCR
AUDIO VIDEO IN FROM
,)
,,o°i!!o+++
/ / OUT TO ....
IN 00:I Ot®TV
+ :
<Model PV-C2081 unit shown>
Recording (Editing) unit
Playing (Source) VCR
1
Insert pre- 1
recorded tape. __
Insert blank tape
with record tab.
• Dubbing tapes protected
with Copy Guard will have
poor quality results.
2
Select "LINE" mode.
See "Selecting Input Mode" below.
] Press PLAY then Press REC, then
pAUSEPAUSE/SLOW
PAUSE PAUSE at starting _ _-_ immediately to put in
point to put in
Standby mode. Standby mode.
(Perform operation of steps 4 and 5 on both units at same time.)
_ Press PLAY
4 _ to start dubbing. ___
to stop dubbing. I_)
Press PAUSE/SLOW
to start dubbing.
Press STOP
to stop dubbing.
Method 1:
Press OH AV. The display will change as follows.
• Unauthorized exchanging
and/or copying of copyrighted
recordings may be copyright
infringement.
(CABLE) (TV) "_
Method 2: ",--+-LINE_---_125 or 69 _--/
a Press ACTION for MAIN MENU.
b Press _,V4 • to select "TV", then press ACTION
for SET UP TV screen.
e Press _,V to select "INPUT SELECT," and
then press • to select "TUNER" or "LINE."
d Press ACTION twice to exit this mode.
15
 Loading...