

Panasonic Omnivision VHS PV-9405S Operating Instructions Manual
Video Cassette Recorder
Panasonic
Ornnlvi81onl IH31
Operating Instructions
MODEL PV-9405S
Please read these instructions carefully before
attempting to connect, operate or adjust this
product. Please save this manual.
Spanish Quick Use Guideis included.(Guia
para rdpida consultaen espaSol estd incluida.)
Quick Use Guide is on the back cover.
As an ENERGY STAR®Partner,
Matsushita Electric Corporation of
America has determined that this product
or product model meets the ENERGY
STAR®guidelines for energy efficiency.

ImportantSafeguardsand Precautions
FOR YOUR SAFETY, READ _,ND I OUTDOOR ANTENNA INSTALLATION ]
RETAINALL SAFETYANDOPERATING
INSTRUCTIONS.HEEDALL WARNINGS
INTHEMANUALAND ONTHE UNIT
INSTALLATION
POWER SOURCE CAUTION
Operate only from a power source indiCated on the unit or in
thismanual. If necessary, have your Electdc Utility Service
Company or Video products Dealer vedfy thepower soume
in your home.
2 POLARIZED OR GROUNDING PLUG
ASa safety feature, this Video productcomes with either
a polarized power cordplug (one bladeis wider than the
other), or a three-wire grounding type plug.
P A TI :
This plug willonly fit intoan outlet one way. If you cannot
fullyinsert the plug,try reversing it. If it stillwil/not fit,
have an electdsian installthe proberwall outlet.
DOnot defeat the safety feature by tamperingwith theplug.
GROUNDING PLUG CAUTION:
This plug will only fitintoa three-hole groundingoutlet.
If r_cessary have an electrician installthe proper outlet.
DOnotdefeat the safety eature by tampepog withthe plug.
3 POWER CORD
Make surepower cordsare routedso that they are not likely
to have atnything rest on them, roll over them. or be inthe
way of walkingtraffic. If an extension cOrdisused, make sure
it also has either a belarized or grounded plug and that the
cordscan be securelyconnected. Frayed cords, damaged
pluJgs,and damaged orcrackedwire insulationare hazardous
andshould be replaced bya qualified service technician.
Oveedeqed outlets and extension cords are fire hazards and
should be avoided.
4 DO NOT BLOCK VENTILATION HOLES
Ventilation openings in the cabinet release heat generated
during operation,fftbey are blocked, heat build-upinsidethe
unitcan cause failures that may result in a fire hazard or heat
damage to cassettes,
For protection,fellow these rules:
a. Never cover ventilation slots or the unit
whilein use, oroperate the unit when placed
on a bed, sofa,rug, or other softsurface.
b. Avoid buifi-in installation,such as a book case
or rack, unless properventilationisprovided.
5 AVOID EXTREMELY HOT LOCATIONS OR
SUDDEN TEMPERATURE CHANGES
DOnot place the unitover or nearany kindofheater
or regulator,in direct sunlight, insidea elosed vehicle, etc..
DOnot move the unitseddenly between areas of extreme
temperature variation, ff the unit issuddenly moved from a
cold place toa warm place, moisture may condense in the
unitand on the tape.
6 TO AVOID PERSONAL INJURY
• Do notplace unsecuredequipmenton a sloping surface.
1 SAFE ANTENNA AND CABLE CONNECTION
If an Outsideantenna or cable system
isconnected to the equipment, _c _ o_
be sure the aofenna or cable system ,../.__.=.=_" _L"_ ='="
is groundedsoas to provide some "*4
protectionagainst built up static
charges andvoltage surges,
Sechon 810 of the National _c_'c_"_.,_
Eldctf_el Code, ANSt/NFPA 70 _ _=,_.=_
(in Canada, part t of the Canadian [ _'**=_'= ......
EleCtriCalCode) provides information _ _lf_///;_(_=,_,Qc,_,_
with respect to proper grounding of the _L._ _._ =.,,_=_._._
mast and supportingstructure,grounding _=.=._
of thelead-in wire toan antenna discharg_eunit,
size of grounding conductors, locationot antanna discharge unit, connection
to groundingelectrodes and requirements for the groundingelectrode,
2 KEEP ANTENNA CLEAR OF HIGH VOLTAGE POWER UNES
OR CIRCUITS
An outside antenna System shouldbe located well away from power lines,
electriclightorpower circuitsand where it willnevercome into contact with
these power sources if it should happen to fall. When installingan outside
antenna, extreme Careshould be taken to avoid touching power lines, circuits
or other power sources as this could be fatal.Because of the hazards
involved,antenna installationshouldbe left to a professional.
I USING THE VIDEO UNIT I
If the unit has been in storage or moved to a new location,
refer first to the tNSTALLATtON section ol these safeguards.
1 KEEP THIS VIDEO UNIT AWAY FROM WATER OR
MOISTURE OF ANY KIND.
2 IF EQUIPMENT IS EXPOSED TO RAIN, MOISTURE, OR
STRONG IMPACT, unplug the unitand have it inspected by a qualified
service technician before use.
3 DURING AN ELECTRICAL STORM
DPOnga lightningstorm, whetherindoorsor outdoors,or before leaving the
unit unusedfor exlended pehods of time, disconnectell equipmentfrom the
power source as well as the antenna and cable system.
4 WHEN THE UNIT IS PLUGGED IN
• Never expose the unitto rain or water. DO NOT OPERATE
if liquidhas been spilled into the unit. Immediately unpluJgthe unit,
and have it inspected by a service technician. Fire and shock hazards
can result from eisctricelshorts caused by liquidcontact inside.
• Never drop orpushany objectthrough openJngsinIhe unit. Some internalparts
carryhazardousvoltagesand contactcancause electricshockorfire haZard.
• AVOWplacingthe unit directlyabove or below your 3_" set as thismay cause
electrical interference. Keepall magnets awayfrom electronic equipment.
5 USING ACCESSORIES
Use only accessoites recommended by the manufacturer to avoid risk of fire,
shock,or other hazards.
6 CLEANING THE UNIT
Unplug the unit.Then, use a clean, dry, chemical,lyuntreatedclothto gently
remove dust or deb is. DO NOT USE cleaning fluids, aerosols,o forced a
thatCOuldover-spray, or seep intothe unit and cause electricalshock.
Any substance such as wax, adhesive tape, etc. may mar the cabinetsurface.
Exposure to greasy, humid, ordustyareas may adversely affect intemel parts.
• Do notplace this unit on any support
thatis not firm, level, and adequately _ I SERVICE I
strong.The unitCouldfall causing
seriousldiury to a child oradult and 1 DO NOT SERVICE THIS PRODUCT YOURSELF
damage to the unit, If, after carefully followingthe detailed operating instructions,this Video
• An appliance and caft combination productdoes not operate proberly,do not attempt toopen or remove covers,
chould be moved with care, or make any adjustments notdescribed in the manual.
Quick stops, excessive force, and Unplug the unitand contact a qualifiedservice technician.
uneven surfacesmay cause the 2 IF REPLACEMENT PARTS ARE REQUIRED
appliance and cart Combination to ovedum.
Make sure the service technician uses onJ_/partsspecified by the manufacturer,
• Carefully follow all operatinginstructions and use orthose having the same safety charactensticsas the original pads. The use of
the manufacturers recommended acoessenes when unaelhonzed substitutes mayresultin fire, electricshoCk,or other hazards.
operating this unit or connecting it to any other equipment
3 HAVE THE SERVICE TECHNICIAN PERFORM A SAFETY CHECK
Afterany service or repairs to the unit, request the service technician to
conducta thoroughsafety check asdescribed in the manufacture's service
literature to insure that the video unitis in safe operatingcondition.
Safety Precautions
Warning: To prevent fire or shock hazard, do not expose this equipment to rain or moisture.
/-- I-
_ _._ /_ This symbol warns the user that uninsulated voltage within the unit may have sufficient magnitude to cause
zk
_ I" _"_' -- electric shock. Therefore, it is dangerous to make any kind of contact with any inside part of this unit,
Z_ Tbla symbol alerts the user that important Jiterature concerning the operation and maintenance of
this unit has been included, Therefore, it should be read carefully in order to avoid any problems.
2
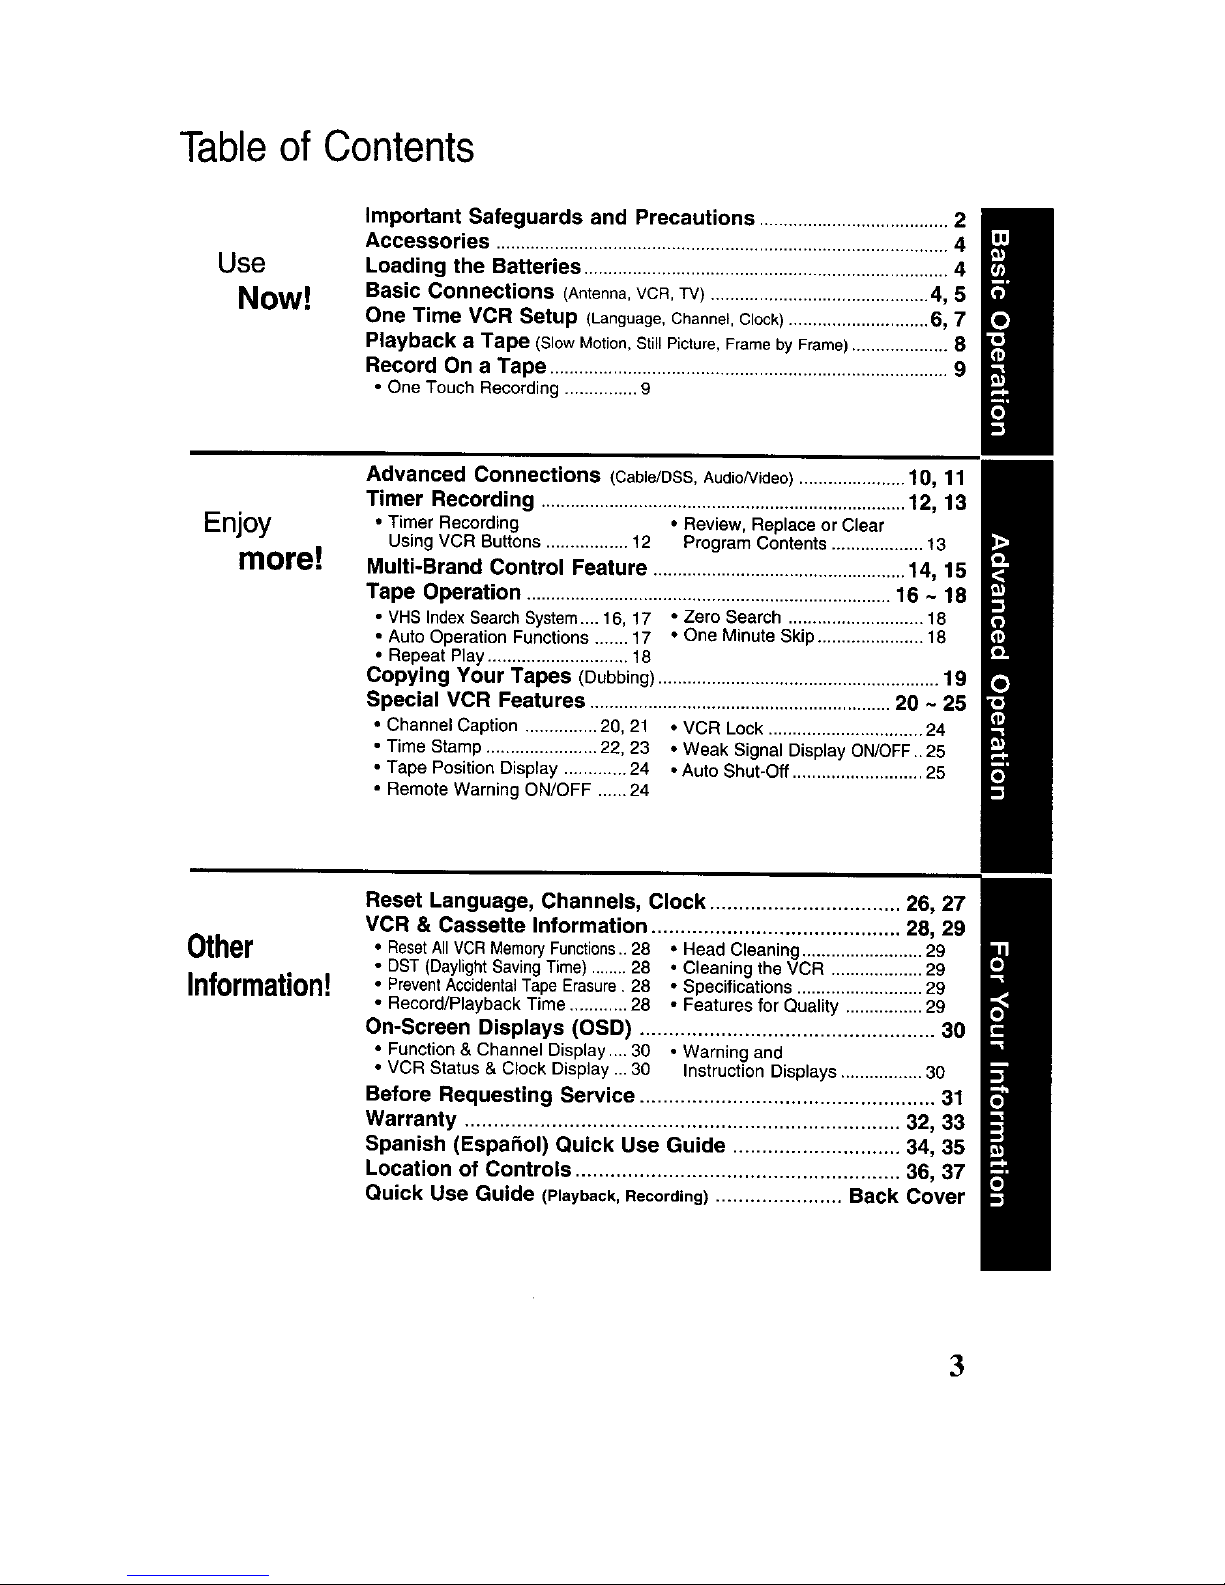
Table of Contents
Use
Now!
Important Safeguards and Precautions ....................................... 2
Accessories ............................................................................................. 4
Loading the Batteries ........................................................................... 4
Basic Connections (Antenna,VCR, TV) ............................................. 4, 5
One Time VCR Setup (Language,Channel,Clock)............................. 6, 7
Playback a Tape (SlowMotion, Still Picture, Frame by Frame) .................... 8
Record On a Tape .................................................................................. 9
• One Touch Recording ............... 9
Enjoy
more!
Advanced Connections (Cable/DSS,AudioNideo)...................... f 0, 11
Timer Recording ........................................................................... 12, 13
• Timer Recording • Review, Replace or Clear
Using VCR Buttons................. 12 Program Contents ................... 13
Multi-Brand Control Feature .................................................... 14, 15
Tape Operation ........................................................................... 16 ~ 18
• VHS IndexSearchSystem.... 16, 17 • Zero Search ............................ 18
• Auto Operation Functions ....... 17 • One Minute Skip ...................... 18
• Repeat Play............................. 18
Copying Your Tapes (Dubbing) .......................................................... 19
Special VCR Features .............................................................. 20 ~ 25
• Channel Caption ............... 20, 21 • VCR Lock ................................ 24
• Time Stamp ....................... 22, 23 ° Weak Signal Display ON/OFF .. 25
• Tape PositionDisplay ............. 24 • Auto Shut-Off........................... 25
• Remote Warning ON/OFF ...... 24
Other
Information!
Reset Language, Channels, Clock ................................. 26, 27
VCR & Cassette Information ........................................... 28, 29
• ResetAllVCRMemoryFunctions..28 ° Head Cleaning......................... 29
• DST (Daylight SavingTime) ........ 28 • Cleaning the VCR ................... 29
• PreventAccidentalTape Erasure. 28 • Specifications .......................... 29
• Record/PlaybackTime............ 28 • Featuresfor Quality ................ 29
On-Screen Displays (OSD) ................................................... 30
• Function & Channel Display.... 30 • Warning and
• VCR Status& Clock Display ... 30 InstructionDisplays ................. 30
Before Requesting Service ................................................... 31
Warranty ........................................................................... 32, 33
Spanish (Espafiol) Quick Use Guide ............................. 34, 35
Location of Controls ........................................................ 36, 37
Quick Use Guide (Playback,Recording)...................... Back Cover
3
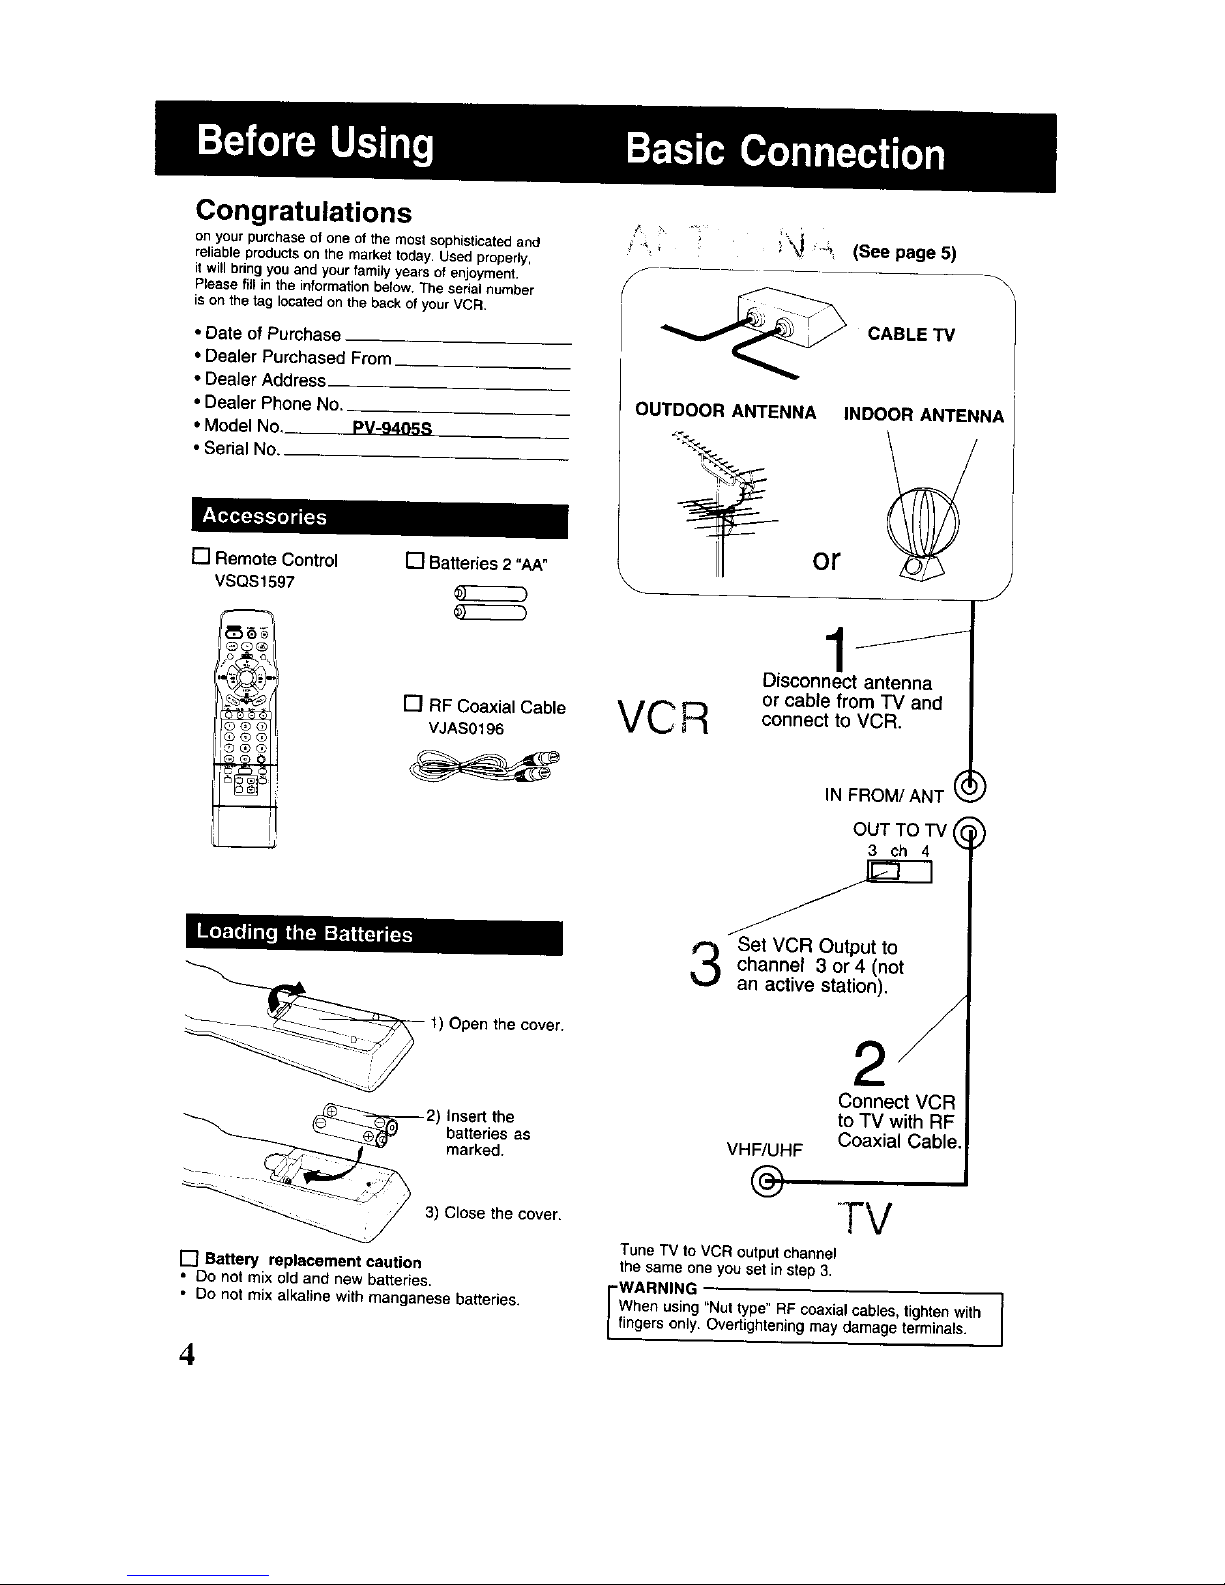
Congratulations
on your purchase of one of the most sophisticated and
reliable products on the market today. Used properly,
it will bring you and your family years of enjoyment.
Ptease lilt in the information below. The serial number
is on the tag located on the back of your VCR.
• Date of Purchase
• Dealer PurchasedFrom
• Dealer Address
•Dealer Phone No.
•Model No, PV-9405S
• Serial No
[] Remote Control [] Batteries 2 "AA"
VSQS1597
[] RF Coaxial Cable
VJAS0196
Open the cover.
Insert the
batteries as
marked.
,,, _'-;, (See page 5)
f
CABLE "IV
OUTDOOR ANTENNA INDOOR ANTENNA
or
j
VCR
lJ
Disconnect antenna
or cable from TV and
connect to VCR.
IN FROM/ANT
OUT TO TV
3 ch 4 --
Set VCR Output to
channel 3 or 4 (not
an active station).
,>
2
Connect VCR
to TV with RF
Coaxial Cable,
VHF/UHF
3) Close the cover.
[] Battery replacement caution
• DO not mix old and new batteries.
• Do not mix alkaline with manganese batteries.
4
TV
Tune TV to VCR output channel
the same one you set in step 3.
WARNING
When using "Nut type" RF coaxiat cables, tighten with
fingers only. Overtightening may damage terminals.

1
F
Between ANT. and VCR
• Case 1: Twin Lead Cable Only
To VCR Terminal
(Flat) Twin Lead Transformer
300 Ohm Cable (notsupplied)
• Case 2: Twin Lead & Coaxial Cables
UHFNHF Band Mixer
(notsupplied)
(Round) 75 Ohm
coaxial Cable
To VCR Terminal
• Case 3: Two Twin Lead Cables
:__UHF/VHF Band Mixer_
3oo-_5o_m It_
Transformer
(not supplied) TOVCR Terminal
• If your TV has both post and plug-type
VHF terminals, the post connection is
recommended to minimize signal loss.
Between VCR and TV
/-
• Case 1: Screw & Plug Type Terminal
UHF/VHF Band _ TV
Separator
(not su__,_(_- VHF
RF Coaxial Cable
• Case 2: Screw Type Terminal
TV
75-300 ohm
Transformer I .,_ |
(nota_,_ I___l_Vo.rF
• Case 3: Double Screw Type Terminal
UHFNHF Band TV
Separator
(not sup_ VHF
• Case 4: Complex TV Terminal
TERMINALSON BACKOFTVSET
s0,out-
ANT2
• Connect to one of the ANT terminals and
select the same antenna number on the TV.
J
5
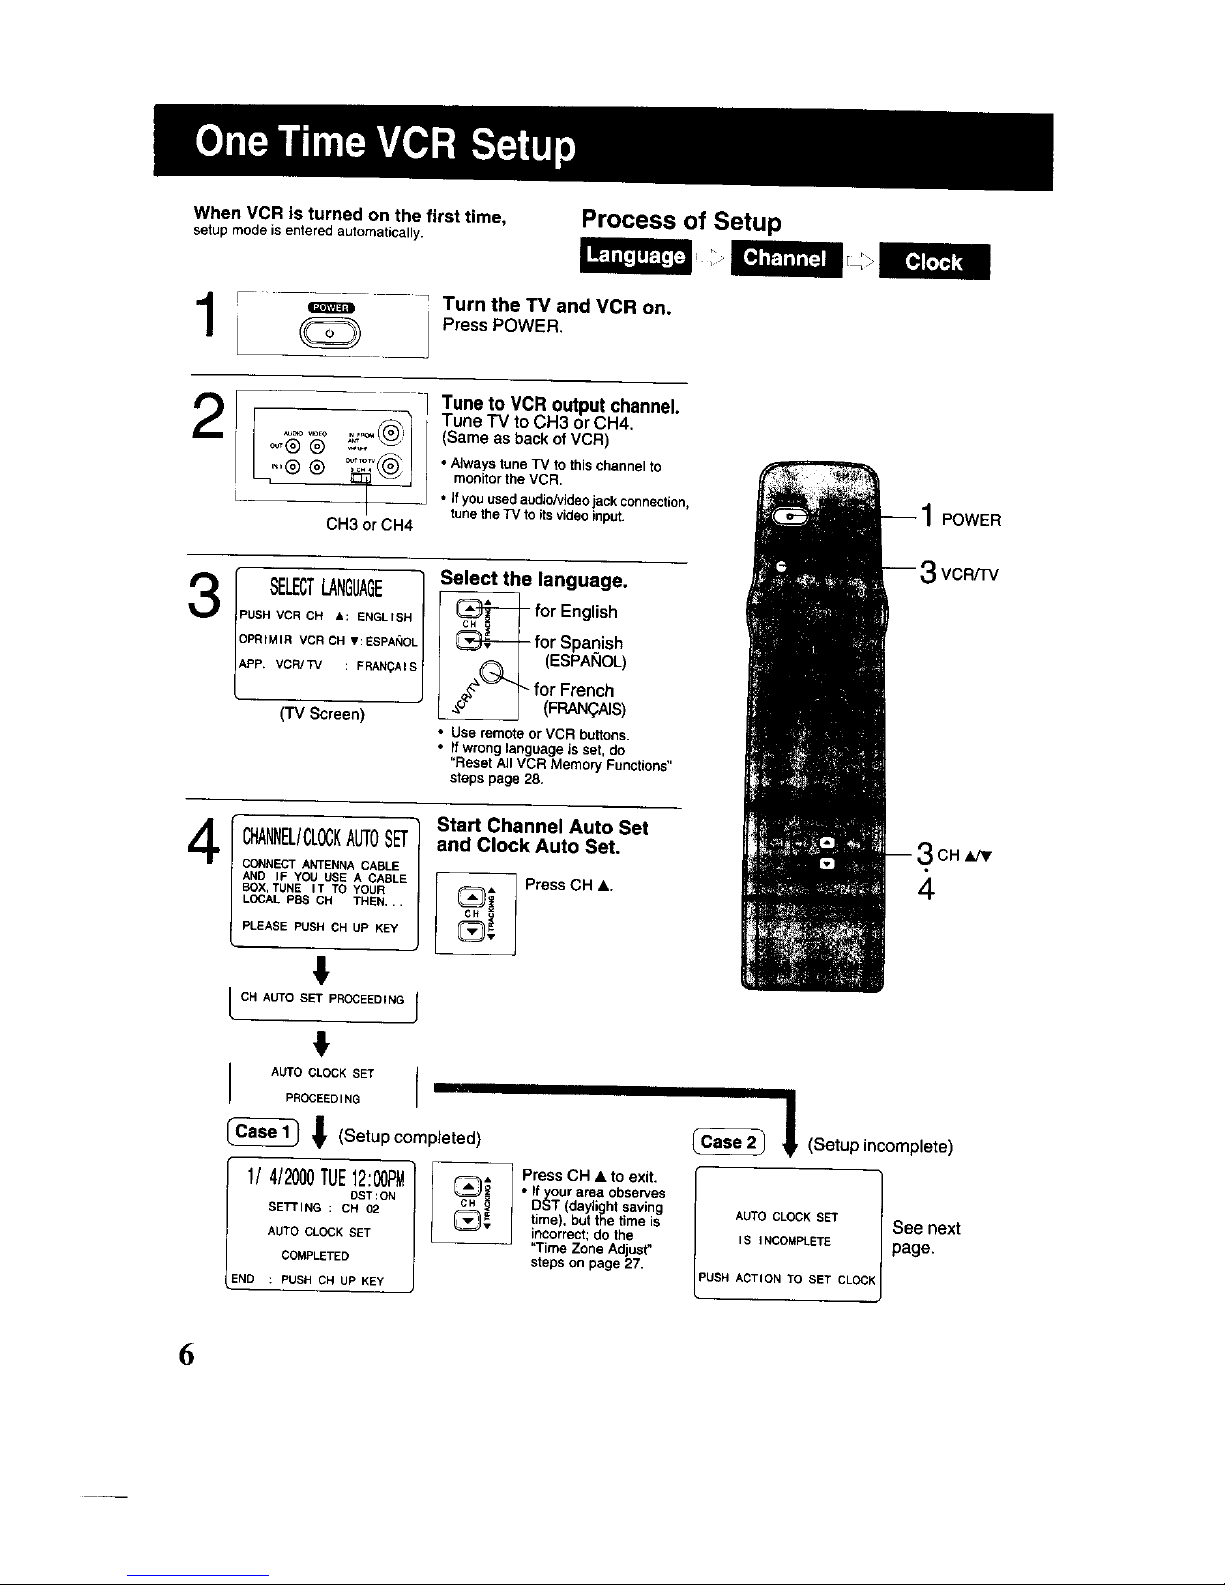
When VCR is turned on the first time,
setupmodeis enteredautomatically.
Process of Setup
I-- ........ Turn the I"V and VCR on.
PressPOWER.
2
CH3 or CH4
Tune to VCR output channel.
Tune TV to CH3 or CH4,
(Same as back ofVCR)
• Always tune TV to this channel to
monitorthe VCR.
• if you usedaudio/videojackconnection,
tunethe TV to itsvideoinput.
I SELECTLANGUAGE1 !electthe language.
PUSHVCRCH A: ENGLISH c._(_ forEnglish
APP. voMI'w : F_AB_;ALB (_ I (ESPANOL)
,,_"_ for French
.,_ I (FBAN_AIS)
Use remote or VCR buttons.
If wrong language is set, do
"Reset All VCR Memory Functions"
steps page 28.
4
CHANNEL/CLOCKAUTOSET
CONNECT ANTENNA CABLE
AND IF YOU USE A CABLE
GOX, TUNS tT TO YOUR
LOCAL PES CH THEN...
PLEASE PLtSH CH UP KEY
Start Channel Auto Set
and Clock Auto Set.
Press CH A.
4
AUTO CLOCK SET
H
PROUEEDINB
_! (Setupcompleted)
ENII412000TUEOST:oN12:00_
SETTING : CH 02
AUTO CLOCK SET
COMPLETED
: PUSH CH UP KEY
_ ress CH • to exit.
• If our area observes
D_T (daylight saving
time), butthe time is
incorrect; do the
"Time Zone Adjust"
steps on page 27.
(Setup incomplete)
POWER
VCR/TV
CH
AUTO CLOCK SET
I S INCOMPLETE
PUSH ACTION TO SET CLOC_
See next
page.
6
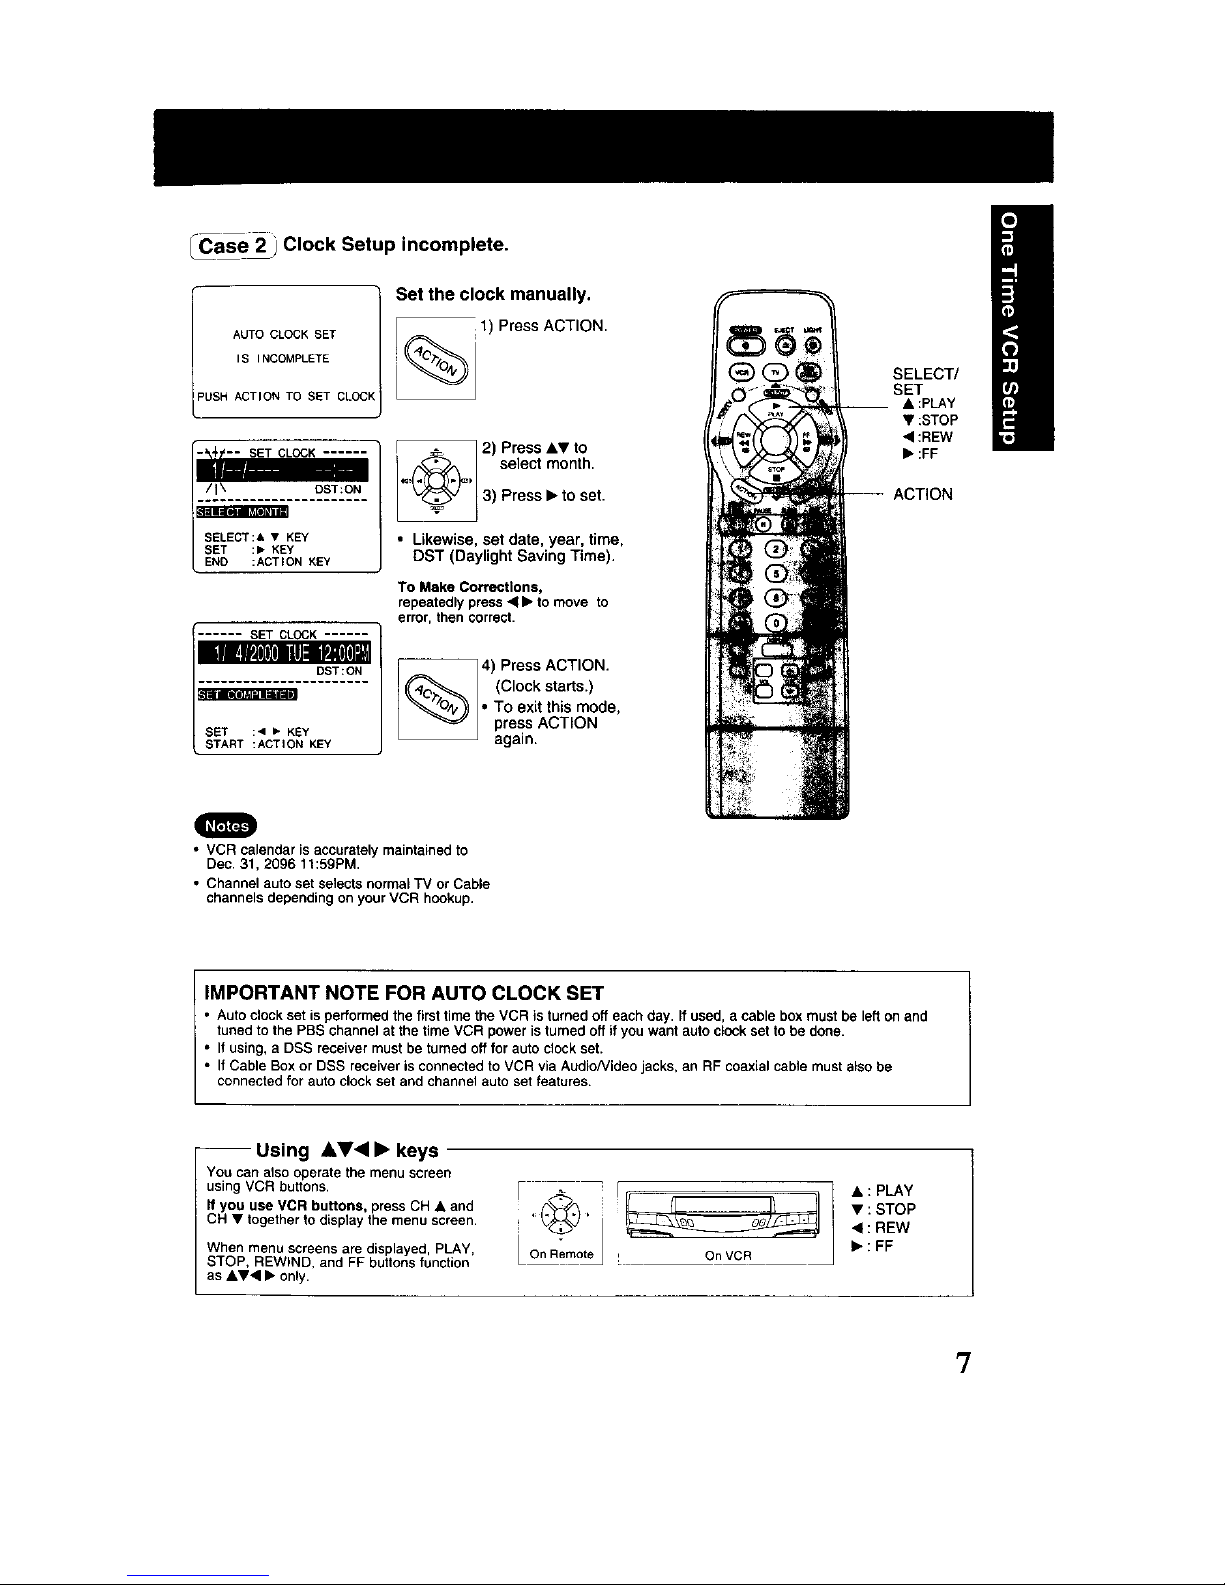
_Case 2 i Clock Setup incomplete.
/
AUTO CLOCK SET
IS INCOMPLETE
'USH ACTION TO SET CLOCK
!_- 4. -- SET CLOCK ......
SELECT:& • KEY
_r._r,r_-Jrr_ PeTON
SSTEIRT ::_C_ i _)ENYKEy
Set the clock manually.
;1) Press ACTION
%
12) Press &V to
"(_'/ select month.
'_ 13) Press b"to set.
• Likewise, set date, year, time,
DST (Daylight Saving Time).
To Make Corrections,
repeatedly press •• to move to
error, then correct.
4) Press ACTION.
(Clock starts.)• To exit this mode,
press ACTION
aga n.
SELECT/
SET
__ • :PLAY
• :STOP
• :REW
• :FF
ACTION
m
w
• VCR calendar is accurately maintained to
Dec. 31, 2096 11:59PM.
• Channel auto set selects normal TV or Cable
channels depending on your VCR hookup.
IMPORTANT NOTE FOR AUTO CLOCK SET
• Auto clock set is performedthefirst time the VCR is turned off each day. if used, a cable boxmust be left on and
tuned tothe PBS channel at the time VCR power is turned off if youwant autoclock set to be done.
• If using, a DSS receiver must be turned off for autoClockset.
• If Cable Boxor DSS receiver is connected to VCR via Audio/Videojacks, an RF coaxial cable must also be
connected for auto clock set and channel auto set features.
-- Using AV<I • keys
You can atso operate the menu screen
using VCR buttons,
If you use VCR buttons, press CH • and
CH • together to display the menu screen.
When menu screens are displayed, PLAY,
STOP, REWIND, and FF buttons function
as AV• • only.
On Remote i
&:PLAY
V:STOP
•:REW
•:FF
?
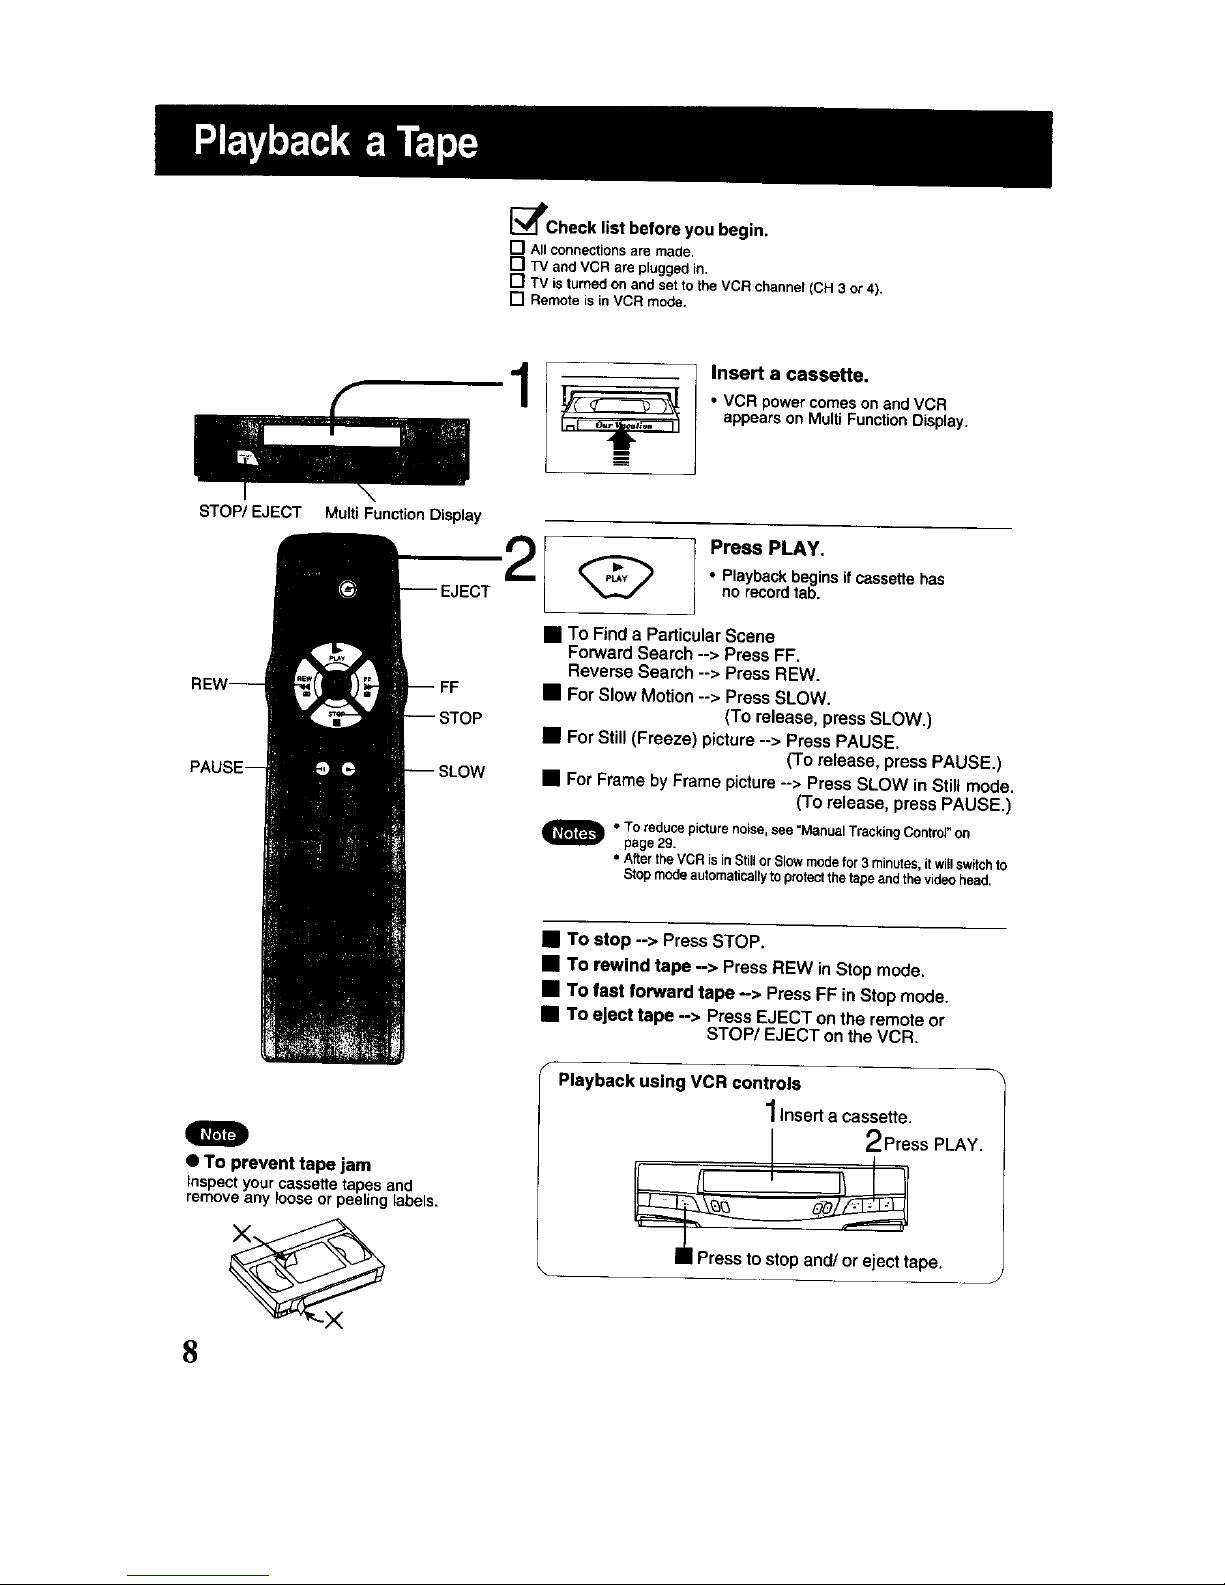
[_Check list before you begin.
[] All connectionsare made,
[] 1N and VCR are pI,J,gg,ed in.
[] TV is turned on and set to the VCR channel (CH 3 or 4),
[] Remote is in VCR mode.
1
Insert a cassette.
• VCR powercomes on and VCR
appears on Multi Function Display.
STOP/EJECT
Multi FunctionDisplay
Press PLAY.
• Playbackbeginsitcassettehas
no recordtab.
• To Find a Particular Scene
ForwardSearch --> Press FF.
Reverse Search--> PressREW.
• ForSlowMotion--> PressSLOW.
(To release, pressSLOW.)
• ForStill(Freeze) picture--> Press PAUSE.
(To release,pressPAUSE.)
• For Frameby Framepicture--> PressSLOW inStillmode.
(To release, pressPAUSE.)
_. To reduce picture noise, see "ManualTracking Control" on
page 29.
• Afterthe VCRis inStillorSlow mode for3 minutes,itwillswitchto
Stop modeautomaticallytoprotectthetapeand thevideohead.
• To stop --> Press STOP.
• To rewind tape --> Press REW in Stop mode.
• To fast forward tape -> PressFF inStop mode.
• To eject tape -> Press EJECT on the remoteor
STOW EJECT on theVCR,
• To prevent tape jam
Inspect your cassette tapes and
removeanylooseorpeelinglabels.
8
Playback using VCR controls
Inserta cassette.
2Press PLAY.
IPress to stop and/or ejecttape.
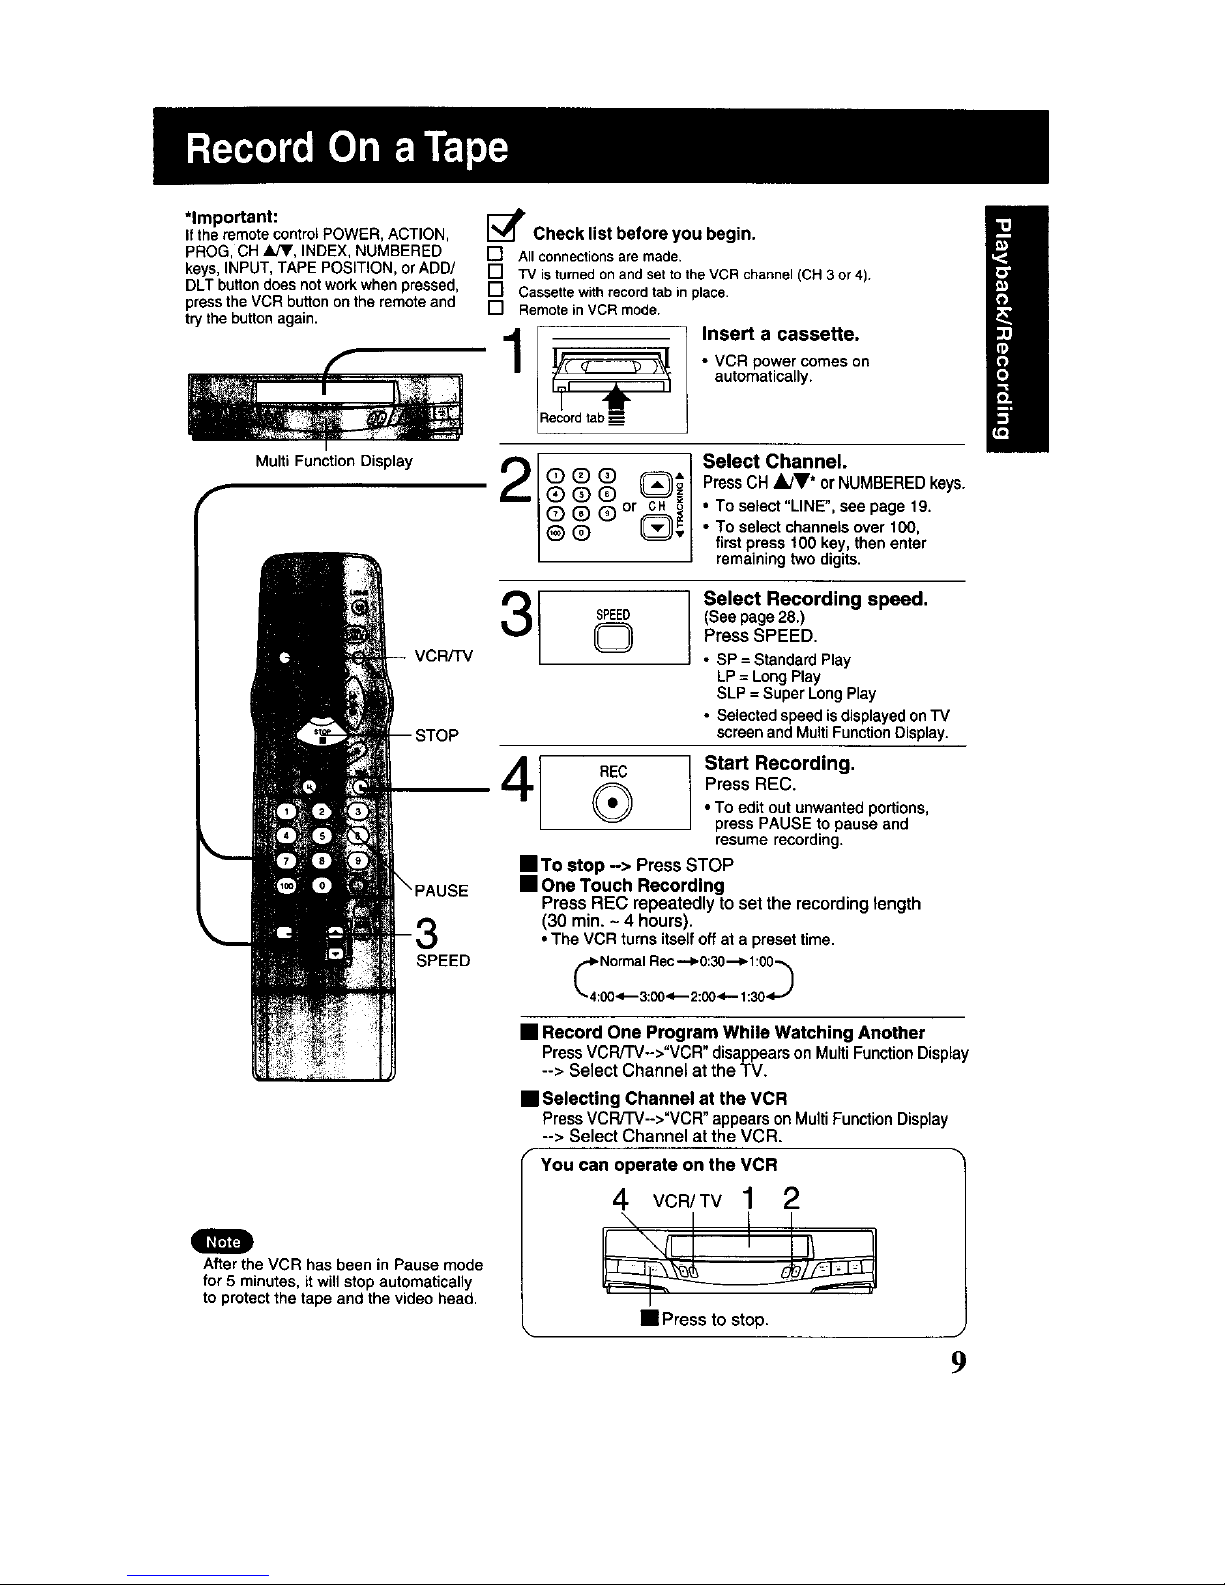
*Important:
If the remote control POWER, ACTION,
PROG, CH A/V, INDEX, NUMBERED
keys, INPUT, TAPE POSITION, or ADD/
DLT button does not work when pressed,
press the VCR button on the remote and
try the button again.
f
Multi Function Display
SPEED
F.I
After the VCR has been in Pause mode
for 5 minutes, it will stop automatically
to protect the tape and the video head.
I_ Check list before you begin.
[] All connections are made.
[] TV is turned on and set to the VCR channel (CH 3 or 4).
[] Cassette with record tab in place.
[] Remote in VCR mode.
1
Insert a cassette.
• VCR power comes on
automatically.
cord tab
2[o oL
®®®
@@@or
®@
Select Channel.
PressCH_idV* or NUMBEREDkeys.
• Toselect"LINE",seepage19.
• To selectchannelsover100,
firstpress100key,thenenter
remainingtwodigits.
SPEEDO
Select Recording speed.
(See page 28.)
Press SPEED.
• SP = Standard Play
LP = LongPlay
SLP = Super LongPlay
• Selected speed isdisplayed onTV
screenand Multi Function Display.
REC Start Recording.
Press REC.• To edit out unwanted portions,
press PAUSE to pause and
resume recording.
• TO stop -> Press STOP
• One Touch Recording
Press REC repeatedly to set the recording length
(30 rain, ~ 4 hours).
• The VCR turns itselfoff at a preset time,
C o°2;o°L-:ooL-Z
• Record One Program While Watching Another
PressVCRFrV->"VCR"disappearsonMultiFunctionDisplay
--> SetectChannelat theTV.
• Selecting Channel at the VCR
PressVCR/TV-->"VCR" appearsonMultiFunctionDisplay
--> Select Channel at the VCR.
You can operate on the VCR
4 VCR/TV1 2
• Press to stop.
9
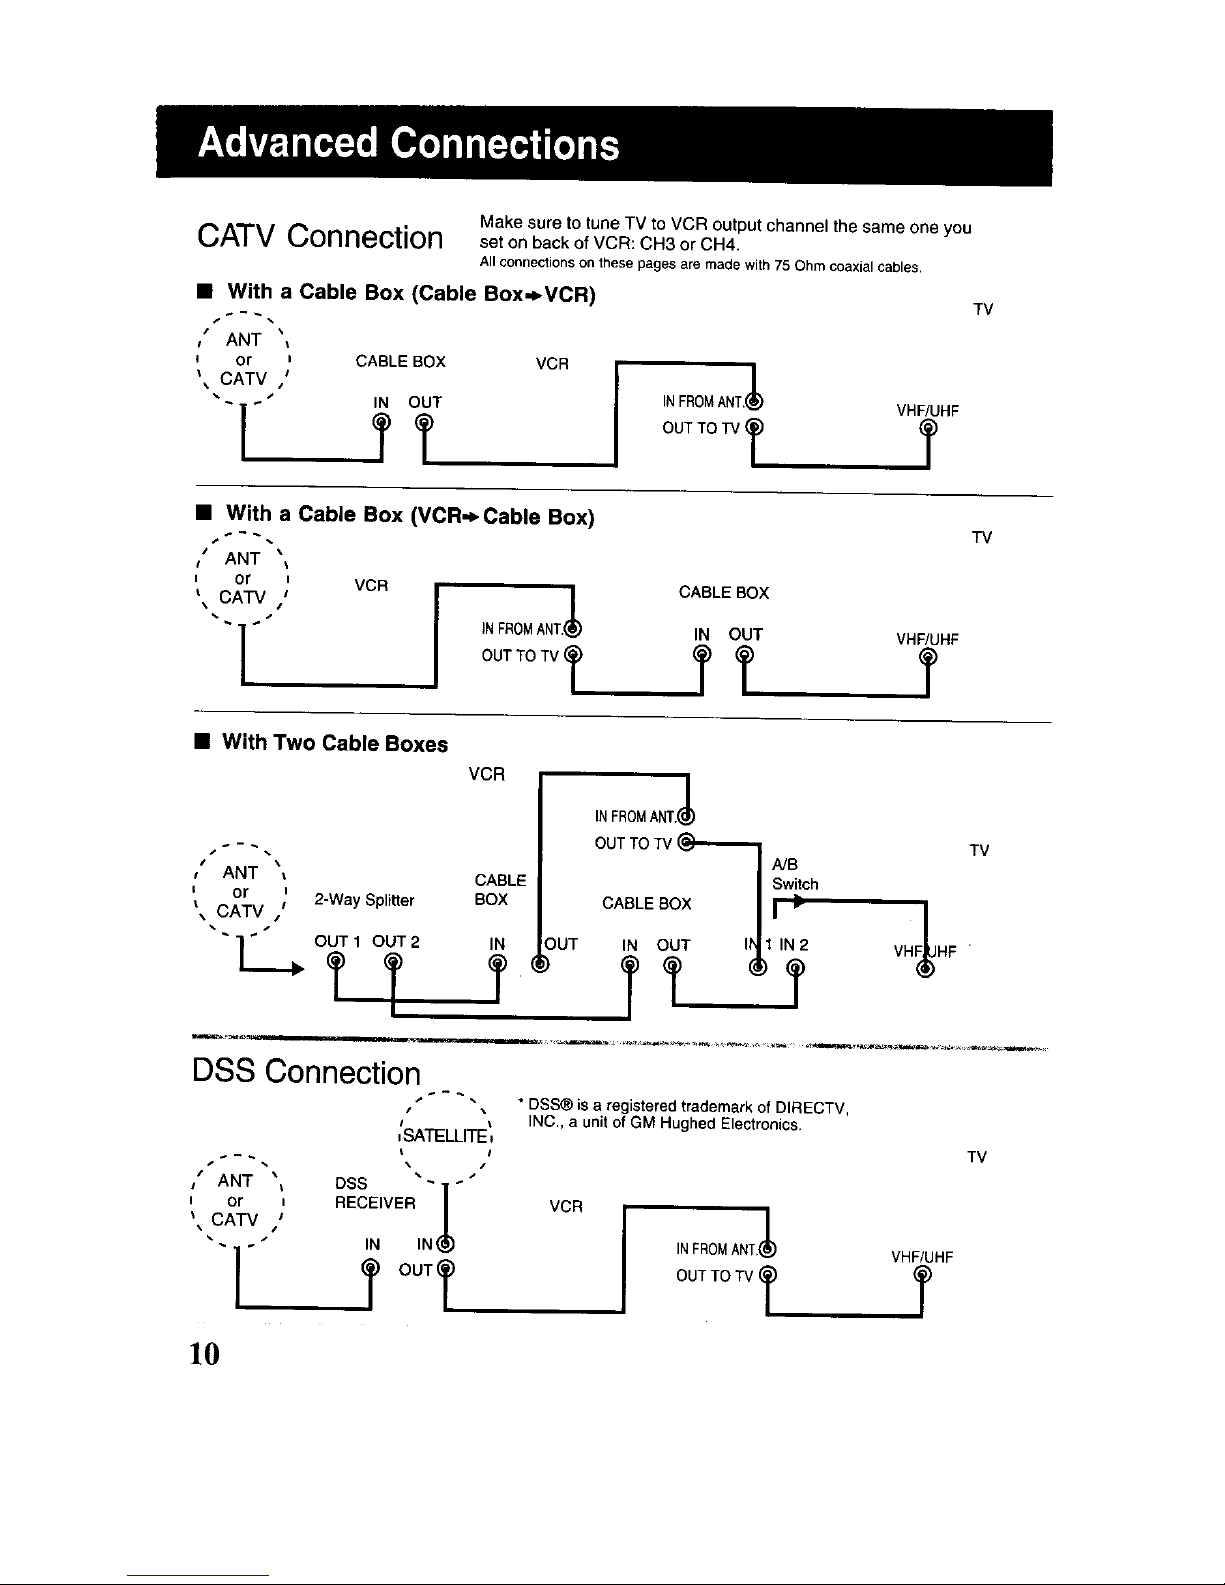
CATV Connection
Make sure to tune TV to VCR output charmer the same one you
set on back of VCR: CH3 or CH4.
All connectionson thesepagesare madewith 75Ohmcoaxialcables.
• With a Cable Box (Cable Box,_VCR)
or ' CABLE BOX VCR
_ CATV I
INFROMANT.(_ VHF/UHF
OUT TO TV T T
TV
• With a Cable Box (VCR,* Cable Box)
" NT"
or , VCR
', CATV,' J
• _ _ • iNFROMANT.(_
OUTTO TV T
CABLE BOX
IN OUT VHF/UHF
TT T
TV
• With Two Cable Boxes
VCR
/ • AN CABLE
= or , 2-Way Splitter BOX
i,, CATV /
OUT 1 OUT 2 IN
I
INFROMANI'.I_
OUTTO TV I_"_ I sA/w_tch TV
CABLEBOXI1'
!OUT IN OUT Ihll IN2 VH HF '
DSS Connection
/ \
,SATELLITE,
/ AN DSS " 1 "
, or , RECEIVER /
I CA'IV /
l
• iN IN(_
I T°UTT
* DSS_ is a registered trademark of DIRECTV,
INC., a unit of GM Hughed Electronics.
VCR I INFROMANT.(_ VHF/UHF
I
OUTTO TV T T
TV
10
• record or view any
(including scrambled)
channel.
• use VCR Remote
Control to select
channels using Multi-
brand control feature.
• view channel
other than the one
selected for any
type of recording.
• do a Timer
recording of a
channel unless you
select it at the
cable box.
• view any (including
scrambled) channel.
• use VCR Remote
Control to select
channels without
using Multi-brand
control feature.
• record scrambled
channels.
• record and view both
scrambled and
unscrambled
channels if additional
equipment is added.
This connection
requires: two
converterboxes,
an NB switch, and a
2-way splitter.
• view channel
other than the one
selected for any
type of recording.
• do a Timer recording
of a channel unless
you select itat the
cable box.
• record and view any
(including scrambled)
channel.
• use your VCR
Remote Control to
select channels
using Multi-brand
control feature.
NOTE:
DSS receiver must be
turned off to view cable
box or antenna programs.
• view channel
other than the one
selected for any
type of recording.
• do a Timer recording
of a channel unless
you select it at the
DSS box.
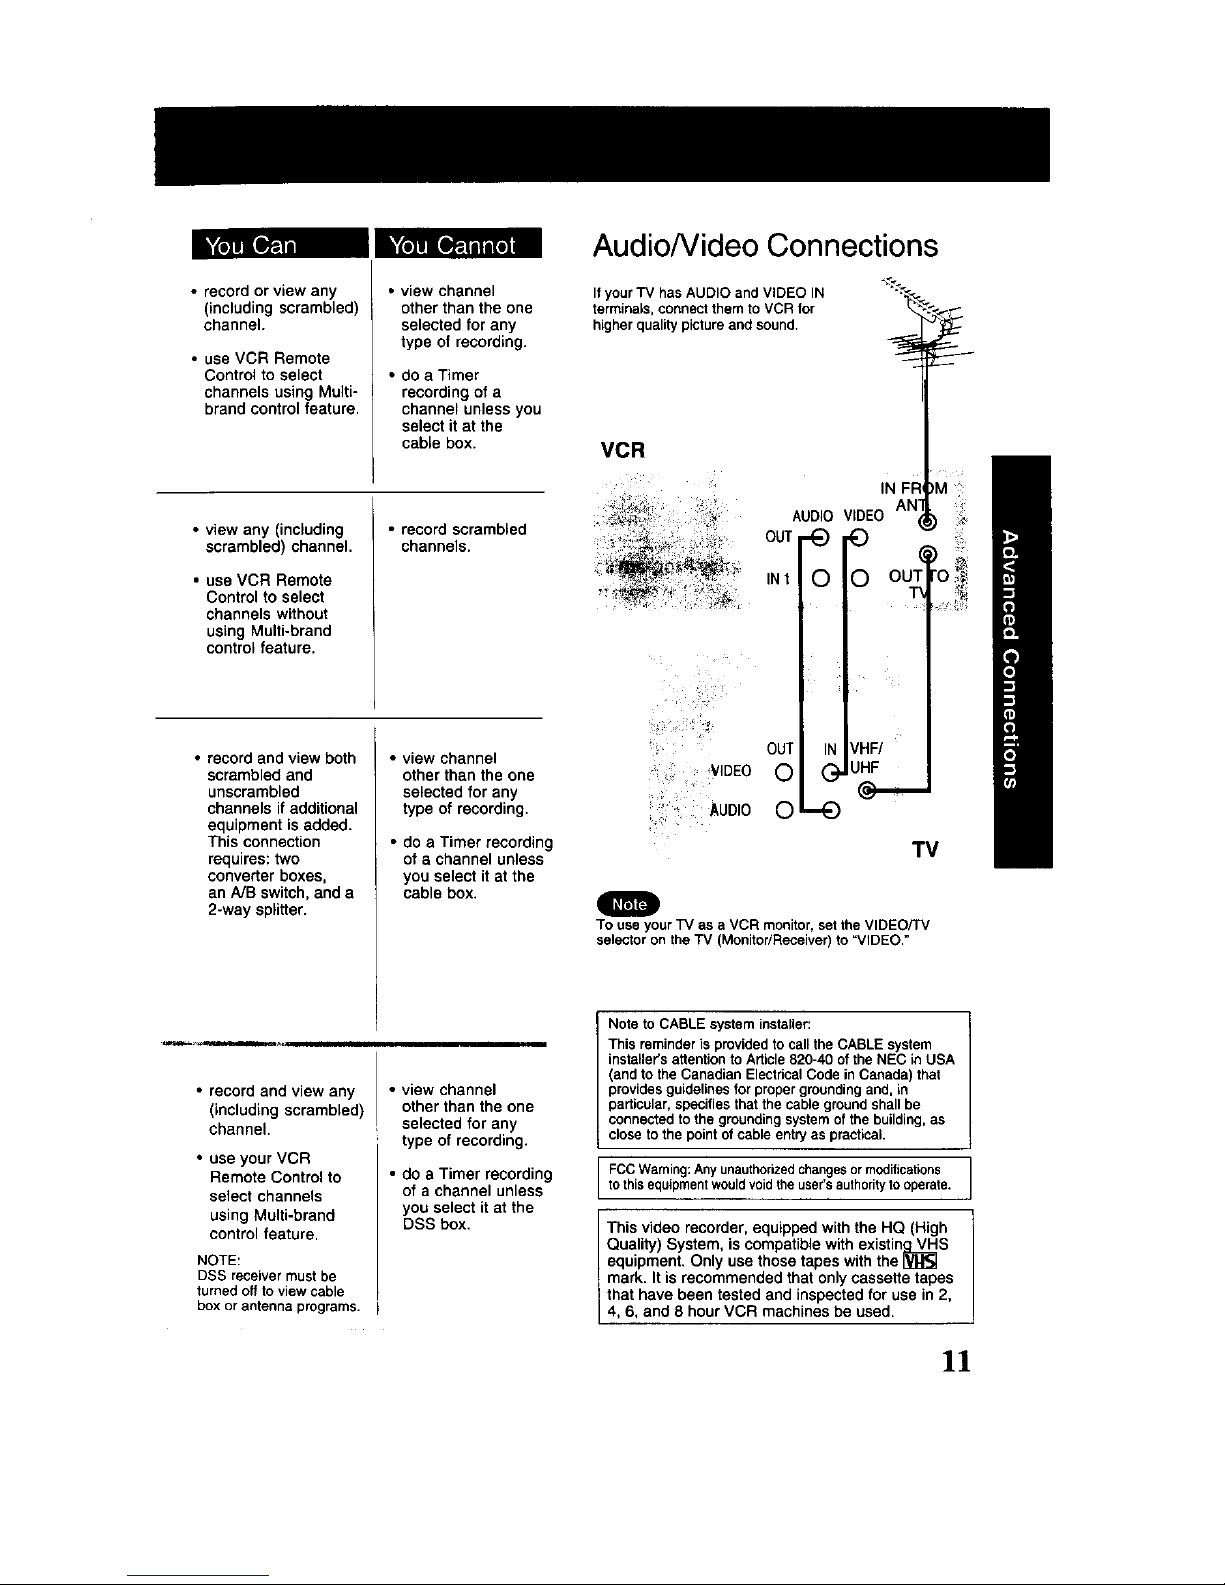
Audio/Video Connections
If your TV has AUDIO and VIDEO IN
terminals, connectthem to VCR for
higher qualitypictureand sound.
VCR
VIDEO
"" AUDIO
I AN ,_
Auo,oV,DEO
OUT _) _E)
OUT IN ¢HFI
0 UHF
TV
To use your TV as a VCR monitor, set the VIDEO/rV
selector on the TV (Monitor/Receiver) to "VIDEO."
Note to CABLE system installer:
This reminder is providedto call the CABLE system
installer'sattention toArticle820-40 of the NEC in USA
(and tothe Canadian ElectricalCode in Canada) that
providesguidelinesfor propergroundingand, in
particular,specifiesthatthe cable groundshall be
connected tothe groundingsystem ofthe building,as
close tothe pointof cable entryas practical.
FCC Warning:Anyunauthorizedchangesor modifications
tothisequipmentwouldvoidthe user'sauthoritytooperate.
This video recorder, equipped with the HQ (High
Quality) System, is compatible with existing VHS
equipment. Only use those tapes with the L_
mark. It is recommended that only cassette tapes
that have been tested and inspected for use in 2,
4, 6, and 8 hour VCR machines be used.
]1
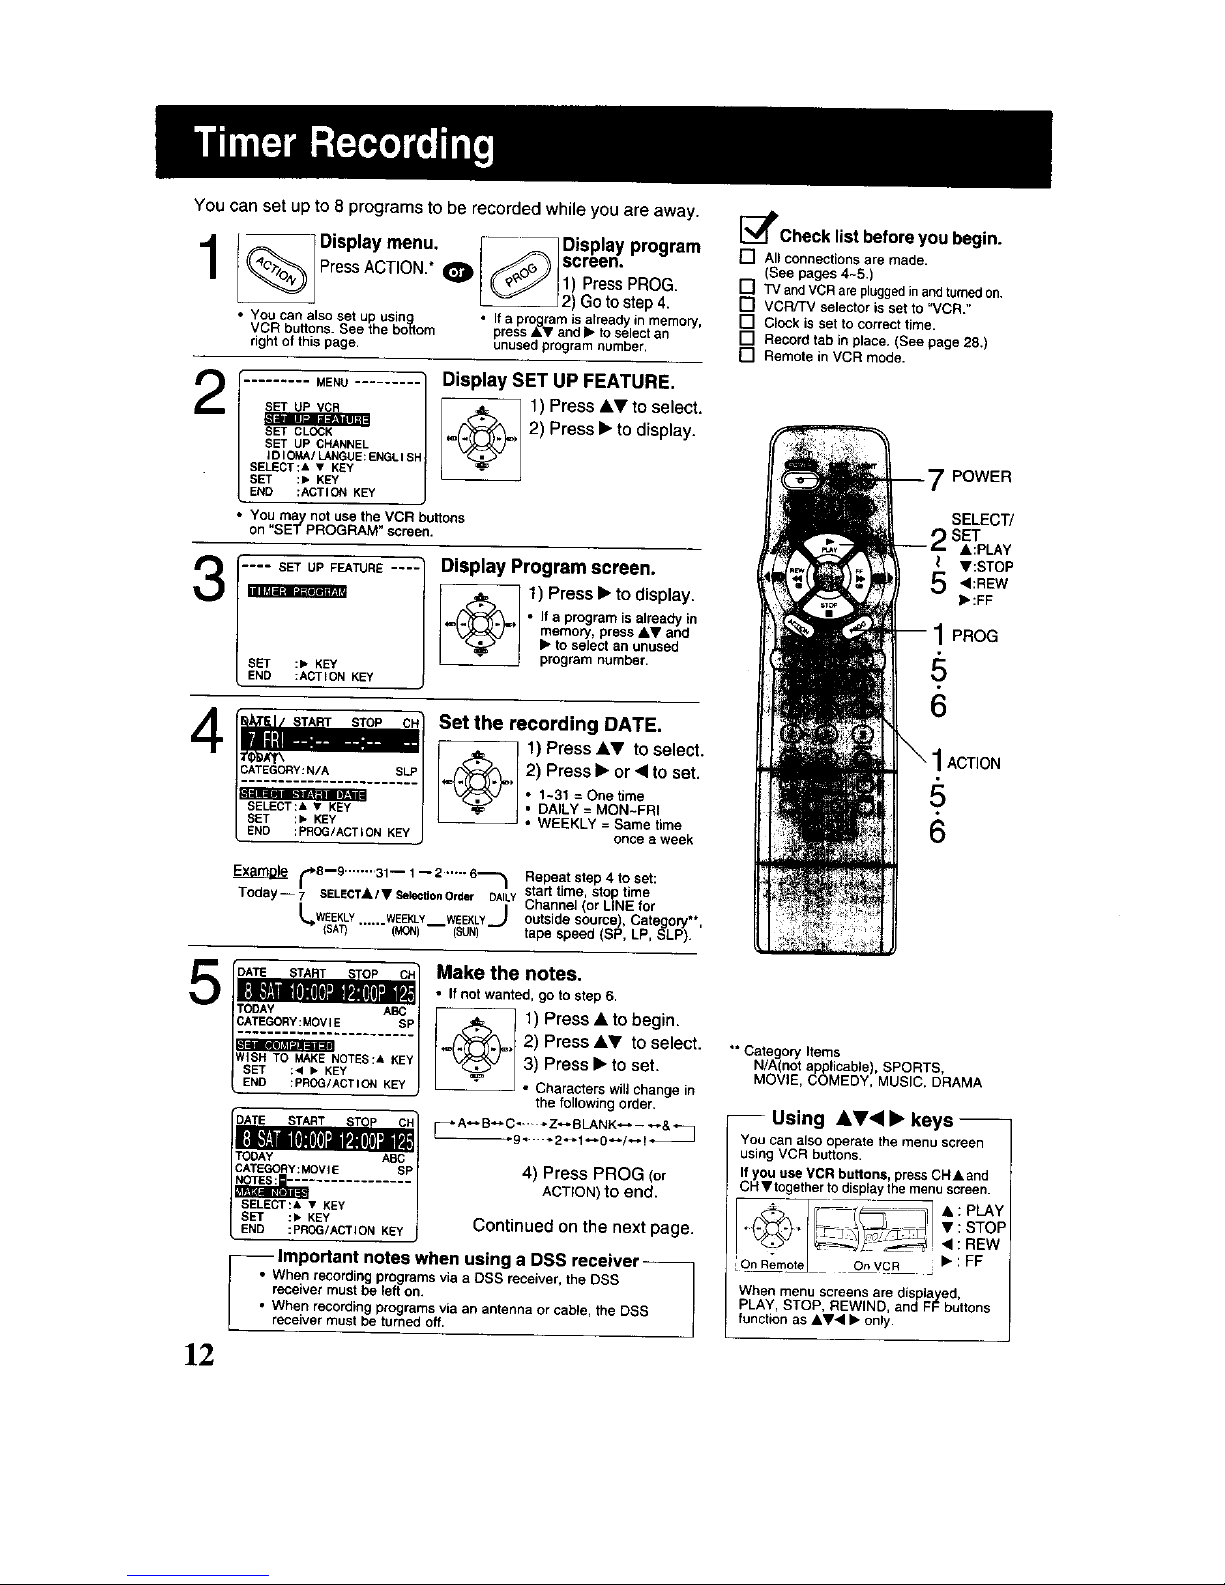
You can set up to 8 programs to be recorded while you are away.
I--1 Display menu. J--_ Display program
_ PressACTION.*O _F_ _)Iscreen"
F _( _'_J 11) Press PROG.
_2) Go to step 4.
• You can also set up usin • If a program is already in memory,
VCR buttons. See the b>tom press •• and• toselect an
right of this page. unused program number.
2
......... MENU .........
VCR
SET UP CHANNEL
IDIOMA/LANGUE:ENGLISP
SELECT:& • KEY
SET :, KEY
END :ACTION KEY
Display SET UP FEATURE.
_ ) Press&V toselect.
2) Press • todisplay.
You may not use the VCR buttons
on "SETPROGRAM" screen.
E....O. o.rmsoreeno.amnmb
_EATU 1) Press • to display.
o t a program is already in
memory, press A• and
• to select an unused
SET :1_ KEY
LEND :ACTIONKEY
_ Set the recording DATE.
1) Press •V to select.
s_/ 2) Press • or • to set.
l_.................... l • I~31 = One tirne
[ SELECT:,b• KEY i • DALLY = MON-FRI
SET :1_KEY 1 • WEEKLY = Same time
END :PROG/ACT_ONKEY once a week
[_IP Check list beforeyou begin.
[] All connectionsare made.
{See pages 4~5.)
[] TV andVCR are pluggedin andturnedon.
[] VCRfTV selector is set to "VCR."
[] Clock is set to correct time.
[] Record tab in place. (See page 28.)
[] Remote inVCR mode.
T POWER
SELEC_
|SET
A:PLAY
•:STOP
4:REW
•:FF
PROG
6
ACTION
6
_'_8--9"'"" 31-- 1-- 2 "'""6'_ I Repeat step 4 to set:
start time, sto time
Today-- 7 SELECT& I• SelectionOrder DAILYChannel (or L_°NEfor
L,WEEKLY .WEEKLY WEEKLY_J outside source), Category*',
SAT) MON)_ [SUN) tape speed (SP, LP, SLP).
[_] Make the notes.
.........oow oto00oose0°
"TODAY A_C i ,_% I 1) Press & to begin.
I,=(_,l 2) Press &V to select.
[_!i TOIp_n_/Ki_'K_;YJ| "/_'J i ?) Press• to set.
L * J Characters will change in
the following order.
.g......
TODAY ABC /
CATEGORY:MOVIE SP 4) Press PROG (or
/_ ............. ACTION) to end.
SELECT:& • KEY j
SET :_ KEY Continued on the next page.
END :PROG/AC'r ION KEY
-- Important notes when using a DSS receiver-
• When recording programsvia a DSS receiver, the DSS
receiver must be left on.
• When recordingprograms via an antenna or cable, the DSS
receiver must be turned off.
*" Category Items
N/A not applicable), SPORTS,
MOV E, COMEDY, MUSIC, DRAMA
-- Using 4,V< • keys --
You can also operate the menu screen
using VCR buttons.
If you use VCR buttons, press CHAand
CR•together to dispMythe menu screen.
:,_ - • : PLAY
LonRemp_ _ O.VCR j • 'FF
When menu screens are displayed,
PLAY, STOP, REWIND, and FF buttons
function as ••<l • only.
12
 Loading...